
Juniper Networks® Steel-Belted Radius® Carrier Installation ...
545
Juniper Networks ® Steel-Belted Radius ® Carrier Installation Guide Release Published 2021-11-29 8.6.0
-
Upload
khangminh22 -
Category
Documents
-
view
0 -
download
0
Transcript of Juniper Networks® Steel-Belted Radius® Carrier Installation ...

JuniperNetworks® Steel-BeltedRadius®Carrier
Installation Guide
ReleasePublished
2021-11-298.6.0

Juniper Networks, In.1133 Innovation WaySunnyvale, California 94089USA408-745-2000www.juniper.net
Juniper Networks, the Juniper Networks logo, Juniper, and Junos are registered trademarks of Juniper Networks, Inc.and/or its affiliates in the United States and other countries. All other trademarks may be property of their respectiveowners.
Juniper Networks assumes no responsibility for any inaccuracies in this document. Juniper Networks reserves the rightto change, modify, transfer, or otherwise revise this publication without notice.
Products made or sold by Juniper Networks or components thereof might be covered by one or more of the followingpatents that are owned by or licensed to Juniper Networks: U.S. Patent Nos. 5,473,599, 5,905,725, 5,909,440, 6,192,051,6,333,650, 6,359,479, 6,406,312, 6,429,706, 6,459,579, 6,493,347, 6,538,518, 6,538,899, 6,552,918, 6,567,902,6,578,186, and 6,590,785.
Ulticom, Signalware, Programmable Network, Ultimate Call Control, and Nexworx are registered trademarks of Ulticom,Inc. Kineto and the Kineto Logo are registered trademarks of KinetoWireless, Inc. Software Advancing Communicationsand SignalCare are trademarks and service marks of Ulticom, Inc. CORBA (CommonObject Request Broker Architecture)is a registered trademark of the Object Management Group (OMG). Raima, Raima Database Manager, and Raima ObjectManager are trademarks of Raima, Inc. Sun, Sun Microsystems, the Sun logo, Java, Solaris, MySQL, and all trademarksand logos that contain Sun, Solaris, MySQL, or Java are trademarks or registered trademarks of Oracle America, Inc. inthe United States and other countries. All other trademarks, service marks, registered trademarks, or registered servicemarks are the property of their respective owners. All specifications are subject to change without notice.
Contains software copyright 2000–2014 by Oracle America, Inc., distributed under license.
Steel-Belted Radius uses Thrift, licensed under the Apache License, Version 2.0 (the “License”); you may not use this fileexcept in compliance with the License.
You may obtain a copy of the license at
http://www.apache.org/licenses/LICENSE-2.0
Unless required by applicable law or agreed to in writing, software distributed under the License is distributed on an “ASIS” BASIS, WITHOUTWARRANTIES OR CONDITIONS OF ANY KIND, either express or implied.
See the License for the specific language governing permissions and limitations under the License.
Steel-Belted Radius uses Xerces XML DOM, from the Apache Group. It has the following terms.
The Apache Software license, Version 1.1
Copyright © 1999-2003 The Apache Software Foundation. All rights reserved.
ii

Redistribution and use in source and binary forms, with or without modification, are permitted provided that the followingconditions are met:
1. Redistributions of source codemust retain the above copyright notice, this list of conditions and the following disclaimer.
2. Redistributions in binary form must reproduce the above copyright notice, this list of conditions and the followingdisclaimer in the documentation and/or other materials provided with the distribution.
3. The end-user documentation included with the redistribution, if any, must include the following acknowledgment:“This product includes software developed by the Apache Software Foundation (http://www.apache.org/).” Alternately,this acknowledgment may appear in the software itself, if and wherever such third-party acknowledgments normallyappear.
4. The names “Xerces” and “Apache Software Foundation” must not be used to endorse or promote products derivedfrom this software without prior written permission. For written permission, please contact [email protected].
5. Products derived from this software may not be called “Apache”, nor may “Apache” appear in their name, without priorwritten permission of the Apache Software Foundation.
THIS SOFTWARE IS PROVIDED “AS IS” AND ANY EXPRESSED OR IMPLIED WARRANTIES, INCLUDING, BUT NOTLIMITED TO, THE IMPLIEDWARRANTIESOFMERCHANTABILITY AND FITNESS FORA PARTICULAR PURPOSE AREDISCLAIMED. IN NO EVENT SHALL THE APACHE SOFTWARE FOUNDATION OR ITS CONTRIBUTORS BE LIABLEFOR ANY DIRECT, INDIRECT, INCIDENTAL, SPECIAL, EXEMPLARY, OR CONSEQUENTIAL DAMAGES (INCLUDING,BUT NOT LIMITED TO, PROCUREMENT OF SUBSTITUTE GOODS OR SERVICES; LOSS OF USE, DATA, OR PROFITS;ORBUSINESS INTERRUPTION)HOWEVERCAUSEDANDONANYTHEORYOF LIABILITY,WHETHER INCONTRACT,STRICT LIABILITY, OR TORT (INCLUDING NEGLIGENCE OR OTHERWISE) ARISING IN ANY WAY OUT OF THE USEOF THIS SOFTWARE, EVEN IF ADVISED OF THE POSSIBILITY OF SUCH DAMAGE.
This software consists of voluntary contributionsmade bymany individuals on behalf of the Apache Software Foundationand was originally based on software copyright © 1999, International BusinessMachines, Inc., http://www.ibm.com. Formore information on the Apache Software Foundation, please see http://www.apache.org/.
Steel-Belted Radius uses the LDAP v2 Server from the University of Michigan. It has the following terms.
Copyright © 1991 Regents of the University of Michigan. All rights reserved.
Redistribution and use in source and binary forms are permitted provided that this notice is preserved and that due creditis given to the University of Michigan at Ann Arbor. The name of the University may not be used to endorse or promoteproducts derived from this software without specific prior written permission. This software is provided “as is” withoutexpress or implied warranty.
Portions of this software copyright 2003-2009 Lev Walkin <[email protected]> All rights reserved.
Redistribution and use in source and binary forms, with or without modification, are permitted provided that the followingconditions are met:
1. Redistributions of source codemust retain the above copyright notice, this list of conditions and the following disclaimer.
iii

2. Redistributions in binary form must reproduce the above copyright notice, this list of conditions and the followingdisclaimer in the documentation and/or other materials provided with the distribution.
THIS SOFTWARE IS PROVIDED BY THE AUTHOR AND CONTRIBUTORS “AS IS” AND ANY EXPRESS OR IMPLIEDWARRANTIES, INCLUDING, BUT NOT LIMITED TO, THE IMPLIED WARRANTIES OF MERCHANTABILITY ANDFITNESS FOR A PARTICULAR PURPOSE ARE DISCLAIMED. IN NO EVENT SHALL THE AUTHOROR CONTRIBUTORSBE LIABLE FOR ANY DIRECT, INDIRECT, INCIDENTAL, SPECIAL, EXEMPLARY, OR CONSEQUENTIAL DAMAGES(INCLUDING, BUT NOT LIMITED TO, PROCUREMENTOF SUBSTITUTE GOODSOR SERVICES; LOSS OF USE, DATA,OR PROFITS; OR BUSINESS INTERRUPTION) HOWEVER CAUSED ANDON ANY THEORY OF LIABILITY, WHETHERIN CONTRACT, STRICT OR OTHERWISE) ARISING IN ANY WAY OUT OF THE USE OF THIS SOFTWARE, EVEN IFADVISED OF THE POSSIBILITY OF SUCH DAMAGE.
Portions of this software copyright 1989, 1991, 1992 by Carnegie Mellon University
SBR includes NetSNMP under the following licenses: DerivativeWork–1996, 1998–2009 Copyright 1996, 1998–2009.The Regents of the University of California All Rights Reserved. Permission to use, copy, modify and distribute thissoftware and its documentation for any purpose and without fee is hereby granted, provided that the above copyrightnotice appears in all copies and that both that copyright notice and this permission notice appear in supportingdocumentation, and that the name of CMU and The Regents of the University of California not be used in advertisingor publicity pertaining to distribution of the software without specific written permission.
CMU AND THE REGENTS OF THE UNIVERSITY OF CALIFORNIA DISCLAIM ALL WARRANTIES WITH REGARD TOTHIS SOFTWARE, INCLUDING ALL IMPLIED WARRANTIES OF MERCHANTABILITY AND FITNESS. IN NO EVENTSHALL CMU OR THE REGENTS OF THE UNIVERSITY OF CALIFORNIA BE LIABLE FOR ANY SPECIAL, INDIRECT ORCONSEQUENTIAL DAMAGES OR ANY DAMAGES WHATSOEVER RESULTING FROM THE LOSS OF USE, DATA ORPROFITS, WHETHER IN AN ACTION OF CONTRACT, NEGLIGENCE OR OTHER TORTIOUS ACTION, ARISING OUTOF OR IN CONNECTIONWITH THE USE OR PERFORMANCE OF THIS SOFTWARE.
Portions of this software copyright© 2001–2009, Networks Associates Technology, Inc. All rights reserved. Redistributionand use in source and binary forms, with or without modification, are permitted provided that the following conditionsare met:
1. Redistributions of source codemust retain the above copyright notice, this list of conditions and the following disclaimer.
2. Redistributions in binary form must reproduce the above copyright notice, this list of conditions and the followingdisclaimer in the documentation and/or other materials provided with the distribution.
3. Neither the name of the Networks Associates Technology, Inc. nor the names of its contributors may be used toendorse or promote products derived from this software without specific prior written permission.
THIS SOFTWARE IS PROVIDED BY THE COPYRIGHT HOLDERS AND CONTRIBUTORS “AS IS” AND ANY EXPRESSOR IMPLIEDWARRANTIES, INCLUDING, BUTNOTLIMITEDTO, THE IMPLIEDWARRANTIESOFMERCHANTABILITYAND FITNESS FOR A PARTICULAR PURPOSE ARE DISCLAIMED. IN NO EVENT SHALL THE COPYRIGHT HOLDERSOR CONTRIBUTORS BE LIABLE FOR ANY DIRECT, INDIRECT, INCIDENTAL, SPECIAL, EXEMPLARY, ORCONSEQUENTIAL DAMAGES (INCLUDING, BUT NOT LIMITED TO, PROCUREMENT OF SUBSTITUTE GOODS ORSERVICES; LOSS OF USE, DATA, OR PROFITS; OR BUSINESS INTERRUPTION) HOWEVER CAUSED AND ON ANYTHEORY OF LIABILITY, WHETHER IN CONTRACT, STRICT LIABILITY, OR TORT (INCLUDING NEGLIGENCE OR
iv

OTHERWISE) ARISING IN ANYWAYOUTOF THEUSEOF THIS SOFTWARE, EVEN IF ADVISEDOF THE POSSIBILITYOF SUCH DAMAGE.
Portions of this software are copyright © 2001–2009, Cambridge Broadband Ltd. All rights reserved. Redistribution anduse in source and binary forms, with or without modification, are permitted provided that the following conditions aremet:
1. Redistributions of source codemust retain the above copyright notice, this list of conditions and the following disclaimer.
2. Redistributions in binary form must reproduce the above copyright notice, this list of conditions and the followingdisclaimer in the documentation and/or other materials provided with the distribution.
3. The name of Cambridge Broadband Ltd. may not be used to endorse or promote products derived from this softwarewithout specific prior written permission.
THIS SOFTWARE IS PROVIDEDBYTHECOPYRIGHTHOLDER “AS IS” ANDANYEXPRESSOR IMPLIEDWARRANTIES,INCLUDING, BUT NOT LIMITED TO, THE IMPLIED WARRANTIES OF MERCHANTABILITY AND FITNESS FOR APARTICULAR PURPOSE ARE DISCLAIMED. IN NO EVENT SHALL THE COPYRIGHT HOLDER BE LIABLE FOR ANYDIRECT, INDIRECT, INCIDENTAL, SPECIAL, EXEMPLARY, OR CONSEQUENTIAL DAMAGES (INCLUDING, BUT NOTLIMITED TO, PROCUREMENT OF SUBSTITUTE GOODS OR SERVICES; LOSS OF USE, DATA, OR PROFITS; ORBUSINESS INTERRUPTION) HOWEVER CAUSED AND ON ANY THEORY OF LIABILITY, WHETHER IN CONTRACT,STRICT LIABILITY, OR TORT (INCLUDING NEGLIGENCE OR OTHERWISE) ARISING IN ANY WAY OUT OF THE USEOF THIS SOFTWARE, EVEN IF ADVISED OF THE POSSIBILITY OF SUCH DAMAGE.
Steel-Belted Radius uses Jaxen, a “Java XPath Engine” from The Werken Company under the following license:
Copyright 2003 © The Werken Company. All Rights Reserved.
Redistribution and use of this software and associated documentation (“Software”), with or without modification, arepermitted provided that the following conditions are met:
1. Redistributions of source code must retain copyright statements and notices. Redistributions must also contain a copyof this document.
2. Redistributions in binary form must reproduce the above copyright notice, this list of conditions and the followingdisclaimer in the documentation and/or other materials provided with the distribution.
3. The name “jaxen” must not be used to endorse or promote products derived from this Software without prior writtenpermission of The Werken Company. For written permission, please contact [email protected].
4. Products derived from this Software may not be called “jaxen” nor may “jaxen” appear in their names without priorwritten permission of The Werken Company. “jaxen” is a registered trademark of The Werken Company.
5. Due credit should be given to The Werken Company. (http://jaxen.werken.com/).
THIS SOFTWARE IS PROVIDED BY THE WERKEN COMPANY AND CONTRIBUTORS “AS IS” AND ANY EXPRESSEDOR IMPLIEDWARRANTIES, INCLUDING, BUTNOTLIMITEDTO, THE IMPLIEDWARRANTIESOFMERCHANTABILITYAND FITNESS FOR A PARTICULAR PURPOSE ARE DISCLAIMED. IN NO EVENT SHALL THEWERKEN COMPANYORITS CONTRIBUTORS BE LIABLE FOR ANY DIRECT, INDIRECT, INCIDENTAL, SPECIAL, EXEMPLARY, OR
v

CONSEQUENTIAL DAMAGES (INCLUDING, BUT NOT LIMITED TO, PROCUREMENT OF SUBSTITUTE GOODS ORSERVICES; LOSS OF USE, DATA, OR PROFITS; OR BUSINESS INTERRUPTION) HOWEVER CAUSED AND ON ANYTHEORY OF LIABILITY, WHETHER IN CONTRACT, STRICT LIABILITY, OR TORT (INCLUDING NEGLIGENCE OROTHERWISE) ARISING IN ANYWAYOUTOF THEUSEOF THIS SOFTWARE, EVEN IF ADVISEDOF THE POSSIBILITYOF SUCH DAMAGE.
HTTPClient package Copyright © 1996–2009 Ronald Tschalär ([email protected])
This library is free software; you can redistribute it and/or modify it under the terms of the GNU Lesser General PublicLicense as published by the Free Software Foundation; either version 2 of the License, or (at your option) any laterversion.
This library is distributed in the hope that it will be useful, but WITHOUT ANYWARRANTY; without even the impliedwarranty ofMERCHANTABILITY or FITNESS FORAPARTICULARPURPOSE. See theGNULesser General Public Licensefor more details. For a copy of the GNU Lesser General Public License, write to the Free Software Foundation, Inc., 59Temple Place, Suite 330, Boston, MA 02111-1307, USA.
Steel-Belted Radius uses OpenSSL version 1.1.1, which have the following terms:
Copyright ©1998-2018 The OpenSSL Project. All rights reserved.
Redistribution and use in source and binary forms, with or without modification, are permitted provided that the followingconditions are met:
1. Redistributions of source codemust retain the above copyright notice, this list of conditions and the following disclaimer.
2. Redistributions in binary form must reproduce the above copyright notice, this list of conditions and the followingdisclaimer in the documentation and/or other materials provided with the distribution.
3. All advertising materials mentioning features or use of this software must display the following acknowledgment:
"This product includes software developed by the OpenSSL Project for use in the OpenSSL Toolkit.(http://www.openssl.org/)"
4. The names "OpenSSL Toolkit" and "OpenSSL Project" must not be used to endorse or promote products derived fromthis software without prior written permission. For written permission, please contact [email protected].
5. Products derived from this software may not be called "OpenSSL" nor may "OpenSSL" appear in their names withoutprior written permission of the OpenSSL Project.
6. Redistributions of any form whatsoever must retain the following acknowledgment:
"This product includes software developed by the OpenSSL Project for use in the OpenSSL Toolkit(http://www.openssl.org/)"
THIS SOFTWARE IS PROVIDEDBYTHEOpenSSL PROJECT ''AS IS'' ANDANYEXPRESSEDOR IMPLIEDWARRANTIES,INCLUDING, BUT NOT LIMITED TO, THE IMPLIED WARRANTIES OF MERCHANTABILITY AND FITNESS FOR APARTICULAR PURPOSE ARE DISCLAIMED. IN NO EVENT SHALL THE OpenSSL PROJECT OR ITS CONTRIBUTORSBE LIABLE FOR ANY DIRECT, INDIRECT, INCIDENTAL, SPECIAL, EXEMPLARY, OR CONSEQUENTIAL DAMAGES
vi

(INCLUDING, BUT NOT LIMITED TO, PROCUREMENTOF SUBSTITUTE GOODSOR SERVICES; LOSS OF USE, DATA,OR PROFITS; OR BUSINESS INTERRUPTION) HOWEVER CAUSED ANDON ANY THEORY OF LIABILITY, WHETHERIN CONTRACT, STRICT LIABILITY, OR TORT (INCLUDING NEGLIGENCE OR OTHERWISE) ARISING IN ANY WAYOUT OF THE USE OF THIS SOFTWARE, EVEN IF ADVISED OF THE POSSIBILITY OF SUCH DAMAGE.
This product includes cryptographic softwarewritten by Eric Young ([email protected]). This product includes softwarewritten by Tim Hudson ([email protected]).
OpenSSL is also subject to the following terms.
Copyright ©1995-1998 Eric Young ([email protected]). All rights reserved.
This package is an SSL implementation written by Eric Young ([email protected]).
The implementation was written so as to conform with Netscapes SSL.
This library is free for commercial and non-commercial use as long as the following conditions are aheared to. Thefollowing conditions apply to all code found in this distribution, be it the RC4, RSA, lhash, DES, etc., code; not just theSSL code. The SSL documentation included with this distribution is covered by the same copyright terms except that theholder is Tim Hudson ([email protected]).
Copyright remains Eric Young's, and as such any Copyright notices in the code are not to be removed.
If this package is used in a product, Eric Young should be given attribution as the author of the parts of the library used.
This can be in the form of a textual message at program startup or in documentation (online or textual) provided withthe package.
Redistribution and use in source and binary forms, with or without modification, are permitted provided that the followingconditions are met:
1. Redistributions of source code must retain the copyright notice, this list of conditions and the following disclaimer.
2. Redistributions in binary form must reproduce the above copyright notice, this list of conditions and the followingdisclaimer in the documentation and/or other materials provided with the distribution.
3. All advertising materials mentioning features or use of this software must display the following acknowledgement:
"This product includes cryptographic software written by Eric Young ([email protected])"
The word 'cryptographic' can be left out if the rouines from the library being used are not cryptographic related :
4. If you include anyWindows specific code (or a derivative thereof) from the apps directory (application code) you mustinclude an acknowledgement:
"This product includes software written by Tim Hudson ([email protected])"
THIS SOFTWARE IS PROVIDEDBYERICYOUNG “AS IS” ANDANYEXPRESSOR IMPLIEDWARRANTIES, INCLUDING,BUT NOT LIMITED TO, THE IMPLIED WARRANTIES OF MERCHANTABILITY AND FITNESS FOR A PARTICULARPURPOSE ARE DISCLAIMED. IN NO EVENT SHALL THE AUTHOROR CONTRIBUTORS BE LIABLE FOR ANYDIRECT,
vii

INDIRECT, INCIDENTAL, SPECIAL, EXEMPLARY, OR CONSEQUENTIAL DAMAGES (INCLUDING, BUT NOT LIMITEDTO, PROCUREMENT OF SUBSTITUTE GOODS OR SERVICES; LOSS OF USE, DATA, OR PROFITS; OR BUSINESSINTERRUPTION) HOWEVER CAUSED AND ON ANY THEORY OF LIABILITY, WHETHER IN CONTRACT, STRICTLIABILITY, OR TORT (INCLUDING NEGLIGENCE OR OTHERWISE) ARISING IN ANYWAY OUT OF THE USE OF THISSOFTWARE, EVEN IF ADVISED OF THE POSSIBILITY OF SUCH DAMAGE.
The licence and distribution terms for any publically available version or derivative of this code cannot be changed. i.e.this code cannot simply be copied and put under another distribution licence [including the GNU Public Licence.]
SBR contains software copyright © 2000–2009 by The Legion Of The Bouncy Castle (http://www.bouncycastle.org)
Permission is hereby granted, free of charge, to any person obtaining a copy of this software and associated documentationfiles (the “Software”), to deal in the Software without restriction, including without limitation the rights to use, copy,modify, merge, publish, distribute, sublicense, and/or sell copies of the Software, and to permit persons to whom theSoftware is furnished to do so, subject to the following conditions:
The above copyright notice and this permission notice shall be included in all copies or substantial portions of the Software.
THE SOFTWARE IS PROVIDED “AS IS”, WITHOUTWARRANTY OF ANY KIND, EXPRESS OR IMPLIED, INCLUDINGBUT NOT LIMITED TO THE WARRANTIES OF MERCHANTABILITY, FITNESS FOR A PARTICULAR PURPOSE ANDNONINFRINGEMENT. IN NO EVENT SHALL THE AUTHORS OR COPYRIGHT HOLDERS BE LIABLE FOR ANY CLAIM,DAMAGESOROTHERLIABILITY,WHETHER INANACTIONOFCONTRACT, TORTOROTHERWISE, ARISINGFROM,OUT OF OR IN CONNECTIONWITH THE SOFTWARE OR THE USE OR OTHER DEALINGS IN THE SOFTWARE.
Steel-Belted Radius uses modified source from OpenSolaris (now Oracle) under the CDDL, which can be found athttp://hub.opensolaris.org/bin/view/Main/opensolaris_license. Modified source is available. Please refer to the SBRCarrier release notes.
SBR includes Spider Monkey libraries under Mozilla Public License Version 2.0
1. Definitions
1.1. “Contributor” means each individual or legal entity that creates, contributes to the creation of, or owns CoveredSoftware.
1.2. “Contributor Version” means the combination of the Contributions of others (if any) used by a Contributor and thatparticular Contributor’s Contribution.
1.3. “Contribution” means Covered Software of a particular Contributor.
1.4. “Covered Software” means Source Code Form to which the initial Contributor has attached the notice in Exhibit A,the Executable Form of such Source Code Form, and Modifications of such Source Code Form, in each case includingportions thereof.
1.5. “Incompatible With Secondary Licenses” means that the initial Contributor has attached the notice described inExhibit B to the Covered Software; or that the Covered Software was made available under the terms of version 1.1 orearlier of the License, but not also under the terms of a Secondary License.
1.6. “Executable Form” means any form of the work other than Source Code Form.
viii

1.7. “Larger Work” means a work that combines Covered Software with other material, in a separate file or files, that isnot Covered Software.
1.8. “License” means this document.
1.9. “Licensable” means having the right to grant, to the maximum extent possible, whether at the time of the initial grantor subsequently, any and all of the rights conveyed by this License.
1.10. “Modifications” means any of the following: any file in Source Code Form that results from an addition to, deletionfrom, or modification of the contents of Covered Software; or any new file in Source Code Form that contains anyCovered Software.
1.11. “Patent Claims” of a Contributor means any patent claim(s), including without limitation, method, process, andapparatus claims, in any patent Licensable by such Contributor that would be infringed, but for the grant of the License,by themaking, using, selling, offering for sale, havingmade, import, or transfer of either its Contributions or its ContributorVersion.
1.12. “Secondary License” means either the GNU General Public License, Version 2.0, the GNU Lesser General PublicLicense, Version 2.1, the GNU Affero General Public License, Version 3.0, or any later versions of those licenses.
1.13. “Source Code Form” means the form of the work preferred for making modifications.
1.14. “You” (or “Your”) means an individual or a legal entity exercising rights under this License. For legal entities, “You”includes any entity that controls, is controlled by, or is under common control with You. For purposes of this definition,“control” means (a) the power, direct or indirect, to cause the direction or management of such entity, whether by contractor otherwise, or (b) ownership of more than fifty percent (50%) of the outstanding shares or beneficial ownership of suchentity.
2. License Grants and Conditions
2.1. Grants
Each Contributor hereby grants You a world-wide, royalty-free, non-exclusive license: under intellectual property rights(other than patent or trademark) Licensable by such Contributor to use, reproduce, make available, modify, display,perform, distribute, and otherwise exploit its Contributions, either on an unmodified basis, with Modifications, or as partof a Larger Work; and under Patent Claims of such Contributor to make, use, sell, offer for sale, have made, import, andotherwise transfer either its Contributions or its Contributor Version.
2.2. Effective Date
The licenses granted in Section 2.1 with respect to any Contribution become effective for each Contribution on the datethe Contributor first distributes such Contribution.
2.3. Limitations on Grant Scope
The licenses granted in this Section 2 are the only rights granted under this License. No additional rights or licenses willbe implied from the distribution or licensing of Covered Software under this License. Notwithstanding Section 2.1(b)above, no patent license is granted by a Contributor: for any code that a Contributor has removed fromCovered Software;or for infringements caused by: (i) Your and any other third party’smodifications of Covered Software, or (ii) the combination
ix

of its Contributions with other software (except as part of its Contributor Version); or under Patent Claims infringed byCovered Software in the absence of its Contributions.
This License does not grant any rights in the trademarks, service marks, or logos of any Contributor (except as may benecessary to comply with the notice requirements in Section 3.4).
2.4. Subsequent Licenses
No Contributor makes additional grants as a result of Your choice to distribute the Covered Software under a subsequentversion of this License (see Section 10.2) or under the terms of a Secondary License (if permitted under the terms ofSection 3.3).
2.5. Representation
Each Contributor represents that the Contributor believes its Contributions are its original creation(s) or it has sufficientrights to grant the rights to its Contributions conveyed by this License.
2.6. Fair Use
This License is not intended to limit any rights You have under applicable copyright doctrines of fair use, fair dealing, orother equivalents.
2.7. Conditions
Sections 3.1, 3.2, 3.3, and 3.4 are conditions of the licenses granted in Section 2.1.
3. Responsibilities
3.1. Distribution of Source Form
All distribution of Covered Software in Source Code Form, including any Modifications that You create or to which Youcontribute, must be under the terms of this License. Youmust inform recipients that the Source Code Form of the CoveredSoftware is governed by the terms of this License, and how they can obtain a copy of this License. You may not attemptto alter or restrict the recipients’ rights in the Source Code Form.
3.2. Distribution of Executable Form
If You distribute Covered Software in Executable Form then:
such Covered Software must also be made available in Source Code Form, as described in Section 3.1, and You mustinform recipients of the Executable Form how they can obtain a copy of such Source Code Form by reasonable meansin a timely manner, at a charge no more than the cost of distribution to the recipient; and
Youmay distribute such Executable Form under the terms of this License, or sublicense it under different terms, providedthat the license for the Executable Form does not attempt to limit or alter the recipients’ rights in the Source Code Formunder this License.
3.3. Distribution of a Larger Work
x

You may create and distribute a Larger Work under terms of Your choice, provided that You also comply with therequirements of this License for the Covered Software. If the Larger Work is a combination of Covered Software with awork governed by one or more Secondary Licenses, and the Covered Software is not Incompatible With SecondaryLicenses, this License permits You to additionally distribute such Covered Software under the terms of such SecondaryLicense(s), so that the recipient of the Larger Work may, at their option, further distribute the Covered Software underthe terms of either this License or such Secondary License(s).
3.4. Notices
Youmay not remove or alter the substance of any license notices (including copyright notices, patent notices, disclaimersof warranty, or limitations of liability) contained within the Source Code Form of the Covered Software, except that Youmay alter any license notices to the extent required to remedy known factual inaccuracies.
3.5. Application of Additional Terms
You may choose to offer, and to charge a fee for, warranty, support, indemnity or liability obligations to one or morerecipients of Covered Software. However, Youmay do so only on Your own behalf, and not on behalf of any Contributor.You must make it absolutely clear that any such warranty, support, indemnity, or liability obligation is offered by Youalone, and You hereby agree to indemnify every Contributor for any liability incurred by such Contributor as a result ofwarranty, support, indemnity or liability terms You offer. Youmay include additional disclaimers of warranty and limitationsof liability specific to any jurisdiction.
4. Inability to Comply Due to Statute or Regulation
If it is impossible for You to comply with any of the terms of this License with respect to some or all of the CoveredSoftware due to statute, judicial order, or regulation then You must: (a) comply with the terms of this License to themaximum extent possible; and (b) describe the limitations and the code they affect. Such description must be placed ina text file included with all distributions of the Covered Software under this License. Except to the extent prohibited bystatute or regulation, such descriptionmust be sufficiently detailed for a recipient of ordinary skill to be able to understandit.
5. Termination
5.1. The rights granted under this License will terminate automatically if You fail to comply with any of its terms. However,if You become compliant, then the rights granted under this License from a particular Contributor are reinstated (a)provisionally, unless and until such Contributor explicitly and finally terminates Your grants, and (b) on an ongoing basis,if such Contributor fails to notify You of the non-compliance by some reasonable means prior to 60 days after You havecome back into compliance. Moreover, Your grants from a particular Contributor are reinstated on an ongoing basis ifsuch Contributor notifies You of the non-compliance by some reasonable means, this is the first time You have receivednotice of non-compliance with this License from such Contributor, and You become compliant prior to 30 days afterYour receipt of the notice.
5.2. If You initiate litigation against any entity by asserting a patent infringement claim (excluding declaratory judgmentactions, counter-claims, and cross-claims) alleging that a Contributor Version directly or indirectly infringes any patent,then the rights granted to You by any and all Contributors for the Covered Software under Section 2.1 of this Licenseshall terminate.
xi

5.3. In the event of termination under Sections 5.1 or 5.2 above, all end user license agreements (excluding distributorsand resellers) which have been validly granted by You or Your distributors under this License prior to termination shallsurvive termination.
6. Disclaimer of Warranty
Covered Software is provided under this License on an “as is” basis, without warranty of any kind, either expressed,implied, or statutory, including, without limitation, warranties that the Covered Software is free of defects, merchantable,fit for a particular purpose or non-infringing. The entire risk as to the quality and performance of the Covered Softwareis with You. Should any Covered Software prove defective in any respect, You (not any Contributor) assume the cost ofany necessary servicing, repair, or correction. This disclaimer of warranty constitutes an essential part of this License.No use of any Covered Software is authorized under this License except under this disclaimer.
7. Limitation of Liability
Under no circumstances and under no legal theory, whether tort (including negligence), contract, or otherwise, shall anyContributor, or anyone who distributes Covered Software as permitted above, be liable to You for any direct, indirect,special, incidental, or consequential damages of any character including, without limitation, damages for lost profits, lossof goodwill, work stoppage, computer failure or malfunction, or any and all other commercial damages or losses, even ifsuch party shall have been informed of the possibility of such damages. This limitation of liability shall not apply to liabilityfor death or personal injury resulting from such party’s negligence to the extent applicable law prohibits such limitation.Some jurisdictions do not allow the exclusion or limitation of incidental or consequential damages, so this exclusion andlimitation may not apply to You.
8. Litigation
Any litigation relating to this License may be brought only in the courts of a jurisdiction where the defendant maintainsits principal place of business and such litigation shall be governed by laws of that jurisdiction, without reference to itsconflict-of-law provisions. Nothing in this Section shall prevent a party’s ability to bring cross-claims or counter-claims.
9. Miscellaneous
This License represents the complete agreement concerning the subject matter hereof. If any provision of this Licenseis held to be unenforceable, such provision shall be reformed only to the extent necessary to make it enforceable. Anylaw or regulation which provides that the language of a contract shall be construed against the drafter shall not be usedto construe this License against a Contributor.
10. Versions of the License
10.1. New Versions
Mozilla Foundation is the license steward. Except as provided in Section 10.3, no one other than the license steward hasthe right to modify or publish new versions of this License. Each version will be given a distinguishing version number.
10.2. Effect of New Versions
You may distribute the Covered Software under the terms of the version of the License under which You originallyreceived the Covered Software, or under the terms of any subsequent version published by the license steward.
xii

10.3. Modified Versions
If you create software not governed by this License, and you want to create a new license for such software, you maycreate and use a modified version of this License if you rename the license and remove any references to the name ofthe license steward (except to note that such modified license differs from this License).
10.4. Distributing Source Code Form that is Incompatible With Secondary Licenses
If You choose to distribute Source Code Form that is Incompatible With Secondary Licenses under the terms of thisversion of the License, the notice described in Exhibit B of this License must be attached.
Exhibit A - Source Code Form License Notice
This Source Code Form is subject to the terms of theMozilla Public License v.2.0. If a copy of theMPLwas not distributedwith this file, You can obtain one at http://mozilla.org/MPL/2.0/.
If it is not possible or desirable to put the notice in a particular file, then You may include the notice in a location (suchas a LICENSE file in a relevant directory) where a recipient would be likely to look for such a notice.
You may add additional accurate notices of copyright ownership.
Exhibit B - “Incompatible With Secondary Licenses” Notice
This Source Code Form is “Incompatible With Secondary Licenses”, as defined by the Mozilla Public License, v. 2.0.
The "inih" library is distributed under the New BSD license:
Copyright © 2009, Brush TechnologyAll rights reserved.
Redistribution and use in source and binary forms, with or without modification, are permitted provided that the followingconditions are met:
1. Redistributions of source codemust retain the above copyright notice, this list of conditions and the following disclaimer.
2. Redistributions in binary form must reproduce the above copyright notice, this list of conditions and the followingdisclaimer in the documentation and/or other materials provided with the distribution.
3. Neither the name of Brush Technology nor the names of its contributors may be used to endorse or promote productsderived from this software without specific prior written permission.
THIS SOFTWARE IS PROVIDED BY BRUSH TECHNOLOGY ''AS IS'' AND ANY EXPRESS OR IMPLIED WARRANTIES,INCLUDING, BUT NOT LIMITED TO, THE IMPLIED WARRANTIES OF MERCHANTABILITY AND FITNESS FOR APARTICULARPURPOSEAREDISCLAIMED. INNOEVENT SHALLBRUSHTECHNOLOGYBE LIABLE FORANYDIRECT,INDIRECT, INCIDENTAL, SPECIAL, EXEMPLARY, OR CONSEQUENTIAL DAMAGES (INCLUDING, BUT NOT LIMITEDTO, PROCUREMENT OF SUBSTITUTE GOODS OR SERVICES; LOSS OF USE, DATA, OR PROFITS; OR BUSINESSINTERRUPTION) HOWEVER CAUSED AND ON ANY THEORY OF LIABILITY, WHETHER IN CONTRACT, STRICTLIABILITY, OR TORT (INCLUDING NEGLIGENCE OR OTHERWISE) ARISING IN ANYWAY OUT OF THE USE OF THISSOFTWARE, EVEN IF ADVISED OF THE POSSIBILITY OF SUCH DAMAGE.
xiii

Contains software copyright 2007-2014, by Sencha, Inc., distributed under license.
Steel-Belted Radius uses Jetty 9 under the Apache License 2.0, You may obtain a copy of the license athttp://www.apache.org/licenses/LICENSE-2.0
Steel-Belted Radius uses GoogleWeb Toolkit (GWT) under the Apache License 2.0, You may obtain a copy of the licenseat http://www.apache.org/licenses/LICENSE-2.0
Steel-Belted Radius uses Apache HTTP components under the Apache License 2.0, You may obtain a copy of the licenseat http://www.apache.org/licenses/LICENSE-2.0
Steel-Belted Radius uses OpenJDK
GNU General Public License, version 2, with the Classpath Exception
The GNU General Public License (GPL)
Version 2, June 1991
Copyright (C) 1989, 1991 Free Software Foundation, Inc.59 Temple Place, Suite 330, Boston, MA 02111-1307 USA
Everyone is permitted to copy and distribute verbatim copies of this license document, but changing it is not allowed.
Preamble
The licenses for most software are designed to take away your freedom to share and change it. By contrast, the GNUGeneral Public License is intended to guarantee your freedom to share and change free software--to make sure thesoftware is free for all its users. This General Public License applies to most of the Free Software Foundation's softwareand to any other program whose authors commit to using it. (Some other Free Software Foundation software is coveredby the GNU Library General Public License instead.) You can apply it to your programs, too.
When we speak of free software, we are referring to freedom, not price. Our General Public Licenses are designed tomake sure that you have the freedom to distribute copies of free software (and charge for this service if you wish), thatyou receive source code or can get it if you want it, that you can change the software or use pieces of it in new freeprograms; and that you know you can do these things.
To protect your rights, we need tomake restrictions that forbid anyone to deny you these rights or to ask you to surrenderthe rights. These restrictions translate to certain responsibilities for you if you distribute copies of the software, or if youmodify it.
For example, if you distribute copies of such a program, whether gratis or for a fee, you must give the recipients all therights that you have. You must make sure that they, too, receive or can get the source code. And you must show themthese terms so they know their rights.
We protect your rights with two steps: (1) copyright the software, and (2) offer you this license which gives you legalpermission to copy, distribute and/or modify the software.
xiv

Also, for each author's protection and ours, wewant tomake certain that everyone understands that there is nowarrantyfor this free software. If the software is modified by someone else and passed on, we want its recipients to know thatwhat they have is not the original, so that any problems introduced by others will not reflect on the original authors'reputations.
Finally, any free program is threatened constantly by software patents. We wish to avoid the danger that redistributorsof a free program will individually obtain patent licenses, in effect making the program proprietary. To prevent this, wehave made it clear that any patent must be licensed for everyone's free use or not licensed at all.
The precise terms and conditions for copying, distribution and modification follow.
TERMS AND CONDITIONS FOR COPYING, DISTRIBUTION AND MODIFICATION
0. This License applies to any program or other work which contains a notice placed by the copyright holder saying itmay be distributed under the terms of this General Public License. The "Program", below, refers to any such program orwork, and a "work based on the Program" means either the Program or any derivative work under copyright law: that isto say, a work containing the Program or a portion of it, either verbatim or with modifications and/or translated intoanother language. (Hereinafter, translation is included without limitation in the term "modification".) Each licensee isaddressed as "you".
Activities other than copying, distribution and modification are not covered by this License; they are outside its scope.The act of running the Program is not restricted, and the output from the Program is covered only if its contents constitutea work based on the Program (independent of having been made by running the Program). Whether that is true dependson what the Program does.
1. You may copy and distribute verbatim copies of the Program's source code as you receive it, in any medium, providedthat you conspicuously and appropriately publish on each copy an appropriate copyright notice and disclaimer of warranty;keep intact all the notices that refer to this License and to the absence of any warranty; and give any other recipients ofthe Program a copy of this License along with the Program.
You may charge a fee for the physical act of transferring a copy, and you may at your option offer warranty protectionin exchange for a fee.
2. You may modify your copy or copies of the Program or any portion of it, thus forming a work based on the Program,and copy and distribute such modifications or work under the terms of Section 1 above, provided that you also meet allof these conditions:
a) You must cause the modified files to carry prominent notices stating that you changed the files and the date of anychange.
b) Youmust cause anywork that you distribute or publish, that in whole or in part contains or is derived from the Programor any part thereof, to be licensed as a whole at no charge to all third parties under the terms of this License.
c) If the modified program normally reads commands interactively when run, you must cause it, when started runningfor such interactive use in themost ordinary way, to print or display an announcement including an appropriate copyrightnotice and a notice that there is no warranty (or else, saying that you provide a warranty) and that users may redistributethe program under these conditions, and telling the user how to view a copy of this License. (Exception: if the Program
xv

itself is interactive but does not normally print such an announcement, your work based on the Program is not requiredto print an announcement.)
These requirements apply to the modified work as a whole. If identifiable sections of that work are not derived from theProgram, and can be reasonably considered independent and separate works in themselves, then this License, and itsterms, do not apply to those sections when you distribute them as separate works. But when you distribute the samesections as part of a whole which is a work based on the Program, the distribution of the whole must be on the terms ofthis License, whose permissions for other licensees extend to the entire whole, and thus to each and every part regardlessof who wrote it.
Thus, it is not the intent of this section to claim rights or contest your rights to work written entirely by you; rather, theintent is to exercise the right to control the distribution of derivative or collective works based on the Program.
In addition, mere aggregation of another work not based on the Program with the Program (or with a work based on theProgram) on a volume of a storage or distribution medium does not bring the other work under the scope of this License.
3. You may copy and distribute the Program (or a work based on it, under Section 2) in object code or executable formunder the terms of Sections 1 and 2 above provided that you also do one of the following:
a) Accompany it with the complete corresponding machine-readable source code, which must be distributed under theterms of Sections 1 and 2 above on a medium customarily used for software interchange; or,
b) Accompany it with a written offer, valid for at least three years, to give any third party, for a charge no more than yourcost of physically performing source distribution, a complete machine-readable copy of the corresponding source code,to be distributed under the terms of Sections 1 and 2 above on a medium customarily used for software interchange; or,
c) Accompany it with the information you received as to the offer to distribute corresponding source code. (This alternativeis allowed only for noncommercial distribution and only if you received the program in object code or executable formwith such an offer, in accord with Subsection b above.)
The source code for a work means the preferred form of the work for making modifications to it. For an executable work,complete source code means all the source code for all modules it contains, plus any associated interface definition files,plus the scripts used to control compilation and installation of the executable. However, as a special exception, the sourcecode distributed need not include anything that is normally distributed (in either source or binary form) with the majorcomponents (compiler, kernel, and so on) of the operating system on which the executable runs, unless that componentitself accompanies the executable.
If distribution of executable or object code is made by offering access to copy from a designated place, then offeringequivalent access to copy the source code from the same place counts as distribution of the source code, even thoughthird parties are not compelled to copy the source along with the object code.
4. You may not copy, modify, sublicense, or distribute the Program except as expressly provided under this License. Anyattempt otherwise to copy, modify, sublicense or distribute the Program is void, and will automatically terminate yourrights under this License. However, parties who have received copies, or rights, from you under this License will not havetheir licenses terminated so long as such parties remain in full compliance.
5. You are not required to accept this License, since you have not signed it. However, nothing else grants you permissionto modify or distribute the Program or its derivative works. These actions are prohibited by law if you do not accept this
xvi

License. Therefore, by modifying or distributing the Program (or any work based on the Program), you indicate youracceptance of this License to do so, and all its terms and conditions for copying, distributing or modifying the Programor works based on it.
6. Each time you redistribute the Program (or any work based on the Program), the recipient automatically receives alicense from the original licensor to copy, distribute or modify the Program subject to these terms and conditions. Youmay not impose any further restrictions on the recipients' exercise of the rights granted herein. You are not responsiblefor enforcing compliance by third parties to this License.
7. If, as a consequence of a court judgment or allegation of patent infringement or for any other reason (not limited topatent issues), conditions are imposed on you (whether by court order, agreement or otherwise) that contradict theconditions of this License, they do not excuse you from the conditions of this License. If you cannot distribute so as tosatisfy simultaneously your obligations under this License and any other pertinent obligations, then as a consequenceyou may not distribute the Program at all. For example, if a patent license would not permit royalty-free redistributionof the Program by all those who receive copies directly or indirectly through you, then the only way you could satisfyboth it and this License would be to refrain entirely from distribution of the Program.
If any portion of this section is held invalid or unenforceable under any particular circumstance, the balance of the sectionis intended to apply and the section as a whole is intended to apply in other circumstances.
It is not the purpose of this section to induce you to infringe any patents or other property right claims or to contestvalidity of any such claims; this section has the sole purpose of protecting the integrity of the free software distributionsystem, which is implemented by public license practices. Many people have made generous contributions to the widerange of software distributed through that system in reliance on consistent application of that system; it is up to theauthor/donor to decide if he or she is willing to distribute software through any other system and a licensee cannotimpose that choice.
This section is intended to make thoroughly clear what is believed to be a consequence of the rest of this License.
8. If the distribution and/or use of the Program is restricted in certain countries either by patents or by copyrightedinterfaces, the original copyright holder who places the Program under this License may add an explicit geographicaldistribution limitation excluding those countries, so that distribution is permitted only in or among countries not thusexcluded. In such case, this License incorporates the limitation as if written in the body of this License.
9. The Free Software Foundation may publish revised and/or new versions of the General Public License from time totime. Such new versions will be similar in spirit to the present version, but may differ in detail to address new problemsor concerns.
Each version is given a distinguishing version number. If the Program specifies a version number of this License whichapplies to it and "any later version", you have the option of following the terms and conditions either of that version orof any later version published by the Free Software Foundation. If the Program does not specify a version number ofthis License, you may choose any version ever published by the Free Software Foundation.
10. If you wish to incorporate parts of the Program into other free programs whose distribution conditions are different,write to the author to ask for permission. For software which is copyrighted by the Free Software Foundation, write tothe Free Software Foundation; we sometimes make exceptions for this. Our decision will be guided by the two goals ofpreserving the free status of all derivatives of our free software and of promoting the sharing and reuse of softwaregenerally.
xvii

NOWARRANTY
11. BECAUSE THE PROGRAM IS LICENSED FREE OF CHARGE, THERE IS NOWARRANTY FOR THE PROGRAM, TOTHEEXTENTPERMITTEDBYAPPLICABLE LAW. EXCEPTWHENOTHERWISE STATED INWRITINGTHECOPYRIGHTHOLDERSAND/OROTHERPARTIES PROVIDETHEPROGRAM"AS IS"WITHOUTWARRANTYOFANYKIND, EITHEREXPRESSED OR IMPLIED, INCLUDING, BUT NOT LIMITED TO, THE IMPLIEDWARRANTIES OFMERCHANTABILITYAND FITNESS FOR A PARTICULAR PURPOSE. THE ENTIRE RISK AS TO THEQUALITY AND PERFORMANCEOF THEPROGRAM ISWITHYOU. SHOULDTHEPROGRAMPROVEDEFECTIVE, YOUASSUMETHECOSTOFALLNECESSARYSERVICING, REPAIR OR CORRECTION.
12. IN NO EVENT UNLESS REQUIRED BY APPLICABLE LAW OR AGREED TO IN WRITINGWILL ANY COPYRIGHTHOLDER, OR ANY OTHER PARTY WHOMAY MODIFY AND/OR REDISTRIBUTE THE PROGRAM AS PERMITTEDABOVE, BE LIABLETOYOUFORDAMAGES, INCLUDINGANYGENERAL, SPECIAL, INCIDENTALORCONSEQUENTIALDAMAGES ARISING OUT OF THE USE OR INABILITY TO USE THE PROGRAM (INCLUDING BUT NOT LIMITED TOLOSS OF DATA OR DATA BEING RENDERED INACCURATE OR LOSSES SUSTAINED BY YOU OR THIRD PARTIESORAFAILUREOFTHEPROGRAMTOOPERATEWITHANYOTHERPROGRAMS), EVEN IF SUCHHOLDEROROTHERPARTY HAS BEEN ADVISED OF THE POSSIBILITY OF SUCH DAMAGES.
END OF TERMS AND CONDITIONS
How to Apply These Terms to Your New Programs
If you develop a new program, and you want it to be of the greatest possible use to the public, the best way to achievethis is to make it free software which everyone can redistribute and change under these terms.
To do so, attach the following notices to the program. It is safest to attach them to the start of each source file to mosteffectively convey the exclusion of warranty; and each file should have at least the "copyright" line and a pointer towhere the full notice is found.
One line to give the program's name and a brief idea of what it does.
Copyright © <year> <name of author>
This program is free software; you can redistribute it and/or modify it under the terms of the GNUGeneral Public Licenseas published by the Free Software Foundation; either version 2 of the License, or (at your option) any later version.
This program is distributed in the hope that it will be useful, but WITHOUT ANYWARRANTY; without even the impliedwarranty of MERCHANTABILITY or FITNESS FOR A PARTICULAR PURPOSE. See the GNU General Public License formore details.
You should have received a copy of the GNU General Public License along with this program; if not, write to the FreeSoftware Foundation, Inc., 59 Temple Place, Suite 330, Boston, MA 02111-1307 USA
Also add information on how to contact you by electronic and paper mail.
If the program is interactive, make it output a short notice like this when it starts in an interactive mode:
xviii

Gnomovision version 69, Copyright © year name of author Gnomovision comes with ABSOLUTELY NOWARRANTY;for details type 'show w'. This is free software, and you are welcome to redistribute it under certain conditions; type'show c' for details.
The hypothetical commands 'show w' and 'show c' should show the appropriate parts of the General Public License. Ofcourse, the commands you usemay be called something other than 'showw' and 'show c'; they could even bemouse-clicksor menu items--whatever suits your program.
You should also get your employer (if you work as a programmer) or your school, if any, to sign a "copyright disclaimer"for the program, if necessary. Here is a sample; alter the names:
Yoyodyne, Inc., hereby disclaims all copyright interest in the program 'Gnomovision' (which makes passes at compilers)written by James Hacker.signature of Ty Coon, 1 April 1989
Ty Coon, President of Vice
This General Public License does not permit incorporating your program into proprietary programs. If your program is asubroutine library, you may consider it more useful to permit linking proprietary applications with the library. If this iswhat you want to do, use the GNU Library General Public License instead of this License.
"CLASSPATH" EXCEPTION TO THE GPL
Certain source files distributed byOracle America and/or its affiliates are subject to the following clarification and specialexception to the GPL, but only where Oracle has expressly included in the particular source file's header the words"Oracle designates this particular file as subject to the "Classpath" exception as provided by Oracle in the LICENSE filethat accompanied this code."
Linking this library statically or dynamically with other modules is making a combined work based on this library. Thus,the terms and conditions of the GNU General Public License cover the whole combination.
As a special exception, the copyright holders of this library give you permission to link this library with independentmodules to produce an executable, regardless of the license terms of these independent modules, and to copy anddistribute the resulting executable under terms of your choice, provided that you also meet, for each linked independentmodule, the terms and conditions of the license of that module. An independent module is a module which is not derivedfrom or based on this library. If you modify this library, you may extend this exception to your version of the library, butyou are not obligated to do so. If you do not wish to do so, delete this exception statement from your version.
SBR uses Gecko SDK 1.4b
Mozilla Public License Version 2.0
1. Definitions
1.1. "Contributor" means each individual or legal entity that creates, contributes to the creation of, or owns CoveredSoftware.
1.2. "Contributor Version" means the combination of the Contributions of others (if any) used by a Contributor and thatparticular Contributor's Contribution.
xix

1.3. "Contribution" means Covered Software of a particular Contributor.
1.4. "Covered Software" means Source Code Form to which the initial Contributor has attached the notice in Exhibit A,the Executable Form of such Source Code Form, and Modifications of such Source Code Form, in each case includingportions thereof.
1.5. "Incompatible With Secondary Licenses" means
(a) that the initial Contributor has attached the notice described in Exhibit B to the Covered Software; or
(b) that the Covered Software was made available under the terms of version 1.1 or earlier of the License, but not alsounder the terms of a Secondary License.
1.6. "Executable Form" means any form of the work other than Source Code Form.
1.7. "Larger Work" means a work that combines Covered Software with other material, in a separate file or files, that isnot Covered Software.
1.8. "License" means this document.
1.9. "Licensable" means having the right to grant, to the maximum extent possible, whether at the time of the initial grantor subsequently, any and all of the rights conveyed by this License.
1.10. "Modifications" means any of the following:
(a) any file in Source Code Form that results from an addition to, deletion from, or modification of the contents of CoveredSoftware; or
(b) any new file in Source Code Form that contains any Covered Software.
1.11. "Patent Claims" of a Contributor means any patent claim(s), including without limitation, method, process, andapparatus claims, in any patent Licensable by such Contributor that would be infringed, but for the grant of the License,by themaking, using, selling, offering for sale, havingmade, import, or transfer of either its Contributions or its ContributorVersion.
1.12. "Secondary License" means either the GNU General Public License, Version 2.0, the GNU Lesser General PublicLicense, Version 2.1, the GNU Affero General Public License, Version 3.0, or any later versions of those licenses.
1.13. "Source Code Form" means the form of the work preferred for making modifications.
1.14. "You" (or "Your") means an individual or a legal entity exercising rights under this License. For legal entities, "You"includes any entity that controls, is controlled by, or is under common control with You. For purposes of this definition,"control" means (a) the power, direct or indirect, to cause the direction or management of such entity, whether by contractor otherwise, or (b) ownership of more than fifty percent (50%) of the outstanding shares or beneficial ownership of suchentity.
2. License Grants and Conditions
2.1. Grants
xx

Each Contributor hereby grants You a world-wide, royalty-free, non-exclusive license:
(a) under intellectual property rights (other than patent or trademark) Licensable by such Contributor to use, reproduce,make available, modify, display, perform, distribute, and otherwise exploit its Contributions, either on an unmodifiedbasis, with Modifications, or as part of a Larger Work; and
(b) under Patent Claims of such Contributor to make, use, sell, offer for sale, have made, import, and otherwise transfereither its Contributions or its Contributor Version.
2.2. Effective Date
The licenses granted in Section 2.1 with respect to any Contribution become effective for each Contribution on the datethe Contributor first distributes such Contribution.
2.3. Limitations on Grant Scope
The licenses granted in this Section 2 are the only rights granted under this License. No additional rights or licenses willbe implied from the distribution or licensing of Covered Software under this License. Notwithstanding Section 2.1(b)above, no patent license is granted by a Contributor:
(a) for any code that a Contributor has removed from Covered Software; or
b) for infringements caused by: (i) Your and any other third party'smodifications of Covered Software, or (ii) the combinationof its Contributions with other software (except as part of its Contributor Version); or
(c) under Patent Claims infringed by Covered Software in the absence of its Contributions.
This License does not grant any rights in the trademarks, service marks, or logos of any Contributor (except as may benecessary to comply with the notice requirements in Section 3.4).
2.4. Subsequent Licenses
No Contributor makes additional grants as a result of Your choice to distribute the Covered Software under a subsequentversion of this License (see Section 10.2) or under the terms of a Secondary License (if permitted under the terms ofSection 3.3).
2.5. Representation
Each Contributor represents that the Contributor believes its Contributions are its original creation(s) or it has sufficientrights to grant the rights to its Contributions conveyed by this License.
2.6. Fair Use
This License is not intended to limit any rights You have under applicable copyright doctrines of fair use, fair dealing, orother equivalents.
2.7. Conditions
Sections 3.1, 3.2, 3.3, and 3.4 are conditions of the licenses granted in Section 2.1.
xxi
3. Responsibilities
3.1. Distribution of Source Form
All distribution of Covered Software in Source Code Form, including any Modifications that You create or to which Youcontribute, must be under the terms of this License. Youmust inform recipients that the Source Code Form of the CoveredSoftware is governed by the terms of this License, and how they can obtain a copy of this License. You may not attemptto alter or restrict the recipients' rights in the Source Code Form.
3.2. Distribution of Executable Form
If You distribute Covered Software in Executable Form then:
(a) such Covered Software must also be made available in Source Code Form, as described in Section 3.1, and You mustinform recipients of the Executable Form how they can obtain a copy of such Source Code Form by reasonable meansin a timely manner, at a charge no more than the cost of distribution to the recipient; and
(b) You may distribute such Executable Form under the terms of this License, or sublicense it under different terms,provided that the license for the Executable Form does not attempt to limit or alter the recipients' rights in the SourceCode Form under this License.
3.3. Distribution of a Larger Work
You may create and distribute a Larger Work under terms of Your choice, provided that You also comply with therequirements of this License for the Covered Software. If the Larger Work is a combination of Covered Software with awork governed by one or more Secondary Licenses, and the Covered Software is not Incompatible With SecondaryLicenses, this License permits You to additionally distribute such Covered Software under the terms of such SecondaryLicense(s), so that the recipient of the Larger Work may, at their option, further distribute the Covered Software underthe terms of either this License or such Secondary License(s).
3.4. Notices
Youmay not remove or alter the substance of any license notices (including copyright notices, patent notices, disclaimersof warranty, or limitations of liability) contained within the Source Code Form of the Covered Software, except that Youmay alter any license notices to the extent required to remedy known factual inaccuracies.
3.5. Application of Additional Terms
You may choose to offer, and to charge a fee for, warranty, support, indemnity or liability obligations to one or morerecipients of Covered Software. However, Youmay do so only on Your own behalf, and not on behalf of any Contributor.You must make it absolutely clear that any such warranty, support, indemnity, or liability obligation is offered by Youalone, and You hereby agree to indemnify every Contributor for any liability incurred by such Contributor as a result ofwarranty, support, indemnity or liability terms You offer. Youmay include additional disclaimers of warranty and limitationsof liability specific to any jurisdiction.
4. Inability to Comply Due to Statute or Regulation
If it is impossible for You to comply with any of the terms of this License with respect to some or all of the CoveredSoftware due to statute, judicial order, or regulation then You must: (a) comply with the terms of this License to the
xxii

maximum extent possible; and (b) describe the limitations and the code they affect. Such description must be placed ina text file included with all distributions of the Covered Software under this License. Except to the extent prohibited bystatute or regulation, such descriptionmust be sufficiently detailed for a recipient of ordinary skill to be able to understandit.
5. Termination
5.1. The rights granted under this License will terminate automatically if You fail to comply with any of its terms. However,if You become compliant, then the rights granted under this License from a particular Contributor are reinstated (a)provisionally, unless and until such Contributor explicitly and finally terminates Your grants, and (b) on an ongoing basis,if such Contributor fails to notify You of the non-compliance by some reasonable means prior to 60 days after You havecome back into compliance. Moreover, Your grants from a particular Contributor are reinstated on an ongoing basis ifsuch Contributor notifies You of the non-compliance by some reasonable means, this is the first time You have receivednotice of non-compliance with this License from such Contributor, and You become compliant prior to 30 days afterYour receipt of the notice.
5.2. If You initiate litigation against any entity by asserting a patent infringement claim (excluding declaratory judgmentactions, counter-claims, and cross-claims) alleging that a Contributor Version directly or indirectly infringes any patent,then the rights granted to You by any and all Contributors for the Covered Software under Section 2.1 of this Licenseshall terminate.
5.3. In the event of termination under Sections 5.1 or 5.2 above, all end user license agreements (excluding distributorsand resellers) which have been validly granted by You or Your distributors under this License prior to termination shallsurvive termination.
6. Disclaimer of Warranty
Covered Software is provided under this License on an "as is" basis, without warranty of any kind, either expressed,implied, or statutory, including, without limitation, warranties that the Covered Software is free of defects, merchantable,fit for a particular purpose or non-infringing. The entire risk as to the quality and performance of the Covered Softwareis with You. Should any Covered Software prove defective in any respect, You (not any Contributor) assume the cost ofany necessary servicing, repair, or correction. This disclaimer of warranty constitutes an essential part of this License.No use of any Covered Software is authorized under this License except under this disclaimer.
7. Limitation of Liability
Under no circumstances and under no legal theory, whether tort (including negligence), contract, or otherwise, shall anyContributor, or anyone who distributes Covered Software as permitted above, be liable to You for any direct, indirect,special, incidental, or consequential damages of any character including, without limitation, damages for lost profits, lossof goodwill, work stoppage, computer failure or malfunction, or any and all other commercial damages or losses, even ifsuch party shall have been informed of the possibility of such damages. This limitation of liability shall not apply to liabilityfor death or personal injury resulting from such party's negligence to the extent applicable law prohibits such limitation.Some jurisdictions do not allow the exclusion or limitation of incidental or consequential damages, so this exclusion andlimitation may not apply to You.
8. Litigation
xxiii

Any litigation relating to this License may be brought only in the courts of a jurisdiction where the defendant maintainsits principal place of business and such litigation shall be governed by laws of that jurisdiction, without reference to itsconflict-of-law provisions. Nothing in this Section shall prevent a party's ability to bring cross-claims or counter-claims.
9. Miscellaneous
This License represents the complete agreement concerning the subject matter hereof. If any provision of this Licenseis held to be unenforceable, such provision shall be reformed only to the extent necessary to make it enforceable. Anylaw or regulation which provides that the language of a contract shall be construed against the drafter shall not be usedto construe this License against a Contributor.
10. Versions of the License
10.1. New Versions
Mozilla Foundation is the license steward. Except as provided in Section 10.3, no one other than the license steward hasthe right to modify or publish new versions of this License. Each version will be given a distinguishing version number.
10.2. Effect of New Versions
You may distribute the Covered Software under the terms of the version of the License under which You originallyreceived the Covered Software, or under the terms of any subsequent version published by the license steward.
10.3. Modified Versions
If you create software not governed by this License, and you want to create a new license for such software, you maycreate and use a modified version of this License if you rename the license and remove any references to the name ofthe license steward (except to note that such modified license differs from this License).
10.4. Distributing Source Code Form that is Incompatible With Secondary Licenses
If You choose to distribute Source Code Form that is Incompatible With Secondary Licenses under the terms of thisversion of the License, the notice described in Exhibit B of this License must be attached.
Exhibit A - Source Code Form License Notice
This Source Code Form is subject to the terms of theMozilla Public License, v. 2.0. If a copy of theMPLwas not distributedwith this file, You can obtain one at http://mozilla.org/MPL/2.0/.
If it is not possible or desirable to put the notice in a particular file, then You may include the notice in a location (suchas a LICENSE file in a relevant directory) where a recipient would be likely to look for such a notice.
You may add additional accurate notices of copyright ownership.
Exhibit B - "Incompatible With Secondary Licenses" Notice
This Source Code Form is "Incompatible With Secondary Licenses", as defined by the Mozilla Public License, v. 2.0.
SBR uses Mozilla LDAP C SDK 5.17
xxiv

MOZILLA PUBLIC LICENSE
Version 1.1
1. Definitions
1.0.1. "Commercial Use" means distribution or otherwise making the Covered Code available to a third party.
1.1. "Contributor" means each entity that creates or contributes to the creation of Modifications.
1.2. "Contributor Version" means the combination of the Original Code, prior Modifications used by a Contributor, andthe Modifications made by that particular Contributor.
1.3. "Covered Code"means theOriginal Code orModifications or the combination of theOriginal Code andModifications,in each case including portions thereof.
1.4. "Electronic DistributionMechanism"means amechanism generally accepted in the software development communityfor the electronic transfer of data.
1.5. "Executable" means Covered Code in any form other than Source Code.
1.6. "Initial Developer" means the individual or entity identified as the Initial Developer in the Source Code notice requiredby Exhibit A.
1.7. "Larger Work" means a work which combines Covered Code or portions thereof with code not governed by theterms of this License.
1.8. "License" means this document.
1.8.1. "Licensable" means having the right to grant, to the maximum extent possible, whether at the time of the initialgrant or subsequently acquired, any and all of the rights conveyed herein.
1.9. "Modifications" means any addition to or deletion from the substance or structure of either the Original Code or anyprevious Modifications. When Covered Code is released as a series of files, a Modification is:
A. Any addition to or deletion from the contents of a file containing Original Code or previous Modifications.
B. Any new file that contains any part of the Original Code or previous Modifications.
1.10. "Original Code" means Source Code of computer software code which is described in the Source Code noticerequired by Exhibit A as Original Code, and which, at the time of its release under this License is not already CoveredCode governed by this License.
1.10.1. "Patent Claims" means any patent claim(s), now owned or hereafter acquired, includingwithout limitation, method,process, and apparatus claims, in any patent Licensable by grantor.
1.11. "Source Code" means the preferred form of the Covered Code for making modifications to it, including all modulesit contains, plus any associated interface definition files, scripts used to control compilation and installation of an Executable,or source code differential comparisons against either the Original Code or another well known, available Covered Code
xxv

of the Contributor's choice. The Source Code can be in a compressed or archival form, provided the appropriatedecompression or de-archiving software is widely available for no charge.
1.12. "You" (or "Your") means an individual or a legal entity exercising rights under, and complying with all of the termsof, this License or a future version of this License issued under Section 6.1. For legal entities, "You" includes any entitywhich controls, is controlled by, or is under common control with You. For purposes of this definition, "control" means(a) the power, direct or indirect, to cause the direction or management of such entity, whether by contract or otherwise,or (b) ownership of more than fifty percent (50%) of the outstanding shares or beneficial ownership of such entity.
2. Source Code License.
2.1. The Initial Developer Grant.
The Initial Developer hereby grants You aworld-wide, royalty-free, non-exclusive license, subject to third party intellectualproperty claims:
(a) under intellectual property rights (other than patent or trademark) Licensable by Initial Developer to use, reproduce,modify, display, perform, sublicense and distribute the Original Code (or portions thereof) with or without Modifications,and/or as part of a Larger Work; and
(b) under Patents Claims infringed by the making, using or selling of Original Code, to make, have made, use, practice,sell, and offer for sale, and/or otherwise dispose of the Original Code (or portions thereof).
(c) the licenses granted in this Section 2.1(a) and (b) are effective on the date Initial Developer first distributes OriginalCode under the terms of this License.
(d) Notwithstanding Section 2.1(b) above, no patent license is granted: 1) for code that You delete from the OriginalCode; 2) separate from the Original Code; or 3) for infringements caused by: i) the modification of the Original Code orii) the combination of the Original Code with other software or devices.
2.2. Contributor Grant.
Subject to third party intellectual property claims, each Contributor hereby grants You a world-wide, royalty-free,non-exclusive license
(a) under intellectual property rights (other than patent or trademark) Licensable by Contributor, to use, reproduce,modify, display, perform, sublicense and distribute the Modifications created by such Contributor (or portions thereof)either on an unmodified basis, with other Modifications, as Covered Code and/or as part of a Larger Work; and
(b) under Patent Claims infringed by the making, using, or selling of Modifications made by that Contributor either aloneand/or in combination with its Contributor Version (or portions of such combination), to make, use, sell, offer for sale,have made, and/or otherwise dispose of: 1) Modifications made by that Contributor (or portions thereof); and 2) thecombination of Modifications made by that Contributor with its Contributor Version (or portions of such combination).
(c) the licenses granted in Sections 2.2(a) and 2.2(b) are effective on the date Contributor first makes Commercial Useof the Covered Code.
(d) Notwithstanding Section 2.2(b) above, no patent license is granted: 1) for any code that Contributor has deleted fromthe Contributor Version; 2) separate from the Contributor Version; 3) for infringements caused by: i) third party
xxvi

modifications of Contributor Version or ii) the combination ofModificationsmade by that Contributor with other software(except as part of the Contributor Version) or other devices; or 4) under Patent Claims infringed by Covered Code in theabsence of Modifications made by that Contributor.
3. Distribution Obligations.
3.1. Application of License.
The Modifications which You create or to which You contribute are governed by the terms of this License, includingwithout limitation Section 2.2. The Source Code version of Covered Code may be distributed only under the terms ofthis License or a future version of this License released under Section 6.1, and You must include a copy of this Licensewith every copy of the Source Code You distribute. You may not offer or impose any terms on any Source Code versionthat alters or restricts the applicable version of this License or the recipients' rights hereunder. However, Youmay includean additional document offering the additional rights described in Section 3.5.
3.2. Availability of Source Code.
Any Modification which You create or to which You contribute must be made available in Source Code form under theterms of this License either on the same media as an Executable version or via an accepted Electronic DistributionMechanism to anyone towhom youmade an Executable version available; and if made available via Electronic DistributionMechanism, must remain available for at least twelve (12) months after the date it initially became available, or at leastsix (6) months after a subsequent version of that particular Modification has been made available to such recipients. Youare responsible for ensuring that the Source Code version remains available even if the Electronic DistributionMechanismis maintained by a third party.
3.3. Description of Modifications.
Youmust cause all Covered Code to which You contribute to contain a file documenting the changes Youmade to createthat Covered Code and the date of any change. Youmust include a prominent statement that theModification is derived,directly or indirectly, fromOriginal Code provided by the Initial Developer and including the name of the Initial Developerin (a) the Source Code, and (b) in any notice in an Executable version or related documentation in which You describethe origin or ownership of the Covered Code.
3.4. Intellectual Property Matters
(a) Third Party Claims. If Contributor has knowledge that a license under a third party's intellectual property rights isrequired to exercise the rights granted by such Contributor under Sections 2.1 or 2.2, Contributor must include a textfile with the Source Code distribution titled "LEGAL" which describes the claim and the party making the claim in sufficientdetail that a recipient will know whom to contact. If Contributor obtains such knowledge after the Modification is madeavailable as described in Section 3.2, Contributor shall promptly modify the LEGAL file in all copies Contributor makesavailable thereafter and shall take other steps (such as notifying appropriate mailing lists or newsgroups) reasonablycalculated to inform those who received the Covered Code that new knowledge has been obtained.
(b) Contributor APIs. If Contributor's Modifications include an application programming interface and Contributor hasknowledge of patent licenses which are reasonably necessary to implement that API, Contributor must also include thisinformation in the LEGAL file.
xxvii

(c) Representations. Contributor represents that, except as disclosed pursuant to Section 3.4(a) above, Contributorbelieves that Contributor's Modifications are Contributor's original creation(s) and/or Contributor has sufficient rightsto grant the rights conveyed by this License.
3.5. Required Notices.
You must duplicate the notice in Exhibit A in each file of the Source Code. If it is not possible to put such notice in aparticular Source Code file due to its structure, then You must include such notice in a location (such as a relevantdirectory) where a user would be likely to look for such a notice. If You created one or more Modification(s) You mayadd your name as a Contributor to the notice described in Exhibit A. You must also duplicate this License in anydocumentation for the Source Code where You describe recipients' rights or ownership rights relating to Covered Code.You may choose to offer, and to charge a fee for, warranty, support, indemnity or liability obligations to one or morerecipients of Covered Code. However, Youmay do so only on Your own behalf, and not on behalf of the Initial Developeror any Contributor. You must make it absolutely clear than any such warranty, support, indemnity or liability obligationis offered by You alone, and You hereby agree to indemnify the Initial Developer and every Contributor for any liabilityincurred by the Initial Developer or such Contributor as a result of warranty, support, indemnity or liability terms Youoffer.
3.6. Distribution of Executable Versions. You may distribute Covered Code in Executable form only if the requirementsof Section 3.1-3.5 have beenmet for that Covered Code, and if You include a notice stating that the Source Code versionof the Covered Code is available under the terms of this License, including a description of how and where You havefulfilled the obligations of Section 3.2. The notice must be conspicuously included in any notice in an Executable version,related documentation or collateral in which You describe recipients' rights relating to the Covered Code. You maydistribute the Executable version of Covered Code or ownership rights under a license of Your choice, whichmay containterms different from this License, provided that You are in compliance with the terms of this License and that the licensefor the Executable version does not attempt to limit or alter the recipient's rights in the Source Code version from therights set forth in this License. If You distribute the Executable version under a different license You must make itabsolutely clear that any terms which differ from this License are offered by You alone, not by the Initial Developer orany Contributor. You hereby agree to indemnify the Initial Developer and every Contributor for any liability incurred bythe Initial Developer or such Contributor as a result of any such terms You offer.
3.7. Larger Works. You may create a Larger Work by combining Covered Code with other code not governed by theterms of this License and distribute the Larger Work as a single product. In such a case, You must make sure therequirements of this License are fulfilled for the Covered Code.
4. Inability to Comply Due to Statute or Regulation.
If it is impossible for You to comply with any of the terms of this License with respect to some or all of the Covered Codedue to statute, judicial order, or regulation then You must: (a) comply with the terms of this License to the maximumextent possible; and (b) describe the limitations and the code they affect. Such descriptionmust be included in the LEGALfile described in Section 3.4 andmust be includedwith all distributions of the Source Code. Except to the extent prohibitedby statute or regulation, such description must be sufficiently detailed for a recipient of ordinary skill to be able tounderstand it.
5. Application of this License.
This License applies to code to which the Initial Developer has attached the notice in Exhibit A and to related CoveredCode.
xxviii

6. Versions of the License.
6.1. New Versions. Netscape Communications Corporation ("Netscape") may publish revised and/or new versions of theLicense from time to time. Each version will be given a distinguishing version number.
6.2. Effect of New Versions. Once Covered Code has been published under a particular version of the License, You mayalways continue to use it under the terms of that version. You may also choose to use such Covered Code under theterms of any subsequent version of the License published by Netscape. No one other than Netscape has the right tomodify the terms applicable to Covered Code created under this License.
6.3. Derivative Works. If You create or use a modified version of this License (which you may only do in order to applyit to code which is not already Covered Code governed by this License), You must (a) rename Your license so that thephrases "Mozilla", "MOZILLAPL", "MOZPL", "Netscape", "MPL", "NPL" or any confusingly similar phrase do not appearin your license (except to note that your license differs from this License) and (b) otherwisemake it clear that Your versionof the license contains terms which differ from the Mozilla Public License and Netscape Public License. (Filling in thename of the Initial Developer, Original Code or Contributor in the notice described in Exhibit A shall not of themselvesbe deemed to be modifications of this License.)
7. DISCLAIMER OF WARRANTY.
COVERED CODE IS PROVIDED UNDER THIS LICENSE ON AN "AS IS" BASIS, WITHOUTWARRANTY OF ANY KIND,EITHER EXPRESSED OR IMPLIED, INCLUDING, WITHOUT LIMITATION, WARRANTIES THAT THE COVERED CODEIS FREEOFDEFECTS,MERCHANTABLE, FIT FORAPARTICULARPURPOSEORNON-INFRINGING. THE ENTIRE RISKAS TO THEQUALITY AND PERFORMANCEOF THE COVERED CODE ISWITH YOU. SHOULDANY COVERED CODEPROVEDEFECTIVE INANYRESPECT, YOU (NOTTHE INITIALDEVELOPERORANYOTHERCONTRIBUTOR)ASSUMETHE COST OF ANY NECESSARY SERVICING, REPAIR OR CORRECTION. THIS DISCLAIMER OF WARRANTYCONSTITUTES AN ESSENTIAL PART OF THIS LICENSE. NO USE OF ANY COVERED CODE IS AUTHORIZEDHEREUNDER EXCEPT UNDER THIS DISCLAIMER.
8. TERMINATION.
8.1. This License and the rights granted hereunder will terminate automatically if You fail to comply with terms hereinand fail to cure such breach within 30 days of becoming aware of the breach. All sublicenses to the Covered Code whichare properly granted shall survive any termination of this License. Provisions which, by their nature, must remain in effectbeyond the termination of this License shall survive.
8.2. If You initiate litigation by asserting a patent infringement claim (excluding declatory judgment actions) against InitialDeveloper or a Contributor (the Initial Developer or Contributor against whom You file such action is referred to as"Participant") alleging that:
(a) such Participant's Contributor Version directly or indirectly infringes any patent, then any and all rights granted bysuch Participant to You under Sections 2.1 and/or 2.2 of this License shall, upon 60 days notice from Participant terminateprospectively, unless if within 60 days after receipt of notice You either: (i) agree in writing to pay Participant a mutuallyagreeable reasonable royalty for Your past and future use of Modifications made by such Participant, or (ii) withdrawYour litigation claim with respect to the Contributor Version against such Participant. If within 60 days of notice, areasonable royalty and payment arrangement are not mutually agreed upon in writing by the parties or the litigationclaim is not withdrawn, the rights granted by Participant to You under Sections 2.1 and/or 2.2 automatically terminateat the expiration of the 60 day notice period specified above.
xxix

(b) any software, hardware, or device, other than such Participant's Contributor Version, directly or indirectly infringesany patent, then any rights granted to You by such Participant under Sections 2.1(b) and 2.2(b) are revoked effective asof the date You first made, used, sold, distributed, or had made, Modifications made by that Participant.
8.3. If You assert a patent infringement claim against Participant alleging that such Participant's Contributor Versiondirectly or indirectly infringes any patent where such claim is resolved (such as by license or settlement) prior to theinitiation of patent infringement litigation, then the reasonable value of the licenses granted by such Participant underSections 2.1 or 2.2 shall be taken into account in determining the amount or value of any payment or license.
8.4. In the event of termination under Sections 8.1 or 8.2 above, all end user license agreements (excluding distributorsand resellers) which have been validly granted by You or any distributor hereunder prior to termination shall survivetermination.
9. LIMITATION OF LIABILITY.
UNDER NO CIRCUMSTANCES AND UNDER NO LEGAL THEORY, WHETHER TORT (INCLUDING NEGLIGENCE),CONTRACT, OR OTHERWISE, SHALL YOU, THE INITIAL DEVELOPER, ANY OTHER CONTRIBUTOR, OR ANYDISTRIBUTOR OF COVERED CODE, OR ANY SUPPLIER OF ANY OF SUCH PARTIES, BE LIABLE TO ANY PERSONFOR ANY INDIRECT, SPECIAL, INCIDENTAL, OR CONSEQUENTIAL DAMAGES OF ANY CHARACTER INCLUDING,WITHOUT LIMITATION, DAMAGES FOR LOSS OF GOODWILL, WORK STOPPAGE, COMPUTER FAILURE ORMALFUNCTION, OR ANY AND ALL OTHER COMMERCIAL DAMAGES OR LOSSES, EVEN IF SUCH PARTY SHALLHAVE BEEN INFORMED OF THE POSSIBILITY OF SUCH DAMAGES. THIS LIMITATION OF LIABILITY SHALL NOTAPPLY TO LIABILITY FOR DEATH OR PERSONAL INJURY RESULTING FROM SUCH PARTY'S NEGLIGENCE TO THEEXTENTAPPLICABLE LAWPROHIBITS SUCHLIMITATION. SOME JURISDICTIONSDONOTALLOWTHEEXCLUSIONOR LIMITATION OF INCIDENTAL OR CONSEQUENTIAL DAMAGES, SO THIS EXCLUSION AND LIMITATION MAYNOT APPLY TO YOU.
10. U.S. GOVERNMENT END USERS.
The Covered Code is a "commercial item," as that term is defined in 48 C.F.R. 2.101 (Oct. 1995), consisting of "commercialcomputer software" and "commercial computer software documentation," as such terms are used in 48 C.F.R. 12.212(Sept. 1995). Consistent with 48 C.F.R. 12.212 and 48 C.F.R. 227.7202-1 through 227.7202-4 (June 1995), all U.S.Government End Users acquire Covered Code with only those rights set forth herein.
11. MISCELLANEOUS.
This License represents the complete agreement concerning subject matter hereof. If any provision of this License isheld to be unenforceable, such provision shall be reformed only to the extent necessary to make it enforceable. ThisLicense shall be governed by California law provisions (except to the extent applicable law, if any, provides otherwise),excluding its conflict-of-law provisions. With respect to disputes in which at least one party is a citizen of, or an entitychartered or registered to do business in the United States of America, any litigation relating to this License shall besubject to the jurisdiction of the Federal Courts of the Northern District of California, with venue lying in Santa ClaraCounty, California, with the losing party responsible for costs, including without limitation, court costs and reasonableattorneys' fees and expenses. The application of the United Nations Convention on Contracts for the International Saleof Goods is expressly excluded. Any law or regulation which provides that the language of a contract shall be construedagainst the drafter shall not apply to this License.
12. RESPONSIBILITY FOR CLAIMS.
xxx

As between Initial Developer and the Contributors, each party is responsible for claims and damages arising, directly orindirectly, out of its utilization of rights under this License and You agree to work with Initial Developer and Contributorsto distribute such responsibility on an equitable basis. Nothing herein is intended or shall be deemed to constitute anyadmission of liability.
13. MULTIPLE-LICENSED CODE.
Initial Developer may designate portions of the Covered Code as "Multiple-Licensed". "Multiple-Licensed" means thatthe Initial Developer permits you to utilize portions of the Covered Code under Your choice of theMPL or the alternativelicenses, if any, specified by the Initial Developer in the file described in Exhibit A.
EXHIBIT A -Mozilla Public License.
“The contents of this file are subject to the Mozilla Public License Version 1.1 (the "License"); you may not use this fileexcept in compliance with the License. You may obtain a copy of the License at http://www.mozilla.org/MPL/
Software distributed under the License is distributed on an "AS IS" basis, WITHOUTWARRANTY OF ANY KIND, eitherexpress or implied. See the License for the specific language governing rights and limitations under the License.
The Original Code is ______________________________________.
The Initial Developer of the Original Code is ________________________. Portions created by ______________________ areCopyright (C) ____________________________. All Rights Reserved.
Contributor(s): ______________________________________.
Alternatively, the contents of this file may be used under the terms of the _____ license (the "[___] License"), in whichcase the provisions of [______] License are applicable instead of those above. If you wish to allow use of your version ofthis file only under the terms of the [____] License and not to allow others to use your version of this file under the MPL,indicate your decision by deleting the provisions above and replace them with the notice and other provisions requiredby the [___] License. If you do not delete the provisions above, a recipient may use your version of this file under eitherthe MPL or the [___] License."
[NOTE: The text of this Exhibit A may differ slightly from the text of the notices in the Source Code files of the OriginalCode. You should use the text of this Exhibit A rather than the text found in the Original Code Source Code for YourModifications.]
Steel-Belted Radius Carrier 8.6.0 Installation GuideRelease 8.6.0
Revision HistoryAugust 2019—Revision 1October 2019—Revision 2March 2020—Revision 3September 2020—Revision 4
The information in this document is current as of the date on the title page.
YEAR 2000 NOTICE
xxxi

Juniper Networks hardware and software products are Year 2000 compliant. Junos OS has no known time-relatedlimitations through the year 2038. However, the NTP application is known to have some difficulty in the year 2036.
END USER LICENSE AGREEMENT
The Juniper Networks product that is the subject of this technical documentation consists of (or is intended for use with)Juniper Networks software. Use of such software is subject to the terms and conditions of the EndUser License Agreement(“EULA”) posted at https://support.juniper.net/support/eula/. By downloading, installing or using such software, youagree to the terms and conditions of that EULA.
xxxii

Abbreviated Table of Contents
About This Guide | xlvii
1 Overview of Steel-Belted Radius Carrier and Session State Register Installation
Chapter 1 Standalone Steel-Belted Radius Carrier Installation Overview | 2
Chapter 2 Session State Register Cluster Installation Overview | 9
2 Preparing for a Steel-Belted Radius Carrier Installation
Chapter 3 Planning Your Session State Register Cluster | 32
Chapter 4 Before You Install Software | 39
Chapter 5 Migrating from Previous SBR Releases | 56
3 Installing and Configuring a SBR Carrier Standalone Server
Chapter 6 Installation and Basic Configuration of a SBR Carrier StandaloneServer | 64
xxxiii

4 Installing Session State Register Nodes
Chapter 7 Installing Session State Register Nodes | 94
Chapter 8 Basic SBR Carrier Node Configuration | 138
Chapter 9 Customizing the SSR Database Current Sessions Table | 144
Chapter 10 Other Session State Register Configuration Files | 182
Chapter 11 When and How to Restart Session State Register Nodes, Hosts, andClusters | 196
5 Expanding a Session State Register Cluster
Chapter 12 Expanding an SSR Cluster | 207
6 SIGTRAN Support for Steel-Belted Radius Carrier
Chapter 13 Migrating Signalware | 310
Chapter 14 Installing Signalware 9 on Linux | 315
Chapter 15 Configuring SIGTRAN/IP Network Communication Files | 332
xxxiv
7 Uninstalling Steel-Belted Radius Carrier Software
Chapter 16 Removing Steel-Belted Radius Carrier Software | 359
8 Upgrading Your SSR Cluster
Chapter 17 Overview of Upgrading Your SSR Cluster | 366
Chapter 18 Using a Transition Server to Mitigate DowntimeWhile Upgrading YourCluster | 369
Chapter 19 Upgrading Your Cluster Using the Rolling Restart Method | 396
Chapter 20 Upgrading Your Cluster Using the Backup, Destroy, and Re-CreateMethod | 447
Part 9 Appendix
Appendix A Testing the Installation with DemoSetup.sh | 482
xxxv
Table of Contents
About This Guide | xlvii
Objective | xlvii
Audience | xlvii
Documentation Conventions | xlviii
Related Documentation | l
Obtaining Documentation | lvi
Documentation Feedback | lvi
Requesting Technical Support | lvii
Overview of Steel-Belted Radius Carrier and Session State RegisterInstallation1
Standalone Steel-Belted Radius Carrier Installation Overview | 2
Migrating from Earlier SBR Releases | 2
Supporting SIM with Signalware | 3
Installation Workflow | 4
Release 8.6.0 Standalone Server Installation Checklist | 4
Before You Begin | 5
Installing SBR Software | 7
Basic Configuration | 7
Session State Register Cluster Installation Overview | 9
SSR Cluster Overview | 9
SSR Cluster Concepts and Terminology | 10
Session State Register Servers | 10
Session State Register Nodes | 11
SSR Data Entities | 11
Cluster Configurations | 13
Session State Register Scaling | 13
Adding a Data Node Expansion Kit | 14
Adding a Third Management Node | 14
xxxvi
Adding More SBR Carrier Front End Servers | 14
Cluster Network Requirements | 15
Supported SBR Carrier SSR Cluster Configurations | 16
Failover Overview | 17
Failover Examples | 18
Distributed Cluster Failure and Recovery | 20
Session State Register Database Tables | 22
IP Address Pools | 22
Subscriber Session Data Controls | 23
Application Support | 24
Supporting SIM, SIGTRAN, and Other Protocols with Signalware | 25
Cluster Installation Workflow | 25
Session State Register Cluster Installation Checklist | 26
Before You Begin | 26
Installing Session State Register Software | 29
Basic Configuration | 29
Preparing for a Steel-Belted Radius Carrier Installation2Planning Your Session State Register Cluster | 32
Planning the Cluster Topology | 32
Naming the Cluster and Its Machines | 32
Starter Kit Cluster Naming Example | 33
Cluster Naming Worksheets | 34
Expansion Kit and Additional Node Worksheet | 35
Renaming Node Hosts | 38
Configuring Multipathing | 38
Before You Install Software | 39
Reviewing the Release Notes | 39
Determining the Server’s Centralized Configuration Management Role | 40
Selecting an Appropriate Server | 41
xxxvii

Meeting System Requirements | 41
Standalone SBR Carrier Server Hardware | 41
Session State Register Host Hardware | 43
SBR Carrier and Management Node Hosts | 43
Data Node Hosts | 44
Checking Free Disk Space | 45
Software | 46
Solaris | 47
Linux | 47
Perl | 48
LDAP Plug-in | 49
Verifying Root Access | 49
Verifying Network Requirements | 49
Verifying Network Connectivity | 49
Verifying Hostname Resolution | 50
Creating Required Users and Groups | 50
Creating Share Directories | 52
Setting Up External Database Connectivity (Optional) | 53
Creating a Copy of Existing SBR Server Release Files for Migration | 54
Installing the SIGTRAN Interface (Optional) | 55
Migrating from Previous SBR Releases | 56
Migration Overview | 56
Supported Releases | 57
Files That May Be Migrated | 57
Files from Earlier Releases That Require Manual Editing | 58
Manual Migration of XML Configurations | 58
Manual Migration of ROOT Certificates | 58
Manual Migration of Dictionaries | 59
Manual Migration of Third-Party Plug-ins and Other Binaries | 59
Manual Migration of SNMP Files | 59
Migrating from SBR Release 6.X | 59
Migrating from SBR Carrier Release 7.0 | 59
Migrating from SBR Carrier Release 7.4.0 | 60
xxxviii

Migration and New Installations of SBR Carrier with WiMAX | 60
Historic Files | 61
Installing and Configuring a SBR Carrier Standalone Server3Installation and Basic Configuration of a SBR Carrier Standalone Server | 64
Unpacking the Steel-Belted Radius Carrier Software | 64
Package Management Commands | 64
Running the Steel-Belted Radius Carrier Configure Script | 68
Starting and Stopping a Standalone Steel-Belted Radius Carrier Server | 77
sbrd | 77
Running sbrd on a Standalone Server | 77
Starting the RADIUS Server | 78
Stopping the RADIUS Server | 79
Displaying RADIUS Status Information | 79
Basic SBR Carrier Configuration | 84
Launching Web GUI | 84
Configuring the Server | 86
Configuring SNMP | 86
Configuring the CST for a Standalone Server | 88
Configuring the sessionTable.ini file | 89
RadAttr Fields and the sessionTable.ini File | 89
Multi-Valued Attributes | 90
Using MVA Facilities | 92
Installing Session State Register Nodes4Installing Session State Register Nodes | 94
Cluster Installation Overview | 94
Unpacking Session State Register Software | 95
Package Management Commands | 95
Setting Up a Starter Kit’s First SBR/Management Node | 99
Configuring the Host Software on the First Server in the Cluster | 99
Setting Up the Second SBR/Management Node in a Starter Kit | 114
Populating the JNPRShare Directory | 115
Configuring Host Software on the Second SBR Carrier and Management Node | 115
xxxix

Setting Up Data Node Hosts Included with the Starter Kit | 126
Striping Data Nodes | 126
Populating the JNPRShare Directory | 128
Configuring the Host Software on the Data Nodes | 129
Initial Cluster Startup Procedure | 132
Recommendations before Configuring the Cluster | 137
Basic SBR Carrier Node Configuration | 138
Launching Web GUI | 138
Configuring the Server | 140
Configuring SNMP | 141
Setting Up IP Address Pools | 142
Customizing the SSR Database Current Sessions Table | 144
Current Sessions Table Overview | 144
Sessions in the CST | 153
Acknowledging Authentication and Accounting Requests when the CST Cannot BeContacted | 153
Current Sessions Table Display | 154
Customizing the CST | 154
Propagating a Changed CurrentSessions.sql File | 155
Performance and Capacity Considerations | 155
Additional Keys | 155
Stored Procedures | 155
Customized CST Applications | 156
Current Sessions Table Fields | 156
System Core Fields | 156
System Feature Fields | 159
System Optional Fields | 160
RadAttr Fields | 162
RadAttr Fields and the sessionTable.ini File | 164
Multi-Valued Attributes | 167
Using MVA Facilities | 169
Admin Private Fields | 170
System Keys and Indexes | 170
xl

Admin Keys and Indexes | 171
SSR Datatypes | 172
Definitions | 172
System Field Datatypes | 173
RadAttr Fields | 174
Matching/Natural Datatype Mappings | 174
Sample ShowSessions.sh Report | 175
Compatible/Unnatural Datatype Conversions | 178
Customizing Datatypes and Data Sizes | 179
Character Sets and Collations | 180
Truncation and Padding | 180
Small Integers | 181
Signed Integers | 181
Unsupported SQL Datatypes | 181
Other Session State Register Configuration Files | 182
Tuning Other SSR Tables Overview | 182
Configuring the dbclusterndb.gen File | 182
[Bootstrap] Section | 182
[NDB] Section | 183
[Database] Section | 186
[IpAddressPools] Section | 188
[IpAddressPools:PoolName] Section | 191
Customizing Other Tables and Scripts | 193
Managing IP Pools | 194
When and How to Restart Session State Register Nodes, Hosts, and Clusters | 196
Overview of Starting and Stopping a Session State Register Cluster | 196
sbrd | 197
Running sbrd on Session State Register Nodes | 197
Starting the Cluster | 200
Proper Order for Starting Nodes in a Cluster | 201
Proper Order for Stopping Individual Nodes | 203
Stopping a Single Node | 204
xli

Starting a Single Node | 204
Proper Order for Stopping the Entire Cluster | 205
Expanding a Session State Register Cluster5Expanding an SSR Cluster | 207
Upgrading from a Restricted Cluster to a Regular Cluster | 207
Adding Nodes to a Cluster Overview | 210
Adding a New SBR Carrier Server to an Existing Cluster | 211
Updating the Existing Cluster Definition Files for the New SBR Node | 212
Distributing the Updated Cluster Definition Files to the Existing Nodes | 218
Installing the SBR Carrier Software on the New SBR Node Host Machine | 220
Configuring the Software on the New SBR Node | 222
Configuring Each Existing Node in the Cluster with the New Cluster Definition Files | 228
Starting the New SBR Node | 235
Adding a Management Node Expansion Kit to an Existing Cluster | 235
Updating the Existing Cluster Definition Files for the New Management Node | 237
Distributing the Updated Cluster Definition Files to the Existing Nodes | 244
Installing the SBR Carrier Software on the New Management Node Host Machine | 245
Configuring the SBR Carrier Software on the New Management Node | 248
Configuring Each Existing Node in the Cluster with the New Cluster Definition Files | 252
Starting the New Management Node | 259
Running CreateDB.sh on the New Management Node | 259
Adding a Data Expansion Kit to an Existing Cluster | 259
Requirements for Selecting a Transition Server in Your Environment | 260
Using a Transition Server When Adding Data Nodes to an Existing Cluster | 261
Existing Cluster Configuration for This Example Procedure | 261
Creating the Transition Server | 263
Stopping the Processes on the Target Transition Server | 263
Configuring the Software on the Transition Server as a Temporary Cluster | 264
Configuring and Starting the Transition Server | 270
Switching Traffic to the Transition Server | 271
Creating the Updated Cluster Definition Files | 271
Installing the SBR Carrier Software on the Two New Data Node Host Machines | 278
Distributing the Updated Cluster Definition Files to the Existing Nodes | 281
xlii
Destroying the Session Database on the Original Cluster | 282
Configuring the Nodes in the Expanded Cluster with the Updated Cluster Definition Files | 284
Configuring the SBR Carrier Software on the New Data Nodes | 284
Running the Configure Script on Each Node from the Original Cluster | 289
Creating the Session Database and IP Pools on the Expanded Cluster | 293
Cleaning the Original Nodes from the Cluster | 293
Creating the Session Database and IP Pools | 294
Removing the Transition Server from Service | 297
Unconfiguring and Rebuilding the Transition Server | 297
Unconfiguring the Transition Server | 297
Retrieving the Updated Cluster Definition Files from SM1 Node | 300
Running the Configure Script on the SM2 Node | 300
Non-Transition Server Method—Terminating Connections | 307
SIGTRAN Support for Steel-Belted Radius Carrier6Migrating Signalware | 310
Migrating an Existing Signalware Configuration | 310
Backing Up the Existing Signalware Configuration | 310
Applying the Saved Signalware Configuration to the New Server | 312
Installing Signalware 9 on Linux | 315
Operating System Prerequisite Packages | 316
64-Bit x86_64 Red Hat Installations | 316
Red Hat Enterprise Linux Release 7.3 and Above | 317
Other Prerequisites to Install Signalware on a Linux Platform | 318
Installing Signalware | 319
Troubleshooting Signalware Installation and Configuration | 328
Configuring SIGTRAN/IP Network Communication Files | 332
Starting and Stopping Signalware | 332
Configuring Signalware to Start Automatically on Reboot | 332
Configuring Communication Files Overview | 333
Communication Pathways and Corresponding Files | 334
Configuration Activities | 335
Signalware MML Commands | 335
xliii

Defining Links, Link Sets, and Route Sets | 336
Example MML Commands | 336
SS7 Example: Creating Links, Link Sets, and Route Sets | 337
SIGTRAN Example: Creating Links, Link Sets, and Route Sets | 337
Configuring authGateway and GWrelay Applications for HLR Communication | 338
Configuring the authGateway Routing Location Information | 338
Example 1—Global Title Routing Using Global Title Identification | 339
Example 2—PCSSN Routing Using Point Code Identification | 339
Configuring the authGateway.conf File | 339
[Routing-Configuration] Section | 340
[Supported-MAP-Messages] Section | 343
[Common-AGW-Configurations] Section | 344
[Process<name>] Section | 347
Configuring the authGateway Startup Information | 348
Example—Creating and Starting the authGateway Process | 352
Configuring the GWrelay.conf File | 353
Example—Configuring the GWrelay.conf File | 353
Starting the GWrelay Process | 353
Configuring the ulcmmg.conf File | 354
Example | 354
Loading the MML Configuration Settings | 354
Example | 355
Sample authGateway Command and File | 355
sampleCreateProcess.mml | 355
authGateway.conf (Gateway Routing Configuration File) | 355
Uninstalling Steel-Belted Radius Carrier Software7Removing Steel-Belted Radius Carrier Software | 359
Uninstalling the Steel-Belted Radius Carrier Server Software | 359
Upgrading Your SSR Cluster8Overview of Upgrading Your SSR Cluster | 366
Upgrade Methods | 366
Notes on Working with Data (D) Nodes | 367
xliv

Using the SSR Configuration Script | 368
Using a Transition Server to Mitigate DowntimeWhile Upgrading Your Cluster | 369
Cluster Migration Strategy | 369
Using a Transition Server | 370
Individual Node Migration Guidelines | 372
Cluster Migration Workflow | 372
Creating a Transition Server | 373
Preparing the Transition Server | 373
Unpacking and Configuring the New Software on the Transition Server | 374
Configuring the Transition Server | 385
Switching Traffic to the Transition Server | 387
Installing the Cluster | 387
Removing the Transition Server from Service | 390
Cleaning the Transition Server | 390
Upgrading Your Cluster Using the Rolling Restart Method | 396
Overview of the Rolling Restart Upgrade Method | 396
Summary of the Rolling Restart Upgrade Method | 397
Introduction and Requirements | 397
Preparation | 399
Upgrading the M Nodes in the Cluster | 400
Installing the New SBRC Software on the M Nodes | 400
Configuring the New SBRC Software on the M Node | 404
Upgrading the SM Nodes in the Cluster | 409
Installing the New SBRC Software on the SM Node | 409
Configuring the New SBRC Software on the SM Node | 413
Upgrading the S Nodes in the Cluster | 422
Installing the New SBRC Software on the S Node | 422
Configuring the New SBRC Software on the S Node | 425
Upgrading the Data (D) Nodes with the New Software | 431
Installing the Complete SBR Release Distribution Package | 431
Installing Only the Latest MySQL Package | 435
Configuring the New Software on the Data Node | 439
xlv

Launching Web GUI | 446
Upgrading Your Cluster Using the Backup, Destroy, and Re-Create Method | 447
Overview of the Backup, Destroy, and Re-Create Upgrade Method | 448
Capturing Your Current Cluster Configuration | 448
Backing Up the State of the Sessions in Your SSR Database | 450
Destroying the Cluster Database | 450
Stopping All Processes on All Nodes | 451
Installing the New SBRC Software on the Data Nodes | 452
Uninstalling and Removing the Software Package on the Data Nodes | 452
Installing the New Software Package on the Data Nodes | 454
Installing the New SBRC Software on the SM Nodes | 455
Configuring the First SM Node and Creating a New Cluster Definition | 457
Configuring the SBRC Software on the SM Nodes | 463
Configuring the SBRC Software on the Data Nodes | 469
Starting the SSR Processes | 473
Creating and Restoring the SSR Database | 476
Starting the RADIUS Process | 478
Launching Web GUI | 480
AppendixPart 9
Appendix ATesting the Installation with DemoSetup.sh | 482
Creating a Test Database | 482
DemoSetup.sh Syntax | 484
Syntax | 484
Options | 484
Notes | 485
Example | 485
xlvi

About This Guide
IN THIS SECTION
Objective | xlvii
Audience | xlvii
Documentation Conventions | xlviii
Related Documentation | l
Obtaining Documentation | lvi
Documentation Feedback | lvi
Requesting Technical Support | lvii
This preface provides the following guidelines for using the SBR Carrier Installation Guide:
Objective
This guide describes how to configure and administer Steel-Belted Radius Carrier software running on theSolaris operating system.
Audience
This guide is intended for network administrators working for wireline and wireless carriers that aredeploying converged services or emerging wireless technologies such as Worldwide InteroperabilityMicrowave Access (WiMAX). It provides the information that administrators need to implement andmaintain authentication, authorization, and accounting (AAA) services.
This guide assumes that you are familiar with general RADIUS and networking concepts, as well as thenetwork environment that includes Steel-Belted Radius Carrier.
If you use Steel-Belted Radius Carrier with third-party products such as Oracle, this guide assumes youare familiar with the installation, configuration, and use of those products.
xlvii

Documentation Conventions
Table 1 on page xlviii defines notice icons used in this guide.
Table 1: Notice Icons
DescriptionMeaningIcon
Indicates important features or instructions.Informational noteNOTE:
Indicates a situation that might result in loss of data orhardware damage.
CautionCAUTION:
Alerts you to the risk of personal injury.WarningWARNING:
Table 2 on page xlviii describes the text conventions used throughout this manual.
Table 2: Text and Syntax Conventions
ExamplesDescriptionConvention
Text Conventions
• Issue the clock source command.
• Specify the keyword exp-msg.
Represents commands and keywordsin text.
Bold text like this
host1(config)#traffic class low-loss1Represents text that the user musttype.
Bold text like this
host1#show ip ospf 2
Routing Process OSPF 2 with Router
ID
5.5.0.250
Router is an Area Bordèr Router
(ABR)
Represents information as displayedon your terminal’s screen.
Fixed-width text like
this
• There are two levels of access, user andprivileged.
• clusterId, ipAddress.
• Appendix A, System Specifications.
• Emphasizes words.
• Identifies variables.
• Identifies chapter, appendix, andbook names.
Italic text like this
Press Ctrl+b.Indicates that youmust press two ormore keys simultaneously.
Plus sign (+) linking key names
xlviii

Table 2: Text and Syntax Conventions (continued)
ExamplesDescriptionConvention
Change directories to /radiusdir/radiusdirRepresents the directory into whichSteel-Belted Radius Carrier has beeninstalled. The default location is/opt/JNPRsbr/radius on Solarissystems, but any location may bespecified during installation.
radiusdir
Syntax Conventions
terminal lengthRepresents keywords.Plain text like this
mask, accessListNameRepresents variables.Italic text like this
<add | replace>Enclose a list of possible selections.< > (angle brackets)
diagnostic | line
In this example, you must specify add orreplace but cannot specify both:
<add | replace>
Attribute [,Attribute]
Represents a choice to select onekeyword or variable in a list ofchoices that is separated by the pipesymbol.
| (pipe symbol)
[ internal | external ], or<add | replace> = Attribute [,Attribute], wherethe second attribute is identified as optionalby the brackets.
When they are used in a configuration filesbrackets identify a section of the file.In scripts or in operating system commands,brackets indicate the default response orentry.
Represent optional keywords orvariables.
[ ] (brackets)
[ level1 | level2 | l1 ]*Represent optional keywords orvariables that can be entered morethan once.
[ ]* (brackets and asterisk)
{ permit | deny } { in | out }{ clusterId | ipAddress }
Represent required keywords orvariables.
{ } (braces)
xlix

Related Documentation
Table 3 on page l lists and describes the Steel-Belted Radius Carrier documentation set:
Table 3: Steel-Belted Radius Carrier Documentation
DescriptionDocument
Describes how to install the Steel-Belted Radius Carriersoftware on the server.
Steel-Belted Radius Carrier Installation Guide
Describes how to configure and operate the Steel-BeltedRadius Carrier and its separately licensed modules.
Steel-Belted Radius Carrier Administration andConfigurationGuide
Describes the settings and valid values of the Steel-BeltedRadius Carrier configuration files.
Steel-Belted Radius Carrier Reference Guide
Provides tips, use cases, and tools you need to:
• Improve SBRC performance through planning, analysis,and configuration
• Increase SBRC throughput and reliability
• Analyze specific use cases, in the lab or in the productionenvironment, to identify areas of potential performanceenhancement and to limit the impact of resourceconstraints and failure scenarios
Steel-BeltedRadius Carrier Performance, Planning and TuningGuide
Contains the latest information about features, changes,known problems, and resolved problems.
Steel-Belted Radius Carrier Release Notes
NOTE: If the information in the Release Notes differs from the information in any guide, followthe Release Notes.
Requests for Comments (RFCs)The Internet Engineering Task Force (IETF) maintains an online repository of Request for Comments (RFCs)online at http://www.ietf.org/rfc.html.
Table 4 on page li lists the RFCs that apply to Steel-Belted Radius Carrier.
l

Table 4: RFCs Related to Steel-Belted Radius Carrier
TitleRFCNumber
DomainNames - ImplementationandSpecification. P.Mockapetris. November1987.
RFC 1035
Structure and Identification of Management Information for TCP/IP-basedInternets. M. Rose, K. McCloghrie, May 1990.
RFC 1155
Management Information Base for Network Management of TCP/IP-basedinternets: MIB-II. K. McCloghrie, M. Rose, March 1991.
RFC 1213
The Definitions of Managed Objects for IP Mobility Support using SMIv2. D.Cong and others. October 1996.
RFC 2006
HMAC: Keyed-Hashing forMessage Authentication.H. Krawczyk,M. Bellare,R. Canetti. February 1997.
RFC 2104
The TLS Protocol. T. Dierks, C. Allen. January 1999.RFC 2246
AnArchitecture forDescribing SNMPManagement Frameworks. D. Harrington,R. Presuhn, B. Wijnen, January 1998.
RFC 2271
PPP Extensible Authentication Protocol (EAP). L. Blunk, J. Volbrecht, March1998.
RFC 2284
Microsoft PPP CHAP Extensions. G. Zorn, S. Cobb, October 1998.RFC 2433
Microsoft Vendor-specific RADIUS Attributes. G. Zorn. March 1999.RFC 2548
ProxyChaining and Policy Implementation in Roaming. B. Aboba, J. Vollbrecht,June 1999.
RFC 2607
RADIUS Authentication Client MIB. B. Aboba, G. Zorn. June 1999.RFC 2618
RADIUS Authentication Server MIB. G. Zorn, B. Aboba. June 1999.RFC 2619
RADIUS Accounting Client MIB. B. Aboba, G. Zorn. June 1999.RFC 2620
RADIUS Accounting Server MIB. G. Zorn, B. Aboba. June 1999.RFC 2621
PPP EAP TLS Authentication Protocol. B. Aboba, D. Simon, October 1999.RFC 2622
li

Table 4: RFCs Related to Steel-Belted Radius Carrier (continued)
TitleRFCNumber
Framework Architecture for Signaling Transport. L. Ong et al., October 1999RFC 2719
Implementation of L2TP Compulsory Tunneling via RADIUS. B. Aboba, G.Zorn. April 2000.
RFC 2809
Remote Authentication Dial In User Service (RADIUS). C. Rigney, S. Willens,A. Rubens, W. Simpson. June 2000.
RFC 2865
RADIUS Accounting. C. Rigney. June 2000.RFC 2866
RADIUS Accounting Modifications for Tunnel Protocol Support. G. Zorn, B.Aboba, D. Mitton. June 2000.
RFC 2867
RADIUSAttributes for Tunnel Protocol Support. G. Zorn, D. Leifer, A. Rubens,J. Shriver, M. Holdrege, I. Goyret. June 2000.
RFC 2868
RADIUS Extensions. C. Rigney, W. Willats, P. Calhoun. June 2000.RFC 2869
Network Access Servers Requirements: ExtendedRADIUSPractices. D.Mitton.July 2000.
RFC 2882
StreamControl Transmission Protocol. R. Stewart and others. October 2000.RFC 2960
DHCP Relay Agent Information Option. M. Patrick. January 2001.RFC 3046
Authentication for DHCP Messages. R.Droms and others. June 2001.RFC 3118
RADIUS and IPv6. B. Aboba, G. Zorn, D. Mitton. August 2001.RFC 3162
IP Mobility Support for IPv4. C. Perkins. August 2002.RFC 3344
Authentication, Authorization, and Accounting (AAA) Transport Profile. B.Aboba, J. Wood. June 2003.
RFC 3539
IANAConsiderations for RADIUS (Remote AuthenticationDial-In User Service).B. Aboba, July 2003.
RFC 3575
RFC3576 - Dynamic Authorization Extensions to Remote to RemoteAuthentication Dial In User Service. Network Working Group, 2003
RFC 3576
lii

Table 4: RFCs Related to Steel-Belted Radius Carrier (continued)
TitleRFCNumber
RADIUS (Remote Authentication Dial In User Service) Support For ExtensibleAuthentication Protocol (EAP). B. Aboba, P. Calhoun, September 2003.
RFC 3579
IEEE 802.1X Remote Authentication Dial In User Service (RADIUS) UsageGuidelines. P. Congdon, B. Aboba, A. Smith, G. Zorn, J. Roese, September2003.
RFC 3580
Diameter Base Protocol. P. Calhoun, J. Loughney, E. Guttman, G. Zorn, J.Arkko.September 2003.
RFC 3588
Extensible Authentication Protocol. B. Aboba, L. Blunk, J. Vollbrecht, J.Carlson, H. Levkowetz. June 2004.
RFC 3748
Authentication, Authorization, and Accounting (AAA) Registration Keys forMobile IPv4. C. Perkins and P. Calhoun. March 2005.
RFC 3957
Diameter Network Access Server Application. P. Calhoun, G. Zorn, D. Spence,D. Mitton. August 2005.
RFC 4005
Extensible Authentication Protocol (EAP) Method Requirements for WirelessLANs. D. Stanley and others. March 2005.
RFC 4017
Diameter Extensible Authentication Protocol (EAP) Application. P. Eronen, G.Zorn, T. Hiller. August 2005.
RFC 4072
Extensible Authentication Protocol Method for Global System for MobileCommunications (GSM) Subscriber IdentityModules (EAP-SIM). H. Haverinen,J. Salowey. January 2006.
RFC 4186
ExtensibleAuthenticationProtocolMethod forGlobal System for 3rdGenerationAuthentication and Key Agreement (EAP-AKA). J. Arkko, H. Haverinen.January 2006.
RFC 4187
The Network Access Identifier. B. Aboba and others. December 2005.RFC 4282
Identity Selection Hints for the Extensible Authentication Protocol (EAP). F.Adrangi, V. Lortz, F. Bari, P. Eronen. January 2006.
RFC 4284
Internet Key Exchange (IKEv2) Protocol. C. Kaufman. December 2005.RFC 4306
liii
Table 4: RFCs Related to Steel-Belted Radius Carrier (continued)
TitleRFCNumber
Chargeable User Identity. F. Adrangi and others. January 2006.RFC 4372
Lightweight Directory Access Protocol (LDAP) Technical Specification RoadMap. K. Zeilenga, June 2006.
RFC 4510
Signaling System 7 (SS7) Message Transfer Part 3 (MTP3) - User AdaptationLayer (M3UA). K. Morneault, J. Pastor-Balbas. September 2006.
RFC 4666
RADIUS Authentication Client MIB for IPv6. D. Nelson. August 2006.RFC 4668
RADIUS Authentication Server MIB for IPv6. D. Nelson. August 2006.RFC 4669
RADIUS Accounting Client MIB for IPv6. D. Nelson. August 2006.RFC 4670
RADIUS Accounting Server MIB for IPv6. D. Nelson. August 2006.RFC 4671
Extensible Authentication Protocol Tunneled Transport Layer SecurityAuthenticated Protocol Version 0 (EAP-TTLSv0). P. Funk, S. Blake-Wilson.August 2008.
RFC 5281
Improved Extensible Authentication Protocol Method for 3rd GenerationAuthentication and Key Agreement (EAP-AKA'). J. Arkko, V. Lehtovirta, P.Eronen. May 2009.
RFC 5448
Use of Status-Server Packets in the Remote AuthenticationDial In User Service(RADIUS) Protocol A. DeKok. August 2010.
RFC 5997
Diameter Base Protocol. V. Fajardo, J. Arkko, J. Loughney, G. Zorn. October2012.
RFC 6733
RADIUS Attributes for IPv6 Access NetworksW. Dec, B. Sarikaya, G. Zorn,D. Miles, B. Lourdelet. April 2013.
RFC 6911
3GPP Technical SpecificationsThe Third-Generation Partnership Project (3GPP) and 3GPP2 maintains an online repository of TechnicalSpecifications and Technical Reports at http://www.3gpp.org and http://www.3gpp2.org, respectively.
Table 5 on page lv lists the 3GPP Technical Specifications that apply to Steel-Belted Radius Carrier.
liv

Table 5: 3GPP Technical Specifications
Applicable SectionsTitle3GPP TS Number
• Section 5.1.7: Interworking between PLMNand WLANs
Requirements on 3GPP system to WirelessLocal Area Network (WLAN) interworking
3GPP TS 22.234Version 12.0.0
• Section 2.2: Composition of IMSINumbering, addressing, and identification3GPP TS 23.003Version 12.6.0
• Section 3B: Definition of subscriber dataI-WLAN domain
Organization of subscriber data3GPP TS 23.008Version 12.6.0
• Section 6.1: Reference Model
• Section 6.2: Network Elements
3GPP system toWireless Local AreaNetwork(WLAN) interworking; System description
3GPP TS 23.234Version 12.0.0
• Section 4.1: Concepts
• Section 4.3: Network Elements
Architecture enhancements for non-3GPPaccesses
3GPP TS 23.402Version 12.8.0
• Section 6: UE – EPC Network protocols
• Section 8: PDUs and parameters specific tothe present document
Access to the 3GPP Evolved Packet Core(EPC) via non-3GPP access networks; Stage3
3GPP TS 24.302Version 14.4.0
• Section 6: Requirements concerning the useof SCCP and TC
• Section 7.1: Terminology and definitions
• Section 7.2: Modelling principles
• Section 7.3: Common MAP service
Mobile Application Part (MAP) specification3GPP TS 29.002Version 12.7.0
• Section 4: SWa Description
• Section 5: STa Description
• Section 6: SWd Description
• Section 7: SWm Description
• Section 8: SWx Description
• Section 9: S6b and H2 Description
• Section 10: Result-Code andExperimental-Result Values
EvolvedPacket System (EPS); 3GPPEPSAAAinterfaces
3GPP TS 29.273Version 12.7.0
lv
Table 5: 3GPP Technical Specifications (continued)
Applicable SectionsTitle3GPP TS Number
• Section 6: Authentication and key agreementprocedures
• Section 7: Establishment of security contextsin the target access system
• Section 8: Establishment of security betweenUE and ePDG
• Section 9: Security for IP based mobilitysignalling
• Section14: Temporary identitymanagement
3GPP System Architecture Evolution (SAE);Security aspects of non-3GPP accesses
3GPP TS 33.402Version 14.2.0
WiMAX Technical SpecificationsThe WiMAX Forum Networking Group (NWG) maintains a repository of technical documents andspecifications online at http://www.wimaxforum.org. You can also view the WiMAX IEEE standards,802.16e-2005 for mobile WiMAX and 802.16-2004 for fixed WiMAX, online at http://www.ieee.org.
Third-Party ProductsFor information about configuring your Ulticom software and hardware, or your access servers and firewalls,consult the manufacturer’s documentation.
Obtaining Documentation
To obtain the most current version of all Juniper Networks technical documentation, see the productsdocumentation page on the Juniper Networks website at https://www.juniper.net/.
Documentation Feedback
We encourage you to provide feedback, comments, and suggestions so that we can improve thedocumentation to better meet your needs. Send your comments to [email protected], orfill out the documentation feedback form at https://www.juniper.net/documentation/feedback/. If youare using e-mail, be sure to include the following information with your comments:
• Document name
• Document part number
lvi

• Page number
• Software release version
Requesting Technical Support
Technical product support is available through the Juniper Networks Technical Assistance Center (JTAC).If you are a customer with an active J-Care or JNASC support contract, or are covered under warranty,and need post-sales technical support, you can access our tools and resources online or open a case withJTAC.
• JTAC Policies—For a complete understanding of our JTAC procedures and policies, review the JTACUser Guide located at https://www.juniper.net/us/en/local/pdf/resource-guides/7100059-en.pdf
• ProductWarranties—For productwarranty information, visit https://www.juniper.net/support/warranty/
• JTAC Hours of Operation—The JTAC centers have resources available 24 hours a day, 7 days a week,365 days a year.
Self-Help Online Tools and ResourcesFor quick and easy problem resolution, Juniper Networks has designed an online self-service portal calledthe Customer Support Center (CSC) that provides you with the following features:
• Find CSC offerings:https://support.juniper.net/support/
• Find product documentation:https://www.juniper.net/documentation/
• Find solutions and answer questions using our Knowledge Base: https://kb.juniper.net/
• Download the latest versions of software and review release notes:https://support.juniper.net/support/downloads/
• Search technical bulletins for relevant hardware and software notifications:https://kb.juniper.net/InfoCenter/index?page=subscriptions, "Manage My Subscriptions"
• Open a case online in the Juniper Networks Customer Service Portal:
https://my.juniper.net
To verify service entitlement by product serial number, use our Serial Number Entitlement (SNE) Toollocated athttps://entitlementsearch.juniper.net/entitlementsearch/
Opening a Case with JTACYou can open a case with JTAC on the Web or by telephone.
lvii

• Use the Juniper Networks Customer Service Portal at https://my.juniper.net
• Call 1-888-314-JTAC (1-888-314-5822 – toll free in the USA, Canada, and Mexico)
For international or direct-dial options in countries without toll-free numbers, visithttps://www.juniper.net/support/requesting-support.html
When you contact technical support, be ready to provide:
• Your Steel-Belted Radius Carrier release number (for example, Steel-Belted Radius Carrier Release 7.x).
• Information about the server configuration and operating system, including any OS patches that havebeen applied.
• For licensed products under a currentmaintenance agreement, your license or support contract number.
• A detailed description of the problem.
• Any documentation that may help in resolving the problem, such as error messages, memory dumps,compiler listings, and error logs.
lviii
1PART
Overview of Steel-Belted Radius Carrierand Session State Register Installation
Standalone Steel-Belted Radius Carrier Installation Overview | 2
Session State Register Cluster Installation Overview | 9
CHAPTER 1
Standalone Steel-Belted Radius Carrier InstallationOverview
IN THIS CHAPTER
Migrating from Earlier SBR Releases | 2
Supporting SIM with Signalware | 3
Installation Workflow | 4
Release 8.6.0 Standalone Server Installation Checklist | 4
This chapter presents an overview of the installation process for standalone Steel-Belted Radius Carrier(SBRC) servers that do not use the Session State Register option and are not members of a Session StateRegister (SSR) cluster. The chapter includes a checklist of required tasks that you can use to track yourprogress as you work through the installation process.
For introductory information about installing a Session State Register cluster, see“Session State Register Cluster Installation Overview” on page 9.
This chapter includes these topics:
Migrating from Earlier SBR Releases
Migration involves moving a copy of the old SBR installation into a directory on the new Release 8.6.0server. When Steel-Belted Radius Carrier is installed, files that may be moved forward are copied andintegrated into the new installation by the configuration script. The corresponding Release 8.6.0 files areloaded on the server too, but not activated.
NOTE: Migration to SBR Release 8.6.0 is not supported from certain SBR versions earlier thanRelease 7.2.0.
2

NOTE: Migration is supported between like operating systems only—oneOracle or Solaris serverto a second and from the same type of server CCM role (primary or replica) to the same type ofserver. Cross-OS and cross-type migrations are not possible.
Many older release configuration filesmay not bemoved forward because they conflict with newer versions.However, portions of these files may be copied and pasted into the corresponding Release 8.6.0 files topreserve existing settings without disabling new features.
NOTE: In SBR Carrier Release 7.0, you configured the ss7ldapdb.gen file to store CDR recordsin the LDAP directory. When you run SBR Carrier Release 8.6.0 in standalone mode, thesesettings are configured in the ss7db.gen file. When you migrate from Release 7.0 to Release8.6.0, you need to move these settings from the ss7ldapdb.gen file to the ss7db.gen file.
Previous releases of SBRC software running in standalone mode and using the SIMmodule useda different method to store the CDR records; SBRC Release 8.6.0 uses an LDAP directory tostore these records. This directory is configured with the ss7db.gen file. After you upgrade toSBRC Release 8.6.0, the CDR records from the previous releases of SBR Carrier software are nolonger accessible.
For details about what works when moving from one of the different supported releases, see“Migrating from Previous SBR Releases” on page 56.
Supporting SIM with Signalware
Steel-Belted Radius Carrier support for SIM and other RADIUS protocols that use EAP-SIM or EAP-AKA(such asWiMAX, which may use EAP-AKA), depend on Signalware 9 with Service Pack 6.A software beingproperly installed on the server.
NOTE: We strongly recommend that Signalware software be installed and configured beforeSteel-Belted Radius Carrier is installed because the SBRCarrier installation incorporates Signalwaresettings, if they are available.
Juniper Networks provides an example Signalware installation with:
• The correct settings for simple integration with Steel-Belted Radius Carrier.
• The recommended procedures to configure Signalware 9 to support Steel-Belted Radius Carrier.
3
• The recommended procedure for migrating configuration settings forward from an existing Signalwareinstallation.
See “SIGTRAN Support for Steel-Belted Radius Carrier” on page 309.
NOTE: Because the Signalware communication stack is not supported on Solaris, the SIMauthentication module cannot be used on the Solaris platform to communicate with an HLR toprocess RADIUS requests. However, the module can be used with an HSS by using the RADIUSto Diameter conversion feature.
Installation Workflow
The installation workflow follows a list of tasks that must be performed to make the Steel-Belted RadiusCarrier server fully functional. This guide presents groups of related tasks in sequential order.
The high-level view of the installation has three groups of tasks:
1. Before YouBegin—The tasks to complete and the information to gather before installing the Steel-BeltedRadius Carrier software. These topics are discussed in detail in “Before You Install Software” on page 39,and in the succeeding chapters that document the optional installation of Signalware that is requiredto support some features.
2. Software installation—Unpacking the software package, selecting configuration tasks, and providingsettings that are used to set up the server. These topics are discussed in detail in“Installation and Basic Configuration of a SBR Carrier Standalone Server” on page 64.
3. Basic configuration—Starting and stopping the server daemon, setting up SNMP, and editing configurationfiles to include information from earlier releases. These topics are discussed in detail in “Basic SBRCarrier Configuration” on page 84.
Release 8.6.0 Standalone Server Installation Checklist
This section includes an installation checklist for a standalone Steel-Belted Radius Carrier (not using SessionState Register). Use the checklist to record the steps for a new installation. It includes all possible options,including integrating configuration files from a previous SBR release. If your installation does not use allthe available options, you can skip those steps.
4
This set of procedures installs a new, unconfigured Steel-Belted Radius Carrier Release 8.6.0 build on aSolaris platform. It includes all possible options that can be included in the Steel-Belted Radius Carrierinstallation.
Before You Begin
Before you begin to install the Steel-Belted Radius Carrier software, perform these preliminary tasks orverify that they have been accomplished:
1. Review the Steel-Belted Radius Carrier Release Notes for up-to-date information that became availableafter the Steel-Belted Radius Carrier guides were published.
Download the most recent Release Notes file from:https://www.juniper.net/documentation/en_US/sbr-carrier8.6.0/information-products/topic-collections/release-notes/sbrc-8.6.0.pdf
If the information in the Release Notes differs from the information in any Steel-Belted Radius Carrierguide, follow the Release Notes.
2. Ensure that the server chassis is physically secure.
To review recommendations on the server’s characteristics, see “Selecting an Appropriate Server” onpage 41.
Migration3. If you are migrating from an earlier SBR server release, put a copy of that installation on the systemthat you want to host Release 8.6.0.
The recommended method is:
a. As root on the old server, shut down the SBR daemon.Execute: /radiusdir /sbrd stop.
b. Create a gzip archive of the radiusdir directory, preserving the file structure.
Change directories to /opt/JNPRsbr/ and execute (for example):tar cfE - radius |gzip > 6_radius.tgz
c. As root on the Release 8.6.0 host, create a working directory for the archive:
Execute:mkdir -p /opt/JNPRsbr/PreviousRelease_backup
and:
cd /opt/JNPRsbr/PreviousRelease_backup
d. Use FTP binary mode to copy the archive file to the Release 8.6.0 host.
e. Gunzip the archive in the working directory. This does not create a working installation, but servesas a source of files that can be reused by the Release 8.6.0 server.
5
Execute (using the example file name):gunzip 6_radius.tgz |tar xf -
f. Check the file permissions on the unzipped archive to ensure that the files are writable.
See “Creating a Copy of Existing SBR Server Release Files for Migration” on page 54 for moreinformation.
4. Confirm that the server chassis provides at least the minimum hardware and software requirements.
See “Meeting System Requirements” on page 41.
5. Verify root access.
6. Verify that the server meets basic network requirements:
• See “Verifying Network Connectivity” on page 49.
• See “Verifying Hostname Resolution” on page 50.
CCM7. Verify the server role in the centralized configurationmanagement (CCM) environment. The installationscript can configure a Steel-Belted Radius Carrier server as:
• An autonomous server.
• The primary server supplying a group of replication servers.
• A replication server.In an environment that uses replication servers, the primary server must be configured first to providea base for replication.
LDAP8. (Optional) If the server will interact with a Lightweight Directory Access Protocol (LDAP) directoryservice agent, verify or record the path to the LDAP library files. (The default path is /usr/lib.)
9. (Optional) If the Steel-Belted Radius Carrier server will authenticate through an external database, youneed to:
• Verify database compatibility and interoperability.
See “Setting Up External Database Connectivity (Optional)” on page 53.
ORACLE10.If the external database is Oracle, the Steel-Belted Radius Carrier server must be configured as a clientof the Oracle server.
As you set up the client, collect this information, or if the client is already installed, record this informationto use while installing SBR software:
6
• Record the path to the local Oracle Home directory (for example:/opt/10g/app/oracle/product/10.2.0.3).
• Record the path to the local Oracle shared library (for example:/opt/10g/app/oracle/product/10.2.0.3/lib)
• Record the path to the local TNS_ADMIN (for example:/opt/10g/app/oracle/product/10.2.0.3/network/admin)
SIM /WiMAX / SIGTRAN12.(Required only for these modules) Install and configure Signalware 9 with Service Pack 6.A software,following the product documentation and the guidelines in “SIGTRAN Support for Steel-Belted RadiusCarrier” on page 309. This step is mandatory for the SIM authenticationmodule and any other SIGTRANapplications. This step is only required for the optionalWiMAXmobility module if it uses the EAP-AKAauthentication protocol, which requires the optional SIM authentication module.
Installing SBR Software
If you have completed all items on the “Before You Begin” list, you are ready to install the SBR software.These are the key steps:
1. Unpack the Steel-Belted Radius Carrier Software.
See “Unpacking the Steel-Belted Radius Carrier Software” on page 64.
If you are not familiar with UNIX package management commands, you can review a list of “PackageManagement Commands” on page 64.
2. Check for running SNMP processes on the server and shut down any that are active.
3. Run the Steel-Belted Radius Carrier configure script. As the script runs, enter the information yourecorded on the previous pages.
See “Setting Up a Starter Kit’s First SBR/Management Node” on page 99.
Basic Configuration
After the Steel-Belted Radius Carrier software is on the Solaris server, ensure that the base software runsproperly and then perform basic configuration steps:
1. Start the Steel-Belted Radius Carrier daemon.
• For standalone systems that are not in a Session State Register cluster:
The basic commands to start and stop the daemon from the command line are as follows:
• Start the RADIUS Server:/ radiusdir /sbrd start
7

or restart: / radiusdir /sbrd restart
• Stop the RADIUS Server:/radiusdir /sbrd stop
• Display RADIUS Status Information:/radiusdir /sbrd status
For more information, see “Starting and Stopping a Standalone Steel-Belted Radius Carrier Server”on page 77.
• For systems that are part of a Session State Register cluster, starting SBR nodes is part of startingand stopping the entire cluster.
2. Launch the Web GUI.
Use an HTML browser to address the Steel-Belted Radius Carrier server HTML server. Download theAdministrator client application and log in as root. Also confirm that the links to the documentationwork.
Verify that you can download and run the application both from the local host and from a workstationon the network.
Migrating from a Previous Release3. Configure the environment.
If you installed a copy of a previous SBR server installation on the new server asmentioned in “Migration”on page 5, the configuration files from that release are used in this startup. Be aware that to use somenew features delivered in Release 8.6.0 you must edit these configuration files to include new settings.See “Migrating from Previous SBR Releases” on page 56.
For a new installation, configuring the environment includes basic low-level configuration tasks suchas:
• Configuring communications between any additional devices and the Steel-Belted Radius Carrierserver.
• Adding additional users to the server.
See “Configuring the Server” on page 86.
4. Configure SNMP. If you elected not to configure the Steel-Belted Radius Carrier SNMP agent duringsoftware installation, but have changed your mind and other agents also run on the server (such as theSolaris operating system agent), you must adjust the ports the agents use so multiple agents do notcontend for the same resource.
See “Configuring SNMP” on page 86.
8

CHAPTER 2
Session State Register Cluster Installation Overview
IN THIS CHAPTER
SSR Cluster Overview | 9
SSR Cluster Concepts and Terminology | 10
Supported SBR Carrier SSR Cluster Configurations | 16
Session State Register Database Tables | 22
Supporting SIM, SIGTRAN, and Other Protocols with Signalware | 25
Cluster Installation Workflow | 25
Session State Register Cluster Installation Checklist | 26
This chapter contains an overview of the Session State Register (SSR) and of the installation process forall nodes and servers in SSR cluster. It includes a checklist of required tasks that you can use to track yourprogress as you work through the installation process.
For introductory information about installing a standalone Steel-Belted Radius (SBR) Carrier server, see“Standalone Steel-Belted Radius Carrier Installation Overview” on page 2.
This chapter includes these topics:
SSR Cluster Overview
A standalone SBR Carrier server runs the entire AAA process using local session database processes on asingle machine.
The Session State Register (SSR) module implements a stateless, highly reliable and highly available AAAplatform. It separates SBR Carrier front end processes from back end data functions that take place ontwo or four Session State Register data servers.
The SBRCarrier front end and SSR back end servers collaborate to create a virtual AAA server that provides:
• High availability
• Session state preserved during failover of front end SBR Carrier nodes
9

• Application session awareness
• Centralized IP address management
• Concurrency management (if the optional Concurrency and Wholesale Module is installed on all SBRCarrier servers)
To work efficiently and to provide redundancy, a production SSR cluster must be built on a fast, isolated,and redundant network infrastructure. It must include multiple hosts and nodes so a single node failurecannot prevent the cluster from operating.
Because the SSR database contains detailed attributes for each session it serves, it is a logical source forapplications that query the AAA environment for correlative and verification purposes. The default SSRdatabase schema addresses standard requirements for most wireless and wireline service providers. Youcan also customize it to address unique requirements or to support other applications. For example, avideo portal or streaming server that has the IP address for a session but requires the user identity attachedto the session for billing or personalization. The video gateway can query the SSR database in real time tocorrelate information about any active session.
NOTE: The Session State Register Database is not, and cannot be used as, a permanent subscriberdatabase.
RADIUS Class Attributes are part of the RADIUS standard, but not all network access devices (NADs) fullysupport them. In order for the SSR to reliably track sessions throughout each session’s lifetime, the networkNADs must support the RADIUS Class Attributes.
SSR Cluster Concepts and Terminology
A Session State Register cluster has both a physical and logical organization. The physical elements areservers. The logical elements are nodes. The two terms are not interchangeable.
Session State Register Servers
The Session State Register has requirements for the entire cluster and all servers that participate in thecluster, over and above the requirements for standalone SBR Carrier servers. So a SSR cluster does nothave any single point of failure, each server in a cluster must have its own memory and disks. We do notrecommend or support virtual servers, network shares, network file systems, and SANs.
All servers in the cluster require at least two physical Ethernet ports that provide the same throughput.Multipathing the NICs to a single IP address is required. Session State Register Cluster can work over a100Base-T network but we recommend 1000Base-T (gigabit Ethernet).
10

All data servers must have equal processor power, memory space, and available bandwidth because theyare tightly coupled and share data. If the overall throughput of the data servers varies from machine tomachine, performance degrades. SBR Carrier servers and management servers’ configuration may varyfrom machine to machine, so long as the basic standalone requirements are met.
Session State Register Nodes
Four types of nodes can be included in a cluster, each with a specific role within the cluster:
• An SBR node, also known as an (s) node, hosts the SBR Carrier RADIUS process software component,any optional modules, and all related processes that read andwrite data into the SSR database. This typeof node accesses and manipulates the cluster’s shared data that is hosted by the data nodes.
• An SBR/management node, also known as an (sm) node, hosts a combination of a SBR node and amanagement node. The SBR node software component runs the SBR Carrier RADIUS process and themanagement node software component runs the management node SSR process.
• Amanagement node, also known as an (m) node, controls itself and all data nodes in the cluster. It providesconfiguration data, starts and stops nodes, can back up the database and perform other databaseoperations. It alsomanages a database process that supports the SSR storage engine. Cluster configurationdata is located in an identical config.ini file on each of the cluster’s management nodes.
• A data node, also known as a (d) node, runs the ndbmtd data process. The ndbmtdd process cooperativelymanages, replicates, and stores data in the SSR storage engine with other data nodes. Each data nodehas its own memory and permanent storage. Each one maintains both a portion of the working copy ofthe SSR database and a portion of one or more replicas of the database.
All the data nodes in a cluster run a special process called the shared memory engine that manages theworking copy of the SSR database. Themanagement nodes coordinate the service among the participatingdata nodes. The shared storage engine and the SSR database replaces the on-board database used bystandalone Steel-Belted Radius Carrier servers. The shared memory engine ensures that the database isupdated by a synchronous replication mechanism that keeps cluster nodes synchronized: a transaction isnot committed until all cluster nodes are updated.
SSR Data Entities
Each data node participates in a node group of two data nodes. A Starter Kit cluster has a single node groupwith two members; a Starter Kit with an Expansion Kit has two node groups, each with two data nodes.Each node group stores different partitions and replicas.
• A partition is a portion of all the data stored by the cluster. There are as many cluster partitions as nodegroups in the cluster. Each node group keeps at least one copy of any partitions assigned to it (that is,at least one replica) available to the cluster.
11

• A replica is a copy of a partition. Each data node in a node group stores a replica of a partition. A replicabelongs entirely to a single data node; a node can (and usually does) store several replicas becausemaintaining two replicas is the fixed setting for SSR.
Figure 1 on page 12 shows the data components of a data cluster with four data nodes arranged in twonode groups of two nodes each. Nodes 1 and 2 belong to Node Group 1. Nodes 3 and 4 belong to NodeGroup 2.
• Because there are four data nodes, there are four partitions.
• The number of replicas is two, to create two copies of each primary partition.
So long as both nodes in one node group are operating, or one node in each node group is operating, thecluster remains viable.
Figure 1: SSR with Four Data Nodes in Two Groups
The data stored by the cluster in Figure 1 on page 12 is divided into four partitions: 0, 1, 2, and 3. Multiplecopies of each partition are stored within the same node group. Partitions are stored on alternate nodegroups:
• Partition 0 is stored on Node Group 1. A primary replica is stored on Data Node 1 and a backup replicais stored on Data Node 2.
• Partition 1 is stored on the other node group, Node Group 2. The primary replica is on Data Node 3 andits backup replica is on Data Node 4.
• Partition 2 is stored onNode Group 1. The placement of its two replicas is reversed from that of Partition0; the primary replica is stored on Data Node 2 and the backup on Data Node 1.
• Partition 3 is stored on Node Group 2, and the placement of its two replicas are reversed from those ofpartition 1: the primary replica is on Data Node 4 and the backup on Data Node 3.
12

TIP: Primary and replica are used in another context in the Steel-Belted Radius Carrier environmentand documentation, which can cause some confusion. These terms mean something specific inthe context of Session State Register, but they are also used when talking about centralizedconfiguration management, or CCM.
CCM is a feature that coordinates Steel-Belted Radius Carrier server settings between a primaryRADIUS server and one or more replica RADIUS servers. It copies critical configuration files fromthe primary to the replicas, so it keeps multiple SBR Carrier servers operating the same way.
CCM is a separate tool and process that are not tied or linked to SSR, but CCM is often used inSSR environments to keep the SBR Carrier nodes operating identically.
Cluster Configurations
For the highest level of redundancy, we recommend that each node in a cluster run on its own server. Inmany locations and for many installations, that might not be practical, so you can run a SBR and amanagement node together on the same machine—in fact, that is the default configuration for the SSRStarter Kit cluster. However, neither a management node nor an SBR node can run on the same machineas a data node. Separation is required so that management arbitration services continue if one of the datanode servers fails.
Using these separation guidelines, the recommended minimum size of a Session State Register cluster isfour physical machines: two machines that each run a SBR/management node combination, and twomachines to host the data nodes. This configuration supports all licenses and nodes included in the SessionState Register Cluster Starter Kit and is shown in Figure 2 on page 13:
Figure 2: Basic Session State Register Starter Kit Cluster
Session State Register Scaling
You scale a Session State Register cluster when you add a separately licensed SSR Expansion Kit to aStarter Kit, a third management node, or additional SBR Carrier front end systems.
13
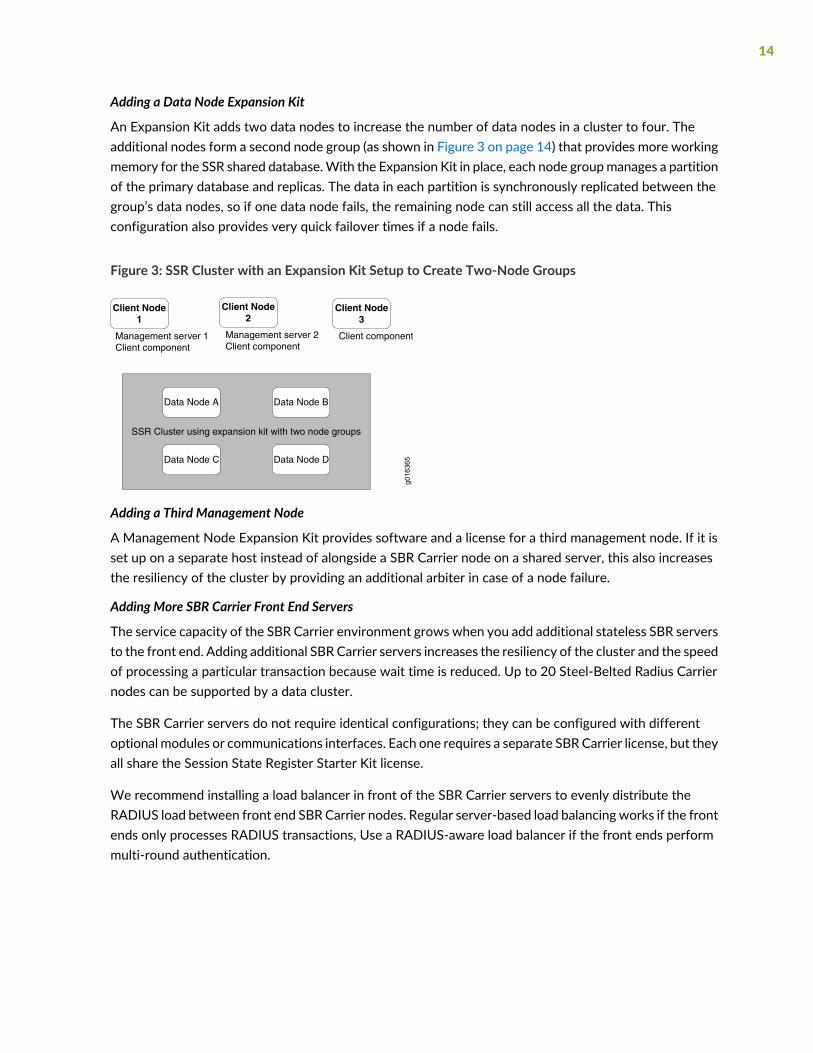
Adding a Data Node Expansion Kit
An Expansion Kit adds two data nodes to increase the number of data nodes in a cluster to four. Theadditional nodes form a second node group (as shown in Figure 3 on page 14) that provides more workingmemory for the SSR shared database.With the Expansion Kit in place, each node groupmanages a partitionof the primary database and replicas. The data in each partition is synchronously replicated between thegroup’s data nodes, so if one data node fails, the remaining node can still access all the data. Thisconfiguration also provides very quick failover times if a node fails.
Figure 3: SSR Cluster with an Expansion Kit Setup to Create Two-Node Groups
g016
365
SSR Cluster using expansion kit with two node groups
Management server 1Client component
Client componentManagement server 2Client component
Data Node A Data Node B
Client Node1
Client Node3
Client Node2
Data Node C Data Node D
Adding a Third Management Node
A Management Node Expansion Kit provides software and a license for a third management node. If it isset up on a separate host instead of alongside a SBR Carrier node on a shared server, this also increasesthe resiliency of the cluster by providing an additional arbiter in case of a node failure.
Adding More SBR Carrier Front End Servers
The service capacity of the SBR Carrier environment grows when you add additional stateless SBR serversto the front end. Adding additional SBRCarrier servers increases the resiliency of the cluster and the speedof processing a particular transaction because wait time is reduced. Up to 20 Steel-Belted Radius Carriernodes can be supported by a data cluster.
The SBR Carrier servers do not require identical configurations; they can be configured with differentoptional modules or communications interfaces. Each one requires a separate SBRCarrier license, but theyall share the Session State Register Starter Kit license.
We recommend installing a load balancer in front of the SBR Carrier servers to evenly distribute theRADIUS load between front end SBR Carrier nodes. Regular server-based load balancing works if the frontends only processes RADIUS transactions, Use a RADIUS-aware load balancer if the front ends performmulti-round authentication.
14

Cluster Network Requirements
A redundant cluster requires a redundant network. At the machine level, we require dual interface cardsin each machine and multipathing.
We recommend that the network be a dedicated subnet with dual switches. This fully duplicates thenetwork and each machine in the cluster has at least two routes to all other machines, as shown inFigure 4 on page 15.
Figure 4: Starter Kit SSR Cluster with Redundant Network
g016
361
SSR Data Node A SSR Data Node B
NDBCLUSTER Storage Engine
Switch A Switch B
Steel-Belted RadiusCarrier Node 1 andManagement Node 1
Steel-Belted RadiusCarrier Server 2 andManagement Node 2
The SSR database schema uses primary key lookups as often as possible during transaction processing, sothe database cluster performance scales almost linearly based on the number of data nodes in the cluster.
Do not configure the subnet to be shared beyond the cluster machines because communications betweennodes are not encrypted or shielded in any way. The only means of protecting transmissions within acluster is to run your cluster on a protected network; do not interpose firewalls between any of the nodes.
Running the cluster on a private or protected network also increases efficiency because the cluster hasexclusive use of all bandwidth between cluster hosts. This protects the cluster nodes from interferencecaused by transmissions between other devices on the network.
We strongly recommend Gigabit Ethernet as the network type; 100Base-T is the minimum supportedspeed. Network latency can severely degrade performance, sowe also recommend that all servers be closeenough together that latency is always much less than 10 ms.
Table 6: Latency between Servers and Its Effect on Performance
Performance DegradationLatency Times
Baseline performance as designed.0 ms latency (LAN)
Up to 40% performance loss10 ms latency
15

Table 6: Latency between Servers and Its Effect on Performance (continued)
Performance DegradationLatency Times
Up to 60% performance loss20 ms latency
Not supported.More than 20 ms latency
Supported SBR Carrier SSR Cluster Configurations
A Starter Kit licenses you for two management node processes and two data node processes. SBR nodeprocesses are not included with the Starter Kit and must be purchased separately. You can collocate oneor both SBR node processes with the management node processes, thereby creating one or twoSBR/management combination nodes. You can add a third management node process to the cluster usingthe Management Node Expansion Kit. You always add data nodes in pairs. One Data Node Expansion Kitincludes two data nodes.
NOTE: Each node type (s), (sm), (m), (d) requires its own machine.
You can have no more than three management node processes in a cluster.
Theminimum requirements for a cluster are two SBR node processes (full licenses) and a Starter Kit license.You can deploy these licenses in a configuration of four, five, or six machines, depending on how manySBR node processes are collocated with management node processes on a single machine. Each SBR nodeprocess is licensed separately; you cannot share SBR licenses. Starter Kit licenses are shared by all processesin the cluster (through the configure script). Table 7 on page 17 lists the possible configurations for theminimum requirements of two SBR node licenses and a Starter Kit license.
If all add-on products are added to the Starter Kit cluster, the maximum size of a data cluster is four datanodes, three management nodes, and up to 20 SBR Carrier nodes, as shown in Table 7 on page 17.
CAUTION: Setting up an unsupported configuration can put data and equipment atrisk and is not supported by Juniper Networks.
Also, note the latency limitation in Table 6 on page 15. We do not support clusterconfigurations with latency between nodes that exceeds 20ms, as can occur if serversare set up to spread a cluster across widely separated locations.
16

Table 7: Supported Cluster Configurations
Node Type (One Machine Required for Each Node Type)
Licenses (D)(M)(SM)(S)
Two–Two–Configuration 1:
Two SBR node processes (full licenses)and one Starter Kit (minimumconfiguration)
TwoOneOneOneConfiguration 2:
Two SBR node processes (full licenses)and one Starter Kit
TwoTwoNoneTwoConfiguration 3:
Two SBR node processes (full licenses)and one Starter Kit
Up to Four–––Configuration 1, 2, 3 with one DataExpansion Kit
–Up to Three––Configuration 1, 2, 3 with oneManagement Node Expansion Kit
Up to FourUp to Three–Up to a total of20
Maximum configuration:
Any of the previously listedconfigurations and additional SBRNodes(front ends)
Failover Overview
To continue functioning without a service interruption after a component failure, a cluster requires at least50 percent of its data and management nodes to be functional. If more than 50 percent of the data nodesfail, expect a service interruption, but continued operation of the available nodes.
Because SBR Carrier nodes function as front ends to the data cluster, they are not involved in any failoveroperations performed by the data cluster. However, as an administrator, you need to ensure that the frontend environment is configured so that it can survive the loss of SBR Carrier nodes. (We recommend usingan emergency IP address pool and running with a RADIUS-aware load balancer.)
A data cluster prepares for failover automatically when the cluster starts. During startup, two events occur:
17

• One of the data nodes (usually the node with the lowest node ID) becomes the primary of the nodegroup. The primary node stores the authoritative copy of the database.
• One data node or management node is elected arbitrator. The arbitrator is responsible for conductingelections among the survivors to determine roles in case of node failures.
In a cluster, each management node and data node is allocated a vote that is used during this startupelection and during failover operations. Onemanagement node is selected as the initial arbitrator of failoverproblems and of elections that result from them.
Within the cluster, data and management nodes monitor each other to detect communications loss andheartbeat failure. When either type of failure is detected, as long as nodes with more than 50 percent ofthe votes are operating, there is instantaneous failover and no service interruption. If exactly 50 percentof nodes and votes are lost, and if a data node is one of the lost nodes, the cluster determines which halfof the database is to remain in operation. The half with the arbitrator (which usually includes the primarynode) stays up and the other half shuts down to prevent each node or node group fromupdating informationindependently and then restarts and attempts to rejoin the active half of the cluster.
When a failed data node (or nodes) returns to service, the working nodes resynchronize the current datawith the restored nodes so all data nodes are up to date. How quickly this takes place depends on thecurrent load on the cluster, the length of time the nodes were offline, and other factors.
Failover Examples
The following examples are based on the basic Starter Kit deployment setup with the recommendedredundant network as shown in Figure 5 on page 18. The cluster is set up in a single data center on a fullyswitched, redundant, layer 2 network. Each of the nodes is connected to two switches using the SolarisIP-multipathing feature for interface failover. The switches have a back-to-back connection.
Figure 5: Starter Kit SSR Cluster with Redundant Network
g016
361
SSR Data Node A SSR Data Node B
NDBCLUSTER Storage Engine
Switch A Switch B
Steel-Belted RadiusCarrier Node 1 andManagement Node 1
Steel-Belted RadiusCarrier Server 2 andManagement Node 2
18

Possible Failure Scenarios
With these basic configurations, a high level of redundancy is supported. So long as one data node isavailable to one SBR Carrier node, the cluster is viable and functional.
• If either SBR Carrier Server 1 or 2, which also run the cluster’s management nodes, (s1 and m1 or s2and m2) goes down, the effect on the facility and cluster is:
• No AAA service impact.
• NADs (depending on the failover mechanism in the device) switch to their secondary targets—theremaining SBR Carrier Server. Recovery of the NAD when the SBR Carrier Server returns to servicedepends on NAD implementation.
• If either data node A or B goes down, the effect is:
• No AAA service impact; both SBR Carrier nodes continue operation using the surviving data node.
• The management nodes and surviving data node detect that one data node has gone down, but noaction is required because failover is automatic.
• When the data node returns to service, it synchronizes its NDB data with the surviving node andresumes operation.
• If both management nodes (m1 and m2) go down, the effect is:
• No AAA service impact because the all s and d nodes are still available. The data nodes continue toupdate themselves.
• If both data nodes go down, the effect on:
• The management nodes is minimal. They detect that the data nodes are offline, but can only monitorthem.
• The SBR Carrier nodes varies:
• Authentication of users and accounting for users that do not require shared resources such as theIP address pool or concurrency continue uninterrupted. If the nodes have local non-shared emergencyIP address pools, the front ends can continue to process some requests.
• Users that require shared resources are rejected.
The carrier nodes continue to operate this way until the data cluster comes back online; the clusterresumes normal AAA operation using the data cluster automatically.
• If one half of the cluster (SBR Carrier Server 1, management node 1, and data node A or SBR CarrierServer 2, management node 2, and data node B) goes down, the effect is:
• No AAA service impact because the SBR Carrier node, a management node, and a data node are allstill in service. NADs using the failed SBR Carrier Server fail over SBR Carrier Server.
• When the failed data node returns to service, it synchronizes and updates its NDB data with thesurviving node and resumes operation.
19

• When the failed SBRCarrier Server returns to service, theNADs assigned to use it as a primary resourcereturn to service depending on the NAD implementation.
Distributed Cluster Failure and Recovery
You can divide a cluster and separate two equal halves between two data centers. In this case, theinterconnection is made by dedicated communications links (shown as bold lines in Figure 6 on page 21and Figure 7 on page 21) that may be either:
• A switched layer 2 network, just as the single site cluster is set up.
• A routed layer 3 network that uses a routing tablewith backup routes to route overmultiple links betweendata centers
However, this creates a configuration that is vulnerable to a catastrophic failure that severs the two halvesof a dispersed cluster. We recommend adding a third management node at a location that has a separatealternative communication route to each half. A third management node:
• Eliminates the possibility of the cluster being evenly split by a communications failure.
• Creates an odd number of votes for elections, which greatly reduces the need for arbitration.
With a third management node in place, failover in the dispersed cluster is well managed because one sideof the cluster does not have to determine what role to assume. Recovery is likely to be quicker when thedata nodes are reunited because each node’s status is more likely to have been monitored by at least onemanagement node that is in communication with each segment.
20
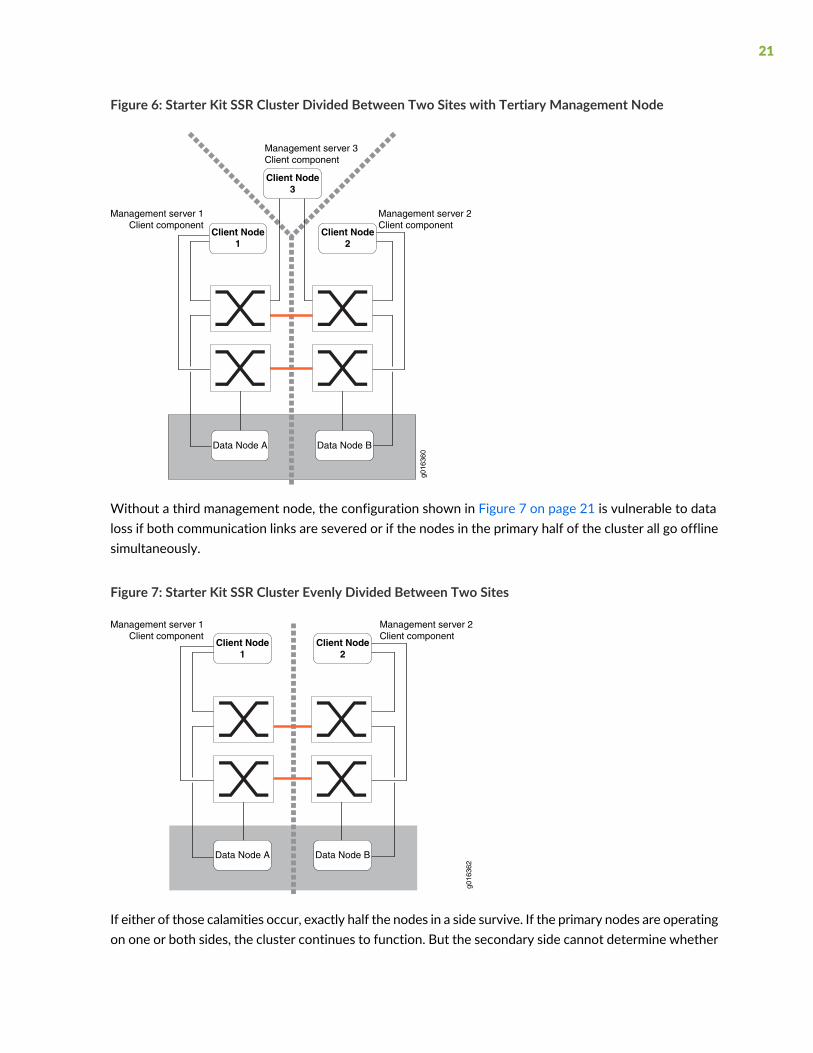
Figure 6: Starter Kit SSR Cluster Divided Between Two Sites with Tertiary Management Node
g016
360
Management server 1Client component
Management server 2Client component
Management server 3Client component
Data Node A Data Node B
Client Node1
Client Node3
Client Node2
Without a third management node, the configuration shown in Figure 7 on page 21 is vulnerable to dataloss if both communication links are severed or if the nodes in the primary half of the cluster all go offlinesimultaneously.
Figure 7: Starter Kit SSR Cluster Evenly Divided Between Two Sites
g016
362
Management server 1Client component
Management server 2Client component
Data Node A Data Node B
Client Node1
Client Node2
If either of those calamities occur, exactly half the nodes in a side survive. If the primary nodes are operatingon one or both sides, the cluster continues to function. But the secondary side cannot determine whether
21

the primary side is really no longer available because it only has two votes. It can take 10-15 minutes forthe secondary side of the cluster to automatically restart, promote itself to primary status, and resumecluster operations.
However, the SBR Carrier nodes that use that portion of the cluster do not automatically reconnect, andcannot communicate with the other half. If they were to reconnect to the secondary side, modificationsmade to the database create a divergence between the two copies of the database (although SBR Carriernodes continue to process requests that do not require the database). The longer the cluster is split, thegreater the divergence, and the longer it takes to resolve when recovery takes place.
To eliminate these problems, we recommend a proven alternative: adding a third management node in athird location that can communicate with each half of the dispersed cluster. Without the tertiarymanagement node, there is a possibility of downtime in a dispersed cluster that suffers a catastrophicfailure.
If you cannot add a third management node, we recommend that you configure the secondary side of thecluster not to automatically restart, but to go out of service when it instantaneously disconnects from theprimary side nodes. Then you can determine the best course of action—to keep the cluster offline or topromote the secondary side of the cluster, relink the SBR Carrier nodes, and be aware that reconciling thedivergence must be part of the recovery procedure.
When the cluster is reunited and goes into recovery mode, the primary and backup data nodes attemptto reconcile the divergence that occurred during separation. The moment they come in contact, transitoryfailures appear on the SBR Carrier nodes because the cluster configuration has changed; any transactionsthat are pending at that moment are terminated. The SBR Carrier nodes retry those transactions becausethey are classified as temporary failures; in most situations they are accepted on the first retry.
Session State Register Database Tables
The database cluster uses a relational SQL design to store data. The database contains multiple tables thatstore Steel-Belted Radius Carrier state information such as IP address pool information and current sessions.
IP Address Pools
Session State Register stores information about all IP address pools centrally in a dedicated table in theSSR database. Network access devices can send RADIUS requests to any stateless SBR Carrier server, andthe SBR Carrier server allocates IP addresses from the shared central pool in response, after authentication.
Operators can query from any SSR management node to verify what addresses are in use and how manyaddresses remain available for an IP address pool or set of pools.
22

Subscriber Session Data Controls
Session State Register stores session data centrally in the Current Sessions Table in the SSR database.
The table’s format is controlled by a configuration file on the cluster’s management nodes; one file is copiedto all nodes in a node group, so all nodes operate with the same information. The standard Session StateRegister database schema addresses the needs of most carriers, but you can modify the CST to addressunique needs and situations. The CurrentSessions.sql file determines the schema used by the CST tablemaintained by the data nodes. When the database is created, the table is set up using the schema outlinedin the CurrentSessions.sql file.
Session control features include:
• User concurrency control—You can enforce concurrency across your entire network by controlling thenumber of active connections on a per-user, per-cluster basis using the username. You can set a limiton themaximumnumber of concurrent connections that a user can have and youmay use any configuredattribute to track instead of just the username.
Subsequently, when the user requests a new connection, the Steel-Belted Radius Carrier servers in thecluster compare the current number of connections to the maximum limit. If a new connection exceedsthe limit, the additional connection can be disallowed, or allowed and logged.
• Optional attribute-based concurrency control—If you have a license for the SSR Optional Concurrencyand Wholesale Module, you can enforce concurrency across the network by tracking any attribute of auser account, not just the username.
• Cluster session—You can set a limit on the maximum number of concurrent sessions based on your SSRusage requirement.
• Change of Authorization (CoA)/Disconnect Message (DM) processing—You can change the state ofauthenticated sessions dynamically. In accordancewith theDynamic Authentication RFC 3576, you can:
• Deploy prepaid scenarios in WLAN integration for GSM/UMTS networks.
• Place users in legal intercept.
• Enable online service and billing profile changes.
• Disconnect or quarantine users for abusing the network.
RELATED DOCUMENTATION
For information about managing and controlling sessions, see the SBR Carrier Administration andConfiguration Guide
23

Application Support
Because the CST is centrally located and can be easily modified, it is often used as the entry point for thirdparty applications that need current session data. This enables Steel-Belted Radius Carrier Session StateRegister to be the logical source for other applications to query for correlative and verification purposes.
A calling application can make its request through an API as SBR Carrier does, or with a SQL query asshown in Figure 8 on page 24. The SQL query usually takes more processing resources and cycles tocomplete than an API call, so we recommend against allowing multiple or repeated queries because theycan slow down the cluster’s primary tasks.
Rows in each table are evenly distributed among a node group’s data nodes. A client application can locatea particular record by accessing the unique primary key of any table, which only involves a single node inthe cluster. Scans of tables for records meeting broader criteria (such as a search for sessions more than2 hours old) involves all the data nodes in the primary node group, and takes more processing cycles tocomplete.We recommend that queries from outside applications be as precise as possible to avoid slowingall operations down.
Figure 8 on page 24 shows the general deployment scenariowith usage examples. Communications initiatedby applications or systems in the operational support system (OSS) can be formatted as standard SQLqueries, shell scripts, or stored procedures, depending on usage requirements.
Figure 8: Database Access by Other Applications
g016
363
Steel-Belted RadiusCarrier Server 1 andManagement Node
Steel-Belted RadiusCarrier Server 2 andManagement Node
State Session Control
Customer Care Help Desk
Application Data Request
SQL Query
IP Pools Data:IP Pools TableIP Ranges TableIP Addresses Table
CST Table:User-Name/IMSIUnique Session ISetc.
NDBCLUSTER Storage Engine
SSR Data Node A SSR Data Node B
For example, a video gatewaymight use its own internal identifier (such as anMSISDN, IMSI, or username)for a subscriber, but might not have the subscriber's current IP address. The video gateway can query theCurrent Sessions Table in real time to retrieve information about an active session.
24

Supporting SIM, SIGTRAN, and Other Protocols with Signalware
Steel-Belted Radius Carrier nodes that support SIM depend on Signalware 9with Service Pack 6.A softwarebeing properly installed on the server.
Also, if the EAP-AKA authentication protocol is used by the WiMAX mobility module, Signalware 9 withService Pack 6.A is required.
NOTE: We strongly recommend that Signalware software be installed and configured beforeSteel-Belted Radius Carrier is installed because the SBRCarrier installation incorporates Signalwaresettings, if they are available.
Juniper Networks provides an example Signalware installation with:
• The correct settings for simple integration with Steel-Belted Radius Carrier.
• The recommended procedures to configure Signalware 9 to support Steel-Belted Radius Carrier.
• The recommended procedure for migrating configuration settings forward from an existing Signalwareinstallation.
For details, see “SIGTRAN Support for Steel-Belted Radius Carrier” on page 309.
NOTE: Because the Signalware communication stack is not supported on Solaris, the SIMauthentication module cannot be used on the Solaris platform to communicate with an HLR toprocess RADIUS requests. However, the module can be used with an HSS by using the RADIUSto Diameter conversion feature.
Cluster Installation Workflow
The installation workflow follows a list of tasks that must be performed in a specific order to make theSession State Register cluster fully functional. This guide presents groups of related tasks in sequentialorder.
The high-level view of the installation has several groups of tasks:
25

1. Planning—Because a SSR cluster involves four or more servers, planning the cluster topology and eachserver’s role and setting is essential. Planning is discussed, and a worksheet you can use to plan yourinstallation are in “Planning Your Session State Register Cluster” on page 32.
2. Before You Begin—The tasks to complete and the information to gather on each server in a clusterbefore installing software are discussed in detail in “Before You Install Software” on page 39, and inthe succeeding chapters that document the optional installation of Signalware that is required to supportsome features.
3. Software installation—Unpacking the software package, selecting configuration tasks, and providingsettings that are used to set up the servers are discussed in detail in“Installing Session State Register Nodes” on page 94.
4. Basic configuration—Setting up configuration files for the SSR database is discussed in“Customizing the SSR Database Current Sessions Table” on page 144.
Session State Register Cluster Installation Checklist
Before You Begin
Before you begin to install the Session State Register software and after you read all of this chapter,perform these preliminary tasks or verify that they have been accomplished:
1. Review the Steel-Belted Radius Carrier Release Notes for up-to-date information that became availableafter the Steel-Belted Radius Carrier guides were published.
Download the most recent Release Notes file from:https://www.juniper.net/documentation/en_US/sbr-carrier8.6.0/information-products/topic-collections/release-notes/sbrc-8.6.0.pdf
If the information in the Release Notes differs from the information in any Steel-Belted Radius Carrierguide, follow the Release Notes.
2. Read the next chapter, “Planning Your Session State Register Cluster” on page 32, and fill out theprovided worksheet so you have all required information ready to use during the installation.
Migration3. If you are migrating settings from a SBR/HA 5.5 server installation, put a copy of that installation onthe system that you want to host Release 8.6.0.
The recommended method is:
a. As root on the old server, shut down the SBR daemon.Execute: /radiusdir /sbrd stop.
b. Create a gzip archive of the radiusdir directory, preserving the file structure.
Change directories to /opt/JNPRsbr/ and execute (for example):
26

tar cfE - radius |gzip > 55_radius.tgz
c. As root on the Release 8.6.0 host, create a working directory for the archive:
Execute:mkdir -p /opt/JNPRsbr/PreviousRelease_backup
and:
cd /opt/JNPRsbr/PreviousRelease_backup
d. Use FTP binary mode to copy the archive file to the Release 8.6.0 host.
e. Gunzip the archive in the working directory. This does not create a working installation, but servesas a source of files that can be reused by the Release 8.6.0 server.
Execute (using the example file name):gunzip 55_radius.tgz |tar xf -
f. Check the file permissions on the unzipped archive to ensure that the files are writable.
See “Creating a Copy of Existing SBR Server Release Files for Migration” on page 54 for moreinformation.
4. Ensure that all server chassis are physically secure.
To review recommendations on the server’s characteristics, see “Selecting an Appropriate Server” onpage 41.
5. Verify root access on all servers.
6. Confirm that all server chassis provide at least the minimum hardware and software requirements.
See “Meeting System Requirements” on page 41.
7. Verify that all servers meet basic network requirements:
• See “Configuring Multipathing” on page 38.
• See “Verifying Network Connectivity” on page 49.
• See “Verifying Hostname Resolution” on page 50.
CCM8. Verify the server role in the centralized configurationmanagement (CCM) environment. The installationscript can configure a Steel-Belted Radius Carrier server as:
• An autonomous server that does not use CCM.
• The primary server supplying a group of replication servers.
• A replication server.
27

• In an environment that uses replication servers, the primary server must be configured first toprovide a base for replication.
Migration• If you are migrating from a SBR/HA 5.5 environment and CCM was in use, you may only migratethe same server type: autonomous to autonomous, primary to primary, and replica to replica.
LDAP9. (Optional) If you want the server to interact with a Lightweight Directory Access Protocol (LDAP)directory service agent, verify or record the path to the LDAP library files. (The default path is /usr/lib.)
Oracle10.(Optional) If you intend the Steel-Belted Radius Carrier server to authenticate using an external database,you need to:
• Verify database compatibility and interoperability.
See “Setting Up External Database Connectivity (Optional)” on page 53.
• If the external database is Oracle, the Steel-Belted Radius Carrier server must be configured as aclient of the Oracle server.
As you set up the client, collect this information, or if the client is already installed, record thisinformation to use while installing SBR software:
• Record the path to the local Oracle Home directory (for example:/opt/10g/app/oracle/product/10.2.0.3).
• Record the path to the local Oracle shared library (for example:/opt/10g/app/oracle/product/10.2.0.3/lib)
• Record the path to the local TNS_ADMIN (for example:/opt/10g/app/oracle/product/10.2.0.3/network/admin)
SIM /WiMAX / SIGTRAN
28

12.(Required only for these modules) Install and configure Signalware 9 with Service Pack 6.A software,following the product documentation and the guidelines in “SIGTRAN Support for Steel-Belted RadiusCarrier” on page 309.
This step is only required for the optional WiMAX mobility module if using EAP-AKA, which requiresthe optional SIM authenticationmodule. This step is mandatory for the SIM authenticationmodule andany other SIGTRAN applications.
Installing Session State Register Software
If you have completed all items on the “Before You Begin” list (for each item for each server in the cluster),you are ready to install the software. The servers must be installed in a particular order, so you performthis portion of the list four times for a Starter Kit.
The order of installation for a four-server Starter Kit cluster is:
1. First SBR Carrier/management node host. This server is also the primary server if CCM is used becauseit must be installed before the replica nodes.
2. Second SBR Carrier/management node host.
3. First data node host.
4. Second data node host.
Repeat these key steps on each server:
1. Unpack the Session State Register software.
See “Unpacking Session State Register Software” on page 95.
If you are not familiar with UNIX package management commands, see “Package ManagementCommands” on page 95.
2. Run the Session State Register configure script to set up or read in cluster and server configurationfiles.
3. Restart the Session State Register configure script.
When the script runs the second time, you are prompted to enter more information that you recordedin “Planning Your Session State Register Cluster” on page 32 and“Before You Install Software” on page 39.
Basic Configuration
After the Session State Register software is on all servers in the cluster, you can ensure that the basesoftware runs properly and then perform basic configuration steps:
29

1. Start the cluster.
See “Initial Cluster Startup Procedure” on page 132.
2. Launch the Web GUI.
Use an HTML browser to address one of the Steel-Belted Radius Carrier servers. Download theAdministrator client application and log in as root. Also confirm that the links to the documentationwork. See “Launching Web GUI” on page 138.
Verify that you can download and run the application both from the local host and from a workstationon the network.
3. Configure the server.
For a new installation, configuring the environment includes basic low-level configuration tasks suchas:
• Configuring communications between any additional devices and the Steel-Belted Radius Carrierservers.
• Adding additional users to the server.
See “Configuring the Server” on page 140.
4. Configure SNMP. If you elected not to configure the Steel-Belted Radius Carrier SNMP agent duringsoftware installation and other agents also run on the server (such as the Solaris operating systemagent), you must adjust the ports the agents use so multiple agents do not contend for the sameresource.
See “Configuring SNMP” on page 141.
5. Set up shared SSR IP address pools and a local emergency pool. See “Setting Up IP Address Pools” onpage 142.
30

2PART
Preparing for a Steel-Belted RadiusCarrier Installation
Planning Your Session State Register Cluster | 32
Before You Install Software | 39
Migrating from Previous SBR Releases | 56

CHAPTER 3
Planning Your Session State Register Cluster
IN THIS CHAPTER
Planning the Cluster Topology | 32
Cluster Naming Worksheets | 34
Renaming Node Hosts | 38
Configuring Multipathing | 38
This chapter documents the planning and preparatory tasks that are required to set up a Session StateRegister cluster. If you are installing a standalone SBR Carrier server, skip this chapter and proceed to Chapter4, “Before You Install Software” on page 39.
These topics are in the chapter:
Planning the Cluster Topology
The topology of all clusters begins with the four machines required to implement the SSR Starter Kit: twomachines that each host both an SBR node and an SSR management node and two machines that eachhost one SSR data node.
Figure 9: Basic Steel-Belted Radius Carrier Session State Register Starter Kit Cluster
Naming the Cluster and Its Machines
To determine the machine names:
32
1. Name the cluster.
The cluster name must:
• Begin with a letter (an alphabetic character).
• Be made up of alphanumeric characters, underbars, and dashes.
• Be a single string without any spaces.
2. Name the nodes. You must set the node name to be the same as the hostname associated with the IPaddress of the primary network interface. You can test the name with the uname -n command.
It is not required, but you can simplify machine identification if you adopt a convention that builds onthe node identification numbers (node ID) that are used by the SSR processes and incorporate theminto the server name.
Guidelines for the assignment of node IDs:
• 0 is for internal use.
• 1–48 are for clustered data nodes.
• 51–59 are for clustered management nodes.
• 61–69 are for clustered management nodes (a function of base node ID + 10).
• 70–99 are reserved for future use.
• 100–149 are for clustered SBRC nodes.
• 150–255 are reserved for future use.
• 256 and higher are not supported.
NOTE: If striping is enabled, you are restricted to the range 1–N for data node IDs, whereN is the total number of data nodes in the cluster.
Starter Kit Cluster Naming Example
Table 8 on page 34 shows a starter kit cluster naming example. The cluster and node names inTable 8 on page 34 are used in subsequent chapters to create a working cluster example. Becausemultipathing is required, only one IP address is used for eachmachine; in this example, because themultipathaddresses are assigned, each server’s IP address is set to echo each server’s primary node ID number.
NOTE: The node IDs used in Table 8 on page 34 and Figure 10 on page 34, are examples onlyand do not accurately reflect the assignment of node IDs.
33
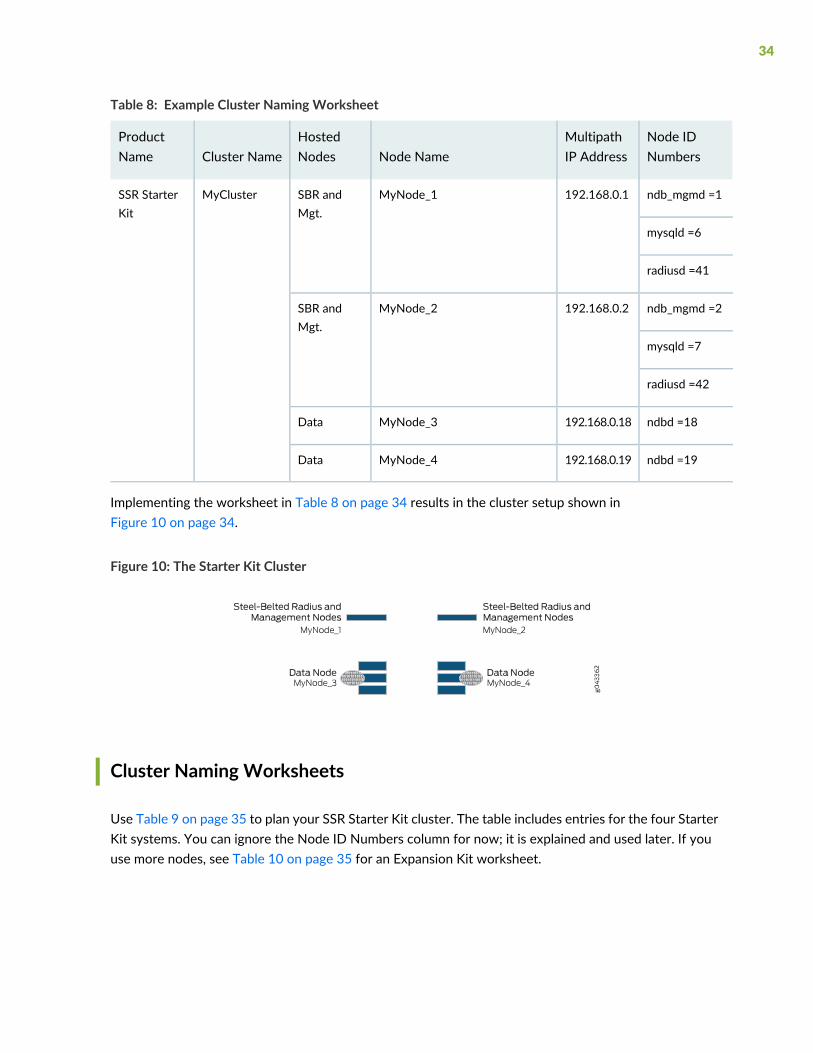
Table 8: Example Cluster Naming Worksheet
Node IDNumbers
MultipathIP AddressNode Name
HostedNodesCluster Name
ProductName
ndb_mgmd =1192.168.0.1MyNode_1SBR andMgt.
MyClusterSSR StarterKit
mysqld =6
radiusd =41
ndb_mgmd =2192.168.0.2MyNode_2SBR andMgt.
mysqld =7
radiusd =42
ndbd =18192.168.0.18MyNode_3Data
ndbd =19192.168.0.19MyNode_4Data
Implementing the worksheet in Table 8 on page 34 results in the cluster setup shown inFigure 10 on page 34.
Figure 10: The Starter Kit Cluster
Cluster Naming Worksheets
Use Table 9 on page 35 to plan your SSR Starter Kit cluster. The table includes entries for the four StarterKit systems. You can ignore the Node ID Numbers column for now; it is explained and used later. If youuse more nodes, see Table 10 on page 35 for an Expansion Kit worksheet.
34

NOTE: The IP address for the SBR node process and management node process in a SM nodemust be the same for both node processes, otherwise the configure script forces the SBR nodeprocess address to the IP address of the management node process.
Table 9: Starter Kit Cluster, Machine, and Interface Naming Worksheet
Node IDNumbers
MultipathIPAddressNode Name
HostedNodesCluster Name
ProductName
ndb_mgmd =. . .SBR and Mgt.SSR StarterKit
mysqld =
radiusd =
ndb_mgmd =. . .SBR and Mgt.
mysqld =
radiusd =
ndbd =. . .Data
ndbd =. . .Data
Expansion Kit and Additional Node Worksheet
You can add two data nodes (a total of four), onemanagement node (a total of three), and up to 18 additionalSBR Carrier nodes (a total of 20) to a cluster. Use the worksheet in Table 10 on page 35 to plan out theaddition of expansion kits and additional nodes.
Table 10: Additional Node Machine, and Interface Naming Worksheet
Node IDNumbers
MultipathIP AddressNode NameNodes
ClusterNameProduct Name
ndbdDataFirst Expansion Kit
ndbdData
35

Table 10: Additional Node Machine, and Interface Naming Worksheet (continued)
Node IDNumbers
MultipathIP AddressNode NameNodes
ClusterNameProduct Name
ndb_mgmdManagementThirdManagementNode
36

Table 10: Additional Node Machine, and Interface Naming Worksheet (continued)
Node IDNumbers
MultipathIP AddressNode NameNodes
ClusterNameProduct Name
SBRAdditional SBRnodes
SBR
SBR
SBR
SBR
SBR
SBR
SBR
SBR
SBR
SBR
SBR
SBR
SBR
SBR
SBR
SBR
SBR
SBR
37

Renaming Node Hosts
If you change the names of any hosts, set the corresponding node names to be the same as the hostnames.You can use the uname -n command to test the hostname.
Configuring Multipathing
To ensure a redundant installation with redundant network interfaces, and to work with the installationscripts, all servers in the cluster need to havemultipathing configured.We recommend static IP addresses.
The general steps required to set up IP multipathing on a Solaris machine are:
1. Ensure that the system detects both network interface cards and they have different MAC addresses.
2. Group the network interface cards.
3. Add a test IP address to the first network interface card.
4. Add a test IP address to the second network interface card.
5. Edit each server’s /etc/hosts file.
6. Change the hostname.* files to keep these settings after a reboot.
BEST PRACTICE: When activating IP multipathing on a server, a total of three IP addresses areused. If the private address space is a Class C space, only 254 usable addresses are usuallyavailable.
To keep the IP address space uncluttered, a convention for IP assignments has evolved—assignthe main failover IP to be in the range 1–54, the first test address 100 higher than the mainaddress, and the second test address 200 higher than the main address. So for a main addressof 192.168.0.41, the first test address is 192.168.0.141 and the second 192.168.0.241.
Create DNS entries for the test addresses although the addresses are not used. The conventionfor this is to use the hostname of the server with -test1 or -test2 appended to the end.
Going back to the sample worksheet (Table 8 on page 34), hostnameMyNode_1 uses amultipathIP of 192.168.0.1 and its interfaces areMyNode_1-test1 at 192.168.0.101 andMyNode_1-test2at 192.168.0.201.
38
CHAPTER 4
Before You Install Software
IN THIS CHAPTER
Reviewing the Release Notes | 39
Determining the Server’s Centralized Configuration Management Role | 40
Selecting an Appropriate Server | 41
Meeting System Requirements | 41
Verifying Root Access | 49
Verifying Network Requirements | 49
Creating Required Users and Groups | 50
Creating Share Directories | 52
Setting Up External Database Connectivity (Optional) | 53
Creating a Copy of Existing SBR Server Release Files for Migration | 54
Installing the SIGTRAN Interface (Optional) | 55
This chapter presents requirements that youmust check and tasks that youmust perform before installingany Steel-Belted Radius (SBR) Carrier software. This chapter and its topics apply to all SBR Carrier servers,both standalone servers and SBR Carrier node hosts in a Session State Register cluster, and to servers ina cluster that do not run SBR Carrier software themselves—management and data node hosts.
These topics are in the chapter:
To understand more about SBR Carrier Licenses, see, Obtaining License Keys. Please refer to the LicensingGuide for general information about License Management. Please refer to the product Data Sheets forfurther details, or contact your Juniper Account Team or Juniper Partner.
Reviewing the Release Notes
The Steel-Belted Radius Carrier Release Notes contain important late-breaking information, such as knownsoftware problems. Please review the release notes deliveredwith your Steel-Belted Radius Carrier softwarebefore you install SBRCarrier to ensure you are informed about important information not found elsewhere.
39

Download the Release Notes from:https://www.juniper.net/documentation/en_US/sbr-carrier8.6.0/information-products/topic-collections/release-notes/sbrc-8.6.0.pdf
Determining the Server’s Centralized Configuration Management Role
Steel-Belted Radius Carrier software includes an optional feature called centralized configurationmanagement (CCM). CCM coordinates Steel-Belted Radius Carrier server settings between a primaryRADIUS server and one or more replica RADIUS servers. It copies critical configuration files from theprimary to the replicas, so it keeps multiple SBR Carrier servers operating the same way.
Althoughwe recommend CCM formultiserver installations, its use is optional. If necessary, an environmentcan contain any number of unique server configurations. A server that does not use CCM is an autonomousserver. In a CCM group one server is the primary server and the others are replicas.
If you are installing in an environment that uses CCM, make sure that the primary server is fully functionalbefore installing any replicas—the replica servers need to communicate with the primary server duringinstallation and when they start to acquire updated configuration files.
TIP: In this context, primary and replica refer to CCM. Primary and replica are used in anothercontext when the topic is data management within a Session State Register cluster. CCM is aseparate tool and process independent of SSR, but it is often used in SSR environments to keepthe SBR Carrier nodes operating identically.
For more information about CCM, see Configuring Replication in the SBR Carrier Administrationand Configuration Guide.
TIP: In the context of datamanagement within a Session State Register cluster, these terms referto the data that data nodes manage. For more information, see “SSR Cluster Concepts andTerminology” on page 10
NOTE: If you are migrating from an earlier SBR release to Release 8.6.0, both servers must bethe same CCM role. For example, a Release 6.1 primary server can be migrated forward to aRelease 8.6.0 primary server. Or an autonomous server can be used to set up a new autonomousserver. But cross-type migration is not supported.
40
Selecting an Appropriate Server
Select a host with these properties to run the Steel-Belted Radius Carrier server software:
• A secure physical location such as a locked server room.
• Root access on the host limited to the system administrator. Restrict login access to the Steel-BeltedRadius Carrier server to system administrators and others who need it. Limit the server to no (or few)user accounts.
• Adequate memory and disk space—See “Meeting System Requirements” on page 41 for informationabout hardware and software requirements.
• Administrative interface not accessible from outside your network. If your Steel-Belted Radius Carrierserver has one network connection, limit access to the ports that it uses for configuration andadministration.
If your Steel-Belted Radius Carrier server has more than one network connection, use an administrativenetwork that is physically separate from other networks to configure and administer the server.
• Does not provide public network services such as FTP or HTTP. Although FTP is often used duringinstallation, disable it afterwards. Turning FTP off both frees some resources and closes a potential entrypoint to malicious attacks. (Steel-Belted Radius Carrier implements its own HTTP service on a differentsocket port than generic web servers use.)
• A shared secret protects all communications to and from the server, including session keys for wirelessdata encryption. Configure shared secrets that are long enough and random enough to resist attack.Avoid using the same shared secret throughout your network.
Specific hardware requirements are discussed in “Meeting System Requirements” on page 41.
Meeting System Requirements
This section describes the hardware and software requirements for running Steel-Belted Radius Carrieron the following server and operating system combinations:
• Oracle Sparc server and Solaris operating system
• x86 server and Linux operating system
Standalone SBR Carrier Server Hardware
These basic specifications may be used for any standalone Steel-Belted Radius Carrier server—one thatdoes not participate in a Session State Register cluster.
41
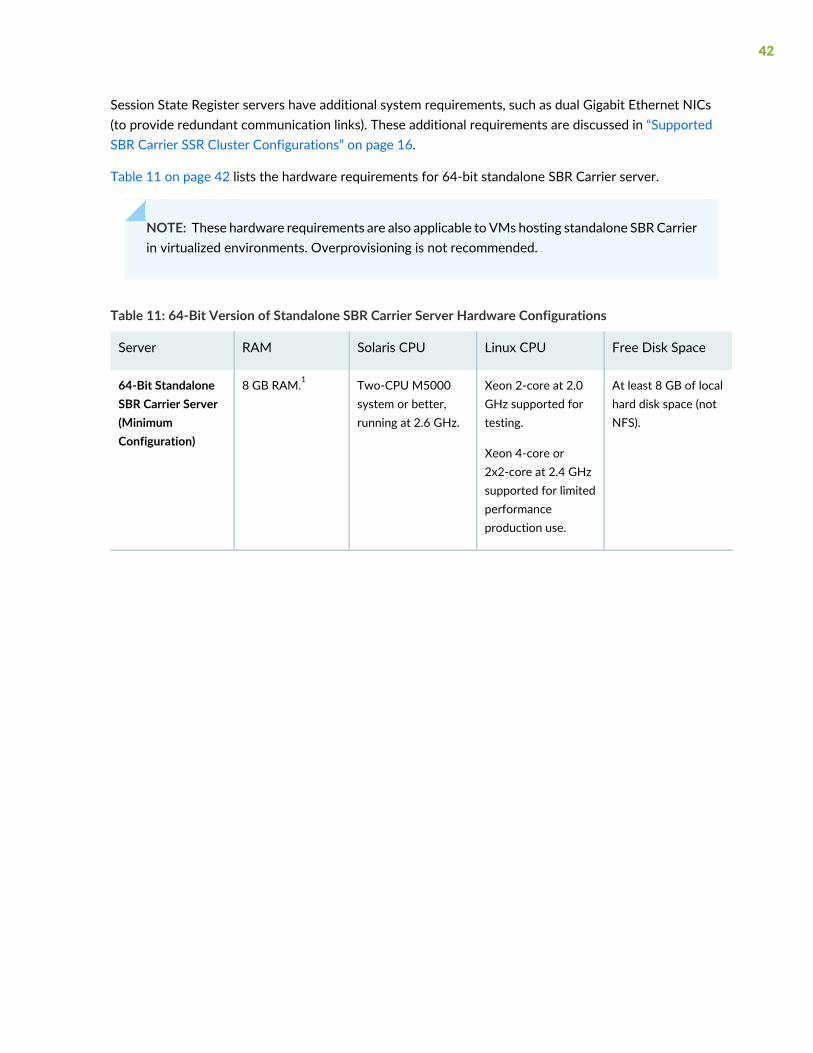
Session State Register servers have additional system requirements, such as dual Gigabit Ethernet NICs(to provide redundant communication links). These additional requirements are discussed in “SupportedSBR Carrier SSR Cluster Configurations” on page 16.
Table 11 on page 42 lists the hardware requirements for 64-bit standalone SBR Carrier server.
NOTE: These hardware requirements are also applicable to VMs hosting standalone SBRCarrierin virtualized environments. Overprovisioning is not recommended.
Table 11: 64-Bit Version of Standalone SBR Carrier Server Hardware Configurations
Free Disk SpaceLinux CPUSolaris CPURAMServer
At least 8 GB of localhard disk space (notNFS).
Xeon 2-core at 2.0GHz supported fortesting.
Xeon 4-core or2x2-core at 2.4 GHzsupported for limitedperformanceproduction use.
Two-CPU M5000system or better,running at 2.6 GHz.
8 GB RAM.164-Bit StandaloneSBR Carrier Server(MinimumConfiguration)
42

Table 11: 64-Bit Version of Standalone SBR Carrier Server Hardware Configurations (continued)
Free Disk SpaceLinux CPUSolaris CPURAMServer
At least 16 GB of localhard disk space (notNFS).
Xeon 2x6-core at 3.6GHz or higher.
Higher core countswith lower processingspeeds may notimprove throughputin certain cases. Seethe Performance,Planning, and TuningGuide for moreinformation.
SPARC T5 or better,running at 3.6 GHz.
16 GB RAM ormore.
If Mitel’sSignalwarecommunicationstack is used, forsystems processingaheavier-than-normalload (for instance,with WiMAX oradditional sessionlicenses), or whenconfiguring a largenumber of threads(for example, toaccommodate highlatency of proxytargets), morememory producesbetterperformance.
64-Bit StandaloneSBR Carrier Server(RecommendedConfiguration)
1. The memory size can be increased based on the subscriber count.
Session State Register Host Hardware
SBR Carrier and Management Node Hosts
Table 12 on page 44 lists the hardware requirements for Session State Register cluster SBR Carrier andmanagement node hosts for 64-bit SBR Carrier server.
43

Table 12: Session State Register SBRC and Management Node Host Hardware Configurations for 64-BitSBR Carrier
NetworkInterfaces
Free DiskSpaceLinux CPU
SolarisCPURAMServer
Two physicalinterfaces on a100 Base-Tnetwork.
Multipathconfiguration isrequired.
At least 8GB of localhard diskspace (notNFS).
Xeon 2-core at 2 GHzsupported for testingand M-only node.
Xeon 4-core or2x2-core supportedfor production for asingle SM node.
SPARC T5or better,running at3.6 GHz.
8 GB RAM.64-Bit SBRCand/orManagementNode Host(MinimumConfiguration)
Two physicalinterfaces on aGigabit Ethernetnetwork.
Multipathconfiguration isrequired.
At least 16GB of localhard diskspace (notNFS).
Xeon 2x4-core at 3.6GHz or higher.
Higher core counts donot improveperformance. See thePerformance, Planning,and Tuning Guide formore information.
SPARC S7or better,running at4.2 GHz.
16 GB RAM or more.
If Mitel’s Signalwarecommunication stack isused, for systemsprocessing aheavier-than-normalload (for instance, withWiMAX or additionalsession licenses), orwhen configuring a largenumber of threads (forexample, toaccommodate highlatency of proxytargets), more memoryproduces betterperformance.
64-Bit SBRCand/orManagementNode Host(RecommendedConfiguration)
Data Node Hosts
Table 13 on page 45 lists the hardware requirements for Session State Register data node hosts.
All data node hosts in a cluster must have the same configuration. Because they collaborate to keep ashared database in virtual shared memory, the processing power, RAM, and communications capability ofall the machines need to be very similar.
NOTE: This free disk space shown in Table 13 on page 45 must be available specifically to the/opt file system for installation of the SSR software.
44
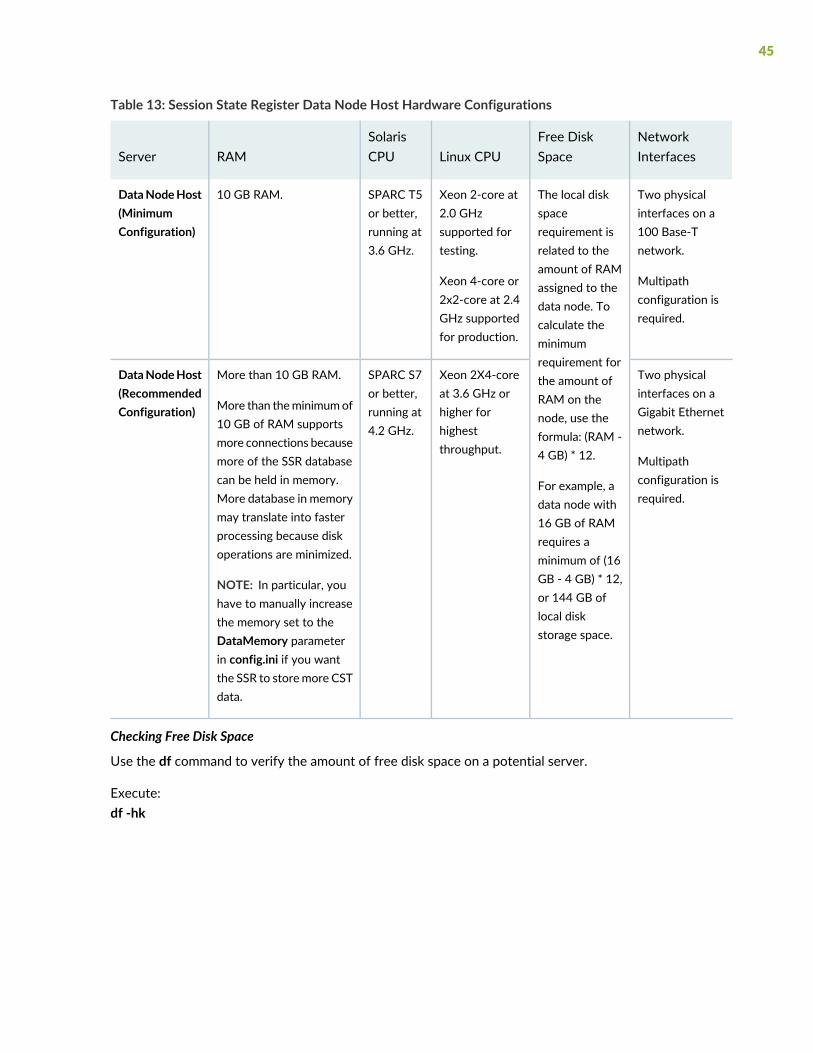
Table 13: Session State Register Data Node Host Hardware Configurations
NetworkInterfaces
Free DiskSpaceLinux CPU
SolarisCPURAMServer
Two physicalinterfaces on a100 Base-Tnetwork.
Multipathconfiguration isrequired.
The local diskspacerequirement isrelated to theamount of RAMassigned to thedata node. Tocalculate theminimumrequirement forthe amount ofRAM on thenode, use theformula: (RAM -4 GB) * 12.
For example, adata node with16 GB of RAMrequires aminimum of (16GB - 4 GB) * 12,or 144 GB oflocal diskstorage space.
Xeon 2-core at2.0 GHzsupported fortesting.
Xeon 4-core or2x2-core at 2.4GHz supportedfor production.
SPARC T5or better,running at3.6 GHz.
10 GB RAM.DataNodeHost(MinimumConfiguration)
Two physicalinterfaces on aGigabit Ethernetnetwork.
Multipathconfiguration isrequired.
Xeon 2X4-coreat 3.6 GHz orhigher forhighestthroughput.
SPARC S7or better,running at4.2 GHz.
More than 10 GB RAM.
More than theminimumof10 GB of RAM supportsmore connections becausemore of the SSR databasecan be held in memory.More database in memorymay translate into fasterprocessing because diskoperations are minimized.
NOTE: In particular, youhave to manually increasethe memory set to theDataMemory parameterin config.ini if you wantthe SSR to storemore CSTdata.
DataNodeHost(RecommendedConfiguration)
Checking Free Disk Space
Use the df command to verify the amount of free disk space on a potential server.
Execute:df -hk
45

Figure 11: Checking Free Disk Space with the df Command
Software
The Steel-Belted Radius Carrier software can be installed on both Solaris and Linux operating systems.
NOTE: You cannot run multiple instances of SBR Carrier on Solaris and Linux platforms.
Make sure that nss-util, nss, nspr, gcc, openldap, Kerberos, cyrus-sasl, and zlib libraries areinstalled on your system before installing the SBR Carrier software. The libraries are normallyavailable and installed with the OS base bundle. SBR Carrier supports the package versions ofpreceding libraries that are provided with Solaris 11.3.36.10.0 or later and RHEL 7.3 or later.
We recommend you to update the OS regularly for security reasons. Any questions concerningvulnerabilities of libraries that are not distributed by Juniper Networks should be addressed tothe OS vendor (Red Hat or Oracle).
46

Solaris
SBRCarrier has been qualified on and supports Oracle Solaris 11.3.36.10, 11.3.36.20, and 11.4.25.0.1.75.3.
NOTE: Because the Signalware communication stack is not supported on Solaris, the SIMauthentication module cannot be used on the Solaris platform to communicate with an HLR toprocess RADIUS requests. However, the module can be used with an HSS by using the RADIUSto Diameter conversion feature.
Special Notes on Solaris Platform Support
You need to consider the following special notes while using SBR Carrier on a Solaris platform:
• To use the command-line tools (snmpget, scriptcheck, ldapsearch, and so on) for 64-bit Solaris, first setthe library path environment variable and then run the command.
To set the library path environment variable for 64-bit Solaris, execute the following strings:
LD_LIBRARY_PATH_64=radiusdir:radiusdir/system/lib/:radiusdir/openldap:/usr/sfw/lib/sparcv9:/usr/lib/mps/sparcv9/:/usr/sbin/lib/sparcv9:/lib/sparcv9:/usr/lib/sparcv9:/usr/openwin/lib/sparcv9:/usr/dt/lib/sparcv9:/usr/proc/lib:/usr/local/lib/sparcv9:/opt/sfw/lib/sparcv9:/usr/ccs/lib/sparcv9:/usr/ucblib/sparcv9:
Linux
SBR Carrier supports Red Hat Enterprise Linux 7.3, 7.4, 7.5, 7.6, 7.7, 7.8, and 8.1 on Intel (Xeon) hardware.
NOTE: SBR Carrier does not support RHEL 6.x, 7.0, 7.1, and 7.2.
By default, SCTP module is blacklisted in RHEL8. Refer the Blacklisting SCTP module by defaultin RHEL 8 section of the RHEL8 release notes to enable the SCTP module for Diameter Feature.
The SBR standalone and cluster configurations are supported on the 64-bit version of Linux operatingsystem.
NOTE: SBR automatically updates the required shared packages from the Red Hat repository.A current RedHat Enterprise Linux support subscription and an access to the RedHat repositoryor a local repository are required to get the latest updates to shared packages. See the appropriateRed Hat administration manuals for more information.
47

Special Notes on Linux Platform Support
You need to consider the following special notes while using SBR Carrier on a Linux platform.
• The authGateway and GWrelay processes must be restarted whenever SBR restarts. This is applicableonly on Linux.
• SBR installation depends on the binary calculator (bc) command-line tool because theAddPools.sh scriptfails to run if the “bc” tool is not installed.
Table 14 on page 48 lists the features that are limited to support on specific operating systems.
Table 14: Features and Their Supported OS
VM Support?64-bit Solaris Support?64-bit Linux Support?Feature
YesYesYesauthGateway application
YesYesYesSIM authenticationmoduleand GWrelay application
No*YesYesSSR cluster
YesYesYesCustomer-written SDKplug-ins
*SSR cluster in virtualized environments is not officially supported. Juniper Networks may still providesupport for known issues and for those where you can demonstrate the issue exists on the native OS.
Subject to the preceding limitation, SBR Carrier supports virtualization on Linux, VMware hypervisor,Kernel-based Virtual Machine (KVM) hypervisor, and logical domains on Solaris. SBR Carrier has beentested with VMware ESXi 5.1, 5.5, 6.0, and 6.5 versions and KVM hypervisor on a RHEL 7.3 machine. Formore information on planning and tuning the performance of SBR Carrier running on the Linux and Solarisoperating systems, see the Performance, Planning, and Tuning Guide.
Perl
Oracle Solaris 11 is shipped with Perl 5.12.5, and Steel-Belted Radius Carrier has been tested with thisversion.Multiple Perl installations in discrete directories are supported, but attempting to use other versionsof Perl with SBR Carrier may cause problems.
After installation, be sure that the first line of the radiusd script specifies the correct path to the Perl 5.12.5executable. For example, if Perl 5.12.5 is installed in the default location, /usr/bin/perl, then the first lineof the radiusd script must be:
#!/usr/bin/perl
48

LDAP Plug-in
The LDAP plug-in requires SASL, which is included with the SBR Carrier package only for Solaris versionsand not for Linux versions. For a Linuxmachine, youmust ensure that you have the SASL package installedbefore starting SBR.
Verifying Root Access
You must have access to the root account on all machines to install Steel-Belted Radius Carrier software.
Verifying Network Requirements
Basic network connectivity is required to complete the tasks in this chapter. Although it is not a strictrequirement, we recommend that a production site use separate networks for RADIUS traffic, SBRadministration and SNMP, and SSR traffic.
Verifying Network Connectivity
Use the ping command both to and from another computer to verify that the server on which you aregoing to install Steel-Belted Radius Carrier can communicate with other devices, such as remote accessservers, database servers, DHCP servers, DNS servers, and management workstations on your network,using TCP/IP.
• If you are going to use CCM, make sure that the primary server and all replica servers can communicatewith each other.
• If you are going to use Session State Register, make sure that all node hosts can communicate with allother node hosts.
For example:
ping 192.168.12.54
Reply from 192.168.12.54: bytes=32 time=7ms TTL=255
Reply from 192.168.12.54: bytes=32 time=7ms TTL=255
Reply from 192.168.12.54: bytes=32 time=7ms TTL=255
Reply from 192.168.12.54: bytes=32 time=7ms TTL=255
49

If the ping command fails, verify that the IP address of the Steel-Belted Radius Carrier host is correct, thatis operational, and that all routers between your server and the remote host are operational.
Verifying Hostname Resolution
The server on which you are going to install Steel-Belted Radius Carrier must have a stable, accessible IPaddress that is mapped in /etc/hosts or the Domain Name System (DNS) server to a resolvable hostname.
NOTE: If you are using installing Session State Register hosts, which must have two networkinterface cards to provide redundant communications, be sure to test both unless multipathinghas already been set up.
To verify that the server has a resolvable hostname, use the ping command with the server’s hostname.For example:
ping foo.juniper.net
Pinging foo.juniper.net [192.168.12.21] with 32 bytes of data:
Reply from 192.168.12.21: bytes=32 time=7ms TTL=255
Reply from 192.168.12.21: bytes=32 time=7ms TTL=255
Reply from 192.168.12.21: bytes=32 time=7ms TTL=255
Reply from 192.168.12.21: bytes=32 time=7ms TTL=255
Creating Required Users and Groups
All Steel-Belted Radius Carrier servers and all nodes in a Session State Register cluster require a hadmuser account that is part of the hadmg group.
NOTE: Make sure the hadm user id and hadmg group id are the same on all machines in thecluster.
• Ensure the home directory for the hadm user is /opt/JNPRhadm
• Ensure the shell is /bin/bash.
To determine whether a hadm user account and hadmg group already exist on the server:
50

1. As root, execute getent group hadmg and look for a hadmg listing.
Execute:getent group hadmg
If the group exists, a message similar to this example is displayed:
root@crispix:/opt> getent group hadmg
hadmg::65536:
If the group exists, and was used for a purpose other than SBR Carrier, or if the group ID number isnot the one you intend to use, then you need to terminate all references to the group (which is beyondthe scope of this document), and delete the group so that it can be re-created and reassigned to SBRCarrier. If the group ID number is correct, then you do not need to delete the group.
Execute:groupdel hadmg
2. As root, execute getent passwd hadm and look for a hadm listing.
Execute:getent passwd hadm
If the hadm user exists, a message similar to this example is displayed:
root@crispix:/opt> getent passwd hadm
hadm:x:16761:65536:SBR software:/opt/JNPRhadm:/bin/bash
If the hadm user exists and was used for a purpose other than SBR Carrier, or if the user ID number isnot the one you intend to use, then you need to terminate all references to the user (which is beyondthe scope of this document), and delete the user so that it can be re-created and reassigned to SBRCarrier. If the user ID number is correct, then you do not need to delete the user. In any case, be sureto back up the existing home directory first, for example, by renaming it.
Execute:mv /opt/hadm /opt/hadm.oldanduserdel hadm
3. Verify that hadm and hadmg have read and write permissions to the /tmp directory.
If the hadm user account and hadmg group do not already exist on the server:
51

1. Create the hadm account and hadmg group.
a. As root, create the hadmg group account with the intended group ID number. According to Solarisconvention, specify a group ID number in the range 100–65535 inclusive; for example, 7772.
Execute:groupadd -g 7772 hadmg
b. Create the hadm user account with the intended user ID number and hadmg as the primary groupaccount. According to Solaris convention, specify a user ID number in the range 100–65535 inclusive;for example, 9969.
Execute (all on one line):useradd -u 9969 -g 7772 -c "SBR Software" -d /opt/JNPRhadm -s /bin/bash hadm
c. Confirm that the group and user were created.
Execute:getent passwd hadmgetent group hadmg
d. Set the hadm user account password.
Execute:passwd hadm
The hadm home directory is created by the configure script in a later task.
2. Verify that hadm and hadmg have read and write permissions to the /tmp directory.
Creating Share Directories
A share directory containing some subdirectories can be used to distribute master files between likemachines. If you choose to create a share directory, it is used among different nodes in the cluster, and totransfer configuration files from previous releases of SBR server.
To create the share directories:
1. As root, create the share directory.
Execute:mkdir -p /opt/JNPRsharechmod 775 /opt/JNPRshare
2. Assign the ownership to root and hadmg.
Execute:chown root:hadmg /opt/JNPRshare
52
3. Move to the share directory.
Execute:cd /opt/JNPRshare
4. Create an /install subdirectory.
Execute:mkdir -p installchmod 775 install
5. Assign the ownership to hadm and hadmg.
Execute:chown hadm:hadmg install
6. Move to the /install directory.
Execute:cd install
7. Create a hostname-specific or SSR cluster-specific subdirectory.
Execute:mkdir -p < hostname >|< cluster-name >chmod 775 < hostname >|< cluster-name >
• If you are installing on a machine to be a standalone SBR Carrier server, use the machine’s hostname.
• If you are installing on a machine to be part of a Session State Register cluster, use the cluster name.If you are not sure what it is, see “Naming the Cluster and Its Machines” on page 32.
8. Assign the ownership to hadm and hadmg.
Execute:chown hadm:hadmg < hostname > or < cluster-name >, whichever you used.
Setting Up External Database Connectivity (Optional)
If the Steel-Belted Radius Carrier server or hosts support use an external database for authentication,verify that it is a supported database, and if necessary, set up the server:
• On a Solaris machine, Oracle 10, 11, and 12 are supported; versions 10.2.0, 11.2.0, and 12.1.0.2 arerecommended.
On a Linux machine, Oracle 11 and 12 are supported; versions 11.2.0 and 12.2.0 are recommended.
The SBR Carrier server must be configured as a client of the Oracle server before installing SBR Carrier,and the Oracle server location is used during installation.
53

Follow the directions in the Oracle documentation to install and configure the client, and record thisinformation to use while installing SBR Carrier software:
1. Record the path to the local Oracle Home directory (for example:/opt/10g/app/oracle/product/10.2.0.3)
2. Record the path to the local Oracle shared library (for example:/opt/10g/app/oracle/product/10.2.0.3/lib)
3. Record the path to the local TNS_ADMIN (for example:/opt/10g/app/oracle/product/10.2.0.3/network/admin)
• The JDBC plug-in has been tested with Oracle on Solaris and the JDBC plug-in for MySQL.
Creating a Copy of Existing SBR Server Release Files for Migration
If you are already operating standalone servers that run SBR Carrier Release 6.0, Release 6.1, or Release7.0, and you want to carry the existing configuration forward during the Release 8.6.0 installation, youneed to transfer a copy of the existing installation to the machine that you want to host SBR Carrier. Thisis a non-functional copy that the installation scripts can access in order to selectively import someconfiguration files. The exact files that can be reused vary from release to release. For details on standalonemigration, see “Migrating from Previous SBR Releases” on page 56.
To create a copy:
1. As root on the existing server, shut down the SBR daemon.
Execute:/radiusdir /sbrd stop.
2. Create a gzip archive of the old radiusdir directory, preserving the file structure.
Change directories to /opt/JNPRsbr/ and execute:tar cfE - radius |gzip > radius.tgz
3. As root on the Release 8.6.0 server or host, create a working directory for the archive:
Execute:mkdir -p /opt/JNPRsbr/PreviousInstall
and:
cd /opt/JNPRsbr/PreviousInstall
54
NOTE: If you are using CCM, remember that you can onlymigrate server configurations betweenmachines of the same type—primary to primary and replica to replica. So if you are migratingboth a primary server and one or more replicas, you need to create a backup directory for eachbecause they contain different types of information.
• The backup of the primary is used when you install the new primary server
• The backup of the replica is used when you install the new replicas.
4. Copy the archive file to the appropriate Release 8.6.0 host.
5. Gunzip the archive in the working directory. This does not create a working installation, but serves asa source of files that can be reused by the Release 8.6.0 server.
Execute:gunzip radius.tgz |tar xf -
6. Check the file permissions on the unzipped archive to ensure that the files are writable.
Remember the path to the archive directory. During installation, the Release 8.6.0 installation script promptsyou to supply the location so some configuration files can be migrated into the new installation.
Installing the SIGTRAN Interface (Optional)
If the SIM authentication plug-in is used, Signalware 9 with Service Pack 6.C needs to be installed in theserver before you install SBR Carrier software.
See “SIGTRAN Support for Steel-Belted Radius Carrier” on page 309 for information and procedures toinstall and configure Signalware configuration files to support SBR Carrier.
55

CHAPTER 5
Migrating from Previous SBR Releases
IN THIS CHAPTER
Migration Overview | 56
Files from Earlier Releases That Require Manual Editing | 58
Migrating from SBR Release 6.X | 59
Migrating from SBR Carrier Release 7.0 | 59
Migrating from SBR Carrier Release 7.4.0 | 60
Migration and New Installations of SBR Carrier with WiMAX | 60
Historic Files | 61
This chapter documents the general—and optional—procedure tomigrate configuration files from previousSBR releases into a Steel-Belted Radius Carrier Release environment. This chapter applies only to standaloneservers, not to servers in a Session State Register environment and only if you imported configuration filesfrom a previous release during installation (discussed in “Running the Steel-Belted Radius Carrier ConfigureScript” on page 68).
This chapter contains these topics:
Migration Overview
You can use the configuration script to move a number of files from selected previous releases from theold platform into the new Release environment when installing Steel-Belted Radius Carrier. Thecorresponding Release files are also loaded on the system, but are not activated. You are responsible formerging new settings fromRelease configuration files into theworking (old) configuration files. To supportnew features, SBR Carrier uses default values for any new settings that have not been merged into theworking configuration files.
NOTE: During migration the logs are written to the configure.log file.
56
Supported Releases
Configuration files from these releases of SBR server installations may be carried forward into Release8.6.0:
• SBR Release 6.0 and Release 6.1
• SBR Carrier Release 7.x.x
• SBR Carrier Release 8.0.0, 8.1.0, 8.2.0, 8.3.0, 8.4.0, 8.4.1, and 8.5.0
Files That May Be Migrated
Depending upon the source release, there may be some limitations or recommendations on copying andmerging certain other binaries, configuration files, and data. These restrictions are listed in therelease-specific sections that follow. In most cases, though, files of these types are rolled forward by theconfigure script:
• *.acc
• *.att
• *.aut
• *.conf
• *.ctrl
• *.dat
• *.dci (See “Manual Migration of Dictionaries” on page 59.)
• *.dcm (See “Manual Migration of Dictionaries” on page 59.)
• *.dct (See “Manual Migration of Dictionaries” on page 59.)
• *.dhc
• *.dic (See “Manual Migration of Dictionaries” on page 59.)
• *.dir
• *.eap
• *.gen
• *.ini
• *.jsi
• *.pro
• *.rr
• radiusdata.*
57

• sbr_id.xml
• *.ses
• vista.*
These subdirectories are also rolled forward:
• SBR JavaScripts in the scripts subdirectory
Files from Earlier Releases That Require Manual Editing
Files listed in this section may require special handling during the migration process.
Manual Migration of XML Configurations
You must manually move existing settings into the corresponding XML files that are delivered in the newSteel-Belted Radius Carrier software installation.
CAUTION: Do not modify any *.xml files except these four:
• /radius/sbr_administration.xml—Socket port number specified by port= setting
• /radius/sbr_ccm.xml—Socket port numbers specified by port= settings
• /radius/sbr_id.xml—Hostname specified by id= setting
• radius/system/config/logging_mgr.xml—LogStream events= settings
• radius/snmp/conf/events.xml—Dilution factor specified by dilutionFactor= setting
The IP addresses, hostnames, socket port numbers, and other similar data entries found in these files oftenhave corresponding parameters in the radius.ini file, which must be kept in agreement.
Manual Migration of ROOT Certificates
The storage of root certificates is managed by the Steel-Belted Radius Carrier server. You use the WebGUI to add and delete root certificates. You must manually migrate root certificates, using the Web GUIto add them from the old root directory.
58

Manual Migration of Dictionaries
If you have stored any modified or third-party dictionary files (*.dci, *.dcm, *.dct, and *.dic) in the /radiusdirectory, you must manually migrate these either by merging each of the modifications with thecorresponding files that are shipped with the new Steel-Belted Radius Carrier software, or by copying thethird-party dictionary files to the new /radius directory.
If you are using the optionalWiMAXmobility module, check the vendor.ini file to confirm that theWiMAXvendor ID is defined. If the field is blank, restore a file from the /install/backup/<time-stamp> directory.
Manual Migration of Third-Party Plug-ins and Other Binaries
If you have stored any third-party plug-ins (*.so) or other binaries in the old release’s radiusdir directory,then you must manually migrate them by copying the files to the new radiusdir.
Manual Migration of SNMP Files
We recommend that you not attempt to migrate a previous release’s SNMP configuration, except if youhave stored any modified or third party MIB files in the old server’s radius/snmp/mibs directory. Migratethese files manually by copying them to the new server.
Migrating from SBR Release 6.X
No files from SBR Release 6.X require special handling.
Migrating from SBR Carrier Release 7.0
The only files that require special handling when migrating from SBR Carrier Release 7.0 to SBR CarrierRelease are the files associated with storing CDR records when running in standalone mode.
In SBR Carrier Release 7.0, the settings for storing CDR records in a remote LDAP server were configuredin the ss7ldapdb.gen file. When running SBR Carrier Release in standalone mode, these settings areconfigured in the ss7db.gen file. When migrating from Release 7.0 to Release, you need to move thesesettings from the ss7ldapdb.gen file to the ss7db.gen file.
59

Migrating from SBR Carrier Release 7.4.0
SBR Carrier Release 7.4.0 uses the latest version of the RAIMA RDM Embedded Database. The RAIMARDM Embedded database is upgraded from RDME version 7.0 to 11.0 when running the configure script.
NOTE: The RAIMA RDM Embedded database upgraded to the new version 11.0 cannot bedowngraded to the old version. Make sure that the old version of the database is backed up.The following files must be backed up:
• radiusdata.dbd
• radiusdata.d01
• radiusdata.d02
• radiusdata.d03
• radiusdata.k02
• radiusdata.k01
• vista.taf
Migration and New Installations of SBR Carrier with WiMAX
Previous releases of SBRCarrier introduced improvements in theWiMAX processing software. This changeimproves both performance and scalability. The improvements include different logic for assigning primarykeys to WiMAX tables and for generating the Class attribute in the Access-Accept response. To controlthese improvements, a new parameter, EnableWiMAXUniqueSessionIdFromNAI, has been added to theradius.ini file.
NOTE: When the EnableWiMAXUniqueSessionIdFromNAI parameter is enabled, new sessionrecords in the database and the Class attribute in Access-Accept messages are incompatiblewith the WiMAX logic in previous releases of SBR Carrier. For this reason, this parameter isdisabled by default.
For new installations of SBR Carrier software running the optional WiMAX module, we recommend thatyou enable this parameter as part of your installation procedure. It must be enabled on all SBR Carrierservers in your network.
60
If you are currently running a previous release of SBR Carrier and using WiMAX, the newWiMAX logic isbackward compatible with the previously released WiMAX logic; that is, it understands the older sessionrecords and Class attributes. However, the older WiMAX logic does not comprehend the new sessionrecords or Class attribute in the Access-Accept messages. Due to this incompatibility, when you havemultiple SBR Carrier servers in your network, you need to upgrade each server before enabling theEnableWiMAXUniqueSessionIdFromNAI parameter.
NOTE: If you are running the Session State Register (High Availability) cluster, this upgrade doesnot require any changes to the session database schema, and does not require any stopping orstarting of nodes in the cluster. Therefore, it is nondisruptive.
For networks running multiple SBR Carrier servers, follow this procedure to upgrade:
NOTE: Upgrading the SBR Carrier software does not interrupt service.
1. Upgrade the first server with the latest SBR Carrier release software. Do not enable theEnableWiMAXUniqueSessionIdFromNAI parameter.
2. Upgrade the next server with the latest SBR Carrier release software. Do not enable theEnableWiMAXUniqueSessionIdFromNAI parameter.
3. Repeat until all servers are running the latest SBR Carrier release software.
At this point, all servers are running the latest SBR Carrier release software, but theEnableWiMAXUniqueSessionIdFromNAI parameter is disabled on all servers. The next step is to enablethe EnableWiMAXUniqueSessionIdFromNAI parameter on all servers one by one.
1. Select the first server.
2. Edit the [Configuration] section of the radius.ini file and set EnableWiMAXUniqueSessionIdFromNAI=1.
3. Restart the server (sbrd restart). (The EnableWiMAXUniqueSessionIdFromNAI parameter is not updatedon receipt of a HUP.)
After the server is back up, repeat this process on each and every server in the network one by one.
Historic Files
When Steel-Belted Radius Carrier Release is installed and a previous release’s files are migrated forward,the Release installation script creates another copy of some critical older files in the /radius/install/backups
61

directory. The data files in Table 15 on page 62 record version and other operating information that isused by subsequent installations.
CAUTION: Do not move, rename, or otherwise modify these files.
Table 15: Historic Files and Directories
FunctionFile
Contains a unique package identifier.radius/install/package.dat
Contains the absolute path name of the backup directory foryour old Steel-Belted Radius Carrier software and configurationfiles (pre-installation backup).
radius/install/preinstall.dat
Contains the absolute path name of the backup directory foryour Steel-Belted Radius Carrier software and configurationfiles, as shippedwithout modification (post-installation backup).
radius/install/install.dat
Contains the absolute place name of the Steel-Belted RadiusCarrier migrate source, if any exist.
radius/install/update.dat
Contains configuration state data.radius/install/configure.dat
Contains the absolute place name of the backup directory foryour Steel-Belted Radius Carrier software and workingconfiguration files (pre-uninstall backup).
radius/install/uninstall.dat
Contains the backups referenced by the .dat files.radius/install/backups/
62
3PART
Installing and Configuring a SBR CarrierStandalone Server
Installation and Basic Configuration of a SBR Carrier Standalone Server | 64

CHAPTER 6
Installation and Basic Configuration of a SBR CarrierStandalone Server
IN THIS CHAPTER
Unpacking the Steel-Belted Radius Carrier Software | 64
Running the Steel-Belted Radius Carrier Configure Script | 68
Starting and Stopping a Standalone Steel-Belted Radius Carrier Server | 77
Basic SBR Carrier Configuration | 84
Configuring the CST for a Standalone Server | 88
This chapter describes how to run the configure script that installs Steel-Belted Radius Carrier softwareon a standalone server, and the basic information about setting up a new Steel-Belted Radius Carrierserver.
These topics are in the chapter:
Unpacking the Steel-Belted Radius Carrier Software
You need to perform this task on each standalone server.
Package Management Commands
The installer for the Solaris version of the Steel-Belted Radius Carrier server software uses pkgadd files,which have filenames that include the edition and version of the server software.
Table 16 on page 64 lists common Solaris package management commands.
Table 16: Useful Package Management Commands
FunctionCommand
Report any pre-existing packages andpatches.
pkginfo -x |egrep “JNPR”
64
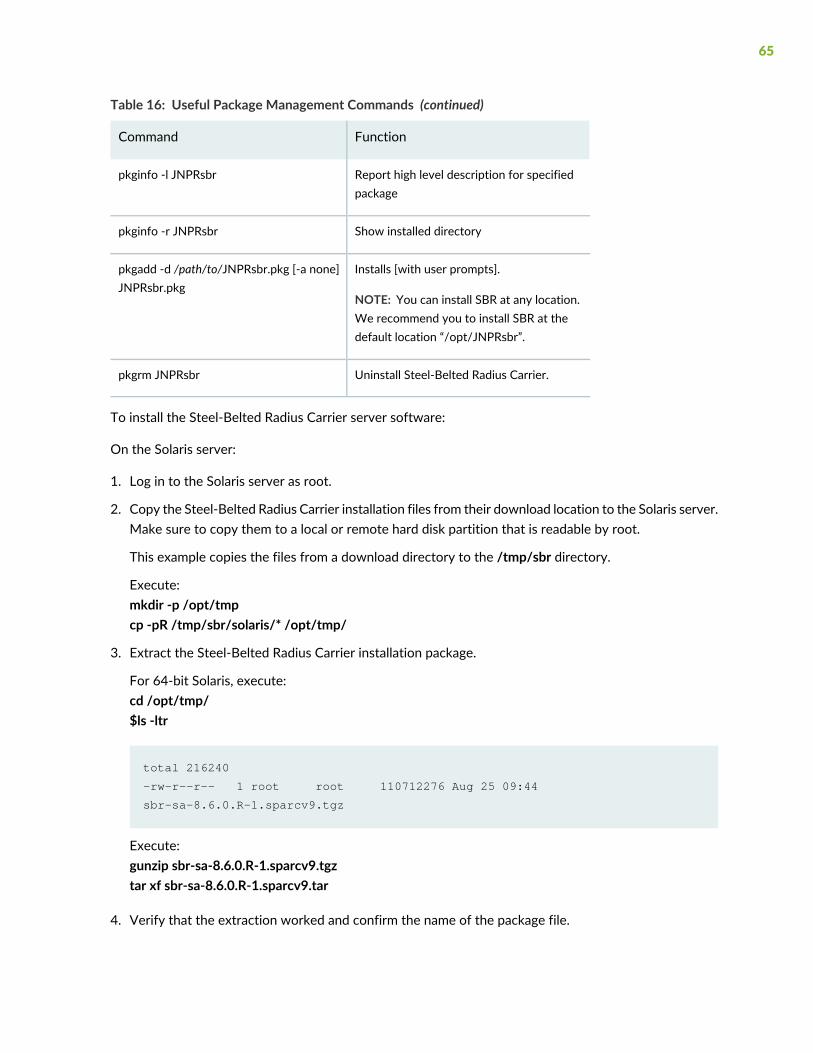
Table 16: Useful Package Management Commands (continued)
FunctionCommand
Report high level description for specifiedpackage
pkginfo -l JNPRsbr
Show installed directorypkginfo -r JNPRsbr
Installs [with user prompts].
NOTE: You can install SBR at any location.We recommend you to install SBR at thedefault location “/opt/JNPRsbr”.
pkgadd -d /path/to/JNPRsbr.pkg [-a none]JNPRsbr.pkg
Uninstall Steel-Belted Radius Carrier.pkgrm JNPRsbr
To install the Steel-Belted Radius Carrier server software:
On the Solaris server:
1. Log in to the Solaris server as root.
2. Copy the Steel-Belted Radius Carrier installation files from their download location to the Solaris server.Make sure to copy them to a local or remote hard disk partition that is readable by root.
This example copies the files from a download directory to the /tmp/sbr directory.
Execute:mkdir -p /opt/tmpcp -pR /tmp/sbr/solaris/* /opt/tmp/
3. Extract the Steel-Belted Radius Carrier installation package.
For 64-bit Solaris, execute:cd /opt/tmp/$ls -ltr
total 216240
-rw-r--r-- 1 root root 110712276 Aug 25 09:44
sbr-sa-8.6.0.R-1.sparcv9.tgz
Execute:gunzip sbr-sa-8.6.0.R-1.sparcv9.tgztar xf sbr-sa-8.6.0.R-1.sparcv9.tar
4. Verify that the extraction worked and confirm the name of the package file.
65
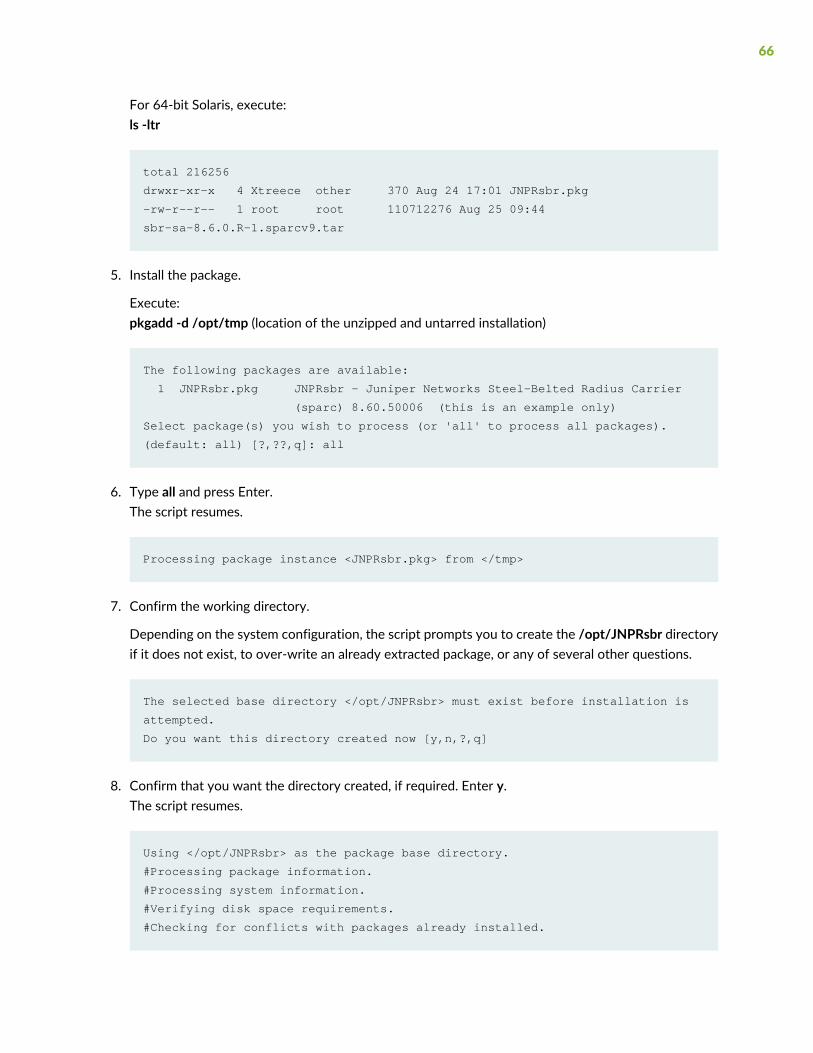
For 64-bit Solaris, execute:ls -ltr
total 216256
drwxr-xr-x 4 Xtreece other 370 Aug 24 17:01 JNPRsbr.pkg
-rw-r--r-- 1 root root 110712276 Aug 25 09:44
sbr-sa-8.6.0.R-1.sparcv9.tar
5. Install the package.
Execute:pkgadd -d /opt/tmp (location of the unzipped and untarred installation)
The following packages are available:
1 JNPRsbr.pkg JNPRsbr - Juniper Networks Steel-Belted Radius Carrier
(sparc) 8.60.50006 (this is an example only)
Select package(s) you wish to process (or 'all' to process all packages).
(default: all) [?,??,q]: all
6. Type all and press Enter.The script resumes.
Processing package instance <JNPRsbr.pkg> from </tmp>
7. Confirm the working directory.
Depending on the system configuration, the script prompts you to create the /opt/JNPRsbr directoryif it does not exist, to over-write an already extracted package, or any of several other questions.
The selected base directory </opt/JNPRsbr> must exist before installation is
attempted.
Do you want this directory created now [y,n,?,q]
8. Confirm that you want the directory created, if required. Enter y.The script resumes.
Using </opt/JNPRsbr> as the package base directory.
#Processing package information.
#Processing system information.
#Verifying disk space requirements.
#Checking for conflicts with packages already installed.
66

#Checking for setuid/setgid programs.
This package contains scripts which will be executed with super-user
permission during the process of installing this package.
Do you want to continue with the installation of <JNPRsbr> [y,n,?]
9. Confirm that you want to continue to install the package. Enter yThe script resumes.
Installing JNPRsbr - Juniper Networks Steel-Belted Radius (Carrier) as <JNPRsbr>
#Executing preinstall script.
#Installing part 1 of 1.
/opt/JNPRsbr/radius/3GPP.dct
/opt/JNPRsbr/radius/3GPP2.dct
/opt/JNPRsbr/radius/3comsw.dct
/opt/JNPRsbr/radius/3gpp.ini
....
/opt/JNPRsbr/radius/wimaxAttributeProcessor.ctrl
/opt/JNPRsbr/radius/wimaxAttributeProcessor.so
/opt/JNPRsbr/radius/xylan.dct
[ verifying class <none> ]
#Executing postinstall script.
Newly installed server directory will be backed up as:
/opt/JNPRsbr/radius/install/backups/2009:08:25-09:47:28
Installation of <JNPRsbr> was successful.
On the Linux server:
1. Log in to the Linux server as root.
2. Copy the Steel-Belted Radius Carrier installation files from their download location to the Linux server.Make sure to copy them to a local or remote hard disk partition that is readable by root.
This example copies the files from a download directory to the /tmp/sbr directory.
Execute:mkdir -p /opt/tmpcp -pR /tmp/sbr/linux/* /opt/tmp/
3. Execute cd /opt/tmp/.
4. Install the package.
To install the 64-bit SBR package, execute:
yum localinstall sbr-sa-8.6.0.R-1.el7.x86_64.rpm on RHEL 7.3 or later.
67

See “Linux” on page 47 for supported RHEL versions.
5. Installation proceeds and SBR is installed at /opt/JNPRsbr/radius/install.
Running the Steel-Belted Radius Carrier Configure Script
1. Navigate to the directory where you installed the Steel-Belted Radius Carrier package(/opt/JNPRsbr/radius/install).
cd /opt/JNPRsbr/radius/install
2. Execute the configure script to install the Steel-Belted Radius Carrier server software:
./configure
3. Review and accept the Steel-Belted Radius Carrier license agreement.
Press the spacebar to move from one page to the next. When you are prompted to accept the termsof the license agreement, enter y.
Do you accept the terms in the license agreement? [n]y
4. Enter the license key or keys that you collected in the preparatory step Obtaining License Keys. Thenpress Enter.
The configure script creates a license file that contains the key on the server for your Steel-BeltedRadius Carrier software.
---------------------------------------------------------------------------
SBR 8.60.50006
on SunOS 5.10 Generic_141444-09 node sbrha-10.spgma.juniper.net
---------------------------------------------------------------------------
Enter SBR licenses meant only for this particular SBR node.
Enter one license per line and an empty line when finished.
Enter SBR full license: xxxx xxxx xxxx xxxx
Enter SBR feature license:
68

5. The script warns that you are changing the server configuration and prompts you to continue. Enter yto continue.
Generating configuration files
WARNING: You are about to make irreversible changes to this node.
Are you sure that you wish to continue? (y,n): y
Migration6. The script prompts for the type of installation, either a new installation or a migration from an earlierrelease:
Please enter backup or radius directory from which to migrate.
Enter n for new configuration, s to search, or q to quit
[n]: n
• For a new installation, enter n.
• If you are migrating an existing Steel-Belted Radius Carrier installation and have copied a previousrelease’s files to the Release 8.6.0 server (in “Creating a Copy of Existing SBR Server Release Filesfor Migration” on page 54), enter the directory path to the copy of the old installation.
For example:
[/opt/JNPRsbr/PreviousInstall]:
• If you are migrating an existing Steel-Belted Radius Carrier installation and have copied a previousrelease’s files to the Release 8.6.0 server (in “Creating a Copy of Existing SBR Server Release Filesfor Migration” on page 54), but you need to search for the directory that contains the Steel-BeltedRadius Carrier files, enter s.
NOTE: Steel-Belted Radius Carrier Release 8.6.0 supports importing configuration files fromprevious versions of SBR Carrier.
If you select this option, remember that some files require manual editing and updating afterinstallation. See “Migrating from Previous SBR Releases” on page 56.
7. Specifywhether youwant to use the JRE installed in your system to enable JDBC plug-ins and JavaScriptimplementation.
69

Do you want to configure Java Runtime Environment for JDBC Feature [n] :
• If no, press Enter to proceed to the next prompt. SBR Carrier does not support JDBC plug-ins unlessyou specify a valid JRE path.
• If yes, type y and press Enter. You are prompted to specify the path where the JRE is installed in yoursystem. The Java Virtual Machine (JVM) architecture should be compatible with SBR Carrier.
NOTE: Java 1.8.0 or a later version is required to access the Web GUI. To support bothJDBC plug-ins and Web GUI, it is recommended to use Java 1.8.0 or a later version withthe JVM architecture compatible with your SBR Carrier. For example, if you are using the64-bit version of SBR Carrier, you must use the 64-bit version of Java 1.8.0 or later.
Enter 64-bit libjvm.so path (Ex: /opt/jvm/jre/lib/amd64/server/ ) :
NOTE: If you enter an incorrect JVM path three times, SBR Carrier proceeds to the nextstep. In this case, you will not be able to use JDBC plug-ins. To specify the valid JVM path,you need to run the configure script again.
8. Supply the name of the initial admin user, root.
Enter initial admin user (UNIX account must have a valid password) [root]:
Press Enter to accept the default, root.
9. Specify whether you want to set up centralized configuration management (CCM).
Enable Centralized Configuration Management (CCM) for this SBR node? [n]: y
10.If you have enabled CCM, specify the server role.
Configure SBR node as CCM primary (p) or replica (r)? [r]: p
a. If no other servers have been installed with CCM enabled, this is the first server to be installed, andCCM is used, this server must be the primary. Enter p to set the role as primary.
70
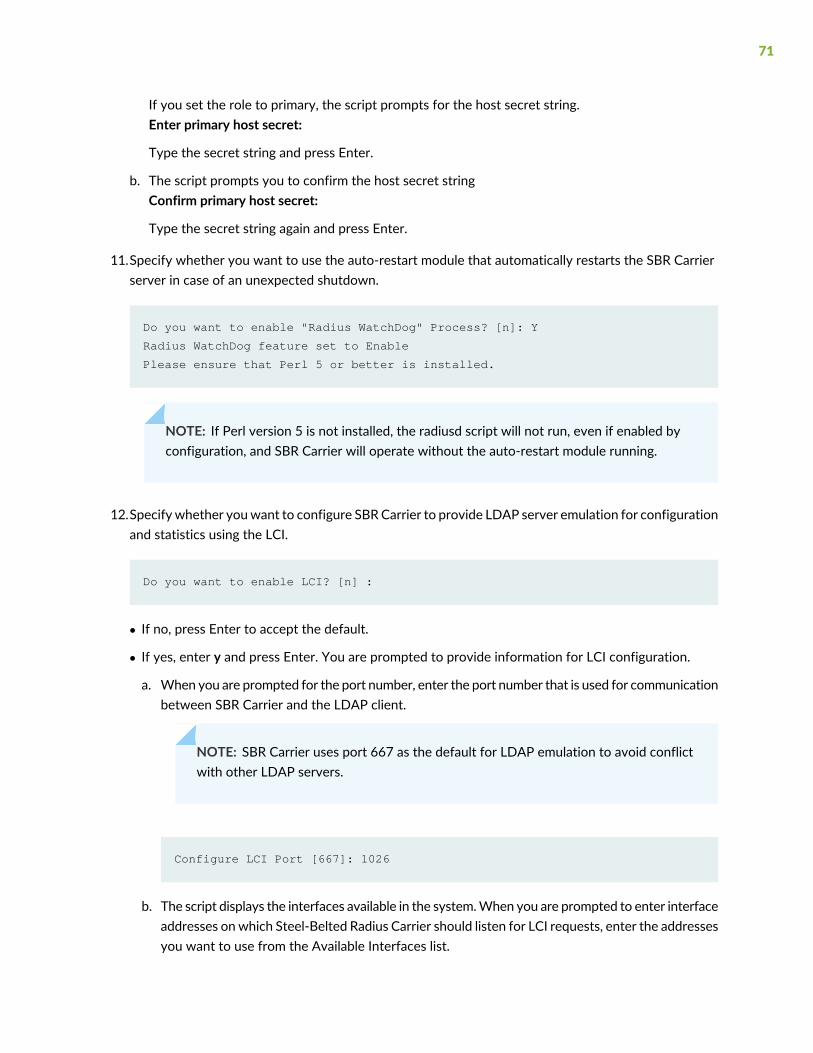
If you set the role to primary, the script prompts for the host secret string.Enter primary host secret:
Type the secret string and press Enter.
b. The script prompts you to confirm the host secret stringConfirm primary host secret:
Type the secret string again and press Enter.
11.Specify whether you want to use the auto-restart module that automatically restarts the SBR Carrierserver in case of an unexpected shutdown.
Do you want to enable "Radius WatchDog" Process? [n]: Y
Radius WatchDog feature set to Enable
Please ensure that Perl 5 or better is installed.
NOTE: If Perl version 5 is not installed, the radiusd script will not run, even if enabled byconfiguration, and SBR Carrier will operate without the auto-restart module running.
12.Specifywhether youwant to configure SBRCarrier to provide LDAP server emulation for configurationand statistics using the LCI.
Do you want to enable LCI? [n] :
• If no, press Enter to accept the default.
• If yes, enter y and press Enter. You are prompted to provide information for LCI configuration.
a. When you are prompted for the port number, enter the port number that is used for communicationbetween SBR Carrier and the LDAP client.
NOTE: SBR Carrier uses port 667 as the default for LDAP emulation to avoid conflictwith other LDAP servers.
Configure LCI Port [667]: 1026
b. The script displays the interfaces available in the system.When you are prompted to enter interfaceaddresses onwhich Steel-Belted Radius Carrier should listen for LCI requests, enter the addressesyou want to use from the Available Interfaces list.
71

LCI Interface Configuration :
Available interfaces :
127.0.0.1
10.212.10.66
HELP : Enter one interface per line and an empty line when finished.
Enter LCI interface addresses from the above list.
Enter LCI interface address : 10.212.10.66
Enter LCI interface address : 127.0.0.1
Enter LCI interface address :
NOTE: SBR Carrier uses all interfaces for listening to LCI requests if you do not enterany interfaces.
c. Specify whether you want to change the default LCI password to prevent unauthorized LDAPclients from accessing your database.
Do you want to change LCI Password? [n]:
• If no, press Enter to accept the default password.
• If yes, enter y and press Enter. You are prompted to enter a new password.
Do you want to change LCI Password? [n]: Y
Password must meet the following requirements:
1. 6-8 Alphanumeric characters.
2. No Special characters other than underscore (’_’).
Enter Password:
Confirm Password:
Password will be changed when SBR restarts.
72
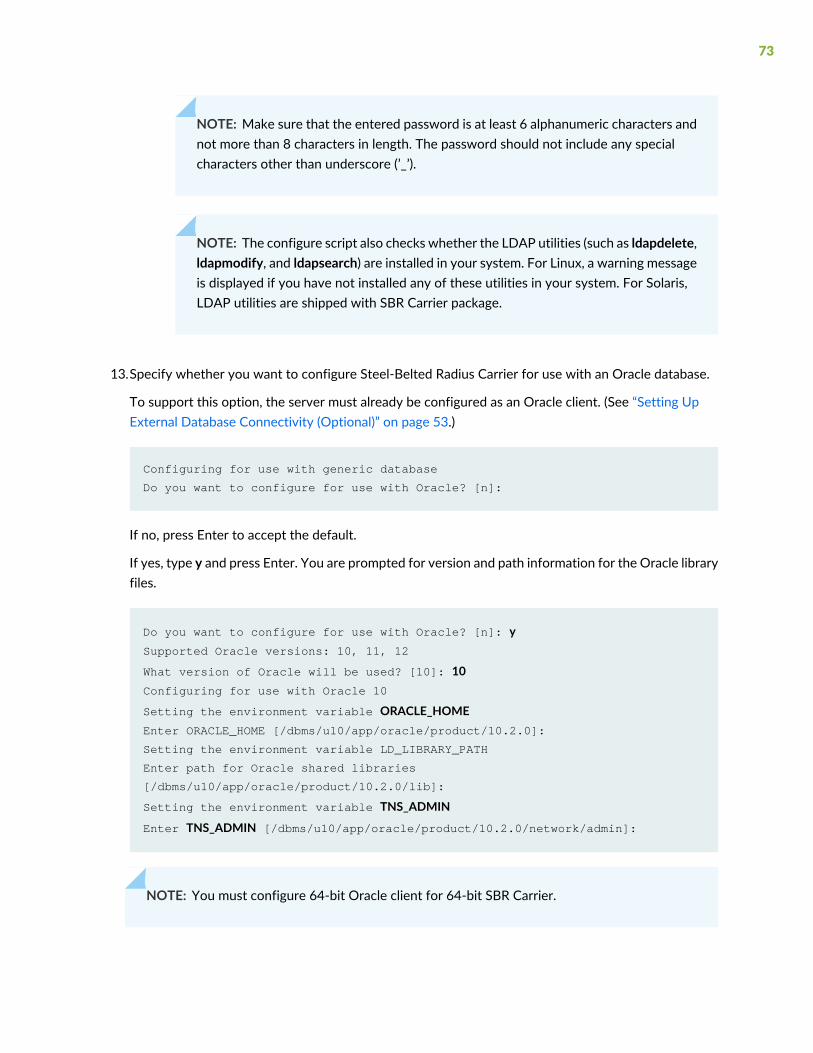
NOTE: Make sure that the entered password is at least 6 alphanumeric characters andnot more than 8 characters in length. The password should not include any specialcharacters other than underscore (’_’).
NOTE: The configure script also checks whether the LDAP utilities (such as ldapdelete,ldapmodify, and ldapsearch) are installed in your system. For Linux, a warning messageis displayed if you have not installed any of these utilities in your system. For Solaris,LDAP utilities are shipped with SBR Carrier package.
13.Specify whether you want to configure Steel-Belted Radius Carrier for use with an Oracle database.
To support this option, the server must already be configured as an Oracle client. (See “Setting UpExternal Database Connectivity (Optional)” on page 53.)
Configuring for use with generic database
Do you want to configure for use with Oracle? [n]:
If no, press Enter to accept the default.
If yes, type y and press Enter. You are prompted for version and path information for the Oracle libraryfiles.
Do you want to configure for use with Oracle? [n]: ySupported Oracle versions: 10, 11, 12
What version of Oracle will be used? [10]: 10Configuring for use with Oracle 10
Setting the environment variable ORACLE_HOMEEnter ORACLE_HOME [/dbms/u10/app/oracle/product/10.2.0]:
Setting the environment variable LD_LIBRARY_PATH
Enter path for Oracle shared libraries
[/dbms/u10/app/oracle/product/10.2.0/lib]:
Setting the environment variable TNS_ADMIN
Enter TNS_ADMIN [/dbms/u10/app/oracle/product/10.2.0/network/admin]:
NOTE: You must configure 64-bit Oracle client for 64-bit SBR Carrier.
73

14.Specify whether you want the Steel-Belted Radius Carrier server to communicate with an SS7 systemusing SIGTRAN.
To support this option, the server must already be configured to support SIGTRAN using Signalware.(See “Installing the SIGTRAN Interface (Optional)” on page 55 for an overview, and “SIGTRAN Supportfor Steel-Belted Radius Carrier” on page 309 for specific instructions.)
Do you want to configure for use with SIGTRAN? [n]: yConfiguring for use with SIGTRAN
Setting the environment variable OMNI_HOME
Enter OMNI_HOME [/opt/JNPRss7]:
15.Specify whether you want to start the GWrelay process while executing the ./sbrd start script.
Do you want to enable "GWrelay" Process? [n]: y
GWrelay will be started with sbrd
16.Specify whether you want to install the optional SNMP module to monitor your Steel-Belted RadiusCarrier server from an SNMP management station.
Do you want to configure SNMP? [n]:
• If no, press Enter to proceed to the next prompt.
• If yes, type y and press Enter. The installer prompts you for the information it needs to configure thejnprsnmpd.conf and startsnmp.sh files.
a. When you are prompted for a community string, enter the community string used to validateinformation sent from the SNMP subagent on the Steel-Belted Radius Carrier server to yourSNMP management station.
Choose a community string: public
b. When you are prompted for a range of IPv4 addresses, specify a starting IP address in ClasslessInter-Domain Routing format. To specify that only one host may query the agent, enter the IPaddress of the host followed by /32. To specify that any host on a designated class C networkmay query the agent, enter the starting address of the network followed by /24.
Specify the range of IPv4 addresses that may query this agent, such as
1.2.3.0/24.
Address range: 192.168.70.0/24
74

c. If you are using SNMPv2, enter the DNS name or IP address of the trap sink to receive trapinformation from the SNMP subagent on the Steel-Belted Radius Carrier server.
SNMPv2 trap sink: 192.168.70.86
d. Set the SNMP agent port.
Although youmay specify the default SNMP port, 161, we recommend that you specify a differentport to avoid contention with other agents that are likely to already be using 161. If you choosean alternate port, make a note of it because your MIB browser needs to be configured to thesame setting.
Specify SNMP agent listening port[161]: 24161
e. Specify a trap sink address, if required.
Optionally specify a trap sink address that will receive SNMPv2 trap
[localhost]: 172.28.72.83 2SNMPv2 trap sink port[162]:
Configuration of SNMP complete.
17.The script searches for the Java 1.8.0 or later version in the default system path and displays aconfirmation message if found.
Configuring Admin GUI Webserver
Compatible Java version 1.8.0_66 found in: /usr/java/jdk1.8.0_66
If the specific version is not found, the script prompts you to enter the directory pathwhere the specificJava version is installed in your system. For example, if the Java version is available in the/usr/java/jdk1.8.0_66/bin/java path, enter only /usr/java/jdk1.8.0_66, do not include bin/java.
Enter Java version 1.8 installed path :
18.Specify whether you want to install a custom SSL certificate for the Web GUI. For more informationabout certificates, see the SBR Carrier Administration and Configuration Guide.
Do you want to install custom SSL certificate for Admin WebServer? [n]:
75

• If no, press Enter. A self-signed certificate is created and installed in the web server.
• If yes, enter y and press Enter. You are prompted to enter the absolute path where the SSL certificateis available. For example, /opt/customSSLCert.pfx.
Enter the absolute path to certificate.
Note: Only *.pfx files are accepted. (Example-/opt/customSSLCert.pfx):
When you are prompted for the password, enter the password to open the SSL certificate.
Enter the password to open the certificate :
13.Specify whether you want to configure the Steel-Belted Radius Carrier server to autoboot (restartautomatically when the operating system is restarted).
Enable (e), disable (d), or preserve (p) RADIUS autoboot [e]: e
Steel-Belted Radius Carrier stores its autoboot settings in the local /radiusdir/radius/sbrd file.
• If you enter e (enable), the configure script copies the local sbrd script to /etc/init.d, where it isautomatically invoked by the OS whenever the OS is stopped or started.
• If you enter d (disable), the configure script removes all copies of the sbrd script from /etc/init.d,thus, disabling autoboot for all versions of Steel-Belted Radius Carrier.
• If you enter p (preserve), the configure script does nothing, thereby leaving your previous autobootscripts unchanged.
When you finish entering settings, the script configures Steel-Belted Radius Carrier with the specifiedsettings and then displays:
The SBR Admin Web GUI can be launched using the following URL:
https://<servername>:2909
Configuration complete
76
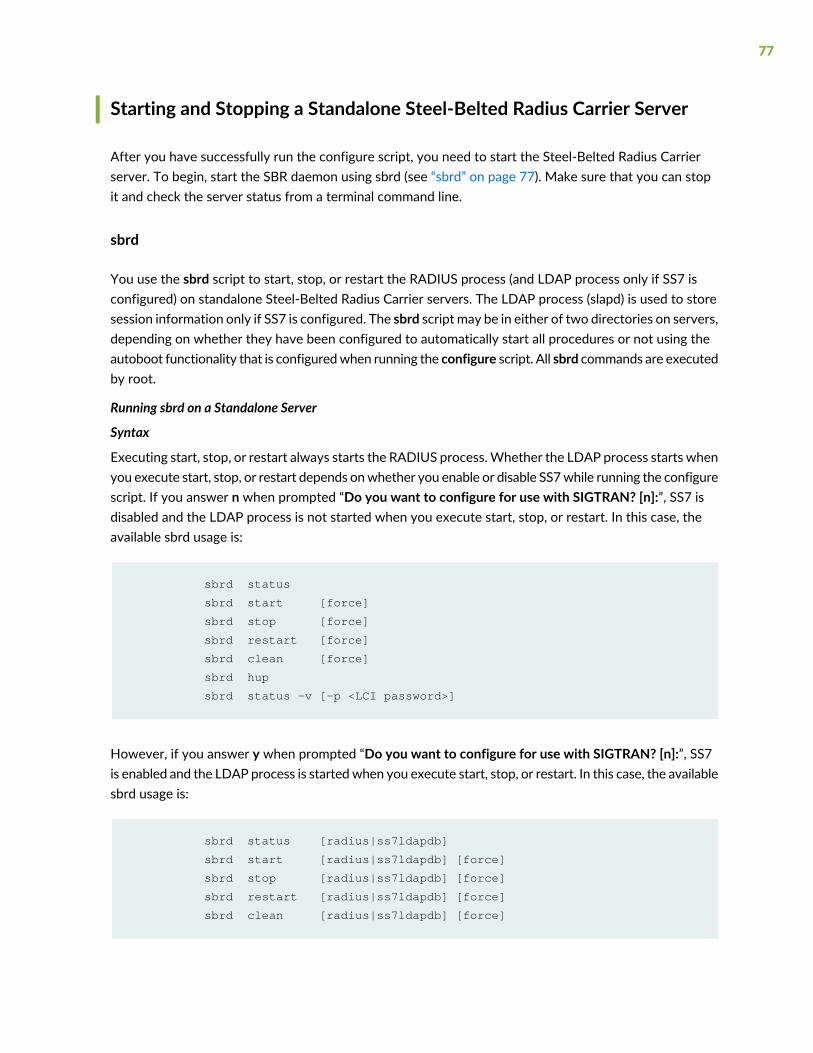
Starting and Stopping a Standalone Steel-Belted Radius Carrier Server
After you have successfully run the configure script, you need to start the Steel-Belted Radius Carrierserver. To begin, start the SBR daemon using sbrd (see “sbrd” on page 77). Make sure that you can stopit and check the server status from a terminal command line.
sbrd
You use the sbrd script to start, stop, or restart the RADIUS process (and LDAP process only if SS7 isconfigured) on standalone Steel-Belted Radius Carrier servers. The LDAP process (slapd) is used to storesession information only if SS7 is configured. The sbrd script may be in either of two directories on servers,depending on whether they have been configured to automatically start all procedures or not using theautoboot functionality that is configuredwhen running the configure script. All sbrd commands are executedby root.
Running sbrd on a Standalone Server
Syntax
Executing start, stop, or restart always starts the RADIUS process.Whether the LDAP process starts whenyou execute start, stop, or restart depends onwhether you enable or disable SS7while running the configurescript. If you answer n when prompted “Do you want to configure for use with SIGTRAN? [n]:”, SS7 isdisabled and the LDAP process is not started when you execute start, stop, or restart. In this case, theavailable sbrd usage is:
sbrd status
sbrd start [force]
sbrd stop [force]
sbrd restart [force]
sbrd clean [force]
sbrd hup
sbrd status -v [-p <LCI password>]
However, if you answer y when prompted “Do you want to configure for use with SIGTRAN? [n]:”, SS7is enabled and the LDAP process is startedwhen you execute start, stop, or restart. In this case, the availablesbrd usage is:
sbrd status [radius|ss7ldapdb]
sbrd start [radius|ss7ldapdb] [force]
sbrd stop [radius|ss7ldapdb] [force]
sbrd restart [radius|ss7ldapdb] [force]
sbrd clean [radius|ss7ldapdb] [force]
77
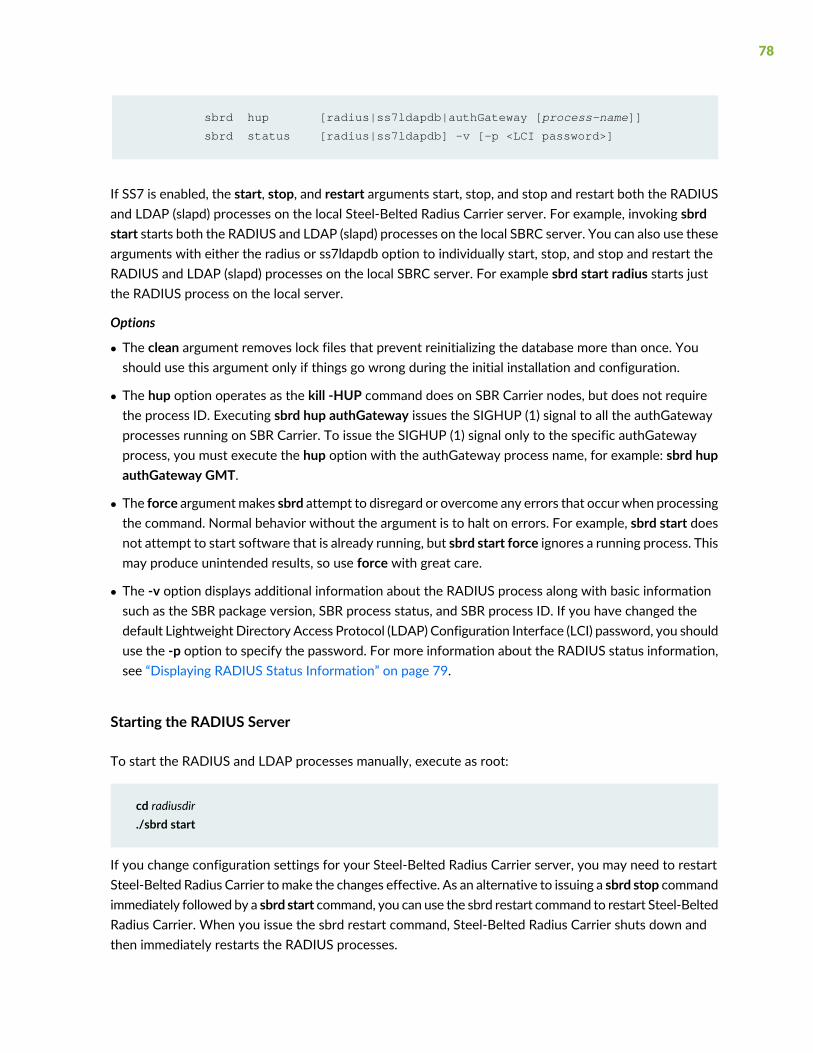
sbrd hup [radius|ss7ldapdb|authGateway [process-name]]
sbrd status [radius|ss7ldapdb] -v [-p <LCI password>]
If SS7 is enabled, the start, stop, and restart arguments start, stop, and stop and restart both the RADIUSand LDAP (slapd) processes on the local Steel-Belted Radius Carrier server. For example, invoking sbrdstart starts both the RADIUS and LDAP (slapd) processes on the local SBRC server. You can also use thesearguments with either the radius or ss7ldapdb option to individually start, stop, and stop and restart theRADIUS and LDAP (slapd) processes on the local SBRC server. For example sbrd start radius starts justthe RADIUS process on the local server.
Options
• The clean argument removes lock files that prevent reinitializing the database more than once. Youshould use this argument only if things go wrong during the initial installation and configuration.
• The hup option operates as the kill -HUP command does on SBR Carrier nodes, but does not requirethe process ID. Executing sbrd hup authGateway issues the SIGHUP (1) signal to all the authGatewayprocesses running on SBR Carrier. To issue the SIGHUP (1) signal only to the specific authGatewayprocess, you must execute the hup option with the authGateway process name, for example: sbrd hupauthGateway GMT.
• The force argumentmakes sbrd attempt to disregard or overcome any errors that occur when processingthe command. Normal behavior without the argument is to halt on errors. For example, sbrd start doesnot attempt to start software that is already running, but sbrd start force ignores a running process. Thismay produce unintended results, so use force with great care.
• The -v option displays additional information about the RADIUS process along with basic informationsuch as the SBR package version, SBR process status, and SBR process ID. If you have changed thedefault Lightweight Directory Access Protocol (LDAP) Configuration Interface (LCI) password, you shoulduse the -p option to specify the password. For more information about the RADIUS status information,see “Displaying RADIUS Status Information” on page 79.
Starting the RADIUS Server
To start the RADIUS and LDAP processes manually, execute as root:
cd radiusdir./sbrd start
If you change configuration settings for your Steel-Belted Radius Carrier server, you may need to restartSteel-Belted Radius Carrier tomake the changes effective. As an alternative to issuing a sbrd stop commandimmediately followed by a sbrd start command, you can use the sbrd restart command to restart Steel-BeltedRadius Carrier. When you issue the sbrd restart command, Steel-Belted Radius Carrier shuts down andthen immediately restarts the RADIUS processes.
78

cd radiusdir./sbrd restart
Stopping the RADIUS Server
Use the following commands to stop the RADIUS server:
cd radiusdir./sbrd stop
When you execute the sbrd stop command, Steel-Belted Radius Carrier allows its subsystems to completeoutstanding work and release resources, and then stops the RADIUS processes gracefully.
If Steel-Belted Radius Carrier fails to stop after you issue the sbrd stop command, you can use the optionalforce argument to terminate all subsystems immediately.
cd radiusdir./sbrd stop force
Displaying RADIUS Status Information
You can use the following command to display basic information (such as SBR package version, SBR processstatus, and SBR process ID) about the RADIUS process:
cd radiusdir./sbrd status
The system responds with:
---------------------------------------------------------------------------
---------------------------------------------------------------------------
SBR-64 8.60-R1.0
on SunOS 5.10 Generic_141444-09 node uranus.carrier.spgma.juniper.net
---------------------------------------------------------------------------
172.28.84.73.1646 Idle
172.28.84.73.1813 Idle
172.28.84.73.1645 Idle
172.28.84.73.1812 Idle
*.1813 *.* 0 0 49152 0 LISTEN
*.1812 *.* 0 0 49152 0 LISTEN
79

root 6628 ./slapd -h ldap://127.0.0.1:389 -f
/opt/JNPRsbr/radius/openldap/slapd.conf
root 4449 radius sbr.xml
root 1189 webserver
You can use the sbrd status command with the -v option to display the following additional informationabout the RADIUS process along with the preceding information:
• Loaded Plug-in Information—Displays the name, version, and status of the loaded authentication andaccounting plug-ins. The InitializationString value of the plug-in is displayed as the name of the plug-in.
• License Status—Displays the license key, feature name, and license status with expiry date.
• IP Pool Information—Displays the pool name, IP range of the pool, total number of addresses in the pool,and total number of available addresses in the pool.
NOTE: This information is displayed only for the SBR standalone version.
• IP Ranges and IP Caches—For IP ranges, displays the pool name, start address of the pool, end addressof the pool, and total number of addresses in the pool. For IP caches, displays the pool name, totalnumber of addresses in the pool, and percentage of the addresses in the pool that are cached.
NOTE: This information is displayed only for the SBR cluster version.
• Statistics Information—Displays statistical information about SBR such as current sessions count, SBRuptime (in seconds), current rate details, and average transaction rate since the SBR server started. Thetransaction rate is calculated using the following formula:Transaction Rate = Total Transaction Count / SBR Running Timewhere:Total Transaction Count = Total Authentication Transactions + Total Accounting Transactions
NOTE: The current rates are updated at a time interval of one second.
• Radius Ports Information—Displays protocols, port types, and port numbers on which the SBR Carrierserver is listening.
• Proxy Configuration Information—Displays proxy names and their IP addresses.
80
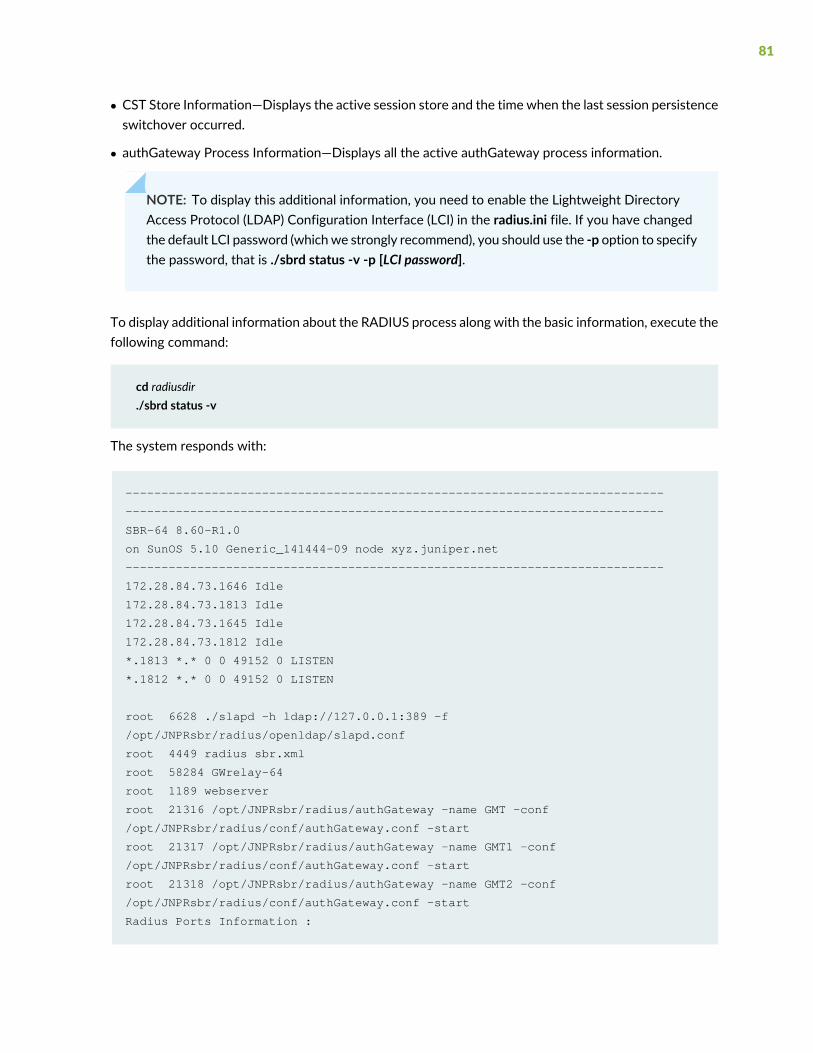
• CST Store Information—Displays the active session store and the time when the last session persistenceswitchover occurred.
• authGateway Process Information—Displays all the active authGateway process information.
NOTE: To display this additional information, you need to enable the Lightweight DirectoryAccess Protocol (LDAP) Configuration Interface (LCI) in the radius.ini file. If you have changedthe default LCI password (whichwe strongly recommend), you should use the -p option to specifythe password, that is ./sbrd status -v -p [LCI password].
To display additional information about the RADIUS process along with the basic information, execute thefollowing command:
cd radiusdir./sbrd status -v
The system responds with:
---------------------------------------------------------------------------
---------------------------------------------------------------------------
SBR-64 8.60-R1.0
on SunOS 5.10 Generic_141444-09 node xyz.juniper.net
---------------------------------------------------------------------------
172.28.84.73.1646 Idle
172.28.84.73.1813 Idle
172.28.84.73.1645 Idle
172.28.84.73.1812 Idle
*.1813 *.* 0 0 49152 0 LISTEN
*.1812 *.* 0 0 49152 0 LISTEN
root 6628 ./slapd -h ldap://127.0.0.1:389 -f
/opt/JNPRsbr/radius/openldap/slapd.conf
root 4449 radius sbr.xml
root 58284 GWrelay-64
root 1189 webserver
root 21316 /opt/JNPRsbr/radius/authGateway -name GMT -conf
/opt/JNPRsbr/radius/conf/authGateway.conf -start
root 21317 /opt/JNPRsbr/radius/authGateway -name GMT1 -conf
/opt/JNPRsbr/radius/conf/authGateway.conf -start
root 21318 /opt/JNPRsbr/radius/authGateway -name GMT2 -conf
/opt/JNPRsbr/radius/conf/authGateway.conf -start
Radius Ports Information :
81

+-----------------+-----------------+-----------------+
| Protocol | Port Number | Port Type |
+-----------------+-----------------+-----------------+
| TCP | 1812 | Admin |
| TCP | 64277 | Others |
| TCP | 64278 | Others |
| TCP | 5235 | Others |
| TCP | 64281 | Others |
| TCP | 64229 | Others |
| UDP | 28000 | Proxy |
| UDP | 28001 | Proxy |
| UDP | 28002 | Proxy |
| UDP | 28003 | Proxy |
| UDP | 28004 | Proxy |
| UDP | 28005 | Proxy |
| UDP | 28006 | Proxy |
| UDP | 28007 | Proxy |
| TCP | 1813 | Admin |
| TCP | 1814 | Others |
| UDP | 1646 | Radius |
| UDP | 1813 | Radius |
| UDP | 1645 | Radius |
| UDP | 1812 | Radius |
+-----------------+-----------------+-----------------+
IP Pools Information :
+-----------------+----------------------+------------+------------+
| Pool Name | Ip Address Range | Total | Available |
+---------- ------+----------------------+------------+------------+
| POOL1 | 10.10.10.1:20 | 20 | 20 |
| POOL2 | 20.20.20.1:20 | 20 | 20 |
+-----------------+----------------------+------------+------------+
Statistics Information :
Current Sessions Count = 94831
Transaction Rate = 62 TPS (Since Server Start)
SBR Uptime = Up Since 2013/06/19 06:39:19 [ 1 Hrs
: 59 Mins : 56 Secs ]
auth-request-current-rate = 965
auth-accept-current-rate = 926
auth-reject-current-rate = 914
acct-start-current-rate = 0
acct-interim-current-rate = 0
82
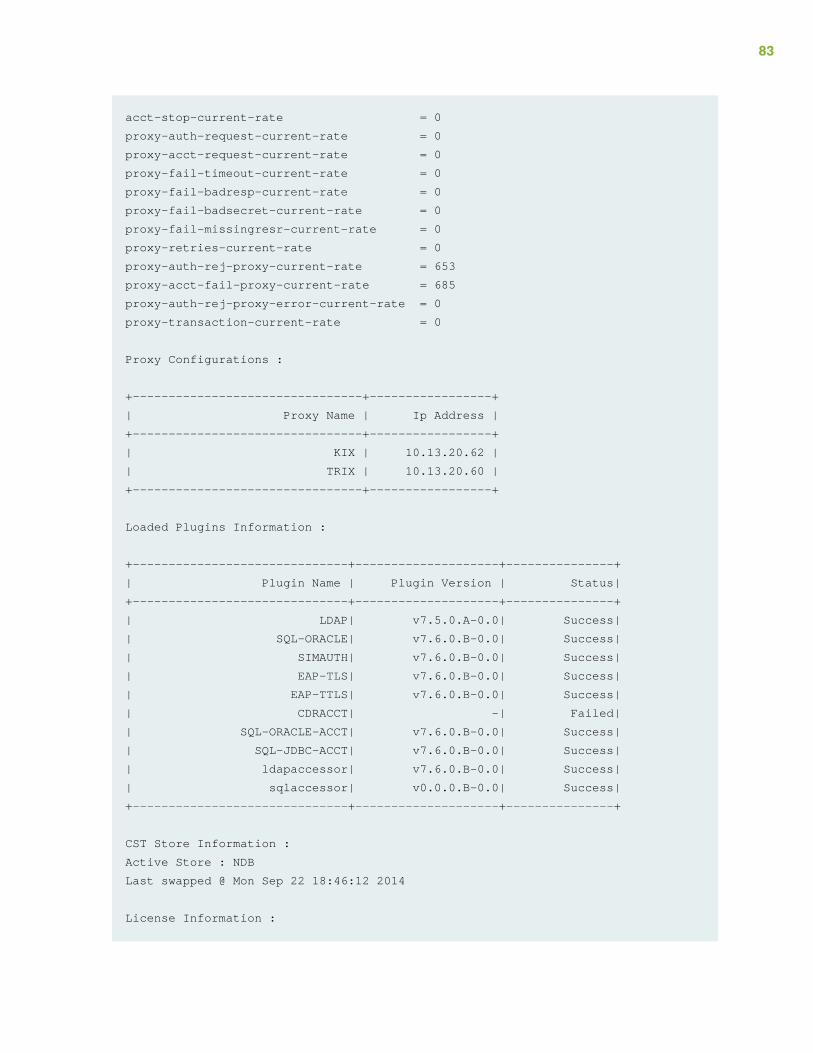
acct-stop-current-rate = 0
proxy-auth-request-current-rate = 0
proxy-acct-request-current-rate = 0
proxy-fail-timeout-current-rate = 0
proxy-fail-badresp-current-rate = 0
proxy-fail-badsecret-current-rate = 0
proxy-fail-missingresr-current-rate = 0
proxy-retries-current-rate = 0
proxy-auth-rej-proxy-current-rate = 653
proxy-acct-fail-proxy-current-rate = 685
proxy-auth-rej-proxy-error-current-rate = 0
proxy-transaction-current-rate = 0
Proxy Configurations :
+--------------------------------+-----------------+
| Proxy Name | Ip Address |
+--------------------------------+-----------------+
| KIX | 10.13.20.62 |
| TRIX | 10.13.20.60 |
+--------------------------------+-----------------+
Loaded Plugins Information :
+------------------------------+--------------------+---------------+
| Plugin Name | Plugin Version | Status|
+------------------------------+--------------------+---------------+
| LDAP| v7.5.0.A-0.0| Success|
| SQL-ORACLE| v7.6.0.B-0.0| Success|
| SIMAUTH| v7.6.0.B-0.0| Success|
| EAP-TLS| v7.6.0.B-0.0| Success|
| EAP-TTLS| v7.6.0.B-0.0| Success|
| CDRACCT| -| Failed|
| SQL-ORACLE-ACCT| v7.6.0.B-0.0| Success|
| SQL-JDBC-ACCT| v7.6.0.B-0.0| Success|
| ldapaccessor| v7.6.0.B-0.0| Success|
| sqlaccessor| v0.0.0.B-0.0| Success|
+------------------------------+--------------------+---------------+
CST Store Information :
Active Store : NDB
Last swapped @ Mon Sep 22 18:46:12 2014
License Information :
83

+--------------------------+---------------------------+-------------------------+-------------+
| License Key| Feature Name| Status
| Expiry Date |
+--------------------------+---------------------------+-------------------------+-------------+
| xxxxxxxxxxxxxxxxxxxxxxxxx|SIM Authentication feature | Valid
| 12/31/2015 |
| xxxxxxxxxxxxxxxxxxxxxxxxx| Run license | Maint_Upgrade - Valid
| - |
| xxxxxxxxxxxxxxxxxxxxxxxxx|SIM Authentication feature | Trial License - Valid
| 12/31/2024 |
| xxxxxxxxxxxxxxxxxxxxxxxxx| WiMAX Mobility feature | Trial License - Expired
| 10/31/2010 |
+--------------------------+---------------------------+-------------------------+-------------+
Basic SBR Carrier Configuration
Launching Web GUI
To test whether the server can be accessed by a management workstation, launch the Web GUI.
To launch the Web GUI:
1. Open a browser connection to the SBR Carrier server you want to administer.
• To administer a SBR Carrier server running on your local host, enter https://localhost:2909, wherethe port assignment of 2909 is the application’s default TCP port for administration connections.
• To administer a SBR Carrier server running on a remote host, enter https://server:2909, where theport assignment of 2909 is the application’s default TCP port for administration connections. Forexample:
https://192.168.24.15:2909/
NOTE: Make sure that you access the Web GUI using HTTPS, instead HTTP.
The Login page (Figure 12 on page 85) appears.
84
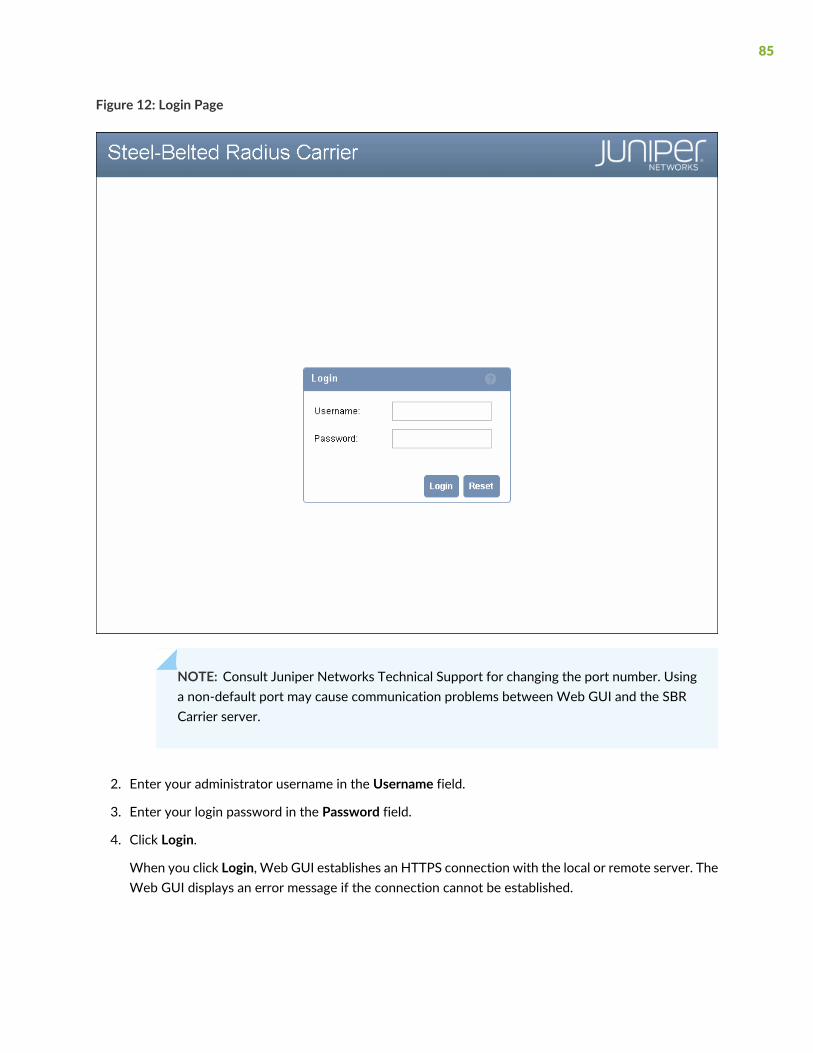
Figure 12: Login Page
NOTE: Consult Juniper Networks Technical Support for changing the port number. Usinga non-default port may cause communication problems between Web GUI and the SBRCarrier server.
2. Enter your administrator username in the Username field.
3. Enter your login password in the Password field.
4. Click Login.
When you click Login, Web GUI establishes an HTTPS connection with the local or remote server. TheWeb GUI displays an error message if the connection cannot be established.
85
NOTE: If a timeout occurs, verify that the SBRCarrier daemon is running on the target serverand that it is listening on the administration port you entered in the URL; that the port is notblocked.
Web GUI verifies that the username you entered exists in the access.ini file. If the username is found,Web GUI validates the password you entered against a local or remote password database.
When you connect to a server, theHome page lists various features of the running server, such as version,platform on which it is running, IP address, available authentication methods, license information, and anyinitialization errors that might have occurred.
Configuring the Server
After you have installed the Steel-Belted Radius Carrier software on the server, have added the appropriatelicenses, and can work withWeb GUI, you can begin configuring the software. The specific steps youmustperform depend on your network’s authentication and accounting needs.
The basic steps for configuring the Steel-Belted Radius Carrier environment include:
1. Configure each of your RADIUS client devices to communicate with your Steel-Belted Radius Carrierserver. To do this, you must log in to each device and run its configuration interface.
2. Use the RADIUS Clients List page in Web GUI to configure the server to communicate with eachRADIUS client. Details are in the Administering RADIUS Clients and Client Groups section of the SBRCarrier Administration and Configuration Guide.
3. If the clients use RADIUS Location Groups or IP Address Pools, each of those entities must exist beforethe clients are configured. See the sections on Administering RADIUS Location Groups and AdministeringAddress Pools in the SBR Carrier Administration and Configuration Guide for instructions on setting theseup.
4. Use the Users panel to identify the users or groups of users who are permitted to access the RADIUSclients.
Specify user attributes by selecting them in the Users panel or by creating user profiles in the Profilesdialog.
For more information, see the SBR Carrier Administration and Configuration Guide.
Configuring SNMP
Steel-Belted Radius Carrier runs its own SNMP agent, but other SNMP agents run on most servers. Ingeneral, only one application can use a socket port; they are not shared resources.
86
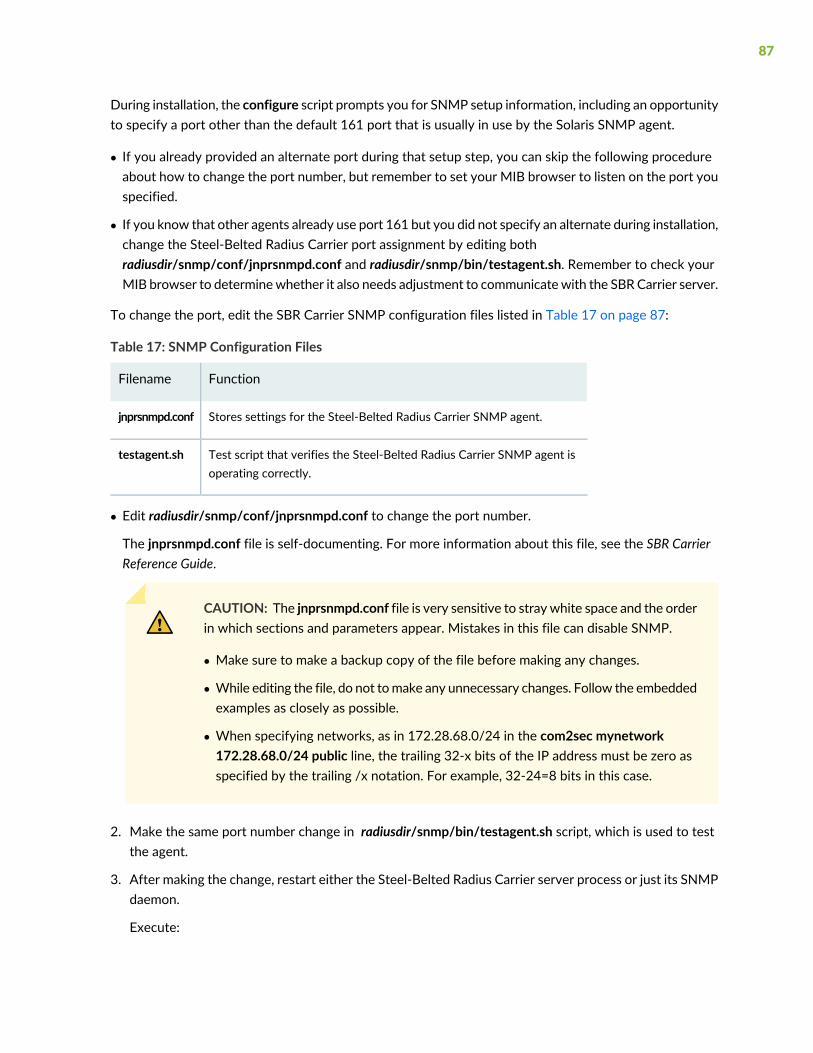
During installation, the configure script prompts you for SNMP setup information, including an opportunityto specify a port other than the default 161 port that is usually in use by the Solaris SNMP agent.
• If you already provided an alternate port during that setup step, you can skip the following procedureabout how to change the port number, but remember to set your MIB browser to listen on the port youspecified.
• If you know that other agents already use port 161 but you did not specify an alternate during installation,change the Steel-Belted Radius Carrier port assignment by editing bothradiusdir/snmp/conf/jnprsnmpd.conf and radiusdir/snmp/bin/testagent.sh. Remember to check yourMIB browser to determinewhether it also needs adjustment to communicatewith the SBRCarrier server.
To change the port, edit the SBR Carrier SNMP configuration files listed in Table 17 on page 87:
Table 17: SNMP Configuration Files
FunctionFilename
Stores settings for the Steel-Belted Radius Carrier SNMP agent.jnprsnmpd.conf
Test script that verifies the Steel-Belted Radius Carrier SNMP agent isoperating correctly.
testagent.sh
• Edit radiusdir/snmp/conf/jnprsnmpd.conf to change the port number.
The jnprsnmpd.conf file is self-documenting. For more information about this file, see the SBR CarrierReference Guide.
CAUTION: The jnprsnmpd.conf file is very sensitive to straywhite space and the orderin which sections and parameters appear. Mistakes in this file can disable SNMP.
• Make sure to make a backup copy of the file before making any changes.
• While editing the file, do not tomake any unnecessary changes. Follow the embeddedexamples as closely as possible.
• When specifying networks, as in 172.28.68.0/24 in the com2sec mynetwork172.28.68.0/24 public line, the trailing 32-x bits of the IP address must be zero asspecified by the trailing /x notation. For example, 32-24=8 bits in this case.
2. Make the same port number change in radiusdir/snmp/bin/testagent.sh script, which is used to testthe agent.
3. After making the change, restart either the Steel-Belted Radius Carrier server process or just its SNMPdaemon.
Execute:
87

/etc/init.d/init.jnprsnmpd start
4. If necessary, set up your SNMP browser to listen on the new port.
5. To verify that the jnprsnmpd SNMP agent functions, run the radiusdir/snmp/bin/testagent.sh script.
NOTE: Refer to the SBR Carrier Administration and Configuration Guide for more informationabout configuring the SBR SNMP agent.
Configuring the CST for a Standalone Server
For a standalone server, the CST is in local memory, and is configured with the dbclusterlocal.gen filewhen you run the configuration script. The dbclusterlocal.gen file is a small file consisting of a [Bootstrap]section that includes LibraryName = dbclusterlocal and Enable=1.
In addition, the setting of the PersistSessions parameter in the radius.ini file determines whether sessionsare restored or not restored when SBR Carrier is restarted. The default and recommended settings for astandalone server are:
LibraryName = dbclusterlocal (set by default)
Enable =1 in dbclusterlocal.gen (set by default)
Enable=0 in the dbclusterndb.gen file (set by default)
PersistSessions=local in the radius.ini file
This configuration enables the CST in local memory and saves session information in a local file on SBRCso that the information is available after the server restarts.
You cannot configure field names in the local CST (dbclusterlocal.gen). However, there are three predefinedfields and seven generic fields you can configure using the sessionTable.ini file. The three predefined fieldsare:
• WimaxSessionId
• AcctMultiSessionId
• FunkOuterUserName
The seven generic fields are:
• Generic1
• Generic2
• Generic3
88

• Generic4
• Generic5
• Generic6
• Generic7
In order to use any of the ten predefined fields, they must be mapped to attributes by editing thesessionTable.ini file.
Configuring the sessionTable.ini file
The sessionTable.ini file allows you to take any attribute in a request and store it in the CST. To configurethe seven generic fields in the standalone CST, you use RadAttr fields. RadAttr fields are designed tocapture data from RADIUS packet attributes. You must be knowledgeable about RADIUS attributes, howthey are used in the network, and which attributes to incorporate into the CST.
Valid Radius-Attribute-Names occur in Steel-Belted Radius Carrier dictionary files, as embodied in the SBRCarrier internal primary dictionary (which includes attributes defined in files having .dct, .dcm, .dci, and.dcx extensions in the SBRCarrier installation root directory). For information about SBRCarrier dictionaries,refer to the readme.dct and dictiona.dcm files.
RadAttr Fields and the sessionTable.ini File
RADIUS attributes can be generated by Steel-Belted Radius Carrier at four capture points, events thatapply only to RadAttr fields:
• [AuthRequest]
• [AuthResponse]
• [AcctRequest]
• [AcctResponse]
Each RadAttr CST field requires at least one capture point to identify when RADIUS attributes are loadedin the field. Specify one ormore capture-points by placing the field entry in one ormore of the four capturepoint sections of the sessionTable.ini file.
One Radius-Attribute-Name can be captured multiple times, at different capture-points, by using multiple(different) RadAttrFieldNames, all of which are mapped to the same Radius-Attribute-Name.
If a RADIUS attribute is not present when a session’s RADIUS packet is scanned at a capture point event,the corresponding CST field is not updated. If the specified attribute does not occur in a packet at anycapture point, the session displays a null value in the CST field.
If a session experiences multiple occurrences of packets at the same capture-point carrying the sameRadius-Attribute-Name, the values of subsequent occurrences overwrite the values of preceding occurrences
89

in the RadAttrFieldName field. For example, if a session receives multiple Accounting-Start packets, thenthe AcctRequest and AcctResponse capture-points are exercised more than once for that session, withthe result that the captured Radius-Attribute-Name/ RadAddrFieldnames are updatedmultiple times. Thus,the CST always reflects the most recent values from each capture-point.
Creating RadAttr Field-to-Attribute Mappings
The sessionTable.ini file maps RadAttrFieldName RadAttr CST fields to Radius-Attribute-Name RADIUSattributes:
RadAttrFieldName = Radius-Attribute-Name
Defining RadAttr Fields
To define a RadAttr field, edit the sessionTable.ini file.
Add the RadAttrFieldName = Radius-Attribute-Name field-to-attributemapping line to the sessionTable.inifile in the appropriate capture point section or in several sections.
For example:
[AcctRequest]
;===========================================================================
Generic1=3GPP-IMSI
Generic2=3GPP-GGSN-Address
Multi-Valued Attributes
The sessionTable.ini file supports a special syntax to support multi-valued attributes. The RADIUS protocolpermits certain attributes to bemulti-valued, meaning that two ormore instances of the attribute can occurin a single RADIUS packet. System fields in the CST always involve single-valued attributes. RadAttr fieldsin the CST can be single-valued or multi-valued.
For RadAttr fields in the CST, we support multi-valued attributes with the six MVA facilities defined in thelist that follows. Any field-to-attribute mapping (in sessionTable.ini) can have its Radius-Attribute-Nameoptionally appended with one (but no more than one) multi-valued attribute @ extension.
MVA-Count
The MVA-Count extension stores the count (0, 1, or more) of attributes of the specifiedRadius-Attribute-Name (occurring in the RADIUS packet being scanned at the specified capture-point).
Syntax:
90
RadAttrFieldName = Radius-Attribute-Name@#
MVA-Index
The MVA-Index extension stores the value of the Nth attribute (where N is equal to or greater than 1) ofthe Radius-Attribute-Name occurring in the RADIUS packet being scanned at the specified capture-point.For example, @1means to store the first value of the specified Radius-Attribute-Name. If the packet carriesfewer than N attributes of the designated type, a value of null is stored.
In this case, N is a 1-based, not 0-based, integer. Thus, N denotes a positive number in the range 1–2038,expressed in standard base-10 notation. Specifying a value for N outside this range is an error.
Syntax:
RadAttrFieldName = Radius-Attribute-Name@N
MVA-First
The MVA-First extension stores the first value of the Radius-Attribute-Name attribute occurring in theRADIUS packet being scanned at the specified capture-point. MVA-First extension is synonymous withthe Radius-Attribute-Name@1 extension.
Syntax:
RadAttrFieldName = Radius-Attribute-Name@^
MVA-Last
The MVA-Last extension stores the last value of the Radius-Attribute-Name attribute occurring in theRADIUS packet being scanned at the specified capture-point.
Syntax:
RadAttrFieldName = Radius-Attribute-Name@$
MVA-CharString-Concat
TheMVA-CharString-Concat extension treats the potentially multiple values of Radius-Attribute-Name astext strings. It concatenates them using the specified string “…”, as a field delimiter between successivevalues.
The value of the delimiter string cannot contain the 2-character sequence @” (at-sign/double-quote) orinternal NULL characters. The delimiter string can consist of any arbitrary (single-byte) characters, suchas comma, colon, space, tab, and new line characters. This facility supports C/C++-languagebackslash-escaping (meta character) conventions. For example, to include a backslash character in a delimiterstring or in a character data-value, enter it as: \\.
91
Syntax:
RadAttrFieldName = Radius-Attribute-Name@"…"
MVA-ByteString-Concat
TheMVA-ByteString-Concat extension treats the potentially multiple values of Radius-Attribute-Name asbyte strings. It concatenates them using a length and value representation: every value is represented bya one-byte length header that identifies the length of the data value in the range 1–253 and is followedby the data value. The concatenation terminates with a one-byte 0-value trailer that indicates a data oflength 0, such as the end of the concatenated byte-string.
Syntax:
RadAttrFieldName = Radius-Attribute-Name@*
Using MVA Facilities
The syntax of the MVA facilities supports single-valued attributes and multi-valued attributes. Forsingle-valued attributes,@1,@^,@$, and no-@-extension returns the value of the attribute. The@"…" and@* extensions return one item in the concatenation; no delimiter appears for @"…", while the 0-byteterminator immediately follows the first item in the list for @*.
Any field-to-attribute mapping in sessionTable.ini (whether its Radius-Attribute-Name is single-valued ormulti-valued) that does not contain an MVA @ extension is considered to be equivalent to the samefield-to-attribute mapping with an @^ extension appended to it.
In both the @"…" and the @* cases, the individual values in the MVA are listed in the order they occur inthe RADIUS packet. According to the RADIUS protocol, attribute sequence is significant.
92

4PART
Installing Session State Register Nodes
Installing Session State Register Nodes | 94
Basic SBR Carrier Node Configuration | 138
Customizing the SSR Database Current Sessions Table | 144
Other Session State Register Configuration Files | 182
When and How to Restart Session State Register Nodes, Hosts, and Clusters | 196

CHAPTER 7
Installing Session State Register Nodes
IN THIS CHAPTER
Cluster Installation Overview | 94
Unpacking Session State Register Software | 95
Setting Up a Starter Kit’s First SBR/Management Node | 99
Setting Up the Second SBR/Management Node in a Starter Kit | 114
Setting Up Data Node Hosts Included with the Starter Kit | 126
Initial Cluster Startup Procedure | 132
Recommendations before Configuring the Cluster | 137
This chapter documents the configure script that installs Session State Register software on the four nodehosts in a Starter Kit cluster. If you have additional nodes to install beyond those four, you can specifythem during the tasks presented in this chapter, although the text assumes the basic four nodes.
These topics are in the chapter:
Cluster Installation Overview
Setting up the four nodes in a Session State Register Starter Kit is straightforward if you have performedthe preparatory and planning steps and set up each server in order.
NOTE: Starting from SBR Release 7.6.0, an upgrade license is available to enable users who havepurchased the Restricted Cluster Session license to upgrade to a Regular Cluster license. TheRestricted Cluster license imposes a limit on the maximum number of concurrent sessions anddoes not allow addition of expansion kit license.
The workflow from this point includes these steps:
94
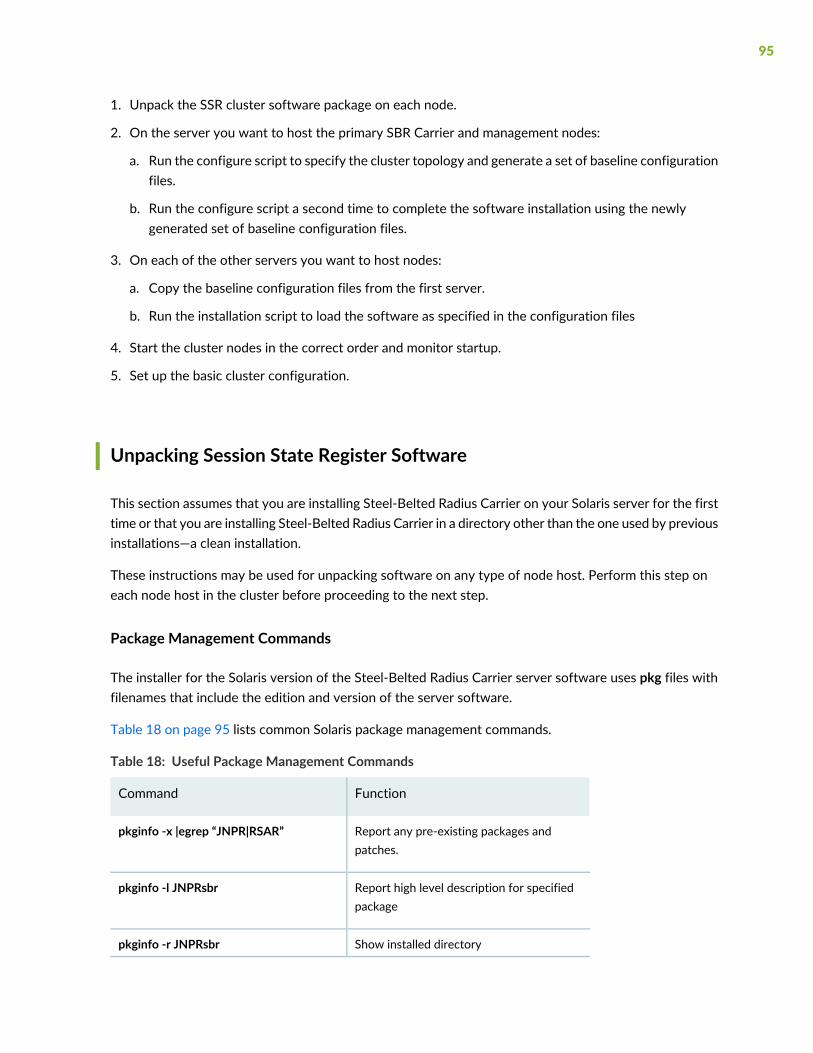
1. Unpack the SSR cluster software package on each node.
2. On the server you want to host the primary SBR Carrier and management nodes:
a. Run the configure script to specify the cluster topology and generate a set of baseline configurationfiles.
b. Run the configure script a second time to complete the software installation using the newlygenerated set of baseline configuration files.
3. On each of the other servers you want to host nodes:
a. Copy the baseline configuration files from the first server.
b. Run the installation script to load the software as specified in the configuration files
4. Start the cluster nodes in the correct order and monitor startup.
5. Set up the basic cluster configuration.
Unpacking Session State Register Software
This section assumes that you are installing Steel-Belted Radius Carrier on your Solaris server for the firsttime or that you are installing Steel-Belted Radius Carrier in a directory other than the one used by previousinstallations—a clean installation.
These instructions may be used for unpacking software on any type of node host. Perform this step oneach node host in the cluster before proceeding to the next step.
Package Management Commands
The installer for the Solaris version of the Steel-Belted Radius Carrier server software uses pkg files withfilenames that include the edition and version of the server software.
Table 18 on page 95 lists common Solaris package management commands.
Table 18: Useful Package Management Commands
FunctionCommand
Report any pre-existing packages andpatches.
pkginfo -x |egrep “JNPR|RSAR”
Report high level description for specifiedpackage
pkginfo -l JNPRsbr
Show installed directorypkginfo -r JNPRsbr
95
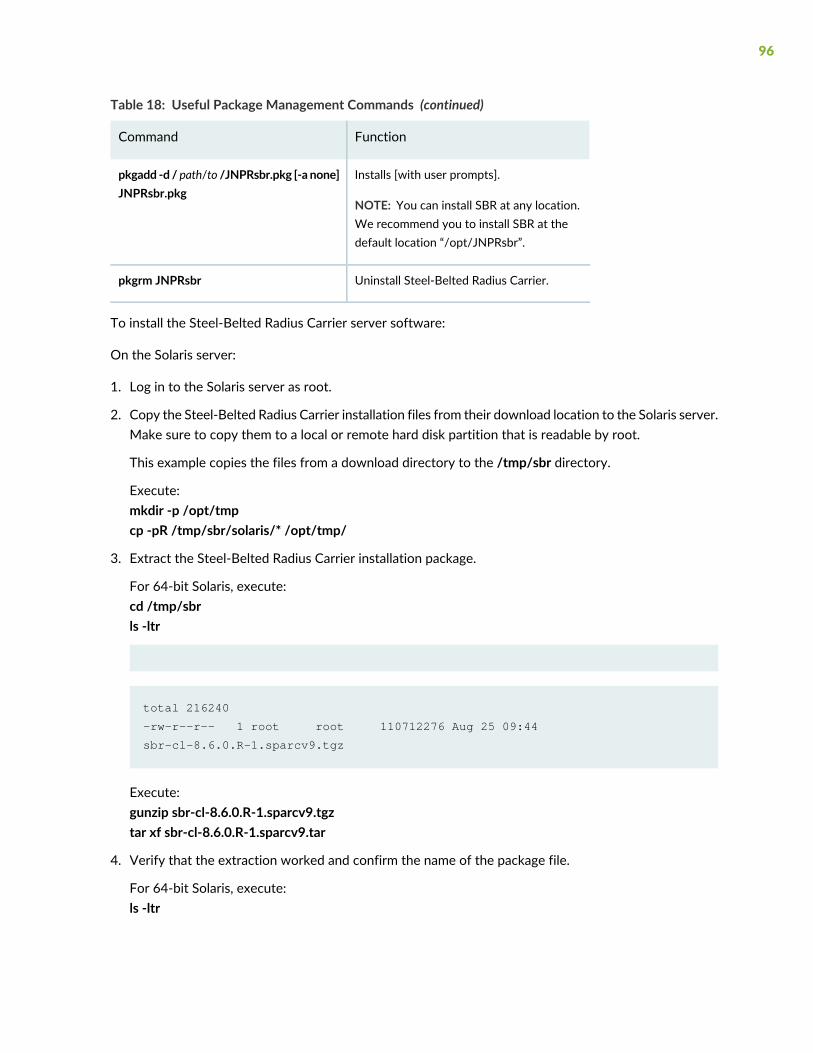
Table 18: Useful Package Management Commands (continued)
FunctionCommand
Installs [with user prompts].
NOTE: You can install SBR at any location.We recommend you to install SBR at thedefault location “/opt/JNPRsbr”.
pkgadd -d / path/to /JNPRsbr.pkg [-a none]JNPRsbr.pkg
Uninstall Steel-Belted Radius Carrier.pkgrm JNPRsbr
To install the Steel-Belted Radius Carrier server software:
On the Solaris server:
1. Log in to the Solaris server as root.
2. Copy the Steel-Belted Radius Carrier installation files from their download location to the Solaris server.Make sure to copy them to a local or remote hard disk partition that is readable by root.
This example copies the files from a download directory to the /tmp/sbr directory.
Execute:mkdir -p /opt/tmpcp -pR /tmp/sbr/solaris/* /opt/tmp/
3. Extract the Steel-Belted Radius Carrier installation package.
For 64-bit Solaris, execute:cd /tmp/sbrls -ltr
total 216240
-rw-r--r-- 1 root root 110712276 Aug 25 09:44
sbr-cl-8.6.0.R-1.sparcv9.tgz
Execute:gunzip sbr-cl-8.6.0.R-1.sparcv9.tgztar xf sbr-cl-8.6.0.R-1.sparcv9.tar
4. Verify that the extraction worked and confirm the name of the package file.
For 64-bit Solaris, execute:ls -ltr
96

total 216256
drwxr-xr-x 4 Xtreece other 370 Aug 24 17:01 JNPRsbr.pkg
-rw-r--r-- 1 root root 110712276 Aug 25 09:44
sbr-cl-8.6.0.R-1.sparcv9.tar
5. Install the package.
Execute:pkgadd -d /tmp/sbr
The following packages are available:
1 JNPRsbr.pkg JNPRsbr - Juniper Networks Steel-Belted Radius (Carrier
Cluster Edition) (sparc) 8.60.50006
Select package(s) you wish to process (or 'all' to process all packages).
(default: all) [?,??,q]: all
6. Type all and press Enter.The script resumes.
Processing package instance <JNPRsbr.pkg> from </tmp>
7. Confirm the installation directory.
Depending on the system configuration, the script prompts you to create the /opt/JNPRsbr directoryif it does not exist, over-write an already-extracted package, or any of several other questions.
The selected base directory </opt/JNPRsbr> must exist before installation is
attempted.
Do you want this directory created now [y,n,?,q]
Answer the question appropriately (or change the extraction path if necessary) so that the script canproceed.
To accept the default directory as a target, enter y.The script resumes.
Using </opt/JNPRsbr> as the package base directory.
#Processing package information.
#Processing system information.
48 package pathnames are already properly installed.
97

#Verifying disk space requirements.
#Checking for conflicts with packages already installed.
#Checking for setuid/setgid programs.
This package contains scripts which will be executed with super-user
permission during the process of installing this package.
Do you want to continue with the installation of <JNPRsbr> [y,n,?]
8. Confirm that you want to continue to install the package. Enter y.
Installing JNPRsbr - Juniper Networks Steel-Belted Radius (Carrier Cluster
Edition) as <JNPRsbr>
## Executing preinstall script.
## Installing part 1 of 1.
.
.
.
[ verifying class <none> ]
## Executing postinstall script.
Newly installed server directory will be backed up as:
/opt/JNPRsbr/radius/install/backups/2009:03:31-00:34:06
Installation of <JNPRsbr> was successful.
On the Linux server:
1. Log in to the Linux server as root.
2. Copy the Steel-Belted Radius Carrier installation files from their download location to the Linux server.Make sure to copy them to a local or remote hard disk partition that is readable by root.
This example copies the files from a download directory to the /tmp/sbr directory.
Execute:
98

mkdir -p /opt/tmpcp -pR /tmp/sbr/linux/* /opt/tmp/
3. Execute cd /opt/tmp/.
4. Install the package.
To install the 64-bit SBR package, execute:
sbr-cl-8.6.0.R-1.el7.x86_64.rpm on RHEL 7.3 or later.
See “Linux” on page 47 for supported RHEL versions.
5. Installation proceeds and SBR is installed at /opt/JNPRsbr/radius/install.
Setting Up a Starter Kit’s First SBR/Management Node
This section describes installing software on the first server in a Starter Kit cluster, usually a server thatyouwant to host a SBR node/management node (sm). The procedure for this first server is unique becauseit includes creating configuration files for all nodes in the cluster.
TIP: If you are going to use centralized Configuration Management (CCM) to share SBR Carrierconfiguration files between SBR nodes, remember that the primary server must be installedbefore replicas. You want the first server you work on in the cluster to be the CCM primaryserver.
Configuring the Host Software on the First Server in the Cluster
Before starting this procedure, review “Before You Install Software” on page 39. In particular, reviewrequirements for: “Setting Up External Database Connectivity (Optional)” on page 53 and “Installing theSIGTRAN Interface (Optional)” on page 55, as steps in this procedure require the server to be preconfiguredfor these capabilities.
To install software on the first server in a cluster, which you want to host a SBR Carrier and aManagementNode:
99

1. As root, navigate to the directory where you installed the Steel-Belted Radius Carrier package. Forinformation about directory in which Steel-Belted Radius Carrier package is installed, see “UnpackingSession State Register Software” on page 95.
Then, navigate to the radius/install subdirectory and run:
Execute:cd /opt/JNPRsbr/radius/install/
2. Run the configure script:
Execute:./configure
3. Review and accept the Steel-Belted Radius Carrier license agreement.
Press the spacebar to move from one page to the next. When you are prompted to accept the termsof the license agreement, enter y.
Do you accept the terms in the license agreement? [n] y
4. From the menu of configuration tasks, enter 2 to specify “Generate Cluster Definition.”
Configuring SBR Software
---------------------------------------------------------------------------
SBR 8.60.50006 cluster
on SunOS 5.10 Generic_141444-09 node MyNode_1
is not configured and processes are down, needs to be configured
---------------------------------------------------------------------------
1. Unconfigure Cluster Node
Not used when merely updating existing cluster definitions.
2. Generate Cluster Definition
Creates new or updates existing cluster definitions.
Modifies the shared directory but does not modify this node.
3. Configure Cluster Node
To be preceded by ’Generate Cluster Definition’ on any node.
Must be invoked on each and every node of the cluster.
100

4. Reconfigure RADIUS Server
Only on SBR nodes, updates the existing SBR configuration.
5. Create Temporary Cluster
Used to approximate a cluster using only this one machine.
Intended for migration and demonstration purposes only.
6. Upgrade From Restricted Cluster License
Used to upgrade from restricted cluster to regular cluster.
Removes database restriction on the number of concurrent
sessions and enables the addition of an expansion kit license
Enter number of desired configuration task, or q to quit [2]: 2
5. Specify the name of the cluster.
Enter the name exactly as you specified it in Table 9 on page 35.
Enter SBR cluster name [MyCluster]: MyCluster
6. Enter SSR license numbers and the number and type of nodes in the cluster.
If a Restricted Cluster license is provided as input for a Starter Kit license, you are not prompted foran Expansion Kit license. By default, you have a minimal cluster of two SBR nodes, two managementnodes, and two data nodes.
The SBR Cluster Starter Kit license allows you to create a minimal
cluster of 2 SBR nodes, 2 management nodes, and 2 data nodes. When
each node is installed on a separate machine the cluster topology is
denoted as {2s,2m,2d}. When SBR nodes are paired with management
nodes on the same machines the cluster topology is denoted as {2sm,2d}.
101
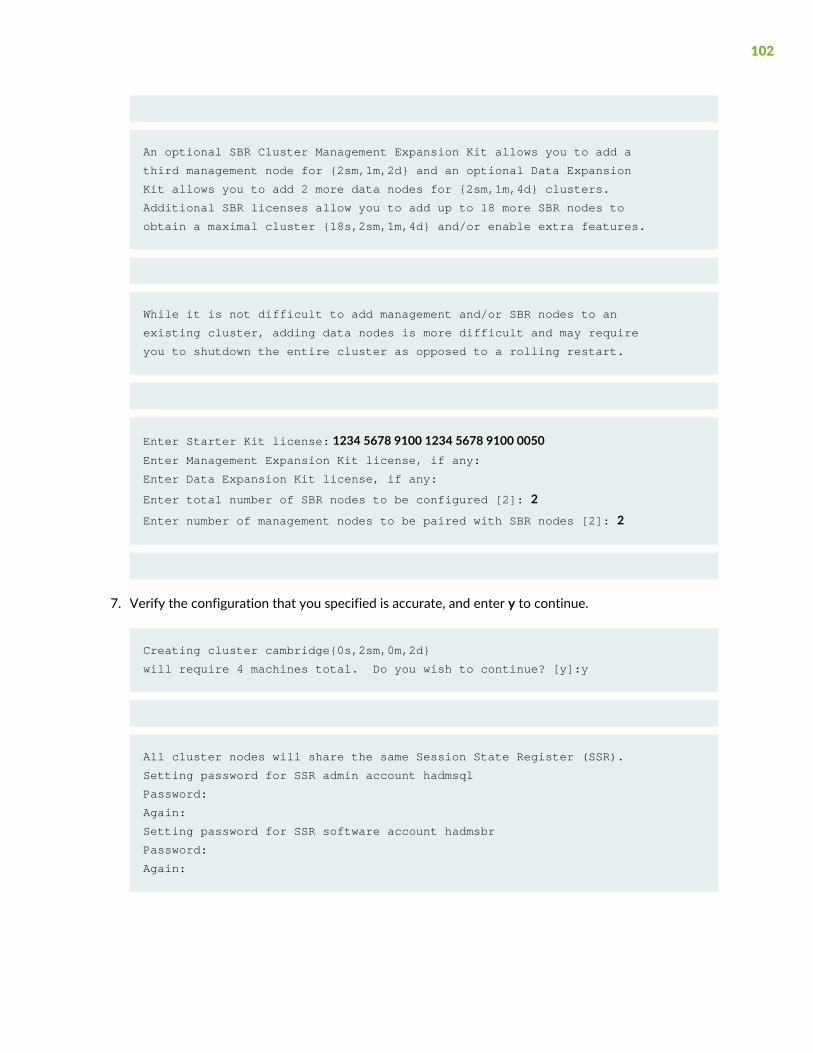
An optional SBR Cluster Management Expansion Kit allows you to add a
third management node for {2sm,1m,2d} and an optional Data Expansion
Kit allows you to add 2 more data nodes for {2sm,1m,4d} clusters.
Additional SBR licenses allow you to add up to 18 more SBR nodes to
obtain a maximal cluster {18s,2sm,1m,4d} and/or enable extra features.
While it is not difficult to add management and/or SBR nodes to an
existing cluster, adding data nodes is more difficult and may require
you to shutdown the entire cluster as opposed to a rolling restart.
Enter Starter Kit license: 1234 5678 9100 1234 5678 9100 0050Enter Management Expansion Kit license, if any:
Enter Data Expansion Kit license, if any:
Enter total number of SBR nodes to be configured [2]: 2
Enter number of management nodes to be paired with SBR nodes [2]: 2
7. Verify the configuration that you specified is accurate, and enter y to continue.
Creating cluster cambridge{0s,2sm,0m,2d}
will require 4 machines total. Do you wish to continue? [y]:y
All cluster nodes will share the same Session State Register (SSR).
Setting password for SSR admin account hadmsql
Password:
Again:
Setting password for SSR software account hadmsbr
Password:
Again:
102

Information will now be gathered for each machine in the cluster.
You will have a chance to review all information at least once
before any machines are modified.
8. Enter, for each node:
• The node name
• Type of node
• Node ID
• SBR Carrier license numbers (if required)
• The IP address for each node
The information you need is in Table 9 on page 35.
Information will now be gathered for each machine in the cluster.
You will have a chance to review all information at least once
before any machines are modified.
---------------------------------------------------------------------------
SBR 8.60.50006 cluster MyCluster{0s,2sm,0m,2d}
on SunOS 5.10 Generic_141444-09 node MyNode_1
Partial configuration at present is {0s,0sm,0m,0d} of {0s,2sm,0m,2d}
---------------------------------------------------------------------------
Enter node name [MyNode_1]: MyNode_1
Enter node type (sm) [sm]: smEnter SBR node ID (30-59) [30]:
Enter SBR node IP address by which it is known to management nodes.
Enter SBR node IP address: 192.168.0.1Enter SBR licenses meant only for this particular SBR node.
Enter one license per line and an empty line when finished.
Enter SBR full license: xxxx xxxx xxxx xxxx
Enter SBR feature license:
Enter MGMT node ID (1-3) [1]:
Enter MGMT node IP address by which it is known to other nodes.
Enter MGMT node IP address: 192.168.0.1
103

---------------------------------------------------------------------------
SBR 8.60.50006 cluster MyCluster{0s,2sm,0m,2d}
on SunOS 5.10 Generic_141444-09 node MyNode_1(sm)
Partial configuration at present is {0s,1sm,0m,0d} of {0s,2sm,0m,2d}
---------------------------------------------------------------------------
Enter node name [MyNode_2]: MyNode_2
Enter node type (sm,d) [sm]: smEnter SBR node ID (30-59) [31]:
Enter SBR node IP address by which it is known to management nodes.
Enter SBR node IP address: 192.168.0.2Enter SBR licenses meant only for this particular SBR node.
Enter one license per line and an empty line when finished.
Enter SBR full license: xxxx xxxx xxxx xxxx
Enter SBR feature license:
Enter MGMT node ID (1-3) [2]:
Enter MGMT node IP address by which it is known to other nodes.
Enter MGMT node IP address: 192.168.0.2---------------------------------------------------------------------------
SBR 8.60.50006 cluster MyCluster{0s,2sm,0m,2d}
on SunOS 5.10 Generic_141444-09 node MyNode_2(sm)
Partial configuration at present is {0s,2sm,0m,0d} of {0s,2sm,0m,2d}
---------------------------------------------------------------------------
Enter node name [MyNode_3]: MyNode_3Enter node type (d) [d]:
Enter DATA node ID (10-19) [10]: 18Enter DATA node IP address by which it is known to management nodes.
Enter DATA node IP address: 192.168.0.18---------------------------------------------------------------------------
SBR 8.60.50006 cluster MyCluster{0s,2sm,0m,2d}
on SunOS 5.10 Generic_141444-09 node MyNode_3 (sm)
Partial configuration at present is {0s,2sm,0m,1d} of {0s,2sm,0m,2d}
---------------------------------------------------------------------------
Enter node name [MyNode_4]: MyNode_4Enter node type (d) [d]:
Enter DATA node ID (10-19) [11]: 19Enter DATA node IP address by which it is known to management nodes.
Enter DATA node IP address: 192.168.0.19---------------------------------------------------------------------------
SBR 8.60.50006 cluster MyCluster{0s,2sm,0m,2d}
on SunOS 5.10 Generic_141444-09 node MyNode_4
Generated configuration is {0s,2sm,0m,2d} of {0s,2sm,0m,2d}
---------------------------------------------------------------------------
104
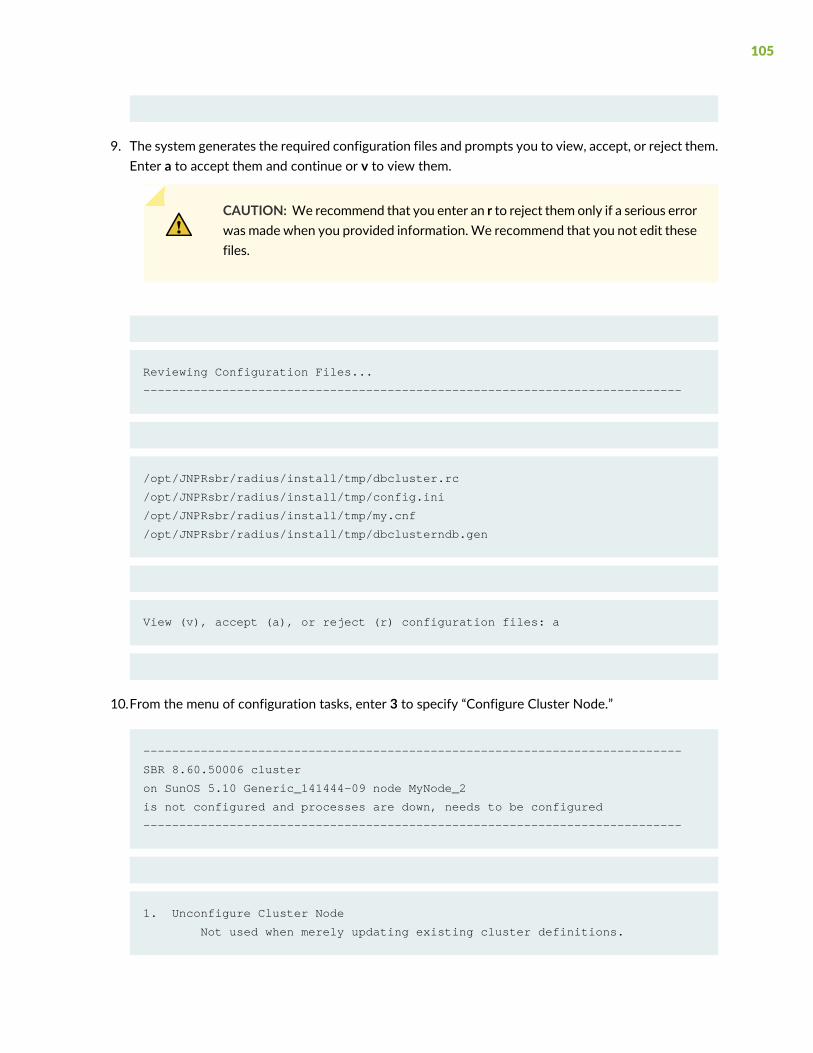
9. The system generates the required configuration files and prompts you to view, accept, or reject them.Enter a to accept them and continue or v to view them.
CAUTION: We recommend that you enter an r to reject them only if a serious errorwas made when you provided information.We recommend that you not edit thesefiles.
Reviewing Configuration Files...
---------------------------------------------------------------------------
/opt/JNPRsbr/radius/install/tmp/dbcluster.rc
/opt/JNPRsbr/radius/install/tmp/config.ini
/opt/JNPRsbr/radius/install/tmp/my.cnf
/opt/JNPRsbr/radius/install/tmp/dbclusterndb.gen
View (v), accept (a), or reject (r) configuration files: a
10.From the menu of configuration tasks, enter 3 to specify “Configure Cluster Node.”
---------------------------------------------------------------------------
SBR 8.60.50006 cluster
on SunOS 5.10 Generic_141444-09 node MyNode_2
is not configured and processes are down, needs to be configured
---------------------------------------------------------------------------
1. Unconfigure Cluster Node
Not used when merely updating existing cluster definitions.
105

2. Generate Cluster Definition
Creates new or updates existing cluster definitions.
Modifies the shared directory but does not modify this node.
3. Configure Cluster Node
To be preceded by ’Generate Cluster Definition’ on any node.
Must be invoked on each and every node of the cluster.
4. Reconfigure RADIUS Server
Only on SBR nodes, updates the existing SBR configuration.
5. Create Temporary Cluster
Used to approximate a cluster using only this one machine.
Intended for migration and demonstration purposes only.
6. Upgrade From Restricted Cluster License
Used to upgrade from restricted cluster to regular cluster.
Removes database restriction on the number of concurrent
sessions and enables the addition of an expansion kit license
Enter number of desired configuration task, or q to quit [2]: 3
11.Specify the name of the cluster.
Enter the name exactly as you specified it in Table 9 on page 35.
Enter SBR cluster name [MyCluster]:MyCluster
106

12.Specifywhether youwant to use the JRE installed in your system to enable JDBC plug-ins and JavaScriptimplementation.
Do you want to configure Java Runtime Environment for JDBC Feature [n] :
• If no, press Enter to proceed to the next prompt. SBR Carrier does not support JDBC plug-ins unlessyou specify a valid JRE path.
• If yes, type y and press Enter. You are prompted to specify the path where the JRE is installed in yoursystem. The Java Virtual Machine (JVM) architecture should be compatible with SBR Carrier.
NOTE: Java 1.8.0 or a later version is required to access the Web GUI. To support bothJDBC plug-ins and Web GUI, it is recommended to use Java 1.8.0 or a later version withthe JVM architecture compatible with your SBR Carrier. For example, if you are using the64-bit version of SBR Carrier, you must use the 64-bit version of Java 1.8.0 or later.
Enter 64-bit libjvm.so path (Ex: /opt/jvm/jre/lib/amd64/server/ ) :
NOTE: If you enter an incorrect JVM path three times, SBR Carrier proceeds to the nextstep. In this case, you will not be able to use JDBC plug-ins. To specify the valid JVM path,you need to run the configure script again.
13.The script prompts for the type of installation, either a new installation or a migration from an earlierrelease:
Please enter backup or radius directory from which to migrate.
Enter n for new configuration, s to search, or q to quit
[n]: n
• For a new installation, enter n.
• If you are migrating an existing Steel-Belted Radius Carrier installation and have copied a previousrelease’s files to the Release 8.6.0 server (in “Creating a Copy of Existing SBR Server Release Filesfor Migration” on page 54), enter the directory path to the copy of the old installation.
For example:
107

[/opt/JNPRsbr/PreviousInstall]:
• If you want to search well known locations in the file system for pre-existing installations or backupsof SBR software, enter s. You are presented with a list of directories from which you may choose tomigrate, if any are found.
14.Specify the username of the UNIX account that you intend to use to gain access to this machine usingthe Web GUI. The UNIX account must be defined on this machine (for example by /etc/passwd orNIS) and must have a valid, non-empty password. Additional accounts may be specified using theWebGUI.
Enter initial admin user (UNIX account must have a valid password) [root]:
Press Enter to accept the default, root.
15.Specify whether you want to set up Centralized Configuration Management (CCM).
CCM allows you to replicate substantial portions of a particular SBR node's configuration acrossmultipleSBR nodes. The SBR node to be replicated is known as the primary and the SBR nodes on which theprimary configuration is replicated are known as replicas. The entire set of an SBR primary and all ofits replicas are known as an SBR replication group. Although any given SBR replication group typicallyincludes all SBR nodes in a particular SSR cluster, an SBR replication group can span multiple clusters(including standalone SBR nodes) or can span only a few SBR nodes in a cluster. SBR nodes for whichCCM is not enabled are known as autonomous because they are configured independently of oneanother.
The rest of this task assumes that you want to configure a typical SBR replication group that includesall SBR nodes in this cluster. If you do not want to enable CCM then skip the rest of this task.
Enable Centralized Configuration Management (CCM) for this SBR node? [n]: y
16.Specify the server role.
a. When CCM is enabled, configure this first SBR/management (sm) node as an SBR primary.
Configure SBR node as CCM primary (p) or replica (r)? [r]: p
b. You are prompted to configure the primary secret you want to use on this SBR replication group:
108

Enter primary host secret:
Type the secret string and press Enter.
c. You are prompted to confirm the primary secret.
Confirm primary host secret:
Type the secret string again and press Enter.
17.Specify whether you want to use the auto-restart module that automatically restarts the SBR Carrierserver in case of an unexpected shutdown.
Do you want to enable "Radius WatchDog" Process? [n]: Y
Radius WatchDog feature set to Enable
Please ensure that Perl 5 or better is installed.
NOTE: If Perl version 5 is not installed, the radiusd script will not run, even if enabled byconfiguration, and SBR Carrier will operate without the auto-restart module running.
18.Specifywhether youwant to configure SBRCarrier to provide LDAP server emulation for configurationand statistics using the LCI.
Do you want to enable LCI? [n] :
• If no, press Enter to accept the default.
• If yes, enter y and press Enter. You are prompted to provide information for LCI configuration.
a. When you are prompted for the port number, enter the port number that is used for communicationbetween SBR Carrier and the LDAP client.
NOTE: SBR Carrier uses port 667 as the default for LDAP emulation to avoid conflictwith other LDAP servers.
Configure LCI Port [667]: 1026
109

b. The script displays the interfaces available in the system.When you are prompted to enter interfaceaddresses onwhich Steel-Belted Radius Carrier should listen for LCI requests, enter the addressesyou want to use from the Available Interfaces list.
LCI Interface Configuration :
Available interfaces :
127.0.0.1
10.212.10.66
HELP : Enter one interface per line and an empty line when finished.
Enter LCI interface addresses from the above list.
Enter LCI interface address : 10.212.10.66
Enter LCI interface address : 127.0.0.1
Enter LCI interface address :
NOTE: SBR Carrier uses all interfaces for listening to LCI requests if you do not enterany interfaces.
c. Specify whether you want to change the default LCI password to prevent unauthorized LDAPclients from accessing your database.
Do you want to change LCI Password? [n]:
• If no, press Enter to accept the default password.
• If yes, enter y and press Enter. You are prompted to enter a new password.
Do you want to change LCI Password? [n]: Y
Password must meet the following requirements:
1. 6-8 Alphanumeric characters.
2. No Special characters other than underscore (’_’).
Enter Password:
Confirm Password:
Password will be changed when SBR restarts.
110

NOTE: Make sure that the entered password is at least 6 alphanumeric characters andnot more than 8 characters in length. The password should not include any specialcharacters other than underscore (’_’).
NOTE: The configure script also checks whether the LDAP utilities (such as ldapdelete,ldapmodify, and ldapsearch) are installed in your system. For Linux, a warning messageis displayed if you have not installed any of these utilities in your system. For Solaris,LDAP utilities are shipped with SBR Carrier package.
19.Specify whether you want to configure Steel-Belted Radius Carrier for use with an Oracle database.
To support this option, the server must already be configured as an Oracle client. (See “Setting UpExternal Database Connectivity (Optional)” on page 53.)
Configuring for use with generic database
Do you want to configure for use with Oracle? [n]:
If no, press Enter to accept the default.
If yes, type y and press Enter. You are prompted for version and path information for the Oracle libraryfiles.
Do you want to configure for use with Oracle? [n]: y
Supported Oracle versions: 10, 11, 12
What version of Oracle will be used? [10]: 10
Configuring for use with Oracle 10
Setting the environment variable ORACLE_HOME
Enter ORACLE_HOME [/dbms/u10/app/oracle/product/10.2.0]:
Setting the environment variable LD_LIBRARY_PATH
Enter path for Oracle shared libraries
[/dbms/u10/app/oracle/product/10.2.0/lib]
Setting the environment variable TNS_ADMIN
Enter TNS_AMDIN [/dbms/u10/app/oracle/product/10.2.0/network/admin]:
NOTE: You must configure 64-bit Oracle client for 64-bit SBR Carrier.
111
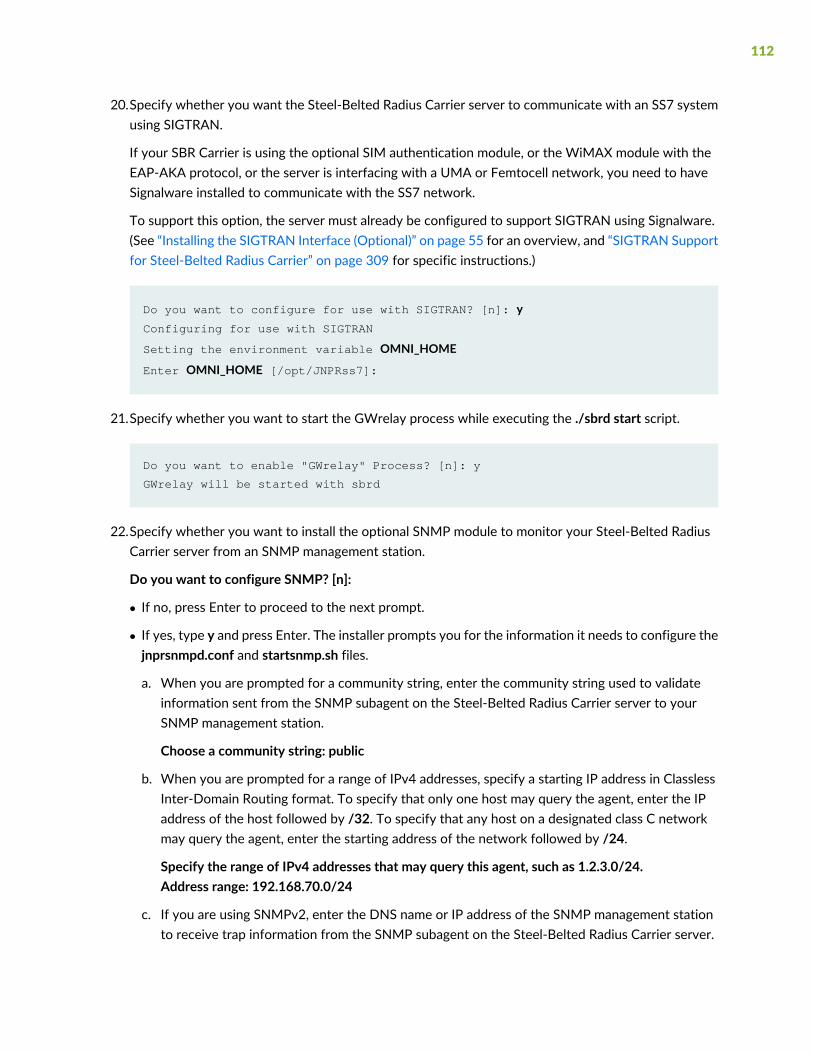
20.Specify whether you want the Steel-Belted Radius Carrier server to communicate with an SS7 systemusing SIGTRAN.
If your SBR Carrier is using the optional SIM authentication module, or the WiMAX module with theEAP-AKA protocol, or the server is interfacing with a UMA or Femtocell network, you need to haveSignalware installed to communicate with the SS7 network.
To support this option, the server must already be configured to support SIGTRAN using Signalware.(See “Installing the SIGTRAN Interface (Optional)” on page 55 for an overview, and “SIGTRAN Supportfor Steel-Belted Radius Carrier” on page 309 for specific instructions.)
Do you want to configure for use with SIGTRAN? [n]: yConfiguring for use with SIGTRAN
Setting the environment variable OMNI_HOME
Enter OMNI_HOME [/opt/JNPRss7]:
21.Specify whether you want to start the GWrelay process while executing the ./sbrd start script.
Do you want to enable "GWrelay" Process? [n]: y
GWrelay will be started with sbrd
22.Specify whether you want to install the optional SNMP module to monitor your Steel-Belted RadiusCarrier server from an SNMP management station.
Do you want to configure SNMP? [n]:
• If no, press Enter to proceed to the next prompt.
• If yes, type y and press Enter. The installer prompts you for the information it needs to configure thejnprsnmpd.conf and startsnmp.sh files.
a. When you are prompted for a community string, enter the community string used to validateinformation sent from the SNMP subagent on the Steel-Belted Radius Carrier server to yourSNMP management station.
Choose a community string: public
b. When you are prompted for a range of IPv4 addresses, specify a starting IP address in ClasslessInter-Domain Routing format. To specify that only one host may query the agent, enter the IPaddress of the host followed by /32. To specify that any host on a designated class C networkmay query the agent, enter the starting address of the network followed by /24.
Specify the range of IPv4 addresses that may query this agent, such as 1.2.3.0/24.Address range: 192.168.70.0/24
c. If you are using SNMPv2, enter the DNS name or IP address of the SNMP management stationto receive trap information from the SNMP subagent on the Steel-Belted Radius Carrier server.
112
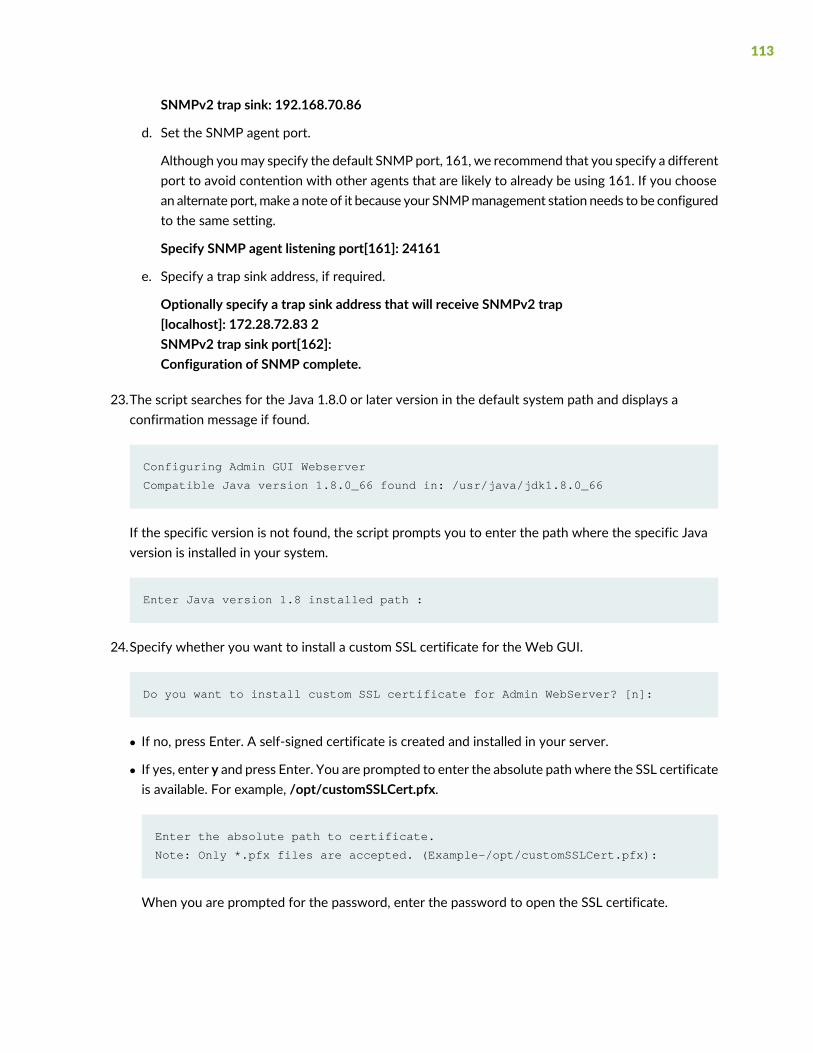
SNMPv2 trap sink: 192.168.70.86
d. Set the SNMP agent port.
Although youmay specify the default SNMP port, 161, we recommend that you specify a differentport to avoid contention with other agents that are likely to already be using 161. If you choosean alternate port, make a note of it because your SNMPmanagement station needs to be configuredto the same setting.
Specify SNMP agent listening port[161]: 24161
e. Specify a trap sink address, if required.
Optionally specify a trap sink address that will receive SNMPv2 trap[localhost]: 172.28.72.83 2SNMPv2 trap sink port[162]:Configuration of SNMP complete.
23.The script searches for the Java 1.8.0 or later version in the default system path and displays aconfirmation message if found.
Configuring Admin GUI Webserver
Compatible Java version 1.8.0_66 found in: /usr/java/jdk1.8.0_66
If the specific version is not found, the script prompts you to enter the path where the specific Javaversion is installed in your system.
Enter Java version 1.8 installed path :
24.Specify whether you want to install a custom SSL certificate for the Web GUI.
Do you want to install custom SSL certificate for Admin WebServer? [n]:
• If no, press Enter. A self-signed certificate is created and installed in your server.
• If yes, enter y and press Enter. You are prompted to enter the absolute path where the SSL certificateis available. For example, /opt/customSSLCert.pfx.
Enter the absolute path to certificate.
Note: Only *.pfx files are accepted. (Example-/opt/customSSLCert.pfx):
When you are prompted for the password, enter the password to open the SSL certificate.
113
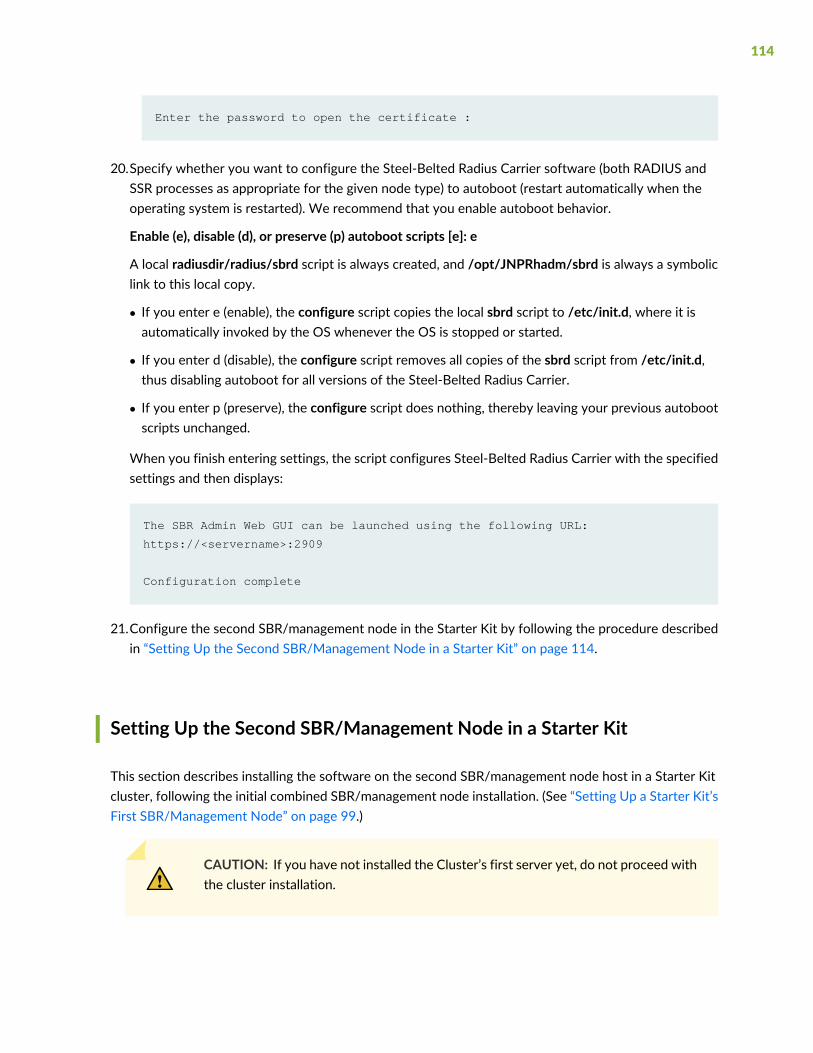
Enter the password to open the certificate :
20.Specify whether you want to configure the Steel-Belted Radius Carrier software (both RADIUS andSSR processes as appropriate for the given node type) to autoboot (restart automatically when theoperating system is restarted). We recommend that you enable autoboot behavior.
Enable (e), disable (d), or preserve (p) autoboot scripts [e]: e
A local radiusdir/radius/sbrd script is always created, and /opt/JNPRhadm/sbrd is always a symboliclink to this local copy.
• If you enter e (enable), the configure script copies the local sbrd script to /etc/init.d, where it isautomatically invoked by the OS whenever the OS is stopped or started.
• If you enter d (disable), the configure script removes all copies of the sbrd script from /etc/init.d,thus disabling autoboot for all versions of the Steel-Belted Radius Carrier.
• If you enter p (preserve), the configure script does nothing, thereby leaving your previous autobootscripts unchanged.
When you finish entering settings, the script configures Steel-Belted Radius Carrier with the specifiedsettings and then displays:
The SBR Admin Web GUI can be launched using the following URL:
https://<servername>:2909
Configuration complete
21.Configure the second SBR/management node in the Starter Kit by following the procedure describedin “Setting Up the Second SBR/Management Node in a Starter Kit” on page 114.
Setting Up the Second SBR/Management Node in a Starter Kit
This section describes installing the software on the second SBR/management node host in a Starter Kitcluster, following the initial combined SBR/management node installation. (See “Setting Up a Starter Kit’sFirst SBR/Management Node” on page 99.)
CAUTION: If you have not installed the Cluster’s first server yet, do not proceed withthe cluster installation.
114

Populating the JNPRShare Directory
Before running the configure script, make a local copy of the configuration files that were created duringinstallation on the first server. (In the following procedures, FTP is used to copy files. Youmay usewhateverdistribution mechanism you want to keep the share directories synchronized, so long as all /JNPRsharedirectories on all servers are readable and writable by the root and hadm accounts.)
To copy the cluster’s base configuration files to this target machine:
1. Log in as hadm.
2. Change directories to the install directory on the local server.
Execute:cd /opt/JNPRshare/install/ <cluster_name>
For example:cd /opt/JNPRshare/install/MyCluster
3. Use FTP binary mode to connect to the first server that was set up and navigate to the radius/installsubdirectory of the directory in which the JNPRsbr packagewas installed (/opt/JNPRsbr/radius/installby default) on the source server.
4. Execute a get command to transfer the configure <cluster name> .tar file to the local directory.
For example:binget configure.MyCluster.tar
5. Extract the configuration files from the archive.
For example:tar xvf configure.MyCluster.tar
The output display includes five files similar to this example:
$ tar xvf configure.MyCluster.tarx dbcluster.rc, 1925 bytes, 4 tape blocks
x config.ini, 2435 bytes, 5 tape blocks
x my.cnf, 1017 bytes, 2 tape blocks
x dbclusterndb.gen, 33474 bytes, 66 tape blocks
x dbcluster.dat, 921 bytes, 2 tape blocks
Configuring Host Software on the Second SBR Carrier and Management Node
Before starting this procedure, review “Before You Install Software” on page 39. In particular, reviewrequirements for: “Setting Up External Database Connectivity (Optional)” on page 53 and “Installing the
115

SIGTRAN Interface (Optional)” on page 55, as steps in this procedure require the server to be preconfiguredfor these capabilities.
To configure SSR software on the second SBR Carrier and management node host in a Starter Kit cluster:
1. As root, navigate to the directory where you installed the Steel-Belted Radius Carrier package. Forinformation about directory in which Steel-Belted Radius Carrier package is installed, see “UnpackingSession State Register Software” on page 95.
Navigate to the radius/install subdirectory and run:
Execute:cd /opt/JNPRsbr/radius/install/
2. Execute the configure script to install the Steel-Belted Radius Carrier server software:
Execute:./configure
3. Review and accept the Steel-Belted Radius Carrier license agreement.
Press the spacebar to move from one page to the next. When you are prompted to accept the termsof the license agreement, enter y.
Do you accept the terms in the license agreement? [n] y
4. From the menu of configuration tasks, enter 3 to specify Configure Cluster Node.
Configuring SBR Software
---------------------------------------------------------------------------
SBR 8.60.50006 cluster
on SunOS 5.10 Generic_141444-09 node MyNode_2
is not configured and processes are down, needs to be configured
---------------------------------------------------------------------------
1. Unconfigure Cluster Node
Not used when merely updating existing cluster definitions.
116

2. Generate Cluster Definition
Creates new or updates existing cluster definitions.
Modifies the shared directory but does not modify this node.
3. Configure Cluster Node
To be preceded by ’Generate Cluster Definition’ on any node.
Must be invoked on each and every node of the cluster.
4. Reconfigure RADIUS Server
Only on SBR nodes, updates the existing SBR configuration.
5. Create Temporary Cluster
Used to approximate a cluster using only this one machine.
Intended for migration and demonstration purposes only.
6. Upgrade From Restricted Cluster License
Used to upgrade from restricted cluster to regular cluster.
Removes database restriction on the number of concurrent
sessions and enables the addition of an expansion kit license
Enter number of desired configuration task, or q to quit [2]: 3
5. Specify the name of the cluster.
Enter the name exactly as you specified it in Table 9 on page 35.
Enter SBR cluster name [MyCluster]:MyCluster
117
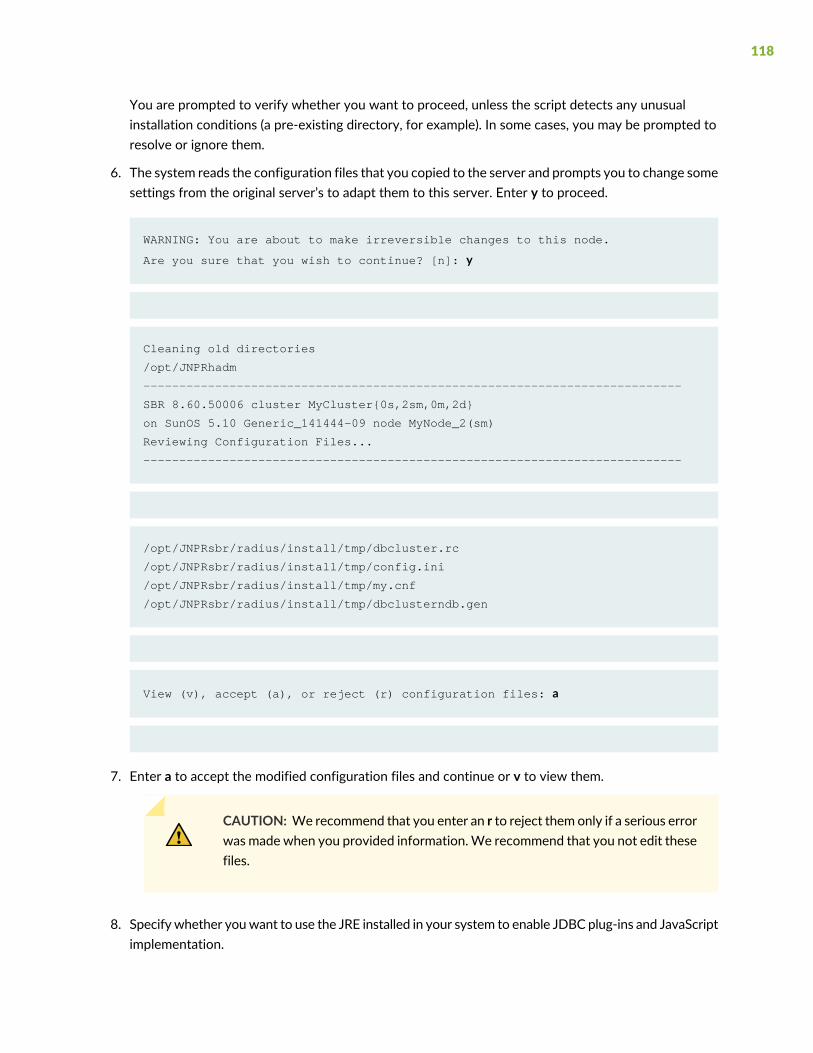
You are prompted to verify whether you want to proceed, unless the script detects any unusualinstallation conditions (a pre-existing directory, for example). In some cases, you may be prompted toresolve or ignore them.
6. The system reads the configuration files that you copied to the server and prompts you to change somesettings from the original server’s to adapt them to this server. Enter y to proceed.
WARNING: You are about to make irreversible changes to this node.
Are you sure that you wish to continue? [n]: y
Cleaning old directories
/opt/JNPRhadm
---------------------------------------------------------------------------
SBR 8.60.50006 cluster MyCluster{0s,2sm,0m,2d}
on SunOS 5.10 Generic_141444-09 node MyNode_2(sm)
Reviewing Configuration Files...
---------------------------------------------------------------------------
/opt/JNPRsbr/radius/install/tmp/dbcluster.rc
/opt/JNPRsbr/radius/install/tmp/config.ini
/opt/JNPRsbr/radius/install/tmp/my.cnf
/opt/JNPRsbr/radius/install/tmp/dbclusterndb.gen
View (v), accept (a), or reject (r) configuration files: a
7. Enter a to accept the modified configuration files and continue or v to view them.
CAUTION: We recommend that you enter an r to reject them only if a serious errorwas made when you provided information.We recommend that you not edit thesefiles.
8. Specifywhether youwant to use the JRE installed in your system to enable JDBC plug-ins and JavaScriptimplementation.
118

Do you want to configure Java Runtime Environment for JDBC Feature [n] :
• If no, press Enter to proceed to the next prompt. SBR Carrier does not support JDBC plug-ins unlessyou specify a valid JRE path.
• If yes, type y and press Enter. You are prompted to specify the path where the JRE is installed in yoursystem. The Java Virtual Machine (JVM) architecture should be compatible with SBR Carrier.
NOTE: Java 1.8.0 or a later version is required to access the Web GUI. To support bothJDBC plug-ins and Web GUI, it is recommended to use Java 1.8.0 or a later version withthe JVM architecture compatible with your SBR Carrier. For example, if you are using the64-bit version of SBR Carrier, you must use the 64-bit version of Java 1.8.0 or later.
Enter 64-bit libjvm.so path (Ex: /opt/jvm/jre/lib/amd64/server/ ) :
NOTE: If you enter an incorrect JVM path three times, SBR Carrier proceeds to the nextstep. In this case, you will not be able to use JDBC plug-ins. To specify the valid JVM path,you need to run the configure script again.
9. Specify the server’s initial admin user.
Enter initial admin user (UNIX account must have a valid password) [root]:
Press Enter to accept the default, root.
10.Specify whether you want to set up Centralized Configuration Management (CCM).
Enable Centralized Configuration Management (CCM) for this SBR node? [n]: y
Then specify the server role.
Configure SBR node as CCM primary (p) or replica (r)? [r]: r
119
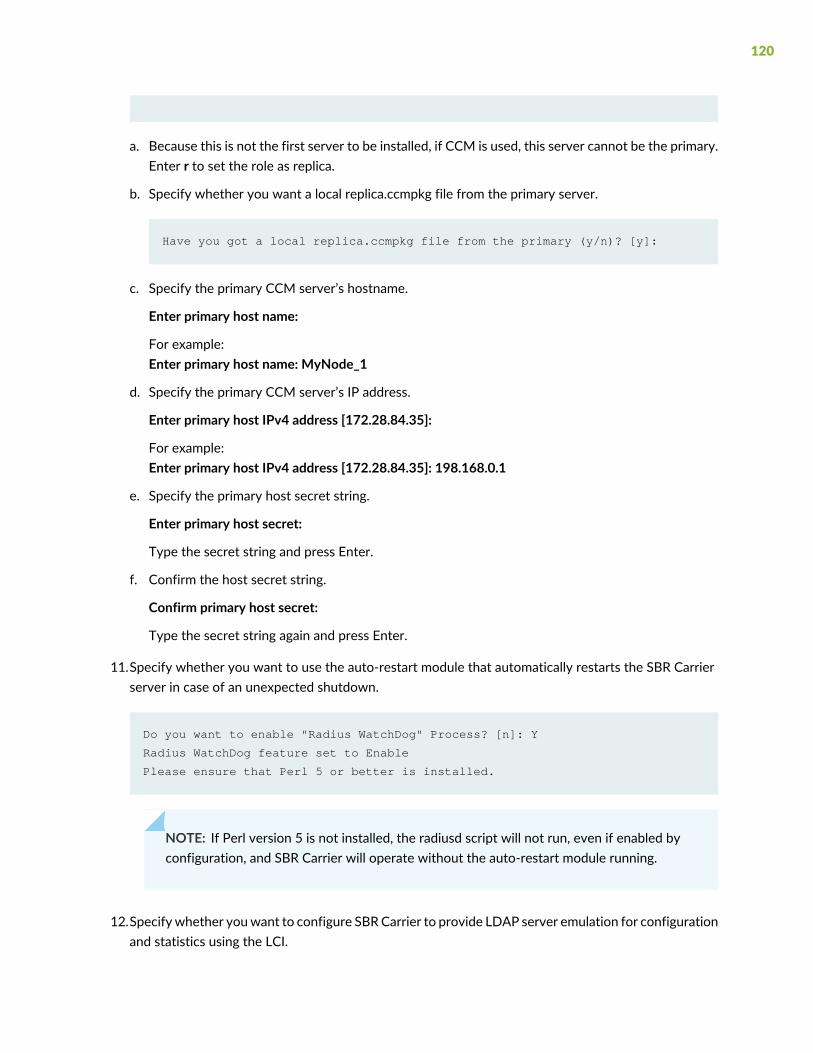
a. Because this is not the first server to be installed, if CCM is used, this server cannot be the primary.Enter r to set the role as replica.
b. Specify whether you want a local replica.ccmpkg file from the primary server.
Have you got a local replica.ccmpkg file from the primary (y/n)? [y]:
c. Specify the primary CCM server’s hostname.
Enter primary host name:
For example:Enter primary host name: MyNode_1
d. Specify the primary CCM server’s IP address.
Enter primary host IPv4 address [172.28.84.35]:
For example:Enter primary host IPv4 address [172.28.84.35]: 198.168.0.1
e. Specify the primary host secret string.
Enter primary host secret:
Type the secret string and press Enter.
f. Confirm the host secret string.
Confirm primary host secret:
Type the secret string again and press Enter.
11.Specify whether you want to use the auto-restart module that automatically restarts the SBR Carrierserver in case of an unexpected shutdown.
Do you want to enable "Radius WatchDog" Process? [n]: Y
Radius WatchDog feature set to Enable
Please ensure that Perl 5 or better is installed.
NOTE: If Perl version 5 is not installed, the radiusd script will not run, even if enabled byconfiguration, and SBR Carrier will operate without the auto-restart module running.
12.Specifywhether youwant to configure SBRCarrier to provide LDAP server emulation for configurationand statistics using the LCI.
120

Do you want to enable LCI? [n] :
• If no, press Enter to accept the default.
• If yes, enter y and press Enter. You are prompted to provide information for LCI configuration.
a. When you are prompted for the port number, enter the port number that is used for communicationbetween SBR Carrier and the LDAP client.
NOTE: SBR Carrier uses port 667 as the default for LDAP emulation to avoid conflictwith other LDAP servers.
Configure LCI Port [667]: 1026
b. The script displays the interfaces available in the system.When you are prompted to enter interfaceaddresses onwhich Steel-Belted Radius Carrier should listen for LCI requests, enter the addressesyou want to use from the Available Interfaces list.
LCI Interface Configuration :
Available interfaces :
127.0.0.1
10.212.10.66
HELP : Enter one interface per line and an empty line when finished.
Enter LCI interface addresses from the above list.
Enter LCI interface address : 10.212.10.66
Enter LCI interface address : 127.0.0.1
Enter LCI interface address :
NOTE: SBR Carrier uses all interfaces for listening to LCI requests if you do not enterany interfaces.
c. Specify whether you want to change the default LCI password to prevent unauthorized LDAPclients from accessing your database.
121

Do you want to change LCI Password? [n]:
• If no, press Enter to accept the default password.
• If yes, enter y and press Enter. You are prompted to enter a new password.
Do you want to change LCI Password? [n]: Y
Password must meet the following requirements:
1. 6-8 Alphanumeric characters.
2. No Special characters other than underscore (’_’).
Enter Password:
Confirm Password:
Password will be changed when SBR restarts.
NOTE: Make sure that the entered password is at least 6 alphanumeric characters andnot more than 8 characters in length. The password should not include any specialcharacters other than underscore (’_’).
NOTE: The configure script also checks whether the LDAP utilities (such as ldapdelete,ldapmodify, and ldapsearch) are installed in your system. For Linux, a warning messageis displayed if you have not installed any of these utilities in your system. For Solaris,LDAP utilities are shipped with SBR Carrier package.
13.Specify whether you want to configure Steel-Belted Radius Carrier for use with an Oracle database.
To support this option, the server must already be configured as an Oracle client (See “Setting UpExternal Database Connectivity (Optional)” on page 53.).
Configuring for use with generic databaseDo you want to configure for use with Oracle? [n]:
If no, press Enter.
If yes, type y and press Enter. You are prompted for version and path information for the Oracle libraryfiles.
Do you want to configure for use with Oracle? [n]: ySupported Oracle versions: 10, 11, 12
122

What version of Oracle will be used? [10]: 10Configuring for use with Oracle 10Setting the environment variable ORACLE_HOMEEnter ORACLE_HOME [/dbms/u10/app/oracle/product/10.2.0]:Setting the environment variable LD_LIBRARY_PATHEnter path for Oracle shared libraries[/dbms/u10/app/oracle/product/10.2.0/lib]:Setting the environment variable TNS_ADMINEnter TNS_AMDIN[/dbms/u10/app/oracle/product/10.2.0/network/admin]:
NOTE: You must configure 64-bit Oracle client for 64-bit SBR Carrier.
14.Specify whether you want the Steel-Belted Radius Carrier server to communicate with an SS7 systemusing SIGTRAN.
To support this option, the server must already be configured to support SIGTRAN using Signalware.(See “Installing the SIGTRAN Interface (Optional)” on page 55 for an overview, and “SIGTRAN Supportfor Steel-Belted Radius Carrier” on page 309 for specific instructions.)
Do you want to configure for use with SIGTRAN? [n]: yConfiguring for use with SIGTRAN
Setting the environment variable OMNI_HOME
Enter OMNI_HOME [/opt/JNPRss7]:
15.Specify whether you want to start the GWrelay process while executing the ./sbrd start script.
Do you want to enable "GWrelay" Process? [n]: y
GWrelay feature set to Enable
16.Specify whether you want to install the optional SNMP module to monitor your Steel-Belted RadiusCarrier server from an SNMP management station.
Do you want to configure SNMP? [n]:
• If no, press Enter to proceed to the next prompt.
• If yes, type y and press Enter. The installer prompts you for the information it needs to configure thejnprsnmpd.conf and startsnmp.sh files.
123
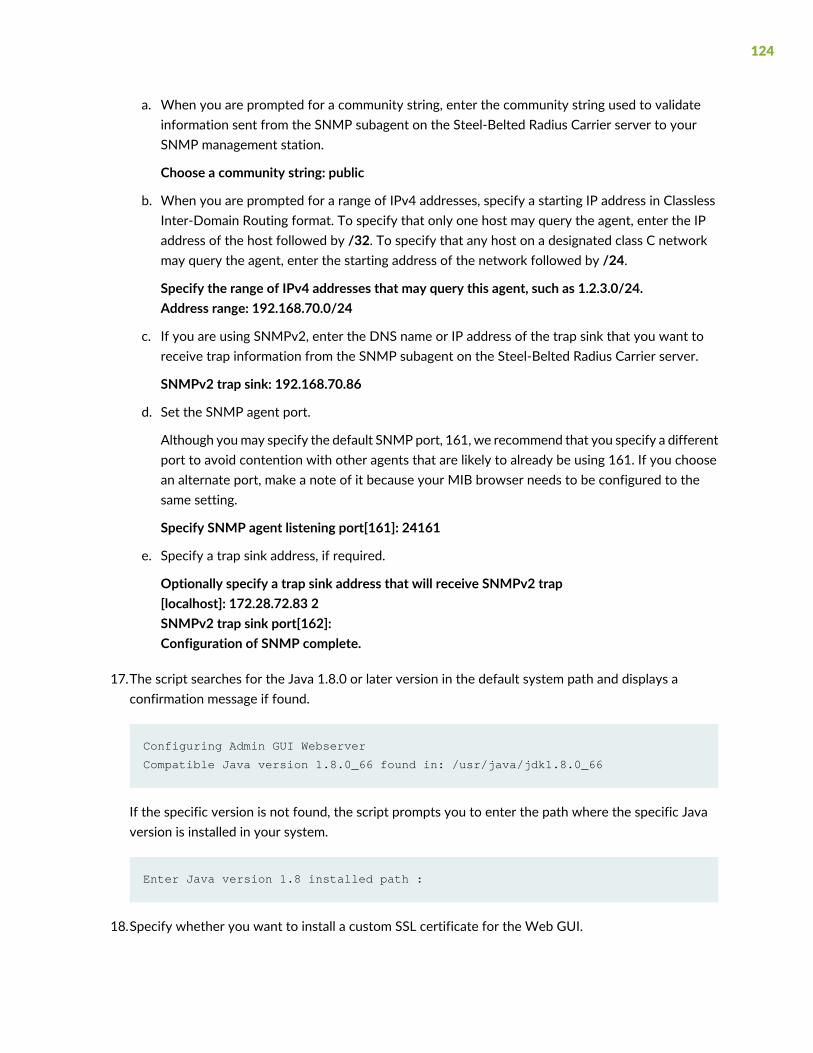
a. When you are prompted for a community string, enter the community string used to validateinformation sent from the SNMP subagent on the Steel-Belted Radius Carrier server to yourSNMP management station.
Choose a community string: public
b. When you are prompted for a range of IPv4 addresses, specify a starting IP address in ClasslessInter-Domain Routing format. To specify that only one host may query the agent, enter the IPaddress of the host followed by /32. To specify that any host on a designated class C networkmay query the agent, enter the starting address of the network followed by /24.
Specify the range of IPv4 addresses that may query this agent, such as 1.2.3.0/24.Address range: 192.168.70.0/24
c. If you are using SNMPv2, enter the DNS name or IP address of the trap sink that you want toreceive trap information from the SNMP subagent on the Steel-Belted Radius Carrier server.
SNMPv2 trap sink: 192.168.70.86
d. Set the SNMP agent port.
Although youmay specify the default SNMP port, 161, we recommend that you specify a differentport to avoid contention with other agents that are likely to already be using 161. If you choosean alternate port, make a note of it because your MIB browser needs to be configured to thesame setting.
Specify SNMP agent listening port[161]: 24161
e. Specify a trap sink address, if required.
Optionally specify a trap sink address that will receive SNMPv2 trap[localhost]: 172.28.72.83 2SNMPv2 trap sink port[162]:Configuration of SNMP complete.
17.The script searches for the Java 1.8.0 or later version in the default system path and displays aconfirmation message if found.
Configuring Admin GUI Webserver
Compatible Java version 1.8.0_66 found in: /usr/java/jdk1.8.0_66
If the specific version is not found, the script prompts you to enter the path where the specific Javaversion is installed in your system.
Enter Java version 1.8 installed path :
18.Specify whether you want to install a custom SSL certificate for the Web GUI.
124

Do you want to install custom SSL certificate for Admin WebServer? [n]:
• If no, press Enter. A self-signed certificate is created and installed in your server.
• If yes, enter y and press Enter. You are prompted to enter the absolute path where the SSL certificateis available. For example, /opt/customSSLCert.pfx.
Enter the absolute path to certificate.
Note: Only *.pfx files are accepted. (Example-/opt/customSSLCert.pfx):
When you are prompted for the password, enter the password to open the SSL certificate.
Enter the password to open the certificate :
14.Specify whether you want to configure the Steel-Belted Radius Carrier software (both RADIUS andSSR processes as appropriate for the given node type) to autoboot (restart automatically when theoperating system is restarted). We recommend that you enable this behavior.
Enable (e), disable (d), or preserve (p) autoboot scripts [e]: e
A local /radiusdir/radius/sbrd script is always created, and /opt/JNPRhadm/sbrd is always a symboliclink to this local copy.
• If you enter e (enable), the configure script copies the local sbrd script to /etc/init.d, where it isautomatically invoked by the OS whenever the OS is stopped or started.
• If you enter d (disable), the configure script removes all copies of the sbrd script from /etc/init.d,thus, disabling autoboot for all versions of Steel-Belted Radius Carrier.
• If you enter p (preserve), the configure script does nothing, thereby leaving your previous autobootscripts unchanged.
15.When prompted, confirm that youwant the installation to proceed and to configure Steel-Belted RadiusCarrier with the specified settings. When the script finishes, it displays:
The SBR Admin Web GUI can be launched using the following URL:
https://<servername>:2909
Configuration complete
16.Configure the two data nodes in the Starter Kit using the procedure described in “Setting Up DataNode Hosts Included with the Starter Kit” on page 126.
125

Setting Up Data Node Hosts Included with the Starter Kit
Use this procedure for any data node host installation. The examples in this section install and set up eachof the two data nodes in a Starter Kit, using theMyCluster cluster example, but the procedure is the samefor expansion kit installations.
NOTE: For performance reasons, the SSR ndbmtd processes on data (D) nodes are configuredto execute under the UNIX root account by default, as opposed to the UNIX hadm account. Inparticular, this allows the ndbmtd processes to lock data in physical memory, which is faster, asopposed to allowing the OS to use swap space on disk, which is slower. The UNIX root accountprivilege is required in order to lock data in physical memory.
• The relevant configuration item is the #sbrd-ndbd-run-as-root = true parameter in the [ndbd]section of the /opt/JNPRhadm/my.cnf file. Note that the leading # character is required todistinguish this parameter as a sbrd script parameter; this parameter is not a comment and isalways active. When the value of this parameter is true, the ndbmtd processes execute underthe UNIX root account.When the value of this parameter is false (or if the parameter is missingentirely), the ndbmtd processes execute under the UNIX hadm account. The value of thisparameter can only be changed immediately after configuring a data (D) node. The value ofthis parameter cannot be changed after the SSR processes are running.
• We recommend, although it is not necessary, that the parameter be configured the same onall data (D) nodes. In order to change the value of this parameter at a later time, you mustunconfigure the data (D) node and then reconfigure it again.
• When the ndbmtd processes are executed under the UNIX root account, it is extremelyimportant that the DataMemory parameter in the [ndbd default] section of the/opt/JNPRhadm/config.ini file be configured properly with respect to the amount of physicalmemory that is actually available on the data (D) node. If the data (D) node does not haveenough physical memory available, then the ndbmtd processes can starve the entire machine,including the OS itself, for memory. By default, SBRC is configured under the assumption thatat least 8 GB of memory is available solely for ndbmtd processes. In practice, more than 8 GBis required to support the OS and other applications.
Striping Data Nodes
For performance reasons, the data stored in the Session State Register (SSR) should be striped. If youchoose not to enable striping, the SBR Carrier software operates in demonstrationmodewithout enforcingminimummemory requirements.When operating in demonstrationmode, the SBRCarrier softwaremakesa best effort attempt to operate in spite of various deficiencies that would normally prevent operationdue to poor performance.
126
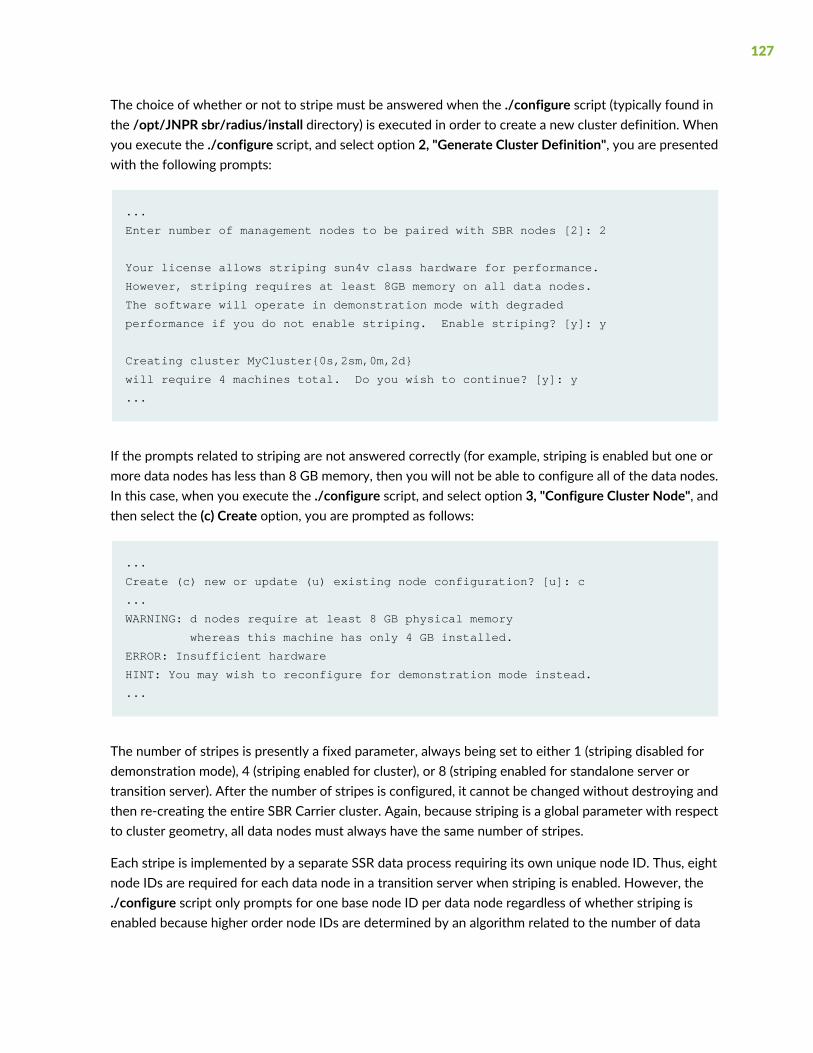
The choice of whether or not to stripe must be answered when the ./configure script (typically found inthe /opt/JNPR sbr/radius/install directory) is executed in order to create a new cluster definition. Whenyou execute the ./configure script, and select option 2, "Generate Cluster Definition", you are presentedwith the following prompts:
...
Enter number of management nodes to be paired with SBR nodes [2]: 2
Your license allows striping sun4v class hardware for performance.
However, striping requires at least 8GB memory on all data nodes.
The software will operate in demonstration mode with degraded
performance if you do not enable striping. Enable striping? [y]: y
Creating cluster MyCluster{0s,2sm,0m,2d}
will require 4 machines total. Do you wish to continue? [y]: y
...
If the prompts related to striping are not answered correctly (for example, striping is enabled but one ormore data nodes has less than 8 GB memory, then you will not be able to configure all of the data nodes.In this case, when you execute the ./configure script, and select option 3, "Configure Cluster Node", andthen select the (c) Create option, you are prompted as follows:
...
Create (c) new or update (u) existing node configuration? [u]: c
...
WARNING: d nodes require at least 8 GB physical memory
whereas this machine has only 4 GB installed.
ERROR: Insufficient hardware
HINT: You may wish to reconfigure for demonstration mode instead.
...
The number of stripes is presently a fixed parameter, always being set to either 1 (striping disabled fordemonstration mode), 4 (striping enabled for cluster), or 8 (striping enabled for standalone server ortransition server). After the number of stripes is configured, it cannot be changed without destroying andthen re-creating the entire SBR Carrier cluster. Again, because striping is a global parameter with respectto cluster geometry, all data nodes must always have the same number of stripes.
Each stripe is implemented by a separate SSR data process requiring its own unique node ID. Thus, eightnode IDs are required for each data node in a transition server when striping is enabled. However, the./configure script only prompts for one base node ID per data node regardless of whether striping isenabled because higher order node IDs are determined by an algorithm related to the number of data
127
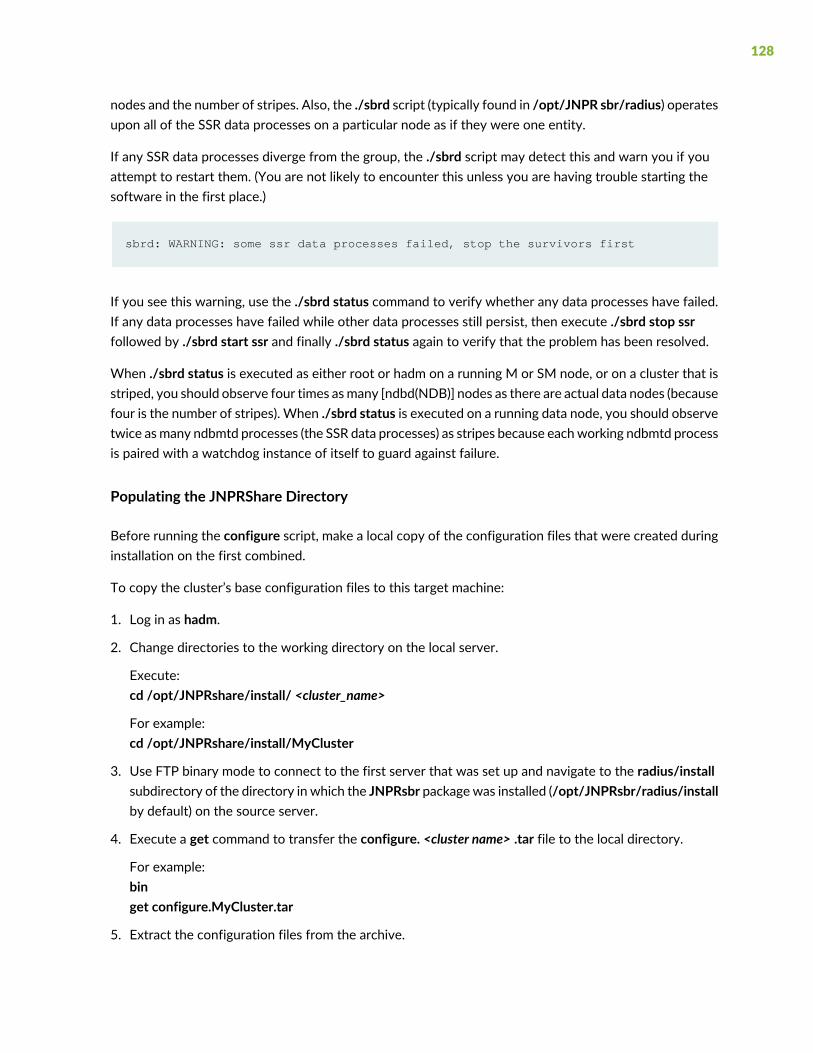
nodes and the number of stripes. Also, the ./sbrd script (typically found in /opt/JNPR sbr/radius) operatesupon all of the SSR data processes on a particular node as if they were one entity.
If any SSR data processes diverge from the group, the ./sbrd script may detect this and warn you if youattempt to restart them. (You are not likely to encounter this unless you are having trouble starting thesoftware in the first place.)
sbrd: WARNING: some ssr data processes failed, stop the survivors first
If you see this warning, use the ./sbrd status command to verify whether any data processes have failed.If any data processes have failed while other data processes still persist, then execute ./sbrd stop ssrfollowed by ./sbrd start ssr and finally ./sbrd status again to verify that the problem has been resolved.
When ./sbrd status is executed as either root or hadm on a running M or SM node, or on a cluster that isstriped, you should observe four times asmany [ndbd(NDB)] nodes as there are actual data nodes (becausefour is the number of stripes). When ./sbrd status is executed on a running data node, you should observetwice asmany ndbmtd processes (the SSR data processes) as stripes because eachworking ndbmtd processis paired with a watchdog instance of itself to guard against failure.
Populating the JNPRShare Directory
Before running the configure script, make a local copy of the configuration files that were created duringinstallation on the first combined.
To copy the cluster’s base configuration files to this target machine:
1. Log in as hadm.
2. Change directories to the working directory on the local server.
Execute:cd /opt/JNPRshare/install/ <cluster_name>
For example:cd /opt/JNPRshare/install/MyCluster
3. Use FTP binary mode to connect to the first server that was set up and navigate to the radius/installsubdirectory of the directory in which the JNPRsbr packagewas installed (/opt/JNPRsbr/radius/installby default) on the source server.
4. Execute a get command to transfer the configure. <cluster name> .tar file to the local directory.
For example:binget configure.MyCluster.tar
5. Extract the configuration files from the archive.
128

For example:tar xvf configure.MyCluster.tar
The output display includes five files similar to this example:
$ tar xvf configure.cambridge.tarx dbcluster.rc, 1925 bytes, 4 tape blocks
x config.ini, 2435 bytes, 5 tape blocks
x my.cnf, 1017 bytes, 2 tape blocks
x dbclusterndb.gen, 33474 bytes, 66 tape blocks
x dbcluster.dat, 921 bytes, 2 tape blocks
Configuring the Host Software on the Data Nodes
To configure the software on a data node in a Starter Kit cluster:
NOTE: You must repeat this procedure on every data node in the cluster.
1. As root, navigate to the directory where you installed the Steel-Belted Radius Carrier package. Forinformation about directory in which Steel-Belted Radius Carrier package is installed, see “UnpackingSession State Register Software” on page 95.
Navigate to the radius/install subdirectory and run:
Execute:cd /opt/JNPRsbr/radius/install/
2. Execute the configure script to install the Steel-Belted Radius Carrier server software:
Execute:./configure
3. Review and accept the Steel-Belted Radius Carrier license agreement.
Press the spacebar to move from one page to the next. When you are prompted to accept the termsof the license agreement, enter y.
Do you accept the terms in the license agreement? [n] y
4. From the menu of configuration tasks, enter 3 to specify Configure Cluster Node.
Configuring SBR Software
129

---------------------------------------------------------------------------
SBR 8.60.50006 cluster
on SunOS 5.10 Generic_141444-09 node MyNode_3
is not configured and processes are down, needs to be configured
---------------------------------------------------------------------------
1. Unconfigure Cluster Node
Not used when merely updating existing cluster definitions.
2. Generate Cluster Definition
Creates new or updates existing cluster definitions.
Modifies the shared directory but does not modify this node.
3. Configure Cluster Node
To be preceded by ’Generate Cluster Definition’ on any node.
Must be invoked on each and every node of the cluster.
4. Reconfigure RADIUS Server
Only on SBR nodes, updates the existing SBR configuration.
5. Create Temporary Cluster
Used to approximate a cluster using only this one machine.
Intended for migration and demonstration purposes only.
130

6. Upgrade From Restricted Cluster License
Used to upgrade from restricted cluster to regular cluster.
Removes database restriction on the number of concurrent
sessions and enables the addition of an expansion kit license
Enter number of desired configuration task, or q to quit [2]: 3
5. Specify the name of the cluster.
Enter the name exactly as you specified it in Table 9 on page 35.
Enter SBR cluster name [MyCluster]:MyCluster
You are prompted to verify whether you want to proceed, unless the script detects any unusualinstallation conditions (a pre-existing directory, for example). In some cases, you may be prompted toresolve or ignore them.
6. The system reads the configuration files that you copied to the server and prompts you to change somesettings to adapt them to this server. Enter y to proceed.
WARNING: You are about to make irreversible changes to this node.
Are you sure that you wish to continue? [n]: y
Cleaning old directories
/opt/JNPRhadm
---------------------------------------------------------------------------
SBR 8.60.50006 cluster MyCluster{0s,2sm,0m,2d}
on SunOS 5.10 Generic_141444-09 node MyNode_3(d)
Reviewing Configuration Files...
---------------------------------------------------------------------------
/opt/JNPRsbr/radius/install/tmp/dbcluster.rc
/opt/JNPRsbr/radius/install/tmp/config.ini
131
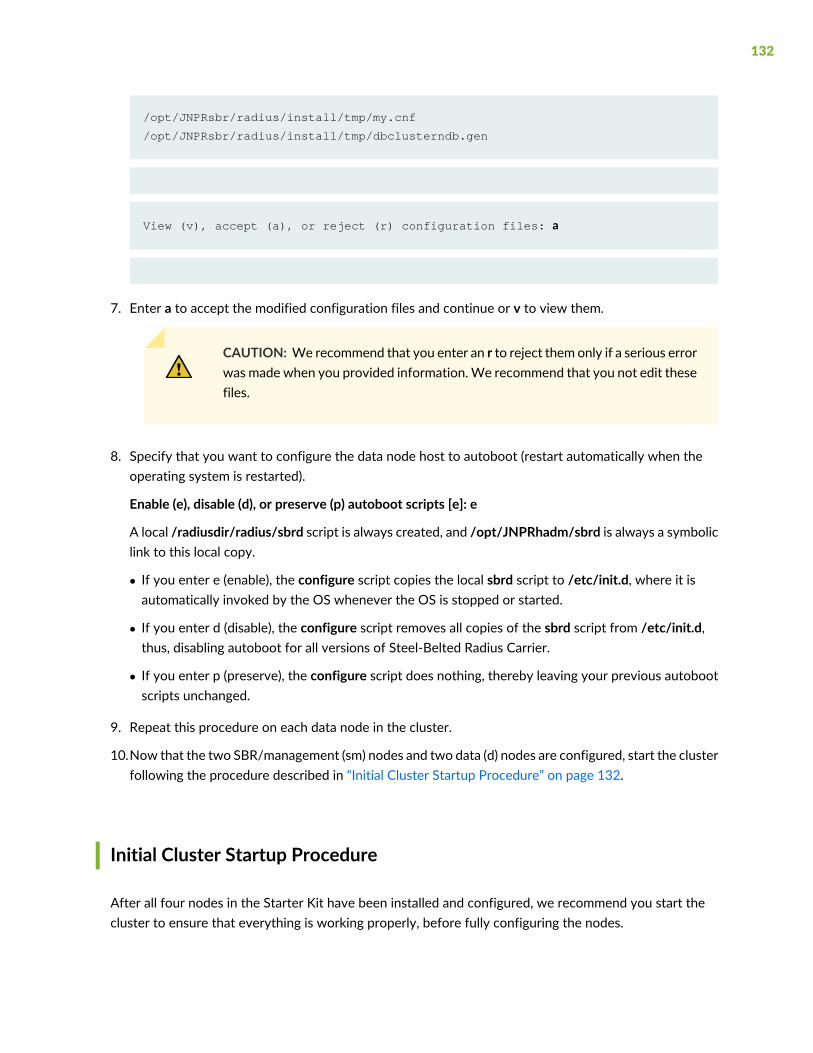
/opt/JNPRsbr/radius/install/tmp/my.cnf
/opt/JNPRsbr/radius/install/tmp/dbclusterndb.gen
View (v), accept (a), or reject (r) configuration files: a
7. Enter a to accept the modified configuration files and continue or v to view them.
CAUTION: We recommend that you enter an r to reject them only if a serious errorwas made when you provided information.We recommend that you not edit thesefiles.
8. Specify that you want to configure the data node host to autoboot (restart automatically when theoperating system is restarted).
Enable (e), disable (d), or preserve (p) autoboot scripts [e]: e
A local /radiusdir/radius/sbrd script is always created, and /opt/JNPRhadm/sbrd is always a symboliclink to this local copy.
• If you enter e (enable), the configure script copies the local sbrd script to /etc/init.d, where it isautomatically invoked by the OS whenever the OS is stopped or started.
• If you enter d (disable), the configure script removes all copies of the sbrd script from /etc/init.d,thus, disabling autoboot for all versions of Steel-Belted Radius Carrier.
• If you enter p (preserve), the configure script does nothing, thereby leaving your previous autobootscripts unchanged.
9. Repeat this procedure on each data node in the cluster.
10.Now that the two SBR/management (sm) nodes and two data (d) nodes are configured, start the clusterfollowing the procedure described in “Initial Cluster Startup Procedure” on page 132.
Initial Cluster Startup Procedure
After all four nodes in the Starter Kit have been installed and configured, we recommend you start thecluster to ensure that everything is working properly, before fully configuring the nodes.
132
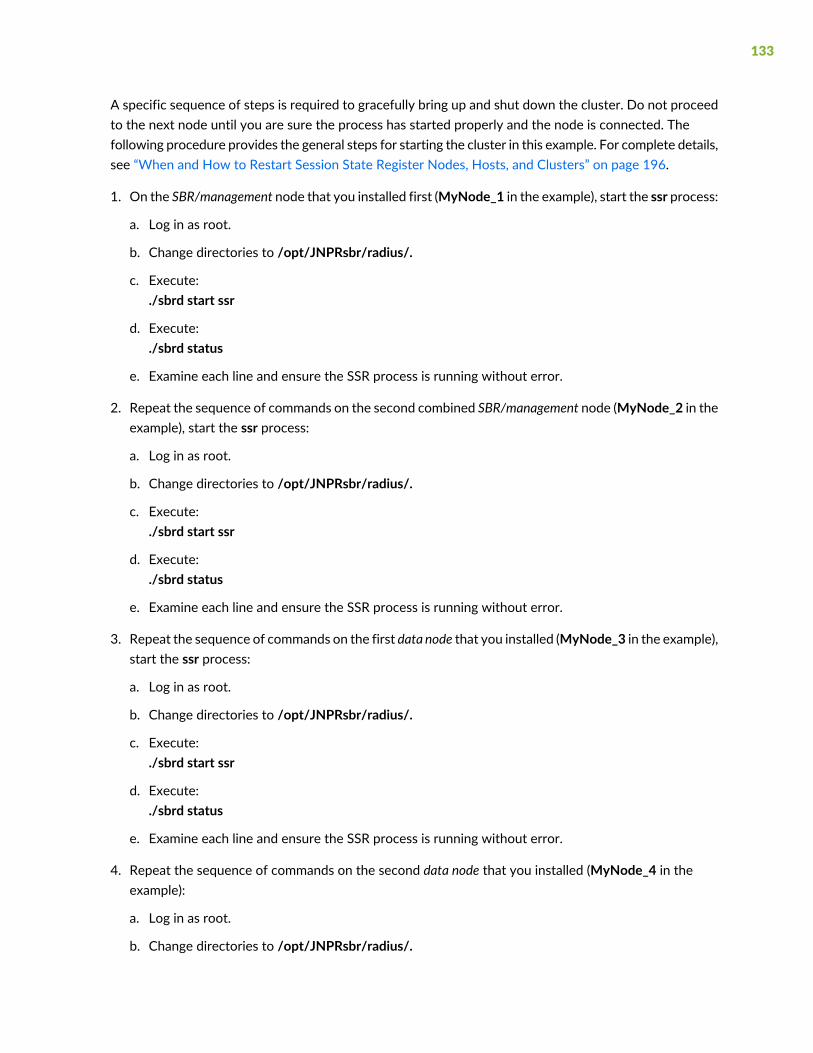
A specific sequence of steps is required to gracefully bring up and shut down the cluster. Do not proceedto the next node until you are sure the process has started properly and the node is connected. Thefollowing procedure provides the general steps for starting the cluster in this example. For complete details,see “When and How to Restart Session State Register Nodes, Hosts, and Clusters” on page 196.
1. On the SBR/management node that you installed first (MyNode_1 in the example), start the ssr process:
a. Log in as root.
b. Change directories to /opt/JNPRsbr/radius/.
c. Execute:./sbrd start ssr
d. Execute:./sbrd status
e. Examine each line and ensure the SSR process is running without error.
2. Repeat the sequence of commands on the second combined SBR/management node (MyNode_2 in theexample), start the ssr process:
a. Log in as root.
b. Change directories to /opt/JNPRsbr/radius/.
c. Execute:./sbrd start ssr
d. Execute:./sbrd status
e. Examine each line and ensure the SSR process is running without error.
3. Repeat the sequence of commands on the first data node that you installed (MyNode_3 in the example),start the ssr process:
a. Log in as root.
b. Change directories to /opt/JNPRsbr/radius/.
c. Execute:./sbrd start ssr
d. Execute:./sbrd status
e. Examine each line and ensure the SSR process is running without error.
4. Repeat the sequence of commands on the second data node that you installed (MyNode_4 in theexample):
a. Log in as root.
b. Change directories to /opt/JNPRsbr/radius/.
133

c. Execute:./sbrd start ssr
d. Execute:./sbrd status
e. Examine each line and ensure the SSR process is running without error.
In the preceding steps, each time the sbrd status command is executed, results similar to this exampleshould be displayed:
hadmUser$>/opt/JNPRsbr/radius/sbrd status
[ndbd(NDB)] 2 node(s)
id=1 @172.28.84.163 (mysql-5.7.25 ndb-7.6.9, Nodegroup: 0, Master)
id=2 @172.28.84.113 (mysql-5.7.25 ndb-7.6.9, Nodegroup: 0)
[ndb_mgmd(MGM)] 2 node(s)
id=51 @172.28.84.36 (mysql-5.7.25 ndb-7.6.9)
id=52 @172.28.84.166 (mysql-5.7.25 ndb-7.6.9)
[mysqld(API)] 4 node(s)
id=61 (not connected, accepting connect from 172.28.84.36)
id=62 (not connected, accepting connect from 172.28.84.166)
id=100 (not connected, accepting connect from 172.28.84.36)
id=101 (not connected, accepting connect from 172.28.84.166)
Examine the lines starting with id=, and verify that there are no references to starting, connecting, ornot connected. Any of these references indicate the process either has not finished starting, or thenode is not connected properly. You may need to execute the sbrd status command more than oncebecause it only shows a snapshot of activity; the display does not refresh automatically.
5. Create the database on every management node. Management nodes include both normalmanagement(m) nodes and combination SBR/management (sm) nodes.
134

This step creates a basic database on each management node in the cluster. Alternatively, you cancreate a sample database, or customize the database for you particular environment:
• If you want to create a sample database, follow the procedure in“Testing the Installation with DemoSetup.sh” on page 482.
• If you want to customize the database, see“Customizing the SSR Database Current Sessions Table” on page 144.
If you choose one of these two options as opposed to performing this step, be sure to come back tothis procedure and complete the remaining steps.
NOTE: Except when migrating from a temporary cluster, all SSR processes must be up on allSSR nodes [sm, m, d] and all SBR processes must be down on all SBR nodes [s, sm] in orderto execute CreateDB.sh.
On each and every management node:
a. Log in as hadm.
b. Change directories to /opt/JNPRhadm/.
c. Execute:CreateDB.sh
6. Configure all server configuration files for you environment.
Complete the configuration of all server initialization (.ini) files, authentication (.aut) files, accounting(.acc) files, as well as configure any proxy setup you may require.
Carefully review the SBR Carrier Reference Guide and configure all files for your environment beforeyou start the RADIUS process. Also review the SBR Carrier Administration and Configuration Guide, andplan the configuration steps for your particular environment.
You cannot connect to the servers in the cluster with Web GUI until the RADIUS process is started;however, we recommend you plan out the administration of the server before starting the RADIUSprocess.
See “Recommendations before Configuring the Cluster” on page 137 for general configurationrecommendations.
After you have completed the configuration of the various configuration files described in the SBRCarrier Reference Guide, remember to come back to this procedure and complete the step in bringingup the cluster.
7. Configure at least one IP address pool and one range using the SSR Administration Scripts. See“Testing the Installation with DemoSetup.sh” on page 482. Also see the section on Session State RegisterAdministration in the SBR Carrier Administration and Configuration Guide.
135
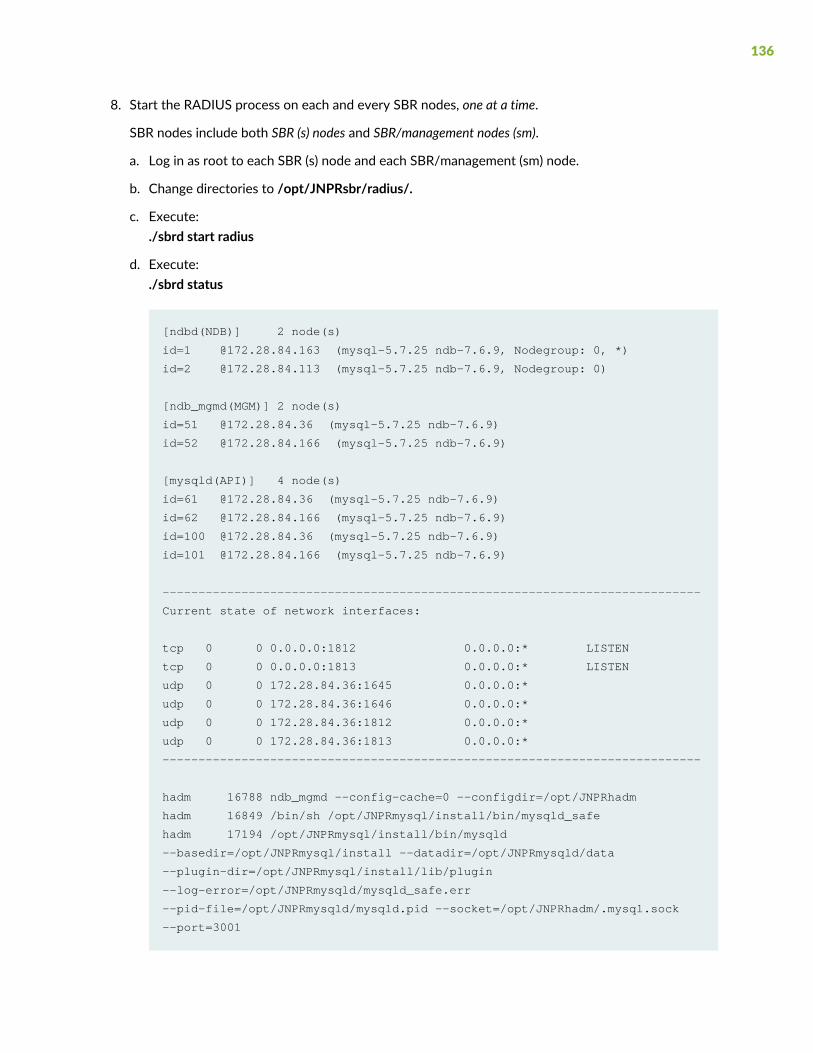
8. Start the RADIUS process on each and every SBR nodes, one at a time.
SBR nodes include both SBR (s) nodes and SBR/management nodes (sm).
a. Log in as root to each SBR (s) node and each SBR/management (sm) node.
b. Change directories to /opt/JNPRsbr/radius/.
c. Execute:./sbrd start radius
d. Execute:./sbrd status
[ndbd(NDB)] 2 node(s)
id=1 @172.28.84.163 (mysql-5.7.25 ndb-7.6.9, Nodegroup: 0, *)
id=2 @172.28.84.113 (mysql-5.7.25 ndb-7.6.9, Nodegroup: 0)
[ndb_mgmd(MGM)] 2 node(s)
id=51 @172.28.84.36 (mysql-5.7.25 ndb-7.6.9)
id=52 @172.28.84.166 (mysql-5.7.25 ndb-7.6.9)
[mysqld(API)] 4 node(s)
id=61 @172.28.84.36 (mysql-5.7.25 ndb-7.6.9)
id=62 @172.28.84.166 (mysql-5.7.25 ndb-7.6.9)
id=100 @172.28.84.36 (mysql-5.7.25 ndb-7.6.9)
id=101 @172.28.84.166 (mysql-5.7.25 ndb-7.6.9)
---------------------------------------------------------------------------
Current state of network interfaces:
tcp 0 0 0.0.0.0:1812 0.0.0.0:* LISTEN
tcp 0 0 0.0.0.0:1813 0.0.0.0:* LISTEN
udp 0 0 172.28.84.36:1645 0.0.0.0:*
udp 0 0 172.28.84.36:1646 0.0.0.0:*
udp 0 0 172.28.84.36:1812 0.0.0.0:*
udp 0 0 172.28.84.36:1813 0.0.0.0:*
---------------------------------------------------------------------------
hadm 16788 ndb_mgmd --config-cache=0 --configdir=/opt/JNPRhadm
hadm 16849 /bin/sh /opt/JNPRmysql/install/bin/mysqld_safe
hadm 17194 /opt/JNPRmysql/install/bin/mysqld
--basedir=/opt/JNPRmysql/install --datadir=/opt/JNPRmysqld/data
--plugin-dir=/opt/JNPRmysql/install/lib/plugin
--log-error=/opt/JNPRmysqld/mysqld_safe.err
--pid-file=/opt/JNPRmysqld/mysqld.pid --socket=/opt/JNPRhadm/.mysql.sock
--port=3001
136

root 17683 radius sbr.xml
root 17723 webserver
e. Examine each line and ensure the RADIUS process is running without error.
f. Repeat this process until the RADIUS process is started and running without error on each andevery SBR node.
9. Complete the configuration of the cluster nodes using Web GUI. See“Basic SBR Carrier Node Configuration” on page 138. For complete details, see the SBR CarrierAdministration and Configuration Guide.
Recommendations before Configuring the Cluster
Before proceeding to configure the SBR Carrier nodes and the SSR database, remember that you areconfiguring a set of machines to act as one entity. You must take some special steps to keep them allworking together.
We recommend that you follow these guidelines:
• Always create a backup file before making any modifications to any file.
• Remember that certain files must be the same on all nodes of the same type. To make this easier tomanage, include a comment in modified files that records the date and type of modification.
• To implement changes, one or more processes often need to be restarted to force modified files to beread and used. Controlling restarts precisely is easier if you become familiar with the sbrd script and itsparameters.
137

CHAPTER 8
Basic SBR Carrier Node Configuration
IN THIS CHAPTER
Launching Web GUI | 138
Configuring the Server | 140
Configuring SNMP | 141
Setting Up IP Address Pools | 142
This chapter contains basic information about setting up Steel-Belted Radius nodes in a Session StateRegister. This chapter contains these topics:
Launching Web GUI
To test whether the server can be accessed by a management workstation, launch the Web GUI.
To launch the Web GUI:
1. Open a browser connection to the SBR Carrier server you want to administer.
• To administer a SBR Carrier server running on your local host, enter https://localhost:2909, wherethe port assignment of 2909 is the SBR Carrier’s default TCP port for administration connections.
• To administer a SBR Carrier server running on a remote host, enter https://server:2909, where theport assignment of 2909 is the SBR Carrier’s default TCP port for administration connections. Forexample:
https://192.168.24.15:2909/
NOTE: Make sure that you access the Web GUI using HTTPS instead of HTTP.
The Login page (Figure 13 on page 139) appears.
138
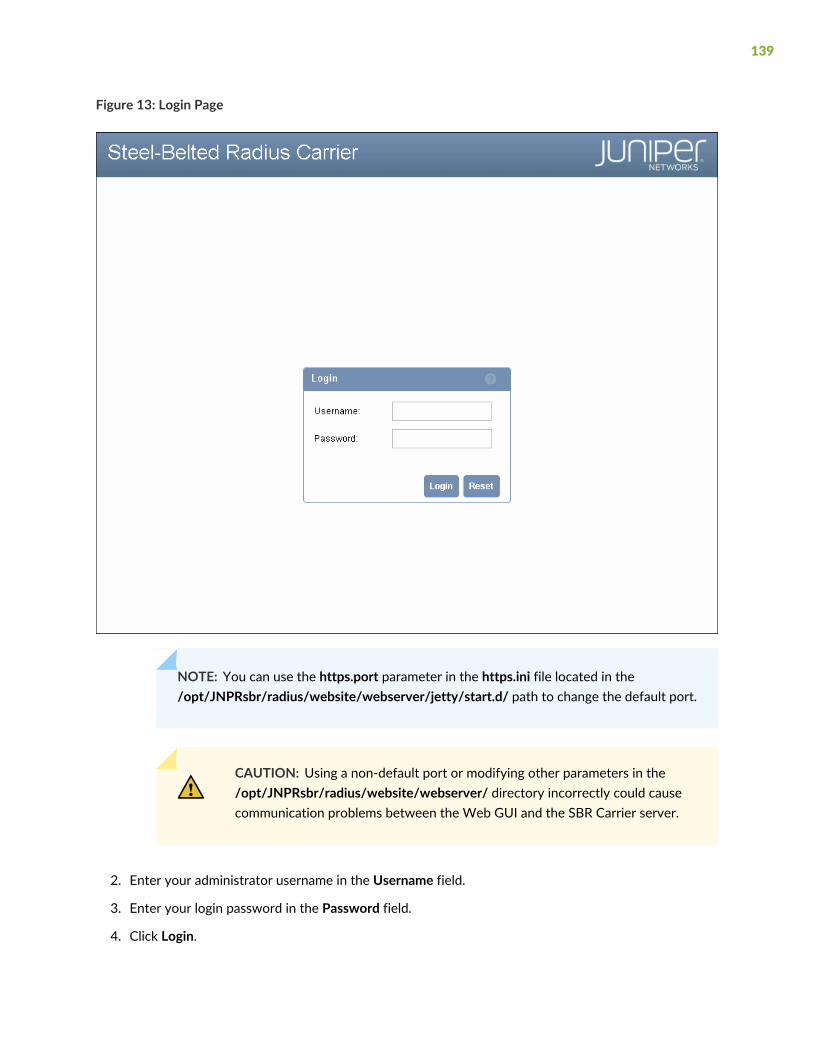
Figure 13: Login Page
NOTE: You can use the https.port parameter in the https.ini file located in the/opt/JNPRsbr/radius/website/webserver/jetty/start.d/ path to change the default port.
CAUTION: Using a non-default port or modifying other parameters in the/opt/JNPRsbr/radius/website/webserver/ directory incorrectly could causecommunication problems between the Web GUI and the SBR Carrier server.
2. Enter your administrator username in the Username field.
3. Enter your login password in the Password field.
4. Click Login.
139
When you click Login, Web GUI establishes an HTTPS connection with the local or remote server. TheWeb GUI displays an error message if the connection cannot be established.
NOTE: If a timeout occurs, verify that the Web browsers are running on the target serverusing the sbrd status command and that it is listening on the administration port you enteredin the URL; that the port is not blocked.
Web GUI verifies that the username you entered exists in the access.ini file. If the username is found,Web GUI validates the password you entered against a local or remote password database.
When you connect to a server, theHome page lists various features of the running server, such as version,platform on which it is running, IP address, available authentication methods, license information, and anyinitialization errors that might have occurred.
Configuring the Server
After you have installed the Steel-Belted Radius Carrier software on the server, have added the appropriatelicenses, and can work withWeb GUI, you can begin configuring the software. The specific steps youmustperform depend on your network’s authentication and accounting needs.
The basic steps for configuring the Steel-Belted Radius Carrier environment include:
1. Configure each of your RADIUS client devices to communicate with your Steel-Belted Radius Carrierserver. To do this, you must log in to each device and run its configuration interface.
2. Use the RADIUS Clients List page in Web GUI to configure the server to communicate with eachRADIUS client. Details are in the Administering RADIUS Clients and Client Groups section of the SBRCarrier Administration and Configuration Guide.
3. If the clients use RADIUS Location Groups or IP Address Pools, each of those entities must exist beforethe clients are configured. See the sections on Administering RADIUS Location Groups and AdministeringAddress Pools in the SBR Carrier Administration and Configuration Guide for instructions on setting theseup.
4. Use the Users panel to identify the users or groups of users who are permitted to access the RADIUSclients.
Specify user attributes by selecting them in the Users panel or by creating user profiles in the Profilesdialog.
For more information, see the SBR Carrier Administration and Configuration Guide.
140
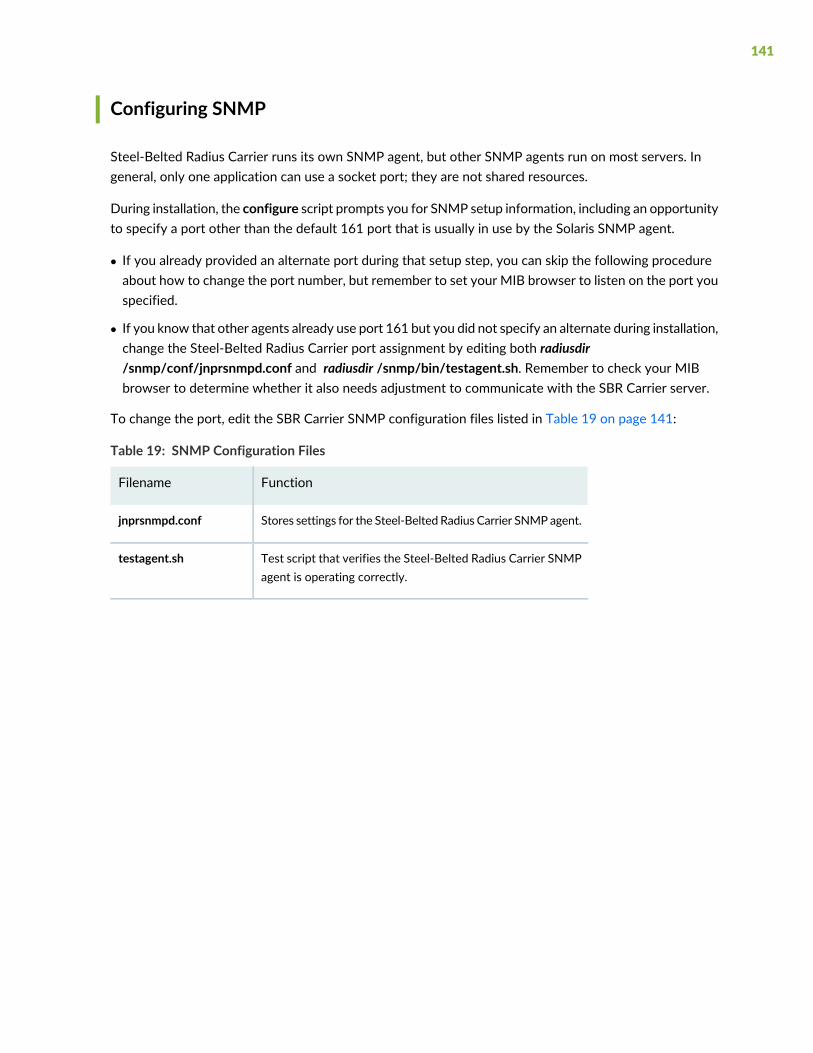
Configuring SNMP
Steel-Belted Radius Carrier runs its own SNMP agent, but other SNMP agents run on most servers. Ingeneral, only one application can use a socket port; they are not shared resources.
During installation, the configure script prompts you for SNMP setup information, including an opportunityto specify a port other than the default 161 port that is usually in use by the Solaris SNMP agent.
• If you already provided an alternate port during that setup step, you can skip the following procedureabout how to change the port number, but remember to set your MIB browser to listen on the port youspecified.
• If you know that other agents already use port 161 but you did not specify an alternate during installation,change the Steel-Belted Radius Carrier port assignment by editing both radiusdir/snmp/conf/jnprsnmpd.conf and radiusdir /snmp/bin/testagent.sh. Remember to check your MIBbrowser to determine whether it also needs adjustment to communicate with the SBR Carrier server.
To change the port, edit the SBR Carrier SNMP configuration files listed in Table 19 on page 141:
Table 19: SNMP Configuration Files
FunctionFilename
Stores settings for the Steel-Belted Radius Carrier SNMP agent.jnprsnmpd.conf
Test script that verifies the Steel-Belted Radius Carrier SNMPagent is operating correctly.
testagent.sh
141

1. Edit radiusdir /snmp/conf/jnprsnmpd.conf to change the port number.
The jnprsnmpd.conf file is self-documenting. For more information, see the section on SNMPConfiguration Overview in the SBR Carrier Reference Guide.
CAUTION: The jnprsnmpd.conf file is very sensitive to stray white space and theorder in which sections and parameters appear. Mistakes in this file can disableSNMP.
• Make sure to make a backup copy of the file before making any changes.
• While editing the file, do not to make any unnecessary changes. Follow theembedded examples as closely as possible.
• When specifying networks, as in 172.28.68.0/24 in the com2sec mynetwork172.28.68.0/24 public line, the trailing 32-x bits of the IP address must be zeroas specified by the trailing /x notation. For example, 32-24=8 bits in this case.
2. Make the same port number change in radiusdir /snmp/bin/testagent.sh script, which is used to testthe agent.
3. After making the change, restart either the Steel-Belted Radius Carrier server process or just its SNMPdaemon.
Execute:/etc/init.d/init.jnprsnmpd start
4. If necessary, set up your SNMP browser to listen on the new port.
5. To verify that the jnprsnmpd SNMP agent functions, run the radiusdir /snmp/bin/testagent.sh script.
NOTE: Refer to the SBR Carrier Administration and Configuration Guide for more informationabout configuring the SBR SNMP agent.
Setting Up IP Address Pools
Set up IP address pools for the SSR database from a cluster management node now.
The same basic concepts discussed in Administering Address Pools in the SBR Carrier Administration andConfiguration Guide apply to address pools maintained in the SSR database; however, the Web GUI is notused to maintain the pools in the SSR database.
142

In the SSR cluster, you set up and administer IP pools using a set of scripts discussed in the Session StateRegister Administration section of the SBR Carrier Administration and Configuration Guide.
BESTPRACTICE: We recommend that each SBRCarrier node have its own emergency IP addressrange, a local pool of addresses that is not shared. If a failover situation takes the shared IPaddress pool offline, each SBR Carrier node can still function by defining and allocating addressesfrom its emergency pool. Make sure addresses in the emergency pool are not in the same rangeof addresses used by the shared SSR IP address pools.
143

CHAPTER 9
Customizing the SSRDatabaseCurrent Sessions Table
IN THIS CHAPTER
Current Sessions Table Overview | 144
Sessions in the CST | 153
Customizing the CST | 154
Current Sessions Table Fields | 156
SSR Datatypes | 172
This chapter describes modifying the CurrentSessions.sql file that control how the Current Sessions andother tables are configured. It describes fields and what modifications you can make to the files. Thesetopics are in this chapter:
Changes to the SSR database affect all SBR Carrier nodes that are part of the cluster.
CAUTION: All SBR Carrier nodes that are part of the cluster must be in managementmode before you make changes to the IP pool address database.
If you areworking on a cluster that is fully functional, be sure to review the section on Session State RegisterAdministration in the SBR Carrier Administration and Configuration Guide for information about managingcluster nodes while working on the database.
Current Sessions Table Overview
The sharedmemory engine of the data cluster contains the current sessions table (CST), which lists currentsessions. The CST is the largest and most active element of the database. The CST contains one record,or row, for each session created or updated by any of the Steel-Belted Radius Carrier servers using thedata cluster.
144
The types of data that a row contains are controlled by adding or deleting fields (which form columns inthe CST) to the /opt/JNPRhadm/CurrentSessions.sql file. Adding a column creates a new field for eachrecord in the table. Within the configuration file, columns are defined as belonging to specific types.
The information stored in the CST is customizable. To ensure that you can identify sessions accuratelyand format CoA/DM requests with the appropriate attributes for the services you are supporting in yournetwork, we recommend that you customize the information stored in the CST for your particular networkenvironment. For example, before you retrieve a value from the CST for use in an attribute in a CoAmessage, you must first map the CST field to a RADIUS attribute in the dbc_mapping.xml file. In thefollowing example, the FunkOuterUserName field is mapped to the Original-User-Name attribute usingthe attribute element to enable retrieving the value in the FunkOuterUserName field as a result of asession control request. The queryAttribute child element is used for indexing the CST while queryingsessions using the SessionControl.sh script or Web GUI. If you want to query sessions using the attribute,then you need to specify the attribute in the queryAttribute child element.
<attributeMapping field="FunkOuterUserName" attribute="Original-User-Name"><queryAttribute name="Original-User-Name"/></attributeMapping>
When Steel-Belted Radius Carrier SSR is installed, the default CST schema contains Core, Required, andOptional System fields. By default, the System Core fields and the Sbr_UserName System Optional fieldare active, with other System fields commented out. When CreateDB.sh is invoked, it includes only activefields in the CST.
If you modify the file, remember:
• All System Core fields must be active.
• System Feature fields must be active if Steel-Belted Radius Carrier is configured to support theircorresponding features. To activate an inactive System Feature field, you must uncomment the entryfor the field in the CurrentSessions.sql file. (If the System Feature field required for a feature is inactive,the feature is disabled and an error message is written to the RADIUS log file.)
• You can comment out the Sbr_UserName field if it is not required.
• After CurrentSessions.sql is modified:
a. The file must be distributed to all management nodes in the cluster.
b. The current running database must be removed. As hadm, run DestroyDB.sh on one managementnode.
c. The new database must be created. As hadm, run CreateDB.sh on all management nodes to rebuildthe database.
145

NOTE: You can change the order of fields, except the System Core fields, in theCurrentSessions.sql file. We strongly recommend that you not edit the System Core fields asthis may result in unexpected session deletions.
Table 20 on page 147 describes each section and each section’s fields:
146
Table 20: Default Current Sessions Table Fields
CurrentSessions.sql EntryField Type
System Core fields aremandatory fields thatmust be present in everyCST.
SeeTable 21onpage158for details on each field.
147
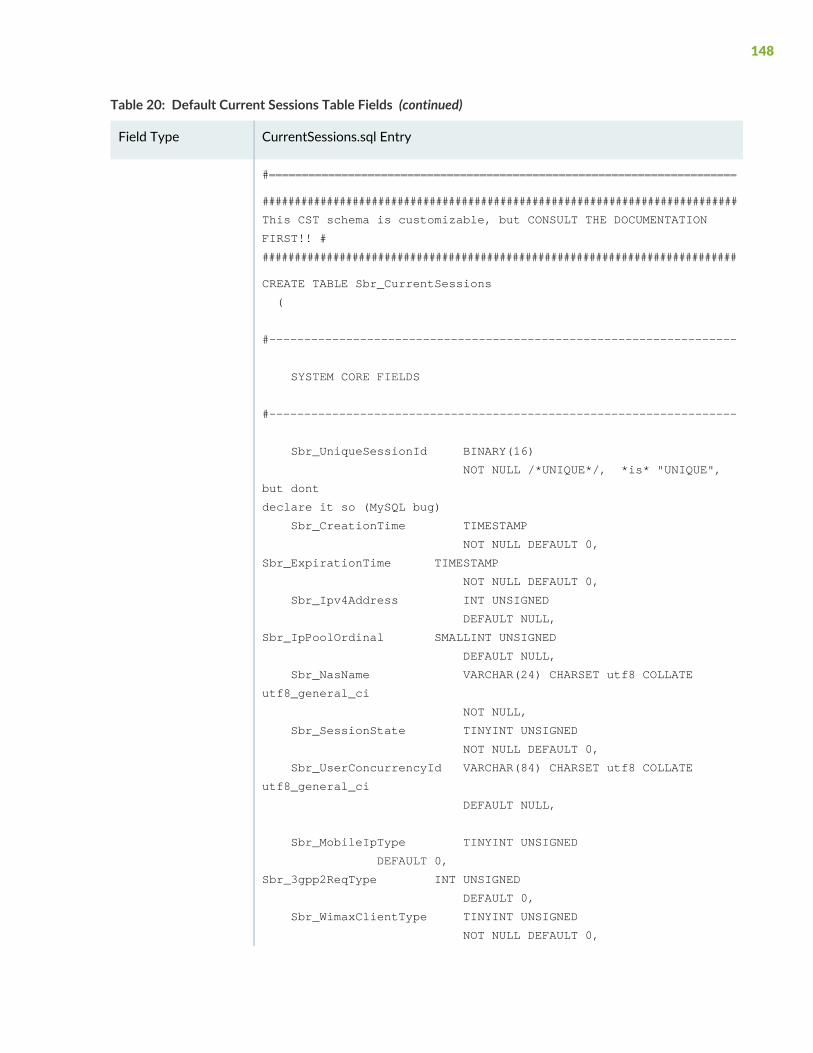
Table 20: Default Current Sessions Table Fields (continued)
CurrentSessions.sql EntryField Type
#=======================================================================
##########################################################################
This CST schema is customizable, but CONSULT THE DOCUMENTATION
FIRST!! #
##########################################################################
CREATE TABLE Sbr_CurrentSessions
(
#-------------------------------------------------------------------
SYSTEM CORE FIELDS
#-------------------------------------------------------------------
Sbr_UniqueSessionId BINARY(16)
NOT NULL /*UNIQUE*/, *is* "UNIQUE",
but dont
declare it so (MySQL bug)
Sbr_CreationTime TIMESTAMP
NOT NULL DEFAULT 0,
Sbr_ExpirationTime TIMESTAMP
NOT NULL DEFAULT 0,
Sbr_Ipv4Address INT UNSIGNED
DEFAULT NULL,
Sbr_IpPoolOrdinal SMALLINT UNSIGNED
DEFAULT NULL,
Sbr_NasName VARCHAR(24) CHARSET utf8 COLLATE
utf8_general_ci
NOT NULL,
Sbr_SessionState TINYINT UNSIGNED
NOT NULL DEFAULT 0,
Sbr_UserConcurrencyId VARCHAR(84) CHARSET utf8 COLLATE
utf8_general_ci
DEFAULT NULL,
Sbr_MobileIpType TINYINT UNSIGNED
DEFAULT 0,
Sbr_3gpp2ReqType INT UNSIGNED
DEFAULT 0,
Sbr_WimaxClientType TINYINT UNSIGNED
NOT NULL DEFAULT 0,
148

Table 20: Default Current Sessions Table Fields (continued)
CurrentSessions.sql EntryField Type
Sbr_WimaxAcctFlows VARBINARY(4095)
DEFAULT NULL,
Sbr_3gpp2HomeAgentAddr INT UNSIGNED
DEFAULT NULL,
#-------------------------------------------------------------------
#-------------------------------------------------------------------
# SYSTEM CORE FIELD added for RFC6911 IPv6Address at index 31
#-------------------------------------------------------------------
Sbr_Ipv6Address VARBINARY(2047)
DEFAULT NULL,
SYSTEM FEATURE FIELDS
#-------------------------------------------------------------------
#Sbr_AcctFileCarryover VARBINARY(1024)
DEFAULT NULL,
Sbr_AcctAutoStop VARBINARY(1023)
DEFAULT NULL,
Sbr_SessionTimeout INT UNSIGNED
DEFAULT NULL,
Sbr_ClassAttribute VARBINARY(1024)
DEFAULT NULL,
#Sbr_UniqueSessionId_Hex CHAR(32) CHARSET ascii COLLATE
ascii_general_ci
DEFAULT NULL,
INDEX Sbr_UniqueSessionId_Hex_Idx USING HASH
(Sbr_UniqueSessionId_Hex),
#-------------------------------------------------------------------
SystemFeature fields arestatic fields that must bepresent if, and only if,specific Steel-BeltedRadius Carrier featuresare enabled.
SeeTable 22onpage160for details on each field.
149

Table 20: Default Current Sessions Table Fields (continued)
CurrentSessions.sql EntryField Type
SYSTEM OPTIONAL FIELDS
#-------------------------------------------------------------------
Sbr_UserName VARCHAR(24) CHARSET utf8 COLLATE
utf8_general_ci
DEFAULT NULL,
Sbr_AcctSessionId VARCHAR(48) CHARSET utf8 COLLATE
utf8_general_ci
DEFAULT NULL,
Sbr_TransactionId BINARY(12)
DEFAULT NULL,
Sbr_NasPortType INT UNSIGNED
DEFAULT NULL,
Sbr_NasPort INT UNSIGNED
DEFAULT NULL,
Sbr_CallingStationId VARCHAR(24) CHARSET utf8 COLLATE
utf8_general_ci
DEFAULT NULL,
Sbr_CalledStationId VARCHAR(24) CHARSET utf8 COLLATE
utf8_general_ci
DEFAULT NULL,
Sbr_MobileCorrelationId VARCHAR(32) CHARSET utf8 COLLATE
utf8_general_ci
DEFAULT NULL,
#-------------------------------------------------------------------
#-------------------------------------------------------------------
# SYSTEM OPTIONAL FIELDS added for Ipv6Prefix at index 30
#-------------------------------------------------------------------
Sbr_Ipv6Prefix VARBINARY(16)
DEFAULT NULL,
System Optional fieldsare static fields that youcan use or comment out.By default, all fields areenabled.
SeeTable 23onpage161for details on each field.
150

Table 20: Default Current Sessions Table Fields (continued)
CurrentSessions.sql EntryField Type
ADMIN RADATTR FIELDS
#-------------------------------------------------------------------
WimaxSessionId VARBINARY(32)
DEFAULT NULL,
AcctMultiSessionId VARCHAR(32) CHARSET utf8 COLLATE
utf8_general_ci
DEFAULT NULL,
FunkOuterUserName VARCHAR(84) CHARSET utf8 COLLATE
utf8_general_ci
DEFAULT NULL,
#RadAttrField1 INT UNSIGNED
DEFAULT NULL,
#RadAttrField2 VARCHAR(24) CHARSET utf8 COLLATE
utf8_general_ci
DEFAULT NULL,
#RadAttrField3 VARBINARY(32)
DEFAULT NULL,
#-------------------------------------------------------------------
RadAttr fields aredynamic custom fieldsthat you can use tocapture raw informationin incoming or outgoingRADIUS attributes. Thecontent of each field inthe CST comes from SBRCarrier attributes.
You canmodify the threetemplate fields if youneed to add customfields.
See Table 24onpage163for details on each field.
ADMIN PRIVATE FIELDS
#-------------------------------------------------------------------
#PrivateField1 INT UNSIGNED
DEFAULT NULL,
#PrivateField2 VARCHAR(24) CHARSET utf8 COLLATE
utf8_general_ci
DEFAULT NULL,
#PrivateField3 BINARY(32)
DEFAULT NULL,
#-------------------------------------------------------------------
Private fields aredynamic custom fieldsthat you can use tocapture information ofany kind from third-partyapplications. SBR Carrierdoes not populateprivate fields, so you canmodify the templatefields if you need to addprivate fields.
151

Table 20: Default Current Sessions Table Fields (continued)
CurrentSessions.sql EntryField Type
SYSTEM KEYS/INDEXES
#-------------------------------------------------------------------
PRIMARY KEY USING HASH (Sbr_UniqueSessionId),
INDEX Sbr_NasName_Idx (Sbr_NasName),
INDEX Sbr_ExpirationTime_Idx (Sbr_ExpirationTime),
INDEX AcctMultiSessionId_Idx (AcctMultiSessionId),
INDEX Sbr_MobileCorrelationId_Idx (Sbr_MobileCorrelationId),
INDEX Sbr_AcctSessionId_Idx (Sbr_AcctSessionId),
INDEX Sbr_UserName_Idx (Sbr_UserName),
INDEX Sbr_CallingStationId_Idx (Sbr_CallingStationId),
INDEX Sbr_CalledStationId_Idx (Sbr_CalledStationId),
INDEX Sbr_Ipv4Address_Idx (Sbr_Ipv4Address),
INDEX Sbr_TransactionId_Idx (Sbr_TransactionId)
#-------------------------------------------------------------------
SystemKeys and Indexesof columns in the tablelist tools that arerequired for SessionState Register adminscripts and shellfunctions. They may alsobe used by otherapplications making callsthrough the NDBAPI orSQL queries.
• A single-column indexmay be used by SBRCarrier front ends, SSRitself, or the LDAPConfigurationInterface.
• A multi-column indexmay only be usedwithin the SessionState Register clusteror from a third partyapplication. It may notbe used by SBRCarrierfront ends, SSR itself,or the LDAPConfigurationInterface.
Because of theselimitations, you cannotuse a multi-columnindex for the sessionlookup in a CoA/DMrequest (for example).However, you can adda private field, indexwith just that one field,and use that index inyour CoA/DM querystrings.
152
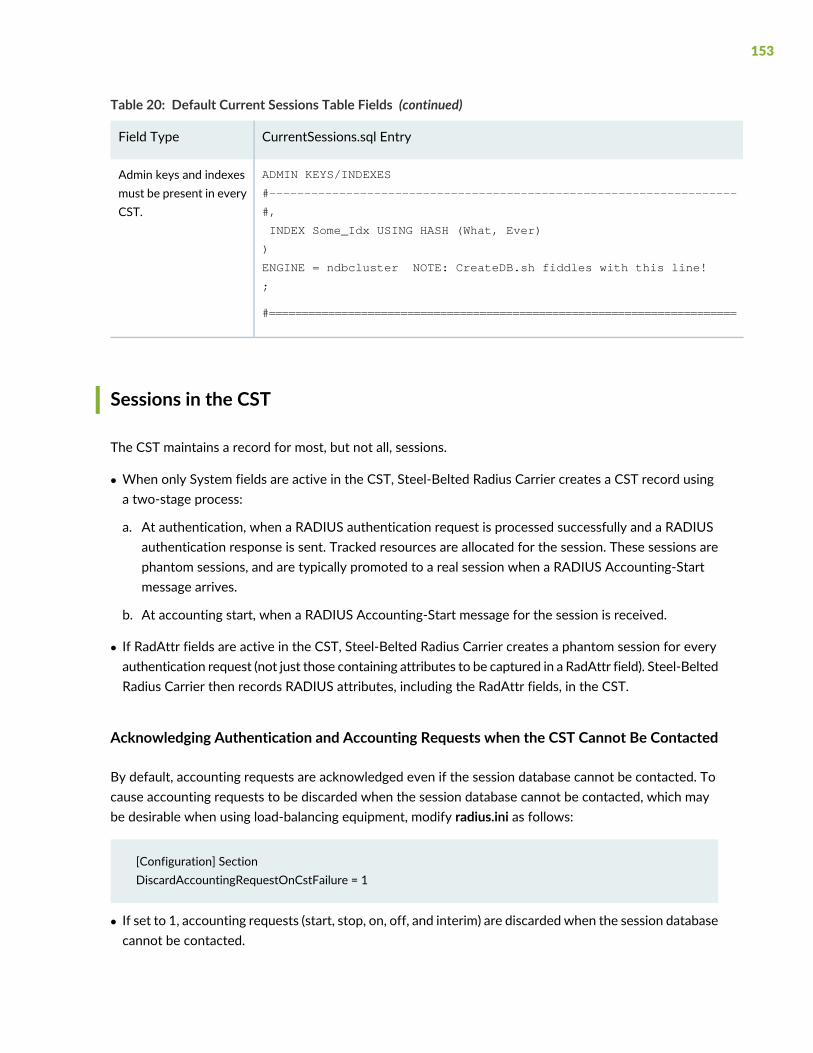
Table 20: Default Current Sessions Table Fields (continued)
CurrentSessions.sql EntryField Type
ADMIN KEYS/INDEXES
#-------------------------------------------------------------------
#,
INDEX Some_Idx USING HASH (What, Ever)
)
ENGINE = ndbcluster NOTE: CreateDB.sh fiddles with this line!
;
#=======================================================================
Admin keys and indexesmust be present in everyCST.
Sessions in the CST
The CST maintains a record for most, but not all, sessions.
• When only System fields are active in the CST, Steel-Belted Radius Carrier creates a CST record usinga two-stage process:
a. At authentication, when a RADIUS authentication request is processed successfully and a RADIUSauthentication response is sent. Tracked resources are allocated for the session. These sessions arephantom sessions, and are typically promoted to a real session when a RADIUS Accounting-Startmessage arrives.
b. At accounting start, when a RADIUS Accounting-Start message for the session is received.
• If RadAttr fields are active in the CST, Steel-Belted Radius Carrier creates a phantom session for everyauthentication request (not just those containing attributes to be captured in a RadAttr field). Steel-BeltedRadius Carrier then records RADIUS attributes, including the RadAttr fields, in the CST.
Acknowledging Authentication and Accounting Requests when the CST Cannot Be Contacted
By default, accounting requests are acknowledged even if the session database cannot be contacted. Tocause accounting requests to be discarded when the session database cannot be contacted, which maybe desirable when using load-balancing equipment, modify radius.ini as follows:
[Configuration] SectionDiscardAccountingRequestOnCstFailure = 1
• If set to 1, accounting requests (start, stop, on, off, and interim) are discarded when the session databasecannot be contacted.
153

• If set to 0, accounting requests (start, stop, on, off, and interim) are acknowledged when the sessiondatabase cannot be contacted.
Similarly, to cause the discard of authentication requests that contact the session database to assignresources (such as IP address assignment or concurrency), modify radius.ini as follows:
[Configuration] SectionDiscardAccessRequestOnCstFailure = 1
• If set to 1, authentication requests requiring access to the session database are discarded when thesession database cannot be contacted.
• If set to 0, SBR Carrier sends an Access-Reject when the session database cannot be contacted.
NOTE: Operation is not affected for requests not requiring session database access.
Current Sessions Table Display
You can display the working CST by executing the ShowSessions.sh script. The format used by theShowSessions.sh tool is specified in the SQL data-display language. The ShowSessions.sh script may bemodified.
When Steel-Belted Radius Carrier SSR is installed, the ShowSessions.sh tool is configured to work withthe default CST schema. The ShowSessions.sh tool contains display commands for all System fields, whichare commented-in or commented-out appropriately. If you comment or uncomment entries in the SQLschema to meet site requirements, you must comment or uncomment corresponding entries inShowSessions.sh too.
Figure 14 on page 175 shows sample ShowSessions.sh output.
Customizing the CST
A key benefit of Session State Register is that you can modify the CST to meet a site’s requirements byadding ormodifying session fields. However, if youmake toomanymodifications, or make them incorrectly,problems can occur. Review the following notes before making any modifications, and test your changesas you go.
In general, try to use as many defaults as possible, and add only what is required.
154

Propagating a Changed CurrentSessions.sql File
Because you are working in a cluster environment where multiple machines use the same data, makingchanges to the CST table is not a trivial task. Each time you change the configuration file, it must bedistributed to all management nodes. Then youmust eliminate the existing database (with theDestroyDB.shcommand) and create a new database. (As hadm, execute the CreateDB.sh command on all managementnodes.)
Performance and Capacity Considerations
Each field that you add to the CST increases the size of every session record stored in the CST. Largertables increases the amount of memory required by the database. As a result, adding fields to the CSTlimits the number of simultaneously active sessions that can be stored in the CST, given fixed memory anddisk space. Adding fields to the CST slows wire communications and internal processing time.
The Steel-Belted Radius Carrier SSR implementation limits the maximum supported size of a CST field to4096 bytes. This limit matches the maximum size of a RADIUS packet as defined in RFC 2865. RFC 2865also limits each packet’s individual RADIUS attributes to a maximum of 253 bytes.
In practice, RADIUS attributes and packets are usually much smaller than 4096 bytes. The entire clusterruns more efficiently when fields are tuned to the size of a site’s RADIUS attributes and correspondingRadAttr fields.
Additional Keys
The default CurrentSessions.sql contains the primary key for the CST and other keys (indexes) requiredfor Steel-Belted Radius Carrier operation. You can comment unused keys out, but we recommend thatyou do not delete any of these in case they need to be restored. You can add additional keys on any fieldsto support faster lookups for site-specific tools or third-party products. Each additional key adds overheadevery time a row (session) is added to or removed from the CST.
Stored Procedures
SSR includes basic stored procedures defined in the StoredRoutines.sql file. You cannot modify or deletethese stored procedures, but you can define new stored procedures to perform special handling of RadAttrfields for tools youmay use or create. Creation of custom stored procedures requires advanced knowledgeof SQL.
Remember that SQL queries tend to run more slowly, and to require more resources, than queries andscripts (such as the admin scripts) that use NDBAPI.
155
Customized CST Applications
You canwrite custom SQL-based tools to query the SSR database. You can base these on the SSR databaseCLI (just as ShowSessions.sh is), or the tools can talk directly to a SSRmanagement server mysqld daemon.You can also define new stored procedures in StoredRoutines.sql andmay create newNDBAPI applications.
Current Sessions Table Fields
The CST and the CurrentSessions.sql contain several types of fields:
• “System Core Fields” on page 156
• “System Feature Fields” on page 159
• “System Optional Fields” on page 160
• “RadAttr Fields” on page 162
• “Admin Private Fields” on page 170
The table also contains settings for keys and indexes:
• “System Keys and Indexes” on page 170
• “Admin Keys and Indexes” on page 171
System Core Fields
The System Core fields are required for basic operation of SBR Carrier SSR.
CAUTION: We strongly recommend that you not edit this section of the file. If anyrequired Core field is not present in the CST, Steel-Belted Radius Carrier SSR cannotboot.
The System Core Fields section of CurrentSessions.sql looks like this:
#=======================================================================
156

##########################################################################
This CST schema is customizable, but CONSULT THE DOCUMENTATION FIRST!! #
##########################################################################
CREATE TABLE Sbr_CurrentSessions
(
#-------------------------------------------------------------------
SYSTEM CORE FIELDS
#-------------------------------------------------------------------
Sbr_UniqueSessionId BINARY(16)
NOT NULL /*UNIQUE*/, *is* "UNIQUE", but dont
declare it so (MySQL bug)
Sbr_CreationTime TIMESTAMP
NOT NULL DEFAULT 0,
Sbr_ExpirationTime TIMESTAMP
NOT NULL DEFAULT 0,
Sbr_Ipv4Address INT UNSIGNED
DEFAULT NULL,
Sbr_IpPoolOrdinal SMALLINT UNSIGNED
DEFAULT NULL,
Sbr_NasName VARCHAR(24) CHARSET utf8 COLLATE utf8_general_ci
NOT NULL,
Sbr_SessionState TINYINT UNSIGNED
NOT NULL DEFAULT 0,
Sbr_UserConcurrencyId VARCHAR(84) CHARSET utf8 COLLATE utf8_general_ci
DEFAULT NULL,
Sbr_MobileIpType TINYINT UNSIGNED
DEFAULT 0,
Sbr_3gpp2ReqType INT UNSIGNED
DEFAULT 0,
Sbr_WimaxClientType TINYINT UNSIGNED
NOT NULL DEFAULT 0,
Sbr_WimaxAcctFlows VARBINARY(4095)
DEFAULT NULL,
Sbr_3gpp2HomeAgentAddr INT UNSIGNED
DEFAULT NULL,
#-------------------------------------------------------------------
# SYSTEM CORE FIELD added for RFC6911 IPv6Address at index 31
#-------------------------------------------------------------------
157
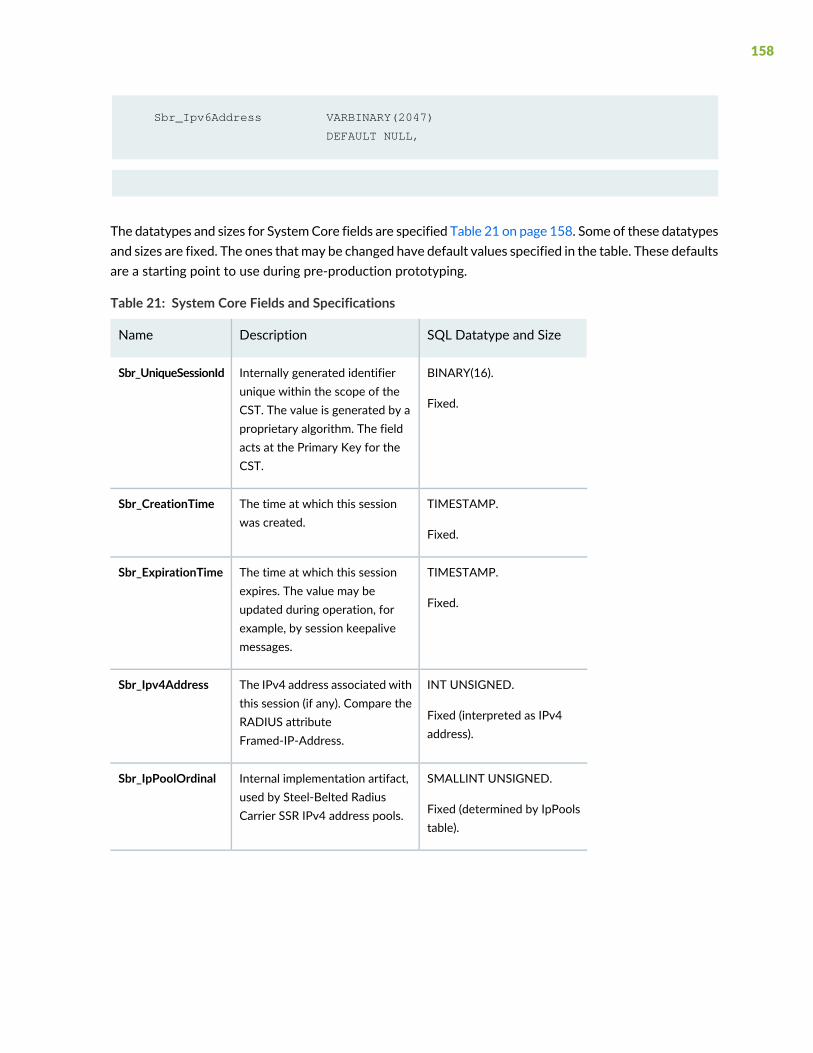
Sbr_Ipv6Address VARBINARY(2047)
DEFAULT NULL,
The datatypes and sizes for SystemCore fields are specified Table 21 on page 158. Some of these datatypesand sizes are fixed. The ones thatmay be changed have default values specified in the table. These defaultsare a starting point to use during pre-production prototyping.
Table 21: System Core Fields and Specifications
SQL Datatype and SizeDescriptionName
BINARY(16).
Fixed.
Internally generated identifierunique within the scope of theCST. The value is generated by aproprietary algorithm. The fieldacts at the Primary Key for theCST.
Sbr_UniqueSessionId
TIMESTAMP.
Fixed.
The time at which this sessionwas created.
Sbr_CreationTime
TIMESTAMP.
Fixed.
The time at which this sessionexpires. The value may beupdated during operation, forexample, by session keepalivemessages.
Sbr_ExpirationTime
INT UNSIGNED.
Fixed (interpreted as IPv4address).
The IPv4 address associated withthis session (if any). Compare theRADIUS attributeFramed-IP-Address.
Sbr_Ipv4Address
SMALLINT UNSIGNED.
Fixed (determined by IpPoolstable).
Internal implementation artifact,used by Steel-Belted RadiusCarrier SSR IPv4 address pools.
Sbr_IpPoolOrdinal
158

Table 21: System Core Fields and Specifications (continued)
SQL Datatype and SizeDescriptionName
VARCHAR(24) utf8.
Customizable type and size.
NAS name as assigned bySteel-Belted Radius Carrier, using(in preferential order):
1. RADIUS attributeNAS-IP-Address (orNAS-IPv6-Address, ifavailable)
2. RADIUS attributeNAS-Identifier
3. Actual IPv4 (or IPv6, ifavailable) address fromwhichthe TCP/IP packet was sent.
Sbr_NasName
TINYINT UNSIGNED.
Fixed.
Internal implementation artifact,used tomanage status of sessions.
Sbr_SessionState
VARCHAR(32) utf8.
Customizable type and size,but must be the same typeand size as the Id field in theSbr_User Concurrency table.
Internal implementation artifact(username concatenated withinteger), used by Steel-BeltedRadius Carrier SSR to manage‘user concurrency’ feature.
Sbr_UserConcurrencyID
VARBINARY(2047).
Fixed (interpreted as IPv6address).
The IPv6 address associated withthis session (if any). Compare theRADIUS attributeFramed-IPv6-Address.
Sbr_Ipv6Address
System Feature Fields
One or more of the System Feature fields listed in Table 22 on page 160 must be present in the CST forSteel-Belted Radius Carrier to run in a special feature enabled mode. If a required System Feature field isnot present in the CST, Steel-Belted Radius Carrier boots, but the special feature is disabled.
The System Feature Fields section of CurrentSessions.sql looks like this:
DEFAULT NULL,
159
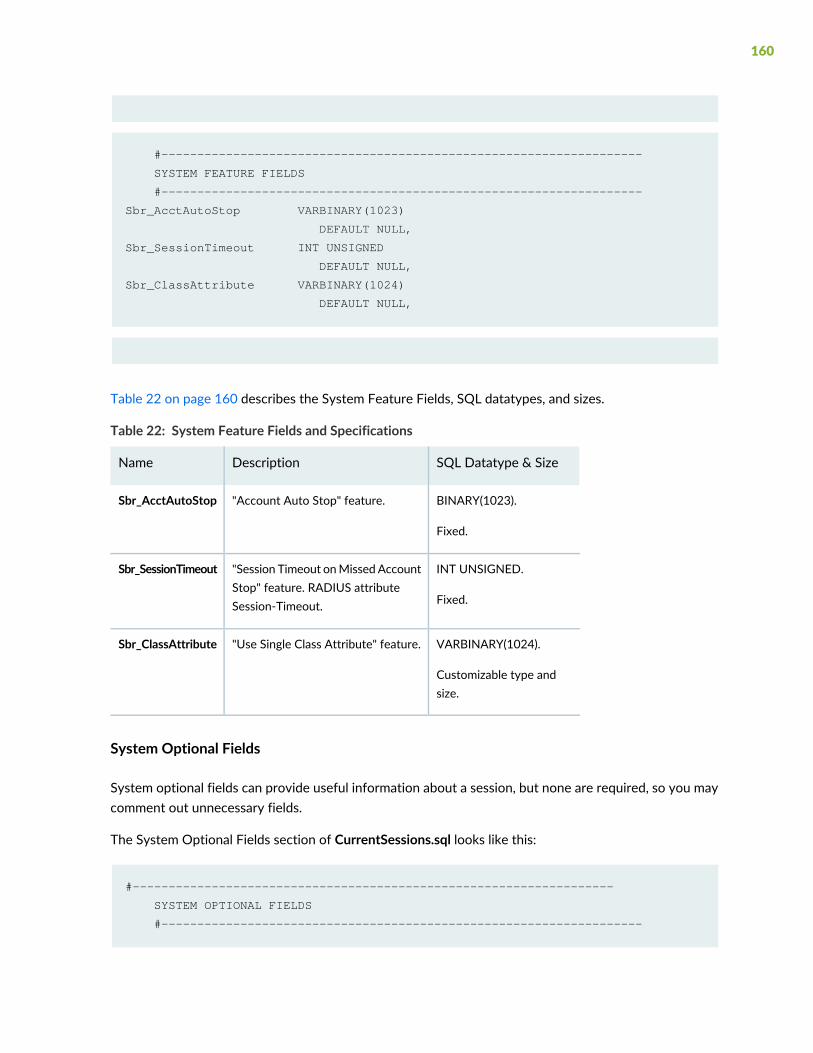
#-------------------------------------------------------------------
SYSTEM FEATURE FIELDS
#-------------------------------------------------------------------
Sbr_AcctAutoStop VARBINARY(1023)
DEFAULT NULL,
Sbr_SessionTimeout INT UNSIGNED
DEFAULT NULL,
Sbr_ClassAttribute VARBINARY(1024)
DEFAULT NULL,
Table 22 on page 160 describes the System Feature Fields, SQL datatypes, and sizes.
Table 22: System Feature Fields and Specifications
SQL Datatype & SizeDescriptionName
BINARY(1023).
Fixed.
"Account Auto Stop" feature.Sbr_AcctAutoStop
INT UNSIGNED.
Fixed.
"Session Timeout onMissed AccountStop" feature. RADIUS attributeSession-Timeout.
Sbr_SessionTimeout
VARBINARY(1024).
Customizable type andsize.
"Use Single Class Attribute" feature.Sbr_ClassAttribute
System Optional Fields
System optional fields can provide useful information about a session, but none are required, so you maycomment out unnecessary fields.
The System Optional Fields section of CurrentSessions.sql looks like this:
#-------------------------------------------------------------------
SYSTEM OPTIONAL FIELDS
#-------------------------------------------------------------------
160
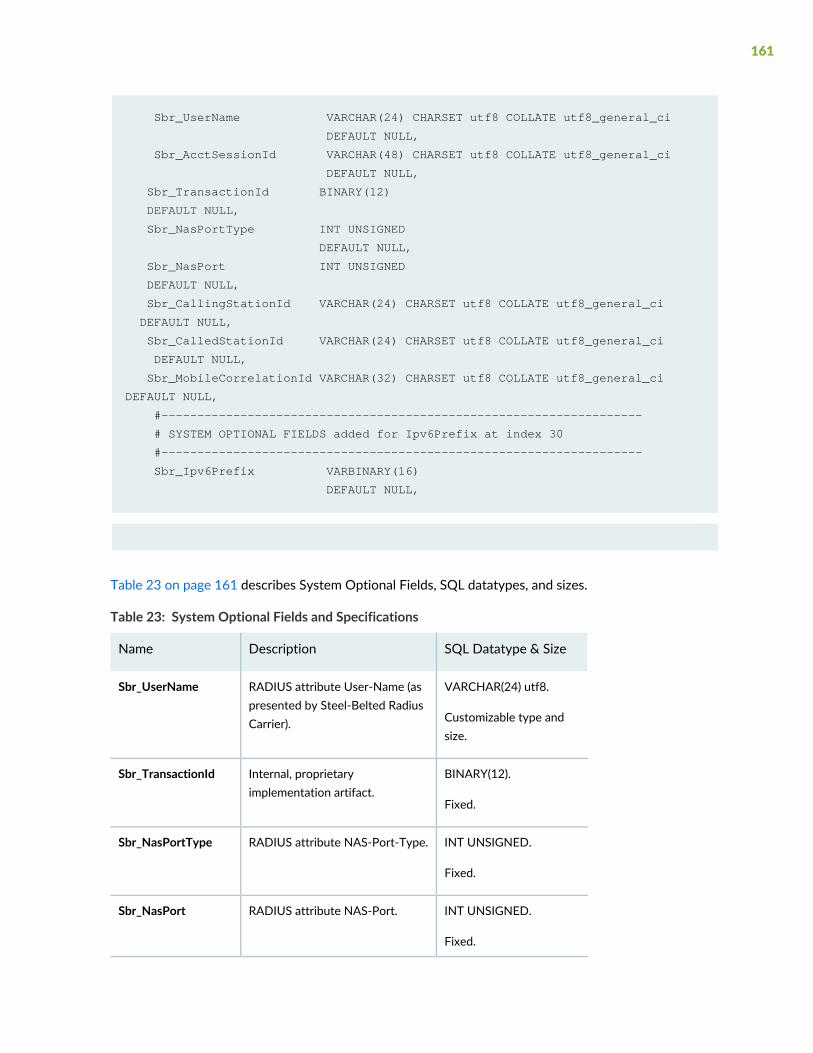
Sbr_UserName VARCHAR(24) CHARSET utf8 COLLATE utf8_general_ci
DEFAULT NULL,
Sbr_AcctSessionId VARCHAR(48) CHARSET utf8 COLLATE utf8_general_ci
DEFAULT NULL,
Sbr_TransactionId BINARY(12)
DEFAULT NULL,
Sbr_NasPortType INT UNSIGNED
DEFAULT NULL,
Sbr_NasPort INT UNSIGNED
DEFAULT NULL,
Sbr_CallingStationId VARCHAR(24) CHARSET utf8 COLLATE utf8_general_ci
DEFAULT NULL,
Sbr_CalledStationId VARCHAR(24) CHARSET utf8 COLLATE utf8_general_ci
DEFAULT NULL,
Sbr_MobileCorrelationId VARCHAR(32) CHARSET utf8 COLLATE utf8_general_ci
DEFAULT NULL,
#-------------------------------------------------------------------
# SYSTEM OPTIONAL FIELDS added for Ipv6Prefix at index 30
#-------------------------------------------------------------------
Sbr_Ipv6Prefix VARBINARY(16)
DEFAULT NULL,
Table 23 on page 161 describes System Optional Fields, SQL datatypes, and sizes.
Table 23: System Optional Fields and Specifications
SQL Datatype & SizeDescriptionName
VARCHAR(24) utf8.
Customizable type andsize.
RADIUS attribute User-Name (aspresented by Steel-Belted RadiusCarrier).
Sbr_UserName
BINARY(12).
Fixed.
Internal, proprietaryimplementation artifact.
Sbr_TransactionId
INT UNSIGNED.
Fixed.
RADIUS attribute NAS-Port-Type.Sbr_NasPortType
INT UNSIGNED.
Fixed.
RADIUS attribute NAS-Port.Sbr_NasPort
161
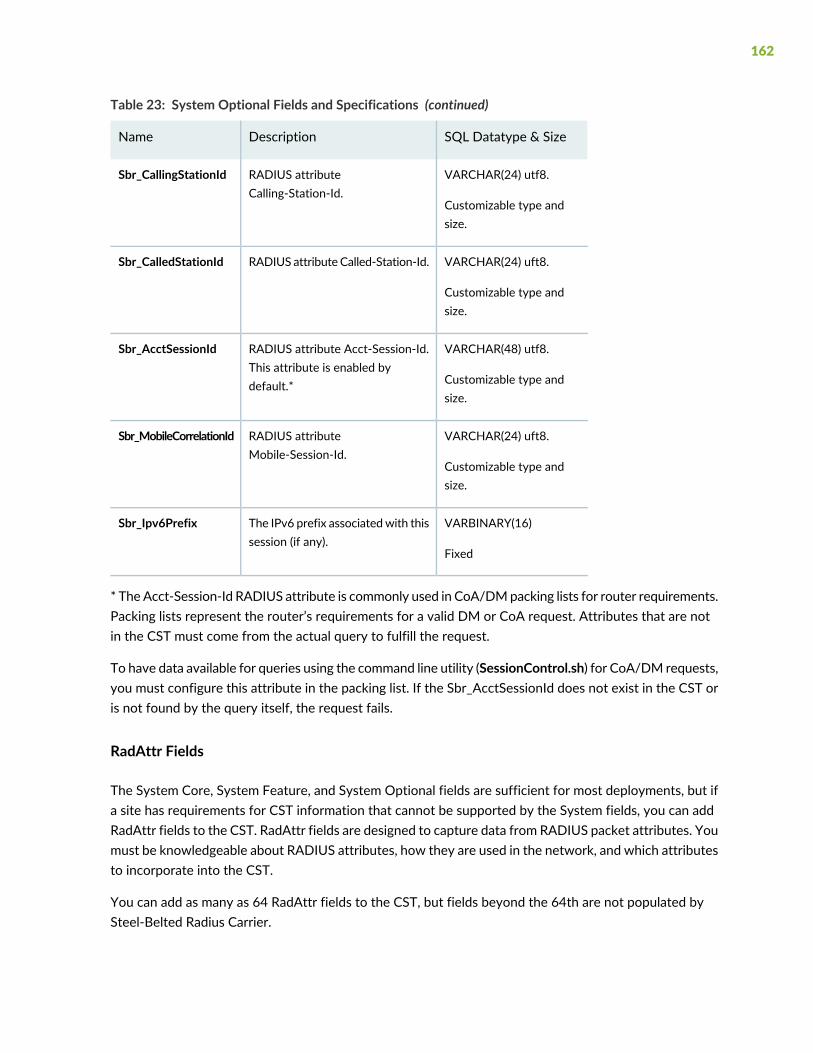
Table 23: System Optional Fields and Specifications (continued)
SQL Datatype & SizeDescriptionName
VARCHAR(24) utf8.
Customizable type andsize.
RADIUS attributeCalling-Station-Id.
Sbr_CallingStationId
VARCHAR(24) uft8.
Customizable type andsize.
RADIUS attribute Called-Station-Id.Sbr_CalledStationId
VARCHAR(48) utf8.
Customizable type andsize.
RADIUS attribute Acct-Session-Id.This attribute is enabled bydefault.*
Sbr_AcctSessionId
VARCHAR(24) uft8.
Customizable type andsize.
RADIUS attributeMobile-Session-Id.
Sbr_MobileCorrelationId
VARBINARY(16)
Fixed
The IPv6 prefix associatedwith thissession (if any).
Sbr_Ipv6Prefix
* The Acct-Session-Id RADIUS attribute is commonly used in CoA/DMpacking lists for router requirements.Packing lists represent the router’s requirements for a valid DM or CoA request. Attributes that are notin the CST must come from the actual query to fulfill the request.
To have data available for queries using the command line utility (SessionControl.sh) for CoA/DM requests,you must configure this attribute in the packing list. If the Sbr_AcctSessionId does not exist in the CST oris not found by the query itself, the request fails.
RadAttr Fields
The System Core, System Feature, and System Optional fields are sufficient for most deployments, but ifa site has requirements for CST information that cannot be supported by the System fields, you can addRadAttr fields to the CST. RadAttr fields are designed to capture data from RADIUS packet attributes. Youmust be knowledgeable about RADIUS attributes, how they are used in the network, and which attributesto incorporate into the CST.
You can add as many as 64 RadAttr fields to the CST, but fields beyond the 64th are not populated bySteel-Belted Radius Carrier.
162

The Admin Radattr Fields section of CurrentSessions.sql looks like this:
ADMIN RADATTR FIELDS
#-------------------------------------------------------------------
WimaxSessionId VARBINARY(32)
DEFAULT NULL,
AcctMultiSessionId VARCHAR(32) CHARSET utf8 COLLATE utf8_general_ci
DEFAULT NULL,
FunkOuterUserName VARCHAR(84) CHARSET utf8 COLLATE utf8_general_ci
DEFAULT NULL,
#RadAttrField1 INT UNSIGNED
DEFAULT NULL,
#RadAttrField2 VARCHAR(24) CHARSET utf8 COLLATE utf8_general_ci
DEFAULT NULL,
#RadAttrField3 VARBINARY(32)
DEFAULT NULL,
#-------------------------------------------------------------------
Table 24 on page 163 describes Admin RadAttr Fields, SQL datatypes, and sizes.
Table 24: RadAttr Fields and Specifications
SQL Datatype & SizeDescriptionName
VARBINARY(32)
Null
Unique WiMAX session IDWimaxSessionId
VARCHAR(32) CHARSET utf8 COLLATEutf8_general_ci
Null
Unique Accounting Multiple SessionID
AcctMultiSessionId
VARCHAR(84) CHARSET utf8 COLLATEutf8_general_ci
Null
Unique outer authenticationusername
FunkOuterUserName
INT UNSIGNED
Null
–#RadAttrField1
163
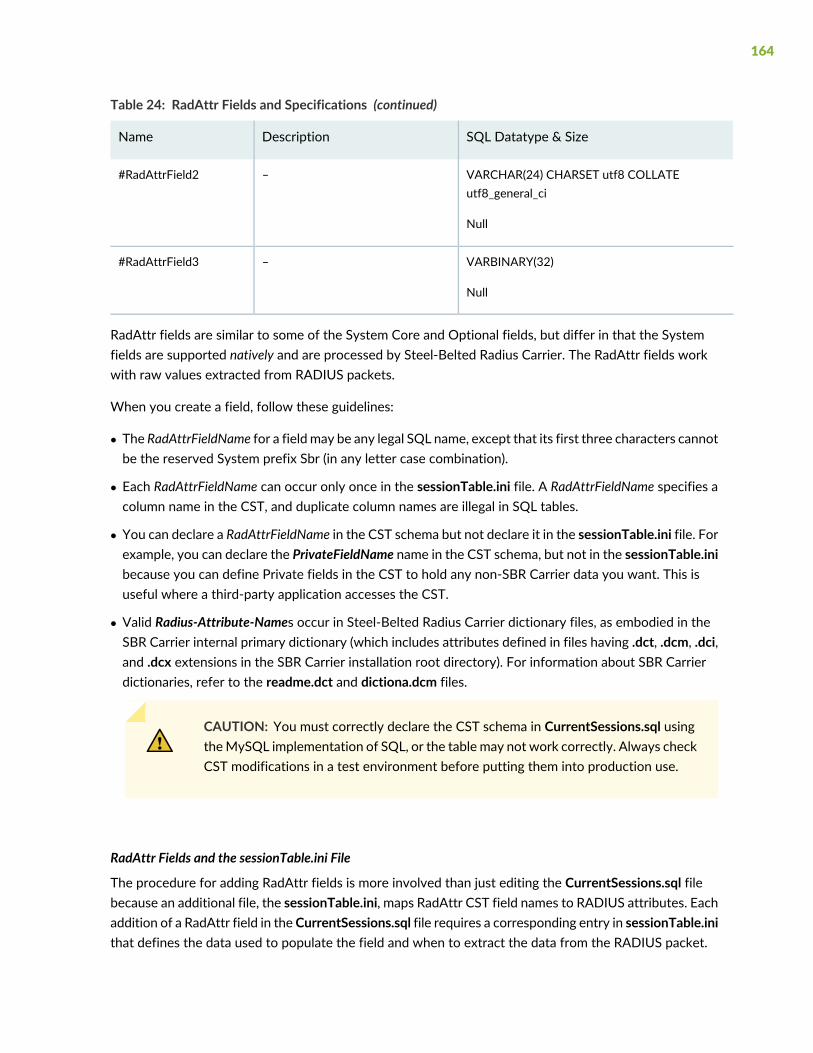
Table 24: RadAttr Fields and Specifications (continued)
SQL Datatype & SizeDescriptionName
VARCHAR(24) CHARSET utf8 COLLATEutf8_general_ci
Null
–#RadAttrField2
VARBINARY(32)
Null
–#RadAttrField3
RadAttr fields are similar to some of the System Core and Optional fields, but differ in that the Systemfields are supported natively and are processed by Steel-Belted Radius Carrier. The RadAttr fields workwith raw values extracted from RADIUS packets.
When you create a field, follow these guidelines:
• The RadAttrFieldName for a field may be any legal SQL name, except that its first three characters cannotbe the reserved System prefix Sbr (in any letter case combination).
• Each RadAttrFieldName can occur only once in the sessionTable.ini file. A RadAttrFieldName specifies acolumn name in the CST, and duplicate column names are illegal in SQL tables.
• You can declare a RadAttrFieldName in the CST schema but not declare it in the sessionTable.ini file. Forexample, you can declare the PrivateFieldName name in the CST schema, but not in the sessionTable.inibecause you can define Private fields in the CST to hold any non-SBR Carrier data you want. This isuseful where a third-party application accesses the CST.
• Valid Radius-Attribute-Names occur in Steel-Belted Radius Carrier dictionary files, as embodied in theSBR Carrier internal primary dictionary (which includes attributes defined in files having .dct, .dcm, .dci,and .dcx extensions in the SBR Carrier installation root directory). For information about SBR Carrierdictionaries, refer to the readme.dct and dictiona.dcm files.
CAUTION: You must correctly declare the CST schema in CurrentSessions.sql usingtheMySQL implementation of SQL, or the table may not work correctly. Always checkCST modifications in a test environment before putting them into production use.
RadAttr Fields and the sessionTable.ini File
The procedure for adding RadAttr fields is more involved than just editing the CurrentSessions.sql filebecause an additional file, the sessionTable.ini, maps RadAttr CST field names to RADIUS attributes. Eachaddition of a RadAttr field in theCurrentSessions.sql file requires a corresponding entry in sessionTable.inithat defines the data used to populate the field and when to extract the data from the RADIUS packet.
164

RADIUS attributes can be generated by Steel-Belted Radius Carrier at four capture points, events thatapply only to RadAttr fields:
• [AuthRequest]
• [AuthResponse]
• [AcctRequest]
• [AcctResponse]
Each RadAttr CST field requires at least one capture point to identify when RADIUS attributes are loadedin the field. Specify one ormore capture-points by placing the field entry in one ormore of the four capturepoint sections of the sessionTable.ini file.
One Radius-Attribute-Name can be captured multiple times, at different capture-points, by using multiple(different) RadAttrFieldNames, all of which are mapped to the same Radius-Attribute-Name.
If a RADIUS attribute is not present when a session’s RADIUS packet is scanned at a capture point event,the corresponding CST field is not updated. If the specified attribute does not occur in a packet at anycapture point, the session displays a null value in the CST field.
If a session experiences multiple occurrences of packets at the same capture-point carrying the sameRadius-Attribute-Name, the values of subsequent occurrences overwrite the values of preceding occurrencesin the RadAttrFieldName field. For example, if a session receives multiple Accounting-Start packets, thenthe AcctRequest and AcctResponse capture-points are exercised more than once for that session, withthe result that the captured Radius-Attribute-Name/ RadAddrFieldnames are updatedmultiple times. Thus,the CST always reflects the most recent values from each capture-point.
Creating RadAttr Field-to-Attribute Mappings
To support customizable CST fields requires a new configuration file, (sessionTable.ini), which is locatedin the Steel-Belted Radius Carrier installation root directory. The sessionTable.ini filemapsRadAttrFieldNameRadAttr CST fields to Radius-Attribute-Name RADIUS attributes:
RadAttrFieldName = Radius-Attribute-Name
How to Define RadAttr Fields
Defining a RadAttr field is a three-step procedure:
1. Create the field in the CurrentSessions.sql file.
Add the RadAttrFieldName field to the CST schema in CurrentSessions.sql.
For example:
ADMIN RADATTR FIELDS
#-------------------------------------------------------------------
WimaxSessionId VARBINARY(32)
165

DEFAULT NULL,
....
threegppImsi VARCHAR(24) CHARSET utf8 COLLATE utf8_general_ci
DEFAULT NULL,
threegppGgsnAddressINT UNSIGNED
DEFAULT NULL,
2. Edit the sessionTable.ini file.
Add theRadAttrFieldName=Radius-Attribute-Name field-to-attributemapping line to the sessionTable.inifile in the appropriate capture point section or in several sections.
This example supports the fields you entered Step 1:
[AcctRequest]
;===========================================================================
threegppImsi=3GPP-IMSI
threegppGgsnAddress=3GPP-GGSN-Address
3. Optionally, edit the ShowSessions.sh file.
Add the RadAttrFieldName to ShowSessions.sh, if you want it to appear in the ShowSessions.shcommand. You can customize the formatting of RadAttr fields, following the guidelines of the Systemfields in ShowSessions.sh.
NOTE: Be particularly careful with a RadAttr fields of type TIMESTAMP. If one is in the CSTschema but you fail to declare the field type in sessionTable.ini, then no sessions are created inthe CST. Every purported CST record that Steel-Belted Radius Carrier SSR presents to NDB hasa NULL value in the declared TIMESTAMP field. Because TIMESTAMP fields must be non-NULLunless they are explicitly declared as TIMESTAMP NULL, NDB refuses the request.
We recommend that every RadAttr TIMESTAMP field always be declared as TIMESTAMPNULLbecause you can rarely guarantee that the required RADIUS attribute will always be present.
166

After completing the preceding procedure for RadAttr fields and customizing System fields as needed,you must delete the existing database and create a new one that invokes your updated files. Then runShowSessions.sh to verify that everything is working correctly.
Multi-Valued Attributes
The sessionTable.ini file supports a special syntax to support multi-valued attributes. The RADIUS protocolpermits certain attributes to bemulti-valued, meaning that two ormore instances of the attribute can occurin a single RADIUS packet. System fields in the CST always involve single-valued attributes. RadAttr fieldsin the CST can be single-valued or multi-valued.
For RadAttr fields in the CST, we support multi-valued attributes with the six MVA facilities defined in thelist that follows. Any field-to-attribute mapping (in sessionTable.ini) can have its Radius-Attribute-Nameoptionally appended with one (but no more than one) multi-valued attribute @ extension.
MVA-Count
The MVA-Count extension stores the count (0, 1, or more) of attributes of the specifiedRadius-Attribute-Name (occurring in the RADIUS packet being scanned at the specified capture-point).Declare RadAttrFieldName as an INTUNSIGNED field in the CST schema. If you declare it to be [VAR]CHARor [VAR]BINARY, the field is automatically formatted.
Syntax:
RadAttrFieldName = Radius-Attribute-Name@#
MVA-Index
The MVA-Index extension stores the value of the Nth attribute (where N is equal to or greater than 1) ofthe Radius-Attribute-Name occurring in the RADIUS packet being scanned at the specified capture-point.For example, @1means to store the first value of the specified Radius-Attribute-Name. If the packet carriesfewer than N attributes of the designated type, a value of null is stored.
In this case, N is a 1-based, not 0-based, integer. Thus, N denotes a positive number in the range 1–2038,expressed in standard base-10 notation. Specifying a value for N outside this range is an error.
Syntax:
RadAttrFieldName = Radius-Attribute-Name@N
MVA-First
The MVA-First extension stores the first value of the Radius-Attribute-Name attribute occurring in theRADIUS packet being scanned at the specified capture-point. MVA-First extension is synonymous withthe Radius-Attribute-Name@1 extension.
Syntax:
167

RadAttrFieldName = Radius-Attribute-Name@^
MVA-Last
The MVA-Last extension stores the last value of the Radius-Attribute-Name attribute occurring in theRADIUS packet being scanned at the specified capture-point.
Syntax:
RadAttrFieldName = Radius-Attribute-Name@$
MVA-CharString-Concat
TheMVA-CharString-Concat extension treats the potentially multiple values of Radius-Attribute-Name astext strings. It concatenates them using the specified string “…”, as a field delimiter between successivevalues. Ensure that values of the Radius-Attribute-Name attribute are the natural CHAR datatype. If theyare not, the appropriate unnatural conversion is applied.
NOTE: The RadAttrFieldName field must be declared in the CST schema to be of [VAR]CHARtype. If the RadAttrFieldName field is of a type other than [VAR]CHAR, Steel-Belted RadiusCarrier reports an error.
The value of the delimiter string cannot contain the 2-character sequence @” (at-sign/double-quote) orinternal NULL characters. The delimiter string can consist of any arbitrary (single-byte) characters, suchas comma, colon, space, tab, and new line characters. This facility supports C/C++-languagebackslash-escaping (meta character) conventions. For example, to include a backslash character in a delimiterstring or in a character data-value, enter it as: \\.
Syntax:
RadAttrFieldName = Radius-Attribute-Name@"…"
MVA-ByteString-Concat
TheMVA-ByteString-Concat extension treats the potentially multiple values of Radius-Attribute-Name asbyte strings. It concatenates them using a length and value representation: every value is represented bya one-byte length header that identifies the length of the data value in the range 1–253 and is followedby the data value. The concatenation terminates with a one-byte 0-value trailer that indicates a data oflength 0, such as the end of the concatenated byte-string. Ensure that values of the Radius-Attribute-Nameattribute are of the natural BYTE datatype. If they are not, the appropriate unnatural conversion is applied.
168
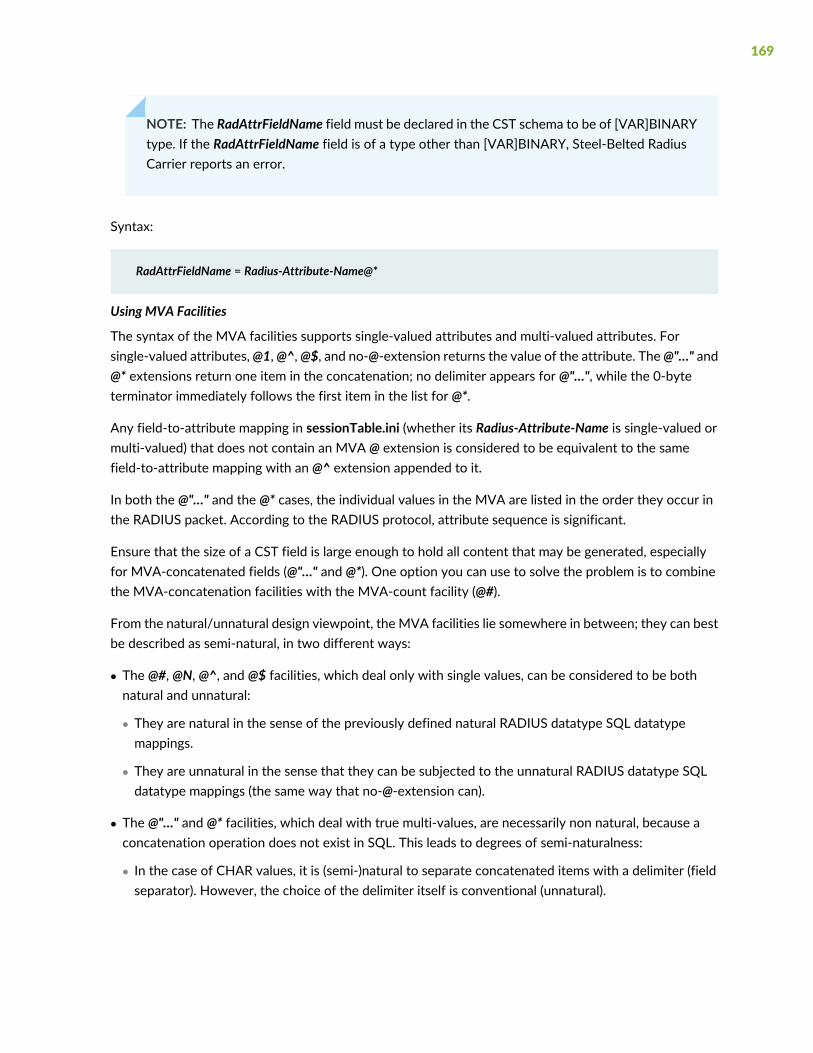
NOTE: The RadAttrFieldName field must be declared in the CST schema to be of [VAR]BINARYtype. If the RadAttrFieldName field is of a type other than [VAR]BINARY, Steel-Belted RadiusCarrier reports an error.
Syntax:
RadAttrFieldName = Radius-Attribute-Name@*
Using MVA Facilities
The syntax of the MVA facilities supports single-valued attributes and multi-valued attributes. Forsingle-valued attributes,@1,@^,@$, and no-@-extension returns the value of the attribute. The@"…" and@* extensions return one item in the concatenation; no delimiter appears for @"…", while the 0-byteterminator immediately follows the first item in the list for @*.
Any field-to-attribute mapping in sessionTable.ini (whether its Radius-Attribute-Name is single-valued ormulti-valued) that does not contain an MVA @ extension is considered to be equivalent to the samefield-to-attribute mapping with an @^ extension appended to it.
In both the @"…" and the @* cases, the individual values in the MVA are listed in the order they occur inthe RADIUS packet. According to the RADIUS protocol, attribute sequence is significant.
Ensure that the size of a CST field is large enough to hold all content that may be generated, especiallyfor MVA-concatenated fields (@"…" and @*). One option you can use to solve the problem is to combinethe MVA-concatenation facilities with the MVA-count facility (@#).
From the natural/unnatural design viewpoint, the MVA facilities lie somewhere in between; they can bestbe described as semi-natural, in two different ways:
• The @#, @N, @^, and @$ facilities, which deal only with single values, can be considered to be bothnatural and unnatural:
• They are natural in the sense of the previously defined natural RADIUS datatype SQL datatypemappings.
• They are unnatural in the sense that they can be subjected to the unnatural RADIUS datatype SQLdatatype mappings (the same way that no-@-extension can).
• The @"…" and @* facilities, which deal with true multi-values, are necessarily non natural, because aconcatenation operation does not exist in SQL. This leads to degrees of semi-naturalness:
• In the case of CHAR values, it is (semi-)natural to separate concatenated items with a delimiter (fieldseparator). However, the choice of the delimiter itself is conventional (unnatural).
169
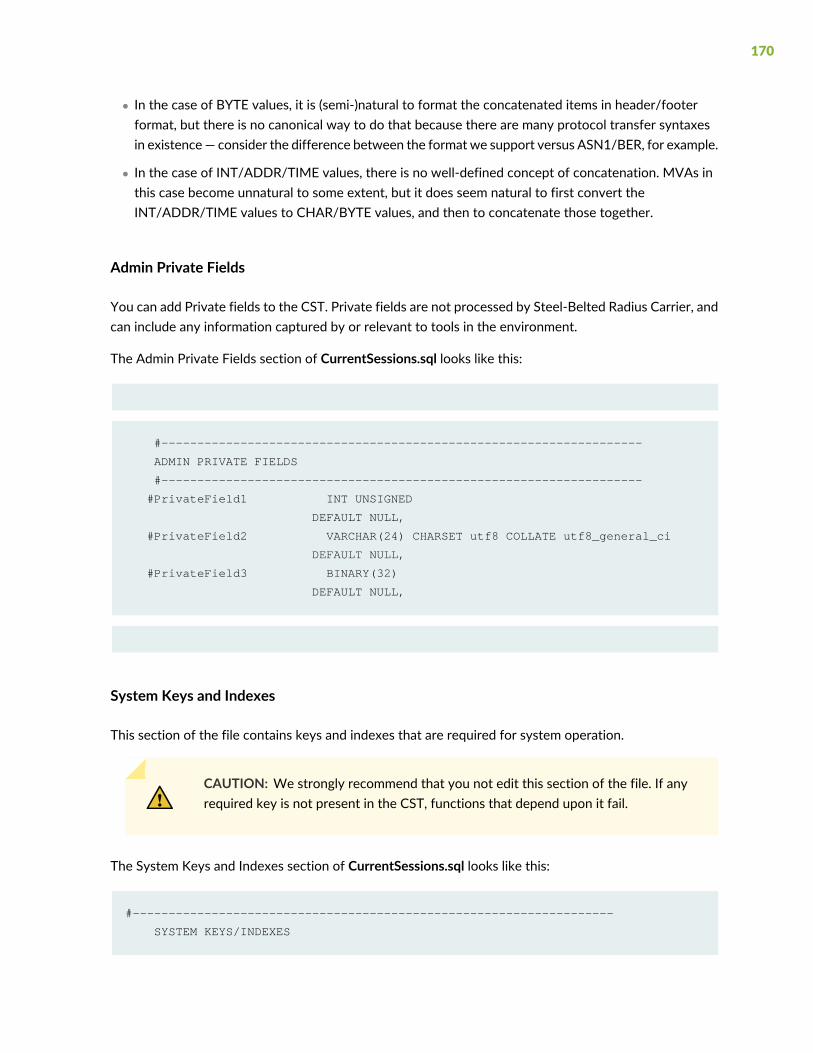
• In the case of BYTE values, it is (semi-)natural to format the concatenated items in header/footerformat, but there is no canonical way to do that because there are many protocol transfer syntaxesin existence— consider the difference between the format we support versus ASN1/BER, for example.
• In the case of INT/ADDR/TIME values, there is no well-defined concept of concatenation. MVAs inthis case become unnatural to some extent, but it does seem natural to first convert theINT/ADDR/TIME values to CHAR/BYTE values, and then to concatenate those together.
Admin Private Fields
You can add Private fields to the CST. Private fields are not processed by Steel-Belted Radius Carrier, andcan include any information captured by or relevant to tools in the environment.
The Admin Private Fields section of CurrentSessions.sql looks like this:
#-------------------------------------------------------------------
ADMIN PRIVATE FIELDS
#-------------------------------------------------------------------
#PrivateField1 INT UNSIGNED
DEFAULT NULL,
#PrivateField2 VARCHAR(24) CHARSET utf8 COLLATE utf8_general_ci
DEFAULT NULL,
#PrivateField3 BINARY(32)
DEFAULT NULL,
System Keys and Indexes
This section of the file contains keys and indexes that are required for system operation.
CAUTION: We strongly recommend that you not edit this section of the file. If anyrequired key is not present in the CST, functions that depend upon it fail.
The System Keys and Indexes section of CurrentSessions.sql looks like this:
#-------------------------------------------------------------------
SYSTEM KEYS/INDEXES
170

#-------------------------------------------------------------------
PRIMARY KEY USING HASH (Sbr_UniqueSessionId),
INDEX Sbr_NasName_Idx (Sbr_NasName),
INDEX Sbr_ExpirationTime_Idx (Sbr_ExpirationTime),
INDEX AcctMultiSessionId_Idx (AcctMultiSessionId),
INDEX Sbr_MobileCorrelationId_Idx (Sbr_MobileCorrelationId),
INDEX Sbr_AcctSessionId_Idx (Sbr_AcctSessionId),
INDEX Sbr_UserName_Idx (Sbr_UserName),
INDEX Sbr_CallingStationId_Idx (Sbr_CallingStationId),
INDEX Sbr_CalledStationId_Idx (Sbr_CalledStationId),
INDEX Sbr_Ipv4Address_Idx (Sbr_Ipv4Address),
INDEX Sbr_TransactionId_Idx (Sbr_TransactionId )
Admin Keys and Indexes
This section of the file contains keys and indexes that are required for system operation.
CAUTION: We strongly recommend that you not edit this section of the file; it containssystem-generated entries. If any required key is not present in the CST, functions thatdepend upon it fail.
The System Keys and Indexes section of CurrentSessions.sql looks like this:
#-------------------------------------------------------------------
ADMIN KEYS/INDEXES
#-------------------------------------------------------------------
#,
INDEX Some_Idx USING HASH (What, Ever)
)
ENGINE = ndbcluster NOTE: CreateDB.sh fiddles with this line!
;
#=======================================================================
171
Copyright (C) 2007-9, Juniper Networks, Inc. All rights reserved.
SSR Datatypes
This section describes the datatypes that Session State Register supports.
NOTE: We do not support any datatype not explicitly addressed in this document. This appliesto datatypes themselves, sizes of datatypes, character sets, and their collations.
Definitions
Data in a RADIUS attribute may be one of six datatypes:
• NULL: No data at all; absence of data.
• INT: Data that is either a bare (numerical, counting) measure or a semantic (enumeration, ordinal) value,representing one value out of a specific set of values.
Examples: 42 (measuring a person's age in years); 0 (as a stand-in for false).
• ADDR: IPv4 addresses. These are ultimately 32-bits quantities as far as networks are concerned, butare usually represented as integers or as dotted-quad strings. Example:10101100000110010110000101001101 = 0xac19614d = 2,887,344,461 = 172.25.97.77.
• TIME: Seconds elapsed in the UNIX epoch, commencing at 00:00:00 (the stroke of midnight) on themorning of January 1, 1970 UTC. Example: 1,142,370,727 = 2006-03-14T16:12:07-0500 = 4:12:07PMEastern Daylight Time, March 14, 2006.
• CHAR: Information expressed in natural languages. Example: Administration Building.
• BYTE: Encoded data. Example: Encrypted communications.
Table 25 on page 172 summarizes these data types:
Table 25: Terminology for Datatypes
SBR/SSRImplementation
Core SBR & SBRDictionariesSQLRADIUS SpecThis Document
(absent)RAD_TYPE_CONSTANTNULL(absent)NULL
172

Table 25: Terminology for Datatypes (continued)
SBR/SSRImplementation
Core SBR & SBRDictionariesSQLRADIUS SpecThis Document
FieldFormat_UInteger,FieldFormat_SInteger
RAD_TYPE_INTEGER,RAD_TYPE_INT1RAD_TYPE_HEX4RAD_TYPE_IPXADDR_POOLintegersigned-integerint1int4hex1hex4ipxaddr-pool
TINYINTSMALLINTMEDIUMINTINT
SIGNED orUNSIGNED
integer(32-bit unsigned,big-endian)
INT
FieldFormat_UIntegerRAD_TYPE_IPADDR,RAD_TYPE_IPADDR_POOLipaddripaddr-pool
INT
UNSIGNED
address (32-bit)ADDR
FieldFormat_UIntegerRAD_TYPE_TIMEtime
TIMESTAMPtime (32-bit)TIME
FieldFormat_String,FieldFormat_StringFixed
RAD_TYPE_STRINGRAD_TYPE_STRINGNZstringstringnz
CHARVARCHAR
text (utf8, 0-255bytes)
CHAR
FieldFormat_Raw,FieldFormat_RawVar
RAD_TYPE_HEXSTRING,RAD_TYPE_IPV6ADDR,RAD_TYPE_IPV6PREFIX,RAD_TYPE_IPV6INTERFACEhexadecimalipv6addripv6prefix,ipv6interface
BINARYVARBINARY
string(0-255 bytes)
BYTE
System Field Datatypes
The datatypes for the System fields have already been specified as listed in Table 25 on page 172. Someare fixed, and some are customizable.
173

RadAttr Fields
A RadAttr field declared in sessionTable.ini as RadAttrFieldName = Radius-Attribute-Name associates aCST field (RadAttrFieldName) with a RADIUS attribute (Radius-Attribute-Name), that involves two datatypes:
• The RADIUS attribute (Radius-Attribute-Name) has a RADIUS datatype specified by the dictionary inwhich Steel-Belted Radius Carrier finds it.
• The CST field (RadAttrFieldName) has a SQL datatype determined by the field's declaration in the CSTschema (CurrentSessions.sql).
These two datatypes must match or be compatible with one another so the RADIUS datatype can bemapped or converted to the SQL datatype. In this context:
• Match—A natural /primary/canonical/favorite mapping, as specified in Table 26 on page 174.
• Compatible—An unnatural/secondary/conventional/formatting conversion, as specified inTable 26 on page 174.
Take care to coordinate datatypes to avoid processing errors.
Matching/Natural Datatype Mappings
Table 26 on page 174 lists the natural datatype conversions from RADIUS datatypes to SQL datatypes,together with the usual way to display values stored in the database using the SQL SELECT command asimplemented in ShowSessions.sh.
Table 26: Matching/Natural Mappings
SQL SELECT Display CommandSQLDatatypeRADIUSDatatype
Conventionally displayed in Steel-Belted RadiusCarrier as (n u l l) (9 characters, 3 of which arespaces,).
NULL(absent)
Supported natively, for example (with auxiliaryformatting options, such as commas for thousandsseparators, available):
SELECTRadAttrFieldNameFROMCurrentSessions;
In the case of enumerative values, you should usetheCONCAT() built-in function to display the nameof the enumerated value, followed by the integervalue in parentheses.
INTUNSIGNEDinteger
174
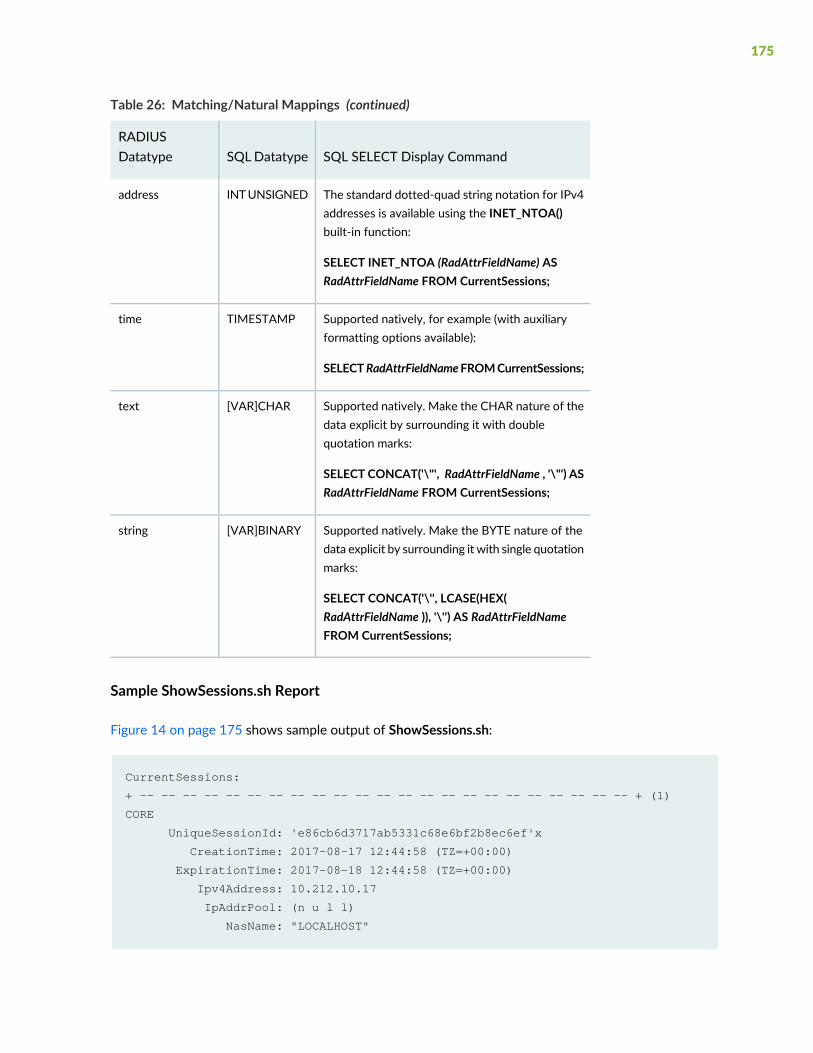
Table 26: Matching/Natural Mappings (continued)
SQL SELECT Display CommandSQLDatatypeRADIUSDatatype
The standard dotted-quad string notation for IPv4addresses is available using the INET_NTOA()built-in function:
SELECT INET_NTOA (RadAttrFieldName) ASRadAttrFieldName FROM CurrentSessions;
INTUNSIGNEDaddress
Supported natively, for example (with auxiliaryformatting options available):
SELECTRadAttrFieldNameFROMCurrentSessions;
TIMESTAMPtime
Supported natively. Make the CHAR nature of thedata explicit by surrounding it with doublequotation marks:
SELECT CONCAT('\"', RadAttrFieldName , '\"') ASRadAttrFieldName FROM CurrentSessions;
[VAR]CHARtext
Supported natively. Make the BYTE nature of thedata explicit by surrounding it with single quotationmarks:
SELECT CONCAT('\'', LCASE(HEX(RadAttrFieldName )), '\'') AS RadAttrFieldNameFROM CurrentSessions;
[VAR]BINARYstring
Sample ShowSessions.sh Report
Figure 14 on page 175 shows sample output of ShowSessions.sh:
CurrentSessions:
+ -- -- -- -- -- -- -- -- -- -- -- -- -- -- -- -- -- -- -- -- -- -- -- + (1)
CORE
UniqueSessionId: 'e86cb6d3717ab5331c68e6bf2b8ec6ef'x
CreationTime: 2017-08-17 12:44:58 (TZ=+00:00)
ExpirationTime: 2017-08-18 12:44:58 (TZ=+00:00)
Ipv4Address: 10.212.10.17
IpAddrPool: (n u l l)
NasName: "LOCALHOST"
175

Status: Active (2)
UserConcurrencyId: (n u l l)
MobileIpType: 0
3gpp2ReqType: 0
WimaxClientType: 0
WimaxAcctFlows:
Ipv6Address: “3333:0000:0000:0000:0000:0000:0000:4444”
FEATURE
AcctAutoStop: (n u l l)
ClassAttribute: '00'x
OPTIONAL
UserName: "test"
AcctSessionId: "1502973868T2gpu"
TransactionId: (n u l l)
NasPortType: NULL
NasPort: 0
CallingStationId: "somecaller"
CalledStationId: (n u l l)
MobileCorrelationId: (n u l l)
Ipv6InterfaceId: (n u l l)
Ipv6Prefix: NULL
NasIpv4Address: 127.0.0.1
NasIpv6Address: (n u l l)
RADATTR
WimaxSessionId: (n u l l)
AcctMultiSessionId: (n u l l)
FunkOuterUserName: (n u l l)
PRIVATE
+ -- -- -- -- -- -- -- -- -- -- -- -- -- -- -- -- -- -- -- -- -- -- -- + (end)
These notes explain the report shown in Figure 14 on page 175:
• The current date reported by the admin host where ShowSessions.sh is running is printed.
• Each CST record is separated within “+---…---+” header and footer delimiters. Each CST record isnumbered (beginning at 1) at its header delimiter, and the end of the printout is marked by an unnumberedfooter delimiter. (In Figure 14 on page 175, the CST contains only a single session.)
• By default, displayed records are sequenced primarily by CreationTime, then by ExpirationTime, andthen by Ipv4Address. You can customize this by changing the SQLORDERBY clause in ShowSessions.sh.
176

• The Core, Feature, Optional, RadAttr, and Private fields are grouped into separate titled sections, forthe convenience of the reader. You can change this or remove titles by modifying the ShowSessions.shscript.
• The System field names have beenmade easier to read by removing their Sbr_ prefixes, and the displayednames of the Admin fields have been customized to include the prefixMy.
• The various kinds of SQL SELECT displays mentioned in Table 26 on page 174 are shown:
• NULL values are shown for 10 fields. To eliminate fields that are always NULL (such as disabled Featurefields), comment them out in ShowSessions.sh so they do not appear in the printout.
• Raw INT data for the NasPort and MyRadAttrField1 fields is displayed. (Note the formatting of theseparators in NasPort. You can customize this.)
• Enumerative INT data for the IpAddrPool, Status, and NasPortType fields is displayed.
• ADDR data is displayed for the Ipv4Address field.
• TIME data is displayed for the CreationTime and ExpirationTime fields.
• CHAR data is displayed for the NasName, UserName, AcctSessionId, and MyRadAttrField2 fields.
• BYTE data is displayed for the UniqueSessionId, TransactionId, and MyRadAttrField3 fields.
Concerning the definitions of the RadAttr fields in this example:
• The SQL declaration of the RadAttr fields is:
RadAttrField1 INT UNSIGNED DEFAULT NULL,RadAttrField2 VARCHAR(24) CHARSET utf8 COLLATE utf8_general_ci DEFAULT NULL,RadAttrField3 BINARY(24) DEFAULT NULL,
• The sessionTable.ini file is:
[AuthRequest]RadAttrField1 = NAS-PortRadAttrField2 = User-NameRadAttrField3 = User-Password[AuthResponse][AcctRequest][AcctResponse]
The definition of the RadAttrField1 has the same value as the NAS-Port field, though the latter has someformatting applied to it (at the natural display level, not at the unnatural storage level; see the followingsubsection).
The definition of RadAttrField2 is the same as User-Name, except that the latter has been processed bySteel-Belted Radius Carrier (as mentioned previously).
177

The definition of RadAttrField3 demonstrates the kind of padding that occurs with SQL BINARY fields.Had it been declared VARBINARY(24), the padding zeros would not have appeared.
NOTE: The RADIUS User-Password attribute is encrypted (hence, BYTE) data.
Compatible/Unnatural Datatype Conversions
In addition to thematching/natural mappings defined previously, Steel-Belted Radius Carrier SSR supportsthe compatible/unnatural conversions listed in Table 27 on page 178.
Table 27: Compatible/Unnatural Conversions
SQL Datatype
RADIUS Datatype [VAR]BINARY[VAR]CHARTIMESTAMPINT UNSIGNED
Base256Base10CoerceNatural Matchinteger
Base256Dotted QuadCoerceNatural Matchaddress
Base256ISO8601Natural MatchCoercetime
CoerceNatural MatchNoneLengthtext
Natural MatchHexNoneLengthstring
This list further explains the values in Table 27 on page 178:
• Coerce—Re-interpret the underlying bits of the RADIUS datatype as if they were the underlying bits ofthe corresponding SQL datatype.
• Length—Length in bytes (not in characters in the CHAR case). A terminating NULL byte, if any, is notcounted. This conversion is supported for its helpfulness in checking database-storage padding andtruncation issues.
• Base10—Express an integer in the usual decimal notation, using the Unicode Basic Latin characters 0…9,possibly preceded by a minus-sign.
• Dotted Quad—Conventional notation for IPv4 addresses.
• ISO8601 (RFC 3339)—Conventional international standard format YYYY-MM-DDThh:mm:ssZ. Both Tand Z are required elements. The Z indicates UTC; if it is not present, the interpretation defaults to localtime zone.
178
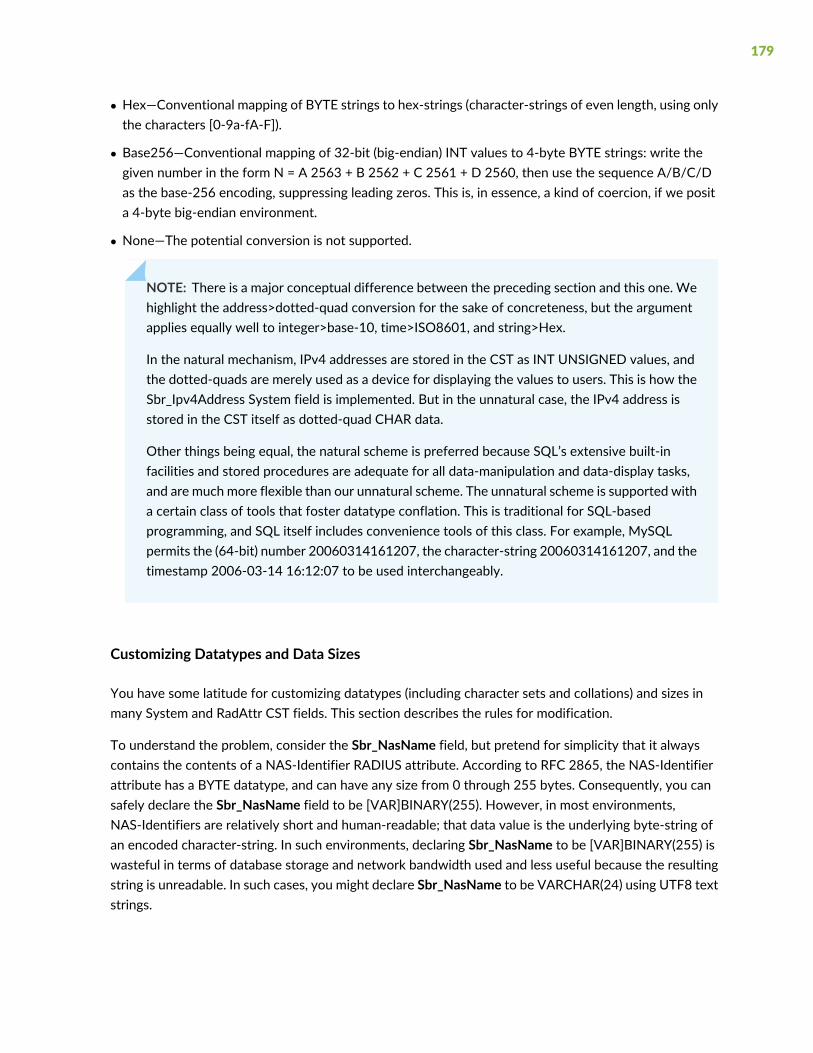
• Hex—Conventional mapping of BYTE strings to hex-strings (character-strings of even length, using onlythe characters [0-9a-fA-F]).
• Base256—Conventional mapping of 32-bit (big-endian) INT values to 4-byte BYTE strings: write thegiven number in the form N = A 2563 + B 2562 + C 2561 + D 2560, then use the sequence A/B/C/Das the base-256 encoding, suppressing leading zeros. This is, in essence, a kind of coercion, if we posita 4-byte big-endian environment.
• None—The potential conversion is not supported.
NOTE: There is a major conceptual difference between the preceding section and this one. Wehighlight the address>dotted-quad conversion for the sake of concreteness, but the argumentapplies equally well to integer>base-10, time>ISO8601, and string>Hex.
In the natural mechanism, IPv4 addresses are stored in the CST as INT UNSIGNED values, andthe dotted-quads are merely used as a device for displaying the values to users. This is how theSbr_Ipv4Address System field is implemented. But in the unnatural case, the IPv4 address isstored in the CST itself as dotted-quad CHAR data.
Other things being equal, the natural scheme is preferred because SQL’s extensive built-infacilities and stored procedures are adequate for all data-manipulation and data-display tasks,and are much more flexible than our unnatural scheme. The unnatural scheme is supported witha certain class of tools that foster datatype conflation. This is traditional for SQL-basedprogramming, and SQL itself includes convenience tools of this class. For example, MySQLpermits the (64-bit) number 20060314161207, the character-string 20060314161207, and thetimestamp 2006-03-14 16:12:07 to be used interchangeably.
Customizing Datatypes and Data Sizes
You have some latitude for customizing datatypes (including character sets and collations) and sizes inmany System and RadAttr CST fields. This section describes the rules for modification.
To understand the problem, consider the Sbr_NasName field, but pretend for simplicity that it alwayscontains the contents of a NAS-Identifier RADIUS attribute. According to RFC 2865, the NAS-Identifierattribute has a BYTE datatype, and can have any size from 0 through 255 bytes. Consequently, you cansafely declare the Sbr_NasName field to be [VAR]BINARY(255). However, in most environments,NAS-Identifiers are relatively short and human-readable; that data value is the underlying byte-string ofan encoded character-string. In such environments, declaring Sbr_NasName to be [VAR]BINARY(255) iswasteful in terms of database storage and network bandwidth used and less useful because the resultingstring is unreadable. In such cases, you might declare Sbr_NasName to be VARCHAR(24) using UTF8 textstrings.
179
• For System Core and Feature fields, use a datatype and size that guarantees full fidelity of information(no semantic data loss). If you use an inappropriate datatype or size, Steel-Belted Radius Carrier SSR canfail in unpredictable ways because the data in question is critical to stable processing. If the data in aSystem Core or Feature field is unreliable, Steel-Belted Radius Carrier might not work correctly.
• If Steel-Belted Radius Carrier does not depend on the data in question, a less restrictive rule applies. Forexample, consider the Sbr_UserName field. Again, the RADIUS RFC guarantees that [VAR]BINARY(255)is safe. You can declare the Sbr_UserName field as VARCHAR(24) using Latin1 text strings, but mightlead to problems if users want to use non-Latin characters (for example, Japanese or Devanagari) in usernames.
To apply these rules, be familiar with the RADIUS RFCs and the network environment.
NOTE: If you have included a customizable field for the Delegated-IPv6-Prefix attribute inMySQL table, its data type needs to be set as VARBINARY(16) for displaying the field in IPv6address format in the SessionControl.sh script output.
Character Sets and Collations
The SSR database supports many character sets (charsets). Steel-Belted Radius Carrier SSR sites can useany charset and any associated collation supported by the SSR database that does not use the NULL bytein its encoding. Examples of permissible charsets are: ASCII, Latin1, and UTF8. A non-example is UCS2(which is the straight-forward 2-byte encoding of the Basic Multilingual Plane (BMP), UnicodeU+0000…U+FFFF).
Because charsets in the SSR database can have an expansion factor (1, 2, or 3) associated with them,specifications for field sizes can be misleading. For example, if a field in the CST schema is declaredVARCHAR(7) CHARSETutf8, then the field is guaranteed to hold up to sevenUnicode characters encodedin UTF8. Because UTF8 has an expansion factor of 3, a VARCHAR(7) field can hold up to 3x7 = 21 bytesof information.
Truncation and Padding
The SQL datatypes [VAR]CHAR(N) and [VAR]BINARY(N) reserve a fixed number of bytes, called the field'sstorage size, for every stored value in NDB. The storage size for [VAR]CHAR is the charset expansionfactor timesN; the storage size for [VAR]BINARY is N. Steel-Belted Radius Carrier always presents exactlythe full storage size of data to NDB.
In cases where a field value is less than the storage size, Steel-Belted Radius Carrier pads the value out tothe full storage size before presenting it to NDB for storage. The padding value is the SPACE character inthe [VAR]CHAR case and the NUL byte in the [VAR]BINARY case.
180
In cases where a field value is greater than the storage size, Steel-Belted Radius Carrier truncates it to thefield storage size. No log file messages are written if data is truncated.
The maximum storage size for any field in the CST is 4096 bytes, large enough for any System field ornatural RadAttr field. This is sufficient to store all the raw data carried in any RADIUS attribute value, evenif the whole RADIUS packet consists of one large multi-value attribute.
Small Integers
Truncation and padding are not usedwith INT numerical data. Because the RADIUS specification discussesonly 4-byte INT data, you can always safely declare a RadAttrFieldName in the CST schema as an INT.
If you are certain that, in your network, all values of RadAttrFieldName fit into a TINYINT (1 byte), SMALLINT(2 bytes), or MEDIUMINT (3 bytes), you can declare RadAttrFieldName to be of an appropriate type in theSQL schema. However, if an illegal overflow value is presented to Steel-Belted Radius Carrier for storagein a field that is too small, the value that Steel-Belted Radius Carrier stores is the largest value that thefield will hold (0xff = 255, 0xffff = 65,535, 0xffffff = 16,777,215 respectively). No log file message isgenerated. As a general rule, do not use TINYINT, SMALLINT, or MEDIUMINT unless you are sure thenetwork can tolerate this potential loss of information.
Signed Integers
In the original RADIUS specifications, all integer attributes were specifically unsigned. Recent usages havestarted to use signed attributes. For this reason, our implementation allows RadAttrFieldNames to bespecified as SIGNED fields in the CST schema. Steel-Belted Radius Carrier SSR supports this only as anatural facility: youmust declare the sign of SQL INT datatypes correctly. There are no (natural or unnatural)conversions between signed and unsigned integers.
For signed INT quantities, you can use TINYINT, SMALLINT, or MEDIUMINT in SSR database schemadeclarations if you know the values in your network can fit into these smaller-sized fields. If a value toolarge for a field is presented to SBR Carrier for storage, SBR Carrier stores the largest possible value (thatis, most-positive, which is 0x7f = 127, 0x7fff = 32,767 or 0x7ffffff = 8,388,607) in the case of overflow,and the smallest possible value (that is, the most-negative, which is -128, -32,-768 or -8,388,608respectively) in the case of underflow. No log file message is generated.
Unsupported SQL Datatypes
RadAttr CST fields do not support SQL datatypes other than those discussed in this section (INTs of varioussizes and sign, CHAR, VARCHAR, BINARY, and VARBINARY).
Unsupported datatypes include INT datatypes such as BIGINT, BIT, DECIMAL, TIME and DATE; CHARdatatypes such as TEXT; and BYTE datatypes such as BLOB.
181

CHAPTER 10
Other Session State Register Configuration Files
IN THIS CHAPTER
Tuning Other SSR Tables Overview | 182
Configuring the dbclusterndb.gen File | 182
Customizing Other Tables and Scripts | 193
Managing IP Pools | 194
This chapter presents information aboutmaintaining andworking the Session State Register module (SSR).This chapter covers the following topics:
Tuning Other SSR Tables Overview
Several other files control tables in the SSR database. These usually do not require modification becausemost values are system-generated, but some settings may be changed. In particular, the ManagementMode field in the dbclusterndb.gen file is often changed to put SBR Carrier nodes into management modefor maintenance. (See the section on Session State Register Administration in the SBR Carrier Administrationand Configuration Guide.) Most other settings in all files are generated by the system and do not usuallyrequire changes.
Configuring the dbclusterndb.gen File
Use the dbclusterndb.gen file to configure the database settings used by each SBR Carrier node to accessthe SSR database. The dbclusterndb.gen file is stored in the radiusdir directory, usually/opt/JNPRsbr/radius.
[Bootstrap] Section
The [Bootstrap] section (Table 28 on page 183) of dbclusterndb.gen specifies information that SBR Carriernodes use to load SSR functions.
182
[Bootstrap]LibraryName = dbclusterndbEnable = 1ManagementMode = 0
Table 28: dbclusterndb.gen [Bootstrap] Fields
FunctionParameter
Specifies the name of the cluster database module.Default value is dbclusterndb.
Do not change this unless you are advised to do so byJuniper Networks Technical Support.
LibraryName
• If set to 0, the high availability functionality is disabled.
• If set to 1, the high availability functionality is enabled.
Default value is 1 in the file provided with SSR. If thissetting is removed from the dbclusterndb.gen file,default value switches to 0.
Enable
• If set to 0, the SBR Carrier server operates in standardhigh-availability mode.
• If set to 1, the SBR Carrier server operates inmanagement mode.
Default value is 0.
ManagementMode
For information aboutmanagement mode, see thesection on Session StateRegister Administration in theSBR Carrier Administration andConfiguration Guide.
[NDB] Section
The [NDB] section (Table 29 on page 184) of dbclusterndb.gen identifies how SBR Carrier nodes accessthe SSR database.
[NDB]ManagementNode = 127.0.0.1:5235;nodeid=30ConnectRetries = 3DelayBetweenConnectRetriesSec = 5TimeoutForFirstAliveSec = 10WaitForAllNodesAlive = 0TimeoutAfterFirstAliveSec = 10NdbHandles = 32NdbHandlesAlert = 1
183

NDBHardErrorThreshold = 10
Table 29: dbclusterndb.gen [NDB] Fields
FunctionParameter
Specifies the NDB connect-string value, made up of theIP address of the management node hosts, the port themanagement node uses for connection requests, and thenode ID (NDB connect-string) of the local SBR Carriernode.
This information is created by the installation script andshould only be changed by that script or under directionof JTAC.
ManagementNode
Specifies how many times SBR Carrier tries to connect tothe management nodes.
Default value is 3.
ConnectRetries
Specifies how many seconds SBR Carrier waits betweenretries when trying to connect to themanagement nodes.
Default value is 5 seconds.
DelayBetweenConnectRetriesSec
Specifies how many seconds SBR Carrier waits for thefirst NDBD server to confirm that it can communicatebefore communicating with the database cluster.
Default value is 10 seconds.
TimeoutForFirstAliveSec
• If set to 0, SBR Carrier does not wait for confirmationthat all NDB nodes are alive before communicatingwiththe database cluster.
• If set to 1, SBR Carrier waits for confirmation that allNDB nodes are alive before communicating with thedatabase cluster.
Default value is 0.
WaitForAllNodesAlive
Specifies how many seconds SBR Carrier waits after thefirst NDBD server alive indicator.
Default value is 10 seconds.
TimeoutAfterFirstAliveSec
184

Table 29: dbclusterndb.gen [NDB] Fields (continued)
FunctionParameter
Specifies the number of NDB handles used for paralleldatabase transactions. One NDB handle is needed foreach ongoing database operation. Therefore, the numberof available handles poses an upper limit to the numberof concurrent operations a SBR Carrier server can maketo NDB. Performance increases with concurrency up toa point, where thread overhead overwhelms the benefitsof concurrency. The best balance depends on yourenvironment.
NOTE: EachNDBhandle usesmore than 32K ofmemory.Increasing the value of NdbHandles increases the starttime for SBR Carrier very slightly.
Enter a value in the range 1–128. Note that one handleis attached permanently to each cache thread, and onehandle is reserved by the system for special usage whenin ManagementMode.
NOTE: The NdbHandles setting, and its associated alertmessage, only counts operational handles, i.e., not thosereserved for MgmtMode or for caching threads.
Default value is 32.
NdbHandles
• If set to 0, the SBR Carrier server does not record NDBhandle messages in its log file.
• If set to 1, the SBR Carrier server records messagesidentifying the maximum number of concurrent NDBhandles that have been used since the server wasrestarted in its log file. The messages take the form:
Max concurrent NDB handles = N
Default value is 0.
NdbHandlesAlert
185
Table 29: dbclusterndb.gen [NDB] Fields (continued)
FunctionParameter
Specifies the threshold value for NDB hard errors. If thenumber of hard errors exceeds the threshold value, SBRCarrier starts tomonitor the cluster health and determineswhether to persist sessions in the local file on the SBRCarrier server on the basis of the value set in theFallbackLocal parameter in the radius.ini file.
You can enter the value in the range from 1 through 100.Default value is 10.
This parameter is reloaded every time when SBR Carrierreceives a hang-up (HUP) signal.
NDBHardErrorThreshold
[Database] Section
The [Database] section (Table 30 on page 186) of dbclusterdb.gen controls how SBR Carrier front endsaccesses the SSR database.
[Database]Database = SteelBeltedRadiusRetries = 6DelayBetweenRetriesMillisec = 50RetryAlertThreshold = 4294967295
Table 30: dbclusterndb.gen [Database] Fields
FunctionParameter
Specifies the name of the database used by SBR Carrier.
Default value is SteelBeltedRadius.
Database
Controls whether the database cluster is disconnectedand reconnected after a HUP signal is sent to thedbcluster plugin.
• If set to 1, the database reconnects after receiving aHUP signal.
• If set to 0, the database does not reconnect afterreceiving a HUP signal.
Default value is 0.
ReconnectOnHUP
186

Table 30: dbclusterndb.gen [Database] Fields (continued)
FunctionParameter
Specifies how many times SBR Carrier tries to connectto the management nodes before giving up.
Default value is 6.
Retries
Specifies the base number of milliseconds SBR Carrierwaits before retrying a database operation. The first retrydelay is 1 x the value specified for DelayBetweenRetries,the second retry delay is 2 x the value specified forDelayBetweenRetries, and the nth retry delay is n x thevalue specified for DelayBetweenRetries.
Default value is 50 milliseconds.
DelayBetweenRetriesMillisec
Specifies the threshold for recording log messages whena retry that exceeds the threshold is attempted. The logmessage identifies why the retry was attempted (that is,why the previous attempt failed).
• If RetryAlertThreshold is set to 0, log messages arewritten before every database retry.
• If RetryAlertThreshold is set to the value of (Retries-1), log messages are written before the last retry andafter the last retry (if it fails).
• If RetryAlertThreshold is set to the value of Retries,log messages are written only after the last retry fails(that is, when the last retry failed and no furtherattempt will be made).
• If RetryAlertThreshold is set to a value of greater thanthe value of Retries, log messages are not recorded.
Default value is 4294967295 (0xffffffff).
RetryAlertThreshold
UseConnectionManager=<bool>. This parameter shouldalways be set to true unless a change is recommendedby Juniper Networks Technical Support. This might havea minor performance impact on throughput,bandwidth-bound installations. Contact your salesengineer or JuniperNetworks Technical Support formoreinformation.
The default is enabled.
UseConnectionManager
187

[IpAddressPools] Section
The [IpAddressPools] section (Table 31 on page 188) of dbclusterndb.gen specifies aging and cachingparameters for IP address pools. Some of these settings are system-wide and cannot be overridden. Othersettings establish system defaults, which can be overridden for specific IP address pools.
[IpAddressPools]MinUnusedAgeSec = 300MaxAgeRetries = 2AgePercent = 50AgeRetryAlertThreshold = 4294967295NumCacheThreads = 2StartCachingAtBootTime = 1CacheThreadSleepMin = 1000CacheThreadSleepMax = 2000CacheLowWater = 100CacheHighWater = 250CacheChunkSize = 50EmergencyChunkSize = 1CacheAlertThreshold = 0CacheThreadVerbose = 0
Table 31: dbclusterndb.gen [IPAddressPools] Fields
FunctionParameter
Specifies how many seconds an IP address can remainunused before SBR Carrier reassigns it.
Default value is 300 seconds.
MinUnusedAgeSec
Specifies the number of times SBR Carrier attempts toretrieve acceptably aged IP addresses before retrievingany available address.
If MaxAgeRetries is 0, SBR Carrier makes one attemptto look for addresses that have been idle for at leastMinUnusedAgeSec seconds, then no retries if enoughaddresses are not found.
Default value is 2.
MaxAgeRetries
188

Table 31: dbclusterndb.gen [IPAddressPools] Fields (continued)
FunctionParameter
Specifies the percentage (a number in the range 0–100)that SBR Carrier uses as the multiplier forMinUnusedAgeSec when enough IP addresses that havebeen idle for MinUnusedAgeSec cannot be found. Forexample, if MinUnsedAgeSec is 400 and AgePercent is75, SBR Carrier would look for addresses idle for at least400 seconds, then look for addresses that have been idlefor at least 300 (400* 0.75) seconds, then look foraddresses that have been idle for at least 225 (300 * 0.75)seconds.
If AgePercent is 100, only the originalMinUnusedAgeSecis used.
If AgePercent is 0, then age is disregarded.
Default value is 50.
AgePercent
Specifies the threshold (0–4294967295) for recordinglogmessages when an aged-based retry that exceeds thethreshold is attempted. The log message identifies whythe retry was attempted (that is, why the previousattempt failed).
• If AgeRetryAlertThreshold is set to 0, logmessages arewritten before every age-based retry.
• If AgeRetryAlertThreshold is set to the value of(MaxAgeRetries -1), log messages are written beforethe last age-based retry and after the last retry (if itfails).
• If AgeRetryAlertThreshold is set to the value ofMaxAgeRetries, log messages are written only afterthe last retry fails (that is, when no addresses havebeen found and no further attempt will be made).
• If AgeRetryAlertThreshold is set to a value of greaterthan the value ofMaxAgeRetries, logmessages are notrecorded.
Default value is 4294967295 (0xffffffff).
AgeRetryAlertThreshold
Specifies how many parallel threads SBR Carrier uses tocache IP addresses.
Default value is 2.
NumCacheThreads
189
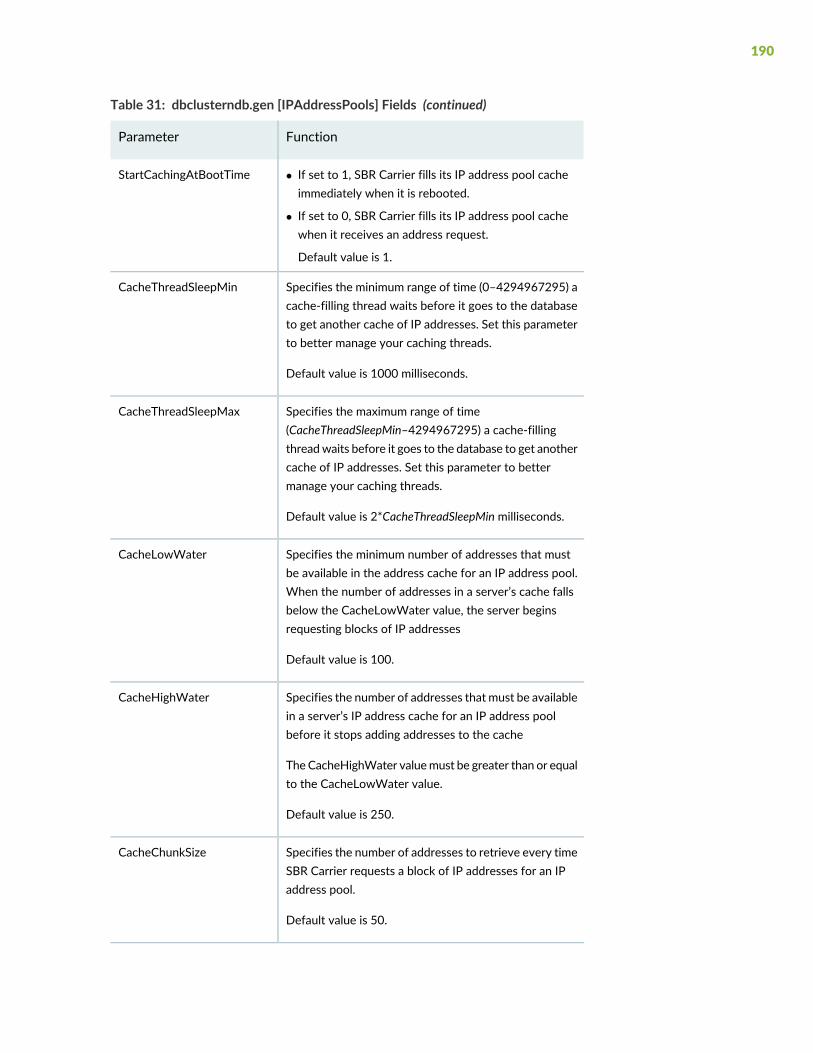
Table 31: dbclusterndb.gen [IPAddressPools] Fields (continued)
FunctionParameter
• If set to 1, SBR Carrier fills its IP address pool cacheimmediately when it is rebooted.
• If set to 0, SBR Carrier fills its IP address pool cachewhen it receives an address request.
Default value is 1.
StartCachingAtBootTime
Specifies the minimum range of time (0–4294967295) acache-filling thread waits before it goes to the databaseto get another cache of IP addresses. Set this parameterto better manage your caching threads.
Default value is 1000 milliseconds.
CacheThreadSleepMin
Specifies the maximum range of time(CacheThreadSleepMin–4294967295) a cache-fillingthreadwaits before it goes to the database to get anothercache of IP addresses. Set this parameter to bettermanage your caching threads.
Default value is 2*CacheThreadSleepMin milliseconds.
CacheThreadSleepMax
Specifies the minimum number of addresses that mustbe available in the address cache for an IP address pool.When the number of addresses in a server’s cache fallsbelow the CacheLowWater value, the server beginsrequesting blocks of IP addresses
Default value is 100.
CacheLowWater
Specifies the number of addresses that must be availablein a server’s IP address cache for an IP address poolbefore it stops adding addresses to the cache
TheCacheHighWater valuemust be greater than or equalto the CacheLowWater value.
Default value is 250.
CacheHighWater
Specifies the number of addresses to retrieve every timeSBR Carrier requests a block of IP addresses for an IPaddress pool.
Default value is 50.
CacheChunkSize
190

Table 31: dbclusterndb.gen [IPAddressPools] Fields (continued)
FunctionParameter
Specifies the (0–CacheChunkSize) number of addressesto retrieve every time SBR Carrier requests a block of IPaddresses to use from a pool, when that pool’s cache isempty, to directly retrieve those addresses from the IPaddress table in the database and put them in the cache.
Default value is 1.
EmergencyChunkSize
Specifies the threshold (0–4294967295) for recordinglogmessages when the number of addresses in the cachefalls below the threshold value.
• If CacheAlertThreshold is set to 0, log messages arenot written.
• If CacheAlertThreshold is set to 1, log messages arewritten when the address cache is empty.
• If CacheAlertThreshold is set to a value equal to orgreater than the sum of the values of CacheHighWaterand CacheChunkSize, log messages are writtenwhenever an address is pulled from the cache.
Default value is 0.
CacheAlertThreshold
• If set to 1, print out an informational message aboutwhat the caching thread just did. Themessage contains:thread identity (OS thread ID number), how long itnapped, pool cached, number of IP addresses cached,and the length of time it took to retrieve the addressesfrom the database.
• If set to 0, no caching thread information is recorded.
Use this parameter to fine-tune the caching parameters.Default value is 0.
CacheThreadVerbose
[IpAddressPools:PoolName] Section
The [IpAddressPools:PoolName] section (Table 32 on page 192) of dbclusterdb.gen identifies how SBRCarrier specifies the override settings for IP address aging for a named IP address pool. You can create asmany [IpAddressPools:PoolName] section as you require in the dbclusterdb.gen file to tune caching forindividual address pools.
[IpAddressPools:Gold]
191

StartCachingAtBootTime = 0CacheLowWater = 10CacheHighWater = 25CacheChunkSize = 5EmergencyChunkSize = 2CacheAlertThreshold = 1
NOTE: You cannot use an [IpAddressPools:PoolName] section to override settings other thanthose listed here. For example, you cannot enter a MaxAgeRetries setting in an[IpAddressPools:PoolName] section to override the value specified in the [IpAddressPools] section.
NOTE: Authentication requests may be rejected when you have configured the default settingsfor parameters in the [IpAddressPools:PoolName] section and the named IP address pool consistsof a smaller number of IP addresses. To avoid this, we recommend that you set the number ofIP addresses in the pool to a value greater than the values entered for CacheLowWater,CacheHighWater, and CacheChunkSize.
Table 32: dbclusterndb.gen [IpAddressPools:PoolName] Fields
FunctionParameter
• If set to 1, SBR Carrier fills its IP address pool cacheimmediately when it is rebooted.
• If set to 0, SBR Carrier fills its IP address pool cachewhen it receives an address request.
Default value is 0.
StartCachingAtBootTime
Specifies the minimum number of addresses that mustbe available in the named pool’s IP address cache. Whenthe number of addresses in the pool’s cache falls belowthe CacheLowWater value, the server begins requestingblocks of IP addresses.
CacheLowWater
Specifies the number of addresses that must be availablein a server’s IP address cache before it adding addressesto the IP address cache for the named IP address pool.
The CacheHighWater valuemust be greater than or equalto the CacheLowWater value.
CacheHighWater
192

Table 32: dbclusterndb.gen [IpAddressPools:PoolName] Fields (continued)
FunctionParameter
Specifies the number of addresses to retrieve every timeSBR Carrier requests a block of IP addresses for thenamed IP address pool.
CacheChunkSize
Specifies the (0–CacheChunkSize) number of addressesto retrieve every time SBR Carrier requests a block of IPaddresses to use from a pool, when that pool’s cache isempty, to directly retrieve those addresses from the IPaddress table in the database and put them in the cache.
Default value is 1.
EmergencyChunkSize
Specifies the threshold (0–4294967295) for recordinglogmessages when the number of addresses in the cachefalls below the threshold value.
• If CacheAlertThreshold is set to 0, log messages arenot written.
• If CacheAlertThreshold is set to 1, log messages arewritten when the address cache is empty.
• If CacheAlertThreshold is set to a value equal to orgreater than the sum of the values of CacheHighWaterand CacheChunkSize, log messages are writtenwhenever an address is pulled from the cache.
Default value is 0.
CacheAlertThreshold
Customizing Other Tables and Scripts
In addition to the Current Sessions Table (CST), SSR uses other SSR database tables. These tables may notbe customized, except for the entries noted in Table 33 on page 194:
193
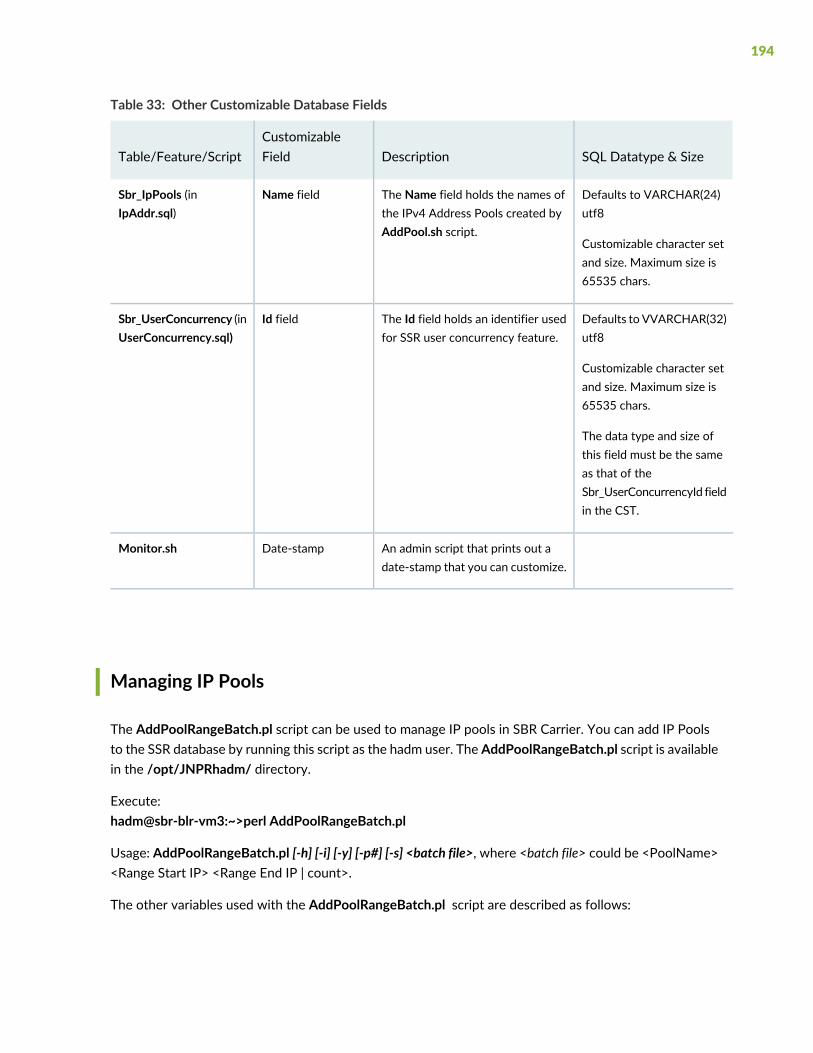
Table 33: Other Customizable Database Fields
SQL Datatype & SizeDescriptionCustomizableFieldTable/Feature/Script
Defaults to VARCHAR(24)utf8
Customizable character setand size. Maximum size is65535 chars.
The Name field holds the names ofthe IPv4 Address Pools created byAddPool.sh script.
Name fieldSbr_IpPools (inIpAddr.sql)
Defaults to VVARCHAR(32)utf8
Customizable character setand size. Maximum size is65535 chars.
The data type and size ofthis field must be the sameas that of theSbr_UserConcurrencyId fieldin the CST.
The Id field holds an identifier usedfor SSR user concurrency feature.
Id fieldSbr_UserConcurrency (inUserConcurrency.sql)
An admin script that prints out adate-stamp that you can customize.
Date-stampMonitor.sh
Managing IP Pools
The AddPoolRangeBatch.pl script can be used to manage IP pools in SBR Carrier. You can add IP Poolsto the SSR database by running this script as the hadm user. The AddPoolRangeBatch.pl script is availablein the /opt/JNPRhadm/ directory.
Execute:hadm@sbr-blr-vm3:~>perl AddPoolRangeBatch.pl
Usage: AddPoolRangeBatch.pl [-h] [-i] [-y] [-p#] [-s] <batch file>, where <batch file> could be <PoolName><Range Start IP> <Range End IP | count>.
The other variables used with the AddPoolRangeBatch.pl script are described as follows:
194

• [-h]—Displays help.
• [-i]—Ignores range conflicts.
• [-y]—Answers yes to questions.
• [-p#]—Uses # processes simultaneously for batch processing, where # represents the number of processesused.
• [-s]—Installs the stored procedure used for cleaning the zombie pool (that is assigning IP from zombiepools to other pools).
• [-u]—Cleans zombie sessions.
NOTE: You can alternatively use the AddRange.sh script to manage IP pools but it takes longertime to accomplish the task. For more information on AddRange.sh, see the Administration andConfiguration Guide.
195
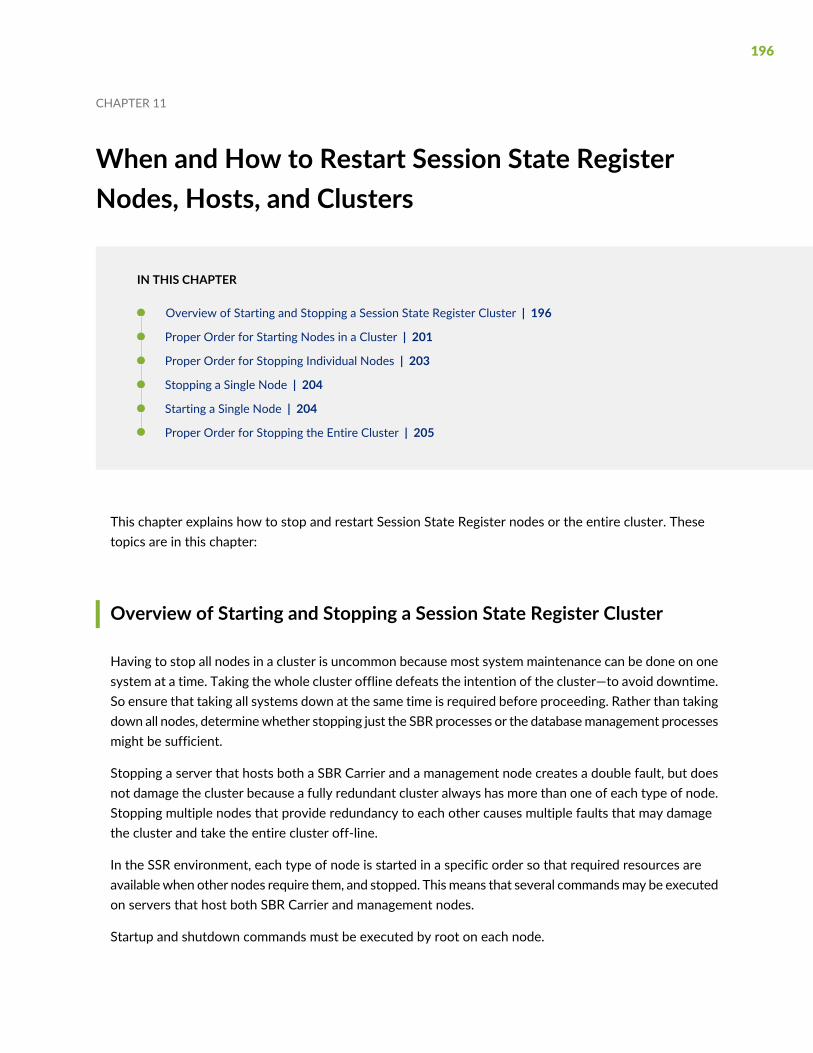
CHAPTER 11
When and How to Restart Session State RegisterNodes, Hosts, and Clusters
IN THIS CHAPTER
Overview of Starting and Stopping a Session State Register Cluster | 196
Proper Order for Starting Nodes in a Cluster | 201
Proper Order for Stopping Individual Nodes | 203
Stopping a Single Node | 204
Starting a Single Node | 204
Proper Order for Stopping the Entire Cluster | 205
This chapter explains how to stop and restart Session State Register nodes or the entire cluster. Thesetopics are in this chapter:
Overview of Starting and Stopping a Session State Register Cluster
Having to stop all nodes in a cluster is uncommon because most system maintenance can be done on onesystem at a time. Taking the whole cluster offline defeats the intention of the cluster—to avoid downtime.So ensure that taking all systems down at the same time is required before proceeding. Rather than takingdown all nodes, determinewhether stopping just the SBR processes or the databasemanagement processesmight be sufficient.
Stopping a server that hosts both a SBR Carrier and a management node creates a double fault, but doesnot damage the cluster because a fully redundant cluster always has more than one of each type of node.Stopping multiple nodes that provide redundancy to each other causes multiple faults that may damagethe cluster and take the entire cluster off-line.
In the SSR environment, each type of node is started in a specific order so that required resources areavailablewhen other nodes require them, and stopped. Thismeans that several commandsmay be executedon servers that host both SBR Carrier and management nodes.
Startup and shutdown commands must be executed by root on each node.
196
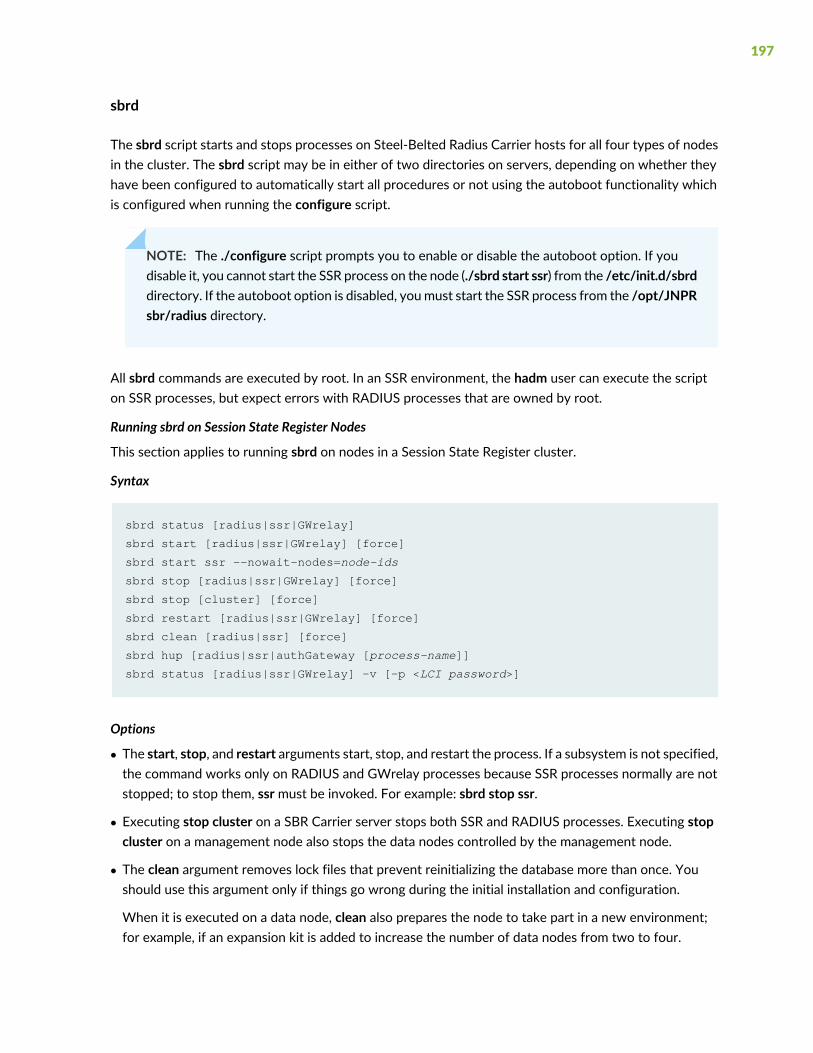
sbrd
The sbrd script starts and stops processes on Steel-Belted Radius Carrier hosts for all four types of nodesin the cluster. The sbrd script may be in either of two directories on servers, depending on whether theyhave been configured to automatically start all procedures or not using the autoboot functionality whichis configured when running the configure script.
NOTE: The ./configure script prompts you to enable or disable the autoboot option. If youdisable it, you cannot start the SSR process on the node (./sbrd start ssr) from the /etc/init.d/sbrddirectory. If the autoboot option is disabled, youmust start the SSR process from the /opt/JNPRsbr/radius directory.
All sbrd commands are executed by root. In an SSR environment, the hadm user can execute the scripton SSR processes, but expect errors with RADIUS processes that are owned by root.
Running sbrd on Session State Register Nodes
This section applies to running sbrd on nodes in a Session State Register cluster.
Syntax
sbrd status [radius|ssr|GWrelay]
sbrd start [radius|ssr|GWrelay] [force]
sbrd start ssr --nowait-nodes=node-ids
sbrd stop [radius|ssr|GWrelay] [force]
sbrd stop [cluster] [force]
sbrd restart [radius|ssr|GWrelay] [force]
sbrd clean [radius|ssr] [force]
sbrd hup [radius|ssr|authGateway [process-name]]
sbrd status [radius|ssr|GWrelay] -v [-p <LCI password>]
Options
• The start, stop, and restart arguments start, stop, and restart the process. If a subsystem is not specified,the command works only on RADIUS and GWrelay processes because SSR processes normally are notstopped; to stop them, ssr must be invoked. For example: sbrd stop ssr.
• Executing stop cluster on a SBR Carrier server stops both SSR and RADIUS processes. Executing stopcluster on a management node also stops the data nodes controlled by the management node.
• The clean argument removes lock files that prevent reinitializing the database more than once. Youshould use this argument only if things go wrong during the initial installation and configuration.
When it is executed on a data node, clean also prepares the node to take part in a new environment;for example, if an expansion kit is added to increase the number of data nodes from two to four.
197

• The radius, ssr, or GWrelay optional argument specifies which process to operate on when executedon a server that hosts more than one node.
• radius specifies the local Steel-Belted Radius Carrier processes
• ssr specifies data node and management node processes according to the type of node on which it isexecuted
• GWrelay specifies the GWrelay application.
• Executing start ssr --nowait-nodes=node-ids starts the cluster without waiting for the full cluster to beinitialized. The node-ids variable specifies the comma-separated list of node IDs that are unreachable,for example: sbrd start ssr --nowait-nodes=51,52. You must use this argument only if one half of thecluster has network connectivity, but has lost the ability to communicate with the other half. When thenetwork connectivity between the two halves of the cluster is restored, you can start the remainingnodes with the normal startup scripts.
• The status option displays information such as SBR package version, SBR process status, and loadedplug-in information.
• The hup option operates as the kill -HUP command does on SBR Carrier nodes, but does not requirethe process ID. Executing sbrd hup authGateway issues the SIGHUP (1) signal to all the authGatewayprocesses running on SBR Carrier. To issue the SIGHUP (1) signal only to the specific authGatewayprocess, you must execute the hup option with the authGateway process name, for example: sbrd hupauthGateway GMT.
• The force argumentmakes sbrd attempt to disregard or overcome any errors that occur when processingthe command. Normal behavior without the argument is to halt on errors. For example, sbrd start doesnot attempt to start software that is already running, but sbrd start force ignores a running process. Thismay produce unintended results, so use force with great care.
• The -v option displays additional information about the RADIUS process along with basic informationsuch as the SBR package version, SBR process status, and SBR process ID. If you have changed thedefault Lightweight Directory Access Protocol (LDAP) Configuration Interface (LCI) password, you shoulduse the -p option to specify the password. For more information about the RADIUS status information,see “Displaying RADIUS Status Information” on page 79.
198
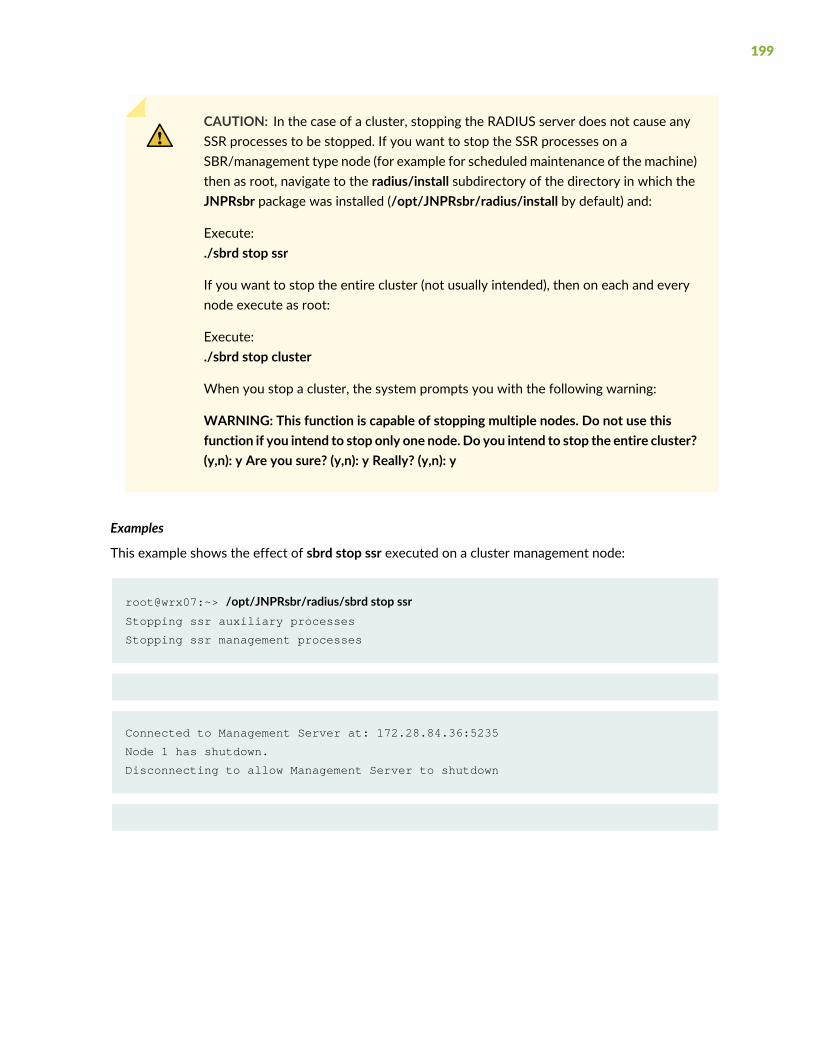
CAUTION: In the case of a cluster, stopping the RADIUS server does not cause anySSR processes to be stopped. If you want to stop the SSR processes on aSBR/management type node (for example for scheduled maintenance of the machine)then as root, navigate to the radius/install subdirectory of the directory in which theJNPRsbr package was installed (/opt/JNPRsbr/radius/install by default) and:
Execute:./sbrd stop ssr
If you want to stop the entire cluster (not usually intended), then on each and everynode execute as root:
Execute:./sbrd stop cluster
When you stop a cluster, the system prompts you with the following warning:
WARNING: This function is capable of stopping multiple nodes. Do not use thisfunction if you intend to stop only one node. Do you intend to stop the entire cluster?(y,n): y Are you sure? (y,n): y Really? (y,n): y
Examples
This example shows the effect of sbrd stop ssr executed on a cluster management node:
root@wrx07:~> /opt/JNPRsbr/radius/sbrd stop ssrStopping ssr auxiliary processes
Stopping ssr management processes
Connected to Management Server at: 172.28.84.36:5235
Node 1 has shutdown.
Disconnecting to allow Management Server to shutdown
199

This example shows the effect of sbrd start ssr on a management node. Be aware that this does not startthe data nodes.
root@wrx07:~> /opt/JNPRsbr/radius/sbrd start ssrStarting ssr management processes
bash-3.00#
Notes
• When sbrd is executedwithout a <radius|ssr> argument, it runs against all node processes on the server.For example, sbrd start starts both RADIUS and SSR processes for all nodes on a server. For completedetails see “When and How to Restart Session State Register Nodes, Hosts, and Clusters” on page 196.
• In an SSR environment, because some servers may host both SBR Carrier and management nodes, sbrdmay be executed more than once with different arguments.
• The clean argument removes lock files that prevent reinitializing the database more than once. Youshould use this argument only if something goes wrong during the initial installation and configuration,or when adding data nodes.
Starting the Cluster
If all nodes in the cluster are shut down, restarting requires bringing each type of node online in a specificorder. If the systems are completely shut down, rebooting the machine restarts the appropriate processesautomatically because automatic restart is the default configuration for all types of Session State Registernodes.
If the systems have not been totally shut down and just the SSR processes have been halted, log in as rootand execute the start commands in the order described in “Proper Order for Starting Nodes in a Cluster”on page 201, to start each type of node’s processes.
During the cluster startup process, each time a SSR or RADIUS process is started on a node, we recommendthat you verify the status of that node before moving on to the next node by executing the sbrd statuscommand:
1. Log in to the node as hadm or root.
2. Execute:
/opt/JNPRsbr/radius/sbrd status
Results similar to this example are displayed:
hadmUser$>/opt/JNPRsbr/radius/sbrd status
200

[ndbd(NDB)] 2 node(s)
id=10 @172.28.84.163 (mysql-5.7.25 ndb-7.6.9, Nodegroup: 0, Master)
id=11 @172.28.84.113 (mysql-5.7.25 ndb-7.6.9, Nodegroup: 0)
[ndb_mgmd(MGM)] 2 node(s)
id=1 @172.28.84.36 (mysql-5.7.25 ndb-7.6.9)
id=2 @172.28.84.166 (mysql-5.7.25 ndb-7.6.9)
[mysqld(API)] 4 node(s)
id=21 @172.28.84.36 (mysql-5.7.25 ndb-7.6.9)
id=22 @172.28.84.166 (mysql-5.7.25 ndb-7.6.9)
id=30 @172.28.84.36 (mysql-5.7.25 ndb-7.6.9)
id=31 @172.28.84.166 (mysql-5.7.25 ndb-7.6.9)
Examine the line starting with id=, and verify that there are no references to starting, connecting, ornot connected. Any of these references indicate the process has either not finished starting, or thenode is not connected properly. You may need to execute the sbrd status command more than oncebecause it only shows a snapshot of activity; the display does not refresh automatically. Do not proceedto the next node until you are sure the process has started properly and the node is connected.
Proper Order for Starting Nodes in a Cluster
Begin by starting all SSR nodes, one at a time in the following order:
1. SBR/management nodes (sm):On each SBR/management node, one at a time, execute sbrd start ssr. Then, check the status of thatnode by executing sbrd status, and ensure the SSR process is running without error. There should beno indication of starting, connecting, or disconnected. Repeat this process until each SBR/managementnode is started and running without error.
2. Management nodes (m):On each management node, one at a time, execute sbrd start ssr. Then, check the status of that nodeby executing sbrd status, and ensure the SSR process is running without error. There should be no
201

indication of starting, connecting, or disconnected. Repeat this process until each management nodeis started and running without error.
3. Data nodes (d):On each data node, one at a time, execute sbrd start ssr. Then, check the status of that node by executingsbrd status, and ensure the SSR process is running without error. There should be no indication ofstarting, connecting, or disconnected. Repeat this process until each data node is started and runningwithout error.
4. If this is the first time starting the cluster, or if the schema has changed, you need to executeCreateDB.shon every management node before proceeding to the next step of starting the RADIUS process on allSBR nodes.
By definition, the schema has changed if DestroyDB.sh has been executed on any management nodeincluding: SBR/management nodes (sm) or management nodes (m).
If you have executed DestroyDB.sh on any management node, we recommend you run ./sbrd cleanbefore starting the SSR process on the node with the ./sbrd start ssr command.
NOTE: Except when migrating from a temporary cluster, all SSR processes must be up on allSSR nodes [sm, m, d] and all SBR processes must be down on all SBR nodes [s, sm] in orderto execute CreateDB.sh. This is also the case when executing DestroyDB.sh. SeeTable 34 on page 202 for a definition of SSR nodes compared to SBR nodes.
Table 34: Node Type Definitions
SBR NodesSSR Nodes
SBR/management (sm)SBR/management (sm)*
SBR node (s)Management nodes (m)
–Data nodes (d)
* These are also referred to as management nodes.
If this is not the first time starting the cluster, and you are sure the schema has not changed, proceedto next Step.
5. Start all SBR nodes, one at a time, by executing sbrd start radius in the following order:
a. SBR nodes (s):On each SBR node, one at a time, execute sbrd start radius. Then, check the status of that node byexecuting sbrd status, and ensure the RADIUS process is running without error. There should beno indication of starting, connecting, or disconnected. Repeat this process until each SBR node isstarted and running without error.
202

b. SBR/management nodes (sm):On each SBR/management node, one at a time, execute sbrd start radius. Then, check the statusof that node by executing sbrd status, and ensure the RADIUS process is running without error.There should be no indication of starting, connecting, or disconnected. Repeat this process untileach SBR node is started and running without error.
NOTE: When CCM is enabled, you must start the primary SBR Carrier server first, wherever itis. In most cases, one of the sm nodes is the primary. So, in the case of CCM, the order in whichSBR nodes are started is ultimately determined by which s or sm node is the primary. Start theSBR nodes beginning with the primary first, and then follow the order listed previously.
Proper Order for Stopping Individual Nodes
Follow this procedure in precise order to properly shut down nodes in the cluster. Log in as root on eachmachine, in the order specified, and execute the specified command.
CAUTION: Stopping multiple systems and processes removes all redundancy, cancreate multiple faults, and may damage the cluster. If you do need to stop multiplenodes, be sure to restart them properly. See “Starting the Cluster” on page 200 for thecorrect order.
1. On each SBR node (s), one at a time, execute:sbrd stop radiussbrd status
2. On each SBR/management (sm) node, one at a time, execute:sbrd stop radiussbrd status
3. On each SBR/management (sm) node, one at a time, execute:sbrd stop ssrsbrd status
4. On each management node (m), one at a time, execute:sbrd stop ssrsbrd status
5. On each data node (d), one at a time, execute:sbrd stop ssr
203

sbrd status
Stopping a Single Node
You can stop any single node in the cluster to perform maintenance without affecting the integrity of thecluster (because the server’s redundant partner takes on the primary role). These commands just stop thenode’s process—they have no effect on the system itself, which may still need to be shut down.
If the node is a SBR node, modifying configuration files often requires a restart.
The stop commands for each type of node are as follows:
SBR nodes (s):sbrd stop radius
SBR/management nodes (sm) (in the following order):sbrd stop radiussbrd stop ssr
Management nodes (m) and data nodes (d):sbrd stop ssr
Starting a Single Node
To restart a node use the following commands.
SBR nodes (s):sbrd start radiussbrd status (Verify the node is working error free.)
SBR/management nodes (sm) (in the following order):sbrd start ssrsbrd status (Verify the node is working error free.)sbrd start radiussbrd status (Verify the node is working error free.)
Management nodes (m) and data nodes (d):sbrd start ssrsbrd status (Verify the node is working error free.)
204
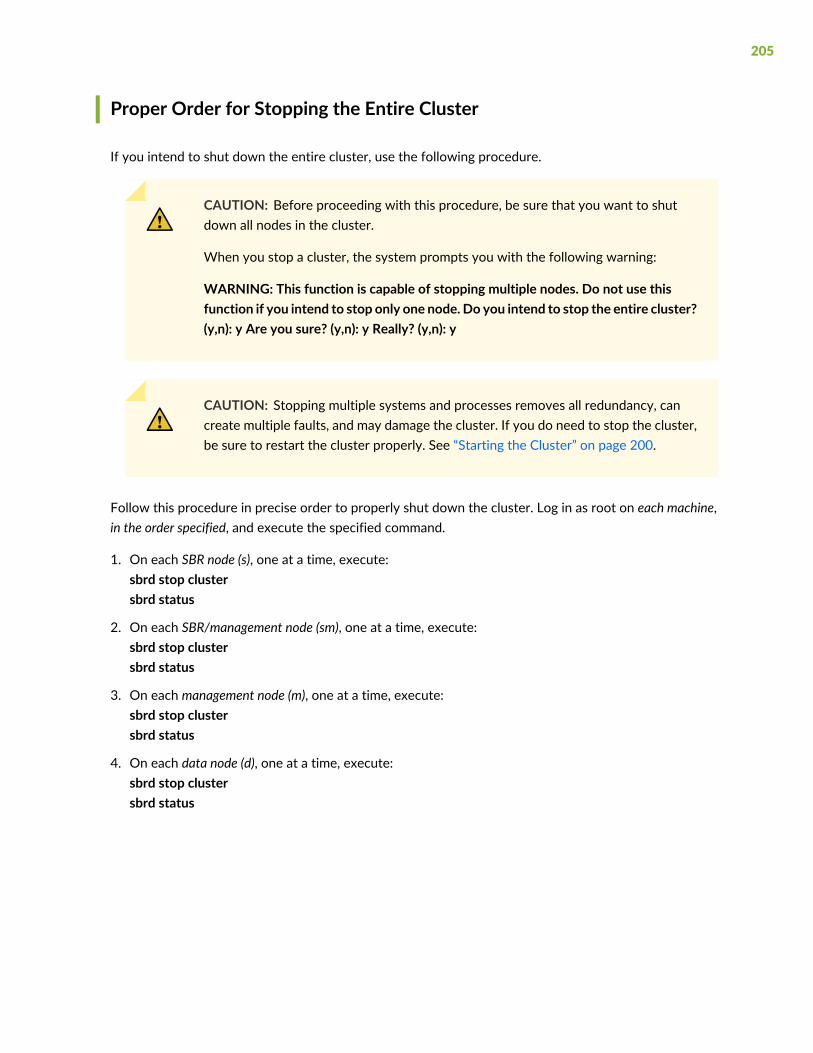
Proper Order for Stopping the Entire Cluster
If you intend to shut down the entire cluster, use the following procedure.
CAUTION: Before proceeding with this procedure, be sure that you want to shutdown all nodes in the cluster.
When you stop a cluster, the system prompts you with the following warning:
WARNING: This function is capable of stopping multiple nodes. Do not use thisfunction if you intend to stop only one node. Do you intend to stop the entire cluster?(y,n): y Are you sure? (y,n): y Really? (y,n): y
CAUTION: Stopping multiple systems and processes removes all redundancy, cancreate multiple faults, and may damage the cluster. If you do need to stop the cluster,be sure to restart the cluster properly. See “Starting the Cluster” on page 200.
Follow this procedure in precise order to properly shut down the cluster. Log in as root on each machine,in the order specified, and execute the specified command.
1. On each SBR node (s), one at a time, execute:sbrd stop clustersbrd status
2. On each SBR/management node (sm), one at a time, execute:sbrd stop clustersbrd status
3. On each management node (m), one at a time, execute:sbrd stop clustersbrd status
4. On each data node (d), one at a time, execute:sbrd stop clustersbrd status
205

5PART
Expanding a Session State RegisterCluster
Expanding an SSR Cluster | 207

CHAPTER 12
Expanding an SSR Cluster
IN THIS CHAPTER
Upgrading from a Restricted Cluster to a Regular Cluster | 207
Adding Nodes to a Cluster Overview | 210
Adding a New SBR Carrier Server to an Existing Cluster | 211
Adding a Management Node Expansion Kit to an Existing Cluster | 235
Adding a Data Expansion Kit to an Existing Cluster | 259
This chapter explains how to scale an existing Session State Register (SSR) cluster by installing a DataExpansion Kit that adds two data nodes, a third management node, or additional SBR Carrier front endservers to a cluster.
These topics are in the chapter:
Upgrading from a Restricted Cluster to a Regular Cluster
This section describes how to upgrade from a restricted cluster to a regular cluster. You upgrade from arestricted cluster to a regular cluster to remove the restrictions on the maximum number of concurrentsessions and you are allowed to add an expansion kit to your cluster. To upgrade to a regular cluster,perform the following tasks:
207

NOTE: This procedure is applicable only if you provided a Restricted Cluster license during SSRinstallation.
This procedure must be executed in all SBR nodes (that is, S and SM nodes) involved in the SSRcluster.
1. As root, navigate to the directory where you installed the Steel-Belted Radius Carrier package. Forinformation about directory in which Steel-Belted Radius Carrier package is installed, see “UnpackingSession State Register Software” on page 95.
Then, navigate to the radius/install subdirectory and run:
cd /opt/JNPRsbr/radius/install/
2. Run the configure script:
./configure
3. At the configuration tasks prompt, enter 6 to upgrade from a restricted cluster to a regular cluster.
Configuring SBR Software
---------------------------------------------------------------------------
SBR 8.60.24028 cluster red{0s,2sm,0m,2d}
on SunOS 5.10 Generic_141444-09 node sbrha-2.englab.juniper.net(sm)
is CONFIGURED and processes are UP, may be stopped if reconfigured
---------------------------------------------------------------------------
1. Unconfigure Cluster Node
Not used when merely updating existing cluster definitions.
2. Generate Cluster Definition
Creates new or updates existing cluster definitions.
Modifies the shared directory but does not modify this node.
3. Configure Cluster Node
To be preceded by ’Generate Cluster Definition’ on any node.
Must be invoked on each and every node of the cluster.
208

4. Reconfigure RADIUS Server
Only on SBR nodes, updates the existing SBR configuration.
5. Create Temporary Cluster
Used to approximate a cluster using only this one machine.
Intended for migration and demonstration purposes only.
6. Upgrade From Restricted Cluster License
Used to upgrade from restricted cluster to regular cluster.
Removes database restriction on the number of concurrent
sessions and enables the addition of an expansion kit license
Enter number of desired configuration task, or q to quit : 6
4. Enter the license number of the Regular Cluster license.
Enter the Upgrade regular cluster license:
Restricted Cluster has been upgraded to regular cluster.
Now as per your concurrent session license, maximum concurrent sessions will
bring into effect.
For adding concurrent session license, use the SBR Admin Web GUI.
5. Execute the steps 1 to 4 in all SBR nodes (that is, S and SM nodes) involved in the SSR cluster.
After you have successfully upgraded from a restricted cluster to a regular cluster, the restriction on themaximumnumber of concurrent sessions is removed and you are allowed to add any number of concurrentsession licenses through the Web GUI.
209
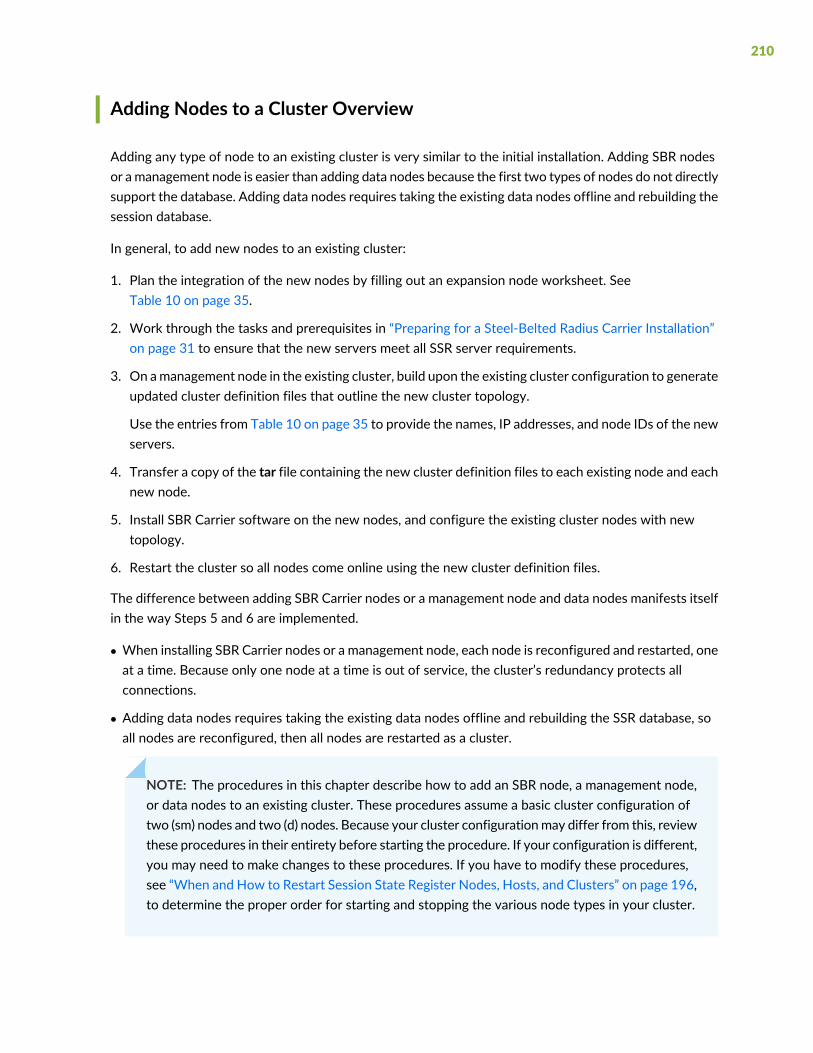
Adding Nodes to a Cluster Overview
Adding any type of node to an existing cluster is very similar to the initial installation. Adding SBR nodesor amanagement node is easier than adding data nodes because the first two types of nodes do not directlysupport the database. Adding data nodes requires taking the existing data nodes offline and rebuilding thesession database.
In general, to add new nodes to an existing cluster:
1. Plan the integration of the new nodes by filling out an expansion node worksheet. SeeTable 10 on page 35.
2. Work through the tasks and prerequisites in “Preparing for a Steel-Belted Radius Carrier Installation”on page 31 to ensure that the new servers meet all SSR server requirements.
3. On amanagement node in the existing cluster, build upon the existing cluster configuration to generateupdated cluster definition files that outline the new cluster topology.
Use the entries from Table 10 on page 35 to provide the names, IP addresses, and node IDs of the newservers.
4. Transfer a copy of the tar file containing the new cluster definition files to each existing node and eachnew node.
5. Install SBR Carrier software on the new nodes, and configure the existing cluster nodes with newtopology.
6. Restart the cluster so all nodes come online using the new cluster definition files.
The difference between adding SBR Carrier nodes or a management node and data nodes manifests itselfin the way Steps 5 and 6 are implemented.
• When installing SBR Carrier nodes or a management node, each node is reconfigured and restarted, oneat a time. Because only one node at a time is out of service, the cluster’s redundancy protects allconnections.
• Adding data nodes requires taking the existing data nodes offline and rebuilding the SSR database, soall nodes are reconfigured, then all nodes are restarted as a cluster.
NOTE: The procedures in this chapter describe how to add an SBR node, a management node,or data nodes to an existing cluster. These procedures assume a basic cluster configuration oftwo (sm) nodes and two (d) nodes. Because your cluster configurationmay differ from this, reviewthese procedures in their entirety before starting the procedure. If your configuration is different,you may need to make changes to these procedures. If you have to modify these procedures,see “When and How to Restart Session State Register Nodes, Hosts, and Clusters” on page 196,to determine the proper order for starting and stopping the various node types in your cluster.
210
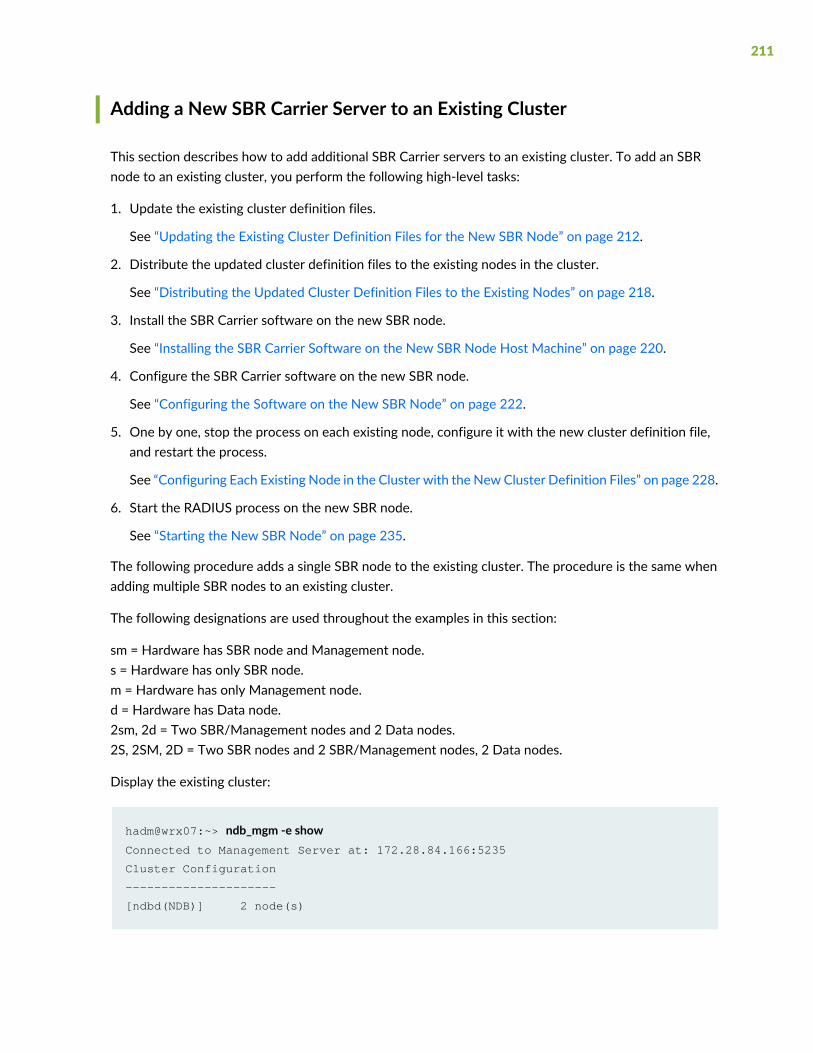
Adding a New SBR Carrier Server to an Existing Cluster
This section describes how to add additional SBR Carrier servers to an existing cluster. To add an SBRnode to an existing cluster, you perform the following high-level tasks:
1. Update the existing cluster definition files.
See “Updating the Existing Cluster Definition Files for the New SBR Node” on page 212.
2. Distribute the updated cluster definition files to the existing nodes in the cluster.
See “Distributing the Updated Cluster Definition Files to the Existing Nodes” on page 218.
3. Install the SBR Carrier software on the new SBR node.
See “Installing the SBR Carrier Software on the New SBR Node Host Machine” on page 220.
4. Configure the SBR Carrier software on the new SBR node.
See “Configuring the Software on the New SBR Node” on page 222.
5. One by one, stop the process on each existing node, configure it with the new cluster definition file,and restart the process.
See “Configuring Each Existing Node in the Cluster with the NewCluster Definition Files” on page 228.
6. Start the RADIUS process on the new SBR node.
See “Starting the New SBR Node” on page 235.
The following procedure adds a single SBR node to the existing cluster. The procedure is the same whenadding multiple SBR nodes to an existing cluster.
The following designations are used throughout the examples in this section:
sm = Hardware has SBR node and Management node.s = Hardware has only SBR node.m = Hardware has only Management node.d = Hardware has Data node.2sm, 2d = Two SBR/Management nodes and 2 Data nodes.2S, 2SM, 2D = Two SBR nodes and 2 SBR/Management nodes, 2 Data nodes.
Display the existing cluster:
hadm@wrx07:~> ndb_mgm -e showConnected to Management Server at: 172.28.84.166:5235
Cluster Configuration
---------------------
[ndbd(NDB)] 2 node(s)
211
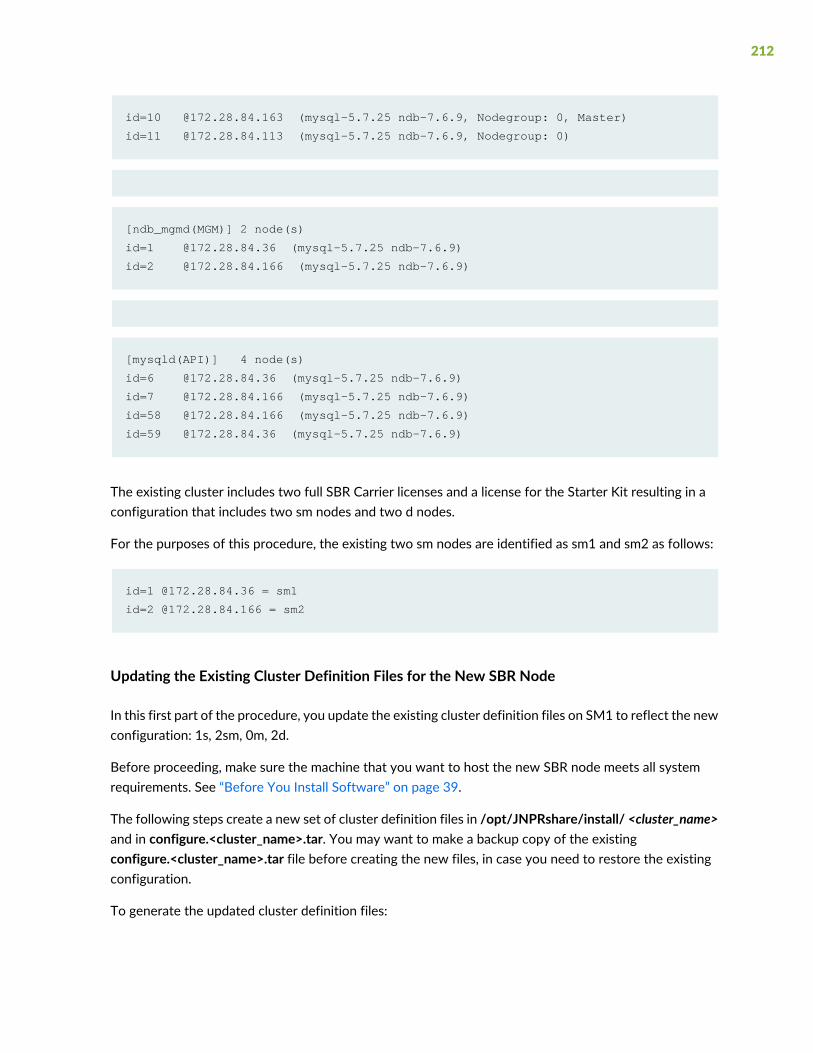
id=10 @172.28.84.163 (mysql-5.7.25 ndb-7.6.9, Nodegroup: 0, Master)
id=11 @172.28.84.113 (mysql-5.7.25 ndb-7.6.9, Nodegroup: 0)
[ndb_mgmd(MGM)] 2 node(s)
id=1 @172.28.84.36 (mysql-5.7.25 ndb-7.6.9)
id=2 @172.28.84.166 (mysql-5.7.25 ndb-7.6.9)
[mysqld(API)] 4 node(s)
id=6 @172.28.84.36 (mysql-5.7.25 ndb-7.6.9)
id=7 @172.28.84.166 (mysql-5.7.25 ndb-7.6.9)
id=58 @172.28.84.166 (mysql-5.7.25 ndb-7.6.9)
id=59 @172.28.84.36 (mysql-5.7.25 ndb-7.6.9)
The existing cluster includes two full SBR Carrier licenses and a license for the Starter Kit resulting in aconfiguration that includes two sm nodes and two d nodes.
For the purposes of this procedure, the existing two sm nodes are identified as sm1 and sm2 as follows:
id=1 @172.28.84.36 = sm1
id=2 @172.28.84.166 = sm2
Updating the Existing Cluster Definition Files for the New SBR Node
In this first part of the procedure, you update the existing cluster definition files on SM1 to reflect the newconfiguration: 1s, 2sm, 0m, 2d.
Before proceeding, make sure the machine that you want to host the new SBR node meets all systemrequirements. See “Before You Install Software” on page 39.
The following steps create a new set of cluster definition files in /opt/JNPRshare/install/ <cluster_name>and in configure.<cluster_name>.tar. You may want to make a backup copy of the existingconfigure.<cluster_name>.tar file before creating the new files, in case you need to restore the existingconfiguration.
To generate the updated cluster definition files:
212

1. As root, on the sm1 node, navigate to the radius/install subdirectory of the directory in which theJNPRsbr package was installed (/opt/JNPRsbr by default).
Example:cd /opt/JNPRsbr/radius/install/
2. Run the configure script:
Execute:./configure
Example:
root@sbrha-4:/opt/JNPRsbr/radius/install> ./configure
Configuring SBR Software
---------------------------------------------------------------------------
SBR 8.60.50006 cluster cambridge{0s,2sm,0m,2d}
on SunOS 5.10 Generic_141444-09 node sbrha-4(sm)
is CONFIGURED and processes are UP, may be stopped if reconfigured
---------------------------------------------------------------------------
1. Unconfigure Cluster Node
Not used when merely updating existing cluster definitions.
2. Generate Cluster Definition
Creates new or updates existing cluster definitions.
Modifies the shared directory but does not modify this node.
3. Configure Cluster Node
To be preceded by 'Generate Cluster Definition' on one node.
Must be invoked on each and every node of the cluster.
213

4. Reconfigure RADIUS Server
Only on SBR nodes, updates the existing SBR configuration.
5. Create Temporary Cluster
Used to approximate a cluster using only this one machine.
Intended for migration and demonstration purposes only.
6. Upgrade From Restricted Cluster License
Used to upgrade from restricted cluster to regular cluster.
Removes database restriction on the number of concurrent
sessions and enables the addition of an expansion kit license
Enter the number of the desired configuration task or quit (4,q):
3. From the menu of configuration tasks, enter 2 to specify Generate Cluster Definition.
---------------------------------------------------------------------------
SBR 8.60.50006 cluster cambridge{0s,2sm,0m,2d}
on SunOS 5.10 Generic_141444-09 node sbrha-4(sm)
is CONFIGURED and processes are UP, may be stopped if reconfigured
---------------------------------------------------------------------------
Generating Cluster Definition...
Enter SBR cluster name [cambridge]:
You are prompted to enter the name of the cluster.
4. Press Enter to use the current cluster name.
214

You are prompted either to create a new cluster or update an existing cluster definition.
Create (c) new or update (u) existing cluster definition? [u]:
5. Enter u to update the existing cluster definition.
The SBR Cluster Starter Kit license allows you to create a minimal
cluster of 2 SBR nodes, 2 management nodes, and 2 data nodes. When
each node is installed on a separate machine the cluster topology is
denoted as {2s,2m,2d}. When SBR nodes are paired with management
nodes on the same machines the cluster topology is denoted as {2sm,2d}.
An optional SBR Cluster Management Expansion Kit allows you to add a
third management node for {2sm,1m,2d} and an optional Data Expansion
Kit allows you to add 2 more data nodes for {2sm,1m,4d} clusters.
Additional SBR licenses allow you to add up to 18 more SBR nodes to
obtain a maximal cluster {18s,2sm,1m,4d} and/or enable extra features.
While it is not difficult to add management and/or SBR nodes to an
existing cluster, adding data nodes is more difficult and may require
you to shutdown the entire cluster as opposed to a rolling restart.
Another license is required if you wish to add a third management node.
Adding a third management node will require a rolling restart later.
Enter Management Expansion Kit license, if any:
Another license is required if you wish to add more data nodes.
Adding data nodes may require you to shutdown the entire cluster.
Enter Data Expansion Kit license, if any:
This cluster presently contains 2 of 20 possible SBR nodes.
Adding more SBR nodes will require a rolling restart later.
Enter number of SBR nodes to be added [0]:
215

6. Enter 1 to add one SBR node.
Updating cluster cambridge{1s,2sm,0m,2d}
will require 1 new machines. Do you wish to continue? [y]:
7. Verify the proper configuration of {1s,2sm,0m,2d} for the cluster named cambridge and enter y tocontinue.
Information will now be gathered for each new machine to be added.
You will have a chance to review all information at least once
before any machines are modified.
8. When prompted, enter the IP address and license number for the new SBR node.
---------------------------------------------------------------------------
SBR 8.60.50006 cluster cambridge{1s,2sm,0m,2d}
on SunOS 5.10 Generic_141444-09 node sbrha-4(sm)
Partial configuration at present is {0s,2sm,0m,2d} of {1s,2sm,0m,2d}
---------------------------------------------------------------------------
IMPORTANT: node names must be entered as reported by 'uname -n'.
Enter node name [cambridge-5]: sbrha-8.carrier.spgma.juniper.net
Enter node type (s) [s]:
Enter SBR node ID (40-59) [57]:
Enter SBR node IP address by which it is known to management nodes.
Enter SBR node IP address: 172.28.84.178
Enter SBR licenses meant only for this particular SBR node.
Enter one license per line and an empty line when finished.
Enter SBR full license: xxxx xxxx xxxx xxxx
Enter SBR feature license:
---------------------------------------------------------------------------
SBR 8.60.50006 cluster cambridge{1s,2sm,0m,2d}
on SunOS 5.10 Generic_141444-09 node sbrha-4(sm)
Generated configuration is {1s,2sm,0m,2d} of {1s,2sm,0m,2d}
---------------------------------------------------------------------------
Generating configuration files
The system generates the required cluster definition files and prompts you to view, accept, or rejectthem.
216
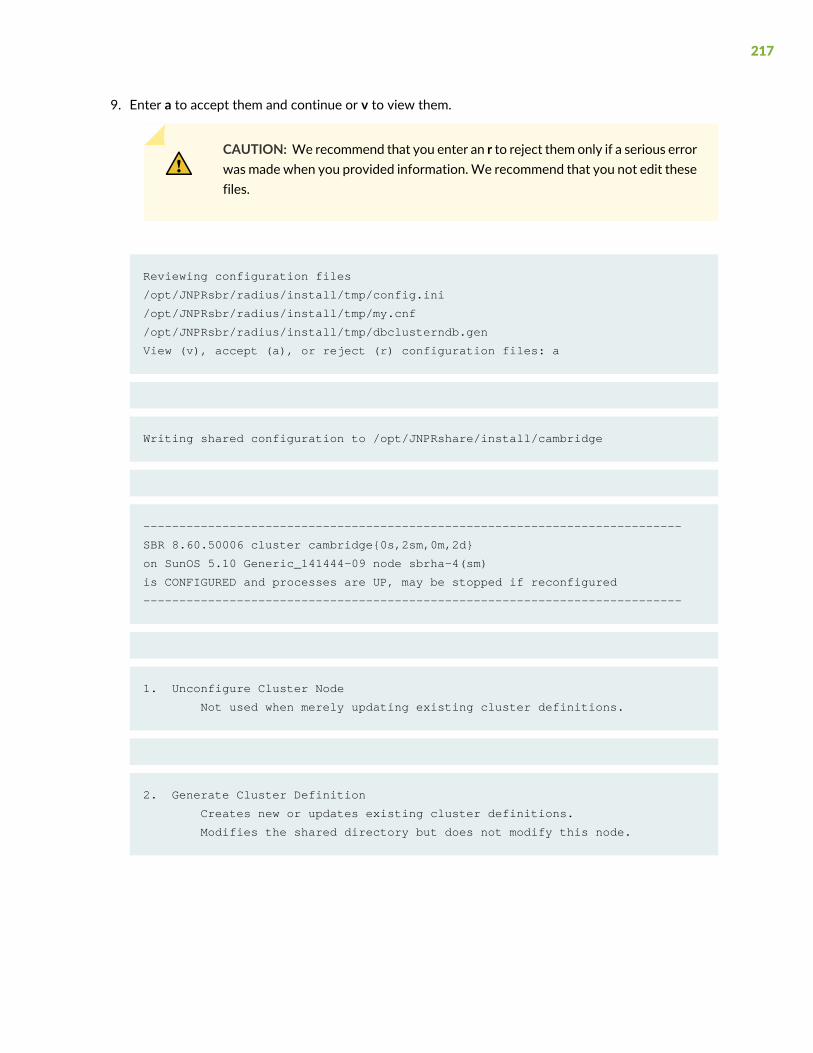
9. Enter a to accept them and continue or v to view them.
CAUTION: We recommend that you enter an r to reject them only if a serious errorwas made when you provided information.We recommend that you not edit thesefiles.
Reviewing configuration files
/opt/JNPRsbr/radius/install/tmp/config.ini
/opt/JNPRsbr/radius/install/tmp/my.cnf
/opt/JNPRsbr/radius/install/tmp/dbclusterndb.gen
View (v), accept (a), or reject (r) configuration files: a
Writing shared configuration to /opt/JNPRshare/install/cambridge
---------------------------------------------------------------------------
SBR 8.60.50006 cluster cambridge{0s,2sm,0m,2d}
on SunOS 5.10 Generic_141444-09 node sbrha-4(sm)
is CONFIGURED and processes are UP, may be stopped if reconfigured
---------------------------------------------------------------------------
1. Unconfigure Cluster Node
Not used when merely updating existing cluster definitions.
2. Generate Cluster Definition
Creates new or updates existing cluster definitions.
Modifies the shared directory but does not modify this node.
217

3. Configure Cluster Node
To be preceded by 'Generate Cluster Definition' on one node.
Must be invoked on each and every node of the cluster.
4. Reconfigure RADIUS Server
Only on SBR nodes, updates the existing SBR configuration.
5. Create Temporary Cluster
Used to approximate a cluster using only this one machine.
Intended for migration and demonstration purposes only.
6. Upgrade From Restricted Cluster License
Used to upgrade from restricted cluster to regular cluster.
Removes database restriction on the number of concurrent
sessions and enables the addition of an expansion kit license
READY: last operation succeeded, generated cluster definition.
Enter the number of the desired configuration task or quit (4,q):
The softwarewrites the new cluster definition files to this node and returns you to themain configurationmenu.
10.Press q to quit.
Distributing the Updated Cluster Definition Files to the Existing Nodes
At this point, the updated cluster definition files (*.tar file) have been created on the sm1 node only. Nowyou need to distribute the new definition files to the other nodes in the cluster, including the new SBRnode.
218

On both the existing nodes and the new SBR node in the expanded cluster, create a copy of the newcluster definition files. Doing this does not invoke the new files, but makes them available to the configurescript later in the workflow.
To distribute the new cluster definition files:
1. Log in to each node (existing and new) as hadm.
2. Change directories to the install directory.
(On new nodes, the entire path may not exist because the <cluster name> portion of the path was notcreated when you prepared the new machine, so you may need to create it.) See “Creating ShareDirectories” on page 52.
Execute:cd /opt/JNPRshare/install/ <cluster_name>
For example:cd /opt/JNPRshare/install/cambridge
3. Use FTP binary mode to connect to the node host (in this example sm1) where you created the newcluster definition files.
4. Execute the get command to transfer the configure. <cluster name> .tar file.
For example:binget /opt/JNPRsbr/radius/install/configure.cambridge.tar
5. In a terminal window, extract the new cluster definition files from the archive.
Execute:tar xvf configure. <cluster_name> .tar
Output similar to this example is displayed:
$ tar xvf configure.MyCluster.tarx dbcluster.rc, 1925 bytes, 4 tape blocks
x config.ini, 2435 bytes, 5 tape blocks
x my.cnf, 1017 bytes, 2 tape blocks
x dbclusterndb.gen, 33474 bytes, 66 tape blocks
x dbcluster.dat, 921 bytes, 2 tape blocks
6. Repeat these steps until every node in the cluster has a copy of the new cluster definition files.
219

Installing the SBR Carrier Software on the New SBR Node Host Machine
This procedure describes how to unpack and install the SBR Carrier software on the host machine for thenew SBR node.
1. Log in to the machine as root.
2. Copy the Steel-Belted Radius Carrier installation files from their download location to the machine.Make sure to copy them to a local or remote hard disk partition that is readable by root.
This example copies the files from a download directory to the /tmp/sbr directory.
Execute:mkdir -p /opt/tmpcp -pR /tmp/sbr/solaris/* /opt/tmp/
3. Extract the SBR Carrier installation package.
For 64-bit Solaris, execute:cd /tmp/sbrls -ltr
total 216240
-rw-r--r-- 1 root root 110712276 Aug 25 09:44
sbr-cl-8.6.0.R-1.sparcv9.tgz
Execute:gunzip sbr-cl-8.6.0.R-1.sparcv9.tgztar xf sbr-cl-8.6.0.R-1.sparcv9.tar
4. Verify that the extraction worked and confirm the name of the package file.
For 64-bit Solaris, execute:ls -ltr
total 216256
drwxr-xr-x 4 Xtreece other 370 Aug 24 17:01 JNPRsbr.pkg
-rw-r--r-- 1 root root 110712276 Aug 25 09:44
sbr-cl-8.6.0.R-1.sparcv9.tar
5. Install the package.
Execute:pkgadd -d /tmp/sbr
220

The following packages are available:
1 JNPRsbr.pkg JNPRsbr - Juniper Networks Steel-Belted Radius
(Carrier Cluster Edition) (sparc) 8.60.50006
Select package(s) you wish to process (or 'all' to process all packages).
(default: all) [?,??,q]:
6. Type all and press Enter.The script resumes.
Processing package instance <JNPRsbr.pkg> from </tmp>
7. Confirm the installation directory.
Depending on the system configuration, you are prompted whether to create the /opt/JNPRsbrdirectory if it does not exist, or to over-write an already extracted package, or any of several otherquestions.
The selected base directory </opt/JNPRsbr> must exist before installation is
attempted.
Do you want this directory created now [y,n,?,q]
8. Answer the question appropriately (or change the extraction path if necessary) so that the script canproceed.
To accept the default directory as a target, enter y.The script resumes.
Using </opt/JNPRsbr> as the package base directory.
#Processing package information.
#Processing system information.
48 package pathnames are already properly installed.
#Verifying disk space requirements.
221
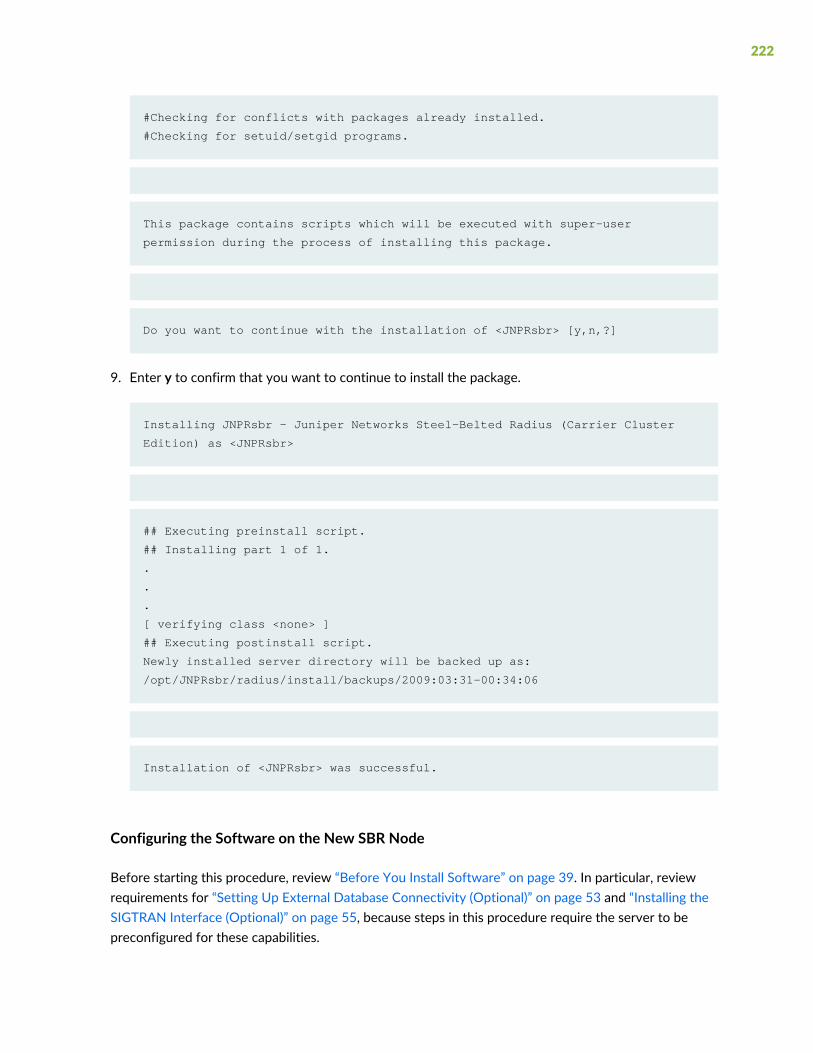
#Checking for conflicts with packages already installed.
#Checking for setuid/setgid programs.
This package contains scripts which will be executed with super-user
permission during the process of installing this package.
Do you want to continue with the installation of <JNPRsbr> [y,n,?]
9. Enter y to confirm that you want to continue to install the package.
Installing JNPRsbr - Juniper Networks Steel-Belted Radius (Carrier Cluster
Edition) as <JNPRsbr>
## Executing preinstall script.
## Installing part 1 of 1.
.
.
.
[ verifying class <none> ]
## Executing postinstall script.
Newly installed server directory will be backed up as:
/opt/JNPRsbr/radius/install/backups/2009:03:31-00:34:06
Installation of <JNPRsbr> was successful.
Configuring the Software on the New SBR Node
Before starting this procedure, review “Before You Install Software” on page 39. In particular, reviewrequirements for “Setting Up External Database Connectivity (Optional)” on page 53 and “Installing theSIGTRAN Interface (Optional)” on page 55, because steps in this procedure require the server to bepreconfigured for these capabilities.
222

To install the software on the new SBR node:
1. As root, navigate to the radius/install subdirectory of directory where you installed the Steel-BeltedRadius Carrier package in “Installing the SBR Carrier Software on the New SBR Node Host Machine”on page 220.
Example: cd /opt/JNPRsbr/radius/install
2. Run the configure script.
Execute:./configure
3. Review and accept the Steel-Belted Radius Carrier license agreement.
Press the spacebar to move from one page to the next. When you are prompted to accept the termsof the license agreement, enter y.
Do you accept the terms in the license agreement? [n] y
4. From the menu of configuration tasks, enter 3 to specify Configure Cluster Node.
---------------------------------------------------------------------------
SBR 8.60.50006 cluster
on SunOS 5.10 Generic_141444-09 node sbrha-8.carrier.spgma.juniper.net
is not configured and processes are down, needs to be configured
---------------------------------------------------------------------------
1. Unconfigure Cluster Node
Not used when merely updating existing cluster definitions.
2. Generate Cluster Definition
Creates new or updates existing cluster definitions.
Modifies the shared directory but does not modify this node.
3. Configure Cluster Node
To be preceded by 'Generate Cluster Definition' on one node.
Must be invoked on each and every node of the cluster.
223
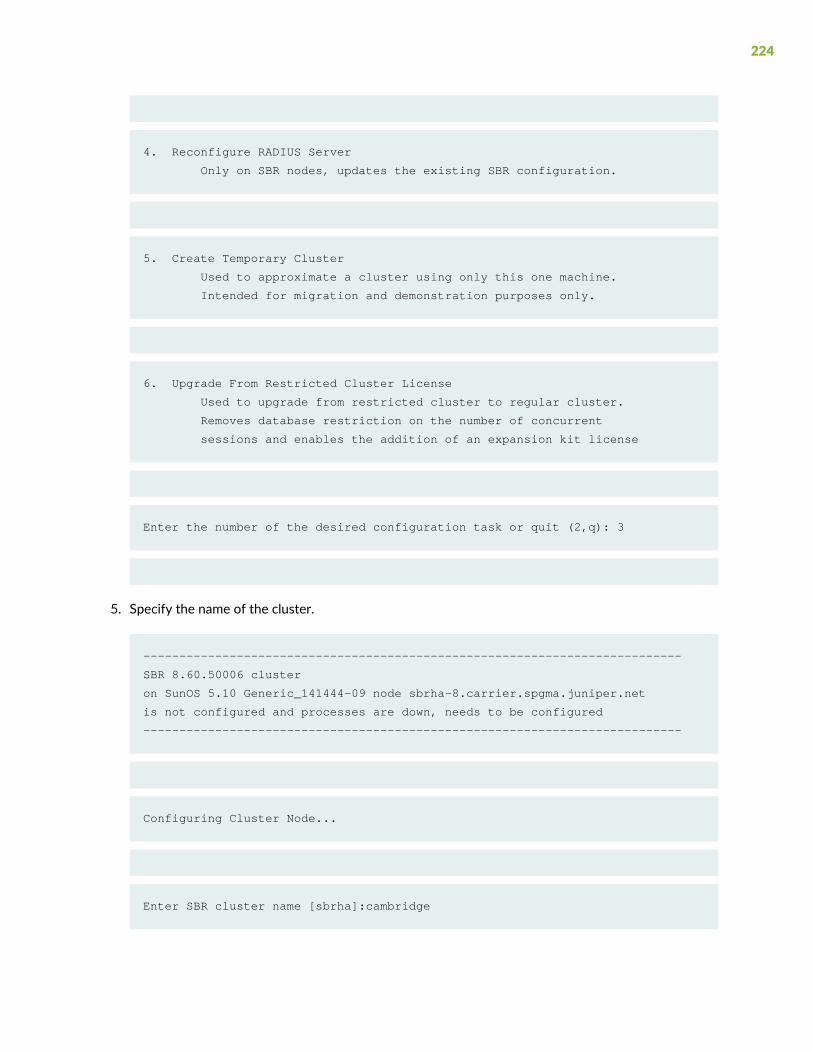
4. Reconfigure RADIUS Server
Only on SBR nodes, updates the existing SBR configuration.
5. Create Temporary Cluster
Used to approximate a cluster using only this one machine.
Intended for migration and demonstration purposes only.
6. Upgrade From Restricted Cluster License
Used to upgrade from restricted cluster to regular cluster.
Removes database restriction on the number of concurrent
sessions and enables the addition of an expansion kit license
Enter the number of the desired configuration task or quit (2,q): 3
5. Specify the name of the cluster.
---------------------------------------------------------------------------
SBR 8.60.50006 cluster
on SunOS 5.10 Generic_141444-09 node sbrha-8.carrier.spgma.juniper.net
is not configured and processes are down, needs to be configured
---------------------------------------------------------------------------
Configuring Cluster Node...
Enter SBR cluster name [sbrha]:cambridge
224

Reading shared configuration from /opt/JNPRshare/install/cambridge
Generating configuration files
Reviewing configuration files
/opt/JNPRsbr/radius/install/tmp/dbclusterndb.gen
View (v), accept (a), or reject (r) configuration files: a
6. Enter a to accept the modified configuration files and continue or v to view them.
CAUTION: We recommend that you enter an r to reject them only if a serious errorwas made when you provided information.We recommend that you not edit thesefiles.
7. The configure script prompts you with a warning about whether or not to apply the cluster definitionto this node. Enter y to proceed.
WARNING: You are about to make irreversible changes to this node.
Are you sure that you wish to continue? (y,n): y
Cleaning directories
/opt/JNPRhadm
Applying configuration
Initializing Session State Register, please wait a few minutes...
225
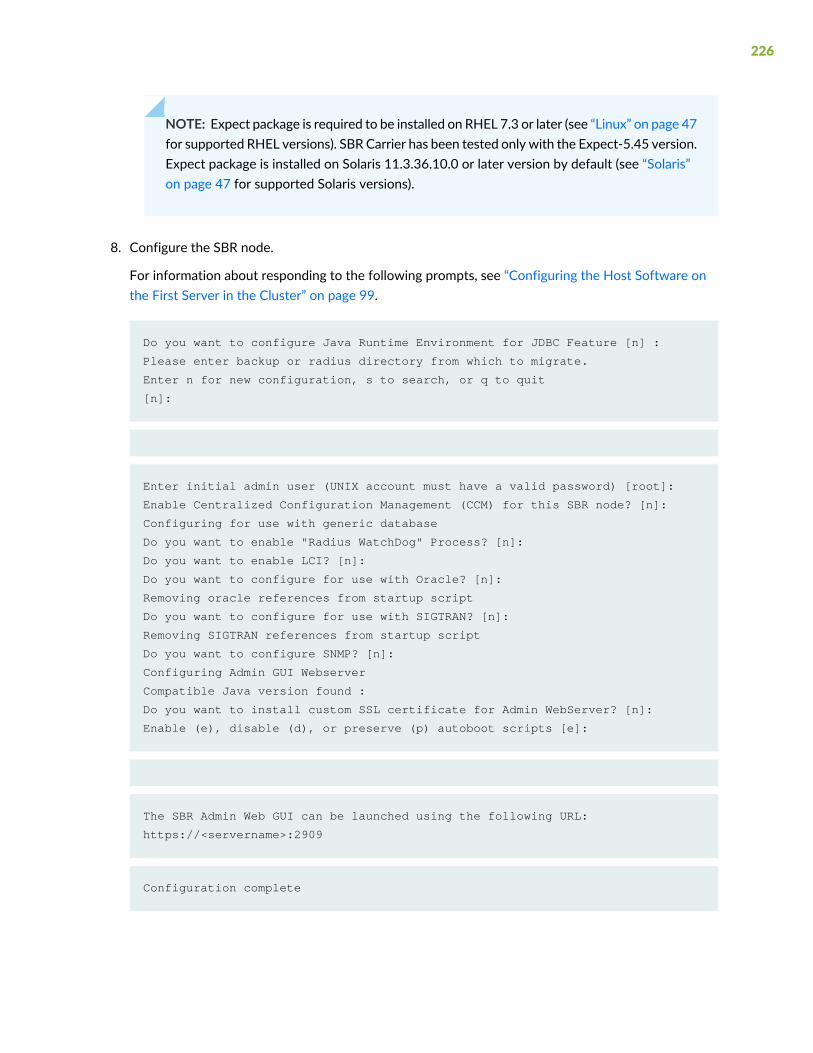
NOTE: Expect package is required to be installed on RHEL 7.3 or later (see “Linux” on page 47for supported RHEL versions). SBR Carrier has been tested only with the Expect-5.45 version.Expect package is installed on Solaris 11.3.36.10.0 or later version by default (see “Solaris”on page 47 for supported Solaris versions).
8. Configure the SBR node.
For information about responding to the following prompts, see “Configuring the Host Software onthe First Server in the Cluster” on page 99.
Do you want to configure Java Runtime Environment for JDBC Feature [n] :
Please enter backup or radius directory from which to migrate.
Enter n for new configuration, s to search, or q to quit
[n]:
Enter initial admin user (UNIX account must have a valid password) [root]:
Enable Centralized Configuration Management (CCM) for this SBR node? [n]:
Configuring for use with generic database
Do you want to enable "Radius WatchDog" Process? [n]:
Do you want to enable LCI? [n]:
Do you want to configure for use with Oracle? [n]:
Removing oracle references from startup script
Do you want to configure for use with SIGTRAN? [n]:
Removing SIGTRAN references from startup script
Do you want to configure SNMP? [n]:
Configuring Admin GUI Webserver
Compatible Java version found :
Do you want to install custom SSL certificate for Admin WebServer? [n]:
Enable (e), disable (d), or preserve (p) autoboot scripts [e]:
The SBR Admin Web GUI can be launched using the following URL:
https://<servername>:2909
Configuration complete
226
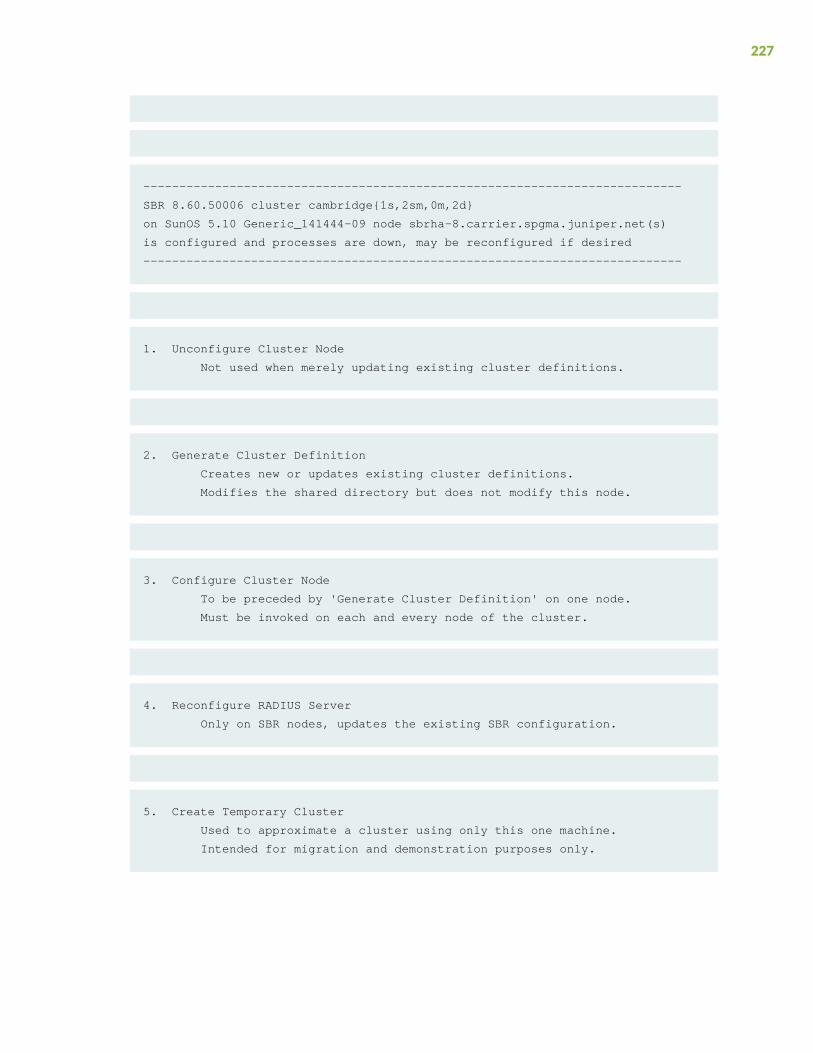
---------------------------------------------------------------------------
SBR 8.60.50006 cluster cambridge{1s,2sm,0m,2d}
on SunOS 5.10 Generic_141444-09 node sbrha-8.carrier.spgma.juniper.net(s)
is configured and processes are down, may be reconfigured if desired
---------------------------------------------------------------------------
1. Unconfigure Cluster Node
Not used when merely updating existing cluster definitions.
2. Generate Cluster Definition
Creates new or updates existing cluster definitions.
Modifies the shared directory but does not modify this node.
3. Configure Cluster Node
To be preceded by 'Generate Cluster Definition' on one node.
Must be invoked on each and every node of the cluster.
4. Reconfigure RADIUS Server
Only on SBR nodes, updates the existing SBR configuration.
5. Create Temporary Cluster
Used to approximate a cluster using only this one machine.
Intended for migration and demonstration purposes only.
227

6. Upgrade From Restricted Cluster License
Used to upgrade from restricted cluster to regular cluster.
Removes database restriction on the number of concurrent
sessions and enables the addition of an expansion kit license
READY: last operation succeeded, node configured.
Enter the number of the desired configuration task or quit (4,q):
9. Enter q to quit.
Configuring Each Existing Node in the Cluster with the New Cluster Definition Files
At this point in the process, all nodes in the cluster have the new cluster definition files loaded and thenew SBR node has been configured with the new files. The existing nodes are still running with the oldcluster definition files.
In this procedure, you log in to each existing node, stop the process, run the configure script, and restartthe processes. You must complete these steps on every existing node in the cluster. This example startswith the sm1 node.
CAUTION: In this procedure, you need to stop and restart each existing node one byone to apply the new cluster definition to each of the original cluster nodes and tokeep the cluster up and running. Do not operate on multiple nodes at the same timebecause that creates multiple faults that can stop the entire cluster.
Always review the recommended start and stop order and processes and plan theorder in which to perform the equivalent steps in your cluster. See“WhenandHowtoRestart SessionStateRegisterNodes,Hosts, andClusters” onpage196.
1. Log in to the first existing node (in this example, sm1) as root.
2. Navigate to the radius subdirectory of the directory in which the JNPRsbr package was installed(/opt/JNPRsbr by default).
Example: cd /opt/JNPRsbr/radius
3. Stop the RADIUS processes on the node you are configuring:
a. Execute:
228

./sbrd stop radius
b. Execute:./sbrd status
4. Stop the ssr processes on the node you are configuring:
./sbrd stop ssr
5. Check the status of the node:
./sbrd status
Cluster Configuration
---------------------
[ndbd(NDB)] 2 node(s)
id=10 @172.28.84.163 (mysql-5.7.25 ndb-7.6.9, Nodegroup: 0, Master)
id=11 @172.28.84.113 (mysql-5.7.25 ndb-7.6.9, Nodegroup: 0)
[ndb_mgmd(MGM)] 2 node(s)
id=1 (not connected, accepting connect from 172.28.84.36)
id=2 @172.28.84.166 (mysql-5.7.25 ndb-7.6.9)
[mysqld(API)] 4 node(s)
id=6 (not connected, accepting connect from 172.28.84.36)
id=7 @172.28.84.166 (mysql-5.7.25 ndb-7.6.9)
id=58 @172.28.84.166 (mysql-5.7.25 ndb-7.6.9)
id=59 (not connected, accepting connect from 172.28.84.36)
hadm@wrx07:~>
6. Verify that the node you are about to configure is not connected. In this example, the node ID for sm1indicates: id=1 (not connected, accepting connect from 172.28.84.36), indicating the sm1 node isstopped.
7. Run the configure script:
Execute:./configure
229

Configuring SBR Software
---------------------------------------------------------------------------
SBR 8.60.50006 cluster cambridge{0s,2sm,0m,2d}
on SunOS 5.10 Generic_141444-09 node sbrha-4(sm)
is configured and processes are down, may be reconfigured if desired
---------------------------------------------------------------------------
1. Unconfigure Cluster Node
Not used when merely updating existing cluster definitions.
2. Generate Cluster Definition
Creates new or updates existing cluster definitions.
Modifies the shared directory but does not modify this node.
3. Configure Cluster Node
To be preceded by 'Generate Cluster Definition' on one node.
Must be invoked on each and every node of the cluster.
4. Reconfigure RADIUS Server
Only on SBR nodes, updates the existing SBR configuration.
5. Create Temporary Cluster
Used to approximate a cluster using only this one machine.
Intended for migration and demonstration purposes only.
230

6. Upgrade From Restricted Cluster License
Used to upgrade from restricted cluster to regular cluster.
Removes database restriction on the number of concurrent
sessions and enables the addition of an expansion kit license
Enter the number of the desired configuration task or quit (4,q):
8. From the menu of configuration tasks, enter 3 to specify Configure Cluster Node.
---------------------------------------------------------------------------
SBR 8.60.50006 cluster cambridge{0s,2sm,0m,2d}
on SunOS 5.10 Generic_141444-09 node sbrha-4(sm)
is configured and processes are down, may be reconfigured if desired
---------------------------------------------------------------------------
Configuring Cluster Node...
Enter SBR cluster name [cambridge]:
9. Press Enter to accept the existing cluster name (in the example: cambridge).
Create (c) new or update (u) existing node configuration? [u]:
10.Enter u to update the existing node configuration.
Reading shared configuration from /opt/JNPRshare/install/cambridge
Generating configuration files
231

Reviewing configuration files
/opt/JNPRsbr/radius/install/tmp/config.ini
/opt/JNPRsbr/radius/install/tmp/my.cnf
/opt/JNPRsbr/radius/install/tmp/dbclusterndb.gen
View (v), accept (a), or reject (r) configuration files:
11.Enter a to accept the new cluster definition files.
WARNING: You are about to make irreversible changes to this node.
Are you sure that you wish to continue? (y,n):
The configure script prompts youwith awarning aboutwhether or not to apply the new cluster definitionto the node.
12.Enter y to continue.
Applying configuration
---------------------------------------------------------------------------
SBR 8.60.50006 cluster cambridge{1s,2sm,0m,2d}
on SunOS 5.10 Generic_141444-09 node sbrha-4(sm)
is configured and processes are down, may be reconfigured if desired
---------------------------------------------------------------------------
1. Unconfigure Cluster Node
Not used when merely updating existing cluster definitions.
232

2. Generate Cluster Definition
Creates new or updates existing cluster definitions.
Modifies the shared directory but does not modify this node.
3. Configure Cluster Node
To be preceded by 'Generate Cluster Definition' on one node.
Must be invoked on each and every node of the cluster.
4. Reconfigure RADIUS Server
Only on SBR nodes, updates the existing SBR configuration.
5. Create Temporary Cluster
Used to approximate a cluster using only this one machine.
Intended for migration and demonstration purposes only.
6. Upgrade From Restricted Cluster License
Used to upgrade from restricted cluster to regular cluster.
Removes database restriction on the number of concurrent
sessions and enables the addition of an expansion kit license
READY: last operation succeeded, node configured.
Enter the number of the desired configuration task or quit (4,q):
13.Enter q to quit.
root@sbrha-4:/opt/JNPRsbr/radius/install>
233
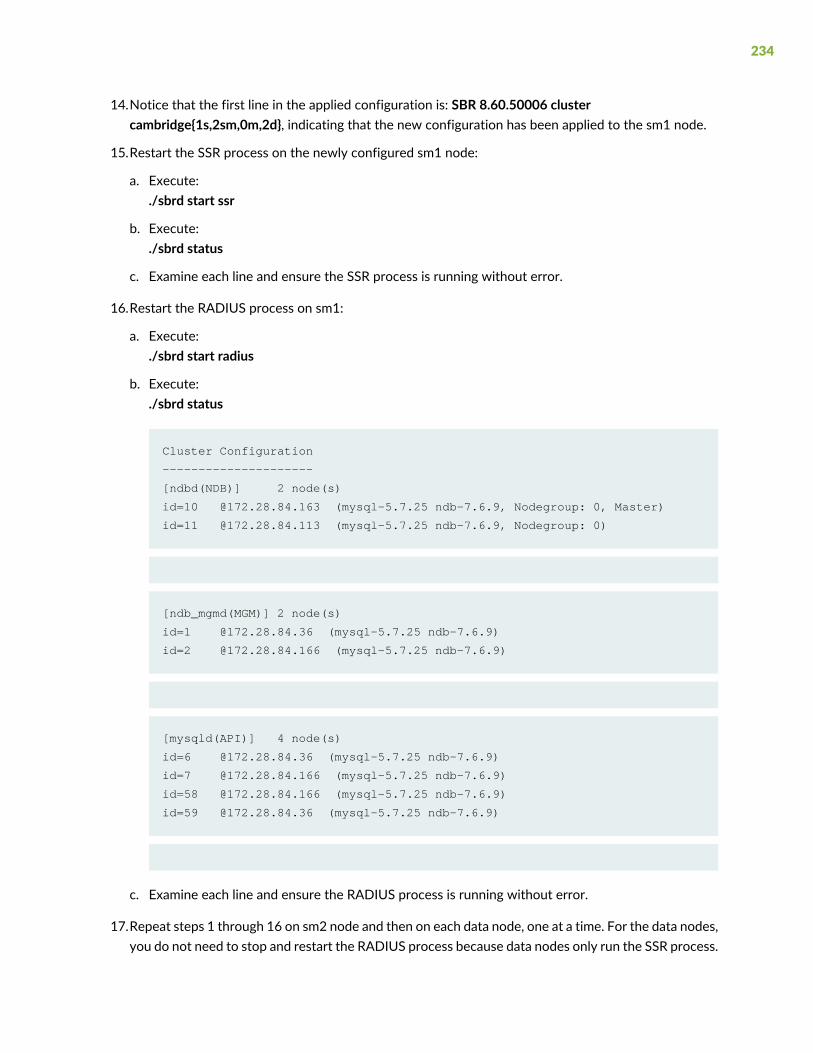
14.Notice that the first line in the applied configuration is: SBR 8.60.50006 clustercambridge{1s,2sm,0m,2d}, indicating that the new configuration has been applied to the sm1 node.
15.Restart the SSR process on the newly configured sm1 node:
a. Execute:./sbrd start ssr
b. Execute:./sbrd status
c. Examine each line and ensure the SSR process is running without error.
16.Restart the RADIUS process on sm1:
a. Execute:./sbrd start radius
b. Execute:./sbrd status
Cluster Configuration
---------------------
[ndbd(NDB)] 2 node(s)
id=10 @172.28.84.163 (mysql-5.7.25 ndb-7.6.9, Nodegroup: 0, Master)
id=11 @172.28.84.113 (mysql-5.7.25 ndb-7.6.9, Nodegroup: 0)
[ndb_mgmd(MGM)] 2 node(s)
id=1 @172.28.84.36 (mysql-5.7.25 ndb-7.6.9)
id=2 @172.28.84.166 (mysql-5.7.25 ndb-7.6.9)
[mysqld(API)] 4 node(s)
id=6 @172.28.84.36 (mysql-5.7.25 ndb-7.6.9)
id=7 @172.28.84.166 (mysql-5.7.25 ndb-7.6.9)
id=58 @172.28.84.166 (mysql-5.7.25 ndb-7.6.9)
id=59 @172.28.84.36 (mysql-5.7.25 ndb-7.6.9)
c. Examine each line and ensure the RADIUS process is running without error.
17.Repeat steps 1 through 16 on sm2 node and then on each data node, one at a time. For the data nodes,you do not need to stop and restart the RADIUS process because data nodes only run the SSR process.
234
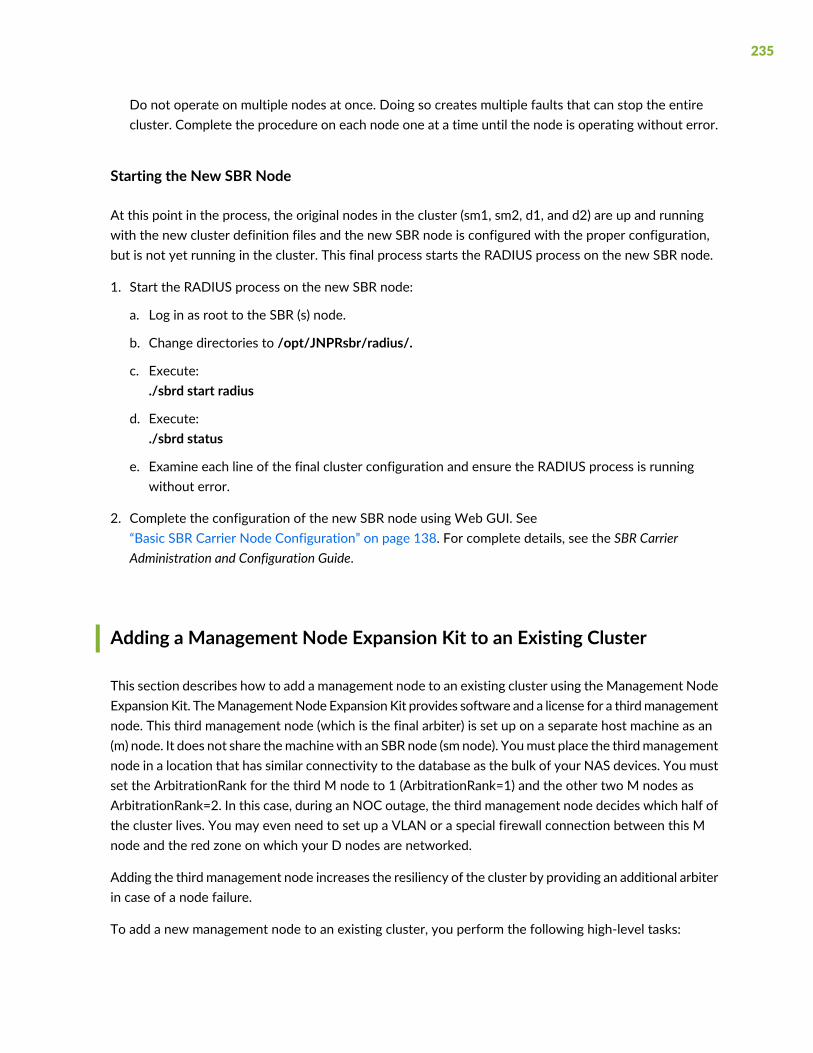
Do not operate on multiple nodes at once. Doing so creates multiple faults that can stop the entirecluster. Complete the procedure on each node one at a time until the node is operating without error.
Starting the New SBR Node
At this point in the process, the original nodes in the cluster (sm1, sm2, d1, and d2) are up and runningwith the new cluster definition files and the new SBR node is configured with the proper configuration,but is not yet running in the cluster. This final process starts the RADIUS process on the new SBR node.
1. Start the RADIUS process on the new SBR node:
a. Log in as root to the SBR (s) node.
b. Change directories to /opt/JNPRsbr/radius/.
c. Execute:./sbrd start radius
d. Execute:./sbrd status
e. Examine each line of the final cluster configuration and ensure the RADIUS process is runningwithout error.
2. Complete the configuration of the new SBR node using Web GUI. See“Basic SBR Carrier Node Configuration” on page 138. For complete details, see the SBR CarrierAdministration and Configuration Guide.
Adding a Management Node Expansion Kit to an Existing Cluster
This section describes how to add a management node to an existing cluster using the Management NodeExpansionKit. TheManagementNode ExpansionKit provides software and a license for a thirdmanagementnode. This third management node (which is the final arbiter) is set up on a separate host machine as an(m) node. It does not share themachinewith an SBR node (sm node). Youmust place the thirdmanagementnode in a location that has similar connectivity to the database as the bulk of your NAS devices. You mustset the ArbitrationRank for the third M node to 1 (ArbitrationRank=1) and the other two M nodes asArbitrationRank=2. In this case, during an NOC outage, the third management node decides which half ofthe cluster lives. You may even need to set up a VLAN or a special firewall connection between this Mnode and the red zone on which your D nodes are networked.
Adding the third management node increases the resiliency of the cluster by providing an additional arbiterin case of a node failure.
To add a new management node to an existing cluster, you perform the following high-level tasks:
235

1. Update the existing cluster definition files to include the new management node.
See “Updating the Existing Cluster Definition Files for the New Management Node” on page 237.
2. Distribute the updated cluster definition files to the existing nodes in the cluster.
See “Distributing the Updated Cluster Definition Files to the Existing Nodes” on page 244.
3. Install the SBR Carrier software on the new management node.
See “Installing the SBR Carrier Software on the New Management Node Host Machine” on page 245.
4. Configure the SBR Carrier software on the new management node.
See “Configuring the SBR Carrier Software on the New Management Node” on page 248.
5. One by one, stop the process on each existing node, configure it with the new cluster definition file,and restart the process.
See “Configuring Each Existing Node in the Cluster with the NewCluster Definition Files” on page 252.
6. Start the SSR process on the new management node.
See “Starting the New Management Node” on page 259.
7. Run CreateDB.sh on the new management node.
See “Running CreateDB.sh on the New Management Node” on page 259.
The following procedure adds a single management node to an existing cluster.
The following designations are used throughout the examples in this section:
sm = Hardware has SBR node and Management node.s = Hardware has only SBR node.m = Hardware has only Management node.d = Hardware has Data node.2sm, 2d = Two SBR/Management nodes and 2 Data nodes.2S, 2SM, 2D = Two SBR nodes and 2 SBR/Management nodes, 2 Data nodes.
Display the existing cluster:
hadm@wrx07:~> ndb_mgm -e showConnected to Management Server at: 172.28.84.166:5235
Cluster Configuration
---------------------
[ndbd(NDB)] 2 node(s)
id=10 @172.28.84.163 (mysql-5.7.25 ndb-7.6.9, Nodegroup: 0, Master)
id=11 @172.28.84.113 (mysql-5.7.25 ndb-7.6.9, Nodegroup: 0)
236

[ndb_mgmd(MGM)] 2 node(s)
id=1 @172.28.84.36 (mysql-5.7.25 ndb-7.6.9)
id=2 @172.28.84.166 (mysql-5.7.25 ndb-7.6.9)
[mysqld(API)] 4 node(s)
id=6 @172.28.84.36 (mysql-5.7.25 ndb-7.6.9)
id=7 @172.28.84.166 (mysql-5.7.25 ndb-7.6.9)
id=58 @172.28.84.166 (mysql-5.7.25 ndb-7.6.9)
id=59 @172.28.84.36 (mysql-5.7.25 ndb-7.6.9)
The existing cluster includes two full SBR Carrier licenses and a license for the Starter Kit resulting in aconfiguration that includes: two sm nodes and two d nodes.
For the purposes of this procedure, the existing two sm nodes are identified as sm1 and sm2 as follows:
id=1 @172.28.84.36 = sm1
id=2 @172.28.84.166 = sm2
Updating the Existing Cluster Definition Files for the NewManagement Node
In this first part of the procedure, you update the existing cluster definition files on SM1 to reflect the newconfiguration of 0s, 2sm, 1m, 2d.
Before proceeding, make sure the machine that you want to host the new management node meets allsystem requirements. See “Before You Install Software” on page 39.
The following steps create a new set of cluster definition files in /opt/JNPRshare/install/ <cluster_name>and in configure.<cluster_name>.tar. You may want to make a backup copy of the existingconfigure.<cluster_name>.tar file before creating the new files, in case you need to restore the existingconfiguration.
To generate the updated cluster definition files:
237
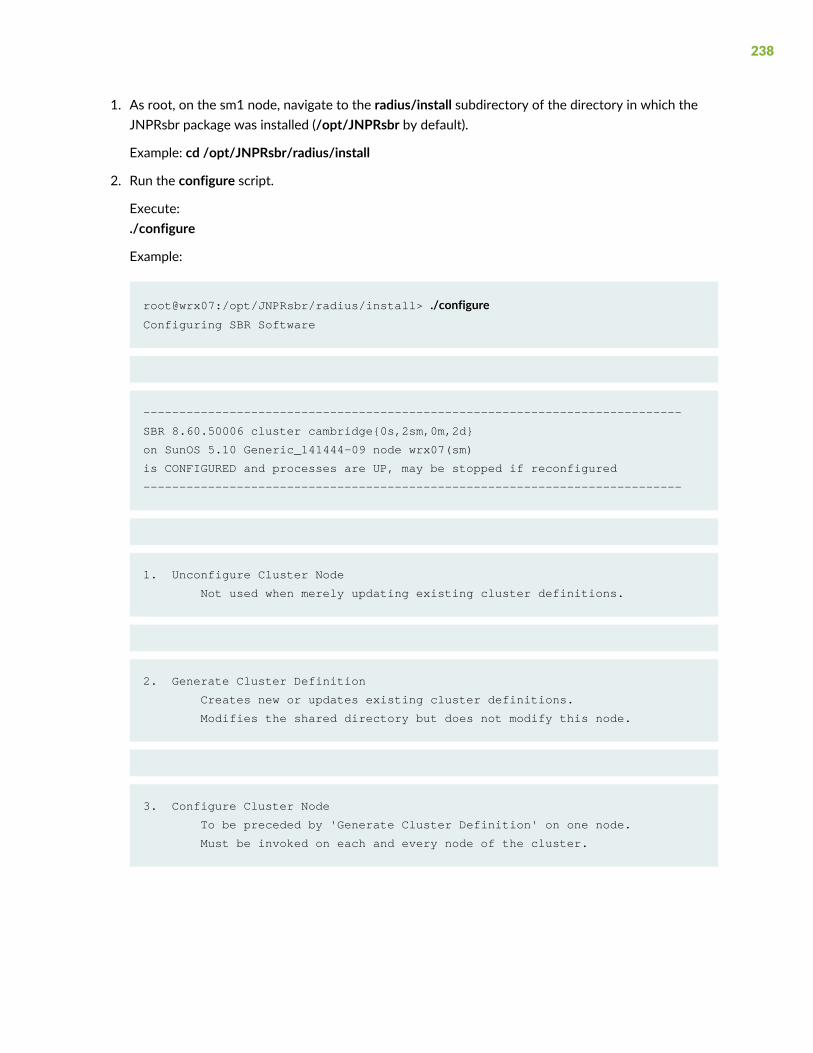
1. As root, on the sm1 node, navigate to the radius/install subdirectory of the directory in which theJNPRsbr package was installed (/opt/JNPRsbr by default).
Example: cd /opt/JNPRsbr/radius/install
2. Run the configure script.
Execute:./configure
Example:
root@wrx07:/opt/JNPRsbr/radius/install> ./configureConfiguring SBR Software
---------------------------------------------------------------------------
SBR 8.60.50006 cluster cambridge{0s,2sm,0m,2d}
on SunOS 5.10 Generic_141444-09 node wrx07(sm)
is CONFIGURED and processes are UP, may be stopped if reconfigured
---------------------------------------------------------------------------
1. Unconfigure Cluster Node
Not used when merely updating existing cluster definitions.
2. Generate Cluster Definition
Creates new or updates existing cluster definitions.
Modifies the shared directory but does not modify this node.
3. Configure Cluster Node
To be preceded by 'Generate Cluster Definition' on one node.
Must be invoked on each and every node of the cluster.
238
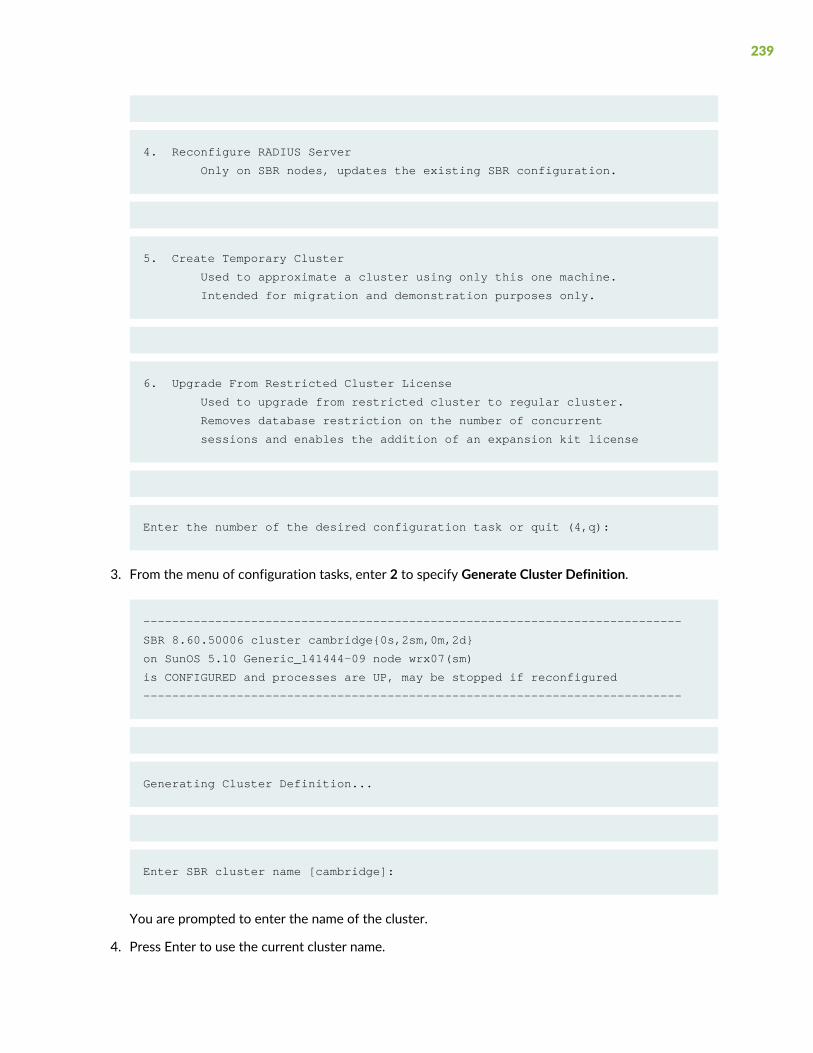
4. Reconfigure RADIUS Server
Only on SBR nodes, updates the existing SBR configuration.
5. Create Temporary Cluster
Used to approximate a cluster using only this one machine.
Intended for migration and demonstration purposes only.
6. Upgrade From Restricted Cluster License
Used to upgrade from restricted cluster to regular cluster.
Removes database restriction on the number of concurrent
sessions and enables the addition of an expansion kit license
Enter the number of the desired configuration task or quit (4,q):
3. From the menu of configuration tasks, enter 2 to specify Generate Cluster Definition.
---------------------------------------------------------------------------
SBR 8.60.50006 cluster cambridge{0s,2sm,0m,2d}
on SunOS 5.10 Generic_141444-09 node wrx07(sm)
is CONFIGURED and processes are UP, may be stopped if reconfigured
---------------------------------------------------------------------------
Generating Cluster Definition...
Enter SBR cluster name [cambridge]:
You are prompted to enter the name of the cluster.
4. Press Enter to use the current cluster name.
239

You are prompted either to create a new cluster or update an existing cluster definition.
Create (c) new or update (u) existing cluster definition? [u]:
5. Enter u to update the existing cluster definition.
The SBR Cluster Starter Kit license allows you to create a minimal
cluster of 2 SBR nodes, 2 management nodes, and 2 data nodes. When
each node is installed on a separate machine the cluster topology is
denoted as {2s,2m,2d}. When SBR nodes are paired with management
nodes on the same machines the cluster topology is denoted as {2sm,2d}.
An optional SBR Cluster Management Expansion Kit allows you to add a
third management node for {2sm,1m,2d} and an optional Data Expansion
Kit allows you to add 2 more data nodes for {2sm,1m,4d} clusters.
Additional SBR licenses allow you to add up to 18 more SBR nodes to
obtain a maximal cluster {18s,2sm,1m,4d} and/or enable extra features.
While it is not difficult to add management and/or SBR nodes to an
existing cluster, adding data nodes is more difficult and may require
you to shutdown the entire cluster as opposed to a rolling restart.
Another license is required if you wish to add a third management node.
Adding a third management node will require a rolling restart later.
Enter Management Expansion Kit license, if any: 1770 0002 0112 0100 1145 3801
6. Enter the license number for the new management node.
Another license is required if you wish to add more data nodes.
Adding data nodes may require you to shutdown the entire cluster.
Enter Data Expansion Kit license, if any:
240
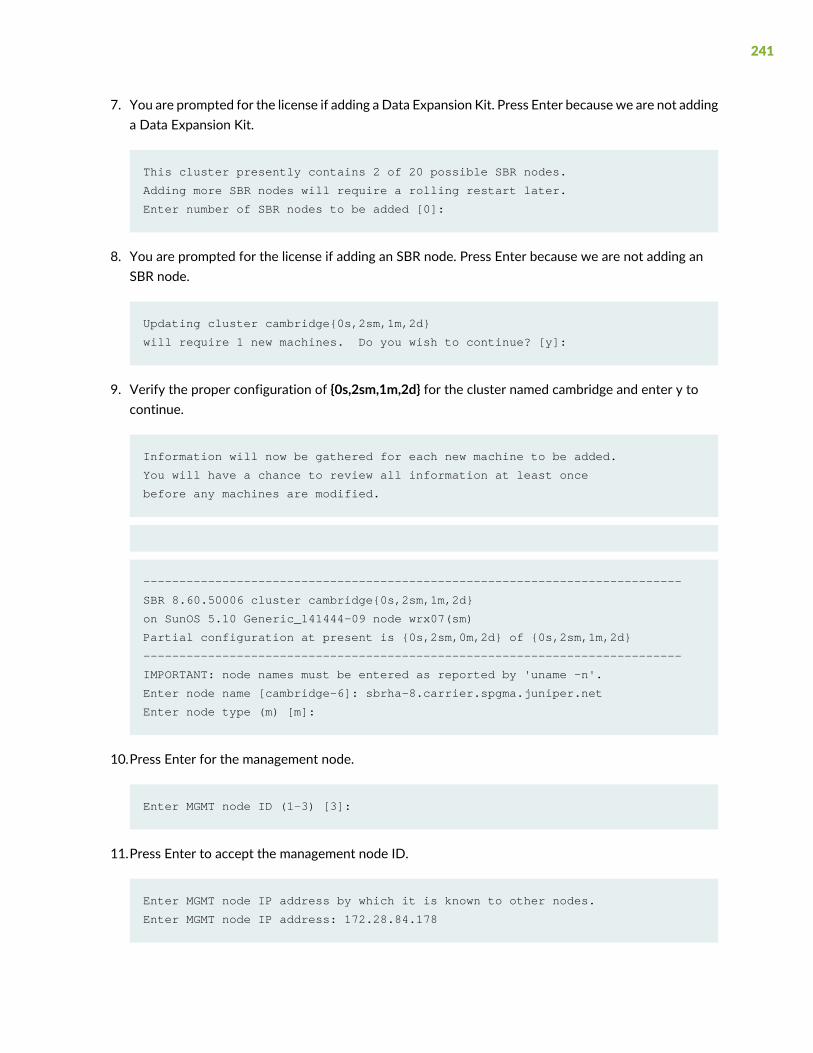
7. You are prompted for the license if adding a Data Expansion Kit. Press Enter because we are not addinga Data Expansion Kit.
This cluster presently contains 2 of 20 possible SBR nodes.
Adding more SBR nodes will require a rolling restart later.
Enter number of SBR nodes to be added [0]:
8. You are prompted for the license if adding an SBR node. Press Enter because we are not adding anSBR node.
Updating cluster cambridge{0s,2sm,1m,2d}
will require 1 new machines. Do you wish to continue? [y]:
9. Verify the proper configuration of {0s,2sm,1m,2d} for the cluster named cambridge and enter y tocontinue.
Information will now be gathered for each new machine to be added.
You will have a chance to review all information at least once
before any machines are modified.
---------------------------------------------------------------------------
SBR 8.60.50006 cluster cambridge{0s,2sm,1m,2d}
on SunOS 5.10 Generic_141444-09 node wrx07(sm)
Partial configuration at present is {0s,2sm,0m,2d} of {0s,2sm,1m,2d}
---------------------------------------------------------------------------
IMPORTANT: node names must be entered as reported by 'uname -n'.
Enter node name [cambridge-6]: sbrha-8.carrier.spgma.juniper.net
Enter node type (m) [m]:
10.Press Enter for the management node.
Enter MGMT node ID (1-3) [3]:
11.Press Enter to accept the management node ID.
Enter MGMT node IP address by which it is known to other nodes.
Enter MGMT node IP address: 172.28.84.178
241

12.Enter the IP address for the new management node and press Enter.
---------------------------------------------------------------------------
SBR 8.60.50006 cluster cambridge{0s,2sm,1m,2d}
on SunOS 5.10 Generic_141444-09 node wrx07(sm)
Generated configuration is {0s,2sm,1m,2d} of {0s,2sm,1m,2d}
---------------------------------------------------------------------------
Generating configuration files
Reviewing configuration files
/opt/JNPRsbr/radius/install/tmp/config.ini
/opt/JNPRsbr/radius/install/tmp/my.cnf
/opt/JNPRsbr/radius/install/tmp/dbclusterndb.gen
View (v), accept (a), or reject (r) configuration files:
The system generates the required cluster definition files and prompts you to view, accept, or rejectthem.
13.Enter a to accept them and continue or v to view them.
CAUTION: We recommend that you enter an r to reject them only if a serious errorwas made when you provided information.We recommend that you not edit thesefiles.
In this example, notice that the new configuration displays as Generated configuration is {0s,2sm,1m,2d},confirming that the new management node is included in the cluster definition.
Enter a to accept the new definition files.
Writing shared configuration to /opt/JNPRshare/install/cambridge
---------------------------------------------------------------------------
SBR 8.60.50006 cluster cambridge{0s,2sm,0m,2d}
242

on SunOS 5.10 Generic_141444-09 node wrx07(sm)
is CONFIGURED and processes are UP, may be stopped if reconfigured
---------------------------------------------------------------------------
1. Unconfigure Cluster Node
Not used when merely updating existing cluster definitions.
2. Generate Cluster Definition
Creates new or updates existing cluster definitions.
Modifies the shared directory but does not modify this node.
3. Configure Cluster Node
To be preceded by 'Generate Cluster Definition' on one node.
Must be invoked on each and every node of the cluster.
4. Reconfigure RADIUS Server
Only on SBR nodes, updates the existing SBR configuration.
5. Create Temporary Cluster
Used to approximate a cluster using only this one machine.
Intended for migration and demonstration purposes only.
6. Upgrade From Restricted Cluster License
Used to upgrade from restricted cluster to regular cluster.
Removes database restriction on the number of concurrent
sessions and enables the addition of an expansion kit license
243
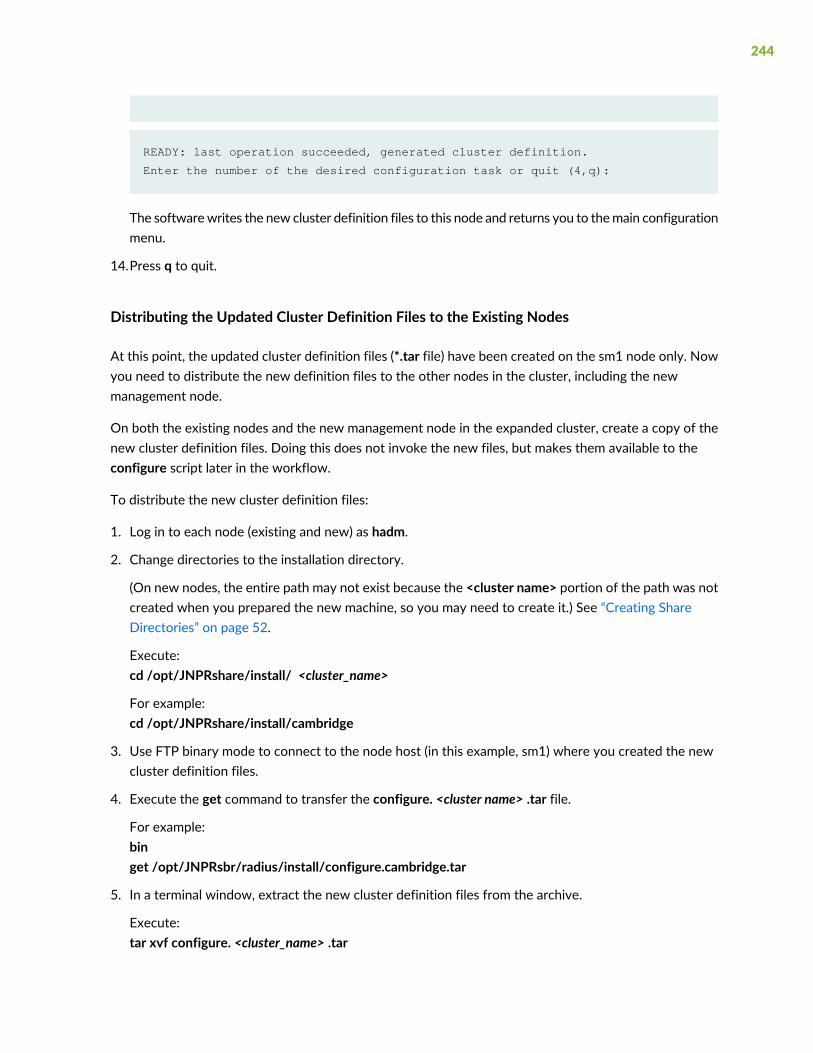
READY: last operation succeeded, generated cluster definition.
Enter the number of the desired configuration task or quit (4,q):
The softwarewrites the new cluster definition files to this node and returns you to themain configurationmenu.
14.Press q to quit.
Distributing the Updated Cluster Definition Files to the Existing Nodes
At this point, the updated cluster definition files (*.tar file) have been created on the sm1 node only. Nowyou need to distribute the new definition files to the other nodes in the cluster, including the newmanagement node.
On both the existing nodes and the new management node in the expanded cluster, create a copy of thenew cluster definition files. Doing this does not invoke the new files, but makes them available to theconfigure script later in the workflow.
To distribute the new cluster definition files:
1. Log in to each node (existing and new) as hadm.
2. Change directories to the installation directory.
(On new nodes, the entire path may not exist because the <cluster name> portion of the path was notcreated when you prepared the new machine, so you may need to create it.) See “Creating ShareDirectories” on page 52.
Execute:cd /opt/JNPRshare/install/ <cluster_name>
For example:cd /opt/JNPRshare/install/cambridge
3. Use FTP binary mode to connect to the node host (in this example, sm1) where you created the newcluster definition files.
4. Execute the get command to transfer the configure. <cluster name> .tar file.
For example:binget /opt/JNPRsbr/radius/install/configure.cambridge.tar
5. In a terminal window, extract the new cluster definition files from the archive.
Execute:tar xvf configure. <cluster_name> .tar
244

Output similar to this example is displayed:
$ tar xvf configure.MyCluster.tarx dbcluster.rc, 1925 bytes, 4 tape blocks
x config.ini, 2435 bytes, 5 tape blocks
x my.cnf, 1017 bytes, 2 tape blocks
x dbclusterndb.gen, 33474 bytes, 66 tape blocks
x dbcluster.dat, 921 bytes, 2 tape blocks
6. Repeat these steps until every node in the cluster has a copy of the new cluster definition files.
Installing the SBR Carrier Software on the NewManagement Node Host Machine
This procedure describes how to unpack and install the SBR Carrier software on the host machine for thenew management node.
1. Log in to the host machine for the new management node as root.
2. Copy the Steel-Belted Radius Carrier installation files from their download location to the machine.Make sure to copy them to a local or remote hard disk partition that is readable by root.
This example copies the files from a download directory to the /tmp/sbr directory.
Execute:mkdir -p /opt/tmpcp -pR /tmp/sbr/solaris/* /opt/tmp/
3. Extract the SBR Carrier installation package.
For 64-bit Solaris, execute:cd /tmp/sbrls -ltr
total 216240
-rw-r--r-- 1 root root 110712276 Aug 25 09:44
sbr-cl-8.6.0.R-1.sparcv9.tgz
Execute:gunzip sbr-cl-8.6.0.R-1.sparcv9.tgztar xf sbr-cl-8.6.0.R-1.sparcv9.tar
4. Verify that the extraction worked and confirm the name of the package file.
For 64-bit Solaris, execute:ls -ltr
245

total 216256
drwxr-xr-x 4 Xtreece other 370 Aug 24 17:01 JNPRsbr.pkg
-rw-r--r-- 1 root root 110712276 Aug 25 09:44
sbr-cl-8.6.0.R-1.sparcv9.tar
5. Install the package.
Execute:pkgadd -d /tmp/sbr
The following packages are available:
1 JNPRsbr.pkg JNPRsbr - Juniper Networks Steel-Belted Radius
(Carrier Cluster Edition) (sparc) 8.60.50006
Select package(s) you wish to process (or 'all' to process all packages).
(default: all) [?,??,q]: all
6. Type all and press Enter.The script resumes.
Processing package instance <JNPRsbr.pkg> from </tmp>
7. Confirm the installation directory.
Depending on the system configuration, the script prompts you to create the /opt/JNPRsbr directoryif it does not exist, or to over-write an already extracted package, or any of several other questions.
The selected base directory </opt/JNPRsbr> must exist before installation is
attempted.
Do you want this directory created now [y,n,?,q]
8. Answer the question appropriately (or change the extraction path if necessary) so that the script canproceed.
To accept the default directory as a target, enter y.The script resumes.
246
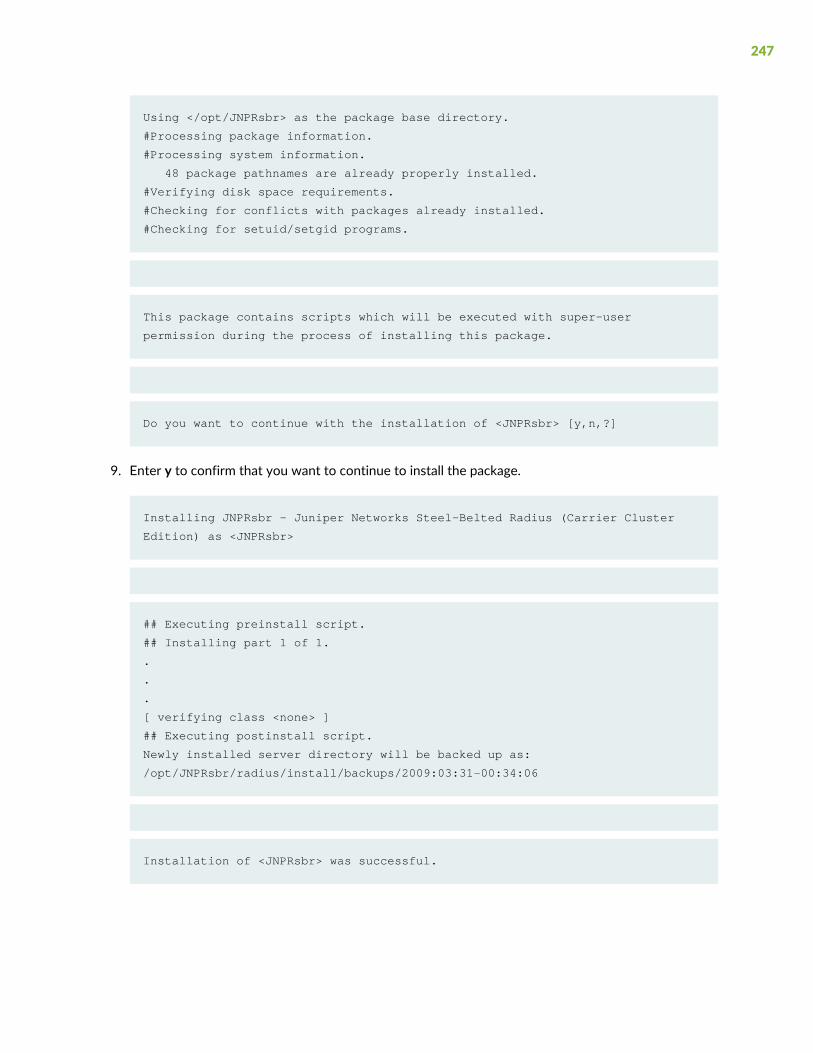
Using </opt/JNPRsbr> as the package base directory.
#Processing package information.
#Processing system information.
48 package pathnames are already properly installed.
#Verifying disk space requirements.
#Checking for conflicts with packages already installed.
#Checking for setuid/setgid programs.
This package contains scripts which will be executed with super-user
permission during the process of installing this package.
Do you want to continue with the installation of <JNPRsbr> [y,n,?]
9. Enter y to confirm that you want to continue to install the package.
Installing JNPRsbr - Juniper Networks Steel-Belted Radius (Carrier Cluster
Edition) as <JNPRsbr>
## Executing preinstall script.
## Installing part 1 of 1.
.
.
.
[ verifying class <none> ]
## Executing postinstall script.
Newly installed server directory will be backed up as:
/opt/JNPRsbr/radius/install/backups/2009:03:31-00:34:06
Installation of <JNPRsbr> was successful.
247
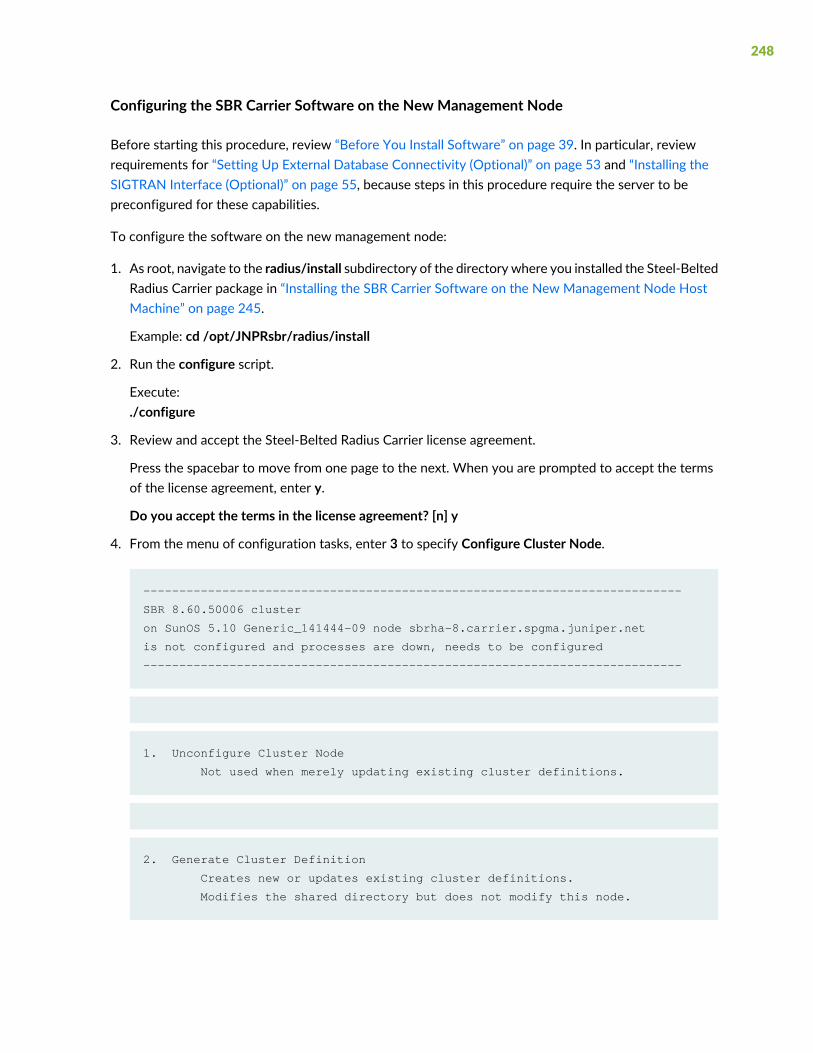
Configuring the SBR Carrier Software on the NewManagement Node
Before starting this procedure, review “Before You Install Software” on page 39. In particular, reviewrequirements for “Setting Up External Database Connectivity (Optional)” on page 53 and “Installing theSIGTRAN Interface (Optional)” on page 55, because steps in this procedure require the server to bepreconfigured for these capabilities.
To configure the software on the new management node:
1. As root, navigate to the radius/install subdirectory of the directory where you installed the Steel-BeltedRadius Carrier package in “Installing the SBR Carrier Software on the New Management Node HostMachine” on page 245.
Example: cd /opt/JNPRsbr/radius/install
2. Run the configure script.
Execute:./configure
3. Review and accept the Steel-Belted Radius Carrier license agreement.
Press the spacebar to move from one page to the next. When you are prompted to accept the termsof the license agreement, enter y.
Do you accept the terms in the license agreement? [n] y
4. From the menu of configuration tasks, enter 3 to specify Configure Cluster Node.
---------------------------------------------------------------------------
SBR 8.60.50006 cluster
on SunOS 5.10 Generic_141444-09 node sbrha-8.carrier.spgma.juniper.net
is not configured and processes are down, needs to be configured
---------------------------------------------------------------------------
1. Unconfigure Cluster Node
Not used when merely updating existing cluster definitions.
2. Generate Cluster Definition
Creates new or updates existing cluster definitions.
Modifies the shared directory but does not modify this node.
248
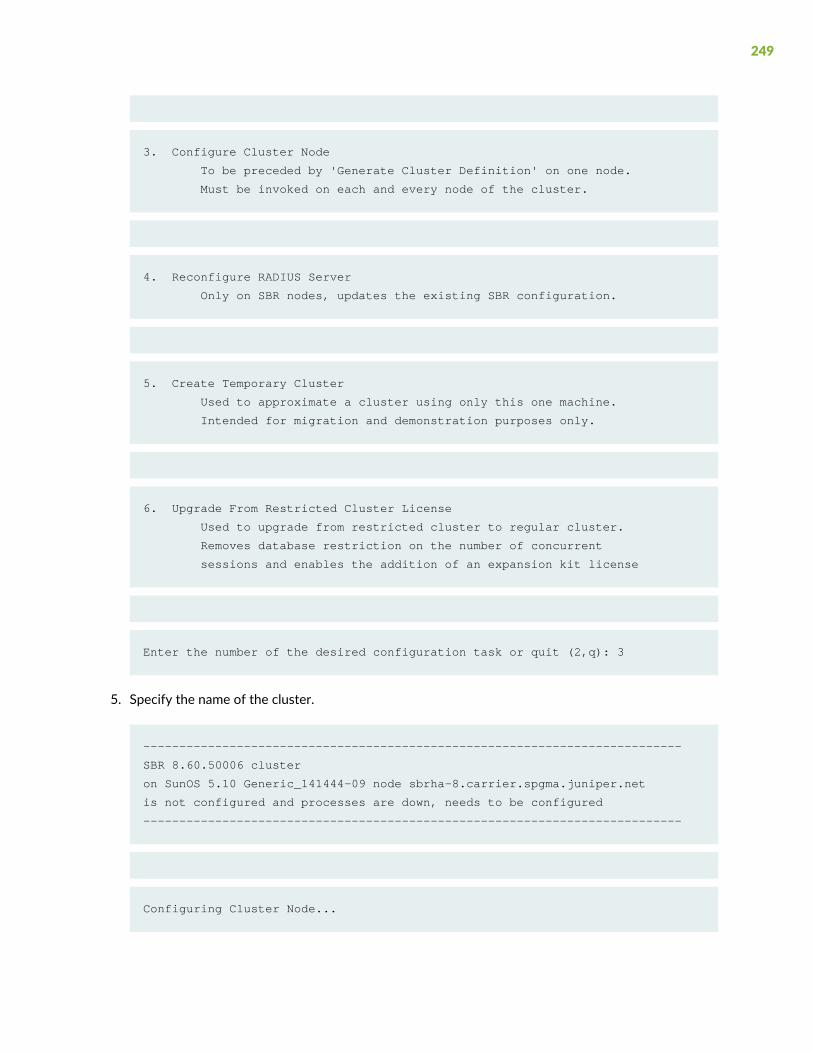
3. Configure Cluster Node
To be preceded by 'Generate Cluster Definition' on one node.
Must be invoked on each and every node of the cluster.
4. Reconfigure RADIUS Server
Only on SBR nodes, updates the existing SBR configuration.
5. Create Temporary Cluster
Used to approximate a cluster using only this one machine.
Intended for migration and demonstration purposes only.
6. Upgrade From Restricted Cluster License
Used to upgrade from restricted cluster to regular cluster.
Removes database restriction on the number of concurrent
sessions and enables the addition of an expansion kit license
Enter the number of the desired configuration task or quit (2,q): 3
5. Specify the name of the cluster.
---------------------------------------------------------------------------
SBR 8.60.50006 cluster
on SunOS 5.10 Generic_141444-09 node sbrha-8.carrier.spgma.juniper.net
is not configured and processes are down, needs to be configured
---------------------------------------------------------------------------
Configuring Cluster Node...
249

Enter SBR cluster name [sbrha]:cambridge
Reading shared configuration from /opt/JNPRshare/install/cambridge
Generating configuration files
Reviewing configuration files
/opt/JNPRsbr/radius/install/tmp/dbclusterndb.gen
View (v), accept (a), or reject (r) configuration files: a
6. Enter a to accept the modified cluster definition files and continue or v to view them.
CAUTION: We recommend that you enter an r to reject them only if a serious errorwas made when you provided information.We recommend that you not edit thesefiles.
7. The configure script prompts you with a warning whether or not to apply the cluster definition to thisnode. Enter y to proceed.
WARNING: You are about to make irreversible changes to this node.
Are you sure that you wish to continue? (y,n): y
Cleaning directories
/opt/JNPRhadm
Applying configuration
250

Initializing Session State Register, please wait a few minutes...
Configuration complete
---------------------------------------------------------------------------
SBR 8.60.50006 cluster cambridge{0s,2sm,1m,2d}
on SunOS 5.10 Generic_141444-09 node sbrha-8.carrier.spgma.juniper.net(s)
is configured and processes are down, may be reconfigured if desired
---------------------------------------------------------------------------
1. Unconfigure Cluster Node
Not used when merely updating existing cluster definitions.
2. Generate Cluster Definition
Creates new or updates existing cluster definitions.
Modifies the shared directory but does not modify this node.
3. Configure Cluster Node
To be preceded by 'Generate Cluster Definition' on one node.
Must be invoked on each and every node of the cluster.
4. Reconfigure RADIUS Server
Only on SBR nodes, updates the existing SBR configuration.
251

5. Create Temporary Cluster
Used to approximate a cluster using only this one machine.
Intended for migration and demonstration purposes only.
6. Upgrade From Restricted Cluster License
Used to upgrade from restricted cluster to regular cluster.
Removes database restriction on the number of concurrent
sessions and enables the addition of an expansion kit license
READY: last operation succeeded, node configured.
Enter the number of the desired configuration task or quit (4,q):
NOTE: Expect package is required to be installed on RHEL 7.3 or later (see “Linux” on page 47for supported RHEL versions). SBR Carrier has been tested only with the Expect-5.45 version.Expect package is installed on Solaris 11.3.36.10.0 or later version by default (see “Solaris”on page 47 for supported Solaris versions).
8. Enter q to quit.
Configuring Each Existing Node in the Cluster with the New Cluster Definition Files
At this point in the process, all nodes in the cluster have the new cluster definition files loaded. However,only the newmanagement node has been configuredwith the new files. The existing nodes are still runningwith the old cluster definition files.
In this procedure, you log in to each existing node, stop the processes, run the configure script, and restartthe processes. You must complete these steps on every existing node in the cluster. This example startswith the sm1 node.
252

CAUTION: In this procedure, you need to stop and restart each existing node one byone to apply the new cluster definition to each of the original cluster nodes. Do notoperate on multiple nodes at the same time because that creates multiple faults thatcan stop the entire cluster.
Always review the recommended start and stop order and processes and plan out theorder in which to perform the equivalent steps in your cluster. See“WhenandHowtoRestart SessionStateRegisterNodes,Hosts, andClusters” onpage196.
1. Log in to the first existing node (in this example, sm1) as root.
2. Navigate to the radius subdirectory of the directory in which the JNPRsbr package was installed(/opt/JNPRsbr by default).
Example: cd /opt/JNPRsbr/radius
3. Stop the RADIUS processes on the node you are configuring (required on each (s) and (sm) node), andexecute:
a. ./sbrd stop radius
b. ./sbrd status
4. Stop the ssr processes on the node you are configuring (required on each (sm), (m) and (d) node):
./sbrd stop ssr
5. Check the status of the node:
./sbrd status
Cluster Configuration
---------------------
[ndbd(NDB)] 2 node(s)
id=10 @172.28.84.163 (mysql-5.7.25 ndb-7.6.9, Nodegroup: 0, Master)
id=11 @172.28.84.113 (mysql-5.7.25 ndb-7.6.9, Nodegroup: 0)
[ndb_mgmd(MGM)] 2 node(s)
id=1 (not connected, accepting connect from 172.28.84.36)
id=2 @172.28.84.166 (mysql-5.7.25 ndb-7.6.9)
253

[mysqld(API)] 4 node(s)
id=6 (not connected, accepting connect from 172.28.84.36)
id=7 @172.28.84.166 (mysql-5.7.25 ndb-7.6.9)
id=58 @172.28.84.166 (mysql-5.7.25 ndb-7.6.9)
id=59 (not connected, accepting connect from 172.28.84.36)
hadm@wrx07:~>
6. Verify that the node you are about to configure is not connected. In this example, the node ID for sm1indicates: id=1 (not connected, accepting connect from 172.28.84.36), indicating the sm1 node isstopped.
7. Run the configure script:
Execute:./configure
Configuring SBR Software
---------------------------------------------------------------------------
SBR 8.60.50006 cluster cambridge{0s,2sm,0m,2d}
on SunOS 5.10 Generic_141444-09 node sbrha-4(sm)
is configured and processes are down, may be reconfigured if desired
---------------------------------------------------------------------------
1. Unconfigure Cluster Node
Not used when merely updating existing cluster definitions.
2. Generate Cluster Definition
Creates new or updates existing cluster definitions.
Modifies the shared directory but does not modify this node.
254
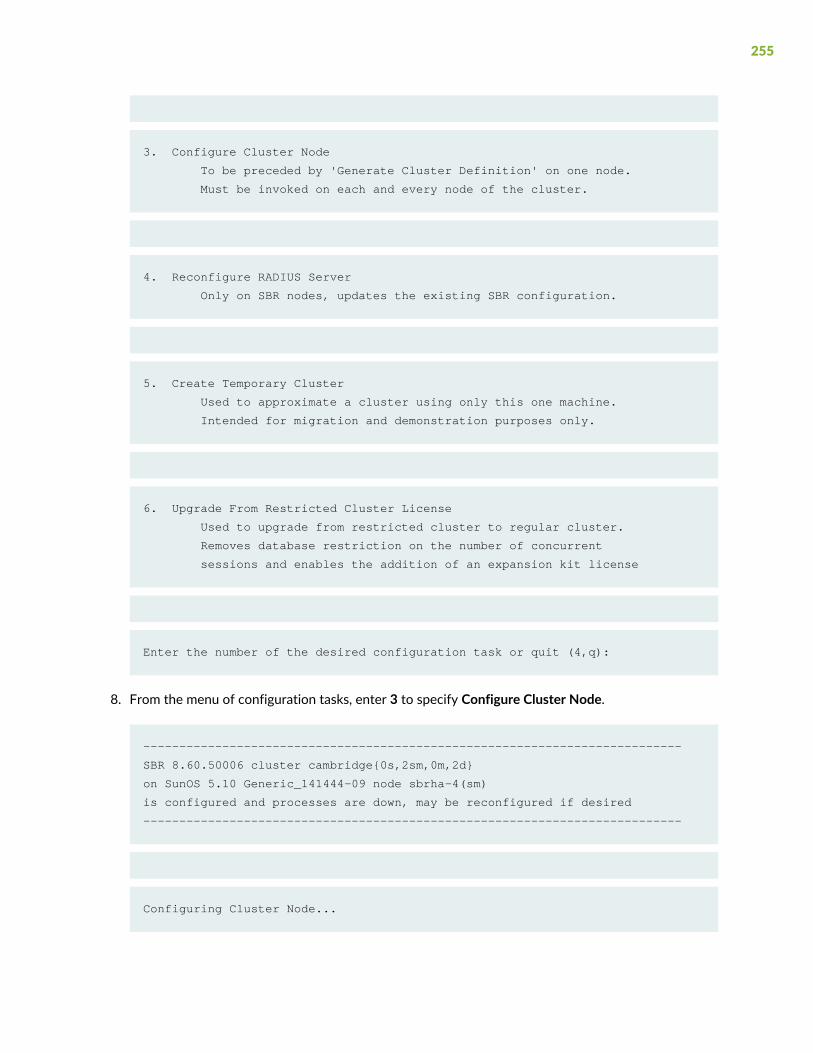
3. Configure Cluster Node
To be preceded by 'Generate Cluster Definition' on one node.
Must be invoked on each and every node of the cluster.
4. Reconfigure RADIUS Server
Only on SBR nodes, updates the existing SBR configuration.
5. Create Temporary Cluster
Used to approximate a cluster using only this one machine.
Intended for migration and demonstration purposes only.
6. Upgrade From Restricted Cluster License
Used to upgrade from restricted cluster to regular cluster.
Removes database restriction on the number of concurrent
sessions and enables the addition of an expansion kit license
Enter the number of the desired configuration task or quit (4,q):
8. From the menu of configuration tasks, enter 3 to specify Configure Cluster Node.
---------------------------------------------------------------------------
SBR 8.60.50006 cluster cambridge{0s,2sm,0m,2d}
on SunOS 5.10 Generic_141444-09 node sbrha-4(sm)
is configured and processes are down, may be reconfigured if desired
---------------------------------------------------------------------------
Configuring Cluster Node...
255
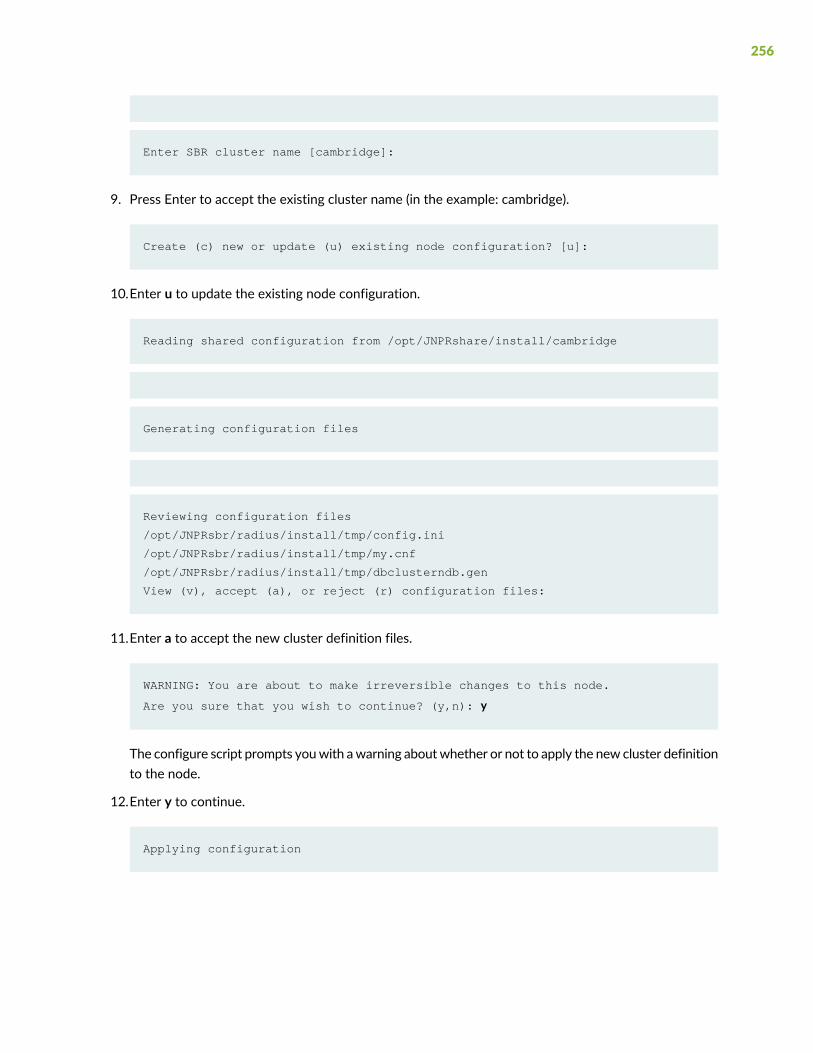
Enter SBR cluster name [cambridge]:
9. Press Enter to accept the existing cluster name (in the example: cambridge).
Create (c) new or update (u) existing node configuration? [u]:
10.Enter u to update the existing node configuration.
Reading shared configuration from /opt/JNPRshare/install/cambridge
Generating configuration files
Reviewing configuration files
/opt/JNPRsbr/radius/install/tmp/config.ini
/opt/JNPRsbr/radius/install/tmp/my.cnf
/opt/JNPRsbr/radius/install/tmp/dbclusterndb.gen
View (v), accept (a), or reject (r) configuration files:
11.Enter a to accept the new cluster definition files.
WARNING: You are about to make irreversible changes to this node.
Are you sure that you wish to continue? (y,n): y
The configure script prompts youwith awarning aboutwhether or not to apply the new cluster definitionto the node.
12.Enter y to continue.
Applying configuration
256

---------------------------------------------------------------------------
SBR 8.60.50006 cluster cambridge{0s,2sm,1m,2d}
on SunOS 5.10 Generic_141444-09 node sbrha-4(sm)
is configured and processes are down, may be reconfigured if desired
---------------------------------------------------------------------------
1. Unconfigure Cluster Node
Not used when merely updating existing cluster definitions.
2. Generate Cluster Definition
Creates new or updates existing cluster definitions.
Modifies the shared directory but does not modify this node.
3. Configure Cluster Node
To be preceded by 'Generate Cluster Definition' on one node.
Must be invoked on each and every node of the cluster.
4. Reconfigure RADIUS Server
Only on SBR nodes, updates the existing SBR configuration.
5. Create Temporary Cluster
Used to approximate a cluster using only this one machine.
Intended for migration and demonstration purposes only.
6. Upgrade From Restricted Cluster License
Used to upgrade from restricted cluster to regular cluster.
257
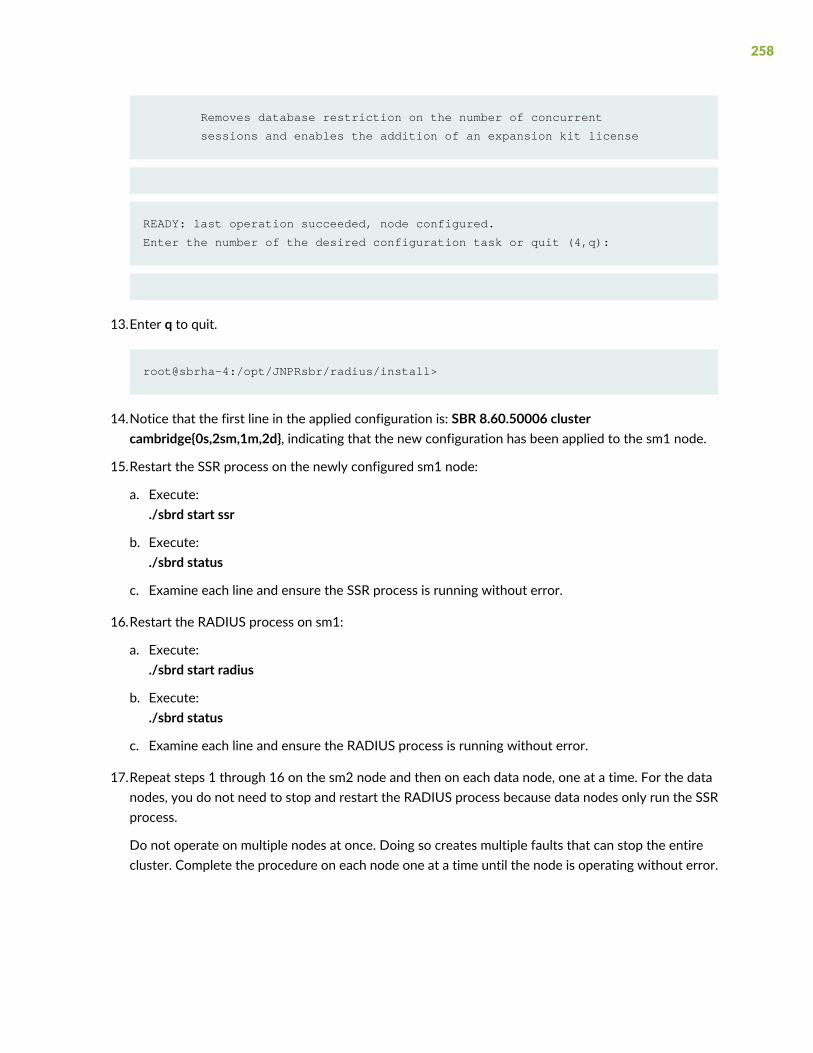
Removes database restriction on the number of concurrent
sessions and enables the addition of an expansion kit license
READY: last operation succeeded, node configured.
Enter the number of the desired configuration task or quit (4,q):
13.Enter q to quit.
root@sbrha-4:/opt/JNPRsbr/radius/install>
14.Notice that the first line in the applied configuration is: SBR 8.60.50006 clustercambridge{0s,2sm,1m,2d}, indicating that the new configuration has been applied to the sm1 node.
15.Restart the SSR process on the newly configured sm1 node:
a. Execute:./sbrd start ssr
b. Execute:./sbrd status
c. Examine each line and ensure the SSR process is running without error.
16.Restart the RADIUS process on sm1:
a. Execute:./sbrd start radius
b. Execute:./sbrd status
c. Examine each line and ensure the RADIUS process is running without error.
17.Repeat steps 1 through 16 on the sm2 node and then on each data node, one at a time. For the datanodes, you do not need to stop and restart the RADIUS process because data nodes only run the SSRprocess.
Do not operate on multiple nodes at once. Doing so creates multiple faults that can stop the entirecluster. Complete the procedure on each node one at a time until the node is operating without error.
258
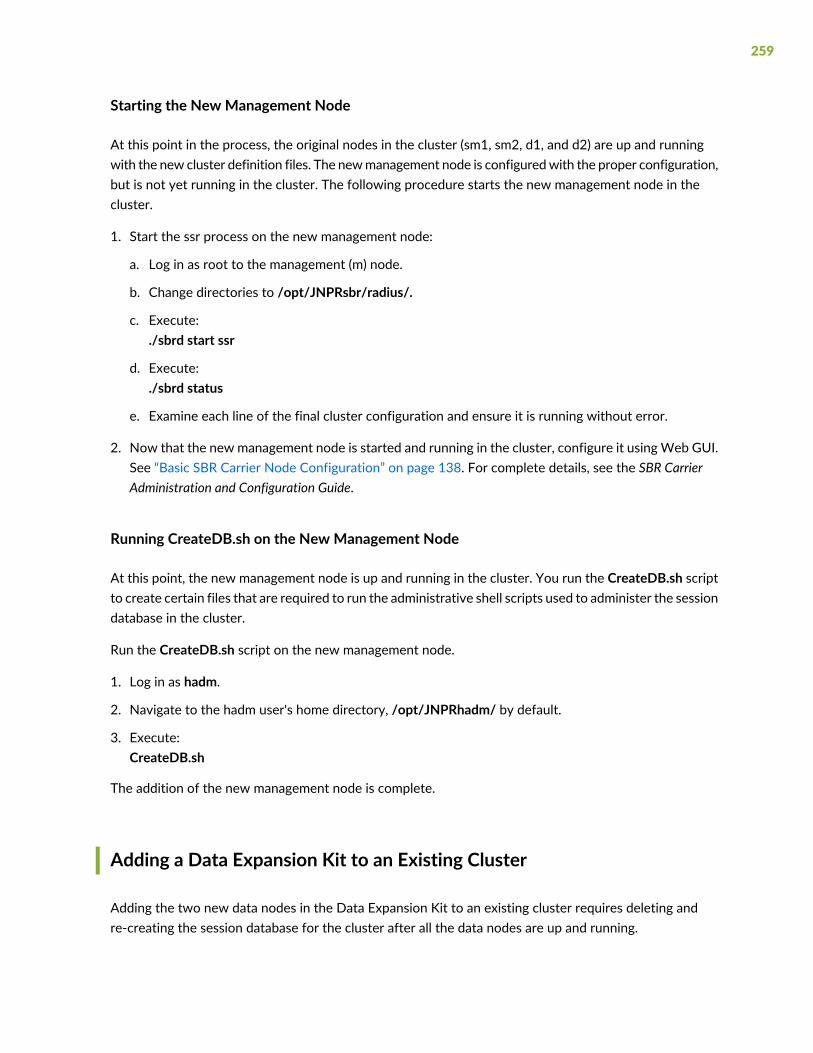
Starting the NewManagement Node
At this point in the process, the original nodes in the cluster (sm1, sm2, d1, and d2) are up and runningwith the new cluster definition files. The newmanagement node is configuredwith the proper configuration,but is not yet running in the cluster. The following procedure starts the new management node in thecluster.
1. Start the ssr process on the new management node:
a. Log in as root to the management (m) node.
b. Change directories to /opt/JNPRsbr/radius/.
c. Execute:./sbrd start ssr
d. Execute:./sbrd status
e. Examine each line of the final cluster configuration and ensure it is running without error.
2. Now that the new management node is started and running in the cluster, configure it usingWeb GUI.See “Basic SBR Carrier Node Configuration” on page 138. For complete details, see the SBR CarrierAdministration and Configuration Guide.
Running CreateDB.sh on the NewManagement Node
At this point, the new management node is up and running in the cluster. You run the CreateDB.sh scriptto create certain files that are required to run the administrative shell scripts used to administer the sessiondatabase in the cluster.
Run the CreateDB.sh script on the new management node.
1. Log in as hadm.
2. Navigate to the hadm user's home directory, /opt/JNPRhadm/ by default.
3. Execute:CreateDB.sh
The addition of the new management node is complete.
Adding a Data Expansion Kit to an Existing Cluster
Adding the two new data nodes in the Data Expansion Kit to an existing cluster requires deleting andre-creating the session database for the cluster after all the data nodes are up and running.
259
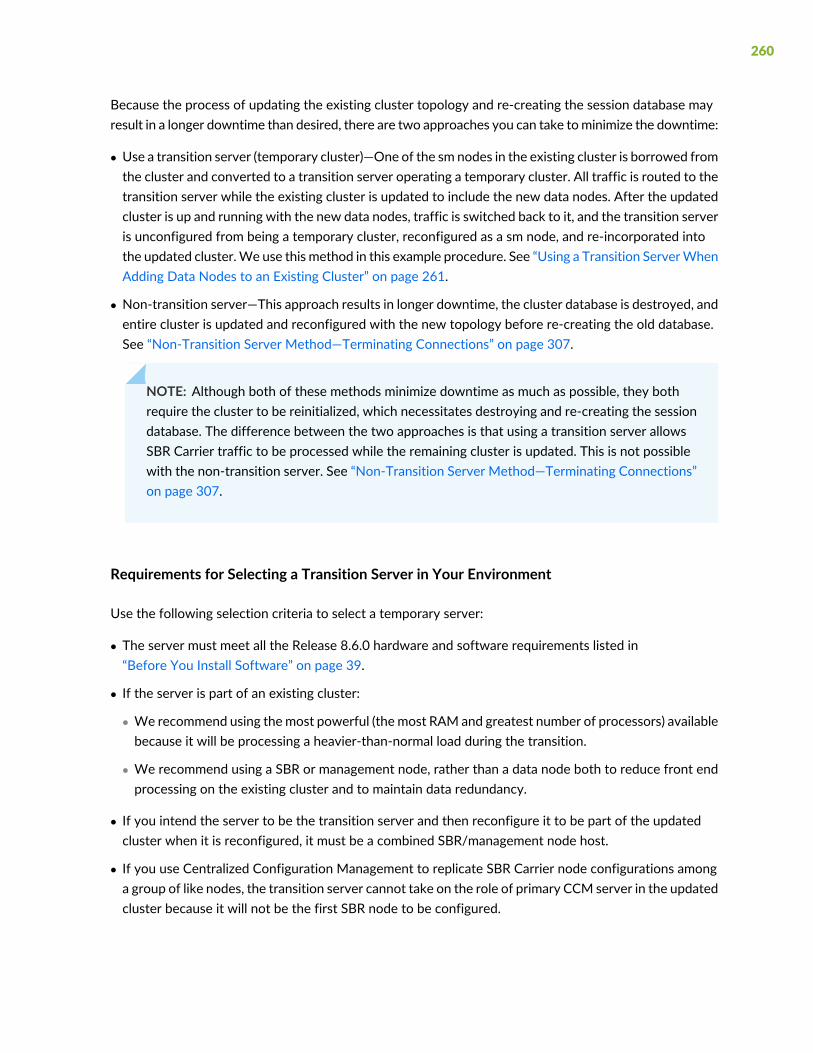
Because the process of updating the existing cluster topology and re-creating the session database mayresult in a longer downtime than desired, there are two approaches you can take tominimize the downtime:
• Use a transition server (temporary cluster)—One of the sm nodes in the existing cluster is borrowed fromthe cluster and converted to a transition server operating a temporary cluster. All traffic is routed to thetransition server while the existing cluster is updated to include the new data nodes. After the updatedcluster is up and running with the new data nodes, traffic is switched back to it, and the transition serveris unconfigured from being a temporary cluster, reconfigured as a sm node, and re-incorporated intothe updated cluster.We use this method in this example procedure. See “Using a Transition ServerWhenAdding Data Nodes to an Existing Cluster” on page 261.
• Non-transition server—This approach results in longer downtime, the cluster database is destroyed, andentire cluster is updated and reconfigured with the new topology before re-creating the old database.See “Non-Transition Server Method—Terminating Connections” on page 307.
NOTE: Although both of these methods minimize downtime as much as possible, they bothrequire the cluster to be reinitialized, which necessitates destroying and re-creating the sessiondatabase. The difference between the two approaches is that using a transition server allowsSBR Carrier traffic to be processed while the remaining cluster is updated. This is not possiblewith the non-transition server. See “Non-Transition Server Method—Terminating Connections”on page 307.
Requirements for Selecting a Transition Server in Your Environment
Use the following selection criteria to select a temporary server:
• The server must meet all the Release 8.6.0 hardware and software requirements listed in“Before You Install Software” on page 39.
• If the server is part of an existing cluster:
• We recommend using themost powerful (the most RAM and greatest number of processors) availablebecause it will be processing a heavier-than-normal load during the transition.
• We recommend using a SBR or management node, rather than a data node both to reduce front endprocessing on the existing cluster and to maintain data redundancy.
• If you intend the server to be the transition server and then reconfigure it to be part of the updatedcluster when it is reconfigured, it must be a combined SBR/management node host.
• If you use Centralized Configuration Management to replicate SBR Carrier node configurations amonga group of like nodes, the transition server cannot take on the role of primary CCM server in the updatedcluster because it will not be the first SBR node to be configured.
260
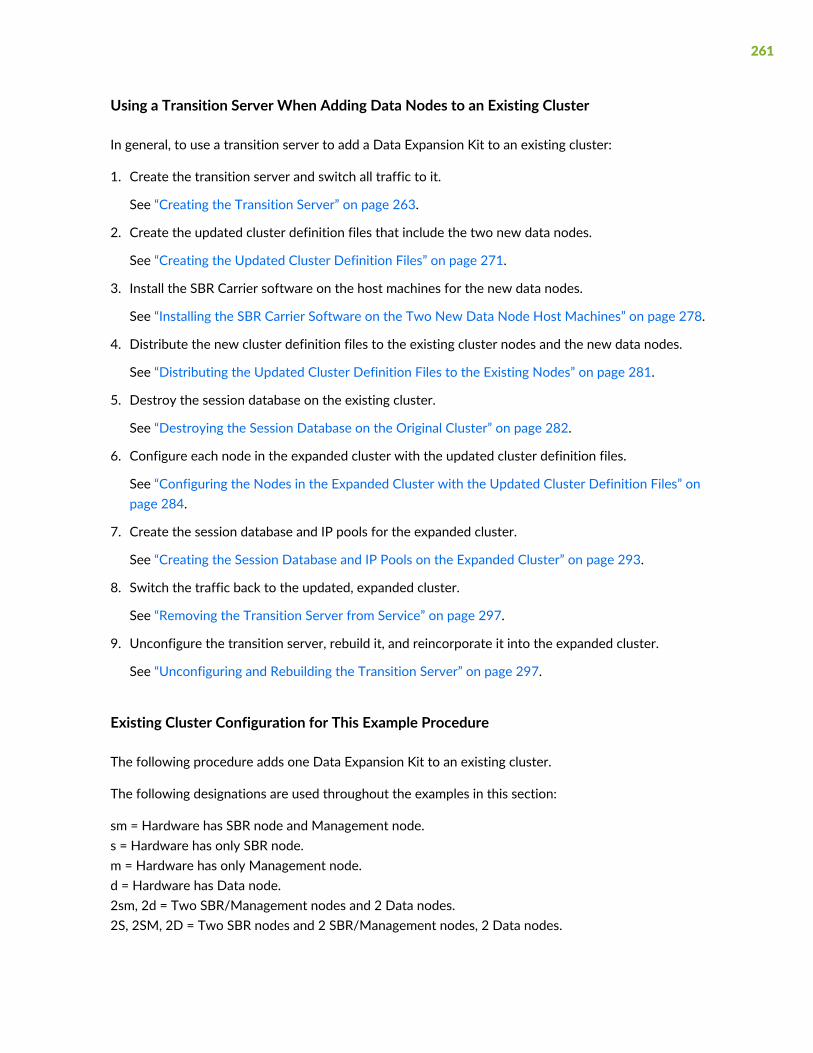
Using a Transition Server When Adding Data Nodes to an Existing Cluster
In general, to use a transition server to add a Data Expansion Kit to an existing cluster:
1. Create the transition server and switch all traffic to it.
See “Creating the Transition Server” on page 263.
2. Create the updated cluster definition files that include the two new data nodes.
See “Creating the Updated Cluster Definition Files” on page 271.
3. Install the SBR Carrier software on the host machines for the new data nodes.
See “Installing the SBR Carrier Software on the Two New Data Node Host Machines” on page 278.
4. Distribute the new cluster definition files to the existing cluster nodes and the new data nodes.
See “Distributing the Updated Cluster Definition Files to the Existing Nodes” on page 281.
5. Destroy the session database on the existing cluster.
See “Destroying the Session Database on the Original Cluster” on page 282.
6. Configure each node in the expanded cluster with the updated cluster definition files.
See “Configuring the Nodes in the Expanded Cluster with the Updated Cluster Definition Files” onpage 284.
7. Create the session database and IP pools for the expanded cluster.
See “Creating the Session Database and IP Pools on the Expanded Cluster” on page 293.
8. Switch the traffic back to the updated, expanded cluster.
See “Removing the Transition Server from Service” on page 297.
9. Unconfigure the transition server, rebuild it, and reincorporate it into the expanded cluster.
See “Unconfiguring and Rebuilding the Transition Server” on page 297.
Existing Cluster Configuration for This Example Procedure
The following procedure adds one Data Expansion Kit to an existing cluster.
The following designations are used throughout the examples in this section:
sm = Hardware has SBR node and Management node.s = Hardware has only SBR node.m = Hardware has only Management node.d = Hardware has Data node.2sm, 2d = Two SBR/Management nodes and 2 Data nodes.2S, 2SM, 2D = Two SBR nodes and 2 SBR/Management nodes, 2 Data nodes.
261
Display the existing cluster:
Cluster Configuration
---------------------
[ndbd(NDB)] 2 node(s)
id=10 @172.28.84.163 (mysql-5.7.25 ndb-7.6.9, Nodegroup: 0, Master)
id=11 @172.28.84.113 (mysql-5.7.25 ndb-7.6.9, Nodegroup: 0)
[ndb_mgmd(MGM)] 2 node(s)
id=1 @172.28.84.36 (mysql-5.7.25 ndb-7.6.9)
id=2 @172.28.84.166 (mysql-5.7.25 ndb-7.6.9)
[mysqld(API)] 5 node(s)
id=6 @172.28.84.36 (mysql-5.7.25 ndb-7.6.9)
id=7 @172.28.84.166 (mysql-5.7.25 ndb-7.6.9)
id=58 @172.28.84.166 (mysql-5.7.25 ndb-7.6.9)
id=59 @172.28.84.36 (mysql-5.7.25 ndb-7.6.9)
The existing cluster includes two full SBR Carrier licenses and a license for the Starter Kit resulting in aconfiguration that includes two sm nodes and two d nodes. For the purposes of this procedure, the existingtwo sm nodes are identified as sm1 and sm2 as follows:
id=1 @172.28.84.36 = sm1
id=2 @172.28.84.166 = sm2
In this example, we borrow the sm2 node, and convert it to a transition server operating as a temporarycluster.
262

Creating the Transition Server
In this example, we borrow the sm2 node and convert it to a transition server operating as a temporarycluster. To set up the transition server to temporarily take the place of the existing cluster, you need toprepare the server, install software, and configure the database.
The SBRC Temporary Cluster, also termed the transition server, is an exceptional node in the sense that itexecutes all processes on one machine. The transition server is assigned the node type= smdt. TheCreateDB.sh and configuration of pool(s) must be donemanually on a transition server, just like in a cluster.
Stopping the Processes on the Target Transition Server
1. Log in to the server that you are reconfiguring to act as the transition server (in this example sm2) asroot.
2. Navigate to the radius subdirectory of the directory in which the JNPRsbr package was installed(/opt/JNPRsbr by default).
Example: cd /opt/JNPRsbr/radius
3. Stop the RADIUS and SSR processes on the node.
Execute:./sbrd stop radius./sbrd stop ssr
4. Check the status of the node and confirm it is not connected to the cluster:
./sbrd status
Cluster Configuration
---------------------
[ndbd(NDB)] 2 node(s)
id=10 @172.28.84.163 (mysql-5.7.25 ndb-7.6.9, Nodegroup: 0, Master)
id=11 @172.28.84.113 (mysql-5.7.25 ndb-7.6.9, Nodegroup: 0)
[ndb_mgmd(MGM)] 2 node(s)
id=1 @172.28.84.36 (mysql-5.7.25 ndb-7.6.9)
id=2 (not connected, accepting connect from 172.28.84.166)
[mysqld(API)] 4 node(s)
id=6 (not connected, accepting connect from 172.28.84.36)
id=7 @172.28.84.166 (mysql-5.7.25 ndb-7.6.9)
263
id=58 @172.28.84.166 (mysql-5.7.25 ndb-7.6.9)
id=59 (not connected, accepting connect from 172.28.84.36)
hadm@wrx07:~>
In this example, notice that the sm2 node is not connected as indicated by
id=2 (not connected, accepting connect from 172.28.84.166).
Configuring the Software on the Transition Server as a Temporary Cluster
Now that the processes are stopped on themachine we are reconfiguring as the transition server, we needto reconfigure it as a temporary cluster. At this point, you are still logged in to the target machine as root(in this case the original sm2 node).
1. Execute the configure script to reconfigure the machine as a temporary cluster:
Execute:./configure
Example:
root@wrx07:/opt/JNPRsbr/radius/install> ./configure
Configuring SBR Software
---------------------------------------------------------------------------
SBR 8.60.50006 cluster cambridge{0s,2sm,0m,2d}
on SunOS 5.10 Generic_141444-09 node wrx07(sm)
is not configured and processes are down, needs to be configured
---------------------------------------------------------------------------
264

1. Unconfigure Cluster Node
Not used when merely updating existing cluster definitions.
2. Generate Cluster Definition
Creates new or updates existing cluster definitions.
Modifies the shared directory but does not modify this node.
3. Configure Cluster Node
To be preceded by ’Generate Cluster Definition’ on any node.
Must be invoked on each and every node of the cluster.
4. Reconfigure RADIUS Server
Only on SBR nodes, updates the existing SBR configuration.
5. Create Temporary Cluster
Used to approximate a cluster using only this one machine.
Intended for migration and demonstration purposes only.
6. Upgrade From Restricted Cluster License
Used to upgrade from restricted cluster to regular cluster.
Removes database restriction on the number of concurrent
sessions and enables the addition of an expansion kit license
Enter the number of the desired configuration task or quit (2,q):
2. From the menu of configuration tasks, enter 5 to specify Create Temporary Cluster.
265

Creating Temporary Cluster...
Enter SBR cluster name [wrx07]:
3. Enter the exact name of the existing cluster. In this example: cambridge.
In order to avoid service outages when performing certain major
cluster maintenance tasks, you are allowed to reuse each of
your licenses in order to create a temporary cluster that
consists of 1 SBR node, 1 management node, and 1 data node all
installed on the same machine. Note that this is not a true
cluster since it is vulnerable to single points of failure.
4. Enter the SSR Starter Kit license number, the license number for one SBR node, and, if you are usingone of the optional SBR Carrier modules, the license number for it.
While migrating to the updated cluster, you can use the same licenses for the transition server as forthe updated cluster.
Enter Starter Kit license: xxxx xxxx xxxx xxxxEnter SBR licenses meant only for this particular SBR node.
Enter one license per line and an empty line when finished.
Enter SBR full license: xxxx xxxx xxxx xxxxEnter SBR feature license:
5. Enter passwords for two internal accounts. The password input is not echoed to the screen; the fieldsappear to be blank.
All cluster nodes will share the same Session State Register (SSR).
Setting password for SSR admin account hadmsql
Password:
Again:
Setting password for SSR software account hadmsbr
Password:
Again:
266

Generating configuration files
Reviewing configuration files
/opt/JNPRsbr/radius/install/tmp/config.ini
/opt/JNPRsbr/radius/install/tmp/my.cnf
/opt/JNPRsbr/radius/install/tmp/dbclusterndb.gen
View (v), accept (a), or reject (r) configuration files:
The system generates the required configuration files and prompts you to view, accept, or reject them.
6. Enter a to accept them and continue or v to view them.
CAUTION: We recommend that you enter an r to reject them only if a serious errorwas made when you provided information.We recommend that you not edit thesefiles.
WARNING: You are about to make irreversible changes to this node.
Are you sure that you wish to continue? (y,n):
You are prompted with a warning whether or not to apply the changes.
7. Enter y to continue.
8. For the remainder of the prompts, simply press Enter to configure the transition server with the existingconfiguration.
Cleaning directories
/opt/JNPRhadm
/opt/JNPRmysql
/opt/JNPRmysqld
/opt/JNPRndb_mgmd
/opt/JNPRndbd
Applying configuration
267
Initializing Session State Register, please wait a few minutes...
Configuring for use with generic database
Do you want to configure Java Runtime Environment for JDBC Feature [n] :
Do you want to enable "Radius WatchDog" Process? [n]:
Do you want to enable LCI? [n]:
Do you want to configure for use with Oracle? [n]:
Removing oracle references from startup script
Do you want to configure for use with SIGTRAN? [n]:
Removing SIGTRAN references from startup script
Do you want to configure SNMP? [n]:
Configuring Admin GUI Webserver
Compatible Java version found :
Do you want to install custom SSL certificate for Admin WebServer? [n]:
Enable (e), disable (d), or preserve (p) autoboot scripts [e]:
The SBR Admin Web GUI can be launched using the following URL:
https://<servername>:2909
Configuration complete
---------------------------------------------------------------------------
SBR 8.60.50006 temporary cluster cambridge
on SunOS 5.10 Generic_141444-09 node wrx07(smdt)
is configured and processes are down, may be reconfigured if desired
---------------------------------------------------------------------------
1. Unconfigure Cluster Node
Not used when merely updating existing cluster definitions.
268

2. Generate Cluster Definition
Creates new or updates existing cluster definitions.
Modifies the shared directory but does not modify this node.
3. Configure Cluster Node
To be preceded by 'Generate Cluster Definition' on one node.
Must be invoked on each and every node of the cluster.
4. Reconfigure RADIUS Server
Only on SBR nodes, updates the existing SBR configuration.
5. Create Temporary Cluster
Used to approximate a cluster using only this one machine.
Intended for migration and demonstration purposes only.
6. Upgrade From Restricted Cluster License
Used to upgrade from restricted cluster to regular cluster.
Removes database restriction on the number of concurrent
sessions and enables the addition of an expansion kit license
READY: last operation succeeded, created temporary cluster.
Enter the number of the desired configuration task or quit (4,q):
9. Enter q to quit.
10.Notice the server configuration in the line:
269

SBR 8.60.50006 temporary cluster cambridge
on SunOS 5.10 Generic_141444-09 node wrx07(smdt)
(smdt) indicates the machine is configured as an s,m,d temporary cluster.
Configuring and Starting the Transition Server
Now that the software is configured, you need to create the session database and the IP pools and rangeson the transition server. All cluster traffic will ultimately be switched to this single transition servertemporarily, while you take the other nodes in the existing cluster down and upgrade and reconfigurethem. So, you need to configure the temporary transition server tomatch the existing cluster configuration.
1. Navigate to the radius subdirectory of the directory in which the JNPRsbr package was installed(/opt/JNPRsbr by default) and start the SSR process on the transition server.
Example: cd /opt/JNPRsbr/radius
2. As root, execute:./sbrd start ssr
Status messages are displayed as the programs start:
Starting ssr management processes
Starting ssr auxiliary processes
Starting ssr data processes
3. Verify the process started without error:
As root, execute:./sbrd status
4. Create the session database.
If you need to customize the sessions database to match your existing cluster session database, see“Customizing the SSRDatabase Current Sessions Table” on page 144. Any customizationmust be doneprior to running the CreateDB.sh script.
a. Log in as hadm.
b. Navigate to the hadm user's home directory, /opt/JNPRhadm/ by default.
Execute:./CreateDB.sh
5. As hadm, set up IP address pools and ranges using the SSR Administration Scripts. The IP address rangeshould be separate from the in-use pools on the existing and upgraded cluster to avoid overlaps. If theold and transitional pools overlap, then during the transition the two clusters may give the same IP
270

address to two different users. See the section Session State Register Administration in the SBR CarrierAdministration and Configuration Guide for more information.
6. Start the RADIUS process:
As root, execute:sbrd start radius
Status messages are displayed as the programs start:
Starting radius server processes
RADIUS: Process ID of daemon is 13224
RADIUS: Starting DCF system
RADIUS: Configuration checksum: 2D D6 38 1D
RADIUS started
.
.
.
RADIUS: DCF system started
7. Verify the process started without error:
As root, execute:./sbrd status
8. Finish configuring the transition server using Web GUI. Follow the steps outlined in“Basic SBR Carrier Node Configuration” on page 138. For complete details, see the SBR CarrierAdministration and Configuration Guide.
Switching Traffic to the Transition Server
After the transition server is set up and tested, and a working database created, reconfigure the site’srouters to gradually direct traffic to the transition server instead of to the existing cluster’s SBR servers.
Creating the Updated Cluster Definition Files
The next phase of the process is to create the new cluster definition files to include the two new datanodes from the Data Expansion Kit. At this point in the process the existing cluster configuration showsthe sm2 node processes are not running and not connected, as indicated by id=2 (not connected, acceptingconnect from 172.28.84.166):
Cluster Configuration
---------------------
[ndbd(NDB)] 2 node(s)
271

id=10 @172.28.84.163 (mysql-5.7.25 ndb-7.6.9, Nodegroup: 0, Master)
id=11 @172.28.84.113 (mysql-5.7.25 ndb-7.6.9, Nodegroup: 0)
[ndb_mgmd(MGM)] 2 node(s)
id=1 @172.28.84.36 (mysql-5.7.25 ndb-7.6.9)
id=2 (not connected, accepting connect from 172.28.84.166)
[mysqld(API)] 5 node(s)
id=6 @172.28.84.36 (mysql-5.7.25 ndb-7.6.9)
id=7 (not connected, accepting connect from 172.28.84.166)
id=58 (not connected, accepting connect from 172.28.84.166)
id=59 @172.28.84.36 (mysql-5.7.25 ndb-7.6.9)
Start by creating the updated cluster definition files on the sm1 node:
1. As root, on the sm1 node, navigate to the radius/install subdirectory of the directory in which theJNPRsbr package was installed (/opt/JNPRsbr by default).
Example: cd /opt/JNPRsbr/radius/install
2. Run the configure script:
Execute:./configure
Example:
root@sbrha-4:/opt/JNPRsbr/radius/install> ./configure
Configuring SBR Software
---------------------------------------------------------------------------
SBR 8.60.50006 cluster cambridge{0s,2sm,0m,2d}
on SunOS 5.10 Generic_141444-09 node sbrha-4(sm)
272

is CONFIGURED and processes are UP, may be stopped if reconfigured
---------------------------------------------------------------------------
1. Unconfigure Cluster Node
Not used when merely updating existing cluster definitions.
2. Generate Cluster Definition
Creates new or updates existing cluster definitions.
Modifies the shared directory but does not modify this node.
3. Configure Cluster Node
To be preceded by 'Generate Cluster Definition' on one node.
Must be invoked on each and every node of the cluster.
4. Reconfigure RADIUS Server
Only on SBR nodes, updates the existing SBR configuration.
5. Create Temporary Cluster
Used to approximate a cluster using only this one machine.
Intended for migration and demonstration purposes only.
6. Upgrade From Restricted Cluster License
Used to upgrade from restricted cluster to regular cluster.
Removes database restriction on the number of concurrent
sessions and enables the addition of an expansion kit license
273

Enter the number of the desired configuration task or quit (4,q):
3. From the menu of configuration tasks, enter 2 to specify Generate Cluster Definition.
---------------------------------------------------------------------------
SBR 8.60.50006 cluster cambridge{0s,2sm,0m,2d}
on SunOS 5.10 Generic_141444-09 node sbrha-4(sm)
is CONFIGURED and processes are UP, may be stopped if reconfigured
---------------------------------------------------------------------------
Generating Cluster Definition...
Enter SBR cluster name [cambridge]:
You are prompted to enter the name of the cluster.
4. Press Enter to use the current cluster name.
You are prompted either to create a new cluster or update an existing cluster definition.
Create (c) new or update (u) existing cluster definition? [u]:
5. Enter u to update the existing cluster. definition.
The SBR Cluster Starter Kit license allows you to create a minimal
cluster of 2 SBR nodes, 2 management nodes, and 2 data nodes. When
each node is installed on a separate machine the cluster topology is
denoted as {2s,2m,2d}. When SBR nodes are paired with management
nodes on the same machines the cluster topology is denoted as {2sm,2d}.
An optional SBR Cluster Management Expansion Kit allows you to add a
third management node for {2sm,1m,2d} and an optional Data Expansion
274
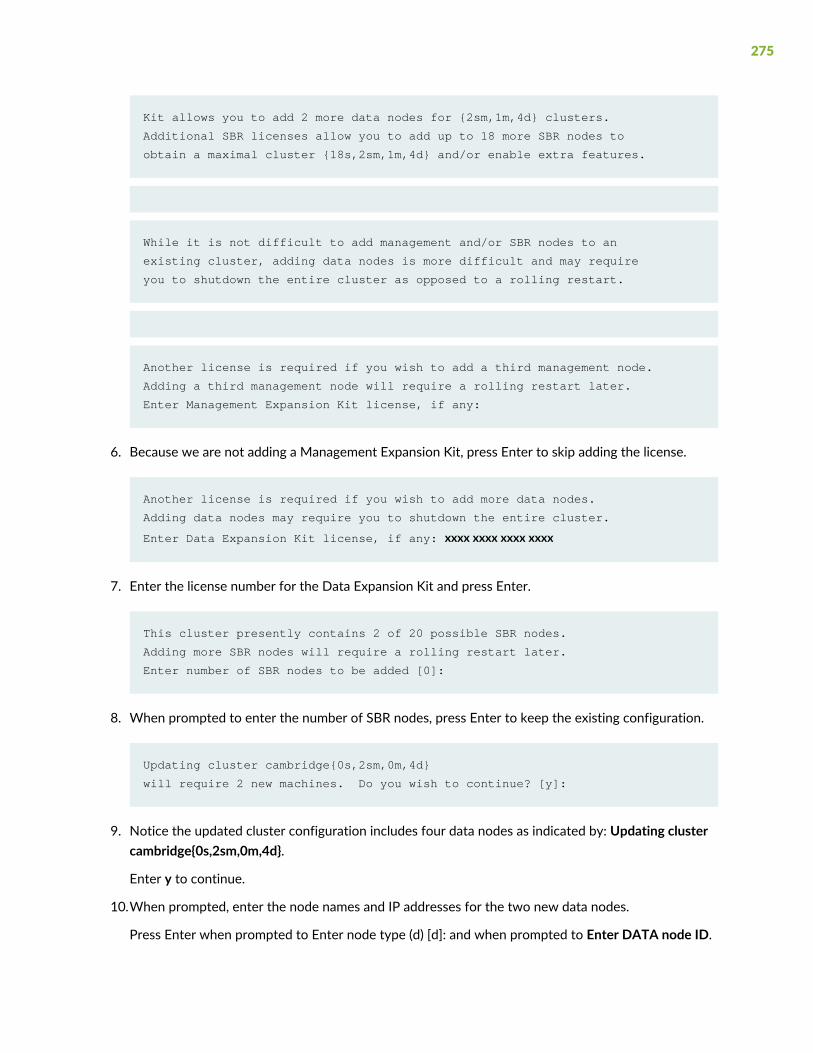
Kit allows you to add 2 more data nodes for {2sm,1m,4d} clusters.
Additional SBR licenses allow you to add up to 18 more SBR nodes to
obtain a maximal cluster {18s,2sm,1m,4d} and/or enable extra features.
While it is not difficult to add management and/or SBR nodes to an
existing cluster, adding data nodes is more difficult and may require
you to shutdown the entire cluster as opposed to a rolling restart.
Another license is required if you wish to add a third management node.
Adding a third management node will require a rolling restart later.
Enter Management Expansion Kit license, if any:
6. Because we are not adding a Management Expansion Kit, press Enter to skip adding the license.
Another license is required if you wish to add more data nodes.
Adding data nodes may require you to shutdown the entire cluster.
Enter Data Expansion Kit license, if any: xxxx xxxx xxxx xxxx
7. Enter the license number for the Data Expansion Kit and press Enter.
This cluster presently contains 2 of 20 possible SBR nodes.
Adding more SBR nodes will require a rolling restart later.
Enter number of SBR nodes to be added [0]:
8. When prompted to enter the number of SBR nodes, press Enter to keep the existing configuration.
Updating cluster cambridge{0s,2sm,0m,4d}
will require 2 new machines. Do you wish to continue? [y]:
9. Notice the updated cluster configuration includes four data nodes as indicated by: Updating clustercambridge{0s,2sm,0m,4d}.
Enter y to continue.
10.When prompted, enter the node names and IP addresses for the two new data nodes.
Press Enter when prompted to Enter node type (d) [d]: and when prompted to Enter DATA node ID.
275

Information will now be gathered for each new machine to be added.
You will have a chance to review all information at least once
before any machines are modified.
---------------------------------------------------------------------------
SBR 8.60.50006 cluster cambridge{0s,2sm,0m,4d}
on SunOS 5.10 Generic_141444-09 node sbrha-4(sm)
Partial configuration at present is {0s,2sm,0m,2d} of {0s,2sm,0m,4d}
---------------------------------------------------------------------------
IMPORTANT: node names must be entered as reported by 'uname -n'.
Enter node name [cambridge-6]: sbrha-8.carrier.spgma.juniper.net
Enter node type (d) [d]:
Enter DATA node ID (10-29) [12]:
Enter DATA node IP address by which it is known to management nodes.
Enter DATA node IP address: 172.28.84.178
---------------------------------------------------------------------------
SBR 8.60.50006 cluster cambridge{0s,2sm,0m,4d}
on SunOS 5.10 Generic_141444-09 node sbrha-4(sm)
Partial configuration at present is {0s,2sm,0m,3d} of {0s,2sm,0m,4d}
---------------------------------------------------------------------------
IMPORTANT: node names must be entered as reported by 'uname -n'.
Enter node name [cambridge-7]: sbrha-2.spgma.juniper.net
Enter node type (d) [d]:
Enter DATA node ID (10-29) [13]:
Enter DATA node IP address by which it is known to management nodes.
Enter DATA node IP address: 172.28.84.104
The system generates the updated cluster definition files.
11.Verify the proper configuration by examining the line: Generated configuration is {0s,2sm,0m,4d} of{0s,2sm,0m,4d} showing the four data nodes.
When prompted to, enter a to accept the updated configuration.
276

---------------------------------------------------------------------------
SBR 8.60.50006 cluster cambridge{0s,2sm,0m,4d}
on SunOS 5.10 Generic_141444-09 node sbrha-4(sm)
Generated configuration is {0s,2sm,0m,4d} of {0s,2sm,0m,4d}
---------------------------------------------------------------------------
Generating configuration files
Reviewing configuration files
/opt/JNPRsbr/radius/install/tmp/config.ini
/opt/JNPRsbr/radius/install/tmp/my.cnf
/opt/JNPRsbr/radius/install/tmp/dbclusterndb.gen
View (v), accept (a), or reject (r) configuration files: a
Writing shared configuration to /opt/JNPRshare/install/cambridge
---------------------------------------------------------------------------
SBR 8.60.50006 cluster cambridge{0s,2sm,0m,2d}
on SunOS 5.10 Generic_141444-09 node sbrha-4(sm)
is CONFIGURED and processes are UP, may be stopped if reconfigured
---------------------------------------------------------------------------
1. Unconfigure Cluster Node
Not used when merely updating existing cluster definitions.
2. Generate Cluster Definition
Creates new or updates existing cluster definitions.
Modifies the shared directory but does not modify this node.
277

3. Configure Cluster Node
To be preceded by 'Generate Cluster Definition' on one node.
Must be invoked on each and every node of the cluster.
4. Reconfigure RADIUS Server
Only on SBR nodes, updates the existing SBR configuration.
5. Create Temporary Cluster
Used to approximate a cluster using only this one machine.
Intended for migration and demonstration purposes only.
6. Upgrade From Restricted Cluster License
Used to upgrade from restricted cluster to regular cluster.
Removes database restriction on the number of concurrent
sessions and enables the addition of an expansion kit license
READY: last operation succeeded, generated cluster definition.
Enter the number of the desired configuration task or quit (4,q):
12.When the main configuration menu is displayed, enter q to quit.
root@sbrha-4:/opt/JNPRsbr/radius/install>
Installing the SBR Carrier Software on the Two New Data Node Host Machines
At this point in the process, the updated cluster definition files have been generated and reside on thesm1 node only. Next you need to install the SBR Carrier software on each of the machines that you wantto host the two newdata nodes. After the SBRCarrier software is installed on thesemachines, you distributethe updated cluster definition files to all the other nodes in the original cluster.
278
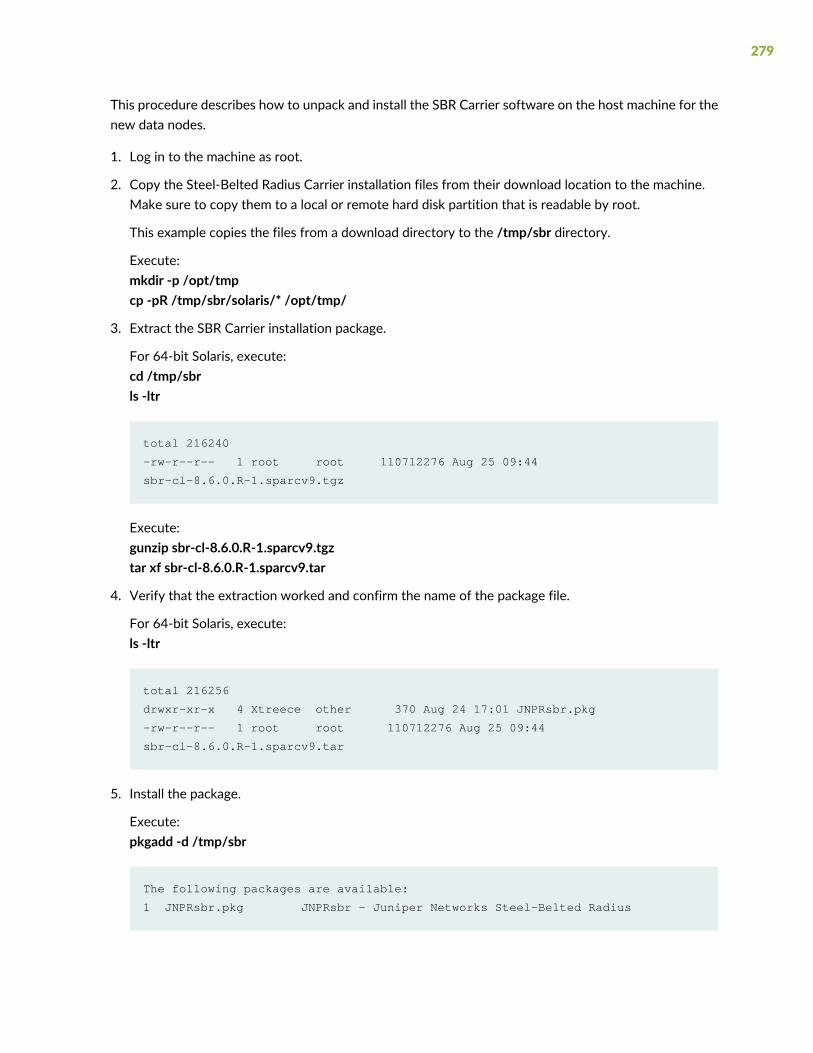
This procedure describes how to unpack and install the SBR Carrier software on the host machine for thenew data nodes.
1. Log in to the machine as root.
2. Copy the Steel-Belted Radius Carrier installation files from their download location to the machine.Make sure to copy them to a local or remote hard disk partition that is readable by root.
This example copies the files from a download directory to the /tmp/sbr directory.
Execute:mkdir -p /opt/tmpcp -pR /tmp/sbr/solaris/* /opt/tmp/
3. Extract the SBR Carrier installation package.
For 64-bit Solaris, execute:cd /tmp/sbrls -ltr
total 216240
-rw-r--r-- 1 root root 110712276 Aug 25 09:44
sbr-cl-8.6.0.R-1.sparcv9.tgz
Execute:gunzip sbr-cl-8.6.0.R-1.sparcv9.tgztar xf sbr-cl-8.6.0.R-1.sparcv9.tar
4. Verify that the extraction worked and confirm the name of the package file.
For 64-bit Solaris, execute:ls -ltr
total 216256
drwxr-xr-x 4 Xtreece other 370 Aug 24 17:01 JNPRsbr.pkg
-rw-r--r-- 1 root root 110712276 Aug 25 09:44
sbr-cl-8.6.0.R-1.sparcv9.tar
5. Install the package.
Execute:pkgadd -d /tmp/sbr
The following packages are available:
1 JNPRsbr.pkg JNPRsbr - Juniper Networks Steel-Belted Radius
279
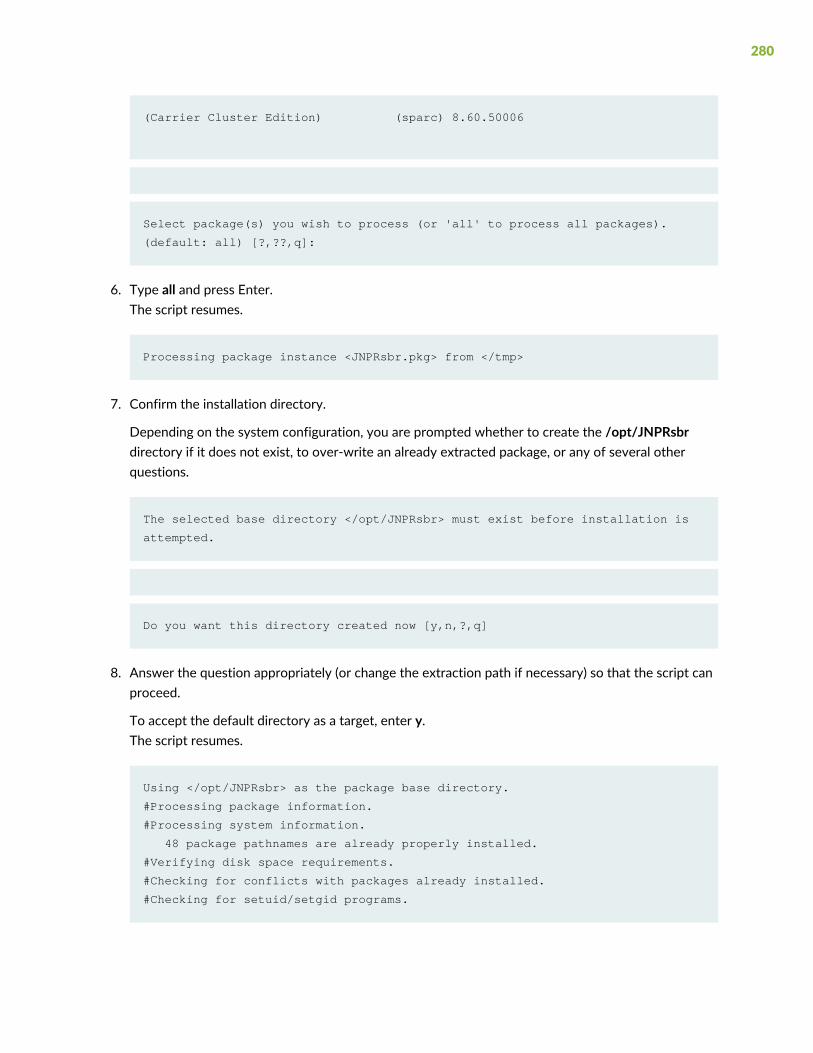
(Carrier Cluster Edition) (sparc) 8.60.50006
Select package(s) you wish to process (or 'all' to process all packages).
(default: all) [?,??,q]:
6. Type all and press Enter.The script resumes.
Processing package instance <JNPRsbr.pkg> from </tmp>
7. Confirm the installation directory.
Depending on the system configuration, you are prompted whether to create the /opt/JNPRsbrdirectory if it does not exist, to over-write an already extracted package, or any of several otherquestions.
The selected base directory </opt/JNPRsbr> must exist before installation is
attempted.
Do you want this directory created now [y,n,?,q]
8. Answer the question appropriately (or change the extraction path if necessary) so that the script canproceed.
To accept the default directory as a target, enter y.The script resumes.
Using </opt/JNPRsbr> as the package base directory.
#Processing package information.
#Processing system information.
48 package pathnames are already properly installed.
#Verifying disk space requirements.
#Checking for conflicts with packages already installed.
#Checking for setuid/setgid programs.
280
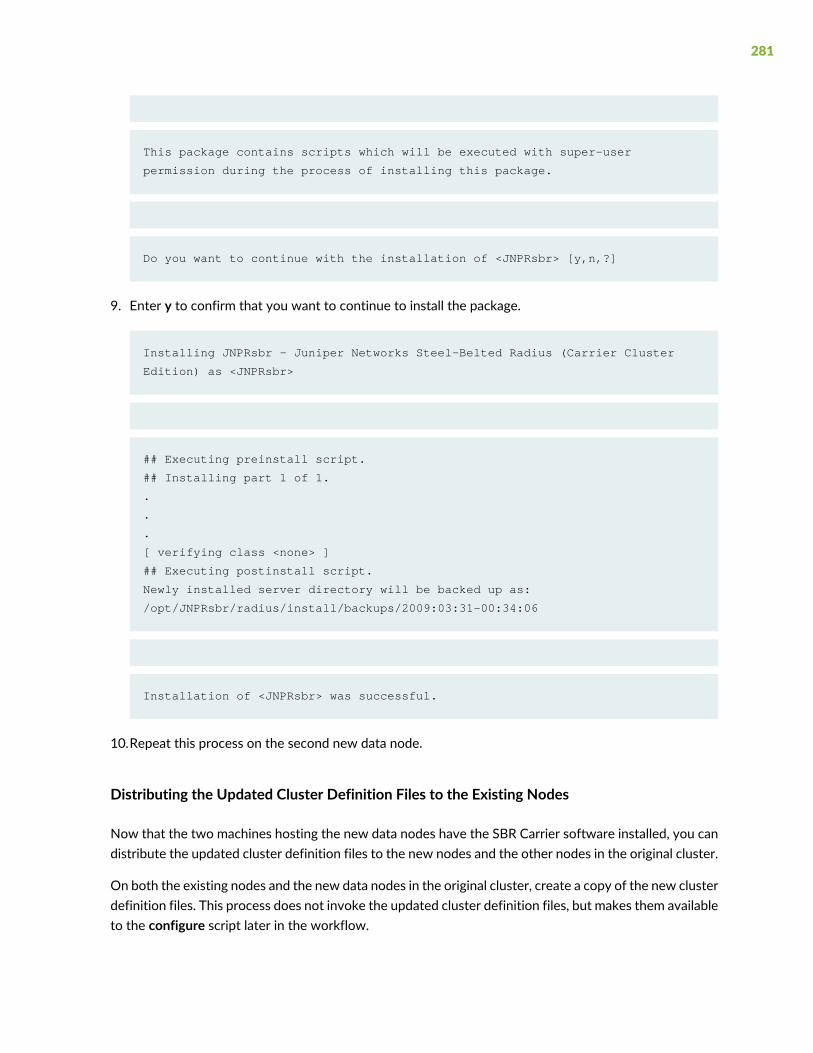
This package contains scripts which will be executed with super-user
permission during the process of installing this package.
Do you want to continue with the installation of <JNPRsbr> [y,n,?]
9. Enter y to confirm that you want to continue to install the package.
Installing JNPRsbr - Juniper Networks Steel-Belted Radius (Carrier Cluster
Edition) as <JNPRsbr>
## Executing preinstall script.
## Installing part 1 of 1.
.
.
.
[ verifying class <none> ]
## Executing postinstall script.
Newly installed server directory will be backed up as:
/opt/JNPRsbr/radius/install/backups/2009:03:31-00:34:06
Installation of <JNPRsbr> was successful.
10.Repeat this process on the second new data node.
Distributing the Updated Cluster Definition Files to the Existing Nodes
Now that the two machines hosting the new data nodes have the SBR Carrier software installed, you candistribute the updated cluster definition files to the new nodes and the other nodes in the original cluster.
On both the existing nodes and the new data nodes in the original cluster, create a copy of the new clusterdefinition files. This process does not invoke the updated cluster definition files, but makes them availableto the configure script later in the workflow.
281

To distribute the new cluster definition files:
1. Log in to each node (existing and new) as hadm.
2. Change directories to the install directory.
(On new nodes, the entire path may not exist because the <cluster name> portion of the path was notcreated when you prepared the new machine, so you may need to create it.) See “Creating ShareDirectories” on page 52.
Execute:cd /opt/JNPRshare/install/ <cluster_name>
For example:cd /opt/JNPRshare/install/cambridge
3. Use FTP binary mode to connect to the node host (in this example, sm1) where you created the newcluster definition files.
4. Execute the get command to transfer the configure. <cluster name> .tar file.
For example:binget /opt/JNPRsbr/radius/install/configure.cambridge.tar
5. In a terminal window, extract the new cluster definition files from the archive.
Execute:tar xvf configure. <cluster_name> .tar
Output similar to this example is displayed:
$ tar xvf configure.MyCluster.tarx dbcluster.rc, 1925 bytes, 4 tape blocks
x config.ini, 2435 bytes, 5 tape blocks
x my.cnf, 1017 bytes, 2 tape blocks
x dbclusterndb.gen, 33474 bytes, 66 tape blocks
x dbcluster.dat, 921 bytes, 2 tape blocks
6. Repeat these steps until every node in the cluster has a copy of the new cluster definition files.
Destroying the Session Database on the Original Cluster
You now log in to the sm1 node, destroy the session database from the original cluster, and stop theoriginal cluster.
1. Log in to sm1 as hadm.
2. Navigate to the hadm user's home directory, /opt/JNPRhadm by default.
282

3. Execute:
/DestroyDB.sh
hadm@sbrha-4:~> ./DestroyDB.sh
SBRs must be offline; OK? <yes|no> yes
This will destroy the "SteelBeltedRadius" database; OK? <yes|no> yes
Really? <yes|no> yes
4. Each time you are prompted as to whether you really want to destroy the database, enter yes.
The system responds with:
Database "SteelBeltedRadius" destroyed.
5. Stop the original cluster by executing:
/sbrd stop cluster
hadm@sbrha-4:~> su
Password:
# bash
root@sbrha-4:~>
root@sbrha-4:~> /etc/init.d/sbrd stop cluster
WARNING: This function is capable of stopping multiple nodes.
Do not use this function if you intend to stop only one node.
Do you intend to stop the entire cluster? (y,n): y
Are you sure? (y,n): y
Really? (y,n): y
6. Each time you are prompted as to whether you really want to stop the entire cluster, enter y.
The software stops the RADIUS processes first and then the SSR processes.
Stopping radius server processes
waiting for radius
10 seconds elapsed, still waiting
radius stopped
Stopping ssr auxiliary processes
Stopping ssr management processes
Connected to Management Server at: 172.28.84.36:5235
Shutdown of NDB Cluster node(s) failed.
* 1006: Illegal reply from server
283

*
root@sbrha-4:~>
7. On each remaining node of the original cluster, execute /sbrd stop cluster and verify that the processesare stopped.
Perform this step on the remaining nodes in this order: s nodes, sm nodes, m nodes, d nodes.
a. Log in to each remaining node in the existing cluster as root.
b. Navigate to the radius subdirectory of the directory in which the JNPRsbr package was installed(/opt/JNPRsbr by default).
Example: cd /opt/JNPRsbr/radius
c. Execute:/sbrd stop cluster
d. Execute:/sbrd status
e. Examine each line to ensure it says not connected.
Configuring the Nodes in the Expanded Cluster with the Updated Cluster Definition Files
To configure the nodes in the expanded cluster with the updated cluster definition files, you run theconfigure script on each node. First you run the script on the two new data nodes, then run it on theoriginal nodes in the cluster (except for the sm2 node, which is still operating as the transition server).
Configuring the SBR Carrier Software on the New Data Nodes
Configure the software on each new data node:
1. As root, navigate to the directory where you installed the Steel-Belted Radius Carrier package in“Installing the SBR Carrier Software on the Two New Data Node Host Machines” on page 278.
Then, navigate to the radius/install subdirectory.
Example: cd /opt/JNPRsbr/radius/install
2. Run the configure script.
Execute:./configure
# ./configure
Configuring SBR Software
3. The EndUser License Agreement is displayed. Review the Steel-Belted Radius Carrier license agreement.
284

Press the spacebar to move from one page to the next.
4. When you are prompted to accept the terms of the license agreement, enter y.
Do you accept the terms in the license agreement? [n] y
5. From the menu of configuration tasks, enter 3 to specify Configure Cluster Node.
---------------------------------------------------------------------------
SBR 8.60.50006 cluster
on SunOS 5.10 Generic_141444-09 node sbrha-2.spgma.juniper.net
is not configured and processes are down, needs to be configured
---------------------------------------------------------------------------
1. Unconfigure Cluster Node
Not used when merely updating existing cluster definitions.
2. Generate Cluster Definition
Creates new or updates existing cluster definitions.
Modifies the shared directory but does not modify this node.
3. Configure Cluster Node
To be preceded by 'Generate Cluster Definition' on one node.
Must be invoked on each and every node of the cluster.
4. Reconfigure RADIUS Server
Only on SBR nodes, updates the existing SBR configuration.
5. Create Temporary Cluster
Used to approximate a cluster using only this one machine.
Intended for migration and demonstration purposes only.
285

6. Upgrade From Restricted Cluster License
Used to upgrade from restricted cluster to regular cluster.
Removes database restriction on the number of concurrent
sessions and enables the addition of an expansion kit license
Enter the number of the desired configuration task or quit (2,q): 3
---------------------------------------------------------------------------
SBR 8.60.50006 cluster
on SunOS 5.10 Generic_141444-09 node sbrha-2.spgma.juniper.net
is not configured and processes are down, needs to be configured
---------------------------------------------------------------------------
Configuring Cluster Node...
Enter SBR cluster name [sbrha]: cambridge
6. Enter the exact name of the cluster and press Enter.
Reading shared configuration from /opt/JNPRshare/install/cambridge
Generating configuration files
286

Reviewing configuration files
/opt/JNPRsbr/radius/install/tmp/config.ini
/opt/JNPRsbr/radius/install/tmp/my.cnf
View (v), accept (a), or reject (r) configuration files:
7. Enter a to accept the configuration.
WARNING: You are about to make irreversible changes to this node.
Are you sure that you wish to continue? (y,n):
8. Enter y to continue.
Cleaning directories
/opt/JNPRhadm
Applying configuration
Initializing Session State Register, please wait a few minutes...
---------------------------------------------------------------------------
SBR 8.60.50006 cluster cambridge{0s,2sm,0m,4d}
on SunOS 5.10 Generic_141444-09 node sbrha-2.spgma.juniper.net(d)
is configured and processes are down, may be reconfigured if desired
---------------------------------------------------------------------------
1. Unconfigure Cluster Node
Not used when merely updating existing cluster definitions.
287

2. Generate Cluster Definition
Creates new or updates existing cluster definitions.
Modifies the shared directory but does not modify this node.
3. Configure Cluster Node
To be preceded by 'Generate Cluster Definition' on one node.
Must be invoked on each and every node of the cluster.
4. Reconfigure RADIUS Server
Only on SBR nodes, updates the existing SBR configuration.
5. Create Temporary Cluster
Used to approximate a cluster using only this one machine.
Intended for migration and demonstration purposes only.
6. Upgrade From Restricted Cluster License
Used to upgrade from restricted cluster to regular cluster.
Removes database restriction on the number of concurrent
sessions and enables the addition of an expansion kit license
READY: last operation succeeded, node configured.
Enter the number of the desired configuration task or quit (2,q):
9. Enter q to quit.
10.Notice the line: node sbrha-2.spgma.juniper.net(d) is configured and processes are down, may bereconfigured if desired indicating the node name you assigned and that the node was configuredwithout error. The processes remain down for now.
11.Log in to the next new data node and repeat this procedure.
288
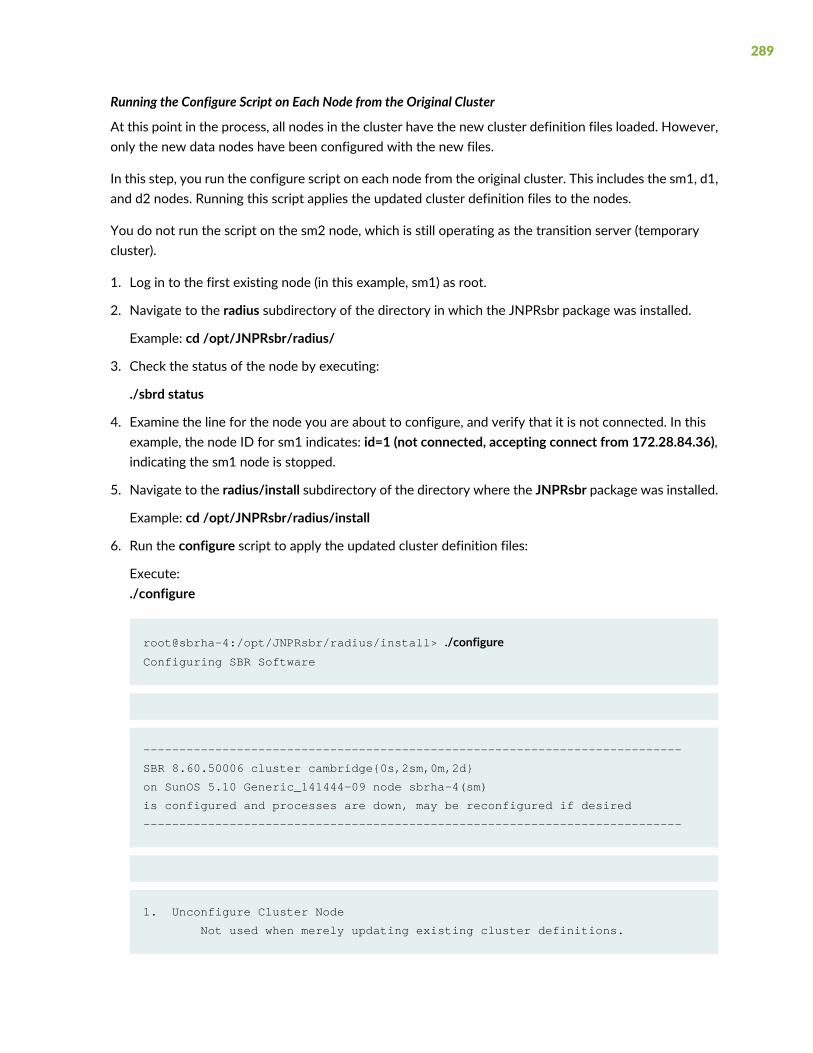
Running the Configure Script on Each Node from the Original Cluster
At this point in the process, all nodes in the cluster have the new cluster definition files loaded. However,only the new data nodes have been configured with the new files.
In this step, you run the configure script on each node from the original cluster. This includes the sm1, d1,and d2 nodes. Running this script applies the updated cluster definition files to the nodes.
You do not run the script on the sm2 node, which is still operating as the transition server (temporarycluster).
1. Log in to the first existing node (in this example, sm1) as root.
2. Navigate to the radius subdirectory of the directory in which the JNPRsbr package was installed.
Example: cd /opt/JNPRsbr/radius/
3. Check the status of the node by executing:
./sbrd status
4. Examine the line for the node you are about to configure, and verify that it is not connected. In thisexample, the node ID for sm1 indicates: id=1 (not connected, accepting connect from 172.28.84.36),indicating the sm1 node is stopped.
5. Navigate to the radius/install subdirectory of the directory where the JNPRsbr package was installed.
Example: cd /opt/JNPRsbr/radius/install
6. Run the configure script to apply the updated cluster definition files:
Execute:./configure
root@sbrha-4:/opt/JNPRsbr/radius/install> ./configureConfiguring SBR Software
---------------------------------------------------------------------------
SBR 8.60.50006 cluster cambridge{0s,2sm,0m,2d}
on SunOS 5.10 Generic_141444-09 node sbrha-4(sm)
is configured and processes are down, may be reconfigured if desired
---------------------------------------------------------------------------
1. Unconfigure Cluster Node
Not used when merely updating existing cluster definitions.
289

2. Generate Cluster Definition
Creates new or updates existing cluster definitions.
Modifies the shared directory but does not modify this node.
3. Configure Cluster Node
To be preceded by 'Generate Cluster Definition' on one node.
Must be invoked on each and every node of the cluster.
4. Reconfigure RADIUS Server
Only on SBR nodes, updates the existing SBR configuration.
5. Create Temporary Cluster
Used to approximate a cluster using only this one machine.
Intended for migration and demonstration purposes only.
6. Upgrade From Restricted Cluster License
Used to upgrade from restricted cluster to regular cluster.
Removes database restriction on the number of concurrent
sessions and enables the addition of an expansion kit license
Enter the number of the desired configuration task or quit (4,q):
7. Enter 3 to specify Configure Cluster Node and press Enter.
---------------------------------------------------------------------------
SBR 8.60.50006 cluster cambridge{0s,2sm,0m,2d}
290

on SunOS 5.10 Generic_141444-09 node sbrha-4(sm)
is configured and processes are down, may be reconfigured if desired
---------------------------------------------------------------------------
Configuring Cluster Node...
Enter SBR cluster name [cambridge]:
8. Press Enter to accept the cluster name and continue.
You are prompted either to create a new or update an existing node configuration.
Create (c) new or update (u) existing node configuration? [u]:
9. Enter u to update the node with the updated cluster definition files.
Reading shared configuration from /opt/JNPRshare/install/cambridge
Generating configuration files
Reviewing configuration files
/opt/JNPRsbr/radius/install/tmp/config.ini
/opt/JNPRsbr/radius/install/tmp/my.cnf
/opt/JNPRsbr/radius/install/tmp/dbclusterndb.gen
View (v), accept (a), or reject (r) configuration files:
10.Enter a to accept the updated configuration.
WARNING: You are about to make irreversible changes to this node.
Are you sure that you wish to continue? (y,n):
291

11.Enter y to continue.
Applying configuration
---------------------------------------------------------------------------
SBR 8.60.50006 cluster cambridge{0s,2sm,0m,4d}
on SunOS 5.10 Generic_141444-09 node sbrha-4(sm)
is configured and processes are down, may be reconfigured if desired
---------------------------------------------------------------------------
1. Unconfigure Cluster Node
Not used when merely updating existing cluster definitions.
2. Generate Cluster Definition
Creates new or updates existing cluster definitions.
Modifies the shared directory but does not modify this node.
3. Configure Cluster Node
To be preceded by 'Generate Cluster Definition' on one node.
Must be invoked on each and every node of the cluster.
4. Reconfigure RADIUS Server
Only on SBR nodes, updates the existing SBR configuration.
5. Create Temporary Cluster
Used to approximate a cluster using only this one machine.
Intended for migration and demonstration purposes only.
292

6. Upgrade From Restricted Cluster License
Used to upgrade from restricted cluster to regular cluster.
Removes database restriction on the number of concurrent
sessions and enables the addition of an expansion kit license
READY: last operation succeeded, node configured.
Enter the number of the desired configuration task or quit (4,q):
Notice the applied configuration includes the four data nodes as indicated by the line: SBR 8.60.50006cluster cambridge{0s,2sm,0m,4d}.
12.Enter q to quit.
13.Log in to the remaining nodes from the original cluster (d1 and d2) and repeat this procedure.
Creating the Session Database and IP Pools on the Expanded Cluster
At this point in the process, all nodes in the expanded cluster have been configured with the updatedcluster definition files. All of these nodes are currently down. You now create the session database andIP pools and ranges for the expanded cluster. To create the new session database, we recommend thatyou run the clean command on the nodes from the original cluster (in this case, sm1, d1, and d2).
The sm2 node is still operating as the transition server (temporary cluster). Do not disrupt it in any way.
The following procedure describes how to run the clean command on sm1, d1, and d2, start the SSRprocess and create the session database and IP pools.
Cleaning the Original Nodes from the Cluster
Perform the following procedure on sm1, d1, and d2 only:
1. Log in to the first existing node (in this example, sm1) as root.
2. Navigate to the radius subdirectory of the directory in which the JNPRsbr package was installed.
Example: cd /opt/JNPRsbr/radius
3. Execute:./sbrd clean
293

WARNING: Cleaning the SSR lock on this node may be destructive.
Do not use this function unless you are attempting to start the
entire cluster for the first time, or for recovery purposes.
Clean the SSR lock on this node? (y,n): y
Are you sure? (y,n): y Really? (y,n): y
Cleaning SSR lock
4. Repeat this procedure on the d1 and d2 nodes.
Creating the Session Database and IP Pools
In this procedure, you create the session database and IP address pools for the expanded cluster. Fordetails on performing these tasks, see the section on Session State Register Administration in the SBR CarrierAdministration and Configuration Guide.
First you start the SSR process. The proper order for starting the SSR process is (sm) nodes, (m) nodes,and (d) nodes. We do not have any (m) nodes in this example, so start the SSR process in the followingorder: sm1, d1, d2, d3, and d4. Start the SSR process on each node in the expanded cluster one at a time,starting with the sm1 node and then on each data node. For complete details on the proper order of startingand stopping nodes, see“When and How to Restart Session State Register Nodes, Hosts, and Clusters” on page 196.
Starting the SSR Processes on the Nodes in the Expanded Cluster
1. Log in to the first sm node (in this example, sm1) as root.
2. Navigate to the radius subdirectory of the directory in which the JNPRsbr package was installed(/opt/JNPRsbr by default).
Example: cd /opt/JNPRsbr/radius
3. Start the SSR process:
./sbrd start ssr
4. Before moving on to the next node, verify the SSR process started without error by executing:
./sbrd status
5. Examine the status and ensure there are no errors.
6. Repeat this procedure on the d1 and d2 nodes.
When you finish starting the SSR process on sm1, d1, d2, d3, and d4, the cluster configuration is as follows:
Cluster Configuration
---------------------
[ndbd(NDB)] 4 node(s)
id=10 @172.28.84.163 (mysql-5.7.25 ndb-7.6.9, Nodegroup: 0, Master)
294
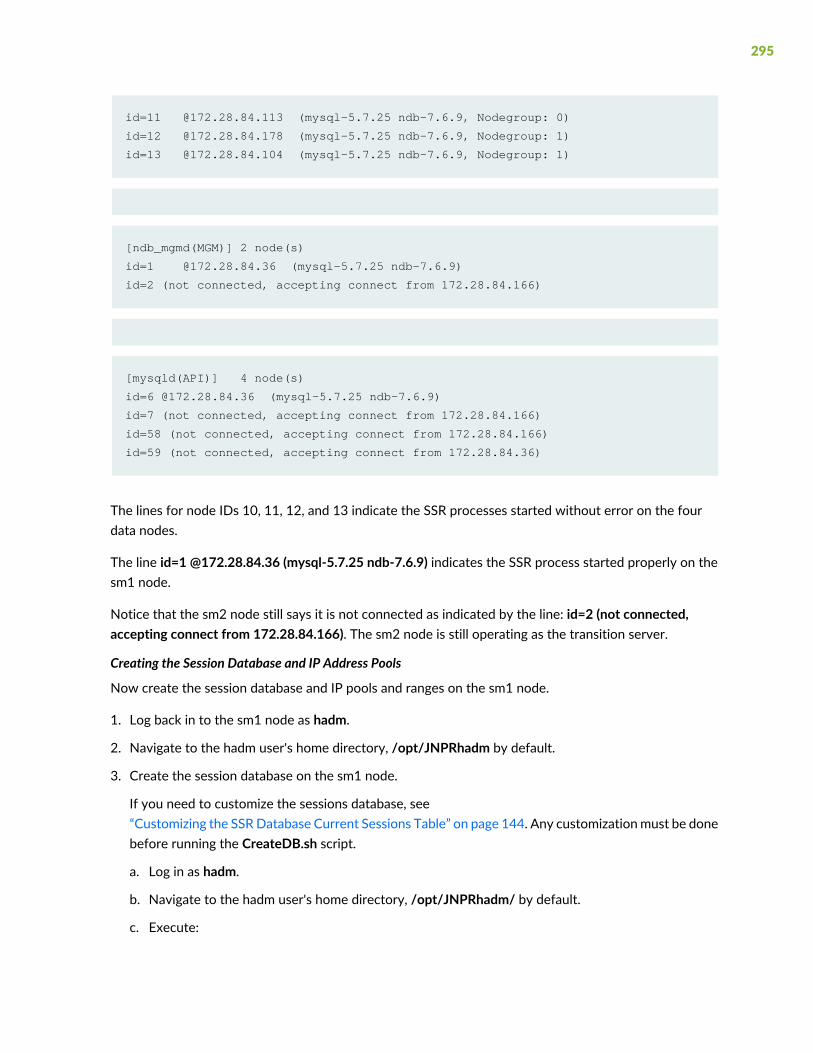
id=11 @172.28.84.113 (mysql-5.7.25 ndb-7.6.9, Nodegroup: 0)
id=12 @172.28.84.178 (mysql-5.7.25 ndb-7.6.9, Nodegroup: 1)
id=13 @172.28.84.104 (mysql-5.7.25 ndb-7.6.9, Nodegroup: 1)
[ndb_mgmd(MGM)] 2 node(s)
id=1 @172.28.84.36 (mysql-5.7.25 ndb-7.6.9)
id=2 (not connected, accepting connect from 172.28.84.166)
[mysqld(API)] 4 node(s)
id=6 @172.28.84.36 (mysql-5.7.25 ndb-7.6.9)
id=7 (not connected, accepting connect from 172.28.84.166)
id=58 (not connected, accepting connect from 172.28.84.166)
id=59 (not connected, accepting connect from 172.28.84.36)
The lines for node IDs 10, 11, 12, and 13 indicate the SSR processes started without error on the fourdata nodes.
The line id=1 @172.28.84.36 (mysql-5.7.25 ndb-7.6.9) indicates the SSR process started properly on thesm1 node.
Notice that the sm2 node still says it is not connected as indicated by the line: id=2 (not connected,accepting connect from 172.28.84.166). The sm2 node is still operating as the transition server.
Creating the Session Database and IP Address Pools
Now create the session database and IP pools and ranges on the sm1 node.
1. Log back in to the sm1 node as hadm.
2. Navigate to the hadm user's home directory, /opt/JNPRhadm by default.
3. Create the session database on the sm1 node.
If you need to customize the sessions database, see“Customizing the SSRDatabase Current Sessions Table” on page 144. Any customizationmust be donebefore running the CreateDB.sh script.
a. Log in as hadm.
b. Navigate to the hadm user's home directory, /opt/JNPRhadm/ by default.
c. Execute:
295
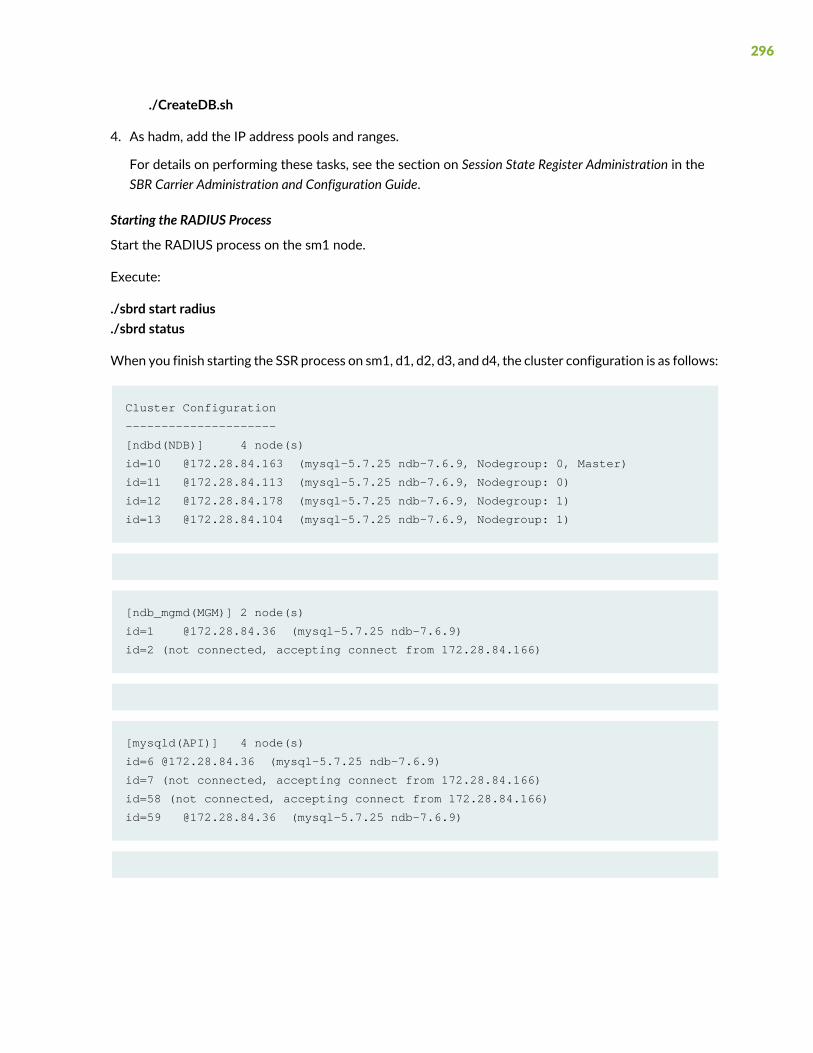
./CreateDB.sh
4. As hadm, add the IP address pools and ranges.
For details on performing these tasks, see the section on Session State Register Administration in theSBR Carrier Administration and Configuration Guide.
Starting the RADIUS Process
Start the RADIUS process on the sm1 node.
Execute:
./sbrd start radius
./sbrd status
When you finish starting the SSR process on sm1, d1, d2, d3, and d4, the cluster configuration is as follows:
Cluster Configuration
---------------------
[ndbd(NDB)] 4 node(s)
id=10 @172.28.84.163 (mysql-5.7.25 ndb-7.6.9, Nodegroup: 0, Master)
id=11 @172.28.84.113 (mysql-5.7.25 ndb-7.6.9, Nodegroup: 0)
id=12 @172.28.84.178 (mysql-5.7.25 ndb-7.6.9, Nodegroup: 1)
id=13 @172.28.84.104 (mysql-5.7.25 ndb-7.6.9, Nodegroup: 1)
[ndb_mgmd(MGM)] 2 node(s)
id=1 @172.28.84.36 (mysql-5.7.25 ndb-7.6.9)
id=2 (not connected, accepting connect from 172.28.84.166)
[mysqld(API)] 4 node(s)
id=6 @172.28.84.36 (mysql-5.7.25 ndb-7.6.9)
id=7 (not connected, accepting connect from 172.28.84.166)
id=58 (not connected, accepting connect from 172.28.84.166)
id=59 @172.28.84.36 (mysql-5.7.25 ndb-7.6.9)
296
The RADIUS process for the sm1 node has started properly as indicated by the line:
id=59 @172.28.84.36 (mysql-5.7.25 ndb-7.6.9)
Notice that the sm2 node is the only node that still is not connected, as indicated by the lines:
id=2 (not connected, accepting connect from 172.28.84.166)
id=7 (not connected, accepting connect from 172.28.84.166)
id=58 (not connected, accepting connect from 172.28.84.166)
Now that the expanded cluster nodes sm1, d1, d2, d3, and d4 are all started and running without erroryou can switch traffic back to the expanded cluster.
Removing the Transition Server from Service
After you bring the expanded cluster online, configure it, and test it, begin transferring live traffic to it andaway from the transition server. When all traffic has been shifted to the new expanded cluster and thenumber of on-going sessions managed by the transition server has reached a suitably low level, take thetransition server offline. Some sessions are terminated, but reconnect through the new cluster.
Unconfiguring and Rebuilding the Transition Server
To free the licenses used by the transition server (in this case, sm2), and clean up installed software, uninstallthe SBR Carrier software. See “Uninstalling Steel-Belted Radius Carrier Software” on page 358.
Unconfiguring the Transition Server
1. Log in to the sm2 node as root.
2. Navigate to the radius subdirectory of the directory in which the JNPRsbr package was installed(/opt/JNPRsbr by default).
Example: cd /opt/JNPRsbr/radius
3. Stop the RADIUS processes.
Execute:./sbrd stop radius
4. Stop the SSR processes:
297
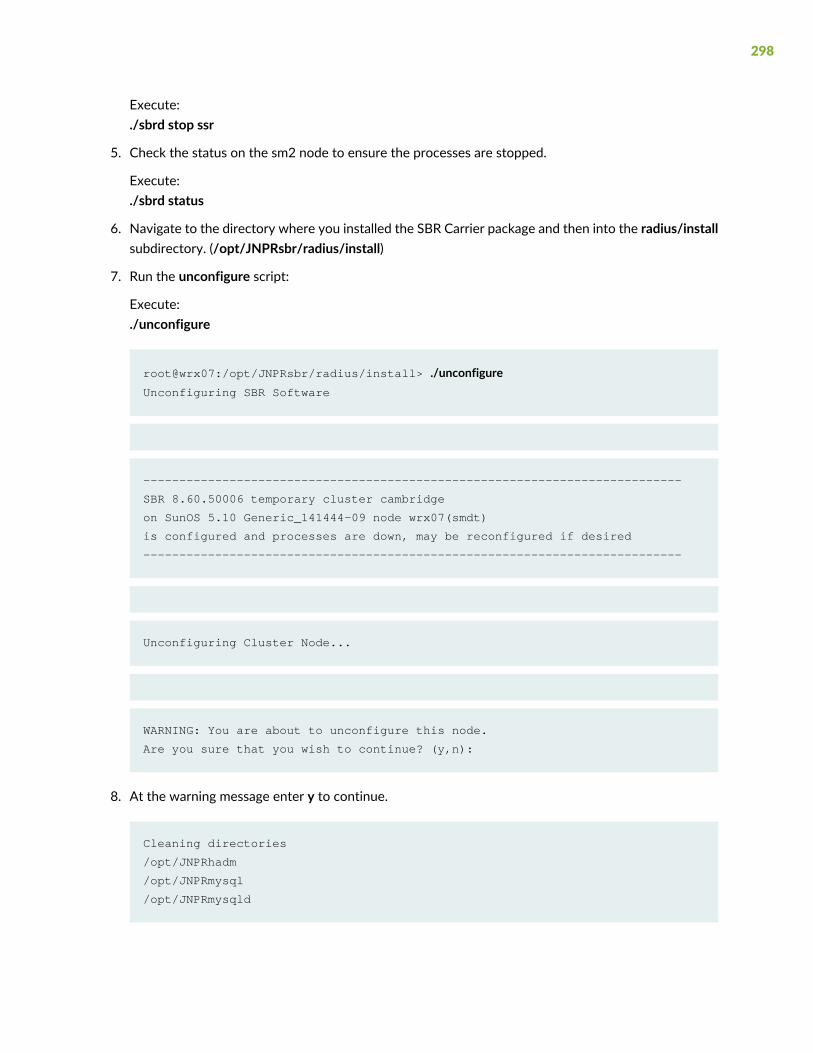
Execute:./sbrd stop ssr
5. Check the status on the sm2 node to ensure the processes are stopped.
Execute:./sbrd status
6. Navigate to the directory where you installed the SBR Carrier package and then into the radius/installsubdirectory. (/opt/JNPRsbr/radius/install)
7. Run the unconfigure script:
Execute:./unconfigure
root@wrx07:/opt/JNPRsbr/radius/install> ./unconfigureUnconfiguring SBR Software
---------------------------------------------------------------------------
SBR 8.60.50006 temporary cluster cambridge
on SunOS 5.10 Generic_141444-09 node wrx07(smdt)
is configured and processes are down, may be reconfigured if desired
---------------------------------------------------------------------------
Unconfiguring Cluster Node...
WARNING: You are about to unconfigure this node.
Are you sure that you wish to continue? (y,n):
8. At the warning message enter y to continue.
Cleaning directories
/opt/JNPRhadm
/opt/JNPRmysql
/opt/JNPRmysqld
298

/opt/JNPRndb_mgmd
/opt/JNPRndbd
Locating shared directory...
drwxrwxr-x 2 hadm hadmg 512 Apr 15 20:19
/opt/JNPRshare/install/cambridge
WARNING: If you remove the shared directory for this cluster, you
will either have to recover the data from another cluster node or
reconfigure the entire cluster again. This is neither necessary
nor recommended if you are updating an existing configuration.
Remove the shared directory for this cluster? [n]:
9. Press Enter indicating you do not want to remove the shared directory.
Locating OS user account and home directory...
hadm:x:16663:65536::/opt/JNPRhadm:/bin/bash
hadmg::65536:
drwxrwx--- 2 hadm hadmg 1536 Apr 16 00:03 /opt/JNPRhadm
WARNING: If you remove the OS user account hadm you will have
to recreate it, the associated OS group account hadmg, and
the associated home directory /opt/JNPRhadm
This is neither necessary nor recommended if you are updating
an existing configuration. Remove the OS user account? [n]:
10.Press Enter indicating you do not want to remove the OS user account.
Unconfigured
root@wrx07:/opt/JNPRsbr/radius/install>
299

Retrieving the Updated Cluster Definition Files from SM1 Node
To distribute the new cluster definition files:
1. Log in to the sm2 node as hadm.
2. Change directories to the install directory.
(On new nodes, the entire path may not exist because the <cluster name> portion of the path was notcreated when you prepared the new machine, so you may need to create it.) See “Creating ShareDirectories” on page 52.
Execute:cd /opt/JNPRshare/install/ <cluster_name>
For example:cd /opt/JNPRshare/install/cambridge
3. Use FTP binary mode to connect to the node host (in this example, sm1) where you created the newcluster definition files.
4. Execute the get command to transfer the configure. <cluster name> .tar file.
For example:binget /opt/JNPRsbr/radius/install/configure.cambridge.tar
5. In a terminal window, extract the new cluster definition files from the archive.
Execute:tar xvf configure. <cluster_name> .tar
Output similar to this example is displayed:
$ tar xvf configure.MyCluster.tarx dbcluster.rc, 1925 bytes, 4 tape blocks
x config.ini, 2435 bytes, 5 tape blocks
x my.cnf, 1017 bytes, 2 tape blocks
x dbclusterndb.gen, 33474 bytes, 66 tape blocks
x dbcluster.dat, 921 bytes, 2 tape blocks
Running the Configure Script on the SM2 Node
1. Log in to the sm2 node as root.
2. Navigate to the radius/install subdirectory of the directory in which the JNPRsbr packagewas installed(/opt/JNPRsbr by default).
Example: cd /opt/JNPRsbr/radius/install
3. Run the configure script to apply the updated cluster definition files:
300

Execute:./configure
4. Review and accept the Steel-Belted Radius Carrier license agreement.
Press the spacebar to move from one page to the next. When you are prompted to accept the termsof the license agreement, enter y.
Do you accept the terms in the license agreement? [n] y
---------------------------------------------------------------------------
SBR 8.60.50006 cluster cambridge{0s,2sm,0m,2d}
on SunOS 5.10 Generic_141444-09 node wrx07(sm)
is not configured and processes are down, needs to be configured
---------------------------------------------------------------------------
1. Unconfigure Cluster Node
Not used when merely updating existing cluster definitions.
2. Generate Cluster Definition
Creates new or updates existing cluster definitions.
Modifies the shared directory but does not modify this node.
3. Configure Cluster Node
To be preceded by 'Generate Cluster Definition' on one node.
Must be invoked on each and every node of the cluster.
4. Reconfigure RADIUS Server
Only on SBR nodes, updates the existing SBR configuration.
301

5. Create Temporary Cluster
Used to approximate a cluster using only this one machine.
Intended for migration and demonstration purposes only.
6. Upgrade From Restricted Cluster License
Used to upgrade from restricted cluster to regular cluster.
Removes database restriction on the number of concurrent
sessions and enables the addition of an expansion kit license
Enter the number of the desired configuration task or quit (2,q):
5. From the menu of configuration tasks, enter 3 to specify Configure Cluster Node.
---------------------------------------------------------------------------
SBR 8.60.50006 cluster
on SunOS 5.10 Generic_141444-09 node wrx07(sm)
is not configured and processes are down, needs to be configured
---------------------------------------------------------------------------
Configuring Cluster Node...
Enter SBR cluster name []:cambridge
6. Specify the exact name of the cluster.
Reading shared configuration from /opt/JNPRshare/install/cambridge
302

Generating configuration files
Reviewing configuration files
/opt/JNPRsbr/radius/install/tmp/dbclusterndb.gen
View (v), accept (a), or reject (r) configuration files:
7. Enter a to accept the modified configuration files and continue or v to view them.
CAUTION: We recommend that you enter an r to reject them only if a serious errorwas made when you provided information.We recommend that you not edit thesefiles.
8. The configure script prompts you with a warning whether or not to apply the cluster definition to thisnode. Enter y to proceed.
WARNING: You are about to make irreversible changes to this node.
Are you sure that you wish to continue? (y,n): y
Cleaning directories
/opt/JNPRhadm
Applying configuration
Initializing Session State Register, please wait a few minutes...
303

NOTE: Expect package is required to be installed on RHEL 7.3 or later (see “Linux” on page 47for supported RHEL versions). SBR Carrier has been tested only with the Expect-5.45 version.Expect package is installed on Solaris 11.3.36.10.0 or later version by default (see “Solaris”on page 47 for supported Solaris versions).
9. Configure the node.
For information about configuring the node in the following prompts, see “Configuring theHost Softwareon the First Server in the Cluster” on page 99.
Do you want to configure Java Runtime Environment for JDBC Feature [n] :
Please enter backup or radius directory from which to migrate.
Enter n for new configuration, s to search, or q to quit
[n]:
Enter initial admin user (UNIX account must have a valid password) [root]:
Enable Centralized Configuration Management (CCM) for this SBR node? [n]:
Configuring for use with generic database
Do you want to enable "Radius WatchDog" Process? [n]:
Do you want to enable LCI? [n]:
Do you want to configure for use with Oracle? [n]:
Removing oracle references from startup script
Do you want to configure for use with SIGTRAN? [n]:
Removing SIGTRAN references from startup script
Do you want to configure SNMP? [n]:
Configuring Admin GUI Webserver
Compatible Java version found :
Do you want to install custom SSL certificate for Admin WebServer? [n]:
Enable (e), disable (d), or preserve (p) autoboot scripts [e]:
The SBR Admin Web GUI can be launched using the following URL:
https://<servername>:2909
Configuration complete
304

---------------------------------------------------------------------------
SBR 8.60.50006 cluster cambridge{0s,2sm,0m,4d}
on SunOS 5.10 Generic_141444-09 node wrx07(sm)is configured and processes are
down, may be reconfigured if desired
---------------------------------------------------------------------------
1. Unconfigure Cluster Node
Not used when merely updating existing cluster definitions.
2. Generate Cluster Definition
Creates new or updates existing cluster definitions.
Modifies the shared directory but does not modify this node.
3. Configure Cluster Node
To be preceded by 'Generate Cluster Definition' on one node.
Must be invoked on each and every node of the cluster.
4. Reconfigure RADIUS Server
Only on SBR nodes, updates the existing SBR configuration.
5. Create Temporary Cluster
Used to approximate a cluster using only this one machine.
Intended for migration and demonstration purposes only.
305
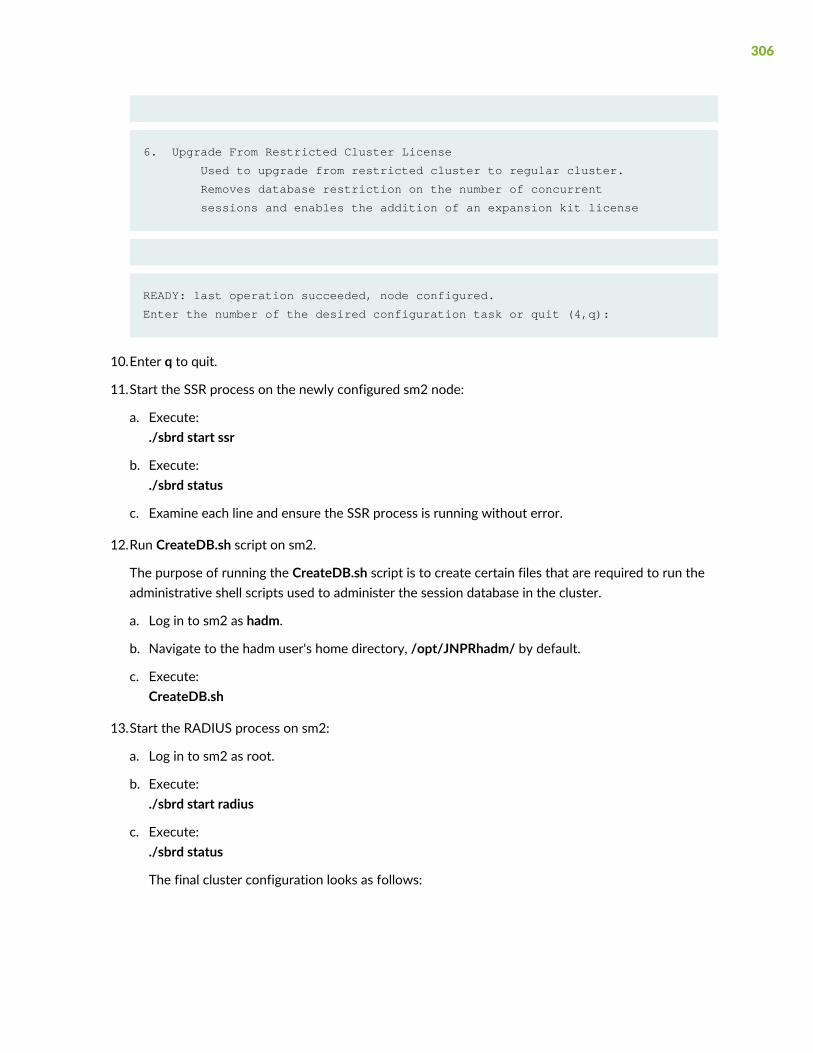
6. Upgrade From Restricted Cluster License
Used to upgrade from restricted cluster to regular cluster.
Removes database restriction on the number of concurrent
sessions and enables the addition of an expansion kit license
READY: last operation succeeded, node configured.
Enter the number of the desired configuration task or quit (4,q):
10.Enter q to quit.
11.Start the SSR process on the newly configured sm2 node:
a. Execute:./sbrd start ssr
b. Execute:./sbrd status
c. Examine each line and ensure the SSR process is running without error.
12.Run CreateDB.sh script on sm2.
The purpose of running the CreateDB.sh script is to create certain files that are required to run theadministrative shell scripts used to administer the session database in the cluster.
a. Log in to sm2 as hadm.
b. Navigate to the hadm user's home directory, /opt/JNPRhadm/ by default.
c. Execute:CreateDB.sh
13.Start the RADIUS process on sm2:
a. Log in to sm2 as root.
b. Execute:./sbrd start radius
c. Execute:./sbrd status
The final cluster configuration looks as follows:
306

Cluster Configuration
---------------------
[ndbd(NDB)] 4 node(s)
id=10 @172.28.84.163 (mysql-5.7.25 ndb-7.6.9, Nodegroup: 0, Master)
id=11 @172.28.84.113 (mysql-5.7.25 ndb-7.6.9, starting, Nodegroup: 0)
id=12 @172.28.84.178 (mysql-5.7.25 ndb-7.6.9, starting, Nodegroup: 1)
id=13 @172.28.84.104 (mysql-5.7.25 ndb-7.6.9, starting, Nodegroup: 1)
[ndb_mgmd(MGM)] 2 node(s)
id=1 @172.28.84.36 (mysql-5.7.25 ndb-7.6.9)
id=2 @172.28.84.166 (mysql-5.7.25 ndb-7.6.9)
[mysqld(API)] 4 node(s)
id=6 @172.28.84.36 (mysql-5.7.25 ndb-7.6.9)
id=7 @172.28.84.166 (mysql-5.7.25 ndb-7.6.9)
id=58 @172.28.84.166 (mysql-5.7.25 ndb-7.6.9)
id=59 @172.28.84.36 (mysql-5.7.25 ndb-7.6.9)
d. Examine each line and ensure the cluster is running with no errors.
Non-Transition Server Method—Terminating Connections
If you can tolerate some downtime while the existing data nodes are stopped, the new configurationimposed, and all nodes restarted, that is the quickest and easiest method to incorporate the new datanodes. However, sessions are disconnected, and reconnection is not possible until all nodes come backonline.
CAUTION: This procedure stops the entire cluster. You will not be able to processany requests from users.
To estimate how long this process takes, note the amount of time it takes to reconfigure one or two nodes.
307
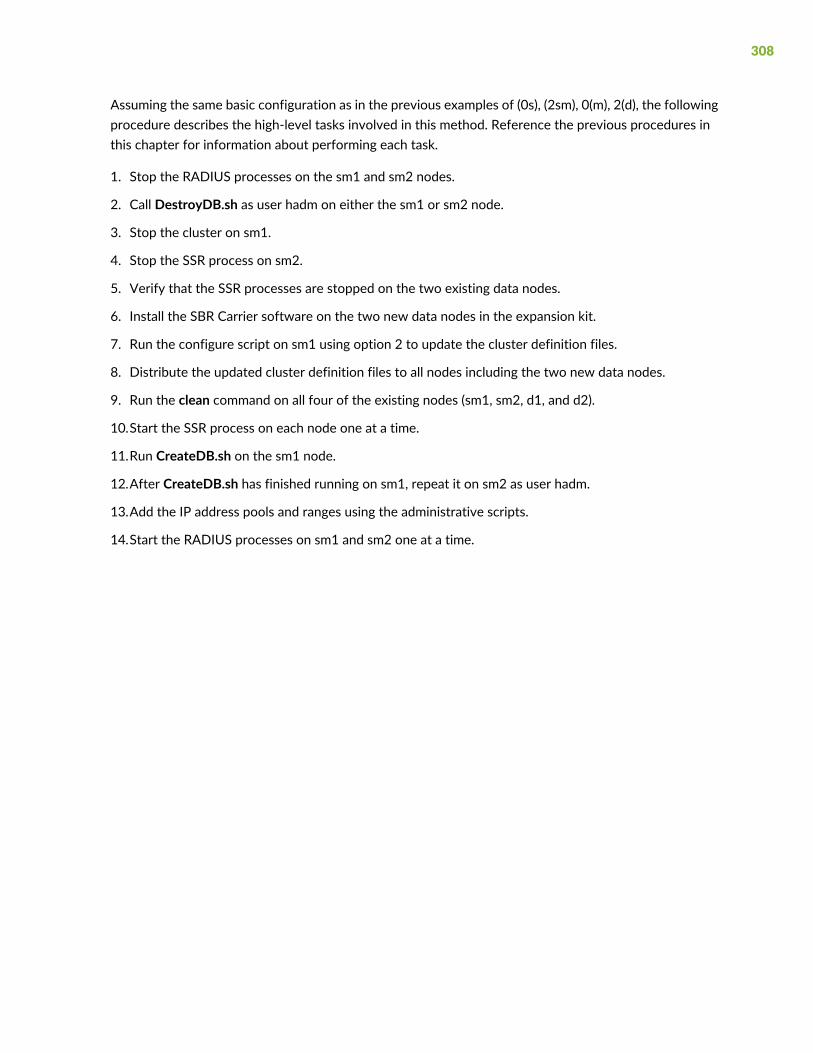
Assuming the same basic configuration as in the previous examples of (0s), (2sm), 0(m), 2(d), the followingprocedure describes the high-level tasks involved in this method. Reference the previous procedures inthis chapter for information about performing each task.
1. Stop the RADIUS processes on the sm1 and sm2 nodes.
2. Call DestroyDB.sh as user hadm on either the sm1 or sm2 node.
3. Stop the cluster on sm1.
4. Stop the SSR process on sm2.
5. Verify that the SSR processes are stopped on the two existing data nodes.
6. Install the SBR Carrier software on the two new data nodes in the expansion kit.
7. Run the configure script on sm1 using option 2 to update the cluster definition files.
8. Distribute the updated cluster definition files to all nodes including the two new data nodes.
9. Run the clean command on all four of the existing nodes (sm1, sm2, d1, and d2).
10.Start the SSR process on each node one at a time.
11.Run CreateDB.sh on the sm1 node.
12.After CreateDB.sh has finished running on sm1, repeat it on sm2 as user hadm.
13.Add the IP address pools and ranges using the administrative scripts.
14.Start the RADIUS processes on sm1 and sm2 one at a time.
308

6PART
SIGTRAN Support for Steel-BeltedRadius Carrier
Migrating Signalware | 310
Installing Signalware 9 on Linux | 315
Configuring SIGTRAN/IP Network Communication Files | 332

CHAPTER 13
Migrating Signalware
IN THIS CHAPTER
Migrating an Existing Signalware Configuration | 310
Backing Up the Existing Signalware Configuration | 310
Applying the Saved Signalware Configuration to the New Server | 312
This chapter contains basic Signalware 9 backup and restore procedures, the tools that you can use tomove an existing configuration to a new server to prepare for a new Steel-Belted Radius Carrier installation.
This chapter contains these topics:
Migrating an Existing Signalware Configuration
If you have an existing Signalware installation, for instance one supporting Signalware 9 with Service Pack6.3, you can migrate the Signalware configuration to a new server to support Steel-Belted Radius CarrierRelease 8.6.0. Migrating your Signalware installation is a two-step operation: backing up your existingSignalware configuration and then restoring it to a new Signalware 9 installation on the server that youintend to support Steel-Belted Radius Carrier.
If you are installing on a server that does not already have a Signalware license, you need to update yourlicense because each license is tied to a specific host.
Backing Up the Existing Signalware Configuration
To back up the existing Signalware 9 configuration:
310

1. Retrieve your Signalware LSN number, which can be used to track the license.To view your Signalware LSN number, execute:
$ cat ULCM_Signalware_9_license.lic | grep LSN
The system responds with the LSN number. Record it.
2. Back up your license file (/etc/ULCM_Signalware_9_license.lic) by copying it to a safe location.
The Signalware license is tied to the workstation by a unique host identification code, so if you use adifferent chassis as the new server, you must obtain a new or reissued license for that chassis.
You cannot physically transfer license files from one chassis to another, but you can save and restorethem to a new installation on the same chassis.
3. Convert any rc (recently changed) files to db files using the MML BACKUP-NODE command.
a. Make sure that Signalware is running.
b. Change directories to $OMNI_HOME/bin and run the swmml utility.
c. From within swmml run BACKUP-NODE.
d. In another window, look in $OMNI_HOME/CE NAME/dffile for a file named archive.xxx that istime stamped with the date and time you ran the BACKUP-NODE command.
e. Type exit to close swmml.
To learn more about BACKUP-NODE, at a system prompt, execute:man BACKUP-NODE
4. Use the DFcat command to save the contents of the following files to a safe place such as a directoryon the new server, a network file system, or a CD.
These files are in the $OMNI_HOME/CENAME/dffile directory:
• cestart. $SHM
• archive.NODENAME. $SHM .date
• db.nodename.mtp. $SHM .pri
• db.nodename.sccp. $SHM .pri
Where $SHM represents the value of the environment variable.
For example:
$OMNI_HOME/bin/DFcat cestart. $SHM >SAFE_PLACE/cestart. $SHM
311

Applying the Saved Signalware Configuration to the New Server
After you install Signalware 9 (as described in “Installing Signalware 9 on Linux” on page 315), restore thesaved configuration to that installation.
To restore the Signalware configuration:
1. Ensure that Signalware is not running. To stop Signalware, execute the terminate command:
$OMNI_HOME/bin/Terminate 0
2. Copy or send through FTP the archived backup copies ofNODENAME. $SHM .date and cestart. $SHMto $OMNI_HOME/ulcm/bin on the new server.
3. Create a new process.mml file from the old server’s settings.
a. Execute DFcat on the cestart. $SHM file from the old server to create cestart.txt.
For example, execute:$OMNI_HOME/bin/DFcat cestart. $SHM > cestart.txt
Output is similar to this example:
.CE tssunblade100
GMT . 0 DEF DEF 0 0 /opt/JNPRsbr/radius/authGateway -name GMT -port 2000
-host tssunblade100 -node MGW -prot C7 -trace -conf
/opt/JNPRsbr/radius/conf/authGateway.con f -lri 1 -lpc 2002 -lssn 6 -appctx
3 -debug 0xff
@MGW C7M3UA
b. Copy the cestart.txt file to create a new file named process.mml.
The new file should contain three lines, butDFcatmight have inserted line breaks in the long stringof the second line of the output that affect the appearance of the file. Delete these extra line breaks.
Depending on the string and your text editor, you may need to insert a space where the line breakshad been, to separate the items in the command string. After you delete the line breaks, make surethe command string entry is one long, unbroken, string.
4. Edit the new process.mml file.
This file contains the START-PROCESS command for the new server, built from the syntax used onthe old server.
a. Add a new first line to the file that contains the string:START-PROCESS:
b. Create a CE entry from the old server’s CE data.
Change the line that reads (in the example):
312

.CE tssunblade100to an attribute-and-field format that reads:CE="tssunblade100"
c. Create a NAME entry.
The first set of characters on the second line of the source file is the name of the server. Edit thisline to change the string into a valid NAME entry (in the example) on its own line:GMTto the attribute-and-field format:NAME="GMT"
d. Create an EXEC entry.
Most of the remainder of the file contents is the invocation of the authGateway program, thecommand syntax the program uses when it starts. If the old server was functioning correctly, donot make any changes to the string syntax. You do need to clean up the raw string.
• Delete any characters at the beginning of the line that precede the command string (the commandstring begins with /opt/JNPRsbr/radius...).In the example, the characters to delete are:. 0 DEF DEF 0 0
• Insert an EXEC=” field label before the command string.
• Insert a closing quotation mark at the end of the command string.
With those edits made, the file resembles this example:
START-PROCESS:
CE="tssunblade100"
NAME="GMT"
EXEC="/opt/JNPRsbr/radius/authGateway -name GMT -port 2000 -host tssunblade100
-node MGW -prot C7 -trace -conf /opt/JNPRsbr/radius/conf/authGateway.conf
-lri 1 -lpc 2002 -lssn 6 -appctx 3 -debug 0xff"
@MGW C7M3UA
e. Delete the last line of the file, which contains the Signalware node name.In the example, that line reads:@MGW C7M3UA
f. The file still contains both the old server’s name and CE setting (tssunblade100 and GMT). If thenew server does not use those names, edit and update the CE, NAME, and EXEC fields with thenew server settings.
313

g. During the Signalware installation on the new server, if you changed the Signalware node namefrom the name used on the old server, edit and update that entry in the EXEC line (-node MGW inthe example).
h. Change the path to the SBRCarrier authGateway program from the 5.5.4 setting to the new defaultpath for Steel-Belted Radius Carrier:/opt/JNPRsbr/radius
i. Save and close the file.
5. Use the DFcat program on the archive file to create an .mml file.
For example:$OMNI_HOME/bin/DFcat archive.NODENAME. $SHM .date > archive.mml
6. If the new Signalware installation does not inherit the same hostname and IP address used by theexisting server, edit the archive.mml file to use the new server’s information. You may change othersettings at this time to match the new server environment.
7. Start Signalware.
Execute:$OMNI_HOME/bin/go.omni
8. Load archive.mml first. Then load process.mml.
Execute:$OMNI_HOME/bin/swmml -f archive.mml$OMNI_HOME/bin/swmml -f process.mml
314

CHAPTER 14
Installing Signalware 9 on Linux
IN THIS CHAPTER
Operating System Prerequisite Packages | 316
Other Prerequisites to Install Signalware on a Linux Platform | 318
Installing Signalware | 319
Troubleshooting Signalware Installation and Configuration | 328
Steel-Belted Radius Carrier supports Signalware installation on a Linux platform.
This chapter contains the basic procedure recommended by Juniper Networks for a new Signalware 9with Service Pack 6 installation on a Linux platform. The installation example provided here is for yourconvenience and assumes that this is a clean first-time installation of Signalware.
Steel-Belted Radius Carrier supports a 64-bit kernel. Your Red Hat Enterprise Linux 7 operating systemmust complywith a 64-bit kernel with x86-based architecture. To verify the Linux kernel, run the followingcommand:
[root@sbr-wf-eng1 ~]# cat /etc/redhat-release
Red Hat Enterprise Linux Server release 7.4 (Maipo)
[root@sbr-wf-eng1 ~]# uname -a
Linux sbr-wf-eng1 3.10.0-693.el7.x86_64 #1 SMP
Thu Jul 6 19:56:57 EDT 2017 x86_64 x86_64 x86_64 GNU/Linux
Youmust refer to the following Signalware documentation for instructions to install and configure Signalwareon a Linux platform:
• Signalware Read Me First
• Signalware Release Notes
• Signalware SP Release 9C Service Pack 6 Linux Installation Manual
The Signalware documentation can be accessed from https://my.ulticom.com.
To troubleshoot errors that might occur during the installation and configuration process, see“Troubleshooting Signalware Installation and Configuration” on page 328.
315
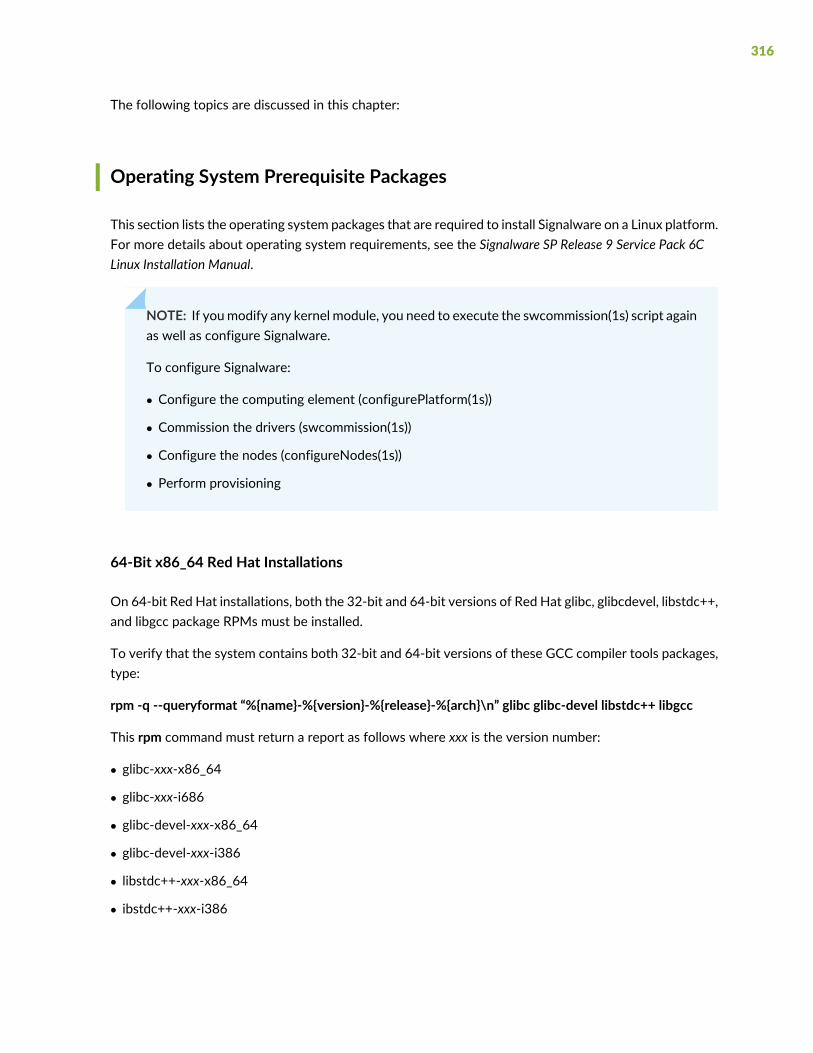
The following topics are discussed in this chapter:
Operating System Prerequisite Packages
This section lists the operating system packages that are required to install Signalware on a Linux platform.For more details about operating system requirements, see the Signalware SP Release 9 Service Pack 6CLinux Installation Manual.
NOTE: If youmodify any kernel module, you need to execute the swcommission(1s) script againas well as configure Signalware.
To configure Signalware:
• Configure the computing element (configurePlatform(1s))
• Commission the drivers (swcommission(1s))
• Configure the nodes (configureNodes(1s))
• Perform provisioning
64-Bit x86_64 Red Hat Installations
On 64-bit Red Hat installations, both the 32-bit and 64-bit versions of Red Hat glibc, glibcdevel, libstdc++,and libgcc package RPMs must be installed.
To verify that the system contains both 32-bit and 64-bit versions of these GCC compiler tools packages,type:
rpm -q --queryformat “%{name}-%{version}-%{release}-%{arch}\n” glibc glibc-devel libstdc++ libgcc
This rpm command must return a report as follows where xxx is the version number:
• glibc-xxx-x86_64
• glibc-xxx-i686
• glibc-devel-xxx-x86_64
• glibc-devel-xxx-i386
• libstdc++-xxx-x86_64
• ibstdc++-xxx-i386
316

• libgcc-xxx-x86_64
• libgcc-xxx-i386
Only the 64-bit version of libstdc++-devel needs to be installed. To verify that the system contains the64-bit version of the libstdc++-devel package, type:
rpm -q --queryformat “%{name}-%{version}-%{release}-%{arch}\n” libstdc++-devel
This must return a report as follows where xxx is the version number:
libstdc++-devel-xxx-x86_64
Red Hat Enterprise Linux Release 7.3 and Above
Ensure that the following packages are installed on the Red Hat Enterprise Linux Release 7.3 operatingsystem and above:
• kernel-3.10.0-229.11.1.el7.x86_64 or higher, configured with smp enabled
• kernel-devel-3.10.0-229.11.1.el7.x86_64 or higher, matching the running smp enabled kernel
• kernel-headers-3.10.0-229.11.1.el7.x86_64 or higher, matching the running smp enabled kernel
• bash-4.2.46-12.el7 or higher
• bind-utils-9.9.4-18.el7 and bind-libs-lite-9.9.4-18.el7 or higher
• coreutils-8.22-12.el7 or higher
• rpm-4.11.1-25.el7 or higher
• gcc, version 4.8.3-9.el7 or higher
• 64 bit libstdc++, libstdc++-devel, version 4.8.3-9.el7 or higher
• 32 bit libstdc++, libstdc++-devel, version 4.8.3-9.el7 or higher
• 64 bit glibc, glibc-devel, version glibc-2.17-78.el7 or higher
• 32 bit glibc, glibc-devel, version glibc-2.17-78.el7 or higher
• xinetd-2.3.15-12.el7 or higher
• java-1.6.0-openjdk-1.6.0.0-1.20.b17 or higher
• perl-Env-1.04-2.el7
317

Other Prerequisites to Install Signalware on a Linux Platform
The following are the prerequisites to install Signalware on a Linux platform:
• Uninstall any operating system Stream Control Transmission Protocol (SCTP) packages before installingSignalware. For example, none of the following packages should be installed:
[root@sbr-wf-eng1 ~]# yum info *sctp*
Loaded plugins: product-id, rhnplugin, subscription-manager
Updating Red Hat repositories.
Available Packages
Name : lksctp-tools
Arch : x86_64
Version : 1.0.17
Release : 2.el7
Size : 227 k
Repo : installed
From repo : rhel-7-server-rpms
Summary : User-space access to Linux Kernel SCTP
URL : http://lksctp.sourceforge.net
License : GPLv2 and GPLv2+ and LGPLv2 and MIT
Description : This is the lksctp-tools package for Linux Kernel SCTP (Stream Control
Transmission Protocol) Reference Implementation. This package is intended to
supplement the Linux Kernel SCTP Reference Implementation now available in the
Linux kernel source tree in versions 2.5.36 and following. For more information
on LKSCTP see the package documentation README file, section titled "LKSCTP - Linux
Kernel SCTP." This package contains the base run-time library and command-line
tools.
• Copy the Signalware 9 license file to the /etc directory.
• If you are migrating from an existing installation, you can use the existing Signalware 9 license as longas the license is applied on the same host (hostid).
• To obtain a new license file for Signalware 9, contact your Juniper Networks representative.
• Create a UNIX user account called siguser as a member of the users group.
• Download Signalware packages to a temporary working directory or copy from a Signalware CD.
• For RedHat Enterprise Linux 7.3 or later, download “Signalware 9 SP6.v” (base package) and “Signalware9 SP6.C” (upgrade).
• Install the Signalware packages.
318

• For RedHat Enterprise Linux 7.3 or later, install the “Signalware 9 SP6.v” package first and then upgradeto “Signalware 9 SP6.C”.
• To troubleshoot errors that might occur during the installation and configuration process, see“Troubleshooting Signalware Installation and Configuration” on page 328.
NOTE: On RHEL 7.5 or later, you must disable the kernel address space layout randomization(KASLR) feature on Linux Kernel. For more information on how to disable the KASLR feature,see Table 35 on page 329.
Installing Signalware
To install Signalware on a Linux platform:
1. Log in as root. We recommend that you not use a console port.
2. Stop the RADIUS process.
3. Copy the Signalware 9 license file to the /etc directory.
4. Create a UNIX group called users and verify that the group exists.
• To add a group, execute the UNIX groupadd command:$ groupadd users
• To view a list of existing groups, execute the UNIX cat command:$ cat /etc/group
5. Create a UNIX user account called siguser as a member of the users group.
6. Start the Signalware installation.
319

• For Red Hat Enterprise Linux 7.3 or later, get the “Signalware 9 SP6.v” package setup file (swsetup)by running <package-directory>/rpm -Uvh --replacefilesOMNI-UTIL-K269.02SP6EECNv.OMNIUTIL.ECN9S6v.7-6.x86_64.rpm.
<package-directory> is the directory pathwhere the “Signalware 9 SP6.v” package setup file (swsetup)is located.
Now, you can find the swsetup file in the /opt/swintall/bin location.
Start the “Signalware 9 SP6.C” installation by executing /opt/swintall/bin/swsetup.
The script prompts you for a user identifier.
7. Enter the unique user that you had created earlier. For example, siguser.
The script prompts you for a scheduling priority.
8. Press Enter to accept the default value of 10.
The system checks for previous installations, a valid package file, and updates. Then the Product Menuis displayed.
HOST: bng-lnx-perf2 Ulticom (R) Product Menu siguser (root)
Product Menu 10 May 2018 12:15
1 = Signalware .................... Develop/Deploy SS7 Services
2 = nSignia ....................... SS7 and IP Networks Convergence
3 = WLAN Libraries ................ Authentication/SMS Library Source
4 = Exit
>
Type 1-4 <enter>; <esc> or F11=Previous Menu; F12=Help; ?<enter>=Status
9. Enter 1 at the command prompt to install Signalware.
HOST: bng-lnx-perf2 Ulticom (R) Product Menu siguser (root)
Signalware Main Menu 10 May 2018 12:16
1 = Install/Configure (Signalware is uninstalled or off-line)
2 = Online Upgrade (Signalware is installed and running)
3 = Installation Status and Reports
4 = Installation Maintenance
5 = Configuration Maintenance
6 = Start an Installed Instance of Signalware
320
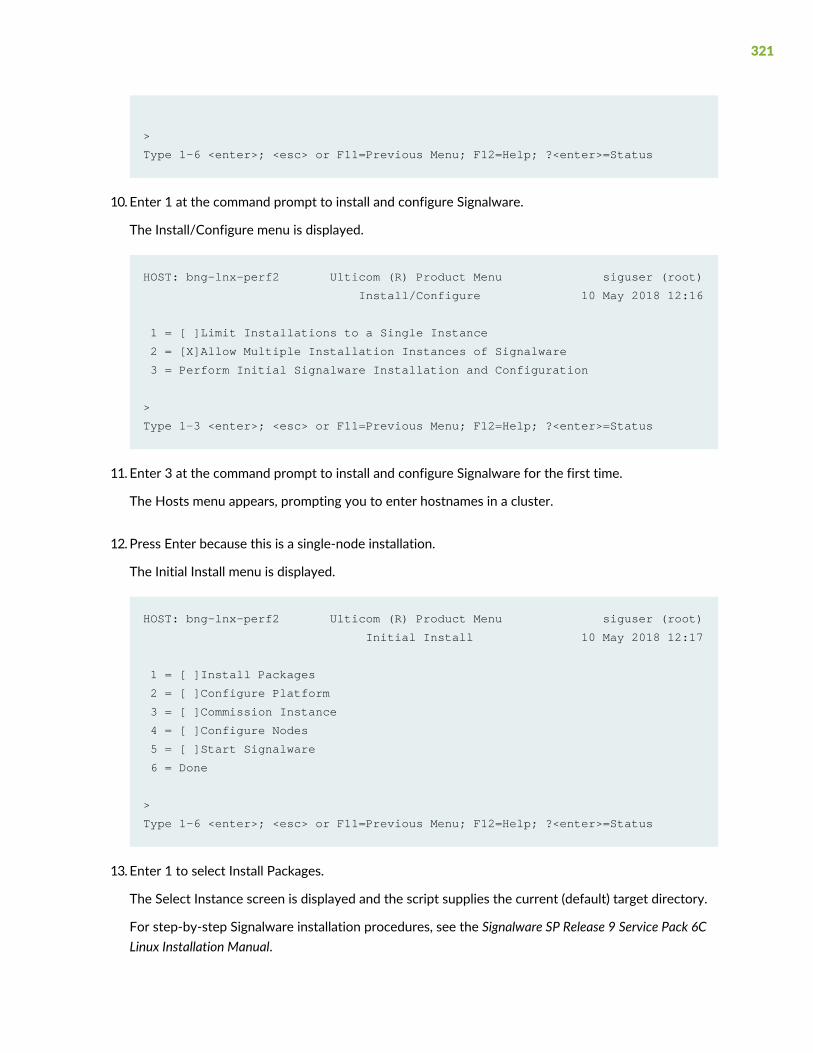
>
Type 1-6 <enter>; <esc> or F11=Previous Menu; F12=Help; ?<enter>=Status
10. Enter 1 at the command prompt to install and configure Signalware.
The Install/Configure menu is displayed.
HOST: bng-lnx-perf2 Ulticom (R) Product Menu siguser (root)
Install/Configure 10 May 2018 12:16
1 = [ ]Limit Installations to a Single Instance
2 = [X]Allow Multiple Installation Instances of Signalware
3 = Perform Initial Signalware Installation and Configuration
>
Type 1-3 <enter>; <esc> or F11=Previous Menu; F12=Help; ?<enter>=Status
11. Enter 3 at the command prompt to install and configure Signalware for the first time.
The Hosts menu appears, prompting you to enter hostnames in a cluster.
12. Press Enter because this is a single-node installation.
The Initial Install menu is displayed.
HOST: bng-lnx-perf2 Ulticom (R) Product Menu siguser (root)
Initial Install 10 May 2018 12:17
1 = [ ]Install Packages
2 = [ ]Configure Platform
3 = [ ]Commission Instance
4 = [ ]Configure Nodes
5 = [ ]Start Signalware
6 = Done
>
Type 1-6 <enter>; <esc> or F11=Previous Menu; F12=Help; ?<enter>=Status
13. Enter 1 to select Install Packages.
The Select Instance screen is displayed and the script supplies the current (default) target directory.
For step-by-step Signalware installation procedures, see the Signalware SP Release 9 Service Pack 6CLinux Installation Manual.
321

14.Press Enter to accept the default target directory or specify an alternative location and press Enter.
The script prompts you to confirm the location.
15. Enter Y to continue.
The Package Directory screen is displayed.
16. Enter the full path to the directory containing the packages.
The packages are validated and installed.
The Protocol Selection menu is displayed.
17. Select the protocol that is appropriate to your location and system. Then press Enter.
As each protocol is activated, the screen is displayed again. When all protocols have been activated,type 0 and press Enter to continue.
NOTE: We recommend that you select only one protocol, typically option “2 = ITUProtocol”.Selecting multiple protocols may cause routing problems and complicate the MMLconfigurations in later steps.
The protocol you select here must match the protocol choice you make in the later steps.For example, if you have selected option “2 = ITU Protocol”, then youmust select the protocol“C7”.
The following information helps you to map the protocol selection:
• ANSI protocol corresponds to the A7 protocol
• ITU protocol corresponds to the C7 protocol
• CHINA protocol corresponds to the CH7 protocol
• JAPAN protocol corresponds to the J7 protocol
The Interface Selection menu is displayed.
18. Type 3 to select M3UA (SIGTRAN) (the interfaces supported by Steel-Belted Radius Carrier) and pressEnter.
When the screen is redisplayed, type 0 and press Enter to continue.
The first page of the Select Packages menu is displayed.
19.Review the packages to be installed. (Generally, accept the defaults and do not deselect any packages.
322
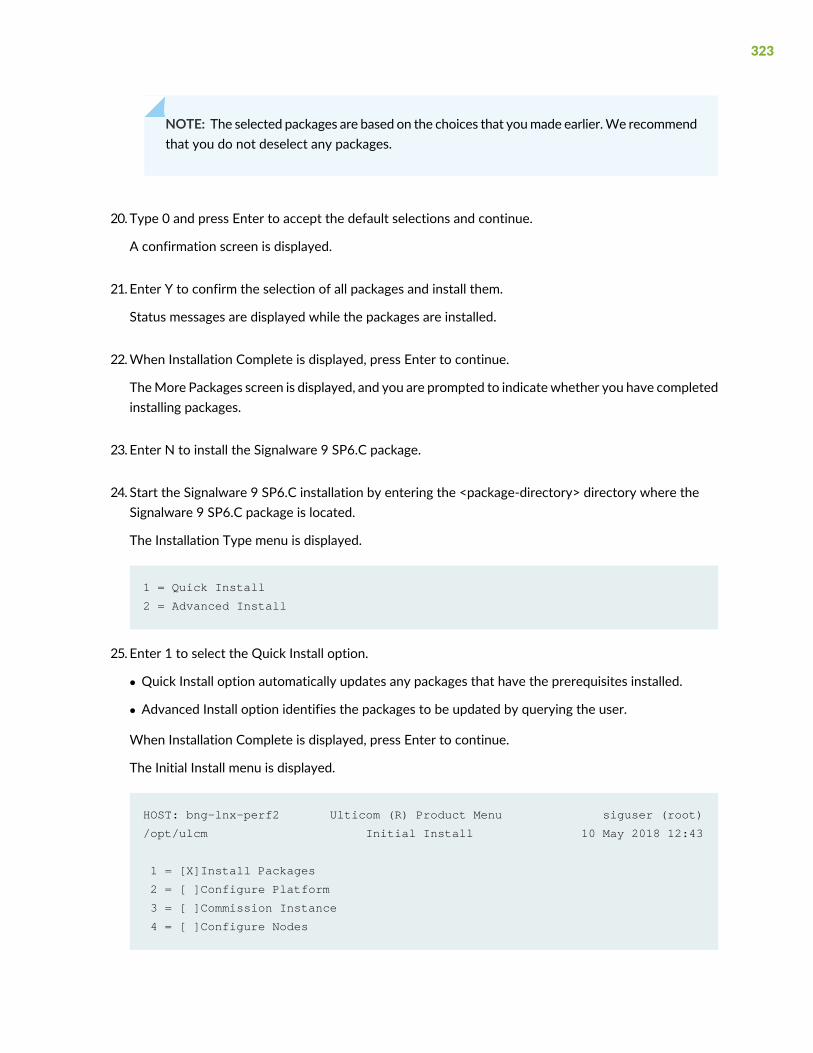
NOTE: The selected packages are based on the choices that youmade earlier.We recommendthat you do not deselect any packages.
20. Type 0 and press Enter to accept the default selections and continue.
A confirmation screen is displayed.
21. Enter Y to confirm the selection of all packages and install them.
Status messages are displayed while the packages are installed.
22.When Installation Complete is displayed, press Enter to continue.
TheMore Packages screen is displayed, and you are prompted to indicatewhether you have completedinstalling packages.
23. Enter N to install the Signalware 9 SP6.C package.
24. Start the Signalware 9 SP6.C installation by entering the <package-directory> directory where theSignalware 9 SP6.C package is located.
The Installation Type menu is displayed.
1 = Quick Install
2 = Advanced Install
25. Enter 1 to select the Quick Install option.
• Quick Install option automatically updates any packages that have the prerequisites installed.
• Advanced Install option identifies the packages to be updated by querying the user.
When Installation Complete is displayed, press Enter to continue.
The Initial Install menu is displayed.
HOST: bng-lnx-perf2 Ulticom (R) Product Menu siguser (root)
/opt/ulcm Initial Install 10 May 2018 12:43
1 = [X]Install Packages
2 = [ ]Configure Platform
3 = [ ]Commission Instance
4 = [ ]Configure Nodes
323
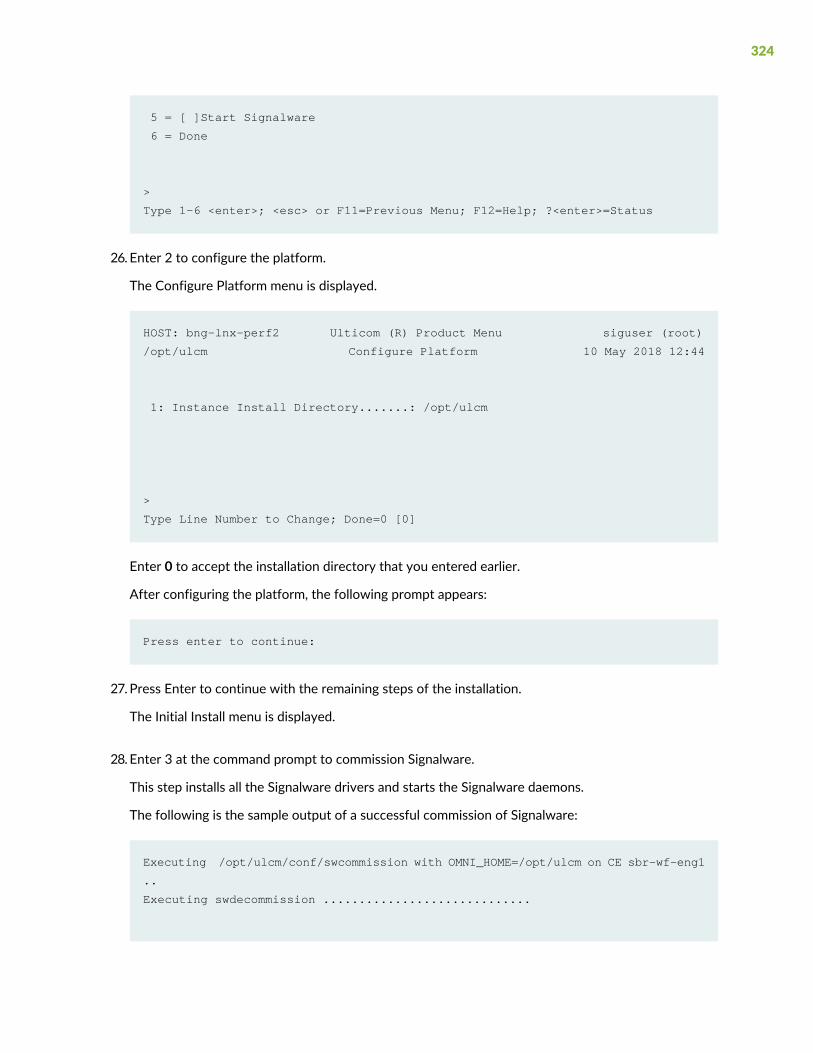
5 = [ ]Start Signalware
6 = Done
>
Type 1-6 <enter>; <esc> or F11=Previous Menu; F12=Help; ?<enter>=Status
26. Enter 2 to configure the platform.
The Configure Platform menu is displayed.
HOST: bng-lnx-perf2 Ulticom (R) Product Menu siguser (root)
/opt/ulcm Configure Platform 10 May 2018 12:44
1: Instance Install Directory.......: /opt/ulcm
>
Type Line Number to Change; Done=0 [0]
Enter 0 to accept the installation directory that you entered earlier.
After configuring the platform, the following prompt appears:
Press enter to continue:
27.Press Enter to continue with the remaining steps of the installation.
The Initial Install menu is displayed.
28. Enter 3 at the command prompt to commission Signalware.
This step installs all the Signalware drivers and starts the Signalware daemons.
The following is the sample output of a successful commission of Signalware:
Executing /opt/ulcm/conf/swcommission with OMNI_HOME=/opt/ulcm on CE sbr-wf-eng1
..
Executing swdecommission .............................
324

Removing Signalware information from /etc/sysctl.conf
Removing Signalware information from /etc/ld.so.conf
Commissioning instance 1 in progress..........
.
installing sbin/sctpd
installing sbin/ulcm_start_native_sctp_wrap
installing bin/sctp_addr
installing bin/sctp_catcher
installing bin/sctp_discard
installing bin/sctp_echo
installing bin/sctp_pitcher
installing bin/sctp_stat
installing bin/sctp_monitor
installing bin/sctp_telnet
installing bin/sctp_daytime
installing lib/libsctp.so
installing lib/libsctp.a
installing include/sctp.h
installing include/sctp_notify.h.
Starting SCTP Daemon...
........
SW_HOME=/opt/ulcm (instance 1) is commissioned.
After the Signalware is commissioned successfully, the following prompt is displayed:
Press enter to continue:
29.Press Enter to continue with the remaining steps of the installation.
The Initial Install menu is displayed.
30. Enter 4 at the command prompt to configure the node.
The Enter SHM screen is displayed.
HOST: bng-lnx-perf2 Ulticom (R) Product Menu siguser (root)
/opt/ulcm Enter SHM 10 May 2018 12:51
In order to perform this operation, the system needs a SHM value.
325
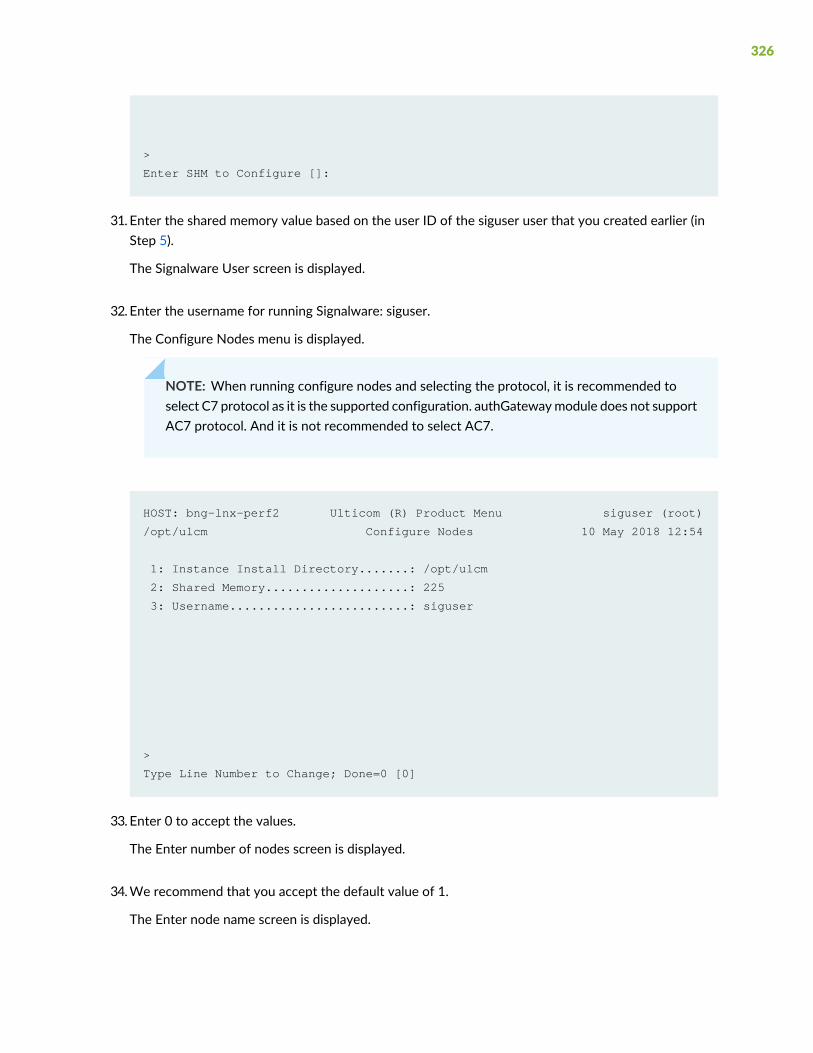
>
Enter SHM to Configure []:
31. Enter the shared memory value based on the user ID of the siguser user that you created earlier (inStep 5).
The Signalware User screen is displayed.
32. Enter the username for running Signalware: siguser.
The Configure Nodes menu is displayed.
NOTE: When running configure nodes and selecting the protocol, it is recommended toselect C7 protocol as it is the supported configuration. authGatewaymodule does not supportAC7 protocol. And it is not recommended to select AC7.
HOST: bng-lnx-perf2 Ulticom (R) Product Menu siguser (root)
/opt/ulcm Configure Nodes 10 May 2018 12:54
1: Instance Install Directory.......: /opt/ulcm
2: Shared Memory....................: 225
3: Username.........................: siguser
>
Type Line Number to Change; Done=0 [0]
33. Enter 0 to accept the values.
The Enter number of nodes screen is displayed.
34.We recommend that you accept the default value of 1.
The Enter node name screen is displayed.
326

35. Enter the name of the node.
The Select Protocol screen is displayed.
HOST: bng-lnx-perf2 Ulticom (R) Product Menu siguser (root)
/opt/ulcm Select Protocol 10 May 2018 12:54
1 = A7
2 = C7
3 = CH7
4 = J7
>2
Type 1-4 <enter>; <esc> or F11=Previous Menu; F12=Help; ?<enter>=Status
NOTE: The protocol you select here must match the corresponding protocol selected in theearlier steps. For example, if you have selected option “2 = ITU Protocol”, then you mustselect the protocol “C7”.
The following information helps you to map the protocol selection:
• A7 protocol corresponds to the ANSI protocol
• C7 protocol corresponds to the ITU protocol
• CH7 protocol corresponds to the CHINA protocol
• J7 protocol corresponds to the JAPAN protocol
The AC7 protocol (if it appears) corresponds to the hybrid ANSI/ITU. We recommend thatyou avoid selecting the AC7 protocol because it is not a proper superset of the A7 and C7protocols. Selecting the AC7 protocol may cause routing problems and complicate the MMLconfigurations in later steps.
36. Enter the protocol for the node.
The Select Protocol Type screen is displayed.
37. Enter the protocol type for the node. Select 3 for SIGTRAN.
The Select Options screen is displayed.
327

38.After the logical node and shared memory (SHM) values are configured successfully, the followingprompt is displayed:
Press enter to continue:
39.Press Enter to continue with the remaining steps of the installation.
The Initial Install menu appears.
40. Enter 5 at the command prompt to start Signalware.
41. Enter 4 at the command prompt to exit the Initial Install menu.
This completes the Signalware installation on a Linux platform.
NOTE:The following points has to be considered, if you are planning for Installing/Upgrade of Signalwareversion to 9s6C on RHEL 7.6 or Later version.
• Before installing Signalware on RHEL 7.6 or later, you must disable the Hardened User-copyfeature, which is enabled by default on RHEL 7.6 or later.
• Signalware is incompatiblewithHardenedUser-copy feature and the featureMUST be disabledto ensure the Omnimon debugger is 100% safe to run in production network.
• For detailed information of system perquisites and installing procedure, refer SignalwareInstallation/Upgrade.
Troubleshooting Signalware Installation and Configuration
This section describes how to troubleshoot errors that might occur during the installation and configurationof Signalware on a Linux platform.
328

Table 35: Troubleshooting Signalware Installation and Configuration
SolutionError
| ERROR |Cannot find the kernel source config file/proc/config.gz or/lib/modules/3.10.0-693.el7.x86_64/build/.config.Please ensure that a config file that matches therunning kernel exists.rm: cannot remove `.': Is a directoryrm: cannot remove `..': Is a directory
329

Table 35: Troubleshooting Signalware Installation and Configuration (continued)
SolutionError
This error occurs when you configure the platform if the runningkernel != kernel-devel version.
If you have used a precompiled kernel, you must make sure thatyour kernel sources have the same kernel configuration used forcompiling the kernel. You must copy the kernel configurationfrom /proc/config.gz, or /boot/config-<version> into/lib/modules/uname -r/build/.config by using the gunzip </proc/config.gz > /lib/modules/$(uname -r)/build/.configcommand.
Recompile and install ndiswrapper.
[root@sbr-wf-eng1]# yum info kernel|more
Loaded plugins: product-id, rhnplugin,
subscription-manager Updating Red Hat
repositories.
Installed Packages
Name : kernel
Arch : x86_64
Version : 3.10.0
Release : 693.el7
[root@sbr-wf-eng1]# yum info kernel-devel|more
Loaded plugins: product-id, rhnplugin,
subscription-manager Updating Red Hat
repositories.
Installed Packages
Name : kernel-devel
Arch : x86_64
Version : 3.10.0
Release : 693.el7
[root@sbr-wf-eng1]# yum info kernel-headers|more
Loaded plugins: product-id, rhnplugin,
subscription-manager Updating Red Hat
repositories.
Installed Packages
Name : kernel-headers
Arch : x86_64
Version : 3.10.0
Release : 693.el7
[root@sbr-wf-eng1]# yum install
kernel-devel-3.10.0-693.el7
[root@sbr-wf-eng1]# yum install
330
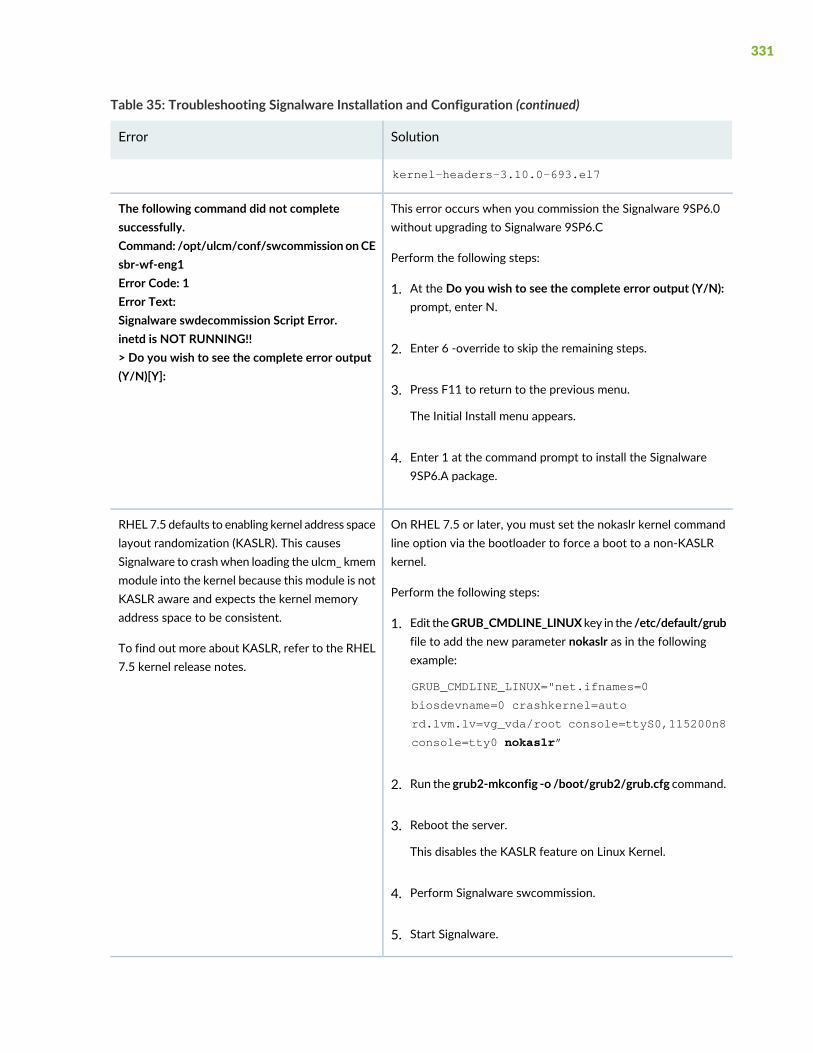
Table 35: Troubleshooting Signalware Installation and Configuration (continued)
SolutionError
kernel-headers-3.10.0-693.el7
This error occurs when you commission the Signalware 9SP6.0without upgrading to Signalware 9SP6.C
Perform the following steps:
1. At the Do you wish to see the complete error output (Y/N):prompt, enter N.
2. Enter 6 -override to skip the remaining steps.
3. Press F11 to return to the previous menu.
The Initial Install menu appears.
4. Enter 1 at the command prompt to install the Signalware9SP6.A package.
The following command did not completesuccessfully.Command: /opt/ulcm/conf/swcommissiononCEsbr-wf-eng1Error Code: 1Error Text:Signalware swdecommission Script Error.inetd is NOT RUNNING!!> Do you wish to see the complete error output(Y/N)[Y]:
On RHEL 7.5 or later, you must set the nokaslr kernel commandline option via the bootloader to force a boot to a non-KASLRkernel.
Perform the following steps:
1. Edit theGRUB_CMDLINE_LINUX key in the /etc/default/grubfile to add the new parameter nokaslr as in the followingexample:
GRUB_CMDLINE_LINUX="net.ifnames=0
biosdevname=0 crashkernel=auto
rd.lvm.lv=vg_vda/root console=ttyS0,115200n8
console=tty0 nokaslr”
2. Run the grub2-mkconfig -o /boot/grub2/grub.cfg command.
3. Reboot the server.
This disables the KASLR feature on Linux Kernel.
4. Perform Signalware swcommission.
5. Start Signalware.
RHEL 7.5 defaults to enabling kernel address spacelayout randomization (KASLR). This causesSignalware to crashwhen loading the ulcm_ kmemmodule into the kernel because this module is notKASLR aware and expects the kernel memoryaddress space to be consistent.
To find out more about KASLR, refer to the RHEL7.5 kernel release notes.
331
CHAPTER 15
Configuring SIGTRAN/IP Network CommunicationFiles
IN THIS CHAPTER
Starting and Stopping Signalware | 332
Configuring Communication Files Overview | 333
Communication Pathways and Corresponding Files | 334
Configuration Activities | 335
Signalware MML Commands | 335
Defining Links, Link Sets, and Route Sets | 336
Configuring authGateway and GWrelay Applications for HLR Communication | 338
Loading the MML Configuration Settings | 354
Sample authGateway Command and File | 355
This chapter discusses configuring Signalware to communicate through SIGTRAN (provided as a moduleof Signalware) to allow SS7 communication over IP networks. These topics are included in this chapter:
Starting and Stopping Signalware
To start the Signalware system manually, execute: /$OMNI_HOME/bin/go.omni.
To stop Signalware, execute: /$OMNI_HOME/bin/Terminate 0.
Configuring Signalware to Start Automatically on Reboot
We recommend that you configure Signalware so that it restarts automatically when the system is rebooted.If you choose not to configure Signalware in this way, you need to restart Signalware with the go.omnicommand whenever the system reboots.
To configure Signalware to start automatically on reboot:
332

1. Change to superuser mode.
Execute:$su
2. Copy the S91omni file as omni into the directory /etc/init.d. The S91omni file is located atradius/samples/SIM.
3. Edit the omni file to change the SHM= line to specify the SHM value set during Signalware installation.
Example:SHM = 102
To find your user ID (which is the same as the SHM), execute id at the prompt.
4. Change the run permissions.
Execute:$ chmod 755 omni
5. Create links into the /etc/rc3.d directory.
Execute:
$ ln -s /etc/init.d/omni /etc/rc3.d/S91omni
6. Make sure a subdirectory called Logs is in the directory where Signalware is installed. If necessary,create the Logs directory.
Configuring Communication Files Overview
When configuring the communication pathways between Steel-Belted Radius Carrier and equipment inthe SS7 network, you need to configure certain files based on your choices of the following:
• Type of network equipment Steel-Belted Radius Carrier communicates with for processing authorizationrequests. (See Table 36 on page 333 for information of which type of equipment is used.)
• HLR
• Type of network.
• SS7 over IP (SIGTRAN)
Table 36: Network Equipment Used for Authorization
Network EquipmentAction Needed to Process Access-Request
HLRObtain SIM triplets
333
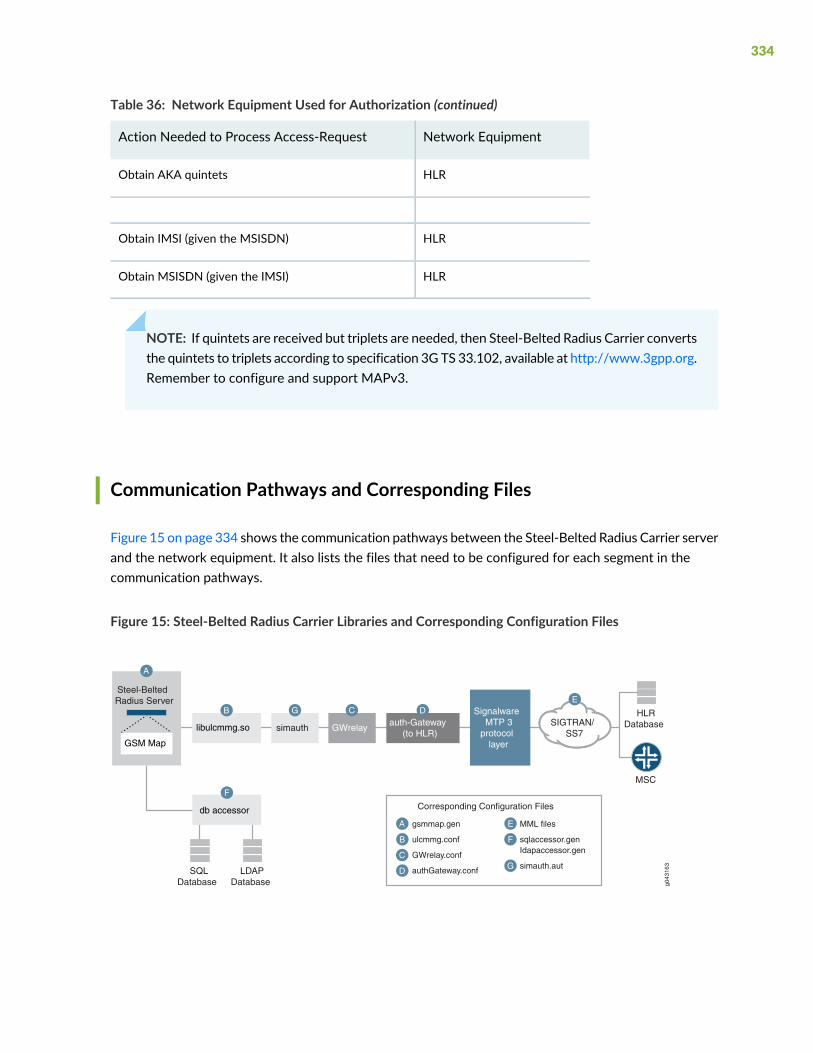
Table 36: Network Equipment Used for Authorization (continued)
Network EquipmentAction Needed to Process Access-Request
HLRObtain AKA quintets
HLRObtain IMSI (given the MSISDN)
HLRObtain MSISDN (given the IMSI)
NOTE: If quintets are received but triplets are needed, then Steel-Belted Radius Carrier convertsthe quintets to triplets according to specification 3GTS 33.102, available at http://www.3gpp.org.Remember to configure and support MAPv3.
Communication Pathways and Corresponding Files
Figure 15 on page 334 shows the communication pathways between the Steel-Belted Radius Carrier serverand the network equipment. It also lists the files that need to be configured for each segment in thecommunication pathways.
Figure 15: Steel-Belted Radius Carrier Libraries and Corresponding Configuration Files
C
C
G
G
D
D
F
F
B
B
A
A
E
E
g043
163
HLRDatabase
MSC
GWrelaysimauthauth-Gateway
(to HLR)
Corresponding Configuration Files
gsmmap.gen
ulcmmg.conf
GWrelay.conf
authGateway.conf
MML files
sqlaccessor.genIdapaccessor.gen
simauth.autLDAP
Database
libulcmmg.so
SignalwareMTP 3
protocollayer
Steel-BeltedRadius Server
GSM Map
SIGTRAN/SS7
SQLDatabase
db accessor
334

Configuration Activities
To configure the communication pathways:
1. Install Signalware. For details on the recommended procedure to install and run Signalware 9, see“Installing Signalware 9 on Linux” on page 315.
2. Define links, link sets, and route sets with MML commands for SS7 or SIGTRAN. See “Defining Links,Link Sets, and Route Sets” on page 336.
3. Configure the authGateway and GWrelay applications for HLR communication. See “ConfiguringauthGateway and GWrelay Applications for HLR Communication” on page 338.
4. Load the MML configuration settings. See “Loading the MML Configuration Settings” on page 354.
5. Start Signalware.
Signalware MML Commands
After Signalware is installed, you can configure and provision Signalware using commands sent to theSignalware system. For details about installing and running Signalware, see“Installing Signalware 9 on Linux” on page 315.
These commands are in Man-Machine Language (MML). You can input MML commands individually usingthe SWMML program, or save them in a file. The procedures in this chapter assume that you save theMML commands to .mml text files and execute them as described in “Loading the MML ConfigurationSettings” on page 354.
The basic activities that require MML commands are:
• Setting up link sets, links, and routes—See “Defining Links, Link Sets, and Route Sets” on page 336.
• Configuring the authGateway location and startup information—See “Configuring authGateway andGWrelay Applications for HLR Communication” on page 338.
• Loading the MML configuration settings—See “Loading the MML Configuration Settings” on page 354.
To view a list of all MML commands and definitions, enter: man MML_Intro
To view specific information about any MML command, enter: man cmdname.
For example:$ man CRTE-LSET
335
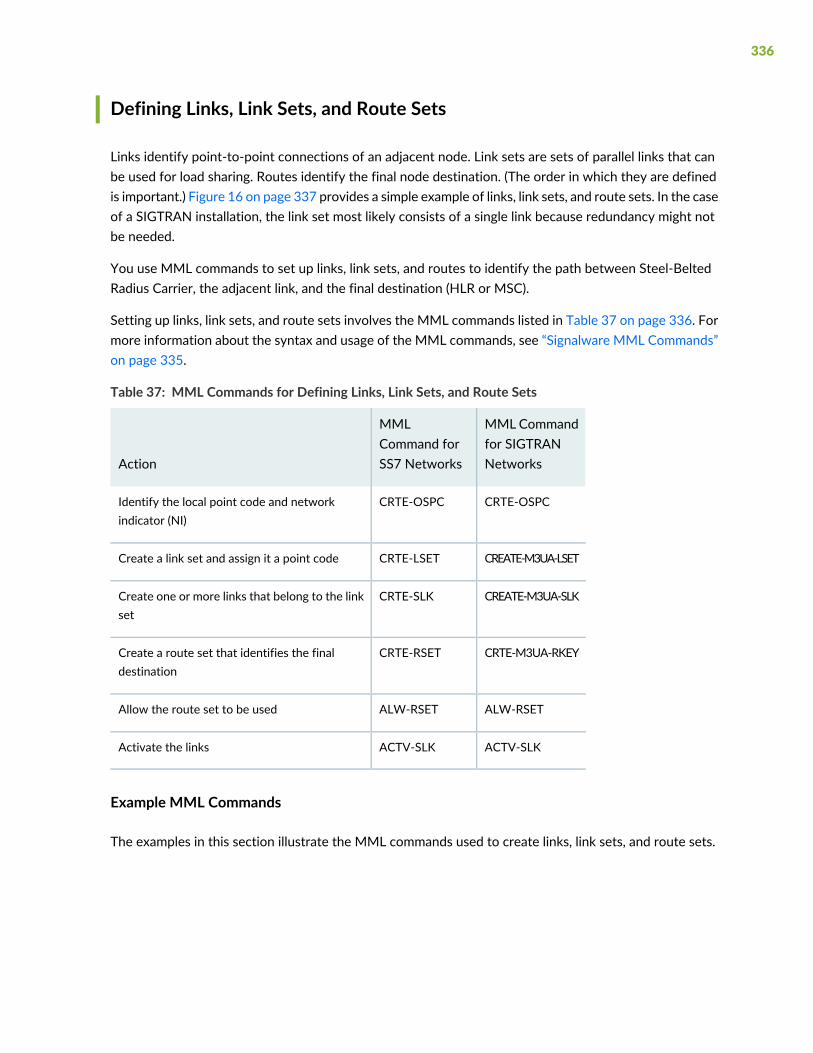
Defining Links, Link Sets, and Route Sets
Links identify point-to-point connections of an adjacent node. Link sets are sets of parallel links that canbe used for load sharing. Routes identify the final node destination. (The order in which they are definedis important.) Figure 16 on page 337 provides a simple example of links, link sets, and route sets. In the caseof a SIGTRAN installation, the link set most likely consists of a single link because redundancy might notbe needed.
You use MML commands to set up links, link sets, and routes to identify the path between Steel-BeltedRadius Carrier, the adjacent link, and the final destination (HLR or MSC).
Setting up links, link sets, and route sets involves the MML commands listed in Table 37 on page 336. Formore information about the syntax and usage of the MML commands, see “Signalware MML Commands”on page 335.
Table 37: MML Commands for Defining Links, Link Sets, and Route Sets
MMLCommandfor SIGTRANNetworks
MMLCommand forSS7 NetworksAction
CRTE-OSPCCRTE-OSPCIdentify the local point code and networkindicator (NI)
CREATE-M3UA-LSETCRTE-LSETCreate a link set and assign it a point code
CREATE-M3UA-SLKCRTE-SLKCreate one or more links that belong to the linkset
CRTE-M3UA-RKEYCRTE-RSETCreate a route set that identifies the finaldestination
ALW-RSETALW-RSETAllow the route set to be used
ACTV-SLKACTV-SLKActivate the links
Example MML Commands
The examples in this section illustrate the MML commands used to create links, link sets, and route sets.
336

Figure 16: Links, Link Sets, and Route Sets
Figure 17: MML Provisioning
SS7 Example: Creating Links, Link Sets, and Route Sets
CRTE-OSPC:PC=14275,NI=NAT0;CRTE-LSET:LSET=LSET1,PC=253;CRTE-SLK:SLK=LNK1,LSET=LSET1,SLC=0,SPEED=64K,PORT=0,CHANNEL=17CRTE-RSET:RSET=RSET1,PC=253,RTES=LSET1,LOADSHR=YES;CRTE-RSET:RSET=RSET2,PC=61,RTES=LSET1,LOADSHR=YES;ALW-RSET:RSET=RSET1;ALW-RSET:RSET=RSET2;ACTV-SLK:SLK=LNK1;
SIGTRAN Example: Creating Links, Link Sets, and Route Sets
CREATE-OSPC:PC=4004,NI=INT0;
337
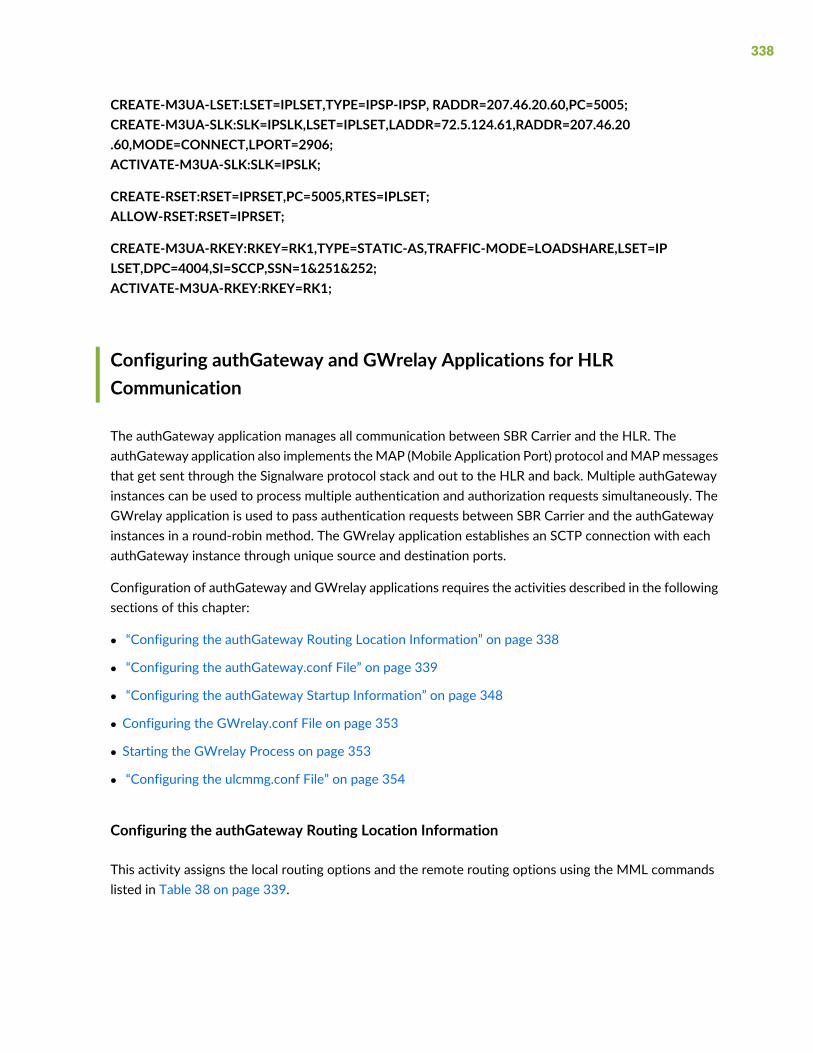
CREATE-M3UA-LSET:LSET=IPLSET,TYPE=IPSP-IPSP, RADDR=207.46.20.60,PC=5005;CREATE-M3UA-SLK:SLK=IPSLK,LSET=IPLSET,LADDR=72.5.124.61,RADDR=207.46.20.60,MODE=CONNECT,LPORT=2906;ACTIVATE-M3UA-SLK:SLK=IPSLK;
CREATE-RSET:RSET=IPRSET,PC=5005,RTES=IPLSET;ALLOW-RSET:RSET=IPRSET;
CREATE-M3UA-RKEY:RKEY=RK1,TYPE=STATIC-AS,TRAFFIC-MODE=LOADSHARE,LSET=IPLSET,DPC=4004,SI=SCCP,SSN=1&251&252;ACTIVATE-M3UA-RKEY:RKEY=RK1;
Configuring authGateway and GWrelay Applications for HLRCommunication
The authGateway application manages all communication between SBR Carrier and the HLR. TheauthGateway application also implements theMAP (Mobile Application Port) protocol andMAPmessagesthat get sent through the Signalware protocol stack and out to the HLR and back. Multiple authGatewayinstances can be used to process multiple authentication and authorization requests simultaneously. TheGWrelay application is used to pass authentication requests between SBR Carrier and the authGatewayinstances in a round-robin method. The GWrelay application establishes an SCTP connection with eachauthGateway instance through unique source and destination ports.
Configuration of authGateway and GWrelay applications requires the activities described in the followingsections of this chapter:
• “Configuring the authGateway Routing Location Information” on page 338
• “Configuring the authGateway.conf File” on page 339
• “Configuring the authGateway Startup Information” on page 348
• Configuring the GWrelay.conf File on page 353
• Starting the GWrelay Process on page 353
• “Configuring the ulcmmg.conf File” on page 354
Configuring the authGateway Routing Location Information
This activity assigns the local routing options and the remote routing options using the MML commandslisted in Table 38 on page 339.
338

Table 38: MML Commands for Configuring authGateway Routing Location
DescriptionMML Command
Identify the concerned point code (CPC), which is the destinationpoint code and the local application (authGateway).
CREATE-CPC
Identify the point code of the HLR and the remote application.CREATE-REMSSN
Create a global title translation for the remote HLR (if Global Titlerouting is used).
CREATE-GT
Formore information about the syntax and usage of theMML commands, see “SignalwareMMLCommands”on page 335.
Example 1—Global Title Routing Using Global Title Identification
In the following example, these actions take place:
Line 1 (CREATE-GT): Global Title type translation is used so that digits 22201 are sent to PC, SSN=61, 6.RI=GT notifies 61,6 that it needs to find the next routing hop for the request.
CREATE-GT:TT=0,NP=ISDN-MOB,NA=INT,DIG="22201",PC=61,SSN=6,RI=GT;
Example 2—PCSSN Routing Using Point Code Identification
In the following example, these actions take place:
Line 1 (CREATE-CPC): authGateway is assigned a subsystem number (SSN) of 7 on the local host and theconcerned point code on the HLR is identified as 61.
Line 2 (CREATE-REMSSN): The subsystem number (application) on the remote host is identified as 6.
Line 3 (CREATE-GT): Global Title type translation is used so that digits 22201 are sent to PC, SSN=61, 6.RI=PCSSN indicates that digits 22201 are handled by PC, SSN=61, 6.
CREATE-CPC:PC=61,SSN=7;CREATE-REMSSN:PC=61,SSN=6;CREATE-GT:TT=0,NP=ISDN-MOB,NA=INT,DIG="22201",PC=61,SSN=6,RI=PCSSN;
NOTE: MML commands are saved in MML files, which can be loaded into Signalware. See“Loading the MML Configuration Settings” on page 354.
Configuring the authGateway.conf File
The authGateway.conf file configures the following authGateway options:
339

• Remote routing options control how the remote HLR is addressed based on the incoming IMSI.
• Authorization options control whether or not a subscriber requesting an account is authorized forWLANaccess, and which Steel-Belted Radius Carrier profile or native user is used.
• The FetchMSISDNRoutingInfoLCS parameter specifies the type of message that is used to requestMSISDN information from an HLR or HSS, and the CamelSupportedPhases parameter specifies whichCAMEL phase services are supported in the network.
• Common configurations of the authGateway process.
• Process-specific options specify settings related to the authGateway process.
[Routing-Configuration] Section
Each line in the authGateway.conf file represents a target HLR, where eachHLR has its own routing optionsand authorization options. Indicate each HLR listed in this file with the initial digits of the subscriberpassword, specified by the odigits option.
Table 39 on page 340 lists the remote routing options for the authGateway.conf file.
Table 39: authGateway.conf [Routing-Configuration] Section Syntax
PurposeOption
Bearer Service. See “Authorization Options” on page 341.bs
The msisdn option can be used in place of ndigits and odigits when notranslation is required. See “Example 2—authGateway.conf file[Routing-Configuration] Section” on page 343.
msisdn
Replacement digits for numbering plan translation (hybrid IMSI).ndigits
Operator-Determined Barring. See “Authorization Options” on page 341.odb
Initial digits of IMSI or password for this HLR. For each request, the firstdigits of the IMSI are compared with odigits. The first line of theconfiguration file that matches is selected for the current request.
If the routing indicator (rri) is 0 (Global Title), the leading digits are replacedwith the new digits (ndigits) to perform the numbering plan translation.
Example of direct replacement:
If the rule is “odigits 12345 ndigits 98765” and the IMSI is123456789012345, the resulting digits are 987656789012345.
Example of wildcard replacement:
If the rule is “odigits 12345* ndigits 98765” and the IMSI is123456789012345, the resulting digits are 98765.
odigits
340

Table 39: authGateway.conf [Routing-Configuration] Section Syntax (continued)
PurposeOption
(Global Title only) GTI value. 4 for C7; 2 for A7. (Usually 4.)rgti
(Global Title only) Nature of Address Indicator.rnai
(Global Title only) Numbering Plan.
Acceptable values are:
1—ISDN/Telephony
3—DATA
4—TELEX
5—Maritime Mobile
6—Land/Mobile
7—ISDN/Mobile
10—British Telecom special 1
11—British Telecom special 2
14—Private Network
rnp
Remote Point Code. Point Code of HLR or MSC.rpc
Routing indicator - 0 for GT (Global Title), 1 for PC/SSN (PointCode/Subsystem Number).
rri
Subsystem Number of HLR.rssn
(Global Title only) Translation Type (usually 0).rtt
Teleservice. See “Authorization Options” on page 341.ts
Authorization Options
TheHLR database includes authorization information that is assigned to each subscriber. Three authorizationdesignations are relevant to Steel-Belted Radius Carrier with the SIM authentication module:
• BS (Bearer Service)
• TS (Teleservice)
• ODB (Operator-Determined Barring)
341
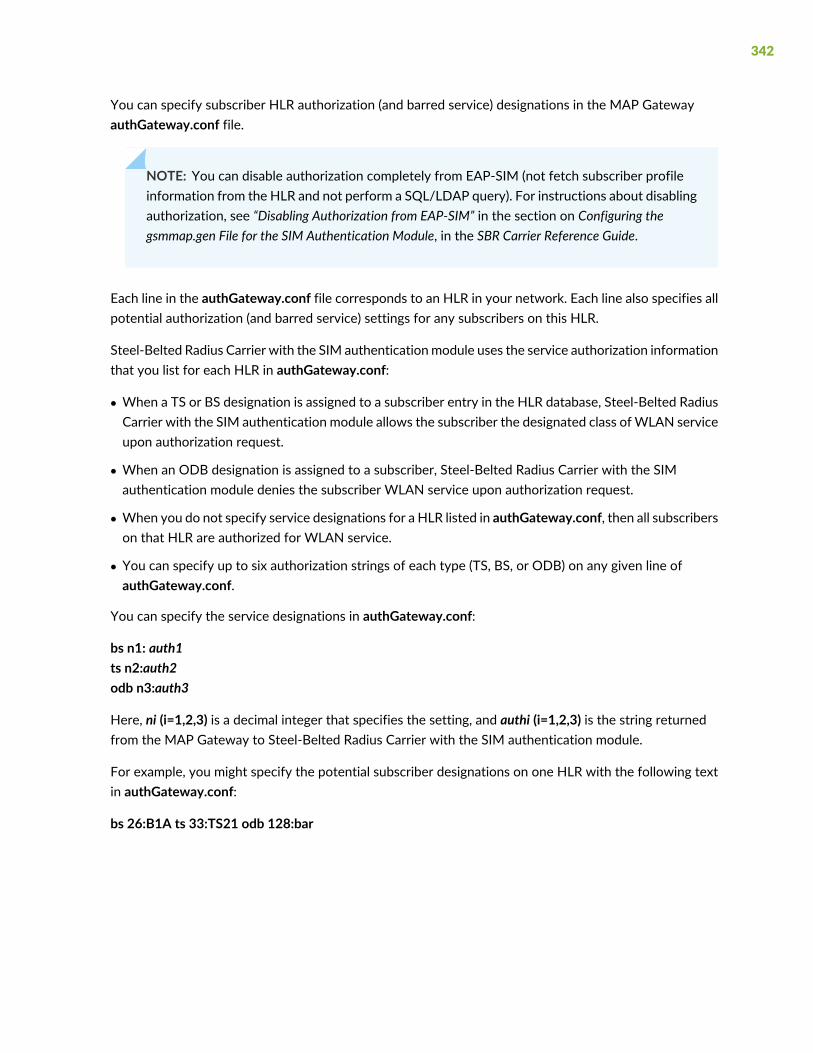
You can specify subscriber HLR authorization (and barred service) designations in the MAP GatewayauthGateway.conf file.
NOTE: You can disable authorization completely from EAP-SIM (not fetch subscriber profileinformation from the HLR and not perform a SQL/LDAP query). For instructions about disablingauthorization, see “Disabling Authorization from EAP-SIM” in the section on Configuring thegsmmap.gen File for the SIM Authentication Module, in the SBR Carrier Reference Guide.
Each line in the authGateway.conf file corresponds to an HLR in your network. Each line also specifies allpotential authorization (and barred service) settings for any subscribers on this HLR.
Steel-Belted Radius Carrier with the SIM authenticationmodule uses the service authorization informationthat you list for each HLR in authGateway.conf:
• When a TS or BS designation is assigned to a subscriber entry in the HLR database, Steel-Belted RadiusCarrier with the SIM authentication module allows the subscriber the designated class ofWLAN serviceupon authorization request.
• When an ODB designation is assigned to a subscriber, Steel-Belted Radius Carrier with the SIMauthentication module denies the subscriber WLAN service upon authorization request.
• When you do not specify service designations for a HLR listed in authGateway.conf, then all subscriberson that HLR are authorized for WLAN service.
• You can specify up to six authorization strings of each type (TS, BS, or ODB) on any given line ofauthGateway.conf.
You can specify the service designations in authGateway.conf:
bs n1: auth1ts n2:auth2odb n3:auth3
Here, ni (i=1,2,3) is a decimal integer that specifies the setting, and authi (i=1,2,3) is the string returnedfrom the MAP Gateway to Steel-Belted Radius Carrier with the SIM authentication module.
For example, you might specify the potential subscriber designations on one HLR with the following textin authGateway.conf:
bs 26:B1A ts 33:TS21 odb 128:bar
342

NOTE: If you require any HLR authorization strings to define different classes of service foryour subscribers, you must also specify those TS, BS, and ODB authorization strings in certainfiles associated with the SIM authentication module. For information about how to match thesestrings to Steel-Belted Radius Carrier variables, see the “simauth.aut [ProfileMap] Section” ofConfiguring EAP-SIM and EAP-AKA for the SIM Authentication Module in the SBR Carrier ReferenceGuide.
Example 1—authGateway.conf file [Routing-Configuration] Section
(Lines are wrapped.)
odigits 2310 ndigits 2324 rnai 4 rnp 7 rgti 4 rtt 0 rri 0 rpc 3003 rssn 251 bs 12:gold bs 23:silver ts 91:bronzets 92:red ts 93:green odb 1:black aqua
odigits 31026 ndigits 32476 rnai 4 rnp 7 rgti 4 rtt 0 rri 1 rpc 3003 rssn 253 bs 23:morning bs 24:afternoonts 1:night
Example 2—authGateway.conf file [Routing-Configuration] Section
In this global title example, odigits and ndigits are the same and do not require translation. You can usethe msisdn option in place of ndigits and odigits when no translation is required.
(Lines are wrapped.)
msisdn 31026 rnai 4 rnp 7 rgti 4 rtt 0 rri 0 rpc 3003 rssn 251 bs 12:gold bs 23:silver ts 91:bronze ts 92:redts 93:green odb 1:black aqua
[Supported-MAP-Messages] Section
The [Supported-MAP-Messages] section (Table 40 on page 344) of the authGateway.conf file specifies themethod of fetching MSISDN and which CAMEL phase services are supported in the network.
343

Table 40: authGateway.conf [Supported-MAP-Messages] Syntax
DescriptionParameter
Specifies the type of message that is used to fetch MSISDN information from anHLR or HSS.
MSISDN information is usually fetched from anHLR through the d interface usingthe RestoreData message. Setting the FetchMSISDNRoutingInfoLCS parameterto 0 configures the authGateway process to interact with the HLR through theRestoreDatamessage. The default SSN configuredwhen the authGateway processstarts is used as the originating SSN in the RestoreData message.
MSISDN information is usually fetched from an HLR or HSS through the SLh orLh interface using the SendRoutingInfoForLCS message. Setting theFetchMSISDNRoutingInfoLCSparameter to 1 configures the authGateway processto interact with the HLR or HSS through the SendRoutingInfoForLCS message.Because SBR Carrier acts as a GMLC in this case, the GMLC SSN (i.e. 145) is usedas the originating SSN.
By default, this parameter is set to 0.
FetchMSISDNRoutingInfoLCS
Specifies which CAMEL phase services are supported in the network.
• If set to 0 or commented out, the RestoreData message populates only themandatory parameter IMSI.
• If set to 1, the network supports CAMEL phase 1 services.
• If set to 2, the network supports CAMEL phase 2 services.
• If set to 3, the network supports CAMEL phase 3 services.
• If set to 4, the network supports CAMEL phase 4 services.
By default, this parameter is set to 0.
CamelSupportedPhases
[Common-AGW-Configurations] Section
The [Common-AGW-Configurations] section (Table 41 on page 344) of the authGateway.conf file specifiescommon configurations for the authGateway process.
Table 41: authGateway.conf [Common-AGW-Configurations] Syntax
DescriptionOption
Specifies the MAP protocol revision (2 or 3). Only MAPv3 retrieves quintets, so it must beused to support EAP-AKA.
Default value is 2.
appctx
344

Table 41: authGateway.conf [Common-AGW-Configurations] Syntax (continued)
DescriptionOption
Specifies the number of connection attempts.
Default value is 10.
connretry
Specifies the connection timeout in minutes.
Default value is 0 minute.
conntimeout
Specifies the local hostname. Youmust use the hostname associated with the IP address thatthe authGateway listen on. Also, you must ensure that the entry is coordinated with theradius/GWrelay.conf file (if authGateway is running as multiple instances) andradius/conf/ulcmmg.conf (if authGateway is running as a single instance) files. If a hostnameis not specified, 0.0.0.0 is used.
host
Specifies the number of invoke retries.
Default value is 1.
invkretry
Specifies the duration of invoke timeout in seconds.
Default value is 30 seconds.
invktimeout
(Global Title only) Specifies the local GTI value, usually 4 for C7 and 2 for A7.
Default value is 4.
lgti
(Global Title only) Specifies the MSISDN value of the local node.
Default value is 0.
lmsisdn
(Global Title only) Specifies the scope of the address value, such as whether it is aninternational number (includes country code) or a national number (no country code).
• 1—Subscriber number with no area code (example: 5551234)
• 2—Unused
• 3—National significant number with no country code (example: 2015551234)
• 4—International number with country code (example: 12015551234)
Default value is 4.
lnai
345
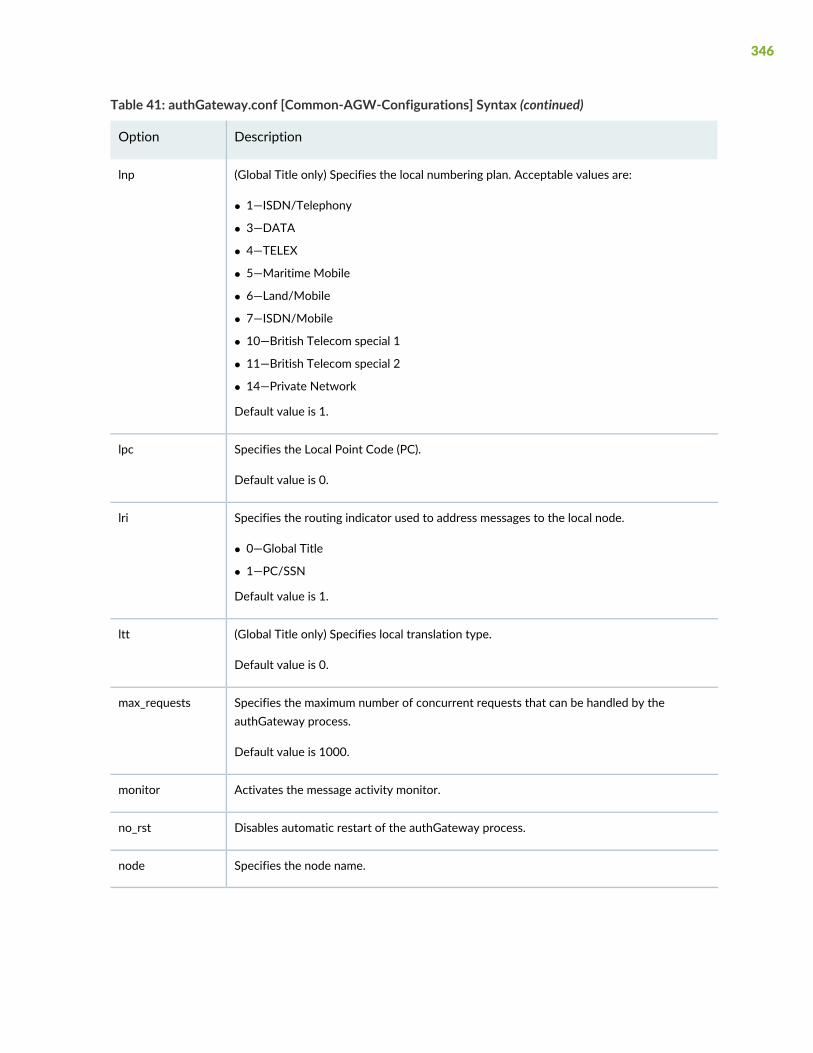
Table 41: authGateway.conf [Common-AGW-Configurations] Syntax (continued)
DescriptionOption
(Global Title only) Specifies the local numbering plan. Acceptable values are:
• 1—ISDN/Telephony
• 3—DATA
• 4—TELEX
• 5—Maritime Mobile
• 6—Land/Mobile
• 7—ISDN/Mobile
• 10—British Telecom special 1
• 11—British Telecom special 2
• 14—Private Network
Default value is 1.
lnp
Specifies the Local Point Code (PC).
Default value is 0.
lpc
Specifies the routing indicator used to address messages to the local node.
• 0—Global Title
• 1—PC/SSN
Default value is 1.
lri
(Global Title only) Specifies local translation type.
Default value is 0.
ltt
Specifies the maximum number of concurrent requests that can be handled by theauthGateway process.
Default value is 1000.
max_requests
Activates the message activity monitor.monitor
Disables automatic restart of the authGateway process.no_rst
Specifies the node name.node
346
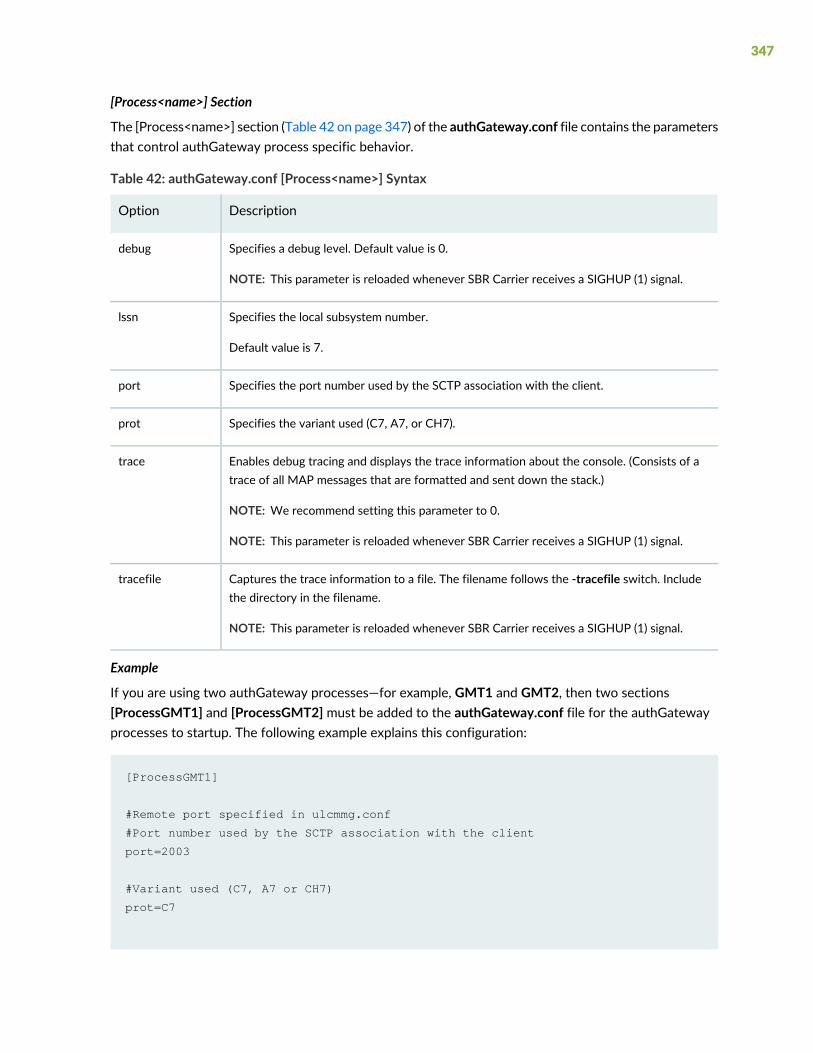
[Process<name>] Section
The [Process<name>] section (Table 42 on page 347) of the authGateway.conf file contains the parametersthat control authGateway process specific behavior.
Table 42: authGateway.conf [Process<name>] Syntax
DescriptionOption
Specifies a debug level. Default value is 0.
NOTE: This parameter is reloaded whenever SBR Carrier receives a SIGHUP (1) signal.
debug
Specifies the local subsystem number.
Default value is 7.
lssn
Specifies the port number used by the SCTP association with the client.port
Specifies the variant used (C7, A7, or CH7).prot
Enables debug tracing and displays the trace information about the console. (Consists of atrace of all MAP messages that are formatted and sent down the stack.)
NOTE: We recommend setting this parameter to 0.
NOTE: This parameter is reloaded whenever SBR Carrier receives a SIGHUP (1) signal.
trace
Captures the trace information to a file. The filename follows the -tracefile switch. Includethe directory in the filename.
NOTE: This parameter is reloaded whenever SBR Carrier receives a SIGHUP (1) signal.
tracefile
Example
If you are using two authGateway processes—for example, GMT1 and GMT2, then two sections[ProcessGMT1] and [ProcessGMT2] must be added to the authGateway.conf file for the authGatewayprocesses to startup. The following example explains this configuration:
[ProcessGMT1]
#Remote port specified in ulcmmg.conf
#Port number used by the SCTP association with the client
port=2003
#Variant used (C7, A7 or CH7)
prot=C7
347
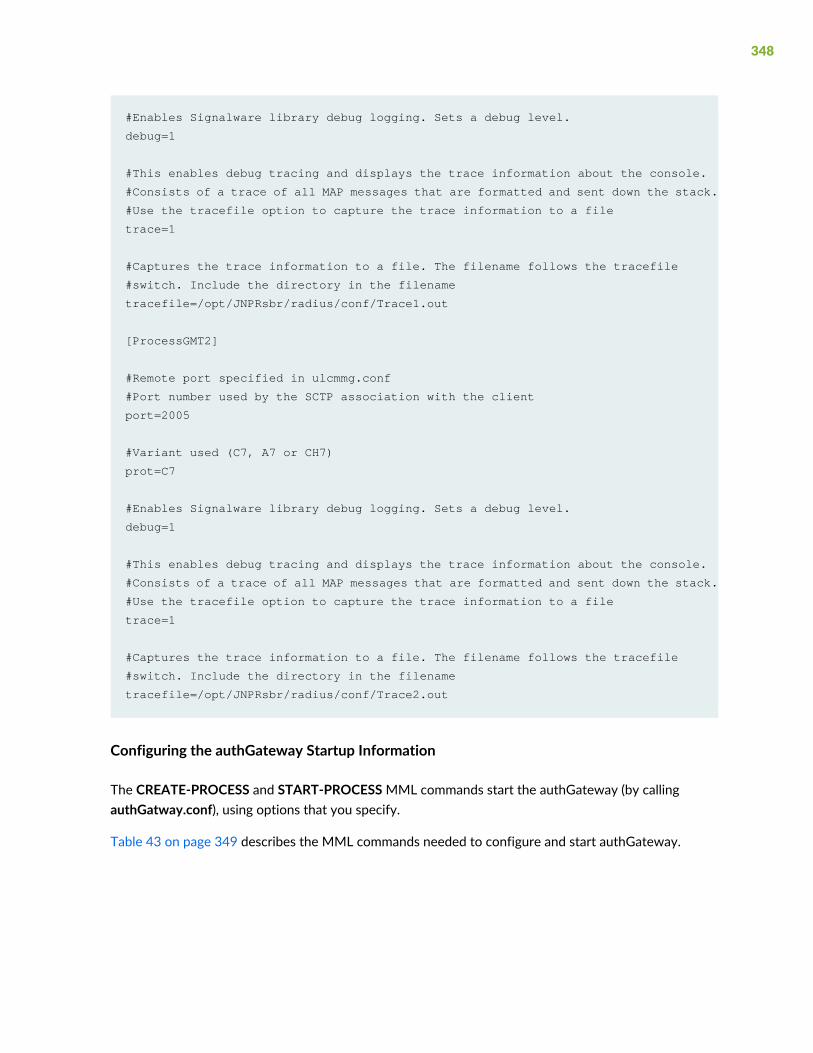
#Enables Signalware library debug logging. Sets a debug level.
debug=1
#This enables debug tracing and displays the trace information about the console.
#Consists of a trace of all MAP messages that are formatted and sent down the stack.
#Use the tracefile option to capture the trace information to a file
trace=1
#Captures the trace information to a file. The filename follows the tracefile
#switch. Include the directory in the filename
tracefile=/opt/JNPRsbr/radius/conf/Trace1.out
[ProcessGMT2]
#Remote port specified in ulcmmg.conf
#Port number used by the SCTP association with the client
port=2005
#Variant used (C7, A7 or CH7)
prot=C7
#Enables Signalware library debug logging. Sets a debug level.
debug=1
#This enables debug tracing and displays the trace information about the console.
#Consists of a trace of all MAP messages that are formatted and sent down the stack.
#Use the tracefile option to capture the trace information to a file
trace=1
#Captures the trace information to a file. The filename follows the tracefile
#switch. Include the directory in the filename
tracefile=/opt/JNPRsbr/radius/conf/Trace2.out
Configuring the authGateway Startup Information
The CREATE-PROCESS and START-PROCESSMML commands start the authGateway (by callingauthGatway.conf), using options that you specify.
Table 43 on page 349 describes the MML commands needed to configure and start authGateway.
348

Table 43: MML Commands for Configuring the Start of authGateway
DescriptionMML Command
Identify the authGateway configuration file and the authGatewayoptions.
CREATE-PROCESS
Start the process.START-PROCESS
Formore information about the syntax and usage of theMML commands, see “SignalwareMMLCommands”on page 335. See “Loading theMML Configuration Settings” on page 354 for information about executingthe MML commands.
Table 44 on page 349 lists themandatoryMML options to be usedwith theCREATE-PROCESS command.
Table 44: authGateway Process Options Used with CREATE-PROCESS
DescriptionOption
Path and name of the authGateway configuration file. The default file is$RADIUSDIR/conf/authGateway.conf.
conf
Name of the authGateway process.name
The MML options listed in Table 45 on page 349 are still supported for backward compatibility.
NOTE: Starting from SBR Carrier 8.4.0 release, the authGateway.conf file configuration takesprecedence over any existingMML CREATE-PROCESS options. While upgrading to SBR CarrierRelease 8.4.0 or later, the authGateway.conf file will be imported from older versions of SBRCarrier. If there is no specified configuration present in the imported authGateway.conf file, SBRCarrier uses the existing MML configurations. If no MML configurations are present, theauthGateway.conf defaults are used. If any mandatory parameters (port, host, and node) aremissing, then error messages are logged.
Table 45: authGateway Process Options Supported for Backward-Compatibility
DescriptionOption
MAP protocol revision (2 or 3). Only MAPv3 retrieves quintets, so itmust used to support EAP-AKA.
appctx
Path and name of the authGateway configuration file. The default fileis $RADIUSDIR/conf/authGateway.conf.
conf
349
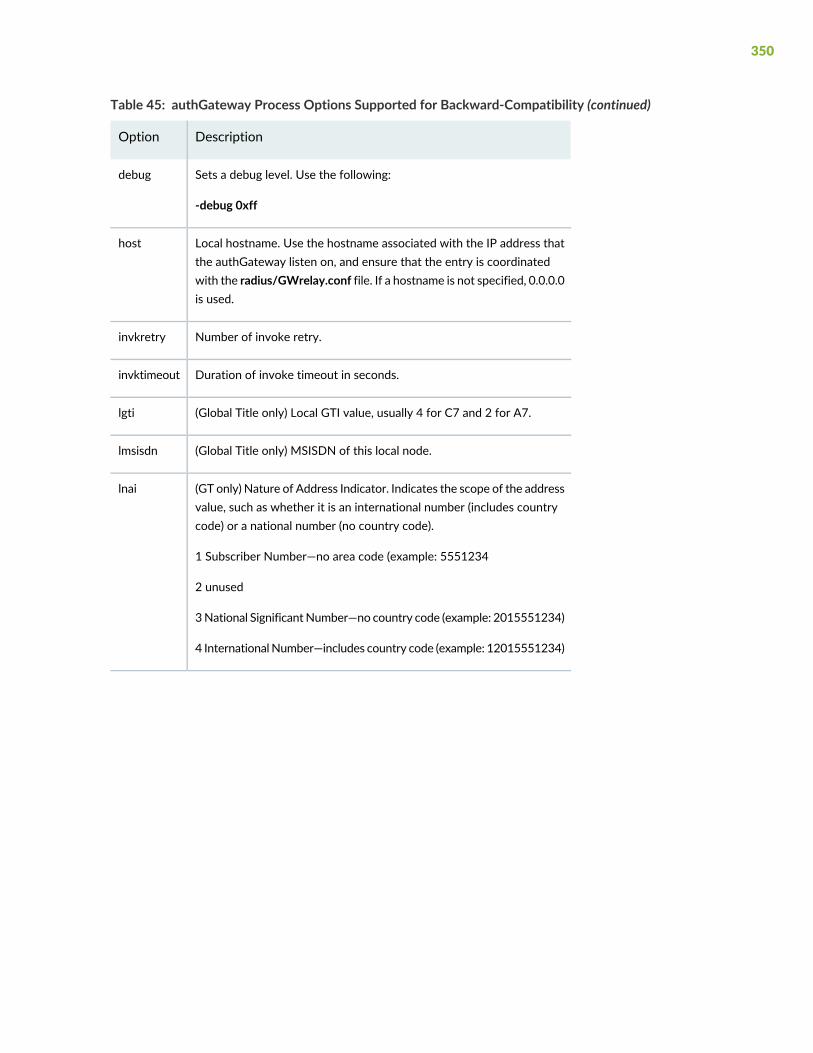
Table 45: authGateway Process Options Supported for Backward-Compatibility (continued)
DescriptionOption
Sets a debug level. Use the following:
-debug 0xff
debug
Local hostname. Use the hostname associated with the IP address thatthe authGateway listen on, and ensure that the entry is coordinatedwith the radius/GWrelay.conf file. If a hostname is not specified, 0.0.0.0is used.
host
Number of invoke retry.invkretry
Duration of invoke timeout in seconds.invktimeout
(Global Title only) Local GTI value, usually 4 for C7 and 2 for A7.lgti
(Global Title only) MSISDN of this local node.lmsisdn
(GT only) Nature of Address Indicator. Indicates the scope of the addressvalue, such as whether it is an international number (includes countrycode) or a national number (no country code).
1 Subscriber Number—no area code (example: 5551234
2 unused
3National SignificantNumber—no country code (example: 2015551234)
4 International Number—includes country code (example: 12015551234)
lnai
350
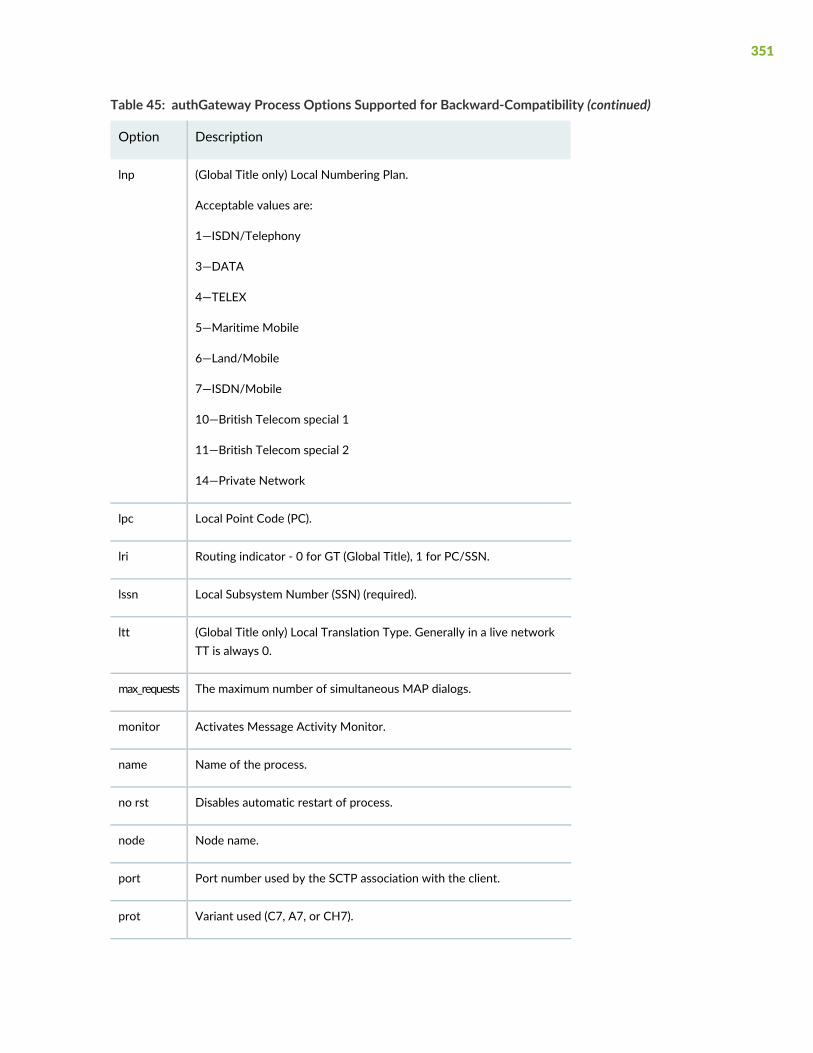
Table 45: authGateway Process Options Supported for Backward-Compatibility (continued)
DescriptionOption
(Global Title only) Local Numbering Plan.
Acceptable values are:
1—ISDN/Telephony
3—DATA
4—TELEX
5—Maritime Mobile
6—Land/Mobile
7—ISDN/Mobile
10—British Telecom special 1
11—British Telecom special 2
14—Private Network
lnp
Local Point Code (PC).lpc
Routing indicator - 0 for GT (Global Title), 1 for PC/SSN.lri
Local Subsystem Number (SSN) (required).lssn
(Global Title only) Local Translation Type. Generally in a live networkTT is always 0.
ltt
The maximum number of simultaneous MAP dialogs.max_requests
Activates Message Activity Monitor.monitor
Name of the process.name
Disables automatic restart of process.no rst
Node name.node
Port number used by the SCTP association with the client.port
Variant used (C7, A7, or CH7).prot
351

Table 45: authGateway Process Options Supported for Backward-Compatibility (continued)
DescriptionOption
Subsystem number of HLR.rssn
We recommend setting this to 0xff; this enables debug tracing anddisplays the trace information about the console. (Consists of a trace ofall MAP messages that are formatted and sent down the stack.)
Use the tracefile option to capture the trace information to a file.
trace
Captures the trace information to a file. The filename follows the-tracefile switch. Include the directory in the filename.
tracefile
Example—Creating and Starting the authGateway Process
Notice that the SSN=7 in the CREATE-CPC of the previous example (Example 2 in “Configuring theauthGateway Routing Location Information” on page 338) becomes the lssn (local subsystem number) inthe CREATE-PROCESS command of this example. The SSN=6 in the CREATE-REMSSN command of theprevious example (Example 2 in “Configuring the authGateway Routing Location Information” on page 338)becomes the -rssn (remote subsystemnumber) in this example.We recommend that you specify an absolute(full) path in the EXEC command.
The following configuration example explains how to create and start three authGateway instances:
(Lines are wrapped.)
CREATE-PROCESS:NAME="GMT", CE="sbr-lnx-perf", EXEC="/opt/JNPRsbr/radius/authGateway
-name GMT -conf /opt/JNPRsbr/radius/conf/authGateway.conf -port 2003"
START-PROCESS:NAME="GMT",CE="sbr-lnx-perf";
CREATE-PROCESS:NAME="GMT1", CE="sbr-lnx-perf", EXEC="/opt/JNPRsbr/radius/authGateway
-name GMT1 -conf /opt/JNPRsbr/radius/conf/authGateway.conf -port 2005"
START-PROCESS:NAME="GMT1",CE="sbr-lnx-perf";
CREATE-PROCESS:NAME="GMT2", CE="sbr-lnx-perf", EXEC="/opt/JNPRsbr/radius/authGateway
-name GMT2 -conf /opt/JNPRsbr/radius/conf/authGateway.conf -port 2007"
START-PROCESS:NAME="GMT2",CE="sbr-lnx-perf";
352

NOTE: MMLcommands are saved inMML files that can be loaded into Signalware. See “Loadingthe MML Configuration Settings” on page 354.
Configuring the GWrelay.conf File
TheGWrelay application is used to pass authentication requests between SBRCarrier and the authGatewayinstances in a round-robin method. The GWrelay.conf file is used to define the source and destinationports throughwhich an SCTP connection is established between theGWrelay application and authGatewayinstances.
You can modify the LOCAL_HOST, REMOTE_HOST, and RELAY_SERVER lines in the GWrelay.conf fileto define DNS names and port numbers. When you specify a DNS name for a local or remote host, youcan enter the host’s IP address in brackets as a backup. We recommend that you make hostname and IPaddress entries in the /etc/hosts file because it is more reliable than DNS.
Example—Configuring the GWrelay.conf File
The following example explains how to define source and destination ports for three authGateway instances:
LOCAL_HOST sbr-blr-vm5:2002
REMOTE_HOST sbr-blr-vm5:2003 [10.20.0.2]
LOCAL_HOST sbr-blr-vm5:2004
REMOTE_HOST sbr-blr-vm5:2005 [10.20.0.2]
LOCAL_HOST sbr-blr-vm5:2006
REMOTE_HOST sbr-blr-vm5:2007 [10.20.0.2]
RELAY_SERVER sbr-blr-vm5:2000
NOTE: The specified host-name and port parameters in the REMOTE_HOST line must matchthe -host and -port options in the MML CREATE-PROCESS statement, respectively.
Starting the GWrelay Process
You can use the sbrd script to start and stop the GWrelay process. All sbrd commands can be executedonly by the root user. To start the GWrelay process, execute ./sbrd start GWrelay. To stop the GWrelayprocess, execute ./sbrd stop GWrelay. To restart the GWrelay process, execute ./sbrd restart GWrelay.
353

NOTE: The GWrelay application gets terminated automatically when all the configuredauthGateway instances are down. So, you must manually start the GWrelay application whenthe authGateway instances are restarted.
If you have set the GWRELAYENABLE parameter in the sbrd.conf file to 1 or answered Yes tothe question Do you want to enable "GWrelay" Process? [n]: while running the SBR Carrierconfiguration script, then the GWrelay process will be started, stopped, or restarted when youexecute the ./sbrd start, ./sbrd stop, or ./sbrd restart script respectively.
Configuring the ulcmmg.conf File
The ulcmmg.conf file establishes the connection between the GWrelay application and SBR Carrier.
The ulcmmg.conf file consists of two lines, as shown in the following example. Modify the ulcmmg.conffile shipped with SBR Carrier so that hostnames of LOCAL_HOST and REMOTE_HOST are same. If youspecify a DNS name for a local or remote host, you can enter the host’s IP address in brackets as a backup.Making an entry in the /etc/hosts file is recommended because it is more reliable than DNS.
Example
LOCAL_HOST myhost.com:2001REMOTE_HOST myhost.com:2000 [172.25.97.230]
NOTE: If an IP address is specified, it must be the address of the server specified as theHostName set when the Create-Process -host option is invoked.
For additional examples, see “Sample authGateway Command and File” on page 355.
Loading the MML Configuration Settings
The files containing MML commands need to be loaded into Signalware. Enter an SWMML command foreach .mml file that you created.
In the following example, three files are loaded into Signalware.
• The links.mml file sets up the links, link sets, and routes.
• The config_authgateway.mml file configures the authGateway application.
• The start_authgateway.mml contains authGateway startup information.
354

These files do not exist and are used here as an example. You need to create your own files for accomplishingthe tasks of creating links, configuring the authGateway application, and starting the authGatewayapplication.
Example
$ swmml -f links.mml$ swmml -f config_authgateway.mml$ swmml -f start_authgateway.mml
NOTE: Signalware retains the MML configuration commands and uses the same configurationeach time you start Signalware. To reconfigure the nodes, use the configureNodes commandwith the -f or -clean or -realclean options.
Sample authGateway Command and File
sampleCreateProcess.mml
CRTE-PROCESS:NAME="GMT",CE="as1",EXEC="authGateway -name GMT -port 2000 -host as1
-node MGW -prot C7 -conf conf/authGateway.conf.100 -lri 1 -lssn 7 -appctx 3
-ldigits 358402114300"; START-PROCESS:NAME="GMT", CE="as1";
authGateway.conf (Gateway Routing Configuration File)
Each line of this configuration file describes:
• The parameters used to form the destination SCTP address.
• The decimal value of the bearer service (bs) and/or teleservices (ts) indicating an authorization.
• A string associated with each bs or ts value. If no bs and no ts are specified, no authorization is performedby the authGateway.
For each request, the first digits of the IMSI are compared with odigits. The first line of the configurationfile that matches is selected for the current request. If the routing indicator (rri) specifies that the routingis done on GT, the leading digits are replaced with the new digits (ndigits) to perform the numbering plantranslation. If a parameter is not present on the line, it is not present in the destination SCTP address. If
355

this is incompatible with the routing indicator, an error message is issued when the MAP authenticationGateway is started.
After modifying this configuration file, the authGateway has to be restarted. Modification of the ndigitsvalue may require the creation of a new GT rule (CREATE-GT command).
Table 46: Parameters Used in Create and Start Commands
DescriptionParameter
Routing indicator - 0 for GT (Global Title), 1 for PC/SSN (PointCode/Subsystem Number).
rri
Local Global Title Indicator value. 4 for C7; 2 for A7. (Usually4.)
rgti
Subsystem Number of HLR.rssn
(GT only) Translation Type (usually 0).rtt
(GT only) Numbering Plan. 1=E.164=ISDN-TEL,7=E.214=ISDN-MOB.
rnp
Nature of address indicator. (4=INT)rnai
bs dec:string
If the specified bearer service exists in HLR SIM-profile, thenstring is returned for further processing (see ProfileMap insimauth.aut).
bs
356

Table 46: Parameters Used in Create and Start Commands (continued)
DescriptionParameter
ts dec:string
If the specified teleservice exists in HLR SIM-profile, thenstring is returned for further processing (see ProfileMap insimauth.aut).
ts
357
7PART
Uninstalling Steel-Belted Radius CarrierSoftware
Removing Steel-Belted Radius Carrier Software | 359

CHAPTER 16
Removing Steel-Belted Radius Carrier Software
IN THIS CHAPTER
Uninstalling the Steel-Belted Radius Carrier Server Software | 359
This chapter explains how to remove all Steel-Belted Radius Carrier Release 8.6.0 software from a server.
CAUTION: Do not uninstall Steel-Belted Radius Carrier if you intend to install anotherversion of the Steel-Belted Radius Carrier software. If you remove an existinginstallation, you cannot migrate that data and configuration information forward tothe newer version.
These topics are in the chapter:
Uninstalling the Steel-Belted Radius Carrier Server Software
The software uninstall procedure is essentially the same for a standalone server or cluster node, the onlydifference being how the processes are stopped.
To uninstall the Steel-Belted Radius Carrier server software from its default location (/opt/JNPRsbr) onSolaris server:
1. Log in to the server or node as root.
2. Stop the RADIUS process. The exact syntax for this step depends on the server type:
For a standalone server, execute:cd /opt/JNPRsbr/radius./sbrd stop
In a cluster environment, stopping the SSR and RADIUS processes on the various node types, must bedone in a specific order. Follow the procedures described in“When and How to Restart Session State Register Nodes, Hosts, and Clusters” on page 196, and thenproceed to the next step.
359
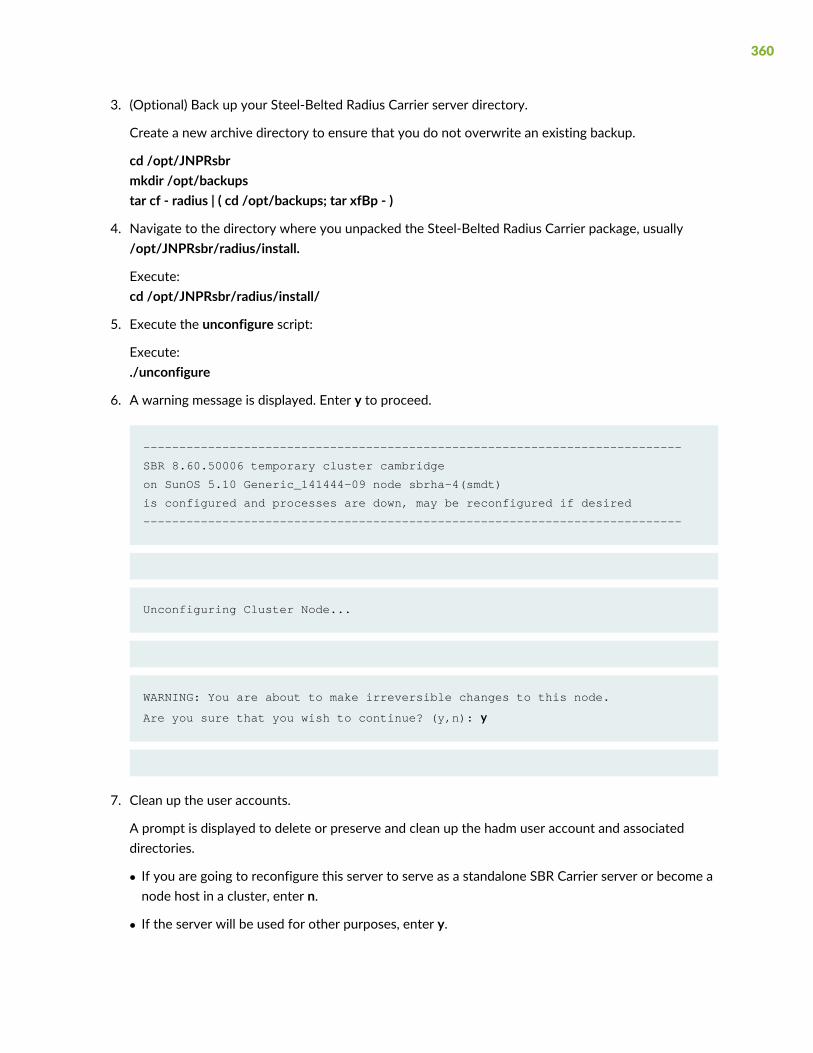
3. (Optional) Back up your Steel-Belted Radius Carrier server directory.
Create a new archive directory to ensure that you do not overwrite an existing backup.
cd /opt/JNPRsbrmkdir /opt/backupstar cf - radius | ( cd /opt/backups; tar xfBp - )
4. Navigate to the directory where you unpacked the Steel-Belted Radius Carrier package, usually/opt/JNPRsbr/radius/install.
Execute:cd /opt/JNPRsbr/radius/install/
5. Execute the unconfigure script:
Execute:./unconfigure
6. A warning message is displayed. Enter y to proceed.
---------------------------------------------------------------------------
SBR 8.60.50006 temporary cluster cambridge
on SunOS 5.10 Generic_141444-09 node sbrha-4(smdt)
is configured and processes are down, may be reconfigured if desired
---------------------------------------------------------------------------
Unconfiguring Cluster Node...
WARNING: You are about to make irreversible changes to this node.
Are you sure that you wish to continue? (y,n): y
7. Clean up the user accounts.
A prompt is displayed to delete or preserve and clean up the hadm user account and associateddirectories.
• If you are going to reconfigure this server to serve as a standalone SBR Carrier server or become anode host in a cluster, enter n.
• If the server will be used for other purposes, enter y.
360

Locating OS user account and home directory...
hadm:x:16666:65536::/opt/JNPRhadm:/bin/bash
hadmg::65536:
drwxrwx--- 2 hadm hadmg 1536 Mar 28 10:59 /opt/JNPRhadm
WARNING: If you remove the OS user account hadm you will have
to recreate it, the associated OS group account hadmg, and
the associated home directory /opt/JNPRhadm
This is neither necessary nor recommended if you are updating
an existing configuration. Remove the OS user account? [n]:
8. The script removes the software from various directories in /opt:
Cleaning directories
/opt/JNPRhadm
/opt/JNPRmysql
/opt/JNPRmysqld
/opt/JNPRndb_mgmd
/opt/JNPRndbd
9. Remove the software:
a. Log in as root.
b. Execute:cd/optpkgrm JNPRsbr
Example:
root@life:/opt/JNPRsbr/radius/install> cd /opt
root@life:/opt> pkgrm JNPRsbr
361
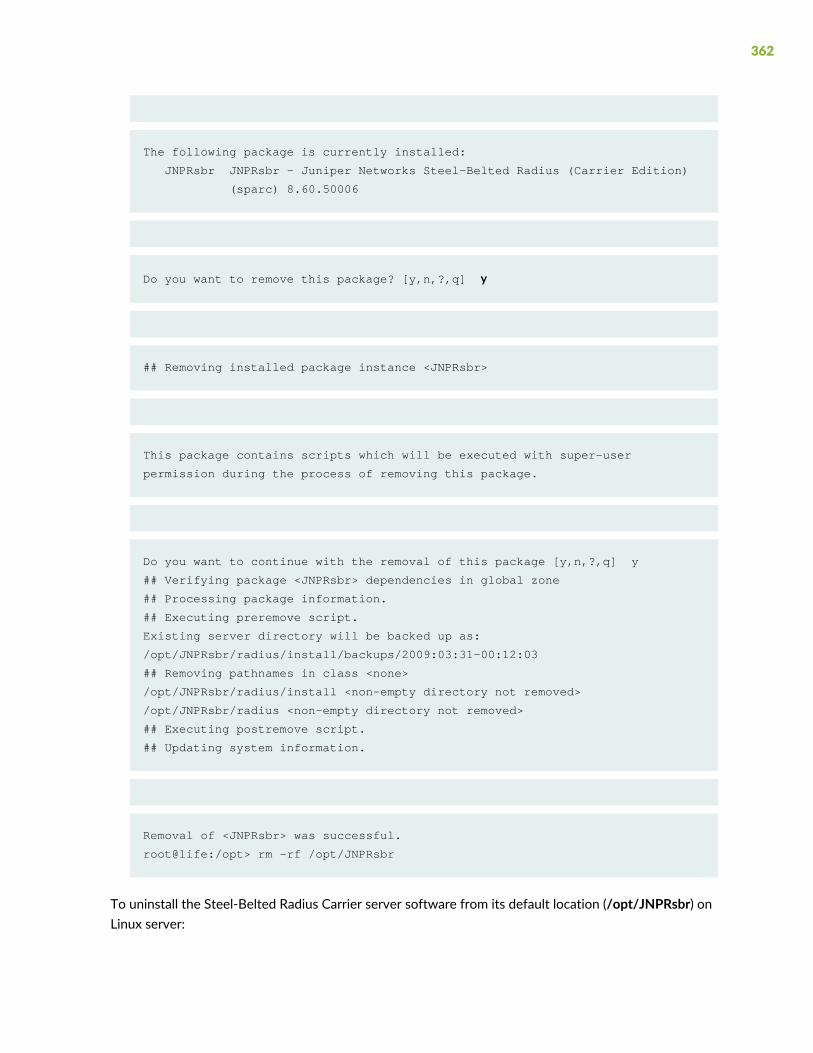
The following package is currently installed:
JNPRsbr JNPRsbr - Juniper Networks Steel-Belted Radius (Carrier Edition)
(sparc) 8.60.50006
Do you want to remove this package? [y,n,?,q] y
## Removing installed package instance <JNPRsbr>
This package contains scripts which will be executed with super-user
permission during the process of removing this package.
Do you want to continue with the removal of this package [y,n,?,q] y
## Verifying package <JNPRsbr> dependencies in global zone
## Processing package information.
## Executing preremove script.
Existing server directory will be backed up as:
/opt/JNPRsbr/radius/install/backups/2009:03:31-00:12:03
## Removing pathnames in class <none>
/opt/JNPRsbr/radius/install <non-empty directory not removed>
/opt/JNPRsbr/radius <non-empty directory not removed>
## Executing postremove script.
## Updating system information.
Removal of <JNPRsbr> was successful.
root@life:/opt> rm -rf /opt/JNPRsbr
To uninstall the Steel-Belted Radius Carrier server software from its default location (/opt/JNPRsbr) onLinux server:
362

1. Log in to the server or node as root.
2. Stop the RADIUS process. The exact syntax for this step depends on the server type:
For a standalone server, execute:cd /opt/JNPRsbr/radius./sbrd stop
In a cluster environment, you need to stop the SSR and RADIUS processes on the various node typesin a specific. Follow the procedures described in“When and How to Restart Session State Register Nodes, Hosts, and Clusters” on page 196, and thenproceed to the next step.
3. (Optional) Back up your Steel-Belted Radius Carrier server directory.
Create a new archive directory to ensure that you do not overwrite an existing backup.
4. Navigate to the directory where you unpacked the Steel-Belted Radius Carrier package, usually/opt/JNPRsbr/radius/install.
Execute:cd /opt/JNPRsbr/radius/install/
5. Execute the unconfigure script:
Execute:./unconfigure
6. A warning message is displayed. Enter y to proceed.
---------------------------------------------------------------------------
SBR 8.60.50006 temporary cluster cambridge
on Linux 3.10.0-693.el7.x86_64 #1 SMP Thu Jul 6 19:56:57 EDT 2017 node Cambridge
is configured and processes are down, may be reconfigured if desired
---------------------------------------------------------------------------
Unconfiguring Cluster Node...
WARNING: You are about to make irreversible changes to this node.
Are you sure that you wish to continue? (y,n): y
7. The script removes the software from various directories in /opt:
363

Cleaning directories
/opt/JNPRhadm
/opt/JNPRmysql
/opt/JNPRmysqld
/opt/JNPRndb_mgmd
/opt/JNPRndbd
8. Clean up the user accounts.
A prompt is displayed to delete or preserve and clean up the hadm user account and associateddirectories.
• If you are going to reconfigure this server so that it serves as a standalone SBR Carrier server orbecomes a node host in a cluster, enter n.
• If the server will be used for other purposes, enter y.
Locating OS user account and home directory...
hadm:x:16666:65536::/opt/JNPRhadm:/bin/bash
hadmg::65536:
drwxrwx--- 2 hadm hadmg 1536 Mar 28 10:59 /opt/JNPRhadm
WARNING: If you remove the OS user account hadm you will have
to recreate it, the associated OS group account hadmg, and
the associated home directory /opt/JNPRhadm
This is neither necessary nor recommended if you are updating
an existing configuration. Remove the OS user account? [n]:
Unconfigured
9. To remove the SBR software, execute:
• yum remove sbr-cl for the cluster configuration.
• yum remove sbr-sa for the standalone configuration.
10.The script removes the SBR software from the server.
364
8PART
Upgrading Your SSR Cluster
Overview of Upgrading Your SSR Cluster | 366
Using a Transition Server toMitigate DowntimeWhile Upgrading Your Cluster | 369
Upgrading Your Cluster Using the Rolling Restart Method | 396
Upgrading Your Cluster Using the Backup, Destroy, and Re-Create Method | 447

CHAPTER 17
Overview of Upgrading Your SSR Cluster
IN THIS CHAPTER
Upgrade Methods | 366
Notes on Working with Data (D) Nodes | 367
Using the SSR Configuration Script | 368
This section provides an overview of the procedures used to upgrade your SSR cluster. For informationabout upgrading standalone servers, see “Installing and Configuring a SBR Carrier Standalone Server” onpage 63.
These topics are included in this section:
Upgrade Methods
SBR Carrier provides SSR cluster performance enhancements, as well as other product improvements.However, depending on the current release of software you are running, and which upgrade method youuse to perform the upgrade, you may or may not be able to take advantage of the performanceenhancements.
The choice of which upgrade method you use depends on your tolerance for downtime in the SSR cluster.You can use one of the following two methods to upgrade your SSR cluster:
• Rolling restart upgrade—Use this method to upgrade existing SBR Carrier release SSR clusters to Release8.6.0. This upgrade provides numerous product improvements and corrections, but does not provideperformance enhancements to the cluster. To experience product improvements and corrections, aswell as improved performance in your cluster, youmust upgrade using the backup, destroy, and re-createupgrademethod. For complete details on the changes to the Release 8.6.0 software, see the SBRCRelease8.6.0 Release Notes. When using this upgrademethod, we recommend youmitigate the risk of downtimein your cluster by using a transition server; for more information see“Using a Transition Server to Mitigate Downtime While Upgrading Your Cluster” on page 369.
• Backup, destroy, and re-create your cluster—Use this method to upgrade from clusters running previousreleases of SBR Carrier software to Release 8.6.0. This upgrade method results in the data nodes using
366

a multi-threaded process which improves performance over the single-threaded data node processesused in previous SBR Carrier software releases. In addition, Release 8.6.0 provides many improvementsand corrections to the SBRC software. For complete details on the changes to Release 8.6.0 software,see the SBRC Release 8.6.0 Release Notes. Using the backup, destroy, and re-create upgrade methodrequires cluster downtime. For this reason, we recommend you use a transition server during the upgradeprocess. For details on using a transition server, see“Using a Transition Server to Mitigate Downtime While Upgrading Your Cluster” on page 369.
RELATED DOCUMENTATION
Upgrading Your Cluster Using the Backup, Destroy, and Re-Create Method | 447
Upgrading Your Cluster Using the Rolling Restart Method | 396
Using a Transition Server to Mitigate Downtime While Upgrading Your Cluster | 369
Notes on Working with Data (D) Nodes
For performance reasons, the SSR ndbmtd processes on data (D) nodes are configured to execute underthe UNIX root account by default, as opposed to the UNIX hadm account. In particular, this allows thendbmtd processes to lock data in physical memory, which is faster, as opposed to allowing the OS to useswap space on disk, which is slower. The UNIX root account privilege is required in order to lock data inphysical memory.
• The relevant configuration item is the #sbrd-ndbd-run-as-root = true parameter in the [ndbd] sectionof the /opt/JNPRhadm/my.cnf file. Note that the leading # character is required to distinguish thisparameter as a sbrd script parameter; this parameter is not a comment and is always active. When thevalue of this parameter is true, the ndbmtd processes execute under the UNIX root account. When thevalue of this parameter is false (or if the parameter is missing entirely), the ndbmtd processes executeunder the UNIX hadm account. The value of this parameter can only be changed immediately afterconfiguring a data (D) node. The value of this parameter cannot be changed after the SSR processes arerunning.
• We recommend, although it is not necessary, that the parameter be configured the same on all data (D)nodes. In order to change the value of this parameter at a later time, you must unconfigure the data (D)node and then reconfigure it again.
• When the ndbmtd processes are executed under the UNIX root account, it is extremely important thatthe DataMemory parameter in the [ndbd default] section of the /opt/JNPRhadm/config.ini file beconfigured properly with respect to the amount of physical memory that is actually available on the data(D) node. If the data (D) node does not have enough physical memory available, then the ndbmtd processescan starve the entire machine, including the OS itself, for memory. By default, SBRC is configured under
367
the assumption that at least 8 GB of memory is available solely for ndbmtd processes. In practice, morethan 8 GB is required to support the OS and other applications.
Using the SSR Configuration Script
When running the SSR configuration script, option 2. Generate Cluster Definition, always generates a16-digit random number that is saved in dbcluster.dat as the CLUSTER_DEFAULT_KEY. Upon selectingconfigure script option 3. Configure Cluster Node, the following occurs:
1. The CLUSTER_DEFAULT_KEY is used to configure spi.ini [Keys] if:
• CurrentKey= has not already been configured.
and
• The first key 1= has not already been configured.
2. Any IP addresses previously specified for nodes in the cluster are added to the spi.ini [Hosts] sectionif they are not already present.
NOTE: If you are migrating from an older spi.ini, then:
1. It is likely that [Keys] have already been configured and it is up to you to maintain [Keys] inthis case.
2. Node IP addresses may still be added to [Hosts] but pre-existing (and possibly obsolete)addresses will not be removed.
Also note that the IP addresses specified for nodes during cluster configuration are primarilyintended for SSR as opposed to RADIUS-specific configuration. If RADIUS traffic utilizesdifferent IP addresses from SSR traffic, then it is up to the user to maintain spi.ini [Hosts].
368
CHAPTER 18
Using a Transition Server toMitigateDowntimeWhileUpgrading Your Cluster
IN THIS CHAPTER
Cluster Migration Strategy | 369
Cluster Migration Workflow | 372
Creating a Transition Server | 373
Installing the Cluster | 387
Removing the Transition Server from Service | 390
Cleaning the Transition Server | 390
This chapter describes how to use a transition server to mitigate downtime while upgrading your cluster.
These topics are included in this section:
Cluster Migration Strategy
The easiest way to replace an existing cluster with an upgraded cluster is to fully install and configure thenew cluster and then simply cut over to the new install.
This causes a brief service disruption that can bemitigated if both clusters run online in parallel long enoughfor existing sessions to naturally drop off the old cluster as they end. Because no new sessions are addedto the old cluster, after some period of time, most active sessions are managed by the new cluster. Anyremaining long-term sessions are terminated when the old cluster is brought down. When they reconnectto the network, they connect to the new cluster.
Some sites may have a problem implementing this strategy because it requires enough servers to supporttwo clusters, and not all sites have that many machines available.
369

Using a Transition Server
To address this, we developed a migration strategy that uses a transition server. A single transition servertemporarily takes the place of your entire existing cluster while the servers in your existing cluster aretaken offline, upgraded with new SBRC Session State Register software, and then brought back online.
NOTE: We recommend using a transition server to mitigate downtime when performing anyupgrade. The examples shown here depict the use of a transition server during an upgrade fromSBR/HA5.5 to a Release 8.6.0 Session State Register (SSR) cluster. However, we also recommendusing a transition server when upgrading from previous releases of SBR Carrier software toRelease 8.6.0.
The SBRC Temporary Cluster, also termed the transition server, is an exceptional node in the sense that itexecutes all processes on one machine. The transition server is assigned the node type= smdt. TheCreateDB.sh and configuration of pool(s) must be donemanually on a transition server, just like in a cluster.
Use a transition server (fifth machine) in addition to the four servers that a basic cluster installation requiresto ensure redundancy. The additional fifth machine performs the work of the entire cluster while the fourexisting cluster servers are taken offline, updated, and brought online in a SSR Starter Kit configuration.
If an additional fifth machine is not available and you must work only with the four servers that currentlymake up your cluster, the transition server strategy can be adapted and one server in the existing clustercan be borrowed from the existing cluster and used as the transition server. This increases the risk ofcluster failure during the switchover because some level of redundancy or capacity is removed from theexisting, working cluster when a machine is taken offline.
370

Figure 18: SBR Migration Using the Transition Server Four-Server Strategy
g016
366
Data Node A Data Node B
Steel-Belted RadiusHA Node 1 andAdmin Node 1
Steel-Belted RadiusHA Node 2 andAdmin Node 2
Data Node A Data Node B
Steel-Belted RadiusHA Node 1 andAdmin Node 1
SSR Optional ModuleData Node B
SSR Optional ModuleData Node A
Steel-Belted RadiusCarrier Server 1 and
NDB Management Node
Steel-Belted RadiusCarrier Server 2 andNDB Management Node
NDBCLUSTER Storage Engine
Transition Serverrunning SSR
Four-Server Strategy OnlyIf you must use the four-server strategy, look for special labels in the margin note area beside criticalparagraphs in this chapter, like this one. They identify extra steps required if the transition server was partof an existing cluster and the cluster is running on three nodes. The step identified by the Four-ServerStrategy Only label is not required if you use the five-node strategy (extra fifth machine) and leave theexisting cluster fully functional.
The transition takes at least several hours and may take longer. The amount of time varies from site tosite and depends upon:
• The number of servers involved.
• Whether the servers require a Solaris upgrade. Many SBR/HA Release 5.5 servers ran on Solaris 9 butSteel-Belted Radius Carrier Release 8.6.0 requires Solaris 11.3.36.10.0 or later.
• Whether a Release 8.6.0 test environment that replicates the production environment exists and canbe moved to the production cluster, or the production environment needs to be created and tested.
• Whether one person or crew is installing one server at a time, or several are being installed in parallel.
371

Individual Node Migration Guidelines
Before beginning an upgrade that reuses your existing cluster servers, confirm that all machines can meetthe Release 8.6.0 server requirements in “Before You Install Software” on page 39. In addition, observethese guidelines:
• Migration of SBR/HA Release 5.5 data nodes or management nodes is not supported. These nodes mustbe taken offline, existing software removed, and new software installed.
• No server may host both SBR/HA Release 5.5 software and Release 8.6.0 SSR software at the sametime. Just one version may be installed at any time.
• Migration of SBR/HARelease 5.5 RADIUS node configuration files to Release 8.6.0 SBR Carrier (S) nodesis not supported because of the significant differences between SBR/HA Release 5.5 and Release 8.6.0.
• If an existing Release 8.6.0 environment exists, perhaps one used for testing, you can use the configurationfiles from those SBR Carrier (S) nodes for the production installation.
Cluster Migration Workflow
The migration workflow follows a list of tasks that must be performed in a specific order to make theSession State Register cluster server fully functional. This guide presents groups of related tasks in sequentialorder.
The high-level view of the migration has several groups of tasks:
1. Planning—Because a SSR cluster involves four or more servers, planning the cluster topology and eachserver’s role and setting is essential. Planning is discussed, and a worksheet you can use to plan yourinstallation is in “Planning Your Session State Register Cluster” on page 32.
2. Creating a transition server—Setting up a transition server to temporarily provide cluster services whileother servers are set up is discussed in this chapter. See “Creating a Transition Server” on page 373.
3. Taking your existing cluster offline—After the transition server is handling traffic, the other nodes maybe taken offline.
4. Preparing—The tasks to complete and the information to gather on each server in a cluster beforesoftware can be installed are discussed in detail in “Before You Install Software” on page 39, and in thesucceeding chapters that document the optional installation of Signalware that is required to supportsome features.
Because this chapter was written for new installations rather than migration, some tasks may need tobe completed out of order, but all need to be completed.
5. Installing software—This includes completing preparatory steps that youwere unable to complete whileyour existing servers were online, unpacking the SSR software package on all nodes, selecting
372

configuration tasks, and providing settings used to set up the cluster servers. The preparatory stepsare discussed in “Before You Install Software” on page 39; the actual software installation in“Installing Session State Register Nodes” on page 94.
6. Configuring—Setting up configuration files for the SSR database is discussed in“Customizing the SSR Database Current Sessions Table” on page 144.
7. “Removing the Transition Server from Service” on page 390—Taking the transition server offline andcompleting the cutover is discussed in this chapter. See “Removing the Transition Server from Service”on page 390.
Creating a Transition Server
To set up a transition server to temporarily take the place of your existing cluster, you need to preparethe server, install software, and configure the database.
Preparing the Transition Server
To prepare the transition server:
1. Select the server.
• The server must meet all the Release 8.6.0 hardware and software requirements listed in“Before You Install Software” on page 39.
• If the server is part of your existing cluster:
• We recommend using themost powerful (themost RAMand greatest number of processors) serveravailable because it processes a heavier-than-normal load during the transition.
• We recommend using an SBR or management node, rather than a data node, to reduce front endprocessing on the old cluster and to maintain data redundancy.
• If the server is acting as the transition server to be reconfigured as part of the new SSR Starter Kitcluster when it is reconfigured, it must be a combined SBR Carrier/management node host in afour-server cluster.
If you use Centralized ConfigurationManagement to replicate SBRCarrier node configurations amonga group of like nodes, the transition server cannot assume the role of primary CCM server in the newcluster because it is not the first SBR Carrier node to be configured.
Four-Server Strategy Only2. If the transition server is one of the existing cluster’s SBR (S) or management (M) nodes:
373

a. Navigate to the radius/install subdirectory of the directory where the server package was installed.As root, stop the RADIUS processes:
Execute:sbrd stop radius
b. As root, identify and kill the ndb_mgmd and mysql processes.
Execute:Ps –ef|grep ndb_mgmdkill -9 <Ndb_mgmd process_id>
Ps –ef|grep mysqlkill -9 <mysql process_id>
c. Remove the Admin node and SBR node from the server.
Execute:InstallAdminNode.sh – upkgrm JNPRsbr
d. Perform all other tasks required to make the server conform to all installation prerequisites listedin “Before You Install Software” on page 39.
Unpacking and Configuring the New Software on the Transition Server
Before starting this procedure, review “Before You Install Software” on page 39. In particular, reviewrequirements for “Setting Up External Database Connectivity (Optional)” on page 53 and “Installing theSIGTRAN Interface (Optional)” on page 55. Steps in this procedure require the server to be preconfiguredfor these capabilities.
To unpack and configure the software on the transition server:
1. Log in as root.
2. Download, unpack, and install (pkgadd -d) the Steel-Belted Radius Carrier software package.
See “Unpacking Session State Register Software” on page 95 for complete instructions.
3. Navigate to the radius/install subdirectory of the directory in which the JNPRsbr packagewas installed(/opt/JNPRsbr/radius/install by default):
Execute:cd /opt/JNPRsbr/radius/install/
4. Execute the configure script to set up the Steel-Belted Radius Carrier server software:
Execute:./configure
5. Review and accept the Steel-Belted Radius Carrier license agreement.
374

Press the spacebar to move from one page to the next. When you are prompted to accept the termsof the license agreement, enter y.
Do you accept the terms in the license agreement? [n] y
6. From themenu of configuration tasks, enter 5 to specify the type of installation as theCreate TemporaryCluster.
Configuring SBR Software
---------------------------------------------------------------------------
SBR 8.60.50006 cluster
on SunOS 5.10 Generic_141444-09 node sbrha-4
is not configured and processes are down, needs to be configured
---------------------------------------------------------------------------
1. Unconfigure Cluster Node
Not used when merely updating existing cluster definitions.
2. Generate Cluster Definition
Creates new or updates existing cluster definitions.
Modifies the shared directory but does not modify this node.
3. Configure Cluster Node
To be preceded by ’Generate Cluster Definition’ on any node.
Must be invoked on each and every node of the cluster.
4. Reconfigure RADIUS Server
Only on SBR nodes, updates the existing SBR configuration.
375
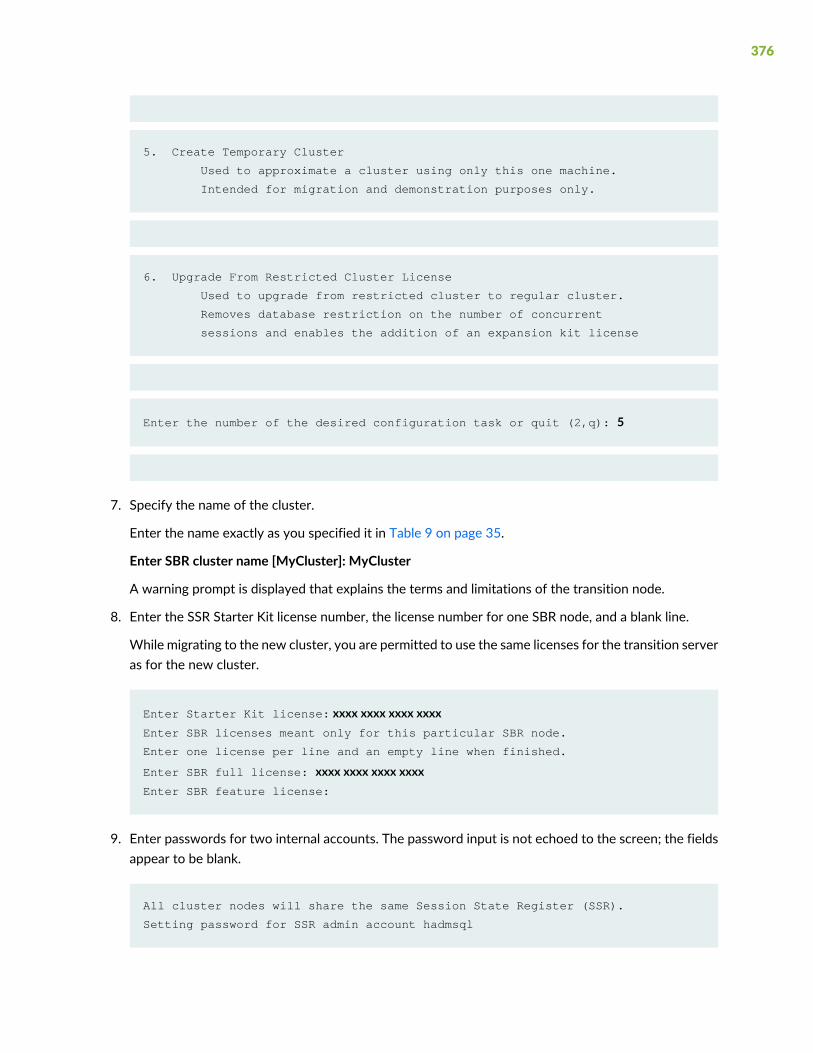
5. Create Temporary Cluster
Used to approximate a cluster using only this one machine.
Intended for migration and demonstration purposes only.
6. Upgrade From Restricted Cluster License
Used to upgrade from restricted cluster to regular cluster.
Removes database restriction on the number of concurrent
sessions and enables the addition of an expansion kit license
Enter the number of the desired configuration task or quit (2,q): 5
7. Specify the name of the cluster.
Enter the name exactly as you specified it in Table 9 on page 35.
Enter SBR cluster name [MyCluster]: MyCluster
A warning prompt is displayed that explains the terms and limitations of the transition node.
8. Enter the SSR Starter Kit license number, the license number for one SBR node, and a blank line.
While migrating to the new cluster, you are permitted to use the same licenses for the transition serveras for the new cluster.
Enter Starter Kit license: xxxx xxxx xxxx xxxxEnter SBR licenses meant only for this particular SBR node.
Enter one license per line and an empty line when finished.
Enter SBR full license: xxxx xxxx xxxx xxxxEnter SBR feature license:
9. Enter passwords for two internal accounts. The password input is not echoed to the screen; the fieldsappear to be blank.
All cluster nodes will share the same Session State Register (SSR).
Setting password for SSR admin account hadmsql
376

Password:
Again:
Setting password for SSR software account hadmsbr
Password:
Again:
10.The system generates the required configuration files and prompts you to view, accept, or reject them.Enter a to accept them and continue or v to view them.
CAUTION: We recommend that you enter an r to reject them only if a serious errorwas made when you provided information.We recommend that you not edit thesefiles.
Reviewing Configuration Files...
---------------------------------------------------------------------------
/opt/JNPRsbr/radius/install/tmp/dbcluster.rc
/opt/JNPRsbr/radius/install/tmp/config.ini
/opt/JNPRsbr/radius/install/tmp/my.cnf
/opt/JNPRsbr/radius/install/tmp/dbclusterndb.gen
View (v), accept (a), or reject (r) configuration files: a
11.Specifywhether youwant to use the JRE installed in your system to enable JDBC plug-ins and JavaScriptimplementation.
Do you want to configure Java Runtime Environment for JDBC Feature [n] :
• If no, press Enter to proceed to the next prompt. SBR Carrier does not support JDBC plug-ins unlessyou specify a valid JRE path.
• If yes, type y and press Enter. You are prompted to specify the path where the JRE is installed in yoursystem. The Java Virtual Machine (JVM) architecture should be compatible with SBR Carrier.
377

NOTE: Java 1.8.0 or a later version is required to access the Web GUI. To support bothJDBC plug-ins and Web GUI, it is recommended to use Java 1.8.0 or a later version withthe JVM architecture compatible with your SBR Carrier. For example, if you are using the64-bit version of SBR Carrier, you must use the 64-bit version of Java 1.8.0 or later.
Enter 64-bit libjvm.so path (Ex: /opt/jvm/jre/lib/amd64/server/ ) :
NOTE: If you enter an incorrect JVM path three times, SBR Carrier proceeds to the nextstep. In this case, you will not be able to use JDBC plug-ins. To specify the valid JVM path,you need to run the configure script again.
12.Supply the name of the initial admin user, root.
Enter initial admin user (UNIX account must have a valid password) [root]:
Press Enter to accept the default, root.
13.Do not set up centralized configuration management (CCM).
Enable Centralized Configuration Management (CCM) for this SBR node? [n]:
14.Specify whether you want to use the auto-restart module that automatically restarts the SBR Carrierserver in case of an unexpected shutdown.
Do you want to enable "Radius WatchDog" Process? [n]: Y
Radius WatchDog feature set to Enable
Please ensure that Perl 5 or better is installed.
NOTE: If Perl version 5 is not installed, the radiusd script will not run, even if enabled byconfiguration, and SBR Carrier will operate without the auto-restart module running.
15.Specifywhether youwant to configure SBRCarrier to provide LDAP server emulation for configurationand statistics using the LCI.
378

Do you want to enable LCI? [n] :
• If no, press Enter to accept the default.
• If yes, enter y and press Enter. You are prompted to provide information for LCI configuration.
a. When you are prompted for the port number, enter the port number that is used for communicationbetween SBR Carrier and the LDAP client.
NOTE: SBR Carrier uses port 667 as the default for LDAP emulation to avoid conflictwith other LDAP servers.
Configure LCI Port [667]: 1026
b. The script displays the interfaces available in the system.When you are prompted to enter interfaceaddresses onwhich Steel-Belted Radius Carrier should listen for LCI requests, enter the addressesyou want to use from the Available Interfaces list.
LCI Interface Configuration :
Available interfaces :
127.0.0.1
10.212.10.66
HELP : Enter one interface per line and an empty line when finished.
Enter LCI interface addresses from the above list.
Enter LCI interface address : 10.212.10.66
Enter LCI interface address : 127.0.0.1
Enter LCI interface address :
NOTE: SBR Carrier uses all interfaces for listening to LCI requests if you do not enterany interfaces.
c. Specify whether you want to change the default LCI password to prevent unauthorized LDAPclients from accessing your database.
379

Do you want to change LCI Password? [n]:
• If no, press Enter to accept the default password.
• If yes, enter y and press Enter. You are prompted to enter a new password.
Do you want to change LCI Password? [n]: Y
Password must meet the following requirements:
1. 6-8 Alphanumeric characters.
2. No Special characters other than underscore (’_’).
Enter Password:
Confirm Password:
Password will be changed when SBR restarts.
NOTE: Make sure that the entered password is at least 6 alphanumeric characters andnot more than 8 characters in length. The password should not include any specialcharacters other than underscore (’_’).
NOTE: The configure script also checks whether the LDAP utilities (such as ldapdelete,ldapmodify, and ldapsearch) are installed in your system. For Linux, a warning messageis displayed if you have not installed any of these utilities in your system. For Solaris,LDAP utilities are shipped with SBR Carrier package.
16.Specify whether you want to configure Steel-Belted Radius Carrier for use with an Oracle database.
To support this option, the server must already be configured as an Oracle client. (See “Setting UpExternal Database Connectivity (Optional)” on page 53.)
Configuring for use with generic database
Do you want to configure for use with Oracle? [n]:
If no, press Enter to accept the default.
If yes, type y and press Enter. You are prompted for version and path information for the Oracle libraryfiles.
380

Do you want to configure for use with Oracle? [n]: ySupported Oracle versions: 10, 11, 12What version of Oracle will be used? [10]: 10Configuring for use with Oracle 10Setting the environment variable ORACLE_HOMEEnter ORACLE_HOME [/dbms/u10/app/oracle/product/10.2.0]:Setting the environment variable LD_LIBRARY_PATHEnter path for Oracle shared libraries [/dbms/u10/app/oracle/product/10.2.0/lib]:Setting the environment variable TNS_ADMINEnter TNS_AMDIN [/dbms/u10/app/oracle/product/10.2.0/network/admin]:
NOTE: You must configure 64-bit Oracle client for 64-bit SBR Carrier.
17.Specify whether you want the Steel-Belted Radius Carrier server to communicate with an SS7 systemusing SIGTRAN.
To support this option, the server must already be configured to support SIGTRAN using Signalware.(See “Installing the SIGTRAN Interface (Optional)” on page 55 for an overview, and “SIGTRAN Supportfor Steel-Belted Radius Carrier” on page 309 for specific instructions.)
Do you want to configure for use with SIGTRAN? [n]: yConfiguring for use with SIGTRAN
Setting the environment variable OMNI_HOME
Enter OMNI_HOME [/opt/JNPRss7]:
18.Specify whether you want to start the GWrelay process while executing the ./sbrd start script.
Do you want to enable "GWrelay" Process? [n]: y
GWrelay will be started with sbrd
19.Specify whether you want to install the optional SNMP module to monitor your Steel-Belted RadiusCarrier server from an SNMP management station.
Do you want to configure SNMP? [n]:
• If no, press Enter to proceed to the next prompt.
• If yes, type y and press Enter. The installer prompts you for the information it needs to configure thejnprsnmpd.conf and startsnmp.sh files.
381

a. When you are prompted for a community string, enter the community string used to validateinformation sent from the SNMP subagent on the Steel-Belted Radius Carrier server to yourSNMP management station.
Choose a community string: public
b. When you are prompted for a range of IPv4 addresses, specify a starting IP address in ClasslessInter-Domain Routing format. To specify that only one host may query the agent, enter the IPaddress of the host followed by /32. To specify that any host on a designated class C networkmay query the agent, enter the starting address of the network followed by /24.
Specify the range of IPv4 addresses that may query this agent, such as 1.2.3.0/24.Address range: 192.168.70.0/24
c. If you are using SNMPv2, enter the DNS name or IP address of the trap sink to receive trapinformation from the SNMP subagent on the Steel-Belted Radius Carrier server.
SNMPv2 trap sink: 192.168.70.86
d. Set the SNMP agent port.
Although youmay specify the default SNMP port, 161, we recommend that you specify a differentport to avoid contention with other agents that are likely to already be using 161. If you choosean alternate port, make a note of it because your MIB browser needs to be configured to thesame setting.
Specify SNMP agent listening port[161]: 24161
e. Specify a trap sink address, if required.
Optionally specify a trap sink address that will receive SNMPv2 trap[localhost]: 172.28.72.83 2SNMPv2 trap sink port[162]:Configuration of SNMP complete.
20.The script searches for the Java 1.8.0 or later version in the default system path and displays aconfirmation message if found.
Configuring Admin GUI Webserver
Compatible Java version 1.8.0_66 found in: /usr/java/jdk1.8.0_66
If the specific version is not found, the script prompts you to enter the path where the specific Javaversion is installed in your system.
Enter Java version 1.8 installed path :
21.Specify whether you want to install a custom SSL certificate for the Web GUI.
382
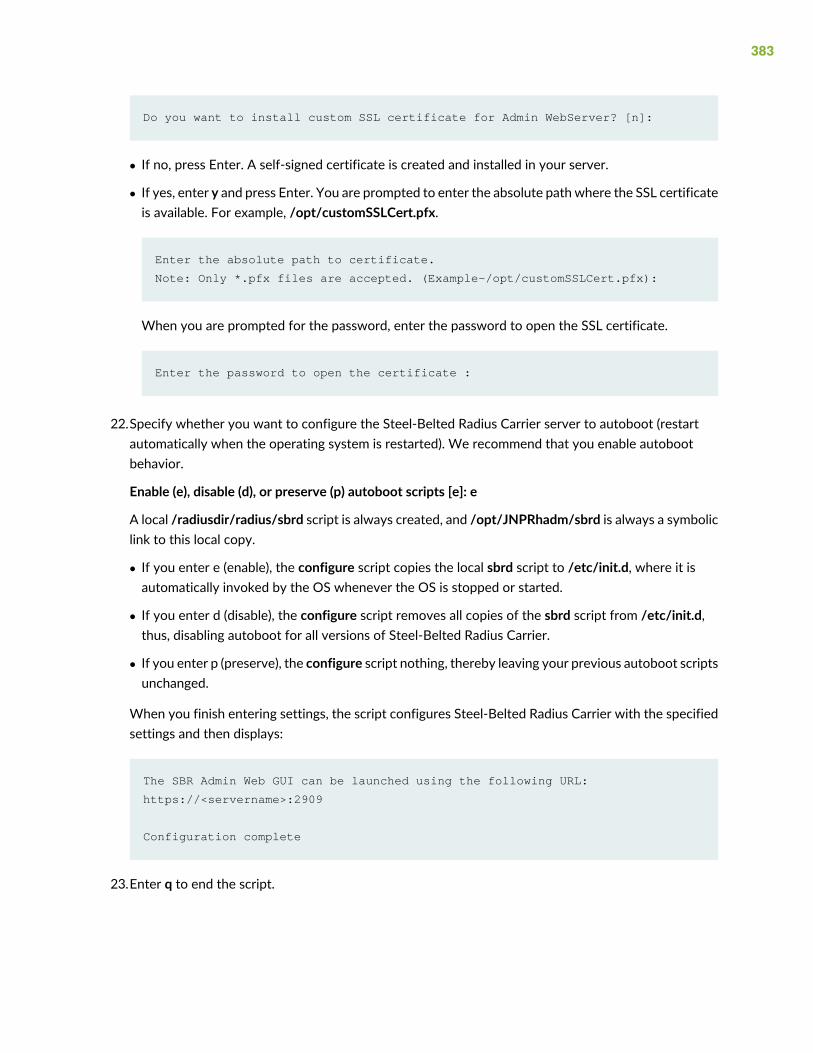
Do you want to install custom SSL certificate for Admin WebServer? [n]:
• If no, press Enter. A self-signed certificate is created and installed in your server.
• If yes, enter y and press Enter. You are prompted to enter the absolute path where the SSL certificateis available. For example, /opt/customSSLCert.pfx.
Enter the absolute path to certificate.
Note: Only *.pfx files are accepted. (Example-/opt/customSSLCert.pfx):
When you are prompted for the password, enter the password to open the SSL certificate.
Enter the password to open the certificate :
22.Specify whether you want to configure the Steel-Belted Radius Carrier server to autoboot (restartautomatically when the operating system is restarted). We recommend that you enable autobootbehavior.
Enable (e), disable (d), or preserve (p) autoboot scripts [e]: e
A local /radiusdir/radius/sbrd script is always created, and /opt/JNPRhadm/sbrd is always a symboliclink to this local copy.
• If you enter e (enable), the configure script copies the local sbrd script to /etc/init.d, where it isautomatically invoked by the OS whenever the OS is stopped or started.
• If you enter d (disable), the configure script removes all copies of the sbrd script from /etc/init.d,thus, disabling autoboot for all versions of Steel-Belted Radius Carrier.
• If you enter p (preserve), the configure script nothing, thereby leaving your previous autoboot scriptsunchanged.
When you finish entering settings, the script configures Steel-Belted Radius Carrier with the specifiedsettings and then displays:
The SBR Admin Web GUI can be launched using the following URL:
https://<servername>:2909
Configuration complete
23.Enter q to end the script.
383

---------------------------------------------------------------------------
SBR 8.60.50006 temporary cluster cambridge
on SunOS 5.10 Generic_141444-09 node sbrha-4(smdt)
is configured and processes are down, may be reconfigured if desired
---------------------------------------------------------------------------
1. Unconfigure Cluster Node
Not used when merely updating existing cluster definitions.
2. Generate Cluster Definition
Creates new or updates existing cluster definitions.
Modifies the shared directory but does not modify this node.
3. Configure Cluster Node
To be preceded by ’Generate Cluster Definition’ on any node.
Must be invoked on each and every node of the cluster.
4. Reconfigure RADIUS Server
Only on SBR nodes, updates the existing SBR configuration.
5. Create Temporary Cluster
Used to approximate a cluster using only this one machine.
Intended for migration and demonstration purposes only.
6. Upgrade From Restricted Cluster License
Used to upgrade from restricted cluster to regular cluster.
Removes database restriction on the number of concurrent
sessions and enables the addition of an expansion kit license
384

READY: last operation succeeded, created temporary cluster.
Enter the number of the desired configuration task or quit (4,q): q
Configuring the Transition Server
After the new software is configured, you need to configure the transition server as a temporary replacementfor your existing cluster. All cluster traffic is ultimately switched to this single transition server temporarily,while you take the other nodes in the existing cluster down and upgrade and reconfigure them. So, youneed to configure the temporary transition server as close to your existing configuration as possible. Todo this, you need to configure the server configuration files on the temporary transition server for youenvironment.
We recommend that you complete the configuration of all server initialization (.ini) files, authentication(.aut) files, accounting (.acc) files, as well as configure any proxy setup you may require. Carefully reviewthe SBR Carrier Reference Guide and configure all files for you environment prior to starting the temporarytransition server.
Also review the SBR Carrier Administration and Configuration Guide, and plan the configuration steps foryour particular environment. You cannot connect to the transition server withWeb GUI until the RADIUSprocess is started; however, we recommend you plan out the administration of the server before startingthe RADIUS process.
After you have completed the configuration of the various configuration files described in the SBR CarrierReference Guide, remember to come back and complete this procedure.
1. Start the ssr process.
As root, execute:cd /opt/JNPRsbr/radius./sbrd start ssr
Status messages are displayed as the programs start:
Starting ssr management processes
Starting ssr auxiliary processes
Starting ssr data processes
2. Create the session database.
Log on as hadm and execute:./CreateDB.sh
385
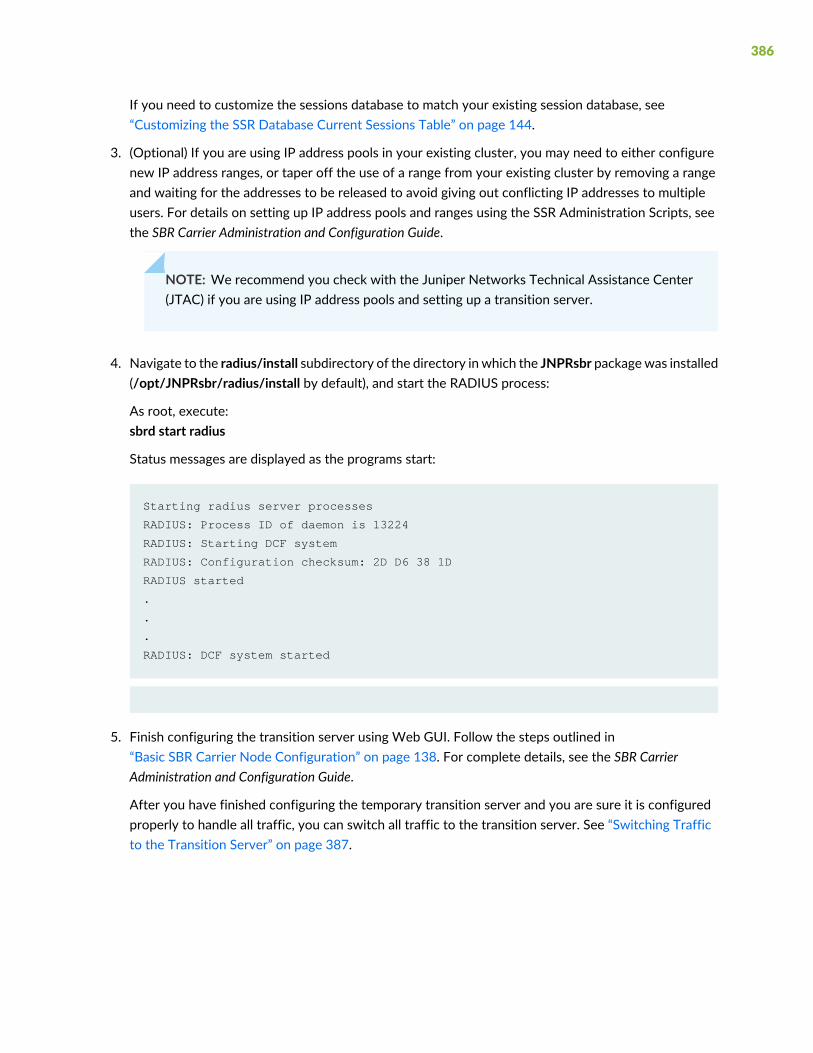
If you need to customize the sessions database to match your existing session database, see“Customizing the SSR Database Current Sessions Table” on page 144.
3. (Optional) If you are using IP address pools in your existing cluster, you may need to either configurenew IP address ranges, or taper off the use of a range from your existing cluster by removing a rangeand waiting for the addresses to be released to avoid giving out conflicting IP addresses to multipleusers. For details on setting up IP address pools and ranges using the SSR Administration Scripts, seethe SBR Carrier Administration and Configuration Guide.
NOTE: We recommend you check with the Juniper Networks Technical Assistance Center(JTAC) if you are using IP address pools and setting up a transition server.
4. Navigate to the radius/install subdirectory of the directory in which the JNPRsbr packagewas installed(/opt/JNPRsbr/radius/install by default), and start the RADIUS process:
As root, execute:sbrd start radius
Status messages are displayed as the programs start:
Starting radius server processes
RADIUS: Process ID of daemon is 13224
RADIUS: Starting DCF system
RADIUS: Configuration checksum: 2D D6 38 1D
RADIUS started
.
.
.
RADIUS: DCF system started
5. Finish configuring the transition server using Web GUI. Follow the steps outlined in“Basic SBR Carrier Node Configuration” on page 138. For complete details, see the SBR CarrierAdministration and Configuration Guide.
After you have finished configuring the temporary transition server and you are sure it is configuredproperly to handle all traffic, you can switch all traffic to the transition server. See “Switching Trafficto the Transition Server” on page 387.
386

Switching Traffic to the Transition Server
After the transition server is set up and tested, and a working database created, reconfigure the site’srouters to gradually direct traffic to the transition server instead of to the existing cluster’s SBR servers.
When the transition server is handling all traffic, back up your existing cluster servers and take them offline.
Installing the Cluster
With your existing cluster servers offline, you can proceed with a normal cluster installation:
1. Confirm that the cluster topology plan is complete. See“Planning Your Session State Register Cluster” on page 32.
Four-Server Strategy OnlyIf you are using the four-server strategy and plan to incorporate the transition server into the newStarter Kit cluster, the transition server must be the second SBR/management (SM) node host.
NOTE: During this procedure, the new cluster is configured as if the second SBR/managementnode host were present. However, it is not present because it is currently functioning as thetransition server, so you defer configuring and starting the second SBR/management nodehost until after the new cluster is operational.
2. Make sure that each server in the new cluster conforms to the requirements in“Before You Install Software” on page 39.
CAUTION: Do not skip this step; the server requirements for Session State Registerhave changed significantly since SBR/HA Release 5.x.
3. Install and configure the software on all cluster nodes.
Follow the procedures in “Installing Session State Register Nodes” on page 94.
Four-Server Strategy OnlyIf you are using the four-server strategy and plan to incorporate the transition node as the secondSBR/management node in the new cluster, skip “Setting Up the Second SBR/Management Node in aStarter Kit” on page 114 entirely as you work through the node installations.
4. When you begin configuring the cluster nodes, if you edited theCurrentSessions.sql file on the transitionserver during the procedure for “Configuring the Transition Server” on page 385, you can copy that
387

CurrentSessions.sql to the first management node that you set up. See“Customizing the SSR Database Current Sessions Table” on page 144.
5. Start the cluster.
• If you are using a five-node strategy, use the “Initial Cluster Startup Procedure” on page 132.
• In the following procedure, each time the sbrd status command is executed results similar to thisexample are displayed:
hadmUser$>/opt/JNPRsbr/radius/sbrd status
[ndbd(NDB)] 2 node(s)
id=10 @172.28.84.163 (mysql-5.7.25 ndb-7.6.9, Nodegroup: 0, Master)
id=11 @172.28.84.113 (mysql-5.7.25 ndb-7.6.9, Nodegroup: 0)
[ndb_mgmd(MGM)] 2 node(s)
id=1 @172.28.84.36 (mysql-5.7.25 ndb-7.6.9)
id=2 @172.28.84.166 (mysql-5.7.25 ndb-7.6.9)
[mysqld(API)] 4 node(s)
id=21 @172.28.84.36 (mysql-5.7.25 ndb-7.6.9)
id=22 @172.28.84.166 (mysql-5.7.25 ndb-7.6.9)
id=30 @172.28.84.36 (mysql-5.7.25 ndb-7.6.9)
id=31 @172.28.84.166 (mysql-5.7.25 ndb-7.6.9)
Examine the line starting with id=, and verify that there are no references to starting, connecting, ornot connected. Any of these references indicate the process has either not finished starting, or thenode is not connected properly. You may need to execute the sbrd status command more than oncebecause it only shows a snapshot of activity; the display does not refresh automatically. Do notproceed to the next node until you are sure the process has started properly and the node is connected.
Four-Server Strategy Only
• If you are using the four-server strategy, start the new cluster using a non-standard series of commandsbecause the fourth server that hosts the second management node is missing. Use this sequence ofcommands:
388

a. Log in to the SBR/management node as root.
b. Change directories to /opt/JNPRsbr/radius/.
c. Execute:./sbrd start ssr
d. Execute:./sbrd status
e. Examine each line and ensure the SSR process is running without error.
f. Log in to a data node as root.
g. Change directories to /opt/JNPRsbr/radius/.
h. Execute:./sbrd start ssr
i. Execute:./sbrd status
j. Examine each line and ensure the SSR process is running without error.
k. Log in to the second data node as root.
l. Change directories to /opt/JNPRsbr/radius/.
m. Execute:./sbrd start ssr
n. Execute:./sbrd status
o. Examine each line and ensure the SSR process is running without error.
p. Go back to the management node, still as root.
q. Change directories to /opt/JNPRhadm/.
r. Log in as hadm.
s. Execute:./CreateDB.sh
6. Run CreateDB.sh on each SBR/management node and each management node in the cluster.
If you need to customize the sessions database, see“Customizing the SSR Database Current Sessions Table” on page 144.
7. Configure at least one IP address pool and one range using the SSR Administration Scripts. See“Testing the Installation with DemoSetup.sh” on page 482. See the SBR Carrier Administration andConfiguration Guide for details on configuring IP address pools and ranges.
389
NOTE: We recommend you consult with the Juniper Networks Technical Assistance Center(JTAC) if you are using IP address pools and creating a transition server.
8. Start the RADIUS process on the SBR/management node.
a. Log in as root to the SBR/management (sm) node.
b. Change directories to /opt/JNPRsbr/radius/.
c. Execute:./sbrd start radius
d. Execute:./sbrd status
e. Examine each line and ensure the RADIUS process is running without error.
Now that the RADIUS process is running, you can complete the configuration using Web GUI. See“Basic SBRCarrier NodeConfiguration” on page 138. For complete details, see the SBRCarrier Administrationand Configuration Guide.
Removing the Transition Server from Service
After you bring the new cluster online, configure it, and test it, begin transferring live traffic to it and awayfrom the transition server. When all traffic has been shifted to the new cluster and the number of ongoingsessionsmanaged by the transition server has reached a suitably low level, take the transition server offline.Some sessions are terminated, but reconnect through the new cluster.
Cleaning the Transition Server
To free the licenses used by the transition server, and clean up installed software, uninstall the SBR Carriersoftware. See “Uninstalling Steel-Belted Radius Carrier Software” on page 358.
1. Log in as root.
2. Navigate to the directory where you installed the Steel-Belted Radius Carrier package, usually/opt/JNPRsbr. Then, navigate to the /opt/JNPRsbr/radius subdirectory.
3. Stop the RADIUS processes.
Execute:./sbrd stop radius
390

4. Stop the ssr processes:./sbrd stop ssr
5. Navigate to the /opt/JNPRsbr/radius/install directory and run the configure script:
Execute:./configure
6. From the menu of configuration tasks, enter 1 to specify Unconfigure Cluster Node.
Configuring SBR Software
---------------------------------------------------------------------------
SBR 8.60.50006 cluster
on SunOS 5.10 Generic_141444-09 node sbrha-4
is not configured and processes are down, needs to be configured
---------------------------------------------------------------------------
1. Unconfigure Cluster Node
Not used when merely updating existing cluster definitions.
2. Generate Cluster Definition
Creates new or updates existing cluster definitions.
Modifies the shared directory but does not modify this node.
3. Configure Cluster Node
To be preceded by ’Generate Cluster Definition’ on any node.
Must be invoked on each and every node of the cluster.
4. Reconfigure RADIUS Server
Only on SBR nodes, updates the existing SBR configuration.
391

5. Create Temporary Cluster
Used to approximate a cluster using only this one machine.
Intended for migration and demonstration purposes only.
6. Upgrade From Restricted Cluster License
Used to upgrade from restricted cluster to regular cluster.
Removes database restriction on the number of concurrent
sessions and enables the addition of an expansion kit license
Enter the number of the desired configuration task or quit (2,q): 1
7. A warning message is displayed. Enter y to proceed.
---------------------------------------------------------------------------
SBR 8.60.50006 temporary cluster cambridge
on SunOS 5.10 Generic_141444-09 node sbrha-4(smdt)
is configured and processes are down, may be reconfigured if desired
---------------------------------------------------------------------------
Unconfiguring Cluster Node...
WARNING: You are about to make irreversible changes to this node.
Are you sure that you wish to continue? (y,n): y
8. Clean up the user accounts.
A prompt is displayed to delete or preserve and clean up the hadm user account and associateddirectories.
• If you are going to reconfigure this server to serve as a standalone SBR Carrier server or become anode host in a cluster, enter n.
392

• If you want the server to be used for other purposes, enter y.
Locating OS user account and home directory...
hadm:x:16666:65536::/opt/JNPRhadm:/bin/bash
hadmg::65536:
drwxrwx--- 2 hadm hadmg 1536 Mar 28 10:59 /opt/JNPRhadm
WARNING: If you remove the OS user account hadm you will have
to recreate it, the associated OS group account hadmg, and
the associated home directory /opt/JNPRhadm
This is neither necessary nor recommended if you are updating
an existing configuration. Remove the OS user account? [n]:
9. Enter q to end the script.
Cleaning directories
/opt/JNPRhadm
/opt/JNPRmysql
/opt/JNPRmysqld
/opt/JNPRndb_mgmd
/opt/JNPRndbd
---------------------------------------------------------------------------
SBR 8.60.50006 cluster
on SunOS 5.10 Generic_141444-09 node sbrha-4
is not configured and processes are down, needs to be configured
---------------------------------------------------------------------------
1. Unconfigure Cluster Node
Not used when merely updating existing cluster definitions.
393

2. Generate Cluster Definition
Creates new or updates existing cluster definitions.
Modifies the shared directory but does not modify this node.
3. Configure Cluster Node
To be preceded by ’Generate Cluster Definition’ on any node.
Must be invoked on each and every node of the cluster.
4. Reconfigure RADIUS Server
Only on SBR nodes, updates the existing SBR configuration.
5. Create Temporary Cluster
Used to approximate a cluster using only this one machine.
Intended for migration and demonstration purposes only.
6. Upgrade From Restricted Cluster License
Used to upgrade from restricted cluster to regular cluster.
Removes database restriction on the number of concurrent
sessions and enables the addition of an expansion kit license
READY: last operation succeeded, node unconfigured.
Enter the number of the desired configuration task or quit (2,q): q
Four-Server Strategy Only
394

10.You can now set up the server as the second SBR/management node in the new cluster. Because allpreparatory steps have already been performed, follow the steps in “Setting Up the SecondSBR/Management Node in a Starter Kit” on page 114, with the exception of the last step for configuringthe data nodes. After completing these steps, remember to return to this procedure to complete theremaining steps.
11.Start the second SBR/management node using this sequence of commands:
a. Log in to the SBR/management node as root.
b. Change directories to /opt/JNPRsbr/radius/.
c. Execute:./sbrd start ssr
d. Execute:./sbrd status
e. Examine each line and ensure the SSR process is running without error.
12.Create the database on the SBR/management (sm) node:
a. Log in as hadm.
b. Execute:./CreateDB.sh
If you need to customize the sessions database, see“Customizing the SSR Database Current Sessions Table” on page 144.
13.Start the RADIUS process on the SBR/management node:
a. Log in as root.
b. Change directories to /opt/JNPRsbr/radius/.
c. Execute:./sbrd start radius
d. Execute:./sbrd status
e. Examine each line and ensure the RADIUS process is running without error.
14.Now that the RADIUS process is running, you can complete the configuration using Web GUI. See“Basic SBR Carrier Node Configuration” on page 138. For complete details, see the SBR CarrierAdministration and Configuration Guide.
395
CHAPTER 19
Upgrading Your Cluster Using the Rolling RestartMethod
IN THIS CHAPTER
Overview of the Rolling Restart Upgrade Method | 396
Preparation | 399
Upgrading the M Nodes in the Cluster | 400
Upgrading the SM Nodes in the Cluster | 409
Upgrading the S Nodes in the Cluster | 422
Upgrading the Data (D) Nodes with the New Software | 431
Launching Web GUI | 446
This section describes the rolling restart upgrade procedure, which you can use to upgrade servers runningin a SSR cluster. For information about upgrading servers running standalone, see “Installing and Configuringa SBR Carrier Standalone Server” on page 63.
These topics are included in this section:
Overview of the Rolling Restart Upgrade Method
This section describes how to perform a rolling restart upgrade to your 8.6.0 SSR cluster. By following thisprocedure, you should not experience any downtime in your cluster.
NOTE: Although you should not experience any service interruption during this procedure, werecommend you schedule a maintenance window when performing this procedure. To mitigatethe risk of experiencing downtime in your cluster, we recommend using a transition server. Forinstructions on creating and using a transition server, see“Using a Transition Server to Mitigate Downtime While Upgrading Your Cluster” on page 369.
396

NOTE: The example procedures in this section assume your cluster consists of one SM node,one S node, two M nodes, and two D nodes, as follows:
• First M node, bng-mars.englab.juniper.net (10.212.10.68)
• Second M node, bng-sbr-perf1 (10.212.10.66)
• SM node, sbr1.englab.juniper.net (10.212.10.213)
• First D node, bng-sbr-perfm3000-3 (10.212.10.188)
• Second D node, bng-sbr-perf2 (10.212.10.67)
• S node, bng-sbrha-1 (10.212.10.65)
Summary of the Rolling Restart Upgrade Method
During this upgrade procedure, you will need to:
1. Stop the SSR management process on the M node that you are planning to upgrade, upgrade theM node (install and configure the new software), and restart the SSR management process on theM node. Repeat this process on each M node, one at a time.
2. Stop the SSR management process and RADIUS process on the SM node, upgrade the SM node (installand configure the new software), and restart the SSR management process and RADIUS process onthe SM node. Repeat this process on each SM node, one at a time.
3. Stop the RADIUS process on the S node, install the new software on the S node, configure the newsoftware, and restart the SSR data process on the S node.
4. Stop the SSR data process on the D node, install the new software on the D node, configure the newsoftware, and restart the SSR data process on the D node. Repeat this process on each D node, one ata time.
Introduction and Requirements
Using these instructions, you will be able to upgrade your working SSR cluster from any of the specifiedsoftware releases without interruption of service. However, because the cluster will momentarily run withone node lesser than normally required, it is advisable to schedule the maintenance window outside anybusy hours.
397
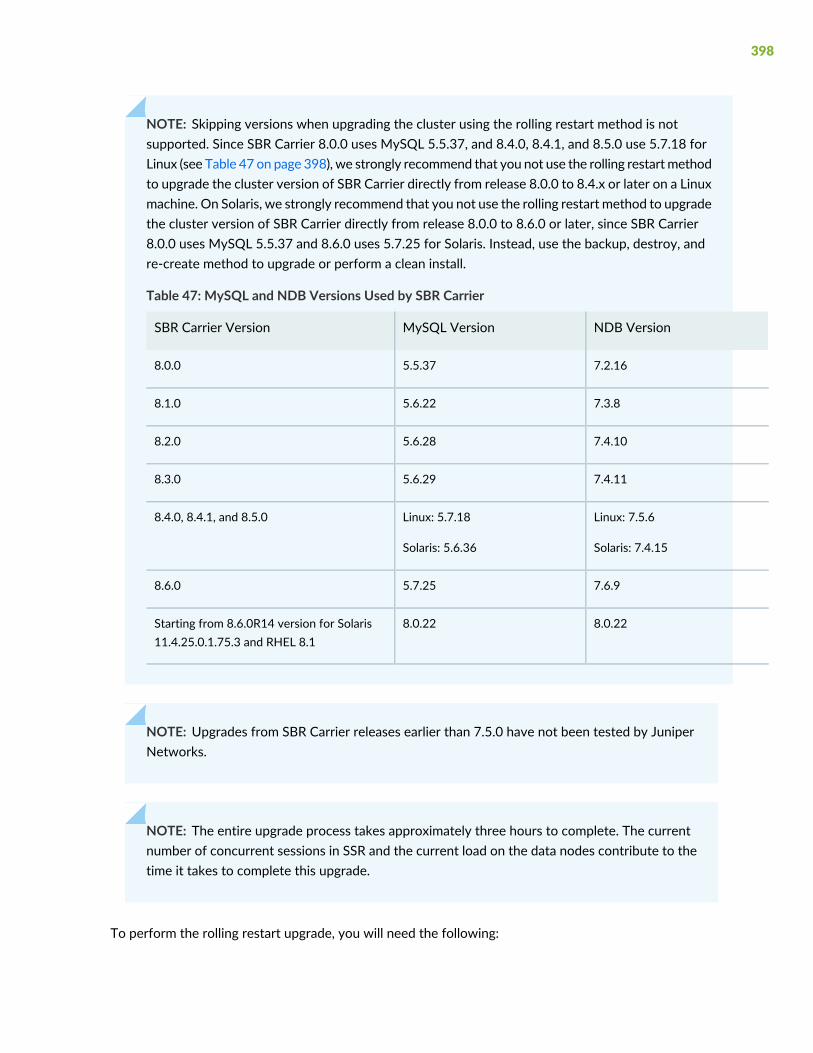
NOTE: Skipping versions when upgrading the cluster using the rolling restart method is notsupported. Since SBR Carrier 8.0.0 uses MySQL 5.5.37, and 8.4.0, 8.4.1, and 8.5.0 use 5.7.18 forLinux (see Table 47 on page 398), we strongly recommend that you not use the rolling restartmethodto upgrade the cluster version of SBR Carrier directly from release 8.0.0 to 8.4.x or later on a Linuxmachine. On Solaris, we strongly recommend that you not use the rolling restart method to upgradethe cluster version of SBR Carrier directly from release 8.0.0 to 8.6.0 or later, since SBR Carrier8.0.0 uses MySQL 5.5.37 and 8.6.0 uses 5.7.25 for Solaris. Instead, use the backup, destroy, andre-create method to upgrade or perform a clean install.
Table 47: MySQL and NDB Versions Used by SBR Carrier
NDB VersionMySQL VersionSBR Carrier Version
7.2.165.5.378.0.0
7.3.85.6.228.1.0
7.4.105.6.288.2.0
7.4.115.6.298.3.0
Linux: 7.5.6
Solaris: 7.4.15
Linux: 5.7.18
Solaris: 5.6.36
8.4.0, 8.4.1, and 8.5.0
7.6.95.7.258.6.0
8.0.228.0.22Starting from 8.6.0R14 version for Solaris11.4.25.0.1.75.3 and RHEL 8.1
NOTE: Upgrades from SBR Carrier releases earlier than 7.5.0 have not been tested by JuniperNetworks.
NOTE: The entire upgrade process takes approximately three hours to complete. The currentnumber of concurrent sessions in SSR and the current load on the data nodes contribute to thetime it takes to complete this upgrade.
To perform the rolling restart upgrade, you will need the following:
398

• The original cluster configuration files from the previous release of SBR Carrier installation (the contentsof /opt/JNPRshare).
• The SBR Carrier cluster distribution files, for example: sbr-cl-8.6.0.R-1.sparc.tgz.
• At least 10 GB of disk space on each machine running an SBRC front-end (S or SM node).
• At least 3 GB of disk space on each machine running a data node (D node).
Preparation
Complete the following steps to prepare for the upgrade:
1. Verify that all your front-end S or SM nodes are configured with matching keys in the spi.ini file. Fordetails, see the spi.ini file section in the SBR Carrier Reference Guide, and ensure that all your S or SMnodes have the same keys and are listed in the [Hosts] section.
CAUTION: Do not proceed with this upgrade until all your S or SM nodes areconfigured with matching keys and are listed in the [Hosts] section of the spi.inifile. Failure to do so will cause the upgrade to fail.
2. Copy the sbr-cl-8.6.0.R-1.sparc.tgz software distribution package to every node in the cluster, regardlessof its role (S, SM, D, and M nodes). Copy the package to the /opt/tmp directory or another locationwith enough disk space, and unzip and un-tar the distribution package.
For example:cd /opt/tmp
gunzip sbr-cl-8.6.0.R-1.sparc.tgz
tar xf sbr-cl-8.6.0.R-1.sparc.tar
3. (Optional) For simplicity, in this procedure the entire distribution is copied to every node in the cluster.If you have limited disk space, you can optionally just copy the file *mysqlcluster*.tar.gz to every data(D) node and management (M) node, or mount it over NFS. This is the only file that is actually requiredon data nodes and management (M) nodes. If you are comfortable with Solaris, you can choose tounpack the entire distribution only on the S and SM nodes, and copy just *mysqlcluster*.tar.gz to theM andD nodes. If you choose this advancedmethod, youmust be sure to unpack the entire distributionon all S or SM nodes. Note the path to the file *mysqlcluster*.tar.gz on your D nodes, for example:/opt/tmp/JNPRsbr.pkg/reloc/radius/install/ndb/bin/*mysqlcluster*.tar.gz.
399

NOTE: When SBR Carrier is upgraded from a release earlier than 7.4.0 (inclusive) to 7.4.1 ora later release, the /opt/tmp/JNPRsbr.pkg/reloc/radius/install/ndb/bin/ path contains twoversions of MySQL files. We recommend that you use the latest version of MySQL file.
4. Verify that you havemore than 6GB of disk space remaining on each node running SBR (S or SMnodes)after copying the entire distribution package.
5. Verify that you havemore than 1 GB of disk space remaining on eachD node after copying the package.
6. Verify that you havemore than 1GB of disk space remaining on eachMnode after copying the package.
Upgrading the M Nodes in the Cluster
To perform a rolling restart upgrade in your cluster, first you need to install the new software and configureit on each M node in the cluster.
NOTE: Execute this procedure on each M node, one at a time. This example procedure usestwo M nodes bng-mars.englab.juniper.net (10.212.10.68) and bng-sbr-perf1 (10.212.10.66).
NOTE: If you have limited disk space, you can just copy the file *mysqlcluster*.tar.gz to everyMnode, or mount it over NFS. Refer to “InstallingOnly the LatestMySQL Package” on page 435.
Installing the New SBRC Software on the M Nodes
Execute the following steps to install the new SBRC software package on the M node:
1. Stop the SSR process.
Log in to the node as root and execute:root@bng-mars: /opt/JNPRsbr/radius/sbrd stop ssr
Stopping ssr auxiliary processes
Stopping ssr management processes
Connected to Management Server at: 10.212.10.68:5235
400
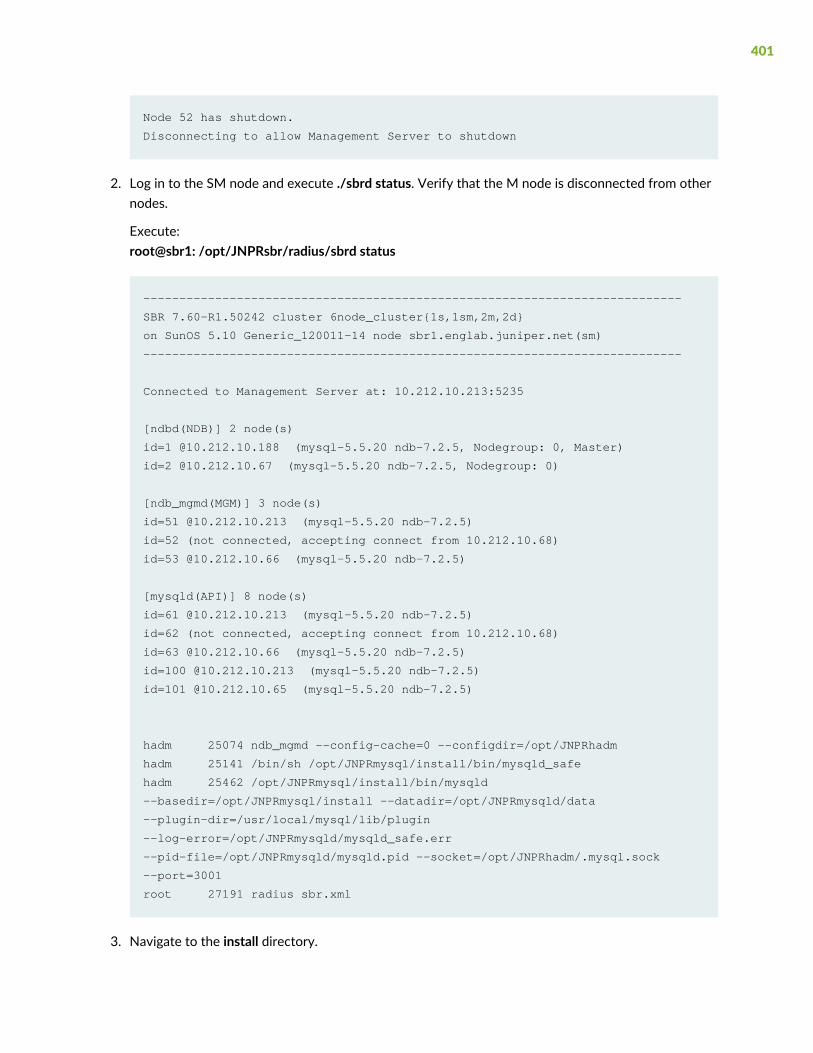
Node 52 has shutdown.
Disconnecting to allow Management Server to shutdown
2. Log in to the SM node and execute ./sbrd status. Verify that the M node is disconnected from othernodes.
Execute:root@sbr1: /opt/JNPRsbr/radius/sbrd status
---------------------------------------------------------------------------
SBR 7.60-R1.50242 cluster 6node_cluster{1s,1sm,2m,2d}
on SunOS 5.10 Generic_120011-14 node sbr1.englab.juniper.net(sm)
---------------------------------------------------------------------------
Connected to Management Server at: 10.212.10.213:5235
[ndbd(NDB)] 2 node(s)
id=1 @10.212.10.188 (mysql-5.5.20 ndb-7.2.5, Nodegroup: 0, Master)
id=2 @10.212.10.67 (mysql-5.5.20 ndb-7.2.5, Nodegroup: 0)
[ndb_mgmd(MGM)] 3 node(s)
id=51 @10.212.10.213 (mysql-5.5.20 ndb-7.2.5)
id=52 (not connected, accepting connect from 10.212.10.68)
id=53 @10.212.10.66 (mysql-5.5.20 ndb-7.2.5)
[mysqld(API)] 8 node(s)
id=61 @10.212.10.213 (mysql-5.5.20 ndb-7.2.5)
id=62 (not connected, accepting connect from 10.212.10.68)
id=63 @10.212.10.66 (mysql-5.5.20 ndb-7.2.5)
id=100 @10.212.10.213 (mysql-5.5.20 ndb-7.2.5)
id=101 @10.212.10.65 (mysql-5.5.20 ndb-7.2.5)
hadm 25074 ndb_mgmd --config-cache=0 --configdir=/opt/JNPRhadm
hadm 25141 /bin/sh /opt/JNPRmysql/install/bin/mysqld_safe
hadm 25462 /opt/JNPRmysql/install/bin/mysqld
--basedir=/opt/JNPRmysql/install --datadir=/opt/JNPRmysqld/data
--plugin-dir=/usr/local/mysql/lib/plugin
--log-error=/opt/JNPRmysqld/mysqld_safe.err
--pid-file=/opt/JNPRmysqld/mysqld.pid --socket=/opt/JNPRhadm/.mysql.sock
--port=3001
root 27191 radius sbr.xml
3. Navigate to the install directory.
401
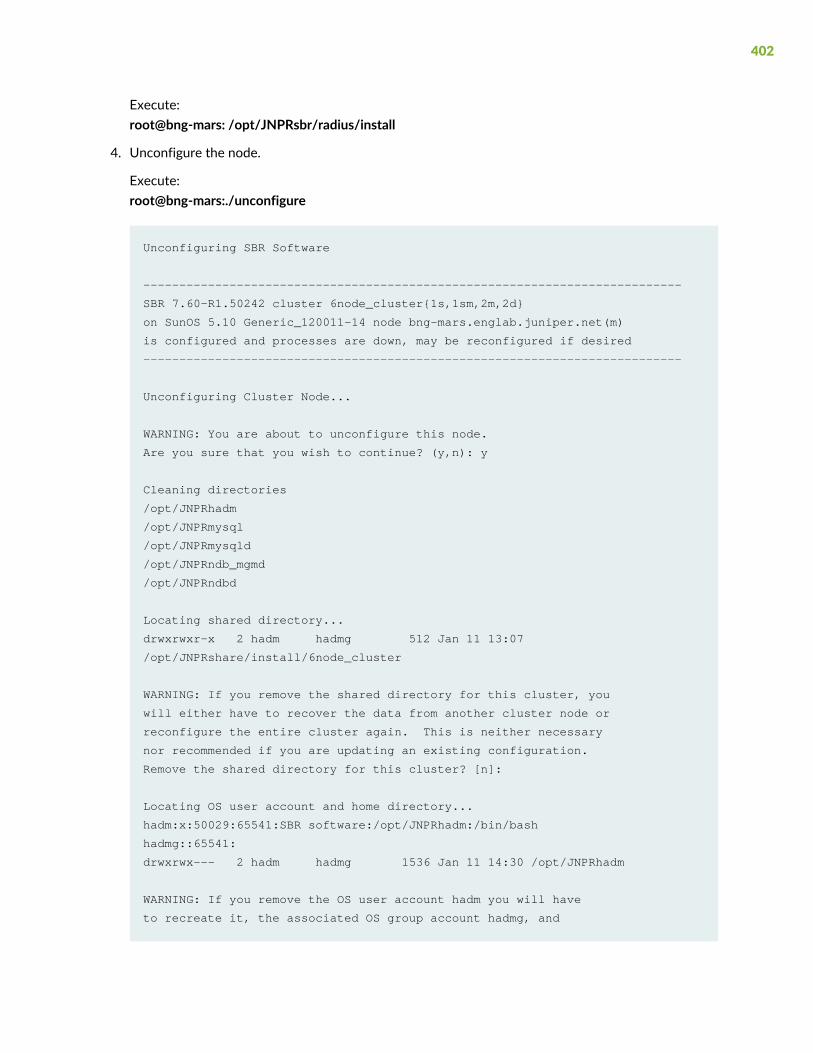
Execute:root@bng-mars: /opt/JNPRsbr/radius/install
4. Unconfigure the node.
Execute:root@bng-mars:./unconfigure
Unconfiguring SBR Software
---------------------------------------------------------------------------
SBR 7.60-R1.50242 cluster 6node_cluster{1s,1sm,2m,2d}
on SunOS 5.10 Generic_120011-14 node bng-mars.englab.juniper.net(m)
is configured and processes are down, may be reconfigured if desired
---------------------------------------------------------------------------
Unconfiguring Cluster Node...
WARNING: You are about to unconfigure this node.
Are you sure that you wish to continue? (y,n): y
Cleaning directories
/opt/JNPRhadm
/opt/JNPRmysql
/opt/JNPRmysqld
/opt/JNPRndb_mgmd
/opt/JNPRndbd
Locating shared directory...
drwxrwxr-x 2 hadm hadmg 512 Jan 11 13:07
/opt/JNPRshare/install/6node_cluster
WARNING: If you remove the shared directory for this cluster, you
will either have to recover the data from another cluster node or
reconfigure the entire cluster again. This is neither necessary
nor recommended if you are updating an existing configuration.
Remove the shared directory for this cluster? [n]:
Locating OS user account and home directory...
hadm:x:50029:65541:SBR software:/opt/JNPRhadm:/bin/bash
hadmg::65541:
drwxrwx--- 2 hadm hadmg 1536 Jan 11 14:30 /opt/JNPRhadm
WARNING: If you remove the OS user account hadm you will have
to recreate it, the associated OS group account hadmg, and
402
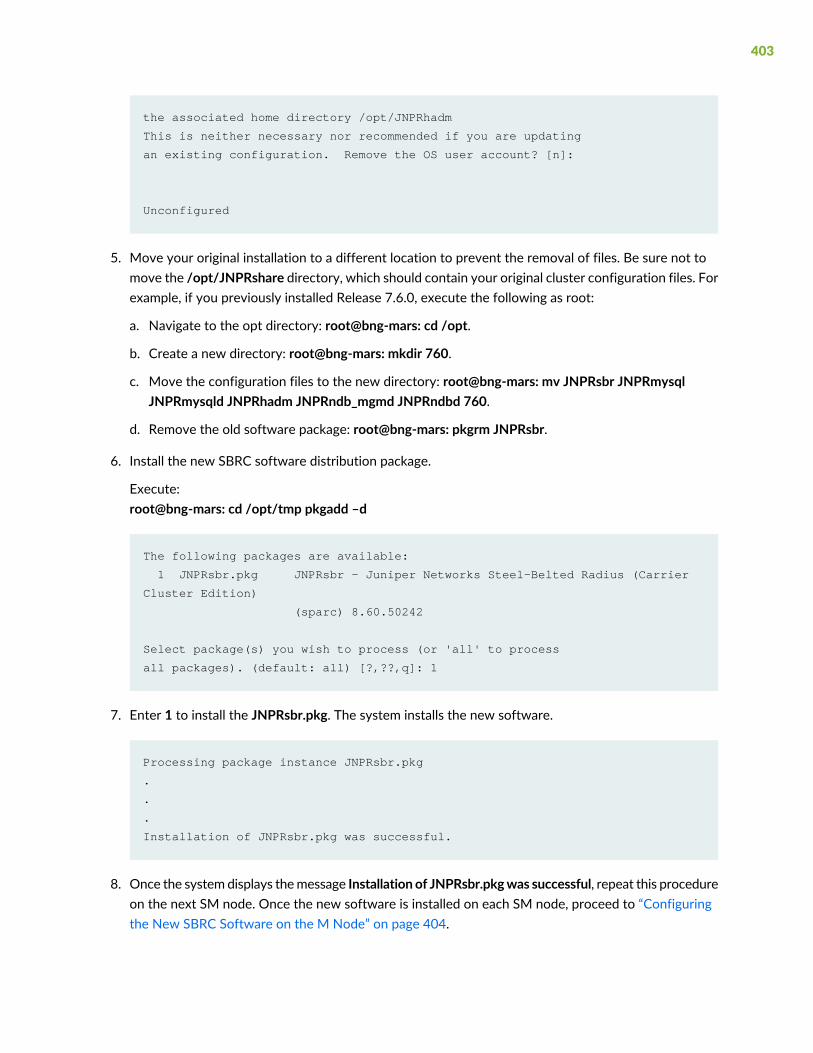
the associated home directory /opt/JNPRhadm
This is neither necessary nor recommended if you are updating
an existing configuration. Remove the OS user account? [n]:
Unconfigured
5. Move your original installation to a different location to prevent the removal of files. Be sure not tomove the /opt/JNPRshare directory, which should contain your original cluster configuration files. Forexample, if you previously installed Release 7.6.0, execute the following as root:
a. Navigate to the opt directory: root@bng-mars: cd /opt.
b. Create a new directory: root@bng-mars: mkdir 760.
c. Move the configuration files to the new directory: root@bng-mars: mv JNPRsbr JNPRmysqlJNPRmysqld JNPRhadm JNPRndb_mgmd JNPRndbd 760.
d. Remove the old software package: root@bng-mars: pkgrm JNPRsbr.
6. Install the new SBRC software distribution package.
Execute:root@bng-mars: cd /opt/tmp pkgadd –d
The following packages are available:
1 JNPRsbr.pkg JNPRsbr - Juniper Networks Steel-Belted Radius (Carrier
Cluster Edition)
(sparc) 8.60.50242
Select package(s) you wish to process (or 'all' to process
all packages). (default: all) [?,??,q]: 1
7. Enter 1 to install the JNPRsbr.pkg. The system installs the new software.
Processing package instance JNPRsbr.pkg
.
.
.
Installation of JNPRsbr.pkg was successful.
8. Once the system displays themessage Installation of JNPRsbr.pkgwas successful, repeat this procedureon the next SM node. Once the new software is installed on each SM node, proceed to “Configuringthe New SBRC Software on the M Node” on page 404.
403

Configuring the New SBRC Software on the M Node
Configure the new software on each M node, one at a time:
1. Configure the SBRC software on the M node, using the original cluster configuration files.
Execute:root@bng-mars: ./configure
Configuring SBR Software
END USER LICENSE AGREEMENT READ THIS END USER LICENSE AGREEMENT ("AGREEMENT")…………
.
.
.
Do you accept the terms in the license agreement? [n]: y
2. Enter y to accept the license agreement.
---------------------------------------------------------------------------
SBR 8.60-R1.50765 cluster
on SunOS 5.10 Generic_141444-09 node bng-mars.englab.juniper.net
is not configured and processes are down, needs to be configured
---------------------------------------------------------------------------
1. Unconfigure Cluster Node
Not used when merely updating existing cluster definitions.
2. Generate Cluster Definition
Creates new or updates existing cluster definitions.
Modifies the shared directory but does not modify this node.
3. Configure Cluster Node
To be preceded by 'Generate Cluster Definition' on one node.
Must be invoked on each and every node of the cluster.
4. Reconfigure RADIUS Server
Only on SBR nodes, updates the existing SBR configuration.
5. Create Temporary Cluster
404

Used to approximate a cluster using only this one machine.
Intended for migration and demonstration purposes only.
6. Upgrade From Restricted Cluster License
Used to upgrade from restricted cluster to regular cluster.
Removes database restriction on the number of concurrent
sessions and enables the addition of an expansion kit license
Enter the number of the desired configuration task or quit (2,q): 3
3. Enter 3 to select option 3. Configure Cluster Node.
---------------------------------------------------------------------------
SBR 8.60-R1.50765 cluster
on SunOS 5.10 Generic_141444-09 node bng-mars.englab.juniper.net
is not configured and processes are down, needs to be configured
---------------------------------------------------------------------------
Configuring Cluster Node...
4. Specify the name of your existing cluster. In this example the cluster name is “6node_cluster”.
Enter SBR cluster name [bng-mars]: 6node_cluster
Reading shared configuration from /opt/JNPRshare/install/6node_cluster
......
5. Migrate the configuration from your previous software release to the new software package. In mostcases, you simply need to identify your previous installation. In this example, the cluster configurationis named configure.6node_cluster.tar (see the previous step), and is stored in the/opt/JNPRsbr/radius/install directory. Once you specify the configuration, SBRC migrates yourconfiguration.
Enter:root@bng-mars: /opt/JNPRsbr/radius/install
Reading shared configuration from /opt/JNPRshare/install/6node_cluster
Enter absolute path to configure.6node_cluster.tar
405
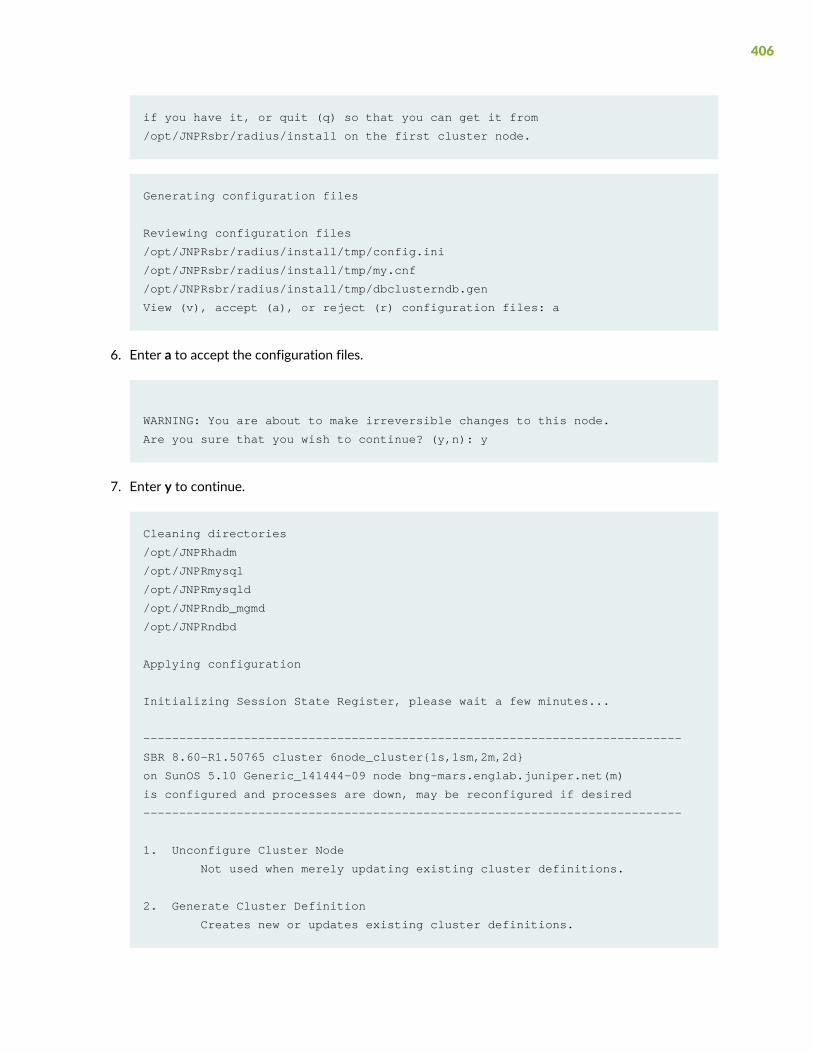
if you have it, or quit (q) so that you can get it from
/opt/JNPRsbr/radius/install on the first cluster node.
Generating configuration files
Reviewing configuration files
/opt/JNPRsbr/radius/install/tmp/config.ini
/opt/JNPRsbr/radius/install/tmp/my.cnf
/opt/JNPRsbr/radius/install/tmp/dbclusterndb.gen
View (v), accept (a), or reject (r) configuration files: a
6. Enter a to accept the configuration files.
WARNING: You are about to make irreversible changes to this node.
Are you sure that you wish to continue? (y,n): y
7. Enter y to continue.
Cleaning directories
/opt/JNPRhadm
/opt/JNPRmysql
/opt/JNPRmysqld
/opt/JNPRndb_mgmd
/opt/JNPRndbd
Applying configuration
Initializing Session State Register, please wait a few minutes...
---------------------------------------------------------------------------
SBR 8.60-R1.50765 cluster 6node_cluster{1s,1sm,2m,2d}
on SunOS 5.10 Generic_141444-09 node bng-mars.englab.juniper.net(m)
is configured and processes are down, may be reconfigured if desired
---------------------------------------------------------------------------
1. Unconfigure Cluster Node
Not used when merely updating existing cluster definitions.
2. Generate Cluster Definition
Creates new or updates existing cluster definitions.
406
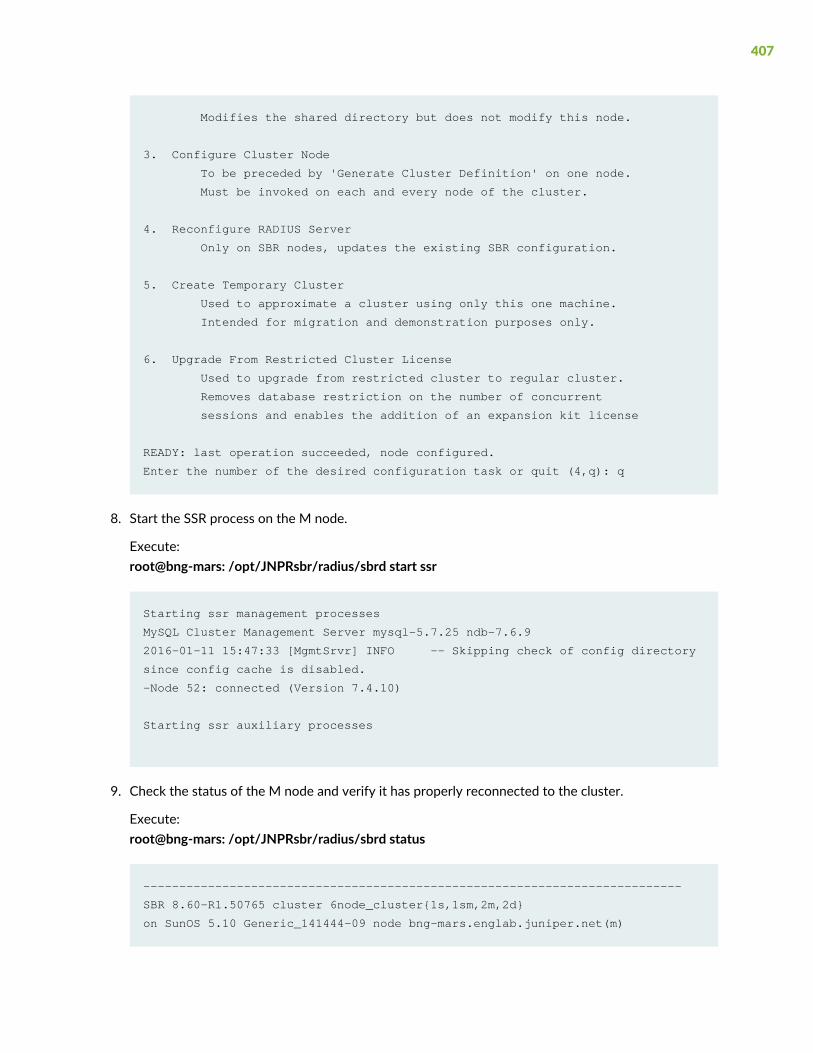
Modifies the shared directory but does not modify this node.
3. Configure Cluster Node
To be preceded by 'Generate Cluster Definition' on one node.
Must be invoked on each and every node of the cluster.
4. Reconfigure RADIUS Server
Only on SBR nodes, updates the existing SBR configuration.
5. Create Temporary Cluster
Used to approximate a cluster using only this one machine.
Intended for migration and demonstration purposes only.
6. Upgrade From Restricted Cluster License
Used to upgrade from restricted cluster to regular cluster.
Removes database restriction on the number of concurrent
sessions and enables the addition of an expansion kit license
READY: last operation succeeded, node configured.
Enter the number of the desired configuration task or quit (4,q): q
8. Start the SSR process on the M node.
Execute:root@bng-mars: /opt/JNPRsbr/radius/sbrd start ssr
Starting ssr management processes
MySQL Cluster Management Server mysql-5.7.25 ndb-7.6.9
2016-01-11 15:47:33 [MgmtSrvr] INFO -- Skipping check of config directory
since config cache is disabled.
-Node 52: connected (Version 7.4.10)
Starting ssr auxiliary processes
9. Check the status of the M node and verify it has properly reconnected to the cluster.
Execute:root@bng-mars: /opt/JNPRsbr/radius/sbrd status
---------------------------------------------------------------------------
SBR 8.60-R1.50765 cluster 6node_cluster{1s,1sm,2m,2d}
on SunOS 5.10 Generic_141444-09 node bng-mars.englab.juniper.net(m)
407
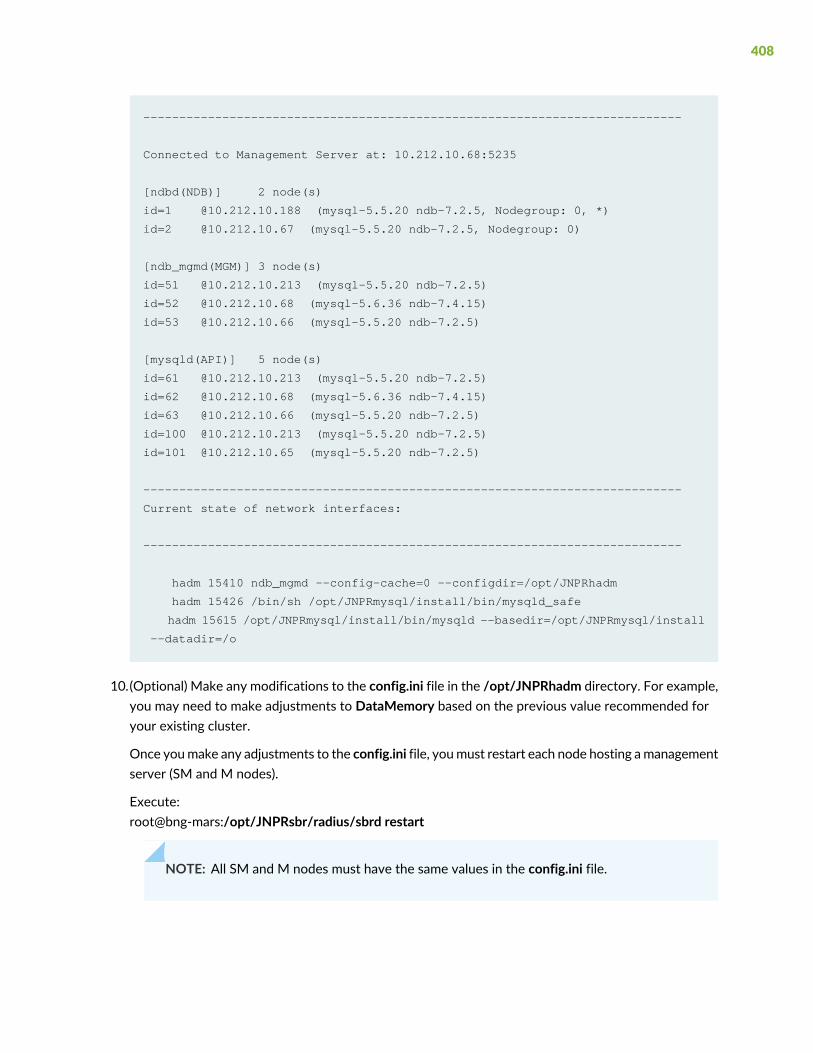
---------------------------------------------------------------------------
Connected to Management Server at: 10.212.10.68:5235
[ndbd(NDB)] 2 node(s)
id=1 @10.212.10.188 (mysql-5.5.20 ndb-7.2.5, Nodegroup: 0, *)
id=2 @10.212.10.67 (mysql-5.5.20 ndb-7.2.5, Nodegroup: 0)
[ndb_mgmd(MGM)] 3 node(s)
id=51 @10.212.10.213 (mysql-5.5.20 ndb-7.2.5)
id=52 @10.212.10.68 (mysql-5.6.36 ndb-7.4.15)
id=53 @10.212.10.66 (mysql-5.5.20 ndb-7.2.5)
[mysqld(API)] 5 node(s)
id=61 @10.212.10.213 (mysql-5.5.20 ndb-7.2.5)
id=62 @10.212.10.68 (mysql-5.6.36 ndb-7.4.15)
id=63 @10.212.10.66 (mysql-5.5.20 ndb-7.2.5)
id=100 @10.212.10.213 (mysql-5.5.20 ndb-7.2.5)
id=101 @10.212.10.65 (mysql-5.5.20 ndb-7.2.5)
---------------------------------------------------------------------------
Current state of network interfaces:
---------------------------------------------------------------------------
hadm 15410 ndb_mgmd --config-cache=0 --configdir=/opt/JNPRhadm
hadm 15426 /bin/sh /opt/JNPRmysql/install/bin/mysqld_safe
hadm 15615 /opt/JNPRmysql/install/bin/mysqld --basedir=/opt/JNPRmysql/install
--datadir=/o
10.(Optional) Make any modifications to the config.ini file in the /opt/JNPRhadm directory. For example,you may need to make adjustments to DataMemory based on the previous value recommended foryour existing cluster.
Once youmake any adjustments to the config.ini file, youmust restart each node hosting amanagementserver (SM and M nodes).
Execute:root@bng-mars:/opt/JNPRsbr/radius/sbrd restart
NOTE: All SM and M nodes must have the same values in the config.ini file.
408
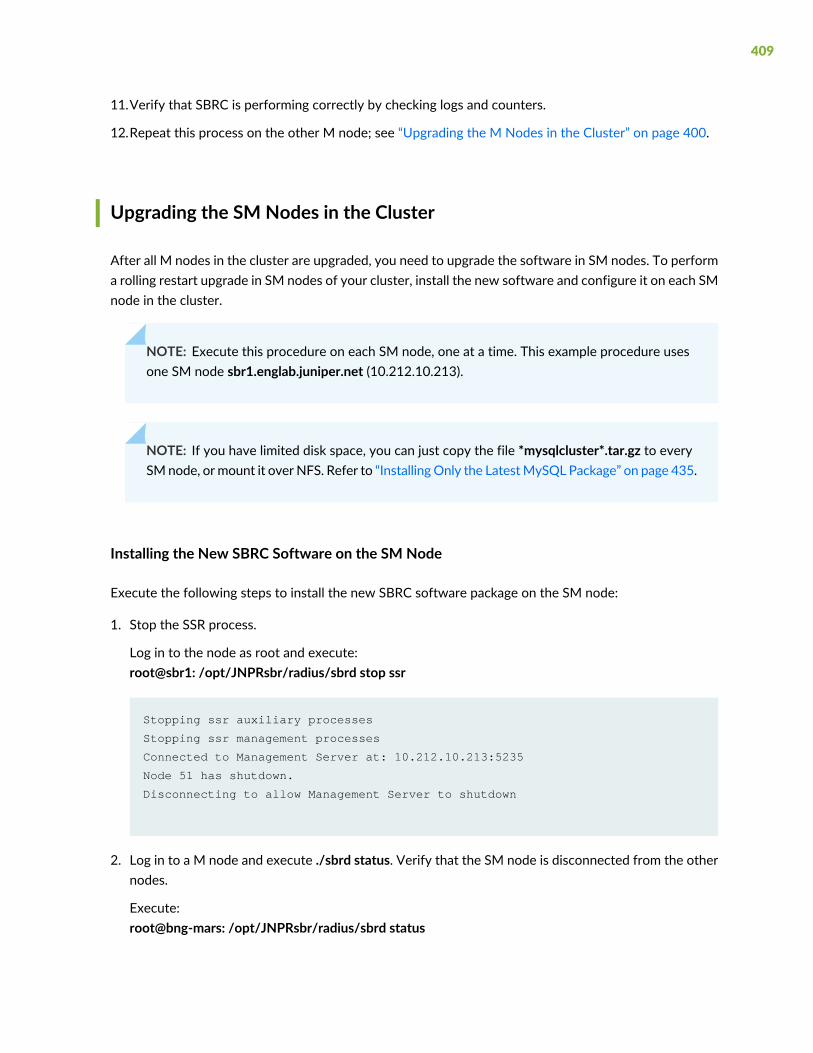
11.Verify that SBRC is performing correctly by checking logs and counters.
12.Repeat this process on the other M node; see “Upgrading the M Nodes in the Cluster” on page 400.
Upgrading the SM Nodes in the Cluster
After all M nodes in the cluster are upgraded, you need to upgrade the software in SM nodes. To performa rolling restart upgrade in SM nodes of your cluster, install the new software and configure it on each SMnode in the cluster.
NOTE: Execute this procedure on each SM node, one at a time. This example procedure usesone SM node sbr1.englab.juniper.net (10.212.10.213).
NOTE: If you have limited disk space, you can just copy the file *mysqlcluster*.tar.gz to everySMnode, ormount it over NFS. Refer to “InstallingOnly the LatestMySQL Package” on page 435.
Installing the New SBRC Software on the SM Node
Execute the following steps to install the new SBRC software package on the SM node:
1. Stop the SSR process.
Log in to the node as root and execute:root@sbr1: /opt/JNPRsbr/radius/sbrd stop ssr
Stopping ssr auxiliary processes
Stopping ssr management processes
Connected to Management Server at: 10.212.10.213:5235
Node 51 has shutdown.
Disconnecting to allow Management Server to shutdown
2. Log in to a M node and execute ./sbrd status. Verify that the SM node is disconnected from the othernodes.
Execute:root@bng-mars: /opt/JNPRsbr/radius/sbrd status
409
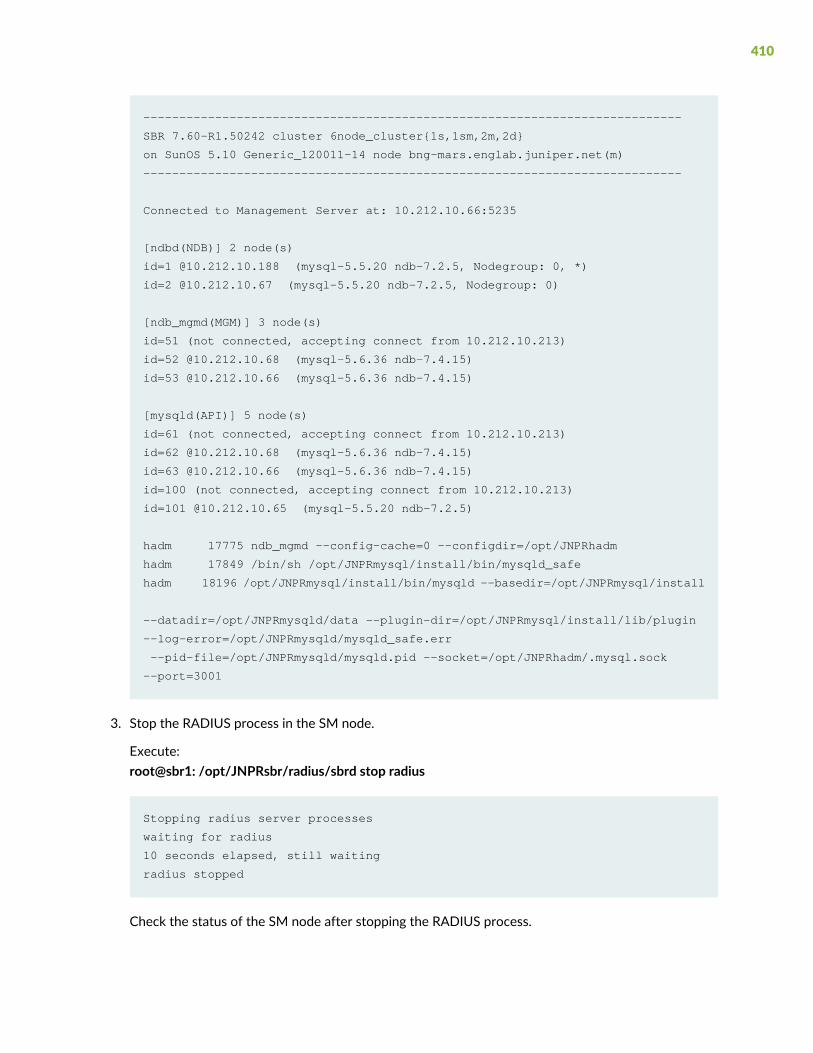
---------------------------------------------------------------------------
SBR 7.60-R1.50242 cluster 6node_cluster{1s,1sm,2m,2d}
on SunOS 5.10 Generic_120011-14 node bng-mars.englab.juniper.net(m)
---------------------------------------------------------------------------
Connected to Management Server at: 10.212.10.66:5235
[ndbd(NDB)] 2 node(s)
id=1 @10.212.10.188 (mysql-5.5.20 ndb-7.2.5, Nodegroup: 0, *)
id=2 @10.212.10.67 (mysql-5.5.20 ndb-7.2.5, Nodegroup: 0)
[ndb_mgmd(MGM)] 3 node(s)
id=51 (not connected, accepting connect from 10.212.10.213)
id=52 @10.212.10.68 (mysql-5.6.36 ndb-7.4.15)
id=53 @10.212.10.66 (mysql-5.6.36 ndb-7.4.15)
[mysqld(API)] 5 node(s)
id=61 (not connected, accepting connect from 10.212.10.213)
id=62 @10.212.10.68 (mysql-5.6.36 ndb-7.4.15)
id=63 @10.212.10.66 (mysql-5.6.36 ndb-7.4.15)
id=100 (not connected, accepting connect from 10.212.10.213)
id=101 @10.212.10.65 (mysql-5.5.20 ndb-7.2.5)
hadm 17775 ndb_mgmd --config-cache=0 --configdir=/opt/JNPRhadm
hadm 17849 /bin/sh /opt/JNPRmysql/install/bin/mysqld_safe
hadm 18196 /opt/JNPRmysql/install/bin/mysqld --basedir=/opt/JNPRmysql/install
--datadir=/opt/JNPRmysqld/data --plugin-dir=/opt/JNPRmysql/install/lib/plugin
--log-error=/opt/JNPRmysqld/mysqld_safe.err
--pid-file=/opt/JNPRmysqld/mysqld.pid --socket=/opt/JNPRhadm/.mysql.sock
--port=3001
3. Stop the RADIUS process in the SM node.
Execute:root@sbr1: /opt/JNPRsbr/radius/sbrd stop radius
Stopping radius server processes
waiting for radius
10 seconds elapsed, still waiting
radius stopped
Check the status of the SM node after stopping the RADIUS process.
410

Execute:root@sbr1: /opt/JNPRsbr/radius/sbrd status
---------------------------------------------------------------------------
SBR 7.60-R1.50242 cluster 6node_cluster{1s,1sm,2m,2d}
on SunOS 5.10 Generic_120011-14 node sbr1.englab.juniper.net(sm)
---------------------------------------------------------------------------
4. Navigate to the install directory.
Execute:root@sbr1: /opt/JNPRsbr/radius/install
5. Unconfigure the node.
Execute:root@sbr1:./unconfigure
Unconfiguring SBR Software
---------------------------------------------------------------------------
SBR 7.60-R1.50242 cluster 6node_cluster{1s,1sm,2m,2d}
on SunOS 5.10 Generic_120011-14 node sbr1.englab.juniper.net(sm)
is configured and processes are down, may be reconfigured if desired
---------------------------------------------------------------------------
Unconfiguring Cluster Node...
WARNING: You are about to unconfigure this node.
Are you sure that you wish to continue? (y,n): y
Cleaning directories
/opt/JNPRhadm
/opt/JNPRmysql
/opt/JNPRmysqld
/opt/JNPRndb_mgmd
/opt/JNPRndbd
Locating shared directory...
drwxrwxr-x 2 hadm hadmg 512 Jan 11 02:32
/opt/JNPRshare/install/6node_cluster
WARNING: If you remove the shared directory for this cluster, you
will either have to recover the data from another cluster node or
reconfigure the entire cluster again. This is neither necessary
411

nor recommended if you are updating an existing configuration.
Remove the shared directory for this cluster? [n]:
Locating OS user account and home directory...
hadm:x:50025:65540:SBR software:/opt/JNPRhadm:/bin/bash
hadmg::65540:
drwxrwx--- 2 hadm hadmg 1536 Jan 11 06:54 /opt/JNPRhadm
WARNING: If you remove the OS user account hadm you will have
to recreate it, the associated OS group account hadmg, and
the associated home directory /opt/JNPRhadm
This is neither necessary nor recommended if you are updating
an existing configuration. Remove the OS user account? [n]:
Unconfigured
6. Move your original installation to a different location to prevent the removal of files. Be sure not tomove the /opt/JNPRshare directory, which should contain your original cluster configuration files. Forexample, if you previously installed Release 7.6.0, execute the following as root:
a. Navigate to the opt directory: root@sbr1: cd /opt.
b. Create a new directory: root@sbr1: mkdir 760.
c. Move the configuration files to the new directory: root@sbr1:mv JNPRsbr JNPRmysql JNPRmysqldJNPRhadm JNPRndb_mgmd JNPRndbd 760.
d. Remove the old software package: root@sbr1: pkgrm JNPRsbr.
7. Install the new SBRC software distribution package.
Execute:root@sbr1: cd /opt/tmp pkgadd –d
The following packages are available:
1 JNPRsbr.pkg JNPRsbr - Juniper Networks Steel-Belted Radius (Carrier
Cluster Edition)
(sparc) 8.60.50242
Select package(s) you wish to process (or 'all' to process
all packages). (default: all) [?,??,q]: 1
8. Enter 1 to install the JNPRsbr.pkg. The system installs the new software.
412
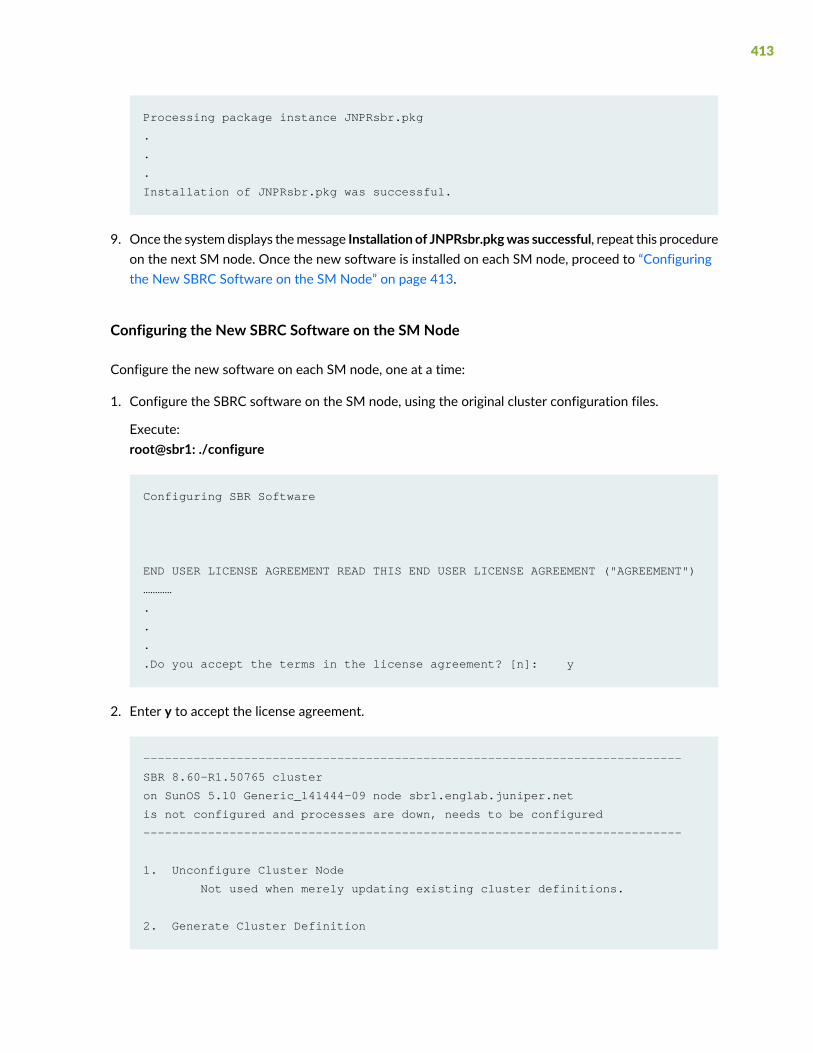
Processing package instance JNPRsbr.pkg
.
.
.
Installation of JNPRsbr.pkg was successful.
9. Once the system displays themessage Installation of JNPRsbr.pkgwas successful, repeat this procedureon the next SM node. Once the new software is installed on each SM node, proceed to “Configuringthe New SBRC Software on the SM Node” on page 413.
Configuring the New SBRC Software on the SM Node
Configure the new software on each SM node, one at a time:
1. Configure the SBRC software on the SM node, using the original cluster configuration files.
Execute:root@sbr1: ./configure
Configuring SBR Software
END USER LICENSE AGREEMENT READ THIS END USER LICENSE AGREEMENT ("AGREEMENT")
…………
.
.
.
.Do you accept the terms in the license agreement? [n]: y
2. Enter y to accept the license agreement.
---------------------------------------------------------------------------
SBR 8.60-R1.50765 cluster
on SunOS 5.10 Generic_141444-09 node sbr1.englab.juniper.net
is not configured and processes are down, needs to be configured
---------------------------------------------------------------------------
1. Unconfigure Cluster Node
Not used when merely updating existing cluster definitions.
2. Generate Cluster Definition
413

Creates new or updates existing cluster definitions.
Modifies the shared directory but does not modify this node.
3. Configure Cluster Node
To be preceded by 'Generate Cluster Definition' on one node.
Must be invoked on each and every node of the cluster.
4. Reconfigure RADIUS Server
Only on SBR nodes, updates the existing SBR configuration.
5. Create Temporary Cluster
Used to approximate a cluster using only this one machine.
Intended for migration and demonstration purposes only.
6. Upgrade From Restricted Cluster License
Used to upgrade from restricted cluster to regular cluster.
Removes database restriction on the number of concurrent
sessions and enables the addition of an expansion kit license
Enter the number of the desired configuration task or quit (2,q): 3
3. Enter 3 to select option 3. Configure Cluster Node.
---------------------------------------------------------------------------
SBR 8.60-R1.50765 cluster
on SunOS 5.10 Generic_141444-09 node sbr1.englab.juniper.net
is not configured and processes are down, needs to be configured
---------------------------------------------------------------------------
Configuring Cluster Node...
4. Specify the name of your existing cluster. In this example the cluster name is “6node_cluster”.
Enter SBR cluster name [sbr1]: 6node_cluster
Reading shared configuration from /opt/JNPRshare/install/6node_cluster
......
5. Migrate the configuration from your previous software release to the new software package. In mostcases, you simply need to identify your previous installation. In this example, the cluster configuration
414

is named configure.6node_cluster.tar (see the previous step), and is stored in the/opt/JNPRsbr/radius/install directory. Once you specify the configuration, SBRC migrates yourconfiguration.
Enter:root@sbr1: /opt/JNPRsbr/radius/install
Reading shared configuration from /opt/JNPRshare/install/6node_cluster
Enter absolute path to configure.6node_cluster.tar
if you have it, or quit (q) so that you can get it from
/opt/JNPRsbr/radius/install on the first cluster node.
Generating configuration files
Reviewing configuration files
/opt/JNPRsbr/radius/install/tmp/config.ini
/opt/JNPRsbr/radius/install/tmp/my.cnf
/opt/JNPRsbr/radius/install/tmp/dbclusterndb.gen
View (v), accept (a), or reject (r) configuration files: a
6. Enter a to accept the configuration files.
WARNING: You are about to make irreversible changes to this node.
Are you sure that you wish to continue? (y,n): y
7. Enter y to continue.
Cleaning directories
/opt/JNPRhadm
/opt/JNPRmysql
/opt/JNPRmysqld
/opt/JNPRndb_mgmd
/opt/JNPRndbd
Applying configuration
Initializing Session State Register, please wait a few minutes...
19949 Killed
415

Do you want to configure Java Runtime Environment for JDBC Feature [n] :
Please enter backup or radius directory from which to migrate.
Enter n for new configuration, s to search, or q to quit
[/opt/JNPRsbr/radius/install/backups/2010:10:21-08:31:21]:
Migrating files, please wait...
-
WARNING: A manual merge may be required between the files located in
/opt/JNPRsbr/radius (working files) and
/opt/JNPRsbr/radius/install/backups/2010:10:21-08:32:18 (shipped files)
8. Press Enter through the following prompts to keep your configuration.
Enter initial admin user (UNIX account must have a valid password) [root]:
Configuring for use with generic database
Do you want to enable "Radius WatchDog" Process? [n]:
Do you want to enable LCI? [n]:
Do you want to configure for use with Oracle? [n]:
Removing oracle references from startup script
Do you want to configure for use with SIGTRAN? [n]:
Removing SIGTRAN references from startup script
Do you want to configure SNMP? [n]:
Configuring Admin GUI Webserver
Compatible Java version found :
Do you want to install custom SSL certificate for Admin WebServer? [n]:
9. Enter e when prompted to enable the autoboot scripts.
Enable (e), disable (d), or preserve (p) autoboot scripts [e]: e
10.The main configuration menu is displayed.
Enter q to quit.
The SBR Admin Web GUI can be launched using the following URL:
https://<servername>:2909
---------------------------------------------------------------------------
SBR 8.60-R1.50765 cluster 6node_cluster{1s,1sm,2m,2d}
on SunOS 5.10 Generic_141444-09 node sbr1.englab.juniper.net(sm)
416

is configured and processes are down, may be reconfigured if desired
---------------------------------------------------------------------------
1. Unconfigure Cluster Node
Not used when merely updating existing cluster definitions.
2. Generate Cluster Definition
Creates new or updates existing cluster definitions.
Modifies the shared directory but does not modify this node.
3. Configure Cluster Node
To be preceded by 'Generate Cluster Definition' on one node.
Must be invoked on each and every node of the cluster.
4. Reconfigure RADIUS Server
Only on SBR nodes, updates the existing SBR configuration.
5. Create Temporary Cluster
Used to approximate a cluster using only this one machine.
Intended for migration and demonstration purposes only.
6. Upgrade From Restricted Cluster License
Used to upgrade from restricted cluster to regular cluster.
Removes database restriction on the number of concurrent
sessions and enables the addition of an expansion kit license
READY: last operation succeeded, node configured.
Enter the number of the desired configuration task or quit (4,q): q
11.Start the SSR process on the SM node.
Execute:root@sbr1: /opt/JNPRsbr/radius/sbrd start ssr
Starting ssr management processes
MySQL Cluster Management Server mysql-5.7.25 ndb-7.6.9
2016-01-11 07:18:49 [MgmtSrvr] INFO -- Skipping check of config directory
since config cache is disabled.
-Node 51: connected (Version 7.4.10)
Starting ssr auxiliary processes
12.Log in as the user ‘hadm’, navigate to the hadm user's home directory (/opt/JNPRhadm/ by default),and re-create the stored procedures by executing CreateDB.sh.
417

If you need to customize the sessions database to match your existing cluster session database, see“Customizing the SSRDatabase Current Sessions Table” on page 144. Any customizationmust be doneprior to running the CreateDB.sh script.
NOTE: Despite its name, this command does not change the contents of your database, sincethe database already exists. However, it re-creates the stored procedures that are requiredby the administration scripts. Failure to execute this step results in inoperable managementscripts, such as ShowSessions.sh, DelSession.sh, and CreateDB.sh.
13.Execute the UpdateSchema.pl utility for schema upgrades.
a. First, you need to determinewhether your schema needs to be updated for this release by executingUpdateSchemawith no arguments as the hadm user. This command returns a list of schemas whichneed to be updated.
Execute:hadm@sbr1:~>perl ./UpdateSchema.pl
Usage: perl UpdateSchema.pl [version]
where [version] is 5.4, 5.5, 7.2.5, or 8.4 and above
Other versions do not need a schema update.
From SBR 8.5 release, to increase the Column size of AcctSessionId from 24
to 48, the below usage is recommended:
Usage: perl UpdateSchema.pl <To_Version> ColumnUpdate:Sbr_AcctSessionId
NOTE: Future SBR Carrier software releases may require additional updates, werecommend you execute this step every time you upgrade to determine if a schemaupgrade is required.
b. If you are running a software release that requires a schema change, execute the command againwith the version to which you are upgrading. For example, if you are upgrading to SBR CarrierRelease 8.6.0:
Execute:hadm@sbr1:~>perl ./UpdateSchema.pl 8.6 ColumnUpdate:Sbr_AcctSessionId
Altering Tables for adding Sbr_Ipv6Address- Please wait...Done
Altering Tables for changing Sbr_AcctSessionId size from 24 to 48- Please
wait... Done
418
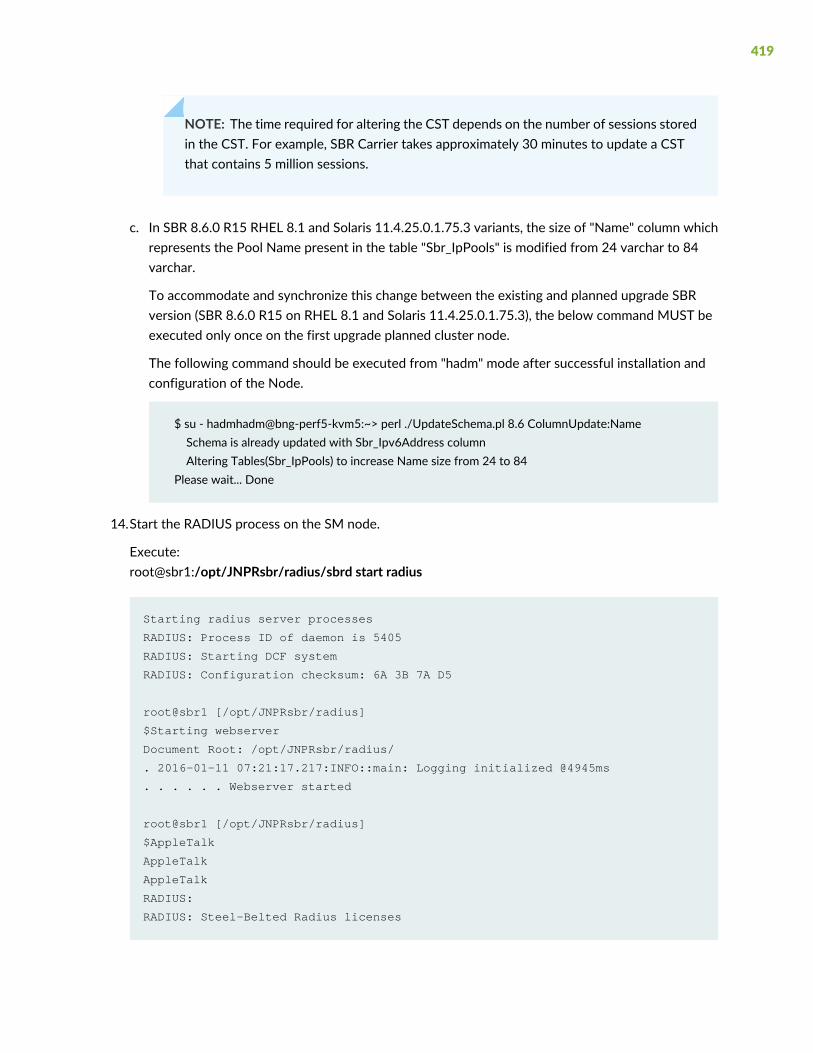
NOTE: The time required for altering the CST depends on the number of sessions storedin the CST. For example, SBR Carrier takes approximately 30 minutes to update a CSTthat contains 5 million sessions.
c. In SBR 8.6.0 R15 RHEL 8.1 and Solaris 11.4.25.0.1.75.3 variants, the size of "Name" column whichrepresents the Pool Name present in the table "Sbr_IpPools" is modified from 24 varchar to 84varchar.
To accommodate and synchronize this change between the existing and planned upgrade SBRversion (SBR 8.6.0 R15 on RHEL 8.1 and Solaris 11.4.25.0.1.75.3), the below command MUST beexecuted only once on the first upgrade planned cluster node.
The following command should be executed from "hadm" mode after successful installation andconfiguration of the Node.
$ su - hadmhadm@bng-perf5-kvm5:~> perl ./UpdateSchema.pl 8.6 ColumnUpdate:NameSchema is already updated with Sbr_Ipv6Address columnAltering Tables(Sbr_IpPools) to increase Name size from 24 to 84
Please wait... Done
14.Start the RADIUS process on the SM node.
Execute:root@sbr1:/opt/JNPRsbr/radius/sbrd start radius
Starting radius server processes
RADIUS: Process ID of daemon is 5405
RADIUS: Starting DCF system
RADIUS: Configuration checksum: 6A 3B 7A D5
root@sbr1 [/opt/JNPRsbr/radius]
$Starting webserver
Document Root: /opt/JNPRsbr/radius/
. 2016-01-11 07:21:17.217:INFO::main: Logging initialized @4945ms
. . . . . . Webserver started
root@sbr1 [/opt/JNPRsbr/radius]
$AppleTalk
AppleTalk
AppleTalk
RADIUS:
RADIUS: Steel-Belted Radius licenses
419
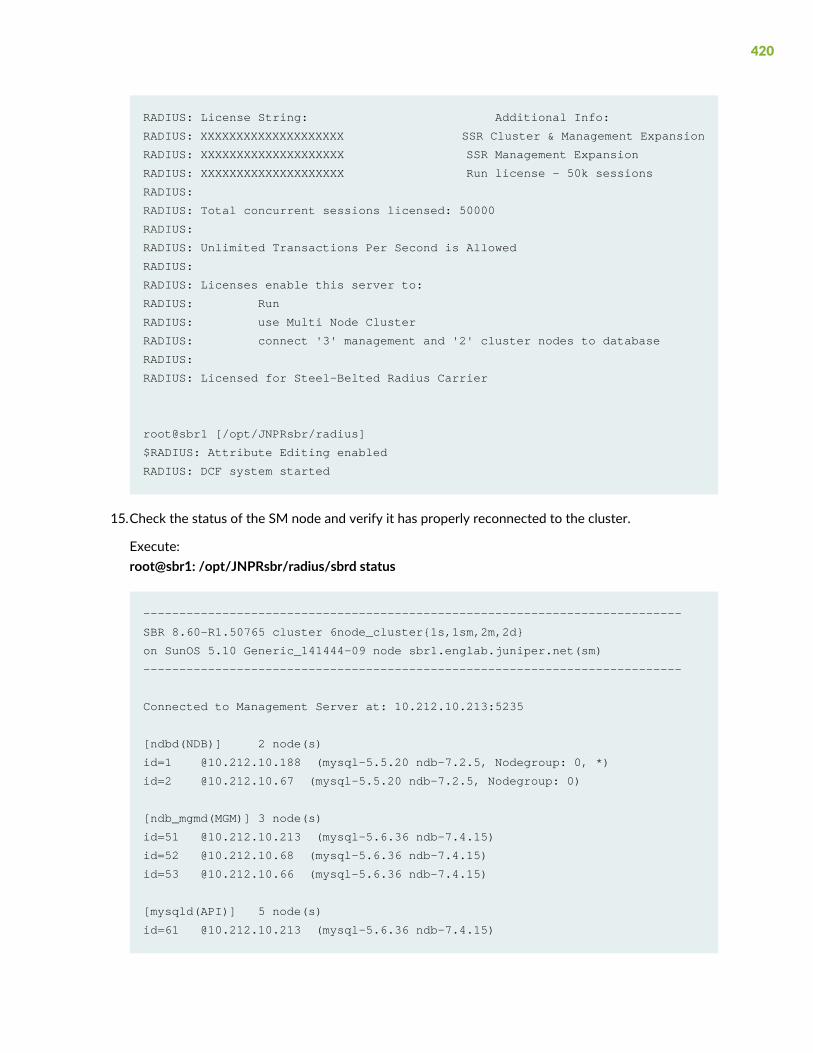
RADIUS: License String: Additional Info:
RADIUS: XXXXXXXXXXXXXXXXXXXX SSR Cluster & Management Expansion
RADIUS: XXXXXXXXXXXXXXXXXXXX SSR Management Expansion
RADIUS: XXXXXXXXXXXXXXXXXXXX Run license - 50k sessions
RADIUS:
RADIUS: Total concurrent sessions licensed: 50000
RADIUS:
RADIUS: Unlimited Transactions Per Second is Allowed
RADIUS:
RADIUS: Licenses enable this server to:
RADIUS: Run
RADIUS: use Multi Node Cluster
RADIUS: connect '3' management and '2' cluster nodes to database
RADIUS:
RADIUS: Licensed for Steel-Belted Radius Carrier
root@sbr1 [/opt/JNPRsbr/radius]
$RADIUS: Attribute Editing enabled
RADIUS: DCF system started
15.Check the status of the SM node and verify it has properly reconnected to the cluster.
Execute:root@sbr1: /opt/JNPRsbr/radius/sbrd status
---------------------------------------------------------------------------
SBR 8.60-R1.50765 cluster 6node_cluster{1s,1sm,2m,2d}
on SunOS 5.10 Generic_141444-09 node sbr1.englab.juniper.net(sm)
---------------------------------------------------------------------------
Connected to Management Server at: 10.212.10.213:5235
[ndbd(NDB)] 2 node(s)
id=1 @10.212.10.188 (mysql-5.5.20 ndb-7.2.5, Nodegroup: 0, *)
id=2 @10.212.10.67 (mysql-5.5.20 ndb-7.2.5, Nodegroup: 0)
[ndb_mgmd(MGM)] 3 node(s)
id=51 @10.212.10.213 (mysql-5.6.36 ndb-7.4.15)
id=52 @10.212.10.68 (mysql-5.6.36 ndb-7.4.15)
id=53 @10.212.10.66 (mysql-5.6.36 ndb-7.4.15)
[mysqld(API)] 5 node(s)
id=61 @10.212.10.213 (mysql-5.6.36 ndb-7.4.15)
420

id=62 @10.212.10.68 (mysql-5.6.36 ndb-7.4.15)
id=63 @10.212.10.66 (mysql-5.6.36 ndb-7.4.15)
id=100 @10.212.10.213 (mysql-5.6.36 ndb-7.4.15)
id=101 @10.212.10.65 (mysql-5.5.20 ndb-7.2.5)
---------------------------------------------------------------------------
Current state of network interfaces:
10.212.10.213.1646 Idle
10.212.10.213.1813 Idle
10.212.10.213.1645 Idle
10.212.10.213.1812 Idle
*.1812 *.* 0 0 49152 0 LISTEN
*.1813 *.* 0 0 49152 0 LISTEN
---------------------------------------------------------------------------
hadm 4761 ndb_mgmd --config-cache=0 --configdir=/opt/JNPRhadm
hadm 4779 /bin/sh /opt/JNPRmysql/install/bin/mysqld_safe
hadm 4968 /opt/JNPRmysql/install/bin/mysqld --basedir=/opt/JNPRmysql/install
--datadir=/o
root 5405 radius sbr.xml
root 5475 webserver
16.(Optional) Make any modifications to the config.ini file in the /opt/JNPRhadm directory. For example,you may need to make adjustments to DataMemory based on the previous value recommended foryour existing cluster.
Once youmake any adjustments to the config.ini file, youmust restart each node hosting amanagementserver (SM nodes).
Execute:root@sbr1:/opt/JNPRsbr/radius/sbrd restart
NOTE: All SM nodes must have the same values in the config.ini file.
17.Verify that SBRC is performing correctly by checking logs and counters.
18.Repeat this process on the other SM node; see “Upgrading the SM Nodes in the Cluster” on page 409.
421
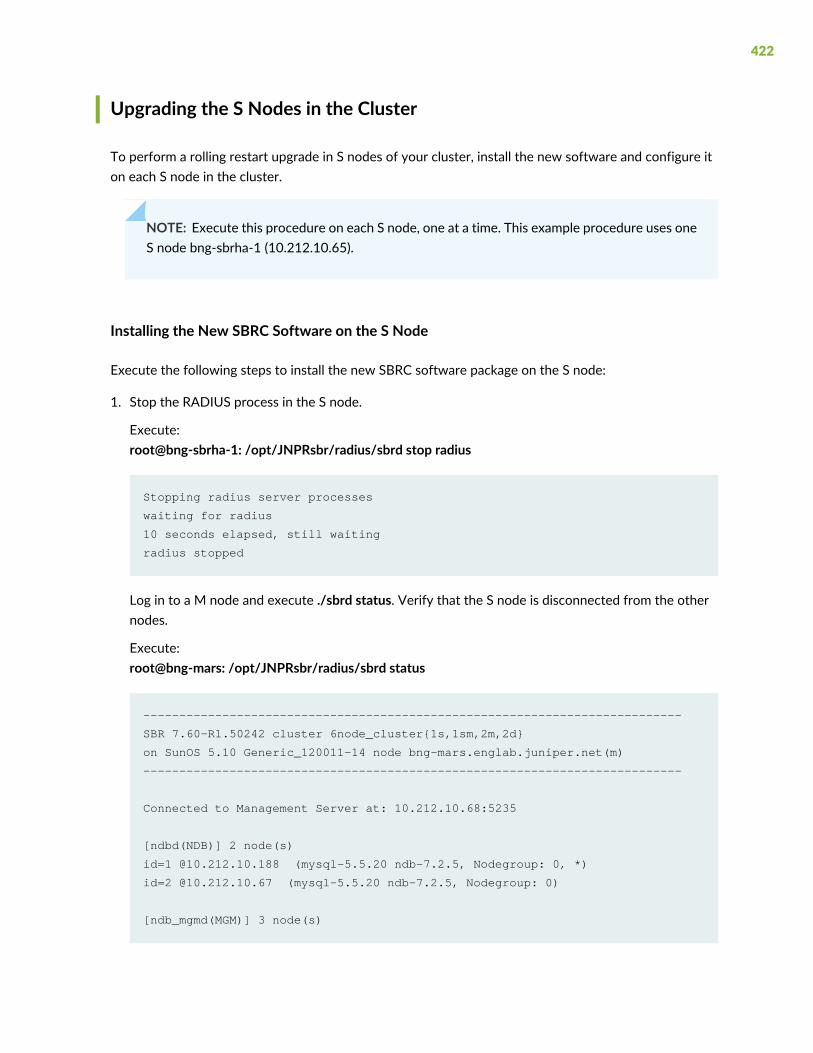
Upgrading the S Nodes in the Cluster
To perform a rolling restart upgrade in S nodes of your cluster, install the new software and configure iton each S node in the cluster.
NOTE: Execute this procedure on each S node, one at a time. This example procedure uses oneS node bng-sbrha-1 (10.212.10.65).
Installing the New SBRC Software on the S Node
Execute the following steps to install the new SBRC software package on the S node:
1. Stop the RADIUS process in the S node.
Execute:root@bng-sbrha-1: /opt/JNPRsbr/radius/sbrd stop radius
Stopping radius server processes
waiting for radius
10 seconds elapsed, still waiting
radius stopped
Log in to a M node and execute ./sbrd status. Verify that the S node is disconnected from the othernodes.
Execute:root@bng-mars: /opt/JNPRsbr/radius/sbrd status
---------------------------------------------------------------------------
SBR 7.60-R1.50242 cluster 6node_cluster{1s,1sm,2m,2d}
on SunOS 5.10 Generic_120011-14 node bng-mars.englab.juniper.net(m)
---------------------------------------------------------------------------
Connected to Management Server at: 10.212.10.68:5235
[ndbd(NDB)] 2 node(s)
id=1 @10.212.10.188 (mysql-5.5.20 ndb-7.2.5, Nodegroup: 0, *)
id=2 @10.212.10.67 (mysql-5.5.20 ndb-7.2.5, Nodegroup: 0)
[ndb_mgmd(MGM)] 3 node(s)
422

id=51 @10.212.10.213 (mysql-5.6.36 ndb-7.4.15)
id=52 @10.212.10.68 (mysql-5.6.36 ndb-7.4.15)
id=53 @10.212.10.66 (mysql-5.6.36 ndb-7.4.15)
[mysqld(API)] 5 node(s)
id=61 @10.212.10.213 (mysql-5.6.36 ndb-7.4.15)
id=62 @10.212.10.68 (mysql-5.6.36 ndb-7.4.15)
id=63 @10.212.10.66 (mysql-5.6.36 ndb-7.4.15)
id=100 @10.212.10.213 (mysql-5.6.36 ndb-7.4.15)
id=101 (not connected, accepting connect from 10.212.10.65)
hadm 4354 ndb_mgmd --config-cache=0 --configdir=/opt/JNPRhadm
hadm 4908 /bin/sh /opt/JNPRmysql/install/bin/mysqld_safe
hadm 5255 /opt/JNPRmysql/install/bin/mysqld --basedir=/opt/JNPRmysql/install
--datadir=/opt/JNPRmysqld/data --plugin-dir=/opt/JNPRmysql/install/lib/plugin
--log-error=/opt/JNPRmysqld/mysqld_safe.err
--pid-file=/opt/JNPRmysqld/mysqld.pid --socket=/opt/JNPRhadm/.mysql.sock
--port=3001
2. Navigate to the install directory.
Execute:root@bng-sbrha-1: /opt/JNPRsbr/radius/install
3. Unconfigure the node.
Execute:root@bng-sbrha-1:./unconfigure
Unconfiguring SBR Software
---------------------------------------------------------------------------
SBR 7.60-R1.50242 cluster 6node_cluster{1s,1sm,2m,2d}
on SunOS 5.10 Generic_120011-14 node bng-sbrha-1(s)
is configured and processes are down, may be reconfigured if desired
---------------------------------------------------------------------------
Unconfiguring Cluster Node...
WARNING: You are about to unconfigure this node.
Are you sure that you wish to continue? (y,n): y
Cleaning directories
/opt/JNPRhadm
423

Locating shared directory...
drwxrwxr-x 2 hadm hadmg 512 Jan 11 13:25
/opt/JNPRshare/install/6node_cluster
WARNING: If you remove the shared directory for this cluster, you
will either have to recover the data from another cluster node or
reconfigure the entire cluster again. This is neither necessary
nor recommended if you are updating an existing configuration.
Remove the shared directory for this cluster? [n]:
Locating OS user account and home directory...
hadm:x:554542:554539:SBR software:/opt/JNPRhadm:/bin/bash
hadmg::554539:
drwxrwx--- 2 hadm hadmg 512 Jan 11 19:47 /opt/JNPRhadm
WARNING: If you remove the OS user account hadm you will have
to recreate it, the associated OS group account hadmg, and
the associated home directory /opt/JNPRhadm
This is neither necessary nor recommended if you are updating
an existing configuration. Remove the OS user account? [n]:
Unconfigured
4. Move your original installation to a different location to prevent the removal of files. Be sure not tomove the /opt/JNPRshare directory, which should contain your original cluster configuration files. Forexample, if you previously installed Release 7.6.0, execute the following as root:
a. Navigate to the opt directory: root@bng-sbrha-1: cd /opt.
b. Create a new directory: root@bng-sbrha-1: mkdir 760.
c. Move the configuration files to the new directory: root@bng-sbrha-1: mv JNPRsbr JNPRmysqlJNPRmysqld JNPRhadm JNPRndb_mgmd JNPRndbd 760.
d. Remove the old software package: root@bng-sbrha-1: pkgrm JNPRsbr.
5. Install the new SBRC software distribution package.
Execute:root@bng-sbrha-1: cd /opt/tmp pkgadd –d
The following packages are available:
1 JNPRsbr.pkg JNPRsbr - Juniper Networks Steel-Belted Radius (Carrier
Cluster Edition)
(sparc) 8.60.50242
424

Select package(s) you wish to process (or 'all' to process
all packages). (default: all) [?,??,q]: 1
6. Enter 1 to install the JNPRsbr.pkg. The system installs the new software.
Processing package instance JNPRsbr.pkg
.
.
.
Installation of JNPRsbr.pkg was successful.
7. Once the system displays themessage Installation of JNPRsbr.pkgwas successful, repeat this procedureon the next S node. Once the new software is installed on each S node, proceed to “Configuring theNew SBRC Software on the S Node” on page 425.
Configuring the New SBRC Software on the S Node
Configure the new software on each S node, one at a time:
1. Configure the SBRC software on the S node, using the original cluster configuration files.
Execute:root@bng-sbrha-1: ./configure
Configuring SBR Software
END USER LICENSE AGREEMENT READ THIS END USER LICENSE AGREEMENT ("AGREEMENT")
…………
.
.
.
.Do you accept the terms in the license agreement? [n]: y
2. Enter y to accept the license agreement.
---------------------------------------------------------------------------
SBR 8.60-R1.50765 cluster
on SunOS 5.10 Generic_141444-09 node bng-sbrha-1
425

is not configured and processes are down, needs to be configured
---------------------------------------------------------------------------
1. Unconfigure Cluster Node
Not used when merely updating existing cluster definitions.
2. Generate Cluster Definition
Creates new or updates existing cluster definitions.
Modifies the shared directory but does not modify this node.
3. Configure Cluster Node
To be preceded by 'Generate Cluster Definition' on one node.
Must be invoked on each and every node of the cluster.
4. Reconfigure RADIUS Server
Only on SBR nodes, updates the existing SBR configuration.
5. Create Temporary Cluster
Used to approximate a cluster using only this one machine.
Intended for migration and demonstration purposes only.
6. Upgrade From Restricted Cluster License
Used to upgrade from restricted cluster to regular cluster.
Removes database restriction on the number of concurrent
sessions and enables the addition of an expansion kit license
Enter the number of the desired configuration task or quit (2,q): 3
3. Enter 3 to select option 3. Configure Cluster Node.
---------------------------------------------------------------------------
SBR 8.60-R1.50765 cluster
on SunOS 5.10 Generic_141444-09 node bng-sbrha-1
is not configured and processes are down, needs to be configured
---------------------------------------------------------------------------
Configuring Cluster Node...
4. Specify the name of your existing cluster. In this example the cluster name is “6node_cluster”.
Enter SBR cluster name [bng-sbrha-1]: 6node_cluster
426

Reading shared configuration from /opt/JNPRshare/install/6node_cluster
......
5. Migrate the configuration from your previous software release to the new software package. In mostcases, you simply need to identify your previous installation. In this example, the cluster configurationis named configure.6node_cluster.tar (see the previous step), and is stored in the/opt/JNPRsbr/radius/install directory. Once you specify the configuration, SBRC migrates yourconfiguration.
Enter:root@bng-sbrha-1: /opt/JNPRsbr/radius/install
Reading shared configuration from /opt/JNPRshare/install/6node_cluster
Enter absolute path to configure.6node_cluster.tar
if you have it, or quit (q) so that you can get it from
/opt/JNPRsbr/radius/install on the first cluster node.
Generating configuration files
Reviewing configuration files
/opt/JNPRsbr/radius/install/tmp/config.ini
/opt/JNPRsbr/radius/install/tmp/my.cnf
/opt/JNPRsbr/radius/install/tmp/dbclusterndb.gen
View (v), accept (a), or reject (r) configuration files: a
6. Enter a to accept the configuration files.
WARNING: You are about to make irreversible changes to this node.
Are you sure that you wish to continue? (y,n): y
7. Enter y to continue.
Cleaning directories
/opt/JNPRhadm
/opt/JNPRmysql
/opt/JNPRmysqld
/opt/JNPRndb_mgmd
/opt/JNPRndbd
427
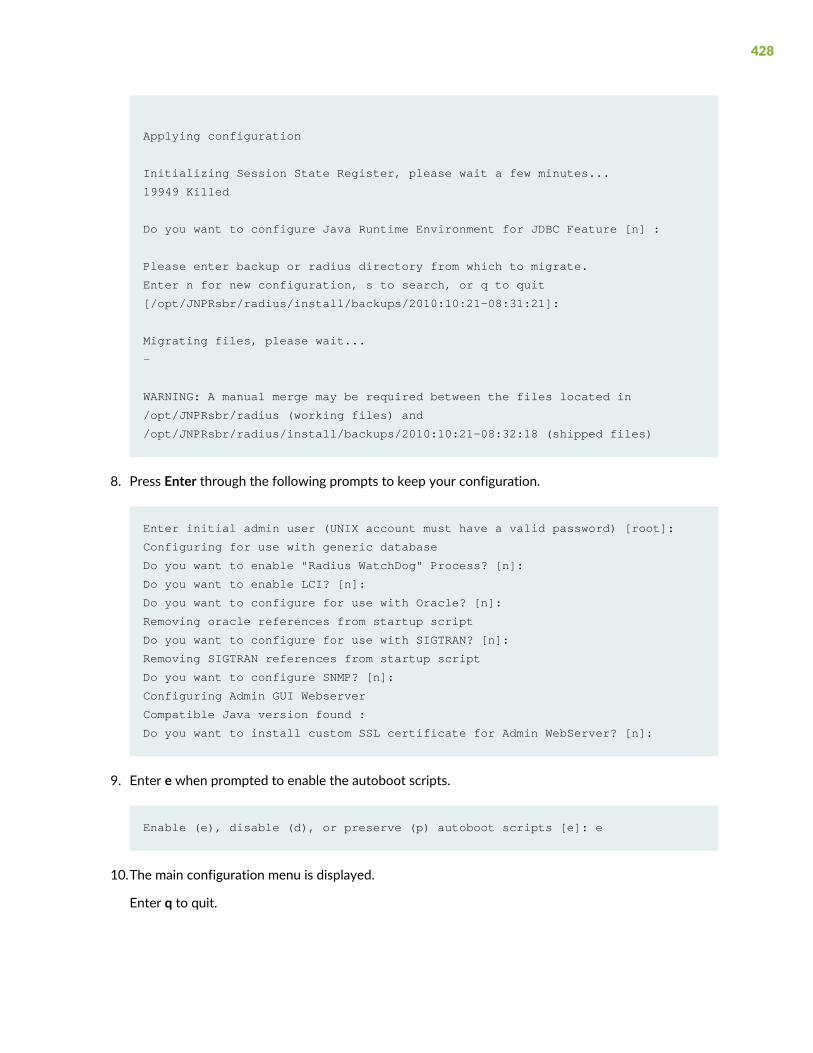
Applying configuration
Initializing Session State Register, please wait a few minutes...
19949 Killed
Do you want to configure Java Runtime Environment for JDBC Feature [n] :
Please enter backup or radius directory from which to migrate.
Enter n for new configuration, s to search, or q to quit
[/opt/JNPRsbr/radius/install/backups/2010:10:21-08:31:21]:
Migrating files, please wait...
-
WARNING: A manual merge may be required between the files located in
/opt/JNPRsbr/radius (working files) and
/opt/JNPRsbr/radius/install/backups/2010:10:21-08:32:18 (shipped files)
8. Press Enter through the following prompts to keep your configuration.
Enter initial admin user (UNIX account must have a valid password) [root]:
Configuring for use with generic database
Do you want to enable "Radius WatchDog" Process? [n]:
Do you want to enable LCI? [n]:
Do you want to configure for use with Oracle? [n]:
Removing oracle references from startup script
Do you want to configure for use with SIGTRAN? [n]:
Removing SIGTRAN references from startup script
Do you want to configure SNMP? [n]:
Configuring Admin GUI Webserver
Compatible Java version found :
Do you want to install custom SSL certificate for Admin WebServer? [n]:
9. Enter e when prompted to enable the autoboot scripts.
Enable (e), disable (d), or preserve (p) autoboot scripts [e]: e
10.The main configuration menu is displayed.
Enter q to quit.
428
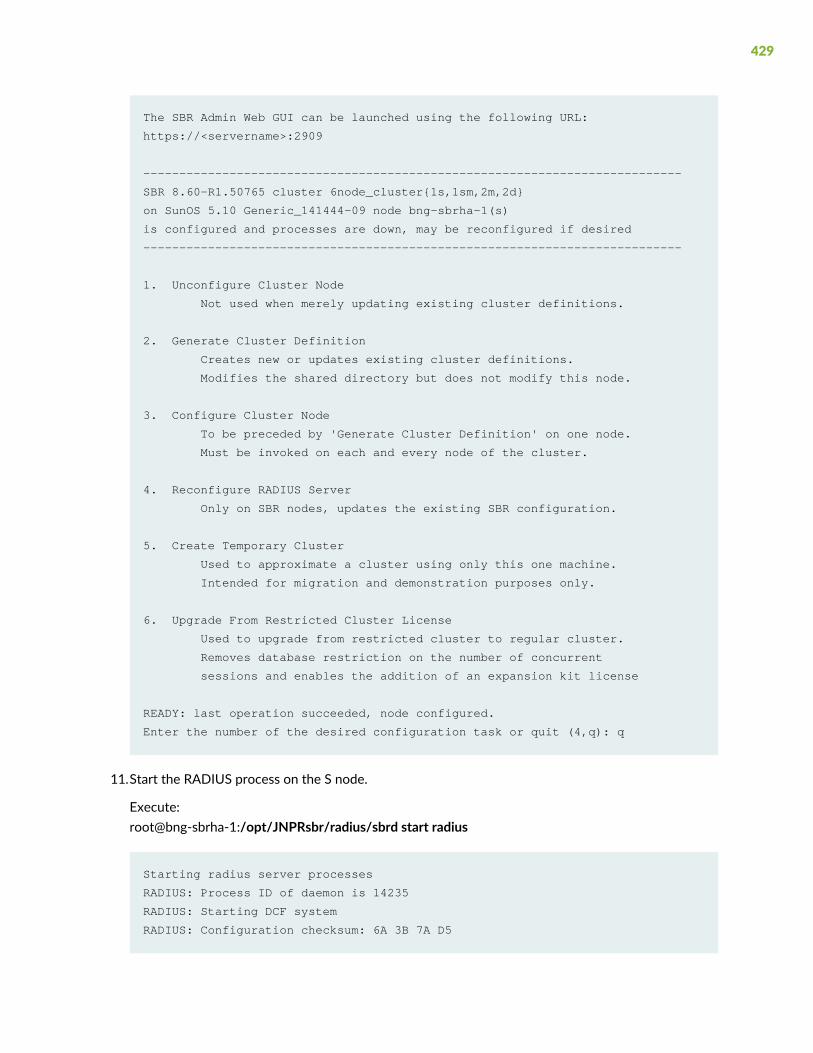
The SBR Admin Web GUI can be launched using the following URL:
https://<servername>:2909
---------------------------------------------------------------------------
SBR 8.60-R1.50765 cluster 6node_cluster{1s,1sm,2m,2d}
on SunOS 5.10 Generic_141444-09 node bng-sbrha-1(s)
is configured and processes are down, may be reconfigured if desired
---------------------------------------------------------------------------
1. Unconfigure Cluster Node
Not used when merely updating existing cluster definitions.
2. Generate Cluster Definition
Creates new or updates existing cluster definitions.
Modifies the shared directory but does not modify this node.
3. Configure Cluster Node
To be preceded by 'Generate Cluster Definition' on one node.
Must be invoked on each and every node of the cluster.
4. Reconfigure RADIUS Server
Only on SBR nodes, updates the existing SBR configuration.
5. Create Temporary Cluster
Used to approximate a cluster using only this one machine.
Intended for migration and demonstration purposes only.
6. Upgrade From Restricted Cluster License
Used to upgrade from restricted cluster to regular cluster.
Removes database restriction on the number of concurrent
sessions and enables the addition of an expansion kit license
READY: last operation succeeded, node configured.
Enter the number of the desired configuration task or quit (4,q): q
11.Start the RADIUS process on the S node.
Execute:root@bng-sbrha-1:/opt/JNPRsbr/radius/sbrd start radius
Starting radius server processes
RADIUS: Process ID of daemon is 14235
RADIUS: Starting DCF system
RADIUS: Configuration checksum: 6A 3B 7A D5
429

Document Root: /opt/JNPRsbr/radius/
root@bng-sbrha-1 [/opt/JNPRsbr/radius]
$Starting webserver
. 2016-01-11 20:03:18.493:INFO::main: Logging initialized @3821ms
. . . . . Webserver started
AppleTalk
AppleTalk
AppleTalk
RADIUS:
RADIUS: Steel-Belted Radius licenses
RADIUS: License String: Additional Info:
RADIUS: XXXXXXXXXXXXXXXXXXX SSR Cluster & Management Expansion
RADIUS: XXXXXXXXXXXXXXXXXXX SSR Management Expansion
RADIUS: XXXXXXXXXXXXXXXXXXX Run license - lab license - 1k
sessions
RADIUS:
RADIUS: Total concurrent sessions licensed: 1000
RADIUS:
RADIUS: Unlimited Transactions Per Second is Allowed
RADIUS:
RADIUS: Licenses enable this server to:
RADIUS: Run
RADIUS: use Multi Node Cluster
RADIUS: connect '3' management and '2' cluster nodes to database
RADIUS:
RADIUS: Licensed for Steel-Belted Radius Carrier
RADIUS: Attribute Editing enabled
RADIUS: DCF system started
12.Check the status of the S node and verify it has properly reconnected to the cluster.
Execute:root@bng-sbrha-1: /opt/JNPRsbr/radius/sbrd status
---------------------------------------------------------------------------
SBR 8.60-R1.50765 cluster 6node_cluster{1s,1sm,2m,2d}
on SunOS 5.10 Generic_141444-09 node bng-sbrha-1(s)
---------------------------------------------------------------------------
---------------------------------------------------------------------------
Current state of network interfaces:
10.212.10.65.1646 Idle
430

10.212.10.65.1813 Idle
10.212.10.65.1645 Idle
10.212.10.65.1812 Idle
*.1812 *.* 0 0 49152 0 LISTEN
*.1813 *.* 0 0 49152 0 LISTEN
---------------------------------------------------------------------------
root 14235 radius sbr.xml
root 14305 webserver
Upgrading the Data (D) Nodes with the New Software
After all M, SM, and S nodes in the cluster are upgraded, you need to upgrade the software in D nodes byinstalling the complete SBR release distribution package or by installing only the latest MySQL package.
Installing the Complete SBR Release Distribution Package
This section describes the procedure to install the new software on the data nodes by copying the completeSBR release distribution package.
To install the new software on the data node by copying the complete SBR release distribution package:
NOTE: You must repeat this procedure on every D node in the cluster, one at a time. Thisexample procedure uses twoD nodes, bng-sbr-perfm3000-3 (10.212.10.188) and bng-sbr-perf2(10.212.10.67).
1. Verify that the /opt/JNPRmysql directory contains the directories install andmysql-cluster-advanced-7.4.15-solaris10-sparc-64bit. If these directories are not present, yourinstallation is using non-default locations for these files. Locate these files and execute the steps in thefollowing procedure in the same directory that contains these files.
2. Log in to the first D node as root, and stop the SSR process. In the following example, the D node iscalled bng-sbr-perfm3000-3 (10.212.10.188).
Execute:root@bng-sbr-perfm3000-3: ./sbrd stop ssr
Stopping ssr data processes
431

3. Log in to a M node and execute ./sbrd status. Verify that the first D node is disconnected from theother nodes.
Execute:root@bng-mars: ./sbrd status
---------------------------------------------------------------------------
SBR 7.60-R1.50242 cluster 6node_cluster{1s,1sm,2m,2d}
on SunOS 5.10 Generic_141444-09 node bng-mars.englab.juniper.net(m)
---------------------------------------------------------------------------
Connected to Management Server at: 10.212.10.68:5235
[ndbd(NDB)] 2 node(s)
id=1 (not connected, accepting connect from 10.212.10.188)
id=2 @10.212.10.67 (mysql-5.5.20 ndb-7.2.5, Nodegroup: 0, *)
[ndb_mgmd(MGM)] 3 node(s)
id=51 @10.212.10.213 (mysql-5.6.36 ndb-7.4.15)
id=52 @10.212.10.68 (mysql-5.6.36 ndb-7.4.15)
id=53 @10.212.10.66 (mysql-5.6.36 ndb-7.4.15)
[mysqld(API)] 5 node(s)
id=61 @10.212.10.213 (mysql-5.6.36 ndb-7.4.15)
id=62 @10.212.10.68 (mysql-5.6.36 ndb-7.4.15)
id=63 @10.212.10.66 (mysql-5.6.36 ndb-7.4.15)
id=100 @10.212.10.219 (mysql-5.6.36 ndb-7.4.15)
hadm 4354 ndb_mgmd --config-cache=0 --configdir=/opt/JNPRhadm
hadm 4908 /bin/sh /opt/JNPRmysql/install/bin/mysqld_safe
hadm 5255 /opt/JNPRmysql/install/bin/mysqld --basedir=/opt/JNPRmysql/install
--datadir=/opt/JNPRmysqld/data --plugin-dir=/opt/JNPRmysql/install/lib/plugin
--log-error=/opt/JNPRmysqld/mysqld_safe.err
--pid-file=/opt/JNPRmysqld/mysqld.pid --socket=/opt/JNPRhadm/.mysql.sock
--port=3001
4. Log in to the second data node and execute ./sbrd status, and verify that it is still connected to thecluster. The following is an example of what the status of the second D node should look like:
---------------------------------------------------------------------------
SBR 7.60-R1.50242 cluster 6node_cluster{1s,1sm,2m,2d}
432
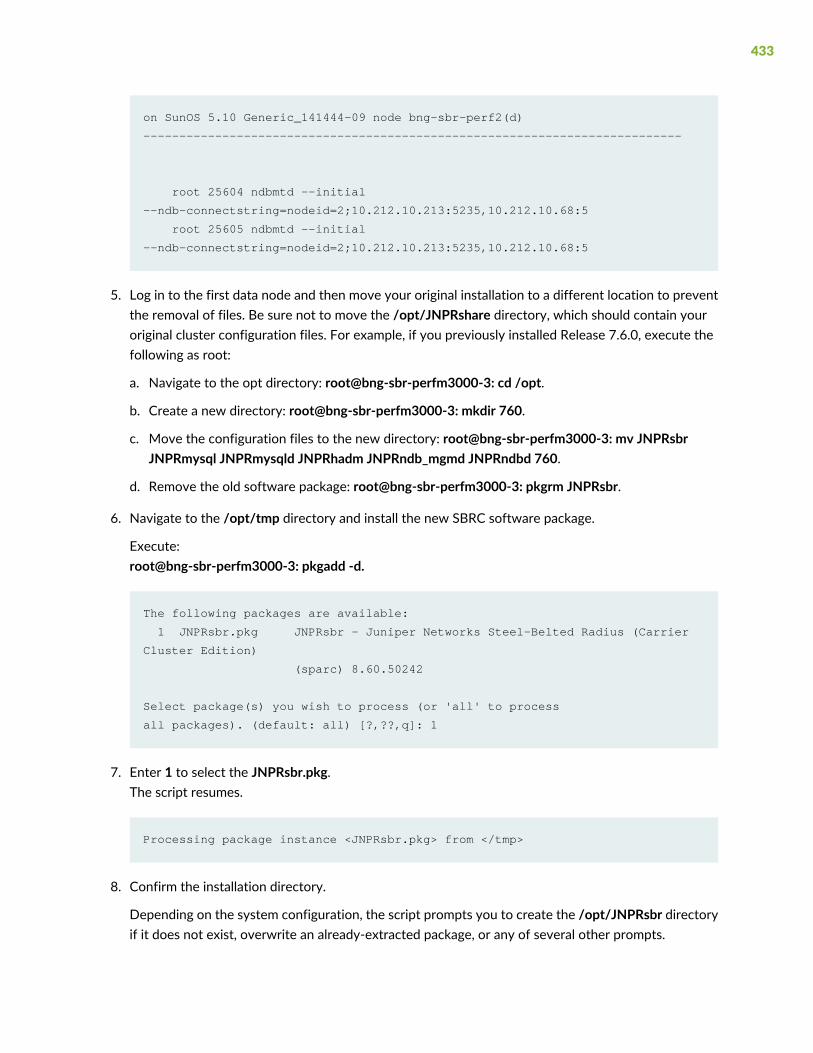
on SunOS 5.10 Generic_141444-09 node bng-sbr-perf2(d)
---------------------------------------------------------------------------
root 25604 ndbmtd --initial
--ndb-connectstring=nodeid=2;10.212.10.213:5235,10.212.10.68:5
root 25605 ndbmtd --initial
--ndb-connectstring=nodeid=2;10.212.10.213:5235,10.212.10.68:5
5. Log in to the first data node and then move your original installation to a different location to preventthe removal of files. Be sure not to move the /opt/JNPRshare directory, which should contain youroriginal cluster configuration files. For example, if you previously installed Release 7.6.0, execute thefollowing as root:
a. Navigate to the opt directory: root@bng-sbr-perfm3000-3: cd /opt.
b. Create a new directory: root@bng-sbr-perfm3000-3: mkdir 760.
c. Move the configuration files to the new directory: root@bng-sbr-perfm3000-3: mv JNPRsbrJNPRmysql JNPRmysqld JNPRhadm JNPRndb_mgmd JNPRndbd 760.
d. Remove the old software package: root@bng-sbr-perfm3000-3: pkgrm JNPRsbr.
6. Navigate to the /opt/tmp directory and install the new SBRC software package.
Execute:root@bng-sbr-perfm3000-3: pkgadd -d.
The following packages are available:
1 JNPRsbr.pkg JNPRsbr - Juniper Networks Steel-Belted Radius (Carrier
Cluster Edition)
(sparc) 8.60.50242
Select package(s) you wish to process (or 'all' to process
all packages). (default: all) [?,??,q]: 1
7. Enter 1 to select the JNPRsbr.pkg.The script resumes.
Processing package instance <JNPRsbr.pkg> from </tmp>
8. Confirm the installation directory.
Depending on the system configuration, the script prompts you to create the /opt/JNPRsbr directoryif it does not exist, overwrite an already-extracted package, or any of several other prompts.
433

The selected base directory </opt/JNPRsbr> must exist before installation is
attempted.
Do you want this directory created now [y,n,?,q]
Answer the prompt appropriately (or change the extraction path if necessary) so that the script canproceed.
To accept the default directory as a target, enter y.The script resumes.
Using </opt/JNPRsbr> as the package base directory.
#Processing package information.
#Processing system information.
48 package pathnames are already properly installed.
#Verifying disk space requirements.
#Checking for conflicts with packages already installed.
#Checking for setuid/setgid programs.
This package contains scripts which will be executed with super-user
permission during the process of installing this package.
Do you want to continue with the installation of <JNPRsbr> [y,n,?]
9. Enter y to confirm that you want to continue to install the package.
Installing JNPRsbr - Juniper Networks Steel-Belted Radius (Carrier Cluster
Edition) as <JNPRsbr>
## Executing preinstall script.
## Installing part 1 of 1.
.
.
.
[ verifying class <none> ]
## Executing postinstall script.
434
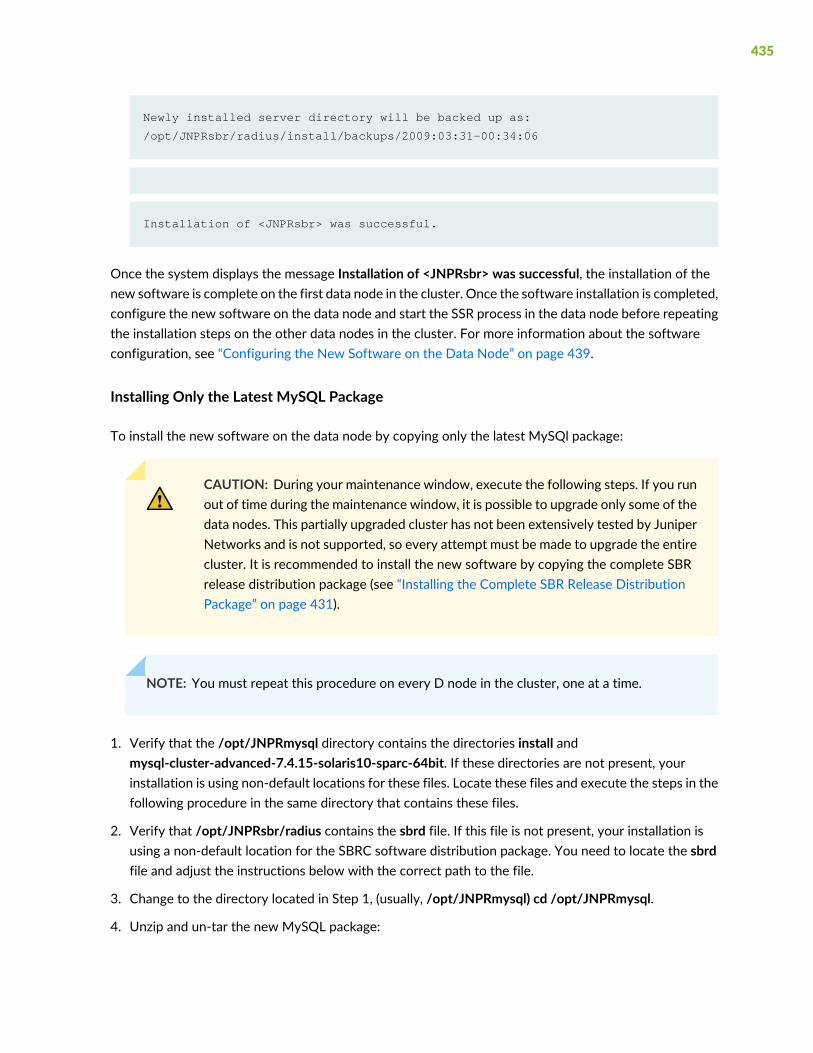
Newly installed server directory will be backed up as:
/opt/JNPRsbr/radius/install/backups/2009:03:31-00:34:06
Installation of <JNPRsbr> was successful.
Once the system displays the message Installation of <JNPRsbr> was successful, the installation of thenew software is complete on the first data node in the cluster. Once the software installation is completed,configure the new software on the data node and start the SSR process in the data node before repeatingthe installation steps on the other data nodes in the cluster. For more information about the softwareconfiguration, see “Configuring the New Software on the Data Node” on page 439.
Installing Only the Latest MySQL Package
To install the new software on the data node by copying only the latest MySQl package:
CAUTION: During your maintenance window, execute the following steps. If you runout of time during the maintenance window, it is possible to upgrade only some of thedata nodes. This partially upgraded cluster has not been extensively tested by JuniperNetworks and is not supported, so every attempt must be made to upgrade the entirecluster. It is recommended to install the new software by copying the complete SBRrelease distribution package (see “Installing the Complete SBR Release DistributionPackage” on page 431).
NOTE: You must repeat this procedure on every D node in the cluster, one at a time.
1. Verify that the /opt/JNPRmysql directory contains the directories install andmysql-cluster-advanced-7.4.15-solaris10-sparc-64bit. If these directories are not present, yourinstallation is using non-default locations for these files. Locate these files and execute the steps in thefollowing procedure in the same directory that contains these files.
2. Verify that /opt/JNPRsbr/radius contains the sbrd file. If this file is not present, your installation isusing a non-default location for the SBRC software distribution package. You need to locate the sbrdfile and adjust the instructions below with the correct path to the file.
3. Change to the directory located in Step 1, (usually, /opt/JNPRmysql) cd /opt/JNPRmysql.
4. Unzip and un-tar the new MySQL package:
435

Execute:gunzip -c /opt/tmp/JNPRsbr.pkg/reloc/radius/install/ndb/bin/*mysqlcluster*.tar.gz \ | tar -xf –
5. Log in to the first D node as root, and stop the SSR process. In the following example, the D node iscalled bng-sbr-perfm3000-3.
Execute:root@bng-sbr-perfm3000-3: ./sbrd stop ssr
Stopping ssr data processes
6. Check the status of the D node.
Execute:root@bng-sbr-perfm3000-3: ./sbrd status
---------------------------------------------------------------------------
SBR 8.60-R1.50765 cluster 6node_cluster{1s,1sm,2m,2d}
on SunOS 5.10 Generic_141444-09 node bng-sbr-perfm3000-3(d)
---------------------------------------------------------------------------
7. Log in to the SM node and execute ./sbrd status, and verify that the D node is disconnected from theother nodes. The following is an example of what the status should look like:
---------------------------------------------------------------------------
SBR 8.60-R1.50765 cluster 6node_cluster{1s,1sm,2m,2d}
on SunOS 5.10 Generic_141444-09 node sbr1.englab.juniper.net(sm)
---------------------------------------------------------------------------
Connected to Management Server at: 10.212.10.213:5235
[ndbd(NDB)] 2 node(s)
id=1 (not connected, accepting connect from 10.212.10.188)
id=2 @10.212.10.67 (mysql-5.5.20 ndb-7.2.5, Nodegroup: 0, Master)
[ndb_mgmd(MGM)] 3 node(s)
id=51 @10.212.10.213 (mysql-5.6.36 ndb-7.4.15)
id=52 @10.212.10.68 (mysql-5.6.36 ndb-7.4.15)
id=53 @10.212.10.66 (mysql-5.6.36 ndb-7.4.15)
[mysqld(API)] 5 node(s)
id=61 @10.212.10.213 (mysql-5.6.36 ndb-7.4.15)
id=62 @10.212.10.68 (mysql-5.6.36 ndb-7.4.15)
id=63 @10.212.10.66 (mysql-5.6.36 ndb-7.4.15)
id=100 @10.212.10.213 (mysql-5.6.36 ndb-7.4.15)
id=101 @10.212.10.65 (mysql-5.6.36 ndb-7.4.15)
436
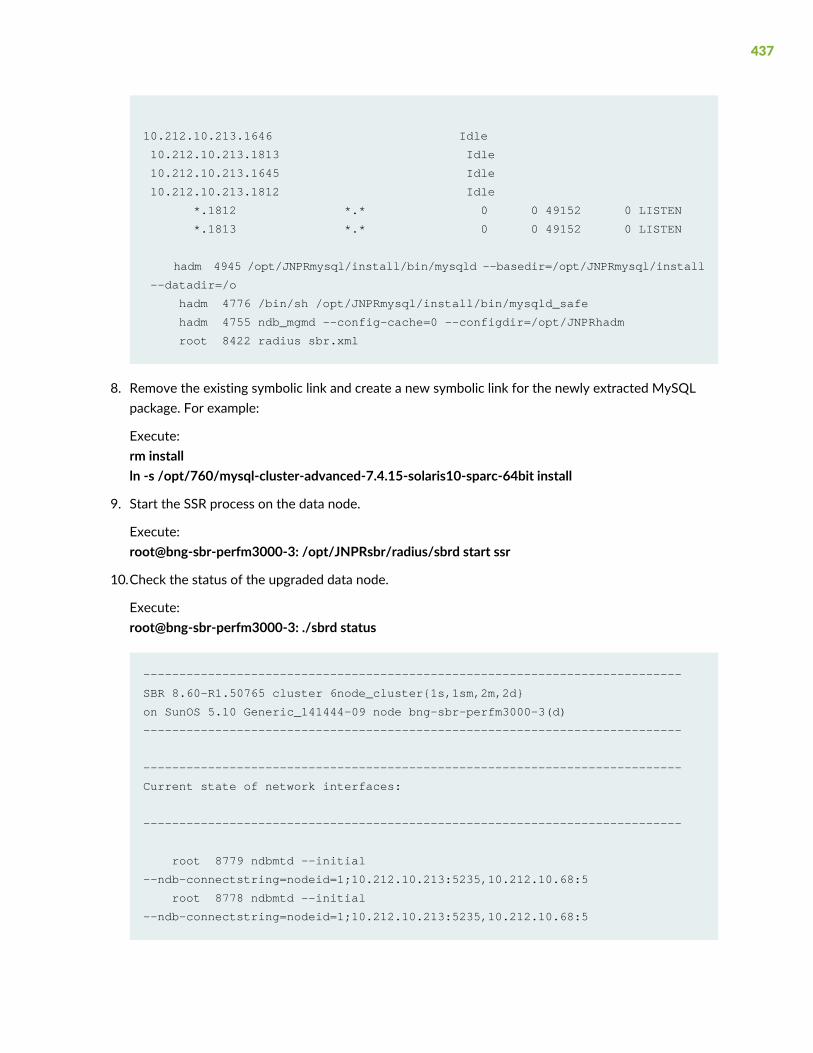
10.212.10.213.1646 Idle
10.212.10.213.1813 Idle
10.212.10.213.1645 Idle
10.212.10.213.1812 Idle
*.1812 *.* 0 0 49152 0 LISTEN
*.1813 *.* 0 0 49152 0 LISTEN
hadm 4945 /opt/JNPRmysql/install/bin/mysqld --basedir=/opt/JNPRmysql/install
--datadir=/o
hadm 4776 /bin/sh /opt/JNPRmysql/install/bin/mysqld_safe
hadm 4755 ndb_mgmd --config-cache=0 --configdir=/opt/JNPRhadm
root 8422 radius sbr.xml
8. Remove the existing symbolic link and create a new symbolic link for the newly extracted MySQLpackage. For example:
Execute:rm installln -s /opt/760/mysql-cluster-advanced-7.4.15-solaris10-sparc-64bit install
9. Start the SSR process on the data node.
Execute:root@bng-sbr-perfm3000-3: /opt/JNPRsbr/radius/sbrd start ssr
10.Check the status of the upgraded data node.
Execute:root@bng-sbr-perfm3000-3: ./sbrd status
---------------------------------------------------------------------------
SBR 8.60-R1.50765 cluster 6node_cluster{1s,1sm,2m,2d}
on SunOS 5.10 Generic_141444-09 node bng-sbr-perfm3000-3(d)
---------------------------------------------------------------------------
---------------------------------------------------------------------------
Current state of network interfaces:
---------------------------------------------------------------------------
root 8779 ndbmtd --initial
--ndb-connectstring=nodeid=1;10.212.10.213:5235,10.212.10.68:5
root 8778 ndbmtd --initial
--ndb-connectstring=nodeid=1;10.212.10.213:5235,10.212.10.68:5
437
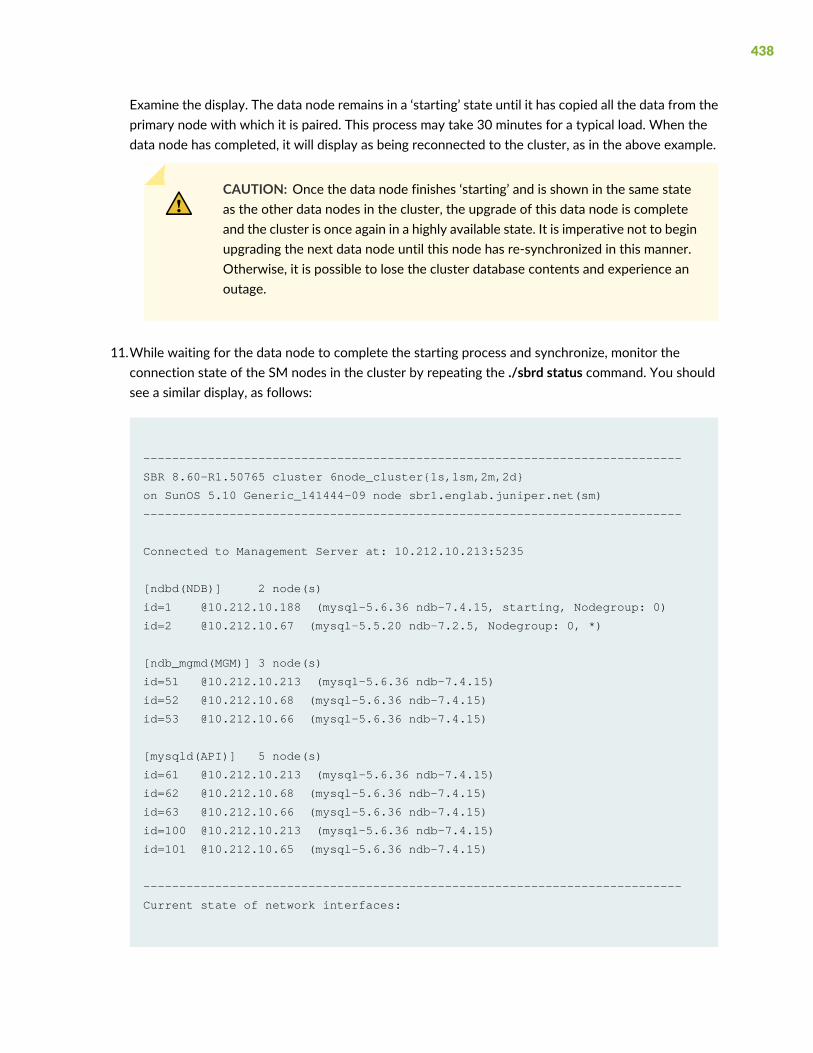
Examine the display. The data node remains in a ‘starting’ state until it has copied all the data from theprimary node with which it is paired. This process may take 30 minutes for a typical load. When thedata node has completed, it will display as being reconnected to the cluster, as in the above example.
CAUTION: Once the data node finishes ‘starting’ and is shown in the same stateas the other data nodes in the cluster, the upgrade of this data node is completeand the cluster is once again in a highly available state. It is imperative not to beginupgrading the next data node until this node has re-synchronized in this manner.Otherwise, it is possible to lose the cluster database contents and experience anoutage.
11.While waiting for the data node to complete the starting process and synchronize, monitor theconnection state of the SM nodes in the cluster by repeating the ./sbrd status command. You shouldsee a similar display, as follows:
---------------------------------------------------------------------------
SBR 8.60-R1.50765 cluster 6node_cluster{1s,1sm,2m,2d}
on SunOS 5.10 Generic_141444-09 node sbr1.englab.juniper.net(sm)
---------------------------------------------------------------------------
Connected to Management Server at: 10.212.10.213:5235
[ndbd(NDB)] 2 node(s)
id=1 @10.212.10.188 (mysql-5.6.36 ndb-7.4.15, starting, Nodegroup: 0)
id=2 @10.212.10.67 (mysql-5.5.20 ndb-7.2.5, Nodegroup: 0, *)
[ndb_mgmd(MGM)] 3 node(s)
id=51 @10.212.10.213 (mysql-5.6.36 ndb-7.4.15)
id=52 @10.212.10.68 (mysql-5.6.36 ndb-7.4.15)
id=53 @10.212.10.66 (mysql-5.6.36 ndb-7.4.15)
[mysqld(API)] 5 node(s)
id=61 @10.212.10.213 (mysql-5.6.36 ndb-7.4.15)
id=62 @10.212.10.68 (mysql-5.6.36 ndb-7.4.15)
id=63 @10.212.10.66 (mysql-5.6.36 ndb-7.4.15)
id=100 @10.212.10.213 (mysql-5.6.36 ndb-7.4.15)
id=101 @10.212.10.65 (mysql-5.6.36 ndb-7.4.15)
---------------------------------------------------------------------------
Current state of network interfaces:
438
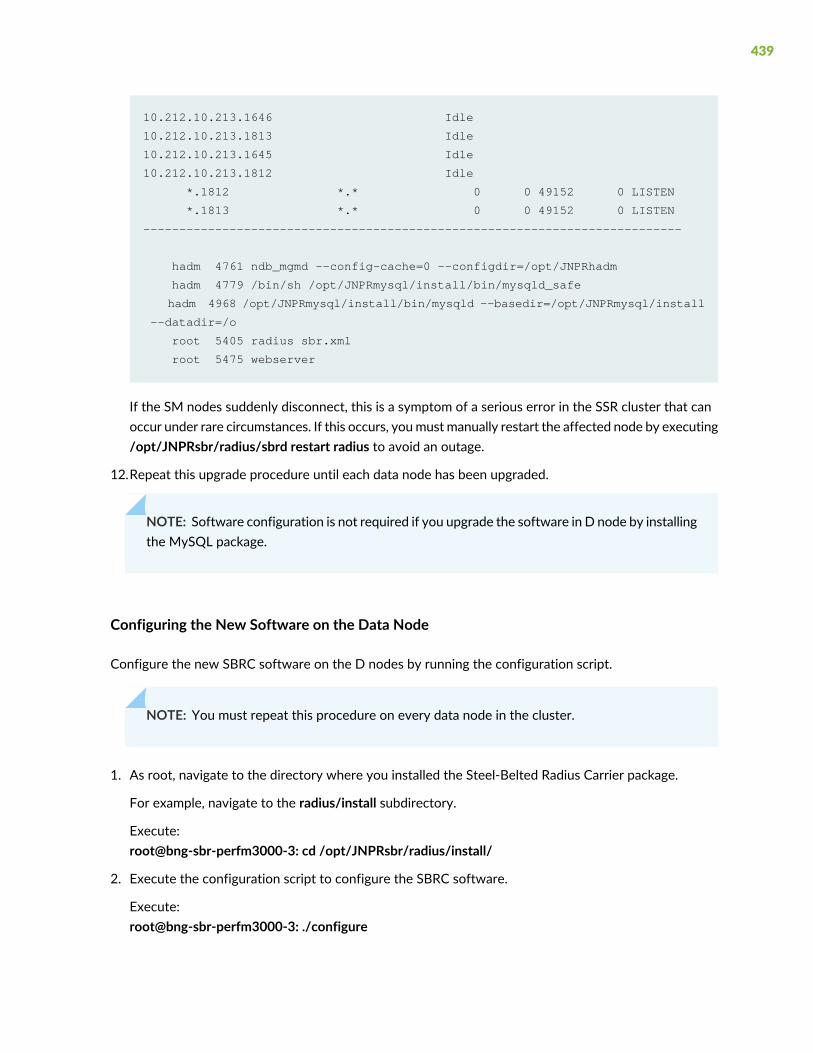
10.212.10.213.1646 Idle
10.212.10.213.1813 Idle
10.212.10.213.1645 Idle
10.212.10.213.1812 Idle
*.1812 *.* 0 0 49152 0 LISTEN
*.1813 *.* 0 0 49152 0 LISTEN
---------------------------------------------------------------------------
hadm 4761 ndb_mgmd --config-cache=0 --configdir=/opt/JNPRhadm
hadm 4779 /bin/sh /opt/JNPRmysql/install/bin/mysqld_safe
hadm 4968 /opt/JNPRmysql/install/bin/mysqld --basedir=/opt/JNPRmysql/install
--datadir=/o
root 5405 radius sbr.xml
root 5475 webserver
If the SM nodes suddenly disconnect, this is a symptom of a serious error in the SSR cluster that canoccur under rare circumstances. If this occurs, youmustmanually restart the affected node by executing/opt/JNPRsbr/radius/sbrd restart radius to avoid an outage.
12.Repeat this upgrade procedure until each data node has been upgraded.
NOTE: Software configuration is not required if you upgrade the software in D node by installingthe MySQL package.
Configuring the New Software on the Data Node
Configure the new SBRC software on the D nodes by running the configuration script.
NOTE: You must repeat this procedure on every data node in the cluster.
1. As root, navigate to the directory where you installed the Steel-Belted Radius Carrier package.
For example, navigate to the radius/install subdirectory.
Execute:root@bng-sbr-perfm3000-3: cd /opt/JNPRsbr/radius/install/
2. Execute the configuration script to configure the SBRC software.
Execute:root@bng-sbr-perfm3000-3: ./configure
439

3. Review and accept the Steel-Belted Radius Carrier license agreement.
Press the spacebar to move from one page to the next. When you are prompted to accept the termsof the license agreement, enter y.
Do you accept the terms in the license agreement? [n] y
---------------------------------------------------------------------------
SBR 8.60-R1.50765 cluster
on SunOS 5.10 Generic_141444-09 node bng-sbr-perfm3000-3
is not configured and processes are down, needs to be configured
---------------------------------------------------------------------------
1. Unconfigure Cluster Node
Not used when merely updating existing cluster definitions.
2. Generate Cluster Definition
Creates new or updates existing cluster definitions.
Modifies the shared directory but does not modify this node.
3. Configure Cluster Node
To be preceded by 'Generate Cluster Definition' on one node.
Must be invoked on each and every node of the cluster.
4. Reconfigure RADIUS Server
Only on SBR nodes, updates the existing SBR configuration.
5. Create Temporary Cluster
Used to approximate a cluster using only this one machine.
Intended for migration and demonstration purposes only.
6. Upgrade From Restricted Cluster License
Used to upgrade from restricted cluster to regular cluster.
Removes database restriction on the number of concurrent
sessions and enables the addition of an expansion kit license
4. From the menu of configuration tasks, enter 3 to specify Configure Cluster Node.
---------------------------------------------------------------------------
SBR 8.60-R1.50765 cluster
on SunOS 5.10 Generic_141444-09 node bng-sbr-perfm3000-3
is not configured and processes are down, needs to be configured
---------------------------------------------------------------------------
440

Configuring Cluster Node...
5. When prompted, enter the name of your existing cluster. In this example the cluster name is“6node_cluster”.
Enter SBR cluster name [sbrha]: 6node_cluster
You are prompted to verify whether you want to proceed, unless the script detects any unusualinstallation conditions (a pre-existing directory, for example). In some cases, you may be prompted toresolve or ignore them.
6. The system reads the configuration files that you copied to the server and prompts you to change somesettings to adapt them to this server.
Enter a to accept the files.
Reading shared configuration from /opt/JNPRshare/install/6node_cluster
Generating configuration files
Reviewing configuration files
/opt/JNPRsbr/radius/install/tmp/config.ini
/opt/JNPRsbr/radius/install/tmp/my.cnf
View (v), accept (a), or reject (r) configuration files: a
7. The system displays the following warning and prompts you to continue. Enter y to continue.
WARNING: You are about to make irreversible changes to this node.
Are you sure that you wish to continue? [n]: y
Cleaning directories
/opt/JNPRhadm
/opt/JNPRmysql
/opt/JNPRndbd
Applying configuration
441
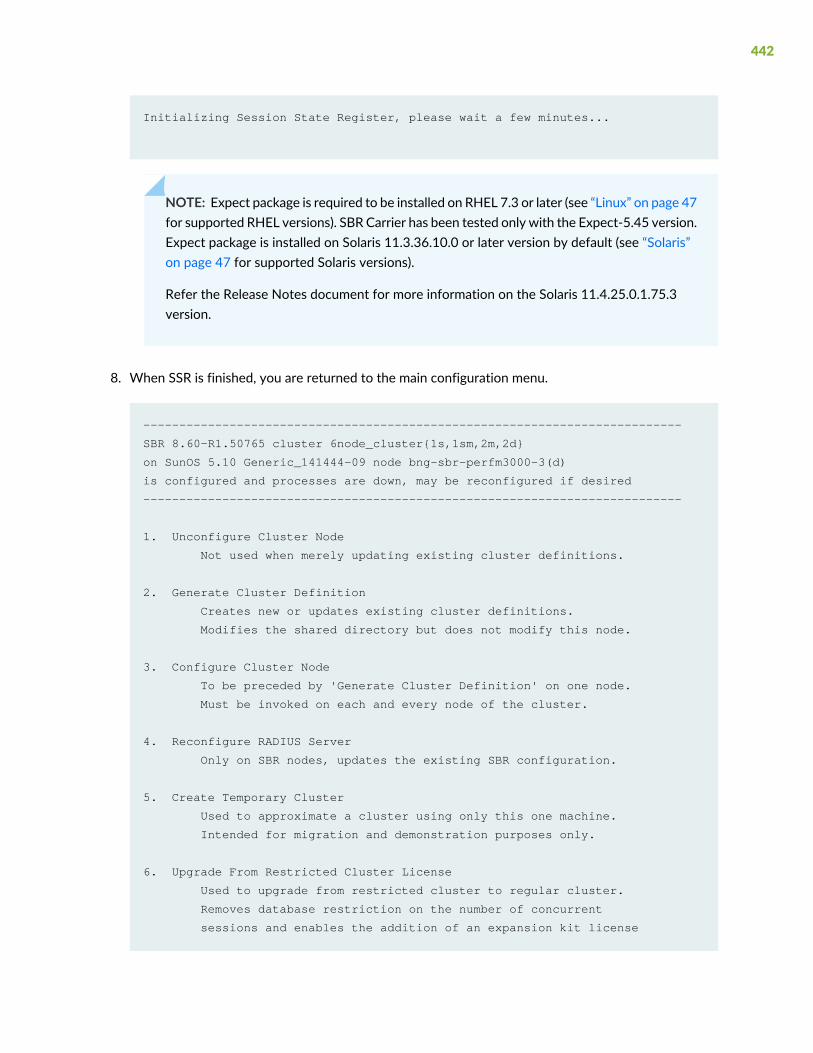
Initializing Session State Register, please wait a few minutes...
NOTE: Expect package is required to be installed on RHEL 7.3 or later (see “Linux” on page 47for supported RHEL versions). SBR Carrier has been tested only with the Expect-5.45 version.Expect package is installed on Solaris 11.3.36.10.0 or later version by default (see “Solaris”on page 47 for supported Solaris versions).
Refer the Release Notes document for more information on the Solaris 11.4.25.0.1.75.3version.
8. When SSR is finished, you are returned to the main configuration menu.
---------------------------------------------------------------------------
SBR 8.60-R1.50765 cluster 6node_cluster{1s,1sm,2m,2d}
on SunOS 5.10 Generic_141444-09 node bng-sbr-perfm3000-3(d)
is configured and processes are down, may be reconfigured if desired
---------------------------------------------------------------------------
1. Unconfigure Cluster Node
Not used when merely updating existing cluster definitions.
2. Generate Cluster Definition
Creates new or updates existing cluster definitions.
Modifies the shared directory but does not modify this node.
3. Configure Cluster Node
To be preceded by 'Generate Cluster Definition' on one node.
Must be invoked on each and every node of the cluster.
4. Reconfigure RADIUS Server
Only on SBR nodes, updates the existing SBR configuration.
5. Create Temporary Cluster
Used to approximate a cluster using only this one machine.
Intended for migration and demonstration purposes only.
6. Upgrade From Restricted Cluster License
Used to upgrade from restricted cluster to regular cluster.
Removes database restriction on the number of concurrent
sessions and enables the addition of an expansion kit license
442

READY: last operation succeeded, node configured.
Enter the number of the desired configuration task or quit (2,q): q
Enter q to quit.
9. Start the SSR process on the data node.
Execute:root@bng-sbr-perfm3000-3: /opt/JNPRsbr/radius/sbrd start ssr
10.Check the status of the upgraded data node.
Execute:root@bng-sbr-perfm3000-3: ./sbrd status
---------------------------------------------------------------------------
SBR 8.60-R1.50765 cluster 6node_cluster{1s,1sm,2m,2d}
on SunOS 5.10 Generic_141444-09 node bng-sbr-perfm3000-3(d)
---------------------------------------------------------------------------
---------------------------------------------------------------------------
Current state of network interfaces:
---------------------------------------------------------------------------
root 8779 ndbmtd --initial
--ndb-connectstring=nodeid=1;10.212.10.213:5235,10.212.10.68:5
root 8778 ndbmtd --initial
--ndb-connectstring=nodeid=1;10.212.10.213:5235,10.212.10.68:5
Examine the display. The data node remains in a ‘starting’ state until it has copied all the data from theprimary node with which it is paired. This process may take 30 minutes for a typical load. When thedata node has completed, it will display as being reconnected to the cluster, as in the above example.
CAUTION: Once the data node finishes ‘starting’ and is shown in the same stateas the other data nodes in the cluster, the upgrade of this data node is completeand the cluster is once again in a highly available state. It is imperative not to beginupgrading the next data node until this node has re-synchronized in this manner.Otherwise, it is possible to lose the cluster database contents and experience anoutage.
443

11.While waiting for the data node to complete the starting process and synchronize, monitor theconnection state of the SM nodes in the cluster by repeating the ./sbrd status command. You shouldsee a similar display, as follows:
---------------------------------------------------------------------------
SBR 8.60-R1.50765 cluster 6node_cluster{1s,1sm,2m,2d}
on SunOS 5.10 Generic_141444-09 node sbr1.englab.juniper.net(sm)
---------------------------------------------------------------------------
Connected to Management Server at: 10.212.10.213:5235
[ndbd(NDB)] 2 node(s)
id=1 @10.212.10.188 (mysql-5.6.36 ndb-7.4.15, starting, Nodegroup: 0)
id=2 @10.212.10.67 (mysql-5.5.20 ndb-7.2.5, Nodegroup: 0, *)
[ndb_mgmd(MGM)] 3 node(s)
id=51 @10.212.10.213 (mysql-5.6.36 ndb-7.4.15)
id=52 @10.212.10.68 (mysql-5.6.36 ndb-7.4.15)
id=53 @10.212.10.66 (mysql-5.6.36 ndb-7.4.15)
[mysqld(API)] 5 node(s)
id=61 @10.212.10.213 (mysql-5.6.36 ndb-7.4.15)
id=62 @10.212.10.68 (mysql-5.6.36 ndb-7.4.15)
id=63 @10.212.10.66 (mysql-5.6.36 ndb-7.4.15)
id=100 @10.212.10.213 (mysql-5.6.36 ndb-7.4.15)
id=101 @10.212.10.65 (mysql-5.6.36 ndb-7.4.15)
---------------------------------------------------------------------------
Current state of network interfaces:
10.212.10.213.1646 Idle
10.212.10.213.1813 Idle
10.212.10.213.1645 Idle
10.212.10.213.1812 Idle
*.1812 *.* 0 0 49152 0 LISTEN
*.1813 *.* 0 0 49152 0 LISTEN
---------------------------------------------------------------------------
hadm 4761 ndb_mgmd --config-cache=0 --configdir=/opt/JNPRhadm
hadm 4779 /bin/sh /opt/JNPRmysql/install/bin/mysqld_safe
hadm 4968 /opt/JNPRmysql/install/bin/mysqld --basedir=/opt/JNPRmysql/install
--datadir=/o
444

root 5405 radius sbr.xml
root 5475 webserver
If the SM nodes suddenly disconnect, this is a symptom of a serious error in the SSR cluster that canoccur under rare circumstances. If this occurs, youmustmanually restart the affected node by executing/opt/JNPRsbr/radius/sbrd restart radius to avoid an outage.
12.Repeat this upgrade procedure until each data node has been upgraded; see “Upgrading the Data (D)Nodes with the New Software” on page 431.
After all nodes are upgraded, you should see a similar output as follows:
---------------------------------------------------------------------------
SBR 8.60-R1.50765 cluster 6node_cluster{1s,1sm,2m,2d}
on SunOS 5.10 Generic_141444-09 node sbr1.englab.juniper.net(sm)
---------------------------------------------------------------------------
Connected to Management Server at: 10.212.10.213:5235
[ndbd(NDB)] 2 node(s)
id=1 @10.212.10.188 (mysql-5.6.36 ndb-7.4.15, Nodegroup: 0, *)
id=2 @10.212.10.67 (mysql-5.6.36 ndb-7.4.15, Nodegroup: 0)
[ndb_mgmd(MGM)] 3 node(s)
id=51 @10.212.10.213 (mysql-5.6.36 ndb-7.4.15)
id=52 @10.212.10.68 (mysql-5.6.36 ndb-7.4.15)
id=53 @10.212.10.66 (mysql-5.6.36 ndb-7.4.15)
[mysqld(API)] 5 node(s)
id=61 @10.212.10.213 (mysql-5.6.36 ndb-7.4.15)
id=62 @10.212.10.68 (mysql-5.6.36 ndb-7.4.15)
id=63 @10.212.10.66 (mysql-5.6.36 ndb-7.4.15)
id=100 @10.212.10.213 (mysql-5.6.36 ndb-7.4.15)
id=101 @10.212.10.65 (mysql-5.6.36 ndb-7.4.15)
---------------------------------------------------------------------------
Current state of network interfaces:
10.212.10.213.1646 Idle
10.212.10.213.1813 Idle
10.212.10.213.1645 Idle
10.212.10.213.1812 Idle
*.1812 *.* 0 0 49152 0 LISTEN
445

*.1813 *.* 0 0 49152 0 LISTEN
---------------------------------------------------------------------------
hadm 4761 ndb_mgmd --config-cache=0 --configdir=/opt/JNPRhadm
hadm 4779 /bin/sh /opt/JNPRmysql/install/bin/mysqld_safe
hadm 4968 /opt/JNPRmysql/install/bin/mysqld --basedir=/opt/JNPRmysql/install
--datadir=/o
root 5405 radius sbr.xml
root 5475 webserver
Launching Web GUI
Now that the RADIUS process is running, you can complete the configuration usingWeb GUI. For details,see “Basic SBR Carrier Node Configuration” on page 138. For complete details, see the SBR CarrierAdministration and Configuration Guide.
446
CHAPTER 20
Upgrading Your Cluster Using the Backup, Destroy,and Re-Create Method
IN THIS CHAPTER
Overview of the Backup, Destroy, and Re-Create Upgrade Method | 448
Capturing Your Current Cluster Configuration | 448
Backing Up the State of the Sessions in Your SSR Database | 450
Destroying the Cluster Database | 450
Stopping All Processes on All Nodes | 451
Installing the New SBRC Software on the Data Nodes | 452
Installing the New SBRC Software on the SM Nodes | 455
Configuring the First SM Node and Creating a New Cluster Definition | 457
Configuring the SBRC Software on the SM Nodes | 463
Configuring the SBRC Software on the Data Nodes | 469
Starting the SSR Processes | 473
Creating and Restoring the SSR Database | 476
Starting the RADIUS Process | 478
Launching Web GUI | 480
This section describes the backup, destroy, and re-create upgrade method, which you can use to upgradeservers running in a SSR cluster. For information about upgrading servers running standalone, see “Installingand Configuring a SBR Carrier Standalone Server” on page 63.
These topics are included in this section:
447
Overview of the Backup, Destroy, and Re-Create Upgrade Method
NOTE: This upgrade procedure requires downtime of the cluster, which can be mitigated bytemporarily switching your cluster traffic to a single transition server. For details on using atransition server, see“Using a Transition Server to Mitigate Downtime While Upgrading Your Cluster” on page 369.Although the use of a transition server can mitigate downtime, you will experience slowerperformance since a single server does not provide the same performance as a cluster.
CAUTION: This procedure requires you to back up the cluster database, destroy thedatabase, install and configure the new SBRC software, and re-create your database.You should schedule a maintenance window when performing this upgrade, even ifyou use a transition server to mitigate a complete outage. If you are using a transitionserver, do not proceed with this upgrade until you have tested the operation andperformance of the transition server.
This upgrade method results in the data nodes using a multi-threaded process, which provides improvedperformance over the single-threaded data node processes in previous SBR Carrier software releases.
The example procedures in this section assume your cluster consists of two SM nodes and two data (D)nodes as follows:
• First SM node, uranus-js (10.13.20.89)
• Second SM node, sbrha-3 (10.13.20.77)
• First D node, sbrha-9 (10.13.20.83)
• Second D node, sbrha-7 (10.13.20.81)
Capturing Your Current Cluster Configuration
To prepare for the upgrade, capture your current cluster configuration:
1. (Optional) If you previously upgraded the D nodes in your cluster to Release 8.6.0 by pushing thepackage only as described in Step 3 of “Preparation” on page 399, you need to copy the sbrd script fromone SM node to each data node. If you upgraded using the pkgadd command, you do not need toperform this step.
448

2. Log in to each node in your cluster as root, and verify that it is operating correctly. Print out the statusof each node in the cluster. For example:
Execute:root@uranus-js: /opt/JNPRsbr/radius./sbrd status
---------------------------------------------------------------------------
SBR 8.60.50006 cluster sbrqa{0s,2sm,0m,2d}
on SunOS 5.10 Generic_141444-09 node uranus-js.englab.juniper.net(sm)
---------------------------------------------------------------------------
Connected to Management Server at: 10.13.20.89:5235
[ndbd(NDB)] 2 node(s)
id=1 @10.13.20.83 (mysql-5.6.36 ndb-7.4.15, Nodegroup: 0)
id=2 @10.13.20.81 (mysql-5.6.36 ndb-7.4.15, Nodegroup: 0, Master)
[ndb_mgmd(MGM)] 2 node(s)
id=51 @10.13.20.89 (mysql-5.6.36 ndb-7.4.15)
id=52 @10.13.20.77 (mysql-5.6.36 ndb-7.4.15)
[mysqld(API)] 4 node(s)
id=61 @10.13.20.89 (mysql-5.6.36 ndb-7.4.15)
id=62 @10.13.20.77 (mysql-5.6.36 ndb-7.4.15)
id=100 @10.13.20.89 (mysql-5.6.36 ndb-7.4.15)
id=101 @10.13.20.77 (mysql-5.6.36 ndb-7.4.15)
10.13.20.89.1646 Idle
10.13.20.89.1813 Idle
10.13.20.89.1645 Idle
10.13.20.89.1812 Idle
*.1812 *.* 0 0 49152 0 LISTEN
*.1813 *.* 0 0 49152 0 LISTEN
hadm 25069 /opt/JNPRmysql/install/bin/mysqld --basedir=/opt/JNPRmysql/install
--datadir=/o
hadm 25004 /bin/sh /opt/JNPRmysql/install/bin/mysqld_safe
hadm 24983 ndb_mgmd
root 28131 radius sbr.xml
449
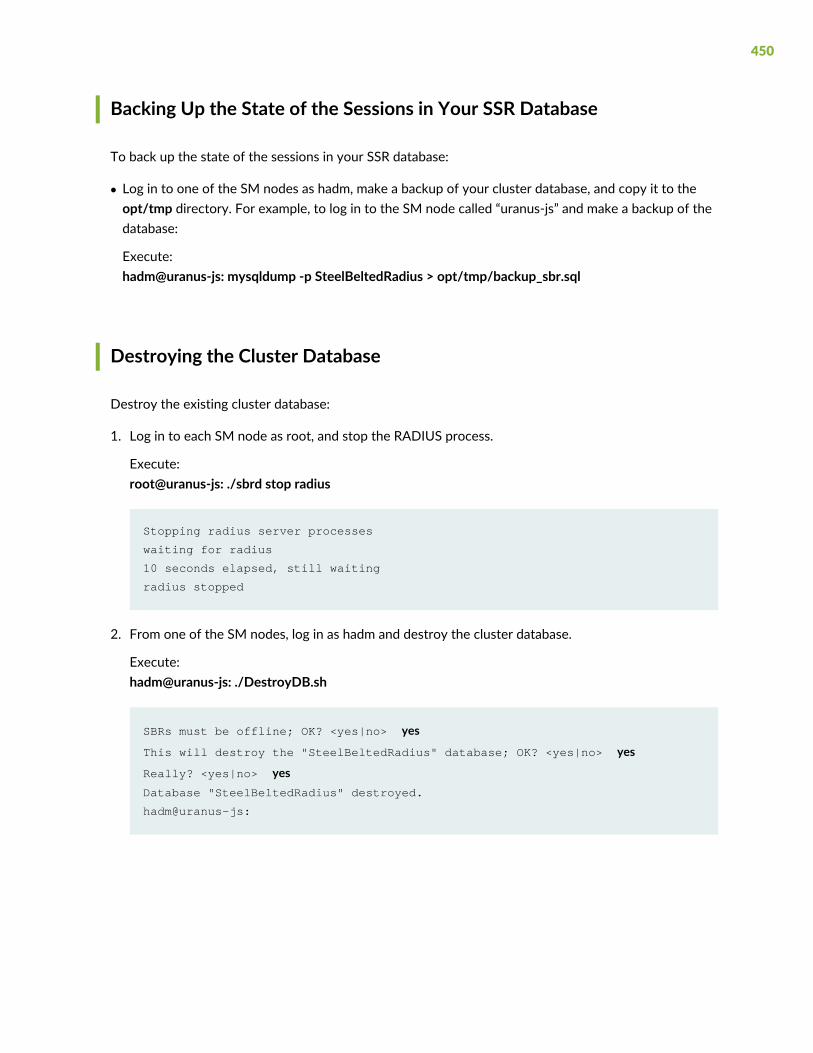
Backing Up the State of the Sessions in Your SSR Database
To back up the state of the sessions in your SSR database:
• Log in to one of the SM nodes as hadm, make a backup of your cluster database, and copy it to theopt/tmp directory. For example, to log in to the SM node called “uranus-js” and make a backup of thedatabase:
Execute:hadm@uranus-js: mysqldump -p SteelBeltedRadius > opt/tmp/backup_sbr.sql
Destroying the Cluster Database
Destroy the existing cluster database:
1. Log in to each SM node as root, and stop the RADIUS process.
Execute:root@uranus-js: ./sbrd stop radius
Stopping radius server processes
waiting for radius
10 seconds elapsed, still waiting
radius stopped
2. From one of the SM nodes, log in as hadm and destroy the cluster database.
Execute:hadm@uranus-js: ./DestroyDB.sh
SBRs must be offline; OK? <yes|no> yes
This will destroy the "SteelBeltedRadius" database; OK? <yes|no> yes
Really? <yes|no> yesDatabase "SteelBeltedRadius" destroyed.
hadm@uranus-js:
450

Stopping All Processes on All Nodes
On each SM node, stop both the SSR and RADIUS process. On each D node stop, the SSR process.
1. Stop the SSR process and RADIUS process on the SM node.
• Execute:
root@uranus-js: /opt/JNPRsbr/radius]$ ./sbrd stop ssr
Stopping ssr auxiliary processes
Stopping ssr management processes
Connected to Management Server at: 10.13.20.89:5235
Node 51 has shutdown.
Disconnecting to allow Management Server to shutdown
Killing remaining ssr processes
hadm 24983 ndb_mgmd
• Shut down the RADIUS process on the SM node.
Execute:
root@uranus-js: /opt/JNPRsbr/radius]$ ./sbrd stop radius
waiting for radius
10 seconds elapsed, still waiting
radius stopped
• Repeat for each SM node.
2. Stop the SSR process on each data node.
• Log in to the data node and execute:
sbrha-7: /opt/JNPRsbr/radius]$ ./sbrd stop ssr
Stopping ssr data processes
• Repeat for each Data node.
451

Installing the New SBRC Software on the Data Nodes
NOTE: You only need to perform the steps in this section if you did not previously perform therolling restart upgrade procedure (see“Upgrading Your Cluster Using the Rolling Restart Method” on page 396).
You need to uninstall and remove the current software package and install new software package on eachD node (one at a time) and M-only node (not applicable in this example procedure).
Uninstalling and Removing the Software Package on the Data Nodes
You must perform this procedure on each data node, one at a time.
1. To uninstall the current software package, navigate to the /opt/JNPRsbr/radius/install directory.
Execute:root@sbrha-9: ./unconfigure
Unconfiguring SBR Software
---------------------------------------------------------------------------
SBR 8.60.50006 cluster sbrqa{0s,2sm,0m,2d}
on SunOS 5.10 Generic_141444-09 node sbrha-9.englab.juniper.net(d)
is configured and processes are down, may be reconfigured if desired
---------------------------------------------------------------------------
Unconfiguring Cluster Node...
WARNING: You are about to unconfigure this node.
Are you sure that you wish to continue? (y,n): y
Cleaning directories
/opt/JNPRhadm
/opt/JNPRmysql
/opt/JNPRndbd
Locating shared directory...
drwxrwxr-x 2 hadm hadmg 512 Oct 14 17:02 /opt/JNPRshare/install/sbrqa
WARNING: If you remove the shared directory for this cluster, you
will either have to recover the data from another cluster node or
452

reconfigure the entire cluster again. This is neither necessary
nor recommended if you are updating an existing configuration.
Remove the shared directory for this cluster? [n]:
Locating OS user account and home directory...
hadm:x:54321:12345:SBR Software:/opt/JNPRhadm:/bin/bash
hadmg::12345:
drwxrwx--- 2 hadm hadmg 512 Oct 21 19:19 /opt/JNPRhadm
WARNING: If you remove the OS user account hadm you will have
to recreate it, the associated OS group account hadmg, and
the associated home directory /opt/JNPRhadm
This is neither necessary nor recommended if you are updating
an existing configuration. Remove the OS user account? [n]:
Unconfigured
2. Remove the software package.
Execute:root@sbrha-9: pkgrm JNPRsbr
The following package is currently installed:
JNPRsbr JNPRsbr - Juniper Networks Steel-Belted Radius (Carrier Cluster
Edition)
(sparc) 8.60.50006
Do you want to remove this package? [y,n,?,q] y
## Removing installed package instance JNPRsbr
This package contains scripts which will be executed with super-user
permission during the process of removing this package.
Do you want to continue with the removal of this package [y,n,?,q] y## Verifying package JNPRsbr dependencies in global zone
## Processing package information.
## Executing preremove script.
Existing server directory will be backed up as:
453

/opt/JNPRsbr/radius/install/backups/2010:10:21-19:21:20
## Removing pathnames in class none
/opt/JNPRsbr/radius/install non-empty directory not removed
/opt/JNPRsbr/radius non-empty directory not removed
## Executing postremove script.
## Updating system information.
Removal of JNPRsbr was successful.
3. Repeat Step 1 and Step 2 on the next data node.
Installing the New Software Package on the Data Nodes
You must install the new software on each data node, one at a time.
• To install the new software package, navigate to the folder where you unzipped it, for example the/opt/tmp directory.
Execute:root@sbrha-9: pkgadd -d.
The following packages are available:
1 JNPRsbr.pkg JNPRsbr - Juniper Networks Steel-Belted Radius (Carrier
Cluster Edition)
(sparc) 8.60.50006
Select package(s) you wish to process (or 'all' to process
all packages). (default: all) [?,??,q]: 1
Processing package instance JNPRsbr.pkg from /opt/tmp/gdir
JNPRsbr - Juniper Networks Steel-Belted Radius (Carrier Cluster Edition)(sparc)
8.60.50006
(C) Copyright 1996-2016 Juniper Networks, Inc. See license.txt
Using /opt/JNPRsbr as the package base directory.
## Processing package information.
## Processing system information.
## Verifying disk space requirements.
## Checking for conflicts with packages already installed.
The following files are already installed on the system and are being
used by another package:
* /opt/JNPRsbr/radius attribute change only
454
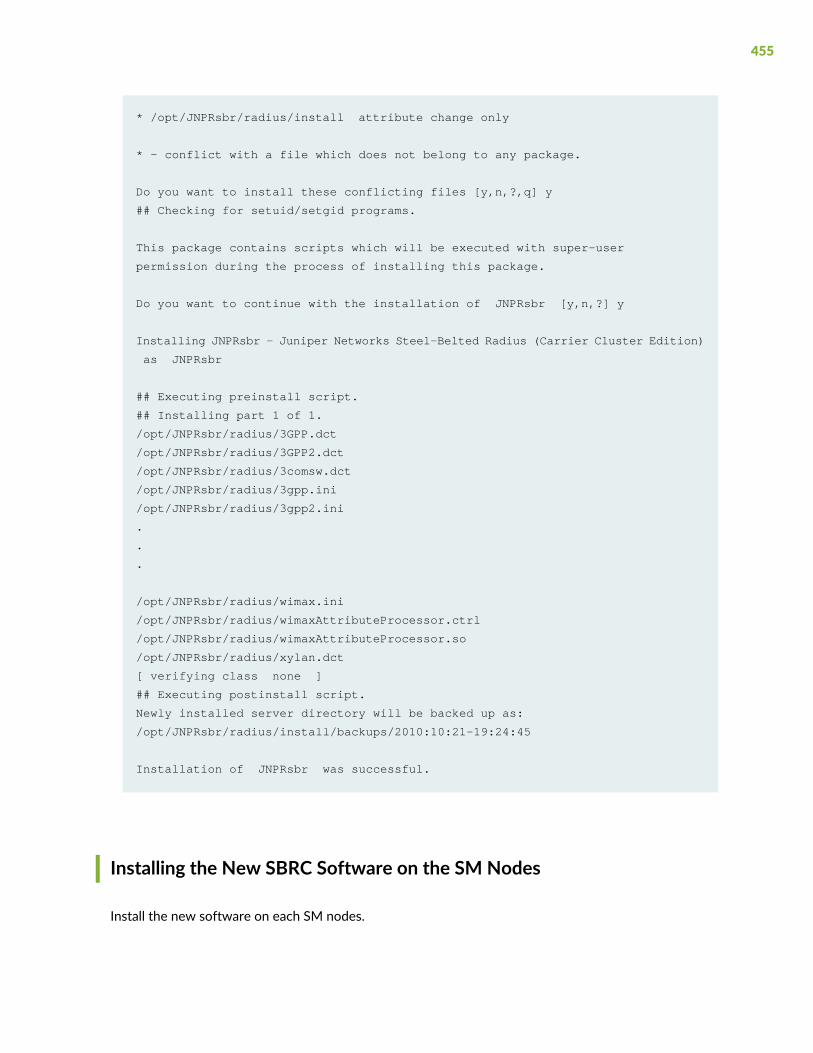
* /opt/JNPRsbr/radius/install attribute change only
* - conflict with a file which does not belong to any package.
Do you want to install these conflicting files [y,n,?,q] y
## Checking for setuid/setgid programs.
This package contains scripts which will be executed with super-user
permission during the process of installing this package.
Do you want to continue with the installation of JNPRsbr [y,n,?] y
Installing JNPRsbr - Juniper Networks Steel-Belted Radius (Carrier Cluster Edition)
as JNPRsbr
## Executing preinstall script.
## Installing part 1 of 1.
/opt/JNPRsbr/radius/3GPP.dct
/opt/JNPRsbr/radius/3GPP2.dct
/opt/JNPRsbr/radius/3comsw.dct
/opt/JNPRsbr/radius/3gpp.ini
/opt/JNPRsbr/radius/3gpp2.ini
.
.
.
/opt/JNPRsbr/radius/wimax.ini
/opt/JNPRsbr/radius/wimaxAttributeProcessor.ctrl
/opt/JNPRsbr/radius/wimaxAttributeProcessor.so
/opt/JNPRsbr/radius/xylan.dct
[ verifying class none ]
## Executing postinstall script.
Newly installed server directory will be backed up as:
/opt/JNPRsbr/radius/install/backups/2010:10:21-19:24:45
Installation of JNPRsbr was successful.
Installing the New SBRC Software on the SM Nodes
Install the new software on each SM nodes.
455
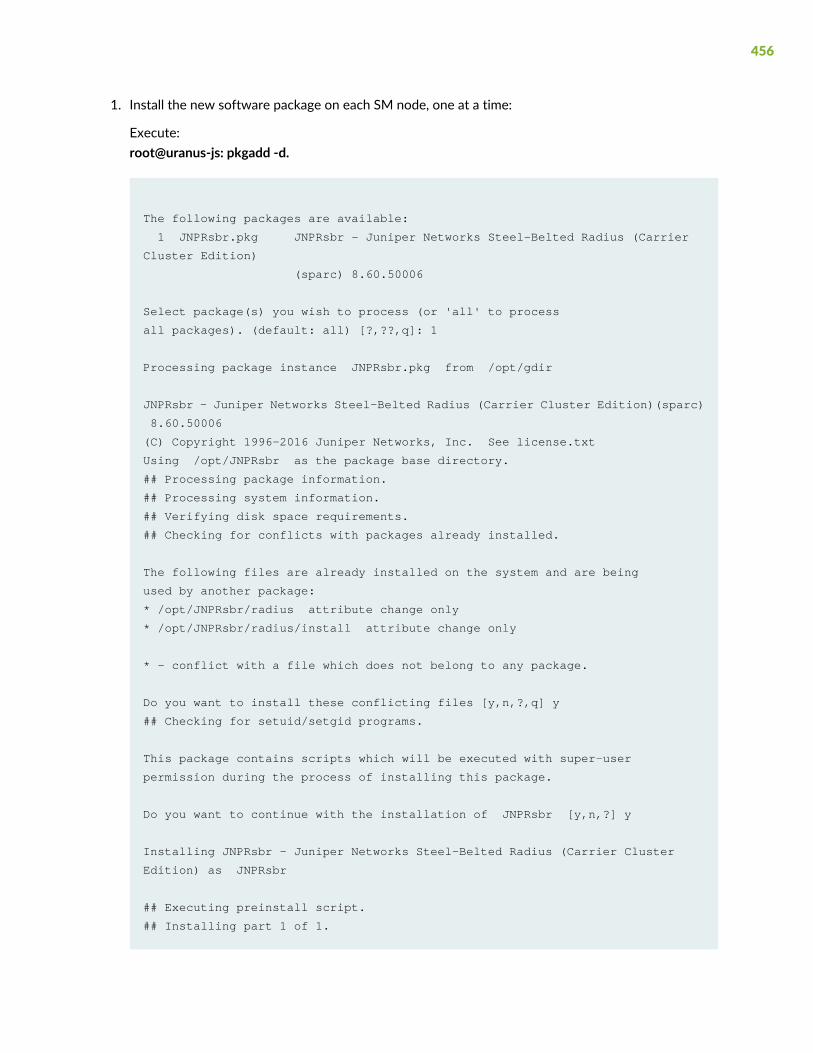
1. Install the new software package on each SM node, one at a time:
Execute:root@uranus-js: pkgadd -d.
The following packages are available:
1 JNPRsbr.pkg JNPRsbr - Juniper Networks Steel-Belted Radius (Carrier
Cluster Edition)
(sparc) 8.60.50006
Select package(s) you wish to process (or 'all' to process
all packages). (default: all) [?,??,q]: 1
Processing package instance JNPRsbr.pkg from /opt/gdir
JNPRsbr - Juniper Networks Steel-Belted Radius (Carrier Cluster Edition)(sparc)
8.60.50006
(C) Copyright 1996-2016 Juniper Networks, Inc. See license.txt
Using /opt/JNPRsbr as the package base directory.
## Processing package information.
## Processing system information.
## Verifying disk space requirements.
## Checking for conflicts with packages already installed.
The following files are already installed on the system and are being
used by another package:
* /opt/JNPRsbr/radius attribute change only
* /opt/JNPRsbr/radius/install attribute change only
* - conflict with a file which does not belong to any package.
Do you want to install these conflicting files [y,n,?,q] y
## Checking for setuid/setgid programs.
This package contains scripts which will be executed with super-user
permission during the process of installing this package.
Do you want to continue with the installation of JNPRsbr [y,n,?] y
Installing JNPRsbr - Juniper Networks Steel-Belted Radius (Carrier Cluster
Edition) as JNPRsbr
## Executing preinstall script.
## Installing part 1 of 1.
456
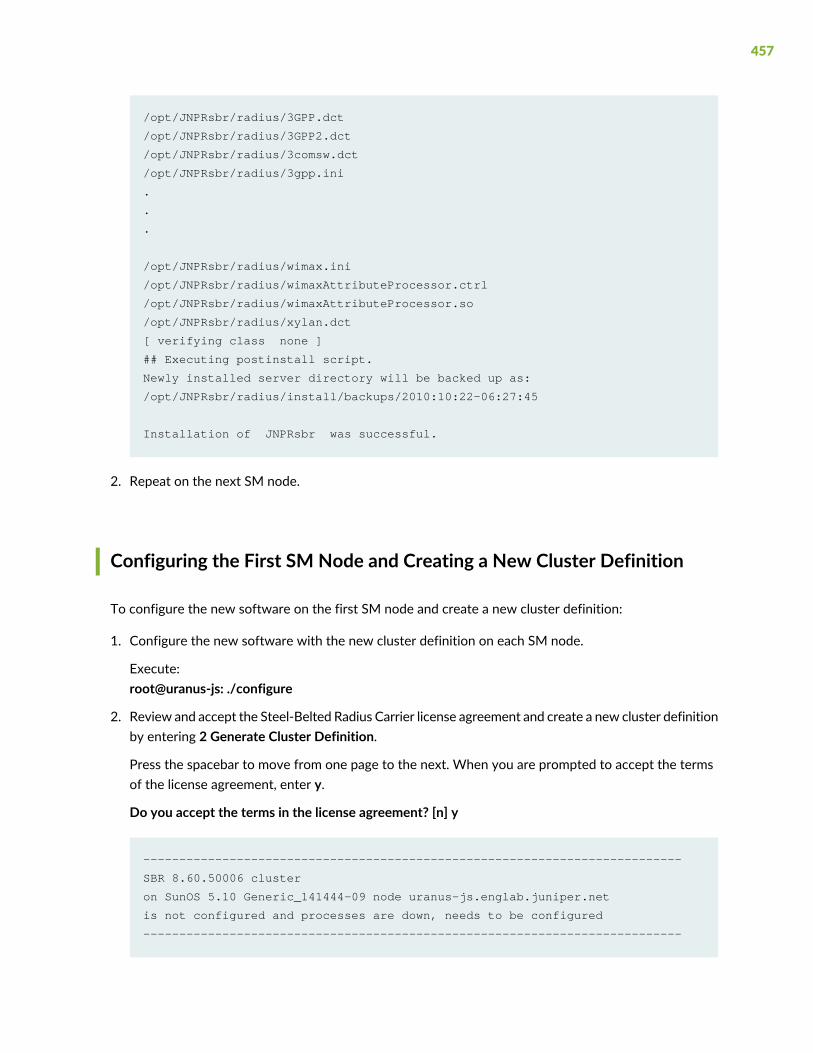
/opt/JNPRsbr/radius/3GPP.dct
/opt/JNPRsbr/radius/3GPP2.dct
/opt/JNPRsbr/radius/3comsw.dct
/opt/JNPRsbr/radius/3gpp.ini
.
.
.
/opt/JNPRsbr/radius/wimax.ini
/opt/JNPRsbr/radius/wimaxAttributeProcessor.ctrl
/opt/JNPRsbr/radius/wimaxAttributeProcessor.so
/opt/JNPRsbr/radius/xylan.dct
[ verifying class none ]
## Executing postinstall script.
Newly installed server directory will be backed up as:
/opt/JNPRsbr/radius/install/backups/2010:10:22-06:27:45
Installation of JNPRsbr was successful.
2. Repeat on the next SM node.
Configuring the First SM Node and Creating a New Cluster Definition
To configure the new software on the first SM node and create a new cluster definition:
1. Configure the new software with the new cluster definition on each SM node.
Execute:root@uranus-js: ./configure
2. Review and accept the Steel-Belted Radius Carrier license agreement and create a new cluster definitionby entering 2 Generate Cluster Definition.
Press the spacebar to move from one page to the next. When you are prompted to accept the termsof the license agreement, enter y.
Do you accept the terms in the license agreement? [n] y
---------------------------------------------------------------------------
SBR 8.60.50006 cluster
on SunOS 5.10 Generic_141444-09 node uranus-js.englab.juniper.net
is not configured and processes are down, needs to be configured
---------------------------------------------------------------------------
457

1. Unconfigure Cluster Node
Not used when merely updating existing cluster definitions.
2. Generate Cluster Definition
Creates new or updates existing cluster definitions.
Modifies the shared directory but does not modify this node.
3. Configure Cluster Node
To be preceded by 'Generate Cluster Definition' on one node.
Must be invoked on each and every node of the cluster.
4. Reconfigure RADIUS Server
Only on SBR nodes, updates the existing SBR configuration.
5. Create Temporary Cluster
Used to approximate a cluster using only this one machine.
Intended for migration and demonstration purposes only.
6. Upgrade From Restricted Cluster License
Used to upgrade from restricted cluster to regular cluster.
Removes database restriction on the number of concurrent
sessions and enables the addition of an expansion kit license
Enter the number of the desired configuration task or quit (2,q): 2
3. Create a new cluster definition by entering 2 Generate Cluster Definition. This example creates acluster named “junCluster” that contains two SM nodes named “uranus-js” and “sbrha-3”, and two datanodes named “sbrha-9” and “sbrha-7”.
NOTE: If you use the original cluster name, the system attempts to use the originalconfiguration files, which may contain pre-8.6.0 values. You must either back up and removethe old cluster definition, or use a new cluster name. However, you can use the same nodenames.
---------------------------------------------------------------------------
SBR 8.60.50006 cluster
on SunOS 5.10 Generic_141444-09 node uranus-js.englab.juniper.net
is not configured and processes are down, needs to be configured
---------------------------------------------------------------------------
458
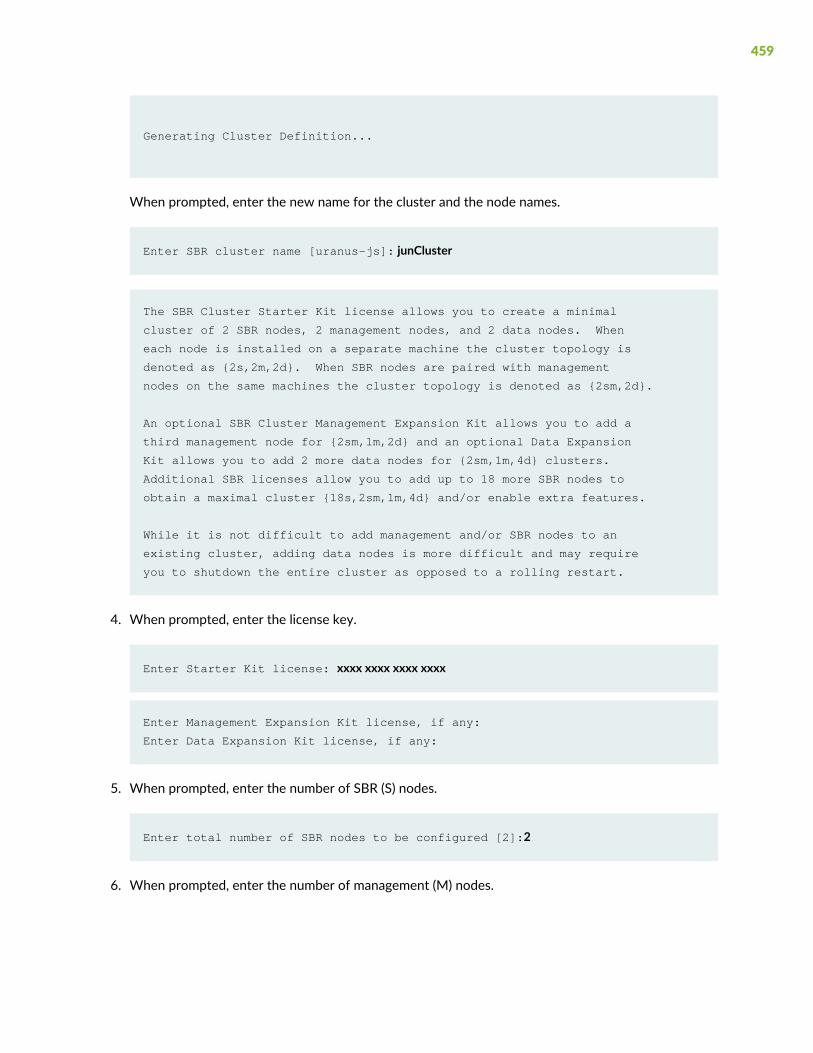
Generating Cluster Definition...
When prompted, enter the new name for the cluster and the node names.
Enter SBR cluster name [uranus-js]: junCluster
The SBR Cluster Starter Kit license allows you to create a minimal
cluster of 2 SBR nodes, 2 management nodes, and 2 data nodes. When
each node is installed on a separate machine the cluster topology is
denoted as {2s,2m,2d}. When SBR nodes are paired with management
nodes on the same machines the cluster topology is denoted as {2sm,2d}.
An optional SBR Cluster Management Expansion Kit allows you to add a
third management node for {2sm,1m,2d} and an optional Data Expansion
Kit allows you to add 2 more data nodes for {2sm,1m,4d} clusters.
Additional SBR licenses allow you to add up to 18 more SBR nodes to
obtain a maximal cluster {18s,2sm,1m,4d} and/or enable extra features.
While it is not difficult to add management and/or SBR nodes to an
existing cluster, adding data nodes is more difficult and may require
you to shutdown the entire cluster as opposed to a rolling restart.
4. When prompted, enter the license key.
Enter Starter Kit license: xxxx xxxx xxxx xxxx
Enter Management Expansion Kit license, if any:
Enter Data Expansion Kit license, if any:
5. When prompted, enter the number of SBR (S) nodes.
Enter total number of SBR nodes to be configured [2]:2
6. When prompted, enter the number of management (M) nodes.
459

Enter number of management nodes to be paired with SBR nodes [2]:2
Creating cluster junCluster{0s,2sm,0m,2d}
will require 4 machines total. Do you wish to continue? [y]:
7. When prompted whether you wish to continue, enter y to continue.
All cluster nodes will share the same Session State Register (SSR).
Do you wish to continue? [y]:y
8. When prompted whether you wish to continue, enter y to continue.
All cluster nodes will share the same Session State Register (SSR).
Setting password for SSR admin account hadmsql
Password:
Again:
Setting password for SSR software account hadmsbr
Password:
Again:
9. When prompted, enter the password for the account.
Information will now be gathered for each machine in the cluster.
You will have a chance to review all information at least once
before any machines are modified.
10.Enter the information to re-create each node in your cluster.
---------------------------------------------------------------------------
SBR 8.60.50006 cluster junCluster{0s,2sm,0m,2d}
on SunOS 5.10 Generic_141444-09 node uranus-js.englab.juniper.net
Partial configuration at present is {0s,0sm,0m,0d} of {0s,2sm,0m,2d}
---------------------------------------------------------------------------
IMPORTANT: node names must be entered as reported by 'uname -n'.
460

Enter node name [junCluster-1]: uranus-js.englab.juniper.netEnter node type (sm,d) [sm]:
Enter SBR node ID (100-149) [100]:
Enter SBR node IP address by which it is known to management nodes.
Enter SBR node IP address: 10.13.20.89Enter SBR licenses meant only for this particular SBR node.
Enter one license per line and an empty line when finished.
Enter SBR full license: xxxx xxxx xxxx xxxxEnter SBR feature license:
Enter MGMT node ID (51-59) [51]:
Enter MGMT node IP address by which it is known to other nodes.
Enter MGMT node IP address: 10.13.20.89---------------------------------------------------------------------------
SBR 8.60.50006 cluster junCluster{0s,2sm,0m,2d}
on SunOS 5.10 Generic_141444-09 node uranus-js.englab.juniper.net
Partial configuration at present is {0s,1sm,0m,0d} of {0s,2sm,0m,2d}
---------------------------------------------------------------------------
IMPORTANT: node names must be entered as reported by 'uname -n'.
Enter node name [junCluster-2]: sbrha-3.englab.juniper.netEnter node type (sm,d) [sm]:
Enter SBR node ID (100-149) [101]:
Enter SBR node IP address by which it is known to management nodes.
Enter SBR node IP address: 10.13.20.77Enter SBR licenses meant only for this particular SBR node.
Enter one license per line and an empty line when finished.
Enter SBR full license: xxxx xxxx xxxx xxxxEnter SBR feature license:
Enter MGMT node ID (51-59) [52]:
Enter MGMT node IP address by which it is known to other nodes.
Enter MGMT node IP address: 10.13.20.77---------------------------------------------------------------------------
SBR 8.60.50006 cluster junCluster{0s,2sm,0m,2d}
on SunOS 5.10 Generic_141444-09 node uranus-js.englab.juniper.net
Partial configuration at present is {0s,2sm,0m,0d} of {0s,2sm,0m,2d}
---------------------------------------------------------------------------
IMPORTANT: node names must be entered as reported by 'uname -n'.
Enter node name [junCluster-3]: sbrha-9.englab.juniper.netEnter node type (d) [d]:
Enter DATA node ID (1-40) [1]:
Enter DATA node IP address by which it is known to management nodes.
Enter DATA node IP address: 10.13.20.83---------------------------------------------------------------------------
SBR 8.60.50006 cluster junCluster{0s,2sm,0m,2d}
461

on SunOS 5.10 Generic_141444-09 node uranus-js.englab.juniper.net
Partial configuration at present is {0s,2sm,0m,1d} of {0s,2sm,0m,2d}
---------------------------------------------------------------------------
IMPORTANT: node names must be entered as reported by 'uname -n'.
Enter node name [junCluster-4]: sbrha-7.englab.juniper.netEnter node type (d) [d]:
Enter DATA node ID (1-40) [2]:
Enter DATA node IP address by which it is known to management nodes.
Enter DATA node IP address: 10.13.20.81---------------------------------------------------------------------------
SBR 8.60.50006 cluster junCluster{0s,2sm,0m,2d}
on SunOS 5.10 Generic_141444-09 node uranus-js.englab.juniper.net
Generated configuration is {0s,2sm,0m,2d} of {0s,2sm,0m,2d}
---------------------------------------------------------------------------
Generating configuration files
Reviewing configuration files
/opt/JNPRsbr/radius/install/tmp/config.ini
/opt/JNPRsbr/radius/install/tmp/my.cnf
/opt/JNPRsbr/radius/install/tmp/dbclusterndb.gen
11.After reviewing the information you entered for each node, accept the configuration files.
View (v), accept (a), or reject (r) configuration files: a
WARNING: No such directory: /opt/JNPRshare/install/junCluster
12.(Optional) If prompted to create a shared directory for collecting and distributing the shared configurationof the cluster, enter y.
It is recommended that you create a shared directory owned by hadm
for the purposes of collecting and distributing shared configuration
among the various nodes of your clusters. Create this directory now,
along with the OS user account hadm if required? [y]: y
Writing shared configuration to /opt/JNPRshare/install/junCluster
462

---------------------------------------------------------------------------
SBR 8.60.50006 cluster
on SunOS 5.10 Generic_141444-09 node uranus-js.englab.juniper.net
is not configured and processes are down, needs to be configured
---------------------------------------------------------------------------
1. Unconfigure Cluster Node
Not used when merely updating existing cluster definitions.
2. Generate Cluster Definition
Creates new or updates existing cluster definitions.
Modifies the shared directory but does not modify this node.
3. Configure Cluster Node
To be preceded by 'Generate Cluster Definition' on one node.
Must be invoked on each and every node of the cluster.
4. Reconfigure RADIUS Server
Only on SBR nodes, updates the existing SBR configuration.
5. Create Temporary Cluster
Used to approximate a cluster using only this one machine.
Intended for migration and demonstration purposes only.
6. Upgrade From Restricted Cluster License
Used to upgrade from restricted cluster to regular cluster.
Removes database restriction on the number of concurrent
sessions and enables the addition of an expansion kit license
READY: last operation succeeded, generated cluster definition.
Enter the number of the desired configuration task or quit (2,q):
13.Proceed to “Configuring the SBRC Software on the SM Nodes” on page 463.
Configuring the SBRC Software on the SM Nodes
To configure the newly installed software on the SM nodes:
1. Configure the first SM node. When the main configuration menu is displayed, enter 3 to configure thenode.
463
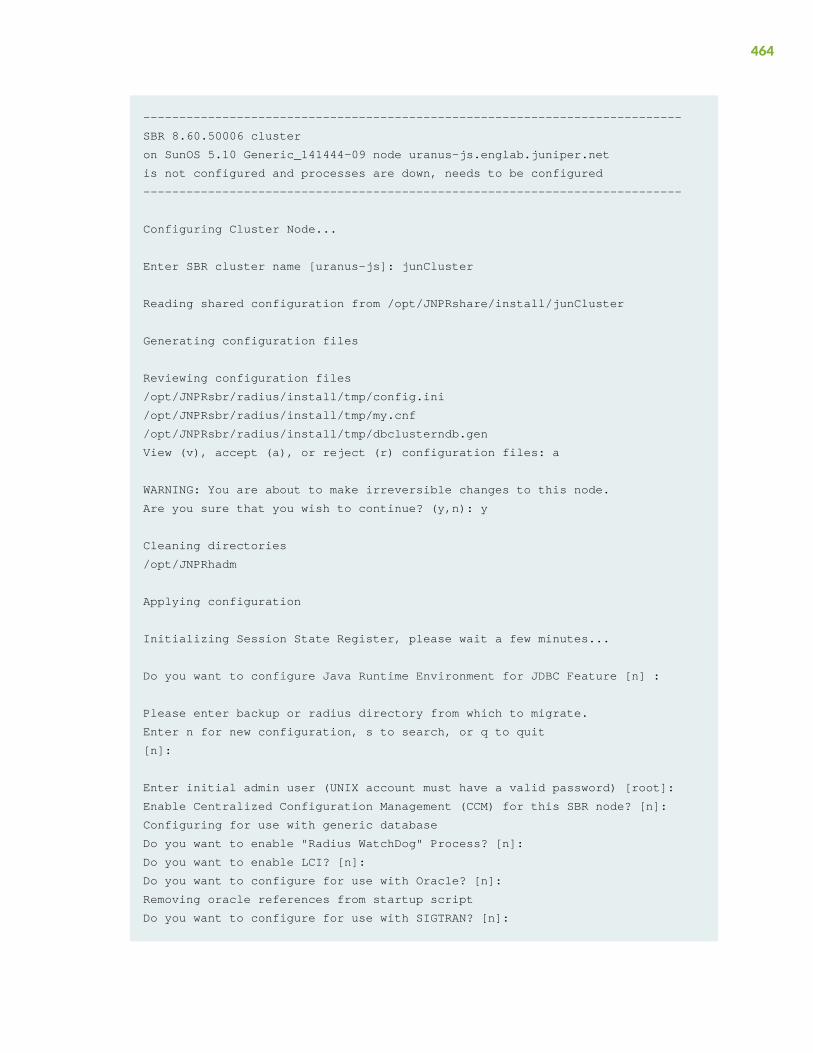
---------------------------------------------------------------------------
SBR 8.60.50006 cluster
on SunOS 5.10 Generic_141444-09 node uranus-js.englab.juniper.net
is not configured and processes are down, needs to be configured
---------------------------------------------------------------------------
Configuring Cluster Node...
Enter SBR cluster name [uranus-js]: junCluster
Reading shared configuration from /opt/JNPRshare/install/junCluster
Generating configuration files
Reviewing configuration files
/opt/JNPRsbr/radius/install/tmp/config.ini
/opt/JNPRsbr/radius/install/tmp/my.cnf
/opt/JNPRsbr/radius/install/tmp/dbclusterndb.gen
View (v), accept (a), or reject (r) configuration files: a
WARNING: You are about to make irreversible changes to this node.
Are you sure that you wish to continue? (y,n): y
Cleaning directories
/opt/JNPRhadm
Applying configuration
Initializing Session State Register, please wait a few minutes...
Do you want to configure Java Runtime Environment for JDBC Feature [n] :
Please enter backup or radius directory from which to migrate.
Enter n for new configuration, s to search, or q to quit
[n]:
Enter initial admin user (UNIX account must have a valid password) [root]:
Enable Centralized Configuration Management (CCM) for this SBR node? [n]:
Configuring for use with generic database
Do you want to enable "Radius WatchDog" Process? [n]:
Do you want to enable LCI? [n]:
Do you want to configure for use with Oracle? [n]:
Removing oracle references from startup script
Do you want to configure for use with SIGTRAN? [n]:
464

Removing SIGTRAN references from startup script
Do you want to configure SNMP? [n]:
Configuring Admin GUI Webserver
Compatible Java version found :
Do you want to install custom SSL certificate for Admin WebServer? [n]:
Enable (e), disable (d), or preserve (p) autoboot scripts [e]:
The SBR Admin Web GUI can be launched using the following URL:
https://<servername>:2909
---------------------------------------------------------------------------
SBR 8.60.50006 cluster junCluster{0s,2sm,0m,2d}
on SunOS 5.10 Generic_141444-09 node uranus-js.englab.juniper.net(sm)
is configured and processes are down, may be reconfigured if desired
---------------------------------------------------------------------------
1. Unconfigure Cluster Node
Not used when merely updating existing cluster definitions.
2. Generate Cluster Definition
Creates new or updates existing cluster definitions.
Modifies the shared directory but does not modify this node.
3. Configure Cluster Node
To be preceded by 'Generate Cluster Definition' on one node.
Must be invoked on each and every node of the cluster.
4. Reconfigure RADIUS Server
Only on SBR nodes, updates the existing SBR configuration.
5. Create Temporary Cluster
Used to approximate a cluster using only this one machine.
Intended for migration and demonstration purposes only.
6. Upgrade From Restricted Cluster License
Used to upgrade from restricted cluster to regular cluster.
Removes database restriction on the number of concurrent
sessions and enables the addition of an expansion kit license
READY: last operation succeeded, node configured.
Enter the number of the desired configuration task or quit (4,q): q
[07:33:44][root@uranus-js:/opt/JNPRsbr/radius/install]$
2. At the main menu, enter q to quit.
465
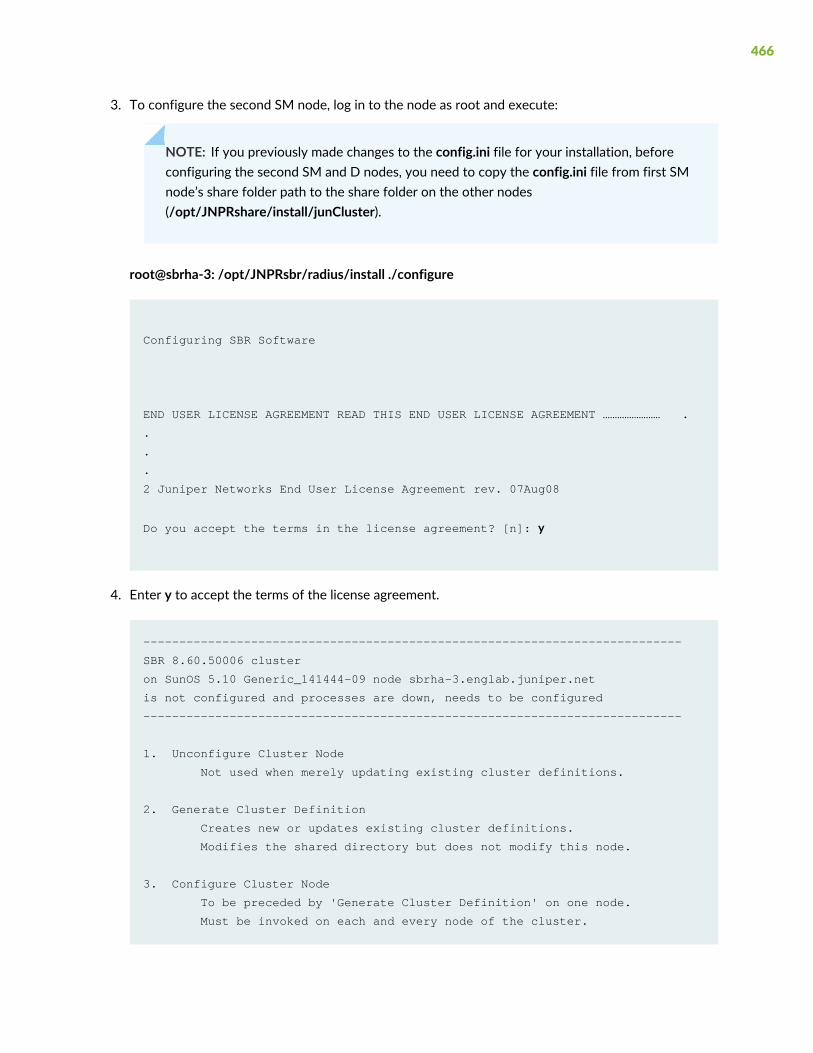
3. To configure the second SM node, log in to the node as root and execute:
NOTE: If you previously made changes to the config.ini file for your installation, beforeconfiguring the second SM and D nodes, you need to copy the config.ini file from first SMnode’s share folder path to the share folder on the other nodes(/opt/JNPRshare/install/junCluster).
root@sbrha-3: /opt/JNPRsbr/radius/install ./configure
Configuring SBR Software
END USER LICENSE AGREEMENT READ THIS END USER LICENSE AGREEMENT …………………… .
.
.
.
2 Juniper Networks End User License Agreement rev. 07Aug08
Do you accept the terms in the license agreement? [n]: y
4. Enter y to accept the terms of the license agreement.
---------------------------------------------------------------------------
SBR 8.60.50006 cluster
on SunOS 5.10 Generic_141444-09 node sbrha-3.englab.juniper.net
is not configured and processes are down, needs to be configured
---------------------------------------------------------------------------
1. Unconfigure Cluster Node
Not used when merely updating existing cluster definitions.
2. Generate Cluster Definition
Creates new or updates existing cluster definitions.
Modifies the shared directory but does not modify this node.
3. Configure Cluster Node
To be preceded by 'Generate Cluster Definition' on one node.
Must be invoked on each and every node of the cluster.
466

4. Reconfigure RADIUS Server
Only on SBR nodes, updates the existing SBR configuration.
5. Create Temporary Cluster
Used to approximate a cluster using only this one machine.
Intended for migration and demonstration purposes only.
6. Upgrade From Restricted Cluster License
Used to upgrade from restricted cluster to regular cluster.
Removes database restriction on the number of concurrent
sessions and enables the addition of an expansion kit license
Enter the number of the desired configuration task or quit (2,q): 3
5. When the main menu displays, enter 3 to configure the node.
---------------------------------------------------------------------------
SBR 8.60.50006 cluster
on SunOS 5.10 Generic_141444-09 node sbrha-3.englab.juniper.net
is not configured and processes are down, needs to be configured
---------------------------------------------------------------------------
Configuring Cluster Node...
Enter SBR cluster name [sbrha]: junClusterReading shared configuration from /opt/JNPRshare/install/junCluster
Generating configuration files
Reviewing configuration files
/opt/JNPRsbr/radius/install/tmp/config.ini
/opt/JNPRsbr/radius/install/tmp/my.cnf
/opt/JNPRsbr/radius/install/tmp/dbclusterndb.gen
View (v), accept (a), or reject (r) configuration files: a
6. Enter a to accept the configuration files.
467
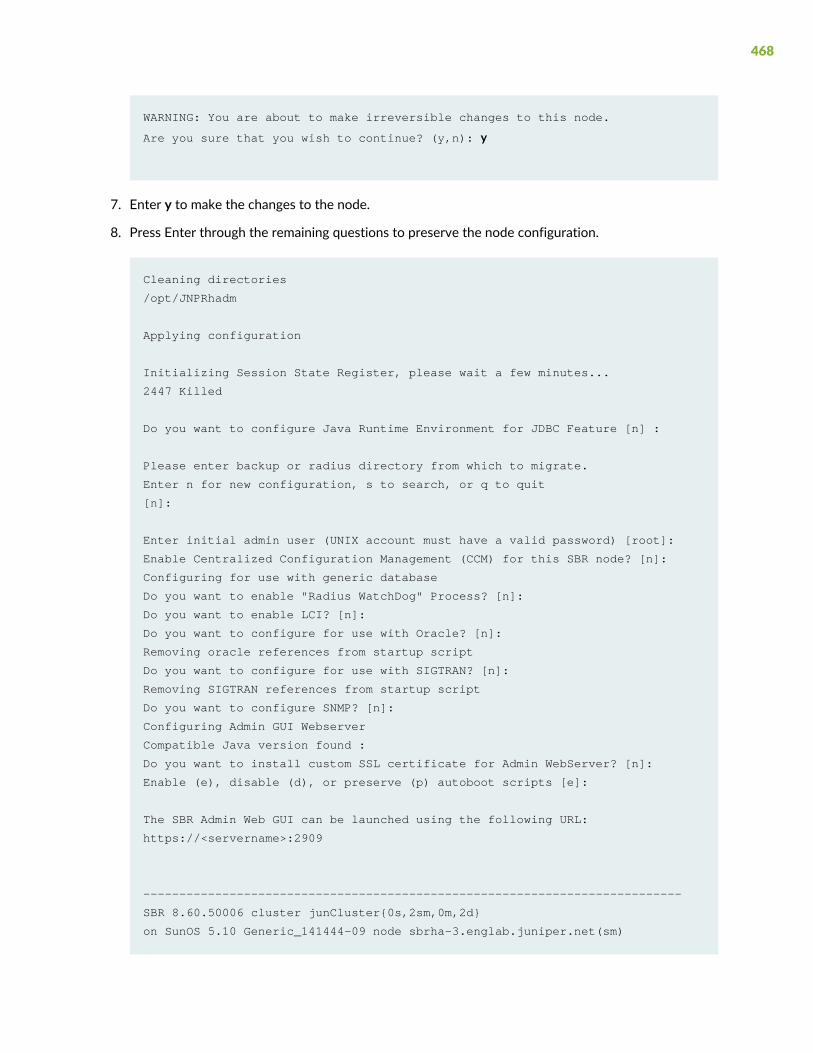
WARNING: You are about to make irreversible changes to this node.
Are you sure that you wish to continue? (y,n): y
7. Enter y to make the changes to the node.
8. Press Enter through the remaining questions to preserve the node configuration.
Cleaning directories
/opt/JNPRhadm
Applying configuration
Initializing Session State Register, please wait a few minutes...
2447 Killed
Do you want to configure Java Runtime Environment for JDBC Feature [n] :
Please enter backup or radius directory from which to migrate.
Enter n for new configuration, s to search, or q to quit
[n]:
Enter initial admin user (UNIX account must have a valid password) [root]:
Enable Centralized Configuration Management (CCM) for this SBR node? [n]:
Configuring for use with generic database
Do you want to enable "Radius WatchDog" Process? [n]:
Do you want to enable LCI? [n]:
Do you want to configure for use with Oracle? [n]:
Removing oracle references from startup script
Do you want to configure for use with SIGTRAN? [n]:
Removing SIGTRAN references from startup script
Do you want to configure SNMP? [n]:
Configuring Admin GUI Webserver
Compatible Java version found :
Do you want to install custom SSL certificate for Admin WebServer? [n]:
Enable (e), disable (d), or preserve (p) autoboot scripts [e]:
The SBR Admin Web GUI can be launched using the following URL:
https://<servername>:2909
---------------------------------------------------------------------------
SBR 8.60.50006 cluster junCluster{0s,2sm,0m,2d}
on SunOS 5.10 Generic_141444-09 node sbrha-3.englab.juniper.net(sm)
468

is configured and processes are down, may be reconfigured if desired
---------------------------------------------------------------------------
1. Unconfigure Cluster Node
Not used when merely updating existing cluster definitions.
2. Generate Cluster Definition
Creates new or updates existing cluster definitions.
Modifies the shared directory but does not modify this node.
3. Configure Cluster Node
To be preceded by 'Generate Cluster Definition' on one node.
Must be invoked on each and every node of the cluster.
4. Reconfigure RADIUS Server
Only on SBR nodes, updates the existing SBR configuration.
5. Create Temporary Cluster
Used to approximate a cluster using only this one machine.
Intended for migration and demonstration purposes only.
6. Upgrade From Restricted Cluster License
Used to upgrade from restricted cluster to regular cluster.
Removes database restriction on the number of concurrent
sessions and enables the addition of an expansion kit license
READY: last operation succeeded, node configured.
Enter the number of the desired configuration task or quit (4,q): q
root@sbrha-3:/opt/JNPRsbr/radius/install $
9. When the main menu displays, enter q to quit.
Configuring the SBRC Software on the Data Nodes
To configure the new software on the D nodes:
1. Log in to the first D node as root and execute:
root@sbrha-9: /opt/JNPRsbr/radius/install$ ./configure
469

Configuring SBR Software
END USER LICENSE AGREEMENT READ THIS END USER LICENSE AGREEMENT ………….
.
.
.
(Translation: The parties confirm that this Agreement and all related
documentation is and will be in the English language).
2 Juniper Networks End User License Agreement rev. 07Aug08
Do you accept the terms in the license agreement? [n]: y
2. Enter y to accept the license agreement.
---------------------------------------------------------------------------
SBR 8.60.50006 cluster
on SunOS 5.10 Generic_141444-09 node sbrha-9.englab.juniper.net
is not configured and processes are down, needs to be configured
---------------------------------------------------------------------------
1. Unconfigure Cluster Node
Not used when merely updating existing cluster definitions.
2. Generate Cluster Definition
Creates new or updates existing cluster definitions.
Modifies the shared directory but does not modify this node.
3. Configure Cluster Node
To be preceded by 'Generate Cluster Definition' on one node.
Must be invoked on each and every node of the cluster.
4. Reconfigure RADIUS Server
Only on SBR nodes, updates the existing SBR configuration.
5. Create Temporary Cluster
Used to approximate a cluster using only this one machine.
Intended for migration and demonstration purposes only.
6. Upgrade From Restricted Cluster License
470
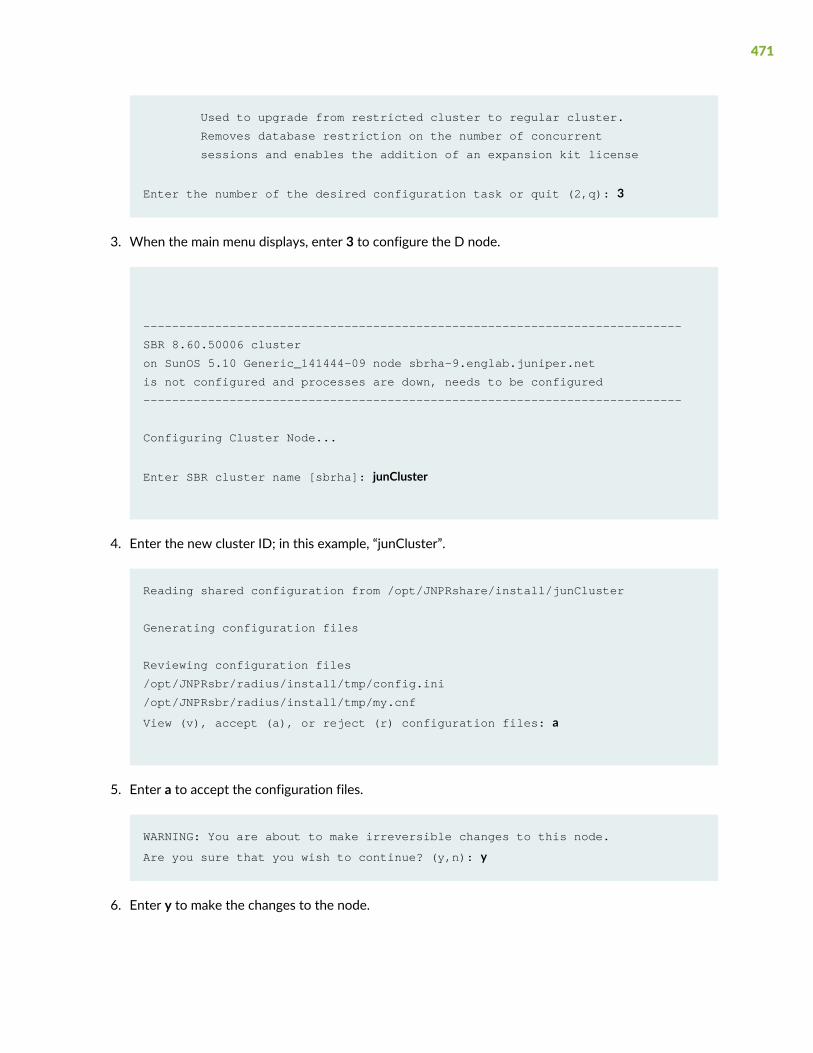
Used to upgrade from restricted cluster to regular cluster.
Removes database restriction on the number of concurrent
sessions and enables the addition of an expansion kit license
Enter the number of the desired configuration task or quit (2,q): 3
3. When the main menu displays, enter 3 to configure the D node.
---------------------------------------------------------------------------
SBR 8.60.50006 cluster
on SunOS 5.10 Generic_141444-09 node sbrha-9.englab.juniper.net
is not configured and processes are down, needs to be configured
---------------------------------------------------------------------------
Configuring Cluster Node...
Enter SBR cluster name [sbrha]: junCluster
4. Enter the new cluster ID; in this example, “junCluster”.
Reading shared configuration from /opt/JNPRshare/install/junCluster
Generating configuration files
Reviewing configuration files
/opt/JNPRsbr/radius/install/tmp/config.ini
/opt/JNPRsbr/radius/install/tmp/my.cnf
View (v), accept (a), or reject (r) configuration files: a
5. Enter a to accept the configuration files.
WARNING: You are about to make irreversible changes to this node.
Are you sure that you wish to continue? (y,n): y
6. Enter y to make the changes to the node.
471

Cleaning directories
/opt/JNPRhadm
Applying configuration
Initializing Session State Register, please wait a few minutes...
---------------------------------------------------------------------------
SBR 8.60.50006 cluster junCluster{0s,2sm,0m,2d}
on SunOS 5.10 Generic_141444-09 node sbrha-9.englab.juniper.net(d)
is configured and processes are down, may be reconfigured if desired
---------------------------------------------------------------------------
1. Unconfigure Cluster Node
Not used when merely updating existing cluster definitions.
2. Generate Cluster Definition
Creates new or updates existing cluster definitions.
Modifies the shared directory but does not modify this node.
3. Configure Cluster Node
To be preceded by 'Generate Cluster Definition' on one node.
Must be invoked on each and every node of the cluster.
4. Reconfigure RADIUS Server
Only on SBR nodes, updates the existing SBR configuration.
5. Create Temporary Cluster
Used to approximate a cluster using only this one machine.
Intended for migration and demonstration purposes only.
6. Upgrade From Restricted Cluster License
Used to upgrade from restricted cluster to regular cluster.
Removes database restriction on the number of concurrent
sessions and enables the addition of an expansion kit license
READY: last operation succeeded, node configured.
Enter the number of the desired configuration task or quit (2,q): q
root@sbrha-9:/opt/JNPRsbr/radius/install$
472

7. When the main menu displays, enter q to quit.
8. Repeat Step 1 through Step 7 on the next data node.
Starting the SSR Processes
Start the SSR process on each node in the cluster, one at a time. Start the SSR process on the nodes in thefollowing order:
• SM nodes
• D nodes
After you start the SSR process on the node, check the status of the node and wait for the process tofinish starting before moving on to the next node.
1. Log in to the first SM node.
Execute:root@uranus-js: /opt/JNPRsbr/radius/sbrd start ssr
Starting ssr management processes
MySQL Cluster Management Server mysql-5.7.25 ndb-7.6.9
-Node 51: connected (Version 7.1.8)
Starting ssr auxiliary processes
root@uranus-js:
2. After starting the SSR process on the node, monitor the status of the node and make sure that itreconnects to the cluster.
Execute:root@uranus-js: /opt/JNPRsbr/radius ./sbrd status
---------------------------------------------------------------------------
SBR 8.60.50006 cluster junCluster{0s,2sm,0m,2d}
on SunOS 5.10 Generic_141444-09 node uranus-js.englab.juniper.net(sm)
---------------------------------------------------------------------------
Connected to Management Server at: 10.13.20.89:5235
473
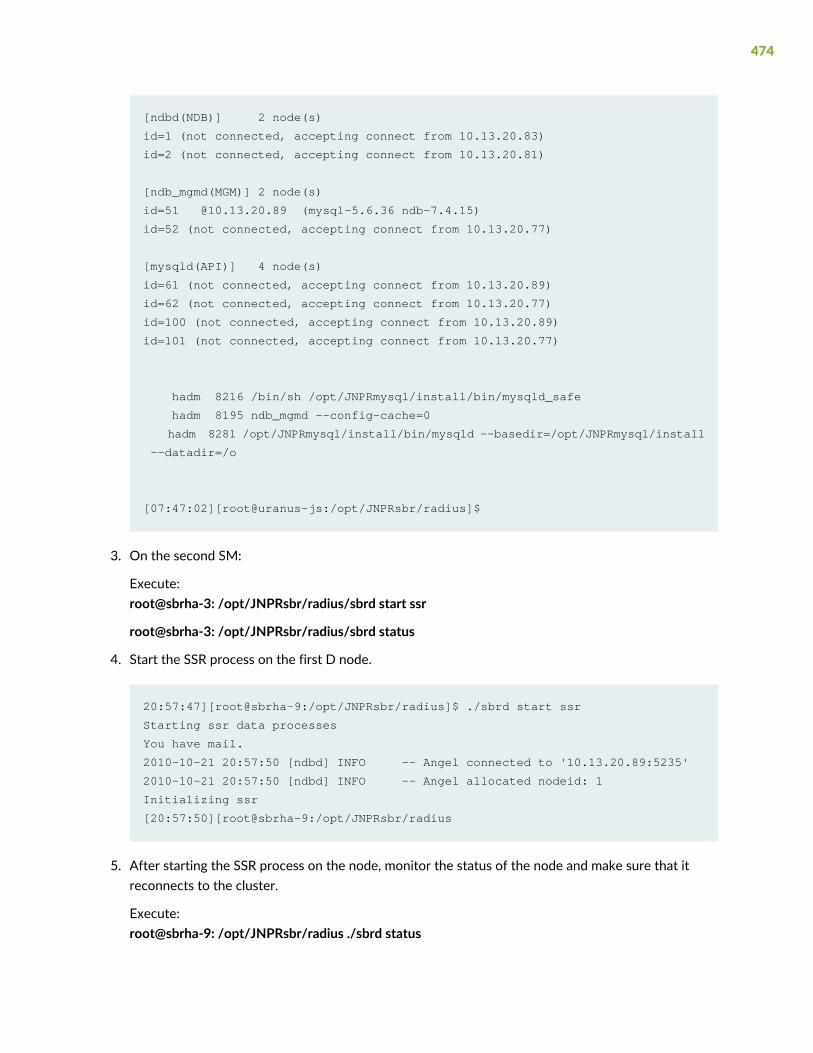
[ndbd(NDB)] 2 node(s)
id=1 (not connected, accepting connect from 10.13.20.83)
id=2 (not connected, accepting connect from 10.13.20.81)
[ndb_mgmd(MGM)] 2 node(s)
id=51 @10.13.20.89 (mysql-5.6.36 ndb-7.4.15)
id=52 (not connected, accepting connect from 10.13.20.77)
[mysqld(API)] 4 node(s)
id=61 (not connected, accepting connect from 10.13.20.89)
id=62 (not connected, accepting connect from 10.13.20.77)
id=100 (not connected, accepting connect from 10.13.20.89)
id=101 (not connected, accepting connect from 10.13.20.77)
hadm 8216 /bin/sh /opt/JNPRmysql/install/bin/mysqld_safe
hadm 8195 ndb_mgmd --config-cache=0
hadm 8281 /opt/JNPRmysql/install/bin/mysqld --basedir=/opt/JNPRmysql/install
--datadir=/o
[07:47:02][root@uranus-js:/opt/JNPRsbr/radius]$
3. On the second SM:
Execute:root@sbrha-3: /opt/JNPRsbr/radius/sbrd start ssr
root@sbrha-3: /opt/JNPRsbr/radius/sbrd status
4. Start the SSR process on the first D node.
20:57:47][root@sbrha-9:/opt/JNPRsbr/radius]$ ./sbrd start ssr
Starting ssr data processes
You have mail.
2010-10-21 20:57:50 [ndbd] INFO -- Angel connected to '10.13.20.89:5235'
2010-10-21 20:57:50 [ndbd] INFO -- Angel allocated nodeid: 1
Initializing ssr
[20:57:50][root@sbrha-9:/opt/JNPRsbr/radius
5. After starting the SSR process on the node, monitor the status of the node and make sure that itreconnects to the cluster.
Execute:root@sbrha-9: /opt/JNPRsbr/radius ./sbrd status
474

---------------------------------------------------------------------------
SBR 8.60.50006 cluster junCluster{0s,2sm,0m,2d}
on SunOS 5.10 Generic_141444-09 node sbrha-9.englab.juniper.net(d)
---------------------------------------------------------------------------
root 6025 ndbmtd --initial
--ndb-connectstring=nodeid=1;10.13.20.89:5235,10.13.20.77:5235
root 6026 ndbmtd --initial
--ndb-connectstring=nodeid=1;10.13.20.89:5235,10.13.20.77:5235
6. On the second D node:
Execute:root@sbrha-7: /opt/JNPRsbr/radius/sbrd start ssr
root@sbrha-7: /opt/JNPRsbr/radius/sbrd status
7. After the SSR process has been started on all four nodes, check the status of the cluster from one ofthe SM nodes.
Execute:root@uranus-js: /opt/JNPRsbr/radius ./sbrd status
The status of the cluster should look similar to the following example. Notice that all nodes are connectedexcept for (in this example) node IDs 100 and 101. These will be connected after you re-create andrestore the cluster database and start the RADIUS processes.
[07:49:09][root@uranus-js:/opt/JNPRsbr/radius]$ ./sbrd status
---------------------------------------------------------------------------
SBR 8.60.50006 cluster junCluster{0s,2sm,0m,2d}
on SunOS 5.10 Generic_141444-09 node uranus-js.englab.juniper.net(sm)
---------------------------------------------------------------------------
Connected to Management Server at: 10.13.20.89:5235
[ndbd(NDB)] 2 node(s)
id=1 @10.13.20.83 (mysql-5.6.36 ndb-7.4.15, Nodegroup: 0, Master)
id=2 @10.13.20.81 (mysql-5.6.36 ndb-7.4.15, Nodegroup: 0)
[ndb_mgmd(MGM)] 2 node(s)
id=51 @10.13.20.89 (mysql-5.6.36 ndb-7.4.15)
id=52 @10.13.20.77 (mysql-5.6.36 ndb-7.4.15)
475

[mysqld(API)] 4 node(s)
id=61 @10.13.20.89 (mysql-5.6.36 ndb-7.4.15)
id=62 @10.13.20.77 (mysql-5.6.36 ndb-7.4.15)
id=100 (not connected, accepting connect from 10.13.20.89)
id=101 (not connected, accepting connect from 10.13.20.77)
hadm 8216 /bin/sh /opt/JNPRmysql/install/bin/mysqld_safe
hadm 8195 ndb_mgmd --config-cache=0
hadm 8281 /opt/JNPRmysql/install/bin/mysqld --basedir=/opt/JNPRmysql/install
--datadir=/o
[07:49:48][root@uranus-js:/opt/JNPRsbr/radius]$
Creating and Restoring the SSR Database
Create and restore the SSR database.
NOTE: If you need to customize the sessions database to match your existing cluster sessiondatabase, see “Customizing the SSR Database Current Sessions Table” on page 144. Anycustomization must be done prior to running the CreateDB.sh script.
1. Create the database by logging in to one of the SM nodes as hadm.
Execute:hadm@uranus-js:~>./CreateDB.sh
Creating database "SteelBeltedRadius" (using ENGINE ndbcluster).
Creating misc tables.
Creating IP Pool, Range and Address tables.
Creating Wimax tables.
Creating SIM Auth tables.
Creating TTLS Resumption Cache tables.
Creating Current Sessions table.
Proxy AutoStop feature configured.
Session Timeout on Missed Account Stop feature configured.
Use Single Class Attribute feature configured.
476

Creating User Concurrency table.
Creating stored routines.
2. Restore the database from the backup you made in “Backing Up the State of the Sessions in Your SSRDatabase” on page 450.
Execute:hadm@uranus-js:~>mysql -D SteelBeltedRadius </opt/backup_sbr.sql
3. Execute the UpdateSchema.pl utility for schema upgrades.
a. First, determine whether your schema needs to be updated for this release by executingUpdateSchema with no arguments as the hadm user. This will return a list of schemas which needto be updated for the installed version of software.
Execute:hadm@uranus-js:~>perl ./UpdateSchema.pl
Usage: perl UpdateSchema.pl [version]
where [version] is 5.4, 5.5, 7.2.5, or 8.4 and above
Other versions do not need a schema update.
From SBR 8.5 release, to increase the Column size of AcctSessionId from 24
to 48, the below usage is recommended:
Usage: perl UpdateSchema.pl <To_Version> ColumnUpdate:Sbr_AcctSessionId
NOTE: Future SBRCarrier software releasesmay require schema updates, we recommendyou execute this step every time you upgrade to determine if a schema upgrade is required.
b. If you are running a software release that requires a schema change, execute the command againwith the version to which you are upgrading. For example, if you are upgrading to SBR CarrierRelease 8.6.0:
Execute:hadm@uranus-js:~>perl ./UpdateSchema.pl 8.6 ColumnUpdate:Sbr_AcctSessionId
Altering Tables for adding Sbr_Ipv6Address- Please wait...Done
Altering Tables for changing Sbr_AcctSessionId size from 24 to 48- Please
wait... Done
477

NOTE: The time required for altering the CST depends on the number of sessions storedin the CST. For example, SBR Carrier takes approximately 30 minutes to update a CSTthat contains 5 million sessions.
4. Check the database restore.
Execute:hadm@uranus-js:~>./ShowSessions.sh -c
Total Sessions: 611443
5. If you need to customize the sessions database, see“Customizing the SSR Database Current Sessions Table” on page 144.
6. Configure at least one IP address pool and one range using the SSR Administration Scripts. See“Testing the Installation with DemoSetup.sh” on page 482. See also Session State Register Administrationin the SBR Carrier Administration and Configuration Guide.
Starting the RADIUS Process
Start the RADIUS process on each S and SM node.
To start the RADIUS process on each SM node:
1. Log in to the SM node as root.
Execute:root@uranus-js: ./sbrd start radius
Starting radius server processes
RADIUS: Process ID of daemon is 8993
RADIUS: Starting DCF system
RADIUS: Configuration checksum: 59 3C 6B AA
radius started
[08:06:38][root@uranus-js:/opt/JNPRsbr/radius]$
2. Repeat Step 1 on the second SM node.
3. Check the status of the cluster from each SM node.
Execute:
478

root@uranus-js: ./sbrd status
The cluster status should look similar to the following example. Notice that all nodes are now connectedto the cluster.
---------------------------------------------------------------------------
SBR 8.60.50006 cluster junCluster{0s,2sm,0m,2d}
on SunOS 5.10 Generic_141444-09 node uranus-js.englab.juniper.net(sm)
---------------------------------------------------------------------------
Connected to Management Server at: 10.13.20.89:5235
[ndbd(NDB)] 2 node(s)
id=1 @10.13.20.83 (mysql-5.6.36 ndb-7.4.15, Nodegroup: 0, Master)
id=2 @10.13.20.81 (mysql-5.6.36 ndb-7.4.15, Nodegroup: 0)
[ndb_mgmd(MGM)] 2 node(s)
id=51 @10.13.20.89 (mysql-5.6.36 ndb-7.4.15)
id=52 @10.13.20.77 (mysql-5.6.36 ndb-7.4.15)
[mysqld(API)] 4 node(s)
id=61 @10.13.20.89 (mysql-5.6.36 ndb-7.4.15)
id=62 @10.13.20.77 (mysql-5.6.36 ndb-7.4.15)
id=100 @10.13.20.89 (mysql-5.6.36 ndb-7.4.15)
id=101 @10.13.20.77 (mysql-5.6.36 ndb-7.4.15)
10.13.20.89.1646 Idle
10.13.20.89.1813 Idle
10.13.20.89.1645 Idle
10.13.20.89.1812 Idle
*.1812 *.* 0 0 49152 0 LISTEN
*.1813 *.* 0 0 49152 0 LISTEN
hadm 8216 /bin/sh /opt/JNPRmysql/install/bin/mysqld_safe
hadm 8195 ndb_mgmd --config-cache=0
hadm 8281 /opt/JNPRmysql/install/bin/mysqld --basedir=/opt/JNPRmysql/install
--datadir=/o
root 8993 radius sbr.xml
[08:09:44][root@uranus-js:/opt/JNPRsbr/radius]$
479

Launching Web GUI
Now that the RADIUS process is running, you can complete the configuration usingWeb GUI. For details,see “Basic SBR Carrier Node Configuration” on page 138. For complete details, see the SBR CarrierAdministration and Configuration Guide.
480
PART 9
Appendix
This part contains the following appendix:
481
APPENDIX A
Testing the Installation with DemoSetup.sh
IN THIS SECTION
Creating a Test Database | 482
DemoSetup.sh Syntax | 484
This appendix describes how to set up a test database to test the installation. Creation of the test databaserequires at least one IP address pool to be configured for SBR Carrier. These topics are in this appendix:
Creating a Test Database
If all the nodes come up correctly and see each other, you can create a test databasewith theDemoSetup.shscript.
To create a test database, on each management node:
1. Log in as root. (You use both root and hadm accounts; using two windows makes this easier.)
2. Stop the SBR Carrier node.
a. Change directories to /opt/JNPRsbr/radius/.
b. Execute:sbrd stop radius
3. Log in (using the second window) as hadm.
482
4. Create a database with the DemoSetup.sh script, using the default values.
Execute: DemoSetup.sh
For example:DemoSetup.sh
5. Respond to the script prompts with yes.
For example:
SBRs must be offline, do you want to proceed? <yes|no> yes
This will destroy the “ SteelBeltedRadius” database (if it exists), OK? <yes|no>
yes
6. In the hadm window, check the status of all nodes as they come online.
/opt/JNPRsbr/radius/sbrd status
Results similar to this example are displayed:
hadmUser$>/opt/JNPRsbr/radius/sbrd status
[ndbd(NDB)] 2 node(s)
id=10 @172.28.84.163 (mysql-5.7.25 ndb-7.6.9, Nodegroup: 0, Master)
id=11 @172.28.84.113 (mysql-5.7.25 ndb-7.6.9, Nodegroup: 0)
[ndb_mgmd(MGM)] 2 node(s)
id=1 @172.28.84.36 (mysql-5.7.25 ndb-7.6.9)
id=2 @172.28.84.166 (mysql-5.7.25 ndb-7.6.9)
[mysqld(API)] 4 node(s)
id=21 @172.28.84.36 (mysql-5.7.25 ndb-7.6.9)
id=22 @172.28.84.166 (mysql-5.7.25 ndb-7.6.9)
id=30 @172.28.84.36 (mysql-5.7.25 ndb-7.6.9)
id=31 @172.28.84.166 (mysql-5.7.25 ndb-7.6.9)
483

Examine the line starting with “id=”, and verify that there are no references to starting, connecting, ornot connected. Any of these references indicate the process has either not finished starting, or thenode is not connected properly. You may need to execute the sbrd status command more than oncebecause it only shows a snapshot of activity; the display does not refresh. Do not proceed to the nextnode until you are sure the process has started properly and the node is connected.
DemoSetup.sh Syntax
TheDemoSetup.sh script creates a new database with the name specified in theDBName.txt file, createsall required tables, and populates the database with a sample IP address pool configuration. You can usethis program to test the installation and to become familiar with Session State Register.
Syntax
DemoSetup.sh [ numpools maxranges minaddrs maxaddrs ]DemoSetup.sh -h
Options
Table 48: DemoSetup.sh Options
DescriptionOption
A number in the range 1–25 that specifies the number of IP addresspools to create.
Default value is 5.
numpools
A number in the range 1–20 that specifies the number of address rangeswithin each IP address pool to create.
Default value is 4.
maxranges
484

Table 48: DemoSetup.sh Options (continued)
DescriptionOption
A number in the range 1–100,000 that specifies the minimum numberof IP addresses per range to create.
Default value is 1000.
minaddrs
A number in the range 1–100,000 that specifies the maximum numberof IP addresses per range to create.
Default value is the value of minaddrs x 2.
maxaddrs
Displays help for the DemoSetup script.-h
Notes
The script must be executed by hadm on a management node.
Example
This example displays the contents of the DBName.txt file (to verify the name (SteelBeltedRadius) to beused to create the database) and creates a database called SteelBeltedRadius.
hadm$- DemoSetup.sh
SBRs must be offline, do you want to proceed? <yes|no> yesThis will destroy the “ SteelBeltedRadius” database (if it exists),
OK? <yes|no> yes NUMPOOLS=5 MAXRANGES=4 MINADDRS=1000 MAXADDRS=2000
Destroying old database
Database "SteelBeltedRadius" destroyed.
Creating new database
Creating database "SteelBeltedRadius" (using ENGINE ndbcluster).
Creating misc tables.
Creating IP Pool, Range and Address tables.
Creating Current Sessions table.
(Proxy AutoStop feature not configured.)
(Session Timeout on Missed Account Stop feature not configured.)
485
(Use Single Class Attribute feature not configured.)
Creating User Concurrency table.
Creating stored routines.
Adding pool: A-PLATINUM
Adding range: A-PLATINUM 238.203.131.14 670
Adding range: A-PLATINUM 48.226.119.162 761
Adding pool: B-GOLD
Adding range: B-GOLD 90.169.221.242 549
Adding range: B-GOLD 20.97.26.189 89
Adding range: B-GOLD 114.23.180.47 407
Adding range: B-GOLD 236.99.7.33 384
Adding pool: C-SILVER
Adding range: C-SILVER 201.213.13.198 978
Adding range: C-SILVER 15.28.1.17 22
Adding range: C-SILVER 28.189.195.246 2
Adding range: C-SILVER 132.185.74.85 11
Adding pool: D-BRONZE
Adding range: D-BRONZE 122.219.182.131 1247
Adding range: D-BRONZE 247.168.228.227 20
Adding pool: E-ZINC
Adding range: E-ZINC 135.54.24.139 1794
IpPools:
+--------------------+-------+------------+
| Name| Ord| Count|
+--------------------+-------+------------+
| (z o m b i e)| 0| 0|
| A-PLATINUM| 1| 1,431|
| B-GOLD| 2| 1,429|
| C-SILVER| 3| 1,013|
| D-BRONZE| 4| 1,267|
| E-ZINC| 5| 1,794|
+--------------------+-------+------------+
Total Pools : 5 + 1 zombie pseudo-pool.
Total Ranges: 13 + 0 zombie pseudo-ranges.
Total Addrs : 6,934 + 0 zombie pseudo-addrs.
IpRanges:
+--------------------+--------------------+-------------------+-------+
| Pool| StartAddr| EndAddr| Count|
+--------------------+--------------------+-------------------+-------+
| (z o m b i e) | (v a r i o u s)| (v a r i o u s)| 0|
| A-PLATINUM| 48.226.119.162| 48.226.122.154| 761|
| A-PLATINUM| 238.203.131. 14| 238.203.133.171| 670|
| B-GOLD| 20. 97. 26.189| 20. 97. 27. 21| 89|
| B-GOLD| 90.169.221.242| 90.169.224. 22| 549|
486

| B-GOLD| 114. 23.180. 47| 114. 23.181.197| 407|
| B-GOLD| 236. 99. 7. 33| 236. 99. 8.160| 384|
| C-SILVER| 15. 28. 0. 17| 15. 28. 0. 38| 22|
| C-SILVER| 28.189.195.246| 28.189.195.247| 2|
| C-SILVER| 132.185. 74. 85| 132.185. 74. 95| 11|
| C-SILVER| 201.213. 13.198| 201.213. 17.151| 978|
| D-BRONZE| 122.219.182.131| 122.219.187. 97| 1,247|
| D-BRONZE| 247.168.228.227| 247.168.228.246| 20|
| E-ZINC| 135. 54. 24.139| 135. 54. 31.140| 1,794|
+--------------------+-------------------+-------------------+-------+
487