Pulse Policy Secure - Juniper Networks
141
© 2015 by Pulse Secure, LLC. All rights reserved Pulse Policy Secure Guest Access Solution Configuration Guide Product Release 5.2 Document Revision 1.0 Published: 2015-03-31
-
Upload
khangminh22 -
Category
Documents
-
view
3 -
download
0
Transcript of Pulse Policy Secure - Juniper Networks

© 2015 by Pulse Secure, LLC. All rights reserved
Pulse Policy Secure
Guest Access Solution Configuration Guide
Product Release 5.2
Document Revision 1.0 Published: 2015-03-31

Guest Access Solution Configuration Guide
© 2015 by Pulse Secure, LLC. All rights reserved 2
Pulse Secure, LLC 2700 Zanker Road, Suite 200 San Jose, CA 95134 http://www.pulsesecure.net
© 2015 by Pulse Secure, LLC. All rights reserved
Pulse Secure and the Pulse Secure logo are trademarks of Pulse Secure, LLC in the United States. All other trademarks, service marks, registered
trademarks, or registered service marks are the property of their respective owners.
Pulse Secure, LLC assumes no responsibility for any inaccuracies in this document. Pulse Secure, LLC reserves the right to change, modify, transfer,
or otherwise revise this publication without notice. Pulse Policy Secure Enterprise Guest Access Solution Configuration Guide
The information in this document is current as of the date on the title page.
END USER LICENSE AGREEMENT
The Pulse Secure product that is the subject of this technical documentation consists of (or is intended for use with) Pulse Secure software. Use of
such software is subject to the terms and conditions of the End User License Agreement (“EULA”) posted at http://www.pulsesecure.net/support/eula.
By downloading, installing or using such software, you agree to the terms and conditions of that EULA.

Table of Contents
© 2015 by Pulse Secure, LLC. All rights reserved 3
Table of Contents
About the Documentation ..................................................................................................................................... 10
Documentation and Release Notes ................................................................................................................................ 10
Supported Platforms ............................................................................................................................................... 10
Documentation Conventions........................................................................................................................................ 10
Requesting Technical Support ....................................................................................................................................... 12 Self-Help Online Tools and Resources ............................................................................................................... 12 Opening a Case with PSGSC .................................................................................................................................. 12
PART 1 Overview ............................................................................................................................................. 13
CHAPTER 1 Guest Access................................................................................................................................ 15
CHAPTER 2 Deployment ................................................................................................................................. 17
Guest Access Solution with WLC .................................................................................................................................. 17
Captive Portal with Juniper EX/SRX Firewall with GUAM Managed Users .................................................................. 18
PART 2 Configuration ....................................................................................................................................... 19
CHAPTER 3 Configuration Settings on Pulse Policy Secure for Wireless LAN Controller Deployment........ 21
Default Configuration Settings on Pulse Policy Secure ................................................................................................ 21 Sign-In-Policies ........................................................................................................................................................ 21 User Realms ............................................................................................................................................................. 22 User Roles ................................................................................................................................................................ 28 Location Groups ...................................................................................................................................................... 29 Authentication Protocol Set .................................................................................................................................... 30 Authentication Server ............................................................................................................................................. 31
Configuring RADIUS Client on Pulse Policy Secure ....................................................................................................... 34
Configuring SMTP and SMS gateway settings on Pulse Policy Secure ......................................................................... 37 SMTP Settings for Guest User Accounts .................................................................................................................. 37 SMS Gateway Settings for Guest User Accounts ..................................................................................................... 38
Configuring Guest Access Settings on Pulse Policy Secure ........................................................................................... 41
Enabling Onboarding Feature ................................................................................................................................. 43
Localization .................................................................................................................................................................. 44
CHAPTER 4 Guest User Account Management Framework ............................................................................. 47
Using Task Guidance ................................................................................................................................................. 47
Configuring the Guest User Access ............................................................................................................................... 48 Before You Begin ................................................................................................................................................... 48 Configuring the Local Authentication Server ................................................................................................. 49 Configuring a Role for Guest User Account Managers ................................................................................... 50 Configuring a Role for Guest Users .................................................................................................................... 53 Configuring a Guest Realm ................................................................................................................................. 56 Configuring Role Mapping Rules ........................................................................................................................ 56 Configuring a Sign-In Policy for Guests ............................................................................................................. 57 Configuring Resource Access Policies for Guests ............................................................................................. 58 Configuring a Guest User Account Manager Account ................................................................................... 61
Customizing Guest Self Registration Pages by Sample Files ........................................................................................... 62

Guest Access Solution Configuration Guide
4 © 2015 by Pulse Secure, LLC. All rights reserved
Downloading the Sample Template Files ........................................................................................................ 62 Modifying the Sample Template Files .............................................................................................................. 63 Uploading Your Customized Files ....................................................................................................................... 66 Using the Customized Pages ............................................................................................................................... 68 Verifying the Customization.............................................................................................................................. 69
Customizing Guest Login Page through Admin UI .......................................................................................................... 70 Modifying the settings in Pulse Policy Secure Admin UI ......................................................................................... 70 Verifying the Customization .................................................................................................................................... 72
Part 3 Configuring WLC ................................................................................................................................... 73
CHAPTER 5 Configuring Cisco 2500 WLC ......................................................................................................... 75
Configuring Cisco WLC for Pulse Policy Secure GUAM and Guest Self-Registration .................................................... 75 Configuration required on Cisco WLC for Local AP mode .............................................................................. 75 Configuration Required on Cisco WLC in Remote AP mode .......................................................................... 82
CHAPTER 6 Configuring Cisco 3850 WLC ......................................................................................................... 89
Configuring Cisco WLC using Web GUI ........................................................................................................................ 89
Configuring Cisco WLC using CLI ................................................................................................................................ 103
CHAPTER 7 Configuring Aruba WLC .............................................................................................................. 105
Configuring Aruba WLC for Pulse Policy Secure Guest Self-Registration ........................................................ 105 Configuration required on Aruba WLC for Campus Only mode ............................................................. 105 External Captive Portal Configuration .......................................................................................................... 115 RFC 3576 server configuration ....................................................................................................................... 115 WLAN Configuration for Remote Networking mode on Aruba WLC ..................................................... 117 Configuring Aruba WLC in campus only mode using CLI ....................................................................................... 119 Configuring Aruba WLC in Remote Networking mode using CLI ........................................................................... 120
Configuring Aruba Instant Access Point .............................................................................................................. 122
PART 4 Administration ................................................................................................................................... 129
CHAPTER 8 Guest User Account Managers ................................................................................................... 131
Creating Guest User Accounts ...................................................................................................................................... 131
Appendix................................................................................................................................................................ 137
Guest User Creating Login Credentials ................................................................................................................ 137 Scenario I ............................................................................................................................................................... 137 Scenario II .............................................................................................................................................................. 139
Glossary ................................................................................................................................................................. 141

Table of Figures
© 2015 by Pulse Secure, LLC. All rights reserved 5
List of Figures Figure 1: Self-Registration work flow by a guest user ..................................................................................... 15 Figure 2: Guest Access in WLC Environment .................................................................................................. 17 Figure 3: Captive Portal with Juniper EX/SRX Firewall .................................................................................... 18 Figure 4: Sign-in-Polices .................................................................................................................................. 22 Figure 5: Default Sign-in-Policy ....................................................................................................................... 22 Figure 6: User Realms...................................................................................................................................... 23 Figure 7: User Realms - Role Mapping ............................................................................................................ 23 Figure 8: Role Mapping Rule ........................................................................................................................... 23 Figure 9: User Authentication Realms - General ............................................................................................. 24 Figure 10: User Authentication Realms - Authentication Policy ..................................................................... 24 Figure 11: Browser settings ............................................................................................................................. 25 Figure 12: Certificate Details ........................................................................................................................... 25 Figure 13: Password Settings .......................................................................................................................... 25 Figure 14: Host Checker Settings .................................................................................................................... 26 Figure 15: Limit Options .................................................................................................................................. 26 Figure 16: RADIUS Request Policies ................................................................................................................ 27 Figure 17: Default Guest Admin Role .............................................................................................................. 28 Figure 18: Roles ............................................................................................................................................... 28 Figure 19: Roles - General - Overview ............................................................................................................. 29 Figure 20: Location Groups ............................................................................................................................. 29 Figure 21: Default Location Group .................................................................................................................. 30 Figure 22: Authentication Protocols ............................................................................................................... 30 Figure 23: Default Authentication Protocol Set .............................................................................................. 31 Figure 24: Authentication Servers ................................................................................................................... 31 Figure 25: Authentication Server Settings ...................................................................................................... 32 Figure 26: Authentication Server - Users ........................................................................................................ 33 Figure 27: Creating and configuring new RADIUS client-Aruba WLC .............................................................. 34 Figure 28: Creating and configuring new RADIUS client-Cisco WLC ............................................................... 35 Figure 29: Creating and Configuring RADIUS Return Attributes Policy for Aruba WLC .................................. 36 Figure 30: Creating and Configuring RADIUS Return Attributes Policy for Cisco WLC ................................... 37 Figure 31: SMTP settings ................................................................................................................................. 38 Figure 32: Guest Access SMS Gateway Settings, Clickatell Email2SMS as SMS Gateway Type ...................... 39 Figure 33: Guest Access Configuration ........................................................................................................... 41 Figure 34: Sign-In Policies................................................................................................................................ 42 Figure 35: Enabling On-Boarding link .............................................................................................................. 43 Figure 36: Onboarding link displayed in guest environment on Pulse Policy Secure Login Page ................... 44 Figure 37: Guest Login Page ............................................................................................................................ 44 Figure 38: Guest Access Configurations section - Update the marked fields in a localized language ............ 45 Figure 39: Updating the Guest User Info Field in a Localized language .......................................................... 45 Figure 40: Guest Login Page in a Localized Language ..................................................................................... 46 Figure 41: Task Guidance ................................................................................................................................ 47 Figure 42: Guest User Auth Server .................................................................................................................. 49 Figure 43: GUAM User Role Configuration ..................................................................................................... 50 Figure 44: Guest User Role Configuration ....................................................................................................... 53 Figure 45: Guest Access User Realm ............................................................................................................... 56 Figure 46: Example Role Mapping Rules ......................................................................................................... 57 Figure 47: Sign-in Policy .................................................................................................................................. 58 Figure 48: Resource Access Policy – Allow All ................................................................................................. 59 Figure 49: Resource Access Policy – Deny ...................................................................................................... 60 Figure 50: GUAM User Account ...................................................................................................................... 61 Figure 51: Custom Sign-in Page ....................................................................................................................... 62

Guest Access Solution Configuration Guide
6 © 2015 by Pulse Secure, LLC. All rights reserved
Figure 52: Admin Console Sign-in Page ........................................................................................................... 63 Figure 53: GuestSelfRegistration.thtml ........................................................................................................... 63 Figure 54: Default Guest Self Registration Page ............................................................................................. 65 Figure 55: Custom Guest Self Registration Page - Email field removed ......................................................... 65 Figure 56: Customized Guest Self Registration Page - Mobile Number field modified as Contact Number .. 66 Figure 57: Sign-in Page .................................................................................................................................... 67 Figure 58: Custom Template Uploaded Successfully ...................................................................................... 67 Figure 59: Sign-in Policy Page .......................................................................................................................... 68 Figure 60: Sign-in Policy Page Showing Customized Pages ............................................................................. 69 Figure 61: Customized Guest Self Registration Page ...................................................................................... 69 Figure 62: Default Sign-In Page ....................................................................................................................... 70 Figure 63: Modified Default Sign-In Page ....................................................................................................... 71 Figure 64: Sign-in Policy .................................................................................................................................. 71 Figure 65: The default Guest Self Registration Login Page ............................................................................. 72 Figure 66: Customized Login Page .................................................................................................................. 72 Figure 67: Network Topology between Pulse Policy Secure and Cisco WLC .................................................. 75 Figure 68: Authentication server settings ....................................................................................................... 76 Figure 69: Accounting server settings ............................................................................................................. 76 Figure 70: Creating an IPv4 ACL ...................................................................................................................... 77 Figure 71: Creating a WLAN ............................................................................................................................ 78 Figure 72: WLAN - General settings ................................................................................................................ 78 Figure 73: WLAN Layer 2 settings ................................................................................................................... 78 Figure 74: WLAN Layer 3 settings ................................................................................................................... 79 Figure 75: WLAN – AAA Server settings .......................................................................................................... 79 Figure 76: WLAN – Advanced settings ............................................................................................................ 80 Figure 77: Mapping WLAN with the Local AP ................................................................................................. 81 Figure 78: Authentication server settings ....................................................................................................... 82 Figure 79: Accounting server settings ............................................................................................................. 82 Figure 80: FlexConnect ACL list ....................................................................................................................... 83 Figure 81: Creating a WLAN ............................................................................................................................ 84 Figure 82: WLAN - General settings ................................................................................................................ 84 Figure 83: WLAN – Layer 2 settings ................................................................................................................ 85 Figure 84: WLAN – Layer 3 settings ................................................................................................................ 85 Figure 85: WLAN – AAA Server settings .......................................................................................................... 86 Figure 86 WLAN – Advanced settings ............................................................................................................. 87 Figure 87: Mapping WLAN Flexl AP ................................................................................................................. 87 Figure 88: Adding ACLs in FlexConnect Group ................................................................................................ 88 Figure 89: CISCO Wireless Controller home page ........................................................................................... 89 Figure 90: Security section .............................................................................................................................. 90 Figure 91: Radius Servers ................................................................................................................................ 90 Figure 92: Creating a Radius Server ................................................................................................................ 91 Figure 93: Radius Server Groups ..................................................................................................................... 91 Figure 94: Creating a Radius Server Group ..................................................................................................... 92 Figure 95: Authentication list .......................................................................................................................... 92 Figure 96: Creating a new Authentication list ................................................................................................. 92 Figure 97: Accounting list ................................................................................................................................ 93 Figure 98: Creating an Accounting list ............................................................................................................ 93 Figure 99: Authorization list ............................................................................................................................ 94 Figure 100: Creating an Authorization list ...................................................................................................... 94 Figure 101: Webauth Parameter Map ............................................................................................................ 95 Figure 102: Creating a Webauth Parameter Map ........................................................................................... 96 Figure 103: Default Webauth Parameter Map ............................................................................................... 97 Figure 104: Access Control List ....................................................................................................................... 98

Table of Figures
© 2015 by Pulse Secure, LLC. All rights reserved 7
Figure 105: Creating an Access Control List .................................................................................................... 98 Figure 106: Creating a Sequence Number ...................................................................................................... 99 Figure 107: Connecting with Pulse Policy server IP address ........................................................................... 99 Figure 108: WLANs .......................................................................................................................................... 99 Figure 109: Creating a WLAN ........................................................................................................................ 100 Figure 110: Newly created WLAN ................................................................................................................. 100 Figure 111: WLAN - General screen .............................................................................................................. 100 Figure 112: WLAN - Security - Layer2 ............................................................................................................ 101 Figure 113: WLAN - Security - Layer3 ............................................................................................................ 101 Figure 114: WLAN - Security - AAA Server .................................................................................................... 102 Figure 115: WLAN - Advanced settings ......................................................................................................... 102 Figure 116: Network Topology between Pulse Policy Secure and Aruba WLC ............................................. 105 Figure 117: WLAN Configuration .................................................................................................................. 106 Figure 118: WLAN Configuration – Specifying a Group ................................................................................ 106 Figure 119: WLAN Configuration – Wirless LANs configuration ................................................................... 107 Figure 120: Specifying a WLAN ..................................................................................................................... 107 Figure 121: Forwarding Mode configuration ................................................................................................ 108 Figure 122: Radio and VLAN configuration ................................................................................................... 108 Figure 123: Internal Guest configuration ...................................................................................................... 109 Figure 124: Authentication and Encryption .................................................................................................. 109 Figure 125: Captive Portal options ................................................................................................................ 110 Figure 126: Authentication Server configuration ......................................................................................... 110 Figure 127: Specifying Roles and Policies...................................................................................................... 111 Figure 128: Configuring Role Assignment ..................................................................................................... 112 Figure 129: WLAN configuration complete message .................................................................................... 112 Figure 130: WLAN configuration complete message with details ................................................................ 113 Figure 131: Controller configured ................................................................................................................. 113 Figure 132: RADIUS Accounting Server Group .............................................................................................. 114 Figure 133: L3 Authentication configuration ................................................................................................ 115 Figure 134: RFC 3576 Server Configuration .................................................................................................. 115 Figure 135: RFC Server - Key Details ............................................................................................................. 116 Figure 136: RFC Server - Adding a server ...................................................................................................... 116 Figure 137: Remote Networking configuration ............................................................................................ 117 Figure 138: Group configuration ................................................................................................................... 117 Figure 139: RAP DHCP Settings ..................................................................................................................... 118 Figure 140: RAP DNS Query Routing ............................................................................................................. 118 Figure 141: Configuring Wireless LANs ......................................................................................................... 119 Figure 142: Aruba Instant Home Page .......................................................................................................... 122 Figure 143: Creating a New WLAN ................................................................................................................ 123 Figure 144: VLAN Settings ............................................................................................................................. 123 Figure 145: Security Settings ......................................................................................................................... 124 Figure 146: Security Settings - Creating a New Server .................................................................................. 125 Figure 147: Security Settings ......................................................................................................................... 126 Figure 148: Access Settings ........................................................................................................................... 127 Figure 149: Access Settings - Creating a Role ............................................................................................... 127 Figure 150: Access Settings - Creating a Rule ............................................................................................... 128 Figure 151: Access Settings - Creating an Access Rule .................................................................................. 128 Figure 152: GUAM Page after Log In ............................................................................................................. 131 Figure 153: Guest User – Create One User Page .......................................................................................... 132 Figure 154: Guest User – Create Many Users Page ...................................................................................... 133 Figure 155: Multiple Users Created Popup Message .................................................................................... 134 Figure 156: Multiple users created - Displayed on the guest admin page ................................................... 135 Figure 157: Guest User – Edit User Page....................................................................................................... 135

Guest Access Solution Configuration Guide
8 © 2015 by Pulse Secure, LLC. All rights reserved
Figure 158: Guest User – Edit User Successful popup with Email, SMS, and Print options .......................... 136 Figure 159: Guest User – Print Details Page ................................................................................................. 136 Figure 160: Pulse Policy Secure Login page for guests.................................................................................. 137 Figure 161: Guest - Personal Details ............................................................................................................. 138 Figure 162: Guest’s Username and Password created ................................................................................. 138 Figure 163: Guest using the credentials in Sign In page ............................................................................... 138 Figure 164: Pulse Policy Secure Login page for guests.................................................................................. 139 Figure 165: Guest - Personal Details ............................................................................................................. 139 Figure 166: Guest’s Username and Password created ................................................................................. 140 Figure 167: Pulse Policy Secure Login page .................................................................................................. 140

Table of Tables
© 2015 by Pulse Secure, LLC. All rights reserved 9
List of Tables Table 1: Notice Icons ....................................................................................................................................... 10 Table 2: Text and Syntax Conventions ............................................................................................................ 11 Table 3: Guest Access SMS Gateway Settings ................................................................................................. 39 Table 4: Local Authentication Server Guest Access Configurations ................................................................ 50 Table 5: Configuring a Role for GUAM User .................................................................................................... 51 Table 6: Role Settings for Guest Users ............................................................................................................ 53 Table 7: Variables ............................................................................................................................................ 63 Table 8: Guidelines for Configuring a Customized Collection ......................................................................... 67 Table 9: Admin User Page - Field Descrioptions ........................................................................................... 131 Table 10: Create One User Page Field Descriptions ...................................................................................... 132 Table 11: Create Many Users Page - Field Descriptions ................................................................................ 134

Guest Access Solution Configuration Guide
10 © 2015 by Pulse Secure, LLC. All rights reserved
About the Documentation
Documentation and Release Notes
Supported Platforms
Documentation Conventions
Requesting Technical Support
Documentation and Release Notes
To obtain the latest version of all Pulse Secure technical documentation, see the product documentation page
at http://www.juniper.net/techpubs.
Supported Platforms
For the features described in this document, the following platforms are supported:
MAG Series
Documentation Conventions
Table 1 defines notice icons used in this guide.
Table 1: Notice Icons
Icons Meaning Description
Informational note Indicates important features or instructions
Caution Indicates a situation that might result in loss of data or hardware damage
Warning Alerts you to the risk of personal injury or death.
Laser warning Alerts you to the risk of personal injury from a laser
Tip Indicates useful information
Best practice Alerts you to a recommended use or implementation

About the Documentation
© 2015 by Pulse Secure, LLC. All rights reserved 11
Table 2 defines the text and syntax conventions used in this guide.
Table 2: Text and Syntax Conventions
Convention Description Examples
Bold text like this Represents text that you type
To enter configuration mode, type the configure command:
user@host> configure
Fixed-width text like this Represents output that appears on the terminal screen
user@host> show chassis alarms
No alarms currently active
Italic text like this
Introduces or emphasizes important new terms.
Identifies guide names.
Identifies RFC and Internet draft titles
A policy term is a named structure that defines match conditions and actions.
Junos OS CLI User Guide
RFC 1997, BGP Communities Attribute
Italic text like this Represents variables (options for which you substitute a value) in commands or configuration statements.
Configure the machine’s domain name:
[edit]
root@# set system domain-name
domain-name
Text like this
Represents names of configuration statements, commands, files, and directories; configuration hierarchy levels; or labels on routing platform components.
To configure a stub area, include the stub statement at the [edit protocols ospf area area-id] hierarchy level.
The console port is labeled CONSOLE.
< > (angle brackets) Encloses optional keywords or variables. stub <default-metric metric>;
| (pipe symbol)
Indicates a choice between the mutually exclusive keywords or variables on either side of the symbol. The set of choices is often enclosed in parentheses for clarity.
broadcast | multicast
(string1 | string2 | string3)
# (pound sign) Indicates a comment specified on the same line as the configuration statement to which it applies.
rsvp { # Required for dynamic MPLS only
[ ] (square brackets) Encloses a variable for which you can substitute one or more values.
community name members [community-ids ]
Indention and braces ( { } )
; (semicolon)
Identifies a level in the configuration hierarchy.
Identifies a leaf statement at a
configuration hierarchy level.
[edit]
routing-options { static {
route default { nexthop address; retain;
}
}
}
GUI Conventions
Bold text like this Represents graphical user interface (GUI) items you click or select.
In the Logical Interfaces box, select All Interfaces.
To cancel the configuration, click Cancel
> (bold right angle bracket) Separates levels in a hierarchy of menu selections. In the configuration editor hierarchy, select Protocols>Ospf

Guest Access Solution Configuration Guide
12 © 2015 by Pulse Secure, LLC. All rights reserved
Requesting Technical Support
Technical product support is available through the Pulse Secure Global Support Center (PSGSC). If you have
a support contract, then file a ticket with PSGSC.
Product warranties—For product warranty information, visit http://www.pulsesecure.net/support.
Self-Help Online Tools and Resources
For quick and easy problem resolution, Pulse Secure, LLC has designed an online self -service portal called the
Customer Support Center (CSC) that provides you with the following features:
Find CSC offerings: http://www.pulsesecure.net/support
Search for known bugs: http://www.pulsesecure.net/support
Find product documentation: http://www.juniper.net/techpubs/
Find solutions and answer questions using our Knowledge Base: http://www.pulsesecure.net/support
Download the latest versions of software and review release notes: http://www.pulsesecure.net/support
Search technical bulletins for relevant hardware and software notifications: http://www.pulsesecure.net/support
Open a case online in the CSC Case Management tool: http://www.pulsesecure.net/support
To verify service entitlement by product serial number, use our Serial Number Entitlement (SNE) Tool: http://www.pulsesecure.net/support
Opening a Case with PSGSC
You can open a case with PSGSC on the Web or by telephone.
Use the Case Management tool in the CSC at http://www.pulsesecure.net/support.
Call 1-888-314-5822 toll-free in the USA, Canada, and Mexico).
For international or direct-dial options in countries without toll-free numbers, see:
http://www.pulsesecure.net/support.

© 2015 by Pulse Secure, LLC. All rights reserved 13
PART 1 Overview
Guest Access
Deployment

Guest Access Solution Configuration Guide
14 © 2015 by Pulse Secure, LLC. All rights reserved

© 2015 by Pulse Secure, LLC. All rights reserved 15
CHAPTER 1 Guest Access Pulse Policy Secure is a complete guest access management solution and simplifies an organization's ability to
provide secure, differentiated guest user access to their networks.
The Guest Access feature enables a guest/contractor to access a special Self–Registration URL and create
their own guest account for internet access. This is an optional feature along with Guest User Account
Manager (GUAM) based guest creation within the WLC based Guest Access deployment mode.
Figure 1: Self-Registration work flow by a guest user

Guest Access Solution Configuration Guide
16 © 2015 by Pulse Secure, LLC. All rights reserved

© 2015 by Pulse Secure, LLC. All rights reserved 17
CHAPTER 2 Deployment Guest Access Solution with WLC
In current scenarios, guest access solution for wireless network can be deployed with leading Wireless LAN
controllers. In this deployment, customer can deploy wireless network with WLCs and wireless network for
guests. Guest authentication can be done with external authentication server. Pulse Policy Secure Server can
be positioned as external authentication server.
Assumption for this deployment is customer has already deployed wireless network for guest using WLC and
would like to have centralized authentication server. When wireless network is built with multiple vendors
WLCs then it further becomes useful to have centralized authentication server.
Figure 2: Guest Access in WLC Environment

Guest Access Solution Configuration Guide
18 © 2015 by Pulse Secure, LLC. All rights reserved
Captive Portal with Juniper EX/SRX Firewall with GUAM Managed Users
When a Pulse Policy Secure and an EX Series switch/SRX firewall is deployed, users might not know that they
must first sign into Pulse Policy Secure for authentication before they can access a protected resource behind
the EX Series switch/SRX firewall.
To facilitate sign-in, you can configure a redirect policy on the EX Series switch/SRX firewall to automatically
redirect HTTP traffic destined for protected resources to Pulse Policy Secure. This feature is called captive
portal. When the sign-in page for the Pulse Policy Secure is displayed, the user signs in, and access is granted
to the protected resource. These user accounts can be created by Guest User Account Manager.
Figure 3: Captive Portal with Juniper EX/SRX Firewall

© 2015 by Pulse Secure, LLC. All rights reserved 19
PART 2 Configuration Configuration Settings on Pulse Policy Secure for Wireless LAN Controller Deployment
Guest User Account Management Framework

Guest Access Solution Configuration Guide
20 © 2015 by Pulse Secure, LLC. All rights reserved

© 2015 by Pulse Secure, LLC. All rights reserved 21
CHAPTER 3 Configuration Settings on Pulse Policy Secure for Wireless LAN Controller Deployment
Default Configuration Settings on Pulse Policy Secure
Configuring RADIUS Client on Pulse Policy Secure
Configuring SMTP and SMS gateway settings on Pulse Policy Secure
Configuring Guest Access Settings on Pulse Policy Secure
This section describes the configuration that is required on Pulse Policy Secure to communicate with a Wireless LAN
Controller (WLC) for Guest user management.
Pulse Policy Secure server acts as RADIUS server that allows to centralize the authentication and accounting for
the users. A Cisco or Aruba WLC needs to be added as RADIUS client on Pulse Policy Secure server. Guest user
Self-Registration options need to be configured in the authentication server used for managing guest accounts (by
default, this is Guest authentication) and in sign-in policy settings.
Default Configuration Settings on Pulse Policy Secure
Pulse Policy Secure has some default configuration settings for convenience of the Admin users.
NOTE: The default configuration settings are available when you upgrade to Pulse Policy
Secure 5.2, or when you install Pulse Policy Secure 5.2 version.
The default settings are:
Sign-in Policies
User Realms
User Roles
Location Groups
Authentication Protocol Sets
Authentication Server
Sign-In-Policies
The */guestadmin/ and */guest/ are the default Sign-in-Polices in Pulse Policy Secure. A Sign-in Policy is
mapped with a default Authentication Realm.
To view the Sign-in-Polices:
1. On the Pulse Policy Secure main page select Authentication > Signing In > Sign-in
Policies.
The Sign-in Policies screen appears.

Guest Access Solution Configuration Guide
22 © 2015 by Pulse Secure, LLC. All rights reserved
Figure 4: Sign-in-Polices
2. Click on a Sign-in Policy to view the settings.
Figure 5: Default Sign-in-Policy
3. You can make necessary changes or add realms in a Sign-in Policy and click Save Changes
to save the settings.
User Realms
The ‘Guest Admin’ and ‘Guest’ are the default user realms in Pulse Policy Secure. A user realm is mapped
with a default Role.
NOTE: For a Guest Admin realm, Admin has to create the role mapping rule for the user
name who has rights for creating Guest accounts.
To view a user realm:
1. On the Pulse Policy Secure main page select Users > User Realms.
The User Authentication Realms screen appears.

CHAPTER 3: Configuration Settings on Pulse Policy Secure for Wireless LAN Controller Deployment
© 2015 by Pulse Secure, LLC. All rights reserved 23
Figure 6: User Realms
2. Click on a User Authentication Realm to view the settings.
The Role Mapping screen of the Realm appears.
Figure 7: User Realms - Role Mapping
3. Click an existing Rule of the Role to view the settings.
Figure 8: Role Mapping Rule
4. You can make necessary changes and click Save Changes to save the settings.

Guest Access Solution Configuration Guide
24 © 2015 by Pulse Secure, LLC. All rights reserved
5. Click New Rule in the Role Mapping screen to add a new Rule to the Role and click Save
Changes to save the Rule.
6. Click the General tab to view the settings.
The General screen appears.
Figure 9: User Authentication Realms - General
7. You can make necessary changes and click Save Changes to save the settings.
8. Click the Authentication Policy tab.
The Source IP screen appears.
Figure 10: User Authentication Realms - Authentication Policy
9. You can make necessary changes and click Save Changes to save the settings.
10. Click the Browser tab.
The Browser settings are displayed.

CHAPTER 3: Configuration Settings on Pulse Policy Secure for Wireless LAN Controller Deployment
© 2015 by Pulse Secure, LLC. All rights reserved 25
Figure 11: Browser settings
11. You can make necessary changes and click Save Changes to save the settings.
12. Click Certificate.
The certificate details of the Realm are displayed.
Figure 12: Certificate Details
13. You can make necessary changes and click Save Changes to save the settings.
14. Click Password to view the password related settings.
Password related setting options are displayed.
Figure 13: Password Settings
Guest Access Solution Configuration Guide
26 © 2015 by Pulse Secure, LLC. All rights reserved
15. You can make necessary changes and click Save Changes to save the settings.
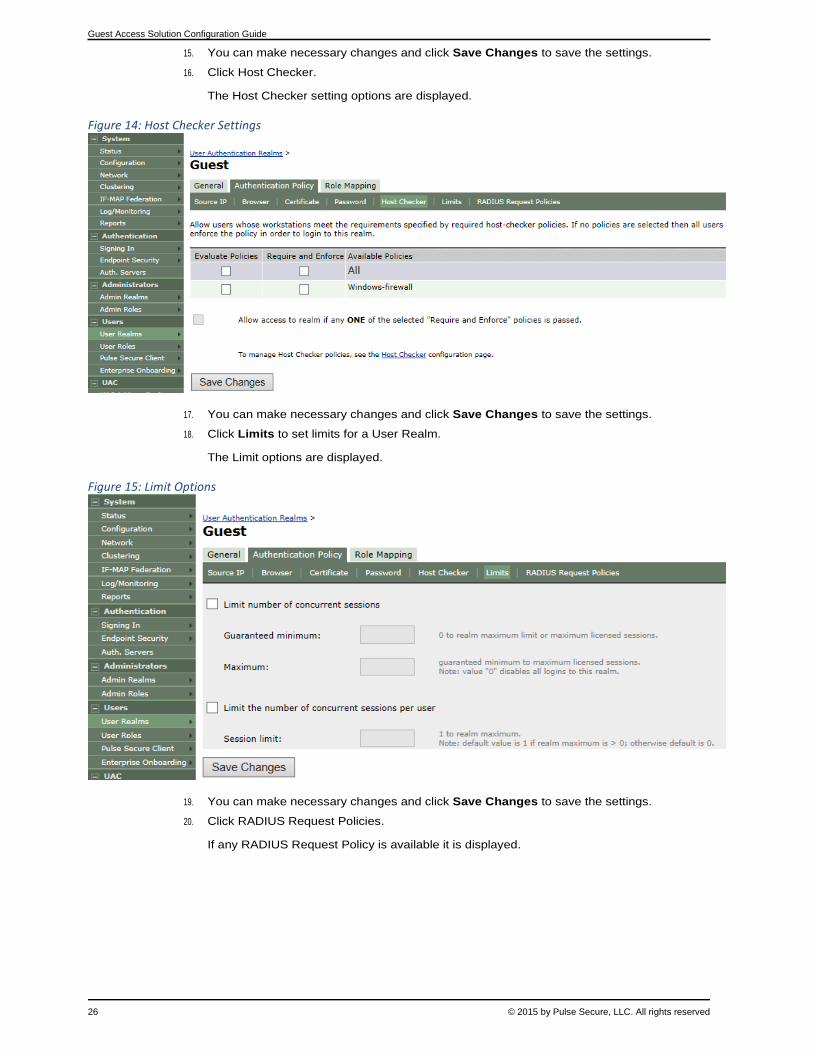
16. Click Host Checker.
The Host Checker setting options are displayed.
Figure 14: Host Checker Settings
17. You can make necessary changes and click Save Changes to save the settings.
18. Click Limits to set limits for a User Realm.
The Limit options are displayed.
Figure 15: Limit Options
19. You can make necessary changes and click Save Changes to save the settings.
20. Click RADIUS Request Policies.
If any RADIUS Request Policy is available it is displayed.

CHAPTER 3: Configuration Settings on Pulse Policy Secure for Wireless LAN Controller Deployment
© 2015 by Pulse Secure, LLC. All rights reserved 27
Figure 16: RADIUS Request Policies
21. You can make necessary changes and click Save Changes to save the settings

Guest Access Solution Configuration Guide
28 © 2015 by Pulse Secure, LLC. All rights reserved
User Roles
The ‘Guest Admin’ and ‘Guest’ are the default user roles in Pulse Policy Secure. A user realm is mapped with
a default Role.
Figure 17: Default Guest Admin Role
To view a User Role:
1. On the Pulse Policy Secure main page select Users > User Roles.
The Roles screen appears.
Figure 18: Roles
2. Click on a default User Role to view the settings.
The General > Overview screen appears.

CHAPTER 3: Configuration Settings on Pulse Policy Secure for Wireless LAN Controller Deployment
© 2015 by Pulse Secure, LLC. All rights reserved 29
Figure 19: Roles - General - Overview
3. You can make necessary changes and click Save Changes to save the settings.
You can go to other tabs of the User Role, to view the default settings and make necessary
changes.
Location Groups
The ‘Guest’ is the default Location Group configured in Pulse Policy Secure. A Location Group is mapped with
a default Sign-in Policy and a default Realm.
To view a Location Group:
1. On the Pulse Policy Secure main page select UAC > Network Access > Location Group.
The Location Group screen appears.
Figure 20: Location Groups
2. Click the Location Group to view the settings.

Guest Access Solution Configuration Guide
30 © 2015 by Pulse Secure, LLC. All rights reserved
Figure 21: Default Location Group
3. You can make necessary changes and click Save Changes to save the settings.
Authentication Protocol Set
The ‘Guest’ is the default Authentication Protocol Set configured in Pulse Policy Secure.
To view the Authentication Protocol:
1. On the Pulse Policy Secure main page select Authentication > Signing In > Authentication
Protocol Sets.
The Authentication Protocol screen appears.
Figure 22: Authentication Protocols
2. Click the Authentication Protocol to view the settings.

CHAPTER 3: Configuration Settings on Pulse Policy Secure for Wireless LAN Controller Deployment
© 2015 by Pulse Secure, LLC. All rights reserved 31
Figure 23: Default Authentication Protocol Set
3. You can make necessary changes and click Save Changes to save the settings.
Authentication Server
The ‘Guest Authentication’ is the default Authentication Server configured in Pulse Policy Secure.
To view the Authentication Server:
1. On the Pulse Policy Secure main page select Authentication > Auth. Servers.
The Authentication Servers screen appears.
Figure 24: Authentication Servers
2. Click the default Authentication Server to view the settings.
The options under the Settings tab appears.

Guest Access Solution Configuration Guide
32 © 2015 by Pulse Secure, LLC. All rights reserved
Figure 25: Authentication Server Settings
3. You can make necessary changes and click Save Changes to save the settings.
4. Click the Users tab to view the guest users list.

CHAPTER 3: Configuration Settings on Pulse Policy Secure for Wireless LAN Controller Deployment
© 2015 by Pulse Secure, LLC. All rights reserved 33
Figure 26: Authentication Server - Users
This page displays all the users that are created by guest self-registration option and through
the GUAM.
5. Click the Admin Users page to view the settings.

Guest Access Solution Configuration Guide
34 © 2015 by Pulse Secure, LLC. All rights reserved
Configuring RADIUS Client on Pulse Policy Secure
The Radius Framework on Pulse Policy Secure is configured with the default settings. You have to configure
only the Radius client and a RADIUS Return Attributes Policy.
To configure RADIUS Client on Pulse Policy Secure:
1. Select UAC > Network Access > RADIUS Client > New RADIUS Client to create a new
RADIUS client.
The New RADIUS Client screen appears.
Figure 27: Creating and configuring new RADIUS client-Aruba WLC

CHAPTER 3: Configuration Settings on Pulse Policy Secure for Wireless LAN Controller Deployment
© 2015 by Pulse Secure, LLC. All rights reserved 35
Figure 28: Creating and configuring new RADIUS client-Cisco WLC
2. Configure a WLC and name accordingly as per your network preferences:
Configure the Aruba WLC as RADIUS client and map with the default Location Group.
Configure the Cisco WLC as RADIUS client and map with the default Location Group.
3. Click Save Changes to save the settings.
4. Select UAC > Network Access > RADIUS Attributes > Return Attributes > New Policy to
create a new RADIUS Return Attribute policy.
The New Policy screen appears.

Guest Access Solution Configuration Guide
36 © 2015 by Pulse Secure, LLC. All rights reserved
Figure 29: Creating and Configuring RADIUS Return Attributes Policy for Aruba WLC

CHAPTER 3: Configuration Settings on Pulse Policy Secure for Wireless LAN Controller Deployment
© 2015 by Pulse Secure, LLC. All rights reserved 37
Figure 30: Creating and Configuring RADIUS Return Attributes Policy for Cisco WLC
5. Map with the default location group. Configure other return attributes and session-timeout
attributes as required.
6. Click Save Changes to save the Return Attribute Policy.
Configuring SMTP and SMS gateway settings on Pulse Policy Secure
The SMTP and SMS configuration settings must be configured to enable guest users to create user accounts
on their own.
SMTP Settings for Guest User Accounts
1. On Pulse Policy Secure main page select System > Configuration > Guest Access > SMTP
Settings.
The SMTP Settings screen appears.

Guest Access Solution Configuration Guide
38 © 2015 by Pulse Secure, LLC. All rights reserved
Figure 31: SMTP settings
2. Enter the necessary details and click Save Changes.
SMS Gateway Settings for Guest User Accounts
Short Message Service (SMS) is delivered through an SMS gateway service that supports HTTP, HTTPS, and
SMTP (Simple Mail Transport Protocol) delivery. You need to subscribe to an external service to be able to
deliver guest details using SMS. The SMS gateway sends SMS in formatted text message using HTTP/HTTPS
interface (SMS message) and can also allow email message to be sent as an SMS. An example of an SMS
gateway is clickatell.com. You should have a valid account with this third party.
To create an account with Clickatell:
1. Go to http://www.clickatell.com/products/sms_gateway.php, and choose the appropriate API
sub-product (connection method) you wish to use.
2. Click on the registration hyperlink.
3. Select the Account type you would like to use (Local or International).
4. Enter your personal information to complete the registration form.
5. Accept the Terms & Conditions.
6. Click Continue - An email containing your login details such as account login name,
password, and clientID will be sent to the email address you have provided.
7. Activate your account – When user has logged in, and user will be on the Clickatell Central
landing page and HTTP API will be added to the account and client API ID will be issued to
the account. A single account may have multiple API IDs associated with it.
To enable the SMS gateway settings using Pulse Policy Secure:
1. On Pulse Policy Secure main page select System > Configuration > Guest Access > SMS
Gateway Settings.
The SMS Gateway Settings screen appears.

CHAPTER 3: Configuration Settings on Pulse Policy Secure for Wireless LAN Controller Deployment
© 2015 by Pulse Secure, LLC. All rights reserved 39
Figure 32: Guest Access SMS Gateway Settings, Clickatell Email2SMS as SMS Gateway Type
2. Select the Enable SMS Gateway Settings check box.
3. Complete the configuration settings as described in the following Table.
4. Click Save Changes.
5. Click Send Test SMS.
Table 3: Guest Access SMS Gateway Settings
Settings Guidelines
SMS Gateway Settings
SMS Gateway Type
Select the gateway type:
Clickatell – Select this option to send SMS as a text message.
Clickatell Email2SMS – Select this option to use email format as an SMS using SMTP.
API product ID Specify the API product ID that you received from Clickatell during account creation.
SMS Gateway Login Name Specify the SMS gateway login name.
SMS Gateway Login password Specify the SMS gateway login password.
Text Message (SMS) Format
(Optional) Select the following fields:
Guest Account Start Time
Guest Account End Time

Guest Access Solution Configuration Guide
40 © 2015 by Pulse Secure, LLC. All rights reserved
Settings Guidelines
Guest Account Sign-in URL
Wireless SSID
The following options apply if you select Clickatell as gateway type.
SMS Gateway URL Specify the SMS Gateway URL.
(Default) https://api.clickatell.com or http://api.clickatell.com
HTTPS Select this option to use a secure connection. If you don't select this option user will be notified about clear text transmission of guest user credentials.
Use Proxy Server Select this option to access the internet or SMS gateway URL using a proxy server.
Address Specify the address of the proxy server and its port.
Username Specify the username of the proxy server.
Password Specify the password of the proxy server.
Send Test SMS
Mobile Number
Select the country name and then specify a valid phone number of the guest user. The phone number should not include country code or any special character such as +,*, and so on.
The Pulse Policy Secure sends a test SMS with the login credentials to this mobile number through SMS.
Source Mobile Number Specify the sender ID configured in Clickatell Account

CHAPTER 3: Configuration Settings on Pulse Policy Secure for Wireless LAN Controller Deployment
© 2015 by Pulse Secure, LLC. All rights reserved 41
Configuring Guest Access Settings on Pulse Policy Secure
1. On Pulse Policy Secure main page select Authentication > Auth. Servers > System Local >
Settings.
Under Guest Access Configurations:
Select the check box Enable Guest User Account Managers to administer Guest Accounts
Under the Guest Self-Registration select Send guest user credentials via
o SMS
o Email
o Click the SMS/Email settings link and do the necessary settings.
Show credentials on screen after guest completes registration
Maximum Account Validity Period for Self Registered Guest – by default 24 hours is the
default time period. You can change this as per the requirement.
Figure 33: Guest Access Configuration
2. On Pulse Policy Secure main page select Authentication >Signing In >Sign-In Policies.

Guest Access Solution Configuration Guide
42 © 2015 by Pulse Secure, LLC. All rights reserved
Figure 34: Sign-In Policies
3. Select the sign-in policy that is created earlier. Under Configure Guest settings select the
check boxes:
Use this signin policy for Guest and Guest admin to use specific pages
Show Guest Self Registration link on the guest login page
The Register as Guest link appears on the guest login page.

CHAPTER 3: Configuration Settings on Pulse Policy Secure for Wireless LAN Controller Deployment
© 2015 by Pulse Secure, LLC. All rights reserved 43
Enabling Onboarding Feature
Enterprise onboarding feature provides automated onboarding of BYOD clients on premises (WLAN & LAN).
Pulse Policy Secure enables personal devices to be automatically configured for corporate access.
To enable this feature:
1. To enable this option in the Pulse Policy secure main page select Authentication > Signing
In > Sign-in Policies.
The Sign-in Polices tab displays the available sign-in policies.
2. Under the User URLs section select the default sign-in policy.
The Sign-in Policy configuration screen appears.
Figure 35: Enabling On-Boarding link
3. Select the Show On-Boarding link on guest login page check box.
A drop-down list appears next to it.
4. Select a required URL.
5. Click Save Changes to save the settings.

Guest Access Solution Configuration Guide
44 © 2015 by Pulse Secure, LLC. All rights reserved
When this settings is done the Employees can onboard their device here link appears in an
enterprise guest environment as shown in the following figure.
Figure 36: Onboarding link displayed in guest environment on Pulse Policy Secure Login Page
Localization
In a localized guest user environment when a user tries to register as a guest all the fields are displayed in that
particular localized language, except the Company Name and Host or Sponsor fields which are displayed in
English language.
NOTE: Here French language is used as an example.
Figure 37: Guest Login Page
To localize these two fields, an Admin user must enter the translated field names of Company Name and Host
or Sponsor fields in the Guest Access Configurations section in Pulse Policy Secure.
To make these changes:
1. In the Pulse Policy secure main page select Authentication > Auth.Servers.
The Authentication Servers screen appears.
2. Select a default Authentication Server to make the changes.

CHAPTER 3: Configuration Settings on Pulse Policy Secure for Wireless LAN Controller Deployment
© 2015 by Pulse Secure, LLC. All rights reserved 45
The Settings tab of the Auth Server displays the settings.
Figure 38: Guest Access Configurations section - Update the marked fields in a localized language
3. In the Guest Access Configurations section, enter the translated field names of Company
Name and Host or Sponsor fields in the Guest User Info Fields box.
Figure 39: Updating the Guest User Info Field in a Localized language

Guest Access Solution Configuration Guide
46 © 2015 by Pulse Secure, LLC. All rights reserved
4. Click Save Changes to save the settings.
5. In the enterprise guest environment when a guest tries to register, the Company Name and
Host or Sponsor fields are displayed in the respective language.
Figure 40: Guest Login Page in a Localized Language

© 2015 by Pulse Secure, LLC. All rights reserved 47
CHAPTER 4 Guest User Account Management Framework
Using Task Guidance
Configuring the Guest User Account Management Framework
Customizing the Guest User Account Manager Pages
Using Task Guidance
The following figure shows the Task Guidance menu for enterprise guest access (EGA). You can use Task Guidance to
navigate through the tasks required to configure EGA.
NOTE: The Task Guidance is applicable only for Juniper SRX devices.
To display Task Guidance:
1. Select the Guidance link at the top of the Web console.
2. Click System Setup to display guidance for setting the date and time, upgrading
software, and installing licenses.
3. Click Guest Users to display guidance for configuring the local authentication server,
user roles, user realms, sign-in policies, and resource access policies for guest users.
Figure 41: Task Guidance

Guest Access Solution Configuration Guide
48 © 2015 by Pulse Secure, LLC. All rights reserved
Configuring the Guest User Access
This topic describes the elements of the Pulse Policy Secure guest access management feature. It includes
the following information:
Before You Begin
Configuring the Local Authentication Server
Configuring a Role for Guest User Account Managers
Configuring a Role for Guest Users
Configuring a Guest Realm
Configuring Role Mapping Rules
Configuring a Sign-In Policy for Guests
Configuring Resource Access Policies for Guests
Configuring a Guest User Account Manager Account
Before You Begin
This configuration example assumes the following tasks have been completed:
Installed the MAG Series hardware.
Upgraded the Access Control Service software to the latest version.
Enabled Guest Access mode.
Configured basic host and network settings. Keep in mind the following best practices:
o Configure NTP. Synchronization to standard network clock is not only a requirement for
meaningful logging but is also necessary for security features that examine time-based
validity, such as SSL certificate security. Select System > Status to display the system
status page; then click the Edit link next to System Date and Time to display the
configuration page for NTP.
o Configure a hostname. Hostname is used to construct the HTTP redirect URL for the
captive portal page presented to guest users. If hostname is not specified, the URL is
based on the SSL certificate distinguished name (DN) in the SSL certificate associated
with the external port. If none, the URL uses the IP address of the external port. We
recommend specifying a hostname to create a more user friendly captive portal URL.
Select System > Network > Overview to display the configuration page for hostname.
o Configure DNS. Guest users depend on the DNS servers you specify when they initially
attempt to connect to the network. In addition, the captive portal HTTP redirect
presents a hostname in the URL only if DNS can resolve the hostname. Select System
o > Network > Overview to display the configuration page for DNS.
o Configure SSL certificate security. Use SSL certificate security so that the guest users
do not have to examine certificate warnings when they are redirected to the captive
portal to sign in. Select System > Configuration > Certificates > Device Certificates to
display the device certificate configuration page. You can use this page to import an SSL
certificate that has been signed by a well-known certificate authority, such as VeriSign,
Entrust, and the like. Use this page to associate the certificate with the external port.

CHAPTER 4: Guest User Account Management Framework
© 2015 by Pulse Secure, LLC. All rights reserved 49
Configuring the Local Authentication Server
Select System > Authentication > Auth. Server and create a new local authentication server for guest users. The
following figure shows a local authentication server configuration. Table 5 describes the guest access configuration.
Figure 42: Guest User Auth Server

Guest Access Solution Configuration Guide
50 © 2015 by Pulse Secure, LLC. All rights reserved
Table 4: Local Authentication Server Guest Access Configurations
Settings Guidelines
Enable Guest User Account Managers
Select this option to allow guest user account managers (GUAM) to create guest user accounts on the local authentication server.
Guest User Name Prefix
Specify the prefix to be used in auto generated guest usernames.
We recommend you retain the default guest_ so that you can rely on the naming convention in your role mapping rules.
Guest User Info Fields (Optional) Add line items to represent fields that you want to appear on the configuration page for creating guest user accounts. For example, you can create fields for Company Name, Host Person, Meal Preference, and so on.
Instructions for Guest User Account Manager
(Optional) Add instructions to the GUAM that appear on the GUAM sign-in page. You can use the following HTML tags to format the text: <b>, <br>, <font>, <noscript>, and <a
href>. See Figure 153 and Figure 154 to see examples of how this text is displayed on the
GUAM sign-in page.
Maximum Account Validity Period
Specify the number of hours the account is valid. The default is 24 hours.
Configuring a Role for Guest User Account Managers
Select Users > User Roles and create a user roles for the GUAM user. The following figure shows the user role for the
GUAM user. Table 5 describes the key settings for the GUAM user role.
Figure 43: GUAM User Role Configuration

CHAPTER 4: Guest User Account Management Framework
© 2015 by Pulse Secure, LLC. All rights reserved 51
Table 5: Configuring a Role for GUAM User
Settings Guidelines
Enable Guest User Management Rights
Select this option, which is the key option to distinguish GUAM users from other users. When a user matching the GUAM role logs in, the user sees the Guest User Access Manager page..
Session Options
Enable Session Options. In addition, click the Edit link to display the Session Options configuration page. Select the Allow VPN through Firewall option to allow guest users to use VPN technology to connect to their own corporate networks. If you do not enable this option, creating a VPN connection would result in disconnection because the VPN tunnel would prevent heartbeat traffic used by the Access Control Service in monitoring user sessions.
NOTE: You must select the Allow VPN Through Firewall option only for Juniper SRX integration. It is not
required for a WLC integration. If a heartbeat is not detected between a guest user and the MAG Series Gateway, the user receives notification of the failure. After a heartbeat failure has occurred, a retry occurs after 30 seconds. Subsequent failures result in a retry at 1.5 times the prior interval up to a maximum value of the initial heartbeat interval.

Guest Access Solution Configuration Guide
52 © 2015 by Pulse Secure, LLC. All rights reserved
Settings Guidelines
Agent
Click the Agent tab to display the agent configuration page. Ensure that the Install Agent for this role options is not selected.
Agentless
Click the Agentless tab to display the agentless access configuration page. Ensure that the Install agent for this role options is not selected.
.

CHAPTER 4: Guest User Account Management Framework
© 2015 by Pulse Secure, LLC. All rights reserved 53
Configuring a Role for Guest Users
Select Users > User Roles and create a user roles for the guest user. The following figure shows the user role
for the guest users. Table 6 describes the key settings for the guest user role. The user role configuration for
guest users is similar to the role configuration for the GUAM user with one key difference: do not give the guest
user role guest user account management rights.
Figure 44: Guest User Role Configuration
Table 6: Role Settings for Guest Users
Settings Guidelines
Enable Guest User Management Rights
This option is specifically for the GUAM user. Do not enable this option for the guest user role. When a guest user without guest user management rights logs in, the guest user page does not include controls for adding guest users, which is what you want for guest users.
The following page is displayed after a guest logs into the guest realm
Session Enable Session Options. In addition, click the Edit link to display the Session Options configuration page. Select the Allow

Guest Access Solution Configuration Guide
54 © 2015 by Pulse Secure, LLC. All rights reserved
Settings Guidelines
Options
VPN through Firewall option to allow guest users to use VPN technology to connect to their own corporate networks. If you do not enable this option, creating a VPN connection would result in disconnection because the VPN tunnel would prevent heartbeat traffic used by the Access Control Service in monitoring user sessions
NOTE:
You must select the Allow VPN through Firewall option only for Juniper SRX integration. It is not required for a WLC integration
If a heartbeat is not detected between a guest user and the MAG Series Gateway, the user receives notification of the failure. After a heartbeat failure has occurred, a retry occurs after 30 seconds. Subsequent failures result in a retry at 1.5 times the prior interval up to a maximum value of the initial heartbeat interval.
Agent Click the Agent tab to display the agent configuration page. Ensure that the Install Agent for this role options is not selected.

CHAPTER 4: Guest User Account Management Framework
© 2015 by Pulse Secure, LLC. All rights reserved 55
Settings Guidelines
Agentless Click the Agentless tab to display the agentless access configuration page. Ensure that the Install agent for this role options is not selected.

Guest Access Solution Configuration Guide
56 © 2015 by Pulse Secure, LLC. All rights reserved
NOTE: Some role and realm restrictions are not available in Guest Access mode. For example,
certificate restrictions. Use Task Guidance to help you determine which options are available.
Configuring a Guest Realm
Select Users > User Realms and create an authentication realm for guest access. The following figure shows the
configuration for the user realm in this example.
Figure 45: Guest Access User Realm
Configuring Role Mapping Rules
From the user realm configuration page, click the Role Mapping tab and create role mapping rules. The
following figure shows the role mapping rules configuration for this example. Users matching the string and
wildcard guest* (the default guest user prefix convention for the local authentication server) map to the Guest
role. The user named guam (not yet created in this example) maps to the GUAM role.

© 2015 by Pulse Secure, LLC. All rights reserved 57
Figure 46: Example Role Mapping Rules
Configuring a Sign-In Policy for Guests
Select Authentication > Signing-In > Sign-In Policies to display the sign-in policies configuration page.
Create a sign-in policy specifically for the guest user administrator and guest users. The following figure
shows the policy used in this example. Note that it uses a user-defined URL named */guam/. The */ represents
the Access Control Service host and the directory guam/ specifies a new, user-defined directory for managing
guest access. The realm selected is the guest realm created previously. This example uses the default sign-in
page.

Guest Access Solution Configuration Guide
58 © 2015 by Pulse Secure, LLC. All rights reserved
Figure 47: Sign-in Policy
Configuring Resource Access Policies for Guests
Select Pulse Policy Secure > Infranet Enforcer > Resource Access to display the resource access policies
configuration page. In a Layer 2 bridge deployment, the resource access policy is like a firewall rule that
determines what traffic is allowed through the MAG Series gateway once the guest user has authenticated.
The following figure shows a policy that allows all traffic by users with the guest role.

CHAPTER 4: Guest User Account Management Framework
© 2015 by Pulse Secure, LLC. All rights reserved 59
Figure 48: Resource Access Policy – Allow All

Guest Access Solution Configuration Guide
60 © 2015 by Pulse Secure, LLC. All rights reserved
The following figure shows a more complex policy that you would configure to implement EGA features in a
standard Pulse Policy Secure solution that has deployed Infranet Enforcers in front of corporate resources.
Figure 49: Resource Access Policy – Deny
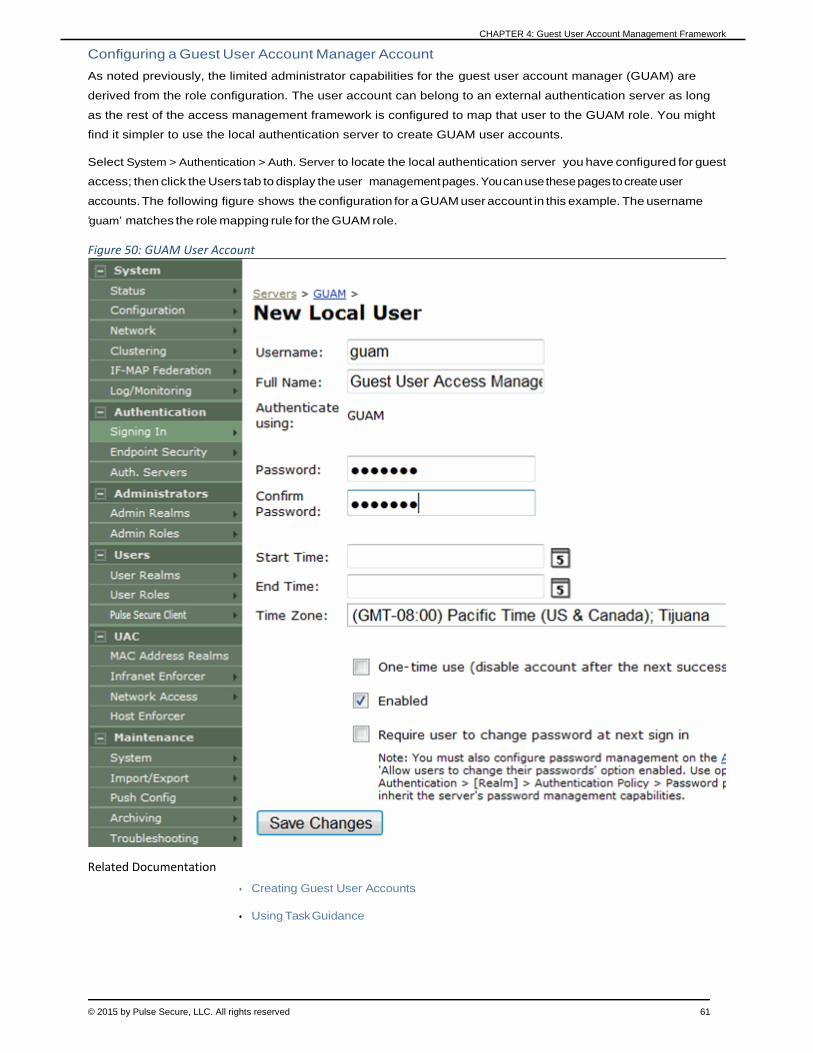
CHAPTER 4: Guest User Account Management Framework
© 2015 by Pulse Secure, LLC. All rights reserved 61
Configuring a Guest User Account Manager Account
As noted previously, the limited administrator capabilities for the guest user account manager (GUAM) are
derived from the role configuration. The user account can belong to an external authentication server as long
as the rest of the access management framework is configured to map that user to the GUAM role. You might
find it simpler to use the local authentication server to create GUAM user accounts.
Select System > Authentication > Auth. Server to locate the local authentication server you have configured for guest
access; then click the Users tab to display the user management pages. You can use these pages to create user
accounts. The following figure shows the configuration for a GUAM user account in this example. The username
‘guam’ matches the role mapping rule for the GUAM role.
Figure 50: GUAM User Account
Related Documentation
Creating Guest User Accounts
Using Task Guidance

Guest Access Solution Configuration Guide
62 © 2015 by Pulse Secure, LLC. All rights reserved
Customizing Guest Self Registration Pages by Sample Files
The guest Self Registration pages can be customized by modifying the sample.zip file. It includes the following
information:
Downloading the Sample Template Files
Modifying the Sample Template Files
Uploading Your Customized Files
Using the Customized Pages
Verifying the Customization
NOTE: Customizing GUAM using sample template files is no more supported from the
Pulse Policy Secure 5.2 release.
Downloading the Sample Template Files
The sample template zip file includes the following files which are added for the Pulse Policy Secure 5.2 release:
GuestLoginPage.thtml
GuestLogout.thtml
GuestSelfRegistration.thtml
GuestForgotPassword.thtml
GuestSigninNotifPreAuth.thtml
guest.css
To download the sample template files:
1. On the Pulse Policy Secure main page select Authentication > Signing In > Sign in pages.
The Signing In screen appears.
Figure 51: Custom Sign-in Page
2. Click Upload Custom Pages.
The Upload Custom Sign-In Pages screen appears. This page hosts the sample.zip files
which can be used to customize the guest sign in pages.

CHAPTER 4: Guest User Account Management Framework
© 2015 by Pulse Secure, LLC. All rights reserved 63
Figure 52: Admin Console Sign-in Page
3. Click the Sample link in the Sample Template Files pane.
4. Download the latest sample.zip file.
Modifying the Sample Template Files
You can edit the HTML to modify the look and feel of your page. You can add, modify, or delete JavaScript
functions and variables to customize the functionality presented on your page. This section provides examples
of common customizations for Guest Self Registration pages. For a reference on the files, functions, and
variables found in the templates included in the sample.zip file, see the Custom Sign-In Pages Developer
Reference.
Figure 53 shows the contents of the GuestSelfRegistration.thtml file. The JavaScript functions and variables used
for the standard user interface controls that appear in the predefined pages are highlighted in bold.
The following table describes some of the common variables used in the template and their meaning.
Table 7: Variables
Variable Definition
I18N_FULL_NAME Field for entering the full name of guest user.
I18N_USERNAME_ADMIN_EMAIL Field for entering the email id of guest user.
I18N_USER_ADMIN_MOBILE_NUMBER Field for entering mobile number of guest user.
I18N_USER_ADMIN_REGISTER Register button in the Guest Self Registration page. Click the button after entering the user details.
I18N_CANCEL Cancel button. Cancels the registration process and takes the user back to the Sign In page of Guest User.
I18N_USERNAME_COLON Username: field. It displays the username in the confirmation box.
I18N_PASSWORD_COLON Password: field. It displays the password in the confirmation box
I18N_USER_ADMIN_CREATING_ACCOUNT Displays the message “An account has been created for you” in the confirmation box.
Figure 53: GuestSelfRegistration.thtml
<div id= "fnDiv" class="form-group required"> <label for="fullname" class="col-sm-2 control-label"><% I18N_FULL_NAME %></label> <div id="fnDiv2" class="col-sm-5"> <input type="text" class="form-control" id="fullname" name="fullname" placeholder="<% I18N_FULL_NAME %>" autofocus validate> </div> </div>

Guest Access Solution Configuration Guide
64 © 2015 by Pulse Secure, LLC. All rights reserved
<div id= "emailDiv" class="form-group <%IF emailRequired == 1%> required <%END%>"> <label for="email" class="col-sm-2 control-label"><% I18N_USER_ADMIN_EMAIL %></label> <div id="emailDiv2" class="col-sm-5"> <input type="email" class="form-control" id="email" name="email" placeholder="<% I18N_USER_ADMIN_EMAIL %>" validate> </div> </div> <div id= "mnDiv" class="form-group <%IF smsRequired == 1%> required <%END%>"> <label for="mobilenumber" class="col-sm-2 control-label"><% I18N_USER_ADMIN_MOBILE_NUMBER %></label> <div id="mnDiv1" class="col-sm-2"> <select id="cmbCountryCode" class="form-control" name="cmbCountryCode" <%disabled%>> <% FOREACH country = countryCode %> <option id="<% country.id %>" value="<% country.id %>" <%IF countrySelected == country.id%> selected <%END%>> <% country.name %> </option> <%END%> </select> </div> <div id="mnDiv2" class="col-sm-3"> <input type="tel" class="form-control" id="mobilenumber" name="mobilenumber" placeholder="<% I18N_USER_ADMIN_MOBILE_NUMBER %>" validate> </div> </div>
Removing Fields
You can remove fields from the user interface form by deleting the HTML and JavaScript that define them from the
sample file. For example, to delete the “Email” option box, delete the following HTML and variables:
Example
<<div id= "emailDiv" class="form-group <%IF emailRequired == 1%> required <%END%>"> <label for="email" class="col-sm-2 control-label"><% I18N_USER_ADMIN_EMAIL %></label> <div id="emailDiv2" class="col-sm-5"> <input type="email" class="form-control" id="email" name="email" placeholder="<% I18N_USER_ADMIN_EMAIL %>" validate> </div> </div>
NOTE: Never delete or modify the following required variables:
Guest_Includes–
signinAgainUrl–
LoginPageErrorMessage–Specifies the error message. The device generates the error
message in case of an error otherwise it will be empty
preAuthSNText–
In this example, * indicates the required fields. The following figure shows the Guest Self Registration Page before
customization.

CHAPTER 4: Guest User Account Management Framework
© 2015 by Pulse Secure, LLC. All rights reserved 65
Figure 54: Default Guest Self Registration Page
NOTE: You can add a field in the html to display messages
The following figure shows the result of the customization
NOTE: After making a modification in sample.zip file, you must upload the file to see the
effect of the customization. To know about the process of uploading see Uploading Your
Customized Files
Figure 55: Custom Guest Self Registration Page - Email field removed
Editing Fields
You can edit fields in the user interface form by editing the HTML and JavaScript that define them from the sample
file. For example, to edit the “Mobile Number” option box as ‘Contact Number”, edit the following HTML and
variables:
Script Before Editing
<div id= "mnDiv" class="form-group <%IF smsRequired == 1%> required <%END%>"> <label for="mobilenumber" class="col-sm-2 control-label"> <% I18N_USER_ADMIN_MOBILE_NUMBER %>Contact Number</label> <div id="mnDiv1" class="col-sm-2"> <select id="cmbCountryCode" class="form-control" name="cmbCountryCode" <%disabled%>> <% FOREACH country = countryCode %> <option id="<% country.id %>" value="<% country.id %>" <%IF countrySelected == country.id%> selected <%END%>> <% country.name %> </option>

Guest Access Solution Configuration Guide
66 © 2015 by Pulse Secure, LLC. All rights reserved
<%END%> </select> </div> <div id="mnDiv2" class="col-sm-3"> <input type="tel" class="form-control" id="mobilenumber" name="mobilenumber" placeholder="<% I18N_USER_ADMIN_MOBILE_NUMBER %>" validate> </div> </div>
Script After Editing
<div id= "mnDiv" class="form-group <%IF smsRequired == 1%> required <%END%>"> <label for="mobilenumber" class="col-sm-2 control-label"> Contact Number</label> <div id="mnDiv1" class="col-sm-2"> <select id="cmbCountryCode" class="form-control" name="cmbCountryCode" <%disabled%>> <% FOREACH country = countryCode %> <option id="<% country.id %>" value="<% country.id %>" <%IF countrySelected == country.id%> selected <%END%>> <% country.name %> </option> <%END%> </select> </div> <div id="mnDiv2" class="col-sm-3"> <input type="tel" class="form-control" id="mobilenumber" name="mobilenumber" placeholder="Contact Number" validate> </div> </div>
Figure 56: Customized Guest Self Registration Page - Mobile Number field modified as Contact Number
Uploading Your Customized Files
After you have edited the sample template files, save the files with the same name and add them to the sample.zip
file by replacing the previous files.
To upload the files to the system:
1. On the Pulse Policy Secure main page select Authentication > Signing In > Sign in pages.
2. Click Upload Custom Pages.
The Upload Custom Sign-In Pages screen appears.

CHAPTER 4: Guest User Account Management Framework
© 2015 by Pulse Secure, LLC. All rights reserved 67
Figure 57: Sign-in Page
3. Click Browse and select the sample.zip file containing the custom templates and assets
4. Click Upload Custom Pages to upload the modified sample.zip file.
The following table describes the guidelines for completing the configuration.
Table 8: Guidelines for Configuring a Customized Collection
Settings Guidelines
Sign-In Pages.
Name Specify the name for the sign-in page
Page Type Specify the page type. Access is selected by default.
Template File Select the template file in zipped format that contains the custom templates and assets
Upload
Skip validation checks during upload
Select this option to skip the validation checks for the template file.
Upload Custom Pages Select this option to upload the custom pages.
The following figure shows that the template file is uploaded successfully.
Figure 58: Custom Template Uploaded Successfully

Guest Access Solution Configuration Guide
68 © 2015 by Pulse Secure, LLC. All rights reserved
Using the Customized Pages
After you have uploaded the customized files, you must associate them with your Guest Self Registration sign-in
page.
To use the customized pages:
1. On the Pulse Policy Secure main page select Authentication > Signing-In > Sign-In
Policies to display the sign-in policies configuration page.
2. Select the custom sign-in page from the Sign-in page drop-down list.
Figure 59: Sign-in Policy Page
3. Click Save Changes.

CHAPTER 4: Guest User Account Management Framework
© 2015 by Pulse Secure, LLC. All rights reserved 69
In the following figure the Sign-In Policies page shows the customized Sign-In Page.
Figure 60: Sign-in Policy Page Showing Customized Pages
Verifying the Customization
Sign in to the Guest Self Registration sign-in page as a guest user account manager and verify that the
customizations you have made were applied.
The following figure shows the customized Guest Self Registration page, without the Email ID field, and the Mobile
Number field changed as Contact Number.
Figure 61: Customized Guest Self Registration Page
Related Documentation
Creating Guest User Accounts
Custom Sign-In Pages Developer Reference, Release 8.0/5.0

Guest Access Solution Configuration Guide
70 © 2015 by Pulse Secure, LLC. All rights reserved
Customizing Guest Login Page through Admin UI
Customizing through the Admin UI of Guest Self Registration is limited to the Login page.
Modifying the settings in Pulse Policy Secure Admin UI
To customize the Login page:
1. On the Pulse Policy Secure main page select Authentication > Signing-In > Sign-In Pages
to display the Sign-in Pages tab.
Select and open the Sign-In Page, which you are using.
Figure 62: Default Sign-In Page
2. Make changes as per your requirement.
In this example the following fields (marked in the above screen shot) are modified as shown
in the following figure.
Submit button – Changed the field name as Submit
Username – Changed the filed name as Login ID
Current appearance – Changed the logo

CHAPTER 4: Guest User Account Management Framework
© 2015 by Pulse Secure, LLC. All rights reserved 71
Figure 63: Modified Default Sign-In Page
3. Click Save Changes to save the settings.
4. Select Authentication > Signing-In > Sign-In Policies and open the Sign-in Policy which
you are using.
Figure 64: Sign-in Policy
5. From the Sign-in page drop-down list, select the Sign-In Page which you have modified.
6. Click Save Changes to save the settings.

Guest Access Solution Configuration Guide
72 © 2015 by Pulse Secure, LLC. All rights reserved
Verifying the Customization
To verify the changes you have made in the Pulse Policy Secure Admin UI, access the guest URL which is
mapped with the Admin UI.
Figure 65: The default Guest Self Registration Login Page
The following screen shot is the login page after making modification in the Admin UI.
Figure 66: Customized Login Page

© 2015 by Pulse Secure, LLC. All rights reserved 73
Part 3 Configuring WLC
Configuring Cisco 2500 WLC
Configuring Cisco 3850 WLC
Configuring Aruba WLC

Guest Access Solution Configuration Guide
74 © 2015 by Pulse Secure, LLC. All rights reserved

© 2015 by Pulse Secure, LLC. All rights reserved 75
CHAPTER 5 Configuring Cisco 2500 WLC
Configuring Cisco WLC for Pulse Policy Secure GUAM and Guest Self-Registration
Configuration required on Cisco WLC for Local AP mode
Configuration Required on Cisco WLC in Remote AP mode
Configuring Cisco WLC for Pulse Policy Secure GUAM and Guest Self-Registration
This section explains the steps to configure Cisco 2500 WLC for deploying Pulse Policy Secure GUAM and Guest
Self-Registration feature.
Figure 67: Network Topology between Pulse Policy Secure and Cisco WLC
Configuration required on Cisco WLC for Local AP mode
Configuring RADIUS server
1. Login to Cisco WLC. Select Security > AAA > RADIUS. Configure Pulse Policy Secure
server as authentication and accounting servers.
Support for RFC 3576 - Enable this option to trigger RADIUS disconnect when required.

Guest Access Solution Configuration Guide
76 © 2015 by Pulse Secure, LLC. All rights reserved
Figure 68: Authentication server settings
Figure 69: Accounting server settings
Using CLI
Before creating the radius server, you need to allot an index number to it which is not currently in use. To find
out the index numbers which are currently in use in WLC, use the following command
show radius summary Go through the authentication servers and accounting servers section in the displayed output. Use an unused index number for adding radius authentication or accounting server. config radius auth add <RADIUS auth server ID> <RADIUS server IP> 1812 ascii <password> config radius auth disable < RADIUS auth server ID > config radius auth rfc3576 enable < RADIUS auth server ID > config radius auth enable < RADIUS auth server ID > config radius acct add <RADIUS acct server ID > <RADIUS server IP> 1813 ascii <password>
Configuring ACLs
1. On the CISCO WLC main screen go to Security > Access Control Lists. Create an IPv4
ACL list to allow DNS, DHCP and Pulse Policy Secure (Traffic).

CHAPTER 5: Configuring Cisco 2500 WLC
© 2015 by Pulse Secure, LLC. All rights reserved 77
Figure 70: Creating an IPv4 ACL
Using CLI
To see all of the ACLs that are configured on the controller enter the following command:
show acl summary To create an ACL with name test config acl create test To create a rule in the test ACL config acl rule add test 1 # Creating Rule No 1 config acl rule protocol test 1 17 # 17 is UDP protocol config acl rule source port range test 1 68 68 # 68 is DHCP client port number config acl rule action test 1 permit # Allow access config acl rule add test 2 # Creating Rule No 2 config acl rule protocol test 2 17 config acl rule source port range test 2 67 67 # 67 is DHCP server port number config acl rule action test 2 permit config acl rule add test 3 # Creating Rule No 3 config acl rule protocol test 3 17 config acl rule source port range test 3 53 53 # Port 53 for DNS config acl rule action test 3 permit config acl rule add test 4 # Creating Rule No 4 config acl rule protocol test 4 17 config acl rule destination port range test 4 53 53 config acl rule action test 4 permit config acl rule add test 5 # Creating Rule No 5 config acl rule source address test 5 3.3.3.2 255.255.255.255 config acl rule action test 5 permit config acl rule add test 6 # Creating Rule No 6 config acl rule destination address test 6 3.3.3.2 255.255.255.255 config acl rule action test 6 permit

Guest Access Solution Configuration Guide
78 © 2015 by Pulse Secure, LLC. All rights reserved
Configuring WLAN
1. On the CISCO WLC main screen select WLANs tab and create a new WLAN.
Figure 71: Creating a WLAN
2. Select to General tab and enable Status checkbox
Figure 72: WLAN - General settings
3. Select Security > Layer 2 in WLANs tab. Select ‘None’ from the Layer 2 Security drop-
down list.
Figure 73: WLAN Layer 2 settings
4. Select Security > Layer3 in WLANs tab.

CHAPTER 5: Configuring Cisco 2500 WLC
© 2015 by Pulse Secure, LLC. All rights reserved 79
From the Layer 3 security drop-down list select 'Web Policy'.
For Preauthentication ACL, associate the ACL that is created earlier for IPv4.
Over-ride Global Config - Select the Enable check box.
From the Web auth type drop-down list select External (Re-direct to external server)
URL – Enter the Pulse Policy secure (Guest sign-in URL) for redirection URL.
Figure 74: WLAN Layer 3 settings
5. Select Security > AAA Servers tab. Configure RADIUS server for authentication and
accounting.
Figure 75: WLAN – AAA Server settings
6. Select the Interim Update check box.

Guest Access Solution Configuration Guide
80 © 2015 by Pulse Secure, LLC. All rights reserved
NOTE: Instead of management port, if some other Interface/Interface Group (G) is selected
during WLAN creation then Radius Server Overwrite interface option must be enabled.
7. Select Advanced tab and enable Allow AAA Override checkbox.
Figure 76: WLAN – Advanced settings
Using CLI
Before creating a new WLAN verify the existing WLANs on the WLC using the following command and use an
unused index id for the new WLAN
show wlan summary To create a new WLAN config wlan create <WLAN_ID> <Profile name> <SSID> Ex:- config wlan create 10 Test Test # Test is the WLAN name and SSID config wlan interface <WLAN_ID> <interface-name> Ex:- config wlan interface 10 management # assigning the WLAN to management port config wlan security wpa disable <WLAN_ID> config wlan security web-auth enable <WLAN_ID> config wlan custom-web global disable <WLAN_ID> config wlan custom-web ext-webauth-url <ext-webauth-url> <WLAN_ID> config wlan custom-web webauth-type external <WLAN_ID>

CHAPTER 5: Configuring Cisco 2500 WLC
© 2015 by Pulse Secure, LLC. All rights reserved 81
config wlan security web-auth acl <WLAN_ID> <ACL_name> config wlan radius_server auth add <WLAN_ID> <Radius_auth_server_ID> config wlan radius_server acct add <WLAN_ID> <Radius_acct_server_ID> config wlan radius_server overwrite-interface enable <WLAN_ID> ( This command is required only if instead of management, some other interface is configured for WLAN. Please check steps 2 and 5) config wlan radius_server acct interim-update enable <WLAN_ID> config wlan radius_server acct interim-update <Interval> <WLAN_ID> config wlan aaa-override enable <WLAN_ID> config wlan enable <WLAN_ID>
Configuring AP Group
1. On the CISCO WLC main screen go to WLANs > Advanced > AP Groups screen and map
WLAN to the Local AP (Campus Only mode) group.
Figure 77: Mapping WLAN with the Local AP
Using the CLI
config wlan apgroup interface-mapping add <APgroup Name> <WLAN ID> <interfacename>
NOTE: default-group which comes by default is not editable .So the above command
cannot be used with it.
Save the config using the following command:
save config

Guest Access Solution Configuration Guide
82 © 2015 by Pulse Secure, LLC. All rights reserved
Configuration Required on Cisco WLC in Remote AP mode
Configuring RADIUS server
1. Login to Cisco WLC. Go to Security > AAA > RADIUS. Configure Pulse Policy Secure server
as authentication and accounting server.
Support for RFC 3576 - Enable this option to trigger RADIUS disconnect when required.
NOTE: Support for RFC3576 for RADIUS disconnect does not work properly with Cisco 2500,
5500, 7500, and 8500 series.
Figure 78: Authentication server settings
Figure 79: Accounting server settings
Using the CLI
Before creating the radius server, you need to allot an index number to it which is not currently in use. To find out
the index numbers which are currently in use in WLC, use the following command
show radius summary
Go through the authentication servers and accounting servers section in the displayed output. Use an unused index
number for adding radius authentication or accounting server.

CHAPTER 5: Configuring Cisco 2500 WLC
© 2015 by Pulse Secure, LLC. All rights reserved 83
config radius auth add <RADIUS auth server ID> <RADIUS server IP> 1812 ascii <password> config radius auth disable < RADIUS auth server ID > config radius auth rfc3576 enable < RADIUS auth server ID > config radius auth enable < RADIUS auth server ID > config radius acct add <RADIUS acct server ID > <RADIUS server IP> 1813 ascii <password>
Configuring FlexConnect ACLs
1. Select Security > Access Control Lists > FlexConnect ACLS. Create a FlexConnect ACL
list to allow DNS, DHCP and Pulse Policy Secure (Traffic).
Figure 80: FlexConnect ACL list
Using the CLI
To see all of the ACLs that are configured on the controller enter the following command:
show flexconnect acl summary
To create a new ACL
config flexconnect acl create <ACL name>
To create rules in the newly created ACL
config flexconnect acl rule add <ACL name> <Rule number1> config flexconnect acl rule protocol <ACL name> <Rule number1> 17 # 17 is UDP config flexconnect acl rule source port range <ACL name> <Rule number1> 68 68 # 68 is DHCP client port number config flexconnect acl rule action <ACL name> <Rule number1> permit # Allow access config flexconnect acl rule add <ACL Name> <Rule number2> config flexconnect acl rule protocol <ACL name> <Rule number2> 17 config flexconnect acl rule source port range <ACL name> <Rule number2> 67 67 # 67 is DHCP server port number config flexconnect acl rule action <ACL name> <Rule number2> permit config flexconnect acl rule add <ACL name> <Rule number3> config flexconnect acl rule protocol <ACL name> <Rule number3> 6 config flexconnect acl rule source port range <ACL name> <Rule number3> 53 53 # Port 53 for DNS config flexconnect acl rule action <ACL name> <Rule number3> permit config flexconnect acl rule add <ACL name> <Rule number4>

Guest Access Solution Configuration Guide
84 © 2015 by Pulse Secure, LLC. All rights reserved
config flexconnect acl rule protocol <ACL name> <Rule number4> 6 config flexconnect acl rule destination port range <ACL name> <Rule number4> 53 53 #port 53 for DNS config flexconnect acl rule action <ACL name> <Rule number4> permit config flexconnect acl rule add <ACL name> <Rule number5> config flexconnect acl rule source address <ACL name> <Rule number5> <PPS IP> <Subnetmask> config flexconnect acl rule action <ACL name> <Rule number5> permit config flexconnect acl rule add <ACL name> <Rule number6> config flexconnect acl rule destination address <ACL name> <Rule number6> <PPS IP> <Subnetmask> config flexconnect acl rule action <ACL name> <Rule number6> permit
Configuring WLAN
1. Go to WLANs tab and create a new WLAN.
Figure 81: Creating a WLAN
2. Navigate to General tab and enable Status checkbox.
Figure 82: WLAN - General settings
3. Go to Security > Layer 2 in WLAN settings. From the Layer 2 Security drop-down list Select
‘None’

CHAPTER 5: Configuring Cisco 2500 WLC
© 2015 by Pulse Secure, LLC. All rights reserved 85
Figure 83: WLAN – Layer 2 settings
4. Go to Security > Layer3 in WLANs tab.
From the Layer 3 security drop-down list select 'Web Policy'.
For Preauthentication ACL, associate the FlexConnectACL that is created earlier.
Over-ride Global Config - Select the Enable check box.
From the Web auth type drop-down list select External (Re-direct to external server)
URL – Enter the Pulse Policy secure (Guest sign-in URL) for redirection URL.
Figure 84: WLAN – Layer 3 settings
5. Go to Security > AAA Servers in WLANs tab. Configure RADIUS server for authentication
and accounting.

Guest Access Solution Configuration Guide
86 © 2015 by Pulse Secure, LLC. All rights reserved
Figure 85: WLAN – AAA Server settings
6. Select the Interim Update check box.
NOTE: Instead of management port, if some other Interface/Interface Group (G) is selected
during WLAN creation then Radius Server Overwrite interface option must be enabled.
7. Select Advanced tab and enable Allow AAA Override checkbox.

CHAPTER 5: Configuring Cisco 2500 WLC
© 2015 by Pulse Secure, LLC. All rights reserved 87
Figure 86 WLAN – Advanced settings
Using the CLI
Before creating a new WLAN verify the existing WLANs on the WLC using the following command and use an
unused index id for the new WLAN
show wlan summary
To create a new WLAN:
config wlan create <WLAN_ID> <Profile name> <SSID> eg: config wlan create 10 Test Test # Test is the WLAN name and SSID config wlan interface <WLAN_ID> <interface-name> eg: config wlan interface 10 management # assigning the WLAN to management port config wlan security wpa disable <WLAN_ID> config wlan security web-auth enable <WLAN_ID> config wlan custom-web global disable <WLAN_ID> config wlan custom-web ext-webauth-url <ext-webauth-url> <WLAN_ID> config wlan custom-web webauth-type external <WLAN_ID> config wlan security web-auth flexacl <WLAN_ID> <ACL_name> config wlan radius_server auth add <WLAN_ID> <Radius_auth_server_ID> config wlan radius_server acct add <WLAN_ID> <Radius_acct_server_ID> config wlan radius_server overwrite-interface enable <WLAN_ID> ( This command is required only if instead of management, some other interface is configured for WLAN. Please check steps 2 and 5) config wlan radius_server acct interim-update enable <WLAN_ID> config wlan radius_server acct interim-update <Interval> <WLAN_ID> config wlan aaa-override enable <WLAN_ID> config wlan enable <WLAN_ID>
Configuring AP Group
1. On the CISCO WLC main screen go to WLANs > Advanced > AP Groups screen and map
WLAN Flexl AP (Remote AP mode) group.
Figure 87: Mapping WLAN Flexl AP

Guest Access Solution Configuration Guide
88 © 2015 by Pulse Secure, LLC. All rights reserved
Using the CLI
config wlan apgroup interface-mapping add <APgroup Name> <WLAN ID> <interfacename>
NOTE: default-group which comes by default is not editable .So the above command
cannot be used with it.
Save the config using the following command:
save config
Adding ACLs in FlexConnect Group
To add ACLs in FlexConnect Group:
1. Select Wireless >FlexConnect Groups. Click on the required FlexConnect Group and select
ACL Mapping > Policies. Add all the required FlexConnect ACLs to this group. This
configuration is required when admin wants to push ACL name using RADIUS return
attributes from Pulse Policy Secure.
Figure 88: Adding ACLs in FlexConnect Group
Using the CLI
To see all of the flexconnect groups that are configured on the controller enter the following command:
show flexconnect group summary
To add policy ACLs in the flexconnect group use the following command:
config flexconnect group <flex-group> policy acl add <flexconnect_ACL>
Save the config using the following command:
save config
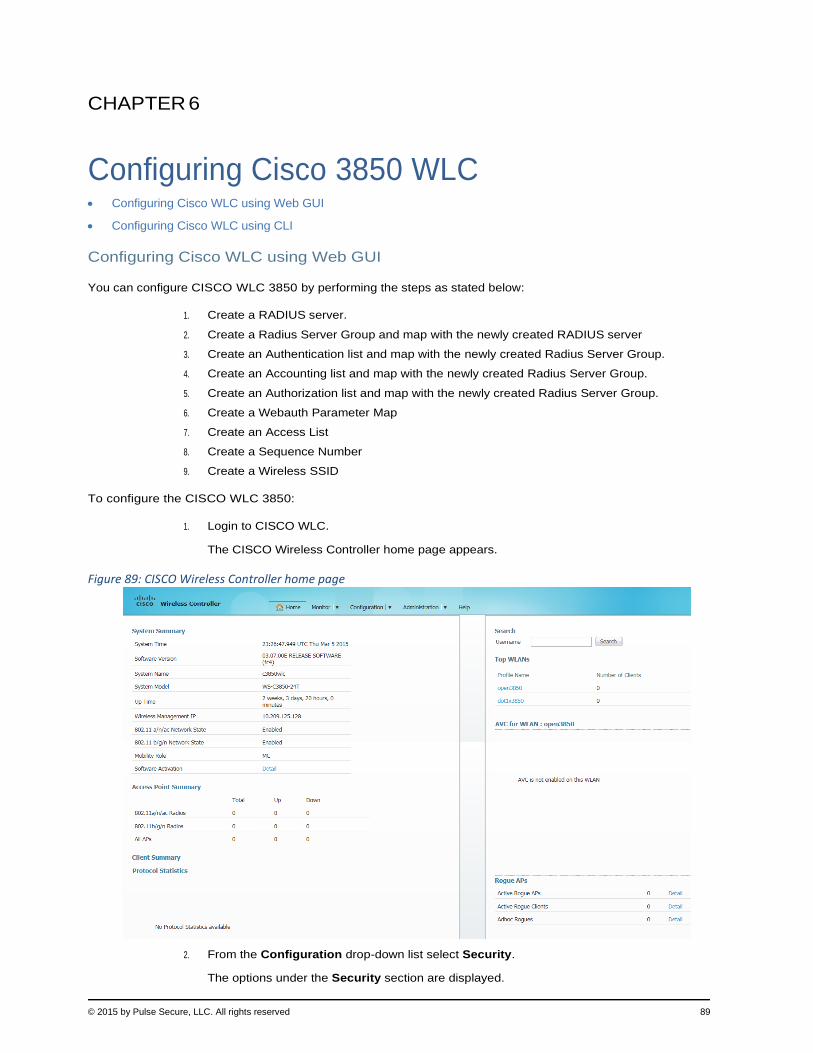
© 2015 by Pulse Secure, LLC. All rights reserved 89
CHAPTER 6 Configuring Cisco 3850 WLC Configuring Cisco WLC using Web GUI
Configuring Cisco WLC using CLI
Configuring Cisco WLC using Web GUI
You can configure CISCO WLC 3850 by performing the steps as stated below:
1. Create a RADIUS server.
2. Create a Radius Server Group and map with the newly created RADIUS server
3. Create an Authentication list and map with the newly created Radius Server Group.
4. Create an Accounting list and map with the newly created Radius Server Group.
5. Create an Authorization list and map with the newly created Radius Server Group.
6. Create a Webauth Parameter Map
7. Create an Access List
8. Create a Sequence Number
9. Create a Wireless SSID
To configure the CISCO WLC 3850:
1. Login to CISCO WLC.
The CISCO Wireless Controller home page appears.
Figure 89: CISCO Wireless Controller home page
2. From the Configuration drop-down list select Security.
The options under the Security section are displayed.

Guest Access Solution Configuration Guide
90 © 2015 by Pulse Secure, LLC. All rights reserved
Figure 90: Security section
3. Select AAA > Radius > Servers to create a Radius server.
The Radius Server screen appears.
Figure 91: Radius Servers
4. Click New to create a Radius server.

CHAPTER 6: Configuring Cisco 3850 WLC
© 2015 by Pulse Secure, LLC. All rights reserved 91
Figure 92: Creating a Radius Server
5. Enter relevant details and click Apply at the right top corner of the page.
A new RADIUS server is created.
6. Select AAA > Server Groups > Radius to create a Radius Server Group.
The Radius Server Groups screen appears.
Figure 93: Radius Server Groups
7. Click New
The Radius Server Group > New screen appears.

Guest Access Solution Configuration Guide
92 © 2015 by Pulse Secure, LLC. All rights reserved
Figure 94: Creating a Radius Server Group
8. Enter a name in the Name field. From the Available Servers box select the server which you
have created in step 5 and click the button to move it to the Assigned Servers box.
9. Click Apply to save the Radius Server Group.
10. Select AAA > Method List > Authentication to create an Authentication list.
The Authentication screen appears.
Figure 95: Authentication list
11. Click New.
The Authentication > New screen appears.
Figure 96: Creating a new Authentication list

CHAPTER 6: Configuring Cisco 3850 WLC
© 2015 by Pulse Secure, LLC. All rights reserved 93
12. Enter the details in the fields as follows:
In the Method List Name field enter webauth_radius
For Type, select login
For Group Type select group
Select the ‘wirelessradius’ server group that you have created earlier from the Available
Server Groups box and click to move it to the Assigned Server Groups box.
13. Click Apply to save the Authentication.
14. Select AAA > Method List > Accounting to create an Accounting list.
The Accounting screen appears.
Figure 97: Accounting list
15. Click New to create an Accounting list.
The Accounting > New screen appears.
Figure 98: Creating an Accounting list
16. Enter the details in the fields as follows:
In the Method List Name field enter webauth_radius.
For Type, select network.
Select the ‘wirelessradius’ server group that you have created earlier from the Available
Server Groups box and click to move it to the Assigned Server Groups box.
17. Click Apply to save the Accounting list.
18. Select AAA > Method Lists > Authorization to create an Authorization list.
The Authorization screen appears.

Guest Access Solution Configuration Guide
94 © 2015 by Pulse Secure, LLC. All rights reserved
Figure 99: Authorization list
19. Click New to create an Authorization list.
The Authorization > New screen appears.
Figure 100: Creating an Authorization list
20. Enter the details in the fields as follows:
In the Method List Name field enter webauth_radius.
For Type, select network.
For Group Type select group.
Select the ‘wirelessradius’ server group that you have created earlier from the Available
Server Groups box and click to move it to the Assigned Server Groups box.
21. Click Apply to save the Authorization list.
22. Select Web Auth > Webauth Parameter Map to create a Webauth Parameter Map.
The Webauth Parameter Map screen appears.

CHAPTER 6: Configuring Cisco 3850 WLC
© 2015 by Pulse Secure, LLC. All rights reserved 95
Figure 101: Webauth Parameter Map
23. Click New to create a Webauth Parameter Map.
The Webauth Parameter Map > New screen appears.

Guest Access Solution Configuration Guide
96 © 2015 by Pulse Secure, LLC. All rights reserved
Figure 102: Creating a Webauth Parameter Map
24. Enter the details in the fields as follows:
In the Parameter – map name field enter vt_web.
In Maximum HTTP connections(1-200) enter 30.
In Init-State Timeout (60-3932100 in seconds) enter 120.
In Fin-Wait Timeout (1-2147483647 in millisecond) enter 3000
In Redirect for login field enter https://10.204.89.165/guest - This is the Pulse Policy Secure URL to which a guest is redirected when tried to access a website.
In Portal IPv4 address enter 10.204.89.165
25. Click Apply to save the Webauth Parameter Map.
NOTE: A default Webauth Parameter Map is created a shown in the following figure.

CHAPTER 6: Configuring Cisco 3850 WLC
© 2015 by Pulse Secure, LLC. All rights reserved 97
Figure 103: Default Webauth Parameter Map
26. Select ACL > Access Control List to create an Access Control List.
The Access Control Lists screen appears.

Guest Access Solution Configuration Guide
98 © 2015 by Pulse Secure, LLC. All rights reserved
Figure 104: Access Control List
27. Click Add New.
The New Access List screen appears.
Figure 105: Creating an Access Control List
28. In the Name field enter REDIRECT-ACL and then click Apply at the right top corner.
The New Sequence Number screen appears.

CHAPTER 6: Configuring Cisco 3850 WLC
© 2015 by Pulse Secure, LLC. All rights reserved 99
Figure 106: Creating a Sequence Number
29. Enter relevant details and click Apply.
Allow traffic to the Pulse Policy server IP address - 10.204.89.165.
Figure 107: Connecting with Pulse Policy server IP address
30. On the main menu select Configuration > Wireless to create a Wireless SSID.
The WLANs screen appears.
Figure 108: WLANs
31. Click New.
The WLANs > Create New screen appears.

Guest Access Solution Configuration Guide
100 © 2015 by Pulse Secure, LLC. All rights reserved
Figure 109: Creating a WLAN
32. Click Apply.
The WLAN is created and displayed in WLANs screen.
Figure 110: Newly created WLAN
33. Click the WLAN to configure.
The General tab options of the WLAN appears.
Figure 111: WLAN - General screen

CHAPTER 6: Configuring Cisco 3850 WLC
© 2015 by Pulse Secure, LLC. All rights reserved 101
34. Select the options as shown in the above figure and then click Apply to save the
configurations.
35. Click the Security tab.
The options under Security > Layer2 appears.
Figure 112: WLAN - Security - Layer2
36. Select the options as shown in the above figure and then click Apply to save the
configurations.
37. Click Layer3
The options under Layer3 appears.
Figure 113: WLAN - Security - Layer3
38. Select the options:
For Webauth Authentication List select ‘webauth_radius’ which you have created earlier.
For Preauthentication IPv4 ACL select ‘REDIRECT-ACL’ which you have created earlier.
39. Click Apply to save the configurations.
40. Click AAA Server.
The options under AAA Server appears.

Guest Access Solution Configuration Guide
102 © 2015 by Pulse Secure, LLC. All rights reserved
Figure 114: WLAN - Security - AAA Server
41. From the Accounting Method drop-down list select ‘webauth_radius’ which you have created
earlier. Click Apply to save the configurations.
42. Click Advanced.
The options under Advanced appears.
Figure 115: WLAN - Advanced settings
43. Select the check box Allow AAA Override, so that radius attribute sent from Pulse Policy
Secure can be applied. Select other options as shown in the above figure and then click
Apply to save the configurations.

CHAPTER 6: Configuring Cisco 3850 WLC
© 2015 by Pulse Secure, LLC. All rights reserved 103
Configuring Cisco WLC using CLI
Configuring RADIUs server:
radius server <RADIUS-Profile-Name> address ipv4 <RADIUS-Server-IP> auth-port <auth-port> acct-port <acct-port> key <RADIUS-Shared-Secret>
Configuring server group:
aaa group server radius <Server-group-name> server name <RADIUS-Server-name>
Configuring AAA method lists:
aaa authentication login <authentication-list-name> group <Server-group-name> aaa authorization network <authorization-list-name> group <Server-group-name> aaa accounting network <accounting-list-name> action-type start-stop group <Server-group-name>
Configuring Webauth Parameter-map:
parameter-map type webauth <Webauth-name> type webauth redirect for-login <PPS-guest-URL> redirect portal ipv4 <PPS-IP>
Configuring IPv4 extended ACL:
ip access-list extended <ACL-Name> permit ip any host <PPS-IP> permit ip host <PPS-IP> any permit udp any eq domain any deny ip any any
Configuring WLAN profile:
wlan <wlan-profile-name> <wlan-id> <ssid-name> aaa-override accounting-list <accountung-list-name> client vlan <vlan-id> ip access-group web <ipv4-acl> no security wpa security web-auth security web-auth authentication-list <authentication-list-name> security web-auth parameter-map <parameter-map name> no shutdown

Guest Access Solution Configuration Guide
104 © 2015 by Pulse Secure, LLC. All rights reserved

© 2015 by Pulse Secure, LLC. All rights reserved 105
CHAPTER 7 Configuring Aruba WLC
Configuring Aruba WLC for Pulse Policy Secure Guest Self-Registration
Configuration required on Aruba WLC for Campus Only mode
External Captive Portal Configuration
RFC 3576 server configuration
WLAN Configuration for Remote Networking mode on Aruba WLC
Configuring Aruba WLC in campus only mode using CLI
Configuring Aruba WLC in Remote Networking mode using CLI
Configuring Aruba WLC for Pulse Policy Secure Guest Self-Registration
This sections explains the steps to configure Aruba WLC for deploying Pulse Policy Secure GUAM and ‘Guest Self-
Registration’ feature.
Figure 116: Network Topology between Pulse Policy Secure and Aruba WLC
Configuration required on Aruba WLC for Campus Only mode
WLAN Configuration for Campus Only mode
1. Login to Aruba WLC. Select Configuration > Wizards > WLAN/LAN Wizard.
The Welcome to the WLAN/LAN Configuration Wizard appears.

Guest Access Solution Configuration Guide
106 © 2015 by Pulse Secure, LLC. All rights reserved
Figure 117: WLAN Configuration
2. Select Campus Only option and click Begin.
The Specify Group to Configure screen appears
Figure 118: WLAN Configuration – Specifying a Group
3. On Specify Group to Configure screen select an existing AP group or create a new AP
group and click Next.
The Ready to Configure Wireless LANs for Group screen appears.

CHAPTER 7: Configuring Aruba WLC
© 2015 by Pulse Secure, LLC. All rights reserved 107
Figure 119: WLAN Configuration – Wirless LANs configuration
4. Click Continue button.
The Specify Wireless LAN (WLAN) for Group default screen appears
Figure 120: Specifying a WLAN
5. On Specify Wireless LAN (WLAN) for Group default screen, select a group from the AP
Groups list.
In the WLANS for list select an existing WLAN, or
Click New to create a new WLAN
6. Click Next.
The Specify Forwarding Mode for Guest_Aruba in Group default screen appears

Guest Access Solution Configuration Guide
108 © 2015 by Pulse Secure, LLC. All rights reserved
Figure 121: Forwarding Mode configuration
7. On Specify Forwarding Mode for Guest_Aruba in Group default screen, under Forward Mode,
select Tunnel option and click Next.
The Specify Radio Type and VLAN for Guest_Aruba in Group default screen appears.
Figure 122: Radio and VLAN configuration
8. On Specify Radio Type and VLAN for Guest_Aruba in Group default screen select:
Radio Type - Select ‘all’ from the drop-down list
VLAN - Select required options from the drop-down list and click the arrow button to include in the VLAN box.
9. Click Next.
The Specify whether WLAN is for Internal or Guest use for Guest_Aruba in Group default
screen appears

CHAPTER 7: Configuring Aruba WLC
© 2015 by Pulse Secure, LLC. All rights reserved 109
Figure 123: Internal Guest configuration
10. On, Specify whether WLAN is for Internal or Guest use for Guest_Aruba in Group default
screen specify the purpose of the WLAN.
Select Guest option for WLAN use and click Next.
The Specify Authentication and Encryption for Guest_Aruba in Group default screen appears.
Figure 124: Authentication and Encryption
11. On Specify Authentication and Encryption for Guest_Aruba in Group default screen move the
slider to Captive portal with authentication via credentials option and click Next.
The Specify Captive Portal Options for Guest_Aruba in Group default screen appears.

Guest Access Solution Configuration Guide
110 © 2015 by Pulse Secure, LLC. All rights reserved
Figure 125: Captive Portal options
12. On Specify Captive Portal Options for Guest_Aruba in Group default screen, click Next.
The Specify Authentication Server for Guest_Aruba in Group default screen appears.
Figure 126: Authentication Server configuration
13. On Specify Authentication Server for Guest_Aruba in Group default screen, specify Pulse
Policy Secure server as the authentication server and click Next.
The Specify Roles & Policies for Guest_Aruba in Group default screen appears.

CHAPTER 7: Configuring Aruba WLC
© 2015 by Pulse Secure, LLC. All rights reserved 111
Figure 127: Specifying Roles and Policies
14. On Specify Roles & Policies for Guest_Aruba in Group default screen, configure the roles and
click Next.
The Configure Role Assignment for Guest_Aruba in Group default screen appears.

Guest Access Solution Configuration Guide
112 © 2015 by Pulse Secure, LLC. All rights reserved
Figure 128: Configuring Role Assignment
15. On Configure Role Assignment for Guest_Aruba in Group default screen, click Next.
The WLAN Configuration is Complete screen appears.
Figure 129: WLAN configuration complete message
16. Click Finish to complete the configuration.
The WLAN Configuration is Complete screen appears displaying the summary of the
configuration.

CHAPTER 7: Configuring Aruba WLC
© 2015 by Pulse Secure, LLC. All rights reserved 113
Figure 130: WLAN configuration complete message with details
17. Click Finish.
The Controller Has Been Configured screen appears.
Figure 131: Controller configured
18. Click Finish.
The system refreshes and takes you to the Configuration tab.
19. Select Security > Authentication > AAA Profiles and click on RADIUS Accounting Server
Group.
Select an appropriate server group for RADIUS Accounting Server Group.

Guest Access Solution Configuration Guide
114 © 2015 by Pulse Secure, LLC. All rights reserved
Figure 132: RADIUS Accounting Server Group

CHAPTER 7: Configuring Aruba WLC
© 2015 by Pulse Secure, LLC. All rights reserved 115
External Captive Portal Configuration
1. In Aruba WLC select Configuration > Security > Authentication > L3 authentication.
The L3 authentication screen appears.
Figure 133: L3 Authentication configuration
2. Click Captive Portal Authentication Profile. The list expands. Select the corresponding
profile of the above configured WLAN.
Select the check box Add switch IP addressin the redirection URL.
In the Login page box enter the Pulse Policy Secure guest access URL that is configured as part of Pulse Policy Secure configuration.
3. Click Apply to save the configuration.
RFC 3576 server configuration
1. In Aruba WLC go to Configuration > Security > Authentication > Servers tab.
A list of configured servers is displayed.
Figure 134: RFC 3576 Server Configuration
2. Click the RFC 3576 Server and add Pulse Policy Secure as RFC 3576 server, for
supporting disconnect messages.

Guest Access Solution Configuration Guide
116 © 2015 by Pulse Secure, LLC. All rights reserved
3. Click on the RFC server that is newly created to provide the key.
Figure 135: RFC Server - Key Details
4. Select Security > Authentication > AAA Profiles. Go to AAA profile and click on RFC 3576
server. Add the server that is newly created in step1.
Figure 136: RFC Server - Adding a server

CHAPTER 7: Configuring Aruba WLC
© 2015 by Pulse Secure, LLC. All rights reserved 117
WLAN Configuration for Remote Networking mode on Aruba WLC
1. Login to Aruba WLC. Select Configuration > Wizards >WLAN/LAN Wizard.
The Welcome to the WLAN/LAN Configuration Wizard screen appears.
Figure 137: Remote Networking configuration
2. Select Remote Networking option and click Begin.
The Specify Group to Configure screen appears.
Figure 138: Group configuration
3. On Specify Group to Configure screen, select an AP group and click Next.
The Specify RAP DHCP settings for Group qa-remote screen appears.

Guest Access Solution Configuration Guide
118 © 2015 by Pulse Secure, LLC. All rights reserved
Figure 139: RAP DHCP Settings
4. On Specify RAP DHCP settings for Group qa-group screen, configure:
DHCP pool start
DHCP pool end
DHCP pool netmask
Default router
DNS server
VLAN ID
DHCP Lease time – Select the required option and set the limit.
5. Click Next.
The Specify RAP DNS Query Routing for Groups qa-group appears.
Figure 140: RAP DNS Query Routing
6. On the Specify RAP DNS Query Routing for Groups qa-group screen click Next.

CHAPTER 7: Configuring Aruba WLC
© 2015 by Pulse Secure, LLC. All rights reserved 119
The Ready to Configure Wired LANs, and Wireless LANs for Group screen appears.
Figure 141: Configuring Wireless LANs
7. On Ready to Configure Wired LANs, and Wireless LANs for Group screen, click Wireless
LANs Wizard link.
8. Follow the Steps 4-18 of Campus Only mode to complete Wireless WLAN configuration.
9. Follow External Captive Portal Configuration of Campus Only mode to configure Captive
Portal for Remote Networking mode.
10. Follow RFC 3576 Configuration of Campus Only mode to configure Pulse Policy Secure as
RFC 3576 server.
Configuring Aruba WLC in campus only mode using CLI
To configure Aruba WLC for Guest Access in campus only mode via command-line interface, access the CLI in
config mode and issue the following commands.
Configuring RADIUS server:
aaa authentication-server radius <RADIUS-profile-name> host <PPS ip-address> key <password>
Configuring Server Group:
aaa server-group <server-group-name> auth-server <RADIUS-profile-name>
Configuring AAA profile:
aaa profile <AAA-profile-name>
Configuring SSID profile:
wlan ssid-profile <ssid-profie-name> essid <ssid-name> ssid-enable no hide-ssid opmode opensystem
Configuring Captive portal:
aaa authentication captive-portal <CP-profile-name> login-page <PPS-guest-URL>

Guest Access Solution Configuration Guide
120 © 2015 by Pulse Secure, LLC. All rights reserved
switchip-in-redirection-url server-group <server-group-name> user-logon no guest_logon default-role guest
Creating a User-role:
user-role <Role-Name> captive-portal <CP-profile-name> access-list session logon-control access-list session captiveportal
Attaching initial-role to AAA profile:
aaa profile <AAA-profile-name> initial-role <role-name>
Configuring Firewall policy rules for PPS: ip access-list session captiveportal
host <PPS-IP> any any permit position 1 any host <PPS-IP> any permit position 2
Configuring Virtual-AP and associating SSID profile:
wlan virtual-ap <vap-profile-name> forward-mode tunnel vlan <vlan-id> ssid-profile <ssid-profile-name> aaa-profile <AAA-profile-name>
Configuring AP group and associating Virtual-AP profile:
ap-group default
# If it is other ap-group, give as required.
virtual-ap <vap-profile-name>
Configuring RFC-3576 server:
aaa rfc-3576-server <PPS-IP> key <password>
Attaching RFC-3576 server to AAA profile:
aaa profile <aaa-profile-name> rfc-3576-server <PPS-IP>
Attaching RADIUS accounting server group to AAA profile:
aaa profile <aaa-profile-name> radius-accounting <server-group-name>
Configuring Aruba WLC in Remote Networking mode using CLI
To configure Aruba WLC for Guest Access in Remote Networking mode via command-line interface, access
the CLI in config mode and issue the following commands.
Configuring RADIUS server:
aaa authentication-server radius <RADIUS-profile-name> host <PPS ip-address> key <password>
Configuring Server Group:
aaa server-group <server-group-name> auth-server <RADIUS-profile-name>
Configuring AAA Profile:
aaa profile <AAA-profile-name>

CHAPTER 7: Configuring Aruba WLC
© 2015 by Pulse Secure, LLC. All rights reserved 121
Configuring SSID Profile:
wlan ssid-profile <ssid-profie-name> essid <ssid-name> ssid-enable no hide-ssid opmode opensystem
Configuring Captive Portal:
aaa authentication captive-portal <CP-profile-name> login-page <PPS-guest-URL> switchip-in-redirection-url server-group <server-group-name> user-logon no guest_logon default-role guest
Creating a User-role:
user-role <Role-Name> captive-portal <CP-profile-name> access-list session logon-control access-list session captiveportal
Attaching initial-role to AAA profile:
aaa profile <AAA-profile-name> initial-role <role-name>
Configuring Firewall policy rules for PPS:
ip access-list session captiveportal host <PPS-IP> any any permit position 1 any host <PPS-IP> any permit position 2
Configuring Virtual-AP and associating SSID profile:
wlan virtual-ap <vap-profile-name> forward-mode tunnel vlan <vlan-id> ssid-profile <ssid-profile-name> aaa-profile <AAA-profile-name>
Configuring DHCP server on Remote AP:
ap system-profile <name> rap-dhcp-default-router <ipaddr> rap-dhcp-dns-server <ipaddr> rap-dhcp-lease <days> rap-dhcp-pool-start <ipaddr> rap-dhcp-pool-end <ipaddr> rap-dhacp-pool-netmask <netmask> rap-dhcp-server-vlan <vlan>
Configuring AP group and associating Virtual-AP profile:
ap-group default
# If it is other ap-group, give as required.
virtual-ap <vap-profile-name> ap-system-profile <name>
Configuring RFC-3576 server:
aaa rfc-3576-server <PPS-IP> key <password>
Attaching RFC-3576 server to AAA profile:
aaa profile <aaa-profile-name>

Guest Access Solution Configuration Guide
122 © 2015 by Pulse Secure, LLC. All rights reserved
rfc-3576-server <PPS-IP>
Attaching RADIUS accounting server group to AAA profile:
aaa profile <aaa-profile-name> radius-accounting <server-group-name>
Configuring Aruba Instant Access Point
To configure Aruba Instant Access Point:
1. Login to the Aruba Instant Access portal.
The Aruba Instant page appears.
Figure 142: Aruba Instant Home Page
2. Click New to create a new SSID.
The New WLAN window appears.

CHAPTER 7: Configuring Aruba WLC
© 2015 by Pulse Secure, LLC. All rights reserved 123
Figure 143: Creating a New WLAN
3. In the WLAN Settings tab:
In the New (SSID) field enter a name for the SSID.
In the Primary usage options select Guest.
4. Click Next.
The VLAN tab options appears.
Figure 144: VLAN Settings
5. Keep the DHCP setting as per your network design.

Guest Access Solution Configuration Guide
124 © 2015 by Pulse Secure, LLC. All rights reserved
Client IP assignment here Network Assigned is chosen.
For Client VLAN assignment here Default. is chosen
6. Click Next.
The Security tab options appears.
Figure 145: Security Settings
7. In the Security Level section do the following:
From the Security page type drop-down list select External.
From the Captive portal profile drop-down list select New
The New screen appears.
Enter the details as shown in the above figure and then click OK.
The newly created captive portal appears in the Captive portal profile drop-down list.

CHAPTER 7: Configuring Aruba WLC
© 2015 by Pulse Secure, LLC. All rights reserved 125
Figure 146: Security Settings - Creating a New Server
8. From the Auth server 1 drop-down list select New.
The New Server screen appears.
Create a server pointing to Pulse Policy Secure server. Enter the details as shown in the
above figure and then click OK.
The configured Security tab options appears as in the following figure.

Guest Access Solution Configuration Guide
126 © 2015 by Pulse Secure, LLC. All rights reserved
Figure 147: Security Settings
9. Click Next.
The Access tab options appears.

CHAPTER 7: Configuring Aruba WLC
© 2015 by Pulse Secure, LLC. All rights reserved 127
Figure 148: Access Settings
10. In the Access Rules section:
Move the slider to Role-based,
Under the Roles section, click New to create a new role ‘pre-logon’.
Figure 149: Access Settings - Creating a Role

Guest Access Solution Configuration Guide
128 © 2015 by Pulse Secure, LLC. All rights reserved
11. Under the Access Rules section click New to create an access rule for the role.
The New Rule window appears.
Figure 150: Access Settings - Creating a Rule
12. Select the options as shown in the above figure.
From the Destination drop-down list select ‘to a particular server’.
In the IP box enter the Pulse Policy Secure server’s IP address.
Click OK.
The Access Rule appears in the Access Rules for list box.
Figure 151: Access Settings - Creating an Access Rule
13. Select the Assign pre-authentication role check box and then select ‘pre-logon’ from the
drop-down list.
14. Click Finish to complete the settings.

© 2015 by Pulse Secure, LLC. All rights reserved 129
PART 4 Administration
Guest User Account Managers

Guest Access Solution Configuration Guide
130 © 2015 by Pulse Secure, LLC. All rights reserved

© 2015 by Pulse Secure, LLC. All rights reserved 131
CHAPTER 8 Guest User Account Managers
Creating Guest User Accounts
Creating Guest User Accounts
When the guest user account manager (GUAM) logs in through the sign-in page for the guest realm, an interface is
presented for creating accounts as shown in the following figure.
Figure 152: GUAM Page after Log In
Table 9: Admin User Page - Field Descrioptions
Settings Guidelines
Create One User Click to create one user
Create Many Users Click to create multiple users
Delete Helps to delete the selected users
Delete All Helps to delete all the users on the page.
Show / hide columns Select the option to hide or show specific columns.
This icon helps to delete the record of the guest user.
This icon helps to reset the password of the guest user.
This icon helps to edit the details of the guest user.
Search Helps you to search for guest/s with specific names.
From this page, the GUAM user can add users one-at-a-time or in bulk.

Guest Access Solution Configuration Guide
132 © 2015 by Pulse Secure, LLC. All rights reserved
The following figure shows the page for adding a single guest user. Table 10 describes the user configuration.
Figure 153: Guest User – Create One User Page
Table 10: Create One User Page Field Descriptions
Settings Guidelines
Username
Specify an account username. If the local authentication server has been configured with a prefix for guest accounts, the username box is populated with the next username in the prefix-based sequence. We recommend you retain the guest_ prefix so that you can rely on the naming convention in your role mapping rules.
Full Name Specify the name of the guest.
Password
A strong password is generated automatically, or you can specify a different password. After you have saved the configuration, the system displays the password characters as asterisks (*) instead of blanks or cleartext.
NOTE: The password cannot be decrypted later unless the appropriate option is set when you create a local authentication server.
Mobile Number Select the country name and then specify a valid phone number of the guest user. The Policy Secure sends the login credentials to this mobile number through SMS.
Email Specify an email address you can use to contact the guest if necessary.
Start Time By default the ‘Now’ option is displayed. You can specify a start time for the account activity period by clicking on the drop-down and selecting from the calendar menu.
End Time
By default ‘After 24 hours is displayed. You can specify an end of the account activity period. Click on the drop-down menu and select from the calendar menu. Once a user account has expired, it is deleted from the system.
The process that deletes the guest user account runs every ten minutes. There may be a delay of some minutes before the account is purged. Even if the time or date on the system is moved ahead past the expiration time, the account could still be valid until the purge process runs. One-time user accounts are not affected by the ten-minute delay: one-time accounts are deleted immediately after the user exits.

CHAPTER 8: Guest User Account Managers
© 2015 by Pulse Secure, LLC. All rights reserved 133
Settings Guidelines
Company Name Enter the name of the company of the guest.
Host or Sponsor Enter whether the guest is a Host or Sponsor.
One-time use Select this option if you want the account deleted immediately after the guest user exits the browser or signs out.
Enabled Select this option to enable the account
Require user to change password at next sign in
Select this option to prompt the user to change the configured password.
NOTE: This option will not be supported in GUAM for WLC case. This option should not be enabled. Even if enabled, it will not have any effect.
The following figure shows the page for adding many users. Table 11 describes the user configuration.
Figure 154: Guest User – Create Many Users Page
The guest usernames and passwords are created by the system as you click in the Username text box.

Guest Access Solution Configuration Guide
134 © 2015 by Pulse Secure, LLC. All rights reserved
Table 11: Create Many Users Page - Field Descriptions
Settings Guidelines
Username
Specify the prefix to be used for the multiple accounts you are creating. If the local authentication server has been configured with a guest prefix, it is populated here. When configuring the local authentication server, the default prefix is guest_. We recommend you retain the default guest_ so that you can rely on the naming convention in your role mapping rules.
Full Name Enter the full name of the guest.
Password
A strong password is generated automatically, or you can specify a different password. After you have saved the configuration, the system displays the password characters as asterisks (*) instead of blanks or cleartext.
NOTE: The password cannot be decrypted later unless the appropriate option is set when you create a local authentication server.
Start Time By default the ‘Now’ option is displayed. You can specify a start time for the account activity period by clicking on the drop-down and selecting from the calendar menu
End Time
By default ‘After 24 hours is displayed. You can specify an end of the account activity period. Click on the drop-down menu and select from the calendar menu. Once a user account has expired, it is deleted from the system.
The process that deletes the guest user account runs every ten minutes. There may be a delay of some minutes before the account is purged. Even if the time or date on the system is moved ahead past the expiration time, the account could still be valid until the purge process runs. One-time user accounts are not affected by the ten-minute delay: one-time accounts are deleted immediately after the user exits.
Company Name Enter the name of the company of the guest. (Optional)
Host or Sponsor Enter whether the guest is a Host or Sponsor. (Optional)
One-time use Select this option if you want the account deleted immediately after the guest user exits the browser or signs out
Enabled Select this option to enable the account.
Require user to change password at next sign in
Select this option to prompt the user to change the configured password
NOTE: This option will not be supported in GUAM for WLC case. This option should not be enabled. Even if enabled, it will not have any effect.
After the GUAM user clicks the Create button the following popup is displayed.
Figure 155: Multiple Users Created Popup Message
Select SMS and click OK to send the credentials to the guests’ mobiles.
Click Print to generate a printout of the credentials.

CHAPTER 8: Guest User Account Managers
© 2015 by Pulse Secure, LLC. All rights reserved 135
Figure 156: Multiple users created - Displayed on the guest admin page
From the GUAM page, the GUAM user can click Edit icon of a guest user account to modify the guest user account
details. The following figure shows the Edit User window.
Figure 157: Guest User – Edit User Page

Guest Access Solution Configuration Guide
136 © 2015 by Pulse Secure, LLC. All rights reserved
After clicking Save Changes the following popup appears.
Figure 158: Guest User – Edit User Successful popup with Email, SMS, and Print options
From the GUAM page, the GUAM user can click Print to generate a printable record of the guest user account. The
following figure shows the print details page.
Figure 159: Guest User – Print Details Page

© 2015 by Pulse Secure, LLC. All rights reserved 137
Appendix
Guest User Creating Login Credentials
Once Pulse Policy Secure is integrated with an existing WLC, and if a guest using the guest SSID tries to
access a website, the guest is redirected to the Pulse Policy Secure login page. The guest user can create the
login credentials. Using these credentials the guest user can access any of the websites permitted by the
Admin user.
Scenario I
When a guest tries to create login credentials, the User ID and Password are displayed on the monitor .
Settings required on Pulse Policy Secure:
To enable this option in the Pulse Policy secure main page select Authservers > Guest Authentication >
Settings
In the Guest Access Configurations section select the check box:
Show credentials on screen after guest completes registration
A guest user tries to access a website. The guest user is redirected to the Pulse Policy Secure Login page.
Figure 160: Pulse Policy Secure Login page for guests
To create login credentials:
1. Click the Register as guest link.
The following page appears.

Guest Access Solution Configuration Guide
138 © 2015 by Pulse Secure, LLC. All rights reserved
Figure 161: Guest - Personal Details
2. Enter a name in the Full Name field, and then click Register.
A popup box appears, which displays the newly created username and password.
Figure 162: Guest’s Username and Password created
3. Click OK.
The guest is redirected to the Pulse Policy Secure login page where the user credentials are
populated in the Username and Password fields.
Figure 163: Guest using the credentials in Sign In page
4. Click Sign In.
The guest is redirected to the website which the guest tried to access earlier.

Appendix
© 2015 by Pulse Secure, LLC. All rights reserved 139
Scenario II
When a guest tries to create login credentials, the guest receives the credentials through email and SMS.
Settings required on Pulse Policy Secure:
To enable this option in the Pulse Policy secure main page select Authservers > Guest Authentication >
Settings
In the Guest Access Configurations section select the check boxes:
Send guest user credentials via
o SMS
o Email
A guest user tries to access a website. The guest user is redirected to the Pulse Policy Secure Login page.
Figure 164: Pulse Policy Secure Login page for guests
To create login credentials:
1. Click the Register as guest link.
The following page appears.
Figure 165: Guest - Personal Details
2. Enter details in all the mandatory fields:
Full Name - Enter your full name
Email – Enter a valid email address

Guest Access Solution Configuration Guide
140 © 2015 by Pulse Secure, LLC. All rights reserved
Mobile Number – Enter your mobile number to receive an SMS
3. Click Register.
The pop message “An account has been created for you” is displayed.
Figure 166: Guest’s Username and Password created
NOTE: The guest user credentials are sent to the email and also an SMS is delivered to the
mobile number entered by the guest. The email ID entered in the Email text box is by
default used to create Username of the guest.
4. Click OK.
The guest is redirected to the Pulse Policy Secure login page.
Figure 167: Pulse Policy Secure Login page
5. Check your email or SMS and enter the details.
6. Click Sign In.
The guest is redirected to the website which the guest tried to access earlier.

© 2015 by Pulse Secure, LLC. All rights reserved 141
Glossary Abbreviation Expansion
AAA Authentication Authorization Accounting
ACL Access Control List
RADIUS Remote Authentication Dial-In User Service
SMTP Simple Mail Transfer Protocol
SMS Short Message Service
WLAN Wireless Local Area Network
WLC Wireless LAN Controller