High-throughput zebrafish histology
9
High-throughput zebrafish histology Nicole A. Sabaliauskas a,1 , Christina A. Foutz a,1 , Jason R. Mest a , Lynn R. Budgeon a , Adam T. Sidor a , Joseph A. Gershenson a , Sanjay B. Joshi b , Keith C. Cheng a, * a Jake Gittlen Cancer Research Foundation, Department of Pathology, The Pennsylvania State University College of Medicine, Hershey, PA 17033, USA b Department of Industrial and Manufacturing Engineering, The Pennsylvania State University, University Park, PA 16802, USA Accepted 3 March 2006 Abstract The morphological effects of mutation and disease are often critical to our understanding of normal and abnormal function. The power and popularity of zebrafish as a forward and reverse genetic vertebrate model system, combined with its small size, have made it an ideal model in which to study the genetics of histologically scorable phenotypes. The presence of multiple tissue types in this organ- ism’s small larvae also makes it a potentially important model for toxicological analysis. Studying histological phenotypes is greatly enhanced by high-throughput methods of histology. Here, we describe details of high-throughput histology of the zebrafish using larval arrays, along with recent advances in mold design and discussion of work in progress that will lead to easier ways for people in the field to more rapidly score phenotypes in arrays. These detailed descriptions, together with the troubleshooting guide, should enable any labo- ratory with ties to a histology facility to perform high-throughput histology of zebrafish. Ó 2006 Elsevier Inc. All rights reserved. Keywords: Zebrafish; Histology; High-throughput toxicology method; Atlas screen; Array genetic screen 1. Introduction The light microscopic study of thin tissue sections reveals an infinite variety of architectural and cytological detail. Pathologists routinely use histology to distinguish a multitude of cell types, cell processes, and abnormalities in the diagnosis of human diseases, including cancer [1,2]. While its development lies in the roots of medicine, histol- ogy is also an effective method of detecting the subtle changes in morphology found in experimental biology. In the large-scale zebrafish histology screens performed in our laboratory, significant numbers of larvae must be rapidly scored for changes in tissues associated with muta- tions. Due to their small size (4 mm · 0.5 mm · 1 mm for 7-day old zebrafish), histology on individual larvae is impractical; therefore, we developed a method to perform high-throughout histology on arrays of agarose-embedded fish (Fig. 1). This method reduces both the number of slides that need to be produced to score each fish and the time it takes to diagnose the changes in each individual [3,4]. We applied this method to a mutagenesis screen [5], in which thousands of larvae were scored individually and tracked by hand; seven non-complementing, recessive mutations affecting cellular differentiation were found. Here, we pres- ent an updated description of high-throughput histology, including discussion of digitization and computer-assisted analysis, being developed for new screens. 2. Methods 2.1. Fixation Proper fixation, the first critical step in large-scale histol- ogy, preserves tissue structure as close to the in vivo state as possible. The purpose of fixation is to prevent autolysis and distortion of tissue structure. Formaldehyde-based fixatives are the most commonly used for histological analysis. These fixatives act by covalently cross-linking tissue www.elsevier.com/locate/ymeth Methods 39 (2006) 246–254 1046-2023/$ - see front matter Ó 2006 Elsevier Inc. All rights reserved. doi:10.1016/j.ymeth.2006.03.001 * Corresponding author. E-mail address: [email protected] (K.C. Cheng). 1 These authors contributed equally to the work.
-
Upload
independent -
Category
Documents
-
view
3 -
download
0
Transcript of High-throughput zebrafish histology

www.elsevier.com/locate/ymeth
Methods 39 (2006) 246–254
High-throughput zebrafish histology
Nicole A. Sabaliauskas a,1, Christina A. Foutz a,1, Jason R. Mest a, Lynn R. Budgeon a,Adam T. Sidor a, Joseph A. Gershenson a, Sanjay B. Joshi b, Keith C. Cheng a,*
a Jake Gittlen Cancer Research Foundation, Department of Pathology, The Pennsylvania State University College of Medicine, Hershey, PA 17033, USAb Department of Industrial and Manufacturing Engineering, The Pennsylvania State University, University Park, PA 16802, USA
Accepted 3 March 2006
Abstract
The morphological effects of mutation and disease are often critical to our understanding of normal and abnormal function. Thepower and popularity of zebrafish as a forward and reverse genetic vertebrate model system, combined with its small size, have madeit an ideal model in which to study the genetics of histologically scorable phenotypes. The presence of multiple tissue types in this organ-ism’s small larvae also makes it a potentially important model for toxicological analysis. Studying histological phenotypes is greatlyenhanced by high-throughput methods of histology. Here, we describe details of high-throughput histology of the zebrafish using larvalarrays, along with recent advances in mold design and discussion of work in progress that will lead to easier ways for people in the field tomore rapidly score phenotypes in arrays. These detailed descriptions, together with the troubleshooting guide, should enable any labo-ratory with ties to a histology facility to perform high-throughput histology of zebrafish.� 2006 Elsevier Inc. All rights reserved.
Keywords: Zebrafish; Histology; High-throughput toxicology method; Atlas screen; Array genetic screen
1. Introduction
The light microscopic study of thin tissue sectionsreveals an infinite variety of architectural and cytologicaldetail. Pathologists routinely use histology to distinguisha multitude of cell types, cell processes, and abnormalitiesin the diagnosis of human diseases, including cancer [1,2].While its development lies in the roots of medicine, histol-ogy is also an effective method of detecting the subtlechanges in morphology found in experimental biology.
In the large-scale zebrafish histology screens performedin our laboratory, significant numbers of larvae must berapidly scored for changes in tissues associated with muta-tions. Due to their small size (�4 mm · 0.5 mm · 1 mm for7-day old zebrafish), histology on individual larvae isimpractical; therefore, we developed a method to performhigh-throughout histology on arrays of agarose-embedded
1046-2023/$ - see front matter � 2006 Elsevier Inc. All rights reserved.
doi:10.1016/j.ymeth.2006.03.001
* Corresponding author.E-mail address: [email protected] (K.C. Cheng).
1 These authors contributed equally to the work.
fish (Fig. 1). This method reduces both the number of slidesthat need to be produced to score each fish and the time ittakes to diagnose the changes in each individual [3,4]. Weapplied this method to a mutagenesis screen [5], in whichthousands of larvae were scored individually and trackedby hand; seven non-complementing, recessive mutationsaffecting cellular differentiation were found. Here, we pres-ent an updated description of high-throughput histology,including discussion of digitization and computer-assistedanalysis, being developed for new screens.
2. Methods
2.1. Fixation
Proper fixation, the first critical step in large-scale histol-ogy, preserves tissue structure as close to the in vivo state aspossible. The purpose of fixation is to prevent autolysis anddistortion of tissue structure. Formaldehyde-based fixativesare the most commonly used for histological analysis.These fixatives act by covalently cross-linking tissue
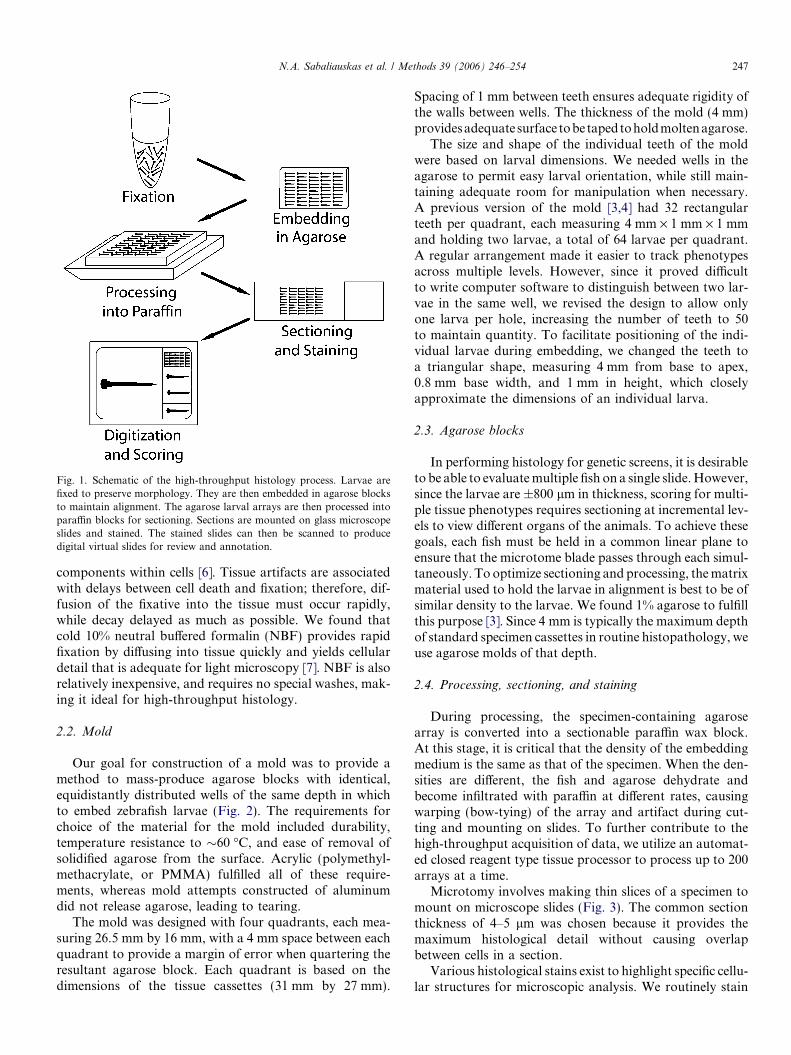
Fig. 1. Schematic of the high-throughput histology process. Larvae arefixed to preserve morphology. They are then embedded in agarose blocksto maintain alignment. The agarose larval arrays are then processed intoparaffin blocks for sectioning. Sections are mounted on glass microscopeslides and stained. The stained slides can then be scanned to producedigital virtual slides for review and annotation.
N.A. Sabaliauskas et al. / Methods 39 (2006) 246–254 247
components within cells [6]. Tissue artifacts are associatedwith delays between cell death and fixation; therefore, dif-fusion of the fixative into the tissue must occur rapidly,while decay delayed as much as possible. We found thatcold 10% neutral buffered formalin (NBF) provides rapidfixation by diffusing into tissue quickly and yields cellulardetail that is adequate for light microscopy [7]. NBF is alsorelatively inexpensive, and requires no special washes, mak-ing it ideal for high-throughput histology.
2.2. Mold
Our goal for construction of a mold was to provide amethod to mass-produce agarose blocks with identical,equidistantly distributed wells of the same depth in whichto embed zebrafish larvae (Fig. 2). The requirements forchoice of the material for the mold included durability,temperature resistance to �60 �C, and ease of removal ofsolidified agarose from the surface. Acrylic (polymethyl-methacrylate, or PMMA) fulfilled all of these require-ments, whereas mold attempts constructed of aluminumdid not release agarose, leading to tearing.
The mold was designed with four quadrants, each mea-suring 26.5 mm by 16 mm, with a 4 mm space between eachquadrant to provide a margin of error when quartering theresultant agarose block. Each quadrant is based on thedimensions of the tissue cassettes (31 mm by 27 mm).
Spacing of 1 mm between teeth ensures adequate rigidity ofthe walls between wells. The thickness of the mold (4 mm)providesadequate surface tobetapedtoholdmoltenagarose.
The size and shape of the individual teeth of the moldwere based on larval dimensions. We needed wells in theagarose to permit easy larval orientation, while still main-taining adequate room for manipulation when necessary.A previous version of the mold [3,4] had 32 rectangularteeth per quadrant, each measuring 4 mm · 1 mm · 1 mmand holding two larvae, a total of 64 larvae per quadrant.A regular arrangement made it easier to track phenotypesacross multiple levels. However, since it proved difficultto write computer software to distinguish between two lar-vae in the same well, we revised the design to allow onlyone larva per hole, increasing the number of teeth to 50to maintain quantity. To facilitate positioning of the indi-vidual larvae during embedding, we changed the teeth toa triangular shape, measuring 4 mm from base to apex,0.8 mm base width, and 1 mm in height, which closelyapproximate the dimensions of an individual larva.
2.3. Agarose blocks
In performing histology for genetic screens, it is desirableto be able to evaluate multiple fish on a single slide. However,since the larvae are ±800 lm in thickness, scoring for multi-ple tissue phenotypes requires sectioning at incremental lev-els to view different organs of the animals. To achieve thesegoals, each fish must be held in a common linear plane toensure that the microtome blade passes through each simul-taneously. To optimize sectioning and processing, the matrixmaterial used to hold the larvae in alignment is best to be ofsimilar density to the larvae. We found 1% agarose to fulfillthis purpose [3]. Since 4 mm is typically the maximum depthof standard specimen cassettes in routine histopathology, weuse agarose molds of that depth.
2.4. Processing, sectioning, and staining
During processing, the specimen-containing agarosearray is converted into a sectionable paraffin wax block.At this stage, it is critical that the density of the embeddingmedium is the same as that of the specimen. When the den-sities are different, the fish and agarose dehydrate andbecome infiltrated with paraffin at different rates, causingwarping (bow-tying) of the array and artifact during cut-ting and mounting on slides. To further contribute to thehigh-throughput acquisition of data, we utilize an automat-ed closed reagent type tissue processor to process up to 200arrays at a time.
Microtomy involves making thin slices of a specimen tomount on microscope slides (Fig. 3). The common sectionthickness of 4–5 lm was chosen because it provides themaximum histological detail without causing overlapbetween cells in a section.
Various histological stains exist to highlight specific cellu-lar structures for microscopic analysis. We routinely stain

Fig. 2. Computer-generated and actual images of tools used for large-scale histology. Solidworks images (Dassault Systems, Concord, MA) of the moldfrom (A) top, (B) angle, and (C) side. (D) Top view of the actual mold, showing size and spacing of teeth. (E) Agarose block being removed from moldsurface after solidification. (F) Tool used for embedding larvae in agarose. Scale bars (A–F) = 4 mm.
Fig. 3. (A) Agarose-embedded larval array (B) Hematoxylin and eosin (H and E) stained paraffin section from a larval array. (C) Single embedded larva inagarose (D) Single H and E stained larval section. Scale Bars (A and B) = 4 mm, (C and D) = 500 lm. The number of larvae represented on a single slidewill fluctuate due to variations in embedding and processing.
248 N.A. Sabaliauskas et al. / Methods 39 (2006) 246–254
the sections with hematoxylin and eosin (Figs. 3 and 4).These are the two most commonly used stains for tissue his-tology, which stain nucleic acid blue and protein pink,respectively.
2.5. Digitization
Web-accessible high-resolution digital representationsof slides (virtual slides) enable users to navigate and

Fig. 4. Section of 7-day H and E stained larva. (A) Midsection, (B) liverand gut, (C) eye. Scale bars (A–C) = 25 lm.
Fig. 5. Aperio T2 ScanScope. (A) Opened console, (B) objective [O] andstage [S], (C) slide racks [SR] and slide gripper [SG].
N.A. Sabaliauskas et al. / Methods 39 (2006) 246–254 249
magnify the image, thus allowing computers to functionas microscopes. The digital slide format reduces the timeinvolved in data sharing and facilitates record keepingand diagnosis by allowing nondestructive annotationsto be digitally overlaid on each slide. Virtual slidescan also be linked, coordinating navigation and magnifi-cation, allowing direct comparisons between multipleslides. Utilizing the digital format also allows thepotential for multiple viewers in remote locations to view
slides. This eases collaborative efforts between labs sepa-rated by long distances while protecting irreplaceableglass slides.
The creation of web-based virtual slides, has become awidely accepted resource for the scientific and educationalcommunities. Posting digital slides on the internet, (e.g. theUniversity of Iowa’s ‘‘Virtual Slidebox;’’ http://www.path.uiowa.edu/virtualslidebox/), allows global access by collab-orators, educators, and students. Digitization of glass slidescan be achieved using automated slide scanners such as theAperio ScanScope T2 with automated slide loader (Fig. 5),which allows up to 120 slides to be loaded at a time. This

250 N.A. Sabaliauskas et al. / Methods 39 (2006) 246–254
scanner has interchangeable 20· and 40· objectives, provid-ing a balance between fast-production and high-resolutionimages (http://zfatlas.psu.edu).
2.6. Annotation
In our laboratory’s previous histology screen, slideswere scored manually under a microscope, and abnormal-ities documented by hand on a record sheet. This process istedious because several levels of each larva must be scoredto comprehensively annotate the phenotype, but is man-ageable when scoring only a small number of larvae. Asnumbers rise, it becomes increasingly impractical to carryout annotation in such a manner. Therefore, softwareenhancements are being developed to automate thisprocess.
In addition to the software developed by Aperio, ourlaboratory is developing its own annotation software(Fig. 6), designed to display histological data based oneach individual zebrafish larva by utilizing the grid-likearray layout of the larvae on each of the slides. In con-trast to Aperio’s software, where digital slides have tobe individually opened before being manually linked andnavigation coordinated, our software will provide one-touch access to all slides of a block with pre-coordinated
Fig. 6. Screen captures from our lab’s pilot annotation software. (A)Main image control area, (B) database entry screen.
navigation; clicking on a specific larva from the array willopen up macro images of each section localized to thatindividual fish. All of the macro images will be linked,so when a diagnosis is made, it will be applied to that lar-va on all levels. This technology will eliminate the need toswitch slides to keep track of individual larvae from slideto slide.
3. Materials, solutions and equipment
3.1. Materials
Plastic or glass screw-top vials (VWR: 60011-041)Glass pipettes (Fisher: 3-678-20A)ParafilmMolecular biology-grade agarose (Invitrogen:15510-027)Label tape (Fisher: 11-880)Razor bladePetri dishMicro-point round tool (Fine Scientific Tools:FST#10064-14)Lint-free task wipe (Fisher: 06-666)Tissue cassette (Electron Microscopy Sciences: 62500)Stainless steel spatula (VWR: 57950-000)Paraffin (Fisher: 12-646-111)Stainless steel dish (VWR: 25608-832)Disposable microtome blades (VWR: 25608-964)Wet iceSilane-coated glass slides (Mercedes Medical: MER7255/90/WH)Coverslip (Mercedes Medical: MER R24500).
3.2. Solutions
Tricaine methanesolufonate (Finquel, Argent: MS-222)10% Neutral buffered formalin (NBF, Fisher:SF100-4)EthanolXylene (Fisher: X3P-1)Harris Hematoxylin (Eng Scientific: 8497)Hydrochloric acidAmmonium hydroxideWorking alcoholic eosin (Eng Scientific: 8913)Mounting Medium (Clarion, Biomeda Corp: M06).
3.3. Equipment
Polymethylmethacrylate Mold4 �C refrigerator55 �C water bathDissecting microscopeAutomated closed reagent type processor (RMC model1530)Rotary microtome (Reichert-Jung Histocut 820)45 �C untreated water bath

N.A. Sabaliauskas et al. / Methods 39 (2006) 246–254 251
70 �C incubation ovenAutomated slide stainer (Sakura Tissue Tek DRS).
Table 1Tissue processing steps
Time (min) Solution Temp (�C) Vacuum (in. Hg)
Overnight 70% ETOH �25 —45 70% ETOH �25 —45 95% ETOH �25 1545 95% ETOH �25 —45 100% ETOH �25 —45 100% ETOH �25 1545 100% ETOH �25 1545 Xylene �25 —45 Xylene �25 1560 Paraffin 60 1560 Paraffin 60 1560 Paraffin 60 15
4. Protocols
4.1. Fixation
Transfer live 7-day zebrafish larvae into plastic or glassscrew-top vials filled with cold 0.15% w/v Finquel solution.Once fish are immobile, pipette off the Finquel and replacewith cold 10% v/v NBF. Seal the vials with Parafilm to pre-vent evaporation and store at 4 �C overnight to allow forfixative penetration into the tissue. Pipette off the 10%NBF from the vials and replace with a solution of 70% eth-anol in double distilled water. Reseal the vials with Para-film and store at 4 �C until embedding (preferably notlonger than one week).
4.2. Making agarose blocks
Use a fresh solution of 1% agarose in double distilledwater. Heat the solution to dissolve the agarose then allowit to cool to a comfortable handling temperature (�55 �C)before pouring the arrays. Store the agarose in a 55 �Cwater bath.
Prepare the mold by wrapping a single piece of tapearound the sides, such that the tape does not extend belowthe bottom edge. Set the taped mold on the laboratorybench and check that it is level. Slowly pipette a specifiedvolume of 1% agarose onto the mold calculated by the fol-lowing equation:
½mold length � mold width � agarose depth ð4 mmÞ�� ½volume of tooth� � number of teeth�
For triangular teeth, the volume of the tooth is 0.5 ·base of triangle · height of triangle · depth of tooth.For rectangular teeth, the volume of the tooth is thelength of rectangle · width of rectangle · depth oftooth.
Let the poured agarose cool for at least 45 min andthen remove the tape. Carefully separate the agaroseblock from the mold by individually loosening each cor-ner. The agarose will now easily separate from the moldsurface with a delicate peeling motion. Cut the blockinto four quadrants and notch each in the upper left cor-ner for orientation purposes using a sharp, single-edgedrazor blade.
4.3. Embedding in agarose
Embed zebrafish larvae in agarose blocks under a dis-secting microscope. Set the block on top of a Petri dishto allow for repositioning as necessary. Remove the larvaefrom their storage vials using a flamed glass pipette. Pipettethe number of larvae to be embedded onto the block,
leaving a thin layer of liquid. Using a micro-point roundtool (Fig. 2F), gently lift a larva up by the neck regionand place it into a well. Once all of the larvae are situatedindividually in wells, use a lint-free task wipe placed flat onthe surface of the array to wick up excess liquid. Again,using the micro-point round tool, carefully position larvaein the wells so their heads are all facing the same directionand they are lying ventral side up. When the larvae are allproperly oriented, twist the corner of a task wipe and use itto wick out the remaining liquid from each of the wellsindividually. Make sure the tail of each larva is adherentto the wall in the same way in each well so that they lieparallel.
4.4. Topping off wells
Remove the agarose from the 55 �C water bath anddraw up a small amount in a glass pipette. Gently touchthe tip of the pipette to the apex of each well, allowingthe agarose to flow out of the tip and into the well. Someindividuals prefer to use flame-pulled pipettes to gain bettercontrol over the rate of dispensing the agarose. The smallertip diameter requires faster work, since agarose solidifiesmore quickly in thinner tips.
After the wells have been filled, allow the array to sitfor approximately one minute before setting it into alabeled tissue cassette using a flat stainless steel spatula.Place the cassette into 70% ethanol in double distilledwater.
4.5. Processing
The purpose of processing is to replace water with par-affin, which is firm enough to cut. The process is done grad-ually to minimize artifact. The details of the processingsteps we routinely use within our automated, closedreagent type processor are described in Table 1.
Just as is done with any other normal tissue of similar sizeand shape, the next step is to embed the infiltrated arrays in ablock of paraffin. As a result of the processing, the density ofthe material and tissue being cut gains a uniformity of cut-ting properties that is required for the best sectioning. The

252 N.A. Sabaliauskas et al. / Methods 39 (2006) 246–254
processed arrays are thus placed one at a time in a stainlesssteel dish (�3.5 cm · 2 cm · 0.7 cm), and covered with mol-ten paraffin. Position the bottom of the original tissue cas-sette with its lid removed on top of the array and top offwith molten paraffin to adhere the two together upon solid-ification. This attached cassette is used to hold the paraffinblock in the microtome during sectioning.
4.6. Sectioning
Use a rotary microtome set to 4–5 lm. Once set,insert a fresh disposable microtome blade into the knife
Table 2Automated staining steps
Time Solution
3 min Xylene5 min Xylene (fresh)2 min 100% ETOH2 min 95% ETOH1 min Running water3 min Harris Hematoxylin1 min Running water1 min 1% hydrochloric acid in 70% ETOH1 min Running water1 min 0.2% ammonium hydroxide in water1 min Running water20–30 sec Working alcoholic eosin1 min 30% ETOH45 sec 95% ETOH1 min 100% ETOH1 min Xylene1 min Xylene (fresh)
Table 3Troubleshooting
Problem Cause
Fixation
Artifact Poor fixationBowed larvae Fixed bent or curvedMold
Agarose does not release from mold Mold materialSurface build-up
Scratched mold surfaceAsymmetric agarose blocks Mold warps or expands with heaAgarose blocks
Bow-tying Old agaroseOld agarose blocks
State change from liquid to solid
Uneven thickness of agarose blocRapid flood of agarose onto mol
Embedding
Larvae difficult to move into wells Surface of block dry
Larvae difficult to orient in wells Well too dry
stage. Clamp the paraffin block into the objective holderof the microtome and slowly trim away the face of theparaffin block until the first features of the fish appear.When a desired cutting face presents itself, remove theblock from the objective holder and place it on wet icefor approximately 20 min. Return the block to the objec-tive holder, cut a ribbon of sections, and float them on a45 �C untreated water bath. Quickly mount desirable sec-tions on silane-coated glass slides; too much time on thewater bath will result in tissue distortion, caused bydifferential rates of hydration of different tissues. Allowthe slides to air-dry for at least three hours before plac-ing them in staining racks. For hematoxylin and eosinstaining, heat the slides in an incubation oven at 70 �Cfor 30 min. If the slides are intended for DNA extractionor immunohistochemical staining, heat slides at theprotocol-recommended temperature.
4.7. Staining
Use an automated slide stainer. The sequence and dura-tion of the steps that are programmed into our machine areshown in Table 2. After staining, protect sections bymounting a coverslip over the tissue using a mountingmedium to adhere the coverslip to the slide.
5. Troubleshooting
A summary of the problems we and other labs haveencountered in using these molds over the past decade,together with their reasons and solutions, are presented
Solution
Keep fix cold to avoid tissue degradationLay the tubes so the fish lie in a natural position
Use PMMA or similar materialClean mold with deionized water; spray a thin coat of siliconelubricant and wipe off excessDo not use metal tools to remove the agarose
t Use PMMA or heat resistant material
Dispose of agarose after 48 hWrap in plastic wrap for overnight storage at 4 � C; do notkeep longer than 72 hKeep agarose temperature consistent; keep out of water bathfor as short a time as possible
k Level mold before pouringd Pipette slowly; use 10–200 lL plastic pipette tip to remove
bubbles before agarose solidifies
Pipette a few drops of ethanol onto block surface; larvaemoved without liquid prone to damageTouch ethanol-filled pipette tip to block surface to allow atrace amount of liquid to enter the well

Table 3 (continued )
Problem Cause Solution
Irregularly shaped or young larvae Orient larvae as level as possible without pushing them againstthe side of the well; take special care to avoid damage to theyolk of young larvae
Sections do not show all larvae Larvae not embedded in even plane Make sure larvae remain on the bottom of wells when filling inwith agarose, so all are in the same plane when sectioning
Larvae not straight in sections Larvae not properly oriented in wells Use larvae’s eyes as guides for orientation; eyes should appearsymmetrical and in the same plane
Bow-tying Dried out block Do not allow blocks to sit uncovered for an extended period oftime
Larva does not adhere to wall afterwicking excess fluid
Larva not properly oriented Touch ethanol-filled pipette tip to block surface to allow a traceamount of liquid to flow out; reorient larva and wick excess fluid
Topping off wells
Bow-tying Too much agarose used to top off wells Touch agarose-filled pipette tip to well apex; allow agarose toflow out; do not push agarose out
Air bubbles hidden underneath larvae Frequent with young and mutants; use embedding tool to removeAgarose solidifies in pipette when topping
off wellsPipette tip too cold Pre-warm multiple pipettes; switch pipettes when agarose
solidifies; do not allow temperature to exceed 60 �C, as this willcompromise DNA and immunohistochemical stainingproperties
Larvae do not remain on walls Too much excess liquid in well Twist the corner of a task wipe and wick fluid out of each wellbefore topping off with agarose
Flow of agarose too fast Experiment with pulled pipettes, different pipet bulbs, andways of holding the pipet (closer to base of thumb)
Processing
Bow-tying Agarose concentration altered in storage Ensure array storage in 70% ethanol, dry or pure water storagewill change agarose concentration
Sectioning
Sections do not show all larvae Cassette not situated properly in holder Paraffin block face must be parallel to knife blade; cassettemust be properly clamped into holder
Ribbons wrinkle when coming off blade Block not chilled or adequately hydrated Leave cassette on wet ice for longer period to chill and hydratethe block cut surface
Larvae not intact within paraffin Block not hydrated Leave cassette on wet ice for longer period to chill and hydratethe block cut surface
Ribbons contract Too long on water bath Remove ribbons more quickly from water bathSections fall off slides Slides not silane-coated Use silane-coated slides, or another adhesive material that will
adhere the sectionsStaining
Tissue falls off slide during staining Slides not fully dried before staining Ensure slides are dry after sectioning before loading into theautomatic slide stainer
Slide returns unstained or verylightly stained
Residual paraffin remains on the slides Ensure all paraffin is removed from the slides before loadinginto the stainer
Stain appears too bright or dull Stain times incorrect Thinner sections need more time exposed to stain as there isless tissue to pick it up; thicker sections need less time; timesgiven are for 4–5 lm sections
Bubbles on slides after coverslipping Mounting medium uneven Use a thin, even coat of mounting medium; do not movecoverslip once mounted, as this will cause damage to the tissue
Slides yellow after time Poor mounting medium Use mounting medium with high optical clarityDigitization
Slides not scanning, or scanningpoorly
External vibration House slide scanner in an area far away from frequently usedequipment, elevators, and air passages, as these cause thescanner to vibrate
Bubbles in mounting medium Slides may need to be scanned manually; recoverslip byimmersing slide in xylene and reapplying mounting medium
Small amounts of tissue on the slide Especially young embryos; scan slides manually withnumerous focus points on the tissue
Slides not clean Remove fingerprints and dust from slide surface; razor bladescan be used to remove mounting medium that may have oozedout to external slide surfaces
Sections too thick Rescan slide manually with numerous focus pointsColors incorrect No white balance performed Select an area on the slide with no tissue to serve as
background color; resultant scan will have this backgroundtone removed, yielding more accurate colors
Scans do not appear sharp No unsharp mask performed Scanning software has unsharp mask filter that sharpens edgesof out-of-focus features; use unsharp mask tool to restoresharpness that is apparent in binocular view
N.A. Sabaliauskas et al. / Methods 39 (2006) 246–254 253

254 N.A. Sabaliauskas et al. / Methods 39 (2006) 246–254
in Table 3. Please send emails about additional problems orquestions to [email protected] or [email protected].
Acknowledgments
We thank Peggy Hubley for fish facility maintenance,Melissa Lighty for graphics assistance, Jing Fu and theDepartment of Industrial and Manufacturing Engineeringfor mold construction, and Fred Dee (U. Iowa) and thestaff of Aperio Corp for their advice with scanning. Thiswork was supported by National Institutes of HealthGrants 5R01HD040179 and 5R24RR017441, the LifeSciences Greenhouse of Central Pennsylvania, and ThePennsylvania Tobacco Settlement Fund to K.C. Imageswere taken in the Penn State Zebrafish Functional Genom-ics Core Facility.
References
[1] R. Demay, The cell, the Art and Science of Cytopathology,American Society of Clinical Pathologists’ Press, Chicago, 1996, pp.40–44.
[2] V. Kumar, A. Abbas, N. Fausto, Pathologic Basis of Disease, WBSaunders, Philadelphia, 2005, pp. 1525.
[3] G. Tsao-Wu, C. Weber, L. Budgeon, K. Cheng, BioTechniques 25(1998) 614–618.
[4] G. Tsao-Wu, C. Weber, L. Budgeon, K. Cheng, in: M. McClelland, A.Pardee (Eds.), Expression Genetics: High-Throughput Methods, EatonPublishing, 1999, pp. 31–36 (Chapter 4).
[5] M.-A.P.K. Mohideen, L. Beckwith, G. Tsao-Wu, J. Moore, A. Wong,M. Chinoy, K. Cheng, Developmental Dynamics 228 (2003) 414–423.
[6] M. Ross, G. Kaye, W. Pawlina, Histology: A Text and Atlas with Celland Molecular Biology, Lippincott Williams and Wilkins, Philadel-phia, 2003, pp. 3.
[7] J. Moore, M. Aros, K. Steudel, K. Cheng, BioTechniques 32 (2002)296–298.