General Journal Entry/Proof - Racine County
12
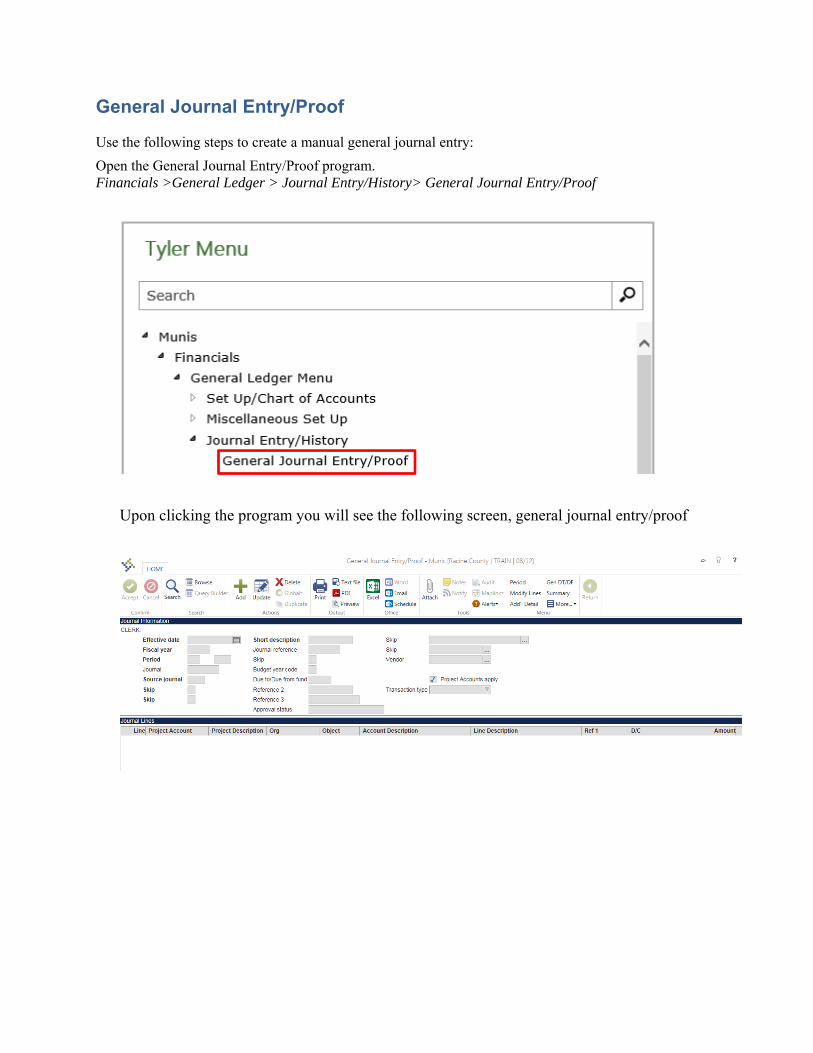
General Journal Entry/Proof Use the following steps to create a manual general journal entry: Open the General Journal Entry/Proof program. Financials >General Ledger > Journal Entry/History> General Journal Entry/Proof Upon clicking the program you will see the following screen, general journal entry/proof
-
Upload
khangminh22 -
Category
Documents
-
view
1 -
download
0
Transcript of General Journal Entry/Proof - Racine County
General Journal Entry/Proof
Use the following steps to create a manual general journal entry:
Open the General Journal Entry/Proof program. Financials >General Ledger > Journal Entry/History> General Journal Entry/Proof
Upon clicking the program you will see the following screen, general journal entry/proof
The program is split between Journal Information (header) and Journal Lines (detail)
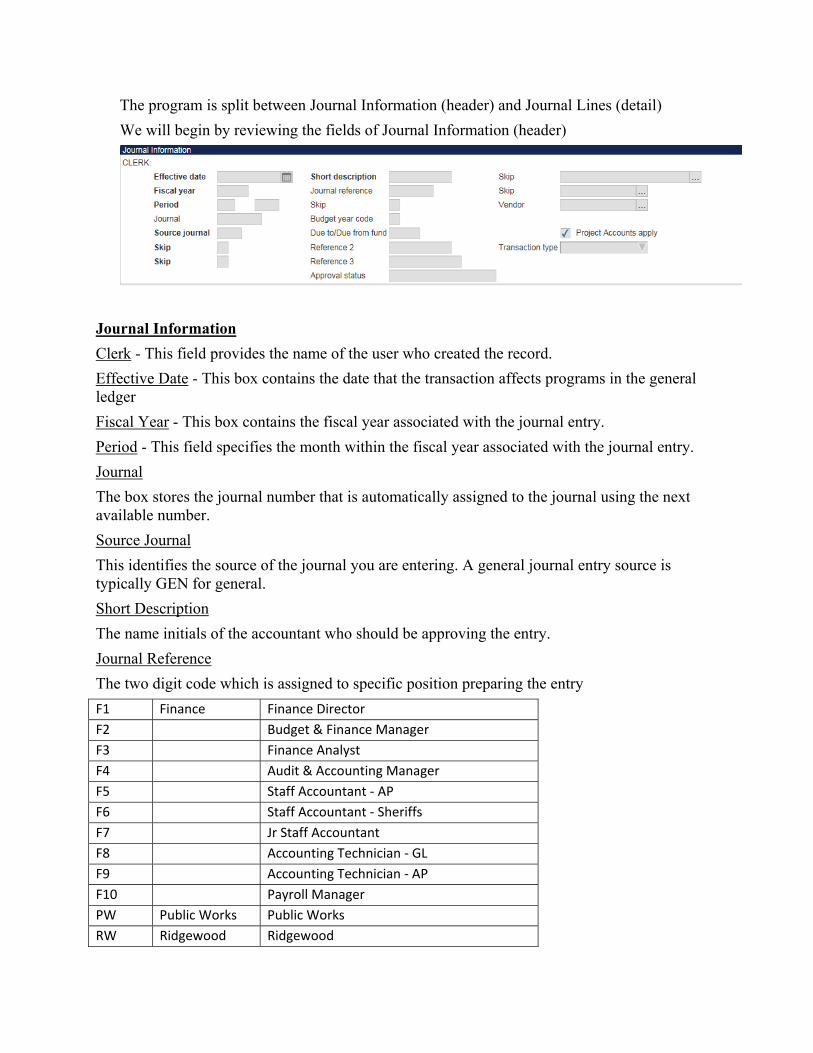
We will begin by reviewing the fields of Journal Information (header)
Journal Information
Clerk - This field provides the name of the user who created the record.
Effective Date - This box contains the date that the transaction affects programs in the general ledger
Fiscal Year - This box contains the fiscal year associated with the journal entry.
Period - This field specifies the month within the fiscal year associated with the journal entry.
Journal
The box stores the journal number that is automatically assigned to the journal using the next available number.
Source Journal
This identifies the source of the journal you are entering. A general journal entry source is typically GEN for general.
Short Description
The name initials of the accountant who should be approving the entry.
Journal Reference
The two digit code which is assigned to specific position preparing the entry
F1 Finance Finance Director
F2 Budget & Finance Manager
F3 Finance Analyst
F4 Audit & Accounting Manager
F5 Staff Accountant ‐ AP
F6 Staff Accountant ‐ Sheriffs
F7 Jr Staff Accountant
F8 Accounting Technician ‐ GL
F9 Accounting Technician ‐ AP
F10 Payroll Manager
PW Public Works Public Works
RW Ridgewood Ridgewood
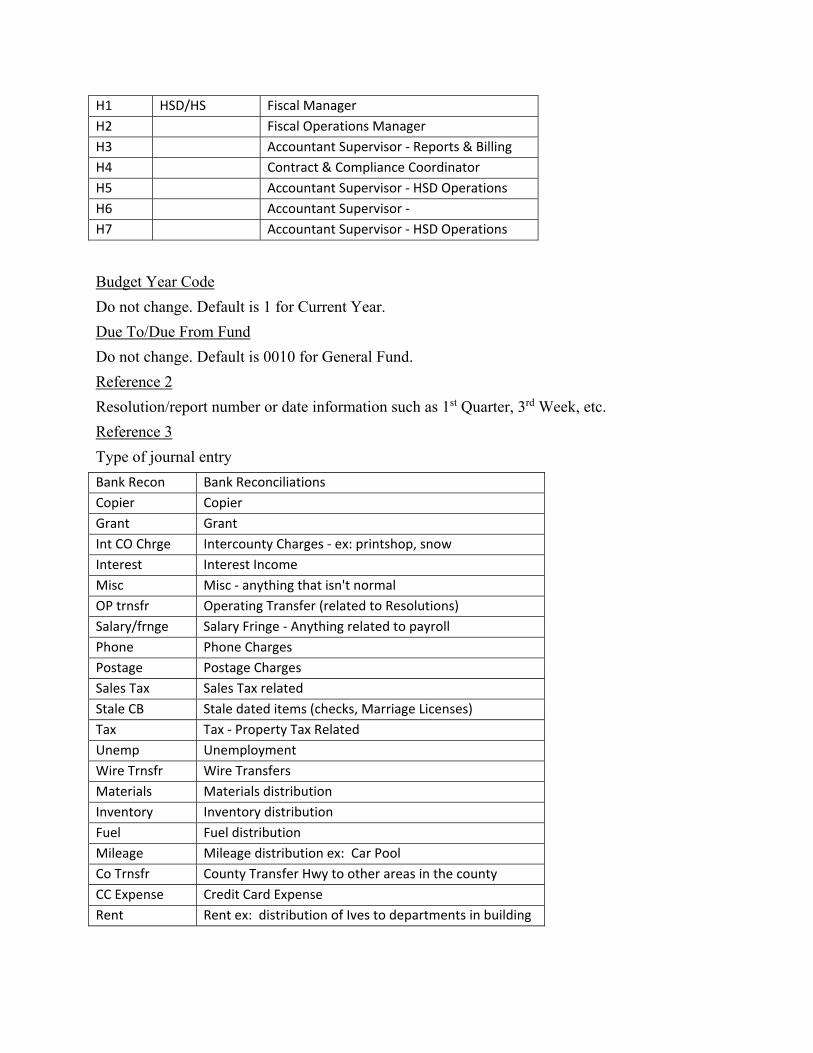
H1 HSD/HS Fiscal Manager
H2 Fiscal Operations Manager
H3 Accountant Supervisor ‐ Reports & Billing
H4 Contract & Compliance Coordinator
H5 Accountant Supervisor ‐ HSD Operations
H6 Accountant Supervisor ‐
H7 Accountant Supervisor ‐ HSD Operations
Budget Year Code
Do not change. Default is 1 for Current Year.
Due To/Due From Fund
Do not change. Default is 0010 for General Fund.
Reference 2
Resolution/report number or date information such as 1st Quarter, 3rd Week, etc.
Reference 3
Type of journal entry
Bank Recon Bank Reconciliations
Copier Copier
Grant Grant
Int CO Chrge Intercounty Charges ‐ ex: printshop, snow
Interest Interest Income
Misc Misc ‐ anything that isn't normal
OP trnsfr Operating Transfer (related to Resolutions)
Salary/frnge Salary Fringe ‐ Anything related to payroll
Phone Phone Charges
Postage Postage Charges
Sales Tax Sales Tax related
Stale CB Stale dated items (checks, Marriage Licenses)
Tax Tax ‐ Property Tax Related
Unemp Unemployment
Wire Trnsfr Wire Transfers
Materials Materials distribution
Inventory Inventory distribution
Fuel Fuel distribution
Mileage Mileage distribution ex: Car Pool
Co Trnsfr County Transfer Hwy to other areas in the county
CC Expense Credit Card Expense
Rent Rent ex: distribution of Ives to departments in building

Approval Status
This field provides the current status of the journal entry. When you enter a journal, the status is Held. The program completes this box and you cannot change it.
Project Accounts Apply
This check box indicates that project account strings have been applied as part of the journal entry. This box will default to checked.
Journal Lines
Line
This number is assigned by the system to uniquely identify each line of the journal detail.
Project Account & Project Description
This is the project account string to which the entry applies. You can click the field help button
to select an account string from a list of available options. The Project Description provides the name of the selected project account.
Org & Object
This box contains the general ledger account number to which the journal entry is to be posted. Enter the org code and object code.
Account Description
This is the description of the general ledger account entered. The program completes the description and you cannot change it.
Line Description
This box contains the description for the individual line entry. The description can contain up to 30 characters.
D/C
This box indicates whether this journal line entry is to be a debit or credit.
Amount
This is the amount of the entry transaction.
Do not enter the decimal point and zeros if the transaction is a whole dollar amount. For example, enter 10000 for $10,000.00. You cannot enter a negative value in this field. Type a value up to 99,999,999,999.99.
When the amount is entered for an expense account, the available budget is instantly reduced. Any subsequent change or deletion makes corresponding adjustments to available budget.

When you complete this field, the program checks the available budget for expense accounts and displays a warning if the entered amount causes the account to be over budget. You can continue if you have the appropriate permissions; if not, a supervisor's password is required to continue. If that cannot be efficiently obtained, delete this line, complete the rest of the journal entry, and enter the over budget line when a supervisor is available.
Journal Totals
Debits
This box displays the total amount of the debit entries.
Credits
This box displays the total amount of the credit entries.
Workflow
These options provide the workflow status levels an approver can assign to the journal. If you are a workflow approver, the My Approvals button provides a list of the records currently awaiting your approval.
Add a general journal entry
1. On the ribbon, click Add .
2. Complete the fields, as required. Refer to the Field Descriptions table for details.
3. Press Tab to move through the fields in which you do not enter data.
When you have completed the fields for the journal header, the program automatically moves to the Journal Lines group.
4. Enter journal details by line. When you add multiple lines, the program completes the Line Description box from the previous line, but you can change this.

5. When you have completed all line entries, click Accept . If the debits and credits do not balance or you have crossed funds, the program displays a message asking if you want to correct the out-of-balance issue before exiting. It is recommended that you balance the entries prior to exiting the line detail.
If you have crossed funds, you must exit the line detail and make the correction by clicking Gen DT/DF to automatically make adjusting entries.
6. If the program does not detect errors or warnings, it displays the Choices box. The screen
options vary according to the status of the journal: the journal is in balance, debits do not equal credits, the journal is out of balance by fund, or the journal is out of balance by fund/segment. Each screen provides applicable options for continuing.
7. Select the option appropriate for the entry you are creating.
8. Click Accept .
Once you have added journal entries, the Summary and Add'l Detail buttons are available.
Click the Add'l Desc button to open a text screen that allows you to add or update additional descriptions for the selected journal.
Click Summary to view the total debits and credits by fund for this journal.

9. Once the entry is complete, click on More and Release to release the entry to workflow.
Browse existing journals
1. On the ribbon, click Browse. The program displays an Options box:
2. Select Browse Own Journals to view only those journals you created, Browse All Journals, or Browse by Clerk. If you select Browse by Clerk, the Clerk ID box is accessible for you to enter the user ID.
3. Click Accept . The program displays a list of journal records.
4. Double-click a record number to view details for that journal.
5. To view workflow approvers' comments and steps, click Workflow Status in the Menu group of the ribbon. If there are pending actions, click Generate Chart to view the items in chart format. Use the Expand and Collapse options to reset the information that displays.

6. Click Return to return to the Browse screen.
Change Fiscal Year Period
1. With the journal entry pulled up, Click Period
2. Enter the new year and period for the journal. The current year, next year, or last year are
acceptable values.
3. Enter the Effective Date.
4. Click Accept. The project completes the New Journal box with the next available journal number. The program displays a confirmation message.
5. Click Yes to complete the change.
Copy a journal into proof
1. From the menu group of the ribbon, click Posted Find. The program displays the Find Posted Journals screen.

2. Complete one or more of the fields in order to define the search criteria.
3. Click Accept. The program searches for journal entries that match your criteria, and displays those journals in the Posted Journal Results group.
4. Select the journal to copy by clicking it, and then click Accept. The program makes the Menu group of the ribbon accessible.
5. Click Create Jnl. The program displays the Define Required Journal Fields screen.
6. Enter the fiscal year, period, and effective date of the journal to create.
7. Click Accept. The program creates the new journal and returns to the main program screen with the journal as the active record.
8. Release or output/post the journal according to your organization's business practices.
Delete a journal entry
1. On the ribbon, click Search. The Fiscal Year, Period, and Journal fields open for data entry.
2. Complete one or more of the fields.
3. Click Accept . The program displays the first record in the active set of records matching the search criteria.
4. Click Browse to view a list of all active set records and double-click the journal entry that you want to delete. The program opens the journal entry.
5. Click Delete on the Munis ribbon. The program displays a confirmation message

Important! If you complete the process, the deletion is immediate. You cannot recover the entry, except by restoring your system from a backup.
Find a specific journal
On the ribbon, click Search . The Fiscal Year, Period, and Journal fields for data entry.
2. Complete one or more of the fields.
3. Click Accept . The program displays a record matching the search criteria.
Modify Lines
1. Click Modify Lines.
2. Make the changes, as required.
3. Click Accept. The program displays the Choices screen.
Output post a journal entry
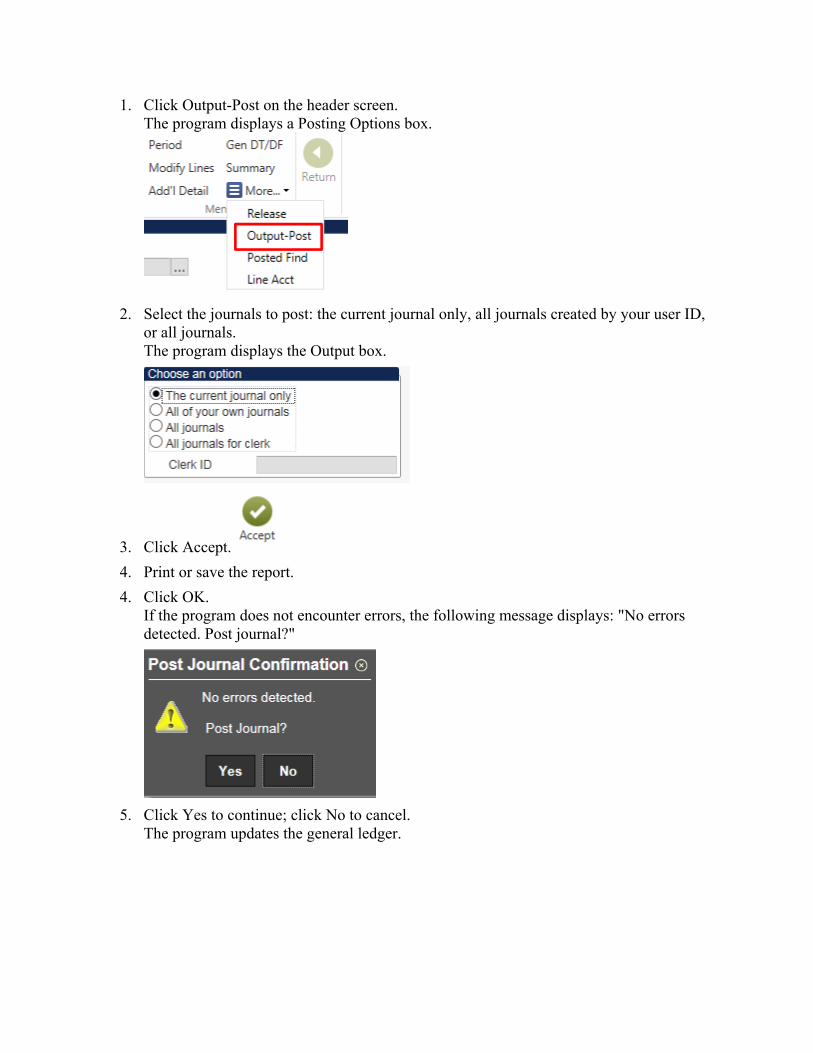
1. Click Output-Post on the header screen. The program displays a Posting Options box.
2. Select the journals to post: the current journal only, all journals created by your user ID,
or all journals. The program displays the Output box.
3. Click Accept.
4. Print or save the report.
4. Click OK. If the program does not encounter errors, the following message displays: "No errors detected. Post journal?"
5. Click Yes to continue; click No to cancel.
The program updates the general ledger.

Update a journal entry
1. On the ribbon, click Search. The Fiscal Year, Period, and Journal fields are available for data entry.
2. Complete one or more of the fields.
3. Click Accept. The program displays the record matching the search criteria.
4. On the ribbon, click Update.
5. Modify the fields, as necessary. You cannot change the Fiscal Year, Period, Journal, or Budget Year Code fields.
6. Click Accept.