EZ Video Converter Software Guide - Smarta Saker
10
EZ VIDEO CONVERTER SOFTWARE GUIDE ENGLISH ( 1 –8)
-
Upload
khangminh22 -
Category
Documents
-
view
0 -
download
0
Transcript of EZ Video Converter Software Guide - Smarta Saker

EZ VIDEO CONVERTER
SOFTWARE GUIDE ENGLISH ( 1 –8)

1
INTRODUCTION Thank you for purchasing VIDEO 2 PC. We've included EZ Video Converter software which you can use to easily convert VHS tapes to digital files on your computer. This guide will outline the basic functions of the software to help you capture and edit your videos. DRIVER & SOFTWARE INSTALLATION To get started, you'll need to install VIDEO 2 PC's drivers, then install the software. Installation with Windows XP (32-bit only): 1. Insert the included software CD into your computer's CD drive. 2. Connect VIDEO 2 PC to your computer with the included USB cable. The driver installation will begin
automatically. 3. When a dialog box asks you to connect to Windows Update to search for software, select "No, not at
this time" and click Next. 4. Select "Install software automatically" and click Next. The driver installation process will begin.
5. When the driver installation has completed, click Finish. When the drivers have been successfully installed, you will see the message "Your new hardware is installed and ready to use."
6. Click the "Install EZ Video Converter Software" button on the screen. Follow the simple on-screen instructions to complete this process.
Installation with Windows Vista (32-bit only): 1. Insert the included software CD into your computer's CD drive. 2. Connect VIDEO 2 PC to your computer with the included USB cable. The driver installation will begin
automatically. 3. When the "Found New Hardware Wizard" dialog box appears, click "Locate and install driver software
automatically."
4. When Windows asks you to insert a CD, click Next. The driver installation process will begin.
5. When the driver installation has completed, click Close. 6. Click the "Install EZ Video Converter Software" button on the screen. Follow the simple on-screen
instructions to complete this process.
Note for Mac Users: If you are an Intel-based Mac user, you can use EZ Video Converter if Windows XP or Vista is installed on your machine using Parallels Desktop or Boot Camp.
Note: It is a good idea to make sure your software stays up-to-date to ensure the best performance. If your computer is connected to the internet, open the software, and from the "home" page, click Setup, then General, then About EZ Video Converter, then Update to check for available updates. When you are done, move the mouse to the upper left-hand corner of the screen and click the "home" icon to return to the first page.

2
FLOATING TOOLBARS When you move the mouse in the software, a "floating" toolbar with the following icons will appear at the top of the screen.
1 2 3 4 5 6 1. Home: Takes you back to EZ Video Converter's startup screen.
2. Previous: Takes you to the previous screen.
3. Help: Opens EZ Video Converter's Help window, which explains the software's different functions and features.
4. Minimize: Minimizes the software window.
5. Maximize: Maximizes the software window.
6. Close: Closes EZ Video Converter. Depending on what screen you are viewing, you may also see the following icons on a toolbar at the bottom of the screen:
7 8 9 10 11 12 13 14 15 16 17 18 19 7. Pause: Pauses playback.
8. Stop: Stops playback.
9. Record: Starts recording.
10. Rewind: Reverses playback (clicking more than once will change the reverse playback speed).
11. Fast Forward: Speeds up playback (clicking more than once will change the playback speed).
12. Skip Back: When viewing MPEG-2 videos and video files, skips backward approximately 27 seconds. When watching movie discs, skips to the previous chapter.
13. Skip Forward: When viewing MPEG-2 videos and video files, skips forward approximately 27 seconds. When watching movie discs, skips to the next chapter.
14. Volume Up: Decreases the volume.
15. Volume Down: Increases the volume.
16. Channel Up: This control is disabled in this software version.
17. Channel Down: This control is disabled in this software version.
18. Favorite: This control is disabled in this software version.
19. Ratio: Adjusts the aspect ratio when watching TV with VIDEO 2 PC.

3
INITIAL SETUP Before capturing your first video, follow these steps to select the appropriate settings: 1. Open the software.
2. Click Setup.
3. Click General.
4. Click Video Recording Storage.
5. Select a location on your computer to save and store your future video files. The default location is the My Videos folder in your computer's My Documents folder, but you can select a different location, as well. Click on a folder you want to select and enter it (or use the "Up" and "Down" arrows in the bottom-right corner of the small window). Click the arrow button above the list to return to the previous folder.
6. Once you have selected a location, select the video quality you want to capture. You can select from HQ (High Quality), SP (Standard Play), LP (Long Play), and EP (Extended Play).
7. When you are done, click Save to save it or Cancel to abandon any changes you made.
8. Move the mouse to the upper left-hand corner of the screen and click the Home icon to return to the home page.
CAPTURING YOUR VIDEOS The following steps are a walkthrough of how to use EZ Video Converter to capture video on your computer: 1. Connect VIDEO 2 PC to your computer's USB
port (a rear USB port, if possible). Set the TAPE / OTHER switch on VIDEO 2 PC's front panel to "Tape."
2. Open EZ Video Converter.
3. On the home page, click Convert. 4. In the File Name field, create a name for the
video you are about to capture. (Optional: If you do not want to stop the capturing process manually, you can enter a fixed length of video to capture so the software will stop it automatically.)
5. Use the controls on your VCR, camcorder, etc. to find the part of your recording you want to capture. (You will see the video on the screen in the upper right-hand corner of the software window. If you don't see the video here, click Device Settings and select the proper Video Input Source – "Composite Video," if your video device is connected to VIDEO 2 PC's RCA audio/video inputs, or "S-Video," if your video device is connected to VIDEO 2 PC's S-Video input.)
6. Optional: If you want to burn your video to disc immediately after capturing it, check the box labeled "Automatically create a disc with the captured video." Otherwise, you can burn it yourself later (see TRANSFERRING A VIDEO).
7. When you are ready, click Record in the software, then play your video from your VCR, camcorder, etc. The software will capture the video as it plays. A timer will appear under the screen to show how much time has elapsed, and a "REC" symbol will appear above the screen to indicate it is capturing the video. (You can also capture an individual frame by clicking Capture Frame instead of Record.)
8. When you are finished, click Stop in the software. Click "Yes" to confirm or "No" to continue recording. Don't forget to press VIDEO 2 PC's STOP button, too.
9. Once you have stopped recording, the file will be saved in the location you designated in your settings (see INITIAL SETUP).
4
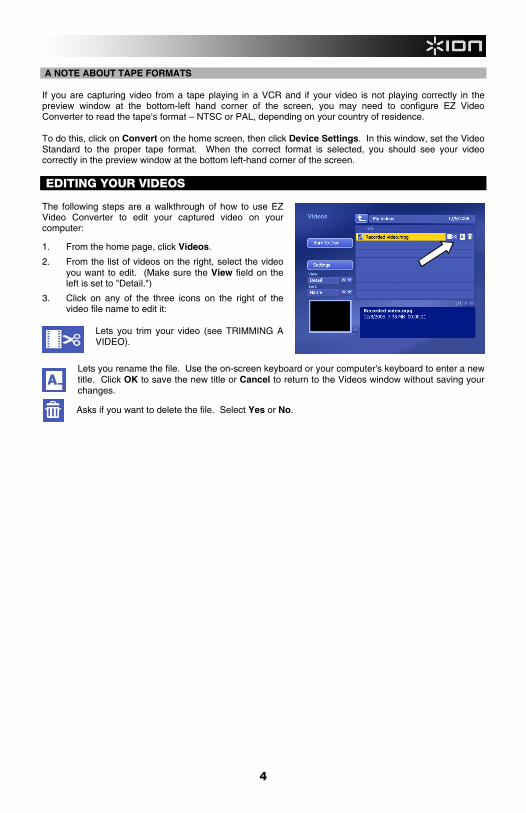
A NOTE ABOUT TAPE FORMATS If you are capturing video from a tape playing in a VCR and if your video is not playing correctly in the preview window at the bottom-left hand corner of the screen, you may need to configure EZ Video Converter to read the tape's format – NTSC or PAL, depending on your country of residence. To do this, click on Convert on the home screen, then click Device Settings. In this window, set the Video Standard to the proper tape format. When the correct format is selected, you should see your video correctly in the preview window at the bottom left-hand corner of the screen. EDITING YOUR VIDEOS The following steps are a walkthrough of how to use EZ Video Converter to edit your captured video on your computer:
1. From the home page, click Videos.
2. From the list of videos on the right, select the video you want to edit. (Make sure the View field on the left is set to "Detail.")
3. Click on any of the three icons on the right of the video file name to edit it:
Lets you trim your video (see TRIMMING A VIDEO).
Lets you rename the file. Use the on-screen keyboard or your computer's keyboard to enter a new title. Click OK to save the new title or Cancel to return to the Videos window without saving your changes.
Asks if you want to delete the file. Select Yes or No.

5
TRIMMING A VIDEO
Clicking the "film and scissors" icon will open a window in which you can trim your captured video so the final product contains only the footage you want. The following steps will walk you through this process:
1. The length of the captured video is represented by
the striped green bar on the bottom of the window. Use the preview controls in the window (Play, Stop, Forward or Back) or the mouse to move the cursor along the green bar until you reach the beginning of a section you want to trim out of your video.
2. Click the Mark In button (the downward arrow icon to the left of the scissor icon) to create a "mark in" point.
3. Use the preview controls in the window (Play, Stop, Forward or Back) or the mouse to move the cursor along the green bar until you reach the beginning of a section you want to trim out of your video.
4. Click the Mark Out button (the downward arrow icon to the right of the scissor icon) to create a "mark out" point. The section of the video you have marked off should now be red with a scissor icon in the middle of it. This section will be cut out of your video.
5. To trim more than one section out of your video, repeat Steps 1-4. To skip to the next or previous edited section, use the "forward" and "back" arrows under the Mark In and Mark Out buttons.
6. Optional: To create a thumbnail (an image that serves as an icon for that file when in "Thumbnail View") from a frame in your video, simply find the frame you want, then click Set Thumbnail.
7. When you are finished, click Save to save your changes or Cancel to return to the Videos window without saving your changes.
If you make a mistake at any point while trimming your video, you can use the following buttons on the screen:
Undo: Click this to undo your last action.
Redo: Click this to redo your last action (if you clicked Undo before).
Reset: Click this to erase all trim sections from this video. Even if you already saved your changes, clicking this will erase those changes.

6
TRANSFERRING A VIDEO After capturing and editing your videos, you can store and view them on your computer, but there are also several ways you can transfer them to other media so you can share them with others. BURNING TO DVD If your computer has a DVD drive that can burn DVDs, or if it is connected to a DVD burner, you can use EZ Video Converter to burn your videos to DVD: 1. From the home page, click Videos.
2. Insert a blank DVD into your computer's DVD drive or remote DVD drive.
3. Click Burn to Disc, which will take you a new menu.
4. From the list of "Selected Videos," check the box next to the ones you want to burn to DVD.
5. Optional: Click on Menu Design to select how you want the DVD's chapter menu to appear (this is the home/menu screen that appears when you first insert a DVD). You can also click on Disc Settings to set the format of the DVD*.
6. When you are ready to burn your DVD, click Burn. (If you selected "Enter My Own Title" in the Menu Design page, you will be aske d to enter the title of your DVD.) A progress meter will appear to show you how much of it is completed.
7. When the burning process is done, a smaller window will appear. You can select from the following options:
Make Another Copy: This will let you make an additional copy of your videos on a new DVD.
Create Cover: Here, you can create and print an optional cover for your DVD.
Done: Closes the window and returns to the Videos menu.
7
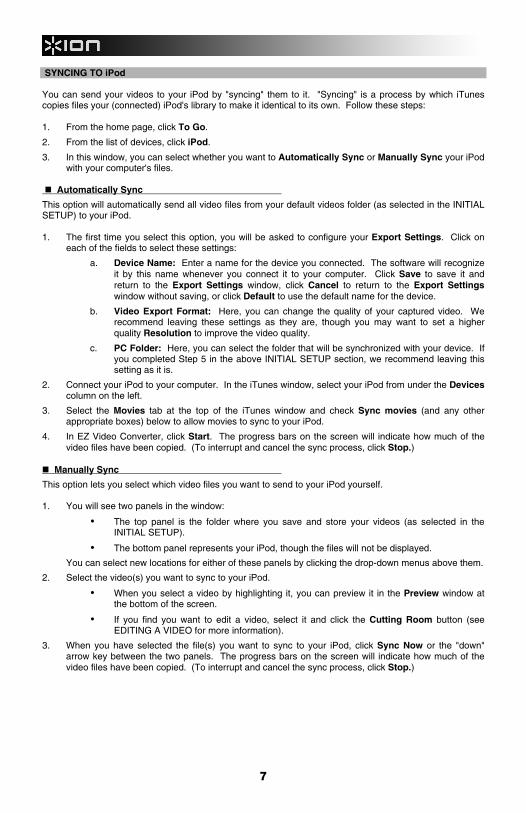
SYNCING TO iPod You can send your videos to your iPod by "syncing" them to it. "Syncing" is a process by which iTunes copies files your (connected) iPod's library to make it identical to its own. Follow these steps: 1. From the home page, click To Go.
2. From the list of devices, click iPod.
3. In this window, you can select whether you want to Automatically Sync or Manually Sync your iPod with your computer's files.
Automatically Sync
This option will automatically send all video files from your default videos folder (as selected in the INITIAL SETUP) to your iPod. 1. The first time you select this option, you will be asked to configure your Export Settings. Click on
each of the fields to select these settings:
a. Device Name: Enter a name for the device you connected. The software will recognize it by this name whenever you connect it to your computer. Click Save to save it and return to the Export Settings window, click Cancel to return to the Export Settings window without saving, or click Default to use the default name for the device.
b. Video Export Format: Here, you can change the quality of your captured video. We recommend leaving these settings as they are, though you may want to set a higher quality Resolution to improve the video quality.
c. PC Folder: Here, you can select the folder that will be synchronized with your device. If you completed Step 5 in the above INITIAL SETUP section, we recommend leaving this setting as it is.
2. Connect your iPod to your computer. In the iTunes window, select your iPod from under the Devices column on the left.
3. Select the Movies tab at the top of the iTunes window and check Sync movies (and any other appropriate boxes) below to allow movies to sync to your iPod.
4. In EZ Video Converter, click Start. The progress bars on the screen will indicate how much of the video files have been copied. (To interrupt and cancel the sync process, click Stop.)
Manually Sync
This option lets you select which video files you want to send to your iPod yourself. 1. You will see two panels in the window:
The top panel is the folder where you save and store your videos (as selected in the INITIAL SETUP).
The bottom panel represents your iPod, though the files will not be displayed.
You can select new locations for either of these panels by clicking the drop-down menus above them.
2. Select the video(s) you want to sync to your iPod.
When you select a video by highlighting it, you can preview it in the Preview window at the bottom of the screen.
If you find you want to edit a video, select it and click the Cutting Room button (see EDITING A VIDEO for more information).
3. When you have selected the file(s) you want to sync to your iPod, click Sync Now or the "down" arrow key between the two panels. The progress bars on the screen will indicate how much of the video files have been copied. (To interrupt and cancel the sync process, click Stop.)
8
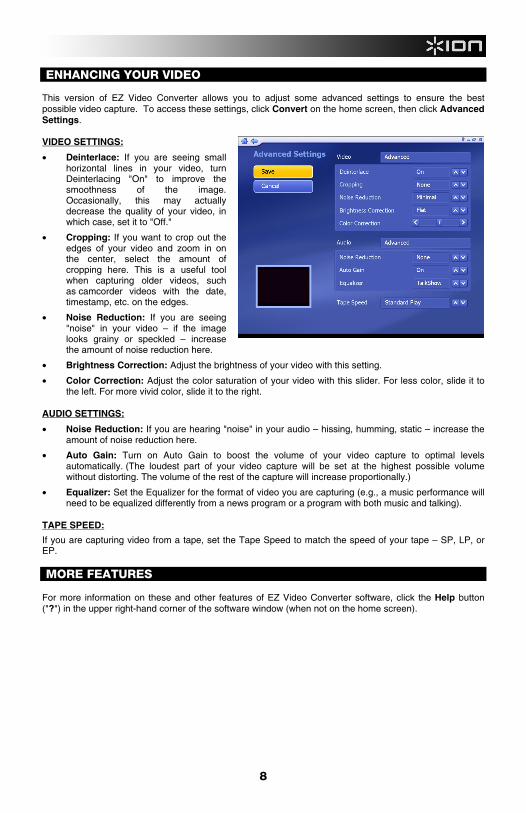
ENHANCING YOUR VIDEO This version of EZ Video Converter allows you to adjust some advanced settings to ensure the best possible video capture. To access these settings, click Convert on the home screen, then click Advanced Settings. VIDEO SETTINGS:
• Deinterlace: If you are seeing small horizontal lines in your video, turn Deinterlacing "On" to improve the smoothness of the image. Occasionally, this may actually decrease the quality of your video, in which case, set it to "Off."
• Cropping: If you want to crop out the edges of your video and zoom in on the center, select the amount of cropping here. This is a useful tool when capturing older videos, such as camcorder videos with the date, timestamp, etc. on the edges.
• Noise Reduction: If you are seeing "noise" in your video – if the image looks grainy or speckled – increase the amount of noise reduction here.
• Brightness Correction: Adjust the brightness of your video with this setting.
• Color Correction: Adjust the color saturation of your video with this slider. For less color, slide it to the left. For more vivid color, slide it to the right.
AUDIO SETTINGS:
• Noise Reduction: If you are hearing "noise" in your audio – hissing, humming, static – increase the amount of noise reduction here.
• Auto Gain: Turn on Auto Gain to boost the volume of your video capture to optimal levels automatically. (The loudest part of your video capture will be set at the highest possible volume without distorting. The volume of the rest of the capture will increase proportionally.)
• Equalizer: Set the Equalizer for the format of video you are capturing (e.g., a music performance will need to be equalized differently from a news program or a program with both music and talking).
TAPE SPEED:
If you are capturing video from a tape, set the Tape Speed to match the speed of your tape – SP, LP, or EP. MORE FEATURES For more information on these and other features of EZ Video Converter software, click the Help button ("?") in the upper right-hand corner of the software window (when not on the home screen).

www.ion-audio.com
ION Audio, LLC Tel: (U.S.) 401.658.3743
Email: [email protected]
MANUAL REVISION 1.0