Chip Carving Patterns
131
-
Upload
khangminh22 -
Category
Documents
-
view
1 -
download
0
Transcript of Chip Carving Patterns


Chip Carving Patterns
Wayne Barton
Sterling Publishing Co., Inc. New York

This book is lovingly dedicated to the memory of my parents,
Bruce B. and Ruth L. Barton, who always had faith in their son.
Library of Congress Cataloging-in-Publication Data
Barton, Wayne. Chip carving patterns / Wayne Barton,
p. cm. ISBN 0-8069-5782-4 1. Wood-carving. 2. Wood-carving—Patterns. I. Title.
TT199.7.B36 1990 73674—dc20 89-26174
CIP
Copyright © 1990 by Wayne Barton Published by Sterling Publishing Co., Inc. 387 Park Avenue South, New York, N.Y. 10016 Distributed in Canada by Sterling Publishing % Canadian Manda Group, P.O. Box 920, Station U 'Toronto, Ontario, Canada M8Z 5P9 Distributed in Great Britain and Europe by Cassell PLC Artillery House, Artillery Row, London SW1P 1RT, England Distributed in Australia by Capricorn Ltd. P.O. Box 665, Lane Cove, NSW 2066 Manufactured in the United States of America
All rights reserved

Contents
Introduction 4
Tools and Materials 6
Helpful Hints 10
Borders 14
Sculptured Edges 20
Rosettes 23
Free-Form Motifs 53
Fettering 89
Furniture Carving 112
Index 126
About the Author 127
Acknowledgments 128

Introduction
& Chip carving has embraced a multitude of motifs, interpretations, and adaptations through the centuries. This certainly would in¬ dicate that it is a fluid art form and one within the range of capabilities, talents, and enjoyable pursuits of many people. With more leisure time on their hands than ever before, those who are inclined to carve are happily discovering chip carving in numbers that give rise to a renaissance.
There are several reasons for chip carving’s growing popularity today. One is that chip carving is the fastest, easiest, and simplest way there is to carve. The tools are few and the technique is quite basic. Another reason is that being a decorative form of carving, it has a wide application. Most important, it is a type of carving that most anyone can do with pleasing results.
This book is a design effort. Unlike my previous book, Chip Carving Techniques & Patterns, also published by Sterling, which is more instructionally oriented, this book focuses on designs and how they can be developed.
The book is not representatively definitive. Chip carving cuts across many cultures and centuries that have contributed to a vast array of design possibilities. It is hoped that this book will play a role in the continuing development of chip-carving designs for future generations.
Having studied in Switzerland, I must confess that many of the
4 Introduction

designs in this book bear a strong Swiss influence, although all are not representative of that particular style. In fact, some designs
are very different from those that are recognized as belonging to
the Swiss genre. However, because Swiss chip carving has a lyrical
style that is vibrant with movement, rhythm, and balance, it does
offer much from which we can all benefit. Most of the pieces shown in this book are accompanied by the
primary line drawings (patterns) from which they are carved. These drawings have neither shading nor embellishment so that
you can easily trace or photocopy them, or change their sizes with a photocopying machine. Comparing the carving drawing with
the photo of the carving will help you understand what and how
to carve. In order to get the correct proportions and balance of a design
translated into a carving, it’s helpful to make a complete picture of
the carving on paper first. It is easy to become confused and overwhelmed by the size or complexity of a chip carving. But by making a drawing first, you can break down a complex carving
into its components, and it will become much simpler to under¬
stand. Design is the way we define space, and how we resolve that
definition becomes our carving. Eliminating the dark mystery of design sheds light upon the
entire carving process. It is with this purpose in mind that this
book has been written.

Tools and Materials
One of the pleasures of chip carving is the limited number of tools
and materials that is needed to do a complete job. And, unlike
some other forms of carving, acquiring additional tools will not
increase your skill nor produce a better finished product.
All of the carvings shown in this book were executed with only
two knives (see Illus. 1). Made in Switzerland, they are the finest
knives on the market today for chip carving, and are manufac¬
tured with the same high quality and precision for which all Swiss
tools have become famous. It is necessary to have knives of this
quality with these strong handles and blade configurations in or¬
der to make deep, curved cuts safely and accurately in a single
pass. This will give your work a smooth, sharp appearance, which
typifies excellent chip carving. More potential carvers have be¬
come discouraged as a result of initially trying to carve with the
wrong tools that were improperly sharpened than by any other
factor. Fortunately, these chip-carving knives are available throughout
North America and Europe. They are manufactured by Klotzli
and have a “WB” logo on the handle. These are the same knives
used in Swiss carving schools and carried by Swiss shops. After
6 Tools and Materials

many years of carving and trying other knives, these are the only
ones I recommend. The two Swiss chip-carving knives are quite different from each
other in shape and use. The #1 knife is called a cutting knife and is used for any cuts that result in the removal of wood or chips.
The #2 knife is referred to as a stab knife and removes no wood
at all. Instead, it is used for decorative purposes, and makes a
wedge-shaped mark or incision by cutting the wood fibres and spreading them permanently at the same time. This knife, though not used as frequently as the other, is extremely important. It makes its own designs and enhances the carving executed by the cutting knife. The two knives complement each other very nicely.
Once you have the two correct carving knives, you’ll need to
sharpen them and keep them sharp. There are as many devices
for sharpening as there are ways to do so. In my previous book,
Chip Carving Techniques & Patterns, I suggested the use of flat,
hard Arkansas stones. However, true hard Arkansas stones have become difficult to find and are expensive. Today I use and rec¬ ommend only flat ceramic sharpening stones for several good reasons. First, they are so hard that no matter how much you use
them, they will remain absolutely flat. This is important for keep¬
ing the cutting edges of the knives straight. Also, unlike natural stones in which quality will vary from one stone to another, the high quality of flat ceramic sharpening stones remains constant
because they are manufactured. Secondly, ceramic stones need no oil or water as a lubricant for the sharpening process. This makes
sharpening a much less messy process. Most importantly, flat ce¬
ramic stones will sharpen and polish your knives to a mirror finish, which is essential for clean, crisp carving.
You will need only two ceramic sharpening stones and both are
Illus. 1. Swiss chip-carving knives.
Tools and Materials 7

necessary. One is a medium-grade, which is used first for shaping and sharpening the blade. The other is an ultra-fine and is used for polishing the blade and keeping the edge freshly sharp. Once
your blade is sharp and polished, just the ultra-fine stone is needed to keep it that way. In a day’s carving, depending on the type of wood you are using and how much work is done, you will need to freshen the blade only once or twice.
Sharpening the two knives at the correct angle is imperative. The #1 cutting knife is sharpened at an approximate 10° angle or
less. You can determine this angle by raising the knife off the stone no more than the space that would accommodate a dime under the back edge of the blade (see Illus. 2). This angle is a maximum. In many cases, you may have to sharpen the #1 knife at an even flatter angle. Proper angling is extremely important in order to have the blade flow through the wood smoothly and
easily. The #2 stab knife is sharpened at approximately 30°, which is about what the factory-established angle is on a new blade.
Illus. 2. Raise the #1 cutting knife off the sharpening stone no more than what it takes to insert a dime under the back edge of the blade.
The remainder of the tools needed for chip carving are a pencil (a mechanical one with a .05 lead size works well), ruler, eraser, and a drafting-type compass (Illus. 3). Use a grade “B” lead for both the compass and pencil. This softer-grade lead makes legible lines without impressing the wood, and it is easier to clean off than harder grades of lead. When it’s time to clean excess pencil marks off your carving, you’ll find an ink eraser does it quickly and neatly.
All of the carvings shown in this book are executed in basswood, butternut, and eastern white pine. These woods, particularly bass-
8 Tools and Materials

lllus. 3. Tools needed for chip carving.
wood (also known as linden or lime), are exceptionally well suited
for chip carving, although they are not the only ones that carve
well. The tools and materials recommended and shown in this book,
including the basswood plates and boxes, are generally available from most wood-carving suppliers. Should you have any difficulty
finding them, however, contact me for some specific suppliers at
the Alpine School of Woodcarving, Ltd., 225 Vine Avenue, Park
Ridge, IL 60068 (807/692-2822).
Tools and Materials 9

Helpful Hints
Many times when a carver is just beginning, things don’t always go
as planned or seem as easy as originally considered. (This phe¬
nomenon is not limited to beginners.) It may be that the actual carving doesn’t appear correct, or there may be a problem with
the design. Perhaps it is the process of laying out the work that is
awkward. Eventually, everyone experiences one problem or an¬
other. Here are a few hints that will make your carving easier, more accurate, and professional-looking. With a little practice,
anyone can master them.
1. For a good contrast of light and shadow, make your cuts or
chips at a 65° angle in the wood (see Illus. 4). 2. When making curved cuts, stand the knife up (see Illus. 5).
The tighter or smaller the curve, the more perpendicular
the knife must be to the carving. It is impossible to drag an excess amount of metal around a curve without producing a
chatter or choppy appearance. However, the 65° angle at
which the blade is inserted into the wood to scribe the wall of
the chip does not change. 3. Clean your chips out as you carve. Don’t leave little bits of
wood in the bottom of your cuts. Your work should appear
clean and crisp.
10 Helpful Hints

4. To carve straight lines successfully, train your eye always to look ahead of the blade. Never look at the blade itself and
don’t use a straightedge as a guide. In a short time, you will be making straight lines quicker than you imagined possible.
5. Make all cuts only as deep as necessary to remove a chip. Avoid excessive undercutting that might remove wood that
you wanted to remain. 6. Making crescent-shaped chips where curved lines are drawn
will add a fullness or a three-dimensional appearance to a carving. This is particularly true for free-form designs (see
Illus. 6 and 7). 7. Vary and combine geometrical shapes in a carving for a look
of life and vitality. Using the same chip (particularly the
three-cornered chip) may be mechanically correct but is ar¬
tistically very dull. 8. Don’t overcarve a piece. In most cases, the area you leave
uncarved is as important as what you do carve. It will help “show” the work.
9. When two tapered chips of the same shape must be brought
to a single point (see Illus. 8), you will be able to keep the center ridge straight and unbroken if you bring only one
chip all the way to the center and hold the second back
slightly. This is especially true when cutting cross grain. 10. It is best to draw your design directly on the wood. All lines
that can be drawn with a straightedge or compass should be
done this way. Because most pieces vary in size, drawing directly on the wood will allow you to proportion your work
accurately. In some cases, it will be easier to space free-form designs properly on a piece or within a larger design if you
Illus. 4 (left). The #1 cutting knife is properly inserted in the wood at a 65° angle. Illus. 5 (right). When making curved cuts, stand the knife perpendicular to the wood.
Helpful Hints 11

Ulus. 6. Pattern.
Illus. 7. For a three-dimensional effect, make curved chips crescent shaped in free form.
12 Helpful Hints

trace them from a predrawn sketch. When tracing, use
graphite paper, which cleans off wood like an ordinary pen¬
cil. Regular carbon paper is greasy and difficult to remove. For easy final cleaning of pencil and tracing marks, use an ink eraser.
Here’s a neat trick. You can transfer any single-line drawing, or
pattern, to wood by simply making a photocopy of it, placing the
copy face down on the wood, and ironing it. The heat will drop
the drawing from the paper to the wood. This technique also works well with transferring letters if you first make a transpar¬
ency. Turn the transparency so that the lettering is copied back¬
wards on regular paper. Then, when you place the paper face
down on the wood, the letters will come out correctly.
Helpful Hints 13

Borders
& In any carving, the border usually sets the tone or feel of the
carving. It may be a single line or intricate enough to render the
carving complete. The borders shown in Illus. 9—13 are by no
means the entire spectrum of possibilities for chip carving. They
do represent, however, the very simple to the difficult, from the
basic three-cornered chip (1—3 and 7 in Illus. 10) to the complexly
convoluted paisley (14 in Illus. 12). Though all of the borders
here are drawn on a curve, they work just as successfully when
executed on a straight line.
Note the different feeling the simple three-cornered-chip bor¬
der gives when its direction is reversed (1 and 2 in Illus. 10), or
combined with a scallop (5). Note also that the heart border (11 in
Illus. 12) is made only of slightly modified, small three-cornered
chips on top and larger ones on the bottom. The paisley border
(14) is entirely drawn with a compass.

Illus. 9. Box lid of 21" x 10" butternut.
Borders 15

16 Borders

Illus. 11. Border designs.
Borders 17

10
18 Borders

Illus. 13. Border designs.
Borders 19

Sculptured Edges
One little-known aspect of chip carving involves taking a basic
geometric shape, such as a square or rectangle, and transforming
it into a decorative piece. This is accomplished by giving the shape
what is called sculptured edges. By cutting any combination of
notches and scoops in the edges of the wood, you can give a piece
the appearance of taking on another form or shape. Applying this
little carving trick will extend your design possibilities. See Illus.
14—17 for various examples.
20 Sculptured Edges

Ulus, 14, Scalloped edges on a chip-carved, 11" x 17", basswood address plate.
Ulus, 15, Ornately chip-carved scalloped edges on a 2%" x 6V2" white pine box.
Sculptured Edges 21

Ulus. 17. A corbel of 5" x 7" basswood with chip-carved edges.
22 Sculptured Edges

Rosettes
& One of the most popular (as well as traditional) aspects of chip
carving is the making of rosettes. There are rosettes in nearly
every style. You can use bold, deep cuts to create a piece that
resembles a Gothic rose window, or small, delicate chips to create
a lace-doily pattern. The design possibilities are endless.
Looking at the completed carving of a rosette can be a bit in¬
timidating because of its apparent complexity. But when seen as a
simple line drawing, it can be more readily understood. When the
line drawing (or pattern) and the finished work are juxtaposed, all chip carving takes on clarity.
As you look at the photos in this section, separate the rosettes
from the borders. Isolating the various components of a work also
helps to clarify its design.

nius. is.
24 Rosettes

Illus. 19. Basswood 8"-diameter plate.
Rosettes 25

Illus. 20.
26 Rosettes

11 his. 21. Pierced lid for a 5" x 5" x Vs”, chip-carved, basswood box.
Rosettes 27

Illus. 22.
28 Rosettes

Illus. 23. Swiss lace 4,T-diameter rosette.
Illus. 24. Box lid with Swiss lace rosette and triple-lace border carved in 13" x 8Wr basswood.
Rosettes 29

Illus. 25.
30 Rosettes

Illus, 26, Basswood 10”-diameter plate.
Rosettes 31

Illus. 27.
32 Rosettes

Illus. 28. Basswood 8"-diameter plate (design by Robert Ostmann).
Rosettes 33

AWWVWV
WWWVVAV

Illus. 30. Basswood 10"-diameter plate.
Rosettes 35


Illus. 32. Basswood 12”-diameter plate.
Rosettes 37

lllus. 33.
38 Rosettes

Illus. 34. Plate with six-point rosette and floral border—of 10"-diameter basswood.
Rosettes 39

Illus. 35.
40 Rosettes

Illus. 36. Plate with a locking-rings rosette and egg-and-dart border—of 8"-diameter basswood.
Rosettes 41

lllus. 37.
42 Rosettes

Illus. 38. Basswood 14"-diameter plate with paisley rosette.
Rosettes 43

Illus. 39.
44 Rosettes

Illus. 40. Basswood 10"-diameter plate.
Rosettes 45


Illus. 42. Basswood 14"-diameter plate.
Rosettes 47

Illus. 43
Illus. 44. Basswood 14"-diameter plate.
48 Rosettes

Illus. 45.
IUus. 46. Box lid of 9W x 7" basswood.
Rosettes 49

Illus. 47.
50 Rosettes

Illus. 48. Basswood 14" - diameter plate.
Rosettes 51

Illus. 49. Wall plaque of 12" x 18" basswood.
52 Rosettes

Free-Form Motifs
The traditional free-forrn motifs found in Switzerland (and other European countries) are those with which the people are familiar in their everyday lives, and many have a symbolic significance. These motifs include the predominance of flowers and birds (and in the canton of Bern, the bear). They are not, however, the only motifs that adapt well to chip carving. Nearly all natural forms, objects, and scenes can be translated into chip carving, and can be represented in realistic, stylized, or abstract ways. Probably more than any other type of chip carving, free form offers a carver the greatest opportunity for self-expression because nature can be portrayed by such a wide variety of interpretations. Various free¬ form motifs follow.
Free-Form Motifs 53

^ .Mill I
\ ^vV \ . , . , / /
/ / /
! 14 '
///"/. ^ ' f i , t Xi
Ulus. 50.
Ulus. 51. Grizzly bear and border executed entirely with the #2 stab knife on an 8"-diameter basswood plate (design by Vard Porter).
54 Free-Form Motifs
/»*
V

Ulus. 52.
Illus. 53. Dandelion carved in basswood—4" high.
Free-Form Motifs 55


IUus. 55. Canadian maple leaf \
IUus. 56. Canadian fleur-de-lis.
Free-Form Motifs 57

lllus. 58. Tulip carved in white pine—5" high.
58 Free-Form Motifs

Illus. 60. Thistle carved in white pine—5" high.
Free-Form Motifs 59

60 Free-Form Motifs

Illus. 64. Zinnia carved in white pine—
5" high.
Free-Form Motifs 61

62 Free-Form Motifs

Free-Form Motifs 63

Illus. 70. Corbel with six-point rosette and floral design—of 17” x 17” white pine.
64 Free-Form Motifs

Illus. 72. Floral bouquet—of 16”-diameter basswood.
Free-Form Motifs 65

66 Free-Form Motifs

Illus. 74. Butterhoard of 7" x 13" basswood.
Free-Form Motifs 67

68 Free-Form Motifs
Illu
s. 7
5.

Free-Form Motifs 69

70 Free-Form Motifs
Illu
s. 7
7.

Illus, 78.
IUus. 79. Box lid with floral design and double-diamond border—of 9V2" x 7" basswood.
Free-Form Motifs 71

72 Free-Form Motifs

Illus. 81. Wall plaque with the four seasons carved in 18"-diameter basswood (photo by Martin Vogel).
Free-Form Motifs 73

V
74 Free-Form Motifs
Ulu
s. 8
3.
Bo
x fro
nt
panel—
<
5" x
12”
bas
swood.

Free-Form Motifs 75
IUus. 8
5.
Bo
x r
ear
panel—
of
5”
x 1
2"
bas
swo
od
.


Free-Form Motifs 77


IUus. 89. Wedding plate with love birds and egg-and-dart border, dated 1987—14"-diameter basswood.
Ulus. 90. Lid of wedding box with love birds and garland border, dated 1988—13" x 8 Vs" basswood.
Free-Form Motifs 79

nius. 91.
80 Free-Form Motifs

:
Ulus. 92. Plate with American eagle—14”-diameter basswood.
Free-Form Motifs 81

82 Free-Form Motifs

Illus. 94, Plate with German eagle, egg-and-dart border, Imperial crown, and Old English lettering—12ff-diameter basswood,
Free-Form Motifs 83

Illus. 95. Double-eagle crest from the House of Habsburg.
84 Free-Form Motifs

o
Illus. 96. Rooster at dawn.
Free-Form Motifs 85

86 Free-Form Motifs
IUus. 9
7.

Illus. 98. Plate with great horned owl—14"-diameter basswood. (Suggested by Jean Lanham.)
Free-Form Motifs 87

88 Free-Form Motifs

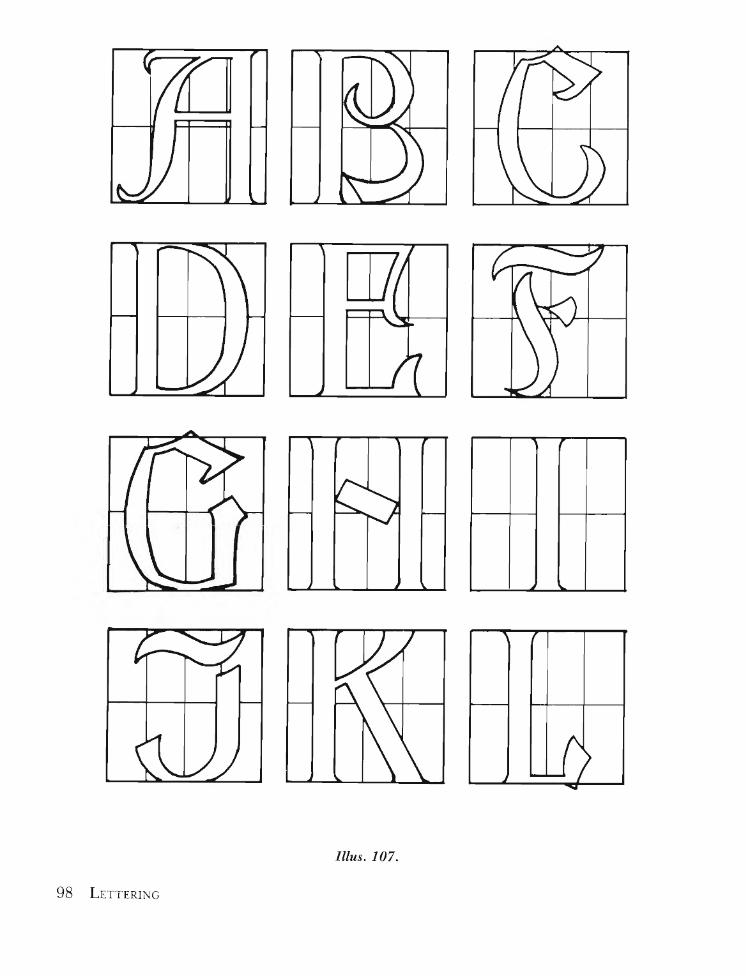
Lettering
The tradition of carving letters in works of art probably dates back to the first works of art ever produced. Carving names, dates, initials, and inscriptions on any object satisfies the vanity of both client and artist alike. Even the humble farmer who carved from the human propensity for artistic expression found satisfaction in applying his own name or initials to his work.
Many carving students perceive letter carving as the most dif¬ ficult task in their learning curriculum. This may be because as children we were coached, drilled, and graded on how to write properly; but when it came to drawing, we were encouraged to express ourselves freely. The fear and anxiety still linger.
The fastest and easiest way to carve letters is the incised method employed in chip carving. The method you use to carve letters is the same as the one applied in executing all other chip carving. The reason this method of carving is easily executed is because you are using a single-edged knife held in a constantly locked position, which is drawn towards you. Carving this way allows greater strength and control, and moves along quickly.
You can choose among any number of lettering styles, for carv¬ ing. Some, of course, are much easier to execute than others. The real criteria, however, should be how well the lettering style com¬ plements the rest of the carving. However, if the project consists
Lettering 89

of lettering alone, its style should be appropriate for its surround¬ ings. For instance, Roman is a plain lettering style consisting of
only capital letters, and it is easy to read (which is why it’s so
frequently used on plaques and inscriptions). But it may not be
appropriate for the architectural style and decor of a church, for
which an Old English style might be better suited. If the lettering
is to be read from a distance at a glance, its size and legibility
should also be considered. If you want to carve a monogram, a script-style lettering would do very nicely. Or, you may desire a
plain, readable lettering like Roman but need to use it in a smaller
space than that in which Roman will fit. In that case, Ambrosia
may be just what you’re looking for. In carving, the lettering styles that show the best are the ones
with both wide and narrow features to each letter. Normally, the
horizontal part is narrow and the vertical part wide. This causes the letter to appear supported and interesting. In most circum¬
stances, letters cut at all the same width may be technically correct
but are usually visually unexciting.
The secret to excellent letter carving really is in the layout. How¬ ever, with a few general rules to guide you, the mystery soon dis¬
solves and you’re on your way to one of the most enjoyable aspects
of woodcarving. The most important part of laying out letters is
spacing. The most common error made in spacing is placing the
letters too far apart. These wide spaces become more apparent
when the letters are carved because of shadow depth and the three-
dimensional aspect of carved letters. Unless there is some artistic
reason for extending the letters in words or names—don’t. Take a
look at the printing on this page. The letters of each word are so
close together that you see and read them as units (words) and not
individually. To spread the letters out would force the eye to jump
back and forth, making reading difficult and annoying.
There are two ways to space or adjust letters. One is mechanical
and the other is artistic (see Illus. 100). The print that you see in
newspapers, magazines, and books is generally done with me¬
chanical spacing. Artistic spacing allows you to move those letters
that do noy inherently fit well together to one side or the other so
that they are visually compatible with all the other spacing within
a word. For instance, when mechanically spaced, the letters A and
V in Roman (and many other types) leave a notable gap. The two letters are far more pleasing when the leg of the V is slid closer to
the leg of the A. (Again, see Illus. 100.) Because letters are nor¬
mally drawn one at a time in preparation for carving, you’ll be
able to artistically space all your lettering as you go along, which
is preferable.
90 Lettering

Illus. 100. Top: mechanically adjusted, letters. Bottom: artistically adjusted letters.
Though there are always exceptions (as noted above), here are
some guidelines to assist you with your spacing. These rules are not chiselled in stone (or wood) and will vary with lettering style
and conditions, but they will help you when starting.
• The space between letters is one-half the width of the widest
part of the letter, which is usually the vertical leg. For example,
if the vertical leg of H is V4" wide, the letters of the particular word would be Vs" apart.
• The space between words is one-half the height of the capital
letter. The space between the period at the end of the sentence
and the first word of the new sentence is the full height of the
capital. The space between lines of words is one-half the height
of the capital. For example, if the capital of a particular type is
1W', the top of the capitals on the next line will be %" below the
first line.
• If you choose one of the more ornate styles of lettering that has
very decorative capitals—such as Old English, Becker, or
Gothic (all quite similar)—be sure to use both upper- and lowercase. Some make the mistake of using all capitals in order
to capture more of the flair offered in these styles. Doing so,
however, makes the words difficult, if not impossible, to read
and is intrinsically incorrect. A good rule of thumb to follow is

that if a particular lettering style has upper- and lowercase letters, use them both.
• The two styles shown here are Becker and Ambrosia. Both
have a nice contrast of wide verticals and narrow horizontals,
which makes them excellent choices for carving. Becker is a
very legible style with both upper- and lowercase letters. It is a
pleasing balance between the simplicity of Roman and decora¬
tive Old English. Ambrosia is plain with an artistic flair. It has
the added benefit of having narrower letters than most letter¬
ing styles, which allows the carving of more letters within a
given space. Ambrosia consists of only uppercase letters.
• There are several ways to test for proper spacing. I usually
squint at all the lettering as a whole to the extent that I blur the
letters beyond recognition. This way, I can immediately see if
any letters are spaced too close or too far apart. Another
method is to turn your paper around and hold it up to a light
so that you can see your lettering from the backside. Because
we don’t normally read in reverse, looking through the back of
a paper blurs the letters and the eye sees only shapes. You will
be able to tell immediately whether or not the shapes are spaced correctly.
Illus. 101. Box lid with Ambrosia lettering and floral design—x 7" basswood.

When designing and carving letters, following these simple
rules will ensure a good balance and better continuity in your chip
carving.
Illus. 102. Wall plaque with Ambrosia lettering—17" x 9" basswood.
Lettering 93

Illus. 103.
94 Lettering

Illus. 104. Ambrosia.
Lettering 95

96 Lettering

Illus. 106. Ambrosia.
Lettering 97
Ulus. 107.
98 Lettering

Lettering 99

Illus. 109.
100 Lettering

Illus. 110. Becker.
Lettering 101

i $ ►
Illus. Ill (above). Illus. 112 (right). Becker.
102 Lettering

Lettering 103

nius. 113.
104 Lettering

Illus. 114. Becker.
Lettering 105


Illus. 116. Becker.
Lettering 107

nius. 117.
108 Lettering

Illus. 118. Becker.
Lettering 109

IUus. 119. Z?ox lid with Haverton lettering and double-diamond border—13" x 8V2" basswood.
Ulus. 120. 5ox Z/c? zfifA OZrf English lettering and triple-lace border—i3" x basswood.
110 Lettering

IUus. 121. Box lid with Ambrosia lettering and swirl rosette—13" x 82/2rr basswood.
Illus. 122. Box lid with Script Monogram LCS and garland border—x 7" basswood.
Lettering 111

Furniture Carving
An exciting way to enhance the appearance of furniture is to carve it. The practice of carving was, and still is, done with tradi¬ tional furniture in Switzerland as well as in some other European countries. And traditional furniture often is chip-carved.
When designing carving for furniture, the most important con¬ sideration should be that the carving fits well on the particular piece of furniture. The carving should not dominate the furni¬ ture but rather accent and blend with it so that the carving and the furniture will be seen as one integrated piece. Don’t overcarve furniture.
Panels of doors and cabinets are perfect for chip carving, as are drawer fronts, chair backs, clockfaces and a host of other items. Once you start, you’ll never look at furniture the same way again. Being able to apply chip carving to furniture is one of the reasons for this craft’s growing popularity.
112 Furniture Carving

lUus. 123. Hutch—70" high, 60" wide, and 20" deep, of eastern white pine. (Designed and built by Gottlieb Brandli, Swiss Cabinetry, Monroe, WI.) See Ulus. 124—134 for details.
Furniture Carving 113

Illus. 124. Door panel with Old English B, dated 1986.
Illus. 125. Scalloped border around drawer pull.
114 Furniture Carving

Illus. 126. Egg-and-dart border around drawer pull.
Illus. 127 (left). Simple line border on the edge of the drawer. lUus. 128 (right). Wheat design on the edge of the hutch’s side support.
Furniture Carving 115

116 Furniture Carving

Furniture Carving 117

panel—I'/2" diameter.
118 Furniture Carving

Ulus. 135. Door panels—eastern white pine. (Designed and built by
Gottlieb BrandlL)
Furniture Carving 119

IUus, 136. Fifteenth century Norman Gothic hearth stool—18" high, of butternut, (Designed and built by Gottlieb Brandli,)(See Illus, 137—142 for details.)
120 Furniture Carving

Illus. 137. Trestle of hearth stool, carved on both sides.
Illus. 138. Rosette on seat of hearth stool pierced to make an 8"-diameter handle.
Furniture Carving 121

122 Furniture Carving
Ulus. 140. Six-point rosette on side support of hearth stool—4V4 diameter.

Illus. 142. Three-point rosette on side support of hearth stool—41/41 diameter.
Furniture Carving 123


Illus. 146. Child’s rocker—24" high, of basswood. (Designed and built by Gottlieb Brandli.)
Furniture Carving 125

Index
Address plate, 21 Ambrosia lettering, 92,
94-97 on box lid, 92, 111 on wall plaque, 93
Arkansas stones, 7 Becker lettering, 91, 92,
99-109 Borders, 14—19, 115
egg-and-dart, 115 garland, 111
Box(es) with floral designs,
74-77 scalloped edges on, 21 wedding, 78—79
Box lid(s) with Ambrosia lettering,
92, 111 butternut, 15 with floral design, 70—71 with Haverton lettering,
110 with Old English
lettering, 110 pierced, 26—27 with rosette pattern, 49 with Script monogram
and garland border, 111 with Swiss lace rosette,
28-29 Ceramic sharpening stones,
7-8 Child’s rocker, 124-125 Corbels, 22, 64 Designs. See also specific
designs drawing on wood, 11, 13 transfer of, 13
Door panels with floral rosette,
117-119 with Old English
lettering, 114 with paisley rosette, 116
Drawer pulls, 114—115 Eagle
American, on plate, 80-81
crest, 84 German, on plate, 82—83
Floral designs bouquet motif, 65 on box, 74—77 on box lid, 70-71, 92 on knitting-needle box,
68-69 ‘ rosette, on door panel,
117-119 Free-form motifs, 11, 53
adelweiss, 62 American eagle plate,
80-81 on butterboard, 66—67 Canadian fleur-de-lis,
56-57 dandelion, 55 floral bouquet, 65 floral designs, 64, 70-71,
74-77 ' German eagle plate,
82-83 great horned owl plate,
86-88 grizzly bear plate, 54 House of Habsburg crest,
84 Lily-of-the-valley, 63 Queen Anne’s lace, 60 rooster at dawn, 85 rosettes on knitting-
needle box, 68-69 thistle, 59 tulip, 58 on wall plaque of four
seasons, 72—73 on wedding plate and
box, 78-79 zinnia, 61
Haverton lettering, on box lid, 110
Hearth stool, norman Gothic, 120-123
Hutch, 113, 115 Knives, 6—7 Old English lettering,
90-92 on box lid, 110 on door panel, 114
Paisley rosettes, 42—43, 116
Plate(s) 8"-diameter
with grizzly bear and border, 54
with locking ring rosette, 40-41
with rosette, 24—25, 32-33
10"-diameter with rosette, 30-31,
34-35, 44-45 with six-point rosette
and floral border, 38-39
12"-diameter German eagle, 82—83 with rosette, 36—37
14"-diameter with American eagle,
80-81 with great horned owl,
86-88 with paisley rosette,
42-43 with rosette, 46—48,
50-51 with wedding motif,
78-79 Rooster at dawn, 85 Rosettes, 23-52
on corbel, with floral design, 64
on knitting-needle box, 68-69
paisley, 42—43, 116 Scalloped borders, 20—22,
114 Script monogram, on box
lid, 111 Sculptured edges, 20—22 Tools, 6-9 Transfer of designs, 13 Wall plaque(s)
with ambrosia lettering, 93
of four seasons, 72—73 with rosette pattern, 52
Wheat design, 115 Woods, 8—9
126

About the Author
Wayne Barton is an American-born professional woodcarver, who
lives in Park Ridge, Illinois, with his Swiss wife, Marlies, and their children. First given an interest in woodcarving at the age of five
by his Norwegian grandfather, he has had a serious interest in, and love for, carving all his life.
Mr. Barton took his formal training in Brienz, Switzerland, and
his carvings can be found in private collections in Europe and
North America. He is the founder and director of the Alpine
School of Woodcarving, Ltd., and devotes much of his time to teaching throughout North America and in Switzerland.
Although versed in all disciplines of carving, he specializes in
chip carving and has won both national and international awards and recognition for his work.

Acknowledgments
No one truly accomplishes anything alone. Somewhere along the way, someone assists with a word, a deed, a thought, no matter
how small. In the writing of this book, there were many who helped in these ways. Standing squarely in the middle are my
students, both present and former, as well as a number of partic¬ ipants in the North American carving community who have con¬
tinually offered encouraging comments and criticism with their
friendship. Outstanding among my students is Robert A. Ostmann. Be¬
cause of his gracious hospitality, I found myself frequently at his dinner table while he shared with me his broad grasp and under¬
standing of design and chip carving. Apart from my students, most notable is Gottlieb Brandli, who is more knowledgeable about wood and how to work with it,-than afryone I’ve ever met.
Over many years, he has shared with me his time, wisdom, and ability, with a rare warmth of companionship. His insights and
suggestions have been invaluable to me. Nearly all of the pieces
shown in this book were designed and built by him. In terms of the actual writing, I am grateful to my dear friend
and secretary, Joanne Inda, who cheerfully endured an endless number of rewrites and assisted in the collating. I am also grateful to Dave Henderson and Carlos Collazo for their professionalism
and superb attention to detail in producing nearly all of the pho¬
tographs. Most of all, as always, it has been the unfailing assistance and
encouragement from my wife, Marlies, that have made this un¬
dertaking a reality. I have relied heavily upon her artistic judg¬
ment as well as moral support, both of which have made my course wider and straighter. Her unseen energies in this endeavor are enormous. It is with love and gratitude that her contributions
are acknowledged.

$10.95 Can. $14.95
Chip Carving Patterns Two Swiss carving knives and a block of wood are all you need!
It sounds unbelievable, but you can create exquisitely detailed, beautiful chip carving projects from easy-to-use patterns with simple, f ully explained techniques.
This brand-new pattern collection offers the largest selection of patterns in any book! With Barton’s marvelous, step-by-step guide, you quickly master a range of borders, sculptured edges, rosettes and free-form motifs, as well as the essentials of lettering. Then you go on to the excitement of making your own hand-carved plaques, plates and boxes of all sizes. After that come magnificent furniture-carving projects: drawer fronts, door panels, chair backs, and pieces you can personalize in ways you never imagined!
Mix and match dozens of designs in hundreds of combinations— all from the simplest, quickest and most portable form of woodworking in the world.
Wayne Barton is the internationally acclaimed master of the art, and author of Chip Carving: Techniques & Patterns.
Sterling Publishing Co., Inc. New York
Fro111 cm r r photogm j>h hy Bill AI //nr
9 780806 957821 ISBN