By Hand! Wax Carving Tips, Tricks and Techniques
32
561 May 2019 Wolf By Hand! Wax Carving Tips, Tricks and Techniques Kate Wolf Wolf Tools ® Portland, Maine, USA Introduction I have been hand carving wax for 40 years, including 18 years as a model maker for the jewelry industry. In this paper I’ll go over some basics and a few wax carving projects, sharing techniques and approaches I wish I had known when I started. Why make a model by hand when you can have it done on a computer? CAD (computer-aided design) is here to stay, and it gets better every year. However, there is a substantial learning curve (hundreds of hours) to master the software and not everyone has the time, money or inclination to do so. There is a big difference in designing on a computer and hand carving––both creative experiences are viable––but the physical acts of creating and the outcomes are different. Evaluation The first step of a project is evaluation––should the piece be carved in wax, done in CAD or fabricated in metal? If you can make your piece from wire, sheet and tubing, make it in metal. If it is difficult to fabricate the piece in metal (using sheet, wire and/or tubing), try carving it from wax. Hand carving is ideal for figurative, curvilinear and organic forms. I job out complicated and tedious (to me, anyway) pieces like school rings and micro-pavé to be done in CAD. Size matters. It’s not necessary to carve your pieces actual size (and no longer necessary to work under a microscope). There is a wonderful option for hand carvers––work at a comfortable scale (Figure 1) and have a 3D scan made from your wax. The file from this scan can be output to be milled or grown, scaled up or down, and even used to make male and female conforming dies (Figure 2). For more on dies, see G. Phil Poirier and Peter Gilroy’s 2017 Santa Fe Symposium ® paper, Die Making for Hydraulic Forming in the Small Studio. 1
-
Upload
khangminh22 -
Category
Documents
-
view
1 -
download
0
Transcript of By Hand! Wax Carving Tips, Tricks and Techniques

561May 2019
Wolf
By Hand! Wax Carving Tips, Tricks and Techniques
Kate WolfWolf Tools®
Portland, Maine, USA
Introduction I have been hand carving wax for 40 years, including 18 years as a model maker for the jewelry industry. In this paper I’ll go over some basics and a few wax carving projects, sharing techniques and approaches I wish I had known when I started.
Why make a model by hand when you can have it done on a computer? CAD (computer-aided design) is here to stay, and it gets better every year. However, there is a substantial learning curve (hundreds of hours) to master the software and not everyone has the time, money or inclination to do so. There is a big difference in designing on a computer and hand carving––both creative experiences are viable––but the physical acts of creating and the outcomes are different.
Evaluation The first step of a project is evaluation––should the piece be carved in wax, done in CAD or fabricated in metal? If you can make your piece from wire, sheet and tubing, make it in metal. If it is difficult to fabricate the piece in metal (using sheet, wire and/or tubing), try carving it from wax. Hand carving is ideal for figurative, curvilinear and organic forms. I job out complicated and tedious (to me, anyway) pieces like school rings and micro-pavé to be done in CAD.
Size matters. It’s not necessary to carve your pieces actual size (and no longer necessary to work under a microscope). There is a wonderful option for hand carvers––work at a comfortable scale (Figure 1) and have a 3D scan made from your wax. The file from this scan can be output to be milled or grown, scaled up or down, and even used to make male and female conforming dies (Figure 2). For more on dies, see G. Phil Poirier and Peter Gilroy’s 2017 Santa Fe Symposium®
paper, Die Making for Hydraulic Forming in the Small Studio.1
_04D7H_Wolf_Kate.indd 561 7/16/19 2:52 PM

562By Hand! Wax Carving: Tips, Tricks and Techniques
Wolf
Figure 1 Over-sized carving Figure 2 Ring and dies
Good Practices Carve a pound of wax. Allow yourself to make mistakes; push past your comfort zone and you will have a better understanding of materials and limitations––and more breakthroughs.
Make it twice. Tell yourself, “The first time is my fact-finding mission and the second time I will nail it.” This gives you permission to loosen up and explore, and you’re more apt to get it right the first time.
Give yourself the gift of play. Carve something for the fun of it. Experiment without being attached to results.
Work on more than one project at a time. When you get stuck, put the piece you are working on aside and get lost in another project. You will come back to the first project with fresh eyes and new insights on how to resolve creative issues.
When carving figurative pieces, start by gathering images of different views and details of your subject to refer to while you are carving. Work with the artwork and your carving upside down––you will see shape and form––and you won't be distracted by preconceived ideas of what something looks like (Figure 3).
Shift your focus. Jewelers are like crows: We tend to watch shiny moving things—our tools––while we are working. Get your tool hand in the easiest position, start working, and then shift your focus to the piece you are working on. Watch how the tool affects the surface––you’ll automatically make adjustments to the way you’re holding the piece and you’ll have better tool control. When I have a struggling student, I often ask, “Are you looking at the piece or looking at the tool?” They have breakthroughs when they make the shift.
Do a dry run. Get into working position, hands braced if possible (Figure 4). I rarely have the wax flat on the benchpin. I support the wax in my fingers. With my holding hand braced on the bench pin, I can easily pivot the piece and support it wherever I am applying pressure so the wax doesn’t break. Now, check out your tool-holding hand. Mime your way through the process, then adjust the piece in your holding hand to find the easiest tool-working position (Figure 5).
_04D7H_Wolf_Kate.indd 562 7/16/19 2:52 PM

563By Hand! Wax Carving: Tips, Tricks and Techniques May 2019
Wolf
Figure 3 Upside down Figure 4 Brace hands Figure 5 Hand position
Find the ideal proportions. Most of my models are a minimum of 1 mm thick (except for small pieces such as findings). I can cast a piece that is thinner, but it will be hard to reproduce if it’s too thin. The molten wax will solidify before it can fill the cavity of the mold. I make women’s ring shanks a minimum of 1.5 mm thick and men’s rings 2.0 mm thick, as I don’t want the customer to bang the ring out of round. When hollowing out, pay attention to cross-section wax thicknesses. Avoid abrupt, drastic changes in wall thickness. Hollow out evenly or gradually taper the thickness (Figure 6).
Use a degree gauge often. Hold the wax up to the light and use the translucency and color of the wax to help you gauge the wall thickness.
Figure 7 shows a ring with ideal proportions for progressive solidification of the molten metal. For more about shrinkage and preparing your pieces for casting, read the article, “Now What? How to Avoid a Meltdown When Having Your Pieces Cast.”2
Figure 6 Optimal cross-section2 Figure 7 Optimal dimensions2
_04D7H_Wolf_Kate.indd 563 7/16/19 2:52 PM

564By Hand! Wax Carving: Tips, Tricks and Techniques
Wol
f
The Two Magic QuestionsTrust your eye. There’s a visual tension that is compelling when something is out of whack. I think it’s where the word eyesore comes from. A choked-down part of a spiral, a flat spot that interrupts a long graceful curve, or a machined clasp on a gnarly organic pendant becomes a magnet for our eye. As you are working, continually look over the piece and ask the two magic questions: “Where is your eye being pulled?” and “Why?” Keep resolving these visual tensions until your eye is at rest––and you’re done! You’ve achieved a state of visual repose. Sometimes we want these tensions––to direct our eye. Look at the Celtic triangle design in Figure 8. Where is your eye being pulled? Why?
Figure 8 This Celtic triangle illustrates visual tension.
Materials, Tools and Techniques I work with a carving wax that comes in a variety of sheets, solid rods, ring tubes and extruded shapes. The carving wax is incredibly versatile––it can be drilled, milled, turned on a lathe, sawed with a band saw, jigsaw or a jeweler’s saw with spiral or skip-tooth blade. It can be refined by filing, carving, scraping and melting. Carving wax is primarily worked in subtractive techniques but can be built up and repaired with molten waxes.
SafetyWhen working with carving waxes and rotary tools, be sure to wear NIOSH®-approved safety glasses and particle mask. Position a shop-vac near the drill press or trimmer to suck up the dust as you are working. I attach a zip tie near the end of a shop-vac hose and use a small clamp to attach it to my bench pin or drill press. When working with molten waxes, be sure to keep the wax temperature below smoking to avoid fumes. Some carvers and burs are wicked sharp––be mindful of your fingers.
_04D7H_Wolf_Kate.indd 564 7/16/19 2:52 PM

565By Hand! Wax Carving: Tips, Tricks and Techniques May 2019
Wolf
A Good StartHere are some techniques to make your carving more fun. Prep the ring blank or sheet wax close to the finished dimensions. Use drywall sanding screen to sand the slices thinner (Figure 9).
You can use a drill press or mill to prep the wax; this is quicker than sanding and results in wax with a parallel surface. Using a drill press with a cylinder wax bur (make sure the bur has teeth on the end), get your business hand in the correct position—pinky or ring finger on the edge of the trimmer, middle finger and thumb hold the edges of the wax, and index finger holds the wax flat to the deck. Give the bur space; don’t get the bur caught in a tight space, and don’t overcut (cutting past the halfway point of bur) or the bur will be grabby. Use easy, glancing strokes to mill the surface of the wax (Figure 10). Scrape the surface of the wax with a razor blade to remove tool marks (Figure 11).
Figure 9 Sanding Figure 10 Milling Figure 11 Razor blade
Lower the head of the drill press, lock it down and mill the other side. If you are removing a lot of material, mill off a few millimeters at a time or the bur may overheat and melt the wax. You can use a coarse, flat file to remove material, but the drill press method is quicker and more accurate.
Steps to Carving a Flower with Low Prongs1. Transfer the pattern: Heavily coat the back of your image with a 6B pencil
(Figures 12 and 13). Coat the surface of the carving wax with a white China marker (Figure 14).
Figure 12 Pattern Figure 13 Graphite Figure 14 China marker
_04D7H_Wolf_Kate.indd 565 7/16/19 2:52 PM
566By Hand! Wax Carving: Tips, Tricks and Techniques
Wolf
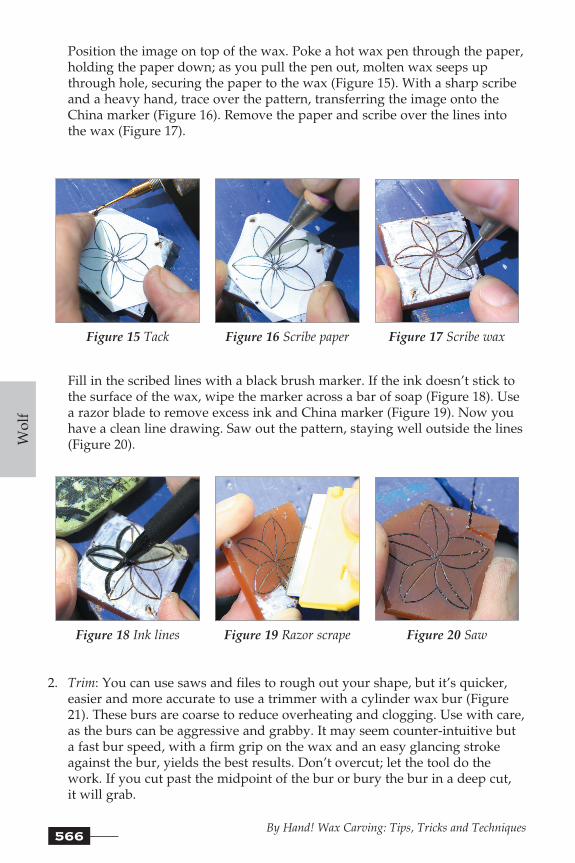
Position the image on top of the wax. Poke a hot wax pen through the paper, holding the paper down; as you pull the pen out, molten wax seeps up through hole, securing the paper to the wax (Figure 15). With a sharp scribe and a heavy hand, trace over the pattern, transferring the image onto the China marker (Figure 16). Remove the paper and scribe over the lines into the wax (Figure 17).
Figure 15 Tack Figure 16 Scribe paper Figure 17 Scribe wax
Fill in the scribed lines with a black brush marker. If the ink doesn’t stick to the surface of the wax, wipe the marker across a bar of soap (Figure 18). Use a razor blade to remove excess ink and China marker (Figure 19). Now you have a clean line drawing. Saw out the pattern, staying well outside the lines (Figure 20).
Figure 18 Ink lines Figure 19 Razor scrape Figure 20 Saw
2. Trim: You can use saws and files to rough out your shape, but it’s quicker, easier and more accurate to use a trimmer with a cylinder wax bur (Figure 21). These burs are coarse to reduce overheating and clogging. Use with care, as the burs can be aggressive and grabby. It may seem counter-intuitive but a fast bur speed, with a firm grip on the wax and an easy glancing stroke against the bur, yields the best results. Don’t overcut; let the tool do the work. If you cut past the midpoint of the bur or bury the bur in a deep cut, it will grab.
_04D7H_Wolf_Kate.indd 566 7/16/19 2:52 PM

567By Hand! Wax Carving: Tips, Tricks and Techniques May 2019
Wolf
Figure 21 Trim
Hand position is important! Brace pinky or ring finger on the edge of the trimmer, thumb and middle finger on the outside of the wax, with index finger holding the wax down. The finger on the edge of the trimmer limits your range of motion, keeping your fingers away from the bur. Trim up to but not over your line. As you get closer to the line, lighten up the pressure, using an easy glancing strike against the bur to get a smooth cut. If need be, reduce bur size to trim a tighter radii.
3. Carve: Use a #1 onglette graver to make stop cuts at the corners on the side of the flower (Figure 22). Finesse corners with a #00 barrette needle file (Figure 23).
Figure 22 #1 onglette graver Figure 23 #00 barrette needle file
_04D7H_Wolf_Kate.indd 567 7/16/19 2:52 PM

568By Hand! Wax Carving: Tips, Tricks and Techniques
Wolf
Use a #1 onglette graver to make stop cuts on the outside of each curve. These set the depth of the low part of the petals (Figure 24). Use the corner of the knife to scrape the wax down, making each petal tuck underneath the adjacent petal (Figure 25). Use the diamond-point tool to cut and round the center veins (Figure 26).
Figure 24 Stop cuts Figure 25 Scraping Figure 26 Rounding
Scrape with the corner of the knife to round the edges. With the safety edge of the 90° tool against the top of the petals, use the sharp end of the tool to clean up the edges of the petal (Figure 27). Use a ball bur to open up a hole for a center stone (Figure 28). Use a setting bur to open up the hole, just deep enough for the girdle of the stone to be barely above the surface (Figure 29).
Figure 27 Safety edge Figure 28 Pilot hole Figure 29 Setting bur
Rub the flower with a knife-edge felt wheel to remove tool marks and smooth the surface of the wax (Figure 30). Rub the back of the wax on drywall sanding screen to make the wax 1.2 mm at its thinnest point (Figure 31). Check the thickness often with a degree gauge (Figure 32).
_04D7H_Wolf_Kate.indd 568 7/16/19 2:52 PM

569By Hand! Wax Carving: Tips, Tricks and Techniques May 2019
Wolf
Figure 30 Felt wheel Figure 31 Sand Figure 32 Degree gauge
Use a double-ended wax file (Figure 33), burs and carvers to remove material from the back of the flower until it is 1 mm thick (Figure 34). Choose carvers that best match the desired contours. Again, use a degree gauge often to check thickness.
Figure 33 Double-ended wax file Figure 34 Scrape
4. Prongs: Put stone in place. Use Relief Wax™ and a wax pen to apply round spheres to make prongs for the center stone (Figure 35). Relief Wax melts at 73°C (164°F) and the carving wax melts at 116°C (240°F). Test the wax pen on scrap wax before applying wax to the flower. The pen should be hot enough to melt the Relief Wax but not hot enough to melt the carving wax. You must touch the pen to the surface of the carving wax while depositing the Relief Wax to ensure a good bond; if you just drip the wax on, it will peel off. Use the beveled end of the detailing knife to open up the inside of the prongs just enough to remove the stone (Figure 36).
_04D7H_Wolf_Kate.indd 569 7/16/19 2:52 PM

570By Hand! Wax Carving: Tips, Tricks and Techniques
Wolf
Figure 35 Add prongs Figure 36 Open prongs
Wax Carving Tool TipsBlame Your Tools
If you are having a problem, maybe it’s not you; maybe your tools can be better, so… modify your tools.
• Put a safety edge on a file, bur or carving tool. • Cut up a knife-edge felt wheel (used for smoothing the wax); now you
can reach tighter areas (Figure 37). • Lower the blade on a ring tube sizer so it doesn’t leave gouges inside
the ring. • Bend a wax pen tip. File it to make it thinner. Make a groove close to
the end of the tip; now you can reach into tight spaces, and the groove will keep the wax from riding up the tip.
• If you are using a dial wax pen, make marks for the different waxes you use (Figure 38).
Figure 37 Felt wheel Figure 38 Wax pen
_04D7H_Wolf_Kate.indd 570 7/16/19 2:52 PM

571By Hand! Wax Carving: Tips, Tricks and Techniques May 2019
Wolf
Wax Pen/Ring AssemblyIt is ideal to have an electric wax pen. A controlled temperature allows consistency in the wax’s viscosity. I prefer a pen with spatula-style tips for carving as they can reach into tighter areas. I use the loop-style wax pens for spruing, building trees and building up large areas. If you are working with an alcohol lamp, heat the shank of the spatula over the flame, pick up some wax, heat the shank over flame again, then apply the wax. You will get a feel for the timing by watching the translucency and viscosity of the wax.
The correct pen temperature for carving wax is "between smoke and string." Turn the pen on. Clean the wax pen tip by stabbing it into coarse steel wool (Figure 39). Pick up some wax. If the wax is smoking, the pen is too hot; if the wax is stringy, the pen is too cool and you will be mixing air bubbles into your wax. Adjust the pen until the wax on the spatula is fluid and the temperature is between smoke and string. When applying carving wax to fill in, build up or connect pieces, don’t drip wax on the surface––it won’t bond but will peel apart like layers of an onion. Drag the hot wax pen tip over the surface of the wax(es) you are adding onto. All surfaces must be molten to achieve a good bond.
Figure 39 Steel wool helps to clean the wax pen tip.
I always, always tack the waxes before welding them together. Use a hot, sharp, dry needle-tip spatula; poke between the parts or into the seam and wait for the wax to solidify (Figure 40). This barely tacks the pieces so you can still easily adjust the parts and continue tacking or separate and tack them again. (Hint: Position difficult-to-hold pieces in Silly Putty, Figure 41. This makes it easier to assemble the pieces properly.) I may tack, examine and break apart, tack again a few times before I get the alignment right.
Now is a good time for the two magic questions: Where is my eye being pulled? and Why? Oh! The bezel is higher on the left––or the shank is not quite lined up. Break it apart and tack again until everything is positioned correctly. Then, and only then, pick up scrap carving wax with your hot spatula, build up the side of the ring, in this case, only on the side of the shank where it is easy to refine the
_04D7H_Wolf_Kate.indd 571 7/16/19 2:52 PM
572By Hand! Wax Carving: Tips, Tricks and Techniques
Wolf
surface (Figure 42). Important: When bonding carving wax to carving wax, get all surfaces of the wax molten, i.e., hot enough that you are not introducing air bubbles. If you find air bubbles, scoop them out with the pen, and possibly turn the temperature of your pen up.
Figure 40 Tacking Figure 41 Positioning Figure 42 Joining
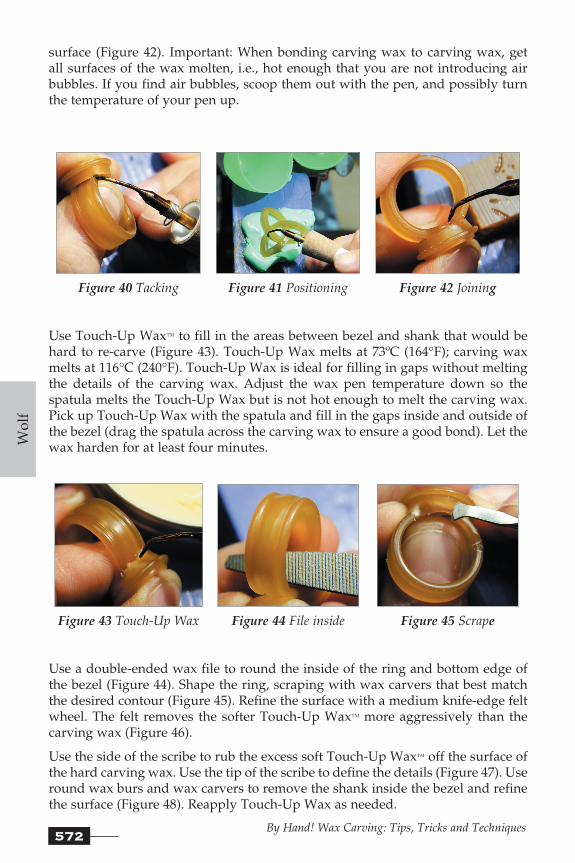
Use Touch-Up Wax™ to fill in the areas between bezel and shank that would be hard to re-carve (Figure 43). Touch-Up Wax melts at 73ºC (164°F); carving wax melts at 116°C (240°F). Touch-Up Wax is ideal for filling in gaps without melting the details of the carving wax. Adjust the wax pen temperature down so the spatula melts the Touch-Up Wax but is not hot enough to melt the carving wax. Pick up Touch-Up Wax with the spatula and fill in the gaps inside and outside of the bezel (drag the spatula across the carving wax to ensure a good bond). Let the wax harden for at least four minutes.
Figure 43 Touch-Up Wax Figure 44 File inside Figure 45 Scrape
Use a double-ended wax file to round the inside of the ring and bottom edge of the bezel (Figure 44). Shape the ring, scraping with wax carvers that best match the desired contour (Figure 45). Refine the surface with a medium knife-edge felt wheel. The felt removes the softer Touch-Up Wax™ more aggressively than the carving wax (Figure 46).
Use the side of the scribe to rub the excess soft Touch-Up Wax™ off the surface of the hard carving wax. Use the tip of the scribe to define the details (Figure 47). Use round wax burs and wax carvers to remove the shank inside the bezel and refine the surface (Figure 48). Reapply Touch-Up Wax as needed.
_04D7H_Wolf_Kate.indd 572 7/16/19 2:52 PM

573By Hand! Wax Carving: Tips, Tricks and Techniques May 2019
Wolf
surface (Figure 42). Important: When bonding carving wax to carving wax, get all surfaces of the wax molten, i.e., hot enough that you are not introducing air bubbles. If you find air bubbles, scoop them out with the pen, and possibly turn the temperature of your pen up.
Figure 40 Tacking Figure 41 Positioning Figure 42 Joining
Use Touch-Up Wax™ to fill in the areas between bezel and shank that would be hard to re-carve (Figure 43). Touch-Up Wax melts at 73ºC (164°F); carving wax melts at 116°C (240°F). Touch-Up Wax is ideal for filling in gaps without melting the details of the carving wax. Adjust the wax pen temperature down so the spatula melts the Touch-Up Wax but is not hot enough to melt the carving wax. Pick up Touch-Up Wax with the spatula and fill in the gaps inside and outside of the bezel (drag the spatula across the carving wax to ensure a good bond). Let the wax harden for at least four minutes.
Figure 43 Touch-Up Wax Figure 44 File inside Figure 45 Scrape
Use a double-ended wax file to round the inside of the ring and bottom edge of the bezel (Figure 44). Shape the ring, scraping with wax carvers that best match the desired contour (Figure 45). Refine the surface with a medium knife-edge felt wheel. The felt removes the softer Touch-Up Wax™ more aggressively than the carving wax (Figure 46).
Use the side of the scribe to rub the excess soft Touch-Up Wax™ off the surface of the hard carving wax. Use the tip of the scribe to define the details (Figure 47). Use round wax burs and wax carvers to remove the shank inside the bezel and refine the surface (Figure 48). Reapply Touch-Up Wax as needed.
Figure 46 Felt wheel Figure 47 Scribe Figure 48 Bur
Drill-Press Bezel I prefer making bezels and partial bezels for cabochons using a drill press with a cylinder bur to mill out settings. This technique creates a level seat and walls that are parallel (Figure 50). Put a thin smear of Positioning Wax™ on the back of the cabochon (Figure 51). Press the stone firmly onto the prepped slice of carving wax.
Figure 49 Finished Figure 50 Partial bezel Figure 51 Positioning Wax™
Trace around the stone with a scribe (Figure 52). Remove the stone and fill in the line with a brush marker (Figure 53). If needed, wipe the marker across a bar of soap to help it stick to the wax. Scrape ink and Positioning Wax™ off with a razor blade (Figure 54).
Figure 52 Scribe Figure 53 Ink Figure 54 Razor
_04D7H_Wolf_Kate.indd 573 7/16/19 2:52 PM

574By Hand! Wax Carving: Tips, Tricks and Techniques
Wolf
Use a round wax bur to drill through the wax (Figure 55). Position the wax below the bur on the drill press. Hold wax firmly, then pull down lever to cut a hole to desired depth of seat (Figure 56). Check the depth of the hole with a depth gauge or degree gauge. When you have opened the hole up to the correct depth, position wax under the bur. Loosen knob and lower the head assembly with the bur down into the hole. Tighten knob to lock the depth position (Figure 57).
Figure 55 Pilot hole Figure 56 Set depth Figure 57 Lock depth
Using two hands to hold the wax, at a medium speed move the wax around to open up the setting. Only cut at the front of the bur where you can see, and use an easy glancing stroke to get a smooth cut. Go up to, but not over, your layout line (Figure 58). Loosen the knob, lift the head assembly to remove wax. Use a carving knife to make a stop cut in the corner of the wax and carve open the point (Figure 59). Using a diamond point tool, poke into the base of the wall and pull up to clean out the corner (Figure 60).
Figure 58 Mill open Figure 59 Carving knife Figure 60 Open corner
Evenly coat the walls with a brush marker. Press stone into setting (don’t force it as the wax will crack!). Wherever ink is missing, scrape walls with a 90° carver (Figure 61). Repeat until stone fits (Figure 62). The stone should fall out of the setting easily. This allows for casting shrinkage. Saw off excess material (Figure 63).
_04D7H_Wolf_Kate.indd 574 7/16/19 2:52 PM

575By Hand! Wax Carving: Tips, Tricks and Techniques May 2019
Wolf
Figure 61 90° carver Figure 62 Stone fitting Figure 63 Saw excess
Use a trimmer with a cylinder bur to trim around the setting (Figure 64). Check wall thickness with a degree gauge. I left the walls 1.25 mm thick (Figure 65). Use dividers to mark around the outside of the bezel just below the seat (Figure 66).
Figure 64 Trim Figure 65 Degree gauge Figure 66 Dividers
Using an adjustable trimmer with a cylinder bur, set deck to desired angle. Trim around the wax up to the scribed line, tapering the bezel (Figure 67). If you are doing this step by hand, scribe a second line around the bottom of the bezel (Figure 68). With the corner of the carving knife, scrape around the side of the bezel, making multiple passes, until you have tapered the bezel from layout line to layout line (Figure 69). File and scrape the outside of the bezel to finesse.
Figure 67 Trim angle Figure 68 Bottom taper Figure 69 Scrape
_04D7H_Wolf_Kate.indd 575 7/16/19 2:52 PM
576By Hand! Wax Carving: Tips, Tricks and Techniques
Wolf
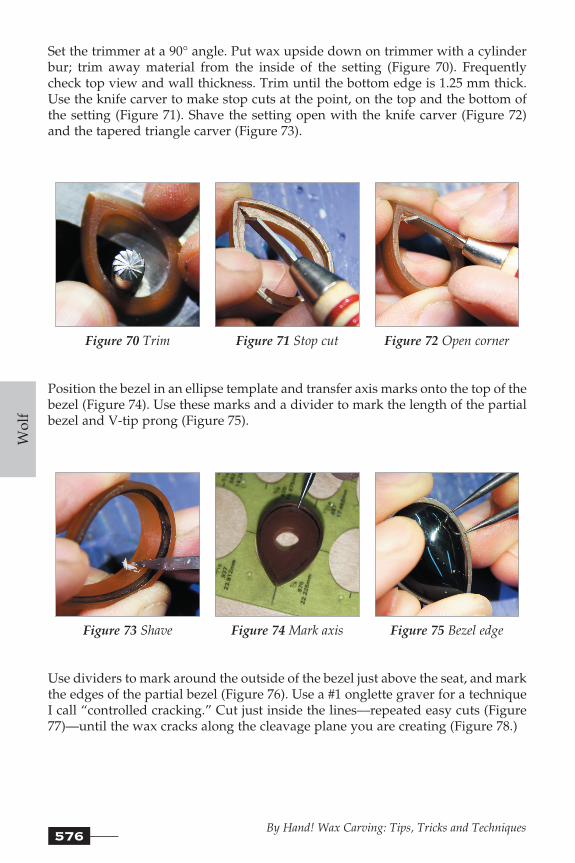
Set the trimmer at a 90° angle. Put wax upside down on trimmer with a cylinder bur; trim away material from the inside of the setting (Figure 70). Frequently check top view and wall thickness. Trim until the bottom edge is 1.25 mm thick. Use the knife carver to make stop cuts at the point, on the top and the bottom of the setting (Figure 71). Shave the setting open with the knife carver (Figure 72) and the tapered triangle carver (Figure 73).
Figure 70 Trim Figure 71 Stop cut Figure 72 Open corner
Position the bezel in an ellipse template and transfer axis marks onto the top of the bezel (Figure 74). Use these marks and a divider to mark the length of the partial bezel and V-tip prong (Figure 75).
Figure 73 Shave Figure 74 Mark axis Figure 75 Bezel edge
Use dividers to mark around the outside of the bezel just above the seat, and mark the edges of the partial bezel (Figure 76). Use a #1 onglette graver for a technique I call “controlled cracking.” Cut just inside the lines––repeated easy cuts (Figure 77)—until the wax cracks along the cleavage plane you are creating (Figure 78.)
_04D7H_Wolf_Kate.indd 576 7/16/19 2:52 PM

577By Hand! Wax Carving: Tips, Tricks and Techniques May 2019
Wolf
Figure 76 V-tip Figure 77 #1 onglette Figure 78 Controlled cracking
Use a file (Figure 79), the corner of a carving knife and tapered triangle carver to shape the setting (Figures 80 and 81). Use corner of the 90° carver to clean up the junctions (Figure 82).
Figure 79 Angle Figure 80 Shape
Figure 81 Scrape Figure 82 90° carver
_04D7H_Wolf_Kate.indd 577 7/16/19 2:52 PM
578By Hand! Wax Carving: Tips, Tricks and Techniques
Wolf
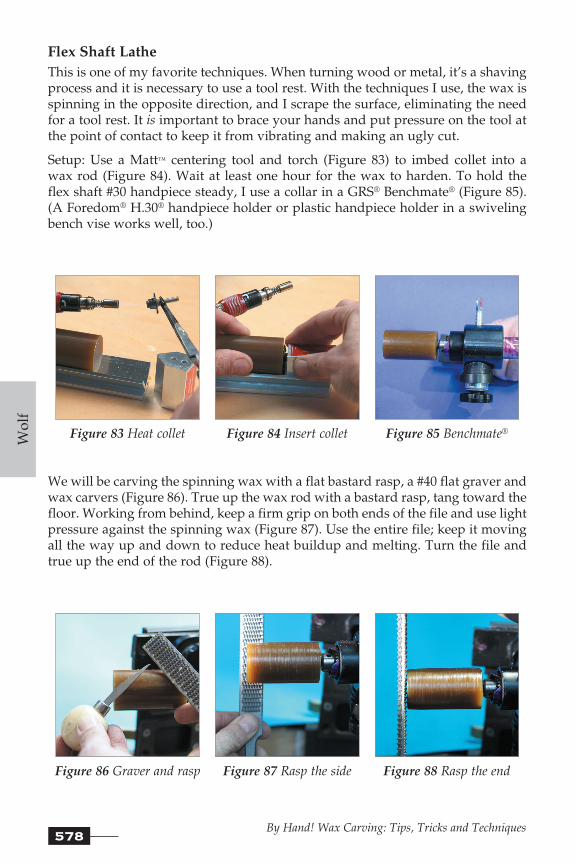
Flex Shaft LatheThis is one of my favorite techniques. When turning wood or metal, it’s a shaving process and it is necessary to use a tool rest. With the techniques I use, the wax is spinning in the opposite direction, and I scrape the surface, eliminating the need for a tool rest. It is important to brace your hands and put pressure on the tool at the point of contact to keep it from vibrating and making an ugly cut.
Setup: Use a Matt™ centering tool and torch (Figure 83) to imbed collet into a wax rod (Figure 84). Wait at least one hour for the wax to harden. To hold the flex shaft #30 handpiece steady, I use a collar in a GRS® Benchmate® (Figure 85). (A Foredom® H.30® handpiece holder or plastic handpiece holder in a swiveling bench vise works well, too.)
Figure 83 Heat collet Figure 84 Insert collet Figure 85 Benchmate®
We will be carving the spinning wax with a flat bastard rasp, a #40 flat graver and wax carvers (Figure 86). True up the wax rod with a bastard rasp, tang toward the floor. Working from behind, keep a firm grip on both ends of the file and use light pressure against the spinning wax (Figure 87). Use the entire file; keep it moving all the way up and down to reduce heat buildup and melting. Turn the file and true up the end of the rod (Figure 88).
Figure 86 Graver and rasp Figure 87 Rasp the side Figure 88 Rasp the end
_04D7H_Wolf_Kate.indd 578 7/16/19 2:52 PM

579By Hand! Wax Carving: Tips, Tricks and Techniques May 2019
Wolf
When working on the end of the wax rod, you will be working between the center and four o’clock. Remember: Flat causes friction; corners cut. Place the long corner of the flat graver against the end of the wax rod; apply pressure on the blade, shaving the end smooth (Figure 89). To mark the inside diameter of the ring, open dividers to half of the inside diameter. On an angle, feed the left divider leg into the center of the rod (Figure 90), then pivot the dividers to the right, cutting a circle (Figure 91). Thanks to Kerry Smith for this trick!
Figure 89 Graver end Figure 90 Finding center Figure 91 Divider I.D.
With the tip and the long corner of the graver, cut in a few millimeters at a pass, pulling the graver parallel from the center toward the scribed circle (Figure 92). Check the size with a digital mm gauge. When working on the outside of the ring, have the graver handle lower than the tip of the tool, and work with the tool just below center to remove excess wax (Figure 93). Use the long corner of the graver to level and cut the outside of the ring (Figure 94). Shift your focus up to the top edge of the wax to see the profile of the wax.
Figure 92 Open end Figure 93 Remove excess Figure 94 Graver side
With the tip of the graver, make a cut outside the ring to indicate where it will be cut off. Use a rounding carver (with a concave end) to cut round rails on the edges of the ring (Figure 95). Use a diamond-point carver (Figure 96) to cut the center section beveled (rock the tool if you want this section to be domed). Rock the corner of the graver against the inside edge of the ring to round it (Figure 97).
_04D7H_Wolf_Kate.indd 579 7/16/19 2:52 PM
580By Hand! Wax Carving: Tips, Tricks and Techniques
Wolf
Figure 95 Rounding Figure 96 Shaping Figure 97 Comfort fit
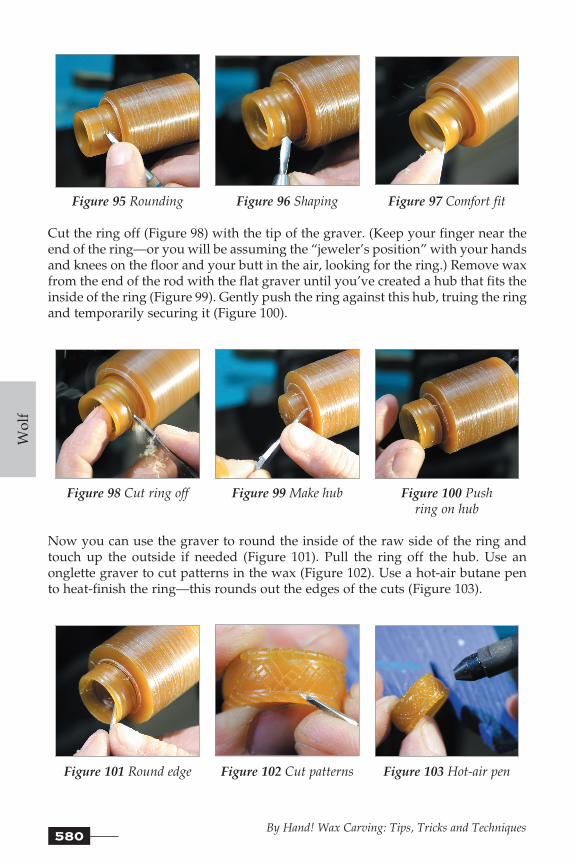
Cut the ring off (Figure 98) with the tip of the graver. (Keep your finger near the end of the ring––or you will be assuming the “jeweler’s position” with your hands and knees on the floor and your butt in the air, looking for the ring.) Remove wax from the end of the rod with the flat graver until you’ve created a hub that fits the inside of the ring (Figure 99). Gently push the ring against this hub, truing the ring and temporarily securing it (Figure 100).
Figure 98 Cut ring off Figure 99 Make hub Figure 100 Push ring on hub
Now you can use the graver to round the inside of the raw side of the ring and touch up the outside if needed (Figure 101). Pull the ring off the hub. Use an onglette graver to cut patterns in the wax (Figure 102). Use a hot-air butane pen to heat-finish the ring––this rounds out the edges of the cuts (Figure 103).
Figure 101 Round edge Figure 102 Cut patterns Figure 103 Hot-air pen
_04D7H_Wolf_Kate.indd 580 7/16/19 2:52 PM

581By Hand! Wax Carving: Tips, Tricks and Techniques May 2019
Wolf
Ring Tubes and Hand-Cut SettingsWax ring tubes come in a variety of shapes. We’ll use a large, flat, top-wax ring tube to make a ring for a faceted stone (Figure 104). The first steps in Figures 104−132 are how I also hand-cut settings for cabochons.
Start by making sure the end of the ring tube is squared off, using a double-ended wax file or a Matt™ End Reamer (Figure 105). Smear some Positioning Wax™
under the stone to adhere it to the top of the ring tube. Allowing at least 1.5 mm on either side of the stone, use dividers to draw a line all the way around the ring tube and ink in the line (Figure 106).
Figure 104 Ring Figure 105 Square Figure 106 Mark width
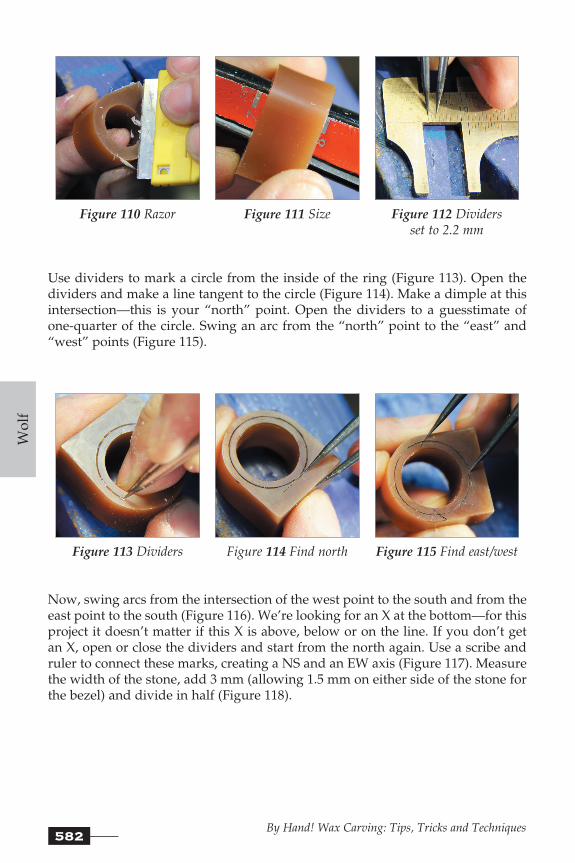
Saw outside the line (Figure 107). Mill the raw end of the wax tube (Figure 108) or file up to the line (Figure 109). Use a razor blade to smooth the sides of the ring (Figure 110). Use a wax ring sizer (a tapered blade mandrel) to open up the ring (Figure 111). Caution: Always check the size on a steel ring mandrel as the markings on the tapered blade mandrel do not correlate to anything in this universe. Set dividers to 2.2 mm (Figure 112).
Figure 107 Saw Figure 108 Mill Figure 109 File
_04D7H_Wolf_Kate.indd 581 7/16/19 2:52 PM
582By Hand! Wax Carving: Tips, Tricks and Techniques
Wolf
Figure 110 Razor Figure 111 Size Figure 112 Dividers set to 2.2 mm
Use dividers to mark a circle from the inside of the ring (Figure 113). Open the dividers and make a line tangent to the circle (Figure 114). Make a dimple at this intersection––this is your “north” point. Open the dividers to a guesstimate of one-quarter of the circle. Swing an arc from the “north” point to the “east” and “west” points (Figure 115).
Figure 113 Dividers Figure 114 Find north Figure 115 Find east/west
Now, swing arcs from the intersection of the west point to the south and from the east point to the south (Figure 116). We’re looking for an X at the bottom––for this project it doesn’t matter if this X is above, below or on the line. If you don’t get an X, open or close the dividers and start from the north again. Use a scribe and ruler to connect these marks, creating a NS and an EW axis (Figure 117). Measure the width of the stone, add 3 mm (allowing 1.5 mm on either side of the stone for the bezel) and divide in half (Figure 118).
_04D7H_Wolf_Kate.indd 582 7/16/19 2:52 PM

583By Hand! Wax Carving: Tips, Tricks and Techniques May 2019
Wolf
Figure 116 Find south Figure 117 Scribe axis Figure 118 Measure
Transfer this measurement from the centerline out (Figure 119). Open the dividers and work diagonally across the ring blank to find an arc that intersects your top markings (Figure 120). Connect the top X’s to mark the ring top. Use a ruler and scribe to connect edge of circle and ring top (Figure 121).
Figure 119 Top width Figure 120 Diagonal arc Figure 121 Connect
Use a cylinder wax bur and trimmer to trim excess wax, trimming up to but not over the layout lines (Figure 122). Flatten the ring top with a file and razor (Figures 123 and 124).
Figure 122 Trim Figure 123 File Figure 124 Razor
_04D7H_Wolf_Kate.indd 583 7/16/19 2:52 PM
584By Hand! Wax Carving: Tips, Tricks and Techniques
Wolf
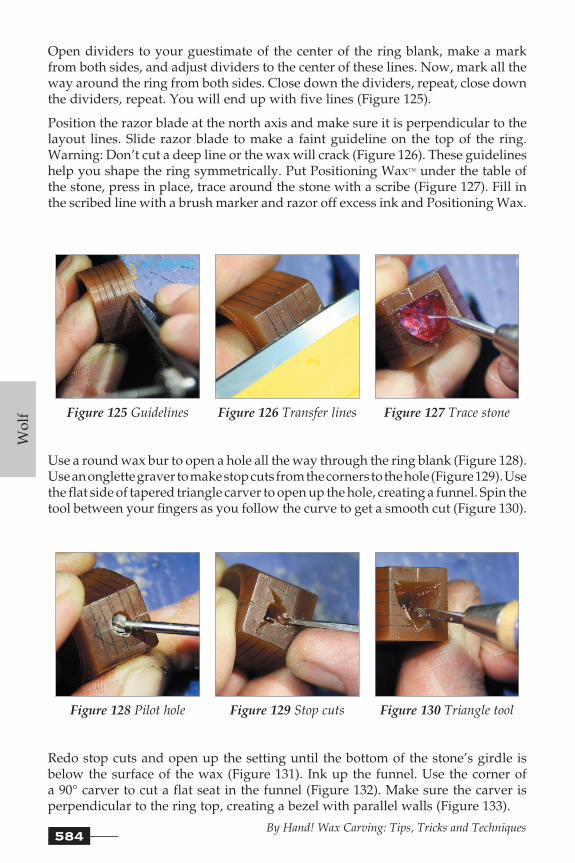
Open dividers to your guestimate of the center of the ring blank, make a mark from both sides, and adjust dividers to the center of these lines. Now, mark all the way around the ring from both sides. Close down the dividers, repeat, close down the dividers, repeat. You will end up with five lines (Figure 125).
Position the razor blade at the north axis and make sure it is perpendicular to the layout lines. Slide razor blade to make a faint guideline on the top of the ring. Warning: Don’t cut a deep line or the wax will crack (Figure 126). These guidelines help you shape the ring symmetrically. Put Positioning Wax™ under the table of the stone, press in place, trace around the stone with a scribe (Figure 127). Fill in the scribed line with a brush marker and razor off excess ink and Positioning Wax.
Figure 125 Guidelines Figure 126 Transfer lines Figure 127 Trace stone
Use a round wax bur to open a hole all the way through the ring blank (Figure 128). Use an onglette graver to make stop cuts from the corners to the hole (Figure 129). Use the flat side of tapered triangle carver to open up the hole, creating a funnel. Spin the tool between your fingers as you follow the curve to get a smooth cut (Figure 130).
Figure 128 Pilot hole Figure 129 Stop cuts Figure 130 Triangle tool
Redo stop cuts and open up the setting until the bottom of the stone’s girdle is below the surface of the wax (Figure 131). Ink up the funnel. Use the corner of a 90° carver to cut a flat seat in the funnel (Figure 132). Make sure the carver is perpendicular to the ring top, creating a bezel with parallel walls (Figure 133).
_04D7H_Wolf_Kate.indd 584 7/16/19 2:52 PM

585By Hand! Wax Carving: Tips, Tricks and Techniques May 2019
Wolf
Figure 131 Fit Figure 132 90° carver Figure 133 Carver angle
Position a diamond-point carver on the seat and pull up to clean out the corner of the bezel wall (Figure 134). Drag down to remove the seat at the corners of the setting. Ink up the bezel and gently push the stone in. Where the ink is rubbed off, remove more wax with your carvers until the stone fits into the setting.
Using the pavilion carver (this tool has a long safety edge adjacent to a sharp angled edge) with the safety edge against the bezel wall, scrape around the corner of the flat seat, creating an angled seat (Figure 135).
Figure 134 Relieve corners Figure 135 Pavilion tool
The top of the stone’s girdle should be below the surface of the wax now (Figure 136). If not, go back a few steps to lower the seat. Use the diamond-point carver to remove wax from the inside edge of the shelf, making the angled seat 0.5 mm wide (Figure 137). Ink in the setting and press the stone in, rocking it if possible. Use the carvers to remove material wherever the ink was rubbed away, as that’s where the setting is tight (Figure 138). Ink, check fit, adjust and repeat until the stone fits easily into the ring with the girdle below the surface.
_04D7H_Wolf_Kate.indd 585 7/16/19 2:52 PM
586By Hand! Wax Carving: Tips, Tricks and Techniques
Wolf
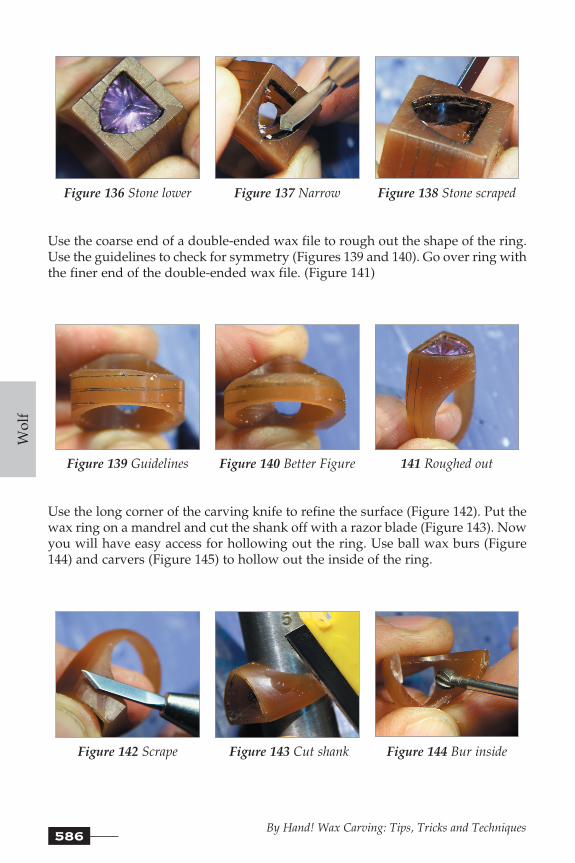
Figure 136 Stone lower Figure 137 Narrow Figure 138 Stone scraped
Use the coarse end of a double-ended wax file to rough out the shape of the ring. Use the guidelines to check for symmetry (Figures 139 and 140). Go over ring with the finer end of the double-ended wax file. (Figure 141)
Figure 139 Guidelines Figure 140 Better Figure 141 Roughed out
Use the long corner of the carving knife to refine the surface (Figure 142). Put the wax ring on a mandrel and cut the shank off with a razor blade (Figure 143). Now you will have easy access for hollowing out the ring. Use ball wax burs (Figure 144) and carvers (Figure 145) to hollow out the inside of the ring.
Figure 142 Scrape Figure 143 Cut shank Figure 144 Bur inside
_04D7H_Wolf_Kate.indd 586 7/16/19 2:52 PM

587By Hand! Wax Carving: Tips, Tricks and Techniques May 2019
Wolf
Use a shortened Q-tip in the flex shaft to smooth the concave surfaces. (First dip the Q-tip into full-strength orange solvent and then blot it almost dry with a paper towel.) Repeat with a dry Q-tip (Figure 146). Rinse the wax or the solvent residue will continue to melt the wax. Position the ring on a mandrel and dry tack the shank with the hot wax pen (Figure 147). Check to see that the seams are lined up; if not, break them apart and tack again.
Figure 145 Scrape Figure 146 Q-tip Figure 147 Tack shank
Pick up scrap carving wax with the wax pen, drag the pen through the seam, melting the surface of the ring and depositing wax to fill in the seam (Figure 148). Turn the wax pen temperature down and test on a piece of scrap wax––the pen needs to be hot enough to flow the Touch-Up Wax™ but not hot enough to melt the carving wax. Apply Touch-Up Wax inside the bezel to fill in the gap (Figure 149) and fill in surface imperfections (Figure 150).
Figure 148 Join Figure 149 Touch-Up Wax™
Figure 150 Fill surface imperfections
Let the wax harden for five minutes, then use the carvers to blend in the repair. Ink up the setting, put the stone in, remove wax where the ink was scraped by the stone (Figure 151) and repeat until the stone fits easily. File and scrape the outside of the ring with wax carvers to refine the seams (Figure 152).
_04D7H_Wolf_Kate.indd 587 7/16/19 2:52 PM
588By Hand! Wax Carving: Tips, Tricks and Techniques
Wolf
Figure 151 Adjust Figure 152 Refine
Decorative Techniques
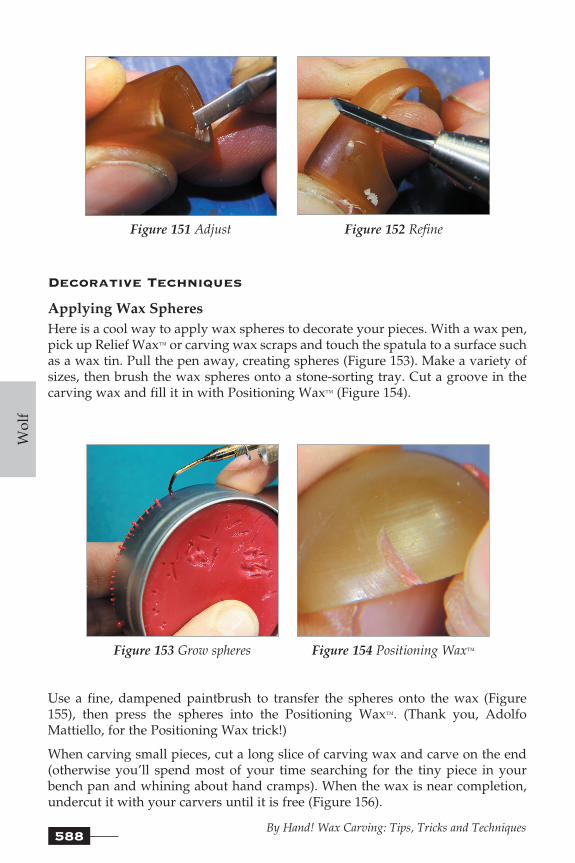
Applying Wax SpheresHere is a cool way to apply wax spheres to decorate your pieces. With a wax pen, pick up Relief Wax™ or carving wax scraps and touch the spatula to a surface such as a wax tin. Pull the pen away, creating spheres (Figure 153). Make a variety of sizes, then brush the wax spheres onto a stone-sorting tray. Cut a groove in the carving wax and fill it in with Positioning Wax™ (Figure 154).
Figure 153 Grow spheres Figure 154 Positioning Wax™
Use a fine, dampened paintbrush to transfer the spheres onto the wax (Figure 155), then press the spheres into the Positioning Wax™. (Thank you, Adolfo Mattiello, for the Positioning Wax trick!)
When carving small pieces, cut a long slice of carving wax and carve on the end (otherwise you’ll spend most of your time searching for the tiny piece in your bench pan and whining about hand cramps). When the wax is near completion, undercut it with your carvers until it is free (Figure 156).
_04D7H_Wolf_Kate.indd 588 7/16/19 2:52 PM

589By Hand! Wax Carving: Tips, Tricks and Techniques May 2019
Wolf
Figure 155 Transfer balls Figure 156 Work off end
Creating a Raised Pattern on a Smooth BackgroundI use Relief Wax™ to build up detail on the surface of carving wax. The Relief Wax is similar to Touch-Up Wax™––they both melt at 73°C (164°F) and can be carved, but the Relief Wax is formulated to be more viscous, making it ideal for building up detail. Start by adjusting the temperature of the wax pen and test on a piece of scrap wax. Make sure the pen is not hot enough to melt the carving wax, and the consistency of the Relief Wax isn’t lumpy or too runny. Prep the surface of the carving wax by removing surface imperfections and then rub it with a felt wheel.
Pick up some Relief Wax™ with the wax pen and drag the tip of the pen across the surface of the carving wax while depositing the Relief Wax (Figure 157). Add more Relief Wax until the outlines of your patterns are filled in. Wait five minutes for the Relief Wax to harden, and then use your wax carvers to scrape excess material from the surface (Figure 158). Then sculpt the Relief Wax into the desired forms (Figures 159 and 160).
Figure 157 Trail wax Figure 158 Scrape
_04D7H_Wolf_Kate.indd 589 7/16/19 2:52 PM

590By Hand! Wax Carving: Tips, Tricks and Techniques
Wolf
Figure 159 Sculpt Figure 160 Sculpt the detail
Use the tip of the detailing knife carver to crisp up the corners (Figure 161). Position the safety edge of a 90° carver against the carving wax and use the sharp end of the carver to shape the softer Relief Wax™ (Figure 162). Touch the pen down to add a sphere in the middle of the flower. Trail on more Relief Wax to make stems (Figure 163).
Figure 161 Define Figure 162 Safety edge position
Figure 163 Trail stem
Hollow Forms and Mirror ImagesYou can temporarily join pieces of wax together to make boxes, lockets, beads and mirror images, then easily separate the waxes to hollow and finish.
Prepare two slices of wax with a razor and assemble with strips of Double Sided Scotch® Tape between (Figure 164). Press the wax slices firmly together. For hollow forms, such as the pillbox in Figure 165, use two different thicknesses of wax. Transfer a pattern and trim out the waxes with a cylinder bur and trimmer. Burs, files and carvers easily cut through the tape.
_04D7H_Wolf_Kate.indd 590 7/16/19 2:52 PM

591By Hand! Wax Carving: Tips, Tricks and Techniques May 2019
Wolf
Figure 164 Double Sided Scotch® Tape
Figure 165 Pill box
For mirror image pieces, after trimming use a divider to put guidelines around the edge of the wax (Figure 166). Using files and carvers, work both sides of the wax (Figure 167) and check the side view guidelines to make sure you are removing material evenly. If the waxes separate before you are finished carving, remove the tape, position the waxes together, and poke into the seam in a few places with a hot wax pen. When the outside of the wax is done, pry the pieces apart, then hollow and finish the backs.
Figure 166 Guidelines Figure 167 Carve
Pierce-out WorkHollow out the back of the piece. Use a scribe to draw layout lines. Use the beveled edge of the detailing knife to make stop cuts into the corners (Figure 168). Put a flat side of the tapered triangle tool in the hole and shave side to side to remove material, leaving a smooth surface (Figure 169). Redo the stop cuts and use the tapered triangle tool until the windows are open and clean.
Figure 168 Stop cuts Figure 169 Tapered triangle tool
_04D7H_Wolf_Kate.indd 591 7/16/19 2:52 PM

592By Hand! Wax Carving: Tips, Tricks and Techniques
Wolf
When doing curved pierce-out work, make stop cuts with a detailing knife, then position a flat side of the tapered triangle carver in the hole against the surface of the wax. Spin the tool as you follow the curve—spinning it keeps the corner of the tool from catching and leaving marks (Figure 170).
Figure 170 Spin the tapered triangle carver
Conclusion So, how about it? Give yourself the gift of play––carve something for the fun of it. Get lost in the creative process…because getting lost on purpose takes you to the place where magic happens!
Acknowledgements I wish to thank my clever, generous students and fellow jewelers who have shared their ideas with me. Thanks to my assistant Cindy Stiles-Stacey—you make everything better. Thank you, Adolfo Mattiello, for allowing me to hang out and watch you work all day at trade shows. Thanks to G. Phil Poirier for the dies and information on 3D scanning. Thank you to Eddie Bell, Jessa Cast, Janet Haldeman and the Santa Fe Symposium® staff.
References 1. G. Phil Poirier and Peter Gilroy, “Die Making for Hydraulic Forming in the
Small Studio,” The Santa Fe Symposium on Jewelry Manufacturing Technology 2017, ed. E. Bell et al. (Albuquerque: Met-Chem Research, 2017).
2. Kate Wolf, “Now What? Tips for Avoiding a Meltdown.” MJSA Journal (August 2016): 35−42; https://mjsa.org/publicationsmedia/article_and_video_library/casting/now_what.
_04D7H_Wolf_Kate.indd 592 7/16/19 2:52 PM