Central and Remote User Guide - Idexx
62
Central and Remote Users Guide
-
Upload
khangminh22 -
Category
Documents
-
view
2 -
download
0
Transcript of Central and Remote User Guide - Idexx
Central and Remote Users Guide
Proprietary Rights Notice © 1985-2006 IDEXX Laboratories, Inc. All rights reserved. Information in this document is subject to change without notice. Practice names, doctors, staff, patients, clinics, companies and data used in examples are fictitious unless otherwise noted. No part of this document may be reproduced or transmitted in any form or by any means, electronic, mechanical or otherwise, for any purpose, without the express written permission of IDEXX Computer Systems. IDEXX Computer Systems retains all rights, title and interest in this document, and any copies thereof, and in all patent or trademark, copyright, trade secret and/or other intellectual or industrial property rights covering this document or subject matter in this document. The furnishing of this document does not give a license to these property rights except as expressly provided in any written license agreement from IDEXX Computer Systems. Your use of this document and the software that is the subject of this document shall be in accordance with the express terms and conditions of that license agreement. Your possession of this document does not alter or affect the terms of that license agreement in any way.
Cornerstone and Practice what's possible are trademarks or registered trademarks of IDEXX Laboratories, Inc. or its affiliates in the United States and/or other countries. Microsoft is a registered trademark of Microsoft Corporation in the United States and/or other countries. All other product and company names and logos referenced herein are trademarks of their respective holders. Published by IDEXX Laboratories, Inc. IDEXX Computer Systems 2536 Alpine Road Eau Claire, Wisconsin 54703, USA (715) 834-0355 idexx.com Printed in the United States of America.
Table of Contents
INTRODUCTION........................................................................................................................................... 1
Overview of Cornerstone® Central and Cornerstone® Remote...............................................................................1
INITIAL SETUP............................................................................................................................................. 3
Preparing to Use Central and Remote.......................................................................................................................3
Initial Remote Setup....................................................................................................................................................5 Set Up Security for Remote Location........................................................................................................................5 Set Up Remote Preferences .......................................................................................................................................5 Set Up a Shared Folder ..............................................................................................................................................6 Set Up Your Site ID at Remote .................................................................................................................................6
Initial Central Setup....................................................................................................................................................8 Set Up Security in Central .........................................................................................................................................8 Set Up Central Preferences........................................................................................................................................8 Set Up Staff Members ...............................................................................................................................................9 Set Up Site Region Descriptions .............................................................................................................................10 Set Up Site Information ...........................................................................................................................................11 Fill Central database with Invoice Items, Units of Measure, Species and Sex IDs .................................................12 Set Up Invoice Items ...............................................................................................................................................13 Set Up Species .........................................................................................................................................................18 Set Up Data Selections ............................................................................................................................................19 Set Up Transmission Groups ...................................................................................................................................20 Synchronizing IDs with Remote Sites .....................................................................................................................22
Maintain Remote links to Central............................................................................................................................23 Set Up Species Links...............................................................................................................................................23 Set Up Unit of Measure Links .................................................................................................................................24 Set Up Invoice Item Links.......................................................................................................................................25 Set Up Sex ID Links................................................................................................................................................26
USING CORNERSTONE CENTRAL ......................................................................................................... 27
Introduction ...............................................................................................................................................................27 Logging on to and out of Cornerstone Central ........................................................................................................27
Updating Invoice Item Information at the Central Site .........................................................................................28 Regional Dispensing Items ......................................................................................................................................31
Sending Updated Invoice Item Information to Remote Sites.................................................................................33
Retrieving Summary Data ........................................................................................................................................34 Updating Central......................................................................................................................................................34 Verifying Transmissions..........................................................................................................................................35

Printing Reminders in Central .................................................................................................................................37 To print reminders from Central..............................................................................................................................37
Connecting to Another Site.......................................................................................................................................38
Generating Central Reports .....................................................................................................................................38 Previewing, Printing, and Saving Reports ...............................................................................................................38 Cornerstone Central Reports....................................................................................................................................42
Using Central Practice Explorer ..............................................................................................................................46 Central-specific Reports in Practice Explorer..........................................................................................................46
USING CORNERSTONE REMOTE ........................................................................................................... 49
Introduction ...............................................................................................................................................................49 Logging on to and out of Cornerstone Remote........................................................................................................49
Generating the Summary Data.................................................................................................................................50
Extracting Previous Summary Data Files ...............................................................................................................50
Generating Reminders at the Remote Site ..............................................................................................................51 To Generate Reminders ...........................................................................................................................................51
Updating Invoice Item Information at the Remote Site .........................................................................................52
Receiving Invoice Item Updates ...............................................................................................................................52 Automatic Update of Invoice Item Information ......................................................................................................52 Updating Invoice Item Information .........................................................................................................................52
Generating Invoice Item Update Reports................................................................................................................54 Previewing and Printing Reports .............................................................................................................................54 Cornerstone Remote Reports ...................................................................................................................................55
INDEX ......................................................................................................................................................... 56
Using Central and Remote 1
Introduction
Overview of Cornerstone® Central and Cornerstone® Remote Cornerstone Central and Cornerstone Remote are separate programs used together to collect and update information from multiple practices. Using Central and Remote software, practices that are linked can:
• Generate combined reports by gathering summary data from remote sites.
• Maintain common invoice item information.
Cornerstone® Central The location with the Cornerstone Central program serves as the control center for your remote sites. At Cornerstone Central: • Automatically receive end-of-day information from your remote
sites on the time schedule you choose. • Organize remote information into reports of summary activity
for each remote site or region. These reports are printed at the Central site.
• Add and change invoice classes and items at the Central site. To keep invoice item information standard among your sites, it is important that all modifications to invoice information be controlled by the Central site.
• Transmit invoice item additions and changes to remote sites.
Note If set up to do so, remote sites can accept or reject individual invoice item modifications.
• If set up to do so, print and send reminders for remote sites.
Note The reminder files must be generated at the remote sites and automatically transmitted to the Central site before the Central server can print the reminders.
Using Central and Remote 2
Cornerstone® Remote At remote sites, Cornerstone Foundation software is used to process most of the activity (end-of-day, invoicing, reminders, client and patient records, etc.). At Cornerstone Remote sites: • Automatically collect End-of-Period summary data and transmit
the data to the Central server. • Allow you to accept or reject invoice item modifications sent
from the Central server if set up to do so. However, you can choose to set up your remote site so that all invoice item modifications are automatically accepted.
• Transmit reminder files to the Central server to be printed. (Optional. You can choose to print reminders at the remote site.) Whether you print the files from the Central server or at the remote sites, the reminder files must be generated in the Cornerstone Foundation software.

Using Central and Remote 3
Initial Setup
Preparing to Use Central and Remote To be able to transfer data between Cornerstone Remote and Cornerstone Central, you must first set up the information the Remote module requires to synchronize the Central and Remote databases. Follow this checklist to ensure that you have completed all steps.
Initial setup on Remote:
1 Load Cornerstone Foundation and Remote Module software. 2 Set up security for Remote location. 3 Set preferences. 4 Set up reminder defaults. 5 Share the folder (usually cstone) that contains the Cornerstone
database. 6 Set up a Site ID for the Remote site. Communicate this ID to
Central. Central must have your remote Site ID when it sets up your remote site in the Central database.
Initial setup on the Central:
1 Load Cornerstone Foundation (optional) and Central Module. 2 Set up security for Central location. 3 Set up Central information (name, address, state, postal code,
phone and fax numbers). 4 Set up defaults (unit of measure, dispensing fee, etc.). 5 Set up Central toolbar preferences. 6 Set up the staff members who can access Central software. 7 Set up site information (site regions and sites) for each remote
site. 8 Fill the Central database with existing invoice items and species
extracted from one of the remote sites or from the main site. 9 If necessary, set up additional invoice items (including invoice
item classifications and units of measure).
Using Central and Remote 4
10 If necessary, set up additional species. 11 Set up data selections. 12 Set up transmission groups. 13 Synchronize master files.
Set up links at Remote locations after completing initial Central setup:
1 Set up species links. 2 Set up unit of measure links. 3 Set up invoice item links. 4 Set up sex ID links.
Using Central and Remote 5
Initial Remote Setup
Set Up Security for Remote Location Due to its confidential nature, specific security instructions are not provided inthis book. To set up security for each staff member, choose Security Setup on the File menu, and follow the instructions included separately with Cornerstone Foundation.
Note If none of the staff at a remote has security access to the Update Invoice Item dialog box, invoice items updates from the Central server will occur as soon as Cornerstone Remote software is opened.
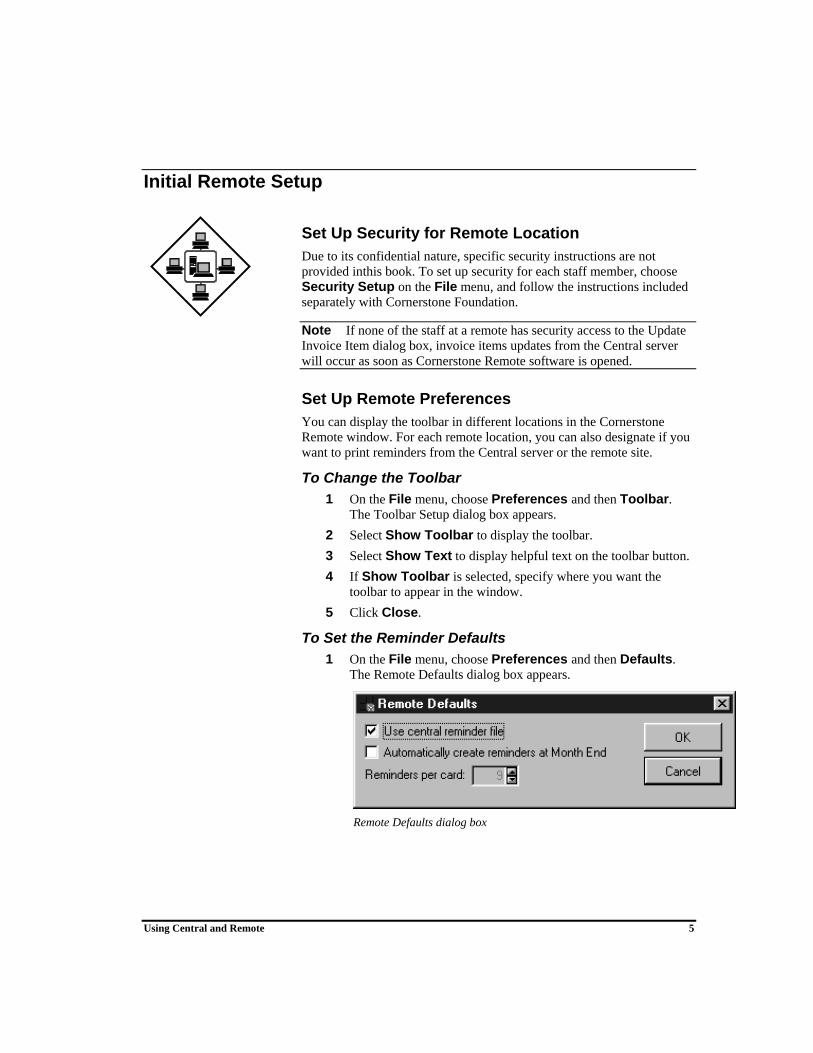
Set Up Remote Preferences You can display the toolbar in different locations in the Cornerstone Remote window. For each remote location, you can also designate if you want to print reminders from the Central server or the remote site.
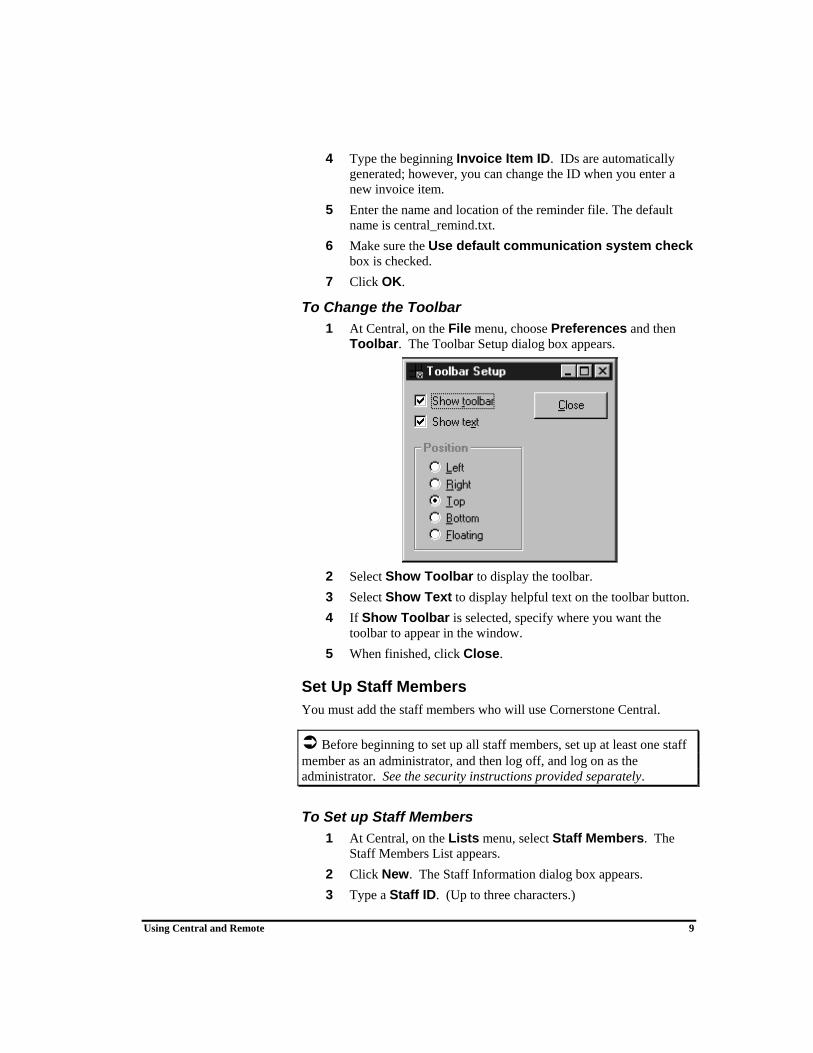
To Change the Toolbar 1 On the File menu, choose Preferences and then Toolbar.
The Toolbar Setup dialog box appears. 2 Select Show Toolbar to display the toolbar. 3 Select Show Text to display helpful text on the toolbar button. 4 If Show Toolbar is selected, specify where you want the
toolbar to appear in the window. 5 Click Close.
To Set the Reminder Defaults 1 On the File menu, choose Preferences and then Defaults.
The Remote Defaults dialog box appears.
Remote Defaults dialog box

Using Central and Remote 6
2 Click the Use central reminder file check box if you want to print your reminders from the Central server. Leave this box unchecked if you want to print your reminders at the remote location.
3 Click OK when finished.
Set Up a Shared Folder In order for Cornerstone Central software to access necessary data from your remote computer, you must allow shared access to the folder that contains the Cornerstone database (cstone.db). By default this is the cstone folder on the server's hard drive.
Note You must be logged on the network as a user with administrator privileges.
1 In Windows Explorer, right-click the folder that contains the Cornerstone database. (By default this is the cstone folder.) A pop-up menu appears.
2 On the menu, click Sharing. The Cstone Properties dialog box appears.
3 Click the Sharing tab (if not already selected) and specify Share this folder.
4 In the Share name field, enter cstone. 5 In the User Limit field, select Maximum allowed. 6 Choose OK.
Set Up Your Site ID at Remote As data is being retrieved from remote locations, site IDs make it easier to identify the location where the data was generated. So that Central can identify your site when it receives your data, you must set up a Site ID record at Remote. When your remote site information is set up at Central, this same Site ID must be included in Central's information for your remote site. You must also identify your shared directory. This shared directory is where the data that is being received from Central resides.
To Add Your Site ID 1 At Remote, on the Activities menu, select Site ID Setup. The
Setup Site ID dialog box appears. In the Practice field, the practice name set up in Cornerstone Foundation Practice Information appears by default.
2 In the Site ID field, enter an ID for the site. The ID can be letters, numbers, or a combination of letters and numbers. You choose the
Using Central and Remote 7
ID. Communicate this ID to Central because the ID must match the Site ID used in the Central database.
Note You must set up the remote site ID before Central can set up your site information in the Central database.
3 In the Cornerstone directory share name field, enter your machine (computer) name or remote server's IP address followed by \cstone, e.g., machine name\cstone.
Note If you do not know your machine name or remote server's IP address, call Software Support at 1-800-695-2877 for assistance.
4 Click OK.

Using Central and Remote 8
Initial Central Setup
Set Up Security in Central Due to its confidential nature, separate security instructions are not provided in this book. To set up security for each staff member, choose Security Setup on the File menu, and follow the instructions provided separately.
Set Up Central Preferences Through Preferences, you can do the following: • Set up location information (name, address, phone #, etc.) for the
Central site. (This information must be entered before using Cornerstone Central Practice Explorer reports.)
• Select default settings for unit of measure, dispensing fee amount, and beginning invoice item ID.
• Determine where the toolbar appears on the Cornerstone Central window.
To Enter the Central Information 1 On the File menu, choose Preferences and then choose
Central Information. The Central Information dialog box appears.
2 Type the Name, Address, City, State, Postal code, and Phone and Fax numbers of the Central location.
3 Click OK.
To Set the Defaults 1 On the File menu, choose Preferences and then Defaults.
The Setup Defaults dialog box appears.
Setup Defaults dialog box
2 Select the Unit of Measure to appear by default when setting up new invoice items.
3 Type the Dispensing Fee to appear by default when setting up new invoice items.
Using Central and Remote 9
4 Type the beginning Invoice Item ID. IDs are automatically generated; however, you can change the ID when you enter a new invoice item.
5 Enter the name and location of the reminder file. The default name is central_remind.txt.
6 Make sure the Use default communication system check box is checked.
7 Click OK.
To Change the Toolbar 1 At Central, on the File menu, choose Preferences and then
Toolbar. The Toolbar Setup dialog box appears.
2 Select Show Toolbar to display the toolbar. 3 Select Show Text to display helpful text on the toolbar button. 4 If Show Toolbar is selected, specify where you want the
toolbar to appear in the window. 5 When finished, click Close.
Set Up Staff Members You must add the staff members who will use Cornerstone Central.
Before beginning to set up all staff members, set up at least one staff member as an administrator, and then log off, and log on as the administrator. See the security instructions provided separately.
To Set up Staff Members 1 At Central, on the Lists menu, select Staff Members. The
Staff Members List appears. 2 Click New. The Staff Information dialog box appears. 3 Type a Staff ID. (Up to three characters.)

Using Central and Remote 10
4 To prevent a staff member from logging into the Central server, deselect the Active box.
5 Type the staff member’s First Name, Last Name, and Middle Initial.
Staff Information dialog box
6 Click OK. 7 Repeat steps 2 - 6 to add more staff members. To update staff member information, select the staff member
and then click Update to modify the Staff Information. To delete a staff member, select the staff member and click
Delete. A message appears asking you to confirm the decision. Click Yes.
Set Up Site Region Descriptions In the Cornerstone Central database, each remote location must be set up as a site with a Site ID. Because each site must be included in a Site Region, before you can set up a site, you must set up Site Regions. A Site Region includes a group of sites organized by similar properties, such as location, market size, ownership, or time zone. The Central server sends invoice item information to remote sites and site regions through transmission groups.
Note Site regions appear when you set up regional pricing in the Setup Invoice Item Information dialog box.
1 On Central, on the Lists menu, select Regions. The Site Region List appears.
2 Click New. The New Region dialog box appears. 3 Type the region Description. 4 Click OK. 5 Repeat steps 2-4 to add another region.
To modify a region description, select the site region and then click Update. Change the Description. To delete the site region, select the region and then click Delete. A message appears asking you to confirm the decision. Click Yes.

Using Central and Remote 11
Set Up Site Information 1 On Central, on the Lists menu, select Sites. The Site List
appears. 2 Click New. The New Site dialog box appears.
New Site dialog box
5 In the Site ID field, enter the site ID that the remote location used when it set up its Site ID record. The two IDs must match. This ID is associated with the computer name/sharename (see below) and links the remote site to Central. See "Set Up Your Site ID at Remote" on page 6.
6 In the Contact field, enter the name of the contact person at the remote site.
7 In the Region field, click the down arrow to the right of the field. From the drop-down list, select the site region (group) to assign the new site to. This group is listed with the individual sites in Transmission Groups dialog box, and as a region in Setup Invoice Item regional pricing and Mass Markup.
8 Enter the remote site's Phone and Fax numbers, Address, City, State, and Postal code.
9 At Connection, select Direct. 10 In the Connect time field, enter the time of day that you want the
summary data files retrieved from this remote site, e.g., 12:15 AM. 11 In the Try to Connect field, enter the number of times to try to
connect to the remote site. 12 In the Timeout field, enter the number of seconds to wait for the
computer to find the necessary files before disconnecting. If nothing is entered, the system waits 300 seconds.
If you do not know the remote server's IP address, call 1-800-695-2877.

Using Central and Remote 12
13 In the Connection Name field, enter a name for the connection to the remote. This is a required field; however, you choose the name you want to use.
14 If applicable, in the Password field, enter the password of the remote site.
15 In the Computer name\sharename field, enter your remote server's IP address followed by \cstone, e.g., IP address\cstone.
Note If you do not know your remote server's IP address and do not know how to find it, call Software Support at 1-800-695-2877 for assistance.
14 In the DB Server Name field, enter the database server name of the Cornerstone server at the remote site. The database server name is usually cstone. However, depending on your configuration your database server may be different.
Note If the database name is incorrect, a 999 error message appears when Central attempts to connect to the remote site.
15 Click OK. 16 Repeat steps 2 – 14 to add another site.
To modify a site's information, select the site and then click Update. Change the applicable information. To delete the site, select the site and click Delete. A message appears asking you to confirm the decision. Click Yes.
Fill Central database with Invoice Items, Units of Measure, Species and Sex IDs Your Central database does not include any invoice items and species. To fill the Central database with existing invoice items and species, choose one of your remote locations and run a custom Cornerstone program to copy your invoice items, units of measure, species and sex ID to disk. Take the disk to the Central location and run the same custom program to place the extracted data in the Central database.
To copy invoice items, units of measure, species and Sex IDs from a main or remote server Do not perform this step more than once. Running this custom program will take the species, invoice items, units of measure and sex IDs from a Remote site and load it into the Central database.
Note If you have more than one remote site, run this program on the Remote server that has the database you want to copy to Central.
Using Central and Remote 13
1 On the selected remote server, click the Start button and then select Run.
2 In the Open box, type csextrac to open the program. If the program does not run, enter the full path to the program, e.g. c:\cstone\csextrac.
3 Click the Extract button. 4 The system prompts "Are you at your Central Management
Site?" Insert a blank disk into your drive. Click No to save the files to a floppy disk. You may need more than one disk.
5 After saving the files to disk, the system displays a message telling you to take the disk to the Central site. Click OK and then click Close to exit.
To place extracted data in Central database 1 At Central, click the Start button and then select Run. 2 In the Open box, type csextrac to open the program. If the
program does not run, enter the full path to the program, e.g. c:\cstone\csextrac.
3 Click the Insert button. 4 The system prompts "Are you importing files from floppy
disks?" Click No unless you are using floppy disks. Press Enter when ready.
5 When done, the system displays a message telling you the process is finished. Click OK and then click Close to exit.
Set Up Invoice Items Set up the invoice item classifications, units of measure and invoice items in Cornerstone Central in order to update remote sites’ databases.
• Invoice item classifications are used to group common types of service and inventory invoice items in Cornerstone. Examples of classifications include anesthesia, diet or supplies.
• Common weights, measurements and amounts need to be set up in the Central database. Bottle, capsule, cc and tablet are examples of invoice item units of measure.
• Finally, you must set up the invoice items to maintain in the Cornerstone Central database.
To Set up Invoice Item Classifications Remote site invoice item classifications must match Central invoice item classifications in order for invoice items to be accepted at the remote site.
1 On the Lists menu, choose Invoice Items and then Invoice Item Classes. The Invoice Item Classification List appears.
2 To add a classification, choose New. The Invoice Item Classification Information dialog box appears.
Using Central and Remote 14
3 Type a Class ID (of up to seven characters) and Description. 4 Click OK. 5 Repeat steps 2 - 4 to add another classification.
To modify a classification description, select the classification, and click Update. Change the Description. To delete the classification, select the classification and then click Delete. A message appears asking you to confirm the decision. Click Yes.
To Set up Units of Measure 1 On the Lists menu, choose Invoice Items and then Unit of
Measure. The Invoice Item Units of Measure list appears. 2 Click New. The Invoice Item Unit of Measure Setup appears. 3 Type a unit of measure Description. 4 Click OK. 5 Repeat steps 2 - 4 to add another unit of measure. To modify a unit of measure description, select the
classification, and click Update. Change the Description. You cannot delete a unit of measure that is linked to an invoice item.
To delete the unit of measure, select the unit of measure and click Delete. A message appears asking you to confirm the decision. Click Yes.
You can set up a unit of measure as a default to use when entering invoice items. See “To Set the Defaults” on page 8.
To Set up Invoice Item Information 1 On the Lists menu, choose Invoice Items and then Invoice
Items, or click the Invoice Item toolbar button. The Invoice Items List appears.
2 Click New. The Setup Invoice Item Information window appears.
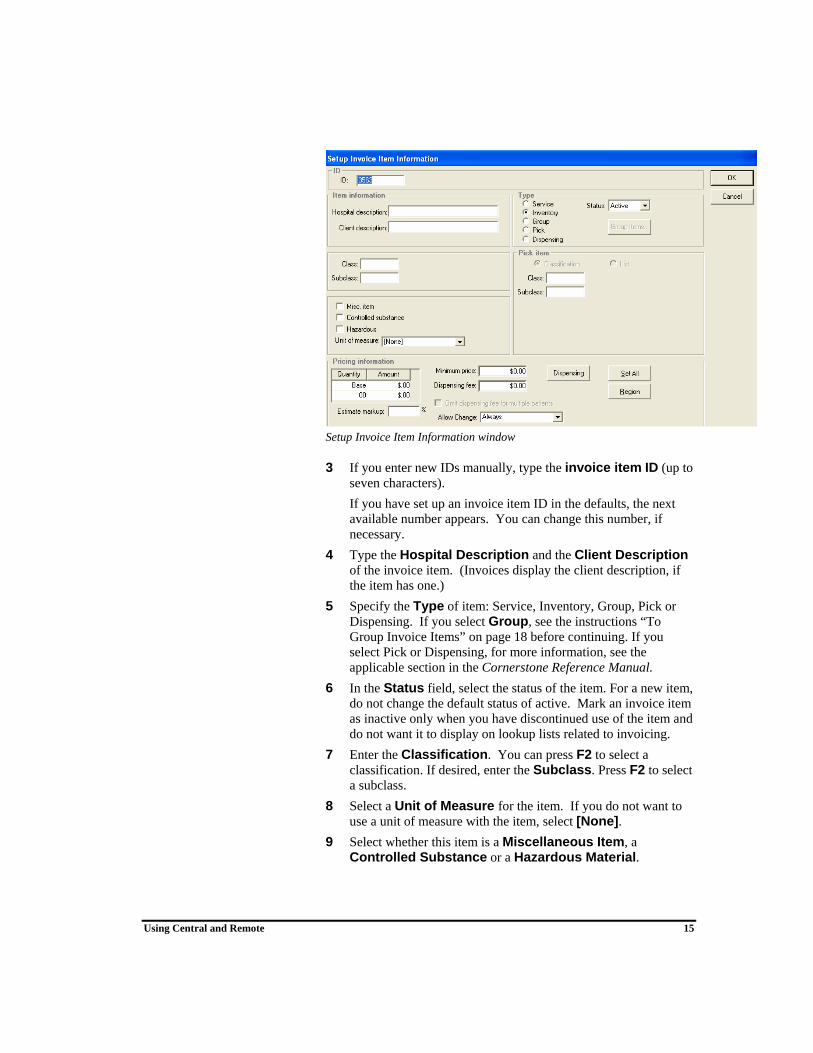
Using Central and Remote 15
Setup Invoice Item Information window
3 If you enter new IDs manually, type the invoice item ID (up to seven characters).
If you have set up an invoice item ID in the defaults, the next available number appears. You can change this number, if necessary.
4 Type the Hospital Description and the Client Description of the invoice item. (Invoices display the client description, if the item has one.)
5 Specify the Type of item: Service, Inventory, Group, Pick or Dispensing. If you select Group, see the instructions “To Group Invoice Items” on page 18 before continuing. If you select Pick or Dispensing, for more information, see the applicable section in the Cornerstone Reference Manual.
6 In the Status field, select the status of the item. For a new item, do not change the default status of active. Mark an invoice item as inactive only when you have discontinued use of the item and do not want it to display on lookup lists related to invoicing.
7 Enter the Classification. You can press F2 to select a classification. If desired, enter the Subclass. Press F2 to select a subclass.
8 Select a Unit of Measure for the item. If you do not want to use a unit of measure with the item, select [None].
9 Select whether this item is a Miscellaneous Item, a Controlled Substance or a Hazardous Material.
Using Central and Remote 16
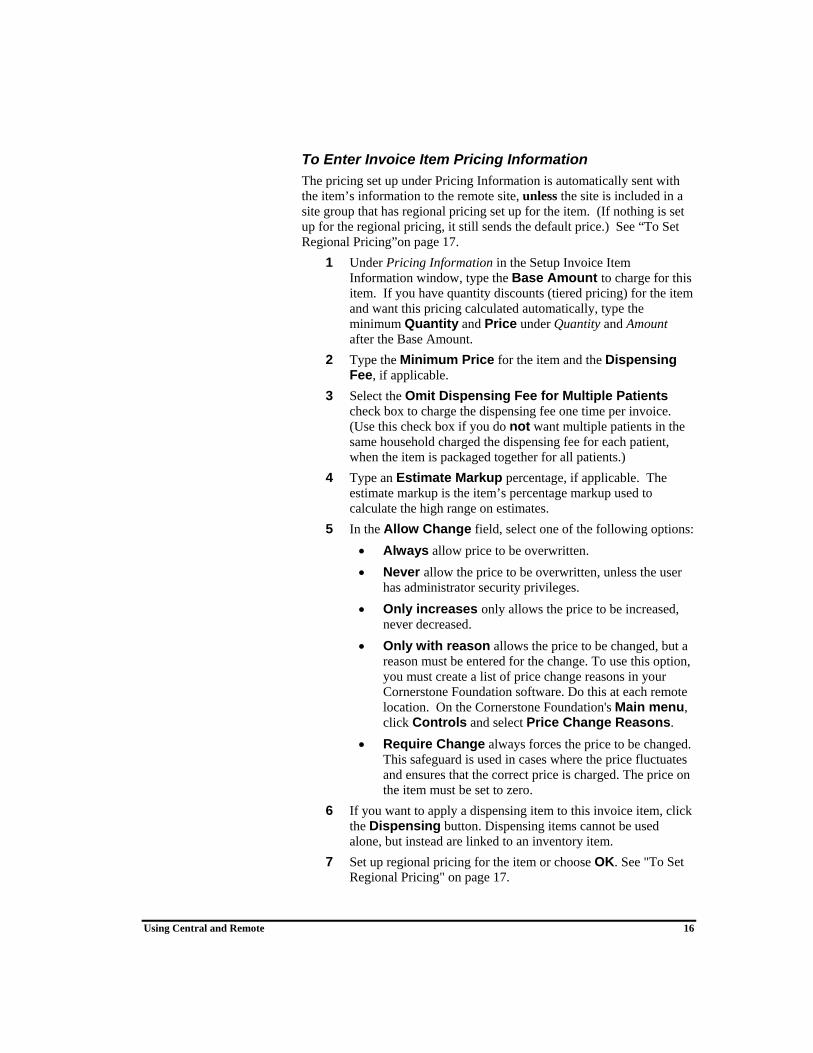
To Enter Invoice Item Pricing Information The pricing set up under Pricing Information is automatically sent with the item’s information to the remote site, unless the site is included in a site group that has regional pricing set up for the item. (If nothing is set up for the regional pricing, it still sends the default price.) See “To Set Regional Pricing”on page 17.
1 Under Pricing Information in the Setup Invoice Item Information window, type the Base Amount to charge for this item. If you have quantity discounts (tiered pricing) for the item and want this pricing calculated automatically, type the minimum Quantity and Price under Quantity and Amount after the Base Amount.
2 Type the Minimum Price for the item and the Dispensing Fee, if applicable.
3 Select the Omit Dispensing Fee for Multiple Patients check box to charge the dispensing fee one time per invoice. (Use this check box if you do not want multiple patients in the same household charged the dispensing fee for each patient, when the item is packaged together for all patients.)
4 Type an Estimate Markup percentage, if applicable. The estimate markup is the item’s percentage markup used to calculate the high range on estimates.
5 In the Allow Change field, select one of the following options: • Always allow price to be overwritten. • Never allow the price to be overwritten, unless the user
has administrator security privileges. • Only increases only allows the price to be increased,
never decreased. • Only with reason allows the price to be changed, but a
reason must be entered for the change. To use this option, you must create a list of price change reasons in your Cornerstone Foundation software. Do this at each remote location. On the Cornerstone Foundation's Main menu, click Controls and select Price Change Reasons.
• Require Change always forces the price to be changed. This safeguard is used in cases where the price fluctuates and ensures that the correct price is charged. The price on the item must be set to zero.
6 If you want to apply a dispensing item to this invoice item, click the Dispensing button. Dispensing items cannot be used alone, but instead are linked to an inventory item.
7 Set up regional pricing for the item or choose OK. See "To Set Regional Pricing" on page 17.

Using Central and Remote 17
To modify invoice item information, select the item and click Update. You can change any information except the ID. To delete an invoice item, select the item and click Delete. A message appears asking you to confirm the decision. Click Yes.
To Set Regional Pricing After entering an item’s information in the Setup Invoice Information dialog box, do the following if you want to apply different prices for the item based on its region:
1 On the Setup Invoice Item Information window, click Region to set up specific prices to apply to different site regions. The Select Region dialog box appears.
2 Select the Region to set up specific pricing for and then click OK. The Regional Pricing dialog box appears.
Regional Pricing dialog box
3 Type the item’s price Base Amount. If you want quantity pricing calculated automatically for this item, type the minimum Quantity and Price in the additional rows as necessary.
4 Type the Minimum Price for the item and the Dispensing Fee, if applicable.
5 Select the Omit Dispensing Fee for Duplicate Patients check box to charge the dispensing fee one time per invoice. (Use this check box if you do not want multiple patients in the same household charged the dispensing fee for each patient, when the item is packaged together for all patients.)
6 Type an Estimate Markup percentage, if applicable. The estimate markup is the item’s percentage markup used to calculate the high range on estimates.
7 If you want to apply a dispensing item to this invoice item, click the Dispensing button. Dispensing items cannot be used alone, but instead are linked to an inventory item.
8 Click OK. 9 Repeat steps 1 - 8 to set up pricing for additional regions.

Using Central and Remote 18
Choose Set All to apply the default pricing information in the Setup Invoice Item Information to all regions (which includes every site).
To Group Invoice Items 1 In the Setup Invoice Information dialog box, specify Group as
the invoice item Type and then click the Group Items button. The Group Item Information dialog box appears.
Tip If this is a new group, in the Copy line items from group ID field, press F2 to select invoice items from another group.
2 Enter the Item ID of each item in the group or press F2 to select an item from the Invoice Item List.
3 Type the Quantity of each invoice item in the group. 4 To designate an invoice item as a Smart code, click in the Smart
column. For more information about Smart codes, see the Cornerstone Reference Manual.
5 From the Printing option drop-down menu, select how you want the group to print on invoices.
6 Click OK.
Note When remote sites use group items, the pricing information is taken from the individual invoice item’s information, not the group item. Therefore, if an individual item is not updated in the remote site’s Cornerstone database, the same item within a group will not contain accurate price information.
Set Up Species In order to print statistical reports by species, you must set up all of the species used by your sites. A number of standard species are preloaded when you run csextract. You can also set up additional species.
To Set up Species 1 On the Lists menu, choose Species. The Species List appears. 2 To add a new species, click New. The New Species dialog box
appears. 3 Type a Species ID (of up to seven characters) and the
Description. 4 Click OK. 5 Repeat steps 2 - 4 to add another species.
To modify a species description, select the species, and then click Update. Change the description.
Using Central and Remote 19
To delete the species, select the species, and then click Delete. A message appears asking you to confirm the decision. Click Yes.
To Set up Sexes A number of standard sexes are preloaded when you run csextract. You can also set up additional sexes.
1 On the Lists menu, choose Patient Sexes. The Sexes List appears.
2 To add a new species, click New. The New Patient Sex dialog box appears.
3 In the Description field, type a description of the sex. 4 Click OK. 5 Repeat steps 2 - 4 to add another sex.
To modify a sex description, select the sex, and then click Update. Change the description.
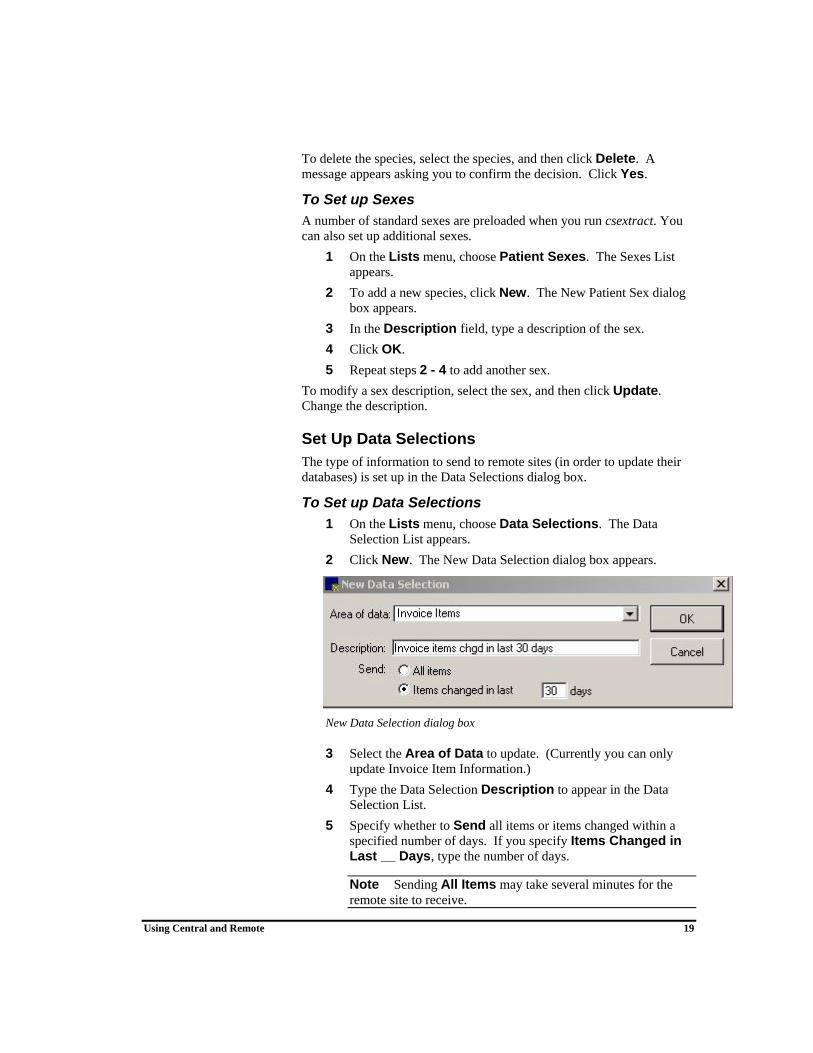
Set Up Data Selections The type of information to send to remote sites (in order to update their databases) is set up in the Data Selections dialog box.
To Set up Data Selections 1 On the Lists menu, choose Data Selections. The Data
Selection List appears. 2 Click New. The New Data Selection dialog box appears.
New Data Selection dialog box
3 Select the Area of Data to update. (Currently you can only update Invoice Item Information.)
4 Type the Data Selection Description to appear in the Data Selection List.
5 Specify whether to Send all items or items changed within a specified number of days. If you specify Items Changed in Last __ Days, type the number of days.
Note Sending All Items may take several minutes for the remote site to receive.
Using Central and Remote 20
6 Click OK. 7 Repeat steps 2 - 6 to add another data selection.
To modify a data selection, select the data selection, and then click Update. Change the Description, items to Send, or when to send data. To delete the data selection, select the data selection, and click Delete. A message appears asking you to confirm the decision. Click Yes.
Note You cannot delete a data selection that is linked to a transmission group.
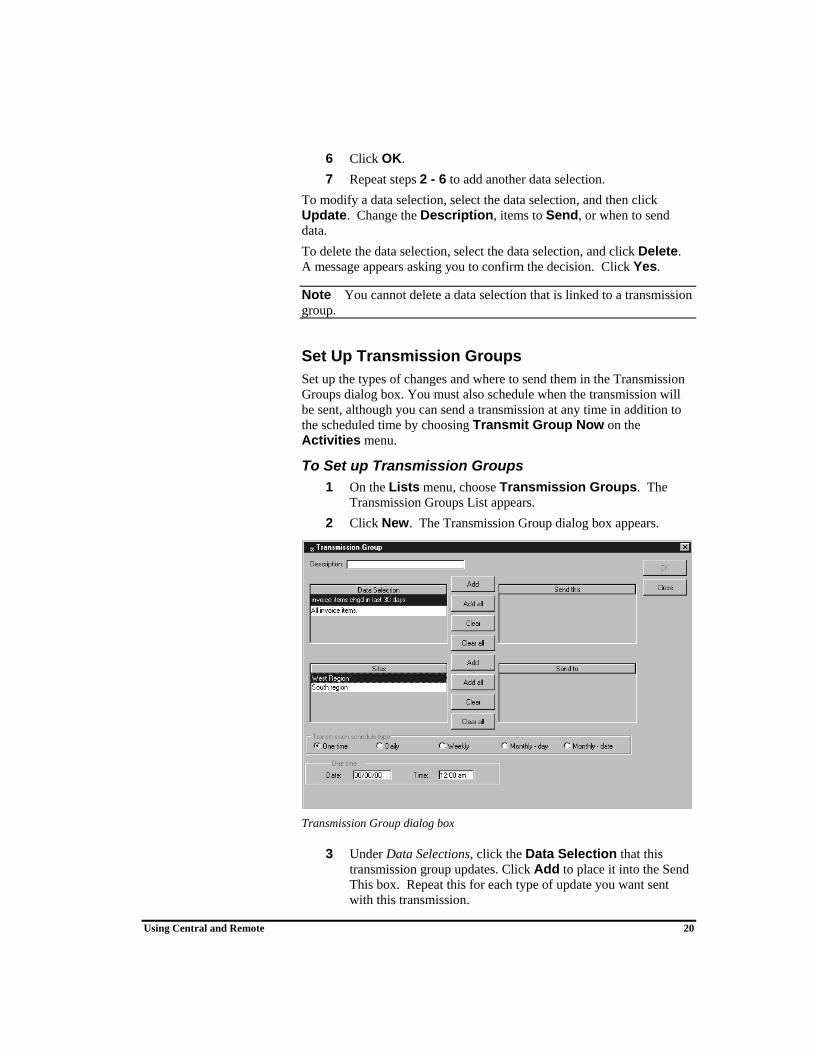
Set Up Transmission Groups Set up the types of changes and where to send them in the Transmission Groups dialog box. You must also schedule when the transmission will be sent, although you can send a transmission at any time in addition to the scheduled time by choosing Transmit Group Now on the Activities menu.
To Set up Transmission Groups 1 On the Lists menu, choose Transmission Groups. The
Transmission Groups List appears. 2 Click New. The Transmission Group dialog box appears.
Transmission Group dialog box
3 Under Data Selections, click the Data Selection that this transmission group updates. Click Add to place it into the Send This box. Repeat this for each type of update you want sent with this transmission.

Using Central and Remote 21
To send all of the data selections, click Add All. If you add a region, each site in that region is individually added to the Send To list.
4 Under Sites, click the Site or Region to send the selected updates to, and click Add to enter the sites into the Send To box. Repeat this for each applicable site or region.
To send to all of the sites, click Add All. 5 Under Transaction Schedule Type, choose one of the following
options: • Specify One Time and the Date and Time if you do not
want this transmission to send the selected update regularly.
• Specify Daily to send this transmission each day. Enter the day of the week and type the time.
• Specify Weekly to send the update less frequently than daily, and more frequently than monthly. Enter the frequency, day of the week, and time to send the update.
• Specify Monthly - Day to send the update monthly on a specific day of the week. Enter the frequency, day of the week and time to send the update.
• Specify Monthly - Date to send the update every number of months on a specific date. Enter the frequency and time information.
6 When finished, click OK. 7 Repeat steps 2 - 6 to add another transmission group.
To modify a transmission group, select the group, and then click Update. Change the Data Selections, Sites or Transmission Schedule. To delete a transmission group, select the group and then choose Delete.
Using Central and Remote 22
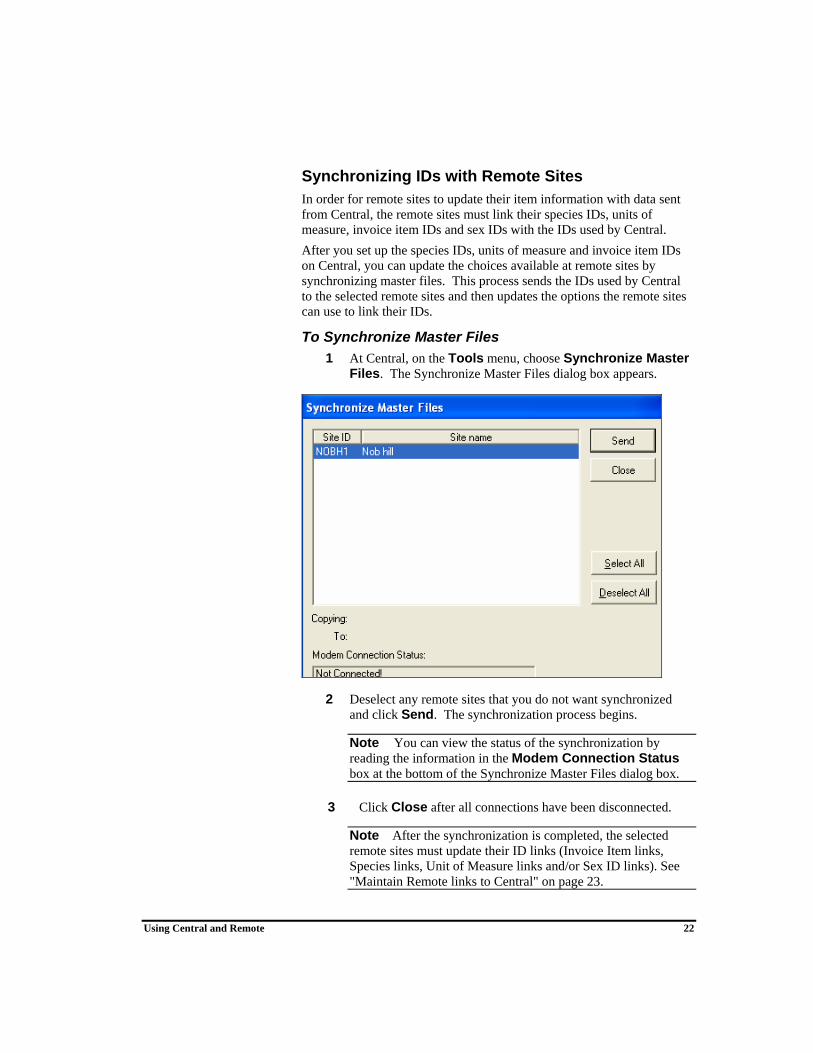
Synchronizing IDs with Remote Sites In order for remote sites to update their item information with data sent from Central, the remote sites must link their species IDs, units of measure, invoice item IDs and sex IDs with the IDs used by Central. After you set up the species IDs, units of measure and invoice item IDs on Central, you can update the choices available at remote sites by synchronizing master files. This process sends the IDs used by Central to the selected remote sites and then updates the options the remote sites can use to link their IDs.
To Synchronize Master Files 1 At Central, on the Tools menu, choose Synchronize Master
Files. The Synchronize Master Files dialog box appears.
2 Deselect any remote sites that you do not want synchronized and click Send. The synchronization process begins.
Note You can view the status of the synchronization by reading the information in the Modem Connection Status box at the bottom of the Synchronize Master Files dialog box.
3 Click Close after all connections have been disconnected.
Note After the synchronization is completed, the selected remote sites must update their ID links (Invoice Item links, Species links, Unit of Measure links and/or Sex ID links). See "Maintain Remote links to Central" on page 23.
Using Central and Remote 23
Maintain Remote links to Central
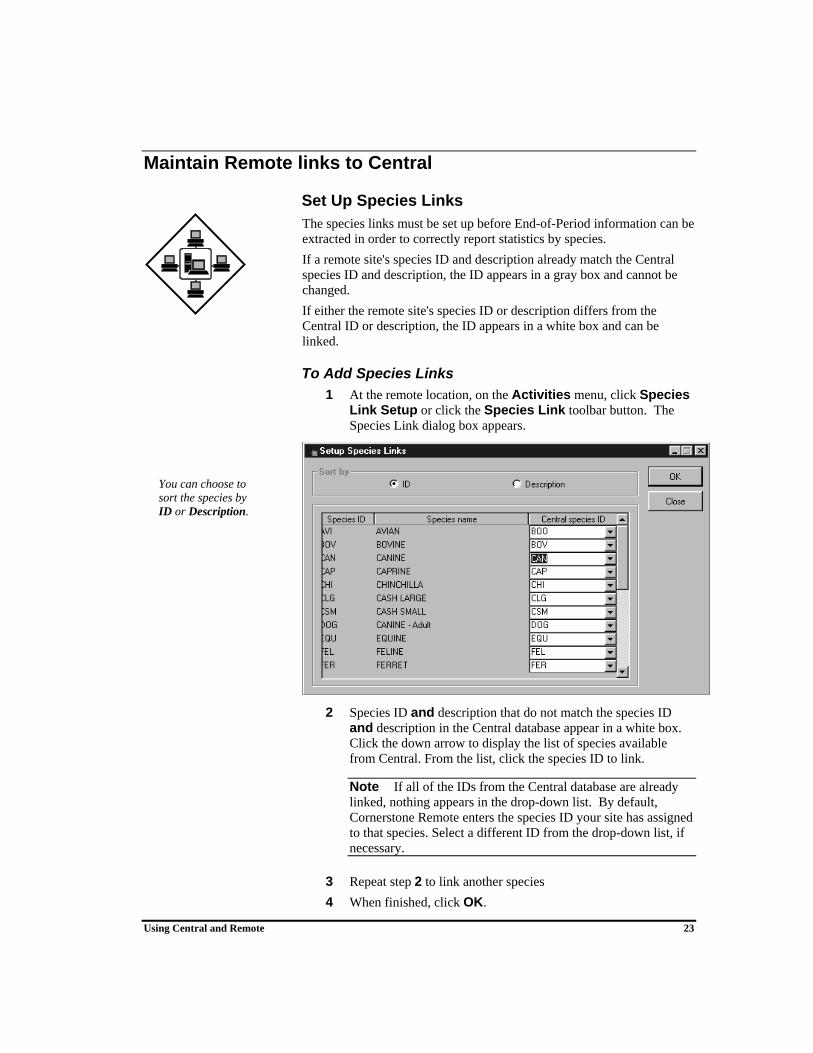
Set Up Species Links
The species links must be set up before End-of-Period information can be extracted in order to correctly report statistics by species. If a remote site's species ID and description already match the Central species ID and description, the ID appears in a gray box and cannot be changed. If either the remote site's species ID or description differs from the Central ID or description, the ID appears in a white box and can be linked.
To Add Species Links 1 At the remote location, on the Activities menu, click Species
Link Setup or click the Species Link toolbar button. The Species Link dialog box appears.
2 Species ID and description that do not match the species ID
and description in the Central database appear in a white box. Click the down arrow to display the list of species available from Central. From the list, click the species ID to link.
Note If all of the IDs from the Central database are already linked, nothing appears in the drop-down list. By default, Cornerstone Remote enters the species ID your site has assigned to that species. Select a different ID from the drop-down list, if necessary.
3 Repeat step 2 to link another species 4 When finished, click OK.
You can choose to sort the species by ID or Description.

Using Central and Remote 24
Set Up Unit of Measure Links You must set up Unit of Measure links to properly identify a Remote site's units of measure to Central. If the unit of measure and description already match the Central unit of measure and description, the unit of measure appears in a gray box, and cannot be changed. If either the unit of measure or description is different, the unit of measure appears in a white box and can be linked.
Note Initially, all boxes are white and you must link each remote unit of measure description to the applicable unit of measure description from Central. If no applicable unit of measure exists at Central or if it has already been selected once, select Do Not Link from the Central Description drop-down list.
To Add Unit of Measure Links 1 At the remote location, from the Activities menu, choose Unit
of Measure Link Setup or click the Unit of Measure Link toolbar button. The Setup Unit of Measure Links dialog box appears.
Setup Unit of Measure dialog box
2 Any unit of measure and description that do not match the ID and description in the Central database appear in a white box. Click the down arrow to display the list of units of measure. From the list, click the unit of measure to link.
Note If all units of measure from Central are linked, nothing appears in the drop-down list. By default, Cornerstone Remote
Using Central and Remote 25
enters the unit of measure your site has assigned. Select a different ID from the drop-down list, if necessary.
3 Repeat step 2 to link another unit of measure or click OK to exit.
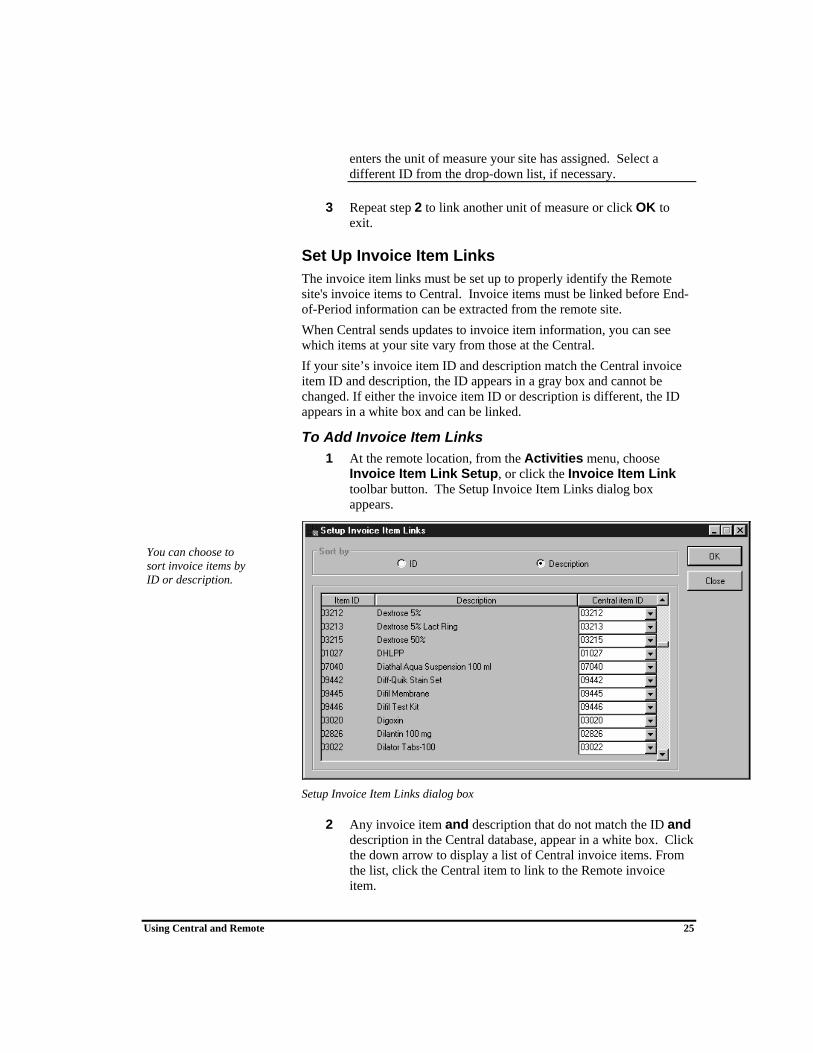
Set Up Invoice Item Links The invoice item links must be set up to properly identify the Remote site's invoice items to Central. Invoice items must be linked before End-of-Period information can be extracted from the remote site. When Central sends updates to invoice item information, you can see which items at your site vary from those at the Central. If your site’s invoice item ID and description match the Central invoice item ID and description, the ID appears in a gray box and cannot be changed. If either the invoice item ID or description is different, the ID appears in a white box and can be linked.
To Add Invoice Item Links 1 At the remote location, from the Activities menu, choose
Invoice Item Link Setup, or click the Invoice Item Link toolbar button. The Setup Invoice Item Links dialog box appears.
Setup Invoice Item Links dialog box
2 Any invoice item and description that do not match the ID and description in the Central database, appear in a white box. Click the down arrow to display a list of Central invoice items. From the list, click the Central item to link to the Remote invoice item.
You can choose to sort invoice items by ID or description.
Using Central and Remote 26
Note If all of the IDs from Central are linked, nothing appears in the drop-down list. By default, Cornerstone Remote enters the invoice item ID your site has assigned to the item. Select a different ID from the drop-down list, if necessary.
3 Repeat step 2 to link another item. 4 When finished, click OK.
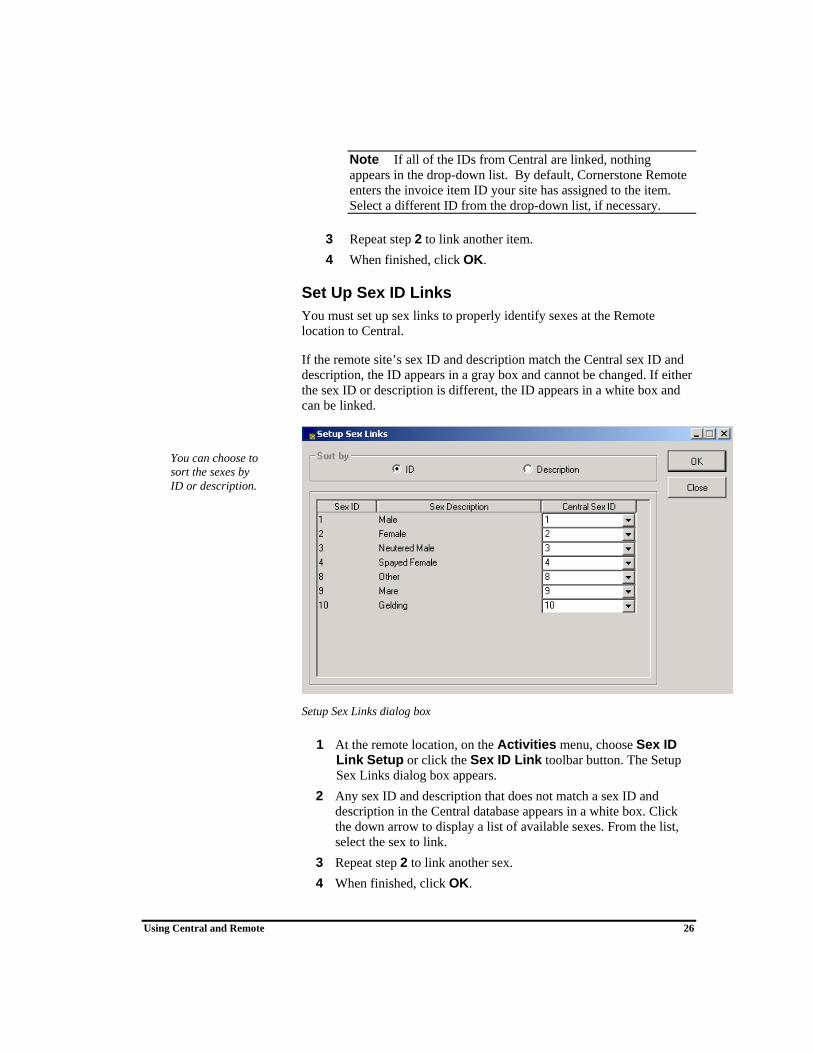
Set Up Sex ID Links You must set up sex links to properly identify sexes at the Remote location to Central.
If the remote site’s sex ID and description match the Central sex ID and description, the ID appears in a gray box and cannot be changed. If either the sex ID or description is different, the ID appears in a white box and can be linked.
Setup Sex Links dialog box
1 At the remote location, on the Activities menu, choose Sex ID Link Setup or click the Sex ID Link toolbar button. The Setup Sex Links dialog box appears.
2 Any sex ID and description that does not match a sex ID and description in the Central database appears in a white box. Click the down arrow to display a list of available sexes. From the list, select the sex to link.
3 Repeat step 2 to link another sex. 4 When finished, click OK.
You can choose to sort the sexes by ID or description.
Using Central and Remote 27
Using Cornerstone Central
Introduction Central is the hub of the Cornerstone Central and Remote programs. Use Central to do the following:
• Maintain the database of invoice item information. • Collect information from remote sites and generate collective
reports. • Print reminders.
Logging on to and out of Cornerstone Central To protect the information you keep in the Cornerstone Central database, you can limit staff members’ access to certain areas of the Central software through the security feature. Because different security levels can pose a problem if several staff members use the same computer, Cornerstone Central software allows you to enter a password at any time to change the security level access for the current user. The current user can also log off without exiting Cornerstone by choosing Log Off on the File menu. Logging off forces the next user to log on before using Cornerstone Central software.
Important! Exercise care when changing users. The database records the user who is logged on when it saves information.
To Enter a Password Cornerstone Central software automatically prompts you for your password when you start the program; however, you can change users at any time.
1 To enter a password, on the File menu, select Password Entry. The Cornerstone Central Login dialog box appears.
2 In the User field, type or select your name or ID. 3 In the Password field, type your password. As you type your
password, asterisks appear in place of the characters. 4 Click OK or press ENTER.

Using Central and Remote 28
Updating Invoice Item Information at the Central Site The Central database maintains common invoice item information for all Cornerstone remote sites. Invoice item information should be modified at the Central location and then sent to the remote sites to update each individual practice’s Cornerstone database. You can change most information for individual items, or you can mass markup (or markdown) price information for a particular item, or invoice item classification or subclass, either by a specified dollar amount or by a percentage.
To Update Invoice Item Information 1 On the Lists menu, choose Invoice Items and then Invoice
Items, or click the Invoice Item toolbar button. The Invoice Items List appears.
2 Select the item to update and click Update. The Setup Invoice Item Information appears.
3 Change the applicable item information. See the following instructions to mass markup prices by region.
4 Click OK.
To Mass Markup Prices by Region
Important! We strongly advise making a backup of your database before mass marking invoice items.
1 On the Activities menu, choose Regional Mass Markup. The Select Region dialog box appears.
If you choose Default region, Mass Markup uses the items’ default pricing information.
2 Select the Region to change pricing for and then click OK.
Using Central and Remote 29
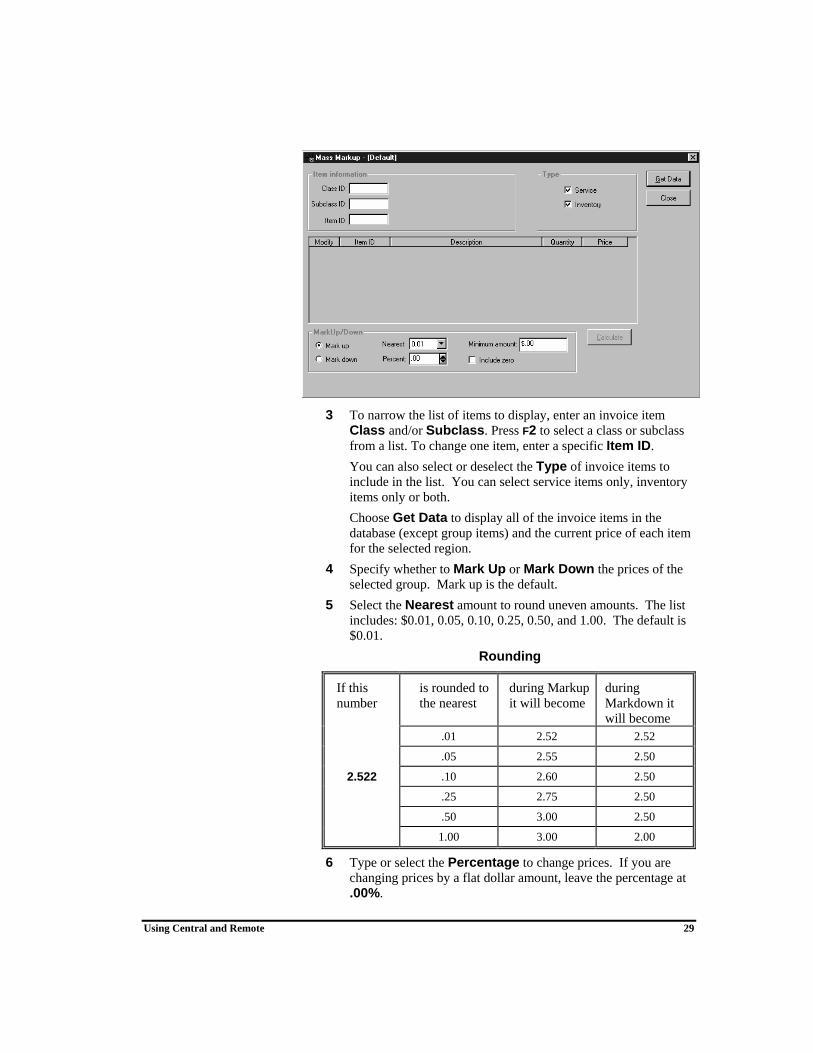
3 To narrow the list of items to display, enter an invoice item
Class and/or Subclass. Press F2 to select a class or subclass from a list. To change one item, enter a specific Item ID.
You can also select or deselect the Type of invoice items to include in the list. You can select service items only, inventory items only or both.
Choose Get Data to display all of the invoice items in the database (except group items) and the current price of each item for the selected region.
4 Specify whether to Mark Up or Mark Down the prices of the selected group. Mark up is the default.
5 Select the Nearest amount to round uneven amounts. The list includes: $0.01, 0.05, 0.10, 0.25, 0.50, and 1.00. The default is $0.01.
Rounding
If this number
is rounded to the nearest
during Markup it will become
during Markdown it will become
.01 2.52 2.52
.05 2.55 2.50
2.522 .10 2.60 2.50
.25 2.75 2.50
.50 3.00 2.50
1.00 3.00 2.00
6 Type or select the Percentage to change prices. If you are changing prices by a flat dollar amount, leave the percentage at .00%.
Using Central and Remote 30
7 Type the Minimum Amount to change a price. If you are changing prices by a flat dollar amount, type the dollar amount in the box.
8 Select Include Zero to change items with no current price by the minimum amount.
9 Deselect the Modify checkmark button if you do not want an invoice item affected by the price change.
10 Choose Calculate to see the effect of the price change in the Price column. (The change is not applied to the checked items until you choose Apply. After viewing the new prices, if you decide you do not want to make the change, click Cancel or deselect specific items that you do not want to change.)
New Price = Greater of:
Old Price + (Old Price * % Price Change) OR
Old Price + Minimum Amount Change Rounding is performed last.
11 Click Apply to apply the new pricing.
Using Central and Remote 31
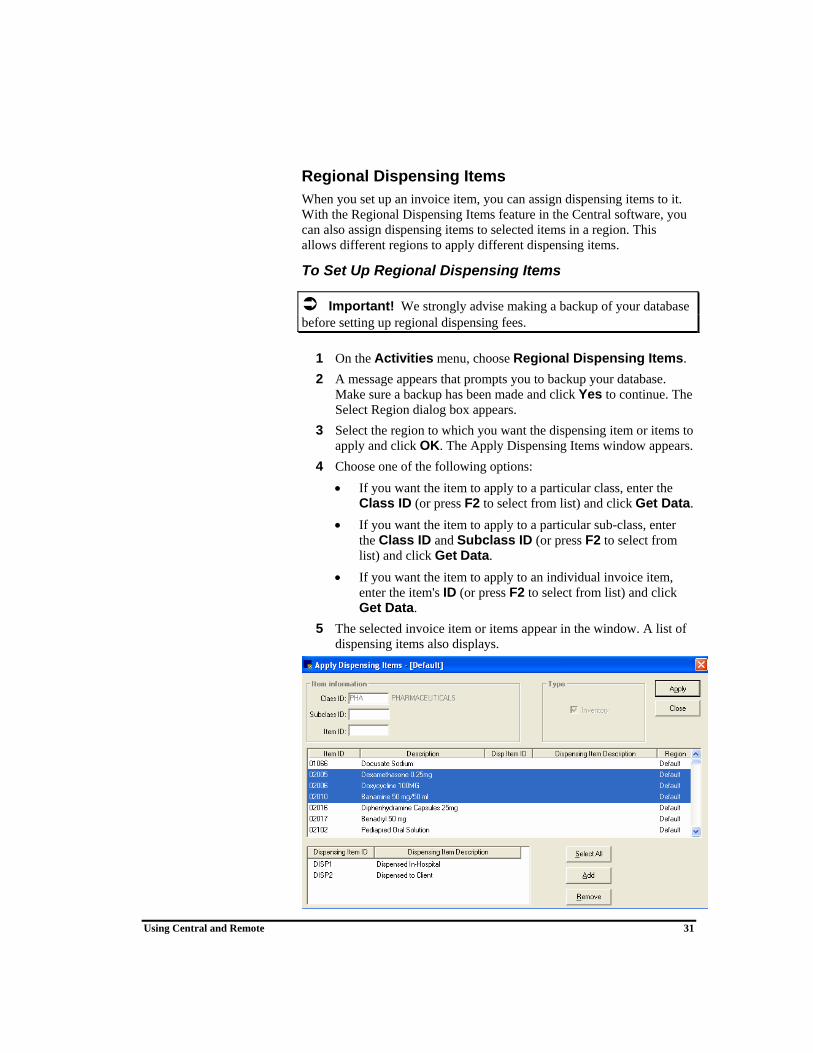
Regional Dispensing Items When you set up an invoice item, you can assign dispensing items to it. With the Regional Dispensing Items feature in the Central software, you can also assign dispensing items to selected items in a region. This allows different regions to apply different dispensing items.
To Set Up Regional Dispensing Items
Important! We strongly advise making a backup of your database before setting up regional dispensing fees.
1 On the Activities menu, choose Regional Dispensing Items. 2 A message appears that prompts you to backup your database.
Make sure a backup has been made and click Yes to continue. The Select Region dialog box appears.
3 Select the region to which you want the dispensing item or items to apply and click OK. The Apply Dispensing Items window appears.
4 Choose one of the following options: • If you want the item to apply to a particular class, enter the
Class ID (or press F2 to select from list) and click Get Data. • If you want the item to apply to a particular sub-class, enter
the Class ID and Subclass ID (or press F2 to select from list) and click Get Data.
• If you want the item to apply to an individual invoice item, enter the item's ID (or press F2 to select from list) and click Get Data.
5 The selected invoice item or items appear in the window. A list of dispensing items also displays.
Using Central and Remote 32
6 Select the invoice items to which you want the dispensing item or items to apply. To select more than one item, hold the Ctrl key and click the items you want to select. To select all items, click Select All.
7 In the Dispensing Item section, click the dispensing item that you want to add to the selected invoice item or items.
8 Click Add. 9 When finished, click Apply.
To Remove a Dispensing Item 1 On the Activities menu, choose Regional Dispensing Items. 2 A message appears that prompts you to backup your database.
Make sure a backup has been made and click Yes to continue. The Select Region dialog box appears.
3 Select the region in which you want to remove the dispensing item and click OK. The Apply Dispensing Items window appears.
4 Choose one of the following options: • If you want to remove a dispensing item in a particular class,
enter the Class ID (or press F2 to select from list) and click Get Data.
• If you want to remove a dispensing item in a particular sub-class, enter the Class ID and Subclass ID (or press F2 to select from list) and click Get Data.
• If you want remove a dispensing item from a single invoice item, enter the item's ID (or press F2 to select from list) and click Get Data.
5 The selected invoice item or items appear in the window. A list of dispensing items also displays.
6 Click the invoice item from which you want to remove a dispensing item.
7 In the Dispensing Item box, click the dispensing item that you want to remove.
8 Click Remove. 9 Repeat steps 5-8 to remove dispensing items from additional
invoice items. 10 When finished, click Apply.

Using Central and Remote 33
Sending Updated Invoice Item Information to Remote Sites You should have set up a schedule of sending updated invoice item information to remote sites when you set up transmission groups. Transmission groups send the data selections you specify to specific sites or site groups. You can, however, send information at any time to one transmission group by using Transmit Group Now.
To Immediately Send Updated Information 1 On the Central server, on the Activities menu, choose
Transmit Group Now or click the Transmit Group Now toolbar button. The Transmit Group Now dialog box appears.
2 Select the Transmission Group to send the updated invoice item information to.
3 Click Send. Like Synchronize Master Files, the Status of the connection appears at the bottom of the dialog box.
4 After all connections are disconnected, click Close.
Note Before this process is complete, you must update the invoice information at your remote sites. See "Updating Invoice Item Information at the Remote Site" on page 52.
Using Central and Remote 34
Retrieving Summary Data Each time a Cornerstone remote site runs End of Day or End of Month or generates reminders, several files of summary data are generated and placed in a special folder (cstone\send) on the remote site’s Cornerstone server. When Central calls each remote site, it retrieves all of the files in this folder.
Updating Central After retrieving the summary data from each Remote site, you must update Central information.
☺ Tip To save time, update Central with the information from all of the sites at one time (after all of the Remote files have been retrieved).
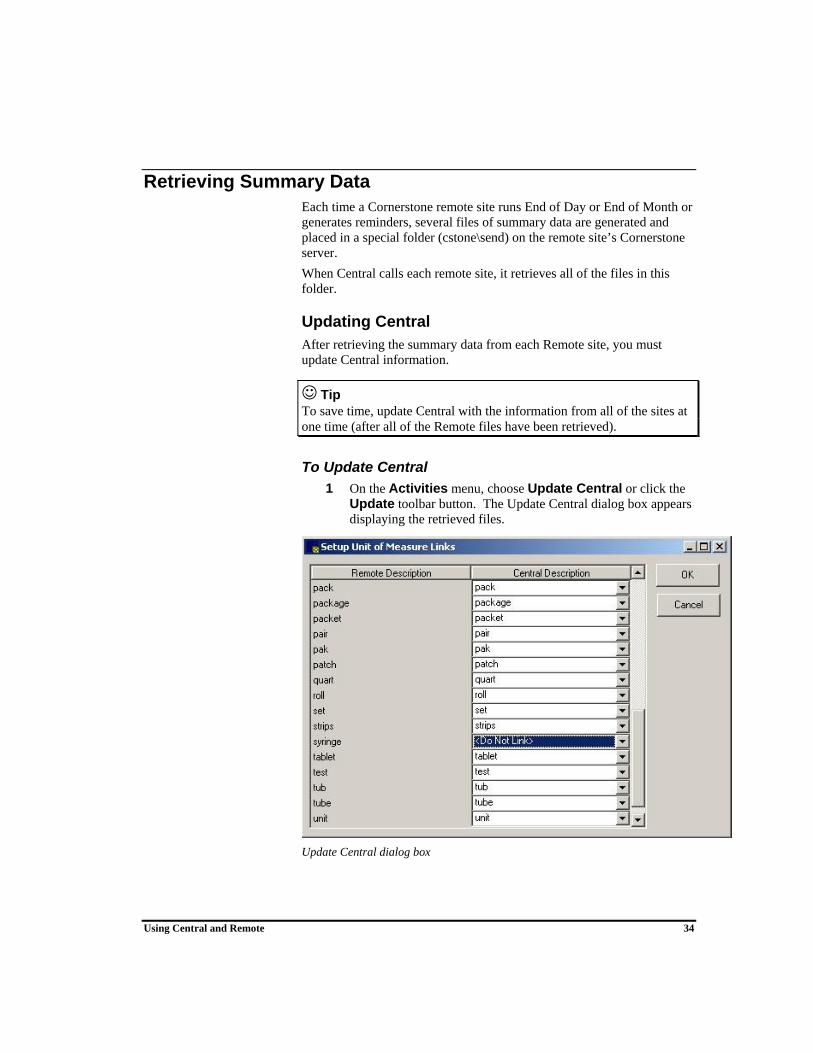
To Update Central 1 On the Activities menu, choose Update Central or click the
Update toolbar button. The Update Central dialog box appears displaying the retrieved files.
Update Central dialog box
Using Central and Remote 35
2 Under Files, select the file(s) to add to the Central database. (You can use standard windows methods to select multiple files.)
3 Click Add to move the highlighted files to the Selected box or click Add All to move all of the files.
To remove files from the Selected box, select the file to remove, and click Clear, or Clear All to remove all of the files.
4 Click OK.
Important! Choosing New Files will call every site to retrieve summary files. This process can take several minutes.
Verifying Transmissions You can verify that information was sent or received from a remote site by checking the Transmission Summary.
To View Transmission Results 1 On the Tools menu, choose Transmission Summary. The
Transmission Summary dialog box appears with the list of all of the transmissions made from the central site to remote sites, and the status of each.
2 Click Close when you have finished viewing the log.
To Purge Transmission Data 1 On the Tools menu, choose Data Purge and then
Transmission Log. The Delete Transmission Log Entries dialog box appears.
2 Enter the date range of transmission log entries to delete in the From and To boxes.
3 Click OK. A message appears asking you to confirm the decision.
4 Click Yes.

Using Central and Remote 36
To Recall a Remote Site to Upload Summary Data You may have to call a remote site again for any of the following reasons:
• The remote site neglected to process End of Period, so the information was not available for Central to retrieve at the scheduled connection time.
• The remote site regenerated end-of-period data, which you need before the next scheduled connection.
• Central did not connect with the remote site within the allotted number of attempts. (This is entered in the Try to Connect box in the site’s information.)
Verify with the remote site that their computer is turned on and that the summary data files are waiting to be retrieved in the cstone\send folder. To recall the site:
1 On the Lists menu, select Sites. The Site List appears. 2 Select the site to recall, and click Update. The site’s
information appears. 3 If the date has not changed since the Central server last tried to
connect to the site, increase the number in the Try to Connect box by 1.
The system time can be found at the end of your taskbar.
If the date is now different than the date Central last tried to connect to the site, change the Connect Time to 1 minute past the current system time.
4 Click OK. The Central server should try to connect to the site and retrieve the summary data.
5 Return changed site information to the original settings.
If you need to recall all of the sites, choose New Files on the Update Central dialog box.

Using Central and Remote 37
Printing Reminders in Central Reminders for a remote location can be printed from Central. To use this feature, you must set up reminder defaults for the remote location. See "To Set the Reminder Defaults" on page 5. For your convenience, special reminder templates are included with your Central software.
To print reminders from Central 1 On the Central server, start Microsoft® Word and from the File
menu, select Open. 2 At the Files of Type drop down box, select document
templates (*.dot) and from the cstone directory, select the applicable reminder template.
Note All reminder templates to be used with Central software begin with “cent,” for example, centtrifolds.dot. These templates include bookmarks for the specific site name and address. The templates will automatically import the central_remind.txt file that was created by the Central server during a recent update. For more information on generating reminders at a remote site, see "Generating Reminders at the Remote" on page 51.
3 Print your reminders as usual. For more information on printing reminders, see your Cornerstone Reference Manual.
4 After all your reminders have successfully printed, delete the central_remind.txt file from your cstone directory. It will be created again the next time you generate reminders at the remote site and send an update to Central.
Note If you do not delete the central_remind.txt file, each time you generate reminders at a remote site and send an update to Central, the new information will be appended to the existing file. The existing information will not be written over.
Reminder Templates for Central Here is a list of the special reminder templates to be used with reminders printed from Central:
• Centemail.dot • Centlasrem3s.dot • Centmaillb2b.dot • Centmaillb2.dot • Centmaillb3.dot • Centpostcrds.dot

Using Central and Remote 38
• Centreminder4.dot • Centtrifolds.dot
Connecting to Another Site To Connect to Another Site
Alert Are you trying to connect to an off-site Remote server from your Central workstation? If yes, you must close the Cornerstone database server on your local area network or disconnect from the network. Contact support for help with this process. If you are connecting to an on-site Remote server, proceed with the instructions.
1 On the Activities menu, choose Connect to Site, or click the Connect toolbar button. The Connect to Site dialog box appears.
2 Select the site to connect to and choose Connect. 3 When you are connected to the remote site, minimize Central
and open Cornerstone on your computer.
Note These instructions apply for using a Cornerstone module as well. (Open the module instead of the Cornerstone Foundation on your computer.) The remote site must be using the same version of the module as Central.
4 When you are finished using Cornerstone, exit Cornerstone, maximize Central and choose Hang Up on the Connect to site dialog box.
Generating Central Reports You can run many reports in Cornerstone Central software or use Cornerstone Central Practice Explorer to generate reports you design.
Previewing, Printing, and Saving Reports Cornerstone Central software includes four categories of reports:
• Client and patient reports • Financial reports • Inventory reports • Sales reports
A description of the information each report contains begins in "Cornerstone Central Reports" on page 42. You can:
Using Central and Remote 39
• Preview, print, or save (to a file) any of the reports. • Specify the type of report to print and the data it will contain in
the Report Type dialog box. • Format report as a report or a bar chart.
You can only display summary data (for periods or sites) in bar charts.
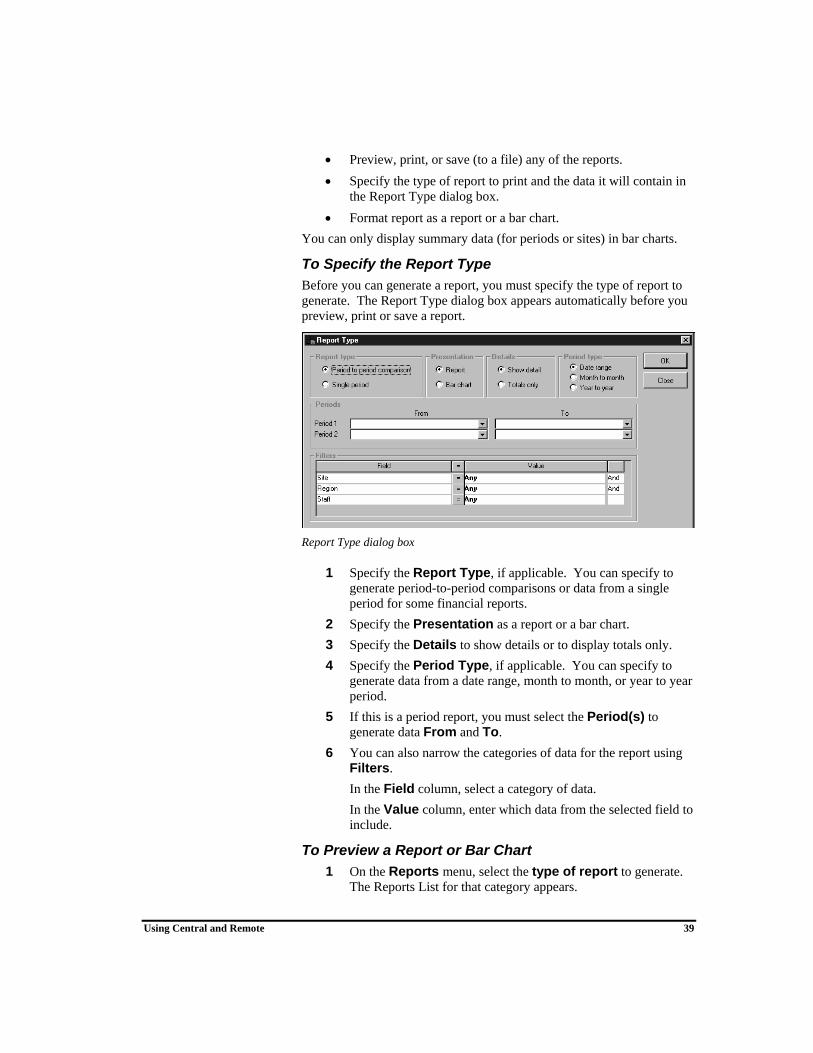
To Specify the Report Type Before you can generate a report, you must specify the type of report to generate. The Report Type dialog box appears automatically before you preview, print or save a report.
Report Type dialog box
1 Specify the Report Type, if applicable. You can specify to generate period-to-period comparisons or data from a single period for some financial reports.
2 Specify the Presentation as a report or a bar chart. 3 Specify the Details to show details or to display totals only. 4 Specify the Period Type, if applicable. You can specify to
generate data from a date range, month to month, or year to year period.
5 If this is a period report, you must select the Period(s) to generate data From and To.
6 You can also narrow the categories of data for the report using Filters.
In the Field column, select a category of data. In the Value column, enter which data from the selected field to
include.
To Preview a Report or Bar Chart 1 On the Reports menu, select the type of report to generate.
The Reports List for that category appears.
Using Central and Remote 40
2 Select the specific report to generate. 3 Click Preview. The Report Type dialog box appears. 4 Specify the Report Type, Presentation, Details and
Period Type, as applicable. If you have chosen a Period Type, select the Period(s) to
generate data From and To. 5 Enter any Filters to use for this report. 6 Click OK to preview the report for the selected range. The
Reports Preview appears. The top of the Report Preview displays the total amount of
records in the report, the number of records selected (either all or a range), and the number of records read. It also displays the number of pages in the report and the current page being viewed.
To Print a Report or Bar Chart 1 On the Reports menu, select the type of report to generate.
The Reports List for that category appears. 2 Select the specific report to generate. 3 Click Print. The Report Type dialog box appears. 4 Specify the Report Type, Presentation, Details and
Period Type, as applicable. If you have chosen a Period Type, select the Period(s) to
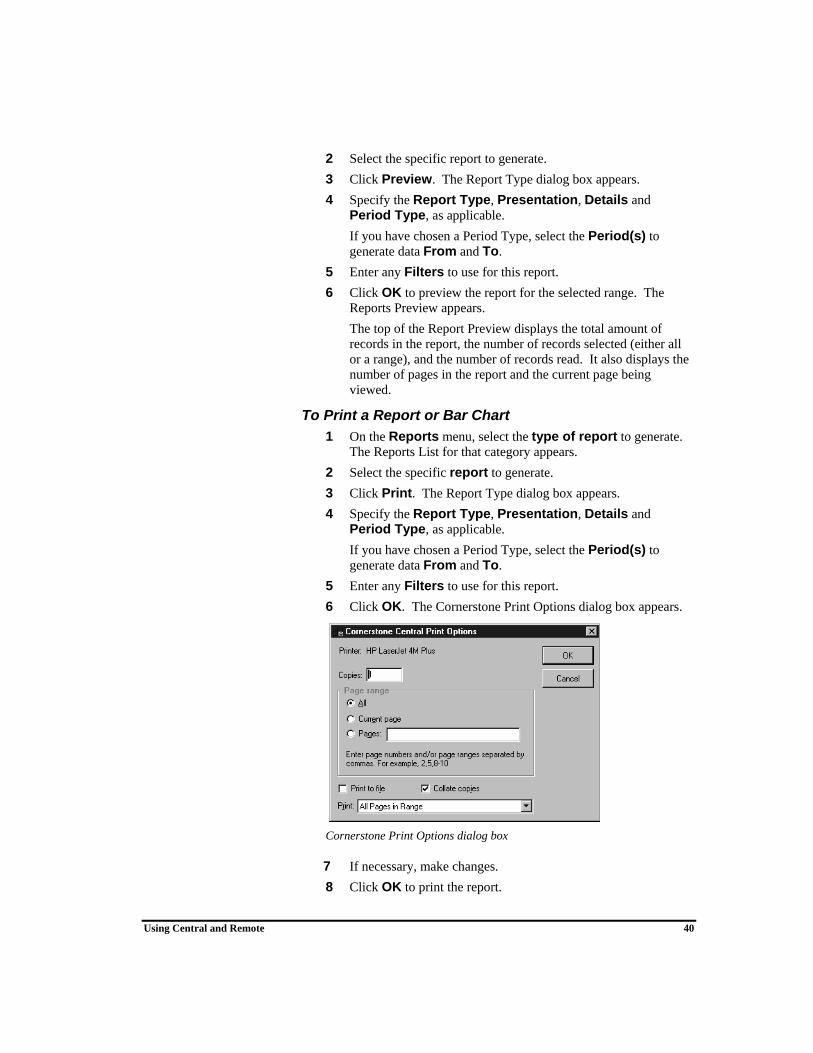
generate data From and To. 5 Enter any Filters to use for this report. 6 Click OK. The Cornerstone Print Options dialog box appears.
Cornerstone Print Options dialog box
7 If necessary, make changes. 8 Click OK to print the report.
Using Central and Remote 41
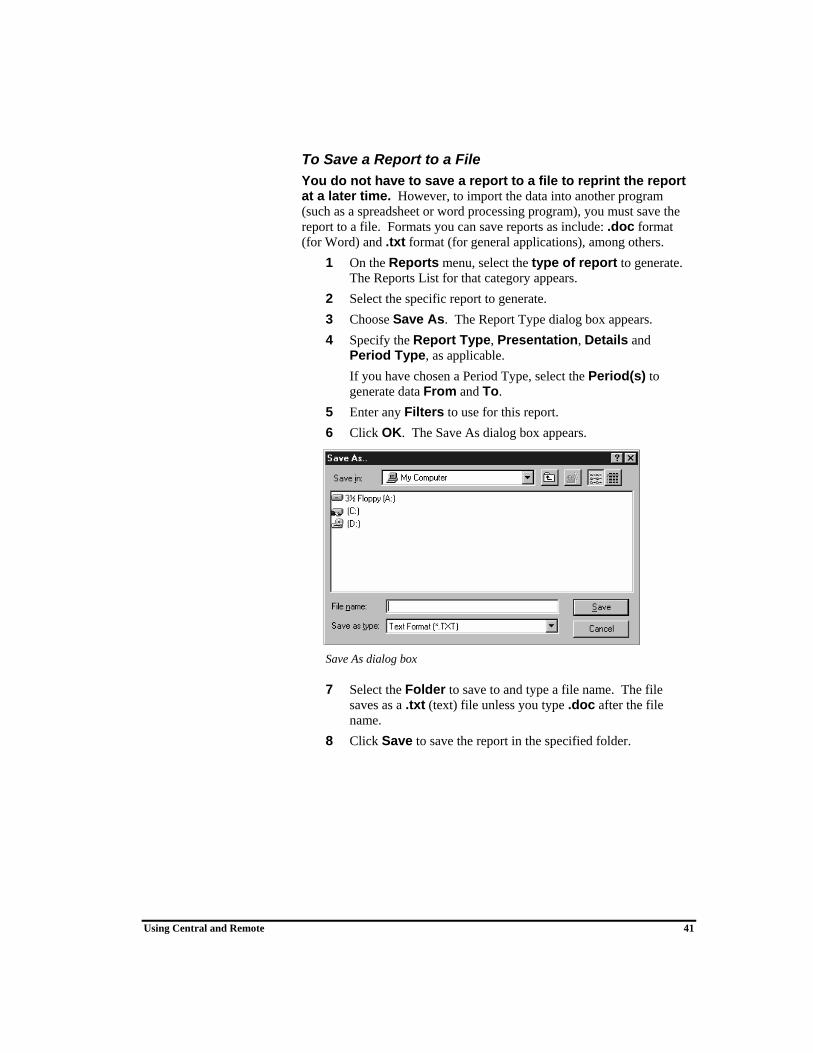
To Save a Report to a File You do not have to save a report to a file to reprint the report at a later time. However, to import the data into another program (such as a spreadsheet or word processing program), you must save the report to a file. Formats you can save reports as include: .doc format (for Word) and .txt format (for general applications), among others.
1 On the Reports menu, select the type of report to generate. The Reports List for that category appears.
2 Select the specific report to generate. 3 Choose Save As. The Report Type dialog box appears. 4 Specify the Report Type, Presentation, Details and
Period Type, as applicable. If you have chosen a Period Type, select the Period(s) to
generate data From and To. 5 Enter any Filters to use for this report. 6 Click OK. The Save As dialog box appears.
Save As dialog box
7 Select the Folder to save to and type a file name. The file saves as a .txt (text) file unless you type .doc after the file name.
8 Click Save to save the report in the specified folder.

Using Central and Remote 42
Cornerstone Central Reports Client and Patient Reports
Report: Period report?
Filters: Displays:
Active Client No Site, Region Site ID, site name, number of active clients for each site
Active Patients by Species
No Region, Site, Species
Species ID, species description, number of active patients for each species
Deceased Patients by Species
No Region, Site, Species
Species ID, species description, number of deceased patients for each species
Inactive Patients by Species
No Region, Site, Species
Species ID, species description, number of inactive patients for each species
New Client Yes Site, Region Site ID, site name, number of new clients for the selected period(s)
Patient Visits by Species
Yes Region, Site, Species
Species ID, species description, number of visits for each species for the selected period(s)
Financial Reports Report: Period
report? Filters: Displays:
Account Adjustments
Yes Site, Region Site ID, site name, amount adjusted for the selected period(s)
Accounts over 30 Days
No Site, Region Site ID, site name, amount of the accounts over 30 days for each site
Charged on Account
Yes Site, Region Site ID, site name, amount charged on accounts for the selected period(s)
Discount Statistics
Yes Site, Region, Discount Type
Site ID, description of discount, number of discounts, total amount
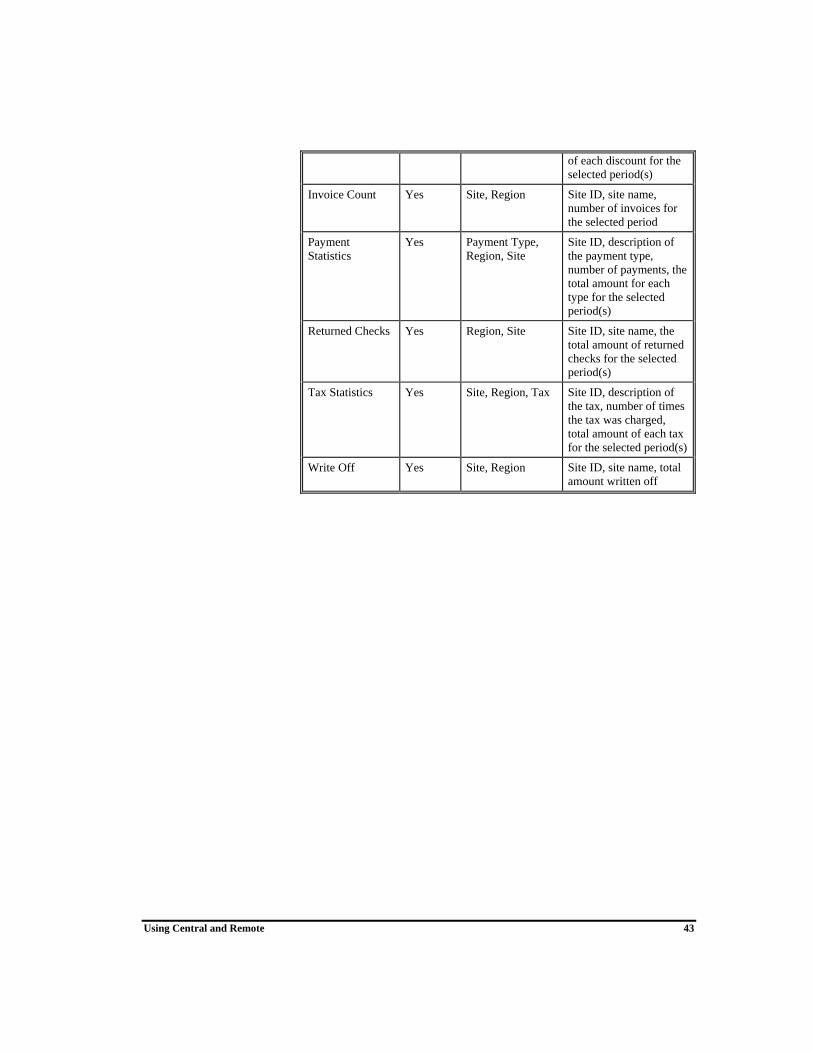
Using Central and Remote 43
of each discount for the selected period(s)
Invoice Count Yes Site, Region Site ID, site name, number of invoices for the selected period
Payment Statistics
Yes Payment Type, Region, Site
Site ID, description of the payment type, number of payments, the total amount for each type for the selected period(s)
Returned Checks Yes Region, Site Site ID, site name, the total amount of returned checks for the selected period(s)
Tax Statistics Yes Site, Region, Tax Site ID, description of the tax, number of times the tax was charged, total amount of each tax for the selected period(s)
Write Off Yes Site, Region Site ID, site name, total amount written off
Using Central and Remote 44
Inventory Reports Report: Period
report? Filters: Displays:
Cost of Goods Sold (by Class)
Yes Site, Region, Class
Classification ID, description of the class, the cost of goods sold (in dollars) for the selected period(s)
Cost of Goods Sold (by Item)
Yes Site, Region, Item ID
Item ID, description of the item, the cost of goods sold (in dollars) for the selected period(s)
Inventory Adjustments (by Class)
Yes Site, Region, Class
Classification ID, description of the class, the quantity adjusted for the selected period(s)
Inventory Adjustments (by Item)
Yes Site, Region, Item ID
Item ID, description of the item, the quantity of the item adjusted for the selected period(s)
Inventory Internal Usage (by Class)
Yes Site, Region, Class
Classification ID, description of the class, the quantity used internally for the selected period(s)
Inventory Internal Usage (by Item)
Yes Site, Region, Item ID
Item ID, description of the item, the quantity used internally for the selected period(s)
Inventory Purchases (by Class)
Yes Site, Region, Class
Classification ID, description of the classification, the quantity purchased for the selected period(s)
Inventory Purchases (by Item)
Yes Site, Region, Item ID
Item ID, description of the item, the quantity purchased for the selected period(s)
Inventory Quantity On Hand
No Class, Item ID, Region, Site
Item ID, description of the item, quantity on hand, the extended value (the quantity on hand * average cost)
Inventory Quantity on Order
No Class, Item ID, Region, Site
Item ID, description of the item, the quantity on order
Inventory Returns to Vendor (by Class)
Yes Site, Region, Class
Classification ID, description of the class, the quantity returned to vendors for the selected period(s)
Inventory Returns to Vendor (by Item)
Yes Site, Region, Item ID
Item ID, description of the item, the quantity returned to vendors for the selected period(s)
Using Central and Remote 45
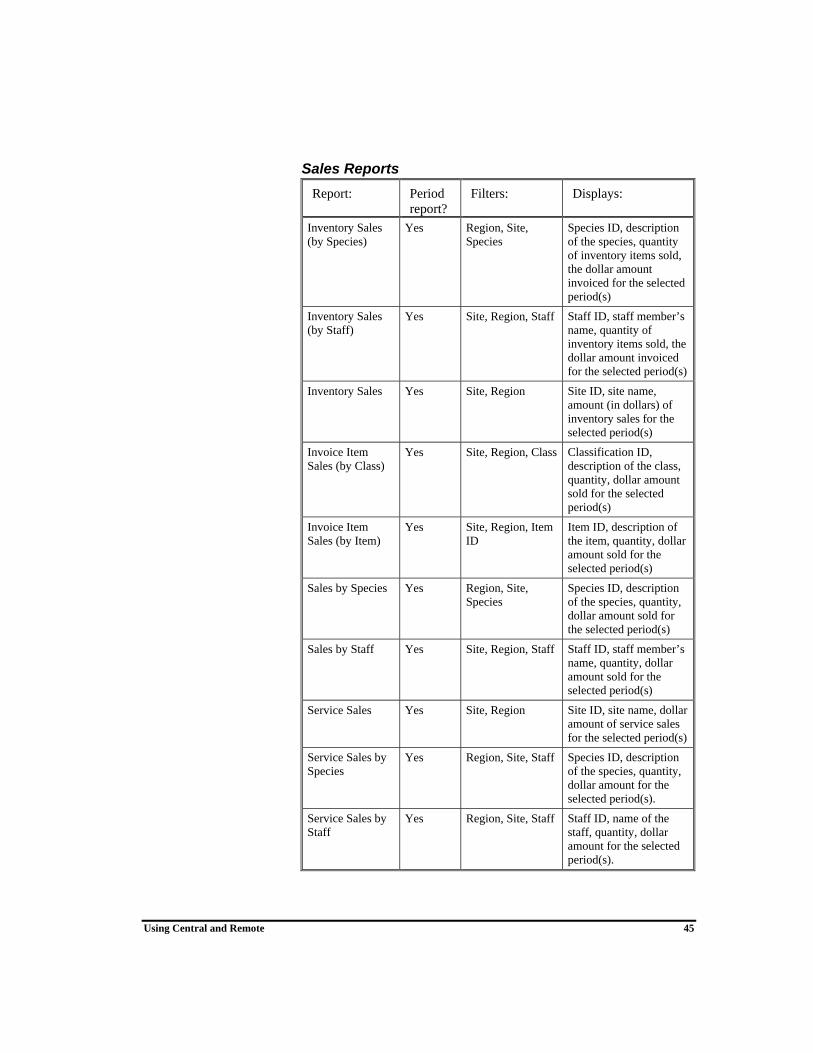
Sales Reports
Report: Period report?
Filters: Displays:
Inventory Sales (by Species)
Yes Region, Site, Species
Species ID, description of the species, quantity of inventory items sold, the dollar amount invoiced for the selected period(s)
Inventory Sales (by Staff)
Yes Site, Region, Staff Staff ID, staff member’s name, quantity of inventory items sold, the dollar amount invoiced for the selected period(s)
Inventory Sales Yes Site, Region Site ID, site name, amount (in dollars) of inventory sales for the selected period(s)
Invoice Item Sales (by Class)
Yes Site, Region, Class Classification ID, description of the class, quantity, dollar amount sold for the selected period(s)
Invoice Item Sales (by Item)
Yes Site, Region, Item ID
Item ID, description of the item, quantity, dollar amount sold for the selected period(s)
Sales by Species Yes Region, Site, Species
Species ID, description of the species, quantity, dollar amount sold for the selected period(s)
Sales by Staff Yes Site, Region, Staff Staff ID, staff member’s name, quantity, dollar amount sold for the selected period(s)
Service Sales Yes Site, Region Site ID, site name, dollar amount of service sales for the selected period(s)
Service Sales by Species
Yes Region, Site, Staff Species ID, description of the species, quantity, dollar amount for the selected period(s).
Service Sales by Staff
Yes Region, Site, Staff Staff ID, name of the staff, quantity, dollar amount for the selected period(s).
Using Central and Remote 46
Using Central Practice Explorer Practice Explorer is an additional module for use with Cornerstone. A special version of Practice Explorer comes with Cornerstone Central software. This version of Practice Explorer can only be used with Central. (If you want to use Practice Explorer with Cornerstone Foundation, the regular version of Practice Explorer must be purchased.) Using Practice Explorer, you can:
• Gather information from your Cornerstone Central database to help you identify opportunities for your practice's growth.
• Retrieve information from your Cornerstone Central database using pre-designed Practice Explorer reports, or design your own Practice Explorer reports.
For more information on the features of Practice Explorer, please refer to the Practice Explorer manual.
To Access Practice Explorer from Cornerstone Central
To access the Cornerstone Central Practice Explorer, choose Practice Explorer on the Activities menu, or click the Practice Explorer toolbar button. You must use Practice Explorer to create ad hoc queries; however, you cannot compare periods using Practice Explorer (unless you import the data into another program).
Central-specific Reports in Practice Explorer Several pre-designed queries are included with Practice Explorer. These reports gather information from your Cornerstone Central database so that you can analyze the productivity of your practice and determine opportunities to generate revenue. Because not all practices are set up in the same way, you should verify practice-specific fields, such as IDs, as well as transaction dates and some of the database fields before running a query.
Rows marked with an hould be verified or changed before running the query. In most cases, you can press F2 to select the necessary value.

Using Central and Remote 47
Daily Site Statistics Report #1 Lists site statistics for each site by end-of-day processing date. SELECTION
Category Field Operator Value And/Or Site Statistics Site ID = site1 And
Site Statistics Date/Time EOD Process
= 11/23/05
OUTPUT Category Field Order Heading Sort Avg/
Total
Site Statistics Invoices 1 Invoices Site Statistics Open Invoices 2 Open Invoices Site Statistics Adjustments 3 Adjustments Site Statistics Write Offs 4 Write Offs Site Statistics Change Given 5 Change Given Site Statistics Refunds 6 Refunds Site Statistics Returned
Checks 7 Returned
Checks
Site Statistics Service Charges 8 Service Charges
OMIT DUPLICATES: no
Using Central and Remote 48
Daily Site Statistics Report #2 Lists site statistics for each site by end-of-day processing date. OUTPUT
Category Field Order Heading Sort Avg/ Total
Site Statistics Preset Discounts 1 Preset Discounts
Site Statistics Manual Discounts
2 Manual Discounts
Site Statistics Taxable Merchandise
3 Taxable Merchandise
Site Statistics Taxable Services
4 Taxable Services
Site Statistics Non-Taxable Merchandise
5 Non-Taxable Merchandise
Site Statistics Non-Taxable Services
6 Non-Taxable Services
Site Statistics Sales Tax 7 Sales Tax
Site Statistics Current Month Charges
8 Current Month Charges
OMIT DUPLICATES: no
Daily Payment Statistics Report Lists payment statistics for each site by end-of-day processing date. SELECTION
Category Field Operator Value And/Or Payment Statistics
Site ID = site1 And
Payment Statistics
Date/Time EOD Process
= 11/23/05
OUTPUT Category Field Order Heading Sort Avg/
Total
Payment Statistics Site ID 1 Site ID Payment Statistics Date/Time EOD
Process 2 Date/Time EOD
Process
Payment Statistics Description 3 Description Payment Statistics Amount 4 Amount
OMIT DUPLICATES: no

Using Central and Remote 49
Using Cornerstone Remote
Introduction Cornerstone Remote collects end-of-period summary data at each remote site and transmits it to Central. Using invoice item data sent from Central, each remote site periodically updates invoice items in their Cornerstone Foundation software.
Logging on to and out of Cornerstone Remote The current user can also log off without exiting Cornerstone by choosing Log Off on the File menu. Logging off forces the next user to log on before using Cornerstone Remote software.
Important! Exercise care when changing users. The database records the user that is logged on when it saves information.
To Enter a Password Cornerstone Remote automatically prompts you for your password when you start the program; however, you can change users at any time.
1 To display the Cornerstone Remote Login dialog box, on the File menu, select Password Entry.
2 In the User field, type or select your name or ID. 3 In the Password field, type your password. As you type your
password, asterisks appear in place of the characters. 4 Click OK or press ENTER.
To View the Current Users If you are running Cornerstone Remote on a network, it is important to be the only user logged in Cornerstone when updating invoice items. By viewing user information, you can check if other users are logged into Cornerstone.
1 On the File menu, select User Information. The User Information dialog box appears, showing users who are currently logged into Cornerstone at the remote site.
2 Click OK.
Using Central and Remote 50
Generating the Summary Data Each time you run End of Day (EOD) or End of Month (EOM) at the remote site, text (.TXT) files of summary data are automatically generated for the Central location. These files are placed in the Send folder within the shared folder for Central to retrieve. Central uses this information to generate reports. The computer must remain on and logged on to the network (if one exists) in order for Central to access the files it needs. These files should be retrieved daily.
Because your server will always be on, protect your hardware and phone lines with a high-quality surge protector. For more information, contact Supplies Sales (1-888-224-4408).
Extracting Previous Summary Data Files You can recreate previous data summary files. These files are text (.TXT) files, and are saved in the Send folder within the shared folder that appears in the Setup Site ID dialog box. If Central needs information from a previous End of Day, you can regenerate the summary data using the Extract Summary Data utility.
To Extract Summary Data 1 At the remote site, on the Activities menu, select Extract Summary Data or click the Extract toolbar button. The Export Data dialog box appears.
Export Data dialog box
2 Select the closing date that contains the end-of-day information to extract.
3 Click Select. The information is extracted and saved in the Send folder.

Using Central and Remote 51
Generating Reminders at the Remote Site At a remote location, you can either generate a reminder file that can be transmitted to the Central server to be printed or you can generate and print reminders at your remote location. Which option you use is determined by the reminder defaults that you set up. See "To Set the Reminder Defaults" on page 5.
To Generate Reminders 1 At your remote site, start Cornerstone. 2 From the Activities menu, select Generate Reminders. 3 Generate your reminders as usual. For more information on
generating your reminders, see your Cornerstone Reference Manual.
4 Depending on how your reminder defaults are set up, follow the applicable instructions below. • If you are set up to print reminders at the Central
location, at the remote site, generate a reminder file. The reminder file is automatically placed in your Send directory. The next time you send an update to Central, the reminder file is sent. From this file, Central creates a text file called central_remind.txt and places it in your cstone directory. From the Central server, print reminders. See "Printing Reminders in Central" on page 37.
• If you are set up to print reminders at the remote location, using your Cornerstone Foundation software, generate reminders. This creates the namelist.txt file and reminders can be printed as usual at the remote location.

Using Central and Remote 52
Updating Invoice Item Information at the Remote Site At Central, invoice item information can be changed at any time. Central then transmits these changes to the remote sites. This process ensures standardized descriptions, fees, and other invoice item information at all practice locations. Central can send updated invoice item information to a remote site on a predetermined schedule or at any particular time. In order to receive the update, your remote server should be left on at a point past the network login.
Because your server will always be on, protect your hardware and phone lines with a high-quality surge protector.
Receiving Invoice Item Updates Before Central can download invoice item updates to your remote site, you must have already linked your remote invoice item IDs with Central. See "Set Up Invoice Item Links" on page 25.
Automatic Update of Invoice Item Information When you open the Cornerstone Remote software, if none of your staff members have security access to the Update Invoice Items dialog box, the remote site's database is automatically updated with the updated invoice item information from Central. The Invoice Item Update Reports dialog box appears so you can print invoice item reports as necessary. The Login dialog box then appears as usual.
Updating Invoice Item Information When you process End of Day in Cornerstone, a message appears if invoice item files exist that need to be updated.
To Update Invoice Items 1 On the Activities menu, select Update Invoice Items or
click the Update toolbar button. 2 A message box appears informing you that files are being
imported. If no updates have been received, a message appears to inform
you that no update files from the central server exist. Click OK. 3 If there are items to be updated, the Update Invoice Items dialog
box appears.
Using Central and Remote 53
Update Invoice Items dialog box
4 To accept all of the changes, click OK. If you do not want an item to be modified, click the Modify
check mark. The check mark disappears and the item will not be modified.
5 To view a specific item’s changes or accept individual changes to an item, click Details. The Item Details dialog appears.
Item Details dialog box
The Item Details dialog box displays specific changes to an invoice item. You can choose to accept each change individually.
Using Central and Remote 54
6 The remote site's invoice item information that differs from the central site's information is highlighted in aqua.
7 Click OK to accept the individual item’s changes, or if you do not want to accept a change, click the Yes check box to change accept to No.
8 To continue accepting individual item changes, repeat steps 5 - 8, or click OK. The Update Invoice Item Reports dialog box appears. See "Generating Invoice Item Update Reports."
Generating Invoice Item Update Reports After you have updated invoice items, the Invoice Item Update Reports dialog box appears. You must print these reports at this time; you cannot retrieve these reports at a later time.
Invoice Item Update Reports dialog box
Previewing and Printing Reports To Preview a Report The top of the Report Preview displays the total amount of records in the report, the number of records selected (either all or a range), and the number of records read. It also displays the number of pages in the report and the current page displayed.
1 In the Update Invoice Item Reports dialog box, select the report to generate.
2 Click Preview. The Reports Preview appears. 3 When you are finished viewing the report, click Close. 4 Repeat steps 1 - 3 to preview additional reports or click Close
to exit.
Using Central and Remote 55
To Print a Report 1 In the Update Invoice Item Reports dialog box, select the report
to generate. 2 Click Print. 3 Make any changes, if necessary. (We recommend that you do
not change the default settings. Use Save to a File to save a report as a text file.)
4 Click OK to print the report. 5 Repeat steps 1 - 4 to print additional reports or click Close.
To Save a Report to a File Use this option if you want to import the data into another program (such as a spreadsheet or word processing program). Among other file formats, you can save the report in a .doc format (for Word) or a .txt format (for general applications).
1 In the Update Invoice Item Reports dialog box, select the report to generate.
2 Click Save As. The Save As dialog box appears. 3 Select the Folder to save to and type a file name. The file
saves as a .txt (text) file unless you type a different extension (such as .doc) after the file name.
4 Click OK to save the report in the specified folder. 5 Repeat steps 1 - 4 to save additional reports to files or click
Close to exit.
Cornerstone Remote Reports The following reports are included in Cornerstone Remote software. Invoice Items Exception Report Includes the class ID of invoice items that do not match between the central site and remote site. You will need to modify the invoice item information for these items in the Cornerstone database. Invoice Items Not Selected for Update Includes items that have been deselected for modification. Invoice Items Sent from Central Includes every item that had modifications sent from the central server. Invoice Items Updated Includes the invoice items that were updated.
Using Central and Remote 56
Index
A Automatic update of invoice
item information 49
C Central
Defaults 7 Enter a password 24 Fill database with existing
invoice items and species 9
Information 7 Initial setup 3, 7 Install programs on 3 Logging on to 24 Overview 1 Practice Explorer 43 Preferences 7 Preparing to use 3 Recall Remote site 33 Reminders 1, 34, 48 Reports 35, 39 Security 7 Sending invoice item
information to Remote 30
Staff members 8 Summary data 31, 33 Synchronize IDs with Remote
18 Toolbar 8 Transmission group 3, 16 Updating invoice item
information 25, 30 Checklist for setting up Central
and Remote 3 Client reports 39
Connecting to another site 35 Copy database to Central 9 Csextrac program 9, 10
D Daily Payment Statistics Report
45 Daily Site Statistics Report 44,
45 Data selections, setting up 15,
16, 17 Defaults
In Central 7 In Remote 5
E Extract existing invoice items
and species from remote site 9
Extract previous summary data files 47
F Financial reports 39
G Group invoice items 14
I Install programs
On Central 3 On Remote 3
Inventory reports 41 Invoice item classifications
Setting up in Central 10 Invoice item information
Setting up in Central 10, 11, 12
Sending to Remote sites 30 Receiving updates at Remote
49
Using Central and Remote 57
Updating at Central site 25 Invoice item
Group items 14 Links 21 Mass markup pricing 25 Pricing information 12, 13 Regional pricing 13
Invoice Items Exception Report 52
Invoice Items Not Selected for Update (report) 52
Invoice Items Sent from Central (report) 52
Invoice Items Updated (report) 52
L Links
Invoice item 21 Sex 22 Species 19 Unit of measure 20
Log on to Central 24 Log on to Remote 46
M Mass markup prices by region
25
O Overview 1
P Password
Entering in Central 24 Entering in Remote 46
Patient reports 39 Practice Explorer
Reports 43 Using 43
Preferences In Central 7 In Remote 5
Pricing Information on invoice items
12, 13 Mass markup pricing 25 Regional pricing 13
R Recall remote site 33 Regional dispensing items 28 Regional mass markup 25 Regional pricing 13 Reminders
Remote defaults 5 Generate at Remote 48 Print at Central 34, 48 Print at Remote 48 Templates 34
Remote Defaults 5 Enter a password 46 Generating summary data 47 Initial setup 3, 5 Introduction 1, 46 Invoice Item Update reports
51 Logging on to 46 Overview 1 Preferences 5 Preparing to use 3 Receiving updates 49 Reminders 5, 48 Reports 51, 52 Security 5 View current users 46
Reports Client and patient 39 Daily Site Statistics Report
44, 45 Daily Payment Statistics
Report 45 Financial 39 Inventory 41 Invoice Item Update reports
51 Previewing in Central 37 Previewing in Remote 51 Printing in Central 37 Printing in Remote 52 Sales 42 Saving in Central 38 Saving in Remote 52
Using Central and Remote 58
Specify report type 36 Rounding 26
S Sales reports 42 Security
In Central 7 In Remote 5
Sex ID links 22 Species, setting up 9 Species links, setting up 19 Staff members, setting up 8 Summary data 31, 47 Synchronize Master Files 18
T Toolbar
Changing in Central 8 Changing in Remote 5
Transmission groups, setting up 16
Transmission data Purging 32 Viewing 32
U Units of measure 7, 11 Units of measure links 20
V Verify transmissions 32 View transmission results 32