Remote Deposit Express User Guide - 1st Source Bank
24
Remote Deposit Express March 2010, v03 Remote Deposit Express User Guide
-
Upload
khangminh22 -
Category
Documents
-
view
5 -
download
0
Transcript of Remote Deposit Express User Guide - 1st Source Bank

Remote Deposit Express
March 2010, v03
Remote Deposit Express
User Guide
Remote Deposit Express
Customer Support: 574-235-2003 / 1-800-399-5592 / [email protected]
- 1 -
Table of Contents
TABLE OF CONTENTS ........................................................................................................................................1
OVERVIEW ..............................................................................................................................................................2
BEST PRACTICES & DAILY PROCEDURES .............................................................................................3
SERVICE STANDARDS.......................................................................................................................................6
RDE MINIMUM WORKSTATION REQUIREMENTS..............................................................................7
NEW BATCHES.......................................................................................................................................................8
COMMON CHECK WARNINGS AND MESSAGES .................................................................................12
CLOSING & APPROVING THE BATCH .....................................................................................................13
OPEN BATCHES...................................................................................................................................................15
TRANSACTIONS – ACCESS YOUR CHECK ARCHIVE .......................................................................16
BATCH STATUS ...................................................................................................................................................16
CHECK COPIES ....................................................................................................................................................17
REPORTS ................................................................................................................................................................20
USER SET-UP .......................................................................................................................................................21
Remote Deposit Express
Customer Support: 574-235-2003 / 1-800-399-5592 / [email protected]
- 2 -
Overview
Thank you for choosing Remote Deposit Express (RDE) from 1st Source Bank. RDE will save you time and effort by allowing you to make check deposits from your office and avoid trips to the bank.
This guide gives you easy-to-use instructions on how to access many of RDE’s most commonly used features, and provides screen shots for easy convenience.
If you have any questions about RDE, you can reach us at:
Remote Deposit Express Customer Support
1st Source Direct: 574-235-2003 or 1-800-399-5592 toll free
Monday - Friday (closed on federal holidays) 8:00 am - 5:00 pm ET

Remote Deposit Express
Customer Support: 574-235-2003 / 1-800-399-5592 / [email protected]
- 3 -
Best Practices & Daily Procedures
The following sections outline the key things to know and practice as a remote deposit user. The equipment you use and functionality provided by RDE makes your company an extension of 1st Source Bank. At 1st Source, we are focused on securely and accurately processing your transactions. The best practices below will help you to also keep this focus at your place of business.
Check Storage
Per the agreement you signed to use remote deposit, the scanned checks must be stored in a locked, fireproof container. Once you have submitted your deposit, print out the summary report. Flip the report face down and place your checks in the center of the page. Fold the report page in thirds to create a wrap around your deposited checks. Take the bundle of checks to your secure location and store them for 90 days. You must keep the checks for 90 days because that is the window of time that 1st Source or another bank can request the original paper check as proof of payment. After 90 days has passed, it is safe to destroy the checks.
Check Destruction
After 90 days, you have 10 business days to enter the checks into your document destruction process. In the same way you would destroy other sensitive information, the checks must be shredded or destroyed in a commercially acceptable manner. When you store your checks, write the destruction date on the bundle to remind you when the checks need to be destroyed.
Audit
1st Source reserves the right to audit your check storage and destruction procedures. 1st Source may suspend service if storage and destruction policies are not adequate.
Information Breach
As you know, you are responsible for safeguarding the information contained on the checks you receive. Since you may be keeping checks on hand longer with RDE than you would normally, it is very important that the checks are kept secure while in your possession. In the event that the checks or any information on the checks are obtained by unauthorized individuals, you may need to take action. Each state has slightly different regulations on safeguarding customer information and taking action in the case of a breach; so talk with your advisors and stay up to date on your responsibilities.
Remote Deposit Express
Customer Support: 574-235-2003 / 1-800-399-5592 / [email protected]
- 4 -
Data Storage and Online History
The RDE site will archive a 24 month rolling history of all deposits. You can search for a specific item or a whole deposit batch as well as run reports on the stored data. If you are electronically filing the check images on your network it is very important that the network is secure and only authorized personnel have access to the electronic files.
Security
All data and information entering into or accessed through the RDE system is encrypted with SSL 128 bit encryption. This includes the login page where users enter their Office, User ID and Password information. All sensitive data (account and routing number) is encrypted AES 256 bit encryption.
At your place of business, it is critical to have a secure network (especially if using a wireless network), firewall, virus protection, spy ware, keystroke protection and/or any other relevant form of systematic protection in your computing environment. All systems should be up-to-date.
Dual Controls
RDE is a system that contains important information and we recommend that you institute appropriate dual controls at your company. Separation of duties forces at least two people to be involved in completing a task so no one person has control over all phases of a transaction. Dual controls help prevent, or decrease the risk of errors, and identify problems. Just as you may have one person issue a check and another person sign the check, you may want to consider having one person responsible for remote deposits and another person handling the accounts receivables. You can also consider having one person scan in the deposits and a second person review and approve those batches for deposit.
Duplicate Items
You cannot scan a check into Remote Deposit Express more than once. If you have a check that was returned or did not get processed for some reason, contact 1st Source about the status of the item and how you should proceed.
Images & Non-conforming Images
It is very important to submit clear images of your deposited checks. Make sure that you organize your checks by size and line up the leading edges of the checks when you place the batch in the scanner. This will help to ensure that the scanner gets a straight and clear image of the check. It will also help prevent checks getting stuck in the scanner. If your images are not straight or clear, they may not be accepted by 1st Source, other banks or the Federal Reserve. A rejected check is known as a non-conforming image. 1st Source will debit your account for any non-conforming images.
Remote Deposit Express
Customer Support: 574-235-2003 / 1-800-399-5592 / [email protected]
- 5 -
Unbalanced Batches
You cannot deposit a batch of checks if the batch is out of balance. If you are getting a message that your batch is not balanced, recalculate the amount of your deposit and verify that all of your checks have been read correctly by the system. Edit and correct any items that need adjusting and then close the batch.
Types of Checks
You may deposit checks and drafts drawn on a United States chartered bank and written in United States Dollar currency. Money orders are also accepted but are often difficult for the scanner to read, so some manual editing may need to occur. All checks must be made payable to the name on your deposit account.
Item and Deposit Limits
Your RDE account is set up with a maximum daily deposit limit and a maximum single check limit. If the value of your deposits or an item exceeds these limits, you will need to call us to have your batch reviewed prior to depositing.
Contingency
If the RDE site is down or your scanner is not working, we will make every effort to get you up and running again as soon as possible. In the meantime, we recommend you take your deposits to the nearest banking center, mail in your deposits or wait until the system is operational.
Batch Volume
For quickest processing, we recommend depositing no more than 100 checks in a batch. There is no restriction to the number of batches that can be deposited, as long as you do not exceed your daily deposit limit.
Equipment Maintenance
You are responsible for periodically cleaning the scanner. It is important to keep your scanner free of dust so the images are clear and the machine does not jam. Your scanner will come with a manual and/or disc that contain cleaning instructions as well as some replacement parts.
Remote Deposit Express
Customer Support: 574-235-2003 / 1-800-399-5592 / [email protected]
- 6 -
Service Standards
Customer Service
As your remote deposit provider, we are committed to delivering a quality service to you. The Remote Deposit Express website is available for deposits at any time and 1st Source specialists are accessible via phone and email for any question you may have. Our Customer Service Line is available Monday – Friday, 8:00 am - 5:00 pm ET.
Message Board
When you log in, take a moment to read any news or updates posted beneath the welcome message on the message board. This is where we will post any information about scheduled maintenance, federal holidays or updates that will affect your deposit activity.
Maintenance
There may be times where the site is down for maintenance. We will always try to complete maintenance at an off-peak time whenever possible and have the site back up promptly. Scheduled maintenance will be communicated to you through the message board on the site. We may also contact you by phone or email about unscheduled maintenance or any status changes with the site.
Cut-off Times
When your RDE account was established, a cut-off time was also set. The cut-off time is the deadline for same day deposits. For example, if you have a 6:00 pm ET cut-off and you make a deposit at 4:00 am ET and another deposit at 6:02 pm ET. The first deposit will get processed that day and the next deposit will get processed the following business day. Cut-off times are listed next to each deposit account on the Capture screen.
Holidays & Non- Processing Days
The banking industry does not process transactions on Federal Reserve Holidays or weekends. Although 1st Source is often open during these times and the RDE site is available for deposits, the transactions will not post until the next business day. You are free to do your banking on these days, just be aware when the money will go into your account. The following list contains the Federal Reserve Holidays that are non-processing days. Notifications will be posted on the RDE message board the day prior to the holiday.
• New Year's Day
• Martin Luther King, Jr. Day
• Presidents' Day
• Memorial Day
• Independence Day
• Labor Day
• Columbus Day
• Veteran's Day
• Thanksgiving Day
• Christmas Day

Remote Deposit Express
Customer Support: 574-235-2003 / 1-800-399-5592 / [email protected]
- 7 -
RDE Minimum Workstation Requirements
Workstations:
933MHZ, 512MB RAM, 8MB-Video, USB 2.0 Port, keyboard, mouse, monitor
Operating Systems:
• Windows XP (32-bit)
• Windows Vista 32-bit and 64-bit
o certified for use with Panini and Digital Check scanner drivers
o certified for use with Ethernet-attached Magtek scanners
Software:
• Adobe Acrobat Reader version 6.0 or higher (free from Adobe)
• Java Runtime Environment (JRE) (web browser plug-in; free from Sun Microsystems)
• JRE 6u10 or higher
o for Windows Vista users
o for Panini VisionX 2009 and Panini I:Deal 2009 drivers
o for Digital Check 2009 driver
• JRE 1.4.2 or higher for other all other scanner driver packages
Browsers:
• Microsoft Internet Explorer version 5.5 or higher
• Mozilla Firefox – 3.0 or higher
• Apple Safari – 3.0.4 or higher
• Google Chrome – 2.0.172.39 or higher
Internet Connectivity:
Any broadband or DSL type Internet access, with a minimum of 128Kbps download speed. Dial up access may be
used but system performance is not guaranteed.
Certified Scanners
Panini VisionX 1F,50,75,100
I:Deal
Digital Check
Tellerscan 215
Tellerscan 230-35,65,100
Tellerscan 4120
CheXpress CX30
Canon CR-180
CR-55
CR-25
MagTek
Excella STX
Excella
RDM
EC7000i
Remote Deposit Express
Customer Support: 574-235-2003 / 1-800-399-5592 / [email protected]
- 8 -
New Batches
Creating a New Batch
1) Prepare the checks you want to deposit by organizing them by size and removing the stub, paperclips, sticky notes, etc.
2) Log in to the RDE website – https://remotedeposit.1stsource.com.
o Please note that the password is case sensitive. o If you have three unsuccessful log in attempts, your account will be locked and
you will need to contact us to be reset.
3) Make sure your scanner is plugged into the power source and connected to your computer. Please reference the Operator Manual you received with your scanner.
4) If you are logging in for the first time, you will need to set up your security parameters
and reset your password. The application will walk you through these screens.
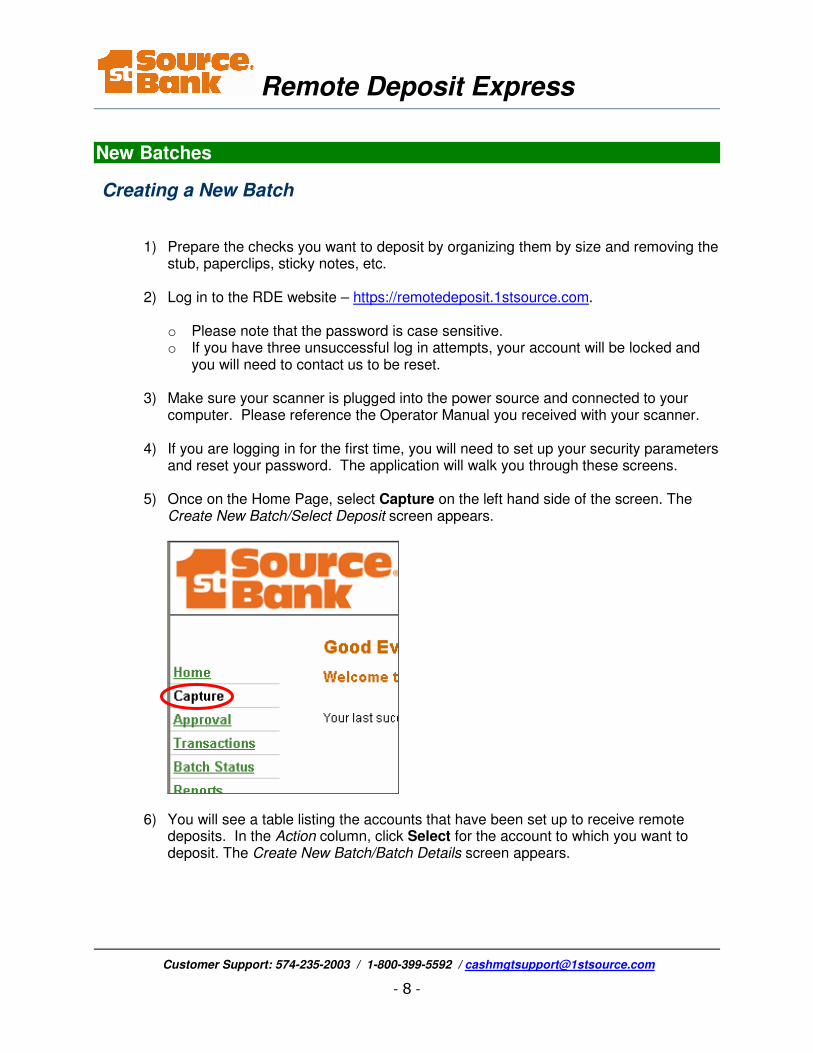
5) Once on the Home Page, select Capture on the left hand side of the screen. The Create New Batch/Select Deposit screen appears.
6) You will see a table listing the accounts that have been set up to receive remote deposits. In the Action column, click Select for the account to which you want to deposit. The Create New Batch/Batch Details screen appears.
Remote Deposit Express
Customer Support: 574-235-2003 / 1-800-399-5592 / [email protected]
- 9 -
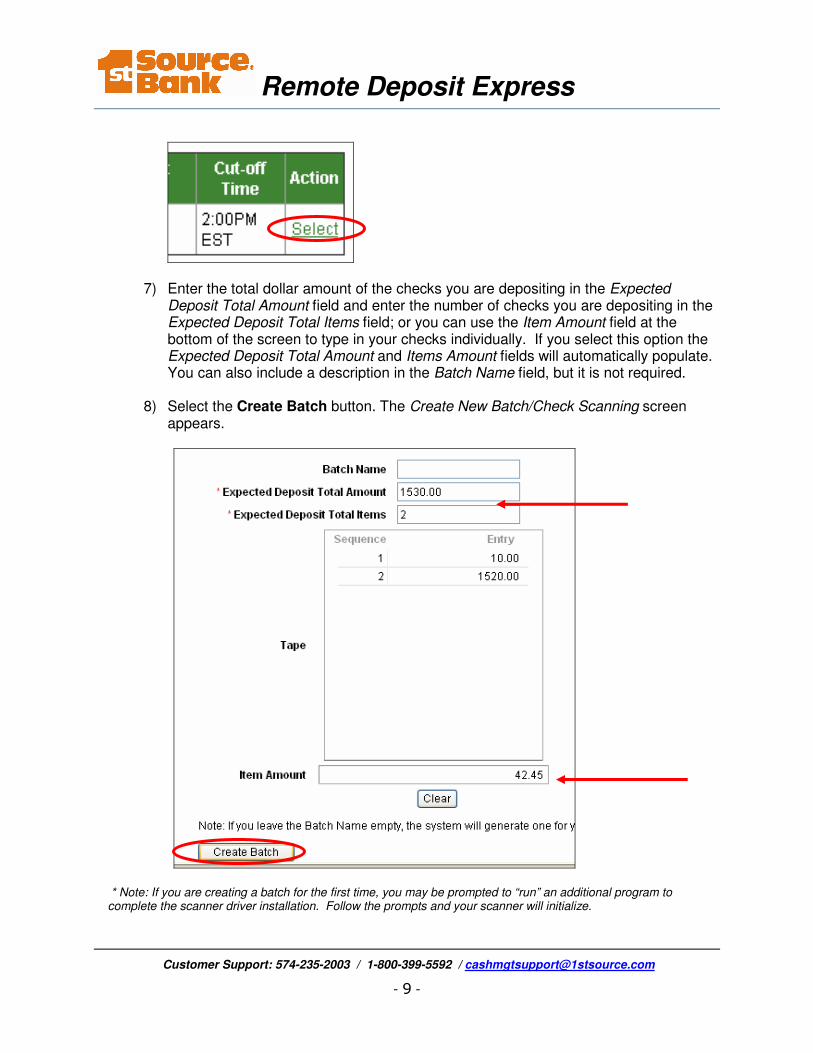
7) Enter the total dollar amount of the checks you are depositing in the Expected Deposit Total Amount field and enter the number of checks you are depositing in the Expected Deposit Total Items field; or you can use the Item Amount field at the bottom of the screen to type in your checks individually. If you select this option the Expected Deposit Total Amount and Items Amount fields will automatically populate. You can also include a description in the Batch Name field, but it is not required.
8) Select the Create Batch button. The Create New Batch/Check Scanning screen
appears.
* Note: If you are creating a batch for the first time, you may be prompted to “run” an additional program to complete the scanner driver installation. Follow the prompts and your scanner will initialize.
Remote Deposit Express
Customer Support: 574-235-2003 / 1-800-399-5592 / [email protected]
- 10 -
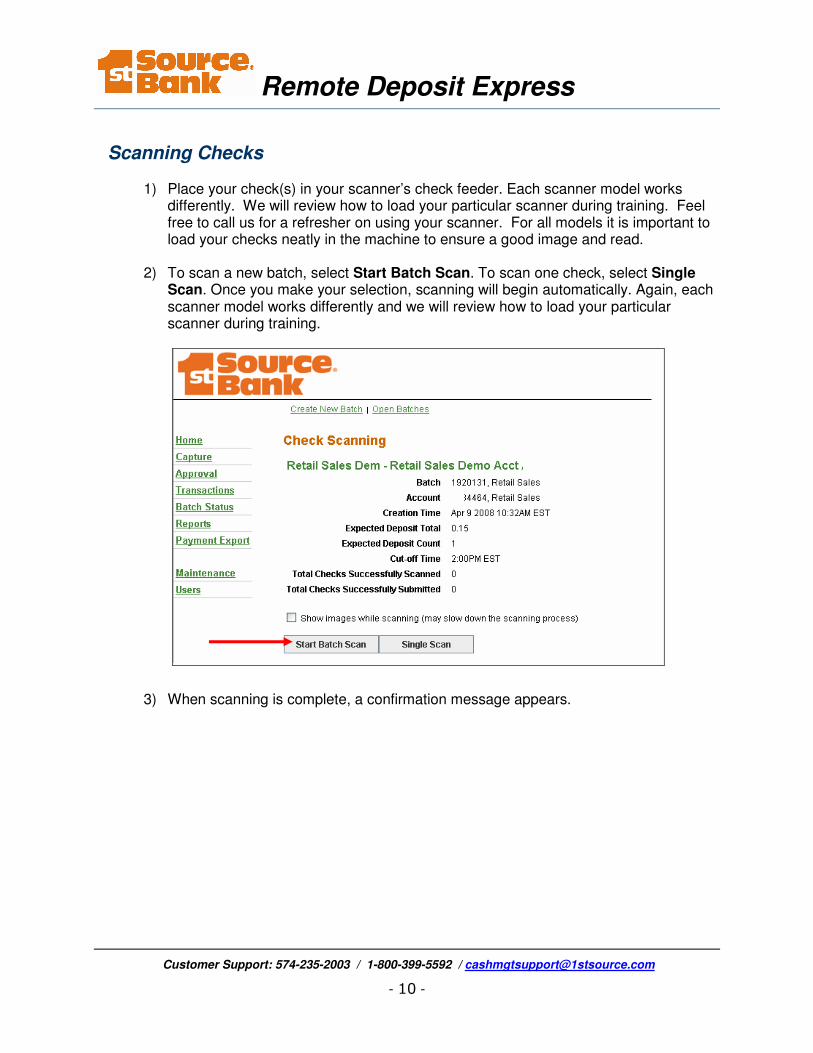
Scanning Checks
1) Place your check(s) in your scanner’s check feeder. Each scanner model works differently. We will review how to load your particular scanner during training. Feel free to call us for a refresher on using your scanner. For all models it is important to load your checks neatly in the machine to ensure a good image and read.
2) To scan a new batch, select Start Batch Scan. To scan one check, select Single
Scan. Once you make your selection, scanning will begin automatically. Again, each scanner model works differently and we will review how to load your particular scanner during training.
3) When scanning is complete, a confirmation message appears.

Remote Deposit Express
Customer Support: 574-235-2003 / 1-800-399-5592 / [email protected]
- 11 -
4) Select OK. The Create New Batch/Check Scanning screen reappears. 5) Select the green Complete Batch link under the scanning buttons.
6) If the batch is balanced, select Close Batch. If you have any errors or duplicate items in the batch, you will see a screen with the image of the check(s) in question. You will need to make the requested edits in order to move forward.
Remote Deposit Express
Customer Support: 574-235-2003 / 1-800-399-5592 / [email protected]
- 12 -
Common Check Warnings and Messages
The scanners have a dual goal of reading your checks and filtering out potentially fraudulent items, so do not be alarmed if you are asked to review and/or complete information for checks. Some common edits you may be asked to make: 1) Complete the amount – Checks are read based on the position of the information on
the check. If the information, such as the amount, is outside of the area that the application is looking to read it, it will ask you to type in the amount. You may also need to enter the amount if the ink quality is poor or if there is a distinct background pattern on the check.
2) Edit the MICR – MICR is the Magnetic Ink Character Recognition which is the ink
and format of the key clearing numbers along the bottom of your check. These include the routing, account and check numbers. These numbers are displayed in yellow boxes under the check image. If any of the boxes are blue or green, look for a “?” in the number sequence. Reference the original check to see what number is missing, then remove the “?” and type in the number.
3) Warnings – If basic check information cannot be confirmed by the scanner, it may
display a warning that the signature, date, and/or legal amount might be missing. Reference the original check to see if this information is properly displayed on the check and if so, click the Submit button. If not, you may want to delete the check and contact the check writer to get a corrected check.
4) Edit may significantly alter the check – There are a few checks that fall completely
outside of the standard check formatting allowances and cannot be edited on the normal page. You will need to click the Advanced Edit button to confirm the check information. Call us with questions on these items.
5) Piggy back items – If two or more checks are pulled through the scanner at the same
time, you may get a message about a piggy back item. You will need to click the Delete button at the bottom of the item screen and then rescan the checks individually.
6) Document skew – It is very important to send your checks through the scanner nice
and straight so that your images meet the image quality standards. If the check is crooked, delete the item and rescan it taking care to send the check through straight.
Remote Deposit Express
Customer Support: 574-235-2003 / 1-800-399-5592 / [email protected]
- 13 -
Closing & Approving the Batch
Closing the Batch
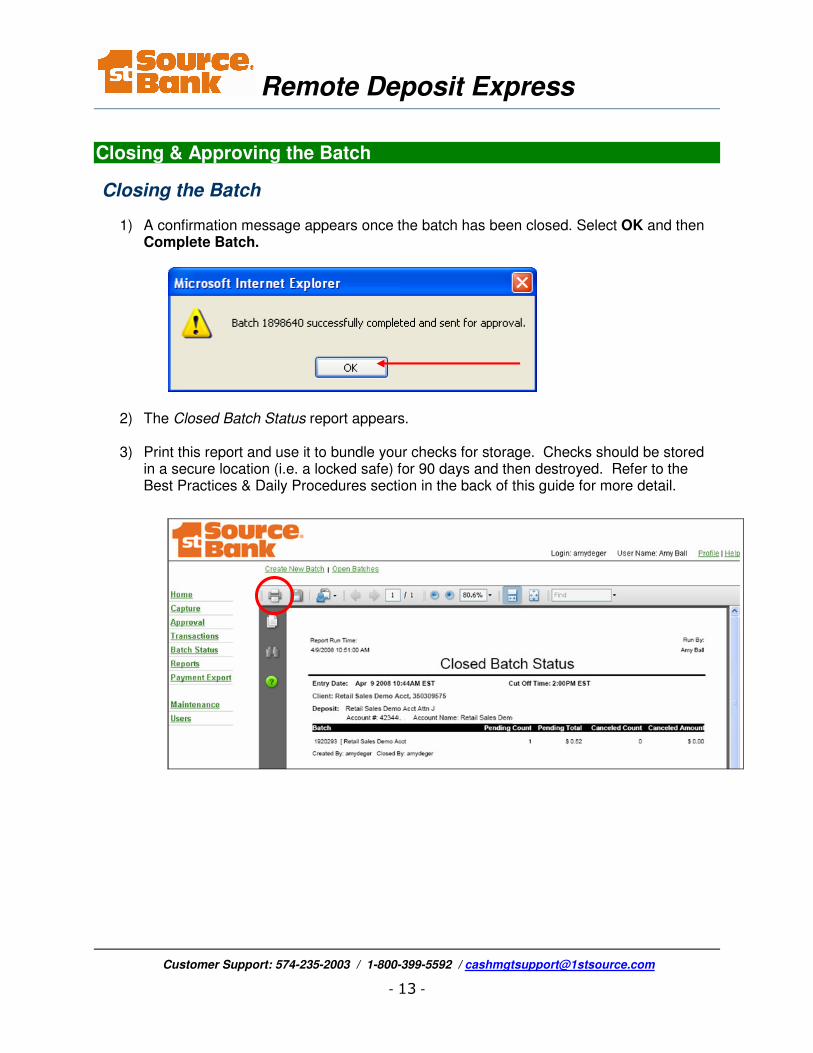
1) A confirmation message appears once the batch has been closed. Select OK and then Complete Batch.
2) The Closed Batch Status report appears.
3) Print this report and use it to bundle your checks for storage. Checks should be stored in a secure location (i.e. a locked safe) for 90 days and then destroyed. Refer to the Best Practices & Daily Procedures section in the back of this guide for more detail.
Remote Deposit Express
Customer Support: 574-235-2003 / 1-800-399-5592 / [email protected]
- 14 -
Approving the Batch
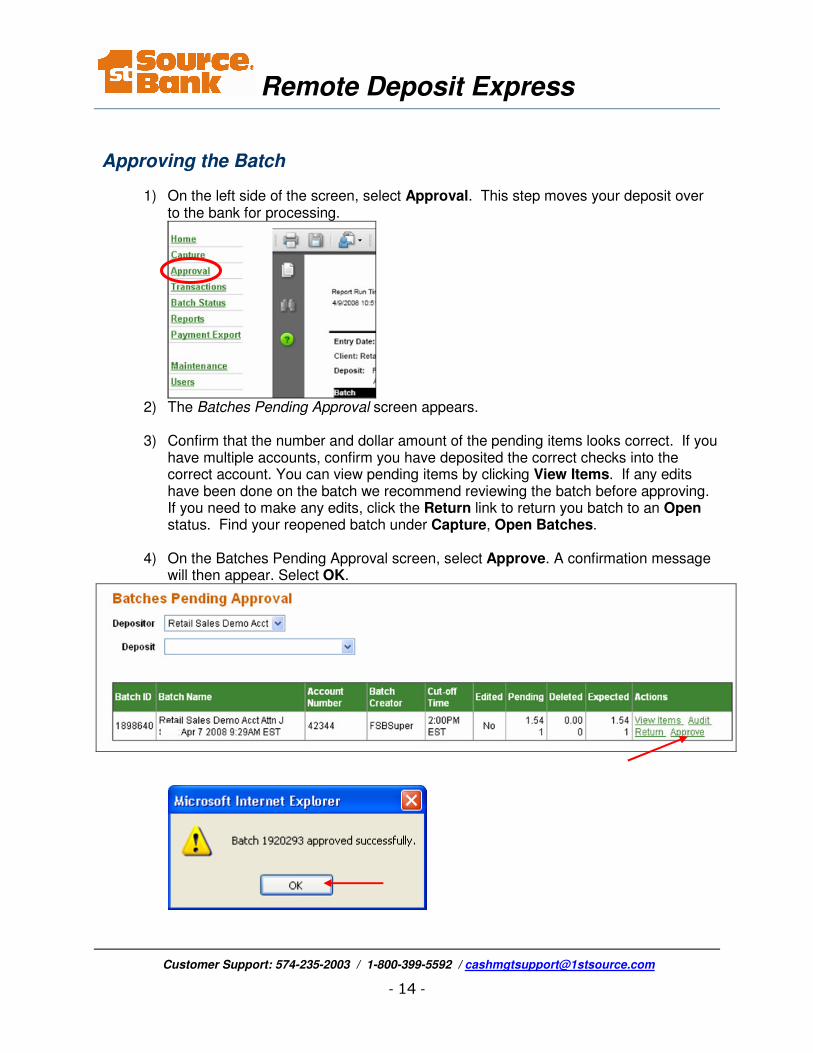
1) On the left side of the screen, select Approval. This step moves your deposit over to the bank for processing.
2) The Batches Pending Approval screen appears. 3) Confirm that the number and dollar amount of the pending items looks correct. If you
have multiple accounts, confirm you have deposited the correct checks into the correct account. You can view pending items by clicking View Items. If any edits have been done on the batch we recommend reviewing the batch before approving. If you need to make any edits, click the Return link to return you batch to an Open status. Find your reopened batch under Capture, Open Batches.
4) On the Batches Pending Approval screen, select Approve. A confirmation message
will then appear. Select OK.
Remote Deposit Express
Customer Support: 574-235-2003 / 1-800-399-5592 / [email protected]
- 15 -
Open Batches
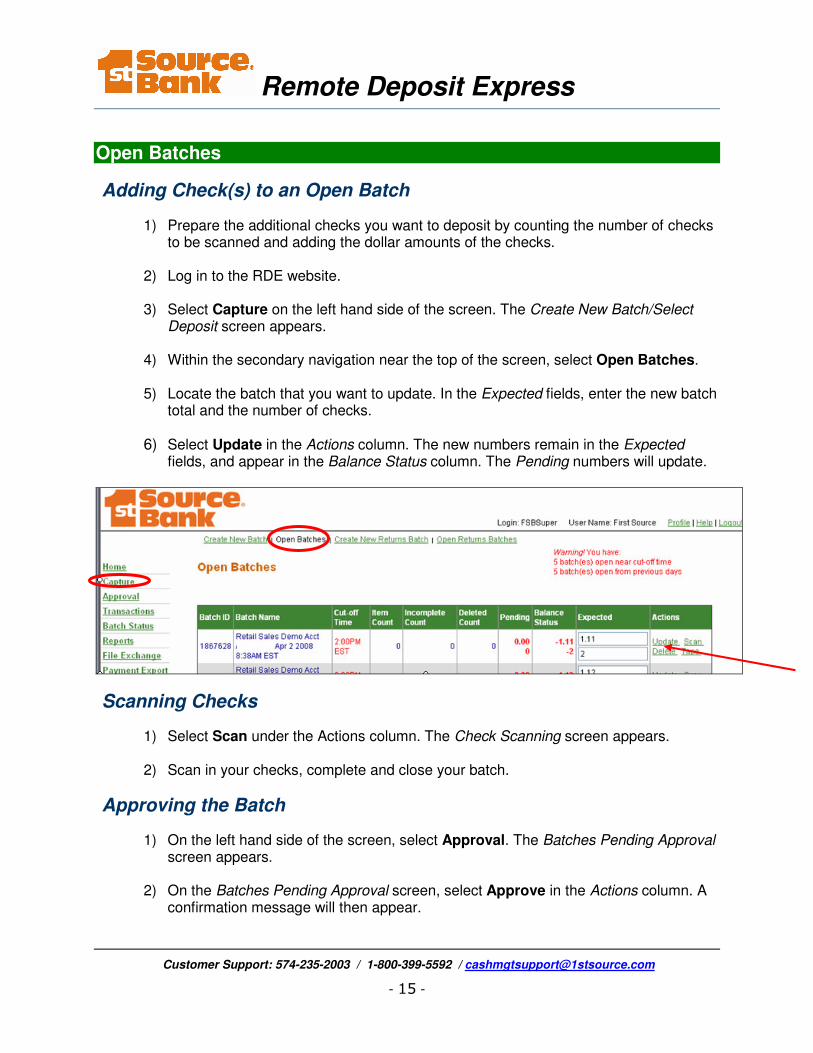
Adding Check(s) to an Open Batch
1) Prepare the additional checks you want to deposit by counting the number of checks to be scanned and adding the dollar amounts of the checks.
2) Log in to the RDE website.
3) Select Capture on the left hand side of the screen. The Create New Batch/Select
Deposit screen appears.
4) Within the secondary navigation near the top of the screen, select Open Batches.
5) Locate the batch that you want to update. In the Expected fields, enter the new batch total and the number of checks.
6) Select Update in the Actions column. The new numbers remain in the Expected
fields, and appear in the Balance Status column. The Pending numbers will update.
Scanning Checks
1) Select Scan under the Actions column. The Check Scanning screen appears. 2) Scan in your checks, complete and close your batch.
Approving the Batch
1) On the left hand side of the screen, select Approval. The Batches Pending Approval screen appears.
2) On the Batches Pending Approval screen, select Approve in the Actions column. A
confirmation message will then appear.
Remote Deposit Express
Customer Support: 574-235-2003 / 1-800-399-5592 / [email protected]
- 16 -
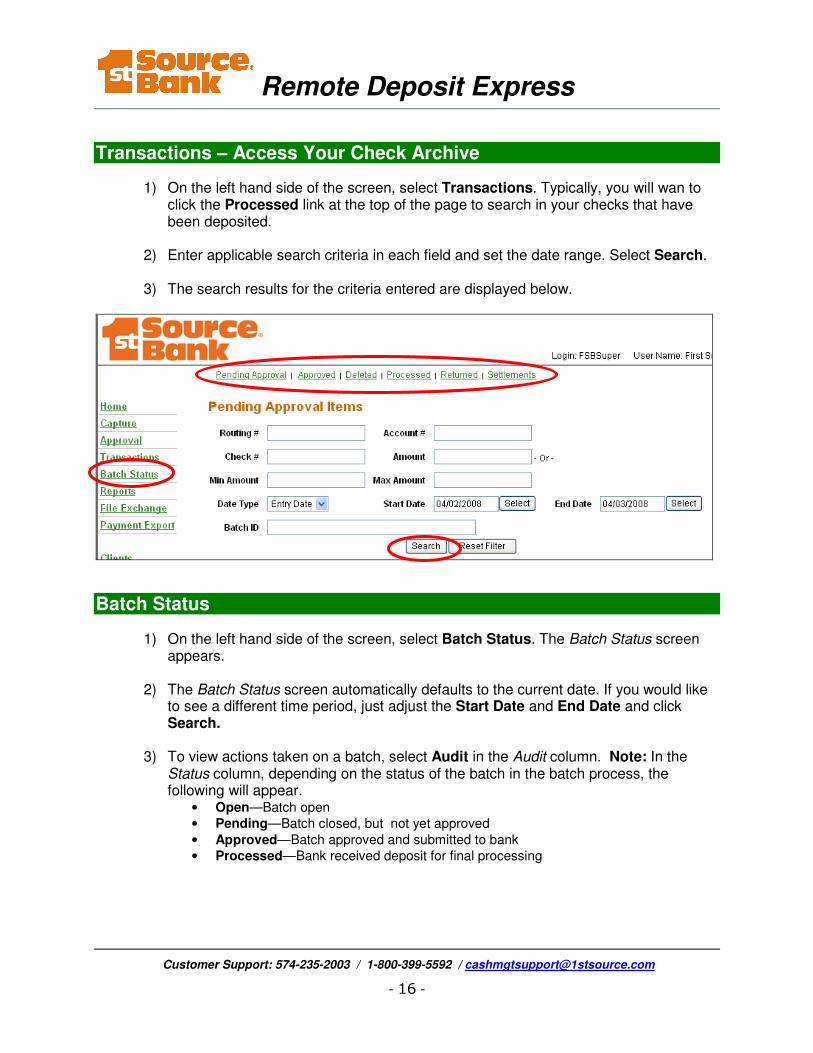
Transactions – Access Your Check Archive
1) On the left hand side of the screen, select Transactions. Typically, you will wan to click the Processed link at the top of the page to search in your checks that have been deposited.
2) Enter applicable search criteria in each field and set the date range. Select Search.
3) The search results for the criteria entered are displayed below.
Batch Status
1) On the left hand side of the screen, select Batch Status. The Batch Status screen appears.
2) The Batch Status screen automatically defaults to the current date. If you would like
to see a different time period, just adjust the Start Date and End Date and click Search.
3) To view actions taken on a batch, select Audit in the Audit column. Note: In the
Status column, depending on the status of the batch in the batch process, the following will appear.
• Open—Batch open
• Pending—Batch closed, but not yet approved
• Approved—Batch approved and submitted to bank
• Processed—Bank received deposit for final processing

Remote Deposit Express
Customer Support: 574-235-2003 / 1-800-399-5592 / [email protected]
- 17 -
Check Copies
If you retain copies of your checks for your records, Remote Deposit can run a report of the check images for you; eliminating the need to manually create copies. The directions for printing the PDF report of the check images are:
1) After approving the batch, click on Batch Status.
2) In the Processed or Approved column (whichever matches the status of the batch), click the link that displays the item amount and total.
Remote Deposit Express
Customer Support: 574-235-2003 / 1-800-399-5592 / [email protected]
- 18 -
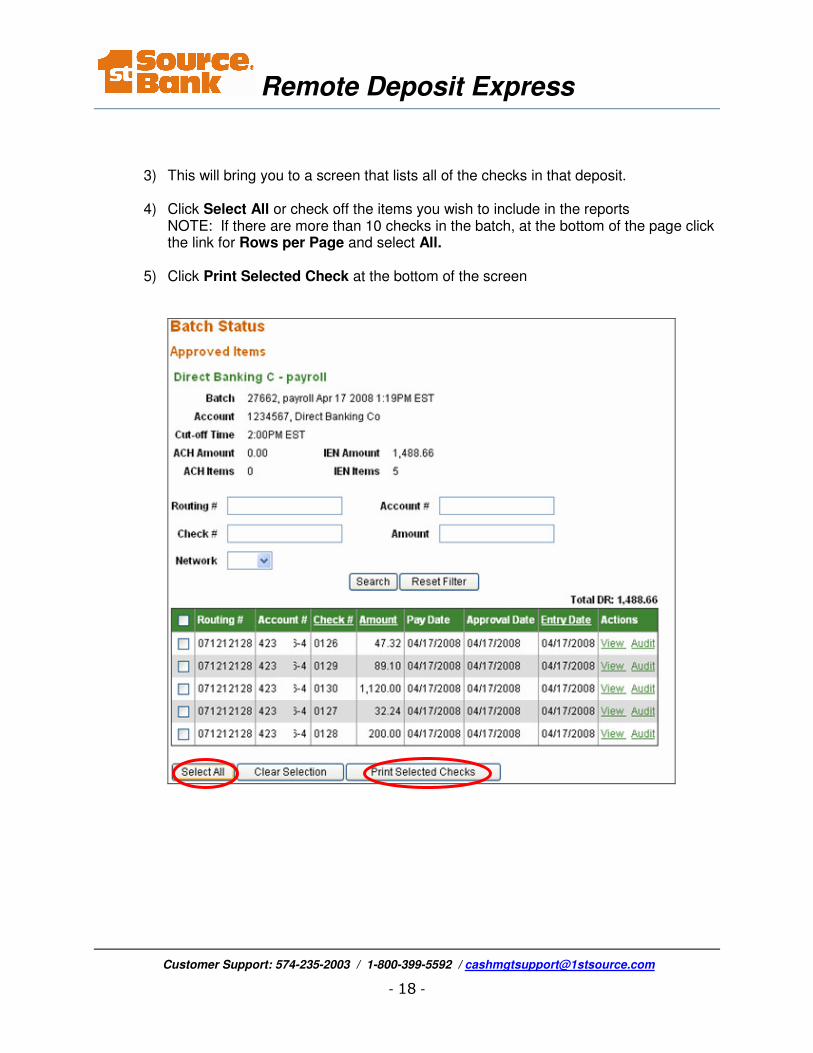
3) This will bring you to a screen that lists all of the checks in that deposit.
4) Click Select All or check off the items you wish to include in the reports NOTE: If there are more than 10 checks in the batch, at the bottom of the page click the link for Rows per Page and select All.
5) Click Print Selected Check at the bottom of the screen
Remote Deposit Express
Customer Support: 574-235-2003 / 1-800-399-5592 / [email protected]
- 19 -
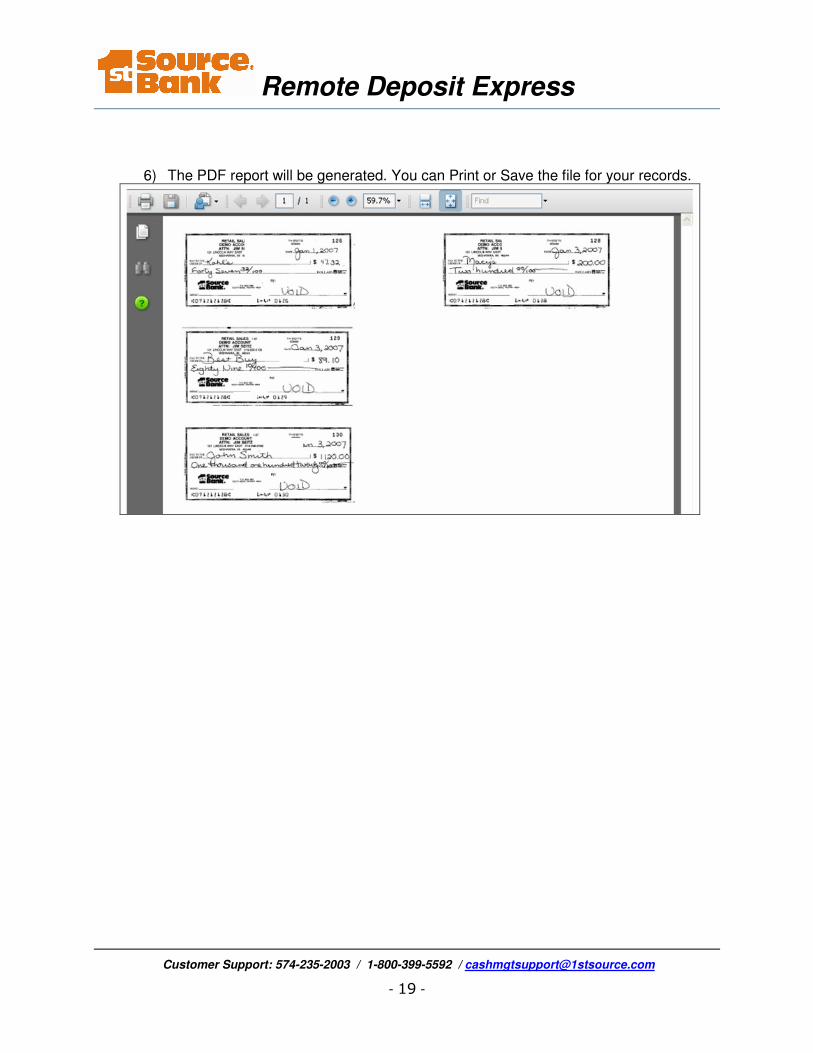
6) The PDF report will be generated. You can Print or Save the file for your records.
Remote Deposit Express
Customer Support: 574-235-2003 / 1-800-399-5592 / [email protected]
- 20 -
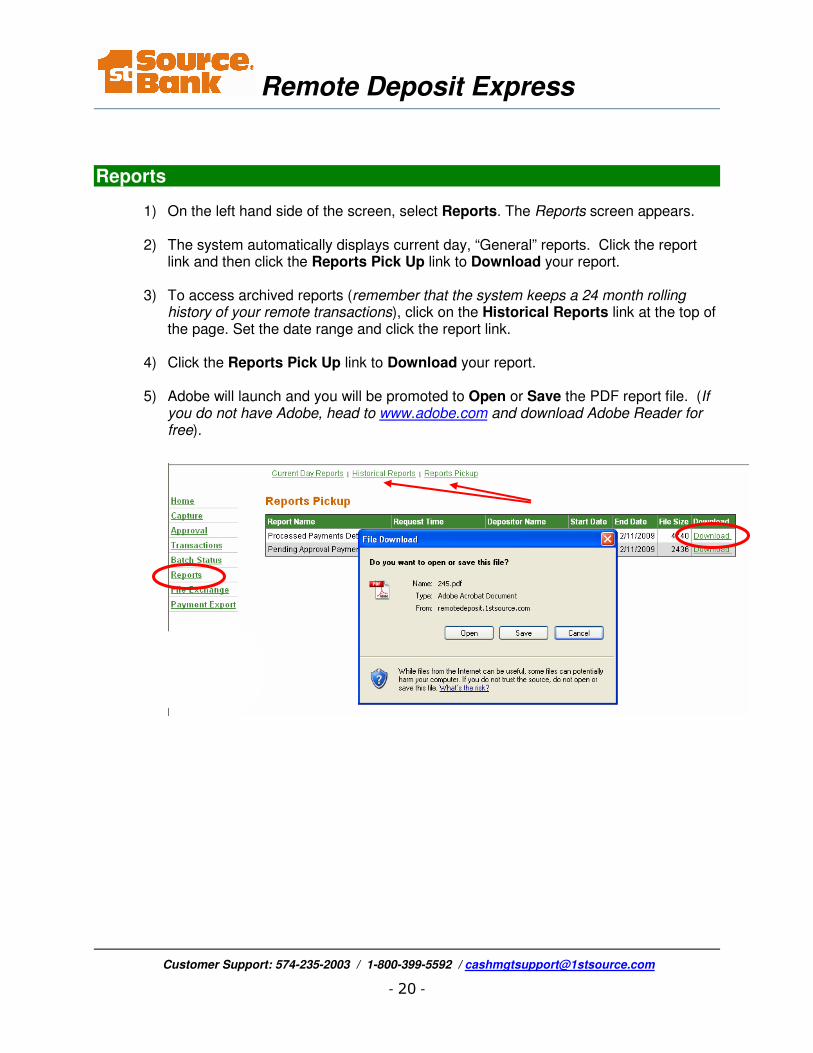
Reports
1) On the left hand side of the screen, select Reports. The Reports screen appears.
2) The system automatically displays current day, “General” reports. Click the report link and then click the Reports Pick Up link to Download your report.
3) To access archived reports (remember that the system keeps a 24 month rolling
history of your remote transactions), click on the Historical Reports link at the top of the page. Set the date range and click the report link.
4) Click the Reports Pick Up link to Download your report.
5) Adobe will launch and you will be promoted to Open or Save the PDF report file. (If
you do not have Adobe, head to www.adobe.com and download Adobe Reader for free).
Remote Deposit Express
Customer Support: 574-235-2003 / 1-800-399-5592 / [email protected]
- 21 -
User Set-up
One person at your company will be set up as the administrator for RDE. The administrator is responsible for adding and deleting remote deposit users. It is critical for auditing and tracking purposes that each person has their own log-in and does not share it with others. It is the administrator’s job to keep the user list current.
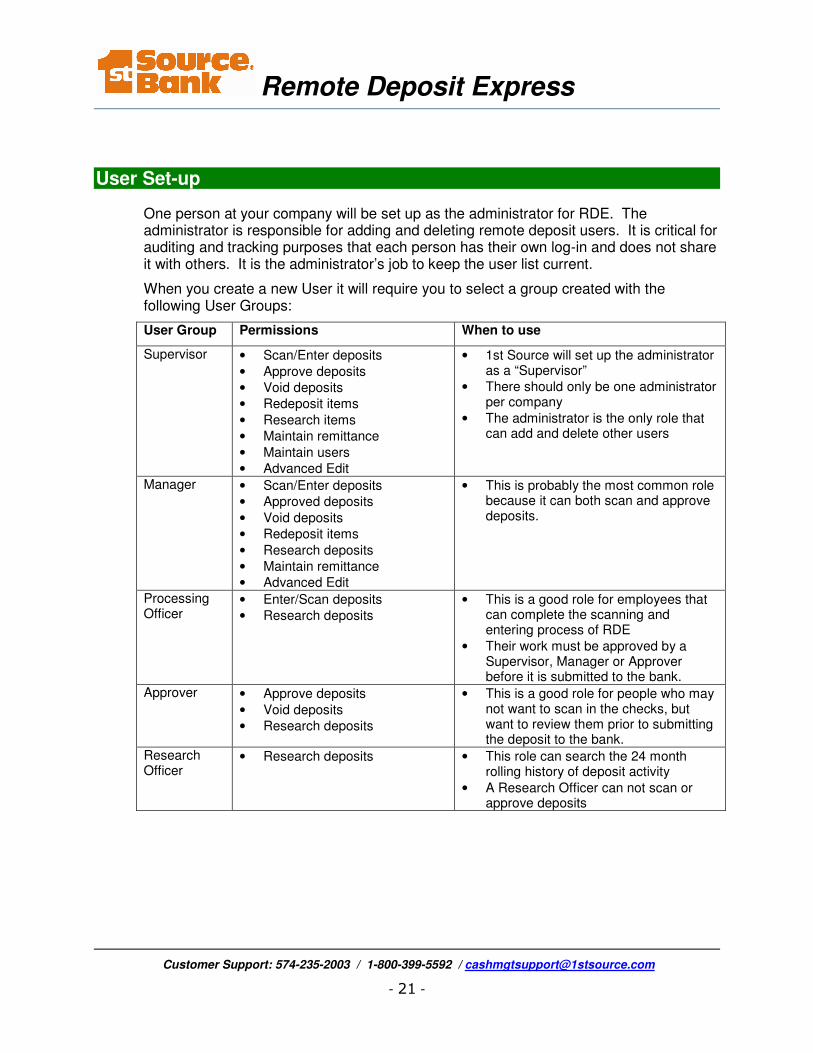
When you create a new User it will require you to select a group created with the following User Groups:
User Group Permissions When to use
Supervisor • Scan/Enter deposits
• Approve deposits
• Void deposits
• Redeposit items
• Research items
• Maintain remittance
• Maintain users
• Advanced Edit
• 1st Source will set up the administrator as a “Supervisor”
• There should only be one administrator per company
• The administrator is the only role that can add and delete other users
Manager • Scan/Enter deposits
• Approved deposits
• Void deposits
• Redeposit items
• Research deposits
• Maintain remittance
• Advanced Edit
• This is probably the most common role because it can both scan and approve deposits.
Processing Officer
• Enter/Scan deposits
• Research deposits
• This is a good role for employees that can complete the scanning and entering process of RDE
• Their work must be approved by a Supervisor, Manager or Approver before it is submitted to the bank.
Approver • Approve deposits
• Void deposits
• Research deposits
• This is a good role for people who may not want to scan in the checks, but want to review them prior to submitting the deposit to the bank.
Research Officer
• Research deposits • This role can search the 24 month rolling history of deposit activity
• A Research Officer can not scan or approve deposits
Remote Deposit Express
Customer Support: 574-235-2003 / 1-800-399-5592 / [email protected]
- 22 -
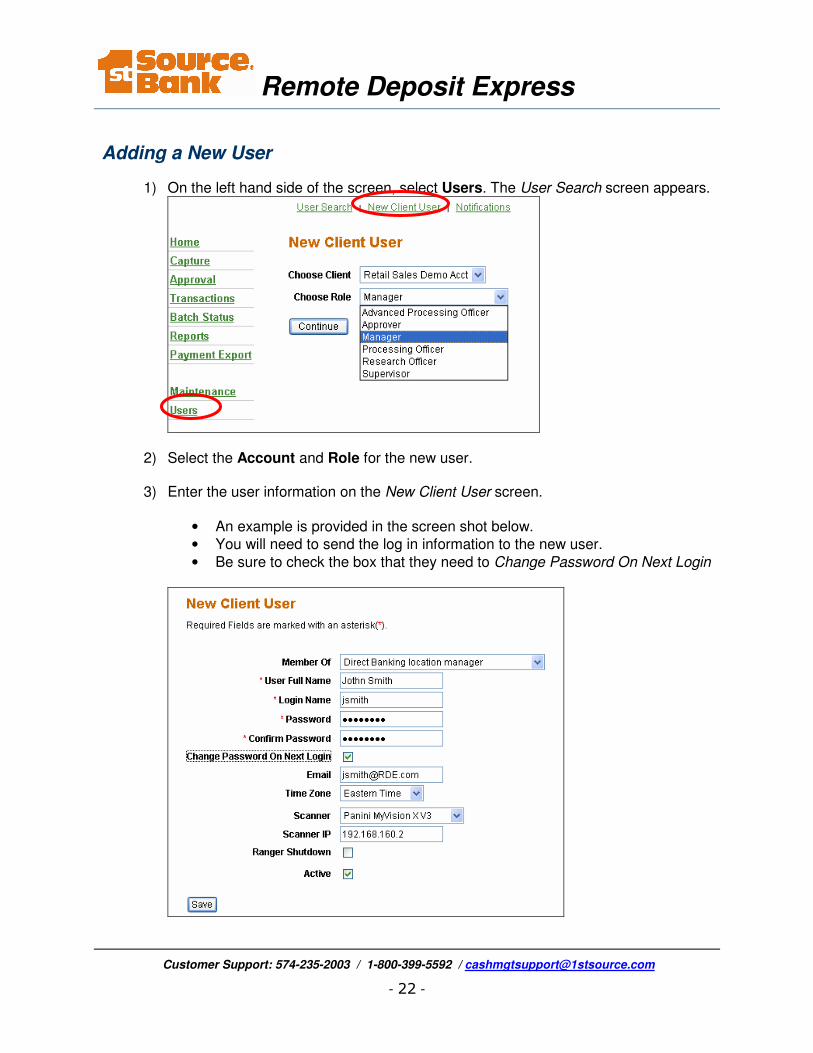
Adding a New User
1) On the left hand side of the screen, select Users. The User Search screen appears.
2) Select the Account and Role for the new user. 3) Enter the user information on the New Client User screen.
• An example is provided in the screen shot below.
• You will need to send the log in information to the new user.
• Be sure to check the box that they need to Change Password On Next Login
Remote Deposit Express
Customer Support: 574-235-2003 / 1-800-399-5592 / [email protected]
- 23 -
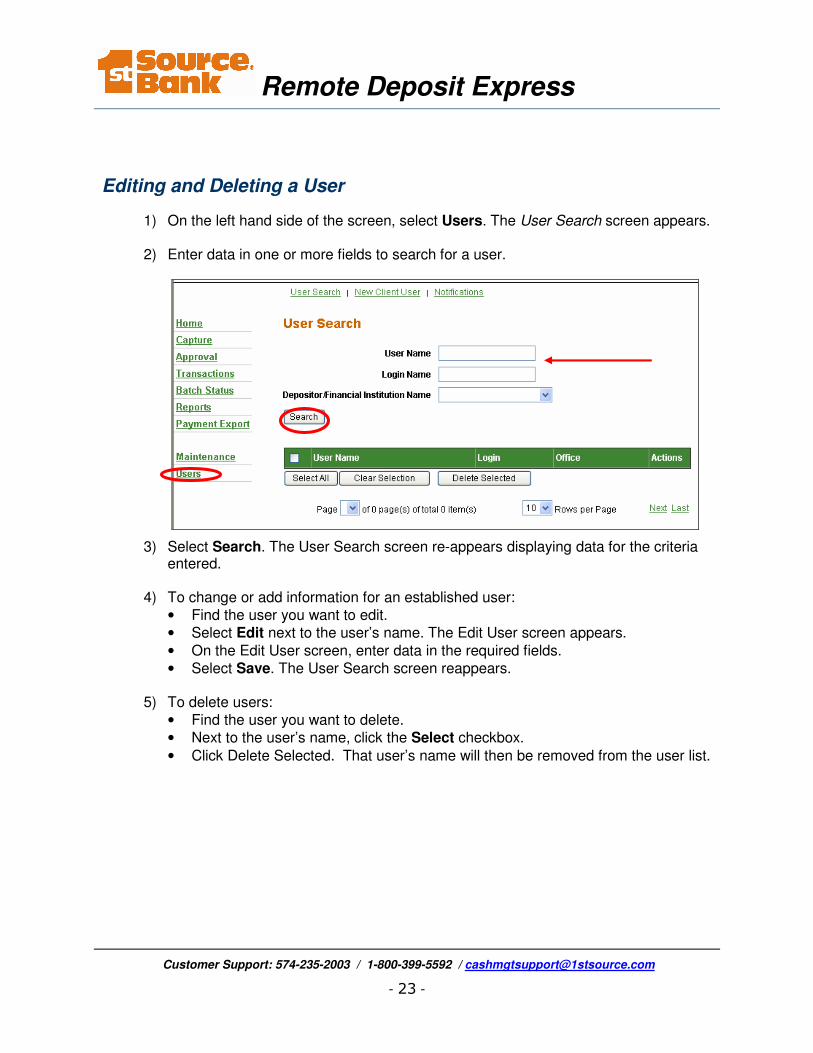
Editing and Deleting a User
1) On the left hand side of the screen, select Users. The User Search screen appears. 2) Enter data in one or more fields to search for a user.
3) Select Search. The User Search screen re-appears displaying data for the criteria entered.
4) To change or add information for an established user:
• Find the user you want to edit.
• Select Edit next to the user’s name. The Edit User screen appears.
• On the Edit User screen, enter data in the required fields.
• Select Save. The User Search screen reappears.
5) To delete users:
• Find the user you want to delete.
• Next to the user’s name, click the Select checkbox.
• Click Delete Selected. That user’s name will then be removed from the user list.