ASG-ControlManager User's Guide
267
ASG-ControlManager TM User’s Guide Version 2.7.9 Publication Number: CMR0200-279 Publication Date: September 2020 The information contained herein is the confidential and proprietary information of ASG GmbH & Co. KG. Unauthorized use of this information and disclosure to third parties is expressly prohibited. This technical publication may not be reproduced in whole or in part, by any means, without the express written consent of ASG GmbH & Co. KG. Copyright © 2020 ASG GmbH & Co. KG, a wholly owned subsidiary of Allen Systems Group, Inc. All rights reserved. All names and products contained herein are the trademarks or registered trademarks of their respective holders. ASG Worldwide Headquarters Naples Florida USA | asg.com | [email protected] 1333 Third Avenue South, Naples, Florida 34102 USA Tel: 239.435.2200 Fax: 239.263.3692 Toll Free: 800.932.5536 (USA only)
-
Upload
khangminh22 -
Category
Documents
-
view
0 -
download
0
Transcript of ASG-ControlManager User's Guide

ASG-ControlManagerTM User’s GuideVersion 2.7.9
Publication Number: CMR0200-279 Publication Date: September 2020
The information contained herein is the confidential and proprietary information of ASG GmbH & Co. KG. Unauthorized use of this information and disclosure to third parties is expressly prohibited. This technical publication may not be reproduced in whole or in part, by any means, without the express written consent of ASG GmbH & Co. KG.
Copyright © 2020 ASG GmbH & Co. KG, a wholly owned subsidiary of Allen Systems Group, Inc. All rights reserved.All names and products contained herein are the trademarks or registered trademarks of their respective holders.
ASG Worldwide Headquarters Naples Florida USA | asg.com | [email protected] Third Avenue South, Naples, Florida 34102 USA Tel: 239.435.2200 Fax: 239.263.3692 Toll Free: 800.932.5536 (USA only)

TOCControlManager User Documentation 4
ControlManager™ User's Guide 5
About ControlManager 6
Manager Products Users 7
The Integrated Dialog Director 7
The MP-AID 7
The Full Screen Editor 8
Online Documentation and Help 8
Tailoring the Environment 9
Personal Storage and User Executive Routines 9
ControlManager Capabilities and Environments Supported 10
Capabilities Provided by ControlManager 10
Environments Supported by ControlManager 11
Language and Coding 12
Statements and their Formats 12
Amendment Lines (in ALTER and MODIFY Commands) 15
Spaces in Statements 16
Keywords in Statements 16
Comments in Statements 17
Variables in Statements 18
Logging On and Off 25
Logging On 25
Logging Off 28
ControlManager Screens 30
Screen Areas 30
Screen Formats 31
The Extended Interactive Facility 39
Overview of the Extended Interactive Facility 39
Modes, Buffers, and Lookaside 39
The Full Screen Editor 45
Entering, Leaving, and Abandoning an Edit 48
Scrolling the Text on the Screen 49

Deleting, Inserting, and Overtyping Characters 50
Adding and Deleting Lines 50
Copying and Moving Text 51
Tailoring and Checking Your Environment 53
Commands that Affect Command Syntax and Availability 53
Commands that Affect Language and the Keyboard 54
Commands that Affect the Format of Screens and Output 59
Commands that Affect Timing and Processing 61
Commands that Affect InfoView 62
Commands that Should Be Used under ASG Direction 63
QUERY Commands which Have No Corresponding SET Command 63
Multiple Commands in a Single Command Line 64
The Version Log Facility 65
InfoSystem 66
InfoSystem in Different Environments 67
How to Access, Leave, and Re-enter InfoSystem 67
Moving Around InfoBank 69
PF Key Settings 70
Looking Up a Panel Name 72
Revision Bars and Deleted Lines Indicators 72
Error Notification 72
The MP-AID 81
Access to MP-AID Members 82
MP-AID Related Facilities 83
MP-AID Member Types 84
Output from an MP-AID LIST Command 91
Commands 95
Submitting Batch Jobs 95
Commands Available in all Environments 95
Commands Available with the Basic Interactive Facilities 98
Commands Available with the Extended Interactive Facility 99
ControlManager Commands 102
Selectable Units Available with ControlManager 227
Functional Prompting 228
2

Teleprocessing Interfaces 230
User Defined Commands Facility 230
User Defined InfoSystem 231
The User Interface Facility 232
Workstation Interfaces 232
ASG-Web Enabler 232
ASG-Manager Products Server Facility (MPSF) 232
Record and Play Facility 234
Recording a Session 234
Replaying a Session: Non-automatic PLAY Mode 234
Replaying a Session: Automatic PLAY Mode 235
Replaying a Session: DEMO Mode 236
Notes 236
Revision Log 238
Data Manager ADABAS Interface 238
ControlManager Index 239
Language and Coding 239
ControlManager Screens 239
The Extended Interactive Facility 240
InfoSystem 241
Commands 249
3

ControlManager User DocumentationThis ControlManager documentation introduces the following sections in detail.
Section Reference Description
About ControlManagerThis section gives an introductory overview of the basic capabilities of ControlManager.
ControlManager Capabilities and Envir-onments Supported
This section details the capabilities provided and environments supported by ControlManager.
Language and CodingThis section describes general points about language and the rules involved in coding.
Logging On and OffThis section provides details on different ways to log on to Con-trolManager.
ControlManager ScreensThis section describes the ControlManager screens in fully interactive envir-onments.
Extended Interactive FacilityThis section details additional features and capabilities of the Extended Interactive Facility.
Tailoring and Checking Your Envir-onment
This section describes how you can tailor environments using SET and QUERY commands.
InfoSystemThis section provides many commands available to access, leave, and re-enter InfoSystem, and to move around InfoBank; and Contents lists and Indexes to help find information.
MP-AIDThis section details capabilities provided by the Manager Products Admin-istration and Information Dataset.
CommandsThis section provides the ControlManager commands available in all envir-onments, those available with the Basic Interactive facilities, and those available with the Extended Interactive Facility.
Selectable Units Available with Con-trolManager
This section describes the selectable units provided in this publication.
Record and Play Facility This section describes the basic options of the Record and Play facility.
4

ControlManager™ User's GuideControlManager User’s Guide is one of a series describing the ASG-Manager Family of Program Products developed by ASG for use on IBM System/370, 30xx, and 4300 series, and plug compatible machines. The publication is intended for all users of ASG-Manager Products (herein called Manager Products). It provides an overview of Manager Products and describes the capabilities of the Manager Products Nucleus, the Basic Interactive facilities, and the Extended Interactive Facility.
5
ControlManager™ User's Guide

About ControlManagerControlManager is supplied to all users of ASG-Manager Products (herein called Manager Products). It provides:
l The software that supports the use of Manager Products at your installation.
l A friendly and easy-to-use interface between you and Manager Products (including the Dialog Director which handles all your command input).
l Basic dictionary management software (BDMS), that is, the software required to create, maintain, and use a dictionary.
This publication documents the interface between you and Manager Products.
l You can execute Manager Products in either a client/server (MPSF) mode or a non-client/server (standard) mode. This publication assumes the use of standard mode and only documents minor differences between the two modes. When executing under MPSF you can create repositories and MP-AIDs using the Data-in-Virtual (DIV) access method. The DIV access method and significant MPSF installation and usage differences are documented in the ASG-Manager Products Server Facility User's Guide.
l For details on the installation of Manager Products, refer to your Manager Products Installation manual.
Within the ASG-Manager Family of Program Products, ControlManager and ASG-DictionaryManager (herein called Dic-tionaryManager) are co-requisites for each other. Both are Environmental Prerequisites (EPRs), as they must be at the latest version and release level for each and every other Manager Products to execute correctly. This EPR rule applies to Manager Products in both Mainframe Environments (MFEs) and Intelligent Workstation Environments (IWSEs).
ControlManager and DictionaryManager complement each other in providing a gateway environment to OSI (Open Sys-tems Interconnection) across information engineering techniques and dictionaries/directories from ASG and other vendors.
Thus, ControlManager and DictionaryManager enable Manager Products users to position themselves to take full advantage of the ASG-Manager Family in providing a Computer Aided Systems Engineering (CASE) environment.
In addition to providing access to Manager Products and to the capabilities that each provides, ControlManager has many capabilities of its own. The basic capabilities are provided by the Nucleus, and many additional capabilities are provided by selectable units. Your organization can decide which capabilities they require and install the selectable unit(s) that provide(s) those capabilities.
The capabilities of the Nucleus, the Basic Interactive facilities, and the Extended Interactive Facility are:
l Logging on and off
l Batch processing
l Interactive processing
l A full screen editor
l A comprehensive online documentation and help system
l Tailoring the environment
6

l Executive routines
l Local language commands and messages
l Panel Driven Processing (PDP)
l Personal storage
The above capabilities are documented in this publication. The facilities and capabilities provided by ControlManager selectable units are documented elsewhere, although an introduction is given in Selectable Units Available with Con-trolManager.
Manager Products UsersA user is any of these categories:
General user. Any user of Manager Products.
Dictionary Controller. A user responsible for one or more Manager Products dictionaries: controlling access to a dic-tionary, tailoring the dictionary environment, and enforcing standards. As well as the commands available to general users, a number of additional, restricted, commands are available to the dictionary Controller.
Systems Administrator. A user responsible for the overall security and smooth running of a Manager Products install-ation and, in particular, for the MP-AID (the Manager Products Administrative and Information Dataset). As well as the commands available to general users, a number of additional, restricted, commands are available to the Systems Admin-istrator.
A Systems Administrator may also be a dictionary Controller and so use those commands restricted to dictionary Controllers.
The Integrated Dialog DirectorThe interface between ControlManager and the various Manager Products is the Integrated Dialog Director (IDD), and this handles all your command input.
As a rule, each Manager Products command applies to only one product: the Integrated Dialog Director recognizes which product a command applies to and routes it accordingly. However, if ASG-DesignManager (herein called DesignManager) is installed, there are several commands which can apply either to the Workbench Design Area (WBDA) or to the dic-tionary, and you may have to instruct the Integrated Dialog Director to target a command to the WBDA or to the dic-tionary, as you require.
For details on Targeting Mode, see MODE and QUERY MODE.
The MP-AIDThe Manager Products Administrative and Information Dataset (MP-AID) is a dataset which holds and processes inform-ation relating to the control and operation of all the Manager Products dictionaries at your installation. It is maintained
7
Manager Products Users

by the Systems Administrator using a private dictionary - the Manager Products Administration Dictionary.
Many of the capabilities provided by ControlManager are via the MP-AID. These include:
l Logon capabilities and controls
l InfoSystem (the online help and documentation system)
l Executive languages
l User-definable dictionary member types
l User-definable commands
l User-definable output from dictionary REPORT commands
l For details on the MP-AID, see The MP-AID.
l For details on InfoBank panels, see InfoSystem.
l For an introduction to Logon and Global profiles, see Tailoring the Environment.
l For an introduction to Corporate executive routines (described as part of the User Defined Commands Facility), and User Defined Syntax, see Selectable Units Available with ControlManager.
The Full Screen EditorControlManager provides a powerful editor for creating and amending members in a dictionary or on the MP-AID. Using the Full Screen Editor, you can perform these operations:
l Move text in a buffer
l Insert, amend, and delete lines in a buffer
l Copy and move text
l Create a dictionary member and certain types of MP-AID member
For details on the Full Screen Editor, see The Extended Interactive Facility.
Online Documentation and HelpInfoSystem, Manager Products online information system, provides you with immediate access to help information and comprehensive technical documentation concerning Manager Products.
Information/documentation is held in discrete panels of text. These panels form a hierarchical structure, and various com-mands are provided for moving through this structure.
With User Defined InfoSystem installed, you can tailor InfoBank to suit your own installation, and create your own online documentation.
8

l See InfoSystem for details on InfoSystem.
l See User Defined InfoSystem for details on User Defined InfoSystem.
Tailoring the EnvironmentYou can tailor the Manager Products environment to suit the needs of individuals or groups of users. For example, you can perform these tasks to meet your specific business requirements:
l Restrict, disable, or modify commands
l Rename commands in your natural language
l Specify update or read-only access to a dictionary and/or MP-AID
l Perform character translation to help overcome difficulties caused when characters appear on the keyboard but not on the terminal or printer, and vice versa
l Enter and process Kanji characters
l Output error messages in different languages
l Specify different screen layouts
This tailoring can be done via profiles which are executed when a user logs on.
Some tailoring is also possible via Installation macros. This is documented in your Installation manual.
Personal Storage and User Executive RoutinesThe Extended Interactive Facility provides two members on the MP-AID for personal storage: USER-MEMBERs and TRANSIENTs. These members can be listed, printed, or deleted only by the user who created them, or by the Systems Administrator.
If the User Defined Commands Facility is installed you can place commands in USER-MEMBERs and TRANSIENTs and so create executive routines; the commands in such a routine can be executed simply by entering the name of the routine as a command.
For details on USER-MEMBERs and TRANSIENTs, see USER-MEMBERs and TRANSIENT Members.
9
Tailoring the Environment

ControlManager Capabilities and Environments Sup-ported Capabilities Provided by ControlManagerThe ControlManager Nucleus provides commands to perform these tasks:
l Start and end a Manager Products session
l Access InfoSystem and move around InfoBank
l Tailor your environment
l Query the current tailoring of your environment
l Allocate, deallocate, and access z/OS datasets
l Interrogate the MP-AID
The Basic Interactive facilities are supplied with the Nucleus and provide these features:
l The ability to set PF keys to execute commands
l The ability to RECALL previous commands you’ve executed
l Additional tailoring commands
l Commands to scroll text on the screen
With the Extended Interactive Facility installed, then as well as the commands provided by the Nucleus and the Basic Interactive facilities, you have many more commands and capabilities:
l The Full Screen Editor
l Additional tailoring commands
l User storage facilities on the MP-AID
l Additional commands to interrogate the MP-AID
l Panel Driven Processing
l Search Facility for Manager Products components
See The Extended Interactive Facility for details on the Extended Interactive Facility.
The ControlManager Nucleus has one operating mode, Command Mode, and this means you have a single buffer: the Command Buffer. The Extended Interactive Facility gives you another three operating Modes: Edit, Update, and Lookaside. Each of these can have a number of buffers.
Capabilities provided by other optional facilities (selectable units) are documented in the relevant Facility manuals. However, where the presence of another selectable unit enhances the functionality available with the Basic Interactive facilities or the Extended Interactive Facility, then that enhanced functionality is also described in this publication.
10

See Selectable Units Available with ControlManager for an overview of the ControlManager select-able units.
Environments Supported by ControlManagerASG defines three types of environments in which you can run Manager Products:
l Fully interactive
l Pseudo-interactive
l Batch
Fully interactive environments are those where ControlManager is fully in control of the interaction between the user and the Manager Products software. These environments are:
l CICS
l CMS
l Siemens Time Sharing Interface
l TSO
In these environments, the non-interactive, Basic Interactive, and Extended Interactive capabilities of ControlManager are fully supported.
Pseudo-interactive environments are those where ControlManager is not fully in control of the interaction between the user and the Manager Products software. In these environments, some of the screen responses may differ from those indicated in this publication; for example, long output lines may wrap around on the screen, or PF keys may not be avail-able. The pseudo-interactive environments are:
l ICCF
l IMS/DC
l ROSCOE
l TSO/ISPF
In these environments, the non-interactive capabilities of ControlManager are fully supported, and some interactive cap-abilities similar to those provided by ControlManager may be provided by the Teleprocessing environment.
Batch environments are defined as those where there is no direct interaction between the user and the Manager Products software. In these environments, the non-interactive capabilities of ControlManager are fully supported. These environments are:
l Access Call
l Batch execution under OS, DOS, and BS2000
Access Call programs (available with the ControlManager User Interface facility) might be used in pseudo-interactive or batch environments.
InfoSystem is available in all three environments: interactive, pseudo-interactive, and batch.
11
Environments Supported by ControlManager

Language and CodingManager Products language has been designed to offer the maximum possible flexibility in coding, so that statements are to a high degree free form. The language includes:
l Command statements
l Member definition statements
l Amendment lines (in ALTER and MODIFY commands)
l Executive languages
l Reusable Sourcelanguage and Inline Data Descriptions
l Formatting capabilities
This topic addresses general points about language (the structure of statements and amendments), and the rules involved in coding (how the statements and amendments are entered).
Language and coding are affected by the environment in which you are working (batch, pseudo-interactive, or inter-active). The differences caused by these different environments are noted in the text.
For details on the environments, see ControlManager Capabilities and Environments Supported.
Executive languages are provided by the User Defined Commands facility.
Reusable Sourcelanguage and the coding of Inline Data Descriptions are documented in the ASG-SourceManager User’s Guide.
The formatting of output from the REPORT command is provided by the DictionaryManager User Defined Output facility, and the formatting of output from the Workbench Design Area is provided by the DesignManager User Formatted Out-put facility.
Statements and their FormatsManager Products language includes two types of statements: command statements and member definition state-ments. A statement has three parts:
l The identifier (a keyword which controls the body)
l The body (a number of input records or lines consisting of keywords, variables, and punctuation symbols)
l The terminator (a semicolon or a period).
For example, in the command statement:
WHICH INFOBANK-PANELS HAVE AUTHOR EQ '2274';
WHICH is the identifier, INFOBANK-PANELS HAVE AUTHOR EQ '2274' is the body, and ; is the terminator.
In the member definition statement:
ITEMDEFAULT CHARACTER 6
12

ENTERED-AS NUMERIC 6HELD-AS PACKED 6REPORTED-AS PICTURE 'ZZZZZ9'
ITEM is the identifier, The body consists of four input records.
Statement IdentifiersThe keyword which controls the body of a command statement is called a command identifier (a command name); for example, LIST or PRINT. The keyword which controls the body of a member definition statement is called a member type identifier, for example, ITEM or GROUP.
A command identifier can be preceded by a Prefix Command identifier. For example, in this command:
KEEP LIST ONLY SYNTAX ;
KEEP is the prefix command identifier, LIST is the command identifier, ONLY SYNTAX is the statement body, and ; is the terminator.
Statement BodiesThe body consists of keywords and/or variables, and any punctuation symbols required or permitted by the command or member definition specification. Individual keywords (including identifiers), variables, and terminators are called ele-ments. Within the body, a keyword which controls a subordinate keyword and/or variable, together with its subordinate keyword and/or variable, is called a clause.
The body can continue over any number of input records (lines) with each record containing a maximum of 248 char-acters. What constitutes an input record depends on the input device. For example, it can be:
l Input from a visual display terminal
l Records from tape or disk
l Lines passed to Manager Products from an Access Call program
In OS environments, input records can be fixed length, variable length, or undefined, and may be blocked or unblocked.
In DOS environments, input records must be fixed length 80 bytes and unblocked.
However, in interactive environments, a command statement must be wholly contained in one input record.
In interactive environments, the Command Area (by default) appears as two lines at the bottom of the screen.
Although the Command Area appears as two lines on screen, it is considered as one input line (one input record).
As a general rule an element can start in any character position of an input record provided it is wholly contained in that record. An exception to this is the terminator of a member definition statement which must be placed in the first char-acter position of the record.
Statement TerminatorsYou use a terminator to indicate the end of a command statement or member definition statement.A terminator is either a semicolon or a period (full stop).
13
Statements and their Formats

In a command statement, unless it is in the last character position of the input record, the terminator should be followed by a space. If it is not, then the result is unpredictable:
l If the terminator is a period, the system may try to treat it as an element within the command. A diagnostic message may be output, and the command rejected in whole or part.
l If the terminator is a semicolon, the command is usually accepted.
In a member definition statement, a period or semicolon is recognized as a terminator only when it is in the first char-acter position of an input record:
l The period must be followed immediately by a space. This is because a period (or decimal point) can occur as the first character of an element within the definition of a dictionary member. If a record begins with a period which is not followed by a space, then it is treated as part of the member definition.
l The semicolon need not be followed immediately by a space.
In the record containing the terminator (the terminator record), any characters after the terminator are ignored. The ter-minator record of a command statement is normally printed, so any characters after a recognized terminator can be regarded as comment. The terminator record of a member definition statement is not printed, so any characters after the terminator are lost.
Interactive EnvironmentsWhen entering multiple commands in the Command Area, terminators are optional except when a member definition statement is followed by another command; then the member definition statement must be followed by a terminator.
For details on the multiple input of commands, see Multiple Commands in a Single Command Line.
When not entering multiple commands in the Command Area, you must place a terminator at the end of a member defin-ition statement, in the first character position of the record. (You do not place a terminator at the end of each input record, only at the end of the whole statement.) A terminator is optional at the end of a command statement and, if omit-ted, one is provided by the software itself.
You can execute a sequence of Manager Products commands that have been set up in an Edit Buffer:
l You can enter the RUN command in the Command Area while in the Edit Buffer
l You can file the commands in a USER-MEMBER and then enter the name of that USER-MEMBER as a com-mand. (This is available if you have the User Defined Commands facility installed.)
l You can set up the commands in a User Defined profile, and they will then be executed when you log on. (This is available if you have the Systems Administrator’s Environmental Control facility installed.)
Within the buffer the rules for terminators are the same as those for batch and pseudo-interactive environments.
For more details, see Batch and Pseudo-interactive Environments.
You can use an Update Buffer to create a new dictionary member. Within the buffer, terminators are used only with COMMAND-STREAM members. Commands within a COMMAND-STREAM must have terminators.
14

When using an ADD, INSERT, MODIFY, ALTER, or REPLACE command within a COMMAND-STREAM to create or amend a dictionary member, you will have to use an escape character. Where an input record would contain a terminator in the first character position, then the escape character must be entered in its place and the terminator moved to the second character position.
Batch and Pseudo-interactive EnvironmentsIn batch and pseudo-interactive environments there must be a terminator:
l At the end of a command statement.
l At the end of a member definition statement, in the first character position of the record. (There is not a ter-minator at the end of each input record, only at the end of the complete statement.)
Amendment Lines (in ALTER and MODIFY Commands)A member definition amendment is made up of these components:
l An ALTER or MODIFY command statement.
l One or more input records (amendment lines) to amend an existing member definition.
l A terminator (a semicolon or a period) to indicate the end of the amendment.
l Instead of a semicolon or period, the amendment lines ACCEPT, QUIT, or END can be used as amendment terminators.
l For details, see the ASG-Manager Products Dictionary/Repository User’s Guide.
Example of a member definition amendment:
MODIFY EMPLOYEE-CODE; CHANGE ALL '4' TO '6';
MODIFY EMPLOYEE-CODE; is the command statement. This is followed by an amendment line to change all occurrences of 4 to 6, and a terminator ; to indicate the end of the amendment.
For the format of particular amendment lines, see the syntax of the ALTER and MODIFY commands in InfoBank.
The rules which apply to the coding of command statements and member definition statements also apply as general rules to the coding of member definition amendments. Rules which apply specifically to amendments are as follows:
l An amendment line must be wholly contained in one input record - it cannot continue onto the following record.
l There must be a terminator to indicate the end of the amendment. (There is not a terminator at the end of each input record, only at the end of the complete amendment.)
l A period is recognized as a terminator only when immediately followed by a space, whereas a semicolon is recognized as a terminator whether or not it is immediately followed by a space.
l If the amendment has a string which is a single period or which starts with a semicolon, then the period or semicolon must not be in the first character position of the input line. (A period or semicolon in such a pos-ition is interpreted as a terminator.)
15
Amendment Lines (in ALTER and MODIFY Commands)

Spaces in StatementsAs a general rule, the elements in a statement must be separated from each other by one or more spaces. Exceptions to this rule are described below.
In a command statement, spaces between the terminator and the preceding element are optional. For example:
LIST member-name;
and
LIST member-name ;
are both accepted.
In a list of variables separated by commas, spaces before or after the commas are optional. There is no comma after the last variable in a list. For example:
PRINT member-name-1, member-name-2, member-name-3 ;
In a list of keywords, a comma may sometimes be needed between each; the command specifications show where. Spaces before or after the comma are optional. There is no comma after the last keyword in a list.
If an element ends in the last character position of an input record, the next element can (but need not) start in the first character position of the next record.
Keywords in Statements Keywords form the statement identifiers and may also appear within statement bodies. Within the body, a keyword which controls a subordinate keyword and/or variable, together with its subordinate keyword and/or variable, is called a clause.
There are no reserved words in the Manager Products language. The language is so designed that a variable cannot be mistaken for a keyword if you enter the syntax as documented in InfoBank or Manager Products technical pub-lications. For example, words which elsewhere in context would be keywords can be used as member names.
Most keywords can be truncated. Some can be truncated to different extents in different statements, depending on what other keywords could appear in that position.
Truncation limits for statement identifiers are determined by these variable:
l The environment (batch, pseudo-interactive, interactive)
l The Manager Products and/or selectable units installed
l The commands that have been disabled, renamed, or added
l The user-defined member types
l The user class (general user, Controller, Systems Administrator)
16

If a keyword is truncated beyond a certain limit it may become ambiguous. For example (unless affected by User Defined Commands), the command identifier RENAME can be truncated to RENAM, RENA, or REN and still be recognized, but if truncated to RE then it becomes ambiguous: RE could mean RENAME, REMOVE, REPLACE, or REPORT.
If you enter an ambiguous Primary Command, then the result will depend on the AMBIGUITY-ASSUMPTION setting.
For details on QUERY PRIMARY-COMMANDS and SET and QUERY AMBIGUITY-ASSUMPTION, see ControlManager Commands.
ASG supplies a number of abbreviated forms of Primary Commands. For example, QUERY can also be entered as Q or QU. But note that these are abbreviated forms not truncations.
If you enter an ambiguous keyword other than a Primary Command, then ControlManager makes an assumption as to the intended keyword (if it is reasonable to do so in the particular context). However, you should not rely on this as it may not give the result you expect.
If an enhancement to Manager Products results in new keywords that may be included in a member definition state-ment, truncation limits for old keywords in that statement could change from one release to the next. ASG will try to ensure that keywords truncated to the maximum permissible extent will give the same result across Manager Products releases, but no guarantee can be given that this will always be achieved. If truncation limits of keywords are extended in a later release, then a warning message will be output when the statement is processed by the later release.
To minimize the possibility of unexpected results from an ambiguity assumption, or warning messages from later releases, ASG recommends that truncated forms of keywords should not be used in member definition statements or in any stored commands (that is, commands stored in COMMAND-STREAMs, executive routines, and profiles).
The abbreviated forms of Primary Commands can be used without risk of unintended results or warning messages.
Comments in StatementsA comment line is any record in either a command statement or a member definition where the first two character positions of the record are --. The comment is the remainder of that input record.
In a command statement, any comment lines are ignored by the command syntax processor.
In a member definition statement, the comment lines are assumed to belong to any following keyword or attribute, but are ignored by the encode process and any command that selects that keyword or attribute. However, the comment lines will be retained by any command that updates that member, and will also be output in the Manager Products XML data model.
17
Comments in Statements

Variables in Statements
Names
Character Sets for NamesThe standard character set for names is made up of these objects:
l The letters A through Z
l The numerals 0 through 9
l Hyphens (EBCDIC X'60')
l Underscores (EBCDIC X'6D'), as separate characters and not as underscores of other characters
l # symbols (EBCDIC X'7B')
l @ symbols (EBCDIC X'7C')
l Local currency symbol (EBCDIC X'5B')
An extended character set is also available. Names containing any of these characters must be delimited:
l Space characters (hexadecimal 40)
l Characters with the internal code hexadecimal A1, C0, D0, and E0
l Characters whose hexadecimal codes are in any of these ranges:
o 4A through 50
o 5A through 61
o 6A through 6F
o 79 through 7F
o Greater than 80 if it is a valid character in your host code page.
This does not apply to characters in those ranges mentioned above for the standard character set.
Dictionary NamesA dictionary name can be a maximum of six characters long. It can consist of the letters of the alphabet and the numerals 0 to 9. It must commence with a letter.
Status Names, Dictionary Members, and MP-AID Member NamesStatus names can be a maximum of 32 characters long. Dictionary member names can be a maximum of 32 characters, unless the Dictionary controller specifies an extended name length. The maximum length of an MP-AID member name is ten characters. ======= Status names can be a maximum of 32 characters long. Dictionary member names can be a maximum of 32 characters, unless the Dictionary controller specifies an extended name length. The maximum length of an MP-AID member name is ten characters.
18

Whether a status, dictionary member, or MP-AID member name needs to be delimited is determined by the character set from which the name is formed. The rules for the character sets are:
l Names made up of characters from the standard character set need not be delimited unless the name con-tains only numeric characters, or the first character of the name is a hyphen or underscore.
l Names containing characters from the extended character set must be delimited.
A status, dictionary member, or MP-AID member name must be delimited when it could appear at the same point in a command statement as a keyword, or the abbreviation of a keyword, with which it is ambiguous.
Delimited status, dictionary member, and MP-AID member names are governed by the rules for delimited character strings with the restriction that non-printable characters must not be used.
Restrictions on Dictionary Member NamesIn FILE, GROUP, and ITEM member definition statements, the following restrictions apply to dictionary member names declared in the comparand position within an IF clause:
l A name commencing with numerals and having the same format as a floating point literal, is interpreted as a floating point literal.
l A delimited name is interpreted as a delimited character string literal.
Restrictions on ENTITY and Data Element NamesFor users who have the optional Enterprise Modeling facility installed, the following constraints should be observed:
l ENTITY names should not exceed 31 characters.
l Neither ENTITY names nor data element names should start with either of the prefix characters reserved for creating default data element names from ENTITY names during processing of a MERGE command.
If these constraints are not observed, conflicts may occur when entities are merged into the Workbench Design Area if they are already present during processing of the MERGE command.
l For further information on prefix characters in default data elements, see the Manager Products Install-ation manual under the LHSPRE and RHSPRE parameters of the LOPT1 Macro.
l For details on Extended Dictionary Member Names, see the ASG-Manager Products Controller’s Manual.
Aliases, Catalog Classifications, and KEPT-DATA List NamesCatalog classifications and alias names can be a maximum of 79 characters long, unless the dictionary has been enabled for Extended member names when the maximum length is automatically extended to 159.
Aliases can be a maximum of 79 characters long unless specified otherwise using the CONTROL NEW-ALIASES command (see the ASG-Manager Products Controller’s Manual).
Aliases and catalog classifications must be enclosed within delimiters when entered in ALIAS or CATALOG common clauses in member definition statements. Aliases and catalog classifications appearing within WHAT IS commands must obey the rules for delimiters which apply to dictionary member names.
Whether an alias, catalog classification or KEPT-DATA list name needs to be delimited when it appears in any command statement other than the above is dependent on the character set from which it is formed. The rules for the character
19
Variables in Statements

sets are as follows:
l Aliases, catalog classifications, and KEPT-DATA list names made up of characters from the standard character set need not be delimited.
l Aliases, catalog classifications, and KEPT-DATA list names containing characters from the extended character set must be delimited.
An alias, catalog classification, and KEPT-DATA list name must be delimited when it could appear at the same point in a command statement as a keyword, or the abbreviation of a keyword, with which it is ambiguous.
Delimited aliases, catalog classifications, and KEPT-DATA list names are governed by the rules for delimited character strings with the restriction that non-printable characters must not be used.
Owner Names and User NamesOwner names and user names can be a maximum of 32 characters long.
Owner names must be delimited when they appear in the Controller’s commands OWNER ADD and OWNER DELETE.
Whether an owner name or user name requires to be delimited when it appears in any command statement other than those mentioned above depends on the character set from which it is formed. The rules for the character sets are:
l Owner names and user names made up of characters from the standard character set need not be delimited
l Owner names and user names containing characters from the extended character set must be delimited.
An owner name or user name must be delimited when it could appear at the same point in a command statement as a keyword, or the abbreviation of a keyword, with which it is ambiguous.
Delimited owner names and user names are governed by the rules for delimited character strings with the restriction that non-printable characters must not be used.
POST/MAIL Dataset File Names and Destination IdentificationsPOST/MAIL Sequential Output dataset file names can be a maximum of either seven characters long under DOS or eight characters long under OS.
POST/MAIL Extrapartition dataset destination identifications can be a maximum of seven characters long but are trun-cated from the right to four characters when declared in the POST/MAIL command.
Both file names and destination identifications may only contain characters from the standard character set and must not be delimited. These restrictions also apply:
l The first character must not be an underscore or hyphen.
l They must not contain only numeric characters.
Representation of Names in Manager Products SyntaxTo avoid complicating the syntax for statements, the alternative way of declaring status names, dictionary member names, MP-AID member names, KEPT-DATA list names, owner names, user names, aliases, and catalog classifications within delimiters is not shown except where the circumstances require that they must be delimited. Wherever any of these names appear undelimited in statement syntax it should be interpreted as offering the choice:
20

Character StringsDictionary member definitions and commands may include character strings: these are delimited or undelimited strings or printable and/or non-printable characters.
When a dictionary member is encoded, a string is held differently depending on whether or not it is delimited, and whether or not it is entered in a text attribute.
Delimited Character StringsA delimited character string is a character string of printable and/or non-printable characters, enclosed within delimiters.
The delimiters supplied as a default are the single quote ' and the double quote " characters, but the Systems Admin-istrator can specify certain additional characters. To display the current delimiters, enter this command:
QUERY STRING-DELIMITER ;
Each string must have the same character as its opening and closing delimiter, and this character must not appear within the string.
A string can be entered as a series of consecutive delimited character strings. Each delimited string must be wholly con-tained in one input record, but one input record can contain more than one delimited string. The delimiter character need not be the same for every string.
Concatenation of Delimited Character StringsWhen a member is encoded, consecutive delimited character strings are concatenated (joined together) to form a single character string.
If the strings are separated by commas, then they are not concatenated but are output on separate lines.
For example, if the source record of an InfoBank panel contains this clause:
INDEX-TERMS 'ONE: First term','TWO: Second','THREE: Third' 'term'
then a GLOSSARY that provides INDEX-TERMS would produce this output from the encoded record:
INDEX-TERMS ONE: First term TWO: Second THREE: Third term
Each term is on a separate line, and the third is concatenated.
There are at least two instances when you must divide a character string into two or more delimited strings for con-catenation:
21
Variables in Statements

l If a character string is to contain both single and double quote characters, and an additional delimiter char-acter has not been specified by your Systems Administrator
l If a character string cannot be wholly contained on an input line
The following example shows how to enter a character string which contains single quote and double quote characters. This sentence:
A string can be delimited by single quotes 'thus' or by double quotes "thus".
could be entered as:
'A STRING CAN BE DELIMITED BY SINGLE ’ "QUOTES 'THUS' OR"' BY DOUBLE QUOTES "THUS".'
Strings within text attributes (text strings) are not concatenated.
Delimited Character Strings within Text AttributesCertain text attributes can contain delimited character strings (text strings); for example, the common clauses DESCRIPTION and NOTE. There can be up to 32,767 delimited strings in a text attribute.
When a member is encoded, consecutive delimited text strings are not concatenated, but are output on separate lines. For example, if the source record of an InfoBank panel contains this clause:
DESCRIPTION 'This is an example of a ''DESCRIPTION clause.' 'There is no concatenation.'
then a GLOSSARY that provides DESCRIPTION would produce this output from the encoded record:
DESCRIPTION This is an example of a DESCRIPTION clause. There is no concatenation.
Undelimited Character StringsAn undelimited character string is a string of any printable characters. (A space is not a printable character in this context, because it is identified as an element separator.)
For example, in the selection clause of an INFOBANK-PANEL, the selection string is an undelimited character string:
SELECT string panel-name
where string is an undelimited character string.
If a period, semicolon, comma, or right parenthesis appear in an undelimited string, it must be in the first character pos-ition of the string. If it appeared elsewhere it would produce undefined results.
If a member definition statement has an undelimited character string which is a single period (full stop) or which starts with a semicolon, then the period or semicolon must not be in the first character position of the input record because this would be interpreted as a terminator.
22

Free Form Text AttributesA free form text attribute is one which can contain any text and which displays this text exactly as it was entered; for example, the CONTENTS clause of an InfoBank panel.
A free form text attribute may contain stored commands; for example, the CONTENTS clause of a COMMAND-STREAM. If the statement has an undelimited character string which is a single period (full stop) or which starts with a semicolon, then the period or semicolon must not be in the first character position of the input record because this would be inter-preted as a terminator.
Length of Character StringsThe maximum length of character strings and text strings are as follows.
Type of String Length
Delimited character string 256 *
Undelimited character string 248
Text string 246 #
* After concatenation (if applicable). However, there are some character string attributes that have a lower permitted maximum length of string. For example, strings in a CATALOG clause can have a maximum of only 79 characters, and the member will not encode if the concatenated string is greater than this value.
The maximum length of string is stated in the specification of the particular attribute.
# 248 minus two for the delimiters.
Reporting and Interrogating StringsThe encoded record of a member is processed when you report the member (using GLOSSARY or REPORT commands) or interrogate the dictionary (for example, using WHAT or WHICH).
The rules regarding how a string may be interrogated depend on whether it appears within:
l A text attribute
l A value attribute
l A clause with subordinate text or value attributes
These rules are documented with the WHICH command.
For details on the WHICH command, See the ASG-Manager Products Dic-tionary/Repository User’s Guide.
23
Variables in Statements
IntegersAn integer can have a maximum of 19 characters:
l A maximum of 18 digits (0 to 9)
l An optional leading sign (either + or -)
Examples:
+123456789123456789
123
For the definition of a particular integer, see the syntax as defined in InfoBank or in Manager Products technical pub-lications.
Decimal NumbersA decimal number consists of an integer, optionally preceded by a sign, and optionally followed by a decimal point and decimal digits. It can have a maximum of 20 characters:
l An optional leading sign (either + or -)
l A maximum of 18 digits (0 to 9)
l An optional decimal point
The decimal point must not be the last character.
Examples:
+123456789.123456789
-1.234
123
Floating Point NumbersA floating point number consists of:
l The mantissa
l Optionally, the letter E and the exponent
The mantissa is a decimal number of up to 16 digits (0 to 9), and the exponent an integer of up to two digits. Both can have a leading sign (either + or -).
A floating point number can have a maximum of 21 characters, and must lie in the range:
5.4 x 10-79 to .72 x 10+76
Examples:
+123456789. 123456E-12
123.45
-123E9
24

Logging On and OffLogging On To start a session you invoke Manager Products and then log on to ControlManager. You can log on in one of these ways:
l Using the LOGON command (possibly via the Logon Panel)
l Invoking Autolog
l Automatically using the Logon Exit
The availability of different log-on procedures in different environments can be summarized as follows:
The Availability of Different Log-on Procedures in Different Environments
Environment Autolog LOGON Command Logon Exit Logon Panel
Access Call X X X -
Batch X X X -
CICS - - X X
CMS - - X X
ICCF X X X -
IMS/DC X - X -
ROSCOE X X X -
Siemens Timesharing Interface
- - X X
TSO - - X X
TSO/ISPF X - X X
KEY
X = the procedure is available in this environment
- = the procedure is not available in this environment
25
Logging On and Off

The LOGON Command and the Logon PanelIn all environments except IMS/DC, the Systems Administrator assigns you a logon identifier and password to use when you log on.
Where log on is via the LOGON command, you enter this command:
LOGON logon-identifier PASSWORD password
Where log on is via the Logon Panel (see The ControlManager Logon Panel), a formatted panel is automatically displayed and you need only enter your logon identifier and password.
The password does not display for security reasons. For additional security in a batch environment, any password you enter on a separate input line is not printed.
The ControlManager Logon Panel
ASG-Manager Products(TM) - LOGON SCREEN (hit any PF key to exit) ******************* *********************************** ***** ***** ****** ***** ********************* **************** ***** ****** ***** ***** ****** ***** ** ** ***** ************************ **************** ASG-Manager Products are : (c) Copyright 1975-2013 Allen Systems Group, Inc. All Rights Reserved. Warning: Restricted Rights - May only be used in accordance with License Agreement/Government Contract. Further Restrictions apply to usage rights and User obligations. This Product contains copyrighted materials reprinted with permission of their respective owners. For full details of ASG and Vendor Ownership enter the COPYRIGHT command at any time after logon.
26

LOGON: PASSWORD:
Each logon identifier has associated with it a Logon profile. This can contain a number of commands to tailor your envir-onment. Commands common to two or more Logon profiles can be included in a Global profile, and the Global profile invoked from a Logon profile. If your logon identifier and password are accepted, ControlManager executes the com-mands in your Logon profile, and any output from these commands is displayed.
For details on profiles, see PROFILE Members.
AutologAutolog is available in these environments:
l Access Call
l Batch
l ICCF
l IMS/DC
l ROSCOE
l TSO/ISPF
In TSO/ISPF environments you can log on via the Logon Panel (where you need to enter your logon identifier and pass-word) or via Autolog.
In the other environments, if the first command you enter is not the LOGON command then, unless it is:
l The ENVIRONMENT command
l A valid LOGOFF command
l A variant of the MP-AID command
The Autolog procedure is automatically executed.
When you log on via Autolog, the commands set up by the Systems Administrator in GLOBAL0000 and GLOBALAUTO are executed. These Global profiles tailor your environment; for example, they can restrict you to read-only access to Man-ager Products dictionaries, or stop you from using Manager Products unless you specify an acceptable LOGON com-mand.
Logon ExitThe Logon Exit is available in all Manager Products environments. The Systems Administrator tailors the Logon Exit to provide additional log-on processing such as further validation. In full-screen interactive environments, that is:
l CICS
l CMS
l Siemens Timesharing Interface
l TSO
27
Logging On
Administrators can also tailor logon Exits so that these actions occur:
l The Logon Panel is displayed and you need only enter your Logon identifier and password to log on.
l The Logon Panel is bypassed and you log on automatically (the log-on information being provided by the exit).
l The Manager Products run is terminated.
The Logon Exit is available only if the Systems Administrator’s Environmental Facility is installed.
Reconnection after Abnormal Session TerminationIf an online Manager Products session terminates abnormally (e.g., it abends), a subsequent logon under the same logon identifier will fail if the Logon profile is exclusive (see PROFILE Members). This is because the Logon profile is set to in use, precluding access by another user.
To log on in these circumstances, enter the keyword RECONNECT after the password in the LOGON command:
LOGON logon-identifier PASSWORD password RECONNECT;
You then are logged on to Manager Products in the usual way.
If you use the RECONNECT keyword when the previous session did not terminate abnormally, it is ignored and you are logged on.
If you have an exclusive Logon profile, take care not to share your log-on details with other users. The availability of the RECONNECT option means that other users could log on with your log-on details, overriding the normal security on exclusive Logon profiles.
Abnormal session termination also means that users will be prevented from accessing any USER-MEMBERs being updated when termination occurred.
For information on how to reset such members, see MP-AID RESET USER-MEMBER.
Logging OffTo end a Manager Products run, enter this command:
LOGOFF ;
Or
END ;
Both commands invoke shutdown procedures (closing any dictionaries currently open, deleting TRANSIENT members on the MP-AID, etc.), and then return you from ControlManager to your operating environment.
In interactive environments, LOGOFF and END are only valid in Command Mode.
Upon receipt of a valid LOGOFF or END command, no further Manager Products output is returned to the user. In envir-onments where output is buffered in virtual storage, such as the DOUTPUT buffer of an Access Call program or the out-put buffer of a Manager Products Server Facility (MPSF) TCP/IP client, any output written to the buffer as a result of
28

previously issued commands (e.g., commands issued in an executive routine containing a LOGOFF or END command) will therefore be lost.
In interactive environments, to log off from the Logon Screen (that is, without logging on first) simply press any PF key.
29
Logging Off

ControlManager ScreensThis topic describes the ControlManager screens in fully interactive environments.
For details on these environments, see ControlManager Capabilities and Environments Supported.
Screen AreasControlManager divides the screen into four areas (see ControlManager Screen Areas):
l The Heading Area
l The Data Area
l The Line Command Area
l The Command Area
ControlManager Screen Areas
The Heading Area is the top two lines of the screen.
The Data Area is the area between the Heading Area and the Command Area minus the Line Command Area. A line in the Data Area is designated as the Current Line. At present this is the top line of the Data Area as displayed on the screen. There is always a Current Line in the data being processed, even when that data is not being displayed on the screen (as can occur when the contents of a buffer are being processed by a User or Corporate executive routine).
The ASG-supplied default has the Line Command Area as the last six columns (RIGHT) of the screen, between the Heading Area and the Command Area. However, you can set the area to the first six columns (LEFT) or set it OFF if you wish.
30

For details on SET LINE-AREA, see SET and QUERY LINE-AREA.
If the Extended Interactive Facility is installed, the Line Command Area can be used for entering Line Commands.
The ASG-supplied default has the Command Area as the bottom two lines of the screen. However, you can set the first of these lines to the top of the screen, below the Heading Area, if you wish.
For details on SET COMMAND-LINE, see SET and QUERY COMMAND-LINE.
The first column of each area is reserved for system use and is always blank.
Screen FormatsThere are two ControlManager screen formats:
l The General Purpose Screen
l The InfoBank Screen
General Purpose Screen: Heading AreaThe Heading Area is the top two lines of the screen, and displays screen usage information.
The First Line of the Heading AreaThe first line contains these screen features:
l Mode Indicator (may be extended)
l First Line Indicator
l Line Counter
l Activity Indicator
Mode Indicator. Displays the mode in which ControlManager is operating, and may be one of these values:
COMMAND MODE:DICTIONARY UPDATE:MP-AID EDIT:LOOKASIDE:
Command Mode is the basic ControlManager operating mode. Update, Edit, and Lookaside Modes are the operating modes of the Extended Interactive Facility.
For details on operating modes, see The Extended Interactive Facility.
When a dictionary member or MP-AID member is displayed in Update or Edit Modes, the Mode Indicator is extended to include the member-name. For example:
DICTIONARY UPDATE: EMP-CODE
31
Screen Formats

It is also extended when you use any of the commands ALTER, MODIFY, REPLACE, INSERT, or ADD in Command or Lookaside Modes. The first three letters of the command and the full name of the member are displayed after the mode. For example:
LOOKASIDE: MOD EMP-CODE
If you are using the Extended Name Facility (member names up to 160 characters) then there may be insufficient space in the Mode Indicator field to display the full member name. The member name will be truncated on the right and suffixed with the characters ... to indicate an incomplete member name display. For the UPDATE command, you can use the QUERY ACTIVE-BUFFERS command to obtain the full member name.
First Line Indicator. Displays the number, in the buffer, of the first line being displayed in the Data Area.
Line Counter. Displays the current number of lines in the buffer. If it’s being refreshed at an appropriate interval, the Line Counter will change while output is being generated. When all output has been generated the Line Counter shows the total number of lines stored in the buffer.
Activity Indicator. Shows the state of the Manager Products system. It may be either RUNNING or WAITING. RUNNING means that your last command is being processed; a further command cannot yet be accepted. WAITING means that the system is ready to accept your next command.
The Second Line of the Heading AreaIf SCALE is set ON, then the second line may contain:
l Scale
l Left and/or Right Data Extension Indicators
If SCALE is set OFF, then the second line may contain:
l Column Range Indicator
l Dictionary Name (and Status Name if applicable)
l Right Data Extension Indicator
Scale. Shows columns across the screen.
Data Extension Indicator. Displays to the left and/or to the right of the line.
The Left Data Extension Indicator <<<< displays when the contents of the Data Area extend beyond the left of the screen. (This occurs if the RIGHT command has been used.)
The Left Data Extension Indicator is not displayed if a Dictionary Name and Status Name display.
The Right Data Extension Indicator >>>> displays when the contents of the Data Area extend beyond the right of the screen.
Column Range Indicator. Displays to the right of the line, and shows which columns are being displayed. For example:
VIEW: 001 TO 073
If you use the LEFT and RIGHT commands, this view will change. For example, if you enter RIGHT 10 the view in the above example would change to:
32

VIEW: 011 TO 083
Dictionary Name. Displays if an active dictionary is in use. For example:
DICTIONARY: DEMO
Status Name. Displays if:
l An active dictionary is in use
l Either of the Status facilities is installed
l There is a named Status in the active dictionary
For example:
DICTIONARY: DEMO STATUS: UDS
See ControlManager General Purpose Screen with Scale Set Off and ControlManager General Purpose Screen with Scale Set On for examples.
ControlManager General Purpose Screen with Scale Set Off
ControlManager General Purpose Screen with Scale Set On
33
Screen Formats

General Purpose Screen: Data AreaThe Data Area is the area between the Heading Area and the Command Area, excluding the Line Command Area. The first column of the Data Area is reserved for system use and is always blank.
The contents of the buffer currently being viewed (output from commands, or member text) are displayed in the Data Area. The Data Area acts as a window on the buffer contents, the contents may be wider and longer than the Data Area.
The first data line of the buffer contents is preceded by the Data Delimiter:
*** TOP OF DATA ***
and the last line is followed by the Data Delimiter:
*** END OF DATA ***
These Data Delimiters appear on the screen when the Data Area window is positioned at the top or at the bottom of the buffer respectively.
General Purpose Screen: Line Command AreaThe Line Command Area is the first or last six columns of the screen between the Heading Area and the Command Area. The area is made up of one blank column reserved for systems use followed by five columns containing equals (=) signs. These columns are excluded from the Column Range Indicator.
For details on the Column Range Indicator, see General Purpose Screen: Heading Area.
If the Extended Interactive Facility is installed, the Line Command Area can be used for entering Line Commands.
34

For details on Line Commands, see The Extended Interactive Facility.
You can set the Line Command Area to the last six columns (RIGHT), or to the first six columns (LEFT), or set it OFF if you wish.
l For details on SET LINE-AREA, see SET and QUERY LINE-AREA.
l The Line Command Area is not shown when InfoBank panels are being used, although it is still present.
The Line Command Area is not shown when InfoBank panels are being used, although it is still present.
General Purpose Screen: Command AreaThe ASG-supplied default has the Command Area as the bottom two lines of the screen. However, you can set the first line to the top of the screen, below the Heading Area, if you wish.
See SET and QUERY COMMAND-LINE for details on SET COMMAND-LINE. The Command Area contains:
l The Command Entry Indicator
l The Message Line
You enter Primary Commands in the Command Area.
Command Entry Indicator ( = = => ). Displays in the first line of the Command Area; you enter Primary Commands after this indicator.
The first column after the indicator is reserved for system use and is always blank.
Message Line. The second line of the Command Area contains the word ASG. When a single Manager Products message or line is generated, it displays in this line. However, when two or more messages or lines are generated they display in the Data Area.
With both lines of the command area at the bottom of the screen, you can enter commands in the second (the message line) as well as the first if there is no message already displayed there. With the first line at the top of the screen, you can-not enter commands in the second.
You cannot overwrite the word ASG.
InfoBank Screen: Heading Area
The First Line of the Heading AreaThe first line shows the Branch Name, Standard Heading, and Panel Name or Activity Indicator (see InfoBank Screen).
InfoBank Screen
35
Screen Formats

Branch Name. Displays to the left of the line and shows the name of the branch in InfoBank that contains the panel. When the response to a RETRACE DISPLAY command issued from an InfoBank panel is displayed, RETRACE PANEL DISPLAY appears in the Branch Name position.
Standard Heading. InfoBank displays for every InfoBank screen.
Panel Name. Displays to the right of the line and shows the name of the InfoBank panel. When a RETRACE PANEL DISPLAY screen is displayed, the Panel Name is left blank.
The Panel Name can be used in PANEL commands to access the panel directly (without going through menus of retrace paths).
Activity Indicator. Replaces the Panel Name when a command is being performed while an InfoBank panel is displayed. While the command is being performed, RUNNING displays in this position.
The Second Line of the Heading AreaThe second line shows Data Extension Indicator and/or Panel Extension Indicators.
Data Extension Indicator. Displays to the left and/or to the right of the line.
The Left Data Extension Indicator <<<< displays when the contents of the Data Area extends beyond the left of the screen. (This occurs if the RIGHT command has been used.) The Right Data Extension Indicator >>>> displays when the contents of the Data Area extends beyond the right of the screen.
Panel Extension Indicator (<<<<MORE). Displays to the left of the line when there is more text for the panel preceding the text currently displayed.
When the contents of the Data Area extend beyond the left of the screen AND there is more text for the panel preceding the text currently displayed, then a Left Data Extension Indicator is displayed rather than a Panel Extension Indicator. However, it is generally apparent from the text when this circumstance has arisen.
36

InfoBank Screen: Data AreaThe text of an InfoBank panel is displayed in the Data Area.
On the bottom line of the Data Area, below a dotted line, is the Reserved InfoBank Line. As supplied by ASG, this reads:
IF YOU NEED HELP, KEY IN HELP AND PRESS ENTER.
However, if the User Defined InfoSystem facility is installed, the Systems Administrator can change this.
Panel Extension Indicator (MORE>>>>). Displays to the right of the Reserved InfoBank Line when there is more text for the panel following the text currently displayed.
The dotted line and the Reserved InfoBank Line extend into the Line Command Area.
InfoBank Screen: Line Command AreaTo help make the panels easier to read, the Line Command Area is not shown on an InfoBank Screen. However, the area is there and, if the Extended Interactive Facility is installed, can be used for entering Line Commands.
For details on Line Commands, see The Extended Interactive Facility.
If Panel Driven Processing (PDP) is installed, you can use the Line Command Area to display any panel shown in an InfoBank Index panel. Simply key in PAN against the index entry you want and press Enter; that panel is then displayed.
InfoBank Screen: Command AreaThe ASG-supplied default has the Command Area as the bottom two lines of the screen. However, you can set the first line to the top of the screen, below the Heading Area, if you wish.
For details on SET COMMAND-AREA, see ControlManager Commands.
The Command Area contains:
l The Command Entry Indicator
l The word SELECT (by default)
l The Message Line
l The Panel Issue Date
You enter Primary Commands in the Command Area.
Command Entry Indicator ( = = => ). Displays in the first line of the Command Area. As supplied by ASG, the indicator is followed by the word SELECT. However, you can suppress this display of SELECT if you wish.
l For details on SET INFOBANK-SELECT, see SET and QUERY INFOBANK-SELECT.
l The first column after the indicator is reserved for system use and is always blank.
37
Screen Formats

Message Line. Is the second line of the Command Area and contains the Panel Issue Date. When a single Manager Products message or line is generated, it displays in this line. However, when two or more messages or lines are gen-erated they are displayed in the Data Area.
With both lines of the Command Area at the bottom of the screen, you can enter commands in the second as well as the first (if there is no message already displayed there). With the first line at the top of the screen, you cannot enter com-mands in the second.
Panel Issue Date. Displays to the right of the Message Line, and shows the date of the Infobank Release in which the panel was first issued or last constructed. The date is expressed as a six-digit number. For example, if the panel was last constructed on 30th September 1987, the Panel Issue Date would be 870930. You cannot overwrite the Panel Issue Date.
38

The Extended Interactive FacilityOverview of the Extended Interactive FacilityThe Extended Interactive Facility is only available in CICS, CMS, TSO, and Siemens Time Sharing Interface environments; in each of these environments, the relevant ControlManager interface facility must be installed. The Extended Interactive Facility provides these additional features and capabilities:
l Lookaside
l Panel Driven Processing
l Full Screen Editor
l User storage facilities on the MP-AID
l Executing the contents of the Edit Buffer
l Real time Input/Output monitoring
l User defined Panel Driven Processing
l Facilities for tailoring the user environment
l User-defined profiles
For details on user-defined profiles, see User-defined Profiles.
The other features and capabilities are described in this topic and the next.
Modes, Buffers, and Lookaside
ModesWhen you log on to ControlManager, you automatically enter Command Mode. Command Mode is the basic operating mode for ControlManager and is the only mode available if the Extended Interactive Facility is not installed. If the Exten-ded Interactive Facility is installed, there are three additional modes:
l Edit
l Update
l Lookaside
You use Edit Mode to create and edit MP-AID USER-MEMBERs using the Full Screen Editor, and to set up the contents of an Edit Buffer so that they can be executed using the RUN command.
For more details on RUN, see RUN.
You use Update Mode to create and update a dictionary member using the Full Screen Editor.
39
The Extended Interactive Facility

You use Lookaside Mode to interrupt an activity to display and view output on the screen; for example, if you enter InfoSystem, the InfoBank panels are displayed in a Lookaside Buffer.
The name of the mode you are in is displayed at the top left hand corner of the screen, except when you are viewing an InfoBank panel.
For the display of mode, see Buffer Structure.
All DataManager and ControlManager commands are available in each mode with these exceptions:
Mode Commands Not Available
CommandFull Screen Editor commands to add, delete, or move text FILE, RFILE, SFILE, QUIT, and XQUITRUN
Edit Update
LOGOFF RUNSET NUMBERS LOGOFF
LookasideFull Screen Editor commands to add, delete, or move text FILE, RFILE, and SFILE LOGOFF
l In Command and Lookaside Modes, you can use the Full Screen Editor commands to copy text: the Line Commands C, CC, K, and KK, and the Primary Commands PUT and KPUT. You can also use all the scrolling commands: those available with the Basic Interactive facilities, and the /Line Command and DOWN, NEXT, UP, FIND, and LOCATE Primary Commands available with the Extended Interactive Facility.
l For details on these commands, see ControlManager Commands.
l For details on the Full Screen Editor, see The Full Screen Editor.
BuffersCommand Mode has associated with it a single buffer. (A buffer is an output storage area.) The other modes can have one or more buffers up to a total limit set by the Systems Administrator. For example, if the limit is five buffers, there can be a total of five buffers including the Command Mode Buffer. To determine the buffer limit, enter this command:
QUERY BUFFER-LIMIT ;
If you exceed the buffer limit, you will be told by the system. In that case you have to close at least one buffer in order to be able to continue using the system.
40

The maximum size of each buffer is 999,997 lines.
Buffer StackingThe system of buffers allows you to have several layers of display to the screen stored and available for viewing. For example, if you are updating a member MEMBER-A, you can open a second Update Buffer containing MEMBER-B by entering this command:
UPDATE MEMBER-B ;
When you close the Update Buffer of MEMBER-B, you are automatically returned to the Update Buffer containing MEMBER-A. You can then resume the update of MEMBER-A at the point where you left off.
Similarly if during an update or edit you issue a command such as LIST or PRINT or enter InfoSystem, the output is dis-played in a Lookaside Buffer. Having examined the output, you can return to the interrupted update or edit by giving the QUIT command.
For examples of buffer stacking, see Buffer Structure for a diagram of buffer structure, and Example of Buffer Stacking.
When you open two or more buffers, the buffers are stacked. For example, assume that you have opened four buffers:
l Lookaside Buffer
l Update Buffer 2
l Update Buffer 1
l Command Mode Buffer
And you are currently in the Lookaside Buffer. There are two ways to return to Update Buffer 1.
The first is to return to and then close Update Buffer 2. The stack is then as shown:
l Update Buffer 1
l Command Mode Buffer
The second is to enter this command:
UPDATE buffer-name-1 ;
The Lookaside Buffer is automatically closed, and you return to Update Buffer 1. The positions in the stack of Update Buffer 1 and Update Buffer 2 are reversed, and the stack is then as shown:
l Update Buffer 1
l Update Buffer 2
l Command Mode Buffer
The SET LOOKASIDE-RETENTION command enables you to retain Lookaside Buffers despite subsequent EDIT AND UPDATE commands.
For details on SET LOOKASIDE-RETENTION, see SET and QUERY LOOKASIDE-RETENTION.
You can determine what buffers are present in the stack by entering this command:
41
Modes, Buffers, and Lookaside

QUERY ACTIVE-BUFFERS ;
For example, details on the four buffers mentioned above would display as shown:
DISPLAY OF ACTIVE BUFFERSMODE NAMELOOKASIDE ****DICTIONARY UPDATE BUFFER-NAME-2DICTIONARY UPDATE BUFFER-NAME-1COMMAND ****
To log off from ControlManager you have to return through the stack to Command Mode.
Buffer Structure
Buffer CommandsThere are various ways in which a new buffer can be opened:
Buffer Opened by
Command Logging on to ControlManager.
42

Buffer Opened by
Edit Entering an EDIT command.
Update Entering an UPDATE command.
Lookaside
Entering a command that generates output while in Edit or Update Mode, or Prefixing a command that generates output with the BROWSE or LOOKASIDE Prefix Command.
If you issue a command in Command or Lookaside Mode that generates output, the current con-tents of the Command Mode or Lookaside Buffer are overwritten by the generated output unless:
l The command is prefixed by the BROWSE or LOOKASIDE command, in which case the output is displayed in a new Lookaside Buffer, or
l The SET SCROLL-LIMIT command has been given. This command lets you specify that, if the current Com-mand Mode Buffer is overwritten, a number of lines should be taken from the end of the buffer for display at the beginning of the new Command Mode Buffer, or
l Only one line of output is generated, or
l You enter InfoSystem.
For details on SET SCROLL-LIMITSee SET and QUERY SCROLL-LIMIT.
There are various ways in which a buffer can be closed:
Buffer Closed by
Command Entering a LOGOFF command.
Edit Entering a QUIT, XQUIT, or FILE command.
Update Entering a QUIT, XQUIT, FILE, RFILE, or SFILE command.
Lookaside Entering a QUIT or XQUIT command.
If you use the EDIT or UPDATE command, any Lookaside Buffers are automatically closed unless LOOKASIDE-RETENTION is SET on.
For the system of modes and buffers and their associated commands, see Buffer Structure.
The Systems Administrator can limit the number of lines that can be held in a Command Mode or Lookaside Buffer. To determine the limit, enter this command:
43
Modes, Buffers, and Lookaside

QUERY OUTPUT-LINE-LIMIT ;
If a command is given which generates more lines than the Output Line Limit, execution of the command is terminated but the buffer contains the output up to the specified limit.
To clear the contents of any buffer, enter this command:
CLEAR ;
The current contents of the buffer are deleted but the buffer remains open.
Example of Buffer StackingThe following example illustrates further how the buffer stacking feature operates. The task in the example is to copy lines from one dictionary member called XYZ999, into another dictionary member, called ABC999. In Command Mode, enter this command:
UPDATE ABC999
The dictionary member ABC999 is displayed in Update Mode. The lines to be copied are in a member called XYZ999. Enter this command:
UPDATE XYZ999
The member is displayed in a second Update Buffer. The active buffers are structured as shown in Current Active Buffers: Stages 1 and 3.
To check the copying commands, see InfoBank and enter this command:
PANEL EDIT6000
A Lookaside Buffer containing an InfoBank panel has now been created in addition to the three existing buffers. The act-ive buffers are structured as shown in Current Active Buffers: Stage 2.
After reading the InfoBank panel, to return to the last Update Buffer, enter this command:
QUIT
The Lookaside Buffer containing the InfoBank panel is deleted and the buffer containing the dictionary member XYZ999 is redisplayed; the active buffers are now stacked as shown in Current Active Buffers: Stages 1 and 3.
To copy lines from XYZ999 to ABC999 you use the Full Screen Editor commands, making use of the Scratchpad feature (described in The Scratchpad). You then use the QUIT command to delete the Update Buffer containing XYZ999; the act-ive buffers are now stacked as shown in Current Active Buffers: Stage 4.
You insert the lines copied from XYZ999 into ABC999 and FILE the edited member; the member encodes successfully, the buffer containing ABC999 is deleted, and the only remaining buffer is the Command Buffer.
Buffer Scrolling Commands
For details on scrolling commands, see Scrolling the Text on the Screen.
Current Active Buffers: Stages 1 and 3
44

Current Active Buffers: Stage 2
Current Active Buffers: Stage 4
The Full Screen EditorControlManager provides a powerful editor, the Full Screen Editor, for creating and amending members of the dictionary or MP-AID in interactive environments. To create or amend dictionary members you use the UPDATE command; to cre-ate or amend MP-AID members you use the EDIT command.
When you create a new member, you open an empty UPDATE or EDIT Buffer and build up the source record. When you amend an existing member, the source record of that member is automatically copied into an UPDATE or EDIT Buffer.
Using the editor you can move (scroll) forwards or backwards, left or right in the buffer, inserting, amending, or deleting lines as required. And you can incorporate all or part of the source of another member of the dictionary or MP-AID into the buffer: for example, you can copy a skeleton member into an empty buffer to form the basis for a new definition.
45
The Full Screen Editor

When creation or amendment is finished, you can file the buffer:
l Add the contents of the Update Buffer to the dictionary
l Add the contents of the Edit Buffer to the MP-AID
When you file a dictionary member there are three commands you can use: FILE, SFILE, and RFILE. When you file an MP-AID member you can only use the command FILE.
Each of these Editor commands generates an internal dictionary management command that updates the dictionary:
Editor Command Dictionary Management Command
FILEADD (a new member)MODIFY (an existing member)
SFILEINSERT (a new member)ALTER (an existing member)
RFILE REPLACE
The Editor commands themselves are not logged, but the dictionary management commands generated from these Editor commands are.
For details on logging, see the ASG-Manager Products Controller’s Manual.
FILEWhen you FILE an Update Buffer containing a new member, the contents are added to the index dataset and the source dataset, and an encoded record is generated from the source record and added to the data entries dataset. (The data entries dataset contains the encoded definition of the member.) When you FILE an Update Buffer containing an existing member, the source dataset is amended, and an encoded record is generated from the source record and added to the data entries dataset.
If errors are found during encoding, then the source of the member, together with the error messages, is displayed in a Lookaside Buffer. You can note the errors, QUIT back to the Update buffer, correct the errors, and then re-enter the FILE command.
SFILEWhen you SFILE an Update Buffer containing a new member, the contents are added to the index dataset and the source dataset, but no encoded record is generated. When you SFILE an Update Buffer containing an existing member, the source dataset is amended, but again no encoded record is generated.
RFILEYou cannot FILE a new member with the same name as an existing member, but you can RFILE it.
If the existing member is in the current status, then the contents of the old member are replaced by the new. The source dataset is amended, and an encoded record is generated from the source record and added to the data entries dataset.
46

If the existing member is in another status, then the new member is FILEd in the current status. The contents are added to the index dataset and the source dataset, and an encoded record is generated from the source record and added to the data entries dataset. There are now two members with the same name but with different contents in different statuses.
Primary and Line CommandsThere are two types of commands available with the Full Screen Editor: primary and line commands.
l You can execute primary commands in one of two ways: keying the command in the Command Area and pressing Enter, or pressing a Program Function key (PF key) which has been set to the command. Except for EDIT, UPDATE, and the scrolling commands, Editor Primary Commands can only be given in Edit or Update Mode.
l You can execute line commands by keying in the command in the line command area of a line and press-ing Enter. The line command area is the first or last six column positions displayed on the screen and contains = = = = = except when an InfoBank panel is displayed, in which case the area is blank. Most line com-mands can only be given in Edit or Update mode but the I, C, CC, K, and KK line commands can also be given in Command and Lookaside modes. You can set the line command area to the first or last six columns as you wish or you can set it off altogether. If the area is set off, no line commands can be given.
The ScratchpadThe Scratchpad is a data storage area to which text can be copied or moved. You can transfer all or part of any output buf-fer displayed on the screen to the Scratchpad, including output displayed in Command or Lookaside Modes or an InfoBank panel.
The contents of the Scratchpad can be inserted in an Edit or Update Buffer. When you copy the Scratchpad into a buffer, the contents of the Scratchpad are not affected. You can therefore make further copies if you want. The contents of the Scratchpad are automatically deleted when you log off.
ExampleAssume you are creating a member MEMBER-A in Update Mode. You find that there is a section in another member, MEMBER-B, that you want to copy into MEMBER-A.
To copy MEMBER-B into MEMBER-A
1. Key in UPDATE MEMBER-B.
2. You can copy the section as a block in the Line Command Area, key in CC against the first line to be copied and CC against the last line to be copied.
Or
Specify a number of lines in the Line Command Area, key in Cn against the first line to be copied (where n is the number of lines you want to copy).
3. Press Enter; the lines are copied to the Scratchpad.
4. Key in QUIT and press enter; this returns you to the buffer containing MEMBER-A.
47
The Full Screen Editor

5. You can insert the contents of the Scratchpad after any line in the buffer in the Line Command Area, key in I against the appropriate line.
Or
Insert the contents of the Scratchpad after the Current Line (that is, the top line of the Data Area) key in the primary command GET-SCRATCHPAD.
6. Press Enter; the contents of the Scratchpad is inserted.
The CC or Cn commands overwrite the current contents of the Scratchpad with the new. However, you may wish to copy to the Scratchpad without overwriting the current contents. This is done using the KK or Kn commands instead of CC or Cn.
The Current LineIn this release of ControlManager, the current line is the first line displayed in the data area. The concept of the cur-rent line is important because many editing functions take place in relation to the current line. For example, DELETE n deletes n lines beginning with the Current Line; and the GET commands insert text following the Current Line.
Entering, Leaving, and Abandoning an EditThese commands are available for entering, leaving, and abandoning an edit.
Command Function
EDIT Opens an Edit Buffer.
UPDATE Opens an Update Buffer.
FILEFiles the contents of an Edit Buffer as a USER-MEMBER of the MP-AID or files and encodes the contents of an Update Buffer as a member of the dictionary currently open.
RFILEFiles and encodes the contents of an Update Buffer as a member of the dictionary currently open. RFILE is used when the name of the new member is the same as that of an existing one.
SFILEFiles the contents of an Update Buffer as a source member of the dictionary currently open. The member is not encoded.
QUITAbandons an edit. This command cannot be used if the Edit or Update Buffer has been changed.
XQUITAbandons an edit. This command must be used if the Edit or Update Buffer has been changed.
48

Scrolling the Text on the ScreenYou can move, or scroll, the text on the screen up, down, left, or right by giving any of these commands.
Command Function
FORWARD Displays the next screen (if any) in the buffer.
BACKWARD Displays the previous screen (if any) in the buffer.
TOP Displays the first screen in the buffer.
BOTTOM Displays the last screen in the buffer.
LEFT n Moves the window on the text n columns to the left.
RIGHT n Moves the window on the text n columns to the right.
UP n Moves the window on the text up n lines.
DOWN n Moves the window on the text down n lines.
NEXT n Moves the window on the text down n lines.
* LOCATE string
Searches the current buffer, beginning with the line following the Current Line, for the named string. If found, the line containing the string becomes the Current Line.
* FIND string
Searches the current buffer, beginning with the line following the Current Line, for the named string. The string must begin in column 1 of the search zone. If found, the line containing the string becomes the Current Line.
/When entered in the Line Command Area of a line, moves the line up so that it becomes the Current Line.
* The ZONE command enables you to define the columns between which the FIND and LOCATE commands are to search.
For details on ZONE, see ZONE.
Basic Interactive facilities enable you to use the FORWARD, BACKWARD, TOP, BOTTOM, LEFT, and RIGHT commands, and it also enables you to use the UP, DOWN, NEXT, LOCATE, FIND, and / commands.
49
Scrolling the Text on the Screen

Deleting, Inserting, and Overtyping CharactersYou can delete, insert, and overtype characters using the keyboard features available at your terminal. You can key in lines up to 255 columns wide except for an Update buffer, which truncates lines to 246 characters. Use the LEFT and RIGHT commands to scroll the text on the screen left and right.
You cannot input text in the Line Command Area.
Text inserted using the Full Screen Editor is held in the Data Area exactly as it was entered. The only exceptions are:
l If UPPER-CASE is set ON, all lowercase alphabetic characters will be translated to uppercase
l If you use software tabs the text will be formatted
The CHANGE command can be used to replace all or specified occurrences of a character string with another string, and also to delete all or specified occurrences of a string. This is the command format:
CHANGE /old/new/ mm nn ;
old is the character string to be changed or deleted.
new is the character string to be inserted.
mm is the number of lines (starting from and including the Current Line) on which the string is to be changed or deleted.
nn is the number of occurrences of the string which are to be changed or deleted on each line.
The ZONE command enables you to define the columns between which the CHANGE command will work.
For details on ZONE, see ZONE.
Adding and Deleting LinesThe Full Screen Editor provides Primary Commands and Line Commands to add lines to, or delete lines from, an Update or Edit Buffer.
Primary Commands Function
LADD[n] Inserts one or more blank lines after the Current Line.
DELETE[n] Deletes one or more lines starting with the Current Line.
Line Com-mands
Function
A[n]Inserts one or more blank lines after the line on which the command is entered.
50

Line Com-mands
Function
D[n] or DDDeletes one or more lines starting with the line on which the command is entered.
Copying and Moving Text
SummaryControlManager provides Primary Commands and Line Commands to copy and move text between and within mem-bers:
l You can copy text to the Scratchpad (without removing it from the current buffer) or move text to the Scratchpad (removing it from the current buffer).
l You can copy/move text (overwriting the existing contents of the Scratchpad) or also copy/also move text (adding it to the existing contents of the Scratchpad).
The essential difference between Primary and Line Commands is that Primary Commands use the Current Line as the axis for copying and moving text whereas Line Commands enable you to copy or move any lines in a buffer.
Primary Commands
Command Function
GETD Inserts a copy of a dictionary member after the Current Line.
GETEInserts a copy of an EXECUTIVE member of the MP-AID after the Current Line.
GETS Inserts copies of the Scratchpad after the Current Line.
GETTInserts a copy of a TRANSIENT member of the MP-AID after the Current Line.
GETUInserts a copy of a USER-MEMBER of the MP-AID after the Current Line.
KPUTCopies lines to the Scratchpad without overwriting the contents of the Scratchpad.
MOVERemoves lines from an EDIT or UPDATE buffer and copies them to the Scratchpad.
51
Copying and Moving Text

Command Function
PUTCopies lines to the Scratchpad without removing them from the current buffer.
SMOVERemoves lines from an EDIT or UPDATE buffer, and copies them to the Scratchpad without overwriting the contents of the Scratchpad.
WIPE Clears the contents of the Scratchpad.
ZONE Sets column limits for string-searches.
Line Commands
Command Function
C[n] or CCCopies one or more lines to the Scratchpad and deletes the existing contents of the Scratchpad.
K[n] or KK Copies one or more lines to the end of the Scratchpad.
M[n] or MMMoves one or more lines to the Scratchpad and deletes the existing contents of the Scratchpad.
S[n] or SS Moves one or more lines to the end of the Scratchpad.
F[n] or I[n]Inserts one or more copies of the Scratchpad following the line on which the command is entered.
P[n]Inserts one or more copies of the Scratchpad before the line on which the command is entered.
"[n]Copies the line on which the command is entered and inserts the new line immediately after the copied line.
52

Tailoring and Checking Your EnvironmentThere are many SET commands that you can use to tailor the environment:
l Commands that affect command syntax and availability
l Commands that affect language and the keyboard
l Commands that affect the format of screens and output
l Commands that affect timing and processing
l Commands that affect InfoView
l Commands that should be used under ASG direction
Most of these commands are available to all users, however some are available only to the Systems Administrator.
Each SET command has a corresponding QUERY command, and this is available to all users. And there are also QUERY commands which have no corresponding SET command.
You can enter SET commands in the Command Area, or in batch, or placed in user-members, executive routines, or com-mand streams. When executed in these ways, the commands are effective for the current session only; when you log off, no record is kept of these settings, and when you next log on, the settings will be those of the default.
When you place a Manager Products SET command in an executive routine, it must be prefixed by the MPR directive. For example:
MPR SET EXEC-WRITE OFF;
If not prefixed by MPR, the SET command would be interpreted as a SET directive.
You can change the default settings by including SET commands in profiles. The commands are then executed each time you log on and so become the effective default for each session. If the Systems Administrator’s Environmental Control Facility is installed, the Systems Administrator can change the default for individuals/groups of users via a Logon profile or a Global profile. If the Extended Interactive Control Facility is also installed, you can change the default to suit your own needs via a User Defined profile.
In a Logon profile or Global profile, the Systems Administrator can include any SET command. In a User Defined profile, you can only include those SET commands that are normally available to you.
You can tailor Manager Products using installation macros.
See the ASG-Manager Products Controller’s Manual for a summary of these macros and a list of the pub-lications describing the installation of Manager Products in different environments.
Commands that Affect Command Syntax and Availability
Command Function
SET ESCAPE-CHARACTER
Sets the escape character. For use in the CONTENTS
53
Tailoring and Checking Your Environment

Command Function
clause of COMMAND-STREAMs, LOGON-PROFILEs, GLOBAL-PROFILEs, EXECUTIVE-ROUTINEs, and MPAID ADD and MPAID APPEND commands. Where a line of input would normally contain a terminator in the first character position, an escape character must be entered in its place, and the terminator moved to the second character position.
SET LINE-END-CHARACTER Sets the Line-End-Character (used as a logical line end).
SET PERFORM-CHARACTER
Sets the Perform-Character (used in the PERFORM command).
For each of these SET commands there is a corresponding QUERY command. There are also QUERY commands that cor-respond to SET commands available to the Systems Administrator only:
Command Function
QUERY AMBIGUITY-ASSUMPTION
Displays the action that will be taken when an ambiguous Primary Command is entered.
QUERY LINE-COMMANDS Displays a list of the Line Commands.
QUERY PRIMARY-COMMANDS Displays a list of the Primary Commands.
QUERY STRING-DELIMITER Displays the characters set up as string delimiters.
There is also a QUERY command for which there is no SET command:
QUERY MODE Displays the current Mode.
Commands that Affect Language and the Keyboard
Command Function
SET PFn Sets a PF key to a command.
54

Command Function
SET TAB-CHARACTER Sets the software tab character.
For each of these SET commands there is a corresponding QUERY command. There are also QUERY commands that cor-respond to SET commands available to the Systems Administrator only:
Command Function
QUERY ASCII-CHARACTER- TRANSLATION
Displays the current ASCII to EBCDIC character translation
QUERY CHARACTER-TRANSLATION Displays any Character-Translation which is active.
QUERY KANJI-MODE Displays the Kanji-Mode setting.
QUERY KANJI-STRING-DELIMITER
Displays the character used as the Kanji String Delimiter.
QUERY MESSAGE-LANGUAGE
Displays the language in which Manager Products messages are output.
Introduction to the ‘Soft’ Keyboard
Character Translation This feature enables users in non-English-speaking countries to overcome national language, character, and keyboard problems. It may also be of use in environments where incompatible hardware and software configurations cause similar problems. The feature enables you to:
l Redefine the input made by your keyboard (e.g., so that the backslash operates as an o-umlaut key)
l Utilize all characters supported by your keyboards, terminals, and printers
l Perform non-standard case translation
How It WorksWhen uppercase translation is not applied the hexadecimal representation (hexadecimal code) of all characters input in a Manager Products Full Screen Interactive session are passed unaltered (unless the Input Translation Tables have been modified using the character translation facilities described in this panel). When uppercase translation is applied, the hexadecimal code of any character input in lowercase is translated to uppercase in the standard manner; that is, by ORing the input hexadecimal code with X'40'. After translation, if any, has occurred, the resultant hexadecimal codes are stored internally for subsequent processing.
(Uppercase translation is applied to all input via the Command Area and the Line Command Area. Uppercase translation is not applied to all other input unless UPPER-CASE has been set on.)
55
Commands that Affect Language and the Keyboard

When output, all hexadecimal codes for which no coded support is provided in the Output Translation Tables are trans-lated to spaces (X'40'). Consequently, if you input a character for which no coded support is provided in the Output Trans-lation Tables, it will be translated to a space character when output to your terminal and/or printer(s).
The installation macro DCHAR generates the Output Translation Tables.
For details on the initial configuration of these tables and how they may be modified via DCHAR, see the Manager Products installation manual relevant to your installation.
The SET CHARACTER TRANSLATION command has two variants:
l SET CHARACTER-TRANSLATION INPUT
l SET CHARACTER-TRANSLATION OUTPUT
Both forms of the command are restricted to use by the Systems Administrator.
SET CHARACTER TRANSLATION INPUT enables you to modify the Input Translation Tables so that specified hexadecimal codes are translated, on input, as you require. This form of the command is available in Full Screen Interactive envir-onments; that is, when Manager Products are running under CICS, TSO, CMS, or Siemens Timesharing Interface.
SET CHARACTER TRANSLATION OUTPUT enables you to modify the Output Translation Tables so that the hexadecimal codes passed unaltered or translated by the Input Translation Tables, and held internally by Manager Products, are trans-lated, as required, when output to your terminals and/or printer(s). (In order for any character to be output, by a ter-minal or printer, as it is entered, the terminal or printer must receive the hexadecimal code to which it is configured for that character.)
The OUTPUT variant of the command is available in all environments. In Full Screen Interactive environments a different output translation may be specified for your terminals and for your printers. In all other environments the translation specified for output to the printer will also be applied to output to a terminal; separate translation of output to terminals cannot be accomplished.
Similarly, when the Output Translation Tables are modified via the DCHAR macro, only one translation may be specified for each hexadecimal code and applies to output for your terminals and printer(s) alike.
Manager Products also provide support for the Kanji character set. If you are working in a Kanji environment you may need to use the SET CHARACTER-TRANSLATION command if your keyboard does not have a key that inputs the shift-out and shift-in codes, required by the Manager Products Kanji Mode you are using.
Using the INPUT and OUTPUT VariantThe circumstances under which you may need to use the SET CHARACTER-TRANSLATION command and the appropriate variant for each, are described in the following paragraphs.
Use the OUTPUT variant when you want to use a character supported by your keyboard, but not by your terminal and/or printer(s); that is, the character is displayed/printed as some other character or is not displayed/printed at all.
The command enables you to alter the Output Translation Tables so that the character you input is translated to the hexadecimal code required in order that your terminals and/or printer(s) display/print the character required.
56
Use the INPUT variant when you want to use a character supported by your terminal and/or printer(s), but not by your keyboard.
The command enables you to alter the Input Translation tables so that the character you input is translated to the hexa-decimal code required in order that your terminals and/or printer(s) display/print the character you want.
However, if the hexadecimal code required by your terminals and/or printer(s), for the character you want to use, is not one of the codes supported by the Output Translation Tables, you must also use the OUTPUT variant of the command.
Use the INPUT and the OUTPUT variants when you want to use a character that is supported by your terminal/printer but not by your keyboard or by Manager Products Output Translation Tables.
Use the INPUT variant to modify the Input Translation Tables so that the hexadecimal representation of a keyboard char-acter is translated, stored internally, and subsequently processed as another hexadecimal code.
Use the OUTPUT variant if a hexadecimal code to which input is translated, via the Input Translation Tables, is either:
l Not supported by the Output Translation Tables and therefore translated to a space (X'40') when output to your terminals and/or printer(s)
l Not the hexadecimal code required by your terminals and/or printer(s) to print the desired character
In both cases the OUTPUT variant is used so that a hexadecimal code held internally, is translated to another hexadecimal code when output.
Example 1European users who want to use the pound sterling symbol may be prevented from doing so because their keyboard does not have a key for that character. You can overcome this problem by selecting a redundant keyboard character and modifying the Input Translation Tables so that input from the selected key, is translated to the hexadecimal value coded in the Output Translation Tables, for the pound sterling symbol (5B as supplied by ASG). For example:
SET CHARACTER-TRANSLATION INPUT E0 5B 5B ;
where E0 is the hexadecimal code specified by the selected keyboard character (the uppercase character on a numeric key, perhaps). Provided that your terminals and/or printers are configured to display/print the pound sterling character for 5B the redundant key becomes (effectively) a pound sterling character key. If not, you must also modify the Output Translation Tables using a SET CHARACTER-TRANSLATION OUTPUT command.
Example 2Scandinavian users have a problem with the alphabetical sorting of names beginning with certain characters. Although a standard European keyboard has the required characters, those characters occur in a different position in the Scand-inavian alphabet when compared with the alphabet used in other European countries. Consequently, names input using the standard keyboard are output in an order that reflects the standard European alphabet. This may be changed by modifying the Input Translation Tables.
For example, to have names beginning with the character x appearing at the top of output from Manager Products com-mands such as LIST, enter the following commands:
SET CHARACTER-TRANSLATION INPUT A7 7C 7C ;SET CHARACTER-TRANSLATION OUTPUT 7C A7 A7 ;
where 7C is the hexadecimal code for the @ character and A7 the hexadecimal code for x.
57
Commands that Affect Language and the Keyboard

As a result, all names beginning with x will be stored in the dictionary and subsequently processed as if they begin with @, although they still display/print as names beginning with x.
The translation of input from x to @ (in the above example) would only affect the processing of names input while the specified translation for input is effective. Names added at any other time would be processed in the standard way.
Manager Products Support for KanjiThe SET KANJI-MODE command enables you to establish a Manager Products environment in which kanji characters may be input and processed successfully when present in delimited character strings. Three Kanji Modes, corresponding to the three major types of Kanji-supporting hardware/software, are supported:
l IBM
l HITACHI
l FUJITSU
The required Kanji Mode is established using the above mentioned SET command or by adjusting the KANJI operand in the installation macro DCUST.
For details on DCUST, see the Manager Products installation manual relevant to your installation.
Once a Kanji Mode is set, kanji character strings, enclosed within Shift-Out (SO) and Shift-In (SI) characters, may be input within delimited character strings. For example:
DESCRIPTION'SO-character kanji-character-string SI-character'
The Shift-Out and Shift-In characters used must specify the hexadecimal codes recognized in your hardware/software con-figuration, as indicating a shift-out to Kanji Mode and a shift-in to EBCDIC Mode. Since these codes differ in IBM, HITACHI, and FUJITSU environments, each Kanji Mode supported by Manager Products recognizes a different set of shift-out and shift-in codes.
All characters, including delimiters and terminators, entered between a Shift-Out character and a Shift-In character are treated as kanji characters and are not validated by Manager Products.
You must specify the Shift-Out and Shift-In characters when you are interrogating the dictionary or searching for kanji strings in member definitions. If you want to specify partial strings, that is, to interrogate for a sub-string within a kanji string, you must delimit the search string with a special Kanji String Delimiter character. This character is defined using the SET KANJI-STRING-DELIMITER command. When a Kanji String Delimiter is used, Shift-Out and Shift-In characters are not included as part of the search string.
The standard Manager Products string delimiter may be adjusted using the SET STRING-DELIMITER command.
Manager Products Kanji support is available in all environments.
58

Commands that Affect the Format of Screens and Output
Command Function
SET AUTOSKIP
Makes the line on which the first Linear Command is entered the Current Line.
SET BLANK-LINE-DISPLAY
Sets whether blank lines are suppressed or displayed in output to the screen.
SET COMMAND-LINE
Specifies the position on the screen of the first line of the Command Area.
SET COUNTER Sets the increment at which the Line Counter changes.
SET CURSOR-HOLD
Specifies whether the cursor is returned to the Command Area after execution of a command.
SET ECHODisplays commands executed by an executive routine or DataManager ALTER/ MODIFY command as part of the output.
SET EXEC-WRITE Specifies whether output from Level 2 executive routines is deferred.
SET EXCP-MONITOR
Causes the number of Input/Output operations to each DataManager dataset and the MP-AID to be displayed.
SET FORMATSets the default format for output from the REPORT or BULK REPORT commands.
SET FORMAT-TITLE
Specifies a character-string which can be included in user-formatted DesignManager output.
SET LINE-AREA Sets the Line Command Area to the right, to the left, or off.
SET LINEAR-RETENTION
Specifies whether a line command is retained after execution.
SET LINE- Sets the Line-End-Character (used as a logical line end).
59
Commands that Affect the Format of Screens and Output

Command Function
END-CHARACTER
SET LIST-SHIFT Shifts output from a LIST command.
SET LOOKASIDE-RETENTION
Specifies whether to retain lookaside buffers.
SET NUMBERS
Puts source line numbering during an update of a dictionary member under user control.
SET OUTPUT-EDIT
Determines the buffer in which editor commands are to be actioned.
SET PRINT-DELIMITER
Sets whether output from the PRINT and MP-AID PRINT commands is to be delimited.
SET PRINT-SHIFT Shifts output from a PRINT or BULK PRINT command.
SET SCALE Sets a scale of column positions on the second line of the screen.
SET SCREEN-REFRESH
Refreshes the screen with output as it is being generated.
SET SCROLL-LIMIT
Sets the Scroll Limit to retain a number of lines. When output is generated in a Command Mode Buffer, the retained lines from the previous Command Mode Buffer are inserted above the Current Line.
SET TAB-CHARACTER Sets the software tab character.
SET TABS Sets the software tab positions.
SET UPDATE-OUTPUT
Optionally suppresses output from a dictionary update.
60

Command Function
SET UPPER-CASE
Causes all lowercase alphabetic characters input at the terminal to be translated to uppercase.
For each of these SET commands there is a corresponding QUERY command.
Commands that Affect Timing and Processing
Command Function
SET ALERT Sets the audible alert at the terminal.
SET CASE-INSENSITIVE- SELECTION
Specifies whether subsequent FIND and LOCATE commands and dictionary commands using the name-related-selection or WHICH HAVE using text or free-form text attribute value strings are to select objects and text strings regardless of case.
SET DIRECTLY-ASSUMPTION
Specifies whether subsequent WHAT, WHICH, DOES, and GLOSSARY commands report only direct references, or direct and indirect references to selected dictionary members.
SET FOLLOW-ALL-PATHS-ASSUMPTION
Specifies whether subsequent WHAT, WHICH, DOES, and GLOSSARY commands follow all relationship paths, or only hierarchical paths to selected dictionary members.
SET USER-DIRECTORY-SEARCH
Specifies if and the order in which the User Member directory is to be searched when locating a specified executive routine.
For each of these SET commands there is a corresponding QUERY command. There are also QUERY commands that cor-respond to SET commands available to the Systems Administrator only:
Command Function
QUERY BUFFER-LIMIT Displays the limit on the total number of buffers.
QUERY DICTIONARY-UPDATES
Displays whether you have update or read-only access to Manager Products dictionaries.
QUERY EXCP- Displays the limit on the maximum number of Input-Output
61
Commands that Affect Timing and Processing

Command Function
LIMIT operations resulting from the execution of a single command.
QUERY FREE-POOL
Displays the number of K bytes of free virtual storage retained by Manager Products for subsequent usage.
QUERY INTERROGATE-ENQUEUE
Displays whether the standard or alternative enqueuing procedure is active.
QUERY IO-FLUSH-LIMIT
Displays whether a limit has been set on the number of permissible I/O flushes and, if so, what that limit is.
QUERY MPAID-UPDATES
Displays whether you have update or read-only access to the MP-AID.
QUERY OUTPUT-LINE-LIMIT
Displays the limit on the number of lines that can be held in a Command or Lookaside Buffer.
QUERY USER-BLOCKS
Displays the number of blocks of the MP-AID occupied by USER-MEMBERs owned by your logon ID and any restrictions on the number of blocks that can be occupied.
There is also a SET command for which there is no QUERY:
Command Function
SET DOCUWARE
Enables you to examine (for evaluation) InfoBank panels relating to products or selectable units not available at your installation.
Commands that Affect InfoView
Command Function
SET INFOBANK-SELECT
Specifies whether the word SELECT is suppressed or displayed.
SET REVISION-BARS Specifies whether Revision Bars are displayed.
For each of the above SET commands there is a corresponding QUERY command. There are also QUERY commands that correspond to SET commands available to the Systems Administrator only:
62

Command Function
QUERY HELP-ENTRYDisplays the name of the panel which will be displayed when you issue the HELP command.
QUERY INDEX-PANEL Displays the name of the Index-Panel.
QUERY INFOBANK-ENTRY
Displays the name of the panel which will be displayed when you issue the INFOBANK command.
QUERY RESERVED-INFOBANK-LINE
Displays the contents of the Reserved Line on screens displaying InfoBank panels.
QUERY TOP-MENU-ENTRY Displays the Top Level Entry Panel.
Commands that Should Be Used under ASG DirectionThe following SET commands should only be used under ASG direction. For each of these commands there is a cor-responding QUERY command.
Command Function
SET ENQUEUE-TRACE
To provide a report of enqueuing and dequeuing activity during the execution of a Manager Products command.
SET SOS-DUMP
To initiate a dump. This may help to indicate how a shortage of storage occurred.
SET VERIFY To be used under ASG direction.
QUERY Commands which Have No Corresponding SET Command
Command Function
QUERY ACTIVE-BUFFERS Displays what buffers are in the buffer.
QUERY ALL Displays complete details on the current user environment.
QUERY Displays details on your dictionary environment.
63
Commands that Should Be Used under ASG Direction

Command Function
DICTIONARY
QUERY KEPT Displays any KEPT-DATA lists you have created.
QUERY LOGON-ID Displays the Logon-id with which you are logged on.
QUERY ONLINE-USERS
Displays the Logon-ids of users logged on to Manager Products.
QUERY STORAGEDisplays details on the amount of virtual storage you have used and are currently using.
QUERY VIRTUALDisplays details on the amount of virtual storage you have used and are currently using.
Multiple Commands in a Single Command LineControlManager provides a feature that enables you to enter multiple Manager Products commands in the Command Area. This means that several commands can be executed pressing Enter, and the generated output displayed in a single output buffer.
In order to use this feature, you must first define a LINE-END-CHARACTER; this is done with the SET LINE-END-CHARACTER command. Each command statement or member definition statement in the Command Area is separated from the next by the LINE-END-CHARACTER, for example:
PRINT A;/REPORT A;/QUERY PRIMARY-COMMANDS;
where / has been set to the line-end-character.
Multiple input of commands is available with any Manager Products commands except:
l Full Screen Editor commands
l Commands for clearing and scrolling a buffer
Multiple input of commands is available when invoking executive routines, but is not available:
l Within executive routines
l Within command streams
A terminator ; is optional except when a source updating command is followed by another command; then a terminator must be included between two line-end-characters, for example:
ALTER A/100 ITEM/200 HELD-AS-CHARACTER 1/;/PRINT B/REPORT B
ExamplesIn the following examples, the LINE-END-CHARACTER is /.
64

PRINT A;/REPORT A;ALTER A/100 ITEM/200 HELD-AS CHARACTER 1/;PRINT A/REPORT A/ALTER B/100 ITEM/200 HELD-AS-CHARACTER 1/;ALTER C/100 ITEM/200 HELD-AS-CHARACTER 1/;/ALTER D/100 ITEM/;
ASG does not supply a default for the LINE-END-CHARACTER; however one may have been set by the Systems Administrator. If an optional terminator is omitted, a terminator is provided by the software itself.
The Version Log FacilityThe version log facility enables you to selectively monitor and record changes to dictionary members and output reports showing the changes to them. You can:
l ENCODE a repository member in your current status with additional processing during the pre- and post-encode stage of the member to create a HISTORY-LOG member containing details on all changes to the mem-ber. The VENC command is used instead of the normal ENCODE command.
For more details regarding this command, see VENC.
l REPORT the version log of a member by retrieving a member’s associated HISTORY-LOG member and cre-ating a formatted report of changes. The VLOG command creates a report of a monitored member.
For more details regarding this command, see VLOG.
65
The Version Log Facility

InfoSystemThe ControlManager Nucleus includes an online documentation system called InfoSystem; this consists of InfoBank (the panels of text), and InfoView (the software you use to move around InfoBank). There are many commands available to access, leave, and re-enter InfoSystem, and to move around InfoBank; and Contents lists and Indexes to help you find what you want.
The Structure of InfoBankSome panels are menus; they give a choice of other panels and you SELECT the one you want. InfoBank has a tree struc-ture of menus. At the top is the Top Level Menu from which you can select one of these branches:
l How to Use InfoSystem
l InfoBank Contents
l InfoBank Index
l How Customer Support Services Can Help You
l What’s New in the Latest Releases
l Using Manager Products: Technical Information
Each of these branches contains another menu which lists the sub-branches within that branch. For example, "How Cus-tomer Support Services Can Help You" consists of these menus:
l Query resolution
l User training and education
l Manager Products documentation
Selection from menus continues until the information you want displays.
If the User Defined InfoSystem facility is installed, you can tailor InfoBank by adding, changing, and deleting panels. See ASG-Manager Products User Defined InfoSystem for further details.
InfoBank panels display in any environment, but only in CMS, CICS, Siemens Time Sharing Interface, and TSO are these displays formatted.
The structure of InfoBank is shown in InfoBank Structure: Top Levels through InfoBank Structure: ManagerView. Each box represents a panel, and each circle represents a link from one chart to another. For example:
Example of InfoBank Structure
66

InfoSystem in Different Environments In fully interactive environments (TSO, CMS, CICS, and Siemens Time Sharing Monitor) all the features of InfoSystem are available.
In batch environments, and pseudo-interactive environments (ICCF, IMS/DC, TSO/ISPF, and ROSCOE), all the commands for accessing Info System and moving around InfoBank are available, but note the following differences compared with fully interactive environments:
l You cannot use the Enter key to output or display the next logical panel. Instead, you must use the com-mand:
SELECT NEXT ;
l Output from any InfoSystem command is not formatted but is generated line by line. There is no Command Area or Reserved InfoBank Line, and no highlighting of text.
l When making a selection from a menu or panel, you must key in the SELECT keyword as well as your selec-tion.
How to Access, Leave, and Re-enter InfoSystem
How to Access InfoSystemYou can access InfoSystem with a number of different commands. These can be split into two groups.
In the first group, the panel to be displayed has been pre-set by ASG.
Command Displays Panel
HELP Top Level Menu. * HELP0000000
HELP INDEXIndex of subjects available in Help branch.
* HELP-INDEX
HELP PF List of default PF key settings.
INFOBANK Top Level Entry Panel. * INFO000000
67
InfoSystem in Different Environments

Command Displays Panel
SELECT TOP-MENU Top Level Menu. * HELP000000
* If the User Defined InfoSystem is installed, the panel displayed by this command may have been changed by your Sys-tems Administrator. You can determine which panel is displayed by using the appropriate QUERY command:
l QUERY HELP-ENTRY (HELP)
l QUERY INDEX-PANEL (HELP INDEX)
l QUERY INFOBANK-ENTRY (INFOBANK)
l QUERY TOP-MENU-ENTRY (SELECT TOP-MENU).
In the second group, you specify the panel to be displayed.
Command Displays
HELP command-name Panel describing command-name.
HELP command-name-S Panel giving syntax of command-name.
HELP member-type-name Panel describing member-type-name.
HELP topic Panel describing topic.
HELP x Index of terms starting with the letter x.
PANEL panel-name panel-name panel.
PANEL message-id Panel describing message-id.
How to Leave InfoSystemIn any environment, you leave InfoSystem automatically when you enter any valid Manager Products command (other than those to access or move around InfoSystem).
If the Extended Interactive Facility is installed, you can also leave InfoSystem if you enter this command:
QUIT ;
How to Re-enter InfoSystemThere are two commands for re-entering InfoSystem: RETRACE and SELECT.
RETRACE will take you back to the InfoBank panel or menu you saw last in your current Manager Products session.
68

Command Re-enter InfoSystem At
RETRACE The panel or menu you saw last.
RETRACE PANEL The panel you saw last.
RETRACE MENU The menu you saw last.
The SELECT commands use the NEXT-PANEL, LAST-PANEL, and LAST-MENU clauses of the panel you saw last.
Command Re-enter InfoSystem At
SELECT NEXT-PANEL The next panel in that branch.
SELECT LAST-PANEL The previous panel in that branch.
SELECT MENU The menu for that branch.
Moving Around InfoBankYou move around InfoBank in these ways:
l Using any of the commands for accessing InfoSystem
l Using the PF keys
l Looking up a panel name in an Index
l Pressing Enter
l Making a SELECT from a panel or menu
l Retracing your steps
See How to Access, Leave, and Re-enter InfoSystem for the commands for accessing InfoSystem, PF Key Settings for the default PF key settings, and Looking Up a Panel Name for how to look up a panel in an Index.
Pressing EnterIf you do not key anything in the Command Area and just press Enter, you get the next screen of information in the cur-rent panel or, if there are no more screens in the current panel, the first screen of the next panel. The simplest way of reading about a topic is to page through it by pressing Enter.
69
Moving Around InfoBank

Making a SELECT from a Panel or Menu
Command Displays
SELECT NEXT-PANEL The next panel in the current branch.
SELECT LAST-PANEL The previous panel in the current branch.
SELECT MENU The menu you saw last.
SELECT n The panel identified by the number n.
Every INFOBANK-PANEL supplied by ASG has one or more SELECT clauses in its member definition statement and this causes the SELECT 'prompt' to be displayed in the Command Area when the panel is displayed. This means you need only enter your selection and press Enter to be routed to the information you want. However, it also means that to enter a command (not a selection) you must first overtype the SELECT 'prompt'.
For details on how to suppress this display of the SELECT prompt, see SET INFOBANK-SELECT in SET and QUERY INFOBANK-SELECT.
If further information is contained in another panel, you are asked to SELECT a number, for example:
SELECT 2 for full details of the InfoBank screen lay out.
To follow up the cross-reference, key in the number indicated and press Enter. Always use the RETRACE command to return to the panel from which you made the selection.
Retracing Your Steps
Command Displays
RETRACE The panel or menu you saw last.
RETRACE PANEL The panel you saw last.
RETRACE MENU The menu you saw last.
RETRACE DISPLAY
A list of the InfoBank panels and menus you’ve seen since you logged on.
PF Key SettingsThe default PF key settings supplied by ASG with the Basic Interactive Facilities are set out below.
70

You can change these settings to suit your own requirements, and they can also be changed by the Systems Admin-istrator. To determine the current settings, enter this command:
QUERY PFKEYS ;
Default PF Key Set-tings
Description
PF1 Displays the first panel in the Help Branch of InfoBank.
PF2 Displays the InfoBank Index.
PF3 Quit (in Extended Interactive Facility environments).
PF4Displays the first menu of Panel Driven Processing (PDP).
PF5 Displays the panel you saw last.
PF6 Displays the menu you saw last.
PF7Displays the previous screen (if any) in the current panel.
PF8 Displays the next screen (if any) in the current panel.
PF9 Displays the Top Level Entry Panel.
PF10 Scrolls left 20 columns.
PF11 Scrolls right 20 columns.
PF12Displays the last command executed on the Command Line.
PF19 Displays the first screen in the current panel.
PF20 Displays the last screen in the current panel.
PF22 Scrolls left 59 columns.
PF23 Scrolls right 59 columns.
71
PF Key Settings

Looking Up a Panel NameEach panel in InfoBank has a name. In interactive environments, the name is displayed in the top right corner of the screen.
To display a panel’s name, enter this command:
PANEL panel-name ;
If you do not know a panel’s name, the easiest way to determine is to look it up in the index. To access the index, enter this command:
HELP x ;
Or
PANEL INDEXx ;
where x is the first letter of the term you want to look up.
For example, if you want to find the panel describing ControlManager, first enter this command:
HELP C ;
This displays the index of topics starting with C. Page through the index until you find the topic ControlManager and hence the panel-name.
To display this panel
> Enter PANEL panel-name or if Panel Driven Processing is installed (PDP) you can position the cursor against the panel-name (in the Line Command Area), key in PAN, and press Enter.
Revision Bars and Deleted Lines IndicatorsWhenever an InfoBank panel is updated by ASG, the changed or inserted text is flagged in the INFOBANK-PANEL member in the InfoDictionary. The flag takes the form of a vertical bar, the Revision Bar, placed in column one of the CONTENTS clause against those lines that have been changed or inserted. This is to assist you in locating the changes to previously issued panels, to determine whether your previous tailoring of the InfoSystem is affected. The Revision Bar is blanked out by the InfoView software when the constructed panel is displayed, unless the user has SET REVISION-BARS ON.
If lines are deleted, and neither the line immediately before nor the line immediately after the deleted lines is changed or new (that is, is flagged with a Revision Bar), then the position from which the lines were deleted is flagged by a Deleted Lines Indicator. This takes the form of an underscore character placed in column one on the immediately preceding line. The Deleted Lines Indicator is also blanked out by InfoView when the constructed panel is displayed, unless a SET REVISION-BARS ON command has been issued.
Error NotificationIf ASG becomes aware of any errors on InfoBank panels, users will be told about them in Manager Products Software Notices. A command is provided by which the Systems Administrator can flag any panels that are in error, acting on the information contained in the Software Notice. The flag appears on the Message Line as:
72

INFOBANK PANEL IN ERROR - See change-reference
where change-reference is a string of up to 32 characters inserted by the Systems Administrator to tell you where to find the correct information.
Fix tapes are not issued for InfoBank.
If User Defined InfoSystem is installed, the Systems Administrator can incorporate the corrected information into the InfoBank panels, without waiting for the next release.
Another Systems Administrator’s command is provided to remove a flag from an InfoBank panel.
InfoBank Structure: Top Levels
InfoBank Structure: How to Use InfoSystem
73
Error Notification

InfoBank Structure: How Customer Support Services Can Help You
74
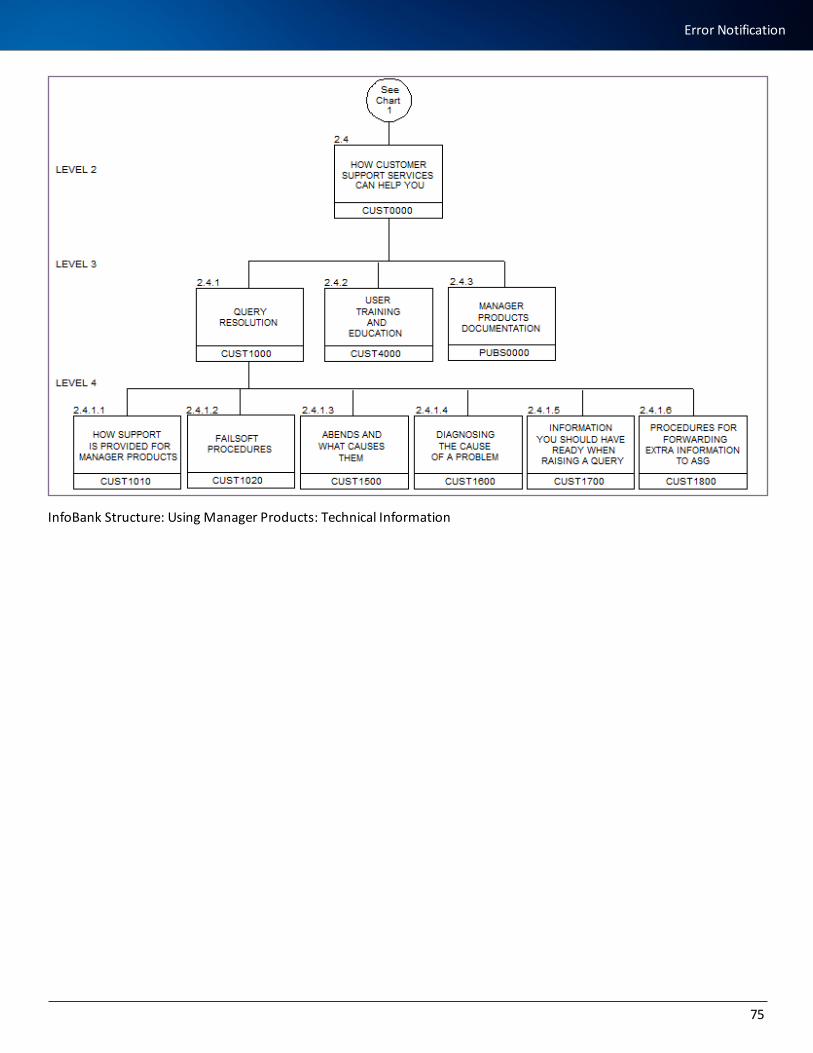
InfoBank Structure: Using Manager Products: Technical Information
75
Error Notification

InfoBank Structure: Introduction to Manager Products
InfoBank Structure: What Do You Want To Do?
76

InfoBank Structure: ControlManager
InfoBank Structure: ControlManager Facilities
77
Error Notification

InfoBank Structure: DataManager
78

InfoBank Structure: DesignManager
InfoBank Structure: DictionaryManager
InfoBank Structure: ManagerView
79
Error Notification

InfoBank Structure: SourceManager
80

The MP-AIDControlManager provides a central dataset called the Manager Products Administration and Information Dataset (the MP-AID). This dataset holds information relating to the control and operation of all the Manager Products and related dic-tionaries you have installed. For example, Logon profiles are set up by the Systems Administrator on the MP-AID and used to control users’ access to Manager Products.
These capabilities are provided using information stored on the MP-AID:
l Log on capabilities and controls
l InfoSystem (the online help and documentation system supplied to all Manager Products users)
l Corporate executive routines
l User-definable dictionary member types
l User-definable commands
l User-definable output from dictionary REPORT commands
l The ability to translate members from a Manager Products dictionary into source input statements for another vendor’s dictionary
l Profiling capabilities to tailor the Manager Products environment at several levels (individual, group, install-ation)
l The ability to store the output from most commands over different Manager Products sessions
l Personal storage capabilities
Although the MP-AID itself is supplied as part of the ControlManager Nucleus, some of the capabilities provided via the MP-AID are only available with other products and/or selectable units installed.
For details on MP-AID related facilities, see MP-AID Related Facilities.
Information is stored on the MP-AID in the form of members. Each member has a name consisting of up to 10 characters; its type depends on the function it is to perform. There are a number of different member types each supporting a par-ticular function. For example, KEPT-DATA members are used to store KEPT-DATA lists over Manager Products sessions.
A Manager Products dictionary consists of four or five datasets, and a dictionary member can have records in each one. The MP-AID consists of a single dataset, and an MP-AID member has records only in this one dataset. Dictionary mem-bers are subject to syntactical validation: MP-AID members are not.
A number of commands to interrogate, manipulate, and report from the MP-AID are available to all users.
Extended variants of the commands available to all users, and additional commands provided for use in maintenance of the MP-AID are restricted to use by the Systems Administrator and, in some instances, to use by Host and Guest Con-trollers.
MP-AID Member TypesThere are several different MP-AID member types each supporting a different capability. For example, KEPT-DATA mem-bers are used to store KEPT-DATA lists over Manager Products sessions whereas LOGON-PROFILEs are used to provide
81
The MP-AID

user access to Manager Products.
Some are available with ControlManager Nucleus but may have additional functionality when a particular Product and/or selectable unit is installed. Others are only available if a particular product and/or selectable unit is installed. For example: LOGON-PROFILEs are available with ControlManager Nucleus but have additional use if the Systems Administrators Envir-onmental Control Facility is installed; KEPT-DATA members may only be created if DataManager is installed (since they are used to store KEPT-DATA lists which may only be created using DataManager).
Some member types may be added directly to the MP-AID by any user. These member types support what may be called personal capabilities, that is, they are for the user’s personal use. For example, USER-MEMBERs provide a personal storage capability for all users.
Some member types must first be defined as dictionary members in the Manager Products Administration Dictionary, and then constructed onto the MP-AID by the Systems Administrator. These member types support what may be called corporate capabilities, that is, they provide facilities or implement environmental conditions that apply to all users, but are defined by the Systems Administrator. For example, a GLOBAL-PROFILE can be used to set certain environmental conditions for all Manager Products users at an installation.
The ASG-supplied InfoBank members and the Panel Driven Processing (PDP) EXECUTIVE members are not constructed onto the MP-AID in this way. They are loaded onto the MP-AID from an ASG-supplied dataset as part of the Manager Products installation procedure.
Access to MP-AID MembersAn MP-AID member can be public, private, or restricted.
This determines who can copy, delete, edit, list, or print it.
A public MP-AID member can be added to the MP-AID by any user, and can be listed, printed, and copied by other users if they specify the logon identifier of the user who added it.
For example you could enter this command:
MP LIST USER-MEMBERS BILL ;
where BILL is the logon identifier of another user. The command would produce a list of USER-MEMBERs added to the MP-AID by user BILL who at the time of adding each USER-MEMBER specified that it was PUBLIC.
A private MP-AID member can be added to the MP-AID (using FILE or HOLD) by the currently logged-on user, or by another user sharing the same logon identifier. It can be listed, printed, edited, copied, or deleted only by a user with that logon identifier. That is, each user can list, print, edit, copy, or delete their own private MP-AID members.
Restricted MP-AID members can be added to the MP-AID only by the Systems Administrator and, apart from the fol-lowing exceptions, can be processed only by the Systems Administrator:
l EXECUTIVE members can be listed, printed, or copied by any user. However, if the Systems Administrators Environmental Control Facility is installed, access to some EXECUTIVE members may be restricted.
l FORMAT and TRANSLATION-RULE members can be listed by any user
l UDS-TABLEs and UDS-COMPARISON-TABLES can be listed by dictionary Controllers and Guest Controllers.
82

The Systems Administrator can delete, list, print, or copy any MP-AID member (private, public, or restricted), but cannot edit another user’s PRIVATE members.
MP-AID Related FacilitiesThe ControlManager Nucleus is available in all environments, and includes the following MP-AID facilities:
l MP-AID creation, housekeeping, and interrogation
l Basic LOGON capabilities
l Control of the global environments
l InfoSystem (the screen based help/information system containing comprehensive technical documentation of Manager Products)
ControlManager selectable units that provide additional functionality via the MP-AID, are:
l The Extended Interactive Facility
l User Defined Commands
l User Defined InfoSystem
l User Defined Syntax
l The Systems Administrator’s Environmental Control Facility
DictionaryManager also provides additional functionality via the MP-AID.
With the Nucleus you can translate the format of ASG dictionary member types to that of another vendor’s dictionary member types; the TRANSLATION-RULES and the output from such a translation are held as members on the MP-AID. With the Corporate Dictionary Definition Export for IDD installed, the output can be exported to the target dictionary.
With User Defined Output installed, output from REPORT commands can be tailored.
DesignManager also provides additional functionality via the MP-AID. With the Nucleus you can STORE the contents of a WORKBENCH on the MP-AID.
Access to MP-AID Member Types
MP-AID Member Type
Access Notes
EXECUTIVE RestrictedAny user may list, print, and copy executive members.
FORMAT Restricted Any user may list format members.
INFOBANK Restricted
KEPT-DATA Private
83
MP-AID Related Facilities

MP-AID Member Type
Access Notes
PROFILE Restricted
TRANSIENT Private
TRANSLATION-RULE RestrictedAny user may list TRANSLATION-RULE members.
UDS-COMPARISON-TABLE
Restricted Controllers/Guest Controllers.
UDS-TABLE Restricted Controllers/Guest Controllers.
USER-MEMBERSPrivate or Public
Public user members may be listed, printed, and subsequently copied by any user who specifies the logon identifier.
VARIABLE-POOL RestrictedMay be listed or deleted by Systems Administrators.
WORKBENCH Public
MP-AID Member Types
EXECUTIVE MembersIf ControlManager’s User Defined Commands facility is installed, the Systems Administrator can create Corporate exec-utive routines. A series of commands and/or directives are placed in an EXECUTIVE-ROUTINE member of the Manager Products Administration Dictionary. The Systems Administrator then constructs this onto the MP-AID to form an EXECUTIVE member.
The Systems Administrator can designate users to define EXECUTIVE-ROUTINE members in the dictionary, but only the Systems Administrator can construct them onto the MP-AID.
All users can execute Corporate executive routines containing in these ways: commands:
l All Manager Products commands normally available to them
l Any non-restricted Manager Products commands which have been disabled
l Any SET commands normally restricted to the Systems Administrator
84
When you place a Manager Products SET command in an executive routine, it must be prefixed by the MPR directive. For example:
MPR SET EXEC-WRITE OFF ;
If not prefixed by MPR, the SET command would be interpreted as a SET directive.
You can nest EXECUTIVEs by naming any other EXECUTIVE member as one of the commands in a given EXECUTIVE. In this way, they can be nested to any depth.
You can execute the commands of an EXECUTIVE member by entering the member name, optionally prefixed by the com-mand keyword CORPORATE-EXECUTIVE. In addition any necessary parameters must also be specified.
If the Systems Administrator’s Environmental Control Facility is installed, the Systems Administrator can assign Access Control levels to an EXECUTIVE member and so control which users can use it.
FORMAT MembersIf DictionaryManager’s User Defined Output facility is installed, the Systems Administrator can tailor the format of output from the REPORT command. The desired output format is specified in a FORMAT member of the Manager Products Administration Dictionary. The Systems Administrator then constructs this onto the MP-AID.
The Systems Administrator can designate users to define FORMAT members in the dictionary, but only the Systems Administrator can construct them onto the MP-AID. Users can also enter FORMAT members in their own dictionaries and use them directly.
INFOBANK MembersAn MP-AID INFOBANK member is an InfoBank Panel, that is, a set of one or more screens in the ASG help or information system InfoSystem.
InfoSystem is a menu-driven online documentation system consisting of these components:
l InfoView, the software which displays the panels of text
l InfoBank, the panels themselves
InfoSystem is designed to help you use Manager Products; it provides detailed information to help you use each specific product, and general information about ASG and its products.
In the installation procedure, the basic INFOBANK members are loaded directly onto the MP-AID from an ASG-supplied dataset.
If the User Defined InfoSystem facility is installed, the ASG-supplied panels can be installed as INFOBANK-PANEL dictionary members in the Manager Products Administration Dictionary (the InfoDictionary). The Systems Administrator then con-structs these INFOBANK-PANEL dictionary members onto the MP-AID to form InfoBank panels. Since these panels are members in the Administration dictionary, they can be modified as required, and new panels added.
KEPT-DATA MembersYou can use the DataManager STORE command to store a KEPT-DATA list as a KEPT-DATA member on the MP-AID. This member is retained over Manager Products sessions, and can be retrieved at any time using the DataManager FETCH command.
85
MP-AID Member Types

KEPT-DATA members are private: they belong to the user who created them and, apart from the Systems Administrator, only users with the same logon identifier can list, print, or delete them.
Any number of these members can be created on the MP-AID. However, if the Systems Administrator’s Environmental Control Facility is installed, the Systems Administrator can specify the maximum space allowed on the MP-AID for each user.
PROFILE Members
Summary There are two types of MP-AID PROFILE member: Logon PROFILEs and Global PROFILEs. Both types are defined as mem-bers of the Manager Products Administration dictionary and subsequently constructed onto the MP-AID by the Systems Administrator.
To log on to Manager Products using the LOGON command, the Logon Panel, or Logon Exit, you must enter a logon iden-tifier and password. For all users, except the Systems Administrator, the logon identifier and password are assigned, by the Systems Administrator, who creates a Logon profile for that purpose. The logon identifier entered by a user must match, exactly, the name of such a Logon profile and the password must match the password specified in that profile. When the logon identifier is entered it invokes the Logon profile with that name.
The Logon profile establishes your credentials and may also include commands to tailor your environment:
l Specifying the setting of PF keys
l Giving an additional level of security by disabling certain commands and restricting access to dictionaries and/or statuses
l Giving different levels of online help to suit the needs of different users
l Routing a user directly into Panel Driven Processing
l Specifying user class (for example, CONTROLLER)
Such commands are executed automatically when the Logon profile is invoked, by entry of the correct logon identifier and password, if the Systems Administrators Environmental Control Facility is installed.
Commands which would be common to two or more Logon profiles can be included in a Global profile rather than being repeated in each user’s Logon profile. Typical uses of a Global profile are:
l To establish a common environment for a group of users (for example, the members of a department)
l To route users to a particular dictionary/status in a multiple dictionary/status environment
l To limit the commands available to certain classes of user
l To establish default settings in interactive environments (for example PF keys)
The use of profiles for Systems Administrators is different to that for other users.
LOGON-PROFILE Members Logon profiles are defined as LOGON-PROFILE members in the Manager Products Administration Dictionary and then con-structed onto the MP-AID as PROFILE members.
86

The name of a Logon profile is used as the logon identifier. When the logon identifier is entered, the Logon profile with that name is invoked - providing it exists on the MP-AID.
As a minimum requirement, a Logon profile will establish a user’s credentials to log on to Manager Products, that is, the logon identifier and password. In addition, the Logon profile may also specify:
l The name under which the Logon profile is to be stored on the MP-AID (if different from the name of the LOGON-PROFILE member in the dictionary)
l Whether the Logon profile is to be shared or exclusive (only in fully interactive environments, that is, CICS, CMS, TSO, and Siemens Time Sharing Interface)
l Whether a user logging on with these credentials is a Designated Controller
A shared Logon profile allows a number of users to be logged on at one time using this logon identifier and password; a Logon counter is incremented by one when each logs on. An exclusive Logon profile allows only one user to be logged on at one time using this logon identifier and password; a Logon flag is set when it is in use.
The Systems Administrator can establish a user as a Designated Controller by including the keyword CONTROLLER in the Logon profile. This will enable the user to execute a subset of restricted User Defined Syntax related commands and to read all InfoBank panels normally restricted to dictionary Controllers.
A number of additional options can be specified in a Logon profile and, if the Systems Administrator’s Environmental Con-trol Facility is installed, these options will be effective:
l The profile can include commands which establish a unique environment for a user. Commands normally available to the user and SET commands restricted to the Systems Administrator can both be included.
l Separate GLOBAL-PROFILE members may be invoked which (depending on the operational mode) perform functions specific to an online or batch environment
l Access Control levels can be specified which control the user’s ability to execute any MP-AID EXECUTIVE members which have been assigned a specific access level. For this capability, the User Defined Commands facility must also be installed.
GLOBAL-PROFILE Members Global profiles are defined as GLOBAL-PROFILE members in the Manager Products Administration dictionary and then constructed onto the MP-AID as PROFILE members. They can contain any of the commands permitted in Logon profiles.
If the Systems Administrator has created a Global profile called GLOBAL0000 then this is invoked automatically whenever you log on. GLOBAL0000 is known as the Universal Global profile. It is invoked when any user logs on (except for the Sys-tems Administrator who may use a NO-PROFILE option when logging on).
If the Systems Administrator has created a Global profile called GLOBALAUTO, it is invoked, automatically, during the Autolog procedure.
For details on Autolog, see Autolog.
A Logon profile may also specify one or more other Global profiles which may, if the Systems Administrators Envir-onmental Control Facility is installed, be invoked in these ways:
87
MP-AID Member Types

l As a COMMON-GLOBAL invoked whenever you log on
l As an ONLINE-GLOBAL invoked when you log on interactively
l As a BATCH-GLOBAL invoked when you log on in batch
l As a TCP-GLOBAL invoked when you log on to the Manager Products Server Facility (MPSF) using a TCP/IP connection
Thus, one Logon profile can establish different environments depending on how you log on.
COMMON-GLOBAL, ONLINE-GLOBAL, TCP-GLOBAL, and BATCH-GLOBAL are keywords to be spe-cified within a Logon profile and followed by the name of a Global profile; they are not member type identifiers.
Any number of Global profiles may be created but each Logon profile can, in addition to GLOBAL0000, define a maximum of four: one of each type listed above.
If the LOGON command is contained in an Access Call from a User Interface program the execution of ONLINE-GLOBALs and BATCH-GLOBALs depends on whether the User Interface program is in online or batch mode.
See the appropriate User Interface Manual for details on User Interface programs.
User-defined Profiles If the Extended Interactive Facility and the Systems Administrator’s Environmental Control Facility are installed you can create your own user-defined profile and so tailor the environment to suit your own needs.
You create a user-defined profile as a series of commands in a USER-MEMBER on the MP-AID. The name of the USER-MEMBER must be the same as your logon-identifier; when you log on, that USER-MEMBER will be invoked and the com-mands in it executed.
Sequence of Execution of ProfilesWhen you log on using the LOGON command, the Logon Panel, or the Logon Exit, the different types of profile, if present, are processed in this sequence:
l The Universal Global profile GLOBAL0000
l The Global profile invoked as COMMON-GLOBAL
l The Global profile invoked as ONLINE-GLOBAL, TCP-GLOBAL, or BATCH-GLOBAL
l The commands contained in the Logon profile
l The user-defined profile
A setting defined by a command executed in one profile may be redefined by a command executed in a another profile that is executed subsequently during the Logon process. For example, if your logon profile contains the command:
SET PF12 HELP ;
and your user-defined profile contains the command:
88

SET PF12 RECALL ;
then when the logon process is complete, PF 12 will be set to RECALL.
TRANSLATION-RULE MembersTRANSLATION-RULES can be supplied as an ASG dataset and loaded directly onto the MP-AID, or they can be defined in the Administration dictionary and constructed onto the MP-AID.
If DictionaryManager is installed, the Systems Administrator can define rules by which a dictionary member type, such as GROUP, is translated from the format of a Manager Products dictionary to that of another vendor’s dictionary.
If you have been given access to the Manager Products Administration dictionary, you can build translation rules as mem-bers of that dictionary; these are then CONSTRUCTed onto the MP-AID by the Systems Administrator.
The TRANSLATION-RULE can be used by subsequent TRANSLATE commands to translate the ASG-supplied format to that of the target dictionary, and/or, if required, to another Manager Products dictionary.
UDS-TABLE MembersIf the User Defined Syntax facility is installed, dictionary Controllers can define their own hierarchically related dictionary member types and their attributes. The syntax they define is organized in table form (the UDS table). A UDS table may be stored on the MP-AID or be present as an ASG-supplied module in the Manager Products Program Library.
If UDS is installed, you can store UDS tables on the MP-AID as primary UDS-TABLE members. This is done in each case by defining a HIERARCHY member, together with a set of members defining the member types and attributes for the target dictionary, in the Manager Products Administration Dictionary and constructing it onto the MP-AID.
A secondary UDS-TABLE member is added to the MP-AID whenever a CONTROL UDS command is entered. The CONTROL UDS command causes a currently opened dictionary to be assigned a specified UDS table, and this is recorded in the sec-ondary UDS table. The secondary UDS table does not contain a copy of the UDS table itself; this may be stored either as a primary UDS-TABLE member of the MP-AID (one which has been defined by a user) or as an ASG-supplied module.
A secondary UDS-TABLE member will also be added or replaced on the MP-AID when a valid CREATE or RELOAD command is processed.
A secondary UDS member may only be created by a Host Controller since only a Host Controller has the authority to enter a CONTROL UDS, CREATE, or RELOAD command.
Details on the CONTROL UDS command and other UDS-related Controller activities can be found in the ASG-Manager Products Controller’s Manual.
UDS-COMPARISON-TABLE MembersA UDS-COMPARISON-TABLE member is added or replaced on the MP-AID whenever a COMPARE UDS command, spe-cifying two UDS tables, is executed.
A UDS table may be stored on the MP-AID or be present as an ASG-supplied module in the Manager Products Program Library.
The COMPARE UDS command may be entered by a Designated Controller when acting as a Guest Controller in another dictionary, or by any other Controller when his or her dictionary is open (that is, by a 'Host' Controller).
89
MP-AID Member Types

USER-MEMBERs and TRANSIENT MembersIf the Extended Interactive Facility is installed, any user can add USER-MEMBERs and TRANSIENTs to the MP-AID: using EDIT, and then FILE (USER-MEMBERs) or HOLD (TRANSIENTs).
You can also create a USER-MEMBER or TRANSIENT from outside of the Full Screen environment using the MP-AID ADD command. Additionally, you can append records to an existing USER-MEMBER or TRANSIENT using the MP-AID APPEND command.
USER-MEMBERs and TRANSIENTs are private: they belong to the user who created them and, apart from the Systems Administrator, only users with the same logon identifier can list, print, or delete them. This means you have the ability to create a personalized filing system.
USER-MEMBERs are retained over Manager Products sessions; TRANSIENTs are automatically deleted when the ori-ginating user logs off.
If the User Defined Commands facility is also installed, you can place commands in USER-MEMBERs and TRANSIENTs and so create User executive routines and Transient executive routines.
As a general rule, the commands in an executive routine can be executed simply by entering the name of the routine fol-lowed by any required parameters. However, it may be necessary to use a prefix command.
Unlike Corporate executive routines, User executive routines and Transient executive routines can only contain Manager Products commands and User Defined Command directives; they cannot contain any Manager Products commands that have been disabled or any SET commands normally restricted to the Systems Administrator.
User executive routines and Transient executive routines can only be executed by the user who created them, or another user having the same logon identifier. They can be nested to any depth.
If DataManager is installed, User executive routines and Transient executive routines may contain one or more PERFORM commands, and these can be nested to any depth.
If the Systems Administrator’s Environmental Control Facility is installed, you can set up a user-defined profile. This is a User executive routine whose name is the same as your logon identifier; when you log on, the commands in the routine are automatically executed.
If DictionaryManager is installed, the output produced by the TRANSLATE command is created as a USER-MEMBER or public USER-MEMBER on the MP-AID. (The name of the member is specified in the TRANSLATE command.) A USER-MEMBER is normally accessible only to the user who created it. A public USER-MEMBER is accessible to any user spe-cifying the logon identifier of the one who created it; this means you can print, copy, and list a public USER-MEMBER, but cannot delete or edit it.
Any number of USER-MEMBERs and TRANSIENTs can be created on the MP-AID. However, if the Systems Administrator’s Environmental Control Facility is installed, the Systems Administrator can specify the maximum space allowed on the MP-AID for each user.
VARIABLE-POOL MembersVARIABLE-POOL members are used by the Manager Products software to store between sessions, the value of any PROFILE variables allocated by a Procedures Language executive routine.
90

VARIABLE-POOL members are created automatically at logoff from the Manager Products session if PROFILE variables have been allocated during the session, session as long as the user is logged on under an Exclusion Logon profile and has read/write access to the primary MP-AID.
The next time the user logs on, the PROFILE variables are automatically retrieved from the MP-AID.
The System Administrator normally shares their logon ID. Therefore, concurrent System Admin-istrator logons can influence each other and result in an undefined VARIABLE-POOL contents. This applies particularly to a server environment where multiple concurrent System Administrator logons occur.
VARIABLE-POOL members are available if selectable unit TE00 and/or the ControlManager User Defined Commands facil-ity are installed.
VARIABLE-POOL members are effectively private, since they are associated with the Manager Products logon ID under which they were created, but no user other than the Systems Administrator can access them directly. The Systems Administrator can use the MP-AID DELETE, EXEC-LIST, and LIST commands with VARIABLE-POOL members.
WORKBENCH MembersYou can use the DesignManager STORE command to store the current contents of a Workbench Design Area as a WORKBENCH member on the MP-AID. This member is retained over Manager Products sessions, and can be retrieved at any time using the DesignManager FETCH command.
WORKBENCH members are private: they belong to the user who created them and, apart from the Systems Admin-istrator, only users with the same logon identifier can list or delete them.
Any number of these members can be created on the MP-AID. However, if the Systems Administrator’s Environmental Control Facility is installed, the Systems Administrator can specify the maximum space allowed on the MP-AID for each user.
Output from an MP-AID LIST CommandOutput from an MP-AID LIST command consists of a list of MP-AID member names and columns of information about each listed member. The output varies when a particular member type is specified in the command. These columns are always output:
Column Title
Description
NAME The name of the member.
TYPEThe type of member.In output from an MP-AID LIST USER-MEMBERs command, the letter P against this column indicates a public USER-MEMBER.
91
Output from an MP-AID LIST Command

Column Title
Description
DATEThe date the member was added to the MP-AID or (if it has been updated since it was added) the date it was last updated.
TIMEThe time the member was added to the MP-AID or (if it has been updated since it was added) the time it was last updated.
BLOCKS The number of blocks of space occupied by the MP-AID member.
Depending upon the member type you specify in the MP-AID LIST command (if any) the following additional information may be output:
Column Title Description
RECORDS The number of lines in the member.
LOGON-ID The user’s logon identifier.
SEC-LEV The Access Control Level.
USAGE
How a Workbench is used.For example, for a DesignManager Workbench this column would contain WBDA (which stands for Workbench Design Area).
Output for USER-MEMBER, TRANSIENT, and KEPT-DATA member types has two additional columns: RECORDS and LOGON-ID.
Output for EXECUTIVE member types has two additional columns: RECORDS and SEC-LEV.
Output for WORKBENCH member types has two additional columns showing USAGE and LOGON-ID.
For FORMAT and TRANSLATION-RULE member types no additional columns are output.
The following is an example of the output produced in response to an MP-AID LIST FORMATs command:
Name Type Date Time Blocks
BOX-ONE FORM 11 AUG 1987 16.13.56 2
BOX-TWO FORM 27 AUG 1987 12.02.03 1
92

There are two FORMAT members: BOX-ONE and BOX-TWO. BOX-ONE was added/last updated on 11th August 1987 at about 4.15 pm, and occupies two blocks of space on the MP-AID; BOX-TWO was added/last updated on 27th August 1987 at midday, and occupies one block.
MP-AID Member: Listing
Member/User Cat-egory
All UsersDesignated
or Host Controller
Systems Admin-istrator
EXECUTIVE Yes* Yes* Yes
FORMAT Yes Yes Yes
INFOBANK No No Yes
KEPT-DATA Yes Yes Yes
PROFILE No No Yes
TRANSIENT Yes# Yes# Yes
TRANSLATION-RULE Yes Yes Yes
UDS-COMPARISON-TABLE
No Yes Yes
UDS-TABLE No Yes Yes
USER-MEMBER Yes# Yes# Yes
VARIABLE-POOL No No Yes
WORKBENCH Yes Yes Yes
The categories marked as * apply only to those members for which the user has been assigned the appropriate Access Control Levels, when the Systems Administrator’s Environmental Control Facility is installed.The categories marked as # apply only to those members which were added by the user who is logged on or by another user who shares the same logon identifier.
93
Output from an MP-AID LIST Command

MP-AID Member: Printing
Member/User Cat-egory
All UsersDesignated or
Host ControllerSystems
Administrator
EXECUTIVE Yes* Yes* Yes
FORMAT No No No
INFOBANK No No No
KEPT-DATA Yes# Yes# Yes
PROFILE No No Yes
TRANSIENT Yes# Yes# Yes
TRANSLATION-RULE No No No
UDS-COMPARISON-TABLE
No No No
UDS-TABLE No No No
USER-MEMBER Yes# Yes# Yes
VARIABLE-POOL NO NO NO
WORKBENCH No No No
The categories marked as * apply only to those members for which the user has been assigned the appropriate Access Control Levels, when the Systems Administrator’s Environmental Control Facility is installed.The categories marked as # apply only to those members which were added by the user who is logged on or by another user who shares the same logon identifier.
94

CommandsThis topic describes the ControlManager commands available in all environments, those available with the Basic Inter-active facilities, and those available with the Extended Interactive Facility.
The commands are arranged alphabetically and documented fully in ControlManager Commands. However, lists of these commands, arranged according to environment and facility, are given in the following sections.
Submitting Batch JobsManager Products to store batch jobs containing the required JCL and Manager Products commands as members on the MP-AID. You can then use the ControlManager SUBMIT command to submit these jobs to the z/OS JES queues. See SUBMIT for further information on the SUBMIT command.
You also can use most Manager Products commands in a batch job. The most notable exceptions are the commands provided by the Full Screen Editor: UPDATE, BACKWARD, CHANGE, LADD, PUT, MM, etc.
For information on the Full Screen Editor commands, see The Extended Interactive Facility.
Commands Available in all EnvironmentsThe ControlManager commands available in all environments can be grouped into these categories:
l Nucleus commands
l SET and QUERY commands
l InfoSystem commands
Nucleus Commands
CLOSE MP-AID PASSWORD
DMS MP-AID PRINT
DSC NOPRINT-SEARCH
DSS SKIP
ENVIRONMENT SPACE
FREE SUBMIT
LOGOFF SWITCH MESSAGES
LOGON SWITCH NAME-CONCATENATION
95
Commands

MODE SWITCH OUTPUT
MP-AID DELETE TEXT
MP-AID LIST WBDA
SET and QUERY Commands
QUERY ALL
QUERY AMBIGUITY-ASSUMPTION
QUERY CHARACTER-TRANSLATION
SET and QUERY CASE-INSENSITIVE-SELECTION
QUERY DICTIONARY
QUERY DICTIONARY-UPDATES
SET and QUERY DIRECTLY-ASSUMPTION
QUERY DOCUWARE
SET and QUERY ECHO
QUERY ENQUEUE-TRACE
SET and QUERY ESCAPE-CHARACTER
SET and QUERY FORMAT
SET and QUERY FORMAT-TITLE
QUERY FREEPOOL
QUERY HELP-ENTRY
QUERY INDEX-PANEL
QUERY INFOBANK-ENTRY
QUERY INTERROGATE-ENQUEUE
QUERY IO-FLUSH-LIMIT
96

QUERY KANJI-MODE
QUERY KANJI-STRING-DELIMITER
QUERY KEPT
SET and QUERY LIST-SHIFT
QUERY LOGON-ID
QUERY MESSAGE-LANGUAGE
QUERY MODE
QUERY MPAID-UPDATES
QUERY ONLINE-USERS
SET and QUERY PERFORM-CHARACTER
QUERY PRIMARY-COMMANDS
SET and QUERY PRINT-DELIMITERS
SET and QUERY PRINT-SHIFT
QUERY RESERVED-INFOBANK-LINE
SET and QUERY REVISION-BARS
QUERY SOS-DUMP
QUERY STORAGE
QUERY STRING-DELIMITER
QUERY TOP-MENU-ENTRY
SET and QUERY TRANSLATION
SET and QUERY USER-DIRECTORY-SEARCH
QUERY USER-BLOCKS
SET and QUERY VERIFY
QUERY VIRTUAL
97
Commands Available in all Environments

InfoSystem Commands
HELP
INFOBANK
PANEL panel-name
QUERY HELP-ENTRY
QUERY INDEX-PANEL
QUERY INFOBANK-ENTRY
QUERY RESERVED-INFOBANK-LINE
RETRACE
SELECT
Commands Available with the Basic Interactive FacilitiesYou can group the ControlManager commands available with the Basic Interactive facilities into these categories:
l SET and QUERY commands
l Other commands
These commands are in addition to those available in all environments.
SET and QUERY Commands
SET and QUERY AUTOSKIP
SET and QUERY BLANK-LINE-DISPLAY
SET and QUERY COMMAND-LINE
SET and QUERY COUNTER
SET and QUERY CURSOR-HOLD
QUERY EXCP-LIMIT
98

SET and QUERY INFOBANK-SELECT
SET and QUERY LINE-AREA
SET and QUERY LINE-END-CHARACTER
QUERY OUTPUT-LINE-LIMIT
QUERY PFKEYS and SET PF
SET AND QUERY SCALE
SET and QUERY UPPER-CASE
Other Commands
BACKWARD
BOTTOM
CLEAR
FORWARD
LEFT
RIGHT
TOP
Commands Available with the Extended Interactive FacilityYou can group the ControlManager commands available with the Extended Interactive facility using these commands:
l Prefix and Primary
l Editor Line
l SET and QUERY
These commands are in addition to those available in all environments and those available with the Basic Interactive facilities.
Prefix and Primary Commands
99
Commands Available with the Extended Interactive Facility

BROWSE LOOKASIDE
CHANGE MOVE
DELETE MP-AID EXEC-LIST
DOWN NEXT
EDIT PUT
FILE QUIT
FIND REFILE
GET-DICTIONARY/GETD RUN
GET-EXECUTIVE/GETE SEARCH
GET-SCRATCHPAD/GETS SMOVE
GET-TRANSIENT/GETT SOURCE-FILE/SFILE
GET-USER/GETU UP
HOLD UPDATE
KPUT WIPE
LADD XQUIT
LOCATE ZONE
Editor Line Commands
/ Current Line Pointer.
"[n] Duplicate the line (n times).
A[n] Add (n) blank line(s).
C[n] Copy (n) line(s).
CC Copy block.
D[n] Delete (n) line(s).
100

DD Delete block.
F[n] Follow (n copies).
I[n] Insert (n copies).
K[n] Also copy (n) line(s).
KK Also copy block.
M[n] Move (n) line(s).
MM Move block.
P[n] Precede (n copies).
S[n] Also move (n) line(s).
SS Also move block.
SET and QUERY Commands
QUERY ACTIVE-BUFFERS
SET and QUERY ALERT
QUERY BUFFER-LIMIT
SET and QUERY EXCP-MONITOR
QUERY LINE-COMMANDS
SET and QUERY LOOKASIDE-RETENTION
SET and QUERY NUMBERS
SET and QUERY SCREEN-REFRESH
SET and QUERY SCROLL-LIMIT
SET and QUERY TAB-CHARACTER
SET and QUERY TABS
SET and QUERY UPDATE-OUTPUT
101
Commands Available with the Extended Interactive Facility

ControlManager CommandsThis section describes the ControlManager commands available in all environments, those available with the Basic Inter-active facilities, and those available with the Extended Interactive Facility.
/ (Current Line Pointer)The / (Current Line Pointer) command makes this line the Current Line.
If you key / in the Line Command Area of a line and press Enter, that line becomes the Current Line; that is, the text is scrolled forward, and that line becomes the top line in the Data Area.
/ is available with the Extended Interactive Facility and can be used in Command, Edit, Lookaside, and Update Modes, and in InfoSystem.
/ (Current Line Pointer) Syntax
/
" (Duplicate Line)The " (Duplicate Line) command duplicates a line.
To duplicate a line, enter " in the Line Command Area and press Enter. To duplicate a line n times, enter "n in the Line Command Area and press Enter. n can be any number ranging from 1 through 9999, subject to the overall limit on your allocation of virtual storage.
After execution, the cursor is placed in column one of the first duplicated line.
" is available with the Extended Interactive Facility.
" (Duplicate Line) Command Syntax
"
A and LADDThe A and LADD command adds one or more blank lines to an Edit or Update Buffer.
The commands are described in the following subsections, for each of which the name of the corresponding InfoBank panel is given.
l A - Add Line Command (CMRCOM3215)
l LADD - Add Primary Command (CMRCOM3126)
A - Add Line CommandTo add one blank line to an Edit or Update Buffer, enter this command:
A
in the Line Command Area and press Enter.
To add n blank lines, enter this command:
An
102

in the Line Command Area and press Enter. n can be any number ranging from 1 through 9999, subject to the overall limit on your allocation of virtual storage.
The blank lines are added after the line in which the command was entered, and the cursor is placed in column one of the first added line.
A is available with the Extended Interactive Facility.
LADD - Add Primary CommandTo add one blank line to an Edit or Update Buffer, immediately after the Current Line, enter this command:
LADD ;
To add n blank lines, enter this command:
LADD n ;
n can be any number ranging from 1 through 9999, subject to the overall limit on your allocation of virtual storage.
When the LADD command is executed, the cursor is placed in column one of the first added line.
LADD is available with the Extended Interactive Facility.
A and LADD command SyntaxThe syntax of the add line command is:
The syntax of the add primary command is:
BACKWARD and FORWARDThe BACKWARD and FORWARD command displays the previous or next screen in the current buffer.
To display the previous screen in the current buffer, enter this command:
BACKWARD ;
When the Current Line is the TOP OF DATA delimiter then you cannot go any further backwards.
To display the next screen in the current buffer, enter this command:
FORWARD ;
When the Current Line is the last line in the buffer then you cannot go any further forwards.
BACKWARD and FORWARD are available with the Basic Interactive Facilities, and can be used in Command, Edit, Lookaside, and Update Modes. and in InfoSystem.
BACKWARD and FORWARD Syntax
103
ControlManager Commands
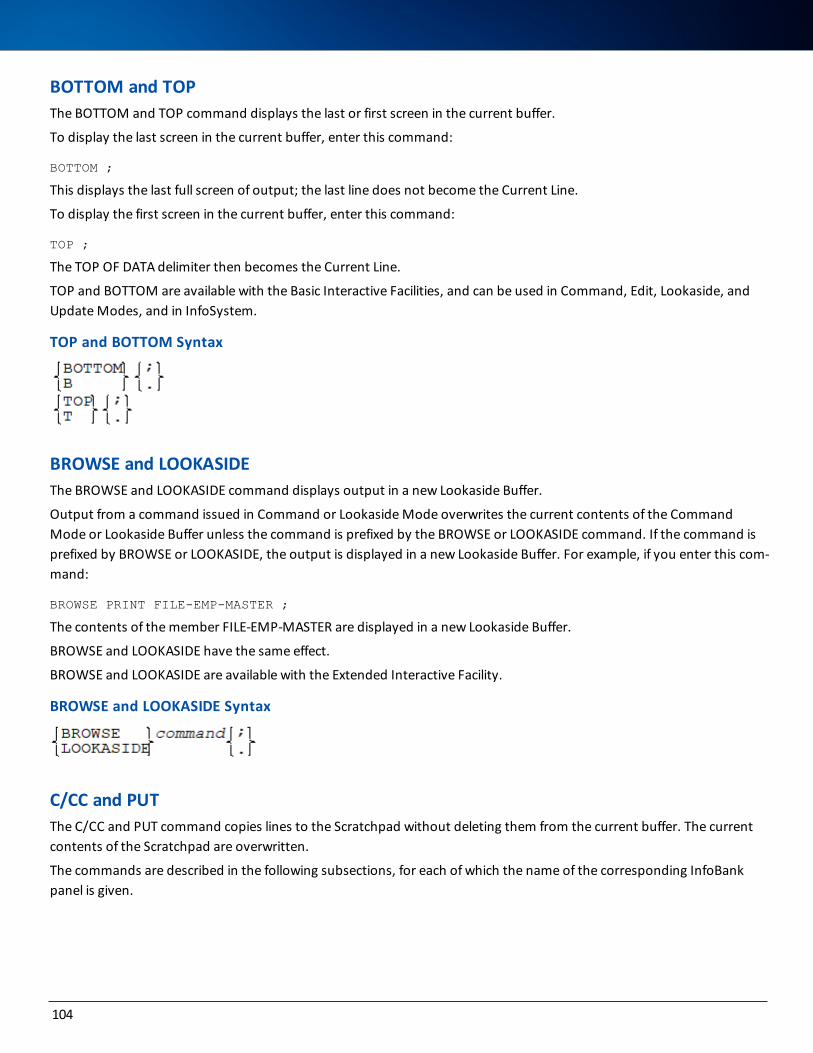
BOTTOM and TOPThe BOTTOM and TOP command displays the last or first screen in the current buffer.
To display the last screen in the current buffer, enter this command:
BOTTOM ;
This displays the last full screen of output; the last line does not become the Current Line.
To display the first screen in the current buffer, enter this command:
TOP ;
The TOP OF DATA delimiter then becomes the Current Line.
TOP and BOTTOM are available with the Basic Interactive Facilities, and can be used in Command, Edit, Lookaside, and Update Modes, and in InfoSystem.
TOP and BOTTOM Syntax
BROWSE and LOOKASIDEThe BROWSE and LOOKASIDE command displays output in a new Lookaside Buffer.
Output from a command issued in Command or Lookaside Mode overwrites the current contents of the Command Mode or Lookaside Buffer unless the command is prefixed by the BROWSE or LOOKASIDE command. If the command is prefixed by BROWSE or LOOKASIDE, the output is displayed in a new Lookaside Buffer. For example, if you enter this com-mand:
BROWSE PRINT FILE-EMP-MASTER ;
The contents of the member FILE-EMP-MASTER are displayed in a new Lookaside Buffer.
BROWSE and LOOKASIDE have the same effect.
BROWSE and LOOKASIDE are available with the Extended Interactive Facility.
BROWSE and LOOKASIDE Syntax
C/CC and PUTThe C/CC and PUT command copies lines to the Scratchpad without deleting them from the current buffer. The current contents of the Scratchpad are overwritten.
The commands are described in the following subsections, for each of which the name of the corresponding InfoBank panel is given.
104

l C/CC - Copy Line Command (CMRCOM3220)
l PUT - Copy Primary Command (CMRCOM3138)
C/CC - Copy Line CommandTo copy one line to the Scratchpad without deleting it from the current buffer, enter C in the Line Command Area and press Enter.
The line containing C is copied from the current buffer and overwrites the contents of the Scratchpad.
To copy a number of lines to the Scratchpad without deleting them from the current buffer, enter Cn in the Line Com-mand Area and press Enter. n is the number of lines you wish to copy and can range from 1 through 9999.
The specified number of lines, starting with the line containing Cn, are copied from the current buffer and overwrite the contents of the Scratchpad.
To copy a block of lines to the Scratchpad without deleting them from the current buffer, enter CC in the Line Command Area in the first and last lines of the block to be copied, and press Enter. The block can extend over more than one screen if you wish.
The specified block of lines is copied from the current buffer and overwrites the contents of the Scratchpad.
C and CC are available with the Extended Interactive Facility, and can be used in Command, Lookaside, Edit, and Update Modes, and in InfoSystem.
PUT - Copy Primary CommandTo copy the Current Line to the Scratchpad without deleting it from the current buffer, enter this command:
PUT ;
The Current Line is copied from the current buffer and overwrites the contents of the Scratchpad.
To copy lines to the Scratchpad without deleting them from the current buffer, enter this command:
PUT n ;
where n is the number of lines you wish to copy.
The specified number of lines, beginning with the Current Line, are copied from the current buffer and overwrite the con-tents of the Scratchpad.
PUT is available with the Extended Interactive Facility, and can be used in Command, Lookaside, Edit, and Update Modes, and in InfoSystem.
C/CC and PUT SyntaxThe syntax of the copy line command is:
C[n]
CC
The syntax of the copy primary command is:
105
ControlManager Commands

CHANGEThe change command replaces all or specified occurrences of one character string by another.
Use CHANGE to change one character string to another or to delete a character string. You can change or delete all occur-rences of the string, or specify which occurrences are to be changed or deleted.
To change a character string, enter this command:
CHANGE /old/new/ mm nn ;
To delete a character string, enter this command:
CHANGE /old// mm nn ;
where:
/ is the delimiter character. Any non-alphanumeric character can be used, but note that the same character must be used throughout the command, and that character must not occur in either string.
old is the character string to be changed or deleted.
new is the character string to be inserted.
mm is the number of lines (starting from and including the Current Line) on which the string is to be changed or deleted. Enter * to change or delete the string on all lines.
nn is the number of occurrences of the string which are to be changed or deleted on each line. Enter * to change or delete all occurrences.
If the old string is found, a message is displayed:
DM08822I nn OCCURRENCES CHANGED ON mm LINES
If the old string is not found, a message is displayed:
DM08823E STRING NOT FOUND
The ZONE command enables you to define the columns between which the CHANGE command will work.
For more information, see ZONE.
ExamplesTo change all occurrences of A to B on all lines, enter this command:
CHANGE /A/B/ * * ;
To change all occurrences on 15 lines, enter this command:
CHANGE /A/B/ 15 * ;
To change the first two occurrences on all lines, enter this command:
CHANGE /A/B/ * 2 ;
To change the first four occurrences on ten lines, enter this command:
CHANGE /A/B/ 10 4 ;
106

Remember, the number of lines to be changed starts from (and includes) the Current Line.
CHANGE is available with the Extended Interactive Facility, and can only be used in an Edit or Update Buffer.
CHANGE Syntax
where:
mm is a number of lines starting with the Current Line
nn is a number of occurrences of old to be changed per line
* denotes all.
CLEARThe CLEAR command clears the contents of the buffer displayed on the screen.
To clear the contents of the current buffer, enter this command:
CLEAR ;
CLEAR is available with the Basic Interactive Facilities, and can be used in Command, Edit, Lookaside, and Update Modes, and in InfoSystem.
CLEAR Syntax
D/DD and DELETEThe D/DD and DELETE command deletes one or more lines from an Edit or Update Buffer.
The commands are described in the following subsections, for each of which the name of the corresponding InfoBank panel is given.
l D/DD - Delete Line Command (CMRCOM3230)
l DELETE - Delete Primary Command (CMRCOM3106)
D/DD - Delete Line CommandTo delete one line from an Edit or Update Buffer, enter this command:
D
in the Line Command Area and press Enter.
To delete n lines, enter this command:
Dn
in the Line Command Area of the first line to be deleted and press Enter. n can be any number ranging from 1 through 9999.
107
ControlManager Commands
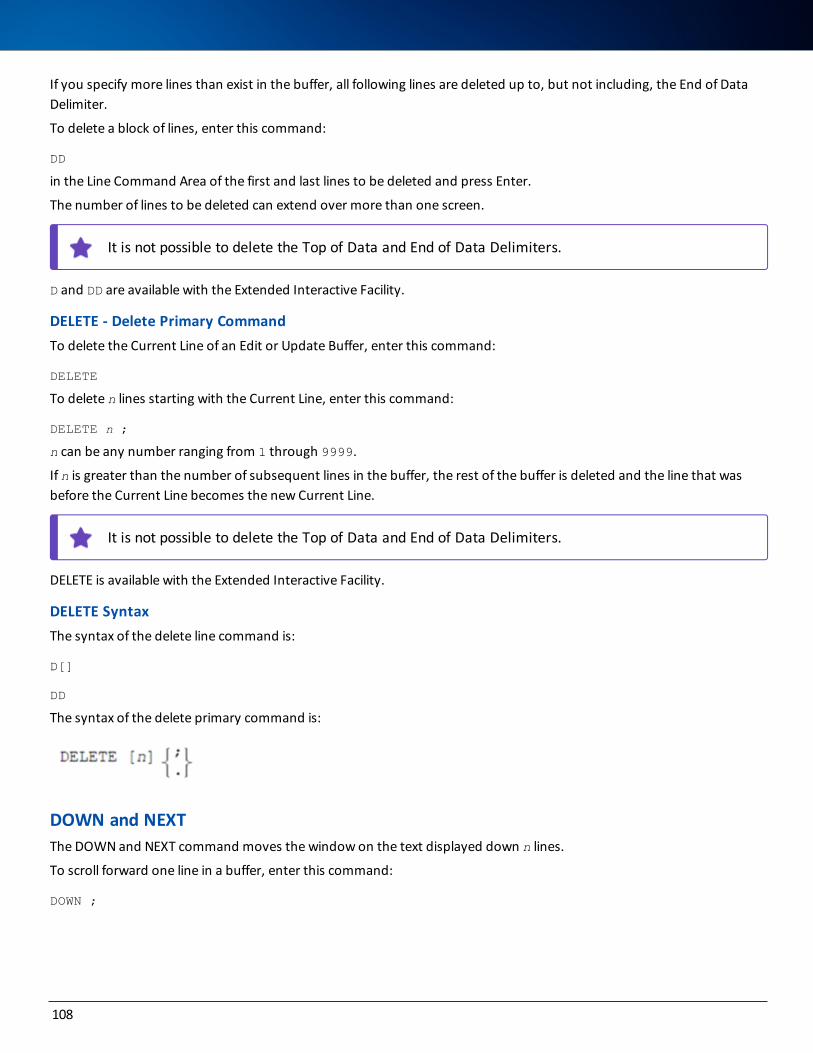
If you specify more lines than exist in the buffer, all following lines are deleted up to, but not including, the End of Data Delimiter.
To delete a block of lines, enter this command:
DD
in the Line Command Area of the first and last lines to be deleted and press Enter.
The number of lines to be deleted can extend over more than one screen.
It is not possible to delete the Top of Data and End of Data Delimiters.
D and DD are available with the Extended Interactive Facility.
DELETE - Delete Primary CommandTo delete the Current Line of an Edit or Update Buffer, enter this command:
DELETE
To delete n lines starting with the Current Line, enter this command:
DELETE n ;
n can be any number ranging from 1 through 9999.
If n is greater than the number of subsequent lines in the buffer, the rest of the buffer is deleted and the line that was before the Current Line becomes the new Current Line.
It is not possible to delete the Top of Data and End of Data Delimiters.
DELETE is available with the Extended Interactive Facility.
DELETE SyntaxThe syntax of the delete line command is:
D[]
DD
The syntax of the delete primary command is:
DOWN and NEXTThe DOWN and NEXT command moves the window on the text displayed down n lines.
To scroll forward one line in a buffer, enter this command:
DOWN ;
108

Or
NEXT ;
To scroll forward n lines in a buffer, enter this command:
DOWN n ;
Or
NEXT n ;
If n is greater than the number of subsequent lines in the buffer, the text is scrolled so that the last line in the buffer becomes the Current Line.
DOWN and NEXT are available with the Extended Interactive Facility, and can be used in Command, Edit, Lookaside, and Update Modes, and in InfoSystem.
DOWN and NEXT Syntax
DSC and DSS (Dataset Services)The Dataset Services Facility (DSSF) provides support for the dynamic allocation and deallocation of sequential and par-titioned datasets together with a number of additional facilities that allow you to determine the presence, attributes, and content of these and other z/OS datasets. Also, DSSF allows dynamic allocation and deallocation of UNIX files.
The facility interfaces with the IBM dynamic allocation service (SVC 99) and operates in both server (MPSF) and non-server environments.
In a non-server environment, the DSS command invokes all functionality of the facility. In a server environment, the DSS command is restricted to use by the Systems Administrator or from within a Corporate Executive routine. Here the DSS command is used to allocate/deallocate datasets on the server side. Allocation/deallocation of datasets can impact all server clients and, therefore, is strictly controlled.
An additional DSC command is available for users executing as host-based clients to allocate/deallocate datasets on the client side. All client-side allocations made using the DSC command are automatically deallocated when the client session ends. You can use the DSC command in a non-server environment, but execution is identical to the DSS command.
In both environments, the syntax of the DSS and DSC commands is identical.
For all services other than allocating/deallocating datasets in a server environment, the DSS and DSC commands are mostly interchangeable.
For more information on using this facility in a server environment, Systems Administrators should see the section on the Dataset Services Facility in the ASG-Manager Products Server Facility User’s Guide.
109
ControlManager Commands

Allocate an Existing DatasetTo allocate an existing dataset, use this syntax:
where
ddname is a one- to eight-character ddname.
dataset-name is a 1- to 44-character physical dataset name.
disp is the required disposition of the dataset (SHR or OLD) and defaults to SHR.
free-opt specifies whether the dataset is to be freed (deallocated) at close time (YES) or is to remain allocated (NO) and defaults to NO.
msg-opt specifies how allocation messages are to be output:
l NONE—suppress all messages.
l ERROR—output only if an error occurs.
l ALL—output all messages (the default).
In server environments, Systems Administrators use the DSS command for server side allocations and general users use the DSC command for client-side allocations.
System Administrators also can use the DSS command to access Manager Products BDAM or VSAM repositories and MP-AIDs when allocated on the server side.
In non-server environments, the DSS and DSC commands both provide the same result.
Examples
DSC ALLOC DDNAME SYS1 DSN SYS1.MACLIB;
DSS ALLOC DD PRODV DSN MPR.REL2500.PROD.DICT.SAVE;
DSC ALLOC DD GENLIB DSN MPR.REl2740.COBOL.SLG FREE NO DISP SHR;
Allocate a New DatasetTo allocate a new dataset, use this syntax:
110

where:
ddname is a one- to eight-character ddname.
dataset-name is a 1- to 44-character dataset name.
free-opt specifies whether the dataset is to be freed (deallocated) at close time (YES) or is to remain allocated (NO) and defaults to NO.
msg-opt specifies how allocation messages are to be output:
l NONE—suppress all messages.
l ERROR—output only if an error occurs.
l ALL—output all messages (the default).
dsorg is the dataset organization and can be either PS (sequential) or PO (partitioned) and defaults to PS.
recfm is the dataset record format and can be one of these values:
l F (fixed)
l FB (fixed blocked)
l FBA (fixed blocked with ANSI control character)
l V (variable)
l VB (variable blocked)
l VBA (variable blocked with ANSI control character)
The default is FB.
lrecl is the dataset logical record length required and defaults to 80.
blksize is the dataset block size required and defaults to 800.
ddd is the number of directory blocks required when the dataset organization is PO and defaults to 5.
space is the required space allocation for the dataset and can be specified in either cylinders or tracks in the form CYL nn or TRK nn. Secondary allocation defaults to the primary quantity. If you want to allocate a specific secondary quantity, specify the allocation in the form CYL(nn,nn) or TRK(nn,nn). The default value is 1 track for both primary and secondary space.
When a PO (partitioned) dataset is specified, you can use the TYPE LIBRARY clause if you want to create a PDSE (par-titioned dataset extended).
111
ControlManager Commands

In server environments, the Systems Administrators uses the DSS command for server side allocations and general users use the DSC command for client-side allocations.
In non-server environments, the DSS and DSC commands both provide the same result.
Examples
DSS ALLOC DDNAME PRODV DSN MPR.REL2740.PROD.DICT.SAVE DISP NEW CYL 20;
DSC ALLOC DD GENLIB DSN MPR.REl2740.COBOL.SLG FREE NO DISP NEW DSORG PO DIRECTORY 80 CYL(10,2);
DSC ALLOC DD PLILIB DSN MPR.REl2740.PLI.SLG DISP NEW TRK 10;
Allocate a UNIX FileTo allocate a UNIX file, use this syntax:
where unix file is:
where:
path consists of the names of the directories from the root to the file being identified, and then the name of the file. The maximum length is 255 characters.
filedata describes the content type of a z/OS UNIX file and is one of these keywords: BINARY, TEXT, or RECORD.
pathdisp1 contains the keyword KEEP or DELETE for normal-termination-disposition.
pathdisp2 contains the keyword KEEP or DELETE for abnormal-termination-disposition.
pathopts specifies access and status for the UNIX file and contains one or more of these keywords:
l Access Group:
o ORDONLY opens the file for reading.
o OWRONLY opens the file for writing.
o ORDWR opens the file for reading and writing.
112

l Status Group:
o OAPPEND sets the file offset to the end of the file before each write.
o OCREAT specifies these actions:
If the file does not exist, the system is to create it.
If the file already exists and OEXCL was not specified, the system allows the program to use the existing file.
If the file already exists and OEXCL was specified, the system fails the allocation and the job step.
o OEXCL specifies these actions:
If the file does not exist, the system is to create it.
If the file already exists, the system fails the allocation and the job step.
The system ignores OEXCL if OCREAT is not also specified.
o ONOCTTY specifies that if the PATH parameter identifies a terminal device, opening of the file does not make the terminal device the controlling terminal for the process.
o ONONBLOCK specifies the handling only for FIFO or character special files.
For more information, see IBM’s MVS JCL Reference.
o OSYNC specifies that the system is to move data from buffer storage to permanent storage before returning control.
o OTRUNC specifies that the system is to truncate the file length to zero if these conditions are true:
The file specified on the PATH parameter exists.
The file is a regular file.
The file successfully opened with ORDWR or OWRONLY.
pathmode specifies the file access attributes when the system is creating the UNIX file named on the PATH parameter. Creating the file is specified by a PATHOPTS=OCREAT parameter. It contains one or more of these keywords:
l File Owner Class:
o SIRUSR specifies permission for the file owner to read the file.
o SIWUSR specifies permission for the file owner to write the file.
o SIXUSR specifies permission for the file to search (if the file is a directory) or to execute the program in the file (if the file is not a directory).
o SIRWXU is a value equivalent to all three parameters (SIRUSR, SIWUSR, and SIXUSR).
l File Group Class:
o SIRGRP specifies permission for users in the file group class to read the file.
o SIWGRP specifies permission for users in the file group class to write the file.
113
ControlManager Commands

o SIXGRP specifies permission for users in the file group class to search (if the file is a directory) or to execute the program in the file (if the file is not a directory).
o SIRWXG is a value equivalent to all three parameters (SIRGRP, SIWGRP, and SIXGRP).
l File Other Class:
o SIROTH specifies permission for users in the file other class to read the file.
o SIWOTH specifies permission for users in the file other class to write the file.
o SIXOTH specifies permission for users in the file other class to search (if the file is a directory) or to execute the program in the file (if the file is not a directory).
o SIRWXO is a value equivalent to all three parameters (SIROTH, SIWOTH, and SIXOTH).
l To Set User and Group IDs:
o SISUID specifies that the system set the user ID of the process to be the same as the user ID of the file owner when the file is run as a program.
o SISGID specifies that the system set the group ID of the process to be the same as the group ID of the file owner when the file is run as a program.
DefaultsWhen creating a new z/OS UNIX file, if you do not code a PATHMODE on a DD statement with a PATH parameter, the sys-tem sets the permissions to 0, which prevents access by all users. If the z/OS UNIX file already exists, PATHMODE is checked for syntax but ignored. The permission bits are left as they are set.
All other non-UNIX-specific keywords like DDNAME, LRECL, etc. have the same meaning as in Allocate a new dataset.
Examples
DSC ALLOC DD DDOUT RECFM VB LRECL 1024 BLKSIZE 2048 FILEDATA TEXT
PATH '/tmp/lxn.txt'
PATHOPTS 'OCREAT,OTRUNC,OWRONLY' PATHMODE 'SIRUSR,SIWUSR,SIRGRP' ;
Deallocating a DatasetTo deallocate (free) an existing dataset, use this syntax:
ddname is a one- to eight-character ddname.
dataset-name is a 1- to 44-character physical dataset name.
When you use the DSN clause, ControlManager deallocates all allocations made for the dataset (using a different ddname).
114

In server environments, the Systems Administrator uses the DSS command for server side deallocations and general users use the DSC command for client-side deallocations.
In non-server environments, the DSS and DSC commands both provide the same result.
Examples
DSC FREE DDNAME SYS1;
DSS FREE DD PRODV;
DSC FREE DD GENLIB MSG ERROR;
DSS FREE DSN MPR.REL2740.COBOL.SLG;
The DSSF LogThe DSSF facility maintains a log of all dataset allocations and deallocations performed using the DSS and DSC com-mands.
A separate log is maintained for each user which is available to display at any time during the user session. It is deleted at session end.
The DSSF facility maintains lists for both successful and unsuccessful allocations and deallocations. It creates an unsuc-cessful entry whenever the dynamic allocation service (SVC 99) returns a nonzero return code.
In server environments, a separate log is maintained for server-side allocations/deallocations (made using the DSS com-mand) and client-side allocations/deallocations (made using the DSC command). In non-server environments, a single log is maintained regardless of the command used.
To display the log at any time, enter this command:
Output from the command consists of a chronological list of all allocations and deallocations performed. The output shown depends on the command used. DSS LOG gives server-side details and DSC LOG gives client-side details.
Details include this information:
l Command time
l DDNAME
l Dataset name
l Allocation options (e.g. DISP, FREE)
l Dynamic allocation (SVC 99) return code
Examples
DSC LOG;
DSS LOG;
115
ControlManager Commands

Displaying AllocationsYou can display all current dataset allocations, including not only allocations made using the DSS and DSC commands, but also those made via JCL, TSO clists, and the TSO ALLOCATE command. To display current dataset allocations, use this syntax:
In a server environment, use the ALC keyword to see server side allocations and CSA to see client-side allocations. The server-side allocations shown include all allocations made by all users.
In non-server environments, use of the CSA keyword is rejected.
Output details include this information:
l Dataset DDNAME
l Dataset disposition (*disp=dataset has been opened)
l Dataset organization (when available)
l Dataset volume serial (when available)
l Dataset name
To see the current allocations made only using the DSS or DSC commands, enter this syntax:
Output from this command displays the ddname and dataset name for each allocation. In server environments, the loc-ation is also indicated as SERVER or CLIENT.
Examples
DSC CSA;
DSS ALC;
DSS CURR;
Displaying Dataset AttributesTo display the attributes of an existing dataset, enter this syntax:
where dataset-name is the name of an existing dataset and can be up to 44 characters long.
Output from the command consists of this information:
l Record format
l Record size
l Block size
116

l Dsorg
l Members (when partitioned)
VSAM datasets are not supported. Only the dataset organization (VSAM) is returned.
Examples
DSC DCB SYSP.APC.STROBE.SMPLOG;
DSS DCB MPR.REL2740.POST;
Deleting a DatasetTo delete a dataset, enter this syntax:
where dataset-name is the name of an existing dataset and can be up to 44 characters long.
The specified dataset is deleted only if you have sufficient authority to access it.
If the dataset is successfully deleted, message DM13202I is returned.
Examples
DSC DELETE SYSP.APC.STROBE.SMPLOG;
DSS DEL MPR.REL2740.POST;
Displaying a Partitioned Dataset DirectoryTo display the directory of a partitioned dataset, enter this syntax:
where dataset-name is the name of an existing partitioned dataset and can be up to 44 characters long.
If the specified dataset is not partitioned, the command is rejected.
The output from the command consists of a list of member names. If the dataset contains no members, the single entry NO MEMBERS is returned.
Examples
DSC DIRECTORY SYS1.PARMLIB;
DSs DIR MPR.REL2740.SOURCE;
Determining if a Dataset ExistsTo determine if a specific dataset exists, enter this syntax:
117
ControlManager Commands

where dataset-name is the name of a dataset and can be up to 44 characters long.
If the dataset exists, message DM13200I is returned.
If the dataset does not exist, message DM13203W is returned.
Examples
DSC EXISTS SYS1.USER.PARMLIB;
DSS EXI SYS2.SAMPLIB;
Determining the Presence of a Partitioned MemberTo determine if a specific member of a partitioned dataset exists, use this syntax:
where:
dataset-name is the name of an existing partitioned dataset and can be up to 44 characters long.
member-name is the required member name and can be up to eight characters long.
The MEMBER keyword is optional but, if given, cannot be truncated.
If the specified dataset is not partitioned, the command is rejected.
If the member exists, message DM13201I is returned.
If the member does not exist, message DM13204W is returned.
Examples
DSC MEMBEREX SYS1.MACLIB STAE;
DSS MEMBEREXISTS MPR.REL2740.SOURCE DCUST;
Displaying a Member of a Partitioned DatasetTo display a specific member of a partitioned dataset, use this syntax:
where:
dataset-name is the name of an existing partitioned dataset and can be up to 44 characters long.
member-name is the required member name and can be up to eight characters long.
The MEMBER keyword is optional but, if given, cannot be truncated.
If the specified dataset is not partitioned, the command is rejected.
118

If the member does not exist, message DM13204W is returned.
Examples
DSC MEMBERVIEW SYS1.MACLIB OPEN;
DSS MEMBERV MPR.REL2740.SOURCE MEMBER DCHAR;
Displaying a Sequential DatasetTo display a sequential dataset with a fixed or variable record format, use this syntax:
where dataset-name is the name of an existing sequential dataset and can be up to 44 characters long.
If the specified dataset is not sequential, the command is rejected.
The maximum logical record length supported is 255. Records exceeding 255 bytes are truncated to 255.
VSAM datasets are not supported and, if specified, are rejected with message DM13227E.
Examples
DSC VIEW SYSP.APC.STROBE.SMPLOG;
DSS VIEW MPR.REL2740.POST;
Releasing all DSS/DSC AllocationsYou can use the DSS and DSC commands to easily release all dataset allocations made during your current session.
In server environments, use the DSS command to release server-side allocations environments and use the DSC com-mand to release client-side allocations.
In non-server environments, you can use either command.
To release allocations, enter this syntax:
Examples:
DSC RELEASE;
DSS RELEASE;
Copying a Sequential DatasetTo copy an existing dataset, use this syntax:
119
ControlManager Commands

where:
dataset-name1 is a 1- to 44-character physical dataset name and is the dataset to be copied.
dataset-name2 is a 1- to 44-character physical dataset name and is the output dataset.
The output dataset must already exist. Attributes of the input dataset overwrite any existing attributes.
Examples
DSC COP INDSN MPR.ARCHIVE1 OUTDSN MPR.ARCHIVE1.COPY;
DSS COPY INDSN MPR.REL2500.PROD.DICT.SAVE OUTDSN
MPR.REL2500.PROD.DICT.SAVE.MIRROR;
Command Syntax SummaryThe following syntax diagrams provide a quick reference for DSSF facilities. For complete details, see the individual descrip-tion of each service.
Allocate an Existing Dataset
Allocate a New Dataset
120

Allocate a UNIX File
Deallocate a Dataset
Display the DSSF Log
Display Allocations
Release all DSS/DSC Allocations
Display a Partitioned Dataset Directory
Determine if a Dataset Exists
Display a Sequential Dataset
121
ControlManager Commands

Copy a Sequential DatasetFor example, both of these commands are acceptable alternatives to DISP NEW:
DISP(NEW)
The EDIT command enters EDIT mode and opens an EDIT Buffer, or edits an existing MP-AID member.
You can use the Full Screen Editor to create new MP-AID USER-MEMBERs or to edit existing ones.
EDIT ;
To edit an existing USER-MEMBER, enter this command:
This opens a buffer in Edit Mode containing a copy of the named MP-AID member, you can then edit this.
If LOOKASIDE-RETENTION is set off and you enter an EDIT command, any Lookaside Buffers currently open will be closed. If LOOKASIDE-RETENTION is set on and you enter an EDIT command, any Lookaside Buffers currently open will be retained (up to the maximum buffer count).
EDIT is available with the Extended Interactive Facility.
EDIT SyntaxYou can also create a USER-MEMBER from outside of the Full Screen environment using the MP-AID ADD command. Addi-tionally, you can append records to an existing USER-MEMBER using the MP-AID APPEND command.
ENVIRONMENTThe ENVIRONMENT command gives information on the Manager Products at your installation. There are three versions of the command:
ENVIRONMENT ; ENVIRONMENT ALL ;ENVIRONMENT CUST ;
In fully interactive environments, you must logon before you can issue any of the commands. In batch and pseudo-inter-active environments, you can issue the command ENVIRONMENT or ENVIRONMENT CUST before you logon, but not the command ENVIRONMENT ALL.
Output from ENVIRONMENT includes this information:
l The current Manager Products release number and fix level
l A list of all user-applied fixes
Output from ENVIRONMENT ALL or CUST includes this information:
l The name and address of your installation
l The machine, model, and operating system
l The number of the release tape and the production date
l The Manager Products installed, release numbers, and release dates
l Manager Products Functional or Selectable Units installed
l The current Manager Products release number and fix level
122

l A list of all user-applied fixes
l The settings of all features that you can tailor (ALL only)
The ENVIRONMENT command is intended as a diagnostic aid: you can check the output from these commands to determ-ine if all relevant fixes have been applied. The ENVIRONMENT command may also be useful in a User Interface Access Call environment to identify the Manager Products release numbers to the program.
There may be times when you have to contact ASG Customer Support with a problem in a Manager Products. If you do, you will be asked to supply the output from an ENVIRONMENT ALL command.
ENVIRONMENT Syntax
F and I (Follow and Insert Line Commands)The F and I command inserts n copies of the Scratchpad after this line.
To insert the contents of the Scratchpad into an Edit or Update Buffer, enter F or I in the Line Command Area and press Enter. The contents of the Scratchpad are inserted after the line containing the F or I.
To insert n copies of the contents of the Scratchpad, enter Fn or In.The contents of the Scratchpad are unchanged after the command has been given.
Both commands can be inserted in the line containing the Top of Data Delimiter, but not in the line containing the End of Data Delimiter.
F and I are available with the Extended Interactive Facility, and can be used in Edit and Update Modes.
F and I SyntaxF[n]
I[n]
FILEThe FILE command files the contents of an Edit Buffer on the MP-AID, or to add or amend the source record of a dic-tionary member by writing the contents of an Update Buffer and to attempt to encode it.
Use FILE to perform these functions:
l Enter the contents of an Update Buffer into the dictionary and generate an encoded record
l Enter the contents of an Edit Buffer onto the MP-AID
If you have updated or edited an existing member, enter this command:
FILE ;
When you FILE an Update Buffer your changes are made to the existing records in the source dataset of the dictionary. An encoded record is generated from the records in the source dataset, and added to the data entries dataset. This encoded record will replace any existing encoded record for the member (if the encode is successful).
When you FILE an Edit Buffer your changes are made to the existing member on the MP-AID.
123
ControlManager Commands

If you have created a new member, enter this command:
FILE dictionary-member-name ;
Or
FILE mpaid-user-member-name ;
When you FILE an Update Buffer, records for this new member are added to the index dataset and source dataset, and an encoded record is generated and added to the data entries dataset. The dictionary-member-name must conform to the rules governing member names.
You cannot FILE a new member giving it the name of an existing member, but you can RFILE it.
For more information, see RFILE.
When you FILE an Edit Buffer this new member is added to the MP-AID. The mpaid-user-member-name can have a maximum of 10 characters. It must not be the same as that of any other USER-MEMBER owned by your Logon-Id.
Error and Warning MessagesIf you FILE an Update Buffer and an error message is generated, the member will not be encoded. Instead, the source of the member, together with the error message, is displayed in a Lookaside Buffer: you can note the errors, QUIT to return to the Update buffer, correct the errors, and then re-enter the FILE command.
If you FILE an Update Buffer and a warning message is generated, the member may or may not be encoded.
You can display the source of the member in a Lookaside Buffer:
l Whenever FILE is executed
l Only when FILE generates warnings or errors
l Only when FILE generates errors
For information on SET UPDATE-OUTPUT, see SET and QUERY UPDATE-OUTPUT.
If you FILE an Edit Buffer and an error or warning message is generated, then this is displayed in the message line.
FILE is available with the Extended Interactive Facility.
FILE Syntax
FIND and LOCATEThe FIND and LOCATE command finds a string and scrolls the text on the screen so that the line with the string in it becomes the Current Line. If the string is not found, the Current Line remains unchanged.
To locate a string, enter this command:
LOCATE string ;
124

Or
LOCATE /string/ ;
To find a string beginning in column 1 of a line, enter this command:
FIND string ;
Or
FIND /string/ ;
where string is a string of characters, and must be entered exactly as it appears in the line. For example, to locate or find the string King, you must enter King and not KING, king, etc.
However, if the case insensitive feature is currently active then an exact string match is not required and the case of the source and target strings is ignored.
For the FIND and LOCATE commands, the case insensitive feature is simply activated by use of the SET CASE-INSENSITIVE-SELECTION ON command.
l For more information on the SET CASE-INSENSITIVE-SELECTION ON command, see SET and QUERY CASE-INSENSITIVE-SELECTION.
l For more information on the Case Insensitive feature, see “Case Insensitive Dictionary Interrogation” in the ASG-Manager Products Dictionary/Repository User’s Guide.
The search begins with the line following the Current Line. If the string is found, the text is scrolled forward and the line containing the string becomes the Current Line. If the string is not found, the message:
STRING NOT FOUND
is displayed and the text is not scrolled.
The ZONE command enables you to define the columns between which the CHANGE command will work.
For more information, see ZONE.
LOCATE and FIND are available with the Extended Interactive Facility. Both commands can be used in Command, Edit, Lookaside, and Update Modes, and in InfoSystem.
FIND and LOCATE Syntax
FREEThe FREE command terminates a currently active DesignManager or SourceManagerenvironment and deletes the appro-priate Product’s program code from virtual storage. This action might be necessary if you encounter space problems
125
ControlManager Commands
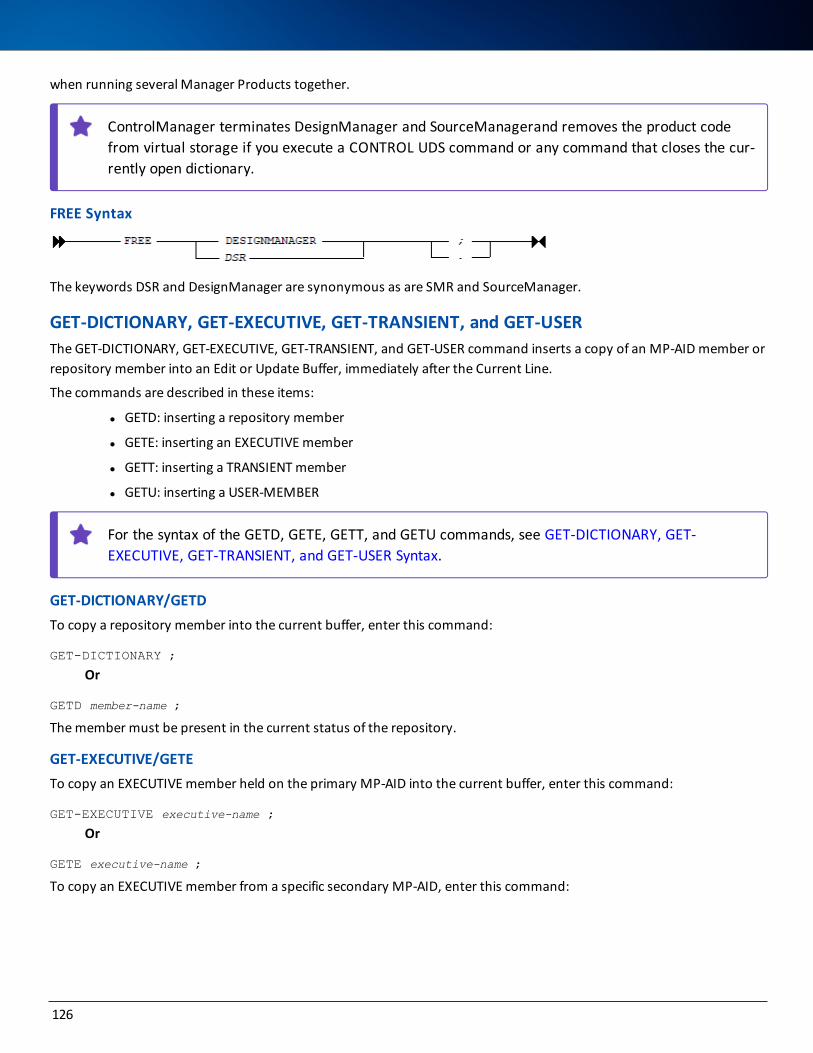
when running several Manager Products together.
ControlManager terminates DesignManager and SourceManagerand removes the product code from virtual storage if you execute a CONTROL UDS command or any command that closes the cur-rently open dictionary.
FREE Syntax
The keywords DSR and DesignManager are synonymous as are SMR and SourceManager.
GET-DICTIONARY, GET-EXECUTIVE, GET-TRANSIENT, and GET-USERThe GET-DICTIONARY, GET-EXECUTIVE, GET-TRANSIENT, and GET-USER command inserts a copy of an MP-AID member or repository member into an Edit or Update Buffer, immediately after the Current Line.
The commands are described in these items:
l GETD: inserting a repository member
l GETE: inserting an EXECUTIVE member
l GETT: inserting a TRANSIENT member
l GETU: inserting a USER-MEMBER
For the syntax of the GETD, GETE, GETT, and GETU commands, see GET-DICTIONARY, GET-EXECUTIVE, GET-TRANSIENT, and GET-USER Syntax.
GET-DICTIONARY/GETDTo copy a repository member into the current buffer, enter this command:
GET-DICTIONARY ;
Or
GETD member-name ;
The member must be present in the current status of the repository.
GET-EXECUTIVE/GETE To copy an EXECUTIVE member held on the primary MP-AID into the current buffer, enter this command:
GET-EXECUTIVE executive-name ;
Or
GETE executive-name ;
To copy an EXECUTIVE member from a specific secondary MP-AID, enter this command:
126
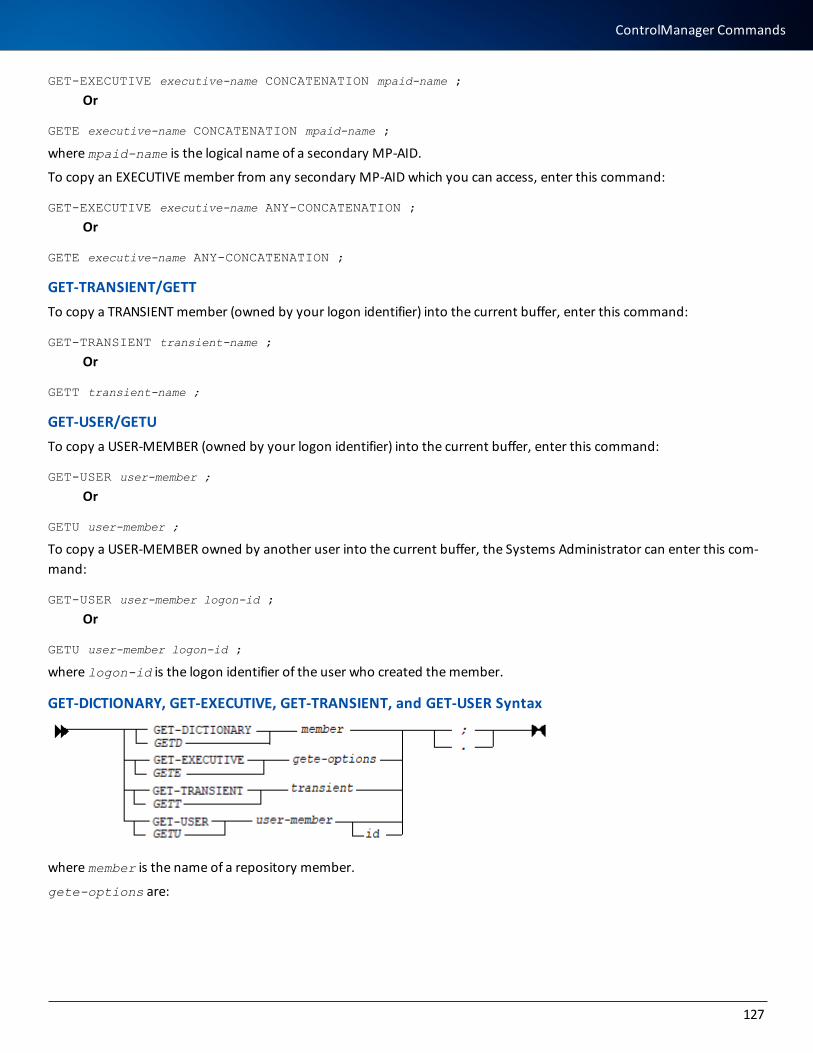
GET-EXECUTIVE executive-name CONCATENATION mpaid-name ;
Or
GETE executive-name CONCATENATION mpaid-name ;
where mpaid-name is the logical name of a secondary MP-AID.
To copy an EXECUTIVE member from any secondary MP-AID which you can access, enter this command:
GET-EXECUTIVE executive-name ANY-CONCATENATION ;
Or
GETE executive-name ANY-CONCATENATION ;
GET-TRANSIENT/GETTTo copy a TRANSIENT member (owned by your logon identifier) into the current buffer, enter this command:
GET-TRANSIENT transient-name ;
Or
GETT transient-name ;
GET-USER/GETUTo copy a USER-MEMBER (owned by your logon identifier) into the current buffer, enter this command:
GET-USER user-member ;
Or
GETU user-member ;
To copy a USER-MEMBER owned by another user into the current buffer, the Systems Administrator can enter this com-mand:
GET-USER user-member logon-id ;
Or
GETU user-member logon-id ;
where logon-id is the logon identifier of the user who created the member.
GET-DICTIONARY, GET-EXECUTIVE, GET-TRANSIENT, and GET-USER Syntax
where member is the name of a repository member.
gete-options are:
127
ControlManager Commands

where:
executive is the name of an EXECUTIVE member on the MP-AID.
mpaid-name is the logical name of a secondary MP-AID.
transient is the name of a TRANSIENT member on the MP-AID.
user-member is the name of a USER-MEMBER on the MP-AID.
id is the logon identifier of a user owning a specified USER-MEMBER.
GET-SCRATCHPADThe GET-SCRATCHPAD command inserts the contents of the Scratchpad into the current Edit or Update buffer.
To insert the contents of the Scratchpad into the current Edit or Update buffer, enter this command:
GETS ;
Or
GET-SCRATCHPAD ;
To insert multiple copies of the Scratchpad, enter this command:
GETS nn ;
Or
GET-SCRATCHPAD nn ;
where nn is the number of copies you wish to insert.
The contents are inserted after the current line.
GETS and GET-SCRATCHPAD are available with the Extended Interactive Facility.
GET-SCRATCHPAD Syntax
where nn is the number of copies you wish to insert.
HELPThe HELP command displays the InfoBank Top Level Menu, or the InfoBank’s Index or Help Index, or to request online help on a particular topic.
To see the Help Entry Panel, enter this command:
HELP ;
In InfoSystem as supplied by ASG, the Help Entry Panel is the Top Level Menu in InfoBank, HELP000000.
To obtain help with a Manager Products command, enter this command:
128

HELP command-name ;
If a command-name consists of two or more keywords, you should key in only the first keyword.
To see the syntax of a Manager Products command, enter this command:
HELP command-name-S ;
To obtain help with a member type, enter this command:
HELP member-type-name ;
To obtain help with any other topic documented in InfoBank, enter this command:
HELP topic ;
To display a list of the command names, member types, and other topics which can be parameters to the HELP com-mand, enter this command:
HELP INDEX ;
To display an index of terms in InfoBank beginning with a given letter of the alphabet, enter this command:
HELP x ;
where x is any letter of the alphabet.
To display a list of the default PF key settings supplied by ASG, enter this command:
HELP PF ;
The settings may have been changed at your installation.
HELP Syntax
HOLDThe HOLD command stores the contents of the current buffer as a TRANSIENT member of the MP-AID.
To store the contents of the current buffer as a TRANSIENT member of the MP-AID, enter this command:
HOLD mpaid-transient-member-name ;
The name must be different from the name of any other TRANSIENT owned by your Logon-Id.
For information on the rules for MP-AID names, see The MP-AID.
129
ControlManager Commands

The command can be given in any mode and is a convenient way of storing output displayed at the screen.
When you issue the HOLD command against a non-formatted screen, the entire content of the buffer is written as a TRANSIENT member. However, when you issue the HOLD command against a MethodManager formatted screen, only the lines that are currently displayed are written as a TRANSIENT (i.e., those sections accessible through scrolling are not written).
When you log off, TRANSIENT members are automatically deleted from the MP-AID. However, if the session terminates abnormally, for example because of an abend, TRANSIENT members may remain. Such members are deleted at the sub-sequent logon provided that the Logon profile is exclusive and that the MP-AID can be updated. Otherwise, the TRANSIENT members cannot be deleted and a subsequent attempt to create a TRANSIENT of the same name will fail.
To store the member permanently
1. Enter the EDIT command to open an Edit Buffer.
2. Enter the GETT command to copy the TRANSIENT into the current buffer.
3. Enter the FILE command to file the contents of the buffer as a USER-MEMBER of the MP-AID.
HOLD is available with the Extended Interactive Facility.
You can also create a TRANSIENT from outside of the Full Screen environment using the MP-AID ADD command. Addi-tionally, you can append records to an existing TRANSIENT using the MP-AID APPEND command.
HOLD Syntax
INFOBANKThe INFOBANK command takes you into InfoBank at the Top Level Entry Panel.
To display the InfoBank Entry Panel, enter this command:
INFOBANK ;
Or
INFO-BANK ;
In InfoSystem as released by ASG, the InfoBank Entry Panel is the Top Level Entry Panel INFO000000.
INFOBANK Syntax
K/KK and KPUTThe K/KK and KPUT command copies lines to the Scratchpad without deleting them from the current buffer. The current contents of the Scratchpad are NOT overwritten.
The commands are described in the following subsections, for each of which the name of the corresponding InfoBank panel is given.
130

l K/KK - Also Copy Line Command (CMRCOM3250)
l KPUT - Also Copy Primary Command (CMRCOM3125)
K/KK - Also Copy Line CommandTo copy one line to the Scratchpad without deleting it from the current buffer and without overwriting the contents of the Scratchpad, enter this command:
K
in the Line Command Area and press Enter.
The line containing K is copied from the current buffer and added to the end of the existing contents of the Scratchpad.
Kn
in the Line Command Area and press Enter. n is the number of lines you wish to copy and can range from 1 through 9999.
The specified number of lines, starting with the line containing Kn, are copied from the current buffer and added to the end of the existing contents of the Scratchpad.
To copy a block of lines to the Scratchpad without deleting them from the current buffer and without overwriting the con-tents of the Scratchpad, enter this command:
KK
in the Line Command Area in the first and last lines of the block to be copied, and press Enter. The block can extend over more than one screen if you wish.
The specified block of lines is copied from the current buffer and added to the end of the existing contents of the Scratch-pad.
K and KK are available with the Extended Interactive Facility, and can be used in Command, Lookaside, Edit, and Update Modes, and in InfoSystem.
KPUT - Also Copy Primary CommandTo copy the Current Line to the Scratchpad without deleting it from the current buffer and without overwriting the con-tents of the Scratchpad, enter this command:
KPUT ;
To copy lines to the Scratchpad without deleting them from the current buffer and without overwriting the contents of the Scratchpad, enter this command:
KPUT n ;
where n is the number of lines you wish to copy.
The specified number of lines, beginning with the current line, will be copied to the end of the Scratchpad.
KPUT is available with the Extended Interactive Facility, and can be used in Command, Lookaside, Edit, and Update Modes, and in InfoSystem.
KPUT SyntaxThe syntax of the also copy line command is:
131
ControlManager Commands

K[n]
KK
LEFT and RIGHTThe LEFT and RIGHT command displays text to the left or right of the text currently displayed.
Although output to the terminal can be up to 255 columns wide, most terminals can only display 80 columns. To see text to the right or left of the current display, you must use the RIGHT or LEFT commands.
To move RIGHT or LEFT by one column, enter this command:
LEFT ;
Or
RIGHT ;
To move RIGHT or LEFT by n columns, enter this command:
LEFT n ;
Or
RIGHT n ;
RIGHT and LEFT are available with the Basic Interactive Facilities, and can be used in Command, Edit, Lookaside, and Update Modes, and in InfoSystem.
LEFT and RIGHT Syntax
LOGOFFThe LOGOFF command terminates a Manager Products run.
To end a Manager Products run, enter one of these commands:
LOGOFF ;
Or
END ;
Both commands invoke shutdown procedures (closing any dictionaries currently open, deleting TRANSIENT members on the MP-AID, etc.), and then return you from ControlManager to your operating environment.
In interactive environments, LOGOFF and END are only valid in Command Mode.
Upon receipt of a valid LOGOFF or END command, no further Manager Products output is returned to the user. In envir-onments where output is buffered in virtual storage, such as the DOUTPUT buffer of an Access Call program or the out-put buffer of a Manager Products Server Facility (MPSF) TCP/IP client, any output written to the buffer as a result of
132

previously issued commands (e.g., commands issued in an executive routine containing a LOGOFF or END command) will therefore be lost.
In interactive environments, to log off from the Logon Screen (that is, without logging on first) simply press any PF key.
LOGOFF Syntax
LOGONThe LOGON command logs on to Manager Products.
To log on to ControlManager, enter this command:
LOGON logon-identifier PASSWORD password ;
where logon-identifier and password are the character strings assigned to you by the Systems Administrator.
The LOGON command is available in all environments (including Batch and User Interface) except IMS/DC.
In interactive environments (CICS, CMS, TSO, and Siemens Time Sharing Interface) and TSO/ISPF environments, you can log on via a formatted Logon Panel, and need only enter your logon identifier and password.
For security reasons, your password is not displayed.
If your logon identifier and password are accepted, ControlManager executes any commands in your Logon profile, and any output from these commands is displayed on the screen.
For information on Logon profiles, see The MP-AID.
If you enter an invalid logon-identifier, this error message displays:
DM08002E LOGON ID logon-identifier NOT IN MP-AID DIRECTORY
If you enter an invalid password, this error message displays:
DM08003E PASSWORD INCORRECT FOR LOGON ID logon-identifier
In either event, check your logon identifier or password and enter them again.
The log on may fail for other reasons; for example, the logon identifier may already be in use, or the MP-AID may be dis-abled. If it fails, you can obtain information on any displayed message in the ASG-Manager Products Message Guide.
Other versions of the LOGON command are available only to the Systems Administrator or Dictionary Controller.
LOGON Syntax
133
ControlManager Commands

M/MM and MOVEThe M/MM and MOVE command removes lines from an Edit or Update Buffer and puts them into the Scratchpad. The current contents of the Scratchpad are overwritten.
The commands are described in these subsections, for each of which the name of the corresponding InfoBank panel is given.
l M/MM - Move Line Command (CMRCOM3260)
l MOVE - Move Primary Command (CMRCOM3130)
M/MM - Move Line CommandTo move one line to the Scratchpad, enter this command:
M
in the Line Command Area and press Enter.
The line containing M is removed from the current buffer and overwrites the contents of the Scratchpad.
To move a number of lines from the current buffer to the Scratchpad, enter this command:
Mn
in the Line Command Area and press Enter. n is the number of lines you wish to copy and can ranged from 1 through 9999.
The specified number of lines, starting with the line containing Mn, are removed from the current buffer and overwrite the contents of the Scratchpad.
To move a block of lines from the current buffer to the Scratchpad, enter this command:
MM
in the Line Command Area in the first and last lines of the block to be copied, and press Enter. The block can extend over more than one screen if you wish.
The specified block of lines is removed from the current buffer and overwrites the contents of the Scratchpad.
M and MM are available with the Extended Interactive Facility, and can be used in Edit and Update Modes.
The moved lines will be lost if they are overwritten by another entry to the Scratchpad before they have been inserted elsewhere.
MOVE - Move Primary CommandTo move the Current Line to the Scratchpad, enter this command:
MOVE ;
The Current Line is removed from the current buffer and overwrites the contents of the Scratchpad.
To move lines from the current buffer to the Scratchpad, enter this command:
MOVE n ;
where n is the number of lines you wish to move.
134
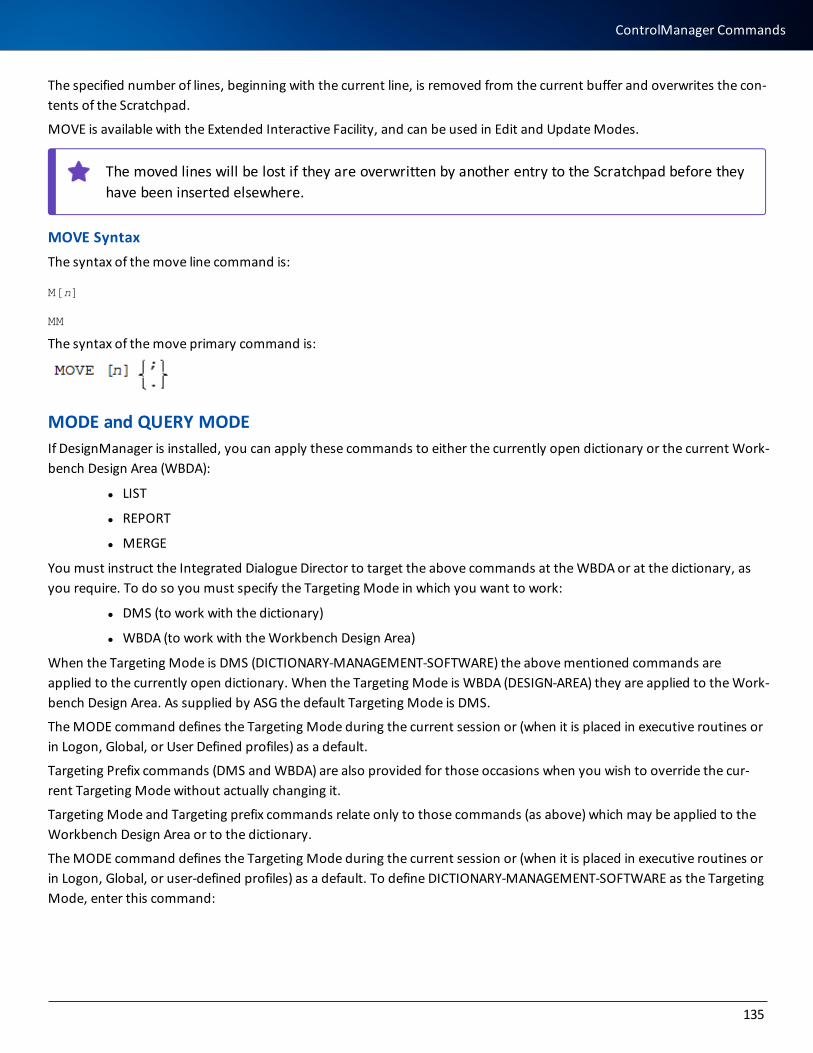
The specified number of lines, beginning with the current line, is removed from the current buffer and overwrites the con-tents of the Scratchpad.
MOVE is available with the Extended Interactive Facility, and can be used in Edit and Update Modes.
The moved lines will be lost if they are overwritten by another entry to the Scratchpad before they have been inserted elsewhere.
MOVE SyntaxThe syntax of the move line command is:
M[n]
MM
The syntax of the move primary command is:
MODE and QUERY MODEIf DesignManager is installed, you can apply these commands to either the currently open dictionary or the current Work-bench Design Area (WBDA):
l LIST
l REPORT
l MERGE
You must instruct the Integrated Dialogue Director to target the above commands at the WBDA or at the dictionary, as you require. To do so you must specify the Targeting Mode in which you want to work:
l DMS (to work with the dictionary)
l WBDA (to work with the Workbench Design Area)
When the Targeting Mode is DMS (DICTIONARY-MANAGEMENT-SOFTWARE) the above mentioned commands are applied to the currently open dictionary. When the Targeting Mode is WBDA (DESIGN-AREA) they are applied to the Work-bench Design Area. As supplied by ASG the default Targeting Mode is DMS.
The MODE command defines the Targeting Mode during the current session or (when it is placed in executive routines or in Logon, Global, or User Defined profiles) as a default.
Targeting Prefix commands (DMS and WBDA) are also provided for those occasions when you wish to override the cur-rent Targeting Mode without actually changing it.
Targeting Mode and Targeting prefix commands relate only to those commands (as above) which may be applied to the Workbench Design Area or to the dictionary.
The MODE command defines the Targeting Mode during the current session or (when it is placed in executive routines or in Logon, Global, or user-defined profiles) as a default. To define DICTIONARY-MANAGEMENT-SOFTWARE as the Targeting Mode, enter this command:
135
ControlManager Commands

MODE DMS ;
Or
MODE DICTIONARY-MANAGEMENT-SOFTWARE ;
To define DESIGN-AREA as the Targeting Mode, enter this command:
MODE WBDA ;
Or
MODE DESIGN-AREA ;
To determine the current Targeting Mode, enter this command:
QUERY MODE ;
If, for a particular command, you want to override the current Targeting mode without actually changing it, simply prefix the command with one of the following prefix commands:
l DMS (to apply the command to the current dictionary)
l WBDA (to apply the command to the Workbench Design Area).
If a Targeting Prefix is used with a command that does not require one or actually duplicates the current Targeting Mode, it will be ignored and will not prevent the command input being executed.
The default Targeting mode, as supplied by ASG, is DICTIONARY-MANAGEMENT- SOFFTWARE.
MODE Syntax
MP-AID ADDUse the MP-AID ADD command to create a USER-MEMBER or TRANSIENT on the MP-AID owned by your Logon Identifier. The command must be followed by one or more input records and forms the contents of the member. Input records are terminated by the presence of a Manager Products terminator in the first position of an input record.
MP-AID ADD Syntax
where:
member-type is either USER-MEMBER or TRANSIENT.
136

member-name is the name of the USER-MEMBER or TRANSIENT.
member-contents is the USER-MEMBER or TRANSIENT contents and must consist of one or more records.
The REPLACE keyword is required when the specified USER-MEMBER or TRANSIENT already exists and you want to over-write it.
If you wish to store a Manager Products terminator in the first position of an input record then that record must begin with the Controlmanager escape character. An escape character in the first position of an input record will be removed and will not be stored as part of the contents of the member. However, if you need to deliberately code an escape char-acter (e. g., in the first position of a procedure line), you must code two consecutive escape characters.
MP-AID APPEND Use the MP-AID APPEND command to append additional contents to an existing USER-MEMBER or TRANSIENT owned by your Logon Identifier. The command must be followed by one or more input records and forms the additional contents to be appended.
Input records are terminated by the presence of a Manager Products terminator in the first position of an input record.
MP-AID APPEND Syntax
where:
member-type is is either USER-MEMBER or TRANSIENT.
member-name is the name of an existing USER-MEMBER or TRANSIENT.
member-contents is the USER-MEMBER or TRANSIENT contents to be appended and consists of one or more records.
If you wish to store a Manager Products terminator in the first position of an input record then that record must begin with the Controlmanager escape character. An escape character in the first position of an input record will be removed and will not be stored as part of the contents of the member. However, if you need to deliberately code an escape char-acter (e.g., in the first position of a procedure line), you must code two consecutive escape characters.
MP-AID CONCATENATION LISTThe MP-AID CONCATENATION LIST command lists all secondary MP-AIDs accessible from the current (primary) MP-AID.
To display the currently active MP-AID concatenation, enter either:
MP-AID CONCATENATION LIST ;
Or
MP-AID CONCATENATION ;
137
ControlManager Commands

A table is displayed, providing this information for each MP-AID:
l Search order (starting from 1)
l Access mode (UPDATE or READ-ONLY)
l Logical name (as specified in the MP-AID CONCATENATION command)
l The physical dataset name
For more information on concatenation, see ASG-Manager Products System Admin-istrator’s Guide.
MP-AID CONCATENATION LIST Syntax
MP-AID DELETEThe MP-AID DELETE command deletes a member on the MP-AID owned by your logon identifier.
To delete a KEPT-DATA member owned by your logon identifier, enter this command:
MP-AID DELETE KEPT-DATA-LIST mpaid-member-name ;
To delete a PUBLIC-USER-MEMBER owned by your logon identifier, enter this command:
MP-AID DELETE USER-MEMBER mpaid-member-name ;
TRANSIENTs are automatically deleted when you log off. If you want to delete a TRANSIENT owned by your logon iden-tifier before you end the session, enter this command:
MP-AID DELETE TRANSIENT mpaid-member-name ;
To delete a USER-MEMBER owned by your logon identifier, enter this command:
MP-AID DELETE USER-MEMBER mpaid-member name ;
To delete WORKBENCH members owned by your logon identifier, enter this command:
MP-AID DELETE WORKBENCH mpaid-member-name ;
MP-AID DELETE Syntax
138

MP-AID EXEC-LIST This command provides a mechanism for performing a given operation on several MP-AID members.
The output of the MP-AID EXEC-LIST command is a stripped down and parameterized version of the output from an equi-valent MP-AID LIST command. You save this output in an executive routine, and execute it with appropriate parameters.
The command provides a list of names of all MP-AID members of the specified category:
l All MP-AID members available to the user
l All members of a specified type available to the user
l All members of a specified type and associated with a specified logon identifier (available only to the Systems Administrator)
Each name is prefixed by the three parameters &PO, &P1, and &P2, and is followed by the parameters &P3, &P4, and &P5.
For example, the command:
MP-AID EXEC-LIST EXECUTIVES ;
might produce the following output:
&P0 &P1 &P2 EXEC1 &P3 &P4 &P5;
&P0 &P1 &P2 EXEC2 &P3 &P4 &P5;
&P0 &P1 &P2 EXEC3 &P3 &P4 &P5;
You can save the output from the MP-AID EXEC-LIST command in a USER-MEMBER or a TRANSIENT member. For example, to save output in a TRANSIENT member MYEXEC, enter this command:
HOLD MYEXEC ;
You can then, for example, print the three members using the command:
TRANSIENT-EXECUTIVE MYEXEC MP-AID PRINT EXECUTIVE ;
To run the MP-AID EXEC-LIST command on a secondary MP-AID, use the CONCATENATION keyword, followed by the logical name of the secondary MP-AID. The output then includes two extra parameters &P6 and &P7, and the output member name is repositioned between parameters &P4 and &P5.
For example, to produce output for all EXECUTIVE members on the secondary MP-AID named M2120, enter this com-mand:
MP-AID EXEC-LIST CONCATENATION M2120 EXECUTIVES ;
MP-AID EXEC-LIST Syntax
where mpaid-name is the logical name of a secondary MP-AID.
139
ControlManager Commands

member-type is:
where logon-id is the logon identifier of a specific user.
selection is:
where string-1, string-2, and string represent the range of the MP-AID members to be selected, and can be from 1 to 10 characters long.
MP-AID LIST The MP-AID LIST command lists members held on a primary or secondary MP-AID.
For the syntax of the MP-AID LIST command, see MP-AID LIST Syntax.
To list all the members of all types held on the primary MP-AID, enter this command:
MP-AID LIST ;
You can also use the MP-AID LIST command to list this information:
l Selected member types
l Members in date order
l Members in size order
l Members selected by name
l Members contained on a secondary MP-AID
140

Listing Selected Member TypesTo list members of a selected type, enter this command:
MP-AID LIST member-type ;
where member-type is either EXECUTIVES, FORMATS, KEPT-DATA-LISTS, PUBLIC-USER-MEMBERS, TRANSIENTS, TRANSLATION-RULES, USER-MEMBERS, or WORKBENCHES.
To list the above member types, you need the functions allowing you to create these member types.
Listing Members in Order of Update/Creation DateTo list MP-AID members in date order, with the most recently created/updated members listed first, enter this com-mand:
MP-AID LIST DATE-ORDER ;
For example, to list all your USER-MEMBERs in date order, enter this command:
MP-AID LIST DATE-ORDER USER-MEMBERS ;
Listing Members in Size OrderTo list MP-AID members in size order, with the largest members by block usage listed first, enter this command:
MP-AID LIST SIZE-ORDER ;
For example, to list all USER-MEMBERs, for your logon-identifier in size order, enter this command:
MP-AID LIST SIZE-ORDER USER-MEMBERS ;
Listing Members within a Given Alphanumeric RangeTo list the member names for all member types beginning with a specified string, enter this command:
MP-AID LIST ONLY string ;
For example, to list all MP-AID members for the current logon identifier beginning with characters RE, enter this com-mand:
MP-AID LIST ONLY RE ;
Alternatively, to select the member names to be listed for all member types in a specified range, enter this command:
MP-AID LIST FROM string1 TO string2 ;
for example, to output all members in the range G to TEST inclusive, enter this command:
MP-AID LIST FROM G TO TEST ;
In the above example:
l Members GROUP-A and TESTBOOK would be included, but members FETCH and TRAIL would be excluded.
l If you omit FROM G, all members up to and including TEST are selected.
141
ControlManager Commands

l If you omit TO TEST, all members from G onwards are selected.
Listing Member Names containing a Given String To list the member names for all member types with names containing a specified string, enter this command:
MP-AID LIST SELECT string ;
For example, to list all MP-AID members for the current logon identifier containing the characters SYS1, enter this com-mand:
MP-AID LIST SELECT SYS1 ;
The FROM, TO, and ONLY clauses can be used in conjunction with the SELECT clause to further refine the selection.
For example, to output all USER members in the range A to M inclusive containing the string PHASE1, enter this com-mand:
MP-AID LIST USER FROM A TO M SELECT PHASE1 ;
Listing Members on a Secondary MP-AIDTo list members contained on a secondary (concatenated) MP-AID, in the same way as on your primary MP-AID, enter this command:
MP-AID LIST CONCATENATION mpaid-name ;
where mpaid-name is the logical name of the secondary MP-AID from which the members are to be listed.
To list members held on all secondary MP-AIDs, enter this command:
MP-AID LIST ALL-CONCATENATIONS ;
You can only use the above facilities if the systems administrator has concatenated the relevant MP-AID(s). To list which MP-AIDs are available to you via concatenation, use the MP-AID CONCATENATION LIST command.
MP-AID LIST Syntax
where mpaid-name is the logical name of a secondary MP-AID.
member-type is:
142

where logon-id is the logon identifier of a specific user.
selection is:
where string-1, string-2, and string specify the range of MP-AID members to be selected and can be from 1 to 10 characters.
MP-AID PASSWORDThe MP-AID PASSWORD command changes the password that you use (in conjunction with your Logon-Id) to log on to Manager Products.
To change the password that you use (in conjunction with your Logon-Id) to log on to Manager Products, enter this com-mand:
MP-AID PASSWORD old-password new-password ;
where old-password is the password that you used to log on to the current session, and new-password is the pass-word you wish to use when you log on subsequently; the password may be a a maximum of eight characters long.
When you next log on, ControlManager tests your password entry against this new-password entry.
If your Logon profile is updated by the Systems Administrator, your password reverts to its original value (unless a new value is specified by the systems administrator).
Notes l You must have update access to the MP-AID to change your password
l Miskeying your intended new password may result in your being unable to log on successfully. If you encounter this, or other problems, when trying to log on to Manager Products, contact your Systems Admin-istrator.
143
ControlManager Commands

MP-AID PASSWORD Syntax
where:
old-password is the password used to log on to the current session
new-password is the password to use when logging on subsequently; the password may be a maximum of eight characters long.
MP-AID PRINTThe MP-AID PRINT command displays the contents of EXECUTIVE, KEPT-DATA-LIST, USER-MEMBER, or TRANSIENT mem-bers held on the primary MP-AID or a secondary MP-AID.
For the syntax of the MP-AID PRINT command, see MP-AID PRINT Syntax.
Printing Members Held on the Primary MP-AIDTo print an EXECUTIVE member to which you have access, enter this command:
MP-AID PRINT EXECUTIVE member-name ;
where member-name is the name of a member (in this case, an EXECUTIVE member) held on the MP-AID.
To print a KEPT-DATA member owned by your logon identifier, enter this command:
MP-AID PRINT KEPT-DATA-LIST member-name ;
To print a private USER-MEMBER (belonging to your logon identifier), enter this command:
MP-AID PRINT USER-MEMBER member-name ;
To print a public USER-MEMBER (created by another user), enter this command:
MP-AID PRINT USER-MEMBER member-name logon-id ;
where logon-id is the logon identifier of the relevant user.
To print a TRANSIENT owned by your logon identifier, enter this command:
MP-AID PRINT TRANSIENT member-name ;
Printing Members held on a Secondary MP-AIDTo print a member contained on a secondary (concatenated) MP-AID, enter this command:
MP-AID PRINT CONCATENATION mpaid-name member-type member-name ;
where:
mpaid-name is the logical name of a secondary MP-AID.
144

member-name is the name of an EXECUTIVE, KEPT-DATA-LIST, TRANSIENT member or USER-MEMBER on the secondary MP-AID.
To print a member held on any MP-AID, primary or secondary, enter this command:
MP-AID PRINT ANY-CONCATENATION member-type member-name ;
If members on different MP-AIDs have the same name, then the member on the MP-AID occurring first in the search sequence is printed. The search sequence is defined by the systems administrator when concatenation is established.
To determine which MP-AIDs (if any) you can access via concatenation, use the MP-AID CONCATENATION LIST command.
MP-AID PRINT Syntax
where:
mpaid-name is the logical name of a secondary MP-AID
member-name is the name of a member on the MP-AID
logon-id is the name of a user’s logon identifier. This is only relevant when printing public USER-MEMBERs.
MP-AID RESET USER-MEMBERThe MP-AID RESET USER-MEMBER command resets the update-in-progress flag for an MP-AID USER-MEMBER created under the ownership of an exclusive Logon profile, after an abnormal termination of a Manager Products session, so that the USER-MEMBER can be used again.
If the Extended Interactive Facility is installed, users can create and update their own MP-AID USER-MEMBERs.
While an MP-AID USER-MEMBER is being updated, no other user has update access to the member. This is achieved via an update-in-progress flag which is set for the USER-MEMBER when it is being edited. The flag is normally unset when the user issues a FILE or XQUIT command. However, if a Manager Products session terminates abnormally, for example because of an abend, the update-in-progress flag remains set and the user cannot access it subsequently.
The MP-AID RESET USER-MEMBER command enables users who log on with an exclusive Logon profile to unset the update-in-progress flag and subsequently gain update access to their USER-MEMBER.
Users with exclusive Logon profiles should take care not to share their log-on details with other users. The availability of the RESET facility means that other users could override the normal security on exclusive Logon profiles.
Users who log on with a shared Logon profile must contact their Systems Administrator in order to reset the update-in-progress flag.
MP-AID RESET USER-MEMBER Syntax
145
ControlManager Commands

where mpaid-member-name is the name of an MP-AID member.
NOPRINTThe NOPRINT command suppresses output from a Manager Products command.
You can place this command in front of any Manager Products command. The command executes as normal, but the NOPRINT command suppresses any output that is normally generated. NOPRINT suppresses output for only the single Manager Products command that follows it. For example, NOPRINT SET LINE-AREA-RIGHT ; and NOPRINT FILE ; suppress the output of any messages or lines resulting from the execution of the SET LINE-AREA RIGHT command and the FILE command, respectively.
If you have the User Defined Commands facility installed, the NOPRINT command is especially useful when used to prefix Manager Products commands within executive routines. The executive routine can then issue messages as appropriate, if required.
The Executive Language System Variables, which supply information concerning previous messages generated by Man-ager Products (i.e., &MSNO, &MSTV, &MSLV, &CCOD, &SCOD, and &ECOD) will continue to be updated even if the dis-play of that message is suppressed by NOPRINT.
NOPRINT Syntax
P (Precede Line Command)The P command inserts n copies of the Scratchpad before this line.
To insert the contents of the Scratchpad into an Edit or Update Buffer, enter this command:
P
in the Line Command Area and press Enter. The contents of the Scratchpad are inserted before the line containing the P.
To insert n copies of the contents of the Scratchpad, enter this command:
Pn
The contents of the Scratchpad are unchanged after the command has been given.
The command can be inserted in the line containing the End of Data Delimiter, but not in the line containing the Top of Data Delimiter.
P is available with the Extended Interactive Facility, and can be used in Edit and Update Modes.
P Syntax
P[n]
PANELThe PANEL command displays the InfoBank panel indicated by panel-name or message identifier.
To display a particular InfoBank panel, enter this command:
146

PANEL panel-name ;
where panel-name is the name of the panel you want to see. For example:
PANEL INDEX0000 ;
You can look up the names of the panels in the InfoBank Contents or Index.
To display the panel describing a message-identifier, enter this command:
PANEL message-identifier ;
where message-identifier is the string that precedes any Manager Products message, including the prefix DM but excluding the severity level suffix. For example, if the message DM08100I is displayed, issue this command to display the explanatory panel:
PANEL DM08100 ;
PANEL Syntax
PUSH and PULLThese commands allow you to store and later restore information about your current environment.
The PUSH command stores information about your current working environment so that you can work in an differently configured environment for a temporary period before reverting to your original environmental configuration using the PULL command.
For example, you may wish to set up a modified environment only for the duration of a particular executive routine and then revert to your original environment.
To save your current Manager Products environment, enter this command:
PUSH;
The information stored is control information which is capable of being operated on by a SET command (e.g., the Line End Character and the Scroll Limit which may be operated on by the SET LINE-END-CHARACTER and SET SCROLL-LIMIT commands respectively). If a value has not been assigned to an item of control information using the SET command then the default value for that item will be stored by the PUSH command.
Certain items of control information with these associated SET commands are not stored by the PUSH command:
l SET DOCUWARE
l SET PRIMARY COMMAND
l SET LINE COMMAND
l SET MESSAGE-LANGUAGE
l SET USER-BLOCKS
l SET MP-AID UPDATES
l SET DICTIONARY-UPDATES
l SET FREE-POOL
147
ControlManager Commands

l SET KANJI-MODE
l SET KANJI-STRING-DELIMITER
l SET TRACE
Additionally, the PUSH command saves the control information generated by use of the MESSAGE and NAME-CONCATENATION clauses of the SWITCH command.
The environmental information stored by the PUSH command is saved in a Last In First Out (LIFO) stack thus enabling multiple environments to be stored and subsequently retrieved.
The PULL command retrieves details on the Manager Products environment most recently stacked.
The number of Manager Products environments you can store is limited only by the amount of virtual storage available to you.
To retrieve the previous Manager Products environment, enter this command:
PULL;
The PUSH and PULL commands are useful if, for example, if you want to run an executive routine which requires some SET commands to have values which may be different to the normal Manager Products environment.
You may, for example, wish to output blank lines of text from an executive routine to separate different categories of out-put information. This can be achieved with the SET BLANK-LINE-DISPLAY command set to ON. However, in order to revert to the original value of BLANK-LINE-DISPLAY (either ON or OFF), when the current executive routine terminates it is neces-sary to preserve the original value by issuing the PUSH command at the beginning of the executive routine and the PULL command at the end of the executive routine.
QUERY ACTIVE-BUFFERSThe QUERY ACITIVE-BUFFERS command determines which Command Mode, Update, Edit, and Lookaside Buffers you cur-rently have open and, in the case of Edit and Update Buffers, which members are contained in the buffers.
To determine which Command Mode, Update, Edit, and Lookaside Buffers you are using and, in the case of Edit and Update Buffers, which members are contained in the buffers, give the command:
QUERY ACTIVE-BUFFERS ;
QUERY ACITIVE-BUFFERS Syntax
In the syntax, QUERY may be abbreviated to QU or Q, and ACTIVE-BUFFERS may be abbreviated down to AC.
QUERY ALLThe QUERY ALL command obtains a complete description of the current user environment.
To obtain a complete description of the current user environment, such as the PF key settings and the dictionary you are in, enter the command:
QUERY ALL ;
148

QUERY ALL Syntax
QUERY AMBIGUITY-ASSUMPTIONThe QUERY AMBIGUITY-ASSUMPTION command determines whether the command ambiguity assumption feature is set on or off.
To determine whether AMBIGUTY-ASSUMPTION is set on or off, enter this command:
QUERY AMBIGUITY-ASSUMPTION ;
If AMBIGUITY-ASSUMPTION is set ON and you enter an ambiguous Primary Command, the system makes an assumption as to the intended command (if it is reasonable to do so in the particular context).
The assumption is always the safest alternative: for example, RE would be assumed to mean REPORT rather than REMOVE, RENAME, or REPLACE. If there is no safe alternative then a warning message is output, for example:
DM00128W RE AMBIGUOUS KEYWORD
and the command is not executed.
If AMBIGUITY-ASSUMPTION is set OFF and you enter an ambiguous Primary Command, a warning message is output, for example:
DM00128W RE AMBIGUOUS KEYWORD
and the command is not executed.
Only the Systems Administrator can set AMBIGUITY-ASSUMPTION on or off.
QUERY AMBIGUITY-ASSUMPTION Syntax
QUERY ASCII-CHARACTER-TRANSLATIONThe Manager Products Server Facility (MPSF) supports non-host based clients, such as Web Enabler running under the Windows operating system on a PC. ASCII input from such clients is translated to EBCDIC for processing on the server and the resultant output is again translated back from EBCDIC to ASCII before transmission to the client.
The Systems Administrator can amend or extend the default translation using the SET ASCII-CHARACTER-TRANSLATION command.
Use the QUERY ASCII-CHARACTER-TRANSLATION command to display the current translation of ASCII input to EBCDIC and vice-versa.
Two translation tables are displayed, one shows the translation of input ASCII characters to EBCDIC, the other shows the translation of output EBCDIC characters to ASCII.
These are the default translation tables:
149
ControlManager Commands

Input ASCII to EBCDIC Translation Table
0 1 2 3 4 5 6 7 8 9 A B C D E F (b) _______________________________________________ (a)] ] 0 ]00 40 40 40 40 40 40 40 40 40 0A 40 40 0D 40 40] 0 1 ]40 40 40 40 40 40 40 40 40 40 40 40 40 40 40 40] 1 2 ]40 5A 7F 7B 5B 6C 50 7D 4D 5D 5C 4E 6B 60 4B 61] 2 3 ]F0 F1 F2 F3 F4 F5 F6 F7 F8 F9 7A 5E 4C 7E 6E 6F] 3 4 ]7C C1 C2 C3 C4 C5 C6 C7 C8 C9 D1 D2 D3 D4 D5 D6] 4 5 ]D7 D8 D9 E2 E3 E4 E5 E6 E7 E8 E9 AD E0 BD 5F 6D] 5 6 ]79 81 82 83 84 85 86 87 88 89 91 92 93 94 95 96] 6 7 ]97 98 99 A2 A3 A4 A5 A6 A7 A8 A9 C0 6A D0 A1 40] 7 8 ]40 40 40 40 40 40 40 40 40 40 40 40 40 40 40 40] 8 9 ]40 40 40 40 40 40 40 40 40 40 40 40 40 40 40 40] 9 A ]40 40 40 40 40 40 40 40 40 40 40 40 40 40 40 40] A B ]40 40 40 40 40 40 40 40 40 40 40 40 40 40 40 40] B C ]40 40 40 40 40 40 40 40 40 40 40 40 40 40 40 40] C D ]40 40 40 40 40 40 40 40 40 40 40 40 40 40 40 40] D E ]40 40 40 40 40 40 40 40 40 40 40 40 40 40 40 40] E F ]40 40 40 40 40 40 40 40 40 40 40 40 40 40 40 40] F ]_______________________________________________] 0 1 2 3 4 5 6 7 8 9 A B C D E F
The hexadecimal representation of the output EBCDIC character is found at the intersection of the hexadecimal digits (ab) of the ASCII character. For example, the EBCDIC hexadecimal translation of ASCII 4 (x'34') is F4.
Output EBCDIC to ASCII Translation Table
0 1 2 3 4 5 6 7 8 9 A B C D E F (y) _______________________________________________ (x)] ] 0 ]00 20 20 20 20 20 20 20 20 20 0A 20 20 0D 20 20] 0 1 ]20 20 20 20 20 20 20 20 20 20 20 20 20 20 20 20] 1 2 ]20 20 20 20 20 20 20 20 20 20 20 20 20 20 20 20] 2 3 ]20 20 20 20 20 20 20 20 20 20 20 20 20 20 20 20] 3 4 ]20 20 20 20 20 20 20 20 20 20 20 2E 3C 28 2B 7C] 4 5 ]26 20 20 20 20 20 20 20 20 20 21 24 2A 29 3B 5E] 5 6 ]2D 2F 20 20 20 20 20 20 20 20 7C 2C 25 5F 3E 3F] 6 7 ]20 20 20 20 20 20 20 20 20 60 3A 23 40 27 3D 22] 7 8 ]20 61 62 63 64 65 66 67 68 69 20 20 20 20 20 20] 8 9 ]20 6A 6B 6C 6D 6E 6F 70 71 72 20 20 20 20 20 20] 9 A ]20 7E 73 74 75 76 77 78 79 7A 20 20 20 5B 20 20] A B ]20 20 20 20 20 20 20 20 20 20 20 20 20 5D 20 20] B C ]7B 41 42 43 44 45 46 47 48 49 20 20 20 20 20 20] C D ]7D 4A 4B 4C 4D 4E 4F 50 51 52 20 20 20 20 20 20] D E ]5C 20 53 54 55 56 57 58 59 5A 20 20 20 20 20 20] E F ]30 31 32 33 34 35 36 37 38 39 20 20 20 20 20 20] F ]_______________________________________________] 0 1 2 3 4 5 6 7 8 9 A B C D E F
The hexadecimal representation of the output ASCII character is found at the intersection of the hexadecimal digits (xy) of the EBCDIC character. For example, the ASCII hexadecimal translation of EBCDIC 9 (x'F9') is 39.
QUERY ASCII-CHARACTER-TRANSLATION Syntax
QUERY ASCII-CHARACTER-TRANSLATION;
150

QUERY BUFFER-LIMITThe QUERY BUFFER-LIMIT command determines the limit on the number of buffers available.
There are four types of ControlManager output buffer:
l Command Mode
l Edit
l Update
l Lookaside
There is always one Command Mode Buffer and there can be several Edit, Update, and Lookaside Buffers. The limit on the total number of buffers including the Command Mode Buffer is set by the Systems Administrator. You can determine this limit by entering this command:
QUERY BUFFER-LIMIT ;
QUERY BUFFER-LIMIT Syntax
The QUERY CHARACTER-TRANSLATION command displays the character translation implemented via the SET CHARACTER-TRANSLATION command (issued by the Systems Administrator).
Use this command to determine which characters are being translated by Manager Products Input and/or Output Trans-lation Tables as the result of modification, via the SET CHARACTER-TRANSLATION command:
QUERY CHARACTER-TRANSLATION ;
The output produced is in this format:
USER CHARACTER-TRANSLATION ACTIVEEBCDIC LOWER UPPER TERM PRINTCl C2 C3 C4 C5
c1 is either:
l The hexadecimal representation of a keyboard character to which the Input Translation Tables are trans-lating:
o c2 when uppercase translation is not applied
o c3 when uppercase translation is applied
l A hexadecimal code to which the Output Translation Tables are translating:
o c4 when it is output to your terminals
o c5 when it is output to your printer(s)
Uppercase translation is applied to all input via the Command Area and the Line Command Area. Uppercase translation is not applied to all other input unless UPPER-CASE has been set on.
151
ControlManager Commands

QUERY CHARACTER-TRANSLATION Syntax
If you want to display the current translation of all characters, irrespective of any modification by the SET CHARACTER-TRANSLATION command, then enter this command:
QUERY CHARACTER-TRANSLATION ALL ;
QUERY DICTIONARY
For the syntax of the QUERY DICTIONARY command, see QUERY DICTIONARY Syntax.
Enter QUERY DICTIONARY to obtain general details and dataset utilizations.
Enter QUERY DICTIONARY ALL to obtain general details, dataset utilizations, and buffer usage statistics.
Enter QUERY DICTIONARY INDEX ; to obtain information about index block utilization.
For more details, see Index Block Utilization.
To obtain buffer usage statistics only, enter this command:
QUERY DICTIONARY BUFFERS ;
General details include this information:
l Repository name.
l Repository access method (i.e., VSAM, BDAM, DIV, or VIRT).
l Repository creation date and time.
l Repository version and release.
l Open mode (i.e., READ-ONLY or UPDATE).
l Whether or not the repository has been disabled by the Controller.
l The name of the current UDS table.
l Buffer flush count.
l Recovery dataset usage.
l Status information.
l Object count.
l Details on shared usage support, using ENQUEUE, RESERVE, or LOCK Services.
l The number of updates performed on the repository.
152

l The maximum length permitted for any MEMBER name. The value will be between 32 (the default maximum length) and 160. When the value is 32 the maximum length for any ALIAS or CATALOG entry is 79 characters. For all other values the maximum length is 159 characters.
l Whether or not the repository has been enabled for case insensitive usage.
l Whether or not the repository has been created with a secondary index.
l Details on the latest logical backup (SAVE ALL) executed. The date and time of the backup is given together with the name of the output dataset and the volumes containing it. All backup information is cleared if the dictionary is rebuilt using the RELOAD command but not if rebuilt using non-MPR software.
Buffer Flush Count indicates the number of times that the dictionary buffer pool has been flushed in response to updates by other Manager Products users since the dictionary was opened by this user. Excessive buffer flushing can degrade per-formance and may indicate that updating of the dictionary should be restricted to certain periods of the day. Buffer flush-ing does not occur with a DIV dictionary as a single buffer is shared by all users.
Object Count provides a count of the number of index entries present in the dictionary. An index entry is one of - MEMBER, CATALOG, ALIAS, or ATTRIBUTE.
Recovery Dataset UsageThe Recovery dataset usage includes this information:
l Recovery usage
l Rollback recovery usage
l Global Recovery Write Rate (GRWR)
l Local Recovery Write Rate (LRWR)
The recovery usage is the maximum used percentage of the Recovery dataset during update without using Logical Units of Work.
The rollback recovery usage is the maximum used percentage of the Recovery dataset during update using Logical Units of Work with the ROLLBACK option.
The Global Recovery Write Rate (GRWR) is the average number of data writes per update command to the Recovery data-set for the life of the repository. The optimum GRWR is 1. If the GRWR is high, say greater than 2, then the Controller should consider increasing buffer pool sizes for all users of the repository. If the GRWR is still high then the Controller should consider increasing the block size of the Recovery dataset.
The Local Recovery Write Rate (LRWR) is the same as the GRWR, except that it is the average for the current session only. If the LRWR is high, say greater than 2, but the GRWR is not high, then you should consider increasing your buffer pool sizes, for this session only.
For further details on how buffer pool sizes affect the number of Recovery dataset writes, see ASG-Manager Products Performance Tuning.
153
ControlManager Commands

Buffer Usage StatisticsThe buffer usage statistics consist of this information:
l The size of the buffer pools
l The maximum number of buffers used during the current session
l Information on the number of logical and physical reads and writes
Such information is useful when monitoring repository performance.
Access to a DIV repository is through a single buffer shared by all users, the size of which is fixed at open time. No physical I/O is performed by users of the repository. Updated records are written to permanent storage by a Resource Processing Task (RPT) of ASG-Manager Products Server Facility (MPSF).
Dictionary Demo Buffer Usage Statistics On 18 Oct. 1989 At 07.38.22 is an example of buffer usage statistics.
Dataset Identification Index Source Data Totals
BUFFERS ALLOCATED: 8 4 30 42
MAXIMUM BUFFERS USED: 8 4 30 42
BUFFER POOL SIZE (K): 164 82 614 860
READ-ONLY BUFFER STEALS: 1 3 58 62
MODIFIED BUFFER STEALS: 0 0 0 0
BUFFER POOL HIT RATE: 83% 98% 99% 98%
DATASET LOGICAL READS: 1160 6139 30379 37678
DATASET PHYSICAL READS: 225 75 156 456
DATASET LOGICAL WRITES: 204 204 1960 2368
DATASET PHYSICAL WRITES: 204 204 668 1076
END OF BUFFER STATISTICS
Dictionary Demo Buffer Usage Statistics On 18 Oct. 1989 At 07.38.22
The statistics consist of ten lines of information. These are described below.
BUFFERS ALLOCATED
The number of buffers allocated to the Index, Source, and Data Entries dataset buffer pools. For a DIV repository suf-ficient buffers are automatically allocated at open time to accommodate the entire repository.
MAXIMUM BUFFERS USED
154

The number of buffers used for each dataset since the repository was opened during the current session. Data in each buffer pool is only overwritten when all available buffers are full. For a DIV repository this value is the same as the num-ber of buffers allocated.
BUFFER POOL SIZE
The size, in K bytes, of the buffer pool for each dataset. This is the number of bytes per buffer, multiplied by the number of buffers allocated to each dataset. The number of bytes per buffer for a dataset is equal to the physical blocksize for that dataset.
READ ONLY and MODIFIED BUFFER STEALS
If, when processing a command, the buffer pool for a dataset becomes full and additional buffer space is required to read in more data, the least recently used buffer is overwritten. If, as processing of the command continues, data from a pre-viously overwritten buffer is again required, it must be read back in, causing additional physical I/O to take place. The pro-cess of overwriting data that subsequently needs to be read back into the buffer pool is called a buffer steal and may have been avoided if a larger buffer pool had been allocated.
If the overwritten data was not updated before it was overwritten, a READ-ONLY buffer steal has occurred. READ-ONLY buffer steals incur additional dataset physical reads, since overwritten data must subsequently be read back into the buf-fer pool.
If data in the buffer was updated before it was overwritten, a MODIFIED buffer steal has occurred. MODIFIED buffer steals incur additional physical reads and writes, since updated records are written out to disk before overwriting takes place and then read back into the buffer pool when required again.
The number of buffer steals is only recorded and reported if you specify the optional keyword MONITOR in the DICTIONARY command, otherwise a row of asterisks is displayed for these Fields.
For a DIV repository these values are always zero. Buffer steals do not occur.
BUFFER POOL HIT RATE
When a command is run, any requests for data that are not met by data already held in the buffer pool must be satisfied by reading in more data from disk.
The BUFFER POOL HIT RATE is the percentage of requests for data that have been satisfied by data directly available from the buffer pool. It is based on the number of physical reads that were needed to transfer the relevant blocks into the buf-fer pool and the number of logical reads needed to access the required data.
The buffer pool hit rate is calculated by dividing the number of logical reads that have occurred since the repository was opened, by the total number of logical and physical reads that have taken place, and multiplying the result by 100. For example, if 255 physical blocks have been read into the buffer pool and within these physical blocks 1160 logical records have been accessed, this would give a buffer pool hit rate of 83%, calculated as follows:
1160 x 100
1160 + 225
An acceptable buffer pool hit rate would be over 70%.
155
ControlManager Commands
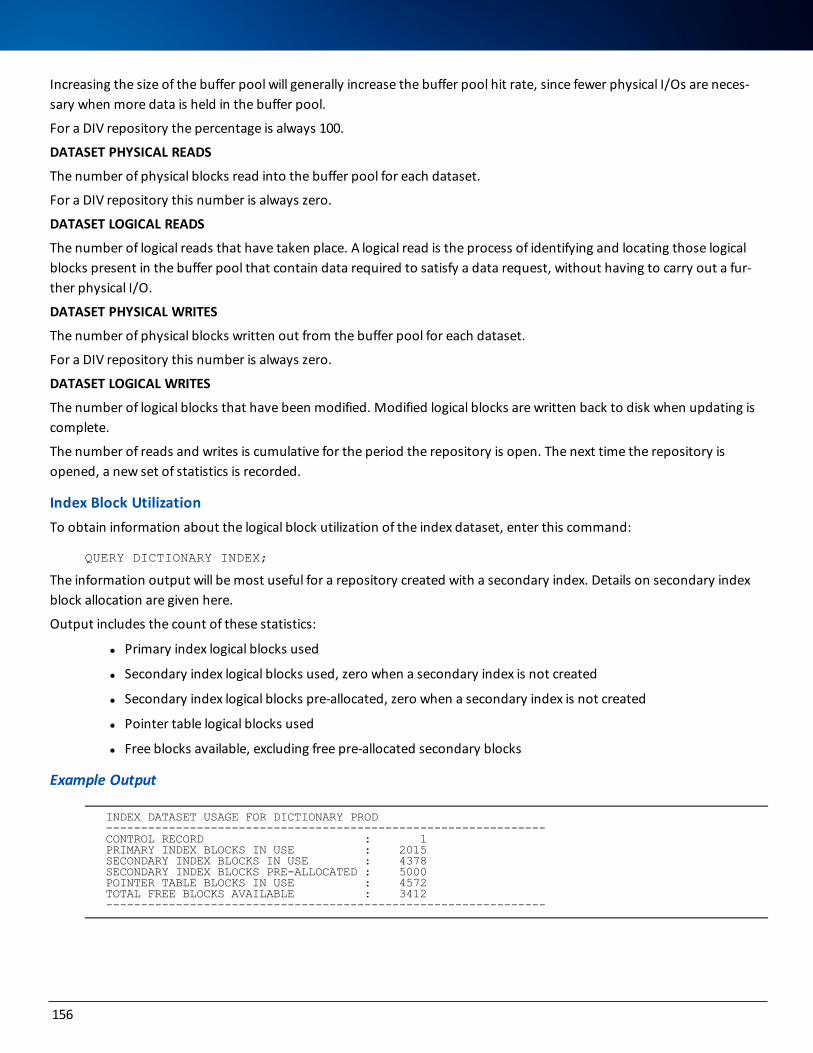
Increasing the size of the buffer pool will generally increase the buffer pool hit rate, since fewer physical I/Os are neces-sary when more data is held in the buffer pool.
For a DIV repository the percentage is always 100.
DATASET PHYSICAL READS
The number of physical blocks read into the buffer pool for each dataset.
For a DIV repository this number is always zero.
DATASET LOGICAL READS
The number of logical reads that have taken place. A logical read is the process of identifying and locating those logical blocks present in the buffer pool that contain data required to satisfy a data request, without having to carry out a fur-ther physical I/O.
DATASET PHYSICAL WRITES
The number of physical blocks written out from the buffer pool for each dataset.
For a DIV repository this number is always zero.
DATASET LOGICAL WRITES
The number of logical blocks that have been modified. Modified logical blocks are written back to disk when updating is complete.
The number of reads and writes is cumulative for the period the repository is open. The next time the repository is opened, a new set of statistics is recorded.
Index Block Utilization To obtain information about the logical block utilization of the index dataset, enter this command:
QUERY DICTIONARY INDEX;
The information output will be most useful for a repository created with a secondary index. Details on secondary index block allocation are given here.
Output includes the count of these statistics:
l Primary index logical blocks used
l Secondary index logical blocks used, zero when a secondary index is not created
l Secondary index logical blocks pre-allocated, zero when a secondary index is not created
l Pointer table logical blocks used
l Free blocks available, excluding free pre-allocated secondary blocks
Example Output
INDEX DATASET USAGE FOR DICTIONARY PROD --------------------------------------------------------------- CONTROL RECORD : 1 PRIMARY INDEX BLOCKS IN USE : 2015 SECONDARY INDEX BLOCKS IN USE : 4378 SECONDARY INDEX BLOCKS PRE-ALLOCATED : 5000 POINTER TABLE BLOCKS IN USE : 4572 TOTAL FREE BLOCKS AVAILABLE : 3412 ---------------------------------------------------------------
156

QUERY DICTIONARY Syntax
QUERY DICTIONARY-UPDATESThe QUERY DICTIONARY-UPDATES command determines whether or not you can open dictionaries in update or read-only mode, enter this command:
QUERY DICTIONARY-UPDATES ;
Output from this command relates to any dictionary opened subsequently. To determine the mode of the dictionary cur-rently open, enter this command:
QUERY DICTIONARY-UPDATES ;
QUERY DICTIONARY-UPDATES Syntax
QUERY DICTIONARYThe QUERY DICTIONARY command finds out details of the dictionary, status, and dictionary dataset utilization, and, if User Defined Syntax is installed, the UDS table name.
To find out details of the dictionary status (if a Status facility is used on your dictionary), utilization of dictionary datasets, and the UDS table in use, enter:
QUERY DICTIONARY ;
QUERY DICTIONARY Syntax
QUERY DICTIONARY-UPDATESThe QUERY DICTIONARY-UPDATES finds out if dictionary updates are permitted. Use the QUERY DICTIONARY-UPDATES command to find out if you can open dictionaries in update or read-only mode. To find out the setting, enter:
QUERY DICTIONARY-UPDATES ;
Output from this command relates to any dictionary opened subsequently. To find out the mode of the dictionary cur-rently open, enter:
QUERY DICTIONARY ;
157
ControlManager Commands

QUERY DICTIONARY-UPDATES Syntax
QUERY EXCP-LIMITThe QUERY EXCP-LIMIT command determines the maximum number of Input/Output operations permitted during the execution of a single command. When a DIV MPAID or repository is in use no physical I/Os are performed and an EXCP is considered to be a logical access to the shared buffer of the DIV resource.
Thc Systems Administrator can put a limit on the maximum number of Input/Output operations resulting from the exe-cution of a single command. To determine the limit, enter this command:
QUERY EXCP-LIMIT ;
QUERY FREE-POOLThe QUERY FREE-POOL command finds the maximum amount of virtual storage that you can retain for Manager Products, and the amount currently retained.
Use the QUERY FREE-POOL command to determine the maximum amount of virtual storage space that you can reserve for Manager Products and the amount currently reserved.
To determine these values, enter one of these commands:
QUERY FREE-POOL ;
Or
QUERY FREEPOOL ;
QUERY FREE-POOL Syntax
QUERY HELP-ENTRYThe QUERY HELP-ENTRY command determines the name of the panel accessed by a HELP command. (The ASG-supplied default is HELP000000.)
The command HELP takes you into InfoBank. By default, HELP takes you to the top of the Help Branch. However, if the User Defined InfoSystem facility is installed the Systems Administrator can change this entry point to another panel.
To determine the name of the panel which will be displayed when you issue the HELP command, enter this command:
QUERY HELP-ENTRY ;
158

QUERY HELP-ENTRY Syntax
QUERY INDEX-PANEL The QUERY INDEX-PANEL command determines the name of the panel accessed by a HELP INDEX command. (The ASG-supplied default is HELP-INDEX.)
If you issue the command HELP member-type-name or HELP command-name, the InfoBank panel describing the mem-ber or command is displayed. The system finds the panel by taking the member-type-name or command-name specified in the command and looking it up in a table known as the Index-Panel. You can determine the name of the Index-Panel by entering this command:
QUERY INDEX-PANEL ;
QUERY INFOBANK-ENTRYThe QUERY INFOBANK-ENTRY command determines the name of the panel accessed by an INFOBANK command. (The ASG-supplied default is INFO000000.)
The command INFOBANK takes you into InfoBank. By default, the command takes you to the Top Level Entry Panel. However, if the User Defined InfoSystem facility is installed the Systems Administrator can change this entry point to another panel.
To determine the name of the panel which will be displayed when you issue the INFOBANK command, enter this com-mand:
QUERY INFOBANK-ENTRY ;
QUERY INFOBANK-ENTRY Syntax
QUERY INTERROGATE-ENQUEUEThe QUERY INTERROGATE-ENQUEUE command determines whether the standard or alternative enqueuing procedure for Manager Products dictionaries is active. (The SET option is restricted to the Systems Administrator.)
There are two enqueuing procedures: standard and alternative.
The standard enqueuing procedure: during processing of an interrogation command, only other interrogation com-mands are allowed access to the dictionary.
159
ControlManager Commands

The alternative enqueuing procedure: during processing of an interrogation command, one dictionary update command (at a time) as well as other interrogation commands are allowed access to the dictionary.
When INTERROGATE-ENQUEUE is set ON, the standard enqueuing procedure is active. When INTERROGATE-ENQUEUE is set OFF, the alternative enqueuing procedure is active.
To determine whether INTERROGATE-ENQUEUE is set ON or OFF, enter this command:
QUERY INTERROGATE-ENQUEUE ;
QUERY INTERROGATE-ENQUEUE Syntax
QUERY IO-FLUSH-LIMITUse the QUERY IO-FLUSH-LIMIT command to determine whether a limit has been set on the number of permissible I/O flushes and, if so, what the limit value is. (The SET option is restricted to the Systems Administrator.)
This is the command:
QUERY IO-FLUSH-LIMIT ;
QUERY IO-FLUSH-LIMIT Syntax
QUERY KANJI-MODEThe QUERY KANJI-MODE command determines which Kanji Mode is set.
To determine which KANJI-MODE is current, enter this command:
QUERY KANJI-MODE ;
Any of these Kanji Modes supported by ASG:
l IBM
l HITACHI
l FUJITSU
may be established by the Systems Administrator. The ASG-supplied default is OFF.
QUERY KANJI-MODE Syntax
160

QUERY KANJI-STRING-DELIMITERThe QUERY KANJI-STRING-DELIMITER command determines the character that is set as the Kanji String Delimiter.
To determine the current setting, enter this command:
QUERY KANJI-STRING-DELIMITER ;
The ASG-supplied default is OFF, that is, no Kanji String Delimiter is defined.
QUERY KANJI-STRING-DELIMITER Syntax
QUERY KEPTThe QUERY KEPT command determines what KEPT-DATA lists, if any, that you have created.
To list any KEPT-DATA lists, enter this command:
QUERY KEPT ALL ;
To list an unnamed KEPT-DATA list, enter this command:
QUERY KEPT ;
Or
QUERY KEPT UNNAMED ;
To list a named KEPT-DATA list, enter this command:
QUERY KEPT LIST list-name ;
Or
QUERY KEPT LISTS list-name1, list-name2... ;
where list-name, list-name1, and list-name2 are the names of specific KEPT-DATA lists.
To list an unnamed KEPT-DATA list and named KEPT-DATA lists, enter this command:
QUERY KEPT UNNAMED AND LISTS list-name1, list-name2... ;
To list the KEPT-DATA lists which contain a specific member, you can include CONTAINING member-name as part of any of the above commands. For example:
QUERY KEPT ALL CONTAINING member-name ;
Or
QUERY KEPT UNNAMED AND LIST list-name CONTAINING member-name ;
where member-name is the name of a specific member and list-name is the name of a KEPT-DATA list.
You can have a maximum of 32,768 named KEPT-DATA lists.
161
ControlManager Commands
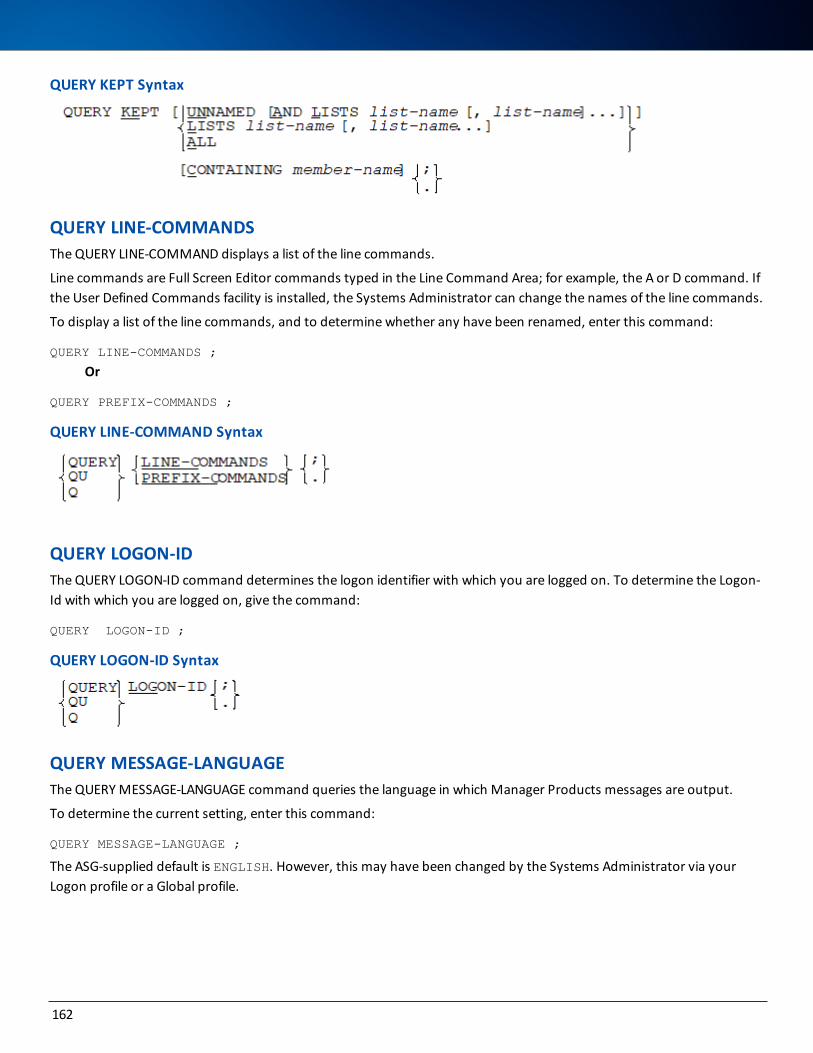
QUERY KEPT Syntax
QUERY LINE-COMMANDSThe QUERY LINE-COMMAND displays a list of the line commands.
Line commands are Full Screen Editor commands typed in the Line Command Area; for example, the A or D command. If the User Defined Commands facility is installed, the Systems Administrator can change the names of the line commands.
To display a list of the line commands, and to determine whether any have been renamed, enter this command:
QUERY LINE-COMMANDS ;
Or
QUERY PREFIX-COMMANDS ;
QUERY LINE-COMMAND Syntax
QUERY LOGON-IDThe QUERY LOGON-ID command determines the logon identifier with which you are logged on. To determine the Logon-Id with which you are logged on, give the command:
QUERY LOGON-ID ;
QUERY LOGON-ID Syntax
QUERY MESSAGE-LANGUAGEThe QUERY MESSAGE-LANGUAGE command queries the language in which Manager Products messages are output.
To determine the current setting, enter this command:
QUERY MESSAGE-LANGUAGE ;
The ASG-supplied default is ENGLISH. However, this may have been changed by the Systems Administrator via your Logon profile or a Global profile.
162

Only the Systems Administrator can alter the language in which messages are output.
QUERY MESSAGE-LANGUAGE Syntax
QUERY MPAID-UPDATESThe QUERY MPAID-UPDATES command determines if the MP-AID is open in update or read-only mode.
To determine the current setting, enter this command:
QUERY MPAID-UPDATES ;
QUERY MPAID-UPDATES Syntax
QUERY ONLINE-USERSThe QUERY ONLINE-USERS command determines which users are logged on to Manager Products, excluding batch users.
To determine which users are logged on to Manager Products, enter this command:
QUERY ONLINE-USERS ;
The output displays the Logon-Ids of all users logged on to Manager Products (except batch users) and indicates whether the Logon-Ids are exclusive to one user or shared by several users.
QUERY ONLINE-USERS Syntax
QUERY OUTPUT-LINE-LIMITThe QUERY OUTPUT-LINE-LIMIT determines the limit on the maximum number of output lines.
The Systems Administrator can limit the number of lines that can be held in each Command Mode and Lookaside Buffer. To determine the limit on the number of lines, enter this command:
QUERY OUTPUT-LINE-LIMIT ;
If output from a command is to be displayed on the screen, the output that is generated is limited by the number of lines that can be held in the buffer.
163
ControlManager Commands

QUERY OUTPUT-LINE-LIMIT Syntax
QUERY PRIMARY-COMMANDSThe QUERY PRIMARY-COMMANDS lists the names of the primary commands available to you, and determines which of these (if any) your Systems Administrator has renamed, disabled, or modified so that they run an executive routine in place of the primary command. If no primary commands have been modified, the message PRIMARY COMMANDS UNCHANGED is displayed at the bottom of the list.
The syntax of the command is:
QUERY PRIMARY-COMMANDS ;
Output from the command is displayed in five columns and includes this information:
l The product to which a command belongs
l The name of the command as supplied by ASG (with synonymous commands marked by equals signs and executive commands marked by "E")
l The name of the command as changed by your Systems Administrator
l Whether or not the command is disabled (with asterisks to mark renamed or disabled commands)
l The name of the executive routine which will be run in place of the command.
Example of output:
PRD STANDARD COMMAND CHANGED COMMAND DSB EXEC NAME
DSR IMS IMS N
CMR DMS DMS Y*
DMR DOES DS N*
CMR = D D N
CMR = DO DO N
CMR = DOWN DOWN N
CMR DROP DROP N
CMR RESERVE RESERVE N
CMR E REPORT REPORT N UREPORT
164

In this example the changes are to the DMS command, which has been disabled; to the DOES command, which has been renamed; and to the REPORT command which, when issued, will invoke the executive routine UREPORT.
QUERY PRIMARY-COMMANDS Syntax
In the syntax, QUERY may be abbreviated to QU or Q, and PRIMARY-COMMANDS may be abbreviated down to PRIM.
QUERY RECALL-BUFFERThe QUERY RECALL-BUFFER command displays a list of commands issued previously in the current Manager Products ses-sion.
This command is useful for viewing the sequence of commands issued earlier in the Manager Products session.
For security reasons, the AUTHORITY command is suppressed from the QUERY RECALL-BUFFER display.
See also the SET PF command which enables you to assign a PF key such that, when pressed, the last command issued is redisplayed in the command area.
The QUERY RECALL-BUFFER command is available in full-screen interactive environments only.
QUERY RECALL-BUFFER Syntax
In the syntax, QUERY may be abbreviated down to QU or Q, and RECALL-BUFFER may be abbreviated down to REC.
QUERY RESERVED-INFOBANK-LINEThe QUERY RESERVED-INFOBANK-LINE command determines the text currently specified for the Reserved InfoBank Line.
When an InfoBank panel displays, a line of text displays at the bottom of the screen. In InfoBank as released, this line reads:
IF YOU NEED HELP, KEY IN HELP AND PRES5 ENTER.
If the User Defined InfoSystem facility is installed at your site, the Systems Administrator can change this line of text. You can determine the line of text by entering this command:
QUERY RESERVED-INFOBANK-LINE ;
QUERY RESERVED-INFOBANK-LINE Syntax
In the syntax, QUERY may be abbreviated to QU or Q, and RESERVED-INFOBANK-LINE may be abbreviated down to RES.
165
ControlManager Commands

QUERY RETAINED-EXECUTIVESThe QUERY RETAINED-EXECUTIVES command determines which executive routines are retained in virtual storage. To determine which executive routines are retained in virtual storage, enter this command:
QUERY RETAINED-EXECUTIVES ;
This information is provided for each retained executive routine:
l The name of the executive routine (MEMBER NAME)
l The type of executive routine (TYPE)
l The number of times the executive routine has been called (USAGE)
l The length in bytes of the executive routine
If the CPUTIME keyword was included in the SET EXECUTIVE-RETENTION command that switched executive-retention on, then the following extra information is given for each retained executive routine:
l CPU time for directives (MPL-TIME)
l CPU time for executive routines called directly or indirectly (MPE-TIME)
l CPU time for Manager Products commands (MPR-TIME)
The CPU time information can be used for monitoring performance improvements to executive routines.
l For further details on retained executive routines, see the SET EXECUTIVE-RETENTION command.
l For details on performance improvements, see ASG-Manager Products Performance Tun-ing.
QUERY RETAINED-EXECUTIVES Syntax
QUERY STORAGE and VIRTUALThe QUERY STORAGE and VIRTUAL command determines the current Virtual Storage usage.
To obtain details on the amount of virtual storage you are taking up (that is, the workspace excluding program code), enter the command:
QUERY STORAGE ;
Or
QUERY VIRTUAL ;
This displays the amount of virtual storage you have USED (the maximum amount acquired during the current session) and the amount of virtual storage CURRENT (the amount actually in use when the command was entered).
The amounts are given in K bytes.
166

QUERY STORAGE and VIRTUAL Syntax
QUERY STRING-DELIMITERThe QUERY STRING-DELIMITER determines which characters may be used to delimit strings.
By default, a character string in ControlManager or DataManager is delimited by the single quote (') or double quote (") character. The Systems Administrator can specify additional characters which can alternatively be used as delimiters. To determine if any such characters were specified, enter this command:
QUERY STRING-DELIMITER ;
QUERY STRING-DELIMITER Syntax
QUERY TOP-MENU-ENTRYThe QUERY TOP-MENU-ENTRY command determines which panel displayed when you enter the SELECT top-menu com-mand.
To determine the current setting, enter this command:
QUERY TOP-MENU-ENTRY ;
The ASG-supplied default is INFO000000. However, this may have been changed by the Systems Administrator via your Logon profile or a Global profile.
Only the Systems Administrator can alter the Top Menu Entry Panel.
QUERY TOP-MENU-ENTRY Syntax
QUERY USER-BLOCKSThe QUERY USER-BLOCKS command determines the number of blocks on the MP-AID occupied by USER-MEMBERs owned by your Logon-Identifier.
To determine the number of blocks of the MP-AID occupied by USER-MEMBERs owned by your Logon-Id, enter this com-mand:
QUERY USER-BLOCKS ;
167
ControlManager Commands

If the Systems Administrator’s Environmental Control Facility is installed, the Systems Administrator can set a limit to the number of blocks which can be occupied by your USER-MEMBERs. If this has been done, the limit will also be displayed when you issue the QUERY USER-BLOCKS command.
QUERY USER-BLOCKS Syntax
QUITThe QUIT command closes and deletes a Lookaside Buffer, or an Update or Edit Buffer which has not been amended.
To leave a Lookaside Buffer, or an Update or Edit Buffer which has not been updated, enter this command:
QUIT ;
The buffer is then deleted.
If the Update or Edit Buffer has been changed and you enter QUIT, a message is displayed asking you to enter either XQUIT or FILE.
QUIT is available with the Extended Interactive Facility.
QUIT Syntax
RETRACEThe RETRACE command displays InfoBank panels you have previously seen, or to display a list of the InfoBank panels you have seen.
To display the InfoBank panel or menu you saw last, enter this command:
RETRACE ;
To display the InfoBank panel you saw last, enter this command:
RETRACE PANEL ;
To display the InfoBank menu you saw last, enter this command:
RETRACE MENU ;
To display a list of the InfoBank panels and menus you have seen since you logged on, enter this command:
RETRACE DISPLAY ;
Up to a maximum of 45 panel names and titles are displayed. The list is in reverse order, that is, the panel you saw last is at the top of the list. Panels displayed as the result of RETRACE commands are not added to the list.
168

The current panel is indicated by an arrow '. All panels RETRACEd from are dropped out of RETRACE processing, but remain in the RETRACE DISPLAY; these panels are flagged by an asterisk *. A RETRACE MENU command causes all panels between the current one and the menu you saw last to be flagged by an asterisk.
To display a panel in the list, enter this command:
PANEL panel-name ;
in the Command Area. Alternatively, if Panel Driven Processing (PDP) is installed, position the cursor in the Line Com-mand Area of the line containing the name of the panel you want to look up, and enter this command:
PAN ;
You can use the RETRACE command at any time during a Manager Products session.
RETRACE will take you back to the InfoBank panel or menu you saw last in your current Manager Products session, whether or not you are in InfoSystem when you issue the command. If you have not seen any InfoBank panels during the current session, then the message INFOSYSTEM NOT INITIATED displays.
If User Defined InfoSystem is installed, the RETRACE command can be specified in NEXT-PANEL, LAST-PANEL, LAST-MENU, and SELECT clauses of INFOBANK-PANEL dictionary members. This is useful for panels that are accessed from any of a number of others, for you can then be returned to the one you came from.
ControlManager retains a list of the last 45 panels you have accessed in the current session (except for those accessed using the RETRACE command). If successive RETRACE commands take you back to the first panel in the list, then further RETRACE is not possible; this is indicated by the message RETRACE PATH EXHAUSTED.
RETRACE Syntax
RFILEThe RFILE command replaces the source record of a member with the contents of the Update Buffer, and attempt to encode it.
The RFILE command is for use in circumstances when the contents of an Update Buffer cannot be successfully FILEd, because the member name being used, is the name of a member that already exists in the dictionary. To file a member in this circumstance, enter this command:
RFILE member-name ;
The RFILE command provides the same facility, in Full Screen Interactive environments where the Extended Interactive facility is installed, as is provided by the REPLACE command in other interactive and batch environments.
RFILE Syntax
169
ControlManager Commands

RUNThe RUN command executes permitted Manager Products commands from an Edit Buffer.
You can execute one or more permitted Manager Products commands in the Edit Buffer by typing RUN in the Command Area and pressing Enter. When the commands have been executed, the output is displayed in a Lookaside Buffer.
The buffer can contain any Manager Products command that you are permitted to use except for these commands:
l EDIT and UPDATE
l All editor commands
l All scrolling commands
l FILE, RFILE, SFILE, QUIT, and XQUIT
l RUN
RUN is available with the Extended Interactive Facility.
RUN Syntax
SEARCHThe SEARCH command provides an easy mechanism to search for a specified string in a number of character-based sources. You can search current dictionary source records across one or more statuses, primary and/or secondary MPAID members, the current ControlManager fullscreen buffer, and non-Manager Products external datasets.
The SEARCH command displays all records found with a matching search string together with the dataset or member record number. When outputting records from an MPAID or partitioned dataset member search, the member name is also displayed as the first field of each output record.
To maximize performance, execute the SEARCH command in a Manager Products fullscreen environment.
SEARCH is available to any user, and all searches are case-insensitive.
To search current dictionary source records, use this syntax:
where:
search-string is a string of up to 80 characters. You can omit the delimiters if the string consists of a single word.
status-selection is:
170

Selection Description
ALL STATUSES
Searches in ALL statuses irrespective of the current status view and, therefore, differs from the ALL-STATUSES keyword available with the LIST command.
CURRENT STATUS
Searches in the current status only.
CURRENT VIEW
Searches the current status view.
STATUS status-name
Searches only in the specified status.
If status selection is omitted, CURRENT VIEW is the default.
The status structure determines the current status view.
selection-clauses can be any permitted combination of these elements:index-name-type
KEPT DATA clause
MEMBERS clausename-related-selection
status-related-selection
time- and user-related-selection
These elements are as given for the selection clauses of the LIST command.
For information on the LIST command and its syntax, see ASG-Manager Products Dic-tionary/Repository User’s Guide.
The omission of the element selection-clauses will cause a search of all source records of the members belonging to the specified or defaulted status-selection.
A status related selection (such as NEW or AMENDED) is available only when the status selection CURRENT VIEW is spe-cified or defaulted.
Examples
SEARCH DICT 'ALLOCATED' CURRENT STATUS ONLY PR00;SEA REP CONTAINS ALL STATUSES ITEMS ONLY DP;SEA R 'CUSTOMER REFERENCE' STATUS LIVE ITEM FROM CUST TO CZZZ;
To search the MP-AID, use this syntax:
171
ControlManager Commands

where:
search-string is a string of up to 80 characters. You can omit the delimiters if the string consists of a single word.
ccc is any current MP-AID concatenation ddname up to eight characters long.
selection-clauses is:
where string-1, string-2, and string specify the range of MP-AID members from which to select and can be up to ten characters long.
The EXECUTIVE and PROFILE member types are available to the Systems Administrator only.
By default, ControlManager searches only the primary MP-AID when the CONCATENATION clause or ALL-CONCATENATIONS keyword is not specified.
When ALL is specified then all member types available to the user are selected. An additional column (x) is output adja-cent to the member name where x is a single character representation of the member type and is:
U for User Members
E for Executive Routines
T for Transient Members
I for Infobank Panels
P for Profile Members
Examples
SEARCH MPAID 'ARRAYGEN' USER SELECT PROC;SEA MP 'THEN DO' CONC COM EX FROM D TO H;
To search an external partitioned (PO) or sequential (PS) dataset, use this syntax:
172

where:
search-string is a string of up to 80 characters. You can omit the delimiters if the string consists of a single word.
dataset-name is an existing dataset and is up to 44 characters long.
ddname is the ddname of a currently allocated dataset and is up to eight characters long.
string specifies the starting characters of partitioned dataset members to select and can be up to eight characters long.
Manager Products determines the access method of the specified dataset. Only partitioned (PO) or sequential (PS) access methods are supported.
The ONLY clause is applicable to partitioned datasets only. It is ignored if specified for a sequential dataset.
Examples
SEARCH DATASET 'IS OPEN' SYS1.MACLIB;SEA DATA JOB FILE MYASM;SEA DA STRUCTURE DD LIBA ONLY DPR;
To search the current ControlManager fullscreen buffer, use this syntax:
where search-string is a string of up to 80 characters. You can omit the delimiters if the string consists of a single word.
If the optional keyword NOT is used, then all records in the current buffer without the specified string will be output.
Searching begins at the start of the buffer regardless of the position of the current line pointer.
Examples
SEARCH BUFFER 'ENCODED';SEA B 'EXCP COUNT';SEA BUFF NOT 060619;
S/SS and SMOVEThe S/SS and SMOVE command removes lines from an Edit or Update Buffer and put them into the Scratchpad. The cur-rent contents of the Scratchpad are NOT overwritten.
The commands are described in the following subsections, for each of which the name of the corresponding InfoBank panel is given.
l S/SS - Also Move Line Command (CMRCOM3275)
l SMOVE - Also Move Primary Command (CMRCOM3143)
173
ControlManager Commands

S/SS - Also Move Line CommandTo move a number of lines from the current buffer to the Scratchpad without overwriting the contents of the Scratchpad, enter this command:
Sn
in the Line Command Area and press Enter. n is the number of lines you wish to copy and can range from 1 through 9999.
The specified number of lines, starting with the line containing Sn, are removed from the current buffer and added to the end of the existing contents of the Scratchpad.
To move a block of lines from the current buffer to the Scratchpad without overwriting the contents of the Scratchpad, enter this command:
SS
in the Line Command Area in the first and last lines of the block to be moved, and press Enter. The block can extend over more than one screen if you wish.
S and SS are available with the Extended Interactive Facility, and can be used in Edit and Update Modes.
The moved lines will be lost if they are overwritten by another entry to the Scratchpad before they have been inserted elsewhere.
SMOVE - Also Move Primary CommandTo move lines from the current buffer to the Scratchpad, without overwriting the contents of the Scratchpad, enter this command:
SMOVE n ;
where n is the number of lines you wish to move.
The specified number of lines, beginning with the current line, will be removed from the current buffer and added to the end of the Scratchpad.
SMOVE is available with the Extended Interactive Facility, and can be used in Edit and Update Modes.
The moved lines will be lost if they are overwritten by another entry to the Scratchpad before they have been inserted elsewhere.
S/SS and SMOVE SyntaxThe syntax of the also move line command is:
S[n]
SS
The syntax of the also move primary command is:
174

SELECTThe SELECT command displays an InfoBank panel chosen from the panel you are viewing.
To display the menu for the current branch, enter this command:
SELECT MENU ;
If you entered the current branch by a selection from another branch, the menu for the current branch may be different from the menu you saw last.
To display the next panel in the current branch, enter this command:
SELECT NEXT-PANEL ;
To display the previous panel in the current branch, enter this command:
SELECT LAST-PANEL ;
If you entered the current branch by a selection from another branch, the previous panel for the cur-rent branch may be different from the panel you saw last.
To make a selection from a panel or menu, enter this command:
SELECT n ;
where n is the number or character-string beside the item you want to select. To see the Top Level Menu in InfoBank, enter this command:
SELECT TOP-MENU ;
Every INFOBANK-PANEL supplied by ASG has one or more SELECT clauses in its member definition statement and this causes the SELECT prompt to be displayed in the Command Area when the panel is displayed. This means you need only enter your selection and press Enter to be routed to the information you want. However, it also means that to enter a command (not a selection) you must first overtype the SELECT prompt.
For details on how to suppress this display of the SELECT prompt, see SET INFOBANK-SELECT in SET and QUERY INFOBANK-SELECT.
Users with the User Defined InfoSystem facility installed should note that if there are no SELECT clauses in an INFOBANK-PANEL, then no SELECT prompt will appear in the Command Area when that panel is displayed.
175
ControlManager Commands

SELECT Syntax
where n is an alphanumeric character.
SET and QUERY ALERTThe SET and QUERY ALERT command sets the audible alert on or off (SET), and determines the current setting (QUERY).
The alert is the warning sound given when a Manager Products error message is output. To turn on the audible alert, enter this command:
SET ALERT ON ;
To turn off the audible alert, enter this command:
SET ALERT OFF ;
To determine whether the alert is set on or off, enter this command:
QUERY ALERT ;
Some terminals are not fitted with an alert so the SET command sometimes has no effect.
The SET ALERT command is available with the Extended Interactive Facility.
SET ALERT Syntax
SET and QUERY AUTOSKIPThe SET and QUERY AUTOSKIP command sets the Autoskip feature on or off (SET), and determines the current setting (QUERY).
The Autoskip feature is available with the Basic Interactive Facilities provided that the User Defined Commands facility is installed at your site.
Autoskip is used in conjunction with Linear Commands.
For full details on these Commands, see ASG-Manager Products Procedures Lan-guage.
176

If the feature is set on and a Linear Command is executed, the line in which the command was entered becomes the Cur-rent Line. If two or more Linear Commands are executed at the same time, the line containing the last Linear Command becomes the Current Line.
If the feature is set off, the buffer is redisplayed exactly as it was when the command was given.
To set the feature on, enter this command:
SET AUTOSKIP ON ;
To set the feature off, enter this command:
SET AUTOSKIP OFF ;
To determine whether the feature is set off or on, enter this command:
QUERY AUTOSKIP ;
SET and QUERY AUTOSKIP Syntax
SET and QUERY BLANK-LINE-DISPLAYUse the SET BLANK-LINE-DISPLAY command to suppress or display blank lines in output to the screen. Valid forms of the command are:
SET BLANK-LINE-DISPLAY ON ;
Or
SET SPACE-LINE-DISPLAY ON ;
which cause the display of blank lines.
SET BLANK-LINE-DISPLAY OFF ;
Or
SET SPACE-LINE-DISPLAY OFF ;
which cause the suppression of blank lines.
To determine the current setting, enter this command:
QUERY BLANK-LINE-DISPLAY ;
Or
QUERY SPACE-LINE-DISPLAY ;
An InfoBank panel displayed on the screen will always include blank lines, if present.
177
ControlManager Commands

When using the PRINT command:
l If source line numbers are output, then blank lines are always included.
l If source line numbers are suppressed, then blank lines can be suppressed.
Blank lines are always included in hard copy output.
The ASG-supplied default is OFF.
SET BLANK-LINE-DISPLAY Syntax
SET and QUERY CASE-INSENSITIVE-SELECTIONUse the SET CASE-INSENSITIVE-SELECTION command to activate or deactivate the Case Insensitive feature of Manager Products.
The command may be issued by any user at any time but is only effective for dictionary interrogates where the current dictionary is enabled for case insensitive object name selection and string searching.
To activate the Case-insensitive feature, enter this command:
SET CASE-INSENSITIVE-SELECTION ON ;
To deactivate the Case Insensitive feature, enter this command:
SET CASE-INSENSITIVE-SELECTION OFF ;
To determine the current setting, enter this command:
QUERY CASE-INSENSITIVE-SELECTION ;
An alternative form of the CASE-INSENSITIVE-SELECTION keyword is CIS.
The ASG-supplied default is OFF.
The SET CASE-INSENSITIVE-SELECTION command is available in all execution environments.
For further details on the Case Insensitive feature, see “Case Insensitive Dictionary Interrogation” in the ASG-Manager Products Dictionary/Repository User’s Guide.
SET and QUERY CHECK-CHARACTERThe SET and QUERY CHECK-CHARACTER command specifies the check-character (SET), and determines the current setting (QUERY).
The check-character is displayed against members marked as check-needed when you list members. It is given imme-diately after:
178

l SCE ENC, for an encoded member
l DUM, for a dummy member
To specify the check-character, enter this command:
SET CHECK-CHARACTER character ;
where character is any delimited or undelimited character except a space.
To set the check-character off, enter this command:
SET CHECK-CHARACTER OFF ;
The check-character is by default set off.
To determine the current check-character, enter this command:
QUERY CHECK-CHARACTER ;
See the LIST command for an example of the use of the check-character.
SET and QUERY CHECK-CHARACTER Syntax
where x is any delimited or undelimited character except a space.
SET and QUERY COMMAND-LINEUse the SET COMMAND-LINE command to control the position of the Command Area. Valid forms of the command are:
SET COMMAND-LINE TOP ;
which sets the Command Area to the top of the screen.
SET COMMAND-LINE BOTTOM ;
which sets the Command Area to the bottom of the screen.
To determine the current position of the Command Area, enter this command:
QUERY COMMAND-LINE ;
If the Command Area is set to the bottom of the screen there are two lines available for entering commands. If the Com-mand Area is set to the top of the screen there is only one line available for entering commands.
The ASG-supplied default is BOTTOM.
The RECALL buffer is emptied whenever SET COMMAND-LINE TOP or SET COMMAND-LINE BOTTOM is entered. Therefore commands entered when the Command Area was at the bottom of the screen cannot be recalled if the Command Area has since been set to the top of the screen; and vice versa.
179
ControlManager Commands

SET COMMAND-LINE Syntax
SET and QUERY COUNTERThe SET and QUERY COUNTER defines the increment for the Line Counter (SET), and to determine the current setting (QUERY).
At the top right hand corner of any screen other than an InfoBank panel are the words LINE: aaaaa OF bbbbb.
aaaaa is the number of the Current Line. bbbbb is the total number of lines in the output being viewed and is known as the Line Counter.
The Line Counter is incremented as lines of output are being generated. You can change the increment by entering this command:
SET COUNTER n ;
where n is the increment at which the Line Counter is to change.
For example, if the increment is set to 20 and the output contains 56 lines, the Line Counter will be 00000 until 20 lines of output are built up, 00020 when 20 and not more than 40 lines are built up, then 00040 and finally 00056 when the com-plete display is ready.
You can determine the increment at which the Line Counter changes by entering this command:
QUERY COUNTER ;
The ASG-supplied default is 25. You can enhance performance by setting the increment to a relatively high value when executing under MPSF and/or generating large amounts of output.
The SET COUNTER command is available with the Basic Interactive Facilities.
SET and QUERY COUNTER Syntax
SET and QUERY CURSOR-HOLDThe SET and QUERY CURSOR-HOLD command specifies whether the cursor is to be retained in its current position on the screen when Enter is pressed in Edit Mode or Update Mode (SET), and determines the current setting (QUERY).
Use this command when you key or overkey characters in an EDIT or UPDATE buffer and press Enter, then after execution the cursor can be held in its original position or returned to the Command Area.
Use the SET CURSORHOLD command to specify one of these options. These are valid forms of the command:
SET CURSOR-HOLD ON ;
180

When you first press Enter, the cursor will be held in its original position. To return to the Command Area you must press Enter a second time.
SET CURSOR-HOLD OFF ;
When you press Enter the cursor is returned to the Command Area. To determine the current setting, enter this com-mand:
QUERY CURSOR-HOLD ;
The ASG-supplied default is OFF.
The SET CURSOR-HOLD command is available with the Basic Interactive Facilities.
SET and QUERY CURSOR-HOLD Syntax
SET and QUERY DIRECTLY-ASSUMPTIONThe SET DIRECTLY-ASSUMPTION command specifies whether subsequent WHAT, WHICH, DOES, and GLOSSARY com-mands report only direct references to selected members, or direct and indirect references, unless otherwise specified. (For GLOSSARY, this applies only when the keywords USAGES or REFERENCES are used.) Valid forms of the command are:
SET DIRECTLY-ASSUMPTION ON ;
which causes subsequent commands to report direct references only, unless INDIRECTLY (WHAT, WHICH, and DOES) or INDIRECT (GLOSSARY) is specified.
SET DIRECTLY-ASSUMPTION OFF ;
which causes subsequent commands to report direct and indirect references unless DIRECTLY (WHAT, WHICH, and DOES) or DIRECT (GLOSSARY) is specified.
To determine the current setting, enter this command:
QUERY DIRECTLY-ASSUMPTION ;
The current setting is ignored whenever INDIRECTLY/INDIRECT or DIRECTLY/DIRECT is specified.
If, while the assumption is set ON, you want a particular command to report indirect and direct references, specify INDIRECTLY/INDIRECT in that command. For example:
WHAT INDIRECTLY USES EMP-CODE ;
If, while the assumption is set OFF, you want a particular command to report direct references only, specify DIRECTLY/DIRECT in that command. For example:
GLOSSARY KEPT GIVING DIRECT USAGE ;
The ASG-supplied default is OFF.
The SET DIRECTLY-ASSUMPTION command is available in all environments.
181
ControlManager Commands

SET DIRECTLY-ASSUMPTION Syntax
SET: Reports: OPTIONS:
WHAT/WHICH/DOES GLOSSARY
ONDirect references only
Specify INDIRECTLY to report Indirect as well as Direct
Specify INDIRECT to report Indirect as well as Direct
OFFDirect and Indirect references
Specify DIRECTLY to report Direct only
Specify DIRECT to report Direct only
Options Available with QUERY DIRECTLY-ASSUMPTION
SET and QUERY FOLLOW-ALL-PATHS-ASSUMPTIONUse the SET FOLLOW-ALL-PATHS-ASSUMPTION command to specify whether subsequent WHAT, WHICH, DOES, and GLOSSARY commands follow all relationship paths, unless otherwise specified, when indirect references or usages are explicitly requested or defaulted. (For GLOSSARY, this applies only when the keywords USAGES or REFERENCES are used.) Valid forms of the command are:
SET FOLLOW-ALL-PATHS-ASSUMPTION ON ;
which causes subsequent commands to follow all relationship paths, unless HIERARCHICALLY is specified or unless DIRECTLY (WHAT, WHICH and DOES) or DIRECT (GLOSSARY) is specified.
SET FOLLOW-ALL-PATHS-ASSUMPTION OFF ;
which causes subsequent commands to follow only hierarchical relationship paths when INDIRECTLY is assumed or spe-cified, unless FOLLOW-ALL-PATHS is specified, in the WHAT, WHICH, DOES, and GLOSSARY commands.
To determine the current setting, enter this command:
QUERY FOLLOW-ALL-PATHS-ASSUMPTION ;
The current setting is ignored whenever FOLLOW-ALL-PATHS or HIERARCHICALLY is specified.
If, while the assumption is set OFF, you want a particular command to follow all relationship paths, specify FOLLOW-ALL-PATHS in that command.
For example:
WHAT USES EMP-CODE FOLLOW-ALL-PATHS;
182

If, while the assumption is set ON, you want a particular command to follow only hierarchical paths, specify HIERARCHICALLY in that command. For example:
DOES MODA USE ITEMB HIERARCHICALLY;
The ASG-supplied default is OFF.
The SET FOLLOW-ALL-PATHS-ASSUMPTION command is available in all environments.
SET DOCUWAREThe SET DOCUWARE command enables you to examine InfoBank panels relating to Product Nuclei or selectable units that are not included in your Manager Products installation, subject to the terms of a Non-Disclosure Agreement.
In order to maintain the CONFIDENTIAL nature of information contained in InfoBank, InfoView does not permit you to see panels relating to Product Nuclei or selectable units that are not included in your Manager Products installation, except under the conditions described below.
You may examine such documentation for evaluation purposes under the terms of a Non-Disclosure Agreement. The doc-umentation is made available to you when you issue the following command:
SET DOCUWARE selectable-unit-code ON ;
Issuing this command implies that you have entered into a Non-Disclosure Agreement with your Manager Products Sup-plier.
The selectable-unit-code you enter in the SET DOCUWARE command is the code for the selectable unit or Product Nucleus you want to read about. Only one such code must be included in a SET DOCUWARE command; but you may enter as many SET DOCUWARE commands as you require for your evaluation. For example, if you do not have DesignManager installed, but are interested in Enterprise Modeling, you could enter this command:
SET DOCUWARE DSR-DS01 ON;SET DOCUWARE DSR-EM10 ON;
The SET DOCUWARE .... ON command operates only for the duration of the run in which it was issued. As you will prob-ably require access to the information in successive runs over several weeks, you could include this command in your user-defined profile, if the Systems Administrator’s Environmental Control Facility is installed; or otherwise ask your Sys-tems Administrator to include it in your Logon profile.
The period during which you can examine documentation under a Non-Disclosure Agreement lasts for thirteen weeks, unless it is extended by agreement with your Manager Products Supplier. Therefore, you should remember to remove any SET DOCUWARE commands from your Logon or user-defined profile on expiry of this period. Whenever a SET DOCUWARE command is processed, a warning is displayed to remind you of this.
SET DOCUWARE Syntax
SET and QUERY ECHOThe SET and QUERY ECHO command sets the Command Echo capability on or off (SET), and determines the current set-ting (QUERY).
183
ControlManager Commands

To cause every Manager Products command executed by an executive routine to be displayed as part of the output, enter this command:
SET ECHO ON ;
To set the echo off, enter this command:
SET ECHO OFF ;
To determine the current setting, enter this command:
QUERY ECHO ;
The SET ECHO command can be issued in all environments, but is only effective in host-based environments such as TSO and batch.
SET and QUERY ECHO Syntax
SET and QUERY ENQUEUE-TRACEThe SET and QUERY ENQUEUE-TRACE command provides a report of enqueueing and dequeuing activity during the exe-cution of subsequent commands (SET), and to determine the current setting (QUERY). The SET command should only be used under ASG supervision. Valid forms of the command are:
SET ENQUEUE-TRACE ON ;
which provides a report of enqueuing and dequeuing activity during the execution of subsequent commands.
SET ENQUEUE-TRACE OFF ;
which sets the ENQUEUE-TRACE command off.
To determine the current setting, enter this command:
QUERY ENQUEUE-TRACE ;
The ASG-supplied default is OFF.
The SET ENQUEUE-TRACE command is available in all environments.
SET and QUERY ENQUEUE-TRACE Syntax
184

SET and QUERY ESCAPE-CHARACTERThe SET and QUERY ESCAPE-CHARACTER command specifies the escape character (SET), and determines the current set-ting (QUERY).
When a line of input for an MPAID ADD or MPAID APPEND command or in the CONTENTS clause of a COMMAND-STREAM, LOGON-PROFILE, GLOBAL-PROFILE, or EXECUTIVE-ROUTINE would normally contain a terminator in the first column position, that line must begin with an escape character. The default escape character is a percent sign (%). For example:
COMMAND-STREAMCONTENTSALTER *;LOCATE 'CATALOG'LOCATE NEXT 'TRIAL'CHANGE LINE 'TRIAL' TO 'ACCEPTED'%;;
For MPAID ADD and MPAID APPEND commands, an escape character in the first position of an input record is not stored as part of the contents of the USER member. For COMMAND-STREAM members, the escape character is stored as part of the member definition but bypassed during command execution if it is in the first position of an input record. For LOGON-PROFILE, GLOBAL-PROFILE, and EXECUTIVE-ROUTINE members, the escape character is stored as part of the member definition but bypassed during CONSTRUCT if it is in the first position of an input record (e.g., it will not be part of the resulting MPAID member).
To change this default character to another, enter this command:
SET ESCAPE-CHARACTER x ;
where x is a delimited or undelimited character.
To determine what character is being used as the escape character, give the command:
QUERY ESCAPE-CHARACTER ;
The SET ESCAPE-CHARACTER command is available in all environments.
SET ESCAPE-CHARACTER Syntax
SET and QUERY EXCP-MONITORThe SET and QUERY EXCP-MONITOR command sets a display of the number of input/output operations on the dic-tionary and MP-AID to a particular integer value or turns off the display (SET), and determines the current setting (QUERY).
185
ControlManager Commands

The Excp Monitor records the number of input and output operations for each of your dictionary’s datasets and the MP-AID for each command. If you enter the SET EXCP-MONITOR command, a message similar to that below is displayed on the message line while each command is executed:
MP-AID 00002 INDEX 00002 SOURCE 00006 DATA 00002 ERROR 00000 LOG 00000
This message indicates that there have been two I/O operations to the MP-AID, two to the Index Dataset, and so on.
The syntax of the SET EXCP-MONITOR command is:
SET EXCP-MONITOR n ;
The display on the screen is updated every n I/O operations. For example, if n is 50, the display is updated every fifty I/O operations.
When executing Manager Products under MPSF with DIV repositories and MPAIDs, no physical I/O operations are per-formed by users accessing DIV resources. In this situation an EXCP is considered to be a logical access to the shared buf-fer containing the resource. When using SET EXCP-MONITOR you need to use a value significantly larger than the value used for non-DIV access. If for example, a non-DIV value of 1000 is used, then a reasonable DIV value would be 50,000.
To set the monitor and the display to the screen off, enter the command:
SET EXCP-MONITOR OFF ;
To determine whether the monitor is set on or off, enter the command:
QUERY EXCP-MONITOR ;
The SET EXCP-MONITOR command is available with the Extended Interactive Facility.
SET EXCP-MONITOR Syntax
SET and QUERY EXEC-WRITEThe SET and QUERY EXEC-WRITE command permits or suppresses output to the terminal while an executive routine is executing (SET), and determines the current setting (QUERY).
Typically, you only use the SET EXEC-WRITE within executive routines. Valid forms of the command are:
SET EXEC-WRITE ON ;
SET EXEC-WRITE OFF ;
If switched OFF, any output to the terminal is suppressed until execution of the executive routine is complete.
EXEC-WRITE is commonly set to OFF if OUTPUT-EDIT is set to ON, to enable an output buffer being built by an executive routine to be completed and possibly amended before being output to the screen.
To determine the current setting, enter this command:
186

QUERY EXEC-WRITE ;
The ASG-supplied default is ON.
The SET EXEC-WRITE command is available with the User Defined Commands Facility.
SET EXEC-WRITE Syntax
SET and QUERY EXECUTIVE-RETENTIONThe SET EXECUTIVE-RETENTION command allows retention of executive routines in virtual storage (SET) and determines the current setting (QUERY).
If an executive routine is retained in virtual storage, it is only loaded once, no matter how many times it is called, whereas if it is not retained it is loaded every time it is called, except when an executive routine is called from another executive routine on a repeated basis then, once loaded into virtual storage, the storage copy of the executive routine is used and is only released when the highest level executive routine terminates. For an executive routine that is called many times, retention can lead to a significant improvement in performance.
To retain an executive routine, these conditions must exist:
l Executive-retention must be on
l The executive routine must execute the RETAIN directive
To switch executive-retention on, enter this command:
SET EXECUTIVE-RETENTION ON ;
To switch executive-retention off, enter this command:
SET EXECUTIVE-RETENTION OFF ;
By default executive-retention is set off.
Use the QUERY RETAINED-EXECUTIVES command to determine which executive routines have been retained.
If you include the CPUTIME keyword, the output from the QUERY RETAINED-EXECUTIVES command includes statistics on CPU usage.
For more information on these statistics, see QUERY RETAINED-EXECUTIVES.
If you alter a retained executive routine’s MP-AID member, the alteration is not reflected in the retained executive routine until it is retained again.
The SET EXECUTIVE-RETENTION command is available to any user.
The COMMAND-RETENTION keyword is a synonym for the EXECUTIVE-RETENTION keyword.
187
ControlManager Commands

For information on the RETAIN directive, see the ASG-Manager Products Procedures Language.
To determine the current executive-retention setting (ON or OFF), enter this command:
QUERY EXECUTIVE-RETENTION ;
SET EXECUTIVE-RETENTION Syntax
SET and QUERY FORMATThe SET FORMAT command sets the format of reports of members to a preferred set format, a user-defined format, or back to the standard ASG format (SET), and determines the current setting (QUERY).
Output from the REPORT command can be formatted in one of these ways:
l In the standard format issued by ASG
l In one of the preferred set of alternative formats issued with DictionaryManager
l If the DictionaryManager User Defined Output facility is installed, in one of the user-defined formats defined at your site
If you want to use one of the preferred set of alternative formats or a user-defined format, you can issues either of these commands:
l FORMAT
l SET FORMAT
The FORMAT command is a DictionaryManager Prefix Command. The format specified applies to output from the pre-fixed REPORT or BULK REPORT command.
See Dictionary Manager ASG-DictionaryManager User’s Guide for details.
The format specified in the SET FORMAT command applies to output from all following REPORT or BULK REPORT com-mands for the member types specified in the command unless some other format is invoked for a particular command by the FORMAT Prefix Command.
To set a preferred set format, enter the command:
SET FORMAT FOR REPORT OF member-type AS preferred-set-format ;
where:
188

member-type may be ITEMS, GROUPS, CONVENTIONAL-FILES, MODULES, PROGRAMS, or SYSTEMS, or any user-defined member type based on any of these member types.
preferred-set-format can be any of the following: PSR-ITEM, PSR-GROUP, PSR-FILE, PSR-MODULE, PSR-PROGRAM, PSR-SYSTEM, PSR-SUMMARY, or PSR-DETAILS. Except for PSR-SUMMARY, reports based on these formats contain all the details that appear in a standard report, laid out in columns. PSR-SUMMARY contains the common clauses only.
To set a user-defined format held in the MP-AID, enter the command:
SET FORMAT FOR REPORT OF member-type TO MP-AID user-format ;
To set a user-defined format held in a dictionary, enter the command:
SET FORMAT FOR REPORT OF member-type TO DICTIONARY user-format ;
If the ControlManager User Defined Syntax facility is installed, you can optionally precede the member type in the SET FORMAT command by the word GENERIC, in which case, the command is applied to the specified member type and all member types based on that member type.
Two or more member types can optionally be specified in a SET FORMAT command separated by commas, for example:
SET FORMAT FOR REPORT OF PROGRAMS, GENERIC MODULES TO MP-AID UD05 ;
To set the format back to the standard ASG format for REPORT output, enter this command:
SET FORMAT FOR REPORT OF member-type [, member-type ]... OFF ;
To determine whether any of the preferred set of alternative formats will be applied to output from the REPORT com-mand, enter the command:
QUERY FORMAT ;
A dictionary must be open for a SET or QUERY FORMAT command to be accepted. If you close a dictionary, any user-defined formats held in a dictionary are automatically set off.
The SET FORMAT command is available in all environments.
SET FORMAT Syntax
SET FORMAT [FOR] REPORT
where basic-member-type is:
189
ControlManager Commands
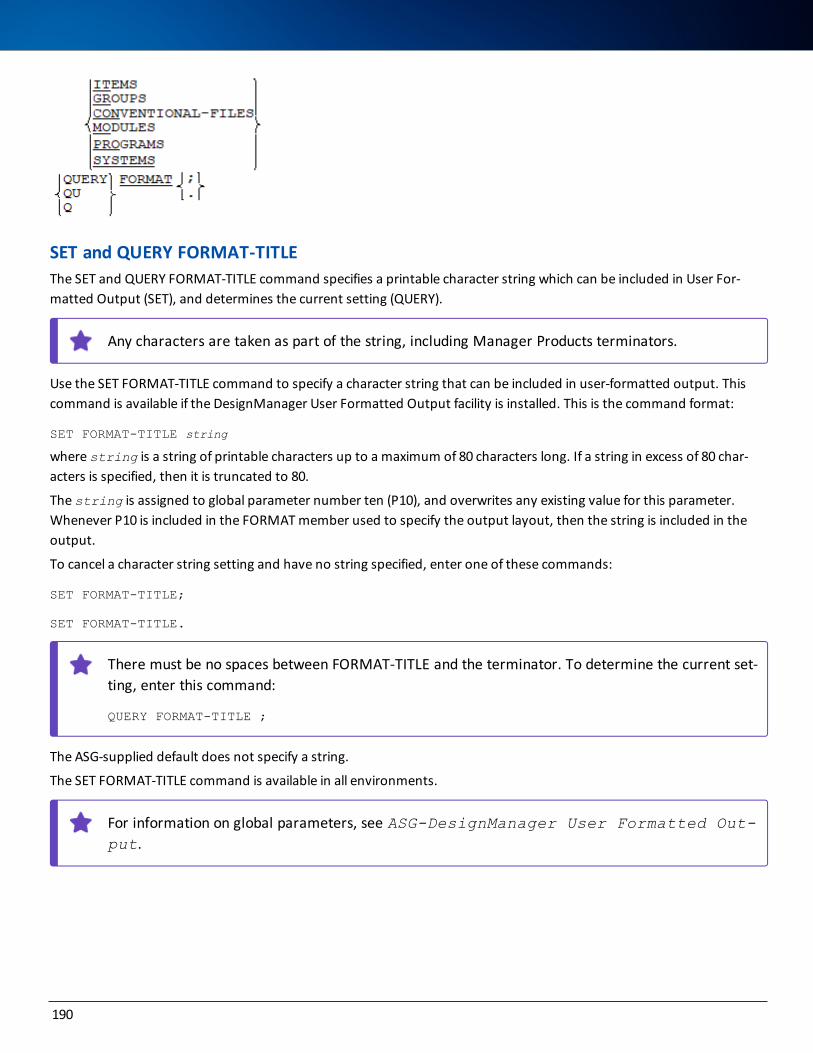
SET and QUERY FORMAT-TITLEThe SET and QUERY FORMAT-TITLE command specifies a printable character string which can be included in User For-matted Output (SET), and determines the current setting (QUERY).
Any characters are taken as part of the string, including Manager Products terminators.
Use the SET FORMAT-TITLE command to specify a character string that can be included in user-formatted output. This command is available if the DesignManager User Formatted Output facility is installed. This is the command format:
SET FORMAT-TITLE string
where string is a string of printable characters up to a maximum of 80 characters long. If a string in excess of 80 char-acters is specified, then it is truncated to 80.
The string is assigned to global parameter number ten (P10), and overwrites any existing value for this parameter. Whenever P10 is included in the FORMAT member used to specify the output layout, then the string is included in the output.
To cancel a character string setting and have no string specified, enter one of these commands:
SET FORMAT-TITLE;
SET FORMAT-TITLE.
There must be no spaces between FORMAT-TITLE and the terminator. To determine the current set-ting, enter this command:
QUERY FORMAT-TITLE ;
The ASG-supplied default does not specify a string.
The SET FORMAT-TITLE command is available in all environments.
For information on global parameters, see ASG-DesignManager User Formatted Out-put.
190

SET FORMAT-TITLE Syntax
SET and QUERY INFOBANK-SELECTThe SET INFOBANK-SELECT command controls the display of the command keyword SELECT in the command area of an InfoBank panel (SET), and determines the current setting (QUERY).
Use the SET INFOBANK-SELECT command to display or suppress the word SELECT in the Command Area of the InfoBank Screen. Valid forms of the command are:
SET INFOBANK-SELECT ON ;
which causes the display of the word SELECT.
SET INFOBANK-SELECT OFF ;
which causes the suppression of the word SELECT.
To determine the current setting, enter this command:
QUERY INFOBANK-SELECT ;
The ASG-supplied default is ON. This is to make it as easy as possible to use InfoBank. With SELECT set ON, you need only enter a number and press Enter to be routed to the panel you want; with SELECT set OFF you must enter the word SELECT as well as the number.
The SET INFOBANK-SELECT command is available with the Basic Interactive facilities.
SET INFOBANK-SELECT Syntax
SET and QUERY LINE-AREAThe SET LINE-AREA command controls the position of the Line Command Area on the screen (SET) and determines the cur-rent setting (QUERY).
Use the SET LINE-AREA command to specify the position of the Line Command Area on the screen. Valid forms of the com-mand are:
SET LINE-AREA LEFT ;
SET PREFIX-AREA LEFT ;
which positions the Line Command Area on the left of the screen.
SET LINE-AREA RIGHT ;
191
ControlManager Commands

SET PREFIX-AREA RIGHT ;
which positions the Line Command Area on the right of the screen.
SET LINE-AREA OFF ;
SET PREFIX-AREA OFF ;
which removes the Line Command Area from the screen.
To determine the current setting, enter this command:
QUERY LINE-AREA ;
QUERY PREFIX-AREA ;
The ASG-supplied default is RIGHT.
The SET LINE-AREA command is available with the Basic Interactive Facilities.
If the Line Command Area is removed:
l The features that depend upon it will NOT be available. These include:
o Full Screen Editor Line commands
o User Defined Linear commands
o Certain PDP capabilities.
l The width of the Data Area on the screen is increased by six characters.
SET LINE-AREA Syntax
SET and QUERY LINE-END-CHARACTERThe SET LINE-END-CHARACTER command sets the Line End Character to a user-chosen character (SET), and determines the current setting (QUERY).
Use the SET LINE-END-CHARACTER command in full-screen interactive environments to specify the character that rep-resents a logical line end. This enables you to enter multiple Manager Products commands in the Command Area with each command statement or member definition statement separated from the next by the LINE-END-CHARACTER. Valid forms of the command are:
SET LINE-END-CHARACTER x ;
where x is any single character with the exception of the Manager Products terminators.
SET LINE-END-CHARACTER OFF ;
which cancels a previously set LINE-END-CHARACTER, and disables the multiple input of commands.
192

To determine the current setting, enter this command:
QUERY LINE-END-CHARACTER ;
The ASG-supplied default is OFF; that is, no LINE-END-CHARACTER is set.
The SET LINE-END-CHARACTER command is available with the Basic Interactive Facilities.
ExampleFirst set the line-end-character.
SET LINE-END-CHARACTER / ;
Then enter the following:
DICTIONARY DEMO / AUTHORITY MIC / STATUS LIVE
The three commands are executed when you press Enter.
Notes l You must select a LINE-END-CHARACTER with care. Using an alphabetic character as a LINE-END-CHARACTER
can cause a problem: if that character also occurs in a command, then it is read as the LINE-END-CHARACTER, the command is not recognized and processing is terminated. ASG recommends using a character such as / or & rather than an alphabetic character; that is, a character that is not normally used in any command input.
l Multiple input of commands is possible only if a LINE-END-CHARACTER has been defined.
SET LINE-END-CHARACTER Syntax
SET and QUERY LINEAR-RETENTIONThe SET LINEAR-RETENTION command sets the Linear Retention capability on or off (SET), and to determine the current setting (QUERY).
Use the SET LINEAR-RETENTION command to retain a line command in the Line Command Area, after it has been executed. Valid forms of the command are:
SET LINEAR-RETENTION ON ;
which causes subsequent line commands to be retained, and a terminator to be inserted to show that it has been executed. The cursor is positioned under the last line command executed; press Enter to return it to the Command Area.
SET LINEAR-RETENTION OFF ;
which causes subsequent line commands to be automatically deleted from the Line Command Area after execution.
To determine the current setting, enter this command:
193
ControlManager Commands

QUERY LINEAR-RETENTION ;
The ASG-supplied default is OFF.
The SET LINEAR-RETENTION command is available with the User Defined Commands Facility.
SET LINEAR-RETENTION ON will not affect Full Screen Editor line commands; these are always deleted from the Line Command Area after execution.
SET LINEAR-RETENTION Syntax
SET and QUERY LIST-SHIFTThe SET LIST-SHIFT command specifies whether the display of member names in output from a LIST command is to be shifted left (SET), and determines the current setting (QUERY).
Use the SET LIST-SHIFT command to shift the display of member names in output from a LIST command.
Member names which have special characters, for example space characters, must be delimited if they are to be pro-cessed by Linear commands. The LIST-SHIFT command is used when additional space is required to insert the delimiters. Valid forms of the command are:
SET LIST-SHIFT OFF ;
In subsequent lists, the member names are indented two spaces to the right of the heading LIST OF MEMBERS.
SET LIST-SHIFT ON ;
In subsequent lists, the member names are aligned with the heading LIST OF MEMBERS. This shift to the left creates another two spaces between the MEMBER NAME and the TYPE.
To determine the current setting, enter this command:
QUERY LIST-SHIFT ;
The ASG-supplied default is OFF.
The SET LIST-SHIFT command is available in all environments.
Example
LIST OF MEMBERS MEMBER NAME TYPE EMPLOYEE-TELEPHONE-NUMBERS LIST1 ITEM
Because the member name contains a space (before LIST1), it must be delimited in order to be processed by Linear com-mands.
194

Delimiters can be added to the names in a list by the SWITCH NAME-CONCATENATION command. However, if the name is 31 or 32 characters long, it is truncated when the delimiters are added.
LIST OF MEMBERS MEMBER NAME TYPE ’EMPLOYEE-TELEPHONE-NUMBERS LIS’ ITEM
With SET LIST-SHIFT ON, the member names are shifted to the left, and the name is not truncated when the delimiters are added.
LIST OF MEMBERS MEMBER NAME TYPE ’EMPLOYEE-TELEPHONE-NUMBERS LIST1’ ITEM
SET LIST-SHIFT Syntax
SET and QUERY LOOKASIDE-RETENTIONThe SET LOOKASIDE-RETENTION command specifies whether Lookaside Buffers are to be retained up to the maximum buffer count despite subsequent EDIT or UPDATE commands (SET), and determines the current setting (QUERY).
Use the SET LOOKASIDE-RETENTION command to retain lookaside buffers. Valid forms of the command are:
SET LOOKASIDE-RETENTION ON ;
SET BROWSE-RETENTION ON ;
SET LA-RETENTION ON ;
which cause any current lookaside buffers to be retained (up to the maximum buffer count) when you enter an EDIT or UPDATE buffer.
SET LOOKASIDE-RETENTION OFF ;
SET BROWSE-RETENTION OFF ;
SET LA-RETENTION OFF ;
which cause any current lookaside buffers to be automatically deleted when you enter an EDIT or an UPDATE command.
To determine the current setting, enter this command:
QUERY LOOKASIDE-RETENTION ;
QUERY BROWSE-RETENTION ;
QUERY LA-RETENTION ;
The ASG-supplied default is OFF.
The SET LOOKASIDE-RETENTION command is available with the Extended Interactive Facility.
195
ControlManager Commands

SET LOOKASIDE-RETENTION Syntax
SET and QUERY NUMBERSThe SET NUMBERS command sets the Numbers feature for source lines of dictionary members on or off (SET), and determines the current setting (QUERY).
If the Numbers feature is set off, the source line numbers of a dictionary member during update are not displayed and are managed automatically. If the Numbers feature is set on and you update an existing dictionary member, an eight digit line number is displayed preceding each line in the Update Buffer. The management of source line numbers is entirely under user control. When the updated member is filed, the lines in the member are resequenced into line num-ber order.
To set the feature on, enter the command:
SET NUMBERS ON ;
To set the feature off, enter the command:
SET NUMBERS OFF ;
To determine whether the feature is set on or off, give the command:
QUERY NUMBERS ;
If the Numbers feature is set on, these effects occur:
l If you are creating a new dictionary member, line numbers are not displayed. Source lines are auto-matically incremented by 100.
l If you are updating an existing member and insert one or more new lines with the A line command or the LADD command, 00000... is inserted before each inserted line. The source line number must be typed in before the updated member is filed.
l If you copy or move lines, the source line numbers are also copied or moved. When the lines are inserted, you should update the source line numbers. If there are two lines with the same line number, the first is overwritten by the second.
The ASG-supplied default is OFF.
The SET NUMBERS command is available with the Extended Interactive Facility.
196

SET NUMBERS Syntax
SET and QUERY OUTPUT-EDITThe SET OUTPUT-EDIT command determines the buffer which is to be addressed by an executive routine (SET), and determines the current setting (QUERY).
The editor subcommands (such as FIND and DELETE) and other Manager Products commands (such as HOLD and CLEAR) operate by referencing a ControlManager buffer. Additionally, some executive language System Variables (such as &BUFN, &COLO, &CURL, &LINC, and &LINO) are assigned using certain attributes of this ControlManager buffer. If these commands and System Variables are to be used within an executive routine there are two alternative buffers that you can address:
l The buffer which was current before the executive routine was invoked
l The buffer which holds any output generated from within the executive routine.
You may choose which buffer is to be addressed by using the SET OUTPUT-EDIT command. Valid forms of the command are:
SET OUTPUT-EDIT ON ;
SET BROWSE-EDIT ON ;
SET OUTPUT-EDIT OFF ;
SET BROWSE-EDIT OFF ;
If OUTPUT-EDIT is set to OFF, the executive routine addresses the buffer that was current before the routine was invoked, unless the routine creates additional buffers via EDIT or UPDATE. In this case, the executive routine addresses the most recent of these newly created buffers.
If OUTPUT-EDIT is set to ON, the executive routine addresses the buffer that holds any output generated by the routine.
If OUTPUT-EDIT is set to ON, then you can use the ControlManager editor commands to manipulate the contents of the buffer even if the buffer is normally protected from user modification (i.e., Command Buffers, Lookaside Buffers, and InfoBank Buffers).
If OUTPUT-EDIT is set to ON, any commands that create additional buffers, such as EDIT and UPDATE are rejected.
To determine the current setting, enter this command:
QUERY OUTPUT-EDIT ;
QUERY BROWSE-EDIT ;
The default value of SET OUTPUT-EDIT is OFF.
The SET OUTPUT-EDIT command is available with the User Defined Commands Facility.
197
ControlManager Commands

SET OUTPUT-EDIT Syntax
SET and QUERY PERFORM-CHARACTERThe SET PERFORM-CHARACTER command sets the Perform Character for PERFORM commands and COMMAND-STREAM members (SET), and determines the current setting (QUERY).
By default an asterisk (*) indicates that the PERFORM command is to apply to each member in a specified list. For example:
PERFORM 'PRINT *' ONLY COM-CUST ;
prints the contents of every member in the dictionary whose name begins with the characters CON-CUST. In this case * acts as the Perform Character. The Perform Character can also appear in COMMAND-STREAM members.
You can change the * character to another character by entering this command:
SET PERFORM-CHARACTER x ;
where x is a delimited or undelimited character.
To determine what character is currently specified, enter this command:
QUERY PERFORM-CHARACTER ;
The SET PERFORM-CHARACTER command is available in all environments.
SET PERFORM-CHARACTER Syntax
SET and QUERY PF KEYSThe SET PF KEYS command sets a PF Key to a command (SET), and determines the current settings (QUERY).
You can set the Program Function (PF) keys of your terminal so that pressing one of the keys has the same effect as enter-ing a command.
For example:
SET PFnn command ;
where nn is the number of the key to be set and command is the command it is to perform.
The SET PFnn command is available with the Basic Interactive Facilities.
198

Immediate and Delayed ExecutionYou can specify the keyword IMMEDIATE, in which case the command to be performed is executed immediately. For example:
SET PFnn IMMEDIATE command ;
Alternatively, you can specify DELAY, in which case the command to be performed is not executed immediately. Instead, it is displayed in the Command Area, and you execute it by pressing Enter. This means you can edit the command before you execute it. For example:
SET PFnn DELAY command ;
If neither DELAY nor IMMEDIATE is specified, the command to be performed is executed immediately; that is, the default is IMMEDIATE.
Recalling Last Command IssuedIf you issue the command:
SET PFnn RECALL ;
pressing PF key nn causes the last command to be redisplayed in the Command Area. If the key is pressed again, the com-mand before that is redisplayed, and so on. The exception is the AUTHORITY command which, for security reasons, is sup-pressed. This facility is very useful when a sequence of commands has to be given several times or to correct errors. (See also QUERY RECALL-BUFFER.)
Passing Values to the PF Key SettingIf you wish to pass values to the PF key setting from the Command Area, enter this command:
SET PFnn SUBSTITUTE command * ;
The command to be performed is executed immediately you press the PF key.
The SUBSTITUTE keyword allows you to modify a command associated with a given PF key without having to change the PF key setting. If you specify a substitution character (*) when setting the PF key, any data you subsequently enter in the Command Area is substituted at the point indicated by the substitution character.
For example, if you want to vary the number of lines you scroll your text upwards, enter this command:
SET PF2 SUBST UP * ;
The numeric value you subsequently key in the Command Area is passed to the PF key setting when you press PF2 and the screen scrolls up that number of lines.
If you do not specify an asterisk in a PF key setting that uses the SUBST keyword, any data you enter in the Command Area is ignored when you press the PF key and the command to which the PF key is set is processed instead, using default values for command variables. For example, if you fail to specify an asterisk for the number of lines to scroll in the above example, the default setting for the UP command is one. Thus, text scrolls up one line when you press PF2, regard-less of what you enter in the Command Area.
Querying PF Key SettingsTo determine the settings of your PF keys, enter this command:
QUERY PFKEYS ;
199
ControlManager Commands

SET PF KEYS Syntax
In the syntax, DELAY and IMMEDIATE may be abbreviated down to three characters; SUBSTITUTE may be abbreviated to SUBST; QUERY may be abbreviated to QU or Q; and PFKEYS may be abbreviated down to PF.
SET and QUERY PRINT-DELIMITERSThe SET QUERY PRINT-DELIMITERS command sets the PRINT OF ... / END OF PRINT delimiters for prints of dictionary and MP-AID members on or off (SET), and determines the current setting (QUERY).
If the Print Delimiter feature is set on, output from the PRINT, BULK PRINT, and MP-AID PRINT commands is preceded by the delimiter:
PRINT OF ...
and followed by the delimiter:
END OF PRINT
If the feature is set off, these delimiters are not output.
To set the feature on, enter the command:
SET PRINT-DELIMITERS ON ;
To set it off enter the command:
SET PRINT-DELIMITERS OFF ;
To determine whether the feature is on or off, enter the command:
QUERY PRINT-DELIMITERS ;
The ASG-supplied default is ON.
The SET PRINT-DELIMITERS command is available in all environments.
SET PRINT-DELIMITERS Syntax
In the syntax, QUERY may be abbreviated to QU or Q, and PRINT-DELIMITERS may be abbreviated down to PRINT-D.
SET and QUERY PF KEYSThe SET PF KEYS sets a PF Key to a command (SET), and finds out the current settings (QUERY).
200

You can set the Program Function (PF) keys of your terminal so that pressing one of the keys has the same effect as enter-ing a command. Valid forms of the command are:
SET PFn command ;
SET PFn IMMEDIATE command ;
SET PFn DELAY command ;
where n is the number of the key to be set and command is the command it is to perform.
If IMMEDIATE is specified, the command to be performed is executed immediately.
If DELAY is specified, the command to be performed is not executed immediately. Instead, it is displayed in the Command Area, and you execute it by pressing ENTER. This means you can edit the command before you execute it.
If neither DELAY nor IMMEDIATE is specified, the command to be performed is executed immediately; that is, the default is IMMEDIATE.
If you give the command:
SET PFn RECALL ;
pressing PF key n causes the last command to be redisplayed in the Command Area. If the key is pressed again, the com-mand before that is redisplayed, and so on. This facility is very useful when a sequence of commands has to be given sev-eral times or to correct errors in commands.
Commands entered during a session are stored in a RECALL buffer.
This buffer is emptied whenever a PF key is set to RECALL, and therefore commands entered before the key was set cannot be recalled afterwards.
To find out the settings of your PF keys, enter:
QUERY PFKEYS ;
The SET PFn command is available with the Basic Interactive Facilities.
Syntax
SET and QUERY PRINT-DELIMITER
PurposeTo set the PRINT OF... /END OF PRINT delimiters for prints of dictionary and MP-AID members on or off (SET), and to find out the current setting (QUERY).
201
ControlManager Commands

UseIf the Print Delimiter feature is set on, output from the PRINT, BULK PRINT, and MP-AID PRINT commands is preceded by the delimiter:
PRINT OF...
and followed by the delimiter:
END OF PRINT
If the feature is set off, these delimiters are not output.
To set the feature on, enter the command:
SET PRINT-DELIMITER ON ;
To set it off, enter the command:
SET PRINT-DELIMITER OFF ;
To find out whether the feature is on or off, enter the command:
QUERY PRINT-DELIMITER ;
The ASG-supplied default is ON.
Syntax
SET and QUERY PRINT-SHIFTThe SET PRINT-SHIFT command sets the output from PRINT and BULK PRINT commands so that leading spaces and/or source line numbers can be displayed or suppressed (SET), and determines the current setting (QUERY).
Use the SET PRINT-SHIFT command to control the position on the screen of output from PRINT and BULK PRINT com-mands. Valid forms of the command are:
SET PRINT-SHIFT OFF ;
which causes output from subsequent PRINT and BULK PRINT commands to contain leading spaces and source line num-bers.
SET PRINT-SHIFT ON ;
which causes output from subsequent PRINT and BULK PRINT commands to have leading spaces removed.
SET PRINT-SHIFT NOSEQ ;
which causes output from subsequent PRINT and BULK PRINT commands to have leading spaces and source line num-bers removed.
202
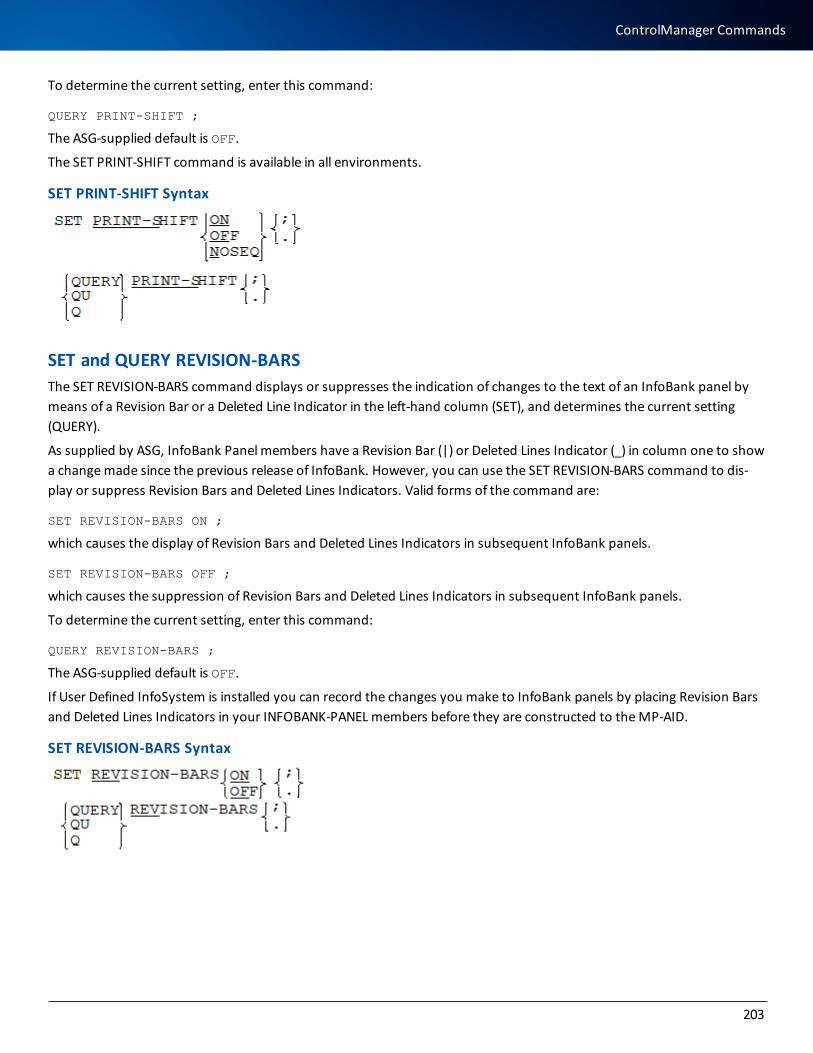
To determine the current setting, enter this command:
QUERY PRINT-SHIFT ;
The ASG-supplied default is OFF.
The SET PRINT-SHIFT command is available in all environments.
SET PRINT-SHIFT Syntax
SET and QUERY REVISION-BARSThe SET REVISION-BARS command displays or suppresses the indication of changes to the text of an InfoBank panel by means of a Revision Bar or a Deleted Line Indicator in the left-hand column (SET), and determines the current setting (QUERY).
As supplied by ASG, InfoBank Panel members have a Revision Bar (|) or Deleted Lines Indicator (_) in column one to show a change made since the previous release of InfoBank. However, you can use the SET REVISION-BARS command to dis-play or suppress Revision Bars and Deleted Lines Indicators. Valid forms of the command are:
SET REVISION-BARS ON ;
which causes the display of Revision Bars and Deleted Lines Indicators in subsequent InfoBank panels.
SET REVISION-BARS OFF ;
which causes the suppression of Revision Bars and Deleted Lines Indicators in subsequent InfoBank panels.
To determine the current setting, enter this command:
QUERY REVISION-BARS ;
The ASG-supplied default is OFF.
If User Defined InfoSystem is installed you can record the changes you make to InfoBank panels by placing Revision Bars and Deleted Lines Indicators in your INFOBANK-PANEL members before they are constructed to the MP-AID.
SET REVISION-BARS Syntax
203
ControlManager Commands

SET and QUERY SCALEThe SET SCALE command sets the Scale feature of the General Purpose Screen on or off (SET), and determines the current setting (QUERY).
To display a scale of column positions at the top of the screen, enter this command:
SET SCALE ON ;
To display details on the current dictionary, status (if either of the ControlManager Status facilities is installed) and the numbers of the first and last columns being viewed, enter this command:
SET SCALE OFF ;
To determine whether the scale is on or off, enter this command:
QUERY SCALE ;
The SET SCALE command is available with the Basic Interactive facilities.
SET SCALE Syntax
SET and QUERY SCREEN-REFRESHThe SET SCREEN-REFRESH command sets the Screen Refresh capability to scroll continuously through output as it is being generated, or sets it off (SET), and determines the current setting (QUERY).
When output from a command exceeds the capacity of your screen, only the first screenful is displayed; you can see the rest of the output by scrolling after completion of the command.
The SET SCREEN-REFRESH command initiates the automatic scrolling of output as it is generated, the screen being con-tinuously refreshed after a specified number of lines have been generated.
SET SCREEN-REFRESH OFF ;
which causes only the first screenful of output to be displayed.
SET SCREEN-REFRESH n ;
where n is a number of lines. This specifies that for every n lines generated, the screen is automatically refreshed to dis-play the latest output. The minimum value that can be specified is 2. If 1 is specified, then 2 is assumed.
To determine the current selling, enter this command:
QUERY SCREEN-REFRESH ;
The ASG-supplied default is OFF.
The SET SCREEN-REFRESH command is available with the Extended Interactive Facility.
204

SET SCREEN-REFRESH Syntax
SET and QUERY SCROLL-LIMITThe SET SCROLL-LIMIT command sets a value for the Scroll Limit capability (retention of lines in Command Mode Buffer), or sets it off (SET), and determines the current setting (QUERY).
By default, output from a command entered in Command Mode overwrites the previous Command Mode Buffer unless the command is prefixed by the BROWSE or LOOKASIDE commands. However, you can cause n lines of the previous Com-mand Mode Buffer to be retained and inserted into the new buffer followed by the output from the new command. To set this feature on, enter the command:
SET SCROLL-LIMIT n ;
where n is any number, subject to the limits on your allocation of virtual storage. The new Command Mode Buffer is dis-played from the start of the new output.
The Output Line Limit feature limits the total size of the buffer including lines included in the buffer by virtue of the Scroll Limit feature.
For details See QUERY OUTPUT-LINE-LIMIT.
You can set the Scroll Limit feature off by entering this command:
SET SCROLL-LIMIT OFF ;
To determine whether the feature is set on or off, and, if set on, the limit set, enter this command:
QUERY SCROLL-LIMIT ;
The SET SCROLL-LIMIT command is available with the Extended Interactive Facility.
SET SCROLL-LIMIT Syntax
SET and QUERY SOS-DUMPThe SET SOS-DUMP command initiates a dump (SET), and determines the current setting (QUERY). The SET command should only be used under ASG direction.
205
ControlManager Commands

If ControlManager becomes Short On Storage (SOS) during a Manager Products session, then the command currently processing is terminated and a message displays. You can use the SOS-DUMP command to initiate a dump; this may help to indicate how the shortage occurred. Valid forms of the command are:
SET SOS-DUMP ON ;
which initiates a dump.
SET SOS-DUMP OFF ;
which sets the SOS-DUMP command off.
To determine the current setting, enter this command:
QUERY SOS-DUMP ;
SOS-DUMP Syntax
SET and QUERY TABSSET and QUERY TAB-CHARACTERThe SET TABS command specifies tab positions (SET), and determines the current settings (QUERY). The SET TAB-CHARACTER specifies the tab character (SET), and determines the current setting (QUERY).
Text inserted in an Edit or Update Buffer is normally accepted unchanged. However you can format the text by using soft-ware tabs.
For example, assume that you want to enter the following text:
Member-name TypeXBFH0000 USERTYPO0000 INFOGLOWBAL INFO
You can format the text into columns by using tabs.
First you need to set the tab positions - that is, the number of the column in which the first character of each column of text is to appear. In the example, to set the tab positions, enter this command:
SET TABS 6 20
The tab positions can be any numbers in the range 1 through to 255. Each number must be separated from the next by at least one space. Other separators such as commas are not permitted. The numbers must be in ascending order. To determine what the current tab positions are, enter this command:
QUERY TABS
Then you key in the text. Instead of inserting spaces between each column entry, key in the tab character. Assuming that + is the tab character, the first line of the example would be keyed in as follows:
206

+Member-name+Type
When you press Enter, the system will automatically move the text across so that it appears in the correct column pos-itions on the screen. The tab character itself is omitted.
ASG does not supply a default tab character. If you want to set one, enter this command:
SET TAB-CHARACTER x
where x is any character.
To determine what the tab character, enter this command:
QUERY TAB-CHARACTER
If the number of the first column displayed on screen is greater than a tab setting, then that tab set-ting is ignored. For example, if the first column displayed on screen is column 10 and you enter this command:
SET TABS 5 15
the first tab position will be ignored, and the text will be aligned in column 15.
The command:
SET SCALE ON
sets a scale at the top of the screen to help you work out column positions.
The SET TABS and SET TAB-CHARACTER commands are available with the Extended Interactive Facility.
SET TABS and SET TAB-CHARACTER Syntax
SET and QUERY UPDATE-OUTPUTThe SET UPDATE-OUTPUT command specifies whether the updated/altered source record of a dictionary member and any messages relating to it are displayed in a Lookaside Buffer when a FILE, RFILE, or SFILE command is entered (SET), and determines the current setting (QUERY).
When you FILE or RFILE an existing dictionary member, the updated source record and any messages relating to it may be displayed in a Lookaside Buffer. Using the SET UPDATE-OUTPUT command you can decide when this output is to be displayed.
There are three options:
207
ControlManager Commands

SET UPDATE-OUTPUT LONG ;
SET UPDATE-OUTPUT WARN ;
SET UPDATE-OUTPUT ERROR ;
Depending on the setting, the source record and any relevant messages are displayed:
l Whenever the command is executed (LONG)
l Only when execution generates warnings or errors (WARN)
l Only when execution generates errors (ERROR).
When you SFILE an existing dictionary member, the altered source record and any messages relating to it are displayed in a Lookaside Buffer only when UPDATE-OUTPUT is set to LONG. (The output from the insertion of a new member would be displayed in the message line.)
To determine what the setting is, enter this command:
QUERY UPDATE-OUTPUT ;
The ASG-supplied default is WARN.
The SET UPDATE-OUTPUT command is available with the Extended Interactive Facility.
SET UPDATE-OUTPUT Syntax
SET and QUERY UPPER-CASEThe SET UPPER-CASE command sets the Uppercase capability (conversion of lowercase alphabetic characters) on or off (SET), and determines the current setting (QUERY).
You can cause all lowercase alphabetic characters entered at the terminal to be translated to uppercase characters by entering this command:
SET UPPER-CASE ON ;
You can set this feature off by entering this command:
SET UPPER-CASE OFF ;
If you accidentally set the Uppercase feature on and convert all lowercase characters to uppercase, you cannot convert the characters back again simply by setting the feature off.
You can determine whether this feature has been set on or off by entering this command:
QUERY UPPER-CASE ;
The SET UPPER-CASE command is available with the Basic Interactive Facility.
208

The ASG-supplied default is OFF.
SET UPPER-CASE Syntax
QUERY USER-BLOCKSTo determine the number of blocks in the MP-AID occupied by USER-MEMBERs owned by your logon ID, enter this com-mand:
QUERY USER-BLOCKS ;
If the Systems Administrator’s Environmental Control Facility is installed, the Systems Administrator can set a limit for the number of blocks that can be occupied by your USER-MEMBERs. If this has been done, the limit also is displayed when you use the QUERY USER-BLOCKS command.
SET and QUERY USER-DIRECTORY-SEARCHWhen searching the MP-AID for a specified executive routine, the User Member directory is searched first, followed by the Corporate executive routine directory (unless the CEXEC command is used, in which case the User Member directory is not searched).
A single User Member directory is maintained for all users’ USER-MEMBERs; therefore, it might become quite large and take considerable time to search.
To bypass the User Member directory and access the Corporate executive routine directory only, enter this command:
SET USER-DIRECTORY-SEARCH OFF;
To search both directories, enter this command:
SET USER-DIRECTORY-SEARCH ON;
To search the Corporate executive routine directory first, followed by the User Member directory, enter this command:
SET USER-DIRECTORY-SEARCH LAST;
The SET USER-DIRECTORY-SEARCH command is set to ON, by default, which enables the User Member directory search to take place first. The keyword FIRST can also can be used and is equivalent to ON.
To determine the current setting, enter this command:
QUERY USER-DIRECTORY-SEARCH;
When an executive routine name is preceded by the EXECUTE command, the User Member dir-ectory is always searched.
209
ControlManager Commands

SET and QUERY VERIFYThe SET VERIFY command must only be used under direction of ASG Support staff. Valid forms of the command are:
SET VERIFY ON ;
SET VERIFY OFF ;
To determine what the current setting is, enter this command:
QUERY VERIFY ;
The ASG-supplied default is OFF.
SET VERIFY Syntax
SFILEThe SFILE command adds or amends the source record of a dictionary member without attempting to encode it.
Use SOURCE-FILE to enter the contents of an Update Buffer into the dictionary without generating an encoded record.
If you have updated an existing member, enter this command:
SOURCE-FILE ;
Or
SFILE ;
Your changes are then applied to the member’s source record in the dictionary. However, the encoded record of the member (if there is one) in the data entries dataset is not changed.
If you have created a new member, enter this command:
SOURCE-FILE dictionary-member-name ;
Or
SFILE dictionary-member-name ;
Records for this new member are then added to the source dataset of the dictionary. No encoded record is generated.
The dictionary-member-name must conform to the rules governing member names. It must not be the same as that of any other member of the current dictionary.
If an error or warning message is generated, then this is displayed in the message line.
You can tailor the environment so that the source of the member is displayed in a Lookaside Buffer when you suc-cessfully enter SFILE.
210

For information on SET UPDATE OUTPUT, see SET and QUERY UPDATE-OUTPUT.
SFILE is available with the Extended Interactive Facility.
SFILE Syntax
SKIPThe SKIP command causes the next line of printed output, if directed to a line printer, to be printed at the head of a new page.
To cause output to a line printer to skip to the top of a new page, enter this command:
SKIP ;
The line of output following the SKIP command is printed at the top of the next page.
Output may be to magnetic tape or disk. If this is then output to a line printer, SKIP will work as described above unless the print program determines otherwise.
If output is to a terminal then SKIP has no effect.
SKIP Syntax
SPACEThe SPACE command causes the next line of printed output, if directed to a line printer, to be printed after a stated num-ber of blank lines.
To insert n blank lines into output to a line printer, enter this command:
SPACE n ;
where n is an unsigned integer in the range 1 to 99; if you do not specify n then a default value of one is assumed.
The next line of output is printed:
l After n blank lines
l At the top of a new page
whichever involves the least paper movement.
Output may be to tape or disk. If this output is then output to a line printer, SPACE will work as described above unless the print program determines otherwise.
If output is to a terminal then SPACE has no effect.
If the SPACE command is used as a free standing command, it is first displayed or printed as input on the primary output device; then the blank lines are inserted.
211
ControlManager Commands

You should use SPACE only when incorporated into one of these commands:
l A DataManager PERFORM command
l A ControlManager POST or MAIL command
DataManager PERFORM CommandThe SPACE command itself is not printed unless the keyword PRINT is specified.
ControlManager POST or MAIL commandIf AND is specified in the POST or MAIL command, the SPACE command is first output on the primary output device; then the blank lines are inserted.
The SPACE command has no effect on the POST/MAIL output file.
If AND is not specified in the POST or MAIL command, the SPACE command has no effect.
SPACE Syntax
SUBMITThe SUBMIT command enables you to submit both Manager Products and non-Manager Products batch jobs via the internal reader to the z/OS JES queues. The command is available to all users in all Manager Products environments.
Jobs to be submitted can be stored as MPAID user members or Corporate executive routines. Also, you can submit the contents of a ControlManager full-screen buffer or Procedures Language array (command or global variable).
No validation of buffer, member, or array contents is performed. All necessary JCL must be provided.
If a valid job is not submitted, then JES will flush the erroneous content. Any empty buffer or array is rejected.
Output from executed jobs is available in the normal JES output queues.
When executed from an MPSF environment, ownership of the submitted job is assigned to the owner of the MPSF batch job or started task. For any client running under TSO, ownership of the submitted job can be assigned to the TSO user ID by using the CS-SUBMIT command, which directs job submission to take place on the client side.
When CS-SUBMIT is used outside of MPSF or when no TSO client side exists, SUBMIT is assumed.
Alternatively, you can use the CSS command for the CS-SUBMIT command and the SSS command for the SUBMIT command.
SUBMIT SyntaxThis syntax submits the contents of the current full-screen ControlManager buffer:
212

This syntax submits the contents of the specified user member:
SUBMIT USER-MEMBER xxxxxx;
This syntax submits the contents of the specified Corporate executive routine:
SUBMIT EXECUTIVE xxxxxx;
This syntax submits the contents of the specified global or command array (executed from within a user executive):
SUBMIT ARRAY pppppp;
where:
xxxxxx is the name of an MPAID user member or Corporate executive routine with a maximum length of 10 characters.
pppppp is the name of a Procedures Language command or global variable with a maximum length of 50 characters.
SWITCH MESSAGESThe SWITCH MESSAGES command enables the output of Manager Products messages to be switched off and on.
There are five types of messages issued by Manager Products:
I Informatory
W Warning
E Error
C Critical
S Severe
The last character in the message-id indicates the type of message; for example:
DM01896W
is a Warning message.
You can switch off:
l All messages
l Only informatory messages
l Only warning messages
l A particular message
l All messages in a particular range
l All messages except particular ones
You cannot switch off Critical messages.
213
ControlManager Commands

ExamplesTo switch off all Informatory and Warning messages, enter this command:
SWITCH OFF MESSAGES ;
To switch off all Warning messages, enter this command:
SWITCH OFF MESSAGES LEVELS W ;
To switch off all Informatory messages, enter this command:
SWITCH OFF MESSAGES LEVELS I ;
To switch off all Severe messages, enter this command:
SWITCH OFF MESSAGES LEVELS S ;
To switch off all Error and Severe messages, enter this command:
SWITCH OFF MESSAGES LEVELS E,S ;
You can switch off a particular message by including the message number in the command. For example, to switch off the Warning message DMOlS96W, enter this command:
SWITCH OFF MESSAGE LEVEL W NUMBER 1896 ;
And you can switch off all the messages in a particular range:
SWITCH OFF MESSAGES LEVEL W NUMBERS m TO n ;
where m and n are unsigned integers ranging from 0 through 32767, and n must be greater than m.
For example, to switch off all Warning messages DM00100W through DM00200W, and DM00500W through DM00700W, and all Informatory messages DM00800I through DM00900I, enter this command:
SWITCH OFF MESSAGES LEVEL W NUMBERS 100 TO 200, 500 TO 700 LEVELS I NUMBERS 800 TO 900 ;
To switch off all messages (both Informatory and Warning) 100 through 200, and 500 through 700, but only Informatory messages 800 through 900, enter this command:
SWITCH OFF MESSAGES NUMBERS 100 TO 200, 500 TO 700 LEVELS I NUMBERS 800 TO 900 ;
If Warning messages have already been switched off, and you also want to switch off Informatory messages DM00200I through DM00500I, enter this command:
SWITCH OFF MESSAGES ALSO LEVELS I NUMBERS 200 TO 500 ;
If you do not specify ALSO, then this command will override the previous one (to switch off all Warning messages): all Warning messages will be switched back on and only the Informatory messages DM00200I through DM00500I will be switched off.
You can switch off all Warning and/or Informatory messages except a particular one. For example, to switch off all Warn-ing messages except DM00097W, enter the two commands:
SWITCH OFF MESSAGES LEVEL W ;
SWITCH ON MESSAGE NUMBER 97 ;
214

You can switch on all the Informatory and Warning messages which have been switched off:
SWITCH ON MESSAGES ;
and you can switch on a particular level, number or range of messages, for example:
SWITCH ON MESSAGES LEVELS W ;
SWITCH ON MESSAGES LEVELS E,S ;
SWITCH ON MESSAGE LEVEL W NUMBER 1896 ;
SWITCH ON MESSAGES LEVEL W NUMBERS 100 TO 200, 500 TO 700 LEVEL I NUMBERS 800 TO 900 ;
l A SWITCH MESSAGES command is accepted whether or not a dictionary is open.
l The effect of a SWITCH MESSAGES command is not changed by any subsequent DICTIONARY command.
l Message number 0 is a special case. There is no documented message number 0, but it is used internally to display member source lines output by the ENCODE command. Switching off message number 0 sup-presses these lines.
SWITCH MESSAGES Syntax
where:
levels is:
where lev can be E, I, S or W.
numbers is:
where m and n are unsigned integers ranging from 0 through 32767 and n must be greater than m.
SWITCH NAME-CONCATENATIONThe SWITCH NAME-CONCATENTATION command enables alternative ways of identifying members in output to be switched on and off.
215
ControlManager Commands

In output from any of these Manager Products commands, members are usually identified by their NAME:
l DOES
l DOWNLOAD DATA
l GLOSSARY
l LIST
l REPORT
l WHAT (except WHAT IS)
l WHICH
l WHOSE
However, using SWITCH NAME-CONCATENATION you can identify members by their NAME, ALIAS, and all or part of their DESCRIPTION or NOTE clause. If you specify two or more of these identification-elements (NAME, ALIAS, DESCRIPTION, and NOTE) you can also specify whether the elements are concatenated or separated; and if separated you can specify what character is used as the separator. And you can delimit the identification-element(s).
The NAME identification-element is taken from the member’s source data entries record, whereas the ALIAS, DESCRIPTION, and NOTE identification-elements are taken from the member’s data entries record. Non-encoded mem-bers have a source data entries record but no data entries record, and so are always identified by NAME.
If you do not specify SEPARATOR c or NO-SEPARATOR, then a space is assumed as the separator.
If you specify a delimiter, the identification is delimited, as well as these objects:
l Aliases and catalog classifications in the output
l User defined indexed attributes in output from LIST. This is available if the User Defined Syntax facility is installed
If the identification is longer than 32 characters (including separators and delimiters), then it is truncated to 32 characters by the removal of characters from the right hand end (excluding the closing delimiter). If the dictionary is enabled for extended names, then the current maximum name length for the dictionary will be used instead of 32.
If an alias, catalog classification or user indexed attribute (including delimiters) is longer than 79 characters, then it is trun-cated to 79 characters by the removal of characters from the right hand end (excluding the delimiter). If the dictionary is enabled for extended names, then 159 will be used instead of 79.
If any identification-elements specified in a SELECT clause are not available they are omitted from the member’s iden-tification. However, if none of the identification-elements are available, then the identification defaults to the member name.
To switch off the NAME-CONCATENATION, enter this command:
SWITCH OFF NAME-CONCATENATION;
The settings which previously applied are not lost, and can be applied again if you enter this command:
SWITCH ON NAME-CONCATENATION ;
However, if a new SWITCH NAME-CONCATENATION command with a SELECT clause is entered, any previous settings are lost.
216

ExamplesTo identify members by their alias, enter this command:
SWITCH ON NAME-CONCATENATION SELECT ALIAS ;
To identify members by the contents of the first delimited string of the DESCRIPTION clause, enter this command:
SWITCH ON NAME-CONCATENATION SELECT DESCRIPTION LINE 1 ;
To identify members by the contents of the third delimited string of the NOTE clause, enter this command:
SWITCH ON NAME-CONCATENATION SELECT NOTE LINE 3 ;
To identify members by their COBOL alias, enter this command:
SWITCH ON NAME-CONCATENATION SELECT ALIAS COBOL ;
Any member that does not have a COBOL alias or is not encoded, will continue to be identified by its member name.
To identify members by the first line of their description, their name and first alias, and to separate each of these with a forward slash (/) and delimit them with an asterisk (*), enter these commands:
SWITCH ON NAME-CONCATENATION SELECT DESCRIPTION LINE 1, NAME, ALIAS 1 SEPARATOR / DELIMITER * ;
Then the members would be identified by:
*description-first-string/member-name/first-alias*
For any member without a DESCRIPTION clause or ALIAS clause, the relevant identification-element would be omitted from the identification. Thus members with neither of these clauses would be identified by:
*member-name*
Any aliases and catalog classifications appearing in output would also be delimited by asterisks.
A SWITCH NAME-CONCATENATION command is accepted only if a dictionary is open. The effect of a SWITCH NAME-CONCATENATION command is not changed by any subsequent DICTIONARY com-mand.
SWITCH NAME-CONCATENATION Syntax
where identification-element is:
217
ControlManager Commands

SWITCH OUTPUTThe SWITCH OUTPUT command enables output to be switched to an additional or alternative dataset.
To switch output from one device to another, enter this command:
SWITCH OUTPUT TO ddname [AND ddname] ;
SWITCH OUTPUT can only be used in CICS, CMS, TSO, Siemens Time Sharing Interface, and OS batch environments.
In CMS, TSO, Siemens Time Sharing Interface, and OS batch environments, ddname is the logical name used in OS job control statements to indicate the name of the external dataset (the physical file) to which output is to be written.
In CICS environments where the dataset is allocated on the Manager Products Server Facility (MPSF) client side, ddname is any 4-character destination identification.
The name of the external dataset must not be one of these:
l MPBLOBR, MPBLOBV or any ddname in the form of MPBLOBnn (where nn is in the range 00 to 99)
l MPAID, MPAIDR, and MPAIDV or any other active secondary MPAID ddname
l The name of the dictionary, or the dictionary name with the suffix D, E, G, H, J, R, S, or V
l The ddname of any currently open PRODUCE external dataset
l The ddname of any currently open SENDF external dataset
l MPRPOST (only permissible if you redirect output using the POST/MAIL prefix command)
l MPTRACE or the currently specified trace dataset ddname
l MPRDIAG
l MPIN
If two output files are specified, one must be MPOUT. For example:
SWITCH OUTPUT TO MPRT AND MPOUT ;
This would cause output to be written to MPRT as well as the primary output device.
You can only process the output held in an external data set when the data set has been closed. You can close an external data set by issuing a CLOSE command, otherwise it is closed automatically when you redirect output to another external data set or at LOGOFF.
The effect of a SWITCH OUTPUT command is not changed by any subsequent DICTIONARY command.
For information on the SWITCH OUTPUT command in CICS environments, see ASG-Manager Products Installation in OS Environments.
218

SWITCH OUTPUT Syntax
where:
data-set-name is the logical file name (ddname) used in OS job control statements to indicate the name of the external dataset (physical file name) to which output is to be written (in CMS, TSO, Siemens Timesharing Interface and OS batch environments). In CICS environments, ddname is any 4 character destination identification.
member-name is any 1 to 8 character name valid as a member name of a Partitioned dataset.
The MEMBER clause is only valid in TSO and OS batch environments. It cannot be used following a data-set-name of MPOUT.
TEXTThe TEXT command outputs user-supplied text in the context of an executive routine, a PERFORM command, or a POST or MAIL command.
To insert text in output, enter this command:
TEXT 'text' [,'text']... ;
where text is a character string of not more than 255 characters. If a string is longer than 255 characters (after con-catenation if appropriate), then that string and any following ones in that TEXT command are not output; instead an error message is output.
The delimiters round the strings are not output.
The text can be coded as a series of delimited character strings to be concatenated (joined together) when processed. For example:
TEXT 'This'' is'' an example';
would be output as:
This is an example
If a delimited string is preceded by a comma, then that string will start in the next print line or output record. For example:
TEXT 'This is another',' example';
would be output as:
This is anotherexample
If the TEXT command is used as a free standing command, it is first displayed or printed as input on the primary output device; then the text is displayed or printed.
219
ControlManager Commands

You should use TEXT only when incorporated into one of these commands:
l A ControlManager EXECUTIVE
l A DataManager PERFORM command or COMMAND-STREAM member
l A ControlManager POST or MAIL command
ControlManager EXECUTIVEThe TEXT command enables user-specified text to be included in the output from the executed commands; the TEXT com-mand itself is not printed unless ECHO is set on.
DataManager PERFORM Command or COMMAND-STREAM MemberThe TEXT command enables user-specified headings or text to be included in the output from the performed commands; the TEXT command itself is not printed unless the keyword PRINT is specified.
ControlManager POST or MAIL CommandThe TEXT command enables user-specified text or markers to be output as separate records to the POST/MAIL output file.
ExampleSuppose that for each FILE defined in the dictionary we want to output these elements:
l A standard ControlManager REPORT
l A list of all the programs that refer that file
l The COBOL data description of that file
And we want headings before the list of programs and the COBOL descriptions. To do this, enter these commands:
PERFORM 'REPORT *;', 'TEXT"PROGRAMS REFERRING TO FILE *";', 'WHICH PROGRAMS USE *;', 'TEXT "COBOL DESCRIPTION OF FILE *";', 'PRODUCE COBOL FROM * NOGEN PRINT;'FILES;
The PRODUCE COBOL command is available only if the DataManager Source Language Generation facility is installed.
TEXT Syntax
UPThe UP command moves the window on the text displayed on the screen up n lines.
To scroll backward one line, enter this command:
UP ;
To scroll backward n lines, enter this command:
220

UP n ;
If the Top of Data Delimiter is displayed as the top line in the Data Area, the command has no effect.
UP is available with the Extended Interactive Facility, and can be used in Command, Edit, Lookaside, and Update Modes, and in InfoSystem.
UP Syntax
UPDATEThe UPDATE command enters Update Mode and opens an Update Buffer, or updates an existing dictionary member.
You can use the Full Screen Editor to create new dictionary members and to update existing ones.
To create a new dictionary member, enter this command:
UPDATE ;
This opens a buffer in Update Mode into which you insert text. To update an existing dictionary member, enter this com-mand:
UPDATE dictionary-member-name ;
This opens a buffer in Update Mode containing a copy of the source record of the named dictionary member; you can then update this.
If LOOKASIDE-RETENTION is set off and you enter an UPDATE command, any Lookaside Buffers currently open will be closed. If LOOKASIDE-RETENTION is set on and you enter an UPDATE command, any Lookaside Buffers currently open will be retained (up to the maximum buffer count).
To add the contents of the buffer to the dictionary use FILE, RFILE, or SFILE. To abandon the update without adding the contents to the dictionary use QUIT or XQUIT.
If the UPDATE command is issued while working in a read-only status, the Update buffer is created. Additionally, this mes-sage is output as a reminder that any changes made to the Update buffer cannot be saved using the FILE, SFILE, or RFILE commands:
DM00078W STATUS IS READ-ONLY - ANY CHANGES CANNOT BE SAVED
UPDATE is available with the Extended Interactive Facility.
UPDATE Syntax
VENCThe VENC command encodes an existing member and maintains a version log. The log is kept in the HISTORY-LOG mem-ber type and contains information on changes made to the member.
221
ControlManager Commands

The first parameter in the VENC command is mandatory and is the name of the member to encode. More parameters can be used, if directed to do so by ASG Customer Support, and are provided for maintenance purposes only.
The member to be VENCoded must exist as:
l SOURCE only—VENC will create an ENCODEd version
l ENCODED, UNVERIFIED—VENC creates a new ENCODEd version
l ENCODED, VERIFIED—ENCODE will create an unmodified newly ENCODEd version
In all other cases, VENC will terminate with error messages.
VENC collects pre-ENCODE information from members which are found to be already ENCODEd (in a visible status). After an internal ENCODE which must be successful (RC <= 4), a post-ENCODE state is collected and a difference report is added to the member’s associated HISTORY-LOG member.
VENC is controlled and can be customized by modifying the profile executive VENC-PROF. There are no further user exits or other customizable parameters except the ENCODE exits.
VENC SyntaxThe syntax of the VENC command is:
VENC member-name FOR venc-reason ;
A member name must be supplied. If omitted or invalid the VENC command will terminate with an error message and the system variable &CCOD will be set appropriately.
The FOR venc-reason clause is optional and can be used to attach a 1-line comment to the change information stored in the HISTORY-LOG member. If not specified no comment is stored.
VLOGThe VLOG command creates a formatted report of the version log for a specific HISTORY-LOG member type.
To access the version log member, the associated real member must exist and must have been VENCoded at least once to meet the prerequisite for a HISTORY-LOG member to exist. This member may reside in the same status as the mon-itored member or in a specific status defined by the VENC-PROF executive.
VLOG can report only the last executed VENC, the complete path of all monitored VENCodes or specific filtered activities.
The amount of displayed information can be controlled by optional parameters following the mandatory member name.
VLOG is controlled and can be customized by modifying the profile executive VENC-PROF, delivered in the release dataset MP.CORP.
VLOG SyntaxThe syntax of the VLOG command is:
VLOG member-name ...options... ;
A member name must be supplied. If omitted or invalid the VLOG command will terminate with an error message and the system variable &CCOD will be set appropriately.
222

l If the given member does not exist, or has never been VENCoded, an error message displays.
l If the associated HISTORY-LOG member cannot be retrieved (using rules stated in the version log profile VENC-PROF), an error message displays.
Options are:
Option Description
FULLDisplays all VENCodes in descending time sequence. If FULL is not specified, only the last executed VENCode is reported.
LAST nnn Shows the last nnn VENCode executions.
DETAILS Displays individual modifications.
ALL-DETAILS Reports all attributes details and changed values.
HISTORY-LOG Member TypeThe HISTORY-LOG member type is located in the default UDS tables DU016 and DU032. Any newly created repository will allow members of that type to be encoded.
The current attribute structure is:
ALIAS vvvv 'member-name'
which back-references the HISTORY-LOG member to its associated monitored members.
where:
'vvvv' is the ALIAS TYPE which has to be defined matching the setting in VENC-PROF.
'member-name' is the name of the VENC monitored member.
HISTORY-DATA
Attribute Description
HISTORY-TIMESTAMP 'string'
Timestamp of ENCODE in format yyyy-mm-ddThh.mm.ss-tt:tt.
HISTORY-STATUS 'string'The status where the ENCODED member resides after ENCODE.
HISTORY-USER 'string'Name of the &LOGO user who executed the VENC command.
HISTORY-INFO text Value of the VENC ... FOR clause comment.
HISTORY-DIFFERENCE text Information regarding the differences between pre-
223
ControlManager Commands

Attribute Description
encode and post-encode member states.
This member type is RESERVED for the commands VENC and VLOG and future extensions. The content of such members is for use by these commands only. Modification of such content by any other means is not permitted as the correct functioning of these commands may be impaired.
The structure of this member-type may change without announcement.
VENC-PROF Profile The commands VENC and VLOG call (after parameter checking) the version log profile executive VENC-PROF which is delivered as a customizable corporate executive routine named EX-VERSION-LOG-PROFILE in the release dataset MP.CORP.
VENC-PROF is called once for every execution of VENC and/or VLOG to establish profile variables used to control the pro-cessing.
These GLOBAL variables are:
Variable Description
mpvx_venc_versionlog_ member
Format for the LOG member.
The default pattern is .?M? which proceeds the member name (in '?M?') with a period (.) to identify the HISTORY-LOG member to be created for the member to be VENCoded.
This setting is mandatory for VENC-PROF to be valid. Wrong or missing values cause an error message and will terminate.
mpvx_venc_versionlog_ alias_type
The ALIAS type used inside a HISTORY-LOG member to refer back to the ENCODEd member.
One HISTORY-LOG member is used for all instances of a member regardless of how many versions exist in different statuses. Even if a member is removed from a status, the HISTORY-LOG member is kept.
The default ALIAS-TYPE is VERSIONED and must be defined using a CONTROL NEW-ALIASES command.
mpvx_venc_ Name of the status to watch for monitored ENCODES.
224

Variable Description
rules_status
mpvx_venc_rules_status_ use
Type of the processing done for that status.
The default processing of VENC is to monitor ALL ENCODEs of ALL member types in ALL statuses of a repository.
With these variables, SPECIFIC statuses can be set to be monitored by VENC. For all other statuses VENC works exactly like ENCODE.
You can set mpvx_venc_rules_status_use to one of these values:
l NEVER—the given status is not monitored, all VENC =
ENCODE
l ALWAYS—every member is monitored.
l TYPES—additional variables define filtering for specific
member types to be ignored or processed.
mpvx_venc_rules_ include_member_type
mpvx_venc_rules_ exclude_member_type
Define INCLUSION and/or EXCLUSION rules for (generically) named member types (e.g., DOCUMENT or ORACLE-* to select a member type DOCUMENT or all member types starting with ORACLE-).
The VENC-PROF profile contains some initial settings. You should modify these as required.
If version log profile VENC-PROF is not properly constructed to an accessible MP-AID, then default settings take effect which may cause errors if previous uses of VENC used different settings.
WIPEThe WIPE command enables you to clear the current contents of the Scratchpad.
To clear the contents, enter this command:
WIPE ;
225
ControlManager Commands

WIPE Syntax
XQUITThe XQUIT command closes and deletes an Update or Edit Buffer which has been amended, without filing the amended member.
To leave an Update or Edit Buffer which has been changed in some way, enter this command:
XQUIT ;
The buffer is then deleted: if it contained a new member, this is not added to the dictionary or MP-AID; if it contained an existing member, the changes are not applied.
If you want to keep the changes, you must file the contents of the buffer.
XQUIT is available with the Extended Interactive Facility.
XQUIT Syntax
ZONEThe ZONE command enables you to define the columns on the screen between which FIND, LOCATE, and CHANGE com-mands are to operate.
To define the ZONE, enter this command:
ZONE mm nn ;
where mm is the first column and nn is the last column of the zone. The ZONE setting is effective until it is re-set or you LOGOFF.
The ASG-supplied default is column 1 through column 255.
ZONE Syntax
226

Selectable Units Available with ControlManagerThe basic ControlManager capabilities are provided by the ControlManager Nucleus. Additional capabilities are provided by selectable units. These can be incorporated into the Nucleus to provide just those capabilities that your installation needs.
ControlManager itself provides a number of selectable units. The following are documented in this publication:
Code Facility Name Other Facilities Required
CMR-FE01
Extended Interactive Facility
CMR-CM01 and any of CMR-TP2, CMR-TP7, CMR-TP8, or CMR-TP11
This topic provides a brief introduction to each of these facilities:
Code Facility Name Other Facilities Required
CMR-FE70
TSO/ISPF Interface CMR-CM01
CMR-FE90
Web Enabler CMR-CM01, CMR-SF01
CMR-FP30
Functional Prompting CMR-CM01, DSR-DS01
CMR-SC05
Systems Administrator’s Environmental Control Facility
CMR-CM01
CMR-SF01
Manager Products Server Facility (MPSF)
CMR-CM01
CMR-TP2
CICS Interface CMR-CM01
CMR-TP4
IMS/DC Interface CMR-CM01 (OS)
CMR-TP6
ROSCOE Interface CMR-CM01 (OS)
CMR-TP7
OS/TSO Interface CMR-CM01 (OS)
227
Selectable Units Available with ControlManager

Code Facility Name Other Facilities Required
CMR-TP8
VM/CMS Interface CMR-CM01 (CMS)
CMR-TP10
DOS/VSE ICCF Interface CMR-CM01 (DOS)
CMR-TP11
Siemens Timesharing Interface
CMR-CM01 (Siemens)
CMR-UD05
User Defined Commands CMR-CM01
CMR-UD10
User Defined InfoSystem CMR-CM01
CMR-UI1
User Interface CMR-CM01
CMR-WS01
Workstation InterfaceCMR-CM01, MVW-AD10, CMR-FE01, CMR-TP7 or CMR-TP8, DYR-DY01, DYR-TE00, DYR-TE13, DYR-TI00, DYR-TI13, DMR-DD1
CMR-WS02
Workstation InterfaceCMR-CM01, MVW-EX10, CMR-FE01, CMR-TP7 or CMR-TP8, DYR-DY01, DMR-DD1
Functional PromptingThe ControlManager Functional Prompting facility provides additional ease of use for DesignManager users in interactive environments (TSO or CMS).
If you issue an incomplete DesignManager command interactively, ControlManager will prompt you by outputting the word EXPECTING followed by a list of all the acceptable options for the next keyword or argument.
For example, if you enter the command identifier PLOT by itself, ControlManager prompts you with the options for the next acceptable keyword:
EXPECTING -L.OGICAL-SCHEMAR.ELATIONAL-SCHEMAN.ETWORK-SCHEMA
where the period or full stop (.) in each keyword indicates the minimum unambiguous abbreviation of the keyword.
If you then enter N in response to the prompt, you are further prompted:
EXPECTING -CL.USTERCO.NSOLIDATED
228

U.SINGD.ETAILSS.UMMARYTERMINATOR
ControlManager will continue to prompt until the command is complete and can be processed.
The Systems Administrator’s Environmental Control Facility
With the Systems Administrator’s Environmental Control Facility installed, the Systems Administrator can tailor the Man-ager Products environment to achieve these objectives:
l Provide a user-friendly environment in which to work
l Enhance security
l Regulate usage of resources
This tailoring can start at the logon process. One of several logon conditions can be set when the facility is installed. For example, Logon Exit. This can be used (for example) to allow users logged on to CMS to access Manager Products without logging on again; the Logon Screen is bypassed, the logon identifier and password being provided by the exit.
When a user logs on, one or more profiles may be invoked. These profiles are used to tailor the environment that the user will operate in.
Global profiles are usually applied to groups of users to establish. For example:
l That some commands are not available to certain groups
l Default PF key settings
l Default Report Formats for dictionary members
Once the Global profiles (if any) are invoked, the user’s logon profile (associated with the user’s logon identifier) is invoked. As well as controlling access, the Logon profile can be used to tailor the environment to suit a user’s needs (or the Systems Administrator’s). You can use the Logon profile to perform these tasks:
l Tailor the environment by executing SET commands. Any Manager Products SET command may be included in the profile including those normally restricted to the Systems Administrator.
l Invoke help levels (available with the User Defined InfoSystem installed).
l Select alternative output formats for dictionary members (available with the User Defined Output facility installed).
l Route into Panel Driven Processing.
If the Extended Interactive Facility is also installed, users can be allowed to define their own profile: a user-defined profile. The user may decide, for example, to reset some of the PF key functions, or to use further SET commands. The user-defined profile is created as a USER-MEMBER on the MP-AID, and is the last profile executed when the user logs on.
The Systems Administrator can restrict the amount of space that USER-MEMBERs can take up on the MP-AID; this restric-tion might be included in a user’s Logon profile.
If the User Defined Commands facility is also installed, the Systems Administrator can set up Corporate executive routines. A Corporate executive routine is created as a series of commands and/or directives in an EXECUTIVE-ROUTINE member of the Manager Products Administration Dictionary, and then constructed onto the MP-AID as an EXECUTIVE member. Users can execute the commands and/or directives in the routine simply by entering the name of the
229
Functional Prompting

EXECUTIVE member. A Corporate executive routine can contain commands normally restricted to Systems Admin-istrators and Controllers.
The Systems Administrator can specify Access Control Levels and so control which users can execute any particular routine.
Teleprocessing InterfacesThese Teleprocessing Interface selectable units are provided by ControlManager:
l CICS Interface (CMR-TP2)
l IMS/DC Interface (CMR-TP4)
l Roscoe Interface (DMR-TP6)
l TSO Interface (CMR-TP7)
l CMS Interface (CMR-TP8)
l DOS/VSE ICCF Interface (CMR-TP10)
l Siemens Time Sharing Interface (CMR-TP11)
l TSO/ISPF Interface (CMR-FE70)
User Defined Commands FacilityThe User Defined Commands facility has two main benefits: it allows you to store a sequence of instructions in an exec-utive routine and then execute these instructions simply by entering the name of that routine as a command; and it enables the Systems Administrator to rename and disable Manager Products Primary commands.
A Corporate executive routine is one that can be executed by all users. (The Systems Administrator can specify who can execute a particular Routine by assigning it an Access Control Level.) It can contain:
l All Manager Products commands normally available to you
l Any User Defined Command directives (DO... END, GOTO, IF... THEN, etc.) These provide standard pro-gramming capabilities which can be used, for example, to control the sequence in which the commands in the executive routine are executed.
l Any non-restricted Manager Products commands which have been disabled
l Any SET commands normally restricted to the Systems Administrator.
With the Extended Interactive Facility installed you can create your own executive routines: User Executive and Transient executive routines. Unlike Corporate executive routines, these can only contain Manager Products commands and User Defined Command directives.
The Extended Interactive Facility also gives you the ability to execute the Routine as a Linear Command (by entering the name of the Routine in the Line Command Area), or as a Cursor Spatial Command (usually by assigning a PF key to the name of the Routine).
230

By renaming commands, the Systems Administrator can tailor Manager Products to suit your installation. For example, in non-English speaking countries, commands can be renamed so that they can be entered in your natural language. Commands can also be disabled, and thus restricted to certain users.
User Defined InfoSystemInfoSystem is supplied as part of the ControlManager Nucleus, for use both in interactive and batch environments. InfoSystem comprises InfoView, the software that runs InfoSystem, and InfoBank, the bank of information held in InfoSystem. The information is stored as INFOBANK members in the MP-AID, to which they are loaded from an MP-AID LOAD dataset on the installation tape. Each INFOBANK member is one panel that displays on your screen. A panel may be a single screen or several screens long.
When the User Defined InfoSystem facility is installed, InfoBank is additionally supplied as a saved source dataset of the ASG InfoDictionary. In the InfoDictionary, information is stored as INFOBANK-PANEL members. You can interrogate and update an INFOBANK-PANEL member the same as any other dictionary member, and you can create new ones. (To help you create new members there is a model INFOBANK-PANEL member.) This means you can tailor InfoSystem to suit your installation. You can perform these tasks (or functions):
l Change ASG-supplied panels to reflect your organization’s own terminology
l Rewrite the text in another language
l Remove panels that are not relevant to your installation
l Add panels to document your organization’s standards and particular use of Manager Products
l Add new branches to document other areas of interest to your organization
And you can tailor InfoSystem to suit different users.
Each panel may contain one of the Restriction Level keywords:
l SYSTEMS-ADMINISTRATOR
l CONTROLLER
l MASTER-OPERATOR
A panel with such a keyword cannot be displayed by any user below the defined level.
The commands HELP, HELP-INDEX, INFOBANK, and SELECT TOP-MENU each route the user to an InfoBank panel preset by ASG:
l HELP routes to HELP000000
l HELP-INDEX routes to HELP-INDEX
l INFOBANK routes to INFO000000
l SELECT TOP-MENU routes to HELP000000
The Systems Administrator can change these entry points and so provide different levels and complexity of information for different levels of user.
231
User Defined InfoSystem

The User Interface FacilityThe User Interface facility provides a means by which Manager Products can be interfaced with user-written software, or with other proprietary software, for which a specific interface is not supplied.
Three forms of interface are provided:
l A POST or MAIL command prefaced to any other Manager Products command writes the output from that command to a sequential file on disk or magnetic tape. This file can then be processed in a user program.
l An Access Call capability enables Manager Products to be invoked dynamically by CALLs from user programs. By this capability, any Manager Products command can be given directly from a user program: the output from the command is placed in a specifiable area of main storage, from where it can be processed by the user program.
l An input user exit in the Manager Products program calls a user-written module after each input line is read, before the line is processed. Return codes from the user-written module instruct Manager Products to accept the input line or to reject it with an error message.
The facility is documented in the appropriate User Interface Facility manual.
Workstation InterfacesThe ControlManager Workstation Interface is a pre-requisite for connectivity to Manager Products Mainframe Tech-nology and PC and Mainframe Environmental Tailoring (MVW-AD10).
The ControlManager Workstation Interface, selectable unit CMR-WS01, is a pre-requisite for connectivity to ASG-Man-ager Products Mainframe Technology and PC Environmental Tailoring (MVW-EX10).
ASG-Web EnablerWeb Enabler is a graphical user interface (GUI) that allows end-user access to a remote repository. Users can graphically search, report, list, analyze, update, delete, and create repository objects. Previous object selections can be saved for future use, or combined with other selections to support more elaborate searches. Users can view specific pre-generated repository content diagrams, and the import and export of repository content is supported. An Expert mode is provided so that experienced users can enter lines of repository command syntax for specific processing requirements without leaving the web browser.
Most standard web browsers, such as Microsoft Internet Explorer (Version 4.0 or later) and Netscape Navigator (Version 4.0 or later), work with Web Enabler.
No installation is necessary for the end-user; all content and functionality is supplied by Web Enabler components that reside on the web server and the repository.
ASG-Manager Products Server Facility (MPSF)Manager Products Server Facility (MPSF) is a multi-tasking, multi-user environment that provides a separate and per-sistent Manager Products environment for each client. It works as an APPC/MVS server supporting access to Manager
232

Products from various client environments, including TCP/IP clients.
A typical environment is an MVS mainframe running TSO and batch jobs along with access via the internet with a web browser. Multiple servers are permitted, but each must be uniquely named and separately defined to APPC/VTAM.
These are some of the functions performed by MPSF:
l Registers and de-registers as an APPC/MVS server
l Connects to/terminates the TCP/IP interface
l Receives requests for new client conversations
l Creates and starts a Client Processing Task (CPT) for each new conversation
l Terminates client conversations
l Manages timeouts
233
ASG-Manager Products Server Facility (MPSF)

Record and Play FacilityOther possible uses include:
l Documentation in user environments of problems which are difficult to describe in words, for submission to ASG for investigation
l Production of hard copy Manager Products screens in environments where the PWS is not available
l Demos and prototypes; a recorded session can be replayed without installing the software which was used to record the session. Instead, recorded input commands and output screens simulate the Manager Products interactive session.
There are two stages in operating this facility: recording a session, and replaying. Replay can be executed in one of three modes:
l Non-automatic play mode, which requires user intervention to continue execution each time a new screen is displayed
l Automatic play mode, in which execution is continuous and no intervention is required from the user
l Demo mode, in which no Manager Products software is executed to generate the screen contents during playback. By default, demo playback requires user intervention, but it can be made continuous.
Recording a SessionAn interactive session is recorded by executing the Manager Products code and passing a parm of RECORD. For an example invocation, see Example Invocation.
These output sequential variable length datasets are created:
MPRECORD The ddname used to collect all input from the screen.
MPRESULTThe ddname used to collect all output written to the screen.
These datasets have a record format of VB and a record length of 4096. Any suitable blocksize can be defined, with a min-imum of 4100. The default is 9442.
Once invoked, recording continues until the session is ended, normally by use of the LOGOFF command.
Replaying a Session: Non-automatic PLAY Mode
OverviewA session may be played back in a manner which requires user intervention to continue between screens, by executing the Manager Products code and passing a parm of PLAY. See Example Invocation for an example invocation. The com-mands and input that have been recorded in the MPRECORD dataset are then re-executed against the software that is currently invoked. The output screens generated are again written to the MPRESULT dataset. If a comparison of output
234

from more than one Manager Products version or release is required, a different physical dataset name must be alloc-ated from that used during the previous record/playback run.
As each input is fetched from the MPRECORD dataset, it is displayed on the screen as if it had just been entered by the user. Continuation, and therefore execution of the input, requires intervention by the user (by pressing Enter or any PF key except PF3). The user can thus control of the speed of the playback.
Breaking into a Session During ReplayA PLAY mode session can be broken into at any of the points at which the software waits for intervention by the user. The PF3 key causes Manager Products to:
l Interrupt the current PLAY mode
l Discard the input currently queued
l Clear the command input area(s)
l Wait for the next input to be entered by the user
The user is then in a standard Manager Products session.
PLAY mode can be resumed at any time by issuing the SET REPLAY ON command. Since input queued at the time of a break-in is lost, it must be re-entered by the user if required before PLAY mode is resumed. If, however, the queued input is a LOGOFF and thus the last record of the MPRECORD, the LOGOFF command is re-displayed and subsequently executed to end the session.
Since any MPRESULT dataset created with a break-in is incomplete and possibly truncated, it is unsuitable for use as input to a DEMO mode session, or for comparison with another MPRESULT dataset created from the same MPRECORD dataset.
Replaying a Session: Automatic PLAY Mode
OverviewA session may be played back without requiring user intervention by executing the Manager Products code and passing parms of PLAY and AUTO. See Example Invocation for an example invocation. Re-execution of the MPRECORD dataset is then continuous.
As with non-automatic PLAY mode, all output screens are written to the MPRESULT dataset.
Varying the Speed of ReplayAfter each input has been displayed on the screen, execution is delayed for a defined waiting period. By default, the wait-ing period is 1 second, but the user can define a different wait time via a third parm. The value of the wait time may be 0 (no delay) or an integer between 2 and 99 (seconds’ delay). Since a wait time of 0 gives no delay, it can be specified to give optimum performance when running regression tests, whose primary objective is to produce an MPRESULT dataset for comparison purposes.
Repeated PlaybackThe LOOP keyword may be used with automatic PLAY mode to allow for the repetition of commands in the MPRECORD dataset. The number of iterations to be performed is controlled by specifying the required value as a parameter of LOOP.
235
Replaying a Session: Automatic PLAY Mode

If omitted, a default value of 9999999 applies and the commands will repeat indefinitely. The first and last records of the MPRECORD dataset are skipped after their initial execution, since these are normally LOGON and LOGOFF records which should not be re-executed. Output to the MPRESULT dataset is suppressed.
LOOP can be used, for example, in testing Manager Products software in the areas of concurrent updating and the detec-tion of illegal virtual storage retention across commands.
Replaying a Session: DEMO Mode
OverviewA session may be played back in demo mode by passing a parm of DEMO. See Example Invocation for an example invoc-ation. This mode differs from PLAY mode in that no Manager Products software is executed to generate the contents of the output screens. Although input comes from the MPRECORD dataset, the output screens are derived from an existing MPRESULT dataset.
By default, playback speed is user-controlled as in non-automatic PLAY mode. However, it can be made automatic by using a second parm of AUTO, and in this case playback is continuous with a waiting period of one second. The user can again define a waiting period of 0 or 2-99 seconds. For further information, see automatic and non-automatic play mode, above.
Production of Hardcopy OutputDemo mode allows for the creation of an MPSPRINT hardcopy dataset, a sequential VBA listing dataset containing cap-tured screens that can be output to any suitable printer. This is achieved by using the parm PRINT.
Each input from or output to the screen results in the generation of a screen image in the hardcopy dataset. By default, additional information, such as screen co-ordinates, is written with each screen. However, this may be suppressed by using the ASIS parm which is used with the PRINT parm in invoking hardcopy dataset creation.
Notes
Date and Time SettingsSince date and time problems can arise when comparing MPRESULT datasets, all record and playback runs are executed with the date and time set to 31 DECEMBER 2004 at 23.59.59. These are the date and time used when updating dates and/or times in the dictionary/repository or MP-AID.
To select a different year to use, specify a 4-digit year as an additional parameter following the RECORD parameter. The year specified must range from 2000 through 2099.
Mode Identification and Attention-Key UsageDuring recording, the identifier <Rec> appears in the lower right of the screen to indicate the mode of operation.
During playback in PLAY or DEMO modes, an identifier is displayed in the lower right of the screen to indicate the current mode of operation and the key used during recording to signal attention to the host. This sets the next screen display in context, as the user will see which key was pressed during recording. These are the identifiers:
In PLAY mode: <Ent> or <Pfnn>
236

In DEMO mode: *Ent> or *Pfnn>
For example, if the PF8 key had been pressed during recording, the identifier <PF8> (in PLAY mode) or *PF8> (in DEMO mode) would be displayed during playback. The user can then put into context the next screen displayed.
Truncation of ParametersAll specified parameters can be truncated to two characters. In TSO and VM Option 1 environments, parameters are sep-arated by a comma. In VM Option 2 or 3 environments, parameters are separated by one or more spaces. For further information on these environments, see the Manager Products Installation manuals.
Example InvocationAn example invocation in TSO is:
CALL ’MPR.REL2210.LOADLIB(MPR00)' 'DEMO,AUTO,0,PRINT,ASIS’
This invokes demo mode, running continuously with no delay between screens. Each screen image is written to the hard-copy dataset, but no additional information is written.
An example invocation in VM Option 3 is:
LOADM MPR00START * PLAY AUTO 2 LOOP 10
This invokes Manager Products in automatic play mode, in which no intervention is required during playback. A delay of two seconds is set between screens, and the commands in MPRECORD are repeated ten times.
All invalid or conflicting parameters are discarded. No error messages are output.
Shortening Printed OutputIf an MPSPRINT dataset is to be created and subsequently printed, the amount of output generated can be reduced by issuing the command:
SET #RUNNING OFF
This command suppresses the change of the Manager Products status indicator from WAITING to RUNNING, and thus avoids the generation of additional screens in the print dataset.
Replay Mode: Supported TerminalsSupport for the replay facility is currently limited to 3270 Model 2 (80 x 24). Attempted use on other terminals will be ignored.
237
Notes

Revision LogData Manager ADABAS InterfaceASG-Manager Products Server Facility User’s Guide
ASG-Manager Products Dictionary/Repository User’s Guide
ASG-Manager Products Message Guide
ASG-Manager Products System Administrator’s Guide
ASG-Manager Products Performance Tuning
ASG-Manager Products Procedures Language
ASG-DictionaryManager User’s Guide
ASG-DesignManager User Formatted Output
ASG-Manager Products Installation in OS Environments
The Extended Interactive FacilityASG-Manager Products Controller’s Manual
InfoSystemASG-Manager Products User Defined InfoSystem
Language and CodingASG-SourceManager User’s Guide
ASG-Manager Products Dictionary/Repository User’s Guide
ASG-Manager Products Controller’s Manual
ASG-Manager Products Dictionary/Repository User’s Guide
The MP-AIDASG-Manager Products Controller’s Manual
Tailoring and Checking Your EnvironmentASG-Manager Products Controller’s Manual
238

ControlManager IndexLanguage and Coding
Syntax Keywords
Representation of Names in Manager Products Syntax name'name'
ControlManager Screens
Syntax Keywords
Con-trolManager Screen Areas
HEADING AREA (top two lines)LINECOMMANDDATA AREAREA(last six columns)COMMAND AREA (bottom two lines)
Con-trolManager General Pur-pose Screen with Scale Set Off
COMMAND MODE:LINE: 00000 OF 00018 WAITINGDICTIONARY:INFO STATUS:DEV1VIEW: 001 TO 073*** TOP OF DATA ***=*** END OF DATA ***=SGMODE INDICATORDICTIONARY NAME & STATUS NAMEFIRST LINE INDICATORLINE COUNTERACTIVITY INDICATORDATA DELIMITERCOMMAND ENTRY INDICATORCOLUMN RANGE INDICATORMESSAGE LINE
Con-trolManager General Pur-pose Screen with Scale Set On
COMMAND MODE:LINE: 00000 OF 00018 WAITING<<<< .+...20....+...30....+...40....+...50....+...60....+...70....+...80..>>>*** TOP OF DATA ***=*** END OF DATA ***=ASGDATA EXTENSION INDICATORSCALEDATA EXTENSION INDICATOR
InfoBank Screen
TOP level menuMSP-InfoBankHELP000000THE TOP LEVEL MENUWelcome to InfoSystem. What would you like to see?1 InfoBank Contents2 How to use InfoSystem3 InfoBank Index4 An overview of ASG and its Products5 How Customer Support Services can help you6 What’s new in the latest releases?7 Using MANAGER Products: technical information
239
ControlManager Index

Syntax Keywords
SELECT the number of the option you want and press ENTER.(c) Copyright Management Systems & Programming Limited and/or WHDL - MSP INC 1983, 1984, 1985, 1986, 1987, 1988 Licensed Material - Program Product & Data Structures Confidential Property ofManagement Systems & Programming Limited and/or WHDS - MSP INC All rights reservedIF YOU NEED HELP, KEY IN HELP AND PRESS ENTER.====>SELECT880831BRANCH NAMESTANDARD HEADINGPANEL NAMERESERVED LINECOMMAND ENTRY INDICATORMESSAGE LINEPANEL ISSUE DATE
The Extended Interactive Facility
Syntax Keywords
Buffer Structure
LookasideModeSCRATCHPADCommandModeEditModeUpdateModeCOPYINSERTEDIT/UPDATEQUITEDIT QUITUPDATEEDITUPDATE QUITCOPINFOBANK/LOOKASIDEQUIQUITLOOKASIDE prefix/BROWSE prefix/INFOBANKINFO/MPR commandQUIT/EDINFO/MPR commandQUIT/UPDAoverwritingoverwriting
Current Active Buffers: Stages 1 and 3
CommandABC999UpdateXYZ999UPDATEmember name
Current Active Buffers: Stage 2CommandABC999Update
240

Syntax Keywords
XYZ999UPDATEmember-nameLookaside-InfoBankEDIT6000PANELEDIT6000
Current Active Buffers: Stage 4CommandUpdateABC999UPDATE ABC999
InfoSystem
Syntax Keywords
Example of InfoBank Struc-ture
USER TRAINING AND EDUCATIONCUST40002.4.2The Panel TitleThe Panel Name
InfoBank Struc-ture: Top Levels
ENTRY POINT FROM INFOBANK COMMANDTOP LEVELENTRY PANELINFO000000ENTRY POINT FROM HELP COMMANDTOP LEVELMENUHELP000000ASG’S TRADEMARKS AND TRADEMARK ACKNOWLEDGEMENTSINFO000015INFO000025INFO000020LIMITED REPRODUCTION RIGHTS WHERE USER DEFINED InfoSystem IS INSTALLEDMAINTENANCE SERVICE PROVIDED BY ASGMANAGER PRODUCTS RELEASES TO WHICH THIS EDITION OF InfoBank RELATESHOW TO USE InfoSystemHELP0000InfoBank CONTENTSCONT0000InfoBank INDEXINDEX0000LEVEL 0LEVEL 1LEVEL 2COMMANDMANAGER PRODUCT SELECTABLE UNIT CODESASG1000HOW CUSTOMER SUPPORT SERVICES CAN HELP YOUCUST0000WHAT’S NEW IN THE LATEST RELEASESNEWS0000USING MANAGERInfoBank ELEVENTH EDITION01.21.3
241
InfoSystem

Syntax Keywords
1.41.51.12.12.22.32.42.52.62.2.1
InfoBank Struc-ture: How to Use InfoSystem
ENTRY POINT FROM SELECT HELP FROM A PANELHOW TO SCROLL THE TEXT ON THE SCREENHELP0040HELP0000LEVEL 2LEVEL 32.1HOW TO MOVE AROUND AND RETRACE YOUR STEPS IN InfoBank PANELHELP0020NDA1000ACCESSABILITYInfoBankHELP-INDEXINDEXTEACH YOURSELF HOW TO ACCESS InfoSystem AND LEAVE InfoBankInfoSystemHELP0010CONT0000CONTENTSPF KEYHELP0030SETTINGSSYNTAXSYNTAX9000CONVENTIONS2.1.12.1.3(2.3)2.1.52.1.72.1.92.1.22.1.4(2.2)2.1.62.1.8
InfoBank Struc-ture: How Cus-tomer Support Services Can Help You
LEVEL 2LEVEL 32.4USER TRAINING AND EDUCATIONCUST4000QUERYCUST1000RESOLUTION MANAGER DOCUMENTATIONPUBS0000PRODUCTSFAILSOFTCUST1020PROCEDURES2.4.12.4.22.4.3
242

Syntax Keywords
2.4.1.12.4.1.22.4.1.5CUST0000CUST1010HOW CUSTOMER CAN HELP YOU SUPPORT SERVICESHOW SUPPORT MANAGER PRODUCTS IS PROVIDED FOR ABENDS ANDCUST1500THEMWHAT CAUSES2.4.1.3DIAGNOSINGCUST1600OF A PROBLEMTHE CAUSE2.4.1.4INFORMATION YOU SHOULD HAVE READY WHEN RAISING A QUERY CUST1700LEVEL 4
InfoBank Struc-ture: Using Man-ager Products: Technical Inform-ation
LEVEL 2LEVEL 3INTRODUCTION TO MANAGER PRODUCTS RELATIONALMPRBC0000RELTC0000SUPPORT TECHNOLOGY2.6.12.6.32.6.2WHAT DOMPRUSE0005TO DOYOU WANTMPRUSE0000DMR0000ASG-DATAMANAGER2.6.5DYR0000ASG-2.6.7ASG-MANAGERVIEW2.6.9PERFORMANCEMPTUNE0000TUNING2.6.112.6.13CMR0000ASG-2.6.4CONTROLMANAGERDSR0000ASG-DESIGNMANAGER2.6.6SMR0000ASG-SOURCEMANAGER2.6.8MESS0000MESSAGES2.6.102.6USING MANAGERPRODUCTS:TECHNICAL INFORMATION DICTIONARYMANAGER2.6.12DOCUMENTATIONCONTR0000CONTOLLERSFOR DICTIONARY
243
InfoSystem

Syntax Keywords
InfoBank Struc-ture: Intro-duction to Manager Products
LEVEL 3LEVEL 42.6.1EXECUTING MANAGER PRODUCTS COMMANDS IN INTERACTIVE AND BATCH ENVIRONMENTSMPRBC0050MPRBC1300COMPUTER AIDED TOOLS SOFTWARE ENGINEERING2.6.1.42.6.1.2INTRODUCTIONMPRBC0000MANAGER PRODUCTSTOTHEMPRBC0003REPOSITORYMANAGER PRODUCTS2.6.1.1MANAGER PRODUCTSMPLANG0000DEFINITION LANGUAGECOMMANDS AND2.6.1.5
InfoBank Struc-ture: What Do You Want To Do?
LEVEL 3LEVEL 42.6.2GENERATE COBOL,ASSEMBLER, ORSLG0000PL/I DATASTRUCTURES?DEVELOP ANASG06400APPLICATION?ACCESS, UPDATE,DMRCOM0000A DICTIONARY?OR INTERROGATE2.6.2.32.6.2.52.6.2.1WHAT DO YOUMPRUSE0005WANT TO DO?IMPORT INFORMATIONDYRUSE6000OBJECTS?ABOUT EXTERNAL2.6.2.7EXECUTE GROUPSOF MANAGERPROCL0000PRODUCTSCOMMANDS?2.6.2.9DESIGN ADATABASEDSPRINT2000(DATA AND ENTITYMODELING)?2.6.2.2GENERATE DDL
244

Syntax Keywords
(DATABASE DEFINITIONMPRUSE5000LANGUAGE)STATEMENTS?2.6.2.4CREATEMVUG1100ON A PC?DIAGRAMS2.6.2.6CHANGE/TAILORYOUR MANAGERMPRUSE8000PRODUCTSCONFIGURATION?2.6.2.8
InfoBank Struc-ture: Relational Technology Sup-port
LEVEL 3LEVEL 42.6.3SQL/DSSQLDS0000SUPPORTDB2DB20000SUPPORT2.6.3.12.6.3.2RELATIONALRELTC0000SUPPORTTECHNOLOGYIDMS/RIDMSR0000SUPPORT2.6.3.3
InfoBank Struc-ture: Con-trolManager
LEVEL 3LEVEL 42.6.4THEMPAID0000MP-AID2.6.4.3CONTROLMANAGERCMR0000CONTROLMANAGERCOMMANDSSYNCOMCMRSYNTAXSUMMARY2.6.4.7CONTROLMANAGERCMRSCR0000SCREENS2.6.4.2CONTROLMANAGERFACILITIESCMRSU0000(SELECTABLEUNITS)2.6.4.6BASIC DICTIONARYBDMS0000
245
InfoSystem

Syntax Keywords
SOFTWAREMANAGEMENT2.6.4.4CONTROLMANAGERMEMBER TYPESSYNMEMCMRSYNTAXSUMMARY2.6.4.8INTRODUCTION TOCMRINT0000CONTROLMANAGER2.6.4.1CONTROLMANAGERCMRCOM0000COMMANDS2.6.4.5
InfoBank Struc-ture: Con-trolManager Facilities
LEVEL 4LEVEL 5EXTENDEDEIF0000FACILITYINTERACTIVE2.6.4.6.1INTERFACESTOCMRTP0000TELEPROCESSINGMONITORS2.6.4.6.9SYSTEMSADMINISTRATORSSAECF0000ENVIRONMENTALCONTROL FACILITY2.6.4.6.8FUNCTIONALFP0000PROMPTING2.6.4.6.10USERUDI0000InfoSystemDEFINED2.6.4.6.3USERUII0000FACILITYINTERFACE2.6.4.6.5STATUSSTATUS0000FACILITIES2.6.4.6.7USERUDC0000COMMANDSDEFINED2.6.4.6.2USERUDS0000SYNTAXDEFINED
246

Syntax Keywords
2.6.4.6.4AUDITAUDIT0000AND SECURITY2.6.4.6.6CONTROLMANAGERFACILITIESCMRSU0000(SELECTABLEUNITS)2.6.4.6
InfoBank Struc-ture: DesignMan-ager
LEVEL 3LEVEL 42.6.6ASG-DESIGNMANAGERFACILITIESDSRSU0000(SELECTABLEUNITS)ASG-DESIGNMANAGERDSRMEM0000MEMBER TYPESINTRODUCTIONDSRINT0000ASG-DESIGNMANAGERTO2.6.6.32.6.6.52.6.6.1ASG-DESIGNMANAGERDSR0000ASG-DESIGNMANAGERDSRCOM0000COMMANDS2.6.6.2ASG-DESIGNMANAGERDSROUTS0000OUTPUT2.6.6.4ASG-DESIGNMANAGERDSRUSE0000AND USEPROCEDURES2.6.6.6ASG-DESIGNMANAGERCOMMANDSSYNCOMDSRSYNTAXSUMMARY2.6.6.8ASG-DESIGNMANAGERINTEGRATIONDSINTG0000WITH OTHERMANAGER PRODUCTS2.6.6.7
InfoBank Struc-ture: Dic-tionaryManager
LEVEL 3LEVEL 42.6.7ASG-DICTIONARYMANAGERDYR0020VERSION 02
247
InfoSystem

Syntax Keywords
ASG-DICTIONARYMANAGERDYR0050VERSION 012.6.7.12.6.7.2DYR0000ASG-DICTIONARYMANAGERCOMMANDSDYRCOM00002.6.7.3
InfoBank Struc-ture: Man-agerView
LEVEL 3LEVEL 42.6.9SYSTEMMVSAT0000ADMINISTRATOR’SUSER’SMVINS00002.6.9.12.6.9.2MVW0000ASG-MANAGERVIEWQUICK REFERENCEMVUG00002.6.9.3GUIDECARDGUIDE
InfoBank Struc-ture: SourceMan-ager
LEVEL 3LEVEL 42.6.8ASG-SOURCEMANAGERCOMMANDSSMRCOMSMRSYNTAXSUMMARYASG-SOURCEMANAGERPUBS0060PUBLICATIONSOVERVIEW OFASG0060VERSION 02ASG-SOURCEMANAGER2.6.8.22.6.8.32.6.8.1ASG-SOURCEMANAGERSMR0000ASG-SOURCEMANAGERMEMBER TYPESSYNMEMSMRSYNTAXSUMMARY2.6.8.7
248

Commands
Syntax Keywords
Add Primary Command Syntax LADD [n]
BACKWARD and FORWARD Syntax BACKWARDFORWARD
TOP and BOTTOM SyntaxBOTTOMBTOPT
BROWSE and LOOKASIDE SyntaxBROWSELOOKASIDEcommand
C/CC and PUT Syntax C[n]CCcopy primary command is:PUT [n]
CHANGE SyntaxCHANGE /old/new/mmnn
CLEAR Syntax CLEAR
DELETE - Delete Primary CommandD[n]DDDELETE [n]
DOWN and NEXT Syntax
DOWNDOD[n]NEXTN[n]
Allocate an Existing Dataset
DCSDSSALLOC DDNAMEddnameDSNdataset-nameDISPdispFREEfree-optMSGmsg-opt
Allocate a New Dataset
DSCDSSALLOC DDNAMEddnameDSNdataset-nameDISP NEWFREE
249
Commands

Syntax Keywords
free-optMSGmsg-optRECFMrecfmLRECLlreclDSORGdsorgDIRECTORYdddspaceBLKSIZEblksize
Allocate a UNIX File
DSCDSSALLOC DDNAMEddnameunix fileRECFMrecfmLRECLlreclBLKSIZEblksizeFREEfree-optMSGmsg-optPATH 'path'FILEDATAfiledataPATHDISP 'pathdisp1,pathdisp2'PATHOPTS'pathoptsPATHMODE 'pathmode'
Deallocate a Dataset
DSCDSSFREEDDNAMEddnameDSNdataset-nameMSGmsg-optDSCDSSLOG
The DSSF Log
Displaying Allocations
DSCDSSALCCSADSCDSSCURRENT
250

Syntax Keywords
Displaying Dataset Attributes DSCDSSDCBdataset-name
Deleting a DatasetDSCDSSDELETEdataset-name
Displaying a Partitioned Dataset Dir-ectory
DSCDSSDIRECTORYdataset-name
Determining if a Dataset ExistsDSCDSSEXISTSdataset-name
Determining the Presence of a Par-titioned Member
DSCDSSMEMBEREXISTSdataset-nameMEMBERmember-name
Displaying a Member of a Partitioned Dataset
DSCDSSMEMBERVIEWdataset-nameMEMBERmember-name
Displaying a Sequential DatasetDSCDSSVIEWdataset-name
Releasing all DSS/DSC AllocationsDSCDSSRELEASE
Copying a Sequential Dataset
DSCDSSCOPY INDSNdataset-name1OUTDSNdataset-name2Command Syntax Summary
ENVIRONMENT SyntaxENVIRONMENT[ALL][CUST][]
F and I SyntaxF[n]I[n]FILE SyntaxFILE [member-name]
251
Commands

Syntax Keywords
FIND and LOCATE Syntax
FINDFIFstring/string/LOCATELOL
FREE Syntax DSRFREE
GET-DICTIONARY/GETD
GET-DICTIONARY, GET-EXECUTIVE, GET-TRANSIENT,and GET-USER SyntaxGETDGET-DICTIONARYGETEGET-EXECUTIVEGETTGET-TRANSIENTGETUGET-USERmembergete-optionstransientuser-memberid
GET-SCRATCHPAD SyntaxGET-SCRATCHPADGETSnn
HELP Syntax
command-namecommand-name-SINDEXmember-type-namePFtopicxHELP []
HOLD SyntaxHOLD mp-aid-transient-member-nameINFOBANK SyntaxINFOBANKINFO-BANK
KPUT SyntaxK[n]KKKPUT [n]
LEFT and RIGHT Syntax LEFT [n]RIGHT [n]
LOGOFF Syntax LOGOFFEND
LOGON Syntax
LOGONlogon-idPASSWORDpassword
252

Syntax Keywords
MOVE SyntaxM[n]MMMOVE [n]
MODE Syntax
DMSDESIGN-AREAWBDAMODEDICTIONARY-MANAGEMENT-SOFTWAREQUERY MODE
MP-AID ADD Syntax MP-AID ADD USER-MEMBERmember-nameREPLACEuser-member-contents
MP-AID APPEND SyntaxMP-AID APPEND USER-MEMBERmember-nameuser-member-contents
MP-AID CONCATENATION LIST SyntaxMP-AIDMPAIDCONCATENATION LIST
MP-AID DELETE Syntax
TRANSIENTUSER-MEMBERWORKBENCHKEPT-DATA-LISTMPAIDMP-AIDDELETEWBCHWBDAmpaid-member-name
MP-AID EXEC-LIST Syntax
MPAIDMP-AIDEXEC-LISTCONCATENATION mpaid-nameDATE-ORDERmember-typeselectionSIZE-ORDERCOMMANDEXECUTIVESCMNDFORMATSINFOBANK-PANELSKEPT-DATA-LISTSPUBLIC-USER-MEMBERSALLPUBLIC-USER-MEMBERSlogon idTRANSIENTSTRANSLATION-RULESTR-RULESTRULUSER-MEMBERSWORKBENCHESWBCHWBDAFROMstring-1
253
Commands

Syntax Keywords
TOstring-2ONLYstringSELECTstring
MP-AID LIST Syntax
MPAIDMP-AIDLISTCONCATENATION mpaid-nameALL-CONCATENATIONSDATE-ORDERmember-typeselectionSIZE-ORDEREXECUTIVESFORMATSKEPT-DATA-LISTSPUBLIC-USER-MEMBERSALLPUBLIC-USER-MEMBERSlogon idTRANSIENTSTRANSLATION-RULESTR-RULESTRULUSER-MEMBERSWORKBENCHESWBCHWBDAFROMstring-1TOstring-2ONLYstringSELECTstring
MP-AID PASSWORD SyntaxMPAIDMP-AIDPASSWORD old-password new-password
MP-AID PRINT Syntax
MPAIDMP-AIDPRINTCONCATENATION mpaid-nameALL-CONCATENATIONSEXECUTIVEKEPT-DATA-LISTUSER-MEMBER member-namelogon idTRANSIENT
MP-AID RESET USER-MEMBER Syntax MP-AID RESET USER-MEMBERmpaid-member-name
NOPRINT SyntaxNOPRINTcommandP Syntax
254

Syntax Keywords
P[n]
PANEL SyntaxPANELmessage-identifierpanel-name
QUERY ACITIVE-BUFFERS Syntax QUERY ACTIVE-BUFFERS
QUERY ALL SyntaxQUERYQUQALL
QUERY AMBIGUITY-ASSUMPTION Syntax
QUERYQUQAMBIGUITY-ASSUMPTION
QUERY BUFFER-LIMIT Syntax
QUERYQUQBUFFER-LIMIT
QUERY CHARACTER-TRANSLATION Syntax
QUERYQUQCHARACTER-TRANSLATION
QUERY DICTIONARY Syntax
DICTIONARYQUERYQUQALLBUFFERSINDEX
QUERY DICTIONARY-UPDATES SyntaxDICTIONARY-UPDATESQUERYQUQ
QUERY EXCP-LIMIT SyntaxQUERYQUQEXCP-LIMIT
QUERY FREE-POOL Syntax
QUERYQUQFREE-POOLFREEPOOL
QUERY HELP-ENTRY Syntax
QUERYQUQHELP-ENTRY
255
Commands

Syntax Keywords
QUERY INDEX-PANEL Syntax
QUERYQUQINDEX-PANEL
QUERY INFOBANK-ENTRY SyntaxQUERYQUQINFOBANK-ENTRY
QUERY INTERROGATE-ENQUEUE Syn-tax
QUERYQUQINTERROGATE-ENQUEUE
QUERY IO-FLUSH-LIMIT SyntaxQUERYQUQIO-FLUSH-LIMIT
QUERY KANJI-MODE SyntaxQUERYQUQKANJI-MODE
QUERY KANJI-STRING-DELIMITER Syn-tax
QUERYQUQKANJI-STRING-DELIMITER
QUERY KEPT Syntax
UNNAMED [AND LISTS list-name [,list-name]...]LISTSlist-name[,list-name...]ALLQUERYKEPT [][CONTAINING member-name]
QUERY LINE-COMMAND Syntax
QUERYQUQLINE-COMMANDSPREFIX-COMMANDS
QUERY LOGON-ID SyntaxQUERYQUQLOGON-ID
QUERY MESSAGE-LANGUAGE SyntaxQUERYQUQMESSAGE-LANGUAGE
QUERY MPAID-UPDATES SyntaxQUERYQUQ
256

Syntax Keywords
MP AID-UPDATES
QUERY ONLINE-USERS Syntax
QUERYQUQONLINE-USERS
QUERY OUTPUT-LINE-LIMIT SyntaxQUERYQUQOUTPUT-LINE-LIMIT
QUERY PRIMARY-COMMANDS Syn-tax
QUERYPRIMARY-COMMANDS
QUERY RECALL-BUFFER Syntax QUERY RECALL-BUFFERS
QUERY RESERVED-INFOBANK-LINE Syntax
QUERYRESERVED-INFOBANK-LINE
QUERY RETAINED-EXECUTIVES SyntaxRETAINED-EXECUTIVESQUERYQUQ
QUERY STORAGE and VIRTUAL Syntax
QUERYQUQSTORAGEVIRTUAL
QUERY STRING-DELIMITER Syntax QUERYQUQSTRING-DELIMITER
QUERY TOP-MENU-ENTRY Syntax
QUERYQUQTOP-MENU-ENTRY
QUERY USER-BLOCKS SyntaxQUERYQUQUSER-BLOCKS
QUIT Syntax QUIT
RETRACE SyntaxPANELMENUDISPLAYRETRACE []
257
Commands
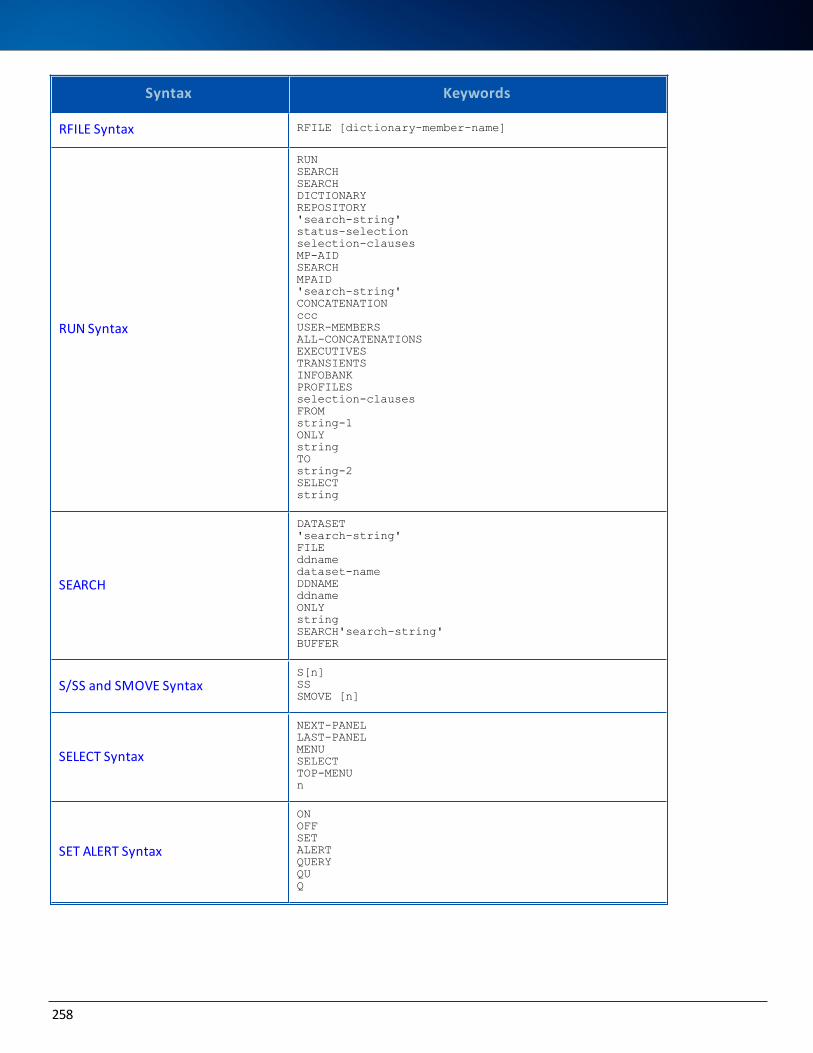
Syntax Keywords
RFILE Syntax RFILE [dictionary-member-name]
RUN Syntax
RUNSEARCHSEARCHDICTIONARYREPOSITORY'search-string'status-selectionselection-clausesMP-AIDSEARCHMPAID'search-string'CONCATENATIONcccUSER-MEMBERSALL-CONCATENATIONSEXECUTIVESTRANSIENTSINFOBANKPROFILESselection-clausesFROMstring-1ONLYstringTOstring-2SELECTstring
SEARCH
DATASET'search-string'FILEddnamedataset-nameDDNAMEddnameONLYstringSEARCH'search-string'BUFFER
S/SS and SMOVE SyntaxS[n]SSSMOVE [n]
SELECT Syntax
NEXT-PANELLAST-PANELMENUSELECTTOP-MENUn
SET ALERT Syntax
ONOFFSETALERTQUERYQUQ
258

Syntax Keywords
ALERT
SET and QUERY AUTOSKIP Syntax
ONOFFSETAUTOSKIPQUERYQUQAUTO SKIP
SET BLANK-LINE-DISPLAY Syntax
SETBLANK-LINE-DISPLAYSPACE-LINE-DISPLAYONOFFQUERYQUQBLANK-LINE-DISPLAYSPACE-LINE-DISPLAY
SET and QUERY CHECK-CHARACTER Syntax
SET CHECK-CHARACTERxOFFQUERYQUQCHECK-CHARACTER
SET COMMAND-LINE Syntax
SETCOMMAND-LINECOMMAND-LINETOPBOTTOMQUERYQUQCOMMAND-LINE
SET and QUERY COUNTER Syntax
SETCOUNTERintegerQUERYQUQCOUNTER
SET and QUERY CURSOR-HOLD Syn-tax
ONOFFSETCURSOR-HOLDQUERYQUQCURSOR-HOLD
SET DIRECTLY-ASSUMPTION SyntaxONOFFSET
259
Commands

Syntax Keywords
DIRECTLY-ASSUMPTIONQUERYQUQDIRECTLY-ASSUMPTION
SET DOCUWARE Syntax
ONOFFSETDOCUWAREselectable-unit-code
SET and QUERY ECHO Syntax
ONOFFSETECHOQUERYQUQECHO
SET and QUERY ENQUEUE-TRACE Syn-tax
ONOFFSETENQUEUE-TRACEQUERYQUQENQUEUE-TRACE
SET ESCAPE-CHARACTER Syntax
SETESCAPE-CHARACTERcharacterQUERYQUQESCAPE-CHARACTER
SET EXCP-MONITOR Syntax
integerOFFSETEXCP-MONITORQUERYQUQEXCP-MONITOR
SET EXEC-WRITE Syntax
ONOFFSETEXEC-WRITEQUERYQUQEXEC-WRITE
SET EXECUTIVE-RETENTION Syntax SETEXECUTIVE-RETENTION
260

Syntax Keywords
COMMAND-RETENTIONONOFFCPUTIMEQUERYQUQEXECUTIVE-RETENTION
SET FORMAT Syntax
SET FORMAT [FOR] REPORT[GENERIC]basic-member-typemember-typeOFASpreferred-set-format-nameTOMP-AIDmp-aid-format-nameTODICTIONARYdictionary-format-nameOFFITEMSGROUPSCONVENTIONAL-FILESMODULESPROGRAMSSYSTEMSQUERYQUQFORMATSET FORMAT-TITLE SyntaxSETFORMAT-TITLEstringQUERYQUQFORMAT-TITLE
SET INFOBANK-SELECT Syntax
ONOFFSETINFOBANK-SELECTQUERYQUQINFOBANK-SELECT
SET LINE-AREA Syntax
LEFTRIGHTOFFLINE-AREAPREFIX-AREASETQUERYQUQLINE-AREAPREFIX-AREA
261
Commands

Syntax Keywords
SET LINE-END-CHARACTER Syntax
xOFFSETLINE-END-CHARACTERQUERYQUQLINE-END-CHARACTER
SET LINEAR-RETENTION Syntax
ONOFFSETLINEAR-RETENTIONQUERYQUQLINEAR-RETENTION
SET LIST-SHIFT Syntax
ONOFFSETLIST-SHIFTQUERYQUQLIST-SHIFT
SET LOOKASIDE-RETENTION Syntax
LOOKASIDE-RETENTIONBROWSE-RETENTIONLA-RETENTIONSETONOFFQUERYQUQLOOKASIDE-RETENTIONBROWSE-RETENTIONLA-RETENTION
SET NUMBERS Syntax
ONOFFSETNUMBERSQUERYQUQNUMBERS
SET OUTPUT-EDIT Syntax
OUTPUT-EDITBROWSE-EDITSETONOFFQUERYQUQOUTPUT-EDITBROWSE-EDIT
262

Syntax Keywords
SET PERFORM-CHARACTER Syntax
SETPERFORM-CHARACTERcharacterQUERYQUQPERFORM-CHARACTER
SET PF KEYS Syntax
DELAYSUBSTITUTE command *IMMEDIATERECALLcommandSET PFnnPFKEYSQUERY
SET PRINT-DELIMITERS Syntax
ONOFOFFPRINT-DELIMITERSSETPRINT-DELIMITERSQUERY
SET and QUERY PRINT-DELIMITER
ONOFSETPRINT-DELIMITERQUERYQUQPRINT-DELIMITERS
SET PRINT-SHIFT Syntax
ONOFFSETPRINT-SHIFTNOSEQQUERYQUQPRINT-SHIFT
SET REVISION-BARS Syntax
ONOFFSETREVISION-BARSQUERYQUQREVISION-BARS
SET SCALE Syntax
ONOFFSETSCALEQUERYQUQSCALE
263
Commands

Syntax Keywords
SET SCREEN-REFRESH Syntax
OFFSETSCREEN-REFRESHQUERYQUQSCREEN-REFRESH
SET SCROLL-LIMIT Syntax
nOFFSETSCROLL-LIMITQUERYQUQSCROLL-LIMIT
SOS-DUMP Syntax
ONOFFSETSOS-DUMPQUERYQUQSOS-DUMP
SET TABS and SET TAB-CHARACTER Syntax
SETTABS [nn] [nn]...SETTAB-CHARACTERxQUERYQUQTABSQUERYQUQTAB-CHARACTER
SET UPDATE-OUTPUT Syntax
LONGWARNERRORSETUPDATE-OUTPUTQUERYQUQUPDATE-OUTPUT
SET UPPER-CASE Syntax
ONOFFSETUPPER-CASEQUERYQUQUPPER-CASE
SET VERIFY Syntax ONOFF
264

Syntax Keywords
SETVERIFYQUERYQUQVERIFY
SFILE Syntax[dictionary-member-name]SOURCE-FILESFILE
SKIP Syntax SKIP
SPACE Syntax SPACE [n]
SUBMIT Syntax SUBMIT
SWITCH MESSAGES Syntax
SWITCHOFFONMESSAGESALSOlevelsnumbersLEVELSlevNUMBERSmm TO n
SWITCH NAME-CONCATENATION Syn-tax
SWITCHONNAME-CONCATENATION [SELECT identification-element[,identification-element]...[][d]]OFF NAME-CONCATENATIONNO-SEPARATORSEPARATORcDELIMITEDDELIMITERNAME[LINE string-number]alias-typenumberDESCRIPTIONNOTEALIAS
SWITCH OUTPUT SyntaxSWITCHOUTPUTTOddname [AND ddname]
TEXT Syntax TEXT ’text’ [,’text’]...
UP Syntax[n]UPU
265
Commands

Syntax Keywords
UPDATE Syntax UPDATE [dictionary-member-name]
VENC SyntaxVENCmember-nameFORvenc-reason
VLOG Syntax VLOGmember-name ...options...
WIPE Syntax WIPEXQUIT Syntax
XQUIT Syntax XQUIT
ZONE SyntaxZONEmmnn
266