User's Guide - NTS Telecom
124
Control See Software Solutions Ltd. All Rights Reserved. 1995-2006 www.controlsee.com
-
Upload
khangminh22 -
Category
Documents
-
view
2 -
download
0
Transcript of User's Guide - NTS Telecom

�����������
Control See Software Solutions Ltd. All Rights Reserved. 1995-2006
www.controlsee.com
�� �����������
�����������
���

��������� U.C.ME® is a trademark of Control See Software Solutions Ltd. Windows® is a trademark of Microsoft Corporation Ltd. Excel® is a trademark of Microsoft Corporation Ltd. Access® is a trademark of Microsoft Corporation Ltd. SQL-Server® is a trademark of Microsoft Corporation Ltd. IIS® is a trademark of Microsoft Corporation Ltd. OPC® is a trademark of OPC is a trademark of the OPC Foundation. DDE®is a trademark of Microsoft Corporation Ltd. Opera® is a trademark of Opera Software ASA. Nokia® is a trademark of Nokia Corporate Communications. CiTect® is a trademark of CiTect Pty Ltd. RS-View® is a trademark of Rockwell Automation Inc. Cimplicity® is a trademark of GE-Fanuc Automation Ltd. InTouch® is a trademark of is a trademark of Invensys plc.

�
�� ���� �
U.C.ME enables you to send alarm notification via: Phone, SMS, WAP, Fax, Email, RSS and Multimedia. U.C.ME connects to multiple OPC servers and sends alarms in real-time. U.C.ME enables you to analyze alarms in real-time. At the moment of the alarm, U.C.ME takes a snapshot of all relevant parameters (tags) and sends them straight to your cell phone, offering you a complete picture of the system. U.C.ME enables you to analyze alarms and events from any PC on the Internet or Intranet. U.C.ME logs all the alarms and events to a relational database that may be viewed using an Internet browser. In addition, U.C.ME enables users to perform bi-directional communication with their application by calling U.C.ME via phone or sending SMS command messages to U.C.ME. U.C.ME is an event driven and multi-threaded application. It waits for messages coming from the OPC servers and only then it starts its notification activity. U.C.ME may dial up to 4 telephone lines concurrently, play voice messages and send fax documents. U.C.ME may use a cellular modem to send SMS messages and receive SMS commands. U.C.ME may send alarms by email to any email recipient. U.C.ME uses the Dialogic (an Intel company) telephony boards. Dialogic telephony boards are approved in more than 30 countries all over the world. U.C.ME also uses the Hi-Phone telephony USB device.

����� � ���� �� ���� U.C.ME has both Software and Hardware minimum system requirements. These requirements must be met in order for the software to work properly. ����� ������� �� ������The server requires, at a minimum, the following software: • Microsoft Windows® 2000 Service Pack 2, Microsoft Windows® XP or Microsoft Windows® 2003 Server. • Microsoft IIS® server version 5.0 or higher (In case you intend to use the web features of U.C.ME™). • Intel/Dialogic drivers SR 6.0 Redistributable Edition • Internet Explorer 5.0 (in case you intend to use the web features of U.C.ME) or higher. • Microsoft SQL-Server® 2000 or higher (In case you intend to log your data to MS-SQL database). �� ��� ������� �� ������U.C.ME requires, at a minimum, the following hardware: • Intel Pentium III or better • 512MB RAM • Dialogic telephony board or Way2Call telephony device (Hi-Phone USB) in case you intend to use the telephony features of U.C.ME. • Cellular modem – Siemens (MC35i or TC35i) or Wavecom (Fastrack) and a SIM card (in case you intend to use the SMS features of U.C.ME) • Available serial port for the modem connection (in case you intend to use the SMS features of U.C.ME) • Internet connection (in case you intend to use the web features of U.C.ME) • Analog modem and a landline telephone for SMS sending using TAP protocol

�������������������� ��
Installing U.C.ME™ Insert the U.C.ME CD to the CD-ROM drive. The Setup program should start automatically. However, depending on your Windows™ settings, the Setup program might not start automatically. In this case, click on the “Start ����” key, select “Run” and type “X:Setup” (where X is your CD-ROM drive letter). The U.C.ME logo dialog box will appear. Click Next. The welcome dialog box will appear: Read the information in the dialog box, and then click Next.

The License agreement dialog box will appear: Please read the license agreement carefully and choose between "I accept" or "I do not accept" options. If you choose "I do not to accept", the setup program will be aborted. Click Next. The Readme information dialog box will appear: Please read the information carefully and click Next. The Customer Information dialog box will appear. Enter your name and organization name and select between "Anyone who uses this computer (all users)" or "Only for me (username)". Click Next.

The Destination folder dialog will appear: Click Next to accept the default folder name, or click Change to select a different folder name. Click Next. The Ready to Install Program dialog box will appear. You may review your setup options and click Back to change your settings or Install to continue. The following dialog box will appear.

Following the file copy process, The Aladdin device driver should be installed. The following dialog box should appear. Click OK to continue. Click on the Finish button. The U.C.ME Application/Service setup dialog box will appear.
����������� !"!������# ��������� ��$� Select Standard application (default) or Service. If you choose that U.C.ME will be installed as a Windows service, you may select the dependency services. The dependency services are services that need to be running before the U.C.ME service is running. For example: if you are using the Dialogic telephony features, you will need to select the Dialogic service as a dependency service. Click OK. The setup process is now completed. You may later change this configuration by using the U.C.ME Service Configuration program.

Installing U.C.ME as a Windows service has several advantages. First, U.C.ME will be started automatically after a computer reboot. There is no need to login to start it. Second, users can login and logoff the computer without interrupting the server. Third, you can setup recovery actions if the service fails, such as restarting the service automatically or restarting the computer (for computers running Windows 2000 & XP only).
!"!���% �� �� ������ ������&� �$�� The setup program creates the U.C.ME program folder, which will include the following items: The Administrative Tools group contains the following items: In addition, the setup program creates a shortcut to U.C.ME configuration on your desktop (see below).
Note: Running U.C.ME as a service is possible only when using an OPC server that also capable to run as a service.

The default U.C.ME folder is C:\Program Files\Control-See\UCME-OPC. You may see the content of each sub folder in the table below. Folder name Content BIN All binary files (EXE, DLL,OCX) BACKUP Backup ZIP files HTML Web application (HTML,XML, XHTML, ASP, JPG, GIF) FTP Web application (HTML, XML, XHTML, ASP, JPG, GIF) – Used
when working with a remote server. LOG Daily Log files Email Used as a temporary folder for email sending WAV_E English voice files - Wave format WAV_H Hebrew voice files - Wave format VOX_E English voice files – VOX format VOX_H Hebrew voice files - VOX format Pagers Directory Users' definition files Voice Files - Replies Voice files recorded by users as a reply to alarms History History files created by U.C.ME for later analysis SendMessageFiles A folder that holds files used for manual message sending. EXT_alarms A folder that holds alarm ASCII files created by 3rd party programs. TIMEOUT A folder that holds temporary files for alarms that are defined with
timeout. Note: At the last step of the U.C.ME setup program, it will invoke the HINSTALL program that will install the Hasp device driver for the U.C.ME hard-lock key. If for any reason the program didn't run, you may open a CMD window, switch to the U.C.ME bin folder, and run the program: HINSTALL /i. For more information regarding hasp drivers see: http://www.ealaddin.com/ .

����������������� ��� �� Installing the Dialogic telephony board If you intend to use the Dialogic telephony PCI board, install the board in your PC. See more installation information and instructions in the Dialogic installation guide.
Installing the Dialogic drivers (software) 1. Insert the Dialogic drivers CD and run the setup program. If you have a Dialogic board installed, the
setup program may automatically detect it. If not, you should define it using the DCM (Dialogic Configuration Manager) program.
2. Install the Dialogic drivers as described in the Dialogic installation guide. If have a Dialogic board installed, make sure that the Dialogic service startup mode is defined as Automatic.
�Installing the Way2Call telephony USB device If you intend to use the Way2Call telephony USB device (Hi-Phone), please use the Way2Call to install the Hi-Phone drivers. Note: Do not connect the Hi-Phone device to the USB port before installing the drivers! See more installation information and instructions in the Hi-Phone installation guide.
�Installing a cellular modem If you intend to send SMS messages using a cellular modem, you should have an available COM port in your computer. U.C.ME uses COM1 to COM10 for modem connection. Insert a CIM card into the modem and connect it to one of the COM ports. Testing the modem����If U.C.ME fails to send SMS messages using the modem, you may use the HyperTerminal program to test the modem connection. Start the HyperTerminal program (Start���� �Programs �Accessories �Communications �HyperTerminal) and choose the COM port which the modem is connected to. Use the "9600,N,8,1" port settings. Type the AT and press Enter. You should get an OK from the modem. If there is no response from the modem, you should check the possible causes: 1. The modem is connected to the wrong COM port. 2. There is no CIM card inside the modem. 3. The power line is disconnected. 4. The modem is defined as AUTO-BAUD. See the troubleshooting section to see how to change the AUTO-BAUD to fixed BAUD.
Note: You must install the Dialogic drivers in any case!
�&��$������ ������% �� ��
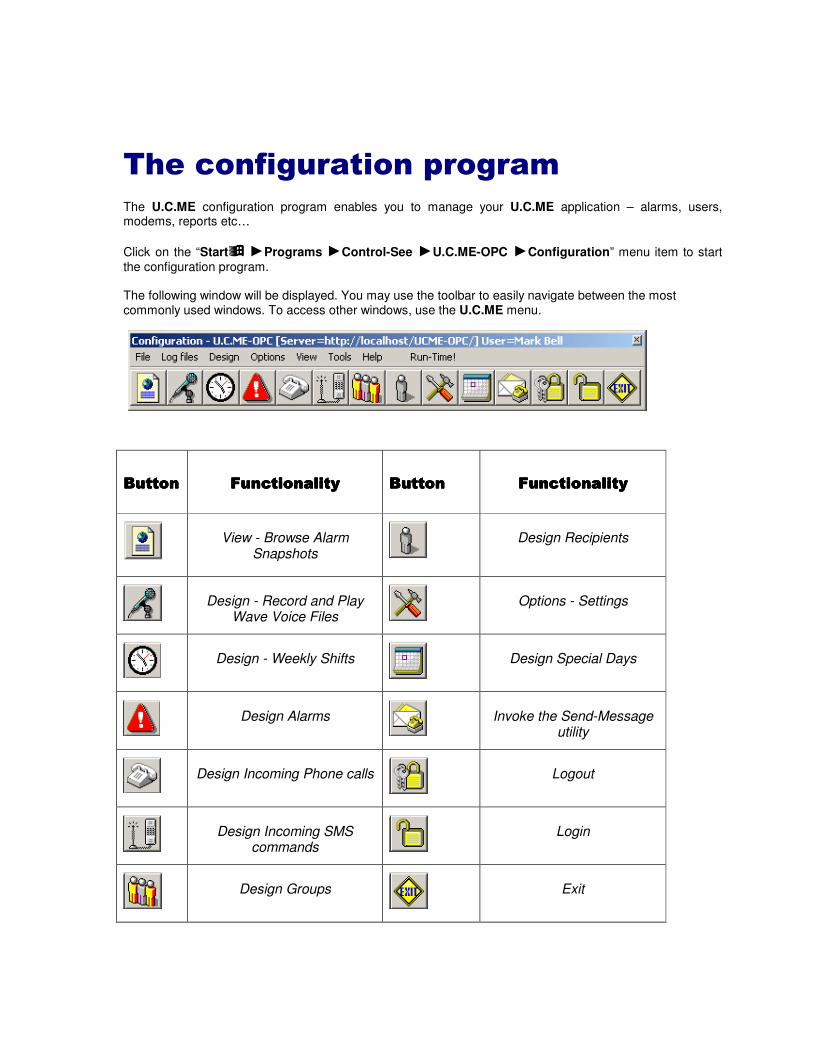
The U.C.ME configuration program enables you to manage your U.C.ME application – alarms, users, modems, reports etc… Click on the “Start���� �Programs �Control-See �U.C.ME-OPC �Configuration” menu item to start the configuration program. The following window will be displayed. You may use the toolbar to easily navigate between the most commonly used windows. To access other windows, use the U.C.ME menu.
����
'�����'�����'�����'���������
����
(��$���������(��$���������(��$���������(��$�������������
����
'�����'�����'�����'���������
����
(��$���������(��$���������(��$���������(��$�������������
View - Browse Alarm
Snapshots
Design Recipients
Design - Record and Play
Wave Voice Files
Options - Settings
Design - Weekly Shifts
Design Special Days
Design Alarms
Invoke the Send-Message
utility
Design Incoming Phone calls
Logout
Design Incoming SMS
commands
Login
Design Groups
Exit
�&��%������� ���� �������$�����%&�������������������
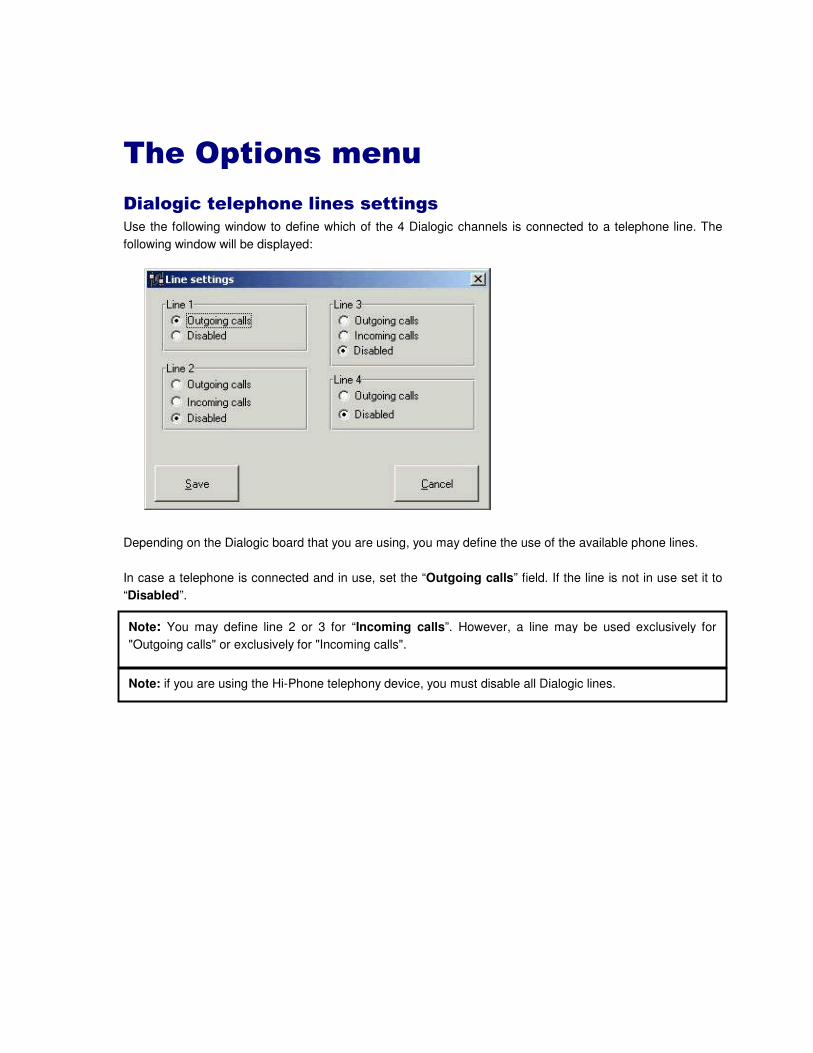
Use the following window to define which of the 4 Dialogic channels is connected to a telephone line. The following window will be displayed: Depending on the Dialogic board that you are using, you may define the use of the available phone lines. In case a telephone is connected and in use, set the “Outgoing calls” field. If the line is not in use set it to “Disabled”.
Note: You may define line 2 or 3 for “Incoming calls”. However, a line may be used exclusively for "Outgoing calls" or exclusively for "Incoming calls".
Note: if you are using the Hi-Phone telephony device, you must disable all Dialogic lines.

��% ���$����Use the following window to define the SMS protocols that you wish to use (depending on your SMS providers). U.C.ME may handle few SMS protocols concurrently. Each SMS protocol is handled in a separate thread, so that messages may be sent to different recipients at the same time. Click on the "Add" or "Delete" button to add or delete an SMS protocol. When clicking on the "Add" button or when double-clicking on an existing protocol, the following window will be opened. Choose the Paging system from the list. Set the appropriate values for the fields: Port Name – (COM1, COM2, etc…), Baud rate, Data bits, Stop bits, Parity, Phone number etc… Click on the "Defaults for…." button to set the default settings for the specific paging system. When using the GSM-SMS protocol, you may use this protocol for incoming SMS as well. In this case, you should set the "Use port for incoming SMS messages" parameter.

�&��)������� �% ���$���*+� �� ���,�
The GSM-Modem protocol may be used to send and receive SMS messages (TEXT messaging) using a cellular GSM modems. The advantage of using a cellular modem is that you don't need internet connection and the Email-to-SMS service to send SMS messages. This protocol utilizes the GSM cellular modem in PDU mode.
Tested and approved GSM modems The modems that were tested and verified for use with U.C.ME are:
� Wavecom – Fastrack (GSM) � Siemens - MC35/TC35 (GSM)
These modems require a SIM card installed and a free serial COM port to connect to.
�&����+�% ���$����
The TAP Protocol allows you to send SMS Messages using a Standard Data Modem and Telephone Landline. For a detailed list of TAP providers, click on the following button.
�
�
�
�&��"������ ���-��% ���$���*��.��� ���,�
The Cellular-TEXT protocol may be used to send and receive SMS messages (TEXT messaging) using a cellular GSM and CDMA modems. The advantage of using a cellular modem is that you don't need internet connection and the Email-to-SMS service to send SMS messages. This protocol utilizes the GSM and the CDMA cellular modems in Text mode.
Tested and approved modems using TEXT mode The modems that were tested and verified for use with U.C.ME are:
� Wavecom – Fastrack � Siemens - MC35/TC35
Note: Each service provider (i.e.: Verizon, Sprint, SkyTel. etc…) sets the number of messages you may deliver in one call. Please check with your provider regarding this parameter and set it in U.C.ME.

���������������
The settings window enables you to set various U.C.ME settings. Switch between the different tabs to change the settings.
)��� ���
���� Write activity to log file Use this option to instruct U.C.ME to write all its activity to a log file. If this option is set, U.C.ME will write all the activity to a log file named: UCMEyyyymmdd.LOG (where yyyy is the year, mm is the month and dd is the day of month). This file may be viewed or printed at any time. You may use this log file to analyze U.C.ME activity, or to find the cause for any software error or problem. Don’t forget to delete this file from time to time. ���� Display activity in list-box If you wish to display U.C.ME activities in the U.C.ME main window, set this field. In this case U.C.ME will display a circular list of the last 1,000 activities in its main window. ���� Save alarms to history files If defined, U.C.ME will save all alarms to history files. These file can be used for report generation.

���� Sort Dialing List according to priorities Set this field if you want that U.C.ME will sort the alarms’ dialing list according to each person’s priority. If this field is not set, U.C.ME will dial according to the dialing list order. ���� Play current item value before writing new value Set this option if you want that U.C.ME will play current value before it let you change its value. For example, if you define an action - "Set interactive tag value", you may want to listen to the current value before you change it. ���� Use Family for Alarm templates Set this option if you want that U.C.ME will use Family alarm templates. The use of alarm templates eases the definition of multiple alarms that are different only in their voice file name. All other settings are the same. ���� Add voice time-stamp to each alarm This feature is applicable for phone/voice alarms only. When it is in use, U.C.ME will play the alarm's time-stamp before playing the alarm message. For example: "Alarm started at 12 and 35 minutes – Fire alarm 2nd floor …." ���� Language type Use this feature to set the language type: "Left_To_Right" or "Right_To_Left". "Right_To_Left" may be used with languages like Arabic and Hebrew. ���� Week starts at Use "Sunday" or "Monday" as the first day of the week ���� Alarm date format Select a date format in which the alarms' date will be displayed. The following formats are available:
� dd/mm/yy � dd/mm/yyyy � mm/dd/yy � mm/dd/yyyy � dd/mm � mm/dd � dd.mm.yy � dd.mm.yyyy � mm.dd.yy � mm.dd.yyyy � dd.mm � mm.dd
���� Save acknowledge information into the SQL database Set this property to instruct U.C.ME to add a record into the SQL database containing the acknowledge information – Alarm text and the name of the user who acknowledged the alarm.

����%&����
���� Enable Telephony Click to enable/disable Telephony features ���� Telephony type Choose between Dialogic and Hi-Phone. Note that with Hi-Phone you can only use one telephone line and for outgoing calls only. Hi-Phone telephony is limited to:
� Getting password via DTMF � Playing wave files � Alarm acknowledge � End of call verification
���� Maximum silence interval before hang-up This field defines the maximum silence time interval (in seconds). When U.C.ME reaches this time interval, it will terminate the call ���� Maximum number of rings before hang-up This field defines the maximum number of rings before hang-up. When U.C.ME reaches this number it will terminate the call.
���� Number of rings before “Call Analysis” begins U.C.ME is using a sophisticated “Call Progress Analysis” procedure. This procedure identifies when the call is answered, and when the call receiver speaks to his phone (Hello...).

You may set the number of rings before the “Call Analysis” begins. This may be used in cases where you dial to telephone (especially mobile) which does not enable you to hear the first ring. In this case you should set value of this field to “2”. The default value for this field is “1”. ���� Delay after dialing before “Call Analysis” begins This parameter is also used for the “Call Progress Analysis” procedure. The default value for this field is “250” (0.25 second). If you specify greater values, U.C.ME will ignore noises until the end of the delay time. ���� Dialing System Set this field to “Tone” or “Pulse” according to your telephone line type. ���� Dialing Prefix If U.C.ME uses a line that is connected to a switchboard, type the dialing prefix. For example: “9”. This prefix number will be added to all of the telephone numbers, which are defined in your phone book. ���� Dual Tone system Use this option if you are using U.C.ME in a country with dual tone telephony system. (For example: Australia, UK)
Note: U.C.ME can dial out either using “Tone” or “Pulse”, but, U.C.ME can’t get DTMF tones from a telephone, which operates in “Pulse” mode!
Note: If you are dialing to internal telephone numbers which doesn’t require the prefix number, leave the “Dialing Prefix” field empty, and add the “Dialing Prefix” to each external phone number in your phone book.

�����
Select an OPC server and then press on the browse button to select a tag name. ���� Tag time format Set this field to “Seconds_since_00:00” or to “Minutes_since_00:00” according to the format which is used in your SCADA application. ���� Write "1" to tag when maximum dialing retries is reached Use this option to instruct U.C.ME to write the value "1" to a tag to indicate that maximum dialing retries has been reached. ���� Write handshake values to tag Use this option to instruct U.C.ME to write values to a tag. This option may be used if you want to verify (in your SCADA application) that U.C.ME is up and running. If set, U.C.ME will write the seconds of the hour every 20 seconds to tag defined in this field. ���� Write activity to string tag Use this option to instruct U.C.ME to write all its activity to a string tag. ���� Enable/Disable alarm notification tag Use this option to enable/disable the alarm notification by changing a tag value within your SCADA application. Assign the value of "1" to disable alarm notification. Assign the value of "0" to enable alarm notification.

���� Delete all alarms from queue Use this option to delete all alarms from U.C.ME's queue by changing a tag value within your SCADA application. Assign the value of "1" to force alarm deletion. The value will be set to "0" after alarm deletion.

/�������� Set each type of information you wish to be written to the log file: ���� General information (recommended) ���� Errors (recommended) ���� Debug information - setting this option will instruct U.C.ME to write additional information that may be ���� unclear to the common user. Use this option only if you are facing problems and want to investigate it via the log file. ���� Warnings (recommended) U.C.ME's log file name is "UCMEyyyymmdd.log" (where yyyy is the year, mm is the month and dd is the day). It can be viewed with any text editor. In addition you may view the file U.C.ME errors file named "UCME errors.txt". These log files can be also viewed from U.C.ME's run-time and configuration modules.
Log Files Folder - The default folder for U.C.ME log files is: C:\Program Files\Control-See\UCME-OPC\LOG. You may change this folder by setting a different folder path. You may use the Browse button to browse for a folder.
Log Viewer - The default log file viewer program is Lister.exe. Leave this field empty to use the default viewer. To select a different viewer, click on the Browse button and select another viewer program. For example: Notepad or TextPad.

0��$��������
���� Voice Files Path - This field defines the directory in which all of the VOX or WAV files are located.
The default path for the U.C.ME voice files is: "C:\Program Files\Control-See\UCME-OPC\WAV_E" (E - English, H - Hebrew)
���� Voice File format Choose the voice file format you prefer: VOX or WAV. VOX is a dialogic standard while WAV is a Microsoft Windows standard. WAV file format enables you to use standard recording and playback utilities and thus, the recording and playback is much easier. In addition, U.C.ME's configuration program contains built-in playback and recording functions that are supported for WAV file format only. When working with the WAV format, make sure you record files with the following properties: WAV Audio format: PCM 11.025 kHz, 8 bit, Mono. Improving WAV files quality Recording with Microsoft Windows® Sound recorder utility, you may change the audio properties to improve WAV file quality. Click on Edit �Audio properties. The following window will be displayed:
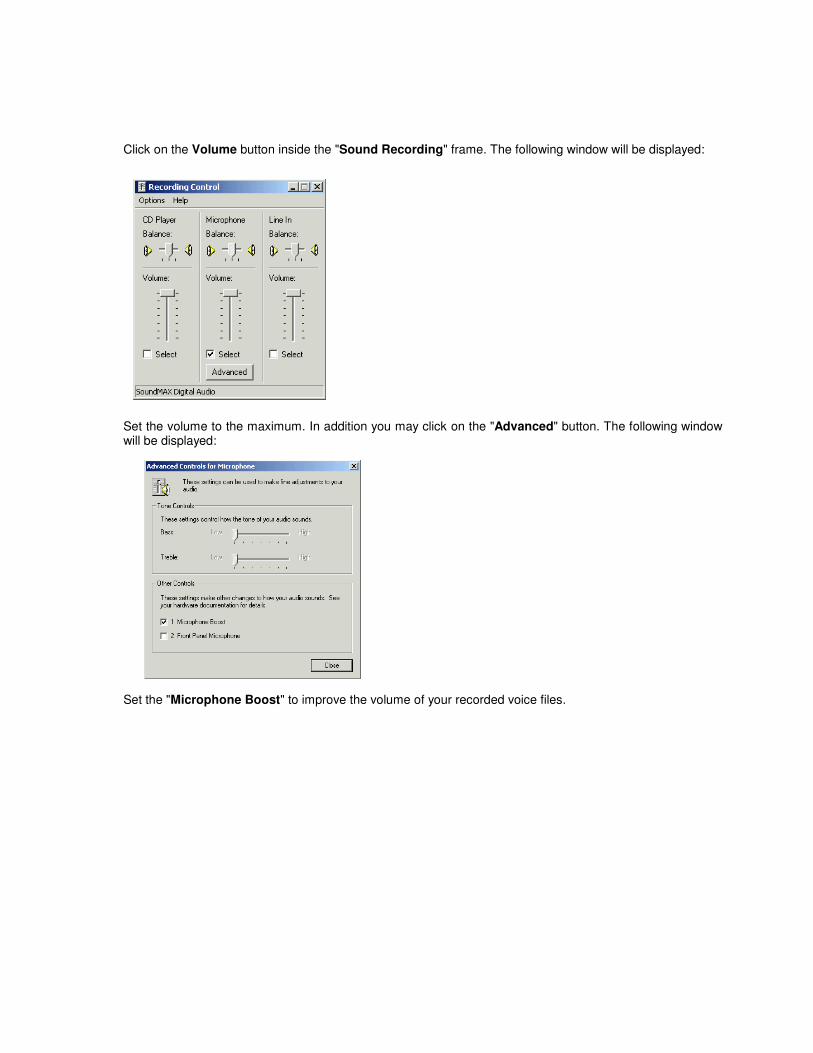
Click on the Volume button inside the "Sound Recording" frame. The following window will be displayed: Set the volume to the maximum. In addition you may click on the "Advanced" button. The following window will be displayed: Set the "Microphone Boost" to improve the volume of your recorded voice files.

������ �����
���� Play alarms to local loudspeakers - set to enable alarm playing to your local loudspeakers. ���� Control Tags Optional tag names that can be used to control U.C.ME alarm playing via the SCADA application or OPC server.
Enable/disable alarm replay – if the tag value is 1, the alarm replay is disabled. If 0, alarms will be played. Stop replay, delete all alarms – if the tag value is 1, all alarms will be deleted from the wav replay queue.
���� Delay between replay – Enter delay time (in milliseconds) between each wav file replay. ���� Replay count – Enter replay count for the alarm. For example, if set to "5". The alarm will be played 5 times. Set to -1 to replay forever. ���� Add Alarm timestamp – set to instruct U.C.ME to play the alarm's timestamp. (HH:MM) ���� Play Ended alarms – set to instruct U.C.ME to play the alarm's wav file name also when alarm is ended. In this case the alarm will be played only once. For example: "Alarm ended – Fire alarm 2nd floor". ���� Play "New alarm" message – set to instruct U.C.ME to play the "New alarm" message each time a new alarm is created. This message will be played only at the first occurrence of the alarm.
��� �����
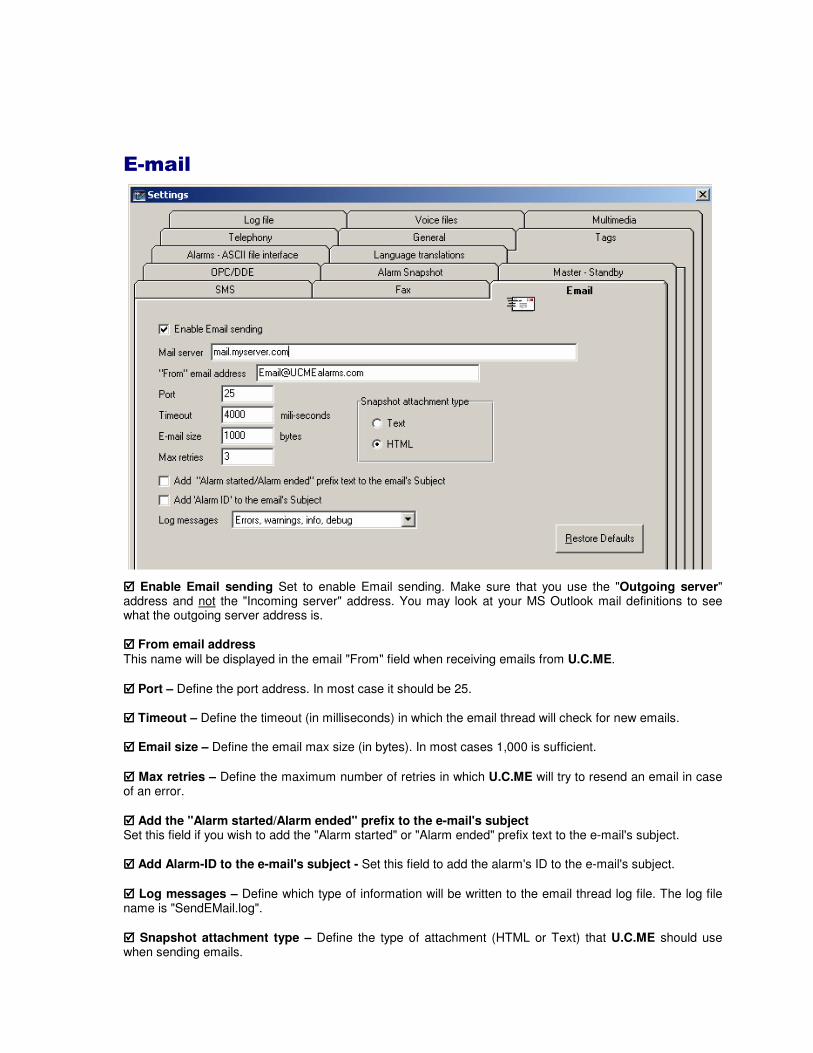
���� Enable Email sending Set to enable Email sending. Make sure that you use the "Outgoing server" address and not the "Incoming server" address. You may look at your MS Outlook mail definitions to see what the outgoing server address is. ���� From email address This name will be displayed in the email "From" field when receiving emails from U.C.ME. ���� Port – Define the port address. In most case it should be 25. ���� Timeout – Define the timeout (in milliseconds) in which the email thread will check for new emails. ���� Email size – Define the email max size (in bytes). In most cases 1,000 is sufficient. ���� Max retries – Define the maximum number of retries in which U.C.ME will try to resend an email in case of an error. ���� Add the "Alarm started/Alarm ended" prefix to the e-mail's subject Set this field if you wish to add the "Alarm started" or "Alarm ended" prefix text to the e-mail's subject. ���� Add Alarm-ID to the e-mail's subject - Set this field to add the alarm's ID to the e-mail's subject. ���� Log messages – Define which type of information will be written to the email thread log file. The log file name is "SendEMail.log". ���� Snapshot attachment type – Define the type of attachment (HTML or Text) that U.C.ME should use when sending emails.

(�-� ���� Enable Fax sending - Set to enable Fax sending. Note that fax sending requires a Dialogic board that supports fax (For example D/4PCIUF). ���� Local ID – this is the string that will be displayed in the receiving fax display. ���� User Header – this text will be printed at the top of the fax page.

�� ���� Enable SMS sending - set to enable SMS sending. ���� Add alarm time to message – when set, the alarm time will be added to the SMS message. When set, the date format should be selected. ���� Send feedback message to users after acknowledge commands – when set, U.C.ME will send feedback message to users who will perform acknowledge commands via SMS. When a feedback SMS message is received, the user can be assured that his acknowledge command was executed successfully. When set, the following texts should be translated to your local language: "Done", "Failed", "The value is". ���� Add the "Alarm started/Alarm ended" prefix text to the SMS text – when set, U.C.ME will add the "Alarm started" or "Alarm ended" SMS text. When set, the following texts should be translated to your local language: "Alarm started", "Alarm ended". ���� Add "Alarm ID" to enable alarm acknowledge – when set, U.C.ME will add the alarm ID to the SMS text. This ID will allow users who receive alarms via SMS to acknowledge the alarms.

+"1���� You may choose between "OPC server", "DDE server" or "No server". When choosing OPC, you may use the browse button to select an OPC server name. Define "No Server" when using a 3rd party program that creates alarms using the ASCII file interface. ���� OPC
Server name - OPC server name. Use the browse button to browse for OPC servers. Update rate – the minimal time (in milliseconds) that passes between U.C.ME will get new updates from the OPC server. The default value is 1,000. Log messages – Select the OPC thread's log options. The log file name is OAI.LOG.

Initialization timeout – (in seconds): At startup, U.C.ME creates the connection with the OPC server. The initialization time may be influenced by various parameters: The amount of alarms defined in U.C.ME, the OPC server and the communication performance between the OPC server and the PLC/s. U.C.ME enables the user to set different initialization time to prevent initialization timeout errors. Computer name – The computer name on which the OPC server is running on. Note that if the OPC server is running on a different computer, you need to use the DCOM configuration program to configure security settings that will enable U.C.ME to communicate with this server. Logical name – A name that identifies the OPC server. Note that the logical name has to be unique for each OPC server.

' �������+"��� �� ��
Click on the Browse button. The following window will be displayed:
����
����
����
����
����
����
����
����
����
����
����
Choose one of the servers. Its name will be displayed in the server name field.
���� DDE Application/Server – DDE server name (See the table below). Topic – DDE topic name (See the table below). Connection name – select a name for the Application/Topic. DDE Application/Topic names Software Application Topic Cimplicity CWSERV Point CiTect CITECT VARIABLE Excel EXCEL Book1.xls InTouch VIEW TAGNAME iFIX DMDDE DATA PCIM DBSR PCIM Vuniq VuServer DataTable Wizcon WIZCON GATE ���� No server - Choose No Server if you are not connecting to an OPC or DDE server.

����� �����2���%%��$������
U.C.ME support master-standby application. A master-standby application contains 2 computers on the same network, when each computer is running U.C.ME. Use the screen above to define the functionality of each station – "Master" or "Standby". A "Standby" station will work in passive mode while the "Master" station is working. When the "Master" station is unavailable, the "Standby" station will take control and will start the alarm notification process. ���� Synchronization tag name – A valid tag name that exist in your OPC server or SCADA application. The same tag name should be defined both in the Master and the Standby stations.

��� � ���%�&���
U.C.ME enables you to record alarm and event snapshots each time an alarm or event is triggered. When alarms or event occurs, U.C.ME performs a snapshot of up to twenty tag values that are related to the alarm. The snapshot may be sent to your cell-phone, viewed in an RSS reader or in a standard Internet explorer. ���� Enable Web Snapshots Click to enable/disable the Web Snapshot. When this parameter is set, U.C.ME will add each alarm to a database and will create HTML/XML files that will allow users to view alarm information through the web. ���� HTML/XML folder Define the folder name in which U.C.ME will create the XML/HTML files. The default value for this parameter is: "C:\Program Files\Control-See\UCME-OPC\HTML".
Note: To use the Alarm Snapshots, Microsoft IIS must be installed. A virtual directory called UCME-OPC is automatically created by the setup program.

���� HTML/XML URL - Define the URL name. (i.e.: http://localhost/UCME-OPC ). ���� Title - Define the title that will be displayed in the web pages. i.e.: "Alarm History". ���� URL link - This link will be used by the RSS reader software. This link may lead to any web page. ���� Description - Define the description that will be displayed in the web pages. i.e.: "U.C.ME – Advanced Alarm Snapshot". ���� Logo image URL - Some RSS readers enable to display a small GIFF image. This image also serves as a link to the URL link (see above). ���� Logo image width and height - Define the logo image width and height. ���� Log file options - Define the log options. Use debug only when you wish to track and analyse a problem. The log file name is AMI.LOG. ���� Use FTP for remote web server - In case your web server is located on a remote server, set this parameter and define the FTP settings (see below). ���� Enable Cellular Snapshots - Set this parameter if you wish that U.C.ME will create cellular snapshots. If set, U.C.ME will create XHTML files that will be transferred to the remote FTP site (see below FTP definitions). ���� Enable FTP - Set this parameter if you wish that U.C.ME will use FTP to transfer the appropriate files to a remote FTP server. (�+��������� ���� FTP server - Set the FTP server address. For example: ftp.mysite.com . ���� Use PING to improve performance - To improve FTP performance, you may set this parameter. If your FTP server doesn't support PING, don't use this option. ���� FTP username and password - Set the FTP username and password. ���� Send errors via SMS - In case of errors connecting the FTP server, U.C.ME may send an SMS to the selected user.

���� Clear snapshot history You may delete alarm snapshot history from time to time. Select the date range and the categories you wish to delete and click on the "OK" button. U.C.ME will delete the appropriate records from the database and all the related files.
Note: All "Category" fields must be provided. Use the Category buttons to select a category or sub-category, or type * to delete all the records of the category/sub-category. For example when using Category="*", Sub-Category1="Pumps" and Sub-Category2="*", all records with Sub-Category1="Pumps" will be deleted.

��� � ��3��"������������ ��$��
����
���� Enable ASCII file interface U.C.ME enables other applications to generate alarms. The other application should create the alarms in ASCII files that are placed on the hard disk. The files should be created in the "EXT_alarms" folder (For example: "C:\Program Files\Control-See\UCME-OPC\EXT_alarms"). Set this parameter if you wish to activate the external alarms thread. ���� Check for new alarm files every ___ milliseconds Set the timeout (in milliseconds) in which U.C.ME will check for new alarm files.

/��������� �����������
U.C.ME enables users to translate various texts to any language. These texts are used by U.C.ME when sending messages or when storing data into the database.

����2��� U.C.ME enables users to choose which database they want to use when storing alarm information. The supported databases are:
� MS-Access � MS-SQL Server
MS-Access may be used in smaller applications with small amount of data. MS-SQL Server may be used in larger applications with large amount of data. SQL-Server settings ���� Username – Username as defined in MS-SQL Server. ���� Password – Password as defined in MS-SQL Server. ���� Data source – computer name. U.C.ME may write its data to a database located on the local computer or to a remote computer.
Note: MS-SQL Server is not supplied and installed with U.C.ME. You have to purchase it and install it separately.
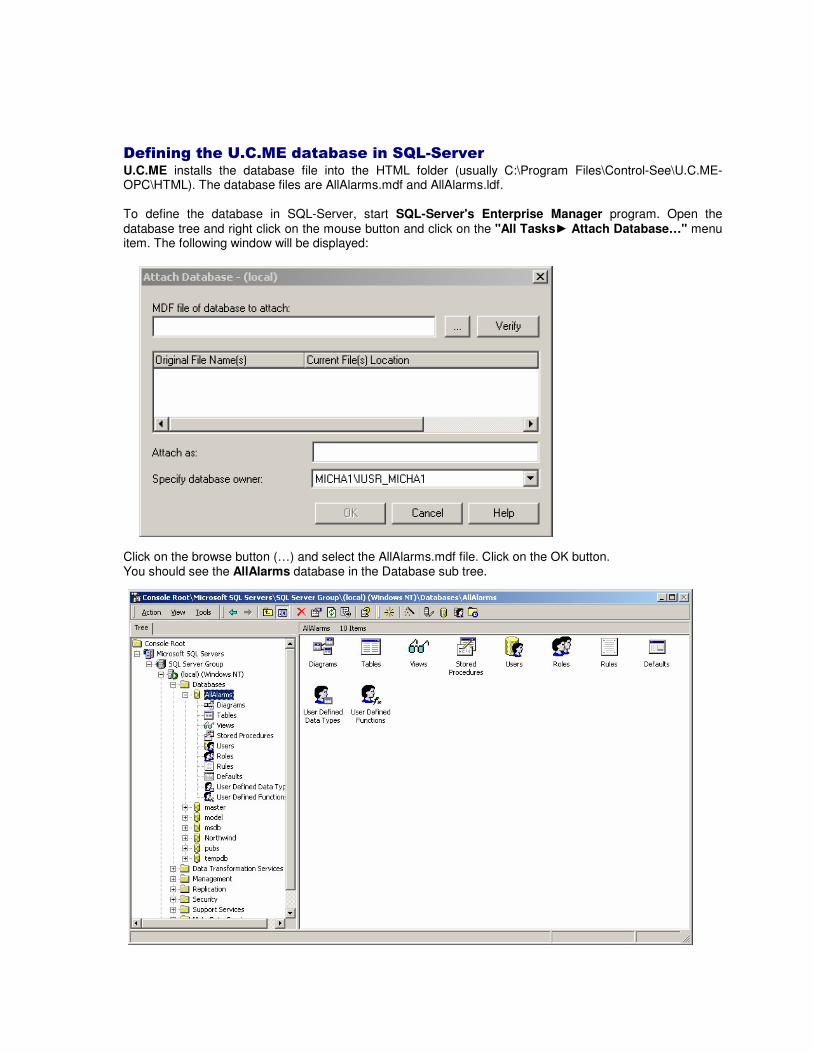
����������&�� !"!�������2�������4/�� �� �U.C.ME installs the database file into the HTML folder (usually C:\Program Files\Control-See\U.C.ME-OPC\HTML). The database files are AllAlarms.mdf and AllAlarms.ldf. To define the database in SQL-Server, start SQL-Server's Enterprise Manager program. Open the database tree and right click on the mouse button and click on the "All Tasks� Attach Database…" menu item. The following window will be displayed:
Click on the browse button (…) and select the AllAlarms.mdf file. Click on the OK button. You should see the AllAlarms database in the Database sub tree.

����������&������������� ����4/�� �� �� In order to view the database content using an Internet explorer, you must define the default user. The default user name should be IUSR_XXXX where XXXX is the computer name (data source). Make sure that this user has the db_datareader and db_datawriter permissions (see below).

�&���������� ����
��$�%��������+&����'��5�
Use the Recipients Phone book window to manage alarm recipients. In this phone book you may define recipients' names, phone numbers, email address etc… The following window will be displayed:
Note: You can not change the name of existing user. A user name may appear in alarms and groups. Changing its name may cause errors when searching for non-existing users.
The Phone book menu To access the phone book menu, point the mouse over the recipients list and click on the mouse right button. Alternatively, you may click on the Edit menu on the top left corner of the phone book window. The following menu will be displayed: Click on the required menu item to perform any of the operations.
��������� �$�%������
When deleting a recipient, the following message will be displayed:
If you click on the "Yes" button, the recipient (in this example - "Ben") will be deleted from all alarms and groups when saving the phonebook. Clicking on "No" will delete the recipient but will keep its name in all alarms and groups. Clicking on "Cancel" will keep the user in the phone book and in all alarms and groups.
���������� � �$�%������
Click on the "New Ctrl+N" menu to add a new recipient. Double click on an existing recipient to change its properties. Use the "Copy Recipient Ctrl+C" and "Paste Ctrl+V" menu items to create new users based on existing recipient definitions.
��%������� �$�%������
Click on the Suspend Recipient menu item. The following window will be displayed:
�
�
�
�
�
�
�
�
�
�
A recipient may be suspended for any time period. Select the date interval using the calendar objects. Set the "Time From" and "Time To" properties.
When a recipient is suspended you may see the suspension period in the recipients list (see above).
To cancel a recipient suspension, click on the "Resume Recipient" menu item.
(������� �$�%������
To find a recipient, click Ctrl+F keys, use the Recipients menu item or click on the Find Recipient button. The following window will be displayed: You may find a recipient by name or by phone number. To find another user with the same name, click on the Find Next button.

���/� �%� � You may create an HTML report that shows the alarms that a recipient is included in. You may use the checkboxes in the list-box to select recipients that will be included in the report. Click on the "HTML report" button to create the report. See below a sample report: In this sample report you may see that the user called David.G@Phone is listed in three alarms as displayed in the Alarms column.

��� ��������������������The following window enables you to set the time intervals and the days in which U.C.ME is allowed to send messages.
���� Name User name (15 characters). Depending on the Paging system (Phone, SMS, Fax, Email) the appropriate string will be added to the user's name. For example: David@SMS, Jim@Email, John@Phone and Mike@Fax. These extensions will later on assist you to differentiate between the different users. ���� Phone/Fax number or email Phone/Fax number to dial to or email address. ���� Password - Password (1 to 6 numeric digits). Required for phone recipients only. For other users the string "null" will be automatically used. ���� Paging System – Use phone, fax, SMS or email. ���� Protocol – Use one SMS protocol. ���� Priority - The “Priority” may be any value from 0 to 9. If desired, U.C.ME may sort the alarms’ dialing list according to the priority defined for each name in the list. If priority is set to 0, the user won't get any messages at that day. You may use the three time intervals to define time intervals. All time intervals may be in the same day. Set or reset on the “Day” check-box to enable/disable the dialing during that day.

In addition to the regular weekdays there are additional three special day types: Special_day_1 Special_day_2 Special_day_3 These definitions will take effect when defining special days (i.e.: holiday). See "Special days" definition below. By using Priorities, you can change the order U.C.ME sends the alarms. The priority may be different for each day of the week. In addition, if one user is on vacation, you may set his priority 0. In this case U.C.ME will not dial to this user. ���&� �6����������� Enable dial-in - Determines if a user is allowed to dial-in into U.C.ME ���� Enable deletion of alarms log file - Determines if user is authorized to delete alarms (from history files) while playing them via phone. In addition, it lets you set different authorization levels for each user. For example, one user may be authorized to perform actions via SMS while others are not. # �+�7�$�� %���2���$������ �%&����
U.C.ME and its snapshot functionality enable recipients who carry cellular phones with WAP-2/XHTML support, to receive alarms together with their snapshots. (See below). Set this parameter if you wish that the recipient will receive alarm snapshots in XHTML format.

�����������$�%������ ��%���
It may be more convenient to define alarms with groups rather than having long list of recipients. See below the first window that will be displayed. The existing groups will be displayed in the list-box. You may delete; copy or paste groups. To create new group click on the "New group…" button. The following window will be displayed: In the above window there are two lists. On the left-hand side you can see all the users that are define in your phonebook. In the right-hand side, you can see the users that are members of the group. To add or remove users you may use one of the following ways:
1. Double click on the recipient name. 2. Select a recipient and click on the "Add one" or "Remove one" button. 3. Drag and drop the recipient from one list to the other.
To remove all recipients from the group, click on the "Remove all" button. You can change the order of the recipients in the group by selecting a recipient and then moving it up or down using the "Up" and "Down" buttons. When including a group in alarm's recipients list, the order of the users will be kept.

To save a group, click on Save. The following dialog box will be displayed. Enter the group name and click on OK. When deleting a group, the following dialog-box will be displayed. If "Yes" is selected, the following dialog-box will be displayed. If "Yes" is selected, the group will be deleted from all alarm and family-templates.

&�����������������
In some cases, organizations choose to send alarm notifications according to predefined work shifts. U.C.ME enables you to design weekly shifts – up to 3 shifts a day.
When using shifts in alarms, the recipient notification list is taken from the shift's definition and not from the alarm itself. At run-time, U.C.ME will search for a shift instance that matches the current date and time. If such shift instance is found, the recipient list will be taken from it.
In case where a shift instance is found and a special day (holiday) is defined at the same date, U.C.ME will check each recipient for its special day settings to see if the alarm notification can be sent.
The first thing you should do is to create the shift model. You may correlate shift models to alarm families are to any other subject. See the window below:
Click on the "New model" button to create a new shift model. Once the model was created, you may start creating new instances. One shift model may include unlimited number of instances. For example, you can create 12 instances for the next 12 months: Jan, Feb…Dec.
Click on the "New instance" button to create a new instance. The following window will be displayed:

You may drag and drop recipients to each of the shifts in each of the days.
To copy recipients from one shift to another, drag and drop a recipient while pressing on the shift key.
Each day may contain up to 3 shifts. To disable a shift click on "Shift 1", "Shift 2" or "Shift 3".
Specify the shift's Date range. The shift instance will be valid only when the current date is within the shift's date range.
Note:
Make sure that you don't have two (or more) shift instances with overlapping date interval! U.C.ME will find the first shift instance that matches the current date (when the alarm occurs). Therefore, the users' list per alarm may be unpredictable.

���������� � �� " ���������� � ��To create a new alarm, Click on the "New" button, or click on "New Alarm" menu item. You may also use the "Ctrl+N" combination keys. "�%�������� � ��To copy an existing alarm, select an alarm and then click on the "Copy" button. To create a new alarm based on the copied alarm, click on the "Paste" button. You may also use the "Copy alarm" and "Paste alarm" menu items or click on the "Ctrl+C" and "Ctrl+V" keys respectively. ������������ � ��To delete alarms, select the alarms you wish to delete and click on the "Delete selected alarms" menu item. You may also use the "Del" key. ���������� ����%������ � ��To define several alarms which have similar properties, select the alarms you wish to define, and use the mouse right button to click on the "Define selected alarms…" menu item. Please note that some properties are not available when defining multiple alarms. For example: alarm condition, voice file and more. These properties are available only when defining single alarm. You should switch between the different tabs to ensure that you are satisfied with the multiple alarm properties.
����
����

The first step in the alarm definition is to define the alarm condition. The following window will be displayed.
)��� ������ � �% �%� �����
���� Alarm text - Type the alarm text. ���� Alarm ID - This property is automatically set by U.C.ME. It is used to have unique alarm identification. ���� Group (Telephony only) - Each alarm may be associated with a group. For example, all fire alarms may be associated with the “Fire” group. When the alarm is generated, U.C.ME adds a record to the daily alarms log file. The file name format is: YYMMDD.WVL, where YY(00 to 99) is for the year, MM(01-12) is for the month, and DD(01-31) is for the day of the month. Each record in this alarms log file also contains the group number. This may be later used, when the user calls U.C.ME (Incoming call) and asks for an alarm voice report for all alarms belonging to a specific group. ���� Use Alarm Family template - In case the alarm is included in a family template, you may select the appropriate template. In this case, few of the alarm's parameters will be taken from the template. These parameters will be disabled in this window. The only properties that you can change in this case are: the Voice file names and the alarm's actions.
In addition, the text "Alarm Template" (in Red) will be displayed in the Red color to indicate the family correlation.

��� � �$���������
���� Server Name – Select an OPC or DDE server.
���� Tag Name – type the tag name, or click on the Browse button in case you are connecting to an OPC server. If you are connecting to a DDE server, you shall have to write the tag name.
When clicking on the Browse button, the following window will be opened: Double-click on one item. Its name will be automatically inserted to tag name field. ���� Condition – select a condition from the list. For example "<=", ">=", "=" etc… ���� Value – type the alarm condition's value. ���� Retries count – type the number of retries that U.C.ME should use in case it fails to send the alarm. ���� High severity alarm – always notify - To enforce alarm notification, use this property. If set, the alarm will be delivered no matter what are the user's time and day settings. ���� Notify when alarm ends - Set if you want that U.C.ME will dial when the alarm ends. ���� Alarm disabled between - You can disable U.C.ME from dialing to the phone list in a specific time interval. To disable the alarm set the time interval in which the alarm is disabled.

���� Category Please specify the alarm's category. For example: "Reactor", "Conveyor", etc... These categories will be displayed together with the alarms and will help you perform alarm filtering. To add, delete or choose a category, click on the "Category…" button. The following window will be displayed: ���� Sub-Category 1 Each Category may have sub categories. To add, delete or choose a sub-category, click on the "Sub Category 1…" button. ���� Sub-Category 2 Each Sub-Category 1 may have sub categories. To add, delete or choose a sub-category, click on the "Sub Category 2…" button. ���� Save alarm to history - Set to instruct U.C.ME to save the alarm to history. ����
���� Alarm disabled - Set to disable the alarm ���� Timeout – In some cases you may want to delay alarm generation. When the alarm timeout exceeded and the alarm is still active, U.C.ME will generate the alarm. If the alarm is ended before its timeout expired, U.C.ME will not generate the alarm. The alarm timeout is set in seconds. ���� Alarm Inhibit Tag – alarms may be inhibited according to the value of the Inhibit Tag. When the value of this tag is non zero, the alarm will be inhibited. This functionality enables users to inhibit alarms in on-line without changing the alarm definitions.

0��$��������
If you are using telephony or multimedia, you need to select the voice file that will be played when the alarm is triggered. ���� Play alarm to local loudspeakers – set to play the alarm's voice file to the local loudspeakers when the alarm is triggered. You may select up to three voice file per alarm. U.C.ME will concatenate the voice files into one message. For example, in the alarm displayed in the above window the following voices will be played: "Main building fire alarm 3rd floor."
��$�%������
����
Select the recipients and groups that need to be notified. You may drag and drop a recipient or a group into the recipients list. When a group is added, it will appear with a '$' sign prefix. For example: "Security". When a recipient is included in the recipients list while he was deleted from the phone book, the "Undefined Recipients" list will turn yellow. Once this recipient is deleted or re-defined in the phone book, the color will become white again. See below. U.C.ME will notify to recipients in this list in the same order which they are displayed. You may change the recipients order by using the Move Up and Move Down buttons:

�������� ��� ��&��� U.C.ME may send SMS messages in one of the following methods:
1. Send the SMS to all recipients included in the recipients list. 2. Stop sending the SMS after successful delivery to one of the recipients (successful delivery means
that U.C.ME received confirmation from the modem/server that the message was successfully sent). 3. Send the alarm to one recipient, wait XX minutes for acknowledge. If acknowledge was not received,
send the alarm to the next recipient etc… If acknowledge was received, stop the SMS notification.

����%&���� ���� Acknowledge – set to enable alarm acknowledge over the phone. ���� Record_voice_reply Used for recording voice replies. Use this option if you want that the phone call receiver will record his replay after he hears the alarm message. The recording is stored on the hard-disk and can be later heard by authorized personnel. The recorded file name will be in the following format "Family - User-Name Date - Time wav". The recorded files will be stored in the ".\Voice Files - Replies" folder. ���� Tag action (one of the following)
Set_interactive_tag_value - For interactive tag value assignment Set_interactive_tag_value(time) - For interactive time-tag value assignment Play_message_and_tag_value - For playing the voice message and the tag’s value Set_fixed_tag_value - For pre-defined tag value assignment.
For each tag action you should set the appropriate parameters. For example, for the “Set_fixed_tag_value” action, you should set the tag name and value. ���� Ask for password This is an optional parameter that instructs U.C.ME whether to ask for the password from the phone receiver. If this field is not set, U.C.ME will play the alarm voice file immediately after the call has been answered.

���� Ask for # to verify “end of call” This is an optional parameter that enables U.C.ME to verify if the call has ended with no problems. If this parameter is set, U.C.ME will ask for the “#” key at the end of the call. If the person who receives the call will click on the “#” key, U.C.ME will “understand” that the call has ended successfully. If not, U.C.ME will re-dial and transfer the voice message again. ���� Send to - Set the “All” or “One”. If “All” is defined, U.C.ME will dial to all of the phone users in the list. If “One” is defined, U.C.ME will stop dialing after one phone user from the list answered the call and confirmed its reception. ���$����8� �$� ���������%����������$��������There are three voice file that you may define:
1. Alarm voice file. 2. "More Info." voice file. 3. "Tag action" voice file.
To select a pre-recorded voice file, click on the voice file button. The following window with the list of all voice files will be displayed. Double click on the desired voice file, or select a voice file and click on the “OK” button. The "Play WAV" and "Record WAV…" buttons will be displayed only if the voice file format is defined as WAV. U.C.ME launches the Windows™ Sound Recorder program. By using a microphone connected to your sound card, you can easily record new voice files. You may record new voice files or re-record existing files.

To play a WAV voice file, select the file and click on the "Play WAV" button. (�-� When sending alarms to Fax recipients, you may attach additional text file to the fax. In addition, you may attach alarm statistics. Click on the Browse button to select the attached text file.
Note: Make sure not to change the file "empty.wav". This file is used as a template for every recording.
Note: If a voice file does not exist, its name on the button will be marked with a special strikeout font. For example: FIRE001.wav.

��� � ���%�&���
The alarm snapshot is optional. In case you don't need the alarm snapshot functionality, you may ignore this tab. At the moment of the alarm, U.C.ME may capture up to 20 tag values that are related to the alarm. For each tag in the snapshot you need to define the following properties: ���� Description – the tag's description. For example: "Temperature set-point value". ���� Tag name – the tag's name. ���� Units – The units may be any string when the Tag-type is "Analog". For example: "Celsius". When the Tag-type is "Digital" or "Bit", the Units field should be in the following format: "Text1*Text2" where "Text1" is the text that will be displayed when the tag value is 0 and "Text2" is the text that will be displayed when the tag value is 1. ���� Tag-type – may be "Analog", "Digital" or "Bit_NN" (where NN is the bit number between 0 to 31). ���� Check Tag-Range – when set, U.C.ME will check the tag value against its required range. Each tag that is out of its desired range will be marked as a possible alarm cause. The "Min. Value" and the "Max. Value" properties purpose is to check if the tag value is within the desired range. Use these properties to set the tag's desired range. ���� Min. type – May be "Numeric" or "Tag". If "Tag" is chosen, the tag's "Min Value" will be taken from that tag. If "Numeric" is chosen, you shall have to specify the numeric value.

���� Max. type – May be "Numeric" or "Tag". If "Tag" is chosen, the tag's "Max Value" will be taken from that tag. If "Numeric" is chosen, you shall have to specify the numeric value. ���� Attach image to web snapshot – to attach an image that will be displayed together with the alarm snapshot using the web, set this parameter and choose a file name (JPEG or GIF). ���� Attach image to cellular snapshot - to attach an image that will be displayed together with the alarm snapshot using a cellular phone, set this parameter and choose a file name (GIF, MP4 or 3GP). ���� Attach alarm snapshot to email – set to attach the alarm snapshot to email recipients.
(���������� � ��To find an alarm, click on Find. You may search for alarm text or alarm family name. Once an alarm was found, you may click on Find next to find the next alarm that matches the searched text. You may also use the Alarm Filter field to search all alarms that meets the filter.
�
�
�
�For example:��*text1* - look for alarm text that contains the word "text1" text2 – look for alarms text that starts with the text "text2" To clear the alarm filter, select and delete the text inside the alarm filter box. �
����2������������2�������� � ��To disable or to enable an alarm, double-click on it and set the field "Alarm disabled" accordingly. You can use the "Alarm disabled" column in the alarms window to check if the alarm is disabled or enabled.

��� � ������������
Use the Tools � Validate alarms menu to validate your alarms. This feature may save time trying to find errors in your definitions. The following dialog box will be displayed: The list-box will contain the list of voice files that you have defined in your alarms, but do not exist on your hard-disk. The Alarm ID field will guide you the appropriate alarm that you need to fix. In the lower part of the window you will see the following information:
� Total number of alarms This information may help you to verify that alarms are well defined.
(� $������� � ��
You may force alarm by selecting an alarm and then clicking on Ctrl+F. You may also use the mouse right button and then click in the Force Start Alarm menu item.
You may force an alarm to:
1. Simulate the alarm (without having to change the alarm's tag value) to see how the notification process works.
2. Create a predefined alarm scenario that is generated manually. In this case you may use dummy alarm condition that will never be met. For example: in emergency situations where the source is not a tag value, but an event that is created manually by the plant personnel.
U.C.ME Runtime module must be running to force alarms.

��� � ��-%� �������� %� ����1� �� ��-$���
U.C.ME supports export and import functionality to/from Excel CSV format. In the Design Alarms window, click on "Tools� Export alarms…". Set a file name and click on the "OK" button. A CSV file will be created. See below sample file. ��������������������������������������������������������������������Open the file using MS Excel.���� CSV File format Line 1: $VERSION – U.C.ME version number. Line 2: $DESCRIPTION – a description line that described each column Line 3: $ALARM – the 1st line of the alarm
Column 2 – Alarm text. Column 3 – Automatically set. Ignore this field. Column 4 – Server logical name. Column 5 – Tag name. Column 6 – Alarm condition. Use <,>,=,<=, >=, Bit_NN (where NN is between 0 to 31) Column 7 – Alarm value/ Must be numeric. Use 0 or 1 for digital tags or for Bit_NN condition. Column 8 – Alarm family name. [Optional] Column 9 – Alarm shift name. [Optional] Column 10 – Alarm voice file name 1. Should not be an empty string. Column 11 – Alarm voice file name 2. (Optional – may be empty) Column 12 – Alarm voice file name 3. (Optional – may be empty) Column 13 – Save to history. Use 0 for "No" and 1 for "Yes". Column 14 – Alarm disabled. Use 0 for "No" and 1 for "Yes". Column 15 – Dial To. Used for Telephony. Use "One" or "All". Column 16 – Disable alarm "from time" HH (use 0 to 23) – hours. Column 17 – Disable alarm "from time" MM (use 0 to 59) – minutes.

Column 18 – Disable alarm "to time" HH (use 0 to 23) – hours. Column 19 – Disable alarm "to time" MM (use 0 to 59) – minutes. Column 20 – Number of retries. Must be >= 1. Column 21 – Handle end-alarm. Use 0 for "No" and 1 for "Yes". Column 22 – Always notify. Use 0 for "No" and 1 for "Yes". If set to "1", U.C.ME will ignore the recipients time schedule and the alarm will be sent in any case. Column 23 – Alarm acknowledge. Use 0 for "No" and 1 for "Yes". If set to "1", alarm acknowledge is enabled via phone or SMS. Column 24 – Acknowledge file name. Must be "ack". Column 25 – Record voice reply (telephony only). Use 0 for "No" and 1 for "Yes". Column 26 – Record voice reply file name (telephony only). Must be "dummy". Column 27 – Tag action (telephony only). Use 0 for "No" and 1 for "Yes". Column 28 – Tag action voice file name(telephony only). If column Z is 1, a valid file name must be used. Column 29 – Tag action type (telephony only). Use valid tag actions. For example: "Set_fixed_tag_value". Column 30 – Tag action tag name (telephony only). Use valid tag name. Column 31 – Tag action server logical name (telephony only). Use valid OPC or DDE server name. Column 32 – Tag action tag value (telephony only). Use valid tag value. Column 33 – Ask password (telephony only). Use 0 for "No" and 1 for "Yes". Column 34 – End of call verification (telephony only). Use 0 for "No" and 1 for "Yes". Column 35 – Alarm group (telephony only). Should not be empty. Column 36 – Play alarm to loudspeakers. Use 0 for "No" and 1 for "Yes". Column 37 – Shift in use. Use 0 for "No" and 1 for "Yes". Column 38 – Shift name. If column AI is 1, column AJ must contain a valid shift name. Column 39 – attach snapshot to email. Use 0 for "No" and 1 for "Yes". Column 40 – Fax attachment. Use 0 for "No" and 1 for "Yes". Column 41 – Fax attachment file name (*.txt). If column AL is 1, column AM must contain a valid file name. Column 42 – Fax statistics attachment. Use 0 for "No" and 1 for "Yes". Column 43 – Alarm category. Use a valid category name. Column 44 – Alarm Sub category 1. Use a valid sub category name. Column 45 – Alarm Sub category 2. Use a valid sub category name. Column 46 – Snapshot format. Use "DESCRIPTION" or "VALUE". When "DESCRIPTION" is used, U.C.ME will use the snapshot's full description. i.e.: "The temperature is 25 degrees". When "VALUE" is used, U.C.ME will use the snapshots value only. i.e.: "25". Column 47 – Timeout (in seconds). Column 48 – Inhibit tag name. Column 49 – Inhibit OPC or DDE server logical name. Column 50 – SMS delivery method. Use USER_ACK, SERVER_ACK or SEND_ALL. Column 51 – SMS wait time (in minutes). If USER_ACK was defined as the delivery method, specify the number of minutes to wait before sending the SMS to the next recipient.
Line 4: $USER – contains 1st user name. For example: Mike@SMS. [Optional line] Line 5: $USER – contains 2nd user name. [Optional line] … … Line N: $SNAPSHOT – line per tag contained in the snapshot [Optional line]

Column 2 – Tag description Column 3 – Tag name Column 4 – OPC or DDE server logical name Column 5 – Tag units Column 6 – Tag type (Analog, Digital, BIT_NN) Column 7 – Min. value type (Numeric or Tag) Column 8 – Min. value. If column 6 is "Numeric", column 7 must be numeric. If column 6 is "Tag", column 7 must be a valid tag name. Column 9 – Min value - OPC or DDE server logical name Column 10 – Max value type (Numeric or Tag) Column 11 – Max value. If column 8 is "Numeric", column 9 must be numeric. If column 8 is "Tag", column 9 must be a valid tag name. Column 12 – Max value - OPC or DDE server logical name Column 13 – Check tag range. Use "1" to enable U.C.ME to check the tag's value against its required range. Use "0" to disable.
Line N+1: $SNAPSHOT – line per tag contained in the snapshot [Optional line] … … Line P: $WEB_ATTACHMENT – contains web snapshots graphics attachment info. Use "1" in column B if you want to attach a graphic image (*.gif ; *.jpg) to the web alarm snapshot. Type the file name in column C. Use "0" in column B for no snapshot attachment. Line P+1: $CEL_ATTACHMENT – contains cellular snapshot graphics attachment info. Use "1" in column B if you want to attach a graphic image (*.gif ; *.mp4) to the cellular alarm snapshot. Type the file name in column C. Use "0" in column B for no snapshot attachment.
To import the Excel CSV file to U.C.ME, click on "Tools � Import alarms…" menu item. The following message will be displayed. ���� Click on the "Yes" button, to continue the import process. The import process might take some time depending on the file length. A progress bar will be displayed at the bottom of the window to indicate the progress of the import process. ����
Note: When importing alarms, alarm IDs may change. As a result the alarm database file may contain occurrences of the same alarm but with different ID.
Note: you should close Excel before starting the import operation.

�� %� �������� � ��� �� �"���1�����%%��$�������
To import alarms, open the Design Alarms window. Use the Tools menu to import alarms.
����
����
����
����
����
����
Note: Before importing alarms from other applications, you must check the following:
1. MS Excel is installed on your computer. 2. MS Excel is closed before starting the import.

�� %� �������� � ��� �� �"���$�9�
U.C.ME enables users to import alarms defined in CiTect. Use the Tools � Import CiTect alarms menu item (inside the Design alarms window) to import CiTect alarms. The following window will be opened:
U.C.ME support CiTect analog and digital alarm files. The file names that can be selected are:
� anaalm.DBF – for analog alarms
� digalam.DBF – for digital alarms
�� %� �����"���$�9������������ � ��
U.C.ME scans the digalam.DBF file and will use the following columns:
Column 4: VAR_A – will be used for alarm's Tag Name.
Column 6: CATEGORY – will be used for alarm's Category.
Column 10: COMMENT – will be used for the alarm's Text.
Note:
Lines with empty COMMENT or VAR_A fields will be ignored.
�� %� �����"���$�9����������� � ��
U.C.ME scans the anaalm.DBF file and will use the following columns:
Column 3: VAR – will be used for alarm's Tag Name.
Column 4: HIGH – will be used for alarm's HIGH alarm.
Column 5: HIGHHIGH – will be used for alarm's HIGHHIGH alarm.
Column 6: LOW – will be used for alarm's LOW alarm.
Column 7: LOWLOW – will be used for alarm's LOWLOW alarm.
Column 13: CATEGORY – will be used for alarm's Category.
Column 17: COMMENT – will be used for the alarm's Text.
�
�
�
�
Note:
Lines with empty HIGH, HIGHHIGH, LOW and LOWLOW fields will be ignored.

�� %� �������� � ��� �� ������$&9�
U.C.ME enables users to import alarms defined in InTouch. Use the Tools �Import InTouch alarms menu item (inside the Design alarms window) to import InTouch alarms. The following window will be opened:
����
U.C.ME searches for the file DB.CSV. This file may be created using the DBdump utility (usually located in the C:\Program Files\Wonderware\InTouch folder) provided by Wonderware.
U.C.ME supports the following InTouch alarm tag types:
� Memory Discrete
� I/O Discrete
� Memory Integer
� I/O Integer
� Memory Real
� I/O Real

�� %� �������� � ��� �� ���0��� �:79�
U.C.ME enables users to import alarms defined in RS-View. Use the Tools �Import RS-View alarms menu item (inside the Design alarms window) to import your RS-View alarms. The following window will be opened:
Use the Browse buttons to search for the Tag and Alarm CSV files. The following window will appear.
After selecting the tag and alarm files, click on Import.

The RS-View alarms will be displayed in the list. ������������������������������������������������������������������������Select the alarms you intend to export to U.C.ME. Unselect the alarms you do not intend to export to U.C.ME. Click on Save.����

�� %� �������� � ��� �� �"�� %��$���9�
U.C.ME enables users to import alarms defined in Cimplicity. Use the Tools �Import Cimplicity alarms menu item (inside the Design alarms window) to import your Cimplicity alarms. The following window will be opened: ������������������������������������������������������������������������Select the CSV file name. The alarms will be imported to U.C.ME.����
Note: To create the Cimplicity CSV file, use the Cimplicity export utility as follows: Clie export filename.csv

��� � �(�� ������
To ease the process of alarms definition you can define alarm families. In case large number of alarms has similar settings, an alarm family template can be used. To create a new alarm template, type the family template name and click on the "Add Family" button. Double click on one of the items. The following window will be displayed. As you can see, this window is very similar to the alarm definition window. See the "Design Alarms" chapter for explanations on the various options and settings in this window.

��� � �� ��%���� ���
U.C.ME enables the definition of ten alarm groups. Each alarm may be associated with a group name. This name may be later used when you dial-in into U.C.ME and you ask for a voice report for a specific group (for example: all Air-condition alarms or all Electricity alarms). Group 0 is the group which includes all of the other defined groups. Groups 1 to 9 are user defined. Please note that if you intend to dial-in and get alarm history reports, you must record voice files for each group name. (for example: if you define a group named “Air-cond”, you must record a voice file named “Air-cond” (wav or vox). To record an appropriate voice file use the microphone button. To play an existing voice file, use the loudspeaker button.

��� � � �%� ���
U.C.ME enables you to receive alarm reports via fax or email. The report may be for a specific alarm, a family of alarms or all alarms. The report may be a daily, weekly or monthly report. Report Type: ���� Alarm Family – the report is for a family of alarms ���� All alarms – the reports is for all alarms Report Time Interval: ���� Today - all alarms generated today ���� Yesterday - all alarms generated yesterday ���� This_Week - all alarms generated this week (Sunday this week to Saturday) ���� Last_Week - all alarms generated last week (Sunday to Saturday) ���� This_Month - all alarms generated this month (1st of this month until today) ���� Last_Month - all alarms generated last month (1st of last month to the last day of last month) Send on: Set the day of the week and the time you wish the report to be created and sent.
Click on the "Add" button to add a new report.

��$�� ����%&����$��������
Incoming call enables users to perform actions disregard to alarm situations. This feature enables users to dial-in to U.C.ME and to perform actions such as: ���� Change tag values ���� Retrieve active alarms’ list ���� Retrieve historic alarms’ list ���� Acknowledge alarms ���� Listen to tag’s current value ���� And more… One may dial-in to U.C.ME, enter his password, and type an “Action Id”. If the password is correct, U.C.ME will play a voice file describing the chosen action. Following this voice message, the user may press on the “1” key and U.C.ME will continue and execute the action. Following this action, the user will be informed if the operation succeeded or failed. The Incoming phone calls window: Fields ���� ID 3 digits for action ID. ���� Action See the following table for the supported actions.

���� Parameter 1 - parameters required for the action. ���� Parameter 2 - parameters required for the action. ���� Parameter 3 - parameters required for the action. ���� Voice File Status when an action's voice file does not exist, a proper message will be displayed. Voice files naming convention for incoming phone calls For each action you must record a voice file which will describe it. The file name format is: DIALnnn.WAV (or DIALnnn.VOX) where nnn is the action ID.
�$�������%���
���� Set_fixed_tag_value - This action enables the user to assign a value defined in the “Tag Value” field to the tag defined in the “Tag Name” field. ���� Get_alarms_log - This action enables you to get a list of all historic alarms that were handled by U.C.ME. This option is most important for applications without operators. Managers or technicians may call U.C.ME and listen to a voice log of all alarms together with their date and time stamp. The alarms are being played in a reversed mode. (i.e.: the most recent alarm is being played first) For example: “February 8, 11:25 - Main engine is not working.” “February 8, 10:58 - Main lobby - temperature to high” Press 0 to exit. Press 1 to proceed to the previous historic alarm. Press 9 to delete the current alarm. Press * to repeat the current alarm. The caller may delete an alarm by pressing 9, skip to previous alarm without delete by pressing 1, exit by pressing 0, or repeat current alarm by pressing *. If there are no alarms, U.C.ME will play the message: “No alarms”. ���� Get_active_alarms - This action enables you to get a list of all active (un-acknowledged) alarms. After you dial in and choose the appropriate action id, you will get all active alarms together with their respective time and date stamps. Click 1 to proceed to the next active alarm. Click 0 to exit. Click 9 to acknowledge the alarm. Click * to re-play the current alarm. ���� Play_Last_10_alarms - This action enables you to get a voice list of the last ten occurrences of a specific alarm. When you will choose this action, you will be asked to enter the alarm ID. U.C.ME will search for this alarm in the last 60 daily alarms log files and will play the alarms in a reverse historic order, starting from today and backwards. ���� Set_interactive_tag_value - This action enables you to assign a new value to a tag. The new value is entered interactively by pressing on the phone’s digits. This action enables the user to change tag values (for example: set points, timers etc.) by using their phone at home or on the road. After the user enters the tag’s new value, U.C.ME will play the following message: “The chosen value is NNNNN, press 1 to confirm or any other key to continue.” If the user presses the “1” key, U.C.ME will perform the action. If U.C.ME fails to set the new tag value, it will play the message “Operation failed”. Otherwise it will play the voice file “Operation succeeded”.

For float values, you should use the “*” key as the “.” decimal point. For example: the value 35.5 will be typed as: 35*5. ���� Set_interactive_tag_value(time) - this action is very similar to Set_interactive_tag_value, except that the value in this action is time value. The time is value is entered in the Hours + Minutes format. For example: to assign the time value 20:47, you should type “2047”. If the time value is valid, U.C.ME will play the voice message: “The chosen time is HH and MM minutes. Please press 1 to confirm, or any other key to cancel.” If the “1” is pressed, U.C.ME will transform the time entered by the user to the time format defined in the Settings window. The time format may be “Minutes_since_00:00” or “Seconds_since_00:00”. For example the time value 06:31 will be transformed to the value of 391 (for “Minutes_since_00:00” format) and to the value of 23,460 (for “Seconds_since_00:00” format). This transformed value will be send to the tag. ���� Get_tag_value - this action enables to listen to a specific tag value by phone. After you click the action code, the tag name and description is played (as recorded by you in the file DIALxxx, where xxx is the action code). After your confirmation U.C.ME will get the tag value, and will play it to your phone. ���� Run_Program - this action enables the user who dials in to run a specific program. When choosing the Run_Program action the following fields are displayed:
Program to run - the name of the program file you wish to run. You may locate the path of this program by clicking on the Browse button. Parameters - parameters for the program to run. Start in - the path were the program will run. For example: C:\MyFolderName.
���� Action_Program - this action enables the user who dials in to execute up to ten actions without having to enter the action numbers during the incoming call. When choosing the Action_Program action the following fields are displayed: Actions - Ten actions' numbers. Please note that the Action_Program action number can not be included in one of the possible ten action number fields. To clear the action numbers click on the Clear button. ���� Restart_Computer This action enables the user who dials in to restart the computer. This action is identical to the Windows Shutdown process when you choose to restart the computer. ���� Suspend_Dial-out - This action enables the user to dial into U.C.ME and suspend all dial-out operations. ���� Resume_Dial-out - This action enables the user to dial into U.C.ME and resume all dial-out operations.

��$�� ������� ��������
You may use Incoming SMS messages for sending command to your application, or, for information retrieval. U.C.ME waits for incoming SMS messages. Once a message is received, U.C.ME identifies the sender via the Caller-ID that is included in the message. U.C.ME verifies if this phone number is defined in U.C.ME's phonebook. If not, the command is rejected. If the phone number is defined, U.C.ME will check if this user is authorized to perform the specific action. As described in the Phonebook section, each SMS user has its own authorizations for SMS commands. Once the user is found authorized, the command is identified by the received text. If the received SMS text is identical to one of the defined SMS commands, U.C.ME will process the action that is correlated to this text. Here are the modems that support bi-directional SMS communications and incoming SMS messages:
� Wavecom – Fastrack (GSM) � Siemens - MC35/TC35 (GSM)
The Incoming SMS window: ���� Send acknowledge to sender – when set, U.C.ME will send the user an SMS message containing information about the execution status. For example: "Done" or "Command failed!"
���$������
The actions below are similar to the actions used in the previous section - Incoming Phone calls. Please look ate the definitions in the previous section. ���� ChangeTagValue ���� ChangeTagValueInteractive ���� GetTagValue ���� RunProgram ���� RestartComputer ���� SuspendAlarmNotification ���� ResumeAlarmNotification
��� � ��$5���������������$�� ������ Alarms may be acknowledged in one of the following ways:
1. Returning the alarm text back to the cellular modem. (In this case, the alarm ID must be included in the alarm text. See Options �Settings window in the SMS tab).
2. Sending the following text to the cellular modem: ACK NNNNN (where NNNNN is the alarm Id) Acknowledge information is added to the daily log file and may also added to the SQL database (depending on your settings). Acknowledge operation may be used to stop alarm notification via SMS (depending on your alarm definition properties – see SMS delivery options above).
Note: Try to define SMS commands with text length shorter as possible. Maximum SMS length is 70 characters. When verification messages are requested, additional text may be appended to the SMS (sent back to the user): "Done", "Command failed!" etc...

� �� ��&������1�%�������$�������
U.C.ME may send messages in one of the following cases: 1. When U.C.ME starts its execution. 2. When it looses connection with the OPC/DDE server. Set the appropriate field in the window below. In addition translate the appropriate text that will be sent via SMS. If you are telephony, you may record a voice message using the microphone button. In most cases, the SCADA application should run 24x7. It should not stop in any case. When the SCADA software (or the OPC server) is not active (from any reason) - no alarms will be generated. U.C.ME can detect such cases and will automatically dial and play the appropriate message. (The voice file "serveroff.wav" is played in these cases) When you are notified on such a problem, you must restart your SCADA application and U.C.ME. ��$�%������ ���� SMS Delivery method - U.C.ME may send SMS messages in one of the following methods:
1. Send the SMS to all recipients included in the recipients list. 2. Stop sending the SMS after successful delivery to one of the recipients (successful delivery means
that U.C.ME received confirmation from the modem/server that the message was successfully sent). 3. Send the alarm to one recipient, wait XX minutes for acknowledge. If acknowledge was not received,
send the alarm to the next recipient etc… If acknowledge was received, stop the SMS notification. ����%&�������� Dial To - Define the users who need to receive the "Server shutdown" call. Define the "Dial To" to "One" or "All". If "One" is selected, U.C.ME will stop dialing after one from the list have received the voice alarm. If "All" is selected, all the people in the list will receive the voice alarms. This property refers to phone recipients only. All other recipients (SMS, Fax, e-mail) will receive the alarm in any case. ���� Ask for Password – for phone recipients only. When set, a phone recipient will have to enter his password at the beginning of the call.

)��� ��������������������� ���� Number of retries - The number of time U.C.ME should try to send the alarm in case of an error. This parameter is applicable for Phone, Fax and SMS recipients. ���� Play alarm to local loudspeakers – When set, U.C.ME will play the alarm voice file to the local loudspeakers (the file name is serverof.wav). ���� Automatic notification after server shutdown – when set, U.C.ME will generate the server shutdown alarm. ���� Automatic notification after U.C.ME starts – when set, U.C.ME will notify the recipients that it was just started its operation.

%�$���������&��������
U.C.ME enables administrators to plan when and who should receive alarms during special days and holidays. Click on Design�Special days to view the Special-days window: To define a special day, choose a date in the calendar, type its description and select its pattern. A pattern may be one of the following values:
Friday Saturday Special_Day_1 Special_Day_2 Special_Day_3
When U.C.ME's Run-Time module finds that a specific date is a special day, it will operate accordingly. When an alarm occurs, U.C.ME will notify users according to their special day definitions. See the section Phonebook – Time and day settings.

��$� ���������+�������# �0����$��������
U.C.ME provides you an easy tool for recording and playing WAV files. This tool uses the multimedia card installed in your PC and microphone. Select a file and click on the "Play WAV", "Record WAV" or "New WAV" buttons. ���� Prefix filter To show a subset of the voice files, you may check the Prefix filter checkbox and type a string in the text field. U.C.ME will display the files that meet the filter criteria.

���� Show system files U.C.ME installs a set of system voice file. In most cases there is no need to change these files. To rerecord these files, you first need to display them in the list. To display the system file, check the property Show System files. The following files will be display: To rerecord a system file, select it and use the mouse right button. The following menu will be displayed: Use the Change type menu item to change the voice file type from System to Private. Once the file is Private, you may rerecord it. After the file was rerecorded, you may change its type to System again.
Private files are marked with the following icon:
System files are marked with the following icon:

When recording files, U.C.ME launches the Windows™ Sound Recorder program. By using a microphone connected to your sound card, you can easily record new voice files. Click on the "Refresh list" button to view the newly created voice files in the list. Improving WAV files quality Recording with Microsoft Windows® Sound recorder utility, you may change the audio properties to improve WAV file quality. Click on Edit �Audio properties. The following window will be displayed: Click on the Volume button inside the "Sound Recording" frame. The following window will be displayed:
Note: Make sure not to change the file "empty.wav". This file is used as a template for every recording.

Set the volume to the maximum. In addition you may click on the "Advanced" button. The following window will be displayed: Set the "Microphone Boost" to improve the volume of your recorded voice files.

�� ����&� �6������
U.C.ME enables the system administrator to define users with different authorizations. Use the Design� User Authorizations menu to enter the User Authorization window. The following window will be displayed:
Properties:
Full Name – The user's name that will be used for
Department – The user's department name. (For exemple: Administration, Maintenance, Etc.…)
Username – The name the user needs to use when he logs in.
Password - The password the user needs to use when he logs in.
Password expiration – Choose between one of the following:
Never – The user's password never expire.
Every days – The user's password expires after XX days. When the user will try to log in after his password expired, he will not be able to log in. The administrator will have to provide him a new password.
User is disabled – The user will not be able to log in.
Inactivity timeout (in minutes) – when a user is logged in without any activity (keyboard hits, mouse movement) he will be automatically logged out.

Once users were created, each user will have to log in to perform any change in the U.C.ME application or view reports. Once the U.C.ME-Configuration program was launched, all the buttons in the tool bar and all the menu items will be disabled. See below.
To log in, the user will need to click on the login button. The login window will be displayed:

/���������
�
"������ ������������� ����
U.C.ME keeps electronic records of every operator action (change in alarm configuration) electronically signed with explanatory text and securely logged to a proprietary format database.
To view the database click on Log Files � Configuration Audit Trail. The following window will be displayed:
The default date range is the current month. To view another date range select the "From" month and year and the "To" month and year. Click on the Refresh button to view the required date range.
U.C.ME displays all users' activities. To filter one user's activity, select a user using the User Filter field and click on the Refresh button.
To view the report in HTML format, click on the HTML report button.

"������ ������������� ����3����������� �;��-%������ ����-��
The user may add his comments and explanatory text for the events (changes) by double clicking on any event. The following window will be displayed:
Users may add up to five users' texts. To add a text type the text in the User comment field and click on the "Add" button. Each text is added with the time stamp and an electronic signature of the user.
Note: Users' texts can not be deleted!

�� ����/���
U.C.ME's email thread logs its activity to a log file. The file name is: "SendEmail.log". This file can be also viewed with any text editor.
��� � ���%�&���/���
U.C.ME's Alarm-Snapshot thread logs its activity to a log file. The file name is: "AMI.log". This file can be also viewed with any text editor.
+"�/���
U.C.ME logs the OPC servers' activity to log files. Each server activity is logged into a different file. The file naming convention is: "OAInn.log" (where nn is the OPC server index). These files can be also viewed with any text editor. The files are located in the main U.C.ME folder.
����/���
U.C.ME logs the DDE server's activity to a log file. The log file name is ddeal.log.
!"!���/���
U.C.ME logs its activity to daily log files. The file name convention is: "UCMEyyyymmdd.log". To view the files, click on the Log Files U.C.ME Log. The following window will be displayed. Double click on a specific date or a specific file to view the log.
����
����
The files can be also viewed with any text editor.
!"!���� � �/���
U.C.ME logs all the errors to an error log file. The file name is: "UCME errors.txt". This file can viewed with any text editor. In addition, it can be viewed via the Configuration program's menu items (View �U.C.ME errors).
0��� �
����%&������������$��
U.C.ME writes all its dialing and communication activities to history files. To view the statistics, click on View �Telephony statistics or on the appropriate button in the toolbar. The following window will be displayed:
The Statistics window contains the following information: Date – One day date. Alarms – Number of alarms generated at that date. Calls – Number of calls U.C.ME initiated at that date. Confirmed – Number of calls confirmed by the users (SMS or Phone) Not answered – Number of phone calls not answered. The Total shows the totals of each column. You may delete the statistics by clicking on the "Delete Statistics" button. You may create a report for a different date interval. Click on the "From" and "To" date buttons to set a different date range. Then click on the "Create Report" button.
��� � ����%�&����
To view alarm snapshot history, click on the "View �Alarm snapshots" menu item. The internet explorer will be opened displaying the alarm snapshot database. For more details see the "Viewing alarm snapshots using the web" chapter ahead.����

��%�����&������
Tip of the day is automatically displayed when starting the U.C.ME-Configuration program. To disable the Tip of the day window at startup, uncheck the Tip of the Day menu item.
See below sample tip:

������
'�$5�%����<�+�������
U.C.ME makes it easy for you to back and restore the applications files. Click on Tools �Backup to ZIP to create a backup of your application. The following window will be displayed.
Select the file types you wish to backup and click on the Start button. The following message should be displayed:

����� ����� �� �<�+�������
To restore U.C.ME application files, click on the Tools �Restore from ZIP menu. The following window will be displayed:
Select the file types you wish to restore and click on the Restore button. The files will be restored to their original location.
This is a convenient tool for system integrators to move the application from their office PC to the customer's PC.
The files are located in the BACKUP sub-folder of U.C.ME. You should always place your U.C.ME ZIP files in this folder.

��$� ���������%�������0.�����# �0�������������
����%&��� Recording can be also done via the U.C.ME's console utility called WVMULREC (Multiple File Recording). This utility uses the Dialogic board and a telephone line for recording. To use this utility connect the telephone line to the board and click on: Start���� �Programs �Control-See �U.C.ME �Record Voice Files The WVMULREC utility waits for an incoming call from line 1(the default). Use a standard phone and dial to the appropriate number. The WVMULREC will answer the call and will ask you to type the voice file name. After you type the voice file name, press on the <Enter> key. Then, you will hear a beep that instructs you to start the recording. To terminate the recording, click on any of the phone’s keys. The WVMULREC program will ask for a new file name. You may enter a new file name or press <Enter> (with empty file name) to abort the recording (see below). The default voice file format is WAV. If you wish to record VOX files, please modify the properties of this utility and add the word VOX after the channel number. For example: WVMULREC 1 VOX The WVMULREC window
To end the recording, click on any of the phone’s keypad.

" ���������� � ������: ��%� ���% �� �� ��U.C.ME may also receive alarms that are generated by other programs. Such programs can create ASCII files that can be read by U.C.ME. The program should create ASCII files with the name format ASCalarm.* (any extension name is valid). U.C.ME will search for these files in every rounded minute. If a file exist (For example: ASCalarm.000, ASCalarm.002, ASCalarm.003 etc…), U.C.ME will read this file, create the alarm and delete the file. Each file defines one alarm. The program that creates the alarms files should check if such file exists before it tries to create it. If the file exists, this means that U.C.ME didn’t read this alarm file yet. In this case the software should choose another name for the file. The file format is shown below: Line 1: Alarm description (up to 70 characters)
Line 2: N (N may be 1 or 0. 1 stands for "Start Alarm" while 0 stands for "End alarm")
Line 3: "Number_of_calls X" (where X is the number of recipients)
Line 4: Recipient_name_1
Line 5: Recipient_name_2
…
Line X+6: Recipient_name_X
Line X+6: "DialToOneOrAll Value" (where Value may be "One" or "All". Use "one" when you want that U.C.ME will stop dialing after
one person received and acknowledged the alarm. This option is applicable for Phone users only.
Line X+7: "NumberOfRetries N" (where N is the number of call retries U.C.ME will do in case of busy line or no answer)
Line X+8: "AcknowledgeAlarm N" (where N may be 1 or 0. The value 1 will instruct U.C.ME to ask the user to acknowledge the alarm)
Line X+9: "AskForPassword N" (where N may be 1 or 0. The value 1 will instruct U.C.ME to ask the user to enter his password at the
start of the call)
Line X+10: "AlarmVoiceFile Name" (when Name is the voice file name. For example: use "fire" when the voice file name is "fire.wav")
Line X+11: "LoudSpeaker N" (where N may be 1 or 0. The value 1 will instruct U.C.ME to play the alarm voice file to the external
loudspeakers)
Line X+12: "EndOfCallAck N" (where N may be 1 or 0. The value 1 will instruct U.C.ME to ask the user to verify the end of the
phone call by pressing the # key)
Note: 1. Recipient names must be in the following format: Name@Phone , Name@Fax , Name@SMS ,
Name@Email. The recipient's Name must be the same name as displayed in U.C.ME phonebook.
2. Please make sure that the tokens included in the recipient's name -"Fax", "SMS", "Email" and "Phone" must appear exactly as shown above!
3. Recipient name may be a group name. For example: $Group1, $Group2 etc…Group name must have the same name as defined in U.C.ME's groups definition window.
4. U.C.ME will handle external alarms disregard shifts definition. This means that the alarm will be sent to the recipient list according to the standard time and day settings for each user.
Example for alarm file: Pump B71 malfunction 1 Number_of_calls 5 Mike@Phone David@SMS Jim@Email Ben@Fax $Group1 Dial_To All NumberOfRetries 5 AckAlarm 0 AskPassword 1 Alarm_voice_file fire1 LoudSpeaker 1 EndOfCallKey 1
See the sample files in the U.C.ME Samples folder.

�������� ������� U.C.ME enables users to send textual and voice messages to Fax, SMS, E-mail and phone in a very simple and convenient way. To launch the Send Message utility click on: Start ���� �Programs �Control-See �U.C.ME �Send Message The following window will be opened: Drag and drop users and group to the users' notification list. If you wish to send voice messages via voice, record a voice file or select one from the list. In this case, you should also set the following fields:
� Send to: One or All � Ask for password � Acknowledge required � Ask for '# ' to verify End of Call � Play to loudspeakers � SMS delivery method
If you wish to send textual message, enter the message text or select an existing one from the list.

!"!���������� ��� ������
The U.C.ME run-time module is an OPC or DDE client. It is an event driven module. It doesn’t consume CPU time, it doesn’t scan any database and therefore it can maintain a large number of alarms without harming the overall application performance. This module is multi-tasking and multi-threaded software. It was designed to run on the Microsoft® Windows XP/2000 and Windows 2003 Server.
!"!����%� ��������� �����
There are tow operational modes for U.C.ME- � Service mode � Standard application mode.
!"!��� ������������# ��������� ��$��
Depending on the chosen setup type (service or standard), U.C.ME may be installed as a Windows service. The service's Startup Type is set to Automatic. To view or change the service properties you may use the Service Control Manager (Start� Settings� Control Panel� Administrative Tools� Services). The following window will be displayed:

To modify the service properties select the U.C.ME-OPC Run-Time service, click on the mouse's right button and select Properties. The following window will appear.
U.C.ME-OPC Run-Time service's Startup type is set to Automatic. This means that it will automatically start when Windows is starting. You may change this property to Manual if you wish to start the U.C.ME service manually. Using the U.C.ME Service/Application Configuration program, you may select dependency services for U.C.ME. Dependency services are services that need to run before the U.C.ME service is running. Once the dependency services are set, you may see the dependencies in the Dependencies tab. The following window will appear.

�� ������������%%�����&�� !"!����� ��$��Another way to control the U.C.ME service is by using the U.C.ME Service Manager. Click on Start �� Programs �Control-See �UCME-OPC �U.C.ME Service Manager. The following window will appear.
Click on the start button to start the service.
Click on the start button to start the service. When the service is running, the following picture will be displayed: When the service is stopped, the following picture will be displayed:

!"!��;�� ������ �������� � ����
����
���� The U.C.ME Run-Time window may be used for the following options:
� View the last section of the U.C.ME log file � Suspend alarm notification (using the Alarms menu) � Delete all alarms from the alarms queue (using the Alarms menu) � Suspend alarms replay (multimedia) (using the Loudspeakers menu) � Delete all alarms from the multimedia alarms queue (using the Loudspeakers menu) � Viewing the various log files (using the View menu)
����

/���$&���� !"!������&�����&� ��%%��$������� The U.C.ME Run-Time program name is UCME-RT.EXE. You may find it in the U.C.ME BIN folder. You may run this program within any other application. You need to ensure that this program will be running in the right path (Usually: "C:\Program Files\Control-See\UCME-OPC"). To ensure that U.C.ME is running in the right folder, you may pass the folder name as a parameter to U.C.ME Run-Time module (UCME-RT.exe). Example 1: to automatically run U.C.ME-Run-Time from your Citect® application you should run the following Cicode EXEC command. This Cicode function should run at startup. FUNCTION RunUCME Exec("C:\Program Files\Control-See\UCME-OPC\BIN\UCME-RT.exe C:\Program Files\Control-See\UCME-OPC",1); END Example 2: to automatically run U.C.ME-Run-Time from any software that is able to launce a batch file, you may use the following batch file: @echo off cls c: cd\ cd program files\control-see\UCME-OPC\ START "UCME-Run-Time" /MIN .\bin\UCME-RT.EXE Exit

!"!�����������$�������&�������� �� ���
�
�
�
When U.C.ME Run-Time module is running, the�U.C.ME logo �appears in the Tool Tray, located by default at the bottom right of the Windows desktop (see below). Clicking on the U.C.ME status icon will display the U.C.ME Run-Time window on the desktop. This window may be closed (without terminating the Run-Time) by clicking on the close icon (see below). ����
����
����
����Clicking on the mouse's right button when the cursor is over the U.C.ME status icon will display the following menu. Clicking on the About U.C.ME menu, will open the About window. The About window provides license and version information. Clicking on the Alarm History menu, will open Internet Explorer with U.C.ME's Alarm Snapshot login page. Clicking on the Restore menu, will restore the U.C.ME-Run-Time window. Clicking on the Exit menu, will display the following dialog box. Clicking on Yes will terminate the Run-Time process. If U.C.ME is installed as a service, the service will be stopped.
Note: If U.C.ME is installed as a service, the U.C.ME icon status may not be available in the system tray.����

��2���������� � !"!����%%��$����� Clicking on the Trace U.C.ME Log menu, will open the Tail.exe viewer which will enable you to trace the daily log file and analyze your application. Using the Tail.exe viewer you can mark different key-word with different colors. Click on Settings� Keywords and select the desired keywords. See below. Once keywords were defined, all matching lines will be marked in the appropriate color. See below. The Tail.exe program will always show the last part of the log file.

0���������� � ����%�&�����������&����2 The U.C.ME Setup program creates a virtual directory called UCME-OPC. This virtual directory may be accessed using any Internet browser. Open any internet browser and type the following URL address: http://localhost/UCME-OPC . The following page will be displayed:
Using this page you may choose to:
1. View the RSS feed. This feed may be used by any RSS reader software to display the alarms from any computer in the Internet or Intranet. When clicking on this link, the following window will be displayed:
When the feed (see above) is displayed, copy the URL field (for example: http://localhost/UCME-
OPC/LastAlarms.XML). Later on, you may use this feed in your RSS reader software.

2. View the alarm snapshot history. The alarms and events are stored in a database file called "AllAlarms.MDB" (MS Access file). The alarms in this file can be viewed using this link. Click on the "View alarm snapshot history" link and the following page will be opened.
Enter your Username and Password and click on the Submit button. The default username is "admin" and the default password is "admin". This default user has administrator rights. You may later change this default user password to prevent users with lower access rights from using this username. A user with administrator rights may create, delete or modify users that can view the database content.
The following window will be displayed:

Click on the "Alarm and Event" link. The following window will be displayed:
You may show all alarms or a sub-set. Use the "Search for" fields to select a sub-set. Click on the "Show All" button to display all alarms in the database. Click on the alarm's description to see its snapshot. The following window will be displayed:
3. Download an RSS reader. Click on this link to download RSS reader software. You may use RSS reader software to view alarms in real-time (depending on the update rate of the RSS reader). 4. Download Opera Internet explorer. Opera is recommended due its built-in RSS functionality. Once you define your email account in Opera, a new menu named "Feeds" will be displayed in Opera. To create a new feed in Opera, click on "Feeds �Manage Feeds…". Then click on the "New" button. See below how alarms are displayed in Opera.

0���������� � �����%� ���������������
Below you can see how alarms are displayed in Opera. You can sort alarms, filter alarms and mark alarms with different labels. For example: "Important" or "To-do".����
In addition, you may forward alarms via email. Click on a specific alarm, use the mouse right click and then click on "Forward".����
Double-click on any alarm to view the alarm snapshot link. Click on the link (see below) to view the alarm snapshot.
The link to the alarm snapshot
����
����
Alarm list in Opera����
����
����
����
����
����
����
����
����
����

Alarm snapshot window in Opera����

��$&����� ����� !"!���
U.C.ME's Queues U.C.ME maintains several queues:
� Phone/Fax queue � SMS queue � Loudspeaker queue
Each queue can hold up to 200 items. When an alarm is generated, U.C.ME adds items to the appropriate queues. Different threads in U.C.ME are handling the different queues. Each thread deletes an item forma queue and trying to complete the task – delivering an SMS, playing a voice message etc… If a task terminates unsuccessfully, the item will be returned to the queue. This process will continue until the “Number of retries” defined in the U.C.ME configuration program will be reached. Phone calls - picking up the phone Once the call is answered, U.C.ME waits for non-silence detection. This ensures that the phone’s handset is near the person’s ear. Therefore, you must say “Hello” (in any language) to here the welcome message. Phone calls - Playing the welcome message The “welcome message” is played only when U.C.ME waits for a password. If the “Wait for password” field is not set, U.C.ME will not play the “welcome message” and will play the alarm voice file immediately. While the “welcome message” is being played, the person who receives the call can start enter his password. The password may be combined from 1 to 6 digits. It is recommended that the password will be combined from at least 3 digits. After the password has entered, you may click on the “#” key to inform U.C.ME that your password was fully entered. When U.C.ME gets the “#” key is plays the alarm voice message immediately with no delays. U.C.ME gets the password and checks if it is a correct one. If not, you will here the “Bad password” message, and you may try one more time. If the password is incorrect again, U.C.ME will terminate the call, and try again. Phone calls - playing the alarm voice message After a correct password you will hear the alarm message. If you missed part of the message and you want to replay it, click on the “*” key at any time, and the message will be replayed. Sending e-mail To send e-mail, U.C.ME requires that the Advanced Direct Remailer program will be running in the background. Make sure that this program is running and automatically loaded at startup. In addition, you have to ensure that your PC is connected to the internet. Sending fax To send fax, U.C.ME requires that the Dialogic board installed in your PC will support fax.

� ��2���&�������
The following sections address some of the most common problems encountered while using this U.C.ME. Please check the following list of Problems and Solutions before contacting Control-See support.
+ �2��� : U.C.ME run-time service fails to load.
�������=��1. Check that the U.C.ME service startup type is set to Automatic. Use the Windows
Start� Settings� Administrative Tools� Services menu to view the service properties. 2. Make sure the OPC server can run as a service. If not, U.C.ME can't run in service mode.
+ �2��� : Plug is missing Dialog box is displayed. U.C.ME is running in demo mode.
�������=��1. Make sure that the U.C.ME plug is connected to the USB port. 2. Check that Aladdin's Hasp driver is installed. Open a command window and type "HINSTALL
/info". See below the window containing the driver information. The HINSTALL.EXE program is located in the BIN directory of U.C.ME. Type "HINSTALL /i" to install the driver.
3. Check that the maximum number of alarms allowed by the U.C.ME license is not exceeded. In this case you will have to upgrade your U.C.ME license.
4. Check that a standby plug is used. When a standby plug is used, you must define the application as "Master-Standby" (see Configuration – Settings window).
+ �2��� : U.C.ME configuration fails to start. The following message is displayed: "Note: The Dialogic drivers are not installed!"
�������=��Make sure that the Dialogic drivers are installed. Use the Intel/Dialogic drivers CD to install.
+ �2��� : The following error message is displayed: "[Error] Can not open dialogic device!".
�������=��Make sure that the Dialogic service is defined as startup type -"Automatic".

+ �2��� : Unable to move to folder - 'folder_name'!
�������=��The application_folder_name may be passed to U.C.ME Run-Time module as a parameter. For example, "UCME-RT C:\Program Files\Control-See\UCME-OPC". Make sure that this is a valid path.
+ �2��� : The following error is displayed: "[Error] Hi-Phone Init Device failed! Please check that the device is properly connected to your PC."
�������=��1. If you are using the Hi-Phone telephony USB device, make sure that the Hi-Phone drivers are
properly installed. 2. Make sure that the Hi-Phone device is connected to your computer.
+ �2��� : The following error message is displayed: "OPC client DLL failed to start (x)!"
�������=��1. Make sure that the OPC server defined in U.C.ME is running properly. 2. Try increasing the "Initialization timeout" defined in the settings window.
+ �2��� : The following error message is displayed: "Errors detected during OPC client startup(x)!"
�������=��Make sure that the OPC tag names defined in U.C.ME are valid. You may look at the file OAI.log for further details.
+ �2��� : The following error message is displayed: "[Error] DDE client DLL failed to start!"
�������=��1. Make sure that the DDE server name defined in U.C.ME is correct. 2. Make sure that the DDE server software is loaded before U.C.ME.
+ �2��� : The following error message is displayed: "Error! GSM modem is not responding(1) Modem initialization stopped"
�������=��1. Make sure that the modem's power is ON. 2. Make sure that the modem is connected to the same port defined in the SMS protocol window. 3. Make sure that the SIM card is installed in the modem. 4. Open the Hyper Terminal program and try send the AT command to the modem. Use the
following parameters to connect to the modem: "9600,N,8,1". 5. If you fail to communicate with the modem check your communication cable. 6. If the communication cable is OK, try to check if the modem is defined as auto-baud rate. Try
connecting the modem at different baud rates until you get a response to your AT commands. 7. To remove the "auto baud rate" use the following AT command: AT+IPR=9600;&W . After you
type this command, close the Hyper Terminal program and run it again, this time with the baud rate of 9600.

�&���������$�0��$���� %���+ �� �� � The Dialogic Voice Sample Program can be used to Open a voice channel, play and record voice files. To operate this program click on the “Start�” key, then click on “Programs”, “Dialogic Development Package” and “Voice Sample Program”. The following window will be displayed. Click on File� Open to open a voice channel. The following window will be displayed. Select the channel you want to use. Use dxxxB1C1 for Channel 1, dxxxB1C2 for channel 2 etc. Click on OK. The following window should be opened.

Click on “Function �Dial”. The following window will be displayed. Enter the phone number you wish to call. Click OK. The following window should be displayed. Now you can play or record any file. Click on “Function �Play vox” or “Function �Record vox” to play and record voice files. Record your voice after the beep sound. To end recording, click on any of the phone’s keys. Following a successful recording, the following window will be displayed.

����� ����$��������
The U.C.ME software package uses several reserved voice files for internal use. You can record these system voice file with your voice, but try to keep the message context as is. U.C.ME searches for these files and won't run if they are not found. File name Voice contents ACTION "Please enter action code." ACTNOFND "Action code does not exist!" ALREND "Alarm ended:" ALRSTART "Alarm started:" ACK "Acknowledge alarm" AND The word “AND”. Use for: “The time is 10 AND 15minutes.” ARERESUME "Dialing activity is resumed." ASUSPEND "Dialing activity is suspended." AT The word “At”. Used for: “Fire alarm! at February 2, 12:35." BADPASS "Wrong password, please try again." CANCEL ”The operation has been canceled." CURVALIS ”The current tag value is..." DEFACT “To perform…" DELALRTS ”To delete alarms log file press ‘9’. Other key to end.” DIALnnn "Dial in voice files, where nnn is the defined action code” ENDOFCAL "To verify END-OF- CALL please type on #" FAILED "The operation failed." FOR “For…" GETALRNO "Please enter alarm ID number." GETKEY "Press 1 to confirm or 0 to exit." GETTIME "Please type the desired time. (0000 to 2359)." GETVALUE "Please type the desired tag value. To end, press "#"." GOODREC "Your voice message has been recorded." ILLEGAL "Illegal" MINUTES The word ”Minutes”. Used for: “The time is 10 and 25 minutes” MINUS ”Minus" MISSFILE ”Missing voice file" MOREINFO ”Playing alarm additional information" NOALERTS ”No alarms found." OUTRANGE "The chosen value is out of the tag’s limits.” POINT "The word "point". Used for: "The value is 1 point 5." SHUTDOWN This is a sound file is played at the end of the call. SUCCESS “The operation succeeded." THEVALIS "The chosen value is..." VERIFY “You have choose to perform the following action." WELCOME "Hello, this is a U.C.ME message, please enter your password to get the rest of the message." WVRECORD "Please record your voice after the beep. To end recording type on any key on the phone's keypad." 0 – 59 60 voice files which represents the values 0 to 59. These files are used for date and time stamps.
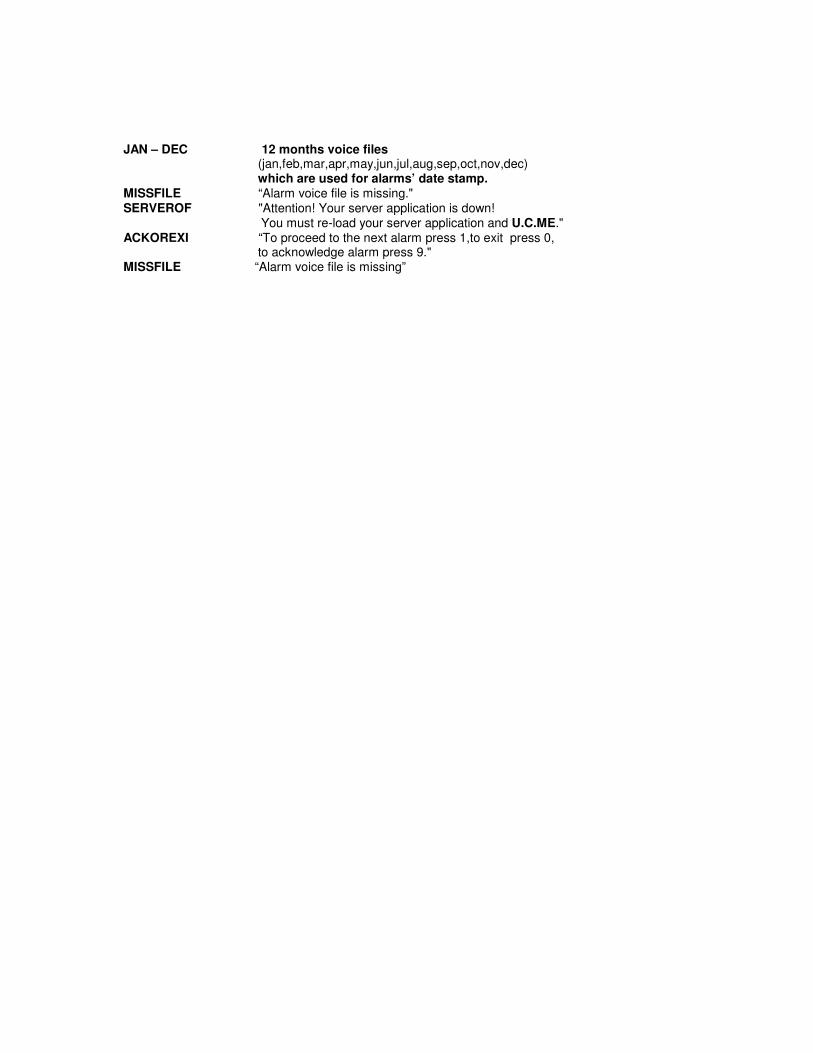
JAN – DEC 12 months voice files (jan,feb,mar,apr,may,jun,jul,aug,sep,oct,nov,dec) which are used for alarms’ date stamp. MISSFILE “Alarm voice file is missing." SERVEROF "Attention! Your server application is down!
You must re-load your server application and U.C.ME." ACKOREXI “To proceed to the next alarm press 1,to exit press 0, to acknowledge alarm press 9." MISSFILE “Alarm voice file is missing”

4��$5���� ��������� ��&��%&���� �$�%������ This chapter intends to guide you (the phone call receiver) how to react when U.C.ME places a call to you. Usually when you pick up the phone’s handset, you start with the “hello” or “This is George speaking” greetings. U.C.ME waits for these greetings and will play the “Welcome” message after the analyzing the voice from the other side of the line. When you here the “Welcome” message you can immediately enter your password. You don’t have to wait until the “Welcome” message is ended. Enter your password, and when you are done, click on the � key. This key indicates that you have finished entering your password. By entering the � key, you will get the next voice message with no delay. If you won’t enter the �, you may wait few more seconds until the next message will be played.
While the alarm voice message is being played, you may click on the � (asterisk) key to instruct U.C.ME to replay the voice message. This key should be used if the voice message was corrupted. After the receiving the voice message you may click on any key to inform U.C.ME that you got the message. In this case U.C.ME will play the next message with no delays. After receiving the alarm message, you may be requested to click on the � key to acknowledge that you have received the call with no problems. If you were asked to click on this key and you didn’t, U.C.ME will re-dial to this phone number again.
Note: The “Welcome” message is optional and may be omitted. This is set by the engineer who designs the U.C.ME application.

�&��;��� ���� %� ����� ��$�;��������� U.C.ME may be upgraded remotely via the RUS utility. To operate the RUS utility click on: Start �Programs �Control-See �U.C.ME �RUS The following window will be displayed:
Click on the "Get ID" button, to retrieve the plug ID. Send this number to Control-See together with your upgrade order. Control-See will provide you the license code. Copy this license code and paste it into the code area. Once you have the license key file (*.LIC) click on "File �Load License File…" menu item. Select the license key file. The license key will be displayed in the "Code" window. Click on the "Perform Update" button. The plug should now be upgraded.
Click on the "Get plug Info." button to view the plug information. The following window will be displayed.

+� $&�������&���������$1������2�� �� You may purchase the Dialogic board from your local Dialogic sales office (See below).
Dialogic Internet web site For latest updated files and drivers from Dialogic please log on to http://www.intel.com/network/csp/trans/dialogic.htm Or http://www.intel.com/
+� $&�������&�����+&��������%&��������$�� You may purchase the Hi-Phone telephony device via Way2Call's web site: http://www.store.communitech.com/web/way2call/default.asp