
DT830/DT430/DT410 USER'S GUIDE - Warner Telecom Group
263
DT830/DT430/DT410 USER’S GUIDE 2016 JANUARY NWD-172904-001 ISSUE 3.0
-
Upload
khangminh22 -
Category
Documents
-
view
4 -
download
0
Transcript of DT830/DT430/DT410 USER'S GUIDE - Warner Telecom Group

DT830/DT430/DT410USER’S GUIDE
2016 JANUARY
NWD-172904-001ISSUE 3.0

LIABILITY DISCLAIMER
NEC Corporation reserves the right to change the specifications, functions,or features, at any time, without notice. NEC Corporation has prepared this document for use by its employees andcustomers. The information contained herein is the property of NEC Cor-poration and shall not be reproduced without prior written approval fromNEC Corporation. All brand names and product names on this documentare trademarks or registered trademarks of their respective companies.
Copyright 2014 - 2016
NEC Corporation

WARNING
For Customers in AustraliaTelephone receivers produce magnetic fields that can attract small metallic objects such as pins or staples. Toavoid injury, do not place the handset where such objects can be picked up.

The Terms and Conditions of Software
Customers shall use the software embedded in DT830 pursuant to the terms andconditions of software license agreement of the UNIVERGE SV9500 communi-cation server (SLA). The software contains certain third party open source soft-ware components which are provided under the terms and conditions designatedat http://www.bcom.nec.co.jp/soft-license/DT800_OSS.html.The terms and conditions of SLA are not applied to such third party open sourcesoftware components.

1
2
3
4
i
. INTRODUCTIONFACE LAYOUT ................................................................................... 1KEYS AND PARTS............................................................................. 6MENU KEY ......................................................................................... 9SIMPLE OPERATION BY MENU KEY AND CURSOR KEY.............. 11SHORTCUT MENU ............................................................................ 12DISPLAY............................................................................................. 13PROGRAMMABLE FEATURE KEYS................................................. 15FUNCTION KEY ACTIVITIES............................................................. 16CONDITIONS FOR DT830 SERIES................................................... 16SOFT KEYS........................................................................................ 178LD DISPLAY ..................................................................................... 21
.INSTALLATION PROCEDUREADJUSTING ANGLE OF TILT LEG.................................................... 25CONNECTING LAN CABLE ............................................................... 26CONNECTING LINE CORD ............................................................... 27CONNECTING AC ADAPTER............................................................ 28INSTALLING DIRECTORY CARD...................................................... 29INSTALLING/REMOVING LINE KEY CARD .................................... 29WALL MOUNTING ............................................................................ 30
.TERMINAL SETUPSETUP WITH UP/DOWN KEY ........................................................... 33SETUP WITH FEATURE KEY............................................................ 34SETUP WITH MENU KEY FOR DT830 SERIES ............................... 38SETUP WITH MENU KEY FOR DT430 SERIES ............................... 87
.BASIC OPERATIONTO LOGIN .......................................................................................... 92TO LOGOUT ...................................................................................... 93
TABLE OF CONTENTS

5
ii
DISPLAY ENLARGED CHARACTERS ............................................. 93TO MAKE AN EXTERNAL CALL........................................................ 94TO MAKE AN INTERNAL CALL ......................................................... 96TO ANSWER AN EXTERNAL CALL .................................................. 97TO ANSWER AN INTERNAL CALL ................................................... 99MULTILINE OPERATION ................................................................... 100TO HOLD A CALL ............................................................................. 100TO PLACE A CALL ON EXCLUSIVE HOLD .................................... 101TO TRANSFER A CALL ..................................................................... 101HOW TO INPUT CHARACTERS ....................................................... 102SECURITY MODE ............................................................................. 115EMERGENCY CALL .......................................................................... 117XML APPLICATION ........................................................................... 118SCREEN POP-UP ............................................................................. 120
.FEATURE OPERATION TO ORIGINATE A CALL USING SELECTIVE DIALING(DYNAMIC DIAL PAD, PRESET DIAL) .............................................. 122TO ORIGINATE A CALL USING SPEED CALLING(ONE-TOUCH SPEED CALLING KEYS)............................................ 123TO REGISTER NAME ON ONE-TOUCH SPEED CALLING KEY ..... 124TO ORIGINATE A CALL USING SPEED CALLING - STATION/GROUP .............................................. 126TO ORIGINATE A CALL USING SPEED CALLING - SYSTEM......... 126ONE-TOUCH SPEED CALLING SETTING USING SPD SET KEY ..................................................... 127TO EDIT THE REGISTERED DATA ................................................. 129ACCOUNT CODE ............................................................................. 132FORCED ACCOUNT CODE............................................................... 132AUTHORIZATION CODE ................................................................... 132

iii
VOICE CALL ..................................................................................... 133TO ANSWER A VOICE CALL Hands-Free ....................................... 134AUTOMATIC INTERCOM................................................................... 134MANUAL INTERCOM......................................................................... 135DIAL INTERCOM .............................................................................. 136CONFERENCE ................................................................................. 137TO SWITCH A CALL WITH TRANSFER KEY .................................. 137TO ANSWER A CAMPED-ON CALL.................................................. 138CALL WAITING - ORIGINATING........................................................ 138CALL PARK ...................................................................................... 140CALL PICK-UP (GROUP)................................................................... 141CALL PICK-UP (DIRECT)................................................................... 142OUTGOING TRUNK QUEUING ......................................................... 142OFF-HOOK TRUNK QUEUING.......................................................... 142EXECUTIVE OVERRIDE.................................................................... 143REDIAL ............................................................................................... 144LAST NUMBER REDIAL .................................................................... 145CALL FORWARDING - ALL CALLS ................................................... 146CALL FORWARDING - BUSY LINE ................................................... 147CALL FORWARDING - DON’T ANSWER .......................................... 149LOGGED OUT IP STATION - CALL DESTINATION ......................... 150CALL BACK ...................................................................................... 152TO SAVE AND REPEAT A NUMBER ................................................ 152TO LEAVE A MESSAGE .................................................................... 153TO ANSWER A MESSAGE ................................................................ 154VOICE MAIL SYSTEM........................................................................ 155MEET-ME PAGING ............................................................................ 155PAGING TRANSFER.......................................................................... 156BOSS/SECRETARY TRANSFER....................................................... 157

6
7
iv
BOSS/SECRETARY - MW LAMP CONTROL .................................. 158BOSS SECRETARY OVERRIDE ....................................................... 159DO NOT DISTURB ........................................................................... 160CALL REDIRECT .............................................................................. 161PRIVACY .......................................................................................... 162PRIVACY RELEASE........................................................................... 163PHONEBOOK ................................................................................... 164CALL HISTORY ................................................................................ 174
.DIRECTORY OPERATIONTO ADD NEW DATA ......................................................................... 178TO CHANGE GROUP NAME ............................................................ 186TO FIND REGISTERED DATA........................................................... 188TO MAKE A CALL FROM DIRECTORY............................................. 202TO ADD PREFIX TO NUMBER ......................................................... 203TO EDIT DIRECTORY DATA ............................................................ 206TO DELETE ALL DATA ..................................................................... 207TO DELETE SPECIFIC DATA ........................................................... 208
.CALL HISTORY OPERATION FOR DT830 SERIES .......................................................................... . 210TO VIEW CALL HISTORY ................................................................. 210TO MAKE A CALL FROM CALL HISTORY ....................................... 211TO ADD CALL HISTORY DATA TO DIRECTORY ............................ 212TO EDIT DIRECTORY DATA FROM CALL HISTORY ...................... 214TO DELETE ALL DATA ..................................................................... 217TO DELETE SPECIFIC DATA ........................................................... 218
FOR DT430 SERIES .......................................................................... . 219TO VIEW CALL HISTORY ................................................................. 219TO MAKE A CALL FROM CALL HISTORY ....................................... 222
8
M
W
A
A
v
TO DELETE ALL DATA ..................................................................... 223TO DELETE SPECIFIC DATA ........................................................... 224
.SPECIFICATIONSTECHNICAL SPECIFICATIONS......................................................... 225
ENU LISTMENU LIST FOR DT830 SERIES ...................................................... 227MENU LIST FOR DT430 SERIES ...................................................... 238
EB PROGRAMMINGOUTLINE ............................................................................................ 239TO LOGIN........................................................................................... 240TO LOGOUT....................................................................................... 242HOW TO OPERATE ........................................................................... 244
PPENDIX A OPTION DEVICESSMART DEVICE INTEGRATION ....................................................... 245TERMINAL MODE .............................................................................. 248OTHER FEATURES ........................................................................... 251
PPENDIX B HEADSET OPERATIONATTACHING THE HEADSET ............................................................. 252TERMINAL OPERATION USING THE HEADSET ............................. 253ADJUSTING HEADSET RINGER TONE VOLUME ........................... 254HOW TO USE THE WIRELESS HEADSET ....................................... 254

1.
1FAC
nu
ure
1
. INTRODUCTION
E LAYOUT
ITZ-8LD-3 (DT830 Series) DTZ-8LD-3 (DT430 Series)
Scroll
Exit Help
Menu
HOLD Transfer Speaker
Recall Feature
Answer Mic
Redial
Scroll
Exit Help
Me
HOLD Transfer Speaker
Recall Feat
Answer Mic
Redial

1.
e
lp
2
ITZ-8LDG-3 (DT830 Series) ITZ-24D-3 (DT830 Series)
Scroll
Exit Help
Menu
HOLD Transfer Speaker
Recall Feature
Answer Mic
Redial
Menu
HOLD Transfer Speaker
Recall Featur
Answer Mic
Exit He
Redial

1.
e
lp
3
DTZ-24D-3 (DT430 Series) ITZ-12D-3 (DT830 Series)
Menu
HOLD Transfer Speaker
Recall Feature
Answer Mic
Exit Help
Redial
Menu
HOLD Transfer Speaker
Recall Featur
Answer Mic
Exit He
Redial

1.
lp
e
e
4
DTZ-12D-3 (DT430 Series) DTZ-6DE-3 (DT410 Series)
Menu
HOLD Transfer Speaker
Recall Feature
Answer Mic
Exit Help
Redial
HOLD Transfer Speaker
Exit He
Recall Featur
Redial Conf
Directory
Mic
Messag
Answer

1.
5
DTZ-2E-3 (DT410 Series)
HOLD Transfer Speaker
Recall Feature
Redial Conf
Directory
Mic
Message
Answer

1.
KE
• K
Here24D-
(1) CLfAL
rminal Key
the
is played pro-
up on
Line ny
“One-e keys, e num-
ur
ed this and u can
6
YS AND PARTS
EYS AND PARTS ON ITZ-24D-3
explains keys and parts of DT Series taking ITZ-3 as an example.
all Indicator Lampamp at the top corner of the terminal Display lashes when a call terminates to the terminal. lso, when Voice Mail service is available, the amp lights to indicate there has been a message.
(2) LCDLCD (Liquid Crystal Display) provides the teactivity information plus date, time and SoftOperation.
(3) ExitTo exit Menu or Help mode and go back to time display.
(4) Soft KeysAny feature shown at the bottom of the LCDavailable. The appropriate feature key is dison the screen according to the call handlingcess.
(5) HelpExplanations of the Soft Keys can be calledthe LCD by pressing this key.
(6) Programmable KeysThese keys can be programmed as Flexiblekey/Programmable Feature Key by TelephoServer administrator. When Telephony Server administrator sets Touch Speed Dial key” on the programmablyou can assign any numbers (ex. Telephonber, etc.) to the key (up to 32 digits).
* For the assignment of the keys, contact yoTelephony Server administrator.
** When two telephone numbers are assignkey which has a two-page memory (Page 0Page 1) of “One-Touch Speed Dial key”, yoswitch the page with the PAGE key.
(15) (14) (13)
(2)
(3)
(5)
(4)
(6)
(10)
(11)
(1)
Menu
HOLD Transfer Speaker
Recall Feature
Answer Mic
Exit Help
Redial
(7)
(8)
(9)
(12)

1.
(7) RPt
(8) FUft
(9) AWa
(10)Pk
(11)Ta
(12)BvAo
ver vol-
idle
conver-
rminal
roup)ss the s that r is dialing.
ds to
ds to
OWN key)
IGHT key)
WN) key
7
ecallress this key to finish the call and hear the dial
one.
eaturesed to activate any features as terminal setup
unctions (see FUNCTION KEY ACTIVITIES), and o program One-Touch Speed Dial Keys.
nswerhen LED on this key is lit, press this key to
nswer a waiting call.
Micress this key to respond hands-free. LED on this ey lights during speaker phone operation.
Menuo access the local menus of DT830 Series, such s Call History, Directory or Terminal Setting.
Cursory using this key, the terminal user can access to arious features with a simple operation.lso, this key is used as a cursor-movement key n the Menu screen.
Details on Cursor key
(a) UP/DOWNUsed to adjust LCD contrast, speaker/receiume, and ringer volume.
• LCD Contrast:Press the UP/DOWN key while an state.
• Speaker/Receiver Volume:Press the UP/DOWN key during a sation.
• Ringer Volume:Press the UP/DOWN key while a teis ringing.
(b) Redial(Last Number Call, Speed Calling-Station/GPress the key to activate redial feature. PreRedial key and scroll back through numberhave been dialed. When the desired numbedisplayed, press the or # key to activate
Up Move the highlighted area one line up the screen.
Down Move the highlighted area one line down the screen.
Left Go back to the previous screen.
Right Go to the screen which corresponthe highlighted menu item.
Enter Go to the screen which corresponthe highlighted menu item.
Enter Key
(4-way Scroll D
(4-way Scroll RDirectory key
(4-way Scroll UP key)
(4-way Scroll LEFT key)Redial key
Volume (UP) key
Volume (DO
(a)
(b)
(a)
(c)
(d)

1.
(PdO
(DfpFi
(13)ChL
(14)At
(15)Po
E-3)oup)ss the s that
ss the
-3)ED on
DE-3)stem
DE-3)em.
-6DE-
er/
state.
versa-
inal is
Not
Not
a, Latintions]: #ng, Tai-
8
c) Directoryressing this key opens Directory menu. For etails on Directory service, see 6.DIRECTORY PERATION.
d) EnterT830 Series/DT430 Series have a shortcut menu
or frequently-used features. Use this key to dis-lay the shortcut menu (see PROGRAMMABLE EATURE KEYS) and determine the selected item
n the menu.
Speakerontrols the built-in speaker which can be used forands-free dialing/monitoring.ED on the key lights when the key is active.
Transferllows the station user to transfer established calls
o another station, without attendant assistance.
Holdress this key to place an internal or external call n hold.
• THE OTHER KEYS AND PARTS
Redial (only for DTZ-2E-3 and DTZ-6D (Last Number Call, Speed Calling-Station/Gr
Press the key to activate redial feature. PreRedial key and scroll back through numberhave been dialed. When the desired number is displayed, pre
or # key to activate dialing.
Conf (only for DTZ-2E-3 and DTZ-6DEPress this key to establish a conversation. Lthe key lights when the key is active.
Directory (only for DTZ-2E-3 and DTZ-6Press this key to activate speed calling - syfeature.
Message (only for DTZ-2E-3 and DTZ-6Press this key to access the voice mail syst
UP/DOWN (only for DTZ-2E-3 and DTZ3)Used to adjust the LCD contrast, the speakreceiver volumes, and a ringer volume.
• LCD Contrast:Press the UP/DOWN key while an idle
• Speaker/Receiver Volume:Press the UP/DOWN key during a contion.
• Ringer Volume:Press the UP/DOWN key while a termringing.
e: A-law Countries [Europe, Australia, Russia, LatinAmerica, Middle Near East, other Asian nations]: #µ-law Countries [North America, Hong Kong, Tai-wan]:
e: DT830/DT430 support for a full duplex hands-freemode. DT410 is a half duplex hands-free mode.
Note: A-law Countries [Europe, Australia, RussiAmerica, Middle Near East, other Asian naµ-law Countries [North America, Hong Kowan]:

1.
MEFromfeatu
To D
STE
cation
There History hand, red in emory. history emory
7.1FOR apter 7 n).ures. g three
tures.ry: Con- set. For CTORY
trolled details, in chap-
ory: ternal
tails, ystem
9
NU KEY key, you can use various applicationres such as Directory and Call History.
isplay Menu List
P 1: Press key while indicating the currenttime on LCD. The Menu List is displayed inLCD. Use Cursor Key to select the desiredMenu Item. You can also select the MenuItem directly using digit keys.
Main Menu for DT830 Series without XML application
Main Menu for DT830 Series with XML appli
Menu
Menu
History
Directory
Setting
Phone
Menu Item Digit key to select Description
History
To view Call History. are two types of Call features. On the one the history data is stothe server (system) mOn the other hand, thedata is stored in the mof the telephone (see DT830 SERIES in chCall History Operatio
Directory
To use Directory featThere are the followintypes of directory fea
• Personal Directotrolled by telephonedetails, see 6.DIREOPERATION.• Phonebook: Conby the system. For see PHONEBOOK ter 5.• Corporate DirectControlled by the exXML server. For deplease contact the sadministrator.
History
Directory
Setting
Portal
Service
1
2

1.
M
cation 3isplayedplicationdow.ation en en).en URL is
home , Home yed.nu and us
reen ofapplica- homeer XML
10
Service
To access external XML server. For details, please contact the system administrator.
Note: This icon appears only when XML service is used.
Setting
To control settings for ringing volume, LCD display, and Music on Hold.For details, see SETUP WITH MENU KEY FOR DT830 SERIES.
Phone To switch from Main Menu to the Portal screen or Phone screen (time indication screen).
• When Home URL is reg-istered, Portal icon ap-pears.• When Home URL is not registered, Phone icon ap-pears.
For details, please contact the system administrator.
Portal
XML-1
To display XML application 1 screen. History or Directory screen being used is treated as an application. This icon is displayed when an XML application starts with a new window.
XML-2
To display XML application 2screen. This icon is displayedwhen an XML applicationstarts with a new window.
enu Item Digit key to select Description
3
4
5
6
7
XML-3
To display XML appliscreen. This icon is dwhen an XML apstarts with a new win
Phone Soft Key 1To switch from applicscreen to phone scre(Time Indication scre
Home Soft Key 2
XML application screregistered in the homedisplayed. When the URL is not registeredURL icon is not displa
Return Soft Key 4To close the main mego back to the previoscreen.
Note: A Portal screen is the home (entrance) scthe phone. When you use multiple XML tions, the URL that is registered as theURL is the Portal screen: this is where othapplications can be accessed.
Menu Item Digit key to select Description
8

1.
KEY
ser canettings
how to
Me
C
D
S
Not
Not
1
2
3
key
K
KK
11
Main Menu for DT430 Series SIMPLE OPERATION BY MENU AND CURSOR KEYBy using key and key, the terminal uaccess Call History, Directory and terminal swith simple operation.
As an example, the following operations showaccess the Directory menu.
nu Item Description
all HistoryTo view Call History. For details, see 7.2FOR DT430 SERIES in chapter 7Call History Operation.
irectory To use Phonebook function. For details, see PHONEBOOK in Chapter 5.
ettingTo control settings for ringing volume, LCD display. For details, see SETUP WITH MENU KEY FOR DT430 SERIES.
e: DTZ-6DE-3/DTZ-2E-3 does not have Menu key.
e: Unavailable Menu items are grayed out.
12
[Menu]
3OKBack
SettingsDirectoryCall History Menu
GHI
9WXYZ
#
Menu
Speaker
Answer Mic
Redial
Press Menu key
Press Directory
2 Directory1 Hisotry[Menu]
2 System1 Personal[Directory]
3 Tool
Back O
Up Down Back OBack O

1.
SHAs shSeriefeatu
(E
Shor
showsom the
menu
pressoft key.
d.
Not
Not
M
V
B
GH
9WXYZ
#
Speaker
R
1
2
3
e Mail.
12
ORTCUT MENUown in the figure below, DT830 Series and DT430s have a Shortcut Menu for frequently-usedres. You can access to Shortcut Menu by pressingnter) key.
tcut Menu includes the following features.
Shortcut Menu for DT830 Series
Shortcut Menu for DT430 Series
As an example of DT830 Series, the followinghow to view the log data of missed a call frShortcut menu.
STEP 1: Press (Enter) key. The Shortcutscreen is displayed on LCD.
STEP 2: Select Missed Calls and then(Enter), (Right-cursor) or the OK s
STEP 3: The log data of the last call is displaye
e: DT410 Series do not support the Shortcut Menu.
e: Unavailable Menu items are grayed out.
Feature Description
issed Calls Access history of Missed Calls.
oice Mail Access history of incoming Voice Mail.
luetooth Option Access the current status of the Bluetooth connection.
I
Menu
Answer Mic
edial
Press Enter Key
[Shortcut Menu]
2 Voice Mail3 Bluetooth Option
Back OK
1/21 Missed Calls: 2
Feature Description
Missed Calls Access to history of Missed Call.
Voice Mail Access to history of incoming Voic
1
2
1
12
[Shortcut Menu]
3 Bluetooth OptionVoice Mail
OKBack
Missed Calls
1
[Missed]
OptionBack
11/MAY/2015 (MON) 10:00Ken Kobus
7205

1.
STE
display events
Not
Not
Not
Not
e is a hecked
n of u have
icon will
rdless ection d to
.
his icon s only.
erminal icon is nly.
13
P 4: Press (Enter) key while displaying the logdata for the target telephone number on LCD.
DISPLAYThe LCD of DT830 Series and DT430 Series Desktop Icons which provide notification when(such as missed a call and a voice mail) occur.
e: If two or more records exist, use or the UP/DOWN soft key to display the next/formerrecords.
e: For unanswered incoming calls, will be dis-played on the left of the name.
e: If you make/answer a call to/from the telephonenumber which is registered to Personal Directory,the corresponding name will be displayed as callhistory data.
e: While the log data is displayed, you cannot makea call by dialing a telephone number.
Feature Icon Description
Missed CallThis icon appears when thermissed call. Once you have cthe missed call, this icon willdisappear.
Voice MailThis icon provides notificatioreceived Voice Mail. Once yochecked the Voice Mail, this disappear.
BluetoothThis icon appears when a cohandset or Bluetooth ConnAdapter (BCA-Z) is connecteDT830 Series/DT430 Series
EncryptionThis icon appears when the conversation is encrypted. Tis displayed for DT830 Serie
Power SaveThis icon appears when the tis in power save mode. Thisdisplayed for DT830 Series o
4:26 PM MON 11 MAY 2015
Icon Display
NoDist >>>Mic
VM Ken Kobus [31300 ]
My Line Information(Name and Station Number)
ECO

1.
Curs
Not
Not
Not
Fe
14
or This icon indicates the currently available direction of the Cursor key.
e: The LCD can display the My Line information(name and station number) when the station is inan idle state. For details, please contact the sys-tem administrator.
e: The Bluetoothword mark and logos are regis-tered trademarks owned by Bluetooth SIG,Inc. and any use of such marks by NEC Corpora-tion is under license.
e: Power save mode can be set at installation. Fordetails, please contact the system administrator.
ature Icon Description

1.
PRThesby pusingusersyste
LEDProgEmitthe a
AICMPres
DICMPres
NoDPres
CF-APresAll C
CF-BPresward
CF-NPresward
MICMPres
MSGPrestion i
tion on
cation
ed
d sta-
e-
its dis-
ller ID is pro-rator) LINE
15
OGRAMMABLE FEATURE KEYSe are examples of the terminal features availableressing the programmable keys. Some features feature access code may be programmed by the
. Others must be programmed by the telephonem administrator.
rammable Feature keys have a built-in Lightting Diode (LED) that lights or flashes according toctivity of the Feature key.
:s the key to activate “Automatic Intercom”.
:s the key to activate “Dial Intercom”.
ist (Do Not Disturb):s the key to activate or cancel “Privacy” feature.
ll:s the key to activate or cancel “Call Forwarding – alls” feature.
usy:s the key to activate, verify, or cancel “Call For-ing – Busy Line” feature.
oAns:s the key to activate, verify, or cancel “Call For-ing – Don’t Answer” feature.
:s the key to activate “Manual Intercom”.
(Message):s the key to leave a message indication at a sta-n no answer or busy condition.
MSG Wait:Press the key to leave a message waiting indicaboss’ station from secretary’s station.
no MSGwt:Press the key to cancel a message waiting indion boss’s station from secretary’s station.
Priv.Rel:Press the key to release “Privacy” feature.
Save&Rep (Save and Repeat):Press the key to store a number or redial a stornumber.
Signal:Press the key to cause chime at a predeterminetion.
SPD Name:Press the key to register name for the key to OnTouch Speed Calling key.
Reverse:Press the key to reverse the black and white in play: background, characters and icons.
MULTILINE APPEARANCE:You can see the caller information (such as a caor a name) using the programmable key (whichgrammed for a multiline by the system administduring an incoming call. For details, see MULTIOPERATION in chapter 4.

1.
FUNFeatFeatFeatFeatFeatFeatFeatFeat
Feat
Seature
ies.
tor.ual Set-toring.
tor.ual Set-s”/“Re-
tor.ual Set- of On-
olumetor.ual Set-s”/“Re-g.
n
16
CTION KEY ACTIVITIESure + 0 = Side Tone On/Off (for handset)ure + 1 = Turns microphone on or off.ure + 2 = Adjusts handset receiver volume.ure + 3 = Selects ringer tone.ure + 4 = Adjusts transmission/receiving volume.ure + 5 = Activates hands-free operation.ure + 6 = Deactivates hands-free operation.ure + 7 = Turns call indicator lamp on or off for
incoming call notification (If turned off,this lamp will still light to indicatemessage waiting.)
ure + 8 = Selects between Normal, Dynamic DialPad, and Preset Dial.
CONDITIONS FOR DT830 SERIEPlease note that following terminal settings (by FKey + Digit Key) cannot be used for DT830 Ser
• Feature+0 =Side Tone On/Off (for handset)For the settings, contact the administra* You can confirm the settings in “Audio&Vistings” “Side Tone Volume” of Online Moni
• Feature+2 =Adjusts handset receiver volumeFor the settings, contact the administra* You can confirm the settings in “Audio&Vistings” “Audio Settings” “Receive Biaceive Gain” of Online Monitoring.
• Feature+3 =Selects ringer toneFor the settings, contact the administra* You can confirm the settings in “Audio&Vistings” “Audio Settings” “Ring Settings”line Monitoring.
• Feature+4 =Adjusts transmission/receiving vFor the settings, contact the administra* You can confirm the settings in “Audio&Vistings” “Audio Settings” “Receive Biaceive Gain”/“Send Gain” of Online Monitorin
• Feature+5 =Activates hands-free operationNot Available
• Feature+6 =Deactivates hands-free operatioNot Available

1.
SOThe that adefacan bsoft namfunctspecdepeNext
DefaDiffefor iterm
Defapartidisplstatu
Not
Not
17
FT KEYSSoft Keys provide a set of functions on the LCDdapt to the changing state of the telephone. While
ult soft key settings are provided, desired functionse assigned to individual stations as required. The
keys, at the bottom of the LCD, can display thees of available functions, names of user-assignedions and names of functions assigned by aific soft key pattern. Displayed soft keys can vary,nding on the state of the phone and/or when the/Previous key is pressed.
ult Displays for Each Statusrent patterns of soft key settings can be registeredndividual call status and assigned to individualinals as required.
ult soft key settings are provided corresponding tocular functions. Different soft key settings areayed at the bottom of the LCD depending on thes, as follows:
e: For DT830 Series, eight digits characters are dis-played on the LCD. For other terminals, the softkey indication characters are displayed as sixdigits without a frame. For the details, contact thesystem administrator.
e: The soft key function is available for the terminalswith LCD.
7:354051
>>>Mic AM MON 11 MAY 2015
Exit Help
NoDist
4:26 PM MON 11 MAY 2015Mic >>>NoDist
DIAL TONE/DIALING
IDLE
4:26 PM MON 11 MAY 2015Mic >>>PickUp
(1)
Push >>>
4:26 PM MON 11 MAY 2015CF-NoAns >>>CF-Busy
CF-All
(2)
4:26 PM MON 11 MAY 2015Mic >>> Voice
RINGING

1.
SoftWhenamblinkfeatuspec
The main
diately
n to be or idle
ropriateUT IP
y been
ering ainto the
cominge busyanswer
a CALL as the
er and
Not
BU
CO
(
(
CO
18
Key Featuresn the soft key corresponding to a desired featuree is operated, the selected feature name starts to on the LCD. The blinking display of availableres takes precedence over the display of featuresified by the soft key pattern.
following shows the default display patterns of features.
CF-Busy/FDB (Call Forwarding - Busy Line)Permits a call to a busy station to be immeforwarded to a predesignated station.
CF-All/FDA (Call Forwarding - All Calls)Permits all calls designated for a particular statiorouted to another station regardless of the busystatus of the called station.
CFLogout/FDL (Logged Out IP Station - CallDestination)Enables a system to transfer the call to appstation when the terminal whose LOGGED OSTATION - CALL DESTINATION has alreadregistered is in logout status.
Exe-Over/E-OVR (Executive Override)Enables selected station users, upon encountbusy condition at an internal station, to bridge busy connection.
CallWait/CW (Call Waiting)Enables a busy station to receive a second incall. A camp-on indication tone is sent to thstation, and you can use a switchhook flash to the second call.
CallBack/CB (Call Back)Provides the ability for a calling station to set BACK. The calling station will be rung as soonbusy station becomes available.
Save&Rep/S&R (Save and Repeat)Allows a station to save a specific dialed numbthen redial that number later.
e: The soft keys can be programmed in SystemData to blink, remain steady, have no indication,or display a character when either in use or idle.
4:26 PM MON 11 MAY 2015TRANSFER 2000
Mic >>>Conf.
SY
NSULTATION HOLD
4:26 PM MON 11 MAY 2015BUSY 2000
Mic >>>CallBack1)
Push >>>
4:26 PM MON 11 MAY 2015BUSY 2000
Save&Rep >>>
CallWait
2)
4:26 PM MON 11 MAY 20152000
Mic >>>NoDist
NNECTION

1.
MSGAllowlamp
CallHPermretur
no MAllowor la
PickPermothe
ConEnabconfealrea
VoicEnabspeacan c
SysSAllownumthan
CASAllowoutsi
BusyAllow
wardedoes not
only.
Speedgroup.
ey andaged in
ion line
for useinates
umbers.
ing the
19
Wait/MWSET (Message Waiting - Set)s a station to set a Message Waiting indication or.
old/HOLD (Call Hold)its a station user to hold a call in progress and to
n to the previously held call.
SGwt/MWOFF (Message Waiting - Cancel)s a station to cancel a Message Waiting indication
mp.
UP/PICK (Call Pickup - Group)its a station user to answer any calls directed to
r lines in the user's preset Call Pickup Group.
f./CONF (Three-way Calling)les a station user to establish a three-wayrence by connecting an additional party to andy existing conversation.
e/VOICE (Voice Call)les you to make a call to the called party's built-inker. If the called party's Mic is on, the called partyonverse on hands-free.
peed/S-SPD (Speed Calling - System)s a station user to call certain frequently dialed
bers using fewer digits (abbreviated call codes) would normally be required.
SHF/CAS (CAS-Switch Hook Flash)s you to send a switchhook flash while on an
de trunk.
Out/UCDBO (UCD Busy Out)s a station user to block UCD calls and to cancel
Busy Out.Flash/FLASH (Flash)Provides the station with a switchhook flash.
CF-NoAns/FDN (Call Forward - No Answer)Permits a call to an unanswered station to be forto a predesignated station if the called station danswer within a predetermined period of time.
MC-Trace/C-RPT (ISDN Malicious Call Trace)Allows you to initiate a Call Trace on ISDN calls
GrpSpeed/G-SPD (Speed Calling - Group)Allows a station user to share a set of commonCalling numbers with other station users in the Priv.Rel/P-RLS (Privacy Release)Allows another station user to press a busy line kenter the conversation of a station already engcommunication.
NoDist/DND (Do Not Disturb)Allows a station user to deny access to the statfor incoming calls.
Mic/MIC (Microphone On/Off)Allows you to turn the microphone on and off with the speakerphone. LED on the Mic key illumwhen the Microphone is on.
Page/PAGE (Button Page)Allows you to toggle between pages when two nare registered on One-Touch Speed Calling key
Headset/HSET (Headset)Allows you to go off-hook and on-hook when usheadset.
1.
ReleAllowhead
SignPermpredfrominter
CallKAllowall in
SeriaAllowextenannoto dia
IZPaAllowof th
IDChAllowalter
G-PiEnhaAllowexpa
CH CAllowconn
n.
er is inovering
ringing.
display:
) Speed
20
ase/RLS (Release Key)s you to release the current call when using theset, without waiting for the party to hang up.
al/SIG (Manual Signaling)its station users to send a one-second ring to a
etermined station. If the signaled station is ringing another call, the manual intercom signal willrupt that ringing.
eep/CKEEP (Eight-Party Conference Retrain)s all outside parties to stay on a conference when
ternal parties hang up.
l/SCALL (Serial Call)s you to set Serial Call for the caller beforeding the call, allowing the caller to receive anuncement at the end of the call guiding the callerl the next number and subsequent numbers.
ging/IZP (Internal Zone Paging)s a user to make a voice call through the speakers
e designated group.
ange/IDCHG (Call ID Change Display)s you to toggle between standard display and an
nate display.
ckUp/GPICK (Call Pickup - Group ncement)s you to answer any ringing station within yournded call pickup group.
onf./CHCNF (Call Hold - Conference)s a station user to establish a conferenceection by adding a third party, who is held on
another line, to the existing two-party connectio
Visitor/VISIT (Survivable Remote MGC)Allows a station to indicate a status: when a usremote office, VISIT will be blinking. After recthe main office, VISIT will return to light.
RingMute/RMUTE (Ringer Mute)Allows a station user to mute or recover station
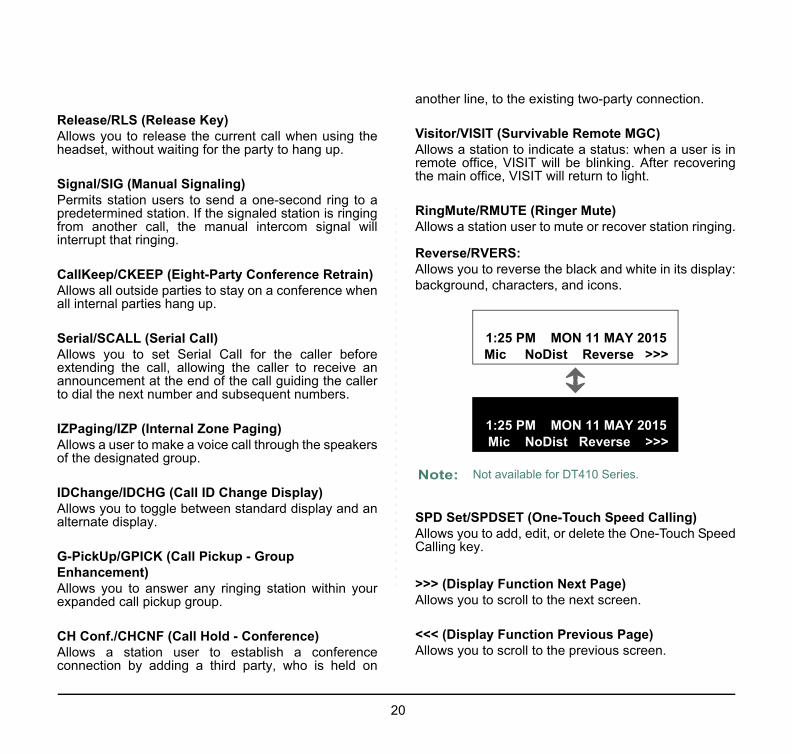
Reverse/RVERS:Allows you to reverse the black and white in its background, characters, and icons.
SPD Set/SPDSET (One-Touch Speed CallingAllows you to add, edit, or delete the One-TouchCalling key.
>>> (Display Function Next Page)Allows you to scroll to the next screen.
<<< (Display Function Previous Page)Allows you to scroll to the previous screen.
Note: Not available for DT410 Series.
Mic NoDist Reverse >>> 1:25 PM MON 11 MAY 2015
Mic NoDist Reverse >>> 1:25 PM MON 11 MAY 2015

1.
8LD88
DTamomt
WTybUCO
*T
s, etc.)
21
DISPLAYLD Display is available for DTZ-8LD-3, ITZ-LD-3, and ITZ-8LDG-3.
TZ-8LD-3/ITZ-8LD-3/ITZ-8LDG-3hese terminals provide 32 (8 keys x 4 pages dditional programmable keys) keys. Also, infor-ation set to each programmable key is displayed n DESI-less screen. For setting of the program-able key, contact Telephony Server administra-
or.
hen Telephony Server administrator sets “One-ouch Speed Dial key” on the programmable keys, ou can assign any numbers (ex. Telephone num-er, etc.) to the key (see TO ORIGINATE A CALL SING SPEED CALLING (ONE-TOUCH SPEED ALLING KEYS) and TO REGISTER NAME ON NE-TOUCH SPEED CALLING KEY).
For the assignment of the keys, confirm with the elephony Server administrator.
1 2ABC
3DEF
4GHI
5JKL
6MNO
7PQRS
8TUV
9WXYZ
0 #
Menu
HOLD Transfer Speaker
Recall Feature
Answer Mic
Scroll
Exit Help
Redial
Scroll
1
2
3
4
BENRACHEL JULIA
PaulJAMES
HANNAH
FDA
FDN
(a) (b) (C) (b) (a)
7:25 AM WED 13 MAY 2015
Mic NoDist >>>
Time Indication Screen
DESI-less Screen
(Indicates current time information, call information, and Soft Key
DTZ-8LD-3/ITZ-8LD-3/ITZ-8LDG-3

1.
(Stf
fol-
mma- cur-
by
• Idle• Ca(IndiCall • Ca(Whecatio• Ca(OthCall • Re(CallHold
• Re
• DuUse)• Ca• Co• DuUse)• Acfeatu
ximum ts to be played
digits
digits
digitsote1
e maxi-s 6 dig-strator.
icates ge.
ge with
22
a) Icontatus information on the Line key such as Call
ermination, Call Hold or Busy can be indicated as ollowing Icons.
(b) Programmable Key InformationProgrammable Key Information displays thelowings.
(c) Page IconDESI-less screen has four pages (8 prograble keys per page). Page Icon key indicatesrently displayed page. You can switch the programmable key display from page 1 to 4using Scroll key.
User Status Icon Flashing Pattern
No Icon -ll Holdvidual Hold/Individual Hold on Park Group)ll Forwarding-All Callsn “Call Forward Line Lamp Indi-
n” feature is set)
Blink ll Holder Party Hold/Other Party Hold on Park Group)call (Individual Hold/Exclusive Hold/Call Transfer/Individual on Call Park Group)
ceiving an Incoming Call
ring Conversation (Individual
ll Transfernference
Steady Litring Conversation (Other Party
tive Feature (Under a setting of re key like a “Call Forwarding”)
Key DescriptionMa
digidis
Line Key - Name and Number informa-tion 8
One-Touch Speed Dial Key
- Speed Dial Name Informa-tion- Number Information
8
Feature Key - Feature Name 11N
Note1: Depending on the configuration setting, thmum number of digits may be displayed aits. For details, contact the system admini
Programmable Key 1-8
Black background indcurrently displayed pa
Programmable Key 9-16
Programmable Key 17-24
Flashing indicates paevent happening.
Programmable Key 25-32
1
2
3
4

1.
Exam
ram-
to the by
hen mable
d.
Not
Not
KeyKey
KeyKey
Key Key
Key Key
23
ple: Page Turning by Scroll Key
(d) Programmable Key IndicationThe following shows LCD indication of Progmable keys.
- OR -
Appropriate icons are displayed according feature. These displays cannot be changeduser.
The following shows each LCD indication wOne-Touch Speed Dial key is set to Programkey.
When a Station line/Trunk line is assigne
- OR -
e: The icon flashes during events such as call termi-nation to a line key or call back.
e: For example, when an incoming call is terminatedto a line key on Page 3 while Page 1 is being dis-played on the screen, the screen is not automati-cally switched from Page 1 to page 3. You mustdisplay Page 3 manually and then answer theincoming call.
Scroll
Scroll
BENRACHEL LINDA
PAUL012345
HANNAH
FDA
FDN
No. 1 No. 2
No. 3 No. 4
Key No. 5Key No. 6Key No. 7Key No. 8
MICHAELPETER
JULIA
JAMES
POWELL
Switch Page
No. 17No. 18
No. 19No. 20
Key No. 21Key No. 22Key No. 23Key No. 24
Press Feature Key 22 on Page 3 to answer incoming call.
Page 1
Page 3IncomingCall
Press twice.
Flashing
1
2
3
4
12
3
4
12345678
PETER
12345678
PETER

1.
No
24
No icons are displayed.* You can register name on each One-Touch Speed Dial key. For the procedures, see TO REG-ISTER NAME ON ONE-TOUCH SPEED CALLING KEY.
When any features using feature access code are assigned.
Black square icons are displayed.* You can register name on each One-Touch Speed Dial key. For the procedures, see TO REG-ISTER NAME ON ONE-TOUCH SPEED CALLING KEY.
(e)Scroll Key
DTZ-8LD-3, ITZ-8LD-3, ITZ-8LDG-3
This key is used to turn over the page of DESI-lessscreen.te: The following key operations are not available
while DESI-less screen is displayed.- Soft Key- Help Key- Exit Key
- Right-cursor key and Left-cursor key
CF-AllCalls■

2AD
The
•
STE
STE
gain.
r, pushThe leg
gain.
DT8
pper
25
. INSTALLATION PROCEDURE
JUSTING ANGLE OF TILT LEG
angle of the tilt leg can be adjusted in four levels.
TO RAISE TILT LEG
P 1: Turn the telephone set upside down.
P 2: Adjust the angle of the tilt leg by pulling theleg in the direction of the arrow. The leg clickswhen it is in position.
STEP 3: Turn the telephone set upside down a
• TO LOWER TILT LEG
STEP 1: Turn the telephone set upside down.
STEP 2: While lifting the center of the stoppethe tilt leg in the direction of the arrow. clicks when it is in position.
STEP 3: Turn the telephone set upside down a
30 DT430/410
First Level
Second Level
Third Level
Fourth Level
Tilt Leg
StoTilt Leg

•
Confcorrestopp
aight) rk de-
device
ove on
o LAN
roove
o PC
26
TO CONFIRM THE ANGLE ADJUSTMENT
irm that the tilt leg and the stoppter are joinedctly. If they are not joined correctly, join theer's junction to the recessed point of the tilt leg.
CONNECTING LAN CABLE
STEP 1: Prepare 10 BASE-T/100 BASE-TX/ 1000BASE-T (8LDG only) cables (Strfor connecting the telephone to netwovices such as HUB or PoE Switch.
STEP 2: Connect the telephone to the networkusing the LAN cable.
STEP 3: Thread the LAN cable through the grothe back of the telephone.
Stoppter’s Junction
Recessed Points of Tilt Leg
DT830
Telephone
T
GLAN Straight Cable
T

STE
nnectorntil you
ove on
To
nnector
Groove
27
P 4: When an AC adapter is used to supply powerto the telephone, connect the AC/DC adapterto the telephone as shown below.
CONNECTING LINE CORD
STEP 1: Insert a Line cord plug into the Line coon the back of the telephone set uhear it click.
STEP 2: Thread the line cord through the grothe back of the telephone.
Telephone
Groove
LAN To PC
LAN Cable
DT430/410
Line Cord
Line Cord Plug
Line CoTelephone
Line Cord
Telephone

STE
nnectorback of
groove
Tilt
e termi-.
28
P 3: Lead the line cord out through the groove onthe tilt leg as shown in the figure below.
CONNECTING AC ADAPTER
STEP 1: Insert the AC adapter plug into the coof the AC adapter (AC-L UNIT) on the telephone.
STEP 2: Fix the AC adapter cord through the on the back of telephone.
Leg
Groove
Line Cord
Note: When you remove the AC adapter from thnal, disconnect the LAN cable beforehand
DT830 DT430
Telephone
AC Adapter Plug
AC Adapter Cord
Connector for AC Adapter
Telephone
AC Adapter Plug AC Adapter Cord
Connector for AC Adapter
Groove

INS
An abbrteleprecoinfor
STE
STE
EY
EY
screw- panel.
hone.Not
DT8
y Card
29
TALLING DIRECTORY CARD
optional directory card (also known as aneviated dialing table) can be attached to thehone sets. The directory card can be used tord often dialed numbers or other importantmation.
P 1: Remove the protective sheet from the cover.
P 2: Attach the cover to the directory card andthen attach it to the directory card holder.
INSTALLING/REMOVING LINE KCARD
• TO REMOVE KEY SET UNIT (LINE KPANEL AND LINE KEY CARD)
STEP 1: Insert the tip of a tool (such as a smalldriver) into the right side of the line key
STEP 2: Pull the line key panel out of the telep
STEP 3: Remove the line key card.
e: To remove the directory card, pinch both sides ofthe directory card holder inward until the tabsrelease and pull the holder out of the grooves.
30 DT430/410
Cover
Directory Card
HolderGrooves
DT830 DT430/410
Line Key Panel
Line Ke

•
STE
STE
ount alle back
llowing
Not
Line
et while jury.ounted
et from
0
b Slots
roximately)
nsions in mm
30
TO INSTALL KEY SET UNIT (LINE KEY PANEL, BUTTON PANEL, AND LINE KEY CARD)
P 1: Align the holes in the line key card with thebuttons on the telephone.
P 2: Align the holes in the line key panel with thebuttons on the telephone and then push thefour corners of the panel until the panel clicksinto place.
WALL MOUNTING
A wall mount unit (WM-L UNIT) is used to mtelephones to the wall. This unit connects to thside of the telephone.
To mount the telephone set on the wall, the fospace is required.
e: Be sure to install the line key panel correctly, or itmay cause undesired operation of the terminal.
Line Key Card
Key Panel
WARNING Be careful not to drop the telephone smounting it on the wall. It can cause inMake sure the telephone set is firmly mon the wall to prevent the telephone sfalling out. It can cause injury.
DT830 DT430/41
Telephone
Ta
Space forModular terminal
117.5
136
25 (approximately)
15 (app
35 (approximately)
30 (approximately)
83.5 60
60
(In the case of 12D/24D)
All dime

To mfollow
STE
STE
STE
ll plate:
he wall
DT430
he next
Step 8he tele-
wall asodular
WM-L UNIT
L
31
ount the telephone set on the wall, use theing procedure.
P 1: Mount the hanger of the handset upsidedown.
Remove the hanger from the handset once.Turn it upside down and then insert the hang-er until you hear it clicks.
P 2: Turn the telephone set upside down and wid-en the tilt leg.
P 3: Attach WM-L UNIT to the wall directly or thewall plate.
- When attaching WM-L UNIT to the walldirectly:
Secure WM-L UNIT with the six screws (in-cluded with the telephone set) or hang WM-LUNIT on the wall with the two screws (pur-chased separately) inserted into the wall.
- When attaching WM-L UNIT to the wa
Attach WM-L UNIT to the posts on tplate as shown in the figure below.
The remainder of the procedure varies betweenSeries and DT830 Series.
- In the case of DT430 Series: Go to tstep.
- In the case of DT830 Series: Go to after the LAN cable is connected to tphone.
STEP 4: Attach the modular terminal to the shown in the following figure. If the m
Handset Hanger
Telephone
Wall Wall
Screws (suppulied)
Screws
WM-L UNIT
WM-
Posts
Switch box

STE
STE
on thee figure
the tab
.
lephone
ove
ular Plug
ab Slots
32
connector is attached directly on the wall orthe wall plate is used instead of modular ter-minal, skip this step.
P 5: Insert the line cord plug (included with thetelephone set) into the modular connector.
P 6: Insert the line cord plug into the LINE connec-tor on the back of the telephone. Wrap the ex-cess cord and secure it with a tie wrap.
STEP 7: Fit the coiled cord through the grooveback of the telephone as shown in thbelow.
STEP 8: Insert the four tabs on WM-L UNIT inslots on the back of the telephone.
Tuck the excess cord into WM-L UNIT
WallWM-L
Modular Terminal
Line Cord
Modular Terminal
Wall
Line Cord
WM-L Line Connector
Te
Gro
Mod
Wall
Tabs
T

3This termkey a
Variopasskey.
SET
• TV
Presdurin
r phone
l is
T830
33
. TERMINAL SETUP
chapter describes operating procedures forinal settings with the Up/Down ( ) key, nd key.
us terminal settings such as display, sounds,word, and language are also available from
UP WITH UP/DOWN KEY
O ADJUST HANDSET RECEIVER OLUME
s the Up/Down ( ) key in the off-hook status org the call.
LCD indication for North America, Latin America, Asia, Middle East and Russia
LCD indication for Australia
• TO ADJUST SPEAKER VOLUME
Press the Up/Down ( ) key during an speakeoperation or during the call.
• TO ADJUST RINGER TONE
Press the Up/Down ( ) key while the terminaringing.
Feature
Menu
Menu
DT830 DT430/410
HANDSET
HANDSET
DDT430/410
SPEAKER
DT830 DT430/410
RING

• T
Pres
For controf asettin
Wide
Narr
built-in
Mic on.
IVER
isplays
ate be-Not
D
34
O ADJUST LCD CONTRAST
s the Up/Down ( ) key in the on-hook status.
DT830 Series, an adjustment range of the LCDast is available in 2 types (Wide/Narrow). The typedjustment range depends on the configurationg.
Setting
ow Setting
SETUP WITH FEATURE KEY
• MICROPHONE ON/OFF
LED on key shows the status of the microphone.
STEP 1: Press the soft key associated with thethe LCD or press and key
• TO CHANGE THE HANDSET RECEVOLUME
The handset receiver volume can be changed.
STEP 1: Press and key. The LCD dthe current volume status.
STEP 2: Press and key to alterntween Large and Small volume.
e: For the details of configuration setting, pleasecontact the system administrator.
T830 DT430/410
LCD
LCD
LCD
DT830DT430/410
Mic
Feature 1
DT430/410
Feature 2
4:26 PM MON 11 MAY 2015RCV VOL. SMALL
Feature 2
4:26 PM MON 11 MAY 2015RCV VOL. LARGE

• TThe selec
STE
EIV-
isplays
lternateN
Not
35
O SELECT RINGER TONE terminal have 10 kinds of ringer tones that you cant.
P 1: Press and key. The LCD displaysthe selected tone number (n=1 ~ 10).
• TO ADJUST TRANSMISSION/RECING VOLUME
The handset volume can be changed.
STEP 1: Press and key. The LCD dthe current volume.
STEP 2: Press and key again to abetween Large and Small volume.
o. Frequency (Hz) Modulation (Hz)1 520/660 162 520/660 83 1100/1400 164 660/760 165 Melody 16 Melody 27 Melody 38 Melody 49 Melody 5
10 Melody 6
e: The tone number 5, 6, and 8~10 (Melody 1, 2,4~6) sound continuously.
DT430/410
Feature 3
4:26 PM MON 11 MAY 2015RINGER TONE n
DT430/410
Feature 4
4:26 PM MON 11 MAY 2015T/R VOL. SMALL
Feature 4
4:26 PM MON 11 MAY 2015T/R VOL. LARGE

• TTo S
STE
To SSTE
• C
You or of
STE
ic Dial
isplays:
Not
De a callthe sta-ally. ForUSING
L PAD,
36
O ACTIVATE HANDS-FREE et hands-free On:
P 1: Press and key. The LCD displays:
et hands-free Off:P 1: Press and key. The LCD displays:
ALL INDICATOR LAMP ON/OFF
can choose to turn the call indicator lamp either onf during the call.
P 1: Press and key. The LCD displays:
• SELECT DIAL MODE
You can select one pattern from Normal, DynamPad or Preset Dial to originate a call.
When only Dynamic Dial Pad is activated:
To Set/Reset Dynamic Dial Pad
STEP 1: Press and key. The LCD d
e: The call indicator lamp lights when used as aMessage Waiting Lamp, even when it is turnedoff by the above operation.
DT430/410
Feature 5
4:26 PM MON 11 MAY 2015HANDS FREE ON
Feature 6
4:26 PM MON 11 MAY 2015HANDS FREE OFF
T830 DT430/410
Feature 7
4:26 PM MON 11 MAY 2015INDICATOR ON
4:26 PM MON 11 MAY 2015INDICATOR OFF
Note: When this feature is ON, you may initiatby immediately dialing the number and tion will go hands-free off-hook automaticdetails, see TO ORIGINATE A CALL SELECTIVE DIALING (DYNAMIC DIAPRESET DIAL).
DT830 DT430/410
Feature 8
4:26 PM MON 11 MAY 2015Direct Dial Pad ON
4:26 PM MON 11 MAY 2015Direct Dial Pad OFF

Whe
To S
STE
ial are
ressed,lays:
Not
37
n only Preset Dial is activated:
et/Reset Preset Dial
P 1: Press and key. The LCD displays:
When both Dynamic Dial Pad and Preset Dactivated:
To Set Dial Mode
STEP 1: Every time and key are pthe Dial Mode switches. The LCD disp
e: When this feature is ON, you may initiate a callby pressing the Speaker key or going off-hookafter dialing the number. For details, see TOORIGINATE A CALL USING SELECTIVE DIAL-ING (DYNAMIC DIAL PAD, PRESET DIAL)
Feature 8
4:26 PM MON 11 MAY 2015Preset Dial ON
4:26 PM MON 11 MAY 2015Preset Dial OFF
Feature 8
4:26 PM MON 11 MAY 2015Dial Mode: Direct
4:26 PM MON 11 MAY 2015Dial Mode: Preset
4:26 PM MON 11 MAY 2015Dial Mode: Normal

SETDT8
• TR
The hook
STE
STE
STE
ons.N soft
ey.
38
UP WITH MENU KEY FOR 30 SERIES
O ENABLE/DISABLE OFF-HOOK INGING
procedure below shows how to enable/disable Off- ringing
P 1: Display the Menu screen, and select Setting.
P 2: Select User Setting.Select an item by either of the following operations.• Highlight an item by using or the UP/DOWN soft
key, and then press , or the OK soft key.
• Press key.
P 3: Select Incoming Call.Select an item by either of the following operations.• Highlight an item by using or the UP/DOWN soft
key, and then press , or the OK soft key.
• Press key.
STEP 4: Select Offhook RingSelect an item by either of the following operati• Highlight an item by using or the UP/DOW
key, and then press , or the OK soft k
• Press key
1
1
12
Data Backup/Restore
[Setting]
3Download
OKMenu
User Setting
1
1
12
Display
[User Setting]
34567
Change Password
Peripherals
Talk
OKBack
Security
Incoming Call
Usability
2
2
12
Headset Ring
[Incoming Call]
3456
Ring Tone
Headset Ring VolumeOKBack
Illumination
Ring VolumeOffhook Ring

STE
ble the
etting.
ons.N soft
ey.
Not
Not
39
P 5: To disable/enable the off-hook ringing, selectDisable or Enable.
Select an item by one of the following operations.• Highlight an item by using or the UP/DOWN soft
key, and then press or the OK soft key.
• Press or key, and then press or the OK
soft key.
• TO SET RINGING OF HEADSET
The procedure below shows how to enable/disaringing of headset.
STEP 1: Display the Menu screen, and select S
STEP 2: Select User Setting.Select an item by either of the following operati• Highlight an item by using or the UP/DOW
key, and then press , or the OK soft k
• Press key.
e: Default setting is Enable.
e: The enabled item is highlighted.
1 2
1 2
[Offhook Ring]
OKBack
12
DisableEnable
2
1
1
12
Data Backup/Restore
[Setting]
3Download
OKMenu
User Setting

STE
STE
set, se-
s.N soft
the OK
40
P 3: Select Incoming Call.Select an item by either of the following operations.• Highlight an item by using or the UP/DOWN soft
key, and then press , or the OK soft key.
• Press key.
P 4: Select Headset Ring.Select an item by either of the following operations.• Highlight an item by using or the UP/DOWN soft
key, and then press , or the OK soft key.
• Press key.
STEP 5: To disable/enable the ringing of headlect Disable or Enable.Select an item by one of the following operation• Highlight an item by using or the UP/DOW
key, and then press or the OK soft key.
• Press or key, and then press or
soft key.
1
1
12
Display
[User Setting]
34567
Change Password
Peripherals
Talk
OKBack
Security
Incoming Call
Usability
3
3
Note: Default setting is Disable.
Note: The enabled item is highlighted.
12
[Incoming Call]
3456
Ring Tone
Headset Ring VolumeOKBack
Illumination
Ring VolumeOffhook Ring
Headset Ring
1 2
1 2
[Headset Ring]
OKBack
12 Enable
Disable
1

• T
The tone
STE
STE
STE
ons.N soft
ey.
41
O SET RINGER TONE
procedure below shows how to change the ringer for internal call and external call.
P 1: Display the Menu screen, and select Setting.
P 2: Select User Setting.Select an item by either of the following operations.• Highlight an item by using or the UP/DOWN soft
key, and then press , or the OK soft key.
• Press key.
P 3: Select Incoming Call.Select an item by either of the following operations.• Highlight an item by using or the UP/DOWN soft
key, and then press , or the OK soft key.
• Press key.
STEP 4: Select Ring ToneSelect an item by either of the following operati• Highlight an item by using or the UP/DOW
key, and then press , or the OK soft k
• Press key.
1
1
12
Data Backup/Restore
[Setting]
3Download
OKMenu
User Setting
1
1
12
Display
[User Setting]
34567
Change Password
Peripherals
Talk
OKBack
Security
Incoming Call
Usability
4
4
12
[Incoming Call]
3456 Headset Ring Volume
OKBack
Illumination
Ring VolumeOffhook Ring
Headset RingRing Tone

STE
STE
Not
42
P 5: Select External Call when setting theringer tone for external calls. Select Inter-nal Call when setting the ringer tone for inter-nal calls.Select an item by either of the following operations.• Highlight an item by using or the UP/DOWN soft
key, and then press , or the OK soft key.
• Press or key.
P 6: Select a desired tone type. You can previewthe designated ringer tone.
Select an item by either of the following operations.• Highlight an item by using or the UP/DOWN soft
key, and then press or the OK soft key.
• Press - key, and then press or the OK
soft key.
For example, press + to select Down-load1.
e: The enabled item is highlighted.
12
1 2
12
IM
[Ring Tone]
3Internal Call
OKBack
External Call
0 9
1 5 15
01
[External Call]
234567
Automatic
OKBack
Tone Type 1
89
16151413121110
17
Tone Type 2 Tone Type 3
Tone Type 10 Tone Type 11
Tone Type 5 Tone Type 4
Tone Type 6 Tone Type 7 Tone Type 8 Tone Type 9
Tone Type 12 Tone Type 13 Tone Type 14 Download 1 Download 2 Download 3

No.
012345678
9
1011121314151617
Not
Not
sounds tone is
ffective,details,
set me”, one n the
43
Menu ItemFrequency (Hz)
Remarks1st 2nd
Automatic 520 660 16Hz modulationTone Type 1 520 660 16Hz modulationTone Type 2 520 660 8Hz modulationTone Type 3 1400 1100 Door PhoneTone Type 4 1100 No modulationTone Type 5 540 No modulationTone Type 6 1100 1400 16Hz modulationTone Type 7 660 760 16Hz modulationTone Type 8 1100 Envelope
Tone Type 9 -Door Phone
MelodyTone Type 10 - Melody 1Tone Type 11 - Melody 2Tone Type 12 - Melody 3Tone Type 13 - Melody 4Tone Type 14 - Melody 5Download 1 - DT830 onlyDownload 2 - DT830 onlyDownload 3 - DT830 only
e: When selecting Automatic or not performing this ringer tone setting, Tone Type 1 is automatically applied.
e: When selecting Automatic, the preview function will not operate. Also, when selecting Download 1/2/3, the ringer tone file must be downloaded in advance. If there is no downloaded file, you hear no tone.
Note: Tone Type 1 to Tone Type 8:In the preview function, each ringer tone continuously. Actual ringer pattern of eachdetermined by the initial system settings.
Note: Terminal settings may not become eaccording as the system settings. For contact the System administrator.
Note: You can set ringer tone for the telephone here. Ringer Tone type can be set for “Na“Group” and "Telephone set”. The ringer Ttype set for “Name” has higher priority thatypes set for “Group” and “Terminal set”.

• TC
The patte
STE
STE
STE
ons.N soft
ey.
44
O SET ILLUMINATION PATTERN FOR ALL INDICATION LAMP
procedure below shows how to set the illuminationrn (color of Call Indicator Lamp).
P 1: Display the Menu screen, and select Setting.
P 2: Select User Setting.Select an item by either of the following operations.• Highlight an item by using or the UP/DOWN soft
key, and then press , or the OK soft key.
• Press key.
P 3: Select Incoming Call.Select an item by either of the following operations.• Highlight an item by using or the UP/DOWN soft
key, and then press , or the OK soft key.
• Press key.
STEP 4: Select Illumination.Select an item by either of the following operati• Highlight an item by using or the UP/DOW
key, and then press , or the OK soft k
• Press key.
1
1
12
Data Backup/Restore
[Setting]
3Download
OKMenu
User Setting
1
1
12
Display
[User Setting]
34567
Change Password
Peripherals
Talk
OKBack
Security
Incoming Call
Usability
5
5
12
[Incoming Call]
3456 Headset Ring Volume
OKBack
Ring VolumeOffhook Ring
Headset RingRing ToneIllumination

STE
STEfunction
ing thispplied.
ephoneset for
e illumi- priorityerminal
45
P 5: Select External Call when setting the illu-mination pattern for external calls. Select
Internal Call when setting the illuminationpattern for internal call.Select an item by one of the following operations.• Highlight an item by using or the UP/DOWN soft
key, and then press , or the OK soft key.
• Press or key.
P 6: Select a desired illumination pattern.You canpreview the designated illumination pattern.Select an item by either of the following operations.• Highlight an item by using or the UP/DOWN soft
key, and then press or the OK soft key.
• Press - key.
• For DT830 Series1
2
1 2
12
[Illumination]
3 IMOKBack
External Call
Internal Call
0 9
Note: When selecting Automatic, the preview will not operate.
Note: When selecting Automatic or not performillumination setting, Red is automatically a
Note: You can set illumination pattern for the telset here. Illumination pattern can be “Name”, “Group” and “Telephone set”. Thnation pattern set for “Name” has higherthan the patterns set for “Group” and “Tset”.
01
[External Call]
234567
Automatic
OKBack
Disable
89
RedGreen
YellowBlue
PurpleLight BlueWhiteRotation

• TThe RTP
STE
STE
ons.N soft
ey.
ons.N soft
ey.
46
O ENABLE/DISABLE RTP ALARM procedure below shows how to enable/disable
alarm.
P 1: Display the Menu screen, and select Setting.
P 2: Select User Setting.Select an item by either of the following operations.• Highlight an item by using or the UP/DOWN soft
key, and then press , or the OK soft key.
• Press key.
STEP 3: Select Talk.Select an item by either of the following operati• Highlight an item by using or the UP/DOW
key, and then press , or the OK soft k
• Press key.
STEP 4: Select RTP Alarm.Select an item by either of the following operati• Highlight an item by using or the UP/DOW
key, and then press , or the OK soft k
• Press key.
1
1
12
Data Backup/Restore
[Setting]
3Download
OKMenu
User Setting
2
2
12
Display
[User Setting]
34567
Change Password
Peripherals
OKBack
Security
Incoming CallTalk
Usability
1
1
12
[Talk]
345
OKBack
DTMF ToneKey Touch ToneHold MusicPrefix
RTP Alarm

STE E
disable
etting.
ons.N soft
ey.
ons.N soft
ey.
No.
0
1
2
Not
Not
47
P 5: Select Automatic, Disable or En-able (see the following table).Select an item by either of the following operations.• Highlight an item by using or the UP/DOWN soft
key, and then press or the OK soft key.
• Press - key, and then press or the OK
soft key.
• TO ENABLE/DISABLE DTMF TON
The procedure below shows how to enable/DTMF Tone.
STEP 1: Display the Menu screen, and select S
STEP 2: Select User Setting.Select an item by either of the following operati• Highlight an item by using or the UP/DOW
key, and then press , or the OK soft k
• Press key.
STEP 3: Select Talk.Select an item by either of the following operati• Highlight an item by using or the UP/DOW
key, and then press , or the OK soft k
• Press key.
Menu Items Descriptions
Automatic
Follow the setting on the System. If no setting is made in the Sys-tem, the default setting (Alarm=ON) is applied.
Disable Follow the setting on the terminal (OFF).
Enable Follow the setting on the terminal (ON).
e: For the setting on the System, contact the Sys-tem administrator.
e: The enabled item is highlighted.
0 1 2
0 2
01
[RTP Alarm]
2
Automatic
OKBack
DisableEnable
1
1
12
Data Backup/Restore
[Setting]
3Download
OKMenu
User Setting
2
2

STE
En-
ons.N soft
he OK
Sys-e in setting
termi-
termi-
he Sys-
2
48
P 4: Select DTMF Tone.Select an item by either of the following operations.• Highlight an item by using or the UP/DOWN soft
key, and then press , or the OK soft key.
• Press key.
STEP 5: Select Automatic, Disable or able (see the following table).Select an item by either of the following operati• Highlight an item by using or the UP/DOW
key, and then press or the OK soft key.
• Press - key, and then press or t
soft key.
12
Display
[User Setting]
34567
Change Password
Peripherals
OKBack
Security
Incoming CallTalk
Usability
2
2
12
[Talk]
345
OKBack
Key Touch ToneHold MusicPrefix
RTP AlarmDTMF Tone
No. Menu Items Descriptions
0 Automatic
Follow the setting on thetem. If no setting is madthe System, the default (DTMF=ON) is applied.
1 Disable Follow the setting on thenal (OFF).
2 Enable Follow the setting on thenal (ON).
Note: For the setting on the System, contact ttem administrator.
Note: The enabled item is highlighted.
0 1
0 2
01
[DTMF Tone]
2
OKBack
DisableAutomatic
Enable

• T
The Tonedigit
STE
STE
STE
ons.N soft
ey.
49
O SET KEY TOUCH TONE
procedure below shows how to set Key Touch. Key Touch Tone is a tone generated when thekeys are pressed while the terminal is off-hook.
P 1: Display the Menu screen, and select Setting.
P 2: Select User Setting.Select an item by either of the following operations.• Highlight an item by using or the UP/DOWN soft
key, and then press , or the OK soft key.
• Press key.
P 3: Select Talk.Select an item by either of the following operations.• Highlight an item by using or the UP/DOWN soft
key, and then press , or the OK soft key.
• Press key.
STEP 4: Select Key Touch Tone.Select an item by either of the following operati• Highlight an item by using or the UP/DOW
key, and then press , or the OK soft k
• Press key.
1
1
12
Data Backup/Restore
[Setting]
3Download
OKMenu
User Setting
2
2
12
Display
[User Setting]
34567
Change Password
Peripherals
OKBack
Security
Incoming CallTalk
Usability
3
3
12
[Talk]
345
OKBack
Hold MusicPrefix
RTP AlarmDTMF Tone
Key Touch Tone

STE
n Hold
etting.
ons.N soft
ey.
Not
Not
50
P 5: Select Automatic, No Tone, Toneor Voice.Select an item by either of the following operations.• Highlight an item by using or the UP/DOWN soft
key, and then press or the OK soft key.
• Press - key, and then press or the OK
soft key.
• TO SET MUSIC ON HOLD
The procedure below shows how to set Music oto be heard by the terminal user.
STEP 1: Display the Menu screen, and select S
STEP 2: Select User Setting.Select an item by either of the following operati• Highlight an item by using or the UP/DOW
key, and then press , or the OK soft k
• Press key.
e: When Automatic is set, the default setting(Tone) is applied.
e: The enabled item is highlighted.
0 1 23
0 3
01
[Key Touch Tone]
2
OKBack
No Tone
Tone
Automatic
3 Voice
0
1
1
12
Data Backup/Restore
[Setting]
3Download
OKMenu
User Setting

STE
STE
an pre-
Minuet) nload on
ons.N soft
the OK
on holdre is nopreviewMinuet”
51
P 3: Select Talk.Select an item by either of the following operations.• Highlight an item by using or the UP/DOWN soft
key, and then press , or the OK soft key.
• Press key.
P 4: Select Hold Music.Select an item by either of the following operations.• Highlight an item by using or the UP/DOWN soft
key, and then press , or the OK soft key.
• Press key.
STEP 5: Select a desired Music on Hold. You cview the designated Music on Hold.
Select Default when the default data (is used as Music on Hold. Select Dowwhen a downloaded data is used as MusicHold.
Select an item by either of the following operati• Highlight an item by using or the UP/DOW
key, and then press or the OK soft key.
• Press or key, and then press or
soft key.
2
2
12
Display
[User Setting]
34567
Change Password
Peripherals
OKBack
Security
Incoming CallTalk
Usability
4
4
12
[Talk]
345
OKBackPrefix
RTP AlarmDTMF Tone
Key Touch ToneHold Music
Note: When selecting 2 Download, the music file must be downloaded in advance. If thedownloaded file, you hear no tone in the function (in actual operating conditions, “is automatically applied.).
12
1 2
12
[Hold Music]
OKBack
Download
Default

• T
The patte
STE
STE
ons.N soft
ey.
ons.N soft
ey.
Not
52
O SET CALENDAR FORMAT
following explains how to set the time displayrn on the LCD.
P 1: Display the Menu screen, and select Setting.
P 2: Select User Setting.Select an item by either of the following operations.• Highlight an item by using or the UP/DOWN soft
key, and then press , or the OK soft key.
• Press key.
STEP 3: Select Display.Select an item by either of the following operati• Highlight an item by using or the UP/DOW
key, and then press , or the OK soft k
• Press key.
STEP 4: Select Calendar Format.Select an item by either of the following operati• Highlight an item by using or the UP/DOW
key, and then press , or the OK soft k
• Press key.
e: This setting is available for the following condi-tions.• SV9500 V2 or later• Terminal firmware version 3.0.3.0 or later
1
1
12
Data Backup/Restore
[Setting]
3Download
OKMenu
User Setting
3
3
12
[User Setting]
3456
Change Password
Peripherals
OKBack
Security
Incoming CallTalk
Display
7 Usability
1
1
12
[Display]
3456
Back Light
LanguageOKBack
Font Size
Local VolumeScreen Saver
Calendar Format

STE
STE
No01234
R
53
P 5: Select Calendar Format.Select an item by either of the following operations.• Highlight an item by using or the UP/DOWN soft
key, and then press , or the OK soft key.
• Press key.
P 6: Make a selection from the following list.Select an item by either of the following operations.• Highlight an item by using or the UP/DOWN soft
key, and then press or the OK soft key.
• Press - key, and then press or the OK
soft key.
. Menu Item MeaningAutomatic Follows the setting on the system Type 1 7:25 AM MON 23 MAR 2015Type 2 23 MAR MON 7:25AMType 3 7:25AM MAR 23 MONType 4 3-23 MON 7:25AM
1
1
1
[Calendar Format]
2
OKBack
Calendar Format
Time Format
0 5
01
[Calendar]
2
OKBack
Type 1
Automatic
Type 2
5 Type 5 7:25AM MON 23 MA
Note: Default setting is Automatic.
Note: The enabled item is highlighted.
No. Menu Item Meaning

• T
Dete24-h
STE
STE
ons.N soft
ey.
ons.N soft
ey.
Not
54
O SET TIME FORMAT
rmines whether time is displayed with a 12-hour orour clock format.
P 1: Display the Menu screen, and select Setting.
P 2: Select User Setting.Select an item by either of the following operations.• Highlight an item by using or the UP/DOWN soft
key, and then press , or the OK soft key.
• Press key.
STEP 3: Select Display.Select an item by either of the following operati• Highlight an item by using or the UP/DOW
key, and then press , or the OK soft k
• Press key.
STEP 4: Select Calendar Format.Select an item by either of the following operati• Highlight an item by using or the UP/DOW
key, and then press , or the OK soft k
• Press key.
e: This setting is available for Time Display only.Call Log feature displays the time in 24-hour for-mat regardless of this setting.
1
1
12
Data Backup/Restore
[Setting]
3Download
OKMenu
User Setting
3
3
12
[User Setting]
3456
Change Password
Peripherals
OKBack
Security
Incoming CallTalk
Display
7 Usability
1
1
12
[Display]
3456
Back Light
LanguageOKBack
Font Size
Local VolumeScreen Saver
Calendar Format

STE
t.ons.
N soft
he OK
Not
n the
ing thistomati-
55
P 5: Select Time Format.Select an item by either of the following operations.• Highlight an item by using or the UP/DOWN soft
key, and then press , or the OK soft key.
• Press key.
STEP 6: Make a selection from the following lisSelect an item by either of the following operati• Highlight an item by using or the UP/DOW
key, and then press or the OK soft key.
• Press - key, and then press or t
soft key.
e: For SV9500 V1, Time Format is displayed instead of Calendar Format. Select Time Format and go to Step 6.
2
2
1
[Calendar Format]
2
OKBack
Calendar Format
Time FormatNo. Menu Item Meaning
0 Automatic Follows the setting osystem (default)
1 12 hour Indication 12-hour clock2 24 hour Indication 24-hour clock
Note: When selecting Automatic or not performtime format setting, 12-hour clock is aucally applied.
Note: Default setting is Automatic.
Note: The enabled item is highlighted.
0 2
01
[Time Format]
2
OKBack
12 hour Indication
24 hour Indication
Automatic

• TD
Detevolumvolum
STE
STE
STE
ons.N soft
ey.
56
O ENABLE/DISABLE VOLUME LEVEL ISPLAY
rmines whether or not to display the followinge levels: handset receiver volume, speakere, ringer tone volume and LCD contrast.
P 1: Display the Menu screen, and select Setting.
P 2: Select User Setting.Select an item by one of the following operations.• Highlight an item by using or the UP/DOWN soft
key, and press , or the OK soft key.
• Press key.
P 3: Select Display.Select an item by either of the following operations.• Highlight an item by using or the UP/DOWN soft
key, and then press , or the OK soft key.
• Press key.
STEP 4: Select Local Volume.Select an item by either of the following operati• Highlight an item by using or the UP/DOW
key, and then press , or the OK soft k
• Press key.
1
1
12
Data Backup/Restore
[Setting]
3Download
OKMenu
User Setting
3
3
12
[User Setting]
34567
Change Password
Peripherals
OKBack
Security
Incoming CallTalk
Display
Usability
2
2
12
[Display]
3456
Back Light
LanguageOKBack
Font Size
Screen Saver
Calendar FormatLocal Volume

STEan idleScreenr when
can notn Saver
etting.
ons.N soft
ey.
No.
0
1
2
Not
he Sys-
57
P 5: Make a selection from the following list.Select an item by either of the following operations.• Highlight an item by using or the UP/DOWN soft
key, and then press or the OK soft key.
• Press - key, and then press or the OK
soft key.
• TO SET SCREEN SAVER Screen Saver works after the telephone is in state for a certain period of time. The latest Saver contents will be displayed from XML servethe Screen Saver works. If the latest contents be downloaded from XML server, default Screewill be displayed.
STEP 1: Display the Menu screen, and select S
STEP 2: Select User Setting.Select an item by either of the following operati• Highlight an item by using or the UP/DOW
key, and then press , or the OK soft k
• Press key.
Menu Item Meaning
Automatic Each volume level is displayed on LCD (default).
Disable Each volume level is not displayed on LCD.
Enable Each volume level is displayed on LCD.
e: The enabled item is highlighted.
0 2
01
[Local Volume]
2
OKBack
Disable
Enable
Automatic
Note: For details on the XML service, contact ttem administrator.
1
1
12
Data Backup/Restore
[Setting]
3Download
OKMenu
User Setting

STtions.WN soft
t key.
tions.WN soft
t key.
58
EP 3: Select Display.Select an item by either of the following operations.• Highlight an item by using or the UP/DOWN soft
key, and then press , or the OK soft key.
• Press key.
STEP 4: Select Screen Saver.Select an item by either of the following opera• Highlight an item by using or the UP/DO
key, and then press , or the OK sof
• Press key.
STEP 5: Select Screen Saver Mode.Select an item by either of the following opera• Highlight an item by using or the UP/DO
key, and then press , or the OK sof
• Press key.
3
3
12
[User Setting]
34567
Change Password
Peripherals
OKBack
Security
Incoming CallTalk
Display
Usability
3
3
12
[Display]
3456
Back Light
LanguageOKBack
Font Size
Local VolumeScreen Saver
Calendar Format
1
1
12
[Screen Saver]
OKBack
Screen Saver Mode Wait Time
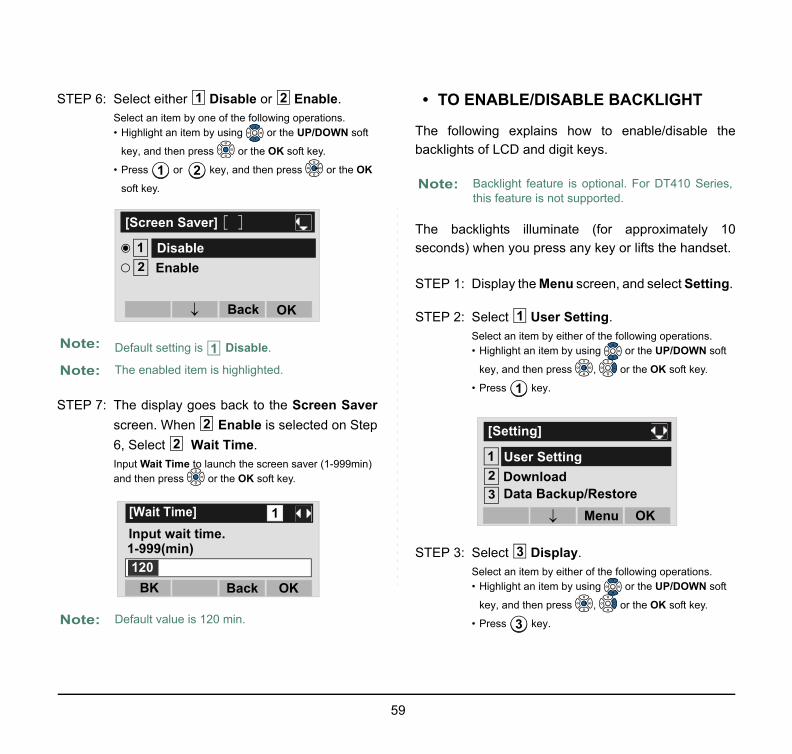
STE
STE
T
le the
ely 10ndset.
etting.
ons.N soft
ey.
ons.N soft
ey.
Not
Not
Not
Series,
59
P 6: Select either Disable or Enable.Select an item by one of the following operations.• Highlight an item by using or the UP/DOWN soft
key, and then press or the OK soft key.
• Press or key, and then press or the OK
soft key.
P 7: The display goes back to the Screen Saverscreen. When Enable is selected on Step6, Select Wait Time.Input Wait Time to launch the screen saver (1-999min) and then press or the OK soft key.
• TO ENABLE/DISABLE BACKLIGH
The following explains how to enable/disabbacklights of LCD and digit keys.
The backlights illuminate (for approximatseconds) when you press any key or lifts the ha
STEP 1: Display the Menu screen, and select S
STEP 2: Select User Setting.Select an item by either of the following operati• Highlight an item by using or the UP/DOW
key, and then press , or the OK soft k
• Press key.
STEP 3: Select Display.Select an item by either of the following operati• Highlight an item by using or the UP/DOW
key, and then press , or the OK soft k
• Press key.
e: Default setting is Disable.
e: The enabled item is highlighted.
e: Default value is 120 min.
1 2
1 2
12
[Screen Saver]
OKBack
Enable
Disable
1
22
OKBackBK
1[Wait Time]Input wait time.
1201-999(min)
Note: Backlight feature is optional. For DT410this feature is not supported.
1
1
12
Data Backup/Restore
[Setting]
3Download
OKMenu
User Setting
3
3

STE
t.ons.
N soft
the OK
it keys
it keys
60
P 4: Select Back Light.Select an item by either of the following operations.• Highlight an item by using or the UP/DOWN soft
key, and then press , or the OK soft key.
• Press key.
STEP 5: Make a selection from the following lisSelect an item by either of the following operati• Highlight an item by using or the UP/DOW
key, and then press or the OK soft key.
• Press or key, and then press or
soft key.
12
[User Setting]
34567
Change Password
Peripherals
OKBack
Security
Incoming CallTalk
Display
Usability
4
4
12
[Display]
3456 Language
OKBack
Font Size
Screen Saver
Calendar FormatLocal Volume
Back Light
No. Menu Item Meaning
1 Disable Backlights of LCD and digare disabled.
2 Enable Backlights of LCD and digare enabled.
Note: The enabled item is highlighted.
1 2
12
[Back Light]
OKBack
Disable
Enable

• T
The char
STE
STE
STE
ons.N soft
ey.
61
O CHANGE CHARACTER SIZE
following explains how to change the displayedacter size on the LCD.
P 1: Display the Menu screen, and select Setting.
P 2: Select User Setting.Select an item by either of the following operations.• Highlight an item by using or the UP/DOWN soft
key, and then press , or the OK soft key.
• Press key.
P 3: Select Display.Select an item by either of the following operations.• Highlight an item by using or the UP/DOWN soft
key, and then press , or the OK soft key.
• Press key.
STEP 4: Select Font Size.Select an item by either of the following operati• Highlight an item by using or the UP/DOW
key, and then press , or the OK soft k
• Press key.
1
1
12
Data Backup/Restore
[Setting]
3Download
OKMenu
User Setting
3
3
12
[User Setting]
34567
Change Password
Peripherals
OKBack
Security
Incoming CallTalk
Display
Usability
5
5
12
[Display]
3456 Language
OKBack
Screen Saver
Calendar FormatLocal Volume
Back LightFont Size

STE
to be
etting.
ons.N soft
ey.
Not
62
P 5: Select either “Standard (16dot)“ or “Small (12dot)“.Select an item by either of the following operations.• Highlight an item by using or the UP/DOWN soft
key, and then press or the OK soft key.
• Press or key, and then press or the OK
soft key.
• TO SET A LANGUAGE
The following explains how to set a languagedisplayed on LCD.
STEP 1: Display the Menu screen, and select S
STEP 2: Select User Setting.Select an item by either of the following operati• Highlight an item by using or the UP/DOW
key, and then press , or the OK soft k
• Press key.
e: The enabled item is highlighted.
1 2
12
[Font Size]
OKBack
Small (12dot)
Standard (16dot)
1
1
12
Data Backup/Restore
[Setting]
3Download
OKMenu
User Setting

STEons.
N soft
ey.
ons.WN soft
the OK
glish.
age as
63
P 3: Select Display.Select an item by either of the following operations.• Highlight an item by using or the UP/DOWN soft
key, and then press , or the OK soft key.
• Press key.
STEP 4: Select LanguageSelect an item by either of the following operati• Highlight an item by using or the UP/DOW
key, and then press , or the OK soft k
• Press key (DT830).
STEP 5: Select a desired language. Select an item by either of the following operati• Highlight an item by using or the UP/DO
key, and then press or the OK soft key.• Press - key, and then press or
soft key.For example, press + to select En
3
3
12
[User Setting]
34567
Change Password
Peripherals
OKBack
Security
Incoming CallTalk
Display
Usability
Note: The enabled item is highlighted.
Note: Each item is displayed in its native langufollows:
6
6
12
[Display]
3456
OKBack
Screen Saver
Calendar FormatLocal Volume
Back LightFont SizeLanguage
0 9
1 3 13
OKBack
01
Automatic日本語

STE
cedurellowing
etting.
ons.N soft
ey.
Not
on, theied. Forstrator.
64
P 6: After making a selection, press or the OKsoft key.
• TO CHANGE PASSWORD
To change an existing password, follow the probelow. This password is used for the fooccasions.
• To lock/unlock the telephone.• To delete the directory data.• To reset the telephone settings.
STEP 1: Display the Menu screen, and select S
STEP 2: Select User Setting.Select an item by either of the following operati• Highlight an item by using or the UP/DOW
key, and then press , or the OK soft k
• Press key.e: “23. Simplified Chinese” and “24. Traditional Chi-
nese” are available since SV9500 V3, and theterminal firmware version 4.0.0.0 or later.
0:Telephony Server side’s language setting is applied.1:Japanese2:NEC English3.NEC Portuguese4:NEC Spanish5:NEC French6:German7:Italian8:Dutch9:Norwegian10:Danish11:Swedish12:Greek13:English14:Portuguese15:Spanish16:French17:Russian18:Turkish19:Romania20:Polish21:Catalan22:Korean23:Simplified Chinese24:Traditional Chinese
Note: Depending on the System Configuratiexpiration date of password can be specifdetails, please contact the system admini
1
1
12
Data Backup/Restore
[Setting]
3Download
OKMenu
User Setting

STE
STE
ess
d then
Not
be set
65
P 3: Select Change Password.Select an item by either of the following operations.• Highlight an item by using or the UP/DOWN soft
key, and then press , or the OK soft key.
• Press key.
P 4: The Change Password screen is displayed.Enter the old password and then press orthe Set soft key.
STEP 5: Enter the new password and then pror the Set soft key.
STEP 6: Enter the new password again anpress or the OK soft key.
e: The initial password is “0000”. When changingthe password for the first time, enter “0000” asthe old password.
4
4
12
[User Setting]
34567
Peripherals
OKBack
Security
Incoming CallTalk
DisplayChange Password
Usability
New Pass
[Change Password]
OKCancelSetBK
1Old Pass
Retry Pass
Note: A maximum of 32 digits (0-9, * and #) canas a password.
[Change Password]
OKCancelSetBK
1Old Pass
Retry Pass
****New Pass
[Change Password]
OKCancelSetBK
1Old Pass ****New Pass
Retry Pass****

STEation of.
etting.
s.
N soft
Not
Not
66
P 7: When the password entry completes suc-cessfully, the display changes as follows.Press or the OK soft key.
• TO SET USABILITYThe procedure below shows how to set the operthe Help key while pop-up window is displayed
STEP 1: Display the Menu screen, and select SSTEP 2: Select User Setting.
Select an item by one of the following operation• Touch panel operation.
• Highlight an item by using or the UP/DOW
key, and press , or the OK soft key.
• Press key.
e: When the password entry ends in failure, the fol-lowing error message is issued. In that case,press the OK soft key and try again.
e: When you enter the current password to the NewPass, the following error message is issued. Inthat case, press the OK soft key and enter thepassword except for the current password.
[Password]
OK
Complete.
[Password]
OK
Password Error.
[Password]
OK
Can't repeat the previouspassword.
1
1
12
Data Backup/Restore
[Setting]
3Download
OKMenu
User Setting
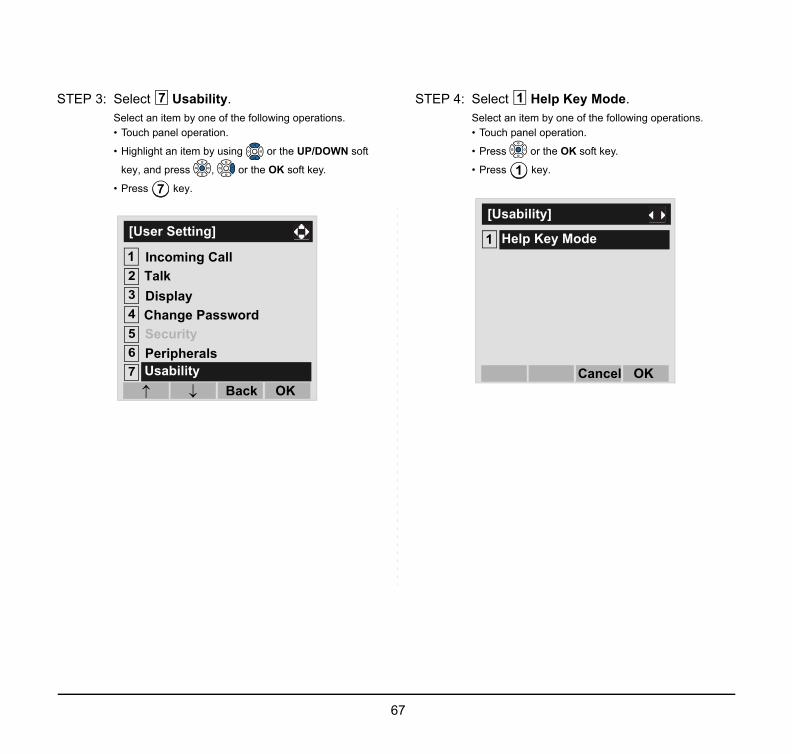
STEs.
67
P 3: Select Usability.Select an item by one of the following operations.• Touch panel operation.
• Highlight an item by using or the UP/DOWN soft
key, and press , or the OK soft key.
• Press key.
STEP 4: Select Help Key Mode.Select an item by one of the following operation• Touch panel operation.
• Press or the OK soft key.
• Press key.
7
7
12
[User Setting]
34567
Peripherals
OKBack
Security
Incoming CallTalk
DisplayChange Password
Usability
1
1
1
[Usability]
OKCancel
Help Key Mode

STE S
al data
etting.
ons.N soft
ey.
No
1
2
68
P 5: Select a desired mode of Help key.Select an item by one of the following operations.• Touch panel operation, and press or the OK soft
key.
• Highlight an item by using or the UP/DOWN soft
key, and press or the OK soft key.
• Press or key, and press or the OK soft
key.
• TO RESET TELEPHONE SETTING
The following explains how to clear the personoff the telephone.
STEP 1: Display the Menu screen, and select S
STEP 2: Select User Setting.Select an item by either of the following operati• Highlight an item by using or the UP/DOW
key, and then press , or the OK soft k
• Press key.
. ITEM DESCRIPTION
Sub Menu Set the Help key which displays sub menu
Popup Window Set the Help key which displays pop-up window
1 2
1
[Help Key Mode]
OKCancel
SubMenu2 Popup Window
1
1
12
Data Backup/Restore
[Setting]
3Download
OKMenu
User Setting

STE
STE
he per-
69
P 3: Select Setting Reset.Select an item by either of the following operations.• Highlight an item by using or the UP/DOWN soft
key, and then press , or the OK soft key.
• Press key.
P 4: Enter the password and then press or theOK soft key.
STEP 5: Press or the OK soft key to clear tsonal data of the telephone.
0
0
2
[User Setting]
3456
0
Peripherals
OKBack
Security
Talk
DisplayChange Password
Setting Reset7 Usability
[Setting Reset]
OKBackBK
1Input a password.
[Setting Reset]
OKBack
Are you sure?

• T
The HoldtheseTFTP
BefoFTP/
STE
STE
STE
ons.N soft
ey.
Not
70
O DOWNLOAD A FILE
DT830 Series user can download files for Music on, Ringer Tone and Directory. When downloading files, the terminal needs to be connected FTP/ server.
re starting the download, the IP Address of theTFTP Server must be entered from the terminal.
P 1: Set up the FTP/TFTP server.
<FTP server>Put the downloading file into the designated directory (for Windows IIS, the default is “C:\InetPub\ftproot”) of the FTP server.
<TFTP server>Put the downloading file into a desired direc-tory of TFTP server and then specify it as the directory for downloading.
P 2: Display the Menu screen, and select Setting.
P 3: Select Download.Select an item by either of the following operations.• Highlight an item by using or the UP/DOWN soft
key, and then press , or the OK soft key.
• Press key.
STEP 4: Select Protocol.Select an item by either of the following operati• Highlight an item by using or the UP/DOW
key, and then press , or the OK soft k
• Press key.
e: For details on the FTP/TFTP service, contact theSystem administrator.
2
2
12
Data Backup/Restore
[Setting]
3OKMenu
User SettingDownload
3
3
12
[Download Menu]
34 FTP Settings
OKBack
Download FilesDownload Address
Protocol

STE
STE
STE
ons.N soft
ey.
s, then
71
P 5: Select a protocol used by the server whichstores the download file.Select an item by either of the following operations.• Highlight an item by using or the UP/DOWN soft
key, and then press or the OK soft key.
• Press or key, and then press or the OK
soft key.
P 6: The display goes back to the DownloadMenu screen.
When FTP is selected here, go to STEP 7.
When TFTP is selected here, go to STEP 15.
P 7: Select FTP Settings.Select an item by either of the following operations.• Highlight an item by using or the UP/DOWN soft
key, and then press , or the OK soft key.
• Press key.
STEP 8: Select User ID.Select an item by either of the following operati• Highlight an item by using or the UP/DOW
key, and then press , or the OK soft k
• Press key.
STEP 9: Enter a User ID by using digit keypress or the OK soft key.
1 2
12
[Protocol]
OKBack
TFTP
FTP
1
2
4
4
12
[Download Menu]
34
OKBack
Download FilesDownload Address
ProtocolFTP Settings
1
1
12
[FTP Settings]
3OKBack
PasswordFolder
User ID
[User ID]
OKBackBK
AInput a user ID.

STE
STE
ettings
ions.N soft
ey.
d file isoft key.
Not
Not
e HOW Basic
72
P 10:The display goes back to the FTP Settingsscreen. Select Password.Select an item by either of the following operations.• Highlight an item by using or the UP/DOWN soft
key, and then press , or the OK soft key.
• Press key.
P 11:Enter a password by using digit keys, thenpress or the OK soft key.
STEP 12:The display goes back to the FTP Sscreen. Select Folder.Select the item by either of the following operat• Highlight an item by using or the UP/DOW
key, and then press , or the OK soft k
• Press key.
STEP 13:Enter the directory where the downloastored and then press or the OK s
e: For details on character entry method, see HOWTO INPUT CHARACTERS in Chapter 4 BasicOperation.
e: For details on character entry method, see HOWTO INPUT CHARACTERS in chapter 4 BasicOperation.
2
2
12
[FTP Settings]
3OKBack
Folder
User IDPassword
OKBackBK
A[Password]Input a password.
Note: For details on character entry method, seTO INPUT CHARACTERS in chapter 4Operation.
3
3
12
[FTP Settings]
3OKBack
User IDPassword
Folder
OKBackBK
A[Folder]Input a folder name.

STE
STE
STE
e OK
nloadiles.ons.
N soft
ey.
73
P 14:The display goes back to the FTP Settingsscreen. Press or the Back soft key to dis-play the Download Menu screen.
P 15:Select Download Address.Select an item by either of the following operations.• Highlight an item by using or the UP/DOWN soft
key, and then press , or the OK soft key.
• Press key.
P 16:Enter the IP address of the FTP/TFTP serverwhich stores the download file. For example,to set the IP address of 10.41.208.205, enter10*41*208*205 [separate with an asterisk(*)].
After entering the IP address, press or thsoft key.
STEP 17:The display goes back to the DowMenu screen. Select Download FSelect an item by either of the following operati• Highlight an item by using or the UP/DOW
key, and then press , or the OK soft k
• Press key.
12
[FTP Settings]
3OKBack
Folder
User IDPassword
2
2
12
[Download Menu]
34 FTP Settings
OKBack
Download Files
ProtocolDownload Address
[Download Address]
OKBackBK
1‘*‘For‘.‘
. . .
1
1
12
[Download Menu]
34 FTP Settings
OKBack
Download Files
ProtocolDownload Address

STE
STE
.
ld, the
e, the
Whefile foWhefile foWhefile fo
ize
nds
ize
nds
74
P 18:Select a file to be downloaded.
P 19:When Ring Tone is selected at STEP 18,the following Ring Tone screen is displayed. Select either Download1, Download2or Download3.Select an item by either of the following operations.• Highlight an item by using or the UP/DOWN soft
key, and then press , or the OK soft key.
• Press - key.
STEP 20:The default file name will be displayed
- When downloading a file for Music on Hodefault file name is “MOH.wav”.
- When downloading a file for ringer tondefault file name is “Melody1/2/3.wav”.
n downloading a r Music on Hold
:Select Hold Music and go to STEP 20.
n downloading a r ringer tone
:Select Ring Tone and go to STEP 19.
n downloading a r directory
:Select Directory and go to STEP 20.
1
2
3
12
[Download Files]
3OKBack
Directory
Hold MusicRing Tone
2
1 23
1 3
12
[Ring Tone]
3OKBack
Download3
Download1Download2
File Format Maximum S
PCM µ-law 8kHz/s wav under 32 seco
File Format Maximum S
PCM µ-law 8kHz/s wav under 32 seco
[Hold Music]
ExecCancelBK
AInput a file name.
MOH.wav
[Download1/2/3]
ExecCancelBK
AInput a file name.
Melody 1/2/3.wav

- Wfile
PresThe “Dire
the de-e name
tart theding a
...” first
Fil
Co
Not
e HOW Basic
”, “a-z”,s a file
BK soft
s while
75
hen downloading a file for Directory, the default name is “Directory.csv”.
s the Enc soft key to download the encrypted file.encrypted file name is displayed as
ctory.csv.ef”.
When changing the file name, go to STEP 21.When not changing the file name, go to STEP 22.
STEP 21:Press the BK soft key once to delete fault file name and then enter a new filby using the digit keys.
STEP 22:Press or the Exec soft key to sdownloading process. While downloafile, the LCD displays “Downloadingand then “Saving...”.
e Name Directory.csv (Fixed)
de Unicode (UTF-8)
e: If you change the encrypted file into the unen-crypted file, press the NoEnc soft key.
[Directory]
ExecCancelBK
AInput a file name.
Directory.csvEnc
[Directory]
ExecCancelBK
AInput a file name.
Directory.csv.efNoEnc
Note: For details on character entry method, seTO INPUT CHARACTERS in chapter 4Operation.
Note: A maximum of 20 characters (“0-9”, “A-Z“*”, “#”, “.”, “-” or “_”) can be entered aname.
Note: To delete an entered character, press the key.
Note: Be sure not to turn OFF the DT830 Serie“Saving...” is displayed on the LCD.

STE
S
ettings up thed to the
e FTP/.
Win-root”)
for the
etting.
ons.N soft
ey.
Not
DowplacdirecA difspecDT8TFTIncoFTPbeentelepThe TFTequiLANdisc
tact the
76
P 23:After the downloading process is complete,the display changes as follows:
The display goes back to the Download Files screen with the Exit soft key.
• TO BACKUP PERSONAL SETTING
The DT830 Series user can backup personal sof the terminal to the FTP/TFTP server. To backsetting data, the terminal needs to be connecteFTP/TFTP server.
Before starting the backup, the IP Address of thTFTP server must be entered from the terminal
STEP 1: Set up the FTP/TFTP server.
<FTP server>Confirm the designated directory (for dows IIS, the default is “C:\InetPub\ftpfor the backed up file.
<TFTP server>Specify a desired destination directorybacked up file.
STEP 2: Display the Menu screen, and select S
STEP 3: Select Data Backup/Restore.Select an item by either of the following operati• Highlight an item by using or the UP/DOW
key, and then press , or the OK soft k
• Press key.
e: When the downloading process ends in failure,“Downloading Failed!” is displayed on the LCD.Check to see the following and then retry.
Check Points Actions
nload file is not ed in the specified tory.
Place the download file in the specified directory.
ferent file name is ified between 30 Series and FTP/P server.
Set the same file name from both DT830 Series and FTP/TFTP server.
rrect IP address of /TFTP server has entered from the hone.
Set the proper IP address of FTP/TFTP server.
power to FTP/P server or network pment is OFF.
Turn on the power.
cable is onnected.
Reconnect the cable securely.
Exit
Download Complete!
Note: For details on the FTP/TFTP service, conSystem administrator.
3
3

STE
STE
up/Re-
STEP
STEP
ons.N soft
ey.
77
P 4: Select Protocol.Select an item by either of the following operations.• Highlight an item by using or the UP/DOWN soft
key, and then press , or the OK soft key.
• Press key.
P 5: Select a protocol used by the destinationserver.Select an item by either of the following operations.• Highlight an item by using or the UP/DOWN soft
key, and then press or the OK soft key.
• Press or key, and then press or the OK
soft key.
STEP 6: The display goes back to the Backstore screen.
When FTP is selected here, go to 7.
When TFTP is selected here, go to15.
STEP 7: Select FTP Settings.Select an item by either of the following operati• Highlight an item by using or the UP/DOW
key, and then press , or the OK soft k
• Press key.
12
[Setting]
3OKMenu
User SettingDownload
Data Backup/Restore
4
4
12
[Backup/Restore]
34
OKBack
Data BackupData Restore
Server Address
5 FTP SettingsProtocol
1 2
12
[Protocol]
OKBack
TFTP
FTP
1
2
5
5
12
[Backup/Restore]
34
OKBack
Data BackupData Restore
Server Address
5ProtocolFTP Settings

STE
STE
STE
s, then
ettings
ons.N soft
ey.
Not
e HOW Basic
78
P 8: Select User ID.Select an item by either of the following operations.• Highlight an item by using or the UP/DOWN soft
key, and then press , or the OK soft key.
• Press key.
P 9: Enter a User ID by using digit keys, thenpress or the OK soft key.
P 10:The display goes back to the FTP Settingsscreen. Select Password.Select an item by either of the following operations.• Highlight an item by using or the UP/DOWN soft
key, and then press , or the OK soft key.
• Press key.
STEP 11:Enter a password by using digit keypress or the OK soft key.
STEP 12:The display goes back to the FTP Sscreen. Select Folder.Select an item by either of the following operati• Highlight an item by using or the UP/DOW
key, and then press , or the OK soft k
• Press key.
e: For details on character entry method, see HOWTO INPUT CHARACTERS in chapter 4 BasicOperation.
1
1
12
[FTP Settings]
3OKBack
PasswordFolder
User ID
[User ID]
OKBackBK
AInput a user ID.
2
2
Note: For details on character entry method, seTO INPUT CHARACTERS in chapter 4Operation.
12
[FTP Settings]
3OKBack
Folder
User IDPassword
OKBackBK
A[Password]Input a password.
3
3

STE
STE
ons.N soft
ey.
n FTP/ IP ad-08*205
or
Not
79
P 13:Enter the destination directory of the FTP/TFTP server and then press or the OKsoft key.
P 14:The display goes back to the FTP Settingsscreen. Press or the Back soft key to dis-play the Backup/Restore screen.
STEP 15:Select Server Address.Select an item by either of the following operati• Highlight an item by using or the UP/DOW
key, and then press , or the OK soft k
• Press key.
STEP 16:Enter the IP address of the destinatioTFTP server. For example, to set thedress of 10.41.208.205, enter 10*41*2[separate with an asterisk (*)].
After entering the IP address, press the OK soft key.
e: For details on character entry method, see HOWTO INPUT CHARACTERS in chapter 4 BasicOperation.
12
[FTP Settings]
3OKBack
User IDPassword
Folder
OKBackBK
A[Folder]Input a folder name.
12
[FTP Settings]
3OKBack
Folder
User IDPassword
3
3
12
[Backup/Restore]
34
OKBack
Data BackupData Restore
5 FTP SettingsProtocolServer Address
[Server Address]
OKBackBK
1‘*‘For‘.‘
. . .

STE
STE
ed
yed as
tart thep copy,nd then
Not
Not
e HOW Basic
”, “a-z”,s a file
BK soft
ss the
s while
80
P 17:The display goes back to the Backup/Re-store screen. Select Data Backup.Select an item by either of the following operations.• Highlight an item by using or the UP/DOWN soft
key, and then press , or the OK soft key.
• Press key.
P 18:The default file name is displayed as follows:
Press the Enc soft key to download the encryptbackup file. The encrypted backup file name is displa“PersonalData.tgz.ef”.
STEP 19:Press or the Exec soft key to sdata backup. While making a backuthe LCD displays “Uploading...” first a“Saving...”.
e: Do not change the extension of the backup file.The setting data of the telephone can only bebacked up as a.tgz file.
e: When changing the default file name, press theBK soft key once to delete the default file nameand then enter a new file name by using the digitskeys.
1
1
12
[Backup/Restore]
34
OKBack
Data Restore
5 FTP SettingsProtocolServer Address
Data Backup
ExecCancelBK
A[Data Backup]Input a folder name.
PersonalData.tgzEnc
Note: For details on character entry method, seTO INPUT CHARACTERS in chapter 4Operation.
Note: A maximum of 20 characters (“0-9”, “A-Z“*”, “#”, “.”, “-” or “_”) can be entered aname.
Note: To delete an entered character, press the key.
Note: If you make the unencrypted file, preNoEnc soft key.
Note: Be sure not to turn OFF the DT830 Serie“Saving...” is displayed on the LCD.
ExecCancelBK
A[Data Backup]Input a folder name.
PersonalData.tgz.efNoEnc

STE
GS
ersonalp file tocted to
of theinal.
e into IIS, e FTP
into a nd nload-
etting.
Not
A dspeDTTFTIncFTPbeeteleTheTFTequLANdis
tact the
81
P 20:After the data backup is complete, the displaychanges as follows:
The display goes back to the Backup/Restore screen with the Exit soft key.
• TO RESTORE PERSONAL SETTIN
The DT830 Series user can restore the psettings of the terminal. To download the backuthe telephone, the terminal needs to be conneFTP/TFTP server.
Before starting the download, the IP AddressFTP/TFTP server must be entered from the term
STEP 1: Set up the FTP/TFTP server.
<FTP server>Put the backup file you want to restorthe designated directory (for Windowsthe default is “C:\InetPub\ftproot”) of thserver.
<TFTP server>Put the backup file you want to restoredesired directory of the TFTP server athen specify it as the directory for dowing.
STEP 2: Display the Menu screen, and select S
e: When the data backup ends in failure, “UploadFailed!” is displayed on the LCD. Check to seethe following and then make a retry.
Check Points Actions
ifferent file name is cified between
830 Series and FTP/P server.
Set the same file name from both DT830 Series and FTP/TFTP server.
orrect IP address of /TFTP server has n entered from the phone.
Set the proper IP address of FTP/TFTP server.
power to FTP/P server or network ipment is OFF.
Turn on the power.
cable is connected.
Reconnect the cable securely.
Exit
Upload Complete!
Note: For details on the FTP/TFTP service, conSystem administrator.

STE
STE
r which
ons.N soft
the OK
up/Re-
STEP
STEP
82
P 3: Select Data Backup/Restore.Select an item by either of the following operations.• Highlight an item by using or the UP/DOWN soft
key, and then press , or the OK soft key.
• Press key.
P 4: Select Protocol.Select an item by either of the following operations.• Highlight an item by using or the UP/DOWN soft
key, and then press , or the OK soft key.
• Press key.
STEP 5: Select a protocol used by the servestores the backup file.Select an item by either of the following operati• Highlight an item by using or the UP/DOW
key, and then press or the OK soft key.
• Press or key, and then press or
soft key.
STEP 6: The display goes back to the Backstore screen.
When FTP is selected here, go to 7.
When TFTP is selected here, go to15.
3
3
12
[Setting]
3OKMenu
User SettingDownload
Data Backup/Restore
4
4
12
[Backup/Restore]
34
OKBack
Data BackupData Restore
Server Address
5 FTP SettingsProtocol
1 2
12
[Protocol]
OKBack
TFTP
FTP
1
2

STE
STE
STE
ettings
ons.N soft
ey.
e HOW Basic
83
P 7: Select FTP Settings.Select an item by either of the following operations.• Highlight an item by using or the UP/DOWN soft
key, and then press , or the OK soft key.
• Press key.
P 8: Select User ID.Select an item by either of the following operations.• Highlight an item by using or the UP/DOWN soft
key, and then press , or the OK soft key.
• Press key.
P 9: Enter the User ID by using digit keys, thenpress or the OK soft key.
STEP 10:The display goes back to the FTP Sscreen. Select Password.Select an item by either of the following operati• Highlight an item by using or the UP/DOW
key, and then press , or the OK soft k
• Press key.
5
5
12
[Backup/Restore]
34
OKBack
Data BackupData Restore
Server Address
5ProtocolFTP Settings
1
1
12
[FTP Settings]
3OKBack
PasswordFolder
User ID
Note: For details on character entry method, seTO INPUT CHARACTERS in chapter 4Operation.
[User ID]
OKBackBK
AInput a user ID.
2
2
12
[FTP Settings]
3OKBack
Folder
User IDPassword

STE
STE
STE
ettings to dis-
Not
e HOW Basic
84
P 11:Enter the password by using digit keys, thenpress or the OK soft key.
P 12:The display goes back to the FTP Settingsscreen. Select Folder.Select an item by either of the following operations.• Highlight an item by using or the UP/DOWN soft
key, and then press , or the OK soft key.
• Press key.
P 13:Enter the directory where the backup file isstored and then press or the OK soft key.
STEP 14:The display goes back to the FTP Sscreen. Press or the Back soft keyplay the Backup/Restore screen.
e: For details on character entry method, see HOWTO INPUT CHARACTERS in chapter 4 BasicOperation.
OKBackBK
A[Password]Input a password.
3
3
12
[FTP Settings]
3OKBack
User IDPassword
Folder
Note: For details on character entry method, seTO INPUT CHARACTERS in chapter 4Operation.
OKBackBK
A[Folder]Input a folder name.
12
[FTP Settings]
3OKBack
Folder
User IDPassword

STE
STE
STE
.ons.
N soft
ey.
as fol-
backupnnot be
ess thee namee digits
85
P 15:Select Server Address.Select an item by either of the following operations.• Highlight an item by using or the UP/DOWN soft
key, and then press , or the OK soft key.
• Press key.
P 16:Enter the IP address of the FTP/TFTP serverwhich stores the backup file. For example, toset the IP address of 10.41.208.205, enter10*41*208*205 [separate with an asterisk(*)].
After entering the IP address, press or the OK soft key.
P 17:The display goes back to the Backup/Re-
store screen. Select Data RestoreSelect an item by either of the following operati• Highlight an item by using or the UP/DOW
key, and then press , or the OK soft k
• Press key.
STEP 18:The default file name will be displayedlows:
3
3
12
[Backup/Restore]
34
OKBack
Data BackupData Restore
5 FTP SettingsProtocolServer Address
[Server Address]
OKBackBK
1‘*‘For‘.‘
. . .Note: Do not change the extension (.tgz) of the
file. If the extension is changed, the file carestored properly.
Note: When changing the default file name, prBK soft key once to delete the default filand then enter a new file name by using thkeys.
2
2
12
[Backup/Restore]
34
OKBack
Data Backup
5 FTP SettingsProtocolServer AddressData Restore
ExecCancelBK
A[Data Restore]Input a folder name.
PersonalData.tgzEnc

PresrestoThe “Pers
STE
mplete,
/
Not
Not
Not
Not
Not
failure,e LCD. a retry.
file in y.
e ries r.
dress
86
s the Enc soft key to download the encrypted re file. encrypted restore file name is displayed as onalData.tgz.ef”.
P 19:Press or the Exec soft key to start restor-ing the backup data to the telephone. Whiledownloading the backup data, the LCD dis-plays “Downloading...” first and then “Sav-ing...”.
STEP 20:After the downloading process is cothe display changes as follows:
The display goes back to the BackupRestore screen by the Exit soft key.
e: For details on character entry method, see HOWTO INPUT CHARACTERS in chapter 4 BasicOperation.
e: A maximum of 20 characters (“0-9”, “A-Z”, “a-z”,“*”, “#”, “.”, “-” or “_”) can be entered as a filename.
e: To delete an entered character, press the BK softkey.
e: If you change the encrypted file into the unen-crypted file, press the NoEnc soft key.
e: Be sure not to turn OFF the DT830 Series while“Saving...” is displayed on the LCD.
ExecCancelBK
A[Data Backup]Input a folder name.
PersonalData.tgz.efNoEnc
Note: When the downloading process ends in“Download Failed!” is displayed on thCheck to see the following and then make
Check Points ActionsDownload file is not placed in the specified directory.
Place the download the specified director
A different file name is specified between DT830 Series and FTP/TFTP server.
Set the same file namfrom both DT830 Seand FTP/TFTP serve
Incorrect IP address of FTP/TFTP server has been entered from the telephone.
Set the proper IP adof FTP/TFTP server.
The power to FTP/TFTP server or network equipment is OFF.
Turn on the power.
LAN cable is disconnected.
Reconnect the cablesecurely.
Exit
Download Complete!

SETDT4
• TThe of rin
STE
STE
0 - 12).ing key.
87
UP WITH MENU KEY FOR 30 SERIES
O CHANGE RINGER TONE VOLUME procedure below shows how to change the volumeger tone.
P 1: While indicating the current time on LCD,press key to open the Menu screen.Then, select Settings.Select an item by either of the following operations.• Highlight an item by using , and then press ,
or the OK soft key.
• Press key.
P 2: Select Ring Volume.Select an item by either of the following operations.• Highlight an item by using , and then press ,
or OK soft key.
• Press key.
STEP 3: Ring Volume can be set in 13 levels (Adjust the ringer tone volume by uskey and then press or the OK soft
Menu
3
3
12
[Menu]
3OKBack
DirectoryCall History
Settings
1
1
Turn the volume up.
Turn the volume down.
12
[Settings]
3
OKBack
Off Hook RingBack Light
45
HeadsetPeripherals
Ring Volume
[ ]
[Ring Volume]
OKBack

• TR
The off-h
STE
STE
, select
ons.s or
the OK
88
O ENABLE/DISABLE OFF-HOOK INGING
procedure below shows how to enable/disable theook ringing.
P 1: While indicating the current time on LCD,press key to open the Menu screen.Then, select Settings.Select an item by either of the following operations.• Highlight an item by using , and then press ,
or the OK soft key.
• Press key.
P 2: Select Off Hook Ring.Select an item by either of the following operations.• Highlight an item by using , and then press ,
or the OK soft key.
• Press key.
STEP 3: To disable/enable the off-hook ringingDisable or Enable.
Select an item by either of the following operati• Highlight an item by using , and then pres
the OK soft key.
• Press or key, and then press or
soft key.
Menu3
3
12
[Menu]
3OKBack
DirectoryCall History
Settings
2
2
Note: Default setting is Enable.
Note: The enabled item is highlighted.
12
[Settings]
3
OKBack
Back Light45
HeadsetPeripherals
Ring VolumeOff Hook Ring
1 2
1 2
Back OK
[Offhook Ring]
Disable12 Enable
2

• TThe back
The seco
STE
STE
t.ons.s or
the OK
the OK
t keys
t keys
89
O ENABLE/DISABLE BACKLIGHT following explains how to enable/disable the
lights of LCD and digit keys.
backlights illuminate (for approximately 10nds) when you press any key or lift the handset.
P 1: While indicating the current time on LCD,press key to open the Menu screen.Then, select Settings.Select an item by either of the following operations.• Highlight an item by using , and then press ,
or the OK soft key.
• Press key.
P 2: Select Back Light.Select an item by either of the following operations.• Highlight an item by using , and then press ,
or the OK soft key.
• Press key.
STEP 3: Make a selection from the following lisSelect an item by either of the following operati• Highlight an item by using , and then pres
the OK soft key.
• Press or key, and then press or
soft key.
STEP 4: After Making a selection, press or soft key.
Menu
3
3
12
[Menu]
3OKBack
DirectoryCall History
Settings
3
3
No. Menu Item Meaning
1 DisableBacklights of LCD and digiare disabled.
2 EnableBacklights of LCD and digiare enabled.
Note: Default setting is Enable.
Note: The enabled item is highlighted.
12
[Settings]
3
OKBack
45
HeadsetPeripherals
Ring VolumeOff Hook RingBack Light
1 2
2
Back OK
[Back Light]
12 Enable
Disable

• T
The ringin
STE
STE
set, se-
ons.s or
the OK
90
O SET RINGING OF HEADSET
procedure below shows how to enable/disable theg of headset.
P 1: While indicating the current time on LCD,press key to open the Menu screen.Then, select Settings.Select an item by either of the following operations.• Highlight an item by using , and then press ,
or the OK soft key.
• Press key.
P 2: Select Headset.Select an item by either of the following operations.• Highlight an item by using , and then press ,
or the OK soft key.
• Press key.
STEP 3: To disable/enable the ringing of headlect Disable or Enable.Select an item by either of the following operati• Highlight an item by using , and then pres
the OK soft key.
• Press or key, and then press or
soft key.
Menu
3
3
12
[Menu]
3OKBack
DirectoryCall History
Settings
4
4 Note: Default setting is Disable.
Note: The enabled item is highlighted.
12
[Settings]
3
OKBack
45 Peripherals
Ring VolumeOff Hook RingBack LightHeadset
1 2
1 2
Back OK
[Headset]
12 Enable
Disable
1

4This DT S
•••••••••••••••••
91
. BASIC OPERATION
chapter describes the following basic operation oferies.
TO LOGINTO LOGOUTDISPLAY ENLARGED CHARACTERSTO MAKE AN EXTERNAL CALLTO MAKE AN INTERNAL CALLTO ANSWER AN EXTERNAL CALLTO ANSWER AN INTERNAL CALLMULTILINE OPERATIONTO HOLD A CALLTO PLACE A CALL ON EXCLUSIVE HOLDTO TRANSFER A CALLHOW TO INPUT CHARACTERSHOW TO INPUT CHARACTERSSECURITY MODEEMERGENCY CALLXML APPLICATIONSCREEN POP-UP

TO
STE
STE
STE
hanges
rmationion is inhe sys-
92
LOGIN
P 1: When the login mode is activated, the tele-phone prompts for Login ID and Password.
P 2: Enter the login code and press the Set softkey.(Station number is used as the Login code.)
P 3: Enter the password and press the OK softkey.
STEP 4: If the login code is accepted, display cto a normal idle state.
DT830
Cancel Back Set OKPasswordLogin ID :
:-
Cancel Back Set OKPasswordLogin ID :
:31313
Cancel Back Set OKPasswordLogin ID :
:31313
*****
Note: The LCD can display the My Line info(name and station number) when the statan idle state. For details, please contact ttem administrator.
Mic NoDist >>>7:25 AM MON 11 MAY 2015
[31313 ]Ken Kobus

TOSTE
STE
STE
ht as a on thevailableplayeding theers”.
NotNot
racters”tact the
93
LOGOUT P 1: Press the preassigned Logout Feature key
on the terminal.
P 2: “LOGOUT?” is displayed on the LCD of theterminal.
P 3: Press the Logout Feature key again, or theLogout soft key on the terminal. The terminaldisplays the Login screen.
DISPLAY ENLARGED CHARAC-TERS This feature enables to display characters heigdouble height size for the terminal informationLCD. The indication of enlarged characters is afor 2nd line or 3rd line on the LCD. The line disas enlarged characters can be switched by usLine/Feature key for “Display Enlarged Charact
e: The following soft key location is an example.
e: The Logout key is assigned by the systemadministrator.
DT830
Mic NoDist Logout >>>7:25 AM MON 11 MAY 2015
7:25 AM MON 11 MAY 2015Logout >>>
LOGOUT?
Cancel Back Set OKPasswordLogin ID :
:-
Note: The feature key of “Display Enlarged Chais assigned at installation. For details, consystem administrator.
DT830

To SCha
By pcan size "EnlaCharThe ture.
• N
• E
• E
in Per-rmationile you a con-displaye infor-
receive
.g. 9.
tion is
garding CALL
C DIAL
r)
e
94
witch the Line Indicating Double Heightracters
ressing the soft key or the Line/Feature key, youswitch the characters displayed to double heightin the order of "Enlarged Characters (2nd line)" →rged Characters (3rd line)" → "No Enlargedacters".following shows an example when using this fea-
o Enlarged Characters
nlarged Characters (2nd line)
nlarged Characters (3rd line)
TO MAKE AN EXTERNAL CALL
When a dialed telephone number is registeredsonal Directory, the corresponding name infowill be displayed on LCD of DT830 Series whare hearing a ringback tone or are engaged inversation. According to the initial settings, the may differ from the following examples. For mormation, contact the system administrator.
STEP 1: Lift the handset or press key, a dial tone.
STEP 2: Dial the Central Office access code, e
Mic NoDist >>>7:25 AM MON 11 MAY 2015
31313
Mic NoDist >>>7:25 AM MON 11 MAY 2015
31313
Mic NoDist >>>
31313
7:25 AM MON 11 MAY 2015
Note: Personal Directory Name Display funcavailable only for DT830 Series.
Note: Here describes the Normal Dial Mode. Rethe other mode, see TO ORIGINATE AUSING SELECTIVE DIALING (DYNAMIPAD, PRESET DIAL) in Chapter 5.
DT830 DT430/410
Speaker
1:25 PM MON 11 MAY 2015Mic NoDist >>>
31313
My Line Information (Name and Station Numbe
Ken Kobus
1:25 PM MON 11 MAY 2015Mic PickUp CF-All >>>
9
Dialed Cod

STE
(w
STE
(w
• Wto
onal Di-
Not
associ-ne. Youally, Mying the
de
95
P 3: Dial desired telephone number.
hile hearing a ringback tone)
P 4: Use the handset or Mic to start a conversa-tion. Display indicates:
hile in a conversation)
hen the dialed number is registered in Personal Direc-ry
• When the dialed number is not registered in Persrectory
e: In the above case, a maximum of eight digits ofthe number (including “*”) can be displayed. If thedialed number exceeds eight digits, “the firstseven digits of the number” + “*” or “the lastseven digits of the number” + “*” are displayed.For more information, please contact the systemadministrator.
1:25 PM MON 11 MAY 20159XXXXXXXXX
Mic PickUp CF-All >>>
Dialed Code + Number
9XXXXXX*00:05
Elapsed Time
TOM JONESMic NoDist >>>
Dialed Code Name Informationregistered in Personal Directory + Number
Note: My Line is an actual line that is directly ated with station number of the telephocan make/answer a call via this line. UsuLine is seized automatically only by lifthandset or pressing the Speaker key.
00:05
Elapsed Time
Mic NoDist >>>
Dialed Co
9XXXXXXXXX
+ Number

TO
WheDirecplayeheartion. differtion,
STE
STE
(w• W
D
in Per-
nversa-
ersonal
Not
Not
DT8 mber
r
ber
96
MAKE AN INTERNAL CALL
n a dialed station number is registered in Personaltory, the corresponding name information is dis-d on the LCD of DT830 Series while you are
ing a ringback tone or are engaged in a conversa-According to the initial settings, the display may from the following examples. For more informa-contact the system administrator.
P 1: Lift the handset or press key, receivea dial tone.
P 2: Dial the desired station number. Display indi-cates digits dialed.
hile hearing a ringback tone)hen the dialed station number is registered in Personalirectory
• When the dialed station number is not registeredsonal Directory
STEP 3: Use the handset or Mic to start a cotion.
(while in a conversation)
• When the dialed station number is registered in PDirectory
e: Personal Directory Name Display function isavailable only for DT830 Series.
e: Here describes the Normal Dial Mode. About theother mode, see TO ORIGINATE A CALL USINGSELECTIVE DIALING (DYNAMIC DIAL PAD, PRE-SET DIAL) in chapter 5.
30 DT430/410
Speaker
1:25 PM MON 11 MAY 201531313
My Line Information (Name and Station Number)
Blink
Mic NoDist >>>
Ken Kobus
31314
Dialed Station Nu
Mic >>>MARY HARRIS
Name Information registeredin Personal Directory
1:25 PM MON 11 MAY 201531314
Dialed Station Numbe
Mic >>>
31314
Dialed Station Num
Name Informationregistered in Personal Directory
Mic NoDist >>>MARY HARRIS
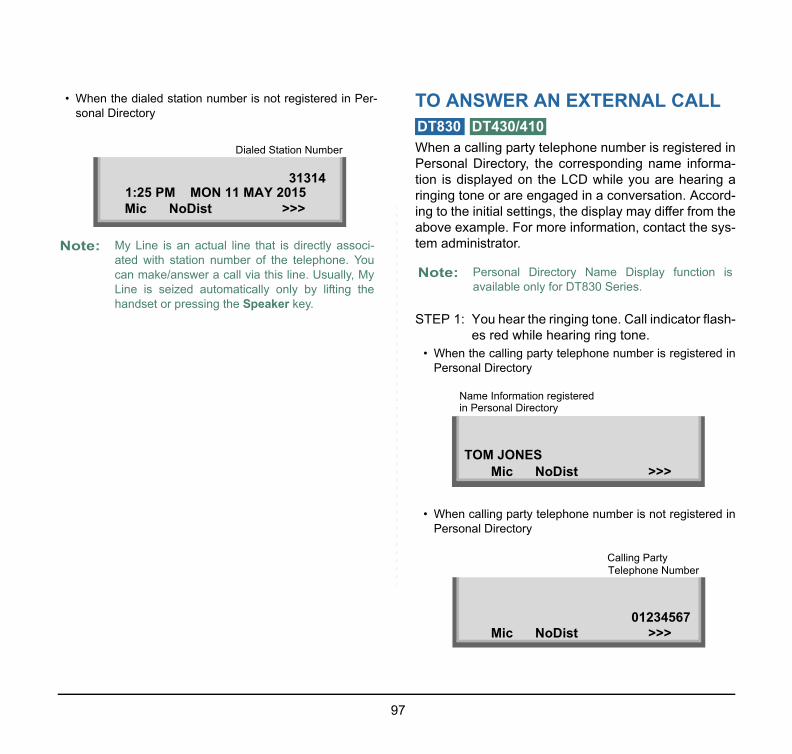
• Wso
LL
tered informa-aring accord-
rom thehe sys-
r flash-
tered in
tered in
Not
tion is
r
97
hen the dialed station number is not registered in Per-nal Directory
TO ANSWER AN EXTERNAL CA
When a calling party telephone number is regisPersonal Directory, the corresponding name intion is displayed on the LCD while you are heringing tone or are engaged in a conversation. Aing to the initial settings, the display may differ fabove example. For more information, contact ttem administrator.
STEP 1: You hear the ringing tone. Call indicatoes red while hearing ring tone.
• When the calling party telephone number is regisPersonal Directory
• When calling party telephone number is not regisPersonal Directory
e: My Line is an actual line that is directly associ-ated with station number of the telephone. Youcan make/answer a call via this line. Usually, MyLine is seized automatically only by lifting thehandset or pressing the Speaker key.
1:25 PM MON 11 MAY 201531314
Dialed Station Number
Mic NoDist >>>
Note: Personal Directory Name Display funcavailable only for DT830 Series.
DT830 DT430/410
TOM JONES
Name Information registeredin Personal Directory
Mic NoDist >>>
01234567Mic NoDist >>>
Calling Party Telephone Numbe
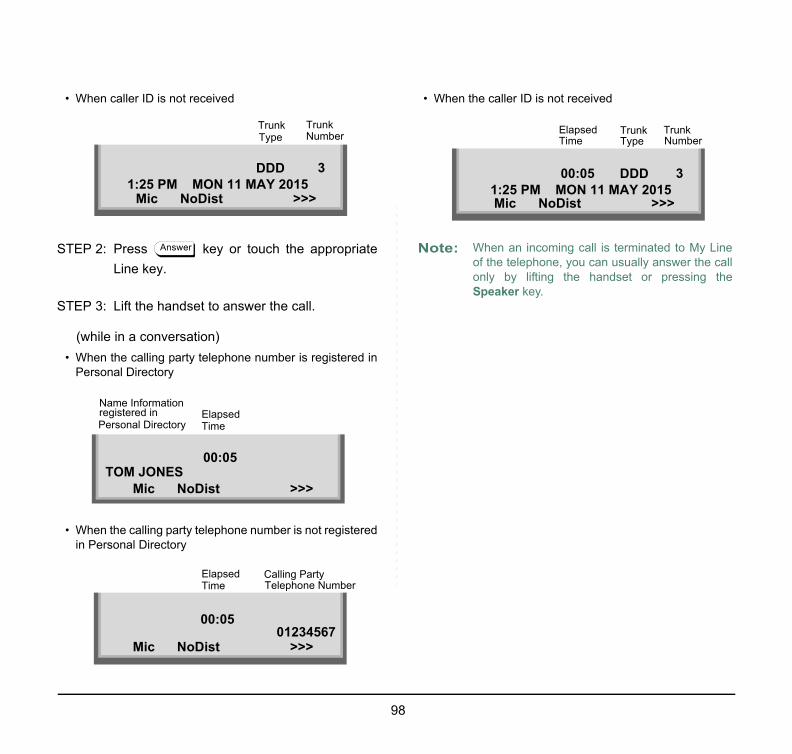
• W
STE
STE
(w• W
P
• Win
y Line the calling the
er
98
hen caller ID is not received
P 2: Press key or touch the appropriateLine key.
P 3: Lift the handset to answer the call.
hile in a conversation)hen the calling party telephone number is registered in
ersonal Directory
hen the calling party telephone number is not registered Personal Directory
• When the caller ID is not received
1:25 PM MON 11 MAY 2015DDD 3
Trunk Trunk NumberType
Mic NoDist >>>
Answer
TOM JONES
Name Information
Personal Directory
Mic NoDist >>>
registered in
00:05
ElapsedTime
Calling Party
Mic NoDist >>>
Telephone Number
00:05
ElapsedTime
01234567
Note: When an incoming call is terminated to Mof the telephone, you can usually answeronly by lifting the handset or pressSpeaker key.
1:25 PM MON 11 MAY 2015DDD 3
Trunk TrunkNumbType
Mic NoDist >>>
00:05
ElapsedTime

TOThe inter
Whesonadisplheartion. differconta
STE
• WD
• Wso
ropriate
onal Di-
ersonal
Not
y Line the calling the
tation
tion
99
ANSWER AN INTERNAL CALL following procedure explains how to answer annal call routed to My Line of the telephone.
n a calling station number is registered in Per-l Directory, the corresponding name information isayed on the LCD of DT830 Series while you areing a ringing tone or are engaged in a conversa-According to the initial settings, the display may from the above example. For more information,ct the system administrator.
P 1: You hear the ringing tone. Call indicator flash-es red while hearing ring tone.
hen the calling station number is registered in Personalirectory
hen the calling station number is not registered in Per-nal Directory
STEP 2: Press key or touch the appLine key.
STEP 3: Lift the handset to answer the call.
(while in a conversation)• When calling station number is registered in Pers
rectory
• When calling station number is not registered in PDirectory
e: Personal Directory Name Display function isavailable only for DT830 Series.
Name Information registeredin Personal Directory
Mic >>>MARY HARRIS
31314
Calling Station Number
Calling Station Number
1:25 PM MON 11 MAY 201531314
Mic >>>
Note: When an incoming call is terminated to Mof the telephone, you can usually answeronly by lifting the handset or pressSpeaker key.
Answer
Name Information
Personal Directory registered in
31314
Calling SNumber
Mic >>>MARY HARRIS
Calling StaNumber
1:25 PM MON 11 MAY 201531314
Mic >>>

MU
You presothe
To OSTE
STE
STE
To A
STE
STE
STE
y wink
dset to
Recall
nd ring call on
DT8
associ-
ce can
n yourows as
flashinged LED
0
100
LTILINE OPERATION
can answer an incoming call to the other station tos the MULTILINE key (which is preassigned ther station number).
riginate a CallP 1: Press the MULTILINE key.
P 2: Lift the handset or press key. Dial theCentral Office access code (i.e.9 (US), 0(Aust)).
P 3: Dial the desired number.
nswer a Call
P 1: Press the MULTILINE key (ringing and flash-ing LED alert user to incoming call).
P 2: Lift the handset or press key.
P 3: Speak with the incoming party.
TO HOLD A CALL
STEP 1: Press key. The held line keflashes.
To RetrieveSTEP 1: Lift the handset or press key.
STEP 2: Press the held line key. Use the hanconverse.
If unansweredSTEP 1: After preprogrammed time, Automatic
is initiated.
STEP 2: Visual and audible signal (rapid flash aburst) is sent to the station that placedhold.
30 DT430/410
Speaker
Speaker
Note: If held line appears on other stations, theated LED flashes red slowly.
Note: Any station with this line key appearanretrieve the call.
Note: Hold shows as a flashing green LED ophone. The same line on other phones sha flashing red LED. Recall shows as a green LED on your phone and flashing ron other phones with the same line.
DT830 DT430/41
HOLD
Mic >>>
Held Station Number
2001HOLD1:25 PM MON 11 MAY 2015
Speaker

TOHO
STE
To RSTE
STE
If unSTE
STE
o hold.
rrupted
ang up
tation’sipient’s
Not
Not
e from showse. Theolid red
r
101
PLACE A CALL ON EXCLUSIVE LD
P 1: Press key twice. The line key appear-ance indicates interrupted wink.
etrieveP 1: Lift the handset or press key.
P 2: Press the held line key. Use the handset toconverse.
answeredP 1: After preprogrammed time, Automatic Recall
is initiated.
P 2: Visual and audible signal (rapid flash and ringburst) is sent to the station which placed callon Exclusive Hold. Recall shows as a flash-ing green LED on your phone, and solid redon other phones with same line.
TO TRANSFER A CALL
STEP 1: After conversing, ask the other party t
STEP 2: Press key. Receive an intedial tone.
STEP 3: Dial destination station’s extension, hor wait for answer.
STEP 4: If transferring party hangs up, that snumber appears in the center of recdisplay.
e: If held line key appears on other stations, LEDremains steadily lit red.
e: Only the terminal that set Exclusive Hold optioncan retrieve the call.
DT830 DT430/410
HOLD
Mic >>>
Held Station Number
2001E_HOLD1:25 PM MON 11 MAY 2015
Speaker
Note: Exclusive Hold excludes any other phonpicking up your held call. Exclusive Holdas a flashing green LED on your phonsame line on other phones appears as a sLED.
DT830 DT430/410
Transfer
Mic >>>1:25 PM MON 11 MAY 2015
TRANSFER
Mic >>>1:25 PM MON 11 MAY 2015
TRANSFER 2001
or trunk numbeTransferred station
Mic >>>1:25 PM MON 11 MAY 2015
TRANSFER 2000 DDD 3
Transferring station

HOHere
• CW habeticc ged byp
T
K
102
W TO INPUT CHARACTERS explains how to enter characters on the text input screen such as Name or User ID, etc.
haracter Entry Modehen entering characters from the telephone set, the following three modes are available: uppercase alp
haracter, lowercase alphabetic character and numeric character. The character entry mode can be chanressing key (alphabetic/numeric) or from the Sub Menu screen (uppercase/lowercase).
he enabled entry mode is indicated in the top portion of the LCD screen.
DT830
Uppercase Alphabetic Lowercase Alphabetic
Numeric Character Mode
By pressing “*” key
Indicates the enabled character mode. (DT830 only)
Input a name.[Name]
OKBackOptionBK
AAInput a name.[Name]
OBackOptionBK
Aa
Input a name.[Name]
OKBackOptionBK
A1
12
Word-width
SubMenu
345678
PasteSpace
Change-word
OKCancel
Cut
DeleteCopy
ReturnOverwrite/Insert
910
Word-case
Character ModeCharacter ModeSelect “2 Word-case” to switchbetween uppercase and lowercase.
or from Sub Menu (select “1 Change-word”)

T played.A
103
o display the Sub Menu screen, press the Help key or Option soft key while the text input screen is dislso, the following operations are available from the Sub Menu screen.
Sub Menu Items Descriptions
Change-word Change character entry mode between uppercase alphabetic, lower-case alphabetic and numeric character.
Word-case Switch between uppercase and lowercase.Word-width Not used.Delete Delete a single character.Copy Copy the specified characters.Cut Cut the specified characters.Paste Paste the specified characters.Space Enter a space.Return Start a new line.Overwrite/Insert Write over existing characters.
12
Word-width
SubMenu
345678
PasteSpace
Change-word
OKCancel
Cut
DeleteCopy
ReturnOverwrite/Insert
910
Word-case

• C
<
DIGKE 13th
1
2
3
4
5
6
7
8
9
0
104
haracter Code List
Character Code For English (1/2)>
IT Y
CASE SHIFT 1st 2nd 3rd 4th 5th 6th 7th 8th 9th 10th 11th 12th
. , \ 1 ? ! @ : ;
A B C 2a b c 2D E F 3d e f 3G H I 4g h i 4J K L 5
j k l 5M N O 6m n o 6P Q R S 7p q r s 7T U V 8t u v 8
W X Y Z 9w x y z 9
[SP] 0
A
aAaA
a
A
a
A
a
A
a
A
a
A
a
A
a
A
a

<
N
105
Character Code For English (2/2)>
1st 2nd 3rd 4th 5th 6th 7th 8th 9th 10th
Note1
# . / : ~ ! @ $ %
11th 12th 13th 14th 15th 16th 17th 18th 19th 20th
^ & ( ) ' ? _ + -
21th 22th 23th 24th 25th 26th 27th 28th 29th 30th
= [ ] { } < > , ; \
Note1Used as a case shift key. Shifts the characters between alphabetic and numeric.
ote1: and keys are the same for Russian, Turkish and other Languages.
#
A
a
A
a
A
a
#

<
DK 5th
¡
N
106
Character Code For Russian>
IGIT EY
CASE SHIFT 1st 2nd 3rd 4th 5th 6th 7th 8th 9th 10th 11th 12th 13th 14th 1
. , : ! ? + - % & / ( ) = ¿
A Б В Га б в гД Е Ё Ж Зд е ё ж зИ Й К Ли й к лМ Н О Пм н о пР С Т Ур с т уФ Х Ц Чф х ц чШ Щ Ъ Ы Ьш щ ъ ы ьЭ Ю Яэ ю я
[SP]
ote: and keys are the same for English. Refer to the <Character Code For English (2/2)>.
1A
a
2 Aa
3A
a
4A
a
5A
a
6 A
a
7A
a
8A
a
9A
a
0A
a
#

<
DK 5th
¡
N
107
Character Code For Turkish>
IGIT EY
CASE SHIFT 1st 2nd 3rd 4th 5th 6th 7th 8th 9th 10th 11th 12th 13th 14th 1
. , : ! ? + - % & / ( ) = ¿
A B C Ça b c çD E Fd e fG Ğ H I İg ğ h I iJ K Lj k l
M N O Öm n o öP R S Şp r s ş
T U Ü Vt u ü vY Zy z
[SP]
ote: and keys are the same for English. Refer to the <Character Code For English (2/2)>.
1A
a
2 Aa
3A
a
4 A
a
5 Aa
6A
a
7A
a
8 Aa
9 Aa
0 Aa
#

<
DK 5th
¡
N
108
Character Code For Other Languages>
IGIT EY
CASE SHIFT 1st 2nd 3rd 4th 5th 6th 7th 8th 9th 10th 11th 12th 13th 14th 1
. , : ! ? + - % & / ( ) = ¿
A B C À Á Â Ã Ä Å Æ Ça b c à á â ã ä å æ çD E F È É Ê Ëd e f è é ê ëG H I Ì Í Î Ïg h i ì í î ïJ K Lj k l
M N O Ñ Ò Ó Ô Õ Ö Œ Øm n o ñ ò ó ô õ ö œ øP Q R S ßp q r s ßT U V Ù Ú Û Üt u v ù ú û ü
W X Y Zw x y z
[SP]
ote: and keys are the same for English. Refer to the <Character Code For English (2/2)>.
1A
a
2 Aa
3A
a
4 A
a
5Aa
6A
a
7A
a
8 Aa
9 Aa
0 Aa
#

<
DK 5th
\
N
109
Number Code>
IGIT EY
CASE SHIFT 1st 2nd 3rd 4th 5th 6th 7th 8th 9th 10th 11th 12th 13th 14th 1
1
2
3
4
5
6
7
8
9
0
* # . @ / ( ) , - _ : ‘ ~ &
Used as a case shift key. Shifts the characters between alphabetic and numeric.
ote: When entering password, “0-9”, “*” and “#” are available.“#” is entered by pressing key.
“*” is entered by pressing key.
1 1
2 1
3 1
4 1
5 1
6 1
7 1
8 1
9 1
0 1
# 1
1
#

• CAl
STE
STE
b Menu
110
haracter Entry Methods an example of character entry method, the fol-
owing shows how to enter “Ken Kobus”.
P 1: Press key twice to enter “K”.
P 2: Press the Help key or Option soft key to dis-play Sub Menu screen, and then select
Word-case to switch the text input modefrom uppercase to lowercase.
STEP 3: Press or the OK soft key on the Suto go back to text input screen.
STEP 4: Enter “en” by using digit keys.Press key twice to enter “e”.Press key twice to enter “n“.
STEP 5: Press key once to enter a space.
5
Input a name.[Name]
OKBackOptionBK
A
K
2
12
Word-width
SubMenu
345678
PasteSpace
Change-word
OKCancel
Cut
DeleteCopy
ReturnOverwrite/Insert
910
Word-case
Input a name.[Name]
OKBackOptionBK
a
K
36
Input a name.[Name]
OKBackOptionBK
a
Ken
0
Input a name.[Name]
OKBackOptionBK
a
Ken

STE
STE
to dis- selectt mode
111
P 6: Press the Help key or Option soft key to dis-play Sub Menu screen, and then select
Word-case to switch the text input modefrom lowercase to uppercase.
P 7: Press or the OK soft key on the Sub Menuto go back to text input screen.
STEP 8: Press key twice to enter “K”.
STEP 9: Press the Help key or Option soft keyplay Sub Menu screen, and then
Word-case to switch the text inpufrom uppercase to lowercase.
2
12
Word-width
SubMenu
345678
PasteSpace
Change-word
OKCancel
Cut
DeleteCopy
ReturnOverwrite/Insert
910
Word-case
Input a name.[Name]
OKBackOptionBK
A
Ken
5
Input a name.[Name]
OKBackOptionBK
A
Ken K
2
12
Word-width
SubMenu
345678
PasteSpace
Change-word
OKCancel
Cut
DeleteCopy
ReturnOverwrite/Insert
910
Word-case

STE
STE
STE
racters
.
, select,
112
P 10:Press or the OK soft key on the Sub Menuto go back to text input screen.
P 11:Enter “obus” by using digit keys.Press key three times to enter “o”.Press key twice to enter “b“.Press key twice to enter “u”.Press key four times to enter “s“.
P 12:Press or the OK soft key.
• To Overwrite Characters
STEP 1: Place the cursor at the left of the chato be overwritten.
STEP 2: Press the Help key or Option soft key
STEP 3: On the following Sub Menu screenOverwrite/Insert and then press
or the OK soft key.
Input a name.[Name]
OKBackOptionBK
a
Ken K
6287
Input a name.[Name]
OKBackOptionBK
a
Ken Kobus
Input a name.[Name]
OKBackOptionBK
A
ABCDE
10
12
Word-width
SubMenu
345678
PasteSpace
Change-word
OKCancel
Cut
DeleteCopy
Return910
Word-case
Overwrite/Insert

STE
• TSTE
STE
t of then press
113
P 4: Enter new words over existing characters. Inthis example, “F” is entered.
o Copy and Paste CharactersP 1: While characters which you want to copy are
displayed, the Help key or Option soft key.
P 2: On the Sub Menu screen, press or the OKsoft key while Copy is highlighted, orpress key.
STEP 3: Place the cursor at the starting pointarget characters by using and thethe Start soft key.
Input a name.[Name]
OKBackOptionBK
A
ABFDE
Input a name.[Name]
BackBK
A
ABCDEOption OK
55
12
Word-width
SubMenu
345678
PasteSpace
Change-word
OKCancel
Cut
Delete
Return910
Word-case
Overwrite/Insert
Copy
Input a name.[Copy]
BackStart
A
ABCDE

STE
STE
Pastekey. (or
rted as
114
P 4: Place the cursor at the end point of the targetcharacters and then press the End softkey.
P 5: Place the cursor at position where you wantto paste the copied characters and then pressthe Help key or Option soft key.
STEP 6: On the Sub Menu screen, select and then press , or the OK soft press key.)
STEP 7: The copied characters “CD” are insefollows:
Input a name.[Copy]
BackEnd
A
ABCDE
Input a name.[Name]
BackBK
A
ABCDEOption OK
7
7
12
Word-width
SubMenu
345678 Space
Change-word
OKCancel
Cut
Delete
Return910
Word-case
Overwrite/Insert
Copy
Paste
Input a name.[Name]
BackBK
A
CDABCDEOption OK

SECBy inforlocke
ou cansetting,erminal
g mes-
DT830
Not
Not
Not
Not
vailable. Whende withan con-l opera-
reason ne is leased.
115
URITY MODE pressing the Security key, you can preventmation leakage from terminal. While the terminal isd, Security Lamp lights up.
• To Lock the TelephoneBefore placing DT830 Series in Security mode, yset a password. For details on the password see TO CHANGE PASSWORD in chapter 3 TSetup.
STEP 1: Press the Security key. The followinsage is displayed on LCD.
STEP 2: Press or the OK soft key to placeSeries in Security mode.
e: The Security key must be programmed inadvance. For the programming of the Securitykey, contact the system administrator.
e: For using the feature of the terminal in collabora-tion with a mobile phone, the terminal cannot beplaced in Security mode pressing the Securitykey. For details, contact the system administrator.
e: When the system administrator invalidates the security mode, this function cannot be used. For details of the security mode, contact the system administrator.
e: While the telephone is locked, keybecomes disabled. Also, any features providedby the Telephony Server, such as call originationor call answering, cannot be performed.(TheIncoming call cannot be picked up though "Ring-ing" or "Voice call" are possible.) It is necessaryto release the security mode to respond.
DT830
Security lock will be released.Please input a password.
BK OKCancel
Menu
Note: To make a call of VOICE CALL is atoward a called party in the Security modea called party activates the Security moleaving its Mic to ON, the called party cverse with a calling party though termination is restricted.
Note: Even when the telephone is reset for any (such as power-off, etc.) while the telephoplaced in security mode, the lock is not re
Security Lock?
OKCancel

STE
• TSTE
•
•
or theuished
the fol-t case,
y.
sswordessage
he tele- will be, make
tact the
116
P 3: When DT830 Series is placed in Securitymode, Security Lamp lights red and thescreen saver will be activated.
o Unlock the TelephoneP 1: Display the Password Entry screen by either
of the following operations.
Press any key while the screen saver isactivated.Press the Security key while the screen saveris activated.
STEP 2: Enter the password and then press OK soft key. Security Lamp is extingand Security Mode is canceled.
Security Lock
Security lock will be released.
OKCancel
Please input a password.
BK
Note: When the password entry ends in failure,lowing error message is issued. In tha
press or the OK soft key and then retr
Note: After a third attempt (if incorrect paentered three times), the following error m
is issued. Press or the OK soft key. Tphone locks up, and any key operationdisabled for 10 minutes. After 10 minutesa retry.
Note: If you forget the password, please consystem administrator.
Password Error.
OKCancel
Retry?
Incorrect security code
OK
password entered.

EMYou telepSecutelep
STE
ber by
andset.ecurity
Not
Not
Not
Not
e set incy tele-inistra-
rminedhan thedialed,
ew sec-rgency
ting anafter 60
117
ERGENCY CALL can make a call to a predetermined emergencyhone number while the telephone is locked (inrity mode). This function is available on thehone with the Security key.
P 1: Lift the handset while the telephone is locked(the screen saver is activated).
STEP 2: Dial an emergency telephone numpressing digit keys(0-9, *, #).
STEP 3: After a conversation, replace the hThe LCD turns to time display. Then, Smode is released.
e: You can make an emergency call to only the pre-determined number. For details on the setting ofthe emergency number, contact the systemadministrator.
e: When using Emergency Call, you can use thefeature of the terminal in collaboration with amobile phone until the terminal is placed in Secu-rity mode.
e: Emergency Call cannot be made with theSpeaker key.
e: When pressing the Unlock soft key, the tele-phone prompts for the Security mode cancella-tion password.
DT830
Dial Emergency Number Only
Unlock
Note: Emergency telephone number needs to badvance. For the setting of the emergenphone numbers, contact the system admtor.
Note: You can make a call to only the predetenumber. When telephone numbers other tpredetermined emergency number are the following message appears (after a fonds, the display goes back to "Dial EmeNumber Only” screen).
Note: If Security Lock is not set after originaEmergency Call, Security Lock will be set minutes from releasing Security mode.
Invalid Dial.911

XMDT83the exterservi
Also4 apscreedisplcall wsusp
The fromrelat
• TWhewhicauto
icons,
creen.
yed on
display
118
L APPLICATION 0 has an XML browser function. You can display
information of XML application installed in annal server onto the LCD of DT830 and use variousces in collaboration with the XML application.
, it is possible to launch multiple applications (up toplications) simultaneously, and you can switch then quickly. If you receive an incoming call while
aying an application screen, you can answer theithout exiting the application. You can restart the
ended application by pressing an icon of itself.
following explains how to start the XML application DT830. For more information, refer to manualsing to XML applications.
o start up XML applicationn you start up the phone, the application screen,h is registered as home URL, is displayedmatically.
• To switch XML applicationsFrom the menu screen displays XML applicationXML applications can be switched.
STEP 1: Press key to display the menu s
The icons of running XML applications are displathe menu screen.
STEP 2: Select an application icon you want toon the menu screen.
DT830
Menu
History
Directory
Setting
Portal
Service
XML-1
XML-2
XML-3

• TWhilExit appliapplifrom
• WYou Portanotificurre
Whilexec
on exiturrentlyrtal are to exit
unch a
econds trial ofatically
119
o exit XML applicationse an XML application screen is displayed, press
key to exit the application. After the XMLcation is exited, the icons of the runningcations are aligned to the top of the Menu screen the above.
hen a fifth application is launchedcan launch up to four XML applications includingl at a time. If you try to launch a fifth application, acation message to ask you to exit one of thently running applications is displayed.
e this error message is displayed, you cannotute any operations on XML applications.
When you press the Next key, the applicatiscreen appears. On the exit screen, the crunning XML application icons excluding Podisplayed. Select an application icon you wantand then press icon.
The selected application exits. Now, you can lanew application.
History
Directly
Setting
Portal
Service
XML-1
XML-3
4 windows already set!You need to close 1 window.
NextCancel
Note: If you do not operate anything for 10 safter an error message is displayed, thelaunching the new application is automcanceled.
Please close 1 window.
XML-2
XML-3
XML-1Can you choose among below?
History
Directory
Setting
Portal
Service
XML-1
XML-2
XML-3

SCWhescreedisplthe in
• TSTE
STE
STE
s.
120
REEN POP-UP n you receive an incoming call while an applicationn (History, Directory, or XML application) is
ayed, you can suspend the application and answercoming call.
o set the screen pop-up functionP 1: Press key to display the menu screen.
Then, select Setting.
P 2: Select User Setting.Select an item by one of the following operations.• Highlight an item by using or the UP/DOWN soft
key, and press , or the OK soft key.• Press key.
P 3: Select Usability.Select an item by one of the following operations.• Highlight an item by using or the UP/DOWN soft
key, and press , or the OK soft key.• Press key.
STEP 4: Select Help Key Mode.Select an item by one of the following operation• Press , or the OK soft key.• Press key.
DT830
Menu
1
1
12
Data Backup/Restore
[Setting]
3Download
OKBack
User Setting
7
7
12
[User Setting]
34567
Change Password
Peripherals
OKBack
Security
Incoming CallTalk
Display
Usability
1
1
1
[Usability]
OKBack
Help Key Mode

STE
• TThe displcall w
STE
firm in-elp Key to dis-oft keyPop-up
ck the
you doe list ofscreen.n press
ndset. .
Me1 Su2 PoWin
ing the
121
P 5: Select a desired mode of the Help key.Select an item by one of the following operations.• Highlight an item by using or the UP/DOWN soft
key, and press or the OK soft key.• Press key, and press or the OK soft key.
o use the screen pop-up functionfollowing shows an example of an operation toay a pop-up screen when you receive an incominghile an application screen is being displayed.
P 1: When you receive an incoming call while ed-iting a name list on Directory Menu, call indi-cator lamp and line key flash red.
STEP 2: To open the pop-up screen and concoming call number, when you set HMode as Sub Menu, press keyplay the menu screen and press the s1. When you set Help Key Mode as Window, press the Help key.
The screen is displayed and you can cheincoming call information.
To answer the incoming call, lift the handset. Ifnot answer the call and continue to edit the namDirectory, press key to display the menu And highlight Directory icon using , and the
key.
When you finish a conversation, hang up the haAnd you can go back to the screen of Directory
nu Item Meaningb Menu Set the Help key which displays sub menu pup
dowSet the Help key which displays pop-up window
2
1
[Help Key Mode]
OKBack
Popup Window SubMenu
2
Answer
Line key Answer key Call Indicator Lamp
Note: Pop-up screen cannot be closed by pressExit key.
Menu
12345
Mic NoDist
Menu
Input a name.[Name]
BackBK
A
ABCDEOption OK

5TOSEL(DYDIA
Dyn
STE
STE
STE
it keys
top of
lift the
Notthe fol-
it.
122
. FEATURE OPERATION
ORIGINATE A CALL USING ECTIVE DIALINGNAMIC DIAL PAD, PRESET L)
amic Dial Pad
P 1: Enter desired telephone number (Digit keys0-9, *, and #).
P 2: LED on key lights. Here the key touchtone.
P 3: The dialed number appears on the top ofLCD.
Preset Dial
STEP 1: Enter desired telephone number (Dig0-9, *, and #).
STEP 2: The dialed number appears on theLCD.
STEP 3: Lift handset or press key.
- OR -
STEP 3: Press the originating Line key and handset.
e: Pressing the Speaker key or going off-hook is notnecessary.
DT830 DT430/410
Speaker
2000
Mic >>>1:25 PM MON 11 MAY 2015
Note: DTZ-2E-3 is not supported.
Note: Originating call operation is cancelled by lowing soft key operation;- Press the Exit key or the Cnl key.- Press the Clr key, and cancel by one dig
DT830 DT430/410
2000 Clr Cnl
Input Dial Number
Speaker

TO CA(ON
STE
To P(AvaCalli
STE
STE
STE
STE
To VSTE
STE
STE
d Call-
follows.ation islayed.
uch tic,
DT8
feature. (! dis-
key aslays on
ey afterLCD.)
feature
e usedaccess a sys-
trator.on withan pro-ension.
REG- CALL-
123
ORIGINATE A CALL USING SPEED LLINGE-TOUCH SPEED CALLING KEYS)
P 1: Press the desired One-Touch Speed Call-ing key, or press key and One-TouchSpeed Calling key.
rogramilable only on the terminal with One-Touch Speed ng key.)
P 2: Press key.
P 3: Press the desired One-Touch Speed Call-ing key.
P 4: Enter the desired telephone number or fea-ture access code on the keypad.Display indicates the digits dialed.
P 5: Press key again to save the number.
erifyP 2: Press key.
P 3: Press the desired One-Touch Speed Call-ing key.
P 4: Display indicates digits programmed.
LCD Indication of DESI-less screenSTEP 1: Press the desired One-Touch Spee
ing key and originate a call.Registered name will be displayed as For the key to which no name informregistered, the character “SPD” is disp
When a registering Name Information of One-toSpeed Calling, you can use uppercase alphabeuppercase European or lowercase European characters.
30 DT430/410
Speaker
Feature
Feature
SPEED SET1:25 PM MON 11 MAY 2015
Mic NoDist >>>
Feature
Note: To program a hook switch for transfer or activation, press key as first digitplays on LCD.)
Note: To program a pause, press the any digit other than the first digit. (– dispLCD.)
Note: To program a Voice Call, press kdialing station number. (Voice displays on
Note: The One-Touch Speed Calling key for access:The One-Touch Speed Calling key may bas a feature key by storing the feature code. The features may be programmed ontem basis by the Telephony Server adminisAccess codes may be stored in conjunctitelephone numbers. For example, you cgram one button to transfer to a certain ext
Note: For details of available characters, see TOISTER NAME ON ONE-TOUCH SPEEDING KEY.
Recall
Recall
Transfer

TO SPE
(Ava
STE
STE
STE
STE
n
in To (One-
Speed
Not
Not
DT8
#
#@ &. (, )
’ [
: ]
; !- ?/
124
REGISTER NAME ON ONE-TOUCH ED CALLING KEY
ilable for DESI-less screen terminal.)
P 1: Press the Name soft key.
P 2: Press the desired One-Touch Speed Call-ing key.
P 3: Enter desired name on the keypad.Display indicates the name entered.
P 4: Press the Set soft key to save the name.
To Register Speed Calling Number ODESI-less Screen
STEP 1: Follow the procedure of To programOriginate a Call Using Speed CallingTouch Speed Calling Keys).
• Available characters for One-TouchCalling keys.
ALPHABETIC CHARACTER
e: To delete the entry, press the Delete or the BKkey and delete each one character.
e: To delete the whole setting, press the Clr key andback to an idle state.
30 DT430
Push Speed Calling Key
Name >>>1:25 PM MON 11 MAY 2015
^ NEC BNET
Set Cnl Clr >>>
Name >>>1:25 PM MON 11 MAY 2015
DIGIT KEY 1 2 3 4 5 6 7 8 9 0
CH
AR
AC
TER
1 A D G J M P T W 0B E H K N Q U XC F I L O R V Y
a d g j m S t Z
b e h k n p u w
c f i l o q v x
2 3 4 5 6 r 8 ys z7 9

E)DIGITKEY
CH
AR
AC
TER
Not
#
#
s which
125
EUROPEAN CHARACTER (UPPERCASE) EUROPEAN CHARACTER (LOWERCAS 1 2 3 4 5 6 7 8 9 0 #
. A D G J M P T W 0 #, B E H K N Q U X: C F I L O R V Y! À È Ì 5 Ñ S Ù Z
? Á É Í Ò Ú 9
- Â Ê Î Ó 7 Û+ Ã Ë Ï Ô Ü% Ä 3 4 Õ 8
& Å Ö/ Æ Œ( Ç Ø) 2 6=
¿¡1
e: The shaded area indicates the characters whichcannot be entered.
DIGIT KEY 1 2 3 4 5 6 7 8 9 0
CH
AR
AC
TER
. a d g j m p t w 0, b e h k n q u x: c f i l o r v y! à è ì 5 ñ s ù z
? á é í ò ú 9
- â ê î ó 7 û+ ã ë ï ô ü% ä 3 4 õ 8
& å ö/ æ œ( ç ø) 2 6=
¿¡1
Note: The shaded area indicates the charactercannot be entered.

TO SPE
STE
STE
Key
d Call- stored
access
Not
DT8
126
ORIGINATE A CALL USING ED CALLING - STATION/GROUP
P 1: Press (Redial) key.
P 2: Press the desired speed calling number.
TO ORIGINATE A CALL USING SPEED CALLING - SYSTEM
To Program Speed Calling – System (On One-Touch Speed Calling Key)
STEP 1: Press key.
STEP 2: Press the desired One-Touch Speeing key. The LCD displays previouslydigits.
STEP 3: Dial the “Speed Calling – System” code and the abbreviated call code.
STEP 4: Press key again.
e: When Redial feature is enabled at installation,Last Number Redial feature and Speed Callingfeatures using (Redial) key are not available.For details, contact the system administrator.
30 DT430/410
XXXXXXLNR[ ]/SPD[_ _] –X
Mic PickUp CF-All >>>
DT830 DT430/410
Feature
Feature
SPEED SET1:25 PM MON 11 MAY 2015

To OKeySTE
STE
To O(Only
STE
STE
ed key or ey, e is
Key
Call-
o 32
V2 or
tallation
127
perate From Speed Calling – System
P 1: Press the “Speed Calling – System” key.
P 2: If the terminal does not have the “Speed Call-ing – System” key, dial the “Speed Calling –System” access code, then the abbreviatedcall code.
perate From Directory Key DT410 Series equipped with a Directory key.)
P 1: Press key.
P 2: Dial the abbreviated call code (maximum of 4digits).
ONE-TOUCH SPEED CALLING SETTING USING SPD SET KEY
You can add, edit, or delete a One-Touch SpeCalling key using a programmable Line/Featurea SPD Set key. When using the SPD Set soft kOne-Touch Speed Calling can be set when thterminal in an off-hook state (idle), otherwise, itinvalid.
To Add the One-Touch Speed Callingwith SPD Set Key as New DataSTEP 1: Press the SPD Set key.
STEP 2: Press the desired One-Touch Speeding key.
STEP 3: Enter the desired phone number (up tdigits can be registered).
XXXX1:25 PM MON 11 MAY 2015
Directory
XXXX1:25 PM MON 13 APR 2015
Note: A SPD Set key is available for SV9500later.
Note: A SPD Set key is configured at the insstage.
DT830 DT430
1:25 PM MON 11 MAY 2015SPD Set Mic NoDist
Push Speed Calling Key 1:25 PM MON 11 MAY 2015SPD Set Mic NoDist
08211XX Cnl Clr Set >>>

STE d to ith
Call-
is dis-key.
to 32
essage
Not
Not
Not
128
P 4: Press the Regist key. The following message appears for 3 seconds.
To Replace the Existing Data Assignea the One-Touch Speed Calling Key wNew Data Using SPD Set KeySTEP 1: Press the SPD Set key.
STEP 2: Press the desired One-Touch Speeding key.
STEP 3: The phone number already registeredplayed. Press key or the Edit soft
STEP 4: Enter the desired phone number (Up digits can be registered).
STEP 5: Press the Regist key. The following mappears for 3 seconds.
e: During the registration operation, pressing anyother key (Exit, SPD Set, or Cnl) cancels the set-ting. In that case, the terminal operates in accor-dance with the pressed key.
e: When you receive an incoming call on theaccommodated line while programming the One-Touch Speed Calling key, you can continue withthe programming without answering the call.However, if you answer the call, the conversationwill be started and the registration operation willbe canceled.
e: A new entry overwrites the previously savedphone number (the existing number temporarilydisplays when you try to set a new number).
Entry is added!1:25 PM MON 11 MAY 2015SPD Set Mic NoDist
1:25 PM MON 11 MAY 2015SPD Set Mic NoDist
Push Speed Calling Key 1:25 PM MON 11 MAY 2015SPD Set Mic NoDist
08211XXReRegi Edit Delete
08211XX Cnl Clr Set >>>
Entry is added!1:25 PM MON 11 MAY 2015SPD Set Mic NoDist

A
LEFT/re dis-ing
s is dis-
.
Not
Not
Not
the dig- on theentered
begin- (!) dis-
129
TO EDIT THE REGISTERED DAT
To Enter the Phone NumberSTEP 1: Locate the cursor (underscore) with
RIGHT soft key (these soft keys aplayed pressing >>> soft key), or press/ key.
STEP 2: Enter the desired phone number.
To Enter HookingSTEP 1: Press the Hook soft key (this soft key
played pressing >>> soft key twice).
STEP 2: Hooking is indicated as “!” on the LCD
e: During the registration operation, pressing anyother key (Exit, SPD Set, or Cnl) cancels the set-ting. In that case, the terminal operates in accor-dance with the pressed key.
e: When you receive an incoming call on theaccommodated line while programming the One-Touch Speed Calling key, you can continue withthe programming without answering the call.However, if you answer the call, the conversationwill be started and the registration operation willbe canceled.
e: A new entry overwrites the previously savedphone number (the existing number temporarilydisplays when you try to set a new number).
Note: If the entered number exceeds 24 digits, its following the 24th digit are displayedupper row of LCD. Phone number can be up to 32 digits.
Note: The Hook soft key can be put only at thening of a number, and so “Hooking” signplays only before entering any number.
DT830 DT430
08211XX_Cnl Clr Set >>>
_ Hook Delete >>>
! _ Pause Voice Delete >>>

To ESTE
STE
To ESTE
STE
t of the” is de-se soft
key), or
y is dis-
sec-
Not
“DeleteLCD.
130
nter PauseP 1: Press the Pause soft key (this soft key is dis-
played pressing >>> soft key twice).
P 2: Pause is indicated as “-” on the LCD.
nter Voice CallP 1: Press the Voice soft key (this soft key is dis-
played pressing >>> soft key twice).
P 2: Pause is indicated as “V” on the LCD.
To Delete the Entered CharacterSTEP 1: Place the cursor (underscore) in fron
desired character (in this example, “2leted) with LEFT/RIGHT soft key (thekeys are displayed pressing >>> soft pressing / .
STEP 2: Press the Clr soft key.
To Delete the Phone Number DataSTEP 1: Press the Delete soft key (this soft ke
played pressing >>> soft key twice).
STEP 2: Press the OK soft key.
STEP 3: The following message appears for 3 onds.
e: Up to three consecutive entries of the “Pause”sign (-) are allowed.
1234567890_ Pause Voice Delete >>>
1234567890-_ Pause Voice Delete >>>
1234567890_ Pause Voice Delete >>>
1234567890V_ Pause Voice Delete >>>
Note: When this process ends in failure, Failed!” is displayed for 3 seconds on the
082_11XXCnl Clr Set >>>
08_11XXCnl Clr Set >>>
1234567890_ Pause Voice Delete >>>
Delete this entry?OK Cnl
Entry is deleted
SPD Set Mic NoDist1:25 PM MON 11 MAY 2015

To DCallSTE
STE
STE
STE
STE
ey
Call-
is dis-
lling
Not
131
elete the Number of One-Touch Speed ing Keys Using SPD Set KeyP 1: Press the SPD Set key.
P 2: Press the desired One-Touch Speed Call-ing key.
P 3: The phone number already registered is dis-played. Press the Delete soft key.
P 4: Press the OK soft key.
P 5: The following message appears for 3 sec-onds.
To Switch the Registering One-TouchSpeed Calling Keys Using SPD Set KSTEP 1: Press the SPD Set key.
STEP 2: Press the desired One-Touch Speeding key.
STEP 3: The phone number already registeredplayed.
STEP 4: Press another One-Touch Speed Cakey to switch the key data.
e: When this process ends in failure, “DeleteFailed!” is displayed for 3 seconds on the LCD.
1:25 PM MON 11 MAY 2015 SPD Set Mic NoDist
Push Speed Calling Key 1:25 PM MON 11 MAY 2015 SPD Set Mic NoDist
08211XXSet Edit Delete
Delete this entry?OK Cnl
Entry is deleted
SPD Set Mic NoDist1:25 PM MON 11 MAY 2015
1:25 PM MON 11 MAY 2015 SPD Set Mic NoDist
Push Speed Calling Key 1:25 PM MON 11 MAY 2015 SPD Set Mic NoDist
08211XXReRegi Edit Delete
08211XX0ReRegi Edit Delete

ACTo ESTE
STE
STE
STE
To EAutSTE
STE
STE
STE
receive
e a ser-
p to 10
receive
e a ser-
10 dig-
umber.
Not
Not
e up to can bet Codes
132
COUNT CODE
nterP 1: Lift the handset or press key, receive
a dial tone.
P 2: Enter the feature access code, receive a ser-vice set tone.
P 3: Enter “Account Code” (up to 10 digits).
P 4: Receive a dial tone and dial the desired num-ber.
nter Account Code After horization CodeP 1: Lift the handset or press key, receive
a dial tone.
P 2: Enter the feature access code for “Authoriza-tion Code”, receive a service set tone.
P 3: Enter the “Authorization Code”, receive asecond service set tone.
P 4: Enter the “Account Code”, receive a dial tone,and dial the desired number.
FORCED ACCOUNT CODE
STEP 1: Lift the handset or press key, a dial tone.
STEP 2: Enter the feature access code, receivvice set tone.
STEP 3: Enter the “Forced Account Code” (udigits), receive a dial tone.
AUTHORIZATION CODE
To Enter Without Account CodeSTEP 1: Lift the handset or press key,
a dial tone.
STEP 2: Enter the feature access code, receivvice set tone.
STEP 3: Enter the “Authorization Code” (up toits).
STEP 4: Receive a dial tone, dial the desired n
- OR -
STEP 4: Lift the handset, receive a dial tone.
e: For North America, Account Codes can be up to24 digits.
e: Authorization and Account Codes may be up to20 digits combined (or 34 digits combined).
DT830 DT430/410
Speaker
Speaker
Note: For North America, Account Codes can b24 digits. The total number of digits whichentered for the Authorization and Accounis 34 digits.
DT830 DT430/410Speaker
DT830 DT430/410
Speaker

STE
STE
STE
To EServprog
VOSTE
STE
STE
STE
VOICEnging.
o called
Not
Not
a One-e One-
tension,CE keyd saved
Call isates as
tation isws:
133
P 5: Dial the desired number.
P 6: If an “Authorization Code” is required, thecaller hears a special dial tone.
P 7: Enter “Authorization Code”, or call will be de-nied.
nter With Account Code (see above)ice set tone is optional depending upon system ramming.
ICE CALL
P 1: Lift the handset.
P 2: Dial the desired station number.
P 3: Press the Voice key.
P 4: Speak to called party.
Using Soft KeySTEP 1: Lift the handset.
STEP 2: Dial the desired station number; the soft key appears while the station is ri
STEP 3: Press the VOICE soft key and speak tparty.
e: This option is available only if system is pro-grammed with Least Cost Routing.
e: If a 4, 8, 16 or 32-button display terminal is used,the display indicates all of the digits dialed.
DT830 DT430/410
VOICE 20001:25 PM MON 11 MAY 2015
Note: A Voice Call may be programmed on Touch Speed Calling key by pressing thTouch Speed Calling key, dialing the exand pressing the key. (The VOIwill display on LCD if it is programmed anon the terminal.)
Note: If called party is on their line when a Voiceattempted, calling station's display indicfollows:
Note: A voice call is restricted if called party's snot a DT Series. Display indicates as follo
2000
Mic >>>Voice1:25 PM MON 11 MAY 2015
Transfer
VOICE BUSY1:25 PM MON 11 MAY 2015
VOICE REST1:25 PM MON 11 MAY 2015

TOHASTE
STE
STE
an in-
r press.
Not
a non-ses theer plac-
HOLD
134
ANSWER A VOICE CALL NDS-FREE
P 1: Receive an incoming Voice Call.
P 2: Press the Mic soft key or key. An LEDlights.
P 3: Respond the call with hands-free.
AUTOMATIC INTERCOM
To InitiateSTEP 1: Lift the handset or press key.
STEP 2: Press the AICM key.
STEP 3: Hear a ringback tone.
To AnswerSTEP 1: The AICM key flashes red indicating
coming intercom call.
STEP 2: Press the AICM key, lift the handset o key, the LED lights solid green
e: If privacy is required, lift the handset.
DT830 DT430/410
Mic
Calling station
VOICE 20011:25 PM MON 11 MAY 2015
Note: When the called station is engaged withintercom call, the called station user presAICM key to answer the incoming call afting the non-intercom caller on hold (with key).
DT830 DT430/410
Speaker
Called party
ICM 21:25 PM MON 11 MAY 2015
Overriding party
ICM 11:25 PM MON 11 MAY 2015
Speaker

To B
STE
STE
r press
e called
incom-d.
he LED
Not
a non-ses theer plac-HOLD
135
ridge Into An Automatic Intercom Call
P 1: Press the AICM key, lift the handset or press key.
P 2: A three-party conference is established.
MANUAL INTERCOM
To InitiateSTEP 1: Press the MICM key, lift the handset o
key, a ringback tone is heard.
STEP 2: Press the SIG key if it is desired for thstation to hear ringing.
To AnswerSTEP 1: The MICM key flashes, indicating an
ing call. A ring tone may also be hear
STEP 2: Press the MICM key.
STEP 3: Lift the handset or press key, tlights solid green.
e: Bridging is an optional feature.
Speaker
Overriding party
OVERRIDE 11:25 PM MON 11 MAY 2015
CONF1:25 PM MON 11 MAY 2015
Note: When the called station is engaged withintercom call, the called station user presMICM key to answer the incoming call afting the non-intercom caller on hold (with key).
DT830 DT430/410
Speaker
Called party
ICM 21:25 PM MON 11 MAY 2015
Calling party
ICM 11:25 PM MON 11 MAY 2015
Speaker

To B
STE
STE
ey.
er. Re-
incom-
y. The
Not
Not
Not
a non-ses theer plac-
HOLD
136
ridge Into A Manual Intercom Call
P 1: Press the MICM key, lift the handset or press key.
P 2: A three-party conference is established.
DIAL INTERCOM
To InitiateSTEP 1: Lift the handset or press the k
STEP 2: Press the DICM key.
STEP 3: Dial the desired intercom station numbceive a ringback tone.
To AnswerSTEP 1: The DICM key flashes, indicating an
ing intercom call.
STEP 2: Press the DICM key.
STEP 3: Lift the handset or press keLED lights solid green.
e: Bridging is an optional feature.
e: The SIG key signals the corresponding stationwhen speaking over the intercom path is unnec-essary.
e: Two-button Manual Intercom provides one buttonfor signaling and one for talking. A separate sig-naling button can be used in many ways for thesecretary to alert a boss, or vice versa.
Speaker
Overriding party
OVERRIDE 11:25 PM MON 11 MAY 2015
CONF1:25 PM MON 11 MAY 2015
Note: When the called station is engaged withintercom call, the called station user presDICM key to answer the incoming call afting the non-intercom caller on hold (with key).
DT830 DT430/410
Speaker
Called party
ICM 21:25 PM MON 11 MAY 2015
Speaker
Calling party
ICM 21:25 PM MON 11 MAY 2015

To B
STE
STE
ey and
nf. softhed.
in con-t.
S-
to con-he orig-old.
l caller. hold.
le to al-dicatesime.
Not
Not
TZ-2E-without
mables been
137
ridge Into A Dial Intercom Call
P 1: Press the DICM key, lift handset or press key.
P 2: A three-party conference is established.
CONFERENCE
STEP 1: With a call in progress, press kdial desired number.
STEP 2: After call is answered, press the Cokey. Three-way conference is establis
STEP 3: If one party hang up, other two remanected. The Conf key’s LED goes ou
TO SWITCH A CALL WITH TRANFER KEY STEP 1: While engaged in a call and wishing
sult a third party, press key. Tinal caller is automatically placed on h
STEP 2: Dial desired party to consult.
STEP 3: Press key to return to originaThird party is automatically placed on
STEP 4: By repeating these steps, it is possibternate between calls. The display inconnected station or trunk any given t
e: Bridging is an optional feature.
e: Dial intercom provides a Dial Intercom groupwhere each member of the group may be calledby a 1-digit or 2-digit number without using theirprime lines.
Speaker
Overriding party
OVERRIDE 31:25 PM MON 11 MAY 2015
CONF1:25 PM MON 11 MAY 2015
Note: The Conf key is accommodated on only D3 and DTZ-6DE-3. If using the terminals
key, use a soft key or programfeature key to which conference feature haassigned.
DT830 DT430/410Transfer
CONF
Mic >>>1:25 PM MON 11 MAY 2015
Conf
DT830 DT430/410
Transfer
Transfer

TO
STE
STE
STE
STE
STE
e-
d Call-
LCD.
code.
ceive a
DT8
feature“!” dis-
138
ANSWER A CAMPED-ON CALL
P 1: While engaged in a call, receive the camp-onindication (one short tone burst). LED of
key flashes.
P 2: Press key. Call in progress is placedon hold.
P 3: Connection to camped-on call is established.
P 4: Press key to return to original call.Camped-on call is placed on hold.
P 5: By repeating these steps, it is possible to al-ternate between calls. The display indicatesconnected station or trunk at any given time.
CALL WAITING - ORIGINATING
To Program Call Waiting Key (On OnTouch Speed Calling Key)STEP 1: Press key.
STEP 2: Press the desired One-Touch Speeing key.
STEP 3: Press key, “!” appears on the
STEP 4: Dial the “Call Waiting” feature access
STEP 5: Press key.
To Activate Call Waiting – OriginatingSTEP 1: Dial the desired station number, re
busy tone.
STEP 2: Press the CALL WAITING key.
STEP 3: Receive a special ringback tone.
30 DT430/410
Answer
Answer
Answer
typeTrunk
numberTrunk
CAMP ON DDD 31:25 PM MON 11 MAY 2015
Note: To program a hook switch for transfer oractivation, press as first digit. plays on LCD.
DT830 DT430/410
Feature
Recall
Feature
Recall

STE
STE
STE
STE
a busy
a call
nected.
is pos-ay indi-y given
139
P 4: The Call Waiting tone is sent to busy station.
– OR –
P 4: Lift the handset or press key.
P 5: Dial the “Call Waiting” access code, receive adial tone.
P 6: Dial the busy station.
Using Soft KeySTEP 1: Dial the desired station and receive
tone.
STEP 2: Press the CallWait soft key receivewaiting ringback tone.
To Answer A Waiting CallSTEP 1: A Call Waiting Tone is heard.
STEP 2: Press key.
STEP 3: The waiting call is automatically conOriginal party is placed on hold.
STEP 4: By repeatedly pressing key, itsible to alternate between calls. Displcates connected station or trunk at antime.
Called stationnumber
C WAIT 20001:25 PM MON 11 MAY 2015
Mic >>>CallBack
Speaker
C WAIT1:25 PM MON 11 MAY 2015
Mic >>>CallBack
C WAIT SET 20001:25 PM MON 11 MAY 2015
CallWait
Called stationnumber
C WAIT SET 2000
Mic >>>1:25 PM MON 11 MAY 2015
Answer
Answer
Calling stationnumber
C WAIT 20011:25 PM MON 11 MAY 2015

UsinSTE
STE
To DSTE
ouch
key.
.
, press
140
g Soft KeyP 1: Hear burst of tone Display indicates “C WAIT”
and key flashes.
P 2: Press key receive call waiting tone.
isconnectP 1: Press key. Station user is automati-
cally connected to original party.
CALL PARK
To Program Call Park Key (On One-TSpeed Calling Key)STEP 1: Press key.
STEP 2: Press the One-Touch Speed Calling
STEP 3: Press key. “!” displays on LCD
STEP 4: Dial the “Call Park” access code.
STEP 5: Press key again.
To Park A CallSTEP 1: While connected to a station or trunk
the CALL PARK.
Answer
Answer
Calling stationnumber
C WAIT 2001
Mic >>>1:25 PM MON 11 MAY 2015
Recall
DT830 DT430/410
Feature
Recall
Feature
Parked stationor trunk
CALLPARK SET DDD 31:25 PM MON 11 MAY 2015

To ROrigSTE
STE
To RStatSTE
STE
ings
e “Call on the
hed.
ey and
Up soft
hed.
141
etrieve A Parked Call From inating Station
P 1: Dial the “Call Park” local retrieval code.
P 2: A Station user is connected to parked call.
etrieve A Parked Call From A Remote ionP 1: Dial the “Call Park” local retrieval code.
P 2: A Station user is connected to parked call.
CALL PICK-UP (GROUP)
When Station Within Pick-up Group RSTEP 1: Lift the handset.
STEP 2: Press the CALL PICK-UP or dial thPick-up” access code (may be storedOne-Touch Speed Calling key).
STEP 3: Connection to calling party is establis
STEP 4: If currently on a call, press kdial the “Call Pick-up” access code.The original party is placed on hold.
Using Soft KeySTEP 1: Lift the handset and press the Pick
key.
STEP 2: Connection to calling party is establis
Elapsed time
10:01 DDD 21:25 PM MON 11 MAY 2015
parked the callStation that
2000 DDD 21:25 PM MON 11 MAY 2015
DT830 DT430/410
Transfer
stationCalling
partyCalled
PICK UP 32000 DDD1:25 PM MON 11 MAY 2015
stationCalling
partyCalled
PICK UP 2001
Mic >>>
2000 1:25 PM MON 11 MAY 2015

CA
To PTouSTE
STE
STE
STE
WheSTE
STE
STE
STE
STE
ss theeue for
ation isD.
. A dialally di-
.
.
unter a
ne and
dialed
DT8
142
LL PICK-UP (DIRECT)
rogram Pick- up Direct Key (One-ch Speed Calling Key)P 1: Press key.
P 2: Press the One-Touch Speed Calling key.
P 3: Dial the “Direct Call Pick-up” access code.
P 4: Press key again.
n A Station Within System RingsP 1: Lift the handset, receive a dial tone.
P 2: Press the PICK-DIRECT key and dial the sta-tion number to be picked up.
– OR –
P 2: Dial the “Direct Call Pick-up” access code andthe station number to be picked up.
P 3: Connection to calling party is established.
P 4: If busy, the original call must be placed onhold before new call can be picked up.
OUTGOING TRUNK QUEUING
If Trunk Is BusySTEP 1: Receive Trunk Busy indication. Pre
CALL BACK key, Call is placed in qunext available trunk.
STEP 2: When trunk is available, the setting stalerted by ringing and flashing red LE
STEP 3: Press key or lift the handsettone is heard or number is automaticaled if Least Cost Routing is provided
OFF-HOOK TRUNK QUEUING
STEP 1: Press key, receive a dial tone
STEP 2: Dial desired telephone number. Encotrunk busy condition.
STEP 3: A station user receives a service set toleaves speaker on.
STEP 4: The desired number is automaticallywhen a trunk becomes available.
30 DT430/410
Feature
Feature
stationCalling
partyCalled
PICK UP 32000 DDD1:25 PM MON 11 MAY 2015
DT830 DT430/410
Speaker
OG-Q SET1:25 PM MON 11 MAY 2015
DT830 DT430/410
Speaker

EXE
If CSTE
STE
STE
UsinSTE
STE
Not
DT8lephonyramma-d on aing the
143
CUTIVE OVERRIDE
alled Station Is BusyP 1: Press the OVERRIDE key.
P 2: Interrupted parties receive a warning tone.
P 3: Three-way conference is initiated.
g Soft KeyP 1: Press the Exe-Over soft key.
P 2: Interrupted parties receive a warning toneand three-way conference is initiated.
e: The Conf key is accommodated on only DTZ-2E-3 and DTZ-6DE-3.
30 DT430/410
Overridden station
OVERRIDE 20011:25 PM MON 11 MAY 2015
CONF1:25 PM MON 11 MAY 2015
OVERRIDE 2001
Mic >>>1:25 PM MON 11 MAY 2015
Note: Override may be programmed by the TeServer administrator for one of the Progble feature keys, or may be programmeOne-Touch Speed Calling key by storRecall and Override access code.

RE
To RSTE
STE
STE
STE
f
r dialed
ntil de-
Not
DT8
144
DIAL
edial the Last Number DialedP 1: Press (Redial) key. A last number dialed
is displayed.
P 2: Press or the UP/DOWNsoft key until de-sired number is displayed. Up to 20 previous-ly dialed numbers are available.
P 3: Go off-hook or press key, or theOK soft key to make a call to the displayedparty.
P 4: When party has answered, lift the handset or speak hands-free.
To Delete the One Call History Data oOutgoing CallSTEP 1: Press (Redial) key. A last numbe
is displayed.
STEP 2: Press or the UP/DOWN soft key usired number is displayed.
STEP 3: Press the Delete soft key.
STEP 4: Press the One soft key.
e: When Redial feature is enabled at installation,Last Number Redial feature and Speed Callingfeatures using (Redial) key are not available.For details, contact the system administrator.
30 DT430/410
Redial 01XXXXX1
Delete End
Redial 02XXXXX2
Delete EndSpeaker
Redial 01XXXXX1
Delete End
Redial 02XXXXX2
Delete End
Redial 02XXXXX2
CnlOne All

To DOutSTE
STE
STE
LAS
ber di-
d num- dialed
ber on
hand-
Not
DT8
a, Latinations]:
by thesystem
145
elete the All Call History Data of going CallP 1: Press (Redial) key. A last number dialed
is displayed.
P 2: Press the Delete soft key.
P 3: Press the All soft key.
T NUMBER REDIAL
To Recall Last Number DialedSTEP 1: Press (Redial) key. The last num
aled is displayed.
STEP 2: Press (Redial) key until the desireber is displayed. Up to 5 previouslynumbers.
STEP 3: Press (Note 1, Note 2). The numthe display is automatically redialed.
STEP 4: When the party has answered, lift theset or speak hands-free.
e: When Redial feature is enabled at installation,Last Number Redial feature and Speed Callingfeatures using (Redial) key are not available.For details, contact the system administrator.
Redial 01XXXXX1
Delete End
Redial 01XXXXX1
CnlOne All
30 DT430/410
Note1: A-law Countries [Europe, Australia, RussiAmerica, Middle Near East, other Asian n#µ-law Countries [North America]:
Note2: The key to redial (#, ) can be changedsystem setting. For details, contact the administrator.
LNR[ ]/SPD[_ _] –XXXXXXX
Mic PickUp CF-All >>>

CA
To SSTE
STE
STE
STE
STE
STE
special
ice set
orward-
D)
er calls
DT8
on the
146
LL FORWARDING - ALL CALLS
etP 1: Press key. Receive a dial tone.
P 2: If the setting for another station, press theMULTILINE APPEARANCE feature key.
P 3: Press the FWD key or dial “Call Forwarding –All Calls” access code. Receive a special dialtone.
P 4: Dial the destination station or the externaltelephone number. Receive a service settone.
P 5: The FWD key’s LED lights (at your station orat the terminal of the multiline station you aresetting).
P 6: Press key. Call Forwarding – All Callsis set.
Using Soft KeySTEP 1: Press the CF-All soft key. Receive a
tone.
STEP 2: Dial the destination; wait for a servtone.
STEP 3: “FORWARD SET” is displayed, call fing for all calls is set.
To Verify (Only For Terminal With LCSTEP 1: Press the FWD key.
STEP 2: The display indicates the station numbare forwarded to.
30 DT430/410
Speaker
Speaker
Forwardingstation
FORWARD SET 20001:25 PM MON 11 MAY 2015
Note: With soft key operation, the CF-All lightsdisplay.
FORWARD SET
Mic >>>1:25 PM MON 11 MAY 2015
Forwardingstation
FORWARD 20001:25 PM MON 11 MAY 2015

To CSTE
STE
STE
UsinSTE
STE
E
.
e MUL-
orward- a spe-
xternalice set
stationion you
– Busy
147
ancelP 1: Press key. Receive a dial tone. If can-
celing for another station, press the MULTI-LINE APPEARANCE feature key.
P 2: Press the FWD key or dial “Call Forwarding –All Calls” cancel code. Receive a service settone. LED goes out at your station (or the ter-minal of the multiline station).
P 3: Press key. Call Forwarding – All Callsis cancelled.
g Soft KeyP 1: Press the CF-All soft key.
P 2: Receive a service set tone and “FORWARDCANCEL” is displayed.
CALL FORWARDING - BUSY LIN
To SetSTEP 1: Press key. Receive a dial tone
STEP 2: If setting for another station, press thTILINE APPEARANCE feature key.
STEP 3: Press the FWD-BY key or dial “Call Fing – Busy Line” access code. Receivecial dial tone.
STEP 4: Dial the destination station or the etelephone number. Receive a servtone.
STEP 5: The FWD-BY key’s LED lights (at youror at the terminal of the multiline statare setting).
STEP 6: Press key. Call Forwarding Line is set.
Speaker
Speaker
FORWARD CANCEL1:25 PM MON 11 MAY 2015
FORWARD CANCEL
Mic >>>1:25 PM MON 11 MAY 2015
DT830 DT430/410
Speaker
Speaker
FORWARD SET1:25 PM MON 11 MAY 2015

UsinSTE
STE
STE
To VSTE
STE
. If can-TILINE
orward-ive ser-tion (or
– Busy
WARD
Not
148
g Soft KeyP 1: Press the CF-Busy soft key. Receive a spe-
cial dial tone.
P 2: Dial the destination; wait for a service settone.
P 3: “FORWARD SET” is displayed; Call Forward-ing – Busy Line is set.
erify (Only For Terminal With LCD)P 1: Press the FWD-BY key.
P 2: The display indicates the station number callsare forwarded to.
To CancelSTEP 1: Press key. Receive a dial tone
celing for another station, press MULAPPEARANCE feature key.
STEP 2: Press the FWD-BY key or dial “Call Fing – Busy Line” cancel code. Recevice set tone. LED goes out at your stathe terminal of the multiline station).
STEP 3: Press key. Call Forwarding Line is cancelled.
Using Soft KeySTEP 1: Press the CF-Busy soft key.
STEP 2: Receive a service set tone and “FORCANCEL” is displayed.
e: With soft key operation, the CF-Busy flashes onthe display.
FORWARD SET
Mic >>>1:25 PM MON 11 MAY 2015
Forwarding station
FORWARD 20001:25 PM MON 11 MAY 2015
Speaker
Speaker
FORWARD CANCEL1:25 PM MON 11 MAY 2015
FORWARD CANCEL
Mic >>>1:25 PM MON 11 MAY 2015

CAL
To SSTE
STE
STE
STE
STE
STE
a spe-
ice set
orward-
D)ss thestate.
er calls
DT8
Answerm pro-
flashes
149
L FORWARDING - DON’T ANSWER
etP 1: Press key. Receive a dial tone.
P 2: If setting for another station, press the MUL-TILINE feature key.
P 3: Press the FWD-NA key or dial “Call Forward-ing – Don’t Answer” access code. Receive aspecial dial tone.
P 4: Dial the destination station or the externaltelephone number. Receive a service settone.
P 5: The FWD-NA key’s LED lights (at your stationor at the terminal of the multiline station youare setting).
P 6: Press key. Call Forwarding – Don’tAnswer is set.
Using Soft KeySTEP 1: Press the CF-NoAns soft key. Receive
cial dial tone.
STEP 2: Dial the destination; wait for a servtone.
STEP 3: “FORWARD SET” is displayed; Call Fing – Don’t Answer is set.
To Verify (Only For Terminal With LCSTEP 1: If verifying for another station, pre
MULTILINE feature key while an idle
STEP 2: Press the FWD-NA key.
STEP 3: The display indicates the station numbare forwarded to.
30 DT430/410
Speaker
Speaker
Forwarding station
FORWARD SET 20001:25 PM MON 11 MAY 2015
Note: Call Forwarding for Busy Line and Don't may be combined depending upon systegramming.
Note: With soft key operation, the CF-NoAns on the display.
FORWARD SET
Mic >>>1:25 PM MON 11 MAY 2015
Forwarding station
FORWARD 20001:25 PM MON 11 MAY 2015

To CSTE
STE
STE
LL
ed Outcode.
ceive a
key.ation is
a spe-
WARD
er
150
ancelP 1: Press key. Receive dial tone. If can-
celing for another station, press MULTILINEAPPEARANCE feature key.
P 2: Press the FWD-NA key or dial “Call Forward-ing - Don't Answer” cancel code. Receive ser-vice set tone. LED goes out at your station (orthe terminal of the multiline station).
P 3: Press key. Call Forwarding – Don’tAnswer is cancelled.
LOGGED OUT IP STATION - CADESTINATION To SetSTEP 1: Lift handset or press key.
STEP 2: Press the CFLogout key or dial “LoggIP Station – Call Destination” access
STEP 3: Dial the destination station number; reservice set tone.
STEP 4: Replace the handset or press Logged Out IP Station – Call Destinset.
Using Soft KeySTEP 1: Press the CFLogout soft key; receive
cial Dial Tone.
STEP 2: Dial the destination station number.
STEP 3: Receive a service set tone; “FORSET” is displayed
Speaker
Speaker
FORWARD CANCEL1:25 PM MON 11 MAY 2015
DT830
Speaker
Speak
FORWARD SET XXXX1:25 PM MON 11 MAY 2015
FORWARD SET XXXX
Mic >>>1:25 PM MON 11 MAY 2015

To VSTE
STE
To CSTE
STE
STE
receive
a ser-
ceive a
ination” disap-
Not
151
erify (Only For Terminal with LCD)P 1: Press “Logged Out IP Station – Call Destina-
tion” feature key lit red or press the CFLo-gout soft key.
P 2: The display indicates the station number callsare forwarded.
ancelP 1: Lift the handset or press key; receive
a Dial Tone.
P 2: Press the CFLogout key or dial “Logged OutIP Station – Call Destination” cancel code; re-ceive service set tone.
P 3: Replace the handset or press key.Logged Out IP Station – Call Destination iscanceled.
Using Soft KeySTEP 1: Lift the handset or press key;
a Dial Tone.
STEP 2: Press the CFLogout soft key; receivevice set tone.
STEP 3: Dial the destination station number; reservice set tone.
STEP 4: “Logged Out IP Station – Call Destlamp goes off and CFLogout indicationpears on the LCD.e: With soft key Operation, the CFLogout flashes
on the display.
FORWARD XXXX1:25 PM MON 11 MAY 2015
Speaker
Speaker
FORWARD CANCEL1:25 PM MON 11 MAY 2015
Speaker
FORWARD CANCEL
Mic >>>1:25 PM MON 11 MAY 2015

CAIf CSTE
STE
STE
STE
ceive a
e Call-
ER
number’s LED
ber is
lephony featured Call-
152
LL BACK
alled Station is BusyP 1: Press the CALL BACK key. Receive a ser-
vice set tone.
– OR –
P 1: Press the Flash key and enter “Call Back” ac-cess code.
P 2: When both parties become an idle state, call-ing party's phone rings. Calling party wouldgo off hook and hear ring back tone.The called station would then be ringing.
P 3: The connection is established when thecalled party answers.
Using Soft KeySTEP 1: Press the CallBack soft key and re
service set tone.
STEP 2: “CALLBACK SET” is displayed and thBack soft key flashes on the display.
TO SAVE AND REPEAT A NUMB
To SaveSTEP 1: Press key.
STEP 2: Dial the desired telephone number.
STEP 3: Press the Save&Rep key. The dialed is now stored. The Save&Rep keylights.
– OR –STEP 3: Receive an internal call.
STEP 4: Press the Save&Rep key. The numstored in memory.
STEP 5: The Save&Rep key’s LED lights.
DT830 DT430/410
Called party
CALLBACK SET 20001:25 PM MON 11 MAY 2015
Called party
CALLBACK 20001:25 PM MON 11 MAY 2015
Called party
CALLBACK 20011:25 PM MON 11 MAY 2015
Note: Call Back may be programmed by the TeServer administrator on a Programmablekey or by the user on a One-Touch Speeing key.
CALLBACK SET
Mic >>>1:25 PM MON 11 MAY 2015
DT830 DT430/410
Speaker

UsinSTE
STE
To VSTE
STE
To RSTE
STE
STE
UsinSTE
.
counter
sent to
Not
e termi-
tone is:
ssages,dicates
153
g Soft KeyP 1: Press the Save&Rep key. The number is
stored in memory.
P 2: The Save&Rep key’s LED lights.
erify (Only For Terminal With LCD)P 1: While an idle state, press the Save&Rep key.
P 2: The display indicates digits sorted.
epeatP 1: Press key.
P 2: Press the Save&Rep key. The terminal auto-matically redials the programmed number.
P 3: The Save&Rep automatically cancelled. LEDgoes out.
g Soft KeyP 1: Press flashing the Save&Rep soft key.
Stored number is automatically redialed.“Save&Rep” disappears from display.
TO LEAVE A MESSAGE
STEP 1: Press key. Receive a dial tone
STEP 2: Dial the desired station number. Enno answer or busy condition.
STEP 3: Press the MSG key. The message iscalled the terminal.
STEP 4: The called station MSG LED lights.
e: If saved number is busy or no answer is received,to save it again, press the Save&Rep key againbefore hanging up.
Speaker
Note: Up to four messages can be stored in thnal memory.
Note: If a fifth message is attempted, a reorderheard and the display indicates as follows
Note: If a station is not equipped to receive mea reorder tone is heard and the display inas follows:
DT830 DT430/410
Speaker
Called station
MESSAGE SET 20011:25 PM MON 11 MAY 2015
MESSAGE BUSY1:25 PM MON 11 MAY 2015
MESSAGE REST1:25 PM MON 11 MAY 2015

TO
To DSTE
STE
STE
To RSTE
STE
STE
ing thedesired
ys. The
DT8
lback orft mes-et, noti-urn was
154
ANSWER A MESSAGE
isplayP 1: The MSG key’s LED is lit. The station is an
idle state.
P 2: Press the MSG key.
P 3: Press the MSG key again to display addition-al messages in order received.
espondP 1: While displaying the desired message, press
key.
P 2: Press the MSG key. The station which leftmessage is automatically redialed.
P 3: The message is erased.
To EraseSTEP 1: To erase a message without return
call, press the MSG key to display the message.
STEP 2: Dial # or while the message displamessage is erased.
30 DT430/410
stationCalling
MSG 2001 12:28PM1:25 PM MON 11 MAY 2015
Speaker
Note: If the station that left message is busy, calthe MSG may be set. If the station that lesage does not answer, the MSG may be sfying originating party that a message retattempted.
MESSAGE CANCEL1:25 PM MON 11 MAY 2015
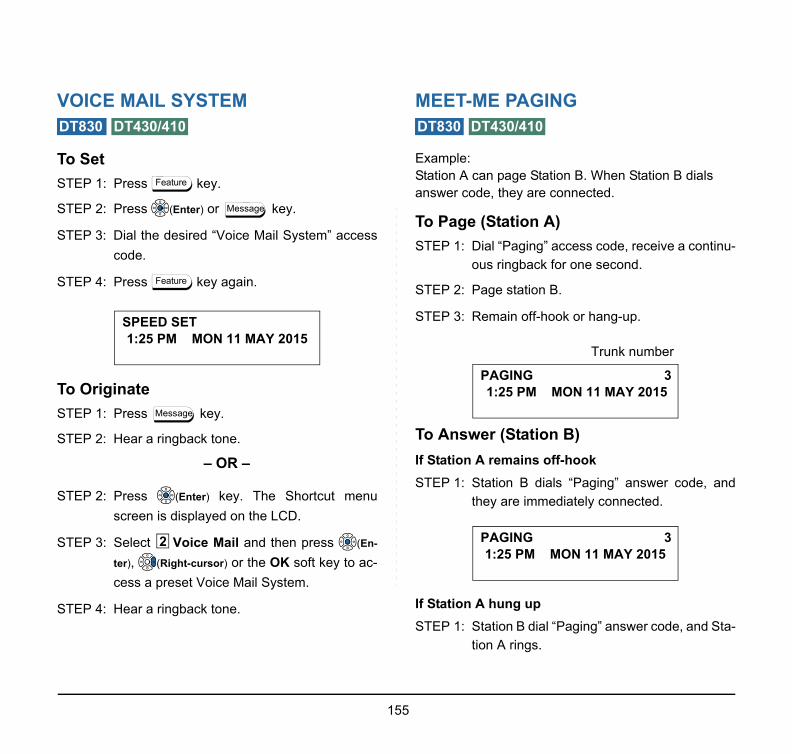
VO
To SSTE
STE
STE
STE
To OSTE
STE
STE
STE
STE
ials
ontinu-
e, and
nd Sta-
DT8
155
ICE MAIL SYSTEM
etP 1: Press key.
P 2: Press (Enter) or key.
P 3: Dial the desired “Voice Mail System” accesscode.
P 4: Press key again.
riginateP 1: Press key.
P 2: Hear a ringback tone.
– OR –
P 2: Press (Enter) key. The Shortcut menuscreen is displayed on the LCD.
P 3: Select Voice Mail and then press (En-
ter), (Right-cursor) or the OK soft key to ac-cess a preset Voice Mail System.
P 4: Hear a ringback tone.
MEET-ME PAGING
Example: Station A can page Station B. When Station B danswer code, they are connected.
To Page (Station A)STEP 1: Dial “Paging” access code, receive a c
ous ringback for one second.
STEP 2: Page station B.
STEP 3: Remain off-hook or hang-up.
To Answer (Station B)If Station A remains off-hookSTEP 1: Station B dials “Paging” answer cod
they are immediately connected.
If Station A hung upSTEP 1: Station B dial “Paging” answer code, a
tion A rings.
30 DT430/410
Feature
Message
Feature
SPEED SET1:25 PM MON 11 MAY 2015
Message
2
DT830 DT430/410
Trunk number
PAGING 31:25 PM MON 11 MAY 2015
PAGING 31:25 PM MON 11 MAY 2015

STE
PAG
ExamStatinot aStatianno
StatSTE
STE
STE
STE
STE
, and isnounc-
calling
Not
DT8
156
P 2: When Station A goes off-hook, they are con-nected.
ING TRANSFER
ple:on A receives an important call for Station B who is t a desk. Station A can page Station B. When
on B dials the Paging answer code, Station A can unce the call and transfer it to Station B.
ion A PagingP 1: Ask calling party to hold.
P 2: Press key. Receive an interrupteddial tone.
P 3: Dial “Paging” access code. Receive a contin-uous ringback for one second.
P 4: Page Station B.
P 5: Remain off-hook or hang-up.
To Answer (Station B)If Station A remained off hookSTEP 1: Station B dials “Paging” answer code
connected with Station A. Station A anes call.
STEP 2: Station A hangs up. Station B and theparty are connected.
e: Paging function can not be supported with IPenabled DT830 Series.
30 DT430/410
Calling trunknumber
TRANSFER DDD 31:25 PM MON 11 MAY 2015
Transfer
Stations A and B each displaythe other’s number
TRANSFER XXXX1:25 PM MON 11 MAY 2015
DDD 31:25 PM MON 11 MAY 2015

If StaSTE
STE
STE
(Dep
STE
ng line.
ll” is au-
eturn to
eturn to
157
tion A hung upP 1: Station B dials “Paging” answer code. Station
A rings.
P 2: Station A picks up and announces call.
P 3: Station A hangs up. Station B and the callingparty are connected.
– OR –endent on System Programming)
P 3: Station B dials “Paging” answer code, and isimmediately connected to the calling party.
BOSS/SECRETARY TRANSFER
SecretarySTEP 1: Lift the handset, press the boss’s ringi
Ask the calling party to hold.
STEP 2: Press the boss’s line again. “Voice Catomatically established.
STEP 3: Announce the call to the boss.
If Boss Accepts CallSTEP 1: Secretary replaces the handset.
STEP 2: Secretary presses the boss’s line to rthe calling party.
If Boss Refuses CallSTEP 1: Secretary presses the boss’s line to r
the calling party.
Stations A and B each displaythe other’s number, flashing
TRANSFER DDD 31:25 PM MON 11 MAY 2015
Calling trunk number
DDD 31:25 PM MON 11 MAY 2015
PAGING DDD 31:25 PM MON 11 MAY 2015
DT830 DT430/410
Calling party
DDD 31:25 PM MON 11 MAY 2015
Boss and secretary station eachdisplay the other’s number
ICM XXXX1:25 PM MON 11 MAY 2015

BOCO
To SPatteSTE
STE
STE
Bossrece
PatteSTE
STE
eceive
ey. Re-
s’ mul-o ser-
a mes-time by press-
158
SS/SECRETARY - MW LAMP NTROL
et MW at Boss’s Stationrn1:
P 1: Lift the handset or press key.
P 2: Press the boss’ ringing line. Ask the callingparty to hold.
P 3: Press the MSG Wait line/feature key. No ser-vice set tone is heard.
sees the MW on display and can call secretary to ive message.
rn2:P 1: After taking message, press key and
receive dial tone.
P 2: Press the MSG Wait line/feature key. Re-ceive a service set tone.
To Cancel At Boss’s StationPattern1:STEP 1: Lift the handset or press key. R
a dial tone.
STEP 2: Press the Boss’s line appearance.
STEP 3: Press the MW-CANCEL line/feature kceive a service set tone.
Pattern2:STEP 1: While engaged in conversation on bos
tiline, press the MW-CANCEL key. Nvice set tone is heard.
DT830 DT430/410
Speaker
MSG Wait1:25 PM MON 11 MAY 2015
Recall
MSG Wait1:25 PM MON 11 MAY 2015
Note: The secretary can hang up after taking sage, and set a message lamp at any going off-hook on the boss’ multiline anding the MSG Wait key.
Speaker
MW CANCEL1:25 PM MON 11 MAY 2015
MW CANCEL1:25 PM MON 11 MAY 2015

BO
ExamStatiBossIncominten
To PSTE
STE
STE
STE
STE
STE
SecSTE
STE
STE
es with
cted to
parties
es with
onvers- key to
DT8
159
SS SECRETARY OVERRIDE
ple:on 2000 is boss, Station 2001 is secretary. is connected to Trunk A.ing call on Trunk B connects to secretary, but is
ded for boss.
rogram Boss/Secretary Override KeyP 1: Press key.
P 2: Press the One-Touch Speed Calling key.
P 3: Dial “Boss/Secretary Override” access code.
P 4: Press key. – displays on LCD.
P 5: Dial the boss’ station number.
P 6: Press key again.
retaryP 1: Lift the handset to answer Trunk B, ask caller
to hold.
P 2: Press the CALL HOLD feature key or key and dial call hold access code. Receive aDial Tone.
P 3: Press the BOSS/SEC OVERRIDE. Receive aringback Tone.
BossSTEP 1: Hear 3 bursts of tone. LCD indicates:
Option 1STEP 1: Boss presses key and convers
secretary. Trunk A is placed on hold.
STEP 2: Secretary hangs up. Boss is conneTrunk B.
STEP 3: Boss can alternate between the twoby pressing key.
Option 2STEP 1: Boss presses key and convers
secretary. Trunk A is placed on hold.
STEP 2: Boss presses the station 01 key and ces with Trunk B. Boss presses reconnect to Trunk A.
30 DT430/410
Feature
Recall
Feature
Transfer
Boss’ stationnumber
C WAIT 20001:25 PM MON 11 MAY 2015
Secretary’s stationnumber
C WAIT 20011:25 PM MON 11 MAY 2015
Answer
Answer
Answer
Answer

STE
STE
OptiSTE
STE
OptiSTE
STE
STE
s when
lephony feature
10
160
P 3: Secretary hears a reorder tone, hangs up.
P 4: Boss can alternate between the two partiesby pressing key.
on 3P 1: If boss does not respond to 3 bursts of tone,
secretary presses key.
P 2: Secretary is connected to Trunk B.
on 4P 1: Boss presses key and converses with
Secretary. Trunk A is placed on hold.
P 2: Boss denies call, presses key to re-turn to Trunk A.
P 3: Secretary is returned to Trunk B.
DO NOT DISTURB
While an Idle State (On Hook)STEP 1: Press the NoDist key. LED lights.
To CancelSTEP 1: Press the NoDist key. LED goes out.
Using Soft KeySTEP 1: Press the flashing NoDist soft key.
Answer
Recall
Answer
Transfer
Note: With soft key operation, "NoDist" flasheset.
Note: NoDist must be programmed by the TeServer administrator on a Programmablekey.
DT830 DT430/4
NoDist SET1:25 PM MON 11 MAY 2015
NoDist CANCEL1:25 PM MON 11 MAY 2015
NoDist CANCEL
Mic NoDist >>>

CA
ExamSNdKCRCti
CallAnsSTE
STE
STE
STE
swer to
isplays
.
and the.
n Call Don't
ers it to
ey.
n A and C.
Not
161
LL REDIRECT
ple: tation A views on the terminal display the Station umber or Caller ID of an Incoming Call and imme-iately redirects the call by pressing a Function ey. The destination of the Call Redirect will be the all Forwarding-Don’t Answer Destination or the ecall Destination if the call is transferred without all Forwarding-Don’t Answer being set at the sta-on.
Redirect To Call Forward-Don’t wer Destination
P 1: Station A sets Call Forward-Don’t Answer toStation B.
P 2: Station C dials Station A, it rings and displaysStation C’s number on the display.
P 3: Station A presses the Call Redirect Key.
P 4: REDIRECT is displayed on the LCD, and thecall immediately forwards to Station B.
Using Soft KeySTEP 1: Station A sets Call Forward-Don’t An
Station B.
STEP 2: Station C dials Station A, it rings and dStation C’s number on the display.
STEP 3: Station A presses the REDIR soft key
STEP 4: REDIRECT is displayed on the LCD, call immediately forwards to Station B
- OR -
Call Redirect to Recall Destination WheIs Transferred Without Call Forwarding-Answer Being SetSTEP 1: Station B calls Station C.
STEP 2: Station C answers the call and transfStation A and then releases the call.
STEP 3: Station A rings.
STEP 4: Station A presses the Call Redirect K
STEP 5: REDIRECTING is displayed on Statiothe call immediately recalls to Station
e: This feature is available in North America only.
DT830 DT430/410

UsinSTE
STE
STE
STE
STE
for the
NoDist”
for the
162
g Soft KeyP 1: Station B calls Station C.
P 2: Station C answers the call and transfers it toStation A and then releases the call.
P 3: Station A rings.
P 4: Station A presses the REDIR soft key.
P 5: REDIRECTING is displayed on Station A andthe call immediately recalls to Station C.
PRIVACY
While Off-HookSTEP 1: Press the NoDist key. LED lights.
STEP 2: Privacy feature prevents interruptionsduration of the call.
Using Soft KeySTEP 1: Press the flashing NoDist soft key. “
flashes when set.
STEP 2: Privacy feature prevents interruptionsduration of the call.
DT830 DT430/410
PRIVACY SET1:25 PM MON 11 MAY 2015
PRIVACY SET
Mic >>>1:25 PM MON 11 MAY 2015
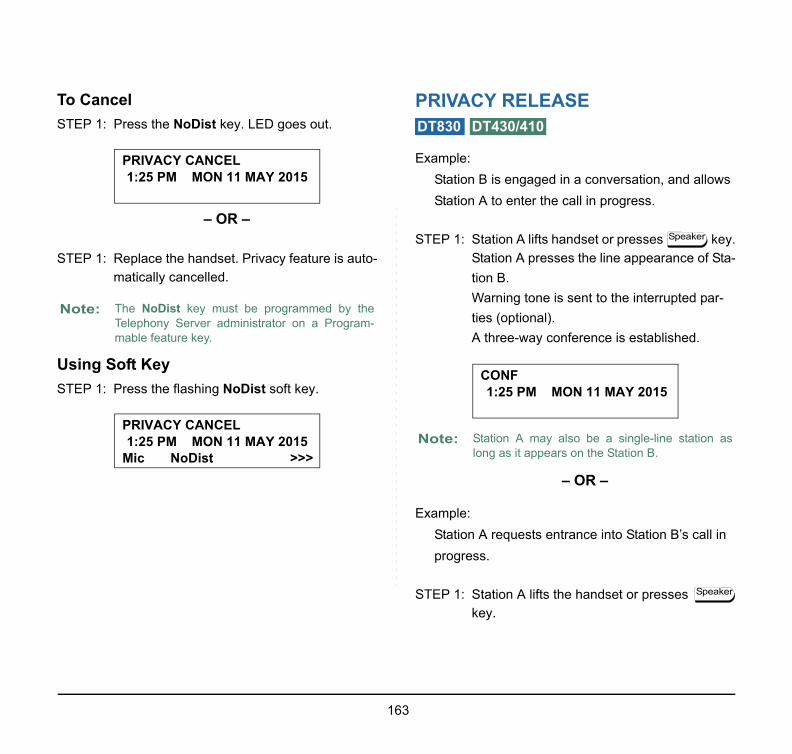
To CSTE
STE
UsinSTE
allows
key. of Sta-
par-
.
call in
Not
tion as
ker
Speaker
163
ancelP 1: Press the NoDist key. LED goes out.
– OR –
P 1: Replace the handset. Privacy feature is auto-matically cancelled.
g Soft KeyP 1: Press the flashing NoDist soft key.
PRIVACY RELEASE
Example: Station B is engaged in a conversation, and Station A to enter the call in progress.
STEP 1: Station A lifts handset or presses Station A presses the line appearancetion B.Warning tone is sent to the interruptedties (optional).A three-way conference is established
– OR –
Example: Station A requests entrance into Station B’s progress.
STEP 1: Station A lifts the handset or presses key.
e: The NoDist key must be programmed by theTelephony Server administrator on a Program-mable feature key.
PRIVACY CANCEL1:25 PM MON 11 MAY 2015
PRIVACY CANCEL
Mic NoDist >>>1:25 PM MON 11 MAY 2015 Note: Station A may also be a single-line sta
long as it appears on the Station B.
DT830 DT430/410
Spea
CONF1:25 PM MON 11 MAY 2015

STE
STE
STE
STE
STE
cal
Up to The
umber. name.
to 100 entries
umber. name.
Not
Not
al with
s the For
ook quired.
inis-
164
P 2: Station A presses the line appearance of Sta-tion B.
P 3: Station B LCD indicates as follows:
P 4: Station B may allow Station A to enter theconversation by pressing Priv.Rel.
P 5: Warning tone is sent to the interrupted parties(optional).
P 6: A three-way conference is established.
PHONEBOOK
There are two types of Phonebook features: LoPhonebook and System Phonebook.
System PhonebookSystem Phonebook is used on a system basis. 12000/60000 entries are available per system. data entry is made by the Telephony Server administrator. Up to 32 digits can be registered for each dial nUp to 24 characters can be registered for each
Local PhonebookLocal Phonebook is used on a station basis. Upentries are available per station. You can make with key operation from the telephone. Up to 32 digits can be registered for each dial nUp to 24 characters can be registered for each
e: Station A can be a single-line station if it appearson the Station B.
e: Up to six parties can break into a two-party con-versation (additional devise is required).
WAIT Priv.Rel?1:25 PM MON 11 MAY 2015
Priv.Rel?1:25 PM MON 11 MAY 2015
CONF1:25 PM MON 11 MAY 2015
Note: This feature is available for the terminLCD.
Note: When the system administrator invalidatePhonebook, this feature cannot be used. details contact the system administrator.
Note: To make the maximum number of Phonebentries as 60000, SV9500 V2 or later is reFor details, please contact the system admtrator.
DT830 DT430/410

• S
To S
E
STE
setting
splay ct
e OK
Not
2
165
YSTEM PHONEBOOK
earch And Make a Call
xample: To Search For “NEC BNET”.
P 1: Press the P.Book soft key while the Station isin an idle state.
If Local Phonebook is enabled by the setting on the system side, go to STEP 2.If Local Phonebook is disabled by the setting on the system side, go to STEP 3.
- OR -
Press key to display the Menu screen. On the Menu screen, select Directory.
If Local Phonebook is enabled by the on the system side, go to STEP 2.If Local Phonebook is disabled, the dichanges as follows. In that case, seleSystem and go to STEP 3.
STEP 2: Press the Sys soft key.
STEP 3: Enter a name and then press or thsoft key to perform a search.
Ex. To enter “NEC”:Press key twice to enter “N”.Press key four times to enter “E“.Press key twice to enter “C“.
e: Select an item on the menu screen in either ofthe following two ways.
• Press an appropriate digit key.
• Highlight a desired item and then press or the OK soft key.
P.Book Mic NoDist1:25 PM MON 11 MAY 2015
Menu
2
History
Back OK
12
Tool3Directory
Personal
Back OK
12
Corporate3System
PhonebookLocal Sys Cnl
632
Name:
>>>OKClrNEC

STE
STE
Not
Not
Not
ok dataame) ordisplay-
n be dis- number or theters/dig-
actersts
166
P 4: A result of the search is displayed. Press or the UP/DOWN soft key to scroll the result.
P 5: The registered Phonebook data for “NEC BNET” appears. From this screen, you can make a call by going off-hook or pressing
key.
e: If “>>>” soft key is pressed on the above screen,the following soft keys appear. Pressing orthe Eu-s/Eu-l soft key shifts characters betweenthe uppercase and lowercase.
e: To delete an entered character, press or theClr soft key.
e: To move the cursor one space to the right, press
key or the RIGHT soft key once
<<< -Eu-s Cnl
(Lower-case character)
<<< -Eu-l Cnl
(Upper-case character)
Search: NECName: NEC ABIKO
UP DOWN More >>>Number: XXXXXXX1
Speaker
Note: The More soft key appears in Phoneboscreen when the number of characters (ndigits (telephone number) are exceeding able limit (Up to 17 characters or digits caplayed at a time). If the name or telephoneexceeds the displayable limit, press More soft key to display the last 17 characits of the name/telephone number.Example: Name Suzuki Taro(JapanSumida) : 24 charNumber: 01234567890123456789 : 20 digi
(Display area)Name: Suzuki Taro(JapanSumida)Number: 01234567890123456789
(Display area)Name: Suzuki Taro(JapanSumida)Number: 01234567890123456789
DOWNUP More >>>
Search: NECName: NEC BNETNumber: XXXXXXXX
NameNumberMore Cnl >>>
: Suzuki Taro(Japan01234567890123456:
NameNumberMore Cnl >>>
: Taro(JapanSumida)34567890123456789:

• L
To A
ExamStatiTele
STEss the
e OK
Not
screen, oretween
167
OCAL PHONEBOOK
dd New Data
ple: on A registers “NEC” as new name and its phone Number.
P 1: Press the P.Book soft key or (Directory) keywhile the Station is in an idle state.
- OR -
Press key to display the Menu screen. On the Menu screen, select Directory.
STEP 2: Press the Local soft key.
STEP 3: Local Phonebook screen appears. PreAdd soft key.
STEP 4: Enter a name and then press or thsoft key.
Ex. To enter “NEC”:Press key twice to enter “N”.Press key twice to enter “E“.Press key three times to enter “C“.
e: Select an item on the menu screen in either ofthe following two ways.
• Press an appropriate digit key.
• Highlight a desired item and then press or the OK soft key.
P.Book Mic NoDist1:25 PM MON 11 MAY 2015
Menu
2
History
Back OK
12
Tool3Directory
Note: If “>>>” soft key is pressed on the above the following soft keys appear. Pressingthe Eu-s/Eu-l soft key shifts characters bthe uppercase and lowercase.
PhonebookLocal Sys Cnl
Local PhonebookAddSrch Cnl
632
Add name:
>>>OKClrNEC

STE
STE
al
played,s regis-ge “Lo-
is en-ft key. sage
Not
Not
Not
168
P 5: Enter the telephone number by using digit keys and press or the OK soft key.
P 6: “NEC” and its telephone number has been added into Local Phonebook. Two seconds later, the display returns to Local Phonebook screen.
To Search For NameThe procedure shown below is available in LocPhonebook.
Example: To Find “NEC BNET”.
STEP 1: While Local Phonebook screen is dispress the Srch soft key. (If no data itered in Local Phonebook, the messacal phone book empty” appears.)
STEP 2: Name Entry screen appears.
STEP 3: Enter a name (in this example, “NEC”tered) and then press or the OK so(If no appropriate data exists, the mes“Entry not found!” appears.)
e: To delete an entered character, press or theClr soft key.
e: To move the cursor one space to the right, press
key or the RIGHT soft key once.
e: To delete an entered digit, press or the Clrsoft key.
<<< -Eu-s Cnl
(Lower-case character)
<<< -Eu-l Cnl
(Upper-case character)
Number:Name: NEC
CnlOKClr
Entry added!
Local PhonebookAddSrch Cnl
Name:
>>>OKClr
Name:
>>>OKClrNEC

STE
STE
Not
Not
Not
ok dataame) ordisplay- be dis-
number or theters/dig-
169
P 4: A result of the search is displayed. Press or the UP/DOWN soft key to scroll the result.
P 5: The registered data for “NEC BNET” ap-pears. From this screen, you can make a call by going off-hook or pressing key.
e: If “>>>” soft key is pressed on the above screen,the following soft keys appear. Pressing orthe Eu-s/Eu-l soft key shifts characters betweenthe uppercase and lowercase.
e: To delete an entered character, press or theClr soft key.
e: To move the cursor one space to the right, press
key or the RIGHT soft key once.
<<< -Eu-s Cnl(Lower-case character)
<<< -Eu-l Cnl(Upper-case character)
Search: NEC
>>>MoreDOWNUP
Name: NEC ABIKO Number: XXXXXXXX1
Speaker
Search: NEC
>>>MoreDOWNUP
Name: NEC BNETNumber: XXXXXXXX
Note: The More soft key appears in Phoneboscreen when the number of characters (ndigits (telephone number) are exceeding able limit (Up to 17 characters or digits canplayed at a time). If the name or telephoneexceeds the displayable limit, press More soft key to display the last 17 characits of the name/telephone number.

To E
ExamTo MNum
STE
STE
STE
STE
e mod-e OK
ears.
screen, oretween
or the
t, press
170
dit An Entry
ple: odify Name “Home” to “House” and Telephone ber “0123456789” to “0123456712”.
P 1: Press “>>>” soft key twice while the targetPhonebook data is displayed.
P 2: Press the Edit soft key.
P 3: The following name edit screen appears.
P 4: Press or the Clr soft key two times to erase “me”.
STEP 5: Enter “use” by using digit keys. After thification has completed, press or thsoft key.
Press key twice to enter “u”.Press key four times to enter “s“.Press key twice to enter “e“.
STEP 6: The following number edit screen app
DOWN MoreNumber: 0123456789Name: Home
>>>UP
Search: Home
Edit DeleteNumber: 0123456789Name: Home
<<<
Search: Home
Edit Name:
>>>OKClrHome
Edit Name:
>>>OKClrHo
Note: If “>>>” soft key is pressed on the above the following soft keys appear. Pressingthe Eu-s/Eu-l soft key shifts characters bthe uppercase and lowercase.
Note: To delete an entered character, press Clr soft key.
Note: To move the cursor one space to the righ
key or the RIGHT soft key once.
873
Edit Name:
>>>OKClrHouse
<<< -Eu-s Cnl
(Lower-case character)
<<< -Eu-l Cnl
(Upper-case character)
Number: 0123456789 Cnl
Name: House
Clr OK

STE
STE
STE
target
the cur-
o sec-e Entry
171
P 7: Press or the Clr soft key twice to erase “89”.
P 8: Enter “12” by pressing digit keys and then press or the OK soft key.
P 9: The data modification has completed. Two seconds later, the display returns to Local Phonebook screen.
To Delete A Record
STEP 1: Press “>>>” soft key twice while thePhonebook data is displayed.
STEP 2: Press the DEL soft key.
STEP 3: Press or the OK soft key to delete rently displaying data.
STEP 4: The data deletion has completed. Twonds later, the display returns to Namscreen.
Number: 01234567 Cnl
Name: House
Clr OK
Number: 0123456712Name: House
Clr OK Cnl
Entry edited!
DOWN MoreNumber: 0123456789Name: NEC ABIKO
>>>UP
Search: NEC ABIKO
EDIT DELNumber: 0123456789Name: NEC ABIKO
<<<
Search: NEC ABIKO
Name: NEC ABIKO
OKNumber: 0123456789
Delete this entry?
Cnl
Entry deleted!

To AThe Phon
ExamTo ad“012
STE
STE
STE
ephonee Pref
the Clr
k datame) orisplay-
can bephoness harac-
172
dd A Prefix To Telephone Numberprocedure shown below is available in Local ebook.
ple: d a prefix “0184” in front of telephone number
3456789”
P 1: Press “>>>” soft key while the target Phone-book data is displayed.
P 2: Press the Pref soft key.
P 3: Enter a prefix (In this example, “0184” is en-tered) by using digit keys and press or the OK soft key.
STEP 4: The prefix is added in front of the telnumber. Once the prefix is added, thsoft key will disappear.
DOWN MoreNumber: 0123456789Name: Takahashi
>>>UP
Search: Takahashi
Pref CnlNumber: 0123456789Name: Takahashi
>>>
Search: Takahashi
<<<
ClrNumber: 0184Prefix Number Input
CnlOK
Note: To delete an entered digit, press or soft key.
Note: The More soft key appears in Phonebooscreen when the number of characters (nadigits (telephone number) are exceeding dable limit (Up to 17 characters or digits displayed at a time). If the name or telenumber exceeds the displayable limit, preor the More soft key to display the last 17 cters/digits of the name/telephone number.
Number: 01840123456789Name: Takahashi
<<< >>>
Search: Takahashi
Cnl

AvaThe Phon
SP: B
DigiCode
Character
* #
* #
173
ilable Characters In Local Phonebookfollowing tables show available characters in Local ebook.
UPPERCASE CHARACTER
lank Space
LOWERCASE CHARACTER
SP: Blank Space
t 1 2 3 4 5 6 7 8 9 0 * #
. A D G J M P T W SP * #, B E H K N Q U X 0: C F I L O R V Y! À È Ì 5 Ñ S Ù Z? Á É Í Ò b Ú 9- Â Ê Î Ó 7 Û+ Ã Ë Ï Ô Ü% Ä 3 4 Õ 8& Å Ö/ Æ Œ( Ç Ø) 2 6=¿¡1
Digit Code 1 2 3 4 5 6 7 8 9 0
Character
. a d g j m p t w SP, b e h k n q u x 0: c f i l o r v y! à è ì 5 ñ s ù z? á é í ò b ú 9: â ê î ó 7 û\ ä ë ï ô ü“ å 3 4 õ 8
@ æ ö1 ç 6
2

CA
TherhandOn thmemOPEThe the CThis exceof ocup tonam
ry Fea-yed on
screen.ory (forDT430oft key.
call is
Not
be dis-
174
LL HISTORY
e are two types of Call History features. On the one , the history data is stored in the system memory. e other hand, the history data is stored in the ory of the telephone (see 7.CALL HISTORY RATION). following describes the operating procedures for all History feature which controlled by the system.Call History feature can store up to 20 records. If eding 20 records, a record will be deleted in order currence. Also, this Call History feature can store 32 digits of dial number and 16 characters of
e information per record.
To View Call HistorySTEP 1: Press History soft key or Call Histo
ture key while the current time is displaLCD.
- OR -
STEP 1: Press key to display the Menu On the Menu screen, select HistDT830 Series)/ Call History (for Series) and then press or the OK s(or press key.)
STEP 2: The history data of the last receiveddisplayed.
e: When the system administrator invalidates thePhonebook, this feature cannot be used. Fordetails contact the system administrator.
DT830 DT430/410
Note: If no history data is saved, "NO LIST" willplayed on LCD.
5:25 PM MON 11 MAY 2015History Mic NoDist
Menu
11
1
Back OK
12
Tool3DirectoryHistory
P.Book31300
1:03 PM MON 11 MAY 2015
>>>
AAAAA

STE
To MSTE
STE
data to
. In thisnteringy.
Not
Not
Not
be set
cluding
or the
175
P 3: Press or the UP/DOWN soft key to displaya desired history data.
ake A Call From Call HistoryP 1: Display the history data of the target party.
P 2: Go off-hook or press key, , or theOK soft key to make a call to the displayedparty.
To Make A Call With PrefixSTEP 1: Press “>>>” soft key while the history
which you want to add a prefix.
STEP 2: Press the Pref soft key.
STEP 3: Enter a prefix by using the digit keysexample, “012345” is entered. After ethe prefix, press or the OK soft ke
e: Call History will display “!!” for an unansweredincoming call.
e: If the calling party information is not notified, CallHistory will display “----” to the history data.
e: While the history data is displayed, you cannotmake a call by dialing a telephone number.
P.Book51500
12:55 PM MON 11 MAY 2015
>>>
!! BBBBB
P.Book51500
1:03 PM MON 11 MAY 2015
>>>
BBBBB!!
Speaker
Note: A maximum of 10 digits (0-9, * and #) canas a prefix.
Note: When prefix is added, up to 32 digits inthe prefix can be sent as dial number.
Note: To delete an entered character, press Clr soft key.
P.Book31300
1:03 PM MON 11 MAY 2015
>>>
AAAAA
Delete31300
1:03 PM MON 11 MAY 2015
EndPref<<<
AAAAA
OKNumber:Prefix Number Input
Clr Cnl

STE
STE
ry data.
Not
nd soft
176
P 4: If the call history data has name information,the name is displayed as follows:
P 5: Go off-hook or press key to make acall to the displayed telephone number.
To Delete A Specific DataSTEP 1: Press “>>>” soft key while the histo
which you want to delete is displayed
STEP 2: Press the Delete soft key.
e: The More soft key appears in Phonebook datascreen when the number of characters (name) ordigits (telephone number) are exceeding display-able limit (Up to 17 characters or digits can be dis-played at a time). If the name or telephone numberexceeds the displayable limit, press or theMore soft key to display the last 17 characters/dig-its of the name/telephone number.
NameNumber
:AAAAA:01234531300
Cnl
Speaker
Note: If you want to exit Call History, press the Ekey.
P.Book31300
1:03 PM MON 11 MAY 2015
>>>
AAAAA
Delete
1:03 PM MON 11 MAY 2015
EndPref<<<31300
AAAAA

To APho
STE
STE
Not
Not
history,
screen, oretween
177
dd Call History Data To Local nebook
P 1: Press the P.Book soft key or the PhonebookFeature key while the history data of the tar-get party.
P 2: Enter a desired name and then press the OKsoft key.(In this example, “NEC ABIKO” is entered.)
e: The Call History data stored on the system canbe added to Phonebook (controlled by the sys-tem) only. The data cannot be added to the Per-sonal Directory (described in 6.DIRECTORYOPERATION) controlled by the telephone.
e: Local Phonebook feature allows you to registerup to 100 records. If exceeding 100 records atthis point, the error message shown belowappears. Press the OK soft key to go back to theabove display.
P.Book31300
1:03 PM MON 11 MAY 2015
>>>
_ _ _
Entry NG (over)OK
Clr
Add name:
OK >>>NEC ABIKO
Note: If name information is stored on the call the name is displayed.
Note: If “>>>” soft key is pressed on the above the following soft keys appear. Pressingthe Eu-s/Eu-l soft key shifts characters buppercase and lowercase.
<<< -Eu-s Cnl
(Lower-case character)
<<< -Eu-l
(Upper-case character)
Cnl

6This of DTyou c
Persentriview500
••••••••
TO
STE
ons.soft key,
Not
Seriesport the
ed, thise, skip
178
. DIRECTORY OPERATION
chapter explains about Personal Directory function830 Series. By using Personal Directory function,an make a call with simple operation.
onal Directory function can register up to 500es (4 telephone numbers per entry). You can add//edit/delete these entries. If the directory containsentries (maximum), entries can be removed using
TO ADD NEW DATATO CHANGE GROUP NAMETO FIND REGISTERED DATATO MAKE A CALL FROM DIRECTORYTO ADD PREFIX TO NUMBERTO EDIT DIRECTORY DATATO DELETE ALL DATATO DELETE SPECIFIC DATA
ADD NEW DATA
P 1: While indicating the current time on LCD,press key to open the Menu screen.
-OR-
Press (Directory) key. The Directory screen shown at STEP 3 can be directly displayed.
STEP 2: Select Personal.Select an item by either of the following operati• Highlight an item by using or UP/DOWN
and then press , or OK soft key.• Press key.
e: A maximum of 500 entries can be registered inDirectory.
DT830
Menu
Note: Directory feature is available for DT830only. DT430/DT410 Series does not supdirectory feature.
Note: When using Phonebook feature is disablscreen will not be displayed. In that casthis step.
1
1
12
[Directory]
3 CorporateSystem
OKMenu
Personal

STE
STE
tory.g the
Not
name.e HOW
179
P 3: Select Edit.Select an item by either of the following operations.• Highlight an item by using or UP/DOWN soft key,
and then press , or OK soft key.• Press key.
P 4: Select Name.Select an item by either of the following operations.• Highlight an item by using , and then press ,
or OK soft key.• Press key.
STEP 5: Enter a name to be registered in direcEnter a name by using digits keys. After enterinname, press or OK soft key.
e: If the Personal/Terminal directory contains 500entries, the following screen appears.
To go back to the Directory screen, press orOK, and delete some entries from Search.
2
2
Search12
Group Setting
[Directory]
340
Own NumberDelete All
Edit
OKBack
Directory is full.
[Edit]
OK
1
1
1
Note: Up to 32 characters can be entered as aFor details on character entry method, seTO INPUT CHARACTERS in chapter 4.
[Edit]
Name12
[Edit]
345
Name
OKBack
67890Save
Gr GroupTel #1
Company NameRing Tone
Tel #4
Tel #2Tel #3
Illumination0No
Input a name.[Name]
OKBackOptionBK
A

STE
STE
ons.s ,
om theee TO
180
P 6: The display goes back to the Edit screen. Se-lect Group.Select an item by either of the following operations.• Highlight an item by using , and then press ,
or OK soft key.• Press key.
P 7: Select a desired group.Select an item by either of the following operations.• Highlight an item by using or UP/DOWN soft key,
and then press or OK soft key.• Press - key, and then press or OK soft
key.In this example, Colleagues is selected.
STEP 8: Select Tel #1.Select an item by either of the following operati• Highlight an item by using , and then pres
or OK soft key.• Press key.
2
2
12
[Edit]
345
OKBack
67890Save
Gr
No
Tel #1
Company NameRing Tone
Ken Kobus
Tel #4
Tel #2Tel #3
Illumination0
Group
0 9
2
Note: Each group name can be changed frGroup Setting screen. For details, sCHANGE GROUP NAME.
12
[Group Select]
3456
20
Colleagues
OKBack
Group 6
FamilyFriends
Default
VIPs
Group 20
:
3
3

STE
STE
ext soft
181
P 9: Enter a telephone number to be registered indirectory.Enter a telephone number by using digits keys. After entering the telephone number, press or Next soft key.
P 10:Select a Category to which the entered tele-phone number belongs. Select an item by either of the following operations.• Highlight an item by using or UP/DOWN soft key,
and then press or Next soft key.• Press - key, and then press or N
key.In this example, Company is selected.
Selectable categories are as follows:
12
[Edit]
345
OKBack
67890Save
Gr
No
Company NameRing Tone
Ken Kobus
Tel #4
Tel #2Tel #3
Illumination0
ColleaguesTel #1
Input a Telephone number.[Tel #1]
NextBackBK
1
Category ICON
Company
Mobile
Voice Mail
Home
Others
0 5
1
12
[Category]
345
Company
NextPrev
HomeOthers
MobileVoice Mail

STE
STE
ter enter-ey.
Not
Not
a com-r entryERS.
182
P 11:Select either Disable or Enable.Select an item by one of the following operations.• Highlight an item by using or UP/DOWN soft key,
and then press or OK soft key.• Press or key, and then press or OK soft
key.
A maximum of four telephone numbers can be set to an entry. If Enable is selected here, the tele-phone number which is being edited will be given top priority. In that case, the telephone number is automatically selected when you make a call with-out specifying a specific telephone number.
P 12:The display goes back to the Edit screenagain. Select Company Name.Select an item by either of the following operations.• Highlight an item by using , and then press ,
or OK soft key.• Press key.
STEP 13:Enter a company name.Enter a company name by using digits keys. Afing the company name, press or OK soft k
e: A maximum of four telephone numbers can beset to an entry. If two or more telephone numbersare required to be set, set the remaining tele-phone numbers to Tel #2 - Tel #4.
e: If multiple telephone numbers are registered toan entry and Priority Flag is disabled to all of thetelephone numbers, the telephone number set toTel #1 is automatically set as first priority number.
1 2
1 2
2
[Priority Flag]
OKPrev
112 Enable
Disable
7
7
Note: Up to 32 characters can be entered as pany name. For details on charactemethod, see HOW TO INPUT CHARACT
12
[Edit]
345
OKBack
67890Save
Gr
No
Ring Tone
Ken Kobus
Tel #4
Tel #2Tel #3
Illumination0
Colleagues
Company Name
31300
Input a Company name.[Company Name]
OKBackOptionBK
A

STE
STE
to theer Toned “Tele-“Name”“Group”
ge the r “Tele-atic is
d.
O SET
183
P 14:The display goes back to the Edit screen. Se-lect Ring Tone.Select an item by either of the following operations.• Highlight an item by using , and then press ,
or OK soft key.• Press key.
P 15:Select a desired Ringing Tone.
Select an item by either of the following operations.• Highlight an item by using or UP/DOWN soft key,
and then press or OK soft key.• Press - key, and then press or OK soft
key.
8
8
12
[Edit]
345
OKBack
67890Save
Gr
No
Ken Kobus
Tel #4
Tel #2Tel #3
Illumination0
Colleagues31300
Ring ToneNEC
0 9
Note: You can set ringer tone for calls routedspecified name (calling party) here. Ringtype can be set for “Name”, “Group” anphone set”. The ringer Tone type set for has higher priority than the types set for and “Terminal set”.
Note: Set 2 Default when you don’t want to chanringer tone here. The setting for “Group” ophone set” is applied. Also, when 1 Automset, 3 Tone Type 1 is automatically applie
Note: For details on each ringer tone type, see TRINGER TONE.
12
[Ring Tone]
3
16171819
Automatic
OKBack
Download 1Tone Type 14
DefaultTone Type 1
Download 3Download 2

STE
STE
uted tollumina-p” andset for set for
nge theoup” or Auto-d.
184
P 16:The display goes back to the Edit screen. Se-lect Illumination.Select an item by either of the following operations.• Highlight an item by using , and then press ,
or OK soft key.• Press key.
P 17:Select a desired color of the Call Indicationlamp.Select an item by either of the following operations.• Highlight an item by using or UP/DOWN soft key,
and then press or OK soft key.• Press - key.
• For DT830 Series9
9
12
[Edit]
345
OKBack
67890Save
Gr
No
Ken Kobus
Tel #4
Tel #2Tel #3
0
Colleagues31300
NEC
IlluminationAutomatic
0 9
Note: You can set illumination type for calls rothe specified name (calling party) here. Ition type can be set for “Name”, “Grou“Telephone set”. The illumination type “Name” has higher priority than the types“Group” and “Terminal set”.
Note: Set 2 Default when you don’t want to chaillumination type here. The setting for “Gr“Telephone set” is applied. Also, when 1matic is set, 4 Red is automatically applie
12
[Illumination]
345678
Automatic
OKBack
Yellow
RedGreen
White9
10
DefaultDisable
BlueLight BluePurple
11 Rotation

STE
STE
e Editthe as-
umber:K soft
rectory
Not
e” will entry.
ill over-pear. Ifs Back, press
185
P 18:The display goes back to the Edit screen.Check the memory number assigned to thedirectory data being edited.
P 19:If you need to assign a memory number man-ually, select Memory ID on the screen ofthe previous step, and then enter a desiredmemory number (0 - 499).
Enter a memory number by using digits keys. After entering the memory number, press or OK soft key.
STEP 20:When the display goes back to thscreen, press Save soft key to save signed data.
STEP 21:“The data is registered at memory nXX” is displayed. Press key or Okey. The display returns to the Discreen.
e: A memory number is automatically set in ascend-ing numeric order.
12
[Edit]
345
OKBack
67890Save
Gr
No
Ken Kobus
Tel #4
Tel #2Tel #3
0
Colleagues31300
NECAutomaticAutomatic
0
Note: If Name is not entered, “No Input Namappear. Name information is required for a
Note: If a duplicate Memory ID is entered, “It wwrite a data at memory number:XX” will apyou do not overwrite the Memory ID, pressoft key. If you overwrite the Memory ID
or OK soft key.
Input a memory number.[Memory ID]
OKBackBK
1
0-499

TOSTE
STE
STE
ons.soft key,
186
CHANGE GROUP NAME P 1: Open the Directory screen (see TO ADD
NEW DATA).
P 2: On the Directory screen, select GroupSetting.Select an item by either of the following operations.• Highlight an item by using or UP/DOWN soft key,
and then press , or OK soft key.• Press key.
P 3: Select a group name to be changed.In this example, Default is selected.Select an item by either of the following operations.• Highlight an item by using or UP/DOWN soft key,
and then press or OK soft key.• Press key, and then press or OK soft key.
STEP 4: Select Name.Select an item by either of the following operati• Highlight an item by using or UP/DOWN
and then press , or OK soft key.• Press key.
DT830
3
3
Search12
[Directory]
340
Own NumberDelete All
Edit
OKMenu
Group Setting
1
1
12
[Group]
3456
20
Default
OKBack
Group 6
FamilyFriends
ColleaguesVIPs
:Group 20
1
1
12
[Group Setting]
3Ring Tone
OKBackIllumination
Name

STE
STE
Not
Not
187
P 5: Enter a new group name.
Enter a group name by using digits keys. After entering the group name, press or OK soft key.
P 6: Display returns to the Group screen. Makesure that the new group name takes effect.
e: Up to 32 characters can be entered as a groupname. For details on character entry method, seeHOW TO INPUT CHARACTERS in chapter 4.
e: You can set ringer tone ( select 2 Ring Tone)and illumination types ( select 3 Illumination)for calls routed to the specified group here. Ringer tone and illumination types can be set for“Name”, “Group” and “Telephone set”. The ringertone and illumination types set for “Name” havehigher priority than the types set for Group andTelephone set. Also, the ringer tone and illumina-tion types for Group have higher priority than thetypes set for Terminal set.
Input a group name.
[Group Name Set]
OKBackOptionBK
A
Default

TO
• TSTE
STE
STE
ons.soft key,
ft key.
DT8
188
FIND REGISTERED DATA
o Search by Group NameP 1: Open the Directory screen (see TO ADD
NEW DATA).
P 2: Select Search on the Directory screen.Select an item by either of the following operations.• Highlight an item by using or UP/DOWN soft key,
and then press , or OK soft key.• Press key.
P 3: Select Group.Select an item by either of the following operations.• Highlight an item by using or UP/DOWN soft key,
and then press , or OK soft key.• Press key.
STEP 4: Select a target group.In this example, Colleagues is selected.Select an item by either of the following operati• Highlight an item by using or UP/DOWN
and then press or OK soft key.• Press key, and then press or OK so
30
1
1
12
[Directory]
340
Own NumberDelete All
Edit
OKMenu
Group Setting
Search
1
1
12
[Search]
34 Others
Name
OKBack
Tel Number
Group
2
2
12
[Group]
3456
20
Colleagues
OKBack
Group 6
FamilyFriends
Default
VIPs
Group 20
:

STE
STE
Not
Not
189
P 5: Select a target name by pressing .
In the following Directory (Name List) screen, you can make a call to the selected party by pressing or Call soft key. If two or more tele-phone numbers are assigned to an entry, a top priority telephone number will be dialed.
P 6: To display the detailed data for a specificname, press Detail soft key while the name ishighlighted.
In the following Detail screen, you can make a call to the selected number by pressing or Call soft key.
e: If no entry is set to the selected group, "No data"is issued.
e: If two or more telephone numbers are assignedto an entry, a top priority telephone number isautomatically selected when the Detail screenappears.
John Smith
[Directory]
CallBackOptionDetailKen KobusJulia
12
[Detail]
34567890
Gr
NoCallBack
Tel #4Tel #3
0
Colleagues
NECAutomaticAutomatic
Ken Kobus
0800XXXXXX31300

• T
STE
STE
STE
soft key.
se andsystemd "kenaracterdminis-
search-
nd, you
entered
a com-r entryERS.
190
o Search by Name
P 1: Open the Directory screen (see TO ADDNEW DATA).
P 2: Select Search.Select an item by either of the following operations.• Highlight an item by using or UP/DOWN soft key,
and then press , or OK soft key.• Press key.
P 3: Select Name.Select an item by either of the following operations.• Highlight an item by using or UP/DOWN soft key,
and then press , or OK soft key.• Press key.
STEP 4: Enter a target name. After entering the name, Press or OK
1
1
12
[Directory]
340
Own NumberDelete All
Edit
OKMenu
Group Setting
Search
2
2
12
[Search]
34 Others
OKBack
Tel Number
GroupName
Note: A distinction is made between upper calower case characters, according as the settings. For example, "Ken Kobus" ankobus" are distinguished as different chstrings. For details, contact the System atrator.
Note: A blank space is also distinguished while ing database for a name.
Note: Even if the name is not entered to the ecan search for a name.
Note: If there is no entry corresponding to the name, "No data" is issued.
Note: Up to 32 characters can be entered as pany name. For details on charactemethod, see HOW TO INPUT CHARACT
Input a name.[Name]
OKBackOptionBK
A
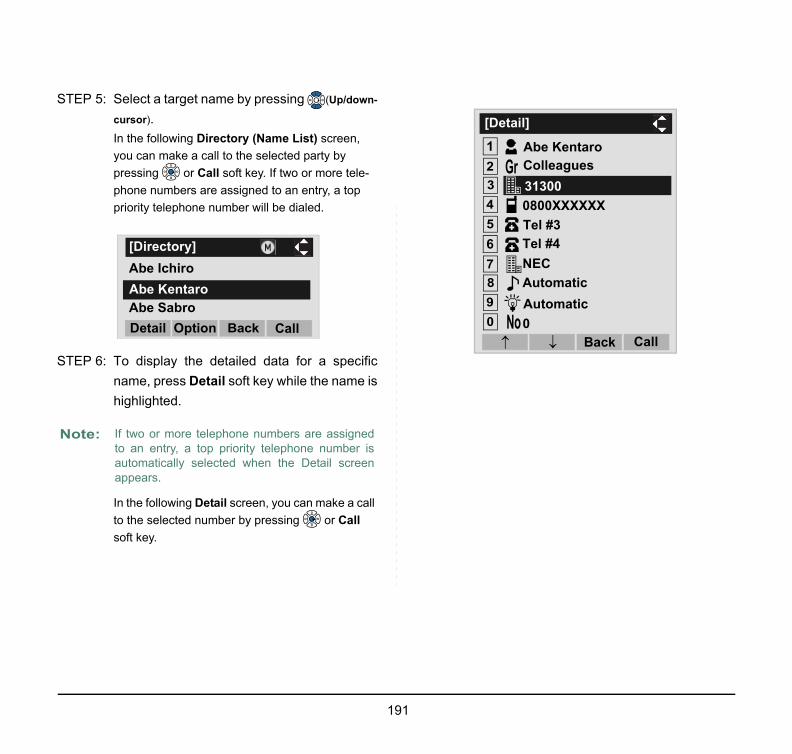
STE
STE
Not
191
P 5: Select a target name by pressing (Up/down-
cursor).In the following Directory (Name List) screen, you can make a call to the selected party by pressing or Call soft key. If two or more tele-phone numbers are assigned to an entry, a top priority telephone number will be dialed.
P 6: To display the detailed data for a specificname, press Detail soft key while the name ishighlighted.
In the following Detail screen, you can make a call to the selected number by pressing or Call soft key.
e: If two or more telephone numbers are assignedto an entry, a top priority telephone number isautomatically selected when the Detail screenappears.
[Directory]
CallBackOptionDetail
Abe Ichiro
Abe SabroAbe Kentaro
12
[Detail]
34567890
Gr
NoCallBack
Tel #4Tel #3
0
Colleagues
NECAutomaticAutomatic
0800XXXXXX31300
Abe Kentaro

• TSTE
STE
STE
K soft
reen, by e tele-a top
ered toumber.
entered.
192
o Search by Telephone NumberP 1: Open the Directory screen (see TO ADD
NEW DATA).
P 2: Select Search.Select an item by either of the following operations.• Highlight an item by using or UP/DOWN soft key,
and then press , or OK soft key.• Press key.
P 3: Select Tel Number.Select an item by either of the following operations.• Highlight an item by using or UP/DOWN soft key,
and then press , or OK soft key.• Press key.
STEP 4: Enter a target telephone number. After entering the number, press or Okey.
STEP 5: Select a target name by pressing .In the following Directory (Name List) scyou can make a call to the selected party pressing or Call soft key. If two or morphone numbers are assigned to an entry, priority telephone number will be dialed.
1
1
12
[Directory]
340
Own NumberDelete All
Edit
OKMenu
Group Setting
Search
3
3
12
[Search]
34 Others
OKBack
Tel Number
GroupName
Note: Even if the telephone number is not entthe end, you can search for a telephone n
Note: If there is no entry corresponding to the number, "No data" is issued on the screen
Input a Telephone number.[Tel Number]
OKBackBK
1
[Directory]
CallBackOptionDetail
Abe Ichiro
Abe SabroAbe Kentaro

STE
Not
193
P 6: To display the detailed data for a specificname, press Detail soft key while the name ishighlighted.
In the following Detail screen, you can make a call to the selected number by pressing or Call soft key.
e: If two or more telephone numbers are assignedto an entry, a top priority telephone number isautomatically selected when the Detail screenappears.
12
[Detail]
34567890
Gr
NoCallBack
Tel #4Tel #3
0
Colleagues
NECAutomaticAutomatic
0800XXXXXX31300
Abe Kentaro

• TSTE
STE
STE
ons.soft key,
or
ed, with r clos-
194
o Search by Memory IDP 1: Open the Directory screen (see TO ADD
NEW DATA).
P 2: Select Search.Select an item by either of the following operations.• Highlight an item by using or UP/DOWN soft key,
and then press , or OK soft key.• Press key.
P 3: Select Others.Select an item by either of the following operations.• Highlight an item by using or UP/DOWN soft key,
and then press , or OK soft key.• Press key.
STEP 4: Select Memory ID.Select an item by either of the following operati• Highlight an item by using or UP/DOWN
and then press , or OK soft key.• Press key.
STEP 5: Enter a memory number (0-499). After entering the memory number, press OK soft key.
The list of memory numbers will be displaythe entered memory number or the numbeest to the entered number in front.
1
1
12
[Directory]
340
Own NumberDelete All
Edit
OKMenu
Group Setting
Search
4
4
12
[Search]
34
OKBack
Tel Number
GroupName
Others
1
1
12
[Others]
34
OKBackAlphabet
CategoryCompany
Memory ID
Input a Memory number.[Memory ID]
OKBackBK
1

STE
STE
Not
Not
195
P 6: Select a target name by pressing (Up/down-
cursor).In the following Directory (Name List) screen, you can make a call to the selected party by pressing or Call soft key. If two or more tele-phone numbers are assigned to an entry, a top priority telephone number will be dialed.
P 7: To display the detailed data for a specificname, press Detail soft key while the name ishighlighted.
In the following Detail screen, you can make a call to the selected number by pressing or Call soft key.
e: If no data exists in Directory, "No data" is issuedon the screen.
e: If two or more telephone numbers are assignedto an entry, a top priority telephone number isautomatically selected when the Detail screenappears.
[Directory]
CallBackOptionDetail
Abe SabroAbe Kentaro
12
[Detail]
34567890
Gr
NoCallBack
Tel #4Tel #3
0
Colleagues
NECAutomaticAutomatic
0800XXXXXX31300
Abe Kentaro

• TSTE
STE
STE
s.soft key,
s.soft key,
ft key.
196
o Search by CategoryP 1: Open the Directory screen (see TO ADD
NEW DATA).
P 2: Select Search.Select an item by either of the following operations.• Highlight an item by using or UP/DOWN soft key,
and then press , or OK soft key.• Press key.
P 3: Select Others.Select an item by either of the following operations.• Highlight an item by using or UP/DOWN soft key,
and then press , or OK soft key.• Press key.
STEP 4: Select Category.Select an item by one of the following operation• Highlight an item by using or UP/DOWN
and then press , or OK soft key.• Press key.
STEP 5: Select a desired category.In this example, Company is selected.Select an item by one of the following operation• Highlight an item by using or UP/DOWN
and then press or OK soft key.• Press key, and then press or OK so
1
1
12
[Directory]
340
Own NumberDelete All
Edit
OKMenu
Group Setting
Search
4
4
12
[Search]
34
OKBack
Tel Number
GroupName
Others
2
2
12
[Others]
34
OKBackAlphabetCompany
Memory ID
Category
1
1
12
[Category]
345
Company
OKBack
HomeEtc
MobileVoice Mail

STE
STE
Not
Not
197
P 6: Select a target name by pressing .In the following Directory (Name List) screen, you can make a call to the selected party by pressing or Call soft key. If two or more tele-phone numbers are assigned to an entry, a top priority telephone number will be dialed.
P 7: To display the detailed data for a specificname, press Detail soft key while the name ishighlighted.
In the following Detail screen, you can make a call to the selected number by pressing or Call soft key.
e: If there is no entry corresponding to the selectedcategory, "No data" is issued on the screen.
e: If two or more telephone numbers are assignedto an entry, a top priority telephone number isautomatically selected when the Detail screenappears.
[Directory]
CallBackOptionDetail
Abe SabroAbe Kentaro
Abe Taro
12
[Detail]
34567890
Gr
NoCallBack
Tel #4Tel #3
0
Colleagues
NECAutomaticAutomatic
0800XXXXXX31300
Abe Kentaro

• TSTE
STE
STE
ons.soft key,
key.
se and, "Ken as dif-
search-
nd, you
a com-r entryERS.
198
o Search by Company NameP 1: Open the Directory screen (see TO ADD
NEW DATA).
P 2: Select Search.Select an item by either of the following operations.• Highlight an item by using or UP/DOWN soft key,
and then press , or OK soft key.• Press key.
P 3: Select Others.Select an item by either of the following operations.• Highlight an item by using or UP/DOWN soft key,
and then press , or OK soft key.• Press key.
STEP 4: Select Company.Select an item by either of the following operati• Highlight an item by using or UP/DOWN
and then press , or OK soft key.• Press key.
STEP 5: Enter a company name.After entering the name, Press or OK soft
1
1
12
[Directory]
340
Own NumberDelete All
Edit
OKMenu
Group Setting
Search
4
4
12
[Search]
34
OKBack
Tel Number
GroupName
Others
Note: A distinction is made between upper calower case characters. For exampleKobus" and "ken kobus" are distinguishedferent character strings.
Note: A blank space is also distinguished while ing database for a name.
Note: Even if the name is not entered to the ecan search for a name.
Note: Up to 32 characters can be entered as pany name. For details on charactemethod, see HOW TO INPUT CHARACT
3
3
12
[Others]
34
OKBackAlphabetCompany
Memory ID
Category
Input a Company name.
[Company]
OKBackOptionBK
A

STE
STE
Not
Not
199
P 6: Select a target name by pressing .In the following Directory (Name List) screen, you can make a call to the selected party by pressing or Call soft key. If two or more tele-phone numbers are assigned to an entry, a top priority telephone number will be dialed.
P 7: To display the detailed data for a specificname, press Detail soft key while the name ishighlighted.
In the following Detail screen, you can make a call to the selected number by pressing or Call soft key.
e: If there is no entry corresponding to the selectedCompany, "No data" is issued on the screen.
e: If two or more telephone numbers are assignedto an entry, a top priority telephone number isautomatically selected when the Detail screenappears.
[Directory]
CallBackOptionDetail
Abe SabroAbe Kentaro
Abe Taro
12
[Detail]
34567890
Gr
NoCallBack
Tel #4Tel #3
0
Colleagues
NECAutomaticAutomatic
0800XXXXXX31300
Abe Kentaro

• TSTE
STE
STE
ons.soft key,
.
s.soft key,
ft key.
200
o Search by AlphabetP 1: Open the Directory screen (see TO ADD
NEW DATA).
P 2: Select Search.Select an item by either of the following operations.• Highlight an item by using or UP/DOWN soft key,
and then press , or OK soft key.• Press key.
P 3: Select Others.Select an item by either of the following operations.• Highlight an item by using or UP/DOWN soft key,
and then press , or OK soft key.• Press key.
STEP 4: Select Alphabet.Select an item by either of the following operati• Highlight an item by using or UP/DOWN
and then press , or OK soft key.• Press key.
STEP 5: Select a desired group of alphabetsIn this example, ABC is selected.Select an item by one of the following operation• Highlight an item by using or UP/DOWN
and then press or OK soft key.• Press key, and then press or OK so
1
1
12
[Directory]
340
Own NumberDelete All
Edit
OKMenu
Group Setting
Search
4
4
12
[Search]
34
OKBack
Tel Number
GroupName
Others
4
4
12
[Others]
34
OKBack
Company
Memory IDCategory
Alphabet
1
0

STE
specificame is
ke a call Call
Not
roup ofen.
ssignedmber isscreen
201
P 6: Select a target name by pressing .In the following Directory (Name List) screen, you can make a call to the selected party by pressing or Call soft key. If two or more tele-phone numbers are assigned to an entry, a top priority telephone number will be dialed.
STEP 7: To display the detailed data for a name, press Detail soft key while the nhighlighted.
In the following Detail screen, you can mato the selected number by pressing orsoft key.
e: Select * Others to find names which begin with acharacter other than alphabet such as numericsor symbols.
12
[Alphabet]
345678
OKBack
PQRS
JKLMND
All*#
DEFGHI
TUVWXYZOthers
ABC
[Directory]
CallBackOptionDetail
Abe SabroAbe Kentaro
Abe Taro
Note: If there is no entry corresponding to the galphabets, "No data" is issued on the scre
Note: If two or more telephone numbers are ato an entry, a top priority telephone nuautomatically selected when the Detail appears.
12
[Detail]
34567890
Gr
NoCallBack
Tel #4Tel #3
0
Colleagues
NECAutomaticAutomatic
0800XXXXXX31300
Abe Kentaro

TO
• T
STE
STE
t party
Not
DT8red to aity tele-
ssignedmber isscreen
202
MAKE A CALL FROM DIRECTORY
o Make a Call from Name List Screen
P 1: Display the Directory (Name List) screen fora target party (see TO FIND REGISTEREDDATA).
P 2: Select a target name and then make a call.Select a target name by pressing , and then press or Call soft key to make a call to the selected party.
• To Make a Call from Detail Screen
STEP 1: Display the Detail screen for a targe(see TO FIND REGISTERED DATA).
e: While Directory screen is being displayed, youcannot make a call by dialing a telephone num-ber.
30
Abe Jiro
[Directory]
CallBackOptionDetail
Abe Ichiro
Abe Kentaro
Abe Jiro
[Directory]
CallBackOptionDetail
Abe Ichiro
Abe Kentaro
Note: If multiple telephone numbers are registetarget party, a call is made to the first priorphone number.
Note: If two or more telephone numbers are ato an entry, a top priority telephone nuautomatically selected when the Detail appears.
12
[Detail]
34567890
Gr
NoCallBack
Tel #4Tel #3
0
Colleagues
NECAutomaticAutomatic
0800XXXXXX31300
Abe Kentaro

STE
to tele-d to be
etting.
ons.soft key,
ons.soft key,
30
203
P 2: Select a target telephone number and thenmake a call.Select a target telephone number by pressing or UP/DOWN soft key, and then press or Call soft key to make a call to the selected number.
TO ADD PREFIX TO NUMBER
• To Set PrefixWhen making a call, a prefix can be addedphone numbers to be dialed. Prefixes neeset in advance.
STEP 1: Display the Menu screen, and select S
STEP 2: Select User Setting.Select an item by either of the following operati• Highlight an item by using or UP/DOWN
and then press , or OK soft key.• Press key.
STEP 3: Select Talk.Select an item by either of the following operati• Highlight an item by using or UP/DOWN
and then press , or OK soft key.• Press key.
12
[Detail]
34567890
Gr
NoCallBack
Tel #4Tel #3
Colleagues
NECAutomaticAutomatic
Abe Kentaro
0800XXXXXXXX31300
0
DT8
1
1
12
[Setting]
3OKMenu
Data Backup/RestoreDownloadUser Setting
2
2

STE
STE
soft key.
reen at set, re-, select
be set
cluding
204
P 4: Select Prefix.Select an item by either of the following operations.• Highlight an item by using or UP/DOWN soft key,
and then press , or OK soft key.• Press key.
P 5: Select Prefix 1.Select an item by either of the following operations.• Highlight an item by using or UP/DOWN soft key,
and then press , or OK soft key.• Press key.
STEP 6: Enter a prefix by using the digit keys. After entering the prefix, press or OK
STEP 7: The display goes back the Prefix scSTEP 5. If multiple prefixes need to bepeat STEP 6 and STEP 7. In that case
Prefix 2 and Prefix 3.
Incoming Call12
Display
[Incoming Call]
345670
Change Password
Peripherals
ConfigOKBack
Security
Talk
Usability
5
5
RTP Alarm12
Key Touch Tone
[Talk]
345
Hold Music
OKBack
DTMF Tone
Prefix
1
1
Note: A maximum of 10 digits (0-9, * and #) canas a prefix.
Note: When prefix is added, up to 32 digits inthe prefix can be sent as dial number.
12
[Prefix]
3OKBack
Prefix 3Prefix 2Prefix 1
Input a prefix number.[Prefix 1]
OKBackBK
1
2 3

• T
STE
STE
STE
. Selectt key to
Not
205
o Add Prefix When Making A Call
P 1: Display the Name List screen for a targetparty (see TO FIND REGISTERED DATA).
P 2: Select a target name and display Sub Menu.Select a target name by pressing , and then press HELP key or Option soft key.
P 3: Select Prefix.Select an item by one of the following operations.• Highlight an item by using or UP/DOWN soft key,
and then press , or OK soft key.• Press key, and then press , or OK soft
key.
STEP 4: Predetermined prefixes are displayeda prefix and then press or OK sofmake a call.
e: If multiple telephone numbers are registered to atarget party, a call is made to the first priority tele-phone number.
[Directory]
CallBackOptionDetailAbe KentaroAbe JiroAbe Ichiro
[Directory]
CallBackOptionDetailAbe KentaroAbe JiroAbe Ichiro
1
1
12
SubMenu
3
OKCancel
Delete AllDelete OnePrefix
4 Edit
12
[Prefix]
3CallBack
187186184

TOSTE
STE
STE
for thee nec-W DA-
ess
206
EDIT DIRECTORY DATA P 1: Display the Name List screen for a target
party (see TO FIND REGISTERED DATA).
P 2: Select a target name and display Sub Menu.Select a target name by pressing , and then press HELP key or Option soft key.
P 3: Select Edit.Select an item by one of the following operations.• Highlight an item by using or UP/DOWN soft key,
and then press , or OK soft key.• Press key, and then press , or OK soft
key.
STEP 4: On the Edit screen, the detailed dataselected name is displayed. Modify thessary data by referring to TO ADD NETA. After the data modification is complete, prSave soft key on the Edit screen.
DT830
[Directory]
CallBackOptionDetailAbe KentaroAbe JiroAbe Ichiro
[Directory]
CallBackOptionDetail
Abe KentaroAbe JiroAbe Ichiro
4
4
12
SubMenu
3
OKCancel
Delete AllDelete OnePrefix
4 Edit
12
[Edit]
34567890
Gr
NoOKBack
Tel #4Tel #3
0Save
31300
NECAutomaticAutomatic
Abe Kentaro
0800XXXXXX
Colleagues

TOSTE
STE
STE
STE
Not
207
DELETE ALL DATA P 1: Open the Directory screen (see TO ADD
NEW DATA).
P 2: Select Delete All.Select an item by either of the following operations.• Highlight an item by using , and then press ,
or OK soft key.• Press key.
P 3: Press or OK soft key to delete all the data.
P 4: After all the directory data is deleted, the dis-
play changes as follows:
STEP 5: Press or OK soft key.
e: To cancel the data deletion, press or Backsoft key.
DT830
0
0
12
[Directory]
340
Own Number
Edit
OKMenu
Group Setting
Search
Delete All
Delete All Directory?
[Directory]
OKBack
Deleted.[Directory]
OK

TO
STE
STE
STE
ppears. appro-
s delet-
r Back
208
DELETE SPECIFIC DATA
P 1: Display the Name List screen for a targetparty (see TO FIND REGISTERED DATA).
P 2: Select a name to be deleted and display SubMenu.
Select a target name by pressing , and then press Help key or Option soft key.
P 3: Select Delete One.Select an item by either of the following operations.• Highlight an item by using or UP/DOWN soft key,
and then press , or OK soft key.• Press key, and then press , or OK soft
key.
STEP 4: The following confirmation message aPress or OK soft key to delete thepriate directory data.
STEP 5: After the appropriate directory data ied, the display changes as follows:
STEP 6: Press or OK soft key.
DT830
[Directory]
CallBackOptionDetail
Abe ShintaroAbe JiroAbe Ichiro
[Directory]
CallBackOptionDetailAbe ShintaroAbe JiroAbe Ichiro
2
2
Note: To cancel the data deletion, press osoft key.
12
SubMenu
3
OKCancel
Delete All
Prefix
4 Edit
Delete One
Delete this entry?
[Directory]
OKBack
Deleted.[Directory]
OK

7This simpleoper
Call Series)into i
••••••
••••
Not off the PER-
Not ystem
209
. CALL HISTORY OPERATION
chapter explains the Call History feature of the terminal. By using Call History, you can make a call withation.
History feature allows the telephone to register up to 50 records (for DT830 Series)/10 records (for DT430ts memory. If exceeding 50 records/10 records, a record will be deleted in order of occurrence.
FOR DT830 SERIES
TO VIEW CALL HISTORYTO MAKE A CALL FROM CALL HISTORYTO ADD CALL HISTORY DATA TO DIRECTORYTO EDIT DIRECTORY DATA FROM CALL HISTORYTO DELETE ALL DATATO DELETE SPECIFIC DATA
FOR DT430 SERIES
TO VIEW CALL HISTORYTO MAKE A CALL FROM CALL HISTORYTO DELETE ALL DATATO DELETE SPECIFIC DATA
e: Register call history data to Personal Directory as necessary. Call History data will be cleared when powering telephone. However, call history data can be backed up to your PC. About Backup/Restore, see “TO BACKUPSONAL SETTINGS” or “TO RESTORE PERSONAL SETTINGS” in “3.TERMINAL SETUP”.
e: The call history data that is stored in the memory of each telephone cannot be added to Phonebook (both SPhonebook and Local Phonebook) controlled by the system.

7.1
TO
STE
STE
STE
.
Mis
Ou
Inc
be dis-
ephoneirectory, as call
be dis-
ess
210
FOR DT830 SERIES
VIEW CALL HISTORY
P 1: Display the Menu screen, and select History.
P 2: Select a kind of calls. In this example, Incoming is selected.Select an item by either of the following operations.• Highlight an item by using or UP/DOWN soft key,
and then press , or OK soft key.• Press key.
P 3: The history data of the last received call is displayed.If two or more records exist, use or UP/DOWN
soft key to display the next/former records
Item Description
sedDisplay the history of unanswered (terminated to the My Line) incoming calls.
tgoing Display the history of outgoing calls.
omingDisplay the history of answered and unanswered (terminated to the My Line) incoming calls.
DT830
3
3
12
[History]
34 Delete All
Outgoing
OKMenu
Missed
Incoming
Note: For unanswered incoming calls, willplayed on the left of the name.
Note: If you make/answer a call to/from the telnumber which is registered to Personal Dthe corresponding name will be displayedhistory data.
Note: If there is no history data, "No data" willplayed on LCD.
Note: To go back to former menu (STEP 3), pror Back soft key.
1
[Incoming]
OptionBack
11/MAY/2015 (MON) 11:00Ken Kobus
7205

TOTO
(CASSTE
STE
(CASSTE
or Op-ub
n press
Not
a prefixt case,ated atscreen. to beneed tof prefix,apter 6
211
MAKE A CALL FROM CALL HIS-RY
E 1)P 1: Display call history data of a target telephone
number (see TO VIEW CALL HISTORY).
The following is an example when a history data ofIncoming Calls is displayed.
P 2: Press key to make a call to the telephone number.
E 2)P 1: Display call history data of a target telephone
number (see TO VIEW CALL HISTORY).
The following is an example when a history data ofIncoming Calls is displayed.
STEP 2: On the above screen, press Help keytion soft key to display the following SMenu.
STEP 3: To make a call, select Call, and the, or OK soft key.
e: While the history data is displayed, you cannotmake a call by dialing a telephone number.
DT830
2
[Incoming]
OptionBack
11/MAY/2015 (MON) 11:00Abe Kentaro
7207
2
[Incoming]
OptionBack
11/MAY/2015 (MON) 9:58Abe KentaroTel: 7207
Note: When making a call from Call History, can be added to the dial number. In thaselect Prefix on the SubMenu (indicSTEP 2 of CASE 2) to display the Prefix On the Prefix screen, choose a prefixadded to the dial number. Also, prefixes be set in advance. For details on setting osee TO ADD PREFIX TO NUMBER in ChDirectory Operation.
12
SubMenu
3
OKBack
PrefixDirectory AddCall
4 Delete One5 Delete All
1
3

TODIR
STE
STE
ons.soft key,
ons.soft key,
oft key.
212
ADD CALL HISTORY DATA TO ECTORY
P 1: Display call history data of a target telephonenumber (see TO VIEW CALL HISTORY).
The following is an example when history data ofan Incoming Call is displayed.
Press Help key or Option soft key whiledisplaying the call history data for the targettelephone number.
P 2: The following Sub Menu is displayed. Select Directory Add.
Select an item by either of the following operations.• Highlight an item by using or UP/DOWN soft key,
and then press , or OK soft key.• Press key, and then press , or OK soft
key.
STEP 3: Select New.Select an item by either of the following operati• Highlight an item by using or UP/DOWN
and then press , or OK soft key.• Press key.
STEP 4: Select a category.In this example, Company is selected.Select an item by either of the following operati• Highlight an item by using or UP/DOWN
and then press or Next soft key.• Press key, and then press or Next s
DT830
1
[Incoming]
OptionBack
11/MAY/2015 (MON) 11:0031312
31312
2
2
12
SubMenu
3
OKBack
Prefix
Call
4 Delete One5 Delete All
Directory Add
1
1
12
[Directory Edit]
Addition
OKBack
New
1
1

STE
. .
r 6 Di-ed datay.
in the be dis-
tored ins name
213
Selectable categories are as follows:
P 5: Select either Disable or Enable.A maximum of four telephone numbers can be set to an entry. If Enable is selected here, the tele-phone number which is being edited will be given top priority. In that case, the telephone number is automatically selected when you make a call with-out specifying a specific telephone number.
Select an item by either of the following operations.• Highlight an item by using or UP/DOWN soft key,
and then press or OK soft key.• Press or key, and then press or OK soft
key.
STEP 6: The following Edit screen is displayed“31312” has been registered to Tel #1
See “TO ADD NEW DATA” in Chapterectory Operation, and register detail(such as name, group, etc) to directorCategory ICON
Company
Mobile
Voice Mail
Home
Others
12
[Category]
345
Company
NextBackOthersHome
MobileVoice Mail
1 2
2
1 2
Note: If the corresponding data is not storeddirectory, only the telephone number willplayed as Tel #1.
Note: If the corresponding data has already sthe directory, the detailed data (such agroup, etc.) is displayed.
12
[Priority Flag]
Disable
OKPrev
Enable
12
[Edit]
34567890
Gr
NoOKBack
Tel #4
Tel #2Tel #3
0Save
Group
Company Name
31312
Ring ToneIllumination
Name

TO CALSTEP
STEP
ns.oft key,
for the
ns.oft key,
214
EDIT DIRECTORY DATA FROM L HISTORY 1: Display call history data of a target telephone
number (see TO VIEW CALL HISTORY).
The following is an example when history data ofan Incoming Call is displayed.
Press Help key or Option soft key whiledisplaying the call history data for the targettelephone number.
2: The following Sub Menu is displayed. Select Directory Add.
Select an item by either of the following operations.• Highlight an item by using or UP/DOWN soft key,
and then press , or OK soft key.• Press key, and then press , or OK soft
key
STEP 3: Select Addition.Select an item by either of the following operatio• Highlight an item by using or UP/DOWN s
and then press , or OK soft key.• Press key.
STEP 4: Select a search method.
See TO FIND REGISTERED DATA procedure of the searching method.
In this example, Group is selected.Select an item by either of the following operatio• Highlight an item by using or UP/DOWN s
and then press , or OK soft key.• Press key.
DT830
1
[Incoming]
OptionBack
11/MAY/2015 (MON) 11:007205
7205
2
2
12
SubMenu
3
OKBack
Prefix
Call
4 Delete One5 Delete All
Directory Add
2
2
12
[Directory Edit]
OKBack
NewAddition
1
1
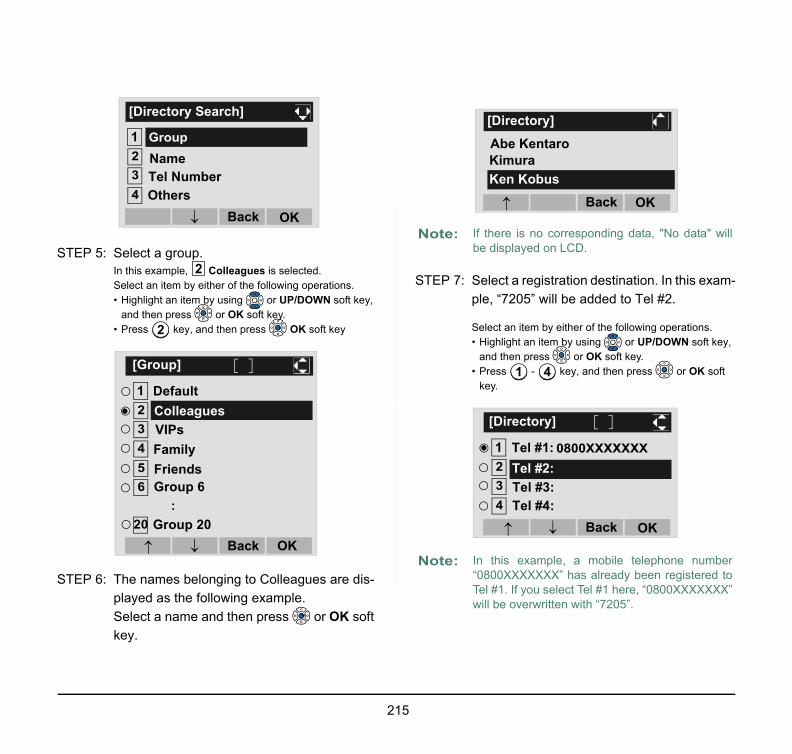
STE
STE
exam-
ons.soft key,
K soft
ata" will
numbertered toXXXX”
215
P 5: Select a group. In this example, Colleagues is selected.Select an item by either of the following operations.• Highlight an item by using or UP/DOWN soft key,
and then press or OK soft key.• Press key, and then press OK soft key
P 6: The names belonging to Colleagues are dis-played as the following example.Select a name and then press or OK soft key.
STEP 7: Select a registration destination. In thisple, “7205” will be added to Tel #2.
Select an item by either of the following operati• Highlight an item by using or UP/DOWN
and then press or OK soft key.• Press - key, and then press or O
key.
12
[Directory Search]
34
Group
OKBackOthers
NameTel Number
2
2
12
[Group]
3456
20
Colleagues
OKBack
Group 6
FamilyFriends
Default
VIPs
Group 20
:
Note: If there is no corresponding data, "No dbe displayed on LCD.
Note: In this example, a mobile telephone “0800XXXXXXX” has already been regisTel #1. If you select Tel #1 here, “0800XXXwill be overwritten with “7205”.
Kimura
[Directory]
OKBack
Abe Kentaro
Ken Kobus
1 4
12
[Directory]
34
Tel #1:
OKBackTel #4:
Tel #2:Tel #3:
0800XXXXXXX

STE
STE
of Di- Tel #2.
pera-
216
P 8: Select a Category to which the telephone number belongs.In this example, Company is selected.Select an item by either of the following operations.• Highlight an item by using or UP/DOWN soft key,
and then press or OK soft key.• Press key, and then press or OK soft key.
P 9: Select either Disable or Enable.A maximum of four telephone numbers can be set to an entry. If Enable is selected here, the tele-phone number which is being edited will be given top priority. In that case, the telephone number is automatically selected when you make a call with-out specifying a specific telephone number.Select an item by either of the following operations.• Highlight an item by using or UP/DOWN soft key,
and then press or OK soft key.• Press or key, and then press or OK soft
key.
STEP 10:The display moves to the Edit screenrectory. “7205” has been registered toSee TO EDIT DIRECTORY DATA in Directory Otion, and edit the data as necessary.
1
1
12
[Category]
345
Company
NextBackOthersHome
MobileVoice Mail
1 2
2
1 2
12
[Priority Flag]
Disable
OKPrev
Enable
12
[Edit]
34567890
Gr
NoOKBack
Tel #4
7205Tel #3
0Save
0800XXXXXXX
Ken KobusColleagues
NECAutomaticBlue
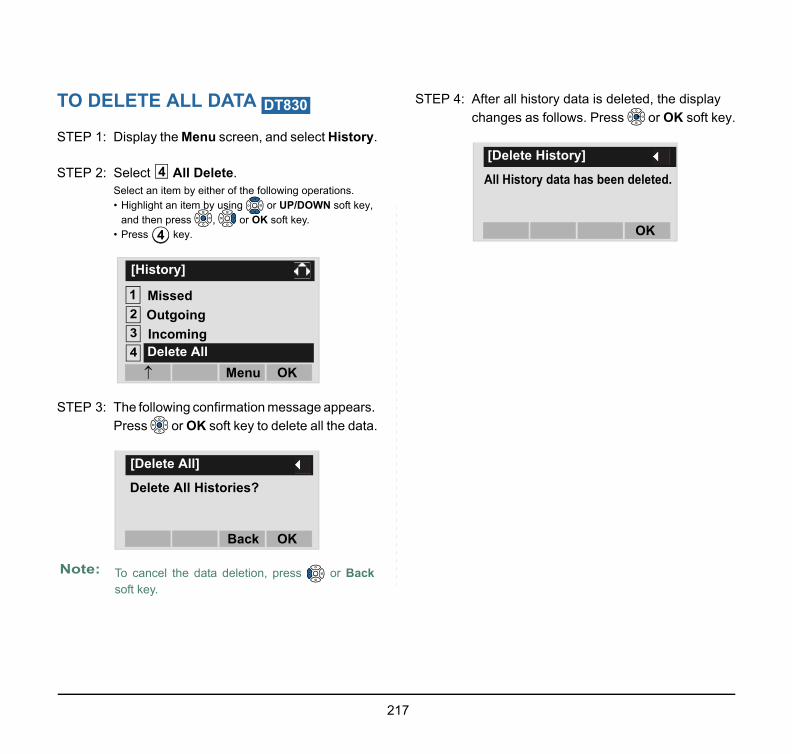
TO
STE
STE
STE
play oft key.
Not
217
DELETE ALL DATA
P 1: Display the Menu screen, and select History.
P 2: Select All Delete.Select an item by either of the following operations.• Highlight an item by using or UP/DOWN soft key,
and then press , or OK soft key.• Press key.
P 3: The following confirmation message appears. Press or OK soft key to delete all the data.
STEP 4: After all history data is deleted, the dischanges as follows. Press or OK s
e: To cancel the data deletion, press or Backsoft key.
DT830
4
4
12
[History]
34
Outgoing
OKMenu
Incoming
Missed
Delete All
[Delete All]
Delete All Histories?
OKBack
[Delete History]
All History data has been deleted.
OK

TO STEP
STEP
pears. appro-
delet-ss
Incom-
r Back
218
DELETE SPECIFIC DATA 1: Display call history data of a target telephone
number referring to TO VIEW CALL HISTO-RY.
The following is an example when a history data ofIncoming Calls is displayed.
Press Help key or Option soft key whiledisplaying the call history data for the targettelephone number.
2: The following Sub Menu is displayed. Select Delete One.
Select an item by either of the following operations.• Highlight an item by using or UP/DOWN soft key,
and then press , or OK soft key.• Press key, and then press , or OK soft
key.
STEP 3: The following confirmation message apPress or OK soft key to delete the priate history data.
STEP 4: After the appropriate call history data ised, the display changes as follows. Preor OK soft key.
DT830
1
[Incoming]
OptionBack
11/MAY/2015 (MON) 11:00Ken Kobus
31310
4
4
12
SubMenu
3
OKBack
Prefix
Call
45 Delete All
Directory Add
Delete One
Note: By selecting Delete All, all records of ing Call can be deleted.
Note: To cancel the data deletion, press osoft key.
5
[Incoming]
OKBack
Delete this entry?
OK
Deleted.[Incoming]

7.2
TO
• TO
STE
STE
d. ons.s ,
all is aller s:
Not
calls. calls.
swereddata ofn,
ates the ber of
219
FOR DT430 SERIES
VIEW CALL HISTORY
O VIEW DATA OF INCOMING CALL/UTGOING CALL
P 1: While indicating the current time on LCD,press key to open the Menu screen.
P 2: Select Call History.Select an item by either of the following operations.• Highlight an item by using , and then press ,
or OK soft key.• Press key.
STEP 3: Select a kind of calls. In this example, Incoming Calls is selecteSelect an item by either of the following operati• Highlight an item by using , and then pres
or OK soft key.• Press key.
STEP 4: The history data of the last received cdisplayed. If name information of the cexists, the name is displayed as follow
e: This feature is for DT830 Series and DT430Series. The following is an example of LCD dis-play of DT430 Series.
DT430
Menu
DT430 Series
2 Directory
[Menu]
Back OK
1 Call History
3 Settings
1
1
12
[Menu]
3OKBack
SettingsDirectoryCall History
Item DescriptionIncoming Calls To view the history of incomingOutgoing Calls To view the history of outgoing
Note: There are two types of incoming call: AnCall and Missed Call. When history missed calls is displayed on the screeappears on the top line of the screen.
1
1
12
[Call History]
OKBackOutgoing Calls:Incoming Calls: 3
7Del
Indicnumcalls
[Incoming Calls]
OKBackDelKen Kobus10. 11 MAY 13:17

STE
Not
Not
Not
Not
Not
220
P 5: To view the telephone number of the caller, press .
e: If two or more records exist, use to displaythe next/former records (or pressing an appropri-ate digit key). For example, press “0” key to dis-play the tenth record.
e: If no history data is saved, "No data" will be dis-played on LCD.
e: To go back to name display, press key. Forthe telephone without the cursor key, switchingbetween “name” and “telephone number” cannotbe performed.
e: To go back to former menu (STEP 3), press Backsoft key.
e: If the telephone number of the caller is notreceived (due to Caller ID blocking, public phoneor out of area, etc.), “Private” is displayed onLCD.
[Incoming Calls]
OKBackDel0901234567810. 11 MAY 13:17

• T
STE
STE
all is aller s:
Not
Not
to dis-ing an “0” key
s Back
is not phoneyed on
221
O VIEW DATA OF MISSED CALL ONLY
P 1: While indicating the current time on LCD,press key to open Shortcut screen.
P 2: Select Missed Calls.Select an item by either of the following operations.• Highlight an item by using , and then press ,
or OK soft key.• Press key.
STEP 3: The history data of the last received cdisplayed. If name information of the cexists, the name is displayed as follow
e: indicates that the telephone has received amissed call.
indicates that the telephone has received avoice mail.
e: When voice mail service is not used, “ -----------” is displayed instead of “ Voice Mail”.
19:20 PM MON 11 MAY 2015
1
1
12
[Shortcut]
3OKBack
---------------------------Voice MailMissed Calls : 2
22
Note: If two or more records exist, use keyplay the next/former records (or pressappropriate digit key). For example, pressto display the tenth record.
Note: To go back to former menu (STEP 3), pressoft key.
Note: If the telephone number of the callerreceived (due to Caller ID blocking, publicor out of area, etc.), “Private” is displaLCD.
[Incoming Calls]
OKBackDelKen Kobus10. 11 MAY 13:17

TOTO
• FSTE
STE
Not
222
MAKE A CALL FROM CALL HIS-RY
OR DT430 SERIESP 1: Display the call history data of the target tele-
phone number (see TO VIEW CALL HISTO-RY).
The following is an example when the history dataof an incoming call is displayed.
P 2: Press key while the history data for the target telephone number is displayed on LCD.
e: While the history data is displayed, you cannotmake a call by dialing a telephone number.
DT430
[Incoming Calls]
OKBackDelKen Kobus10. 11 MAY 13:17

TOSTE
STE
es as
the his-
Inc
Ou
r Back
223
DELETE ALL DATA P 1: Select Call History on the Menu screen.
Select an item by either of the following operations.• Highlight an item by using , and then press ,
or OK soft key.• Press key.
P 2: Select a kind of calls. In this example, Incoming Calls is selected. Select an item by either of the following operations.• Highlight an item by using , and then press ,
or OK soft key.• Press key.
STEP 3: Press Del soft key. The display changfollows:
STEP 4: Press or OK soft key to delete all tory data of selected call type.
Item Description
oming Calls To delete all the history data of incoming calls.
tgoing Calls To delete all the history data of outgoing calls.
DT4301
1
12
[Menu]
3OKBack
SettingsDirectoryCall History
1
1
12
[Call History]
OKBackOutgoing Calls:Incoming Calls: 3
7Del
Indicates the number of calls
Note: To cancel the data deletion, press osoft key.
Delete All
Back
[Incoming Calls]
OK

TO
STE
STE
STE
Not
224
DELETE SPECIFIC DATA
P 1: Display the call history data which you want todelete (see TO VIEW CALL HISTORY). Thefollowing is an example when the history dataof an incoming call is displayed.
P 2: Press Del soft key. The display changes as follows:
P 3: Press or OK soft key to delete the select-ed history data.
e: To cancel the data deletion, press or Backsoft key.
DT430
[Incoming Calls]
OKBackDelKen Kobus10. 11 MAY 13:17
Delete One
Back
[Incoming Calls]
OK
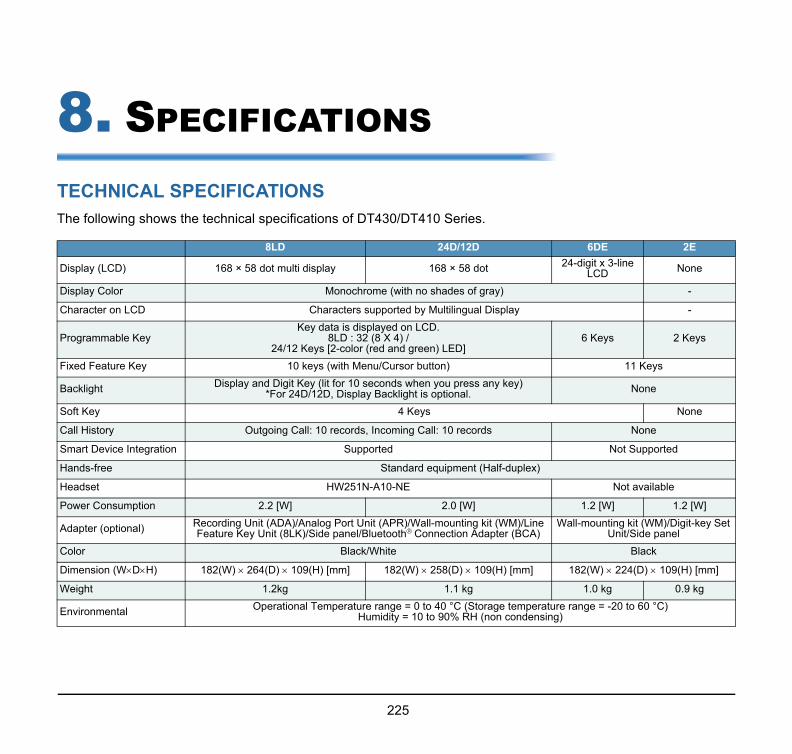
8TECThe
Displ ne
Displ
Char
Progr ys
Fixed
Back
Soft K ne
Call H
Smar
Hand
Head
Powe [W]
Adap -key Set
Color
Dime [mm]
Weig kg
Envir
225
. SPECIFICATIONS
HNICAL SPECIFICATIONSfollowing shows the technical specifications of DT430/DT410 Series.
8LD 24D/12D 6DE 2E
ay (LCD) 168 × 58 dot multi display 168 × 58 dot 24-digit x 3-line LCD No
ay Color Monochrome (with no shades of gray) -
acter on LCD Characters supported by Multilingual Display -
ammable KeyKey data is displayed on LCD.
8LD : 32 (8 X 4) / 24/12 Keys [2-color (red and green) LED]
6 Keys 2 Ke
Feature Key 10 keys (with Menu/Cursor button) 11 Keys
light Display and Digit Key (lit for 10 seconds when you press any key)*For 24D/12D, Display Backlight is optional. None
ey 4 Keys No
istory Outgoing Call: 10 records, Incoming Call: 10 records None
t Device Integration Supported Not Supported
s-free Standard equipment (Half-duplex)
set HW251N-A10-NE Not available
r Consumption 2.2 [W] 2.0 [W] 1.2 [W] 1.2
ter (optional) Recording Unit (ADA)/Analog Port Unit (APR)/Wall-mounting kit (WM)/Line Feature Key Unit (8LK)/Side panel/BluetoothConnection Adapter (BCA)
Wall-mounting kit (WM)/DigitUnit/Side panel
Black/White Black
nsion (WDH) 182(W) 264(D) 109(H) [mm] 182(W) 258(D) 109(H) [mm] 182(W) 224(D) 109(H)
ht 1.2kg 1.1 kg 1.0 kg 0.9
onmental Operational Temperature range = 0 to 40 °C (Storage temperature range = -20 to 60 °C)Humidity = 10 to 90% RH (non condensing)

The
)
226
following shows the technical specifications of DT830 Series.
8LD/8LDG 24D/12DDisplay (LCD) 224 x 96 dot multi display 224 x 96 dotDisplay Color Gray scale (with 8 shades of gray)
Programmable Key Key data is displayed on LCD.8LD (32 (8 X 4) Keys)
Fixed Feature Key 10 keys (with Menu/Cursor/Security button)
Backlight Display and Digit Key (lit for 10 seconds when operating)
Soft Key 4 Keys
Directory 500 records
Call History Outgoing Call: 50 records, Incoming Call: 50 records
XML Browser Available
Hands-free Standard equipment (Full-duplex), Wide-band
Headset HW251N-A10-NE/WT100-EHS-NE/Voyager Legend CS
LAN Interface 2-port, 10BASE-T/100BASE-TX/1000BASE-T (8LDG only), Full-duplex/Half-duplex, AutoNegotiation /Fixed
Voice CODEC G.711(µ-law, A-law), G.729a, G.722
IP Address Setting Sets via DHCP server/Sets Statically
QoS ToS (IP Precedence, Diffserv)
VLAN Tag VLAN (IEEE802.1Q/p), LLDP-MED
Security IEEE802.1x authentication (EAP-MD5, EAPOL Forwarding), SIP&RTP Encryption
Power Supply Center Power Supply = IEEE802.3af, Local Power Supply = AC adapter (AC-L UNIT: optional)
Power Consumption 8LD: 3.7 [W], 8LDG: 4.4 [W] 3.7 [W]
Download Program/Configuration data/Ringing Tone/Music on Hold/Directory data
Adapter (Optional) Recording Unit/Wall-mounting kit/Line Feature Key Unit (8LK)/Side panel/Bluetooth
Connection Adapter (BCA)Color Black/White Black/White
Dimension (WDH) 182(W) 264(D) 109(H) [mm] 182(W) 258(D) 109(H) [mm]
Weight 1.2 kg 1.1 kg
Environmental Operational Temperature range = 0 to 40 °C (Storage temperature range = -20 to 60 °CHumidity = 10 to 90% RH (non condensing)

MME
227
ENU LIST
NU LIST FOR DT830 SERIES
Menu Item Description
With a Home URL registered.
Menu Press to display the Menu screen.
History Select this option to view Call History data. Also, you can add the history datato the directory.
DirectorySelect this option to access directory feature. There are three types ofdirectory features as described below: Personal Directory, Phonebook andCorporate Directory. This chapter explains the menu list for PersonalDirectory feature.
Service Select this option to display XML application screen registered in the serviceURL.
Setting Select this option to access user settings.
Portal Select this option to display XML application screen registered in the homeURL.
Without a Home URL registered.
Menu Press to display the Menu screen.
History Select this option to view Call History data. Also, you can add the history datato the directory.
DirectorySelect this option to access directory feature. There are three types ofdirectory features as described below: Personal Directory, Phonebook andCorporate Directory. This chapter explains the menu list for PersonalDirectory feature.
Setting Select this option to access user settings.
Phone Select this option to move to the default home screen.
Menu
Menu

M
228
enu List For History
Menu Item Description Default Value
History
1 Missed Select this option to view the history of missed calls. You can also make a call from this menu. -
2 Outgoing Select this option to view the history of outgoing calls. You can also make a call from this menu. -
3 Incoming Select this option to view the history of incoming calls. You can also make a call from this menu. -
4 Delete All Select this option to delete all the history data. -

S
P
lueS
y
229
ub Menu
ress Option soft key or Help key while the history data is displayed.
Menu Item Description Default VaubMenu
1 Call Select this option to make a call to the currently displayed party. -2 Directory Add Select this option to add the currently displayed history data to
the personal directory. -
1 New Select this option to add call history data to the personal direc-tory. -
Category Set Select this option to specify phone number types (such as Com-pany, Mobile, Voice Mail, Home or Others). Compan
Priority Flag Select this option to specify whether to use the priority order of dialing number for call origination. Disable
Edit Select this option to edit the directory data. -2 Addition Select this option to edit the personal directory data from call his-
tory. -
Directory Search Select this option to search the personal directory. -Directory Register the telephone number to the searched directory data. -
3 Prefix Select this option to add Prefix to the telephone number and then make a call. -
4 Delete One Select this option to delete specific data. -5 Delete All Select this option to delete all history data of a specific call type
(“missed”, “outgoing” or “incoming”) -

M
lueD
y
ws gs)ws gs)
230
enu List For Directory
Menu Item Description Default Vairectory From Menu screen, select Directory Personal. -
1 Personal Select this option to view the Directory controlled by the tele-phone.
1 Search Select this option to search the personal directory. -1 Group Select this option to specify a group as a search condition. -2 Name Select this option to enter the target name and perform a search. -3 Tel Number Select this option to enter the target telephone number and per-
form a search. -
4 Other Select this option to perform a search by one of the following conditions. -
1 Memory ID Select this option to search by a memory number. -2 Category Select this option to search by a category. -3 Company Select this option to search by a company name. -4 Alphabet Select this option to search by alphabet. -
2 Edit Select this option to add new data to the personal directory. -1 Name Select this option to enter a name of the target party to be added
to the directory. -
2 Group Select this option to select a group to which the target party belongs. Default
3-6 Tel #1-Tel #4 Select this option to enter the telephone number. -
Category Set Select this option to specify phone number types (such as Com-pany, Mobile, Voice Mail, Home or Others). Compan
Priority Flag Select this option to specify whether to use the priority order of dialing number for call origination. Disable
7 Company Name Select this option to enter the company name of the target party. -
8 Ring Tone Select a ringer tone type per caller. Default (follogroup settin
9 Illumination Select an illumination pattern (color) of the call indication lamp. Default (follogroup settin
0 Memory ID Select this option to enter a memory number to be assigned to the target party. -
2 1

lue
ws t-
ws t-
231
Menu Item Description Default Va3 Group Setting Select this option to change a group name. -
1. Default
Select a desired group name to be changed. -
2. Colleagues3. VIPs4. Family5. Friends6. Group 6 - 20. Group 20
1 Name Select this option to enter a new group name. -2 Ring Tone Select this option to select a ringer tone type per group. Default (follo
terminal setings)
3 Illumination Select this option to select an illumination pattern (color) of the call indication lamp.
Default (folloterminal se
tings)4 Own Number Select this option to view the number of the telephone itself. -0 Delete All Select this option to delete all the registered directory data. -
2 System Select this option to view the Directory controlled by the system.3 Corporate Select this option to view the Directory controlled by the external
XML server.

M
e
1)
232
enu List For Setting
Menu Item Description Default ValuSetting
1 User Setting Select this option to make the user setting of the terminal.
1 Incoming Call Select this option to set up for incoming call.
1 Ring Volume Not used. -
2 Offhook Ring Select this option to specify whether to use Off-hook ringing.(Disable/Enable) Enable
3 Headset Ring Select this option to specify whether to use the ringing of headset. (Disable/Enable) Disable
4 Ring Tone Select a ringer tone for External Call and Internal Call.(Automatic/Tone Type 1~14/Download 1~3)
Automatic(Tone Type
5 Illumination Select this option to set an illumination pattern for External Call and Internal Call.(Automatic/Disable/Red/Green/Blue/Yellow/Purple/Light Blue/White/Rotation)
Automatic(Red)
6 Headset Ring Volume Not used. -
2 Talk Select this option to set up for telephone conversation. -
1 RTP Alarm Select this option to specify whether to use RTP alarm.(Automatic/Disable/Enable) Automatic
2 DTMF Tone Select this option to specify whether to use DTMF tone.(Automatic/Disable/Enable) Automatic
3 Key Touch Tone Select this option to set key touch tone generated when the digit keys are pressed while the telephone is off-hook.(Automatic/No Tone/Tone/Voice)
Automatic
4 Hold Music Select a Music on Hold to be heard by the terminal user.(Default/Download) Default
5 Prefix Select this option to register Prefix number.(Prefix 1~Prefix 3) -

2-t)
6
e
233
3 Display Note 1 Select this option to set up for LCD display. -
1 Calender Format Select this option to set up for calender display format and time display format. -
1 Calender Format Select this option to configure the type of calender display format. (Automatic/Type 1/Type 2/Type 3/Type 4/Type 5)
Automatic(Type 1)
2 Time Format Choose between 12-hour and 24-hour clock format. Automatic (1hour forma
2 Local Volume Specify whether to display the following volume levels: handset receiver volume, speaker volume, ringer tone volume and LCD contrast.(Automatic/Disable/Enable)
Automatic(Enable)
3 Screen Saver Select this option to set up Screen Saver related data. -
1 Screen Saver Mode
Select this option to specify whether to use Screen Saver.(Disable/Enable) Disable
2 Wait Time Select this option to specify the Wait Time to launch Screen Saver (1-999 min) 120 min
4 Back Light Select this option to specify whether to use the backlights of LCD and digit keys. (Disable/Enable)
Automatic(Enable)
5 Font Size Select this option to change the displayed character size on the LCD. (Standard (16 dot)/Small (12 dot))
Standard (1dot)
Menu Item Description Default Valu

e
234
6 Language Select this option to specify the language to be displayed on LCD.
* “23. Simplified Chinese” and “24. Traditional Chinese” are available since SV9500 V3, and the terminal firmware ver-sion 4.0.0.0 or later.
Automatic
Menu Item Description Default Valu

s
e
235
7. Advanced Sets other data for display. -
1.Backlight Fade Control
Sets whether Backlight Fade Control is in service, when turning on/off the backlight of the display. (Disable/Enable) Enable
4 Change Password Select this option to change the password to lock/unlock the telephone. 0000
5 Security Not used.*Security key must be programmed in advance. For theprogramming of Security key, contact the systemadministrator.
-
6 Peripherals Select this option to use peripheral equipment of terminal. -
1.USB Memory Not used. -
2.BCA Option Select this option to configure the BCA. -
1.BCA Connection Settings
Select this option to make the BCA connection settings.-
1. Auto Connection
Select this option to use Auto Connection. (Disable/Enable) Enable
2. Connection Cycle
Select this option to set Bluetooth connection cycle.(3 Seconds/10 Seconds/1 Minute/10 Minutes) 10 Second
2.Interrupt Ringing Select this option to specify whether to use Interrupt Ringing.(Disable/Enable) Enable
3.Smart Device Type
Select this option to set the type of Smart Device.(Type 1/Type 2) Type 1
4.Auto Path Switch Select this option to specify whether to use Auto Path Switch(Disable/Enable) Enable
5.Illumination Select this option to Set the illumination pattern (color) for informing call termination.(Disable/Red/Green/Blue/Yellow/Purple/Light Blue/White/Rotation)
Blue
Menu Item Description Default Valu

v
v
v
v
e
236
7. Usability Select this option to set the operation of Help key while pop-up window is displayed. -
1.Help Key Mode Select this option to set up Help Key Mode (SubMenu/Popup Window) SubMenu
0 Setting Reset Select this option to reset the telephone settings. -
2 Download Select this option to set up the file downloading. -
1 Download Files Select this option to download the files for Music on Hold, ringer tone and directory. -
1 Hold Music Select this option to download a file for Music on Hold. MOH.wav
2 Ring Tone Select this option to download files for ringer tones -
1. Download 1 Select this option to download files for ringer tone (Download 1). Melody1.wa
2. Download 2 Select this option to download files for ringer tone (Download 2). Melody2.wa
3. Download 3 Select this option to download files for ringer tone (Download 3). Melody3.wa
3 Directory Select this option to download the directory files. Directory.cs
2 Download Address Select this option to enter an IP address of the FTP/TFTP server. 0.0.0.0
3 Protocol Select this option to select a protocol of the server (either FTP or TFTP). FTP
4 FTP Settings Select this option to set necessary data when using FTP ser-vice. -
1 User ID Select this option to enter a user ID for downloading via FTP server. -
2 Password Select this option to enter a password for downloading via FTP server. -
3 Folder Select this option to specify the directory where the download file is stored. -
Menu Item Description Default Valu

Note
a.t
a.t
at)
e
237
1: Before firmware version 3.0.3.0, the menu item of “3 Display” is as follows.
3 Data Backup/Restore Select this option to set the data required for the file backup/restore. -
1 Data Backup Select this option to select this option to specify the file name to be backed up.
PersonalDatgz
2 Data Restore Select this option to specify the file name to be restored. PersonalDatgz
3 Server Address Select this option to enter an IP address of the FTP/TFTP server. 0.0.0.0
4 Protocol Select this option to select a protocol of the server (either FTP or TFTP). FTP
5 FTP Settings Set necessary data when using FTP service. -
1 User ID Select this option to enter a user ID for the data backup via FTP server. -
2 Password Select this option to enter a password for data backup via FTP server. -
3 Folder Select this option to specify the destination directory of FTP server. -
Menu Item Description Default Value
3 Display Select this option to set up for the LCD display. -
1 Time Format Choose between 12-hour or 24-hour clock format. Automatic (12-hour form
2 Local Volume Specify whether to display the following volume levels:handset receiver volume, speaker volume, ringer tonevolume and LCD contrast.
Automatic (Enable)
Menu Item Description Default Valu

ME
M
238
NU LIST FOR DT430 SERIES
enu List For Call History
Menu Item Description
Menu Press key while indicating the current time on LCD.
Call History Select this option to view call history data.
Directory Select this option to access Phonebook feature. For details, see PHONE-BOOK in chapter 5.
Settings Select this option to make the user setting of the terminal.
Menu Item Description Default Value
1 Call History
1 Incoming Select this option to view the history of incoming calls. You can also make a call from this menu. -
3 Outgoing Select this option to view the history of outgoing calls. You can also make a call from this menu. -
Menu
1
2
3
1

WOUWeb rowser(Inte licationsoftw
N
N ng thetwork.
N
239
EB PROGRAMMING
TLINE Programming allows you to configure the terminal settings of the terminal from the PC. An Internet brnet Explorer, etc.) is used to access Web Programming. It is not necessary to install any special appare onto the PC.
PC Requirements For Web Programming
ote: This feature is only available for DT830 Series.
ote: DT830 Series and Web Programming PC needs to be connected to the same network. When downloadifiles for Music on Hold, Ringer Tone, and Directory to the terminal, FTP (TFTP server) is required on the neFor details on the FTP service, contact the system administrator.
ote: Terminal settings through the Web Programming is available while the DT830 Series logs into the system.
Items Operating ConditionsOperating System Microsoft Windows Vista/Windows7/Windows8.1/Windows10CPU Comply with conditions for use of Microsoft Windows or Microsoft Inter-
net Explorer.Memory
Browser Microsoft Internet Explorer 11.0 or later
Monitor SVGA (minimum: 800 600 pixel, recommended: 1024 768 pixel)Others Mouse, LAN connection port (RJ-45)

TOFollo
STE
STE
STE en click
N
NN oblem
240
LOGINw the steps below to open the Web Programming.
P 1: Start up Internet browser on the PC.
P 2: Enter IP address of the target DT830 Series on the address toolbar and then press Enter key.
P 3: The Web Programming Login screen appears. Enter a user name (type “USER”) and a password, th.
ote: Enter the password you assigned on the procedure “TO CHANGE PASSWORD”. “0000” is used as password by the default setting.
ote: For IP address of the terminal, contact the system administrator.
ote: When the login screen does not appear, check the LAN connection status and entered IP address. If the prpersists, please contact the system administrator.
OK

STE
241
P 4: The following Web Programming Home screen appears.

TOFollo
STE
STE
242
LOGOUTw the steps below to exit the Web Programming.
P 1: Click at the lower left of the screen.
P 2: The confirmation message appears. Click to log out of Web Programming.
Logout
OK
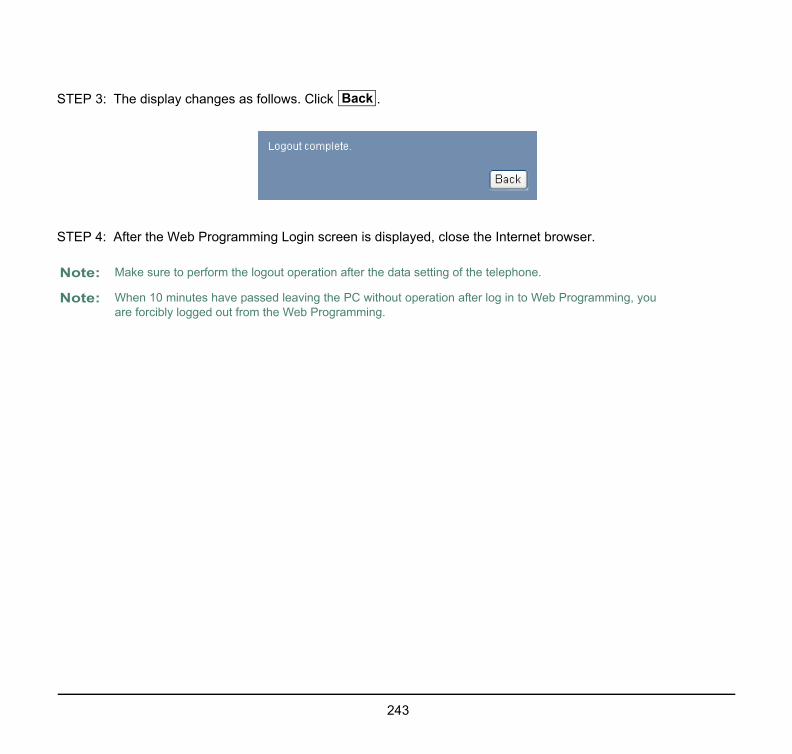
STE
STE
Not
Not
243
P 3: The display changes as follows. Click .
P 4: After the Web Programming Login screen is displayed, close the Internet browser.
e: Make sure to perform the logout operation after the data setting of the telephone.
e: When 10 minutes have passed leaving the PC without operation after log in to Web Programming, youare forcibly logged out from the Web Programming.
Back

HO
As a tone forexter al. Fordeta
STE
STE
STE
STE
244
W TO OPERATE
n example of setting method on the Web Programming, the following explains how to change the ringer nal call. Web Programming includes the same menu configuration as “Setting” of DT830 Series termin
ils on each menu item, see MENU LIST.
P 1: From the Home screen, click User Setting Incoming Call Ring Tone External Call.P 2: Select a desired tone type by clicking the corresponding radio button.
P 3: Click to save the change to the database.
P 4: A confirmation dialog appears. Click on the dialog.
OK
STEP 1: Click items to navigate through the menu.
STEP 3: Click OK button
STEP 2: Click the radio button to select a parameter.
Click Logout button to exit from the Web Programming. to accept the selection.
OK

AP
SMConnAdapDT43with haveBy uphonterm
••••
WheBluedispldisplconn
statusd the
ee the
Not
ture is
ture is
ne is
mobileted to
prior to
245
PENDIX A OPTION DEVICES
ART DEVICE INTEGRATIONecting the optional Bluetooth Connectionter (BCA-Z UNIT) to a terminal (DT830 Series/0 Series), the terminal can work in combination
smart devices (Tablets, mobile phones, etc.) that Bluetooth features.sing the terminal in collaboration with a mobilee, the following features are available on theinal.
Voice Call of the mobile phoneUsing mobile phone as the handsetHands-free callPlaying music
n you start up a terminal connected with thetooth adapter, the Bluetooth icon ( ) will beayed on the LCD. If the Bluetooth icon is notayed, the Bluetooth adapter is not normallyected to the terminal.
• To use Bluetooth FeaturesThe Connect key lamp indicates the connectionbetween DT830 Series/DT430 Series anBluetooth device. For details of the Connect key lamp status, stable below.
e: For the combination with a mobile phone, bothPath key and Connect key must be assigned asthe Programmable Feature Keys on the terminal.If these keys are not assigned, the Bluetooth
adapter can not be operated. For details, pleasecontact the system administrator.
Lamp Indication Patterns Status
Turning Off Indicates that Bluetooth feaOFF.
Lighting Red Indicates that Bluetooth feaON.
Flashing alternatelyRed and Greenevery one second
Pairing mode
Lighting Green Indicates that mobile phoconnecting to Bluetooth.
Flashing GreenIndicates the status when thephone, which is connecBluetooth, is in a call.
Note: Be sure to remove power for the terminal adding or removing the BCA-Z adapter.

• TpDct
FtcB
S
S
S
econdsss thanetooth is turn
nd the
Not
Not
feature
etoothrecently
onds or modery one
246
o pair Bluetooth adapter with mobile honeT830 Series/DT430 Series and a mobile phonean be connected through Bluetooth by pairinghe Bluetooth adapter with the mobile phone.
or the terminal, a maximum of 8 pairing informa-ions can be saved. However, the most recentlyonnected mobile phone is connected throughluetooth first.
TEP 1: Confirm that Bluetooth feature is OFF(Connect key lamp turns off).
TEP 2: Hold down the Connect key for over eightseconds to enable pairing mode. Whenthe Connect key has been kept pressedthree or more seconds, the Connect keylights red. However, to enable pairingmode, continue to press the Connect keyuntil it lights alternately red and green.
TEP 3: The mobile phone scans for theBluetooth device, pairs itself with theBluetooth adapter, and connects to theterminal. For details of this procedure,refer to the manual of your mobile phone.
• To enable Bluetooth featureSTEP 1:Press the Connect key several s
(from three or more seconds to leeight seconds) when the Blufeature is OFF (the Connect keyoff).
STEP 2:The Connect key lights red, aBluetooth feature turns ON.
e: If the terminal is not operated for three and a halfminutes after terminal enters into pairing mode, theBluetoothfeature will be enabled.
e: If the terminal and mobile phone are alreadypaired, the terminal and the mobile phone can beconnected through Bluetoothonly operating withthe mobile phone.
Note: When the terminal starts up, the Bluetoothwill be automatically ON.
Note: When the Bluetoothfeature is ON, the Bluconnection is made with the most connected mobile phone.
Note: If you press the Connect key for eight secmore, the terminal status will be Pairing(Flashing alternately Red and Green evesecond).

• TS
S
0 ne
tomat- a mo- beentoothto the
etoothy lamp
mobilee of aimately
een theone is
Not
Not
erminaluring aion isetooth after 8tion is
247
o disable Bluetooth featureTEP 1: Press the Connect key for several seconds
(More than three seconds when theBluetooth feature is ON (the Connectkey is turn on)).
TEP 2: The Connect key turns off, and the Bluetooth feature turns OFF. The mobile phone, which is connected to Bluetooth, will be forcibly disconnected.
• Bluetooth connection from DT83Series/DT430 Series to mobile pho
Bluetooth connection is manually or auically available between a terminal andbile phone whose pairing process hascompleted. From the terminal, a Blueconnection can be established only most recently connected mobile phone.
• Automatic ConnectionSTEP 1:Be sure to confirm that Blu
connection is ON (the Connect kelights red).
STEP 2:The most recently connected phone must be within the rangBluetooth connection (approx10 meters).
STEP 3:The Bluetooth connection betwterminal and the mobile phestablished automatically.
e: If the connection process between DT830 Series/DT430 Series and the mobile phone is performedduring pairing mode, the Bluetoothfeature cannotbe disabled.
e: When the Connect key has not been pressed for 10minutes while the Bluetoothadapter is connectedto the terminal, the Bluetooth feature willautomatically turn OFF.
Note: When Bluetooth connection between the tand the mobile phone is established dconversation, the voice communicatinterrupted due to a switch to the Bluoutput. You can return to the conversationseconds since the voice communicadisconnected.

•S
S
S
S
• Tf
Wbwps
S
S
ypes ofde and “Wired
all as a
call for
tweenmobile termi-Mobile.
s with Whenhe ter-
de, theterminall mode
d, theer, the Mode.
248
Manual ConnectionTEP 1: Be sure to confirm that Bluetooth
connection is ON (The Connect keylights red).
TEP 2: Press the Connect key less than 3seconds.
TEP 3: The terminal sends a connection requestto the most recently connected mobilephone.
TEP 4: Bluetooth connection between theterminal and the mobile phone will beestablished.
o switch the call by using Bluetooth eature
hen you leave the desk while talking in Mo-ile Phone Mode, you can switch from the callith terminal handset to the call with mobilehone. For the details of Mobile Phone Mode,ee TERMINAL MODE.
TEP 1: Press the Connect key less than 2.5seconds. This operation is canceled bypressing the Connect key again.
TEP 2: The call switches from the terminal to themobile phone. To switch the call usingmobile phone, refer to the manual of yourmobile phone.
TERMINAL MODEFor DT830 Series/DT430 Series, there are two tterminal mode called “Wired Telephone” mo“Mobile Phone” mode. The terminal starts up onTelephone” mode by default.
• Wired Telephone ModeEnables the terminal to make a voice cstation in the system.
• Mobile Phone ModeEnables the terminal to make a voice mobile phone.
• To switch the terminal modeWhen the Bluetooth connection beDT830 Series/DT430 Series and a phone is completed, you can switch thenal mode (“Wired Telephone” mode/“Phone” mode) by pressing the Path key
The Path key indicates the mode statuthe lamp color and the flashing status.the Path key lights or flashes orange, t
Note: When the terminal is placed in Security moBluetooth feature will be OFF even if the is in busy/idle state. After that, the terminaswitches to the Wired Telephone Mode.
Note: When the Security mode is canceleBluetooth feature will be ON. Howevterminal mode will be the Wired Telephone

mkM
Ft
ne”
al is in
When is ON,hed.
LaIndicPat
LighOran
FlasOran
LighGree
FlasGree
00ms
249
inal is in Wired Telephone Mode. When Pathey lights or flashes green, the terminal is inobile Phone Mode.
or details of the Path key lamp status, see theable below.
The flashing periods of Path key are as follows.
• To switch between “Wired Telephomode and “Mobile Phone” modeSTEP 1:Press the Path key when the termin
idle/ringing status.
STEP 2:The terminal mode is switched.you lift the handset or the speakerthe terminal mode cannot be switc
mp ation
terns
Flashing Periods Mode Status
ting ge -
Wired Telephone Mode
Indicates that the mobile phone is idle or not connected.
hing ge
SlowLight
Wired Telephone Mode
Indicates that the mobile phone is originating a call or the terminal is talking through the DT830 Series/DT430 Series.
Flash Indicates that the mobile phone is playing music.
QuickFlash
Indicates that you are talking on your mobile phone.
BurstFlash
Indicates that the mobile phone is ringing.
ting n -
Mobile Phone Mode
Indicates that the terminal is idle on the system line or ringing.
hing n
QuickFlash
Mobile Phone Mode
Indicates that the terminal is talking through the system line.
0ms 500ms 10FlashingPeriods
SlowLight
Flash
QuickFlash
BurstFlash
250ms 750ms
Light

• TDpteplyapmu
SWmsth
at de-it an-
en the
en the
e beep
e beepNot
ne thatype 1,DT430
contact
250
o switch mobile phone answer modeepending on the specifications of a mobilehone, the operation to start a conversation af-r answering the incoming call with the mobilehone is different. You can start a call smooth- by setting the mobile phone answer modeccording the specifications of each mobilehone. Choose the mobile phone answerode corresponding to the mobile phone in
se.
mart Device Type (Type 1):hen you answer an incoming call with theobile phone, the answered call will be
witched from DT830 Series/DT430 Series toe mobile phone automatically.
Smart Device Type (Type 2):It is used for the type of mobile phones thlays the start of a conversation when swers the call on Type 1.
STEP 1:Press and hold the Path key whterminal is in idle status.
STEP 2:You will hear a beep tone whterminal mode is switched.
• Smart Device Type (Type 1): Thtone sounds once.
• Smart Device Type (Type 2): Thtone sounds twice.
e: Depending on the type of mobile phone, a delay onthe starting of the conversation may happen.
Note: When you use this mode for a mobile phocan start immediately a conversation with Tthe call may be on the DT830 Series/Series.
Note: For details of recommended type of mode, the system administrator.

OT• T
HafS
S
• TWSesS
S
S
musicrns offess the music
music,owever,r cases,rted, or
e phoned.
nal, theerefore,one.
251
HER FEATURESo mute the hands-free microphoneands-free microphone can be enabled/dis-bled by the following procedure while hands-
ree call is operated in the mobile phone mode.TEP 1: Press the Mic key or the Feature key and
while hands-free call is operated.TEP 2: When the microphone is enabled, the Mic
key lights red. If the microphone isdisabled, the Mic key turns off. Then, themicrophone is in mute status.
o play musichile Bluetooth connection between DT830eries/DT430 Series and a mobile phone isstablished, you can play music through thepeaker of the terminal.TEP 1: Play the music on the mobile phone. For
more information about how to playmusic, refer to the manual of the mobilephone.
TEP 2: When the phone is hung up, the Speakerkey lamp lights red and the music will beplayed through the speakerautomatically. If you lift the handsetwhile the music is playing, the music willcome from the handset through thereceiver. However, when you replace thehandset on DT830 Series/DT430 Series,the music will stop.
TEP 3: Press the volume key to adjust the soundvolume.
• To stop musicSTEP 1:Press the Speaker key while the
sounds. The Speaker key lamp tuand the music stops. If you prSpeaker key one more time, thewill be played again.
1Note: To adjust the volume for the sound of the
press the Volume key on the terminal. Hadjust the volume on the mobile phone fosuch as when the adjusted sound is distothe volume is low. Depending on the mobilmodel, the volume level cannot be adjuste
Note: Even if you stop the music on the termimusic keeps playing on mobile phone. Thbe sure to stop the music on the mobile ph

AP
ATT
Connback
ADSETe until it
ove as
Not
Not
OW TO
onnector
252
PENDIX B HEADSET OPERATION
ACHING THE HEADSET
ect the headset to HEADSET connector on the of the telephone following the procedure below.
• TO CONNECT THE HEADSET
STEP 1: Insert the modular plug into the HEconnector on the back of the telephonclicks.
STEP 2: Place the headset cord into the groshown in the figure below, and fix it.
e: The Headset key must be programmed inadvance. For the programming of the Headsetkey, contact the system administrator.
e: The headset which can be connected to the tele-phone is “HW251N-A10/WT100-EHS-NE/Voy-ager Legend CS (manufactured by Plantronics)”.
Note: To make a call with the headset, see HINPUT CHARACTERS.
Telephone
HEADSET C
Modular PlugCode Groove

TERHEThe minaoperphon
To OSTE
STE
STE
all, and
ng tone
conver-on the
can an-instead
all, and
Not
set andtion.
eadset
253
MINAL OPERATION USING THE ADSET following procedure explains how to operate a ter-l using the headset. While using the headset, theations equivalent to answering and ending ae call are available by pressing the Headset key.
riginate a CallP 1: Press the Headset key, and the Headset key
lights red.
P 2: The line key lights green and dial tone is re-ceived.
P 3: Dial a desired telephone number, after thetarget party answers the call, you can start aconversation.
STEP 4: Press the Headset key to end the cthe Headset key turns off.
To Answer a CallSTEP 1: Press the Headset key while the ringi
is on, and the Headset key lights red.
STEP 2: Press the flashing line key to start a sation with another line. Depending settings at the installation phase, you swer the call by pressing key of line key.
STEP 3: Press the Headset key to end the cthe Headset key turns off.
e: The Headset key must be programmed inadvance. For the programming of the Headsetkey, contact the system administrator.
Note: To switch to handset mode, lift the handpress the Headset key during a conversa
Note: To switch to headset mode, press the Hkey during a conversation.
Answer

ADTOYou an id
To AStatSTE
STE
STE
For If othsubliwhilewill b
r a call,all witherminal
irelessand theding oner the
of Call
he call,
Not
Not
Not
a callume fort to theall. For
eadsethe pro-tact the
ne andched to
254
JUSTING HEADSET RINGER NE VOLUMEcan adjust the ringer tone volume for a headset inle or a busy state.
djust the Ringer Tone Volume in Idle usP 1: Press the Headset key while in idle status to
switch from headset mode to handset mode,and the Headset key lamp turns off.
P 2: Receives a call from another line.
P 3: Press the Up/Down ( ) key while a ringertone is on.
Ringer Tone Volume in Busy Statuser lines are accommodated in the telephone as ane, the ring tone volume of a subline call received being in the middle of a call through the headsete lower than usual.
HOW TO USE THE WIRELESS HEADSET When using Wireless Headset, you can answeconduct a conversation, or disconnect the chooking operations. Here explains about the toperation using Wireless Headset.
To Answer a CallSTEP 1: Press the Call control button of the W
Headset while the ringing tone is on, Call control button lights red. Depenthe installation phase, you can answcall by pressing key instead control button.
STEP 2: Press the Call control button to end tand the Call control button turns off.
e: To pass a ringer tone through the headset,enable “Headset Ring” from the Settings ofMenu screen. For the details, refer to "Menu ListFor Setting".
e: Ringer tone volume can be adjusted only for awired headset connected to the terminal headsetconnector.
e: Ringer tone volume in busy state cannot bechanged when the ringer tone is set to come fromboth the speaker and the headset. For details,contact the system administrator.
Note: When you receive another call duringthrough the headset, the ringer tone volother lines in headset mode can be sesame level as the normal two-way cdetails, contact the system administrator.
Note: The Call control button of Wireless Hmust be programmed in advance. For tgramming of the Call control button, consystem administrator.
Note: For details on how to connect a telephoWireless Headset, see the manual attathe Wireless Headset.
Answer