
ASG-becubic Installation and Implementation Guide
251
becubic Installation and Implementation Guide Version: 9.9.1 Publication Date: December 2020 ©2021 ASG Technologies Group, Inc. All rights reserved. The information contained herein is the confidential and proprietary information of ASG Technologies Group, Inc. Unauthorized use of this information and disclosure to third parties is expressly prohibited. This technical publication may not be reproduced in whole or in part, by any means, without the express written consent of ASG Technologies Group, Inc. All names and products contained herein are the trademarks or registered trademarks of their respective holders. ASG Technologies Worldwide Headquarters Naples Florida USA | asg.com | [email protected] 708 Goodlette Road North, Naples, Florida 34102 USA Tel: 239.435.2200 Fax: 239.263.3692 Toll Free: 800.932.5536 (USA only)
-
Upload
khangminh22 -
Category
Documents
-
view
3 -
download
0
Transcript of ASG-becubic Installation and Implementation Guide

becubic Installation and Implementation GuideVersion: 9.9.1
Publication Date: December 2020
©2021 ASG Technologies Group, Inc. All rights reserved.
The information contained herein is the confidential and proprietary information of ASG Technologies Group, Inc. Unauthorized use of this information and disclosure to third parties is expressly prohibited. This technical publication may not be reproduced in whole or in part, by any means, without the express written consent of ASG Technologies Group, Inc.
All names and products contained herein are the trademarks or registered trademarks of their respective holders.
ASG Technologies Worldwide Headquarters Naples Florida USA | asg.com | [email protected]
708 Goodlette Road North, Naples, Florida 34102 USA Tel: 239.435.2200 Fax: 239.263.3692 Toll Free: 800.932.5536 (USA only)

Contentsbecubic Installation 1
ASG Access Updates and Service Packs 1
Open Source Components 1
Installing becubic 3
Prerequisite 3
Installation Procedure 4
Customizing Memory Allocation Parameters 17
Allocating Memory for Java on a 64-bit Machine 18
Specifying Temporary Folder 18
Setting Up becubic Database Server 18
Overview 18
Installing a DBMS 18
Installing Oracle DBMS 19
Installing Microsoft SQL Server DBMS 22
Preparing Database Creation 25
Calculating Required Disk Space 25
Distributing Data Files 28
Creating and Initializing a Dedicated Database 30
For Oracle 30
For Microsoft SQL Server 30
Checking Database Parameters 40
Initializing the Database 40
Adding becubic-specific Storage Area 44
Oracle Tablespaces for becubic 44
Microsoft SQL Server Filegroups for becubic 45
Next Step 46
Configuring an Application Server 46
Deploying Server Applications 46
Configuring the Connections 47
Setting Up Apache Tomcat Server 47
Configuring Apache Tomcat Server 48
Starting and Stopping the Preconfigured Tomcat Server 49
i
Setting Tomcat Server URI Encoding 50
Configuring Redirection 50
Setting Up WebLogic Server 50
Setting Up WebSphere Server 51
Using Ant-based Deployment 51
Generating WAR File with Connection Information 52
Generating Standalone WAR/EAR by Ant Task 56
Configuring the Server for Remote Access 56
Securing Remote Admin Access on a Tomcat Server 56
Securing Remote Admin Access on WebSphere 58
Configuring the Web Server’s web.xml File 59
Managing Java Security 60
Implementing a becubic Project 61
Using Model Wizard 61
Starting Model Wizard 62
Creating and Updating Projects 62
Creating a New ADU Project 62
Creating a New Project Using an XMI Model 66
Updating an Existing Project 67
Upgrading a Repository from an Earlier Version 68
Creating and Initializing a CAE Entry Point 72
Output Directory Dialog 76
Establishing the List of Exposed Locales 80
Creating and Initializing the becubic Repository 80
Under Oracle 80
Under Microsoft SQL Server 84
Database Actions 89
Uploading a Project to a Remote Server 94
Managing Projects on a Remote Server 97
Accessing Remote Projects 97
Taking Action on a Remote Server 98
Redocumentation Sequence 100
Preparing to Run the Redocumentation Sequence 100
Running the Redocumentation Sequence 101
ii
Working with a Local Project 105
Managing Source Category Associations 105
Working with Remote Projects 107
Managing Remote Files 108
Working with a Remote Redocumentation Sequence 110
Running an Executable File on a Remote Server 110
Setting up becubic ODBC Bridge 111
Configuring the Dharma SDK Server 112
Verifying Connectivity with the Dharma ISQL Tool 113
Configuring the ODBC Clients 114
becubic ODBC Bridge Output 115
becubic Data Mapped to SQL 115
Examples of Retrieving Data with Microsoft Query 118
Retrieving Data with a Microsoft Excel Macro Statement 133
Implementing Business Names 134
Creating Business Names 134
Opening a Business Name Definition for Editing 136
Selecting User Roles 136
Defining Localized Business Name Definition Names 136
Defining Aliases 138
Removing Aliases 140
Working with Sequence Editor 140
Creating a Redocumentation Sequence 140
Opening a Redocumentation Sequence for Editing 141
Saving a Redocumentation Sequence 141
Specifying Repository Connection 142
Managing Concurrent Executions 144
Editing a Redocumentation Sequence 144
Elements in Redocumentation Step Definition 144
Adding Steps and Substeps 146
Defining a Task for a Step or a Substep 150
Step Tree Shortcut Menus 151
Copying and Pasting Steps, Substeps, and Tasks 153
Using Ant-based Tools 153
Adding Custom Tasks to a Redocumentation Sequence 181
iii
Sample Custom Tasks 181
b3:types 182
b3 Features 183
Editing a Redocumentation Sequence’s Properties 184
Assigning Variable Values to Properties 186
Editing a Property Value 186
Deleting a Property 186
Restoring a Property Value 186
Running a Redocumentation Sequence 187
Executing the Whole Sequence 187
Executing Contextually to Callable Steps 188
Tracking a Redocumentation Sequence 188
Generating a BAT File to Run the Redocumentation Sequence 193
Implementing Load Balancing 194
Principle of Operation 195
Installing and Deploying the Tomcat Web and HTTP Apache Servers 195
Required Software 195
Procedure 195
Deploying Only the WAR File in Multiple Standalone Tomcat Servers 199
Hardware and Software Configurations 199
becubic Collectors 199
Mainframe 199
Distributed Architecture 199
becubic Analyzer 199
becubic Database Server 200
List of Supported Database Platforms 202
becubic Application Server 203
List of Supported Database Platforms 204
becubic Clients 205
becubic Rich Client 206
becubic Web Client 206
becubic Reporting Client 207
Virtual Machine Support 207
List of becubic and CAE Queries 208
iv

Setting Up Database by DBA 211
Sample Scripts 213
Database Creation Scripts 213
Running Model Wizard without the System User 215
Creating the Repository Owner User 216
Running Model Wizard 216
Running Model Wizard through Command Line 217
Logical Models 217
Logical DWR Model 217
Logical Scanner Models 223
Transformation Rules for Logical Scanner Models 223
Data Lineage Support 237
v
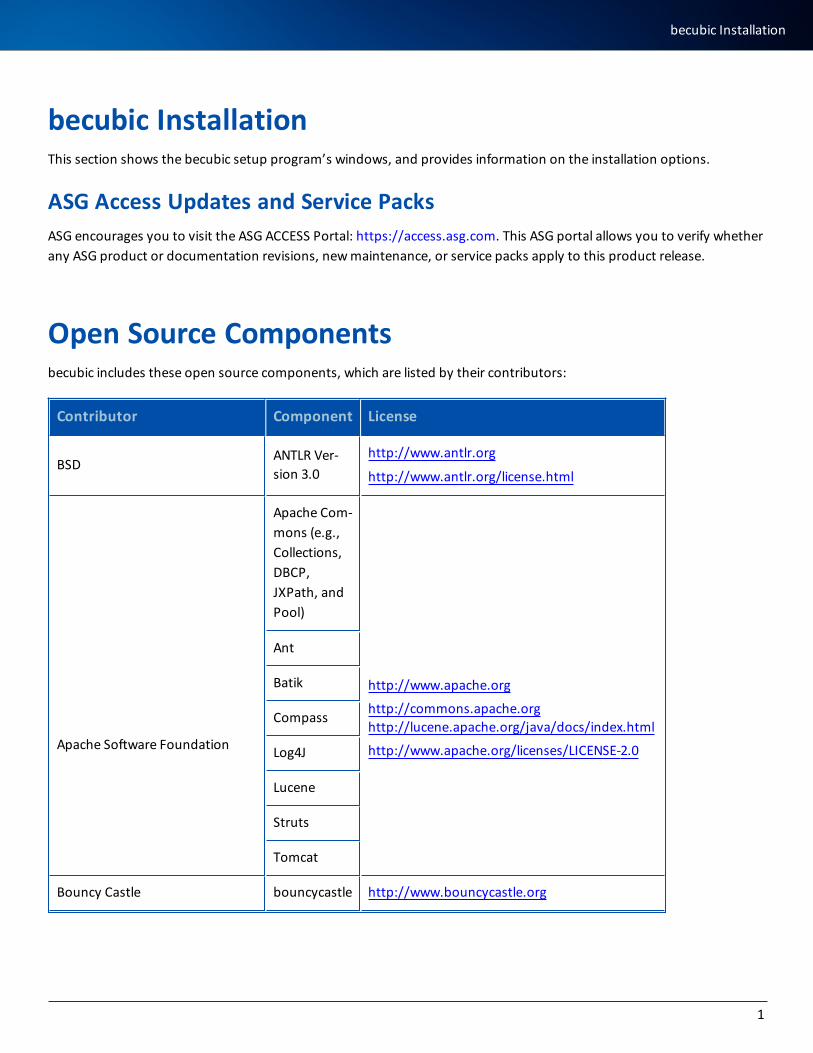
becubic InstallationThis section shows the becubic setup program’s windows, and provides information on the installation options.
ASG Access Updates and Service PacksASG encourages you to visit the ASG ACCESS Portal: https://access.asg.com. This ASG portal allows you to verify whether any ASG product or documentation revisions, new maintenance, or service packs apply to this product release.
Open Source Componentsbecubic includes these open source components, which are listed by their contributors:
Contributor Component License
BSDANTLR Ver-sion 3.0
http://www.antlr.org
http://www.antlr.org/license.html
Apache Software Foundation
Apache Com-mons (e.g., Collections, DBCP, JXPath, and Pool)
http://www.apache.org
http://commons.apache.orghttp://lucene.apache.org/java/docs/index.html
http://www.apache.org/licenses/LICENSE-2.0
Ant
Batik
Compass
Log4J
Lucene
Struts
Tomcat
Bouncy Castle bouncycastle http://www.bouncycastle.org
1
becubic Installation

Contributor Component License
http://www.bouncycastle.org/licence.html (for MIT X11 License)
EclipseEclipse Ver-sion 1.0
http://www.eclipse.org
http://www.eclipse.org/legal/epl-v10.html
Free Software Foundation
Htmlparser http://www.gnu.org
http://www.gnu.org/copyleft/lesser.html (for LGPL License)
Jfreechart
xom
FOP FOP http://xmlgraphics.apache.org/fop/
JavaGeom JavaGeom http://geom-java.sourceforge.net/
JGraft JGrafthttp://www.jgrapht.org
http://www.jgrapht.org/LGPL.html
JNAJNA (Java Nat-ive Access)
https://github.com/twall/jna
JTidy JTidyhttps://sourceforge.net/projects/jtidy/ (for W3C Free License)
Geeknet
JDBMhttp://geek.net/
http://jdbm.sourceforge.net/
http://swtcalendar.sourceforge.net
http://swtcalendar.sourceforge.net/license.html (for MIT License)
swtcalendar
GraphvizGraphviz Ver-sion 1.0
http://graphviz.org
http://www.graphviz.org/License.php (for CPL License)
CSSParser CSS Parserhttp://cssparser.sourceforge.net/
http://www.gnu.org/copyleft/lesser.html (for LGPL License)
2
Installing becubicIf you are upgrading from an earlier release, you cannot use existing repositories with becubic Ver-sion 8.7.2. It is important that you contact ASG Customer Support for guidance.
ASG-License Server (herein called License Server) must be installed on an accessible server machine to be able to validate your license keys. If you intend to upgrade your existing becubic projects, you can install becubic either in a directory in which an earlier version was installed or in a separate directory. Do not, however, rename the directory that contains the earlier version. Renaming the directory will make it impossible for the installer to detect the earlier version. If you have the preconfigured JBoss server installed on the machine on which you want to upgrade becubic, you must stop and remove it (i.e., through the console or the corresponding Windows service). The preconfigured application server is replaced with Tomcat 7.
Prerequisitebecubic and its underlying software (i.e., Eclipse, Ant, and Apache Tomcat) require the Java Runtime Environment (JRE). You must have a JRE installed before installing becubic.
l See Hardware and Software Configurations for information about the version compatibility.
l If you have different versions of JRE/JDK compatible with becubic installed, the most recent version is selected by the setup program.
l If you use a JRE (not a JDK), you may encounter the warning message Unable to locate tools.jar. in different log files. You can ignore this warning since it has no effect on using becubic.
Local Administrator RightsThe becubic setup does not require the Local Administrator rights. However, it also installs CAE, which requires these Microsoft Redistributable programs:
l Microsoft Visual C++ 2010 Redistributable
l Microsoft Visual C++ 2013 Redistributable
l Microsoft SQL Server Native Client 2008 (32-bit or 64-bit depending on the operating system)
l Microsoft SQL Server Native Client 2012 (32-bit or 64-bit depending on the operating system)
These programs are automatically installed by the setup program on the condition that the login account has the Local Administrator rights.
3
Installing becubic
To be able to install becubic and CAE without Local Administrator rights, you must install all these components prior to proceeding to becubic installation.
You can find the required setup programs of these components in the folder on the product dis-tribution CD:product_cd\Disk1\modules\cae\redist.
Installation ProcedurePerform the following steps to install becubic in your machine.
To install becubic
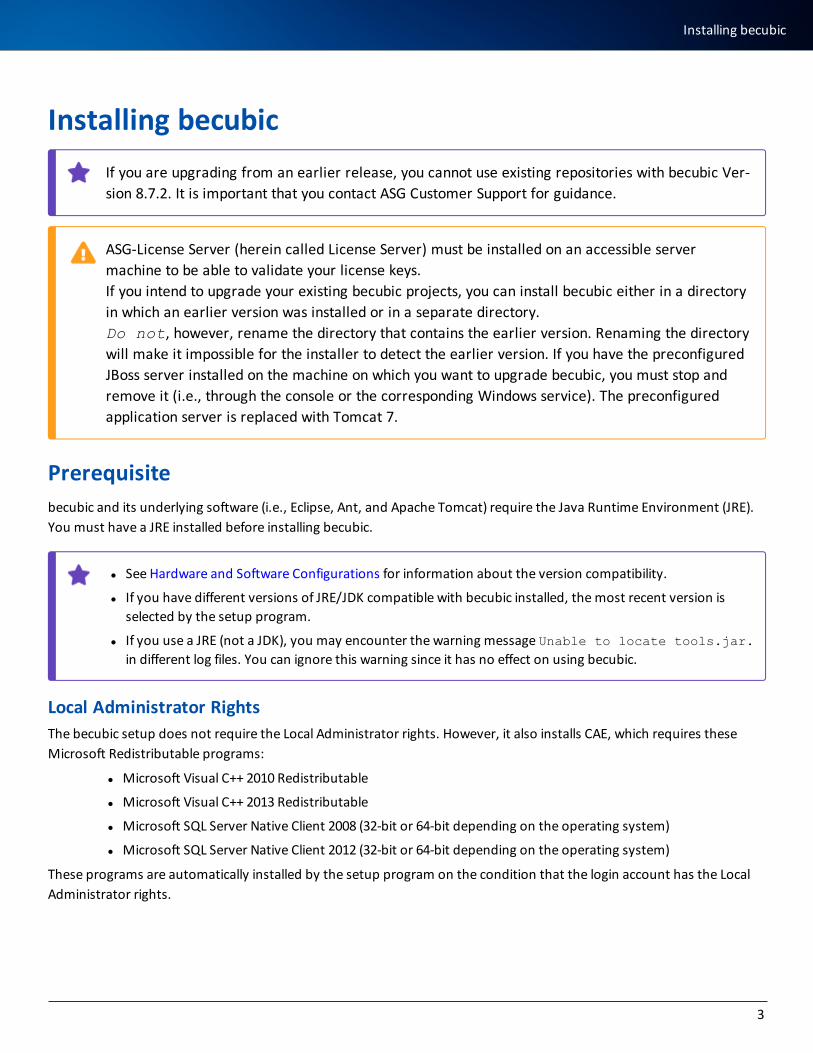
1. Run the installer from the ZIP file downloaded from the ISP or insert the becubic product distribution CD. If you are using the installation files downloaded from the ISP, double-click the setup.bat file. Or, if you are using the CD, the setup program runs automatically.
In both cases, you must run the setup program from a local drive.
A dialog shows the progress of the preparation:
The splash/language selection page displays:
4
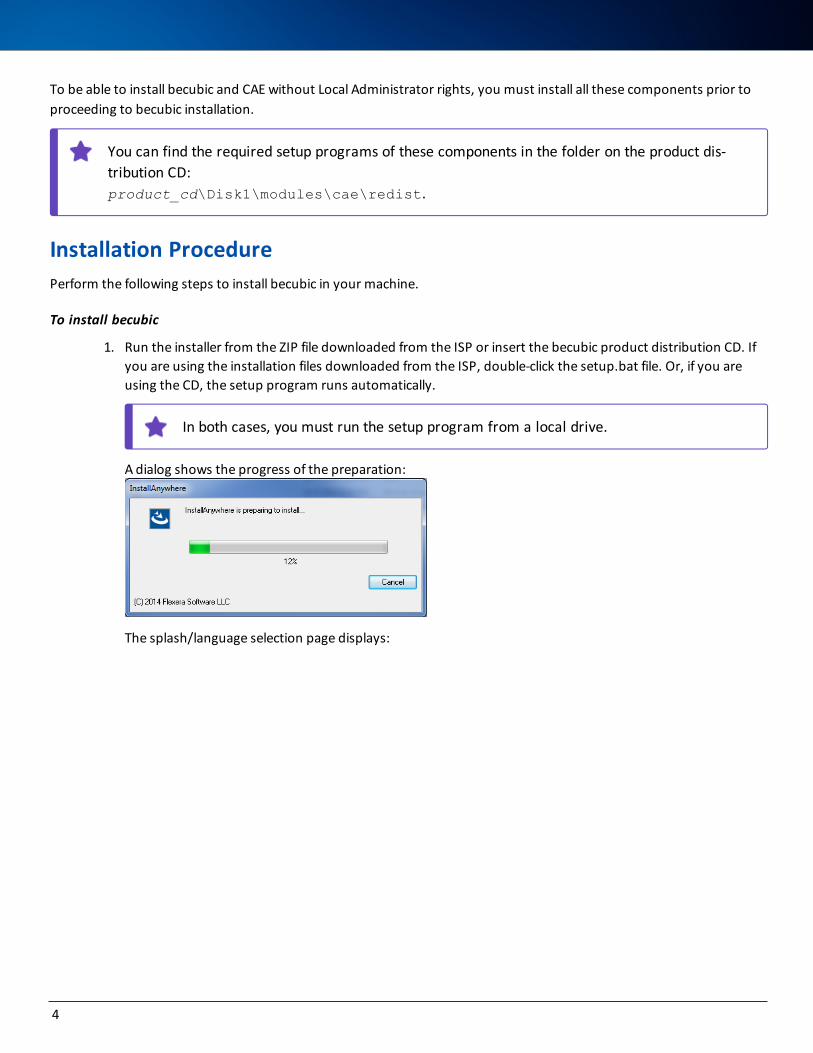
2. Select the language, either English or French, from the drop-down list at the bottom of the window. This choice concerns these items:
l The language used in the setup program pages.
l The GUI version for the localized modules.
3. Click OK. The Introduction page displays:
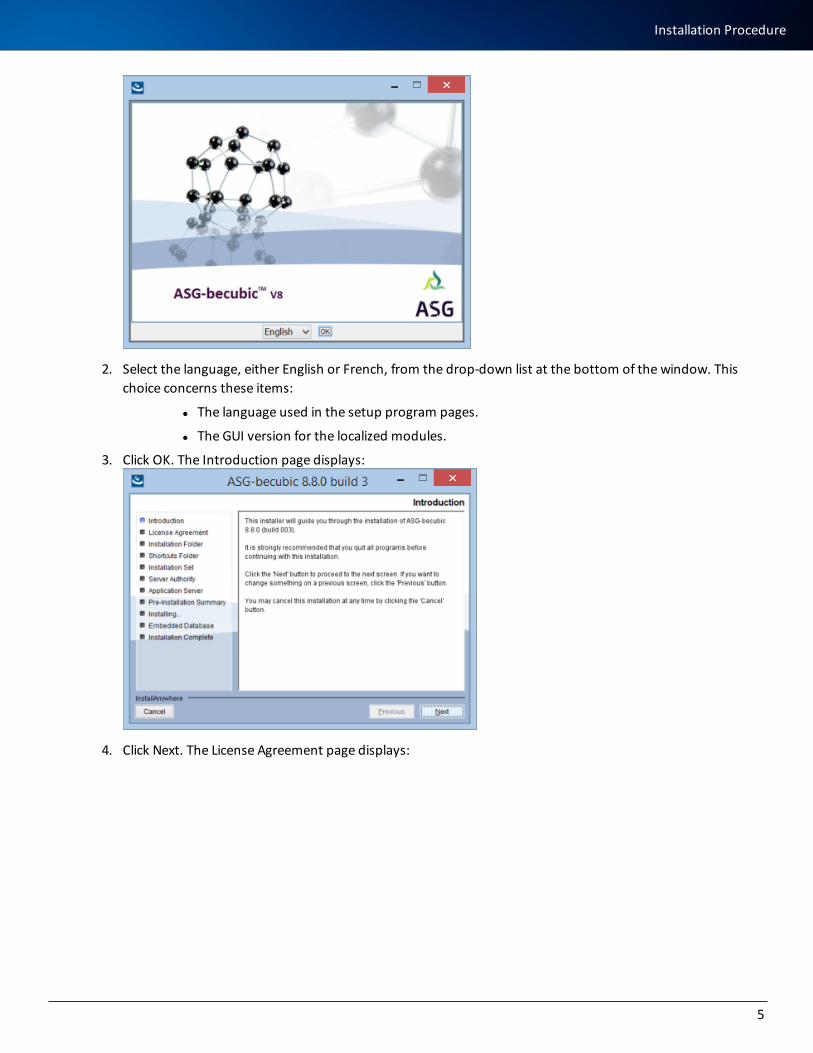
4. Click Next. The License Agreement page displays:
5
Installation Procedure
5. Read and accept the terms of the License Agreement.
6. Click Next. The Select Installation Folder page displays:
7. Specify the installation root directory. To browse for a folder, click Choose. This opens the Browse For Folder dialog where you can choose a folder or create a new one. In this example, C:\ASG\becubic is the install-ation root directory:
6
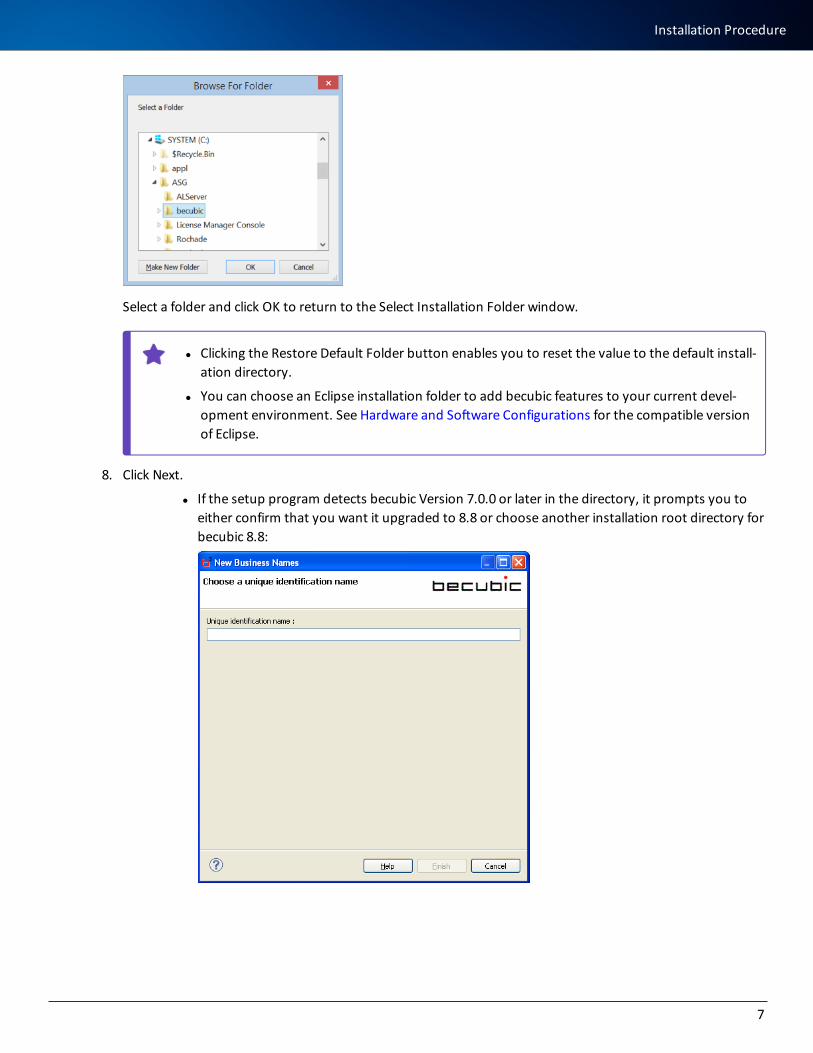
Select a folder and click OK to return to the Select Installation Folder window.
l Clicking the Restore Default Folder button enables you to reset the value to the default install-ation directory.
l You can choose an Eclipse installation folder to add becubic features to your current devel-opment environment. See Hardware and Software Configurations for the compatible version of Eclipse.
8. Click Next.
l If the setup program detects becubic Version 7.0.0 or later in the directory, it prompts you to either confirm that you want it upgraded to 8.8 or choose another installation root directory for becubic 8.8:
7
Installation Procedure
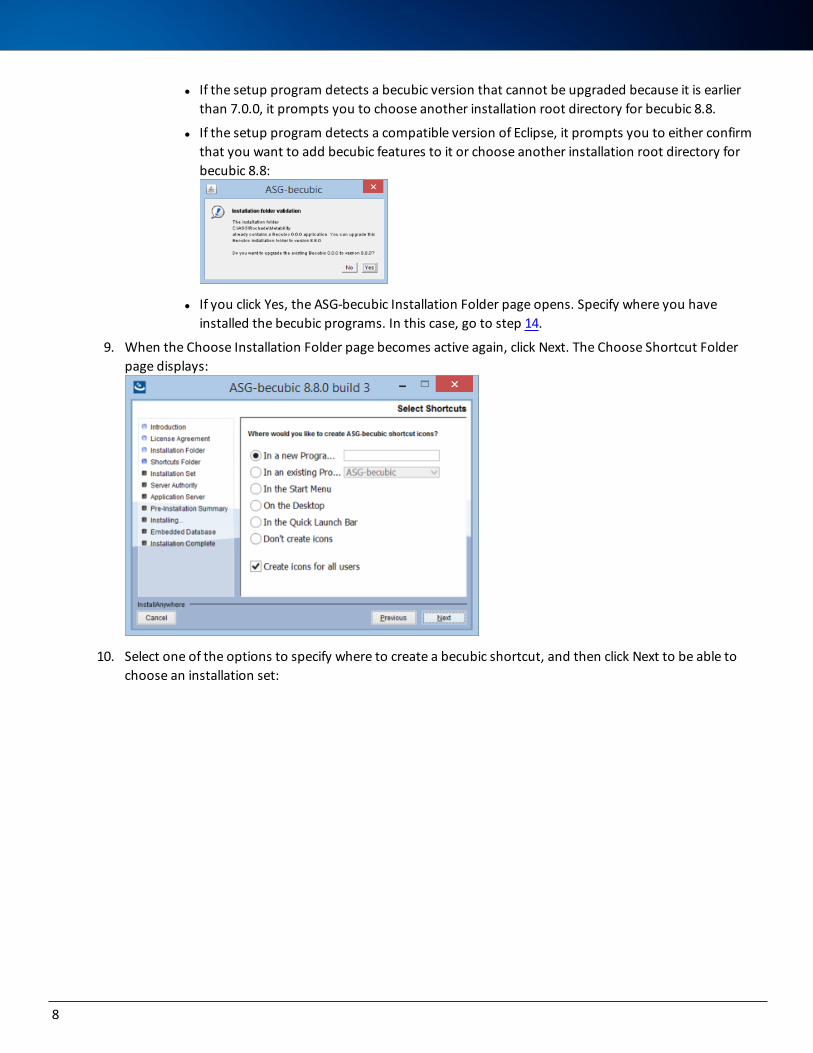
l If the setup program detects a becubic version that cannot be upgraded because it is earlier than 7.0.0, it prompts you to choose another installation root directory for becubic 8.8.
l If the setup program detects a compatible version of Eclipse, it prompts you to either confirm that you want to add becubic features to it or choose another installation root directory for becubic 8.8:
l If you click Yes, the ASG-becubic Installation Folder page opens. Specify where you have installed the becubic programs. In this case, go to step 14.
9. When the Choose Installation Folder page becomes active again, click Next. The Choose Shortcut Folder page displays:
10. Select one of the options to specify where to create a becubic shortcut, and then click Next to be able to choose an installation set:
8
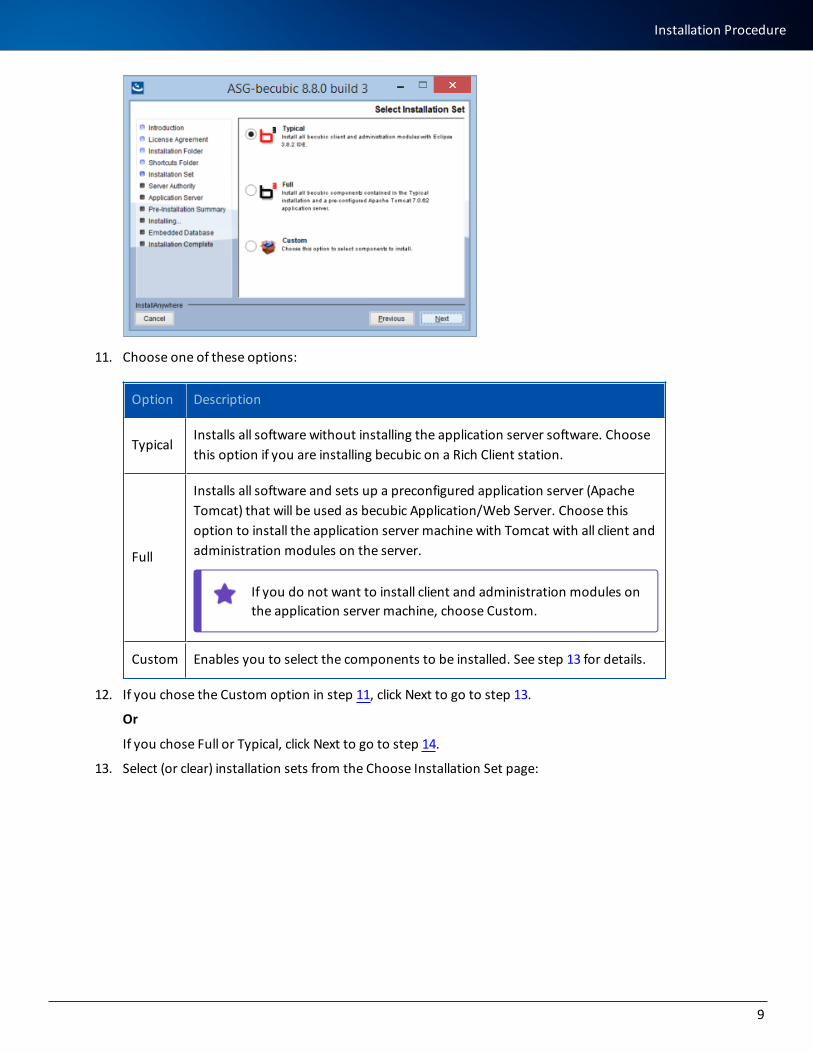
11. Choose one of these options:
Option Description
TypicalInstalls all software without installing the application server software. Choose this option if you are installing becubic on a Rich Client station.
Full
Installs all software and sets up a preconfigured application server (Apache Tomcat) that will be used as becubic Application/Web Server. Choose this option to install the application server machine with Tomcat with all client and administration modules on the server.
If you do not want to install client and administration modules on the application server machine, choose Custom.
Custom Enables you to select the components to be installed. See step 13 for details.
12. If you chose the Custom option in step 11, click Next to go to step 13.
Or
If you chose Full or Typical, click Next to go to step 14.
13. Select (or clear) installation sets from the Choose Installation Set page:
9
Installation Procedure

becubic installation sets are made up of components and/or modules. Which com-ponents/modules are eventually copied onto your machine depending on the license codes that your administrator entered in the License Server.
This table describes the installation sets:
Installation Set Description
Common Ana-lysis Engine
Installs the CAE analysis engine, providers, and the administration tools.
Becubic Light Cli-ent
Installs only the standard Eclipse client. The becubic plug-ins can be installed on your Eclipse IDE Version 3.8 or later.
The version of Eclipse bundled with becubic is 3.8.2, which is the certified and recommended version.
Becubic Admin-istration
Installs the Eclipse client with all the administration tools on Rich Cli-ent stations. This installation set is required for the becubic admin-istrators.
Apache Tomcat 7 application server
Installs a preconfigured Apache Tomcat 7 application server with all server-side applications to be deployed.
14. Click Next. The Server Authority Setting page displays:
10
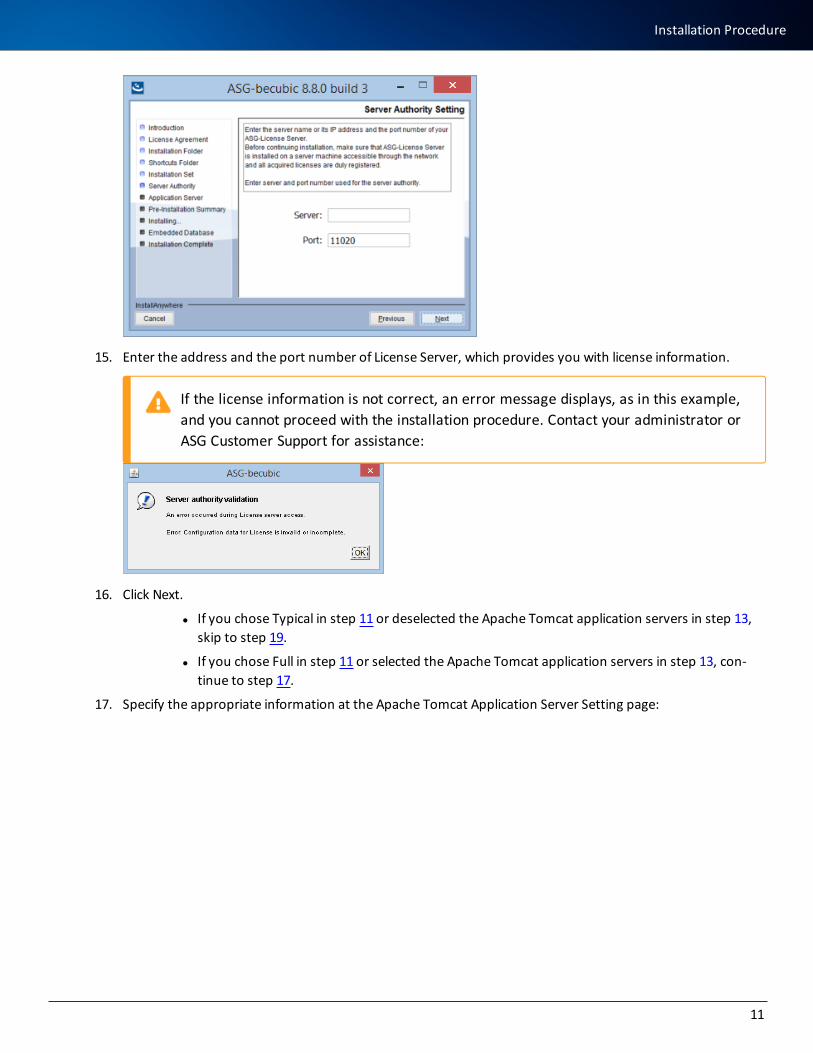
15. Enter the address and the port number of License Server, which provides you with license information.
If the license information is not correct, an error message displays, as in this example, and you cannot proceed with the installation procedure. Contact your administrator or ASG Customer Support for assistance:
16. Click Next.
l If you chose Typical in step 11 or deselected the Apache Tomcat application servers in step 13, skip to step 19.
l If you chose Full in step 11 or selected the Apache Tomcat application servers in step 13, con-tinue to step 17.
17. Specify the appropriate information at the Apache Tomcat Application Server Setting page:
11
Installation Procedure
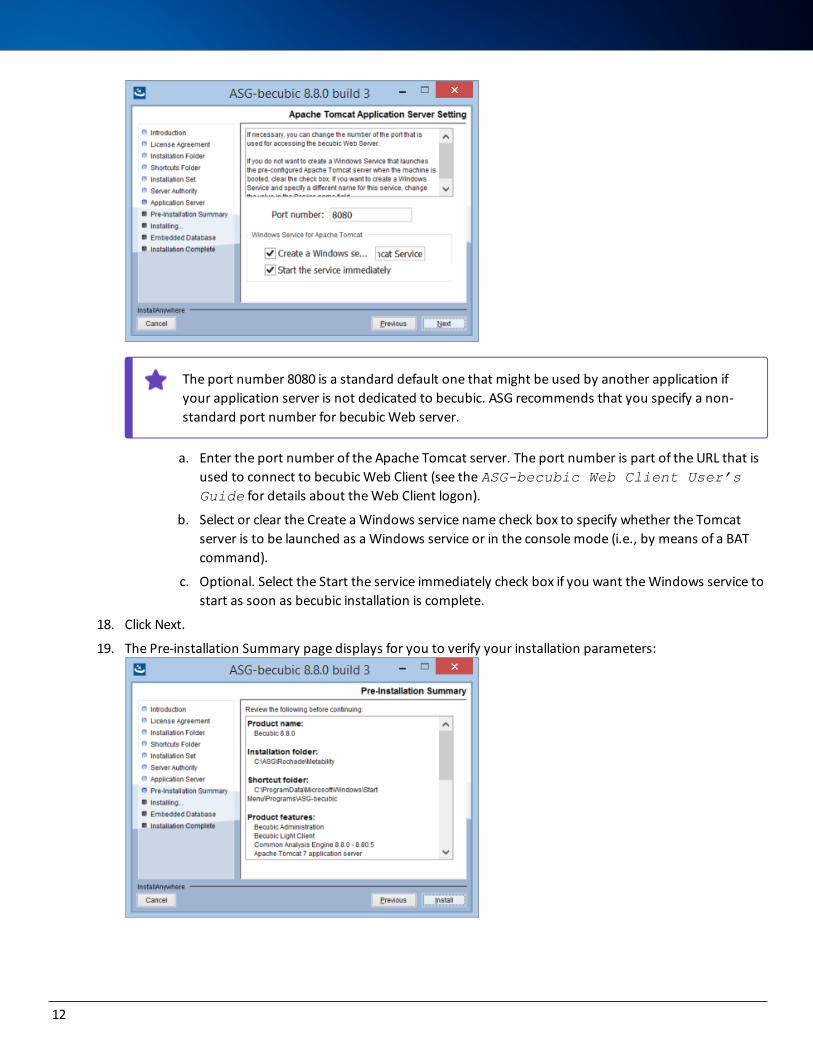
The port number 8080 is a standard default one that might be used by another application if your application server is not dedicated to becubic. ASG recommends that you specify a non-standard port number for becubic Web server.
a. Enter the port number of the Apache Tomcat server. The port number is part of the URL that is used to connect to becubic Web Client (see the ASG-becubic Web Client User’s Guide for details about the Web Client logon).
b. Select or clear the Create a Windows service name check box to specify whether the Tomcat server is to be launched as a Windows service or in the console mode (i.e., by means of a BAT command).
c. Optional. Select the Start the service immediately check box if you want the Windows service to start as soon as becubic installation is complete.
18. Click Next.
19. The Pre-installation Summary page displays for you to verify your installation parameters:
12

This table lists the items that are shown on the Pre-installation Summary page:
Item Description
Product name
Product name (becubic) and the version of the product that is about to be installed.
Installation folder
The installation folder you specified at step 7.
ASG-becubic installation folder
Displays only when installing on an existing Eclipse installation.
The installation folder of the becubic programs.
Shortcut folder
The shortcut folder you specified at step 10.
Product fea-tures
Features and components to be installed (i.e., all or part of installation sets listed at step 13 and CAE version).
License information
License Server and the port number you specified at step 15.
Target archi-tecture
The system architecture that the setup program has detected.
Application server
Information about the preconfigured application server.
JAVA Virtual Machine
Directory of the detected/selected JRE.
Disk space information
Required disk space to install the selected components/features and the amount of free space that the setup program detected on the selected drive.
20. Click Install. The setup program installs becubic on your computer:
13
Installation Procedure
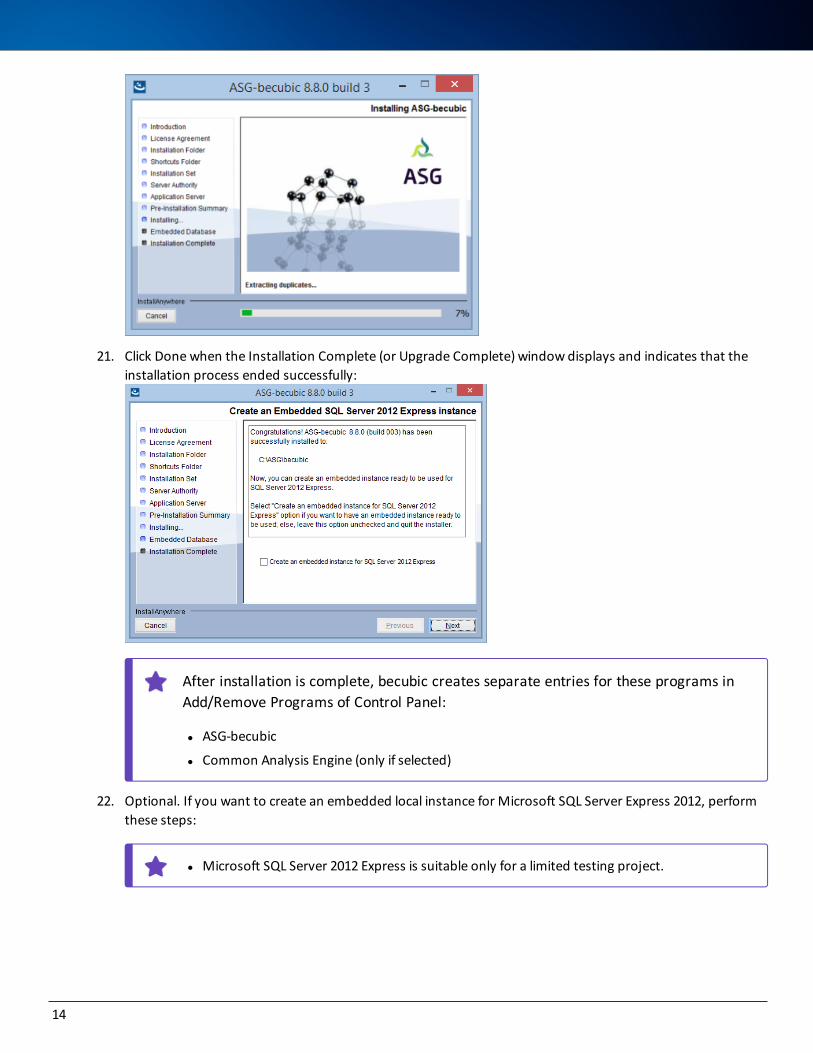
21. Click Done when the Installation Complete (or Upgrade Complete) window displays and indicates that the installation process ended successfully:
After installation is complete, becubic creates separate entries for these programs in Add/Remove Programs of Control Panel:
l ASG-becubic
l Common Analysis Engine (only if selected)
22. Optional. If you want to create an embedded local instance for Microsoft SQL Server Express 2012, perform these steps:
l Microsoft SQL Server 2012 Express is suitable only for a limited testing project.
14
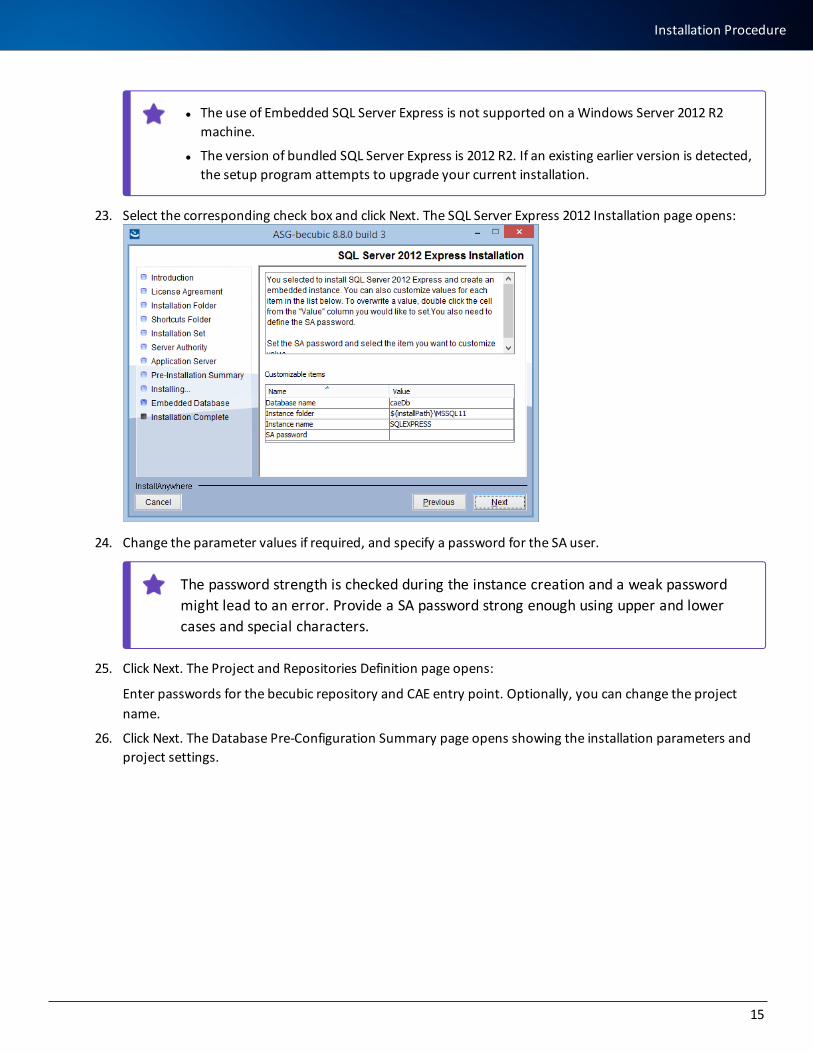
l The use of Embedded SQL Server Express is not supported on a Windows Server 2012 R2 machine.
l The version of bundled SQL Server Express is 2012 R2. If an existing earlier version is detected, the setup program attempts to upgrade your current installation.
23. Select the corresponding check box and click Next. The SQL Server Express 2012 Installation page opens:
24. Change the parameter values if required, and specify a password for the SA user.
The password strength is checked during the instance creation and a weak password might lead to an error. Provide a SA password strong enough using upper and lower cases and special characters.
25. Click Next. The Project and Repositories Definition page opens:
Enter passwords for the becubic repository and CAE entry point. Optionally, you can change the project name.
26. Click Next. The Database Pre-Configuration Summary page opens showing the installation parameters and project settings.
15
Installation Procedure
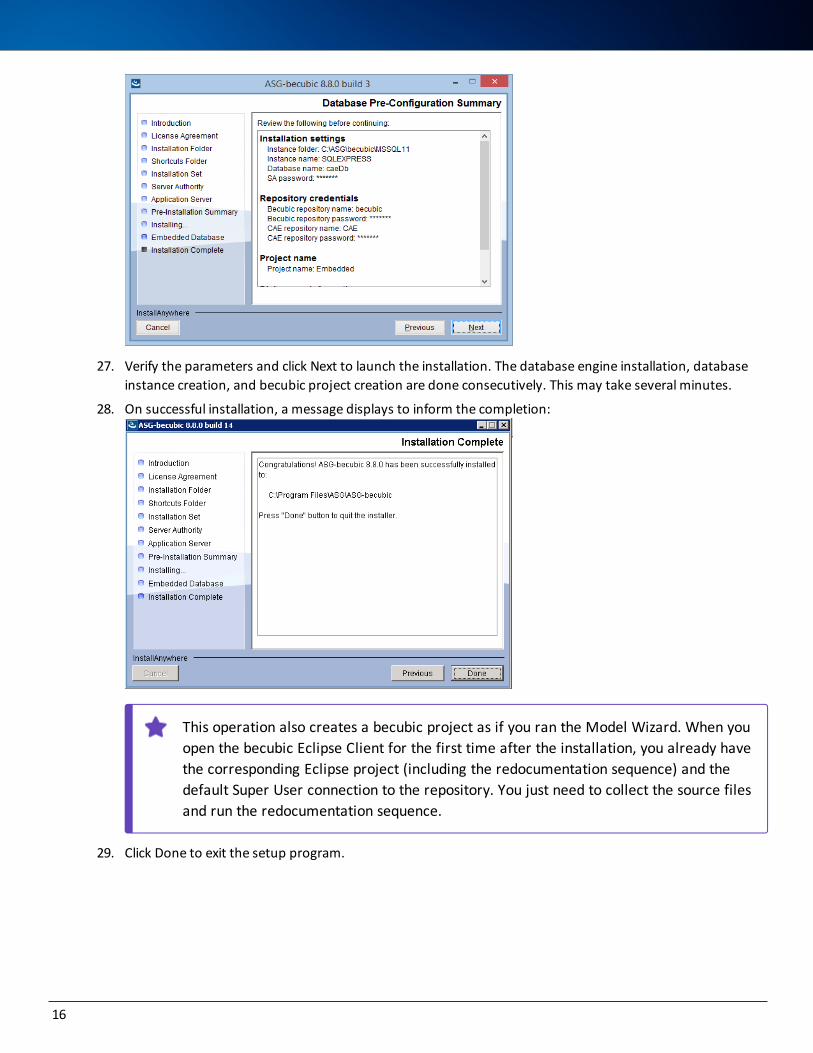
27. Verify the parameters and click Next to launch the installation. The database engine installation, database instance creation, and becubic project creation are done consecutively. This may take several minutes.
28. On successful installation, a message displays to inform the completion:
This operation also creates a becubic project as if you ran the Model Wizard. When you open the becubic Eclipse Client for the first time after the installation, you already have the corresponding Eclipse project (including the redocumentation sequence) and the default Super User connection to the repository. You just need to collect the source files and run the redocumentation sequence.
29. Click Done to exit the setup program.
16
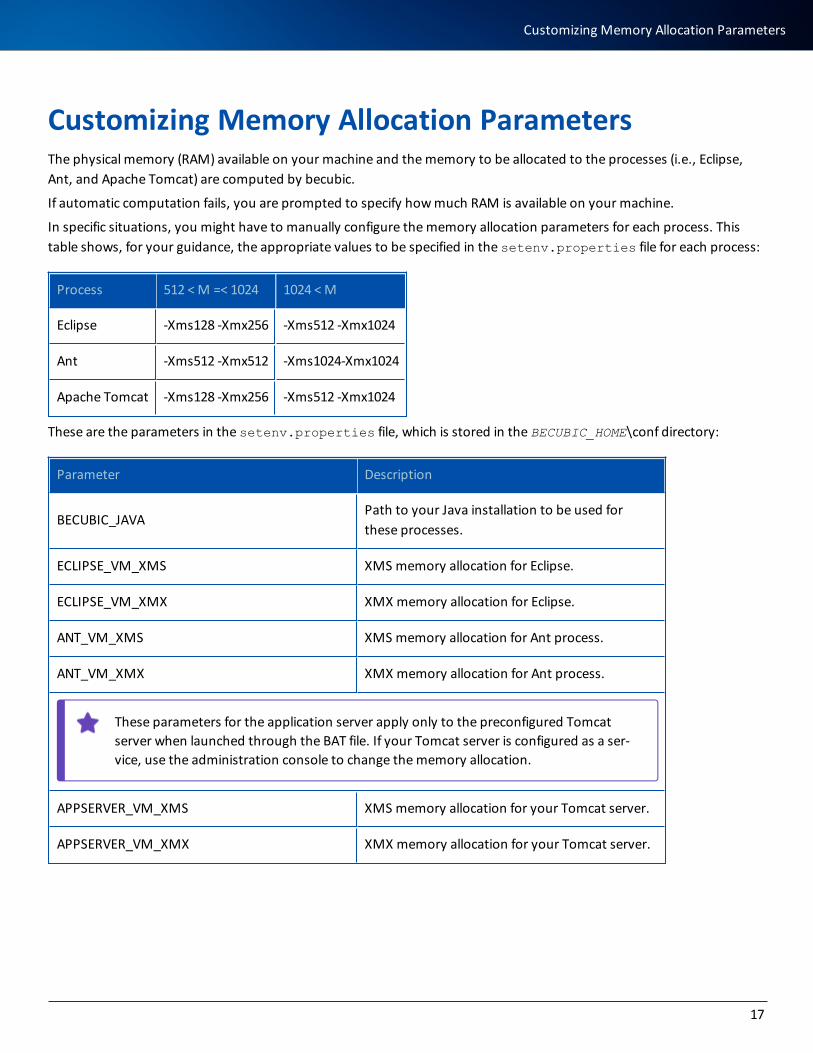
Customizing Memory Allocation ParametersThe physical memory (RAM) available on your machine and the memory to be allocated to the processes (i.e., Eclipse, Ant, and Apache Tomcat) are computed by becubic.
If automatic computation fails, you are prompted to specify how much RAM is available on your machine.
In specific situations, you might have to manually configure the memory allocation parameters for each process. This table shows, for your guidance, the appropriate values to be specified in the setenv.properties file for each process:
Process 512 < M =< 1024 1024 < M
Eclipse -Xms128 -Xmx256 -Xms512 -Xmx1024
Ant -Xms512 -Xmx512 -Xms1024-Xmx1024
Apache Tomcat -Xms128 -Xmx256 -Xms512 -Xmx1024
These are the parameters in the setenv.properties file, which is stored in the BECUBIC_HOME\conf directory:
Parameter Description
BECUBIC_JAVAPath to your Java installation to be used for these processes.
ECLIPSE_VM_XMS XMS memory allocation for Eclipse.
ECLIPSE_VM_XMX XMX memory allocation for Eclipse.
ANT_VM_XMS XMS memory allocation for Ant process.
ANT_VM_XMX XMX memory allocation for Ant process.
These parameters for the application server apply only to the preconfigured Tomcat server when launched through the BAT file. If your Tomcat server is configured as a ser-vice, use the administration console to change the memory allocation.
APPSERVER_VM_XMS XMS memory allocation for your Tomcat server.
APPSERVER_VM_XMX XMX memory allocation for your Tomcat server.
17
Customizing Memory Allocation Parameters
Allocating Memory for Java on a 64-bit MachineOn a recent 64-bit machine with a large amount of RAM (e.g., 4, 6, or 8 GB), you can increase the maximum heap size (-Xmx parameter) up to half of the available RAM for a comfortable performance.
Specifying Temporary FolderYou can define a com.asg.tmpdir java property that points to a folder. All the becubic operations that require a tem-porary file use the specified folder, which can be dedicated and secured. If you do not specify a temporary folder, becubic uses the common temporary folders of the operating system.
Use the -D argument in the command for launching Eclipse or the application server so that becubic (server or client) can take it into account.
Setting Up becubic Database ServerThis section explains how to prepare becubic Database Server to host the becubic repository and CAE entry points.
OverviewTo set up becubic Database Server, perform the following tasks:
1. Installing a DBMS, either Oracle or Microsoft SQL Server on the server machine. See Installing an Oracle DBMS or Installing a Microsoft SQL Server DBMS.
2. Preparing the creation of the database by calculating the required disk space and distributing the data files. See Preparing Database Creation.
3. Creating, configuring a connection to, and initializing a dedicated database. See Creating a becubic Database under Oracle 12c or Creating a CAE Database under MicrosoftSQL Server.
After the repository is initialized by the Model Wizard, you can populate it with objects by running the redocumentation sequence (see Implementing a becubic Project) or importing objects (see the ASG-becubic System Administrator’s Guide for more information).
Installing a DBMSbecubic can use either Oracle or Microsoft SQL Server.
18
Microsoft SQL Server 2012 Express is bundled with the becubic setup program, enabling you to have a local instance of SQL Server Express database that is automatically configured. However, Microsoft SQL Server 2012 Express is suitable only for a limited testing project. See Installing becu-bic for more information about the becubic setup and the bundled Microsoft SQL Server 2012 Express.
Installing Oracle DBMSYou install and configure your Oracle DBMS on becubic Database Server.
l Installing applications requires that you have Local Administrator rights.
l The Oracle installation procedure in this section is based on Oracle 12c. See Hardware and Software Con-figurations for information about compatible Oracle versions.
l For the Oracle 11g-specific installation procedure, refer to an earlier version of the ASG-becubic Installation and Implementation Guide.
To install an Oracle DBMS on becubic Database Server
Clicking Cancel in any Oracle Universal Installer dialog terminates Oracle Universal Installer.
1. Quit any running Oracle application.
2. Stop all Oracle services.
In the Services window, all Oracle service names begin with the word Oracle.
3. Launch the Oracle 12c installer.
4. If you do not have a valid Oracle Support account, clear the I wish to receive security updates via oracle sup-port check box on the Configure Security Updates page.
If you clear this check box and do not specify the e-mail address, you will be prompted to confirm that you want to continue without providing your email address. Click Yes on the message box.
5. On the Download Software Updates page, select the Skip software updates option.
6. On the Select Installation Option page, select the Install database software only option, then click Next.
7. On the Grid Installation Option page, click the Single instance database installation option, then click Next.
8. On the Select Product Languages page, keep the default value (i.e., English), then click Next.
19
Installing Oracle DBMS
9. On the Select Database Edition page, click the Enterprise Edition option, then click Next.
10. On the Oracle Home User Selection page, if there is a dedicated account for Oracle installation, select the Use Existing Windows User option and fill in the User Name and Password fields with appropriate information.
Or
Select the Use Windows Built-in Account option. You are prompted to confirm that you want to use a Win-dows built-in account. Click Yes to confirm.
11. Click Next.
12. On the Specify Installation Location page, enter or browse for the appropriate Oracle installation path, then click Next.
13. On the Summary page, click Install.
14. At the end of the installation process, click Exit. You are prompted to confirm that you want to quit Oracle Universal Installer.
15. Reboot becubic Database Server.
16. Deactivate these Oracle services if they exist:
l OracleMTSRecoveryService
l OracleOracle_HomeHTTPServer
l OracleOracle_HomeAgent
Oracle_Home is the Oracle Home that was assigned when you installed the Oracle application.
The Oracle kernel now is installed on becubic Database Server.
Creating Oracle Listener ServiceThe Oracle Listener service must be active. If it is not, you must create the Listener service using the Oracle Net Con-figuration Assistant.
20
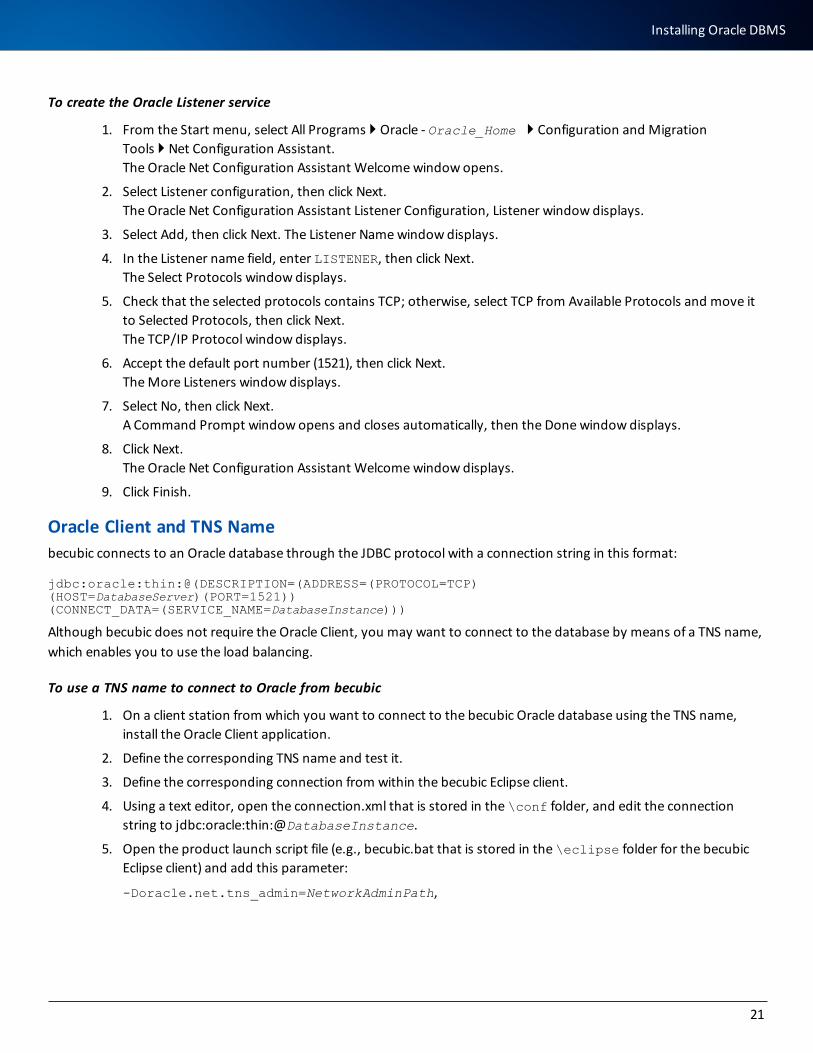
To create the Oracle Listener service
1. From the Start menu, select All Programs } Oracle - Oracle_Home } Configuration and Migration Tools } Net Configuration Assistant. The Oracle Net Configuration Assistant Welcome window opens.
2. Select Listener configuration, then click Next. The Oracle Net Configuration Assistant Listener Configuration, Listener window displays.
3. Select Add, then click Next. The Listener Name window displays.
4. In the Listener name field, enter LISTENER, then click Next. The Select Protocols window displays.
5. Check that the selected protocols contains TCP; otherwise, select TCP from Available Protocols and move it to Selected Protocols, then click Next. The TCP/IP Protocol window displays.
6. Accept the default port number (1521), then click Next.The More Listeners window displays.
7. Select No, then click Next. A Command Prompt window opens and closes automatically, then the Done window displays.
8. Click Next. The Oracle Net Configuration Assistant Welcome window displays.
9. Click Finish.
Oracle Client and TNS Namebecubic connects to an Oracle database through the JDBC protocol with a connection string in this format:
jdbc:oracle:thin:@(DESCRIPTION=(ADDRESS=(PROTOCOL=TCP)(HOST=DatabaseServer)(PORT=1521))(CONNECT_DATA=(SERVICE_NAME=DatabaseInstance)))
Although becubic does not require the Oracle Client, you may want to connect to the database by means of a TNS name, which enables you to use the load balancing.
To use a TNS name to connect to Oracle from becubic
1. On a client station from which you want to connect to the becubic Oracle database using the TNS name, install the Oracle Client application.
2. Define the corresponding TNS name and test it.
3. Define the corresponding connection from within the becubic Eclipse client.
4. Using a text editor, open the connection.xml that is stored in the \conf folder, and edit the connection string to jdbc:oracle:thin:@DatabaseInstance.
5. Open the product launch script file (e.g., becubic.bat that is stored in the \eclipse folder for the becubic Eclipse client) and add this parameter:
-Doracle.net.tns_admin=NetworkAdminPath,
21
Installing Oracle DBMS
where NetworkAdminPath is the \NETWORK\ADMIN folder that contains the TNS configuration file (i.e., tnsnames.ora).
Use slashes (/) as separators in a Java execution parameter.
Installing Microsoft SQL Server DBMSYou install and configure your Microsoft SQL Server DBMS on becubic Database Server.
l Installing applications requires that you have Local Administrator rights.
l The Microsoft SQL Server installation procedure in this section is based on SQL Server 2014. See Hardware and Software Configurations for information about compatible Oracle versions.
To install a Microsoft SQL Server DBMS on becubic Database Server
1. Quit any running Microsoft SQL Server applications.
2. Stop all Microsoft SQL Server services.
On the Services window, all SQL service names begin with the word SQL.
3. Launch the Microsoft SQL Server 2014 setup program from the installation CD-ROM.
You might be prompted to update .Net Framework and Windows Installer.
4. In Microsoft SQL Server Installation Center, click Installation on the menu panel (on the left).
5. In the right frame, click New installation or add features to an existing installation.
6. On the first Setup Support Rules page of the Microsoft SQL Server 2014 Setup window, click OK after the cor-responding operation has completed successfully.
7. On the Product Key page, enter the appropriate value, then click Next.
8. On the License Terms page, accept the license terms, then click Next.
9. On the Setup Support Files page, if you are prompted to install the setup support files, click Install to install them; otherwise, click Next.
10. Click Next on the second Setup Support Rules page after the corresponding operation has completed suc-cessfully.
11. On the Setup Role page, click the Microsoft SQL Server Feature Installation option button, then click Next.
12. On the Feature Selection window, select these check boxes:
l Database Engine Services
l Client Tools Connectivity
22

l Management Tools - Complete
13. If necessary, change the default directories for the shared features, then click Next.
14. On the Installation Rules page, click Next after the corresponding operation has completed successfully.
15. On the Instance Configuration page, select one of these options:
l Default instance, if there is no current default instance. The default instance is named MSSQLSERVER.
l Named instance. Enter the instance name in the corresponding field.
16. Optional. Specify or change as required the Instance ID and the Instance root directory.
17. Click Next
18. On the Disk Space Requirements page that summarizes the disk space requirements for the features you selected, check whether there is enough free disk space, then click Next.
19. On the Service Accounts tab of the Server Configuration page, specify the appropriate account(s) for Microsoft SQL Server services.
By default, NT AUTHORITY\System is used for all services. If you intend to use the Win-dows authentication mode, you must change the Account Name for SQL Server Browser to NT AUTHORITY\LOCAL Service.
20. On the Collation tab of the Server Configuration page, set the Database Engine Collation to Latin1_Gen-eral_BIN, then click Next.
21. On the Account Provisioning tab of the Database Engine Configuration page, perform either or these actions:
Windows authentication mode is required to use the Single Sign-on feature on becubic repositories.
a. Click the Windows authentication mode option button.
b. Specify the Microsoft SQL Server administrator account by clicking Add or Add Current User.
Or
c. Click the Mixed Mode option button.
d. Enter and confirm a system administrator account’s password that complies with your security policy because the default settings for database instance creation are Enforce password policy option enabled and Enforce password expiration disabled.
e. Optional. Specify additional Microsoft SQL Server administrator account(s) by clicking Add or Add Current User.
22. On the Data Directories tab of the Database Engine Configuration page, verify or change the data root dir-ectory as required, then click Next.
23. Click Next on the Error Reporting page.
23
Installing Microsoft SQL Server DBMS

24. Click Next on the Installation Configuration Rules page after the corresponding operation has completed suc-cessfully.
25. On the Ready to Install page, click Install.
26. Click Next on the Installation Progress page when the button becomes enabled.
27. Click Close on the Complete page when the setup program informs you that your Microsoft SQL Server 2014 installation completed successfully.
28. Install any required service packs.
29. Ensure that the SQL Server Browser service is started.
Ensure that the TCP/IP protocol is enabled; otherwise, becubic will fail when creating a repository. You can use SQL Server Configuration Manager (select from the Start menu, All Programs } Microsoft SQL Server 2014 } Configuration Tools } SQL Server Con-figuration Manager) to verify/enable the connection protocol for each instance. (The Properties dialog of the TCP/IP protocol also enables you to verify/change the IP address and the port number if needed.)
30. From the Start menu, select All Programs } Microsoft SQL Server 2014 } Microsoft SQL Server Management Studio.
31. Connect to the Database Engine (i.e., the default Server type on the Connect to Server dialog that opens) with these parameters:
Authentication Mode
Parameters
Windows Authentication
Server name: machine_name\instance_name
Using the IP address in place of the machine name might fix connection issue in some cases.
User name and password fields are greyed in the Windows Authentication mode.
SQL Server Authentication
Server name: machine_name\instance_name
Using the IP address in place of the machine name might fix connection issue in some cases.
Password: The password for administrator account (i.e., sa) that you defined at step 21.
32. In the Object Explorer frame, expand the Microsoft SQL Server tree structure down to System Databases.
24
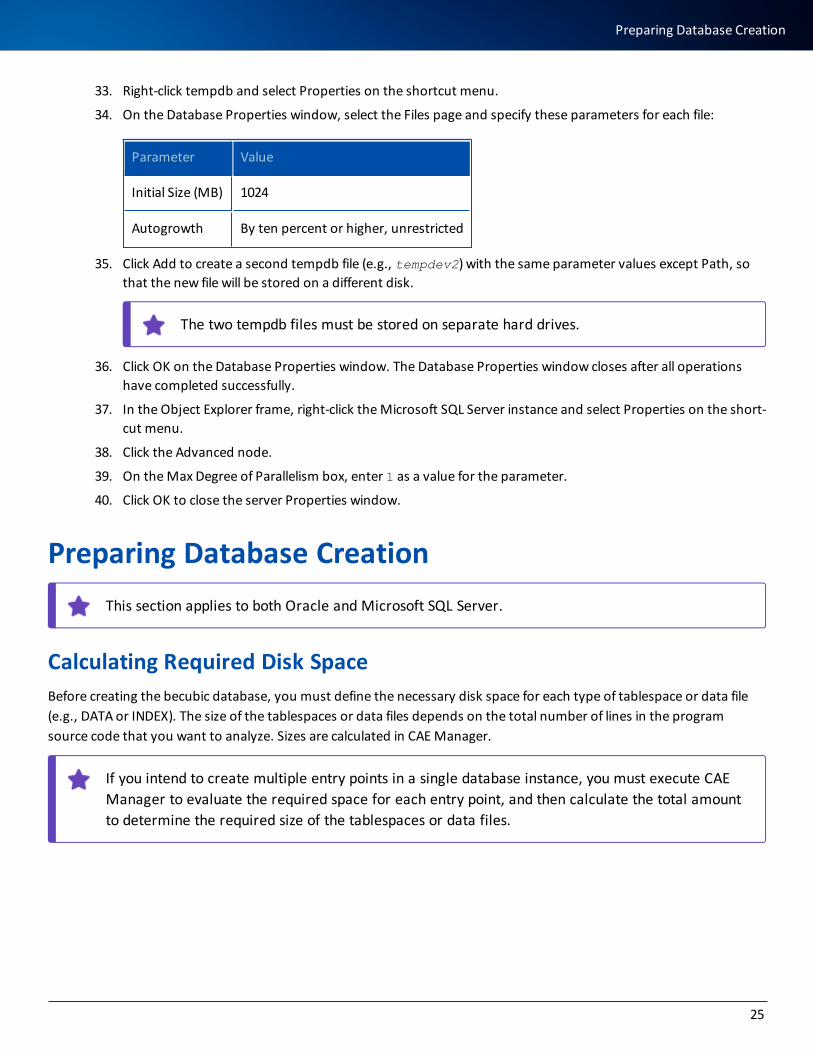
33. Right-click tempdb and select Properties on the shortcut menu.
34. On the Database Properties window, select the Files page and specify these parameters for each file:
Parameter Value
Initial Size (MB) 1024
Autogrowth By ten percent or higher, unrestricted
35. Click Add to create a second tempdb file (e.g., tempdev2) with the same parameter values except Path, so that the new file will be stored on a different disk.
The two tempdb files must be stored on separate hard drives.
36. Click OK on the Database Properties window. The Database Properties window closes after all operations have completed successfully.
37. In the Object Explorer frame, right-click the Microsoft SQL Server instance and select Properties on the short-cut menu.
38. Click the Advanced node.
39. On the Max Degree of Parallelism box, enter 1 as a value for the parameter.
40. Click OK to close the server Properties window.
Preparing Database CreationThis section applies to both Oracle and Microsoft SQL Server.
Calculating Required Disk SpaceBefore creating the becubic database, you must define the necessary disk space for each type of tablespace or data file (e.g., DATA or INDEX). The size of the tablespaces or data files depends on the total number of lines in the program source code that you want to analyze. Sizes are calculated in CAE Manager.
If you intend to create multiple entry points in a single database instance, you must execute CAE Manager to evaluate the required space for each entry point, and then calculate the total amount to determine the required size of the tablespaces or data files.
25
Preparing Database Creation
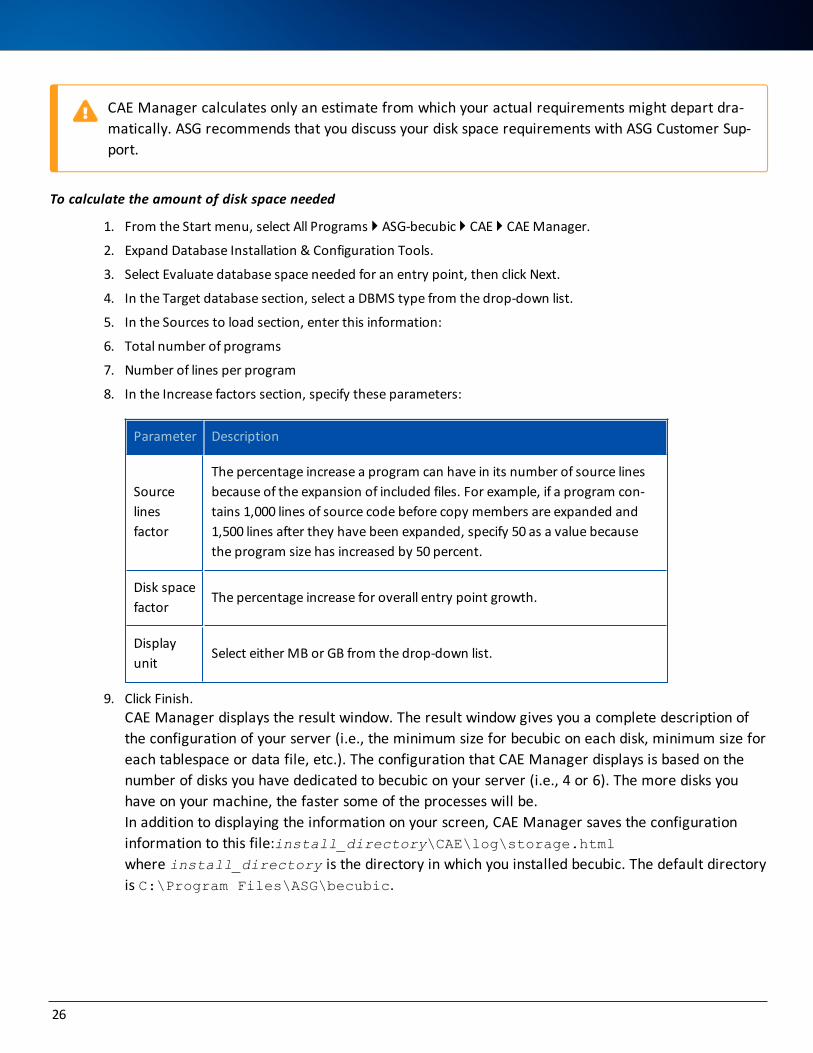
CAE Manager calculates only an estimate from which your actual requirements might depart dra-matically. ASG recommends that you discuss your disk space requirements with ASG Customer Sup-port.
To calculate the amount of disk space needed
1. From the Start menu, select All Programs } ASG-becubic } CAE } CAE Manager.
2. Expand Database Installation & Configuration Tools.
3. Select Evaluate database space needed for an entry point, then click Next.
4. In the Target database section, select a DBMS type from the drop-down list.
5. In the Sources to load section, enter this information:
6. Total number of programs
7. Number of lines per program
8. In the Increase factors section, specify these parameters:
Parameter Description
Source lines factor
The percentage increase a program can have in its number of source lines because of the expansion of included files. For example, if a program con-tains 1,000 lines of source code before copy members are expanded and 1,500 lines after they have been expanded, specify 50 as a value because the program size has increased by 50 percent.
Disk space factor
The percentage increase for overall entry point growth.
Display unit
Select either MB or GB from the drop-down list.
9. Click Finish.CAE Manager displays the result window. The result window gives you a complete description of the configuration of your server (i.e., the minimum size for becubic on each disk, minimum size for each tablespace or data file, etc.). The configuration that CAE Manager displays is based on the number of disks you have dedicated to becubic on your server (i.e., 4 or 6). The more disks you have on your machine, the faster some of the processes will be.In addition to displaying the information on your screen, CAE Manager saves the configuration information to this file:install_directory\CAE\log\storage.htmlwhere install_directory is the directory in which you installed becubic. The default directory is C:\Program Files\ASG\becubic.
26
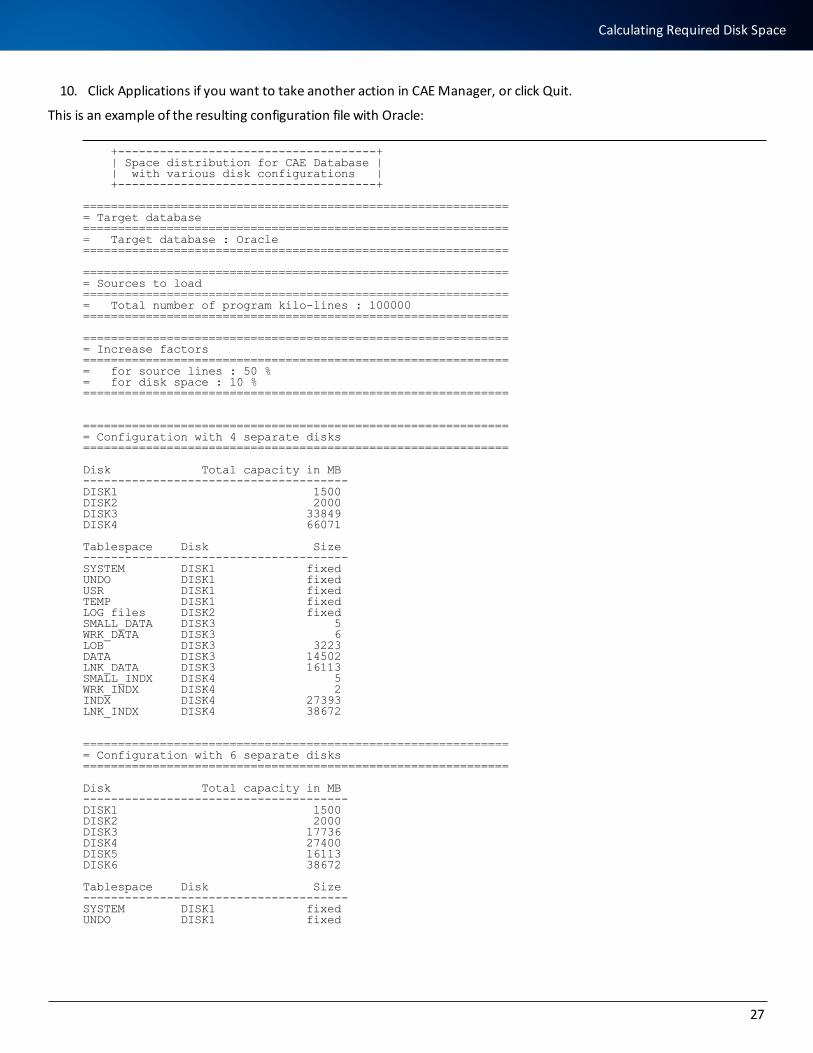
10. Click Applications if you want to take another action in CAE Manager, or click Quit.
This is an example of the resulting configuration file with Oracle:
+-------------------------------------+ | Space distribution for CAE Database | | with various disk configurations | +-------------------------------------+ ============================================================== Target database============================================================== Target database : Oracle============================================================= ============================================================== Sources to load============================================================== Total number of program kilo-lines : 100000============================================================= ============================================================== Increase factors ============================================================== for source lines : 50 %= for disk space : 10 %============================================================= ============================================================== Configuration with 4 separate disks ============================================================= Disk Total capacity in MB--------------------------------------DISK1 1500DISK2 2000DISK3 33849DISK4 66071 Tablespace Disk Size--------------------------------------SYSTEM DISK1 fixedUNDO DISK1 fixedUSR DISK1 fixedTEMP DISK1 fixedLOG files DISK2 fixed SMALL_DATA DISK3 5WRK_DATA DISK3 6LOB DISK3 3223DATA DISK3 14502LNK_DATA DISK3 16113SMALL_INDX DISK4 5WRK_INDX DISK4 2INDX DISK4 27393LNK_INDX DISK4 38672 ============================================================== Configuration with 6 separate disks ============================================================= Disk Total capacity in MB--------------------------------------DISK1 1500DISK2 2000DISK3 17736DISK4 27400DISK5 16113DISK6 38672 Tablespace Disk Size--------------------------------------SYSTEM DISK1 fixedUNDO DISK1 fixed
27
Calculating Required Disk Space
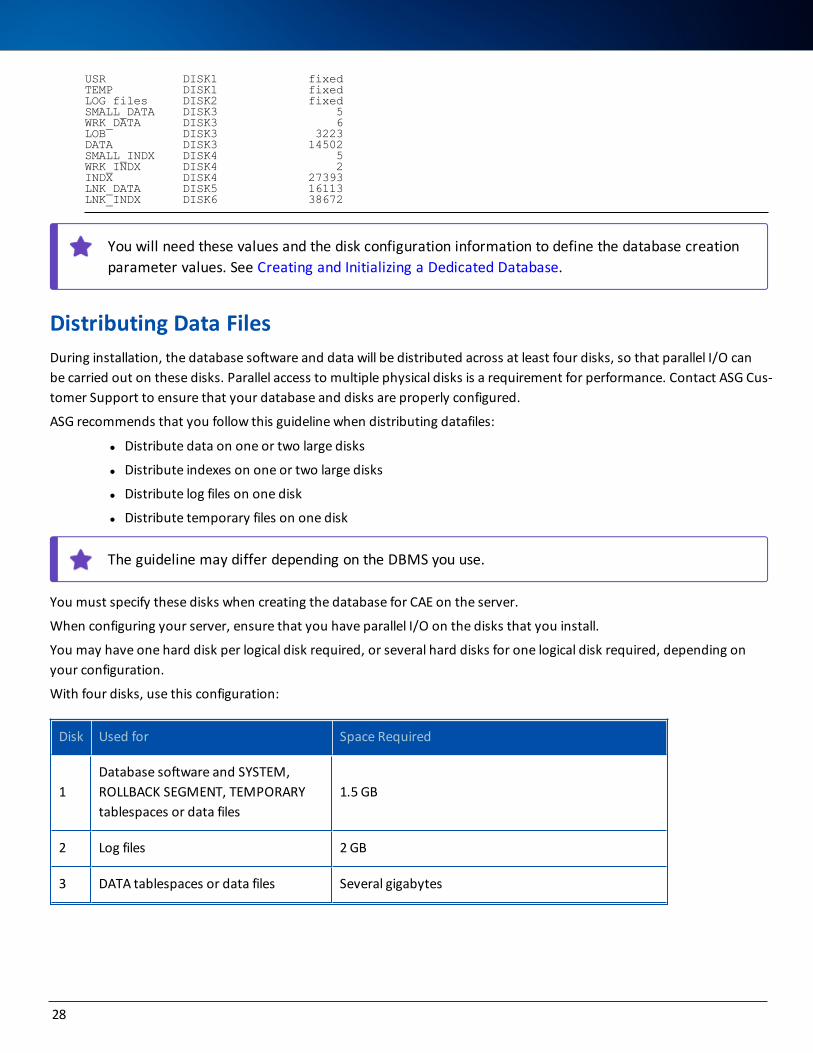
USR DISK1 fixedTEMP DISK1 fixedLOG files DISK2 fixed SMALL_DATA DISK3 5WRK_DATA DISK3 6LOB DISK3 3223DATA DISK3 14502SMALL_INDX DISK4 5WRK_INDX DISK4 2INDX DISK4 27393LNK_DATA DISK5 16113LNK_INDX DISK6 38672
You will need these values and the disk configuration information to define the database creation parameter values. See Creating and Initializing a Dedicated Database.
Distributing Data FilesDuring installation, the database software and data will be distributed across at least four disks, so that parallel I/O can be carried out on these disks. Parallel access to multiple physical disks is a requirement for performance. Contact ASG Cus-tomer Support to ensure that your database and disks are properly configured.
ASG recommends that you follow this guideline when distributing datafiles:
l Distribute data on one or two large disks
l Distribute indexes on one or two large disks
l Distribute log files on one disk
l Distribute temporary files on one disk
The guideline may differ depending on the DBMS you use.
You must specify these disks when creating the database for CAE on the server.
When configuring your server, ensure that you have parallel I/O on the disks that you install.
You may have one hard disk per logical disk required, or several hard disks for one logical disk required, depending on your configuration.
With four disks, use this configuration:
Disk Used for Space Required
1Database software and SYSTEM, ROLLBACK SEGMENT, TEMPORARY tablespaces or data files
1.5 GB
2 Log files 2 GB
3 DATA tablespaces or data files Several gigabytes
28
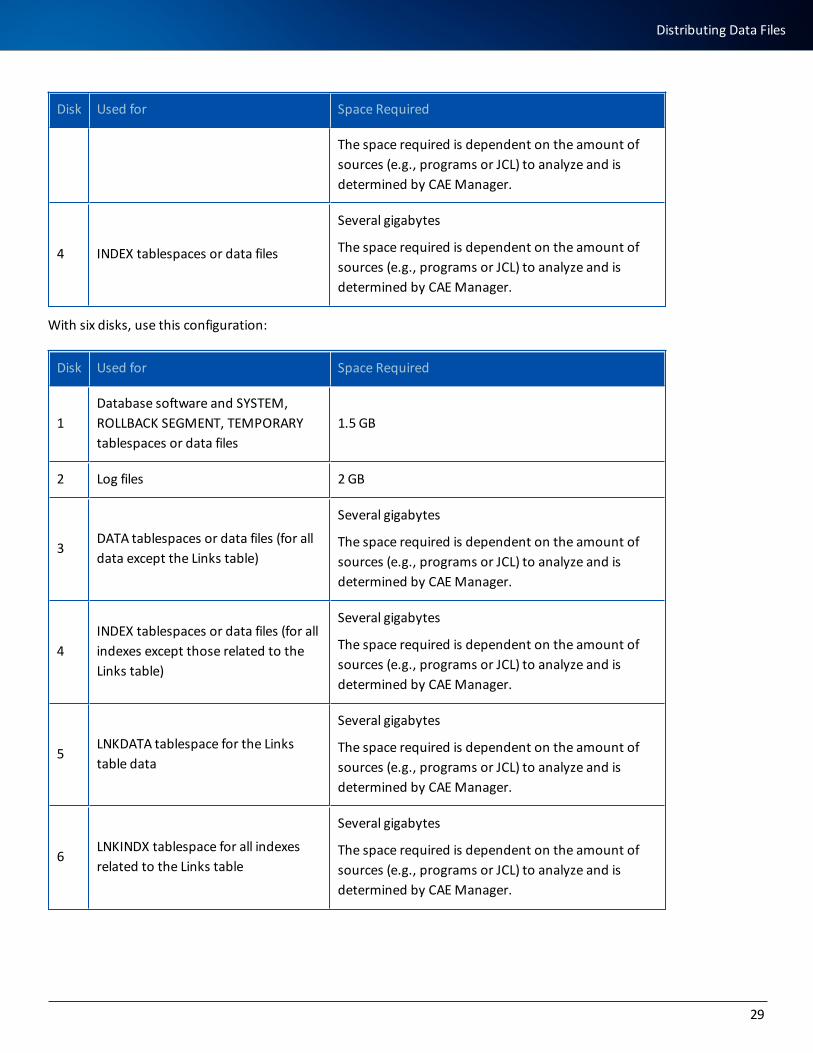
Disk Used for Space Required
The space required is dependent on the amount of sources (e.g., programs or JCL) to analyze and is determined by CAE Manager.
4 INDEX tablespaces or data files
Several gigabytes
The space required is dependent on the amount of sources (e.g., programs or JCL) to analyze and is determined by CAE Manager.
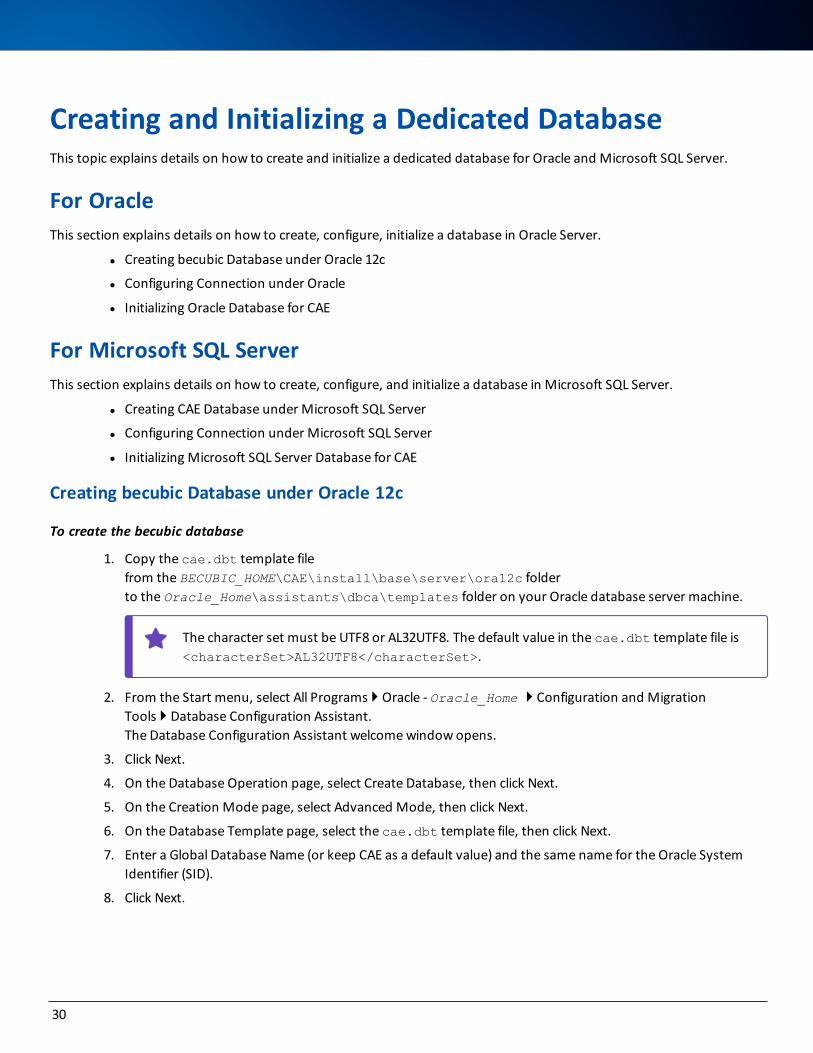
With six disks, use this configuration:
Disk Used for Space Required
1Database software and SYSTEM, ROLLBACK SEGMENT, TEMPORARY tablespaces or data files
1.5 GB
2 Log files 2 GB
3DATA tablespaces or data files (for all data except the Links table)
Several gigabytes
The space required is dependent on the amount of sources (e.g., programs or JCL) to analyze and is determined by CAE Manager.
4INDEX tablespaces or data files (for all indexes except those related to the Links table)
Several gigabytes
The space required is dependent on the amount of sources (e.g., programs or JCL) to analyze and is determined by CAE Manager.
5 LNKDATA tablespace for the Links table data
Several gigabytes
The space required is dependent on the amount of sources (e.g., programs or JCL) to analyze and is determined by CAE Manager.
6LNKINDX tablespace for all indexes related to the Links table
Several gigabytes
The space required is dependent on the amount of sources (e.g., programs or JCL) to analyze and is determined by CAE Manager.
29
Distributing Data Files
Creating and Initializing a Dedicated DatabaseThis topic explains details on how to create and initialize a dedicated database for Oracle and Microsoft SQL Server.
For OracleThis section explains details on how to create, configure, initialize a database in Oracle Server.
l Creating becubic Database under Oracle 12c
l Configuring Connection under Oracle
l Initializing Oracle Database for CAE
For Microsoft SQL ServerThis section explains details on how to create, configure, and initialize a database in Microsoft SQL Server.
l Creating CAE Database under Microsoft SQL Server
l Configuring Connection under Microsoft SQL Server
l Initializing Microsoft SQL Server Database for CAE
Creating becubic Database under Oracle 12c
To create the becubic database
1. Copy the cae.dbt template filefrom the BECUBIC_HOME\CAE\install\base\server\ora12c folder to the Oracle_Home\assistants\dbca\templates folder on your Oracle database server machine.
The character set must be UTF8 or AL32UTF8. The default value in the cae.dbt template file is <characterSet>AL32UTF8</characterSet>.
2. From the Start menu, select All Programs } Oracle - Oracle_Home } Configuration and Migration Tools } Database Configuration Assistant. The Database Configuration Assistant welcome window opens.
3. Click Next.
4. On the Database Operation page, select Create Database, then click Next.
5. On the Creation Mode page, select Advanced Mode, then click Next.
6. On the Database Template page, select the cae.dbt template file, then click Next.
7. Enter a Global Database Name (or keep CAE as a default value) and the same name for the Oracle System Identifier (SID).
8. Click Next.
30
9. Keep the default values on the Management Options window, then click Next.
10. On the Database Credentials window, define passwords as required.
11. Optional. If you want to avoid being prompted for multiple SYSTEM user passwords while you are busy cre-ating the database, click the Use the Same Administrative Password for All Accounts option button and define a single simple password. You will define multiple complex passwords after you complete all your tasks. For now, simply click Yes when the Database Configuration Assistant warns you that your password is not secure and asks whether you want to continue.
12. Click Next.
13. On the Network Configuration page, select the listener created previously (i.e., LISTENER on port 1521), then click Next.
14. On the Storage Locations window, keep the default values, then click File Location Variables.
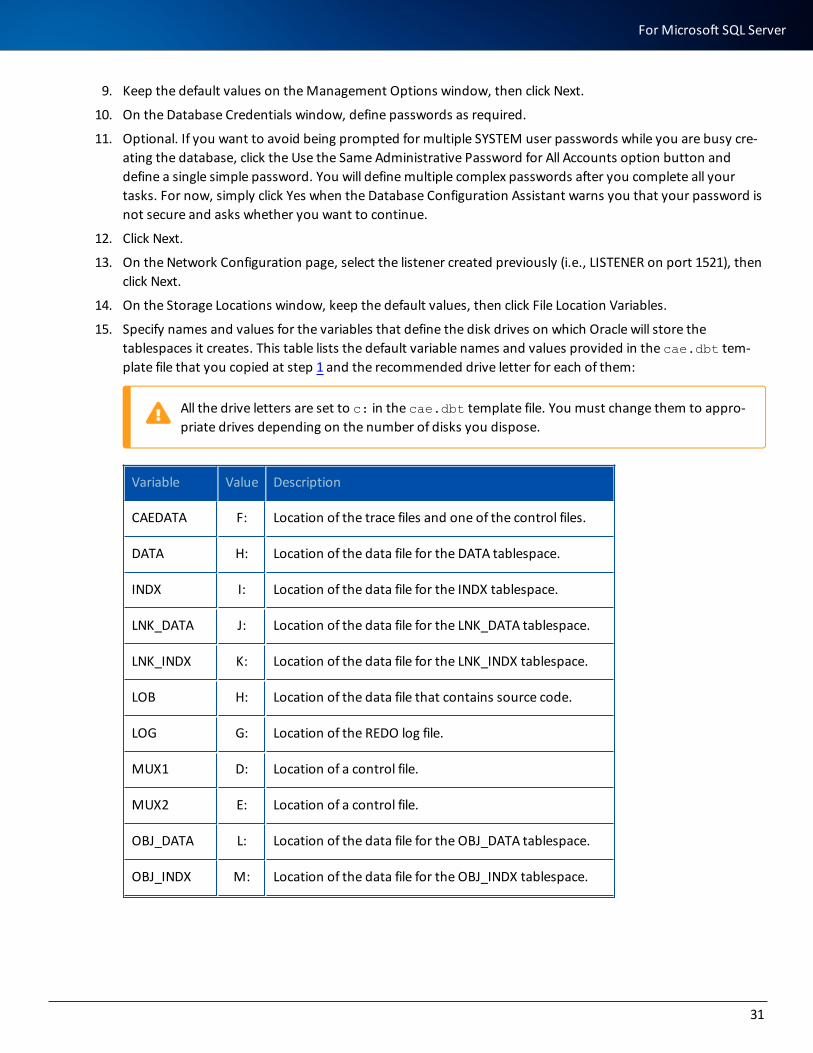
15. Specify names and values for the variables that define the disk drives on which Oracle will store the tablespaces it creates. This table lists the default variable names and values provided in the cae.dbt tem-plate file that you copied at step 1 and the recommended drive letter for each of them:
All the drive letters are set to c: in the cae.dbt template file. You must change them to appro-priate drives depending on the number of disks you dispose.
Variable Value Description
CAEDATA F: Location of the trace files and one of the control files.
DATA H: Location of the data file for the DATA tablespace.
INDX I: Location of the data file for the INDX tablespace.
LNK_DATA J: Location of the data file for the LNK_DATA tablespace.
LNK_INDX K: Location of the data file for the LNK_INDX tablespace.
LOB H: Location of the data file that contains source code.
LOG G: Location of the REDO log file.
MUX1 D: Location of a control file.
MUX2 E: Location of a control file.
OBJ_DATA L: Location of the data file for the OBJ_DATA tablespace.
OBJ_INDX M: Location of the data file for the OBJ_INDX tablespace.
31
For Microsoft SQL Server
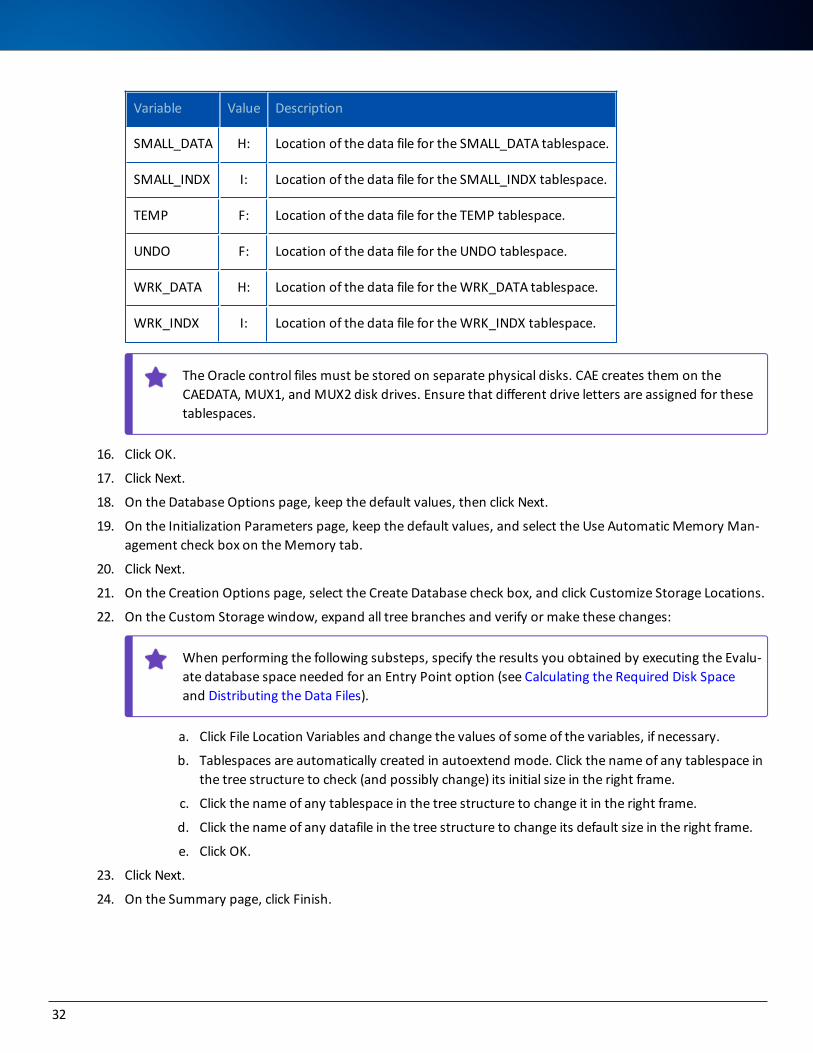
Variable Value Description
SMALL_DATA H: Location of the data file for the SMALL_DATA tablespace.
SMALL_INDX I: Location of the data file for the SMALL_INDX tablespace.
TEMP F: Location of the data file for the TEMP tablespace.
UNDO F: Location of the data file for the UNDO tablespace.
WRK_DATA H: Location of the data file for the WRK_DATA tablespace.
WRK_INDX I: Location of the data file for the WRK_INDX tablespace.
The Oracle control files must be stored on separate physical disks. CAE creates them on the CAEDATA, MUX1, and MUX2 disk drives. Ensure that different drive letters are assigned for these tablespaces.
16. Click OK.
17. Click Next.
18. On the Database Options page, keep the default values, then click Next.
19. On the Initialization Parameters page, keep the default values, and select the Use Automatic Memory Man-agement check box on the Memory tab.
20. Click Next.
21. On the Creation Options page, select the Create Database check box, and click Customize Storage Locations.
22. On the Custom Storage window, expand all tree branches and verify or make these changes:
When performing the following substeps, specify the results you obtained by executing the Evalu-ate database space needed for an Entry Point option (see Calculating the Required Disk Space and Distributing the Data Files).
a. Click File Location Variables and change the values of some of the variables, if necessary.
b. Tablespaces are automatically created in autoextend mode. Click the name of any tablespace in the tree structure to check (and possibly change) its initial size in the right frame.
c. Click the name of any tablespace in the tree structure to change it in the right frame.
d. Click the name of any datafile in the tree structure to change its default size in the right frame.
e. Click OK.
23. Click Next.
24. On the Summary page, click Finish.
32
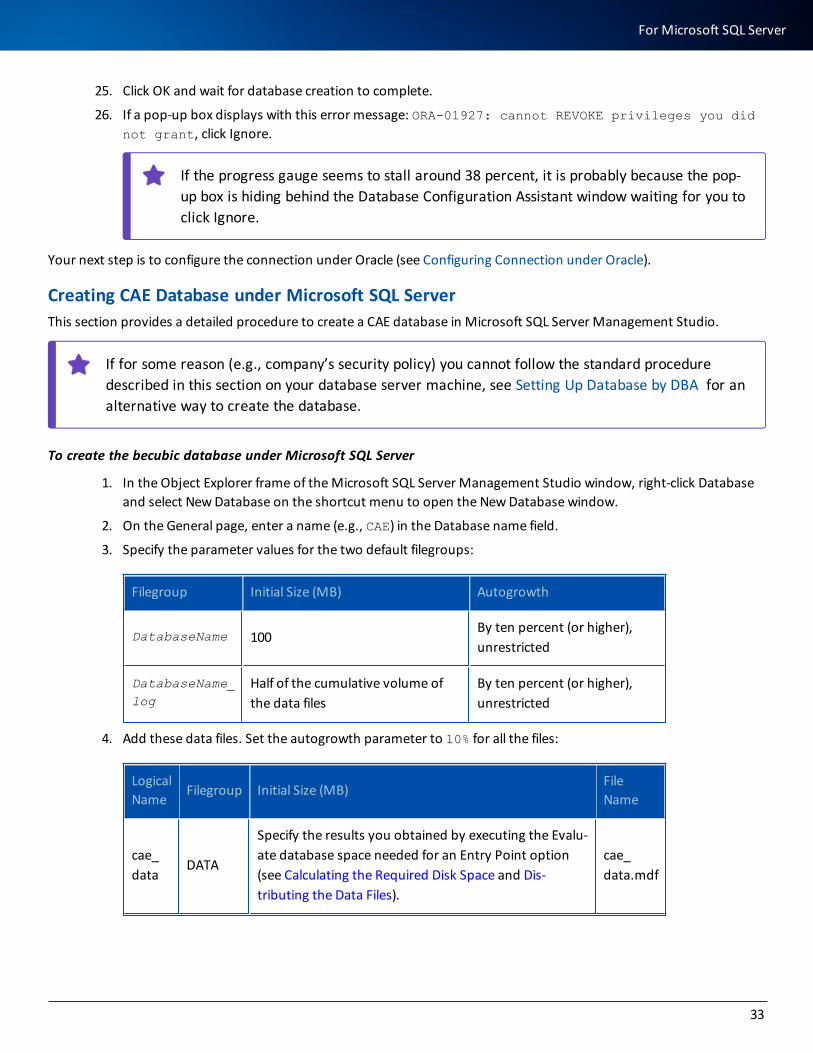
25. Click OK and wait for database creation to complete.
26. If a pop-up box displays with this error message: ORA-01927: cannot REVOKE privileges you did not grant, click Ignore.
If the progress gauge seems to stall around 38 percent, it is probably because the pop-up box is hiding behind the Database Configuration Assistant window waiting for you to click Ignore.
Your next step is to configure the connection under Oracle (see Configuring Connection under Oracle).
Creating CAE Database under Microsoft SQL ServerThis section provides a detailed procedure to create a CAE database in Microsoft SQL Server Management Studio.
If for some reason (e.g., company’s security policy) you cannot follow the standard procedure described in this section on your database server machine, see Setting Up Database by DBA for an alternative way to create the database.
To create the becubic database under Microsoft SQL Server
1. In the Object Explorer frame of the Microsoft SQL Server Management Studio window, right-click Database and select New Database on the shortcut menu to open the New Database window.
2. On the General page, enter a name (e.g., CAE) in the Database name field.
3. Specify the parameter values for the two default filegroups:
Filegroup Initial Size (MB) Autogrowth
DatabaseName 100By ten percent (or higher), unrestricted
DatabaseName_log
Half of the cumulative volume of the data files
By ten percent (or higher), unrestricted
4. Add these data files. Set the autogrowth parameter to 10% for all the files:
Logical Name
Filegroup Initial Size (MB)File Name
cae_data
DATA
Specify the results you obtained by executing the Evalu-ate database space needed for an Entry Point option (see Calculating the Required Disk Space and Dis-tributing the Data Files).
cae_data.mdf
33
For Microsoft SQL Server
Logical Name
Filegroup Initial Size (MB)File Name
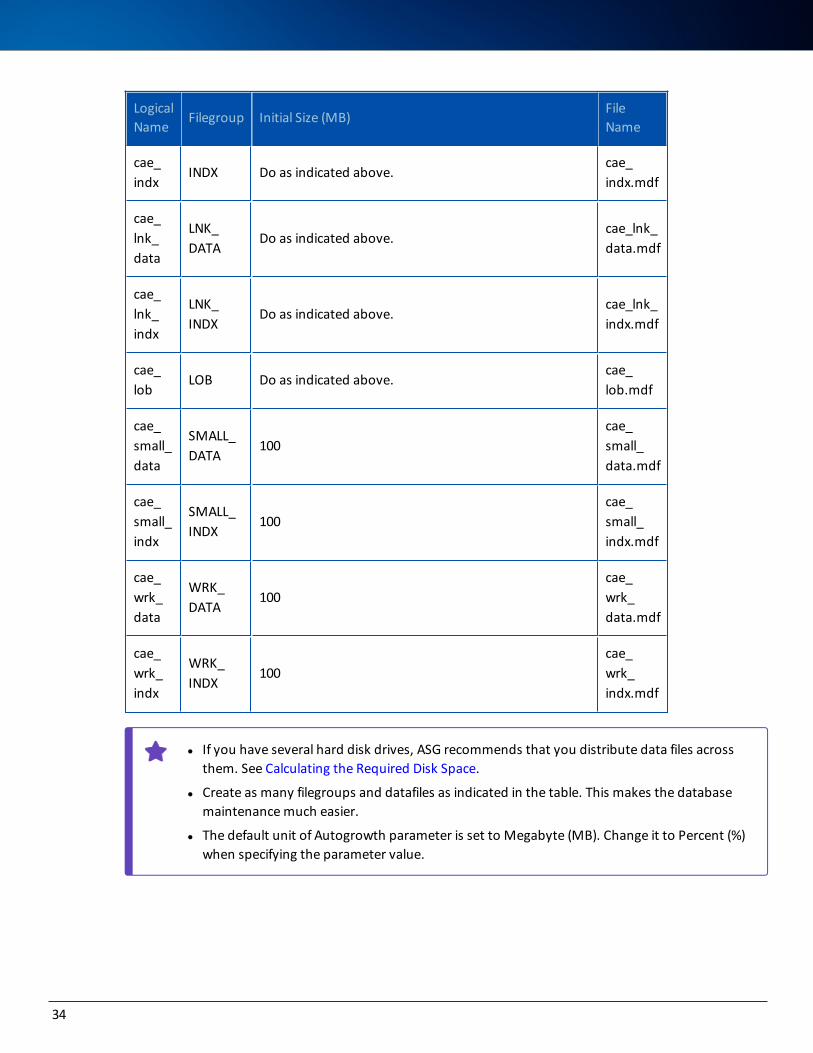
cae_indx
INDX Do as indicated above.cae_indx.mdf
cae_lnk_data
LNK_DATA
Do as indicated above.cae_lnk_data.mdf
cae_lnk_indx
LNK_INDX
Do as indicated above.cae_lnk_indx.mdf
cae_lob
LOB Do as indicated above.cae_lob.mdf
cae_small_data
SMALL_DATA
100cae_small_data.mdf
cae_small_indx
SMALL_INDX
100cae_small_indx.mdf
cae_wrk_data
WRK_DATA
100cae_wrk_data.mdf
cae_wrk_indx
WRK_INDX
100cae_wrk_indx.mdf
l If you have several hard disk drives, ASG recommends that you distribute data files across them. See Calculating the Required Disk Space.
l Create as many filegroups and datafiles as indicated in the table. This makes the database maintenance much easier.
l The default unit of Autogrowth parameter is set to Megabyte (MB). Change it to Percent (%) when specifying the parameter value.
34
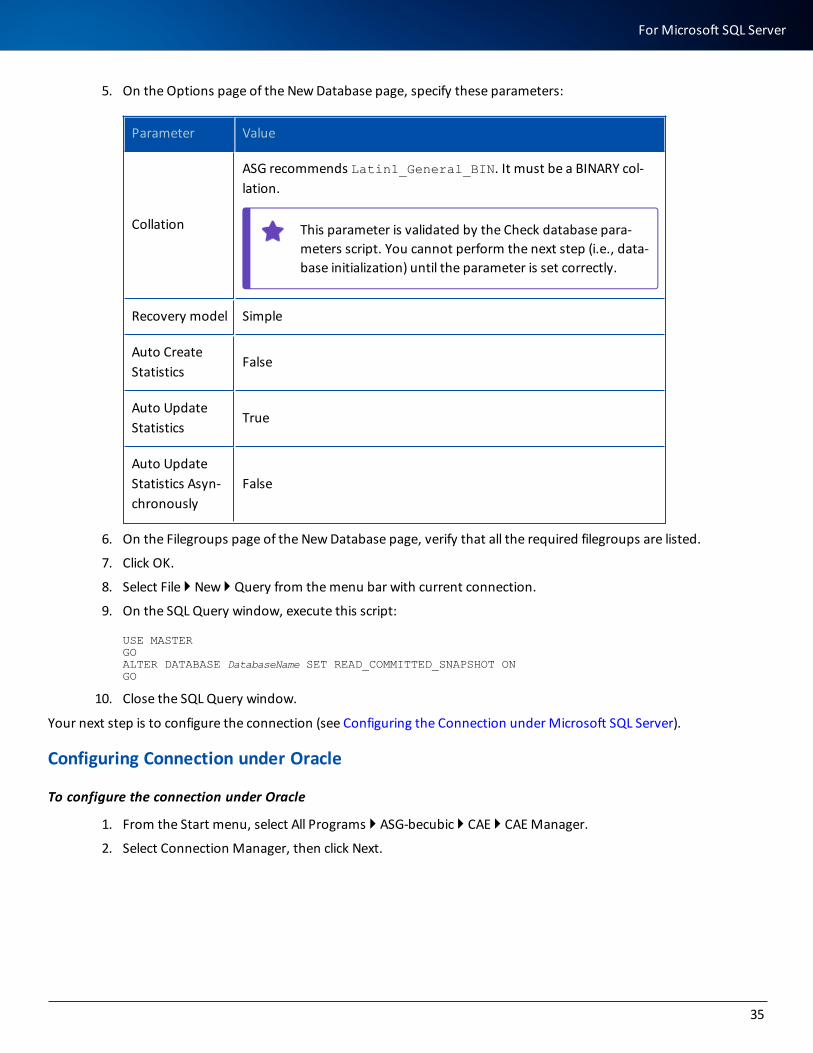
5. On the Options page of the New Database page, specify these parameters:
Parameter Value
Collation
ASG recommends Latin1_General_BIN. It must be a BINARY col-lation.
This parameter is validated by the Check database para-meters script. You cannot perform the next step (i.e., data-base initialization) until the parameter is set correctly.
Recovery model Simple
Auto Create Statistics
False
Auto Update Statistics
True
Auto Update Statistics Asyn-chronously
False
6. On the Filegroups page of the New Database page, verify that all the required filegroups are listed.
7. Click OK.
8. Select File } New } Query from the menu bar with current connection.
9. On the SQL Query window, execute this script:
USE MASTERGOALTER DATABASE DatabaseName SET READ_COMMITTED_SNAPSHOT ONGO
10. Close the SQL Query window.
Your next step is to configure the connection (see Configuring the Connection under Microsoft SQL Server).
Configuring Connection under Oracle
To configure the connection under Oracle
1. From the Start menu, select All Programs } ASG-becubic } CAE } CAE Manager.
2. Select Connection Manager, then click Next.
35
For Microsoft SQL Server
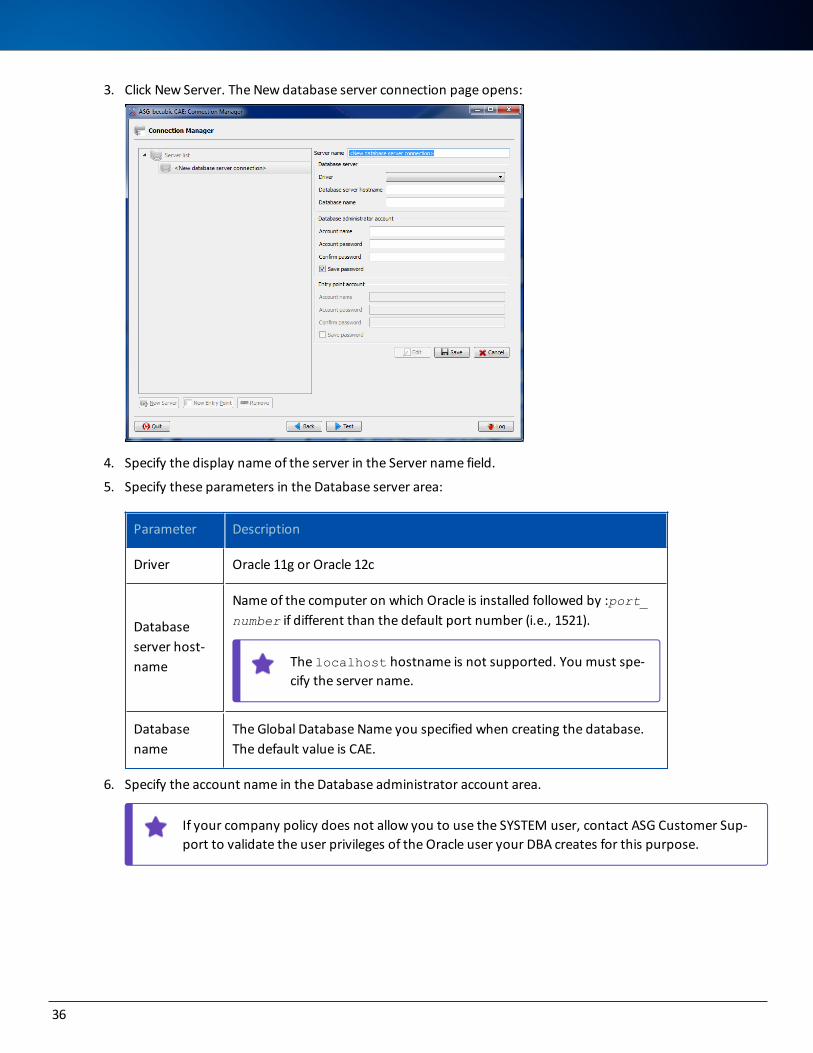
3. Click New Server. The New database server connection page opens:
4. Specify the display name of the server in the Server name field.
5. Specify these parameters in the Database server area:
Parameter Description
Driver Oracle 11g or Oracle 12c
Database server host-name
Name of the computer on which Oracle is installed followed by :port_number if different than the default port number (i.e., 1521).
The localhost hostname is not supported. You must spe-cify the server name.
Database name
The Global Database Name you specified when creating the database. The default value is CAE.
6. Specify the account name in the Database administrator account area.
If your company policy does not allow you to use the SYSTEM user, contact ASG Customer Sup-port to validate the user privileges of the Oracle user your DBA creates for this purpose.
36
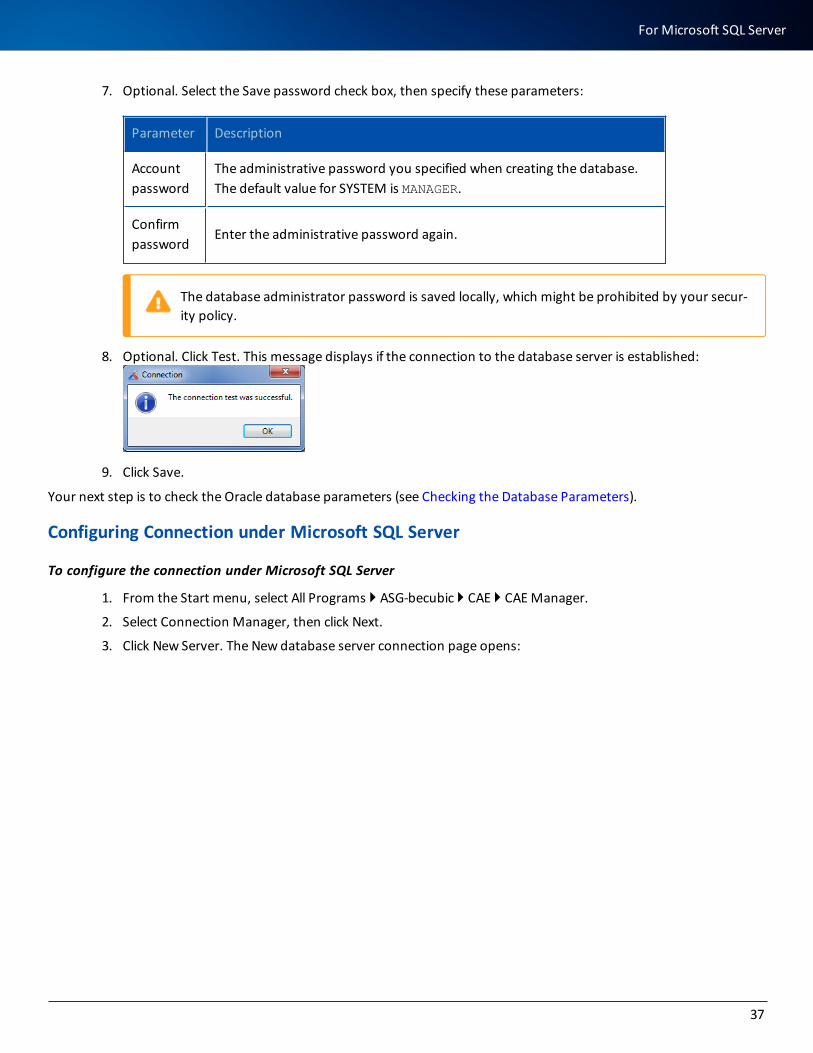
7. Optional. Select the Save password check box, then specify these parameters:
Parameter Description
Account password
The administrative password you specified when creating the database. The default value for SYSTEM is MANAGER.
Confirm password
Enter the administrative password again.
The database administrator password is saved locally, which might be prohibited by your secur-ity policy.
8. Optional. Click Test. This message displays if the connection to the database server is established:
9. Click Save.
Your next step is to check the Oracle database parameters (see Checking the Database Parameters).
Configuring Connection under Microsoft SQL Server
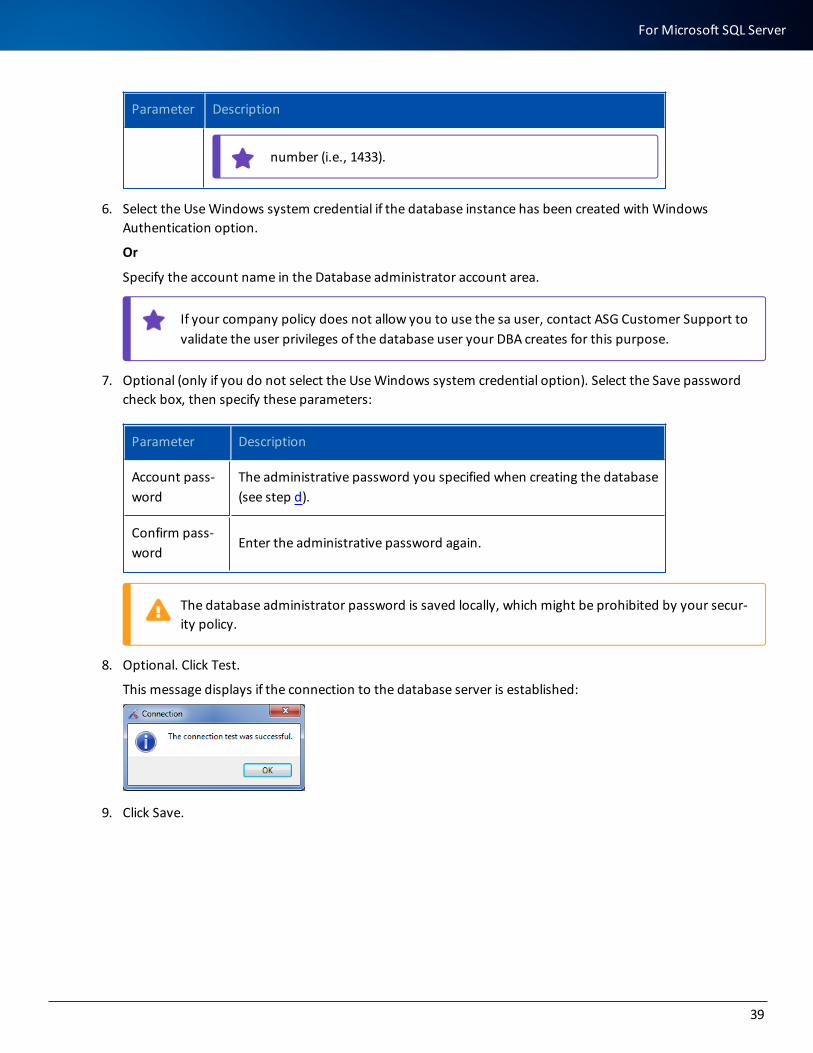
To configure the connection under Microsoft SQL Server
1. From the Start menu, select All Programs } ASG-becubic } CAE } CAE Manager.
2. Select Connection Manager, then click Next.
3. Click New Server. The New database server connection page opens:
37
For Microsoft SQL Server
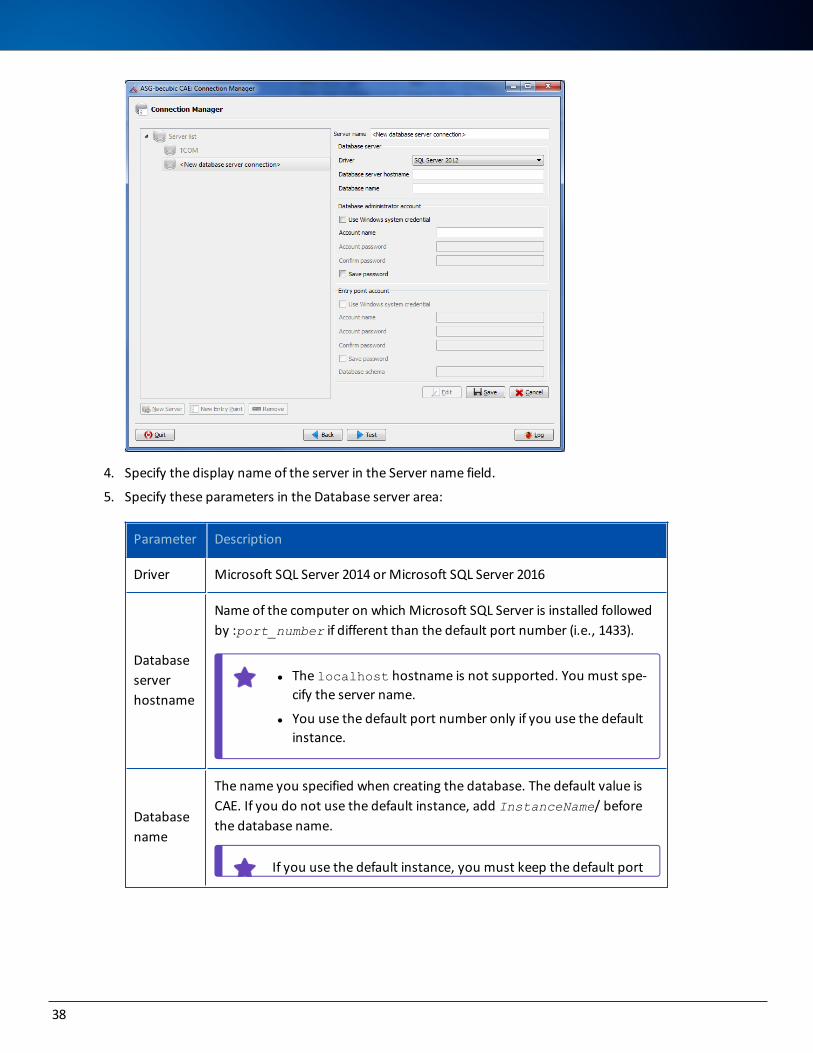
4. Specify the display name of the server in the Server name field.
5. Specify these parameters in the Database server area:
Parameter Description
Driver Microsoft SQL Server 2014 or Microsoft SQL Server 2016
Database server hostname
Name of the computer on which Microsoft SQL Server is installed followed by :port_number if different than the default port number (i.e., 1433).
l The localhost hostname is not supported. You must spe-cify the server name.
l You use the default port number only if you use the default instance.
Database name
The name you specified when creating the database. The default value is CAE. If you do not use the default instance, add InstanceName/ before the database name.
If you use the default instance, you must keep the default port
38
Parameter Description
number (i.e., 1433).
6. Select the Use Windows system credential if the database instance has been created with Windows Authentication option.
Or
Specify the account name in the Database administrator account area.
If your company policy does not allow you to use the sa user, contact ASG Customer Support to validate the user privileges of the database user your DBA creates for this purpose.
7. Optional (only if you do not select the Use Windows system credential option). Select the Save password check box, then specify these parameters:
Parameter Description
Account pass-word
The administrative password you specified when creating the database (see step d).
Confirm pass-word
Enter the administrative password again.
The database administrator password is saved locally, which might be prohibited by your secur-ity policy.
8. Optional. Click Test.
This message displays if the connection to the database server is established:
9. Click Save.
39
For Microsoft SQL Server
Checking Database Parameters
To check the database parameters
1. From the Start menu, select All Programs } ASG-becubic } CAE } CAE Manager.
2. Expand Database Installation & Configuration Tools.
3. Select Check database parameters, then click Next.
Or
Double-click Check database parameters.
4. The connection you have defined already is selected (see Configuring Connection under Oracle or Con-figuring Connection under Microsoft SQL Server). Click Next to launch parameter validation.
The Result tab displays a summary of validation. All database parameters are listed on the Messages tab.
5. Review the status of each database parameter in the generated log file.
If there are any invalid parameters (i.e., if the Result tab displays one or more lines without the word Success at the end), contact ASG Customer Support for assistance and send them the gen-erated log file. Any status other than Success either prevents you from proceeding or severely impacts performance. You cannot perform database initialization until all the parameters are cor-rect.
Your next step is to initialize the database (see Initializing the Oracle Database for CAE or Initializing the Microsoft SQL Server Database for CAE).
Initializing the DatabaseThis section describes how to initialize your database to host becubic repository and CAE entry points by using CAE Man-ager.
If the database security policy of your company requires the DBA to control the scripts (SQL com-mands) that are executed during the database initialization, use the Generate DBA scripts for CAE option instead of Initialize database for CAE. Contact Customer Support and refer to the ASG-CAE (Common Analysis Engine) System Administrator’s Guide for details.
Initializing the Oracle Database for CAE
To initialize the Oracle database for CAE
1. Launch CAE Manager: From the Start menu, select All Programs } ASG-becubic } CAE } CAE Manager.
2. In the left frame, expand Database Installation & Configuration Tools.
40
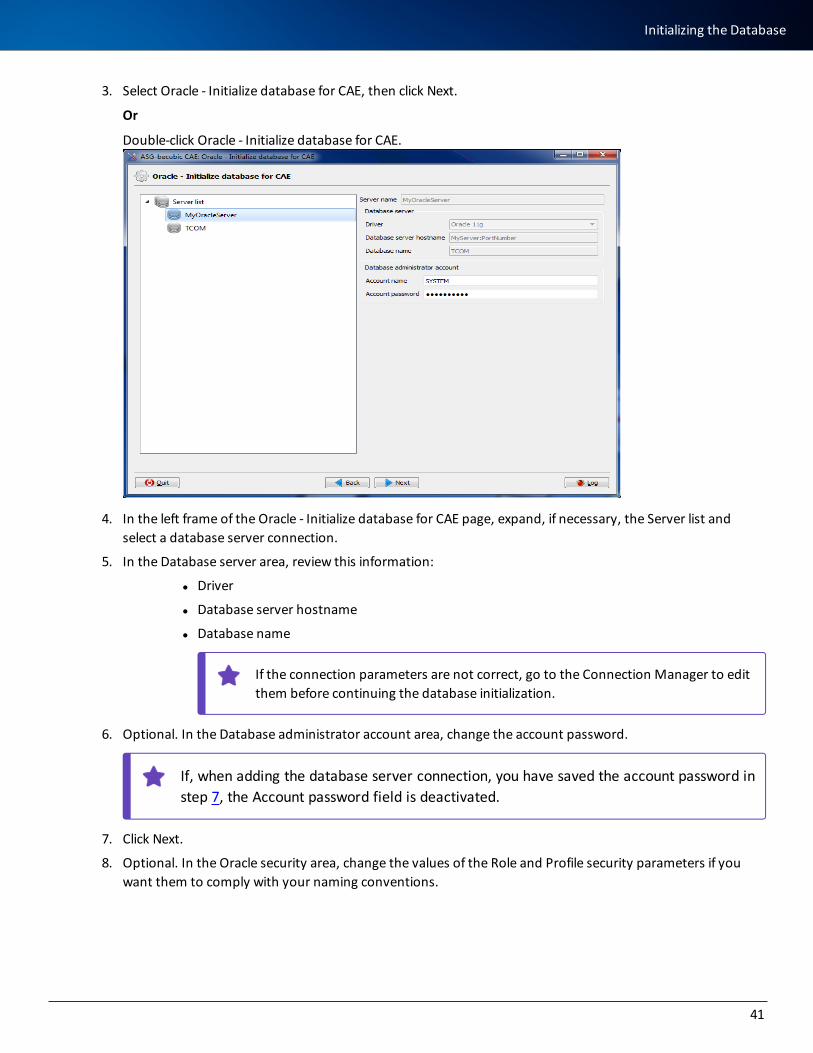
3. Select Oracle - Initialize database for CAE, then click Next.
Or
Double-click Oracle - Initialize database for CAE.
4. In the left frame of the Oracle - Initialize database for CAE page, expand, if necessary, the Server list and select a database server connection.
5. In the Database server area, review this information:
l Driver
l Database server hostname
l Database name
If the connection parameters are not correct, go to the Connection Manager to edit them before continuing the database initialization.
6. Optional. In the Database administrator account area, change the account password.
If, when adding the database server connection, you have saved the account password in step 7, the Account password field is deactivated.
7. Click Next.
8. Optional. In the Oracle security area, change the values of the Role and Profile security parameters if you want them to comply with your naming conventions.
41
Initializing the Database

l When initializing the database, CAE Manager creates these role and profile, which are asso-ciated with the entry point user at the entry point creation.
l If your DBA needs to verify the security settings of these role and profile, you must use the Oracle - Generate DBA scripts for CAE option. See the ASG-CAE (Common Analysis Engine) System Administrator’s Guide for details.
9. Verify or change the tablespaces that contain these elements for the CAE entry point(s):
l Object property tables
l Object property indexes
l Link tables
l Link indexes
l Source and file data
l Model and read-only data tables
l Model and read-only data indexes
l Temporary tables and indexes
l Internal work tables
l Internal work indexes
10. Click Run to initialize the Oracle database for CAE.
l At any time, you can click Back to return to the previous display.
l If you click Quit, CAE Manager closes.
Your next step is to add tablespaces for becubic. See Adding becubic-specific Storage Area.
Initializing the Microsoft SQL Server Database for CAE
To initialize the Microsoft SQL Server database for CAE
1. Launch CAE Manager: From the Start menu, select All Programs } ASG-becubic } CAE } CAE Manager.
2. In the left frame of the Connection Manager page, expand Database Installation & Configuration Tools.
3. Select SQL Server - Initialize database for CAE, then click Next.
Or
Double-click SQL Server - Initialize database for CAE.
42
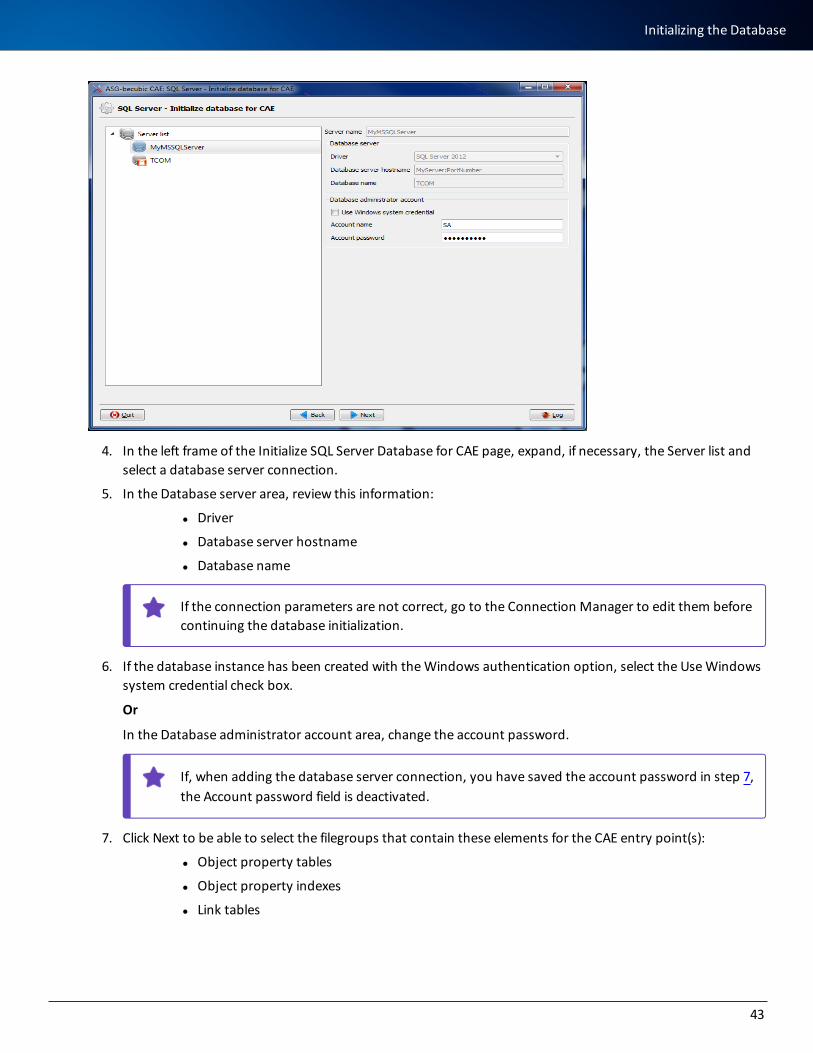
4. In the left frame of the Initialize SQL Server Database for CAE page, expand, if necessary, the Server list and select a database server connection.
5. In the Database server area, review this information:
l Driver
l Database server hostname
l Database name
If the connection parameters are not correct, go to the Connection Manager to edit them before continuing the database initialization.
6. If the database instance has been created with the Windows authentication option, select the Use Windows system credential check box.
Or
In the Database administrator account area, change the account password.
If, when adding the database server connection, you have saved the account password in step 7, the Account password field is deactivated.
7. Click Next to be able to select the filegroups that contain these elements for the CAE entry point(s):
l Object property tables
l Object property indexes
l Link tables
43
Initializing the Database
l Link indexes
l Source and file data
l Model and read-only data tables
l Model and read-only data indexes
l Temporary tables and indexes
l Internal work tables
l Internal work indexes
8. Click Run to initialize the Microsoft SQL Server database for CAE.
l At any time, you can click Back to return to the previous display.
l If you click Quit, CAE Manager closes.
Your next step is to use Model Wizard to create your repository. Model Wizard will create a specific database user for your repository and generate the required datafiles. For information about Model Wizard, see Implementing a becubic Project.
Adding becubic-specific Storage AreaYou can either share a single database schema for becubic repository and the CAE entry point or use dedicated schema for each.
If you want to share the same database schema for becubic and CAE, you can ignore this section but you must grant the CREATE TYPE privilege to the ASG_CAE_ROLE by executing this SQL command:
grant CREATE TYPE to ASG_CAE_ROLE;
If you want to have separate database schema for each, add the becubic-specific storage area as described in this section.
Oracle Tablespaces for becubic
l If tablespaces already exist for becubic, you do not have to add any.
l When running Model Wizard with the database setup option, you will need to specify the password for the system user. The system user is SYSTEM under Oracle (see Implementing a becubic Project).
l The Oracle SYSTEM user corresponds to the SYSTEM tablespace described in this section.
l The repository user (a database user) will be created during initialization of the repository by Model Wiz-ard.
44
Required ParametersWithin the Oracle Enterprise Manager console, or by executing SQL scripts, you must add Oracle tablespaces for becubic by specifying the parameters that are described in this section.
When creating the tablespaces, you need to specify sizes that match the volume of the source files to be processed. You can contact ASG Customer Support for assistance.
This table describes the required tablespaces:
Tablespace Description
SYSTEM
Oracle system tablespace.
This tablespace already has been created by CAE Manager. Extend it if necessary or turn on auto-extend.
SYSAUX
Oracle auxiliary system tablespace.
This tablespace already has been created by CAE Manager. Extend it if necessary or turn on auto-extend.
BECUBIC_DATA
Tablespace that stores all tables for becubic objects.
BECUBIC_INDEX
Tablespace for indexes.
You can give the BECUBIC_DATA and BECUBIC_INDEX tablespaces any names you want, but remember to enter these names in Model Wizard (see Implementing a becubic Project).
Microsoft SQL Server Filegroups for becubic
l If filegroups already exist for becubic, you do not have to add any.
l When running Model Wizard with the database setup option, you will need to specify the password for the system user. The system user is sa under Microsoft SQL Server (see Implementing a becubic Project).
45
Microsoft SQL Server Filegroups for becubic
l The repository user (a database user) will be created during initialization of the repository by Model Wiz-ard.
Required ParametersWithin the SQL Server Management Studio, or by executing SQL scripts, you must add SQL Server filegroups for becubic by specifying the parameters that are described in this section.
When creating the filegroups, you need to specify sizes that match the volume of the source files to be processed. You can contact ASG Customer Support for assistance.
This table describes the required filegroups:
Tablespace Description
BECUBIC_DATA Tablespace that stores all tables for becubic objects.
BECUBIC_INDEX Tablespace for indexes.
You can give the BECUBIC_DATA and BECUBIC_INDEX filegroups any names you want, but remember to enter these names in Model Wizard (see Implementing a becubic Project).
Next StepYour next step is to use Model Wizard to create your repository. Model Wizard will create a specific database user to define a dedicated schema. For information about Model Wizard, see Implementing a becubic Project.
Configuring an Application ServerThis section explains how to configure a becubic application server.
Deploying Server ApplicationsYou must deploy becubic server-side applications on your application server. The specific application to be deployed on each type of application server is copied onto the server machine according to the license code and setup option that you choose during the installation procedure.
For the application deployment procedure, see the documentation of your application server.
46
If you chose the Full installation option on one of the Rich Client stations, a preconfigured Apache Tomcat 7 server is installed with all becubic server-side applications ready to run.
Configuring the Connectionsbecubic Web Server exposes the repositories to the Web users and connects to the database server by means of con-nection settings contained in the connection.xml file and stored on the server.
You can configure the connections on the server in one of these ways:
l By managing the connections from a remote client machine after setting up becubic application server.
l By installing becubic on the application server machine and configuring connections in the becubic Eclipse cli-ent.
l By packaging the connection information in WAR file (see Generating WAR File with Connection Information for details).
For information about managing connections, see the ASG-becubic User’s Guide.
l The server name will display as the repository name in the Logon frame of becubic Web.
l In becubic Web, the domain and repository of the default connection are preselected in the Logon frame.
l You must communicate the server name to the becubic Eclipse client users who wish to define their con-nections through the Web option. See the ASG-becubic User’s Guide.
Setting Up Apache Tomcat ServerThis section describes how to configure a Tomcat server for becubic assuming that you have installed and configured Tomcat correctly.
See Hardware and Software Configurations for information on compatible Tomcat versions.
You must customize the memory allocation parameters for Tomcat as described in Customizing Memory Allocation Parameters.
l If you chose the Full installation option on one of the Rich Client stations, a preconfigured Apache Tomcat 7 server is installed with all becubic server-side applications ready to run.
l If you anticipate having more than 25 concurrent becubic Web Client users, ASG recommends that you deploy multiple instances of the becubic Application Server (i.e., one instance per server machine) and use an HTTP load balancer to dispatch becubic Web Client requests to instances. See Implementing Load Balancing.
47
Configuring the Connections
Configuring Apache Tomcat ServerTo configure your Tomcat server and deploy the becubic applications on it, perform the actions described in this section in this order.
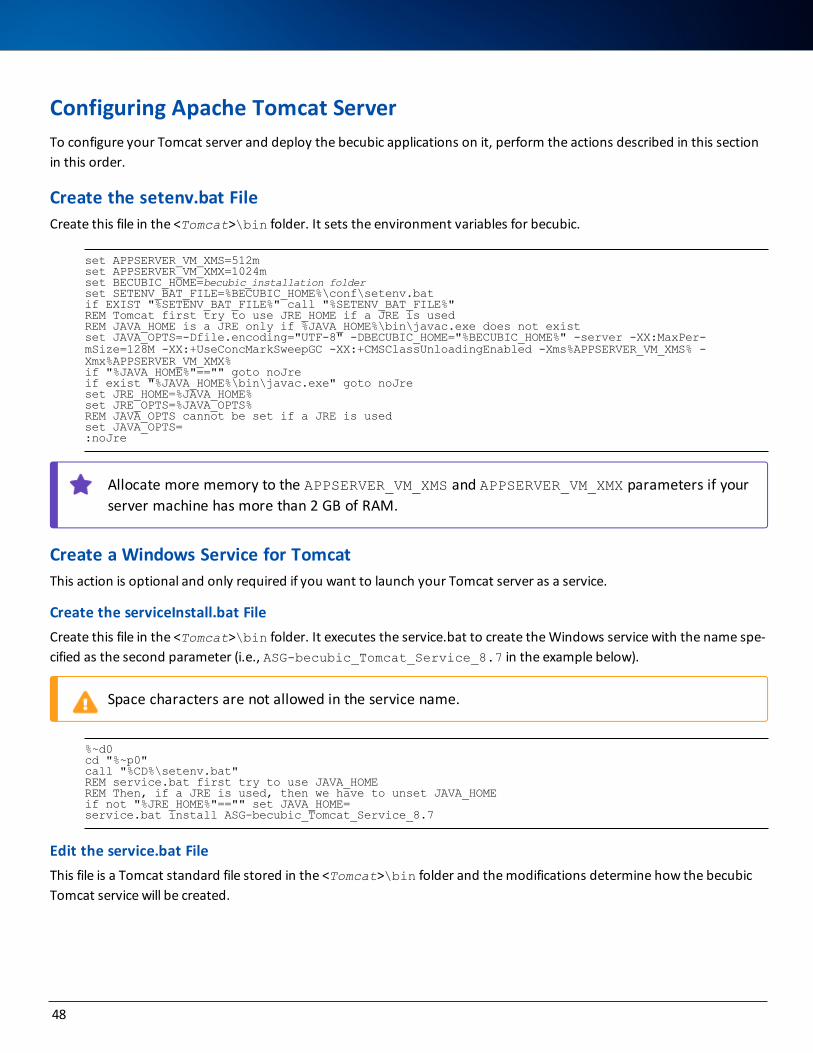
Create the setenv.bat FileCreate this file in the <Tomcat>\bin folder. It sets the environment variables for becubic.
set APPSERVER_VM_XMS=512mset APPSERVER_VM_XMX=1024mset BECUBIC_HOME=becubic_installation folderset SETENV_BAT_FILE=%BECUBIC_HOME%\conf\setenv.batif EXIST "%SETENV_BAT_FILE%" call "%SETENV_BAT_FILE%"REM Tomcat first try to use JRE_HOME if a JRE is usedREM JAVA_HOME is a JRE only if %JAVA_HOME%\bin\javac.exe does not existset JAVA_OPTS=-Dfile.encoding="UTF-8" -DBECUBIC_HOME="%BECUBIC_HOME%" -server -XX:MaxPer-mSize=128M -XX:+UseConcMarkSweepGC -XX:+CMSClassUnloadingEnabled -Xms%APPSERVER_VM_XMS% -Xmx%APPSERVER_VM_XMX%if "%JAVA_HOME%"=="" goto noJreif exist "%JAVA_HOME%\bin\javac.exe" goto noJreset JRE_HOME=%JAVA_HOME%set JRE_OPTS=%JAVA_OPTS%REM JAVA_OPTS cannot be set if a JRE is usedset JAVA_OPTS=:noJre
Allocate more memory to the APPSERVER_VM_XMS and APPSERVER_VM_XMX parameters if your server machine has more than 2 GB of RAM.
Create a Windows Service for TomcatThis action is optional and only required if you want to launch your Tomcat server as a service.
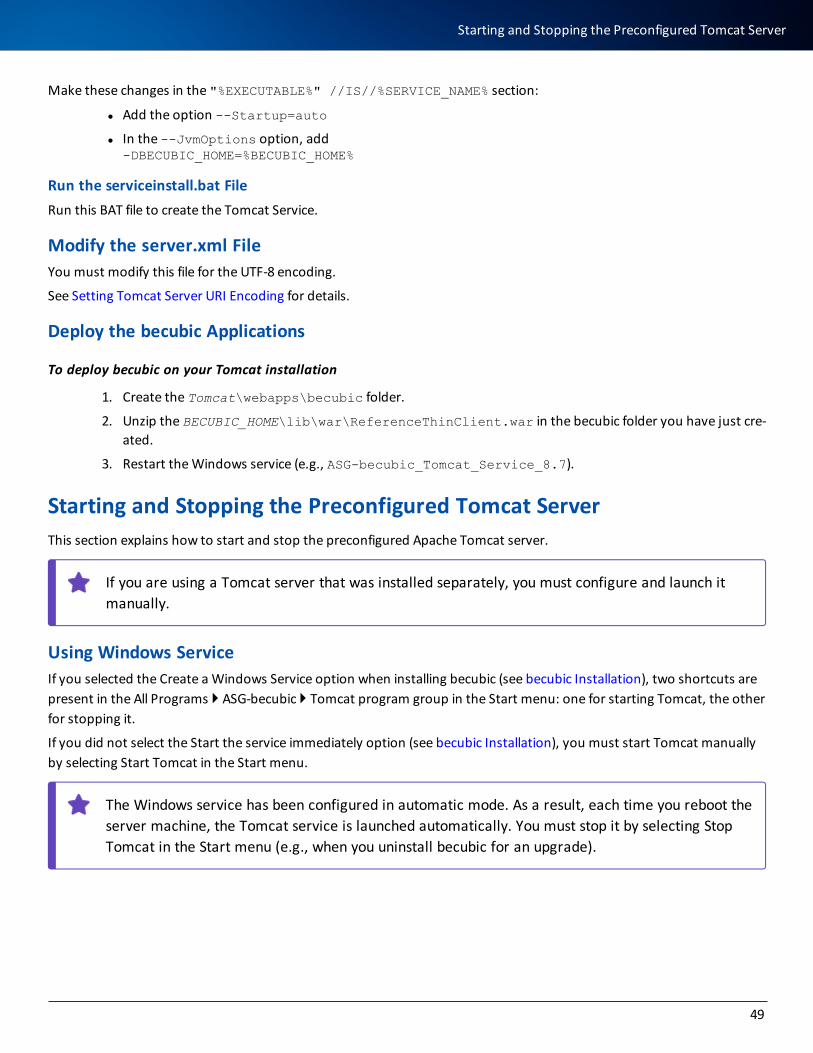
Create the serviceInstall.bat FileCreate this file in the <Tomcat>\bin folder. It executes the service.bat to create the Windows service with the name spe-cified as the second parameter (i.e., ASG-becubic_Tomcat_Service_8.7 in the example below).
Space characters are not allowed in the service name.
%~d0cd "%~p0"call "%CD%\setenv.bat"REM service.bat first try to use JAVA_HOMEREM Then, if a JRE is used, then we have to unset JAVA_HOMEif not "%JRE_HOME%"=="" set JAVA_HOME=service.bat install ASG-becubic_Tomcat_Service_8.7
Edit the service.bat FileThis file is a Tomcat standard file stored in the <Tomcat>\bin folder and the modifications determine how the becubic Tomcat service will be created.
48
Make these changes in the "%EXECUTABLE%" //IS//%SERVICE_NAME% section:
l Add the option --Startup=auto
l In the --JvmOptions option, add-DBECUBIC_HOME=%BECUBIC_HOME%
Run the serviceinstall.bat FileRun this BAT file to create the Tomcat Service.
Modify the server.xml FileYou must modify this file for the UTF-8 encoding.
See Setting Tomcat Server URI Encoding for details.
Deploy the becubic Applications
To deploy becubic on your Tomcat installation
1. Create the Tomcat\webapps\becubic folder.
2. Unzip the BECUBIC_HOME\lib\war\ReferenceThinClient.war in the becubic folder you have just cre-ated.
3. Restart the Windows service (e.g., ASG-becubic_Tomcat_Service_8.7).
Starting and Stopping the Preconfigured Tomcat ServerThis section explains how to start and stop the preconfigured Apache Tomcat server.
If you are using a Tomcat server that was installed separately, you must configure and launch it manually.
Using Windows ServiceIf you selected the Create a Windows Service option when installing becubic (see becubic Installation), two shortcuts are present in the All Programs } ASG-becubic } Tomcat program group in the Start menu: one for starting Tomcat, the other for stopping it.
If you did not select the Start the service immediately option (see becubic Installation), you must start Tomcat manually by selecting Start Tomcat in the Start menu.
The Windows service has been configured in automatic mode. As a result, each time you reboot the server machine, the Tomcat service is launched automatically. You must stop it by selecting Stop Tomcat in the Start menu (e.g., when you uninstall becubic for an upgrade).
49
Starting and Stopping the Preconfigured Tomcat Server
Using a BAT FileIf you did not select the Create a Windows Service option when installing becubic (see becubic Installation), the All Programs } ASG-becubic } Tomcat shortcut is present in the Start menu. This shortcut launches the Tomcat application by means of a BAT file. To stop the Tomcat application, close the corresponding command prompt window.
Setting Tomcat Server URI EncodingUnless you use the preconfigured Tomcat server, you must set the URI encoding parameter to UTF8 in the first Con-nector element in the \tomcat\conf\server.xml file of your Tomcat installation.
For example:
<Connector port="80" protocol="HTTP/1.1" connectionTimeout="20000"redirectPort="8443" URIEncoding="UTF-8" useBodyEncodingForURI="true"/>
Configuring RedirectionIf you want the http://server URL to be redirected to http://server:port/becubic, perform this procedure.
To redirect the Tomcat root URL to becubic Web
1. Edit the /webapp/ROOT/WEB-INF/web.xml file to remove any servlet mapping to the default page (e.g., with the path to /index.jsp).
2. Edit the /webapps/ROOT/WEB-INF/index.jsp to add this statement:
response.sendRedirect("http://server:port/becubic");
3. Restart Tomcat.
Setting Up WebLogic ServerThe BECUBIC_HOME environment variable, which indicates the becubic root directory, is required for becubic to run on WebLogic Server.
All becubic applications are delivered as a single WAR file (BECUBIC_HOME\lib\war\ReferenceThinClient.war) that you deploy on your application server. Install becubic with the Custom or Typical option on the application server machine or copy the required files from another installation.
In addition to deploying the WAR file, you must have an appropriate connection.xml file to ensure the connection to the repositories.
50
Setting Up WebSphere ServerThe BECUBIC_HOME environment variable, which indicates the becubic root directory, is required for becubic to run on WebSphere Server.
All becubic applications are delivered as a single WAR file (BECUBIC_HOME\lib\war\ReferenceThinClient.war) that you deploy on your application server. Install becubic with the Custom or Typical option on the application server machine or copy the required files from another installation.
In addition to deploying the WAR file, you must have an appropriate connection.xml file to ensure the connection to the repositories.
Using Ant-based Deployment
To use Ant-based deployment on WebSphere
1. After installing becubic (see becubic Installation), launch Model Wizard to create a becubic project using either an existing CAE entry point or a new one. See Creating and Initializing a CAE Entry Point.
2. Create the BECUBIC_HOME system environment variable.
3. In the BECUBIC_HOME\setup\websphere\becubic_ws.properties file, specify a value for each of these properties:
Property Value
becubic.build.dir= BECUBIC_HOME
build.root.dir= BECUBIC_HOME\setup\websphere
ws.appserver.dir= WAS_HOME
ws.default_host= default_host
ws.cluster= cluster_name (or blank if no cluster has been set up)
ws.war.name= ReferenceThinClient.war
ws.war.app_name= becubic Web Application
ws.war.context_root= becubic
51
Setting Up WebSphere Server
4. Open the command prompt, and run these commands from the BECUBIC_HOME\setup\websphere dir-ectory:
ant -f becubic_ws.xml common
5. Restart your WebSphere Application Server.
6. Launch becubic.
Generating WAR File with Connection InformationBy default, the becubic application deployed on an application server reads the connection information from the con-nection.xml file, which is generated automatically when configuring connections with the becubic Eclipse client.
Packaging the connection information in the WAR or EAR file makes it possible not to install becubic client on the Application Server machine, or to remotely manage files on it.
l This is notably required to easily deploy becubic Web applications on a UNIX server.
l You can package only one connection within a WAR/EAR file.
To package the connection information in a WAR/EAR file
1. Configure the required connection settings with the becubic Eclipse client.
If you are performing the operation on the Analyzer or Administration station where you have run the Model Wizard, the connection for the target repository with SuperUser is automatically configured.
2. Select the Server node of the connection that you want to package in the Web application.
3. Click Package in Web Application. The Package in Web Application wizard opens:
52

4. Optional. Specify the trusted domain parameters for Single Sign-on.
l Once you select this check box, the Next button is disabled until you specify all the required parameters.
l See the ASG-becubic System Administrator’s Guide for details of Single Sign-on settings and the trusted domain option.
You can either specify parameters for an existing trusted domain or create a new trusted domain.
To specify an existing trusted domain:
a. Select the Use a trusted domain for Single Sign-on check box. The related fields become avail-able.
b. Enter the name of the trusted domain in the Domain name field. If you are connected to the tar-get repository, clicking the ellipsis button [...] to the right of the Domain name field opens the Select trusted domain window that enables you to select it from a list.
c. Optional. Enter the Explicit User name value of the HTTP header if applicable.
d. Optional. Enter the Explicit Roles value of the HTTP header if applicable.
e. Optional. If you want the application server to verify the roles, select the Check roles with applic-ation server check box.
f. Select Connect to existing domain and enter the private key.
To create a new trusted domain:
g. Select the Use a trusted domain for Single Sign-on check box. The related fields become avail-able.
h. Enter a name for the new trusted domain in the Domain name field.
i. Optional. Enter the Explicit User name value of the HTTP header if applicable.
j. Optional. Enter the Explicit Roles value of the HTTP header if applicable.
53
Generating WAR File with Connection Information
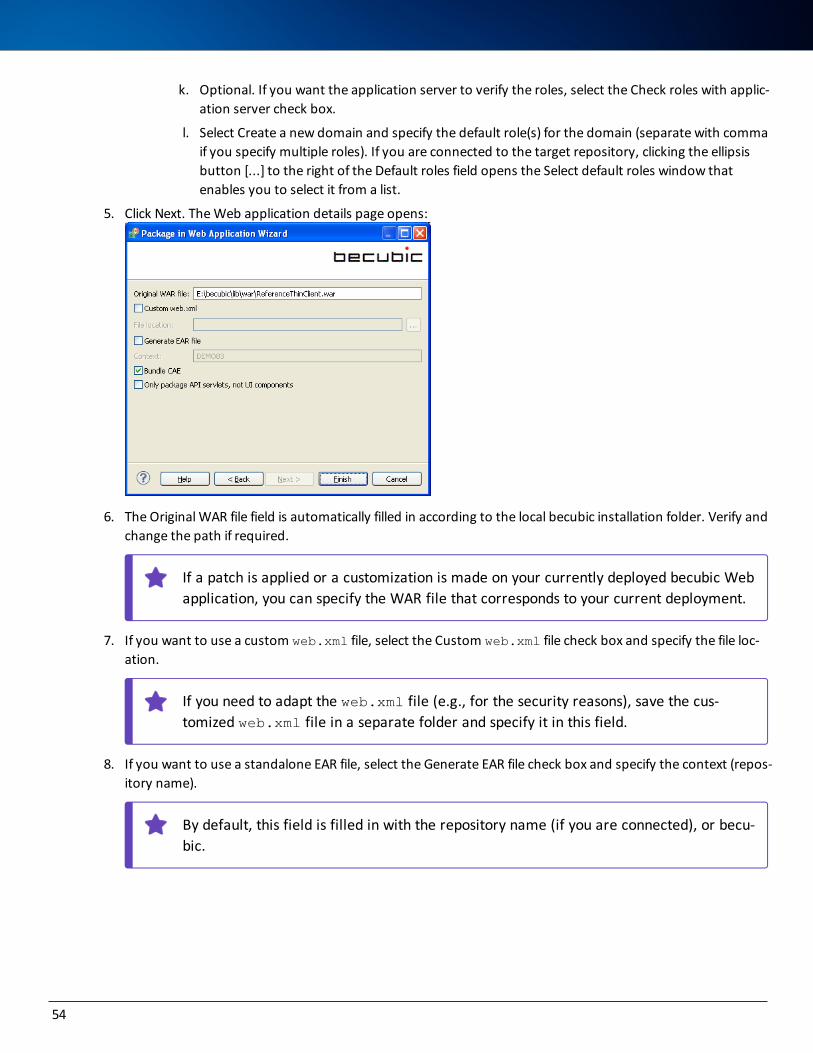
k. Optional. If you want the application server to verify the roles, select the Check roles with applic-ation server check box.
l. Select Create a new domain and specify the default role(s) for the domain (separate with comma if you specify multiple roles). If you are connected to the target repository, clicking the ellipsis button [...] to the right of the Default roles field opens the Select default roles window that enables you to select it from a list.
5. Click Next. The Web application details page opens:
6. The Original WAR file field is automatically filled in according to the local becubic installation folder. Verify and change the path if required.
If a patch is applied or a customization is made on your currently deployed becubic Web application, you can specify the WAR file that corresponds to your current deployment.
7. If you want to use a custom web.xml file, select the Custom web.xml file check box and specify the file loc-ation.
If you need to adapt the web.xml file (e.g., for the security reasons), save the cus-tomized web.xml file in a separate folder and specify it in this field.
8. If you want to use a standalone EAR file, select the Generate EAR file check box and specify the context (repos-itory name).
By default, this field is filled in with the repository name (if you are connected), or becu-bic.
54
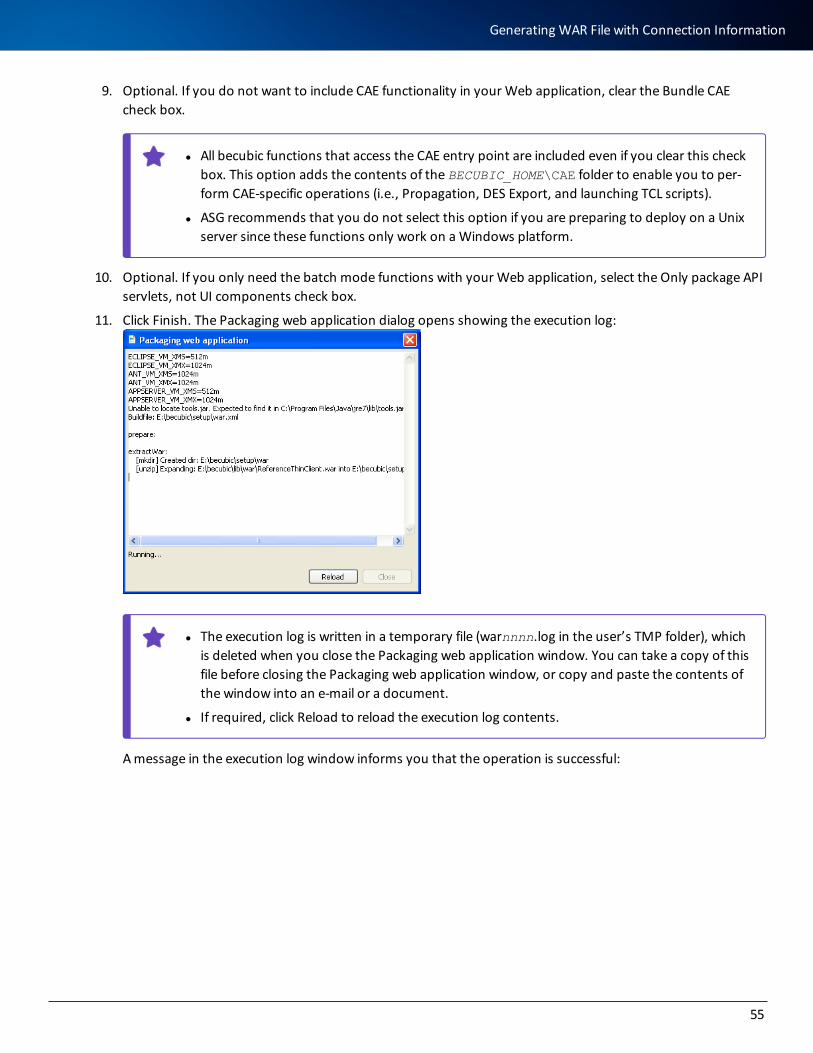
9. Optional. If you do not want to include CAE functionality in your Web application, clear the Bundle CAE check box.
l All becubic functions that access the CAE entry point are included even if you clear this check box. This option adds the contents of the BECUBIC_HOME\CAE folder to enable you to per-form CAE-specific operations (i.e., Propagation, DES Export, and launching TCL scripts).
l ASG recommends that you do not select this option if you are preparing to deploy on a Unix server since these functions only work on a Windows platform.
10. Optional. If you only need the batch mode functions with your Web application, select the Only package API servlets, not UI components check box.
11. Click Finish. The Packaging web application dialog opens showing the execution log:
l The execution log is written in a temporary file (warnnnn.log in the user’s TMP folder), which is deleted when you close the Packaging web application window. You can take a copy of this file before closing the Packaging web application window, or copy and paste the contents of the window into an e-mail or a document.
l If required, click Reload to reload the execution log contents.
A message in the execution log window informs you that the operation is successful:
55
Generating WAR File with Connection Information
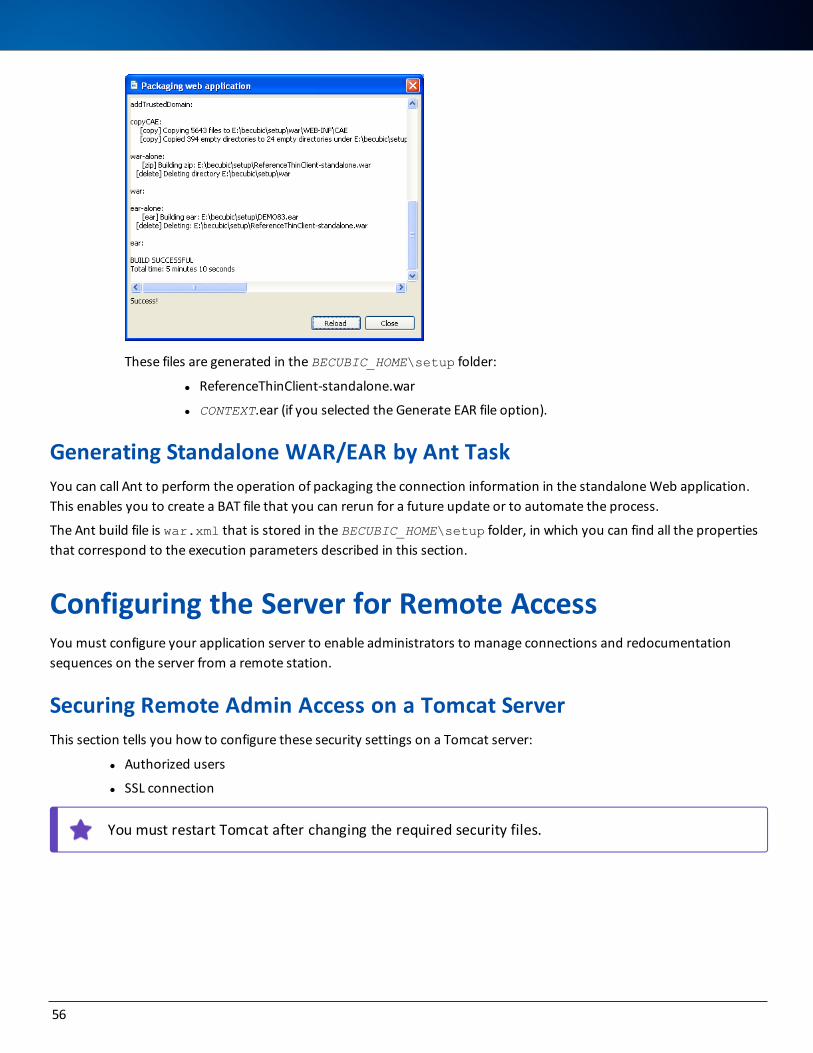
These files are generated in the BECUBIC_HOME\setup folder:
l ReferenceThinClient-standalone.war
l CONTEXT.ear (if you selected the Generate EAR file option).
Generating Standalone WAR/EAR by Ant TaskYou can call Ant to perform the operation of packaging the connection information in the standalone Web application. This enables you to create a BAT file that you can rerun for a future update or to automate the process.
The Ant build file is war.xml that is stored in the BECUBIC_HOME\setup folder, in which you can find all the properties that correspond to the execution parameters described in this section.
Configuring the Server for Remote AccessYou must configure your application server to enable administrators to manage connections and redocumentation sequences on the server from a remote station.
Securing Remote Admin Access on a Tomcat ServerThis section tells you how to configure these security settings on a Tomcat server:
l Authorized users
l SSL connection
You must restart Tomcat after changing the required security files.
56
Declaring Users and RolesTo enable users to access a server for remote management, you must declare remote access users who have admin-istrator role on the application server.
Declaring UsersThe default security mechanism uses two files in the same folder (i.e., \tomcat\conf). They are the tomcat-user-s.xml and the web.xml files.
To declare users
1. Edit the tomcat-users.xml file with this syntax: <user username="username1" password="password1" roles="BecubicAdmin"/><user username="username2" password="password2" roles="BecubicAdmin"/>...
where:
username1 and username2 are remote access users with the administrator role that you declare at the Application Server level and password1 and password2 are their passwords.
2. Edit the web.xml file with this content: <security-role> <role-name>security-role</role-name></security-role>
where security-role is the <role-name> defined in the web.xml configuration file (see Security).
Specifying SSL SettingsThis section provides information for you to create a self-signed certificate.
In a production environment, you should have an SSL certificate for SSL support provided by your sys-tem administrator.
To create a self-signed certificate
1. Choose a keystore location (herein called KEYSTORE). You can use .becubic_keystore in the BECUBIC_HOME\conf folder.
2. Generate the certificate:
a. Submit this command on the Command Prompt window:
%JAVA_HOME%\bin\keytool -genkey -alias ssl -keyalg RSA -keystore %KEYSTORE%
b. Enter a password (the default password is changeit).
c. Enter the server name.
d. Enter details as requested.
3. Export the certificate by executing this command on the Command Prompt window:
57
Securing Remote Admin Access on a Tomcat Server
%JAVA_HOME%\bin\keytool -export -alias ssl -keystore KEYSTORE -file server.crt
Or
If a certificate has been given to you, import it into a keystore on the server by executing this command:
%JAVA_HOME%\bin\keytool -import -alias ssl -file server.crt -keystore KEYSTORE
4. Use a text editor (e.g., Notepad) to open the server.xml file, which is stored in the BECUBIC_HOME\tom-cat\conf folder.
5. Edit the file to enable the SSL connector, as shown in this excerpt:
<Connector port="6443" protocol="HTTP/1.1" SSLEnabled="true"maxThreads="150" scheme="https" secure="true"clientAuth="false" sslProtocol="TLS" keystoreFile="KEYSTORE" URIEncoding="UTF-8"/>
6. If you are using a self-signed certificate, execute this command to configure Eclipse to accept the certificate:
%JAVA_HOME%\bin\keytool -import -alias ssl -file server.crt -keystore %JAVA_HOME%\jre\lib\security\cacerts
Run the command on the machine on which you installed the becubic Eclipse client after copying the CRT file from the server.
Securing Remote Admin Access on WebSphere
Declaring Users and Roles
To declare users in WebSphere
1. Use WebSphere Administration Console to log in to the server.
2. Open the Security } Secure administration, applications, and infrastructure page, then activate the Enable administrative security option.
3. If you have not deployed an EAR file with a proper was.policy file, clear the Java 2 security option check box.
4. Open the Users and Groups } Manage Users page, then add the user/password you want to use to access the admin API.
5. Open the Applications } Enterprise Applications } ReferenceThinClient } Security role to user/group map-ping page, then select BecubicAdmin and click Look up users.
6. Select the user that you want to declare as remote management administrator.
Specifying SSL SettingsWebSphere comes with an internal SSL certificate that you can use to secure the administration console.
58
To use WebSphere’s internal SSL certificate with Eclipse
1. Use WebSphere Administration Console to log in to the server.
2. Open the SSL certificate and key management } SSL configurations } NodeDefaultSSLSettings } Key stores and certificates } NodeDefaultKeyStore page, then select the default certificate and click Extract.
3. Select Base64 as the format.
4. Copy the generated file to the Eclipse client and import it into the cacerts folder by executing this command:
%JAVA_HOME%\bin\keytool -import -alias ws-ssl -file ws.rfc -keystore %JAVA_HOME%\jre\lib\se-curity\cacerts
Configuring the Web Server’s web.xml FileThis section describes the parameters defined in the web.xml file, which is located in the WEB-INF folder of the Refer-enceThinClient.war file.
Servlet Parametersbecubic Application Server handles the Administration interface by means of AdminServlet. This is the default con-figuration:
<servlet id="AdminServlet"> <servlet-name>AdminServlet</servlet-name> <servlet-class>com.asg.reference.web.admin.AdminServlet</servlet-class> <init-param id="admin_user"> <param-name>transmit_passwords</param-name> <param-value>false</param-value> </init-param></servlet>
The default value for transmit_passwords is false (i.e., the server does not send the password information to the client from which you remotely manage the server’s connections and redocumentation sequences). If you want to obtain the password when retrieving information from the server, specify true in place of false.
Servlet PathAdminServlet is called through the /admin path (i.e., http://server:port/becubic/admin), which can be found in this block:
<servlet-mapping id="ServletMapping_AdminServlet"> <servlet-name>AdminServlet</servlet-name> <url-pattern>/admin/*</url-pattern></servlet-mapping>
ASG recommends that you keep the initial setting.
SecurityBy default, the admin path is protected and can be accessed only by valid remote access users that are declared on the Web server and belong to the BecubicAdmin role. The corresponding settings can be found in these blocks:
59
Configuring theWeb Server’s web.xml File

<security-constraint> <web-resource-collection> <web-resource-name>ProtectedArea</web-resource-name> <url-pattern>/admin/*</url-pattern> <http-method>POST</http-method> <http-method>GET</http-method> </web-resource-collection> <auth-constraint> <role-name>BecubicAdmin</role-name> </auth-constraint></security-constraint> <login-config> <auth-method>BASIC</auth-method> <realm-name>becubic protected domain</realm-name></login-config> <security-role> <role-name>BecubicAdmin</role-name></security-role>
l ASG recommends that you keep the initial settings.
l The <realm-name> string is the text that displays on the remote management-related dialog. You can change the string without altering the functionality.
Managing Java SecurityThese Java permission policy files are provided in the ReferenceThinClient.war\WEB-INF folder:
l catalina.policy
l was.policy
Under WebSphere, you must put this file in the EAR file that wraps ReferenceThinClient.war after having deployed the becubic applications.
The policy files are preconfigured with default security settings and commented.
You must tailor some parameters (e.g., server addresses). For example:
// license manager serverpermission java.net.SocketPermission "127.0.0.1:11020", "connect,resolve";
Replace the IP and the port number with those of the ASG License Server that you use to install and run becubic.
// access to oracle db server permission java.net.SocketPermission "127.0.0.1:1521", "connect,resolve";// access to MSSQL DB Serverpermission java.net.SocketPermission "127.0.0.1:1434", "connect,resolve,accept";
Replace the database server IP and port number, and comment out the database type that you do not use.
// executables...permission java.io.FilePermission "${BECUBIC_HOME}${/}bin${/}WordReport.exe", "execute";
60
The execute permission for WordReport.exe is required only if you want to enable report generation through becubic Web.
Most permissions must remain as configured by default for becubic to work properly. Contact ASG Customer Support for guidance if you need to edit settings other than those that are mentioned as examples.
Implementing a becubic ProjectImplementing a becubic project consists of performing these tasks:
l Creating the project by running Model Wizard (see Creating and Updating Projects).
l Creating the corresponding CAE entry point and becubic repository by running Model Wizard (see Creating and Initializing a CAE Entry Point and Creating and Initializing the becubic Repository).
l Customizing analysis, using the CAE Customization application [see the ASG-CAE (Common Analysis Engine) Model and Providers].
l Loading the CAE entry point by running the redocumentation sequence (see Redocumentation Sequence).
You can create the CAE entry point and the becubic repository, then load the CAE entry point, on a remote server that has been configured appropriately.
Using Model WizardModel Wizard performs and manages the various tasks required for setting up and configuring your becubic envir-onment. Model Wizard is available with the Eclipse client.
Model Wizard performs these tasks:
l It creates a new ADU project.
l It creates a new project using a model in the XML format.
l It updates an existing project.
l It creates and initializes a CAE entry point.
l It creates and initializes the becubic repository for the created or updated project.
l Model Wizard also enables you to upload your becubic projects to a remote server and run or manage them from a client station.
l When creating and initializing the becubic repository, you must run Model Wizard on a becubic Rich Client machine.
61
Implementing a becubic Project
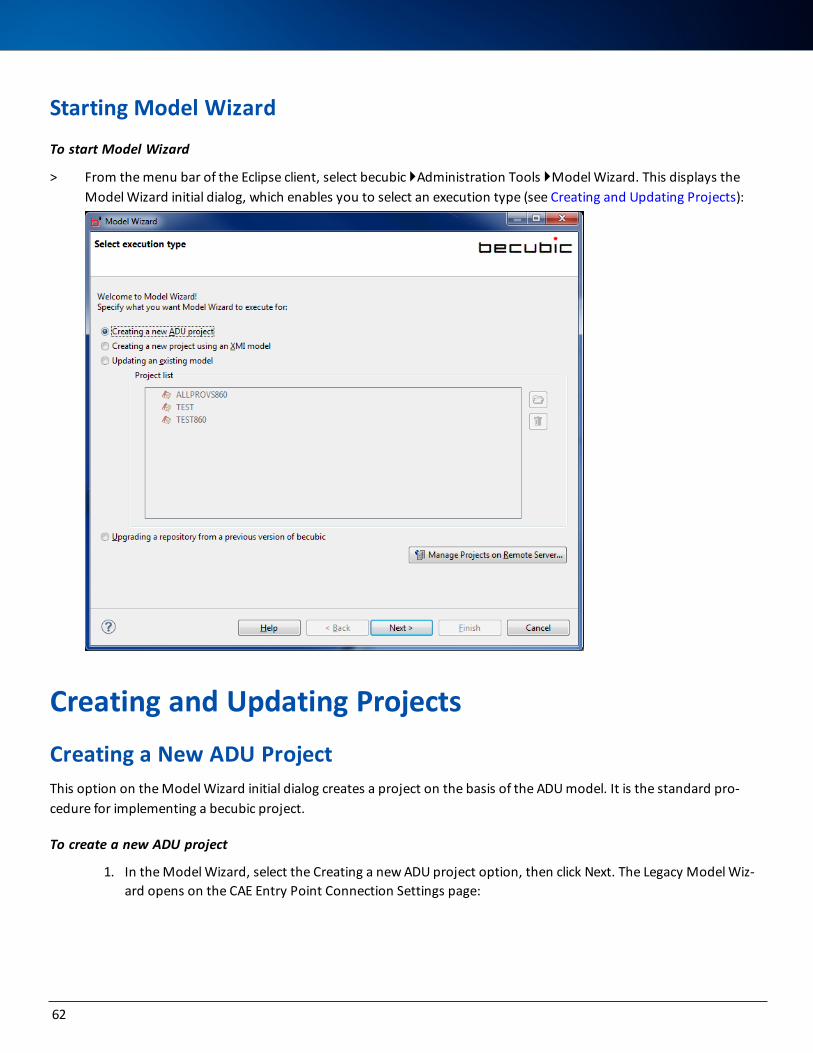
Starting Model Wizard
To start Model Wizard
> From the menu bar of the Eclipse client, select becubic }Administration Tools }Model Wizard. This displays the Model Wizard initial dialog, which enables you to select an execution type (see Creating and Updating Projects):
Creating and Updating ProjectsCreating a New ADU ProjectThis option on the Model Wizard initial dialog creates a project on the basis of the ADU model. It is the standard pro-cedure for implementing a becubic project.
To create a new ADU project
1. In the Model Wizard, select the Creating a new ADU project option, then click Next. The Legacy Model Wiz-ard opens on the CAE Entry Point Connection Settings page:
62

This table describes the parameters and options on the CAE Entry Point Connection Settings dialog:
Parameter or Option
Description
Database type
Select Oracle 11g, Oracle 12c, Microsoft SQL Server 2014, or Microsoft SQL Server 2016.
Microsoft SQL Server 2008 is no longer supported. If you update an existing project using this version of SQL Server, Model Wizard shows the current setting but does not allow to run the repository update on it.
CAE connection information
63
Creating a NewADU Project
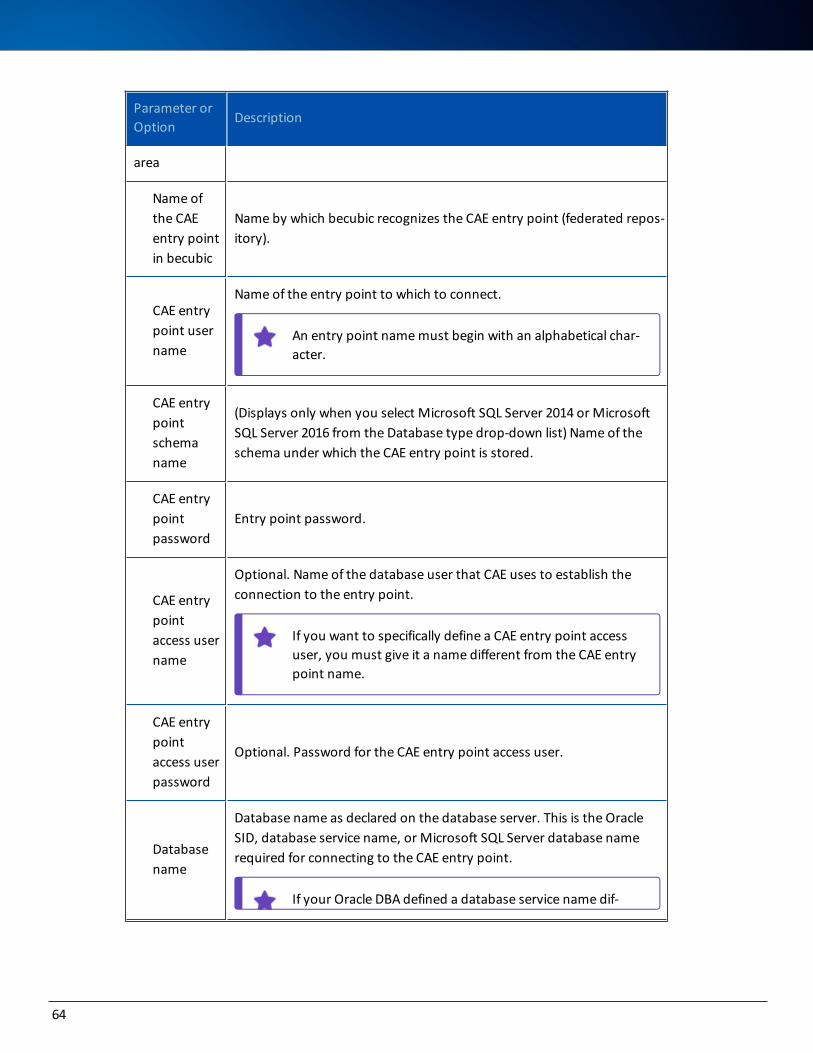
Parameter or Option
Description
area
Name of the CAE entry point in becubic
Name by which becubic recognizes the CAE entry point (federated repos-itory).
CAE entry point user name
Name of the entry point to which to connect.
An entry point name must begin with an alphabetical char-acter.
CAE entry point schema name
(Displays only when you select Microsoft SQL Server 2014 or Microsoft SQL Server 2016 from the Database type drop-down list) Name of the schema under which the CAE entry point is stored.
CAE entry point password
Entry point password.
CAE entry point access user name
Optional. Name of the database user that CAE uses to establish the connection to the entry point.
If you want to specifically define a CAE entry point access user, you must give it a name different from the CAE entry point name.
CAE entry point access user password
Optional. Password for the CAE entry point access user.
Database name
Database name as declared on the database server. This is the Oracle SID, database service name, or Microsoft SQL Server database name required for connecting to the CAE entry point.
If your Oracle DBA defined a database service name dif-
64

Parameter or Option
Description
ferent from its SID, you must enter the service name in this field.
Database instance name
(Displays only when you select Microsoft SQL Server 2014 or Microsoft SQL Server 2016 from the Database type drop-down list) Microsoft SQL Server instance name. If you are using the default MS SQL Server instance (i.e., MSSQLSERVER), leave this field blank.
As a named instance does not require the port number to access it, if this field contain any character, the Database port field is disabled.
Server name
Name of the server machine as recognized on the network.
The localhost server name is not supported.
Database port
Connection port number of the database.
The default port number is 1521 for Oracle and 1433 for Microsoft SQL Server.
Entry point setup area
Create the entry point during setup
When selected, indicates that the entry point is to be created.
If you specify the connection settings of an existing CAE entry point and select this option, this CAE entry point will be dropped and re-created and its current contents will be lost.
Use an existing entry point
When selected, indicates that the entry point already exists.
Test When using an existing entry point, click Test connection to existing
65
Creating a NewADU Project
Parameter or Option
Description
connection to existing entry point
entry point to be able to validate the connection information you enter.
2. Enter parameters and select options as required, then click Next to proceed with the creation/initialization of a CAE entry point (see Creating and Initializing a CAE Entry Point) and the becubic repository (see Creating and Initializing the becubic Repository).
If you have selected the Use an existing entry point option, clicking Next enables you to proceed with the creation and ini-tialization of the becubic repository (see Creating and Initializing the becubic Repository).
Special Implementation Case Considerations
DBA Script Mode ImplementationIf you are implementing a new project with DBA scripts, the CAE entry point must be created and initialized prior to run-ning Model Wizard either with Oracle or Microsoft SQL Server database. Specify the correct entry point parameters to test the connection and keep the Use an existing entry point option selected.
SQL Server in Windows Authentication ModeIf you are implementing a new project on a Microsoft SQL Server database instance that is configured with the Windows Authentication option for single sign-on, select the Microsoft SQL Server 2014 or Microsoft SQL Server 2016 database type and specify only these parameters:
l CAE entry point schema name
l Database name
l MS SQL Server instance name
l Server name
l Database port
Leave all other fields empty.
Make sure that the other fields do not contain space characters. If a field is not actually empty, the execution of Model Wizard fails.
Creating a New Project Using an XMI Model
This task is likely to require guidance from ASG Professional Services.
66
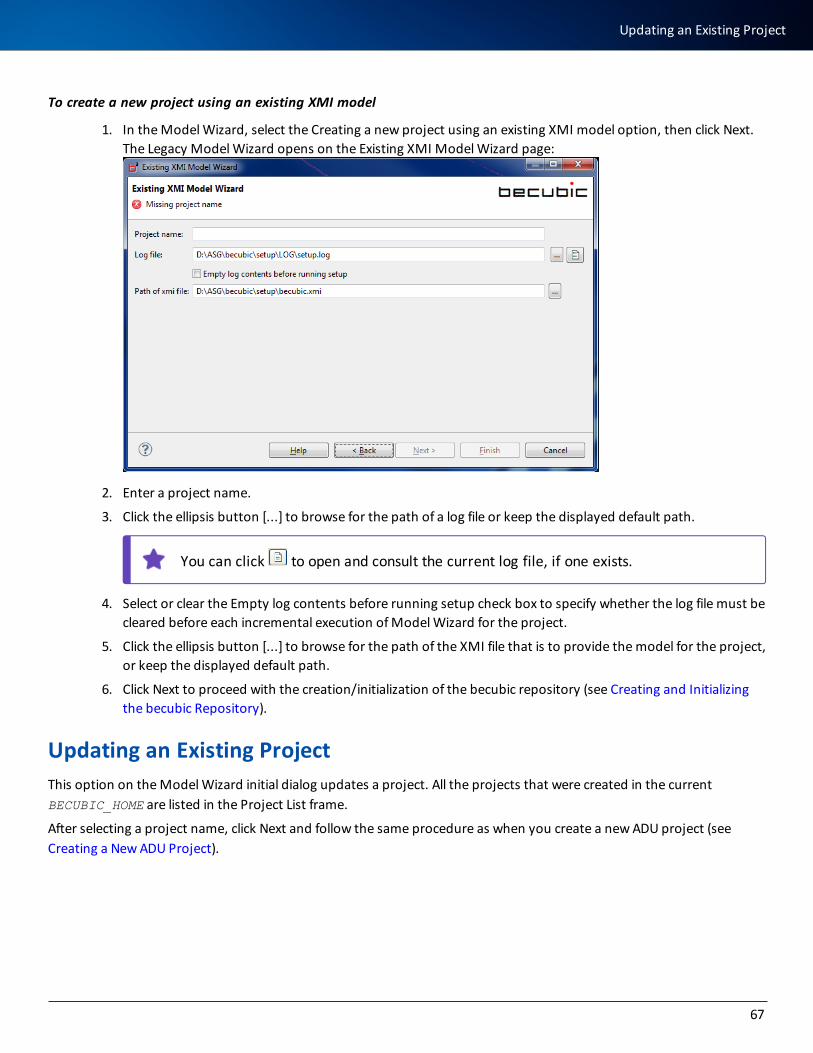
To create a new project using an existing XMI model
1. In the Model Wizard, select the Creating a new project using an existing XMI model option, then click Next. The Legacy Model Wizard opens on the Existing XMI Model Wizard page:
2. Enter a project name.
3. Click the ellipsis button [...] to browse for the path of a log file or keep the displayed default path.
You can click to open and consult the current log file, if one exists.
4. Select or clear the Empty log contents before running setup check box to specify whether the log file must be cleared before each incremental execution of Model Wizard for the project.
5. Click the ellipsis button [...] to browse for the path of the XMI file that is to provide the model for the project, or keep the displayed default path.
6. Click Next to proceed with the creation/initialization of the becubic repository (see Creating and Initializing the becubic Repository).
Updating an Existing ProjectThis option on the Model Wizard initial dialog updates a project. All the projects that were created in the current BECUBIC_HOME are listed in the Project List frame.
After selecting a project name, click Next and follow the same procedure as when you create a new ADU project (see Creating a New ADU Project).
67
Updating an Existing Project
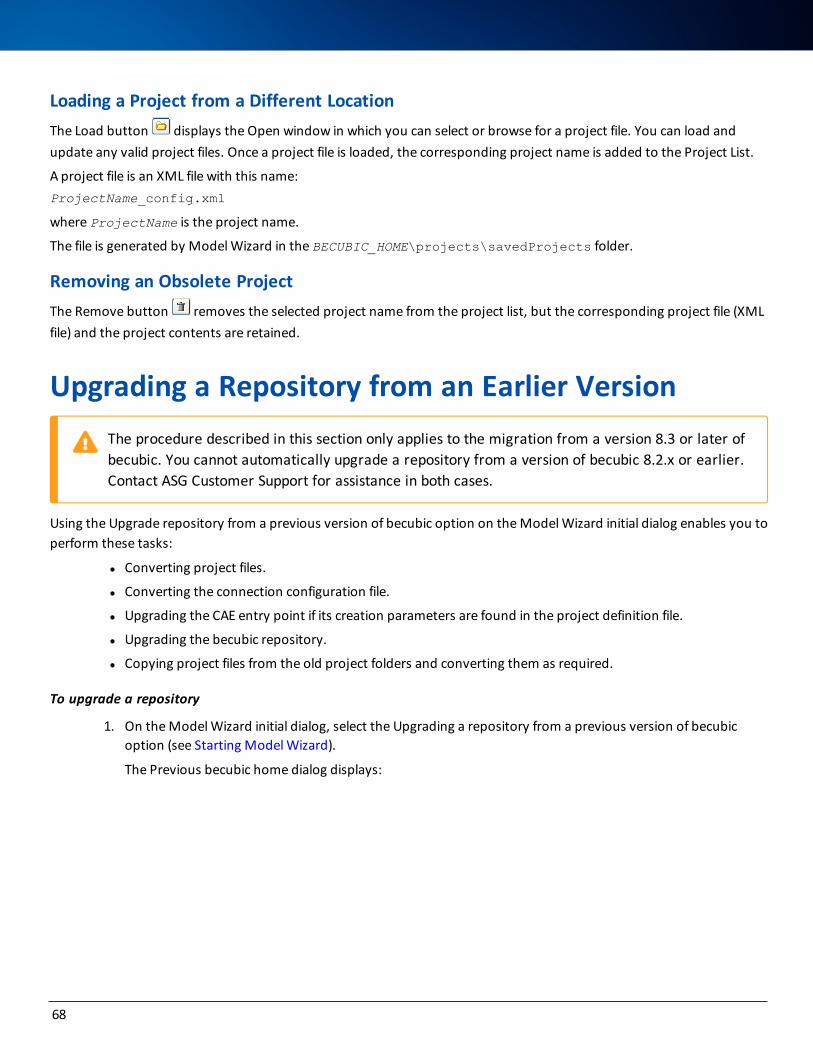
Loading a Project from a Different LocationThe Load button displays the Open window in which you can select or browse for a project file. You can load and update any valid project files. Once a project file is loaded, the corresponding project name is added to the Project List.
A project file is an XML file with this name:ProjectName_config.xml
where ProjectName is the project name.
The file is generated by Model Wizard in the BECUBIC_HOME\projects\savedProjects folder.
Removing an Obsolete ProjectThe Remove button removes the selected project name from the project list, but the corresponding project file (XML file) and the project contents are retained.
Upgrading a Repository from an Earlier VersionThe procedure described in this section only applies to the migration from a version 8.3 or later of becubic. You cannot automatically upgrade a repository from a version of becubic 8.2.x or earlier. Contact ASG Customer Support for assistance in both cases.
Using the Upgrade repository from a previous version of becubic option on the Model Wizard initial dialog enables you to perform these tasks:
l Converting project files.
l Converting the connection configuration file.
l Upgrading the CAE entry point if its creation parameters are found in the project definition file.
l Upgrading the becubic repository.
l Copying project files from the old project folders and converting them as required.
To upgrade a repository
1. On the Model Wizard initial dialog, select the Upgrading a repository from a previous version of becubic option (see Starting Model Wizard).
The Previous becubic home dialog displays:
68
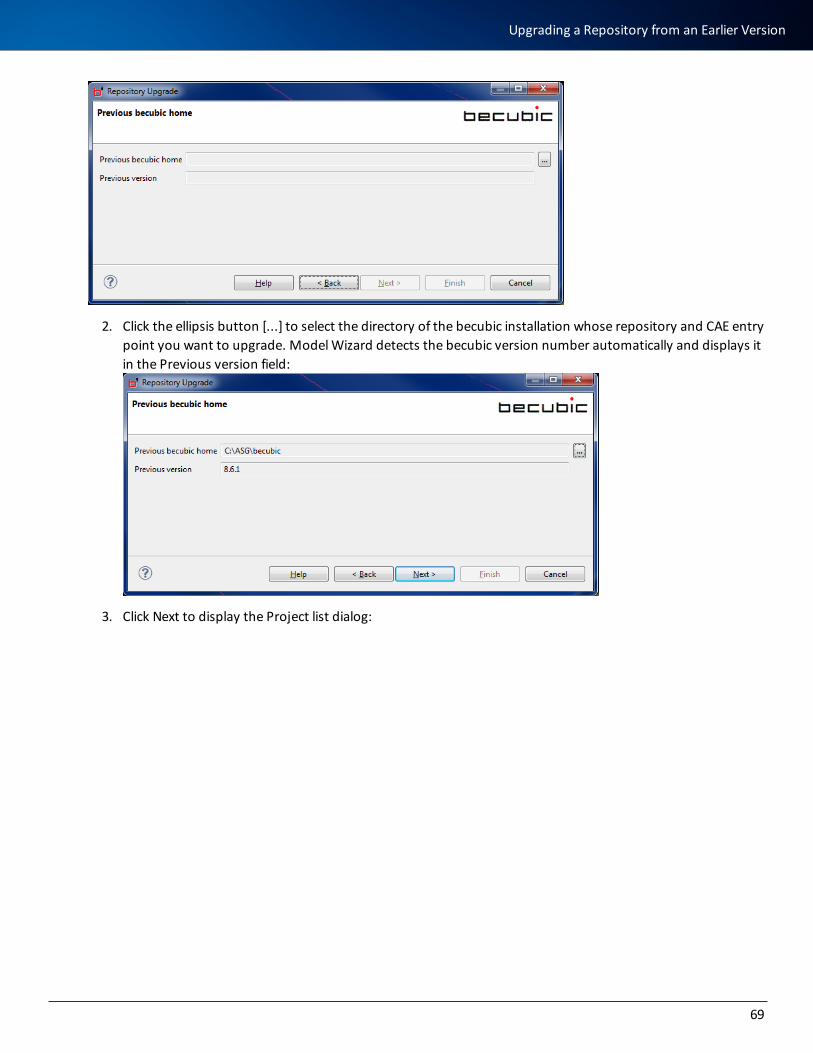
2. Click the ellipsis button [...] to select the directory of the becubic installation whose repository and CAE entry point you want to upgrade. Model Wizard detects the becubic version number automatically and displays it in the Previous version field:
3. Click Next to display the Project list dialog:
69
Upgrading a Repository from an Earlier Version

4. Click the name of the becubic project you want to upgrade.
5. Optional. Clear the Upgrade CAE check box if you do not want to upgrade the CAE entry point.
6. Click Next.
7. If you have kept the Upgrade CAE check box selected, specify the system administration user and password, select the database type, then click OK on the Admin login dialog:
The Migrate connections dialog displays:
70
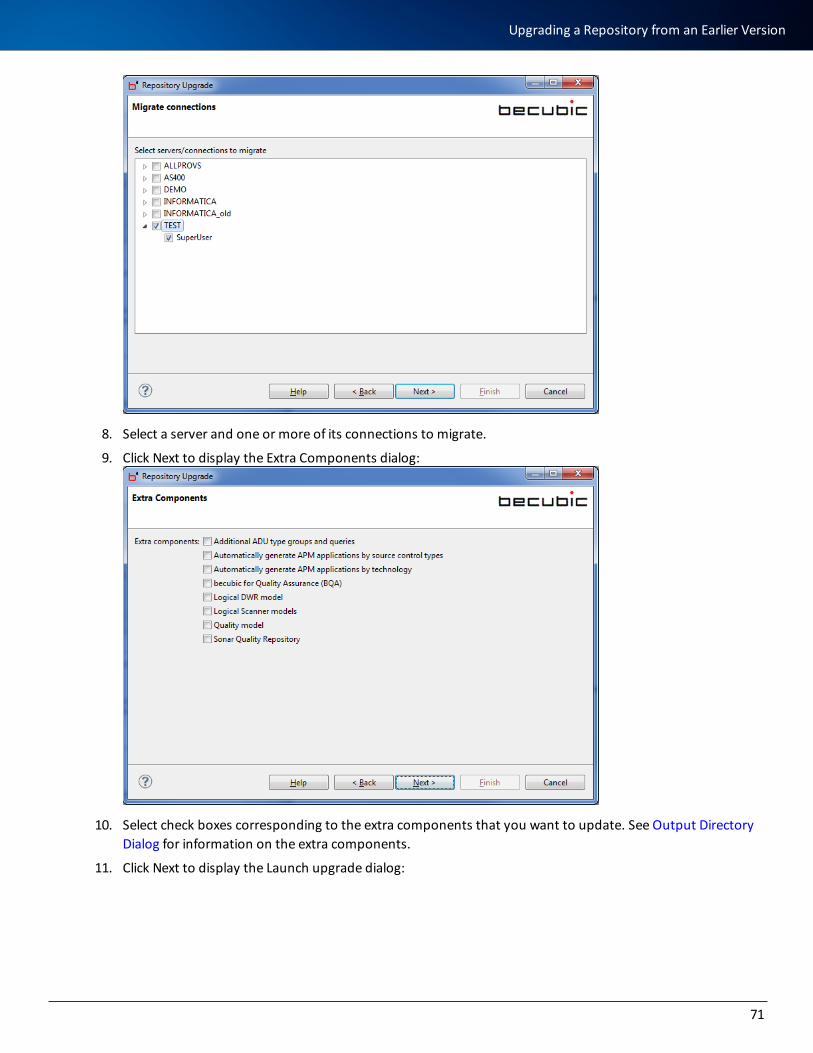
8. Select a server and one or more of its connections to migrate.
9. Click Next to display the Extra Components dialog:
10. Select check boxes corresponding to the extra components that you want to update. See Output Directory Dialog for information on the extra components.
11. Click Next to display the Launch upgrade dialog:
71
Upgrading a Repository from an Earlier Version
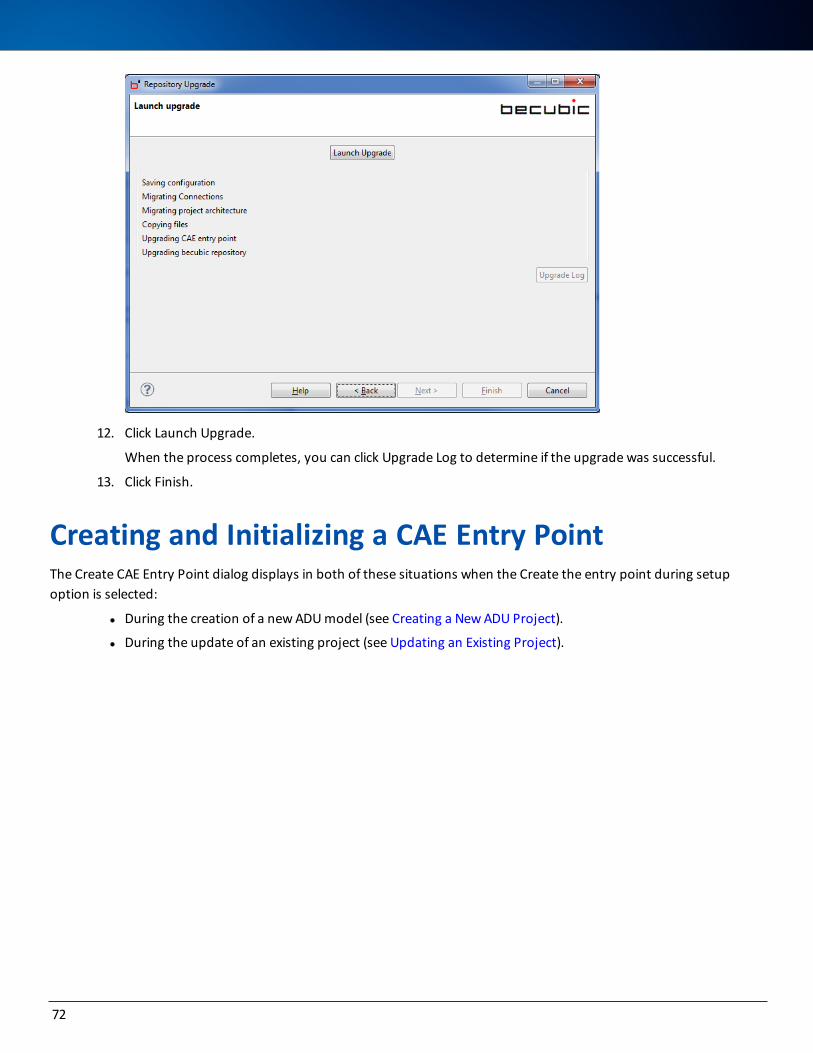
12. Click Launch Upgrade.
When the process completes, you can click Upgrade Log to determine if the upgrade was successful.
13. Click Finish.
Creating and Initializing a CAE Entry PointThe Create CAE Entry Point dialog displays in both of these situations when the Create the entry point during setup option is selected:
l During the creation of a new ADU model (see Creating a New ADU Project).
l During the update of an existing project (see Updating an Existing Project).
72
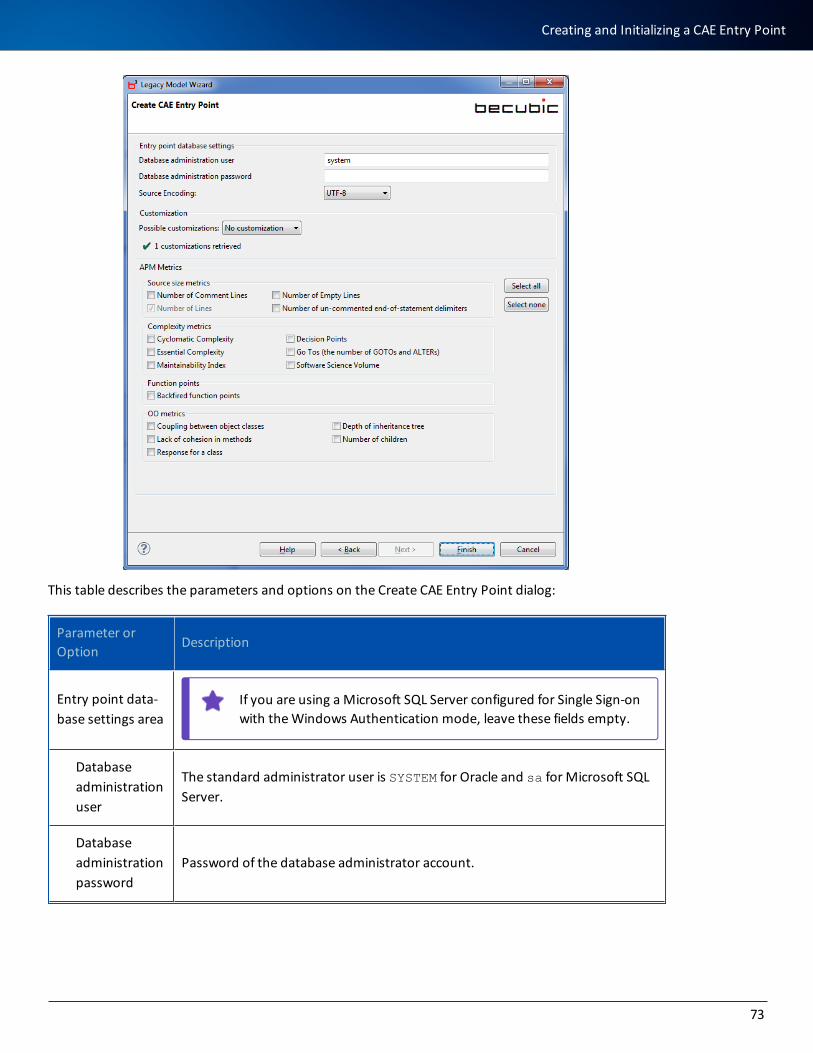
This table describes the parameters and options on the Create CAE Entry Point dialog:
Parameter or Option
Description
Entry point data-base settings area
If you are using a Microsoft SQL Server configured for Single Sign-on with the Windows Authentication mode, leave these fields empty.
Database administration user
The standard administrator user is SYSTEM for Oracle and sa for Microsoft SQL Server.
Database administration password
Password of the database administrator account.
73
Creating and Initializing a CAE Entry Point
Parameter or Option
Description
Source Encoding
Encoding of the source files to be analyzed (Windows-1252 or UTF-8).
If your source files contain non-ASCII Latin characters (e.g., in case of Asian double-byte characters), you must select UTF-8.
Customization area
This option is for sites with specific customizations integrated as options in CAE.
Possible customizations
If applicable, select a customization option from the drop-down list.
If a specific customization is associated with the SITE ID that is registered in the becubic license server, the customization is auto-matically selected and the drop-down list is inactive.
APM Metrics area
Source size met-rics subarea
Number of Comment Lines
When selected, and if you own a license for CAE Provider for APM, activates the addition to the Source object properties of the comment lines count.
Number of Empty Lines
When selected, and if you own a license for CAE Provider for APM, activates the addition to the Source object properties of the blank lines count.
Number of Lines
By default, this option is selected. If you own a license for CAE Provider for APM, it activates the addition to the Source object properties of the total number of lines count.
Number of un-commented end-of-statement delimiters
When selected, and if you own a license for CAE Provider for APM, activates the addition to the Source object properties of the number of trailing delimiters (e.g., ; or .) that have not been embedded within comments or character strings.
Complexity met-rics subarea
74
Parameter or Option
Description
Cyclomatic Complexity
When selected, and if you own a license for CAE Provider for APM, activates the addition to the entry point of cyclomatic complexity information on programs.
Decision PointsWhen selected, and if you own a license for CAE Provider for APM, activates the addition to the entry point of decision points information on programs.
Essential Complexity
When selected, and if you own a license for CAE Provider for APM, activates the addition to the entry point of essential complexity information on programs.
Go Tos (the number of GOTOs and ALTERs)
When selected, and if you own a license for CAE Provider for APM, activates the addition to the entry point of the number of GOTOs and ALTERs in programs.
Maintainability Index
When selected, and if you own a license for CAE Provider for APM, activates the addition to the entry point of maintainability index information on programs.
Software Science Volume
When selected, and if you own a license for CAE Provider for APM, activates the addition to the entry point of software science volume information on pro-grams.
Function points subarea
Backfired function points
When selected, and if you own a license for CAE Provider for APM, activates the addition to the entry point of backfired function point information on programs.
OO metrics sub-area
Coupling between object classes
When selected, and if you own a license for CAE Provider for APM, activates the addition to the entry point of coupling between object classes information.
Depth of inheritance tree
When selected, and if you own a license for CAE Provider for APM, activates the addition to the entry point of depth of inheritance tree information on classes.
Lack of cohesion in
When selected, and if you own a license for CAE Provider for APM, activates the addition to the entry point of lack of cohesion in methods information on
75
Creating and Initializing a CAE Entry Point
Parameter or Option
Description
methods classes.
Number of children
When selected, and if you own a license for CAE Provider for APM, activates the addition to the entry point of number of children information on classes.
Response for a class
When selected, and if you own a license for CAE Provider for APM, activates the addition to the entry point of response for a class information.
Select all button Selects all metrics option check boxes.
Select none button
Clears all metrics option check boxes.
To create a CAE entry point
1. Enter parameters and select options as required.
2. Click Next to display the Output Directory dialog (see Output Directory Dialog).
Output Directory DialogThe Output directory dialog displays in both of these situations:
l During the creation of a new ADU model (see Creating a New ADU Project and Creating and Initializing a CAE Entry Point).
76
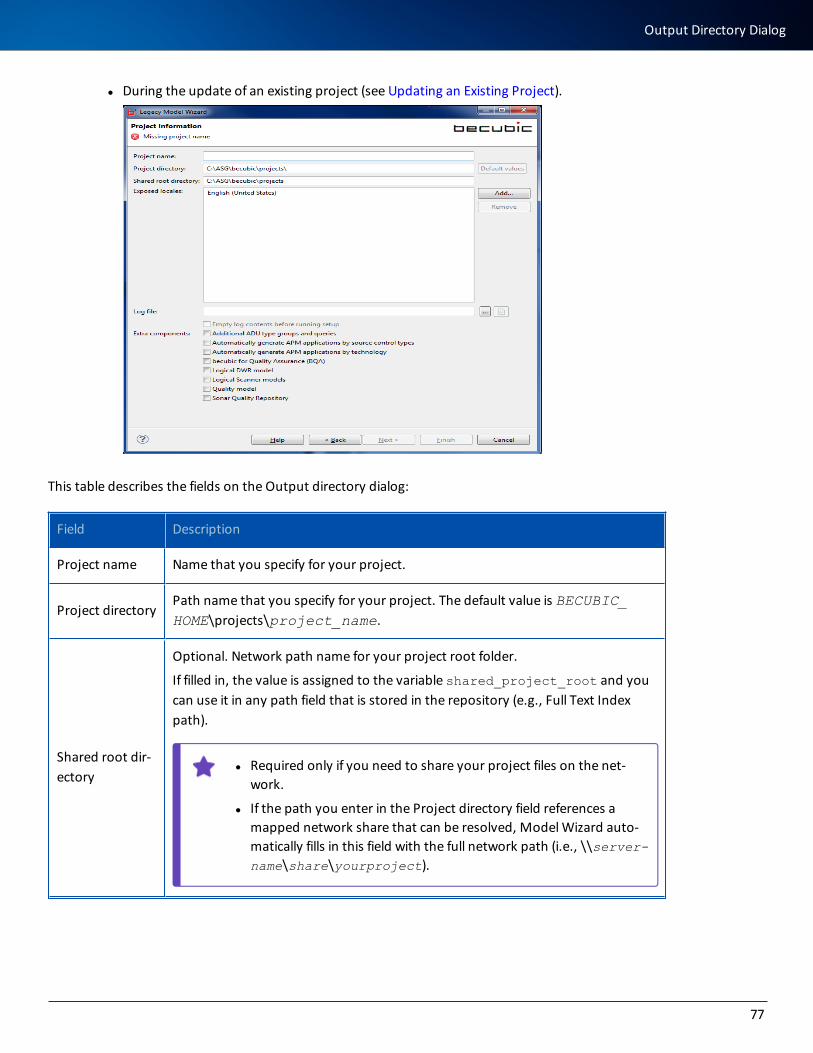
l During the update of an existing project (see Updating an Existing Project).
This table describes the fields on the Output directory dialog:
Field Description
Project name Name that you specify for your project.
Project directoryPath name that you specify for your project. The default value is BECUBIC_HOME\projects\project_name.
Shared root dir-ectory
Optional. Network path name for your project root folder.
If filled in, the value is assigned to the variable shared_project_root and you can use it in any path field that is stored in the repository (e.g., Full Text Index path).
l Required only if you need to share your project files on the net-work.
l If the path you enter in the Project directory field references a mapped network share that can be resolved, Model Wizard auto-matically fills in this field with the full network path (i.e., \\server-name\share\yourproject).
77
Output Directory Dialog
Field Description
Exposed localesEnables you to define a list of locales that are available when creating/editing loc-alizable values (e.g., query names, report names, or business name definitions). See Establishing the List of Exposed Locales for the procedure.
Log file Model Wizard execution log file.
Empty log contents before running setup
Specifies whether the log file must be cleared before each incremental execution of Model Wizard for the current project.
Extra com-ponents
Additional ADU type groups and queries
If selected, additional type groups and related queries are loaded into the repos-itory. These type groups are based of the classifications used for diagrams in the ASG-CAE (Common Analysis Engine) Reference Guide and show only the object types that appear in the corresponding diagrams.
Automatically generate APM applications by source control types
If selected, becubic generates an APM for each source control type and the objects resulting from execution of the standard redocumentation sequence will automatically belong to the corresponding APM application.
Automatically generate APM applications by technology
If selected, becubic generates an APM for each technology and the objects res-ulting from execution of the standard redocumentation sequence will auto-matically belong to the corresponding APM application.
becubic for Quality Assurance (BQA)
Available only if you have the appropriate license. Activates the BQA component. Model Wizard generates a BQA-specific redocumentation sequence.See the ASG-becubic for Quality Assurance Implementation Guide
Logical DWR If selected, the repository is initialized with the logical DWR model, which exposes
78
Field Description
model
a mapping that is close to the OMG industry standard for Data Warehouse and provides an alternate abstracted model ready to consume by user who are already familiar with it.
l This model is based on the Rochade DWR RIM for Data Ware-house. To be selected if you are implementing a federation project.
l Implementing the logical models might impact the performance. Activate this option only if your project requires it.
See Logical Models for more information.
Logical Scanner models
If selected, the repository is initialized with the logical scanner model (based on the ADU model) for streamlined navigation.
l This model is based on the Rochade RIMs for RDBMS. To be selec-ted if you are implementing a federation project, notably for imple-menting Data Lineage.
l Implementing the logical models might impact the performance. Activate this option only if your project requires it.
See Logical Models for more information.
Quality model
Additional object types for the enhanced history functionality of BQA.
Sonar Quality Repository
Available only if you have the appropriate license. Loads administration objects specific to Sonar into the becubic repository.
To provide values on the Output directory dialog
1. Click Default values if you want to use the default values, which create appropriate subdirectories in the pro-ject directory you specified.
Or
Click the ellipsis button [...] to browse for a specific value(s).
2. Click if you want to open and consult the current log file, if one exists.
3. Click Next to proceed with the creation/initialization of the becubic repository (see Creating and Initializing the becubic Repository).
79
Output Directory Dialog
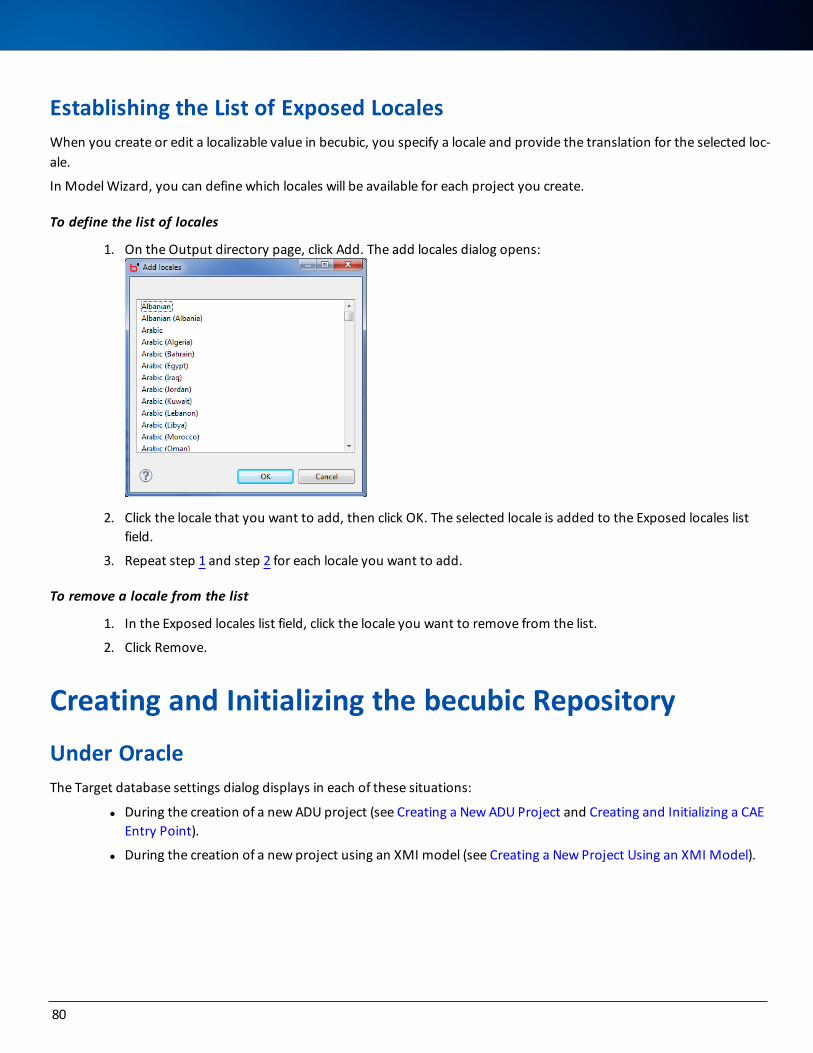
Establishing the List of Exposed LocalesWhen you create or edit a localizable value in becubic, you specify a locale and provide the translation for the selected loc-ale.
In Model Wizard, you can define which locales will be available for each project you create.
To define the list of locales
1. On the Output directory page, click Add. The add locales dialog opens:
2. Click the locale that you want to add, then click OK. The selected locale is added to the Exposed locales list field.
3. Repeat step 1 and step 2 for each locale you want to add.
To remove a locale from the list
1. In the Exposed locales list field, click the locale you want to remove from the list.
2. Click Remove.
Creating and Initializing the becubic RepositoryUnder OracleThe Target database settings dialog displays in each of these situations:
l During the creation of a new ADU project (see Creating a New ADU Project and Creating and Initializing a CAE Entry Point).
l During the creation of a new project using an XMI model (see Creating a New Project Using an XMI Model).
80
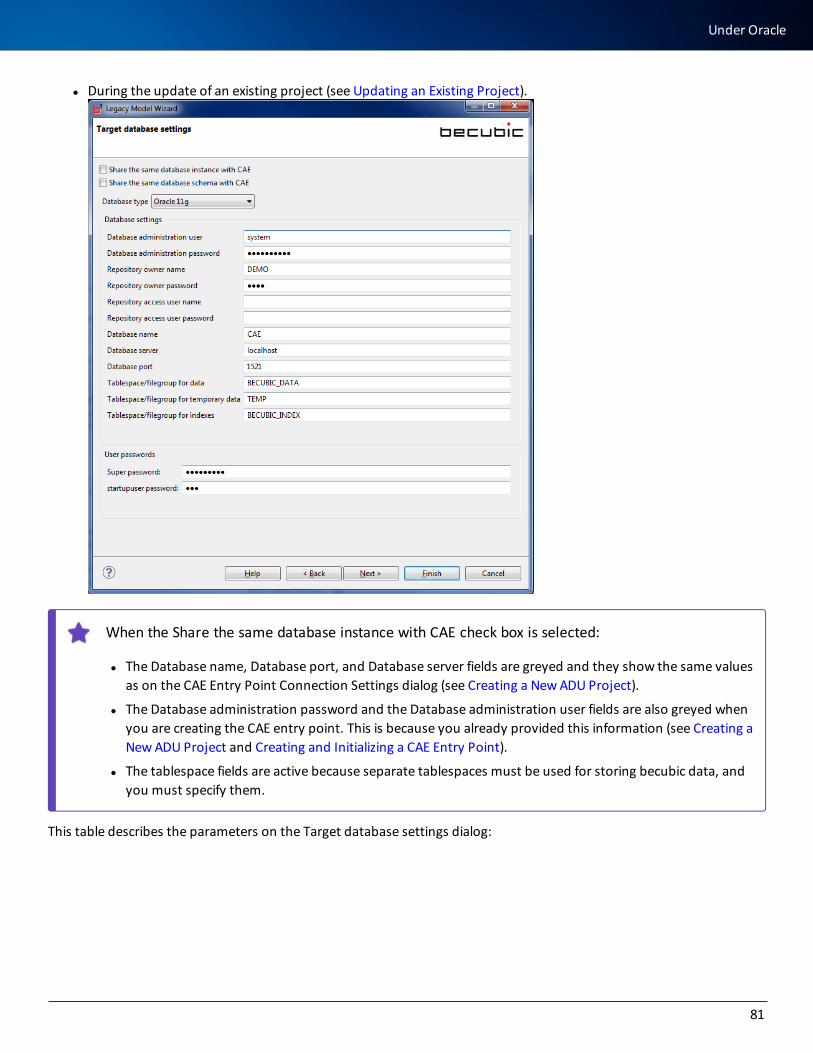
l During the update of an existing project (see Updating an Existing Project).
When the Share the same database instance with CAE check box is selected:
l The Database name, Database port, and Database server fields are greyed and they show the same values as on the CAE Entry Point Connection Settings dialog (see Creating a New ADU Project).
l The Database administration password and the Database administration user fields are also greyed when you are creating the CAE entry point. This is because you already provided this information (see Creating a New ADU Project and Creating and Initializing a CAE Entry Point).
l The tablespace fields are active because separate tablespaces must be used for storing becubic data, and you must specify them.
This table describes the parameters on the Target database settings dialog:
81
Under Oracle
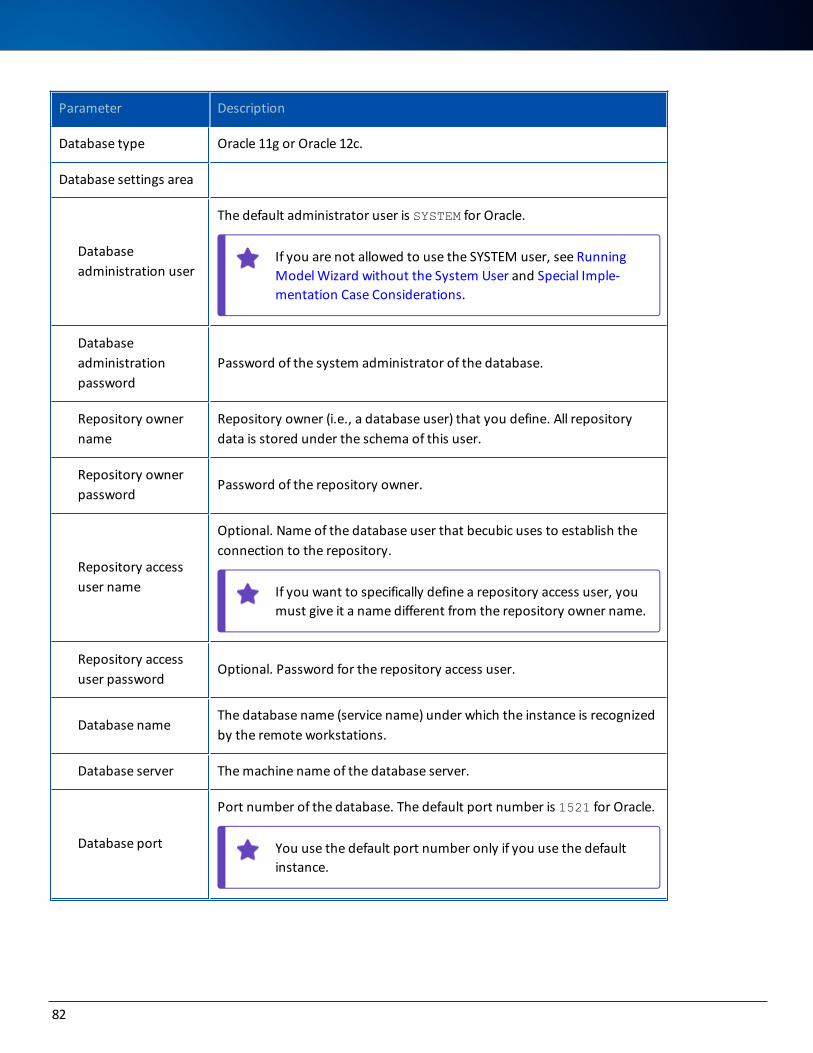
Parameter Description
Database type Oracle 11g or Oracle 12c.
Database settings area
Database administration user
The default administrator user is SYSTEM for Oracle.
If you are not allowed to use the SYSTEM user, see Running Model Wizard without the System User and Special Imple-mentation Case Considerations.
Database administration password
Password of the system administrator of the database.
Repository owner name
Repository owner (i.e., a database user) that you define. All repository data is stored under the schema of this user.
Repository owner password
Password of the repository owner.
Repository access user name
Optional. Name of the database user that becubic uses to establish the connection to the repository.
If you want to specifically define a repository access user, you must give it a name different from the repository owner name.
Repository access user password
Optional. Password for the repository access user.
Database nameThe database name (service name) under which the instance is recognized by the remote workstations.
Database server The machine name of the database server.
Database port
Port number of the database. The default port number is 1521 for Oracle.
You use the default port number only if you use the default instance.
82
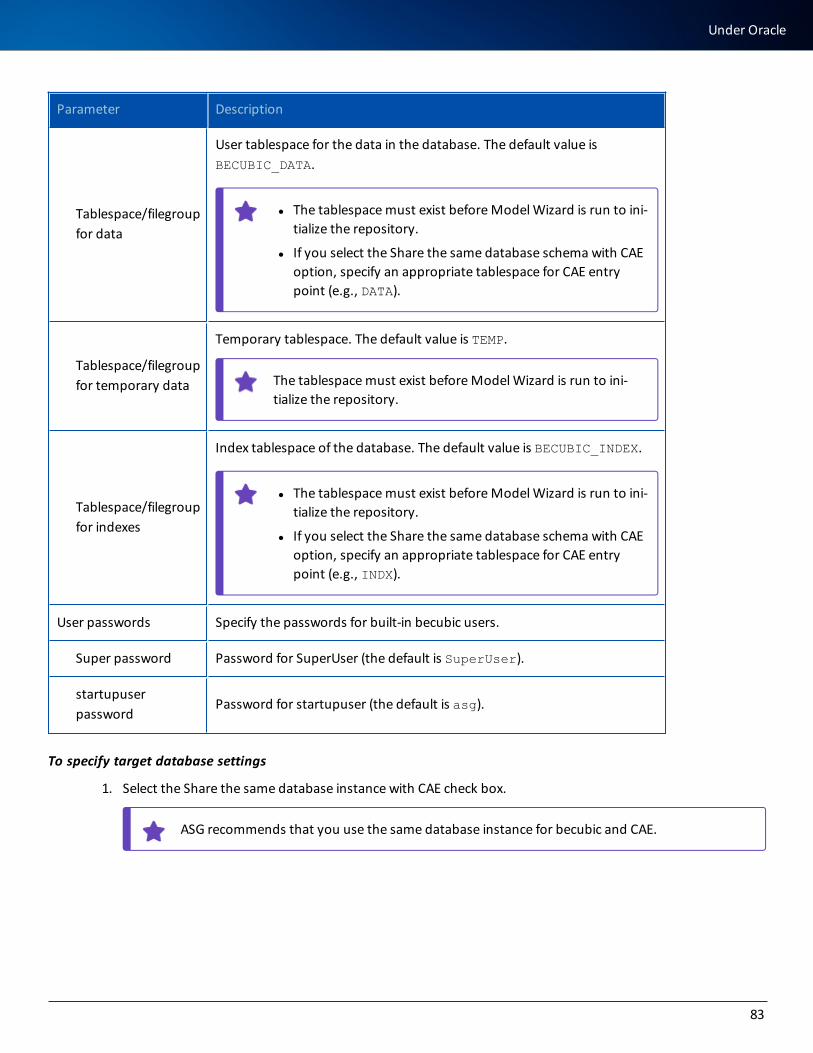
Parameter Description
Tablespace/filegroup for data
User tablespace for the data in the database. The default value is BECUBIC_DATA.
l The tablespace must exist before Model Wizard is run to ini-tialize the repository.
l If you select the Share the same database schema with CAE option, specify an appropriate tablespace for CAE entry point (e.g., DATA).
Tablespace/filegroup for temporary data
Temporary tablespace. The default value is TEMP.
The tablespace must exist before Model Wizard is run to ini-tialize the repository.
Tablespace/filegroup for indexes
Index tablespace of the database. The default value is BECUBIC_INDEX.
l The tablespace must exist before Model Wizard is run to ini-tialize the repository.
l If you select the Share the same database schema with CAE option, specify an appropriate tablespace for CAE entry point (e.g., INDX).
User passwords Specify the passwords for built-in becubic users.
Super password Password for SuperUser (the default is SuperUser).
startupuser password
Password for startupuser (the default is asg).
To specify target database settings
1. Select the Share the same database instance with CAE check box.
ASG recommends that you use the same database instance for becubic and CAE.
83
Under Oracle
2. Optional. Select the Share the same database schema with CAE check box.
If you are using a database created and initialized for an earlier version, make sure that the required permission has been granted on ASG_CAE_ROLE. See Adding becubic-specific Storage Area for details.
3. Provide appropriate values.
4. Click Next to display the Database actions dialog (see Database Actions).
Special Implementation Case Considerations
DBA Script Mode ImplementationIf you are implementing a new project with DBA scripts, an auto-sufficient repository owner user must be created by your DBA prior to running Model Wizard. See Running Model Wizard without the System User for details.
When running Model Wizard, specify the user information (name and password) of the Oracle user created by your DBA in these fields:
l Database administration user/password
l Repository owner name/password
Do not define the repository access user in this case.
Under Microsoft SQL ServerThe Target database settings dialog displays in each of these situations:
l During the creation of a new ADU project (see Creating a New ADU Project and Creating and Initializing a CAE Entry Point).
l During the creation of a new project using an XMI model (see Creating a New Project Using an XMI Model).
84
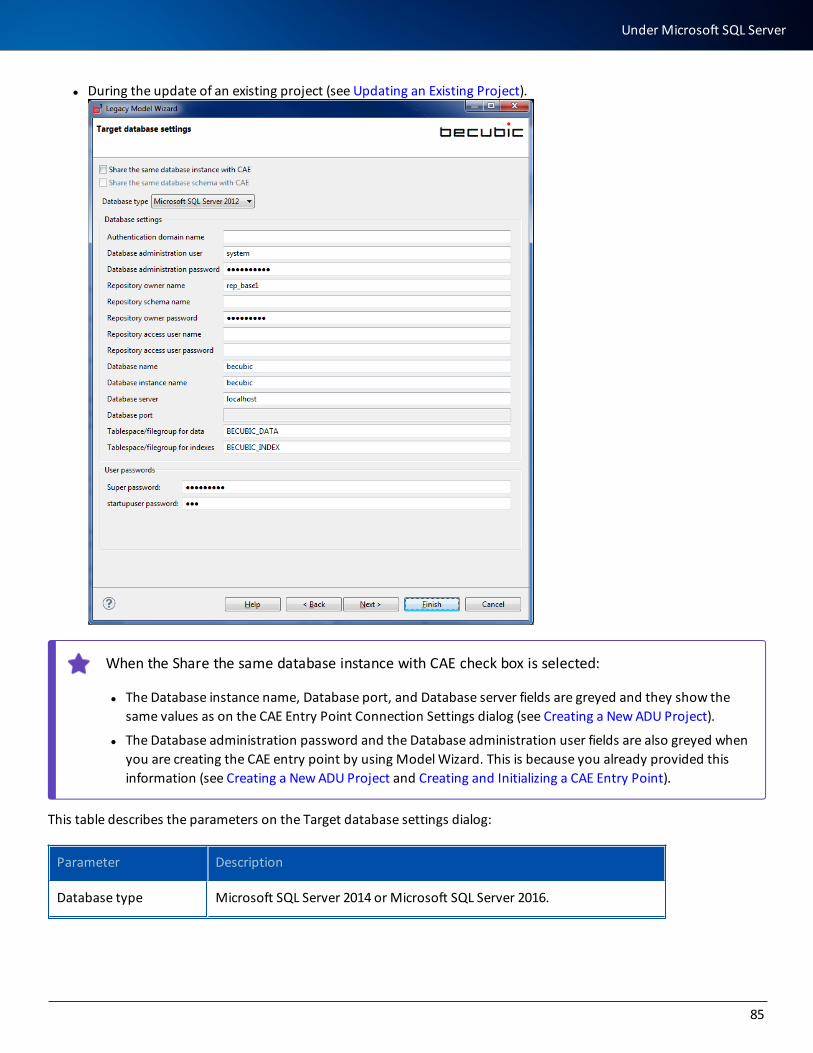
l During the update of an existing project (see Updating an Existing Project).
When the Share the same database instance with CAE check box is selected:
l The Database instance name, Database port, and Database server fields are greyed and they show the same values as on the CAE Entry Point Connection Settings dialog (see Creating a New ADU Project).
l The Database administration password and the Database administration user fields are also greyed when you are creating the CAE entry point by using Model Wizard. This is because you already provided this information (see Creating a New ADU Project and Creating and Initializing a CAE Entry Point).
This table describes the parameters on the Target database settings dialog:
Parameter Description
Database type Microsoft SQL Server 2014 or Microsoft SQL Server 2016.
85
Under Microsoft SQL Server
Parameter Description
Microsoft SQL Server 2008 is no longer supported. If you update an existing project using this version of SQL Server, Model Wizard shows the current setting but does not allow to run the repository update on it.
Database settings area
Authentication domain name
Name of the domain used for the Windows Authentication.
Database administration user
The default administrator user is sa for Microsoft SQL Server.
Database administration password
Password of the system administrator of the database.
If you do not select the Share the same database instance with CAE check box in step 1, becubic will create a database admin-istration user for the new instance. You, therefore, must spe-cify a system administrator account’s password that complies with your security policy because becubic uses the default set-tings to create the instance (i.e., Enforce password policy option enabled and Enforce password expiration disabled).
Repository owner name
Repository owner (i.e., a database user) that you define. All repository data is stored under the schema of this user.
Repository schema name
Name of the schema under which the becubic repository is stored.
Repository owner password
Password of the repository owner.
Repository access user name
Optional. Name of the database user that becubic uses to establish the connection to the repository.
If you want to specifically define a repository access user, you must give it a name different from the repository owner name.
86
Parameter Description
Repository access user password
Optional. Password for the repository access user.
Database nameThe database name (service name) under which the instance is recognized by the remote workstations.
Database instance name
Instance name of the Microsoft SQL Server database.
l If you use the default instance name (i.e., MSSQLSERVER), leave this field blank.
l If you do not select the Share the same database instance with CAE check box in step 1, becubic will create an instance with the name that you specify in this field.
Database server The machine name of the database server.
Database port
Port number of the database. The default port number is 1433 for Microsoft SQL Server.
You use the default port number only if you use the default instance.
Tablespace/filegroup for data
becubic-specific filegroup for the data in the database. The default value is BECUBIC_DATA.
The filegroup must exist before Model Wizard is run to initialize the repository.
Tablespace/filegroup for index
becubic-specific filegroup for the indexes in the database. The default value is BECUBIC_INDEX.
The filegroup must exist before Model Wizard is run to initialize the repository.
User passwords Specify the passwords for built-in becubic users.
Super password Password for SuperUser (the default is SuperUser).
87
Under Microsoft SQL Server
Parameter Description
startupuser password
Password for startupuser (the default is asg).
To specify target database settings
1. Select the Share the same database instance with CAE check box.
ASG recommends that you use the same database instance for becubic and CAE.
2. Optional. Select the Share the same database schema with CAE check box.
If you are using a database created and initialized for an earlier version, make sure that the required permission has been granted on ASG_CAE_ROLE. See Adding becubic-specific Storage Area for details.
3. Provide appropriate values.
4. Click Next to display the Database actions dialog (see Database Actions).
Special Implementation Case Considerations
DBA Script Mode ImplementationIf you are implementing a new project with DBA scripts, an auto-sufficient repository owner user must be created by your DBA prior to running Model Wizard. See Running Model Wizard without the System User for details.
When running Model Wizard, specify the user information (name and password) of the Oracle user created by your DBA in these fields:
l Database administration user/password
l Repository owner name/password
Do not define the repository access user in this case.
SQL Server in Windows Authentication ModeIf you are implementing a new project on a Microsoft SQL Server database instance that is configured with the Windows Authentication option for single sign-on, select the Microsoft SQL Server 2014 or Microsoft SQL Server 2016 database type and specify only these parameters:
l Share the same database instance with CAE
l Repository schema name
88
l Tablespace/filegroup for data
l Tablespace/filegroup for index
Leave all other fields empty.
Make sure that the other fields do not contain space characters. if a field is not actually empty, the execution of Model Wizard fails.
Database ActionsThe Database actions dialog displays in each of these situations:
l During the creation of a new ADU project (see Creating a New ADU Project and Creating and Initializing a CAE Entry Point).
l During the creation of a new project using an XMI model (see Creating a New Project Using an XMI Model).
l During the update of an existing project (see Updating an Existing Project).
Model Wizard is now ready to perform all the operations for which you have been specifying parameters and selecting options on the preceding dialogs. It summarizes the operations for you before taking action.
89
Database Actions
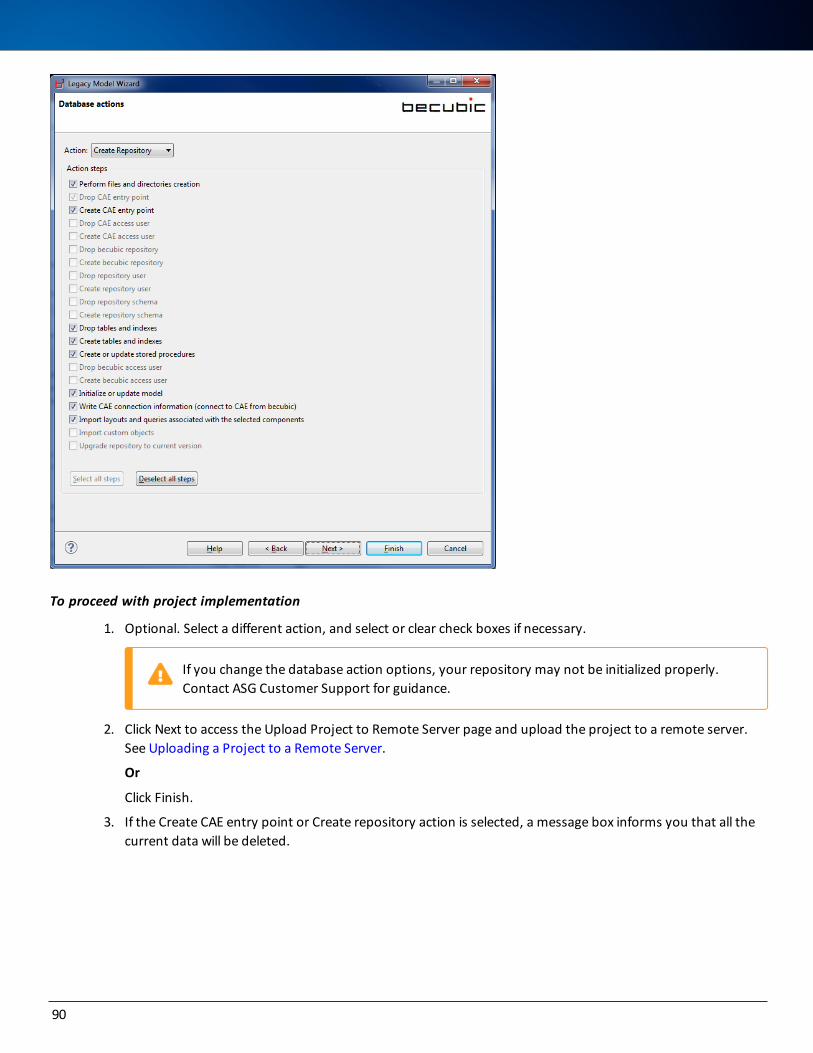
To proceed with project implementation
1. Optional. Select a different action, and select or clear check boxes if necessary.
If you change the database action options, your repository may not be initialized properly. Contact ASG Customer Support for guidance.
2. Click Next to access the Upload Project to Remote Server page and upload the project to a remote server. See Uploading a Project to a Remote Server.
Or
Click Finish.
3. If the Create CAE entry point or Create repository action is selected, a message box informs you that all the current data will be deleted.
90
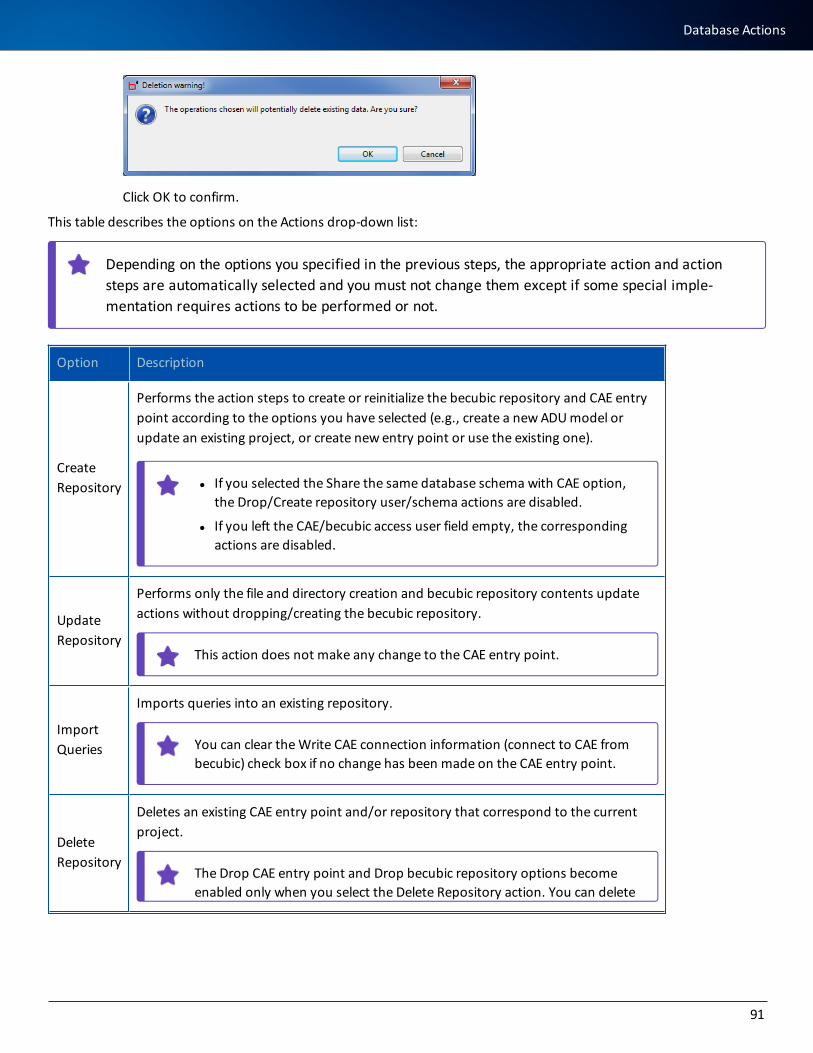
Click OK to confirm.
This table describes the options on the Actions drop-down list:
Depending on the options you specified in the previous steps, the appropriate action and action steps are automatically selected and you must not change them except if some special imple-mentation requires actions to be performed or not.
Option Description
Create Repository
Performs the action steps to create or reinitialize the becubic repository and CAE entry point according to the options you have selected (e.g., create a new ADU model or update an existing project, or create new entry point or use the existing one).
l If you selected the Share the same database schema with CAE option, the Drop/Create repository user/schema actions are disabled.
l If you left the CAE/becubic access user field empty, the corresponding actions are disabled.
Update Repository
Performs only the file and directory creation and becubic repository contents update actions without dropping/creating the becubic repository.
This action does not make any change to the CAE entry point.
Import Queries
Imports queries into an existing repository.
You can clear the Write CAE connection information (connect to CAE from becubic) check box if no change has been made on the CAE entry point.
Delete Repository
Deletes an existing CAE entry point and/or repository that correspond to the current project.
The Drop CAE entry point and Drop becubic repository options become enabled only when you select the Delete Repository action. You can delete
91
Database Actions

Option Description
one or both as required.
Upgrade Repository
Upgrades an existing repository and its federated CAE entry point to the current ver-sion.
This table describes the Action steps options:
Option Description
Perform files and dir-ectories creation
Creates files and directories.
Drop CAE entry point
Drops the user (Oracle) or database (Microsoft SQL Server) to delete the related entry point.
The current contents of the entry point will be deleted. Make a backup if necessary.
If Create CAE entry point is selected, Drop CAE entry point is automatically selected even for a new creation.
Create CAE entry point Creates the CAE entry point.
Drop CAE access user Drops the access user of the CAE entry point.
Create CAE access user Creates the CAE access user.
Drop becubic repos-itory
Drops the Oracle user and the corresponding schema to delete the related becubic repository.
The current contents of the repository will be deleted. If you want to use the same customized or user-defined objects and features (e.g., queries or layouts), export them before running Model Wizard.
If Create becubic repository is selected, Drop becubic repository
92
Option Description
is automatically selected even for a new creation.
Create becubic repos-itory
Creates a user and the corresponding schema for Oracle.
Drop repository user
Drops the repository user of the Microsoft SQL Server database, which hosts the related becubic repository.
The current contents of the repository will be deleted. If you want to use the same customized or user-defined objects and features (e.g., queries or layouts), export them before running Model Wizard.
If Create repository user is selected, Drop repository user is auto-matically selected even for a new creation.
Create repository user Creates the repository user.
Drop repository schema
Drops the Microsoft SQL Server database schema under which the related becubic repository is stored.
If Create repository schema is selected, Drop repository schema is automatically selected even for a new creation.
Create repository schema
Creates the repository schema.
Drop tables and indexes
Drops tables and indexes.
Create tables and indexes
Creates tables and indexes.
Create or update stored procedures
Creates or updates stored procedures for the database or the schema cre-ated in the previous step.
Drop becubic access user
Drops the access user of the becubic repository.
93
Database Actions
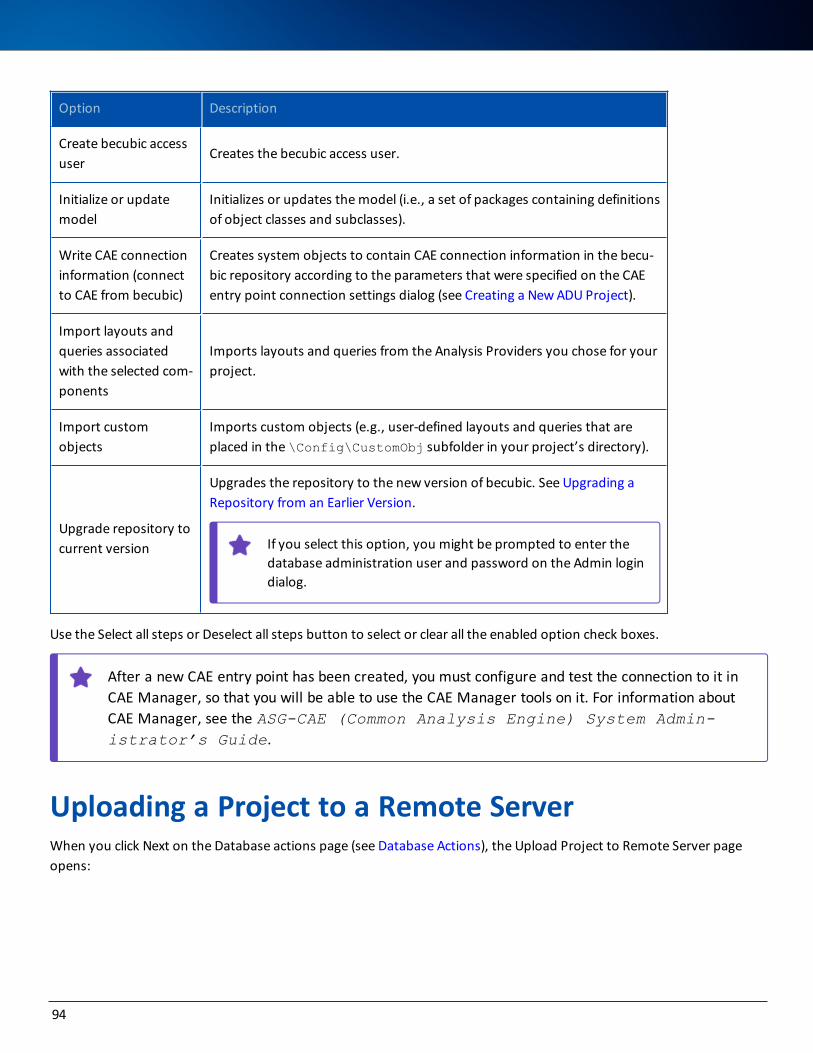
Option Description
Create becubic access user
Creates the becubic access user.
Initialize or update model
Initializes or updates the model (i.e., a set of packages containing definitions of object classes and subclasses).
Write CAE connection information (connect to CAE from becubic)
Creates system objects to contain CAE connection information in the becu-bic repository according to the parameters that were specified on the CAE entry point connection settings dialog (see Creating a New ADU Project).
Import layouts and queries associated with the selected com-ponents
Imports layouts and queries from the Analysis Providers you chose for your project.
Import custom objects
Imports custom objects (e.g., user-defined layouts and queries that are placed in the \Config\CustomObj subfolder in your project’s directory).
Upgrade repository to current version
Upgrades the repository to the new version of becubic. See Upgrading a Repository from an Earlier Version.
If you select this option, you might be prompted to enter the database administration user and password on the Admin login dialog.
Use the Select all steps or Deselect all steps button to select or clear all the enabled option check boxes.
After a new CAE entry point has been created, you must configure and test the connection to it in CAE Manager, so that you will be able to use the CAE Manager tools on it. For information about CAE Manager, see the ASG-CAE (Common Analysis Engine) System Admin-istrator’s Guide.
Uploading a Project to a Remote ServerWhen you click Next on the Database actions page (see Database Actions), the Upload Project to Remote Server page opens:
94
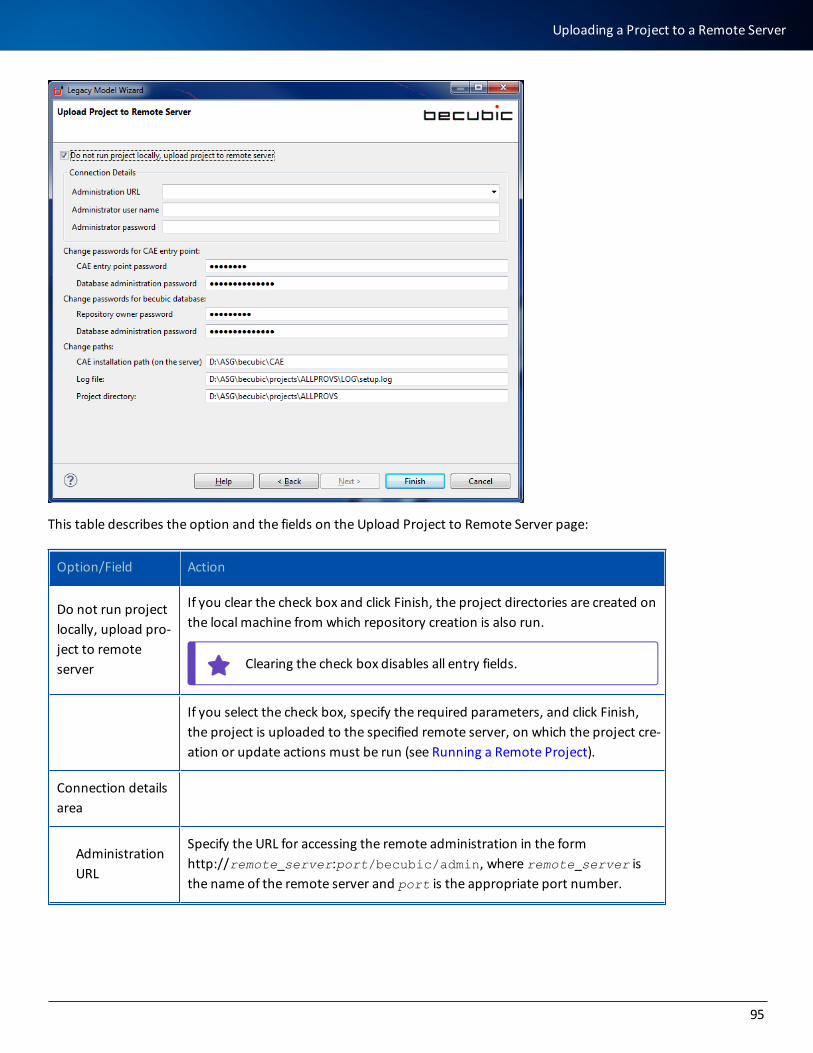
This table describes the option and the fields on the Upload Project to Remote Server page:
Option/Field Action
Do not run project locally, upload pro-ject to remote server
If you clear the check box and click Finish, the project directories are created on the local machine from which repository creation is also run.
Clearing the check box disables all entry fields.
If you select the check box, specify the required parameters, and click Finish, the project is uploaded to the specified remote server, on which the project cre-ation or update actions must be run (see Running a Remote Project).
Connection details area
Administration URL
Specify the URL for accessing the remote administration in the form http://remote_server:port/becubic/admin, where remote_server is the name of the remote server and port is the appropriate port number.
95
Uploading a Project to a Remote Server
Option/Field Action
Administrator user name
Specify a valid remote access user with administrator role. See Configuring the Server for Remote Access for details.
Administrator password
Specify the Administrator user’s password.
Change passwords for CAE entry point
CAE entry point password
Optional. Specify a different password for the CAE entry point user.
Database administration password
Optional. Specify a different password for the CAE entry point administration user.
Change passwords for becubic data-base
Repository owner password
Optional. Specify a different password for the becubic repository user.
Database administration password
Optional. Specify a different password for the database administration user.
Change paths
CAE installation path(on the server)
Change the CAE installation directory path only if it is different on the server.
Log file Change the log file directory path only if it is different on the server.
Project directory
Change the project directory path only if it is different on the server.
96

Managing Projects on a Remote ServerAccessing Remote ProjectsYou access your remote projects by connecting to the appropriate remote server.
To access remote projects
1. From the menu bar of the Eclipse client, select becubic }Administration tools }Model Wizard.
2. Click Manage Projects on Remote Server to open the Manage Remote Projects dialog:
3. Enter the required information in the fields as shown in this table:
Field Action
Administration URL
Specify the URL for accessing the remote administration in the form http://remote_server:port/becubic/admin, where remote_server is the name of the remote server and port is the appropriate port number.
Administrator user name
Specify a valid remote access user with administrator role. See Con-figuring the Server for Remote Access for details.
Administrator password
Specify the becubic user’s password.
4. Click Next. The Manage Projects on ServerName page opens:
97
Managing Projects on a Remote Server
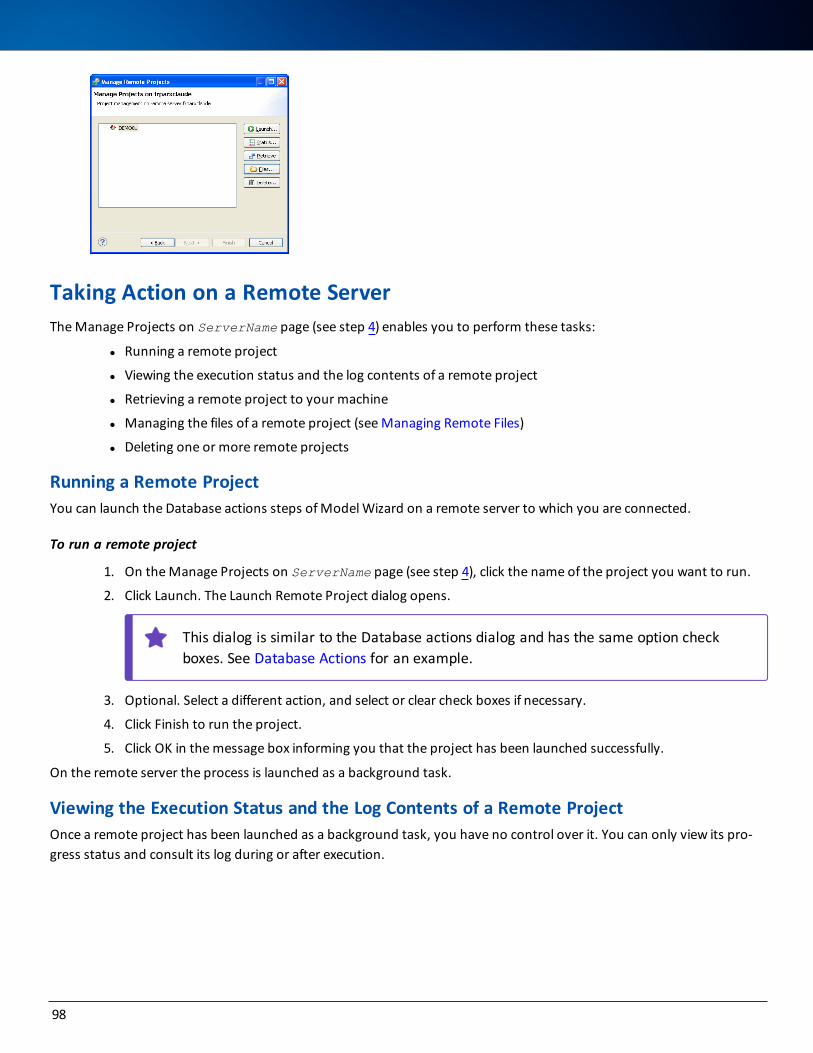
Taking Action on a Remote ServerThe Manage Projects on ServerName page (see step 4) enables you to perform these tasks:
l Running a remote project
l Viewing the execution status and the log contents of a remote project
l Retrieving a remote project to your machine
l Managing the files of a remote project (see Managing Remote Files)
l Deleting one or more remote projects
Running a Remote ProjectYou can launch the Database actions steps of Model Wizard on a remote server to which you are connected.
To run a remote project
1. On the Manage Projects on ServerName page (see step 4), click the name of the project you want to run.
2. Click Launch. The Launch Remote Project dialog opens.
This dialog is similar to the Database actions dialog and has the same option check boxes. See Database Actions for an example.
3. Optional. Select a different action, and select or clear check boxes if necessary.
4. Click Finish to run the project.
5. Click OK in the message box informing you that the project has been launched successfully.
On the remote server the process is launched as a background task.
Viewing the Execution Status and the Log Contents of a Remote ProjectOnce a remote project has been launched as a background task, you have no control over it. You can only view its pro-gress status and consult its log during or after execution.
98
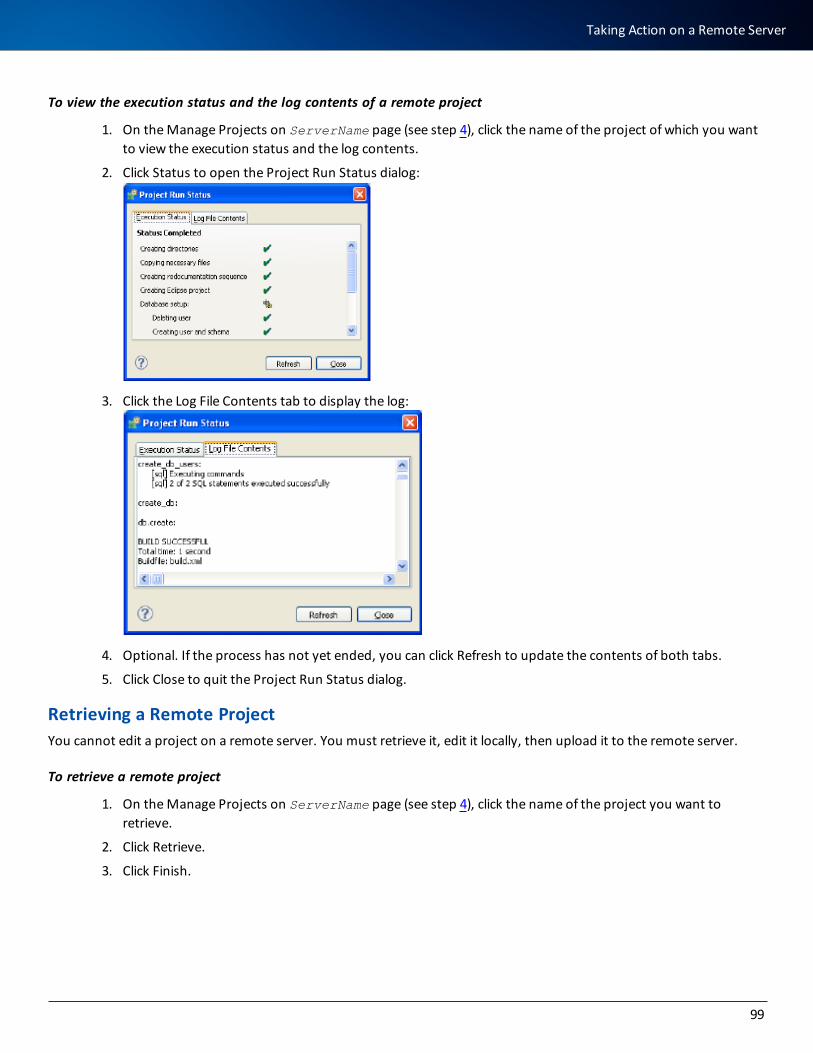
To view the execution status and the log contents of a remote project
1. On the Manage Projects on ServerName page (see step 4), click the name of the project of which you want to view the execution status and the log contents.
2. Click Status to open the Project Run Status dialog:
3. Click the Log File Contents tab to display the log:
4. Optional. If the process has not yet ended, you can click Refresh to update the contents of both tabs.
5. Click Close to quit the Project Run Status dialog.
Retrieving a Remote ProjectYou cannot edit a project on a remote server. You must retrieve it, edit it locally, then upload it to the remote server.
To retrieve a remote project
1. On the Manage Projects on ServerName page (see step 4), click the name of the project you want to retrieve.
2. Click Retrieve.
3. Click Finish.
99
Taking Action on a Remote Server
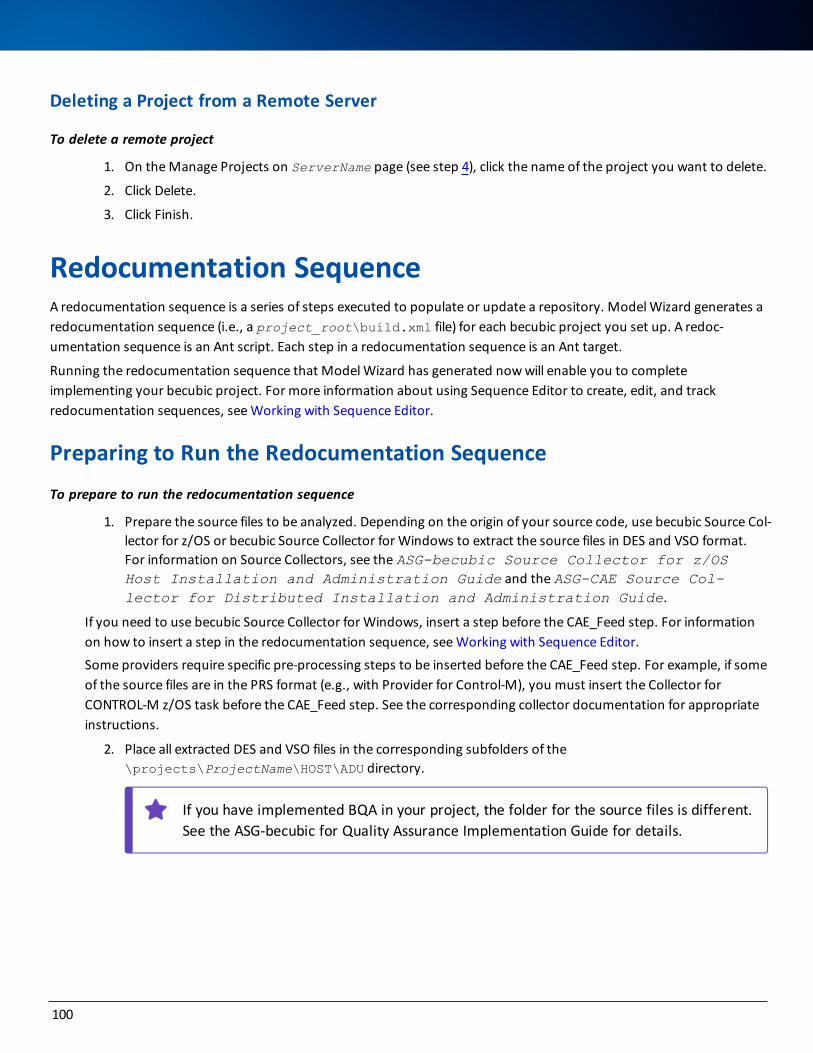
Deleting a Project from a Remote Server
To delete a remote project
1. On the Manage Projects on ServerName page (see step 4), click the name of the project you want to delete.
2. Click Delete.
3. Click Finish.
Redocumentation SequenceA redocumentation sequence is a series of steps executed to populate or update a repository. Model Wizard generates a redocumentation sequence (i.e., a project_root\build.xml file) for each becubic project you set up. A redoc-umentation sequence is an Ant script. Each step in a redocumentation sequence is an Ant target.
Running the redocumentation sequence that Model Wizard has generated now will enable you to complete implementing your becubic project. For more information about using Sequence Editor to create, edit, and track redocumentation sequences, see Working with Sequence Editor.
Preparing to Run the Redocumentation Sequence
To prepare to run the redocumentation sequence
1. Prepare the source files to be analyzed. Depending on the origin of your source code, use becubic Source Col-lector for z/OS or becubic Source Collector for Windows to extract the source files in DES and VSO format. For information on Source Collectors, see the ASG-becubic Source Collector for z/OS Host Installation and Administration Guide and the ASG-CAE Source Col-lector for Distributed Installation and Administration Guide.
If you need to use becubic Source Collector for Windows, insert a step before the CAE_Feed step. For information on how to insert a step in the redocumentation sequence, see Working with Sequence Editor.Some providers require specific pre-processing steps to be inserted before the CAE_Feed step. For example, if some of the source files are in the PRS format (e.g., with Provider for Control-M), you must insert the Collector for CONTROL-M z/OS task before the CAE_Feed step. See the corresponding collector documentation for appropriate instructions.
2. Place all extracted DES and VSO files in the corresponding subfolders of the \projects\ProjectName\HOST\ADU directory.
If you have implemented BQA in your project, the folder for the source files is different. See the ASG-becubic for Quality Assurance Implementation Guide for details.
100
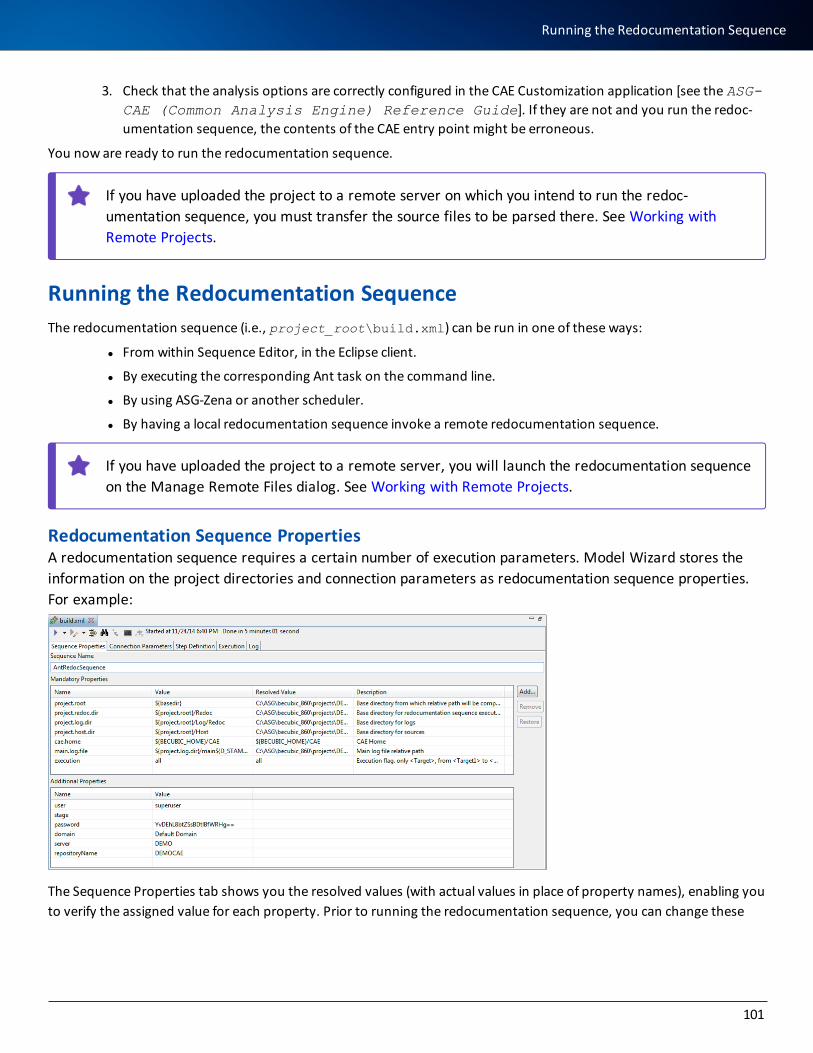
3. Check that the analysis options are correctly configured in the CAE Customization application [see the ASG-CAE (Common Analysis Engine) Reference Guide]. If they are not and you run the redoc-umentation sequence, the contents of the CAE entry point might be erroneous.
You now are ready to run the redocumentation sequence.
If you have uploaded the project to a remote server on which you intend to run the redoc-umentation sequence, you must transfer the source files to be parsed there. See Working with Remote Projects.
Running the Redocumentation SequenceThe redocumentation sequence (i.e., project_root\build.xml) can be run in one of these ways:
l From within Sequence Editor, in the Eclipse client.
l By executing the corresponding Ant task on the command line.
l By using ASG-Zena or another scheduler.
l By having a local redocumentation sequence invoke a remote redocumentation sequence.
If you have uploaded the project to a remote server, you will launch the redocumentation sequence on the Manage Remote Files dialog. See Working with Remote Projects.
Redocumentation Sequence PropertiesA redocumentation sequence requires a certain number of execution parameters. Model Wizard stores the information on the project directories and connection parameters as redocumentation sequence properties. For example:
The Sequence Properties tab shows you the resolved values (with actual values in place of property names), enabling you to verify the assigned value for each property. Prior to running the redocumentation sequence, you can change these
101
Running the Redocumentation Sequence
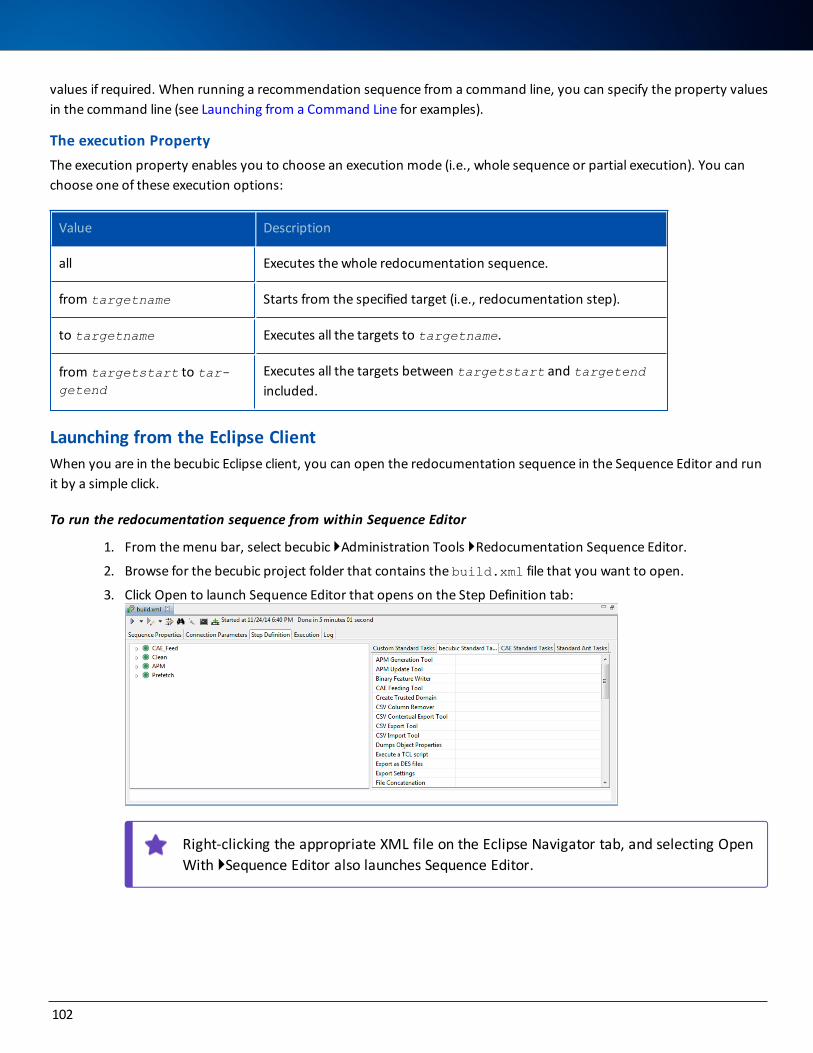
values if required. When running a recommendation sequence from a command line, you can specify the property values in the command line (see Launching from a Command Line for examples).
The execution PropertyThe execution property enables you to choose an execution mode (i.e., whole sequence or partial execution). You can choose one of these execution options:
Value Description
all Executes the whole redocumentation sequence.
from targetname Starts from the specified target (i.e., redocumentation step).
to targetname Executes all the targets to targetname.
from targetstart to tar-getend
Executes all the targets between targetstart and targetend included.
Launching from the Eclipse ClientWhen you are in the becubic Eclipse client, you can open the redocumentation sequence in the Sequence Editor and run it by a simple click.
To run the redocumentation sequence from within Sequence Editor
1. From the menu bar, select becubic }Administration Tools }Redocumentation Sequence Editor.
2. Browse for the becubic project folder that contains the build.xml file that you want to open.
3. Click Open to launch Sequence Editor that opens on the Step Definition tab:
Right-clicking the appropriate XML file on the Eclipse Navigator tab, and selecting Open With }Sequence Editor also launches Sequence Editor.
102

4. Click (i.e., Start Process) in the top left corner of Sequence Editor.
5. Click OK on the Execution Options dialog.
Launching from a Command LineLaunching a redocumentation sequence through a command line enables you to automate and schedule a periodic incre-mental execution of the repository update.
The Sequence Editor can generate a BAT file that launches the current redocumentation sequence. See Generating a BAT File to Run the Redocumentation Sequence for details.
To run the redocumentation sequence from the command line
To launch the redocumentation sequence, use Ant 1.7.1 or later.
> Enter this command in the project_root directory:BECUBIC_HOME\ant\bin\ant
l If the Ant program or the path \ant\bin is recognized by the system, you can just enter the ant com-mand without the full path. If the command ant is not recognized, you must enter this command first:
set path=%path%;BECUBIC_HOME\ant\bin
l Sequence Editor enables you to generate a BAT file to run a redocumentation sequence. See Generating a BAT File to Run the Redocumentation Sequence for details.
l You must either create the BECUBIC_HOME environment variable or specify the -DBECUBIC_HOME para-meter with the full path as a value in the command line.
If you want to specify values for the project properties, use this syntax:ant -Dproperty1=value1 [-Dproperty2=value2...]
This table lists the frequently used execution parameters:
Parameter Syntax Examples
execute-Dexecute=all
-D"execute=from target1 to target2"
buildfile -Dbuildfile filename.xml
l If the property name or its value contains space or other special characters, you must enclose them with the double quotation marks like in the second example.
103
Running the Redocumentation Sequence
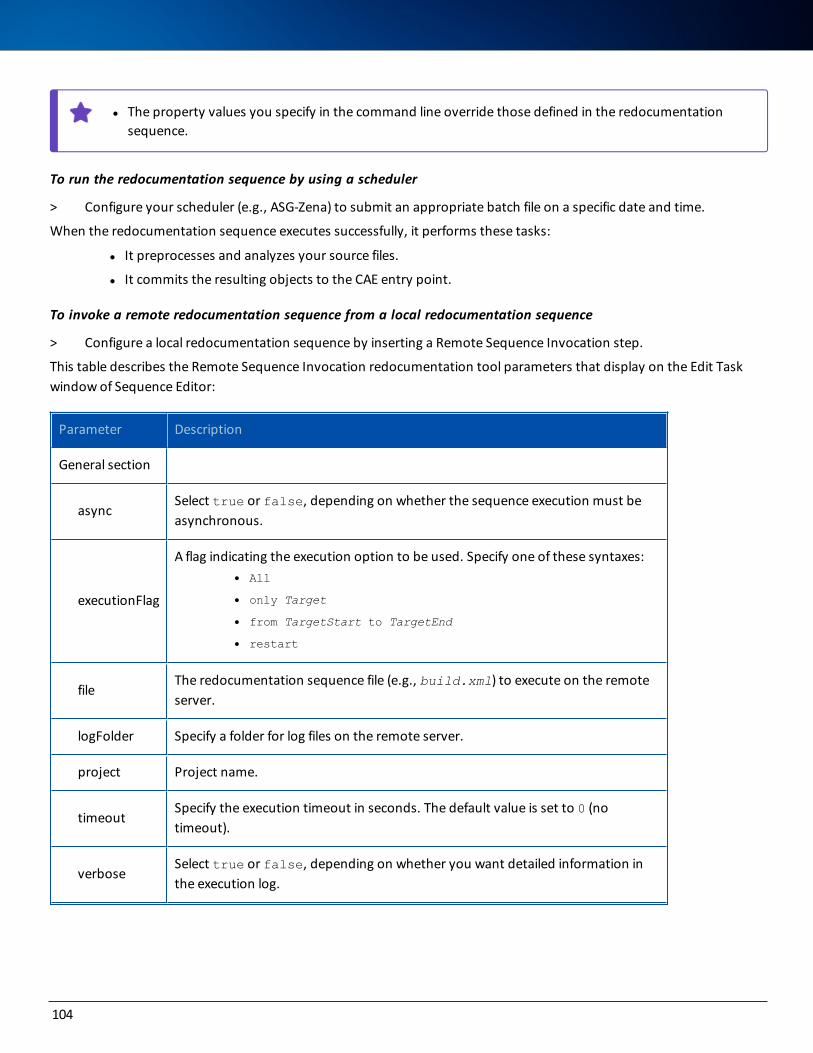
l The property values you specify in the command line override those defined in the redocumentation sequence.
To run the redocumentation sequence by using a scheduler
> Configure your scheduler (e.g., ASG-Zena) to submit an appropriate batch file on a specific date and time.
When the redocumentation sequence executes successfully, it performs these tasks:
l It preprocesses and analyzes your source files.
l It commits the resulting objects to the CAE entry point.
To invoke a remote redocumentation sequence from a local redocumentation sequence
> Configure a local redocumentation sequence by inserting a Remote Sequence Invocation step.
This table describes the Remote Sequence Invocation redocumentation tool parameters that display on the Edit Task window of Sequence Editor:
Parameter Description
General section
asyncSelect true or false, depending on whether the sequence execution must be asynchronous.
executionFlag
A flag indicating the execution option to be used. Specify one of these syntaxes: l All
l only Target
l from TargetStart to TargetEnd
l restart
fileThe redocumentation sequence file (e.g., build.xml) to execute on the remote server.
logFolder Specify a folder for log files on the remote server.
project Project name.
timeoutSpecify the execution timeout in seconds. The default value is set to 0 (no timeout).
verboseSelect true or false, depending on whether you want detailed information in the execution log.
104
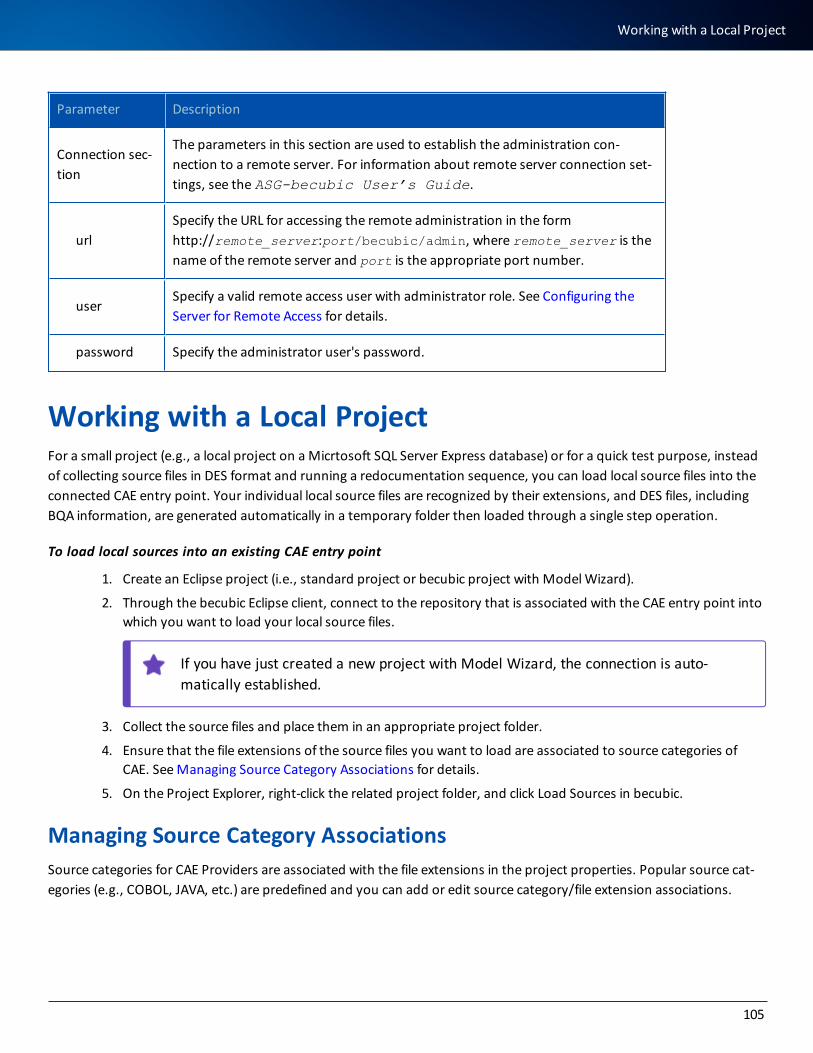
Parameter Description
Connection sec-tion
The parameters in this section are used to establish the administration con-nection to a remote server. For information about remote server connection set-tings, see the ASG-becubic User’s Guide.
urlSpecify the URL for accessing the remote administration in the form http://remote_server:port/becubic/admin, where remote_server is the name of the remote server and port is the appropriate port number.
userSpecify a valid remote access user with administrator role. See Configuring the Server for Remote Access for details.
password Specify the administrator user's password.
Working with a Local ProjectFor a small project (e.g., a local project on a Micrtosoft SQL Server Express database) or for a quick test purpose, instead of collecting source files in DES format and running a redocumentation sequence, you can load local source files into the connected CAE entry point. Your individual local source files are recognized by their extensions, and DES files, including BQA information, are generated automatically in a temporary folder then loaded through a single step operation.
To load local sources into an existing CAE entry point
1. Create an Eclipse project (i.e., standard project or becubic project with Model Wizard).
2. Through the becubic Eclipse client, connect to the repository that is associated with the CAE entry point into which you want to load your local source files.
If you have just created a new project with Model Wizard, the connection is auto-matically established.
3. Collect the source files and place them in an appropriate project folder.
4. Ensure that the file extensions of the source files you want to load are associated to source categories of CAE. See Managing Source Category Associations for details.
5. On the Project Explorer, right-click the related project folder, and click Load Sources in becubic.
Managing Source Category AssociationsSource categories for CAE Providers are associated with the file extensions in the project properties. Popular source cat-egories (e.g., COBOL, JAVA, etc.) are predefined and you can add or edit source category/file extension associations.
105
Working with a Local Project
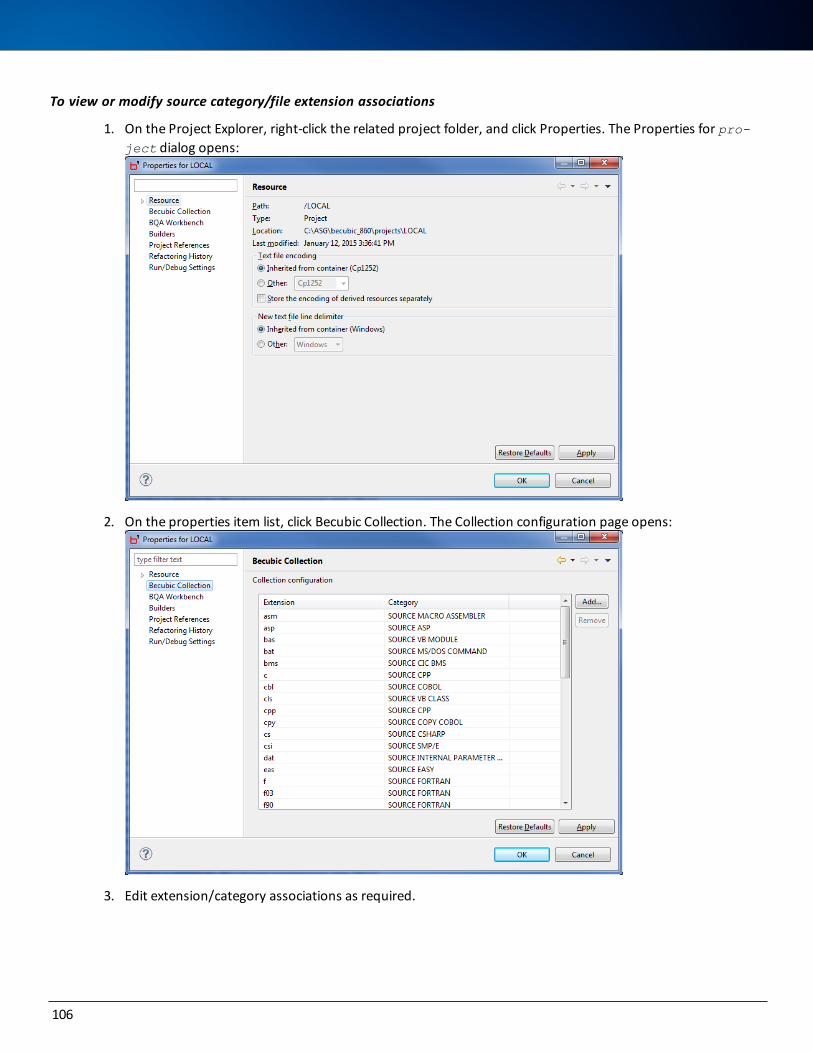
To view or modify source category/file extension associations
1. On the Project Explorer, right-click the related project folder, and click Properties. The Properties for pro-ject dialog opens:
2. On the properties item list, click Becubic Collection. The Collection configuration page opens:
3. Edit extension/category associations as required.
106
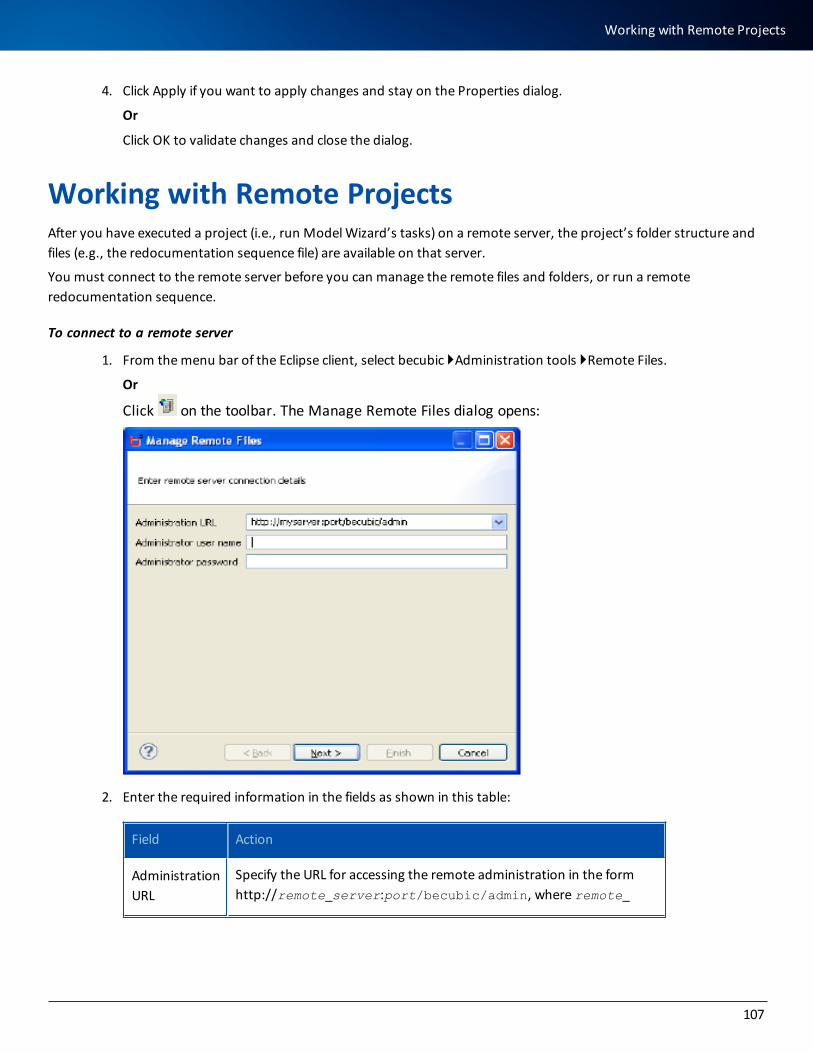
4. Click Apply if you want to apply changes and stay on the Properties dialog.
Or
Click OK to validate changes and close the dialog.
Working with Remote ProjectsAfter you have executed a project (i.e., run Model Wizard’s tasks) on a remote server, the project’s folder structure and files (e.g., the redocumentation sequence file) are available on that server.
You must connect to the remote server before you can manage the remote files and folders, or run a remote redocumentation sequence.
To connect to a remote server
1. From the menu bar of the Eclipse client, select becubic }Administration tools }Remote Files.
Or
Click on the toolbar. The Manage Remote Files dialog opens:
2. Enter the required information in the fields as shown in this table:
Field Action
Administration URL
Specify the URL for accessing the remote administration in the form http://remote_server:port/becubic/admin, where remote_
107
Working with Remote Projects
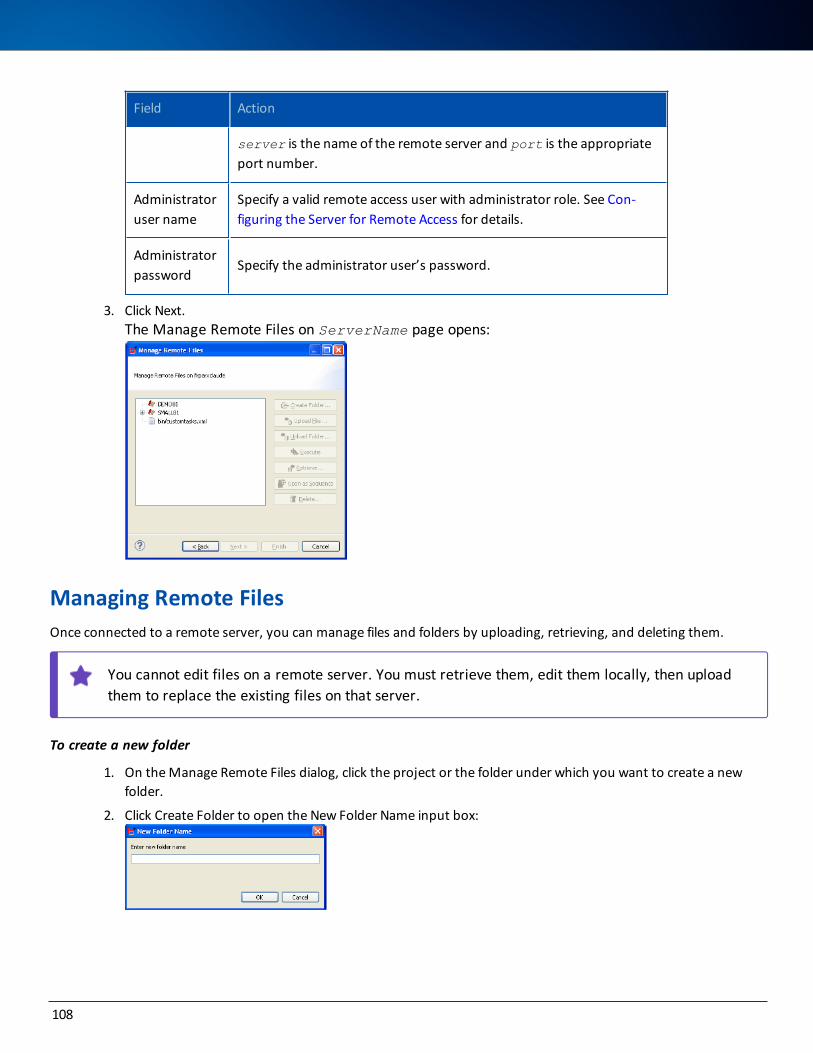
Field Action
server is the name of the remote server and port is the appropriate port number.
Administrator user name
Specify a valid remote access user with administrator role. See Con-figuring the Server for Remote Access for details.
Administrator password
Specify the administrator user’s password.
3. Click Next.The Manage Remote Files on ServerName page opens:
Managing Remote FilesOnce connected to a remote server, you can manage files and folders by uploading, retrieving, and deleting them.
You cannot edit files on a remote server. You must retrieve them, edit them locally, then upload them to replace the existing files on that server.
To create a new folder
1. On the Manage Remote Files dialog, click the project or the folder under which you want to create a new folder.
2. Click Create Folder to open the New Folder Name input box:
108

3. Enter a name for the new folder.
4. Click OK. The icon and name of the new folder are added to the left area of the Manage Remote Files dialog.
5. Click Finish.
6. Click OK in the message box informing you that the folder has been created successfully.
To upload files
1. On the Manage Remote Files dialog, click the project or the folder to which you want to upload files.
If you select the project, the files will be uploaded to the project’s root folder.
2. Click Upload File.
3. On the Windows’ standard Choose dialog that opens, browse for and select the file(s) to upload. You can select multiple files only if they are in the same folder.
4. Click OK. The icon(s) and name(s) of the uploaded file(s) are added to the left area of the Manage Remote Files dialog.
5. Click Finish.
6. Click OK in the message box informing you that the file(s) has(have) been uploaded successfully.
To upload a folder
1. On the Manage Remote Files dialog, click the project or the folder to which you want to upload a folder.
If you select the project, the folder will be uploaded to the project’s root folder.
2. Click Upload Folder.
3. On the Windows’ standard Choose dialog that opens, browse for and select the folder(s) to upload. You can select multiple folders only if they are in the same folder.
4. Click OK. The icon and name of the uploaded folder(s) are added to left area of the Manage Remote Files dia-log.
5. Click Finish.
6. Click OK in the message box informing you that the folder(s) has(have) been uploaded successfully.
To retrieve files, folders, or projects from a remote server
1. On the Manage Remote Files dialog, select one or more files or folders, or a single project that you want to retrieve to your machine.
Retrieving folders and projects also retrieves their contents.
2. Click Retrieve.
109
Managing Remote Files
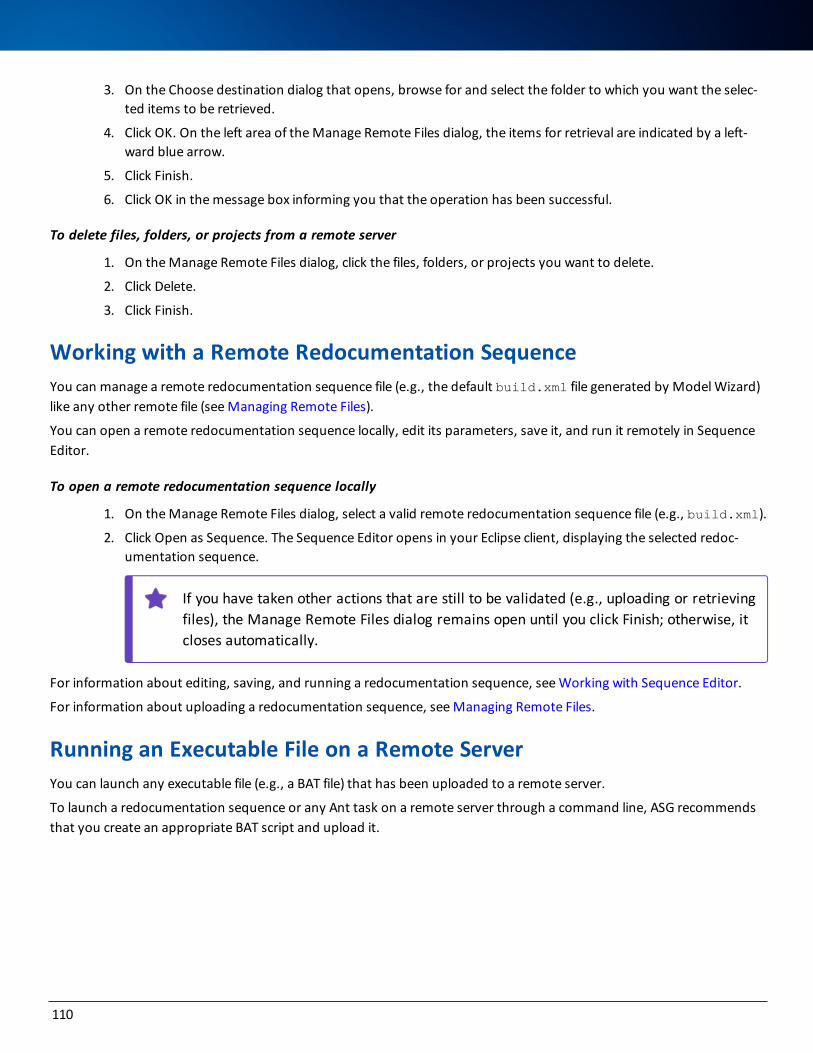
3. On the Choose destination dialog that opens, browse for and select the folder to which you want the selec-ted items to be retrieved.
4. Click OK. On the left area of the Manage Remote Files dialog, the items for retrieval are indicated by a left-ward blue arrow.
5. Click Finish.
6. Click OK in the message box informing you that the operation has been successful.
To delete files, folders, or projects from a remote server
1. On the Manage Remote Files dialog, click the files, folders, or projects you want to delete.
2. Click Delete.
3. Click Finish.
Working with a Remote Redocumentation SequenceYou can manage a remote redocumentation sequence file (e.g., the default build.xml file generated by Model Wizard) like any other remote file (see Managing Remote Files).
You can open a remote redocumentation sequence locally, edit its parameters, save it, and run it remotely in Sequence Editor.
To open a remote redocumentation sequence locally
1. On the Manage Remote Files dialog, select a valid remote redocumentation sequence file (e.g., build.xml).
2. Click Open as Sequence. The Sequence Editor opens in your Eclipse client, displaying the selected redoc-umentation sequence.
If you have taken other actions that are still to be validated (e.g., uploading or retrieving files), the Manage Remote Files dialog remains open until you click Finish; otherwise, it closes automatically.
For information about editing, saving, and running a redocumentation sequence, see Working with Sequence Editor.
For information about uploading a redocumentation sequence, see Managing Remote Files.
Running an Executable File on a Remote ServerYou can launch any executable file (e.g., a BAT file) that has been uploaded to a remote server.
To launch a redocumentation sequence or any Ant task on a remote server through a command line, ASG recommends that you create an appropriate BAT script and upload it.
110
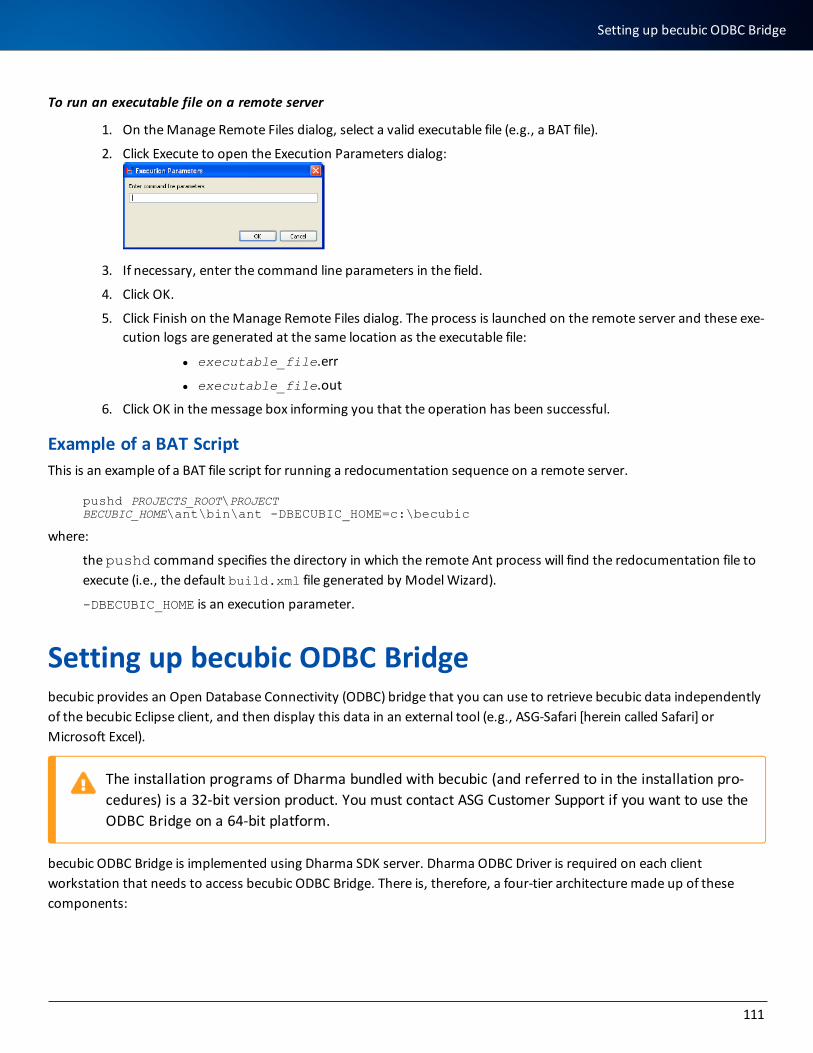
To run an executable file on a remote server
1. On the Manage Remote Files dialog, select a valid executable file (e.g., a BAT file).
2. Click Execute to open the Execution Parameters dialog:
3. If necessary, enter the command line parameters in the field.
4. Click OK.
5. Click Finish on the Manage Remote Files dialog. The process is launched on the remote server and these exe-cution logs are generated at the same location as the executable file:
l executable_file.err
l executable_file.out
6. Click OK in the message box informing you that the operation has been successful.
Example of a BAT ScriptThis is an example of a BAT file script for running a redocumentation sequence on a remote server.
pushd PROJECTS_ROOT\PROJECTBECUBIC_HOME\ant\bin\ant -DBECUBIC_HOME=c:\becubic
where:
the pushd command specifies the directory in which the remote Ant process will find the redocumentation file to execute (i.e., the default build.xml file generated by Model Wizard).
-DBECUBIC_HOME is an execution parameter.
Setting up becubic ODBC Bridgebecubic provides an Open Database Connectivity (ODBC) bridge that you can use to retrieve becubic data independently of the becubic Eclipse client, and then display this data in an external tool (e.g., ASG-Safari [herein called Safari] or Microsoft Excel).
The installation programs of Dharma bundled with becubic (and referred to in the installation pro-cedures) is a 32-bit version product. You must contact ASG Customer Support if you want to use the ODBC Bridge on a 64-bit platform.
becubic ODBC Bridge is implemented using Dharma SDK server. Dharma ODBC Driver is required on each client workstation that needs to access becubic ODBC Bridge. There is, therefore, a four-tier architecture made up of these components:
111
Setting up becubic ODBC Bridge
l The becubic data in its relational database.
l The becubic server on a J2EE application server.
l The Dharma SDK server, which provides an ODBC interface over the network and is itself a becubic client.
l The external client application(s), which use(s) the Dharma ODBC driver to connect to the Dharma server.
Configuring the Dharma SDK ServerBefore you set up the Dharma SDK server, ensure that a becubic Rich Client is present on the machine. Without the becubic specific programs, the Dharma SDK server cannot connect to becubic Access Layer (for information about becubic Access Layer, see Database Access).
To configure the Dharma SDK server
1. Open the ODBC folder on the becubic installation CD-ROM.
2. Decompress the DHJPROSVR112.WIN.zip file, which contains the Dharma SDK setup program, then run setup.exe.
3. Follow the Dharma setup wizard instructions.
4. Create the BECUBIC_HOME system environment variable.
If you launch the Dharma SDK server in console mode, you can use the SET command to define BECUBIC_HOME.
5. Edit the Dharma SDK server INI file (i.e., WINDIR\DHSODBC.INI) exactly as shown here:
[Environment]TPEROOT=dharma_install_dir DB_NAME=db_name DH_USER=dharma DH_PASSWD=dummy TPESQLDBG=N CLASSPATH=BECUBIC_HOME\lib\SIS-JDBC.jar JVM_LIB=BECUBIC_HOME\java\jre\bin\server\jvm.dllDH_DYNAMIC_METADATA=Y
where:
dharma_install_dir is the root directory of your Dharma server installation.
db_name is the project name that you specified in Model Wizard (see Model Wizard’s Output Directory Dialog). It also is the name of the server node that displays on the becubic Eclipse client Preferences window. (For information about the preferences, see the ASG-becubic User’s Guide.)
112
BECUBIC_HOME is the installation directory of the becubic Rich Client on the Dharma JDK server machine.
Under WebSphere, this is the default JVM directory:
BECUBIC_HOME\java\jre\bin\j9vm\jvm.dll
6. Restart the Dharma server.
7. Initialize the database system files for Dharma by taking these actions (the becubic repository becomes a Dharma database):
a. Create a becubic user named dharma with the ABDamrahD password in the Default Domain domain.
b. If the connection to the db_name repository has not yet been created, define it in the becubic Eclipse client.
c. Run mdcreate db_name in the TPEROOT\bin directory to create a db_name.dbs directory that includes the Dharma system files.
d. Delete the dharma user.
Repeat step 5 through step 7 for each becubic connection to be used through ODBC.
Verifying Connectivity with the Dharma ISQL ToolOnce the Dharma server is running and the Dharma database system files are created, you can test the SQL interface by connecting to the database for which you have just created the Dharma system files.
To test the default connection
> Execute isql in the TPEROOT\bin directory.
If the isql> prompt displays, the default connection, whose parameters are defined in the WINDIR\DHSODBC.INI file, is established.
To connect to a Dharma database to execute SQL commands
> Execute this command in the TPEROOT\bin directory:
isql -u b3username -a passwordDB
where:b3username is a valid becubic user name (e.g., startupuser or any other user that your becubic administrator has defined).password is the becubic user’s password.DB is the name of a Dharma database that you have configured.
If you connect as a becubic user, you can use the SQL commands at the isql> prompt to obtain information from the becubic repository. See becubic ODBC Bridge Output for the syntaxes of the SQL commands.
113
Verifying Connectivity with the Dharma ISQL Tool
Configuring the ODBC ClientsOn each client workstation that is to connect to the Dharma SDK Server, you must install the Dharma ODBC driver and configure a data source for each database.
To configure an ODBC client workstation
If the connection is made locally on the Dharma SDK server, you can skip steps step 2 and step 3 because the Dharma SDK server provides the Dharma ODBC driver.
1. Open the ODBC folder on the becubic installation CD-ROM.
2. Decompress the DHPROODBC112.WIN.zip file, which contains the Dharma ODBC driver setup program, then run setup.exe.
3. Follow the Dharma ODBC driver setup wizard instructions.
4. On the Start menu, launch Control Panel }Administration Tools }Data Source (ODBC). The ODBC Data Source Administrator dialog of Windows opens on the User DSN tab.
5. Click Add to open the Create New Data Source dialog.
6. Click Dharma SDK Professional ODBC Driver 11.02.0000, then click Finish.
7. On the Dharma ODBC Setup dialog that opens, specify these parameters:
Parameter Value
Data Source Name
Name for the data source configuration that you will specify when you establish an ODBC connection from within an ODBC compatible applic-ation (e.g., Microsoft Excel).
Description Optional. Description of the data source.
Host Name of the machine on which the Dharma server is running.
DatabaseDharma database you created (i.e., the db_name parameter value you spe-cified in the DHSODBC.INI file when setting up the Dharma SDK server).
User ID
Name of a valid becubic user that you want to use to access the cor-responding becubic repository through the ODBC Bridge.
If you want to specify a becubic user that was created in a dif-ferent domain than the default domain, use the
114
Parameter Value
Domain\userID syntax. (You can create a dedicated becubic user on the Administration page of becubic Web.)
Password Password for the becubic user that you specify in the User ID field.
Service Leave this field empty.
Preserve Cursor
OFF
Client Char-acter Set
"UTF8" (CP CP_UTF8)
Options Optional. The option parameters for the data source.
8. Click OK.
The client workstation can then use the defined data source in ODBC-aware applications.
becubic ODBC Bridge OutputThis section provides information about using Dharma SQL, Microsoft Query, or a Microsoft Excel macro statement to retrieve becubic repository data through ODBC Bridge. ASG recommends that you also consult the appropriate product documentation.
becubic Data Mapped to SQL
becubic Object TypesEach becubic object type is mapped to a relational table in ODBC. The table name is the object type short name in lower case. The table owner name is the object type package name enclosed in double quotation marks (because of the :: delim-iter).
For example, the program table has the "becubic::analysis::common" owner and the SELECT * FROM "becubic::analysis::common".program SQL command returns all mapped fields for all object instances of the becubic::analysis::Common::Program type.
An object instance appears in all the tables that correspond to the object types from which the instance’s object type is inheriting.
115
becubic ODBC Bridge Output
becubic System AttributesThese becubic system attributes are mapped to SQL:
Attribute Description
core_id The first field in each table. It is the string representation of the ID.
core_val-idfrom
The second field in each table. It is the last modification date (i.e., the date from which the current version of the object has been valid).
core_dis-play_name
This is the object’s display name calculated by becubic.
becubic Model ElementsThese becubic model elements are mapped to SQL:
Only single-value elements are mapped. Multiple-value links and attributes are ignored.
l Attributes are mapped as columns of the corresponding type (i.e., VARCHAR for string attributes).
In the becubic repository, the length of string attribute values is not limited, but because of SQL limitations very long strings might be retrieved truncated.
l Links are mapped as VARCHAR columns (i.e., string representations of the target IDs).
Elements are mapped with a lower case name. For example, the SELECT name FROM "becubic::analysis::common".program SQL command returns the Name attribute of each Program object.
becubic Queries
In your model, any attributes or references that are SQL reserved words can cause queries to fail.
Tables are created for the becubic complex queries that can be represented in a stable relational format. Stable means that the number of columns is known in advance, prior to running the query, so that the metadata information on the table is accurate.
To qualify, queries must have a default layout—of either Source or XRef type—set for them and they must not be recursive. They will appear as tables in the SQL interface. The column names and types will be calculated from the layout the queries use.
The table name is that of the query in lower case and its owner is "becubic::administration::query".
116
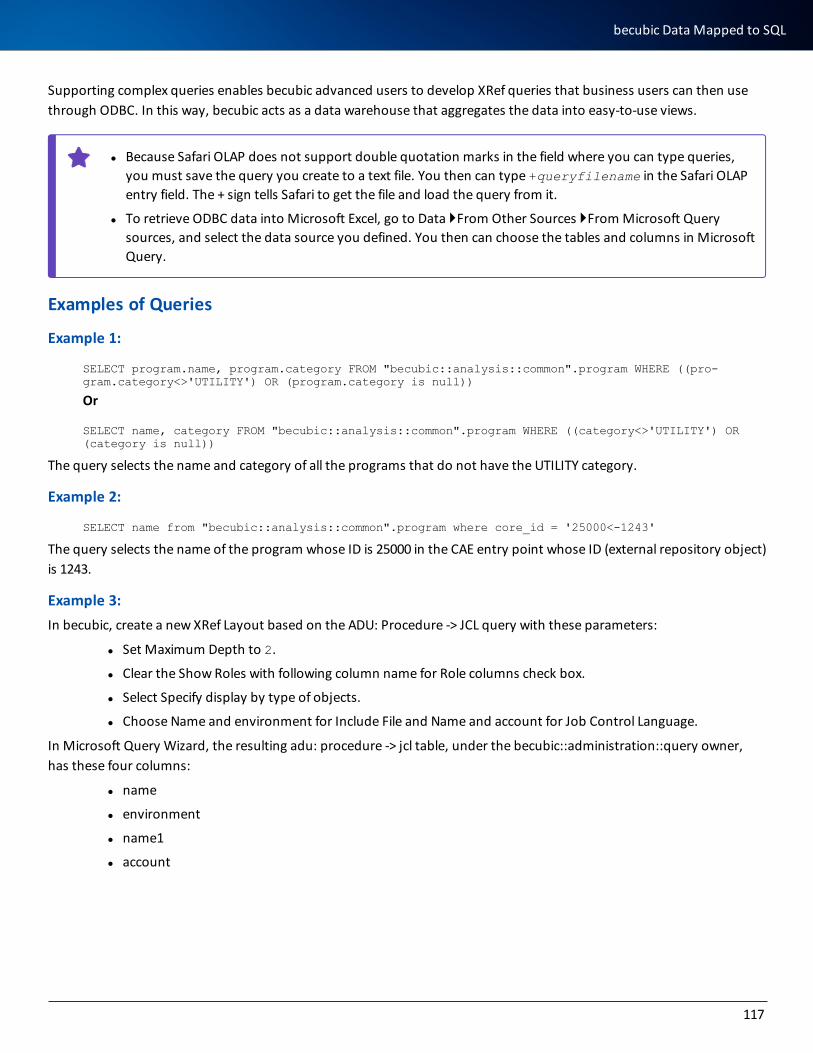
Supporting complex queries enables becubic advanced users to develop XRef queries that business users can then use through ODBC. In this way, becubic acts as a data warehouse that aggregates the data into easy-to-use views.
l Because Safari OLAP does not support double quotation marks in the field where you can type queries, you must save the query you create to a text file. You then can type +queryfilename in the Safari OLAP entry field. The + sign tells Safari to get the file and load the query from it.
l To retrieve ODBC data into Microsoft Excel, go to Data }From Other Sources }From Microsoft Query sources, and select the data source you defined. You then can choose the tables and columns in Microsoft Query.
Examples of Queries
Example 1:
SELECT program.name, program.category FROM "becubic::analysis::common".program WHERE ((pro-gram.category<>'UTILITY') OR (program.category is null))
Or
SELECT name, category FROM "becubic::analysis::common".program WHERE ((category<>'UTILITY') OR (category is null))
The query selects the name and category of all the programs that do not have the UTILITY category.
Example 2:
SELECT name from "becubic::analysis::common".program where core_id = '25000<-1243'
The query selects the name of the program whose ID is 25000 in the CAE entry point whose ID (external repository object) is 1243.
Example 3:In becubic, create a new XRef Layout based on the ADU: Procedure -> JCL query with these parameters:
l Set Maximum Depth to 2.
l Clear the Show Roles with following column name for Role columns check box.
l Select Specify display by type of objects.
l Choose Name and environment for Include File and Name and account for Job Control Language.
In Microsoft Query Wizard, the resulting adu: procedure -> jcl table, under the becubic::administration::query owner, has these four columns:
l name
l environment
l name1
l account
117
becubic Data Mapped to SQL
Examples of Retrieving Data with Microsoft QueryThis section describes several procedures to retrieve becubic data through ODBC and using Microsoft Query in Microsoft Excel.
The procedures have been performed in Microsoft Excel 2007 with Microsoft Query Version 12.0. They might be different when performed with other versions of the software.
These are the basic operations you can perform in Microsoft Query:
l Retrieving all the object instances of a specific type with all their attributes. This is the equivalent to the All Instances view in the becubic GUIs.
l Retrieving a selection of attributes of objects of a specific type. This is similar to a single-step query whose res-ult you display in a custom XRef-type layout.
l Running a becubic query that is compatible with the becubic ODBC Bridge (i.e., any query with an XRef or Source layout).
l You must define the expected results (e.g., objects to be retrieved and information to be shown) in the becu-bic query and the associated default layout.
l Retrieving the history table of APM applications.
Although it is possible to type SQL-like statements in the Microsoft Query SQL Editor, ASG recom-mends that you use the Query Wizard to perform basic operations within Microsoft Query.
To retrieve all instances of a specific type
1. Ensure that a Dharma database and a Windows data source are configured (see Configuring the Dharma SDK Server and Configuring the ODBC Clients).
2. On the Microsoft Excel menu, select Data }From Other Sources }From Data Connection Wizard to open the Data Connection Wizard.
118
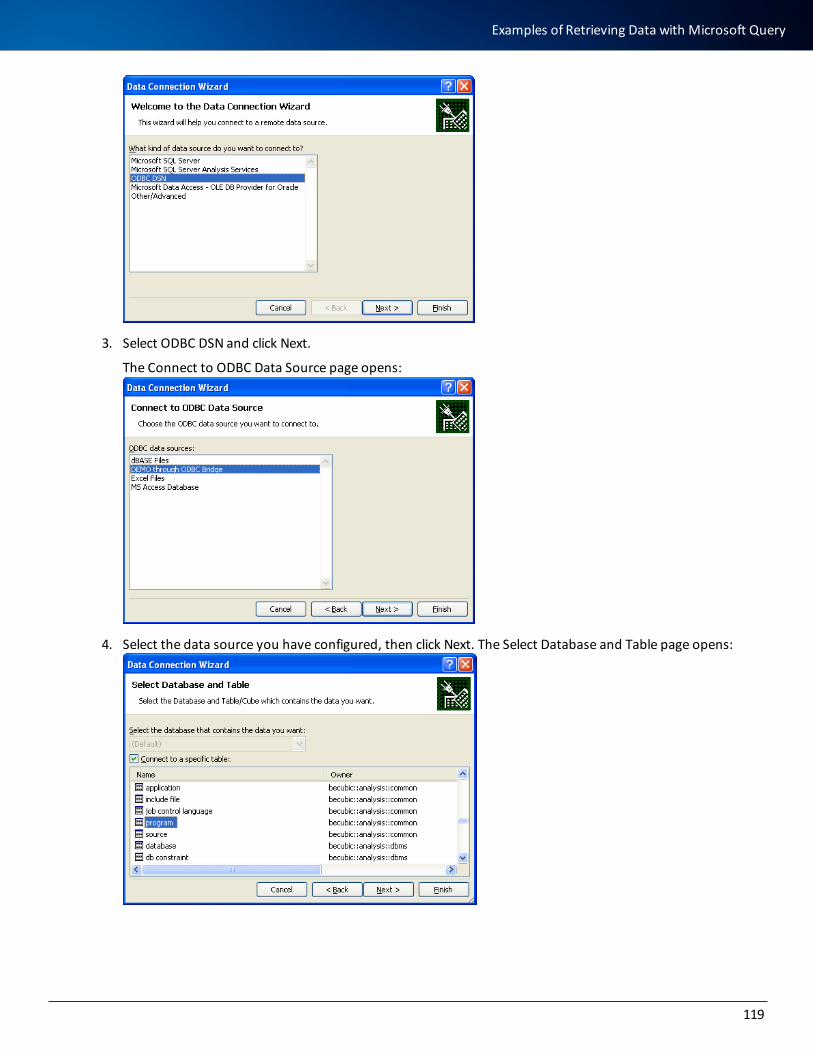
3. Select ODBC DSN and click Next.
The Connect to ODBC Data Source page opens:
4. Select the data source you have configured, then click Next. The Select Database and Table page opens:
119
Examples of Retrieving Data with Microsoft Query
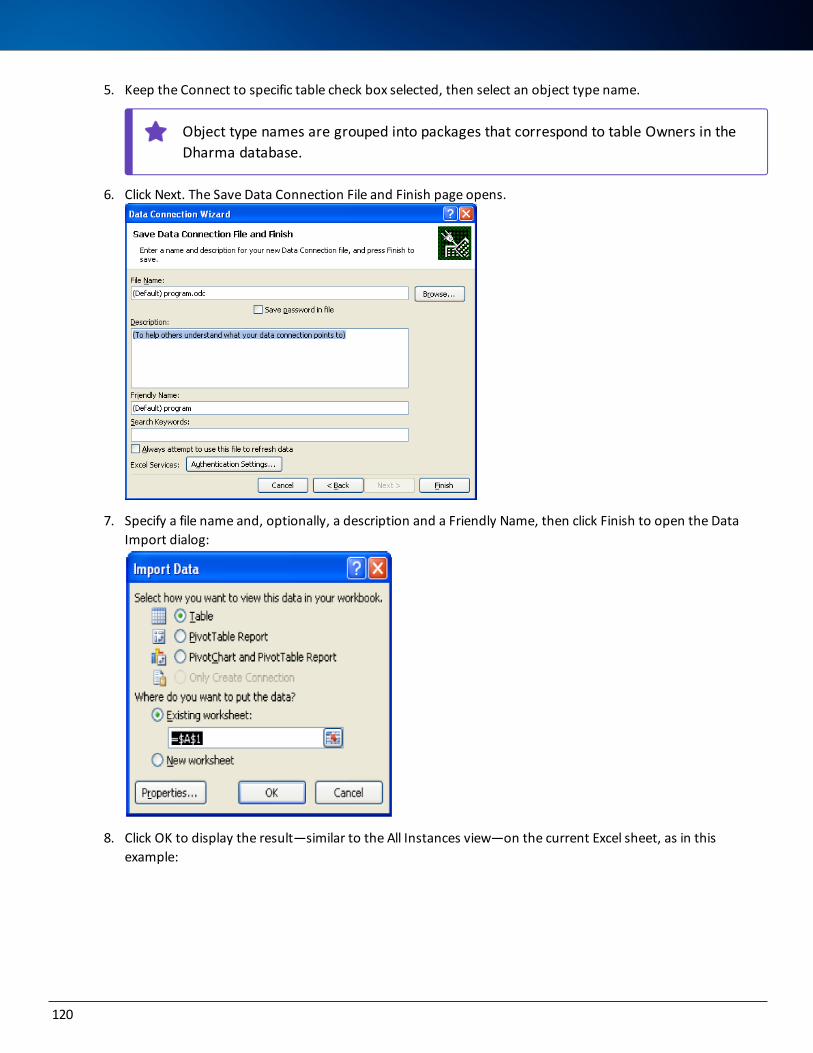
5. Keep the Connect to specific table check box selected, then select an object type name.
Object type names are grouped into packages that correspond to table Owners in the Dharma database.
6. Click Next. The Save Data Connection File and Finish page opens.
7. Specify a file name and, optionally, a description and a Friendly Name, then click Finish to open the Data Import dialog:
8. Click OK to display the result—similar to the All Instances view—on the current Excel sheet, as in this example:
120
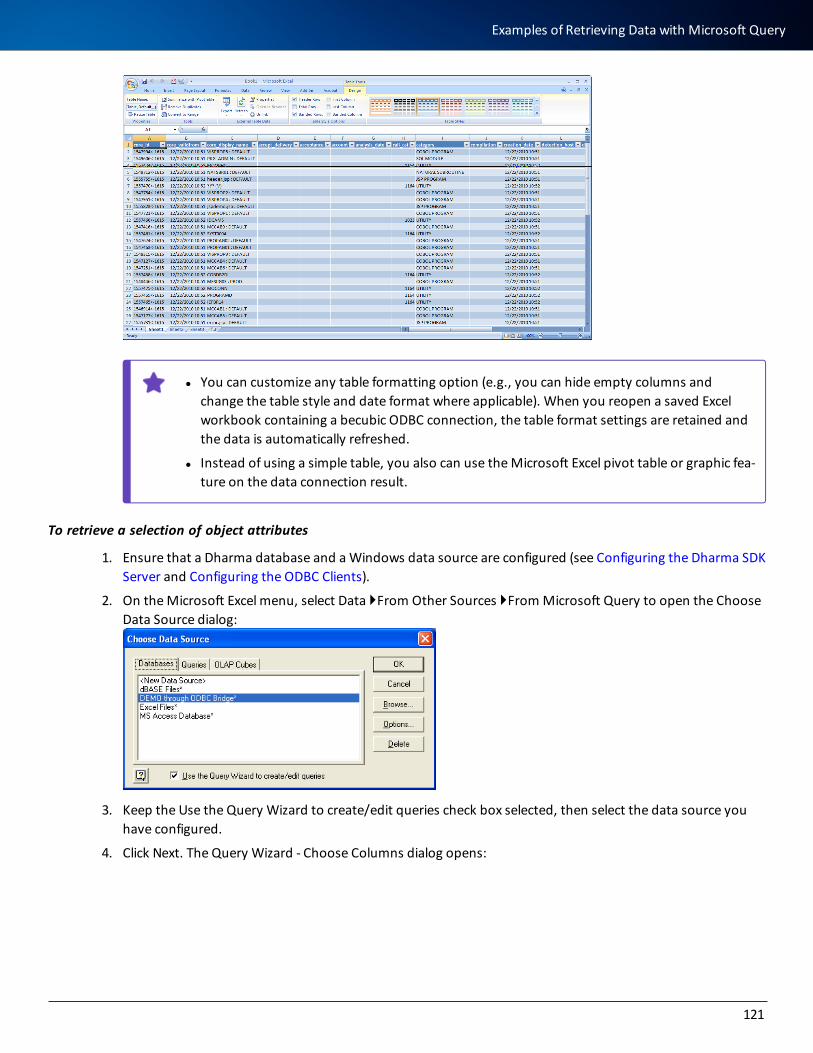
l You can customize any table formatting option (e.g., you can hide empty columns and change the table style and date format where applicable). When you reopen a saved Excel workbook containing a becubic ODBC connection, the table format settings are retained and the data is automatically refreshed.
l Instead of using a simple table, you also can use the Microsoft Excel pivot table or graphic fea-ture on the data connection result.
To retrieve a selection of object attributes
1. Ensure that a Dharma database and a Windows data source are configured (see Configuring the Dharma SDK Server and Configuring the ODBC Clients).
2. On the Microsoft Excel menu, select Data }From Other Sources }From Microsoft Query to open the Choose Data Source dialog:
3. Keep the Use the Query Wizard to create/edit queries check box selected, then select the data source you have configured.
4. Click Next. The Query Wizard - Choose Columns dialog opens:
121
Examples of Retrieving Data with Microsoft Query
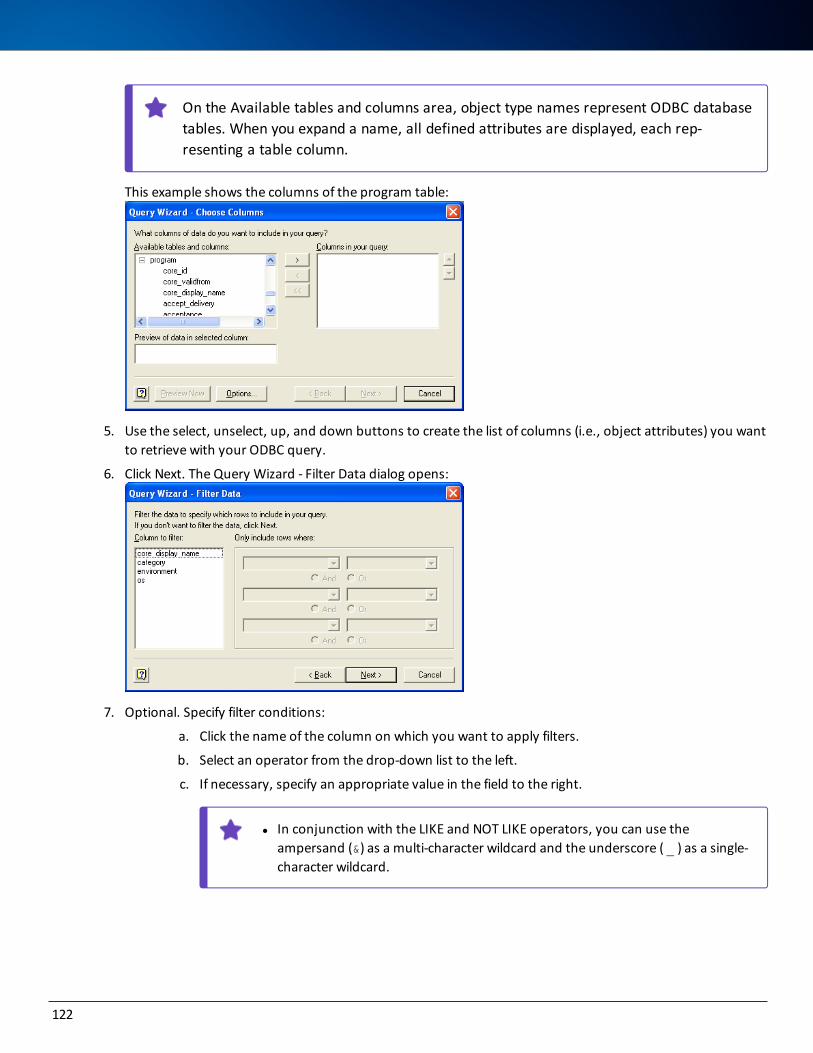
On the Available tables and columns area, object type names represent ODBC database tables. When you expand a name, all defined attributes are displayed, each rep-resenting a table column.
This example shows the columns of the program table:
5. Use the select, unselect, up, and down buttons to create the list of columns (i.e., object attributes) you want to retrieve with your ODBC query.
6. Click Next. The Query Wizard - Filter Data dialog opens:
7. Optional. Specify filter conditions:
a. Click the name of the column on which you want to apply filters.
b. Select an operator from the drop-down list to the left.
c. If necessary, specify an appropriate value in the field to the right.
l In conjunction with the LIKE and NOT LIKE operators, you can use the ampersand (&) as a multi-character wildcard and the underscore ( _ ) as a single-character wildcard.
122
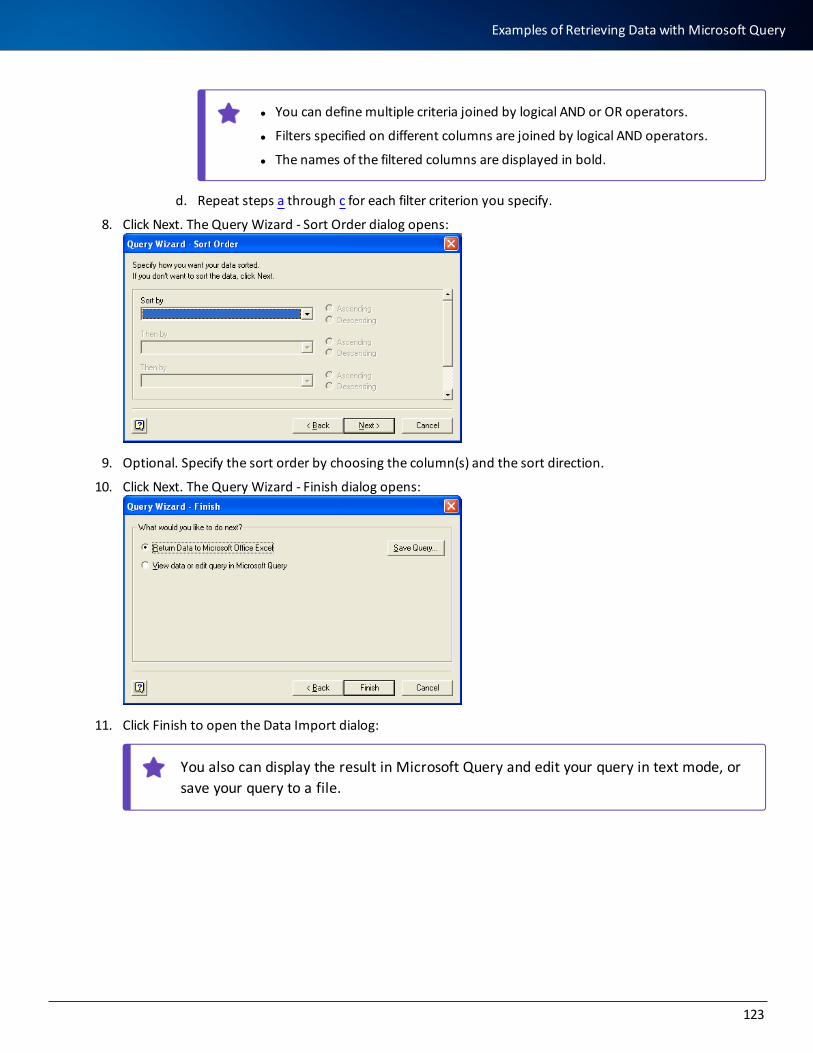
l You can define multiple criteria joined by logical AND or OR operators.
l Filters specified on different columns are joined by logical AND operators.
l The names of the filtered columns are displayed in bold.
d. Repeat steps a through c for each filter criterion you specify.
8. Click Next. The Query Wizard - Sort Order dialog opens:
9. Optional. Specify the sort order by choosing the column(s) and the sort direction.
10. Click Next. The Query Wizard - Finish dialog opens:
11. Click Finish to open the Data Import dialog:
You also can display the result in Microsoft Query and edit your query in text mode, or save your query to a file.
123
Examples of Retrieving Data with Microsoft Query
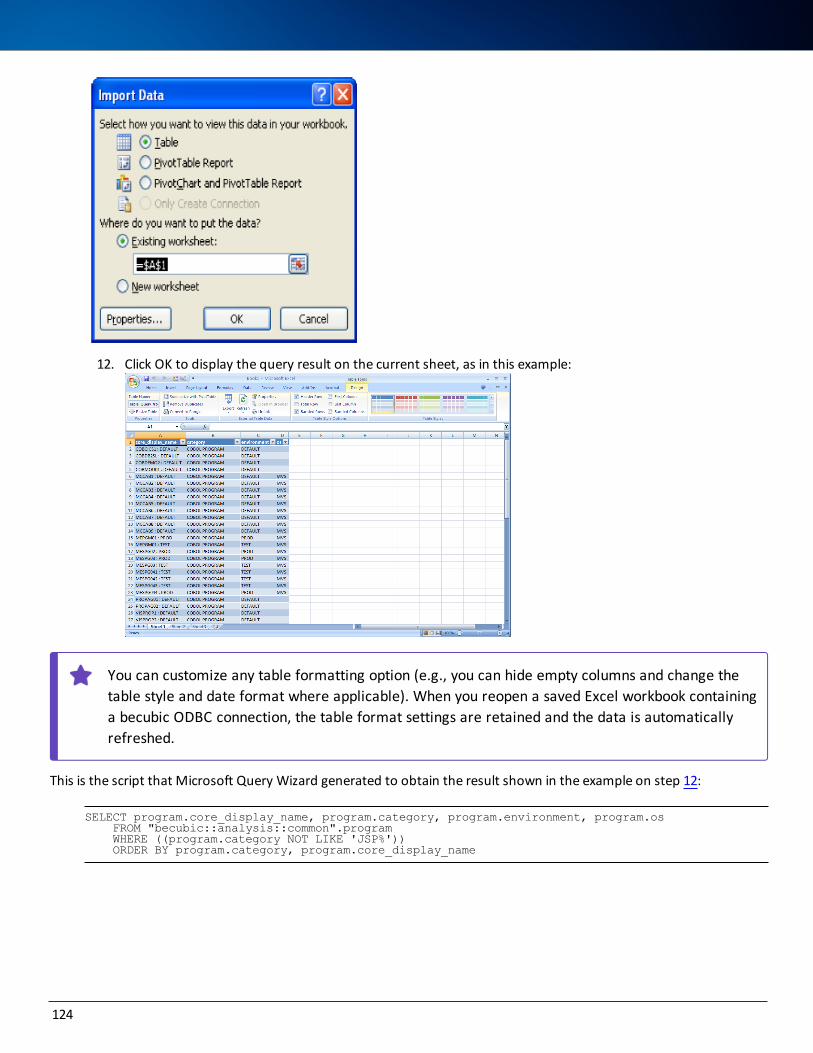
12. Click OK to display the query result on the current sheet, as in this example:
You can customize any table formatting option (e.g., you can hide empty columns and change the table style and date format where applicable). When you reopen a saved Excel workbook containing a becubic ODBC connection, the table format settings are retained and the data is automatically refreshed.
This is the script that Microsoft Query Wizard generated to obtain the result shown in the example on step 12:
SELECT program.core_display_name, program.category, program.environment, program.os FROM "becubic::analysis::common".program WHERE ((program.category NOT LIKE 'JSP%')) ORDER BY program.category, program.core_display_name
124
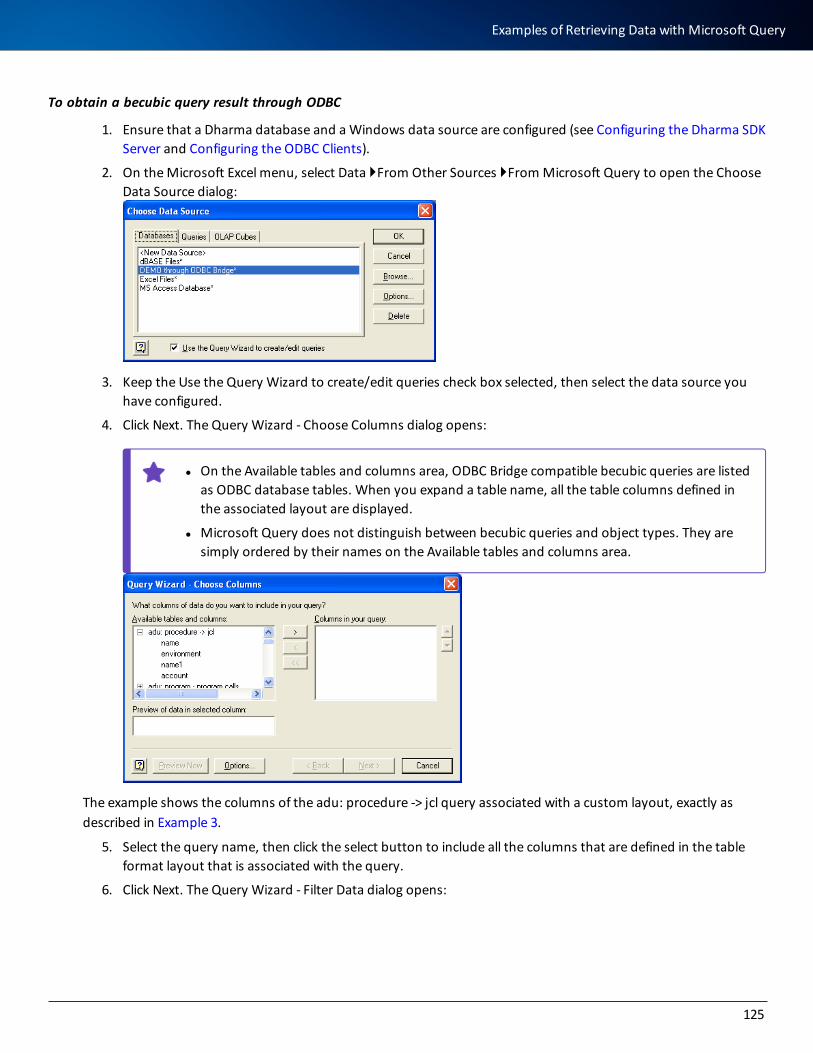
To obtain a becubic query result through ODBC
1. Ensure that a Dharma database and a Windows data source are configured (see Configuring the Dharma SDK Server and Configuring the ODBC Clients).
2. On the Microsoft Excel menu, select Data }From Other Sources }From Microsoft Query to open the Choose Data Source dialog:
3. Keep the Use the Query Wizard to create/edit queries check box selected, then select the data source you have configured.
4. Click Next. The Query Wizard - Choose Columns dialog opens:
l On the Available tables and columns area, ODBC Bridge compatible becubic queries are listed as ODBC database tables. When you expand a table name, all the table columns defined in the associated layout are displayed.
l Microsoft Query does not distinguish between becubic queries and object types. They are simply ordered by their names on the Available tables and columns area.
The example shows the columns of the adu: procedure -> jcl query associated with a custom layout, exactly as described in Example 3.
5. Select the query name, then click the select button to include all the columns that are defined in the table format layout that is associated with the query.
6. Click Next. The Query Wizard - Filter Data dialog opens:
125
Examples of Retrieving Data with Microsoft Query
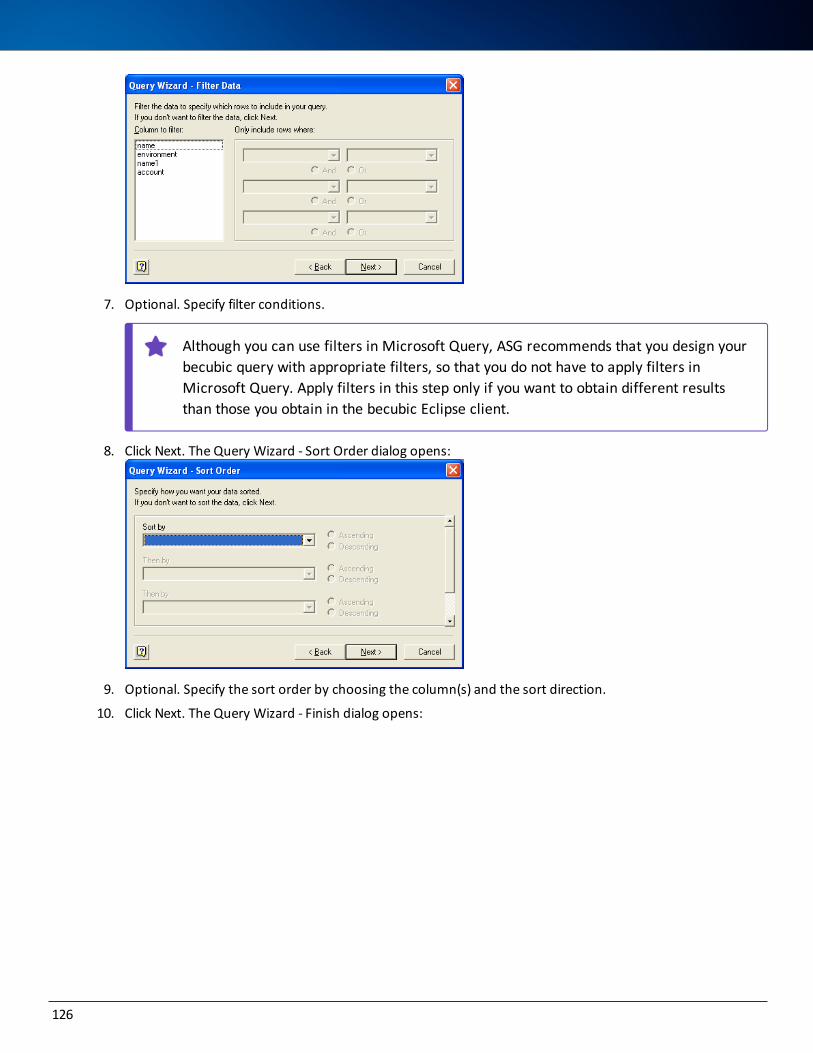
7. Optional. Specify filter conditions.
Although you can use filters in Microsoft Query, ASG recommends that you design your becubic query with appropriate filters, so that you do not have to apply filters in Microsoft Query. Apply filters in this step only if you want to obtain different results than those you obtain in the becubic Eclipse client.
8. Click Next. The Query Wizard - Sort Order dialog opens:
9. Optional. Specify the sort order by choosing the column(s) and the sort direction.
10. Click Next. The Query Wizard - Finish dialog opens:
126
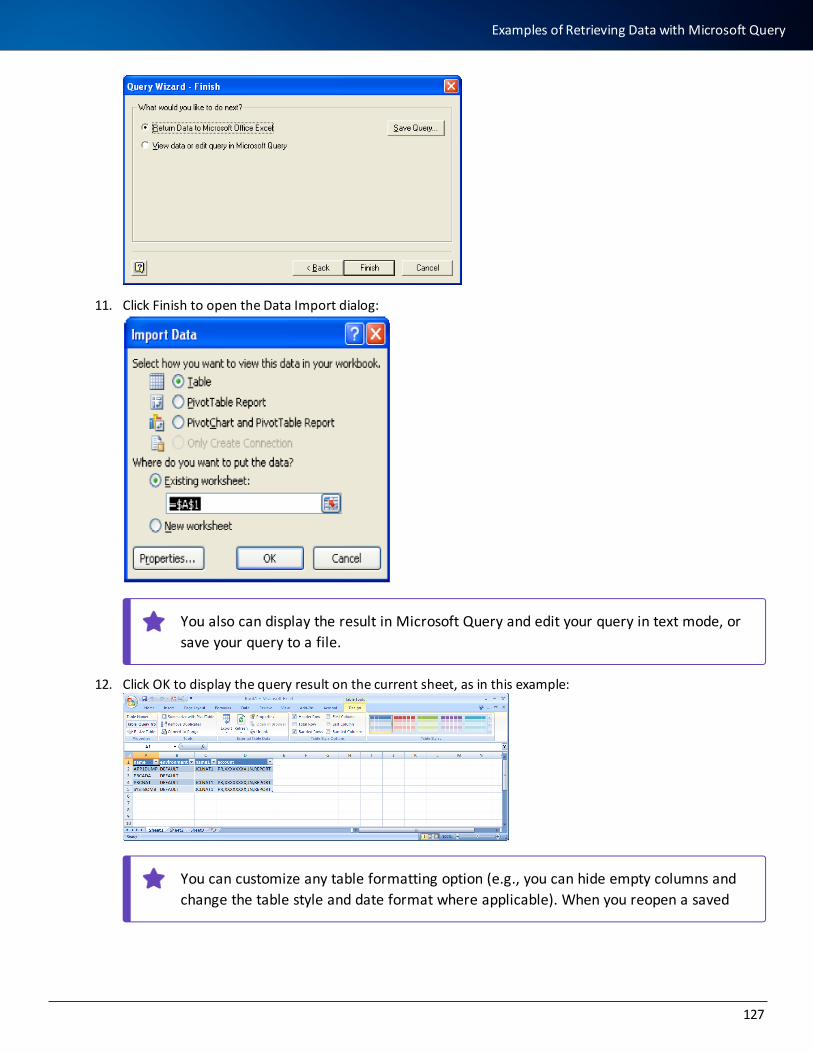
11. Click Finish to open the Data Import dialog:
You also can display the result in Microsoft Query and edit your query in text mode, or save your query to a file.
12. Click OK to display the query result on the current sheet, as in this example:
You can customize any table formatting option (e.g., you can hide empty columns and change the table style and date format where applicable). When you reopen a saved
127
Examples of Retrieving Data with Microsoft Query
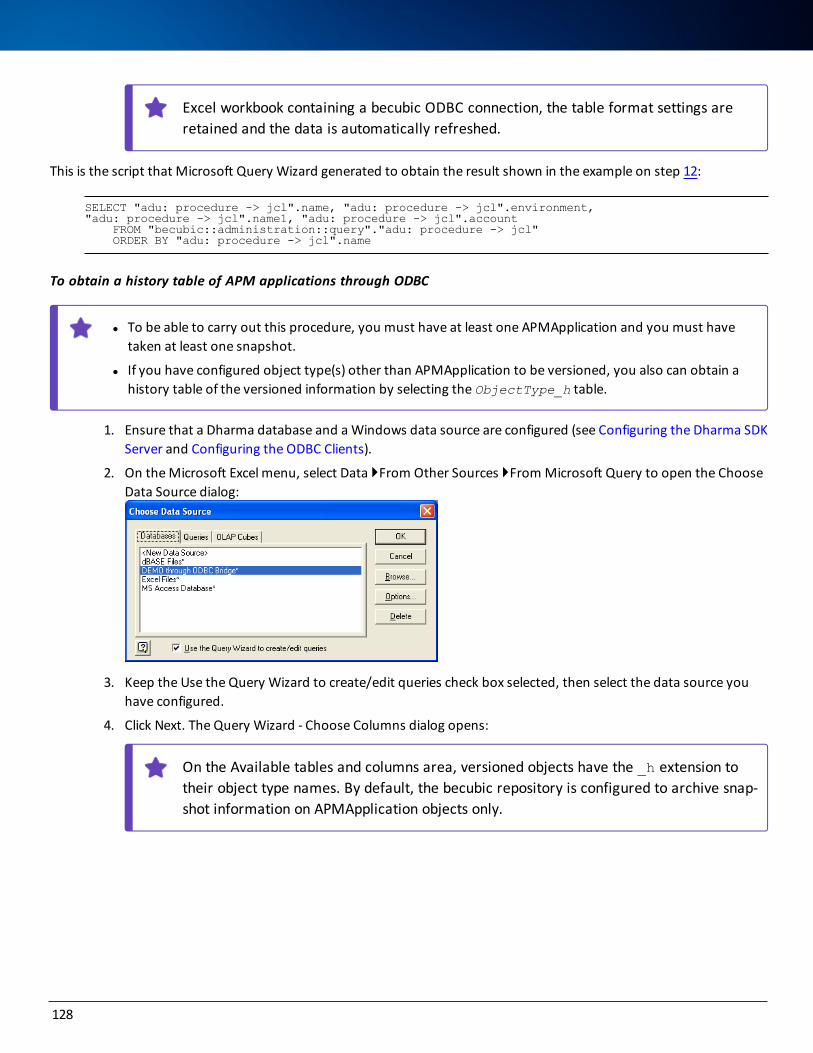
Excel workbook containing a becubic ODBC connection, the table format settings are retained and the data is automatically refreshed.
This is the script that Microsoft Query Wizard generated to obtain the result shown in the example on step 12:
SELECT "adu: procedure -> jcl".name, "adu: procedure -> jcl".environment,"adu: procedure -> jcl".name1, "adu: procedure -> jcl".account FROM "becubic::administration::query"."adu: procedure -> jcl" ORDER BY "adu: procedure -> jcl".name
To obtain a history table of APM applications through ODBC
l To be able to carry out this procedure, you must have at least one APMApplication and you must have taken at least one snapshot.
l If you have configured object type(s) other than APMApplication to be versioned, you also can obtain a history table of the versioned information by selecting the ObjectType_h table.
1. Ensure that a Dharma database and a Windows data source are configured (see Configuring the Dharma SDK Server and Configuring the ODBC Clients).
2. On the Microsoft Excel menu, select Data }From Other Sources }From Microsoft Query to open the Choose Data Source dialog:
3. Keep the Use the Query Wizard to create/edit queries check box selected, then select the data source you have configured.
4. Click Next. The Query Wizard - Choose Columns dialog opens:
On the Available tables and columns area, versioned objects have the _h extension to their object type names. By default, the becubic repository is configured to archive snap-shot information on APMApplication objects only.
128
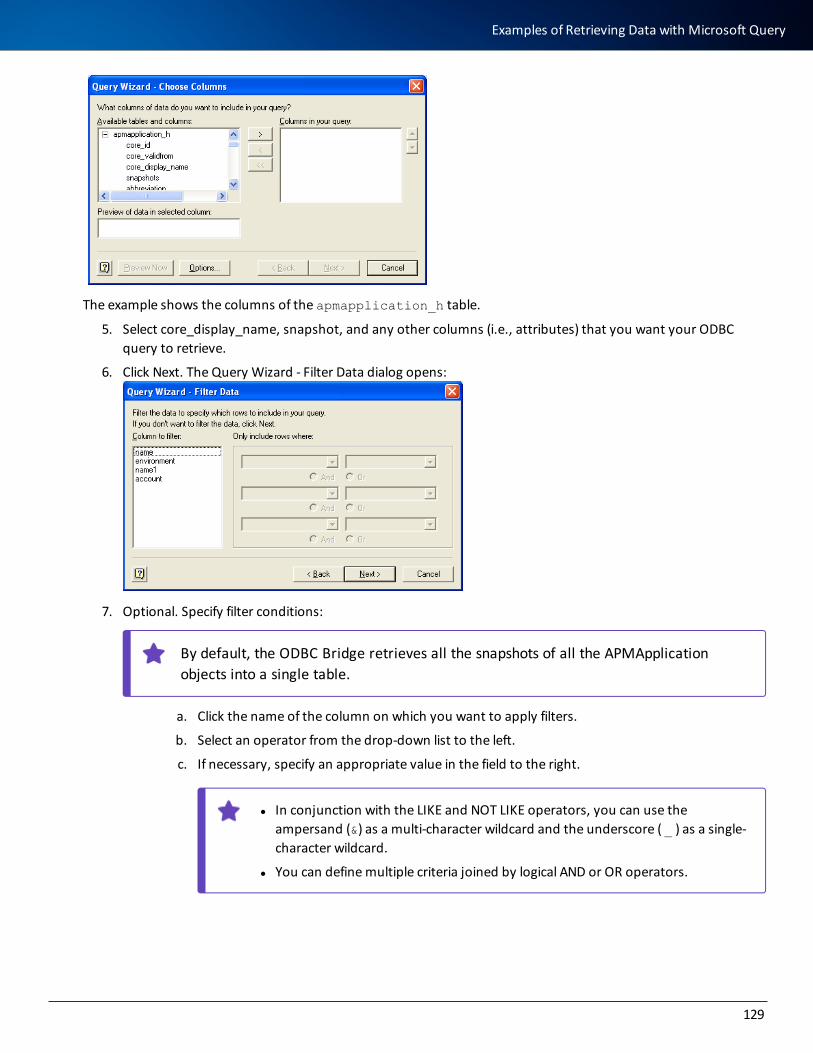
The example shows the columns of the apmapplication_h table.
5. Select core_display_name, snapshot, and any other columns (i.e., attributes) that you want your ODBC query to retrieve.
6. Click Next. The Query Wizard - Filter Data dialog opens:
7. Optional. Specify filter conditions:
By default, the ODBC Bridge retrieves all the snapshots of all the APMApplication objects into a single table.
a. Click the name of the column on which you want to apply filters.
b. Select an operator from the drop-down list to the left.
c. If necessary, specify an appropriate value in the field to the right.
l In conjunction with the LIKE and NOT LIKE operators, you can use the ampersand (&) as a multi-character wildcard and the underscore ( _ ) as a single-character wildcard.
l You can define multiple criteria joined by logical AND or OR operators.
129
Examples of Retrieving Data with Microsoft Query
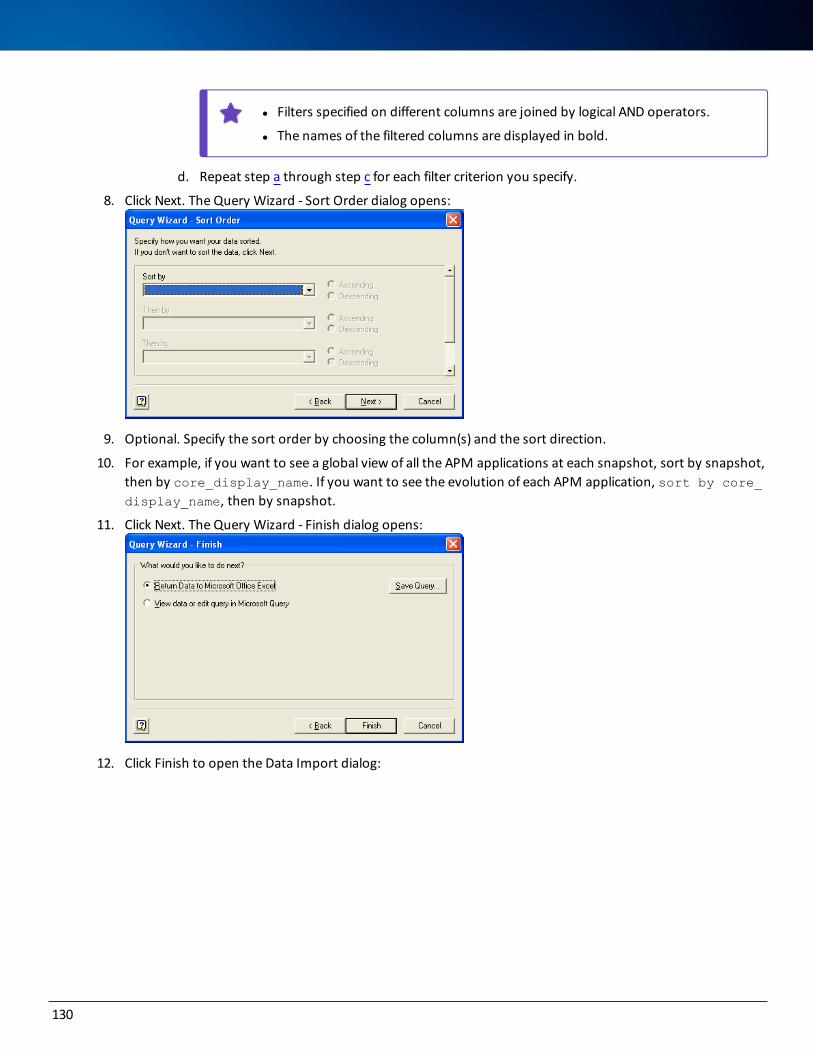
l Filters specified on different columns are joined by logical AND operators.
l The names of the filtered columns are displayed in bold.
d. Repeat step a through step c for each filter criterion you specify.
8. Click Next. The Query Wizard - Sort Order dialog opens:
9. Optional. Specify the sort order by choosing the column(s) and the sort direction.
10. For example, if you want to see a global view of all the APM applications at each snapshot, sort by snapshot, then by core_display_name. If you want to see the evolution of each APM application, sort by core_display_name, then by snapshot.
11. Click Next. The Query Wizard - Finish dialog opens:
12. Click Finish to open the Data Import dialog:
130
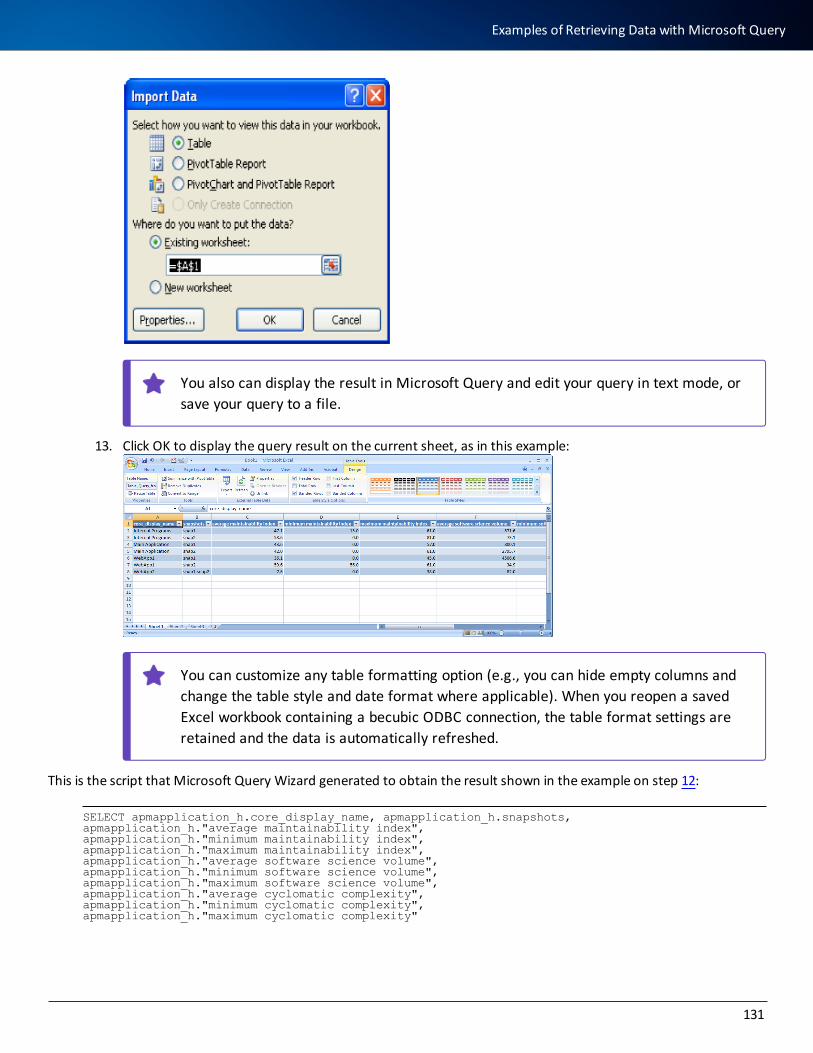
You also can display the result in Microsoft Query and edit your query in text mode, or save your query to a file.
13. Click OK to display the query result on the current sheet, as in this example:
You can customize any table formatting option (e.g., you can hide empty columns and change the table style and date format where applicable). When you reopen a saved Excel workbook containing a becubic ODBC connection, the table format settings are retained and the data is automatically refreshed.
This is the script that Microsoft Query Wizard generated to obtain the result shown in the example on step 12:
SELECT apmapplication_h.core_display_name, apmapplication_h.snapshots,apmapplication_h."average maintainability index",apmapplication_h."minimum maintainability index",apmapplication_h."maximum maintainability index",apmapplication_h."average software science volume",apmapplication_h."minimum software science volume",apmapplication_h."maximum software science volume",apmapplication_h."average cyclomatic complexity",apmapplication_h."minimum cyclomatic complexity",apmapplication_h."maximum cyclomatic complexity"
131
Examples of Retrieving Data with Microsoft Query
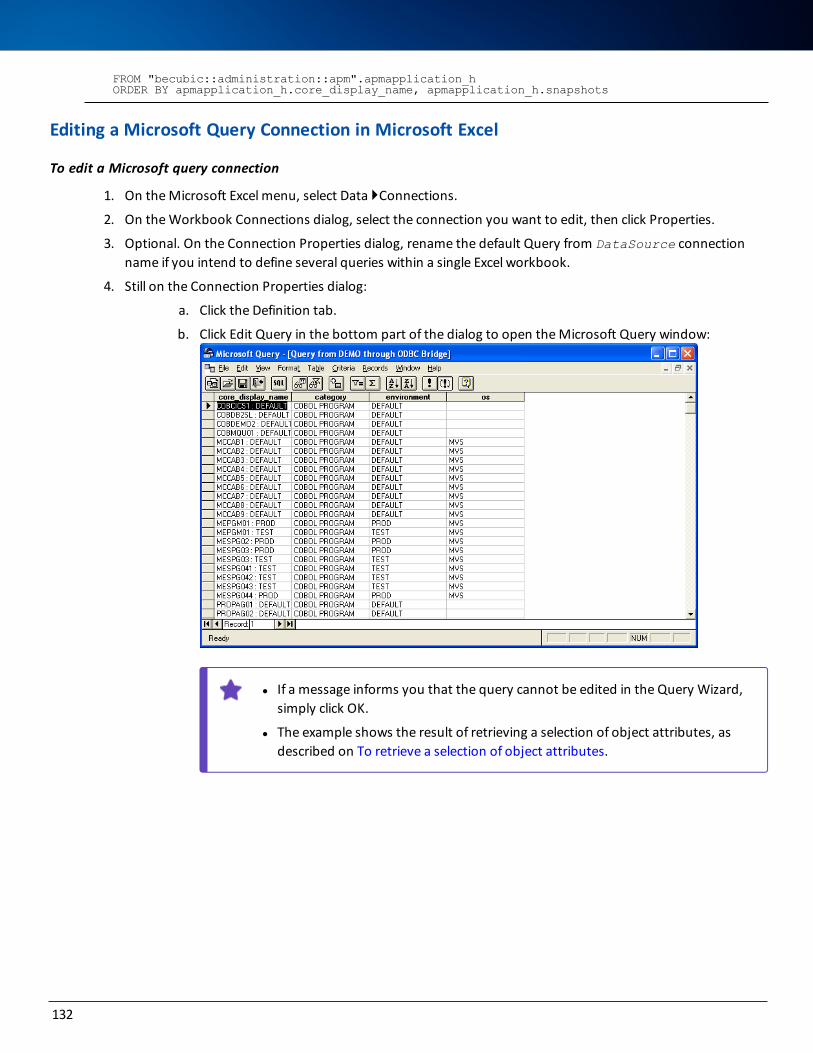
FROM "becubic::administration::apm".apmapplication_h ORDER BY apmapplication_h.core_display_name, apmapplication_h.snapshots
Editing a Microsoft Query Connection in Microsoft Excel
To edit a Microsoft query connection
1. On the Microsoft Excel menu, select Data }Connections.
2. On the Workbook Connections dialog, select the connection you want to edit, then click Properties.
3. Optional. On the Connection Properties dialog, rename the default Query from DataSource connection name if you intend to define several queries within a single Excel workbook.
4. Still on the Connection Properties dialog:
a. Click the Definition tab.
b. Click Edit Query in the bottom part of the dialog to open the Microsoft Query window:
l If a message informs you that the query cannot be edited in the Query Wizard, simply click OK.
l The example shows the result of retrieving a selection of object attributes, as described on To retrieve a selection of object attributes.
132

c. Click the SQL button on the toolbar. The SQL dialog opens:
d. Edit the SQL statements as necessary, then click OK. The result grid on the Microsoft Query win-dow is refreshed automatically.
e. Once you obtain the expected result, quit Microsoft Query.
f. Click OK to close the Connection Properties dialog. The displayed Excel sheet is refreshed auto-matically.
5. Click Close to close the Workbook Connections dialog.
Retrieving Data with a Microsoft Excel Macro StatementThis sample macro statement retrieves all program-type objects with their main attributes, then inserts the results into the active sheet, starting at cell A1.
You can add a WHERE clause to filter the objects to be retrieved.
Sub GetDataThroughDharma() With ActiveSheet.QueryTables.Add(Connection:="ODBC;DSN=dsname;PRSRVCUR=OFF" _, Destination:=Range("A1")) .CommandText = Array("SELECT program.core_id, program.core_validfrom" _ , _ ", program.core_display_name, program.call_cat, program.category" _ , _ ", program.environment, program.inst_src, program.localisation" _ , _ ", program.name, program.os, program.short_name, program.version_num " _ , _ "FROM ""becubic::analysis::Common"".program" _ ) .FieldNames = True .PreserveFormatting = True .BackgroundQuery = True .RefreshStyle = xlInsertDeleteCells .SaveData = True .AdjustColumnWidth = True .PreserveColumnInfo = True .Refresh BackgroundQuery:=FalseEnd WithEnd Sub
133
Retrieving Data with a Microsoft ExcelMacro Statement
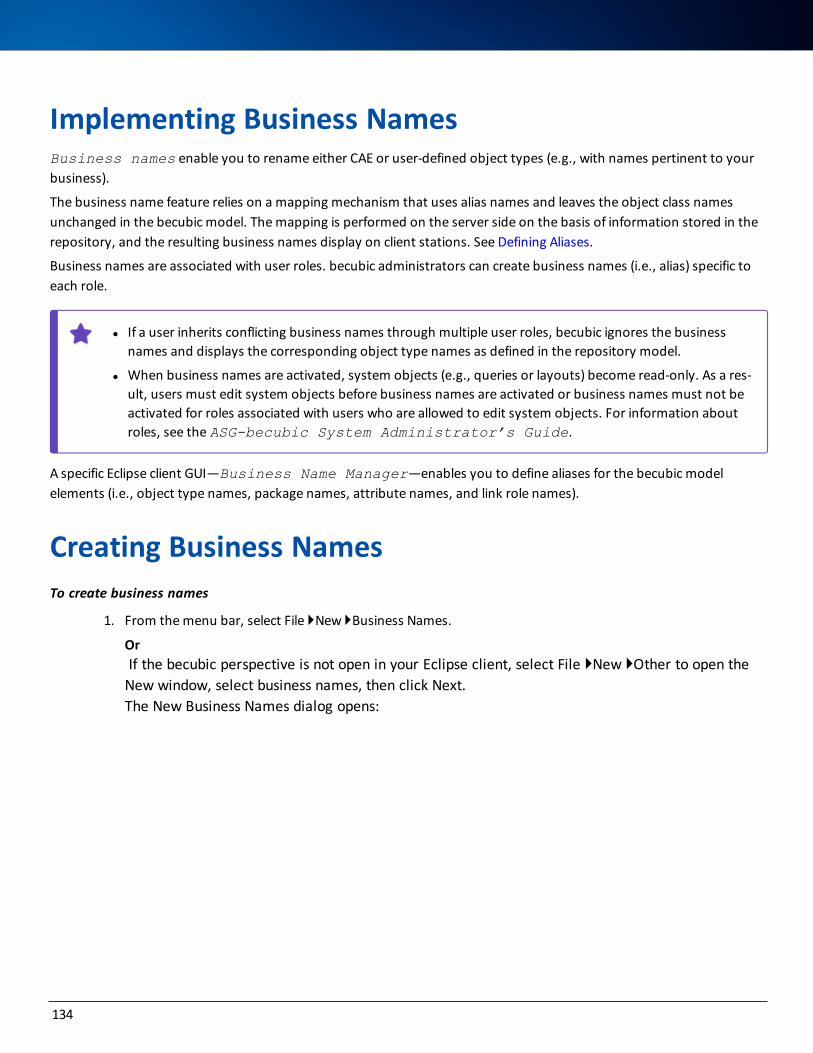
Implementing Business NamesBusiness names enable you to rename either CAE or user-defined object types (e.g., with names pertinent to your business).
The business name feature relies on a mapping mechanism that uses alias names and leaves the object class names unchanged in the becubic model. The mapping is performed on the server side on the basis of information stored in the repository, and the resulting business names display on client stations. See Defining Aliases.
Business names are associated with user roles. becubic administrators can create business names (i.e., alias) specific to each role.
l If a user inherits conflicting business names through multiple user roles, becubic ignores the business names and displays the corresponding object type names as defined in the repository model.
l When business names are activated, system objects (e.g., queries or layouts) become read-only. As a res-ult, users must edit system objects before business names are activated or business names must not be activated for roles associated with users who are allowed to edit system objects. For information about roles, see the ASG-becubic System Administrator’s Guide.
A specific Eclipse client GUI—Business Name Manager—enables you to define aliases for the becubic model elements (i.e., object type names, package names, attribute names, and link role names).
Creating Business NamesTo create business names
1. From the menu bar, select File }New }Business Names.
Or If the becubic perspective is not open in your Eclipse client, select File }New }Other to open the New window, select business names, then click Next.The New Business Names dialog opens:
134
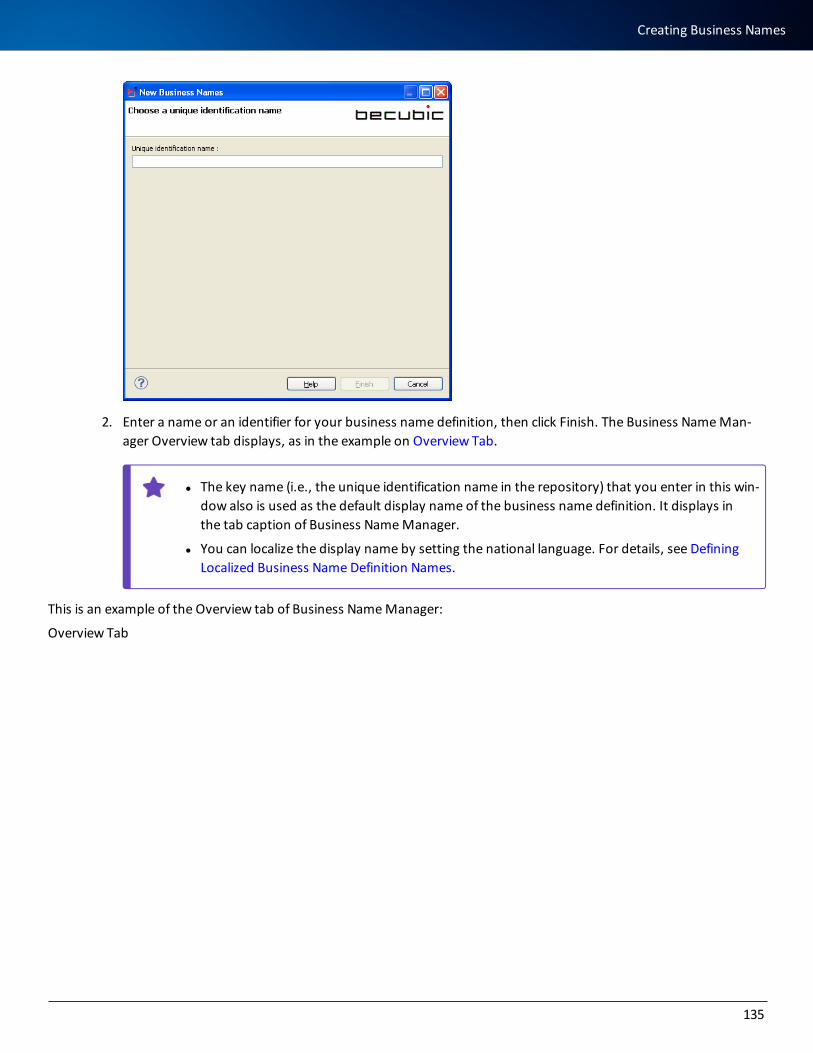
2. Enter a name or an identifier for your business name definition, then click Finish. The Business Name Man-ager Overview tab displays, as in the example on Overview Tab.
l The key name (i.e., the unique identification name in the repository) that you enter in this win-dow also is used as the default display name of the business name definition. It displays in the tab caption of Business Name Manager.
l You can localize the display name by setting the national language. For details, see Defining Localized Business Name Definition Names.
This is an example of the Overview tab of Business Name Manager:
Overview Tab
135
Creating Business Names
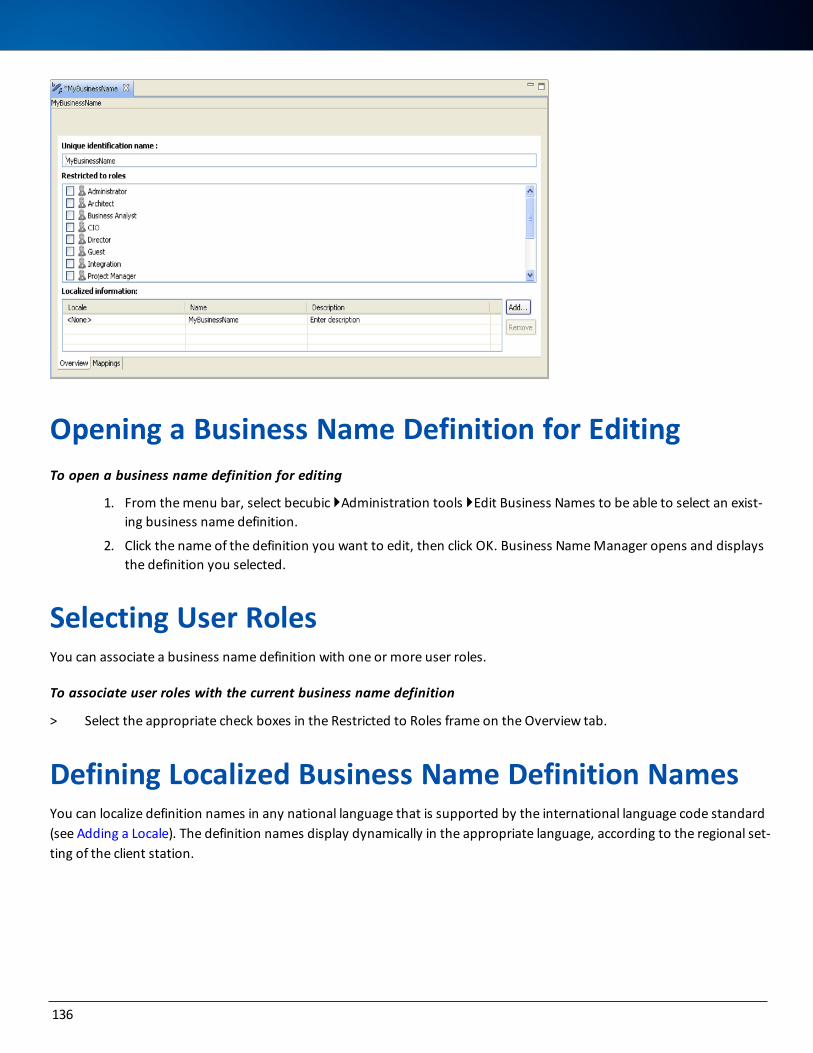
Opening a Business Name Definition for EditingTo open a business name definition for editing
1. From the menu bar, select becubic }Administration tools }Edit Business Names to be able to select an exist-ing business name definition.
2. Click the name of the definition you want to edit, then click OK. Business Name Manager opens and displays the definition you selected.
Selecting User RolesYou can associate a business name definition with one or more user roles.
To associate user roles with the current business name definition
> Select the appropriate check boxes in the Restricted to Roles frame on the Overview tab.
Defining Localized Business Name Definition NamesYou can localize definition names in any national language that is supported by the international language code standard (see Adding a Locale). The definition names display dynamically in the appropriate language, according to the regional set-ting of the client station.
136
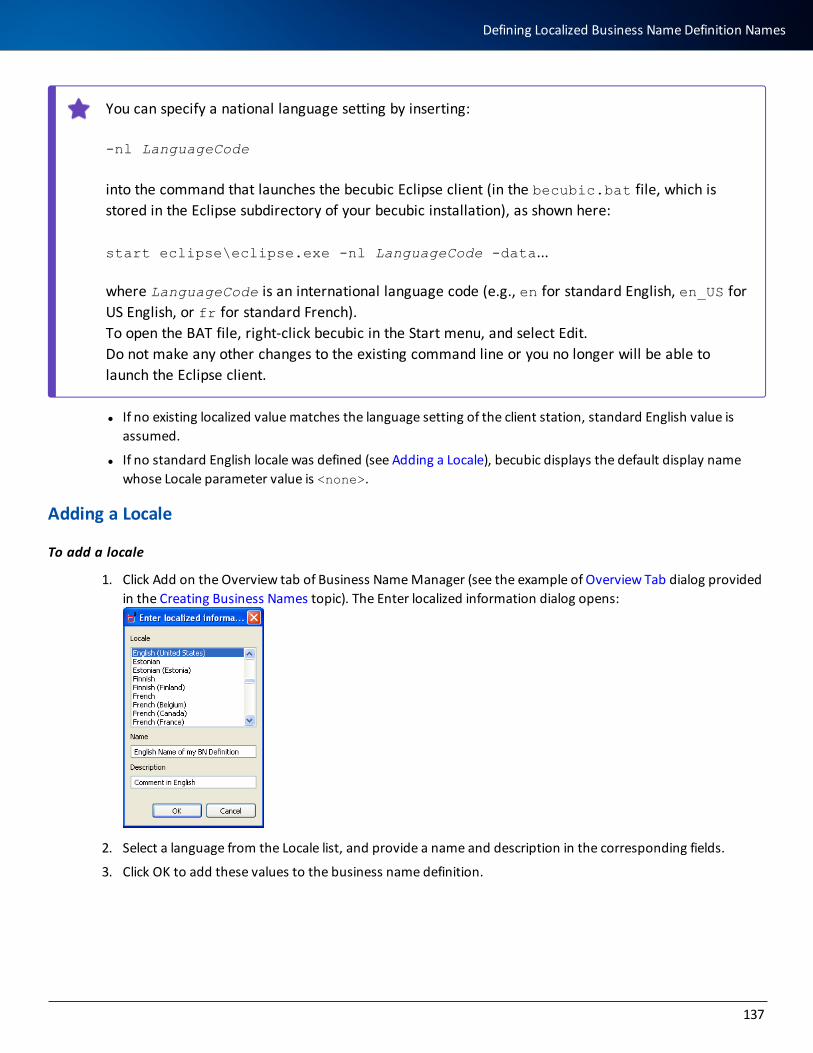
You can specify a national language setting by inserting:
-nl LanguageCode
into the command that launches the becubic Eclipse client (in the becubic.bat file, which is stored in the Eclipse subdirectory of your becubic installation), as shown here:
start eclipse\eclipse.exe -nl LanguageCode -data...
where LanguageCode is an international language code (e.g., en for standard English, en_US for US English, or fr for standard French). To open the BAT file, right-click becubic in the Start menu, and select Edit. Do not make any other changes to the existing command line or you no longer will be able to launch the Eclipse client.
l If no existing localized value matches the language setting of the client station, standard English value is assumed.
l If no standard English locale was defined (see Adding a Locale), becubic displays the default display name whose Locale parameter value is <none>.
Adding a Locale
To add a locale
1. Click Add on the Overview tab of Business Name Manager (see the example of Overview Tab dialog provided in the Creating Business Names topic). The Enter localized information dialog opens:
2. Select a language from the Locale list, and provide a name and description in the corresponding fields.
3. Click OK to add these values to the business name definition.
137
Defining Localized Business Name Definition Names
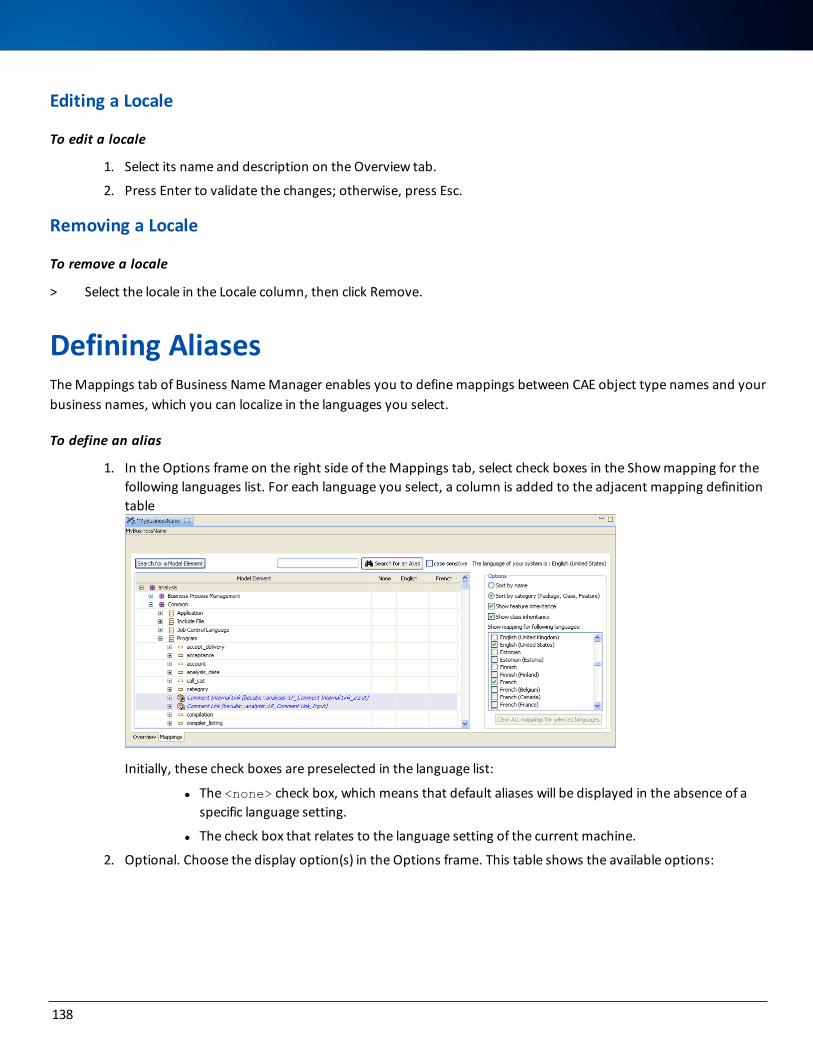
Editing a Locale
To edit a locale
1. Select its name and description on the Overview tab.
2. Press Enter to validate the changes; otherwise, press Esc.
Removing a Locale
To remove a locale
> Select the locale in the Locale column, then click Remove.
Defining AliasesThe Mappings tab of Business Name Manager enables you to define mappings between CAE object type names and your business names, which you can localize in the languages you select.
To define an alias
1. In the Options frame on the right side of the Mappings tab, select check boxes in the Show mapping for the following languages list. For each language you select, a column is added to the adjacent mapping definition table
Initially, these check boxes are preselected in the language list:
l The <none> check box, which means that default aliases will be displayed in the absence of a specific language setting.
l The check box that relates to the language setting of the current machine.
2. Optional. Choose the display option(s) in the Options frame. This table shows the available options:
138

Option Action
Sort by name
If you click this option button, all elements are sorted by name, inde-pendently of their types.
Sort by cat-egory(Package, Class, Feature)
This option button is selected by default. The packages, classes, and fea-tures in the adjacent table display in a tree structure (as in the Model Query).
Show fea-ture inher-itance
Clear this check box if you do not want inherited features displayed in the tree structure in the adjacent table.
Show class inheritance
Clear this check box if you do not want inherited classes displayed in the tree structure in the adjacent table.
3. In the Model Element column of the definition table, expand branches as necessary to display the becubic model element for which you want to define an alias.
Or
Click Search for a Model Element, and select the model element on the Search window.
Or
If you are editing and want to find an alias that is already defined, enter the first letters of the alias you are looking for in the field at the top, and click Search for an Alias. Select or clear the case sensitive check box as required.
4. If you are defining the alias of an attribute: In the appropriate row in the definition table, enter only one alias name of your choice per language column.
5. If you are defining the alias of a reference:
a. Double-click the appropriate link role name displayed in blue italic in a shortcut row. This takes you to the row that contains the reference in a mapping definition table of Link Participants (LPs).
b. Enter only one alias name of your choice per language column.
The alias will apply to all the object types that use this link role to reference objects.
6. Click Save.
You must disconnect and reconnect to see the aliases you have defined in the result views (e.g., the Properties frame).
The becubic model elements for which you have defined one or more aliases are highlighted in green.
If you have defined an alias for an element, the rows corresponding to the element and all its ancestors are highlighted in blue.
139
Defining Aliases
Aliases on Packages and ClassesAll the aliases defined on packages and classes display in the GUI and are translated. As a result, the appropriate objects are retrieved even if the aliases are defined after the query has been created.
Type group definitions, however, use regular expressions that becubic cannot translate. As a result, if you define aliases on packages or classes that impact type group definitions (i.e., the analysis package), you must tailor the impacted type group definitions manually.
Aliases on Object PropertiesIf you define aliases on object properties (e.g., attributes), becubic cannot translate the regular expressions and XPath expressions that you might use in query or layout definitions, and you must tailor them manually.
Removing AliasesTo remove an alias
1. Select the alias in the appropriate row in the definition table.
2. Press Delete.
Working with Sequence EditorTo create, edit, or run a redocumentation sequence—a series of steps executed to populate a repository—you use Sequence Editor, a tool which is integrated in the Eclipse client. Sequence Editor enables you to perform these tasks:
l Creating a redocumentation sequence.
l Specifying whether the steps of a redocumentation sequence use the same or different connection(s).
l Specifying the steps that make up a redocumentation sequence.
l Configuring each step.
l Adding custom tasks to a redocumentation sequence.
l Editing a redocumentation sequence’s relevant properties.
l Running whole or part of a redocumentation sequence.
l Tracking execution of a redocumentation sequence.
Creating a Redocumentation SequenceTo create a redocumentation sequence
1. From the menu bar, select File } New } Redocumentation Sequence to launch Sequence Editor.
2. Click the Sequence Properties tab:
140
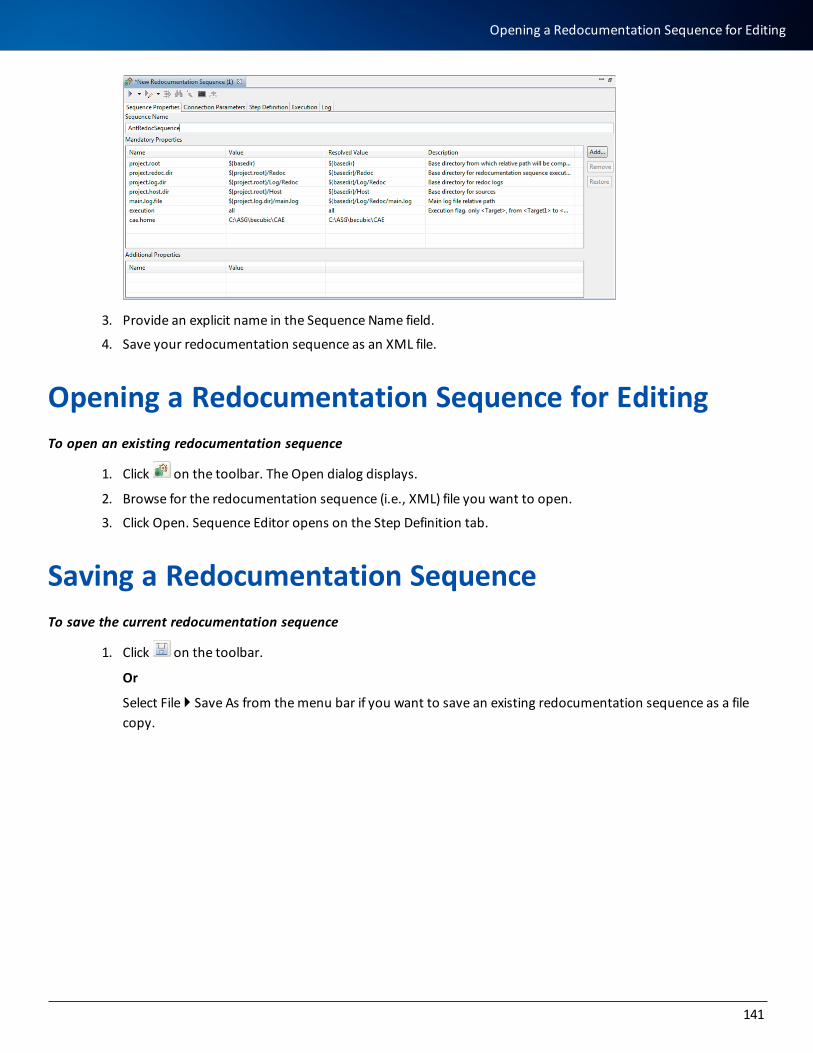
3. Provide an explicit name in the Sequence Name field.
4. Save your redocumentation sequence as an XML file.
Opening a Redocumentation Sequence for EditingTo open an existing redocumentation sequence
1. Click on the toolbar. The Open dialog displays.
2. Browse for the redocumentation sequence (i.e., XML) file you want to open.
3. Click Open. Sequence Editor opens on the Step Definition tab.
Saving a Redocumentation SequenceTo save the current redocumentation sequence
1. Click on the toolbar.
Or
Select File } Save As from the menu bar if you want to save an existing redocumentation sequence as a file copy.
141
Opening a Redocumentation Sequence for Editing
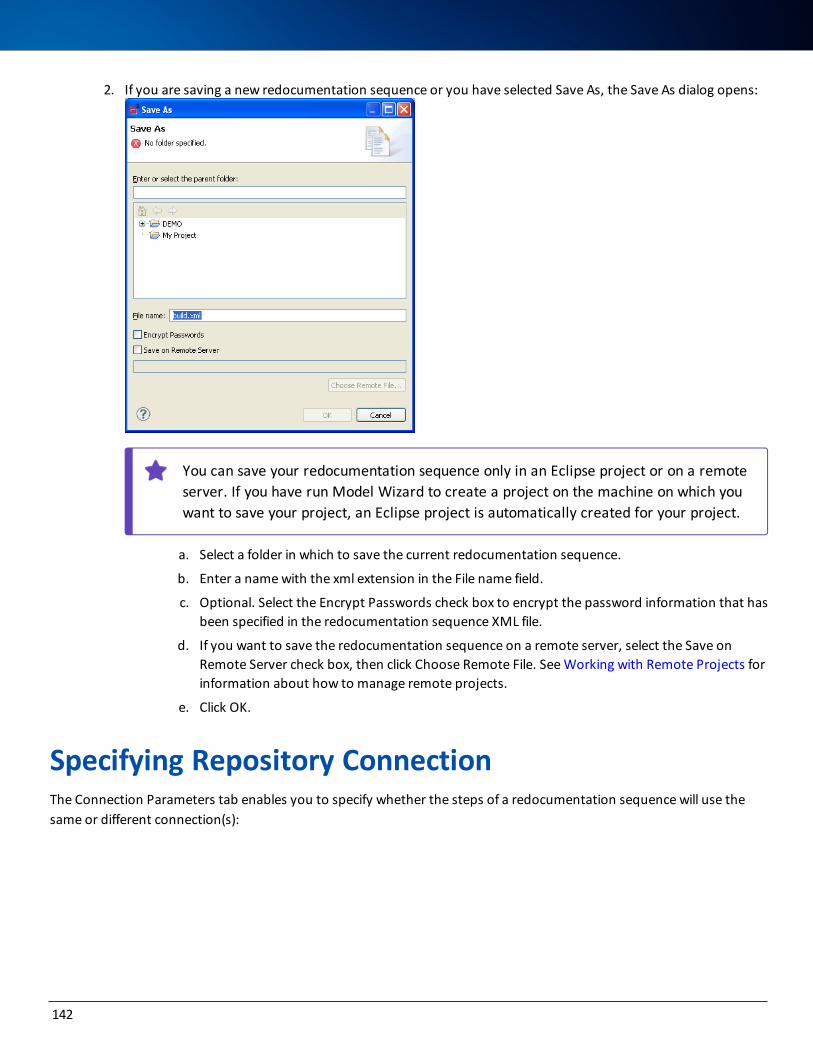
2. If you are saving a new redocumentation sequence or you have selected Save As, the Save As dialog opens:
You can save your redocumentation sequence only in an Eclipse project or on a remote server. If you have run Model Wizard to create a project on the machine on which you want to save your project, an Eclipse project is automatically created for your project.
a. Select a folder in which to save the current redocumentation sequence.
b. Enter a name with the xml extension in the File name field.
c. Optional. Select the Encrypt Passwords check box to encrypt the password information that has been specified in the redocumentation sequence XML file.
d. If you want to save the redocumentation sequence on a remote server, select the Save on Remote Server check box, then click Choose Remote File. See Working with Remote Projects for information about how to manage remote projects.
e. Click OK.
Specifying Repository ConnectionThe Connection Parameters tab enables you to specify whether the steps of a redocumentation sequence will use the same or different connection(s):
142
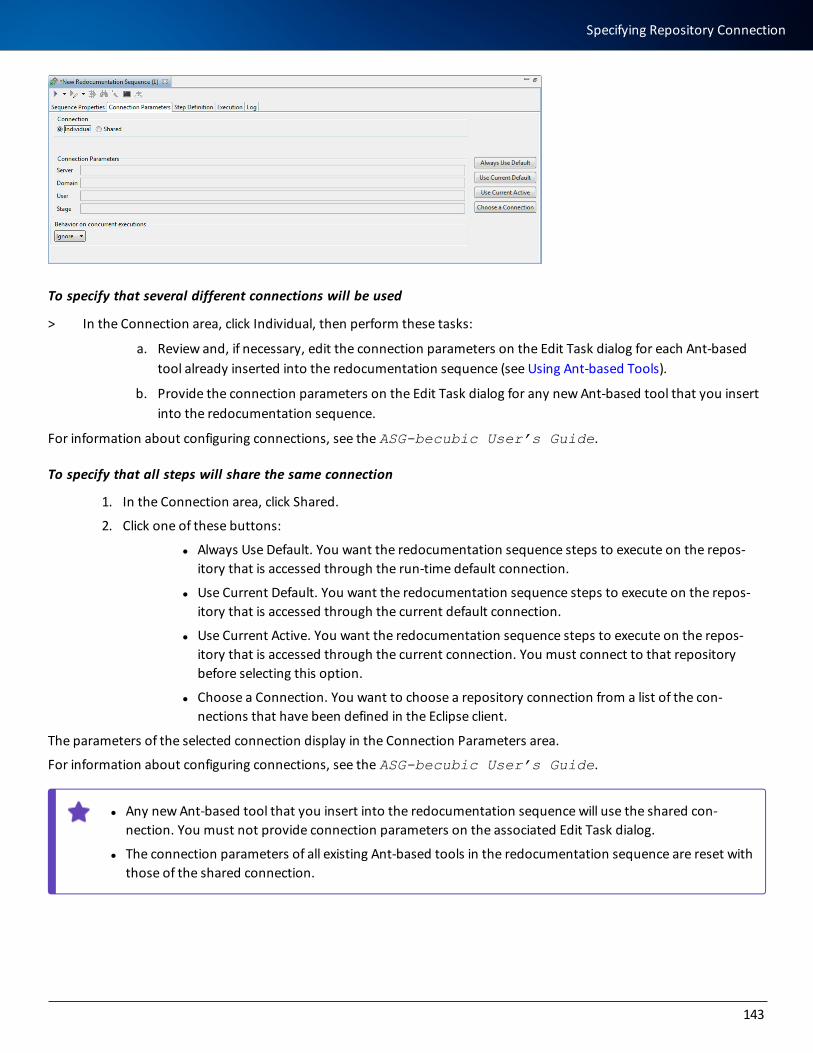
To specify that several different connections will be used
> In the Connection area, click Individual, then perform these tasks:
a. Review and, if necessary, edit the connection parameters on the Edit Task dialog for each Ant-based tool already inserted into the redocumentation sequence (see Using Ant-based Tools).
b. Provide the connection parameters on the Edit Task dialog for any new Ant-based tool that you insert into the redocumentation sequence.
For information about configuring connections, see the ASG-becubic User’s Guide.
To specify that all steps will share the same connection
1. In the Connection area, click Shared.
2. Click one of these buttons:
l Always Use Default. You want the redocumentation sequence steps to execute on the repos-itory that is accessed through the run-time default connection.
l Use Current Default. You want the redocumentation sequence steps to execute on the repos-itory that is accessed through the current default connection.
l Use Current Active. You want the redocumentation sequence steps to execute on the repos-itory that is accessed through the current connection. You must connect to that repository before selecting this option.
l Choose a Connection. You want to choose a repository connection from a list of the con-nections that have been defined in the Eclipse client.
The parameters of the selected connection display in the Connection Parameters area.
For information about configuring connections, see the ASG-becubic User’s Guide.
l Any new Ant-based tool that you insert into the redocumentation sequence will use the shared con-nection. You must not provide connection parameters on the associated Edit Task dialog.
l The connection parameters of all existing Ant-based tools in the redocumentation sequence are reset with those of the shared connection.
143
Specifying Repository Connection
Managing Concurrent ExecutionsYou can change the process mode for the concurrent execution of a redocumentation sequence.
A concurrent execution occurs when you try to launch a redocumentation sequence while a pre-vious session of the same redocumentation sequence is still running.
To change the concurrent execution process mode
> In the Behavior on concurrent executions area, select one of these options from the drop-down list:
Mode Description
Ignore Concurrent executions are ignored and the new session starts immediately.
FailIf the redocumentation sequence is still running, the concurrent execution fails when launching it.
Blockbecubic blocks the execution and launches it once the current execution of the redoc-umentation sequence ends.
Editing a Redocumentation SequenceEditing a redocumentation sequence consists of defining its steps and substeps on the Step Definition tab. Redoc-umentation steps are Ant targets.
Elements in Redocumentation Step DefinitionThis table lists the elements that you add and edit on the Step Definition tab:
Element Description
, , or
Represents a callable step. While at least one mandatory parameter in its or its substep’s task(s) or subtask(s) is not valid, Sequence Editor displays this icon in red. indicates that the step contains one or more invalid substeps that are disabled (therefore, that step can be executed ignoring the invalid substeps).
If the redocumentation sequence XML file (e.g., build.xml by default) con-tains an invalid element or an invalid attribute, the step containing a task cor-
144
Element Description
responding to the invalid XML element is also displayed in red. This may occur only if you have edited the XML file in text mode.
or
Represents a disabled callable step.
Disabling a step is persistent (i.e., if you disable a step for test and save the redocumentation sequence, the step is skipped when you run it sub-sequently).
or
Represents a substep. While at least one mandatory parameter in its task(s) or subtask(s) is not valid, Sequence Editor displays this icon in red.
If the redocumentation sequence XML file (e.g., build.xml by default) con-tains an invalid element or an invalid attribute, the sub-step containing a task corresponding to the invalid XML element is also displayed in red. This may occur only if you have edited the XML file in text mode.
or
Represents a disabled substep.
Disabling a step is persistent (i.e., if you disable a step for test and save the redocumentation sequence, the step is skipped when you run it sub-sequently).
or
Represents a task or a subtask. A task nested under a task is a subtask. While at least one of its or its subtask’s mandatory parameters is not valid, Sequence Editor displays this icon in red.
To edit subtask parameters, you must open the Edit Task by selecting the corresponding subtask. When you edit its main task, you cannot see the parameters of the subtasks.
If the redocumentation sequence XML file (e.g., build.xml by default) con-tains an invalid element or an invalid attribute, the task containing the invalid XML element is also displayed in red. This may occur only if you have edited the XML file in text mode.
or Represents a parameter section of a task. While at least one of its mandatory parameters is not valid, Sequence Editor displays this icon in red.
145
Elements in Redocumentation Step Definition
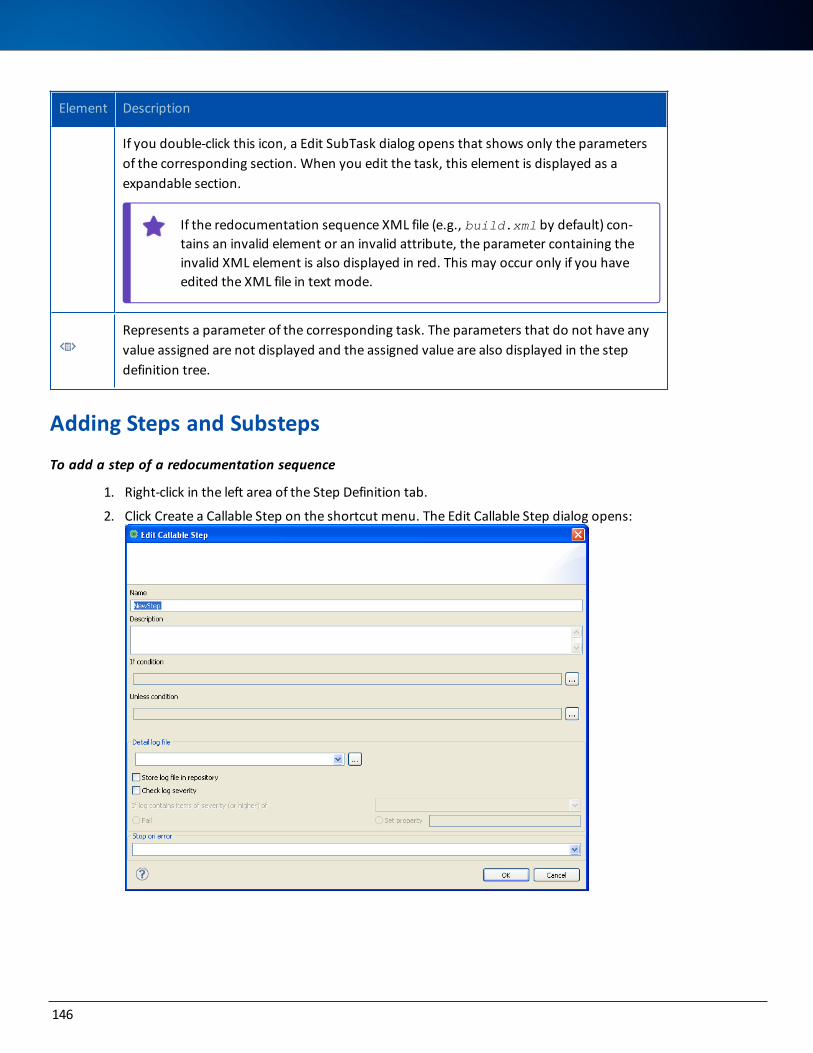
Element Description
If you double-click this icon, a Edit SubTask dialog opens that shows only the parameters of the corresponding section. When you edit the task, this element is displayed as a expandable section.
If the redocumentation sequence XML file (e.g., build.xml by default) con-tains an invalid element or an invalid attribute, the parameter containing the invalid XML element is also displayed in red. This may occur only if you have edited the XML file in text mode.
Represents a parameter of the corresponding task. The parameters that do not have any value assigned are not displayed and the assigned value are also displayed in the step definition tree.
Adding Steps and Substeps
To add a step of a redocumentation sequence
1. Right-click in the left area of the Step Definition tab.
2. Click Create a Callable Step on the shortcut menu. The Edit Callable Step dialog opens:
146
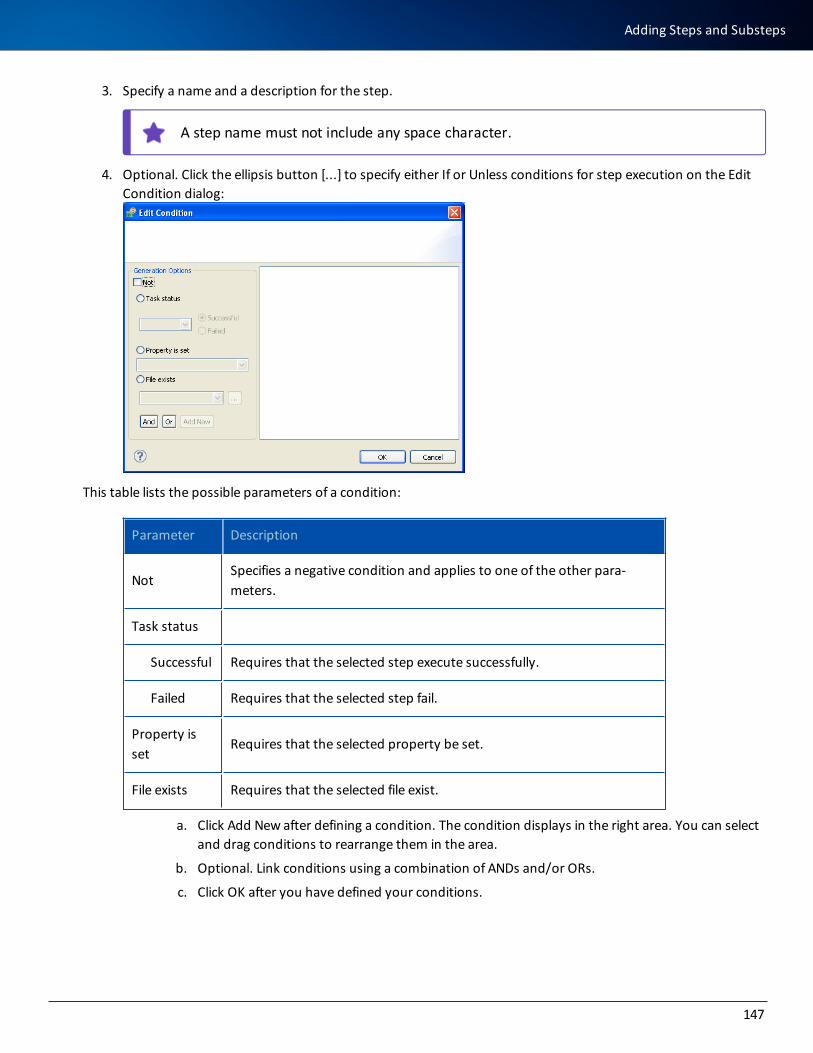
3. Specify a name and a description for the step.
A step name must not include any space character.
4. Optional. Click the ellipsis button [...] to specify either If or Unless conditions for step execution on the Edit Condition dialog:
This table lists the possible parameters of a condition:
Parameter Description
NotSpecifies a negative condition and applies to one of the other para-meters.
Task status
Successful Requires that the selected step execute successfully.
Failed Requires that the selected step fail.
Property is set
Requires that the selected property be set.
File exists Requires that the selected file exist.
a. Click Add New after defining a condition. The condition displays in the right area. You can select and drag conditions to rearrange them in the area.
b. Optional. Link conditions using a combination of ANDs and/or ORs.
c. Click OK after you have defined your conditions.
147
Adding Steps and Substeps
3. Optional. Use the Detail log file drop-down list to select a detail log file or browse for it by clicking the ellipsis button [...].
l By default, all log messages are copied to the project’s main log.
l You must specify the detail log file if you want to control the log severity.
4. Optional. Select the Store log file in repository check box. This option makes the log file available to any allowed user connected to the repository.
l By default, this option is selected in all the callable steps of the standard redocumentation sequence generated by Model Wizard and cleared for any new callable step that you add.
l Any becubic-specific task generates the log in a standard format that you can open with the Tree Log Viewer. This is not the case when you define a callable step for a standard Ant task. See Opening a Log Stored in the Repository and Opening a Log File for information about opening logs.
5. Optional. Specify the log severity control options:
a. Select the Check log severity check box.
b. Select the level of log message from the drop-down list.
c. Specify one of these options to be applied in the event of a message severity equal or higher than the severity selected in step b.
– Fail. The execution of the current callable step will fail.– Set property. Value of the property that you specify in the corresponding field will be set to true. You
can define conditions of the subsequent steps depending on this property value or use this information to warn the administrator.
6. On the Edit Callable Step dialog, use the Stop on error drop-down list to specify an option (i.e., true, false, or variable) that indicates whether to terminate execution of the redocumentation sequence if an error occurs.
This option stops the execution of the whole redocumentation sequence if an error occurs on this step.
7. Click OK.
To add a substep of a redocumentation sequence
1. Right-click an existing step.
2. Click Create a Sub Step on the shortcut menu. The Edit Sub Step dialog opens:
148
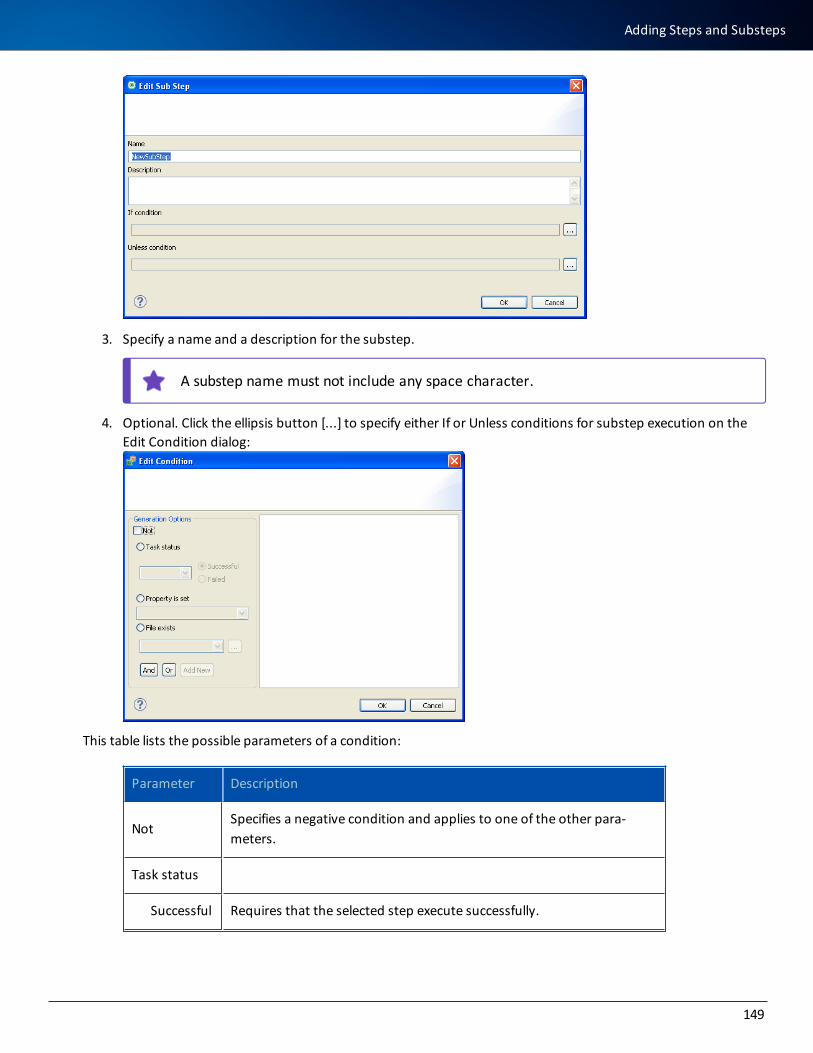
3. Specify a name and a description for the substep.
A substep name must not include any space character.
4. Optional. Click the ellipsis button [...] to specify either If or Unless conditions for substep execution on the Edit Condition dialog:
This table lists the possible parameters of a condition:
Parameter Description
NotSpecifies a negative condition and applies to one of the other para-meters.
Task status
Successful Requires that the selected step execute successfully.
149
Adding Steps and Substeps
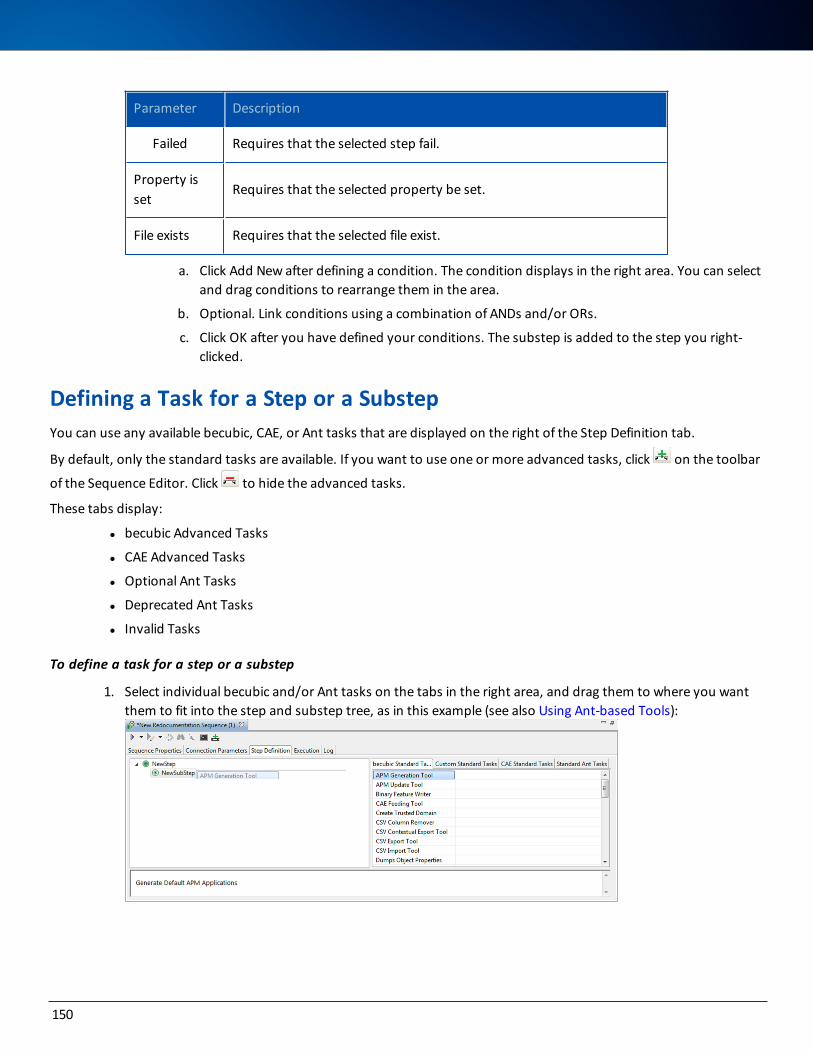
Parameter Description
Failed Requires that the selected step fail.
Property is set
Requires that the selected property be set.
File exists Requires that the selected file exist.
a. Click Add New after defining a condition. The condition displays in the right area. You can select and drag conditions to rearrange them in the area.
b. Optional. Link conditions using a combination of ANDs and/or ORs.
c. Click OK after you have defined your conditions. The substep is added to the step you right-clicked.
Defining a Task for a Step or a SubstepYou can use any available becubic, CAE, or Ant tasks that are displayed on the right of the Step Definition tab.
By default, only the standard tasks are available. If you want to use one or more advanced tasks, click on the toolbar
of the Sequence Editor. Click to hide the advanced tasks.
These tabs display:
l becubic Advanced Tasks
l CAE Advanced Tasks
l Optional Ant Tasks
l Deprecated Ant Tasks
l Invalid Tasks
To define a task for a step or a substep
1. Select individual becubic and/or Ant tasks on the tabs in the right area, and drag them to where you want them to fit into the step and substep tree, as in this example (see also Using Ant-based Tools):
150
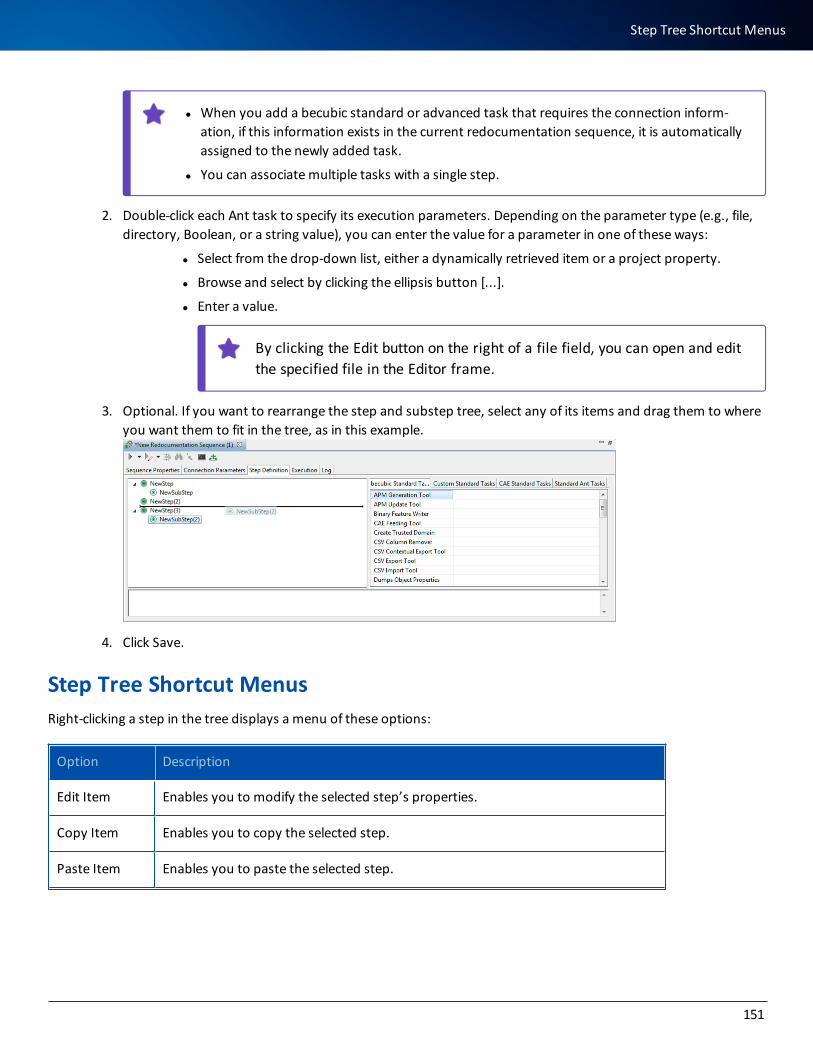
l When you add a becubic standard or advanced task that requires the connection inform-ation, if this information exists in the current redocumentation sequence, it is automatically assigned to the newly added task.
l You can associate multiple tasks with a single step.
2. Double-click each Ant task to specify its execution parameters. Depending on the parameter type (e.g., file, directory, Boolean, or a string value), you can enter the value for a parameter in one of these ways:
l Select from the drop-down list, either a dynamically retrieved item or a project property.
l Browse and select by clicking the ellipsis button [...].
l Enter a value.
By clicking the Edit button on the right of a file field, you can open and edit the specified file in the Editor frame.
3. Optional. If you want to rearrange the step and substep tree, select any of its items and drag them to where you want them to fit in the tree, as in this example.
4. Click Save.
Step Tree Shortcut MenusRight-clicking a step in the tree displays a menu of these options:
Option Description
Edit Item Enables you to modify the selected step’s properties.
Copy Item Enables you to copy the selected step.
Paste Item Enables you to paste the selected step.
151
Step Tree Shortcut Menus
Option Description
Delete Item Deletes the selected Ant step.
Create a Callable Step
Enables you to create a redocumentation sequence step.
Create a Sub Step
Enables you to create a redocumentation sequence substep.
Execute
Only current_step
Executes only the selected step.
From current_step
Executes the selected step and any subsequent step(s).
To current_step
Executes any steps up to and including the selected step.
Disable/EnableDisables or enables the selected step. A disabled step is not executed when you run the redocumentation sequence.
Right-clicking a substep in the tree displays a menu of these options:
Option Description
Edit Item Enables you to modify the selected substep’s properties.
Copy Item Enables you to copy the selected substep.
Paste Item Enables you to paste the selected substep.
Delete Item Deletes the selected Ant substep.
Create a Callable Step
Enables you to create a redocumentation sequence step.
Disable/EnableDisables or enables the selected substep. A disabled substep is not executed when you run the redocumentation sequence.
152
Right-clicking a task in the tree displays a menu of these options:
Option Description
Edit Item Enables you to modify the selected Ant task’s parameters.
Copy Item Enables you to copy the selected Ant task.
Paste Item Enables you to paste the selected Ant task.
Delete Item Deletes the selected Ant task.
Create a Callable Step Enables you to create a redocumentation sequence step.
Copying and Pasting Steps, Substeps, and TasksYou can press Ctrl+c and Ctrl+v on selected items to copy and paste steps, substeps, and individual tasks either within a redocumentation sequence or to another redocumentation sequence that already contains one or more steps.
A copied step is automatically pasted below the step it duplicates. A copied substep is added to the step you select. A copied task is added to the step or substep you select.
A copied step or substep name is immediately followed by a number—enclosed in parentheses—that distinguishes the current item from any other copied items with the same name.
Using Ant-based Tools
l CAE is invoked automatically into each redocumentation sequence through CAE Feeding Tool.
l becubic inserts Repository Cleaning Tool and APM Update Tool in all redocumentation sequences to perform repository cleaning tasks automatically. For more information, see Repository Cleaning Tool and the ASG-becubic User’s Guide.
Sequence Editor provides these Ant-based tools that you can insert into your redocumentation sequences to have specific tasks performed automatically:
l APM Generation Tool generates APM Applications including automatically CAE analysis resulting objects on the condition that you define. For more information, see the ASG-becubic User’s Guide.
l APM Update Tool recalculates contents and/or metrics values of all or part of existing APMApplications.
l Binary Feature Writer exports the value of a binary feature to a file.
l Create Rochade Loader: See the ASG-becubic Supplement Guide for related information.
153
Copying and Pasting Steps, Substeps, and Tasks
l Create Trusted Domain automatically creates a trusted domain (for the single sign-on setting). See the ASG-becubic System Administrator’s Guide for details.
l CSV Column Remover automatically removes a column by specified criteria.
l Dump Object Properties writes all properties of an object to a file or standard output.
l Execute a TCL script automatically generates a CSV report on a propagation result. See the ASG-becubic User’s Guide for information about generating propagation reports.
l Export as DES files exports Source objects as DES files. See the ASG-becubic System Administrator’s Guide for details.
l Export Settings automatically exports the repository settings. See the ASG-becubic System Administrator’s Guide for details.
l File Concatenation concatenates text files. For more information, see File Concatenation.
l File Search performs string search in files in a specific directory.
l Full Text Indexing generates indexes for the Full Text Search. See the ASG-becubic System Administrator’s Guide for details.
l Full-Text Search automatically performs a Full Text Search. See the ASG-becubic User’s Guide for information about performing Full Text Search.
l Import Settings automatically imports the repository settings. See the ASG-becubic System Administrator’s Guide for details.
l Import Tool imports files (i.e., XMI or CSV files). For more information, see Import Tool.
l Load Impact Results to Rochade: See the ASG-becubic Supplement Guide for related information.
l Load Rochade: See the ASG-becubic Supplement Guide for related information.
l Propagation Tool launches an impact analysis. For more information, see the ASG-becubic User’s Guide.
l Purge Propagation Result automatically cleans up a CAE entry point of all propagation results.
l Query Tool runs queries. For more information, see Query Tool for details.
l Remote Sequence Invocation automatically launches a redocumentation sequence on a remote server. See Working with Remote Projects for details.
l Remove Baseline removes the baseline marker on all objects returned by the specified query.
l Report Tool generates one or more reports. For more information, see the ASG-becubic Reporting Client User’s Guide.
l Retrieve setting value retrieves the value of a repository setting into a property.
l Set Baseline sets the baseline marker on all objects returned by the query.
l Set Operation Task automatically performs a set operation (e.g., union or intersection). See the ASG-becubic User’s Guide for information about set operations.
l Set setting value automatically change the value of a repository setting.
154
l Snapshot Tool creates a snapshot at each incremental load. For more information, see the ASG-becubic System Administrator’s Guide.
l Sonar Repository Extractor extracts data from a Sonar repository and loads it into the becubic repository.
l Text Search automatically performs a text search. See the ASG-becubic User’s Guide for information about the text search.
l Translation Helper generates property files from repository information and uploads properties to the repository.
You also can use these CAE-related Ant-based tools, which are documented in the ASG-becubic Windows Source Collector for CAE Installation and Administration Guide:
l Collector convert CP1252 files to UTF-8
l Collector for Archive Files
l Collector for AS/400 Catalog
l Collector for ASG-Zena
l Collector for AutoSys
l Collector for CA7 Incremental
l Collector for CONTROL-M Distributed
l Collector for CONTROL-M z/OS
l Collector for DBMS
l Collector for Directory (File System)
l Collector for Informatica
l Collector for Informatica Clean Task
l Collector for Informatica Split DES Sources
l Collector for MS Access Application
l Collector for OPC Incremental
l Collector for SCMS
l Collector for Serena Dimensions
l Collector for TFC sources from Archive files
l Collector for TNG
l TCL Script Execution and Connection Tool
l TCL Script Execution Tool
Query ToolThis tool enables you to run queries from within the default redocumentation sequence or one that you create. You can either save the query results to a set or export them to a file.
Query Tool provides these becubic Ant-based export tools as predefined macros:
155
Using Ant-based Tools
l Query Tool for Deletion
l Query Tool for Update
l CSV Contextual Export Tool
l CSV Export Tool
l Set Contextual Export Tool
l Set Export Tool
l XMI Contextual Export Tool
l XMI Export Tool
Use the export tool that fits the run mode you select for your query (i.e., globally or contextually) and the output you expect from it (i.e., a CSV file, an XMI file, or a set). See Run Modes and Output Options.
When query results are exported to an XMI file, objects are exported with all the attributes and references that are part of their identification features. In the GUI, the corresponding option is Export objects with all their attributes and all the references required for their identification.
Execution ParametersQuery Tool Execution parameters display on the Edit Task dialog of Sequence Editor
The parameters are not all mandatory. They also depend on the Export Tool that you choose. You might have to leave some of them empty.
This table describes all the Query Tool parameters. For the parameter values specific to each run mode, see Run Modes and Output Options:
156
Parameter Description
General section
completeness
This parameter enables you to export system objects (e.g., queries and layouts) with all required features.
To export system objects automatically by means of a redocumentation sequence, select DEFINITION from the drop-down list.
failOnLimitReachedSelect true or false, or a property to use a variable value, depend-ing on whether you want the query execution to fail if the limit object count is reached.
layoutName
Optional. This parameter is effective only when you want to export the query results to a CSV file or a PDF/HTML file (applicable only to the tabular layout). It specifies the name of the layout to be applied to the query results.
The layout must be of one of these types:
l Source layout
l Tabular layout
l XRef layout
The layout name that you enter here is the key name (i.e., the unique identification name) that was given to the lay-out when it was created.
If the query you specified in the queryName field is defined with an XRef-type layout, it is taken into account by Query Tool. If, however, you specify a valid layout in this field, Query Tool uses it even if the query definition uses a different one.
If the specified name is not found or corresponds to an invalid layout, the Default XRef Layout is used. If in doubt, check the value you spe-cified.
Leave this field empty in these cases:
l When you want to use the Default XRef Layout
l When the results are not exported to a CSV file (i.e., crossReference parameter is set to false)
157
Using Ant-based Tools
Parameter Description
maxObjectCountLimitThis parameter specifies the maximum number of objects to be expor-ted or saved in a set by a single query, whatever the output mode.
pageFormatThis parameter specifies the page format (size and margins) when applicable to the output file type.
queryName
This parameter specifies the query to be executed.
l The query name that you enter here is the key name (i.e., the unique identification name) that was given to the query when it was created.
l You can use a query with Tabular-type default layout (e.g., for a propagation result) and specify the output file format PDF or FO.
saveAggregateResultSelect true or false, or a property to use a variable value, to specify whether the aggregate result is to be saved.
withDerivedFeaturesSelect true or false, or a property to use a variable value, to specify whether the derived features (e.g., APM metrics) are to be included.
withHistorySelect true or false, or a property to use a variable value, to specify whether the historical information (by default, only the APMAp-plication objects) are to be included.
withPermissionsSelect true or false, or a property to use a variable value, to specify whether the permission information is to be included.
withTechnicalReferencesSelect true or false, or a property to use a variable value, to specify whether the technical references (e.g., set contents) are to be included.
Contextuality sectionThe parameters in this section enable you to specify the starting objects (i.e., either in a file or in a set) for the query. This section is available only with Contextual Export Tools.
contextsAreRootsOnlySelect true or false, or a property to use a variable value, to specify whether only the root objects are to be used as contexts.
158
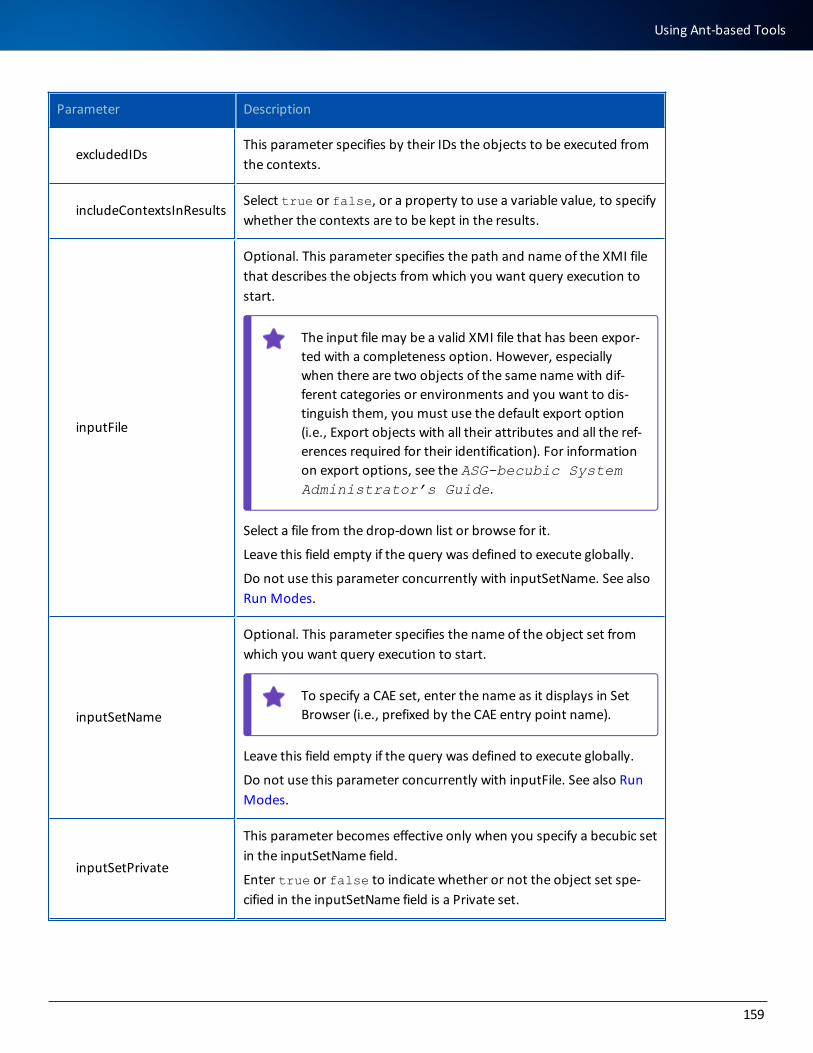
Parameter Description
excludedIDsThis parameter specifies by their IDs the objects to be executed from the contexts.
includeContextsInResultsSelect true or false, or a property to use a variable value, to specify whether the contexts are to be kept in the results.
inputFile
Optional. This parameter specifies the path and name of the XMI file that describes the objects from which you want query execution to start.
The input file may be a valid XMI file that has been expor-ted with a completeness option. However, especially when there are two objects of the same name with dif-ferent categories or environments and you want to dis-tinguish them, you must use the default export option (i.e., Export objects with all their attributes and all the ref-erences required for their identification). For information on export options, see the ASG-becubic System Administrator’s Guide.
Select a file from the drop-down list or browse for it.
Leave this field empty if the query was defined to execute globally.
Do not use this parameter concurrently with inputSetName. See also Run Modes.
inputSetName
Optional. This parameter specifies the name of the object set from which you want query execution to start.
To specify a CAE set, enter the name as it displays in Set Browser (i.e., prefixed by the CAE entry point name).
Leave this field empty if the query was defined to execute globally.
Do not use this parameter concurrently with inputFile. See also Run Modes.
inputSetPrivate
This parameter becomes effective only when you specify a becubic set in the inputSetName field.
Enter true or false to indicate whether or not the object set spe-cified in the inputSetName field is a Private set.
159
Using Ant-based Tools
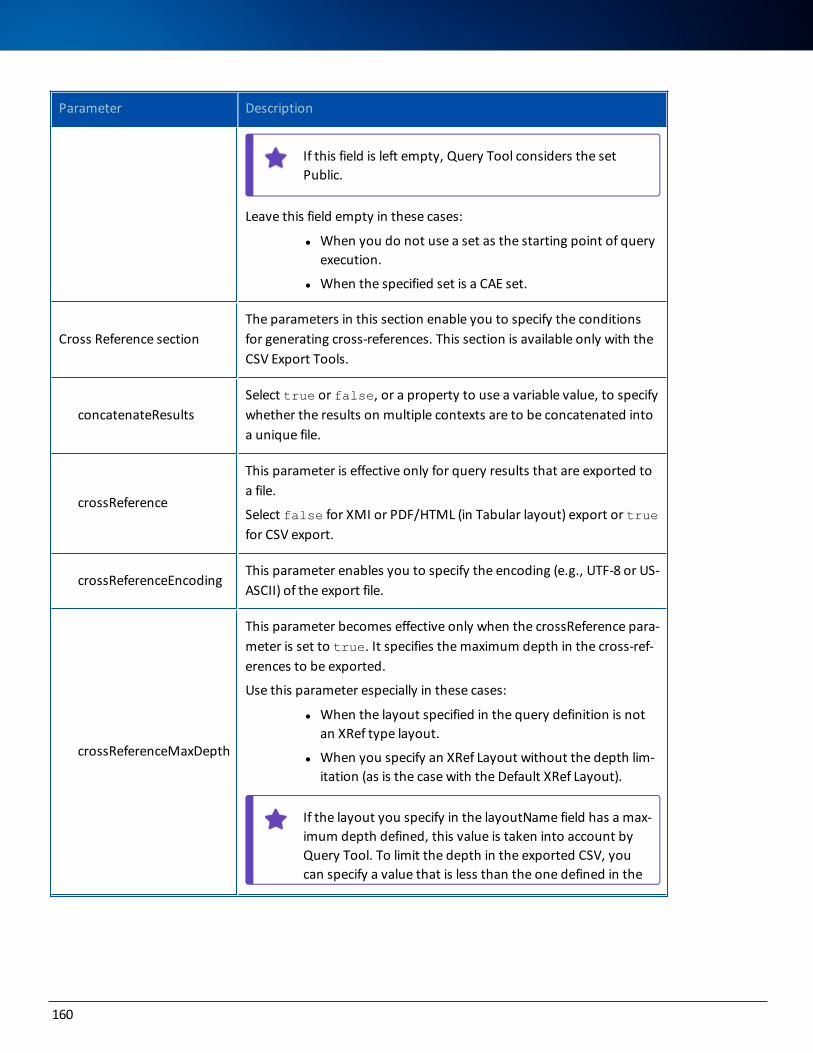
Parameter Description
If this field is left empty, Query Tool considers the set Public.
Leave this field empty in these cases:
l When you do not use a set as the starting point of query execution.
l When the specified set is a CAE set.
Cross Reference sectionThe parameters in this section enable you to specify the conditions for generating cross-references. This section is available only with the CSV Export Tools.
concatenateResultsSelect true or false, or a property to use a variable value, to specify whether the results on multiple contexts are to be concatenated into a unique file.
crossReference
This parameter is effective only for query results that are exported to a file.
Select false for XMI or PDF/HTML (in Tabular layout) export or true for CSV export.
crossReferenceEncodingThis parameter enables you to specify the encoding (e.g., UTF-8 or US-ASCII) of the export file.
crossReferenceMaxDepth
This parameter becomes effective only when the crossReference para-meter is set to true. It specifies the maximum depth in the cross-ref-erences to be exported.
Use this parameter especially in these cases:
l When the layout specified in the query definition is not an XRef type layout.
l When you specify an XRef Layout without the depth lim-itation (as is the case with the Default XRef Layout).
If the layout you specify in the layoutName field has a max-imum depth defined, this value is taken into account by Query Tool. To limit the depth in the exported CSV, you can specify a value that is less than the one defined in the
160
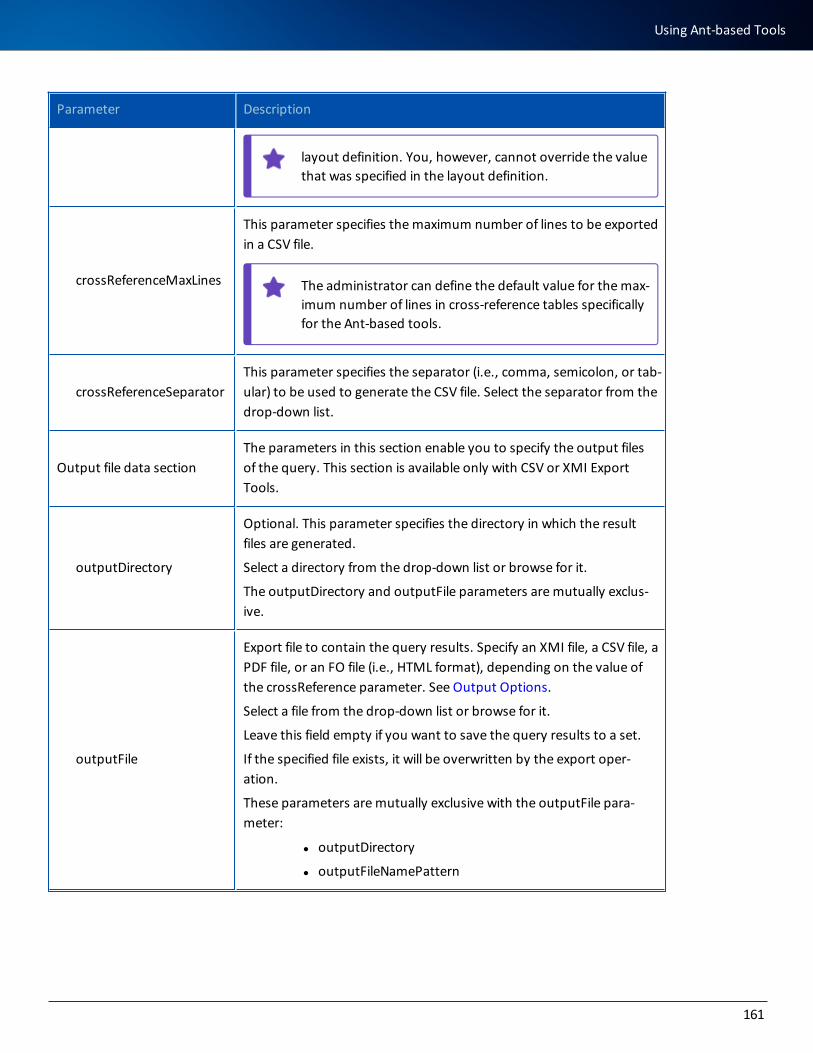
Parameter Description
layout definition. You, however, cannot override the value that was specified in the layout definition.
crossReferenceMaxLines
This parameter specifies the maximum number of lines to be exported in a CSV file.
The administrator can define the default value for the max-imum number of lines in cross-reference tables specifically for the Ant-based tools.
crossReferenceSeparatorThis parameter specifies the separator (i.e., comma, semicolon, or tab-ular) to be used to generate the CSV file. Select the separator from the drop-down list.
Output file data sectionThe parameters in this section enable you to specify the output files of the query. This section is available only with CSV or XMI Export Tools.
outputDirectory
Optional. This parameter specifies the directory in which the result files are generated.
Select a directory from the drop-down list or browse for it.
The outputDirectory and outputFile parameters are mutually exclus-ive.
outputFile
Export file to contain the query results. Specify an XMI file, a CSV file, a PDF file, or an FO file (i.e., HTML format), depending on the value of the crossReference parameter. See Output Options.
Select a file from the drop-down list or browse for it.
Leave this field empty if you want to save the query results to a set.
If the specified file exists, it will be overwritten by the export oper-ation.
These parameters are mutually exclusive with the outputFile para-meter:
l outputDirectory
l outputFileNamePattern
161
Using Ant-based Tools
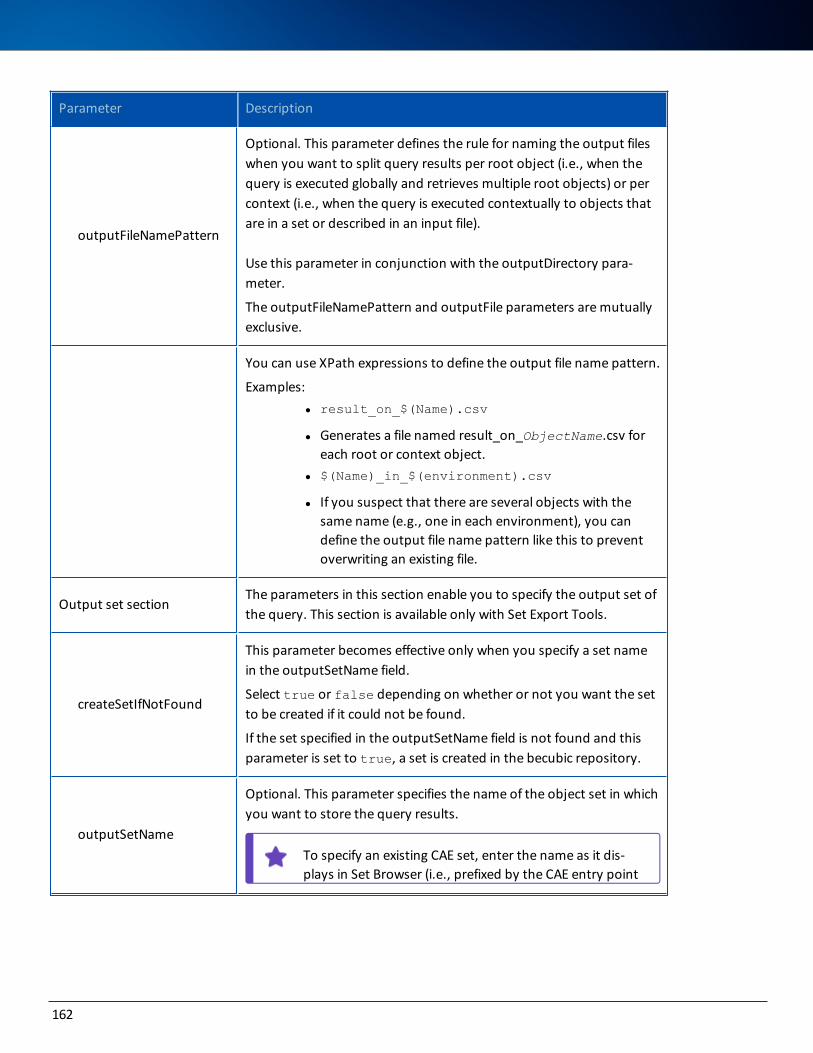
Parameter Description
outputFileNamePattern
Optional. This parameter defines the rule for naming the output files when you want to split query results per root object (i.e., when the query is executed globally and retrieves multiple root objects) or per context (i.e., when the query is executed contextually to objects that are in a set or described in an input file).
Use this parameter in conjunction with the outputDirectory para-meter.
The outputFileNamePattern and outputFile parameters are mutually exclusive.
You can use XPath expressions to define the output file name pattern.
Examples: l result_on_$(Name).csv
l Generates a file named result_on_ObjectName.csv for each root or context object.
l $(Name)_in_$(environment).csv
l If you suspect that there are several objects with the same name (e.g., one in each environment), you can define the output file name pattern like this to prevent overwriting an existing file.
Output set sectionThe parameters in this section enable you to specify the output set of the query. This section is available only with Set Export Tools.
createSetIfNotFound
This parameter becomes effective only when you specify a set name in the outputSetName field.
Select true or false depending on whether or not you want the set to be created if it could not be found.
If the set specified in the outputSetName field is not found and this parameter is set to true, a set is created in the becubic repository.
outputSetName
Optional. This parameter specifies the name of the object set in which you want to store the query results.
To specify an existing CAE set, enter the name as it dis-plays in Set Browser (i.e., prefixed by the CAE entry point
162
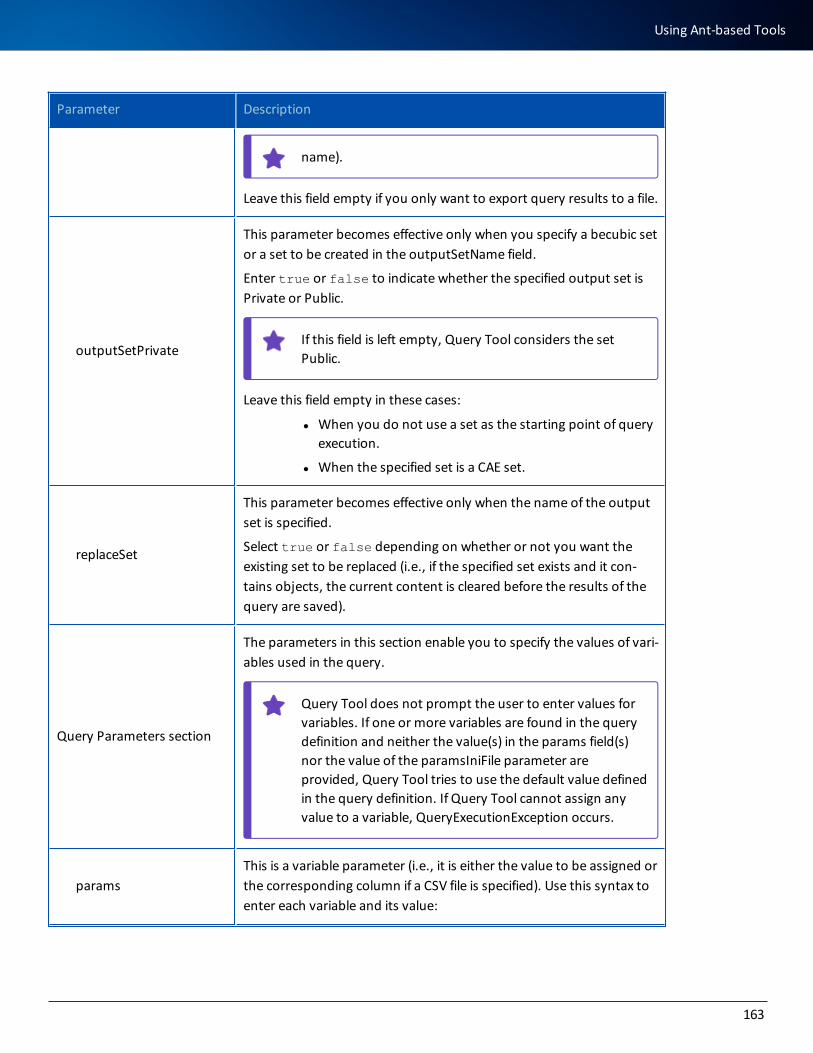
Parameter Description
name).
Leave this field empty if you only want to export query results to a file.
outputSetPrivate
This parameter becomes effective only when you specify a becubic set or a set to be created in the outputSetName field.
Enter true or false to indicate whether the specified output set is Private or Public.
If this field is left empty, Query Tool considers the set Public.
Leave this field empty in these cases:
l When you do not use a set as the starting point of query execution.
l When the specified set is a CAE set.
replaceSet
This parameter becomes effective only when the name of the output set is specified.
Select true or false depending on whether or not you want the existing set to be replaced (i.e., if the specified set exists and it con-tains objects, the current content is cleared before the results of the query are saved).
Query Parameters section
The parameters in this section enable you to specify the values of vari-ables used in the query.
Query Tool does not prompt the user to enter values for variables. If one or more variables are found in the query definition and neither the value(s) in the params field(s) nor the value of the paramsIniFile parameter are provided, Query Tool tries to use the default value defined in the query definition. If Query Tool cannot assign any value to a variable, QueryExecutionException occurs.
paramsThis is a variable parameter (i.e., it is either the value to be assigned or the corresponding column if a CSV file is specified). Use this syntax to enter each variable and its value:
163
Using Ant-based Tools
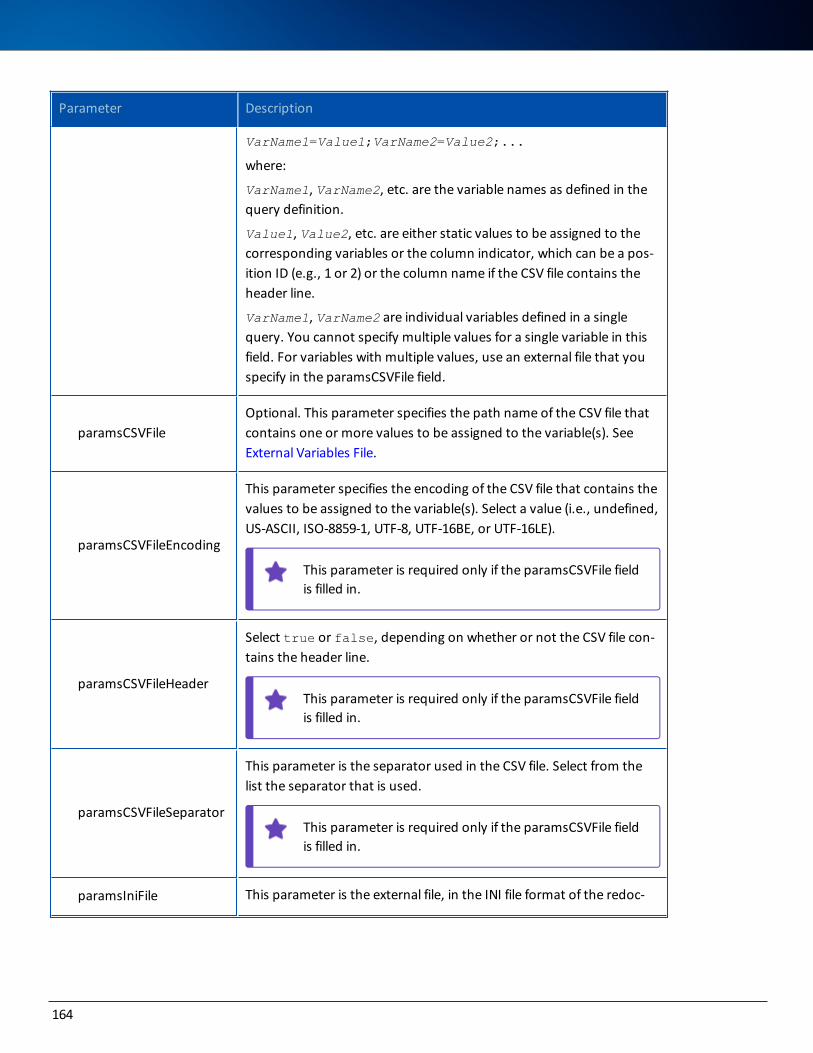
Parameter Description
VarName1=Value1;VarName2=Value2;...
where:
VarName1, VarName2, etc. are the variable names as defined in the query definition.
Value1, Value2, etc. are either static values to be assigned to the corresponding variables or the column indicator, which can be a pos-ition ID (e.g., 1 or 2) or the column name if the CSV file contains the header line.
VarName1, VarName2 are individual variables defined in a single query. You cannot specify multiple values for a single variable in this field. For variables with multiple values, use an external file that you specify in the paramsCSVFile field.
paramsCSVFileOptional. This parameter specifies the path name of the CSV file that contains one or more values to be assigned to the variable(s). See External Variables File.
paramsCSVFileEncoding
This parameter specifies the encoding of the CSV file that contains the values to be assigned to the variable(s). Select a value (i.e., undefined, US-ASCII, ISO-8859-1, UTF-8, UTF-16BE, or UTF-16LE).
This parameter is required only if the paramsCSVFile field is filled in.
paramsCSVFileHeader
Select true or false, depending on whether or not the CSV file con-tains the header line.
This parameter is required only if the paramsCSVFile field is filled in.
paramsCSVFileSeparator
This parameter is the separator used in the CSV file. Select from the list the separator that is used.
This parameter is required only if the paramsCSVFile field is filled in.
paramsIniFile This parameter is the external file, in the INI file format of the redoc-
164
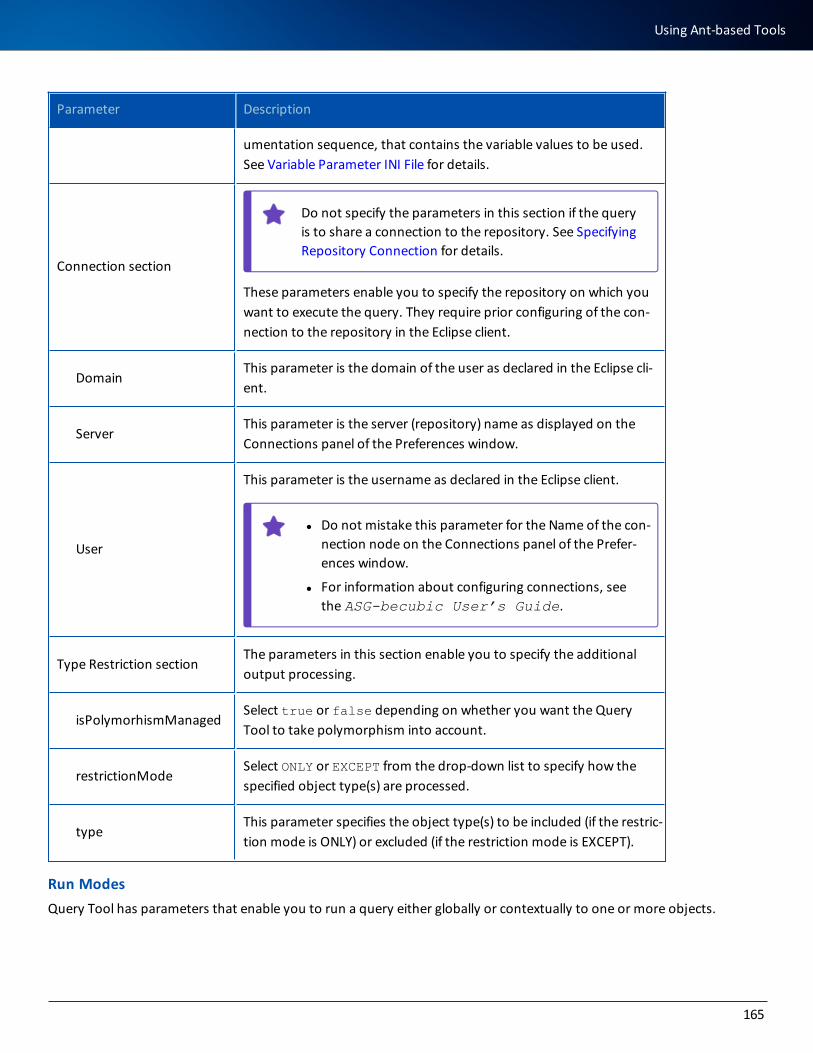
Parameter Description
umentation sequence, that contains the variable values to be used. See Variable Parameter INI File for details.
Connection section
Do not specify the parameters in this section if the query is to share a connection to the repository. See Specifying Repository Connection for details.
These parameters enable you to specify the repository on which you want to execute the query. They require prior configuring of the con-nection to the repository in the Eclipse client.
DomainThis parameter is the domain of the user as declared in the Eclipse cli-ent.
ServerThis parameter is the server (repository) name as displayed on the Connections panel of the Preferences window.
User
This parameter is the username as declared in the Eclipse client.
l Do not mistake this parameter for the Name of the con-nection node on the Connections panel of the Prefer-ences window.
l For information about configuring connections, see the ASG-becubic User’s Guide.
Type Restriction sectionThe parameters in this section enable you to specify the additional output processing.
isPolymorhismManagedSelect true or false depending on whether you want the Query Tool to take polymorphism into account.
restrictionModeSelect ONLY or EXCEPT from the drop-down list to specify how the specified object type(s) are processed.
typeThis parameter specifies the object type(s) to be included (if the restric-tion mode is ONLY) or excluded (if the restriction mode is EXCEPT).
Run ModesQuery Tool has parameters that enable you to run a query either globally or contextually to one or more objects.
165
Using Ant-based Tools
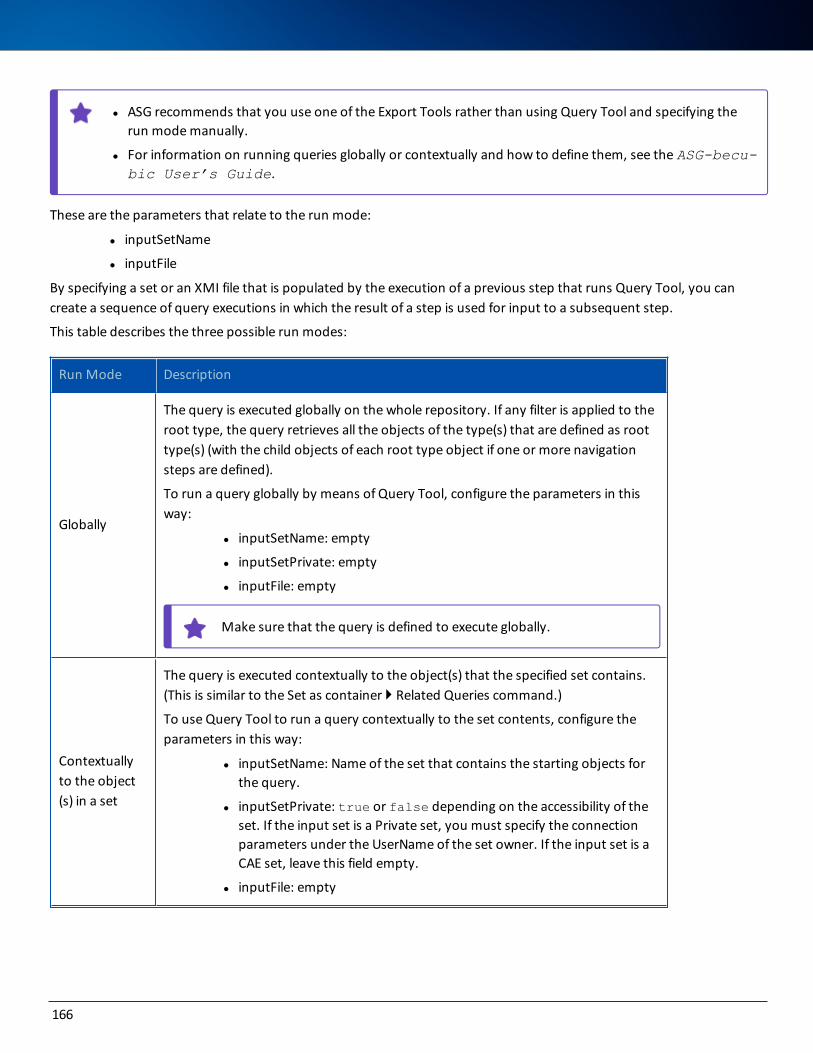
l ASG recommends that you use one of the Export Tools rather than using Query Tool and specifying the run mode manually.
l For information on running queries globally or contextually and how to define them, see the ASG-becu-bic User’s Guide.
These are the parameters that relate to the run mode:
l inputSetName
l inputFile
By specifying a set or an XMI file that is populated by the execution of a previous step that runs Query Tool, you can create a sequence of query executions in which the result of a step is used for input to a subsequent step.
This table describes the three possible run modes:
Run Mode Description
Globally
The query is executed globally on the whole repository. If any filter is applied to the root type, the query retrieves all the objects of the type(s) that are defined as root type(s) (with the child objects of each root type object if one or more navigation steps are defined).
To run a query globally by means of Query Tool, configure the parameters in this way:
l inputSetName: empty
l inputSetPrivate: empty
l inputFile: empty
Make sure that the query is defined to execute globally.
Contextually to the object(s) in a set
The query is executed contextually to the object(s) that the specified set contains. (This is similar to the Set as container } Related Queries command.)
To use Query Tool to run a query contextually to the set contents, configure the parameters in this way:
l inputSetName: Name of the set that contains the starting objects for the query.
l inputSetPrivate: true or false depending on the accessibility of the set. If the input set is a Private set, you must specify the connection parameters under the UserName of the set owner. If the input set is a CAE set, leave this field empty.
l inputFile: empty
166
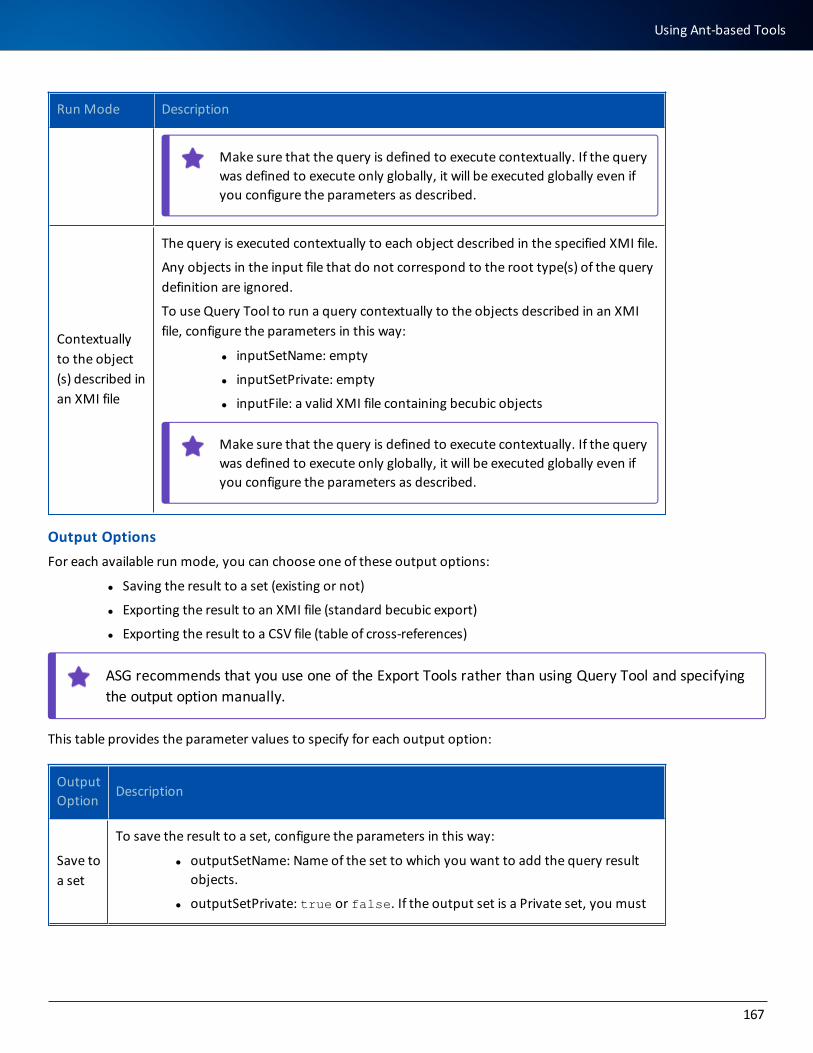
Run Mode Description
Make sure that the query is defined to execute contextually. If the query was defined to execute only globally, it will be executed globally even if you configure the parameters as described.
Contextually to the object(s) described in an XMI file
The query is executed contextually to each object described in the specified XMI file.
Any objects in the input file that do not correspond to the root type(s) of the query definition are ignored.
To use Query Tool to run a query contextually to the objects described in an XMI file, configure the parameters in this way:
l inputSetName: empty
l inputSetPrivate: empty
l inputFile: a valid XMI file containing becubic objects
Make sure that the query is defined to execute contextually. If the query was defined to execute only globally, it will be executed globally even if you configure the parameters as described.
Output OptionsFor each available run mode, you can choose one of these output options:
l Saving the result to a set (existing or not)
l Exporting the result to an XMI file (standard becubic export)
l Exporting the result to a CSV file (table of cross-references)
ASG recommends that you use one of the Export Tools rather than using Query Tool and specifying the output option manually.
This table provides the parameter values to specify for each output option:
Output Option
Description
Save to a set
To save the result to a set, configure the parameters in this way:
l outputSetName: Name of the set to which you want to add the query result objects.
l outputSetPrivate: true or false. If the output set is a Private set, you must
167
Using Ant-based Tools

Output Option
Description
specify the connection parameters under the UserName of the set owner. If the output set is a CAE set, leave this field empty.
l createSetIfNotFound: true or false.
l replaceSet: Set to true if you want to initialize the set (i.e., the set contains only the query result even if it contained other objects before the tool was run) or false if you want to add the query result to the current contents.
l outputFile: empty
l crossReference: false
l crossReferenceMaxDepth: empty
XMI export
To export the result to an XMI file, configure the parameters in this way:
l outputSetName:empty
l outputSetPrivate: empty
l createSetIfNotFound: empty
l replaceSet: empty
l outputFile: Path name of the output file. Specify the file name with the exten-sion XML or XMI.
l crossReference: false
l crossReferenceMaxDepth: empty
The export task is performed with the default options. For information on the default export options, see the ASG-becubic System Administrator’s Guide.
CSV export
To export the result to a CSV file, configure the parameters in this way:
l layoutName: Name of the layout (i.e., Source layout, tabular layout, or XRef lay-out) to be applied.
Name is the key name (i.e., the unique identification name) that was given to the layout when it was created.
l outputSetName:empty
l outputSetPrivate: empty
l createSetIfNotFound: empty
l replaceSet: empty
l outputFile: Path name of the output file. Specify the file name with the exten-sion CSV or TXT.
168
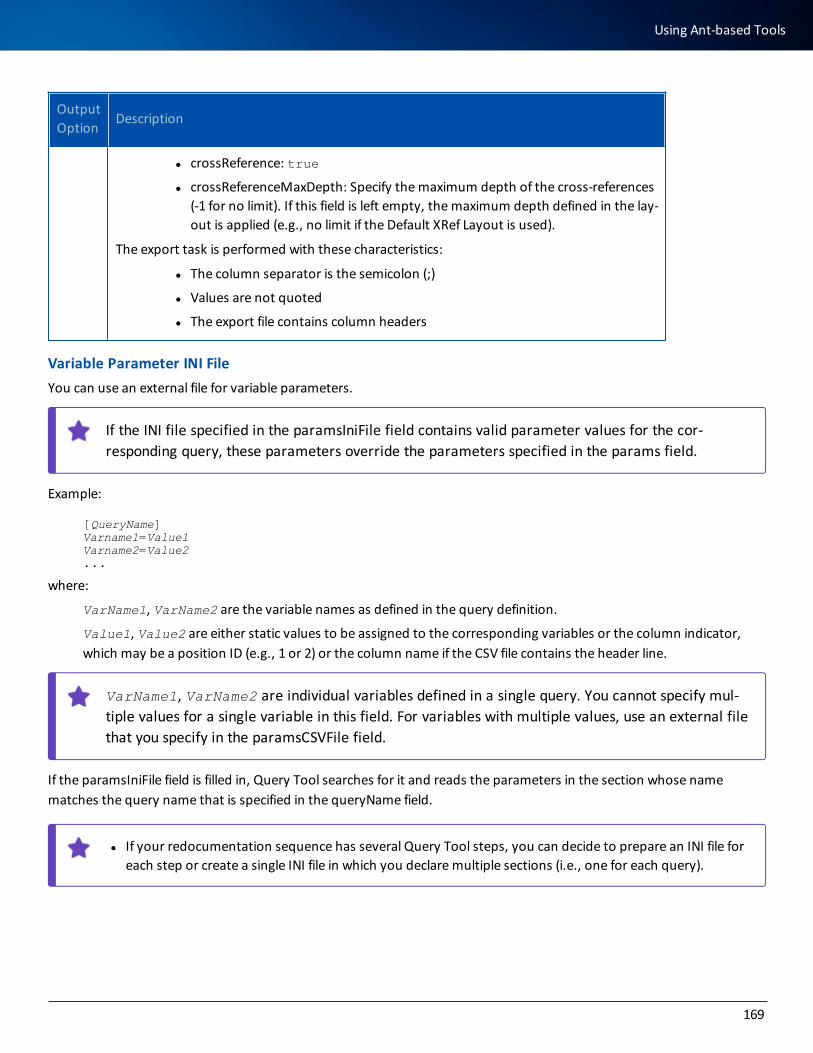
Output Option
Description
l crossReference: true
l crossReferenceMaxDepth: Specify the maximum depth of the cross-references (-1 for no limit). If this field is left empty, the maximum depth defined in the lay-out is applied (e.g., no limit if the Default XRef Layout is used).
The export task is performed with these characteristics:
l The column separator is the semicolon (;)
l Values are not quoted
l The export file contains column headers
Variable Parameter INI FileYou can use an external file for variable parameters.
If the INI file specified in the paramsIniFile field contains valid parameter values for the cor-responding query, these parameters override the parameters specified in the params field.
Example:
[QueryName]Varname1=Value1Varname2=Value2...
where:
VarName1, VarName2 are the variable names as defined in the query definition.
Value1, Value2 are either static values to be assigned to the corresponding variables or the column indicator, which may be a position ID (e.g., 1 or 2) or the column name if the CSV file contains the header line.
VarName1, VarName2 are individual variables defined in a single query. You cannot specify mul-tiple values for a single variable in this field. For variables with multiple values, use an external file that you specify in the paramsCSVFile field.
If the paramsIniFile field is filled in, Query Tool searches for it and reads the parameters in the section whose name matches the query name that is specified in the queryName field.
l If your redocumentation sequence has several Query Tool steps, you can decide to prepare an INI file for each step or create a single INI file in which you declare multiple sections (i.e., one for each query).
169
Using Ant-based Tools

l If you want to use the same query with a different value at each step, you need to create an INI file for each step.
External Variables FileYou can use a CSV file that contains a series of values to be assigned to the variable(s) sequentially. Query Tool executes the specified query as many times as there are values to be assigned. In case you export the query results into a file (which is specified in the outputFile field), the results of each execution are stored separately and the output file name you specified is suffixed with:_n
where n is a numeric value that corresponds to the line number of the value(s) in the CSV file (any header line is omitted from the count).
When saving results to a set, the results of each execution are added successively to a single set. This is an example of a CSV file (with header line):
Column1,Column2Value1a,Value2aValue1b,Value2bValue1c,Value2c...
Example of Step Parameter ValuesIn this section, we will assume that the query to be executed is defined with two variables, pgmName and pgmCategory, and that the CSV file contains the names of the programs to be retrieved by the query in the first column and their expec-ted category in the second column.
This table describes and provides examples of parameter values for use in such a file:
Parameter Example/Description
params
pgmName=Column1;pgmCategory=Column2
Alternatively, you can specify the column index like this:pgmName=1;pgmCategory=2
Specifying the corresponding column by index avoids any para-meter value mismatch. This can be very helpful when the CSV file is generated automatically by an export operation.
paramsIniFileLeave this field empty unless you want to externalize the variable-column correspondence information into an INI file. See Variable Parameter INI File.
170
Parameter Example/Description
paramsCSVFile Path name of the CSV file.
paramsCSVFileHeader true (Select from the drop-down list.)
paramsCSVFileSeparator comma (Select from the drop-down list.)
Successive Query ExecutionsBy using the result of a Query Tool step as input to another step, you can run several query steps successively.
Here are some examples of result-input combinations:
l Result saved to a set and the next step uses a set for input.
l Result saved to an XMI file and the next step uses a file for input.
l Result of an XRef-type query saved to a CSV file and the next step uses the contents of this file as external variable values.
Import ToolImport Tool enables you to perform import tasks from within the default redocumentation sequence or one that you cre-ate. The input file can be either an XMI file that describes becubic objects or a CSV file from which becubic objects will be generated by applying a specific transformation rule.
Import Tool simply automates the import tasks that you can perform interactively in the Eclipse client. You will, therefore, find almost the same execution parameters in the Eclipse client’s GUI.
These Import Tools relate to Import Tool:
l CSV Import Tool
l XMI Import Tool
For information about the execution parameters and the transformation rules for the import tasks, see the ASG-becubic System Administrator’s Guide.
Execution ParametersThis table describes the Import Tool parameters that display in the Edit Task window of Sequence Editor.
Depending on the import tool you use (i.e., CSV or XMI), the exposed parameters may differ:
Parameter Description
General section
CSVFileEncodingSpecifies the encoding of the CSV source files (i.e., undefined, US-ASCII, ISO-8859-1, UTF-8, UTF-16BE, or UTF-16LE).
171
Using Ant-based Tools

Parameter Description
Select a value from the drop-down list.
CSVFileSeparatorSpecifies the column separator used in the source file.
Choose the separator from the drop-down list: semicolon (;), comma (,), or Tab.
detailLogBoolean parameter (true|false). Specifies whether the detail log is to be generated.
Select a value from the drop-down list.
emptyIsNullBoolean parameter (true|false). Specifies whether the null value must be assigned to any empty cell in the CSV source file for import.
Select a value from the drop-down list.
headers
Boolean parameter (true|false). Specifies whether the CSV source files have header rows that the import operation is to ignore.
Select a value from the drop-down list.
id Ant task ID that can be referenced from other tasks if required.
identifiedTypesSpecifies object types to which the unidentified objects handling option will be applied.
importColumnFixedLengths Specify a value if required.
importDir
Mandatory parameter. Directory in which to look for the files to be imported.
Select a directory from the drop-down list or browse for it.
Import Tool imports all the files from the directory that you specify, unless you specify a filter in the includes field.
importMode
Specifies the import mode (i.e., Replace or Add) depending on the import mode.
This parameter takes effect only when you perform an
172
Parameter Description
incremental import or when you update existing objects (i.e., when you add attribute values and/or references to them) through an import operation.
includes
Mandatory parameter. Include mask for filtering the files to be imported. Specify a value.
Examples:
l *.csv imports all the CSV files that are found in the specified directory.
l **/*.csv imports all the CSV files that are found in the specified directory and in its subdirectories.
l filename.csv imports only the file that matches filename.
logWithNamesBoolean parameter (true|false). Specifies whether the processed object names are to be written in the log file.
Select a value from the drop-down list.
providerXmi , Uml, Transformation Rule Set Import, or Excel depending on the type of source files to import.
Select a value from the drop-down list.
repositoryName
Optional. Specify the CAE entry point that contains the objects for which custom attributes and links are to be imported.
This parameter also is required when the import oper-ation involves both a CAE entry point and the becubic repository.
singleLine
Boolean parameter (true|false).
Select true if you want the import provider to process each line as an entry regardless of the usage of string delimiters.
Select false if the source CSV file contains multiple-line attribute values delimited by double quotation marks.
sourcesVersionSpecifies the version of the source files to be imported. If you are importing by using a template XMI file that has been exported with
173
Using Ant-based Tools
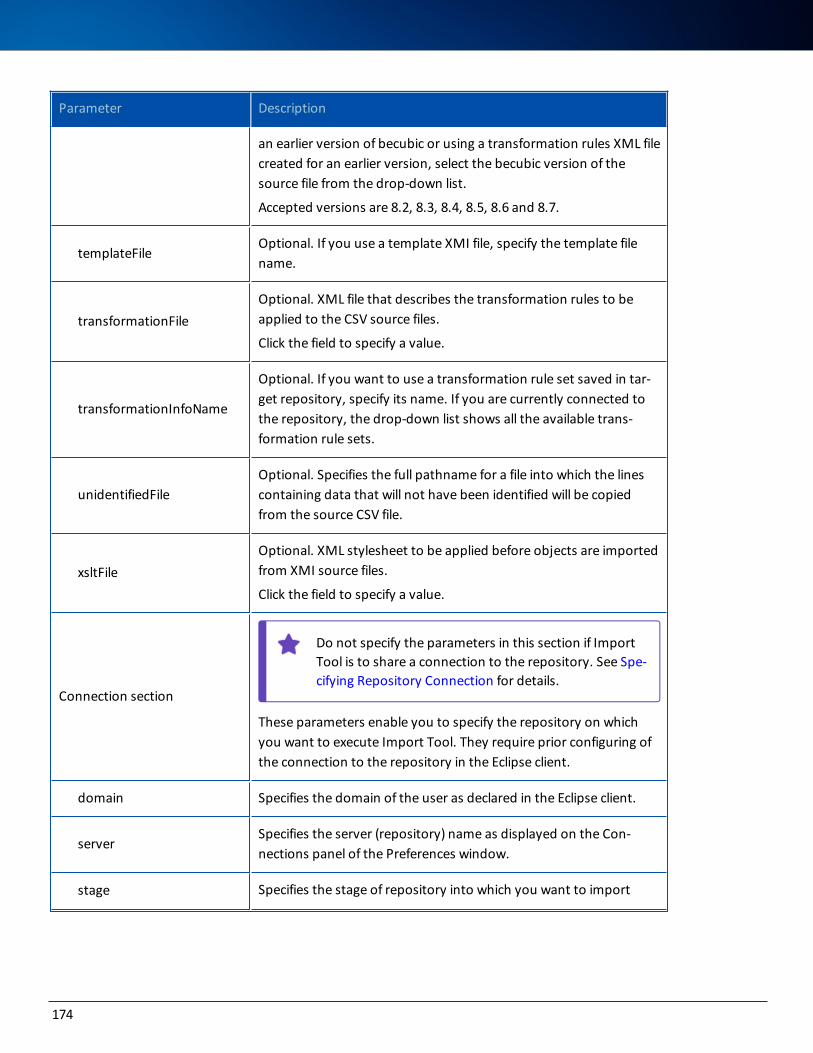
Parameter Description
an earlier version of becubic or using a transformation rules XML file created for an earlier version, select the becubic version of the source file from the drop-down list.
Accepted versions are 8.2, 8.3, 8.4, 8.5, 8.6 and 8.7.
templateFileOptional. If you use a template XMI file, specify the template file name.
transformationFileOptional. XML file that describes the transformation rules to be applied to the CSV source files.
Click the field to specify a value.
transformationInfoName
Optional. If you want to use a transformation rule set saved in tar-get repository, specify its name. If you are currently connected to the repository, the drop-down list shows all the available trans-formation rule sets.
unidentifiedFileOptional. Specifies the full pathname for a file into which the lines containing data that will not have been identified will be copied from the source CSV file.
xsltFileOptional. XML stylesheet to be applied before objects are imported from XMI source files.
Click the field to specify a value.
Connection section
Do not specify the parameters in this section if Import Tool is to share a connection to the repository. See Spe-cifying Repository Connection for details.
These parameters enable you to specify the repository on which you want to execute Import Tool. They require prior configuring of the connection to the repository in the Eclipse client.
domain Specifies the domain of the user as declared in the Eclipse client.
serverSpecifies the server (repository) name as displayed on the Con-nections panel of the Preferences window.
stage Specifies the stage of repository into which you want to import
174
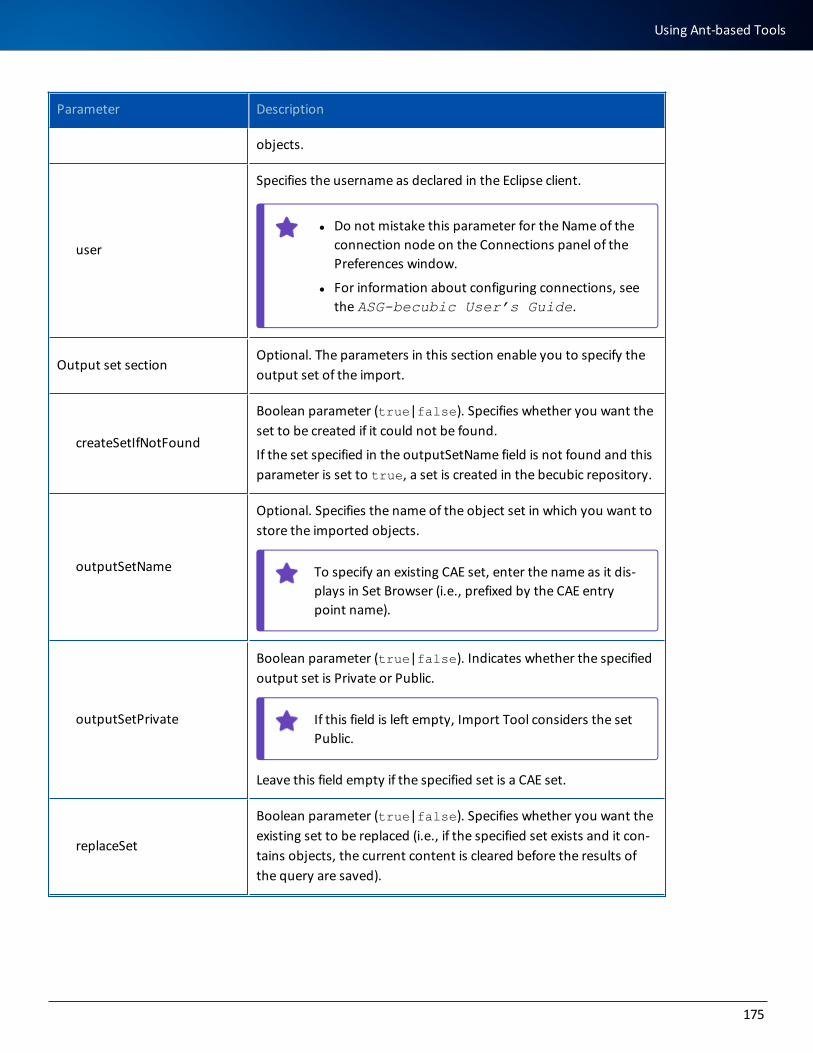
Parameter Description
objects.
user
Specifies the username as declared in the Eclipse client.
l Do not mistake this parameter for the Name of the connection node on the Connections panel of the Preferences window.
l For information about configuring connections, see the ASG-becubic User’s Guide.
Output set sectionOptional. The parameters in this section enable you to specify the output set of the import.
createSetIfNotFound
Boolean parameter (true|false). Specifies whether you want the set to be created if it could not be found.
If the set specified in the outputSetName field is not found and this parameter is set to true, a set is created in the becubic repository.
outputSetName
Optional. Specifies the name of the object set in which you want to store the imported objects.
To specify an existing CAE set, enter the name as it dis-plays in Set Browser (i.e., prefixed by the CAE entry point name).
outputSetPrivate
Boolean parameter (true|false). Indicates whether the specified output set is Private or Public.
If this field is left empty, Import Tool considers the set Public.
Leave this field empty if the specified set is a CAE set.
replaceSet
Boolean parameter (true|false). Specifies whether you want the existing set to be replaced (i.e., if the specified set exists and it con-tains objects, the current content is cleared before the results of the query are saved).
175
Using Ant-based Tools
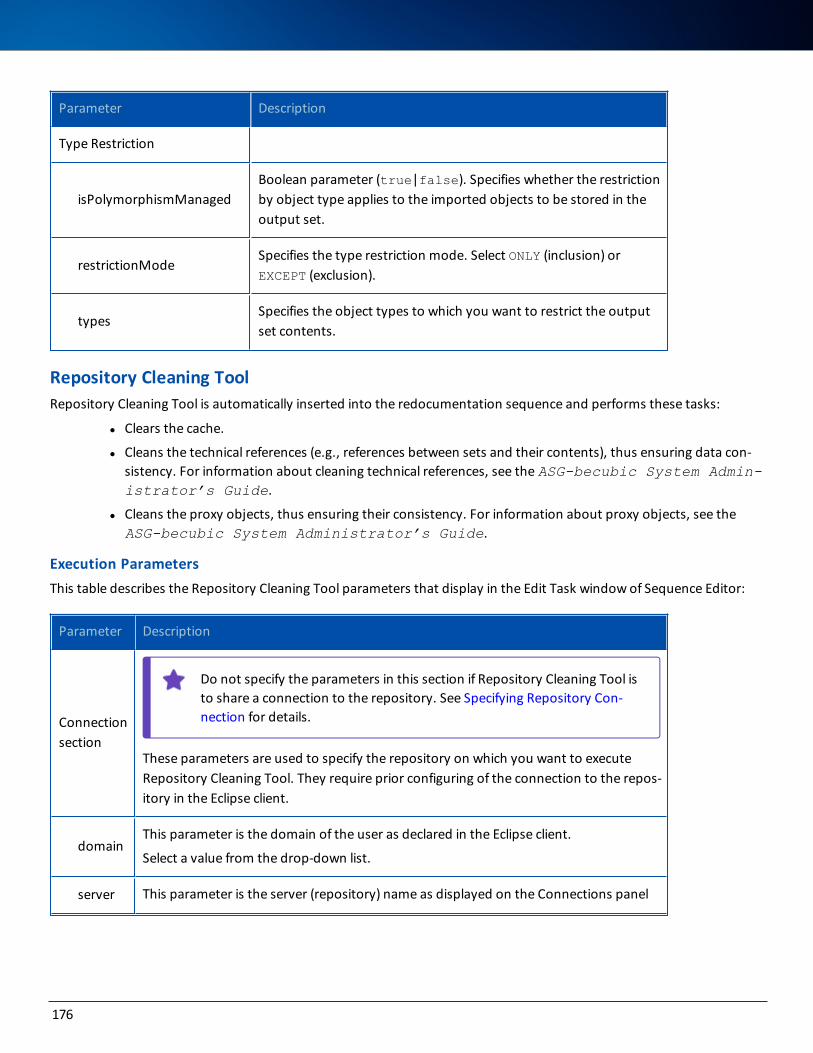
Parameter Description
Type Restriction
isPolymorphismManagedBoolean parameter (true|false). Specifies whether the restriction by object type applies to the imported objects to be stored in the output set.
restrictionModeSpecifies the type restriction mode. Select ONLY (inclusion) or EXCEPT (exclusion).
typesSpecifies the object types to which you want to restrict the output set contents.
Repository Cleaning ToolRepository Cleaning Tool is automatically inserted into the redocumentation sequence and performs these tasks:
l Clears the cache.
l Cleans the technical references (e.g., references between sets and their contents), thus ensuring data con-sistency. For information about cleaning technical references, see the ASG-becubic System Admin-istrator’s Guide.
l Cleans the proxy objects, thus ensuring their consistency. For information about proxy objects, see the ASG-becubic System Administrator’s Guide.
Execution ParametersThis table describes the Repository Cleaning Tool parameters that display in the Edit Task window of Sequence Editor:
Parameter Description
Connection section
Do not specify the parameters in this section if Repository Cleaning Tool is to share a connection to the repository. See Specifying Repository Con-nection for details.
These parameters are used to specify the repository on which you want to execute Repository Cleaning Tool. They require prior configuring of the connection to the repos-itory in the Eclipse client.
domainThis parameter is the domain of the user as declared in the Eclipse client.
Select a value from the drop-down list.
server This parameter is the server (repository) name as displayed on the Connections panel
176
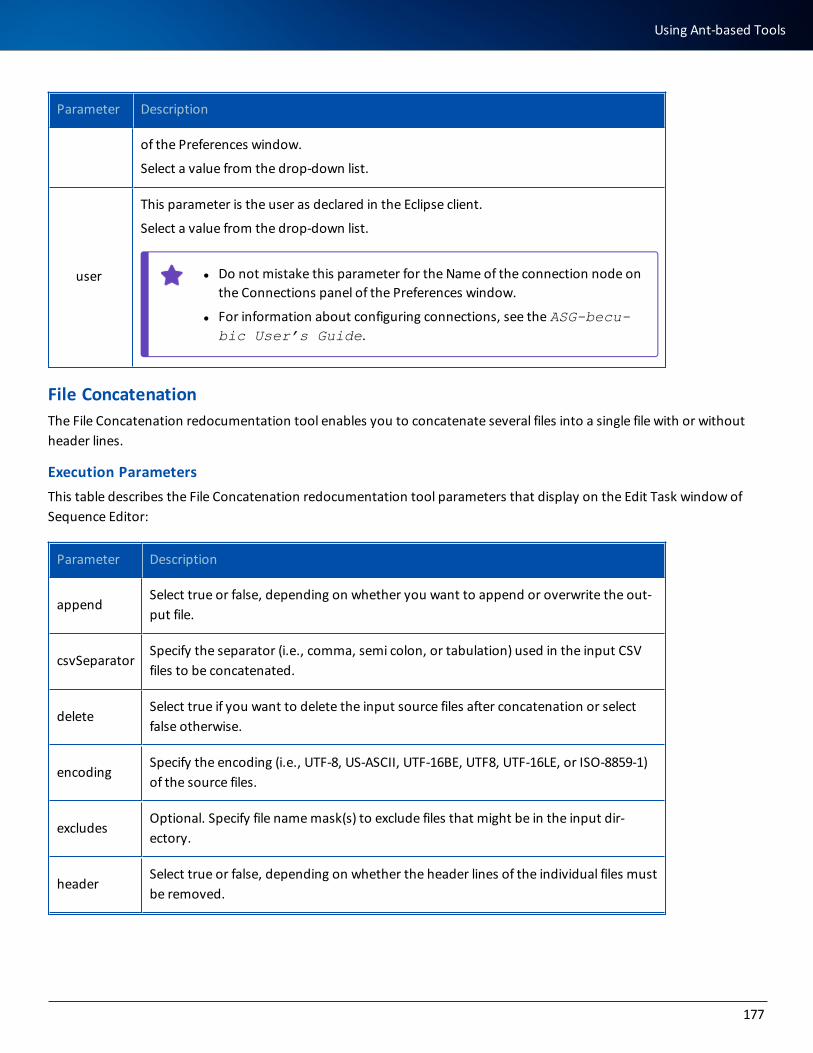
Parameter Description
of the Preferences window.
Select a value from the drop-down list.
user
This parameter is the user as declared in the Eclipse client.
Select a value from the drop-down list.
l Do not mistake this parameter for the Name of the connection node on the Connections panel of the Preferences window.
l For information about configuring connections, see the ASG-becu-bic User’s Guide.
File ConcatenationThe File Concatenation redocumentation tool enables you to concatenate several files into a single file with or without header lines.
Execution ParametersThis table describes the File Concatenation redocumentation tool parameters that display on the Edit Task window of Sequence Editor:
Parameter Description
appendSelect true or false, depending on whether you want to append or overwrite the out-put file.
csvSeparatorSpecify the separator (i.e., comma, semi colon, or tabulation) used in the input CSV files to be concatenated.
deleteSelect true if you want to delete the input source files after concatenation or select false otherwise.
encodingSpecify the encoding (i.e., UTF-8, US-ASCII, UTF-16BE, UTF8, UTF-16LE, or ISO-8859-1) of the source files.
excludesOptional. Specify file name mask(s) to exclude files that might be in the input dir-ectory.
headerSelect true or false, depending on whether the header lines of the individual files must be removed.
177
Using Ant-based Tools

Parameter Description
idOptional. Provide a unique identifier of this task instance, which can be used to ref-erence the task in a script.
includes Optional. Specify file name mask(s) for files that must be concatenated.
inputDir Directory in which the individual files are stored.
outputFile Name of the concatenated file.
verboseSelect true or false, depending on whether you want detailed information in the exe-cution log.
ContextualGroupThe ContextualGroup redocumentation tool enables you to set the counter index that is incremented each time the con-tained task is executed. The counter index value is assigned to a property that you specify.
You find this task on the becubic Advanced Tasks tab.
Execution ParametersThis table describes the ContextualGroup redocumentation tool parameters that display on the Edit Task window of Sequence Editor:
Parameter Description
General This section defines the general parameters of the contextual task group.
batchsize An integer value to define the size of batch process.
counter The name of a property that will be used to store the counter value.
counterformat Optional. Format of the counter.
excludedids Optional. IDs of the object to be excluded.
federatedrepository Optional. Name of the federated repository.
forcedisconnectOptional. Boolean parameter (true or false) to specify whether you want to force the disconnection after execution of each contained task.
178
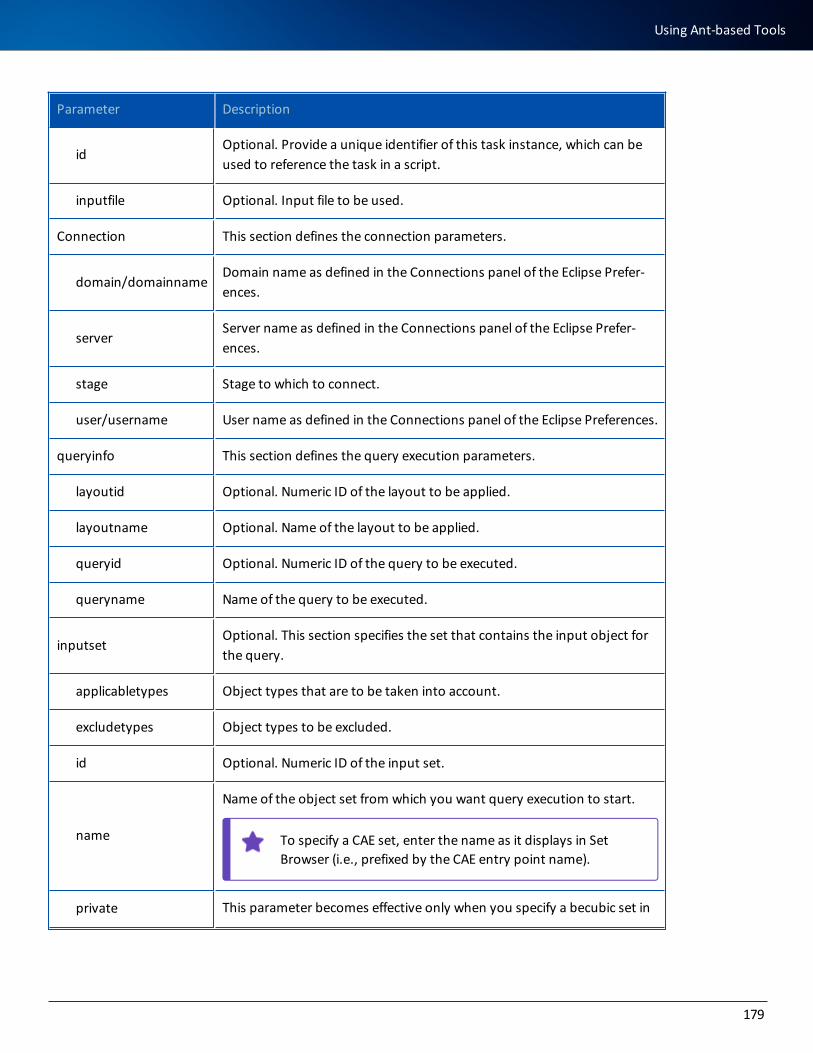
Parameter Description
idOptional. Provide a unique identifier of this task instance, which can be used to reference the task in a script.
inputfile Optional. Input file to be used.
Connection This section defines the connection parameters.
domain/domainnameDomain name as defined in the Connections panel of the Eclipse Prefer-ences.
serverServer name as defined in the Connections panel of the Eclipse Prefer-ences.
stage Stage to which to connect.
user/username User name as defined in the Connections panel of the Eclipse Preferences.
queryinfo This section defines the query execution parameters.
layoutid Optional. Numeric ID of the layout to be applied.
layoutname Optional. Name of the layout to be applied.
queryid Optional. Numeric ID of the query to be executed.
queryname Name of the query to be executed.
inputsetOptional. This section specifies the set that contains the input object for the query.
applicabletypes Object types that are to be taken into account.
excludetypes Object types to be excluded.
id Optional. Numeric ID of the input set.
name
Name of the object set from which you want query execution to start.
To specify a CAE set, enter the name as it displays in Set Browser (i.e., prefixed by the CAE entry point name).
private This parameter becomes effective only when you specify a becubic set in
179
Using Ant-based Tools
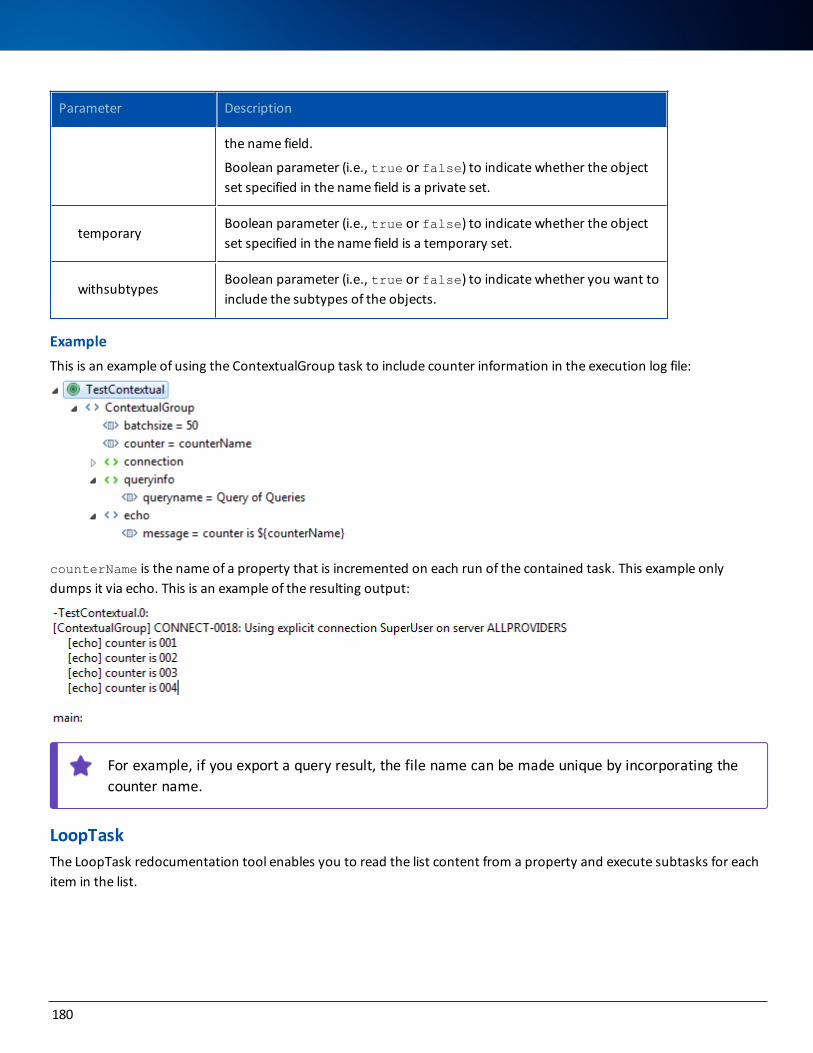
Parameter Description
the name field.
Boolean parameter (i.e., true or false) to indicate whether the object set specified in the name field is a private set.
temporaryBoolean parameter (i.e., true or false) to indicate whether the object set specified in the name field is a temporary set.
withsubtypesBoolean parameter (i.e., true or false) to indicate whether you want to include the subtypes of the objects.
ExampleThis is an example of using the ContextualGroup task to include counter information in the execution log file:
counterName is the name of a property that is incremented on each run of the contained task. This example only dumps it via echo. This is an example of the resulting output:
For example, if you export a query result, the file name can be made unique by incorporating the counter name.
LoopTaskThe LoopTask redocumentation tool enables you to read the list content from a property and execute subtasks for each item in the list.
180
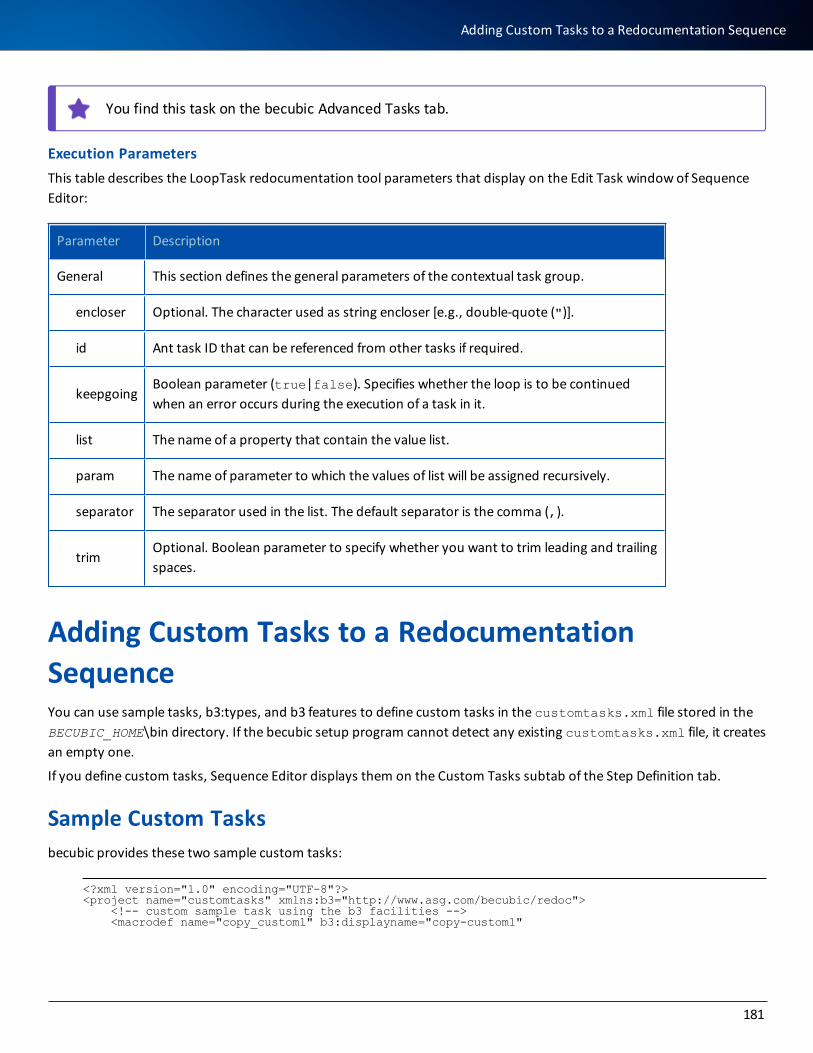
You find this task on the becubic Advanced Tasks tab.
Execution ParametersThis table describes the LoopTask redocumentation tool parameters that display on the Edit Task window of Sequence Editor:
Parameter Description
General This section defines the general parameters of the contextual task group.
encloser Optional. The character used as string encloser [e.g., double-quote (")].
id Ant task ID that can be referenced from other tasks if required.
keepgoingBoolean parameter (true|false). Specifies whether the loop is to be continued when an error occurs during the execution of a task in it.
list The name of a property that contain the value list.
param The name of parameter to which the values of list will be assigned recursively.
separator The separator used in the list. The default separator is the comma (,).
trimOptional. Boolean parameter to specify whether you want to trim leading and trailing spaces.
Adding Custom Tasks to a Redocumentation SequenceYou can use sample tasks, b3:types, and b3 features to define custom tasks in the customtasks.xml file stored in the BECUBIC_HOME\bin directory. If the becubic setup program cannot detect any existing customtasks.xml file, it creates an empty one.
If you define custom tasks, Sequence Editor displays them on the Custom Tasks subtab of the Step Definition tab.
Sample Custom Tasksbecubic provides these two sample custom tasks:
<?xml version="1.0" encoding="UTF-8"?><project name="customtasks" xmlns:b3="http://www.asg.com/becubic/redoc"> <!-- custom sample task using the b3 facilities --> <macrodef name="copy_custom1" b3:displayname="copy-custom1"
181
Adding Custom Tasks to a Redocumentation Sequence

description="copy"> <attribute name="src" b3:type="File" description="source" /> <attribute name="dst" b3:type="File" description="destination" /> <sequential> <copy file="@{src}" toFile="@{dst}"> </copy> </sequential> </macrodef> <!-- Custom sample task not using the b3 facilities --> <macrodef name="copy_custom2" description="copy"> <attribute name="src" description="source" /> <attribute name="dst" description="destination" /> <sequential> <copy file="@{src}" toFile="@{dst}"> </copy> </sequential> </macrodef> </project>
b3:typesYou can use becubic b3:type features to define the types of the fields that you add to the Edit Task dialog for your cus-tom tasks. Use this syntax:
b3:type="FieldType"
This table lists the available b3:type features and the corresponding field types:
b3:type Field Type
ADMIN_URLText providing an administration URL (i.e., http://remote_server:port/becubic/admin).
BOOLEAN Boolean value.
CAE_SCRIPT Name of a CAE script.
CLASS A class in the model.
DIRECTORYText providing a path. The corresponding Browse button [...] displays the Open dialog for selecting a folder.
DOMAIN
Text providing the name of the Domain connection parameter.
This feature retrieves a list of the domains declared in the local con-nection.xml file.
ENUM_ANT Ant enumeration.
ENUM_JAVA Java enumeration.
FILE Text providing a file name. The corresponding Browse button [...] displays the
182
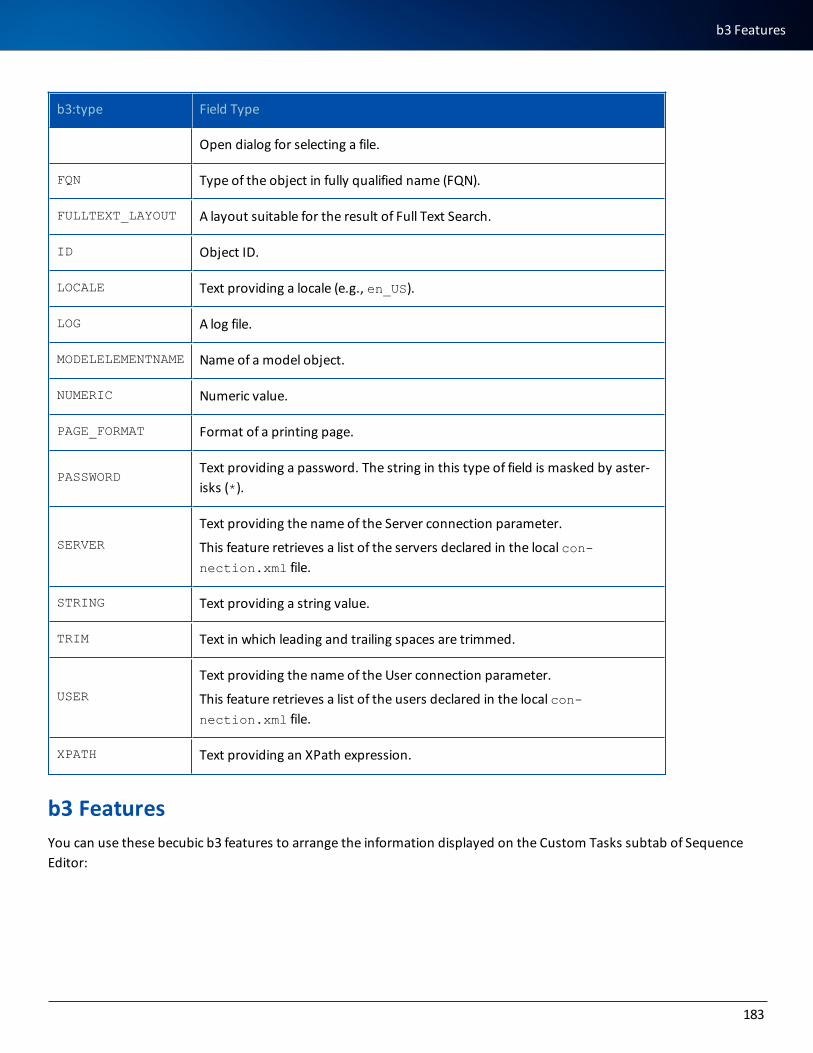
b3:type Field Type
Open dialog for selecting a file.
FQN Type of the object in fully qualified name (FQN).
FULLTEXT_LAYOUT A layout suitable for the result of Full Text Search.
ID Object ID.
LOCALE Text providing a locale (e.g., en_US).
LOG A log file.
MODELELEMENTNAME Name of a model object.
NUMERIC Numeric value.
PAGE_FORMAT Format of a printing page.
PASSWORDText providing a password. The string in this type of field is masked by aster-isks (*).
SERVER
Text providing the name of the Server connection parameter.
This feature retrieves a list of the servers declared in the local con-nection.xml file.
STRING Text providing a string value.
TRIM Text in which leading and trailing spaces are trimmed.
USER
Text providing the name of the User connection parameter.
This feature retrieves a list of the users declared in the local con-nection.xml file.
XPATH Text providing an XPath expression.
b3 FeaturesYou can use these becubic b3 features to arrange the information displayed on the Custom Tasks subtab of Sequence Editor:
183
b3 Features
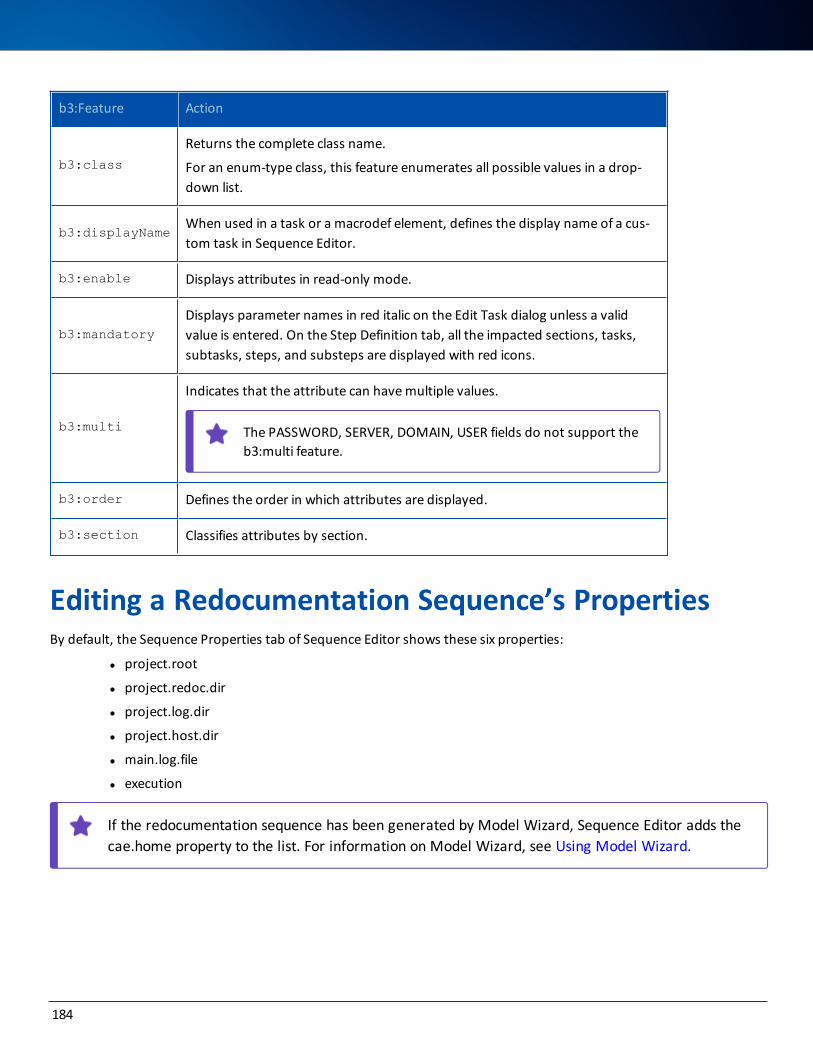
b3:Feature Action
b3:class
Returns the complete class name.
For an enum-type class, this feature enumerates all possible values in a drop-down list.
b3:displayNameWhen used in a task or a macrodef element, defines the display name of a cus-tom task in Sequence Editor.
b3:enable Displays attributes in read-only mode.
b3:mandatoryDisplays parameter names in red italic on the Edit Task dialog unless a valid value is entered. On the Step Definition tab, all the impacted sections, tasks, subtasks, steps, and substeps are displayed with red icons.
b3:multi
Indicates that the attribute can have multiple values.
The PASSWORD, SERVER, DOMAIN, USER fields do not support the b3:multi feature.
b3:order Defines the order in which attributes are displayed.
b3:section Classifies attributes by section.
Editing a Redocumentation Sequence’s PropertiesBy default, the Sequence Properties tab of Sequence Editor shows these six properties:
l project.root
l project.redoc.dir
l project.log.dir
l project.host.dir
l main.log.file
l execution
If the redocumentation sequence has been generated by Model Wizard, Sequence Editor adds the cae.home property to the list. For information on Model Wizard, see Using Model Wizard.
184
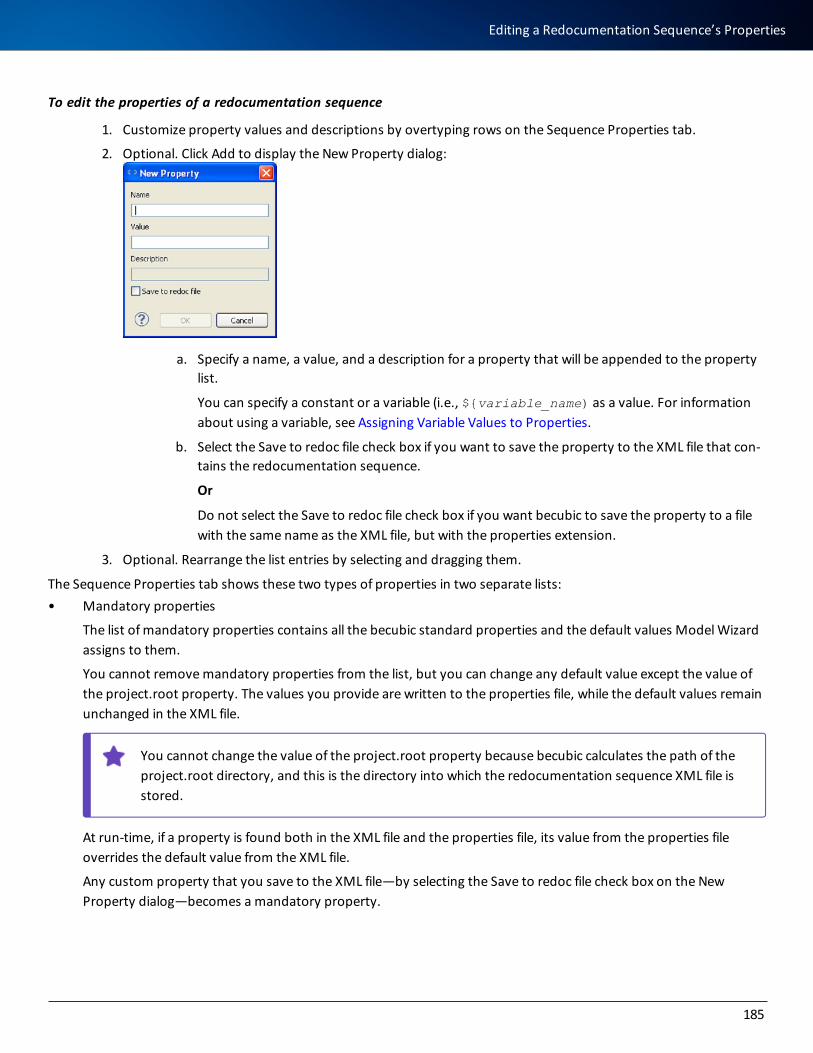
To edit the properties of a redocumentation sequence
1. Customize property values and descriptions by overtyping rows on the Sequence Properties tab.
2. Optional. Click Add to display the New Property dialog:
a. Specify a name, a value, and a description for a property that will be appended to the property list.
You can specify a constant or a variable (i.e., ${variable_name) as a value. For information about using a variable, see Assigning Variable Values to Properties.
b. Select the Save to redoc file check box if you want to save the property to the XML file that con-tains the redocumentation sequence.
Or
Do not select the Save to redoc file check box if you want becubic to save the property to a file with the same name as the XML file, but with the properties extension.
3. Optional. Rearrange the list entries by selecting and dragging them.
The Sequence Properties tab shows these two types of properties in two separate lists:• Mandatory properties
The list of mandatory properties contains all the becubic standard properties and the default values Model Wizard assigns to them.
You cannot remove mandatory properties from the list, but you can change any default value except the value of the project.root property. The values you provide are written to the properties file, while the default values remain unchanged in the XML file.
You cannot change the value of the project.root property because becubic calculates the path of the project.root directory, and this is the directory into which the redocumentation sequence XML file is stored.
At run-time, if a property is found both in the XML file and the properties file, its value from the properties file overrides the default value from the XML file.
Any custom property that you save to the XML file—by selecting the Save to redoc file check box on the New Property dialog—becomes a mandatory property.
185
Editing a Redocumentation Sequence’s Properties
• Optional Properties
The list of optional properties contains all the custom properties that you save to the properties file by not selecting the Save to redoc file check box on the New Property dialog.
The parameters of a shared connection are stored as optional properties into the properties file. When you select the Always Use Default option for a shared connection, the parameters are not saved as properties, and becubic reads from the connection.xml file each time you run the redocumentation sequence. For more information about shared connection and the Always Use Default option, see Specifying Repository Connection.
Assigning Variable Values to PropertiesTo assign variable values to properties
1. Create a sequence.properties file in the project_root directory.
2. Assign a value to each variable you define in the file, using this syntax:${variable_name}=value
You also can assign variable values to the properties when launching the redocumentation sequence from the command line. See Running a Redocumentation Sequence.
Editing a Property ValueYou can edit any property value either for a mandatory or additional property except the project.root property.
To edit a property value
1. Double-click the Value column of the property you want to edit.
2. Enter a value as appropriate.
3. Press Enter.
Deleting a PropertyYou can delete any additional properties if required.
To delete a property from the list
1. Select the property you want to delete in the Additional Properties list.
2. Click Remove.
Restoring a Property ValueYou can restore the default value of a mandatory property that you have edited.
186
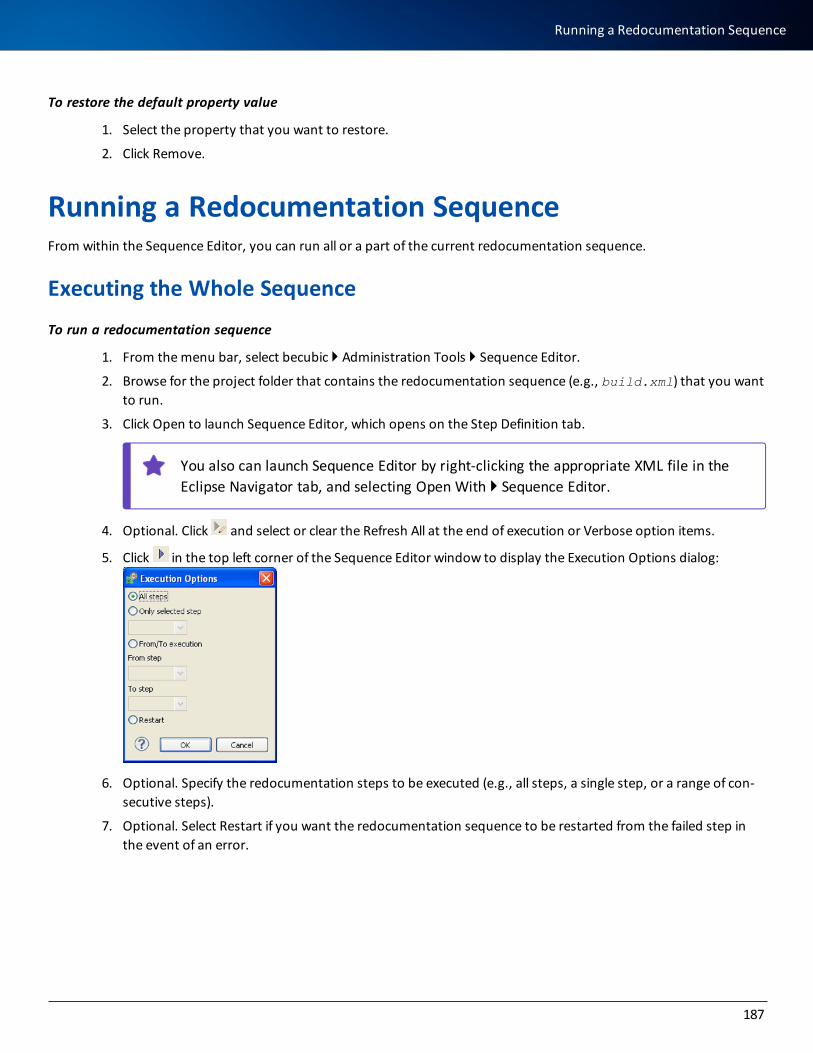
To restore the default property value
1. Select the property that you want to restore.
2. Click Remove.
Running a Redocumentation SequenceFrom within the Sequence Editor, you can run all or a part of the current redocumentation sequence.
Executing the Whole Sequence
To run a redocumentation sequence
1. From the menu bar, select becubic } Administration Tools } Sequence Editor.
2. Browse for the project folder that contains the redocumentation sequence (e.g., build.xml) that you want to run.
3. Click Open to launch Sequence Editor, which opens on the Step Definition tab.
You also can launch Sequence Editor by right-clicking the appropriate XML file in the Eclipse Navigator tab, and selecting Open With } Sequence Editor.
4. Optional. Click and select or clear the Refresh All at the end of execution or Verbose option items.
5. Click in the top left corner of the Sequence Editor window to display the Execution Options dialog:
6. Optional. Specify the redocumentation steps to be executed (e.g., all steps, a single step, or a range of con-secutive steps).
7. Optional. Select Restart if you want the redocumentation sequence to be restarted from the failed step in the event of an error.
187
Running a Redocumentation Sequence
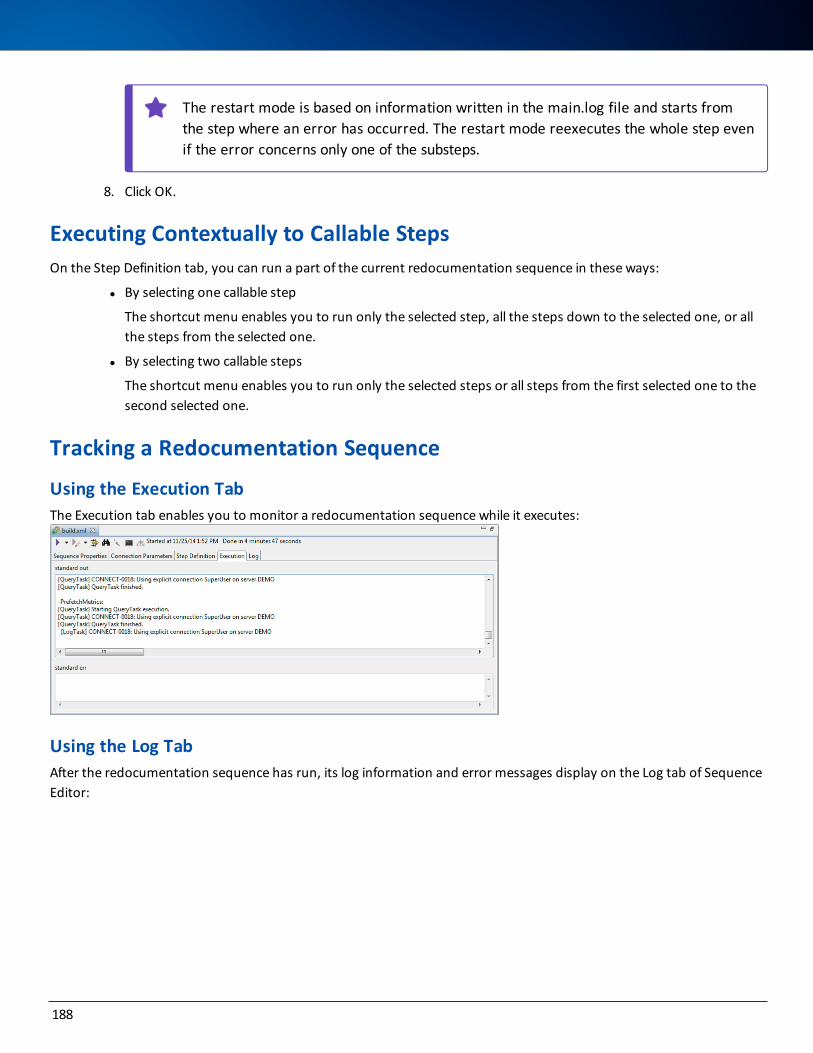
The restart mode is based on information written in the main.log file and starts from the step where an error has occurred. The restart mode reexecutes the whole step even if the error concerns only one of the substeps.
8. Click OK.
Executing Contextually to Callable StepsOn the Step Definition tab, you can run a part of the current redocumentation sequence in these ways:
l By selecting one callable step
The shortcut menu enables you to run only the selected step, all the steps down to the selected one, or all the steps from the selected one.
l By selecting two callable steps
The shortcut menu enables you to run only the selected steps or all steps from the first selected one to the second selected one.
Tracking a Redocumentation Sequence
Using the Execution TabThe Execution tab enables you to monitor a redocumentation sequence while it executes:
Using the Log TabAfter the redocumentation sequence has run, its log information and error messages display on the Log tab of Sequence Editor:
188
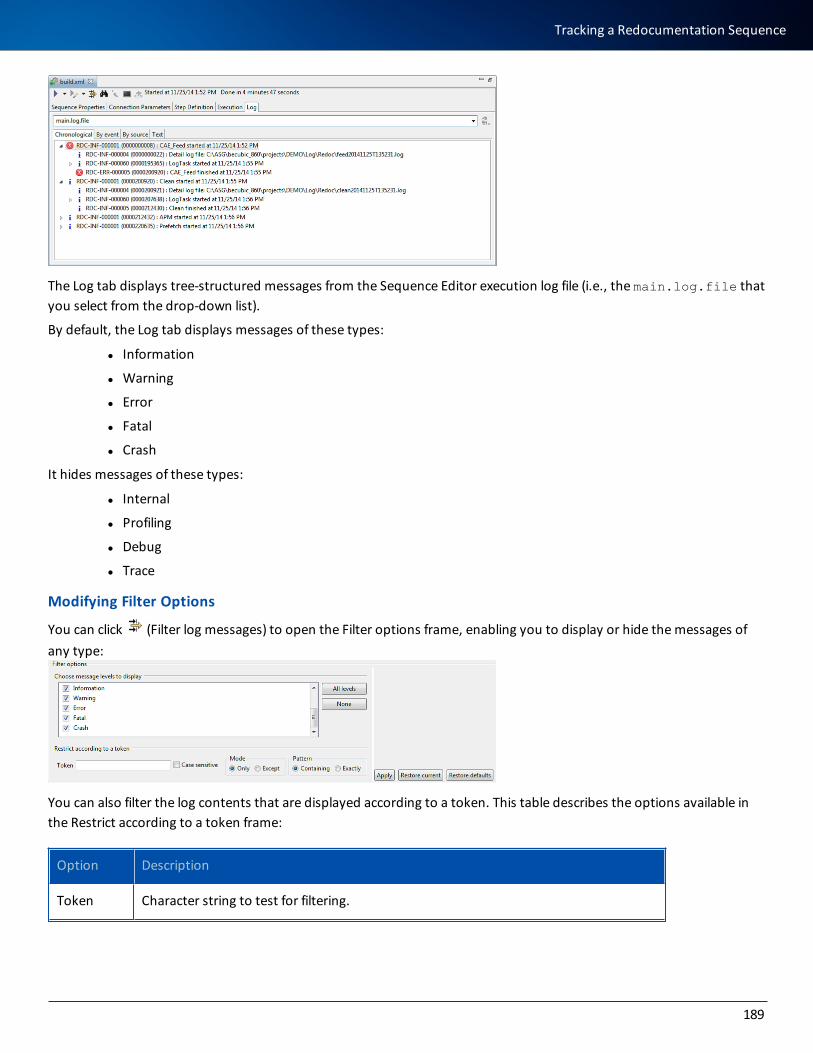
The Log tab displays tree-structured messages from the Sequence Editor execution log file (i.e., the main.log.file that you select from the drop-down list).
By default, the Log tab displays messages of these types:
l Information
l Warning
l Error
l Fatal
l Crash
It hides messages of these types:
l Internal
l Profiling
l Debug
l Trace
Modifying Filter Options
You can click (Filter log messages) to open the Filter options frame, enabling you to display or hide the messages of any type:
You can also filter the log contents that are displayed according to a token. This table describes the options available in the Restrict according to a token frame:
Option Description
Token Character string to test for filtering.
189
Tracking a Redocumentation Sequence
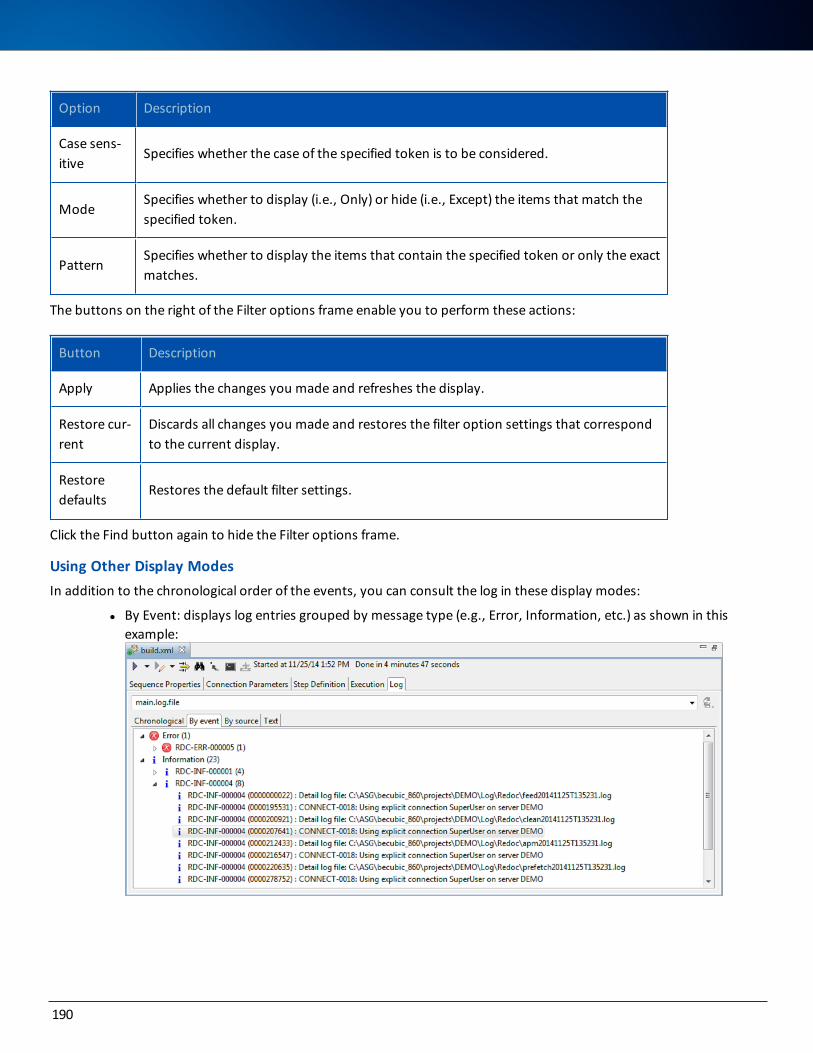
Option Description
Case sens-itive
Specifies whether the case of the specified token is to be considered.
ModeSpecifies whether to display (i.e., Only) or hide (i.e., Except) the items that match the specified token.
PatternSpecifies whether to display the items that contain the specified token or only the exact matches.
The buttons on the right of the Filter options frame enable you to perform these actions:
Button Description
Apply Applies the changes you made and refreshes the display.
Restore cur-rent
Discards all changes you made and restores the filter option settings that correspond to the current display.
Restore defaults
Restores the default filter settings.
Click the Find button again to hide the Filter options frame.
Using Other Display ModesIn addition to the chronological order of the events, you can consult the log in these display modes:
l By Event: displays log entries grouped by message type (e.g., Error, Information, etc.) as shown in this example:
190
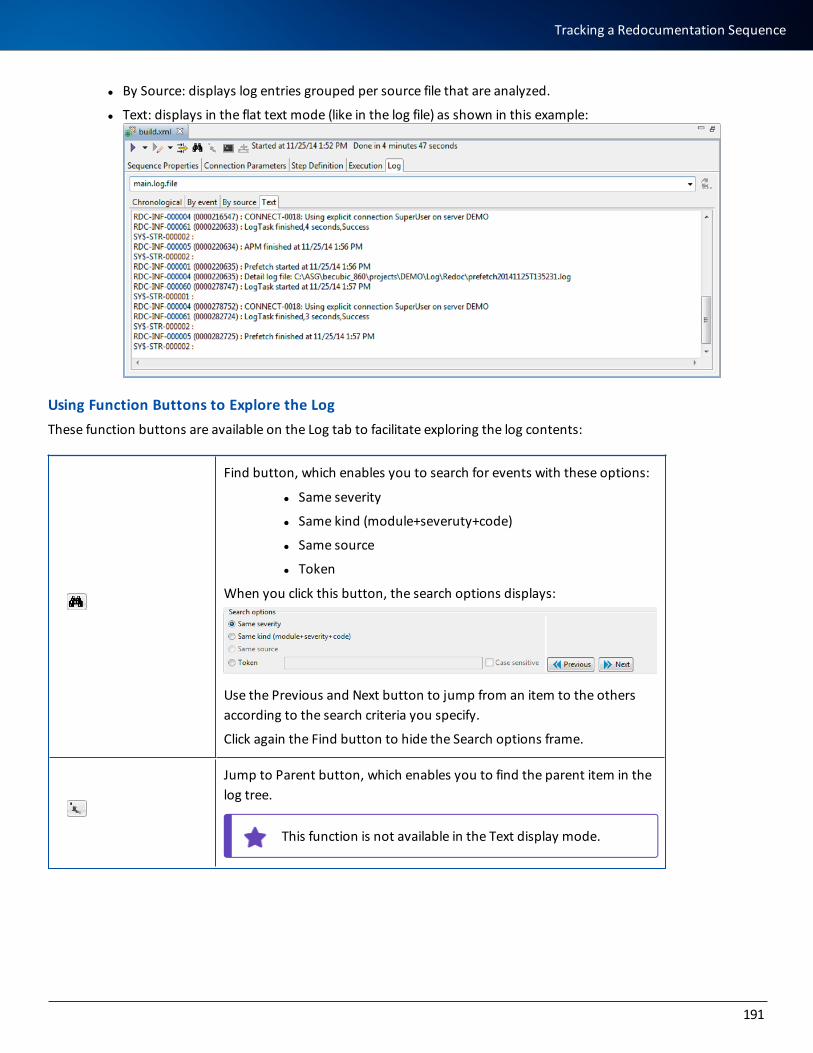
l By Source: displays log entries grouped per source file that are analyzed.
l Text: displays in the flat text mode (like in the log file) as shown in this example:
Using Function Buttons to Explore the LogThese function buttons are available on the Log tab to facilitate exploring the log contents:
Find button, which enables you to search for events with these options:
l Same severity
l Same kind (module+severuty+code)
l Same source
l Token
When you click this button, the search options displays:
Use the Previous and Next button to jump from an item to the others according to the search criteria you specify.
Click again the Find button to hide the Search options frame.
Jump to Parent button, which enables you to find the parent item in the log tree.
This function is not available in the Text display mode.
191
Tracking a Redocumentation Sequence
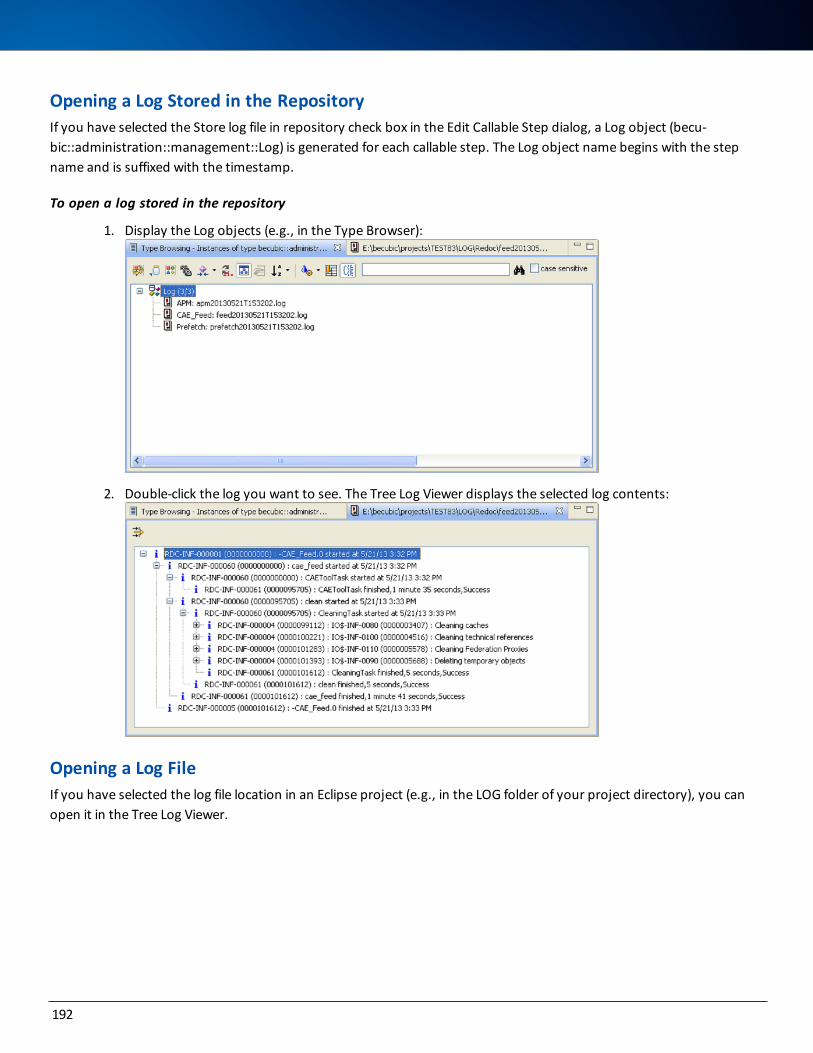
Opening a Log Stored in the RepositoryIf you have selected the Store log file in repository check box in the Edit Callable Step dialog, a Log object (becu-bic::administration::management::Log) is generated for each callable step. The Log object name begins with the step name and is suffixed with the timestamp.
To open a log stored in the repository
1. Display the Log objects (e.g., in the Type Browser):
2. Double-click the log you want to see. The Tree Log Viewer displays the selected log contents:
Opening a Log FileIf you have selected the log file location in an Eclipse project (e.g., in the LOG folder of your project directory), you can open it in the Tree Log Viewer.
192
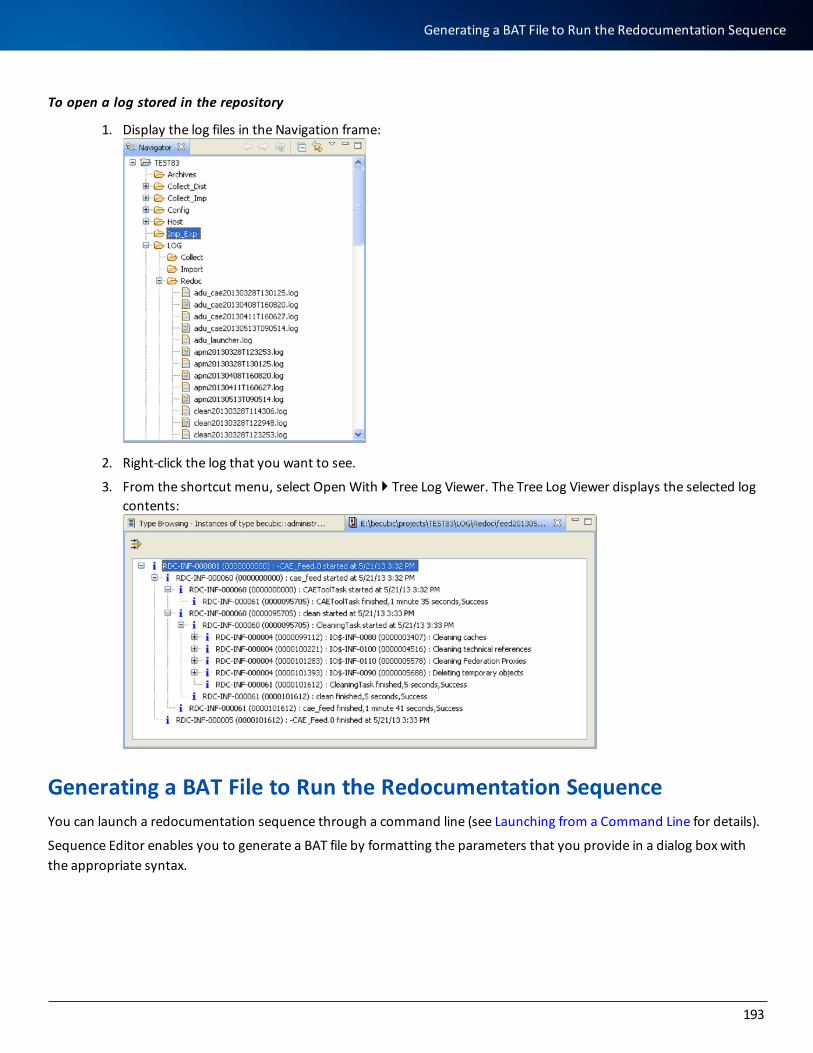
To open a log stored in the repository
1. Display the log files in the Navigation frame:
2. Right-click the log that you want to see.
3. From the shortcut menu, select Open With } Tree Log Viewer. The Tree Log Viewer displays the selected log contents:
Generating a BAT File to Run the Redocumentation SequenceYou can launch a redocumentation sequence through a command line (see Launching from a Command Line for details).
Sequence Editor enables you to generate a BAT file by formatting the parameters that you provide in a dialog box with the appropriate syntax.
193
Generating a BAT File to Run the Redocumentation Sequence

To generate a BAT file that launches the redocumentation sequence
1. Click on the Sequence Editor’s toolbar. The Ant Command Settings dialog opens:
2. Click next to the Execution Flag field. The Execution Options dialog opens:
3. Select an option as required and click OK.
4. Optional. If required, change the becubic Home directory. By default, this field is filled in with the current becubic Home.
a. Click next to the becubic Home field.
b. Browse for the appropriate folder and click OK.
5. Click next to the Output Batch File field.
6. Browse for the folder in which you want to save your BAT file.
7. Specify a name for the BAT file and click Open.
8. Click OK. The BAT file containing the execution option and the becubic Home information is generated.
9. Optional. Open the generated file with a text editor and add any other properties as required. See Launching from a Command Line for information about command line properties.
Implementing Load BalancingThis section explains how to implement load balancing by deploying becubic under multiple Tomcat Web servers and a single HTTP Apache Web server.
194
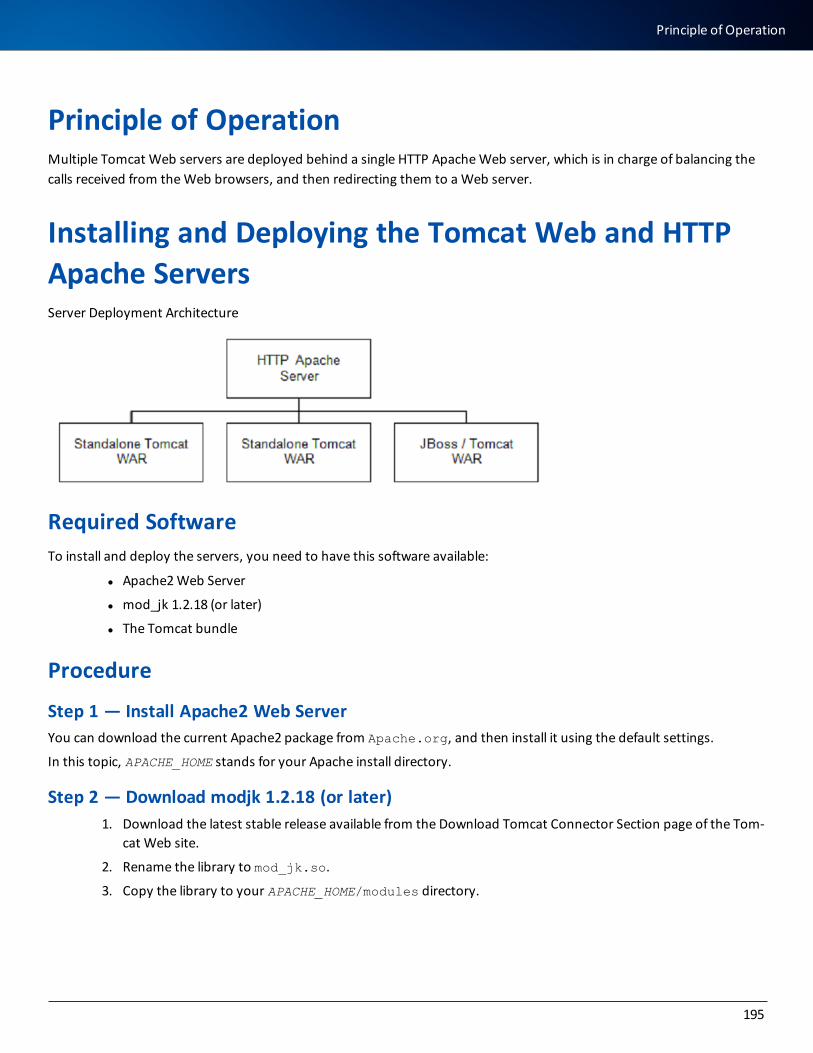
Principle of OperationMultiple Tomcat Web servers are deployed behind a single HTTP Apache Web server, which is in charge of balancing the calls received from the Web browsers, and then redirecting them to a Web server.
Installing and Deploying the Tomcat Web and HTTP Apache ServersServer Deployment Architecture
Required SoftwareTo install and deploy the servers, you need to have this software available:
l Apache2 Web Server
l mod_jk 1.2.18 (or later)
l The Tomcat bundle
Procedure
Step 1 — Install Apache2 Web ServerYou can download the current Apache2 package from Apache.org, and then install it using the default settings.
In this topic, APACHE_HOME stands for your Apache install directory.
Step 2 — Download modjk 1.2.18 (or later) 1. Download the latest stable release available from the Download Tomcat Connector Section page of the Tom-
cat Web site.
2. Rename the library to mod_jk.so.
3. Copy the library to your APACHE_HOME/modules directory.
195
Principle of Operation

Step 3 — Update the Main Apache Configuration File to Include the mod_jk Con-figuration FileAppend this line to the APACHE_HOME/conf/httpd.conf file:
# Include mod_jk configuration fileInclude conf/mod-jk.conf
Step 4 — Create the mod-jk Configuration FileUnder APACHE_HOME/conf, create the mod-jk.conf file with these contents:
# Load mod_jk module# Specify the filename of the mod_jk libLoadModule jk_module modules/mod_jk.so # Where to find workers.propertiesJkWorkersFile conf/workers.properties # Where to put jk logsJkLogFile logs/mod_jk.log # Set the jk log level [debug/error/info]JkLogLevel info # Select the log formatJkLogStampFormat "[%a %b %d %H:%M:%S %Y]" # JkOptions indicates to send SSK KEY SIZE# Note: Changed from +ForwardURICompat.# See http://tomcat.apache.org/security-jk.htmlJkOptions +ForwardKeySize +ForwardURICompatUnparsed -ForwardDirectories # JkRequestLogFormatJkRequestLogFormat "%w %V %T" # Mount your applicationsJkMount /__application__/* loadbalancer# You can use an external file for mount points.# It will be checked for updates each 60 seconds.# The format of the file is: /url=worker# /examples/*=loadbalancerJkMountFile conf/uriworkermap.properties # Add shared memory.# This directive is needed for# load balancing to work properly# Note: It replaced JkShmFile logs/jk.shm due to SELinux issues. Refer to # https://bugzilla.redhat.com/bugzilla/show_bug.cgi?id=225452JkShmFile run/jk.shm # Add jkstatus for managing runtime data<Location /jkstatus/>JkMount statusOrder deny,allowDeny from allAllow from 127.0.0.1</Location>
mod_jk will forward requests to Tomcat instances.
196
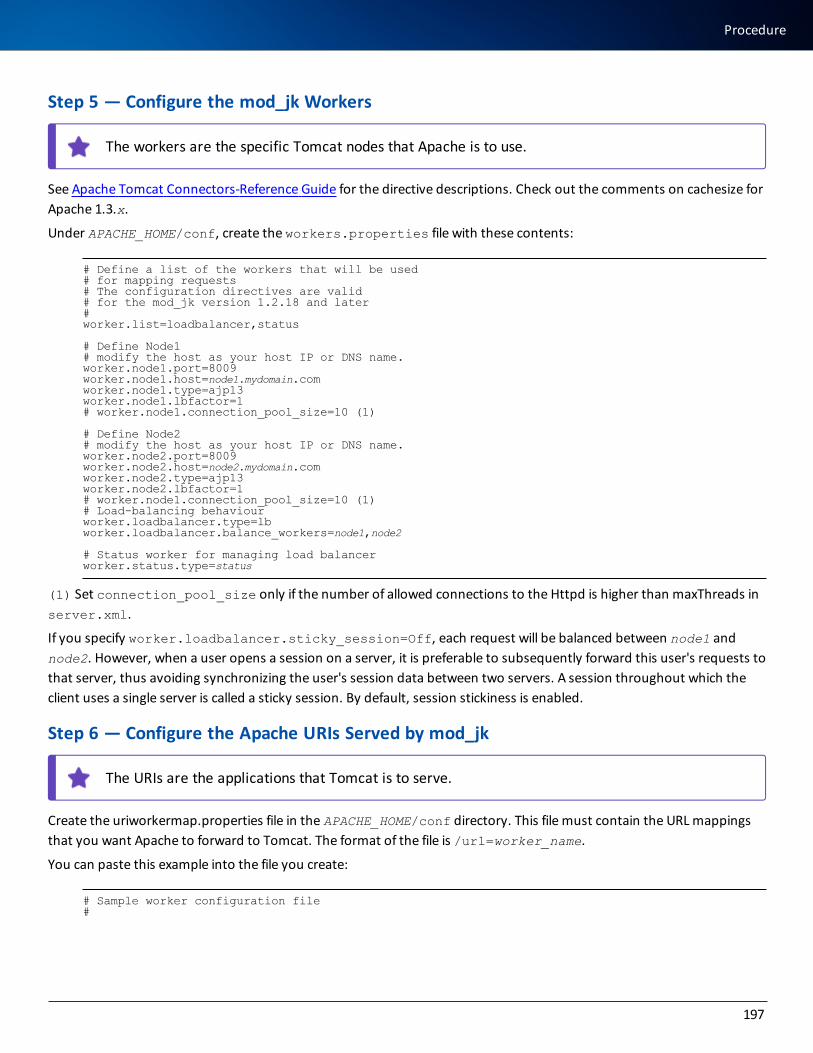
Step 5 — Configure the mod_jk Workers
The workers are the specific Tomcat nodes that Apache is to use.
See Apache Tomcat Connectors-Reference Guide for the directive descriptions. Check out the comments on cachesize for Apache 1.3.x.
Under APACHE_HOME/conf, create the workers.properties file with these contents:
# Define a list of the workers that will be used# for mapping requests# The configuration directives are valid# for the mod_jk version 1.2.18 and later#worker.list=loadbalancer,status # Define Node1# modify the host as your host IP or DNS name.worker.node1.port=8009worker.node1.host=node1.mydomain.comworker.node1.type=ajp13worker.node1.lbfactor=1# worker.node1.connection_pool_size=10 (1) # Define Node2# modify the host as your host IP or DNS name.worker.node2.port=8009worker.node2.host=node2.mydomain.comworker.node2.type=ajp13worker.node2.lbfactor=1# worker.node1.connection_pool_size=10 (1)# Load-balancing behaviourworker.loadbalancer.type=lbworker.loadbalancer.balance_workers=node1,node2 # Status worker for managing load balancerworker.status.type=status
(1) Set connection_pool_size only if the number of allowed connections to the Httpd is higher than maxThreads in server.xml.
If you specify worker.loadbalancer.sticky_session=Off, each request will be balanced between node1 and node2. However, when a user opens a session on a server, it is preferable to subsequently forward this user's requests to that server, thus avoiding synchronizing the user's session data between two servers. A session throughout which the client uses a single server is called a sticky session. By default, session stickiness is enabled.
Step 6 — Configure the Apache URIs Served by mod_jk
The URIs are the applications that Tomcat is to serve.
Create the uriworkermap.properties file in the APACHE_HOME/conf directory. This file must contain the URL mappings that you want Apache to forward to Tomcat. The format of the file is /url=worker_name.
You can paste this example into the file you create:
# Sample worker configuration file#
197
Procedure
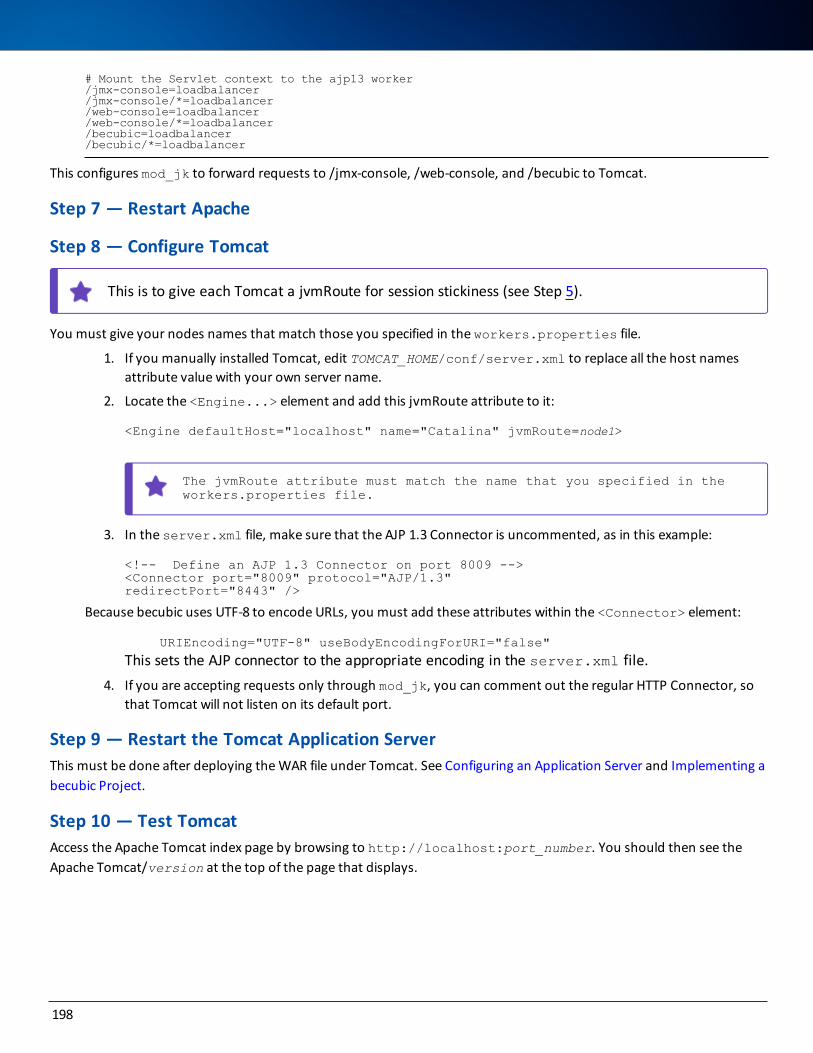
# Mount the Servlet context to the ajp13 worker/jmx-console=loadbalancer/jmx-console/*=loadbalancer/web-console=loadbalancer/web-console/*=loadbalancer/becubic=loadbalancer/becubic/*=loadbalancer
This configures mod_jk to forward requests to /jmx-console, /web-console, and /becubic to Tomcat.
Step 7 — Restart Apache
Step 8 — Configure Tomcat
This is to give each Tomcat a jvmRoute for session stickiness (see Step 5).
You must give your nodes names that match those you specified in the workers.properties file.
1. If you manually installed Tomcat, edit TOMCAT_HOME/conf/server.xml to replace all the host names attribute value with your own server name.
2. Locate the <Engine...> element and add this jvmRoute attribute to it:
<Engine defaultHost="localhost" name="Catalina" jvmRoute=node1>
The jvmRoute attribute must match the name that you specified in the workers.properties file.
3. In the server.xml file, make sure that the AJP 1.3 Connector is uncommented, as in this example:
<!-- Define an AJP 1.3 Connector on port 8009 --><Connector port="8009" protocol="AJP/1.3"redirectPort="8443" />
Because becubic uses UTF-8 to encode URLs, you must add these attributes within the <Connector> element:
URIEncoding="UTF-8" useBodyEncodingForURI="false"
This sets the AJP connector to the appropriate encoding in the server.xml file. 4. If you are accepting requests only through mod_jk, you can comment out the regular HTTP Connector, so
that Tomcat will not listen on its default port.
Step 9 — Restart the Tomcat Application ServerThis must be done after deploying the WAR file under Tomcat. See Configuring an Application Server and Implementing a becubic Project.
Step 10 — Test TomcatAccess the Apache Tomcat index page by browsing to http://localhost:port_number. You should then see the Apache Tomcat/version at the top of the page that displays.
198

Deploying Only the WAR File in Multiple Standalone Tomcat ServersYou only need to deploy the WAR file.
To deploy the WAR file
1. Unzip the ReferenceThinClient.war archive file into the TOMCAT_HOME\webapps\becubic directory.
2. Modify the server.xml configuration file as described at step 8.
3. Start Tomcat.
Hardware and Software ConfigurationsThis section provides hardware and software requirements for setting up each machine in the various possible becubic configurations.
Requirements may differ largely between projects (e.g., depending on the volume of the source code to be processed and the number of concurrent user connections). ASG recommends that you discuss your specific project needs with ASG Customer Support.
becubic CollectorsMainframeSource collectors are installed and run on the host machines to identify and retrieve new and modified source. Their sys-tem requirements and the tasks required for installing and administrating them in each mainframe environment are described in the ASG-becubic Source Collector for z/OS Host Installation and Admin-istration Guide.
Distributed ArchitectureIn distributed architectures, becubic Windows Source Collector for CAE is installed on the becubic Analyzer machine. For details, see the ASG-CAE Source Collector for Distributed Installation and Admin-istration Guide.
becubic AnalyzerThis table provides the system requirements for the becubic Analyzer machine:
199
Deploying Only theWAR File in Multiple Standalone Tomcat Servers

Hardware/Software Requirement
Operating System
Windows 7
Windows Server 2008, 2012, or 2016
If you use Windows Server 2012 R2, you must use the compatibility mode to install becubic.
Processor Intel Xeon Quad Processor 2.2 GHz or higher
Hard Drive 100 GB of free space minimum
Memory 4 GB DDR SDRAM on bus 400 MHz or faster
Network Adapter Gigabit
Other
JDK/JRE 1.7, 1.8, or OpenJDK (Zulu 8) must be installed before you install becu-bic on an Analyzer station.
You can add becubic features to your Eclipse IDE Version 3.8 or higher.
The version of Eclipse bundled with becubic is 3.8.1, which is the cer-tified and recommended version.
The disk space required on this machine depends on the amount of source code to be analyzed by becubic.
If an anti-virus tool is running on the becubic Analyzer station, ASG recommends that you exclude these folders from file scanning:
l All files from folder BECUBIC_HOME (the becubic installation folder) and all its sub-folders.
l All files from the current becubic project folder and all its sub-folders (e.g., <project>\HOST\ADU, where all DES and VSO files are copied and processed, and <project>\REDOC\LOG, where all becubic and CAE log files are written).
Make sure that neither an anti-virus software update nor a full virus scan would run during the becu-bic incremental load.
becubic Database ServerThis table provides the system requirements for the becubic Database Server machine under Windows:
200
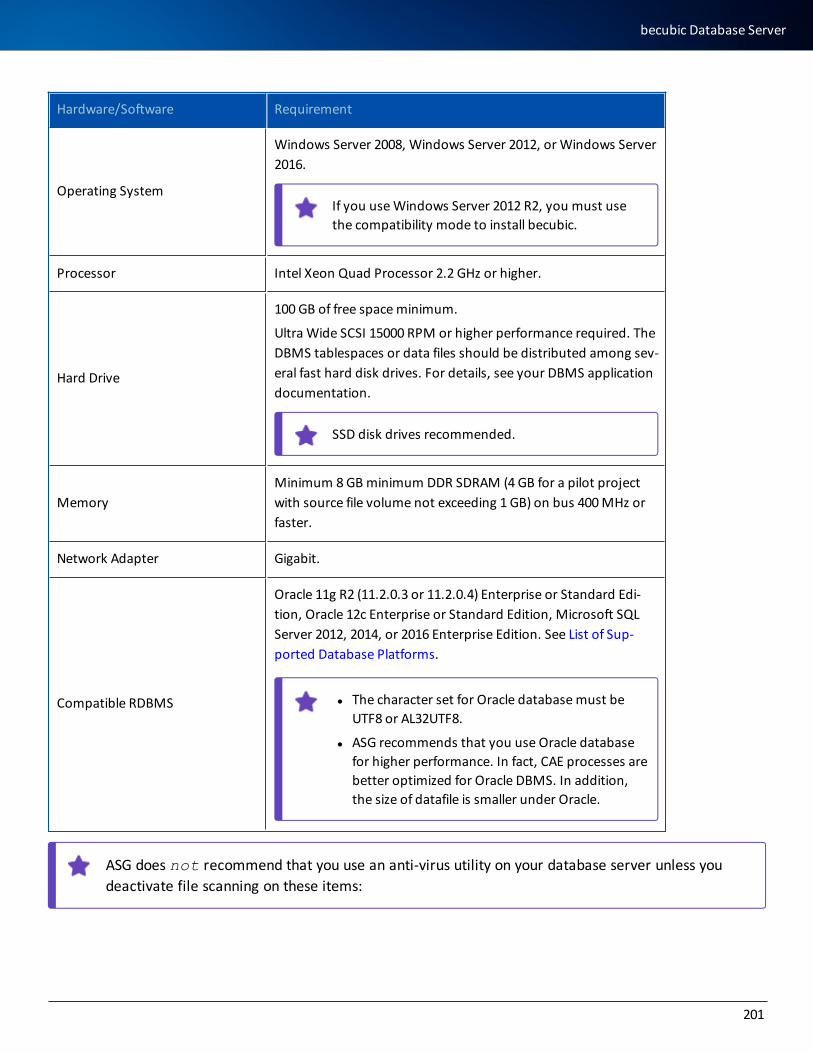
Hardware/Software Requirement
Operating System
Windows Server 2008, Windows Server 2012, or Windows Server 2016.
If you use Windows Server 2012 R2, you must use the compatibility mode to install becubic.
Processor Intel Xeon Quad Processor 2.2 GHz or higher.
Hard Drive
100 GB of free space minimum.
Ultra Wide SCSI 15000 RPM or higher performance required. The DBMS tablespaces or data files should be distributed among sev-eral fast hard disk drives. For details, see your DBMS application documentation.
SSD disk drives recommended.
MemoryMinimum 8 GB minimum DDR SDRAM (4 GB for a pilot project with source file volume not exceeding 1 GB) on bus 400 MHz or faster.
Network Adapter Gigabit.
Compatible RDBMS
Oracle 11g R2 (11.2.0.3 or 11.2.0.4) Enterprise or Standard Edi-tion, Oracle 12c Enterprise or Standard Edition, Microsoft SQL Server 2012, 2014, or 2016 Enterprise Edition. See List of Sup-ported Database Platforms.
l The character set for Oracle database must be UTF8 or AL32UTF8.
l ASG recommends that you use Oracle database for higher performance. In fact, CAE processes are better optimized for Oracle DBMS. In addition, the size of datafile is smaller under Oracle.
ASG does not recommend that you use an anti-virus utility on your database server unless you deactivate file scanning on these items:
201
becubic Database Server
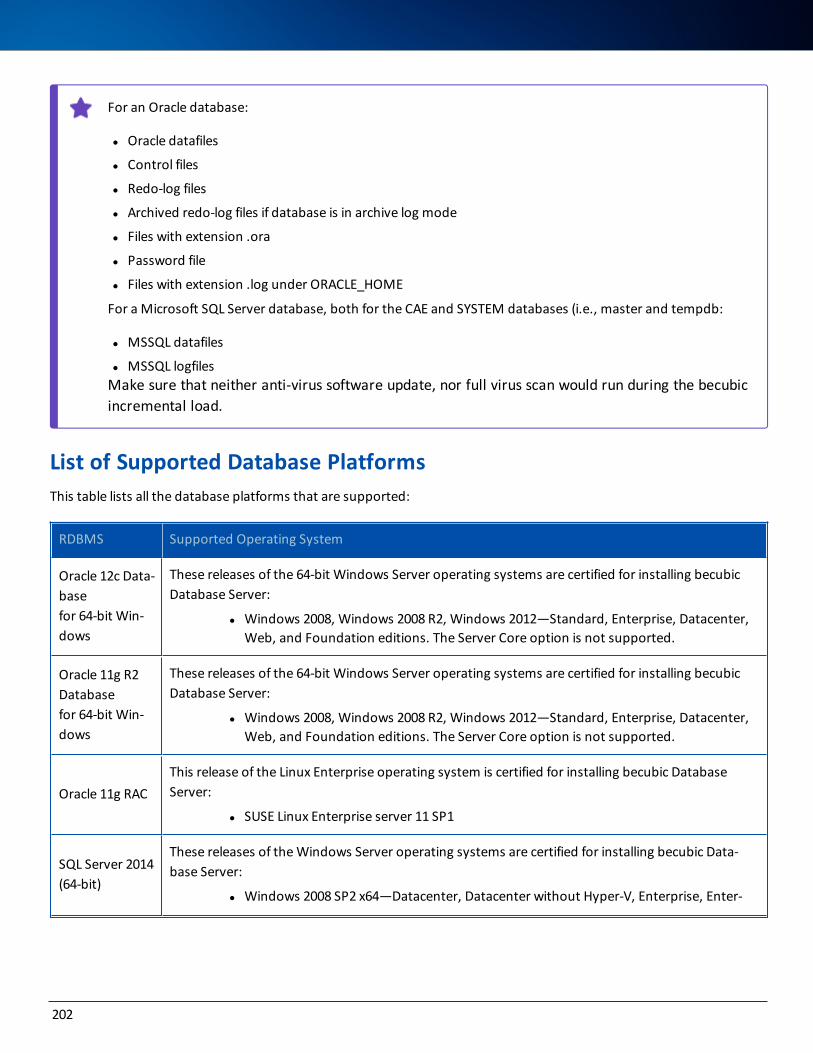
For an Oracle database:
l Oracle datafiles
l Control files
l Redo-log files
l Archived redo-log files if database is in archive log mode
l Files with extension .ora
l Password file
l Files with extension .log under ORACLE_HOME
For a Microsoft SQL Server database, both for the CAE and SYSTEM databases (i.e., master and tempdb:
l MSSQL datafiles
l MSSQL logfilesMake sure that neither anti-virus software update, nor full virus scan would run during the becubic incremental load.
List of Supported Database PlatformsThis table lists all the database platforms that are supported:
RDBMS Supported Operating System
Oracle 12c Data-basefor 64-bit Win-dows
These releases of the 64-bit Windows Server operating systems are certified for installing becubic Database Server:
l Windows 2008, Windows 2008 R2, Windows 2012—Standard, Enterprise, Datacenter, Web, and Foundation editions. The Server Core option is not supported.
Oracle 11g R2 Databasefor 64-bit Win-dows
These releases of the 64-bit Windows Server operating systems are certified for installing becubic Database Server:
l Windows 2008, Windows 2008 R2, Windows 2012—Standard, Enterprise, Datacenter, Web, and Foundation editions. The Server Core option is not supported.
Oracle 11g RACThis release of the Linux Enterprise operating system is certified for installing becubic Database Server:
l SUSE Linux Enterprise server 11 SP1
SQL Server 2014 (64-bit)
These releases of the Windows Server operating systems are certified for installing becubic Data-base Server:
l Windows 2008 SP2 x64—Datacenter, Datacenter without Hyper-V, Enterprise, Enter-
202
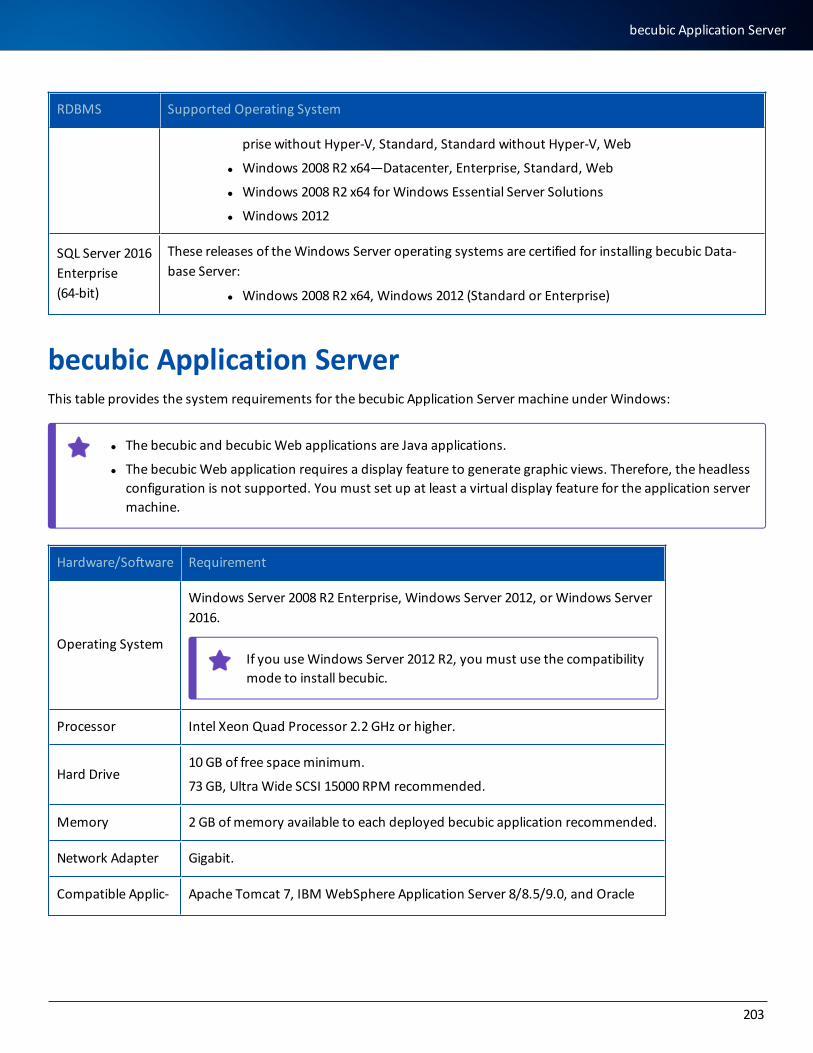
RDBMS Supported Operating System
prise without Hyper-V, Standard, Standard without Hyper-V, Web
l Windows 2008 R2 x64—Datacenter, Enterprise, Standard, Web
l Windows 2008 R2 x64 for Windows Essential Server Solutions
l Windows 2012
SQL Server 2016 Enterprise (64-bit)
These releases of the Windows Server operating systems are certified for installing becubic Data-base Server:
l Windows 2008 R2 x64, Windows 2012 (Standard or Enterprise)
becubic Application ServerThis table provides the system requirements for the becubic Application Server machine under Windows:
l The becubic and becubic Web applications are Java applications.
l The becubic Web application requires a display feature to generate graphic views. Therefore, the headless configuration is not supported. You must set up at least a virtual display feature for the application server machine.
Hardware/Software Requirement
Operating System
Windows Server 2008 R2 Enterprise, Windows Server 2012, or Windows Server 2016.
If you use Windows Server 2012 R2, you must use the compatibility mode to install becubic.
Processor Intel Xeon Quad Processor 2.2 GHz or higher.
Hard Drive10 GB of free space minimum.
73 GB, Ultra Wide SCSI 15000 RPM recommended.
Memory 2 GB of memory available to each deployed becubic application recommended.
Network Adapter Gigabit.
Compatible Applic- Apache Tomcat 7, IBM WebSphere Application Server 8/8.5/9.0, and Oracle
203
becubic Application Server
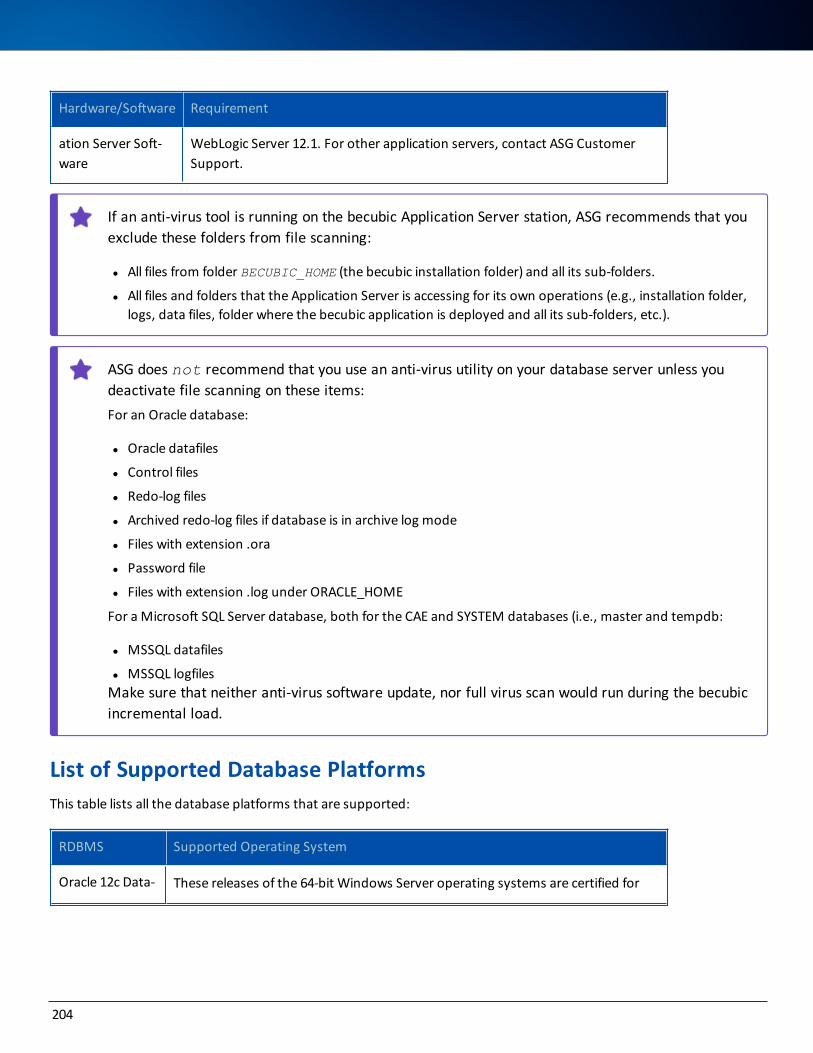
Hardware/Software Requirement
ation Server Soft-ware
WebLogic Server 12.1. For other application servers, contact ASG Customer Support.
If an anti-virus tool is running on the becubic Application Server station, ASG recommends that you exclude these folders from file scanning:
l All files from folder BECUBIC_HOME (the becubic installation folder) and all its sub-folders.
l All files and folders that the Application Server is accessing for its own operations (e.g., installation folder, logs, data files, folder where the becubic application is deployed and all its sub-folders, etc.).
ASG does not recommend that you use an anti-virus utility on your database server unless you deactivate file scanning on these items: For an Oracle database:
l Oracle datafiles
l Control files
l Redo-log files
l Archived redo-log files if database is in archive log mode
l Files with extension .ora
l Password file
l Files with extension .log under ORACLE_HOME
For a Microsoft SQL Server database, both for the CAE and SYSTEM databases (i.e., master and tempdb:
l MSSQL datafiles
l MSSQL logfilesMake sure that neither anti-virus software update, nor full virus scan would run during the becubic incremental load.
List of Supported Database PlatformsThis table lists all the database platforms that are supported:
RDBMS Supported Operating System
Oracle 12c Data- These releases of the 64-bit Windows Server operating systems are certified for
204
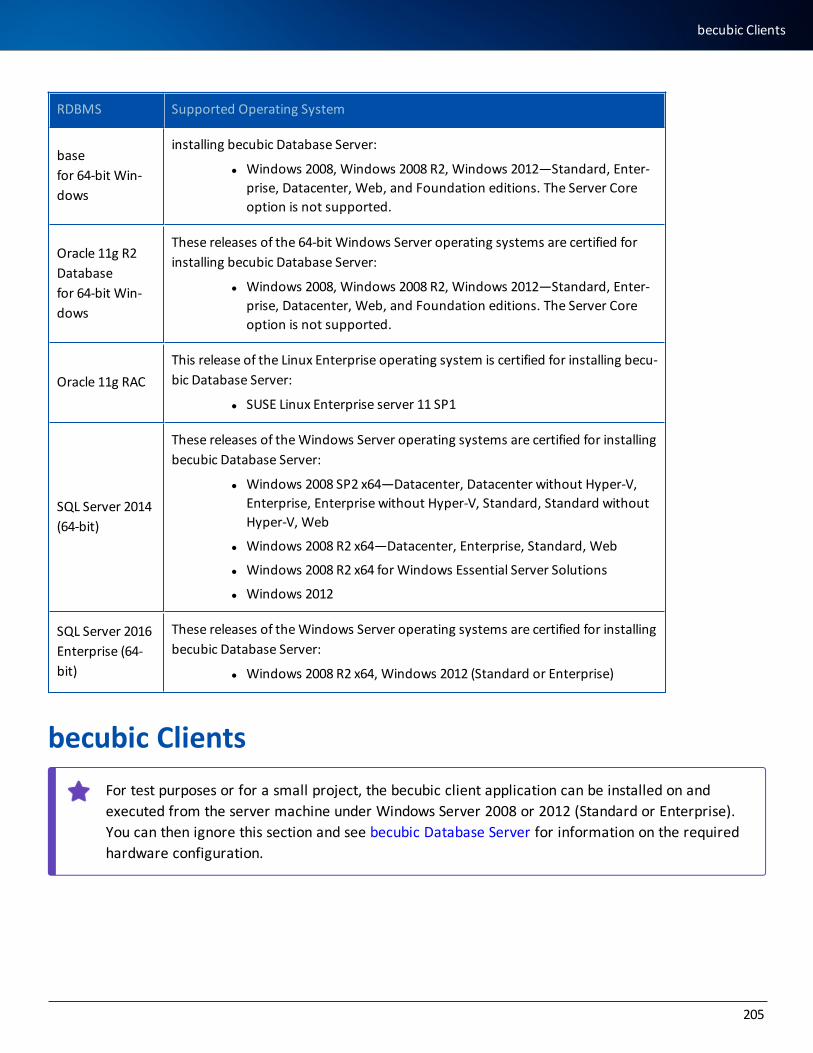
RDBMS Supported Operating System
basefor 64-bit Win-dows
installing becubic Database Server:
l Windows 2008, Windows 2008 R2, Windows 2012—Standard, Enter-prise, Datacenter, Web, and Foundation editions. The Server Core option is not supported.
Oracle 11g R2 Databasefor 64-bit Win-dows
These releases of the 64-bit Windows Server operating systems are certified for installing becubic Database Server:
l Windows 2008, Windows 2008 R2, Windows 2012—Standard, Enter-prise, Datacenter, Web, and Foundation editions. The Server Core option is not supported.
Oracle 11g RACThis release of the Linux Enterprise operating system is certified for installing becu-bic Database Server:
l SUSE Linux Enterprise server 11 SP1
SQL Server 2014 (64-bit)
These releases of the Windows Server operating systems are certified for installing becubic Database Server:
l Windows 2008 SP2 x64—Datacenter, Datacenter without Hyper-V, Enterprise, Enterprise without Hyper-V, Standard, Standard without Hyper-V, Web
l Windows 2008 R2 x64—Datacenter, Enterprise, Standard, Web
l Windows 2008 R2 x64 for Windows Essential Server Solutions
l Windows 2012
SQL Server 2016 Enterprise (64-bit)
These releases of the Windows Server operating systems are certified for installing becubic Database Server:
l Windows 2008 R2 x64, Windows 2012 (Standard or Enterprise)
becubic ClientsFor test purposes or for a small project, the becubic client application can be installed on and executed from the server machine under Windows Server 2008 or 2012 (Standard or Enterprise). You can then ignore this section and see becubic Database Server for information on the required hardware configuration.
205
becubic Clients
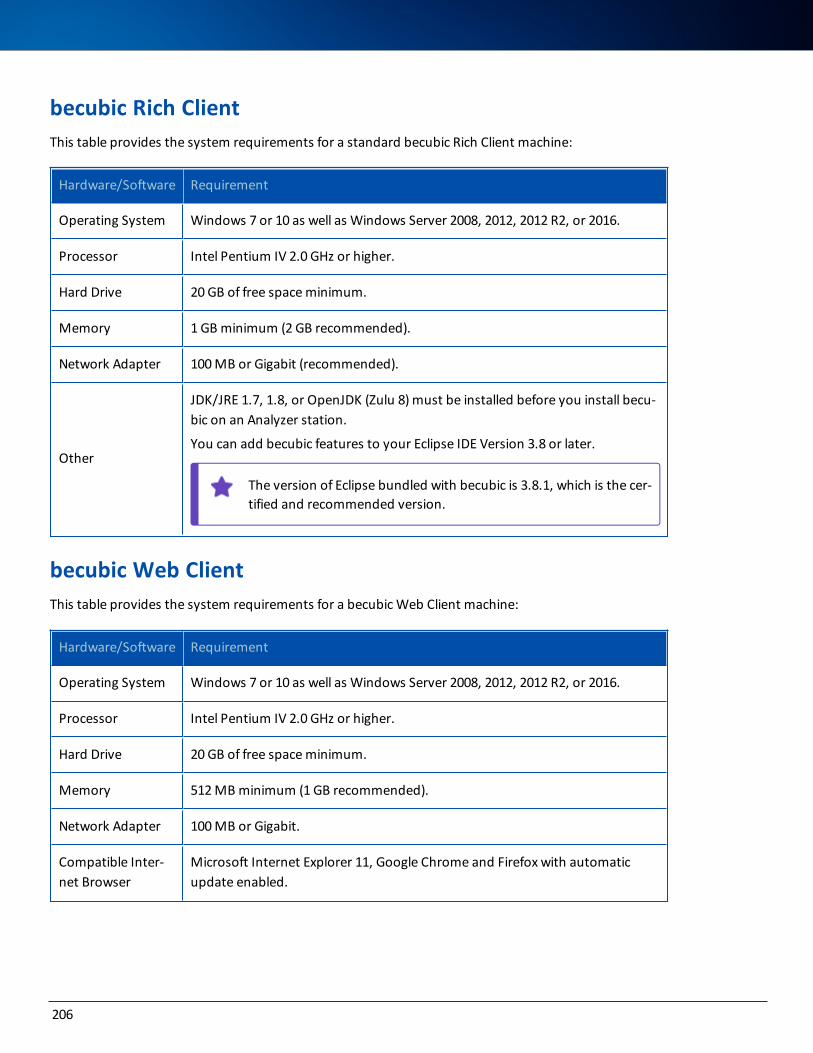
becubic Rich ClientThis table provides the system requirements for a standard becubic Rich Client machine:
Hardware/Software Requirement
Operating System Windows 7 or 10 as well as Windows Server 2008, 2012, 2012 R2, or 2016.
Processor Intel Pentium IV 2.0 GHz or higher.
Hard Drive 20 GB of free space minimum.
Memory 1 GB minimum (2 GB recommended).
Network Adapter 100 MB or Gigabit (recommended).
Other
JDK/JRE 1.7, 1.8, or OpenJDK (Zulu 8) must be installed before you install becu-bic on an Analyzer station.
You can add becubic features to your Eclipse IDE Version 3.8 or later.
The version of Eclipse bundled with becubic is 3.8.1, which is the cer-tified and recommended version.
becubic Web ClientThis table provides the system requirements for a becubic Web Client machine:
Hardware/Software Requirement
Operating System Windows 7 or 10 as well as Windows Server 2008, 2012, 2012 R2, or 2016.
Processor Intel Pentium IV 2.0 GHz or higher.
Hard Drive 20 GB of free space minimum.
Memory 512 MB minimum (1 GB recommended).
Network Adapter 100 MB or Gigabit.
Compatible Inter-net Browser
Microsoft Internet Explorer 11, Google Chrome and Firefox with automatic update enabled.
206
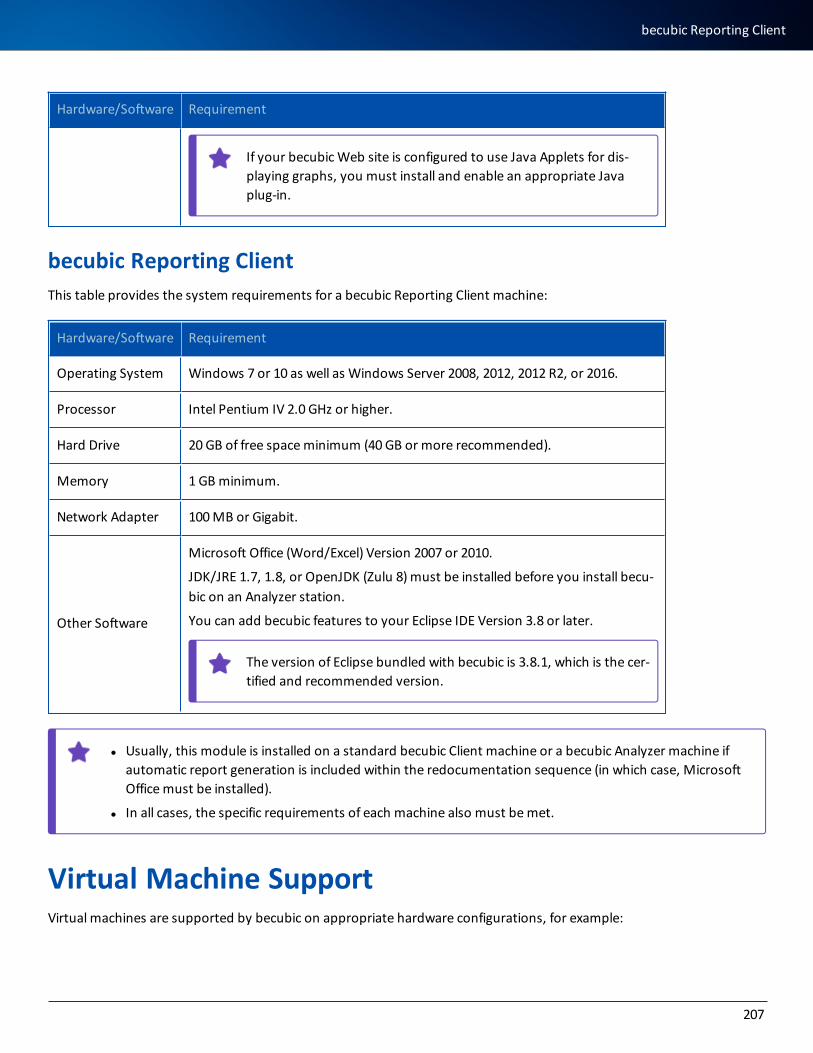
Hardware/Software Requirement
If your becubic Web site is configured to use Java Applets for dis-playing graphs, you must install and enable an appropriate Java plug-in.
becubic Reporting ClientThis table provides the system requirements for a becubic Reporting Client machine:
Hardware/Software Requirement
Operating System Windows 7 or 10 as well as Windows Server 2008, 2012, 2012 R2, or 2016.
Processor Intel Pentium IV 2.0 GHz or higher.
Hard Drive 20 GB of free space minimum (40 GB or more recommended).
Memory 1 GB minimum.
Network Adapter 100 MB or Gigabit.
Other Software
Microsoft Office (Word/Excel) Version 2007 or 2010.
JDK/JRE 1.7, 1.8, or OpenJDK (Zulu 8) must be installed before you install becu-bic on an Analyzer station.
You can add becubic features to your Eclipse IDE Version 3.8 or later.
The version of Eclipse bundled with becubic is 3.8.1, which is the cer-tified and recommended version.
l Usually, this module is installed on a standard becubic Client machine or a becubic Analyzer machine if automatic report generation is included within the redocumentation sequence (in which case, Microsoft Office must be installed).
l In all cases, the specific requirements of each machine also must be met.
Virtual Machine SupportVirtual machines are supported by becubic on appropriate hardware configurations, for example:
207
becubic Reporting Client
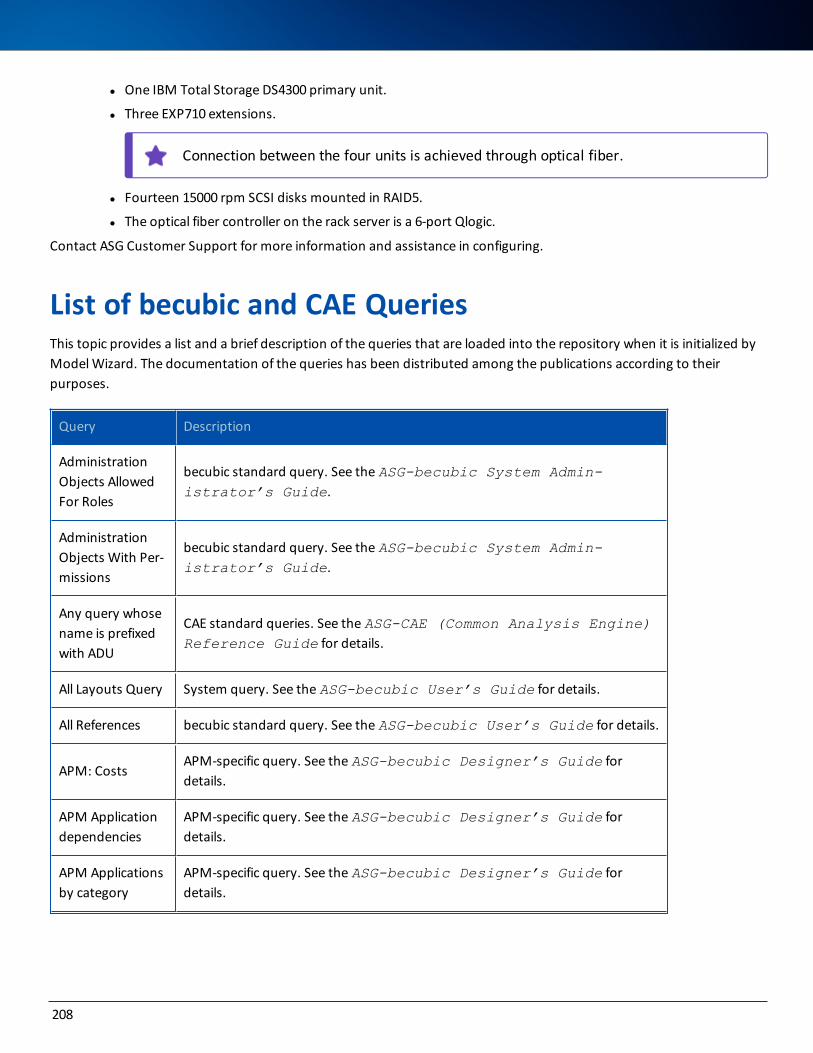
l One IBM Total Storage DS4300 primary unit.
l Three EXP710 extensions.
Connection between the four units is achieved through optical fiber.
l Fourteen 15000 rpm SCSI disks mounted in RAID5.
l The optical fiber controller on the rack server is a 6-port Qlogic.
Contact ASG Customer Support for more information and assistance in configuring.
List of becubic and CAE Queries This topic provides a list and a brief description of the queries that are loaded into the repository when it is initialized by Model Wizard. The documentation of the queries has been distributed among the publications according to their purposes.
Query Description
Administration Objects Allowed For Roles
becubic standard query. See the ASG-becubic System Admin-istrator’s Guide.
Administration Objects With Per-missions
becubic standard query. See the ASG-becubic System Admin-istrator’s Guide.
Any query whose name is prefixed with ADU
CAE standard queries. See the ASG-CAE (Common Analysis Engine) Reference Guide for details.
All Layouts Query System query. See the ASG-becubic User’s Guide for details.
All References becubic standard query. See the ASG-becubic User’s Guide for details.
APM: CostsAPM-specific query. See the ASG-becubic Designer’s Guide for details.
APM Application dependencies
APM-specific query. See the ASG-becubic Designer’s Guide for details.
APM Applications by category
APM-specific query. See the ASG-becubic Designer’s Guide for details.
208
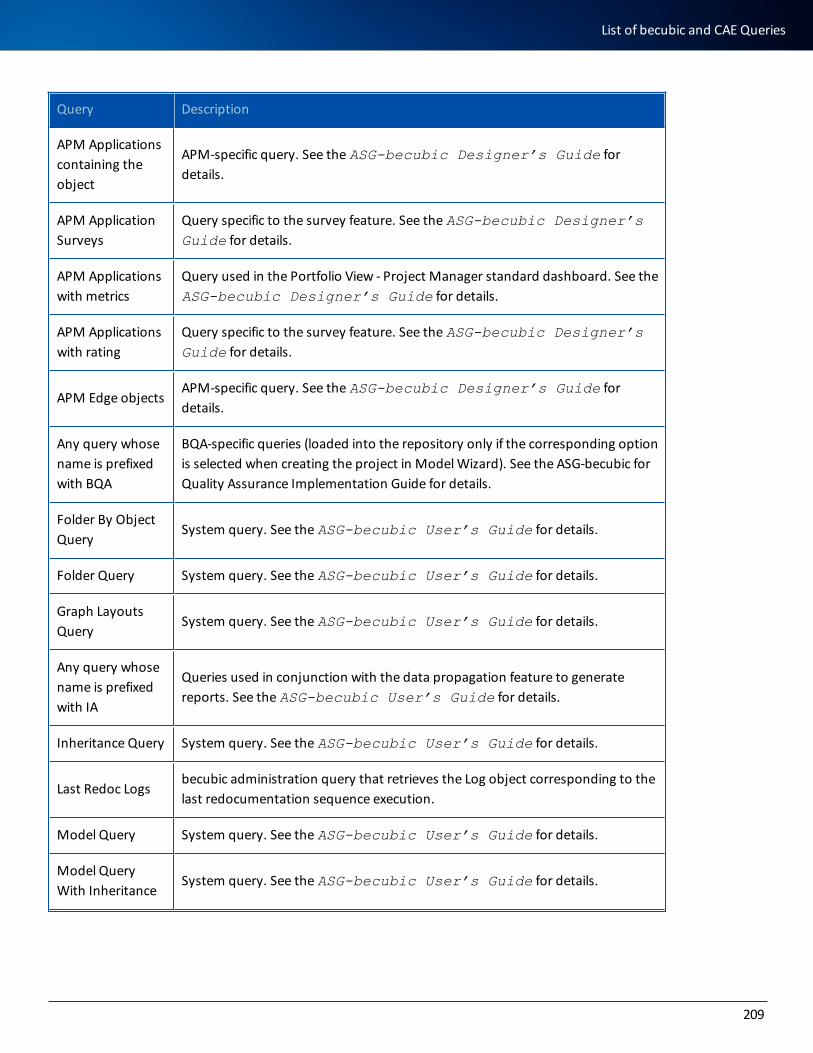
Query Description
APM Applications containing the object
APM-specific query. See the ASG-becubic Designer’s Guide for details.
APM Application Surveys
Query specific to the survey feature. See the ASG-becubic Designer’s Guide for details.
APM Applications with metrics
Query used in the Portfolio View - Project Manager standard dashboard. See the ASG-becubic Designer’s Guide for details.
APM Applications with rating
Query specific to the survey feature. See the ASG-becubic Designer’s Guide for details.
APM Edge objectsAPM-specific query. See the ASG-becubic Designer’s Guide for details.
Any query whose name is prefixed with BQA
BQA-specific queries (loaded into the repository only if the corresponding option is selected when creating the project in Model Wizard). See the ASG-becubic for Quality Assurance Implementation Guide for details.
Folder By Object Query
System query. See the ASG-becubic User’s Guide for details.
Folder Query System query. See the ASG-becubic User’s Guide for details.
Graph Layouts Query
System query. See the ASG-becubic User’s Guide for details.
Any query whose name is prefixed with IA
Queries used in conjunction with the data propagation feature to generate reports. See the ASG-becubic User’s Guide for details.
Inheritance Query System query. See the ASG-becubic User’s Guide for details.
Last Redoc Logsbecubic administration query that retrieves the Log object corresponding to the last redocumentation sequence execution.
Model Query System query. See the ASG-becubic User’s Guide for details.
Model Query With Inheritance
System query. See the ASG-becubic User’s Guide for details.
209
List of becubic and CAE Queries
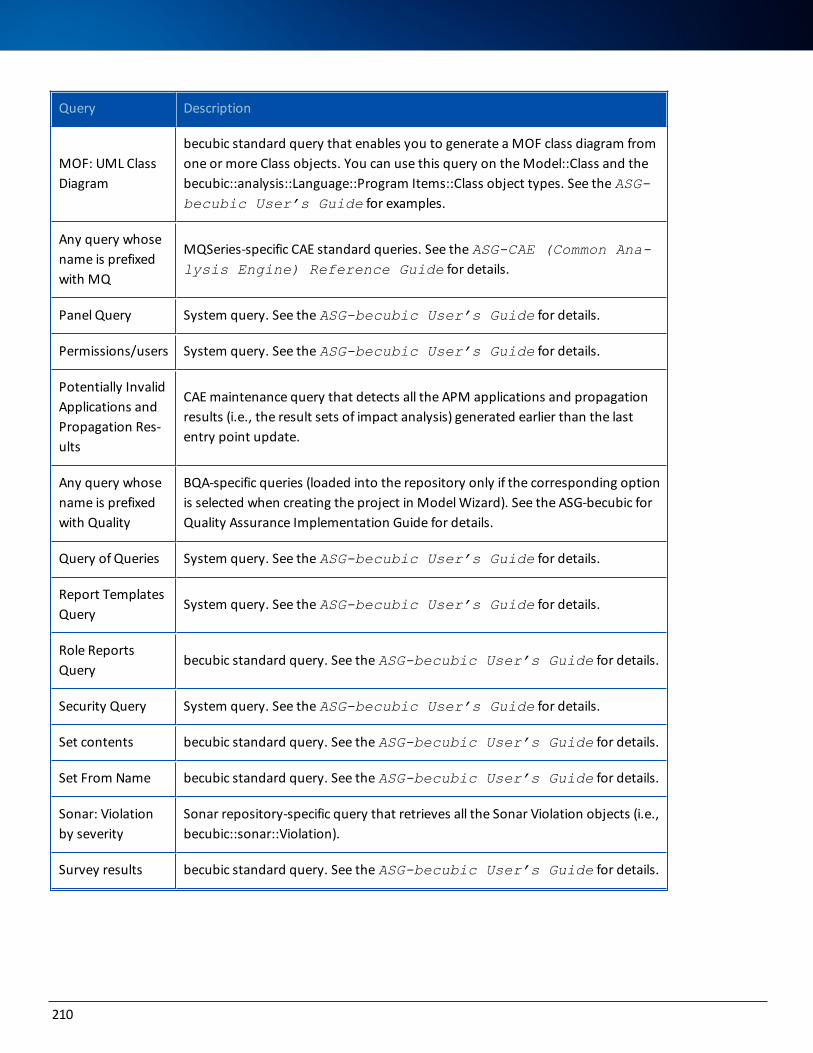
Query Description
MOF: UML Class Diagram
becubic standard query that enables you to generate a MOF class diagram from one or more Class objects. You can use this query on the Model::Class and the becubic::analysis::Language::Program Items::Class object types. See the ASG-becubic User’s Guide for examples.
Any query whose name is prefixed with MQ
MQSeries-specific CAE standard queries. See the ASG-CAE (Common Ana-lysis Engine) Reference Guide for details.
Panel Query System query. See the ASG-becubic User’s Guide for details.
Permissions/users System query. See the ASG-becubic User’s Guide for details.
Potentially Invalid Applications and Propagation Res-ults
CAE maintenance query that detects all the APM applications and propagation results (i.e., the result sets of impact analysis) generated earlier than the last entry point update.
Any query whose name is prefixed with Quality
BQA-specific queries (loaded into the repository only if the corresponding option is selected when creating the project in Model Wizard). See the ASG-becubic for Quality Assurance Implementation Guide for details.
Query of Queries System query. See the ASG-becubic User’s Guide for details.
Report Templates Query
System query. See the ASG-becubic User’s Guide for details.
Role Reports Query
becubic standard query. See the ASG-becubic User’s Guide for details.
Security Query System query. See the ASG-becubic User’s Guide for details.
Set contents becubic standard query. See the ASG-becubic User’s Guide for details.
Set From Name becubic standard query. See the ASG-becubic User’s Guide for details.
Sonar: Violation by severity
Sonar repository-specific query that retrieves all the Sonar Violation objects (i.e., becubic::sonar::Violation).
Survey results becubic standard query. See the ASG-becubic User’s Guide for details.
210
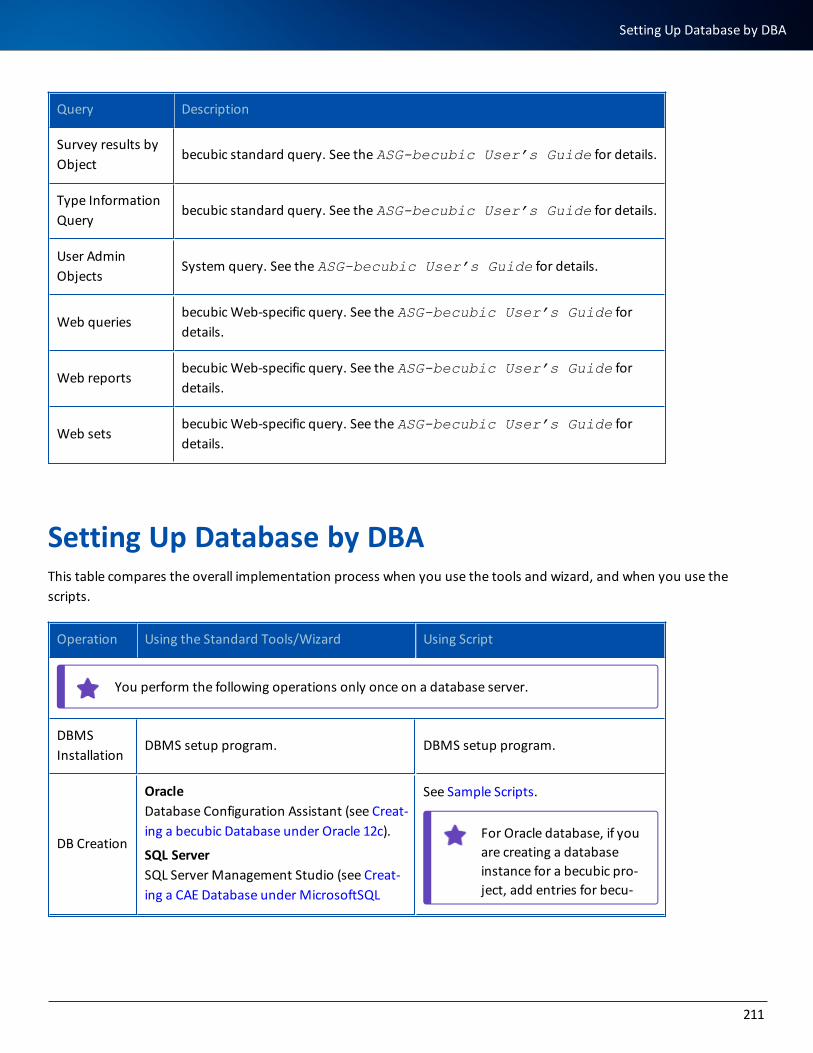
Query Description
Survey results by Object
becubic standard query. See the ASG-becubic User’s Guide for details.
Type Information Query
becubic standard query. See the ASG-becubic User’s Guide for details.
User Admin Objects
System query. See the ASG-becubic User’s Guide for details.
Web queriesbecubic Web-specific query. See the ASG-becubic User’s Guide for details.
Web reportsbecubic Web-specific query. See the ASG-becubic User’s Guide for details.
Web setsbecubic Web-specific query. See the ASG-becubic User’s Guide for details.
Setting Up Database by DBA This table compares the overall implementation process when you use the tools and wizard, and when you use the scripts.
Operation Using the Standard Tools/Wizard Using Script
You perform the following operations only once on a database server.
DBMS Installation
DBMS setup program. DBMS setup program.
DB Creation
OracleDatabase Configuration Assistant (see Creat-ing a becubic Database under Oracle 12c).
SQL ServerSQL Server Management Studio (see Creat-ing a CAE Database under MicrosoftSQL
See Sample Scripts.
For Oracle database, if you are creating a database instance for a becubic pro-ject, add entries for becu-
211
Setting Up Database by DBA
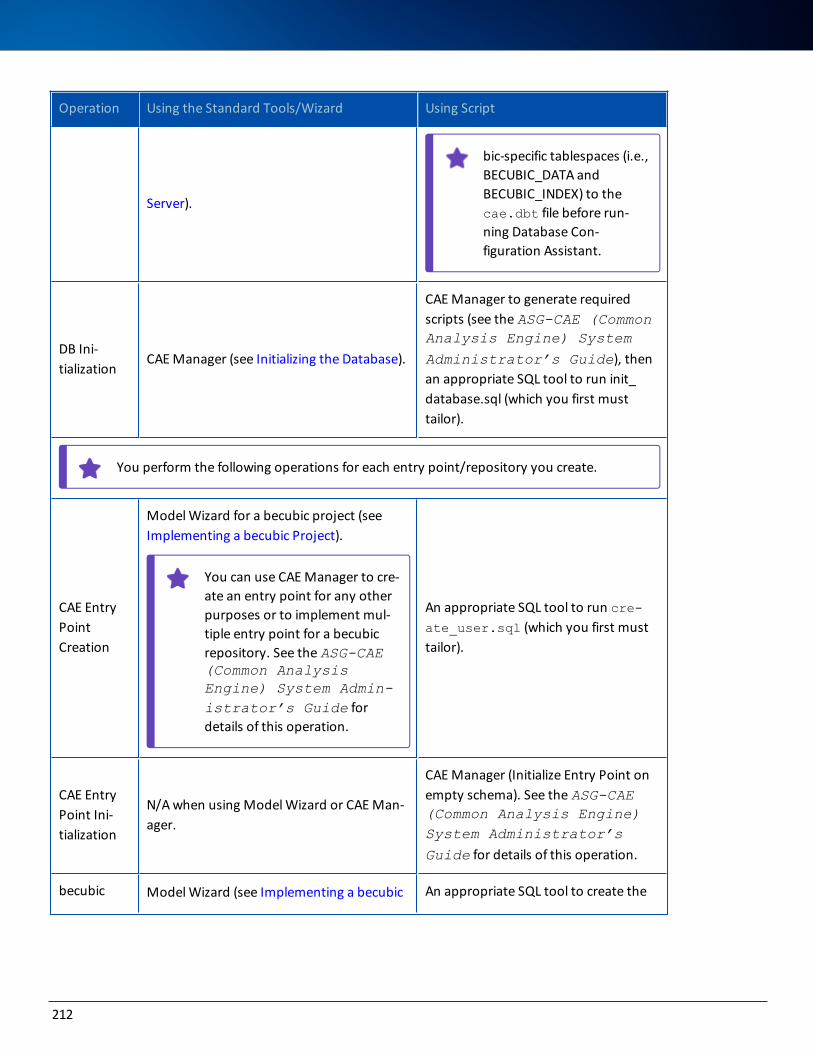
Operation Using the Standard Tools/Wizard Using Script
Server).
bic-specific tablespaces (i.e., BECUBIC_DATA and BECUBIC_INDEX) to the cae.dbt file before run-ning Database Con-figuration Assistant.
DB Ini-tialization
CAE Manager (see Initializing the Database).
CAE Manager to generate required scripts (see the ASG-CAE (Common Analysis Engine) System
Administrator’s Guide), then an appropriate SQL tool to run init_database.sql (which you first must tailor).
You perform the following operations for each entry point/repository you create.
CAE Entry Point Creation
Model Wizard for a becubic project (see Implementing a becubic Project).
You can use CAE Manager to cre-ate an entry point for any other purposes or to implement mul-tiple entry point for a becubic repository. See the ASG-CAE (Common Analysis Engine) System Admin-istrator’s Guide for details of this operation.
An appropriate SQL tool to run cre-ate_user.sql (which you first must tailor).
CAE Entry Point Ini-tialization
N/A when using Model Wizard or CAE Man-ager.
CAE Manager (Initialize Entry Point on empty schema). See the ASG-CAE (Common Analysis Engine) System Administrator’s
Guide for details of this operation.
becubic Model Wizard (see Implementing a becubic An appropriate SQL tool to create the
212
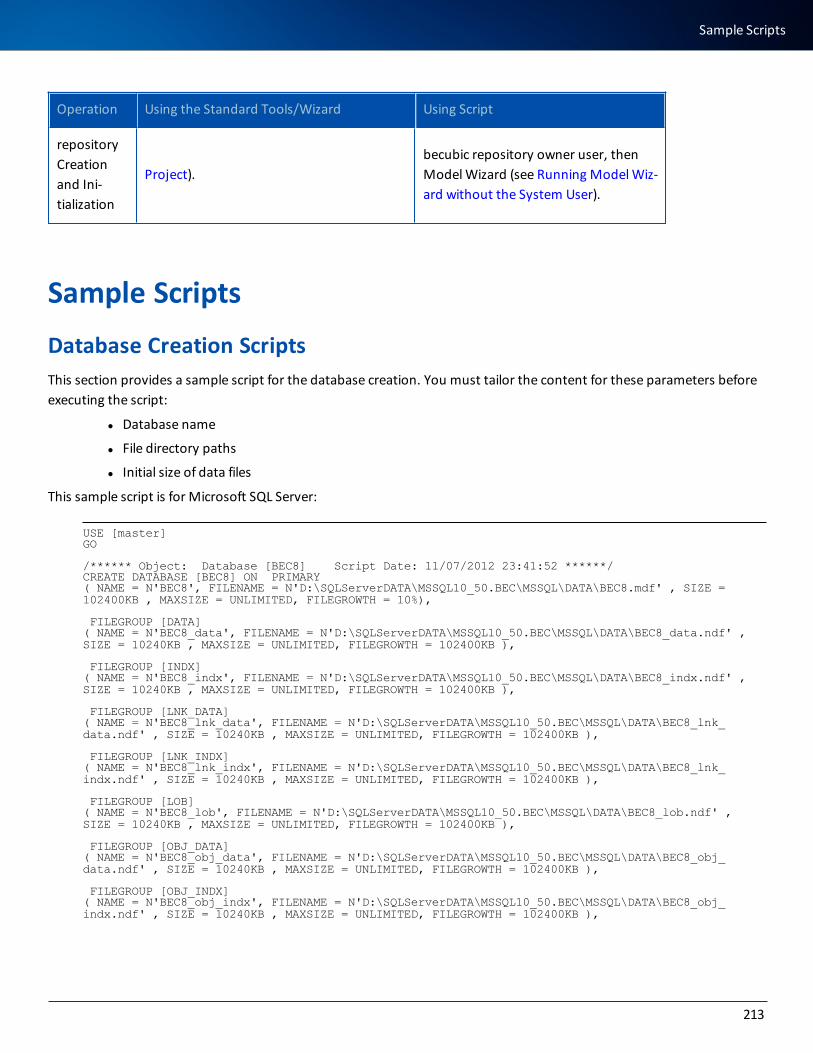
Operation Using the Standard Tools/Wizard Using Script
repository Creation and Ini-tialization
Project).becubic repository owner user, then Model Wizard (see Running Model Wiz-ard without the System User).
Sample ScriptsDatabase Creation ScriptsThis section provides a sample script for the database creation. You must tailor the content for these parameters before executing the script:
l Database name
l File directory paths
l Initial size of data files
This sample script is for Microsoft SQL Server:
USE [master]GO /****** Object: Database [BEC8] Script Date: 11/07/2012 23:41:52 ******/CREATE DATABASE [BEC8] ON PRIMARY ( NAME = N'BEC8', FILENAME = N'D:\SQLServerDATA\MSSQL10_50.BEC\MSSQL\DATA\BEC8.mdf' , SIZE = 102400KB , MAXSIZE = UNLIMITED, FILEGROWTH = 10%), FILEGROUP [DATA] ( NAME = N'BEC8_data', FILENAME = N'D:\SQLServerDATA\MSSQL10_50.BEC\MSSQL\DATA\BEC8_data.ndf' , SIZE = 10240KB , MAXSIZE = UNLIMITED, FILEGROWTH = 102400KB ), FILEGROUP [INDX] ( NAME = N'BEC8_indx', FILENAME = N'D:\SQLServerDATA\MSSQL10_50.BEC\MSSQL\DATA\BEC8_indx.ndf' , SIZE = 10240KB , MAXSIZE = UNLIMITED, FILEGROWTH = 102400KB ), FILEGROUP [LNK_DATA] ( NAME = N'BEC8_lnk_data', FILENAME = N'D:\SQLServerDATA\MSSQL10_50.BEC\MSSQL\DATA\BEC8_lnk_data.ndf' , SIZE = 10240KB , MAXSIZE = UNLIMITED, FILEGROWTH = 102400KB ), FILEGROUP [LNK_INDX] ( NAME = N'BEC8_lnk_indx', FILENAME = N'D:\SQLServerDATA\MSSQL10_50.BEC\MSSQL\DATA\BEC8_lnk_indx.ndf' , SIZE = 10240KB , MAXSIZE = UNLIMITED, FILEGROWTH = 102400KB ), FILEGROUP [LOB] ( NAME = N'BEC8_lob', FILENAME = N'D:\SQLServerDATA\MSSQL10_50.BEC\MSSQL\DATA\BEC8_lob.ndf' , SIZE = 10240KB , MAXSIZE = UNLIMITED, FILEGROWTH = 102400KB ), FILEGROUP [OBJ_DATA] ( NAME = N'BEC8_obj_data', FILENAME = N'D:\SQLServerDATA\MSSQL10_50.BEC\MSSQL\DATA\BEC8_obj_data.ndf' , SIZE = 10240KB , MAXSIZE = UNLIMITED, FILEGROWTH = 102400KB ), FILEGROUP [OBJ_INDX] ( NAME = N'BEC8_obj_indx', FILENAME = N'D:\SQLServerDATA\MSSQL10_50.BEC\MSSQL\DATA\BEC8_obj_indx.ndf' , SIZE = 10240KB , MAXSIZE = UNLIMITED, FILEGROWTH = 102400KB ),
213
Sample Scripts
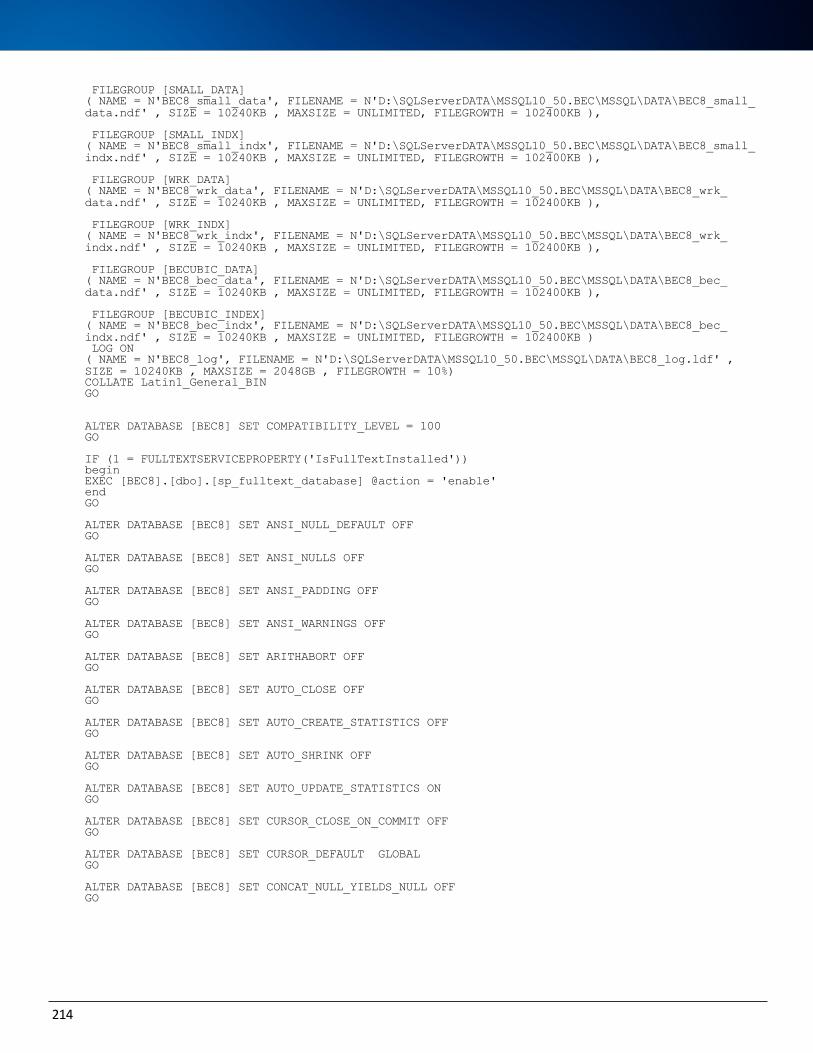
FILEGROUP [SMALL_DATA] ( NAME = N'BEC8_small_data', FILENAME = N'D:\SQLServerDATA\MSSQL10_50.BEC\MSSQL\DATA\BEC8_small_data.ndf' , SIZE = 10240KB , MAXSIZE = UNLIMITED, FILEGROWTH = 102400KB ), FILEGROUP [SMALL_INDX] ( NAME = N'BEC8_small_indx', FILENAME = N'D:\SQLServerDATA\MSSQL10_50.BEC\MSSQL\DATA\BEC8_small_indx.ndf' , SIZE = 10240KB , MAXSIZE = UNLIMITED, FILEGROWTH = 102400KB ), FILEGROUP [WRK_DATA] ( NAME = N'BEC8_wrk_data', FILENAME = N'D:\SQLServerDATA\MSSQL10_50.BEC\MSSQL\DATA\BEC8_wrk_data.ndf' , SIZE = 10240KB , MAXSIZE = UNLIMITED, FILEGROWTH = 102400KB ), FILEGROUP [WRK_INDX] ( NAME = N'BEC8_wrk_indx', FILENAME = N'D:\SQLServerDATA\MSSQL10_50.BEC\MSSQL\DATA\BEC8_wrk_indx.ndf' , SIZE = 10240KB , MAXSIZE = UNLIMITED, FILEGROWTH = 102400KB ), FILEGROUP [BECUBIC_DATA] ( NAME = N'BEC8_bec_data', FILENAME = N'D:\SQLServerDATA\MSSQL10_50.BEC\MSSQL\DATA\BEC8_bec_data.ndf' , SIZE = 10240KB , MAXSIZE = UNLIMITED, FILEGROWTH = 102400KB ), FILEGROUP [BECUBIC_INDEX] ( NAME = N'BEC8_bec_indx', FILENAME = N'D:\SQLServerDATA\MSSQL10_50.BEC\MSSQL\DATA\BEC8_bec_indx.ndf' , SIZE = 10240KB , MAXSIZE = UNLIMITED, FILEGROWTH = 102400KB ) LOG ON ( NAME = N'BEC8_log', FILENAME = N'D:\SQLServerDATA\MSSQL10_50.BEC\MSSQL\DATA\BEC8_log.ldf' , SIZE = 10240KB , MAXSIZE = 2048GB , FILEGROWTH = 10%)COLLATE Latin1_General_BINGO ALTER DATABASE [BEC8] SET COMPATIBILITY_LEVEL = 100GO IF (1 = FULLTEXTSERVICEPROPERTY('IsFullTextInstalled'))beginEXEC [BEC8].[dbo].[sp_fulltext_database] @action = 'enable'endGO ALTER DATABASE [BEC8] SET ANSI_NULL_DEFAULT OFF GO ALTER DATABASE [BEC8] SET ANSI_NULLS OFF GO ALTER DATABASE [BEC8] SET ANSI_PADDING OFF GO ALTER DATABASE [BEC8] SET ANSI_WARNINGS OFF GO ALTER DATABASE [BEC8] SET ARITHABORT OFF GO ALTER DATABASE [BEC8] SET AUTO_CLOSE OFF GO ALTER DATABASE [BEC8] SET AUTO_CREATE_STATISTICS OFF GO ALTER DATABASE [BEC8] SET AUTO_SHRINK OFF GO ALTER DATABASE [BEC8] SET AUTO_UPDATE_STATISTICS ON GO ALTER DATABASE [BEC8] SET CURSOR_CLOSE_ON_COMMIT OFF GO ALTER DATABASE [BEC8] SET CURSOR_DEFAULT GLOBAL GO ALTER DATABASE [BEC8] SET CONCAT_NULL_YIELDS_NULL OFF GO
214
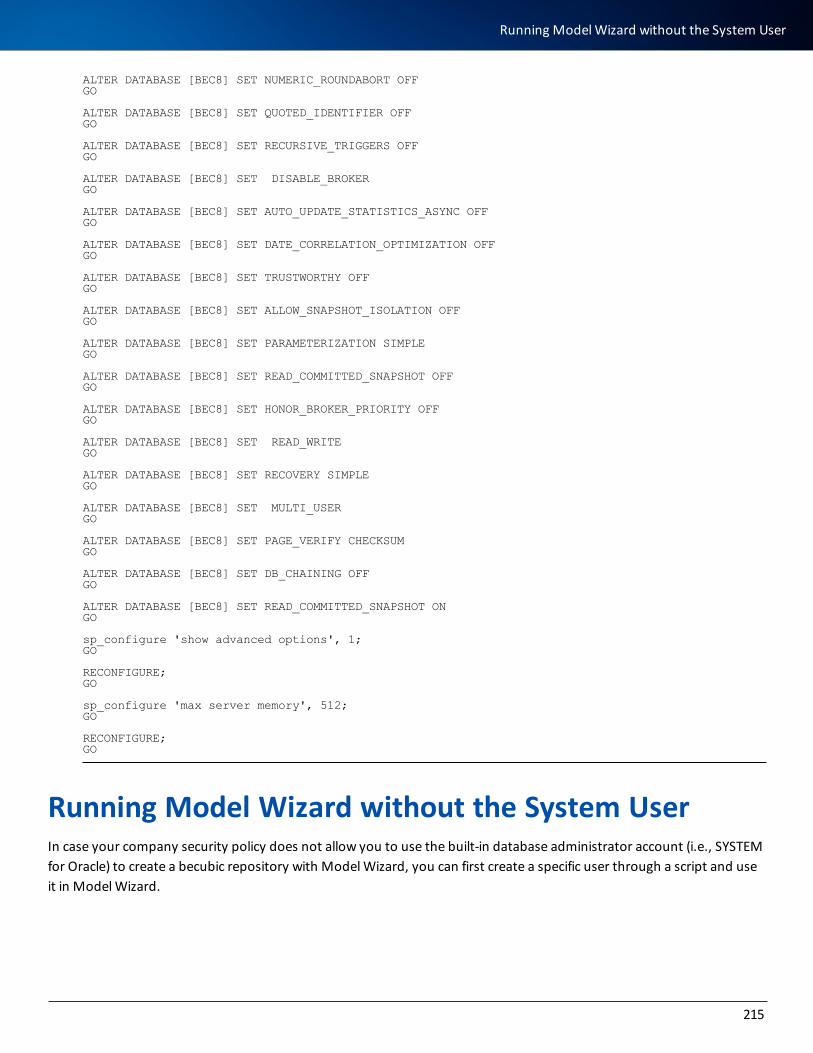
ALTER DATABASE [BEC8] SET NUMERIC_ROUNDABORT OFF GO ALTER DATABASE [BEC8] SET QUOTED_IDENTIFIER OFF GO ALTER DATABASE [BEC8] SET RECURSIVE_TRIGGERS OFF GO ALTER DATABASE [BEC8] SET DISABLE_BROKER GO ALTER DATABASE [BEC8] SET AUTO_UPDATE_STATISTICS_ASYNC OFF GO ALTER DATABASE [BEC8] SET DATE_CORRELATION_OPTIMIZATION OFF GO ALTER DATABASE [BEC8] SET TRUSTWORTHY OFF GO ALTER DATABASE [BEC8] SET ALLOW_SNAPSHOT_ISOLATION OFF GO ALTER DATABASE [BEC8] SET PARAMETERIZATION SIMPLE GO ALTER DATABASE [BEC8] SET READ_COMMITTED_SNAPSHOT OFF GO ALTER DATABASE [BEC8] SET HONOR_BROKER_PRIORITY OFF GO ALTER DATABASE [BEC8] SET READ_WRITE GO ALTER DATABASE [BEC8] SET RECOVERY SIMPLE GO ALTER DATABASE [BEC8] SET MULTI_USER GO ALTER DATABASE [BEC8] SET PAGE_VERIFY CHECKSUM GO ALTER DATABASE [BEC8] SET DB_CHAINING OFF GO ALTER DATABASE [BEC8] SET READ_COMMITTED_SNAPSHOT ONGO sp_configure 'show advanced options', 1;GO RECONFIGURE;GO sp_configure 'max server memory', 512;GO RECONFIGURE;GO
Running Model Wizard without the System UserIn case your company security policy does not allow you to use the built-in database administrator account (i.e., SYSTEM for Oracle) to create a becubic repository with Model Wizard, you can first create a specific user through a script and use it in Model Wizard.
215
Running ModelWizard without the System User
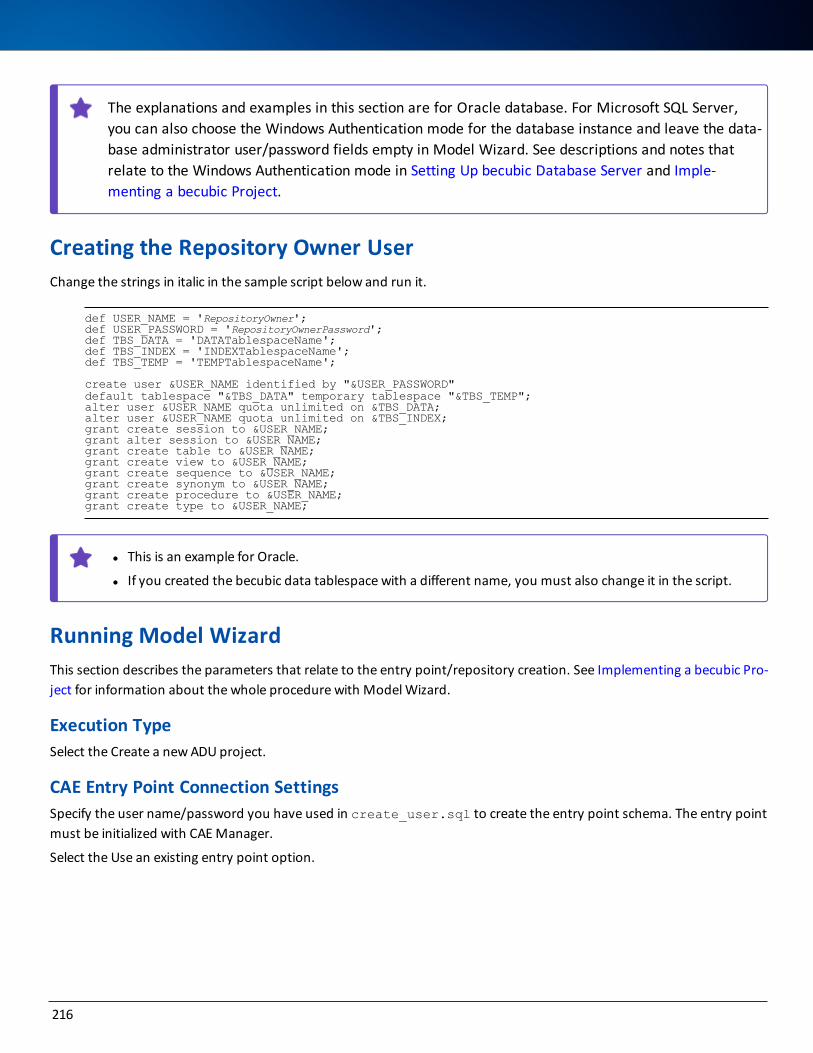
The explanations and examples in this section are for Oracle database. For Microsoft SQL Server, you can also choose the Windows Authentication mode for the database instance and leave the data-base administrator user/password fields empty in Model Wizard. See descriptions and notes that relate to the Windows Authentication mode in Setting Up becubic Database Server and Imple-menting a becubic Project.
Creating the Repository Owner UserChange the strings in italic in the sample script below and run it.
def USER_NAME = 'RepositoryOwner';def USER_PASSWORD = 'RepositoryOwnerPassword';def TBS_DATA = 'DATATablespaceName';def TBS_INDEX = 'INDEXTablespaceName';def TBS_TEMP = 'TEMPTablespaceName'; create user &USER_NAME identified by "&USER_PASSWORD" default tablespace "&TBS_DATA" temporary tablespace "&TBS_TEMP";alter user &USER_NAME quota unlimited on &TBS_DATA;alter user &USER_NAME quota unlimited on &TBS_INDEX;grant create session to &USER_NAME;grant alter session to &USER_NAME;grant create table to &USER_NAME;grant create view to &USER_NAME;grant create sequence to &USER_NAME;grant create synonym to &USER_NAME;grant create procedure to &USER_NAME;grant create type to &USER_NAME;
l This is an example for Oracle.
l If you created the becubic data tablespace with a different name, you must also change it in the script.
Running Model WizardThis section describes the parameters that relate to the entry point/repository creation. See Implementing a becubic Pro-ject for information about the whole procedure with Model Wizard.
Execution TypeSelect the Create a new ADU project.
CAE Entry Point Connection SettingsSpecify the user name/password you have used in create_user.sql to create the entry point schema. The entry point must be initialized with CAE Manager.
Select the Use an existing entry point option.
216
Target Database SettingsSpecify the user name/password you have used in Creating the Repository Owner User for both Database administrator user and Database repository user.
Database ActionsClear these check boxes:
l Drop user
l Create user and schema
Running Model Wizard through Command LineIf necessary, you can launch Model Wizard as an Ant task through a command line.
The Ant build file is BECUBIC_HOME\setup\wizard.ml. Provide the project name as it appears in the BECUBIC_HOME\conf\wizardProject.properties file.
If for any reason the project does not appear in the wizardProject.properties file, you can refer to the project’s configuration file (i.e., project_name_config.xml file in PROJECT_ROOT\savedProjects).
Logical ModelsThe logical models are designed to provide a simple way to retrieve relevant information from the detailed CAE code source analysis.
Model Wizard enables you to apply the logical models by selecting one or both of these options:
l Logical DWR model
l Logical Scanner models
The logical models are implemented by means of the dynamic data mapping defined in the corresponding transformation rule sets.
Logical DWR ModelThe logical DWR model exposes a mapping that is close to the OMG industry standard for Data Warehouse and provides an alternate abstracted model ready to be utilized by users who are already familiar with it.
The mapping is defined in the Data Warehouse transformation rule set and automatically applied if the corresponding option has been selected in Model Wizard at the repository creation time.
217
Running ModelWizard through Command Line

This table describes the logical object types and their references:
Select the Data Warehouse type group to display the DWR model-related object types.
Object Type Description References
DAT::Field
Represents a copybook field and has these attributes:
l description:
l length:
l name: Field name.
l of_type:
l time_creation: Date and time of the cre-ation of the field if specified in the source.
DAT::File
Represents a physical file (i.e., Cartridge File, Disk File, Para-meter File, Print File, or Tape File) and has these attributes:
l description: Type and category of the file.
l name: File name.
l time_creation: Date and time of the cre-ation of the file if spe-cified in the source.
DAT::Record_Type
Represents a copybook and has these attributes:
l description: Type of the copybook (e.g., COBOL COPY)
l name: Copybook name.
l time_creation: Date
A Record_Type object can have this reference:
l has_field: Linked to a Field object. This reference shows the rela-tionship between a copybook and a field defined in it.
218
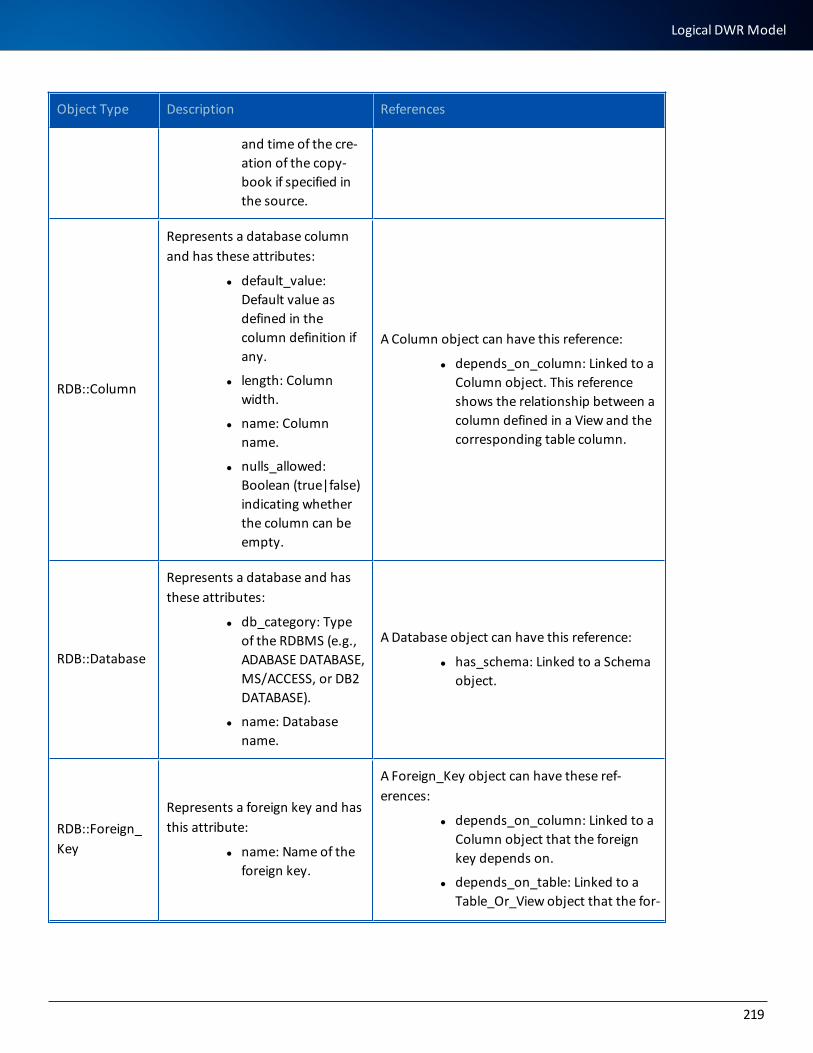
Object Type Description References
and time of the cre-ation of the copy-book if specified in the source.
RDB::Column
Represents a database column and has these attributes:
l default_value: Default value as defined in the column definition if any.
l length: Column width.
l name: Column name.
l nulls_allowed: Boolean (true|false) indicating whether the column can be empty.
A Column object can have this reference:
l depends_on_column: Linked to a Column object. This reference shows the relationship between a column defined in a View and the corresponding table column.
RDB::Database
Represents a database and has these attributes:
l db_category: Type of the RDBMS (e.g., ADABASE DATABASE, MS/ACCESS, or DB2 DATABASE).
l name: Database name.
A Database object can have this reference:
l has_schema: Linked to a Schema object.
RDB::Foreign_Key
Represents a foreign key and has this attribute:
l name: Name of the foreign key.
A Foreign_Key object can have these ref-erences:
l depends_on_column: Linked to a Column object that the foreign key depends on.
l depends_on_table: Linked to a Table_Or_View object that the for-
219
Logical DWRModel
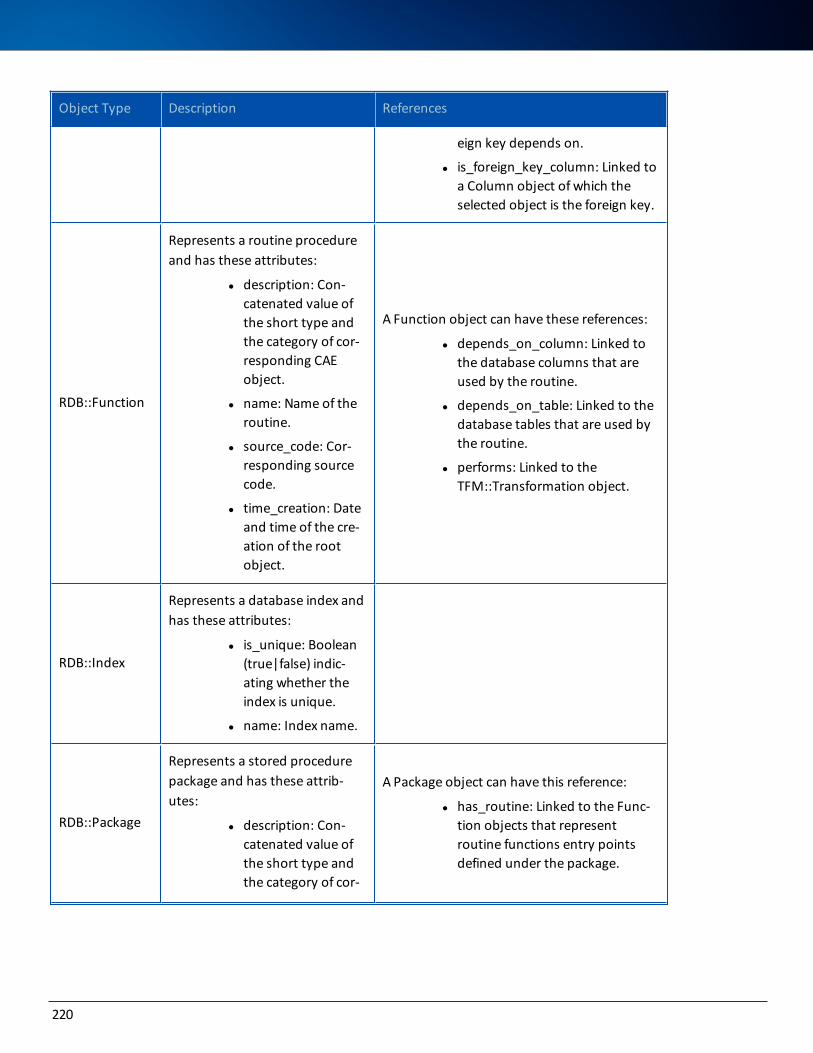
Object Type Description References
eign key depends on.
l is_foreign_key_column: Linked to a Column object of which the selected object is the foreign key.
RDB::Function
Represents a routine procedure and has these attributes:
l description: Con-catenated value of the short type and the category of cor-responding CAE object.
l name: Name of the routine.
l source_code: Cor-responding source code.
l time_creation: Date and time of the cre-ation of the root object.
A Function object can have these references:
l depends_on_column: Linked to the database columns that are used by the routine.
l depends_on_table: Linked to the database tables that are used by the routine.
l performs: Linked to the TFM::Transformation object.
RDB::Index
Represents a database index and has these attributes:
l is_unique: Boolean (true|false) indic-ating whether the index is unique.
l name: Index name.
RDB::Package
Represents a stored procedure package and has these attrib-utes:
l description: Con-catenated value of the short type and the category of cor-
A Package object can have this reference:
l has_routine: Linked to the Func-tion objects that represent routine functions entry points defined under the package.
220
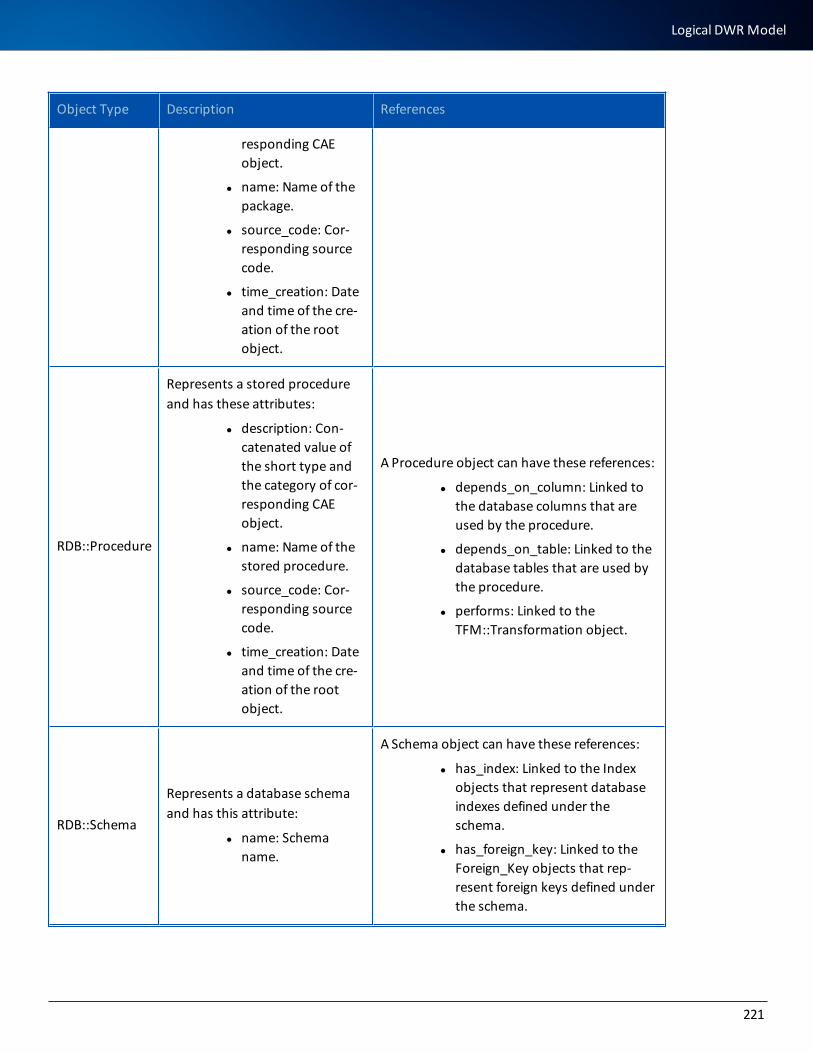
Object Type Description References
responding CAE object.
l name: Name of the package.
l source_code: Cor-responding source code.
l time_creation: Date and time of the cre-ation of the root object.
RDB::Procedure
Represents a stored procedure and has these attributes:
l description: Con-catenated value of the short type and the category of cor-responding CAE object.
l name: Name of the stored procedure.
l source_code: Cor-responding source code.
l time_creation: Date and time of the cre-ation of the root object.
A Procedure object can have these references:
l depends_on_column: Linked to the database columns that are used by the procedure.
l depends_on_table: Linked to the database tables that are used by the procedure.
l performs: Linked to the TFM::Transformation object.
RDB::Schema
Represents a database schema and has this attribute:
l name: Schema name.
A Schema object can have these references:
l has_index: Linked to the Index objects that represent database indexes defined under the schema.
l has_foreign_key: Linked to the Foreign_Key objects that rep-resent foreign keys defined under the schema.
221
Logical DWRModel
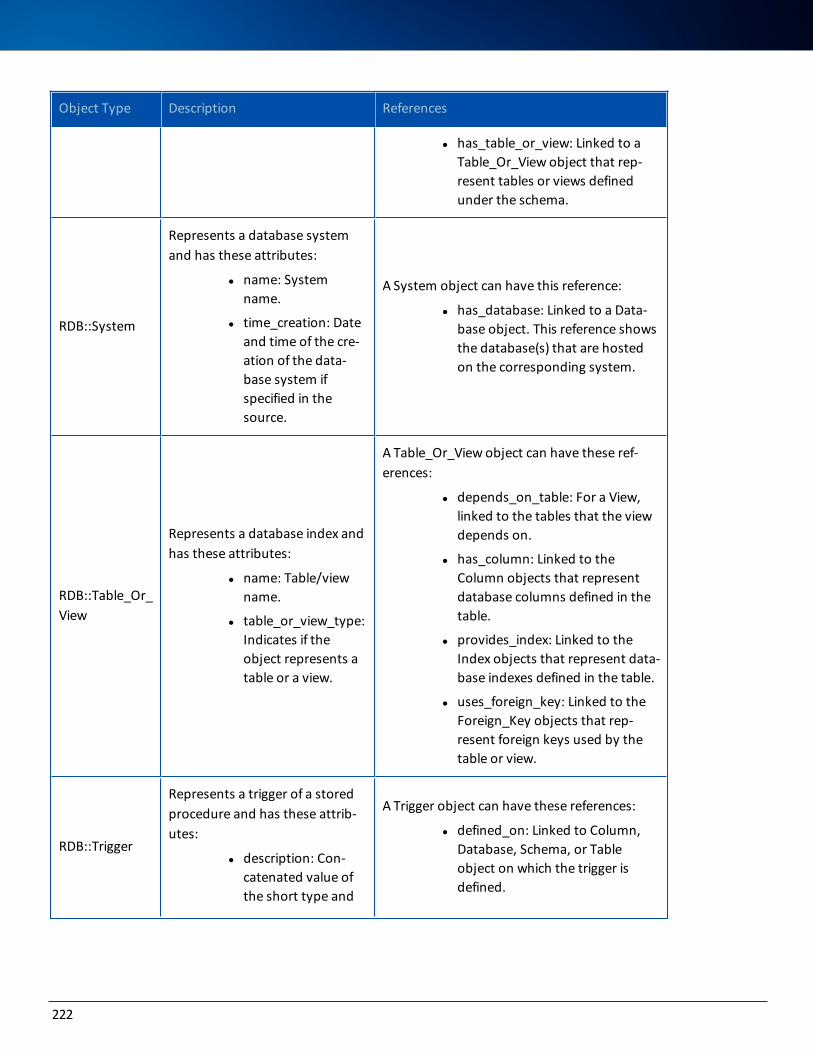
Object Type Description References
l has_table_or_view: Linked to a Table_Or_View object that rep-resent tables or views defined under the schema.
RDB::System
Represents a database system and has these attributes:
l name: System name.
l time_creation: Date and time of the cre-ation of the data-base system if specified in the source.
A System object can have this reference:
l has_database: Linked to a Data-base object. This reference shows the database(s) that are hosted on the corresponding system.
RDB::Table_Or_View
Represents a database index and has these attributes:
l name: Table/view name.
l table_or_view_type: Indicates if the object represents a table or a view.
A Table_Or_View object can have these ref-erences:
l depends_on_table: For a View, linked to the tables that the view depends on.
l has_column: Linked to the Column objects that represent database columns defined in the table.
l provides_index: Linked to the Index objects that represent data-base indexes defined in the table.
l uses_foreign_key: Linked to the Foreign_Key objects that rep-resent foreign keys used by the table or view.
RDB::Trigger
Represents a trigger of a stored procedure and has these attrib-utes:
l description: Con-catenated value of the short type and
A Trigger object can have these references:
l defined_on: Linked to Column, Database, Schema, or Table object on which the trigger is defined.
222
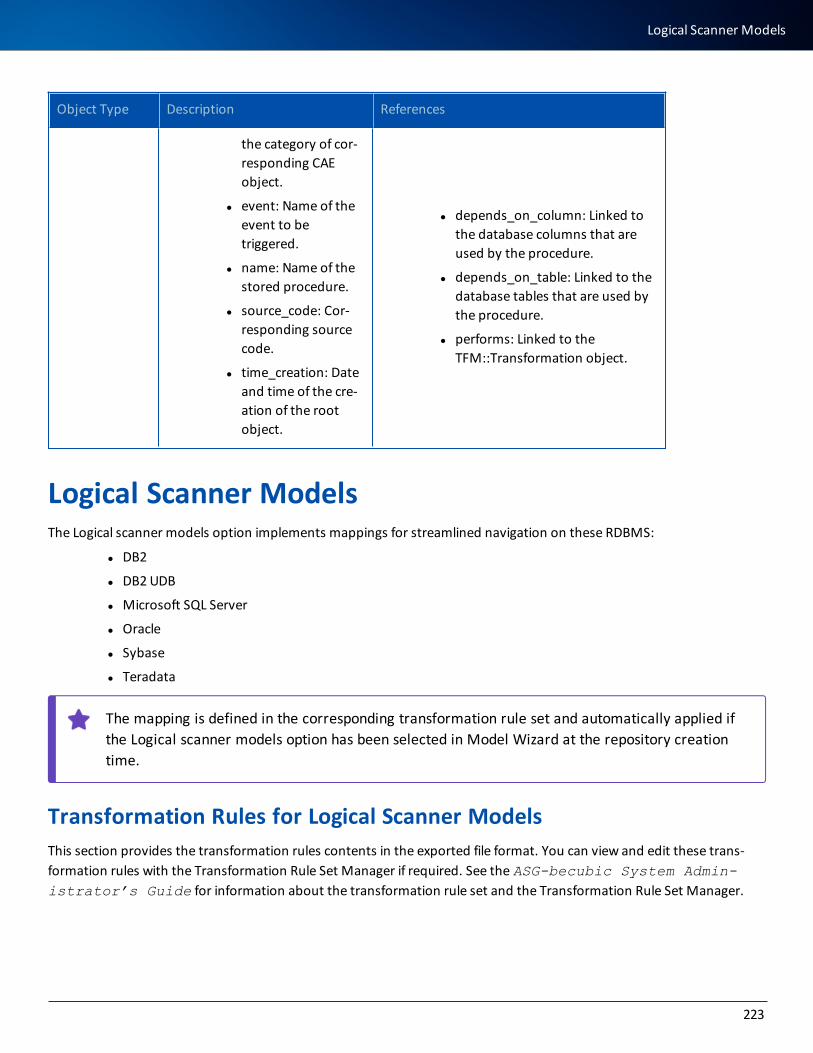
Object Type Description References
the category of cor-responding CAE object.
l event: Name of the event to be triggered.
l name: Name of the stored procedure.
l source_code: Cor-responding source code.
l time_creation: Date and time of the cre-ation of the root object.
l depends_on_column: Linked to the database columns that are used by the procedure.
l depends_on_table: Linked to the database tables that are used by the procedure.
l performs: Linked to the TFM::Transformation object.
Logical Scanner ModelsThe Logical scanner models option implements mappings for streamlined navigation on these RDBMS:
l DB2
l DB2 UDB
l Microsoft SQL Server
l Oracle
l Sybase
l Teradata
The mapping is defined in the corresponding transformation rule set and automatically applied if the Logical scanner models option has been selected in Model Wizard at the repository creation time.
Transformation Rules for Logical Scanner ModelsThis section provides the transformation rules contents in the exported file format. You can view and edit these trans-formation rules with the Transformation Rule Set Manager if required. See the ASG-becubic System Admin-istrator’s Guide for information about the transformation rule set and the Transformation Rule Set Manager.
223
Logical Scanner Models

Transformation Rule Set for DB2
<!DOCTYPE transformRules PUBLIC "-//ASG//DTD TRANSFORM 1.0//EN" "transform.dtd"><transformRules inputModel="becubic" outputModel="DB2" ignoreIfNoRule="true"> <rule fqn="becubic::analysis::Language::Program Items::Data Item" name="column"> <inputCondition test="category='DB2 FIELD'and ((count(root[${table}])>0 and boolean(offset)) or (count(root[${view}])>0 and b3:parentCount('&a-pos;,'','Destination Assignment Link','')>0))"/> <outputType name="Column" alias="DB2::Column" topObject="true"> <outputFeature name="default_value" value="initial_value"/> <outputFeature name="name" value="name"/> <outputFeature name="description" value="description"/> <outputFeature name="nulls" value="boolean(number(nullable))"/> <outputFeature name="length" value="length"/> <outputFeature name="coltype" value="data_type"/> <outputFeature name="core_display_name" value="name"/> <outputFeature name="created" value="creation_date"/> </outputType> </rule> <rule fqn="becubic::analysis::Dbms::Db Constraint" name="constraint"> <inputCondition test="category='DB2'"/> <outputType name="Constraint" alias="DB2::Constraint" topObject="true"> <outputFeature name="constraint_type" value="'Constraint'"/> <outputFeature name="constraint_column" value="b3:rawValues(decomposition_link,&a-pos;Logical Physical Link')" referencedNames="Column"/> <outputFeature name="core_display_name" value="name"/> <outputFeature name="name" value="name"/> </outputType> </rule> <rule fqn="becubic::analysis::Dbms::Database" name="db"> <inputCondition test="category='DB2 DATABASE'"/> <outputType name="Database" alias="DB2::Database" topObject="true"> <outputFeature name="target_system" value="os"/> <outputFeature name="name" value="name"/> </outputType> </rule> <rule fqn="becubic::analysis::Dbms::Db Foreign Key" name="fk"> <inputCondition test="category='DB2'"/> <outputType name="ReferentialConstraint" alias="DB2::ReferentialConstraint" topObject="true"> <outputFeature name="references_table" value="b3:rawValues(decomposition_link/utilisation_link/logical_physical_link,'root',true())" referencedNames="Table"/> <outputFeature name="name" value="name"/> <outputFeature name="uses_parent_column" value="b3:rawValues(decomposition_link,&a-pos;Logical Physical Link')" referencedNames="Column"/> <outputFeature name="has_foreign_keys" value="b3:rawValues(decomposition_link/utilisation_link,'Logical Physical Link')" referencedNames="Column"/> <outputFeature name="core_display_name" value="name"/> </outputType> </rule> <rule fqn="becubic::analysis::Dbms::Index" name="index"> <inputCondition test="category='DB2'"/> <outputType name="Index" alias="DB2::Index" topObject="true"> <outputFeature name="contained_in_database" value="b3:parent(structure_link,&a-pos;','becubic::analysis::Dbms::Database','Decomposition Link')" ref-erencedNames="Database"/> <outputFeature name="name" value="name"/> <outputFeature name="core_display_name" value="name"/> <outputFeature name="unique" value="contains(decomposition_link/key,'UNIQUE')"/> <outputFeature name="includes_columns" value="b3:rawValues(decomposition_link,'Logical Physical Link')" referencedNames="Column"/> <outputFeature name="for_table" value="b3:rawValues(table_link,'Logical Physical Link')" referencedNames="Table"/> </outputType> </rule> <rule fqn="becubic::analysis::Dbms::Dbms Definitions::Db Subsystem" name="system"> <inputCondition test="category='DB2 SUBSYSTEM'"/> <outputType name="System" alias="DB2::System" topObject="true"> <outputFeature name="name" value="name"/> </outputType> </rule> <rule fqn="becubic::analysis::Dbms::Table" name="table"> <inputCondition test="category='DB2 TABLE'"/>
224
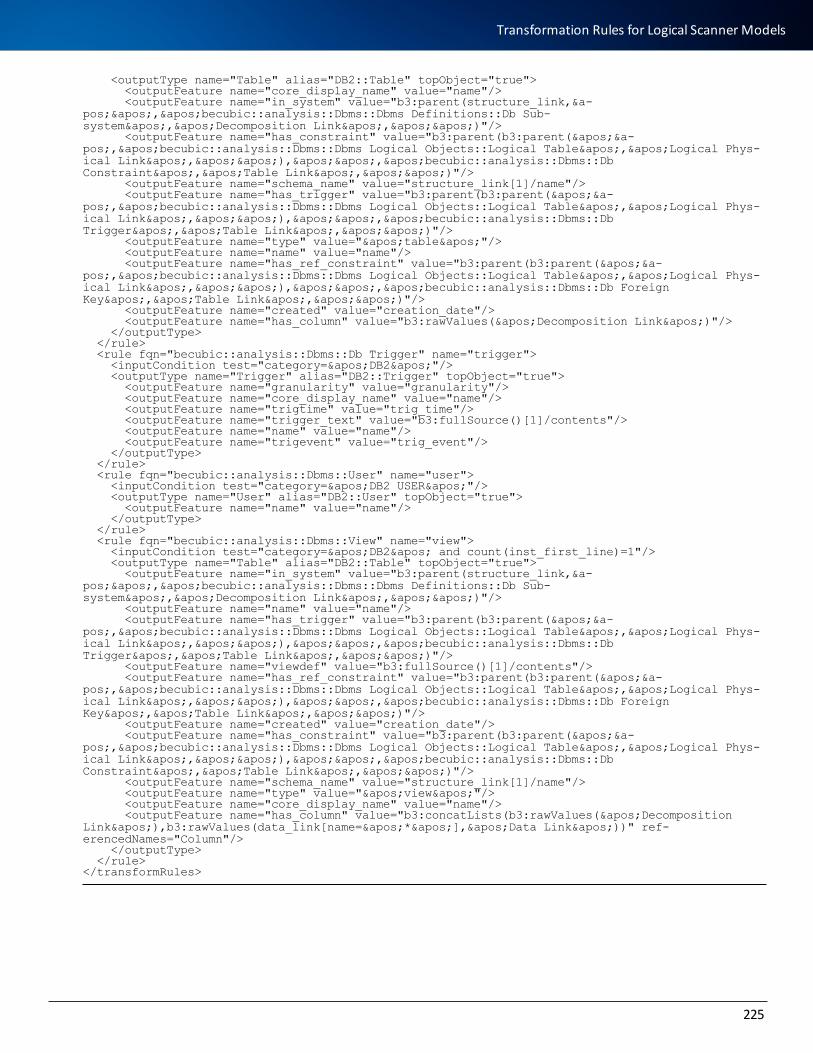
<outputType name="Table" alias="DB2::Table" topObject="true"> <outputFeature name="core_display_name" value="name"/> <outputFeature name="in_system" value="b3:parent(structure_link,&a-pos;','becubic::analysis::Dbms::Dbms Definitions::Db Sub-system','Decomposition Link','')"/> <outputFeature name="has_constraint" value="b3:parent(b3:parent('&a-pos;,'becubic::analysis::Dbms::Dbms Logical Objects::Logical Table','Logical Phys-ical Link',''),'','becubic::analysis::Dbms::Db Constraint','Table Link','')"/> <outputFeature name="schema_name" value="structure_link[1]/name"/> <outputFeature name="has_trigger" value="b3:parent(b3:parent('&a-pos;,'becubic::analysis::Dbms::Dbms Logical Objects::Logical Table','Logical Phys-ical Link',''),'','becubic::analysis::Dbms::Db Trigger','Table Link','')"/> <outputFeature name="type" value="'table'"/> <outputFeature name="name" value="name"/> <outputFeature name="has_ref_constraint" value="b3:parent(b3:parent('&a-pos;,'becubic::analysis::Dbms::Dbms Logical Objects::Logical Table','Logical Phys-ical Link',''),'','becubic::analysis::Dbms::Db Foreign Key','Table Link','')"/> <outputFeature name="created" value="creation_date"/> <outputFeature name="has_column" value="b3:rawValues('Decomposition Link')"/> </outputType> </rule> <rule fqn="becubic::analysis::Dbms::Db Trigger" name="trigger"> <inputCondition test="category='DB2'"/> <outputType name="Trigger" alias="DB2::Trigger" topObject="true"> <outputFeature name="granularity" value="granularity"/> <outputFeature name="core_display_name" value="name"/> <outputFeature name="trigtime" value="trig_time"/> <outputFeature name="trigger_text" value="b3:fullSource()[1]/contents"/> <outputFeature name="name" value="name"/> <outputFeature name="trigevent" value="trig_event"/> </outputType> </rule> <rule fqn="becubic::analysis::Dbms::User" name="user"> <inputCondition test="category='DB2 USER'"/> <outputType name="User" alias="DB2::User" topObject="true"> <outputFeature name="name" value="name"/> </outputType> </rule> <rule fqn="becubic::analysis::Dbms::View" name="view"> <inputCondition test="category='DB2' and count(inst_first_line)=1"/> <outputType name="Table" alias="DB2::Table" topObject="true"> <outputFeature name="in_system" value="b3:parent(structure_link,&a-pos;','becubic::analysis::Dbms::Dbms Definitions::Db Sub-system','Decomposition Link','')"/> <outputFeature name="name" value="name"/> <outputFeature name="has_trigger" value="b3:parent(b3:parent('&a-pos;,'becubic::analysis::Dbms::Dbms Logical Objects::Logical Table','Logical Phys-ical Link',''),'','becubic::analysis::Dbms::Db Trigger','Table Link','')"/> <outputFeature name="viewdef" value="b3:fullSource()[1]/contents"/> <outputFeature name="has_ref_constraint" value="b3:parent(b3:parent('&a-pos;,'becubic::analysis::Dbms::Dbms Logical Objects::Logical Table','Logical Phys-ical Link',''),'','becubic::analysis::Dbms::Db Foreign Key','Table Link','')"/> <outputFeature name="created" value="creation_date"/> <outputFeature name="has_constraint" value="b3:parent(b3:parent('&a-pos;,'becubic::analysis::Dbms::Dbms Logical Objects::Logical Table','Logical Phys-ical Link',''),'','becubic::analysis::Dbms::Db Constraint','Table Link','')"/> <outputFeature name="schema_name" value="structure_link[1]/name"/> <outputFeature name="type" value="'view'"/> <outputFeature name="core_display_name" value="name"/> <outputFeature name="has_column" value="b3:concatLists(b3:rawValues('Decomposition Link'),b3:rawValues(data_link[name='*'],'Data Link'))" ref-erencedNames="Column"/> </outputType> </rule></transformRules>
225
Transformation Rules for Logical Scanner Models
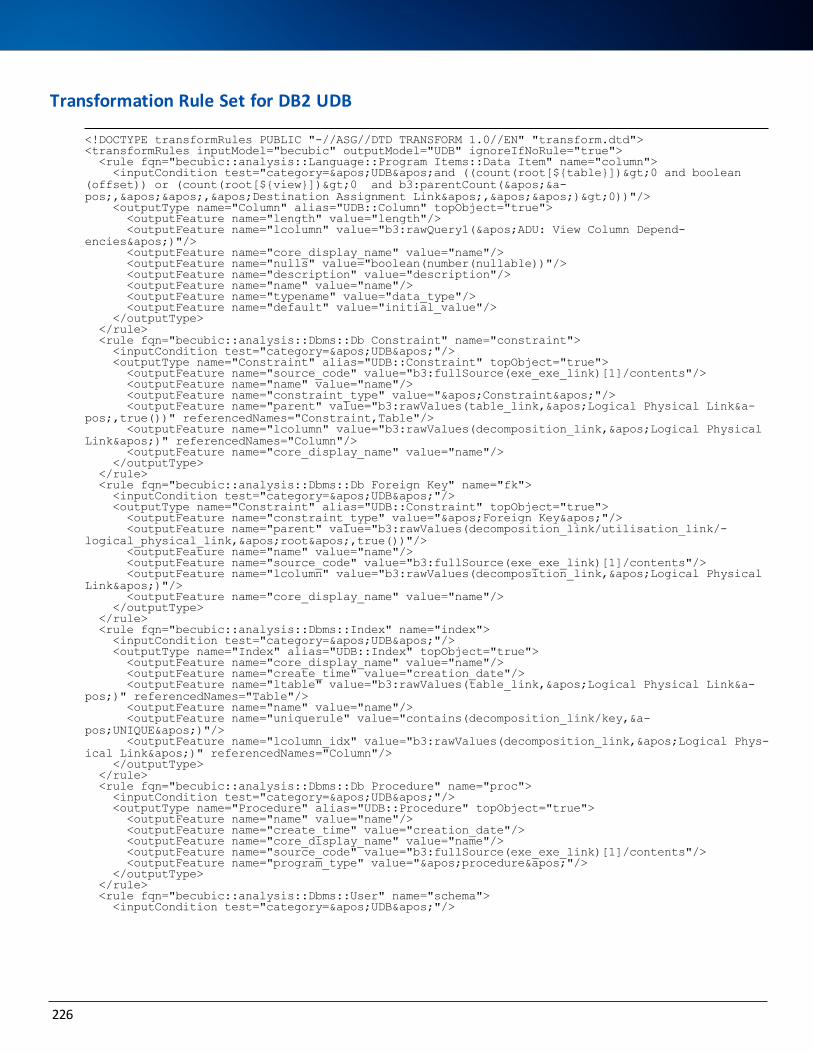
Transformation Rule Set for DB2 UDB
<!DOCTYPE transformRules PUBLIC "-//ASG//DTD TRANSFORM 1.0//EN" "transform.dtd"><transformRules inputModel="becubic" outputModel="UDB" ignoreIfNoRule="true"> <rule fqn="becubic::analysis::Language::Program Items::Data Item" name="column"> <inputCondition test="category='UDB'and ((count(root[${table}])>0 and boolean(offset)) or (count(root[${view}])>0 and b3:parentCount('&a-pos;,'','Destination Assignment Link','')>0))"/> <outputType name="Column" alias="UDB::Column" topObject="true"> <outputFeature name="length" value="length"/> <outputFeature name="lcolumn" value="b3:rawQuery1('ADU: View Column Depend-encies')"/> <outputFeature name="core_display_name" value="name"/> <outputFeature name="nulls" value="boolean(number(nullable))"/> <outputFeature name="description" value="description"/> <outputFeature name="name" value="name"/> <outputFeature name="typename" value="data_type"/> <outputFeature name="default" value="initial_value"/> </outputType> </rule> <rule fqn="becubic::analysis::Dbms::Db Constraint" name="constraint"> <inputCondition test="category='UDB'"/> <outputType name="Constraint" alias="UDB::Constraint" topObject="true"> <outputFeature name="source_code" value="b3:fullSource(exe_exe_link)[1]/contents"/> <outputFeature name="name" value="name"/> <outputFeature name="constraint_type" value="'Constraint'"/> <outputFeature name="parent" value="b3:rawValues(table_link,'Logical Physical Link&a-pos;,true())" referencedNames="Constraint,Table"/> <outputFeature name="lcolumn" value="b3:rawValues(decomposition_link,'Logical Physical Link')" referencedNames="Column"/> <outputFeature name="core_display_name" value="name"/> </outputType> </rule> <rule fqn="becubic::analysis::Dbms::Db Foreign Key" name="fk"> <inputCondition test="category='UDB'"/> <outputType name="Constraint" alias="UDB::Constraint" topObject="true"> <outputFeature name="constraint_type" value="'Foreign Key'"/> <outputFeature name="parent" value="b3:rawValues(decomposition_link/utilisation_link/-logical_physical_link,'root',true())"/> <outputFeature name="name" value="name"/> <outputFeature name="source_code" value="b3:fullSource(exe_exe_link)[1]/contents"/> <outputFeature name="lcolumn" value="b3:rawValues(decomposition_link,'Logical Physical Link')"/> <outputFeature name="core_display_name" value="name"/> </outputType> </rule> <rule fqn="becubic::analysis::Dbms::Index" name="index"> <inputCondition test="category='UDB'"/> <outputType name="Index" alias="UDB::Index" topObject="true"> <outputFeature name="core_display_name" value="name"/> <outputFeature name="create_time" value="creation_date"/> <outputFeature name="ltable" value="b3:rawValues(table_link,'Logical Physical Link&a-pos;)" referencedNames="Table"/> <outputFeature name="name" value="name"/> <outputFeature name="uniquerule" value="contains(decomposition_link/key,&a-pos;UNIQUE')"/> <outputFeature name="lcolumn_idx" value="b3:rawValues(decomposition_link,'Logical Phys-ical Link')" referencedNames="Column"/> </outputType> </rule> <rule fqn="becubic::analysis::Dbms::Db Procedure" name="proc"> <inputCondition test="category='UDB'"/> <outputType name="Procedure" alias="UDB::Procedure" topObject="true"> <outputFeature name="name" value="name"/> <outputFeature name="create_time" value="creation_date"/> <outputFeature name="core_display_name" value="name"/> <outputFeature name="source_code" value="b3:fullSource(exe_exe_link)[1]/contents"/> <outputFeature name="program_type" value="'procedure'"/> </outputType> </rule> <rule fqn="becubic::analysis::Dbms::User" name="schema"> <inputCondition test="category='UDB'"/>
226
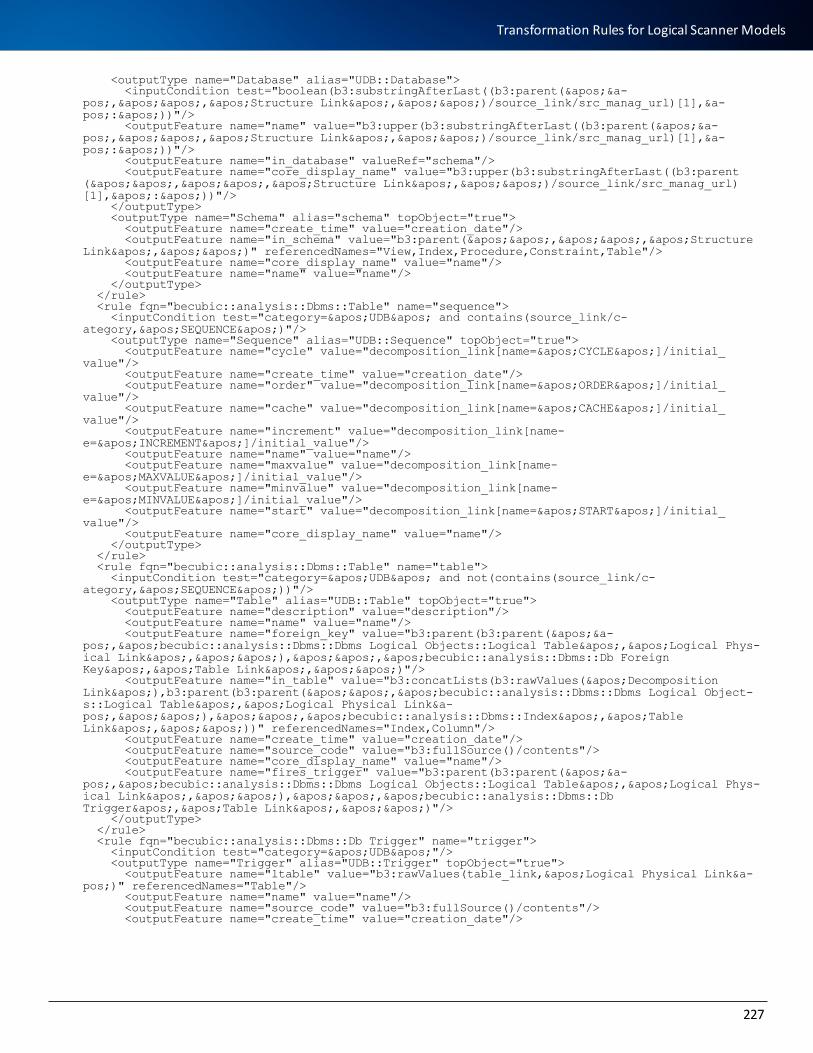
<outputType name="Database" alias="UDB::Database"> <inputCondition test="boolean(b3:substringAfterLast((b3:parent('&a-pos;,'','Structure Link','')/source_link/src_manag_url)[1],&a-pos;:'))"/> <outputFeature name="name" value="b3:upper(b3:substringAfterLast((b3:parent('&a-pos;,'','Structure Link','')/source_link/src_manag_url)[1],&a-pos;:'))"/> <outputFeature name="in_database" valueRef="schema"/> <outputFeature name="core_display_name" value="b3:upper(b3:substringAfterLast((b3:parent('','','Structure Link','')/source_link/src_manag_url)[1],':'))"/> </outputType> <outputType name="Schema" alias="schema" topObject="true"> <outputFeature name="create_time" value="creation_date"/> <outputFeature name="in_schema" value="b3:parent('','','Structure Link','')" referencedNames="View,Index,Procedure,Constraint,Table"/> <outputFeature name="core_display_name" value="name"/> <outputFeature name="name" value="name"/> </outputType> </rule> <rule fqn="becubic::analysis::Dbms::Table" name="sequence"> <inputCondition test="category='UDB' and contains(source_link/c-ategory,'SEQUENCE')"/> <outputType name="Sequence" alias="UDB::Sequence" topObject="true"> <outputFeature name="cycle" value="decomposition_link[name='CYCLE']/initial_value"/> <outputFeature name="create_time" value="creation_date"/> <outputFeature name="order" value="decomposition_link[name='ORDER']/initial_value"/> <outputFeature name="cache" value="decomposition_link[name='CACHE']/initial_value"/> <outputFeature name="increment" value="decomposition_link[name-e='INCREMENT']/initial_value"/> <outputFeature name="name" value="name"/> <outputFeature name="maxvalue" value="decomposition_link[name-e='MAXVALUE']/initial_value"/> <outputFeature name="minvalue" value="decomposition_link[name-e='MINVALUE']/initial_value"/> <outputFeature name="start" value="decomposition_link[name='START']/initial_value"/> <outputFeature name="core_display_name" value="name"/> </outputType> </rule> <rule fqn="becubic::analysis::Dbms::Table" name="table"> <inputCondition test="category='UDB' and not(contains(source_link/c-ategory,'SEQUENCE'))"/> <outputType name="Table" alias="UDB::Table" topObject="true"> <outputFeature name="description" value="description"/> <outputFeature name="name" value="name"/> <outputFeature name="foreign_key" value="b3:parent(b3:parent('&a-pos;,'becubic::analysis::Dbms::Dbms Logical Objects::Logical Table','Logical Phys-ical Link',''),'','becubic::analysis::Dbms::Db Foreign Key','Table Link','')"/> <outputFeature name="in_table" value="b3:concatLists(b3:rawValues('Decomposition Link'),b3:parent(b3:parent('','becubic::analysis::Dbms::Dbms Logical Object-s::Logical Table','Logical Physical Link&a-pos;,''),'','becubic::analysis::Dbms::Index','Table Link',''))" referencedNames="Index,Column"/> <outputFeature name="create_time" value="creation_date"/> <outputFeature name="source_code" value="b3:fullSource()/contents"/> <outputFeature name="core_display_name" value="name"/> <outputFeature name="fires_trigger" value="b3:parent(b3:parent('&a-pos;,'becubic::analysis::Dbms::Dbms Logical Objects::Logical Table','Logical Phys-ical Link',''),'','becubic::analysis::Dbms::Db Trigger','Table Link','')"/> </outputType> </rule> <rule fqn="becubic::analysis::Dbms::Db Trigger" name="trigger"> <inputCondition test="category='UDB'"/> <outputType name="Trigger" alias="UDB::Trigger" topObject="true"> <outputFeature name="ltable" value="b3:rawValues(table_link,'Logical Physical Link&a-pos;)" referencedNames="Table"/> <outputFeature name="name" value="name"/> <outputFeature name="source_code" value="b3:fullSource()/contents"/> <outputFeature name="create_time" value="creation_date"/>
227
Transformation Rules for Logical Scanner Models
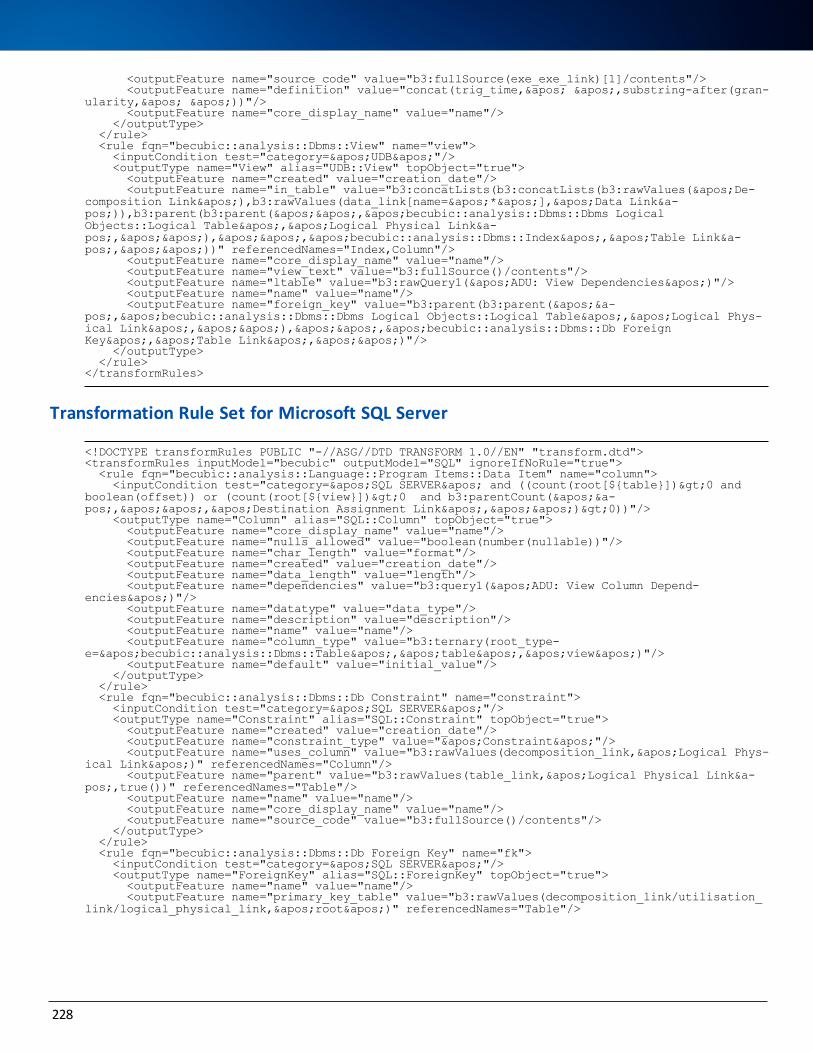
<outputFeature name="source_code" value="b3:fullSource(exe_exe_link)[1]/contents"/> <outputFeature name="definition" value="concat(trig_time,' ',substring-after(gran-ularity,' '))"/> <outputFeature name="core_display_name" value="name"/> </outputType> </rule> <rule fqn="becubic::analysis::Dbms::View" name="view"> <inputCondition test="category='UDB'"/> <outputType name="View" alias="UDB::View" topObject="true"> <outputFeature name="created" value="creation_date"/> <outputFeature name="in_table" value="b3:concatLists(b3:concatLists(b3:rawValues('De-composition Link'),b3:rawValues(data_link[name='*'],'Data Link&a-pos;)),b3:parent(b3:parent('','becubic::analysis::Dbms::Dbms Logical Objects::Logical Table','Logical Physical Link&a-pos;,''),'','becubic::analysis::Dbms::Index','Table Link&a-pos;,''))" referencedNames="Index,Column"/> <outputFeature name="core_display_name" value="name"/> <outputFeature name="view_text" value="b3:fullSource()/contents"/> <outputFeature name="ltable" value="b3:rawQuery1('ADU: View Dependencies')"/> <outputFeature name="name" value="name"/> <outputFeature name="foreign_key" value="b3:parent(b3:parent('&a-pos;,'becubic::analysis::Dbms::Dbms Logical Objects::Logical Table','Logical Phys-ical Link',''),'','becubic::analysis::Dbms::Db Foreign Key','Table Link','')"/> </outputType> </rule></transformRules>
Transformation Rule Set for Microsoft SQL Server
<!DOCTYPE transformRules PUBLIC "-//ASG//DTD TRANSFORM 1.0//EN" "transform.dtd"><transformRules inputModel="becubic" outputModel="SQL" ignoreIfNoRule="true"> <rule fqn="becubic::analysis::Language::Program Items::Data Item" name="column"> <inputCondition test="category='SQL SERVER' and ((count(root[${table}])>0 and boolean(offset)) or (count(root[${view}])>0 and b3:parentCount('&a-pos;,'','Destination Assignment Link','')>0))"/> <outputType name="Column" alias="SQL::Column" topObject="true"> <outputFeature name="core_display_name" value="name"/> <outputFeature name="nulls_allowed" value="boolean(number(nullable))"/> <outputFeature name="char_length" value="format"/> <outputFeature name="created" value="creation_date"/> <outputFeature name="data_length" value="length"/> <outputFeature name="dependencies" value="b3:query1('ADU: View Column Depend-encies')"/> <outputFeature name="datatype" value="data_type"/> <outputFeature name="description" value="description"/> <outputFeature name="name" value="name"/> <outputFeature name="column_type" value="b3:ternary(root_type-e='becubic::analysis::Dbms::Table','table','view')"/> <outputFeature name="default" value="initial_value"/> </outputType> </rule> <rule fqn="becubic::analysis::Dbms::Db Constraint" name="constraint"> <inputCondition test="category='SQL SERVER'"/> <outputType name="Constraint" alias="SQL::Constraint" topObject="true"> <outputFeature name="created" value="creation_date"/> <outputFeature name="constraint_type" value="'Constraint'"/> <outputFeature name="uses_column" value="b3:rawValues(decomposition_link,'Logical Phys-ical Link')" referencedNames="Column"/> <outputFeature name="parent" value="b3:rawValues(table_link,'Logical Physical Link&a-pos;,true())" referencedNames="Table"/> <outputFeature name="name" value="name"/> <outputFeature name="core_display_name" value="name"/> <outputFeature name="source_code" value="b3:fullSource()/contents"/> </outputType> </rule> <rule fqn="becubic::analysis::Dbms::Db Foreign Key" name="fk"> <inputCondition test="category='SQL SERVER'"/> <outputType name="ForeignKey" alias="SQL::ForeignKey" topObject="true"> <outputFeature name="name" value="name"/> <outputFeature name="primary_key_table" value="b3:rawValues(decomposition_link/utilisation_link/logical_physical_link,'root')" referencedNames="Table"/>
228
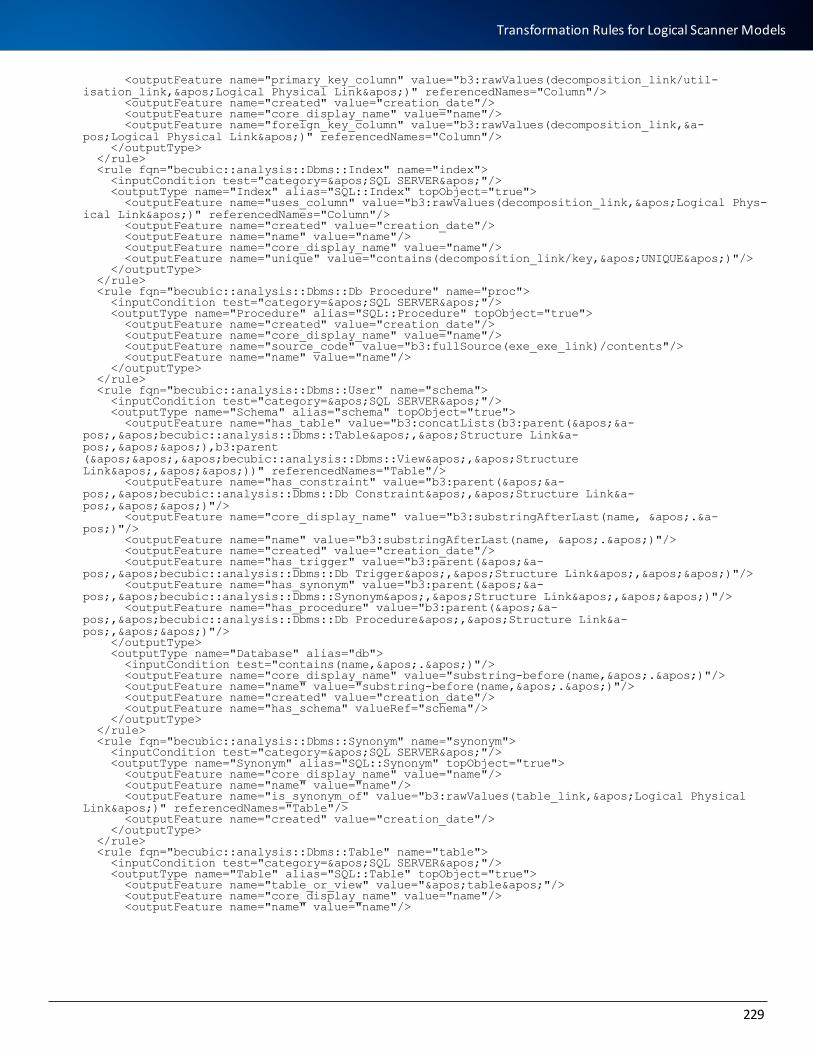
<outputFeature name="primary_key_column" value="b3:rawValues(decomposition_link/util-isation_link,'Logical Physical Link')" referencedNames="Column"/> <outputFeature name="created" value="creation_date"/> <outputFeature name="core_display_name" value="name"/> <outputFeature name="foreign_key_column" value="b3:rawValues(decomposition_link,&a-pos;Logical Physical Link')" referencedNames="Column"/> </outputType> </rule> <rule fqn="becubic::analysis::Dbms::Index" name="index"> <inputCondition test="category='SQL SERVER'"/> <outputType name="Index" alias="SQL::Index" topObject="true"> <outputFeature name="uses_column" value="b3:rawValues(decomposition_link,'Logical Phys-ical Link')" referencedNames="Column"/> <outputFeature name="created" value="creation_date"/> <outputFeature name="name" value="name"/> <outputFeature name="core_display_name" value="name"/> <outputFeature name="unique" value="contains(decomposition_link/key,'UNIQUE')"/> </outputType> </rule> <rule fqn="becubic::analysis::Dbms::Db Procedure" name="proc"> <inputCondition test="category='SQL SERVER'"/> <outputType name="Procedure" alias="SQL::Procedure" topObject="true"> <outputFeature name="created" value="creation_date"/> <outputFeature name="core_display_name" value="name"/> <outputFeature name="source_code" value="b3:fullSource(exe_exe_link)/contents"/> <outputFeature name="name" value="name"/> </outputType> </rule> <rule fqn="becubic::analysis::Dbms::User" name="schema"> <inputCondition test="category='SQL SERVER'"/> <outputType name="Schema" alias="schema" topObject="true"> <outputFeature name="has_table" value="b3:concatLists(b3:parent('&a-pos;,'becubic::analysis::Dbms::Table','Structure Link&a-pos;,''),b3:parent('','becubic::analysis::Dbms::View','Structure Link',''))" referencedNames="Table"/> <outputFeature name="has_constraint" value="b3:parent('&a-pos;,'becubic::analysis::Dbms::Db Constraint','Structure Link&a-pos;,'')"/> <outputFeature name="core_display_name" value="b3:substringAfterLast(name, '.&a-pos;)"/> <outputFeature name="name" value="b3:substringAfterLast(name, '.')"/> <outputFeature name="created" value="creation_date"/> <outputFeature name="has_trigger" value="b3:parent('&a-pos;,'becubic::analysis::Dbms::Db Trigger','Structure Link','')"/> <outputFeature name="has_synonym" value="b3:parent('&a-pos;,'becubic::analysis::Dbms::Synonym','Structure Link','')"/> <outputFeature name="has_procedure" value="b3:parent('&a-pos;,'becubic::analysis::Dbms::Db Procedure','Structure Link&a-pos;,'')"/> </outputType> <outputType name="Database" alias="db"> <inputCondition test="contains(name,'.')"/> <outputFeature name="core_display_name" value="substring-before(name,'.')"/> <outputFeature name="name" value="substring-before(name,'.')"/> <outputFeature name="created" value="creation_date"/> <outputFeature name="has_schema" valueRef="schema"/> </outputType> </rule> <rule fqn="becubic::analysis::Dbms::Synonym" name="synonym"> <inputCondition test="category='SQL SERVER'"/> <outputType name="Synonym" alias="SQL::Synonym" topObject="true"> <outputFeature name="core_display_name" value="name"/> <outputFeature name="name" value="name"/> <outputFeature name="is_synonym_of" value="b3:rawValues(table_link,'Logical Physical Link')" referencedNames="Table"/> <outputFeature name="created" value="creation_date"/> </outputType> </rule> <rule fqn="becubic::analysis::Dbms::Table" name="table"> <inputCondition test="category='SQL SERVER'"/> <outputType name="Table" alias="SQL::Table" topObject="true"> <outputFeature name="table_or_view" value="'table'"/> <outputFeature name="core_display_name" value="name"/> <outputFeature name="name" value="name"/>
229
Transformation Rules for Logical Scanner Models
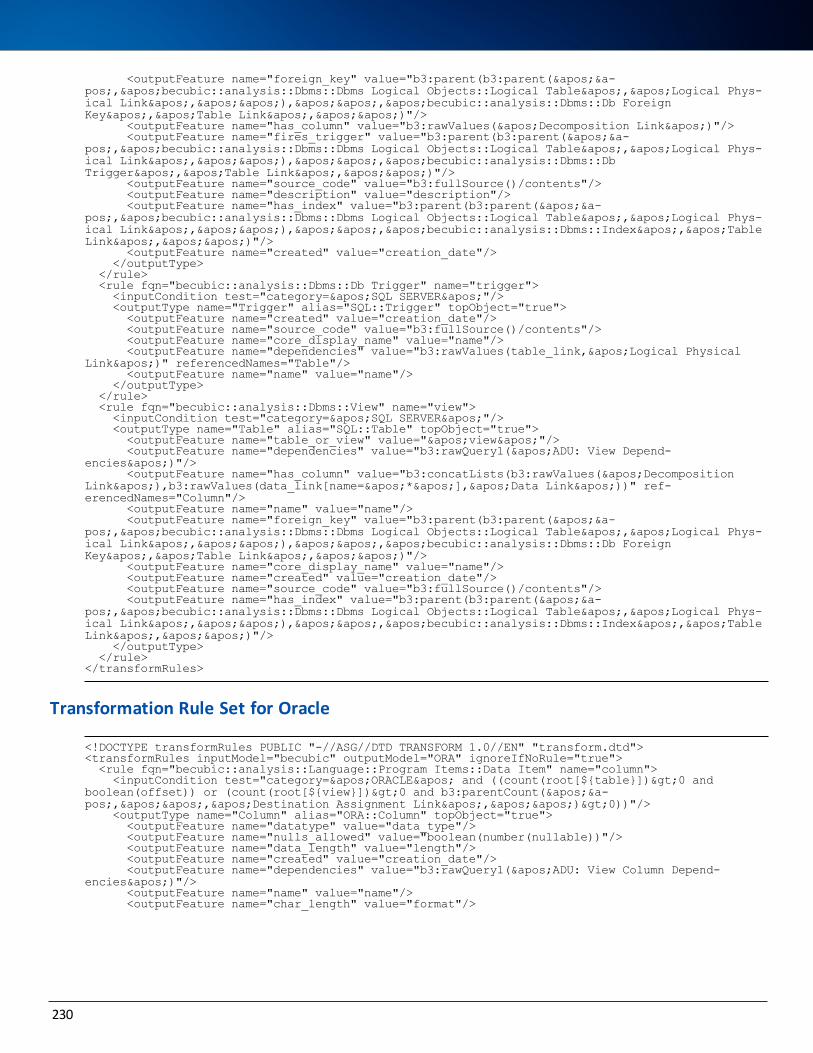
<outputFeature name="foreign_key" value="b3:parent(b3:parent('&a-pos;,'becubic::analysis::Dbms::Dbms Logical Objects::Logical Table','Logical Phys-ical Link',''),'','becubic::analysis::Dbms::Db Foreign Key','Table Link','')"/> <outputFeature name="has_column" value="b3:rawValues('Decomposition Link')"/> <outputFeature name="fires_trigger" value="b3:parent(b3:parent('&a-pos;,'becubic::analysis::Dbms::Dbms Logical Objects::Logical Table','Logical Phys-ical Link',''),'','becubic::analysis::Dbms::Db Trigger','Table Link','')"/> <outputFeature name="source_code" value="b3:fullSource()/contents"/> <outputFeature name="description" value="description"/> <outputFeature name="has_index" value="b3:parent(b3:parent('&a-pos;,'becubic::analysis::Dbms::Dbms Logical Objects::Logical Table','Logical Phys-ical Link',''),'','becubic::analysis::Dbms::Index','Table Link','')"/> <outputFeature name="created" value="creation_date"/> </outputType> </rule> <rule fqn="becubic::analysis::Dbms::Db Trigger" name="trigger"> <inputCondition test="category='SQL SERVER'"/> <outputType name="Trigger" alias="SQL::Trigger" topObject="true"> <outputFeature name="created" value="creation_date"/> <outputFeature name="source_code" value="b3:fullSource()/contents"/> <outputFeature name="core_display_name" value="name"/> <outputFeature name="dependencies" value="b3:rawValues(table_link,'Logical Physical Link')" referencedNames="Table"/> <outputFeature name="name" value="name"/> </outputType> </rule> <rule fqn="becubic::analysis::Dbms::View" name="view"> <inputCondition test="category='SQL SERVER'"/> <outputType name="Table" alias="SQL::Table" topObject="true"> <outputFeature name="table_or_view" value="'view'"/> <outputFeature name="dependencies" value="b3:rawQuery1('ADU: View Depend-encies')"/> <outputFeature name="has_column" value="b3:concatLists(b3:rawValues('Decomposition Link'),b3:rawValues(data_link[name='*'],'Data Link'))" ref-erencedNames="Column"/> <outputFeature name="name" value="name"/> <outputFeature name="foreign_key" value="b3:parent(b3:parent('&a-pos;,'becubic::analysis::Dbms::Dbms Logical Objects::Logical Table','Logical Phys-ical Link',''),'','becubic::analysis::Dbms::Db Foreign Key','Table Link','')"/> <outputFeature name="core_display_name" value="name"/> <outputFeature name="created" value="creation_date"/> <outputFeature name="source_code" value="b3:fullSource()/contents"/> <outputFeature name="has_index" value="b3:parent(b3:parent('&a-pos;,'becubic::analysis::Dbms::Dbms Logical Objects::Logical Table','Logical Phys-ical Link',''),'','becubic::analysis::Dbms::Index','Table Link','')"/> </outputType> </rule></transformRules>
Transformation Rule Set for Oracle
<!DOCTYPE transformRules PUBLIC "-//ASG//DTD TRANSFORM 1.0//EN" "transform.dtd"><transformRules inputModel="becubic" outputModel="ORA" ignoreIfNoRule="true"> <rule fqn="becubic::analysis::Language::Program Items::Data Item" name="column"> <inputCondition test="category='ORACLE' and ((count(root[${table}])>0 and boolean(offset)) or (count(root[${view}])>0 and b3:parentCount('&a-pos;,'','Destination Assignment Link','')>0))"/> <outputType name="Column" alias="ORA::Column" topObject="true"> <outputFeature name="datatype" value="data_type"/> <outputFeature name="nulls_allowed" value="boolean(number(nullable))"/> <outputFeature name="data_length" value="length"/> <outputFeature name="created" value="creation_date"/> <outputFeature name="dependencies" value="b3:rawQuery1('ADU: View Column Depend-encies')"/> <outputFeature name="name" value="name"/> <outputFeature name="char_length" value="format"/>
230
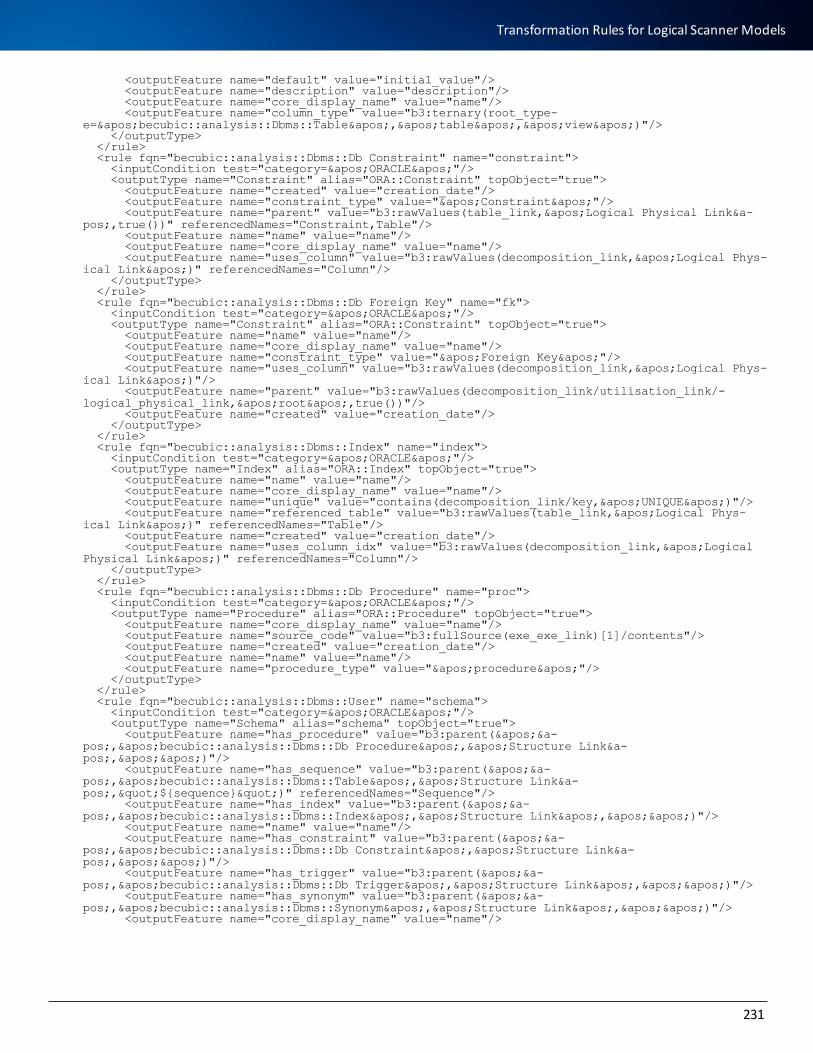
<outputFeature name="default" value="initial_value"/> <outputFeature name="description" value="description"/> <outputFeature name="core_display_name" value="name"/> <outputFeature name="column_type" value="b3:ternary(root_type-e='becubic::analysis::Dbms::Table','table','view')"/> </outputType> </rule> <rule fqn="becubic::analysis::Dbms::Db Constraint" name="constraint"> <inputCondition test="category='ORACLE'"/> <outputType name="Constraint" alias="ORA::Constraint" topObject="true"> <outputFeature name="created" value="creation_date"/> <outputFeature name="constraint_type" value="'Constraint'"/> <outputFeature name="parent" value="b3:rawValues(table_link,'Logical Physical Link&a-pos;,true())" referencedNames="Constraint,Table"/> <outputFeature name="name" value="name"/> <outputFeature name="core_display_name" value="name"/> <outputFeature name="uses_column" value="b3:rawValues(decomposition_link,'Logical Phys-ical Link')" referencedNames="Column"/> </outputType> </rule> <rule fqn="becubic::analysis::Dbms::Db Foreign Key" name="fk"> <inputCondition test="category='ORACLE'"/> <outputType name="Constraint" alias="ORA::Constraint" topObject="true"> <outputFeature name="name" value="name"/> <outputFeature name="core_display_name" value="name"/> <outputFeature name="constraint_type" value="'Foreign Key'"/> <outputFeature name="uses_column" value="b3:rawValues(decomposition_link,'Logical Phys-ical Link')"/> <outputFeature name="parent" value="b3:rawValues(decomposition_link/utilisation_link/-logical_physical_link,'root',true())"/> <outputFeature name="created" value="creation_date"/> </outputType> </rule> <rule fqn="becubic::analysis::Dbms::Index" name="index"> <inputCondition test="category='ORACLE'"/> <outputType name="Index" alias="ORA::Index" topObject="true"> <outputFeature name="name" value="name"/> <outputFeature name="core_display_name" value="name"/> <outputFeature name="unique" value="contains(decomposition_link/key,'UNIQUE')"/> <outputFeature name="referenced_table" value="b3:rawValues(table_link,'Logical Phys-ical Link')" referencedNames="Table"/> <outputFeature name="created" value="creation_date"/> <outputFeature name="uses_column_idx" value="b3:rawValues(decomposition_link,'Logical Physical Link')" referencedNames="Column"/> </outputType> </rule> <rule fqn="becubic::analysis::Dbms::Db Procedure" name="proc"> <inputCondition test="category='ORACLE'"/> <outputType name="Procedure" alias="ORA::Procedure" topObject="true"> <outputFeature name="core_display_name" value="name"/> <outputFeature name="source_code" value="b3:fullSource(exe_exe_link)[1]/contents"/> <outputFeature name="created" value="creation_date"/> <outputFeature name="name" value="name"/> <outputFeature name="procedure_type" value="'procedure'"/> </outputType> </rule> <rule fqn="becubic::analysis::Dbms::User" name="schema"> <inputCondition test="category='ORACLE'"/> <outputType name="Schema" alias="schema" topObject="true"> <outputFeature name="has_procedure" value="b3:parent('&a-pos;,'becubic::analysis::Dbms::Db Procedure','Structure Link&a-pos;,'')"/> <outputFeature name="has_sequence" value="b3:parent('&a-pos;,'becubic::analysis::Dbms::Table','Structure Link&a-pos;,"${sequence}")" referencedNames="Sequence"/> <outputFeature name="has_index" value="b3:parent('&a-pos;,'becubic::analysis::Dbms::Index','Structure Link','')"/> <outputFeature name="name" value="name"/> <outputFeature name="has_constraint" value="b3:parent('&a-pos;,'becubic::analysis::Dbms::Db Constraint','Structure Link&a-pos;,'')"/> <outputFeature name="has_trigger" value="b3:parent('&a-pos;,'becubic::analysis::Dbms::Db Trigger','Structure Link','')"/> <outputFeature name="has_synonym" value="b3:parent('&a-pos;,'becubic::analysis::Dbms::Synonym','Structure Link','')"/> <outputFeature name="core_display_name" value="name"/>
231
Transformation Rules for Logical Scanner Models
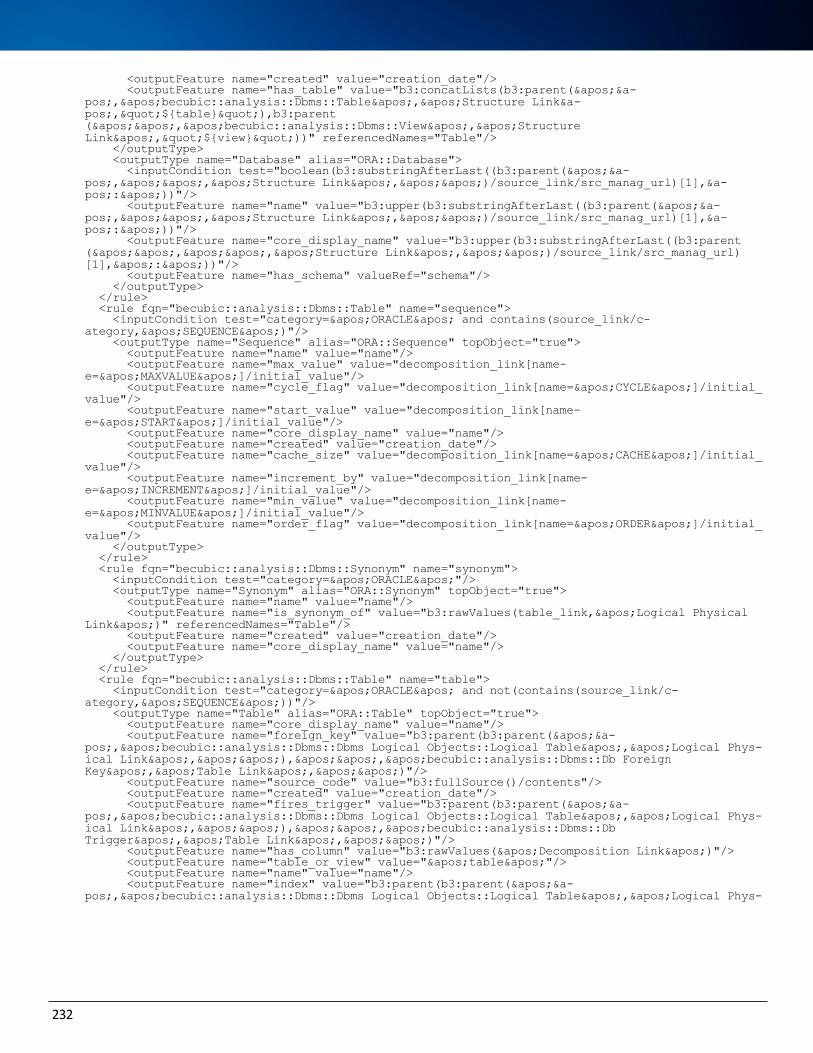
<outputFeature name="created" value="creation_date"/> <outputFeature name="has_table" value="b3:concatLists(b3:parent('&a-pos;,'becubic::analysis::Dbms::Table','Structure Link&a-pos;,"${table}"),b3:parent('','becubic::analysis::Dbms::View','Structure Link',"${view}"))" referencedNames="Table"/> </outputType> <outputType name="Database" alias="ORA::Database"> <inputCondition test="boolean(b3:substringAfterLast((b3:parent('&a-pos;,'','Structure Link','')/source_link/src_manag_url)[1],&a-pos;:'))"/> <outputFeature name="name" value="b3:upper(b3:substringAfterLast((b3:parent('&a-pos;,'','Structure Link','')/source_link/src_manag_url)[1],&a-pos;:'))"/> <outputFeature name="core_display_name" value="b3:upper(b3:substringAfterLast((b3:parent('','','Structure Link','')/source_link/src_manag_url)[1],':'))"/> <outputFeature name="has_schema" valueRef="schema"/> </outputType> </rule> <rule fqn="becubic::analysis::Dbms::Table" name="sequence"> <inputCondition test="category='ORACLE' and contains(source_link/c-ategory,'SEQUENCE')"/> <outputType name="Sequence" alias="ORA::Sequence" topObject="true"> <outputFeature name="name" value="name"/> <outputFeature name="max_value" value="decomposition_link[name-e='MAXVALUE']/initial_value"/> <outputFeature name="cycle_flag" value="decomposition_link[name='CYCLE']/initial_value"/> <outputFeature name="start_value" value="decomposition_link[name-e='START']/initial_value"/> <outputFeature name="core_display_name" value="name"/> <outputFeature name="created" value="creation_date"/> <outputFeature name="cache_size" value="decomposition_link[name='CACHE']/initial_value"/> <outputFeature name="increment_by" value="decomposition_link[name-e='INCREMENT']/initial_value"/> <outputFeature name="min_value" value="decomposition_link[name-e='MINVALUE']/initial_value"/> <outputFeature name="order_flag" value="decomposition_link[name='ORDER']/initial_value"/> </outputType> </rule> <rule fqn="becubic::analysis::Dbms::Synonym" name="synonym"> <inputCondition test="category='ORACLE'"/> <outputType name="Synonym" alias="ORA::Synonym" topObject="true"> <outputFeature name="name" value="name"/> <outputFeature name="is_synonym_of" value="b3:rawValues(table_link,'Logical Physical Link')" referencedNames="Table"/> <outputFeature name="created" value="creation_date"/> <outputFeature name="core_display_name" value="name"/> </outputType> </rule> <rule fqn="becubic::analysis::Dbms::Table" name="table"> <inputCondition test="category='ORACLE' and not(contains(source_link/c-ategory,'SEQUENCE'))"/> <outputType name="Table" alias="ORA::Table" topObject="true"> <outputFeature name="core_display_name" value="name"/> <outputFeature name="foreign_key" value="b3:parent(b3:parent('&a-pos;,'becubic::analysis::Dbms::Dbms Logical Objects::Logical Table','Logical Phys-ical Link',''),'','becubic::analysis::Dbms::Db Foreign Key','Table Link','')"/> <outputFeature name="source_code" value="b3:fullSource()/contents"/> <outputFeature name="created" value="creation_date"/> <outputFeature name="fires_trigger" value="b3:parent(b3:parent('&a-pos;,'becubic::analysis::Dbms::Dbms Logical Objects::Logical Table','Logical Phys-ical Link',''),'','becubic::analysis::Dbms::Db Trigger','Table Link','')"/> <outputFeature name="has_column" value="b3:rawValues('Decomposition Link')"/> <outputFeature name="table_or_view" value="'table'"/> <outputFeature name="name" value="name"/> <outputFeature name="index" value="b3:parent(b3:parent('&a-pos;,'becubic::analysis::Dbms::Dbms Logical Objects::Logical Table','Logical Phys-
232
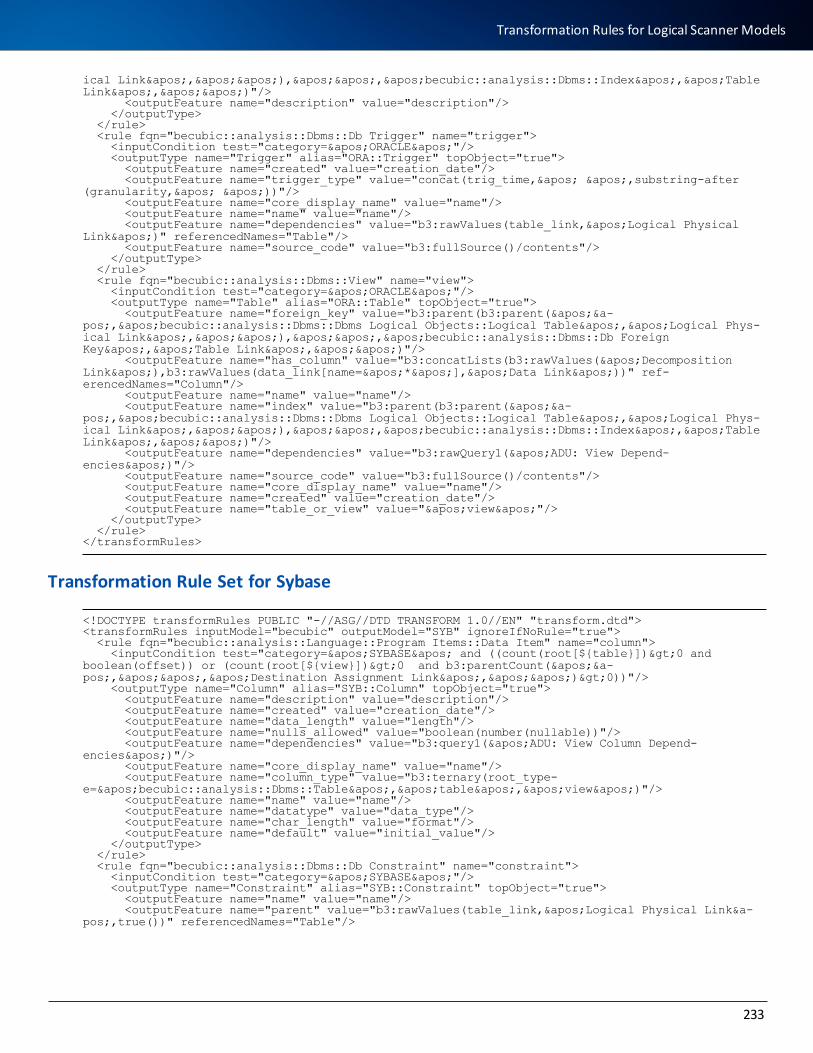
ical Link',''),'','becubic::analysis::Dbms::Index','Table Link','')"/> <outputFeature name="description" value="description"/> </outputType> </rule> <rule fqn="becubic::analysis::Dbms::Db Trigger" name="trigger"> <inputCondition test="category='ORACLE'"/> <outputType name="Trigger" alias="ORA::Trigger" topObject="true"> <outputFeature name="created" value="creation_date"/> <outputFeature name="trigger_type" value="concat(trig_time,' ',substring-after(granularity,' '))"/> <outputFeature name="core_display_name" value="name"/> <outputFeature name="name" value="name"/> <outputFeature name="dependencies" value="b3:rawValues(table_link,'Logical Physical Link')" referencedNames="Table"/> <outputFeature name="source_code" value="b3:fullSource()/contents"/> </outputType> </rule> <rule fqn="becubic::analysis::Dbms::View" name="view"> <inputCondition test="category='ORACLE'"/> <outputType name="Table" alias="ORA::Table" topObject="true"> <outputFeature name="foreign_key" value="b3:parent(b3:parent('&a-pos;,'becubic::analysis::Dbms::Dbms Logical Objects::Logical Table','Logical Phys-ical Link',''),'','becubic::analysis::Dbms::Db Foreign Key','Table Link','')"/> <outputFeature name="has_column" value="b3:concatLists(b3:rawValues('Decomposition Link'),b3:rawValues(data_link[name='*'],'Data Link'))" ref-erencedNames="Column"/> <outputFeature name="name" value="name"/> <outputFeature name="index" value="b3:parent(b3:parent('&a-pos;,'becubic::analysis::Dbms::Dbms Logical Objects::Logical Table','Logical Phys-ical Link',''),'','becubic::analysis::Dbms::Index','Table Link','')"/> <outputFeature name="dependencies" value="b3:rawQuery1('ADU: View Depend-encies')"/> <outputFeature name="source_code" value="b3:fullSource()/contents"/> <outputFeature name="core_display_name" value="name"/> <outputFeature name="created" value="creation_date"/> <outputFeature name="table_or_view" value="'view'"/> </outputType> </rule></transformRules>
Transformation Rule Set for Sybase
<!DOCTYPE transformRules PUBLIC "-//ASG//DTD TRANSFORM 1.0//EN" "transform.dtd"><transformRules inputModel="becubic" outputModel="SYB" ignoreIfNoRule="true"> <rule fqn="becubic::analysis::Language::Program Items::Data Item" name="column"> <inputCondition test="category='SYBASE' and ((count(root[${table}])>0 and boolean(offset)) or (count(root[${view}])>0 and b3:parentCount('&a-pos;,'','Destination Assignment Link','')>0))"/> <outputType name="Column" alias="SYB::Column" topObject="true"> <outputFeature name="description" value="description"/> <outputFeature name="created" value="creation_date"/> <outputFeature name="data_length" value="length"/> <outputFeature name="nulls_allowed" value="boolean(number(nullable))"/> <outputFeature name="dependencies" value="b3:query1('ADU: View Column Depend-encies')"/> <outputFeature name="core_display_name" value="name"/> <outputFeature name="column_type" value="b3:ternary(root_type-e='becubic::analysis::Dbms::Table','table','view')"/> <outputFeature name="name" value="name"/> <outputFeature name="datatype" value="data_type"/> <outputFeature name="char_length" value="format"/> <outputFeature name="default" value="initial_value"/> </outputType> </rule> <rule fqn="becubic::analysis::Dbms::Db Constraint" name="constraint"> <inputCondition test="category='SYBASE'"/> <outputType name="Constraint" alias="SYB::Constraint" topObject="true"> <outputFeature name="name" value="name"/> <outputFeature name="parent" value="b3:rawValues(table_link,'Logical Physical Link&a-pos;,true())" referencedNames="Table"/>
233
Transformation Rules for Logical Scanner Models
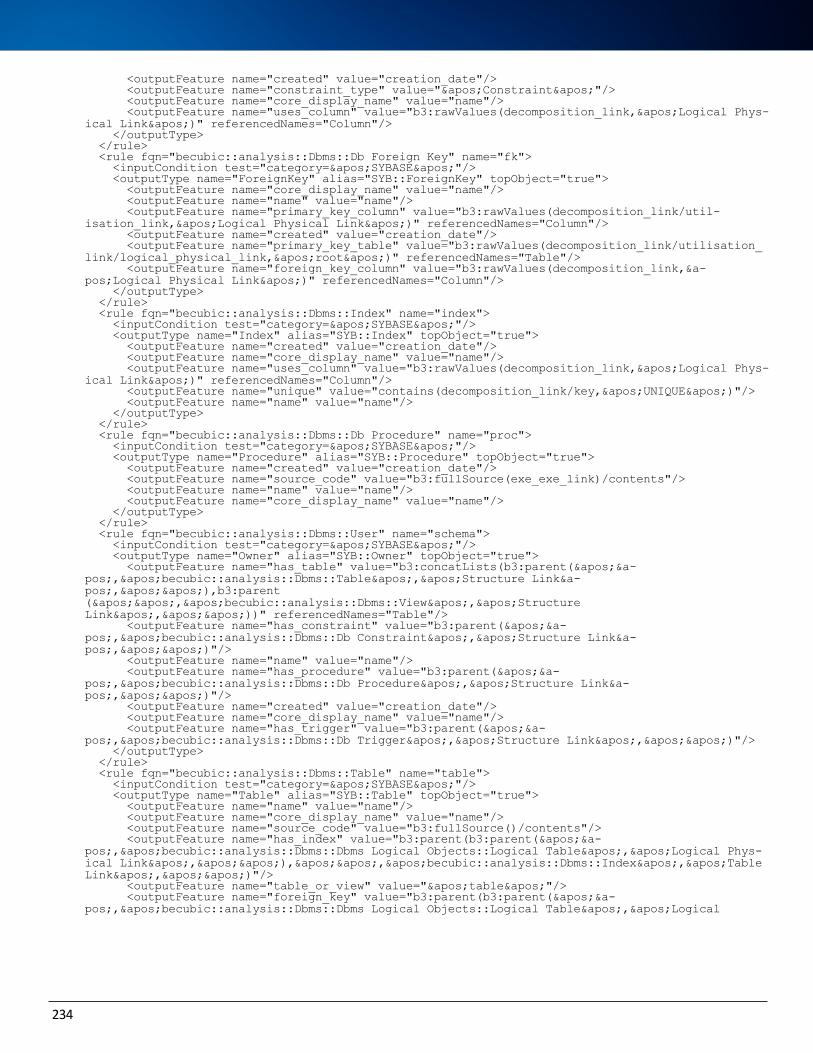
<outputFeature name="created" value="creation_date"/> <outputFeature name="constraint_type" value="'Constraint'"/> <outputFeature name="core_display_name" value="name"/> <outputFeature name="uses_column" value="b3:rawValues(decomposition_link,'Logical Phys-ical Link')" referencedNames="Column"/> </outputType> </rule> <rule fqn="becubic::analysis::Dbms::Db Foreign Key" name="fk"> <inputCondition test="category='SYBASE'"/> <outputType name="ForeignKey" alias="SYB::ForeignKey" topObject="true"> <outputFeature name="core_display_name" value="name"/> <outputFeature name="name" value="name"/> <outputFeature name="primary_key_column" value="b3:rawValues(decomposition_link/util-isation_link,'Logical Physical Link')" referencedNames="Column"/> <outputFeature name="created" value="creation_date"/> <outputFeature name="primary_key_table" value="b3:rawValues(decomposition_link/utilisation_link/logical_physical_link,'root')" referencedNames="Table"/> <outputFeature name="foreign_key_column" value="b3:rawValues(decomposition_link,&a-pos;Logical Physical Link')" referencedNames="Column"/> </outputType> </rule> <rule fqn="becubic::analysis::Dbms::Index" name="index"> <inputCondition test="category='SYBASE'"/> <outputType name="Index" alias="SYB::Index" topObject="true"> <outputFeature name="created" value="creation_date"/> <outputFeature name="core_display_name" value="name"/> <outputFeature name="uses_column" value="b3:rawValues(decomposition_link,'Logical Phys-ical Link')" referencedNames="Column"/> <outputFeature name="unique" value="contains(decomposition_link/key,'UNIQUE')"/> <outputFeature name="name" value="name"/> </outputType> </rule> <rule fqn="becubic::analysis::Dbms::Db Procedure" name="proc"> <inputCondition test="category='SYBASE'"/> <outputType name="Procedure" alias="SYB::Procedure" topObject="true"> <outputFeature name="created" value="creation_date"/> <outputFeature name="source_code" value="b3:fullSource(exe_exe_link)/contents"/> <outputFeature name="name" value="name"/> <outputFeature name="core_display_name" value="name"/> </outputType> </rule> <rule fqn="becubic::analysis::Dbms::User" name="schema"> <inputCondition test="category='SYBASE'"/> <outputType name="Owner" alias="SYB::Owner" topObject="true"> <outputFeature name="has_table" value="b3:concatLists(b3:parent('&a-pos;,'becubic::analysis::Dbms::Table','Structure Link&a-pos;,''),b3:parent('','becubic::analysis::Dbms::View','Structure Link',''))" referencedNames="Table"/> <outputFeature name="has_constraint" value="b3:parent('&a-pos;,'becubic::analysis::Dbms::Db Constraint','Structure Link&a-pos;,'')"/> <outputFeature name="name" value="name"/> <outputFeature name="has_procedure" value="b3:parent('&a-pos;,'becubic::analysis::Dbms::Db Procedure','Structure Link&a-pos;,'')"/> <outputFeature name="created" value="creation_date"/> <outputFeature name="core_display_name" value="name"/> <outputFeature name="has_trigger" value="b3:parent('&a-pos;,'becubic::analysis::Dbms::Db Trigger','Structure Link','')"/> </outputType> </rule> <rule fqn="becubic::analysis::Dbms::Table" name="table"> <inputCondition test="category='SYBASE'"/> <outputType name="Table" alias="SYB::Table" topObject="true"> <outputFeature name="name" value="name"/> <outputFeature name="core_display_name" value="name"/> <outputFeature name="source_code" value="b3:fullSource()/contents"/> <outputFeature name="has_index" value="b3:parent(b3:parent('&a-pos;,'becubic::analysis::Dbms::Dbms Logical Objects::Logical Table','Logical Phys-ical Link',''),'','becubic::analysis::Dbms::Index','Table Link','')"/> <outputFeature name="table_or_view" value="'table'"/> <outputFeature name="foreign_key" value="b3:parent(b3:parent('&a-pos;,'becubic::analysis::Dbms::Dbms Logical Objects::Logical Table','Logical
234

Physical Link',''),'','becubic::analysis::Dbms::Db Foreign Key&a-pos;,'Table Link','')"/> <outputFeature name="description" value="description"/> <outputFeature name="created" value="creation_date"/> <outputFeature name="fires_trigger" value="b3:parent(b3:parent('&a-pos;,'becubic::analysis::Dbms::Dbms Logical Objects::Logical Table','Logical Phys-ical Link',''),'','becubic::analysis::Dbms::Db Trigger','Table Link','')"/> <outputFeature name="has_column" value="b3:rawValues('Decomposition Link')"/> </outputType> </rule> <rule fqn="becubic::analysis::Dbms::Db Trigger" name="trigger"> <inputCondition test="category='SYBASE'"/> <outputType name="Trigger" alias="SYB::Trigger" topObject="true"> <outputFeature name="core_display_name" value="name"/> <outputFeature name="source_code" value="b3:fullSource()/contents"/> <outputFeature name="name" value="name"/> <outputFeature name="dependencies" value="b3:rawValues(table_link,'Logical Physical Link')" referencedNames="Table"/> <outputFeature name="created" value="creation_date"/> </outputType> </rule> <rule fqn="becubic::analysis::Dbms::View" name="view"> <inputCondition test="category='SYBASE'"/> <outputType name="Table" alias="SYB::Table" topObject="true"> <outputFeature name="has_index" value="b3:parent(b3:parent('&a-pos;,'becubic::analysis::Dbms::Dbms Logical Objects::Logical Table','Logical Phys-ical Link',''),'','becubic::analysis::Dbms::Index','Table Link','')"/> <outputFeature name="foreign_key" value="b3:parent(b3:parent('&a-pos;,'becubic::analysis::Dbms::Dbms Logical Objects::Logical Table','Logical Phys-ical Link',''),'','becubic::analysis::Dbms::Db Foreign Key','Table Link','')"/> <outputFeature name="source_code" value="b3:fullSource()/contents"/> <outputFeature name="name" value="name"/> <outputFeature name="has_column" value="b3:concatLists(b3:rawValues('Decomposition Link'),b3:rawValues(data_link[name='*'],'Data Link'))" ref-erencedNames="Column"/> <outputFeature name="dependencies" value="b3:rawQuery1('ADU: View Depend-encies')"/> <outputFeature name="core_display_name" value="name"/> <outputFeature name="table_or_view" value="'view'"/> <outputFeature name="created" value="creation_date"/> </outputType> </rule></transformRules>
Transformation Rule Set for Teradata
<!DOCTYPE transformRules PUBLIC "-//ASG//DTD TRANSFORM 1.0//EN" "transform.dtd"><transformRules inputModel="becubic" outputModel="TDATA" ignoreIfNoRule="true"> <rule fqn="becubic::analysis::Language::Program Items::Data Item" name="column"> <inputCondition test="category='TERADATA' and ((count(root[${table}])>0 and boolean(offset)) or (count(root[${view}])>0 and b3:parentCount('&a-pos;,'','Destination Assignment Link','')>0))"/> <outputType name="Column" alias="TDATA::Column" topObject="true"> <outputFeature name="datatype" value="data_type"/> <outputFeature name="dependencies" value="b3:query1('ADU: View Column Depend-encies')"/> <outputFeature name="name" value="name"/> <outputFeature name="column_type" value="b3:ternary(root_type-e='becubic::analysis::Dbms::Table','table','view')"/> <outputFeature name="char_length" value="format"/> <outputFeature name="created" value="creation_date"/> <outputFeature name="core_display_name" value="name"/> <outputFeature name="description" value="description"/> <outputFeature name="data_length" value="length"/> <outputFeature name="default" value="initial_value"/> <outputFeature name="nulls_allowed" value="boolean(number(nullable))"/> </outputType> </rule> <rule fqn="becubic::analysis::Dbms::Db Foreign Key" name="fk"> <inputCondition test="category='TERADATA'"/>
235
Transformation Rules for Logical Scanner Models
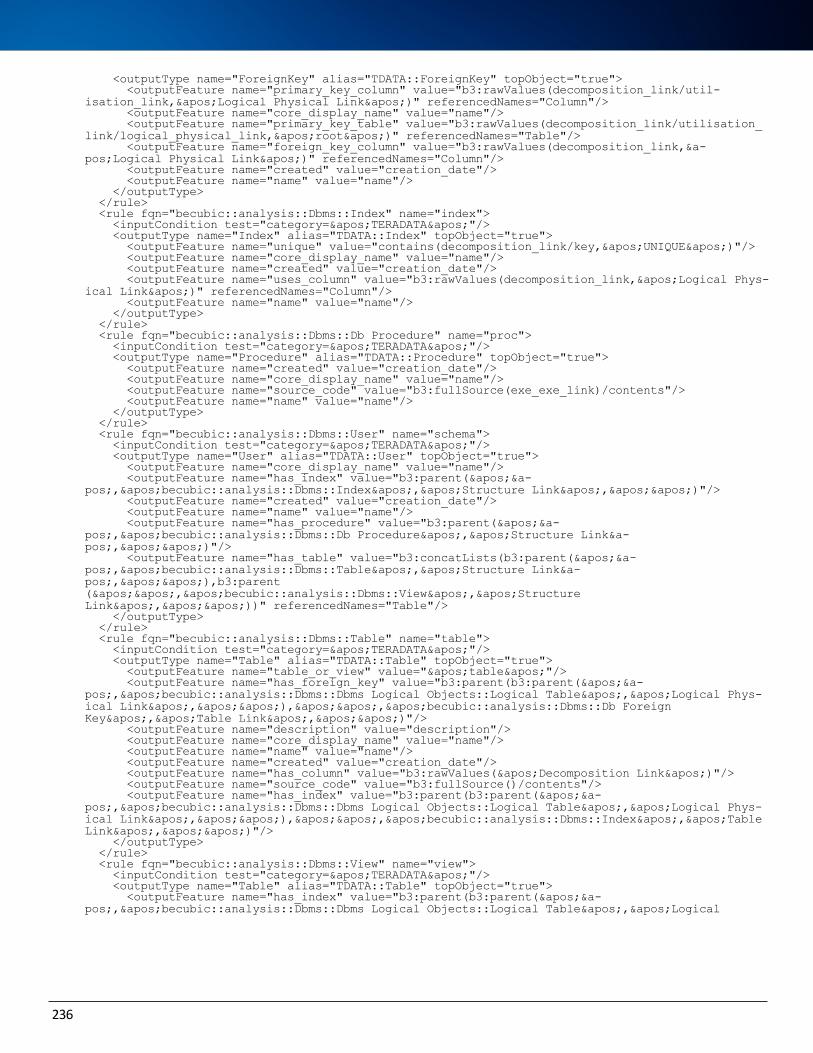
<outputType name="ForeignKey" alias="TDATA::ForeignKey" topObject="true"> <outputFeature name="primary_key_column" value="b3:rawValues(decomposition_link/util-isation_link,'Logical Physical Link')" referencedNames="Column"/> <outputFeature name="core_display_name" value="name"/> <outputFeature name="primary_key_table" value="b3:rawValues(decomposition_link/utilisation_link/logical_physical_link,'root')" referencedNames="Table"/> <outputFeature name="foreign_key_column" value="b3:rawValues(decomposition_link,&a-pos;Logical Physical Link')" referencedNames="Column"/> <outputFeature name="created" value="creation_date"/> <outputFeature name="name" value="name"/> </outputType> </rule> <rule fqn="becubic::analysis::Dbms::Index" name="index"> <inputCondition test="category='TERADATA'"/> <outputType name="Index" alias="TDATA::Index" topObject="true"> <outputFeature name="unique" value="contains(decomposition_link/key,'UNIQUE')"/> <outputFeature name="core_display_name" value="name"/> <outputFeature name="created" value="creation_date"/> <outputFeature name="uses_column" value="b3:rawValues(decomposition_link,'Logical Phys-ical Link')" referencedNames="Column"/> <outputFeature name="name" value="name"/> </outputType> </rule> <rule fqn="becubic::analysis::Dbms::Db Procedure" name="proc"> <inputCondition test="category='TERADATA'"/> <outputType name="Procedure" alias="TDATA::Procedure" topObject="true"> <outputFeature name="created" value="creation_date"/> <outputFeature name="core_display_name" value="name"/> <outputFeature name="source_code" value="b3:fullSource(exe_exe_link)/contents"/> <outputFeature name="name" value="name"/> </outputType> </rule> <rule fqn="becubic::analysis::Dbms::User" name="schema"> <inputCondition test="category='TERADATA'"/> <outputType name="User" alias="TDATA::User" topObject="true"> <outputFeature name="core_display_name" value="name"/> <outputFeature name="has_index" value="b3:parent('&a-pos;,'becubic::analysis::Dbms::Index','Structure Link','')"/> <outputFeature name="created" value="creation_date"/> <outputFeature name="name" value="name"/> <outputFeature name="has_procedure" value="b3:parent('&a-pos;,'becubic::analysis::Dbms::Db Procedure','Structure Link&a-pos;,'')"/> <outputFeature name="has_table" value="b3:concatLists(b3:parent('&a-pos;,'becubic::analysis::Dbms::Table','Structure Link&a-pos;,''),b3:parent('','becubic::analysis::Dbms::View','Structure Link',''))" referencedNames="Table"/> </outputType> </rule> <rule fqn="becubic::analysis::Dbms::Table" name="table"> <inputCondition test="category='TERADATA'"/> <outputType name="Table" alias="TDATA::Table" topObject="true"> <outputFeature name="table_or_view" value="'table'"/> <outputFeature name="has_foreign_key" value="b3:parent(b3:parent('&a-pos;,'becubic::analysis::Dbms::Dbms Logical Objects::Logical Table','Logical Phys-ical Link',''),'','becubic::analysis::Dbms::Db Foreign Key','Table Link','')"/> <outputFeature name="description" value="description"/> <outputFeature name="core_display_name" value="name"/> <outputFeature name="name" value="name"/> <outputFeature name="created" value="creation_date"/> <outputFeature name="has_column" value="b3:rawValues('Decomposition Link')"/> <outputFeature name="source_code" value="b3:fullSource()/contents"/> <outputFeature name="has_index" value="b3:parent(b3:parent('&a-pos;,'becubic::analysis::Dbms::Dbms Logical Objects::Logical Table','Logical Phys-ical Link',''),'','becubic::analysis::Dbms::Index','Table Link','')"/> </outputType> </rule> <rule fqn="becubic::analysis::Dbms::View" name="view"> <inputCondition test="category='TERADATA'"/> <outputType name="Table" alias="TDATA::Table" topObject="true"> <outputFeature name="has_index" value="b3:parent(b3:parent('&a-pos;,'becubic::analysis::Dbms::Dbms Logical Objects::Logical Table','Logical
236
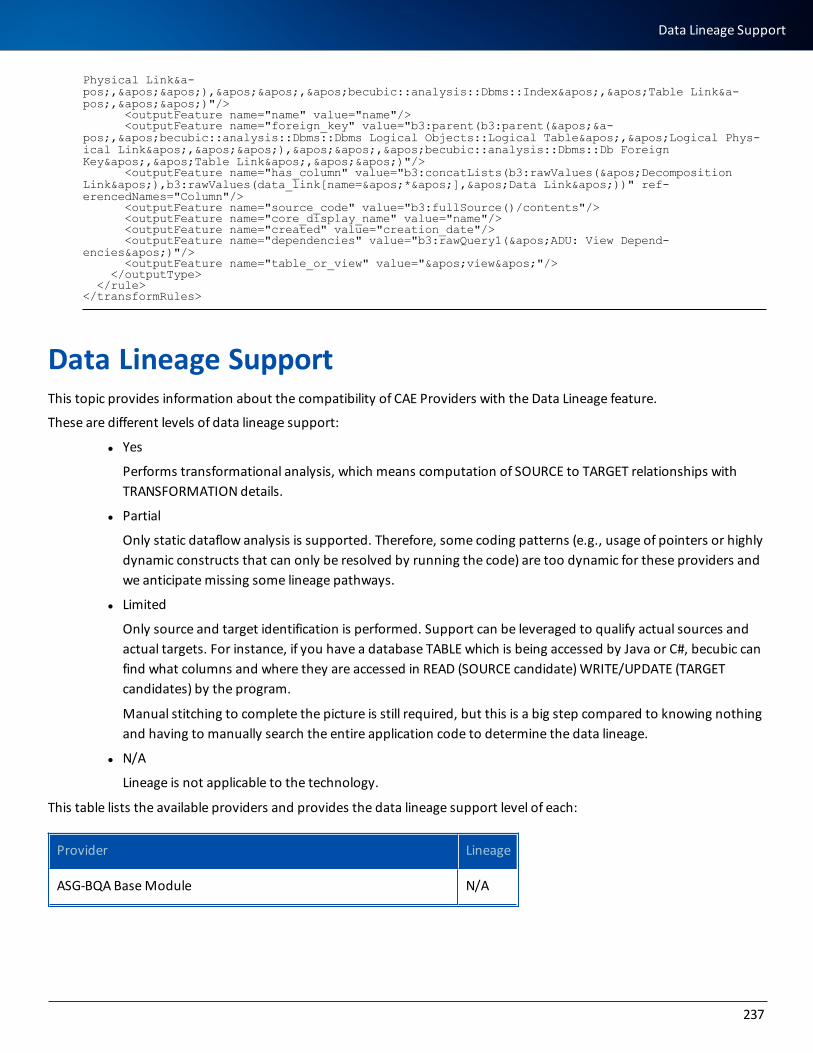
Physical Link&a-pos;,''),'','becubic::analysis::Dbms::Index','Table Link&a-pos;,'')"/> <outputFeature name="name" value="name"/> <outputFeature name="foreign_key" value="b3:parent(b3:parent('&a-pos;,'becubic::analysis::Dbms::Dbms Logical Objects::Logical Table','Logical Phys-ical Link',''),'','becubic::analysis::Dbms::Db Foreign Key','Table Link','')"/> <outputFeature name="has_column" value="b3:concatLists(b3:rawValues('Decomposition Link'),b3:rawValues(data_link[name='*'],'Data Link'))" ref-erencedNames="Column"/> <outputFeature name="source_code" value="b3:fullSource()/contents"/> <outputFeature name="core_display_name" value="name"/> <outputFeature name="created" value="creation_date"/> <outputFeature name="dependencies" value="b3:rawQuery1('ADU: View Depend-encies')"/> <outputFeature name="table_or_view" value="'view'"/> </outputType> </rule></transformRules>
Data Lineage SupportThis topic provides information about the compatibility of CAE Providers with the Data Lineage feature.
These are different levels of data lineage support:
l Yes
Performs transformational analysis, which means computation of SOURCE to TARGET relationships with TRANSFORMATION details.
l Partial
Only static dataflow analysis is supported. Therefore, some coding patterns (e.g., usage of pointers or highly dynamic constructs that can only be resolved by running the code) are too dynamic for these providers and we anticipate missing some lineage pathways.
l Limited
Only source and target identification is performed. Support can be leveraged to qualify actual sources and actual targets. For instance, if you have a database TABLE which is being accessed by Java or C#, becubic can find what columns and where they are accessed in READ (SOURCE candidate) WRITE/UPDATE (TARGET candidates) by the program.
Manual stitching to complete the picture is still required, but this is a big step compared to knowing nothing and having to manually search the entire application code to determine the data lineage.
l N/A
Lineage is not applicable to the technology.
This table lists the available providers and provides the data lineage support level of each:
Provider Lineage
ASG-BQA Base Module N/A
237
Data Lineage Support
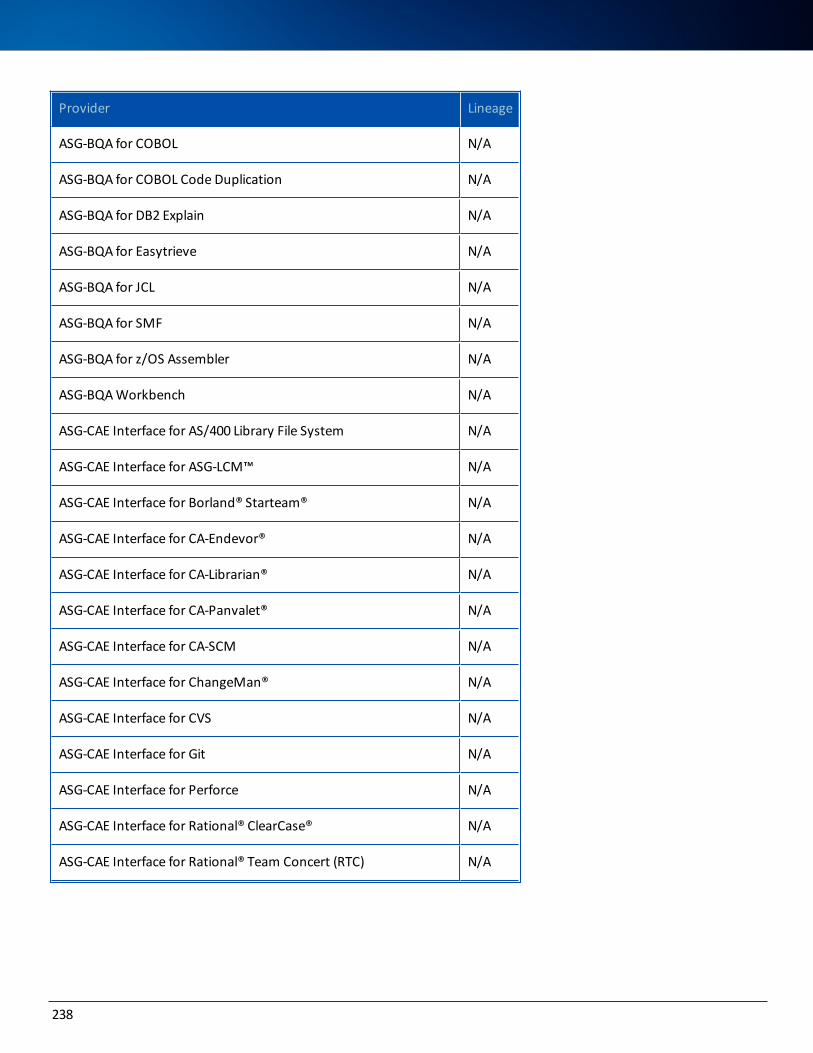
Provider Lineage
ASG-BQA for COBOL N/A
ASG-BQA for COBOL Code Duplication N/A
ASG-BQA for DB2 Explain N/A
ASG-BQA for Easytrieve N/A
ASG-BQA for JCL N/A
ASG-BQA for SMF N/A
ASG-BQA for z/OS Assembler N/A
ASG-BQA Workbench N/A
ASG-CAE Interface for AS/400 Library File System N/A
ASG-CAE Interface for ASG-LCM™ N/A
ASG-CAE Interface for Borland® Starteam® N/A
ASG-CAE Interface for CA-Endevor® N/A
ASG-CAE Interface for CA-Librarian® N/A
ASG-CAE Interface for CA-Panvalet® N/A
ASG-CAE Interface for CA-SCM N/A
ASG-CAE Interface for ChangeMan® N/A
ASG-CAE Interface for CVS N/A
ASG-CAE Interface for Git N/A
ASG-CAE Interface for Perforce N/A
ASG-CAE Interface for Rational® ClearCase® N/A
ASG-CAE Interface for Rational® Team Concert (RTC) N/A
238
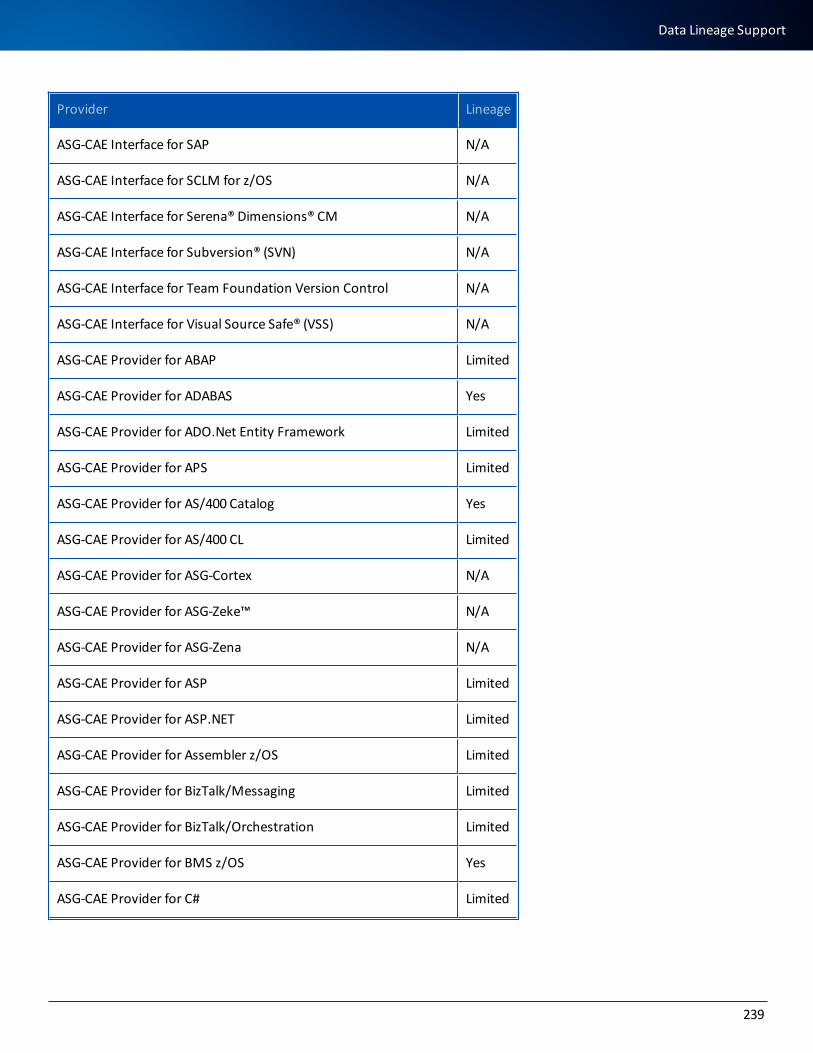
Provider Lineage
ASG-CAE Interface for SAP N/A
ASG-CAE Interface for SCLM for z/OS N/A
ASG-CAE Interface for Serena® Dimensions® CM N/A
ASG-CAE Interface for Subversion® (SVN) N/A
ASG-CAE Interface for Team Foundation Version Control N/A
ASG-CAE Interface for Visual Source Safe® (VSS) N/A
ASG-CAE Provider for ABAP Limited
ASG-CAE Provider for ADABAS Yes
ASG-CAE Provider for ADO.Net Entity Framework Limited
ASG-CAE Provider for APS Limited
ASG-CAE Provider for AS/400 Catalog Yes
ASG-CAE Provider for AS/400 CL Limited
ASG-CAE Provider for ASG-Cortex N/A
ASG-CAE Provider for ASG-Zeke™ N/A
ASG-CAE Provider for ASG-Zena N/A
ASG-CAE Provider for ASP Limited
ASG-CAE Provider for ASP.NET Limited
ASG-CAE Provider for Assembler z/OS Limited
ASG-CAE Provider for BizTalk/Messaging Limited
ASG-CAE Provider for BizTalk/Orchestration Limited
ASG-CAE Provider for BMS z/OS Yes
ASG-CAE Provider for C# Limited
239
Data Lineage Support
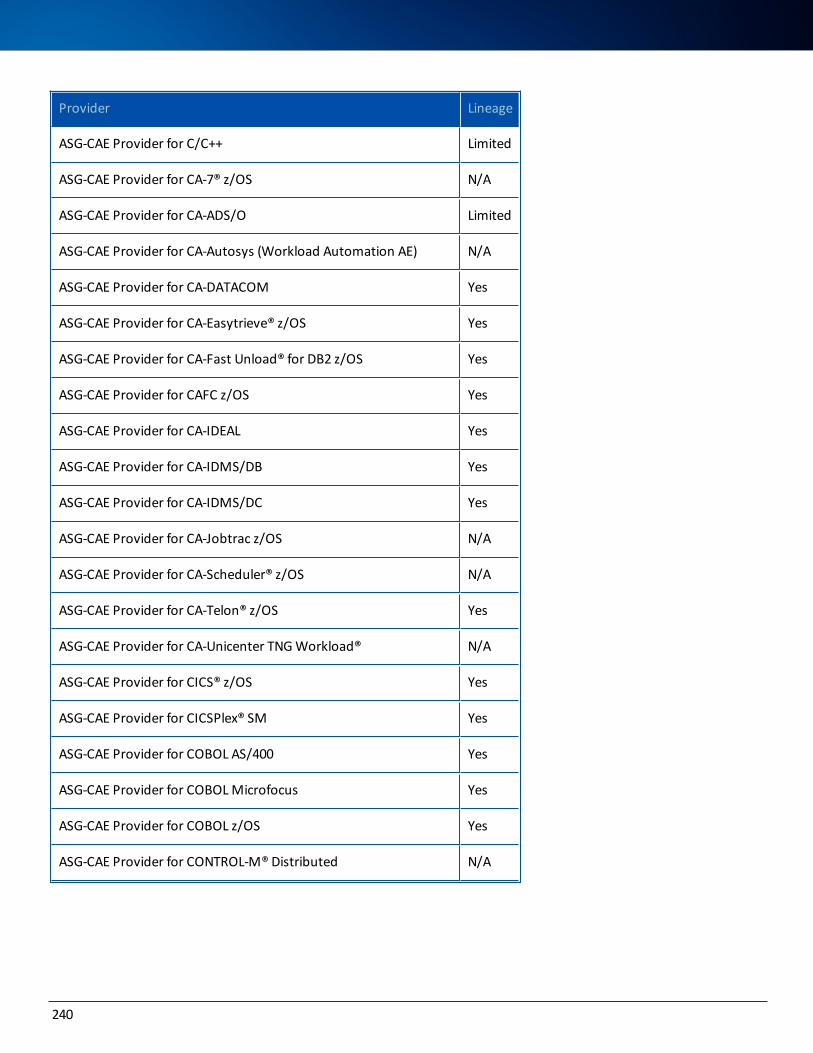
Provider Lineage
ASG-CAE Provider for C/C++ Limited
ASG-CAE Provider for CA-7® z/OS N/A
ASG-CAE Provider for CA-ADS/O Limited
ASG-CAE Provider for CA-Autosys (Workload Automation AE) N/A
ASG-CAE Provider for CA-DATACOM Yes
ASG-CAE Provider for CA-Easytrieve® z/OS Yes
ASG-CAE Provider for CA-Fast Unload® for DB2 z/OS Yes
ASG-CAE Provider for CAFC z/OS Yes
ASG-CAE Provider for CA-IDEAL Yes
ASG-CAE Provider for CA-IDMS/DB Yes
ASG-CAE Provider for CA-IDMS/DC Yes
ASG-CAE Provider for CA-Jobtrac z/OS N/A
ASG-CAE Provider for CA-Scheduler® z/OS N/A
ASG-CAE Provider for CA-Telon® z/OS Yes
ASG-CAE Provider for CA-Unicenter TNG Workload® N/A
ASG-CAE Provider for CICS® z/OS Yes
ASG-CAE Provider for CICSPlex® SM Yes
ASG-CAE Provider for COBOL AS/400 Yes
ASG-CAE Provider for COBOL Microfocus Yes
ASG-CAE Provider for COBOL z/OS Yes
ASG-CAE Provider for CONTROL-M® Distributed N/A
240

Provider Lineage
ASG-CAE Provider for CONTROL-M® z/OS N/A
ASG-CAE Provider for CORBA® IDL Limited
ASG-CAE Provider for Cron N/A
ASG-CAE Provider for DataStage Yes
ASG-CAE Provider for DB2 Schema z/OS Yes
ASG-CAE Provider for DB2 Stored Proc z/OS Yes
ASG-CAE Provider for DB2 UDB Schema AS/400 Yes
ASG-CAE Provider for DB2 UDB Schema Distributed Yes
ASG-CAE Provider for DB2 UDB SQL Script Yes
ASG-CAE Provider for DB2 UDB Stored Proc AS/400 Yes
ASG-CAE Provider for DB2 UDB Stored Proc Distributed Yes
ASG-CAE Provider for DELINK N/A
ASG-CAE Provider for Dynamic SQL Partial
ASG-CAE Provider for ESP z/OS N/A
ASG-CAE Provider for FORTRAN Limited
ASG-CAE Provider for Hibernate Yes
ASG-CAE Provider for HP VUGen N/A
ASG-CAE Provider for HS5000/APM z/OS N/A
ASG-CAE Provider for iBATIS (MyBATIS) Limited
ASG-CAE Provider for IMS/DB (DL/1) Yes
ASG-CAE Provider for IMS/DC Yes
ASG-CAE Provider for Informatica Yes
241
Data Lineage Support

Provider Lineage
ASG-CAE Provider for Informix® Schema Yes
ASG-CAE Provider for J2EE Packaging N/A
ASG-CAE Provider for Java Persistence API (JPA) Partial
ASG-CAE Provider for Java™ Yes
ASG-CAE Provider for JAXB Limited
ASG-CAE Provider for JAX-WS Limited
ASG-CAE Provider for JCL z/OS Yes
ASG-CAE Provider for JDBC/ODBC Schema Yes
ASG-CAE Provider for JDO Limited
ASG-CAE Provider for JSF Partial
ASG-CAE Provider for JSP Limited
ASG-CAE Provider for LINQ.Net Limited
ASG-CAE Provider for MANTIS® z/OS Limited
ASG-CAE Provider for Menu Support N/A
ASG-CAE Provider for Metrics N/A
ASG-CAE Provider for MFS z/OS Yes
ASG-CAE Provider for Microsoft Access Application Limited
ASG-CAE Provider for Microsoft Access Schema Yes
ASG-CAE Provider for Model204 Limited
ASG-CAE Provider for MQSeries® Limited
ASG-CAE Provider for MS-Dos Shell Limited
242
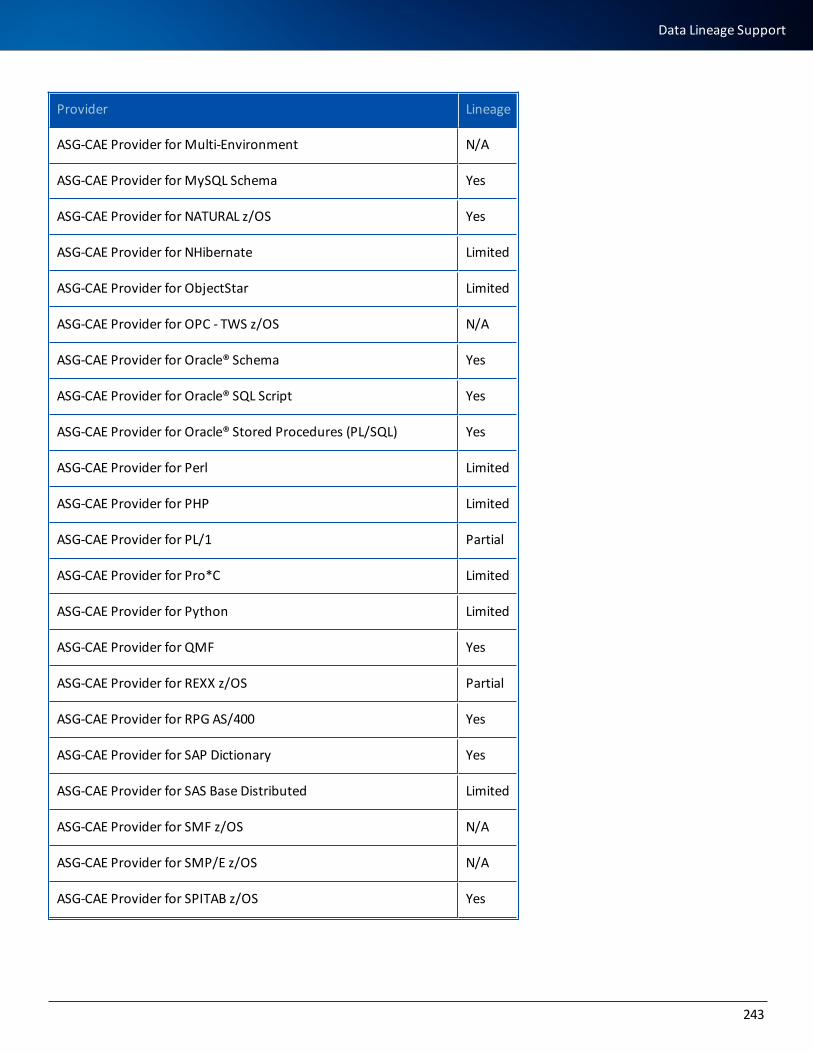
Provider Lineage
ASG-CAE Provider for Multi-Environment N/A
ASG-CAE Provider for MySQL Schema Yes
ASG-CAE Provider for NATURAL z/OS Yes
ASG-CAE Provider for NHibernate Limited
ASG-CAE Provider for ObjectStar Limited
ASG-CAE Provider for OPC - TWS z/OS N/A
ASG-CAE Provider for Oracle® Schema Yes
ASG-CAE Provider for Oracle® SQL Script Yes
ASG-CAE Provider for Oracle® Stored Procedures (PL/SQL) Yes
ASG-CAE Provider for Perl Limited
ASG-CAE Provider for PHP Limited
ASG-CAE Provider for PL/1 Partial
ASG-CAE Provider for Pro*C Limited
ASG-CAE Provider for Python Limited
ASG-CAE Provider for QMF Yes
ASG-CAE Provider for REXX z/OS Partial
ASG-CAE Provider for RPG AS/400 Yes
ASG-CAE Provider for SAP Dictionary Yes
ASG-CAE Provider for SAS Base Distributed Limited
ASG-CAE Provider for SMF z/OS N/A
ASG-CAE Provider for SMP/E z/OS N/A
ASG-CAE Provider for SPITAB z/OS Yes
243
Data Lineage Support
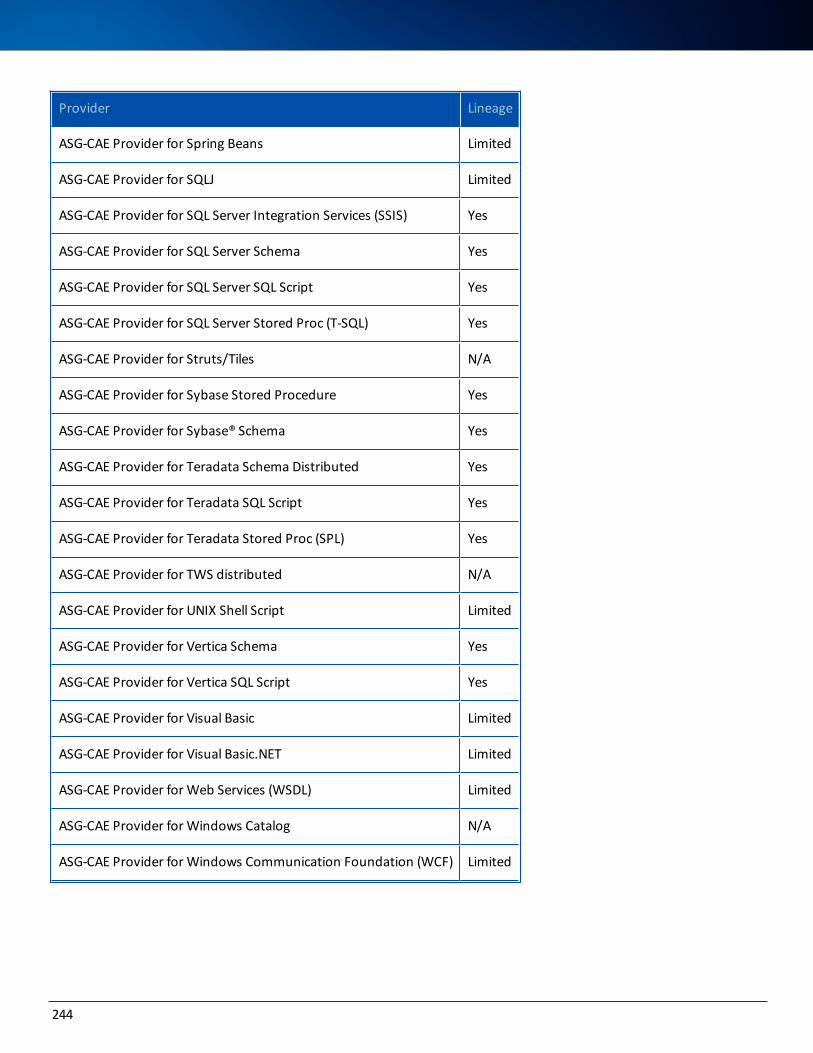
Provider Lineage
ASG-CAE Provider for Spring Beans Limited
ASG-CAE Provider for SQLJ Limited
ASG-CAE Provider for SQL Server Integration Services (SSIS) Yes
ASG-CAE Provider for SQL Server Schema Yes
ASG-CAE Provider for SQL Server SQL Script Yes
ASG-CAE Provider for SQL Server Stored Proc (T-SQL) Yes
ASG-CAE Provider for Struts/Tiles N/A
ASG-CAE Provider for Sybase Stored Procedure Yes
ASG-CAE Provider for Sybase® Schema Yes
ASG-CAE Provider for Teradata Schema Distributed Yes
ASG-CAE Provider for Teradata SQL Script Yes
ASG-CAE Provider for Teradata Stored Proc (SPL) Yes
ASG-CAE Provider for TWS distributed N/A
ASG-CAE Provider for UNIX Shell Script Limited
ASG-CAE Provider for Vertica Schema Yes
ASG-CAE Provider for Vertica SQL Script Yes
ASG-CAE Provider for Visual Basic Limited
ASG-CAE Provider for Visual Basic.NET Limited
ASG-CAE Provider for Web Services (WSDL) Limited
ASG-CAE Provider for Windows Catalog N/A
ASG-CAE Provider for Windows Communication Foundation (WCF) Limited
244
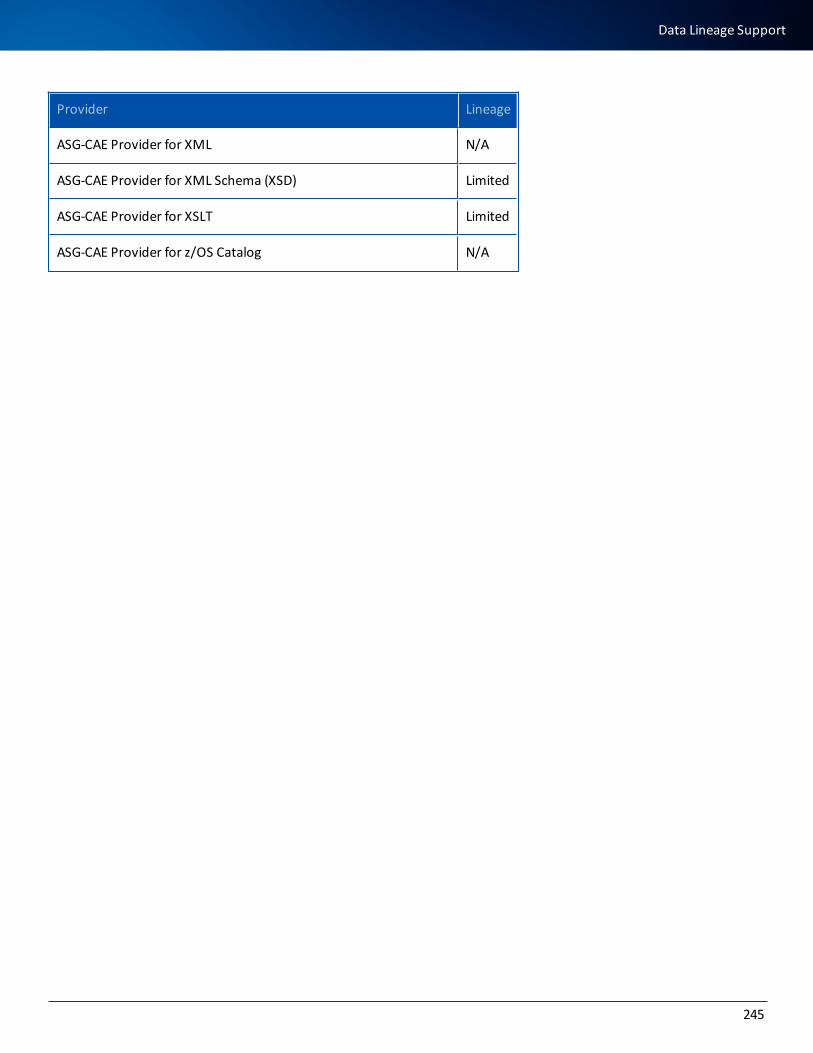
Provider Lineage
ASG-CAE Provider for XML N/A
ASG-CAE Provider for XML Schema (XSD) Limited
ASG-CAE Provider for XSLT Limited
ASG-CAE Provider for z/OS Catalog N/A
245
Data Lineage Support