ASG-INFO/X Enterprise System Administrator Guide
208
ASG-INFO/X Enterprise System Administrator Guide Version: 3.6.0 Publication Date: October 2021 ©2021 ASG Technologies Group, Inc. All rights reserved. The information contained herein is the confidential and proprietary information of ASG Technologies Group, Inc. Unauthorized use of this information and disclosure to third parties is expressly prohibited. This technical publication may not be reproduced in whole or in part, by any means, without the express written consent of ASG Technologies Group, Inc. All names and products contained herein are the trademarks or registered trademarks of their respective holders. ASG Technologies Worldwide Headquarters Naples Florida USA | asg.com | [email protected] 708 Goodlette Road North, Naples, Florida 34102 USA Tel: 239.435.2200 Fax: 239.263.3692 Toll Free: 800.932.5536 (USA only)
-
Upload
khangminh22 -
Category
Documents
-
view
0 -
download
0
Transcript of ASG-INFO/X Enterprise System Administrator Guide

ASG-INFO/X Enterprise System Administrator GuideVersion: 3.6.0
Publication Date: October 2021
©2021 ASG Technologies Group, Inc. All rights reserved.
The information contained herein is the confidential and proprietary information of ASG Technologies Group, Inc. Unauthorized use of thisinformation and disclosure to third parties is expressly prohibited. This technical publication may not be reproduced in whole or in part, by anymeans, without the express written consent of ASG Technologies Group, Inc.
All names and products contained herein are the trademarks or registered trademarks of their respective holders.
ASG Technologies Worldwide Headquarters Naples Florida USA | asg.com | [email protected]
708 Goodlette Road North, Naples, Florida 34102 USA Tel: 239.435.2200 Fax: 239.263.3692 Toll Free: 800.932.5536 (USA only)

ContentsPreface iii
About this Publication iii
Publication Conventions iii
Worldwide Customer Support iii
ASG Customer Care Expert Solution Services Portal (ACCESS) iv
Product Support Policy iv
ASG Documentation/Product Enhancements iv
System Administrator Tasks 1
Set Up INFO/X Platforms, Applications, and Jobs 2
Nodenames 2
Applications 6
Setting Up User Access 28
Individual Access to Product Functions 28
Default JOB Statement 34
Product Password 34
Run-Time Settings 37
Keyword Settings 38
Edit a Keyword Setting 38
Table Settings 39
DEFAULT RTS Member 42
User RTS Members 43
RTS Member Inventory 44
Worksheet for Keyword Settings 46
Worksheet for Table Settings 52
Interfaces 58
Security Interface 58
DASD Management Interfaces 63
Database Interfaces 65
Library Interfaces 68
Scheduler Interfaces 69
Tape Management Interfaces 99
Utility Interfaces 105
The INFO/X Repository 107
i

Flowchart 107
Tips on Loading the INFO/X Repository 109
Maintain the Repository 111
Viewing the History of Repository Updates 112
Editing the History of Repository Updates 112
Deleting CICS CSD Files from the Repository 113
Updating the Repository 114
Automatic Incremental Update (AIU) 117
Batch 137
Format of Statements 142
Large Batch Run Considerations 162
Remote Database Update Facility 163
Maintaining INFO/X Performance 177
Managing the Started Task 179
Starting the Started Task 179
Stopping the Started Task 180
Monitoring the Started Task 180
Managing Processor Tasks 186
Managing TCP/IP Started Tasks 188
Set Up from the Client/Server Interface 193
Applications 194
Nodes 199
Jobs 202
ii
ASG-INFO/X Enterprise System Administrator Guide

PrefaceThis documentation describes how to use our main ASG product ASG-INFO/X Enterprise.
About this PublicationThis documentation describes how to use the different modules that form the ASG product ASG-INFO/X Enterprise.
Publication ConventionsASG uses these conventions in technical publications:
Convention Usage
Bold Indicates that case-sensitive usage is required for a directory, path, file, dataset, member,database, program, command, or parameter name.
Example: }Verify the settings in the asg.config file.
Capitalization For system element names, this varies according to the product interface and its operatingenvironment.
Mainframe file names use uppercase, for example:
} Allocate a JSOPTEM member in the JLRCL library.
Windows file names use mixed cases, for example:
} Create a text file named SECLIST.txt in the C:\Program Files\ASG\config directory.
UNIX file names use mixed case
lowercase italicmonospace
Information that you provide according to your particular situation. For example, youwould replace filename with the actual name of the file.
Monospace Characters you must type exactly as they are shown, such as code,
JCL, file listings, or command/statement syntax. Also used for denoting brief examples in aparagraph.
Worldwide Customer SupportASG provides support throughout the world to resolve questions or problems regarding installation, operation, or use ofour products. ASG provides all levels of supportduring normal business hours and emergency support during non-business hours.
You can access support information from ASG’s Support page.
ASG Third-party Support. ASG provides software products that run in a number of third-party vendor environments.Support for all non-ASG products is the responsibility of the respective vendor. In the event a vendor discontinues
iii
Preface

support for a hardware and/or software product, ASG cannot be held responsible for problems arising from the use ofthat unsupported version.
ASG Customer Care Expert Solution Services Portal (ACCESS)The ACCESS Portal provides online support. Log on to the ACCESS with this information:
Email ID = NNNNNNNNN
Site Password = XXXXXXXXXX
where:
NNNNNNNNN is your email ID supplied by ASG Product Distribution.
XXXXXXXXXX is your unique site password supplied by ASG Product Distribution.
If you do not have your logon information, contact your local support center. This table outlines the support responsetimes you can expect:
Severity MeaningExpected Support ResponseTime
1 Production down, critical situation Within 30 minutes
2 Major component of product disabled Within 2 hours
3 Problem with the product, but customer has work-aroundsolution
Within 4 hours
4 “How-to” questions and enhancement requests Within 4 hours
Product Support PolicyASG fully supports the current release and one previous release of each of its products. ASG will temporarily support anolder release, for up to six months, to provide time for you to upgrade.
After programming support for a product release is withdrawn, ASG will no longer supply new fixes for problems noraccept enhancement requests for that release. When a vendor announces the end of support for system software or ahardware configuration on which ASG products rely, ASG will make a similar announcement regarding the support plansfor its products. ASG’s support for problems affected by system software release levels will terminate when the vendorno longer supports their hardware or software.
Announcements regarding support plans for various products can be found on ASG’s Web site.
ASG Documentation/Product EnhancementsUse ASG’s contact form to submit your product and documentation suggestions. Ensure that you include the name ofthe ASG product you are using.
iv
ASG-INFO/X Enterprise System Administrator Guide

System Administrator TasksThis documentation provides information on how to customize and maintain the ASG-INFO/X Enterprise product (hereincalled INFO/X) operation. This documentation describes:
l How to set up user and group access to product function and features.
l How to customize the operation of INFO/X.
l How to set up defaults.
l How to load and maintain the INFO/X Repository.
l How to manage the started task.
This documentation is designed to be used with the INFO/X Reference Information.
This documentation consist of the following topics:
Topic Description
Set Up INFO/X Platforms, Applications, and Jobs This topic describes the task for creating, modifying, anddeleting applications, nodenames, and jobs.
Setting Up User Access This topic describes the tasks for setting up the varioususers for INFO/X.
Run-Time Settings This topic describes the tasks and facilities for establishingand changing the settings for INFO/X.
Interfaces This topic describes the INFO/X interfaces.
The INFO/X Repository This topic explains how to load and maintain the INFO/XRepository.
Managing the Started Task This topic explains how to start, stop, monitor, andmanage the started task and processor tasks.
Set Up from the Client/Server Interface This topic describes how to set up and use the Windowsclient/server interface.
1
System Administrator Tasks

Set Up INFO/X Platforms, Applications, and JobsThe task and topics in this topic describe how to create, modify, and delete applications, nodenames, and jobs.
What is an INFO/X Application?
An application is a collection of jobs that together perform some task. Some examples of applications: Payroll, InventoryControl, Order Entry/Processing, Ledger. An application can contain jobs from one or more nodenames.
What is an INFO/X Nodename?
The system on which a job resides, or runs, is the nodename. The nodename defines a platform which is the type ofmachine or operating system (for example, MVS).
What is an INFO/X JOB?
A job is a set of JCL statements organized to accomplish a particular task.
n Nodenames
n Applications
NodenamesUse the information in this topic to create, change, view information about, and delete nodenames.
List all the Nodenames
To list all the nodenames at the site
1. Choose Setup from the ASG-INFO/X Main Menu. INFO/X displays the Setup and Maintain INFO/X Repositorypanel.
2. Choose the Nodenames option from the Setup and Maintain INFO/X Repository panel. INFO/X displays theINFO/X Nodename List panel.
File Sort Settings Help--------------------------------------------------------------------------D0DPPLA0 INFO/X Nodename List Row 1 to 7 of 7Command ===> Scroll ===> CSR
Enter CRE or CREATE to create a new nodename.Enter A (About), R (Rename), W (Where-used), E (Edit), or D (Delete).
Sel Nodename Description Uses--- -------- -------------------------------- --------
MVSA An MVS Nodename 1068******************************* Bottom of data ********************************
Create a Nodename
To create a new nodename
1. Type the CRE or CREATE command on the command line of the INFO/X Nodename List panel and press Enter.INFO/X displays the INFO/X Create Nodename pop-up.
2
ASG-INFO/X Enterprise System Administrator Guide

INFO/X Create NodenameD0DPPLA1Command ===>
Enter a nodename name and description.
New nodename name:Platform : (* for list)Description :
Press Enter to create a nodename and to continue creating nodenames.Enter Cancel to exit without creating the nodename.
2. Type the name of the new nodename, the platform, and an optional description, and press Enter. Type anasterisk (*) in the Platform field for a list of platforms.
3. Press End to create the nodename. INFO/X returns to the INFO/X Nodename List panel.
Several nodenames can be added in succession by pressing Enter after each one. For the last one, press Enterto add the nodename and End to return to the INFO/X Nodename List panel.
Each nodename in the repository must be unique, independent of platform.
View Nodename Statistics
Use the following procedure to view nodename information such as date created or date updated.
To view information about a nodename
1. Use the A line command for the nodename on the INFO/X Nodename List panel.
2. Press Enter. INFO/X displays the INFO/X About Nodename pop-up.
INFO/X About Nodename MVSAD0DPPLA6Command ===>
Press End to return to the Nodename List.
Date Created : 2006-04-17 Userid : DSSUSRDate Updated : 2017-04-17 Userid : DSSUSR
Platform : MVS
Where is a Nodename Used?
To view all the entities that reside on a nodename
1. Use the W command for the nodename on the setup Nodename List panel.
2. Press Enter. The INFO/X Entities Used by Nodename panel displays.
3
Nodenames

File Sort Help--------------------------------------------------------------------------D0DPPLA3 INFO/X Entities Used by Nodename MVSA Row 1 to 9 of 9Command ===> Scroll ===> CSR
This nodename is used by the following entities:Enter V (View) to view the list of entities. Press End to return.
Sel Type Uses--- ---------------- --------
CICS Group 177CICS Map 186CICS Transaction 687CSECT Map 137IMS DBD 11IMS PSB 10JCL JOB 64PGM 536PROC 43Data Set 366
******************************* Bottom of data ********************************
To view the list of specific entities
1. Use the V line command to select a Type.
2. Press Enter.
An INFO/X Entities Used by Nodename panel displays.
File Sort Help--------------------------------------------------------------------------D0DPPLAE INFO/X PROCs Used by MVSA Row 1 to 8 of 13Command ===> Scroll ===>PAGE
Press End to return to the Nodename list.
The Nodename is used by the following Procs:
PROCname PROC Library Name Descript-------- -------------------------------------------->PPGL0020 DSSI.R350.TAPE.DEMOLIB(PPGL0020) EDIT ANDPPGL0030 DSSI.R350.TAPE.DEMOLIB(PPGL0030) REMOTE INPPGL0040 DSSI.R350.TAPE.DEMOLIB(PPGL0040) REMOTE INPPGL0050 DSSI.R350.TAPE.DEMOLIB(PPGL0050) GENER OFPPGL0056 DSSI.R350.TAPE.DEMOLIB(PPGL0056) DELETE OFPPPR0020 DSSI.R350.TAPE.DEMOLIB(PPPR0020)PPPR0030 DSSI.R350.TAPE.DEMOLIB(PPPR0030) REMOTE INPPPR0040 DSSI.R350.TAPE.DEMOLIB(PPPR0040) REMOTE IN
Rename a Nodename
To rename a nodename
1. Select the nodename to be renamed with the R command on the INFO/X Nodename List panel. The INFO/XRename Nodename pop-up displays.
2. Type the new name in the New Nodename field, and press Enter.
4
ASG-INFO/X Enterprise System Administrator Guide

INFO/X Rename NodenameD0DPPLA4Command ===>
Enter a new Nodename Name.
Old Nodename MVSNew Nodename
Press Enter to rename the Nodename.Enter Cancel to exit without renaming the Nodename.
F1=Help F3=Exit F12=Cancel
Edit a Nodename's Description
To edit a nodename's description
1. Select the nodename to edit with the E command on the INFO/X Nodename List panel. The INFO/X EditDescription pop-up displays.
2. Type the new description in the Description field, and press Enter.
INFO/X Edit DescriptionD0DPPLA7Command ===>
Edit the description for the nodename.
Name . . . . . MVSADescription. . A MVS Nodename
Press Enter to save the description and return to the Nodename List.Enter Cancel to exit without saving the new description.
Delete a Nodename
You can delete a nodename that has entities assigned to it and a nodename that does not have any. If you delete anodename with entities, you also delete those assignments as well.
To delete a nodename
n On the INFO/X Nodename List panel, select the nodename to delete using the D command.
a. If the node does not have any entities assigned to it, INFO/X displays this panel if the DeleteConfirmation option is set.
b. Press Enter to delete or Cancel to exit without deleting.
5
Nodenames

INFO/X Delete Nodename MVS2D0DPPLA2Command ===>
Are you sure you want to delete this Nodename?
Nodename : MVS2 Desc: MVS2 Nodename
Press Enter to Delete the Nodename.Enter Cancel to exit without deleting the Nodename.
Or
a. If the node has entities assigned to it, the INFO/X Entities Used by Nodename nodename paneldisplays.
File Sort Help--------------------------------------------------------------------------
D0DPPLA8 INFO/X Entities Used by Nodename MVS2 Row 1 to 5 of 5Command ===> Scroll ===> CSR
Enter V (View) to view the list of entities assigned to this nodename.Press Enter to delete the nodename and all entities or Cancel to exit.
Sel Type Uses--- ---------------- --------
CICS Group 177CICS Map 186CICS Transaction 687CSECT Map 137IMS DBD 11
******************************* Bottom of data ********************************
b. Press Enter to delete the nodename and its associations to the listed entities, or Cancel to exitwithout deleting.
ApplicationsUse the information in this topic to create, change, view information about, rename, and delete applications. Listingapplications is the first step to any other operation on applications.
List the Application Inventory
To list applications
1. Choose the Setup option from the ASG-INFO/X Main Menu. INFO/X displays the Setup and Maintain INFO/XRepository panel.
2. Choose the Applications option from the Setup and Maintain INFO/X Repository menu. The INFO/X Setup andMaintain Applications panel displays listing no applications.
6
ASG-INFO/X Enterprise System Administrator Guide

File Sort Settings Help------------------------------------------------------------------------------D0DPAPD1 INFO/X Setup and Maintain ApplicationsCommand ===> Scroll ===> PAGE
Application . . * (Enter name, mask, or * to view an Application List)
Enter CRE or CREATE to create a new application.Enter A(About),D(Delete),E(Edit),R (Rename),S(Select),V(View),
or U (Unassigned JOBs).
Sel Application Criteria Job Total Description--- ----------- -------- --------- --------------------------------******************************* Bottom of data ********************************
3. Type an application name or a mask in the Application field. Use an asterisk (*) to list all the applications at thesite. The INFO/X Setup and Maintain Applications panel displays the applications that meet the criteria.
File Sort Settings Help------------------------------------------------------------------------------
D0DPAPD1 INFO/X Setup and Maintain Applications Row 1 to 3 of 3Command ===> Scroll ===> CSR
Application . . * (Enter name, mask, or * to view an Application List)
Enter CRE or CREATE to create a new application.Enter A(About),D(Delete),E(Edit),R (Rename),S(Select),V(View),
or U (Unassigned JOBs).
Sel Application Criteria Job Total Description--- ----------- -------- --------- --------------------------------
LEDGER Yes 8 General Ledger ApplicationPAYROLL Yes 6 Payroll ApplicationSITE Yes 15 GLOBAL LIST
Locating a Specific Application
To locate an application
n Enter LOCATE application on the command line of the INFO/X Setup and Maintain Applications panel. Forexample, for the application SITE, if you type:
locate site
Or
l site
7
Applications

File Sort Settings Help------------------------------------------------------------------------------D0DPAPD1 INFO/X Setup and Maintain Applications Row 1 to 3 of 3Command ===> locate site Scroll ===> CSR
Application . . * (Enter name, mask, or * to view an Application List)
Enter CRE or CREATE to create a new application.Enter A(About),D(Delete),E(Edit),R (Rename),S(Select),V(View),
or U (Unassigned JOBs).
Sel Application Criteria Job Total Description--- ----------- -------- --------- --------------------------------
LEDGER Yes 8 General Ledger ApplicationPAYROLL Yes 6 Payroll ApplicationSITE Yes 15 GLOBAL LIST
******************************* Bottom of data *******************************
INFO/X will scroll SITE to the top of the list.
File Sort Settings Help------------------------------------------------------------------------------D0DPAPD1 INFO/X Setup and Maintain Applications Row 1 to 3 of 3Command ===> Scroll ===> CSR
Application . . * (Enter name, mask, or * to view an Application List)
Enter CRE or CREATE to create a new application.Enter A(About),D(Delete),E(Edit),R (Rename),S(Select),V(View),
or U (Unassigned JOBs).
Sel Application Criteria Job Total Description--- ----------- -------- --------- --------------------------------
SITE Yes 15 GLOBAL LIST******************************* Bottom of data *******************************
Use the Sort action bar item to sort the list by application, nodename, description, or job countfields.
Create an Application
To create a new application
1. Type CRE or CREATE on the command line of INFO/X Setup and Maintain Applications panel. INFO/X displaysthe INFO/X Create an Application pop-up.
8
ASG-INFO/X Enterprise System Administrator Guide

INFO/X Create an ApplicationD0DPAPD2Command ===>
Enter a new name, and description.
Name . . . . . .Description. . .
Press Enter to create the application and to continue.Enter Cancel to exit without creating the application.
2. Enter the application name in the Name field.
3. Type a description in the Description field (optional).
4. Press Enter to add the application. INFO/X displays the message “Application added” in the INFO/X Create anApplication pop-up and refreshes (blanks out) the fields.
Several applications can be added in succession by pressing Enter after each one; INFO/X continues to display theINFO/X Create an Application pop-up. For the last application, press Enter to add the application and End to return tothe INFO/X Setup and Maintain Applications panel.
Define Jobs to an Application
To define jobs to an application
1. Select an application using the S line command on the INFO/X Setup and Maintain Applications panel (see Step1. Selecting an Application).
2. Select the nodename from the INFO/X Nodename List panel (see Step 2. Selecting the Nodename).
3. Define the job list using inclusion criteria (see Step 3. Defining the Job List).
4. Refine the job list using exclusion criteria (see Step 4. Refining the Job List).
5. Test the job list (see Step 5. Testing the Job List).
6. Repeat steps 2-5 until your job list is built.
7. Generate the job list and save it to the repository (see Step 7. Save the Job Criteria and (optional) the Job List).
8. Repeat steps 2-7 to add jobs which reside on another nodename.
Step 1. Selecting an Application
To select an application
1. Type an S in the SEL field of the INFO/X Setup and Maintain Applications panel.
2. Press Enter. INFO/X displays the INFO/X Nodename List panel.
9
Applications

INFO/X Nodename ListFile Sort Help
--------------------------------------------------------------------------D0DPPLA9 Row 1 to 7 of 7Command ===> Scroll ===> PAGE
Enter / to select a nodename.Enter Cancel to exit without selecting a nodename.
Sel Criteria Nodename Type Description--- -------- -------- -------- --------------------------------
Yes MVSA MVS A MVS Nodename
INFO/X Nodename List panel
The Criteria field shows whether or not criteria already exists for the application on this nodename.
Step 2. Selecting the NodenameAn application may contain jobs that reside on different nodenames.
To select a nodename
n Use a forward slash (/) to select the nodename to which the criteria will apply. The INFO/X CustomizeApplication panel displays.
INFO/X Customize ApplicationD0DPAPD4 Nodename selectedCommand ===>
Name: LEDGER Desc: General Ledger ApplicationNodename: MVSA Platform: MVS
Enter / to select a customization function.Press End to return.
Include CriteriaExclude CriteriaGenerate Job List
Step 3. Defining the Job ListSelect jobs to include in one of several ways:
l Specify each job by name.
l Use one or more appropriate masks.
l A combination of the mask and job name methods.
10
ASG-INFO/X Enterprise System Administrator Guide

File Test Help------------------------------------------------------------------------------D0DPCRI0 INFO/X Inclusion Criteria Row 1 to 1 of 1Command ===> Scroll ===> PAGE
Application: LEDGER Desc: General Ledger ApplicationNodename: MVSA Platform: MVS
Enter Copy to duplicate include criteria from another application.Press End to save changes or enter Cancel to exit without saving the changes.
Enter D (Delete), I (Insert), R (Repeat), T (Test)
Sel Inclusion Criteria--- ------------------
PJGL*
Specify Each Job Name
To individually include each job by name
n Use the I (Insert) and R (Repeat) line commands.
To add a blank line for a job name on the INFO/X Inclusion Criteria panel
n Use the I (Insert) command. Each name must be on a separate line.
To duplicate a line of inclusion criteria
1. Use the R (Repeat) command to duplicate a line of criteria.
2. The criteria is duplicated on a new line (below the duplicated line) where it can be changed.
3. To save the changes, press End. To discard, enter CANCEL.
Use MasksTo include multiple jobs with one criteria, use a mask.
Each mask must be entered on a separate line.
Use the I (Insert) and R (Repeat) commands to add new criteria. Use the I (Insert) command on the INFO/X InclusionCriteria panel to add a blank line on which the mask can be entered.
With the R (Repeat) command, INFO/X duplicates the criteria on a new line where it can be changed.
For example,
l to include all the jobs that start with PJGL use the mask PJGL*
l to include all the jobs that have the digits 123 anywhere in the name use the mask *123*
l to include all five character names that end in X use the mask %%%%X
Combination of Job Names and MasksThis method is most commonly used. Enter the masks and names on separate lines.
To test the include criteria use the T line command on the INFO/X Inclusion Criteria panel.
11
Applications

File Test Help------------------------------------------------------------------------------D0DPCRI0 INFO/X Inclusion Criteria Row 1 to 1 of 1Command ===> Scroll ===> PAGE
Application: LEDGER Desc: General Ledger ApplicationNodename: MVSA Platform: MVS
Enter Copy to duplicate include criteria from another application.Press End to save changes or enter Cancel to exit without saving the changes.
Enter D (Delete), I (Insert), R (Repeat), T (Test)
Sel Inclusion Criteria--- ------------------
PJGL*
This will bring up the INFO/X Job List Test panel showing those jobs included by the criteria. The following job inventoryand include criteria gives the results shown in the below figure.
Job Inventory Criteria
PJGL0020 PJGL*
PJGL0030 *01
PJPL0040 *04*
PJGL0050 LDGR04
PAYROL01 LDGR04
ABCDEF
File Help------------------------------------------------------------------------------D0DPENIE INFO/X Job List Test Row 1 to 8 of 8Command ===> Scroll ===> PAGE
The joblist is a result of the criteria specified for this application.Press End to return.
JOBname JCL Library Member----------- -------------------------------------------- --------PJGL0020 DSSI.SYS.DEMOLIB PJGL0020PJGL0030 DSSI.SYS.DEMOLIB PJGL0030PJPL0040 DSSI.SYS.DEMOLIB PJGL0040PJGL0050 DSSI.SYS.DEMOLIB PJGL0050PAYROL01 DSSI.SYS.DEMOLIB PAYROL01LDGR04 DSSI.SYS.DEMOLIB LDGR04******************************* Bottom of data ********************************
Job List Resulting from Combination of Criteria
12
ASG-INFO/X Enterprise System Administrator Guide

l This panel is the result of a test command.
l There are two criteria that include PJGL0040: PJGL* and *04*, however this job is inserted only once.
Step 4. Refining the Job ListRefine the job list by excluding jobs from the job list. In a manner similar to inclusion criteria, use job names and masks.
Exclusion criteria takes precedence over inclusion criteria
Add the exclusion criteria by selecting Exclusion Criteria from the INFO/X Customize Application panel. Use the Testaction bar item to test the job list. Continuing the example in Step 3. Defining the Job List, adding the exclusion criterionPJGL0050.
File Test Help------------------------------------------------------------------------------D0DPCRE0 INFO/X Exclusion Criteria Row 1 to 1 of 1Command ===> Scroll ===> PAGE
Application: INVENTOR Nodename: MVSA Desc: Company inventory control
Enter Copy to duplicate exclude criteria from another application.Press End to save changes or enter Cancel to exit without saving the changes.
Enter D (Delete), I (Insert), R (Repeat)
Sel Exclusion Criteria--- ------------------
PJGL0050******************************* Bottom of data *******************************
The job list shown in the figure - Job List Resulting from Combination of Criteria becomes as shown below.
File Help------------------------------------------------------------------------------D0DPENIE INFO/X Job List Test Row 1 to 8 of 8Command ===> Scroll ===> PAGE
The joblist is a result of the criteria specified for this application.Press End to return.
JOBname JCL Library Member----------- -------------------------------------------- --------PJGL0020 DSSI.SYS.DEMOLIB PJGL0020PJGL0030 DSSI.SYS.DEMOLIB PJGL0030PJGL0040 DSSI.SYS.DEMOLIB PJGL0040PAYROL01 DSSI.SYS.DEMOLIB PAYROL01LDGR04 DSSI.SYS.DEMOLIB LDGR04******************************* Bottom of data ********************************
When no exclusion criteria are specified, the default exclusion criteria of NONE means that no jobsare to be excluded.
Step 5. Testing the Job ListTest the criteria from either the INFO/X Inclusion Criteria or INFO/X Exclusion Criteria panel.
13
Applications

To test the inclusion criteria
n Use the Test pull-down from the action bar.
Or
n Use the T line command.
To test the inclusion and exclusion criteria together
n Use the Test pull down from the action bar.
File Sort Help------------------------------------------------------------------------------D0DPENIE INFO/X Job List Test Row 1 to 8 of 8Command ===> Scroll ===> PAGE
The joblist is a result of the criteria specified for this application.Press End to return.
JOBname JCL Library Member----------- -------------------------------------------- --------PJGL0020 DSSI.SYS.DEMOLIB PJGL0020PJGL0030 DSSI.SYS.DEMOLIB PJGL0030PJGL0040 DSSI.SYS.DEMOLIB PJGL0040PAYROL01 DSSI.SYS.DEMOLIB PAYROL01LDGR04 DSSI.SYS.DEMOLIB LDGR04******************************* Bottom of data ********************************
Testing the criteria for an application
Sort the list in ascending order on any of the three columns in the panel using the Sort action baritem.
Deleting Criteria
To delete criteria
1. Enter D on the criteria panel in the SEL field.
2. Press Enter.
3. Click End on the criteria panel to confirm deletion; Cancel to keep the criteria.
Changing Criteria
To change criteria
1. Type directly over the criteria you want to change in the Inclusion or Exclusion panel.
2. Press Enter.
3. Press End to save the changed criteria, or enter CANCEL to retain the original criteria.
Step 6. Refine Job ListRepeat Steps 2-5 until the desired job list is built.
14
ASG-INFO/X Enterprise System Administrator Guide

Step 7. Save the Job Criteria and (optional) the Job ListWhen the job list is satisfactory, save the job criteria which defines the application. The job list can be saved at this timefor immediate access or when the next Automatic Incremental Update (AIU) is run (nightly in most shops). This step canbe performed in one of several ways:
To generate and save the job list
1. Choose Generate Job List from the INFO/X Customize Application panel.
INFO/X Customize ApplicationD0DPAPD4 Nodename selectedCommand ===>
Name: LEDGER Desc: General Ledger ApplicationNodename: MVSA Platform: MVS
Enter / to select a customization function.Press End to return.
Include CriteriaExclude CriteriaGenerate Job List
Depending on system load, the number of criteria, and the number of jobs at the site, the time todisplay the job list will vary.
2. Press End to save the list and return to the INFO/X Nodename List panel.
File Help------------------------------------------------------------------------------D0DPENT8 INFO/X View Job List Row 1 to 8 of 8Command ===> Scroll ===> PAGE
Press End to save the generated joblist for this application and return.Enter Cancel to exit without saving the job list.
JOBname JCL Library Member----------- -------------------------------------------- --------PJGL0020 DSSI.SYS.DEMOLIB PJGL0020PJGL0030 DSSI.SYS.DEMOLIB PJGL0030PJGL0040 DSSI.SYS.DEMOLIB PJGL0040PAYROL01 DSSI.SYS.DEMOLIB PAYROL01LDGR04 DSSI.SYS.DEMOLIB LDGR04******************************* Bottom of data ********************************
To refresh the job list and save the criteria
1. From the INFO/X Customize Application panel press End.
15
Applications

INFO/X Customize ApplicationD0DPAPD4 Nodename selectedCommand ===>
Name: LEDGER Desc: General Ledger ApplicationNodename: MVSA Platform: MVS
Enter / to select a customization function.Press End to return.
Include CriteriaExclude CriteriaGenerate Job List
The INFO/X Refresh Joblist pop-up displays.
INFO/X Refresh JoblistD0DPENT4Command ===>
Name: MMSAPPL Nodename: MVSA Desc:
Changes have been made to the include/exclude criteria.Enter / to select an appropriate option.
Refresh Joblist and update criteria (it may take a long time)Update criteria (do not refresh joblist at this time)
Enter Cancel to exit without saving any changes
2. Select Refresh Joblist and update criteria to save the job list to the repository.
To update the criteria only
1. From the INFO/X Customize Application panel press End. INFO/X displays the INFO/X Refresh Joblist pop-up.
2. Select Update criteria to save the job list criteria. The job list will be updated in the repository the next time AIUis run.
Copying Criteria from Another Application
Criteria can be copied from one application to another, and then refined to suit the needs of the new application. TheCOPY command works the same for both exclusion and inclusion criteria.
To copy criteria from another application
1. Use the COPY command on the command line of either INFO/X Inclusion or Exclusion criteria panel. The INFO/XCopy Application Criteria panel displays, which is a list of applications.
16
ASG-INFO/X Enterprise System Administrator Guide

INFO/X Copy Application CriteriaD0DPCRI1 Row 1 to 4 of 4Command ===> Scroll ===> PAGE
Enter / to select an application from which to copy criteria.Press End to exit without copying.
Sel Application Nodename Description--- ----------- -------- --------------------------------
LEDGER MVSA General Ledger ApplicationNEW MVSAPAYROLL MVSA Payroll ApplicationSITE ALL GLOBAL LIST OF JOBS
***************************** Bottom of data ******************************
2. Select an application with a forward slash (/) and press Enter to copy the criteria and return to the criteria panel. INFO/X displays the message “Criteria Copied” at the top of the panel. All criteria from the source application iscopied, duplicates are discarded when the current application is saved.
File Test Help-------------------------------------------------------------------------------D0DPCRI0 INFO/X Inclusion Criteria Criteria CopiedCommand ===> Scroll ===> PAGE
Application: NEW Nodename: MVSA Desc:
Enter Copy to duplicate include criteria from another application.Press End to save changes or enter Cancel to exit without saving the changes.
Enter D (Delete), I (Insert), R (Repeat), T (Test)
Sel Inclusion Criteria--- ------------------
PJGL*PJGL0099
******************************* Bottom of data ********************************
Add Application Criteria in Batch
Criteria can be added to applications in batch using SAMPLIB member IXLCRIT. This job provides a time-saving way toenter INCLUDE/EXCLUDE criteria for a large number of applications.
To add criteria in batch
Edit member IXLCRIT as follows:
1. Add SYSIN statements for each application criteria using the following format:
Column Value
1-8 Application name
10-17 Nodename
20
Include/Exclude
l 'I' for Include
l 'E' for Exclude
17
Applications

Column Value
25-32 Criteria (such as, PJGL*)
35-66 Application description (optional)
2. Submit the job.
l This job only updates the criteria. It does not update the application's job list. The job list is updated thenext time an UPDATE job is run.
l If the specified application does not exist, it is created by the batch job.
l If the specified nodename does not exist, no criteria are added.
l If the specified criteria already exists for an application on the specified nodename, no criteria are added.
View Information About an Application
To view information about an application
1. Enter A in the SEL field for the application in the INFO/X Setup and Maintain Applications panel.
2. Press Enter.The INFO/X About Application pop-up appears.
INFO/X About Application LEDGERD0DPAPP3Command ===>
Press End to return to the Application List.
Application:Date Created . : 1998-05-16 Userid : DSSUSRDate Updated . : 2017-03-28 Userid : DSSUSRNumber of Jobs : 18
This pop-up displays the following information about an application:
l The number of jobs assigned.
l The dates the application was created and last updated and the user ID by whom it was created and updated.An update to an application can be a change to the description, criteria, job list, and so on.
Change the Description of an Application
Sometimes the mission of an application changes, or its scope changes, and the description needs to be updated.
To change the description of an application
1. Choose the application with E in the SEL field on the INFO/X Setup and Maintain Applications panel.
18
ASG-INFO/X Enterprise System Administrator Guide

File Sort Settings Help------------------------------------------------------------------------------
D0DPAPD1 INFO/X Setup and Maintain Applications Row 1 to 3 of 3Command ===> Scroll ===> CSR
Application . . * (Enter name, mask, or * to view an Application List)
Enter CRE or CREATE to create a new application.Enter A(About),D(Delete),E(Edit),R (Rename),S(Select),V(View),
or U (Unassigned JOBs).
Sel Application Criteria Job Total Description--- ----------- -------- --------- --------------------------------E LEDGER Yes 8 General Ledger Application
PAYROLL Yes 6 Payroll ApplicationSITE Yes 15 GLOBAL LIST
INFO/X displays the INFO/X Edit Description pop-up.
INFO/X Edit DescriptionD0DPAPD7Command ===>
Edit the description for the application.
Name . . . . . LEDGERDescription. . General Ledger Application
Press Enter to save the description and return to the Application List.Enter Cancel to exit without saving the new description.
INFO/X Edit Description pop-up
2. Make the required changes to the Description field.
The Description field is the only field that accepts input on this panel.
3. Press Enter to save the changes.
View an Application's Criteria
To view the criteria for the jobs included in and excluded from an application
n Choose the application with V in the SEL field on the INFO/X Setup and Maintain Applications panel.
19
Applications

File Sort Settings Help------------------------------------------------------------------------------
D0DPAPD1 INFO/X Setup and Maintain Applications Row 1 to 3 of 3Command ===> Scroll ===> CSR
Application . . * (Enter name, mask, or * to view an Application List)
Enter CRE or CREATE to create a new application.Enter A(About),D(Delete),E(Edit),R (Rename),S(Select),V(View),
or U (Unassigned JOBs).
Sel Application Criteria Job Total Description--- ----------- -------- --------- --------------------------------V LEDGER Yes 8 General Ledger Application
PAYROLL Yes 6 Payroll ApplicationSITE Yes 15 GLOBAL LIST
The INFO/X View Criteria for Application panel displays.
INFO/X View Criteria for ApplicationFile Sort Help
--------------------------------------------------------------------------D0DPAPD3 Row 1 to 2 of 2Command ===> Scroll ===> PAGE
Application: LEDGER Desc: General Ledger Application
Press End to return to the Application List.
Nodename Criteria Type-------- -------- -------MVSA PJGL* IncludeMVSA PJGL0099 Exclude
The information on this panel is view only. To change the criteria for an application, see Define Jobs to an Application.
Rename an Application
To rename an application
1. Choose the application with R in the SEL field on the INFO/X Setup and Maintain Applications panel.
File Sort Settings Help------------------------------------------------------------------------------
D0DPAPD1 INFO/X Setup and Maintain Applications Row 1 to 3 of 3Command ===> Scroll ===> CSR
Application . . * (Enter name, mask, or * to view an Application List)
Enter CRE or CREATE to create a new application.Enter A(About),D(Delete),E(Edit),R (Rename),S(Select),V(View),
or U (Unassigned JOBs).
Sel Application Criteria Job Total Description--- ----------- -------- --------- --------------------------------R LEDGER Yes 8 General Ledger Application
PAYROLL Yes 6 Payroll ApplicationSITE Yes 15 GLOBAL LIST
The INFO/X Rename Application pop-up displays.
20
ASG-INFO/X Enterprise System Administrator Guide

INFO/X Rename ApplicationD0DPAPD8Command ===>
Enter a new Application Name.
Old Application Name LEDGERNew Application Name
Enter Cancel to exit without renaming the application.
F1=Help F3=Exit F12=Cancel
2. Enter the New Application Name and press Enter.
Deleting Applications
Applications can be deleted from the panels or in batch.
Delete an Application Using the Panels
To delete an application using the panels
1. Choose the application with D in the SEL field on the INFO/X Setup and Maintain Applications panel.
File Sort Settings Help-------------------------------------------------------------------------------D0DPAPD1 INFO/X Setup and Maintain Applications Row 1 to 3 of 3Command ===> Scroll ===> CSR
Application . . * (Enter name, mask, or * to view an Application List)
Enter CRE or CREATE to create a new application.Enter A(About),D(Delete),E(Edit),R (Rename),S(Select),V(View),
or U (Unassigned JOBs).
Sel Application Criteria Job Total Description--- ----------- -------- --------- --------------------------------D LEDGER Yes 8 General Ledger Application
PAYROLL Yes 6 Payroll ApplicationSITE Yes 15 GLOBAL LIST
******************************* Bottom of data *******************************
2. Press Enter. The Delete Application pop-up displays. For example:
INFO/X Delete Application LEDGERD0DPAPD5Command ===>
Application. . . LEDGERDescription. . . General Ledger Application
Press Enter to delete the application.Enter Cancel to exit without deleting the application.
l If delete confirmation setting is on, press Enter to confirm the deletion of the application; type Cancel onthe command line and press Enter to exit without deleting the application.
21
Applications

l Deleting an application does not delete the jobs associated with the application.
Delete Applications in BatchApplications can be deleted in batch using SAMPLIB member IXLAPPD. This job gives you the option of creating a list ofapplications to be removed or actually removing the applications from the repository.
To delete applications in batch
1. Edit the IXLAPPD member in the SAMPLIB dataset.
l Verify the jobcard.
l Specify either an L to list the applications to be deleted, or a D to actually delete the specifiedapplication(s).
//IXLAPPD EXEC IXLREXX,// IN1=L, LIST = DEFAULT// IN2=, NO PARMS TO BE PASSED// IN3=,// REXXMBR=D0DEAPPD NAME OF EXEC BEING EXECUTED
l Specify the input statements (SYSIN) using this format:
Cols 1-8 = Application name or mask
2. Submit the job.
l If an application does not exist, an error message is issued and processing continues with the next entry.
l Deleting an application does not delete the jobs associated with the application.
Find Unassigned JOBs
To find jobs that have not yet been assigned to an application:
1. Enter the U line command next to the SITE application on the INFO/X Setup and Maintain Applications panel.
File Sort Settings Help------------------------------------------------------------------------------
D0DPAPD1 INFO/X Setup and Maintain Applications Row 1 to 3 of 3Command ===> Scroll ===> CSR
Application . . * (Enter name, mask, or * to view an Application List)
Enter CRE or CREATE to create a new application.Enter A(About),D(Delete),E(Edit),R (Rename),S(Select),V(View),
or U (Unassigned JOBs).
Sel Application Criteria Job Total Description--- ----------- -------- --------- --------------------------------
LEDGER Yes 8 General Ledger ApplicationPAYROLL Yes 6 Payroll Application
U SITE Yes 15 GLOBAL LIST
22
ASG-INFO/X Enterprise System Administrator Guide
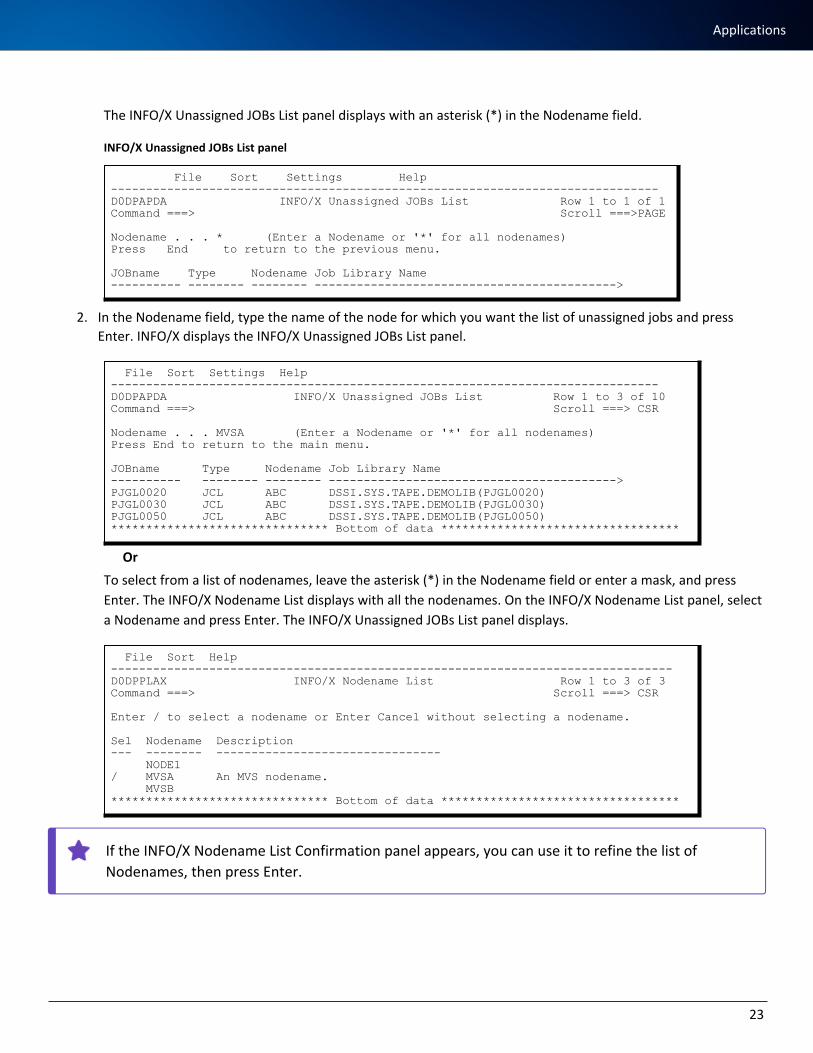
The INFO/X Unassigned JOBs List panel displays with an asterisk (*) in the Nodename field.
File Sort Settings Help------------------------------------------------------------------------------D0DPAPDA INFO/X Unassigned JOBs List Row 1 to 1 of 1Command ===> Scroll ===>PAGE
Nodename . . . * (Enter a Nodename or '*' for all nodenames)Press End to return to the previous menu.
JOBname Type Nodename Job Library Name---------- -------- -------- ------------------------------------------->
INFO/X Unassigned JOBs List panel
2. In the Nodename field, type the name of the node for which you want the list of unassigned jobs and pressEnter. INFO/X displays the INFO/X Unassigned JOBs List panel.
File Sort Settings Help------------------------------------------------------------------------------D0DPAPDA INFO/X Unassigned JOBs List Row 1 to 3 of 10Command ===> Scroll ===> CSR
Nodename . . . MVSA (Enter a Nodename or '*' for all nodenames)Press End to return to the main menu.
JOBname Type Nodename Job Library Name---------- -------- -------- ----------------------------------------->PJGL0020 JCL ABC DSSI.SYS.TAPE.DEMOLIB(PJGL0020)PJGL0030 JCL ABC DSSI.SYS.TAPE.DEMOLIB(PJGL0030)PJGL0050 JCL ABC DSSI.SYS.TAPE.DEMOLIB(PJGL0050)******************************* Bottom of data **********************************
OrTo select from a list of nodenames, leave the asterisk (*) in the Nodename field or enter a mask, and pressEnter. The INFO/X Nodename List displays with all the nodenames. On the INFO/X Nodename List panel, selecta Nodename and press Enter. The INFO/X Unassigned JOBs List panel displays.
File Sort Help--------------------------------------------------------------------------------D0DPPLAX INFO/X Nodename List Row 1 to 3 of 3Command ===> Scroll ===> CSR
Enter / to select a nodename or Enter Cancel without selecting a nodename.
Sel Nodename Description--- -------- --------------------------------
NODE1/ MVSA An MVS nodename.
MVSB******************************* Bottom of data **********************************
If the INFO/X Nodename List Confirmation panel appears, you can use it to refine the list ofNodenames, then press Enter.
23
Applications

File Help---------------------- INFO/X Nodename List Confirmation -------------------D0DPPLW0Command ===>
Number of Nodenames for your site. : 3
Nodename . . . . . . * (Enter name, or mask to shorten the list)
The query to retrieve Nodename information may take a long time.
Press Enter to continue. Enter Cancel to exit without processing.
For information on how to assign the jobs listed on the INFO/X Unassigned JOBs List panel to an application, see DefineJobs to an Application
Use the information in this topic to list, create, and delete jobs and to view information about jobs.
Add jobs to the repository through either of two mechanisms:
l The update facility
Jobs added through the update facility are analyzed by INFO/X. Information about these jobs is inserted intothe repository and includes cross-reference and component data. For more information about the updatefacility, see The INFO/X Repository.
l Manually
Jobs added manually are not analyzed by INFO/X.
List the Job Inventory
To list the jobs from the repository
1. Choose Setup from the ASG-INFO/X Main Menu. INFO/X displays the Setup and Maintain INFO/X Repositorypanel.
2. Choose the Jobs option from the Setup and Maintain INFO/X Repository panel. The INFO/X Job List Confirmationpanel displays.
File Help------------------------ INFO/X Job List Confirmation --------------------------D0DPENTFCommand ===>
Number of jobs in database: 15
Job name . . . . . * (Enter name or mask to shorten the list)
The query to retrieve the data for all the jobs could take a long time.
Press Enter to continue.Enter Cancel to exit without processing.
3. Type the name of the job or a mask for the jobs to be listed.
4. Press Enter. INFO/X displays a list of jobs and redisplays the INFO/X Job List panel.
24
ASG-INFO/X Enterprise System Administrator Guide

File Sort Settings Help--------------------------------------------------------------------------------D0DPENTB INFO/X JOB List Row 1 to 5 of 15Command ===> Scroll ===> CSR
JOBname PJ* (Enter JOBname, mask, or * to View the Job List)
Enter CRE or CREATE to create a new Job.Enter A (About), or D Delete).
Press End to return to the main menu.
Sel JOBname Type Nodename Job Library Name--- ---------- -------- -------- ------------------------------------------->
PJDB0010 JCL MVSA DSSI.SYS.TAPE.DEMOLIB(PJDB0010)PJGL0020 JCL MVSA DSSI.SYS.TAPE.DEMOLIB(PJGL0020)PJGL0030 JCL MVSA DSSI.SYS.TAPE.DEMOLIB(PJGL0030)PJGL0040 JCL MVSA DSSI.SYS.TAPE.DEMOLIB(PJGL0040)PJGL0050 JCL MVSA DSSI.SYS.TAPE.DEMOLIB(PJGL0050)
******************************* Bottom of data **********************************
Listing the jobs at the Site using a mask
TYPE FieldJCL - The job was added to the repository via the update facility.
User - The job was added to the repository through the interface and will only be used for documentation purposes.
Create a Job
To add a job using the update facility
n See The INFO/X Repository.
To add a new job via the interface
1. Choose Setup from the ASG-INFO/X Main Menu. INFO/X displays the Setup and Maintain INFO/X Repositorypanel.
2. Choose the Jobs option from the Setup and Maintain INFO/X Repository panel. The INFO/X Job List paneldisplays with not jobs listed.
3. Type the CRE or CREATE command on the Command line of the Job List panel and press Enter. The INFO/XCreate Job pop-up displays.
INFO/X Create JOBD0DPENTCCommand ===>
Enter a new JOBname, nodename and description.
JOBname . . . .Nodename . . . . (* for list of nodenames)Description . .
Press Enter to create the JOB and to continue creating JOBs.Enter Cancel to exit without creating the JOB.
25
Applications

4. Type the new job name and nodename. To see a list of nodenames, enter an asterisk (*) in the Nodename field.
5. (Optional) Type a description in the Description field.
6. Press Enter to add the job. INFO/X displays the message “Job added” in the INFO/X Create Job pop-up andrefreshes (blanks out) the fields.
Add several jobs in succession by pressing Enter after each one; for the last one, press Enter to add the job and End toreturn to the Job List panel.
User created jobs are used only for documentation.
Job Information
To view information about a job
1. Enter the A line command on the INFO/X Job List panel and press Enter. The INFO/X About Job pop-up displays.
2. Press Enter or End to return to the INFO/X Job List.
INFO/X About JOB PJGL0030D0DPENT1Command ===>
Press End to return to the JOB List.
Job:JCL Library . : DSSI.USR.TAPE.DEMOLIBMember . . . . : PJGL0030Type . . . . . : JCL
Repository Information:Date Created . : 1998-01-23 Userid : DSSUSRDate Updated . : 2017-08-23 Userid : DSSUSR
Delete a Job
There are different ways to delete jobs from the INFO/X Repository ranging from dropping the repository and recreatingit, to deleting jobs using the batch update facility, to deleting jobs manually one at a time.
l If the goal is to delete a large number of jobs, using the batch update facility is the recommended method.Refer to The INFO/X Repository for more information on using the batch update facility to delete jobs.
l If the goal is to clear the repository, ASG recommends using the IXLCLEAR INSTALL member or the IXLDROPINSTALL member to drop the repository.
l If the goal is to delete a few individual jobs, ASG recommends using the ISPF interface.
Delete a Job using the ISPF Interface
To delete an individual job using the ISPF interface
1. Choose Setup from the ASG-INFO/X Main Menu. INFO/X displays the Setup and Maintain INFO/X Repositorypanel.
26
ASG-INFO/X Enterprise System Administrator Guide

2. Choose the Jobs option from the Setup and Maintain INFO/X Repository panel. The INFO/X Job List paneldisplays with no jobs listed.
3. Type the name of the job or a mask for the jobs to be listed,
4. Press Enter. INFO/X redisplays the INFO/X Job List panel with a list of jobs.
5. Enter the D line command in the INFO/X Job List panel and press Enter. INFO/X displays the INFO/X Delete Jobpop-up if the Delete Confirmation is set.
INFO/X Delete Job PJGL0020D0DPENTDCommand ===>
Job name . . . . PJGL0020Type . . . . . . JCLDescription. . . GL MASTER UPDATE
Press Enter to delete the Job.Enter Cancel to exit without deleting the job.
6. Press Enter to delete the job, or type Cancel and press Enter to keep the job.
When deleting jobs individually, the job list in the repository will not be updated resulting in jobcounts that are inaccurate. To ensure the job list is updated correctly, use the batch update facilityto delete any jobs.
27
Applications

Setting Up User AccessThis topic introduces and explains the tasks the Product Administrator does to set up the INFO/X user environment. Fora complete description of any panel or field in a panel, see the INFO/X Reference Information.
Administrator Role
The Product Administrator sets options and features of INFO/X, tailoring the product to suit site requirements and userneeds. The Product Administrator analyzes site and user requirements and assigns product access to users and groups.
User Role
The user IDs assigned to the User role have access to the Query function of INFO/X. Some user IDs which are assignedthe User role might also have the Reports function.
Summary of Setup Tasks
This topic discusses these user setup tasks:
l Granting User access to INFO/X functions.
l Assigning Product Administrator authority to other user IDs.
l Setting up the default JOB statement.
l Inputting and verifying product passwords.
n Individual Access to Product Functions
n Default JOB Statement
n Product Password
Individual Access to Product FunctionsUse the procedures in this topic to set up access to product functions for user IDs and groups.
INFO/X Function Access
Use the below table as a guide to assigning roles to user IDs and groups.
Role AuthorityRTSMemberName
SchedulerSelectionExit Query Update Reports
Administrator
A *ANY* *ANY* *ANY* Y Y Y
User Urtsnameor*ANY*
schedulerornosched
pgm name or*ANY*
Y NY or N
28
ASG-INFO/X Enterprise System Administrator Guide

Role AuthorityRTSMemberName
SchedulerSelectionExit Query Update Reports
or *ANY*
Limit Access to One Run-Time Settings (RTS) MemberA member name in the RTS MEMBER field limits the user to the use of that one Run-Time Settings (RTS) member. Theuser cannot make changes to this member nor create new members.
Product Administrators give general users different capabilities when running INFO/X by assigning different RTSmembers to their user IDs.
Grant Create Access for Any RTS MemberGrant the user authority to create RTS members with the *ANY* entry. Users with this authority can also delete andchange any members they create.
Add Users
To give user IDs and groups User authority
1. Use the I (Insert) line command on the Edit/View INFO/X User Configuration panel to insert a new entry afteranother. INFO/X displays the Edit INFO/X User Configuration panel.
File-------------------------------------------------------------------------------
Edit INFO/X User ConfigurationD0DPDIA0Command ===>
Machine Name. . . . . . . . . SYS* (System ID)User/Group ID . . . . . . . . DSSUSR (User or Group ID)ID Type . . . . . . . . . . . U (U-User G-Group)Authority . . . . . . . . . . U (A-Administrator U-User)RTS Member . . . . . . . . . *ANY* (* for list or '*ANY*' or '*LIST*')Scheduler . . . . . . . . . . *ANY* (* for list or '*ANY*')Selection Exit . . . . . . . *ANY* (Program name or '*ANY*')
Main Menu Panel Tailoring:Query . . . . . . . . . . . Y (Y/N)Update . . . . . . . . . . N (Y/N)Reports . . . . . . . . . . N (Y/N)Directed Execution. . . . . Y (Y/N)
Press Enter or End to continue, Cancel to return and discard changes.
2. In the Machine Name field, enter the system ID (SMF ID) of the MVS system for which the user is beingconfigured. You can use a mask—asterisk (*) or percent (%)—when specifying the machine name.
3. Enter a user ID or group ID in the User/Group ID field.
4. In the ID Type field enter U for user ID or, G for group ID.
29
Individual Access to Product Functions

5. Enter U in the Authority field.
6. Enter a member name in RTS Member field or enter an asterisk (*) to choose from a list.
• Enter *ANY* to give users the ability to use any RTS member and to create RTS members.• Enter *LIST* to allow users to choose from a list of assigned RTS members.
7. Enter a scheduler name in the Scheduler field or enter an asterisk (*) to choose from a list.
• Enter *ANY* to give users the ability to use any scheduler.
8. Enter a program name in the Selection Exit field or *ANY* to give users the ability to use any scheduler.
9. Fill in the Main Menu Panel Tailoring fields as shown in the figure. If the user is to have access to Reports, enterY in the Reports field.
10. Press Enter or End to save changes.
Assign Product Administrator Authority
To assign product administrator authority:
On the Edit/View INFO/X User Configuration panel:
1. In the Machine Name field, enter the system ID (SMF ID) of the MVS system for which the administrator is beingconfigured.
You can use a mask—asterisk (*) or percent (%)—when specifying the machine name.
1. Fill in the User/Group ID field.
2. Enter U in the ID Type field.
3. Enter A in the Authority field.
4. Enter *ANY* in the RTS Member field.
5. Enter *ANY* in the Scheduler field.
6. Enter *ANY* in the Selection Exit field.
7. Fill in the remainder of the fields as shown in the figure.
File-------------------------------------------------------------------------------
Edit INFO/X User ConfigurationD0DPDIA0Command ===>
Machine Name. . . . . . . . . SYS* (System ID)User/Group ID . . . . . . . . DSSADM (User or Group ID)ID Type . . . . . . . . . . . U (U-User G-Group)Authority . . . . . . . . . . A (A-Administrator U-User)RTS Member . . . . . . . . . *ANY* (* for list or '*ANY*' or '*LIST*')Scheduler . . . . . . . . . . *ANY* (* for list or '*ANY*')Selection Exit . . . . . . . *ANY* (Program name or '*ANY*')
Main Menu Panel Tailoring:Query . . . . . . . . . . . Y (Y/N)Update . . . . . . . . . . Y (Y/N)Reports . . . . . . . . . . Y (Y/N)Directed Execution. . . . . Y (Y/N)
Press Enter or End to continue, Cancel to return and discard changes.
30
ASG-INFO/X Enterprise System Administrator Guide

8. Press Enter or End to save changes.
l DEFAULT is a reserved word for RTS member names.
l If the RTS member named in the RTS MEMBER field does not exist when Enter or End is pressed in theEdit/View INFO/X User Configuration panel, INFO/X displays a warning message.
l If an RTS member does not exist when the user starts INFO/X, the DEFAULT RTS member is loaded.
Add Multiple User IDs
To specify several user IDs
On the Edit INFO/X User Configuration panel:
1. In the Machine Name field, enter the system ID (SMF ID) of the MVS system for which the users are beingconfigured.
You can use a mask—asterisk (*) or percent (%)—when specifying the machine name.
2. Fill in the User/Group ID field.
3. Enter U in the ID Type field.
4. Enter U in the Authority field.
5. Enter a member name or *ANY* in the RTS Member field or type and asterisk (*) to choose from a list.
l Enter *LIST* to allow users to choose from a list of assigned RTS members.
6. Enter a scheduler name in the Scheduler field or enter asterisk (*) to choose from a list.
l Enter *ANY* to give users the ability to use any scheduler.
7. Enter a program name in the Selection Exit field or *ANY* to give users the ability to use any scheduler.
8. Fill in the Main Menu Panel Tailoring fields as required.
9. Press Enter or End to save changes.
31
Individual Access to Product Functions

File-------------------------------------------------------------------------------
Edit INFO/X User ConfigurationD0DPDIA0Command ===>
Machine Name . . . . . . . * (System ID)User/Group ID . . . . . . . USR01* (User or Group ID)ID Type . . . . . . . . . . G (U-User G-Group)Authority . . . . . . . . . U (A-Administrator U-User)RTS Member . . . . . . . . *ANY* (* for list or '*ANY*' or '*LIST*')Scheduler . . . . . . . . . *ANY* (* for list or '*ANY*')Selection Exit . . . . . . *ANY* (Program name or '*ANY*')
Main Menu Panel Tailoring:Query . . . . . . . . . . Y (Y/N)Update . . . . . . . . . Y (Y/N)Reports . . . . . . . . . Y (Y/N)Directed Execution. . . . Y (Y/N)
Press Enter or End to continue, Cancel to return and discard changes.
You can enter A in the Authority field to grant several user IDs Product Administrator authority, butuse this feature with caution; INFO/X does not control the creation or deletion of user IDs thatmight match the mask and be granted Product Administrator authority.
Ensure Access to Special Authority
INFO/X reads the User Configuration table from top to bottom to determine the user role. The first entry to match theuser ID (either in group or user ID) is used.
Move One Entry Before Another
To move one entry before another
1. Type M in the SEL field of the entry you want to move, and B in the SEL field of the line you want to move theitem before.
In the below figure, the intent is for USERID01 to be the only Administrator; but because it is afterthe USER* entry, users signing on as USERID01 will not get this authority.
File Help------------------------------------------------------------------------------D0DPDIA2 Edit/View INFO/X User Configuration Row 1 to 3 of 3Command ===> Scroll ===> PAGE
Use: S (Select), I (Insert), R (Repeat), D (Delete), M (Move), A (After),B (Before)
Mach User/ ID RTSSel Name Group ID Type Auth Member Scheduler Query Update Rpts--- ---- -------- ---- ---- -------- --------- ----- ----- ---B SYS* USER* U U RTS02 *ANY* Y Y YM SYS* USERID01 U A *ANY* *ANY* Y Y Y
SYS* ABCUSER G U DEFAULT *ANY* Y N N******************************* Bottom of data ********************************
32
ASG-INFO/X Enterprise System Administrator Guide

2. Press Enter
In the below figure, USERID01 will have administrator authority.
File Help------------------------------------------------------------------------------D0DPDIA2 Edit/View INFO/X User Configuration Row 1 to 3 of 3Command ===> Scroll ===> PAGE
Use: S (Select), I (Insert), R (Repeat), D (Delete), M (Move), A (After),B (Before)
Mach User/ ID RTSSel Name Group ID Type Auth Member Scheduler Query Update Rpts--- ---- -------- ---- ---- -------- --------- ----- ----- ---
SYS* USERID01 U A *ANY* *ANY* Y Y YSYS* USER* U U RTS02 *ANY* Y Y YSYS* ABCUSER G U DEFAULT *ANY* Y N N
******************************* Bottom of data ********************************
Move One Entry After Another
To move one entry after another
1. Type M in the SEL field of the entry you want to move, and A in the SEL field of the line you want to move theitem after.
File Help------------------------------------------------------------------------------D0DPDIA2 Edit/View INFO/X User Configuration Row 1 to 3 of 3Command ===> Scroll ===> PAGE
Use: S (Select), I (Insert), R (Repeat), D (Delete), M (Move), A (After),B (Before)
Mach User/ ID RTSSel Name Group ID Type Auth Member Scheduler Query Update Rpts--- ---- -------- ---- ---- -------- --------- ----- ------ ----
SYS* USERID01 U A *ANY* *ANY* Y Y YM SYS* USER* U U RTS02 *ANY* Y Y YA SYS* DSSUSR G U DEFAULT *ANY* Y N N
******************************* Bottom of data *******************************
2. Press Enter.
File Help------------------------------------------------------------------------------D0DPDIA2 Edit/View INFO/X User Configuration Row 1 to 3 of 3Command ===> Scroll ===> PAGE
Use: S (Select), I (Insert), R (Repeat), D (Delete), M (Move), A (After),B (Before)
Mach User/ ID RTSSel Name Group ID Type Auth Member Scheduler Query Update Rpts--- ---- -------- ---- ---- -------- --------- ----- ------ ----
SYS* USERID01 U A *ANY* *ANY* Y Y YSYS* DSSUSR G U DEFAULT *ANY* Y N NSYS* USER* U U RTS02 *ANY* Y Y Y
******************************* Bottom of data *******************************
33
Individual Access to Product Functions

ExplanationIn the above figure:
l USERID01 is now the only Administrator.
l DSSUSR is a group of users using the DEFAULT RTS member.
l USER* is a collection of users who use RTS02.
Default JOB StatementSet up the default JOB statement for INFO/X. All users can modify the INFO/X JOB statement or their own to use forbackground mode validation.
The default JOB statement is used whenever INFO/X is run in background and a valid JOB statement is not present.
To access the Specify Job Card for Batch panel
1. On the JCL Management Solutions Menu, specify System Info option.
2. On the System Information panel, specify the JOB Card option. The Specify JOB CARD for Batch panel displays.
File Help--------------------------------------------------------------------------------D0SPDIA6 Specify JOB Card for BatchCommand ===>JOB STATEMENT INFORMATION: (Req. - Enter/Verify JOB Control statements)===> //USERID01 JOB (ACCOUNT),'NAME'===> //*===> //*===> //*===> //*
Step accounting information for generated EXEC statement (61 chars max)ACCT ===>
If you wish to be prompted with this panel when the Batch optionis specified, enter Y below:
JOB Statement panel prompt ===> (Y/N)
Press ENTER or END to save changes and return.
Product PasswordThis topic explains how to input and verify product passwords.
Accessing Password Information panel
To access the Password Information panel
n Select Password from the JCL Management Solutions JCL Management Solutions Menu panel. The PasswordInformation panel is displayed. This panel is read-only.
34
ASG-INFO/X Enterprise System Administrator Guide

File------------------------------------------------------------------------------D0SPPSWD Password InformationCommand ===>
Customer ID: 900000000
Expiration Date: MM/DD/YYYY
Activated Product(s):PRO/JCLINFO/X
Customer ID - ASG Customer ID number.
Expiration Date - Date this product password expires.
Activated Products - As determined by the password, the activated product(s) (product(s) this CUSTOMER ID is licensedto use) are listed here.
If Your Product Password Expires
If your product password expires, you must update your product authorization code(s). To obtain product authorizationcodes, call ASG. Please have the following information ready for ASG's contracts personnel:
l Company Name
l CPU Model and Serial Numbers
l ASG Customer ID Number
For information on running job ASMAUTH to apply product authorization codes, see Installation documentation..
Applying Product Authorization Code(s)
Product authorization codes are maintained in the INFO/X load library, in load module ASGPTBL. You receive the productauthorization code(s) separate from the product files. These codes need to be assembled and linked into your INFO/Xload library using INSTALL library member ASMAUTH.
A copy of load module ASGPTBL must be placed in every INFO/X load library. This means that if you are installingINFO/X on multiple systems, or using a shared PCFILE with multiple started tasks, the product authorization code(s)must be applied separately to each system.
Since the product authorization codes are maintained in load libraries instead of PCFILEs, INFO/Xcan no longer automatically synchronize passwords between remote and local systems when usingthe remote PCFILE feature.
To apply your product authorization code(s) using job ASMAUTH
1. Edit INSTALL library member ASMAUTH.
35
Product Password

/DSSnnnQQ JOB (ACCT),BUILD,MSGCLASS=X,NOTIFY=&SYSUID//****************************************************************//* JOB ASMAUTH - INSTALL ASG PRODUCT AUTHORIZATION KEYS...//SYSLIB DD DISP=SHR,DSN=SYS1.MACLIB// DD DISP=SHR,DSN=DSSI.Rnnn.TAPE.INSTALL//SYSPUNCH DD DUMMY//SYSUT1 DD DSN=&WRKA,UNIT=SYSDA,SPACE=(CYL,(5,1))//SYSUT2 DD DSN=&WRKB,UNIT=SYSDA,SPACE=(CYL,(5,1))//SYSUT3 DD DSN=&WRKC,UNIT=SYSDA,SPACE=(CYL,(5,1))//SYSIN DD *
ASGPRODSxxx ASGPROD xxxxxxxxx,xxxxxxx,xxxxxxxxxx,xxxxxx,x,xxxx,xxxx,xxxx, X
PRODVR1='xxxxxxxxxxxxxxxxxxxxx ', X* ...... additional lines or authorization codes ......
ASGPRODE//SYSLIN DD DISP=(,PASS),UNIT=SYSDA,SPACE=(CYL,(2,2,0)),// DCB=(BLKSIZE=400),DSN=&LOADSET//*//LINK EXEC PGM=IEWL,COND=(4,LT,ASSEM),// PARM='LET,LIST,MAP,XREF,SIZE(524288,65536),NCAL,RENT,REUS'//SYSPRINT DD SYSOUT=*//SYSUT1 DD DSN=&WRKAWORK,UNIT=SYSDA,SPACE=(CYL,(5,1))//SYSLMOD DD DISP=SHR,DSN=DSSI.R350.TAPE.LOAD//SYSLIN DD DISP=(OLD,DELETE),DSN=&LOADSET// DD *NAME ASGPTBL(R)******************************** Bottom of Data ********************************
l Replace the lines shown in red with the product authorization code(s) for the product(s) you arelicensed to use.
l If you are licensed for more than one product, the authorization code for each product must beadded to the job.
When entering your product authorization code(s), be sure you include the entire string,including blank spaces and the end quote. Otherwise an error will occur.
2. Submit the job.
36
ASG-INFO/X Enterprise System Administrator Guide

Run-Time SettingsThis topic describes the tasks for setting and maintaining the way INFO/X processes your JCL. These tasks are generallyperformed by the Product Administrator and authorized users when creating or editing RTS members.
What are Run-Time Settings?
Run-Time Settings are parameters that control:
l How INFO/X processes JCL and control statement members,
l The appearance of the Structured JCL Listing (SJL), a report generated from the members scanned.
What Kinds of Run-Time Settings are There?
INFO/X divides Run-Time Settings into two general types:
l Keyword Settings
l Table Settings
Keyword Setting
Keyword Settings are settings for operating system, data base, and software interfaces; and for reportformatting. Keyword Settings are the collection of all Keyword option values. Choose values for Keywordoptions from lists shipped with INFO/X.
Table Setting
Table Settings are settings for site-specific variations of common utility names, special handling of errorconditions, and special environmental concerns. Table Settings are the collection of all Table option values.
Assign values for Table options according to needs at your site.
Where are Run-Time Settings Kept?
All Run-Time Settings are kept in RTS members stored in the Product Control File (PC File). This is a VSAM file that shouldbe maintained (backed-up and re-organized) as any other production dataset.
How are Run-Time Settings Accessed?
To access the Edit/View Run-Time Settings panel, select the RTS Member option from the ASG-INFO/X Main Menu.
n Keyword Settings
n Table Settings
n DEFAULT RTS Member
n User RTS Members
n RTS Member Inventory
n Worksheet for Keyword Settings
n Worksheet for Table Settings
37
Run-Time Settings

Keyword SettingsThis topic discusses the tasks that set and change Keyword Settings. Keyword Settings are divided into severalcategories:
• Run-Time Options • Interfaces
• Format Options • JCL Listing Report
• RTS Report • Enabled Tables
All Keyword Settings are set in the same manner as shown in the examples in this topic.
File------------------------------------------------------------------------------D0SPRUN0 INFO/X Interfaces Row 1 to 15 of 36Command ===> Scroll ===> PAGE
RTS Mbr: DEFAULT Owner: DSSUSR Desc:
Sel Option RTS Value Default Allowable--- ------------------------ ----------------- ----------------- -------------
CA-Jobtrac AJO Date MMDDYY or DDCA-Jobtrac Location within 0 toCA-Jobtrac SCL JOBTRAC.SCL JOBTRAC.SCL Data set namCA-Jobtrac Variables JOBTRAC.DATEFILE JOBTRAC.DATEFILE Data set namCatalog Access Y Y Y or NCatalog Alias Cnt 1 1 within 1 toCA7 Default Schedule ID within 1 toControl-M Resolve YES, NO, orCVOL N N Y or NDB2 Authorization ID ABCD123 ABCD123 an alphabetiDB2 Plan Name IXL1234 IXL1234 an alphabetiDB2 Subsystem D81A D81A an alphabetiDMSVOL ARCHIV ARCHIV VOLSER or NuDSS Version 1.1, 1.2, 1.
l Keywords are ASG defined and not changeable.
l Allowable values are ASG defined and are not changeable.
Edit a Keyword Setting
To edit a Keyword Setting
1. Select the option with a forward slash (/) in the SEL field of the Keyword Setting panel (Run-Time Options,Interfaces, Format Options, JCL Listing Report, RTS Report, Enabled Tables). INFO/X displays the Set Option pop-up for that option.
2. Enter a new value in the RTS Value field.
38
ASG-INFO/X Enterprise System Administrator Guide

Example
To edit the Process IDCAMS Run-Time Setting
1. From the ASG-INFO/X Main Menu, select the RTS Member option. The INFO/X Edit/View Run-Time Settingspanel.
2. Select Run-Time Options. INFO/X displays the Run-Time Options panel.
3. In the SEL field, enter a forward slash (/) next to Process IDCAMS. INFO/X displays the Process IDCAMS pop-up.
Process IDCAMSD0SPRUN1Command ===>
Option Values:RTS . . . YDefault :Allowable: Y or N
Description:
Use Process IDCAMS to enable the interface to validateIDCAMS control statements. Specify Y when you want INFO/X tovalidate IDCAMS control statements and track data setscreated or deleted by an IDCAMS step in the same way JCLreferences are tracked. Specify N when you want INFO/X toignore IDCAMS control statements.
4. Edit value(s) as needed.
5. PF3 out of the pop-up to save your changes.
Table SettingsThese are the Table Setting groups:
• Devices • Control Cards
• PROC Exclude • IMS ACB Datasets
• DD Exclude • Messages
• CSECT Exclude • Return Codes
• DDnames • TMS Codes
• Control Card • Trace
• Utility Alias • Jesprocs
• Data set Preferences • Library Type
• Contention Permitted DSNs
The procedures for setting, modifying and maintaining all Table Settings are described in this topic. There is a panelsimilar to the below figure for each Table Setting.
39
Table Settings

File------------------------------------------------------------------------------D0SPRUN3 Devices Row 1 to 10 of 11Command ===> Scroll ===> PAGE
RTS Mbr: DEFAULT Owner: DSSUSR Desc:
Enter 'ADD' to add Devices
Use: S (Select), R (Repeat), D (Delete)
Sel Unit Name Device Type--- --------- -----------
DISK DASDSYSDA DASDTAPE TAPETP6250 TAPE3380 DASD3390 DASD
Sample Table Setting group panel
l Some Table Settings have a list of allowable values, while some will take any value within a length or rangeconstraint.
l Each Table Setting panel has two columns: an option column 1 (Unit Name) and column 2 (Device Type).Typically, a site specific entry is made in the option column 1, and for column 2, a choice is entered from aset, range or length.
Edit Table Setting Value
To edit or view an option
1. Type S in the SEL field of the entry you want to edit.
2. Press Enter. INFO/X displays EDIT Device Type panel.
EDIT Device TypeD0SPRUN6Command ===>
Press Enter to accept changes, or enter Cancel to reject changes.
Unit Name: TAPEDevice Type . . . . . . TAPEAllowable Values: DASD, TAPE, or STREAM
F1=Help F3=End F12=Cancel
There are two fields in the EDIT Device Type pop-up with the same names as the columns for theoption groups in figure - Sample Table Setting group panel.
40
ASG-INFO/X Enterprise System Administrator Guide

Add Table Option Value
To add an option
1. Type ADD on the command line of the Devices panel (Sample Table Setting group panel). INFO/X displays theAADD Unit Name pop-up.
2. Type a value in the OPTION field (Unit Name in this example), and press Enter.
3. Type one of the allowable values in the column 2 field (Device Type in this example), and press Enter.
ADD Unit NameD0SPRUN4Command ===>
Press Enter to accept changes, or enter Cancel to reject changes.
Unit Name . . . . . . .Device Type . . . . . .Allowable Values: DASD, TAPE, or STREAM
F1=Help F3=End F12=Cancel
Copy (Repeat) Table Option Value
To copy or repeat an option
1. Type R in the SEL field of the desired option on the Devices panel (Sample Table Setting group panel). INFO/Xdisplays Repeat Unit Name panel.
Repeat Unit NameD0SPRUN4Command ===>
Press Enter to accept changes, or enter Cancel to reject changes.
Unit Name . . . . . . . SYSDADevice Type . . . . . . DASDAllowable Values: DASD, TAPE, or STREAM
F1=Help F3=End F12=Cancel
2. Type a value in the Option field (Unit Name in this example).
3. Type one of the allowable values into the column 2 field (Device Type in this example), press Enter. INFO/Xdisplays a message in the table option panel that the message was added to the table. The entry is added afterthe entry you repeated.
41
Table Settings

Delete Table Option Value
To delete an option
1. Type D in the SEL field of the desired option on the Devices panel (Sample Table Setting group panel). INFO/Xdisplays Delete Unit Name panel.
Delete Unit NameD0SPRUN5Command ===>
Press Enter to delete, or enter Cancel to end this request.
Unit Name to be deleted:Unit Name: SYSDADevice Type: DASD
F1=Help F3=End F12=Cancel
2. Press Enter.
DEFAULT RTS MemberThe DEFAULT RTS member contains the default values for settings that control how INFO/X processes JCL and controlstatement members. Set the values in this member before any user attempts to run INFO/X.
Edit the DEFAULT RTS member in a manner similar to other members using the Edit/View Run-Time Settings panel. Toedit the DEFAULT RTS member, choose either of these methods:
l From any product panel with the Settings item in its action bar, select the DEFAULT RTS member from the SelectRTS Member pop-up.
l From the Define Product Access and Default Settings panel, choose the Product Defaults option.
To set the DEFAULT RTS member, follow the procedures in Keyword Settings and Table Settings.
l The DEFAULT RTS member cannot be deleted nor renamed, only changed. Any Product Administrator-authorized user ID can change the DEFAULT RTS member.
l The DEFAULT RTS member can be assigned to a user.
l User-created RTS members can be used to override one or more of the DEFAULT RTS member for aparticular user or group of users. If a field in a user-created RTS member is left blank, the value in theDEFAULT RTS member is automatically used.
l Because User member are to contain exceptions to the values in the DEFAULT RTS member and not becopies of it, it is not possible to save the DEFAULT RTS member with the Save As command.
42
ASG-INFO/X Enterprise System Administrator Guide
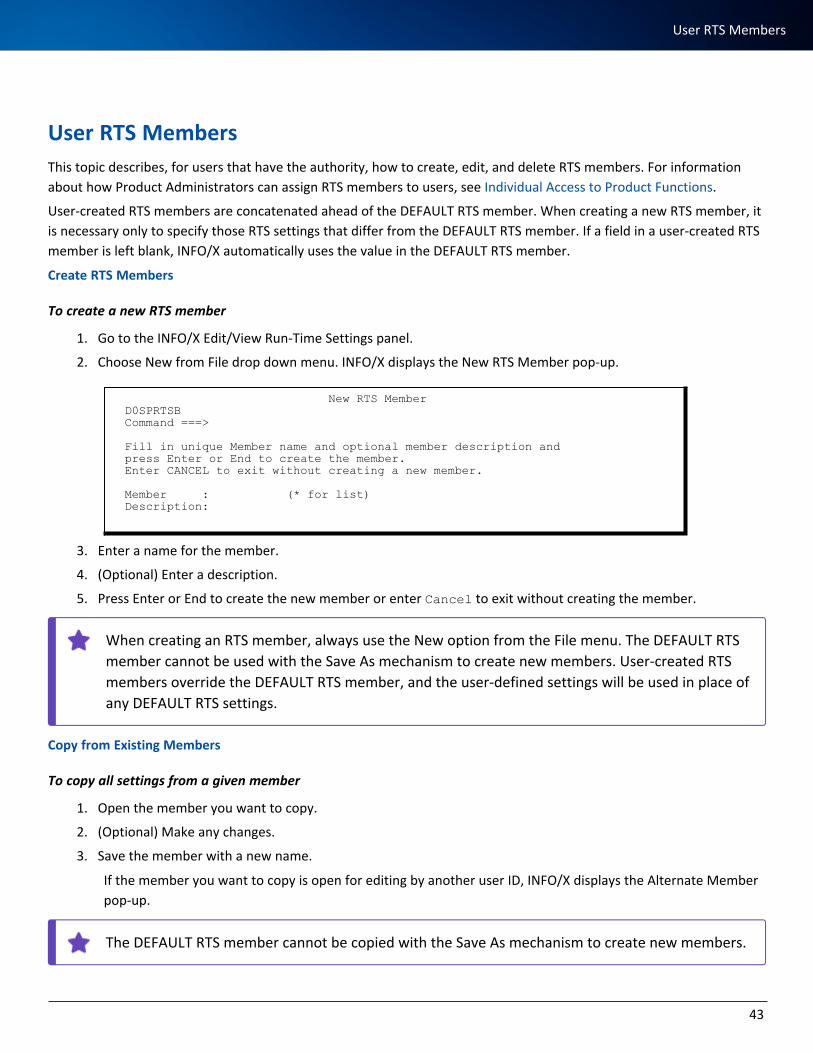
User RTS MembersThis topic describes, for users that have the authority, how to create, edit, and delete RTS members. For informationabout how Product Administrators can assign RTS members to users, see Individual Access to Product Functions.
User-created RTS members are concatenated ahead of the DEFAULT RTS member. When creating a new RTS member, itis necessary only to specify those RTS settings that differ from the DEFAULT RTS member. If a field in a user-created RTSmember is left blank, INFO/X automatically uses the value in the DEFAULT RTS member.
Create RTS Members
To create a new RTS member
1. Go to the INFO/X Edit/View Run-Time Settings panel.
2. Choose New from File drop down menu. INFO/X displays the New RTS Member pop-up.
New RTS MemberD0SPRTSBCommand ===>
Fill in unique Member name and optional member description andpress Enter or End to create the member.Enter CANCEL to exit without creating a new member.
Member : (* for list)Description:
3. Enter a name for the member.
4. (Optional) Enter a description.
5. Press Enter or End to create the new member or enter Cancel to exit without creating the member.
When creating an RTS member, always use the New option from the File menu. The DEFAULT RTSmember cannot be used with the Save As mechanism to create new members. User-created RTSmembers override the DEFAULT RTS member, and the user-defined settings will be used in place ofany DEFAULT RTS settings.
Copy from Existing Members
To copy all settings from a given member
1. Open the member you want to copy.
2. (Optional) Make any changes.
3. Save the member with a new name.
If the member you want to copy is open for editing by another user ID, INFO/X displays the Alternate Memberpop-up.
The DEFAULT RTS member cannot be copied with the Save As mechanism to create new members.
43
User RTS Members
Edit RTS Members
To edit any RTS Member
1. From any product panel displaying the Settings action bar item, choose Settings. The INFO/X Edit/View Run-Time Settings Panel displays.
2. Choose Open from the File pull-down.
3. Choose the RTS member you want to edit from the list in the Select RTS member pop-up. The INFO/X Edit/ViewRun-Time Settings panel displays.
4. Follow the procedures in edit the Run-Time Settings by following the procedures in Keyword Settings and/orTable Settings.
Product Administrators can save changes to any RTS member.
Delete an RTS Member
To delete an RTS member
1. Choose Delete from the File pull-down on the INFO/X Edit/View Run-Time Settings panel.
2. Select the member(s) you want to delete. If you are not an Administrator, the member(s) must be owned byyour user ID.
3. Press Enter. INFO/X displays a confirmation pop-up.
If a product Administrator or owning user deletes the current active RTS member, the DEFAULT RTSmember becomes the active RTS member.
Activate an RTS Member
To activate a different RTS member
1. Choose Open from the File pulldown menu on the INFO/X Edit/View Run-Time Settings panel.
2. Select from the list of members.
3. Press Exit to leave the panel.
RTS Member InventoryFor Product Administrators, this topic describes how to:
l view a list of all RTS members at the site,
l view and/or edit an RTS member,
l delete any unused RTS members.
44
ASG-INFO/X Enterprise System Administrator Guide

View List of RTS Members
To view a list of RTS members
n Select RTS Members from the INFO/X Define Product Access and Default Settings panel.
File Sort------------------------------------------------------------------------------D0SPDIA8 INFO/X RTS Members Row 1 to 3 of 3Command ===> Scroll ===> PAGE
Use: E (Edit), V (View), D (Delete)
Sel Name Owner Description Updated On--- -------- -------- ---------------------------- ---------->
DEFAULT USERID2 04/24/2009JES3OPT USERID3 Used for JES3 validation 04/19/2009RTSTEMP USERID4 04/19/2009
******************************* Bottom of data ********************************
INFO/X RTS Members Panel
l Sort the list on any column.
l The DEFAULT RTS member cannot be deleted or renamed.
Edit an RTS Member
To edit any RTS member
1. View the list of RTS members.
2. Select the member you want to edit by typing an E in the SEL field.
3. Press Enter. INFO/X displays the INFO/X Edit/View Run-Time Settings panel.
4. To edit the Run-Time Settings, follow the procedures in Keyword Settings and/or Table Settings.
Product Administrators can save changes to any RTS member.
View an RTS Member
To view any RTS member
1. View the list of RTS members.
2. Select the member you want to view by typing a V in the SEL field.
3. Press Enter. INFO/X displays the INFO/X Edit/View Run-Time Settings panel.
4. To view information about a setting, type the number of the setting on the command line and press Enter.
5. For information about each Run-Time Setting, see the INFO/X Reference Information.
45
RTS Member Inventory

Delete RTS Members
Use the tasks in this topic to delete:
l RTS Members for discontinued user IDs.
l RTS Members no longer being used.
To delete RTS members
1. View the list of RTS members.2. Select the member you want to delete by typing a D in the SEL field.3. Press Enter. INFO/X displays a confirmation panel.4. Press Enter to confirm
l A product Administrator can remove any RTS member except the DEFAULT.
l If a member is being edited, it cannot be deleted.
Worksheet for Keyword SettingsWrite the default values in the space provided.
Run-Time Options Installed Default Site Default Value
Call Management Class
Call Storage Group
Check DSN Access
Check TAPE DSN Access
Cond Processing
Customer Prefix
FOLT File Size
Free Unused File Interval
GDG UPDATE
Global Exit
Global Exit Parm
ISPF Statistics
46
ASG-INFO/X Enterprise System Administrator Guide

Run-Time Options Installed Default Site Default Value
JES Dest Check
Language Preference
Load JCL Comments
Member Checking
Output PDS ENQ
Output 73-80
Preferred Control Card DD
Preferred Loadlib DDNAME
Preferred Proclib DDNAME
Process ADRDSSU
Process DB2
Process ICEGENER
Process IDCAMS
Process IEBCOPY
Process IEBGENER
Process IEHLIST
Process IEHPROGM
Process SORT
PROCLIBDD
Program Checking
Programmer Name Required
Reformat On Change
Reformat w/Errors
47
Worksheet for Keyword Settings

Run-Time Options Installed Default Site Default Value
Resolve System Symbols
SORT Requires SYSOUT
Status Threshold
Store DSN for DUMMY DD
TSO Submit
Use JES2 PROCLIB Defs
Interfaces Keyword Options Installed Default Site Default Value
CA-Jobtrac AJO Date Format
CA-Jobtrac Default Location
CA-Jobtrac Schedule Control
CA-Jobtrac Variables
Catalog Access
Catalog Alias Cnt
CA7 Default Schedule ID
Control-M Resolve
CVOL
DAGLOBAL
DB2 Authorization ID
DB2 Plan Name
DB2 Subsystem
DMSVOL
DSS Version
48
ASG-INFO/X Enterprise System Administrator Guide

Interfaces Keyword Options Installed Default Site Default Value
HSMVOL
IAM
IMS
IOPLUS
JES
JES Exit Parm
JES Submit Exit
OASIS Delimiter
OASIS Subsystem
TWS Mark ADID Complete
TWS ADID for ASG use
Panexec
Security System
SMS ACS Routines
SMS Class
SMS Default Unit
SQL Block Size
Tape Manager
VTOC Access
Zara Subsystem
Zeke Subsystem
49
Worksheet for Keyword Settings

FormatKeyword Options
Installed Default Site Default Value
Date Format
Flagpage
Headings
Page Length
Report Ditto
Report Footing
Report Width
Uppercase Only
JCL Listing Options Installed Default Site Default Value
JCL Printing
Cntl Card Print
Error Level
Print Accounting Info
Print Changed JOB
Print Password
Print PDS Members
Print Scheduler Stmts
Error Summary
Error Statistics
I/O Statistics
Print OPE Summary
50
ASG-INFO/X Enterprise System Administrator Guide

RTS Report Options Installed Default Site Default Value
Tables
Trace
Enabled Tables Options Installed Default Site Default Value
CA-Jobtrac Alt LOC DSNs ON
Contention Permitted For ON
Control Card DSNs ON
Control Card Printing ON
CSECT Exclusion ON
Data set Prefer ON
DB2 Group Attach ON
DD Exclusion ON
Device Types ON
DFSMShsm MCDS ON
Error Messages ON
Jesproc Concat ON
Library Type ON
PROC Exclusion ON
RC Assignment ON
Required DDnames ON
Tape Out of Area Codes ON
User Utilities ON
Utility Alias ON
51
Worksheet for Keyword Settings

Worksheet for Table SettingsUse this worksheet to record values for the several remaining Table Options groups.
Table OptionGroup
Option NameTitle ofColumn 2
Allowable Values for Column 2
Devices
Unit Name Device Type DASD, Tape, Stream
PROC Exclude
PROC Action Include, Exclude
DD Exclude
DDName Action
CSECT Exclude
CSECT Action
52
ASG-INFO/X Enterprise System Administrator Guide

Table OptionGroup
Option NameTitle ofColumn 2
Allowable Values for Column 2
DDnames
Program.DDname IO Type Output, Input, Update
Control Card
Program.DDnameNumber ofLines
Decimal number from 0 through 999999
Utility Alias
Local Generic
Data setPreference
Data setUse This OneFirst
53
Worksheet for Table Settings

Table OptionGroup
Option NameTitle ofColumn 2
Allowable Values for Column 2
User Utilities
Data set Action Include, Exclude
Control CardDSNs
Data set Action Include, Exclude
DFSMShsmMCDS
Seq.no MCDS Name dataset name with no member
IMS ACB Datasets
Seq.no Data set dataset name with no member
54
ASG-INFO/X Enterprise System Administrator Guide

Table OptionGroup
Option NameTitle ofColumn 2
Allowable Values for Column 2
Messages
Message Number Any 5 digits greater than or equal to 10000
Level Within 0 to 20 and between 1 to 2 digits
Suppress Y or N
Program program name or mask
DDname dataset name or mask
&1 through &4 Parameters for the message
ReasonText noting rationale for making a change inLevel or suppression
Return Codes
Jobname JobstepnameProcstepname
Return CodeorAbend Code
For a return code: decimal number from 0 to4095
For a system abend: a decimal number 0through 999 prefixed by an S
For a user abend: a decimal number 0 through4095 prefixed by a U
Tape Out ofArea Codes
Out of Area Code Action Include, Exclude
55
Worksheet for Table Settings

Table OptionGroup
Option NameTitle ofColumn 2
Allowable Values for Column 2
Jobtrac
Loc. Nr Data set dataset name with no member
Jesprocs
DDname Data set A dataset name
Library Type
Library Name Library Type LIB(RARIAN) or PAN(VALET)
ContentionPermitted DSNs
Data Set Name Action INCLUDE or EXCLUDE
DB2 GroupAttach
Group Attach Name.nnSubsystemName
An alphabetic or national character followed by1-3 alphanumeric or national characters
56
ASG-INFO/X Enterprise System Administrator Guide

Table OptionGroup
Option NameTitle ofColumn 2
Allowable Values for Column 2
Trace
Name Setting On, Off
57
Worksheet for Table Settings

InterfacesThis topic describes the INFO/X interfaces.
n Security Interface
n DASD Management Interfaces
n Database Interfaces
n Library Interfaces
n Scheduler Interfaces
n Tape Management Interfaces
n Utility Interfaces
Security InterfaceINFO/X's security interface works with security software such as RACF, CA-TOP SECRET, and CA-ACF2/MVS to providethe following functions:
l INFO/X access control.
l Dataset name access checking.
l INFO/X job termination.
INFO/X Access Control
To analyze JCL, INFO/X reads procedure libraries, load libraries, and control card libraries, and writes to output files. Thesecurity interface checks whether the INFO/X user is authorized to access these datasets.
If the security interface determines that the user does not have appropriate access to a file, it returns a non-zero returncode to INFO/X in register 15, and INFO/X will not attempt to access the dataset. This prevents access violations and S-913 abends. The interface returns a message code to INFO/X indicating which message to display on the Structured JCLListing (SJL). The INFO/X run continues.
Dataset Name Access Checking
When an MVS user submitting a job lacks appropriate authorization to access a dataset used in the job, the job fails withan access violation. Dataset name access checking validates the access to all datasets within the job stream beingscanned by INFO/X.
To enable this function
n Set the Check DSN Access run-time option to Y.
If you do not need dataset name access checking for a INFO/X job, set the Check DSN Access run-time option to N toimprove performance. See Run-Time Settings for detailed information about RTS options and how to set them.
When this option is turned on, INFO/X calls the security interface to do dataset name access checking for every DDstatement in the JCL input stream that contains a dataset name. The expected access of Read, Update, or Alter isdetermined from the DISP parameter specified in the DD statement. This can be overridden by the I/O code (+I, +O) in
58
ASG-INFO/X Enterprise System Administrator Guide

the JCL comment field. If the security interface returns a non-zero return code (in register 15) from this call, INFO/Xdisplays a message in the Structured JCL Listing (SJL).
INFO/X normally uses the TSO logon ID of the person submitting the INFO/X job to validate dataset name access.However, if the input JCL stream being scanned contains a JOB statement with the USER= parameter, or a //*LOGONIDstatement, security checks will be made by INFO/X using that ID to validate dataset name access. MVS requires INFO/Xto be APF-authorized to perform this alternate user ID validation. Alternate user ID validation is always available whenrunning INFO/X in the foreground, because foreground execution uses the product started task, which is APF-authorized.
In batch, INFO/X uses the alternate user ID to check access to datasets when running APF-authorized, and the logon IDof the user who submitted the INFO/X job when running not APF-authorized.
INFO/X Termination
INFO/X notifies the security interface before terminating. This allows the security interface to free allocated storage andperform any other needed termination tasks.
Choosing the Security Interface
ASG ships three security interfaces in the INFO/X LOAD library: DJ0YSAF0, DJ0YSAF1, and DJ0YSAF2. Read thedescriptions of these interfaces in the below table and choose the one best suited to your site, and rename it DJ0YSAF.
Security Interfaces Description
DJ0YSAF0Uses the System Authorization Facility (SAF) to interface with RACF, CA-ACF2/MVS, orCA-TOP SECRET.
DJ0YSAF1
Uses the third-party RACHECK instead of the RACINIT/RACHECK (used by DJ0YSAF0).DJ0YSAF1 works with RACF release 1.8 or later, the equivalent CA-ACF2/MVS release, orthe equivalent CA-TOP SECRET release. It does not work with ACF2 releases before 5.0.
DJ0YSAF1 uses subpool 251 for storage when invoked in an APF-authorizedenvironment. Subpool 0 storage is deleted after the program module isexecuted, while subpool 251 storage is not deleted until the job setterminates.
DJ0YSAF2
Performs similarly to DJ0YSAF1, but uses the STATUS=ACCESS parameter of theRACROUTE macro to eliminate logging RACF violations if the user does not have accessauthority.
Current releases of CA-ACF2/MVS and CA-TOP SECRET do not support theSTATUS=ACCESS parameter.
DJ0YSAF2 works with RACF 1.8.1 or later, ACF2 6.1 gl 9510 or later, and TopSecret (TSS)4.4 gl 9506 or later.
59
Security Interface

ASG suggests that you use the most advanced security interface that will work with the release ofthe security package running at your site. For example, if you are running RACF 1.8.1 use DJ0YSAF2.
Customizing the Security Interface
The INFO/X security interface is an assembler language module that interfaces with the RACF, CA-TOP SECRET, or CA-ACF2/MVS, security system.
INFO/X includes source code in the SAMPLIB library for the security interfaces in the LOAD library modules: DJ0YSAF0,DJ0YSAF1, and DJ0YSAF2. If your site has special requirements for a security interface, you can modify one of thesemodules to suit your requirements or write your own. Be sure to link the security interface as “RENT” (reentrant) andinstall it in the INFO/X LOAD library with the module name DJ0YSAF.
Program RequirementsThe following actions are required for the interface program to function properly:
l On entering the security interface, save all register contents.
l Before returning to the calling routine, restore all registers except Register 15, and ensure that Register 15contains the appropriate return codes:
o Zero: INFO/X issues no messages.o Non-zero: INFO/X issues the message whose ID is returned in SIPMSGCD in the Security Interface
Parameter list (see table - Security Interface Parameter List ), or message 20780 (“Access to this datasetdenied by SAF interface”) if SIPMSGCD does not contain a message ID.
Registers Used by the Security Interface ProgramEach time the security interface is called, the registers are set as follows:
Register Contents
1 Address of the Security Interface Parameter (SIP) list.
13 Address of a standard MVS register save area.
14 Return address.
15 Entry point address of the security interface routine.
INFO/X passes the name of the dataset, the user ID and group ID, and other information to the security interface modulein a control block called the Security Interface Parameter (SIP) list.
60
ASG-INFO/X Enterprise System Administrator Guide

Security Interface Parameter List
Offsets Dec(Hex)
Type Length Name Description
0 (00) Character 4 SIPID Control block ID ('SIP').
4 (04) Address 4 SIPSADDR Virtual address of SIP.
8 (08) Character 1 Reserved field.
9 (09) Character 11 SIPRSN
Reason security interface is being called. Thefollowing are used for INFO/X access control:
l C'CATALOG REA'—Read the usercatalog.
l C'DYN ALLOC '—Allocate a libraryneeded by INFO/X.
l C'EDIT REQST '—Edit the datasetusing ISPF Edit.
l C'IMS LIBRARY' —Read data set forIMS processing.
l C'JCLLIB READ'—Read dataset toobtain cataloged procedures andINCLUDE libraries.
l C'MBR SELECT '—Read JCL dataset.
l C'READ CC MBR'—Read dataset forcontrol card processing and PDSmember verification.
l C'STEPLIB REA'—Read dataset forPGM verification.
l C'VTOC READ'—Read VTOC fordataset validation.
l C'DSN AUTH CK'—INFO/X DSNAMEValidation: Validate the expectedaccess to the dataset currently beingscanned by INFO/X. If the datasetfield SIPDSN is blank, validate theUSER and/or GROUP name fields,SIPUSRID and SIPGRPID.
l C'TERMINATION'—INFO/X hascompleted validation and isterminating.
61
Security Interface

Offsets Dec(Hex)
Type Length Name Description
20 (14) Character 44 SIPDSN
Dataset name to be used for validation. Thisfield is blank for the termination call, and isalso blank when it is called by INFO/X tovalidate the USER and/or GROUP parametersfrom a JOB card being scanned.
64 (40) Character 6 SIPVOLVolume serial number of the dataset, ifavailable.
70 (46) Character 1
SIPTYPESIPREADSIPUPDATSIPALTER
Type of access desired:
l C'R'—Read access.
l C'W'—Read and write access.
l C'A' —Alter access.
71 (47) Character 1
SIPDVTYPSIPDASDSIPTAPESIPUNKWN
Device type:
l C'D'—DASD device.
l C'T'—Tape device.
l C'U'—Unknown device.
72 (48) Character 8 SIPUSRID
For DSNAME validation only. Contains USERfield from the JOB statement of the jobcurrently being scanned, or if not specified,the user ID of the user who submitted thescan.
80 (50) Character 8 SIPGRPIDFor DSNAME validation only; contains GROUPfield from JOB statement of job currentlybeing scanned.
88 (58) Fixed 4 SIPUSERX
Reserved for security interface use. This fieldis initialized to binary zeros when the securityinterface is initially loaded and is not modifiedfurther; it is to be used exclusively by thesecurity interface.
92 (5C) Fixed 4 SIPMSGCD This field is used to return the message ID ofthe message to be displayed on the SJL.
96 (60) Character 3 SIPRC1This field is used to return a 3-characterreturn code to be placed in a message.
99 (63) Character 3 SIPRC2 This field is used to return a 3-character
62
ASG-INFO/X Enterprise System Administrator Guide

Offsets Dec(Hex)
Type Length Name Description
return code to be placed in a message.
102 (66) Character 3 SIPRC3This field is used to return a 3-characterreturn code to be placed in a message.
106 (6A) Fixed 2 Reserved field.
108 (6C) Character 8 SIPPGMNMFor DSNAME validation only. This fieldcontains program name for EXEC PGM=statement of current step being scanned.
116 (74) Character 8 SIPJOBNMFor DSNAME validation only. This fieldcontains the job name of the current jobbeing scanned.
124 (7C) Character 20 SIPPRGMR
For DSNAME validation only. This fieldcontains programmer name field that wascoded on the JOB statement of the currentjob being scanned.
144 (90) Character 144 SIPACCTG
For DSNAME validation only. This fieldcontains the accounting field that was codedon the JOB statement of the current job beingscanned.
288 (120) Character 8 SIPDDFor DSNAME validation only. This fieldcontains the name of the DD statement that isassociated with the dataset name.
296 (128) Character 8 SIPSECLB
For DSNAME validation only. This fieldcontains the SECLABEL parameter that wascoded on the JOB statement of the currentjob being scanned.
DASD Management InterfacesThis topic provides information on the following DASD (direct-access storage device) management interfaces:
DFSMShsm
The DFSMShsm interface identifies datasets that have been migrated by DFSMShsm. No action needs to be taken toactivate INFO/X HSM simulation for any of the three operating modes of ASG-PRO/JCL. The default volser INFO/Xrecognizes as an HSM-migration volume is MIGRAT. To specify another location as the default, change the value of theHSMVOL option in the RTS member.
63
DASD Management Interfaces

File-------------------------------------------------------------------------------D0SPRUN0 INFO/X Interfaces Row 15 to 37 of 37Command ===> Scroll ===> CSR
RTS Mbr: DEFAULT Owner: DSSUSR Desc:
Sel Option RTS Value Default Allowable--- ------------------------ ----------------- ----------------- -------------
DMSVOL ARCHIV ARCHIV VOLSER or NuDSS Version 1.1, 1.2, 1.
/ HSMVOL MIGRAT MIGRAT VOLSER or NuIAM Y or NIMS Y Y Y or N
...
Changing the default location for HSM—selecting the HSMVOL option
HSMVOLD0SPRUN1 Row 1 to 3 of 3Command ===> Scroll ===> CSR
Option values:RTS . . . MIGRATDefault : MIGRATAllowable: VOLSER or Null Value
Description:Use HSMVOL to specify the VOLSER as the pseudo-VOLSERrecorded in the MVS catalog that represents data setsarchived by Hierarchical Storage Management.
***************************** Bottom of data ******************************
Changing the default location for HSM—entering a new value
DMS
The DMS interface identifies datasets that have been archived by DMS. No action needs to be taken to activate INFO/XDMS simulation for any of the three operating modes of ASG-PRO/JCL. The default volser INFO/X recognizes as a DMS-archived volume is ARCIVE. To specify another location as the default, change the value of the DMSVOL option in theRTS member.
File-------------------------------------------------------------------------------D0SPRUN0 INFO/X Interfaces Row 15 to 37 of 37Command ===> Scroll ===> CSR
RTS Mbr: DEFAULT Owner: DSSUSR Desc:
Sel Option RTS Value Default Allowable--- ------------------------ ----------------- ----------------- -------------/ DMSVOL ARCHIV ARCHIV VOLSER or Nu
DSS Version 1.1, 1.2, 1.HSMVOL MIGRAT MIGRAT VOLSER or NuIAM Y or NIMS Y Y Y or N
...
Changing the default location for DMS—selecting the DMSVOL option
64
ASG-INFO/X Enterprise System Administrator Guide

DMSVOLD0SPRUN1 Row 1 to 5 of 5Command ===> Scroll ===> CSR
Option values:RTS . . . ARCHIVDefault : ARCHIVAllowable: VOLSER or Null Value
Description:Use DMSVOL to specify the volume serial in the MVS catalogwhich represents data sets archived by Data ManagementSystem (DMS). Notes: The DMSVOL VOLSER value must equal thevolume serial coded in the RECATVOLVvvvvv parameter of DMSSYSPARMS.
***************************** Bottom of data ******************************
Changing the default location for DMS—entering a new value
Database InterfacesThis topic provides detailed information about database interfaces.
DB2
ASG provides a DB2 interface for extracting additional information for INFO/X to process. The information is available forbatch DB2 jobs which access databases through the DSN RUN command.
INFO/X ProcessingINFO/X parses and processes the syntax of the DSN commands and parameters, and reports any errors found in the SJL.
INFO/X does not process DB2 utility commands.
Establishing the Interface
To establish the interface
n Turn on the DB2 interface.
When DB2 Group Attach is used it must be specified on the RTS DB2 Group Attach panel, otherwiseINFO/X cannot check the DB2 subsystem when processing JCL.
Turn on the Interface
To turn on the DB2 interface
1. Choose Run-Time Options from the INFO/X Edit/View Run-Time Settings panel.
2. Set Process DB2 to Y on the INFO/X Run-Time Options panel.)
65
Database Interfaces

File------------------------------------------------------------------------------
INFO/X Run-Time Options Row 21 to 38 of 38Command ===> Scroll ===> CSR
RTS Mbr: DEFAULT Owner: DSSUSR Desc:
Sel Option RTS Value Default Allowable--- ------------------------ ----------------- ----------------- ------------
Process ADRDSSU Y Y Y or N/ Process DB2 Y Y Y or N
Process ICEGENER Y Y Y or NProcess IDCAMS Y Y Y or NProcess IEBCOPY Y Y Y or N
...
Run-Time Options panel
File------------------------------------------------------------------------------
INFO/X Interfaces Row 13 to 37 of 37Command ===> Scroll ===> CSR
RTS Mbr: DEFAULT Owner: DSSUSR Desc:
Sel Option RTS Value Default Allowable--- ------------------------ ----------------- ----------------- ------------
DB2 Subsystem DSN7 DSN7 an alphabetiDMSVOL ARCHIV ARCHIV VOLSER or NuDSS Version 1.1, 1.2, 1.HSMVOL MIGRAT MIGRAT VOLSER or NuIAM Y or NIMS Y Y Y or NIMS Version 9 9 an unsigned
...
Interfaces Options panel
Sample Batch DB2 Job StreamThe following is a sample batch DB2 job stream:
//STEP EXEC PGM=IKJEFT01. .. .. .
//SYSIN DD *DSN SYSTEM(DB2P)RUN PROGRAM(PAYDB) LIB(’PROD.LOAD’) PLAN(PAYDB)END
l INFO/X does not process DB2 Utilities.
l If multiple DB2 commands are contained within the SYSTSIN control statements, INFO/X will only processthe first one.
66
ASG-INFO/X Enterprise System Administrator Guide

IMS
ASG provides an Information Management System (IMS) interface for extracting additional information to be validated.The information is available for jobs that access databases through the DLI, BMP, and DBB functions.
INFO/X ProcessingDuring its run, INFO/X processes:
l The IMS application program identified in the PARM parameter of the EXEC statement exists.
l The PSB specified in the Parm field and its associated DBDs can be found in the libraries specified by ddnameIMS for DLI-type processing or ddname IMSACB for DBB-type processing.
l For BMP processing, that the ACB specified in the Parm field can be found in the ACB library.
l Control statements identified by the ddnames DDITV02 or PROCLIB.
Establishing the Interface
To establish the IMS interface
n Enter as many IMS ACB library options as needed in IMS ACB Datasets table of the RTS member (BMPprocessing only).
For example:
File------------------------------------------------------------------------------
IMS ACB Datasets Row 1 to 2 of 2Command ===> Scroll ===> PAGE
RTS Mbr: DEFAULT Owner: DSSUSR Desc:
Enter 'ADD' to add IMS ACB Datasets
Use: S (Select), R (Repeat), D (Delete)
Sel seq. no Data set--- ------- --------
01 DSSI.IMS01.ACBLIB02 DSSI.IMS02.ACBLIB
Setting the IMS ACB datasets
INFO/X performs special processing for batch jobs that access IMS databases using the DFSRRC00driver with the DLI, BMP, and DBB options and the DFHDRP driver that accepts keyword parametersin the Parm field.
Turn On the IMS Interface
To turn on the interface
n Type Y in the IMS option on the Interfaces panel.
67
Database Interfaces

IMSD0SPRUN1 Row 1 to 3 of 3Command ===> Scroll ===> CSR
Option values:RTS . . . NDefault : NAllowable: Y or N
Description:Use IMS to specify whether INFO/X validates DFSRRC00parameters. Specify Y to validate DFSRRC00 parameters.Specify N to ignore DFSRRC00 parameters.
***************************** Bottom of data ******************************
Turn on the IMS Interface
Library InterfacesThis topic provides information about library interfaces.
CA-LIBRARIAN
INFO/X interfaces with CA-LIBRARIAN files. Link DJ0YLIB from the INFO/X SAMPLIB dataset with CA-LIBRARIAN. INFO/Xexpands CA-LIBRARIAN— INCLUDE cards.
Establishing the Interface
To establish the interface to CA-LIBRARIAN
1. Edit the DJ0YLIB member of SAMPLIB as follows:
a. Replace the Job statement with one that is valid for the user site.
b. Modify the HLQ symbolic to specify the first two nodes of the INFO/X load library name.
c. Modify the LIB symbolic to specify the CA-LIBRARIAN load library name.
2. Submit DJ0YLIB. The job should run with a condition of 00.
CA-PANVALET
INFO/X interfaces with CA-PANVALET libraries. Use the installation procedure that corresponds with the CA-PANVALETrelease level used at your user site.
CA-PANVALET Release 12 and LaterIf the library that contains PAM (a CA-PANVALET load module) is not in the link pack area or in the link list, add it to theSTEPLIB:
l If executing INFO/X in batch mode, modify the PR1PROC batch procedure PROC. Add the library containing thePAM load module to the STEPLIB concatenation.
l If executing INFO/X in ISPF mode, modify the DSSISTC started task PROC. Add the library containing the PAMload module to the STEPLIB concatenation.
68
ASG-INFO/X Enterprise System Administrator Guide

l INFO/X expands CA-PANVALET ++ INCLUDE cards.
l If you add the PANVALET load library to the STEPLIB concatenation, it must be APF-authorized.
Scheduler InterfacesTo validate a set of jobs accurately, it is sometimes desirable to process the jobs in run-time order. ASG providesinterfaces between INFO/X and many schedulers.
ASG-ZEKE and OASIS
The ASG-ZEKE interface substitutes an appropriate value into JCL containing ZEKE symbolic parameters.
To establish the interface
1. Link-edit the ZEKEVAR module included in OBJ format in the ZEKE install library. Place the resulting load modulein the INFO/X load library.
2. Make the ZEKE & OASIS load libraries available to the started task, PR1PROC, via STEPLIB, link list, etc.
Under the ZEKE scheduler interface, for versions 4.2 and later, the ZEKE documentation states thatZEKECVAR should be used rather than ZEKEVAR. However, ZEKEVAR should be usedwith INFO/X, regardless of the ZEKE release level.
The ZEKEVAR member can be found in the INFO/X SAMPLIB.
Executing the ZEKE Interface from Panels
To enable the ZEKE & OASIS interfaces
1. Select the Interfaces option from the INFO/X Edit/View Run-Time Settings panel.
2. Specify Zeke Subsystem in the Run-Time Settings. To enable OASIS processing, OASIS Subsystem must bespecified.
The user must also specify the OASIS delimiter, if it is other than the OASIS default of $(.3. Select the Update option from the ASG-INFO/X Main Menu.
4. Select the Update option from the INFO/X Update Repository panel. The INFO/X Update Job Information paneldisplays.
5. Access the Scheduler pop-up from the Settings pull-down menu.
6. Turn on the ZEKE interface by selecting the ZEKE option from the Scheduler pop-up.
7. If OASIS processing is enabled, complete the information fields in the OASIS Context Items for ZEKE Schedulerpanel.
In order to utilize OASIS processing, the OASIS SUBSYSTEM must be the value of the subsystem. If the valueis blank, OASIS processing will not be run. If an OASIS function calls an EXEC, it will actually be done. This isnot a simulation.
69
Scheduler Interfaces

File Settings Help------------------------------------------------------------------------------D0DPRPU0 INFO/X Update Job InformationCommand ===>
.--------------------------------- Scheduler ---------------------------------.| || Command ===> || || Press Enter or End to save changes and return. || Enter CANCEL to discard changes and return. || || Active scheduler: NO SCHED || || Select a scheduler || 5 1. BETA42 || 2. CA7 || 3. CNTLM || 4. CA-Jobtrac || 5. ZEKE || 6. TWS || 7. ESP || 8. NO SCHEDULER |'-----------------------------------------------------------------------------'
Activating the ZEKE interface from the INFO/X Update Job Information panel
OASIS Context Items for ZEKE Scheduler
Command ===>
Press Enter or End to save changes and return.Enter CANCEL to discard changes and return.
Enter the following values for OASIS Context Items:
Job Name . . . . Schedule Date . . ( YYYYDDD )
Netregid . . . . Run Date . . . . . ( YYYYDDD )
Group ID . . . . Application ID . .
User ID . . . . Event Number . . .
System Name . . Version Number . .
F1=Help F3=Exit F12=Cancel
OASIS Context Items for ZEKE Scheduler panel
8. INFO/X returns to the INFO/X UpdateJob Information panel.
9. Fill in the required fields.
10. Enter F or B on the command line and press Enter.
70
ASG-INFO/X Enterprise System Administrator Guide
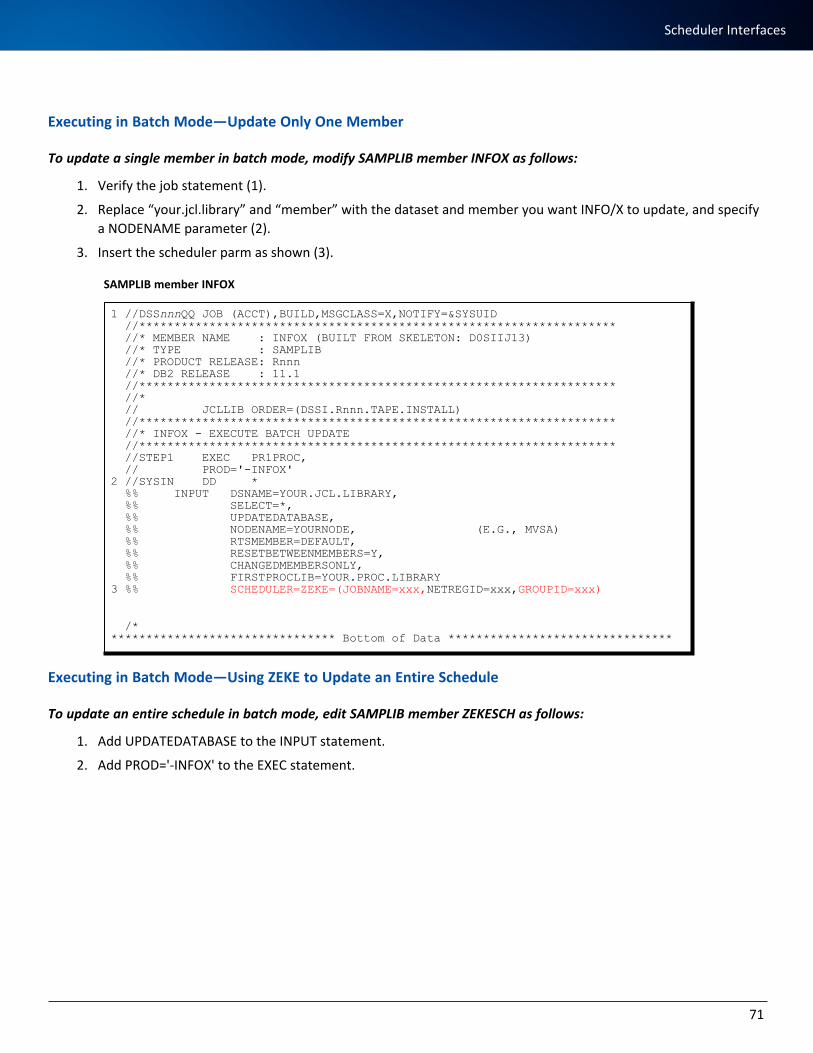
Executing in Batch Mode—Update Only One Member
To update a single member in batch mode, modify SAMPLIB member INFOX as follows:
1. Verify the job statement (1).
2. Replace “your.jcl.library” and “member” with the dataset and member you want INFO/X to update, and specifya NODENAME parameter (2).
3. Insert the scheduler parm as shown (3).
1 //DSSnnnQQ JOB (ACCT),BUILD,MSGCLASS=X,NOTIFY=&SYSUID//********************************************************************//* MEMBER NAME : INFOX (BUILT FROM SKELETON: D0SIIJ13)//* TYPE : SAMPLIB//* PRODUCT RELEASE: Rnnn//* DB2 RELEASE : 11.1//********************************************************************//*// JCLLIB ORDER=(DSSI.Rnnn.TAPE.INSTALL)//********************************************************************//* INFOX - EXECUTE BATCH UPDATE//********************************************************************//STEP1 EXEC PR1PROC,// PROD='-INFOX'
2 //SYSIN DD *%% INPUT DSNAME=YOUR.JCL.LIBRARY,%% SELECT=*,%% UPDATEDATABASE,%% NODENAME=YOURNODE, (E.G., MVSA)%% RTSMEMBER=DEFAULT,%% RESETBETWEENMEMBERS=Y,%% CHANGEDMEMBERSONLY,%% FIRSTPROCLIB=YOUR.PROC.LIBRARY
3 %% SCHEDULER=ZEKE=(JOBNAME=xxx,NETREGID=xxx,GROUPID=xxx)
/********************************* Bottom of Data ********************************
SAMPLIB member INFOX
Executing in Batch Mode—Using ZEKE to Update an Entire Schedule
To update an entire schedule in batch mode, edit SAMPLIB member ZEKESCH as follows:
1. Add UPDATEDATABASE to the INPUT statement.
2. Add PROD='-INFOX' to the EXEC statement.
71
Scheduler Interfaces

//DSSnnnQQ JOB (ACCT),BUILD,MSGCLASS=X,NOTIFY=&SYSUID//*********************************************************************//*//* ZEKESCH - ASG-ZEKE SCHEDULER INTERFACE.//*//* MEMBER NAME : ZEKESCH (BUILT FROM SKELETON: D0SIIJ45)//* TYPE : SAMPLIB//* PRODUCT RELEASE: Rnnn//*********************************************************************// JCLLIB ORDER=DSSI.Rnnn.TAPE.INSTALL//*********************************************************************//* EXECUTE ZEKE PROC "ZEKEUTL".//* JCL SHOULD BE SIMILAR TO://*********************************************************************//ZEKEUTIL EXEC ZEKEUTL,P=(SUBSYS=SSSI)//STEPLIB DD DSN=YOUR.ZEKE.LOADLIB,DISP=SHR//SYSOUT DD SYSOUT=*//SYSPRINT DD DSN=&&FORECAST,DISP=(NEW,PASS),// UNIT=SYSDA,SPACE=(CYL,(1,1),RLSE),// DCB=(RECFM=FBA,LRECL=133,BLKSIZE=0)//*//* PRODUCE A "LIST PLAN" REPORT TO A SEQUENTIAL DATA SET,//* RECFM=FBA,LRECL=133. CONTROL STATEMENTS SHOULD BE SIMILAR TO://*//SYSIN DD *LIST PLAN JOB NOTDONEFIELDS=(EVENT,SCHEDTIM,TYPE,JOBNAME,JCLSOURCE)TITLE 'LIST PLAN FOR PRO/JCL FORECAST'
.
.
.%% INPUT DSNAME=YOUR.ZEKE.JCLLIB, <<<<<<<<SELECTS HERE%% SCHEDULER=ZEKE,%% REPORTS=(SJL),REPORTSTYLE=PAPER,
1 %% UPDATEDATABASE,%% PROCESS=JOB/*//********************************************************************//* EXECUTE PRO/JCL//********************************************************************//PROJCL EXEC PR1PROC,
2 // PROD='-INFOX'//********************************************************************//* USE THE NEWLY CREATED SYSIN//********************************************************************//SYSIN DD DSN=&&SELECTS,DISP=(OLD,PASS)**************************** Bottom of Data ****************************
Using ZEKE to update the database with a schedule
72
ASG-INFO/X Enterprise System Administrator Guide

Executing in Batch Mode: Using ZEKE with OASIS to Update an Entire Schedule
//DSSnnnQQ JOB (ACCT),BUILD,MSGCLASS=X,NOTIFY=&SYSUID//*********************************************************************//*//* ZEKEOASI IS FOR ASG-ZEKE WITH OASIS CONTEXT VARIABLES//*//* MEMBER NAME : ZEKEOASI (BUILT FROM SKELETON: D0SIIJ44)//* TYPE : SAMPLIB//* PRODUCT RELEASE: Rnnn//*********************************************************************// SET HLQ=DSSI.Rnnn.TAPE// JCLLIB ORDER=&HLQ..INSTALL//*********************************************************************//* EXECUTE ZEKE PROC "ZEKEUTL".//* JCL SHOULD BE SIMILAR TO://*********************************************************************//ZEKEUTIL EXEC ZEKEUTL,P='SUBSYS=SSSI'//SYSOUT DD SYSOUT=*//SYSPRINT DD DSN=&&FORECAST,DISP=(NEW,PASS),// UNIT=SYSDA,SPACE=(CYL,(1,1),RLSE),// DCB=(RECFM=FBA,LRECL=133,BLKSIZE=0)//*//* PRODUCE A "LIST PLAN" REPORT TO A SEQUENTIAL DATA SET,//* RECFM=FBA,LRECL=133. CONTROL STATEMENTS SHOULD BE SIMILAR TO://*//SYSIN DD *LIST PLAN JOB TODAY NOTDONEFIELDS=(EVENT,VERSION,TYPE,JOBNAME,JCLSOURCE,SYS,APP,GRO,USE)TITLE 'LIST PLAN FOR PRO/JCL FORECAST'
.
.
.%% PROCESS=JOB,REPORTS=(SJL)%%*//ZEKERPT DD DISP=(OLD,PASS),DSN=&&FORECAST//SELECTS DD UNIT=SYSDA,SPACE=(CYL,(1,1)),DISP=(MOD,PASS),// DSNAME=&&SELECTS,// DCB=(RECFM=FB,LRECL=80,BLKSIZE=2480)//SYSPRINT DD SYSOUT=*//SYSTERM DD SYSOUT=*//********************************************************************//* EXECUTE PRO/JCL//********************************************************************//*//PROJCL EXEC PR1PROC//********************************************************************//* USE THE NEWLY CREATED SYSIN//********************************************************************//SYSIN DD DSN=&&SELECTS,DISP=(OLD,PASS)//********************************************************************//* CREATE A DD FOR EACH DD IN THE ZEKE STARTED TASK THAT IS USED//* FOR EXECUTION JOBS//********************************************************************//ZE45JCL DD DISP=SHR,DSN=ZEKE.V4R5.JCLINPUT**************************** Bottom of Data **************************
Using ZEKE with OASIS to update a schedule
BETA42
INFO/X updates JCL members that contain BETA42 variables. JCL is supplied which updates the database with an entireschedule.
73
Scheduler Interfaces

Modify the started task at PR1PROC
To enable the BETA42 interface, change the started task and PR1PROC as follows:
1. Change PROD= to '-INFOX'
2. Insert three DD statements into the PR1PROC before the PEND statement (2).
3. In the first of these DDs, change the string your.BETA42.SCHJCDB to the dataset name for the BETA42 database.
4. If the BETA42 LOADLIB is not in the LINKLIST, add it at 2.
The BETA42 LOADLIB is your site-specific LOADLIB.
//********************************************************************//* PR1PROC - PROC//*//* MEMBER NAME : PR1PROC (BUILT FROM SKELETON: D0SIIJ10)//* TYPE : INSTALL//* PRODUCT RELEASE: Rnnn//********************************************************************//PR1PROC PROC HLQ=---HLQ---,// DB2EXIT=---DB2EXIT---,// DB2LOAD=---DB2LOAD---,// CICSLOAD=---CICSLOAD---,// PARMPGM='DJ0CBNW',
1 // PROD='-INFOX',// PCHLQ=---PCHLQ---//*//PROJCL EXEC PGM=DJ0YINIB,REGION=0M,PARM='&PARMPGM /&PROD'//STEPLIB DD DISP=SHR,DSN=&HLQ..LOAD
•••
//CEEDUMP DD SYSOUT=* LE TRACE INFORMATION//ABNLIGNR DD DUMMY// UNIT=SYSDA,SPACE=(CYL,(1,1))//* ADD BETA42 DDs HERE
2,3 //SCHJCDB DD DISP=SHR,DSN=YOUR.BETA42.SCHJCDB2 //INPUT DD DISP=(,PASS),DSN=&&INPUT,
// UNIT=VIO,SPACE=(CYL,(1,1)),// DCB=(RECFM=FB,LRECL=80,BLKSIZE=6160)
2 //OUTPUT DD DISP=(,PASS),DSN=&&OUTPUT,// UNIT=VIO,SPACE=(CYL(1,1)),// DCB=(RECFM=FB,LRECL=80,BLKSIZE=6160)//*//*UNCOMMENT JPCSD DD IF MORE SPACE IS NEEDED FOR CICS CSD PROCESSING.//*JPCSD DD DISP=(NEW,DELETE,DELETE),UNIT=SYSDA,SPACE=(TRK,(250,350))//*//*SYSUDUMP DD SYSOUT=* SYSTEM DUMP OUTPUT//*// PEND
**************************** Bottom of Data ***************************
PR1PROC—a portion of the procedure
Individual Execution From the INFO/X Panels
To access BETA42 support from the INFO/X panels
1. Select the Update option from the ASG-INFO/X Main Menu.
2. Select the Update option from the INFO/X Update Repository panel. The INFO/X Update Job Information panel
74
ASG-INFO/X Enterprise System Administrator Guide

displays.
3. Access the Scheduler panel from the Settings pull-down menu of the INFO/X Update Job Information panel.
File Settings Help------------------------------------------------------------------------------D0DPRPU0 INFO/X Update Job InformationCommand ===>
.--------------------------------- Scheduler ---------------------------------.| || Command ===> || || Press Enter or End to save changes and return. || Enter CANCEL to discard changes and return. || || Active scheduler: NO SCHED || || Select a scheduler || 1 1. BETA42 || 2. CA7 || 3. CNTLM || 4. CA-Jobtrac || 5. ZEKE || 6. TWS || 7. ESP || 8. NO SCHEDULER |'-----------------------------------------------------------------------------'
Activating the ZEKE interface from the INFO/X Update Job Information panel
4. Turn on the BETA42 interface by selecting the BETA42 option from the Scheduler panel. .
Scheduler Parms for BETA42
Command ===>
Press Enter or End to save changes and return.Enter CANCEL to discard changes and return.
Taskname . . .
Run Date . . . ( MMDDYY )
F1=Help F3=Exit F12=Cancel
Scheduler Parms for BETA42 pop-up
5. Type the Task Name and the Date in the fields in the Scheduler Parameters for BETA42 pop-up.
6. Press Enter or End when finished with entries; INFO/X returns to the INFO/X UpdateJob Information panel.
7. Fill in the required fields.
8. Enter F or B on the command line and press Enter.
Executing in Batch Mode—Update Only One Member
To update one member in batch, modify SAMPLIB member INFOX as follows:
1. Verify the job statement. (1)
2. Replace YOUR.JCL.LIBRARY and MEMBER with the dataset and member you want INFO/X to update, and
75
Scheduler Interfaces

specify a NODENAME parameter. (2)
3. Insert the scheduler parm as shown. (3)
1 //DSSnnnQQ JOB (ACCT),BUILD,MSGCLASS=X,NOTIFY=&SYSUID//********************************************************************//* MEMBER NAME : INFOX (BUILT FROM SKELETON: D0SIIJ13)//* TYPE : SAMPLIB//* PRODUCT RELEASE: Rnnn//* DB2 RELEASE : 11.1//********************************************************************//*// JCLLIB ORDER=(DSSI.Rnnn.TAPE.INSTALL)//********************************************************************//* INFOX - EXECUTE BATCH UPDATE//********************************************************************//STEP1 EXEC PR1PROC,// PROD='-INFOX'
2 //SYSIN DD *%% INPUT DSNAME=YOUR.JCL.LIBRARY,%% SELECT=MEMBER,%% UPDATEDATABASE,%% NODENAME=YOURNODE, (E.G., MVSA)%% RTSMEMBER=DEFAULT,%% RESETBETWEENMEMBERS=Y,%% CHANGEDMEMBERSONLY,%% FIRSTPROCLIB=YOUR.PROC.LIBRARY,
3 %% SCHEDULER=BETA42=(TASKNAME=YOURTASKNAME,DATE=MMDDYY)/*
SAMPLIB member INFOX
Executing in Batch Mode—Update an Entire BETA42 Schedule
To update an entire BETA42 schedule in batch, make the following changes to SAMPLIB member SCHDBT42:
1. Insert a valid job statement. (1)
2. Type valid values for these variables. (2)
// SET HLQ=---HLQ---// SET LEHLQ=---LEHLQ---// SET SCHJCDB=---BETA42.SCHJCDB---// SET BETA42LD=--BETA42.LOADLIB---
3. In STEP1, put the date for the scheduled jobs you want INFO/X to update. (3)
4. In STEP2, make sure that there is a SYSIN DD * statement with at least PROCESS=JOB and UPDATEDATABASE init. The data in this statement is concatenated to an input statement for each member in the schedule in STEP1.(4)
5. Add PROD='-INFOX' to the EXEC statement.
6. The &&SELECTS dataset, which is SYSIN for STEP3, is built by SCHDBT42 (STEP2) and contains the inputstatements for PR1PROC. (5)
76
ASG-INFO/X Enterprise System Administrator Guide

1 //*SCHDBT42 JOB (ACCT),'INFO/X-BETA42 JOBS'//*//*//********************************************************************
2 // SET HLQ=---HLQ---2 // SET LEHLQ=---LEHLQ---2 // SET SCHJCDB=---BETA42.SCHJCDB---2 // SET BETA42LD=--BETA42.LOADLIB---
// JCLLIB ORDER=&HLQ..INSTALL//********************************************************************//*//* SCHR0040 CREATES A LIST OF SCHEDULED JOBS//* SCHPARM SPECIFIES THE DESIRED DATE OR RANGE OF DATES//*//STEP1 EXEC PGM=SCHR0040,PARM='CONTROL'//STEPLIB DD DISP=SHR,DSN=&BETA42LD//SYSPRINT DD SYSOUT=*//CONTROL DD DSN=&&CONTROL,UNIT=VIO,DISP=(MOD,PASS),// SPACE=(32000,(30,30)),// DCB=(RECFM=FB,LRECL=80,BLKSIZE=3200)//SCHREPRT DD SYSOUT=*//SCHJCDB DD DISP=SHR,DSN=&SCHJCDB//*********//* SCHPARM SPECIFIES THE DATE FOR WHICH TO EXTRACT A SCHEDULE//* FORMAT IS MM/DD/YY//SCHPARM DD *
3 DATE=01/31/98//*//*******************************************************************//*//* DJ0CBT42 CREATES PRO/JCL INPUT STATEMENTS//* FOR EACH JOB IN THE SCHEDULE AN INPUT STATEMENT WILL//* BE CREATED AND THE LINE(S) IN THE SYSIN DD BELOW WILL//* BE COPIED AFTER EACH OF THE INPUT STATEMENTS//* THERE MUST BE AT LEAST ONE SYSIN RECORD//*//STEP2 EXEC PGM=DJ0CBT42//STEPLIB DD DISP=SHR,DSN=&HLQ..LOAD// DD DISP=SHR,DSN=&LEHLQ..SCEERUN//SYSPRINT DD SYSOUT=*//CONTROL DD DSN=&&CONTROL,DISP=(OLD,PASS)//SELECTS DD DSN=&&SELECTS,UNIT=VIO,DISP=(MOD,PASS),// SPACE=(32000,(30,30)),// DCB=(RECFM=FB,LRECL=80,BLKSIZE=3200)//SYSIN DD *
4 %% RTSMEMBER=DEFAULT,PROCESS=JOB,UPDATEDATABASE%%*==============================================================*//*//********************************************************************//* EXECUTE JCL/PRO PROC//********************************************************************
5 //STEP3 EXEC PR1PROC,HLQ=&HLQ,PROD=’-INFOX’//********************************************************************//* SPECIFY INPUT LIBRARY HERE//********************************************************************
6 //SYSIN DD DISP=(OLD,PASS),DSN=&&SELECTS/***************************** Bottom of Data ***************************
SCHDBT42 JCL
CA-Jobtrac
INFO/X simulates some of the functions of CA-Jobtrac. These include:
l Automatic JCL Override.
l JCL Management Facility.
77
Scheduler Interfaces

l Automatic Date Insertion.
l DATELnnn Library Specification.
Prepare an RTS MemberFurnish the dataset where the CA-Jobtrac SCL resides, the dataset where the CA-Jobtrac variables reside, and a defaultlocation in the current RTS member. If your site uses Location dependent DATELIBs, use the CA-Jobtrac DATELIBS tableto specify which library to use for which Location.
Individual Execution From the INFO/X Panels
To access CA-Jobtrac support from the INFO/X panels
1. Select the Update option from the ASG-INFO/X Main Menu.
2. Select the Update option from the INFO/X Update Repository panel.
3. Access the Scheduler pop-up from the Settings pull-down menu of the INFO/X Update Job Information panel.
File Settings Help------------------------------------------------------------------------------D0DPRPU0 INFO/X Update Job InformationCommand ===>
.--------------------------------- Scheduler ---------------------------------.| || Command ===> || || Press Enter or End to save changes and return. || Enter CANCEL to discard changes and return. || || Active scheduler: NO SCHED || || Select a scheduler || 4 1. BETA42 || 2. CA7 || 3. CNTLM || 4. CA-Jobtrac || 5. ZEKE || 6. TWS || 7. ESP || 8. NO SCHEDULER |'-----------------------------------------------------------------------------'
Activating the CA-Jobtrac interface from the INFO/X Update Job Information panel
4. Turn on the CA-Jobtrac interface by selecting the CA-Jobtrac option from the Scheduler pop-up.
5. In the Scheduler Parms for JOBTRAC pop-up, enter the Schedule Date, the Time of Day date, and the Location.
78
ASG-INFO/X Enterprise System Administrator Guide

Scheduler Parms for JOBTRAC
Command ===>
Press Enter or End to save changes and return.Enter CANCEL to discard changes and return.
Original Schedule Date ( YYYYDDD )
Time of Day Date . . . ( YYYYDDD )
Location . . . . . . . ( 000 - 254 )
F1=Help F3=Exit F12=Cancel
Scheduler Parms for JOBTRAC pop-up
6. Press Enter or End when finished with entries. INFO/X returns to the INFO/X UpdateJob Information panel.
7. Fill in the required fields.
8. Enter F or B on the command line and press Enter.
Executing in Batch Mode—Update Only One Member
To update one member in batch, modify the SAMPLIB member INFOX as follows:
1. Verify the job statement. (1)
2. Replace YOUR.JCL.LIBRARY and MEMBER with the dataset and member you want INFO/X to update, andspecify a NODENAME parameter. (2)
3. Insert the scheduler parm as shown. (3)
1 //DSSnnnQQ JOB (ACCT),BUILD,MSGCLASS=X,NOTIFY=&SYSUID//********************************************************************//* MEMBER NAME : INFOX (BUILT FROM SKELETON: D0SIIJ13)//* TYPE : SAMPLIB//* PRODUCT RELEASE: Rnnn//* DB2 RELEASE : 11.1//********************************************************************//*// JCLLIB ORDER=(DSSI.Rnnn.TAPE.INSTALL)//********************************************************************//* INFOX - EXECUTE BATCH UPDATE//********************************************************************//STEP1 EXEC PR1PROC,// PROD='-INFOX'//********************************************************************//* SPECIFY INPUT LIBRARY HERE//********************************************************************
2 //SYSIN DD *%% INPUT DSNAME=YOUR.JCL.LIBRARY,%% SELECT=MEMBER,%% UPDATEDATABASE,%% NODENAME=YOURNODE, (E.G., MVSA)%% RTSMEMBER=DEFAULT,%% RESETBETWEENMEMBERS=Y,%% CHANGEDMEMBERSONLY,%% FIRSTPROCLIB=YOUR.PROC.LIBRARY,
3 %% SCHEDULER=(JOBTRAC=(OSDDATE=YYDDD,TODDATE=yyddd,LOC=nnn))/*
SAMPLIB member INFOX
79
Scheduler Interfaces

Updating Jobs in Run-Time OrderWhen updating jobs in run-time order, use the batch interface program provided by ASG, along with the JCL necessaryto run it.
The interface JCL extracts the information from CA-Jobtrac and automatically updates the jobs in their scheduled order.
The InterfaceThe interface consists of a three-step job that:
l Executes a CA-Jobtrac utility to produce a list of jobs in run-time order.
l Executes the ASG DJ0YJTSC program which selects the jobs and formats the job names into a list for INFO/X.
l Executes INFO/X to update the jobs in run-time order.
Modify the Interface JCL and Submit the Job
To modify the interface JCL and submit the job, edit SAMPLIB member JTSCHED and as follows:
1. Supply a valid job card. (1)
2. Supply the DSN for the CA-Jobtrac load library. (2)
3. The SYSLIST DD for the JREPORT3 step is a temporary dataset for the CA-Jobtrac report. (3) See the belowfigures.
4. Supply the DSN of your forecast. (4)
5. Supply the DSN of your JOB history. (5)
6. Code the selection control card in col 1 in either of two ways: (6)
ALL
Or
START=06/01,01:15-END=06/01,20:59
INFO/X interface JCL, DJ0YJTSC, uses this statement to select the jobs from the CA-Jobtrac report.
7. Supply the dataset name from which INFO/X pulls the jobs. (7)
8. Code the scheduler parameter and UPDATEDATABASE on the input statement. (8)
%% SCHEDULER=(JOBTRAC=(OSDDATE=YYDDD,TODDATE=yyddd,LOC=nnn)),
9. Add PROD='-INFOX' to the EXEC statement. (9)
10. Submit the job.
80
ASG-INFO/X Enterprise System Administrator Guide

1 //DSSnnnQQ JOB (ACCT),BUILD,MSGCLASS=X,NOTIFY=&SYSUID//********************************************************************//* JTSCHED - CA-JOBTRAC INTERFACE.//*//* MEMBER NAME : JTSCHED (BUILT FROM SKELETON: D0SIIJ39)//* TYPE : SAMPLIB//* PRODUCT RELEASE: Rnnn//********************************************************************// JCLLIB ORDER=DSSI.Rnnn.TAPE.INSTALL//********************************************************************//* ==> JTSCHED IS FOR CA-JOBTRAC 3.2 AND LATER ONLY//*********************************************************************//* EXECUTE CA-JOBTRAC PROGRAM "JREPORT3".//* ==> NOTE THAT JREPORT3 DEPENDS ON THE PRIOR EXECUTION OF//* CA-JOBTRAC PROGRAM GJTRVSCH, WHICH LOADS THE FORECAST SCHEDULE.//* JCL SHOULD BE SIMILAR TO://*********************************************************************//JREPORT3 EXEC PGM=JREPORT3
2 //STEPLIB DD DSN=your.JOBTRAC.LOAD,DISP=SHR//SYSPRINT DD SYSOUT=*//SYSOUT DD SYSOUT=*//PULLIST DD SYSOUT=*
3 //SYSLIST DD DSN=JREPORT3.DISPLAY.SCHEDULE,// DISP=(NEW,CATLG,DELETE),// UNIT=SYSDA,SPACE=(CYL,(1,1),RLSE),// DCB=(RECFM=FBA,LRECL=151,BLKSIZE=0)
4 //JOBTRACX DD DSN=your.JOBTRAC.JFST.FORECAST,DISP=SHR5 //JOBHISTX DD DSN=your.JOBTRAC.V3.JOBHIST,DISP=SHR
//SORTIN DD UNIT=SYSDA,SPACE=(CYL,(1,1))//VOLTIN DD UNIT=SYSDA,SPACE=(CYL,(1,1))//SORTOUT DD UNIT=SYSDA,SPACE=(CYL,(1,1))//SORTWK01 DD UNIT=SYSDA,SPACE=(CYL,(3,3))//SORTWK02 DD UNIT=SYSDA,SPACE=(CYL,(3,3))//SORTWK03 DD UNIT=SYSDA,SPACE=(CYL,(3,3))//*//* PRODUCE A "DISPLAY SCHEDULE" REPORT TO A SEQUENTIAL DATA SET,//* RECFM=FBA,LRECL=151. CONTROL STATEMENTS SHOULD BE SIMILAR TO://*//SYSIN DD *DISPLAY SCHEDULE
REMARK (0)TITLE ('DISPLAY SCHEDULE REPORT INPUT TO PRO/JCL');
//*//*********************************************************************//*//* ==> DJ0CJTSC JOBTRAC FORECAST INTERFACE EXECUTION//*//* THE FORECAST DD MUST POINT TO THE REPORT GENERATED BY JOBTRAC//* THE STEPLIB SECOND DD MUST POINT TO THE C++ RUNTIME LIBRARY//*//*********************************************************************//STEP1 EXEC PGM=DJ0CJTSC,PARM='TRAP(ON) TERMTHDACT(TRACE) HEAP(2M,2// M,ANYWHERE,KEEP,2K,2K) ERRCOUNT(0)'//STEPLIB DD DISP=SHR,DSN=&HLQ..LOAD// DD DISP=SHR,DSN=&LEHLQ..SCEERUN C++ RUNTIME LIB
3 //FORECAST DD DISP=(OLD,DELETE),DSN=JREPORT3.DISPLAY.SCHEDULE//*
Sample CA-Jobtrac interface JCL
81
Scheduler Interfaces

//SELECTS DD UNIT=SYSDA,SPACE=(CYL,(1,1)),DISP=(MOD,PASS),// DSNAME=&&SELECTS,// DCB=(RECFM=FB,LRECL=80,BLKSIZE=2480)//SYSPRINT DD SYSOUT=*//SYSTERM DD SYSOUT=*//*//* FIRST CONTROL STATEMENT IS MANDATORY. IF 'ALL' IS IN COLUMN 1,//* DJ0CJTSC PROCESSES ALL JOBS IN THE REPORT. IF 'ALL' IS NOT PRESENT,//* DJ0CJTSC LOOKS FOR VALID BEGINNING DATE IN COLUMN 7, FORM 'MM/DD',//* BEGINNING TIME IN COLUMN 13, FORM 'HH:MM', ENDING DATE IN COLUMN 23//* AND ENDING TIME IN COLUMN 29.//*//SYSIN DD *
6 ALL START=06/01,01:15-END=06/01,20:59%%*%%* THE ABOVE RECORD MUST BE FIRST. IT IS SELECTION PARAMETERS.%%*%%* ALL LINES STARTING WITH %% IN COL 1 WILL BE COPIED TO THE OUTPUT%%* THE LINE BELOW WITH '<<SELECTS HERE' WILL BE REPLACED BY THE%%* GENERATED SELECT STATEMENTS. EACH SELECT WILL HAS A TRAILING COMMA%%* SO THERE MUST BE AT LEAST ONE LINE FOLLOWING '<<SELECTS HERE'%%*
7 %% INPUT DSNAME=DSSI.INFOX.SAMPLIB,<<SELECTS HERE
8 %% SCHEDULER=JOBTRAC=(TODDATE=96360),%% UPDATEDATABASE,%% PROCESS=JOB/*//********************************************************************//* EXECUTE PRO/JCL//********************************************************************
9 //STEP1 EXEC PR1PROC,PROD='-INFOX'//********************************************************************//* USE THE NEWLY CREATED SYSIN//********************************************************************//SYSIN DD DSN=&&SELECTS,DISP=(OLD,PASS)
Sample CA-Jobtrac interface JCL cont.
CA-Driver Interface to CA-7
CA-Driver can be accessed by the Ca-7 Scheduler to provide additional job tailoring. If Both CA-7 and Ca-Driver areactive, then use the INFO/X CA-Driver interface to simulate the functions CA-7 and CA-Driver perform at Job submissiontime.
The CA-Driver interface consists of a three-step job (CADRVR) that:
l Executes the CA-7 LJCK program to extract the JCL from the CA-7 database for the Job specified. CA-7 accessesCA-Driver and resolves the variables.
l Executes the ASG program (D0SECADV) to process the output list from LJCK and produces the JCL exactly as itwould be submitted to the JES reader.
l Executes INFO/X to validate the JCL.
Modify the Interface JCL and Submit the Job
To modify the interface JCL and submit the job, edit EXEC member CADRVR as follows:
1. Determine the requirements for accessing CA-7 in a batch mode. (1)
2. Insert the name of the Job. (2)
82
ASG-INFO/X Enterprise System Administrator Guide

3. The program (CADRVR) was shipped in the HLQ...EXEC installation library. Locate the dataset and verify that theprogram is in it. Insert the dataset name. (3)
4. Insert the INFO/X selection criteria. (4)
5. Submit the Job.
For future executions of the interface, change only the name of the Job in CADRVR.
//DSS320QQ JOB (ACCT),BUILD,MSGCLASS=X,NOTIFY=&SYSUID//********************************************************************//* CA7DRVR- INTERFACE TO CA-DRIVER
.
.
.//* INTERFACE TO CA-DRIVER//* REF: SAMPLIB(CA7DRVR)//*//* NOTE: MODIFY JOB STATEMENT AND ITEMS INDICATED BY ARROWS <==//*********************************************************************//******** GENERATE CA-DRIVER REPORT *********************************//*********************************************************************//STEP1 EXEC PGM=SASSBSTR
1 //CA7CMDS DD DSN=YOUR.CA7.CMDS,DISP=SHR <== CA-7 CMD FILE1 //BATCHIN DD DSN=YOUR.CA7.BATCH,DISP=SHR <== CA-7 INPUT1 //BATCHOUT DD DSN=YOUR.CA7.BATCHOUT,DISP=SHR <== CA-7 OUTPUT
//SYSPRINT DD DSN=&CADRVR,DISP=(,PASS),// SPACE=(TRK,(30,10),RLSE),UNIT=SYSDA, <== VALID UNIT// DCB=(RECFM=FBA,LRECL=133,BLKSIZE=6118)//SYSIN DD DATA,DLM=ZZ/LOGON PASSWORD
2 LJCK,JOB=YOURJOB,LIST=ONLY <===== CHANGE TO YOUR JOB NAME/LOGOFFZZ//SYSUDUMP DD SYSOUT=*//*********************************************************//* EXTRACT THE JCL FROM THE REPORT ********************//*********************************************************//ISPF EXEC PGM=IKJEFT01,DYNAMNBR=25,REGION=1024K//ISPLOG DD SYSOUT=*,// DCB=(RECFM=VA,LRECL=125,BLKSIZE=129)//*
3 //SYSEXEC DD DISP=SHR,DSN=YOUR.REXX.SRC <== APPROPRIATE LIB3 //SYSPROC DD DISP=SHR,DSN=YOUR.REXX.SRC <== APPROPRIATE LIB
//*//INPUT DD DSN=*.STEP1.SYSPRINT,DISP=(OLD,DELETE)//OUTPUT DD DSN=&JCLOUT,DCB=(LRECL=80,BLKSIZE=0),// UNIT=SYSDA,SPACE=(TRK,(5,1)),DISP=(,PASS)//JPDIAG DD SYSOUT=*//SYSTSPRT DD SYSOUT=*//SYSPRINT DD SYSOUT=*//SYSOUT DD SYSOUT=*//SYSTSIN DD *
D0SECADV//*********************************************************//* EXECUTE PRO/JCL ***********************************//*********************************************************//PROJCL EXEC PR1PROC,PROD='-INFOX'//JLJOB DD DSN=*.ISPF.OUTPUT,DISP=(OLD,DELETE)//SYSUDUMP DD SYSOUT=*//SYSEXEC DD DUMMY//SYSIN DD *%% INPUT DDNAME=JLJOB,%% TYPE=SEQ,
4 %% REPORTS=SJL <== PRINT SJL REPORT?/*
CA-Driver Interface program CADRVR
83
Scheduler Interfaces

CA-7
INFO/X simulates the CA-7 # statements that are used to include or exclude lines from a job, based on the schedule ID,date, and time.
Individual Execution From the INFO/X Panels
To access CA-7 support from the INFO/X panels
1. Select the Update option from the ASG-INFO/X Main Menu.
2. Select the Update option from the INFO/X Update Repository panel.
3. Access the Scheduler pop-up from the Settings pull-down menu of the INFO/X Update Job Information panel.
File Settings Help------------------------------------------------------------------------------D0DPRPU0 INFO/X Update Job InformationCommand ===>
.--------------------------------- Scheduler ---------------------------------.| || Command ===> || || Press Enter or End to save changes and return. || Enter CANCEL to discard changes and return. || || Active scheduler: NO SCHED || || Select a scheduler || 2 1. BETA42 || 2. CA7 || 3. CNTLM || 4. CA-Jobtrac || 5. ZEKE || 6. TWS || 7. ESP || 8. NO SCHEDULER |'-----------------------------------------------------------------------------'
Activating the CA---7 interface from the INFO/X Update Job Information panel
4. Choose CA-7 from the Scheduler pop-up.
Scheduler Parms for CA7
Command ===>
Press Enter or End to save changes and return.Enter CANCEL to discard changes and return.
Run Date . . ( YYYYDDD or YYDDD )
Run Time . . ( HHMM )
Schedule Id ( 1 - 255 or ALL )
Scheduler Parms for CA7 pop-up panel
5. Type the Run Date, Run Time, and Schedule ID in the fields in the Scheduler Parameters for CA7 pop-up. Whenspecifying ALL as the Schedule ID, the selected members will be processed in order for each Schedule IDprocessed. The Schedule ID for the run will be printed before each job.
6. Press Enter or End when finished with entries.
84
ASG-INFO/X Enterprise System Administrator Guide

7. Fill in the required fields on the INFO/X UpdateJob Information panel.
8. Enter F or B on the command line and press Enter.
Updating Members in Batch
To update members in batch
1. Turn on the CA-7 interface via the input statement:
%% SCHEDULER=(CA7=(SCHID=nnn,RUNDATE=yyyyddd,RUNTIME=hhmm)
Or
%% SCHEDULER=(CA7=(SCHID=nnn,RUNDATE=yyddd,RUNTIME=hhmm))
2. Furnish a default schedule ID in the CA7 Default Schedule ID interface option in the current RTS member.
Updating Jobs in Run-time OrderWhen updating jobs in run-time order, use the batch interface program provided by ASG, along with the JCL necessaryto run it.
The interface JCL extracts the information from CA-7 and automatically updates the jobs in their scheduled order.
The InterfaceThe interface consists of a three-step job that:
l Executes the CA-7 SASSBSTR program to produce a list of jobs in run-time order.
l Executes the INFO/X DJ0CCA7I program to create all of the necessary input selection statements to be updatedby INFO/X.
l Executes INFOX to update the list of generated jobs.
Modify the Interface JCL and Submit the Job
To modify the interface JCL and submit the job, edit SAMPLIB member CA7CHED as follows:
1. Supply a valid job statement.
2. Change ---HLQ--- to the high-level qualifier for INFO/X.
3. Change ---LEHLQ--- to the high-level qualifier for the LE loadlib.
4. Change the DSN parameters for these DDs:
l CA7CMDS
l BATCHIN
l BATCHOUT
l SYSPRINT
5. Supply the logon password to CA-7.
6. Supply the starting and ending dates and times for the forecast report
7. Change the SLASHCOL and JOBCOL data if the forecast report is different from the coded values.
8. The DSN parameter of the input statement tells INFO/X where to find the job members to be updated.
85
Scheduler Interfaces

9. Add UPDATEDATABASE to the input statement.
10. Add PROD='-INFOX' to the EXEC statement.
11. To complete the preparation of the interface furnish a default schedule ID in the CA7 Default Schedule IDinterface option in the current RTS member, if needed.
12. Submit the job.
//CA7SCHED JOB (ACCT),'PROGRAMMER NAME'//********************************************************************// SET HLQ=---HLQ---// SET LEHLQ=---LEHLQ---,// JCLLIB ORDER=&HLQ..INSTALL//*********************************************************************
.
.
.//***** GENERATE CA-7 SCHEDULE REPORT *********************************//SCHEDULE EXEC PGM=SASSBSTR//CA7CMDS DD DSN=YOUR.CA7.CMDS,DISP=SHR <== CA-7 CMD FILE//BATCHIN DD DSN=YOUR.CA7.BATCH,DISP=SHR <== CA-7 INPUT//BATCHOUT DD DSN=YOUR.CA7.BATCHOUT,DISP=SHR <== CA-7 OUTPUT//SYSPRINT DD DSN=&&CA7RPT,DISP=(,PASS),// SPACE=(TRK,(30,10),RLSE),UNIT=SYSDA, <== VALID UNIT// DCB=(RECFM=FBA,LRECL=133,BLKSIZE=6118)//* => CHANGE MMDDYY AND HHMM VALUES BELOW <===================//SYSIN DD DATA,DLM=ZZ/LOGON PASSWORDFJOB,SYS=GG,FROM=(MMDDYY,HHMM),TO=(MMDDYY,HHMM)/LOGOFFZZ//SYSUDUMP DD SYSOUT=*//*//***** GENERATE SELECTION STATEMENTS FOR THE SCHEDULED JOBS **********//SELECT EXEC PGM=DJ0CCA7I//STEPLIB DD DISP=SHR,DSN=&HLQ..LOAD// DD DISP=SHR,DSN=&LEHLQ..SCEERUN C++ RUNTIME LIB//FORECAST DD DSN=*.SCHEDULE.SYSPRINT,DISP=(OLD,DELETE)//SELECTS DD UNIT=SYSDA,SPACE=(CYL,(1,1)),DISP=(MOD,PASS),// DSNAME=&&SELECTS,// DCB=(RECFM=FB,LRECL=80,BLKSIZE=2480)//SYSIN DD *DATECOL=2 THESE ARE ONLY NECESSARY IF THE FORECAST REPORTJOBCOL=25 HAS THEM IS COLUMNS OTHER THAN 2, 25, 53 AND 77SCHIDCOL=53NOEXCOL=77%% INPUT DSNAME=your.ca7.jcllib, <== YOUR JCL LIBRARY
UPDATEDATABASE//* if jobs do not all come out of one library, use a separate DD//* to concatenate the libraries then specify://* %% INPUT DDNAME=CA7JOBS,REPORTS=(SJL),//* and uncomment and complete the CA7JOBS DD in the PROJCL step.//SYSUDUMP DD SYSOUT=*//*//***** EXECUTE PRO/JCL ***********************************************//*//PROJCL EXEC PR1PROC,PROD='-INFOX'//*//********************************************************************//* USE THE FOLLOWING IF THE JOBS COME FROM DIFFERENT DATA SETS//********************************************************************//*CA7JOBS DD DISP=SHR,DSN=your.first.jcllib <== LIST ALL YOUR//* DD DISP=SHR,DSN=your.second.jcllib <== LIBRARIES HERE//* DD DISP=SHR,DSN=your.third.jcllib//*
Sample CA7SCHED JCL
86
ASG-INFO/X Enterprise System Administrator Guide

CONTROL-M
INFO/X simulates some functions of the CONTROL-M Scheduler. These include:
l A batch interface to CONTROL-M to update production jobs in run-time order.
l A dynamic CONTROL-M interface to resolve the %% variables.
l A batch interface to CONTROL-M to resolve all Auto Edit variables - including variables defined in a schedulinglibrary.
Updating Jobs in Run-Time OrderA batch interface to CONTROL-M is provided for updating all jobs on the schedule for a given time period (SAMPLIBmember CONTROLM). The interface extracts JCL from CONTROL-M and writes it to a sequential file; the file is then inputto INFO/X.
CONTROL-M Scheduler Interface: Resolving %% VariablesProduction JCL run by CONTROL-M often contains CONTROL-M and user %% variables and %%CALCDATE functions. The%% variables need to be resolved before the jobs can be updated. ASG provides an interface to CONTROL-M that can beautomatically invoked during both foreground and batch runs of INFO/X.
INFO/X control statements contain %% symbols. If these control statements are coded in the job JCLbeing scanned, CONTROL-M issues errors.
Prepare the Interface
To establish the interface
1. Modify the PR1PROC PROC as follows:
a. Add the following allocate statement for the DAGLOBAL DD:
//DAGLOBAL DD DSN=PROD.AUTO.EDIT,DISP=SHR//DAPARM DD DISP=SHR,DSN=NDS.IOA602.PARM// DD DISP=SHR,DSN=NDS.IOA602.IOAENV//PRTDBG DD DUMMY
b. Add the following DD for the CONTROL-M load library to the STEPLIB DD concatenation, after theINFO/X load library.
// DD DSN=LOAD.LIB.CNTLM,
If using CONTROL-M %%$WCALC variables, include a DACAL DD statement pointing to theappropriate library.
2. Modify the DSSISTC started task PROC as follows:
a. Add the following allocate statement for the DAGLOBAL DD:
//DAGLOBAL DD DSN=PROD.AUTO.EDIT,DISP=SHR//DAPARM DD DISP=SHR,DSN=NDS.IOA602.PARM
87
Scheduler Interfaces

// DD DISP=SHR,DSN=NDS.IOA602.IOAENV//PRTDBG DD DUMMY
b. Add the following DD for the CONTROL-M load library to the STEPLIB DD concatenation, after theINFO/X load library.
// DD DSN=LOAD.LIB.CNTLM,
l If using CONTROL-M %%$WCALC variables, include a DACAL DD statement pointing to the appropriatelibrary.
l If using CONTROL-M, Release 6.0, include a DAPARM DD statement pointing to the appropriate libraries.
l CONTROL-M, Release 6.0, requires update access to the IOALOG. As a result, all INFO/X users must begranted update access to the CONTROL-M log file.
3. For background, set the Run date on the SCHEDULER parameter in the input statement:
%% SCHEDULER=(CNTLM=(RUNDATE=yymmdd)),
Individual Execution From the INFO/X Panels
To execute CONTROL-M support from the INFO/X panels
1. Select the Update option from the ASG-INFO/X Main Menu.
2. Select the Update option from the INFO/X Update Repository panel.
3. Access the Scheduler pop-up from the Settings pull-down menu of the INFO/X Update Job Information panel.
File Settings Help------------------------------------------------------------------------------D0DPRPU0 INFO/X Update Job InformationCommand ===>
.--------------------------------- Scheduler ---------------------------------.| || Command ===> || || Press Enter or End to save changes and return. || Enter CANCEL to discard changes and return. || || Active scheduler: NO SCHED || || Select a scheduler || 3 1. BETA42 || 2. CA7 || 3. CNTLM || 4. CA-Jobtrac || 5. ZEKE || 6. TWS || 7. ESP || 8. NO SCHEDULER |'-----------------------------------------------------------------------------'
Activating the CONTROL-M interface from the INFO/X Update Job Information panel
4. Choose CONTROL-M from the Scheduler pop-up.
88
ASG-INFO/X Enterprise System Administrator Guide

Scheduler Parms for CNTLM
Command ===>
Press Enter or End to save changes and return.Enter CANCEL to discard changes and return.
Run Date . . ( YYMMDD )
F1=Help F3=Exit F12=Cancel
Scheduler Parms for CNTLM pop-up
5. Type the Run Date in the fields in the Scheduler Parameters for CNTLM pop-up.
6. Press Enter or End when finished with entries; INFO/X returns to the INFO/X UpdateJob Information panel.
7. Fill in the required fields.
8. Enter F or B on the command line and press Enter.
Updating Jobs when Variable Information is Stored in the Job Scheduling DefinitionTo update a set of jobs accurately, all variables must first be resolved. INFO/X provides sample JCL that updates a set ofjobs defined in a scheduling library table (SAMPLIB member CTLMAE). This sample JCL can be used to resolve variablesdefined in the scheduling library.
The InterfaceThe interface consists of a two-step job that:
l Executes the CONTROL-M CTMAESIM PROC to resolve all CONTROL-M variables and control statements, thenplaces those jobs in a sequential file.
l Executes INFO/X to update the jobs (in the sequential file) using the SCHEDLIB definitions.
Establishing the Interface
To establish the interface
1. Modify the interface JCL according to the directions contained in the CTLMAE member of the SAMPLIB library.
2. Add PROD='-INFOX' to the EXEC statement.
3. Add UPDATEDATABASE to the input statement.
4. Submit the job.
This figure shows sample JCL for the CONTROL-M Scheduler interface (in the CTLMAE member of the SAMPLIB library):
89
Scheduler Interfaces

//CTLMAE JOB (ACCT),'PROGRAMMER NAME' <=====//********************************************************************//* INTERFACE TO THE CONTROL-M SCHEDULER (TO PROCESS JOBS WITH ALL//* AUTO-EDIT VARIABLES RESOLVED)//* REF: SAMPLIB(CTLMAE)//*//* NOTE: MODIFY ALL STATEMENTS INDICATED BY AN ARROW <====//*//* NOTE: REFER TO THE CONTROL-M USER MANUAL FOR DETAILS ON CTMAESIM//********************************************************************// SET HLQ='---HLQ---' <====// SET CNTLMPRC='---CONTROL-M PROC LIB---' <====// SET DAGLOBAL='CNTLM.GLOBAL.LIB' <====//*// JCLLIB ORDER=(&HLQ..INSTALL,// &CNTLMPRC)//*THE FOLLOWING STEP EXECUTES THE CONTROL-M SIMULATOR. ALL CONTROL-M//* AUTO-EDIT VARIABLES AND STATEMENTS WILL BE RESOLVED.//CTMAESIM EXEC CTMAESIM//DAGLOBAL DD DSN=&DAGLOBAL,DISP=SHR//DAPARM DD DISP=SHR,DSN=NDS.IOA602.PARM// DD DISP=SHR,DSN=NDS.IOA602.IOAENV//DASUBMIT DD DISP=(,PASS),DSN=&&JCLFILE,UNIT=SYSDA, <==== VALID UNIT// SPACE=(CYL,(1,1)),DCB=(LRECL=80,BLKSIZE=0,RECFM=FB)//SYSPRINT DD SYSOUT=*//* VARIABLES DEFINED IN THE SCHEDULING LIBRARY CAN BE USED//DASIM DD *ODATE ?ORIG.SCHED.DATE? <====SCHEDLIB ?YOUR.SCHEDULING.LIBRARY? <====TABLE ?YOURTABLE? <====JOB * <====SUBMIT
//*//********************************************************************//* EXECUTE PRO/JCL//********************************************************************//STEP2 EXEC PR1PROC,REGION.PROJCL=0M,PROD='-INFOX'//DAGLOBAL DD DSN=&DAGLOBAL,DISP=SHR//SYSUDUMP DD SYSOUT=*//SYSEXEC DD DUMMY//JLJOB DD DSN=&&JCLFILE,DISP=(OLD,DELETE,DELETE)//SYSIN DD *%% INPUT DDNAME=JLJOB,%% TYPE=SEQ,%% RTSMEMBER=DEFAULT,%% USERREPORTTITLE='CONTROL-M AUTOEDIT-RESOLVED JCL',%% UPDATEDATABASE**************************** Bottom of Data ***************************
SAMPLIB member CTLMAE
ESP Scheduler Interface
Prepare the Interface
To prepare the interface
n Verify that Cybermation maintenance APAR (SA02747) has been applied to ESP.
Cybermation ESP load library must be available to the INFO/X started task and PR1PROC via LINKLIST orsteplib.
90
ASG-INFO/X Enterprise System Administrator Guide

1 //DSSnnnQQ JOB (ACCT),BUILD,MSGCLASS=X,NOTIFY=&SYSUID//********************************************************************//* MEMBER NAME : INFOX (BUILT FROM SKELETON: D0SIIJ13)//* TYPE : SAMPLIB//* PRODUCT RELEASE: Rnnn//* DB2 RELEASE : 11.1//********************************************************************//*// JCLLIB ORDER=(DSSI.Rnnn.TAPE.INSTALL)//*//********************************************************************//* INFOX - EXECUTE BATCH UPDATE//********************************************************************//STEP1 EXEC PR1PROC,
2 // PROD='-INFOX'//SYSIN DD *%% INPUT DSNAME=YOUR.JCL.LIBRARY,%% SELECT=MEMBER,%% SCHEDULER=ESP=(SUBSYSTEM=ESP,%% EVENT=ESP.EVENT,%% SCHEDDATE='ESP.SCHED.DATE'),
3 %% UPDATEDATABASE//SYSPRINT DD SYSOUT=*
SAMPLIB member INFOX
Individual Execution from the INFO/X Panels
To run the interface
1. Select the Update option from the ASG-INFO/X Main Menu.
2. Select the Update option from the INFO/X Update Repository panel.
3. Access the Scheduler pop-up from the Settings pull-down menu of the INFO/X Update Job Information panel.
File Settings Help------------------------------------------------------------------------------D0DPRPU0 INFO/X Update Job InformationCommand ===>
.--------------------------------- Scheduler ---------------------------------.| || Command ===> || || Press Enter or End to save changes and return. || Enter CANCEL to discard changes and return. || || Active scheduler: NO SCHED || || Select a scheduler || 7 1. BETA42 || 2. CA7 || 3. CNTLM || 4. CA-Jobtrac || 5. ZEKE || 6. TWS || 7. ESP || 8. NO SCHEDULER |'-----------------------------------------------------------------------------'
Activating the ESP interface from the INFO/X Update Job Information panel
4. Choose ESP from the Scheduler action bar item and specify settings for the ESP scheduler.
91
Scheduler Interfaces

Specify ESP InformationCommand ===>
Press Enter or End to save changes and return.Enter CANCEL to discard changes and return.
ESP Subsystem Name . . ESP
Event to Simulate DSSUSR.TESTSYM ( Qualified Event name )
Schedule Date . . . . ( A valid ESP date )
Root JOB . . . .
User Parameters To Be Passed To The Event:USER1USER2USER3USER4
Scheduler Parms for ESP pop-up
ESP Subsystem Name Subsystem is the name of the ESP subsystem to use.
Event to Simulate
Event to Simulate is the name of any valid ESP event. An existing event must bespecified for simulation. This event should be an event with only one job, as ESP willgenerate messages about all jobs after the first.
Schedule Date Schedule Date is the date ASG-PRO/JCL should simulate.
Root JOB Enter the names of the jobs and successor jobs needed for a partial re-run.
User Parameters Enter up to four parameters to be passed to ESP.
Updating an Entire Schedule in Run-Time OrderThe interface consists of a three-step batch-only job that:
l Defines a temporary dataset to contain the forecasted JCL.
l Executes an ESP utility program to extract the JCL for the set of jobs and places it in the temporary file.
l Executes INFO/X to update the jobs in run-time order. The ESP Scheduler Interface will only run in this manner.
Modify the Control Cards and Interface JCL and Submit the Job
To modify the control cards and interface JCL and submit the job
1. Add a valid job card.
2. Define the CYBJS000 control statements and execution parameters according to ESP documentation. The“SUBSYS” execution parameter must specify the 1 to 4 character name of the ESP subsystem which managesthe schedule to be updated.
3. Modify the DSN parameters for the DD statements according to your site's dataset naming conventions.
92
ASG-INFO/X Enterprise System Administrator Guide
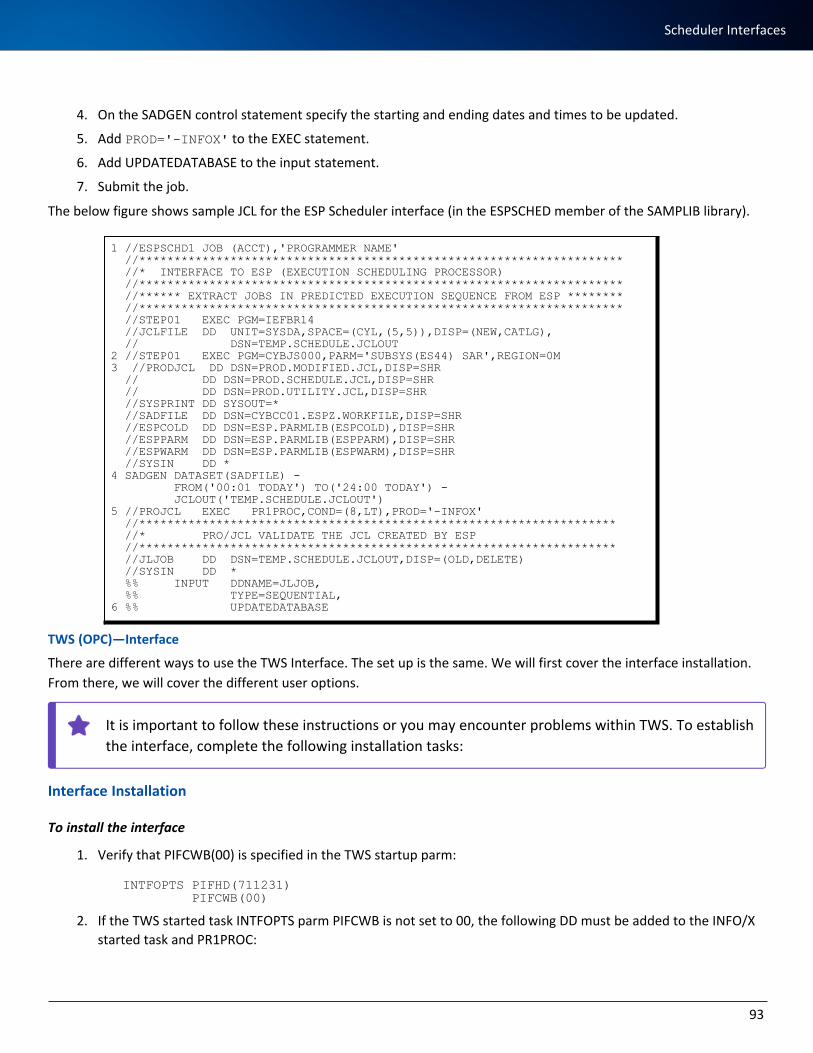
4. On the SADGEN control statement specify the starting and ending dates and times to be updated.
5. Add PROD='-INFOX' to the EXEC statement.
6. Add UPDATEDATABASE to the input statement.
7. Submit the job.
The below figure shows sample JCL for the ESP Scheduler interface (in the ESPSCHED member of the SAMPLIB library).
1 //ESPSCHD1 JOB (ACCT),'PROGRAMMER NAME'//*********************************************************************//* INTERFACE TO ESP (EXECUTION SCHEDULING PROCESSOR)//*********************************************************************//****** EXTRACT JOBS IN PREDICTED EXECUTION SEQUENCE FROM ESP ********//*********************************************************************//STEP01 EXEC PGM=IEFBR14//JCLFILE DD UNIT=SYSDA,SPACE=(CYL,(5,5)),DISP=(NEW,CATLG),// DSN=TEMP.SCHEDULE.JCLOUT
2 //STEP01 EXEC PGM=CYBJS000,PARM='SUBSYS(ES44) SAR',REGION=0M3 //PRODJCL DD DSN=PROD.MODIFIED.JCL,DISP=SHR
// DD DSN=PROD.SCHEDULE.JCL,DISP=SHR// DD DSN=PROD.UTILITY.JCL,DISP=SHR//SYSPRINT DD SYSOUT=*//SADFILE DD DSN=CYBCC01.ESPZ.WORKFILE,DISP=SHR//ESPCOLD DD DSN=ESP.PARMLIB(ESPCOLD),DISP=SHR//ESPPARM DD DSN=ESP.PARMLIB(ESPPARM),DISP=SHR//ESPWARM DD DSN=ESP.PARMLIB(ESPWARM),DISP=SHR//SYSIN DD *
4 SADGEN DATASET(SADFILE) -FROM('00:01 TODAY') TO('24:00 TODAY') -JCLOUT('TEMP.SCHEDULE.JCLOUT')
5 //PROJCL EXEC PR1PROC,COND=(8,LT),PROD='-INFOX'//********************************************************************//* PRO/JCL VALIDATE THE JCL CREATED BY ESP//********************************************************************//JLJOB DD DSN=TEMP.SCHEDULE.JCLOUT,DISP=(OLD,DELETE)//SYSIN DD *%% INPUT DDNAME=JLJOB,%% TYPE=SEQUENTIAL,
6 %% UPDATEDATABASE
TWS (OPC)—Interface
There are different ways to use the TWS Interface. The set up is the same. We will first cover the interface installation.From there, we will cover the different user options.
It is important to follow these instructions or you may encounter problems within TWS. To establishthe interface, complete the following installation tasks:
Interface Installation
To install the interface
1. Verify that PIFCWB(00) is specified in the TWS startup parm:
INTFOPTS PIFHD(711231)PIFCWB(00)
2. If the TWS started task INTFOPTS parm PIFCWB is not set to 00, the following DD must be added to the INFO/Xstarted task and PR1PROC:
93
Scheduler Interfaces

//EQQYPARM DD DISP=SHR,DSN=DSSI.DEV.CNTL(OPCINIT)
This points to a PDS member or SEQ datset that contains the following line:
INIT CWBASE(00)
3. Modify the INFO/X started task, PR1PROC, PR1PROCT JCL members to include the following DDs:
//EQQMLIB DD DISP=SHR,DSN=dsn1//EQQMLOG DD SYSOUT=*//EQQDUMP DD SYSOUT=*//EQQEMSG DD SYSOUT=*
l EQQMLIB points to the TWS Message Library [dsn1].
l There must be an application description (AD) defined in TWS for INFO/X to use for variable resolution. Thisapplication must have ONE AND ONLY ONE computer operation (#001) and any valid job name. TheAutomatic Options for this operation should include SUBMIT 'N'. An occurrence of the application definedto TWS must be in the Current Plan (CP), and the user must have authorization to modify the Current Planfor that application. The run schedule must be set so that the operation always appears in the Current Plan.
l It is normal for INFO/X to modify the Current Plan occurrence of this AD, as necessary.
l INFO/X will look for Application Description DSSIADHOC1 unless an alternate ADID is specified in the RTSmember for the system on which INFO/X is running.
Security IssuesIf any TWS subresources (that is, application, group, etc.) for the ASG application are secured, the user must bepermitted to update these resources (example, CP and JS) for the application descriptions defined for INFO/X use in thecurrent plan.
Multiple SystemsIf multiple systems are being used, there should be an ADID for each system on which INFO/X is running defined to eachTWS controller that can be used.
ExampleThree MVS systems: MVS1, MVS2, and MVS3 all running INFO/X.
l Define three ADIDs in TWS - DSSIADHOC1, DSSIADHOC2, and DSSIADHOC3.
l Specify ADID 'DSSIADHOC1' in the RTS member on MVS1.
l Specify ADID 'DSSIADHOC2' in the RTS member on MVS2.
l Specify ADID 'DSSIADHOC3' in the RTS member on MVS3.
Enabling the Interface
To enable the interface
n Use the Settings and the Scheduler pull-down menus from the "JJ OPT" ISPF Edit Macro to specify the TWSScheduler Interface. Once enabled, you can scan JCL members within ISPF Edit.
94
ASG-INFO/X Enterprise System Administrator Guide

Scanning Within ISPF EditOnce the TWS interface is installed and enabled, the ASG-PRO/JCL Edit Macro can be invoked to scan JCL.
To scan within ISPF edit
n Type JJ on the ISPF Edit Command Line and press Enter.
ASG-PRO/JCL uses the TWS Subsystem name, Input Arrival Date/Time, and Variable Table Name specified on theSettings and the Scheduler pull-down menus to resolve the TWS variables. ASG-PRO/JCL appends the resolved JCL asNOTE lines after the original JCL.
Scanning Within TWS (OPC)Once the TWS interface is installed, the ASG-PRO/JCL Edit Macro can be invoked to scan JCL
To scan within TWS
n From TWS's Editing JCL for a Computer Operation panel, type JJ on the Command Line and press Enter.
ASG-PRO/JCL uses the TWS Subsystem name, Input Arrival. Date/Time, and Variable Table Name directly from TWS toresolve the TWS variables. ASG-PRO/JCL appends the resolved JCL as NOTE lines after the original JCL.
TWS (OPC)—Batch Interface
INFO/X batch processing simulates most of the functions and resolves variables of the TWS Scheduler (Tivoli WorkloadScheduler) or OPC. The interface is invoked by submitting the INFO/X batch JCL.
Enabling the Interface
To enable the interface
n Use the following INPUT statements to specify the TWS Scheduler Interface:
%% SCHEDULER=(OPC=(SUBSYSTEM=opcd,IADATE=yymmdd,IATIME=HHMM,{JCLVTABLE=tablename or APPLID=applicationid}))
If a value is added for APPLID, JCLVTABLE will be ignored.
If the IADATE/IATIME that is specified in the scheduler pull-down is past the end of the CurrentPlan, the variables based on the IA date and time (&OMM, &ODD, etc.) will not be resolved asdesired.
Scanning in BatchOnce the TWS interface is specified and enabled, the INFO/X batch JCL can be submitted to scan JCL.
INFO/X will use the TWS Subsystem name, Input Arrival Date/Time, and Variable Table Name specified on the INPUTstatements to resolve the TWS variables. INFO/X appends the resolved JCL as NOTE lines after the original JCL.
TWS (OPC)—Batch Run-Time Interface
INFO/X simulates most of the functions of TWS Scheduler. Sample interface JCL is contained in SAMPLIB memberOPCESCH1. The interface consists of a three-step job that:
95
Scheduler Interfaces

l Executes an ASG program to generate a list of jobs for the selected application(s).
l Sorts the list of jobs by planned start time. Executes an ASG program to extract the JCL for the set of jobs andplaces it in a temporary PDS with generated member names A followed by seven digits, example, A1234567.
l Executes INFO/X to validate the jobs in run-time order. TWS will only run in this manner.
Establishing the Interface—Procedure Overview
To establish the interface
l Determine the site installation's OPC environment.
l Modify TWS control statements and interface JCL and submit the job.
Determine the TWS Environment
To determine the TWS environment, answer the following questions
l Which workstation ID(s) and application(s) need to be validated?
l What is the name of the TWS subsystem?
l What is the name of the library containing the module EQQYCOM?
l What is the name of the TWS message library dataset?
Modify the Control Cards and Interface JCL and Submit the Job
To modify the control statements and interface JCL, and submit the job
1. Define the Input Selection information on the CARD DD statement in the interface JCL contained in theOPCESCH1 member in the SAMPLIB library.
The only parameter required is WS=. WS identifies the selected workstation IDs for this job. At least oneand as many as 100 can be specified in a single job. The workstation parameter (WS=) must be specified asfour characters. If a workstation ID is less than four characters, right pad it with blanks followed by acomma. For example:
//CARD DD *WS=CPU1,CPU ,CPUX
2. Modify the rest of the JCL according to the directions contained in the member.
3. Submit the job.
l If the last workstation identified in the string is padded with a right blank, it must be followed with a trailingcomma in order to be properly read by INFO/X.
As many lines as necessary can be used. Each line must start with:
WS=
96
ASG-INFO/X Enterprise System Administrator Guide

l For information on optional parameters, see TWS (OPC) Scheduler Interface—Input Parameters . When anyother parameters are used to modify the Control Cards, they each need to be on different cards (oneparameter per card).
Substituting VariablesThis capability is available for TWS Version 1, Release 3.1 and above. The interface will request TWS to supply JCL withthe following conditions:
l Submit variables are substituted.
l Nonpromptable setup variables are substituted.
l Promptable setup variables are substituted using the default values. Specify the defaults when calling PIF;otherwise, no substitution takes place, and the JCL might contain ampersand (&), question mark (?), andpercent (%) characters.
l PHASE=SETUP directives are returned to the caller, even though TWS only simulates submission.
l A time value can be specified in the SIMTIME argument for TWS supplied variables that contain a currenttime value. TWS uses the current time if you do not specify SIMTIME.
l JCL is returned even if errors were found. Error and warning messages are inserted in the JCL.
l The OPCESCH1 member of the SAMPLIB library shows sample JCL for the TWS Scheduler interface.
TWS (OPC) Scheduler Interface—Input Parameters
Required Parameters
WS ParameterThe WS parameter is required. For details, see Modify the Control Cards and Interface JCL and Submit the Job.
Input parameter WS= is the only required input parameter for the TWS Scheduler interface JCL.
Optional ParametersA line with the word DEPENDENCIES in column 1, will cause ASG-PRO/JCL to extract dependencies for JOBS to bescanned and take them into account when ordering jobs.
The below table shows the optional parameters for application IDs, dates, and times.
Group 1 Group 2 Group 3 Group 4
AID1 STAT SIMTIME DATE
AID2 TIME
SDATE
STIME
97
Scheduler Interfaces

Group 1 Group 2 Group 3 Group 4
EDATE
ETIME
Each parameter is discussed below.
Group 1:AID1 and AID2
The AID1 and AID2 parameters select specific application IDs by instructing TWS toinclude application IDs with a value greater than or equal to the value of AID1, and lessthan or equal to the value of AID2. Values can be one to 16 characters long (no maskingallowed). If omitted, AID1 defaults to blanks; AID2 defaults to Z999999999999999. Forexample:AID1=FABC
AID2=H
Group 2:STAT
The STAT parameter identifies the status of each operation (for example, awaitingexecution, complete, or completed in error). The following are valid status codes. Thedefault is AWR*.
A—Ready. No predecessor defined.
C—Complete.
D—Deleted.
E—Operation ended in error.
I—Interrupted operation.
R—All predecessors are complete.
S—Started.
U—Undecided. The status is not known.
W—Waiting for a predecessor to complete.
*—Ready. At least one predecessor was nonreporting. All predecessors are complete.
Group 3:SIMTIME Parameter
The SIMTIME parameter causes TWS to pull jobs using the current plan as if it wererunning on the specified date and time. The format of the parameter is:SIMTIME=CCYYMMDDHHMM
where CCYYMMDDHHMM is a valid TWS SIMTIME value. Refer to TWS ProgrammingInterfaces for more detailed information.
For example:SIMTIME=200008260600
Group 4:DATE and TIME
The DATE, TIME, SDATE, STIME, EDATE, and ETIME parameters restrict the occurrencesof applications where JCL is retrieved using the current plan. All DATE fields are inyymmdd format. All TIME fields are in hhmm format.
98
ASG-INFO/X Enterprise System Administrator Guide

DATE—Occurrences on a particular date.
TIME—Occurrences at a particular time.
SDATE—Occurrences on a start date.
STIME—Occurrences at a start time.
EDATE—Occurrences on an ending date.
ETIME—Occurrences at an ending time.
Valid DATE and TIME CombinationsCertain combinations of DATE, TIME, SDATE, STIME, EDATE, and ETIME are not valid. See the following table todetermine valid combinations.
Parameter DATE TIME SDATE STIME EDATE ETIME
DATE N/A Required Prohibited Prohibited Prohibited Prohibited
TIME Required N/A Prohibited Prohibited Prohibited Prohibited
SDATE Prohibited Prohibited N/A Required Required Required
STIME Prohibited Prohibited Required N/A Required Required
EDATE Prohibited Prohibited Required Required N/A Required
ETIME Prohibited Prohibited Required Required Required N/A
l N/A—Not Applicable
l Required—This combination of parameters is required.
l Prohibited—This combination of parameters can not be used.
Tape Management InterfacesThis topic provides detailed information about tape management interfaces.
AutoMedia/ZARA
INFO/X accesses the ZARA Removable Media Manager database to obtain information about tape datasets to verify thevolume number coded in the JCL or from the system catalog against the ZARA database. INFO/X automatically invokesthe ZARA interface as necessary.
Identify the ZARA LibraryMake sure the ZARA interface routine (ZARAAPI1) is available during INFO/X execution using either of the followingmethods:
99
Tape Management Interfaces

l Make sure ZARA LOADLIB is link-listed.
l Add the ZARA load library name to the STEPLIB concatenation in the started task JCL and in the PR1PROC.
Turn On the Interface
To activate the interface
n Enter ZARA in the RTS field of the TAPEMANAGER interface option.
For example:
Tape ManagerD0SPRUN1 Row 1 to 6 of 6Command ===> Scroll ===> CSR
Option values:RTS . . . ZARADefault :Allowable: TLMS, TMS, TMS5, ZARA, RMM, CTLT, NOTMS, or Null Value
Description:Use Tape Manager to specify the tape management systemINFO/X should use during JCL validation. Use TMS to specifythe CA-TMS tape management system is a release prior torelease 5. Use TMS5 to specify the CA-TMS tape managementsystem as release 5 or greater. Use ZARA to specify the ZARAtape management system (any release).
***************************** Bottom of data ******************************
CA-1 (TMS)
INFO/X accesses the CA-1 (UCC1) Tape Management System (TMS) catalog to obtain information about tape datasets toverify the volume serial number coded in the JCL or from the system catalog against the TMS catalog. INFO/Xautomatically invokes the CA-1 interface as necessary.
Identify the TMS LibraryMake sure the TMS interface routine (TMSSVC) is available during INFO/X execution using either of the followingmethods:
l Make sure TMSSVC is link-listed.
l Add the TMS load library name to the STEPLIB concatenation in the started task JCL and in the PR1PROC.
Turn On the Interface
To activate the interface
l If your CA-1 release is 5.0 or greater, enter TMS5 in the RTS field of the TAPEMANAGER interface option.
l If your CA-1 release is prior to Release 5, enter TMS in the RTS field of the TAPEMANAGER interface option.
For example:
100
ASG-INFO/X Enterprise System Administrator Guide

Tape ManagerD0SPRUN1 Row 1 to 6 of 6Command ===> Scroll ===> CSR
Option values:RTS . . . TMSDefault :Allowable: TLMS, TMS, TMS5, ZARA, RMM, CTLT, NOTMS, or Null Value
Description:Use Tape Manager to specify the tape management systemINFO/X should use during JCL validation. Use TMS to specifythe CA-TMS tape management system is a release prior torelease 5. Use TMS5 to specify the CA-TMS tape managementsystem as release 5 or greater. Use ZARA to specify the ZARAtape management system (any release).
***************************** Bottom of data ******************************
CA-DYNAM/TLMS
INFO/X accesses the CA-DYNAM/TLMS tape management system Volume Master File (VMF) to verify that volume anddataset information coded in the JCL or obtained from the system catalog matches the VMF. INFO/X will flag thosedatasets which are not found on a specified volume at the specified label. INFO/X automatically invokes the CA-DYNAM/TLMS interface as necessary.
Identify the TLMS LibraryThe following DD must be allocated to the PR1PROC and the started task:
l //JTLMSVMF DD DSN=tlms.vmf.dataset,DISP=SHR
This is for the TLMS Volume Master File.
If attempting to write to a dataset which is on a volume that is currently active, INFO/X verifies thatthe specified volume is on-site. It will also confirm that the volume is in the appropriate status (thatis, scratch for write and not scratch for read).
Turn On the CA-DYNAM/TLMS Interface
To activate the interface
n Enter TLMS in the RTS field of the TAPEMANAGER interface option.
For example:
101
Tape Management Interfaces

Tape ManagerD0SPRUN1 Row 1 to 6 of 6Command ===> Scroll ===> CSR
Option values:RTS . . . TLMSDefault :Allowable: TLMS, TMS, TMS5, ZARA, RMM, CTLT, NOTMS, or Null Value
Description:Use Tape Manager to specify the tape management systemINFO/X should use during JCL validation. Use TMS to specifythe CA-TMS tape management system is a release prior torelease 5. Use TMS5 to specify the CA-TMS tape managementsystem as release 5 or greater. Use ZARA to specify the ZARAtape management system (any release).
***************************** Bottom of data ******************************
CONTROL-M/Tape (CTLT)
INFO/X accesses the CONTROL-M/Tape Manager to verify the tapes in the database. INFO/X will flag those datasetswhich are not found on a specified volume at the specified label. INFO/X automatically invokes CTLT as necessary.
Identify the CTLT LibraryThe following 3 DDs must be allocated to the PR1PROC and the started task:
l //DAMDB DD DISP=SHR,DSN=IOA.V5R09702.CTT.MDBD
l //DAMDI DD DISP=SHR,DSN=IOA.V5R09702.CTT.MDBI
l //DATRC DD DISP=SHR,DSN=IOA.V5R09702.CTT.TRC
These are for the CONTROL-M/Tape MEDIA DATABASE (MDBD & MDBI), and the CONTROL-M/Tape trace file. datasetnames should be changed to reflect those used by CONTROL-M/Tape.
The CONTROL-M/Tape load library must be made available to both the started task and the PR1PROC.
Turn On the Interface
To activate the interface
n Enter CTLT in the RTS field of the TAPEMANAGER interface option.
For example:
102
ASG-INFO/X Enterprise System Administrator Guide

Tape ManagerD0SPRUN1 Row 1 to 6 of 6Command ===> Scroll ===> CSR
Option values:RTS . . . CTLTDefault :Allowable: TLMS, TMS, TMS5, ZARA, RMM, CTLT, NOTMS, or Null Value
Description:Use Tape Manager to specify the tape management systemINFO/X should use during JCL validation. Use TMS to specifythe CA-TMS tape management system is a release prior torelease 5. Use TMS5 to specify the CA-TMS tape managementsystem as release 5 or greater. Use ZARA to specify the ZARAtape management system (any release).
***************************** Bottom of data ******************************
If attempting to write to a dataset which is on a volume that is currently active, INFO/X will verifythat the specified volume is on-site. It will also confirm that the volume is in the appropriate status(i.e. scratch for write and not scratch for read).
DFSMSrmm - Removable Media Manager
INFO/X accesses IBM's RMM Control Dataset (CDS) to obtain information regarding tape datasets known to RMM. Thisinformation can be used with information from the system catalog and information on the tape DD card to verify thatthe DD card, the Catalog, and RMM's knowledge of the physical tape are consistent.
Information checked is VOLSER, tape dataset name, availability (out in a disaster store location or in the library), datasetsequence, status (scratch or master file), etc. INFO/X automatically invokes the RMM Applications Interface (API) whenrequired for a tape dataset.
RequirementsThe following conditions must be met to utilize the INFO/X DFSMSrmm interface:
l DFSMS level V1R3 or higher installed. For V1R3, you must be at maintenance level 9806 or have PTF UW47006applied. If running V1R4, you must be at maintenance level 9806 or have PTF UW47007 applied. For V1R5 andabove, no special maintenance is needed.
l An easy way to verify the maintenance level is to locate "EDGDOCX" in SYS1.SAMPLIB and "EDGXAPI" inSYS1.LINKLIB. If these members are present, you are at the correct maintenance level.
l Make sure that RMM is operative.
l The DFSMSrmm load library must be made available to both the started task and the PR1PROC.
Turn On the Interface
To activate the interface
n Enter RMM (for IBM's Removable Media Manager) in the RTS field of the TAPEMANAGER interface option.
For example:
103
Tape Management Interfaces

Tape ManagerD0SPRUN1 Row 1 to 6 of 6Command ===> Scroll ===> CSR
Option values:RTS . . . RMMDefault :Allowable: TLMS, TMS, TMS5, ZARA, RMM, CTLT, NOTMS, or Null Value
Description:Use Tape Manager to specify the tape management systemINFO/X should use during JCL validation. Use TMS to specifythe CA-TMS tape management system is a release prior torelease 5. Use TMS5 to specify the CA-TMS tape managementsystem as release 5 or greater. Use ZARA to specify the ZARAtape management system (any release).
***************************** Bottom of data ******************************
If attempting to write to a dataset which is on a volume that is currently active, INFO/X will verifythat the specified volume is on-site. It will also confirm that the volume is in the appropriate status(i.e. scratch for write and not scratch for read).
NOTMS
Specifies that no tape manager is used.
Activate the Interface
To specify that no Tape Manager Interface option is used
n Enter NOTMS in the RTS field of the TAPEMANAGER interface option.
For example:
Tape ManagerD0SPRUN1 Row 1 to 6 of 6Command ===> Scroll ===> CSR
Option values:RTS . . . NOTMSDefault :Allowable: TLMS, TMS, TMS5, ZARA, RMM, CTLT, NOTMS, or Null Value
Description:Use Tape Manager to specify the tape management systemINFO/X should use during JCL validation. Use TMS to specifythe CA-TMS tape management system is a release prior torelease 5. Use TMS5 to specify the CA-TMS tape managementsystem as release 5 or greater. Use ZARA to specify the ZARAtape management system (any release).
***************************** Bottom of data ******************************
104
ASG-INFO/X Enterprise System Administrator Guide

Utility InterfacesUtility interfaces are specified on the INFO/X PROCLIBDD panel.
To reach this panel
1. Select the Administration—Define Product Access and Default Settings option from the ASG-INFO/X MainMenu.
2. Select INFO/X Product Defaults—Set RTS Defaults from the Define Product Access and Default Settings panel.INFO/X displays the INFO/X Edit/View Run-Time Settings panel.
3. Select Run-Time Options from the INFO/X Edit/View Run-Time Settings panel.
4. Select PROCLIBDD from the Run-Time Options panel. INFO/X displays the PROCLIBDD panel.
DYNAPROC
Activate the InterfaceINFO/X dynamically allocates the DD PROCLIB for DYNAPROC as needed.
To turn on the interface
n Enter the name of the DD (DYNAPROC) in the PROCLIBDD interface option.
This DD specifies the libraries that INFO/X searches for PROCs before it searches the JES PROCS.
PROCLIBDDD0SPRUN1 Row 1 to 8 of 8Command ===> Scroll ===> CSR
Option values:RTS . . . JOBPROCDefault : JOBPROCAllowable: DDname or Null Value
Description:Use PROCLIBDD to specify the DDNAME your system uses toresolve PROC's and INCLUDE'S. This might be 'DYNAPROC' or'EZPROC' if either product is used to resolve PROC's. Notes:INFO/X processes PROC libraries in this order: 1. InstreamPROCs. 2. Those specified in the INFO/X Validation panelFIRSTPROCLIB option. 3. Those specified in the JCLLIBstatement in the JCL. 4. Those specified in this (PROCLIBDD)option. 5. Those specified in JES.
***************************** Bottom of data ******************************
CA-EZPROCLIB
Activate the InterfaceINFO/X dynamically allocates the DD PROCLIB for CA-EZPROCLIB as needed.
To turn on the interface
n Enter the name of the DD (PROCLIB) in the PROCLIBDD interface option.
105
Utility Interfaces

This DD specifies the libraries that INFO/X searches for PROCs before it searches the JES PROCS.
PROCLIBDDD0SPRUN1 Row 1 to 8 of 8Command ===> Scroll ===> CSR
Option values:RTS . . . JOBPROCDefault : JOBPROCAllowable: DDname or Null Value
Description:Use PROCLIBDD to specify the DDNAME your system uses toresolve PROC's and INCLUDE'S. This might be 'DYNAPROC' or'EZPROC' if either product is used to resolve PROC's. Notes:INFO/X processes PROC libraries in this order: 1. InstreamPROCs. 2. Those specified in the INFO/X Validation panelFIRSTPROCLIB option. 3. Those specified in the JCLLIBstatement in the JCL. 4. Those specified in this (PROCLIBDD)option. 5. Those specified in JES.
***************************** Bottom of data ******************************
106
ASG-INFO/X Enterprise System Administrator Guide

The INFO/X RepositoryThis topic explains how to load and maintain the INFO/X Repository.
n Flowchart
n Tips on Loading the INFO/X Repository
n Maintain the Repository
n Viewing the History of Repository Updates
n Editing the History of Repository Updates
n Deleting CICS CSD Files from the Repository
n Updating the Repository
n Automatic Incremental Update (AIU)
n Batch
n Format of Statements
n Large Batch Run Considerations
n Remote Database Update Facility
n Maintaining INFO/X Performance
FlowchartThe following flowchart outlines the process for creating, loading, and maintaining the INFO/X Repository.
107
The INFO/X Repository

108
ASG-INFO/X Enterprise System Administrator Guide

Tips on Loading the INFO/X RepositoryWhen the INFO/X Repository is initially loaded, INFO/X reads the specified JCL libraries, analyzes the JCL items and theirinterrelationships, and places the cross-reference information in the database. At the same time, INFO/X storeshistorical data on the update.
Because initially loading the INFO/X Repository can be a big job, it is recommended that you observe the followingguidelines to minimize the impact on computing resources and to ensure a successful build.
Select Background Mode
To load the repository in background mode
1. Choose one of these execution methods:
l Select option B (batch execution using ISPF panels) from the INFO/X Repository Update panel.
Or
l Run the job in batch mode using the instructions in Batch.
When selecting option B, be sure to specify a Job statement on the Job Statement and TSOOutput Parms panel.
2. Specify a library and library type on the INFO/X Update Job Information panel. The member name and membercount fields are mutually exclusive. It is recommended that the member count is used when doing the initialload of the INFO/X Repository.
3. Use the two fields at the bottom of the panel to build the INFO/X Repository in manageable chunks instead ofone big run. Perform standard DB2 image copies between builds.
4. Specify all desired selection criteria, and then load the file in sections. Type the member number at which youwant to start building the repository, and then enter the number of members to cross-reference in this run. Forexample, to include members 1 through 1000:
File Settings Help
D0DPRPU0 INFO/X Update Job InformationCommand ===>
F Foreground Execution RTS Member. . . . . DEFAULT ( * for list)B Background Execution Processing Mode . . JOB ( * for list)
Nodename . . . . . MVSA ( * for list)
Input Library 'YOUR.LIB.NAME'Member . . . . Show Directory (Y/N)Exclude Member Show Directory (Y/N)Lib Type . . . PDS ( * for list)
or Listname . . ( * for list)First PROCLIB 'YOUR.LIB.NAME'
Lib type . . . PDS ( * for list)
Start at member number . . .1 for a count of . .1000
INFO/X Update Job Information panel
109
Tips on Loading the INFO/X Repository

l To view or edit the INFO/X control cards and execution JCL prior to background execution, enter BE on thecommand line.
l ISPF packed datasets are not supported by the INFO/X database update program. If you scan ISPF packeddatasets during INFO/X database loading or during AIU processing, corrupted data might be put into therepository.
Monitoring Local DELETEFROMDATABASE Processing
When INFO/X deletes large numbers (tens of thousands or more) of jobs from the repository, it is useful to be able tomonitor the progress at intermediate intervals. INFO/X provides a monitoring capability by reporting the cumulativetotal of jobs deleted as a threshold number and multiples of the threshold accumulate.
For example, if the threshold is set to 1000 then cumulative totals are printed when 1000, 2000, 3000,…(and so on) jobshave been deleted. A separate report is printed for each INPUT statement that contains the DELETEFROMDATABASEparameter. Each report consists of lines marking the start and stop of monitoring with the date and time of each, a lineindicating the threshold number of jobs and a line printed each time the deleted count reaches a multiple of thethreshold number.
The threshold number is controlled by setting the STATUSTHRESHOLD Run-Time Option in the Run-Time Settingsmember. See Run-Time Settings for information on Run-Time Settings. The default value of this keyword setting is 1000.
The ability to monitor DELETEFROMDATABASE processing is provided for batch jobs on the local machine (i.e. when aRemote Database Update is not being performed).
The output appears in the SYSPRINT DD in the batch job held output.
12/30/2017 14:40:35:429 Start DELETEFROMDATABASE monitoring.Status message printed every 150 jobs.12/30/2017 15:30:31:285 - Cumulative number of jobs deleted: 15012/30/2017 16:19:35:899 - Cumulative number of jobs deleted: 30012/30/2017 16:44:15:859 End DELETEFROMDATABASE monitoring
DELETEFROMDATABASE Monitoring Output
The figure shows the output resulting from one INPUT statement. The STATUSTHRESHOLD Run-Time Option is set equalto 150 in the Run-Time Settings member and causes a status message to print after every 150 deleted jobs.
Loading JCL with Syntax Errors
When INFO/X loads JCL into the repository, it will sometimes encounter JCL with syntax errors. These errors can impactwhat information gets loaded or how it gets loaded. As a general rule, INFO/X will load JCL containing syntax errors inthe repository using values as coded in the actual JCL as the values that get stored. For example, a DD statement witha DSN containing an unresolved symbolic as its value will have the symbolic itself used as the DSN value for that DDstatement.
Some JCL errors, like an unresolved PGM name on an EXEC PGM= statement, will prevent a job from being loaded sincethere are some pieces of information INFO/X needs to properly create and maintain the relational connections betweenthe JCL items loaded in the repository.
In the case of a JCLLIB ORDER statement, incorrect use of parentheses resulting in JCL syntax errors can cause INFO/X toload only the datasets without the syntax errors. This can result in incomplete JCLLIB output when running various
110
ASG-INFO/X Enterprise System Administrator Guide

INFO/X reports. If necessary, you can use ASG-PRO/JCL (herein called PRO/JCL) to scan jobs to identify those that haveerroneous JCLLIB ORDER statements in addition to other syntax errors.
Loading JCL that Uses the TSO Terminal Monitor Program (TMP)
When INFO/X loads JCL that runs the TMP (IKJEFT01, IKJEFT1A, or IKJEFT1B) to execute an application program, itestablishes relationships in the repository associating DDs specified for the step that runs the TMP as follows:
l DDs that are documented to be used by the TMP itself will be associated with the TMP. These DDs are:o SYSTSIN: This is the DD where the TMP reads its control cardso SYSTSPRT: This is the DD where the TMP writes its output
l Any DDs that are user defined or otherwise not documented to be associated with the TMP will be associatedwith each application program specified for the TMP to run.
The result of this DD association are:
l The reports generated from the repository will reflect the DD associations, as described above.
l Dataset cross reference reports will identify the application program(s) that INFO/X thinks use the datasetsbeing cross referenced. In other words, when generating dataset cross reference reports from the repository,any datasets referenced by DDs known to be used by the TMP will show the TMP as being the program usingthe dataset. If those same datasets are referenced by DDs other than the ones documented to be used by theTMP, the application program(s) or other programs that were associated with those DDs will be shown.
Since these DD associations are made in the repository, only reports from the repository will display the associations ofdatasets with application programs. Reports from the JCL will not display these associations and will show the TMP asbeing the program associated with the datasets.
Maintain the RepositoryThe following two options for maintaining the INFO/X Repository are available from the INFO/X Update Repositorypanel:
l History—INFO/X retains the complete history of updates to the repository.
l Update—Update the INFO/X Repository whenever a job or application changes.
File Help------------------------------------------------------------------------------D0DPRPM0 INFO/X Update RepositoryOption ===>
1 History Display History of Repository Updates2 Update Update Job Information in Repository
Enter an update option.Press End to return to main menu.
111
Maintain the Repository

Viewing the History of Repository Updates
To view the history of repository updates
1. Choose Update from the ASG-INFO/X Main Menu. The INFO/X Update Repository panel displays.
2. Choose History. The INFO/X History Display panel displays.
3. Sort the display on any column.
4. Press End to return to the INFO/X Update Repository panel. This panel is scrollable.
File Sort Help------------------------------------------------------------------------------D0DPRPH0 INFO/X History Display Row 1 to 14 of 17Command ===> Scroll ===> PAGE
Press End to return.
Date Time UserID JOBs JOBs Jobs RemarksAdded Updated Deleted
---------- -------- -------- -------- -------- -------- -------------->2006-03-25 11.47.56 DSSUSR 1 0 0 Successfull Com2006-03-25 11.48.28 DSSUSR 0 0 0 Successfull Com2006-03-25 11.55.51 DSSUSR 0 0 0 Successfull Com2006-03-25 13.32.21 DSSUSR 1 0 0 Successfull Com2006-03-25 15.19.30 DSSUSR 1 0 0 Successfull Com2006-03-25 16.33.39 DSSUSR 1 0 0 Successfull Com2006-03-26 14.17.35 DSSUSR 1 0 0 Successfull Com2006-03-26 14.37.38 DSSUSR 1 0 0 Successfull Com2006-03-26 14.42.38 DSSUSR 1 0 0 Successfull Com2006-03-26 15.29.19 DSSUSR 1 0 0 Successfull Com2006-03-26 16.52.37 DSSTST 0 1 0 Successfull Com2006-03-30 10.19.10 DSSTST 12 0 0 Successfull Com2006-04-06 14.20.30 DSSUSR 1 0 0 Successfull Com
Editing the History of Repository UpdatesYou may want to delete some items from the INFO/X History Display list.
To edit the INFO/X History Display
1. Choose Setup from the ASG-INFO/X Main Menu. INFO/X displays the Setup and Maintain INFO/X Repositorypanel.
2. Choose History. The INFO/X History Display panel displays. This panel is scrollable.
112
ASG-INFO/X Enterprise System Administrator Guide

File Sort Settings Help-------------------------------------------------------------------------------D0DPRPH1 INFO/X History Display Row 1 to 14 of 17Command ===> Scroll ===> PAGE
Enter DEL or DELETE to delete history records.Enter D (Delete selected history records). Press End to return.
Sel Date Time UserID JOBs JOBs Jobs RemarksAdded Updated Deleted
--- ---------- -------- -------- -------- -------- -------- ------------>2006-01-13 08.20.07 DSSUSR 4148 0 0 Successful Com2006-01-13 08.05.15 DSSUSR 0 0 0 CICS Processing2006-01-13 08.04.36 DSS123 967 0 0 CICS Processing2006-01-13 07.57.52 DSSADMN 467 0 0 CICS Processing2006-01-13 07.56.51 DSSADMN 15 0 0 Successful Com2006-01-13 07.52.19 DSSR261 0 0 0 Created INFO/X
Editing the INFO/X History Display
3. Enter a D in the SEL field to remove individual records.
OrUse the DEL(ETE) line command to delete a group of history records. INFO/X displays the INFO/X DeleteHistory Records Options pop-up.
D0DPRPH3 INFO/X Delete History Records OptionsCommand ===>
Enter / to select an option:
_ Delete All History records_ Delete History records that are older than 30 days_ Delete History records that are older than
the following date (yyyy-mm-dd)
Deleting CICS CSD Files from the RepositoryIt may be necessary to delete CICS CSD files from the INFO/X Repository.
To delete a CSD file and all the groups, transactions, maps, programs, DDnames, and datasets associated with the file
1. Choose Setup from the ASG-INFO/X Main Menu. INFO/X displays the Setup and Maintain INFO/X Repositorypanel.
2. Choose CICS Files. INFO/X displays the INFO/X CICS CSD File List panel.
File Sort Settings Help
D0DPXCS8 INFO/X CICS CSD File List Row 1 to 1 of 1Command ===> Scroll ===> PAGE
Enter D (Delete CICS CSD File). Press End to return.
Sel CSD File Name Nodename--- ---------------------------------------------- --------
CICSTS13.CICSTS13.DFHCSD MVSA******************************* Bottom of data ********************************
113
Deleting CICS CSD Files from the Repository

3. Enter a D next to the CICS CSD file that you wish to delete.
Updating the Repository
To update the INFO/X Repository
n Submit a job through the INFO/X Update Job Information panel.
File Settings Help
D0DPRPU0 INFO/X Update Job InformationCommand ===>
F Foreground Execution RTS Member. . . . . DEFAULT ( * for list)B Background Execution Processing Mode . . JOB ( * for list)
Nodename . . . . . MVSA ( * for list)
Input Library 'YOUR.LIB.NAME'Member . . . . PJGL* Show Directory N (Y/N)Exclude Member Show Directory N (Y/N)Lib Type . . . PDS ( * for list)
or Listname . . ( * for list)First PROCLIB 'YOUR.LIB.NAME'
Lib type . . . PDS ( * for list)
Start at member number . . . for a count of . .
Maintaining the Information Repository
During the update process, INFO/X reads JCL, PROCLIBs, MVS Catalogs, VTOCs, and other sources such as DB2. Thisinformation is analyzed and stored in the INFO/X Repository.
Updates can be done for a single job, specified jobs, or for an entire library.
INFO/X provides various modes for updating the repository: foreground, background from panels, and pure batch. Fromthe panels, choose either foreground or background. See Batch for information about submitting batch jobs outside ofthe panels.
To view or edit the INFO/X control cards prior to foreground execution
n Enter FE on the command line.
To view or edit the INFO/X control cards and execution JCL prior to background execution
n Enter BE on the command line.
l ISPF packed datasets are not supported by the INFO/X Enterprise database update program. If you scan ISPFpacked datasets, corrupted data might be put into the repository.
l INFO/X simulates the processing of temporary datasets by generating the name TEMPORARY DATASET forall temporary datasets encountered in the JCL. This name is stored in the INFO/X Repository as a singleentry with a use count based on the number of temporary datasets.
SettingsThese options are available from the Settings action bar item.
114
ASG-INFO/X Enterprise System Administrator Guide

RTS Member Opens the Edit/View Run-Time Settings panel.
First Proclib Opens the pop-up to specify the PROCLIB that INFO/X checks first.
Scheduler Select the scheduler which INFO/X should simulate.
Batch JCL Specify the JOB CARD for batch processing.
TSOParms Enter and/or verify the values for hardcopy output.
Selection List Opens the Selection List Directory pop-up.
Foreground Updates for Named Members
Use Foreground mode to update the repository for small numbers of members.
Foreground updates are made from the INFO/X Update Job Information panel.
To make updates to the repository through foreground panel mode
1. Make sure that the name of the RTS member you want is in the RTS Member field (if this option is available toyou).
2. Choose a Processing mode.
3. Enter the library in the Library field.
4. Enter a member name, name mask, or range of members in the Member field.
5. In the Show Directory field:
l Enter Y to display the directory list for all members matching a mask entered in the Member field.If a mask is entered, specific members can then be selected from the resulting list for processing.
Or
l Enter N to ignore the directory list and process all of the members selected by a mask.
6. If desired, enter a member name, name mask, or range of members in the Exclude Member field.
7. Enter a library type in the Lib Type field.
8. Enter F for foreground.
9. Under the Settings action bar item, make entries for these choices:
l First PROCLIB—INFO/X searches the library specified here before it searches JCLLIB.
l Scheduler—Specify the Scheduler interface INFO/X uses when processing the members.
10. Press Enter.
When processing is complete, INFO/X displays the message “Process Complete” in the upper-right corner of the UpdateJob Information panel.
115
Updating the Repository

To view or edit the INFO/X control cards prior to foreground execution
n Enter FE on the command line.
Background Updates for Named Members
Use Background mode to update the repository anytime processing members from INFO/X panels interferes with otherpanel-driven tasks.
Background updates are made from the INFO/X Update Job Information panel.
To make updates to the repository using background mode
1. Make sure that the name of the RTS member to use is in the RTS Member field.
2. Choose a Processing mode.
3. Enter the library in the Library field.
4. Enter a mask or member name in the Member field.
5. In the Show Directory field:
l Enter Y to display the directory list for all members matching a mask entered in the Member field.If a mask is entered, specific members can then be selected from the resulting list for processing.
Or
l Enter N to ignore the directory list and process all of the members selected by a mask.
6. Enter a library type in the LIB Type field.
7. Enter B for background.
8. Under the Settings action bar item, make entries for these choices:
l First PROCLIB—INFO/X searches the library specified here before it searches JCLLIB.
l Scheduler—Specify the Scheduler interface INFO/X uses when processing the members.
l Batch JCL—Specify up to 5 lines of job related information. All lines in the pop-up must be filled in,even if only with the comment delimiter (//*).
9. Press Enter.
When processing is complete, INFO/X displays the message “Process Complete” in the upper-right corner of the UpdateJob Information panel.
To view or edit the INFO/X control cards and execution JCL prior to background execution
n Enter BE on the command line.
Panel Driven Updates for a Quantity of Members
In both Foreground Updates for Named Members and Background Updates for Named Members, a quantity ofmembers can be specified.
116
ASG-INFO/X Enterprise System Administrator Guide
To specify a quantity of members to be processed during a panel update
n In step 4 of both procedures, substitute these instructions:
a. Leave the Member field blank.
b. Enter numbers in the Member Number and Count fields.
For instance, enter 1 and 1000 in the Member Number and Count fields respectively. INFO/X processes the first member(in alpha/numeric order) through the 1000th member. If you enter 1001 and 1000 for the member number and countfields respectively, then INFO/X processes the second 1000 members.
Automatic Incremental Update (AIU)After the initial load has been performed, the INFO/X Repository can be incrementally updated by specifying thelibraries that hold the JCL. The INFO/X Automatic Incremental Update (AIU) facility performs these functions:
l Processes the specified job and PROC libraries
l Searches the INFO/X Repository entries for jobs and PROCs from those libraries
l Generates a Cyclic Redundancy Check (CRC)
l Compares the previous CRC stored in the database
l Automatically deletes any unreferenced entities
l If a member has been added or changed, AIU makes the appropriate changes to the repository
The INFO/X AIU function can be executed via remote database update by specifying a CONNECTstatement before any AIU statements. See Running Remote AIU for more information.
INFOXAIU
SAMPLIB member INFOXAIU is available to execute the AIU functions. The job consists of three steps.
1. Update the repository with current DB2 cross-reference information.
2. Update the repository using INPUT statement sequences that do the following:
l Specify CHANGEDMEMBERSONLY, FINDCHANGEDCC, FINDCHANGEDPROCS, FIRSTCCLIB, FIRSTPROCLIB,NODENAME, REMOVEUNUSEDMEMBERS, RESETBETWEENMEMBERS=Y, UPDATEDATABASE.
l Process CICS CSD information.
3. Update the repository using UPDATEDATASETINFO statement sequences that do the following:
l Specify ADDEDAFTER, COUNT, EXCLUDE, LASTUPDATEBEFORE, NODENAME, VOLSER.
For a detailed description of the above parameters, refer to AIU INPUT Statement Parameters andUPDATEDATASETINFO Statement Parameters.
l The INFOXAIU job does not include the following available INPUT statement parameter:
117
Automatic Incremental Update (AIU)

DELETEFROMDATABASE
To specify this parm, edit the INFO/X batch job INFOX. (See Batch for more information aboutsetting up and running the batch job INFOX.)
l ISPF packed datasets are not supported by the INFO/X Enterprise database update program. If you scan ISPFpacked datasets during INFO/X Enterprise database loading or during AIU processing, corrupted data mightbe put into the repository.
l If the value specified by a user on an INPUT statement for RTS, Selection Exit, or for a scheduler conflicts withthe value assigned by the administrator for that user, INFO/X uses the assigned value instead of the specifiedvalue. INFO/X informs the user with a message in the JPSEL report.
118
ASG-INFO/X Enterprise System Administrator Guide

//DSSnnnQQ JOB (ACCT),BUILD,MSGCLASS=X,NOTIFY=&SYSUID//********************************************************************//* MEMBER NAME : INFOX (BUILT FROM SKELETON: D0SIIJ13)//* TYPE : SAMPLIB//* PRODUCT RELEASE: Rnnn//* DB2 RELEASE : 11.1//********************************************************************//*// JCLLIB ORDER=(DSSI.Rnnn.TAPE.INSTALL)//********************************************************************//* INFOXAIU - POPULATE THE DB2 CROSS REFERENCE INFORMATION//********************************************************************//*******************************************************************//* INVOKE DSNUPROC//*******************************************************************//DSNUPROC EXEC DSNUPROC,PARM='DB1A,DSNTEX',// LIB=DB2.DSNB10.SDSNLOAD,// SYSTEM=DB1A//DSNTRACE DD SYSOUT=*//SORTLIB DD DISP=SHR,DSN=SYS1.SORTLIB//SYSPUNCH DD DUMMY...//********************************************************************//* THIS STEP WILL UPDATE THE DATABASE WITH JOB, PROC, CONTROL CARD,//* INFORMATION AND DELETE UNUSED MEMBERS.//********************************************************************//INFOX EXEC PR1PROC,// PROD='-INFOX'//********************************************************************//* SPECIFY INPUT LIBRARIES HERE, ONE INPUT STATEMENT SEQUENCE//* FOR EACH LIBRARY THAT NEEDS TO BE PROCESSED.//* REPEAT AS NECESSARY FOR EVERY INPUT LIBRARY.//* COMMENT OUT OR DELETE ANY STATEMENTS WHICH DO NOT//* PERTAIN TO YOUR SPECIFIC REQUIREMENTS.//********************************************************************//SYSIN DD *%% INPUT DSNAME=YOUR.JCL.LIBRARY,%% SELECT=*,%% UPDATEDATABASE,%% NODENAME=YOURNODE, (E.G., MVSA)%% RTSMEMBER=DEFAULT,%% RESETBETWEENMEMBERS=Y,%% CHANGEDMEMBERSONLY, PROCESS NEW OR CHANGED%%* MEMBERS ONLY.%%*%% FINDCHANGEDPROCS, IDENTIFIES AND PROCESSES%%* CHANGED PROCS AND JOBS%%* THAT USE THE PROCS.%%*%% FINDCHANGEDCC, IDENTIFIES CHANGED%%* CONTROL CARDS AND THE%%* JOB MEMBERS THAT USE%%* THOSE CONTROL CARDS%%* FOR PROCESSING.%%*%% REMOVEUNUSEDMEMBERS, MEMBERS NOT IN THE PDS%%* BUT IN THE DATABASE%%* WILL BE DELETED FROM%%* THE DATABASE.%%*%% FIRSTPROCLIB=YOUR.PROC.LIBRARY%%*%%********************************************************************%%* UPDATE DATABASE WITH DATA SET ATTRIBUTE INFORMATION.%%********************************************************************%% UPDATEDATASETINFO SELECT=*, SELECT DSNAME OR MASK.%% RTSMEMBER=DEFAULT, RTS MEMBER.%% NODENAME=YOURNODE (E.G., MVSA)
INPUT Sections of SAMPLIB Member INFOXAIU
119
Automatic Incremental Update (AIU)

%%* COUNT=10, # OF DSNAMES TO UPDATE.%%* VOLSER=*, VOLUME SERIAL #.%%* EXCLUDE=HLQ*, EXCLUDE DSNAME OR MASK.%%* ADDEDAFTER=MM/DD/YYYY, DATE ADDED.%%* LASTUPDATEBEFORE=MM/DD/YYYY DATE UPDATED.%%*%%********************************************************************%%* THIS STEP WILL POPULATE THE DATABASE WITH CICS CSD INFORMATION%%********************************************************************%% INPUT DSNAME=CICSTS32.CICS.DFHCSD,%% UPDATEDATABASE,%% PROCESS=CICSCSD, PROCESS CICS CSD%% NODENAME=YOURNODE, (E.G., MVSA)%% TYPE=VSAM,%% RTSMEMBER=DEFAULT,%% RESETBETWEENMEMBERS=Y//CLEANUP EXEC PR1PROC,// PROD='-INFOX'//********************************************************************//* DELETE ANY UNREFERENCED ENTITIES//********************************************************************//SYSIN DD *%%*%%* AIUDELETEUNREFERENCEDENTITIES%% AIUDUE DELETEPROCS,%% DELETEINCLUDES,%% DELETEPROGRAMS,%% DELETEDATASETS,%% NODENAME=YOURNODE, (E.G., MVSA)%% UPDATEDATABASE/*
AIU INPUT Statement Parameters
To run AIU using the INFOXAIU batch job, specify one or more of the parameters listed in this topic on the INPUTstatement.
CHANGEDMEMBERSONLYThis parameter does the following:
l Makes a member list based on the mask given.
l Performs a Cyclic Redundancy Check (CRC).
l If the CRC is different or the member does not exist in the INFO/X Repository, it is scanned. After the successfulscan, the CRC is stored in the repository.
l If the CRC is the same, the member is not scanned.
This utility is not date sensitive. It is possible that a member could be replaced with an olderversion.
FINDCHANGEDCCWorks the same as FINDCHANGEDPROCS but for Control Card datasets.
120
ASG-INFO/X Enterprise System Administrator Guide

FINDCHANGEDPROCSIdentifies PROCs that have changed since they were last scanned into the database. This is done via a Cyclic RedundancyCheck (CRC) and flags the members that have a different CRC value than what was already stored in the database. Amember select list is built from the flagged members, then the jobs that include these PROCs are rescanned.
FINDCHANGEDPROCS does not use the dataset name on the AIU INPUT statement. It gets thedataset information from what is already stored in the database. Since the dataset name and theselect statement are required, it is recommended that you use a fake member name on the selectstatement. Otherwise, whatever member is selected will get scanned.
Updates are committed to the database as follows:
l After every job, if one job is stored in one member.
l After every member, if multiple jobs are stored in one member.
Resources are released as follows:
l At the end of job.
l After each input statement when processing multiple input statements in one update job.
l If you have more than one node, you must run FINDCHANGEDPROCS for each node (example, MVSA, MVSB).
l If you have PROCs that contain INCLUDE statements, the FINDCHANGEPROCS AIU process will not detectchanges in the INCLUDE members. The process only detects changes in the PROC member. If a PROC containsan INCLUDE statement for a member which includes a step that runs a program, any change to that INCLUDEmember will not be detected during the FINDCHANGEDPROCS AIU process. For example:
PROC://SOMEPROC PROC//INCLSTP INCLUDE MEMBER=SOMESTEP//DD1 DD DSN=A.B.C,DISP=SHR
INCLUDE member://* THIS IS AN INCLUDE MEMBER//STEP1 EXEC PGM=IEFBR14
In this sample JCL, the FINDCHANGEDPROCS AIU will not detect any changes to STEP1 or any otherchanges in the INCLUDE member SOMESTEP (example, adding a DD statement or changing IEFBR14to another program).
To detect changes in INCLUDE members referenced in PROCs, use the FINDCHANGEDINCLUDESparameter available with the AIUFINDCHANGEDENTITIES statement. If you routinely have PROCswith INCLUDE statements in them, use FINDCHANGEDINCLUDES in conjunction with theFINDCHANGEDPROCS AIU. See AIUFINDCHANGEDENTITIES Statement Parameters andFINDCHANGEDINCLUDES for more information.
Sample ReportFINDCHANGEDPROCS (as well as FINDCHANGEDCC) puts out a report similar to the following:
121
Automatic Incremental Update (AIU)

Automatic Incremental Update Summary Report=================================================================================Control Card Data sets that have changed=================================================================================
SVR1.TEST.CNTL(CC)
Automatic Incremental Update Summary Report=================================================================================Procs that have changed=================================================================================
SVR1.TEST.CNTL(TEST3PR)
Automatic Incremental Update Summary Report=================================================================================Jobs that were rescanned=================================================================================
SVR1.TEST.TAPE.DEMOLIB(PJGL0080) rescanned because proc PPGL0080 was unresolvedSVR1.TEST.CNTL(TEST3JOB) rescanned because proc TEST3PR has changed.SVR1.TEST.CNTL(TESTDB2A) rescanned because control cards SVR1.TEST.CNTL(CC)have changed
Sample FINDCHANGEDx Report
NODENAMESpecifies the node where the job runs.
This parameter is required when running database updates in batch, and restricts the search to entities that areidentified as being on that node.
REMOVEUNUSEDMEMBERSThis AIU function is designed to keep the repository up to date when performing other AIUs or loads by removingmembers from the repository before other repository updates are performed. When this parameter is specified, INFO/Xgenerates two lists; one from the PDS and the other from the repository. Members in the repository but not in the PDSare deleted from the repository. Also, any entities (jobs, PROCs, datasets, etc.) that the deleted members leaveunreferenced are deleted from the database.
The datasets specified for processing are scanned and loaded into the repository after the REMOVEUNUSEDMEMBERSAIU has completed. It is not possible to perform this AIU function without loading the specified datasets into therepository.
This AIU function does not work with sequential datasets. Specifying this parameter when processing sequentialdatasets will result in no REMOVEUNUSEDMEMBERS AIU being performed and the sequential datasets will be scannedand jobs loaded into the repository.
If a DDNAME is used to specify a list of datasets to process, each dataset in the DD concatenation will be processedsequentially in the order listed in the DD concatenation.
If using the DDNAME parameter to specify a list of datasets to process, here are some guidelines to follow:
l Multiple datasets can be specified with a standard JCL DD concatenation in the INFO/X job JCL, like this:
122
ASG-INFO/X Enterprise System Administrator Guide

//DSSnnnQQ JOB (ACCT),BUILD,MSGCLASS=X,NOTIFY=&SYSUID//********************************************************************//* MEMBER NAME : INFOX (BUILT FROM SKELETON: D0SIIJ13)//* TYPE : SAMPLIB//* PRODUCT RELEASE: Rnnn//* DB2 RELEASE : 11.1//********************************************************************//*// JCLLIB ORDER=(DSSI.PROD.TAPE.INSTALL)//********************************************************************//* INFOX - EXECUTE BATCH UPDATE//********************************************************************//STEP1 EXEC PR1PROC,// PROD='-INFOX'//TESTDD DD DISP=SHR,DSN=DSSI.PROD.TAPE.DEMOLIB// DD DISP=SHR,DSN=PROD.JCL.JCLLIB//*//SYSIN DD *%% INPUT DDNAME=TESTDD,%% SELECT=A*,%% SELECT=Z*,%% REMOVEUNUSEDMEMBERS,%% TYPE=PDS,%% NODENAME=MVSA, (E.G., MVSA)%% RTSMEMBER=DEFAULT,%% RESETBETWEENMEMBERS=Y,%% CHANGEDMEMBERSONLY,%%* FIRSTPROCLIB=YOUR.PROC.LIBRARY/*
Sample REMOVEUNUSEDMEMBERS
This causes a REMOVEUNUSEDMEMBERS AIU to be performed on all members matching the A* and Z* masksin the datasets listed in the TESTDD concatenation. Any members found in the repository that are no longer inthe dataset on DASD will be removed from the repository.
l Specifying a DUMMY DD prevents the processing of subsequent DDs in the concatenation. For example:
123
Automatic Incremental Update (AIU)

//DSSnnnQQ JOB (ACCT),BUILD,MSGCLASS=X,NOTIFY=&SYSUID//********************************************************************//* MEMBER NAME : INFOX (BUILT FROM SKELETON: D0SIIJ13)//* TYPE : SAMPLIB//* PRODUCT RELEASE: Rnnn//* DB2 RELEASE : 11.1//********************************************************************//*// JCLLIB ORDER=(DSSI.PROD.TAPE.INSTALL)//*//********************************************************************//* INFOX - EXECUTE BATCH UPDATE//********************************************************************//STEP1 EXEC PR1PROC,// PROD='-INFOX'//TESTDD DD DISP=SHR,DSN=DSSI.PROD.TAPE.DEMOLIB// DD DUMMY// DD DISP=SHR,DSN=PROD.JCL.JCLLIB//*//SYSIN DD *%% INPUT DDNAME=TESTDD,%% SELECT=A*,%% SELECT=Z*,%% REMOVEUNUSEDMEMBERS,%% TYPE=PDS,%% NODENAME=MVSA, (E.G., MVSA)%% RTSMEMBER=DEFAULT,%% RESETBETWEENMEMBERS=Y,%% CHANGEDMEMBERSONLY,%%* FIRSTPROCLIB=YOUR.PROC.LIBRARY/*
Sample REMOVEUNUSEDMEMBERS with a DUMMY DD
In this example, the DUMMY DD specified in the TESTDD concatenation prevents members in PROD.JCL.JCLLIB frombeing processed. The results of the REMOVEUNUSEDMEMBERS function are listed in the JPSEL report.
RESETBETWEENMEMBERSA value, Y or N (Default), determines whether or not INFO/X resets its MVS simulator between members. Resetting thesimulator prevents jobs processed in one member from affecting the (simulated) processing of jobs in another member.
For example: If RESETBETWEENMEMBERS=N and a dataset is deleted in a member, INFO/X will issue a “Dataset notfound” error message in all subsequent members where the dataset is referenced. If RESETBETWEENMEMBERS=Y,deleting a dataset in a member will not affect the processing of the dataset in subsequent members. Therefore, no“Dataset not found” message will be issued.
ASG recommends specifying the Y option for runs where jobs are not processed in run-time sequence.
UPDATEDATABASE | NOUPDATEDATABASESpecify UPDATEDATABASE to instruct INFO/X to update the database with data about the specified entities.
Specify NOUPDATEDATABASE to generate a report listing the entities that would have been updated if theUPDATEDATABASE parameter had been specified (for example, during a test run). When NOUPDATEDATABASE isspecified, the INFO/X Repository is not updated.
124
ASG-INFO/X Enterprise System Administrator Guide

l This parameter is required, otherwise an error message is issued.
l You cannot use the NOUPDATEDATABASE parameter for CICS CSD file processing. Currently, it is notpossible to generate a report containing CICS CSD information, even when you update the database.However, in lieu of a report, you can view the raw CICS CSD data that INFO/X will add to the database. Tolook at the raw data, specify UPDATEDATABASE and use the LOCALSPOOL option (see LOCALSPOOL ). Thiscreates a FOLT file with the CICS CSD information in eXtensible Markup Language (XML) format. Afterinspecting this file, you must either load it by running the INFOXRDU job (see Remote Database UpdateFacility) or manually delete it. Otherwise, the file will remain in place.
UPDATEDATASETINFO Statement Parameters
This statement detects when dataset attributes have changed, then updates the INFO/X database with the new values.When this statement is used:
l INFO/X builds a list from the repository entries for the dataset names specified in the select statement.
l Searches the system catalog for the dataset attributes of each entry in the list.
l Updates the repository with any new or changed information.
UPDATEDATASETINFO can be run as part of your regular AIU process, or as a separate job. Specify one or more of thefollowing parameters in the UPDATEDATASETINFO statement of the INFO/X batch job.
ADDEDAFTERScans all datasets that have been added after the date specified.
Example:
ADDEDAFTER=01/01/2006
Cannot be specified with LASTUPDATEBEFORE.
COUNTStops the INFO/X batch job after a specified number of datasets have been updated.
Thousands of datasets could be scanned in the process of finding a small number that need to beupdated.
Example:
COUNT=10
EXCLUDEDataset name or mask. Requires the NODENAME and RTSMEMBER parameters.
Example:
125
Automatic Incremental Update (AIU)

EXCLUDE=VENDOR.TEST.*
The excluded dataset(s) must be a subset of the dataset(s) specified in the SELECT statement.
LASTUPDATEBEFOREScans all datasets since the last update date specified.
Example:
LASTUPDATEBEFORE=02/28/2006
Cannot be specified with ADDEDAFTER.
SELECTDataset name or mask. Requires the NODENAME and RTSMEMBER parameters.
Example:
SELECT=VENDOR.*
VOLSERUpdates the dataset information of the datasets residing on the volume specified.
Example:
VOLSER=VENDOR
Sample UPDATEDATASETINFO StatementThe below figure provides an example of an UPDATEDATASETINFO statement.
//SYSIN DD *%% UPDATEDATASETINFO SELECT=PROD.*,%% EXCLUDE=PROD.TEST.*,%% RTSMEMBER=DEFAULT,%% NODENAME=MVSA, (E.G., MVSA)%% COUNT=100,%% ADDEDAFTER=02/01/2012/*
This example shows:
Select all PROD datasets and exclude all PROD.TEST datasets on the MVSA nodename to update the attributes for thefirst 100 datasets added after February 1, 2012 using the DEFAULT RTS member.
l If the dataset attributes in the repository are the same as the ones in the system catalog, the attributes arenot modified.
126
ASG-INFO/X Enterprise System Administrator Guide

l If a dataset name is specified without a mask, the attributes of only that specific dataset will beupdated. A mask is required to update the attributes of all dataset entries in the database that match thespecified mask.
l The IXLAIU trace can be used to see all the members in the dataset name list and what fields are beingupdated.
l The AIUTIME trace can be used to see how long the repository update ran, the number of datasets read,and the number of datasets updated. The information from the AIUTIME trace is included in the IXLAIUtrace.
AIUFINDCHANGEDENTITIES Statement Parameters
The AIUFINDCHANGEDENTITIES statement (which can be abbreviated as AIUFCE) allows you to find changed PROCs,Control Cards, or INCLUDEs. Unlike using FINDCHANGEDx's on the AIU INPUT statement, the library specified in theAIUFINDCHANGEDENTITIES is the only library that will be processed.
DDNAMESpecify the DD name where INFO/X will look for one or more input datasets.
Example DDNAME parameter:
%% DDNAME=JCLINDD,
Sample JCL for the DD:
//JCLINDD DD DISP=SHR,DSN=DSSI.PROC.CNTL,// DD DISP=SHR,DSN=DSSI.JCL
If multiple libraries are concatenated, make sure they are of the same type. If you are running aFINDCHANGEDPROCS, the concatenated libraries should all be PROCLIBs.
DSNAME (DSN)Specify the dataset where INFO/X will look for members whose names match the member names or mask specified inthe SELECT keyword.
l DSNAME does not support the use of masks at this time.
l To process unresolved PROCS or INCLUDES, specify DSN='' (blank).
EXCLUDESpecify those members that should be excluded from processing. A mask can be used.
FINDCHANGEDCCSee FINDCHANGEDCC for a description of this parameter.
127
Automatic Incremental Update (AIU)

FINDCHANGEDINCLUDESIdentifies INCLUDEs that have changed since they were last scanned into the database. This is done via a CyclicRedundancy Check (CRC) and flags the members that have a different CRC value than what was already stored in thedatabase. A member select list is built from the flagged members, then the jobs containing these INCLUDEs arerescanned.
FINDCHANGEDINCLUDES does not use the dataset name on the AIUFCE INPUT statement. It getsthe dataset information from what is already stored in the database. Since the dataset name andthe select statement are required, it is recommended that you use a fake member name on theselect statement. Otherwise, whatever member is selected will get scanned.
Updates are committed to the database as follows:
l After every job, if one job is stored in one member.
l After every member, if multiple jobs are stored in one member.
Resources are released as follows:
l At the end of job.
l After each input statement when processing multiple input statements in one update job.
If you have more than one node, you must run FINDCHANGEDINCLUDES for each node (example,MVSA, MVSB).
FINDCHANGEDJOBSThis parameter does the following:
l Makes a member list based on the mask given.
l Performs a Cyclic Redundancy Check (CRC).o If the CRC is different or the member does not exist in the INFO/X Repository, it is scanned. After the
successful scan, the CRC is stored in the repository.o If the CRC is the same, the member is not scanned.
This utility is not date sensitive. It is possible that a member could be replaced with an olderversion.
FINDCHANGEDPROCSSee FINDCHANGEDPROCS for a description of this parameter.
l If you have more than one node, you must run FINDCHANGEDPROCS for each node (example, MVSA,MVSB).
128
ASG-INFO/X Enterprise System Administrator Guide
l FINDCHANGEDPROCS, FINDCHANGEDCC, and FINDCHANGEDINCLUDES are mutually exclusive when usingthe AIUFCE Control Card Statement. Only one of these parameters can be specified at a time.
FIRSTCCLIBA dataset name specifying a control card library for INFO/X to search before the control card library in the JCL.
Example FIRSTCCLIB parameter:
%% FIRSTCCLIB=MY.TEST.CCLIB,
FIRSTPROCLIBA dataset name specifying a PROC library for INFO/X to search before any other PROC library, when expanding PROCs forthe input JCL.
Example FIRSTPROCLIB parameter:
%% FIRSTPROCLIB=MY.TEST.PROCLIB,
INFO/X searches PROC libraries in this order:
1. In-stream PROCs.
2. The library specified by the INPUT statement FIRSTPROCLIB parameter.
3. Libraries specified by the JCLLIB statement in the JCL being processed.
4. Libraries specified by the PROCLIBDD (setup by user in the Run-Time Settings) option in the active RTS member.
5. Libraries specified by the JESPROC define option in the RTS member.
INFO/X will query JES2 for a list of proclibs to also search if you set the Use JES2 PROCLIBDefs option to Y. For more information, see the INFO/X Reference Information.
FIRSTPROCLIBTYPEThe type of dataset organization specified by the FIRSTPROCLIB parameter. Allowable values are:
l PDS
l LIBRARIAN
l PANVALET (PAN)
Example FIRSTPROCLIBTYPE parameter:
%% FIRSTPROCLIBTYPE=PDS,
INFILESpecifies a list of dataset names and members that INFO/X will process as changed members. The INFILE will generallybe created by some interface to a change management system. For installations using a change management system,this saves processing time. Using a combination of INFILE and OUTFILE allows more than one library to be used.
INFILE is mutually exclusive with DSNAME and SELECT.
129
Automatic Incremental Update (AIU)

NODENAMESee NODENAME for a description of this parameter.
l This nodename is used for the rescan of the jobs that call the changed entity (PROC, Control Card, orINCLUDE).
l The nodename specified in the AIUFINDCHANGEDENTITIES statement must match the nodename that wasspecified on the AIU INPUT statement when the job was originally scanned in.
OUTFILESpecifies a dataset name to write out a list of member names that would be rescanned because of changes.
REPORTSProduces a Structured JCL Listing (SJL).
REPORTS=SJL, REPORTS=(SJL), REPORTS=(SJL=datasetname)
When requesting an SJL report, the generated output may be very large.
RTSMEMBERSpecify the RTS member to be used when processing the AIUFINDCHANGEDENTITIES statement.
SCHEDULERSpecifies a third-party scheduler interface. Valid entries for the SCHEDULER parameter are:
l CA7 [ = (RUNDATE=yyddd, RUNTIME = hhmm, SCHID = n])
l CNTLM [ = RUNDATE=yymmdd] (for CONTROL-M)
l JOBTRAC [=OSDDATE= yydd, toddate = yyddd, LOCATION|LOC = string]
l ZEKE
SELECTSpecify the member(s) to be processed. Use the member name or a mask.
The asterisk (*) mask is valid for this keyword (example, SELECT=* or SELECT=TEST*) to select allmembers in the specified DSNAME.
SELECTIONEXITA Selection Exit is specified when a user wants to modify the JOB JCL prior to validating it. The JCL modifications will notbe saved.
The Selection Exit name must be a REXX exec that exists in a dataset that has been coded in either the SYSEXEC orSYSPROC DD.
130
ASG-INFO/X Enterprise System Administrator Guide

When running in Batch mode, the SYSEXEC or SYSPROC DD's specified in the PR1PROC will be used. This Selection Exitname can not be modified if the product administrator has assigned one.
Example SELECTIONEXIT:
%% SELECTIONEXIT=SELEXIT,
For more information on selection exits, see the INFO/X Reference Information.
SELECTIONEXITPARMAn optional parm that is passed to the Selection Exit. The parm can be up to 45 characters in length.
%% SELECTIONEXIT=SELEXIT,%% SELECTIONEXITPARM='DD',
For more information on selection exits, see the INFO/X Reference Information.
TYPESpecify the library type for the DSNAME parameter.
PDS|LIB|LIBRARIAN|PAN|PANVALET|SEQ|SEQUENTIAL|PCDIR|PCDIRECTORY
USERREPORTTITLEA string of up to 32 characters, enclosed in apostrophes, for INFO/X to use as a title for the SJL report.
Example USERREPORTTITLE parameter:
USERREPORTTITLE='Quarterly Report'
UPDATEDATABASE | NOUPDATEDATABASESee UPDATEDATABASE | NOUPDATEDATABASE for a description of this parameter.
Sample AIUFINDCHANGEDENTITIES StatementsThe following figures provide examples of AIUFINDCHANGEDENTITIES statements.
Sample #1This example shows:
On the MVSA nodename, find changed PROCs in the USER.PROC.CNTL PROCLIB that begin with TEST (except for TEST1)to update the database using the DEFAULT RTS member.
%% AIUFINDCHANGEDENTITIES FINDCHANGEDPROCS,%% DSN='USER.PROC.CNTL',%% SELECT=TEST*,%% EXCLUDE=TEST1,%% UPDATEDATABASE,%% TYPE=PDS,%% RTSMEMBER=DEFAULT,%% NODENAME=MVSA
Sample AIUFINDCHANGEDENTITIES statement
131
Automatic Incremental Update (AIU)

AIUFINDCHANGEDENTITIES puts out the following report:
Automatic Incremental Update Summary Report=================================================================================Control Card Data sets that have changed=================================================================================
SVR1.TEST.CNTL(CC)
Automatic Incremental Update Summary Report=================================================================================Procs that have changed=================================================================================
SVR1.TEST.CNTL(TEST3PR)
Automatic Incremental Update Summary Report=================================================================================Jobs that were rescanned=================================================================================SVR1.TEST.TAPE.DEMOLIB(PJGL0080) rescanned because proc PPGL0080 was unresolvedSVR1.TEST.CNTL(TEST3JOB) rescanned because proc TEST3PR has changed.SVR1.TEST.CNTL(TESTDB2A) rescanned because control cards SVR1.TEST.CNTL(CC) have changed
Sample AIUFINDCHANGEDENTITIES report
Sample #2
This example uses the INFILE and OUTFILE parameters.
l It deletes the file first, allocates it fresh, and then overrides it with a DISP equal MOD to accumulate everythingwritten to the OUTFILE.
l The FINDCHANGEDPROCS step reads the INFILE and writes its results set to the OUTFILE without updating thedatabase.
l The FINDCHANGEDCC reads its INFILE and appends its result to the OUTFILE without updating the database.
l The FINDCHANGEDJOBS reads the OUTFILE from the previous processes and rescans the jobs which updates thedatabase.
132
ASG-INFO/X Enterprise System Administrator Guide

//DEL EXEC PGM=IEFBR14//SYSUT1 DD DSN=DSSI.TESTSEQ4,// DISP=(MOD,DELETE),// SPACE=(CYL,1)//ALLOC EXEC PGM=IEFBR14//SYSUT1 DD DSN=DSSI.TESTSEQ4,// DISP=(NEW,CATLG,DELETE),// SPACE=(CYL,1),// DCB=(RECFM=FB,LRECL=80,BLKSIZE=80)//*//BATCHRUN EXEC PR1PROC,// PROD='- ',// HLQ='DSSI.nnnn.XXXX',// PCHLQ='DSSI.nnnn.YYYY'//JPAIUOUT DD DSN=DSSI.TESTSEQ4,// DISP=(MOD),// DCB=(RECFM=FB,LRECL=80,BLKSIZE=80)//SYSIN DD *%% AIUFINDCHANGEDENTITIES FINDCHANGEDPROCS,%% TYPE=PDS,%% INFILE=DSSI.PROF.CNTL(SYSIN1),%% OUTFILE='DD:JPAIUOUT',%% NOUPDATEDATABASE,%% RTSMEMBER=DEFAULT,%% NODENAME=MVSA,%% FIRSTPROCLIB=DSSI.PROF.CNTL%% AIUFINDCHANGEDENTITIES FINDCHANGEDCC,%% TYPE=PDS,%% INFILE=DSSI.PROF.CNTL(SYSIN2),%% OUTFILE='DD:JPAIUOUT',%% NOUPDATEDATABASE,%% RTSMEMBER=DEFAULT,%% NODENAME=MVSA,%% FIRSTPROCLIB=DSSI.PROF.CNTL%% AIUFINDCHANGEDENTITIES FINDCHANGEDJOBS,%% TYPE=PDS,%% INFILE=DSSI.TESTSEQ4,%% RTSMEMBER=DEFAULT,%% UPDATEDATABASE,%% NODENAME=MVSA,%% FIRSTPROCLIB=DSSI.PROF.CNTL
Sample #2 AIUFINDCHANGEDENTITIES statement
Sample #3This example is similar to sample two but uses two different OUTFILES and adds a sort step.
l It deletes the file first, allocates it fresh, and then overrides it with a DISP equal MOD to accumulate everythingwritten to the OUTFILE.
l FINDCHANGEDPROCS reads the INFILE and writes its results set to OUTFILE without updating the database.
l FINDCHANGEDCC reads its INFILE and appends its results set to OUTFILE without updating the database.
l FINDCHANGEDINCLUDES reads its INFILE and writes its results set to a different OUTFILE without updating thedatabase.
l The sort then sorts the two files and removes any duplicates and writes out to a third file whichPROCESSCHANGELIST processes and updates the database.
For more information on PROCESSCHANGELIST, see the following topic.
133
Automatic Incremental Update (AIU)

//DEL EXEC PGM=IEFBR14//DD1 DD DSN=DSSI.TESTSEQ2,// DISP=(MOD,DELETE),// SPACE=(CYL,1)//DD2 DD DSN=DSSI.TESTSEQ3,// DISP=(MOD,DELETE),// SPACE=(CYL,1)//DD3 DD DSN=DSSI.TESTSEQ4,// DISP=(MOD,DELETE),// SPACE=(CYL,1)//ALLOC EXEC PGM=IEFBR14//DD1 DD DSN=DSSI.TESTSEQ2,// DISP=(NEW,CATLG,DELETE),// SPACE=(CYL,1),// DCB=(RECFM=FB,LRECL=80,BLKSIZE=80)//DD2 DD DSN=DSSI.TESTSEQ3,// DISP=(NEW,CATLG,DELETE),// SPACE=(CYL,1),// DCB=(RECFM=FB,LRECL=80,BLKSIZE=80)//DD3 DD DSN=DSSI.TESTSEQ4,// DISP=(NEW,CATLG,DELETE),// SPACE=(CYL,1),// DCB=(RECFM=FB,LRECL=80,BLKSIZE=80)//*//BATCHRUN EXEC PR1PROC,// PROD='-INFOX',// HLQ='DSSI.nnnn.XXXX',// PCHLQ='DSSI.nnnn.YYYY'//JPAIUOUT DD DSN=DSSI.TESTSEQ4,// DISP=(MOD),// DCB=(RECFM=FB,LRECL=80,BLKSIZE=80)...
Sample #3 AIUFINDCHANGEDENTITIES statement
134
ASG-INFO/X Enterprise System Administrator Guide

.
.
.//SYSIN DD *%% AIUFINDCHANGEDENTITIES FINDCHANGEDPROCS,%% TYPE=PDS,%% INFILE=DSSI.USR.CNTL(SYSIN3),%% OUTFILE='DD:JPAIUOUT',%% NOUPDATEDATABASE,%% RTSMEMBER=DEFAULT,%% NODENAME=MVSA,%% FIRSTPROCLIB=DSSI.USR.CNTL%% AIUFINDCHANGEDENTITIES FINDCHANGEDCC,%% TYPE=PDS,%% INFILE=DSSI.USR.CNTL(SYSIN3),%% OUTFILE='DD:JPAIUOUT',%% NOUPDATEDATABASE,%% RTSMEMBER=DEFAULT,%% NODENAME=MVSA,%% FIRSTPROCLIB=DSSI.USR.CNTL%% AIUFINDCHANGEDENTITIES FINDCHANGEDINCLUDES,%% TYPE=PDS,%% INFILE=DSSI.USR.CNTL(SYSIN3),%% OUTFILE=DSSI.TESTSEQ2,%% NOUPDATEDATABASE,%% RTSMEMBER=DEFAULT,%% NODENAME=MVSA,%% FIRSTPROCLIB=DSSI.USR.CNTL//* SORT THEM INTO TESTSEQ3//* MERGE INPUT FILES, AND REMOVE DUPLICATE JOBS//*//MERGE EXEC PGM=SORT//STEPLIB DD DISP=SHR,DSN=SYS1.SORTLIB//SORTIN1 DD DISP=SHR,DSN=DSSI.TESTSEQ2//SORTIN2 DD DISP=SHR,DSN=DSSI.TESTSEQ4//SORTOUT DD DSN=DSSI.TESTSEQ3,// DISP=(NEW,CATLG,DELETE),// SPACE=(CYL,1),// DCB=(RECFM=FB,LRECL=80,BLKSIZE=80)//SORTWK01 DD UNIT=SYSDA,SPACE=(CYL,5)//SYSOUT DD SYSOUT=*//SYSIN DD *
MERGE FIELDS=(1,54,CH,A)SUM FIELDS=NONE
/*//* DO A PROCESSCHANGELIST FROM INFILE 3//BATCHRUN EXEC PR1PROC,// PROD='-INFOX',// HLQ='DSSI.nnnn.XXXX',// PCHLQ='DSSI.nnnn.YYYY'//*//SYSIN DD *%% AIUPROCESSCHANGELIST UPDATEDATABASE,%% INFILE=DSSPI.TESTSEQ3,%% RTSMEMBER=DEFAULT,%% NODENAME=MVSA,%% FIRSTPROCLIB=DSS.USR.CNTL
Sample #3 (continued) AIUFINDCHANGEDENTITIES Statement
AIUDELETEUNREFERENCEDENTITIES Statement Parameters
The AIUDELETEUNREFERENCEDENTITIES statement (which can be abbreviated as AIUDUE) allows you to delete from therepository any datasets, PROCs, programs, and INCLUDEs that are no longer being referenced, that is, have a use-countof zero. The following parameters can be used.
135
Automatic Incremental Update (AIU)

DELETEDATASETSWhen specified, removes all unreferenced datasets from the repository.
DELETEINCLUDESWhen specified, removes all unreferenced INCLUDEs from the repository.
DELETEPROCSWhen specified, removes all unreferenced PROCs from the repository.
DELETEPROGRAMSWhen specified, removes all unreferenced programs from the repository.
NODENAMESee NODENAME for a description of this parameter.
l This nodename is used for the rescan of the jobs that call the entity (dataset, INCLUDE, PROC, program).
l The nodename specified in the AIUDELETEUNREFERENCEDENTITIES statement must match the nodenamethat was specified on the AIU INPUT statement when the job was originally scanned in.
RTSMEMBERSpecify the RTS member to be used when processing the AIUDELETEUNREFERENCEDENTITIES statement.
UPDATEDATABASE | NOUPDATEDATABASESee UPDATEDATABASE | NOUPDATEDATABASE for a description of this parameter.
Sample AIUDELETEUNREFERENCEDENTITIES StatementThe below figure provides an example of an AIUDELETEUNREFERENCEDENTITIES statement.
%% AIUDELETEUNREFERENCEDENTITIES UPDATEDATABASE,%% DELETEDATASETS,%% DELETEPROGRAMS,%% DELETEPROCS,%% RTSMEMBER=DEFAULT,%% NODENAME=MVSA/*
Sample AIUDELETEUNREFERENCEDENTITIES statement
This example shows:
On the MVSA nodename, delete all unreferenced datasets, programs, and PROCs from the database using the DEFAULTRTS member.
RUNSTATS and REBIND
When performing regular Automatic Incremental Updates, it is recommended that you also run RUNSTATS and REBINDon the database. This will optimize the space and improve performance of the repository. To invoke RUNSTATS andREBIND, use the following INSTALL library jobs:
136
ASG-INFO/X Enterprise System Administrator Guide

l IXLREORG—Executes REORG and RUNSTATS commands. For more information on REORG and RUNSTATS seethe IBM DB2 for z/OS Utility Guide and Reference or the IBM DB2 UDB for z/OS Utility Guide and Reference. Youcan access these publications online via the IBM® Information Management Software for z/OS® SolutionsInformation Center.
l IXLBINDX—Rebinds the INFO/X packages and plan specified in the DB2PLANI parameter to ensure that the mostcurrent access paths are used.
For additional information, see the Installation documentation.
BatchASG provides a sample INFO/X batch job, INFOX (See figure - Sample INFO/X Batch Job, INFOX), and a sample procedure,PR1PROC (See figure - Sample INFO/X Batch Job, INFOX), to run INFO/X in batch. These jobs are created in the SAMPLIBlibrary during product installation.
To run INFO/X in batch using INFOX and PR1PROC
1. Use the high-level qualifiers for the INFO/X SAMPLIB library.
2. Copy the INFOX member from the SAMPLIB library to your own dataset.
3. Edit this copy of INFOX, as described below.
Batch Job INFOX
To set up the INFOX job, review/edit the items in red color in figure - Sample INFO/X Batch Job, INFOX
1. Verify that the JOB statement is correct.
2. In the INPUT statement, change the string YOUR.JCL.LIBRARY to the dataset name of a partitioned datasetcontaining JCL members to be validated.
3. In the INPUT statement, change the string value SELECT=* to the name of a JCL member or mask in your JCLlibrary.
4. In the INPUT statement, specify a NODENAME parameter. This parm is required when running database updatesin batch.
5. Change the FIRSTPROCLIB in the INPUT statement to the library INFO/X should search prior to JCLLIB.
6. (Optional) Add input statements to the job (example, UPDATEDATASETINFO). The INFOX job accepts multipleinput statements.
Your copy of member INFOX is now ready to run as a batch job. It will invoke INFO/X to update the database andproduce a Structured JCL Listing (SJL). Later sections of this topic describe the datasets involved and more options forthe INPUT statement parameters.
If the value specified by a user on an INPUT statement for RTS, Selection Exit, or for a schedulerconflicts with the value assigned by the administrator for that user, INFO/X uses the assigned valueinstead of the specified value. INFO/X informs the user with a message in the JPSEL report.
137
Batch
INFOX—Sample JCLThis sample JCL shows:
Select all members on the MVSA nodename from YOUR.JCL.LIBRARY to update the database using the DEFAULT RTSmember using YOUR.PROC.LIBRARY to search before JCLLIB.
//DSSFPLQQ JOB (ACCT),BUILD,MSGCLASS=X,NOTIFY=&SYSUID//********************************************************************//* MEMBER NAME : INFOX (BUILT FROM SKELETON: D0SIIJ13)//* TYPE : SAMPLIB//* PRODUCT RELEASE: Rnnn//* DB2 RELEASE : 11.1//********************************************************************//*// JCLLIB ORDER=(DSSI.Rnnn.TAPE.INSTALL)//*//********************************************************************//* INFO - EXECUTE BATCH UPDATE//********************************************************************//STEP1 EXEC PR1PROC,// PROD='-INFOX'//SYSIN DD *%% INPUT DSNAME=YOUR.JCL.LIBRARY,%% SELECT=*,%% UPDATEDATABASE,%% NODENAME=MVSA, (E.G., MVSA)%% RTSMEMBER=DEFAULT,%% RESETBETWEENMEMBERS=Y,%% CHANGEDMEMBERSONLY,%% FIRSTPROCLIB=YOUR.PROC.LIBRARY/***************************** Bottom of Data ***************************
Sample INFO/X Batch Job, INFOX
When run in batch, INFO/X issues one of the following severity codes for each member processed:
0 - No error or warning messages were issued.4 - At least one warning message was issued, but no error messages were issued.8 - At least one error message was issued.12 - At least one severe error message was issued.16 - At least one critical error message was issued.20 - A fatal error message was issued. No scan of this member was performed.
The above severity codes do not terminate the batch job. The highest severity code encountered is used as the overallreturn code for the step. Additional return codes that do result in a termination of the batch process can be issued.These return codes typically represent DB2 SQL errors. Documentation for SQL errors can be found in the appropriateIBM guides.
Batch Procedure PR1PROC
The Product Administrator or product installer sets up PR1PROC as necessary.
To prepare PR1PROC prior to running batch job INFOX
1. Verify that ---HLQ--- is set to the high-level qualifier(s) for the INFO/X libraries. (1)
2. Verify that ---DB2EXIT--- is set to the high-level qualifier of the DB2 exit's dataset name. (2)
138
ASG-INFO/X Enterprise System Administrator Guide

3. Verify that ---DB2LOAD--- is set to the high-level qualifier of the DB2-authorized load library dataset name.This dataset contains the module DSNALI. (3)
4. If you are planning to process CICS CSD files, verify that ---CICSLOAD--- is set to the dataset name of the CICSload library containing module DFHCSDUP. (4)
5. Make sure PROD is set to -INFOX. (5)
6. Verify that ---PCHLQ--- set to the PCFILE high-level qualifier(s). (6)
7. If the VBEX library was unloaded, verify that the SYSEXEC DD statement is set to the VBEX library. (7)
139
Batch

PR1PROC—Sample JCL
//********************************************************************//* PR1PROC - PROC//*//* MEMBER NAME : PR1PROC (BUILT FROM SKELETON: D0SIIJ10)//* TYPE : INSTALL//* PRODUCT RELEASE: Rnnn//********************************************************************
1 //PR1PROC PROC HLQ=---HLQ---,2 // DB2EXIT=---DB2EXIT---,3 // DB2LOAD=---DB2LOAD---,4 // CICSLOAD=---CICSLOAD---,
// PARMPGM='DJ0CBNW',5 // PROD='-INFOX',6 // PCHLQ=---PCHLQ---
//*//PROJCL EXEC PGM=DJ0YINIB,REGION=0M,PARM='&PARMPGM /&PROD'//STEPLIB DD DISP=SHR,DSN=&HLQ..LOAD// DD DISP=SHR,DSN=&DB2EXIT// DD DISP=SHR,DSN=&DB2LOAD// DD DISP=SHR,DSN=&CICSLOAD//PCFILE DD DISP=SHR,DSN=&PCHLQ..PCFILE//JPCONFIG DD DISP=SHR,DSN=&HLQ..VBCNTL(BATCONF)
7 //SYSEXEC DD DISP=SHR,DSN=&HLQ..EXEC//SYSTSPRT DD SYSOUT=*//SYSPRINT DD SYSOUT=* MISC PROGRAM OUTPUT//SYSOUT DD SYSOUT=* MISC PROGRAM OUTPUT//*//JPSJL DD SYSOUT=* STRUCTURED JCL LISTING//JPOPE DD SYSOUT=* (FULL) OPTIONS IN EFFECT REPORT//JPSEL DD SYSOUT=* INPUT SELECTION REPORT//JPAIU DD SYSOUT=* AUTO INCREMENTAL UPDATE REPORT//JPCAT DD SYSOUT=* FOR ASG USE//JPALLOC DD SYSOUT=* FILE ALLOCATIONS REPORT//IORPT DD SYSOUT=* INPUT/OUTPUT REPORT//JDRPT DD SYSOUT=* COMPONENTS LIST REPORT//DSXRPT DD SYSOUT=* DATASET XREF REPORT//INCLXRPT DD SYSOUT=* INCLUDE XREF REPORT//PGMXRPT DD SYSOUT=* PROGRAM XREF REPORT//PROCXRPT DD SYSOUT=* PROC XREF REPORT//SYSOXRPT DD SYSOUT=* SYSOUT XREF REPORT//********************************************************************//* REQUIRED DDS FOR EQQYCOM//********************************************************************//EQQMLIB DD DISP=SHR,DSN=TWS.V9R2M0.SEQQMSG0//EQQEMSG DD SYSOUT=*//EQQMLOG DD SYSOUT=*//EQQDUMP DD SYSOUT=*//********************************************************************//CEEDUMP DD SYSOUT=* LE TRACE INFORMATION//ABNLIGNR DD DUMMY//*UNCOMMENT JPCSD DD IF MORE SPACE IS NEEDED FOR CICS CSD PROCESSING.//*JPCSD DD DISP=(NEW,DELETE,DELETE),UNIT=SYSDA,SPACE=(TRK,(250,350))//*//SYSUDUMP DD SYSOUT=* SYSTEM DUMP OUTPUT//*// PEND******************************** Bottom of Data *******************************
Procedure DDs
This topic describes some DDs coded in PR1PROC.
140
ASG-INFO/X Enterprise System Administrator Guide
STEPLIB
&HLQ..LOAD INFO/X product LOAD library.
&LEHLQ..SCEERUN
C++ run-time library (part of IBM's LE architecture and environment, formerly calledLE/370™).
INFO/X requires LE release 1.4 or later.
&CICSLOAD The CICS LOAD library containing module DFHCSDUP.
PCFILE
&PCHLQ..PCFILEVSAM file containing RTS and Reformat members. Also contains management andutilization data that requires.
SYSEXECREXX EXEC library. JMP routines reside here.
SYSOUTs
JPSJL
The Structured JCL Listing output file. This includes:
l Flag Page. This page indicates the INFO/X release number, run date, andrun time. It includes a legend describing the symbols, columns, and indexnumbers used in the Structured JCL Listing.
l Structured JCL Listing
l Error Summary
l Error Statistics
l Statistics
l Options in Effect (abbreviated).
JPOPEOptions in Effect Report output file. Requires SHOWRUN entry on INPUTstatement REPORTS parameter.
JPSEL Input Selection Report output file.
JPAIU Automatic Incremental Update Report.
JPALLOC File Allocations Report.
SYSTPRT Output from REXX SAY instruction.
SYSPRINT Miscellaneous program messages.
141
Batch

SYSOUT Miscellaneous program messages.
Procedure Parameters
&NULL An optional parameter, reserved for future use.
&PROD The name of the product for which this PROC is run. For INFO/X it should be:// PROD='-INFOX',
Job DDs
This topic describes some DDs coded in the job JCL member INFOX. Find this member in the CNTL library. DDs overridingthose coded in the procedure member PR1PROC can also be coded in the job JCL member INFOX.
SYSININFO/X control statement file. Contains the INPUT statements described below.
Other DDsAny other DD required for your task.
Example DD statement:
//JCLINDD DD DISP=SHR,DSN=MYDATA.SET.NAME1// DD DISP=SHR,DSN=MYDATA.SET.NAME2// DD DISP=SHR,DSN=MYDATA.SET.NAME3
If you are processing multiple datasets in the same INFO/X INPUT statement, you must concatenate the datasets undera single ddname and use the DDNAME parameter. See DDNAME (or DDN) for more information.
Do not specify a concatenated PANVALET or LIBRARIAN dataset. This is because only the firstdataset will be processed.
Format of StatementsThis topic describes the fields found in INFO/X statements.
Statement Fields
An INFO/X statement consists of one or more 80-byte records. Each record is in the form of an 80-column line. Eachstatement is logically divided into the following five fields. All five fields do not necessarily appear on every statement.
Identifier FieldThe identifier field consists of the following:
l Columns 1 and 2 of all statements contain %%.
l Columns 1, 2, and 3 of a comment statement contain %%*.
Name FieldThe name field is optional and for convenience, only. Code the name as follows:
142
ASG-INFO/X Enterprise System Administrator Guide

l The name must begin in column 3.
l The name is 1 through 8 alphanumeric or national ($, #, @) characters.
l The first character must be an alphabetic or national ($, #, @).
l The name must be followed by at least one blank.
Operation FieldThe operation field specifies the type of statement. Code the operation field as follows:
l The operation field consists of a valid statement type.
l The operation follows the name field.
l The operation must be preceded and followed by at least one blank.
Parameter, or Operand FieldThe parameter field (sometimes referred to as the operand field), contains parameters separated by commas. Code theparameter field as follows:
l The parameter field follows the operation field.
l The parameter field must be preceded by at least one blank.
See Parameter Field for details on coding the parameter field.
Comments FieldThe comments field contains any information you might find helpful when you code the control statement. Code thecomments field as follows:
l The comments field follows the parameter field.
l The comments field must be preceded by at least one blank.
You can code comments after the parameter field even though you continue the parameter field on a subsequentstatement; see Continuing Statements.
Location of Fields on Statements
Code the identifier field beginning in column 1 and the name field immediately following the identifier, with nointervening blanks. Code the operation, parameter, and comments fields in free form. Free form fields do not need tobegin in a particular column. Between fields leave at least one blank; the blank serves as the delimiter between fields.
Don’t code fields, except on the comment statement, past column 71. If the total length of the fields would exceed 71columns, continue the fields onto one or more following statements. Continuing fields is described under ContinuingStatements. The comment statement can be coded through column 80.
Parameter Field
The parameter field consists of two types of parameters, called positional, and keyword parameters.
CommasUse commas to separate positional parameters, keyword parameters, and subparameters in the parameter field.
Positional ParametersA positional parameter consists of:
143
Format of Statements

l Characters that appear in uppercase in the syntax and must be coded as shown
l Variable information
l A combination.
Keyword ParametersA keyword consists of characters that appear in uppercase in the syntax and must be coded as shown followed by anequals sign followed by either characters that must be coded as shown or variable information. For example,REPORTS=SJL or DSN=dataset name on the INPUT statement.
Code any of the keyword parameters for a statement in any order.
Multiple SubparametersA positional parameter or the variable information in a keyword parameter sometimes consists of more than one item,called a subparameter list. A subparameter list can consist of both positional and keyword subparameters.
Subparameters follow the same rules as positional and keyword parameters. When a parameter contains more than onesubparameter, separate the subparameters by commas and enclose the subparameter list in parentheses. If the list is asingle keyword subparameter or a single positional subparameter, omit the parentheses.
Continuing Statements
When the total length of the fields on a control statement exceeds 71 columns, continue the fields onto one or morelines.
Continuing the Parameter Field
To continue a parameter field
1. Interrupt the field after a complete parameter or subparameter, including the comma that follows it, at orbefore column 71.
2. Code %% in columns 1 and 2 of the following statement.
3. Code a blank character in column 3 of the following statement. If column 3 contains anything but a blank or anasterisk, the system assumes the following statement is a new statement. The system issues an error messageindicating that no continuation is found and fails the job.
4. Continue the interrupted parameter or field beginning in any column from 4 through 16.
Continuing Quoted Parameters
To continue a parameter that is enclosed in apostrophes
1. Extend the parameter to column 71.
DO NOT code an apostrophe in column 71 in the statement that is continued. The system would interpretthe apostrophe in column 71 as the final character in the statement and ignore the continuation.
To prevent this problem, cause the statement to split in a different way. For example, start the command ina later column or interchange non-positional parameters in the statement.
144
ASG-INFO/X Enterprise System Administrator Guide

2. Code %% in columns 1 and 2 of the following line.
3. Continue the parameter in column 16 of the following line even if this splits the parameter. Trailing blanks orcommas within the apostrophes do not indicate a continued statement; the system treats them as part of theparameter.
Examples of Continued Statements
Example 1This is an example showing the continuation of the parameter field. The parameter field is continued from the first lineto the second line.
%% INPUT DSN=ABC.DEF,%% SELECT=GHI
Example 2This is an example showing the continuation of the parameter field with a comment added. The parameter field iscontinued from the first line to the second line.
%% INPUT DSN=SYS1.JCLLIB, ProductionJCL%% SELECT=ABC001
Example 3This is an example showing the continuation of the parameter field with a comment added. The parameter field iscontinued from the first line to the second and third lines.
%% INPUT DSN=SYS1.JCLLIB%% SELECT=(ABC001,MasterUpdate%% DEF001)
Example 4This is an example showing the continuation of a quoted parameter. The parameter extends to column 71 and iscontinued on the next line in column 16.
column column
16 71| |
%% INPUT DSN=ABC.DEF,SELECT=GHI.WXYZ,JMPPARM='put your data will h%% ere',
INPUT Statement
Parameters of the INPUT statement specify:• The input JCL files for INFO/X to process.• The reports to generate.• Options determining how the input JCL files are processed.
You can include multiple input statements in the same job (example, UPDATEDATASETINFO).
Parameters of an input statement are in effect for the scope of that input statement only. Parameters are separated bycommas and the last parameter is not followed by a comma.
If you need to override the reports selected by the DEFAULT RTS member for an entire job, you must repeat theREPORTS parameter in every input statement of the job.
145
Format of Statements
BYPASSNONJCLA value, Y or N, determines whether or not INFO/X ignores members that are not recognizable as JCL.
Example BYPASSNONJCL parameter:
%% BYPASSNONJCL=Y,
CHANGEDMEMBERSONLYSee CHANGEDMEMBERSONLY for a description of this parameter.
COUNTA number which represents the quantity of members INFO/X processes in a library. Use with START.
%% COUNT=200,
DB2CALLDB2 Call Attach Facility interface. This keyword enables the user to look for a plan name that has the same name as aprogram if no plan is specified in the JCL.
When invoked, DB2CALL checks the DB2 catalog specified in the INPUT statement for a plan name that matches thename of a program. If a match is found, the DB2 catalog information (including any associated tables or views) is copiedinto the INFO/X Repository. If the job being scanned has its own control cards (example, IJKEFT01), the DB2 cataloginformation is obtained from the program cards instead of the program name.
DB2CALL assumes every program is a DB2 program. It checks all program names in the EXEC line ofthe JCL. To reduce overhead, it is recommended that this keyword be used only on directories thatcontain DB2 programs.
Format:
%% INPUT DB2CALL=nnnn
where nnnn is a 1-4 character subsystem ID (example, DSN1).
DELETEFROMDATABASEDeletes a specified member or list of members from the database. The list of members can be specified with theDSNAME parameter for the dataset containing the members to be deleted or with the DDNAME parameter to specify alist of datasets containing the members to be deleted. Both the DSNAME and DDNAME parameters are used inconjunction with the SELECT parameters to determine which members are deleted from the database.
If using the DDNAME parameter to specify a list of datasets from which members should be deleted, here are someguidelines to follow:• Multiple datasets can be specified with a standard JCL DD concatenation in the INFO/X job JCL. For example, the
job shown in the below figure deletes all members matching the A* and Z* masks in the datasets listed in theTESTDD concatenation.
146
ASG-INFO/X Enterprise System Administrator Guide

//DSSnnnQQ JOB (ACCT),BUILD,MSGCLASS=X,NOTIFY=&SYSUID//********************************************************************//* MEMBER NAME : INFOX (BUILT FROM SKELETON: D0SIIJ13)//* TYPE : SAMPLIB//* PRODUCT RELEASE: Rnnn//* DB2 RELEASE : 11.1//********************************************************************//*// JCLLIB ORDER=(DSSI.PROD.TAPE.INSTALL)//*//********************************************************************//* INFOX - EXECUTE BATCH UPDATE//********************************************************************//STEP1 EXEC PR1PROC,// PROD='-INFOX'//TESTDD DD DISP=SHR,DSN=DSSI.PROD.TAPE.DEMOLIB// DD DISP=SHR,DSN=PROD.JCL.JCLLIB//*//SYSIN DD *%% INPUT DDNAME=TESTDD,%% SELECT=A*,%% SELECT=Z*,%% DELETEFROMDATABASE,%% TYPE=PDS,%% NODENAME=MVSA, (E.G., MVSA)%% RTSMEMBER=DEFAULT%%* RESETBETWEENMEMBERS=Y%%* CHANGEDMEMBERSONLY,%%* FIRSTPROCLIB=YOUR.PROC.LIBRARY/*
Sample DELETEFROMDATABASE with DDNAME parameter
l The TYPE parameter is required and must match the type of datasets in the DD concatenation. Additionally, thedatasets in the DD concatenation must be of the same DSORG type.
l Specifying a DUMMY DD will prevent the processing of subsequent DDs in the concatenation. In the belowfigure the DUMMY DD specified in the TESTDD concatenation prevents members in PROD.JCL.JCLLIB from beingdeleted from the database.
147
Format of Statements

//DSSnnnQQ JOB (ACCT),BUILD,MSGCLASS=X,NOTIFY=&SYSUID//********************************************************************//* MEMBER NAME : INFOX (BUILT FROM SKELETON: D0SIIJ13)//* TYPE : SAMPLIB//* PRODUCT RELEASE: Rnnn//* DB2 RELEASE : 11.1//********************************************************************//*// JCLLIB ORDER=(DSSI.PROD.TAPE.INSTALL)//*//********************************************************************//* INFOX - EXECUTE BATCH UPDATE//********************************************************************//STEP1 EXEC PR1PROC,// PROD='-INFOX'//TESTDD DD DISP=SHR,DSN=DSSI.PROD.TAPE.DEMOLIB// DD DUMMY// DD DISP=SHR,DSN=PROD.JCL.JCLLIB//*//SYSIN DD *%% INPUT DDNAME=TESTDD,%% SELECT=A*,%% SELECT=Z*,%% DELETEFROMDATABASE,%% TYPE=PDS,%% NODENAME=MVSA, (E.G., MVSA)%% RTSMEMBER=DEFAULT%%* RESETBETWEENMEMBERS=Y%%* CHANGEDMEMBERSONLY,%%* FIRSTPROCLIB=YOUR.PROC.LIBRARY/*
Sample DELETEFROMDATABASE with a DUMMY DD
Viewing the Results of the DELETEFROMDATABASEThe results of the DELETEFROMDATABASE function will be contained in a report allocated to the JPAIU DD. This reportdisplays the list of datasets specified for member deletion in the database, the list of members that were actuallydeleted, and the list of datasets that didn't contain any members matching the specified selection masks. The JPSELreport contains a message specifying the number of members that were deleted. Refer to the JPAIU report to see whatwas actually deleted.
Sample of JPSEL report output
Input Selection Report================================================================================%% INPUT DDNAME=BIGIN,%% SELECT=A*,%% TYPE=PDS,%% NODENAME=MVSA,%% DELETEFROMDATABASEE1 - DSS01790A - DELETEFROMDATABASE process completed. 1 member(s) deleted.
148
ASG-INFO/X Enterprise System Administrator Guide

Sample INPUT statement
%% INPUT DSNAME='DSSI.R350.TAPE.DEMOLIB',%% SELECT=P*,%% DELETEFROMDATABASE,%% TYPE=PDS,%% NODENAME=MVSA, (E.G., MVSA)%% RTSMEMBER=DEFAULT%%* RESETBETWEENMEMBERS=Y%%* CHANGEDMEMBERSONLY,%%* FIRSTPROCLIB=YOUR.PROC.LIBRARY
Sample JPAIU report
'Delete From Database' Summary Report================================================================================Selected data sets to be deleted from the INFO/X repository :================================================================================DSSI.R350.TAPE.DEMOLIB(P*)*** Total number of data sets: 1
'Delete From Database' Summary Report================================================================================List of Members deleted from the INFO/X Repository :================================================================================DSSI.R350.TAPE.DEMOLIB(PCFDUMP)DSSI.R350.TAPE.DEMOLIB(PERF)DSSI.R350.TAPE.DEMOLIB(PRINTOPT)DSSI.R350.TAPE.DEMOLIB(PROCTEST)DSSI.R350.TAPE.DEMOLIB(PROJCL)*** Total number of members: 5
'Delete From Database' Summary Report================================================================================List of data sets with no members deleted from the INFO/X Repository :================================================================================*** Total number of data sets: 0
Sample INPUT statement
%% INPUT DDNAME=TESTDD,%% SELECT=I*,%% DELETEFROMDATABASE,%% TYPE=PDS,%% NODENAME=MVSA, (E.G., MVSA)%% RTSMEMBER=DEFAULT%%* RESETBETWEENMEMBERS=Y%%* CHANGEDMEMBERSONLY,%%* FIRSTPROCLIB=YOUR.PROC.LIBRARY/*
149
Format of Statements

Sample JPAIU report
'Delete From Database' Summary Report================================================================================Selected data sets to be deleted from the INFO/X repository :================================================================================DSSI.R350.TAPE.DEMOLIB(I*)DSSI.PROD.JCL(I*)PROD.JCL.JCLLIB(I*)*** Total number of data sets: 3
'Delete From Database' Summary Report================================================================================List of Members deleted from the INFO/X Repository :================================================================================DSSI.PROD.JCL(IDCAMS)DSSI.PROD.JCL(IDCXCATE)DSSI.PROD.JCL(INFOX)DSSI.PROD.JCL(INFOXAIU)...DSSI.PROD.JCL(IXLINST)DSSI.PROD.JCL(IXLREORG)PROD.JCL.JCLLIB(IC55006A)PROD.JCL.JCLLIB(IC55010)PROD.JCL.JCLLIB(ID30011)....PROD.JCL.JCLLIB(IXH57038)*** Total number of members: 27
'Delete From Database' Summary Report================================================================================List of data sets with no members deleted from the INFO/X Repository :================================================================================DSSI.R350.TAPE.DEMOLIB*** Total number of data sets: 1
DDNAME (or DDN)DDNAME parameter. Specifies uncataloged, temporary, or multiple datasets allocated in a DD in your INFO/X JCL. Use toprocess multiple datasets with the same INPUT statement. Each DDNAME parameter contains only one ddname. EachINPUT statement contains only one DDNAME parameter.
You can use any DDNAME that does not conflict with an INFO/X DD except when using PROCESS=LOADMODULE. Whenusing PROCESS=LOADMODULE, the required DDNAME is JPINCLIB.
The DDNAME and DSNAME parameters are mutually exclusive.
Normally, the JCL for PR1PROC would look something like this:
//STEP1 EXEC PR1PROC,// PROD='-INFOX'//SYSIN DD *%% INPUT DSNAME=DATA.SET.NAME,%% PROCESS=JOB,...
/*
However, using the DDNAME parameter to specify datasets allocated to a DD, this same JCL looks like this:
//STEP1 EXEC PR1PROC,// PROD='-INFOX'
150
ASG-INFO/X Enterprise System Administrator Guide

//MYDD DD DISP=SHR,DSN=DATA.SET.NAME//SYSIN DD *%% INPUT DDNAME=MYDD,PROCESS=JOB,
.../*
If this JCL were for PROCESS=LOADMODULE, then the JCL must use the DDNAME JPINCLIB and it would look like this:
//STEP1 EXEC PR1PROC,// PROD='-INFOX'//JPINCLIB DD DISP=SHR,DSN=DATA.SET.NAME//SYSIN DD *%% INPUT DDNAME=JPINCLIB,%% PROCESS=LOADMODULE,
.../*
DSNAME (or DSN)Dataset name parameter. Specifies the input JCL library by dataset name.
The DSNAME parameter can contain only one dataset name, and only one DSNAME parameter can be specified for eachINPUT statement.
To process multiple datasets with the same INPUT statement, use the DDNAME parameter.
Example INPUT statement with DSNAME parameter:
%% INPUT DSNAME=DATA.SET.NAME,
Or
%% INPUT DSNAME=CICS.CSDFILE,
where CICS.CSDFILE is a CICS CSD VSAM file.
EXCLUDEThe SELECT parameter masks or ranges can select more members than you want to process, as well as neededmembers. Use the EXCLUDE parameter to exclude such members from processing.
The EXCLUDE parameter does not exclude members that have been selected by specific member name. Mask and rangeoptions that are valid for the SELECT parameter are also valid for the EXCLUDE parameter.
See JCL Member Name Selection Options for a complete description of the use and effect of the options for specifyingmember names in SELECT and EXCLUDE parameters.
Each INPUT statement can contain multiple EXCLUDE parameters. Each EXCLUDE parameter can contain multipleentries.
Example EXCLUDE parameters:
%% EXCLUDE=(PJGL2300), SPECIFIC NAME
%% EXCLUDE=(PJGL2346,*237*), NAME AND MASK
%% EXCLUDE=(PJGL4500-PJGL4840), RANGE
151
Format of Statements

FINDCHANGEDCCSee FINDCHANGEDCC for a description of this parameter.
FINDCHANGEDINCLUDESSee FINDCHANGEDINCLUDES for a description of this parameter.
FINDCHANGEDPROCSSee FINDCHANGEDPROCS for a description of this parameter.
FIRSTCCLIBSee FIRSTCCLIB for a description of this parameter.
FIRSTPROCLIBSee FIRSTPROCLIB for a description of this parameter.
FIRSTPROCLIBTYPESee FIRSTPROCLIBTYPE for a description of this parameter.
GROUPIDA name up to N characters which identifies a user group for the scope of the current input statement. The GROUPIDmight change the availability of RTS member and access to datasets.
Example GROUPID parameter:
%% GROUPID=TEST,
PROCESSThe processing mode for INFO/X to use for processing the input JCL for the current INPUT statement. Valid modes are:
l JOB—Process the input as a JCL job stream.
l DATABASE—Used in conjunction with the REPORT parameter to specify that the report should be generatedfrom the INFO/X Repository.
l CICSCSD—Process the input statements as CICS control statements.
l LOADMODULE—Process load modules, scans the load library rather than the JCL and will find CSECTs.
l PROC—Process the input as JCL PROCs.
Example PROCESS parameter:
%% PROCESS=JOB,
REMOVEUNUSEDMEMBERSSee REMOVEUNUSEDMEMBERS for a description of this parameter.
REPORTSSpecifies the reports to generate for this INPUT statement. Valid entries for the REPORTS parameter are:
152
ASG-INFO/X Enterprise System Administrator Guide

l SJL—Structured JCL Listing (reports generated from the JCL only)
l SHOWRUN—Full Options in Effect Report
l JDRPT—Job Documentation report
l PROCXRPT—PROC cross-reference
l DSXRPT—Dataset name cross-reference
l SYSOXRPT—SYSOUT cross-reference.
l PGMXRPT—Program cross reference
l INCLXRPT—INCLUDE cross-reference report
l IORPT—Input Output files report
To generate reports from the INFO/X Repository, use PROCESS=DATABASE. If the PROCESS parameter is not specified,the report will be generated from the JCL.
The REPORTS parameter can contain multiple entries.
Example REPORTS parameter:
%% REPORTS=(SJL,SHOWRUN),
REPORTSTYLESpecifies the format of the report generated for this INPUT statement. Valid entries for the REPORTSTYLE parameter are:
l ONLINE—Produces a foreground SJL report.
l PAPER—Produces a printable SJL report that can be viewed online or output as a hardcopy.
The default value when running INFO/X in batch is PAPER.
Example REPORTSYLE parameter:
%% REPORTSTYLE=PAPER,
RESETBETWEENMEMBERSSee RESETBETWEENMEMBERS for a description of this parameter.
RTSMEMBERThe RTS member to use instead of RTS member DEFAULT.
Example RTSMEMBER parameter:
%% RTSMEMBER=RTS03,
SCHEDULERSpecifies a third-party scheduler interface. Valid entries for the SCHEDULER parameter are:
l CA7 [ = (RUNDATE=yyddd, RUNTIME = hhmm, SCHID = n])
l CNTLM [ = RUNDATE=yymmdd] (for CONTROL-M)
l JOBTRAC [=OSDDATE= yydd, toddate = yyddd, LOCATION|LOC = string]
l ZEKE
Example SCHEDULER parameter:
153
Format of Statements

%% SCHEDULER=ZEKE,
SELECTSpecifies the members of the input JCL library for INFO/X to process. SELECT parameter entries can be:
l Specific member names.
l Member name masks, including the wildcard characters:
l * (asterisk) matches any string of any length.
l % (percent) matches any single character.
l Ranges of member names.
l A Selection List name. This name cannot contain wild card characters. Use Type=LIST to process a list ofmembers. See Processing Multiple Members.
There is no default value for this parameter.
Members selected by member name masks or ranges of member names can be excluded by EXCLUDE parameter entries(see EXCLUDE and Excluding Members). Members selected by specific member name cannot be excluded by EXCLUDEparameter entries.
Each INPUT statement can contain multiple SELECT parameters. Each SELECT parameter can contain multiple entries.
See JCL Member Name Selection Options for a complete description of the use and effect of the options for specifyingmember names in SELECT and EXCLUDE parameters.
Example SELECT parameters:
%% SELECT=(PJGL2300), SPECIFIC NAME
%% SELECT=(%%%%23*,*0*0), MASKS
%% SELECT=(PJGL2300-PJGL5440), RANGE
%% SELECT=(MYLIST) SELECTION LIST
SPANMEMBERS | NOSPANMEMBERSDetermines whether or not INFO/X will assume that a job can span multiple members, instead of assuming thatbeginning a new member begins a new job.
Example:
%% NOSPANMEMBERS,
The default is NOSPANMEMBERS.
SPLITJOBSSPLITJOBS enables INFO/X to more efficiently utilize memory when processing the input contained in aggregated job(example, sequential files from schedulers). When these files consist of 100s or even 1000s of jobs, this parametercauses INFO/X to individually process each job, reusing the memory for each job. Without this parameter, INFO/Xprocesses the entire file in memory.
See RESETBETWEENMEMBERS for information about the interaction between these two parameters.
%% INPUT DSNAME='DSSUSR.TESTCASE.CNTL',%% SPLITJOBS,
154
ASG-INFO/X Enterprise System Administrator Guide

STARTA number which represents the member INFO/X starts processing in a library. Use with COUNT.
%% START=101,
TYPEThe type of dataset organization of the input JCL library specified by the DSNAME or DDNAME parameter. Allowablevalues for this parameter are:
l PDS
l LIBRARIAN
l PANVALET (PAN)
l SEQUENTIAL (SEQ)
l VSAM -- For PROCESS=CICSCSD only.
Example TYPE parameter:
%% TYPE=PDS,
UPDATEDATABASE | NOUPDATEDATABASESee UPDATEDATABASE | NOUPDATEDATABASE for a description of this parameter.
The default is NOUPDATEDATABASE.
USERPROFILEA member name up to N characters that contains values for in INFO/X panels.
Example USERPROFILE parameter:
%% USERPROFILE=MYPROFILE,
USERREPORTTITLEA string of up to 32 characters, enclosed in apostrophes, for INFO/X to use as a title for each page of output.
Example USERREPORTTITLE parameter:
%% USERREPORTTITLE='Quarterly Report'
Processing Multiple Datasets
To process multiple datasets
n Use the DDNAME parameter to process multiple datasets with a single INPUT statement.
Note that the DSNAME parameter is not coded.
155
Format of Statements

//JOBNAME JOB (ACCT),BUILD,MSGCLASS=X,NOTIFY=&SYSUID//********************************************************************//* MEMBER NAME : INFOX (BUILT FROM SKELETON: D0SIIJ13)//* TYPE : SAMPLIB//* PRODUCT RELEASE: Rnnn//* DB2 RELEASE : 11.1//********************************************************************//*// JCLLIB ORDER=(DSSI.Rnnn.TAPE.INSTALL)//*//********************************************************************//* INFO - EXECUTE BATCH UPDATE//********************************************************************//STEP1 EXEC PR1PROC,// PROD='-INFOX'//JCLINDD DD DSN=MYJCL.DATA.SET// DD DSN=YOURJCL.DATA.SET//SYSIN DD *%% INPUT DDNAME=JCLINDD,%% TYPE=PDS,%% SELECT=MEMBER,%% REPORTS=SJL/***************************** Bottom of Data ***************************
Processing multiple datasets with a single INPUT statement
Processing Multiple Members
To process multiple members
1. Edit your batch member to list the members in run-time order in a SELECT parameter. For example:
SELECT=(JOB1,JOB2)
Or
SELECT=MYLIST,TYPE=LIST
This SELECT parameter names a Selection List. To create a Selection List:
a. Access the Selection List Directory panel. Choose Selection List from the Settings Action bar menuon the INFO/X Update Job Information panel or
b. Use the Command line options to Create a new selection list, or edit an existing list to addmembers to the list or rearrange the list's processing order. See the INFO/X Reference Informationfor more information.
When using a Selection List in batch, do not use the DSNAME or DDNAME parameters onthe INPUT statement.
2. Submit the job.
ExamplesThese examples show the interaction of the SELECT and RESETBETWEENMEMBERS parameters when processingmultiple members explicitly coded in the SELECT parameter of the INPUT statement. You can also see these same effectswith Selection Lists.
156
ASG-INFO/X Enterprise System Administrator Guide

Example 1 illustrates the INPUT statement from the batch job showing the members listed in the SELECT parameter.
Example 2 illustrates the same INPUT statement with the member names reversed in the SELECT parameter.
Example 3 illustrates a variation on Example 2 with RESETBETWEENMEMBERS set to Y.
All of the examples process these JCL members:
DELETE Member:
//DELETE JOB ACCT,'USER',NOTIFY=ASGUSR,MSGLEVEL=1,// MSGCLASS=X,REGION=0M,CLASS=F,TIME=1440//STEP1 EXEC PGM=IEFBR14//PCFDEL DD DSN=USER1.I00116,DISP=(SHR,DELETE,DELETE),// DCB=(LRECL=80,RECFM=FB,BLKSIZE=27920)
CREATE Member:
//CREATE JOB ACCT,'USER',NOTIFY=ASGUSR,MSGLEVEL=1,// MSGCLASS=X,REGION=0M,CLASS=F,TIME=1440//STEP1 EXEC PGM=IEFBR14//PCFCRET DD DSN=USER1.I00116,DISP=(NEW,KEEP,KEEP),// DCB=(LRECL=80,RECFM=FB,BLKSIZE=27920),// SPACE=(TRK,(1500,150),RLSE)
Note that job DELETE deletes the dataset created in job CREATE.
Example 1This example uses this batch JCL to show the message INFO/X issues when it cannot find a dataset in its catalog:
...//STEP1 EXEC PR1PROC,// PROD='-INFOX'//SYSIN DD *%% INPUT DDNAME=INPUTJCL,%% SELECT=(DELETE,CREATE),%% RESETBETWEENMEMBERS=N,
...
The message DSS20028E indicates that INFO/X did not find the dataset in its catalog when it processed the DELETE job.
157
Format of Statements

...********************************************************************Structured JCL Listing - JCL Section
======================================================================INFO/X Release R350 RTS Member: DEFAULT Security Exit: ON======================================================================
//DELETE JOB ACCT,'USER',NOTIFY=ASGUSR,MSGLEVEL=1,// MSGCLASS=X,REGION=0M,CLASS=F,TIME=1440//STEP1 EXEC PGM=IEFBR14//PCFDEL DD DSN=USER1.I00116,DISP=(SHR,DELETE,DELETE),// DCB=(LRECL=80,RECFM=FB,BLKSIZE=27920)
E1 - DSS20028E - Data set 'USER1.I00116' was not found in catalog.//*--- END OF STEP ------ END OF JOB ---
...====================================================================INFO/X Release R350 RTS Member: DEFAULT Security Exit: ON====================================================================
//CREATE JOB ACCT,'USER',NOTIFY=ASGUSR,MSGLEVEL=1,// MSGCLASS=X,REGION=0M,CLASS=F,TIME=1440//STEP1 EXEC PGM=IEFBR14//PCFDEL DD DSN=USER1.I00116,DISP=(NEW,KEEP,KEEP),// DCB=(LRECL=80,RECFM=FB,BLKSIZE=27920),// SPACE=(TRK,(1500,150),RLSE)//*--- END OF STEP ------ END OF JOB ---
Portion of the SJL for Example 1
The value of the RESETBETWEENMEMBERS parameter has no effect on this example because thejobs are out of run-time order.
Example 2This example uses this batch JCL to show that INFO/X updates its copy of the system catalog and retains this informationwith RESETBETWEENMEMBERS=N:
...//STEP1 EXEC PR1PROC,// PROD='-INFOX'//SYSIN DD *%% INPUT DDNAME=INPUTJCL,%% SELECT=(CREATE,DELETE),%% RESETBETWEENMEMBERS=N,
...
Both jobs process without errors. The batch JCL lists the jobs in run-time order, and INFO/X updates its catalog from theJCL in the CREATE job before processing the DELETE job.
158
ASG-INFO/X Enterprise System Administrator Guide

...********************************************************************Structured JCL Listing - JCL Section
======================================================================INFO/X Release R350 RTS Member: DEFAULT Security Exit: ON======================================================================
//CREATE JOB ACCT,'USER',NOTIFY=ASGUSR,MSGLEVEL=1,// MSGCLASS=X,REGION=0M,CLASS=F,TIME=1440//STEP1 EXEC PGM=IEFBR14//PCFDEL DD DSN=USER1.I00116,DISP=(NEW,KEEP,KEEP),// DCB=(LRECL=80,RECFM=FB,BLKSIZE=27920),// SPACE=(TRK,(1500,150),RLSE)//*--- END OF STEP ------ END OF JOB ---
...=================================================================INFO/X Release R350 RTS Member: DEFAULT Security Exit: ON=================================================================
//DELETE JOB ACCT,'USER',NOTIFY=ASGUSR,MSGLEVEL=1,// MSGCLASS=X,REGION=0M,CLASS=F,TIME=1440//STEP1 EXEC PGM=IEFBR14//PCFDEL DD DSN=USER1.I00116,DISP=(SHR,DELETE,DELETE),// DCB=(LRECL=80,RECFM=FB,BLKSIZE=27920)//*--- END OF STEP ------ END OF JOB ---
Portion of SJL for Example 2
Example 3This example uses this batch JCL to show the effect RESETBETWEENMEMBERS=Y has on members when INFO/Xprocesses them in run-time order:
...//STEP1 EXEC PR1PROC,// PROD='-INFOX'//SYSIN DD *%% INPUT DDNAME=INPUTJCL,%% SELECT=(CREATE,DELETE),%% RESETBETWEENMEMBERS=Y,
...
With the CREATE job first and RESETBETWEENMEMBERS set to Y, the DELETE job fails. This parameter setting causesINOF/X to refresh its copy of the system catalog; accordingly, there is no newly created dataset to delete, and INFO/Xissues the 20028E message for the DELETE job.
159
Format of Statements

...********************************************************************INFO/X Release R350 RTS Member: DEFAULT Security Exit: ON=================================================================
//CREATE JOB ACCT,'USER',NOTIFY=ASGUSR,MSGLEVEL=1,// MSGCLASS=X,REGION=0M,CLASS=F,TIME=1440//STEP1 EXEC PGM=IEFBR14//PCFDEL DD DSN=USER1.I00116,DISP=(NEW,KEEP,KEEP),// DCB=(LRECL=80,RECFM=FB,BLKSIZE=27920),// SPACE=(TRK,(1500,150),RLSE)//*--- END OF STEP ------ END OF JOB ---
...====================================================================INFO/X Release R350 RTS Member: DEFAULT Security Exit: ON====================================================================
//DELETE JOB ACCT,'USER',NOTIFY=ASGUSR,MSGLEVEL=1,// MSGCLASS=X,REGION=0M,CLASS=F,TIME=1440//STEP1 EXEC PGM=IEFBR14//PCFDEL DD DSN=USER1.I00116,DISP=(SHR,DELETE,DELETE),// DCB=(LRECL=80,RECFM=FB,BLKSIZE=27920)
E1 - DSS20028E - Data set 'USER1.I00116' was not found in catalog....
Portion of SJL for Example 3
JCL Member Name Selection Options
The INFO/X INPUT statement parameters SELECT and EXCLUDE provide a flexible means of selecting members ofdatasets specified by the INPUT statement parameter DDNAME. Member names can be specified, by either the SELECTor the EXCLUDE parameter, with any of the following options:
l One or more specificmember names.
l Member names included within a specified range.
l Member names that fit a mask of matching and wild card characters (* and %).
This topic provides details about using these options to select JCL members for INFO/X processing.
Entering the OptionsEach INPUT statement can contain multiple SELECT parameters. Each SELECT parameter can contain multiple entriesseparated by commas.
Use as many entries as needed to select all of the members to process. Use any combination of the selection optionsdescribed below. The members will be validated in the order in which you enter them. Member names can be repeatedand will be validated as many times as they are entered. Do not use blanks between entries; a blank in the input fieldwill terminate the list.
The scope of range and mask selection options can overlap or include members already specified by specific name. Thiscan result in repeating the selection of any member from any of the selection options occurring earlier in the list.
Excluding MembersMasks or ranges can be used to exclude members from the JCL run. You can exclude these members from the INFO/Xrun by specifying their names in an EXCLUDE parameter of the same INPUT statement. All of the selection options thatare valid in the SELECT parameter are also valid in the EXCLUDE parameter.
160
ASG-INFO/X Enterprise System Administrator Guide

Members that have been selected by specific name in a SELECT parameter will not be excluded by entries in anEXCLUDE parameter. Members that have been selected by range or mask selection options in a SELECT parameter willbe excluded by entries in EXCLUDE parameters.
Example:
EXCLUDE=JOB005
Or
EXCLUDE=JOB008,
EXCLUDE=JOB247,
Selection Option DescriptionsThe following descriptions of selection options for the SELECT and EXCLUDE parameters provide details of how to usethe different options for specifying member names in these fields.
Specific NameType specific member names (no blanks permitted), in any order.
Example:
SELECT=JOB003
Or
SELECT=JOB003,
SELECT=JOB729,
SELECT=JOB018,
Members of the input library dataset that are specifically named in SELECT parameters will not be excluded by entries inEXCLUDE parameters. They can be specified for processing multiple times in the same INPUT statement, and will beprocessed in the order in which they are entered in SELECT parameters. Specific member names in EXCLUDE parameterswill exclude members that would otherwise be included by range or mask selection options in the same INPUTstatement.
RangeType two member names, separated by a hyphen, to define the range of member names to select.
Example:
SELECT=JOB000-JOB008,
EXCLUDE=JOB004-JOB006,
The names do not need to match actual member names, but must be entered in ascending alpha-numeric sort order.Range will result in selecting members whose names match either of the entered names or fall between the two in sortorder. Range will not result in duplicating any member name from any of the selection options occurring earlier in thelist.
If the input library dataset contains the members JOB001, JOB002, JOB003, JOB004, JOB005, JOB006, JOB007, JOB008,and JOB009, then the example above would select JOB001, JOB002, JOB003, JOB007, and JOB008, in that order, forvalidation. (JOB004, JOB005, and JOB006 are within the scope of the range selection option in the SELECT parameter,but they are excluded by the range selection option in the EXCLUDE parameter.)
161
Format of Statements

MasksUse an asterisk (*) as a wild card character in the mask to match any character string of any length.
Example: PJG*5*
Matches member names PJGL0050, PJGL0055, and PJGL0056.*
Matches all member names in a library.
Use a percent (%) as a wild card character in the mask to match any single character.
Example: PJG*5%%
Because this example specifies exactly 2 characters after the character 5 and any string between the G andthe 5, INFO/X processes members PJGL0500 and PJGL526 but not PJGL5000.
Large Batch Run ConsiderationsTo avoid out-of-memory conditions and to improve performance when running an INFO/X update for a large number ofjobs, do not generate an SJL unless it is actually needed. If an SJL is desired, use these recommended RTS settings:
l JCL PRINTING=EO. This RTS setting option determines the content of the Structured JCL Listing (SJL) report. Byspecifying the EO (Errors Only) option, only the JCL and messages will be included for jobs which INFO/X hasdetected errors (JCL for jobs without errors will not be included). Default option is ALL.
l ERROR SUMMARY=BYJOB. This RTS setting option determines when the Error Summary will be produced withinthe SJL. By specifying the BYJOB option, the Error Summary will be printed after processing each job, eliminatingthe need to store this information until the end of the run. Default option is BYRUN.
In addition to the SJL oriented RTS settings above, we recommend using these options:
l RESETBETWEENMEMBERS=Y. This option determines whether INFO/X resets its MVS simulator betweenmembers. Resetting the simulator prevents jobs processed in one member from affecting the (simulated)processing of jobs in another member.
Example: If RESETBETWEENMEMBERS=N and a dataset is deleted in a member, INFO/X will issue a “Datasetnot found” error message in all subsequent members where the dataset is referenced. IfRESETBETWEENMEMBERS=Y, deleting a dataset in a member will not affect the processing of the dataset insubsequent members. Therefore, no “Dataset not found” message will be issued.
If you are processing the members in run-time order, you should specify the N defaultoption.
l For updates containing more than 1,000 jobs, group the jobs into smaller segments (with no more than 1,000jobs per segment).
o By name.o By application.
If the value specified by a user on an INPUT statement for RTS, Selection Exit, or for a scheduler conflicts with the valueassigned by the administrator for that user, INFO/X uses the assigned value instead of the specified value. INFO/Xinforms the user with a message in the JPSEL report.
162
ASG-INFO/X Enterprise System Administrator Guide

Remote Database Update FacilityThe remote database update facility allows you to populate and update an INFO/X Repository located on a remotemachine with data located on a local machine. Remote communication is established using DSSIAPI – a proprietary ASGnetwork protocol based on TCP/IP. Network connectivity makes it possible to implement remote database update onmultiple servers, optionally using a shared master PC File. Once the connection is established, data is transferred fromthe local machine to the INFO/X Repository machine in eXtensible Markup Language (XML) files called FOLT files.
Database connection information is read from RTS settings, so it is important to configure RTSmembers correctly.
To establish the remote connection and facilitate the data transfer, INFO/X uses CONNECT statement parameters. Theseparameters specify the location of the remote machine (IP address and optional TCP port), and the userid and password(or EPASS) to use when connecting to the remote machine. After the CONNECT statement parameters have beenprocessed on the local machine, a listener on the remote machine receives and validates the network connectionrequest. After the request has been accepted, the listener starts the appropriate server to handle the request.
INFO/X can process the scanned JCL information in one of two ways:
l Transfer directly to the remote machine, via DSSIAPI, and store in a FOLT file.
l Store locally in a FOLT file for transfer to the remote machine via other file transfer mechanisms.
Once the FOLT data has been stored on the remote INFO/X Repository machine, the update factory program is used toprocess that data and populate the INFO/X Repository with it.
Configuration
The Remote Database Update (RDB) function of INFO/X is built-in and requires no special configuration. The onlyrequirement is that the networking functions of INFO/X be enabled when the product is installed.
Remote Database Update Programs
The remote database update facility consists of the following programs:
l Listener
l Update Factory
l Batch JCL Scanning Engine
l PC File Synchronization Program
l EPASS Generation Utility
ListenerThe listener is the program that “listens” for network connections from the INFO/X product. The listener is part of thestarted task.
Starting the ListenerFor information on starting the listener, refer to the Installation documentation.
Once the startup process is complete, the listener should be running and ready to receive connection requests.
163
Remote Database Update Facility

Update Factory—DJ0CUPDTThe update factory is the program that reads FOLT files. The FOLT files are generated by the INFO/X batch interface onthe machine where the JCL was scanned and spooled. The FOLT files are stored in sequential datasets. The following isthe FOLT file naming convention:
{RDB server userid}.INFOX.{remote machine name}.D{date of scan}.T{time of scan}.S{seconds}
The RDB server userid is the userid specified on the CONNECT statement, either with the userid parameter orwith a generated EPASS, or it is the userid specified on the INPUT or AIUFCE statements via the FOLTHLQ parameter.
The remote machine name is the name of the machine where the scan takes place. Based on how the system isconfigured, this might be an SMF id or an IP hostname. If the IP hostname is longer than 8 characters, the SMF id is usedinstead of the IP hostname.
The update factory obtains the database connection information from the RTS member specified in the INPUT or AIUcontrol cards used to scan the JCL. So that the correct database is updated, be sure to specify the correct databaseconnection information in this RTS member used to scan and spool the JCL data.
After the update factory completes processing, the FOLT files are deleted from the file system.
After the update factory completes processing, any FOLT files containing data for jobs where JCL scanned encountered areturn code greater than 4, are renamed. The renaming consists of replacing the INFOX node with IXERR in the originalsequential file name.
For Example:
{RDB server userid}.IXERR.{remote machine name}.D{date of scan}.T{time of scan}.S{seconds}
The DJ0CUPDT report (see DJ0CUPDT Report ) displays which member in which FOLT file encountered a problem. Ifnecessary,
1. The corresponding IXERR sequential dataset can then be edited to correct any JCL-oriented problems, and
2. After they have been renamed (removing the IXERR as the second node), processed by DJ0CUPDT.
If the errors reported in the JPSEL report are normal, then the IXERR named sequential datasets can be deleted.
For INFO/X to locate and process the FOLT files, the update factory must be run:
l Under a TSO userid that matches the first node of a FOLT file HLQ. If necessary, the FOLT files can be renamed—as long as the first node of the HLQ matches the TSO userid that the update factory will run under and thesecond node is INFOX.
l With the -X parameter specified in the PROD parameter of the INFOXRDU job. The -X parameter is used tospecify the first node of the spooled FOLT files.
For example:
//********************************************************************//STEP1 EXEC PR1PROC,// PARMPGM='DJ0CUPDT',// PROD='-INFOX -XASGUPT'
Here, because of the -XASGUPT, the update factory will find and process FOLT files starting with ASGUPT.
164
ASG-INFO/X Enterprise System Administrator Guide

No control cards are required to run the update factory.
Starting DJ0CUPDT
To start the update factory
1. Tailor and submit the SAMPLIB member INFOXRDU generated by the Installation Interface during productinstallation. There are no control cards to tailor.
If the FOLTHLQ parameter was specified on the INPUT or AIUFCE control cards, use the -X parameter in thePROD symbolic to specify the HLQ in the FOLTHLQ parameter. For example:
//********************************************************************//STEP1 EXEC PR1PROC,// PARMPGM='DJ0CUPDT',// PROD='-INFOX -XASGUPT'
2. Review the update factory report in the JPSEL DD of the job output.
If you see any error messages, call ASG customer support to report the exact message received.
DJ0CUPDT ReportWhen the update factory completes processing, a JPSEL selection report is generated and becomes part of theINFOXRDU Job held output.
Sample ReportThe below figure is a sample JPSEL report from the database update factory.
Database Update Factory report================================================================================FOLT File: DV121A.INFOX.ASGZ18A.D080208.T1345.S56220================================================================================Job 'S40775A' in member 'QAL.MGH.PGR.BKTR320(JBS40775)' was successfullyprocessed. Max member severity: 8Job 'S407080A' in member 'QAL.MGH.PGR.BKTR320(JBS4078)' was successfullyprocessed. Max member severity: 4
--------------------------------------------------------------------------------...1 Database Update Factory report AS OF: 02/08/17 13:52:29 PAGE 1===============================================================================Results Summary
===============================================================================| Jobs Processed | Jobs NOT Processed | TOTAL |
================================================================================DV121A.INFOX.ASGZ18A.D080208.T1345.S56220 369 5 374Total 369 5 374
PC File SynchronizationThe PC File synchronization is handled through the product Started Task. For more information, refer to the Installationdocumentation.
165
Remote Database Update Facility

FOLT File Size Allocation Control
The FOLT File Size RTS setting controls the initial allocation size of the FOLT files generated during remote databaseupdate JCL spooling. The FOLT files are allocated in cylinders. This RTS setting allows you to specify the FOLT file initialallocation size. Once the FOLT file is closed, any unused space is freed. Therefore, the actual size of the FOLT file variesbased on how much data is spooled.
The currently supported allocation sizes are:
l SMALL—8 cylinders primary, 32 cylinders secondary.
l MEDIUM—16 cylinders primary, 32 cylinders secondary (default size).
l LARGE—32 cylinders primary, 32 cylinders secondary.
l XLARGE—64 cylinders primary, 32 cylinders secondary.
The amount of data that is being spooled will determine how quickly the FOLT files will fill up. Using this RTS settingalong with the REMOTEMBRMAX INPUT statement parameter can be used to fine-tune the remote database spooling togenerate an optimal FOLT file size, both from a member-per-FOLT file perspective and from a physical size of FOLT fileperspective.
EPASS
When running INFO/X's Remote Database Update, a user ID and password are required for the remote database server.Since these values appear on the CONNECT statement, and can be considered a security risk, ASG has enabled thesupport of EPASS values. An EPASS is an encrypted “cookie” that can only be used by the person for whom the EPASSwas generated.
EPASS is a secure alternative to USERID and PASSWORD. EPASSes are generated using the INFO/X ISPF panels. The EPASSis 32 characters long and case sensitive. Be sure to use CAPS OFF when editing control cards that contain an EPASS.
The EPASS must be generated on the remote database server and then it can be used on the clientmachines as appropriate.
How to Generate an EPASS
EPASS values are generated from the ASG-INFO/X Main Menu.
To generate an EPASS
1. Access the ASG-INFO/X Main Menu.
2. Choose the EPASS option from the Main Menu. INFO/X displays the Generate Encrypted Password for BatchDirected Execution panel.
166
ASG-INFO/X Enterprise System Administrator Guide

File=================================================================================D0JPEPAS Generate Encrypted PasswordCommand ===>
The following user(s) may use this EPASS:Restrict to User ID . . . USER01 (Blank for any user)Restrict to Machine . . . MACH1
(Blank for any machine)
Logon Information for Remote System:User ID . . . . . . . . . USER01 (Required)Password . . . . . . . . (Required)
Generated Encrypted Password:
* * * Note: The Generated Encrypted Password is case sensitive. * * *
3. Fill in the Restrict to User/Machine fields as desired:
l Specify both a User ID and Machine to restrict the EPASS to a particular user on a particular machine. TheRestrict to Machine field can be up to 32 characters.
l If the Restrict to User ID field is left blank, the EPASS generated will be valid for any user on the machinespecified.
l If the Restrict to Machine field is left blank, the EPASS generated will be valid for any machine for the userspecified.
l If both Restrict to User ID and Restrict to Machine fields are left blank, the EPASS generated will be valid forany user on any machine.
4. Fill in the User ID and Password to logon to the remote (target) system.
5. Press Enter. The EPASS value will appear in the Generated Encrypted Password field. The EPASS is case sensitive,use it exactly as it was created.
File=================================================================================D0JPEPAS Generate Encrypted PasswordCommand ===>
The following user(s) may use this EPASS:Restrict to User ID . . . USER01 (Blank for any user)Restrict to Machine . . . MACH1
(Blank for any machine)
Logon Information for Remote System:User ID . . . . . . . . . USER01 (Required)Password . . . . . . . . (Required)
Generated Encrypted Password:QAkh9K2PC+9ne7x40LqciIeAKrq3QW7Z
* * * Note: The Generated Encrypted Password is case sensitive. * * *
How to Use an EPASS
Copy the value in the GEnerated Encrypted Password field to the CONNECT statement on the SYSIN card.
167
Remote Database Update Facility

Example:
%% CONNECT IPADDRESS=123.456.78.90,%% EPASS=QAkh9K2PC+9ne7x40LqciIeAKrq3QW7Z
Product Maintenance
The following tasks should be performed on a regular basis to maintain and optimize the remote INFO/X Repository.
Schedule the Update Factory
To run the update factory at a predetermined time
n Tailor INFO/X SAMPLIB member INFOXRDU:
a. Modify the JOB statement as required for your site.
b. Schedule this job to run at the desired time.
//DSSnnnQQ JOB (ACCT),BUILD,MSGCLASS=X,NOTIFY=&SYSUID//********************************************************************//* MEMBER NAME : INFOXRDU (BUILT FROM SKELETON: D0SIIJ13)//* TYPE : SAMPLIB//* PRODUCT RELEASE: Rnnn//* DB2 RELEASE : 11.1//********************************************************************//*// JCLLIB ORDER=(DSSI.Rnnn.TAPE.INSTALL)//*//********************************************************************//* INFOXRDU - EXECUTE REMOTE DATABASE UPDATE//* -----------------------------------------//* THERE ARE NO CONTROL CARDS REQUIRED TO RUN THE DATABASE UPDATE//* FACTORY. THIS JOB MUST BE RUN EITHER://*//* A) UNDER A TSO ID THAT MATCHES THE FIRST NODE OF THE HLQ OF THE//* FOLT FILES BEING PROCESSED.//*//* --OR--//*//* B) WITH THE '-X' PARAMETER SPECIFIED IN THE PROD PARAMETER. THE//* '-X' PARAMETER IS USED TO SPECIFY THE FIRST NODE OF THE//* SPOOLED FOLT FILES. FOR EXAMPLE://*//* // PROD='-INFOX -XASGUPT'//*//* HERE, THE '-XASGUPT' PARAMETER WILL CAUSE FOLT FILES STARTING//* WITH ASGUPT TO BE FOUND BY THE UPDATE FACTORY AND PROCESSED.//*//* PLEASE REFER TO THE INFO/XE ADMIN GUIDE FOR MORE INFORMATION.//********************************************************************//STEP1 EXEC PR1PROC,// PARMPGM='DJ0CUPDT',// PROD='-INFOX'//* PROD='-INFOX -XASGUPT'
SAMPLIB member INFOXRDU
Delete Old “Error” FOLT FilesAny FOLT files with JCL errors generated during the update factory execution (and named with IXERR in the secondnode) that are no longer needed should be deleted. This should be performed on a regular basis.
168
ASG-INFO/X Enterprise System Administrator Guide

Remote Database Maintenance
Currently only the batch interface, including Automatic Incremental Update (AIU), can be used to remotely update aremote INFO/X Repository.
INFO/X Network Communications Terminology
Client
Any program that has established a connection to a server. The following are validclient types:
l Batch Job
l DSSISTC started task (other than the master started task)
Server
A collection of related programs that function in cooperation with one another tosatisfy the requests of a client. The server may process incoming requests on behalf ofa client, or function as an intermediary to another end-server.
ListenerA program in the DSSISTC Started Task that listens on a specific TCP port for aconnection request from a client.
PortThe port number assigned to a TCP/IP enabled application. The ASG default port is1265.
IP Address Identifies the machine on a network and the network to which the machine is attached.
HostnameA symbolic name assigned to any IP address. Hostname use requires a DNS (DomainName Server) or local hosts file to be configured.
Batch JCL Scanning Engine
The INFO/X batch interface, DJ0CBNW, is used to generate the data that the update factory inserts into the INFO/XRepository. To perform a batch interface update, a CONNECT statement must be specified to configure the remoteconnection. This CONNECT statement will work with existing INFO/X INPUT statements. Thus, any existing INFO/X INPUTstatement can be used to perform a remote database update simply by specifying a CONNECT statement before it.
For example, this INFO/X INPUT statement:
%% INPUT DSN='DSSI.S320.TAPE.DEMOLIB',%% SELECT=PJGL*,%% NODENAME=MVSA,%% UPDATEDATABASE,%% RTSMEMBER=DEFAULT
can be configured to function in a remote database update configuration by adding a CONNECT statement before it:
%% CONNECT IPADDRESS=123.456.7.89,%% USERID=USER1,PASSWORD=USRPWD%%*%% INPUT DSN='DSSI.S320.TAPE.DEMOLIB',%% SELECT=PJGL*,%% NODENAME=MVSA,%% UPDATEDATABASE,%% RTSMEMBER=DEFAULT
169
Remote Database Update Facility

Since the INFO/X Repository is not being immediately updated with the scanned JCL, some remote database updateprogress messages have been added to allow monitoring of long-running remote database update jobs. These progressmessages appear in the 'SYSPRINT' DD of the JCL scanning job.
Here is an example:
15:20:42:466 - Start of spooling of INPUT library: DSSI.S320.TAPE.DEMOLIB15:21:10:767 - End of spooling of INPUT library: DSSI.S320.TAPE.DEMOLIB. 24 members werespooled.*****************************15:21:11:575 - Start of spooling of INPUT library: DSSUSR.TEST.CNTL15:29:13:640 - Currently processing job 'DSSUSRWIN', in member #25: DSSUSR.TEST.CNTL(INSTALL)15:32:22:343 - Currently processing job 'DSSUSRWO', in member #50: DSSUSR.TEST.CNTL(OPTADD2)15:33:24:902 - End of spooling of INPUT library: DSSUSR.TEST.CNTL. 72 members werespooled.*****************************15:33:25:722 - Starting 'FINDCHANGEDPROCS' AIU process to check 20 members for changes.15:33:26:31 - End of 'FINDCHANGEDPROCS' AIU process. 0 update flags were set.15:34:42:460 - Total number of members spooled: 96.*****************************
The messages starting with “Currently processing” appear with each 25th member that is scanned. This is currently notuser configurable. These status messages appear only when running a remote database update or when running a localdatabase update with the 'LOCALSPOOL' INPUT statement parameter specified. See CONNECT Statement forinformation on the CONNECT statement. See LOCALSPOOL for information on the LOCALSPOOL INPUT statementparameter.
When performing remote database updates using the INFO/X batch interface, make sure to specifythe PROD='-INFOX' parameter in the parm field of INSTALL member PR1PROC, or specify thePROD='-INFOX' symbolic override on the PR1PROC invocation (batch job INFOX) so the INFO/Xenvironment will be properly initialized before performing the JCL scan.
CONNECT Statement
The CONNECT statement establishes a connection to a target machine. It has two purposes. First it identifies the targetmachine by its IP address or hostname. Second, it provides a USERID and PASSWORD to connect to the target machine.
The USERID and PASSWORD information is required to allow INFO/X to gain access to the INFO/X Repository and tospool FOLT files to DASD (or disk on Unix). You can provide the USERID and PASSWORD directly or encrypt them using anEPASS. See EPASS for more information.
IPADDRESSThis parameter specifies the IP address or hostname of the target machine where the FOLT files are to be spooled. Youcan use the numerical format: nnn.nnn.nnn.nnn. Or, if a DNS is configured on the mainframe, you can use thehostname. This number and/or name is assigned by the Network Administrators at your company. This parameter ismandatory.
PORTThis parameter specifies the port for the listener on the remote machine. This parameter is needed only if the remotestarted task is not using the ASG default port number of 1265. It can be any number between 1024 and 65535. This
170
ASG-INFO/X Enterprise System Administrator Guide
number is also assigned by the Network Administrators and must match the number used to install INFO/X on theremote system.
USERIDThis is the TSO user ID on the remote machine, under which the FOLT files will be spooled. In a z/OS environment,INFO/X uses the security system on the remote machine, such as RACF, to logon to this user ID. This way, onlyauthorized users will gain access to the remote host.
This user ID does NOT have to be the same user ID that is being used on the local system where the JCL will be scanned.In fact it can be a special user ID setup solely for remote database updates. If this is the case, ASG recommends that youdeny access to TSO and other key system resources for this user ID.
When this parameter is used, PASSWORD must also be specified.
PASSWORDThe password of the user ID for the remote machine.
EPASSSee EPASS for a description of this parameter.
Example
Configuring a Remote Database Update
%% CONNECT IPADDRESS=os390.test-jcl.com,PORT=4242%% USERID=USER1,PASSWORD=OS390%%*%% INPUT DSN='DSSI.S320.TAPE.DEMOLIB',%% SELECT=(PJGL*),%% NODENAME=MVSA,%% UPDATEDATABASE,%% RTSMEMBER=DEFAULT,
In this example, INFO/X is sending locally scanned JCL to the remote system (identified by the remote host addressOS390.test-jcl.com) for later update of the INFO/X Repository. The port for the listener on the remote machine is 4242.The user ID INFO/X will use on the remote system is USER1 and the current password for USER1 is OS390.
For security, an EPASS can be used in place of the USERID/PASSWORD parameters.
DISCONNECT Statement
Use the DISCONNECT statement to terminate the remote connection. If the DISCONNECT statement is missing, INFO/Xautomatically terminates the remote connection.
Syntax DISCONNECT
171
Remote Database Update Facility

l This parameter is optional.
l If more than one INPUT statement is coded as part of a remote AIU, any error messages generated for agiven node will be output immediately after the last INPUT statement referencing that node.
ExampleThe following report highlights two error messages generated during a remote AIU. The first error message is a result ofthe only INPUT statement for the MVSA node. The next error message results from the second of two coded INPUTstatements for the MVSB node. Each message flags problems encountered during AIU processing for its respective node.Messages listed before the highlighted AIU error messages refer to processing on parameters in the preceding INPUTstatements.
Input Selection Report AS OF: 05/05/0515:40:52 PAGE 1=============================================================================================================================%% CONNECT IPADDRESS=LOCALHOST,PORT=4646,%% USERID=DSSIUSER,PASSWORD=********E1 - DSS01753A - Connected to machine localhost, JES Name UNKNOWN on port 4646 asuser DSSIUSER.%% INPUT DSN='DSSUSR.SAMP.JCL',%% RTSMEMBER=LOCALDB,%% SELECT=BR14,%% UPDATEDATABASE,%% FINDCHANGEDPROCS,%% NODENAME=MVSBE2 - DSS01705A - Member BR14 was processed. Max return code 0.E3 - DSS01701A - 1 member selected from data set 'DSSUSR.SAMP.JCL'.%% INPUT DSN='DSSUSR.SAMP.JCL',%% RTSMEMBER=LOCALDB,%% SELECT=BR14,%% UPDATEDATABASE,%% FINDCHANGEDPROCS,%% NODENAME=MVSAE4 - DSS01705A - Member BR14 was processed. Max return code 0.E5 - DSS01701A - 1 member selected from data set 'DSSUSR.SAMP.JCL'.E6 - DSS01186E - During 'FINDCHANGEDPROCS' processing, the CRC could not becalculated for member'DSSUSR.SAMP.JCL(DB2)'. Reason: File 'DSSUSR.SAMP.JCL(DB2)' cannot be opened.%% INPUT DSN='DSSUSR.SAMP.JCL',%% RTSMEMBER=LOCALDB,%% SELECT=STAN,%% UPDATEDATABASE,%% FINDCHANGEDCC,%% NODENAME=MVSBE7 - DSS01002E - File 'DSSUSR.SAMP.JCL(STAN)' cannot be opened.E8 - DSS01186E - During 'FINDCHANGEDPROCS' processing, the CRC could not becalculated for member 'DDSSUSR.SAMP.JCL(MVSBP1)'. Reason: Not Found.%% DISCONNECT
.
.
.
Sample—Remote AIU Error Messages
DJ0CBNW Input Parameters
The following INPUT statement parameters are used to configure special processing during a batch interface update ofthe INFO/X Repository via remote database update.
172
ASG-INFO/X Enterprise System Administrator Guide

REMOTEMBRMAXThis parameter enables the user to control the maximum number of members to scan per FOLT file. By default, INFO/Xscans 1000 members per FOLT file. This parameter is used to override the default setting.
For example:
%% REMOTEMBRMAX=500,
Limiting the maximum number of members scanned is one way to keep the FOLT files that getspooled on the remote database server smaller and easier to manage.
LOCALSPOOLThis parameter enables the user to control whether the FOLT files are spooled to the remote system directly or if theyare spooled to the local system, requiring transfer to the remote system via some other means. This option can bespecified to improve performance of spooling data since any network latency that might otherwise slow down directspooling to the remote system will be eliminated.
For example:
%% LOCALSPOOL,
When using local spooling the INFO/X Repository will not be immediately updated. Instead, the scanned JCL informationwill be spooled to local FOLT files. The update factory (DJ0CUPDT) must be run to update the INFO/X Repository with theJCL data in the generated FOLT files. FTP or some other file transfer mechanism can be used to transfer the FOLT files tothe INFO/X Repository machine for update as needed. Once the FOLT files are on the correct machine, the updatefactory (DJ0CUPDT) is used to update the INFO/X Repository with the data in the FOLT files. Refer to Update Factory—DJ0CUPDT for more information on running the update factory.
The LOCALSPOOL parameter can be specified on INPUT or AIUFINDCHANGEDENTITIES statements.
If using local spooling, the FOLT files will be named the same as if they were spooled directly to theremote system AND they will be stored under the high-level qualifier of the userid specified on theCONNECT statement, either through the USERID parameter or through an EPASS.
FOLTHLQThis parameter is used to specify a FOLT file HLQ that is different from the USERID specified on the CONNECT statementdirectly.
FOLTHLQ controls only the first node of the generated FOLT file name. So that the update factory can locate theFOLT files correctly, the -X{FOLTHLQ} parameter must be specified in the update factory job (INFOXRDU) PROD symbolic.
Example
Remote Database Update with FOLT Files Spooled Locally
%% CONNECT IPADDRESS=os390.test-jcl.com,PORT=4242,%% USERID=USER1,PASSWORD=OS390%%*%% INPUT DSN='DSSI.S320.TAPE.DEMOLIB',
173
Remote Database Update Facility

%% SELECT=(PJGL*),%% NODENAME=MVSA,%% UPDATEDATABASE,%% LOCALSPOOL,%% RTSMEMBER=DEFAULT
In this example, INFO/X is locally spooling locally-scanned JCL for later transfer to the remote machine (identified by theremote host address OS390.test-jcl.com) and update of the INFO/X Repository. The port for the listener on the remotemachine is 4242. The user ID INFO/X will use on the remote system is USER1 and the current password for USER1 isOS390. The locally spooled files will have a HLQ starting with the TSO ID of the user who submitted the remote databaseupdate job.
Running Remote AIU
The INFO/X Automatic Incremental Update function can be run remotely by specifying a CONNECT statement before anyAIU statements.
Example
Remote AIU
%% CONNECT IPADDRESS=os390.test-jcl.com,PORT=4242,%% USERID=USER1,PASSWORD=OS390%%*%%* AIUFINDCHANGEDENTITIES AIU statement%%*%% AIUFINDCHANGEDENTITIES FINDCHANGEDPROCS,%% DSN='USER.PROC.CNTL',%% SELECT=TEST*,%% EXCLUDE=TEST1,%% UPDATEDATABASE,%% TYPE=PDS,%% RTSMEMBER=DEFAULT,%% NODENAME=MVSA,%% USERREPORTTITLE='My AIU Report',%%*%%* Traditional AIU using the INPUT statement%%*%% INPUT DSN='DSSI.S320.TAPE.DEMOLIB',%% SELECT=(PJGL*),%% NODENAME=MVSA,%% UPDATEDATABASE,%% FINDCHANGEDPROCS,%% FINDCHANGEDCC,%% LOCALSPOOL,%% RTSMEMBER=DEFAULT
Troubleshooting
This topic lists problems that can occur when running a remote database update, and includes a corrective action foreach problem. If you encounter a problem not listed here, contact ASG Customer Support.
Problems
Problem Can’t connect to the remote server.
Action
Verify server address and optional port on the CONNECT statement. Make sure theuserid/password information on the CONNECT statement is correct and in the proper case. If usingEPASS, make sure the EPASS is correctly specified on the CONNECT control statement.
If the CONNECT statement information is correct and you still cannot connect to the INFO/X started
174
ASG-INFO/X Enterprise System Administrator Guide

task, you may need to specify a different TCP/IP transport stack other than the default stack. TheTCP/IP transport stack that INFO/X uses is specified in the JPCONFIG dataset name and member(typically BATCONF) defined in INSTALL library member PR1PROC.
To specify an alternate TCP/IP stack
Add this line to the JPCONFIG member:<connectionaffinity tcpipname="STACKNAME" />
where STACKNAME is the name of the desired TCP/IP transport stack.
For example:000001 <configuration >
000002 <remotepcfile
000003 ipaddress="MVSSYSA"
000004 port="1247"/>
000005 <connectionaffinity tcpipname="TCPIP2" />
000006 </configuration>
Problem EPASS doesn’t work when connecting to a Unix server.
Action
Make sure the case-sensitive parms for userid and password were correctly entered when theEPASS was generated. Make sure the EPASS was correctly specified on the CONNECT controlstatement.
Problem The INFO/X RTS member, DEFAULT or other, can’t be found.
Action
Make sure the PROD='-INFOX' symbolic override is applied to the PR1PROC invocation in theINFO/X batch JCL (SAMPLIB member INFOX), ormake sure that PROD='-INFOX' is specified in theparm field of the dj0cbnw execution in PR1PROC itself. This PROD setting ensures the INFO/Xenvironment is properly initialized during JCL scanning.
Action
Check whether a remote PC File connection has been configured and verify the correct remote PCFile master is being used. This can easily be done by checking for the JPCONFIG DD to be allocatedin the JCL submitted to scan JCL for remote update or to update the repository with spooled FOLTfiles.
If JPCONFIG is allocated, look in the dataset referenced by JPCONFIG for remote PC File connectioninformation. This information can be used to confirm the correct PC File master is being used forRTS member retrieval.
Problem DB2 Subsystem and Authorization information can’t be properly found.
Action Make sure the DB2 Subsystem and Authorization settings are set in the appropriate INFO/X RTS
175
Remote Database Update Facility

member in the PC File.
Also, make sure the PROD='-INFOX' symbolic override is applied to the PR1PROC invocation ofthe INFO/X batch JCL (SAMPLIB member INFOX), ormake sure that PROD='-INFOX' is specified inthe parm field of the dj0cbnw execution in PR1PROC itself. This PROD setting ensures the INFO/Xenvironment is properly initialized during JCL scanning.
Action
Check whether a remote PC File connection has been configured and verify the correct remote PCFile master is being used. This can easily be done by checking for the 'JPCONFIG' DD to be allocatedin the JCL submitted to scan JCL for remote update or to update the repository with spooled FOLTfiles.
If 'JPCONFIG' is allocated, look in the dataset referenced by JPCONFIG for remote PC Fileconnection information. This information can be used to confirm the correct PC File master is beingused for RTS member retrieval.
ProblemThe batch job used to spool scanned JCL during Remote Database Update appears to be hung orlooping.
Action
This might not be a problem but just the behavior of the batch job when the scanned JCL is beingspooled. To verify data is actually being spooled:
l The Users panel in the System Information administration panel on the target STC can beused to monitor activity. The target STC is the system to which the JCL data is beingspooled.
l Check the 'SYSPRINT' DD in the batch job spooling the JCL data for status messagesindicating the progress of the scanning and spooling process.
Problem The FOLT files keep filling up and causing the batch spooling job to fail.
Action
Currently, the default allocation size of the FOLT files is 16 cylinders primary with a secondaryallocation of 32 cylinders. Use the FOLT File Size RTS setting to specify a larger initial allocation sizeof the FOLT file. The size of the FOLT file has the impact of causing the loading of the FOLT files torun longer since there is simply more data to process. Additionally, larger FOLT files might be moredifficult to store or manage based on their size. The FOLT File Size RTS setting can be used inconjunction with the REMOTEMBRMAX INPUT statement parameter to control the size ofgenerated FOLT files.
Action
If you are scanning datasets with large numbers of members (example, 10,000+) or datasets withlarge members (example, members with 1000 or more records including PROC and INCLUDEexpansion), the FOLT files can grow in size very quickly. The REMOTEMBRMAX INPUT statementoption can be used to control the number of members that get spooled before a new FOLT file iscreated. Setting REMOTEMBRMAX to a number less than 1000 (which is the default number ofmembers spooled per FOLT file) will cause FOLT files to be created more frequently and shouldreduce, if not eliminate, the problem of the FOLT file allocation being exhausted. The number of
176
ASG-INFO/X Enterprise System Administrator Guide

FOLT files generated has no impact on the processing of those files by the update factory. Reducethe REMOTEMBRMAX setting until the allocation problems are resolved.
Action
If you are using SMS, have the SMS administrator define SMS allocation rules based on the namingconvention of the FOLT files. SMS will override the default FOLT file allocation and can allocate theFOLT files as large as necessary. The naming convention of the FOLT files is:{RACF ID}.INFOX.{REMOTE SYSTEM NAME}.D{date}.T{time}.S{seconds}
Since the date and time nodes are dynamically generated, here is a suggested mask to use for theSMS allocation rule(s):aaaaaaaa.INFOX.bbbb.D*.T*.S*
where aaaaaaaa is whatever mask the RACF IDs that will be used to submit the JCL scanning jobshave in common, and bbbb is whatever mask the scanning systems have in common for IPhostnames or SMF IDs. If there is no commonality, those levels may have to be *. Doing this willallow the allocation of the FOLT files to be controlled by SMS.
Maintaining INFO/X PerformanceThe INFO/X Repository data is stored in DB2 tables. Initially, DB2 chooses access paths based on the data in those tables.Periodically, as you add and delete cross-reference information, the indexes should be reorganized to increase accessefficiency. This is done through the standard DB2 utilities: REORG, RUNSTAT, and REBIND. Reorganization JCL is shippedin IXLREORG in the INSTALL library.
IXLREORGThe INFO/X database definition job IXLREORG in the INSTALL library does the following:
l Runs REORG and RUNSTATS on the repository.
For more information on REORG and RUNSTATS, see the IBM DB2 for z/OS Utility Guide andReference or the IBM DB2 UDB for z/OS Utility Guide and Reference. You can access thesepublications online via the IBM® Information Management Software for z/OS® Solutions Information Center.
Procedure
To run REORG and RUNSTATS on the repository
1. From the ISPF Command Shell (usually Option 6), enter the following command:
EX 'hlq.INSTALL(INSTALL)'
where hlq is the high-level qualifier used to unload the tape. INFO/X displays the main panel of theInstallation Interface.
2. Press Enter to display the PRO/JCL and INFO/X Installation Selection panel.
3. Press Enter to display the Product Installation Checklist panel.
177
Maintaining INFO/X Performance

4. From the Product Installation Checklist panel, select Option 5, INFO/X. INFO/X displays the INFO/X Install Jobspanel:
D0SPIP13 -------------------- INFO/X Install Jobs -----------------------------Option ===>
Subsystem: D91A DB2 Release: 9.1Database : DSSRnnnEdit/Preview Job before submitting ===> N (Y/N)
More: +------------------------------ Setup the database -----------------------------1 Create the database (IXLINST)2 Prime the database (IXLINSTI)3 Bind Packages and plan(s) IXLRnnn (IXLBINDX)4 Grant Access to the database and plan(s) IXLRnnn (IXLGRANX)5 Grant Access to Individual User(s) for Batch INFO/X (IXLGRANB) Optional6 Populate the database with Demo Data (IXLINST1) Optional7 Populate the database with DB2 XREF Info (IXLINST2) Optional8 Populate the database with CICS XREF Info (IXLINST3) Optional
-------------------------- Maintenance and Utilities --------------------------9 Run DB2 REORG and RUNSTATS on the database (IXLREORG)
10 Upgrade database from Release to Rnnn (IXLINSTU)11 Drop the DSSRnnn database (IXLINSTD)12 Unload DB2 XREF Info from the database (IXLUNLD1) Optional13 Load DB2 XREF Info from another SSID (IXLLOAD1) Optional14 Unload all INFO/X tables from the database (IXLUNLD2) Optional15 Load all INFO/X tables into the database (IXLLOAD2) Optional16 Clear the DB2 XREF Info from the database (IXLCLDB2) Optional17 Clear ALL INFO/X tables (including DB2 XREF tables) (IXLCLALL) Optional
INFO/X Install Jobs panel
5. Select Option 9 to run IXLREORG. This job will execute the DB2 REORG and RUNSTATS commands against thedatabase.
If desired, enter Y in the EDIT/PREVIEW JOB field prior to submitting the job.
If you choose to view/edit the job, you must manually submit the job by entering SUB orSUBMIT on the command line.
6. After the job has been submitted, press End to redisplay the INFO/X Install Jobs panel.
178
ASG-INFO/X Enterprise System Administrator Guide

Managing the Started TaskThis topic explains how to start, stop, monitor, and manage the started task and processor tasks.
Started Task IDsThe started task for INFO/X is identified to the commands in this topic with DSSISTC. If the started task is running with anID, append the ID to DSSISTC. For example, the ID for started task Z is appended (in red) in these commands:
START DSSISTCZ
MODIFY DSSISTCZ,STATUS
The examples in this topic do not use started task IDs. For detailed information about started task IDs, see theInstallation documentation.
n Starting the Started Task
n Stopping the Started Task
n Monitoring the Started Task
n Managing Processor Tasks
n Managing TCP/IP Started Tasks
Starting the Started TaskUse the information in this topic to start the started task.
Starting Started Task at IPL-Time
ASG recommends the INFO/X started task be started at each IPL. Consult with ASG Customer Support to determine thebest method of implementing IPL start-up for the started task.The following are some methods for starting a startedtask at IPL time:
l Putting a command in SYS1.PARMLIB(COMMNDxx)
l Adding a command to a NETVIEW auto ops EXEC (either mainframe-based or PC-based)
l Adding a command to a third party auto ops product (mainframe-based or PC-based)
l Adding a command to a VTAM task starter such as VTAMAPPL
Starting the Started Task After IPL
Sometimes it is necessary or desirable to start the started task after the operating system is running.
The the below table shows the two forms of the command to start the started task.
Long Form Short Form Description
START DSSISTC S DSSISTC Start the started task.
179
Managing the Started Task

Stopping the Started TaskUse the commands in the below table to stop the started task.
Long Form Short Form Description
STOP DSSISTC P DSSISTC Stop the started task.
CANCEL DSSISTC C DSSISTC Cancel the started task.
l Each command also stops all associated sub-processes and processor tasks.
l Upon shutdown, the started task displays memory allocations and PCB statuses.
Stopping the Started Task
Use the STOP DSSISTC command to stop the started task. Ensure that no users are using the started task beforeissuing this command. You can check for active users via the INFO/X System Information panel (see Monitoring theStarted Task from INFO/X Panels), or by issuing the STATUS operator command (see Processor Task Status).
If there are active users, ask them to exit from the INFO/X ISPF panels.If the started task is stoppedwhile users are active, their INFO/X sessions will be terminated by abends.
Canceling the Started Task
Canceling the started task may result in damage to the Product Control File and should only be done as a last resort.Wait at least 10 minutes after issuing the STOP DSSISTC command before issuing the CANCEL DSSISTC command.
Monitoring the Started TaskINFO/X provides two methods of monitoring the started task:
l Operator console commands
l Interactive panels
Monitoring via Commands
Use the commands in the below table to monitor the status of the started task.
Long Form Short Form Description
MODIFY DSSISTC,ALLOC F DSSISTC,ALLOCDisplay dataset allocations for thestarted task.
MODIFY DSSISTC,STATUS F DSSISTC,STAT Display processor task status.
180
ASG-INFO/X Enterprise System Administrator Guide

Processor Task StatusOne processor task (or user task) is used by one user ID.
To find out which user IDs are using specific INFO/X resources, the number of jobs validated, and other usage statistics,use the STATUS command.
Issue the STATUS command on the operator console or on the appropriate system log panel if you have operatorauthority.
The below figure shows a sample of the output of the MODIFY,STATUS command. The highlighted items (1-3) andassociated fields are explained in detail on the following pages.
F DSSISTC,STATUS+DSS05030I - STARTED TASK IS PROCESSING THE MODIFY COMMAND+STARTED TASK STARTED AT 07:49:29 ON 2006-08-21
1 +STCID=DSSISTC STCINIPT=04 AUTHTASKS=00+PCBID=0000 PCBSTAT=A USRNAME= SRBRC=000 SRBNTLVL=00 COMM=T+DSSIAPI=TERMSYSTEMAPI CURRENT MEMORY=00034K MAX MEMORY=01509K+JOBS=00002 PROCS=00000 PGMSTEPS=0000001 DDS=0000002 RECORDS=0000007+ERRORS=0000003 STDSMSGS=0000000
2 +PCBID=0001 PCBSTAT=A USRNAME= SRBRC=000 SRBNTLVL=00 COMM=T+DSSIAPI=TERMSYSTEMAPI CURRENT MEMORY=00015K MAX MEMORY=01325K
3 +JOBS=00000 PROCS=00000 PGMSTEPS=0000000 DDS=0000000 RECORDS=0000002+ERRORS=0000001 STDSMSGS=0000000+RNAME=RES_ADMIN+RNAME=RES_PCFILE_MEMBER:INFO/X-DEFAULT+PCBID=0004 PCBSTAT=B USRNAME=DSSUSR SRBRC=000 SRBNTLVL=00 COMM=T+DSSIAPI=PCFREADDATA CURRENT MEMORY=00029K MAX MEMORY=02290K+DSS05006I - STARTED TASK COMPLETED THE MODIFY COMMAND
Sample output from the Started Task STATUS command
Status FieldsThis topic describes the output of the STATUS parameter of the MODIFY command.
Started Task Fields (1)The descriptions below describe fields shown in the figure - Started Task STATUS fields.
STCID The name of the started task
+STARTED TASK STARTED AT 07:49:29 ON 2006-08-21+STCID=DSSISTC STCINIPT=04 AUTHTASKS=00+PCBID=0000 PCBSTAT=A USRNAME= SRBRC=000 SRBNTLVL=00 COMM=T
Started Task STATUS fields
Processor Task Fields (2)The descriptions below describe fields shown in figure - Processor Task information fields.
PCBID The numeric ID for the processor task.
PCBSTATThe status of the processor task.
The STATUS parameter of the MODIFY command returns one of the following values:
181
Monitoring the Started Task

A – The processor task is available.
B – The processor task is busy.
N – The processor task timed out due to started task not responding.
T – The processor task timed out due to user inactivity.
K – The processor task was killed with the Kill command.
X – The processor task incurred an abend.
USRNAME The user ID currently using this processor task.
DSSIAPI The ASG API call most recently active for the processor task.
CURRENT MEMORY The amount of memory the processor task is currently using.
MAX MEMORYThe largest amount of memory used by this processor task. This number is a “high-watermark” of memory. Depending on activity, this number could go higher.
+PCBID=0001 PCBSTAT=A USRNAME= SRBRC=000 SRBNTLVL=00 COMM=T+DSSIAPI=TERMSYSTEMAPI CURRENT MEMORY=00015K MAX MEMORY=01325K+JOBS=00000 PROCS=00000 PGMSTEPS=0000000 DDS=0000000 RECORDS=0000002+ERRORS=0000001 STDSMSGS=0000000
Processor Task information fields
Processor Usage Fields (Optional)The description below describes fields shown in the figure - Processor Task resource usage fields.
RNAMEThe name of the resource allocated to the processor task. In the sample output, PCBID 0001 is usingthe administrator panels and editing the DEFAULT RTS member for INFO/X.
+PCBID=0001 PCBSTAT=A USRNAME= SRBRC=000 SRBNTLVL=00 COMM=T+DSSIAPI=TERMSYSTEMAPI CURRENT MEMORY=00015K MAX MEMORY=01325K+JOBS=00000 PROCS=00000 PGMSTEPS=0000000 DDS=0000000 RECORDS=0000002+ERRORS=0000001 STDSMSGS=0000000+RNAME=RES_ADMIN+RNAME=RES_PCFILE_MEMBER:INFO/X-DEFAULT
Processor Task resource usage fields
Processor Task JCL Fields (3)The descriptions below describe fields shown in the figure - Processor JCL fields.
JOBS The number of jobs processed at the time of the status.
PROCS The number of PROCS processed at the time of the status.
PGMSTEPS The number of program steps processed at the time of the status.
182
ASG-INFO/X Enterprise System Administrator Guide

DDS The number of dd names processed at the time of the status.
RECORDS The number of records (lines) processed at the time of the status.
ERRORS The number of errors recorded at the time of the status.
STDSMSGS The number of standards violations recorded at the time of the status.
+JOBS=00000 PROCS=00000 PGMSTEPS=0000000 DDS=0000000 RECORDS=0000002+ERRORS=0000001 STDSMSGS=0000000
Processor JCL fields
Allocated DatasetsThe ALLOC parameter of the MODIFY command displays the datasets allocated by the started task. The DDs dynamicallyallocated by user sessions have the form:
Jnnnnxxx
where
nnnn is the processor task ID (0000-9999) and xxx is a sequential allocation number.
You can tell which user session has allocated which datasets by looking at the ddnames in the ALLOC display. See thebelow figure.
F DSSISTC,ALLOC+DSS05030I - STARTED TASK IS PROCESSING THE MODIFY COMMAND+DDNAME DATA SET NAME+STEPLIB DSSI.R350.TAPE.LOAD+ DSN610.SDSNLOAD+PCFILE DSSZZZ.PCFILE.R350+JPCONFIG DSSZZZ.R350.VBCNTL+SYSOUT DSSISTC.DSSISTC.STC03923.D0000101.?+SYSPRINT DSSISTC.DSSISTC.STC03923.D0000102.?+CEEDUMP DSSISTC.DSSISTC.STC03923.D0000103.?+ABNLIGNR NULLFILE+VVHC$OFF NULLFILE+SVHC$OFF NULLFILE+SYSEXEC [email protected]+DSSIOPC1 DSSI.OPC1.JOBLIB+EQQMLIB OPC.OPC230.SEQQMSG0+EQQMLOG DSSISTC.DSSISTC.STC03923.D0000104.?+EQQDUMP DSSISTC.DSSISTC.STC03923.D0000105.?+EQQEMSG DSSISTC.DSSISTC.STC03923.D0000106.?+J0000011 DSSZZZ.WORK.CNTL+J0000012 DSSZZZ.WORK.CNTL+J0000013 DSSZZZ.SJL.TEMP2+DSS05006I - STARTED TASK COMPLETED THE MODIFY COMMAND
Sample output from ALLOC parameter
Searching the JES PROCLIB List
To support the RTS option Use JES2 PROCLIB Defs, the INFO/X started task creates an Extended MCS Console and issuesthe command /$D PROCLIB. It reads the results to create a list of the dynamically allocated JES PROCLIBs. The INFO/Xstarted task must be authorized to do this by the security system.
183
Monitoring the Started Task

If possible, INFO/X obtains the list of PROCLIBs from the SubSystem Interface (SSI) facility and only issues the /$DPROCLIB command if it is unable to get the list from the SSI.
You can force INFO/X to refresh the PROCLIB list. Issue this command from the JES console:
f startedtask,refresh
where startedtask is the name of the started task.
See the INFO/X User documentation documentation for more about how INFO/X searches for PROCs. See the INFO/XReference Information for more information about the Use JES2 PROCLIB Defs option.
Refreshing the JES2 PROCLIB List
After dynamic proclibs have been added to the JES2 proclibs, you should refresh the JES2 proclib list.
To refresh the JES2 PROCLIB list
n Use one of these commands:
modify dssistc,jes2proc
Or
f dssistc,jes2proc
See FIRSTPROCLIB for more information on how INFO/X searches for PROCS.
Monitoring the Started Task from INFO/X Panels
Monitoring the started task via the panels is much more limited, though for everyday tasks is much easier to use.Because these panels run under the started task, you cannot start or stop the started task from the panels.
Current User Status
To view the list of users currently using INFO/X
1. Choose System Info from the JCL Management Solutions Menu panel.
2. Select Users from the System Information panel. INFO/X displays the Current Users panel.
Current UsersD0SPSTC2 Row 1 to 6 of 6Command ===> Scroll ===> PAGE
Enter C to Cancel a user processor task.Press RIGHT to see more information.Press END to exit.
Sel Userid Session Status Memory Usage High Memory DSSIAPI Call--- -------- -------------- ------------ ----------- ----------------
DSSXYZ BUSY 737724 877328 SQLFREEHANDLEDSSXXX BUSY 738160 877328 SQLFREEHANDLEDSSZZZ BUSY 9212 12112 MENUGETMAINDSSYYZ BUSY 698676 877532 STCGETUSERSDSSZZY BUSY 738576 878244 WIXXGETOPTION
***************************** Bottom of data ******************************
Use the Cancel command to cancel (Kill) a user ID whose Session Status is either "Not Responding", "Killed","Abended", or "Timed-out".
184
ASG-INFO/X Enterprise System Administrator Guide
See the description of PCBSTAT field in Processor Task Fields (2) for more information about the possible values for theSession Status field.
Currently Allocated ResourcesUse this procedure to view currently allocated resources such as the DEFAULT RTS member, the Administration panelsand the user IDs using them.
To view a list of key INFO/X resources
1. Choose System Info from the JCL Management Solutions Menu panel.
2. Select Resources from the System Information panel.
INFO/X displays the Allocated Resources panel.
Allocated ResourcesD0SPSTC1 Row 1 to 1 of 1Command ===> Scroll ===> PAGE
Enter C to Cancel a user processor task.Press END to exit.
Sel Userid Resource Session Status--- -------- ----------------------------------- --------------
DSSYYZ RES_ADMIN BUSYDSSYYZ RES_PCFILE_MEMBER:INFO/X-DEFAULT BUSY
***************************** Bottom of data ******************************
Use the Cancel command to cancel (Kill) a user ID that has a resource locked out and the Session Status for the user IDis either "Not Responding", "Killed", "Abended", or "Timed-out" or there is an immediate need for the resource to befreed.
See the description of PCBSTAT field in Processor Task Fields (2) for more information about the possible values for theSession Status field.
Currently Allocated Datasets
To view a list of key datasets and the user IDs that currently have them allocated
1. Choose System Info from the JCL Management Solutions Menu panel.
2. Select Data Sets from the System Information panel. INFO/X displays the Allocated Data Sets panel.
Allocated Data SetsD0SPSTC0 Row 1 to 2 of 2Command ===> Scroll ===> PAGE
Enter C to Cancel a user processor task.Press END to exit.
Sel Userid Data Set Session Status--- -------- ----------------------------------- --------------
DSSYYZ DSSYYZ.$BNW.CNTL BUSYDSSYYZ DSSYYZ.$BNW.CNTL BUSY
***************************** Bottom of data ******************************
Use the Cancel command to cancel (Kill) a user ID that has a dataset locked out and the Session Status for the user ID iseither "Not Responding", "Killed", "Abended", or "Timed-out" or there is an immediate need for the dataset to be freed.
185
Monitoring the Started Task

Managing Processor TasksINFO/X provides two methods of managing processor tasks (sometimes referred to as user sessions): operatorcommands and interactive panels.
Managing through Commands
Use the commands in the below table to manage the processor tasks from the console.
Long Form Short Form Description
MODIFY DSSISTC,ALLOC F DSSISTC,ALLOCDisplay dataset allocations for the startedtask.
MODIFY DSSISTC, KILL=nnnn F DSSISTC,KILL=nnnn Kill processor ID nnnn (0000-9999).
MODIFY DSSISTC,STATUS F DSSISTC,STAT Display processor task status.
Stopping an Individual Processor Task
MODIFY started_task_name,KILL=nnnn
where nnnn is the processor task ID that needs to be terminated and started_task_name is the name of the startedtask (this name is 8 characters).
The below figure show the before and after status for the kill command.
F DSSISTC,STATUS+DSS05003I - STARTED TASK IS PROCESSING THE MODIFY COMMAND+STARTED TASK STARTED AT 06:12:51 ON 2006-08-20+STCID=DSSISTC STCMAXPT=45 STCINIPT=04 AUTHTASKS=00+PCBID=0000 PCBSTAT=B USRNAME=DSSZZZ SRBRC=000 SRBNTLVL=01+DSSIAPI=RUNTERMMEMSEL CURRENT MEMORY=01232K MAX MEMORY=01495K+JOBS=00001 PROCS=00000 PGMSTEPS=0000002 DDS=0000003 RECORDS=0000512+PCBID=0001 PCBSTAT=A USRNAME= SRBRC=000 SRBNTLVL=00+DSSIAPI=TERMSESSION CURRENT MEMORY=00962K MAX MEMORY=01216K+JOBS=00002 PROCS=00000 PGMSTEPS=0000002 DDS=0000005 RECORDS=0000007+ERRORS=0000017 STDSMSGS=0000000+PCBID=0002 PCBSTAT=A USRNAME= SRBRC=000 SRBNTLVL=00+DSSIAPI=TERMSESSION CURRENT MEMORY=00958K MAX MEMORY=01215K+JOBS=00001 PROCS=00000 PGMSTEPS=0000003 DDS=0000006 RECORDS=0000039+ERRORS=0000003 STDSMSGS=0000000+DSS05006I - STARTED TASK COMPLETED THE MODIFY COMMAND
Output from STATUS command
186
ASG-INFO/X Enterprise System Administrator Guide

F DSSISTC,STATUS+DSS05003I - STARTED TASK IS PROCESSING THE MODIFY COMMAND+STARTED TASK STARTED AT 06:12:51 ON 2006-08-20+STCID=DSSISTC STCMAXPT=45 STCINIPT=04 AUTHTASKS=00+PCBID=0000 PCBSTAT=K USRNAME=DSSXYZ SRBRC=000 SRBNTLVL=01+DSSIAPI=RUNTERMMEMSEL CURRENT MEMORY=01232K MAX MEMORY=01495K+JOBS=00001 PROCS=00000 PGMSTEPS=0000002 DDS=0000003 RECORDS=0000512+PCBID=0001 PCBSTAT=A USRNAME= SRBRC=000 SRBNTLVL=00+DSSIAPI=TERMSESSION CURRENT MEMORY=00962K MAX MEMORY=01216K+JOBS=00002 PROCS=00000 PGMSTEPS=0000002 DDS=0000005 RECORDS=0000007+ERRORS=0000017 STDSMSGS=0000000+PCBID=0002 PCBSTAT=A USRNAME= SRBRC=000 SRBNTLVL=00+DSSIAPI=TERMSESSION CURRENT MEMORY=00958K MAX MEMORY=01215K+JOBS=00001 PROCS=00000 PGMSTEPS=0000003 DDS=0000006 RECORDS=0000039+ERRORS=0000003 STDSMSGS=0000000+DSS05006I - STARTED TASK COMPLETED THE MODIFY COMMAND
Result of the KILL command
l The KILL parameter of the MODIFY command terminates a user's session in the started task address space.Use the STATUS parameter of the MODIFY command to get the ID of a user's session.
l The KILL command inactivates the processor task.
l Consider the KILL command the last resort; the best way to terminate a user session is to have the userexit from the product.
Managing through Panels
Cancel a Processor TaskUse the Cancel command to cancel (Kill) a processor task in these situations:
l A key dataset is locked out.
l A key INFO/X resource is currently in use.
l The Session Status for the processor task is either "Not Responding", "Killed", "Abended", or "Timed-out".
To cancel or kill a processor task
n Use the C (Cancel) command on any of these panels:o Current Userso Allocated Resourceso Allocated Data Sets
For example:
187
Managing Processor Tasks

Current UsersD0SPSTC2 Row 1 to 6 of 6Command ===> Scroll ===> PAGE
Enter C to Cancel a user processor task.Press RIGHT to see more information.Press END to exit.
Sel Userid Session Status Memory Usage High Memory DSSIAPI Call--- -------- -------------- ------------ ----------- ----------------C DSSXYZ NOT RESPONDING 783652 877152 RUNGETUSERID
DSSXXX BUSY 737724 877328 SQLFREEHANDLEDSSZZZ BUSY 738160 877328 SQLFREEHANDLEDSSYYZ BUSY 9212 12112 MENUGETMAINDSSXYZ BUSY 698676 877532 STCGETUSERSDSSZZY BUSY 738576 878244 WIXXGETOPTION
***************************** Bottom of data ******************************
Canceling (killing) a processor task
Managing TCP/IP Started TasksThe following started task operator commands apply to the product TCP/IP listeners. They govern how listeners arestarted and stopped without cycling the started task, and how the parameters for the listeners can be modified.
Operator Commands
Use the commands in the below table to manage a TCP/IP started task from the console.
Long Form Short Form Description
MODIFY DSSISTC,CONFIG F DSSISTC,CONFIGReloads configuration informationinto the started task.
MODIFY DSSISTC,LISTIP F DSSISTC,LISTIPLists all listeners running on astarted task.
MODIFY DSSISTC,STARTIP=port,IPAddress|Host Name
F DSSISTC,STARTIP=port,IPAddress|Host Name Starts a listener on a started task.
MODIFY DSSISTC,STOPIP=port,IPAddress|Host Name
F DSSISTC,STOPIP=port,IPAddress|Host Name
Stops a listener on a started task.
MODIFY SLAVESTC,SYNC F SLAVESTC,SYNC Synchronizes a local PC File with themaster PC File.
CONFIG
The JPCONFIG DD describes the configuration for individual listeners and for remote PC Files. The JPCONFIG DD is readonce at start-up. If the configuration is modified, then use the CONFIG operator command to reload the informationinto the started task. Any listeners that are active at that time should be stopped and restarted to take advantage of themodification.
188
ASG-INFO/X Enterprise System Administrator Guide

f startedtask,config
where startedtask is the name of the started task.
ListIP
Use this command to list all of the listeners running on a started task:
f startedtask,listip
where startedtask is the name of the master started task.
Sample OutputThe results of the ListIP command appear in JESYSMSG DD of the started task. For example:
DSS06657I - TCP/IP was started on these portsPORT=2000 IP=000.000.000.000PORT=2001 IP=000.000.000.000PORT=2002 IP=192.168.0.143
This output shows three listeners running on a started task. Port 2000 is active on INADDR_ANY, port 2001 on INADDR_ANY and port 2002 on IP address 198.168.0.143.
StartIP
This command is used to start a listener for client connections on a started task. When the StartIP command is issued,the JPCONFIG file is also read to determine if there is additional configuration information for the listener (restrict,contoken, and such).
It is not necessary for the listener to be defined in the JPCONFIG file to use the StartIP command.However, if the listener is defined in JPCONFIG it will be autostarted with the started task.
Any IP Address
To start a listener for client connections from any IP address
n Issue this command:
f startedtask,startip[=port]
where
l startedtask is the name of the master started task.
l =port is the port number of the listener (not required).
Specific IP Address
To start a listener for client connections from a specific IP address or mask
n Issue this command:
f startedtask,startip[=port],IPAddress|HostName
where
189
Managing TCP/IP Started Tasks

l startedtask is the name of the master started task.
l =port is the port number of the listener (not required).
l ,IPAddress|HostName is any valid IP address or host name.
Quickly Restarting a ListenerAdministrators can recycle the Listener without bringing down the started task.
When cycling a Listener with active TCP/IP clients, some sockets can be in a prolonged WAIT state until the clientconnections time out. This can cause a restarted Listener to fail because the port remains in use from the priorconnection.
The NOWAIT option can be used to force the Listener to reuse the port even if some sockets are in the WAIT state. Usethis option sparingly because it could result in corrupted packets for a Listener that is active but in a WAIT state. TheTCP/IP Listener retries the bind to its listen ports for up to two minutes to allow previously used sockets to close.
The syntax for restarting a Listener is:
f started-task,startip[=port],IP Address|,Host Name,NOWAIT
where:
l started-task is the name of the master started task.
l =port is the port number of the listener (optional).
l ,IP-Address|,Host-Name is any valid IP address or host name.
NOWAIT is the parameter passed on an operator Start command in the third position. If no other options are specifiedon the Start command, then the intervening commas are required; otherwise, this causes an error on the Startcommand. See the IBM MVS System Commands Reference for more about starting a system task from a console.
StopIP
This command is used to stop one or more listeners running on a started task.
All Listeners
To stop all listeners
n Issue this command:
f startedtask,stopip
where startedtask is the name of the master started task.
Stopping the listener(s) will not terminate existing client sessions, but no new sessions can beinitiated until a listener is started again.
Specific Port
To stop a listener running on a particular port
n Issue this command:
190
ASG-INFO/X Enterprise System Administrator Guide

f startedtask,stopip[=port]
where
l startedtask is the name of the master started task.
l =port is the port number of the listener.
Specific IP Address
To stop a listener running on a particular IP address
n Issue this command:
f startedtask,stopip[=port],IPAddress|HostName
where
l startedtask is the name of the master started task.
l =port is the port number of the listener.
l ,IPAddress|HostName is any valid IP address or host name.
SYNC
In a shared PC File environment, use the SYNC parameter on the MODIFY command to synchronize the PC File on thelocal (slave) machine with the PC File on the master machine:
MODIFY SLAVESTC,SYNC
Troubleshooting
Try these tasks when troubleshooting the INFO/X started task:
l If a Listener or started task fails to start because of a socket bind failure, the Listener will retry the connectionfor up to two minutes. These retries appear in the Started Task SYSPRINT, as shown in the below figure.
14:16:45 DSS05029A - TCP/IP Listener restart attempt 1 of 8 on port 1265; startedtask DSSISTC.14:17:00 DSS05029A - TCP/IP Listener restart attempt 2 of 8 on port 1265; startedtask DSSISTC.14:17:15 DSS05029A - TCP/IP Listener restart attempt 3 of 8 on port 1265; startedtask DSSISTC.14:17:30 DSS05029A - TCP/IP Listener restart attempt 4 of 8 on port 1265; startedtask DSSISTC.14:17:45 DSS05029A - TCP/IP Listener restart attempt 5 of 8 on port 1265; startedtask DSSISTC.14:18:00 DSS05029A - TCP/IP Listener restart attempt 6 of 8 on port 1265; startedtask DSSISTC.14:18:15 DSS05029A - TCP/IP Listener restart attempt 7 of 8 on port 1265; startedtask DSSISTC.14:18:30 DSS05029A - TCP/IP Listener restart attempt 8 of 8 on port 1265; startedtask DSSISTC.
Listener retries in SYSPRINT for started task
l If the Listener still cannot bind to the socket after the 8 attempts, this final message appears in the Started TaskSYSPRINT:
191
Managing TCP/IP Started Tasks

******************************************************************** TCP/IP LISTENER FAILED!!! ** The TCP/IP Listener failed to start because 'Address ** already in use'. If this is because of a quick restart on the ** Started Task then use the following operator command to ** restart and reuse the port despite the TCP/IP wait state. ** F DSSISTC,STARTIP=1265,,NOWAIT ** See the INFO/X Administration Guide for details. ********************************************************************
Message for the condition of Listener Failed to start due to inaccessible port
This message suggests syntax for starting the started task with the NOWAIT option. The use of this option is atthe operator's discretion. See the IBM's MVS System Commands Reference for syntax on starting asystem task from a console.The system displays two messages on the operator console and in the JESYSMSG log of the Started Task. Thesemessages are non-scrollable and require an operator REPLY command to clear. The messages are:
@DSS05028A - TCP/IP Listener at port 1265 on started task DSSISTC failed to start.@DSS05030A - See SYSPRINT for Job. Use /F DSSISTC,STARTIP=1265,,NOWAIT
Messages for bind Listener failure
l If the Listener fails to start for any other reason, this message appears in the SYSPRINT for the Started Task:
******************************************************************** TCP/IP LISTENER FAILED!!! ** The TCP/IP Listener failed to start because ** .... ********************************************************************
Listener Failed to Start message header and format
where .... is replaced with the full text of the error message explaining the failure.Then, another message appears on the operator console and the JESYSMSG of the Started Task. This messageis not scrollable on the operator console and requires a REPLY from the operator to clear. The message is:
@DSS05028A - TCP/IP Listener at port 1265 on started task DSSISTC failed to start.
Message for non-bind Listener failure
192
ASG-INFO/X Enterprise System Administrator Guide
Set Up from the Client/Server InterfaceThe INFO/X Windows interface runs on Windows 95, 98, 2000, NT, ME, and XP, and follows standard Windowsconventions. This topic assumes the user has a basic understanding of Windows compliant software and conventions. Inaddition, INFO/X requires Internet Explorer 4.0 or greater.
The Main WindowThere are two parts to the INFO/X window: the Systems Tabs and the display window.
System Tabs
The System Tabs are the Applications, Directories, and Nodes tabs.
The System Tabs can be docked on the left, right, top or bottom of the window or, hidden to give more room to thedisplay window. Use the View option from the menu bar to move, hide, or show the System Tabs.
The Display Window
The results of queries are shown in the display window.
Menus
There are menus and toolbars located at the top of the Main, Query, and Report windows. Context menus are alsoavailable for many items by right-clicking on the item of interest.
Getting Help
There are two ways to get online help from the INFO/X Windows interface.
n From the menu bar, select Help and click Help Topics. The resulting dialog box allows contains Contents, Indexand Find tabs.
l Contents—provides a list of topics including How To topics and a glossary.
l Index—provides an index of available topics.
l Find—allows a search of all topics that contain a keyword.
n For context sensitive help:
l Use the ? button on the toolbar to point to the item
Or
l Press F1 when the item of interest is highlighted.
The other Help sources listed in the Preface of this book are also available for the Window's interface of INFO/X.
n Applications
n Nodes
n Jobs
193
Set Up from the Client/Server Interface

ApplicationsUse the information in this topic to create, change, view information about, rename, and delete applications. A list ofapplications can be obtained from either the Applications or Nodes tabs.
The Applications Tab
When INFO/X is opened, the Applications Tab shows the applications at the site.
To view the applications
1. Click the List button.
2. Limit the list in several ways:
l Application Name—only applications that fit the mask are listed
l Job Name—only applications that contain jobs that fit the mask are listed. All jobs contained in theapplication will be listed.
l Job Name Mask—only the jobs that fit the mask are listed. If this is the only mask used, all applications in therepository will be listed.
To open and close the levels in the directory tree
1. Click the + and - boxes.
2. Right-click an entity to see the associated context menu.
Context Menu Options
These options are available from either the Applications or Nodes tabs. Right-click a selected application to access thecontext menu.
Copy Application Create a new application using the criteria from this application.
Delete Application Delete the application from the INFO/X Repository.
Refresh ApplicationQueries the INFO/X Repository for the most up to date information regarding theapplication.
Job List Criteria Displays the Job List Criteria dialog box.
PropertiesDisplays the Properties dialog box. The properties can be edited by users withAdministrator authority.
Create an Application
Create a new application in one of three ways:
l Click the New Application button on the toolbar.
l Select File, New, Application from the menu bar.
194
ASG-INFO/X Enterprise System Administrator Guide

l Copy an application. (See Copy an Application.)
INFO/X displays the New Application dialog box.
To create a new application from this dialog box
1. Enter the name of the application.
2. (Optional) Enter a description of the application.
3. Click the OK button to add the application to the INFO/X Repository or click Cancel.
4. After clicking OK, INFO/X displays the Job List Criteria dialog box (described in the next topic).
Define the Jobs in an Application
Use the Job List Criteria dialog box to define which jobs are included in, and excluded from, an application. This dialogbox is displayed when a new application is created, or by selecting Job List Criteria from an application context menu.
195
Applications

Include Jobs in the Application
To define which jobs are included in an application
1. Select the node on which the jobs reside.
2. Right-click Inclusion Criteria.
3. Click the Add Inclusion Criteria option.
4. Enter a job name or mask.
5. Repeat steps 2 through 4 until the Inclusion list is built.
6. Click the Refresh button at the bottom of the Job List Preview window and then the + sign next to thenodename to see all the jobs that will be included in the application. (To exclude any of these jobs, see the nexttopic.)
7. To include jobs from another node, repeat steps 1 through 6 using a different node in the NODE field.
Inclusion criteria can be deleted or modified by right-clicking on the criteria and selecting Delete or Modifyfrom the context menu.
196
ASG-INFO/X Enterprise System Administrator Guide

Exclude Jobs from the Application
To define which jobs are excluded from an application
1. Select the node on which the job(s) reside(s).
2. Right-click Exclusion Criteria.
3. Click the Add Exclusion Criteria option.
4. Enter a job name or mask.
5. Continue with steps 1 through 4 until the Exclusion list is built.
6. Click the Refresh button at the bottom of the Job List Preview window and then the + sign next to thenodename to see the jobs that will now be included in the application.
Once the Job List Preview window shows all the jobs that should be included in the application, click the OKbutton, and save the changes to the INFO/X Repository.Click Cancel to leave the Job List Criteria dialog box without making any changes to the application.
l Exclusion Criteria takes precedence over Inclusion Criteria.
l To delete all the Inclusion or Exclusion criteria for a node, right-click the nodename and select Delete allInclusion (or Exclusion) Criteria for the Node.
Copy an Application
Copying an application is a fast way to create a new application based on an existing application's criteria. The criteriacan then be altered to fit the specifications of the new application.
To copy an application
1. Click the Applications or Nodes Tab.
2. Select the application to copy.
3. Right-click to see the Context Menu.
4. Choose Copy Application from the Context Menu.
INFO/X displays the Copy Application dialog box.
197
Applications

5. Click OK to create the new application.
6. INFO/X displays the Job List Criteria box with the copied application's criteria. Alter the criteria as directed in theprevious topic.
Delete an Application
Deleting an application removes that application from the INFO/X repository. However, the jobs that were included inthe application remain in the Repository.
To delete an application
n Select Delete Application from the Context Menu (obtained by right-clicking on the application). INFO/X displaysa confirmation box. Confirm or cancel the deletion.
Edit/View an Application's Properties
To view or edit an application's properties
1. Select an application.
2. Right-click to see the application context menu.
3. Choose Properties from an application's context menu. INFO/X displays the following dialog box.
4. Click OK to save changes, or click Cancel to close the dialog box without saving changes.
198
ASG-INFO/X Enterprise System Administrator Guide

NodesUse the information in this topic to create, change, view information about, and delete nodes. Use either the contextmenu or the Manage Nodes dialog box to work with nodes.
The Nodes Tab
The Nodes tab provides the same information as the Applications tab, but sorted by node.
Limit the list with a mask:
l Node Name—only nodes that fit the mask are listed.
l Application Name—only applications that fit the mask are listed
l Job Name—only jobs that fit the mask are listed.
To create the list using the masking criteria, click the List button after inputting the mask. When starting, INFO/X createsthe list with the last criteria used.
199
Nodes

Context Menu
You can Edit or View a node's properties from the node context menu. The node context menu is obtained by right-clicking on a selected node.
Manage Nodes Dialog Box
Access the Manage Nodes dialog box by clicking on the Manage Nodes icon on the Main Window toolbar or, by selectingFile from the menu bar and clicking on the Manage Nodes option.
200
ASG-INFO/X Enterprise System Administrator Guide

Create a Node
To create a new node
1. Select a node that resides on the platform on which the new node resides.
2. Click the Add button on the Manage Nodes dialog box. The new node will appear under the selected node.
3. Fill in the name of the new node.
4. (Optional) Enter a description of the node.
Delete a Node
To delete the node
n Click the Delete button.
Only a node on which no jobs reside can be deleted. If a node can not be deleted, the Delete button will be grayed out
Edit a Node's Name
To change the name of a node
n Click the Edit Name button on the Manage Nodes dialog box. Retype the name of the node.
Edit a Node's Description
To change the description of a node
n Click the Edit Desc button on the Manage Nodes dialog box. Retype the description of the node.
Change the Defined Platform
A node's defined platform specifies the type of machine, i.e.: MVS or Windows.
201
Nodes

To change the selected platform
n Click the Change Platform button on the Manage Nodes dialog box.
Double-clicking on a cell in the Manage Nodes dialog box allows editing of that cell.
JobsUse the information in this topic to list, delete, and view information about jobs that have already been added to theRepository.
Add jobs to the INFO/X Repository one of two ways:
l The Automatic Incremental Update facility—Jobs added through the AIU facility on the mainframe are analyzedby INFO/X. Data for these jobs are gathered and inserted, and include cross reference and component data.
l Manually—Jobs added manually are not analyzed by INFO/X.
Delete a Job
To delete a job
1. Right-click the selected job to view the context menu.
2. Click Delete Job.
3. INFO/X displays a confirmation box, choose Yes to delete the job or No to keep the job.
List Jobs
To see the jobs within a particular application, use one of two methods.
n From the Applications or Nodes Tab:
a. Select an application. To view all the jobs in the INFO/X repository, use the SITE application.
b. Click the + box next to the application. The nodes that are used by jobs in the application will belisted.
c. Select a node and click the + box next to the node.
d. The jobs that run on that node will be listed.
Or
n From the Directories Tab:
a. Select an application in the In Application field.
b. Select Jobs in the Directory Type field.
c. Click the List button.
202
ASG-INFO/X Enterprise System Administrator Guide

Job Information
To Edit/View a job's properties
n Right-click the selected job and choose Properties from the resulting context menu.
To edit the information in a field
n Place the cursor in the field and edit the text. The Creation Date and Modification Date fields are automaticallyupdated by INFO/X.
203
Jobs