ServerEPS User's Guide
383
Version 2.25 November 2014
-
Upload
khangminh22 -
Category
Documents
-
view
3 -
download
0
Transcript of ServerEPS User's Guide

Version 2.25
November 2014

Copyright © 2014 NCR Corporation.
Duluth, GA U.S.A.
All rights reserved.
Address correspondence to:
Manager, Information Solutions Group
NCR Corporation
Discovery Centre, 3 Fulton Road
Dundee, DD2 4SW
Scotland
Internet Address:
http://www.info.ncr.com/Feedback
The product described in this book is a licensed product of NCR Corporation.
NCR is a registered trademark of NCR Corporation. NCR SelfServ is a trademark of NCR Corporation in the United States and/or other
countries. Other product names mentioned in this publication may be trademarks or registered trademarks of their respective companies and are
hereby acknowledged.
The terms HDMI and HDMI High-Definition Multimedia Interface, and the HDMI Logo are trademarks or registered trademarks of HDMI
Licensing LLC in the United States and other countries.
Where creation of derivative works, modifications or copies of this NCR copyrighted documentation is permitted under the terms and conditions
of an agreement you have with NCR, NCR's copyright notice must be included.
It is the policy of NCR Corporation (NCR) to improve products as new technology, components, software, and firmware become available. NCR,
therefore, reserves the right to change specifications without prior notice.
All features, functions, and operations described herein may not be marketed by NCR in all parts of the world. In some instances, photographs are
of equipment prototypes. Therefore, before using this document, consult with your NCR representative or NCR office for information that is
applicable and current.
To maintain the quality of our publications, we need your comments on the accuracy, clarity, organization, and value of this book.

ServerEPS User's Guide
Contents iii
Table of Contents
Table of Contents........................................................................................................................... iii
Chapter 1 .................................................................................................................................. 6
Introduction .................................................................................................................................... 6
What is ServerEPS? ............................................................................................................ 6
Chapter 2 .................................................................................................................................. 9
The ServerEPS Web Interface ........................................................................................................ 9
ServerEPS Main Page ......................................................................................................... 9
Chapter 3 ................................................................................................................................ 17
Web Interface, Screen by Screen .................................................................................................. 17
Home ................................................................................................................................ 17
Transaction Search ............................................................................................................ 21
Reports .............................................................................................................................. 25
Management ..................................................................................................................... 29
Monitoring ........................................................................................................................ 33
Administration .................................................................................................................. 60
Help .................................................................................................................................. 76
My Account ...................................................................................................................... 78
Chapter 4 ................................................................................................................................ 81
Store Configuration Management ................................................................................................. 81
Store Configuration Management GUI Main Screen ........................................................ 82
Lane Configurations Setup Screens ................................................................................ 101
Store Configurations Setup Screens................................................................................ 161
Silverlight Store Configuration Manager ................................................................................... 173
Store Configuration Management GUI Main Screen ...................................................... 174
Lane & Store Configuration Universal Buttons .............................................................. 182
Lane Configurations Setup Screens ................................................................................ 184
Store Configurations Setup Screens................................................................................ 240

ServerEPS User's Guide
Contents iv
Chapter 5 ...............................................................................................................................255
Reporting Service ........................................................................................................................ 255
Report List ....................................................................................................................... 256
Schedule Reports: E-Mail Reports at Each End of Day .................................................. 257
Available Reports ............................................................................................................ 258
Information on Individual Reports .................................................................................. 265
Chapter 6 ...............................................................................................................................320
Transaction Search & Receipt Storage Service ........................................................................... 320
Transaction Search .......................................................................................................... 320
Chapter 7 ...............................................................................................................................331
Debit BIN File Update Service ................................................................................................... 331
Chapter 8 ...............................................................................................................................332
CSV/XML Report File Export .................................................................................................... 332
ServerEPS CSV/XML Export ......................................................................................... 332
Available Exports ............................................................................................................ 332
Web Services Setup for Report User ............................................................................... 333
CSV/XML Download Instructions .................................................................................. 337
CSV Specifications ......................................................................................................... 341
Chapter 9 ...............................................................................................................................347
Multi-Company Management Login ........................................................................................... 347
Multi-Company Accounts ............................................................................................... 347
Multi-Company Configuration Management .................................................................. 349
Appendix A ...........................................................................................................................353
Optional Components ................................................................................................................. 353
Virtual Terminal .............................................................................................................. 353
VeriFone Vx570 Terminal .............................................................................................. 357
Direct Fuel Integration .................................................................................................... 361
SendMesageSEPS.exe Utility ......................................................................................... 361
Appendix B ............................................................................................................................362

ServerEPS User's Guide
Contents v
ServerEPS Response Codes ........................................................................................................ 362
Response Code Table ..................................................................................................... 362
Default Card Codes ......................................................................................................... 363
Appendix C .......................................................................................................................... 364
Supported Hosts Information ...................................................................................................... 364
Supported Hosts List ....................................................................................................... 364
ACI ................................................................................................................................. 365
ADS ................................................................................................................................ 367
Chase Paymentech .......................................................................................................... 369
Concord: EPC Format ..................................................................................................... 371
Concord: H&C Format ................................................................................................... 373
Elavon ............................................................................................................................. 375
Lynk Host ....................................................................................................................... 377
MPS (5th/3rd) Format ..................................................................................................... 379
Shazam Format ............................................................................................................... 381
Solupay/Echo Format ..................................................................................................... 382
Contact Information ............................................................................................................ 383

ServerEPS User's Guide
Chapter 1 6
Chapter 1
Introduction
What is ServerEPS?
ServerEPS is a switch operated by MTXEPS, Inc that handles direct connections to POS lanes, allowing much of the
payments related infrastructure to be moved out of the store and into a professionally hosted data center. ServerEPS
offers many benefits to merchants, including PCI compliance, removal of the overhead associated with running a
WinEPS server in each store, and centrally available reporting.
ServerEPS Highlights:
Centralized enterprise reporting service
Receipt & Signature Storage service
Debit BIN file update service
Automated Dial Backup connection support
Fuel Lane support
Scalability – handles single store installs or chain-wide connections
Centralized configuration management
Glossary of Terms
This section describes some common terms used throughout this guide.
Data Center
A collection of servers that provide web services, data storage, and backup functions for a web-based application. A
data center is secured with both restricted physical access and appropriate firewalls.
ServerEPS is hosted at two professionally managed data centers positioned in geographically separate locations of
the United States. The ServerEPS software replicates all transaction information between the two data centers, and
can accept and process transactions at either location.
OpenEPS

ServerEPS User's Guide
Chapter 1 7
OpenEPS is the name for the software DLL files that reside on each POS lane that coordinate communication
between the POS, the customer terminal, and ServerEPS.
The enhanced OpenEPS package contains an extra DLL file and integrated configuration information for connecting
directly to ServerEPS.
Dial Backup Client
This piece of software is responsible for providing the dial backup connection over a telephone line for the
OpenEPS Direct solution. Once configured, dial backup will occur automatically if the primary internet connection
is lost.
FuelEPS
FuelEPS is a lightweight in-store product that provides streamlined communication between fuel lanes and the data
centers. Once installed, FuelEPS can be configured using the standard online web interface.
ServerEPS
ServerEPS is the transaction processing software hosted at the data centers. ServerEPS accepts connections from the
Dial Backup Client or directly from OpenEPS.
ServerEPS receives transactions, processes them, and sends back an approved or declined response to the location
that initiated the transaction.
Virtual Terminal
Virtual Terminal 2 (VT2) is a lightweight Windows software application that can be used with the OpenEPS Direct
payments solution to process transactions, similar to a POS system. The Virtual Terminal installer package can be
acquired from MTXEPS and can be used free-of-charge as part of OpenEPS Direct.

ServerEPS User's Guide
Chapter 2 8
WinEPS
WinEPS is an in store Electronic Payments Software application that provides a variety of payments processing
options. The WinEPS software coordinates communication between the POS lanes and the payments host, and acts
as a central point for configuration changes and reporting features.
ServerEPS provides many of the features available in the WinEPS software suite, with significant improvements, as
well as no longer requiring the WinEPS in-store piece.

ServerEPS User's Guide
Chapter 2 9
Chapter 2
The ServerEPS Web Interface
This chapter details the basics of logging into the ServerEPS Web Interface.
ServerEPS Main Page
To access the ServerEPS Web Interface, you must have internet access. The ServerEPS Web Interface page is
located at:
www.servereps.com
Enter the address into your internet browser; you will see the following main page.

ServerEPS User's Guide
Chapter 2 10
The Web Services and the legacy Receipt Storage services are hosted separately and require individual login-ins and
user configuration.
The Web Services option is for use by any location using the ServerEPS product suite and includes integrated
Receipt and Signature Capture storage.
The Receipt Storage login is for those users that are not using ServerEPS and instead utilize the stand alone Receipt
Storage service.
If you frequently visit the ServerEPS Web Interface page from your current computer, you can bookmark the site.

ServerEPS User's Guide
Chapter 2 11
Browser Requirements for the ServerEPS Web Site
In order to access the ServerEPS web site for configuration, reporting and other online services, internet browser
software is required.
ServerEPS supports the following browser software:
Internet Explorer 6, Service Pack 1 (or higher) [IE6, SP1+]

ServerEPS User's Guide
Chapter 2 12
Web Services Login
The Web Services option is for use by any location using the ServerEPS product suite and includes integrated
Receipt and Signature Capture storage.
Selecting Web Services from the ServerEPS Main Page will take you to the Login screen as shown below.
Use the login information provided by MTXEPS to fill in the Company Number, User, and Password, and then click
the login arrow.
If this is your first login or if your password has expired, the ServerEPS Web Interface will go directly to the
password changing screen.
Enter a new password in the boxes provided; be sure the password is at least 6 characters long and contains a
minimum of one upper case, one lower case and one numeric character.

ServerEPS User's Guide
Chapter 2 13
For a first time login, the user is also required to agree to the End User License Agreement. Review the agreement,
click the box at the bottom of the screen and then click Accept to continue.

ServerEPS User's Guide
Chapter 2 14
Agreeing to the terms of use will take you to the Reporting Service main screen. For more information on the Web
Interface, proceed to Chapter 3, Web Interface, Screen by Screen. For information about the various ServerEPS
reports, proceed to Chapter 5, Reporting Service.

ServerEPS User's Guide
Chapter 2 15
Receipt Storage Login
The Receipt Storage login is for those users that are not using ServerEPS and instead utilize the stand alone Receipt
Storage service. ServerEPS users no longer need to log into the Receipt Storage service separately as the Receipt
and Signature capture Storage has been combined with the ServerEPS transaction search feature, and should instead
sign into the Web Service Login.
Selecting Receipt Storage from the Web Services Main Page will take you to the Receipt Host Login screen as
shown below.
Use the login information provided by MTXEPS to fill in the Company Number, User, and Password, and then click
the Login button.

ServerEPS User's Guide
Chapter 3 16
You may link directly to this login page instead of the ServerEPS Main Page; additionally, you may also skip
entering the Company number if it is specified in the URL link:
https://rec1.mtxeps.com/Receipt/Login.aspx?companynumber=XXXX
where the XXXX is your assigned Company Number.
If you provide the company number in the URL, then only the User name and Password will be prompted for.
For more information on the Receipt Storage site, please contact MTXEPS Support.

ServerEPS User's Guide
Chapter 3 17
Chapter 3
Web Interface, Screen by Screen
This section is structured the same way that the interface is, using heading and sub headings to represent the menu
format.
Home
The Web Portal Home Page gives the user access to the web-based features, such as configuration and reporting.
Along the top of the screen is a Menu Bar of dropdown links that is used to navigate the Web Services site. Each of
the links in the Menu Bar points to a web page
At the top of the screen, just under the Menu Bar are tabs showing all the Web Interface pages that you have opened
during your session. You may use these tabs to move quickly between opened pages, and you may close a tab by
clicking on the X next to the tab name.

ServerEPS User's Guide
Chapter 3 18
The Web Services screens have been optimized for display at 1024x768 screen resolution, or better. Lower
resolution screens may experience clipping of screen sections or frequent use of scroll bars.
Menu Bar at a Glance
The table below lists all of the Menu Bar items, along with a short description. The table includes a link for each
menu item to the portion of this document where that item is discussed.
Main Screen Menu Item Description
Home Opens the initial Web Services Home page.
Transaction Search Search for a transaction.
Reports View reports for the company and stores.
Management
Voucher
Management Finalize Voucher and Force transactions that were processed with partial information.
Monitoring
Store Status An overview of company and individual store outstanding offline, TOR and electronic signature message statuses.
System Status Displays an overview of data center and web service availability.
Connectivity Test Tests connectivity between your local machine and the data centers.
Administration
Store Configuration Manage the payments configuration for all stores assigned to your company.
Stores and Store
Groups Listing of all stores for the company and manage store groups.
User Management Manage all the users for the company. Includes managing user Permission Levels
Quick Links
Quick Links appear at the top right of the screen. These links provide additional web pages, information and options.
Quick Link Item Description
Help

ServerEPS User's Guide
Chapter 3 19
Quick Link Item Description
Customer Service Opens a page where the user can download the latest Web Services documentation, such as the user’s guide and release notes.
Terms and Conditions Allows the review of the Terms of Service screen
My Account
Change
Password Allows you to change your account password.
Login History Lists the previous login attempts for your account and whether they were successful or not.
My Company
Profile Displays the profile for the company and account you are logged in under.
Logout Logs the user out of Web Services.

ServerEPS User's Guide
Chapter 3 20
Quick Filter
The Quick Filter is a search bar that exists at the top of a variety of pages and can be used to provide a powerful,
simple method of dynamically refining search lists.
The Quick Filter search bar consists of text boxes at the top of each sortable column. When a user enters a string into
one of the text boxes, the corresponding column is searched for that string and only lines containing the search string
are displayed.
Multiple columns can be used at the same time to further narrow the search.
This dynamic Quick Filter search bar has been added to the following pages:
Transaction Search
User Management
User Management, Access Configuration section
Group Activity Configuration

ServerEPS User's Guide
Chapter 3 21
Transaction Search
Path: Transaction Search
For additional Information on Transaction Search, refer to Chapter 6, Transaction Search section.
The Transaction Search screen may be used to locate a specific transaction. The most commonly used criteria are
listed at the top of the page. Uncommon search criteria are available at the bottom in the Advanced Search Options
section.
All search fields that are supplied are used in the search, so supplying more search criteria will narrow the search
and fewer results will be displayed.
Using the Store Selection dropdown, a user can select either a single store, a single group, or use the Search All
Stores option on the footer of the dropdown to search all listed stores.

ServerEPS User's Guide
Chapter 3 22
If multiple pages of stores are listed in the store dropdown, use the page selection option on the footer to select a
different page.
Clicking the Search button will display all results that match the search criteria entered.

ServerEPS User's Guide
Chapter 3 23
Moving your cursor over a transaction listing will highlight that transaction; clicking the highlighted transaction will
bring up the Transaction Detail page for that transaction, including the receipt, if available.

ServerEPS User's Guide
Chapter 3 24

ServerEPS User's Guide
Chapter 3 25
Reports
Path: Reports
This screen provides a listing of all the reports that are available in the Web Interface. To select a report to view,
click the report name.
For a detailed description of each report, refer to Chapter 5, Information on Individual Reports.
After clicking on one of the report links, the store and date selection screen will appear. This screen allows you to
choose a date or range of dates (if available) to review and the Store Group(s) or store(s) from which to generate the
report.

ServerEPS User's Guide
Chapter 3 26
At the top of the report screen, the Date Selection section is used to search either the current date’s transactions, or
to select a single date or a range of dates for the report. Using the radio button to Specify Date Range to Search will
pop up a calendar control on which you may make your date selection.
Simply click on one date for transactions from a single day, or select one date and then a second date to use that
range of dates – dates selected will become highlighted. Use the arrows next to the month and year at the top of the
calendar control to move forward or backward.

ServerEPS User's Guide
Chapter 3 27
The Store Selection portion is used to choose which stores to view transaction data from. The search defaults to
including all stores; using the radio button to Specify Stores to Search will bring up the Stores and Groups selection
screen.
Using the Store tab, you may select the individual stores you wish to include in this report; use the Store Group tab
to select from among the user-defined store groups for your company in order to easily gather data from one or more
groups of stores. The Selected Stores box will be automatically updated to display the stores and groups you have
selected.
If a store happens to be selected more than once due to being a member of one or more groups, that stores data will
only be displayed one time in the resulting report.

ServerEPS User's Guide
Chapter 3 28
When selecting the Beginning and Ending dates for a report, they may not be more than 400 days apart.
After you select the date and store(s), you may click the Generate Report button to move to the Report Viewer
screen and display the report you have selected.
In addition to just displaying the reports, it is also possible to have certain reports e-mailed directly to your e-mail
account each day at close of business. Simply select a report from the list of available reports on the Scheduled
Report Tab, enter your e-mail, and select the stores you would like the report to provide information on.

ServerEPS User's Guide
Chapter 3 29
Management
Voucher Management
Path: Management, Voucher Management
Voucher Management is available thought the main Dashboard dropdown list, under the Management dropdown.
Voucher Management is designed to finalize Voucher and Force transactions that were processed without including
an authorization code, or that need adjustments to the Voucher Number or Amount. These transactions will have
been previously processed at a POS lane are held at the data center, pending the entry of all required information.
Once all required information is provided, the transaction will process to the host.
The store list dropdown will display your list of stores, and the number of Voucher transactions associated with that
store.

ServerEPS User's Guide
Chapter 3 30
You can use the drop down to select any store that has associated Voucher transactions to view a listing of those
transactions.
Once the listing is displayed, you can select any of the displayed transactions to update.
Click the transaction to update and the update screen will display.

ServerEPS User's Guide
Chapter 3 31
Editable Items Description
Authorization Code A valid authorization code is required to submit the voucher to the host for approval.
Voucher # The voucher number for the transaction may be adjusted as needed.
Amount The amount filed may be changed, but the amount may not be increased above the
amount listed; only lowered.
From this screen, you can update the Voucher’s Auth Code, the Voucher #, and the Transaction Amount; however,
the Transaction Amount may never be increased, only decreased. After filling out all missing information, you may
click the Submit button to submit the voucher for processing to the host. A voucher may not be submitted until all
missing information is provided.

ServerEPS User's Guide
Chapter 3 32
If you wish to remove a Voucher, you may select the Delete option; this option will remove the voucher from the
queue. Be certain you wish to do this, as there is no confirmation required – pressing the Delete button will remove
the voucher immediately.
The Prev and Next buttons can be used to cycle through the vouchers that are displayed, without the need to leave
the Voucher Submission screen.
Once you are done, you may exit the Voucher Submission screen by clicking the X at the top right corner.

ServerEPS User's Guide
Chapter 3 33
Monitoring
Store Status
System Status
Connectivity Test
Store Status
Path: Monitoring, Store Status
The Store Status Monitoring tool is currently being released as a customer technology preview. As such, features
may be added or removed when it is finalized. Since it is in the early phases of development it has not undergone
rigorous QA and the potential for bugs is higher than with a fully completed product. This will most likely be an
additional subscription service when it is completed.
The Store Status Monitoring tool is designed to quickly and easily display an overview of company and individual
store offline and TOR statuses as well as other information reported by the lanes.
To access the Store Status page, you must read and accept the preview agreement.
This preview does have some known issues. These issues will be listed on the Known Issues page which can be
access by the Known Issues link at the top of the Store Status page. If you encounter issues other than those listed
here, please report them to MTXEPS so that we can improve our product.

ServerEPS User's Guide
Chapter 3 34
The Store Status Monitoring tool is designed to quickly and easily display an overview of company and individual
store statuses.

ServerEPS User's Guide
Chapter 3 35
Store Monitoring Dashboard
The dashboard contains a summary of all the statuses that apply to your company. You can quickly and easily view
detailed information about any status by clicking on the status or count to view a pop up of the related data.

ServerEPS User's Guide
Chapter 3 36
At the top left of the screen is the Find a Store section with a search box. Entering data into the search box will
display only the Store names or numbers that match the entered search criteria. Just to the right is the Configuration
section that allows access to the configuration screens where the threshold values and automated alerting service is
configured. For more information on configuring, see the Threshold Configuration and Alerting Service section
below.
Just under the search section is the Store Status Counts that contains the five Status Count indicators with a number
next to them indicating how many stores fall into that category.
To the right are the Pending Transactions indicators which display the total count and amount of outstanding
Offlines (Store and Forward), TORs (Time Out Reversals), and electronically captured Signatures that have yet to
be processed up to the data center. Alerts will also be displayed if any of these values are critically high.
The Company Alerts and Store and Lanes Alerts sections at the bottom display individual items that might require
specific attention.

ServerEPS User's Guide
Chapter 3 37
Status Indicator Description
Healthy Health status indicates stores or lanes with no or few pending transactions as well as lanes that have connected recently.
Warning Store or lane has met or exceeded Warning level criteria. Warning and Critical levels may be configured though the Threshold Configuration.
Critical Store or lane has met or exceeded Critical level criteria. Warning and Critical levels may be configured though the Threshold Configuration.
Information Indicates there is an information status about a store or lane that should be reviewed.
Unknown Store or lane status is not currently available.
This level is displayed for stores or lanes that have never connected.
It is important to note that this overview is comprised of the data that the lanes have sent to the datacenters. If a store
location is currently offline and not communicating with any data center, then the offlines and TORs for that
location will not be reflected in the displayed totals until the store reconnects.

ServerEPS User's Guide
Chapter 3 38
If a store has not connected for a significant amount of time, that store status will change. After 8 hours the Warning
indicator will be displayed; after 24 hours the indicator will be marked Critical.
Browse all Stores...
The Find a Store section provides comprehensive access to the status of all stores within a company. By selecting
Browse all Stores, a complete store list will be displayed. Even without filtering, the store list is sorted automatically
so that the more critical stores are listed first. To search for a particular store location, use the Search feature. You
may search by store number or store name.
Use the [+] indicator next to the Store name to expand the store information. You will be presented with a store
overview and a list of lanes. Individual lanes can be expanded as well by selecting the [+] next to the lane number.
This will display specific lane status data.
The date next to the lane is the last time the lane connected to the data center and may be useful for determining if a
lane should be checked by appropriate company administrative personnel.

ServerEPS User's Guide
Chapter 3 39

ServerEPS User's Guide
Chapter 3 40
Pin Pad serial numbers are located in the individual lane status boxes for all lanes that have a connected terminal and
reported serial number. Pin Pad serial numbers can also be found in the PIN Pad Serial Number Report or in the
Transaction Search, in each transaction’s data.

ServerEPS User's Guide
Chapter 3 41
Clicking directly on the count, amount or any listed alert will filter the results down to just the lanes that contain the
selected item.
For example, if the Offline count was selected, then a details box would be displayed that showed only the lanes that
had pending Offline transactions. Those lanes could then be expanded to display their details:

ServerEPS User's Guide
Chapter 3 42
Healthy stores and lanes will have zero or near zero values, indicating that there are few or no transactions stored
and pending on POS lanes. Healthy lanes will have connected up to the data center recently and similarly have few
or no stored transactions or signatures.

ServerEPS User's Guide
Chapter 3 43
Store Status Counts
Within the Store Monitoring Dashboard, the Store Status Counts give a quick overview of your company’s status as
well as providing an easy way to filter your store list by status. The five statuses are Healthy, Warning, Critical,
Information and Unknown; you may quickly filter your store list by clicking on any of these five statuses.
For example, by selecting “Critical” under the Store Status Count, a list of all the critical stores is immediately
displayed. Choosing a store to view and selecting the Offline count from this screen will further refine the search
and display only the lanes of the selected store which currently have offlines to process.

ServerEPS User's Guide
Chapter 3 44
If instead you wanted a complete list of all stores and lanes with offlines to process, you can return to the main
screen and select the Offline count under Pending Transactions.

ServerEPS User's Guide
Chapter 3 45
To return to the Store Status Monitoring screen, you can click the Close Window button at the top right.

ServerEPS User's Guide
Chapter 3 46
Transactions Pending on Lanes
Similar to the Store Status Counts, the Transactions Pending on Lanes counts and amounts can be used as filters.
Clicking on the Offline, TOR or Signature File type will filter the store list to show only the stores that contain the
selected item. This view provides immediate accessibility to the stores and lanes that have the selected item. Any
store/lane displayed can be expanded to show additional details in the Lane Overview and Lane Alerts sections.

ServerEPS User's Guide
Chapter 3 47
History and Features
The History and Features section provides access to additional options related to store and lane monitoring. Users
may select any option listed under the History and Features section to display information related to the selection.
The View Cleared Alert History option will display a list of up to 100 of the most recently cleared alerts.
The View Pin Pad Change History selection will display a separate screen where an individual store and lane may be
selected, and a listing of the that lane’s PIN pad changes will be displayed, or the user can search by all or part of a
PIN pad serial number to view the stores/lanes where matching PIN pads have been deployed.
Ignoring Alerts and Removing Lanes from Store Monitoring
Alerts are provided to enable users to quickly assess the status of their stores and lanes. Sometimes, however, it may
be convenient to to clear alerts that are no longer deemed necessary.
Ignoring an Alert
When viewing individual lane details in the Store Status Monitoring, an option to ignore certain alerts is often
available in the Lane Alerts section. Clicking this option will clear the associated alert from the given lane. A history
of cleared alerts is maintained and can be access from the History and Features section.

ServerEPS User's Guide
Chapter 3 48
Removing a Lane
Lanes that are no longer in use may still have alerts displayed. Users can remove these unused lanes from the
alerting system. Using this option will remove from the monitoring and alerting system any current alert details from
the lane selected. If, however, the lane sends a new alert, the new alert will be displayed.
In order to remove a lane from alerting, from the Store Status tab of Monitoring, select a Store Status, Company
alert or Store/Lane Alert that the missing lane possesses. For example, under Store and Lane Alerts, an absent lane
will often possess the Status Message Lapse alert. Once selected, use the provided list to locate the lane you wish to
remove.
On the right side of the Lane Overview, the “cancel” symbol can be used to remove the lane.

ServerEPS User's Guide
Chapter 3 49
Lane and any alerts currently active on it will be deleted from the system and will no longer show up on the
dashboard or in any emails. To add a Lane back into Store Status Monitoring sign onto the Lane and allow it to send
an update to the server.
For lanes that are still in use, there is an existing feature to ignore specific alerts that should be used instead.
Threshold Configuration and Alerting Service
Complementing the Monitoring Service, the Alerting Service allows users to specify their own Warning and Critical
thresholds for individual Lanes, Stores and Company-wide, and to provide e-mail address to which alerts can be sent
when those thresholds are met.
The Store Status Monitoring Alert Configuration is available from the Store Status Monitoring page through the
Launch Monitoring Configuration link, and consists of 4 pages displayed as tabs along the top of the section: Lane,
Store, Company, and Daily Summary.

ServerEPS User's Guide
Chapter 3 50
Each page is used to configure both the Warning and Critical threshold levels that will apply to that section, and also
the e-mail address or addresses to which alerts should be mailed when those thresholds are met. An alert e-mail is
sent when the Warning level is met, and a second alert e-mail is sent if and when the Critical level is met.
Lane Configuration Tab
The Lane configuration page sets thresholds for individual lanes. If any individual lane exceeds any of the
thresholds listed here, an alert e-mail is sent to the address(es) specified for that type of alert, if any addresses are

ServerEPS User's Guide
Chapter 3 51
configured. Email addresses should be specified in the usual format of [email protected]. Multiple email
addresses should be separated by semicolons.
This page includes alerting for a mismatch of the OpenEPS DLL file, which can occur if the DLL fails to update
successfully either because of an error or because downloading is disabled for that lane due to configuration.
Ignoring Alerts
Scrolling to the bottom of the Lane Configuration Tab, the Ignored Lane Configuration section is available to list
and configure all the lanes that are currently set to ignore one or more of the configured alerts.
The setting to ignore certain alerts can be turn on or off from this page. Additionally, when viewing individual lane
details in the Store Status Monitoring, an option to ignore certain alerts is also available.

ServerEPS User's Guide
Chapter 3 52
Store Configuration Tab
The Store configuration page sets thresholds for individual stores. The Store alerts are generated by summing the
values of all alert related items for a store’s lanes and then comparing them to the Store alert thresholds set.
Depending on the values configured, a store alert may be triggered at the same time as a lane alert, or it may be
triggered before if there are lower thresholds or multiple lanes whose cumulative values exceed the store thresholds,
but not individual lane thresholds, or a store alert may be trigged after lane alerts if the store threshold values are

ServerEPS User's Guide
Chapter 3 53
higher. Generally store alert values are higher than individual lane alert values, but they do not have to be,
depending on business needs.
Company Configuration Tab
The Company configuration page sets thresholds for the whole company. In the same way the Store thresholds
work, the alerts are generated by summing the values of all alert related items for all of a company’s lanes and then
comparing them to the company alert thresholds set.
Daily Summary Tab

ServerEPS User's Guide
Chapter 3 54
When a threshold is met, an alert e-mail is immediately sent to the designated e-mail account(s), and only one e-mail
is triggered by hitting a threshold. To provide ongoing statuses, a Daily Summary e-mail is also sent at the
configured time. This e-mail is sent to each e-mail account configured in the Lane, Store, and Company with a
summary of all the alerts configured for that e-mail address for any alerts that are still ongoing.
In this way, a configured account will receive the alerts that it is configured to receive immediately upon the target
threshold being met, and the account will receive a daily summary of any alerts that still meet or exceed the
threshold value once a day at the configured time.
E-mail accounts are only sent a summary of the active alerts they are configured to receive, and if no alerts are
ongoing for a given account, then no summary e-mail will be sent.

ServerEPS User's Guide
Chapter 3 55
System Status
Path: Monitoring, System Status
The System Status Monitoring tool is currently being released as a customer technology preview. As such, features
may be added or removed when it is finalized. Since it is in the early phases of development it has not undergone
rigorous QA and the potential for bugs is higher than with a fully completed product.
The System Status Monitoring tool is designed to quickly and easily display an overview of data center and service
availability.
To access the System Status page during the beta period, you must read and accept the preview agreement.
This preview does have some known issues. These issues will be listed on the Known Issues page which can be
access by the Known Issues link at the top of the Store Status page. If you encounter issues other than those listed
here, please report them to MTXEPS so that we can improve our product.

ServerEPS User's Guide
Chapter 3 56
The System Status Monitoring tool is designed to quickly and easily display an overview of data center and service
availability.
The Transaction Processing section displays the data centers and the current status of the transaction processors.
The Configuration Service status indicates the availability of the web services interface.
The File Download Service is responsible for downloading all configuration and program files to OpenEPS when a
lane connects up. If this service is down, updated settings and files will not be downloaded to the lane; however, if
the lane has already received a complete download it will generally be able to continue processing transactions.
The BIN Service supplies updated BIN files to the POS lane. BIN updates occur periodically on an approximately
weekly basis.

ServerEPS User's Guide
Chapter 3 57
Status Indicator Description
Healthy Service is up and processing normally.
Warning Service is experiencing difficulty and may not be available.
Critical Service is currently not available.
Maintenance System is undergoing maintenance.
Unknown Service status is not available at this time.

ServerEPS User's Guide
Chapter 3 58
Connectivity Test
Path: Monitoring, Connectivity Test
A new Connectivity Test tool has been added to the Web Services GUI. This tool allows the user to check their
connectivity from the local computer they run the test on to the live Services and Processing hosts.
The connection test is performed from the initiating computer, so connectivity may be different depending on the
location from which the test is processed.
This test is provided to allow a simple and direct method of testing connectivity from a POS system during
installation. To verify connectivity, use your internet browser to log into the Web GUI from the POS computer, and
select Run Connectivity Test. If the test shows success, then the computer can reach the live processing hosts; one or
more failures generally indicates that the computer cannot reach the host and that adjustments to your local network
environment may be needed.
If you receive a failure and wish to confirm that the service is currently available, you may check its status using the
System Status tool under Monitoring.
The Connectivity Test will attempt to establish communication with different transaction processing service internet
addresses from within the browser currently running on your computer. Generally this serves to simulate the actual
requests OpenEPS will send from inside your local environment across the internet to the live services used to

ServerEPS User's Guide
Chapter 3 59
process transactions. In most cases this can be used to validate that your configured systems will be able to
successfully connect and transmit transactions.
The test results will display on the page, noting whether the given connection was attempted successfully, and the
time it took to complete the test of that connection.

ServerEPS User's Guide
Chapter 3 60
Administration
Store Configuration
Stores and Store Groups
User Management
Store Configuration
Path: Administration, Store Configuration
The Store Configuration manager is a graphical interface that allows the user to remotely configure settings for each
store within their company.
For additional Information on Configuration Management, refer to Chapter 4, Configuration Management.
To use the Configuration Manager, click the link on this page and the application will launch. If it is the first time
you have used the Configuration Manager on your current computer, the application will take a moment to
download before launching.
The Configuration Management GUI requires the use of Microsoft .NET Framework Version 2.0. Download and install .NET before running the Configuration Manager.
Initial loading and installation instructions are available on the Config Management page. To view the instructions,
click the “Click to view Configuration Manager launch instructions” link.

ServerEPS User's Guide
Chapter 3 61
It is recommended that you review the instructions prior to installing for the first time.

ServerEPS User's Guide
Chapter 3 62
Stores and Store Groups
Path: Administration, Stores and Store Groups
The Stores and Store Groups page is composed of two tabs: the Stores tab and the Store Groups tab.
The Stores tab displays all of the stores that are defined for your company along with their Address and Phone
Number. This information is not editable by users; if a change needs to be made to the information displayed on this
screen contact MTXEPS ServerEPS Support.
The Store Groups tab allows the creation and managing of Store Groups. Store Groups are user defined groupings of
stores that are intended to simplify reporting and report managing. Users determine what stores a group contains,
and then may run reports for that group, getting results from all specified stores.

ServerEPS User's Guide
Chapter 3 63
New Store Groups can be created by clicking the “New Store Group” link at the top right of the page. This will
allow the user to create a new group of stores, and define a name for that group. Already existing groups may be
modified and renamed by clicking directly on the group to be updated.
Group names are user defined for maximum flexibility, and automatically sorted alphabetically. Users may group
stores as they prefer, adding any number of stores to any number of groups.
The defined groups will be available to users when performing a Transaction Search or running Reports. Reports
that are run with multiple groups may contain overlapping store entries if desired. Each store’s data will appear only
once in a report regardless of how many groups they are a part of.

ServerEPS User's Guide
Chapter 3 64
User Management
Path: Administration, User Management
The User Management page allows the modification and creation of User Accounts and Permission Levels. You
may not modify the user you are currently logged in as, nor may you modify a user with the same Permission Level
as your current account.
User accounts may not be deleted once they are created, but they may be set as Disabled.
To select an account to view or edit, click the account. This will pop up an information box allowing account
editing.

ServerEPS User's Guide
Chapter 3 65
User Store Access
Store and Group access is divided up into two general categories: All Access and Limited Access.
The first radio button option to grant Access to all stores and groups, gives the user account access to all store and
groups with no restrictions. The user will also get access to any new locations or groups added later. This option is
recommended for use with administrative accounts or bookkeeper accounts that must have access to all stores.
The second radio button option allows you to define only a select set of stores and/or groups a user account will
have access to. A user who is a member of a Permission Level with modify access to this page may change other
user accounts, granting those accounts access to all, some or none of the defined stores for the company.
To select the groups and stores which a user has access to, click the Configure Store Access link.

ServerEPS User's Guide
Chapter 3 66
You may adjust access by clicking on the Stores, Groups or Selected Store and Groups to select or unselect a store
or group. Selected stores or groups will be displayed in the Selected Store and Groups.
User accounts with access to a store will be able to view store settings, reports and configurations subject to how
those individual user rights are configured; however, user accounts without access to a store will not be able to view
any information about that store regardless of their other rights.
Password Recovery
The Web Services interface does not allow users to view passwords. Instead of recovering an already existing
password, a new password must be created by an administrative user.
Any user with the rights to edit the account may update an account’s password. Once a new password has been
entered, the user may log in and will be prompted to change their password.

ServerEPS User's Guide
Chapter 3 67
Disabling a User Account
To disable a user account, or to set a user account to disabled on a certain date, the Disable Time field must be set
for that user. Any user account with access to the User Management page can set the Disable Time for any user.
Similarly, if the Disable Time field is set to blank, the user will be reactivated and will remain active indefinitely.
To set a deactivation date, select a user, and then click on the user name. By expanding the status button, the Disable
On date field will become visible. The Disable On field should be filled in with an appropriate date for deactivation
in Month/Day/Year format as shown above. Click the Save button to update the account.
Restrict Web Services Access by IP
Access to the Web Service GUI and Configuration Manger may be restricted based on the IP address that the user is
signing on from.
This feature is available only by direct request to MTX, and is not part of the Web Services configuration
GUI. Contact MTX support if you need this feature set up for your company.

ServerEPS User's Guide
Chapter 3 68
This option allows one or more IP addresses or ranges of IP addresses to be specified that are allowed to connect to
the Web Service GUI for their company number. If a connection is attempted from outside the allowed IPs, the
connection will be refused.
When a login to the Web Services from an IP address that is not allowed is detected the error message “Access has
been restricted for your company” will be displayed.
Attempted login to the Configuration Manager from a restricted IP will result in a failed login with no special
message.

ServerEPS User's Guide
Chapter 3 69
Creating a New User
Path: Administration, User Management (New User link)
To create a new user, click the “New User” link on the top of the User Management page. This will open the Create
New User screen.
Use the text boxes to enter the user information. Be sure to assign the correct Permission Level to the new user.
Note: You may not assign a new user to the same Permission Level as the account that you are logged in as.
In the Status section you may set an Activate On and a Disable on date. If no specific Activate On date is set, the
current date and time will be used. If you wish the account to become active in the future, set the date and time for
activation. You can also set a date the account will automatically be disabled on.

ServerEPS User's Guide
Chapter 3 70
Before the user account can be created, you must assign a password to it. Use the Password section in the upper right
to set the account’s password. The first time the user logs on, they will be prompted to change the password.
You may use the User Store Access section to set the account’s access to stores.

ServerEPS User's Guide
Chapter 3 71
Permission Level & User Group Management
Path: Administration, User Management (Edit Permissions link)
Permission Levels are used to define access rights, in the same way that Windows groups do. Access rights are
assigned to a Permission Level Group, and users are assigned the appropriate Permission Level, inheriting the
associated rights. Thus, the Permission Level access rights determine what reports are viewable and what menu
options are available for each user.
To create and manage Permission Levels, click the “Edit Permissions” link at the top of the User Management page.
Permission Level Groups are displayed in a hierarchical graphical chart-like structure called the Company
Organization Chart. The permission level a User Group belongs to controls what members of that group a will be
able to manage. For example, a user belonging to a User Group at permission level "1" will be able to modify users
in any User or User Group of a permission level "2" or higher. Conversely, members of a User Group at permission
level "3" will not be able to manage users at permission level "1" or "2."

ServerEPS User's Guide
Chapter 3 72
This graphical structure allows a user to see at a glance which groups are ‘above’ or ‘below’ other groups, and have
greater or lesser relative permission access: Groups at the top of the chart have greater management permissions and
are used to manage the groups and users that are lower on the chart (and have a higher number value).
It is important to note that the relative position in the Company Organization Chart controls only the management
abilities of a group, and not the inherent permissions a group possesses. To define a groups permissions, you may
click on the Configure link for the group.
There is no limit to the number of levels available; User Groups can easily be created in a hierarchy by adding new
groups and then adjusting their relative position using the up and down arrow buttons.
Reviewing the rights of a user has become easier, with access from both the Group Management page (through the
Configure link) as well as while viewing an individual user account.
The Group Information page allows the modification of the rights granted by the Permission Level selected. To
rename a group, change the name displayed in the Rename Group text box; for new groups, be sure to enter a group
name.

ServerEPS User's Guide
Chapter 3 73
Be sure to save your changes using the Save button at the bottom of the screen.
If a user group has the View or Modify access to User Management, then any user in that group can view any user
account in the company that does not belong to a root admin.
Users with the right to Reset Passwords may reset passwords of user accounts in any group of the same access level
on the Company Organization Chart or any group with a number higher than its own (higher numbers indicates
lower permissions and are farther down on the Company Organization Chart).
You may use the scroll bar to view the whole list of rights that can be granted to a user. Rights are broken up into
related sections, and rights to each section can be easily granted or removed via the All or None option on the right
side of the screen across from the heading for that section.
You may also select rights individually. To grant a right, put a check in the checkbox across from that right. To deny
a right, leave the checkbox unchecked, or uncheck the box if already checked. The check boxes determine whether
the user can View, Modify, Create or Delete for each of the pages. Not all pages support all three of these options.

ServerEPS User's Guide
Chapter 3 74
Web Service upgrades that add new features with associated new activity items, such as new reports, automatically grant access to those items only for the Administrator and Root Admin groups. Administrative users may grant the right to access this new page to any other group by adjusting that groups activity rights.
Permission level rights should be defined carefully and in accordance with your company’s security policy, as every
user with a given Permission level will inherit all rights granted to that level.
Groups may be deleted by selecting the group, and then clicking the Delete Group button at the bottom of the page.
A group may not be deleted until all users who are part of that group are reassigned to a different group.
The users assigned to the group can be viewed by clicking the “X users currently assigned” link at the top, under
Group Information.
This screen allows you to view the list of Assigned users, and to assign additional users to the group from the
Available Users list.

ServerEPS User's Guide
Chapter 3 75
It is not possible to ‘unassign’ a user because every user must be a member of one and only one group. To assign a
user to a different group, select the new group, and add the user to that group – when a user is added to a group they
are automatically removed from the previous group they were a member of.

ServerEPS User's Guide
Chapter 3 76
Help
Help
Customer Service
Terms and Conditions
Customer Service
Path: Help, Customer Service
The customer service page provides release notes, guides, and installation packages.
Release notes for the latest software version are often provided as a link on the front Home page, so they are
available immediately upon log in; older release notes are maintained on the Customer Service page to provide a
comprehensive listing of upgrades.
The User and Implementation guides provided on this page are the latest guides currently available. They are
updated with all significant feature updates for the product

ServerEPS User's Guide
Chapter 3 77
Terms and Conditions
Path: Help, Terms and Conditions
The Terms and Conditions page displays the Merchant Transaction Reporting and Receipt Storage Reporting
System Agreement that defines the text that has been agreed to as part of using this transaction and reporting
service. You may review the agreement at any time.

ServerEPS User's Guide
Chapter 3 78
My Account
My Account
Change Password
Login History
My Company Profile
Change Password
Path: Personal, Change Password
The Change Password screen allows a user to change their own password. The password must be a minimum of 6
characters in length, with one upper case, one lower case and one number.
As a security feature the password page is only displayed for up to 4 minutes; after this time elapses, the user will be
logged out automatically.
To prevent unauthorized password changes, the user is required to enter their current password as well.

ServerEPS User's Guide
Chapter 3 79
Login History
Path: Personal, Login History
This page displays the login history for the account you are currently using. You may use this page to verify that you
are the only one who is logging into your account.
A green Yes in the Success column indicates the user logged in successfully, while a red No indicates a failed login
attempt, such as a bad password entry.

ServerEPS User's Guide
Chapter 3 80
My Company Profile
Path: Personal, My Company Profile
The Profile page displays the information for your current account.
You cannot modify your own account information. If you are an administrator, you may modify other users’ account
information by using the Administration, User Management page.
In the Company Details section, the Number of Users, Stores and Store groups are visible; each of these values can
be clicked to take you to the related web page.
You can see the details of your Permission Level by clicking the magnifying glass icon next to the listed permission
level for your account.

ServerEPS User's Guide
Chapter 4 81
Chapter 4
Store Configuration Management
The Store Configuration Management GUI provides the interface to configure and manage stores. It will
automatically download and open when the Configuration Manager option is selected. See the Configuration
Management section for information.
To access the Configuration Management GUI, select the Administration dropdown, and then click Store
Configuration.
Once the Store Configuration tab is displayed, click directly on the “Launch Store Configuration Application...” text
to launch the management GUI.
The new Silverlight Store Configuration Manager is ready for public beta trials; it may be launched by clicking the
yellow bar. The new Silverlight Store Configuration Manager is an in-browser configuration tool that performs the
same functionality as the original Store Configuration application, but without the need to load and launch a separate
application.

ServerEPS User's Guide
Chapter 4 82
To review the Silverlight GUI screens, refer to the Silverlight Store Configuration Manager section.
Store Configuration Management GUI Main Screen
The main Configuration Management screen requests the user enter their login information and press the Login
button to proceed.
Even if a user is not currently logged in, they can access the Help menu for additional information.
The Help option will display a help screen with details about the login and opening screens. The About option will
display the current module versions of the executable and DLL files.

ServerEPS User's Guide
Chapter 4 83
Once the user has logged in, the GUI main screen will allow the selection of a Lane or Store configuration to Open.

ServerEPS User's Guide
Chapter 4 84
Configuration Management Buttons
Menu Item Description
Open [Button]
Clicking this button after selecting a store or lane configuration will open that configuration for viewing and editing.
Save [Button]
The Save button will save any changes made to the configuration you have opened.
When you save a configuration you will be given the option of applying it immediately or setting it to be applied at a later time.
Cancel [Button]
This button is displayed once a configuration has been opened.
Clicking this button will discard any changes made to the configuration and close the configuration.

ServerEPS User's Guide
Chapter 4 85
Menu Item Description
New [Button]
Clicking the New button will open a menu with the following options: New Lane Configuration – Creates a New Lane configuration with the default settings and
enables editing. New Store Configuration – Creates a new Store configuration for the store you select and
enables editing. Import Lane Configuration – Allows the importing of previously Exported Lane Configuration
files. Import Store Configuration – Allows the importing of previously Exported Store Configuration
files. Import WinEPS Configuration – allows the importing the configurations of a locally installed
WinEPS program. WinEPS must be at least 824 to be supported for importing.
Refresh [Button]
Refreshes the list of Lanes and Stores; useful for verifying the configurations that are currently being edited by other users and are therefore locked against opening.
Export [Button]
The Export button allows the user to export a copy of a selected Store Configuration or Lane configuration to a local drive. This export can later be imported via the New button.
Close [Button]
Closes the Configuration GUI.
Equivalent to clicking the red X in the upper right corner. If you have a configuration open you will be prompted to save it before exiting.
Menu Item Description
Logout [Button] Logs the current user out of the Configuration GUI without closing the GUI.
Lane Tab Clicking this tab will display the list of available lane configurations.
Store Tab Clicking this tab will display the list of available store configurations.

ServerEPS User's Guide
Chapter 4 86
Configuration Management Right Click Menu
Menu Item Description
Open Clicking this button after selecting a store or lane configuration will open that configuration for viewing and editing.
Cancel
Same as the Cancel button.
This option is available once a configuration has been opened.
Clicking this option will discard any changes made to the configuration and close the configuration.
Save
Same as the Save Button.
The Save option will save any changes made to the configuration you have opened.
When you save a configuration you will be given the option of applying it immediately or setting it to be applied at a later time.

ServerEPS User's Guide
Chapter 4 87
Menu Item Description
New Lane Configuration
New Store Configuration
The menu will display either New Lane Configuration or New Store Configuration depending on whether you are on the Lane or Store Tab.
Same as the New button.
New Lane Configuration – Creates a New Lane configuration with the default settings and enables editing.
New Store Configuration – Creates a new Store configuration for the store you select and enables editing.
Rename
Only available for Lane Configurations.
Allows the user to rename the selected Lane Configuration. If the Lane Configuration file is in use, renaming it will update the name in those store
configurations automatically
Delete
Allows the user to delete the selected Lane Configuration or Store Configuration.
If the user attempts to delete a lane configuration file that is currently assigned to any store, the delete operation will fail. To successfully delete a lane configuration, the lane must be removed from all store configurations.
Export
The Export button allows the user to export a copy of a selected Store Configuration or Lane configuration to a local drive. This export can later be imported via the New button.
See the Exporting Store or Lane Configurations section below for further information.
Copy Configuration
This option allows the user to copy some or all of a Store or Lane Configuration onto another Store or Lane configuration.
See the Copying Configuration Data section below for further information.

ServerEPS User's Guide
Chapter 4 88
Opening an Existing Lane or Store Configuration
To open a Lane of Store configuration, select the Lane or Store tab, and then double click the configuration to open.
Pending and Locked Configurations
Available configurations can have three different statuses associated with them. These statuses serve to indicate
what state the configuration is in. The statuses are: available, pending and locked for editing.
The default status is available; this status indicates that the configuration may be opened for editing. A status of
Pending indicates that changes have been made to the current configuration and that the configuration will be
updated to the new version on the date and time specified. Locked for editing indicates that another user has the
configuration open and no other user may open it.
Status Example Description
Available This configuration may be opened for editing.

ServerEPS User's Guide
Chapter 4 89
Status Example Description
Pending
Configuration has an update that is pending.
A user may open the original config version by clicking
the File icon (Example: ).
A user may open the pending configuration by clicking
the clock icon (Example: )
Locked for Editing
This configuration is locked by other user and may not be opened until released.

ServerEPS User's Guide
Chapter 4 90
Creating a New Configuration
The New button allows the creation of new Lane and Store configurations. Additionally, a Lane or Store
Configuration can be imported from a local copy, or an installation of the WinEPS software.
New Store Configuration
To create a new store configuration, select the New button and then select the Store Configuration option. Use the
dropdown list on the New Configuration window to select the store for which to create a new configuration.

ServerEPS User's Guide
Chapter 4 91
The dropdown box contains the list of stores assigned to the company number you are logged in as, that do not
already have a Store Configuration defined. If the store you are looking for does not appear in the dropdown box,
check the list of already existing store configurations.
If the store you are looking for does not appear in the dropdown and does not already have a configuration created for it, contact Support; only support staff can add a new store to a company.
New Lane Configuration
To create a new store configuration, select the New button and then select the Lane Configuration option. Enter the
new configuration num into the text box provided.

ServerEPS User's Guide
Chapter 4 92
The new configuration will be created with the default settings and will be immediately opened for editing.
Import Lane Configuration
If you have exported a Lane Configuration to a local folder you may use the Import Lane Configuration command to
upload a copy for the company you are currently logged into. This is exceptionally useful for copying lane
configurations from one company to another. See the Exporting Store or Lane Configurations section for further
details on the export process.

ServerEPS User's Guide
Chapter 4 93
Option Description
Configuration Name
Enter the name to be used in the Configuration manager for the imported configuration.
This is not the name of the WinEPS terminal configuration file.
File Import Path
This is the local path to the directory where the configuration was downloaded. Typical path name would be:
C:\Export
Use the Ellipsis button (…) to browse for your export folder.
Provide a Configuration Name; the name provided will be used in the Configuration GUI as the name of the
imported configuration.
Enter a file path, or use the “…” button to browse for the WinEPS installation folder. Select the root folder. A
typical File Import Path would be:
“C:\ Export”
Once selected, click the Ok button to import the configuration

ServerEPS User's Guide
Chapter 4 94
Import Store Configuration
If you have exported a Store Configuration to a local folder you may use the Import Store Configuration command
to upload a copy for the company you are currently logged into. This is exceptionally useful for copying store
configurations from one company to another. See the Exporting Store or Lane Configurations section for further
details on the export process.
Option Description
Store Number
This dropdown box lists all stores that are setup for the company you are currently logged into that do not already have a configuration defined. If the store you are looking for is not present it may already have a configuration defined, or the store may not be setup in the server database. You may need to contact Support to if the store is not yet set up in the database.
File Import Path
This is the local path to the directory where the configuration was downloaded. Typical path name would be:
C:\Export
Use the Ellipsis button (…) to browse for your export folder.
Select a store from the Store Number dropdown list. This is the store that will receive the uploaded configuration.
Enter a file path, or use the “…” button to browse for the WinEPS installation folder. Select the root folder. A
typical File Import Path would be:
“C:\ Export”
Once selected, click the Ok button to import the configuration

ServerEPS User's Guide
Chapter 4 95
Import WinEPS Configuration
If you have a local installation of the WinEPS software product, you may use the Import WinEPS Configuration
option to import all the relevant configuration information from WinEPS into the Configuration Management GUI.
The import feature will load the following information:
WinEPS Lane configurations for defined lanes (only). Each lane configuration file in use will be uploaded
and made available in the Lanes tab.
Number of lanes defined and associated configuration files.
Host selections if the defined hosts are supported by Connected Payments.
Configured IP address information into the Setup.Txt file. This IP address should be updated with the IP
address of the Dial Backup Client before use.
Receipt header and footer, and bank deposit information.
It is only possible to import configurations from WinEPS version 824.0 and higher.
Option Description
Store Number
This dropdown box lists all stores that are setup for the company you are currently logged into that do not already have a configuration defined. If the store you are looking for is not present it may already have a configuration defined, or the store may not be setup in the server database. You may need to contact Support to if the store is not yet set up in the database.
WinEPS Folder
This is the path to the EPS directory of the WinEPS installation.
Typical path name would be:
C:\Program Files\MicroTrax\EPS\
Select a store from the Store Number dropdown list. This is the store that will receive the uploaded configuration.
Enter a file path, or use the “…” button to browse for the WinEPS installation folder. Select the root folder. A
typical File Import Path would be:

ServerEPS User's Guide
Chapter 4 96
“C:\Program Files\MicroTrax\EPS\”
Once selected click the Ok button to import the configuration. The import copies information from the Terminal
Config, Card Processing Profiles, and other WinEPS settings.
After the import, the configuration will be opened for editing.
Consult with Support if you have any questions about importing configurations from WinEPS.

ServerEPS User's Guide
Chapter 4 97
Exporting Store or Lane Configurations
The Export button allows the user to export a copy of the configuration information for a Lane or Store to their local
computer. This is useful for creating a copy that can later be imported into a different company using the Import
feature of the New button.
To export data, either a Lane or a Store must be selected (highlighted in the left hand list), but not opened. Once a
configuration is selected the Export button will become available. Alternately you may simply right click on the
configuration and select the Export option for the menu.

ServerEPS User's Guide
Chapter 4 98
Once Export is selected, the directory selection box will appear, allowing you to determine where to store the
configuration on your local computer. Unless it is moved, this is the directory location you will look for if you later
wish to Import the configuration.
Clicking Ok will copy the data.
Note: The same filenames are used for every store or lane configuration, so if you wish to export configurations from multiple stores and/or lanes, be sure to place them in their own separate directories when you export them.

ServerEPS User's Guide
Chapter 4 99
Copying Configuration Data
The ability to copy lane configurations allows a user to take some or all of the settings in one configuration and copy
them into a different configuration; this eliminates the need to manually repeat configuration choices for multiple
lanes or stores within the same company.
To copy configuration data from a lane or store, simply right click the configuration and select the Copy
Configuration option from the menu.
To paste some or all of the configuration data into another configuration of the same type, select the target
configuration, right click and select the Paste menu option.

ServerEPS User's Guide
Chapter 4 100
Copy Lane Configuration Menu and Copy Store Configuration Menu
This will display a screen that allows the user to determine what items from the original configuration file will be
pasted into the target configuration. Uncheck the items that will not be copied into the target configuration and select
Ok to initiate the copy.

ServerEPS User's Guide
Chapter 4 101
Lane Configurations Setup Screens
Once a Lane Configuration is opened for editing, the Lane Configuration menu becomes available.
The settings in this section pertain to a single lane configuration and thus to any lane that is set to use the
configuration.
Lane Configuration Menu
Menu Item Description
Processing Options The Processing Options window provides access to change miscellaneous settings.
ECC RecInfo
Electronic Check Conversion receipt information setup screen.
Text displayed here is supplied to the POS for printing on any check transaction that is converted to electronic format.
Terminal
Configuration The terminal configuration contains the defined transactions, terminal sequence, selected PIN pad, and display test for the lane.

ServerEPS User's Guide
Chapter 4 102
Menu Item Description
ServerEPS RSP
Codes The ServerEPS response codes link a returned host server code to a terminal action, informing the lane whether the transaction was an approval or decline.
OpenEPS RSP
Codes The OpenEPS response codes handle local and special responses and determine local approvals, declines and flags.
Allowable Card
Prefixes Links a prefix with a two digit card code to determine what card profile to use for the current transaction.
Card Processing
Profile Allows configuring individual options for each card type, such as allowing offline processing, credit to debit, or manual entry.
OpenEPS INI The OpenEPS.INI file is a configuration file that regulates special OpenEPS settings.
WIC State Code The WIC State Code screen is used to list all available states that are supported for WIC, along with the code associated with that state.
FuelEPS
Configuration Controls configuration settings for the Fuel Client in-store software

ServerEPS User's Guide
Chapter 4 103
Processing Options
The Processing Options window provides access to change miscellaneous settings.
Processing Options Window – System Operation Tab
Tab Item Description
Number of Days to Keep Report Files
This setting determines the number of days that each day’s lane journal file will be retained at the POS. After the allotted time the log file will be deleted.
For example, the default of 90 days indicates that the previous 90 days of logs will be retained. Logs older than 90 days are deleted as new logs are created for each day.
Offline Blackhawk receipt Verbiage
The text configured here will be supplied on the receipt whenever a Blackhawk Gift Card is activated while the POS is processing in Offline mode.

ServerEPS User's Guide
Chapter 4 104
ECC RecInfo
The ECC RecInfo screen contains the special receipt information printed on receipts for Electronic Check
Conversion (also known as Electronic Check Authorization or ECA).
The text is defined per host, so each host will have a different set of text. The text is defaulted to the statement
approved by the host during certification; changes to the text should be verified with your host before
implementation.
The text used will be determined by the host you have defined to accept Checks for your store.
The list box on the left side displays the 3 letter suffix associated with each supported Check host that also supports
ECC.
Host Suffix Actual Host Name
BYL Concord H&C
DEM Demo Host – Test Only, not for production
LML LML
LYN Lynk

ServerEPS User's Guide
Chapter 4 105
Host Suffix Actual Host Name
NOV Nova
TRN ePic Tranz
You may add a new suffix to the list by entering a 3 letter code and clicking new. Creating a new entry will not
cause that text to be used if the 3 letter code is not a recognized code for the host currently configured for Check
transactions. It is recommended you only create a new prefix under specific direction from support.

ServerEPS User's Guide
Chapter 4 106
Terminal Configuration
Terminal Configuration allows you to set up many lane specific options for your OpenEPS lane. A new terminal
configuration will contain the default configurations which you may then use as a base from which to create the
configuration you want.
Terminal Configuration: Tender Configuration Tab
The screen will open to the first tab, the Tender Configuration Tab. This tab allows selection of allowed transaction
types that will be allowed for each tender type.
OpenEPS Terminal Configuration – Tender Configuration Tab
Screen Item Description
Allowed Transactions
For each tender, you can define the allowed transaction type by clicking the displayed buttons. The color Green indicates that the transaction has been turned on. Red indicates that the transaction is Not allowed.

ServerEPS User's Guide
Chapter 4 107
Screen Item Description
Language [Radio Buttons]
Allows selection of the language to display and configure.
See the Transaction Sequence Tab section for information.

ServerEPS User's Guide
Chapter 4 108
Allowed Transactions Frame
This frame contains a visual list of all the different transaction types that each tenders supports.
Allowed Transactions Frame
Each Transaction Type (Tender) has a list of transactions that is directly across from it. The transactions that are
listed in Green are turned on, while those listed in Red are turned off. In the example above, Debit Purchase is
turned on, while Debit Return is turned off.
To turn a transaction on or off simply click on the button in the Allowed Transactions Frame. If you wanted to
enable the Debit Return in the example above, all you would do is click on the Return button as shown below.
Transaction
Allowed
Transaction
NOT Allowed
Trx Type Lines
up with
Allowed
Transactions

ServerEPS User's Guide
Chapter 4 109
Turning on Debit Return
Every Transaction that is intended to be used (accepted as payment at the POS) must be turned on in the Allowed
Transaction frame
If a transaction is turned off, then turned on the TAC sequence will be reset to the default. This can be handy if you have made changes and want to start over, but do not remember what the original settings were. Complete Information on TACs is listed in the Transaction Sequence Tab section.

ServerEPS User's Guide
Chapter 4 110
Terminal Configuration: Transaction Sequence Tab
In this section the acronym TAC (Terminal Action Code) and Sequence Code are used interchangeably.
A TAC or Sequence Code is a command to perform a step in the processing of a transaction. For example, the first
step in processing a payment is often to get the type of payment to be used, and the ? – Payment Type TAC is an
instruction to do just that.
OpenEPS Terminal Configuration – Transaction Sequence Tab
Menu Item Description
Language [Radio Buttons]
Allows selection of the language to display and configure.
See section below.

ServerEPS User's Guide
Chapter 4 111
Menu Item Description
First Actions:
Sequence Codes
The list of first Terminal Action sequence Codes (TAC) that are available but unused. Drag and drop the sequence codes to the Sequence section on the right in the desired order.
First Actions:
Sequence
This is the sequence of first sequence code. The Card Slide, Payment Type and Select Language TACs have additional properties. Refer to the Sequence Code Properties section for additional information and screen shots.
First Actions:
Customer Display
This is the prompt that is displayed to the customer during the processing of the associated Sequence Code (TAC)
Prompts are directly editable by clicking on the text, and typing in different text.
First Actions:
Cashier Display
This is the prompt that is displayed to the cashier during the processing of the associated Sequence Code (TAC)
Prompts are directly editable by clicking on the text, and typing in different text.
Tender Type
Dropdown list of all tenders turned on under the Tender Configuration Tab.
If no Allowed Transactions are defined for a given Tender (on the Tender Configuration Tab screen), then the tender will not appear in the list.
Transaction Type Dropdown list of all transaction types available for the selected tender.
If a tender is not turned on in the Tender Configuration Tab screen, it will not show up here.
Void Allowed/ Void Not Allowed
This option allows the user to select whether a void is allowed or disallowed for each transaction type. All transactions default to Void Allowed.
Cashier Display
2x16 Standard Prompts
5x40 Extended Prompts
Selects the size of the cashier display on the POS.
Note: Currently only the Retalix StoreLine version 400 (and above) support the 5x40 cashier messages
If 2x16 is selected for the cashier display prompts, any prompts that you currently have that are larger than 2x16 will be truncated.
If you select 5x40, additional space in the Customer Display column will appear.
Sequence Codes
Sequence Codes (or TACs) control the flow of transactions. You can add a Sequence Code to a transaction by dragging and dropping the selected code into the Transaction Sequence column.
Some sequence codes that have additional properties can be accessed by clicking on the double arrow >>. Sequence codes that allow you to copy prompts are indicated by one arrow >. Refer to the Sequence Code Properties section for additional information and screen shots. You have the option to copy the properties from previous TACs by clicking on the arrow to the right.
Transaction Sequence
The TACs that will be processed for a given Tender/Transaction Type combination, in the order the TACs will be processed.
Customer Display
This is the prompt that is displayed to the customer during the processing of the associated Sequence Code (TAC)
Prompts are directly editable by clicking on the text, and typing in different text.
Cashier Display
This is the prompt that is displayed to the cashier during the processing of the associated Sequence Code (TAC)
Prompts are directly editable by clicking on the text, and typing in different text.

ServerEPS User's Guide
Chapter 4 112
Language Radio Buttons
The Language radio buttons are used in conjunction with the Q-Select Language TAC to provide the options to
display terminal text to the customer in alternate languages.
To enable multiple language support, the Q – Select Language TAC must be the first TAC as shown above. You
may select Language 1,2 or 3 to configure the text. Cashier prompts are configured only in language 1; cashier
display text is only displayed in the first language.

ServerEPS User's Guide
Chapter 4 113
Void Allowed/ Void Not Allowed
This option for the OpenEPS Terminal Configurations allows the user to select whether a void is allowed or
disallowed for each transaction type. All transactions default to Void Allowed.
This setting is 'per transaction' so that, for example, Credit Purchase can be set to Void Allowed while Credit Return
can be set to Void Not Allowed.
When a void is attempted, the transaction is sent to the server; a response of MTX->135 response will be returned to
the lane if a void is not allowed for that transaction type.

ServerEPS User's Guide
Chapter 4 114
TAC Properties
A TAC is a command to the POS or to OpenEPS to perform a step in the processing of a transaction. TAC
Properties are additional settings associated with specific TACs. These indicate additional items that can be
adjusted, and include the Manual Sequence, Customer Cash back settings, and other settings.
If a TAC has only a single > that indicates that it has no configurable additional properties, but the text for that
prompt may be copied from any other instance of the selected TAC. This allows faster configuration, by allowing
the user to only input new text once, and then copy it onto other instances of the TAC.
Clicking the > Indicator
To indicate that a TAC has additional, configurable properties the >> indicator is used.
AC Property Indicator
Clicking on the >> indicator will open up a list of all available configurable properties for the selected TAC, as
shown below.

ServerEPS User's Guide
Chapter 4 115
Clicking the >> Indicator
There are two general types of properties: ON/OFF properties, and screen configurable properties. ON/OFF
properties require no other configuration beyond selecting them. They are indicated by a check mark when they are
turned on, as shown above. Screen configurable properties bring up an entirely new screen to allow the
configuration of several different facets of their function.

ServerEPS User's Guide
Chapter 4 116
Terminal Configuration: PIN Pad Configuration Tab
The Pin Pad Configuration Tab displays the screen where the terminal is selected, and the terminal-specific settings
are changed.
The screen displays a simulation of the selected terminal on the right hand side, with the relevant settings for the
terminal on the left. The settings available will change as different terminals are selected.
PIN Pad Configuration Tab - Everest
The Everest and the ICE 5500 are good examples of how the screen changes and displays only relevant settings for
each terminal.

ServerEPS User's Guide
Chapter 4 117
PIN Pad Configuration Tab – ICE 5500
Screen Item Description
OpenEPS PIN Pad Type
The dropdown list displays all available terminal types that are supported.
When a terminal is selected the picture on the right changes to a simulation of the selected terminal, and the setting options on the left are updated with settings for that terminal.
If the OpenEPS PIN Pad Type is set to None, no terminal will display and the OpenEPS Controlled PIN Pad options will not display.
SCAT Com Port The COM port which the terminal is attached to the POS on.
For the Omni 7000, the option to select USB is also included.
PIN Pad ID Port
This is the port opened by OpenEPS on the POS computer to allow the wireless connection by supported wireless SCAT terminals such as the Vx670.
This option is only displayed for terminals that utilize it.
Screen File Name
(Shown on ICE 5500 example)
This option will display if using a touch-screen terminal that requires screen files.
The default screen file name is displayed. If you have another set of screen files loaded to the server, you may enter a different file name to select those screen files instead of the default. You may need to consult with support to get screen files loaded to the server.
Unassigned Payment Types
(Shown on Everest example)
Shown in this list box are the payment types you can assign to your terminal by dragging and dropping the text from the list box to the Customer Device. To undo the assignment, click the appropriate key on the Customer Device.
Information on the Other 'tender' is described in the Layered Tender Key section

ServerEPS User's Guide
Chapter 4 118
Screen Item Description
Tender Button Selection
(Shown on ICE 5500 example)
For touch-screen terminals, this option will appear instead of the Unassigned Payment Types
On touch-screen terminals, tender buttons are controlled by a combination of drop down boxes listing the available Tender types and text boxes where the name displayed to the terminal can be configured.
Allow Enter=Yes/Clear=No In addition to screen buttons
If this option is checked, the Enter button will activate the Yes and the Clear button will activate the No (in addition to the Yes/No soft key buttons) when Yes/No prompts are displayed on the screen.
If this is not selected, customers must use only the Yes/No soft key buttons as displayed on screen.
Send Receipt to Pin Pad
This checkbox controls sending the receipt on from OpenEPS to a SCAT terminal with an attached or inbuilt printer.
This option is only displayed for terminals that utilize it.
Card Reader Attached to POS Select this option if a Card Reader is attached to the POS in addition to the terminal, such as if the keyboard features an attached card reader (MSR).
PIN Pad Attached to POS Select this option if a PIN Pad is attached to the POS in addition to the terminal.

ServerEPS User's Guide
Chapter 4 119
OpenEPS PIN Pad Type
A variety of different terminals are supported by the OpenEPS Direct interface. Using the dropdown list, you can
select the terminal that you wish to use. As soon as the terminal is selected, the screen will change to show a picture
of that terminal and the relevant settings.
Unassigned Payment Types
Unassigned Payment Types
The Unassigned Payment Types box holds all the tender types that were enabled on the Tender Configuration Tab.
This box allows simple drag and drop of the tender from the box to an ‘Unused’ button on the terminal. The ‘Other’
tender is a special case, and is used to configure Layered Tender Keys (see the section below).
The labels may be placed on any Unused button. Hard buttons are the buttons that are not next to the screen, such as
the second row of buttons on the Everest terminal. Commonly these buttons are placed according to the template
labeling already present on whatever terminal you are using, so you should match the button placement to the actual
labeling on the hardware you have purchased.
For ‘Soft Keys’ it is a bit easier, as soft keys are not labeled on the terminal itself, but rather by the text next to the
button on the terminal’s screen. Once placed on the terminal, for soft keys, Configurable Text will be shown next to
the button.
Tender buttons are configured differently for Touch Screen terminals than for other terminals.
Configurable
Text
Soft Key
Hard Key

ServerEPS User's Guide
Chapter 4 120
Touch Screen Button Selection
The six Buttons with their drop down lists of Tenders supply the information on how many buttons to create and
what those buttons should be. The Button Label text is the text that will be shown on the terminal’s touch screen
button.
Actual placement of the touch screen button on the terminal screen is handled by the screen files automatically.
Unassigned Payment Type: EBT vs. EBTCA & EBTFS
EBT Food Stamps and EBT Cash Benefits may be selected as individual buttons on the terminal instead of as a
single EBT button with a Food/Cash sub-choice. This option allows additional configuration choices; the individual
EBT key is still fully supported.

ServerEPS User's Guide
Chapter 4 121
The screen above shows the two new available keys placed on the Everest template, with the standard EBT button in
the Unassigned Payment Types box. These new buttons can be used in place of the single EBT key.
Layered Tender Keys
Usually, Tender Keys are assigned to permanent buttons on the terminal, corresponding to the labeling that already
exists on the terminal in the store. Layered tender keys allow the configuration of the top row of keys, also known as
the Soft Keys, to show a sequence of different tenders.
To set up the Layered Tender Keys, 'Other' is assigned to a key, as shown below. This causes the layer tabs to
appear on the right.

ServerEPS User's Guide
Chapter 4 122
Layer 1 Example – Soft Keys
In the example above, the customer would see, Credit, Debit and an Other button on screen, when they started. If the
customer selected the Other key, the buttons would change to show the buttons assigned to layer 2. The example
below shows GiftC, Fleet, and another Other button.
Layer 2 Example
Layered tender can also be used with the touch screen terminals, as shown below.

ServerEPS User's Guide
Chapter 4 123
Layer 1 Example – Touch Screen
To add a layer, select the last layer that is available, and drag and drop Other onto a soft button, or for touch screen
terminals, use the drop down list to assign the Other tender to a button. This will automatically add another layer.
The Layer Tabs appear for configuration only once Other is assigned to a button. You can have up to 4 total layers,
though you need not use all of them.
Caution: Removing “Other” from a key will delete all layers and layer setup for lower layers. It is recommended that keys be assigned to the layers in the order of layer 1 through layer 4, and that you not start with the 4th layer and work backward.
The text from the ? - Payment Type TAC (or the / - Auto Tender Type TAC if configured instead) is displayed in the
text box on the Pin Pad Configuration screen as shown below.

ServerEPS User's Guide
Chapter 4 124
Text Configuration
The first layer will always show the text as displayed in the ? or / TAC. The text for the first layer (only) is linked,
so that changing it on either the Transaction Sequence Tab or the Pin Pad Configuration tab.

ServerEPS User's Guide
Chapter 4 125
Available Text Lines
On the Transaction Sequence Tab it is possible to enter two lines of text. Only the top line will show once any
payments are assigned to soft key buttons on the terminal as the bottom line is reserved for the captions of the
buttons.
Layers beyond the first are independently configurable from the ? or / TAC text, but default to the ? or / text. This
allows a different heading to be displayed on each layer 2 through 4.
Layered Tender Keys & Triple Language Support
Each layer may have up to three different languages defined. The language is chosen at the top of the screen; the
language for the prompts you are currently editing is listed at the top right of the Pin Pad Configuration screen.
Two text lines are configurable
Two text lines show up until buttons are placed
Only one line is available once buttons are placed
Line two is for button captions

ServerEPS User's Guide
Chapter 4 126
Language Selection for Prompts
To configure the heading text for each of the layers you have defined, you must also choose a language. That can be
up to 4 layers at 3 languages for a total of 12 different prompts it is possible to configure for a complete triple
language setup.
Be aware of which language you are on, as the language selected at the top of the screen determines which language
you are editing on the Pin Pad Configuration screen. If you want to change languages, select the radio button for the
desired language. You may then edit the text associated with that language.

ServerEPS User's Guide
Chapter 4 127
Terminal Configuration: Miscellaneous Tab
The Miscellaneous Tab contains a variety of different settings. These settings include the Manager Validation
settings and the type of MICR reader.
OpenEPS Lanes: Miscellaneous Tab
OpenEPS Journal Trace Settings Frame
Tab Item Description
OpenEPS Journal Trace Settings
OpenEPS creates a log file of messages at each lane. It is recommended to keep all of these trace setting turned on so that the maximum amount of messages are written. This will enable support personnel to locate problems and errors should the need arise.
This log file is used for troubleshooting by Support personnel. The current log is kept in the /Program Files/MicroTrax/OpenEPS directory. The filename format is jrnlxxxx.txt, where xxxx refers to the day. After midnight, when the next checker signs on, the Journal File is renamed to jrnlxxxx.old and sent to the server for archiving. OpenEPS then creates a new Journal File.
Trace All Calls made by the POST
Select the checkbox to include calls made by the POST in the OpenEPS Journal. It’s recommended that this option be checked.

ServerEPS User's Guide
Chapter 4 128
Tab Item Description
Trace TCP/IP WinEPS Interface
Select the checkbox to include TCP/IP WinEPS Interface on the OpenEPS Journal. It’s recommended that this option be checked.
Trace Serial SCAT Interface
Select the checkbox to include serial SCAT interface on the OpenEPS Journal. It’s recommended that this option be checked.
Unframed Settings
Tab Item Description
Perform Stand in at the POST?
If this box is checked, the POS is allowed to perform Stand-In at the POST.
Stand in at the POST allows the POS (register) to perform offline transactions when the POS cannot contact the host. If offline transactions are disabled (in the host Processor Definition Screen) no Stand in at the POST transactions will be performed, even if checked.
Stand in at the POST uses the offline rules that the user specifies in the Card Processing Profiles to determine whether a card should be accepted during offline mode.
Manager ID Validation Type
Validation of the entered manager ID will be performed by the POS system.
This setting is standard for most POS systems, allowing the POS to be solely responsible for validating mangers.
Manger ID is requested from the POS when the T – Manager ID TAC is used. Even though the POS is responsible for validating the manager ID before setting it, once set the value is recorded as part of the transaction.
POS Gift Card Return is
Normal = A normal gift card return transaction.
Activate = The gift card return transaction is translated into an activation.
Recharge = The gift card return transaction is translated into a recharge.
Use Interval Message at End of Order
If this option is checked, the interval message (configured on the Misc. Prompts Tab) will be displayed when the POS completes and order. This message can assist in preventing additional swipes by the customer.
After an order is complete by the terminal is locked, preventing entry of payment information when not in use.
Not all POS systems utilize the End of Order sequence that will display the interval message. Check with your POS dealer to determine if they utilize the EndOrder function call.
MICR Reader Frame
Tab Item Description
MICR Reader Type
The MICR Reader Type is the type of MICR attached to the terminal. If the MICR is integrated into the POS instead of attached directly to the terminal, select MICR Reader Attached to POS.

ServerEPS User's Guide
Chapter 4 129
Tab Item Description
Error Code
This section is only available if the MICR Reader Type is not set to None or MICR Attached to POS. OpenEPS does not control the MICR reader when there is no reader or when the reader is attached directly to the POS.
OpenEPS receives Error Codes from the MICR reader. You can define up to 15 Error Codes. Use the scroll bar to the right of the Checker Display section to scroll through all the available fields.
Action
The Action corresponds to its Error Code on the left. There are three available actions—OK, Warning and Fail. If you select Warning, when OpenEPS receives this error code, the Checker can override a Warning message by pressing the Enter key on the Checker Pad. If you select Fail, when OpenEPS receives this error code, the transaction stops immediately.
Checker Display
The Checker Display is the message displayed when the MICR Reader receives corresponding code. You can enter a message by inserting your cursor on the appropriate row and typing an abbreviated message.
WIC State Code Frame
Tab Item Description
Enter the 2 character WIC codes for up to 5 supported WIC authorities
In these 5 text boxes, enter the state codes of the states the location supports for WIC transactions, such as TX for Texas or NM for New Mexico.
If the location supports less than 5, leave the remaining boxes blank.
OpenEPS Journal Trace Settings
OpenEPS Journal Trace Frame
Support personnel use the lane journal file to troubleshoot lane-specific issues. The settings here allow you to
remove traces (logging of specific events) in order to reduce the size of the lane journal. Be advised that if any or all
of the traces are turned off support will not be able to accurately diagnose issues in the event of a problem.

ServerEPS User's Guide
Chapter 4 130
Perform Stand in at the POST?
When a lane cannot reach the server to send transactions to, such as in the event of a broken cable or slow network,
the POS cannot perform online transactions. To keep a store functioning in such an event, Stand In at the POST can
be turned on.
Stand in at the POST will not function unless offline processing is turned on.
Manager ID Validation Type
For certain transactions it can be desirable to require a manager to approve them. These transaction types can range
from Returns to Voids.
To instruct OpenEPS to get a Manager ID, the T – Manger ID TAC must be placed into the transaction sequence
(Configuration | Terminal configuration, either the OpenEPS Lanes Transaction Sequence Tab or the Other Lanes
Screen 3).
The Manager Validation Type determines what system validates the manager number.
Manager ID Validation
Manager Validation Type
Description
POS Validation
Validation of the entered manager ID will be performed by the POS system.
This setting is standard for most POS systems, allowing the POS to be solely responsible for validating mangers.
Manger ID is requested from the POS when the T – Manager ID TAC is used. Even though the POS is responsible for validating the manager ID before setting it, once set the value is recorded as part of the transaction.
For information on manager setup refer to the Site Information Menu | Managers section.

ServerEPS User's Guide
Chapter 4 131
POS Gift Card Return is
This setting is used to translate gift card Returns into a different type of gift card transaction. This option exists
because some hosts do not accept Gift Card returns, but do accept other transactions which place a dollar value back
onto a gift card.
To determine your setting you should check with your host to determine what type of gift card transactions they
accept.
MICR Reader Type
This setting determines if a MICR reader is available and what type it is.
MICR Reader Type Dropdown Box
The settings are:
MICR Reader Type Description
IVI (Attached to SCAT)
Indicates that an IVI MICR reader is available, and that it is attached directly to the SCAT Terminal, and thus controlled directly by OpenEPS.
VeriFone 600 (Attached to SCAT)
Indicates that a VeriFone 600 MICR reader is available, and that it attached directly to the SCAT Terminal, and thus controlled directly by OpenEPS.
MICR Reader Attached to POS
Indicates that the MICR reader is attached to the POS and not the SCAT Terminal (such as in the case of an integrated printer/check reader that many POS systems have). The reader in this case is controlled by the POS and not OpenEPS.
In the two cases where OpenEPS has direct control the check reader (the IVI and VeriFone 600), the bottom section
of the screen shows the MICR Status Codes. This section allows the configuration of which action OpenEPS will
take for each of the MICR error codes.

ServerEPS User's Guide
Chapter 4 132
MICR Status Codes
MICR Status Codes are only used when OpenEPS has direct control over the MICR reader because it is attached to
the terminal. OpenEPS does not control any MICR reader that is directly attached to the POS, or simply absent. To
visually reflect this, the MICR Reader Type setting will hide or show the MICR Status Codes dependent on whether
OpenEPS has access to control the MICR. Generally it is not recommended to modify these settings unless under the
instruction of support personnel.

ServerEPS User's Guide
Chapter 4 133
Terminal Configuration: Miscellaneous Prompts Tab
This screen allows the configuration of a variety of text prompts.
Misc Prompts Tab
Screen Item Description
Customer Display (Column)
This column shows the prompts that will be displayed to the customer on the terminal.
Casher Display (Column)
This column shows the prompts that are available to the POS for display to the cashier. Not all POS systems display these prompts.
Interval Message
Enter the interval message you want to display on the customer and cashier devices.
Use Interval Message Form
Form based terminals can display custom-made forms during the interval between orders instead of simply displaying the Interval Message text.
For information on creating the custom forms, contact MTXEPS Support.

ServerEPS User's Guide
Chapter 4 134
Screen Item Description
Terminal Closed Prompt
Enter the prompt you want to display while the terminal is closed.
Use Terminal Closed Form
Form based terminals can display custom-made forms when the terminal is closed instead of simply displaying the Terminal Closed Prompt.
For information on creating the custom forms, contact MTXEPS Support.
Language 1-3
These buttons control which language is shown for editing.
This selection is used to enter customer prompts in multiple languages. If using the multiple-language feature, select Language 2 (or 3) and enter the new customer prompts for each TAC. Text defaults to English for all TAC prompts.

ServerEPS User's Guide
Chapter 4 135
ServerEPS RSP Codes
ServerEPS Response Codes are a listing of the codes returned by the host server. These codes determine if a
transaction was an approval, decline, or a request for additional information.
Most responses have a Cashier Display of “USE HOST MSG”. This text is replaced by the actual message returned
by the host. If this text is edited or replaced the newly entered text will display instead.
Screen Item Description
Response Code Text Box
Enter a response code number in this text box you wish to Find or Add
Find [Button] This button finds the response code listed in the text box.
Add [Button] This button creates a new response code from the entry in the text box.
Help [Button] Displays the Response Code help file.
Print [Button] This button prints the response code list to a local printer.
Resp Code A listing of codes currently available; clicking on a code brings up the editing information for that code.
Description A text listing of what each code means.
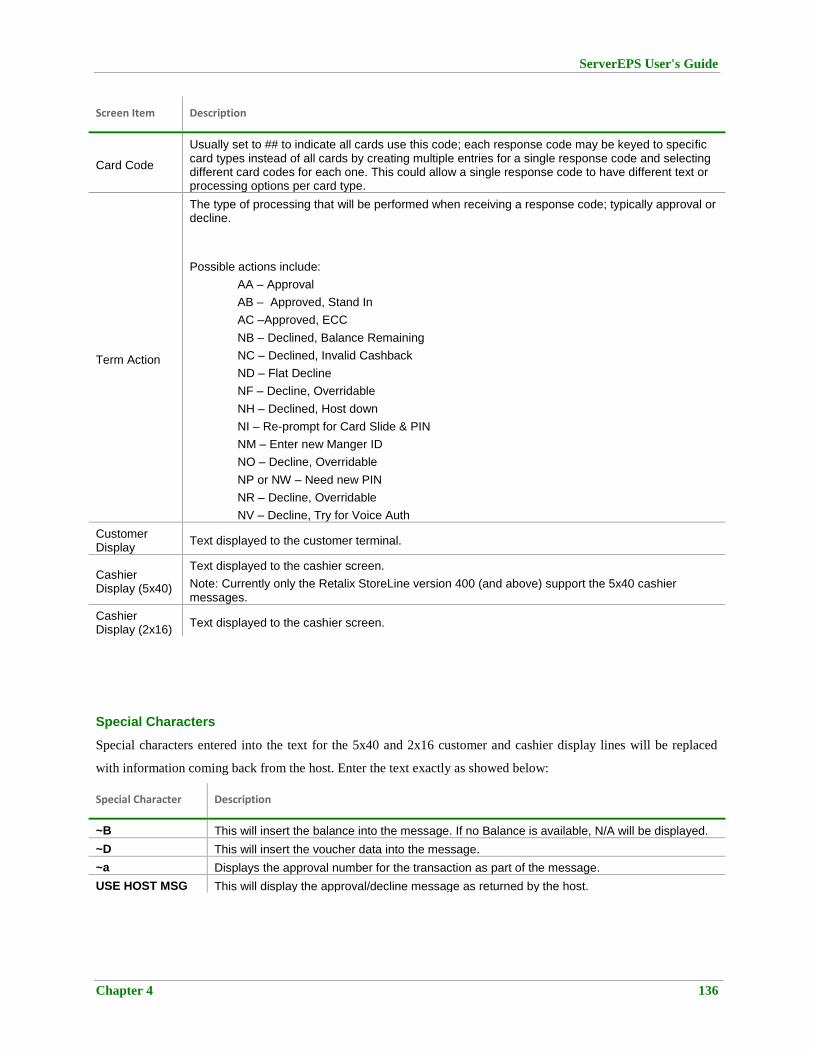
ServerEPS User's Guide
Chapter 4 136
Screen Item Description
Card Code
Usually set to ## to indicate all cards use this code; each response code may be keyed to specific card types instead of all cards by creating multiple entries for a single response code and selecting different card codes for each one. This could allow a single response code to have different text or processing options per card type.
Term Action
The type of processing that will be performed when receiving a response code; typically approval or decline.
Possible actions include:
AA – Approval
AB – Approved, Stand In
AC –Approved, ECC
NB – Declined, Balance Remaining
NC – Declined, Invalid Cashback
ND – Flat Decline
NF – Decline, Overridable
NH – Declined, Host down
NI – Re-prompt for Card Slide & PIN
NM – Enter new Manger ID
NO – Decline, Overridable
NP or NW – Need new PIN
NR – Decline, Overridable
NV – Decline, Try for Voice Auth
Customer Display
Text displayed to the customer terminal.
Cashier Display (5x40)
Text displayed to the cashier screen.
Note: Currently only the Retalix StoreLine version 400 (and above) support the 5x40 cashier messages.
Cashier Display (2x16)
Text displayed to the cashier screen.
Special Characters
Special characters entered into the text for the 5x40 and 2x16 customer and cashier display lines will be replaced
with information coming back from the host. Enter the text exactly as showed below:
Special Character Description
~B This will insert the balance into the message. If no Balance is available, N/A will be displayed.
~D This will insert the voucher data into the message.
~a Displays the approval number for the transaction as part of the message.
USE HOST MSG This will display the approval/decline message as returned by the host.

ServerEPS User's Guide
Chapter 4 137
Special Character Description
SHOW APPROVAL#
This will display ‘APPR# 12345678’ where 12345678 is the host approval number for the transaction.
SHOW APPROVAL# must be the only text on the display line. If added text is desired on the same line, use ~a instead.

ServerEPS User's Guide
Chapter 4 138
OpenEPS RSP Codes
OpenEPS Response Codes are used for local declines and flags. For processor response codes refer to the ServerEPS
RSP Codes section.
OpenEPS Response Codes
Screen Item Description
Response Code Text Box
Enter a response code number in this text box you wish to Find or Add
Find [Button] This button finds the response code listed in the text box.
Add [Button] This button creates a new response code from the entry in the text box.
Help [Button] Displays the Response Code help file.
Print [Button] This button prints the response code list to a local printer.
Resp Code A listing of codes currently available; clicking on a code brings up the editing information for that code.
Description A text listing of what each code means.

ServerEPS User's Guide
Chapter 4 139
Screen Item Description
Card Code
Usually set to ## to indicate all cards use this code; each response code may be keyed to specific card types instead of all cards by creating multiple entries for a single response code and selecting different card codes for each one. This could allow a single response code to have different text or processing options per card type.
Term Action
The type of processing that will be performed when receiving a response code; typically approval or decline.
Possible actions include:
AA – Approval
AB – Approved, Stand In
AC –Approved, ECC
NB – Declined, Balance Remaining
NC – Declined, Invalid Cashback
ND – Flat Decline
NF – Decline, Overridable
NH – Declined, Host down
NI – Re-prompt for Card Slide & PIN
NM – Enter new Manger ID
NO – Decline, Overridable
NP or NW – Need new PIN
NR – Decline, Overridable
NV – Decline, Try for Voice Auth
Customer Display
Text displayed to the customer terminal.
Cashier Display (5x40)
Text displayed to the cashier screen.
Note: Currently only the Retalix StoreLine version 400 (and above) support the 5x40 cashier messages.
Cashier Display (2x16)
Text displayed to the cashier screen.
Special Characters
Special characters entered into the text for the 5x40 and 2x16 customer and cashier display lines will be replaced
with information coming back from the host. Enter the text exactly as showed below:
Special Character Description
~B This will insert the balance into the message. If no Balance is available, N/A will be displayed.
~D This will insert the voucher data into the message.
~a Displays the approval number for the transaction as part of the message.
USE HOST MSG This will display the approval/decline message as returned by the host.

ServerEPS User's Guide
Chapter 4 140
Special Character Description
SHOW APPROVAL#
This will display ‘APPR# 12345678’ where 12345678 is the host approval number for the transaction.
SHOW APPROVAL# must be the only text on the display line. If added text is desired on the same line, use ~a instead.

ServerEPS User's Guide
Chapter 4 141
Allowable Card Prefixes
Credit Card
Debit Card
Private Label Credit Card
Private Label Debit Card
Check Auth
EBT Foodstamp Card
EBT Cash Benefit Card
Gift Card
Fleet Card
Phone Card
Prepaid Wireless
ACH
ConnectPay
eWIC
These tables determine what type of card has been slid on the terminal and link that card type to the correct Card
Processing Profile for the card.
Credit Prefix Table

ServerEPS User's Guide
Chapter 4 142
To make changes to any of the card prefix screens, highlight the card type on the left, and then select the prefix to
edit. Once changes are made to an existing prefix, the Save button will become active so that the changes can be
saved.
When adding a new prefix table, select the Add button. Make sure to click on the Save button prior to exiting the
edit screen to save any changes that may have been made. If you do not click the save button, changes will not be
saved.
Table Item Description
Card Data (X=match any digit)
The primary account number prefix listed is used to match the card swiped with the Card Code.
Enter an "X" as a wildcard to match any number. The X is used as a time saver so all card prefixes don't need to be entered. For example, if the card type is visa and all visas begin with a "4," enter a 4 and then a series of X's to fill the field.
PAN Length (XX=any length)
This is the number of digits in the account number. The entry XX accepts any number of digits.
Card Code This is the card type being referenced. The Card Code is used to relate the Prefix to a specific Card Processing Profile. Card Codes are defined on the Card Processing Profiles screen.
FSA Code This code determines what Card Profile to use when processing Flexible Spending Account Cards.
Program ID
The Program ID field is only displayed when the Gift Card tender type is selected.
The Program ID allows the entry of a special Blackhawk Gift Card identifier. Certain hosts will require specific test entries in this field – that information is detailed in the help file which can be accessed by pressing the Help button next to the Program ID.
Setting a Program ID will allow OpenEPS to differentiate a Blackhawk Gift Card from a normal Gift Card. Click the Help button for additional information.
Note: Some hosts support only 3 characters for this field. If the field is set with 4 characters and then the host is switched to a host that uses only 3, the first 3 characters will be used.

ServerEPS User's Guide
Chapter 4 143
Table Item Description
Exclude this prefix from Auto Tender resolution
This setting is for use with the / - Auto Tender Type TAC.
When this option is checked, the associated card prefix will not be checked for matching when the customer swipes their card when using the Auto Tender Type TAC.
This option is typically used for removing Check, Phone Card and Prepaid Wireless card types that are not used for tendering through the terminal from the list of searched prefixes.
New Insert a new Card Prefix
Save Saves any new entry or changes.
Delete Deletes the highlighted prefix
Print Prints the list of Card Prefixes from the screen you are looking at.
Close Exits the screen.
Card Type Code The card type that used to process under. This 2 letter code matches a Card Processing Profile (described later)
Cancel Appears in place of Delete once a change is made or New is selected.
Quits Changing or Adding a prefix without saving.

ServerEPS User's Guide
Chapter 4 144
Card Processing Profile
The Card Processing Profiles screen allows configuring individual options for each specific card type, such as the
offline processing amounts and allowing manual entry of card number. A profile contains the settings for all of the
cards shown in the left-hand selection list.
Card Processing Profiles
Each profile is unique to the particular Lane Configuration that it is located under. This allows different lane
configurations to have different card profiles.
To select a card to view or change, click the Card Name in the list box on the left.
Select Card Code List, Code & Name
Use the card list on the left to cycle through the card profiles.

ServerEPS User's Guide
Chapter 4 145
Profile Item Description
Code (Card Type) The Card Code is a 2 character code used to link prefixes to a card profile.
The arrow keys can be used to cycle through previously defined card profiles.
CardName The text name used to identify the card.
Fleet Type Only used with Fleet cards, the type is selected through the use of the drop down menu.
Card Processing Profile Buttons
The buttons control the file operations on the Card Processing Profile XML file as well as allowing or preventing
changes from being made.
Profile Item
Description
Add Creates a new, blank, card profile and enables editing of the new profile.
Change Enables the editing of the currently selected profile; be sure to select save to keep any changes made.
Delete Deletes the currently selected card profile.
Save
Saves changes made while editing the specific card profile you are currently viewing, but only saves the changes to memory. This allows the user to make changes to multiple profiles before exiting the card profile screen, and
implements the addition of card codes for use on the Allowable Card Prefixes screen.

ServerEPS User's Guide
Chapter 4 146
Profile Item
Description
Cancel Stops editing the profile you have selected, not saving any changes; does not exit the Card Profile screen.
Help Displays the help button for this screen.

ServerEPS User's Guide
Chapter 4 147
Processing Flags
Profile Item Description
Manual Entry Allowed
If checked, this card’s account number may be manually entered.
If unchecked, any attempt to manually enter the card number will be denied or declined.
Prompt for Zip Code
Used in conjunction with the z – Zip Code TAC.
If both the z TAC is present in the transaction sequence, and this box is checked, the customer will be prompted to enter their zip code on this card.
Prompt for CVV2
Used in conjunction with the v – CVV2 TAC.
If both the v TAC is present in the transaction sequence, and this box is checked, the cashier will be prompted to enter the CVV2 value from the back of the credit card.
Prompt for PO #
Used in conjunction with the 4 – PO Number TAC.
If both the 4 TAC is present in the transaction sequence, and this box is checked, the cashier will be prompted to enter the Purchase Order Number.
Verify Acct# Check Digit
Performs a Mod10 check on the card number prior to sending it to the host. If this option is checked (on) and the card fails the Mod10 check, the transaction will be declined locally and will not be sent to the host.
Not all card types use Mod10 checking.
PIN Required If checked, this card type requires a PIN entry.
Print customer name on receipt
When checked receipt text will be formatted with the customer name listed below the signature line if the customer name is available.
Customer name is typically acquired from Track1 data, and not all cards contain this information.
Some POS systems do not use the receipts supplied by OpenEPS and will be unaffected by this setting.

ServerEPS User's Guide
Chapter 4 148
Profile Item Description
Allow Cashback
Allow on Manual Entry
Allow Max Cash Back Button
If the option to allow cashback is checked, then cashback is allowed for this card type. If this box is checked, the value for Maximum Cashback Allowed (in the Online and Offline Auth Limits section) should be set to a value other than zero.
Checking this box will also display the Not Allow Cashback on Manual Entry box.
If the Allow on Manual Entry box is checked, the normal prompting for cashback will occur even if the card number was entered manually.
If the Allow Max Cash Back Button option is selected then the Max cash back button will be displayed for this tender if the Max Cash back button is configured in the Customer Cash Back TAC for the tender type.
Do NOT Allow Partial Approval
If this box is checked, transactions for the card type will not allow partial approvals (approvals for an amount less than the value requested).
If this flag is checked and a partial approval is returned by the host, a TOR will be created instead for the transaction and will pass a decline to the POS lane. The decline will be listed as MTX -> 171 Partial Not Allowed (ND decline type).
This setting supersedes any POS setting for allowing Partial Approvals, though it does not supersede a POS setting that disables or prevents partial approvals.
This option only applies to OpenEPS lanes, and not to Fuel Lanes. Fuel lanes will use the setting as provided by the POS lane and will ignore the Carp Processing Profile setting.
Decline Cash-Only Transactions
When this option is selected for a card type, all transactions for that card that have a $0 purchase amount but have a cash-back value will automatically be locally declined.
Expiration Date Required
Verify Exp Date Online
If this box is checked, the card type will require an expiration date. Checking this box will also display the Verify Exp Date Online box.
If the Verify Exp Date Online box is checked, OpenEPS will not locally verify the expiration date entered and will send it to the host for authorization.
The Verify Date Offline is always checked because expiration date is always verified when offline.
Skip signature for transactions <= $ (Online)
Skip Signature (Offline)
When this option is selected, the receipt information provided to the POS does not contain a signature line if the transaction amount was under the about listed in the text box (whole dollars only, no cents).
Also, if the Signature Capture TAC has been configured for use, signature capture will be skipped for transactions under the listed amount.
If the Skip Signature (offline) option is checked, the above option will be applied to offline transactions as well; otherwise offline transactions will request a signature, regardless of amount.

ServerEPS User's Guide
Chapter 4 149
Profile Item Description
Stand in for Pre-Paid Credit
For Credit cards, if a Pre-Paid Credit BIN file is in use, and the Credit card is found in the BIN file, then as a default, the card will not be allowed for offline processing, as stored value cards have a higher risk if taken during stand in.
You may enable standard offline processing for Pre-Paid Credit cards by checking this option.
Local Auth Flags
Profile Item Description
Local Auth Flags:
Allow Local Auth? /
Allow Local Void?
These settings determine which transaction types are allowed to be locally approved when connection is lost to the host (offline).
The transaction types are separated into Local Auth and Local Void.
Local Auth transactions are the basic transaction type, such as Purchase; Local Void is the void of that transaction type, such as the Void of a Purchase.
As EBT Vouchers and Voucher Returns entail no risk, the store already having received an authorization number; it is unnecessary to restrict EBT Vouchers and Voucher Returns therefore EBT cards will ignore the Force setting and no Voucher Return setting is available.

ServerEPS User's Guide
Chapter 4 150
Online Auth Limits (in cents)
This section controls the maximum and minimum amounts accepted while processing online for the corresponding
card type. If 99999999 is entered for the maximum amount, then it is considered unlimited.
All values in this section are in cents, so an entry of 20000 would indicate $200.00.
Online Auth Limits Item Description
Maximum Total Amount
Total amount allowed per transaction, including any cash back.
If a transaction is over this amount, manager authorization will be required before sending the transaction to the host for processing.
Default amount of 99999999 indicates that the transaction value will not be limited and any transaction value will be sent to the host for processing.
Maximum Cashback Amount
The maximum amount of cash back that is accepted for this card type.
If cash back is entered over this amount, it will be declined and OpenEPS will re-prompt to enter a new cash back amount.
Minimum Total Amount
The minimum amount allowed for transactions using this card type. If a transaction is attempted that does not meet this minimum amount, the transaction will be declined.
Minimum Cashback Amount
If cash back is requested, the cash back amount must be equal or greater than the value set; if the value entered is lower, OpenEPS will re-prompt to enter a new cash back amount.
Minimum Credit to Debit Amount
Used in conjunction with the e – Convert Debit PIN or f – Convert Debit Y/N TACs.
This setting indicates the minimum transaction amount required before Credit to Debit conversion is attempted. If the amount is not reached, no conversion is attempted.
A zero amount indicates that there is no required minimum and that any transaction may potentially be converted; zero is used as the default.
Offline Auth Limits
Similar to the Online Auth Limits, this section controls the maximum and minimum amounts accepted while
processing offline (not connected to the host) for the corresponding card type. If 99999999 is entered for the
maximum amount, then it is considered unlimited.

ServerEPS User's Guide
Chapter 4 151
All values in this section are in cents, so an entry of 20000 would indicate $200.00.
Profile Item Description
Maximum Total Amount
Total amount allowed per transaction, including any cash back.
If a transaction is over this amount, manager authorization will be required before the transaction is locally approved.
This value indicates a per-transaction amount that will be automatically authorized; the dollar amount entered here indicates the amount the merchant is willing to risk per transaction if the transaction is declined by the host when communication is reestablished.
Maximum Cashback Amount
The maximum amount of cash back that is accepted for this card type.
If cash back is entered over this amount, it will be declined and OpenEPS will re-prompt to enter a new cash back amount.
Minimum Credit to Debit
Used in conjunction with the e – Convert Debit PIN or f – Convert Debit Y/N TACs.
This setting indicates the minimum transaction amount required before Credit to Debit conversion is attempted. If the amount is not reached, no conversion is attempted.
A 99999999 amount indicates that this setting is disabled, and no Credit transaction will be converted to debit while offline. This is disabled by default due to the high risk inherent in PIN based transactions taken offline.
Help [Button] Displays the help file.
Pre-Auth Amounts (In cents)
For Fuel sites, the Pre-Authorization amounts are used to determine the amounts sent to the host to put ‘on hold’ on
a customer’s card prior to pumping gas as well as the amounts to send to the pump.

ServerEPS User's Guide
Chapter 4 152
Profile Item Description
Online:
Amount to send to Host
This value is sent to the host as a preauthorization amount for pay-at-the-pump fuel transactions, insuring a minimum available balance exists on card holders’ account.
For example, if this is set to 5000 ($50), then before the card holder is allowed to pump any fuel, a query is sent to the host to verify that there is at least $50 in the card holders’ account; if not, then the transaction will either be declined, or returned with the current available balance.
If this value is set to exactly $1.00 (100), then the ‘Amount to send to Pump’ box will become available.
Amount to send to Pump
When the Amount to send to Host is set to exactly $1.00 (100), this indicates that only a ‘basic’ preauthorization will occur to check card validity, but that the pumps may require a different amount be sent to them than the $1.00 amount used in the authorization.
For example, if this setting is set to $50.00, the $1.00 amount is used to determine the customer’s card is valid, while the pump is instructed to allow a purchase of up to $50.00 in gas.
Offline:
Amount to send to Pump
While offline, it is not possible to perform an actual pre-authorization to the host; this value is used to simulate a pre-authorization amount for the pump.
Like other offline amounts, this amount represents the amount of risk (per transaction) that the merchant is willing to accept.

ServerEPS User's Guide
Chapter 4 153
OpenEPS INI
The OpenEPS.INI file is a configuration file that regulates special OpenEPS settings.
OpenEPS.INI
The OpenEPS.INI screen can be edited like a text file; to implement any of the keywords below, simply enter them
into the box, each on a separate line.
These keywords should be written exactly as shown in the following table, followed by an equals sign (=) followed
by the setting, with no spaces.
Example:
DISABLEDOWNLOAD=Y PRIVATEDEBITTOACH=Y
The list of keywords and settings are shown in the table below.
Keyword Description
BIAFTERPOS
Balance Inquiry after POS sets Transaction Type If this option is set to ‘Y’ the $ - Purch/Bal Inq TAC will be processed even
after the POS sets a transaction type. This means that the POS could set ‘Purchase’ but the customer could then select Balance Inquiry instead.
When set to ‘N’ (or if this keyword is absent), the $ - Purch/Bal Inq TAC will not be processed after the POS sets the tender type.
Defaults to 'N'
BIOTIMEOUT
Used to specify the timeout value for messages from OpenEPS to the biometrics provider
Defaults to 30 seconds

ServerEPS User's Guide
Chapter 4 154
Keyword Description
DEBITKEYSLOT=1
Determines which DUKPT key slot will be used to encrypt Debit PIN blocks.
Only for use with the Mx800 series terminals.
Used to allow a terminal that has been encrypted with multiple separate keys to send PIN based transactions to separate hosts per tender type, instead of forcing all PIN transactions to go to one host regardless of tender.
DISABLEDOWNLOAD
Allows you to disable file downloading. This prevents updating of files in FVersion.txt file, prevents downloading new configurations and new settings.
Defaults to 'N' (Download Enabled)
DISABLEPREPROCESSING
A “Y” prevents OpenEPS from attempting to forward Stand In at the POST offline transactions while the POS is signed off.
Defaults to “N” (not disabled) if keyword is not present in the OpenEPS.INI file.
The POS will only have offline transactions stored at the POS if it has lost connection to the host server, your configurations specify that offline processing is allowed, and POS has Approved transactions locally during the down time.
DLSPEED
Allows you to select the speed at which SCAT code loads are done. Valid entries are 9600,19200,38400,57600,115200,153600
Defaults to 19200
EBTFSKEYSLOT=1
Determines which DUKPT key slot will be used to encrypt EBT PIN blocks.
Only for use with the Mx800 series terminals.
Used to allow a terminal that has been encrypted with multiple separate keys to send PIN based transactions to separate hosts per tender type, instead of forcing all PIN transactions to go to one host regardless of tender.
ENABLESMARTCARD
When set to 'Y' this enables the smart card reader on the ICE6000 in global parameters
Defaults to 'N', (SmartCard Reader Off)
FTPDLPORT The port to connect to for file downloads Not in use.
LaneStatusInterval Indicates the number of minutes between lane status messages The server does not monitor lane status at this time.
MSGDELAY490
Time to delay before sending a message out the serial port for a 490 terminal
Defaults to 250ms

ServerEPS User's Guide
Chapter 4 155
Keyword Description
oldrec
The latest receipt text supplied to the POS does not include a calculated ‘Beginning Balance’ line for transactions which returned a final balance field. The Oldrec keyword can be used to cause the original receipt text to be supplied, where the ‘Beginning Balance’ line is calculated for any transaction with both an approved amount and a final balance returned by the host.
When using the ordlrec keyword this keyword must also be placed into the Registry.MTX file in addition to the OpenEPS.Ini file, for proper
function.
Defaults to 'N', (Use new balance format on receipt)
POSTranCompleteTimeOutValue
The timer value set by OpenEPS for the POS calling TransactionComplete once it gets a transaction response.
Defaults to 60 seconds
PRIVATEDEBITKEYSLOT=1
Determines which DUKPT key slot will be used to encrypt Private Debit PIN blocks.
Only for use with the Mx800 series terminals.
Used to allow a terminal that has been encrypted with multiple separate keys to send PIN based transactions to separate hosts per tender type, instead of forcing all PIN transactions to go to one host regardless of tender.
PRIVATEDEBITTOACH
Not all POS systems support the ACH tender type. Biometrics utilizes ACH, so this keyword must be present and set to "Y" when using biometrics if the POS does not support ACH.
"Y" indicates that when an ACH is indicated on the terminal, the POS will be told 'Private Debit'
"N" indicates that this setting is not used, and that ACH and Private Debit will be set as selected.
Defaults to 'N'
SmartWIConly
"Y" indicates that Low Cost SmartWIC is in use, and that OpenEPS will not expect to connect up to a server to process WIC transactions. This setting should not be used if transaction types other than WIC will be used.
Use this only as directed. OpenEPS will not connect to the server to process any transactions and
may not download new configurations.
StatusMessageInterval
This ini setting is used to determine how often OpenEPS transmits a status message to the server.
The server does not monitor lane status at this time.
The following relate to resolution settings for Signature Capture:
Keyword Description
XAXISRES X axis resolution, range 0-1024, zero filled
YAXISRES Y axis resolution, range 0-1024, zero filled

ServerEPS User's Guide
Chapter 4 156
Keyword Description
XAXISEXT X axis extended line limit, 0-9
YAXISEXT Y axis extended line limit , 0-9
It is only necessary to include the keywords for the option that are to be set. All other keywords will utilize their
default settings.

ServerEPS User's Guide
Chapter 4 157
WIC State Code
The WIC State Code screen is used to list all available states that are supported for WIC, along with the code
associated with that state. The code serves the same function as the prefix table, in that it identifies cards with the
matching card number prefix as the related state.
The default includes the states and codes shown below.

ServerEPS User's Guide
Chapter 4 158
FuelEPS Configuration
FuelEPS is a lightweight in-store product that provides streamlined communication between fuel lanes and the data
centers. Once installed, FuelEPS can be configured using the standard online web interface, using the settings listed
below.
For locations that were previously using the WinEPS to connect their fuel lanes to the data centers, FuelEPS
provides the same connectivity in a smaller package and moves configuration to the online web interface for added
convenience.
FuelEPS Configuration Window
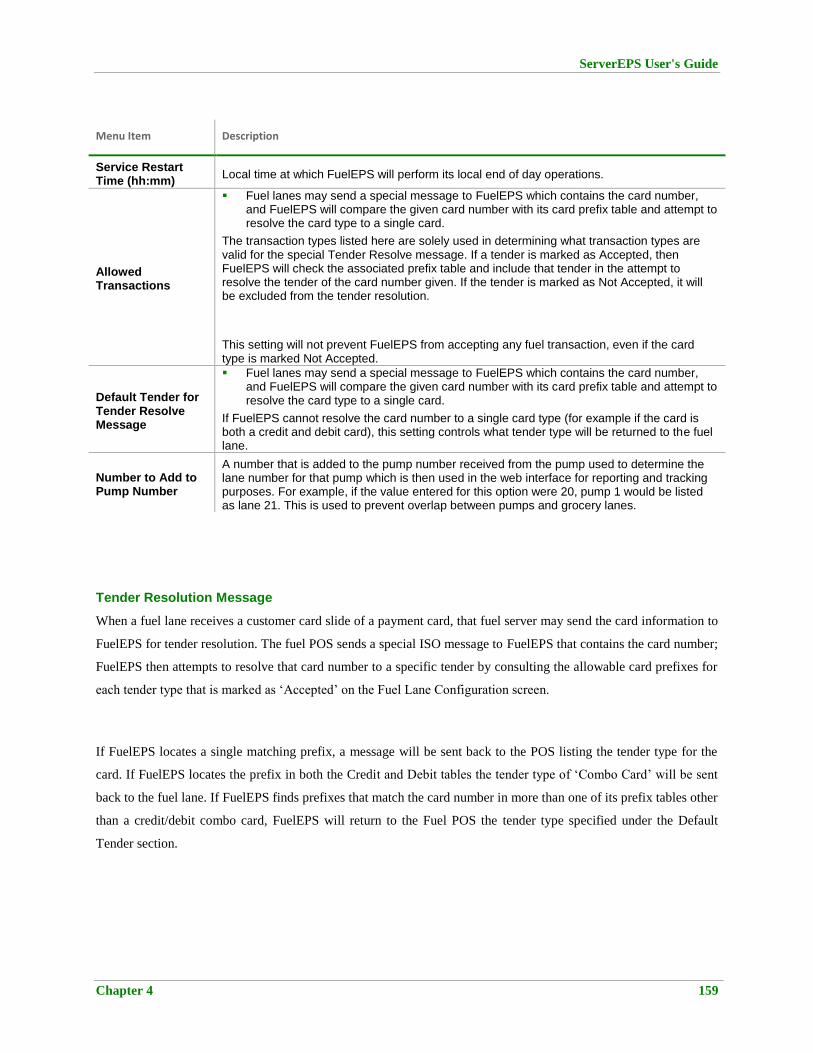
ServerEPS User's Guide
Chapter 4 159
Menu Item Description
Service Restart Time (hh:mm)
Local time at which FuelEPS will perform its local end of day operations.
Allowed Transactions
Fuel lanes may send a special message to FuelEPS which contains the card number, and FuelEPS will compare the given card number with its card prefix table and attempt to resolve the card type to a single card.
The transaction types listed here are solely used in determining what transaction types are valid for the special Tender Resolve message. If a tender is marked as Accepted, then FuelEPS will check the associated prefix table and include that tender in the attempt to resolve the tender of the card number given. If the tender is marked as Not Accepted, it will be excluded from the tender resolution.
This setting will not prevent FuelEPS from accepting any fuel transaction, even if the card type is marked Not Accepted.
Default Tender for Tender Resolve Message
Fuel lanes may send a special message to FuelEPS which contains the card number, and FuelEPS will compare the given card number with its card prefix table and attempt to resolve the card type to a single card.
If FuelEPS cannot resolve the card number to a single card type (for example if the card is both a credit and debit card), this setting controls what tender type will be returned to the fuel lane.
Number to Add to Pump Number
A number that is added to the pump number received from the pump used to determine the lane number for that pump which is then used in the web interface for reporting and tracking purposes. For example, if the value entered for this option were 20, pump 1 would be listed as lane 21. This is used to prevent overlap between pumps and grocery lanes.
Tender Resolution Message
When a fuel lane receives a customer card slide of a payment card, that fuel server may send the card information to
FuelEPS for tender resolution. The fuel POS sends a special ISO message to FuelEPS that contains the card number;
FuelEPS then attempts to resolve that card number to a specific tender by consulting the allowable card prefixes for
each tender type that is marked as ‘Accepted’ on the Fuel Lane Configuration screen.
If FuelEPS locates a single matching prefix, a message will be sent back to the POS listing the tender type for the
card. If FuelEPS locates the prefix in both the Credit and Debit tables the tender type of ‘Combo Card’ will be sent
back to the fuel lane. If FuelEPS finds prefixes that match the card number in more than one of its prefix tables other
than a credit/debit combo card, FuelEPS will return to the Fuel POS the tender type specified under the Default
Tender section.

ServerEPS User's Guide
Chapter 4 160
The most common type of card found on multiple prefix tables is a combo card (Credit/Debit) and these types of cards will be resolved to ‘combo’. However, if more than one tender is valid for the card, such as a card with a prefix that is listed in both the EBT and Gift Card prefix tables, the Default Tender is what is returned to the POS, even if the Default Tender is not valid for the card type. Example, A card is swiped that matches the prefix on two table but is not a combo card, and the Default Tender is set to Debit; the card is found on the EBT and Gift Card tables, so the Default Tender is used, and Debit is returned to the Fuel POS lane.
The Tender Resolution message is an ISO message the fuel server or any POS system that is integrated directly to
FuelEPS can use. Specifics on the messaging format can be found in the Terminal ISO 8583 Base Interface
specification.

ServerEPS User's Guide
Chapter 4 161
Store Configurations Setup Screens
Once a Store Configuration is opened for editing, the Store Configuration menu becomes available.
The parameters in this section are universal settings for the entire store, including determining what hosts are used
for each transaction type as well as defining the store’s lanes and which configuration those lanes use.
Store Config Menu
Menu Item Description
Setup Txt The Setup.Txt file includes configuration settings related to connection information.
Host Parameters This Host Parameters screen allows the user to select the host that transactions will be processed to, along with setting individual host parameters.
Receipt Information Allows configuration of the header and footer information for the receipts.
Lane Definition Used to configure the lanes for the store, determining the number of lanes available and what configurations they use.
Dial Backup
Configurations Controls configuration settings for the Dial Backup Client in-store software

ServerEPS User's Guide
Chapter 4 162
Setup Txt
The Setup.Txt file includes configuration setting keywords related to connection information.
These keywords should be written exactly as shown in the following table, with the keyword, an equals sign (=)
followed by the setting, with no spaces.
Example:
PROXYSERVER=10.250.32.123:443
Keyword Description
PROXYSERVER=XXX.XXX.XXX.XXX:PORT
The IP address & port of the machine on which the Dial Backup Client is installed (if it is in use).
The standard connection port for the Dial Backup Client is 443
HealthStatusInterval=10 Determines how often heath messages are sent to the server to determine connection status.
HealthStatusNotOKInterval=2 Interval for sending health messages when connection is in probation or disconnected mode; typically more often than the HealthStatusInterval.
HealthStatusProbationInterval=6 Number of health messages required to be answered, after the connection has been put on probation, before connection is marked up.
USEWEBSERVICE=Y Activates the web-based interface.
Required setting.
USEBINSERVICE=Y
Causes OpenEPS to request a new BIN file each night, if available.
Store must be signed of for the OpenEPS BIN service to receive
BIN files.

ServerEPS User's Guide
Chapter 4 163
Keyword Description
HASHSEEDPATH={Path}
For POS systems that use the OpenEPS Function call of PANHashSHA256, the path listed for this keyword determines where OpenEPS will look for the seed value.
The path must include the filename as well; the path should be a full UNC path, as it will be used by every lane in the store.
OpenEPS will use the first 20 characters contained within the file as the hash seed.
Automatically Generated Keywords
These keywords will automatically be placed into the Setup.Txt file on the POS lane and generally do not need to be
configured in the Configuration GUI.
Keyword Description
CONFIGFILENAME=TerminalConfiguration.xml Configuration name in use at the lane.
Updated automatically.
CardProcessingProfilesFileName=CardProcessingProfile.xml Configuration name in use at the lane.
Updated automatically.

ServerEPS User's Guide
Chapter 4 164
Host Parameters
This screen allows the user to select the host that transactions will be processed to, along with setting individual host
parameters.
Host Parameters: Host Definition Tab
The host dropdown boxes display all the available hosts currently supported. To configure a host, simply use the
dropdown box next to the tender type you want to configure. Select a host for each tender type that will be processed
by the store.
Once all hosts are defined, click Ok to implement the changes and to open the Host Info Tab.
Property Description
Host Selected for Tran Type
Use the host dropdown to select the host to use for each tender type.
Store Close Time Automatic: Store’s End of Day and report cut over will occur at the selected time.
Manual: The store will not cut over for End of Day automatically and must instead be SendMessageSEPS.exe to coordinate the EOD time for the POS.

ServerEPS User's Guide
Chapter 4 165
ERC Host and Signature Capture
Store locations that are performing signature capture should be certain to define the ERC host as MTX Receipt Host
unless the POS is going to store the receipts locally.
Host Parameters: Host Info Tab
The Host Information Tab allows the user to configure the host-specific information required to correctly process
transactions.
Host Information Tab
All of the hosts that have been selected on the Host Definition Tab will display as tabs along the left side of the
screen. Each host selected will contain different information on the Host Information Tab.

ServerEPS User's Guide
Chapter 4 166
Note: Depending on your host, the Host Parameter window will vary in required information. Consequently, additional fields may not be visible on your specific Host Parameter window.
Host Specific Information
Property Description
Merchant Number / Store Number /State Code / Password / Etc Supplied by the host
Buttons Description
Help Brings up the Help screen
Online Processing Frame
Property Description
Online Processing
Verify Debit Card Prefix? Check this box to force verification of Debit prefixes against the debit bin file
Trace Host Messages Should always be checked; this provides additional information for troubleshooting.
Offline Processing
Offline Processing allowed? Indicates whether offline processing for this host is allowed.
Verify Debit Card Prefix? Check this box to force verification of Debit prefixes against the debit bin file
Resubmit Offline Forwards Check to save and resubmit offline forwards that were declined due to insufficient funds;
attempts over the next several days to complete the offline transaction.
Transaction Information
Online Timeout Value Default of 45 seconds; determines how long to wait for a response from the host before
determining that the host is offline. The POS timers for these transactions should always be greater than the amount shown here seconds to avoid approval errors.
Truncate Pan on Receipt For each transaction type, the PAN will be truncated automatically when it is printed on the
receipt.

ServerEPS User's Guide
Chapter 4 167
Receipt Information
The header and footer text for receipts is user configurable. This receipt text is supplied to all POS systems, though
some POS systems do not make use of it, and the text is used as the header and footer information for all receipts
captured using Signature Capture or Receipt Capture.
Receipt Information & Deposit Info
You can modify the default text in both the Receipt Header and Receipt Message (footer) by clicking on the text
directly. Typically the Receipt Header is used to give information about the store, such as name, address/location
and phone number. The Receipt Message is printed as a footer for the receipt and is typically used as a short thank-
you message to the customer.
The justification (right, left or center) for these messages can be adjusted by selecting the appropriate radio button
on the right side of the screen.
This template of a receipt as viewed is to scale. Consequently, the message typed in this screen is directly
proportional to the printed messages on the physical receipt.
Receipt
Header
Receipt

ServerEPS User's Guide
Chapter 4 168
Reminder: Messages entered on this screen will only print on store receipts that use the supplied text. Some POS systems have their own receipt templates.
In addition to formatting your store receipt information, you can enter Bank Deposit information in the box on the
right. The information can include the name of the bank your store uses, along with the store’s bank account
number. This information is not printed on any receipt, but displayed on a franked check for depositing purposes.
This information is only used if OpenEPS directly controls the check franking; as such use of this text is very rare as
most POS systems utilize an attached MICR reader and check franker.

ServerEPS User's Guide
Chapter 4 169
Lane Definition
The Lanes Definition window is a list view of all defined lane numbers with their associated Lane type and
configuration. This window allows you to add, delete, or edit the properties of each lane.
Lane Definitions Window
Your defined lanes are automatically sorted by lane number in ascending order. You can define as many as ninety-
nine lanes per store. If a window contains more records than can fit in the pane, use the vertical scroll bar to scroll
down and see additional records.
You can easily add or update a lane by using the Lane information section at the bottoms of the screen.
Menu Item Description
Lane Number
The Lane Number text box will display the number of a selected lane; it may also be used to add one or more lanes by entering a single lane number or a range of lane numbers and clicking the Update/Insert button. Only lane numbers 1 to 99 are valid.
Lane Type
The Lane Type drop-down list allows you select how the lane is tended. Normal (a check stand with a cashier present) Grocery Unattended (a Self-Checkout unattended grocery check stand) Gas Unattended (a gas pump that allows the customer to pay at the pump without the aid of
a cashier) Pharmacy (attended lane in the Pharmacy department – noted to the host by a SIC code for
Pharmacy; this setting is not supported for all hosts.)
Lane Configuration
The Lane Configuration dropdown box is populated by the entire list of available lane configurations for the company you are logged in under.
Use the dropdown list to select which configuration is to be applied to the selected lane.

ServerEPS User's Guide
Chapter 4 170
Menu Item Description
Update/Insert [Button]
This button is used to create new lanes or to update the selected lane with changed information.
Delete [Button] This button deletes the selected lane, or the range of lanes entered into the Lane Number box.

ServerEPS User's Guide
Chapter 4 171
Dial Backup Configurations
The Dial Backup Configurations screen allows the configuration of the settings the Dial Backup client will
download when it connects to the data centers.
Remember, for a lane to successfully connect and to use the Dial Backup Client, the lanes Setup.Txt file must be
properly configured to point to the Dial Backup Client. See the Setup.Txt PROXYSERVER keyword in the In the
Store Configuration section.
For in-store installation and configuration instructions for the Dial Backup client, refer to the ServerEPS Installation
and Configuration Guide.
Dial Backup Configurations Window

ServerEPS User's Guide
Chapter 4 172
Menu Item Description
IP Address IP Address or DNS Name of the PC on which the Dial Backup Client is installed.
Port Port on which the lanes will attempt to connect to the Dial Backup Client.
Idle Time Hangup
Time to wait while idle (period where no transactions are being processed though the Dial Backup Client) before hanging up the dial line.
RAS Name
Name of the Dial Up RAS service that is configured for dial backup.
This is the name as shown in the Windows Network Connections listing:

ServerEPS User's Guide
Chapter 4 173
Silverlight Store Configuration Manager
The Store Configuration Management GUI provides the interface to configure and manage stores. It will
automatically download and open when the Configuration Manager option is selected. See the Configuration
Management section for information.
The new Silverlight Store Configuration Manager is ready for public beta trials; it may be launched by clicking the
yellow bar. The new Silverlight Store Configuration Manager is an in-browser configuration tool that performs the
same functionality as the original Store Configuration application, but without the need to load and launch a separate
application.
When selected, the user is automatically logged into the Store Configuration Manager using their current username
and password.

ServerEPS User's Guide
Chapter 4 174
Store Configuration Management GUI Main Screen
Once the auto-login and loading have completed, the main configuration selection screen will be displayed.
From this screen, you can open either a Store Configuration, or Lane Configuration by selecting the appropriate tab
and double clicking the configuration to open.
You may also create a new configuration, using the New button in the bottom right. Depending on which tab you
have selected, the New button will create either a new Store or Lane Configuration.
Optionally, the Show Advanced Controls clickable text in the lower left will display several additional buttons that
allow the import, export or deletion of a configuration.

ServerEPS User's Guide
Chapter 4 175
Configuration Management Tabs & Buttons
Menu Item Description
Logout [Button] Logs the current user out of the Configuration Manager
Store Tab Clicking this tab will display the list of available store configurations.
Lane Tab Clicking this tab will display the list of available lane configurations.
Menu Item Description
Open [Button]
Clicking this button after selecting a store or lane configuration will open that configuration for viewing and editing.
You may also simply double click the Store or Lane configuration to open it.
New [Button]
Clicking the New button will open a menu with the following options: New Store Configuration – If you are on the Store Configuration Tab, this button creates
a new Store configuration for the store you select and enables editing. New Lane Configuration – If you are on the Lane Configuration Tab, this button creates
a New Lane configuration with the default settings and enables editing.
Import Lane Configuration – Allows the importing of previously Exported Lane Configuration files.
Import Store Configuration – Allows the importing of previously Exported Store Configuration files.
Import WinEPS Configuration – allows the importing the configurations of a locally installed WinEPS program. WinEPS must be at least 824 to be supported for importing.
Show Advanced Controls [Text]
Clicking this text will enable additional buttons which will appear at the lower right of the screen. Enables the following buttons: Export, Delete, Import
Export [Button] The Export button allows the user to export a copy of a selected Store Configuration or Lane configuration to a local drive. This export can later be imported via the Import button.
Delete [Button] Clicking this button will delete the selected Lane or Store Configuration.
Import [Button] Allows the importing of either configurations exported via the Export button, or import a set of configuration files from a WinEPS installation.

ServerEPS User's Guide
Chapter 4 176
Pending and Locked Configurations
Available configurations can have three different statuses associated with them. These statuses serve to indicate
what state the configuration is in. The statuses are: available, pending and locked for editing.
The default status is available; this status indicates that the configuration may be opened for editing. A status of
Pending indicates that changes have been made to the current configuration and that the configuration will be
updated to the new version on the date and time specified. Locked for editing indicates that another user has the
configuration open and no other user may open it.
Status Example Description
Available This configuration may be opened for editing.
Pending
Configuration has an update that is pending.
A user may open the original config version by
clicking the File icon (Example: ).
A user may open the pending configuration by
clicking the clock icon (Example: )
Locked for Editing
This configuration is locked by another user and may not be opened until released.

ServerEPS User's Guide
Chapter 4 177
New Store Configuration / New Lane Configuration
When the New button is selected, a pop up box will appear to determine the basic information about the new Store
or Lane configuration.
For a new Store Configuration, the Store dropdown will list all stores in the company that do not have a defined
Store Configuration. Select a store to assign the new configuration to that store. You may create a configuration
using the default setting by selecting the Default Configuration radio button; to copy the settings from an existing
Store Configuration, select the Existing Configuration radio button and select the Store Configuration to copy.
If the store you are looking for does not appear in the dropdown and does not already have a configuration created for it, contact Support; only support staff can add a new store to a company.
For a new Lane Configuration, you may create a configuration using the default setting by selecting the Default
Configuration radio button; to copy the settings from an existing Lane Configuration, select the Existing
Configuration radio button and select the Lane Configuration to copy.
Import Lane Configuration
To access the Import button, click the Show Advance Controls option in the lower left.
If you have exported a Lane Configuration to a local folder you may use the Import Lane Configuration command to
upload a copy for the company you are currently logged into. This is exceptionally useful for copying lane
configurations from one company to another. See the Exporting Store or Lane Configurations section for further
details on the export process.

ServerEPS User's Guide
Chapter 4 178
Option Description
Import / Default Configuration radio buttons
These radio buttons determine what information will be uploaded. You may mix Imported information with default configuration settings, by using the radio buttons to select the desired settings.
The settings within the box (CardProcessingProfile, Prefix, ResponseCodesMTX, ResponseCodesEPS)are linked, and must all be imported together, if they are imported.
New Configuration Name Enter the name to be used in the Configuration Manager for the imported configuration.
Import Files [Button] This button will open a file selection box where you can select the files to be imported.
Import Zipped File This button will open a file selection box where you can select the Zip file of zipped configuration files to be imported.
Provide a Configuration Name; the name provided will be used in the Configuration Manager as the name of the
imported configuration.
Select either the Import Files button or the Import Zipped File button to point to the data to be imported.
Once selected, click the Ok button to import the configuration

ServerEPS User's Guide
Chapter 4 179
Import Store Configuration
To access the Import button, click the Show Advance Controls option in the lower left.
If you have exported a Store Configuration to a local folder you may use the Import Store Configuration command
to upload a copy for the company you are currently logged into. This is exceptionally useful for copying store
configurations from one company to another. See the Exporting Store or Lane Configurations section for further
details on the export process.
Option Description
Store Number
This dropdown box lists all stores that are setup for the company you are currently logged into that do not already have a configuration defined.
If the store you are looking for is not present it may already have a configuration defined, or the store may not be setup in the server database. You may need to contact Support to if the store is not yet set up in the database.
Import / Default Configuration radio buttons
These radio buttons determine what information will be uploaded. You may mix Imported information with default configuration settings, by using the radio buttons to select the desired settings.
Import Files [Button] This button will open a file selection box where you can select the files to be imported.
Import Zipped File This button will open a file selection box where you can select the Zip file of zipped configuration files to be imported.
Import WinEPS tab This tab will select the WinEPS Configuration file import process. Once selected, the button to Import WinEPS Zipped File. Clicking the button will open a file selection dialog to select the Zip file to upload.
Select a store from the Store Number dropdown list. This is the store that will receive the uploaded configuration.
Select either the Import Files button or the Import Zipped File button to point to the data to be imported.

ServerEPS User's Guide
Chapter 4 180
Once selected, click the Ok button to import the configuration.
Import WinEPS Configuration Tab
If you have a local installation of the WinEPS software product, you may use the Import WinEPS Configuration
option to import all the relevant configuration information from WinEPS into the Configuration Management GUI.
The import feature will load the following information:
WinEPS Lane configurations for defined lanes (only). Each lane configuration file in use will be uploaded
and made available in the Lanes tab.
Number of lanes defined and associated configuration files.
Host selections if the defined hosts are supported by Connected Payments.
Configured IP address information into the Setup.Txt file. This IP address should be updated with the IP
address of the Dial Backup Client before use.
Receipt header and footer, and bank deposit information.
It is only possible to import configurations from WinEPS version 824.0 and higher.

ServerEPS User's Guide
Chapter 4 181
Option Description
Store Number
This dropdown box lists all stores that are setup for the company you are currently logged into that do not already have a configuration defined.
If the store you are looking for is not present it may already have a configuration defined, or the store may not be setup in the server database. You may need to contact Support to if the store is not yet set up in the database.
WinEPS Folder
This is the path to the EPS directory of the WinEPS installation.
Typical path name would be:
C:\Program Files\MicroTrax\EPS\
Select a store from the Store Number dropdown list. This is the store that will receive the uploaded configuration.
Select either the Import WinEPS Zipped File button to point to the data to be imported.
Once selected click the Ok button to import the configuration. The import copies information from the Terminal
Config, Card Processing Profiles, and other WinEPS settings.
After the import, the configuration will be opened for editing.

ServerEPS User's Guide
Chapter 4 182
Exporting Store or Lane Configurations
To access the Export button, click the Show Advance Controls option in the lower left.
The Export button allows the user to export a copy of the configuration information for a Lane or Store to their local
computer. This is useful for creating a copy that can later be imported into a different company using the Import
feature.
To export data, either a Lane or a Store must be selected (highlighted in the list), but not opened. Once a
configuration is selected the Export button will become available. Alternately you may simply right click on the
configuration and select the Export option for the menu.
Once Export is selected, the directory selection box will appear, allowing you to determine where to store the
configuration on your local computer. Unless it is moved, this is the directory location you will look for if you later
wish to Import the configuration.
Clicking Save will copy the data.
Lane & Store Configuration Universal Buttons
When either a Lane or Store Configuration is opened, three universal buttons are provided at the top right of the
screen to allow the user to save their changes, cancel the changes, or logout of the configuration manager.

ServerEPS User's Guide
Chapter 4 183
Configuration Errors appear at the bottom of the screen once Upload is clicked.
Menu Item Description
Cancel [Button]
Cancels any changes made to the configuration and exits the configuration screen.
Upload [Button]
Confirms the changes and uploads them to the server.
When selected, a pop up box will provide an option to implement the changes immediately, or allow
the selection of a future date/time to implement the changes on.
If any errors exist in the configuration, clicking this button will open a list of the errors at the bottom
of the screen instead of uploading the configuration. Once the errors are corrected, clicking the
Upload button again will save the changes.
Logout [Button]
Logs the user out of the Configuration Manager.

ServerEPS User's Guide
Chapter 4 184
Lane Configurations Setup Screens
Once a Lane Configuration is opened for editing, the Lane Configuration menu becomes available.
The settings in this section pertain to a single lane configuration and thus to any lane that is set to use the
configuration.
Menu Item Description
Terminal
[Button]
Opens the terminal configuration screen and associated tabs.
The terminal configuration contains the defined transactions, terminal sequence, selected PIN pad, and display test for the lane.
Provides Access to the following Tabs: Tender Configuration Transaction Sequence PIN Pad Configuration Miscellaneous Mics Prompts
Card Prefixes Links a prefix with a two digit card code to determine what card profile to use for the current transaction.
Processing
Profile Allows configuring individual options for each card type, such as allowing offline processing, credit to debit, or manual entry.

ServerEPS User's Guide
Chapter 4 185
Menu Item Description
Misc.
Allows configuring of a variety of additional options.
Provides Access to the following screens: Processing Options OpenEPS INI OpenEPS RSP Codes ServerEPS RSP Codes WIC State Code FuelEPS Configuration ECC RecInfo

ServerEPS User's Guide
Chapter 4 186
Terminal Configuration
Terminal Configuration allows you to set up many lane specific options for your OpenEPS lane. A new terminal
configuration will contain the default configurations which you may then use as a base from which to create the
configuration you want.
Terminal Configuration: Tender Configuration Tab
The screen will open to the first tab, the Tender Configuration Tab. This tab allows selection of allowed transaction
types that will be allowed for each tender type.
Terminal Configuration – Tender Configuration Tab
Screen Item Description
Allowed Transactions
For each tender, you can define the allowed transaction type by clicking the displayed buttons. The color Green indicates that the transaction has been turned on. Red indicates that the transaction is Not allowed.
Language [Radio Buttons]
Allows selection of the language to display and configure.
See the Transaction Sequence Tab section for information.

ServerEPS User's Guide
Chapter 4 187
Allowed Transactions Frame
This frame contains a visual list of all the different transaction types that each tenders supports.
Allowed Transactions Frame
Each Transaction Type (Tender) has a list of transactions that is directly across from it. The transactions that are
listed in Green are turned on, while those listed in Red are turned off. In the example above, Debit Purchase is
turned on, while Debit Return is turned off.
To turn a transaction on or off simply click on the button in the Allowed Transactions Frame. If you wanted to
enable the Debit Return with Validation in the example above, all you would do is click on the “Rtn w/ Vldt” button
as shown below.
Turning on Debit Return w/ Validation
Transaction
Allowed
Transaction Type Lines up with Allowed
Transactions
Transaction NOT
Allowed

ServerEPS User's Guide
Chapter 4 188
Every Transaction that is intended to be used (accepted as payment at the POS) must be turned on in the Allowed
Transaction frame
If a transaction type is turned off, then turned back on, the TAC sequence will be reset to the default. This can be handy if you have made changes and want to start over, but do not remember what the original settings were. Complete Information on TACs is listed in the Transaction Sequence Tab section.

ServerEPS User's Guide
Chapter 4 189
Terminal Configuration: Transaction Sequence Tab
In this section the acronym TAC (Terminal Action Code) and Sequence Code are used interchangeably.
A TAC or Sequence Code is a command to perform a step in the processing of a transaction. For example, the first
step in processing a payment is often to get the type of payment to be used, and the ? – Payment Type TAC is an
instruction to do just that.
OpenEPS Terminal Configuration – Transaction Sequence Tab
Menu Item Description
Language [Radio Buttons]
Allows selection of the language to display and configure.
See section below.
First Actions Frame
First Actions:
Sequence Codes
The list of first Terminal Action sequence Codes (TAC) that are available but unused. Drag and drop the sequence codes to the Sequence section on the right in the desired order.
First Actions:
Sequence
This is the sequence of first sequence code. The Card Slide, Payment Type and Select Language TACs have additional properties. Refer to the Sequence Code Properties section for additional information and screen shots.
First Actions:
Customer Display
This is the prompt that is displayed to the customer during the processing of the associated Sequence Code (TAC)
Prompts are directly editable by clicking on the text, and typing in different text.
First Actions:
Cashier Display
This is the prompt that is displayed to the cashier during the processing of the associated Sequence Code (TAC)
Prompts are directly editable by clicking on the text, and typing in different text.
Transaction Actions Frame
Tender Type
Dropdown list of all tenders turned on under the Tender Configuration Tab.
If no Allowed Transactions are defined for a given Tender (on the Tender Configuration Tab screen), then the tender will not appear in the list.

ServerEPS User's Guide
Chapter 4 190
Menu Item Description
Transaction Type Dropdown list of all transaction types available for the selected tender.
If a tender is not turned on in the Tender Configuration Tab screen, it will not show up here.
Void Allowed/ Void Not Allowed
This option allows the user to select whether a void is allowed or disallowed for each transaction type. All transactions default to Void Allowed.
Cashier Display
2x16 Standard Prompts
5x40 Extended Prompts
Selects the size of the cashier display on the POS.
Note: Only specific POS systems support the 5x40 cashier messages
If 2x16 is selected for the cashier display prompts, any prompts that you currently have that are larger than 2x16 will be truncated.
If you select 5x40, additional space in the Customer Display column will appear.
Sequence Codes
Sequence Codes (or TACs) control the flow of transactions. You can add a Sequence Code to a transaction by dragging and dropping the selected code into the Transaction Sequence column.
Some sequence codes that have additional properties can be accessed by clicking on the double arrow >>. Sequence codes that allow you to copy prompts are indicated by one arrow >. Refer to the Sequence Code Properties section for additional information and screen shots. You have the option to copy the properties from previous TACs by clicking on the arrow to the right.
Transaction Sequence
The TACs that will be processed for a given Tender/Transaction Type combination, in the order the TACs will be processed.
Customer Display
This is the prompt that is displayed to the customer during the processing of the associated Sequence Code (TAC)
Prompts are directly editable by clicking on the text, and typing in different text.
Cashier Display
This is the prompt that is displayed to the cashier during the processing of the associated Sequence Code (TAC)
Prompts are directly editable by clicking on the text, and typing in different text.

ServerEPS User's Guide
Chapter 4 191
Language Radio Buttons
The Language radio buttons are used in conjunction with the Q-Select Language TAC to provide the options to
display terminal text to the customer in alternate languages.
To enable multiple language support, the Q – Select Language TAC must be the first TAC as shown above. You
may select Language 1,2 or 3 to configure the text. Cashier prompts are configured only in language 1; cashier
display text is only displayed in the first language.

ServerEPS User's Guide
Chapter 4 192
Void Allowed/ Void Not Allowed
This option for the OpenEPS Terminal Configurations allows the user to select whether a void is allowed or
disallowed for each transaction type. All transactions default to Void Allowed.
This setting is 'per transaction' so that, for example, Credit Purchase can be set to Void Allowed while Credit Return
can be set to Void Not Allowed.
When a void is attempted, the transaction is sent to the server; a response of MTX->135 response will be returned to
the lane if a void is not allowed for that transaction type.

ServerEPS User's Guide
Chapter 4 193
TAC Properties
A TAC is a command to the POS or to OpenEPS to perform a step in the processing of a transaction. TAC
Properties are additional settings associated with specific TACs. These indicate additional items that can be
adjusted, and include the Manual Sequence, Customer Cash back settings, and other settings.
If a TAC has only a single > that indicates that it has no configurable additional properties, but the text for that
prompt may be copied from any other instance of the selected TAC. This allows faster configuration, by allowing
the user to only input new text once, and then copy it onto other instances of the TAC.
Clicking the > Indicator
To indicate that a TAC has additional, configurable properties the >> indicator is used. Clicking on the >> indicator
will open up a list of all available configurable properties for the selected TAC, as shown below.
Clicking the >> Indicator
There are two general types of properties: ON/OFF properties, and screen configurable properties. ON/OFF
properties require no other configuration beyond selecting them. They are indicated by a check mark when they are
turned on, as shown above. Screen configurable properties bring up an entirely new screen to allow the
configuration of several different facets of their function.

ServerEPS User's Guide
Chapter 4 194
Terminal Configuration: PIN Pad Configuration Tab
The Pin Pad Configuration Tab displays the screen where the terminal is selected, and the terminal-specific settings
are changed.
The screen displays a simulation of the selected terminal on the right hand side, with the relevant settings for the
terminal on the left. The settings available will change as different terminals are selected.
PIN Pad Configuration Tab - Everest
The Everest and the ICE 5500 are good examples of how the screen changes and displays only relevant settings for
each terminal.

ServerEPS User's Guide
Chapter 4 195
PIN Pad Configuration Tab – ICE 5500
Screen Item Description
OpenEPS PIN Pad Type
The dropdown list displays all available terminal types that are supported.
When a terminal is selected the picture on the right changes to a simulation of the selected terminal, and the setting options on the left are updated with settings for that terminal.
If the OpenEPS PIN Pad Type is set to None, no terminal will display and the OpenEPS Controlled PIN Pad options will not display.
SCAT Com Port The COM port which the terminal is attached to the POS on.
For the Omni 7000, the option to select USB is also included.
PIN Pad ID Port
This is the port opened by OpenEPS on the POS computer to allow the wireless connection by supported wireless SCAT terminals such as the Vx670.
This option is only displayed for terminals that utilize it.
Screen File Name
(Shown on ICE 5500 example)
This option will display if using a touch-screen terminal that requires screen files.
The default screen file name is displayed. If you have another set of screen files loaded to the server, you may enter a different file name to select those screen files instead of the default. You may need to consult with support to get screen files loaded to the server.
Unassigned Payment Types
(Shown on Everest example)
Shown in this list box are the payment types you can assign to your terminal by dragging and dropping the text from the list box to the Customer Device. To undo the assignment, click the appropriate key on the Customer Device.
Information on the Other 'tender' is described in the Layered Tender Key section
Tender Button Selection
(Shown on ICE 5500 example)
For touch-screen terminals, this option will appear instead of the Unassigned Payment Types
On touch-screen terminals, tender buttons are controlled by a combination of drop down boxes listing the available Tender types and text boxes where the name displayed to the terminal can be configured.
Allow Enter=Yes/Clear=No In addition to screen buttons
If this option is checked, the Enter button will activate the Yes and the Clear button will activate the No (in addition to the Yes/No soft key buttons) when Yes/No prompts are displayed on the screen.
If this is not selected, customers must use only the Yes/No soft key buttons as displayed on screen.

ServerEPS User's Guide
Chapter 4 196
Screen Item Description
Send Receipt to Pin Pad
This checkbox controls sending the receipt on from OpenEPS to a SCAT terminal with an attached or inbuilt printer.
This option is only displayed for terminals that utilize it.
Card Reader Attached to POS Select this option if a Card Reader is attached to the POS in addition to the terminal, such as if the keyboard features an attached card reader (MSR).
PIN Pad Attached to POS Select this option if a PIN Pad is attached to the POS in addition to the terminal.

ServerEPS User's Guide
Chapter 4 197
OpenEPS PIN Pad Type
A variety of different terminals are supported by the OpenEPS Direct interface. Using the dropdown list, you can
select the terminal that you wish to use. As soon as the terminal is selected, the screen will change to show a picture
of that terminal and the relevant settings.
Unassigned Payment Types
Unassigned Payment Types
The Unassigned Payment Types box holds all the tender types that were enabled on the Tender Configuration Tab.
This box allows simple drag and drop of the tender from the box to an ‘Unused’ button on the terminal. The ‘Other’
tender is a special case, and is used to configure Layered Tender Keys (see the section below).
The labels may be placed on any Unused button. Hard buttons are the buttons that are not next to the screen, such as
the second row of buttons on the Everest terminal. Commonly these buttons are placed according to the template
labeling already present on whatever terminal you are using, so you should match the button placement to the actual
labeling on the hardware you have purchased.
For ‘Soft Keys’ it is a bit easier, as soft keys are not labeled on the terminal itself, but rather by the text next to the
button on the terminal’s screen. Once placed on the terminal, for soft keys, Configurable Text will be shown next to
the button.
Configurable
Text
Soft Key
Hard Key

ServerEPS User's Guide
Chapter 4 198
Tender buttons are configured differently for Touch Screen terminals than for other terminals.
Touch Screen Button Selection
The six Buttons with their drop down lists of Tenders supply the information on how many buttons to create and
what those buttons should be. The Button Label text is the text that will be shown on the terminal’s touch screen
button.
Actual placement of the touch screen button on the terminal screen is handled by the screen files automatically.
Unassigned Payment Type: EBT vs. EBTCA & EBTFS
EBT Food Stamps and EBT Cash Benefits may be selected as individual buttons on the terminal instead of as a
single EBT button with a Food/Cash sub-choice. This option allows additional configuration choices; the individual
EBT key is still fully supported.

ServerEPS User's Guide
Chapter 4 199
The screen above shows the two new available keys placed on the Everest template, with the standard EBT button in
the Unassigned Payment Types box. These new buttons can be used in place of the single EBT key.
Layered Tender Keys
Usually, Tender Keys are assigned to permanent buttons on the terminal, corresponding to the labeling that already
exists on the terminal in the store. Layered tender keys allow the configuration of the top row of keys, also known as
the Soft Keys, to show a sequence of different tenders.
To set up the Layered Tender Keys, 'Other' is assigned to a key, as shown below. This causes the layer tabs to
appear on the right.

ServerEPS User's Guide
Chapter 4 200
Layer 1 Example – Soft Keys
In the example above, the customer would see, Credit, Debit and an Other button on screen, when they started. If the
customer selected the Other key, the buttons would change to show the buttons assigned to layer 2. The example
below shows GiftC, Fleet, and another Other button.
Layer 2 Example
Layered tender can also be used with the touch screen terminals, as shown below.

ServerEPS User's Guide
Chapter 4 201
Layer 1 Example – Touch Screen
To add a layer, select the last layer that is available, and drag and drop Other onto a soft button, or for touch screen
terminals, use the drop down list to assign the Other tender to a button. This will automatically add another layer.
The Layer Tabs appear for configuration only once Other is assigned to a button. You can have up to 4 total layers,
though you need not use all of them.
Caution: Removing “Other” from a key will delete all layers and layer setup for lower layers. It is recommended that keys be assigned to the layers in the order of layer 1 through layer 4, and that you not start with the 4th layer and work backward.
The text from the ? - Payment Type TAC (or the / - Auto Tender Type TAC if configured instead) is displayed in the
text box on the Pin Pad Configuration screen as shown below.

ServerEPS User's Guide
Chapter 4 202
Text Configuration
The first layer will always show the text as displayed in the ? or / TAC. The text for the first layer (only) is linked,
so that changing it on either the Transaction Sequence Tab or the Pin Pad Configuration tab.

ServerEPS User's Guide
Chapter 4 203
Available Text Lines
On the Transaction Sequence Tab it is possible to enter two lines of text. Only the top line will show once any
payments are assigned to soft key buttons on the terminal as the bottom line is reserved for the captions of the
buttons.
Layers beyond the first are independently configurable from the ? or / TAC text, but default to the ? or / text. This
allows a different heading to be displayed on each layer 2 through 4.
Layered Tender Keys & Triple Language Support
Each layer may have up to three different languages defined. The language is chosen at the top of the screen; the
language for the prompts you are currently editing is listed at the top right of the Pin Pad Configuration screen.
Two text lines
are configurable
Two text lines show up
until buttons are placed
Only one line is available once buttons are placed
Line two is for
button captions

ServerEPS User's Guide
Chapter 4 204
Language Selection for Prompts
To configure the heading text for each of the layers you have defined, you must also choose a language. That can be
up to 4 layers at 3 languages for a total of 12 different prompts it is possible to configure for a complete triple
language setup.
Be aware of which language you are on, as the language selected at the top of the screen determines which language
you are editing on the Pin Pad Configuration screen. If you want to change languages, select the radio button for the
desired language. You may then edit the text associated with that language.

ServerEPS User's Guide
Chapter 4 205
Terminal Configuration: Miscellaneous Tab
The Miscellaneous Tab contains a variety of different settings. These settings include the Manager Validation
settings and the type of MICR reader.
OpenEPS Lanes: Miscellaneous Tab
Main Settings
Tab Item Description
Perform Stand in at the POST?
If this box is checked, the POS is allowed to perform Stand-In at the POST.
Stand in at the POST allows the POS (register) to perform offline transactions when the POS cannot contact the host. If offline transactions are disabled (in the host Processor Definition Screen) no Stand in at the POST transactions will be performed, even if checked.
Stand in at the POST uses the offline rules that the user specifies in the Card Processing Profiles to determine whether a card should be accepted during offline mode.
Manager ID Validation Type
Validation of the entered manager ID will be performed by the POS system.
This setting is standard for most POS systems, allowing the POS to be solely responsible for validating mangers.
Manger ID is requested from the POS when the T – Manager ID TAC is used. Even though the POS is responsible for validating the manager ID before setting it, once set the value is recorded as part of the transaction.
POS Gift Card Return is
Normal = A normal gift card return transaction.
Activate = The gift card return transaction is translated into an activation.
Recharge = The gift card return transaction is translated into a recharge.
Use Interval Message at End of Order
If this option is checked, the interval message (configured on the Misc. Prompts Tab) will be displayed when the POS completes and order. This message can assist in preventing additional swipes by the customer.
After an order is complete by the terminal is locked, preventing entry of payment information when not in use.
Not all POS systems utilize the End of Order sequence that will display the interval message. Check with your POS dealer to determine if they utilize the EndOrder function call.
MICR Reader Attached to POS
Check this is the MICR reader is attached to, or part of the POS system instead of being attached directly to the PIN Pad terminal. Checking this will direct OpenEPS to acquire the MICR read from the POS system.

ServerEPS User's Guide
Chapter 4 206
WIC State Code Frame
Tab Item Description
Enter the 2 character WIC codes for up to 5 supported WIC authorities
In these 5 text boxes, enter the state codes of the states the location supports for WIC transactions, such as TX for Texas or NM for New Mexico.
If the location supports less than 5, leave the remaining boxes blank.
OpenEPS Journal Trace Settings Frame
Tab Item Description
OpenEPS Journal Trace Settings
OpenEPS creates a log file of messages at each lane. It is recommended to keep all of these trace setting turned on so that the maximum amount of messages are written. This will enable support personnel to locate problems and errors should the need arise.
This log file is used for troubleshooting by Support personnel. The current log is kept in the /Program Files/MicroTrax/OpenEPS directory. The filename format is jrnlxxxx.txt, where xxxx refers to the day. After midnight, when the next checker signs on, the Journal File is renamed to jrnlxxxx.old and sent to the server for archiving. OpenEPS then creates a new Journal File.
Trace All Calls made by the POST
Select the checkbox to include calls made by the POST in the OpenEPS Journal. It’s recommended that this option be checked.
Trace TCP/IP WinEPS Interface
Select the checkbox to include TCP/IP WinEPS Interface on the OpenEPS Journal. It’s recommended that this option be checked.
Trace Serial SCAT Interface
Select the checkbox to include serial SCAT interface on the OpenEPS Journal. It’s recommended that this option be checked.
OpenEPS Journal Trace Settings
OpenEPS Journal Trace Frame

ServerEPS User's Guide
Chapter 4 207
Support personnel use the lane journal file to troubleshoot lane-specific issues. The settings here allow you to
remove traces (logging of specific events) in order to reduce the size of the lane journal. Be advised that if any or all
of the traces are turned off support will not be able to accurately diagnose issues in the event of a problem.
Perform Stand in at the POST?
When a lane cannot reach the server to send transactions to, such as in the event of a broken cable or slow network,
the POS cannot perform online transactions. To keep a store functioning in such an event, Stand In at the POST can
be turned on.
Stand in at the POST will not function unless offline processing is turned on.
Manager ID Validation Type
For certain transactions it can be desirable to require a manager to approve them. These transaction types can range
from Returns to Voids.
To instruct OpenEPS to get a Manager ID, the T – Manger ID TAC must be placed into the transaction sequence
(Configuration | Terminal configuration, either the OpenEPS Lanes Transaction Sequence Tab or the Other Lanes
Screen 3).
The Manager Validation Type determines what system validates the manager number.
Manager ID Validation

ServerEPS User's Guide
Chapter 4 208
Manager Validation Type
Description
POS Validation
Validation of the entered manager ID will be performed by the POS system.
This setting is standard for most POS systems, allowing the POS to be solely responsible for validating mangers.
Manger ID is requested from the POS when the T – Manager ID TAC is used. Even though the POS is responsible for validating the manager ID before setting it, once set the value is recorded as part of the transaction.
For information on manager setup refer to the Site Information Menu | Managers section.
POS Gift Card Return is
This setting is used to translate gift card Returns into a different type of gift card transaction. This option exists
because some hosts do not accept Gift Card returns, but do accept other transactions which place a dollar value back
onto a gift card.
To determine your setting you should check with your host to determine what type of gift card transactions they
accept.

ServerEPS User's Guide
Chapter 4 209
Terminal Configuration: Misc Prompts Tab
This screen allows the configuration of a variety of text prompts.
Misc Prompts Tab
Screen Item Description
Customer Display (Column)
This column shows the prompts that will be displayed to the customer on the terminal.
Casher Display (Column)
This column shows the prompts that are available to the POS for display to the cashier. Not all POS systems display these prompts.
Use Interval Message Form
Form based terminals can display custom-made forms during the interval between orders instead of simply displaying the Interval Message text.
For information on creating the custom forms, contact MTXEPS Support.
Terminal Closed Prompt
Enter the prompt you want to display while the terminal is closed.
Use Terminal Closed Form
Form based terminals can display custom-made forms when the terminal is closed instead of simply displaying the Terminal Closed Prompt.
For information on creating the custom forms, contact MTXEPS Support.
Language 1-3
These buttons control which language is shown for editing.
This selection is used to enter customer prompts in multiple languages. If using the multiple-language feature, select Language 2 (or 3) and enter the new customer prompts for each TAC. Text defaults to English for all TAC prompts.

ServerEPS User's Guide
Chapter 4 210
Card Prefixes
These tables determine what type of card has been slid on the terminal and link that card type to the correct Card
Processing Profile for the card.
Credit Prefix Table
To make changes to any of the card prefix screens, highlight the card type on the left, and then select the prefix to
edit. Once changes are made to an existing prefix, the Save button will become active so that the changes can be
saved.

ServerEPS User's Guide
Chapter 4 211
When adding a new prefix table, select the Add button. Make sure to click on the Save button prior to exiting the
edit screen to save any changes that may have been made. If you do not click the save button, changes will not be
saved.
Table Item Description
Card Data (X=match any digit)
The primary account number prefix listed is used to match the card swiped with the Card Code.
Enter an "X" as a wildcard to match any number. The X is used as a time saver so all card prefixes don't need to be entered. For example, if the card type is visa and all visas begin with a "4," enter a 4 and then a series of X's to fill the field.
PAN Length (XX=any length)
This is the number of digits in the account number. The entry XX accepts any number of digits.
Card Code This is the card type being referenced. The Card Code is used to relate the Prefix to a specific Card Processing Profile. Card Codes are defined on the Card Processing Profiles screen.
FSA Code This code determines what Card Profile to use when processing Flexible Spending Account Cards.
Program ID
The Program ID field is only displayed when the Gift Card tender type is selected.
The Program ID allows the entry of a special Blackhawk Gift Card identifier. Certain hosts will require specific test entries in this field – that information is detailed in the help file which can be accessed by pressing the Help button next to the Program ID.
Setting a Program ID will allow OpenEPS to differentiate a Blackhawk Gift Card from a normal Gift Card. Click the Help button for additional information.
Note: Some hosts support only 3 characters for this field. If the field is set with 4 characters and then the host is switched to a host that uses only 3, the first 3 characters will be used.
Exclude this prefix from Auto Tender resolution
This setting is for use with the / - Auto Tender Type TAC.
When this option is checked, the associated card prefix will not be checked for matching when the customer swipes their card when using the Auto Tender Type TAC.
This option is typically used for removing Check, Phone Card and Prepaid Wireless card types that are not used for tendering through the terminal from the list of searched prefixes.
Retailer ID Only used with specific hosts; the Retailer ID is provided as part of the receipt text.
RID
FIID Only used with specific hosts; the Freedom ID is provided as part of the receipt text.

ServerEPS User's Guide
Chapter 4 212
Table Item Description
Debit Networks
Only displayed when the Debit Card tender type is selected.
Allows a user to specify which debit networks they would like to take offline, if offline for Debit is turned on (allowed) in the card processing profile.
Any Debit Network ID that is entered in the Network ID box will be considered available for offline processing; Debit cards from networks not listed in this box will automatically be declined for offline processing.
The text entered here must match exactly the Bank Name as defined in the Debit BIN Prefix Table that is currently in use.
If NO text is entered in the Network ID box, then this new functionality will be disabled and Debit cards will all be processed for offline based on the Card Processing Profile settings, regardless of the card’s associated Bank Name/Network ID.
Buttons
New[Button] Insert a new Card Prefix
Save[Button] Saves any new entry or changes.
Delete[Button] Deletes the highlighted prefix
Export [Button] Exports the list of Card Prefixes in CSV format.
Cancel [Button] Quits Changing or Adding a prefix without saving.

ServerEPS User's Guide
Chapter 4 213
Card Processing Profile
The Card Processing Profiles screen allows configuring individual options for each specific card type, such as the
offline processing amounts and allowing manual entry of card number. A profile contains the settings for all of the
cards shown in the left-hand selection list.
Card Processing Profiles
Each profile is unique to the particular Lane Configuration that it is located under. This allows different lane
configurations to have different card profiles.
To select a card profile to view or change, click the card name in the Select Card Code box on the left.

ServerEPS User's Guide
Chapter 4 214
Select Card Code List, Code & Name
Use the card list on the left to cycle through the card profiles.
Profile Item Description
Code (Card Type) The Card Code is a 2 character code used to link prefixes to a card profile.
The arrow keys can be used to cycle through previously defined card profiles.
Name The text name used to identify the card.
Fleet Type Only used with Fleet cards, the type is selected through the use of the drop down menu.
Card Processing Profile Buttons
The buttons control the file operations on the Card Processing Profile XML file as well as allowing or preventing
changes from being made.
Profile Item
Description
New Creates a new, blank card profile, and opens it for editing.
Delete Deletes the currently selected card profile.
Undo Undoes any changes made when editing a profile; selecting a different profile will save any made changes, and no longer allow an Undo of those changes.

ServerEPS User's Guide
Chapter 4 215
Processing Flags
Profile Item Description
Manual Entry Allowed
If checked, this card’s account number may be manually entered.
If unchecked, any attempt to manually enter the card number will be denied or declined.
Prompt for Zip Code
Used in conjunction with the z – Zip Code TAC.
If both the z TAC is present in the transaction sequence, and this box is checked, the customer will be prompted to enter their zip code on this card.
Prompt for CVV2
Used in conjunction with the v – CVV2 TAC.
If both the v TAC is present in the transaction sequence, and this box is checked, the cashier will be prompted to enter the CVV2 value from the back of the credit card.
Prompt for PO #
Used in conjunction with the 4 – PO Number TAC.
If both the 4 TAC is present in the transaction sequence, and this box is checked, the cashier will be prompted to enter the Purchase Order Number.
Verify Acct# Check Digit
Performs a Mod10 check on the card number prior to sending it to the host. If this option is checked (on) and the card fails the Mod10 check, the transaction will be declined locally and will not be sent to the host.
Not all card types use Mod10 checking.
PIN Required If checked, this card type requires a PIN entry.

ServerEPS User's Guide
Chapter 4 216
Profile Item Description
Print customer name on receipt
When checked receipt text will be formatted with the customer name listed below the signature line if the customer name is available.
Customer name is typically acquired from Track1 data, and not all cards contain this information.
Some POS systems do not use the receipts supplied by OpenEPS and will be unaffected by this setting.
Allow Cashback
Allow on Manual Entry
Allow Max Cash Back Button
If the option to allow cashback is checked, then cashback is allowed for this card type. If this box is checked, the value for Maximum Cashback Allowed (in the Online and Offline Auth Limits section) should be set to a value other than zero.
Checking this box will also display the Not Allow Cashback on Manual Entry box.
If the Allow on Manual Entry box is checked, the normal prompting for cashback will occur even if the card number was entered manually.
If the Allow Max Cash Back Button option is selected then the Max cash back button will be displayed for this tender if the Max Cash back button is configured in the Customer Cash Back TAC for the tender type.
DO NOT Allow Contactless EMV
Prevents Contactless EMV from being allowed at the terminal.
Allow Fallback Allows fallback on EMV transactions.
Prompt for Odometer Used for Fleet transactions, if this is checked the Odometer value will be requested.
Discount The type of discount and value entered will be provided to the POS system if the POS requests the data.
Do NOT Allow Partial Approval
If this box is checked, transactions for the card type will not allow partial approvals (approvals for an amount less than the value requested).
If this flag is checked and a partial approval is returned by the host, a TOR will be created instead for the transaction and will pass a decline to the POS lane. The decline will be listed as MTX -> 171 Partial Not Allowed (ND decline type).
This setting supersedes any POS setting for allowing Partial Approvals, though it does not supersede a POS setting that disables or prevents partial approvals.
This option only applies to OpenEPS lanes, and not to Fuel Lanes. Fuel lanes will use the setting as provided by the POS lane and will ignore the Carp Processing Profile setting.
Decline Cash-Only Transactions
When this option is selected for a card type, all transactions for that card that have a $0 purchase amount but have a cash-back value will automatically be locally declined.

ServerEPS User's Guide
Chapter 4 217
Profile Item Description
Expiration Date Required
Verify Exp Date Online
If this box is checked, the card type will require an expiration date. Checking this box will also display the Verify Exp Date Online box.
If the Verify Exp Date Online box is checked, OpenEPS will not locally verify the expiration date entered and will send it to the host for authorization.
The Verify Date Offline is always checked because expiration date is always verified when offline.
Skip signature for transactions <= $ (Online)
Skip Signature (Offline)
Prompt for Sig on Manual
When this option is selected, the receipt information provided to the POS does not contain a signature line if the transaction amount was under the about listed in the text box (whole dollars only, no cents).
Also, if the Signature Capture TAC has been configured for use, signature capture will be skipped for transactions under the listed amount.
If the Skip Signature (offline) option is checked, the above option will be applied to offline transactions as well; otherwise offline transactions will request a signature, regardless of amount.
Stand in for Pre-Paid Credit
For Credit cards, if a Pre-Paid Credit BIN file is in use, and the Credit card is found in the BIN file, then as a default, the card will not be allowed for offline processing, as stored value cards have a higher risk if taken during stand in.
You may enable standard offline processing for Pre-Paid Credit cards by checking this option.
Allow Payment on Account
Allows use of Payment on Account.
Print Minimal Receipt Provides a receipt with less text than the standard receipt.
Allow retry on verify last 4 Allows retry of the entry of the last 4 digits of the customer credit card, if the first entry did not match.

ServerEPS User's Guide
Chapter 4 218
Local Auth Flags
Profile Item Description
Local Auth Flags:
Allow Local Auth? /
Allow Local Void?
These settings determine which transaction types are allowed to be locally approved when connection is lost to the host (offline).
The transaction types are separated into Local Auth and Local Void.
Local Auth transactions are the basic transaction type, such as Purchase; Local Void is the void of that transaction type, such as the Void of a Purchase.
As EBT Vouchers and Voucher Returns entail no risk, the store already having received an authorization number; it is unnecessary to restrict EBT Vouchers and Voucher Returns therefore EBT cards will ignore the Force setting and no Voucher Return setting is available.
Online Auth Limits (in cents)
This section controls the maximum and minimum amounts accepted while processing online for the corresponding
card type. If 99999999 is entered for the maximum amount, then it is considered unlimited.
All values in this section are in cents, so an entry of 20000 would indicate $200.00.

ServerEPS User's Guide
Chapter 4 219
Online Auth Limits Item Description
Maximum Total Amount
Total amount allowed per transaction, including any cash back.
If a transaction is over this amount, manager authorization will be required before sending the transaction to the host for processing.
Default amount of 99999999 indicates that the transaction value will not be limited and any transaction value will be sent to the host for processing.
Maximum Cashback Amount
The maximum amount of cash back that is accepted for this card type.
If cash back is entered over this amount, it will be declined and OpenEPS will re-prompt to enter a new cash back amount.
Minimum Total Amount
The minimum amount allowed for transactions using this card type. If a transaction is attempted that does not meet this minimum amount, the transaction will be declined.
Minimum Cashback Amount
If cash back is requested, the cash back amount must be equal or greater than the value set; if the value entered is lower, OpenEPS will re-prompt to enter a new cash back amount.
Minimum Credit to Debit Amount
Used in conjunction with the e – Convert Debit PIN or f – Convert Debit Y/N TACs.
This setting indicates the minimum transaction amount required before Credit to Debit conversion is attempted. If the amount is not reached, no conversion is attempted.
A zero amount indicates that there is no required minimum and that any transaction may potentially be converted; zero is used as the default.
Offline Auth Limits
Similar to the Online Auth Limits, this section controls the maximum and minimum amounts accepted while
processing offline (not connected to the host) for the corresponding card type. If 99999999 is entered for the
maximum amount, then it is considered unlimited.
All values in this section are in cents, so an entry of 20000 would indicate $200.00.

ServerEPS User's Guide
Chapter 4 220
Profile Item Description
Maximum Total Amount
Total amount allowed per transaction, including any cash back.
If a transaction is over this amount, manager authorization will be required before the transaction is locally approved.
This value indicates a per-transaction amount that will be automatically authorized; the dollar amount entered here indicates the amount the merchant is willing to risk per transaction if the transaction is declined by the host when communication is reestablished.
Maximum Cashback Amount
The maximum amount of cash back that is accepted for this card type.
If cash back is entered over this amount, it will be declined and OpenEPS will re-prompt to enter a new cash back amount.
Minimum Credit to Debit
Used in conjunction with the e – Convert Debit PIN or f – Convert Debit Y/N TACs.
This setting indicates the minimum transaction amount required before Credit to Debit conversion is attempted. If the amount is not reached, no conversion is attempted.
A 99999999 amount indicates that this setting is disabled, and no Credit transaction will be converted to debit while offline. This is disabled by default due to the high risk inherent in PIN based transactions taken offline.
Pre-Auth Amounts (In cents)
For Fuel sites, the Pre-Authorization amounts are used to determine the amounts sent to the host to put ‘on hold’ on
a customer’s card prior to pumping gas as well as the amounts to send to the pump.
Profile Item Description
Online:
Amount to send to Host
This value is sent to the host as a preauthorization amount for pay-at-the-pump fuel transactions, insuring a minimum available balance exists on card holders’ account.
For example, if this is set to 5000 ($50), then before the card holder is allowed to pump any fuel, a query is sent to the host to verify that there is at least $50 in the card holders’ account; if not, then the transaction will either be declined, or returned with the current available balance.
If this value is set to exactly $1.00 (100), then the ‘Amount to send to Pump’ box will become available.

ServerEPS User's Guide
Chapter 4 221
Profile Item Description
Offline:
Amount to send to Pump
While offline, it is not possible to perform an actual pre-authorization to the host; this value is used to simulate a pre-authorization amount for the pump.
Like other offline amounts, this amount represents the amount of risk (per transaction) that the merchant is willing to accept.

ServerEPS User's Guide
Chapter 4 222
Misc
This dropdown contains a variety of additional settings used in configuring a lane.
Misc: Processing Options
The Processing Options window provides access to change miscellaneous settings.
Processing Options – System Operation Tab
Tab Item Description
Blackhawk Settings
Offline Blackhawk receipt Verbiage The text configured here will be supplied on the receipt whenever a Blackhawk Gift Card is activated while the POS is processing in Offline mode.
Miscellaneous Settings
Number of Days to Keep Report Files
This setting determines the number of days that each day’s lane journal file will be retained at the POS. After the allotted time the log file will be deleted.
For example, the default of 90 days indicates that the previous 90 days of logs will be retained. Logs older than 90 days are deleted as new logs are created for each day.
Decline Business Card PO#

ServerEPS User's Guide
Chapter 4 223
Tab Item Description
Signature Capture
Don’t Print signature line and skip signature for credit transactions under ? Dollars
When this option is selected, the receipt information provided to the POS does not contain a signature line if the transaction amount was under the about listed in the text box (whole dollars only, no cents).
Also, if the Signature Capture TAC has been configured for use, signature capture will be skipped for transactions under the listed amount.

ServerEPS User's Guide
Chapter 4 224
Misc: OpenEPS INI
The OpenEPS.INI file is a configuration file that regulates special OpenEPS settings.
OpenEPS.INI
The OpenEPS.INI screen can be edited like a text file; to implement any of the keywords below, simply enter them
into the box, each on a separate line.
These keywords should be written exactly as shown in the following table, followed by an equals sign (=) followed
by the setting, with no spaces.
Example:
DISABLEDOWNLOAD=Y PRIVATEDEBITTOACH=Y
The list of keywords and settings are shown in the table below.
Keyword Description
BIAFTERPOS
Balance Inquiry after POS sets Transaction Type If this option is set to ‘Y’ the $ - Purch/Bal Inq TAC will be processed even
after the POS sets a transaction type. This means that the POS could set ‘Purchase’ but the customer could then select Balance Inquiry instead.
When set to ‘N’ (or if this keyword is absent), the $ - Purch/Bal Inq TAC will not be processed after the POS sets the tender type.
Defaults to 'N'
BIOTIMEOUT
Used to specify the timeout value for messages from OpenEPS to the biometrics provider
Defaults to 30 seconds

ServerEPS User's Guide
Chapter 4 225
Keyword Description
DEBITKEYSLOT=1
Determines which DUKPT key slot will be used to encrypt Debit PIN blocks.
Only for use with the Mx800 series terminals.
Used to allow a terminal that has been encrypted with multiple separate keys to send PIN based transactions to separate hosts per tender type, instead of forcing all PIN transactions to go to one host regardless of tender.
DISABLEDOWNLOAD
Allows you to disable file downloading. This prevents updating of files in FVersion.txt file, prevents downloading new configurations and new settings.
Defaults to 'N' (Download Enabled)
DISABLEPREPROCESSING
A “Y” prevents OpenEPS from attempting to forward Stand In at the POST offline transactions while the POS is signed off.
Defaults to “N” (not disabled) if keyword is not present in the OpenEPS.INI file.
The POS will only have offline transactions stored at the POS if it has lost connection to the host server, your configurations specify that offline processing is allowed, and POS has Approved transactions locally during the down time.
DLSPEED
Allows you to select the speed at which SCAT code loads are done. Valid entries are 9600,19200,38400,57600,115200,153600
Defaults to 19200
EBTFSKEYSLOT=1
Determines which DUKPT key slot will be used to encrypt EBT PIN blocks.
Only for use with the Mx800 series terminals.
Used to allow a terminal that has been encrypted with multiple separate keys to send PIN based transactions to separate hosts per tender type, instead of forcing all PIN transactions to go to one host regardless of tender.
ENABLESMARTCARD
When set to 'Y' this enables the smart card reader on the ICE6000 in global parameters
Defaults to 'N', (SmartCard Reader Off)
FTPDLPORT The port to connect to for file downloads Not in use.
LaneStatusInterval Indicates the number of minutes between lane status messages The server does not monitor lane status at this time.
MSGDELAY490
Time to delay before sending a message out the serial port for a 490 terminal
Defaults to 250ms

ServerEPS User's Guide
Chapter 4 226
Keyword Description
oldrec
The latest receipt text supplied to the POS does not include a calculated ‘Beginning Balance’ line for transactions which returned a final balance field. The Oldrec keyword can be used to cause the original receipt text to be supplied, where the ‘Beginning Balance’ line is calculated for any transaction with both an approved amount and a final balance returned by the host.
When using the ordlrec keyword this keyword must also be placed into the Registry.MTX file in addition to the OpenEPS.Ini file, for proper
function.
Defaults to 'N', (Use new balance format on receipt)
POSTranCompleteTimeOutValue
The timer value set by OpenEPS for the POS calling TransactionComplete once it gets a transaction response.
Defaults to 60 seconds
PRIVATEDEBITKEYSLOT=1
Determines which DUKPT key slot will be used to encrypt Private Debit PIN blocks.
Only for use with the Mx800 series terminals.
Used to allow a terminal that has been encrypted with multiple separate keys to send PIN based transactions to separate hosts per tender type, instead of forcing all PIN transactions to go to one host regardless of tender.
PRIVATEDEBITTOACH
Not all POS systems support the ACH tender type. Biometrics utilizes ACH, so this keyword must be present and set to "Y" when using biometrics if the POS does not support ACH.
"Y" indicates that when an ACH is indicated on the terminal, the POS will be told 'Private Debit'
"N" indicates that this setting is not used, and that ACH and Private Debit will be set as selected.
Defaults to 'N'
SmartWIConly
"Y" indicates that Low Cost SmartWIC is in use, and that OpenEPS will not expect to connect up to a server to process WIC transactions. This setting should not be used if transaction types other than WIC will be used.
Use this only as directed. OpenEPS will not connect to the server to process any transactions and
may not download new configurations.
StatusMessageInterval
This ini setting is used to determine how often OpenEPS transmits a status message to the server.
The server does not monitor lane status at this time.
The following relate to resolution settings for Signature Capture:
Keyword Description
XAXISRES X axis resolution, range 0-1024, zero filled
YAXISRES Y axis resolution, range 0-1024, zero filled

ServerEPS User's Guide
Chapter 4 227
Keyword Description
XAXISEXT X axis extended line limit, 0-9
YAXISEXT Y axis extended line limit , 0-9
It is only necessary to include the keywords for the option that are to be set. All other keywords will utilize their
default settings.

ServerEPS User's Guide
Chapter 4 228
Misc: OpenEPS RSP Codes
OpenEPS Response Codes are used for local declines and flags. For processor response codes refer to the ServerEPS
RSP Codes section.
OpenEPS Response Codes
Screen Item Description
Response Code Text Box
Enter a response code number in this text box you wish to Find or Add
Find [Button] This button finds the response code listed in the text box.
Add [Button] This button opens a pop up to create a new Response Code.
Edit [Button] This button opens the currently selected Response Code for editing.
Delete [Button] This button deletes the currently selected Response Code.

ServerEPS User's Guide
Chapter 4 229
Screen Item Description
Export [Button]
Exports the list of response codes, in CSV format.
Columns
Resp Code A listing of codes currently available; clicking on a code brings up the editing information for that code.
Description A text listing of what each code means.
Card Code
Usually set to ## to indicate all cards use this code; each response code may be keyed to specific card types instead of all cards by creating multiple entries for a single response code and selecting different card codes for each one. This could allow a single response code to have different text or processing options per card type.
Term Action
The type of processing that will be performed when receiving a response code; typically approval or decline.
Possible actions include:
AA – Approval
AB – Approved, Stand In
AC –Approved, ECC
NB – Declined, Balance Remaining
NC – Declined, Invalid Cashback
ND – Flat Decline
NF – Decline, Overridable
NH – Declined, Host down
NI – Re-prompt for Card Slide & PIN
NM – Enter new Manger ID
NO – Decline, Overridable
NP or NW – Need new PIN
NR – Decline, Overridable
NV – Decline, Try for Voice Auth
Customer Display
Text displayed to the customer terminal.
Cashier Display (5x40)
Text displayed to the cashier screen.
Note: Currently only the Retalix StoreLine version 400 (and above) support the 5x40 cashier messages.
Cashier Display (2x16)
Text displayed to the cashier screen.
Special Characters
Special characters entered into the text for the 5x40 and 2x16 customer and cashier display lines will be replaced
with information coming back from the host. Enter the text exactly as showed below:
Special Character Description
~B This will insert the balance into the message. If no Balance is available, N/A will be displayed.
~D This will insert the voucher data into the message.
~a Displays the approval number for the transaction as part of the message.

ServerEPS User's Guide
Chapter 4 230
Special Character Description
USE HOST MSG This will display the approval/decline message as returned by the host.
SHOW APPROVAL#
This will display ‘APPR# 12345678’ where 12345678 is the host approval number for the transaction.
SHOW APPROVAL# must be the only text on the display line. If added text is desired on the same line, use ~a instead.

ServerEPS User's Guide
Chapter 4 231
Misc: ServerEPS RSP Codes
ServerEPS Response Codes are a listing of the codes returned by the host server. These codes determine if a
transaction was an approval, decline, or a request for additional information.
Most responses have a Cashier Display of “USE HOST MSG”. This text is replaced by the actual message returned
by the host. If this text is edited or replaced the newly entered text will display instead.

ServerEPS User's Guide
Chapter 4 232
Screen Item Description
Response Code Text Box
Enter a response code number in this text box you wish to Find or Add
Find [Button] This button finds the response code listed in the text box.
Add [Button] This button opens a pop up to create a new Response Code.
Edit [Button] This button opens the currently selected Response Code for editing.
Delete [Button] This button deletes the currently selected Response Code.
Export [Button]
Exports the list of response codes, in CSV format.
Columns
Resp Code A listing of codes currently available; clicking on a code brings up the editing information for that code.
Description A text listing of what each code means.
Card Code
Usually set to ## to indicate all cards use this code; each response code may be keyed to specific card types instead of all cards by creating multiple entries for a single response code and selecting different card codes for each one. This could allow a single response code to have different text or processing options per card type.
Term Action
The type of processing that will be performed when receiving a response code; typically approval or decline.
Possible actions include:
AA – Approval
AB – Approved, Stand In
AC –Approved, ECC
NB – Declined, Balance Remaining
NC – Declined, Invalid Cashback
ND – Flat Decline
NF – Decline, Overridable
NH – Declined, Host down
NI – Re-prompt for Card Slide & PIN
NM – Enter new Manger ID
NO – Decline, Overridable
NP or NW – Need new PIN
NR – Decline, Overridable
NV – Decline, Try for Voice Auth
Customer Display
Text displayed to the customer terminal.
Cashier Display (5x40)
Text displayed to the cashier screen.
Note: Currently only the Retalix StoreLine version 400 (and above) support the 5x40 cashier messages.
Cashier Display (2x16)
Text displayed to the cashier screen.
Special Characters
Special characters entered into the text for the 5x40 and 2x16 customer and cashier display lines will be replaced
with information coming back from the host. Enter the text exactly as showed below:

ServerEPS User's Guide
Chapter 4 233
Special Character Description
~B This will insert the balance into the message. If no Balance is available, N/A will be displayed.
~D This will insert the voucher data into the message.
~a Displays the approval number for the transaction as part of the message.
USE HOST MSG This will display the approval/decline message as returned by the host.
SHOW APPROVAL#
This will display ‘APPR# 12345678’ where 12345678 is the host approval number for the transaction.
SHOW APPROVAL# must be the only text on the display line. If added text is desired on the same line, use ~a instead.

ServerEPS User's Guide
Chapter 4 234
Misc: WIC State Code
The WIC State Code screen is used to list all available states that are supported for WIC, along with the code
associated with that state. The code serves the same function as the prefix table, in that it identifies cards with the
matching card number prefix as the related state.
The default includes the states and codes shown below.

ServerEPS User's Guide
Chapter 4 235
Misc: FuelEPS Configuration
FuelEPS is a lightweight in-store product that provides streamlined communication between fuel lanes and the data
centers. Once installed, FuelEPS can be configured using the standard online web interface, using the settings listed
below.
For locations that were previously using the WinEPS to connect their fuel lanes to the data centers, FuelEPS
provides the same connectivity in a smaller package and moves configuration to the online web interface for added
convenience.
FuelEPS Configuration Window
Menu Item Description
End of Day Configuration
Fuel System Initiated [Radio Button]
When selected, FuelEPS waits for an End of Day call from the POS system to initiate its EOD.
Schedule Initiated [Radio Button]
When Selected, this is the local time at which FuelEPS will perform its end of day.
Tender Resolve Settings

ServerEPS User's Guide
Chapter 4 236
Menu Item Description
Allowed Transactions
Fuel lanes may send a special message to FuelEPS which contains the card number, and FuelEPS will compare the given card number with its card prefix table and attempt to resolve the card type to a single card.
The transaction types listed here are solely used in determining what transaction types are valid for the special Tender Resolve message. If a tender is marked as Accepted, then FuelEPS will check the associated prefix table and include that tender in the attempt to resolve the tender of the card number given. If the tender is marked as Not Accepted, it will be excluded from the tender resolution.
This setting will not prevent FuelEPS from accepting any fuel transaction, even if the card type is marked Not Accepted.
Default Tender for Tender Resolve Message
Fuel lanes may send a special message to FuelEPS which contains the card number, and FuelEPS will compare the given card number with its card prefix table and attempt to resolve the card type to a single card.
If FuelEPS cannot resolve the card number to a single card type (for example if the card is both a credit and debit card), this setting controls what tender type will be returned to the fuel lane.
Number to Add to Pump Number
A number that is added to the pump number received from the pump used to determine the lane number for that pump which is then used in the web interface for reporting and tracking purposes. For example, if the value entered for this option were 20, pump 1 would be listed as lane 21. This is used to prevent overlap between pumps and grocery lanes.
Tender Resolution Message
When a fuel lane receives a customer card slide of a payment card, that fuel server may send the card information to
FuelEPS for tender resolution. The fuel POS sends a special ISO message to FuelEPS that contains the card number;
FuelEPS then attempts to resolve that card number to a specific tender by consulting the allowable card prefixes for
each tender type that is marked as ‘Accepted’ on the Fuel Lane Configuration screen.
If FuelEPS locates a single matching prefix, a message will be sent back to the POS listing the tender type for the
card. If FuelEPS locates the prefix in both the Credit and Debit tables the tender type of ‘Combo Card’ will be sent
back to the fuel lane. If FuelEPS finds prefixes that match the card number in more than one of its prefix tables other
than a credit/debit combo card, FuelEPS will return to the Fuel POS the tender type specified under the Default
Tender section.

ServerEPS User's Guide
Chapter 4 237
The most common type of card found on multiple prefix tables is a combo card (Credit/Debit) and these types of cards will be resolved to ‘combo’. However, if more than one tender is valid for the card, such as a card with a prefix that is listed in both the EBT and Gift Card prefix tables, the Default Tender is what is returned to the POS, even if the Default Tender is not valid for the card type. Example, A card is swiped that matches the prefix on two table but is not a combo card, and the Default Tender is set to Debit; the card is found on the EBT and Gift Card tables, so the Default Tender is used, and Debit is returned to the Fuel POS lane.
The Tender Resolution message is an ISO message the fuel server or any POS system that is integrated directly to
FuelEPS can use. Specifics on the messaging format can be found in the Terminal ISO 8583 Base Interface
specification.

ServerEPS User's Guide
Chapter 4 238
Misc: ECC RecInfo
The ECC RecInfo screen contains the special receipt information printed on receipts for Electronic Check
Conversion (also known as Electronic Check Authorization or ECA).
The text is defined per host, so each host will have a different set of text. The text is defaulted to the statement
approved by the host during certification; changes to the text should be verified with your host before
implementation.
The text used will be determined by the host you have defined to accept Checks for your store.
The list box on the left side displays the 3 letter suffix associated with each supported Check host that also supports
ECC.
Host Suffix Actual Host Name
BYL Concord H&C
DEM Demo Host – Test Only, not for production
LML LML
LYN Lynk
NOV Nova
TRN ePic Tranz

ServerEPS User's Guide
Chapter 4 239
You may add a new suffix to the list by entering a 3 letter code and clicking new. Creating a new entry will not
cause that text to be used if the 3 letter code is not a recognized code for the host currently configured for Check
transactions. It is recommended you only create a new prefix under specific direction from support.

ServerEPS User's Guide
Chapter 4 240
Store Configurations Setup Screens
Once a Store Configuration is opened for editing, the Store Configuration menu becomes available.
The parameters in this section are universal settings for the entire store, including determining what hosts are used
for each transaction type as well as defining the store’s lanes and which configuration those lanes use.
Store Config Menu
Menu Item Description
Lane Definition Used to configure the lanes for the store, determining the number of lanes available and what configurations they use.
Hosts This Host Parameters screen allows the user to select the host that transactions will be processed to, along with setting individual host parameters.
Receipt Allows configuration of the header and footer information for the receipts.
Misc: Setup Txt The Setup.Txt file includes configuration settings related to connection information.
Misc: Dial Backup
Configurations Controls configuration settings for the Dial Backup Client in-store software

ServerEPS User's Guide
Chapter 4 241
Lane Definition
The Lanes Definition window is a list view of all defined lane numbers with their associated Lane type and
configuration. This window allows you to add, delete, or edit the properties of each lane.
Lane Definitions Window
Your defined lanes are automatically sorted by lane number in ascending order. You can define as many as ninety-
nine lanes per store. If a window contains more records than can fit in the pane, use the vertical scroll bar to scroll
down and see additional records.

ServerEPS User's Guide
Chapter 4 242
You can easily Add, Edit, or Delete a lane by using the buttons at the bottoms of the screen.
Menu Item Description
Lane #
The Lane Number text box will display the number of a selected lane; it may also be used to add one or more lanes by entering a single lane number or a range of lane numbers and clicking the Update/Insert button. Only lane numbers 1 to 99 are valid.
Lane Type
The Lane Type drop-down list allows you select how the lane is tended. Normal (a check stand with a cashier present) Grocery Unattended (a Self-Checkout unattended grocery check stand) Gas Unattended (a gas pump that allows the customer to pay at the pump without the aid of
a cashier) Pharmacy (attended lane in the Pharmacy department – noted to the host by a SIC code for
Pharmacy; this setting is not supported for all hosts.)
Lane Configuration
The Lane Configuration dropdown box is populated by the entire list of available lane configurations for the company you are logged in under.
Use the dropdown list to select which configuration is to be applied to the selected lane.
OK [Button] This button saves the changes made on in the Edit Lane Definition pop up screen.
Cancel [Button] This button cancels any change or addition on the Edit Lane Definition pop up screen.

ServerEPS User's Guide
Chapter 4 243
Hosts
This screen allows the user to select the host that transactions will be processed to, along with setting individual host
parameters.
Hosts: Host Definition Tab
The host dropdown boxes display all the available hosts currently supported. To configure a host, simply use the
dropdown box next to the tender type you want to configure. Select a host for each tender type that will be processed
by the store.

ServerEPS User's Guide
Chapter 4 244
Once all hosts are defined, click the Apply button to implement the changes, updating the Host Info Tab.
Property Description
Host Selected for Tran Type
Use the host dropdown to select the host to use for each tender type.
Apply [Button] This button updates and applies any changes made to the host selection, populating the Host Info Tab with the selected hosts.
ERC Host and Signature Capture
Store locations that are performing signature capture should be certain to define the ERC host as MTX Receipt Host
unless the POS is going to store the receipts locally.

ServerEPS User's Guide
Chapter 4 245
Hosts: Host Info Tab
The Host Information Tab allows the user to configure the host-specific information required to correctly process
transactions.
Host Information Tab
All of the hosts that have been selected on the Host Definition Tab will display as tabs along the left side of the
screen. Each host selected will contain different information on the Host Information Tab.

ServerEPS User's Guide
Chapter 4 246
Note: Depending on your host, the Host Parameter window will vary in required information. Consequently, additional fields may not be visible on your specific Host Parameter window.
Host Specific Information
Property Description
Merchant Number / Store Number /State Code / Password / Etc Supplied by the host
Online Processing Frame
Property Description
Online Processing
Verify Debit Card Prefix? Check this box to force verification of Debit prefixes against the debit bin file
Trace Host Messages Should always be checked; this provides additional information for troubleshooting.

ServerEPS User's Guide
Chapter 4 247
Property Description
Offline Processing
Offline Processing allowed? Indicates whether offline processing for this host is allowed.
Verify Debit Card Prefix? Check this box to force verification of Debit prefixes against the debit bin file
Resubmit Offline Forwards Check to save and resubmit offline forwards that were declined due to insufficient funds;
attempts over the next several days to complete the offline transaction.
Wait timers
It is recommended that these timers are left at their default values unless specifically instructed to
change them by support.
Secs to wait to simulate approval
When Offline Processing, OpenEPS uses this value as a delay before providing an Offline response.
Secs to wait to begin forwarding
Seconds delay after connection has been reestablished to the datacenter before beginning the forwarding of TOR & Offline files generated during the disconnect.
Secs to wait between forwarding
Seconds delay between the completion of once offline forward and the start of the next.
Secs to wait to cycle offline queue
Seconds to wait between attempts to begin forwarding transactions out of the offline queue.
Secs to wait to cycle reversal queue
Seconds to wait between attempts to begin forwarding TORs out of the reversal queue.

ServerEPS User's Guide
Chapter 4 248
Property Description
Transaction Information
Online Timeout Value Default of 45 seconds; determines how long to wait for a response from the host before
determining that the host is offline. The POS timers for these transactions should always be greater than the amount shown here seconds to avoid approval errors.
Truncate Pan on Receipt For each transaction type, the PAN will be truncated automatically when it is printed on the
receipt.
Hosts: Store Info Tab
The host dropdown boxes
Property Description
Store Close Time
Automatic: Store’s End of Day and report cut over will occur at the selected time. This EOD time is set for Pacific Time, where the datacenter resides.
Manual: The store will not cut over for End of Day automatically and must instead be SendMessageSEPS.exe to coordinate the EOD time for the POS.

ServerEPS User's Guide
Chapter 4 249
Receipt
The header and footer text for receipts is user configurable. This receipt text is supplied to all POS systems, though
some POS systems do not make use of it, and the text is used as the header and footer information for all receipts
captured using Signature Capture or Receipt Capture.
Receipt Information & Deposit Info
You can modify the default text in both the Receipt Header and Receipt Message (footer) by clicking on the text
directly. Typically the Receipt Header is used to give information about the store, such as name, address/location
and phone number. The Receipt Message is printed as a footer for the receipt and is typically used as a short thank-
you message to the customer.
The justification (right, left or center) for these messages can be adjusted by selecting the appropriate radio button
on the right side of the screen.
This template of a receipt as viewed is to scale. Consequently, the message typed in this screen is directly
proportional to the printed messages on the physical receipt.
Receipt
Header
Receipt
Footer

ServerEPS User's Guide
Chapter 4 250
Reminder: Messages entered on this screen will only print on store receipts that use the supplied text. Some POS systems have their own receipt templates.
In addition to formatting your store receipt information, you can enter Bank Deposit information in the box on the
right. The information can include the name of the bank your store uses, along with the store’s bank account
number. This information is not printed on any receipt, but displayed on a franked check for depositing purposes.
This information is only used if OpenEPS directly controls the check franking; as such use of this text is very rare as
most POS systems utilize an attached MICR reader and check franker.

ServerEPS User's Guide
Chapter 4 251
Misc
This dropdown contains a variety of additional settings used in configuring a store.
Misc: Setup Txt
The Setup.Txt file includes configuration setting keywords related to connection information.
These keywords should be written exactly as shown in the following table, with the keyword, an equals sign (=)
followed by the setting, with no spaces.
Example:
PROXYSERVER=10.250.32.123:443
Keyword Description
PROXYSERVER=XXX.XXX.XXX.XXX:PORT
The IP address & port of the machine on which the Dial Backup Client is installed (if it is in use).
The standard connection port for the Dial Backup Client is 443
HealthStatusInterval=10 Determines how often heath messages are sent to the server to determine connection status.
HealthStatusNotOKInterval=2 Interval for sending health messages when connection is in probation or disconnected mode; typically more often than the HealthStatusInterval.

ServerEPS User's Guide
Chapter 4 252
Keyword Description
HealthStatusProbationInterval=6 Number of health messages required to be answered, after the connection has been put on probation, before connection is marked up.
USEWEBSERVICE=Y Activates the web-based interface.
Required setting.
USEBINSERVICE=Y
Causes OpenEPS to request a new BIN file each night, if available.
Store must be signed of for the OpenEPS BIN service to receive
BIN files.
HASHSEEDPATH={Path}
For POS systems that use the OpenEPS Function call of PANHashSHA256, the path listed for this keyword determines where OpenEPS will look for the seed value.
The path must include the filename as well; the path should be a full UNC path, as it will be used by every lane in the store.
OpenEPS will use the first 20 characters contained within the file as the hash seed.
Automatically Generated Keywords
These keywords will automatically be placed into the Setup.Txt file on the POS lane and generally do not need to be
configured in the Configuration GUI.
Keyword Description
CONFIGFILENAME=TerminalConfiguration.xml Configuration name in use at the lane.
Updated automatically.
CardProcessingProfilesFileName=CardProcessingProfile.xml Configuration name in use at the lane.
Updated automatically.

ServerEPS User's Guide
Chapter 4 253
Misc: Dial Backup Configurations
The Dial Backup Configurations screen allows the configuration of the settings the Dial Backup client will
download when it connects to the data centers.
Remember, for a lane to successfully connect and to use the Dial Backup Client, the lanes Setup.Txt file must be
properly configured to point to the Dial Backup Client. See the Setup.Txt PROXYSERVER keyword in the In the
Store Configuration section.
For in-store installation and configuration instructions for the Dial Backup client, refer to the ServerEPS Installation
and Configuration Guide.
Dial Backup Configurations Window
Menu Item Description
IP Address IP Address or DNS Name of the PC on which the Dial Backup Client is installed.
Port Port on which the lanes will attempt to connect to the Dial Backup Client.
Idle Time Hangup
Time to wait while idle (period where no transactions are being processed though the Dial Backup Client) before hanging up the dial line.

ServerEPS User's Guide
Chapter 5 254
Menu Item Description
RAS Name
Name of the Dial Up RAS service that is configured for dial backup.
This is the name as shown in the Windows Network Connections listing:

ServerEPS User's Guide
Chapter 5 255
Chapter 5
Reporting Service
This chapter is for use by any customer that has signed up to use the Reporting Service.
Web Service upgrades that add new features with associated new activity items, such as new reports, automatically grant access to those items only for the Administrator and RootAdmin groups. Administrative users may grant the right to access this new page o any other group by adjusting that groups activity rights.

ServerEPS User's Guide
Chapter 5 256
Report List
The section details information on each report that is available through the Reporting Service.
The following reports are available
Host Settlement Report HST01
Host Settlement Exceptions HST02
Offline Approved Transactions OFL01
Offline Declined Transactions OFL02
Offline Pending Report OFL10
Offline Final Disposition Report OFL11
Store Sales Summary SSR01
Store Sales Summary by Store and Lane SSR02
Store Sales Summary by Store and Cashier SSR03
Store Sales Summary by Store SSR04
Abandoned Transactions Log SSR05
Store Sales Summary by Card Name SSR06
Approved Transactions Log TRN01
Approved Trx Log with Dept/User TRN01a
Declined Transactions Log TRN02
Overridden Transactions Log TRN30
Voided Transactions Totals TRN03
Voided Transactions Log TRN04
Credit to Debit Activity Log TRN05
Pre-Auth / Pre-Auth Completion TRN10
Detailed Cashier Report TRN20
Detailed Lane Report TRN21
All Users Report DMT01
PIN Pad Serial Number Report DMT25
Transaction List TRN40
Transaction Count Invoicing Report TRN41
FSA Transactions Log TRN50
eWIC Variance Report TRN60
Store Setup Report DMT10

ServerEPS User's Guide
Chapter 5 257
Schedule Reports: E-Mail Reports at Each End of Day
Certain reports are available to be e-mailed to your e-mail address at the end of each business day.
Reports that are eligible for this new service are displayed in the new Scheduled Reports Tab.
Scheduling Reports
To schedule one of the listed reports for automated e-mailing, simply click the report and a configuration page will
be displayed.
Use the options on the configuration page to configure the report.

ServerEPS User's Guide
Chapter 5 258
The e-mail account you enter is used for all scheduled report e-mailing. You may individually determine which
reports you would like to receive an e-mail for.
You may select a format of PDF or Excel for the report data to be provided in when sent. You may also specify
which stores to gather the data from, for this report.
The summary of your selections is provided in the upper right, including a list of the stores to be included when
gathering the data for this report.
Available Reports
Choosing Report, Stores & Dates
The list of available reports is displayed on the Create New Report Tab of the Reports Dashboard. To view a report,
select that report from the list.

ServerEPS User's Guide
Chapter 5 259
Before running a report you must choose one or more stores from which transactions will be viewed, and the date(s)
you want to view transaction data from.

ServerEPS User's Guide
Chapter 5 260
The calendar control is used to select either a single date or a range of dates for the report. Simply click on one date
for data from a single day, or select one date and then a second date to use that range of dates – dates selected will
become highlighted. Use the arrows next to the month and year at the top of the calendar control to move forward or
backward.
When selecting the Beginning and Ending dates for a report, they may not be more than 400 days apart.
You may select one or more Store Groups and/or Stores. The selections will be displayed in the Selected Store(s)
box on the right side of the screen.
Once you have selected a starting date an (optional) ending date and the stores to view data from, click Generate
Report to display the report.

ServerEPS User's Guide
Chapter 5 261
Report Header and Footer
The report header contains the report name, company name, the date(s) the report is for, and the user who ran the
report.
Most reports contain a footer section as well as a header. The contents of the footer vary between reports. Many
reports list one or more totals, the page number, date the report was run, and the report code.

ServerEPS User's Guide
Chapter 5 262

ServerEPS User's Guide
Chapter 5 263
Report Tool Bar
This tool bar appears at the top of each report.
Exporting Transaction Data
While viewing a report, the web interface offers the option to export the transaction data to a variety of different
formats. Use the dropdown box as shown below to select the format to export to, and then select the Export link next
to the dropdown box.
The example below shows a report exported to Excel
The page number box indicates the page you are on and can be used to jump directly to a specific page
Display Size Export Transaction Data
Search Field Refresh Report
Print Report
Forward and backward arrows allow navigation through reports.

ServerEPS User's Guide
Chapter 5 264
Reports do not display the entire account number; only the first 6 and last 4 digits are displayed.

ServerEPS User's Guide
Chapter 5 265
Information on Individual Reports
After selecting the report, stores and date(s), the selected report will be displayed.
No report will display a full card number; Web Services reporting only displays Partial Account #’s consisting of the
first 6 and last 4 digits of the card. The service also does not retain a record of the total length of the card number; as
such all card numbers will be displayed as XXXXXX…XXXX regardless of their initial length.
Host Settlement Report (HST01)
The Host Settlement Report displays the settled totals for each store location.
This report features the following columns:
Report Headers Description
Tender Type This list displays the different tenders taken.
ServerEPS Totals
Server side totals; this amount reflects the value for the day as the payment server.
Host Totals Host side totals; this amount reflect the amounts sent to the server in the end of day message from the host.
Variance Any difference between the ServerEPS totals and the host totals is displayed in this column.

ServerEPS User's Guide
Chapter 5 266
Host Settlement Exceptions (HST02)
The Host Settlement Exceptions report displays a summary of just the variances from the Host Settlement report.
This report features the following columns:
Report Headers Description
Batch The batch number from which the variance was retrieved.
Store # The Store number for the variance.
Date Date of the batch close.
Transaction The tender and/or transaction type that experienced the variance.
ServerEPS
Results from the ServerEPS host
#: Number of transactions within the specified transaction type.
Amount: Total sum of all the transactions of the transaction type specified, for the specified batch.
Host
Results from the destination host; the hosts name appears at the top of the column.
#: Number of transactions within the specified transaction type.
Amount: Total sum of all the transactions of the transaction type specified, for the specified batch.
Variance The difference between the ServerEPS totals and the host totals is displayed in this column.
The summary section at the bottom displays the total number batches with variances and the total variance amount,
along with the date and time the report was run as well as the report number on the left hand side.

ServerEPS User's Guide
Chapter 5 267
Offline Approved Transactions (OFL01)
This report displays a list of transactions that were initially taken offline, and have since been forward up to the host
and received an approval.
This report features the following columns:
Report Headers Description
Store & Batch
Store and Batch markers are used to separate the transactions.
The reporting service uses a batch number of 0 to indicate the current batch. After a batch is settled, it will receive a new number.
Time The time and date on which the transaction was run.
Lane # The lane number for the lane that processed the transaction.
Cashier The number of the cashier that processed the transaction.
Transaction
The tender and transaction type.
Tenders are represented by a 2 letter code, such as VS indicating Visa. These 2 digit codes are defined in the Card Processing Profile of the Configuration Management GUI for each store.
Default Card codes are listed in Appendix B.
Partial Account #
The first 6 and last 4 digits of the card number. It is never possible to view the full card number in the report service.
Seq #
Sequence Number also known as the System Trace Audit Number (STAN).
This is a semi-unique numeric ID that is generally printed on the receipt and is used to track a transaction during payment processing
Approved Amount
The dollar amount the transaction was approved for.
Negative amounts will be displayed in parentheses ().

ServerEPS User's Guide
Chapter 5 268
Report Headers Description
Flags
m = manually entered card number
L = approved for lesser amount
e = Electronic Check Conversion (ECC)
R = RFID (Radio Frequency Identification / Contact-less payment)
s = Offline
o = Override
The summary section at the bottom displays the total number of transactions along with the date and time the report
was run as well as the report number on the right hand side.

ServerEPS User's Guide
Chapter 5 269
Offline Declined Transactions (OFL02)
This report displays a list of transactions that were initially taken offline, but that received a decline when they were
forwarded up to the host. This report represents money lost by the merchant.
This report features the following columns:
Report Headers
Description
Store & Batch
Store and Batch markers are used to separate the transactions.
The reporting service uses a batch number of 0 to indicate the current batch. After a batch is settled, it will receive a new number.
Time The time and date on which the transaction was run.
Lane The lane number for the lane that processed the transaction.
Cashier The number of the cashier that processed the transaction.
Transaction
The tender and transaction type.
Tenders are represented by a 2 letter code, such as VS indicating Visa. These 2 digit codes are defined in the Card Processing Profile of the Configuration Management GUI for each store.
Default Card codes are listed in Appendix B.
Partial Account #
The first 6 and last 4 digits of the card number. It is never possible to view the full card number in the report service.
Resp Code
The specific response code returned by the end host for this transaction, prefixed by a 3 character identifier that indicates what host or component returned the code.
For a list of hosts and their 3 character identifiers, refer to Appendix C.
If the 3 digit code is “EPS-“ refer to Appendix B for a listing of internal response codes.

ServerEPS User's Guide
Chapter 5 270
Report Headers
Description
Seq #
Sequence Number also known as the System Trace Audit Number (STAN).
This is a semi-unique numeric ID that is generally printed on the receipt and is used to track a transaction during payment processing
Amount The dollar amount of the transaction.
Negative amounts will be displayed in parentheses ().
Flags
m = manually entered card number
L = approved for lesser amount
e = Electronic Check Conversion (ECC)
R = RFID (Radio Frequency Identification / Contact-less payment)
s = Offline
o = Override
Host Text The host text line in each transaction displays the text returned by the host, if any.
The summary section at the bottom displays the total number of transactions along with the date and time the report
was run as well as the report number on the right hand side.

ServerEPS User's Guide
Chapter 5 271
Offline Pending Report (OFL10)
This report displays a list of transactions that were initially taken offline, have been forwarded up to the data centers
and are awaiting transmission to the host.
This report features the following columns:
Report Headers Description
NA NA

ServerEPS User's Guide
Chapter 5 272
Offline Final Disposition Report (OFL11)
This report displays the final disposition of all offline transactions for the selected store and date range.
This report features the following columns:
Report Headers Description
Store & Batch
Store and Batch markers are used to separate the transactions.
The reporting service uses a batch number of 0 to indicate the current batch. After a batch is settled, it will receive a new number.
Approved Transactions
Declined Transactions
The transaction lists are divided up into lists of Approved Transactions and Declined Transactions.
Time The time and date on which the transaction was run.
Lane The lane number for the lane that processed the transaction.
Cashier The number of the cashier that processed the transaction.
Transaction
The tender and transaction type.
Tenders are represented by a 2 letter code, such as VS indicating Visa. These 2 digit codes are defined in the Card Processing Profile of the Configuration Management GUI for each store.
Default Card codes are listed in Appendix B.
Partial Account # The first 6 and last 4 digits of the card number. It is never possible to view the full card number in the report service.
Seq #
Sequence Number also known as the System Trace Audit Number (STAN).
This is a semi-unique numeric ID that is generally printed on the receipt and is used to track a transaction during payment processing
Original Sequence #
For resubmits, the original sequence number for the transaction is listed.
Auth Code The authorization number given to the transaction. Used by the host to prove that a specific transaction was authorized.
Local Auth Code For offline transactions, this is the authorization number given to the transaction at the lane. Transactions that were not taken offline may not have a Local Auth Code.
Approved Amount
The dollar amount of the transaction.
Negative amounts will be displayed in parentheses ().

ServerEPS User's Guide
Chapter 5 273
Report Headers Description
Flags
m = manually entered card number
L = approved for lesser amount
e = Electronic Check Conversion (ECC)
R = RFID (Radio Frequency Identification / Contact-less payment)
s = Offline
o = Override
The summary section at the bottom displays the total number of transactions, and dollar value, along with the date
and time the report was run as well as the report number on the right hand side.

ServerEPS User's Guide
Chapter 5 274
Store Sales Summary (SSR01)
This report presents a summary of transaction information across all selected stores for the chosen dates.
The first screen of this report displays a list of the stores that are being used to generate the report; these stores
reflect the store selection made on the Reports screen.
This first page features the following columns:
Report Headers Description
Store The store’s name
Address Store address
Phone Store Phone Number
At the bottom, the number of pages for this report is displayed along with the date and time the report was run as
well as the report number on the right hand side.

ServerEPS User's Guide
Chapter 5 275
The second page features the following columns:
Report Headers Description
Type
Transaction type, broken out by specific card.
The Other bucket will include all credit card transactions not otherwise listed, such as Private Credit transactions.
Check Auth will contain a sum of both standard paper checks and ECC checks.
Gift cards are summed together; this includes both in-house gift cards and Blackhawk.
Purchase
The ‘#’ column displays a count of the number of Purchases performed by each card type.
The Amount column presents a sum of the total dollar amount of the purchase transactions, by card type.
Cash Back
The ‘#’ column displays a count of the number of transactions that included cash back, by card type.
The Amount column presents a sum of the total dollar amount of the cash back transactions, by card type.

ServerEPS User's Guide
Chapter 5 276
Report Headers Description
Voice Authorization
The ‘#’ column displays a count of the number of Voice Authorization transactions performed by each card type.
The Amount column presents a sum of the total dollar amount of the Voice Authorization transactions, by card type.
Returns
The ‘#’ column displays a count of the number of Returns performed by each card type.
The Amount column presents a sum of the total dollar amount of the Return transactions, by card type.
Net EFT
The # column indicates the total number of transactions performed per card type.
The amount column displays the sum of the amount columns; the returns column is treated as a negative value (indicated by the parentheses), so the total of the other columns will be reduced by that amount.
Summing the amount works like this:
Purchases + Cash back + Activation/Recharge/Refresh + Voice Authorization - Returns
Transactions that are generally not counted as sales are listed in the ‘memo’ section at the bottom of the list. These
non-sales transactions include Gift Card and Phone Card activations, deactivations, and other similar transaction
types. Blackhawk transactions have also been separated from in-house gift card programs to provide an additional
level of visibility.
Report Headers Description
Activation
The ‘#’ column displays a count of the number of card Activation transactions for stored value gift cards.
The Amount column presents a sum of the total dollar amount of those transactions, by card type.
Recharge / Refresh
The ‘#’ column displays a count of the number of transactions that involve putting money onto a stored value gift card.
The Amount column presents a sum of the total dollar amount of those transactions, by card type.
Deactivate
The ‘#’ column displays a count of the number of transactions for deactivating a stored value gift card.
The Amount column presents a sum of the total dollar amount of those transactions, by card type.

ServerEPS User's Guide
Chapter 5 277
The grand totals at the bottom represent the sums of each of the appropriate columns.
The summary section at the bottom displays the date and time the report was run as well as the report number on the
right hand side.

ServerEPS User's Guide
Chapter 5 278
Store Sales Summary by Store and Lane (SSR02)
This report displays a series of summaries for the stores selected; each page is a summary of the transactions
performed by a single lane. The report will contain a summary page for each lane that processed transactions during
the time period selected. If a lane did not process any transactions during that time period, it will not be listed.
As shown above, a blue divider row listing the Store and Lane number will be displayed just under the row of
headers.
This report features the following columns:
Report Headers Description
Type
Transaction type, broken out by specific card.
The Other bucket will include all credit card transactions not otherwise listed, such as Private Credit transactions.
Check Auth will contain a sum of both standard paper checks and ECC checks.
Gift cards are summed together; this includes both in-house gift cards and Blackhawk.

ServerEPS User's Guide
Chapter 5 279
Report Headers Description
Purchase
The ‘#’ column displays a count of the number of Purchases performed by each card type.
The Amount column presents a sum of the total dollar amount of the purchase transactions, by card type.
Cash Back
The ‘#’ column displays a count of the number of transactions that included cash back, by card type.
The Amount column presents a sum of the total dollar amount of the cash back transactions, by card type.
Voice Authorization
The ‘#’ column displays a count of the number of Voice Authorization transactions performed by each card type.
The Amount column presents a sum of the total dollar amount of the Voice Authorization transactions, by card type.
Returns
The ‘#’ column displays a count of the number of Returns performed by each card type.
The Amount column presents a sum of the total dollar amount of the Return transactions, by card type.
Net EFT
The # column indicates the total number of transactions performed per card type.
The amount column displays the sum of the amount columns; the returns column is treated as a negative value (indicated by the parentheses), so the total of the other columns will be reduced by that amount.
Summing the amount works like this:
Purchases + Cash back + Activation/Recharge/Refresh + Voice Authorization - Returns
Transactions that are generally not counted as sales are listed in the ‘memo’ section at the bottom of the list. These
non-sales transactions include Gift Card and Phone Card activations, deactivations, and other similar transaction
types. Blackhawk transactions have also been separated from in-house gift card programs to provide an additional
level of visibility.
Report Headers Description
Activation
The ‘#’ column displays a count of the number of card Activation transactions for stored value gift cards.
The Amount column presents a sum of the total dollar amount of those transactions, by card type.

ServerEPS User's Guide
Chapter 5 280
Report Headers Description
Recharge / Refresh
The ‘#’ column displays a count of the number of transactions that involve putting money onto a stored value gift card.
The Amount column presents a sum of the total dollar amount of those transactions, by card type.
Deactivate
The ‘#’ column displays a count of the number of transactions for deactivating a stored value gift card.
The Amount column presents a sum of the total dollar amount of those transactions, by card type.
The summary section at the bottom displays the total number of transactions along with the date and time the report
was run as well as the report number on the right hand side.

ServerEPS User's Guide
Chapter 5 281
Store Sales Summary by Store and Cashier (SSR03)
This report displays a series of summaries for the stores selected; each page is a summary of the transactions
performed by a single cashier number. The report will contain a summary page for each cashier that handled
transactions during the time period selected. Cashier numbers not listed as performing transactions during the
selected time period, it will not be displayed.
As shown above, a blue divider row listing the Store and Cashier number will be displayed just under the row of
headers.
This report features the following columns:
Report Headers Description
Type
Transaction type, broken out by specific card.
The Other bucket will include all credit card transactions not otherwise listed, such as Private Credit transactions.
Check Auth will contain a sum of both standard paper checks and ECC checks.
Gift cards are summed together; this includes both in-house gift cards and Blackhawk.

ServerEPS User's Guide
Chapter 5 282
Report Headers Description
Purchase
The ‘#’ column displays a count of the number of Purchases performed by each card type.
The Amount column presents a sum of the total dollar amount of the purchase transactions, by card type.
Cash Back
The ‘#’ column displays a count of the number of transactions that included cash back, by card type.
The Amount column presents a sum of the total dollar amount of the cash back transactions, by card type.
Voice Authorization
The ‘#’ column displays a count of the number of Voice Authorization transactions performed by each card type.
The Amount column presents a sum of the total dollar amount of the Voice Authorization transactions, by card type.
Returns
The ‘#’ column displays a count of the number of Returns performed by each card type.
The Amount column presents a sum of the total dollar amount of the Return transactions, by card type.
Net EFT
The # column indicates the total number of transactions performed per card type.
The amount column displays the sum of the amount columns; the returns column is treated as a negative value (indicated by the parentheses), so the total of the other columns will be reduced by that amount.
Summing the amount works like this:
Purchases + Cash back + Activation/Recharge/Refresh + Voice Authorization - Returns
Transactions that are generally not counted as sales are listed in the ‘memo’ section at the bottom of the list. These
non-sales transactions include Gift Card and Phone Card activations, deactivations, and other similar transaction
types. Blackhawk transactions have also been separated from in-house gift card programs to provide an additional
level of visibility.
Report Headers Description
Activation
The ‘#’ column displays a count of the number of card Activation transactions for stored value gift cards.
The Amount column presents a sum of the total dollar amount of those transactions, by card type.

ServerEPS User's Guide
Chapter 5 283
Report Headers Description
Recharge / Refresh
The ‘#’ column displays a count of the number of transactions that involve putting money onto a stored value gift card.
The Amount column presents a sum of the total dollar amount of those transactions, by card type.
Deactivate
The ‘#’ column displays a count of the number of transactions for deactivating a stored value gift card.
The Amount column presents a sum of the total dollar amount of those transactions, by card type.
The summary section at the bottom displays the total number of transactions along with the date and time the report
was run as well as the report number on the right hand side.

ServerEPS User's Guide
Chapter 5 284
Abandoned Transactions Log (SSR05)
The Abandoned Transactions Log displays a list of all offline transactions that have exceeded their maximum
number of resubmissions; these transactions were not successfully processed through the host and were not
approved.
This report features the following columns:
Report Headers Description
Time The time and date on which the transaction was run.
Lane # The lane number for the lane that processed the transaction.
Cashier The number of the cashier that processed the transaction.
Transaction
The tender and transaction type.
Tenders are represented by a 2 letter code, such as VS indicating Visa. These 2 digit codes are defined in the Card Processing Profile of the Configuration Management GUI for each store.
Default Card codes are listed in Appendix B.
Partial Account #
The first 6 and last 4 digits of the card number. It is never possible to view the full card number in the report service.
Host Code The response code returned by the host processor.

ServerEPS User's Guide
Chapter 5 285
Report Headers Description
Sequence #
Sequence Number also known as the System Trace Audit Number (STAN).
This is a semi-unique numeric ID that is generally printed on the receipt and is used to track a transaction during payment processing
Amount The dollar amount of the transaction.
Negative amounts will be displayed in parentheses ().

ServerEPS User's Guide
Chapter 5 286
Store Sales Summary by Card Name (SSR06)
This report provides a summary of the type of transactions performed, divided up by the card type used. Page 1
includes a listing of the stores included in the report; page 2 provides the summary information.
This report features the following columns:
Report Headers Description
Card Name The card type summarized.
Purchase
The ‘#’ column displays a count of the number of Purchases performed by each card type.
The Amount column presents a sum of the total dollar amount of the purchase transactions, by card type.
Cash Back
The ‘#’ column displays a count of the number of transactions that included cash back, by card type.
The Amount column presents a sum of the total dollar amount of the cash back transactions, by card type.

ServerEPS User's Guide
Chapter 5 287
Report Headers Description
Voice Authorization
The ‘#’ column displays a count of the number of Voice Authorization transactions performed by each card type.
The Amount column presents a sum of the total dollar amount of the Voice Authorization transactions, by card type.
Returns
The returns column is treated as a negative value (indicated by the parentheses).
The ‘#’ column displays a count of the number of Returns performed by each card type.
The Amount column presents a sum of the total dollar amount of the Return transactions, by card type.
Net
The # column indicates the total number of transactions performed per card type.
The amount column displays the sum of the amount columns; the returns column is treated as a negative value (indicated by the parentheses), so the total of the other columns will be reduced by that amount.
Summing the amount works like this:
Purchases + Cash back + Activation/Recharge/Refresh + Voice Authorization - Returns

ServerEPS User's Guide
Chapter 5 288
Store Sales Summary by Store (SSR04)
This report displays a summary of transactions for each selected store for the time period selected. Each page
displays a summary of transactions for a single store. Stores that did not process transactions during the time period
selected will not be displayed.
As shown above, a blue divider row listing the Store number will be displayed just under the row of headers.
This report features the following columns:
Report Headers Description
Type
Transaction type, broken out by specific card.
The Other bucket will include all credit card transactions not otherwise listed, such as Private Credit transactions.
Check Auth will contain a sum of both standard paper checks and ECC checks.
Gift cards are summed together; this includes both in-house gift cards and Blackhawk.

ServerEPS User's Guide
Chapter 5 289
Report Headers Description
Purchase
The ‘#’ column displays a count of the number of Purchases performed by each card type.
The Amount column presents a sum of the total dollar amount of the purchase transactions, by card type.
Cash Back
The ‘#’ column displays a count of the number of transactions that included cash back, by card type.
The Amount column presents a sum of the total dollar amount of the cash back transactions, by card type.
Voice Authorization
The ‘#’ column displays a count of the number of Voice Authorization transactions performed by each card type.
The Amount column presents a sum of the total dollar amount of the Voice Authorization transactions, by card type.
Returns
The ‘#’ column displays a count of the number of Returns performed by each card type.
The Amount column presents a sum of the total dollar amount of the Return transactions, by card type.
Net EFT
The # column indicates the total number of transactions performed per card type.
The amount column displays the sum of the amount columns; the returns column is treated as a negative value (indicated by the parentheses), so the total of the other columns will be reduced by that amount.
Summing the amount works like this:
Purchases + Cash back + Activation/Recharge/Refresh + Voice Authorization - Returns
Transactions that are generally not counted as sales are listed in the ‘memo’ section at the bottom of the list. These
non-sales transactions include Gift Card and Phone Card activations, deactivations, and other similar transaction
types. Blackhawk transactions have also been separated from in-house gift card programs to provide an additional
level of visibility.
Report Headers Description
Activation
The ‘#’ column displays a count of the number of card Activation transactions for stored value gift cards.
The Amount column presents a sum of the total dollar amount of those transactions, by card type.

ServerEPS User's Guide
Chapter 5 290
Report Headers Description
Recharge / Refresh
The ‘#’ column displays a count of the number of transactions that involve putting money onto a stored value gift card.
The Amount column presents a sum of the total dollar amount of those transactions, by card type.
Deactivate
The ‘#’ column displays a count of the number of transactions for deactivating a stored value gift card.
The Amount column presents a sum of the total dollar amount of those transactions, by card type.
The summary section at the bottom displays the total number of transactions along with the date and time the report
was run as well as the report number on the right hand side.

ServerEPS User's Guide
Chapter 5 291
Approved Transactions Log (TRN01)
The Approved Transactions Log displays a list of all approved transactions for the given dates, broken down by
store number.
This report features the following columns:
Report Headers Description
Store Store markers are used to separate the transactions.
Time The time and date on which the transaction was run.
Lane The lane number for the lane that processed the transaction.
Cashier The number of the cashier that processed the transaction.
Transaction
The tender and transaction type.
Tenders are represented by a 2 letter code, such as VS indicating Visa. These 2 digit codes are defined in the Card Processing Profile of the Configuration Management GUI for each store.
Default Card codes are listed in Appendix B.
Partial Account #
The first 6 and last 4 digits of the card number. It is never possible to view the full card number in the report service.
Seq #
Sequence Number also known as the System Trace Audit Number (STAN).
This is a semi-unique numeric ID that is generally printed on the receipt and is used to track a transaction during payment processing

ServerEPS User's Guide
Chapter 5 292
Report Headers Description
Auth Code The authorization number given to the transaction. Used by the host to prove that a specific transaction was authorized.
Local Auth Code
For offline transactions, this is the authorization number given to the transaction at the lane. Transactions that were not taken offline may not have a Local Auth Code.
Approved Amount
The dollar amount the transaction was approved for.
Negative amounts will be displayed in parentheses ().
Flags
m = manually entered card number
L = approved for lesser amount
e = Electronic Check Conversion (ECC)
R = RFID (Radio Frequency Identification / Contact-less payment)
s = Offline
o = Override
The summary section at the bottom displays the total number of transactions, the page number you are viewing
along with the date and time the report was run, the Total Transactions as well as the total dollar amount and report
number on the right hand side.

ServerEPS User's Guide
Chapter 5 293
Approved Transactions Log with Department/User (TRN01a)
The Approved Transactions Log displays a list of all approved transactions for the given dates, broken down by
store number.
This report features the following columns:
Report Headers Description
Store Store markers are used to separate the transactions.
Time The time and date on which the transaction was run.
PO/Ref#
Purchase order or Reference Number.
Not present for all transactions, only for the ones where a purchase order or reference number entered.
Dept Department
User The username entered for the cashier, if entered.
Transaction
The tender and transaction type.
Tenders are represented by a 2 letter code, such as VS indicating Visa. These 2 digit codes are defined in the Card Processing Profile of the Configuration Management GUI for each store.
Default Card codes are listed in Appendix B.
Partial Account #
The first 6 and last 4 digits of the card number. It is never possible to view the full card number in the report service.
Seq #
Sequence Number also known as the System Trace Audit Number (STAN).
This is a semi-unique numeric ID that is generally printed on the receipt and is used to track a transaction during payment processing
Auth Code The authorization number given to the transaction. Used by the host to prove that a specific transaction was authorized.
Local Auth Code
For offline transactions, this is the authorization number given to the transaction at the lane. Transactions that were not taken offline may not have a Local Auth Code.
Approved Amount
The dollar amount the transaction was approved for.
Negative amounts will be displayed in parentheses ().

ServerEPS User's Guide
Chapter 5 294
Report Headers Description
Flags
m = manually entered card number
L = approved for lesser amount
e = Electronic Check Conversion (ECC)
R = RFID (Radio Frequency Identification / Contact-less payment)
s = Offline
o = Override

ServerEPS User's Guide
Chapter 5 295
Declined Transactions Log (TRN02)
This report is a list of transactions that were declined. The Response Code field lists a 2 digit number that indicates
why the transactions were declined; a list of these numbers and their meanings is located in Appendix B.
This report features the following columns:
Report Headers
Description
Store
Store markers are used to separate the transactions.
The reporting service uses a batch number of 0 to indicate the current batch. After a batch is settled, it will receive a new number.
Time The time and date on which the transaction was run.
Lane The lane number for the lane that processed the transaction.
Cashier The number of the cashier that processed the transaction.
Transaction
The tender and transaction type.
Tenders are represented by a 2 letter code, such as VS indicating Visa. These 2 digit codes are defined in the Card Processing Profile of the Configuration Management GUI for each store.
Default Card codes are listed in Appendix B.
Partial Account #
The first 6 and last 4 digits of the card number. It is never possible to view the full card number in the report service.

ServerEPS User's Guide
Chapter 5 296
Report Headers
Description
Resp Code
The specific response code returned by the end host for this transaction, prefixed by a 3 character identifier that indicates what host or component returned the code.
For a list of hosts and their 3 character identifiers, refer to Appendix C.
If the 3 digit code is “EPS-“ refer to Appendix B for a listing of internal response codes.
Seq #
Sequence Number also known as the System Trace Audit Number (STAN).
This is a semi-unique numeric ID that is generally printed on the receipt and is used to track a transaction during payment processing
Amount The dollar amount of the transaction.
Negative amounts will be displayed in parentheses ().
Flags
m = manually entered card number
L = approved for lesser amount
e = Electronic Check Conversion (ECC)
R = RFID (Radio Frequency Identification / Contact-less payment)
s = Offline
o = Override
Host Text The host text line in each transaction displays the text returned by the host, if any.
The summary section at the bottom displays the total number of transactions, the page number you are viewing
along with the date and time the report was run, as well as the report number on the right hand side.

ServerEPS User's Guide
Chapter 5 297
Overridden Transactions Log (TRN30)
The Overridden Transactions Log report lists all overridden transactions along with the declined information from
the original transaction.
This report features the following columns:
Report Headers Description
Time The time and date on which the transaction was run.
Lane The lane number for the lane that processed the transaction.
Cashier / Manager
The number of the cashier that processed the transaction.
Transaction
The tender and transaction type.
Tenders are represented by a 2 letter code, such as VS indicating Visa. These 2 digit codes are defined in the Card Processing Profile of the Configuration Management GUI for each store.
Default Card codes are listed in Appendix B.
Partial Account #
The first 6 and last 4 digits of the card number. It is never possible to view the full card number in the report service.
Resp Code
The specific response code returned by the end host for this transaction, prefixed by a 3 character identifier that indicates what host or component returned the code.
For a list of hosts and their 3 character identifiers, refer to Appendix C.
If the 3 digit code is “EPS-“ refer to Appendix B for a listing of internal response codes.

ServerEPS User's Guide
Chapter 5 298
Report Headers Description
Seq #
Sequence Number also known as the System Trace Audit Number (STAN).
This is a semi-unique numeric ID that is generally printed on the receipt and is used to track a transaction during payment processing
Amount The dollar amount of the transaction.
Negative amounts will be displayed in parentheses ().
Flags
m = manually entered card number
L = approved for lesser amount
e = Electronic Check Conversion (ECC)
R = RFID (Radio Frequency Identification / Contact-less payment)
s = Offline
o = Override
The summary section at the bottom displays the total number of transactions that have been overridden, along with
the date and time the report was run as well as the report number on the right hand side.

ServerEPS User's Guide
Chapter 5 299
Voided Transactions Totals (TRN03)
This report displays a list of all the stores selected along with a summary total of how many voids occurred in total
for that group of stores.
This report features the following columns:
Report Headers Description
Store The store’s name
Address Store address
Phone Store Phone Number
Tender This column shows a list of all the tenders for which voids occurred. If a tender has no voids associated with it for the time period the report is for, the tender will not be listed.
Voided Purchases
The ‘#’ column displays a count of the number of voided Purchases performed by each card type.
The Amount column presents a sum of the total dollar amount of the voided transactions, by card type.
Voided Returns
The ‘#’ column displays a count of the number of voided Returns performed by each card type.
The Amount column presents a sum of the total dollar amount of the voided transactions, by card type.
Voided Activations
The ‘#’ column displays a count of the number of voided Activations performed by each card type.
The Amount column presents a sum of the total dollar amount of the voided transactions, by card type.
Voided Deactivations
The ‘#’ column displays a count of the number of voided Deactivations performed by each card type.
The Amount column presents a sum of the total dollar amount of the voided transactions, by card type.

ServerEPS User's Guide
Chapter 5 300
The summary section at the bottom displays the page number and the date and time the report was run as well as the
report number on the right hand side.

ServerEPS User's Guide
Chapter 5 301
Voided Transactions Log (TRN04)
The Voided Transactions Log displays a list of voided transactions for the stores and dates selected, broken up by
store number.
As shown above, a blue divider row listing the Store and Batch number will be displayed just under the row of
headers.
This report features the following columns:
Report Headers
Description
Store
Store markers are used to separate the transactions.
The reporting service uses a batch number of 0 to indicate the current batch. After a batch is settled, it will receive a new number.
Time The time and date on which the transaction was run.
Lane The lane number for the lane that processed the transaction.
Cashier The number of the cashier that processed the transaction.
Transaction
The tender and transaction type.
Tenders are represented by a 2 letter code, such as VS indicating Visa. These 2 digit codes are defined in the Card Processing Profile of the Configuration Management GUI for each store.
Default Card codes are listed in Appendix B.
Partial Account #
The first 6 and last 4 digits of the card number. It is never possible to view the full card number in the report service.
Approved Displays whether the void was approved (True) or declined (False).
Host Code The response code returned by the host processor.
Seq #
Sequence Number also known as the System Trace Audit Number (STAN).
This is a semi-unique numeric ID that is generally printed on the receipt and is used to track a transaction during payment processing
Amount The dollar amount of the transaction.
Negative amounts will be displayed in parentheses ().

ServerEPS User's Guide
Chapter 5 302
Report Headers
Description
Flags
m = manually entered card number
L = approved for lesser amount
e = Electronic Check Conversion (ECC)
R = RFID (Radio Frequency Identification / Contact-less payment)
s = Offline
o = Override
The summary section at the bottom displays the total number of transactions, the page number you are viewing
along with the date and time the report was run, as well as the report number on the right hand side.

ServerEPS User's Guide
Chapter 5 303
Credit to Debit Activity Log (TRN05)
This report displays a list of all Successful and Unsuccessful Credit-to-Debit conversion attempts.
This report is sorted with Successful Conversions listed first, and Unsuccessful Conversions listed directly
afterward.
Successful credit-to-debit conversions are transactions that started as Credit and were converted to Debit before
being sent to the host for approval. Unsuccessful credit-to-debit conversions include any transaction where credit-to-
debit was attempted, but failed, including being offline to the host when Debit was not designated as an acceptable
offline tender (in which case the transaction would be converted back to credit), or the amount of the transaction
being below the Minimum Credit to Debit Conversion value, as set in the Card processing profiles. Additionally, if
customer selects "NO" to "Do You Know Your PIN?" or if the customer presses the ‘Credit’ button on terminal or
otherwise cancels, the conversion is logged as failed.
As shown above, a blue divider row listing the section type as Successful or Unsuccessful will be displayed just
under the row of headers.
This report features the following columns:
Report Headers Description
Lane:Cashier This field displays the Lane and Cashier numbers. The Lane number is listed first, then a colon, and then the Cashier number.
Time The time and date on which the transaction was run.

ServerEPS User's Guide
Chapter 5 304
Report Headers Description
Transaction
The tender and transaction type. For example ‘Credit Purchase’ would have a tender type of credit and a transaction type of Purchase.
Tenders may be represented by a 2 letter code, such as VS indicating Visa. These 2 digit codes are defined in the Card Processing Profile of the Configuration Management GUI for each store.
Default Card codes are listed in Appendix B.
Card Type The specific card type that was used in the transaction.
Partial Account #
The first 6 and last 4 digits of the card number. It is never possible to view the full card number in the report service.
Seq #
Sequence Number also known as the System Trace Audit Number (STAN).
This is a semi-unique numeric ID that is generally printed on the receipt and is used to track a transaction during payment processing
Amount The dollar amount of the transaction.
Negative amounts will be displayed in parentheses ().
Approved True or False field.
Indicates if the transaction was Approved (True) or Declined (False).
Offline True or False field.
Indicates whether the transaction was taken offline (True) or Online (False).
The summary section at the bottom displays the page number you are viewing along with the date and time the
report was run, as well as the report number on the right hand side, Along with the following:
Report Headers Description
Approved / Total – Transactions
This line shows the number of approved Credit-to-Debit transactions (before the /) out of the total number of Credit-to-Debit transactions that were attempted (displayed after the /).
This is not the ratio of Successful to Unsuccessful transactions, as the approved amount counts both Successful and Unsuccessful transactions as long as the transaction were approved.
Approved Transaction Amount Total
Total dollar amount of transactions that were successfully converted from credit to debit.

ServerEPS User's Guide
Chapter 5 305
Pre-Auth / Pre-Auth Completion (TRN10)
The Pre-Auth and Pre-Auth Completion report displays all Pre-Authorization transactions and Completion
transactions for the dates and stores selected.
The transactions are listed in the order they were received, divided up by store. Pre Authorization and Pre-Auth
Completion transactions are linked.
This report features the following columns:
Report Headers Description
Store Store markers are used to separate the transactions.
Time The time and date on which the transaction was run.
Lane The lane number for the lane that processed the transaction.
Cashier The cashier number of the cashier that ran the transaction.
Transaction
The tender and transaction type. For example ‘Credit Purchase’ would have a tender type of credit and a transaction type of Purchase.
Tenders may be represented by a 2 letter code, such as VS indicating Visa. These 2 digit codes are defined in the Card Processing Profile of the Configuration Management GUI for each store.
Default Card codes are listed in Appendix B.
Partial Account #
The first 6 and last 4 digits of the card number. It is never possible to view the full card number in the report service.
Seq #
Sequence Number also known as the System Trace Audit Number (STAN).
This is a semi-unique numeric ID that is generally printed on the receipt and is used to track a transaction during payment processing

ServerEPS User's Guide
Chapter 5 306
Report Headers Description
Auth Code The code received from the authorizing host indicating authorization.
Local Auth Code
For offline transactions, this is the authorization number given to the transaction at the lane. Transactions that were not taken offline may not have a Local Auth Code.
Approved Amount
The dollar amount the transaction was approved for.
Flags
m = manually entered card number
L = approved for lesser amount
e = Electronic Check Conversion (ECC)
R = RFID (Radio Frequency Identification / Contact-less payment)
s = Offline
o = Override

ServerEPS User's Guide
Chapter 5 307
Detailed Cashier Report (TRN20)
The cashier report displays all the transactions processed by each cashier for the dates selected. This report separates
Approved transactions and Declined transactions into individual lists, by cashier number.
This report features the following columns:
Report Headers Description
Store Store markers are used to separate the transactions.
Time The time and date on which the transaction was run.
Lane The lane number for the lane that processed the transaction.
Transaction
The tender and transaction type. For example ‘Credit Purchase’ would have a tender type of credit and a transaction type of Purchase.
Tenders may be represented by a 2 letter code, such as VS indicating Visa. These 2 digit codes are defined in the Card Processing Profile of the Configuration Management GUI for each store.
Default Card codes are listed in Appendix B.
Partial Account #
The first 6 and last 4 digits of the card number. It is never possible to view the full card number in the report service.
Seq #
Sequence Number also known as the System Trace Audit Number (STAN).
This is a semi-unique numeric ID that is generally printed on the receipt and is used to track a transaction during payment processing
Tran Amount The dollar amount of the transaction.
Negative amounts will be displayed in parentheses ().
Approved Amount
The dollar amount the transaction was approved for.
This amount will only differ from the Tran Amount if the host returns a partial approval, such as with Gift Cards or FSA, or if the transaction was declined.

ServerEPS User's Guide
Chapter 5 308
Report Headers Description
Flags
m = manually entered card number
L = approved for lesser amount
e = Electronic Check Conversion (ECC)
R = RFID (Radio Frequency Identification / Contact-less payment)
s = Offline
o = Override

ServerEPS User's Guide
Chapter 5 309
Detailed Lane Report (TRN21)
The cashier report displays all the transactions processed at each lane for the dates selected. This report separates
Approved transactions and Declined transactions into individual lists, by store and lane number.
This report features the following columns:
Report Headers Description
Store Store markers are used to separate the transactions.
Time The time and date on which the transaction was run.
Cashier The number of the cashier that processed the transaction.
Transaction
The tender and transaction type. For example ‘Credit Purchase’ would have a tender type of credit and a transaction type of Purchase.
Tenders may be represented by a 2 letter code, such as VS indicating Visa. These 2 digit codes are defined in the Card Processing Profile of the Configuration Management GUI for each store.
Default Card codes are listed in Appendix B.
Partial Account #
The first 6 and last 4 digits of the card number. It is never possible to view the full card number in the report service.
Seq #
Sequence Number also known as the System Trace Audit Number (STAN).
This is a semi-unique numeric ID that is generally printed on the receipt and is used to track a transaction during payment processing
Tran Amount The dollar amount of the transaction.
Negative amounts will be displayed in parentheses ().

ServerEPS User's Guide
Chapter 5 310
Report Headers Description
Approved Amount
The dollar amount the transaction was approved for.
This amount will only differ from the Tran Amount if the host returns a partial approval, such as with Gift Cards or FSA, or if the transaction was declined.
Flags
m = manually entered card number
L = approved for lesser amount
e = Electronic Check Conversion (ECC)
R = RFID (Radio Frequency Identification / Contact-less payment)
s = Offline
o = Override

ServerEPS User's Guide
Chapter 5 311
All Users Report (DMT01)
A new report is available that displays a list of all the users set up for a company, including the RootAdmins group
users.
This report shows both active and inactive users and displays the last login.
This report features the following columns:
Report Headers Description
Group The user group. Display of the users broken down by defined groups to which the users belong.
User Name The login name of the user.
Full Name The users full name.
Last Login Time and date of the last time the user logged in.

ServerEPS User's Guide
Chapter 5 312
PIN Pad Serial Number Report (DMT25)
The PIN Pad Serial Number Report the Serial Number of the Pin Pad at each POS lane. This report can be used for
tracking the terminals in use at store locations.
All serial numbers that have been reported will be displayed. If a lane has had more than one terminal attached, the
serial numbers for all the terminals will be shown, along with the date they were first implemented.
Serial Number reporting requires the use of OpenEPS version 825.0 or higher at the POS lanes. Lower versions of
OpenEPS do not report the terminal serial numbers. Additionally, MX800 series terminal must be on terminal code
version 220m or higher.
This report features the following columns:
Report Headers Description
Store Store markers are used to separate the transactions.
Lane The lane number on which the PIN pad was located.
PIN Pad Changed Date
The first date the given serial number was reported. Only the first date is recorded; if a new serial number is reported that number will receive its own
Pin Pad Serial Number
The serial number of the PIN pad. Not all PIN pads report their serial number.
If a new serial number is detected (one that has not already been recorded) a new log entry is created for it.

ServerEPS User's Guide
Chapter 5 313
Transaction List (TRN40)
The Transaction List report displays a list of transactions in a format similar to that used on the Info Messages
section of the WinEPS main screen. This report is designed to give the user an ‘at a glance’ overview of a selection
of transactions in the order they were processed for the dates chosen.
This report features the following columns:
Report Headers Description
Server Time (UTC)
The time the transaction was processed at the server.
The servers are set to UTC (Coordinated Universal Time), so the Server Time will likely vary from local time.
Transaction Time Time the transaction was processed, listed in local time based on the time stamp provided in the transaction message.

ServerEPS User's Guide
Chapter 5 314
Report Headers Description
Transaction Info
Transaction Info consists of a set of three columns:
Column 1: Type of transaction
Column 2 Masked PAN Purchase and cash back amounts Auth number, Sequence number Lane number checker number
Column 3 Approval or Decline Approval Number or Decline Code

ServerEPS User's Guide
Chapter 5 315
Transaction Count Invoicing Report (TRN41)
The Transaction Count Invoicing Report displays the number of Approved, Decline and TOR transactions for the
selected stores and dates.
This report features the following columns:
Report Headers Description
Approved Transactions
Number of Approved Transactions
Declined Transactions
Number of Declined Transactions
Time Out Reversals
Number of Transactions that were reversed due to a time out.
Generally time outs occur because the POS lane does not receive the response before the transaction timer expires (default 45 seconds).

ServerEPS User's Guide
Chapter 5 316
FSA Transactions Log (TRN50)
This report displays a list of Flexible Spending Account (FSA) transactions processed during the selected time
interval. The report features an amount breakdown for each transaction by the amount placed in each FSA bucket.
This report features the following columns:
Report Headers Description
Store & Batch
Store and Batch markers are used to separate the transactions.
The reporting service uses a batch number of 0 to indicate the current batch. After a batch is settled, it will receive a new number.
Time The time and date on which the transaction was run.
Transaction
The tender and transaction type.
Tenders are represented by a 2 letter code, such as VS indicating Visa. These 2 digit codes are defined in the Card Processing Profile of the Configuration Management GUI for each store.
Default Card codes are listed in Appendix B.
Partial Account #
The first 6 and last 4 digits of the card number. It is never possible to view the full card number in the report service.
Seq #
Sequence Number also known as the System Trace Audit Number (STAN).
This is a semi-unique numeric ID that is generally printed on the receipt and is used to track a transaction during payment processing
Approved Amount
The dollar amount the transaction was approved for.
Negative amounts will be displayed in parentheses ().
FSA Amount The total FSA amount for the transaction.
FSA Rx The portion of the transaction that was in the FSA prescription bucket.
FSA Medical The portion of the transaction that was in the FSA medical bucket.
FSA Dental The portion of the transaction that was in the FSA dental bucket.
FSA Vision The portion of the transaction that was in the FSA vision bucket.
The summary section at the bottom displays the total number of transactions and the sums of each column, along
with the date and time the report was run as well as the report number on the right hand side.

ServerEPS User's Guide
Chapter 5 317
eWIC Variance Report (TRN60)
This report displays a list of eWIC transactions processed during the selected time interval, and is primarily
designed to aid merchants in tracking due to partially approved eWIC orders.
As part of eWIC processing rules, if an eWIC transaction is approved, the POS will receive a response indicating the
approval along with the full amount of the request, even if the transaction was only partially approved. This means
the POS system has no way to track when or if the transaction was actually approved for the full requested amount,
or a lesser amount (generally based upon pre-agreed pricing schemes).
This report features the following columns:
Report Headers Description
Store & Batch
Store and Batch markers are used to separate the transactions.
The reporting service uses a batch number of 0 to indicate the current batch. After a batch is settled, it will receive a new number.
Time The time and date on which the transaction was run.
Lane The lane number for the lane that processed the transaction.
Cashier The number of the cashier that processed the transaction.
Transaction The tender and transaction type.
This report will contain only eWIC transactions.
Partial Account # The first 6 and last 4 digits of the card number. It is never possible to view the full card number in the report service.
Seq #
Sequence Number also known as the System Trace Audit Number (STAN).
This is a semi-unique numeric ID that is generally printed on the receipt and is used to track a transaction during payment processing
Transaction Amount
The dollar amount of the transaction.
Negative amounts will be displayed in parentheses ().

ServerEPS User's Guide
Chapter 5 318
Report Headers Description
Approved Amount
The dollar amount the transaction was approved for.
Negative amounts will be displayed in parentheses ().
Variance Amount The difference between the requested Transaction Amount, and the actual Approved Amount.
Even though this value is displayed as a positive amount, this value represents merchant losses.
Flags
m = manually entered card number
L = approved for lesser amount
e = Electronic Check Conversion (ECC)
H = FSA (Health)
R = RFID (Radio Frequency Identification / Contact-less payment)
s = Offline
o = Override
The summary section at the bottom displays the total number of transactions and the sums of each column, along
with the date and time the report was run as well as the report number on the right hand side.

ServerEPS User's Guide
Chapter 6 319
Store Setup Report (DMT10)
The Store Setup Report displays the store configuration information that is currently in use for transaction
processing. The data displayed on this report is not available for user configuration and may only be changed by
contacting MTXEPS, Inc.
It is recommend that users review this report after initial store setup to ensure that all the settings match
expectations, and that the hosts selected match the host as configured by the user in the Configuration Manager.
This report features the following columns:
Report Headers Description
Services
Lists the services for which the store is signed up.
Yes – Store is signed up for this service.
No – Store is not signed up for this service.
Transaction Processing This section displays the various settings related to processing transactions.
Tender Type Lists the tender types the store is configured for.
Host Lists the host that each tender will be routed to.
Merchant ID Lists the Merchant ID in use for that host and tender type.
Terminal ID Lists the Terminal ID in use for that host and tender type.
State Code Lists the State Code in use for that host and tender type.
Bank ID Lists the Bank ID in use for that host and tender type.
Check Services Lists the Check Services in use for that host and tender type.
Encryption Lists the Encryption in use for that host and tender type.

ServerEPS User's Guide
Chapter 6 320
Chapter 6
Transaction Search & Receipt Storage Service
The Transaction Search feature allows the lookup of specific transactions by using a variety of possible search
criteria. Once a transaction is located, all the transaction details are displayed, including an image of the
transaction’s receipt with associated customer signature if available.
Transaction Search
The Transaction Search screen may be used to locate a specific transaction. Once a transaction is located, all the
transaction details can be displayed, including the linked receipt and associated customer signature.

ServerEPS User's Guide
Chapter 6 321
Once on this page, a list of search criteria will be displayed. You may search for a transaction using the following
criteria:
Search Criteria Description
Store This dropdown will display a list of available stores; using this criterion can limit the search to the single store that is selected, or the user may select All Stores.
Tender Allows selection of a specific tender type, such as Credit to Debit.
Account First 6 Allows searching by the first 6 digits of the account number for the payment card used in the transaction.
Account Last 4 Allows searching by the last 4 digits of the account number for the payment card used in the transaction.
Transaction Determines the transaction type to be searched for, such as Purchase or Return.
Sequence #
Sequence Number, also know as the System Trace Audit Number (STAN).
This is a semi-unique numeric ID that is generally printed on the receipt and is used to track a transaction during payment processing
Amount Search by the exact amount of the transaction.
Date (From, To) Calendar Controls
Start date is the date to start the search on.
Date range is the date to stop searching at. The maximum range is 15 days
Lane Search by the lane number on which the transaction was run.

ServerEPS User's Guide
Chapter 6 322
In addition to the basic criteria, the following advanced criteria are available in the Advanced Search Options box. If
this box is not visible, click the double down arrow to expand it.
Advanced Search Criteria Description
Cashier Search by the cashier number of the cashier that ran the transaction.
Pad Serial Search by the serial number reported by the PIN Pad
Department Search by the department.
This field is used only with certain POS integrations and is not present for all transactions.
Approved Search by whether the Transaction was approved.
Selecting ‘No’ will display Declined transactions.
User Search by the username entered for the cashier, if available.
Offline Search by whether the transaction was offline (Yes) or Online (No)
PO # Allows search by the Purchase Order Number.
Not all transactions have an associated PO#.
TOR Search by whether the transaction was a Time Out Reversal.
The more criteria entered, the narrower the search becomes; therefore, it is recommended to enter several pieces of
information known about a transaction when searching.
The Sequence Number can be used to quickly locate a transaction. This number is printed on the receipt for each
transaction. There is a small chance that a single Sequence Number will be repeated but in most circumstances,
searching by Seq # will yield only a single transition result.

ServerEPS User's Guide
Chapter 6 323
Once you have completed entry of the search criteria you may click the Search button to display the resulting list of
matching transactions.
Show Details and Filters
The Show Details option on the right side of the screen can be used to display a larger number of detail columns
than are displayed by default.
Many of these columns have their own dropdown list to provide the user with a way to quickly filter the displayed
transactions.
Flags Column
The Flags column can be used to filter the transactions displayed, using one of the flags provided in the dropdown
box.

ServerEPS User's Guide
Chapter 6 324
Flags Description
All (No Filtering by this field)
Manual (m) Manually entered transaction; card was not swiped
Approved Lesser Amt (L)
Transaction was approved for a lower amount than it was initially requested for (customer likely use alternate method to pay for remaining amount)
RFID (R) Payment was provided by the customer using an RFID read on the terminal device instead of magnetic card swipe
ECC (e) Electronic Check Conversion; paper check was returned to customer and the transaction was processed electronically
Offline (s) Transaction was taken in offline (or Stand In) mode
FSA (H) Flexible Spending Account / Health Benefits transaction
Override (o) Cashier/manager override of a soft decline, such as over the floor limit
Transaction and Receipt Details
Clicking ‘Details’ link next to any of the transactions listed in the search will bring up the details for that transaction,
including the receipt.

ServerEPS User's Guide
Chapter 6 325
Transaction Details Description
Company #
Company Name
Store # Store number; store in which the transaction was run
Store Name
Lane The lane number on which the transaction was run.
Sequence # Sequence Number, also know as the System Trace Audit Number (STAN).
A number that is used to track a transaction during payment processing
Original Sequence #
For resubmits, the original sequence number for the transaction is listed.
Local Time Time the transaction was processed, based on the location of the POS.
UTC Coordinated Universal Time that the transaction was processed

ServerEPS User's Guide
Chapter 6 326
Transaction Details Description
Business Date Date on which the transaction was processed.
Card Type Type of card used in the transaction
Account # The first 6 and last 4 digits of the card number used in the transaction.
Transaction Transaction Type
Tender Transaction Tender
Void Whether the transaction was a void transaction.
Voided Whether the transaction has been voided.
TOR Whether the transaction was a Time Out Reversal.
Host Type Displays the host to which the transaction was sent.
Host Response The response type (Approved/Declined) and the response code returned by the host.
Auth Code The code received from the authorizing host indicating authorization.
Local Auth Code For offline transactions, this is the authorization number given to the transaction at the lane. Transactions that were not taken offline may not have a Local Auth Code.
Settled Yes/No
Displays whether the transaction is part of a settled day, or has not yet been settled.
Amount Amount the transaction was submitted for.
Approved Amount the transaction was approved for.
Cash Back Amount of cash back for the transaction.
Approved Cash Back
Amount of cash back for the transaction.
Approved Checkbox indicating whether the transaction was approved. A check indicates approval.
Override This checkbox indicates whether the transaction had an override associated with it. A check indicates the transaction was overridden.
Offline
A check in this checkbox indicates that the transaction was originally taken in offline stand-in mode, and subsequently forward to the host.
An offline transaction will generally have a Host Response approval number that begins with “LA” for Local Approval.
Department
Department
This field is used only with certain POS integrations and is not present for all transactions.
May not be present for all transactions.
User The username entered for the cashier, if entered.
May not be present for all transactions.
Cashier The cashier number of the cashier that ran the transaction.
Pin Pad Serial # The serial number of the Pin Pad the transaction was processed on, if reported
Data Center Data Center indicates which data center the transaction was processed to, center 1 or center 2.
Velocity Info Velocity Info is only applicable to check transactions and is only available if the host supplied velocity data on a check decline.
Receipt & Signature Image
If receipt and signature data are available for the displayed transaction, a JPEG image of the receipt will be displayed on the right hand side of the screen.
Users may right click the receipt image and select “Save As” to save off a local copy.
If a receipt is present, but does not contain a signature, the text NO SIGNATURE AVAILABLE will appear on the
JPEG image, as shown below.

ServerEPS User's Guide
Chapter 6 327

ServerEPS User's Guide
Chapter 6 328
Printing Transaction Search Results
Search results can be printed by selecting the print tab at the upper right; this will display the Print page where the
printing details can be configured.
The Print option will print the results of the search; however the Quick Filter can be used to limit the search further,
and when the Quick Filter is used, the Print tab will print only the results within the search that also match the Quick
Filter.
Printing Tab Details
Description
Print Name The Title of the report, printed at the top of the page.
May be changed by entering a new name.
Total Records
The total number of records to be printed is listed.
The Quick Filter on the results page can be used to limit the number of items printed. You may use the Quick Filter to narrow the search results; the print option will only print the results that match the Quick Filter.
Number of Records
The number of records to print per page.
Page
Determines what page to print.
Only one page will print at a time, so the selected page will be the only page to print.
Comments This page includes a section to place user comments.
If comments are included, they will be printed at the top of the report page.

ServerEPS User's Guide
Chapter 6 329
Printing Tab Details
Description
Print Button Clicking the Print button will print the search results, using the settings selected above.
Printing is limited to 1 page or 1000 records at a time to prevent overloading the data server. To print an entire list
that contains more than 1000 records, it is necessary to print out the individual pages separate by selecting each page
and then clicking the print button.
Example Print results:

ServerEPS User's Guide
Chapter 7 330
Export Transaction Search Results to Excel
The Transaction Search results can be exported to Excel by selecting the “Export” Link at the bottom right of the
Search Results window.
This exports all the visible transactions to excel where they can be manipulated or printed by the user.

ServerEPS User's Guide
Chapter 8 331
Chapter 7
Debit BIN File Update Service
The ServerEPS BIN Update Service is designed to provide automated BIN file updates. Using the WinEPS/Dial
Backup Client configuration, the ServerEPS Client installed on the WinEPS server connects to the remote
ServerEPS machine on a daily basis and downloads the latest Debit BIN file. This is a full BIN download, but future
releases are planned to include partial downloads (updates) so as to reduce network traffic.
Currently, the BIN Update Service is only fully automated when using the WinEPS/Dial Backup Client
configuration setup. Use with the other two configuration methods is limited at present and requires manual
intervention; contact MTXEPS for specific information on requirements for using ServerEPS BIN Update Service
with either OpenEPS/Dial Backup Client or OpenEPS Direct.
Installation & Setup information is provided in the ServerEPS Installation and Configuration Guide.

ServerEPS User's Guide
Chapter 8 332
Chapter 8
CSV/XML Report File Export
ServerEPS CSV/XML Export
ServerEPS offers an export of company-wide transaction data through the use of a specially formatted URL file
request.
The Report Export is provided in addition to the standard Web Services reporting to allow customers to utilize the
raw data provided to generate their own custom reports through outside programs.
The export is provided in both CSV (comma delimited text format), and XML formats to enable a broad range of
consuming applications to make use of the data. It is referred to as just the Report Export for convenience.
The Report Export is available to all companies using ServerEPS.
As with the whole Web Services reporting interface, the Report Export contains no sensitive card data, such as PAN
or track data.
Available Exports
Initially the report export function provided only a single report option for export; today, however, several different
reports are available. New reports may be added in the future, and a query URL can be used to determine the
currently available reports. The following reports are available:
All Transactions eWIC APL Offline Pending Offline Final Disposition Telecheck Transactions Token Report

ServerEPS User's Guide
Chapter 8 333
Web Services Setup for Report User
Downloading the CSV file requires the use of a user login, both name and password. Therefore, prior to performing
a report export, a user account that has the appropriate rights will need to be set up in the Web Services interface.
Follow the steps below to set up a user account for the Report Export feature.
1. Log in to the Web Services using an account that has the rights to create and modify users and user groups.
2. Once you have logged use the Administration drop down to select the User Management option
3. From the User Management screen, select the “Edit Permissions” option at the top in order to open the Group
Management page.
4. Once the Group Management page is open, select the Option to create a New User Group.

ServerEPS User's Guide
Chapter 8 334
5. The new Group Information page will open. At the top of the screen in the Group Name section, enter a group
name of “Report Export” or a similar group name in order to easily recognize what the group is intended for.
6. After entering the Group Name, use the “All” and “None” option boxes on the far right to set all permissions to
“None” for each permission category. It may be convenient to use the minus symbol next to each category to
collapse the category instead of scrolling through them.
7. After all permissions are set to None (all rights are unchecked), locate the Report Permissions section. In that
section, set the View rights to true by checking the box as shown below. This will permit users in the group to
view all
If a new Report Export is added in the future, it will be necessary to return to this page and check the View
box for the new report, since when new options are added, they are not turned on by default.

ServerEPS User's Guide
Chapter 8 335
8. Save the new group by selecting the “Create” button at the bottom of the screen.
9. Exit the Group Management page and return to the User Management page.
10. On the User Management page, select the option at the top to create a New User.
11. The New User account page will be displayed. On this page, Enter the Login name and other data for the user
account. Note the Login name and password, as those will be needed to access the Report Export as part of its
URL.

ServerEPS User's Guide
Chapter 8 336
12. Set the Status to Active, and the User Store Access to “Access to all stores and groups”.
13. Use the Permission Level dropdown to select the Report Export group you just created in order to give this
account the correct rights needed to export the CSV file.
14. Click the Create User button to create and save the user information.
Managing the Report Export User Account
The Account set up for Report Export is not intended to be used by any user to log into the Web Services GUI.
Doing so may result in a change of the Password associated with the account; naturally if the password is changed,
then any scripts responsible for consuming the Report Export will need to be updated with the new password.
For the purposes of the Report Export feature, an expired password will be ignored, but the password must still be
correct. This means that it is not necessary to regularly update the password for the user account designated for
Report Export as required for other accounts, but also if the account password is changed for any reason, then any
automated process will likely need to be updated with the new password as well.

ServerEPS User's Guide
Chapter 8 337
CSV/XML Download Instructions
The assumption made is that the consumption of the Report Export will be performed by an automated process. The
following information can be used to create a valid URL for connecting to the Report Export process. The URL
format below was chosen specifically to enable a simple batch process to acquire the transaction data for a company
each day without requiring the URL message to be changed each time.
When a proper URL is used, the web server will respond by supplying the requested export as an immediate file
download.
Base Report URLs
Listing of Available Reports
The URL to determine what reports are available for export is:
https://www.servereps.com/ServerEPS/Export/Listing.xpt
This will return a listing of the reports that are currently available to be requested. Each section will detail the
available report, as well as parameter requirements for requesting it, such as the need to include the date. The
response will also include restrictions on any requests, such as the number of times a request can be performed in
total or as a daily limit.
All Transactions Report
The base URL for the Report Export is:
https://www.servereps.com/ServerEPS/Export/AllTransactions.xpt
This provides a full export of transactions processed.
Offline Final Disposition & Offline Pending
URL for Offline Final Disposition & Offline Pending Transactions exports:
https://www.servereps.com/ServerEPS/Export/OfflineFinalDisposition.xpt
https://www.servereps.com/ServerEPS/Export/OfflinePendingTransactions.xpt
These provide a report on offlines; Final Disposition lists the disposition (final status, approved/declined) of the
offline transactions. The Offline Pending list provides a ‘snapshot’ of the offlines that are in the offline queues at the

ServerEPS User's Guide
Chapter 8 338
data center at the time the data export is processed. The Pending list is naturally volatile as transitions may be added
to or processed and removed from the queue at any time.
Telecheck Transactions Report
The base URL for the Report Export is:
https://www.servereps.com/ServerEPS/Export/TelecheckTransactions.xpt
Token Report
The base URL for the Report Export is:
https://www.servereps.com/ServerEPS/Export/TokenExport.xpt
Required URL Parameters
Several parameters must be appended to the base URL in order to successfully export a CSV. The following table
provides the list of parameters available with the Report Export:
Example URL:
https://www.servereps.com/ServerEPS/Export/AllTransactions.xpt?companynumber=999&username=ExampleUser
&password=ExamplePassword&format=CSV&Date=04/01/2014
Parameter Description
CompanyNumber The Company Number for the company the CSV will be generated from.
Username Username of the account set up with the Report Export right
Password Password for the Report Export account; must be correct but may be ‘expired’
Format
Valid Formats: CSV XML
(Listing of Available Reports does not use Format)

ServerEPS User's Guide
Chapter 8 339
Parameter Description
Date
Format: mm/dd/yyyy
If no Date is included in the request the default will be yesterday.
Restricted to the last 7 days.
(Offline Pending Transactions does not require a date, is it lists current information only)
(Listing of Available Reports does not use a date)
In most cases, it is expected that an automated process will use the URL each day to acquire the previous day’s
totals. At minimum, the CompanyNumber, Username, Password, and Format parameters must be included in your
request. The Date parameter is optional and only required when requesting a date other than the previous day.
The parameters must be separated from the base URL by a “?” symbol.
Parameters follow the format of “Parameter=Value” in the URL, and each parameter/Value set is separated by the
“&” symbol.
Export Restrictions
Generally it is expected that the export of a CSV will be performed once a day, to gather the previous day’s totals. It
is possible to request an export for previous dates using the Date parameter in the URL; however, only the last 7
days of data are available to export. Requesting a date prior to that, or a future date, will cause the export to fail.
As the expectation is a single request for a given company each day, the number of export requests has been limited.
Only 5 export requests may be made per day for each company. If you have exceeded your limit the export will fail,
and it will be necessary to wait until the next day to make another export request.
Export Errors
After making the export request, the consuming application should check the ‘content type’ of the response in order
to determine if the export was successful or whether an error was generated. Content type will be either
‘application/excel’ for Report Exports or ‘text/xml' for the XML export type or for errors.

ServerEPS User's Guide
Chapter 8 340
Errors will be generated in XML format, with a Result of “Failure”. Examples:
<?xml version="1.0" encoding="utf-8" ?>
<MtxExportingResult Result="Failure" Date="4/9/2010" Time="10:33:04 AM">
<Error Type="Authorization">InvalidUser</Error>
</MtxExportingResult>
<?xml version="1.0" encoding="utf-8" ?>
<MtxExportingResult Result="Failure" Date="4/9/2010" Time="10:33:04 AM">
<Error Type="FormatNotSupported">The format 'XLS' is not supported.</Error>
</MtxExportingResult>

ServerEPS User's Guide
Chapter 8 341
CSV Specifications
The specifications below detail how the information for the various exports will be provided in CSV format.
NOTE: The Field Size column indicates the type and size of the field, as defined for Microsoft SQL database.
All Transactions Specification
Item #
Column Title Field Type/Size
Description
1 Id bigint Transaction ID in the database
2 ServerId tinyint The datacenter into which the transaction was received
3 BatchId int ID for the batch this transaction is a member of
4 BusinessDate datetime
5 HostType int
1 Shazam
4 Chase
6 SoluPay
7 Concord H&C
8 FifthThird
11 ADS
12 Elavon
13 RBS Lynk
14 ACI-KVAT
15 Concord EPC
6 CardType smallint
Fourth position from the right is the tender type
Rightmost 3 are the card type within that tender.
Currently credit is the only one that breaks out card types
2001 Visa
2002 MasterCard
2003 American Express
2004 Discover
7 CardProcId char 2 This is the Card Type sent in from OpenEPS – configurable in the Configuration Manager
8 CompanyNumber Int
9 StoreNumber int
10 MessageCode char 2 Always “00”

ServerEPS User's Guide
Chapter 8 342
Item #
Column Title Field Type/Size
Description
11 TenderCode char 2
1 Debit
2 Credit
3 EBT FS (electronic food stamp)
4 EBT CA (electronic cash benefits)
5 Private Debit
6 Private Credit
7 User Defined 1
8 User Defined 2
9 Check Authorization
10 PIN change
11 Balance Inquiry EBT FS
12 Balance Inquiry EBT CA
13 Gift Card
14 Phone Card
15 Fleet Card
16 PrePaid Wireless
17 ACH
18 Generic EBT (not for use by POS)
19 Self-Checkout Biometrics
20 ConnectPay
21 eWIC
12 TransactionCode char 2
1 Purchase
2 Return
3 Force (Voice Authorization / Voucher)
4 Balance Inquiry
5 PIN Change
6 Void Last (void the last or previous transaction)
7 Post Void using Post Transaction Number
8 Post Void using MTX Sequence Number
9 Card Activation
10 Card Recharge
11 Card Deactivate
12 Pre-Authorization
13 Pre-Authorization Completion
14 Pre-Activation
15 Voucher Return (for EBT FoodStamps)
16 Refresh
13 TranDateTime datetime Date/Time from the POS
14 STAN Int Sequence Number
15 AuthCode char 6 AuthCode from the host
16 ResponseCode char 3 Response code sent to the lane
17 VoidFlag Bit
1 = True 0 = False
(Note: When a void transaction is received, the web service will attempt to match to the original transaction. If it is matched, the original transaction will have its ‘HasBeenVoided’ flag set to true

ServerEPS User's Guide
Chapter 8 343
Item #
Column Title Field Type/Size
Description
18 TORFlag char 1
Indicates this is a Time Out Reversal
Y TOR was matched to original
U TOR received but unable to match to original
19 OverrIdeFlag Bit Indicates this transaction was an override
20 OfflineFlag Bit Indicates this transaction was offline
21 IsFsaCard Bit Indicates that the lane identified this as an FSA card
22 AccountNumberFirst6 char 6 First 6 digits of the PAN
23 AccountNumberLast4 char 4 Last 4 digits of the PAN
24 EntryMode char 1
B Barcode CO eCommerce (Computer Order) E Chip Card EM EMV Fallback to Manual F EMV Fallback to Swipe EC EMV Contactless M Manually Entered by Cashier C Manually Entered by Customer (Note: Only Manual is logged in the CSV, without differentiation between Customer or Cashier entry, so all manual EntryMode value should be “M”) P Swiped at POS R RFID S Swiped [Blank] This field will be blank or be a space character if card information had not been received
25 TransactionAmount money Amount send to the host for authorization
26 ApprovedAmount money Amount that was approved by the host
27 CashBackAmount money
28 PONumber char 12
29 LaneNumber char 4
30 CashierNumber char 10
31 ManagerNumber char 10
32 Department char 20 (if sent from lane)
33 UserId char 40 (if sent from lane)
34 HostDisplayText char 99 Display Text returned from the host
35 EccFlag Bit
36 CreditToDebitFlag char 1
D Credit to Debit conversion
C Credit to Debit to Credit conversion (typically due to offline)
37 OriginalStan Int Used to indicate the original STAN for offline, void and TOR transactions
38 HostResponseCode char 3 Response code received from the host
39 IsApproved Bit True indicates transaction was approved
40 HasBeenVoIded Bit True indicates this transaction was voided
41 IsTraining Bit True indicates this transaction is a training transaction
42 UniversalTime datetime UTC time that the data center received the transaction
43 ApprovedCashBackAmount money Cashback amount approved by the host
44 LocalAuthCode char 6 AuthCode assigned at the lane (used for stand-in)
45 MerchantNumber char 16 Assigned by host
46 TerminalId char 8 Assigned by host
47 POSTranNumber char 30 (if set by POS)

ServerEPS User's Guide
Chapter 8 344
Item #
Column Title Field Type/Size
Description
48 RetrievalReferenceNumber char 12
49 HostRetrievalNumber char 15
50 UPC char 14
51 CheckType char 2
P Personal
E Payroll
B Business
G Government
W WIC
S Social Security
R Tax Refund
C Cashier’s Check
T Traveler’s Check
M Money Order
A ACH
O Other
I Internal Payroll (used for when a store is cashing its own payroll checks, allows handling the accounting differently)
D Manufacturers Rebate
52 FeeAmount money
53 TaxAmount money
54 TipAmount money
55 FsaAmount money
56 FsaRxAmount money
57 FsaMedicalAmount money
58 FsaDentalAmount money
59 FsaVisionAmount money
60 VoucherNumber char 15 (if sent from lane)
61 LaneType char 1
F Fuel Unattended
G Attended
U Grocery Unattended
62 ErrorCode Int Indicates a server side error. If this is not zero, a response was not received from the host
63 CheckVelocity char 500 Check velocity data received from host
64 CustomerZipCode char 10
65 CustomerPhoneNumber char 20
66 DisplayText char 99 Display Text sent to the lane
67 CustomerCity char 40
68 CustomerState char 2
69 MailOrderType tinyint (used for eCommerce)
70 ECommerceData char 3 (used for eCommerce)
71 ManagerNumberPos char 20 Manager number for overrides local to the lane (i.e. overriding a floor limit), but the manager number is not sent to the host
72 ActivationBatch char 12 (used for gift card batch activation)
73 CurrencyCode char 5
74 PanLength tinyint

ServerEPS User's Guide
Chapter 8 345
Item #
Column Title Field Type/Size
Description
75 UUId char 40
76 IsCvv2Present bit True if CVV2 was sent to the host
77 IsBiometrics bit
78 EccProductCode char 6
79 ProgramCode char 5
80 HostParameters char 1024
81 PinPadSerialNumber char 20
82 IsPartialAuthSupported bit
83 Odometer char 10 (used for fleet)
84 VehicleId char 20 (used for fleet)
85 DriverId char 20 (used for fleet)
86 FleetData char 20 (used for fleet)
87 FleetCardType smallint (used for fleet)
88 OriginalTransactionId bigint Used to match void transactions to their original
89 OriginalServerId tinyint
90 ClientIPAddress char 40
91 IsFinalized bit Indicates this was the last attempt for an offline transaction
92 CheckNumber char 8
Telecheck Transactions Specification
Item # Column Title Field Type/Size Description
1 Store Number
2 Terminal ID Lane Number
3 Trace ID
4 Amount
5 Date
Token Report Specification
Item # Column Title Field Type/Size Description
1 Id bigint Transaction ID in the database
2 ServerId tinyint The datacenter into which the transaction was received
3 Resolved Transaction Id bigint
4 CompanyNumber Int
5 StoreNumber int

ServerEPS User's Guide
Chapter 8 346
Item # Column Title Field Type/Size Description
6 LaneNumber char 4
7 UniversalTime datetime UTC time that the data center received the transaction
8 TranDateTime datetime Date/Time from the POS
9 STAN Int Sequence Number
10 TokenType smallint
0 Unknown
101 TgRGP
102 TgLoyalty
103 TgCatalina
105 TgOpenEPSTempToken
106 TgRGPIdentificationNumber
201 VantivCreditCard
301 RGPTemporaryAccountNumber
11 TokenValue varchar(40)
12 BatchId int ID for the batch this transaction is a member of
13 BusinessDate bigint

ServerEPS User's Guide
Chapter 9 347
Chapter 9
Multi-Company Management Login
Multi-Company Accounts
In addition to the standard single-company login, ServerEPS also provides multi-company management logins to
resellers or vendors, in order to facilitate the administration of companies that reside under their banner.
Resellers and vendors that commonly administrate multiple companies may request a multi-company login be set up
for their use. When they do, a management company is created with a company number in the “300xxx” range; this
company is then assigned access to the banner companies. A single administrative login will be provided to the
management company which will allow the reseller to administrate their banner stores and to create their own multi-
company user accounts.
Multi-Company Dashboard
When a user logs into one of the “300xxx” management companies with their multi-company user account, they will
be provided with the multi-company dashboard. This page is designed to allow users to easily view and switch
between companies, without requiring the user to log directly into individual companies.

ServerEPS User's Guide
Chapter 9 348
To provide a visual difference, when a user logs into the dashboard, a teal color scheme is used instead of the
standard blue background.
The dashboard provides a quick-login dropdown in the upper right corner of the screen. This dropdown lists all the
individual companies that you have access to. Using this dropdown, you can click a listed company and be
immediately logged into that company with administrative rights.
Once logged into an individual company, you may administer that company normally. The company selection
dropdown will remain in the upper right corner to facilitate switching between companies, or allow you to return to
the multi-company dashboard.
Multi-Company User Management
The multi-company dashboard provides three standard buttons: Home, Personal, and User Management. The Home
and Personal buttons have the standard options, as described in Chapter 3. The User Management option is also
similar to the User Management as described in Chapter 3, except that the users configured here will have access to
the multi-company dashboard.

ServerEPS User's Guide
Chapter 9 349
You may use this option to create individual user accounts for additional members of your support staff that require
access to the multi-company dashboard.
Any user accounts configured here will be able to log into the multi-company management dashboard and will have
administrative access to all companies that appear in your company dropdown box. If you wish to create an account
for an individual company, log into that company and create an account only within that company.
Company Access for Multi-Company Accounts
Resellers are granted management access only to the individual companies that reside under their banner. Resellers
must contact the MTXEPS Sales department in order to add or remove companies.
Multi-Company Configuration Management
Multi-company user accounts can manage individual store configurations in the same manner as normal accounts;
multi-company users have access to a company selection option that will enable them to quickly switch between
companies without the need to sign out and sign back in.

ServerEPS User's Guide
Chapter 9 350
To launch the Configuration Management GUI, log into a managed company, and then select the Administration,
button, Store Configuration option. This will display the standard Launch Store Configuration Application
hyperlink.
Clicking this will launch the independent Configuration Management GUI.
Sign into the GUI using your multi-company login, and “300xxx” company number. Logging in this way will open
the configuration GUI, and provide an extra option to select the company you wish to load the configurations for.

ServerEPS User's Guide
Chapter 9 351
Clicking the Select Company button at the top right will open a company list box where you can choose the
company to configure.
Select the company to configure and click the Switch Company button at the bottom right to log into that company.

ServerEPS User's Guide
Appendix A 352
For information on the Store Configuration Management GUI, refer to Chapter 4.

ServerEPS User's Guide
Appendix A 353
Appendix A
Optional Components
Virtual Terminal
Virtual Terminal 2 (VT2) is a lightweight Windows software application that can be used with the OpenEPS Direct
payments solution to process transactions, similar to a POS system. VT2 finds wide use in both company POS
laboratories and in live store environments.
In stores, VT2 is used as both a primary payments system and as a supplement for full POS systems already installed
in a store. As a primary payments system it is simple, light, and capable of running all the transaction types available
through OpenEPS.
When used as a supplement VT2 is primarily used to perform transactions that the POS installed in a store does not
support. Such transactions may include the following:
Credit Force (Voice Authorization)
EBT Voucher
EBT Foodstamp Voucher

ServerEPS User's Guide
Appendix A 354
EBT Foodstamp Return
Gift Card Activation
Gift Card De-Activation
Gift Card Recharge
Phone Card Activation
Phone Card De-Activation
VT2 is not limited to the transaction types listed above, and as noted, can run any transaction that OpenEPS
supports. Additionally, as an OpenEPS integrated product Virtual Terminal 2 supports all hardware terminals that
OpenEPS supports. Terminals can be attached to a PC COM port via an RS232 cable.
In lab environments, the ability to directly enter data without requiring a complex POS system can be a huge asset to
streamlining testing procedures. POS developers can use Virtual Terminal to review the kind of data they will be
receiving from OpenEPS and as a baseline for OpenEPS integration.
It is important to note that while Virtual Terminal is a payments interface to OpenEPS and supports all the features
associated with the OpenEPS Direct payments solution, it is not a full POS system and does not include item
tracking, PLUs or other features solely supplied by full POS systems.
Using Virtual Terminal with OpenEPS Direct
Virtual Terminal provides a simple and easy interface to the OpenEPS Direct payments solution. The Virtual
Terminal installer package can be acquired from MTXEPS and can be used free-of-charge as part of OpenEPS
Direct.
When installing, be sure to follow the installation instructions in the Installation and Configuration Guide and install
Virtual Terminal prior to installing other OpenEPS direct installation packages.
For additional information refer to the Virtual Terminal 2 Users Guide; this document and all other OpenEPS Direct
documents are available by contacting MTXEPS support.

ServerEPS User's Guide
Appendix A 355
Virtual Terminal Configuration Information
Complete information on configuring Virtual Terminal can be found in the Virtual Terminal 2 user’s Guide.
Of special note is the Multi-Store Functionality option, which allows a single instance of Virtual Terminal to
connect up as a lane from any designated store within the assigned company. This is useful for a corporate location
that wishes to make adjustments to specific stores. For complete information on this option, see the Virtual Terminal
2 user’s Guide, Chapter 3, VT2 Configuration: Engine Tab, Multi-Store Functionality option.
Multi-Store Functionality Overview
The Multi-Store Functionality checkbox allows Virtual Terminal to log on as a lane from the store specified during
sign on. When this option is not checked Virtual Terminal uses the store number specified in the original installation
and stored in the windows registry.
When this option is checked, a Store Number Option box will become available during the VT sign on process:
The store number may be entered by typing in the box, or may be selected from the dropdown box. The dropdown
box is populated from the list of store numbers contained in the VT2Stores.txt file:

ServerEPS User's Guide
Appendix A 356
The VT2Stores.txt must be manually created by the user. Once created it must be placed into the \Program
Files\MicroTrax\OpenEPS directory that contains the Virtual Terminal application (VT2.exe).
This option does not allow the configuration of the Company Number; the company number will still be drawn from
the PC registry. As such, this Multi-Store option can only be used to sign on to different stores within the same
company.

ServerEPS User's Guide
Appendix A 357
VeriFone Vx570 Terminal
The VeriFone Vx570 terminal is a complete stand beside payments device. The Vx570 can be loaded with a
modified version of OpenEPS code to communicate over a TCP/IP broadband internet connection directly to the
payments server without the need for an integrated Point of Sale system.
The Vx570 is optimal for small businesses, and for businesses that would like to replace existing stand beside
solutions with a PCI/PED approved system without necessitating a move to an entirely new POS.
The VeriFone Vx570 possesses the same functionality as the previous VeriFone Omni 3750 terminal; however the
Omni 3750 is no longer supported as it ceased to be PED compliant and is no longer available from Verifone as of
January 1, 2008.
The Vx570 can receive its IP address automatically via DHCP, or a static IP address can be assigned by modifying
its configuration file.
The Vx570 supports DUKPT encryption only.
The Vx570 must be loaded with terminal code before deploying it onto the network. The terminal code can be
loaded from any windows computer, but it requires the use of a specific download cable (part number 26264-02) and
COM port 1.

ServerEPS User's Guide
Appendix A 358
The Vx570 must possess at least 12 MB of RAM; models with less than 12 MB cannot successfully load or run the
required code. The part number for the 12 MB model is: P/N: M257-050-04-NA1. It is highly suggested that a
model with more than 12 MB be utilized in order to support future development.
For loading and configuration information, refer to the ServerEPS Installation and Configuration Guide.

ServerEPS User's Guide
Appendix A 359
Additional Information – VeriFone Vx570
Setup Instructions for items listed in this section are available in the Installation and Configuration Guide
MagTEK MINI check reader
The MagTEK MINI check reader may be attached directly to the Vx570 to provide check reading capability.
PIN Pad1000
The Vx570 supports the use of the PINPad 1000 as a PIN entry device. When used for PIN entry, the PINPad 1000
must be encrypted.
To connect the PINPad 1000 to the Vx570, use the cable with part number 07042-06.

ServerEPS User's Guide
Appendix A 360
Supported Terminal Action Codes
The VeriFone Vx570 does not support all OpenEPS Terminal Action Codes. The following tables list the TACs that
are valid for use with the Vx570.
First Action TACs:
TAC Name
B Slide Card
? Payment Type
Transaction Sequence Action TACs:
TAC Name
b Verify Card
D Manual Account Number
E Manual Expiration Date
F PIN
g Fee Amount
G Amount
H Cashier Cash Back
J Phone Number
K Tax Amount
M Auth Code
n Verify Customer Name
p UPC Code
S Secondary ID
T Manager ID
W State Code
TAC Name
z Zip Code
Z Print Decline Receipt
$ Purchase / Balance Inquiry
> Send Transaction
2 EBT Voucher Number
6 Check Type
7 Sec ID Type
Manual Actions:
TAC Name
M Auth Code
T Manager ID
6 Check Type
7 Sec ID Type
S Secondary ID
W State Code
D Manual Account Number
E Manual Expiration Date

ServerEPS User's Guide
Appendix B 361
Direct Fuel Integration
ServerEPS offers a fuel lane interface that takes advantage of the Web Services reporting and administrative
features. The Direct Fuel interface uses an in-store software application to coordinate communication with the fuel
lanes.
Because fuel lanes do not use the OpenEPS software they cannot take advantage of the Configuration management
features of the web services, however direct fuel offers the benefit of centralized reporting, combined with the
transactions from other lanes at the same location.
For complete installation and setup instructions, refer to the ServerEPS Installation and Configuration Guide,
Chapter 3, Direct Fuel.
SendMesageSEPS.exe Utility
The SendMesageSEPS.exe allows the ServerEPS End of Day to be called from a Windows PC that will generally
reside in the store where the end of day is to take place. This application is commonly used as part of an end of day
batch file run at the store so as to synchronize the POS back office end of day with the Web Services end of day.
The SendMesageSEPS.exe takes no command line parameters; it draws the company number and store number for
the location from the Windows registry; therefore, the PC on which SendMesageSEPS is run must either be a POS
lane on which the OpenEPS direct solution has already been installed, or another PC on which the OpenEPS direct
solution was installed. The PC requires the same internet connectivity that any OpenEPS Direct POS lane uses. See
the installation guide for information on installing the OpenEPS Direct solution.
To successfully call an end of day, the store’s Web Services profile must have been set to "manual" on the Host
Parameters: Host Definition Tab. If a store is set to manual it will not close automatically and this application must
be used to initiate an end of day.

ServerEPS User's Guide
Appendix B 362
Appendix B
ServerEPS Response Codes
Response Code Table
The following table lists the response codes that are returned by the ServerEPS host in response to a request. If
visible in a report, they will be prefixed with “EPS-“.
Response Code Result Description
00 Approved Approved
01 Declined Refer to card issuer
02 Declined Refer to card issuer’s special conditions
03 Declined ERROR
05 Declined DO NOT HONOUR
12 Declined Error, Invalid transaction
13 Declined Error, Invalid amount
14 Declined Error, Invalid card reader
19 Declined Re-enter transaction
25 Declined Error, Unable to locate record on file
30 Declined Error, Format error
31 Declined Bank not supported by switch
41 Declined Lost card
43 Declined Stolen card, pick up
51 Declined Non sufficient funds
54 Declined Expired card
55 Declined Incorrect PIN
58 Declined Transaction not permitted to terminal
61 Declined Check Velocity Decline
66 Declined Drivers License needed
76 Declined Invalid product codes
77 Declined Reconcile error
78 Declined Trace number not found
79 Declined DECLINED - CVV2
80 Declined Batch number not found
82 Declined NO CLOSED SOC SLOTS
83 Declined NO SUSP. SOC SLOTS
85 Declined BATCH NOT FOUND
89 Declined Bad terminal id.
91 Declined Issuer or switch inoperative (will locally approve transaction)
94 Declined Duplicate transmission
95 Declined Reconcile error, Batch upload started
96 Declined System malfunction
99 Approved Check auth was successfully converted to ECC
** Declined **All other response codes received

ServerEPS User's Guide
Appendix C 363
Default Card Codes
This is a list of the default 2 letter card codes and the card types they represent. These values are located in the Card
Processing Profile of each Lane configuration in the Configuration Management GUI.
Card Code Description
AC ACH
AX American Express
CP ConnectPay
DB Debit
DS Discover Card
EC EBT Cash Benefits
EF EBT Food Stamps
GC Gift Card
HB Health Benefits / FSA
MC MasterCard
MF MasterCard Fleet
MP Pin Change
PD Private Debit
PH Phone Card
PW Prepaid Wireless
VF Visa Fleet
VY Voyager Fleet
WX Wright Express Fleet

ServerEPS User's Guide
Appendix C 364
Appendix C
Supported Hosts Information
Supported Hosts List
This section lists all hosts supported by ServerEPS, giving information on which transactions each host supports.
ServerEPS Supports the following hosts:
Host 3 Character Host Code
ACI ACI
ADS ADS
Chase Paymentech CHA
Concord EPC EPC
Concord H&C BYL
Elavon ELA
Lynk LYN
MPS (5th/3rd) MPS-
Shazam SHA
Solupay/Echo SOL
ServerEPS Specific Component & Codes:
Component 3 Character Host Code
ServerEPS EPS
EpicTranz EPZ
OpenEPS MTX
The ServerEPS specific components listed above sometimes take the place of the end host when the host cannot be
reached (such as during offline processing), and thus sometimes supply their own response codes which may be
visible on certain reports.

ServerEPS User's Guide
Appendix C 365
ACI
Purchase /
GC Redeem
Purch
w/ CB
Cash
Back
Only
Return
Force
[Voice/
Voucher]
Return
Voucher
Balance
Inquiry Activation Deactivation Recharge
PreAuth /
Completion
ACH X X X X X NA NA NA NA NA X
Check (Electronic
Check Conversion) X X X NA X NA NA NA NA NA NA
Check (Standard) B B B NA X NA NA NA NA NA NA
Connect Pay X NA NA X NA NA NA NA NA NA NA
Credit Card X X X X X NA NA NA NA NA X
Credit FSA X NA NA X NA NA NA NA NA NA X
Debit X X X X NA NA NA NA NA NA X
EBT – Cash X X X X X NA X NA NA NA X
EBT – Food Stamp X NA NA X X X X NA NA NA NA
Fleet X NA NA X X NA NA NA NA NA X
Gift Card
(General) B (V) NA NA B (V) B (V) NA O B (V) X B (V) X
Gift Card
(Blackhawk) X NA NA X X NA X B (V) B (V) X X
Phone Card NA NA NA NA NA NA NA X X X NA
Private Credit X X X X NA NA NA NA NA NA X
Private Debit B (V) B (V) B (V) B (V) NA NA NA NA NA NA X
Wireless NA NA NA NA NA NA NA X X X NA
Additional Information
The following check types are supported:
00 Personal Check
01 Payroll Check
Legend:
O – Online only
B – Both On & Offline
B/Disc – As B, with Discover Card only
(V) – Transaction Can be Voided
(VO) –Can be Voided Online Only
X – Not Supported
NA – Not Applicable to Transaction Type

ServerEPS User's Guide
Appendix C 366
02 Government Check
03 Business Check
05 WIC Check
The ACI host supports the Reload transaction type for General Gift Cards.
The transaction service now supports two incoming header formats from the ACI. The two formats differ
by either including or excluding length bytes.

ServerEPS User's Guide
Appendix C 367
ADS
Purchase /
GC Redeem
Purch
w/ CB
Cash
Back
Only
Return
Force
[Voice/
Voucher]
Return
Voucher
Balance
Inquiry Activation Deactivation Recharge
PreAuth /
Completion
ACH X X X X X NA NA NA NA NA X
Check (Electronic
Check Conversion) X X X NA X NA NA NA NA NA NA
Check (Standard) X X X NA X NA NA NA NA NA NA
Connect Pay X NA NA X NA NA NA NA NA NA NA
Credit Card X X X X X NA NA NA NA NA X
Credit FSA X NA NA X NA NA NA NA NA NA X
Debit X X X X NA NA NA NA NA NA X
EBT – Cash X X X X X NA X NA NA NA X
EBT – Food Stamp X NA NA X X X X NA NA NA NA
Fleet X NA NA X X NA NA NA NA NA X
Gift Card
(General) X NA NA X X NA X X X X X
Gift Card
(Blackhawk) X NA NA X X NA X X X X X
Phone Card NA NA NA NA NA NA NA X X X NA
Private Credit O (VO) X X O
(VO) B NA NA NA NA O (VO) X
Private Debit X X X X NA NA NA NA NA NA X
Wireless NA NA NA NA NA NA NA X X X NA
Legend:
O – Online only
B – Both On & Offline
B/Disc – As B, with Discover Card only
(V) – Transaction Can be Voided
(VO) –Can be Voided Online Only
X – Not Supported
NA – Not Applicable to Transaction Type

ServerEPS User's Guide
Appendix C 368
Additional Information
ADS is a Terminal capture batch settled host. Transaction information is complied during normal processing and
forward to ADS during the end of day settlement processing. Merchant accounts are credited for sales based on the
data received during settlement.

ServerEPS User's Guide
Appendix C 369
Chase Paymentech
Supported Transaction Types
Purchase
/ GC
Redeem
Purch
w/ CB
Cash
Back
Only
Return
Force
[Voice/
Voucher]
Return
Voucher
Balance
Inquiry Activation Deactivation Reactivation Recharge
PreAuth /
Completion
ACH X X X X X NA X X X NA X X
Check
(Electronic
Check
Conversion)
X X X NA X NA NA NA NA NA NA NA
Check
(Standard) O X X NA X NA NA NA NA NA NA NA
Connect Pay X NA NA X NA NA NA NA NA NA NA X
Credit Card O (VO) X* NA O (VO) O (VO) NA NA NA NA NA NA O (VO)
Credit
Purchasing O (VO) X* NA X O (VO) O (VO)
Debit O O O O NA NA NA NA NA NA NA X
EBT – Cash O O O X O NA O NA NA NA NA X
EBT – Food
Stamp O NA NA O O ? O NA NA NA NA NA
Fleet X NA NA X X NA NA NA NA NA NA X
Gift Card
(General) O (VO) NA NA ? O NA O O (VO) O (VO) X* O (VO) X
Gift Card
(Blackhawk) X NA NA X X NA X X X X X
Phone Card NA NA NA NA NA NA NA X X NA NA NA
Private Credit X X X X NA NA NA NA NA NA NA X
Private Debit X X X X NA NA NA NA NA NA NA X
Wireless NA NA NA NA NA NA NA X X NA X NA
* = See Additional Information notes below.
Legend:
O – Online only
B – Both On & Offline
B/Disc – As B, with Discover Card only
(V) – Transaction Can be Voided
(VO) –Can be Voided Online Only
X – Not Supported
NA – Not Applicable to Transaction Type

ServerEPS User's Guide
Appendix C 370
Additional Information
Although Chase is marked as only supporting online transactions, most transactions types can be
configured for offline processing anyway. When offline processing does occur, the forwarded transaction
will be passed to Chase as an online transaction when the connection comes back up.
RFID card number entry is not supported with the Chase host.
Credit Purchase with Cash Back, including Discover Purchase with Cash Back, is not supported by the
Chase host. The J and H TACs are therefore not supported for Credit, and should be removed from the
TAC sequence for Credit transactions.
ServerEPS Chase host does not support Gift Card Reactivation at this time. Deactivated gift cards cannot
be reactivated.
Manual Credit transactions are allowed. Chase supports the Zip Code TAC (z) and CVV2 TAC (v) for use
in the manual entry sequence.
Chase host supports Credit Purchasing cards for Visa and Mastercard. The Tax Amount TAC (k) should be
used for purchasing cards.
Manual purchasing card transactions should also include the Zip Code TAC (z).
Manual Gift Card transactions for cards with no expiration date must be entered with an expiration date of
12/49 (1249 if entered as MMYY.)
Chase host supports Use of CVV2 TAC (v) with Gift Cards.
Chase host supports partial amount (available balance) approval with Gift Cards.
FSA transactions are supported and allow Total FSA, RX Dental, Medical and Vision amounts.

ServerEPS User's Guide
Appendix C 371
Concord: EPC Format
Supported Transaction Types
Purchase
/ GC
Redeem
Purch w/
CB
Cash
Back
Only
Return
Force
[Voice/
Voucher]
Return
Voucher
Balance
Inquiry Activation Deactivation Recharge
PreAuth /
Completion
ACH X X X X X NA NA NA NA NA X
Check (Electronic
Check Conversion) O (VO) O (VO) O (VO) NA X NA NA NA NA NA NA
Check (Standard) O O O NA X NA NA NA NA NA NA
Connect Pay X NA NA X NA NA NA NA NA NA NA
Credit Card O (VO) O/Disc
(VO) NA O O NA NA NA NA NA O
Credit FSA O (VO) NA NA O NA NA NA NA NA NA X
Debit O (VO) O (VO) O (VO) O NA NA NA NA NA NA O
EBT – Cash O (VO) O (VO) O (VO) X O NA O NA NA NA X
EBT – Food Stamp O (VO) NA NA O O (VO) ? O NA NA NA NA
Fleet O (VO) NA NA O (VO) O (VO) NA NA NA NA NA O (VO)
Gift Card (General) O (VO*) NA NA O (VO) O NA O O (VO*) O O O
Gift Card
(Blackhawk) X NA NA X X NA X O (VO) ? X X
Phone Card NA NA NA NA NA NA NA X X X NA
Private Credit X X X X NA NA NA NA NA NA X
Private Debit X X X X NA NA NA NA NA NA X
Wireless NA NA NA NA NA NA NA X X X NA
* As a limitation of the Host, only the last Gift Card Redemption transaction can be voided.
Legend:
O – Online only
B – Both On & Offline
B/Disc – As B, with Discover Card only
(V) – Transaction Can be Voided
(VO) –Can be Voided Online Only
X – Not Supported
NA – Not Applicable to Transaction Type

ServerEPS User's Guide
Appendix C 372
Additional Information
Although Concord: EPC is marked as only supporting online transactions, most transactions types can be
configured for offline processing anyway. When offline processing does occur, the forwarded transaction
will be passed to Concord: EPC as an online transaction when the connection comes back up.
The Tax Indicator field is supported:
If TAX amount provided by POS and greater than zero, the Tax Indicator will be Y. If TAX amount provided by POS is equal to zero, then the Tax Indicator will be N. If no tax amount is set by the POS, then the Tax Indicator field will not be sent to the
host.

ServerEPS User's Guide
Appendix C 373
Concord: H&C Format
Supported Transaction Types
Purchase /
GC Redeem
Purch
w/ CB
Cash
Back
Only
Return Force [Voice/
Voucher]
Return
Voucher
Balance
Inquiry Activation Deactivation Recharge
PreAuth /
Completion
ACH X X X X X NA NA NA NA NA X
Check (ECC) X X X NA X NA NA NA NA NA NA
Check
(Standard) B B B NA X NA NA NA NA NA NA
Connect Pay B (V) NA NA B (V) NA NA NA NA NA NA NA
Credit Card B (VO) B/Disc
(VO) NA B B NA NA NA NA NA B
Debit B (VO) B (VO) B (VO) B NA NA NA NA NA NA B
EBT – Cash O (VO) O (VO) O (VO) X B NA O NA NA NA X
EBT – Food
Stamp O (VO) NA NA O B (VO) NA O NA NA NA NA
Fleet X NA NA X X NA NA NA NA NA X
Gift Card O (VO*) NA NA O
(VO) B NA O O (VO)* O O O
Phone Card NA NA NA NA NA NA NA X* X X NA
Private
Credit X X X X NA NA NA NA NA NA X
Private Debit X X X X NA NA NA NA NA NA X
Wireless NA NA NA NA NA NA NA X X X NA
* As a limitation of the Host, only the last Gift Card Redemption transaction can be voided.
Additional Information
As a limitation of the Host, only the last Gift Card Redemption transaction can be voided.
Currently only the Telecheck option is supported for checks. Buycheck regular checks and ECC through
Telecheck Electronic are both under development/testing.
Legend:
O – Online only
B – Both On & Offline
B/Disc – As B, with Discover Card only
(V) – Transaction Can be Voided
(VO) –Can be Voided Online Only
X – Not Supported
NA – Not Applicable to Transaction Type

ServerEPS User's Guide
Appendix C 374
Currently Gift Card transactions are under development/testing. Phase I will include regular gift cards,
Phase II will include Blackhawk.
BYL supports partial amount (available balance) approval for in-store gift cards.
FSA transactions are supported.
The Tax Indicator field is supported:
If TAX amount provided by POS and greater than zero, the Tax Indicator will be Y. If TAX amount provided by POS is equal to zero, then the Tax Indicator will be N. If no tax amount is set by the POS, then the Tax Indicator field will not be sent to the
host.

ServerEPS User's Guide
Appendix C 375
Elavon
Supported Transaction Types
Purchase /
GC
Redeem
Purch w/
CB
Cash
Back
Only
Return
Force
[Voice/
Voucher]
Return
Voucher
Balance
Inquiry Activation Deactivation Recharge
PreAuth /
Completion
ACH X X X X X NA NA NA NA NA X
Check (Electronic
Check Conversion) O (VO) O (VO) O (VO) NA X NA NA NA NA NA NA
Check (Standard) X X X NA X NA NA NA NA NA NA
Connect Pay X NA NA X NA NA NA NA NA NA NA
Credit Card O (VO) X X O (VO) O (VO) NA NA NA NA NA X
Credit FSA O (VO) NA NA O (VO) NA NA NA NA NA NA X
Debit O (VO) O (VO) O (VO) O (VO) NA NA NA NA NA NA X
EBT – Cash O (VO) O (VO) O (VO) X X NA O NA NA NA X
EBT – Food Stamp O (VO) NA NA O (VO) O X O NA NA NA NA
Fleet X NA NA X X NA NA NA NA NA X
Gift Card
(General) O NA NA O X NA O O X O X
Gift Card
(Blackhawk) X NA NA X X NA X O X O X
Phone Card NA NA NA NA NA NA NA X X X NA
Private Credit X X X X NA NA NA NA NA NA X
Private Debit X X X X NA NA NA NA NA NA X
Wireless NA NA NA NA NA NA NA X X X NA
Additional Information
Elavon supports the use of 3DES encryption.
Although Elavon is marked as only supporting online transactions, most transactions types can be configured
for offline processing anyway. When offline processing does occur, the forwarded transaction will be passed to
Elavon as an online transaction when the connection comes back up.
Legend:
O – Online only
B – Both On & Offline
B/Disc – As B, with Discover Card only
(V) – Transaction Can be Voided
(VO) –Can be Voided Online Only
X – Not Supported
NA – Not Applicable to Transaction Type

ServerEPS User's Guide
Appendix C 376
The Elavon host has been updated to support manager overrides.
The following State code values have been added as valid state codes / ID types to allow for additional
identification types:
Courtesy Card 90 Military ID 91 Proprietary Card 93 Passport 94 Puerto Rico 99 Embassy ID 99

ServerEPS User's Guide
Appendix C 377
Lynk Host
Supported Transaction Types
Purchase /
GC Redeem
Purch
w/ CB
Cash
Back
Only
Return
Force
[Voice/
Voucher]
Return
Voucher
Balance
Inquiry Activation Deactivation Recharge
PreAuth /
Completion
ACH X X X X X NA NA NA NA NA X
Check (Electronic
Check Conversion) O (VO) O (VO) O (VO) NA X NA NA NA NA NA NA
Check (Standard) O (VO) O (VO) O (VO) NA X NA NA NA NA NA NA
Connect Pay X NA NA X NA NA NA NA NA NA NA
Credit Card O (VO) O (VO) O (VO) O
(VO) O NA NA NA NA NA X
Credit FSA X NA NA X NA NA NA NA NA NA X
Debit O (VO) O (VO) O (VO) O
(VO) NA NA NA NA NA NA X
EBT – Cash O (VO) O (VO) O (VO) O
(VO) X NA O NA NA NA X
EBT – Food Stamp O (VO) NA NA O O X O NA NA NA NA
Fleet X NA NA X X NA NA NA NA NA X
Gift Card
(General) O (VO) NA NA
O
(VO) X NA O O O O X
Gift Card
(Blackhawk) X NA NA X X NA X X X X X
Phone Card NA NA NA NA NA NA NA X X X NA
Private Credit X X X X NA NA NA NA NA NA X
Private Debit X X X X NA NA NA NA NA NA X
Wireless NA NA NA NA NA NA NA X X X NA
Legend:
O – Online only
B – Both On & Offline
B/Disc – As B, with Discover Card only
(V) – Transaction Can be Voided
(VO) –Can be Voided Online Only
X – Not Supported
NA – Not Applicable to Transaction Type

ServerEPS User's Guide
Appendix C 378
Additional Information
Although Lynk is marked as only supporting online transactions, most transactions types can be configured
for offline processing anyway. When offline processing does occur, the forwarded transaction will be
passed to Lynk as an online transaction when the connection comes back up.
To perform a deactivation with Gift Cards, the Link Host requires an amount to be sent up. The Gift Card
Deactivation sequence default does not contain the required G – Amount TAC, so it is necessary to adjust
the transactions sequence to include the Amount TAC. Since an amount is required to perform a Gift Card
Deactivation to the Lynk Host, it might necessary to perform a balance inquiry prior to the deactivation to
obtain the current balance,
On receipts for purchases using either EBT Cash or EFT Food both remaining balances (Food and Cash)
will be printed on the receipt. If the balance for the tender which was not used in the purchase is $0, no
balance for that tender will be printed. For example, on an EBT Food Purchase, if the EBT Cash balance is
not $0 it will be printed along with the Food balance.
Electronic Check Conversion
ECC has been certified with the Lynk Host.
The Lynk host supports Check transactions by routing them to Certegy. The check transaction options are "Check
Guarantee/Verify" and "Electronic Check Conversion". Check Guarantee/Verify supports both Personal and
Commercial/Business checks; Electronic Check Conversion supports only Personal checks.
Certegy supports the following check transaction types:
Purchase Purchase w/ Cashback
Personal Checks for over $250.00 are not approved through ECC; when approved, they will receive a standard
approval which will require the cashier keep the paper check.

ServerEPS User's Guide
Appendix C 379
MPS (5th/3rd) Format
Supported Transaction Types
Purchase /
GC Redeem
Purch
w/ CB
Cash
Back
Only
Return Force [Voice/
Voucher]
Return
Voucher
Balance
Inquiry Activation Deactivation Recharge
PreAuth /
Completion
ACH X X X X X NA NA NA NA NA X
Check (ECC) X X X X X NA NA NA NA NA NA
Check
(Standard) O O O X X NA NA NA NA NA NA
Connect Pay X NA NA X NA NA NA NA NA NA NA
Credit Card B (V) X X B (V) B (V) NA NA NA NA NA X
Debit B (V) B (V) B B (V) NA NA NA NA NA NA X
EBT – Cash O (VO) O (VO) O (VO) X B (V) NA O NA NA NA X
EBT – Food
Stamp O (VO) NA NA
O
(VO) B (V) X O NA NA NA NA
Fleet X NA NA X X NA NA NA NA NA X
Gift Card O (VO) NA NA X X NA O B (V) O (VO) O (VO) X
Phone Card NA NA NA NA NA NA NA X X X NA
Private
Credit X X X X NA NA NA NA NA NA X
Private Debit X X X X NA NA NA NA NA NA X
Wireless NA NA NA NA NA NA NA X X X NA
Additional Information
Fifth Third will deny offline forwards if they are submitted more than 4 days after they were originally
accepted at the store.
MPS supports Blackhawk Gift Card Activation using the POSA Network ID (in Program ID field) of
"SWAY".
MPS supports partial amount (available balance) approval for in-store gift cards and Credit Purchase
(only).
Legend:
O – Online only
B – Both On & Offline
B/Disc – As B, with Discover Card only
(V) – Transaction Can be Voided
(VO) –Can be Voided Online Only
X – Not Supported
NA – Not Applicable to Transaction Type

ServerEPS User's Guide
Appendix C 380
MPS supports RFID for Credit transactions.
FSA transactions are supported and allow Total FSA, RX Dental, Medical and Vision amounts.
To allow offline EBT, all offline EBT will be processed to the host using the online message formatting.
This will cause all EBT taken offline to be processed at the time it is forward as an online transaction.

ServerEPS User's Guide
Appendix C 381
Shazam Format
Supported Transaction Types
Purchase /
GC Redeem
Purch
w/ CB
Cash
Back
Only
Return Force [Voice/
Voucher]
Return
Voucher
Balance
Inquiry Activation Deactivation Recharge
PreAuth /
Completion
ACH X X X X X NA NA NA NA NA X
Check (ECC) X X X NA X NA NA NA NA NA NA
Check
(Standard) X X X NA X NA NA NA NA NA NA
Connect Pay X NA NA X NA NA NA NA NA NA NA
Credit Card B (V) B/Disc
(V)
B/Disc
(V) B (V) B (V) NA NA NA NA NA ?B
Debit B (V) B (V) B (V) X NA NA NA NA NA NA ?O
EBT – Cash B (V) B (V) B (V) X B NA O NA NA NA X
EBT – Food
Stamp B (V) NA NA B (V) B (V) X O NA NA NA NA
Fleet X NA NA X X NA NA NA NA NA X
Gift Card X NA NA X X NA X X X X X
Phone Card NA NA NA NA NA NA NA X X X NA
Private
Credit X X X X NA NA NA NA NA NA X
Private Debit X X X X NA NA NA NA NA NA X
Wireless NA NA NA NA NA NA NA X X X NA
Legend:
O – Online only
B – Both On & Offline
B/Disc – As B, with Discover Card only
(V) – Transaction Can be Voided
(VO) –Can be Voided Online Only
X – Not Supported
NA – Not Applicable to Transaction Type

ServerEPS User's Guide
Appendix C 382
Solupay/Echo Format
Supported Transaction Types
Purchase /
GC Redeem
Purch
w/ CB
Cash
Back
Only
Return Force [Voice/
Voucher]
Return
Voucher
Balance
Inquiry Activation Deactivation Recharge
PreAuth /
Completion
ACH X X X X X NA NA NA NA NA X
Check (ECC) O (VO) O (VO) O (VO) NA X NA NA NA NA NA NA
Check
(Standard) B (V) B (V) B (V) NA B (V) NA NA NA NA NA NA
Connect Pay X NA NA X NA NA NA NA NA NA NA
Credit Card X X X X X NA NA NA NA NA X
Debit X X X X NA NA NA NA NA NA X
EBT – Cash X X X X X NA X NA NA NA X
EBT – Food
Stamp X NA NA X X NA X NA NA NA NA
Fleet X NA NA X X NA NA NA NA NA X
Gift Card X NA NA X X NA X X X X X
Phone Card NA NA NA NA NA NA NA X X X NA
Private
Credit X X X X NA NA NA NA NA NA X
Private Debit X X X X NA NA NA NA NA NA X
Wireless NA NA NA NA NA NA NA X X X NA
Legend:
O – Online only
B – Both On & Offline
B/Disc – As B, with Discover Card only
(V) – Transaction Can be Voided
(VO) –Can be Voided Online Only
X – Not Supported
NA – Not Applicable to Transaction Type

Contact Information November 21, 2014
Contact Information
Retalix Global Payments
85 Argonaut
Suite 150
Aliso Viejo CA, 92656
Tel: 949-614-1600
E-mail: [email protected]
Web site: http://www.mtxeps.com/
NCR Corporation
NCR Corporation
Discovery Centre, 3 Fulton Road
Dundee, DD2 4SW
Scotland
Web site: http://www.info.ncr.com/