Animated Ceramic Forms - CiteSeerX
47
Rochester Institute of Technology RIT Scholar Works eses esis/Dissertation Collections 5-15-1975 Animated Ceramic Forms Susan Hill Follow this and additional works at: hp://scholarworks.rit.edu/theses is esis is brought to you for free and open access by the esis/Dissertation Collections at RIT Scholar Works. It has been accepted for inclusion in eses by an authorized administrator of RIT Scholar Works. For more information, please contact [email protected]. Recommended Citation Hill, Susan, "Animated Ceramic Forms" (1975). esis. Rochester Institute of Technology. Accessed from
-
Upload
khangminh22 -
Category
Documents
-
view
0 -
download
0
Transcript of Animated Ceramic Forms - CiteSeerX

Rochester Institute of TechnologyRIT Scholar Works
Theses Thesis/Dissertation Collections
5-15-1975
Animated Ceramic FormsSusan Hill
Follow this and additional works at: http://scholarworks.rit.edu/theses
This Thesis is brought to you for free and open access by the Thesis/Dissertation Collections at RIT Scholar Works. It has been accepted for inclusionin Theses by an authorized administrator of RIT Scholar Works. For more information, please contact [email protected].
Recommended CitationHill, Susan, "Animated Ceramic Forms" (1975). Thesis. Rochester Institute of Technology. Accessed from
ANIMATED CERAfVlIC FORMS
Susan L. Hill
Candidate for the Master of Fine Arts in the
College of Fine and Applied Arts
of the Rochester Institute of Technology
May 15, 1975
Advisors: Hobart Cowles
Fred Meyer Susan Carter
ii.

111.
I respectfully dedicate this work
to the memory of
Ralph Waldo Emerson
1803 -1882

IV,
Table of Contents
The Thesis Project 1
Appendix A Materials 12
Appendix B Airbrushes 17
Bibliography 21
v.
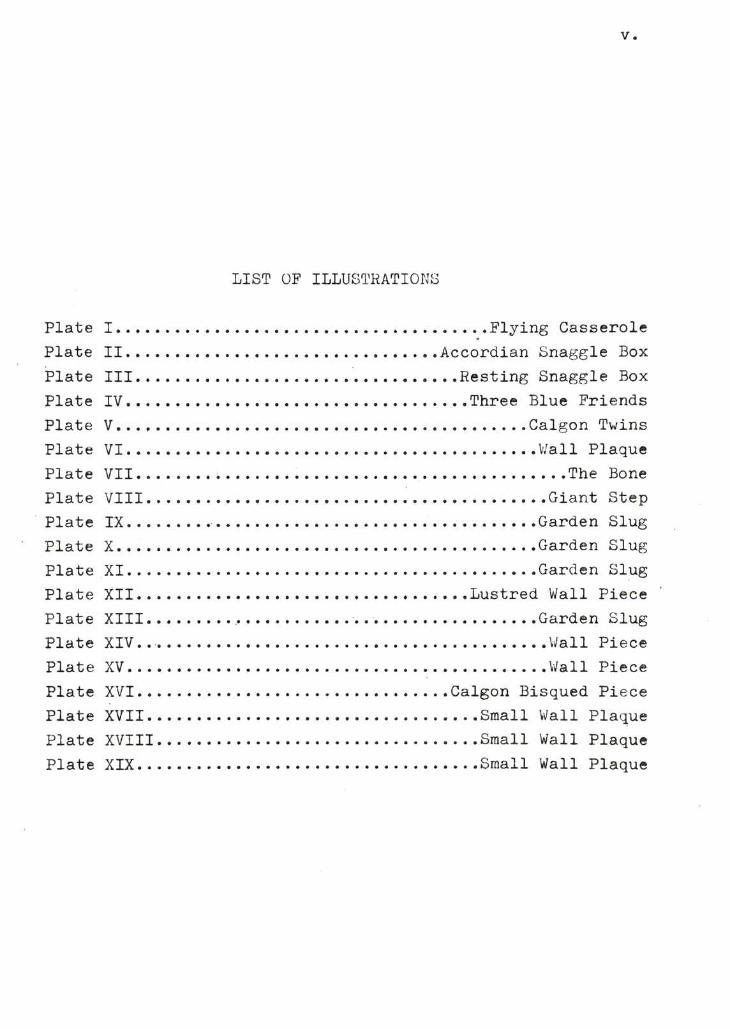
LIST OF ILLUSTRATIONS
Plate I Flying Casserole
Plate II Accordian Snaggle Box
Plate III Resting Snaggle Box
Plate IV Three Blue Friends
Plate V . . . , Calgon Twins
Plate VI V/all Plaque
Plate VII The Bone
Plate VIII Giant Step
Plate IX Garden Slug
Plate X Garden Slug
Plate XI Garden Slug
Plate XII Lustred Wall Piece
Plate XIII Garden Slug
Plate XIV. Wall Piece
Plate XV Wall Piece
Plate XVI Calgon Bisqued Piece
Plate XVII Small Wall Plaque
Plate XVIII Small Wall Plaque
Plate XIX Small Wall Plaque

The Thesis Project

When I turned in my thesis proposal, instead of a sense
of dread of my task, I felt a great feeling of liberation.
At last I was completely free to do what ever and however I
wanted with ceramics. The only requirement that had to be
met was that the objects produced must look as if they could
move about . Actually that was all I ever wanted from my
work.
At first I stuck to the potter's wheel (old habits die
hard) making a series of flying bowls and casseroles. (Plate I)
A freely cut-out slab was attached to the rim of the bowl
or casserole. This was. then carefully joined until no mark
of the joining could be seen. The handle for the casserole
was made by cutting out two matching slabs and joining them
when they were hard enough so they would not collapse ,yet
soft enough so that they could be blown up like a balloon.
Then they were joined to the lid, again so that no joining
could be seen. The school's fast rate of drying made it
difficult to catch these pieces at just the right stage for
joining. I liked the pieces and the idea, but I decided
that they were too literal an interpretation of ambulation.
I preferred inherently suggested movement rather than at
taching wings or legs or fins or whatever that shouted move
ment. Early on, I decided that this would be the direction
that I would take with my thesis project.
I had made wedged boxes (Snaggle boxes I called them...
I guess because of their overbite) first in 1975. I liked
them but largely ignored them because I was trying to learn

2.
to throw well and because I regarded them as a comical fluke
and not a serious way of dealing with clay. I made some more
boxes in the summer of 1974, but again disregarded them.
The boxes were formed by wedging the clay until it formed
lip-like folds. Then the tops were cut off along the fold
line so that they looked like they were all one piece. Then
they were hollowed out, allowed to dry, rubbed with oxide or
slip, bisqued and fired to cone 5.
I think the reason that I ignored these boxes for so
long was that the process of making them was so anti-trad
itional. Normally you build a piece around a volume of
space by wheel, slab or coil} the exterior has a relationship
to and is determined by the interior as well as the exterior
pressure. In the case of the snaggle boxes, the object was
formed as a solid mass. The interior mass has helped form
the exterior of the object, but the hollow interior is almost
an afterthought and determined wholly by the exterior form.When*
I was first learning about ceramics I was>-so concerned
with making a pot-like object that I was disregarding the
possibilities of clay itself. I can remember looking down at
ray clay as I wedged, and thinking that the forms made by the
wedging were very nice, but I did not know what to do with
them. Now I find that I am looking very hard for the hap
penings in clay looking for things that occur inadvertently
to see if I can reproduce them in a natural looking way.
I had been using a porcelain clay (App. A) for my fly
ing bowls. I began again to make snaggle boxes with the
intention of either Mgh firing them or salt firing them.
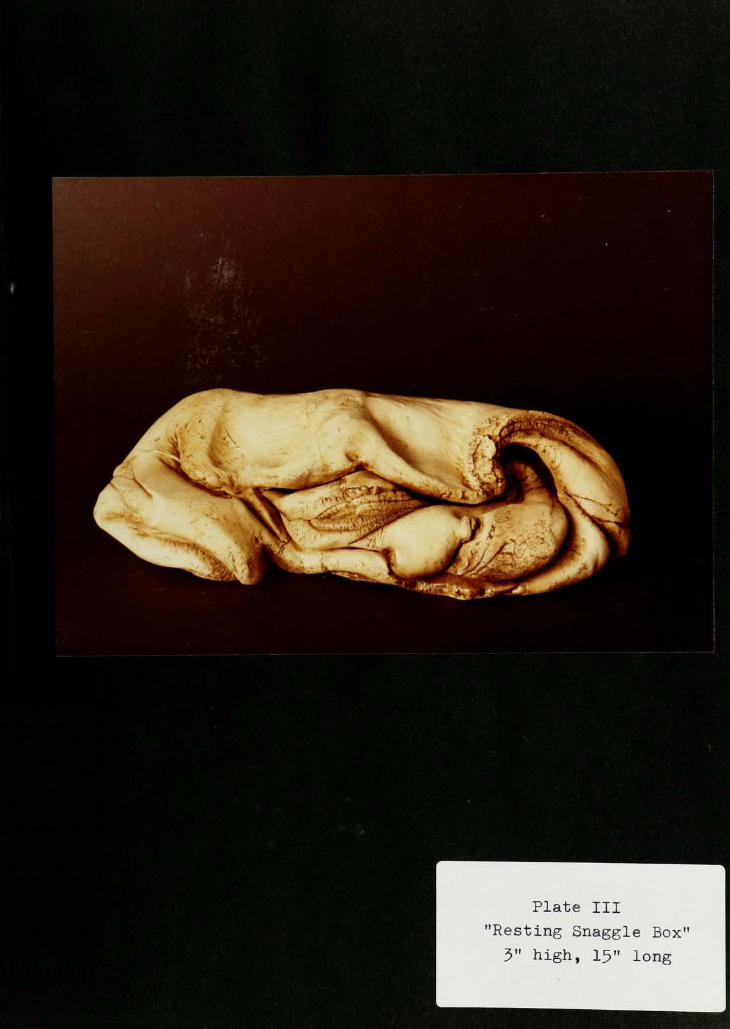
I made the boxes bigger than I ever had before. Because of
the volume of the clay that I was pushing around, the folds
and protuberances of the clay became more exaggerated. Very
quickly, they grew until I was wedging and slamming and
folding twenty-five pound hunks of clay into gigantic
snaggle boxes. (Plates II & III) I also made groups of

3.
snaggle boxes. I liked the idea that these weirdly person
able little boxes would have friends to chum around with.
I wedged related size hunks of clay until I judged that the
pairs or trios had a relationship in appearance. Then I
carefully pressed them together so that their side contours
fitted together and finished them off as I had the other
boxes. (Plates IV & V)
I tried firing some of the smaller boxes in the cone 10
reduction kiln witfo Marci'6 Clear glaze (App. A) over them
and sulfate solutions (App; A) painted on them. The glaze
coating obscured the qualities of the clay. Textures and
folds that were so definite in the green and bisque states
were enveloped by the thick glass surface. No good. I fired
a piece in the salt kiln (which was not working correctly at
the time). The porcelain was grossly over-reduced, grey and
ugly. The entire kiln load was mostly a disaster due to un
controllable over-reduction. The salt glaze on the box was
nice because it did not hide the clay the way the other glaze
had done. This might have been a suitable way of finishing
the pieces. The fact that the salt kiln has been in various
stages of repair, disintegration and rebuilding for two and
one-half quarters of the school year kept me from following
this line any further.
I also tested sulfates on unglazed clay at cone 5 and
cone 9 The surface was then just colored clay very matte
and very natural looking. At cone 5 oxidation the porcelain
clay was very soft looking instead of the usual dense por
celain body. I thought that the softness of the body looked
good with the softness of the shapes and the sulfates, Un
fortunately, as soft looking as the sulfates are, they tend
to show brush strokes. And, working with sulfates does not
Margaret Stouten, Porcelain Boxes. (B.F.A. Thesis
Report, Rochester Institute of Technology, Rochester,N.Y., 1974), p. 6.

4.
give you much leeway for mistakes . Once the sulfate is on,
there is no way to take it off since it is soluble in water
and goes into the surface of the clay. I decided to airbrush
the sulfates onto the surface of the bisqued clay to elimin
ate brush strokes and to get a very even buildup of color.
The buildup of color with an airbrush is very even and
precise. The catch was that I thought it would be nice to
get color overlapping color. This is rarely fail-safe with
glazes and with sulfates, which can change quite radically
with one color on top of another, it was often disastrous.
The cobalt and iron sulfate combination on top of manganese
sulfate gave a beautiful greyed blue once. After that it
came out a raucous khaki-blue-green. Iron sulfate and cobalt
sulfate in general built up so quickly that I was hesitant
about using them at all. Cobalt gave its trusty deep blue
unless sprayed from a distance of about two feet. At that
range, control of the spray buildup and shading on my objects
was impossible. Iron sulfate universally gave a color a
little less than the strength of red iron oxide in the raw
state. Ugh!
To help me see color buildup, I added food colors to
the sulfate solutions. Even then the food colors were most
helpful in determining where I had sprayed, since food color
buildup had little relation to the color buildup of the sul
fates. I found that manganese, copper and chromium sulfates
are the most useful for my purposes. They are the weakest in
color strength of the sulfates and, as such, there is latitude
in color buildup before they become harsh and unpleasant.
For what seemed like too long to me, I could not break
out of making snaggle boxes. I suppose my desire to always
push onward is hasty, but I wanted these forms to grow away
from conceivably being functional. I wanted a breakthrough,
but I did not know what or how. Fortunately, I made a mistake
in the clay mixing room and dumped Kona F.4 feldspar into
my .batch 'of clay instead of Kona A.3. This made my clay

5.
thixotropic and very stretchable. I made some wall hanging
pieces by wedging the clay and pulling it into the shape that
I wanted (Plate VI) or by tossing it in midair like a pizza
or by shaking it into long bone-like forms. (Plate VII)
I made a lot of these, but the more I looked at them the less
pleasing they were. Most of them met their ends in the trash
can after being used as airbrush test tiles. Nevertheless
I had begun to discover the potential of my mistaken batch
of clay and after that mixed only thixotropic clay. I
mixed it at a wetness that was unsuitable for throwing but
just great for shaking. The clay stretched so well that I
was able to make a piece that had a leg-like extension a
foot and a half in length. Too bad it was made in a way
that it could not be hollowed out. It blew a piece off in
the bisque, much to my regret because I enjoyed its car-
toonish appearance of a leg taking a giant step. (Plate VII)
Professor Cowles suggested that I try moving my hand
up under the mass of wedged clay; that since it was thixo
tropic, I would be able to stretch and form and make protub
erances with it this way. I recall meeting this suggestion
with a characteristic blank stare. (It takes , a while for
others'
suggestions to connect up with whatever else is going
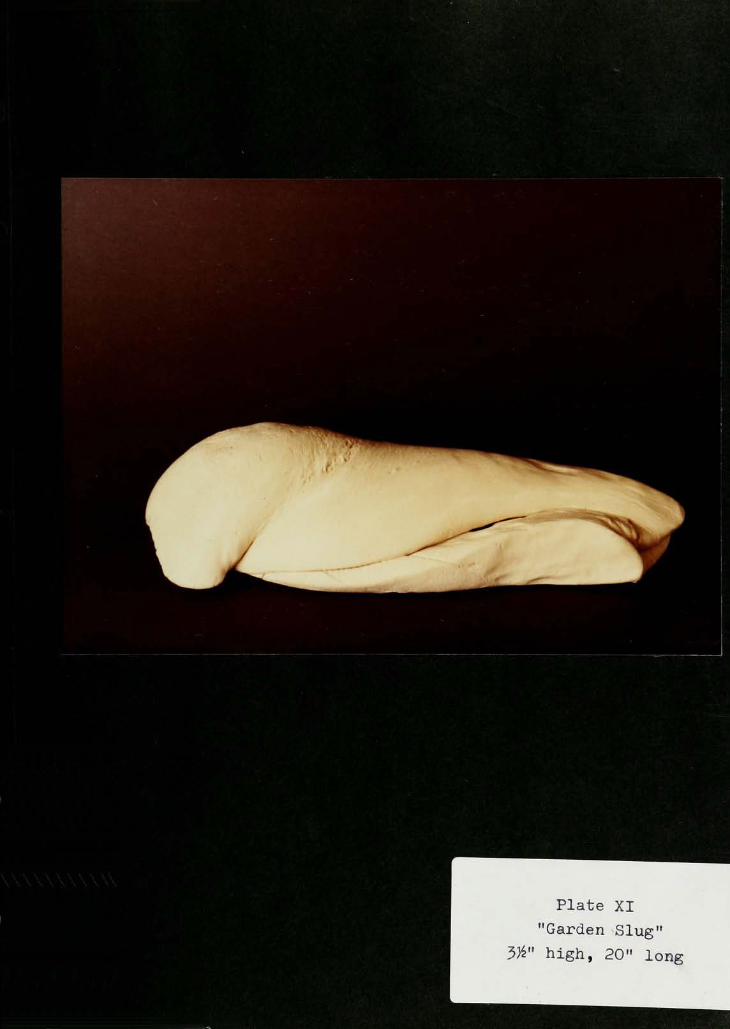
on in my mind.) At any rate, I tried it and with this method
formed a group of pieces that looked vaguely like sides of
beef or garden slugs. (Plates IX & X) Whatever they looked
like, they looked like they might crawl away on me momen
tarily, which was just what I wanted. I wedged the clay
until it formed some potentially good-looking rolls. Then
I rolled it back and forth on my piece of canvas, never
touching it, until it was mostly smooth. Then I would reach
up under the hunk of clay and stretch it up, out and around,
supporting the thinner areas with moistened paper towels.
I noticed that some of these hunks of clay formed a fold at
the base of one side which I thought suggested that they
might be in a state of rolling or inching along. I liked

6.
this a great deal, and although I could not remember exactly
how I had done it, I tried to get that roll in successive
pieces. (Plate XI) By now what had started out as five pound
hunks of clay was up to thirty-five to forty five pounds of
clay being rolled and wedged and stretched from inside and
out. The stretching from the inside produced a lumpy appear
ance in the form and the skin of the form became elephant-like
and wrinkled. At times I would go completely through the skin
of the piece when I stretched the clay from the inside.
This produced a small hole which had jagged and folded rough
edges which were very delicate and contrasted with the mass-
iveness of the form.
With these pieces, I was often so eager to complete them
that I would mar the surface of the piece with fingerprints.
I could not wait until they were hard enough to be hollowed
out. Two of my advisors, Prof. Cowles and Ms. Carter, noticed
this. Ms. Carter pointed out that the fingerprints destroyed
the flow in the lines of the pieces. I had to learn self-
control. I began making the pieces and stashing them in the
damproom for a week or so until they were. hard enough to
work on. Since these large pieces quickly filled up my area
and the damproom in their various stages, I began making
small, flat, coiled and stretched pieces. I used these as test
tiles and I used them to keep myself from going into the damp
room and plunging a finger into a too wet piece. Ms. Carter
and the other students in the shop saw these and suggested
that they were nice on their own. I was made to see these
small things in a different light.
At about this time, Prof. Cowles suggested that I try
wedging sulfates into the clay. The sulfates, being soluble,
would then migrate to the parts of the piece left exposed
to air dry in the manner of Egyptian Paste. I made a series
of tests (App. A) adding successive amounts of the sulfate
solutions to the clay to see what colors would (literally)
come up. I then made up two small batches of clay with

7.
manganese and copper sulfates mixed in the clay. I made more
of the small coiled and stretched pieces, once fired them to
cone 5 and (Mirabile dictu) in the firing parts of these forms
glazed themselves. (Plate XII) The copper and the manganese
are both fluxes and had evidently fluxed the body sufficiently
to form a patchy, unpredictable glaze that in the manganese
sulfate, lustred itself! Yahoo!
The prospect of having a clay-glaze combo that looked as
natural as these self-glazing pieces was very inviting. The
idea of adding chemicals to the clay so it would be self-glazing
was even better. I will go to almost any lengths to avoid
having an army of bisque ware confronting me, almost daring
me to foul up. To this end I tried a series of test tiles
of the sulfated porcelain with various solutirns brushed
on the top. I tried soda ash, pearl ash and borax in water
solutions. These produced no desirable (to me) results.
Then I tried common table salt, lithium metaborate dihydrate,
a chemical which I was sure would work because the supply of
it in the glaze pantry was small, because it had been there
since the school moved to Rochester from Alfred and since it
would no doubt be difficult for me to get once I left school,
and I tried Calgon, because Jan Kellner, a student in the shop,
had deflocculated slip with it and at cone 08 the bisque had
self-glazed. I applied these materials on the wet clay di
rectly after the test piece had been made and once fired
them to cone 5 Amazingly, the lithium compound did not work.
The Calgon did work. It gave a satiny haloed effect on the
colored clay. Then I tried Calgon on bisque. The glaze pro
duced was clear and about one-eig.th of an inch thick. Prof.
Cowles looked up the chemical composition of Calgon: sodium
he'xameta phosphate (NaP0^)6, commonly called Graham's Salt.
Paul G. Stecher, ed.,The Merck Index, (Rahway, N. J.
,
Merck & Co. Inc., 1968), p. 9615

8.
The soda evidently fluxes the clay body to the extent that the
clay and the glass former, phosphate, are able to form a glaze
at cone 5 I tried a test of Calgon on stoneware clay fired
to cone 5 oxidation and to cone 9 reduction. In both cases
the surface was somewhat glassy but it had more the effect
of coloring the clay a spodumene orange. Evidently the free
silica in the porcelain body helped to form the glaze.
Armed with all these thoroughly tested methods of fin
ishing my pieces, I fired a gas kiln (previous to this I
had only fired the electrics) to cone 5 oxidation. I used
black nickel oxide as a base stain with sulfates sprayed
over it. The nickel oxide had always given a flat black-
brown in the folds and crevasses of my pieces. With this
firing it gave a flat chartreuse green everywhere I used it,
even though every other indication was that the kiln had
oxidised just fine. I remember opening the door to the kiln
and looking in... my heart fell to my knees. I closed the
door and thought fast. I decided that I was not going to
let a whole kiln load of some of my favorite things go into
the trash heap. One of the other students in the shoo had
been using commercial non-firing stains on her pieces. I
got some of these stains Reward's Translucent Stains and
tried them out. The stains are made to be applied on bisque.
I decided that if they worked on bisque, they would work on
my non-vitreous clay body. The stains thin with turpentine.
After trying patch tests I found I could thin the stains
down to a wash, paint them on, rub them off and build up
areas of color just as I did with sulfates. The difference
was that these were truely the ultimate no-fail color. (Plate
XIII)
I spent some timereconciling-
myself to these non-firing
stains. Like most people who have been trained in a process,
I felt as though I was not playing by the rules by using a
material that is not part of that process. A lot of the
things I have done this year would make me say to myself

9.
"Hold it. You can't dothis."
just because I nor anyone
else around me had done it before. I guess I have spent so
much time and effort learning the rules that I never thought
about what I could do if I did not use them.
By wedging and stretching the clay to form objects, I
knew I was putting more than the usual strains on the mat
erial. I knew I was not taking these strains out of the
clay as you would by throwing or building with it. My
cracking rate was enormous from wetware straight through to
the final firing. I think that pushing the material until
it almost reaches its breaking point makes the object
indicative of the material and process from which it was made.
I like pieces that make a statement about how they were
made. I like scoring marks that show how handles or other
attachments were put on. I like throwing rings. I like
fingerprints left in the glaze from dip glazing if the prints
look good with the piece as a whole. So it does not seem
strange to me to say that some of the cracks in my pieces
were aesthetically appealing to me. The cracks added a
dynamic tension to a formerly very soft looking piece. (Plates
XIV & XV) I won't say that all cracks are "far out and
groovy". I threw most of them away. But there were pieces
that broke apart on drying that got fired in spite of these
so-called defects and that I particularly like because of
them. Upon the suggestion of Prof. Schmitz, I added silica
sand about 8 percent to my clay body to prevent cracks.
This seems to work and it is useful to be able to control
the cracks when I make things in which cracking is unde
sirable. I did find that more than 8 percent sand caused
my clay to loseits'
thixotropic quality.
I made some more coiled pieces that had wedged-in
sulfates and Calgon painted on them in the greenware state.
Unlike the previous pieces, which had been once fired, I
bisqued these. They came out of the bisque colored a very
soft -looking, smokey orange. (In fact they are quite soft.)

10.
One of the objects that was in pieces when it went into the
bisque came out with one section that was fired sufficiently
high to get to the color it would have been at cone 5. I
never fired it up to cone 5. I could not see how bringing
it up to the temperature that I had been using (which at
that was much less than the temperature of vitrification)
would make it any better looking than it was in the bisque
state. (Plate XVI)
Lately I have been making bigger coiled pieces and I
have .beendoing less stretching and more shaking. I take
a group of coils of various sizes and, placing them side by
side, I join the underneath with a fork. Then I fold the
group of coils around each other until I have the beginnings
of a shape that I like. Then the shape is slapped down on a
wooden bat, or I place it on the bat and slam the bat against
my work table to stretch the shape. I touch the upper
surface little or not at all. Sometimes I go to the under
side and push parts of it up until the parts protrude from
the flatness of the piece. These pieces are then painted
with Calgon and sulfates in the wet state. Painting sulfates
on when the piece is wet prevents the solution from soaking
into the clay and becoming harsh in color. The coiled
pieces do not suggest movement in the same way as the wedged
pieces. They look like they are caught in a state of change
and frozen there. There is an internal movement in the pieces
in the way the clay flows and is caught,but they do not look
animalistic to me. (Plates XVII, XVIII, & XIX)
The important thing that I have learned during this
thesis project is to be open and accepting about what can
be done with clay and firing techniques. In my thesis pro
posal I stated that I wanted to use different firing tech
niques to be able to suit the procedure to the piece and
not vice versa. I ended up doing most of my things at
cone 5 oxidation. I had done this solely before the thesis
project. The difference was that I did not feel locked into

11.
this temperature and I did try other proceedures, some of
which worked, some of which did not. All of the forms
evolved from the wedging or coiling processes coupled with
the peculiarities of the thixotropic clay. These combinations
began to work for me when I began to accept and work with
them. The change has been a change in attitude. Instead
of trying to make my clay, glaze and firing techniques
conform to some preconceived notion, I will try to conform
my notions to the ordained harmonies in the materials.

12.
Appendix A Materials

13-
Clays
Brian's Salt Porcelain
Tennessee #5 Ball Clay 25
Edgar Plastic Kaolin 25
Kona A. 3 Feldspar 25
Flint 25
Brian's Salt Thixoclay
Tennessee #5 Ball Clay 25
Edgar Plastic Kaolin 25
Kona F.4 Feldspar 25
Flint 25
These clays usually mature at cones 9-H Since I pre
ferred a less dense body for my pieces, I fired these clays
at cone 5. Additions of up to 8 percent silica sand lessened
the chances of cracking in my pieces while still retaining
the thixotropic quality of the second body.
Sulfates in 100 ml. Water Solution
Manganese Sulfate 67.76 grams
Cobalt Sulfate 10.60 grams
Copper Sulfate 25. 00 grams
Potassium Dichromate 60.00 grams
Iron Sulfate 32.90 grams
Chromium Sulfate 12.35 grams
Cobalt and Iron Sulfates 15.00 grams Cobalt
10.00 grams Iron
14.
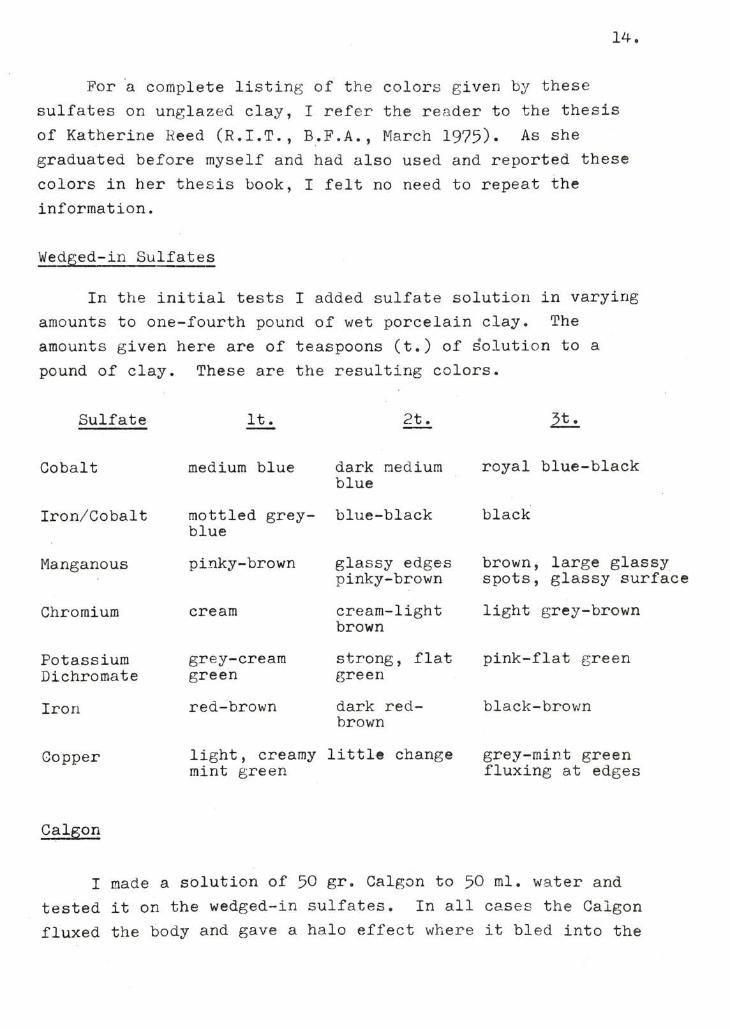
For a complete listing of the colors given by these
sulfates on unglazed clay, I refer the reader to the thesis
of Katherine Reed (R.I.T., B.F.A., March 1975). As she
graduated before myself and had also used and reported these
colors in her thesis book, I felt no need to repeat the
information.
Wedged-in Sulfates
In the initial tests I added sulfate solution in varying
amounts to one-fourth pound of wet porcelain clay. The
amounts given here are of teaspoons (t.) of s'olution to a
pound of clay. These are the resulting colors.
Sulfate It. 2t. 21
Cobalt
Iron/Cobalt
Manganous
Chromium
Potassium
Dichromate
Iron
Copper
medium blue
mottled grey-
blue
pinky-brown
cream
grey-cream
green
red-brown
light , creamy
mint green
dark medium
blue
blue-black
glassy edges
pinky-brown
cream-light
brown
strong, flat
green
dark red-
brown
little change
royal blue-black
black
brown, large glassy
spots, glassy surface
light grey-brown
pink-flat green
black-brown
grey-mint green
fluxing at edges
Calgon
I made a solution of 50 gr. Calgon to 50 ml. water and
tested it on the wedged-in sulfates. In all cases the Calgon
fluxed the body and gave a halo effect where it bled into the

15.
body as it was applied. I tried this solution on bisque.
It produced a very thick clear glaze and made my body trans
lucent in spots. It also had a crackly sound when it was
touched. My guess is that it fluxed the body more than is
practical and that it overfired at cone 5. Then I tried a
solution of 50 gr. Calgon to 100 ml. water. This gave -a
very soft, almost plastic looking covering of the clay. It
is somewhat like a very fine soda or salt glaze. I tried
airbrushing sulfates on top of the unfired Calgon. There
was little color change, except in the case of cobalt, which
gave a delicate blue.
I painted the stronger Celgon solution on wet pieces.
The shape of the clay was retained, but on touching the still
wet clay, I found that the 'Calgon had made the body extremely
thixotropic. Touching it more, the clay turned to stringy,
gooey mush in my hand. Calgon paintedon' leather hard
green ware did not do this and allowed me to fire my pieces
to temperature once they were dried.
Glazes
K4-H Clear Cone 5 Oxidation
Custer Feldspar 41.2
Whiting 14.3
Frit P54-5 26.0
Kaolin 7.1
Flint 11.4
The insides of snaggle boxes were glazed with K4H Clear,
a fritted lead glaze which Prof, Cowles had had tested for
lead release content. It was proclaimed completely lead
safe fired to cone 5 oxidation.
16.
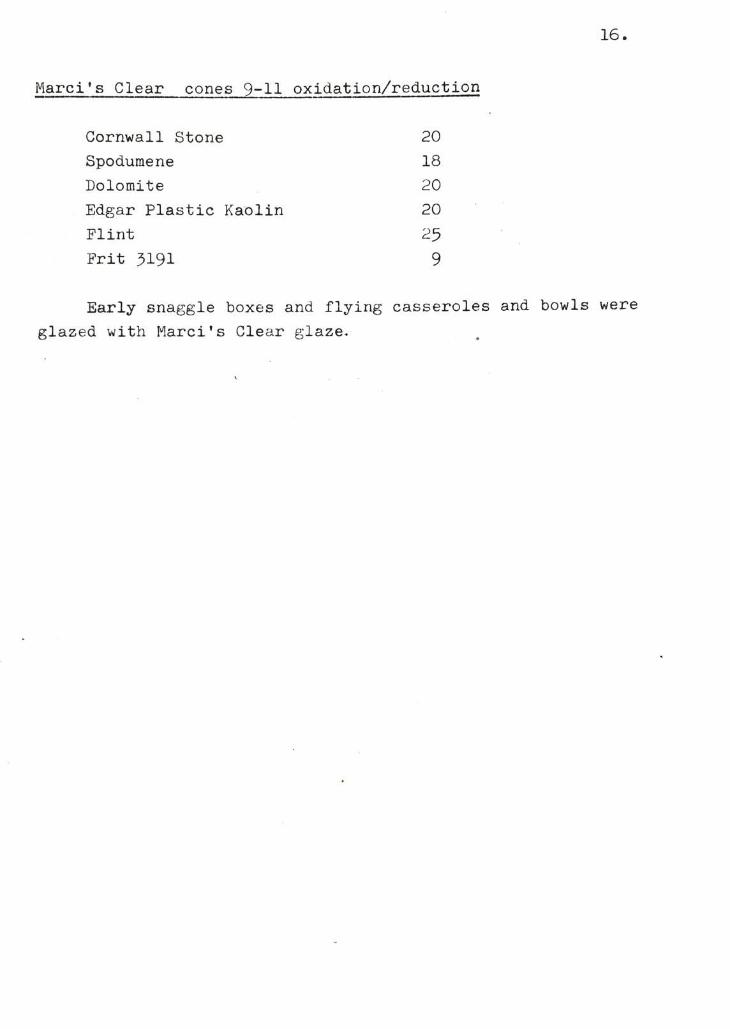
Marci's Clear cones 9-11 oxidation/reduction
Cornwall Stone 20
Spodumene 18
Dolomite 20
Edgar Plastic Kaolin 20
Flint 25
Frit 3191 9
Early snaggle boxes and flying casseroles and bowls were
glazed with Marci's Clear glaze.

17.
Appendix B Airbrushes

18.
Getting an airbrush was a real problem. People are not
particularly willing to lend out this expensive piece of
equipment. It (the airbrush) also seems to have a mystique
built up around it so that people seem to think that it is
a more complicated and delicate piece of equipment than it
really is. True, certain photographic retouching airbrushes
are delicate,but the kind of brush we might use in ceramics
is a much sturdier tool. I met a student, David Solomita,
from the painting department at R.I.T.. He worked exclusively
with airbrushes and was able to answer my questions about
them. Undoubtably this is the best course to follow if one
is thinking about using an airbrush. I will pass along
what I learned about them in the hopes that it might help
others.
The only brands of airbrush that I heard of were Thayer
& Chandler and Paasche (pa-shay) Airbrush Co. Evidently
there are other brands, but these are the best for our use
in terms of sturdiness and reliability. I can only speak
about the Paasche airbrush since that is the kind that I
used and ordered for myself. There are several different
models of airbrush; each model fulfills a different though
related purpose. There are basically two different kinds:
The single action and the double action. The action refers to
the kind of lever that controls the air-paint mixture.
The double action have the most versatility and control of
the spray. I ordered a double action airbrush because of
its versatility ,but because the order did not come in on

19.
time, I used a single action airbrush for all my thesis work.
Not knowing any better, I found it perfectly adequate for what
I was doing. Whether it actually was or not I will soon find
out.
Airbrushes do bare a limit on the particle size that can
be passed through them, but there is latitude in this for a
variety of substances to be sprayed from a watery solution
to thinned down laquers, enamels and acrylics. This would
include ball milled or commercial glazes that have been thinned
down to the point that the glaze can pass through the needle
of the brush. Different airbrushes can pass different sub
stances. A fine photographic airbrush cannot pass glaze,
but there are airbrushes with interchangeable needles which
allow you to spray thin, medium and thick particle size.
Airbrushes run on 25-35 p.s.i. of air pressure, the
thicker the particle size, the more pressure you need. The
pressure must be regulated to this amount. The air hose in
our glaze pantry has a regulator, but some compressors do not.
Regulators are easily attached to the compressor if it does
not have one already.
The needle of the airbrush clogs easily when you are
spraying. It is easily cleared by simply covering the tip
of the airbrush with your finger while the pressure is on.
The back up of pressure forces the obstruction down the
suction tube. The airbrush is easily cleaned by passing the
solvent for the substance you are using through the brush.
If this does not clean it suffiently, then you must disass
emble the brush and soak the needle, tip and head in that
solvent. In the case of glaze or other waterbased substances
the solvent would be water. For lustres and china paints it
would be turpentine. With sulfates ,special care must be
taken in cleaning because the soluble salts are corrosive and
can ruin the spraying mechanism. In any case the spraying
mechanism must be clean to avoid clogging and uneven appli
cation of the material.

20.
One more thing: At this writing I ordered an airbrush
three months ago. Last week it arrived at the store from which
I ordered it. If the reader is thinking about airbrushing,
it would be wise to order one as soon as possible since the
present situation is one of high demand and backorders at
the factory. I would not have been able to work with an
airbrush if the aforementioned acquaintance, David Solomita,
had not lent me his second brush. I am very grateful to him
for this and for his help in answering my questions and
showing me how to use the airbrush.

21.
Bibliography
Brown, Marci. Brushwork on Porcelain. Rochester, N.Y..
B.F.A. Thesis Report. Rochester Institute of Tech
nology. 1974
Stecher, Paul G. , ed.. The Merck Index. Rahway, N.J..
Merck & Co., Inc.. 1968.
Stouten, Margaret. Porcelain Boxes. Rochester, N.Y..
B.F.A. "Thesis Report. Rochester Institute of Tech
nology. 1974.
Williams, Brian. Salt Glazed Clay Surfaces. Rochester,N.Y.. M.F.A. Thesis Report. Rochester Institute of
Technology. 1972.

ILLUSTRATIONS

L|^'-j|jy
|Pg
$&&&m
(
m
P
>s
frOfr^HBi
Plate I
"Flying Casserole"
7"
high,10"
wide
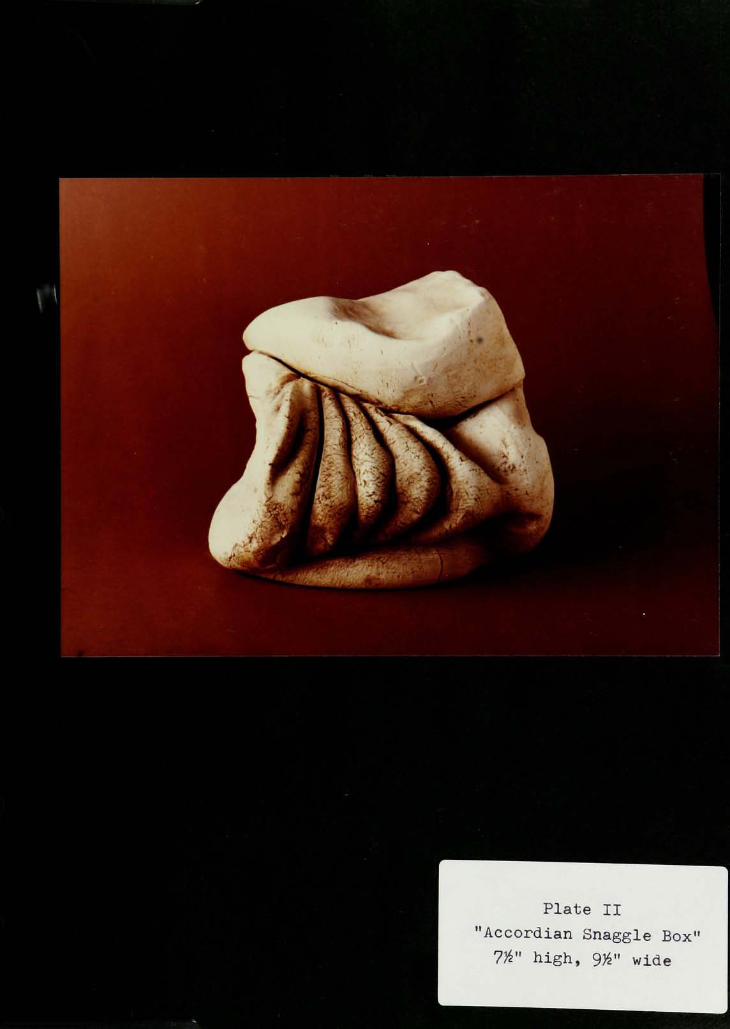
Plate II
"Accordian Snaggle Box"
7#"
high,9#
wide
em
MMlnlfflMHIfl
raw* HE ! 'y'y ^Wi&^Mi
^B
5oMse&^H
* X
Plate III
"Resting Snaggle Box"
3"
high,15"
long

I -*s
Plate IV
"Three Blue Friends"
6"
high, 16g"
long

ZJA
Plate V
"Calgon Twins"
2#"
high,8"
long

m
'*- 1
!#*;'.-'
*i>5*
^.*asi
&*.&H
ftS
NT/0
Plate VI
"Wall Plaque"
15"
wide,12"
long

v L
i
Plate VII
"The Bone"
14"
long,5#"
wide

Plate VIII
"Giant Step"
27"
long,11"
wide

\\\\\m\I
Plate IX
"Garden Slug"
5"
high,23"
long

Plate X
"Garden Slug"
4"
high,20#"
long
4 -4, .
fr?KS
iasi
mhHHt
akMEmi
:; :."'- <'.'''. '".;
Plate XI
"Garden Slug"
3#"
high,20"
long

HI
^r^>^t^^^Ti
K^l? 1
^^^jjfcj.jjyawfrr 1 IT 'St^^t '
2
Ml
\m\\
.PI1
W
I
iff
Plate XII
"Lustred Wall Piece"
3"
wide,21#"
long

^Wm
S4
Mr
I
ShK'''". ..-..--
fr^BBL^^fr^^l
Plate XIII
"Garden Slug"
4#"
high,23#"
long

Plate XIV
"Wall Piece"
5#"
wide,13"
long

.^BfrB5BS^ , i .
.^. ^
--
4~v.''
\ v;HHHH:HHHflKj
*3&KS^5i3lS*S.fi*Ji 2Si ShhI hh^hw'hhhhhB
^|4BJi M 1.BhM-^H
jigggM| nara^a rmmmrams Mi EBHhHKHbMHHHi
hhhhhhhhhhBI
1 .Bhhhhhhhh^hhh
1 hhhhIv"^taH^%BHI
HHHHHHHHHHHHHHHHHHHHfl
^5 a>i 1 ^tHjHP^HHifr^fr^^^v^^^WjivW^^^r .
^ r*"^ ,
'' '
^Ml" " j' '%"*i",r^
"'^^SI^co^SS^fiEBil ^r ^^ ^^*"^^^Hi?
hhhhhhhh! 1 -^^i^&^^^i1 ;(*oiljK
#"
HHHHHHHHHHHHHHHHHH^CX?'1]-?-*'
HbHI HHHHHHHHHH
lip ,jflS HI HI ^Sf^^^^Sa ^"^tRS-SP S*^wp8!i ^KoiiB 9S9K
.HjHHHnHHHV
hhh^hhhhI1 -.'.-*HHl
MH^BHHj|'
1
Plate XV
"Wall Piece"
3"
wide,19"
long

YJ
Plate XVI
"Calgon BisquedPiece"
10)6"
wide,15"
long

^s
\
Plate XVII
"Small WallPlaque"
7"
wide,14#"
long

Plate XVIII
"Small Wall Plaque"
7"
wide,10"
long

TX"- V:
Plate XIX
"Small Wall Plaque"
7"
wide, 1W long