
Pendragon Forms Universal
384
Pendragon Forms Universal Reference Guide
-
Upload
khangminh22 -
Category
Documents
-
view
2 -
download
0
Transcript of Pendragon Forms Universal
Pendragon Forms UniversalReference Guide

2 3
Copyright InformationCopyright © 2010-2014 Pendragon Software Corporation. All rights reserved.This documentation may be printed by licensee for personal use. Except for the foregoing, no part of this document may be reproduced or transmitted in any form by any means, electronic or mechanical, including photocopying or recording on any information storage and retrieval system, without prior written permission from Pendragon Software Corporation.
Pendragon Software CorporationPendragon is a Registered Trademark of Pendragon Software Corporation.
Pendragon Software and Pendragon Forms are trademarks of the Pendragon Software Corporation.
Apple Inc.
Apple, iPod touch, iPad, and iPhone are registered trademarks of Apple.
GoogleGoogle is a registered trademark, and Android is a trademark of Google, Inc.
All other brands and product names may be trademarks or registered trademarks of their respective holders.

2 3
Contents
1. Pendragon Forms Universal - Getting Started .............. 13
Installation Options ..................................................................................... 13
Installing Pendragon Forms Universal - A Typical Installation .................... 14
Connecting Your Server to the Internet - Security Issues ........................... 16
Installing Pendragon Forms Additional License Codes .............................. 16
Two-Stage Installation of Pendragon Forms Universal............................... 17
Installing Pendragon Forms Universal on a Mobile Device ........................ 19
Downloading the Forms Universal Android Client ...................................... 19
Installing the Forms Universal Android Client ............................................. 20
Configuring the Pendragon Forms Universal Android Client ...................... 22
Configuring Pendragon Forms Universal on an iOS Device....................... 24
2. Quick Guide to Using Forms Universal........................... 27
Running the Pendragon Forms Manager program ..................................... 27
Creating a New Form.................................................................................. 28
Adding Fields to your Form......................................................................... 29
Using the Preview Area in the Form Designer Window .............................. 30
Adding, Editing, Re-positioning or Deleting Fields...................................... 31
Setting Advanced Field Properties on the Data Tab ................................... 33
Changing Visual properties on the Visual Tab ............................................ 34
Changing the Screen Space Allocated to Fields on the Sizing Tab ............ 35
Using the Script Tab to add a Script to a field ............................................. 37
Saving Your Form Design ........................................................................... 38

4 5
Editing an Existing Form Design................................................................. 38
Freezing Your Form Design ........................................................................ 39
Distributing a Form to a Mobile Device....................................................... 41
Receiving Form Designs and Entering Data on a Mobile Device ............... 41
Viewing Data on the PC.............................................................................. 44
3. Using Forms Universal on a Mobile Device.................... 45
Installing Pendragon Forms on a Mobile Device ........................................ 45
Running Pendragon Forms on a Mobile Device ......................................... 45
Entering New Records................................................................................ 46
Reviewing Records..................................................................................... 47
Synchronizing the Mobile Device................................................................ 48
Sorting Records .......................................................................................... 49
Filtering Records......................................................................................... 50
Deleting Records and Forms from a Mobile Device ................................... 51
Warning - Do Not Delete the Mobile Device’s Web Browser Cache or the Forms Universal Database on the Device .................................................. 52
4. Planning Your Data Collection Project ............................ 55
How Much Space Does Pendragon Forms Use on a Device? ................... 55
Managing the Number of Records Kept on a Mobile Device...................... 56
Decide if Mobile Users Need to Share Records ......................................... 57
Create Forms that Minimize Data-Entry...................................................... 58
Testing Synchronization.............................................................................. 59
How Often Should Users Synchronize? ..................................................... 60
Ensure that Regular Backups are made..................................................... 61

4 5
5. Managing Users and User Groups .................................. 63
First User Name and Password, and the Default Group ............................ 63
Accessing the Pendragon Transfer Agent .................................................. 64
Adding New Users ...................................................................................... 65
Creating a New Group ................................................................................ 66
Adding Users to a Group ............................................................................ 67
Adding Forms to a Group ........................................................................... 68
Removing Users or Forms from a Group.................................................... 69
Changing a User Name or Password;Deactivating or Removing a User ... 70
Recovery Groups........................................................................................ 71
6. Managing Form Designs................................................... 73
Making Changes to a Frozen Form ............................................................ 73
Copying a Form Design .............................................................................. 74
Organizing Form Designs into Categories.................................................. 75
Recycle Bin ................................................................................................. 76
Deleting a Form and its Records ................................................................ 77
Printing a Form Design ............................................................................... 78
7. Field Types ......................................................................... 79
Freeform Text Field ..................................................................................... 80
Numeric Field.............................................................................................. 83
Currency Field............................................................................................. 86
Option 1 of 5 Field ...................................................................................... 87
Popup List Field .......................................................................................... 88
MultiSelection List Field .............................................................................. 90
Date & Time Field ....................................................................................... 92
Date Field.................................................................................................... 94

6 7
Time Field ................................................................................................... 95
Yes or No Checkbox Field .......................................................................... 96
Time Checkbox Field .................................................................................. 99
Completion Checkbox Field ...................................................................... 100
Section Field ............................................................................................. 101
Jump to Section Field ............................................................................... 104
Lookup List Field....................................................................................... 106
Cascading Lookup .................................................................................... 112
Lookup to Another Form (Lookup to a Reference Form) ......................... 116
Subform Field............................................................................................ 120
Cascading Completion Checkbox from Parent to Subform ...................... 126
Single Subform Field ................................................................................ 129
Signature Field.......................................................................................... 132
Button Field............................................................................................... 135
Custom Control Field - For GPS Control .................................................. 137
Image Field - For Taking Pictures on an Android Device .......................... 140
8. Form Designer & Advanced Field Properties ............... 143
The Form Designer Window ..................................................................... 143
Field Tab ................................................................................................... 145
Data Tab - Advanced Field Properties ...................................................... 146
Data Tab: Column Name........................................................................... 147
Data Tab: Auto-Default.............................................................................. 148
Data Tab: Primary Key .............................................................................. 149
Data Tab: Required ................................................................................... 150
Data Tab: Display Key............................................................................... 151
Data Tab: Default Value ............................................................................ 152
Data Tab: Integer ...................................................................................... 153
Data Tab: Decimal Places......................................................................... 154
6 7
Data Tab: Minimum Value & Maximum Value ........................................... 155
Data Tab: Max Length............................................................................... 156
Data Tab: Pattern ...................................................................................... 157
Data Tab: Do Not Upload to PC................................................................ 158
Visual Tab ................................................................................................. 159
Visual Tab: Making a Field start on a New Screen ................................... 159
Visual Tab: Adding an Image to a Screen ................................................. 160
Visual Tab: Changing Font Size and Color ............................................... 162
Visual Tab: Right-Justifying Numeric and Currency Fields ....................... 165
Visual Tab: Hidden Fields ......................................................................... 166
Visual Tab: Making a Field Read-Only...................................................... 167
Visual Tab: No Focus (No Cursor Blinking in a Text Field) ....................... 167
Sizing Tab ................................................................................................. 168
Sizing Tab: Fitting a Qustion and Answer on One Line............................. 168
Sizing Tab: Adjusting Answer Placement .................................................. 169
Sizing Tab: Sizing Question and Answer Heights ..................................... 170
Script Tab .................................................................................................. 172
9. Form Properties............................................................... 173
Form Properties Window .......................................................................... 173
Data Persistence ...................................................................................... 174
Access Rights ........................................................................................... 175
Category ................................................................................................... 176
Freezing a Form Design ........................................................................... 178
Table Name & Query Name...................................................................... 179
Form ID..................................................................................................... 179
Advanced Form Properties ....................................................................... 180
Views Tab.................................................................................................. 181
Views Tab: No End Button ........................................................................ 181

8 9
Views Tab: No Back Button....................................................................... 181
Behavior Tab ............................................................................................. 182
Behavior Tab: Screen Level Validation ..................................................... 182
Behavior Tab: Disable Action Menus ........................................................ 183
Behavior Tab: Display as Subform............................................................ 183
Behavior Tab: Hide Form in Forms List..................................................... 183
Synchronization Tab.................................................................................. 184
Synchronization Tab: Additional Download Criteria .................................. 184
Synchronization Tab: Desktop/Server Synchronization ............................ 189
Synchronization Tab: Last Server Sync Date Reset Button...................... 191
Synchronization Tab: Read-Only Reference Form(Data Hidden on Handheld) ...................................................................... 191
Synchronization Tab: Synchronize Only When Distributed....................... 191
Columns Tab ............................................................................................. 192
Changing Advanced Form Properties on a Frozen Form ......................... 194
10. Managing Data on the PC ............................................. 195
Viewing and Editing Data in the Pendragon Forms Database.................. 196
Alternative Methods for Viewing Data....................................................... 198
Deleting a Record ..................................................................................... 199
Exporting Data to Microsoft Excel............................................................. 199
Exporting Data to ASCII (.CSV File) ......................................................... 199
Viewing Data in the MySQL Database on the Staging Server.................. 200
Creating a Report in Microsoft Word......................................................... 203
Creating Queries and Reports in Microsoft Access .................................. 208

8 9
11. Importing & Exporting................................................... 209
Import Button ............................................................................................ 209
Importing from a previous Pendragon Forms Database........................... 210
Importing Data from a Different Form Design ........................................... 212
Importing & Exporting Form Designs........................................................ 213
Importing & Exporting Lookup Lists .......................................................... 214
Importing & Exporting Data....................................................................... 215
Creating an ASCII (.CSV) File .................................................................. 217
Creating a Form from a .CSV File............................................................. 218
12. Scripting Reference ...................................................... 219
Format of a Script ..................................................................................... 220
How Scripting Works & Limits of Scripts................................................... 221
Field Labels .............................................................................................. 221
Adding Comments to Scripts .................................................................... 223
Event Procedures ..................................................................................... 224
Variables ................................................................................................... 227
Functions .................................................................................................. 229
Scientific Functions................................................................................... 230
Operators .................................................................................................. 230
Statements................................................................................................ 232
Assignment Statements............................................................................ 232
Conditional Statements............................................................................. 235
Action Statements..................................................................................... 240
Scripting Errors ......................................................................................... 275
Using Scientific Functions in Scripts ......................................................... 276

10 11
13. Scripting Examples ....................................................... 281
Using Scripts to Perform Calculations ...................................................... 281
Working with Dates ................................................................................... 287
Branching.................................................................................................. 290
Using Scripts in Button Fields................................................................... 297
Using a Script in a MultiSelection field...................................................... 299
Using Scripts with Parent forms and Subforms ........................................ 300
Using Scripts to do a Cascading Lookup.................................................. 301
14. Working with Multiple Forms ....................................... 305
Example: Taking Orders on a Mobile Device ........................................... 306
Advanced Scripting................................................................................... 311
Performing a Cascading Lookup to Another Form.................................... 312
Performing a Double Cascading Lookup .................................................. 314
Updating Records in a Reference Form ................................................... 317
15. Creating a Custom Main Menu..................................... 323
Features of a Custom Main Menu Form ................................................... 323
Creating Custom Menu Options ............................................................... 324
Creating a Menu Option for Adding Records ............................................ 325
Creating a Menu Option to Review Existing Records............................... 326
Creating a Menu Option to Synchronize Pendragon Forms ..................... 327
Creating a way to access the Pendragon Forms main menu ................... 328
Creating One Menu Option for Adding and Reviewing Records............... 330
Using a Custom Main Menu form to Filter Records.................................. 334
Advanced Form Properties to Set on the Custom Main Menu ................. 336
10 11
16. Working with Bar Codes ............................................... 337
Bar Code Devices Supported ................................................................... 337
How Bar Code Scanning Works in Pendragon Forms Universal.............. 337
Repeating Forms ...................................................................................... 338
Looking up Records from a Reference Form............................................ 340
17. Linking to an External Access Database .................... 345
Issues to Consider when Linking to an External Access Database .......... 345
Compatibility between Forms field types and Access field types.............. 347
Sample Existing Access Database ........................................................... 349
Step 1: Creating a Form from an Existing Database Table...................... 350
Step 2: Editing the Form Design for Use on the Mobile Device............... 352
Step 3: Controlling which Records go to the Mobile Device .................... 357
Step 4: Linking the Form to the External Access Database...................... 359
Step 5: Sending the Form to the Mobile Device ...................................... 364
Step 6: Viewing Data on the PC ............................................................... 365
Troubleshooting Tips When Linking to an External Database .................. 365
18. Linking to an ODBC Database...................................... 368
Option 1: Creating a Linked Table in Access ............................................ 368
Option 2: Mapping directly to an ODBC Table .......................................... 370
Troubleshooting Tips When Linking to an ODBC Database ..................... 371
Security Concerns when using ODBC Databases.................................... 371

12 13
For Technical Support, visit:
www.pendragonsoftware.com/support
19. Backing Up Pendragon Forms..................................... 372
Backing up the Pendragon Forms Manager Access Database ................ 372
Backing up the Pendragon Forms MySQL Database ............................... 373
Backing Up Form Designs ........................................................................ 374
Recovering Form Designs ........................................................................ 375
Backing up Data within an Individual Form............................................... 375
Index ..................................................................................... 376
12 13
1. Pendragon Forms Universal - Getting Started
Installation Options
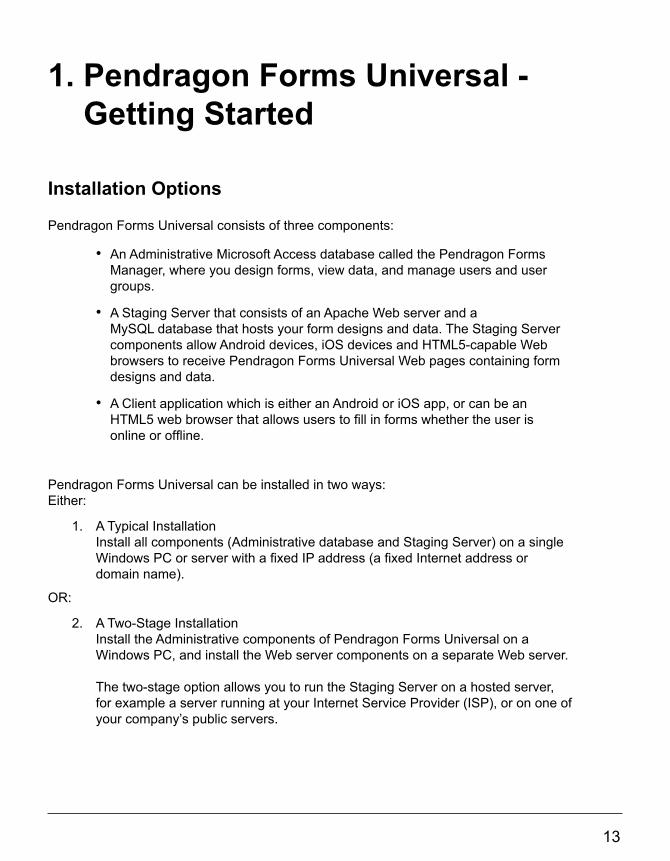
Pendragon Forms Universal consists of three components:
• An Administrative Microsoft Access database called the Pendragon Forms Manager, where you design forms, view data, and manage users and user groups.
• A Staging Server that consists of an Apache Web server and a MySQL database that hosts your form designs and data. The Staging Server components allow Android devices, iOS devices and HTML5-capable Web browsers to receive Pendragon Forms Universal Web pages containing form designs and data.
• A Client application which is either an Android or iOS app, or can be an HTML5 web browser that allows users to fill in forms whether the user is online or offline.
Pendragon Forms Universal can be installed in two ways:Either:
1. A Typical InstallationInstall all components (Administrative database and Staging Server) on a single Windows PC or server with a fixed IP address (a fixed Internet address or domain name).
OR:
2. A Two-Stage InstallationInstall the Administrative components of Pendragon Forms Universal on a Windows PC, and install the Web server components on a separate Web server.
The two-stage option allows you to run the Staging Server on a hosted server, for example a server running at your Internet Service Provider (ISP), or on one of your company’s public servers.

14
Chapter 1: Getting Started
15
Chapter 1: Getting Started
Installing Pendragon Forms Universal - A Typical Installation
1. Double-click the Pendragon Forms Universal installation program (FormsUniversal72Setup.exe) downloaded from www.pendragonsoftware.com.
2. A Welcome screen is displayed, recommending that you exit all Windows programs before continuing with the installation. If you need to stop the installation to close other programs, click Cancel. Otherwise, click Next.
3. A License Agreement screen is displayed. Read the license agreement, and to continue, select I agree to the terms of this license agreement and click Next.
4. A Serial Number / Unlock Code screen is displayed. Enter your Serial Number / Unlock code in the field provided. If you do not have an unlock code, leave the serial number blank to get a 14-day evaluation version.Click Next.
5. You will be prompted to select a folder to install to,The Default installation folder is: C:\Users\Public\FormsUniversal.Click Next to accept the default folder.
6. You will be told that the shortcut folder name will be Pendragon Forms Universal.Click Next.
7. You will be prompted for the version of Microsoft Access that you are using.Either keep the selected choice, or make a different selection. Click Next.

14
Chapter 1: Getting Started
15
Chapter 1: Getting Started
8. A Ready to Install screen is displayed. Click Next to proceed with the installation.
9. Your firewall may prompt you to allow Apache and MySQL servers on your network. Choose to allow these servers to run. If your firewall does not prompt you to allow the Apache and MySQL servers to run, the firewall may have automatically allowed them to run, or you may have to manually set up your firewall to allow Apache and MySQL.
10. You will be prompted to enter a User Name and Password for the first mobile device user. Type a name and a password, then repeat the password to confirm. Note: User Names and Passwords are case sensitive, so make a note of your use of upper and lower case letters. Click OK to continue.
11. A Finished Install screen will be displayed. Click the Next button to exit the installation program and launch the Pendragon Forms Manager.
12. When Microsoft Access opens, if you see a security warning near the top of the screen, click the Options button and choose to Enable This Content.
The Pendragon Forms Manager window will be displayed.
• See Chapter 2, Quick Guide to Using Forms Universal, starting on page 27. for an overview of how to design electronic forms.
• To install Pendragon Forms Universal on a mobile device, see pages19-26.

16
Chapter 1: Getting Started
17
Chapter 1: Getting Started
Connecting Your Server to the Internet - Security Issues
For the purpose of synchronization, the Staging Server is password-protected. However, unless you are synchronizing over a secure, private network, your synchronized information will not be secure. To make your communications secure, even over public networks, we recommend you obtain a secure SSL certificate for your Staging Server, so that all conversations with the server are encrypted by SSL security.
SSL certificates serve two functions. They are used to encrypt data between the two sides of the conversation, and they are used to establish the identity of your server. The identity verification prevents an attacker from pretending to be your server. To get a certificate with identity verification, you will need to purchase an SSL certificate from one of the major Internet security providers (e.g., Network Solutions, GoDaddy, Thawte, Geotrust, etc.).
You can freely generate your own SSL certificates if you do not need identity verification.
Installing Pendragon Forms Additional License Codes
A Pendragon Forms Universal Starter Kit includes a license to use the software on one mobile device. If you have purchased additional Pendragon Forms licenses for additional mobile devices, you can enter your additional license code(s) by doing the following:
1. On the PC, click:Start...All Programs...Pendragon Forms Universal...Pendragon Forms Manager.
2. In the Pendragon Forms Manager window, click the Users button.The Pendragon Transfer Agent window will be displayed.
3. In the Pendragon Transfer Agent window, scroll to the bottom of the window and click the View Licenses button. If you have not already done so, enter your Starter Kit unlock code and click the Add button. Then enter each additional license code and click the Add button.
4. After entering your additional license code(s), you will need to set up a User Name and Password for each mobile user, and add each user to the Default User group or a User Group that you have created. See Chapter 5, Managing Users and User Groups, starting on page 63.

16
Chapter 1: Getting Started
17
Chapter 1: Getting Started
Two-Stage Installation of Pendragon Forms Universal
A two-stage installation of Pendragon Forms Universal allows you to run the Staging Server software on a separate machine. This is useful if your Administrative PC is not accessible 24/7 or if the Administrative PC lacks a fixed IP address. Install your Staging Server software on a PC that is accessible from the Internet at all times, and users can always synchronize with it.
The Administrative PC makes connections to the Staging Server, not the other way around. When the Staging Server is on a separate machine, you do not need to open a hole in your firewall for incoming connections to the Administrative PC. This means you can place your Staging Server machine in a less secure location on the network, while maintaining high security for your enterprise databases. The Staging Server can be hosted by a third party, such as your ISP (Internet Service Provider) or be hosted on your company’s public servers.
To do a two-stage installation of Pendragon Forms Universal:
1. Download the latest Pendragon Forms Universal installer by downloading the Evaluation version of Pendragon Forms Universal.
2. Install Pendragon Forms Universal on the PC that you use as your Administrative PC. (See page 14). This installs the Staging Server locally on your PC.
3. On your web server (at your ISP or on your company’s public server), make sure that you have PHP 5.2 or higher, and that you also have MySQL.
4. Create a folder on the root of your web server called “formsvi”.
5. Copy all the files from yourC:\Users\Public\FormsUniversal\Uniserver\www\formsvifolder up to the forms vi folder on your web server.
6. On your Admin PC, open the fileC:\Users\Public\FormsUniversal\UniServer\www\formsvi\provision.phpusing a text editor (e.g. Notepad).You will see a password that was generated for your local database user account. Write down this password.
7. Create a MySQL database on the server called “formsvi”.
8. Create a MySQL user account for the formsvi database called “formsvi”. Set the password to the password that was in the provision.php file.

18
Chapter 1: Getting Started
19
Chapter 1: Getting Started
9. At this point, you should be able to navigate to your remote server and visit the Forms Universal page:http://myserver.com/formsvi(where myserver.com is the domain name of your server.)
You will see a link to INSTALL/RUN. Click the link.
10. The next step is to set up the initial user accounts:Open your web browser to:http://myserver.com/formsvi/data.php?action=remote(where myserver.com is the domain name of your server.)
You will be prompted for three pieces of information: A new admin password, a first device account name, and the password for that first device account.Enter this information, and make a note of it. Then click the Initialize button.
11. Finally, on your Admin PC, open the Pendragon Forms Manager and click the Users button to open the Pendragon Transfer Agent window. In the Pendragon Transfer Agent window, click the Setup button in the lower right corner of the window. In the Setup window, click on the Remote Admin tab. Type in the URL for your remote formsvi folder. The Forms Universal username will remain “dtaadmin”, but change the password to the admin password that you entered in step 10.
At this point you can try to distribute forms and synchronize data.

18
Chapter 1: Getting Started
19
Chapter 1: Getting Started
Installing Pendragon Forms Universal on a Mobile Device
Pendragon Forms Universal includes various options for running the software on a mobile device:
• On Android devices, you can download and run the Forms Universal Android client. This enables you to use the mobile device’s camera (if it has one) to take pictures and attach the pictures to forms within Pendragon Forms Universal. Also, the Forms Universal Android client does not have a specific database size limit, so you can download more data onto your Android device than was possible in prior versions of Pendragon Forms.
• On iOS devices, and on Windows notebooks, laptops and PC’s, Pendragon Forms Universal can run in a web browser that supports HTML5. Google’s Chrome Web browser, and Apple’s Safari Web browser are both HTML5-capable.
Downloading the Forms Universal Android Client
There are two ways to download the Forms Universal Android client:
1. Direct Download: Tap the Internet icon or Chrome icon on the Android device to open a Web browser.
Browse to:http://www.pendragonsoftware.com/products/forms-universal-edition/android/
Tap the link to download the Pendragon Forms Universal application.
OR
2. Download to PC and Copy to Android Device:On the PC or server, click: Start...All Programs...Pendragon Forms Universal...Install Forms Universal Android Client.
This will take you to a Web page,http://www.pendragonsoftware.com/products/forms-universal-edition/android/where you can download the PendragonFormsUniversal7.2.apk file into the Downloads folder on your PC.
Connect your Android device via USB cable to your PC. A window will be displayed on your PC. Choose to Open device to view files using Windows Explorer. Copy the PendragonFormsUniversal7.2.apk file from the Downloads folder on your PC to the Download folder on your Android device.

20
Chapter 1: Getting Started
21
Chapter 1: Getting Started
Installing the Forms Universal Android Client
After the Forms Universal Android client has been downloaded onto your Android device (see previous page):
1. Tap the My Files icon on your Android device.(The My Files icon may be directly on an Android screen, or you may have to tap the Apps icon and page through the Apps screens to find the My Files icon.)
Apps icon
My Files icon
2. In the My Files app, if you are not on the Home screen, tap the Home icon.
3. On the My Files Home screen, tap the All Files folder, then tap the Download folder.
All Files folder Download
folder

20
Chapter 1: Getting Started
21
Chapter 1: Getting Started
4. In the Download folder, tap on the PendragonFormsUniversal7.2.apk file and choose to install the Pendragon Forms Universal app on your Android device.
Note: If you get a warning message that the Install has been blocked, tap the Settings button, then tap the Unknown sources checkbox. Choose Allow initial installation only, then tap OK.
5. Next you will need to configure the Pendragon Forms Universal client on your Android device - see next page.
22
Chapter 1: Getting Started
23
Chapter 1: Getting Started
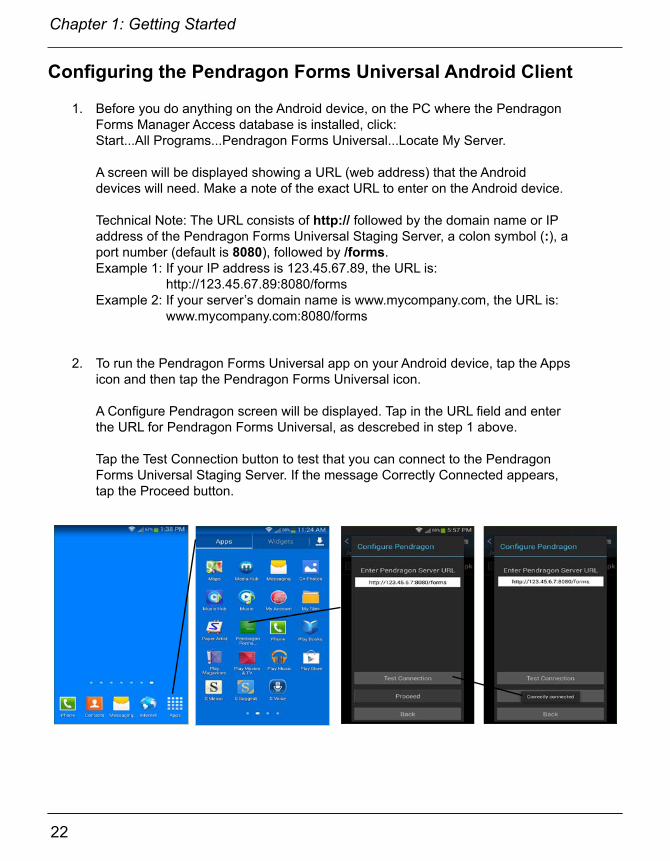
Configuring the Pendragon Forms Universal Android Client
1. Before you do anything on the Android device, on the PC where the Pendragon Forms Manager Access database is installed, click:Start...All Programs...Pendragon Forms Universal...Locate My Server.
A screen will be displayed showing a URL (web address) that the Androiddevices will need. Make a note of the exact URL to enter on the Android device.
Technical Note: The URL consists of http:// followed by the domain name or IP address of the Pendragon Forms Universal Staging Server, a colon symbol (:), a port number (default is 8080), followed by /forms.Example 1: If your IP address is 123.45.67.89, the URL is: http://123.45.67.89:8080/formsExample 2: If your server’s domain name is www.mycompany.com, the URL is: www.mycompany.com:8080/forms
2. To run the Pendragon Forms Universal app on your Android device, tap the Apps icon and then tap the Pendragon Forms Universal icon.
A Configure Pendragon screen will be displayed. Tap in the URL field and enter the URL for Pendragon Forms Universal, as descrebed in step 1 above.
Tap the Test Connection button to test that you can connect to the Pendragon Forms Universal Staging Server. If the message Correctly Connected appears, tap the Proceed button.

22
Chapter 1: Getting Started
23
Chapter 1: Getting Started
3. A Launch-Sync-Setup screen will be displayed. Tap the Setup button.Enter the Pendragon Forms User Name and Password that have been assigned to this Android device. Then tap OK.
4. On the Launch-Sync-Setup screen, tap the Sync button to synchronize the Android device and receive any form designs that have been assigned to the device. At the end of a successful synchronization, the Forms List screen will be displayed, showing the available forms. If the Forms List screen is not displayed, tap the Launch button to view it. Tap on a form to fill out the form.
For information on how to enter records (that is, fill out forms) on a mobile device, see Chapter 3 Using Forms Universal on a Mobile Device, starting on page 45.

24
Chapter 1: Getting Started
25
Chapter 1: Getting Started
Configuring Pendragon Forms Universal on an iOS Device
Pendragon Forms Universal can run on any iOS device with a web browser that supports HTML5.You can also run the mobile component of Pendragon Forms Universal on a PC, netbook or tablet device with a web browser that supports HTML5.
To configure Pendragon Forms Universal on an iOS device:
1. Before you do anything on the iOS device, on the PC where the Pendragon Forms Manager Access database is installed, click:Start...All Programs...Pendragon Forms Universal...Locate My Server.
A screen will be displayed showing a URL (web address) that the iOS devices will need. Make a note of the exact URL to enter on the iOS device.
Technical Note: The URL consists of http:// followed by the domain name or IP address of the Pendragon Forms Universal Staging Server, a colon symbol (:), a port number (default is 8080), followed by /forms .Example 1: If your IP address is 123.45.67.89, the URL is: http://123.45.67.89:8080/formsExample 2: If your server’s domain name is www.mycompany.com, the URL is: www.mycompany.com:8080/forms
2. On the iOS device, open the web browser. On iPod touch, iPhone and iPad devices, tap the Chrome or Safari icon to open the web browser.
3. In the handheld web browser, enter the starting URL for Pendragon Forms Universal from Step 1 above. You will be taken to a web page for Pendragon Forms Universal.

24
Chapter 1: Getting Started
25
Chapter 1: Getting Started
4. On the starting page for Pendragon Forms Universal, tap INSTALL/RUN.A Pendragon Forms Universal Launch-Sync-Setup screen will be displayed.Tap the Setup button and enter the User Name and Password that has been assigned to your mobile device. Then tap OK.
5. After entering the device User Name and Password, you will be returned to the Pendragon Forms Launch-Sync-Setup screen. You should now bookmark this web page so that you can easily return to it in the future.
• On iPod touch and iPhone devices, tap the Bookmark icon at the bottom of the screen and choose to add an icon to the Home screen. On iPad devices, the Bookmark icon is at the top of the screen.
Bookmark icon
26
Chapter 1: Getting Started
27
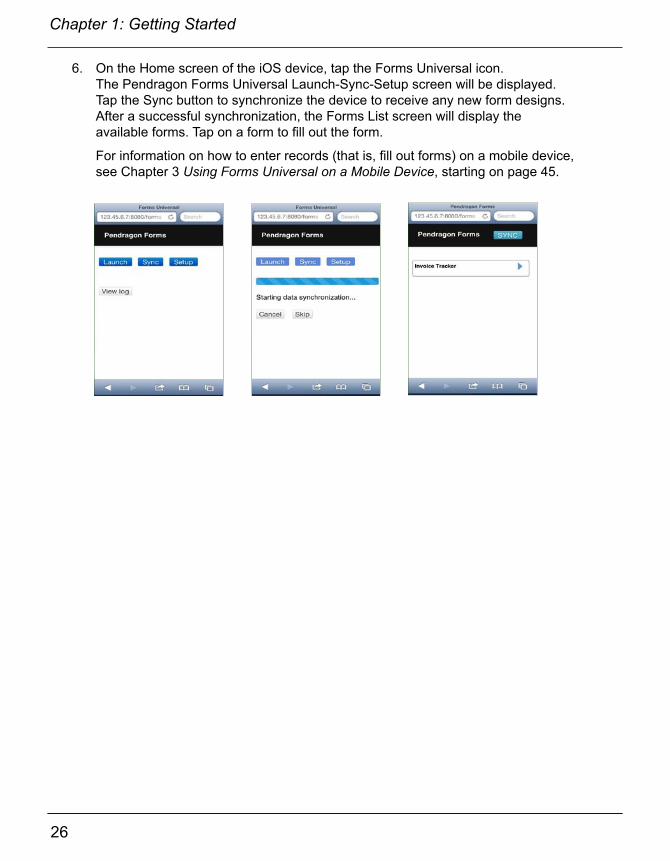
6. On the Home screen of the iOS device, tap the Forms Universal icon.The Pendragon Forms Universal Launch-Sync-Setup screen will be displayed.Tap the Sync button to synchronize the device to receive any new form designs.After a successful synchronization, the Forms List screen will display the available forms. Tap on a form to fill out the form.
For information on how to enter records (that is, fill out forms) on a mobile device, see Chapter 3 Using Forms Universal on a Mobile Device, starting on page 45.

26
Chapter 1: Getting Started
27
2. Quick Guide to Using Forms Universal
This chapter explains how to create a form in Pendragon Forms, and send the form to a mobile device.
Running the Pendragon Forms Manager program
On your PC, run the Pendragon Forms Manager program by clicking:Start...All Programs...Pendragon Forms Universal...Pendragon Forms Manager.
The Pendragon Forms Manager is a Microsoft Access database. Once the database is open, the Pendragon Forms Manager window in the foreground is where you will design forms and view data.
Tip: If you do not see the Pendragon Forms Manager window and instead see this Security Warning:
click the Options button and then select to Enable this content and click OK.
Pendragon Forms Manager window.

28
Chapter 2: Quick Guide to Using Forms Universal
29
Chapter 2: Quick Guide to Using Forms Universal
Creating a New Form
To create a new form:
1. In the Pendragon Forms Manager, click the New button to open the Form Designer window and create a new form.
2. In the Form Designer window, type a name for your form in the Form Name field.
3. Next, add fields to your form by typing a Field Name and selecting a Field Type for each field on your form. (See next page.)
Form Name
Field Name Field Type

28
Chapter 2: Quick Guide to Using Forms Universal
29
Chapter 2: Quick Guide to Using Forms Universal
Adding Fields to your Form
Each instance of data that you want to collect on your form is represented by a field on the form.
To add a field to a new form:
1. Click in the Field Name field, and type a name for your field.
2. In the Field Type field, select the type of data that you want the handheld user to enter in this field. There are 21 possible field types that you can use:
Button field Image field (Android) Section fieldCompletion Checkbox field Jump to Section field Signature fieldCurrency field Lookup List field Single Subform fieldCustom Control field MultiSelection List Subform fieldDate field Numeric field Time fieldDate & Time field Option 1 of 5 field Time CheckboxFreeform Text field Popup List field Yes/No Checkbox
Refer to Chapter 7, Field Types, starting on page 79 for detailed information on each field type.
3. To add another field to your form, click the button, and repeat steps 1 and 2. If you are on the last field of a form, you can also click the right arrow button to add a new field.
4. If you are creating a form with a lot of fields, click the Save button in the Form Designer window often, to save your work regularly.
Save

30
Chapter 2: Quick Guide to Using Forms Universal
31
Chapter 2: Quick Guide to Using Forms Universal
Using the Preview Area in the Form Designer Window
The Preview Area is along the left side of the Form Designer window, and as you add fields to your form, the Preview Area shows what the form will look like on the mobile device.
If your form is several screens long, you can scroll up and down the Preview Area to find a particular screen.
To edit a field, click on that field in the Preview Area.
You can also use these buttons:
(left and right arrow buttons) to move from field to field.
When you click on a field in the Preview area, a triangular black marker appears to the right of that field in the Preview Area, to indicate which field you are on. The selected field is also outlined by a light pink dotted line.
When a field is selected in the Preview Area, the five tabs in the Form Designer window - the Field, Data, Visual, Sizing and Script tabs - will all apply to the selected field.
30
Chapter 2: Quick Guide to Using Forms Universal
31
Chapter 2: Quick Guide to Using Forms Universal
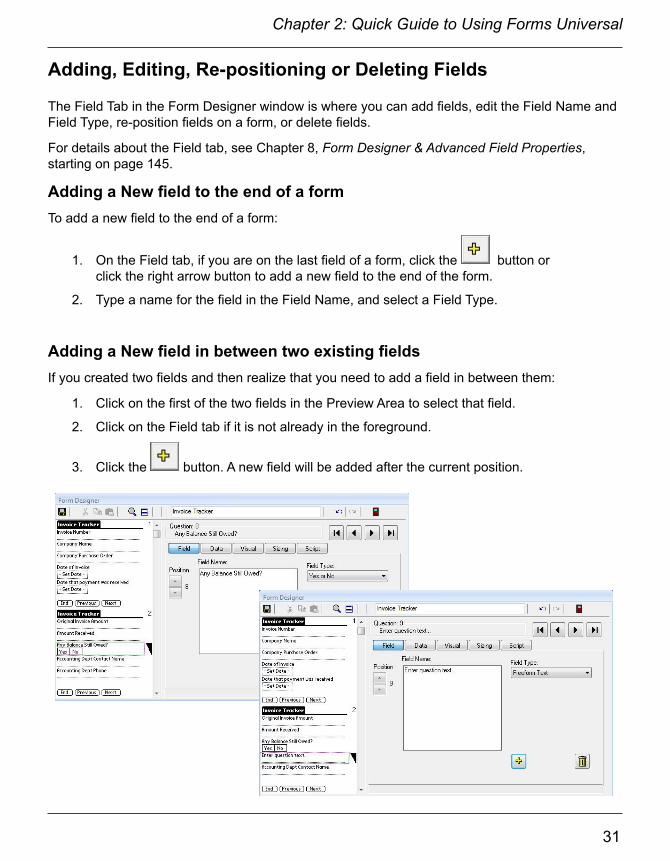
Adding, Editing, Re-positioning or Deleting Fields
The Field Tab in the Form Designer window is where you can add fields, edit the Field Name and Field Type, re-position fields on a form, or delete fields.
For details about the Field tab, see Chapter 8, Form Designer & Advanced Field Properties,starting on page 145.
Adding a New field to the end of a formTo add a new field to the end of a form:
1. On the Field tab, if you are on the last field of a form, click the button or click the right arrow button to add a new field to the end of the form.
2. Type a name for the field in the Field Name, and select a Field Type.
Adding a New field in between two existing fieldsIf you created two fields and then realize that you need to add a field in between them:
1. Click on the first of the two fields in the Preview Area to select that field.
2. Click on the Field tab if it is not already in the foreground.
3. Click the button. A new field will be added after the current position.

32
Chapter 2: Quick Guide to Using Forms Universal
33
Chapter 2: Quick Guide to Using Forms Universal
Deleting a fieldTo delete a field from a form:
1. Click on the field in the Preview Area to select the field that you want to delete.
2. Click on the Field tab if it is not already in the foreground.
3. Click the Delete button (Trash can icon).
Editing a fieldTo edit a field:
1. Click on a field in the Preview Area to select the field.
Alternatively, you can click on the left and right arrow buttons until the desired field is displayed.
2. Once a field has been selected, any changes that you may on any of the five tabs of the Form Designer window will apply to that field.
Re-positioning fields on a formIf you need to move a field so that it comes before or after another field:
1. Click on the field in the Preview Area to select the field.
2. Click on the Field tab if it is not already in the foreground.
3. Use the Up and Down arrows to move the field up or down in the Preview Area.
32
Chapter 2: Quick Guide to Using Forms Universal
33
Chapter 2: Quick Guide to Using Forms Universal
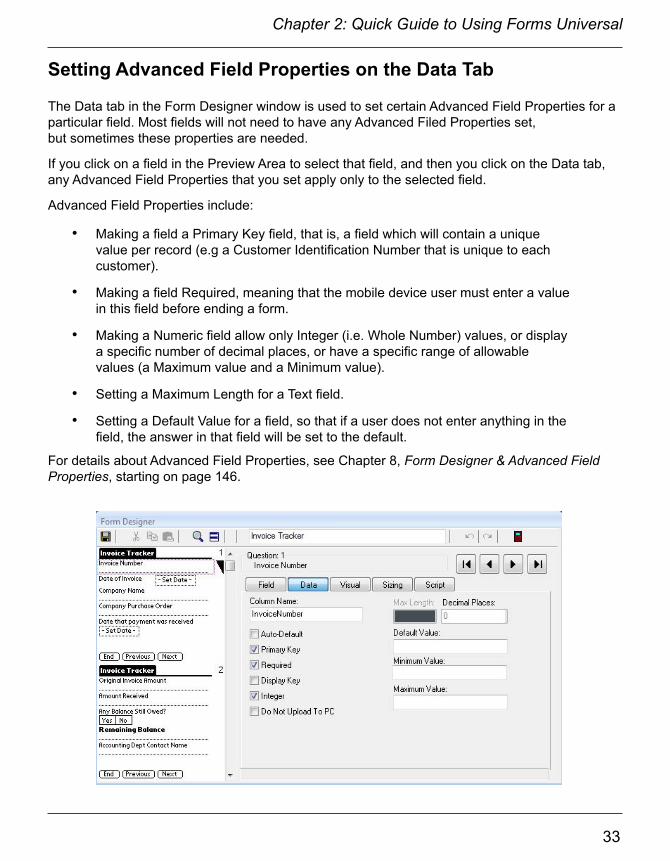
Setting Advanced Field Properties on the Data Tab
The Data tab in the Form Designer window is used to set certain Advanced Field Properties for a particular field. Most fields will not need to have any Advanced Filed Properties set, but sometimes these properties are needed.
If you click on a field in the Preview Area to select that field, and then you click on the Data tab, any Advanced Field Properties that you set apply only to the selected field.
Advanced Field Properties include:
• Making a field a Primary Key field, that is, a field which will contain a unique value per record (e.g a Customer Identification Number that is unique to each customer).
• Making a field Required, meaning that the mobile device user must enter a value in this field before ending a form.
• Making a Numeric field allow only Integer (i.e. Whole Number) values, or display a specific number of decimal places, or have a specific range of allowable values (a Maximum value and a Minimum value).
• Setting a Maximum Length for a Text field.
• Setting a Default Value for a field, so that if a user does not enter anything in the field, the answer in that field will be set to the default.
For details about Advanced Field Properties, see Chapter 8, Form Designer & Advanced Field Properties, starting on page 146.
34
Chapter 2: Quick Guide to Using Forms Universal
35
Chapter 2: Quick Guide to Using Forms Universal
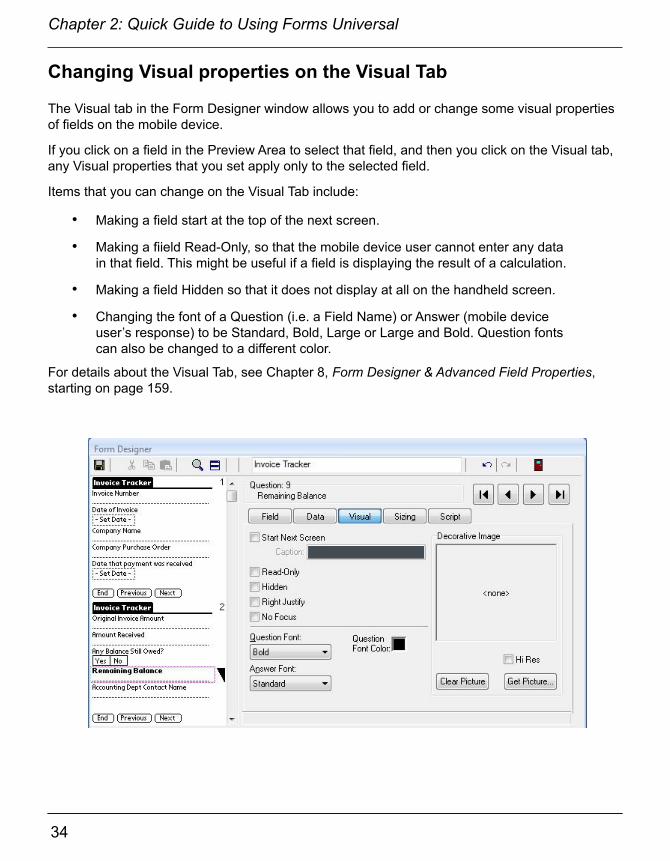
Changing Visual properties on the Visual Tab
The Visual tab in the Form Designer window allows you to add or change some visual properties of fields on the mobile device.
If you click on a field in the Preview Area to select that field, and then you click on the Visual tab, any Visual properties that you set apply only to the selected field.
Items that you can change on the Visual Tab include:
• Making a field start at the top of the next screen.
• Making a fiield Read-Only, so that the mobile device user cannot enter any data in that field. This might be useful if a field is displaying the result of a calculation.
• Making a field Hidden so that it does not display at all on the handheld screen.
• Changing the font of a Question (i.e. a Field Name) or Answer (mobile device user’s response) to be Standard, Bold, Large or Large and Bold. Question fonts can also be changed to a different color.
For details about the Visual Tab, see Chapter 8, Form Designer & Advanced Field Properties, starting on page 159.

34
Chapter 2: Quick Guide to Using Forms Universal
35
Chapter 2: Quick Guide to Using Forms Universal
Changing the Screen Space Allocated to Fields on the Sizing Tab
The Sizing tab in the Form Designer window allows you to control how much screen space a given field occupies on the mobile device.
The default is that a Question (i.e. Field name) occupies one line, and the Answer (i.e. the user’s response) occupies one line immediately following the question.
For details about the Sizing Tab, see Chapter 8, Form Designer & Advanced Field Properties, starting on page 168.
Fitting a Question and Answer on the Same LineIf you have short field names (i.e. questions), and the user’s responses (i.e. answers) will also be short, you can choose to fit both the question and the answer on the same line of the mobile device screen. This will enable you to fit more questions on a single screen.
To fit a question and answer on the same line:
1. Click on the field in the Preview Area to select that field.
2. Click on the Sizing tab.
3. Check the checkbox labelled Question and Answer on Same Line.The Preview Area will display how the field looks with the field name (question) and user’s response (answer) on the same line.Tip: Adjust the Answer Placement slider to make the answer shift to the right in order to view more of the question.

36
Chapter 2: Quick Guide to Using Forms Universal
37
Chapter 2: Quick Guide to Using Forms Universal
Allowing Multiple Lines for a Question and/or AnswerThe Sizing tab of the Form Designer also lets you control if you want a field name (question) or a user’s response (answer) to take up multiple lines on the mobile device screen.
To adjust the space allocated to a question or answer:
1. Click on the field in the Preview Area to select that field.
2. Click on the Sizing tab.
3. Adjust the Question Height and/or Answer Height sliders appropriately. The Spacing slider adds blank lines before the question.The Preview Area will display how the field will look on the mobile device with multiple lines.TIP: The question and answer components of a field cannot be larger than a single screen.

36
Chapter 2: Quick Guide to Using Forms Universal
37
Chapter 2: Quick Guide to Using Forms Universal
Using the Script Tab to add a Script to a field
Pendragon Forms uses a scripting language to allow you to perform various actions depending on the type of data a mobile device user enters as a response in a field.
The Script tab in the Form Designer window is where you write the script associated with a given field.
If you click on a field in the Preview Area to select that field, and then you click on the Script tab, any scripts that you write are associated with the selected field.
Scripts can be used to:
• Perform branching, so that when a user makes a selection in one field, the user is jumped to a different part of the form to fill in.
• Perform calculations, so that when a user enters one or more values, a calculation is performed and displayed in another field.
• Reduce mobile device data-entry by pre-filling certain fields.
For details about writing scripts, see Chapter 12, Scripting Reference, starting on page 219.

38
Chapter 2: Quick Guide to Using Forms Universal
39
Chapter 2: Quick Guide to Using Forms Universal
Saving Your Form Design
As you add fields to your form design, you should save the form design regularly, especially if the form has a lot of fields.
To save a form design:
1. Click the Save button in the upper left corner of the Form Designer window.
2. Also, when you close the Form Designer window by clicking the Exit button, you will be prompted to save your form design. Choose Yes when prompted to save the form.
Editing an Existing Form Design
If you close the Form Designer window before you have finished creating all the fields on your form, you can go back to the form to edit it.
To edit a form design:
1. In the Pendragon Forms Manager window, click on the name of your form.
2. Cick the Edit button on the left side of the Pendragon Forms Manager window. The Form Designer window will be displayed.
Save button Exit button
Edit

38
Chapter 2: Quick Guide to Using Forms Universal
39
Chapter 2: Quick Guide to Using Forms Universal
Freezing Your Form Design
When you have finished creating your form design, the next step in the design process is to freeze the form design.
Freezing a form design creates a database table within the Pendragon Forms Manager Access database, for storing all the records associated with a form. Each record is an instance of filling in the form.
You cannot add, delete or move fields once a form design has been frozen.
To freeze a form design:
1. Click the name of the form in the Pendragon Forms Manager window, to select and highlight that form.
2. Click the Properties button. The Form Properties window will be displayed. (See next page.)

40
Chapter 2: Quick Guide to Using Forms Universal
41
Chapter 2: Quick Guide to Using Forms Universal
3. In the Data Persistence section of the Form Properties window, choose how long you want to keep records on the mobile device after synchronization.Choose one option from the following:
• Leave all options blank to remove all records after synchronization.
• Check the Keep a Copy of Records on Handheld checkbox if you want the mobile device user to have a copy of the records after synchronization. This is a good option to use when testing a form design.
• Keep new records on handheld for X days allows to to specify a number of days from 0 to 999. After synchronization, records will be stored on the mobile device for that number of days.
• Keep incomplete records on handheld means that if your form has a Completion Checkbox field, then a record will stay on the mobile device until the Completion Checkbox is checked as Yes. This allows different records to stay on the device for different amounts of time.
4. To freeze the form design, click the button labelled:Freeze Form Design for Distribution to handheld and create database.
5. Click OK to close the Form Properties window.The form is now ready to be distributed to the mobile device. (See next page.)

40
Chapter 2: Quick Guide to Using Forms Universal
41
Chapter 2: Quick Guide to Using Forms Universal
Distributing a Form to a Mobile Device
Once you have frozen a form, the next step is to distribute the form to the mobile device.
To distribute a form design:
1. Click on the name of the form in the Pendragon Forms Manager window.
2. Click the Distribute button.The form will be added to the Default User Group, and members of that user group will receive the form design on their next synchronization.
If you only have one mobile device, the user name that you created when Pendragon Forms Universal was installed, will have been added to the Default User Group.
If you have more than one mobile device, you can choose to create User Groups and to assign forms to a specific User Group. See Chapter 5, Managing Users and User Groups, starting on page 63.
Receiving Form Designs and Entering Data on a Mobile Device
You must first set up Pendragon Forms Universal on the mobile device before you can receive form designs. See Chapter 1, Pendragon Forms Universal - Getting Started, page 19-26.
To receive a form design:
1. On Android devices: Tap the Pendragon Forms Universal icon in Apps folder of the device. Tap the Sync button in Pendragon Forms Universal.
On iOS devices and in Web browsers: Tap the Pendragon Forms Universal icon on the the Home screen of the mobile device. Alternatively, tap the Safari icon, Chrome icon, or Internet icon on the device and select to go to the bookmarked page for Pendragon Forms Universal. Tap the Sync button in Pendragon Forms Universal.

42
Chapter 2: Quick Guide to Using Forms Universal
43
Chapter 2: Quick Guide to Using Forms Universal
3. On the Synchronization (Launch-Sync-Setup) screen, tap the Sync button. Pendragon Forms Universal will synchronize and the mobile device will receive any new form designs.Note: The mobile device must be connected to the Internet (via WiFi or 3G/4G) or connected via a local area network connection in order to synchronize.When synchronization is complete, a list of form designs will be displayed, or you can tap the Launch button to view the list of form designs on the mobile device. Tap on a form to fill in that form.
4. Each instance of filling in a form is called a record. To create a new record, tap the + button. A blank copy of the form is displayed, ready for you to enter data. Tap in each field in turn to enter data in that field.

42
Chapter 2: Quick Guide to Using Forms Universal
43
Chapter 2: Quick Guide to Using Forms Universal
5. Tap the Next button to move to the next screen of the form.Tap the End button to end the form. You will be returned to the list of records for that form. New records are highlighted in pink. You can tap the Add + button to create another new record, or tap the Back < button to return to the list of forms. Note: Do not use the Back button of the web browser while in Pendragon Forms Universal.
Tap the Next button to move to the next screen of the form.
Tap the End button to exit the form.
6. To send data records back to the server, the mobile device must be connected to the Internet via WiFi or 3G/4G, or connected via a local area network connection to the server. Tap the Sync button to start synchronizing. Or, if you are on the Synchronization (Launch-Sync-Setup) screen, tap the Sync button. A status bar will be displayed as Pendragon Forms Universal is synchronized. After synchronization you will be returned to the list of forms, or you can tap the Launch button to return to the list of forms.
Tap to synchronize.
Tap the Back < button to return to the list of forms.
Tap the Add +button to create another record.
44
Chapter 2: Quick Guide to Using Forms Universal
45
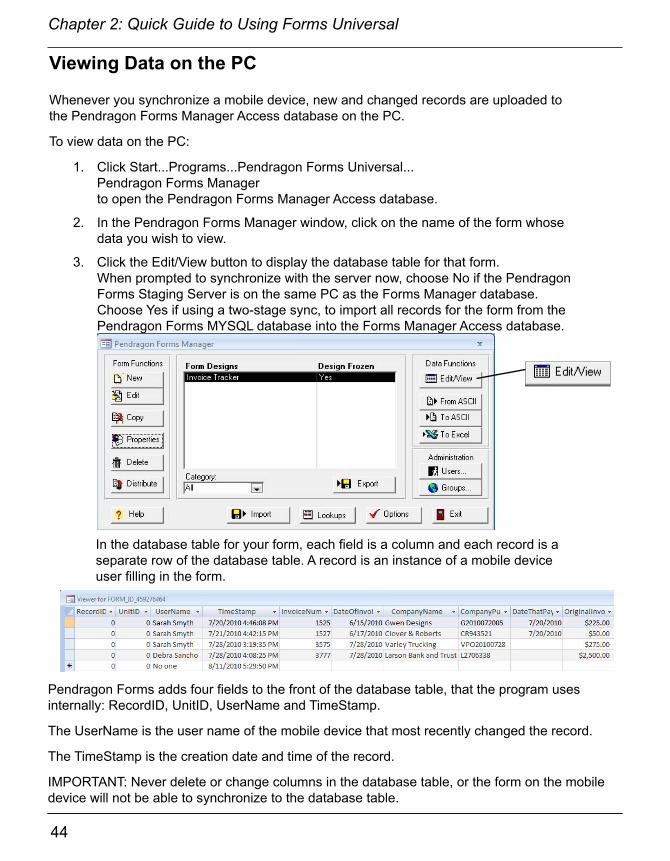
Viewing Data on the PC
Whenever you synchronize a mobile device, new and changed records are uploaded to the Pendragon Forms Manager Access database on the PC.
To view data on the PC:
1. Click Start...Programs...Pendragon Forms Universal...Pendragon Forms Managerto open the Pendragon Forms Manager Access database.
2. In the Pendragon Forms Manager window, click on the name of the form whose data you wish to view.
3. Click the Edit/View button to display the database table for that form.When prompted to synchronize with the server now, choose No if the Pendragon Forms Staging Server is on the same PC as the Forms Manager database. Choose Yes if using a two-stage sync, to import all records for the form from the Pendragon Forms MYSQL database into the Forms Manager Access database.
Pendragon Forms adds four fields to the front of the database table, that the program uses internally: RecordID, UnitID, UserName and TimeStamp.
The UserName is the user name of the mobile device that most recently changed the record.
The TimeStamp is the creation date and time of the record.
IMPORTANT: Never delete or change columns in the database table, or the form on the mobile device will not be able to synchronize to the database table.
In the database table for your form, each field is a column and each record is a separate row of the database table. A record is an instance of a mobile device user filling in the form.
44
Chapter 2: Quick Guide to Using Forms Universal
45
3. Using Forms Universal on a Mobile Device
Installing Pendragon Forms on a Mobile Device
Before you can use Pendragon Forms, the program must first be installed on the mobile device.
See Chapter 1, Pendragon Forms Universal - Getting Started, pages 19-26 to learn how to install Pendragon Forms on your mobile device.
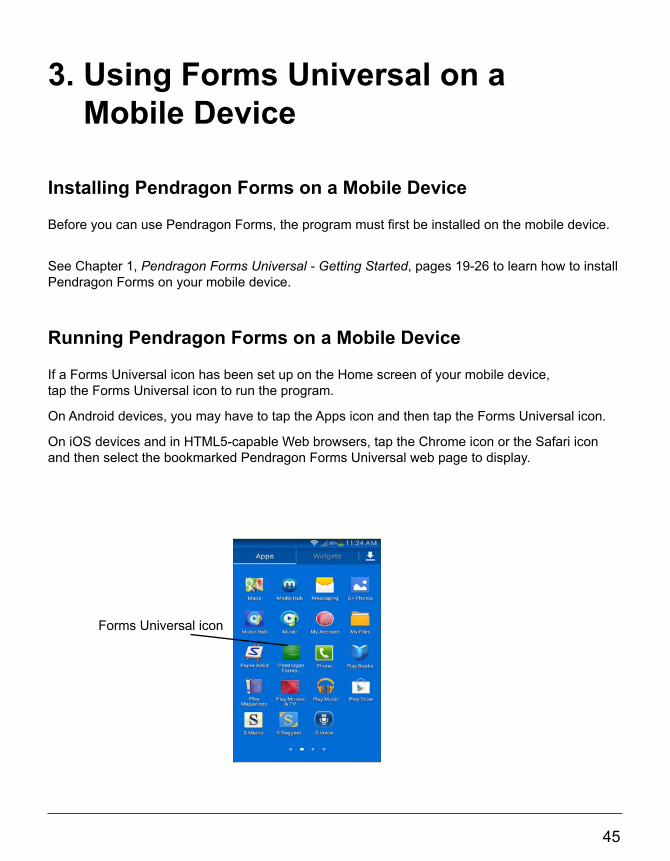
Running Pendragon Forms on a Mobile Device
If a Forms Universal icon has been set up on the Home screen of your mobile device, tap the Forms Universal icon to run the program.
On Android devices, you may have to tap the Apps icon and then tap the Forms Universal icon.
On iOS devices and in HTML5-capable Web browsers, tap the Chrome icon or the Safari icon and then select the bookmarked Pendragon Forms Universal web page to display.
Forms Universal icon

46
Chapter 3: Using Forms Universal on a Mobile Device
47
Chapter 3: Using Forms Universal on a Mobile Device
Entering New Records
Each instance of filling in a form creates a record.
To create a new record on the mobile device:
1. On the Launch-Sync-Setup screen, tap the Launch button.
2. On the Forms List showing the list of available forms, tap the name of the form that you want to fill in.
3. Tap the button. A new, blank record is displayed on the mobile device.
5. Tap in each field in turn, to enter data in that field. On mobile devices with a popup keyboard, the keyboard will automatically pop up when you are in a Text or Numeric field.
6. To move forward or backward one screen at a time, tap the Next or Previous buttons. Note: Do not use the Back button of the web browser when in Pendragon Forms Universal. Tap the End button to exit the record. When you exit a record, you will be returned to the Review screen for the form. Tap the + button to create another new record, or tap the Back button to return to the Forms List.

46
Chapter 3: Using Forms Universal on a Mobile Device
47
Chapter 3: Using Forms Universal on a Mobile Device
Reviewing Records
An existing record is a record that you have already filled in, or a record that has been sent from the server to your mobile device. To modify an existing record, you need to review the record on the mobile device.
To review records on the mobile device:
1. On the Launch-Sync-Setup screen, tap the Launch button.
2. On the Forms List showing the list of available forms, tap the name of the form that you want to review.
3. A list of existing records for that form will be displayed. Tap the record you would like to review.
Note: On the Review screen, the default is that the first three fields from each record are displayed. You can change which three fields you want to display - see Advanced Form Properties, Column tab.
48
Chapter 3: Using Forms Universal on a Mobile Device
49
Chapter 3: Using Forms Universal on a Mobile Device
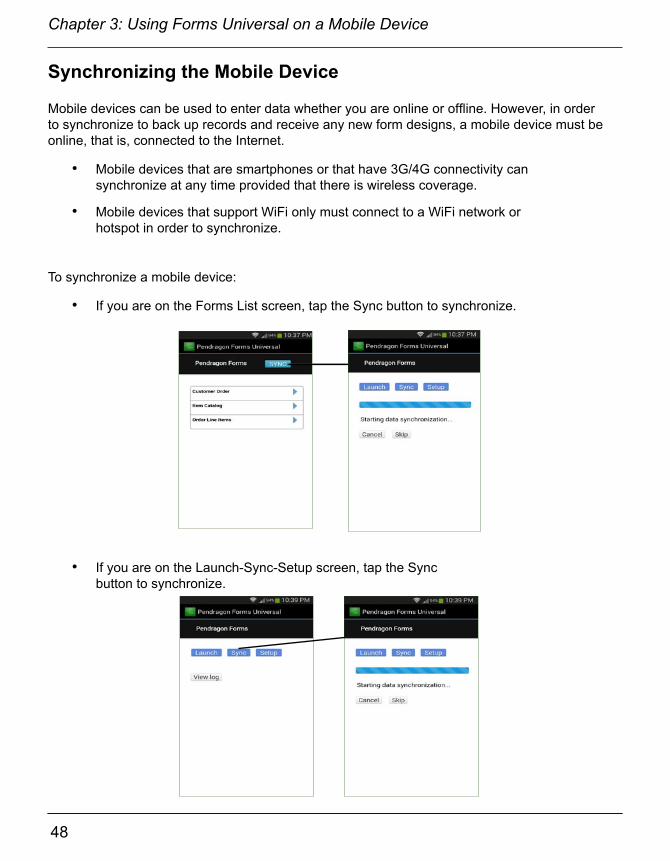
Synchronizing the Mobile Device
Mobile devices can be used to enter data whether you are online or offline. However, in order to synchronize to back up records and receive any new form designs, a mobile device must be online, that is, connected to the Internet.
• Mobile devices that are smartphones or that have 3G/4G connectivity can synchronize at any time provided that there is wireless coverage.
• Mobile devices that support WiFi only must connect to a WiFi network or hotspot in order to synchronize.
To synchronize a mobile device:
• If you are on the Forms List screen, tap the Sync button to synchronize.
• If you are on the Launch-Sync-Setup screen, tap the Sync button to synchronize.
48
Chapter 3: Using Forms Universal on a Mobile Device
49
Chapter 3: Using Forms Universal on a Mobile Device
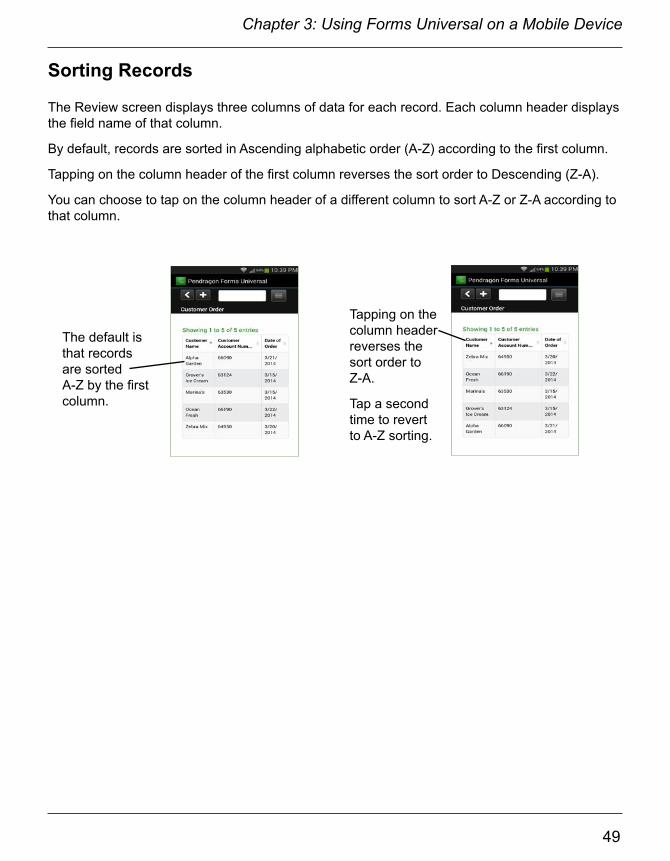
Sorting Records
The Review screen displays three columns of data for each record. Each column header displays the field name of that column.
By default, records are sorted in Ascending alphabetic order (A-Z) according to the first column.
Tapping on the column header of the first column reverses the sort order to Descending (Z-A).
You can choose to tap on the column header of a different column to sort A-Z or Z-A according to that column.
The default is that records are sorted A-Z by the first column.
Tapping on the column header reverses the sort order to Z-A.
Tap a second time to revert to A-Z sorting.

50
Chapter 3: Using Forms Universal on a Mobile Device
51
Chapter 3: Using Forms Universal on a Mobile Device
Filtering Records
On the Review screen, the Filter/Search feature allows you to select search criteria, and display only those records that match the search criteria.
You can search across all fields on a form.
To filter records, start typing in the Search field at the top of the Review screen. If you just type a few characters, the search will be very broad, as any record containing those characters in any field will be displayed. If you type an entire word, such as a name or an entire zip code or customer number (if your form contains such fields) the search will be more refined, finding records that match the exact word or number.
Tip: To revert to the full list of records, just erase the search criteria from the search field.
Typing 66 in the Search field displays all records containing 66 in any field.
Typing a full Customer Account Number, in this example, displays all records that match that number in any field.
50
Chapter 3: Using Forms Universal on a Mobile Device
51
Chapter 3: Using Forms Universal on a Mobile Device
Deleting Records and Forms from a Mobile Device
Pendragon Forms is designed to be centrally managed from the PC.
• To delete a form design and all its associated records from a mobile device, remove the form from the User Group to which the user belongs, and then synchronize the mobile device. See page 69.
• To keep the form design but delete records from the mobile device on an ongoing basis, you need a criteria on the PC that determines which records to remove from the mobile device. Without such criteria, records that are manually deleted from the mobile device will re-appear on the device after synchronization. See Managing the Number of Records Kept on the Mobile Device, page 56.
When should Records be Deleted Manually from a Mobile Device?Allowing mobile device users to delete records is a permission set by the person who designed the form.The default is that the deletion of records is allowed.
You may want to manually delete a record if the record was entered in error. If you delete the record before you synchronize the mobile device, the record will not be sent to the server.
You may also want to delete a record if it was sent from the PC, and incorrect information was entered on the mobile device. If you manually delete the record and then synchronize, you will receive a fresh copy of the record from the PC.
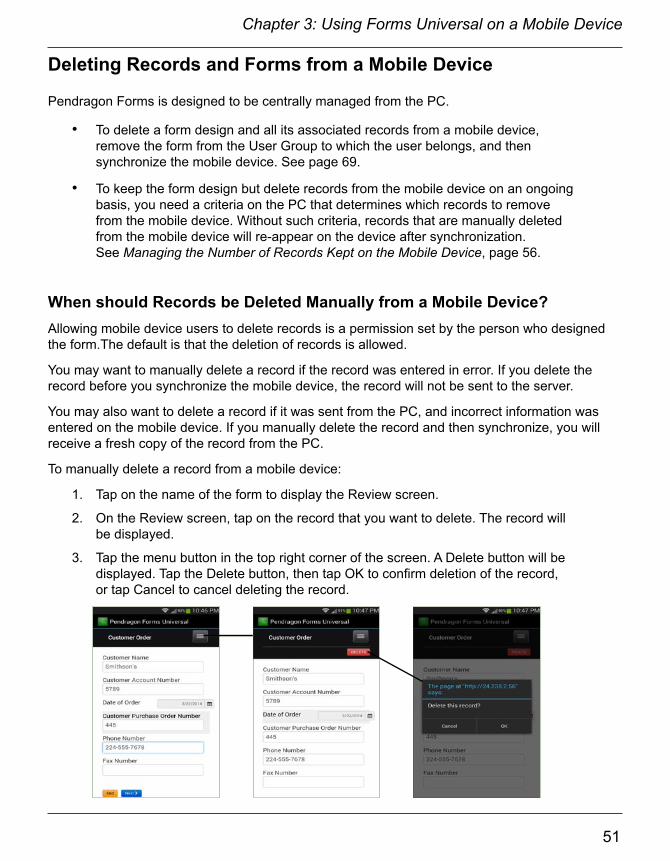
To manually delete a record from a mobile device:
1. Tap on the name of the form to display the Review screen.
2. On the Review screen, tap on the record that you want to delete. The record will be displayed.
3. Tap the menu button in the top right corner of the screen. A Delete button will be displayed. Tap the Delete button, then tap OK to confirm deletion of the record, or tap Cancel to cancel deleting the record.

52
Chapter 3: Using Forms Universal on a Mobile Device
53
Chapter 3: Using Forms Universal on a Mobile Device
Warning - Do Not Delete the Mobile Device’s Web Browser Cache or the Forms Universal Database on the Device
On Android devices, the Pendragon Forms Universal application runs in an Android client app.On iPhone, iPod touch and iPad devices, Pendragon Forms Universal runs in the Web browser of the device (the Chrome icon or the Safari icon).
Pendragon Forms Universal allows you to work offline by doing the following:
• All of your form designs are stored in the cache of the Android app or the Web browser that is running Pendragon Forms Universal.Warning: If you delete the Web browser cache, you will not be able to fill in any forms while you are offline.
• All of your data is stored in the Forms Universal database on the mobile device.Warning: If you delete the Forms Universal database, you will lose all records on the mobile device. If some records have not yet been synchronized, they will be permanently lost.
All mobile devices provide a way to delete the Web browser cache and to delete databases on the device. Handheld users should be advised NOT to delete these items if they want to use Pendragon Forms Universal while offline.
Viewing the Forms Universal Database and Cache on Android DevicesPlease heed the warning above, and never delete the Forms Universal database or cache if you still have data (records) on a mobile device that you have not backed up to the server.
If you want to view how much storage Pendragon Forms Universal is using, tap the Settings icon on the device. The Android device may have a Settings icon on the Home screen, or in the case of some Android smartphones, you may have to swipe your finger vertically down from the top of the screen to see the Settings icon.
Look for the Application Manager. You might have to tap the More icon.
Tap the Application Manager and then tap the Pendragon Forms Universal app.
52
Chapter 3: Using Forms Universal on a Mobile Device
53
Chapter 3: Using Forms Universal on a Mobile Device
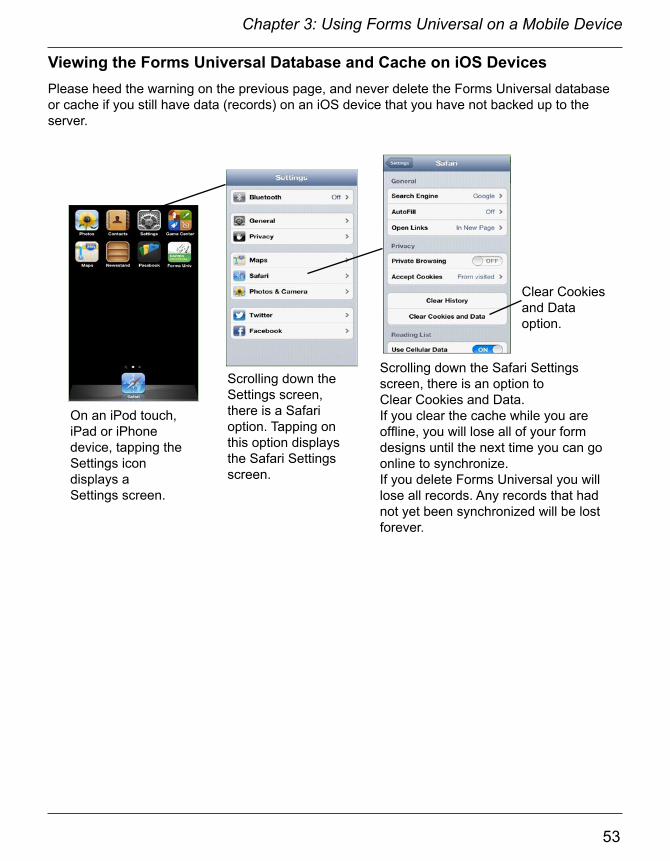
On an iPod touch, iPad or iPhone device, tapping the Settings icon displays a Settings screen.
Scrolling down the Settings screen, there is a Safari option. Tapping on this option displays the Safari Settings screen.
Scrolling down the Safari Settings screen, there is an option to Clear Cookies and Data. If you clear the cache while you are offline, you will lose all of your form designs until the next time you can go online to synchronize. If you delete Forms Universal you will lose all records. Any records that had not yet been synchronized will be lost forever.
Clear Cookies and Data option.
Viewing the Forms Universal Database and Cache on iOS DevicesPlease heed the warning on the previous page, and never delete the Forms Universal database or cache if you still have data (records) on an iOS device that you have not backed up to the server.

54
Chapter 3: Using Forms Universal on a Mobile Device
55
End of Chapter 3.

54
Chapter 3: Using Forms Universal on a Mobile Device
55
4. Planning Your Data Collection Project
This chapter looks at planning considerations to take into account when creating a data collection project based on Pendragon Forms.
In particular, it is important to consider the memory limitations of the mobile devices that you are using, and your mobile users’ data-entry ability.
How Much Space Does Pendragon Forms Use on a Device?
A mobile device has a limited amount of memory, and when you design a data collection system, it is important not to exceed the available memory of the device. Pendragon Forms Universal will use some memory for the form designs, and some memory for each data record.
The following table illustrates the approximate storage space requirements of Pendragon Forms.
Item Memory ConsiderationsAll form designs in Pendragon Forms Universal on the mobile device.
All form designs are stored in the Web browser Cache of the mobile device. A mobile device may limit the size of each Web site, and Pendragon Forms Universal counts as one Web site on the device. To stay within the limits of the Web Cache, Pendragon Software recommends that you not put more than 25 form designs on the mobile device.
Maximum database size for all data records in all forms.
Various mobile devices have different limits on the maximum size that an HTML 5 Web SQL (SQLite) database can be. Some devices have an initial 5MB database limit, but the user may be prompted to increase the amount of space if the Forms Universal database needs more storage. Refer to the database specifications of your specific Web browser.
Maximum number of fields allowed in one form design.
250 fields. (100 fields if you have a lot of Text fields.)
Note: Microsoft Access has some limits on the size of form designs that can be viewed on the desktop. Form designs with a large number of Signature or Text fields (with more than 255 characters) may run into this limitation which will prevent a form design from being frozen, even if the form has less than 250 fields.
Maximum size of one record.
4000 bytes - This is a Microsoft Access limit. If you have a lot of Text fields on a form, and the user enters the maximum number of characters per field, the record may be too large to fit into the Access database during synchronization. Delete or abbreviate text and then re-synchronize the mobile device.

56
Chapter 4: Planning Your Data Collection Project
57
Chapter 4: Planning Your Data Collection Project
Managing the Number of Records Kept on a Mobile Device
Pendragon Forms Universal provides a convenient way for you to automatically remove records from the mobile device. If you remove records from a mobile device on a regular basis, you will avoid exceeding the available memory that the device allocates to Pendragon Forms Universal.
The Data Persistence section of the Form Properties screen allows you to select the criteria for removing records from the handheld.
To set Data Persistence options:
1. Click on the name of the form in the Pendragon Forms Manager window.
2. Click the Properties button.
3. Select the Data Persistence option of your choice. Choices are:
• Leave all Data Persistence checkboxes blank.After a successful synchronization, all records will be removed from the handheld.
• Keep a Copy of Records on Handheld.All records will remain on the mobile device.
• Keep new records on handheld for X days.After synchronization, records will remain on the mobile device for X days. Number X can range from 0 to 999.
• Keep incomplete records on handheld.This option requires your form design to have a Completion Checkbox field.Records stay on the mobile device until the user checks the Completion Checkbox to request removal of the record on the next synchronization.
Tip: If you change a Data Persistence Option, you will need to re-distribute the form and synchronize the mobile devices for the change to take effect.

56
Chapter 4: Planning Your Data Collection Project
57
Chapter 4: Planning Your Data Collection Project
Decide if Mobile Users Need to Share Records
Pendragon Forms is optimized so that mobile device users can share form designs, but not records. This works well if users collect their own data independently of each other.
In some cases, however, you may want users to share certain records, for example, if physicians share the same patients or sales people have a common list of items for sale.
Requirements for Allowing the Sharing of RecordsIf you decide that your mobile users need to share records, there are two things you must do during the form design process to make this possible:
1. Create your own primary key that does not include the UserName field.
A primary key consists of one or more fields that in combination make a record unique. The default primary key in Pendragon Forms is a combination of three fields: the UnitID, the mobile device UserName, and the creation Timestamp of the record. You can click the name of the form in the Pendragon Forms Manager, then click the Edit/View button to view the default primary key fields in a frozen form. The combination of both the UserName and the Timestamp in the default primary key makes it possible for every record from every user to be unique. If two users create records at exactly the same time, then the records are distinguished by their different user names.
If users have to share records, however, the UserName field cannot be used as part of the primary key, as the UserName is updated if a user modifies a record. If two users start out with the same record on both handhelds, and one user makes a change to a record, that user’s UserName is assigned to the record on their handheld. When both users synchronize, there will effectively be a duplication of records in the database on the PC, as the primary keys of the two records will now be different due to a change in UserName of one of the records.
To avoid the problem of duplicate records, you will need to select a unique primary key for your form that does not rely on the UserName field. See page 149 for further information on creating your own primary key.
2. Remove the default Additional Download Criteria for the form.
By default, Pendragon Forms only sends records to a mobile device if the UserName field of the records match the UserName of the mobile device. This default ensures that each user can only receive their own records on the mobile device. This default is controlled by the Additional Download Criteria form property.
When users are sharing records, however, it is necessary to remove this default criteria, so that all the records in a form get sent to all users. See page 184 for information on how to remove the default Additional Download Criteria.

58
Chapter 4: Planning Your Data Collection Project
59
Chapter 4: Planning Your Data Collection Project
Create Forms that Minimize Data-Entry
It is important to think of the audience that will be filling in your forms on the mobile devices. Instead of making the data easy to analyze once it is on the PC, focus on making the form easy to use on the mobile device. If the mobile device users find it easy to fill in a form, they will be more likely to enter data correctly.
To help improve the accuracy of data entry, try to minimize the use of Text fields. If there is a question on your form for which there are several known responses, use a Popup List or a Lookup List field, so that the mobile device user can just select a response. The user will save time by not having to write text, and the data will be more accurate because it will not be susceptible to typographical errors.
Problems with Sharing RecordsDuring synchronization of Pendragon Forms, any new or changed records on the mobile device will overwrite the existing record on the PC. If sharing of records is allowed, and two users modify the same record, then the first user to synchronize will update the record on the PC. If the second user then synchronizes, the second user’s record will overwrite that of the first user. This can be a problem if the user with the less-up-to-date information synchronizes last.
To minimize this problem, it may be necessary to enforce a strict synchronization schedule on the mobile device users. For instance, mobile device users working different shifts may need to synchronize once at the beginning of their shift to receive any updates from the previous shift, and then synchronize again at the end of their shift to upload data for those on the next shift.
If you do not want to risk one user accidently overwritng another's record, then you need to plan your form design so that users never modify the same record, and instead just create their own records. In the case of medical personnel sharing patient records, for example, you can create a parent form for storing the basic patient information, and a subform for storing the details of a patient visit. Each mobile device user can access the parent form record but not modify it, andcreates a separate subform record to log their observations when they see the patient. Since users are creating new subform records, they are not modifying the same record and will not overwrite each other. For information on using parent forms and subforms, see page 120.

58
Chapter 4: Planning Your Data Collection Project
59
Chapter 4: Planning Your Data Collection Project
Testing Synchronization
Before you deploy a form design to your mobile device users, you must test the following:
• Test that new records created on the mobile device can successfully synchronize to the Pendragon Forms Manager Access database.
• If you are creating records on the PC to send to mobile devices, be sure to test:a) that records from the Pendragon Forms Manager Access database (or other Access database if linking to an external database) can be sent to the mobile device, and b) that records created or modified on the mobile device can successfully be sent back to the Access database.
For information on how to synchronize a mobile device, see: Chapter 3, Using Forms Universal on a Mobile Device, page 45.
For most users, synchronizing a mobile device sends data directly to the Pendragon Forms Manager Access database. This is called single-stage synchronization.
Some users prefer to install Pendragon Forms with a two-stage synchronization:
1. When the mobile user taps the Sync button on the mobile device, new and changed records on the mobile device are uploaded to the Pendragon Forms MySQL database on the staging server.
2. At regular intervals, the Pendragon Transfer Agent on the PC imports data from the MySQL database into the Pendragon Forms Manager Access database.To set the frequency of importing data from the MySQL server, see:Desktop/Server Synchronization, page 189.
If a problem prevents data from going to or coming from the mobile device during synchronization, an error message will be generated in the Synchronization Log for that user. Investigate and solve any synchronization problems before deploying your application.
If the user’s mobile device is available, tap the View Log button on the Synchronization screen of the handheld to view the log.
To view the synchronization log for a given user on the PC/server:
1. Click Start... All Programs...Pendragon Forms Universal...Pendragon Forms Manager.
2. In the Pendragon Forms Manager, click the Users button to open the Pendragon Transfer Agent window.
3. In the Pendragon Transfer Agent window, click on the name of the user who has reported synchronization problems. A User screen will be displayed.
4. On the user screen, scroll down and click the View Log button to view the most recent synchronization log message for that handheld user.
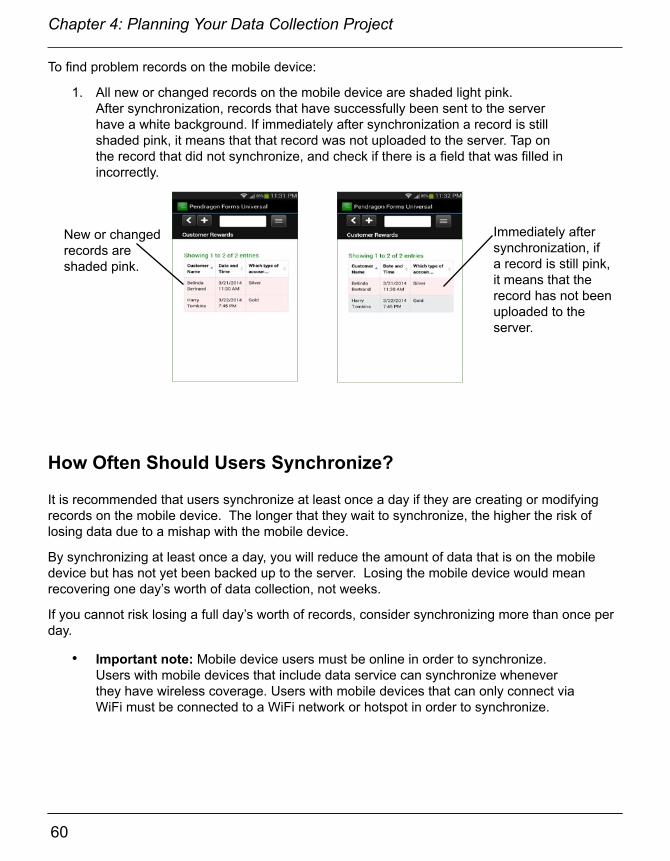
60
Chapter 4: Planning Your Data Collection Project
61
Chapter 4: Planning Your Data Collection Project
How Often Should Users Synchronize?
It is recommended that users synchronize at least once a day if they are creating or modifying records on the mobile device. The longer that they wait to synchronize, the higher the risk of losing data due to a mishap with the mobile device.
By synchronizing at least once a day, you will reduce the amount of data that is on the mobile device but has not yet been backed up to the server. Losing the mobile device would mean recovering one day’s worth of data collection, not weeks.
If you cannot risk losing a full day’s worth of records, consider synchronizing more than once per day.
• Important note: Mobile device users must be online in order to synchronize.Users with mobile devices that include data service can synchronize whenever they have wireless coverage. Users with mobile devices that can only connect via WiFi must be connected to a WiFi network or hotspot in order to synchronize.
To find problem records on the mobile device:
1. All new or changed records on the mobile device are shaded light pink.After synchronization, records that have successfully been sent to the server have a white background. If immediately after synchronization a record is still shaded pink, it means that that record was not uploaded to the server. Tap on the record that did not synchronize, and check if there is a field that was filled in incorrectly.
New or changed records are shaded pink.
Immediately after synchronization, if a record is still pink, it means that the record has not been uploaded to the server.

60
Chapter 4: Planning Your Data Collection Project
61
Chapter 4: Planning Your Data Collection Project
Ensure that Regular Backups are made
Pendragon Forms Universal consists of two databases:
• The Pendragon Forms MySQL database is on the staging server, and is where mobile devices obtain their form designs. In two-stage synchronization, mobile devices also sync their data to the staging server.
• The Pendragon Forms Manager Access database is on a PC or server (often the same PC/server as the MySQL database). In single-stage synchronization, data from mobile devices is sent directly to the Pendragon Forms Manager Access database during synchronization. In two-stage synchronization, at regular intervals, a program called the Pendragon Transfer Agent imports data from the Pendragon Forms MySQL database into the Pendragon Forms Manager Access database.
The Pendragon Forms Manager Access database on the PC is where all of your form designs and data are stored. If you lose everything on your mobile device and you still have the Access database on the PC, you can recover all of your form designs, and all data up to the last synchronization.
Warning: The mobile device is NOT a backup for the data on the PC!
If you lose the Pendragon Forms Manager Access database on the PC but you still have Pendragon Forms on the mobile device, you will NOT be able to synchronize your forms just by re-installing Pendragon Forms UniversaI on the PC/server. This is because each form design has a unique Form ID#, and there needs to be a match between the Form ID# of the form on the mobile device, and the Form ID# of a form design in the database in order to synchronize.
As part of your data collection process, you need to backup the Pendragon Forms Manager Access database regularly, and even daily. If you are going to rely on electronic forms instead of paper forms, you need to take steps to protect your only copy of your data.
The Pendragon Forms Manager database is typically stored in the C:\Users\Public\FormsUniversal folder.
The Pendragon Forms Manager database is named FORMS32K.MDB.
Make a backup copy of the Forms database regularly, even daily, and store the backup on a flash drive, external hard drive or CD-ROM that is separate from the hard drive where Forms Universal is installed.
See Chapter 19, Backing Up Pendragon Forms Universal, starting on page 372 for additional information on making backups.. See page 375 for information on recovering form designs.

62
Chapter 4: Planning Your Data Collection Project
63
End of Chapter 4.

62
Chapter 4: Planning Your Data Collection Project
63
5. Managing Users and User Groups
Each Pendragon Forms Universal user must be assigned a User Name and a Password, and must be added to a User Group to receive the form designs for that Group.
The Pendragon Transfer Agent window is where Users and User Groups are managed.
This chapter covers how to perform administrative tasks within the Pendragon Transfer Agent to add Users, set or change User passwords and permissions, and to assign Users and form designs to various groups.
First User Name and Password, and the Default Group
When Pendragon Forms Universal is first installed, you are prompted to enter a User Name and password for the first mobile device user.
The first mobile device user is automatically added to the Default User Group. Whenever you distribute a form design in the Pendragon Forms Manager, the form design is added to the Default Group. Any users who are members of the Default Group will receive the form designs in that group whenever they synchronize their mobile device.
If you are using Pendragon Forms Universal for just one user, then you do not need to be concerned with Users and Groups, since you will be the first mobile device user and you will be a member of the Default Group.
However, if you purchase additional Forms licenses to allow multiple mobile devices to use the software, then you will need to add the new users to Pendragon Forms Universal, assign a password to each new user, and add each user to at least one Group.

64
Chapter 5: Managing Users and User Groups
65
Chapter 5: Managing Users and User Groups
Accessing the Pendragon Transfer Agent
In the Pendragon Forms Manager, click the Users button to open the Pendragon Transfer Agent.
The Pendragon Transfer Agent window is displayed. The Pendragon Transfer Agent has a Users section for adding or removing users, and a Groups section for creating groups and adding or removing users and forms from groups. The Forms section lists all forms that have been distributed.
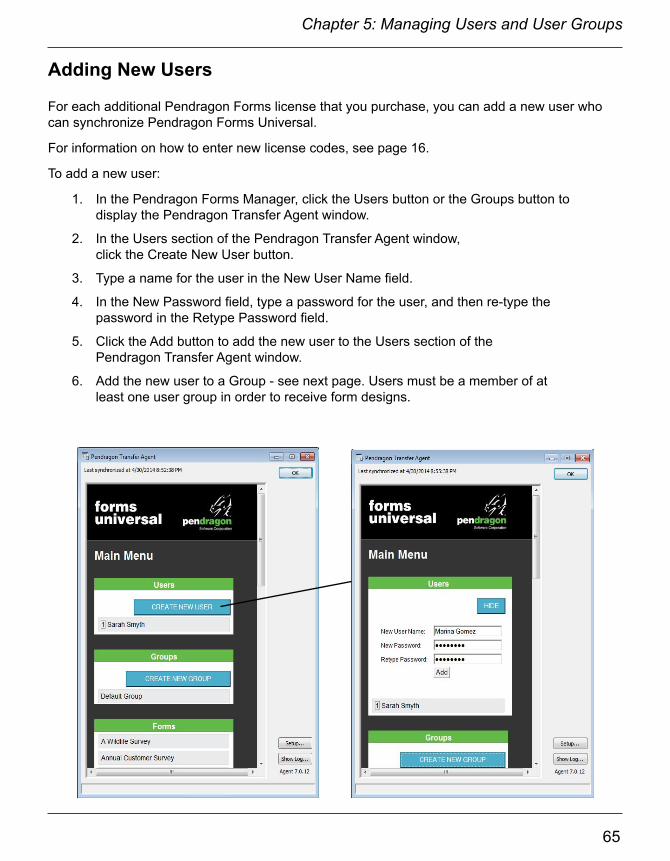
64
Chapter 5: Managing Users and User Groups
65
Chapter 5: Managing Users and User Groups
Adding New Users
For each additional Pendragon Forms license that you purchase, you can add a new user who can synchronize Pendragon Forms Universal.
For information on how to enter new license codes, see page 16.
To add a new user:
1. In the Pendragon Forms Manager, click the Users button or the Groups button to display the Pendragon Transfer Agent window.
2. In the Users section of the Pendragon Transfer Agent window, click the Create New User button.
3. Type a name for the user in the New User Name field.
4. In the New Password field, type a password for the user, and then re-type the password in the Retype Password field.
5. Click the Add button to add the new user to the Users section of the Pendragon Transfer Agent window.
6. Add the new user to a Group - see next page. Users must be a member of at least one user group in order to receive form designs.
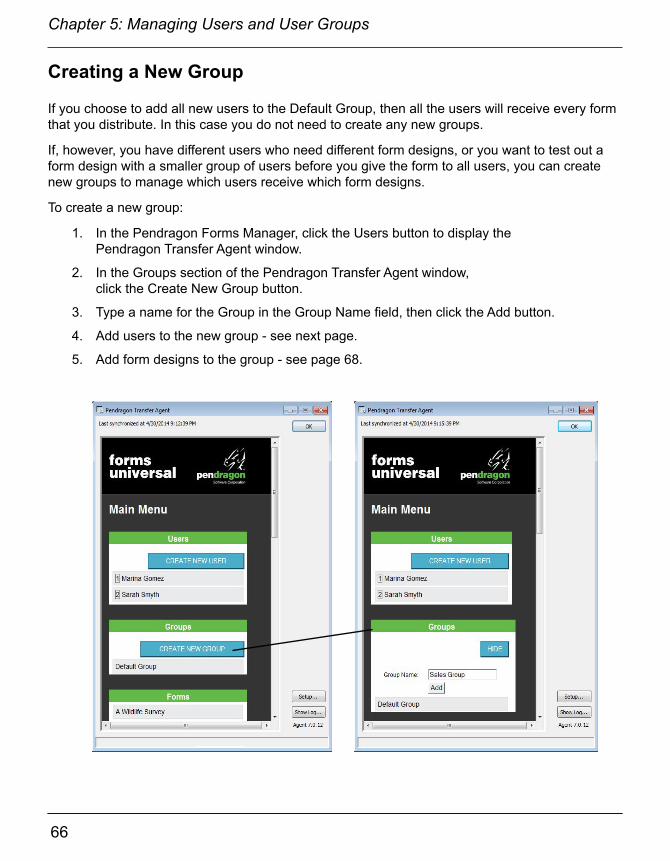
66
Chapter 5: Managing Users and User Groups
67
Chapter 5: Managing Users and User Groups
Creating a New Group
If you choose to add all new users to the Default Group, then all the users will receive every form that you distribute. In this case you do not need to create any new groups.
If, however, you have different users who need different form designs, or you want to test out a form design with a smaller group of users before you give the form to all users, you can create new groups to manage which users receive which form designs.
To create a new group:
1. In the Pendragon Forms Manager, click the Users button to display the Pendragon Transfer Agent window.
2. In the Groups section of the Pendragon Transfer Agent window, click the Create New Group button.
3. Type a name for the Group in the Group Name field, then click the Add button.
4. Add users to the new group - see next page.
5. Add form designs to the group - see page 68.
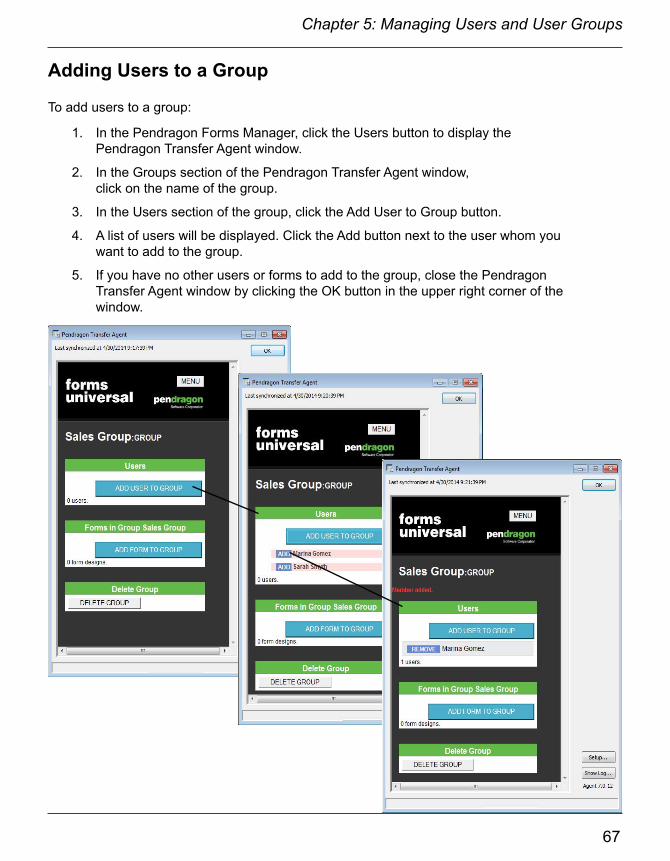
66
Chapter 5: Managing Users and User Groups
67
Chapter 5: Managing Users and User Groups
Adding Users to a Group
To add users to a group:
1. In the Pendragon Forms Manager, click the Users button to display the Pendragon Transfer Agent window.
2. In the Groups section of the Pendragon Transfer Agent window, click on the name of the group.
3. In the Users section of the group, click the Add User to Group button.
4. A list of users will be displayed. Click the Add button next to the user whom you want to add to the group.
5. If you have no other users or forms to add to the group, close the Pendragon Transfer Agent window by clicking the OK button in the upper right corner of the window.
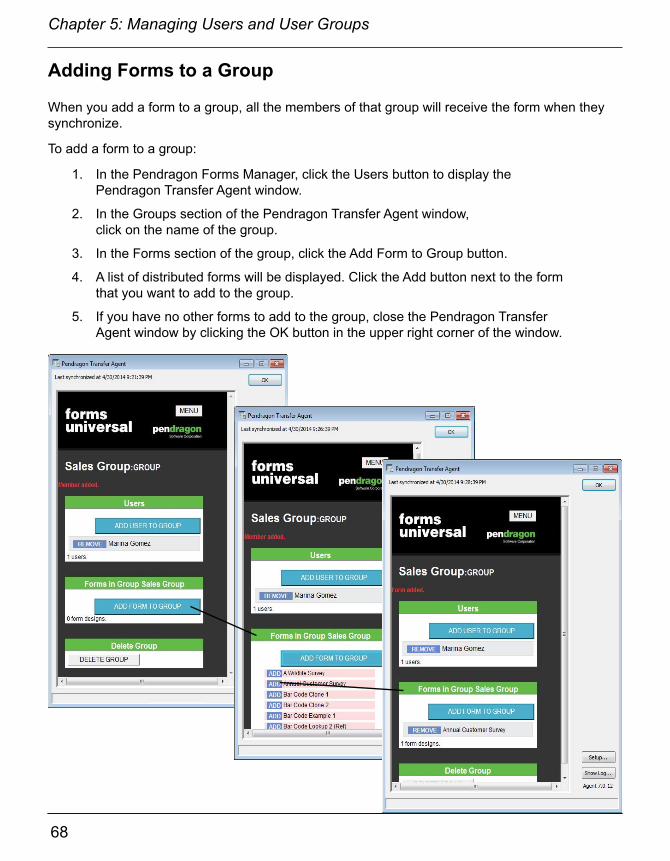
68
Chapter 5: Managing Users and User Groups
69
Chapter 5: Managing Users and User Groups
Adding Forms to a Group
When you add a form to a group, all the members of that group will receive the form when they synchronize.
To add a form to a group:
1. In the Pendragon Forms Manager, click the Users button to display the Pendragon Transfer Agent window.
2. In the Groups section of the Pendragon Transfer Agent window, click on the name of the group.
3. In the Forms section of the group, click the Add Form to Group button.
4. A list of distributed forms will be displayed. Click the Add button next to the form that you want to add to the group.
5. If you have no other forms to add to the group, close the Pendragon Transfer Agent window by clicking the OK button in the upper right corner of the window.

68
Chapter 5: Managing Users and User Groups
69
Chapter 5: Managing Users and User Groups
Removing Users or Forms from a Group
To remove users or forms from a group:
1. In the Pendragon Forms Manager, click the Users button to display the Pendragon Transfer Agent window.
2. In the Groups section of the Pendragon Transfer Agent window, click on the name of the group.
3. Either:To remove a user, click the Remove button next to the user whom you want to remove from the group.Or:To remove a form, click the Remove button next to the form that you want to remove from the group.
4. If you have no other users or forms to remove from the group, close the Pendragon Transfer Agent window by clicking the OK button in the upper right corner of the window.
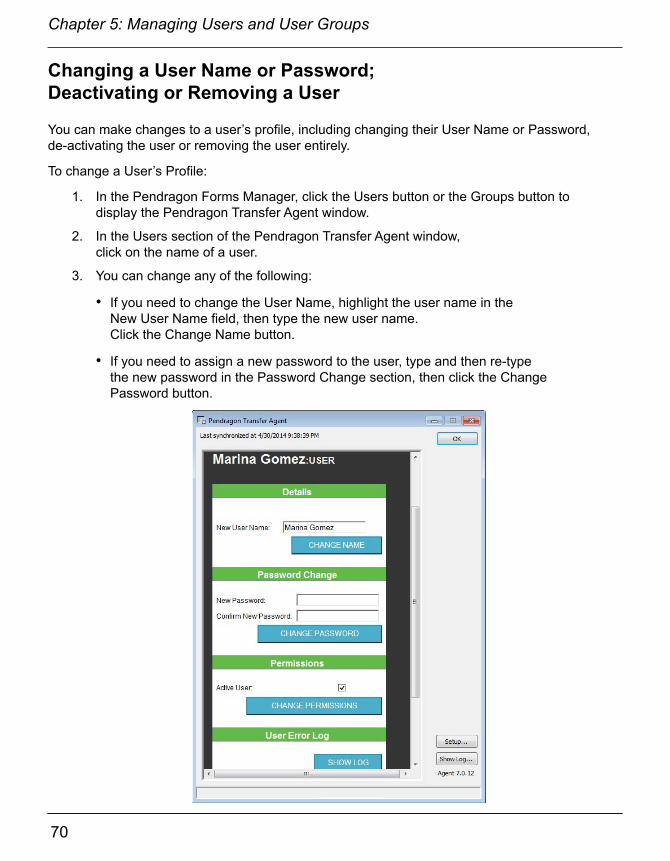
70
Chapter 5: Managing Users and User Groups
71
Chapter 5: Managing Users and User Groups
Changing a User Name or Password;Deactivating or Removing a User
You can make changes to a user’s profile, including changing their User Name or Password, de-activating the user or removing the user entirely.
To change a User’s Profile:
1. In the Pendragon Forms Manager, click the Users button or the Groups button to display the Pendragon Transfer Agent window.
2. In the Users section of the Pendragon Transfer Agent window, click on the name of a user.
3. You can change any of the following:
• If you need to change the User Name, highlight the user name in the New User Name field, then type the new user name. Click the Change Name button.
• If you need to assign a new password to the user, type and then re-type the new password in the Password Change section, then click the Change Password button.
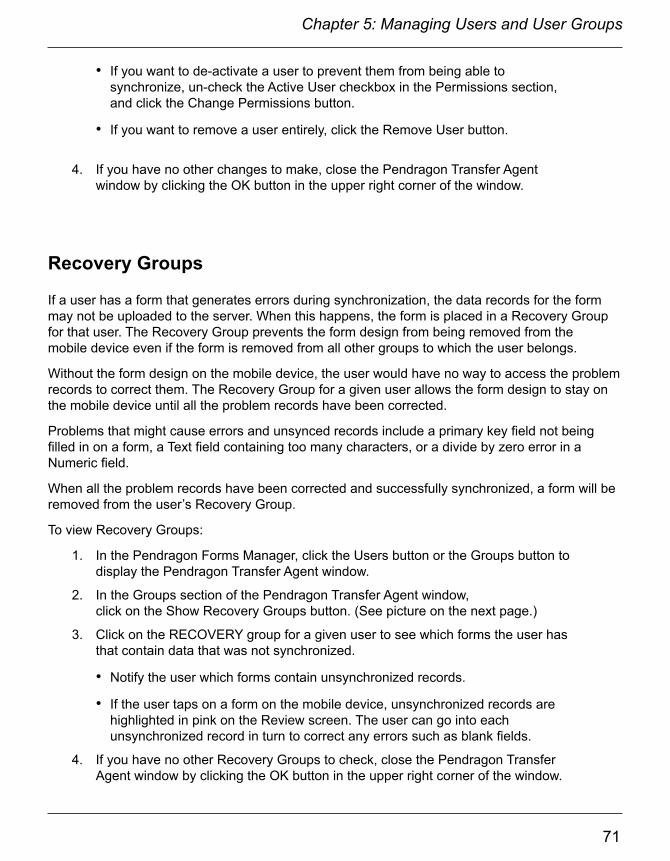
70
Chapter 5: Managing Users and User Groups
71
Chapter 5: Managing Users and User Groups
• If you want to de-activate a user to prevent them from being able to synchronize, un-check the Active User checkbox in the Permissions section, and click the Change Permissions button.
• If you want to remove a user entirely, click the Remove User button.
4. If you have no other changes to make, close the Pendragon Transfer Agent window by clicking the OK button in the upper right corner of the window.
Recovery Groups
If a user has a form that generates errors during synchronization, the data records for the form may not be uploaded to the server. When this happens, the form is placed in a Recovery Group for that user. The Recovery Group prevents the form design from being removed from the mobile device even if the form is removed from all other groups to which the user belongs.
Without the form design on the mobile device, the user would have no way to access the problem records to correct them. The Recovery Group for a given user allows the form design to stay on the mobile device until all the problem records have been corrected.
Problems that might cause errors and unsynced records include a primary key field not being filled in on a form, a Text field containing too many characters, or a divide by zero error in a Numeric field.
When all the problem records have been corrected and successfully synchronized, a form will be removed from the user’s Recovery Group.
To view Recovery Groups:
1. In the Pendragon Forms Manager, click the Users button or the Groups button to display the Pendragon Transfer Agent window.
2. In the Groups section of the Pendragon Transfer Agent window, click on the Show Recovery Groups button. (See picture on the next page.)
3. Click on the RECOVERY group for a given user to see which forms the user has that contain data that was not synchronized.
• Notify the user which forms contain unsynchronized records.
• If the user taps on a form on the mobile device, unsynchronized records are highlighted in pink on the Review screen. The user can go into each unsynchronized record in turn to correct any errors such as blank fields.
4. If you have no other Recovery Groups to check, close the Pendragon Transfer Agent window by clicking the OK button in the upper right corner of the window.
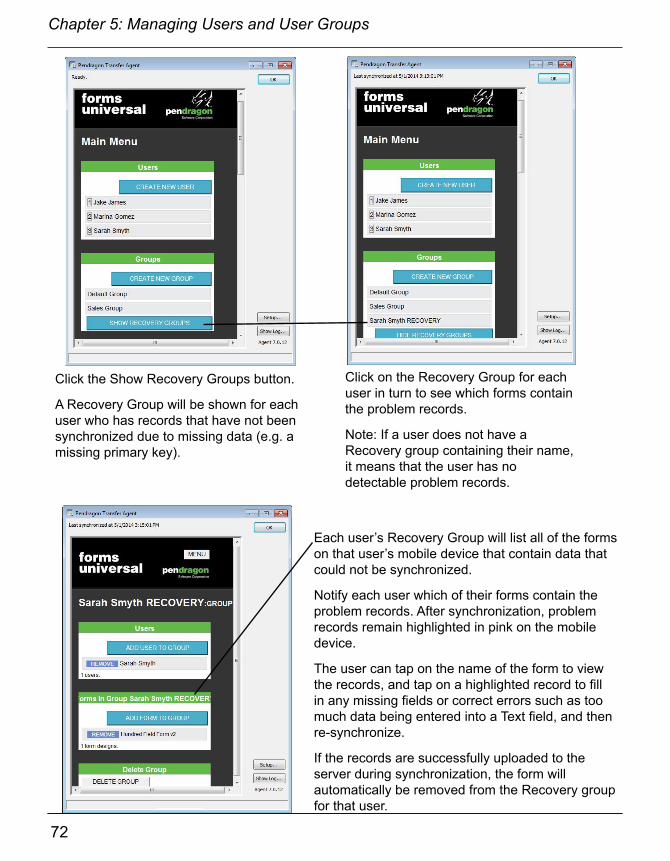
72
Chapter 5: Managing Users and User Groups
73
Click the Show Recovery Groups button.
A Recovery Group will be shown for each user who has records that have not been synchronized due to missing data (e.g. a missing primary key).
Each user’s Recovery Group will list all of the forms on that user’s mobile device that contain data that could not be synchronized.
Notify each user which of their forms contain the problem records. After synchronization, problem records remain highlighted in pink on the mobile device.
The user can tap on the name of the form to view the records, and tap on a highlighted record to fill in any missing fields or correct errors such as too much data being entered into a Text field, and then re-synchronize.
If the records are successfully uploaded to the server during synchronization, the form will automatically be removed from the Recovery group for that user.
Click on the Recovery Group for each user in turn to see which forms contain the problem records.
Note: If a user does not have a Recovery group containing their name, it means that the user has no detectable problem records.

72
Chapter 5: Managing Users and User Groups
73
6. Managing Form Designs
This chapter looks at the options available for changing form designs and organizing form designs within the Pendragon Forms Manager.
Making Changes to a Frozen Form
After a fom design has been frozen, there are some elements of the form design that can be changed, and some that cannot.
CAN be Changed in a Frozen Form CANNOT be Changed in a Frozen Form
• Form Names.
• Field Names.
• Scripts.
• Selection of a Lookup List or Form Name in a Lookup List field.
• Selection of a Form Name in a Subform or Single Subform field.
• Some Advanced Field Properties (i.e. any thing not grayed out.)
• Form Properties and Advanced Form Properties
• Adding a field to the form.
• Deleting a field from a form.
• Column Names.
• Changing the items in a Popup List or MultiSelection List.
• Changing the Field Type of a given field.
To make changes to a frozen form design:
1. Click the name of the form in the Pendragon Forms Manager, then click the Edit button to display the Form Designer window.
2. Make the necessary modifications in the Form Designer window, within the limits of what can be changed. Click the Exit button to close and save your changes.
3. Click the name of the form in the Pendragon Forms Manager and then click the Distribute button.
4. Synchronize the mobile device for the changes to take effect.
Tip: If you need to change an item that cannot be changed on a frozen form, make a copy of the form design and modify the copy.

74
Chapter 6: Managing Form Designs
75
Chapter 6: Managing Form Designs
Copying a Form Design
You may need to copy a form design if:
You want to use one form as a starting point for the design of a different form.
You need to modify a form that is frozen. If you copy a frozen form, the copy is not frozen, and can be modified. When you make a copy of the form, only the form design is copied, not the data in the original form.
To copy a form design:
1. Click on the name of the form in the Pendragon Forms Manager, then click the Copy button. You will be asked to confim that you want to make a new copy of the selected form. Click Yes.
2. The name of the copied form will be the original form name plus an asterisk (*) at the end of the name. Click the Edit button to change the name of the new form, as well as to change, add or delete fields on the form.
3. When the copy is created, the database column names will remain the same as in the original form design. If you need to import data from the original form into the copy, you can do so by freezing the copy and then clicking on the Import button. See page 212.
Tip:Avoid having multiple form designs with exactly the same name. One way to do this is to use version numbers in your form names, e.g. Inspection v1.0, Inspection v.2.0, etc.
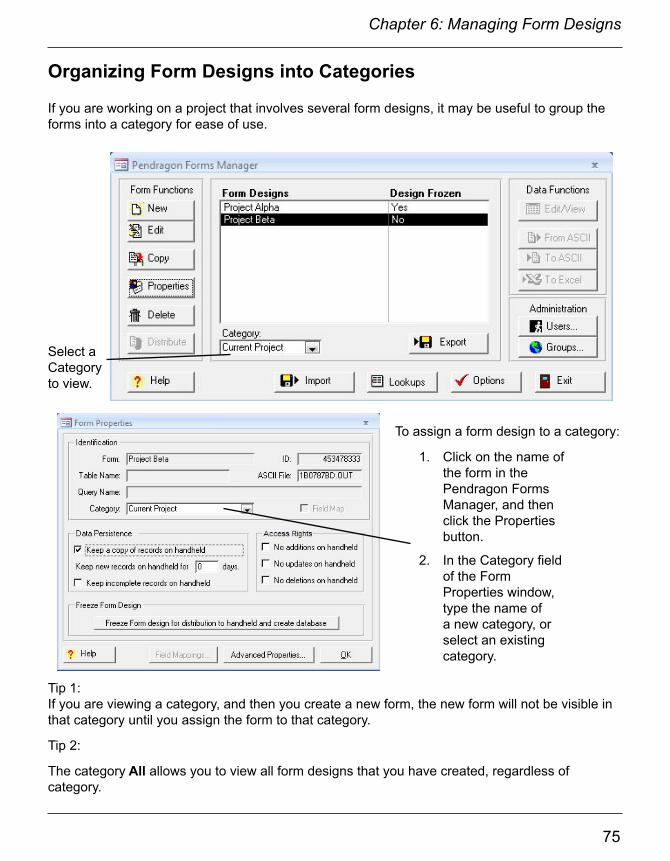
74
Chapter 6: Managing Form Designs
75
Chapter 6: Managing Form Designs
Organizing Form Designs into Categories
If you are working on a project that involves several form designs, it may be useful to group the forms into a category for ease of use.
To assign a form design to a category:
1. Click on the name of the form in the Pendragon Forms Manager, and then click the Properties button.
2. In the Category field of the Form Properties window, type the name of a new category, or select an existing category.
Tip 1:If you are viewing a category, and then you create a new form, the new form will not be visible in that category until you assign the form to that category.
Tip 2:
The category All allows you to view all form designs that you have created, regardless of category.
Select a Category to view.

76
Chapter 6: Managing Form Designs
77
Chapter 6: Managing Form Designs
Recycle Bin
The Recycle Bin is a special category. When you delete a form design from the PC, the form is re-assigned to the Recycle Bin category. If the form design is still on the mobile device, the next time you synchronize, data will still be sent to the PC and then the form will be removed from the mobile device.
To retrieve a form design from the Recycle Bin:
1. In the Pendragon Forms Manager, select the Recycle Bin category to view deleted forms.
2. Click the name of the form that you want to retrieve, and then click the Properties button.
3. In the Form Properties window, assign the form to a different category (for example the Unfiled category), by selecting that category.
A form on a mobile device will not synchronize unless the Form ID# on the device matches the Form ID# in the database. The Recycle Bin provides some protection from accidentally deleting a form from the PC that is still being used on a mobile device. Only if you are certain that a form design is not on a mobile device should you delete form designs from the Recycle Bin category.To delete a form and its data from the Recycle Bin, view the Recycle Bin category, then click the name of the form and click the Delete button in the Pendragon Forms Manager.
Important: If you delete a form from the Recycle Bin category, the form design and its datarecords are permanently deleted from the database.
Select the Recycle Bin category to view deleted forms.
76
Chapter 6: Managing Form Designs
77
Chapter 6: Managing Form Designs
Deleting a Form and its Records
In order to synchronize, the Form ID# of a form on a mobile device must exactly match the Form ID# of a form in the Pendragon Forms Manager database. If you permanently delete a form from the database on the PC, you will lose your ability to synchronize that form, even if the form is still on your mobile device.
The following is the proper sequence for deleting forms from a mobile device:
1. In the Pendragon Forms Manager, click on the Users button. In the Pendragon Transfer Agent window that appears, then click the name of the user group containing the form to be deleted.
• The Default Group contains your form designs if you have not created any groups.
2. Click the Remove button next to the name of the form. Then click OK to close the Pendragon Transfer Agent.
3. Wait until each mobile device has had an opportunity to synchronize. During each synchronization, records for the form will be sent to the PC/server, and then both the form design and the associated records will be removed from the mobile device.
NOTE: In a multi-user scenario it may take several days before each mobile device user has had an opportunity to synchronize.
4. After each user has had an opportunity to synchronize, you can either:
• Keep the form and its data in the Pendragon Forms database.
• Delete both the form design and its data by clicking on the name of the form in the Forms Manager, then clicking the Delete button. Deleting the form design will re-assign the form to the Recycle Bin category (see page 76). You may want to wait a while before deleting the form design from the Recycle Bin, in the event that there is a mobile device user who is still entering data in the form.
Troubleshooting Tips on Deleting forms
• If you delete a form from a User Group and the form returns after synchronization, you may want to check that the form has been removed from the Default user group and any other user groups to which the user belongs.
• If you delete a form from the PC by clicking the Delete button in the Forms Manager, but you still have new records on the mobile device, the records will be able to synchronize to the PC only as long as the form design remains in the Recycle Bin (see page 76). If you delete a form from the Recycle Bin, you will have to attempt to retrieve the form design first before you can retrieve the data from the mobile device. See page 375.

78
Chapter 6: Managing Form Designs
79
Printing a Form Design
You can print a form design to have a hard copy of the sequence of the fields on the form.
To print a form design:
1. Click on the name of the form in the Pendragon Forms Manager window.
2. Click the blue arrows to open the Access Navigation Pane.
3. On the Access Navigation Pane, click the All Access Objects menu and select Reports.
4. In the Reports Menu, double-click on a Report type:
• Form Printed Report Listing displays 9 fields per page.
• Form Printed Report Preview displays 5 fields per page.
• Form Printed Report Preview - Detail displays 2 fields per page, and includes scripts. If you are using this option, you may want to set your print-er properties to print two pages per printer page, to reduce the amount of paper that is used.
3. A print preview window will appear. You can click the < and > arrows at the bottom of the window to move from page to page. Click the Print button in the Microsoft Access menu bar at the top of the screen to print the form design report.
2. Click the blue arrows to open the Access Navigation Pane.
1. Click on the name of a form.
3. Click the All Access Objects menu.
3b. Select Reports.
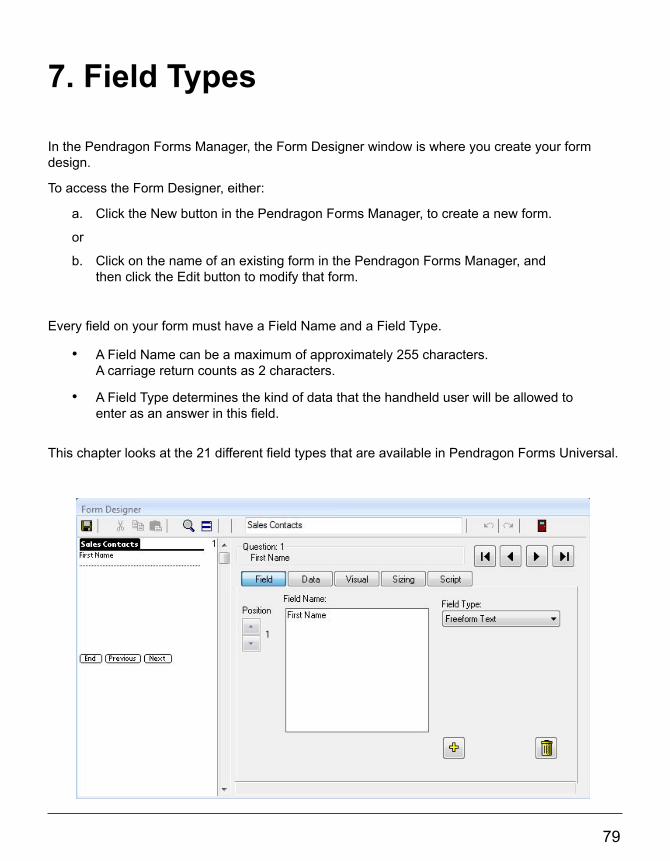
78
Chapter 6: Managing Form Designs
79
7. Field Types
In the Pendragon Forms Manager, the Form Designer window is where you create your form design.
To access the Form Designer, either:
a. Click the New button in the Pendragon Forms Manager, to create a new form.
or
b. Click on the name of an existing form in the Pendragon Forms Manager, and then click the Edit button to modify that form.
Every field on your form must have a Field Name and a Field Type.
• A Field Name can be a maximum of approximately 255 characters. A carriage return counts as 2 characters.
• A Field Type determines the kind of data that the handheld user will be allowed to enter as an answer in this field.
This chapter looks at the 21 different field types that are available in Pendragon Forms Universal.
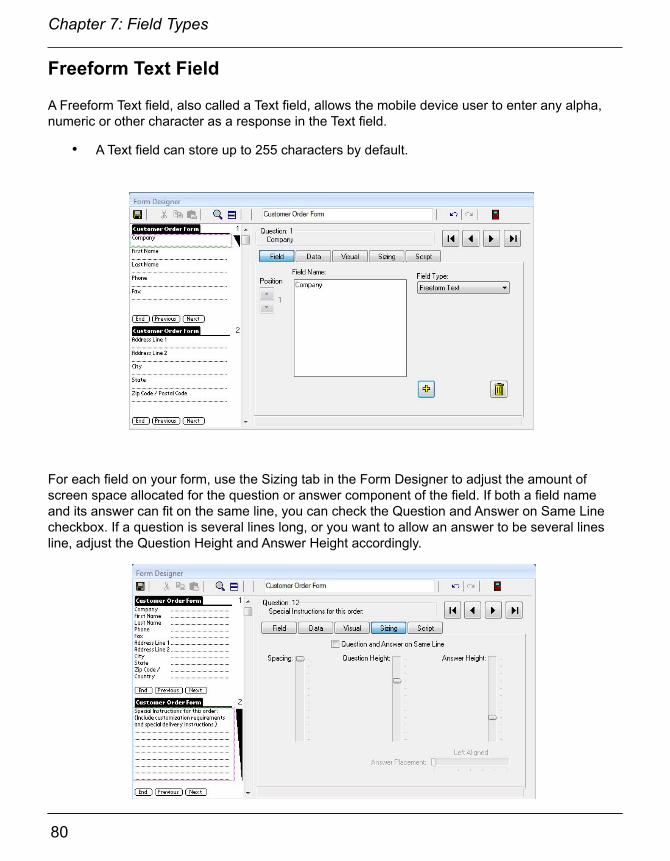
80
Chapter 7: Field Types
81
Chapter 7: Field Types
Freeform Text Field
A Freeform Text field, also called a Text field, allows the mobile device user to enter any alpha, numeric or other character as a response in the Text field.
• A Text field can store up to 255 characters by default.
For each field on your form, use the Sizing tab in the Form Designer to adjust the amount of screen space allocated for the question or answer component of the field. If both a field name and its answer can fit on the same line, you can check the Question and Answer on Same Line checkbox. If a question is several lines long, or you want to allow an answer to be several lines line, adjust the Question Height and Answer Height accordingly.

80
Chapter 7: Field Types
81
Chapter 7: Field Types
Advanced Field Properties of Text FieldsThe Data tab in the Form Designer window shows the Advanced Field Properties that are available for a Text field.
• Maximum LengthThe default maximum length of a Text field is 255 characters, which is long enough for most Text fields. If you need to allow more characters, or limit users to fewer characters, you can change the Max Length field on the Data tab to a number from 1 to 2000.
The Max Length field cannot be changed after a form has been frozen.
• PatternYou can choose that text that the user enters must conform to a pattern: upper case letters only, lower case letter only, alphanumeric characters only (that is characters A to Z or digits 0 to 9 only. No punctuation or other characters including hyphens -), or printable characters only.
For information on other Advanced Field Properties, refer to:Chapter 8, Form Designer & Advanced Field Properties, page 146.
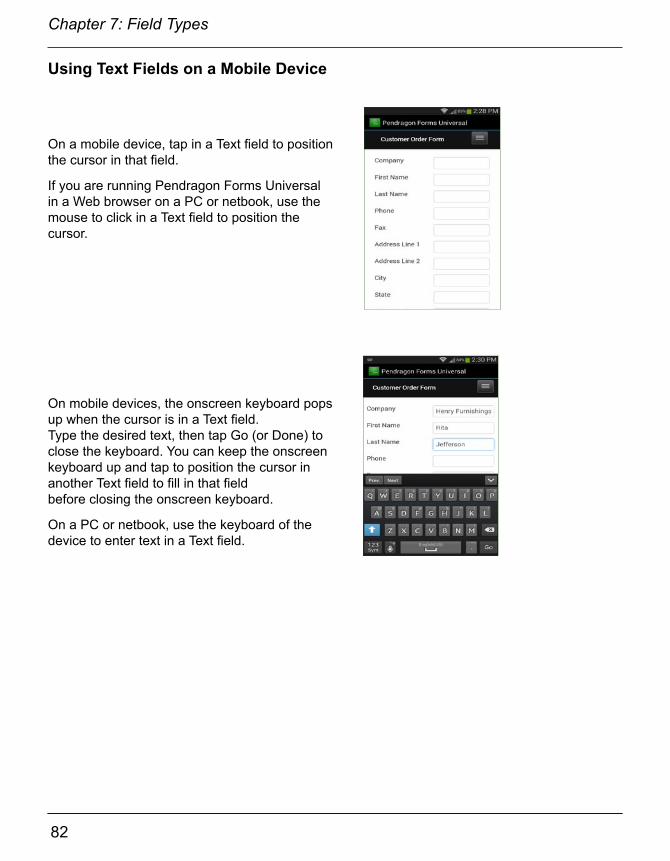
82
Chapter 7: Field Types
83
Chapter 7: Field Types
Using Text Fields on a Mobile Device
On a mobile device, tap in a Text field to position the cursor in that field.
If you are running Pendragon Forms Universal in a Web browser on a PC or netbook, use the mouse to click in a Text field to position the cursor.
On mobile devices, the onscreen keyboard pops up when the cursor is in a Text field. Type the desired text, then tap Go (or Done) to close the keyboard. You can keep the onscreen keyboard up and tap to position the cursor in another Text field to fill in that field before closing the onscreen keyboard.
On a PC or netbook, use the keyboard of the device to enter text in a Text field.
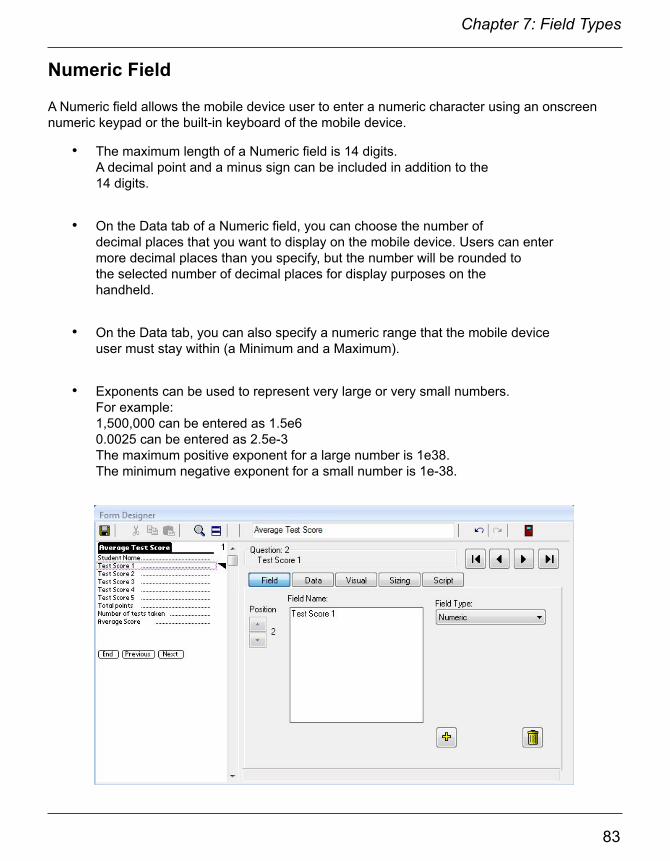
82
Chapter 7: Field Types
83
Chapter 7: Field Types
Numeric Field
A Numeric field allows the mobile device user to enter a numeric character using an onscreen numeric keypad or the built-in keyboard of the mobile device.
• The maximum length of a Numeric field is 14 digits.A decimal point and a minus sign can be included in addition to the 14 digits.
• On the Data tab of a Numeric field, you can choose the number of decimal places that you want to display on the mobile device. Users can enter more decimal places than you specify, but the number will be rounded to the selected number of decimal places for display purposes on the handheld.
• On the Data tab, you can also specify a numeric range that the mobile device user must stay within (a Minimum and a Maximum).
• Exponents can be used to represent very large or very small numbers.For example:1,500,000 can be entered as 1.5e60.0025 can be entered as 2.5e-3The maximum positive exponent for a large number is 1e38.The minimum negative exponent for a small number is 1e-38.

84
Chapter 7: Field Types
85
Chapter 7: Field Types
Advanced Field Properties of Numeric FieldsThe Data tab in the Form Designer window allows to you set Advanced Field Properties of a Numeric field.
• IntegerCheck the Integer checkbox if you want the mobile device user to enter integers (whole numbers) only. If you choose integers, you are limited to 9 digits.
• Decimal PlacesIf you want to display a certain number of decimal places (0 - 14) on themobiel device, enter the number in the Decimal Places field. Any numbers that the user enters with more decimal places will be rounded to the requested number of decimal places for display purposes.
• Minimum Value and Maximum ValueIf you want to restrict the mobile device user to entering numbers within a numeric range, you can set the minimum (Min) value and the maximum (Max) value of the allowable range. You must fill in both the Min and the Max values to specify the range.
For information on other Advanced Field Properties of Numeric fields, refer to:Chapter 8, Form Designer & Advanced Field Properties, page 146.
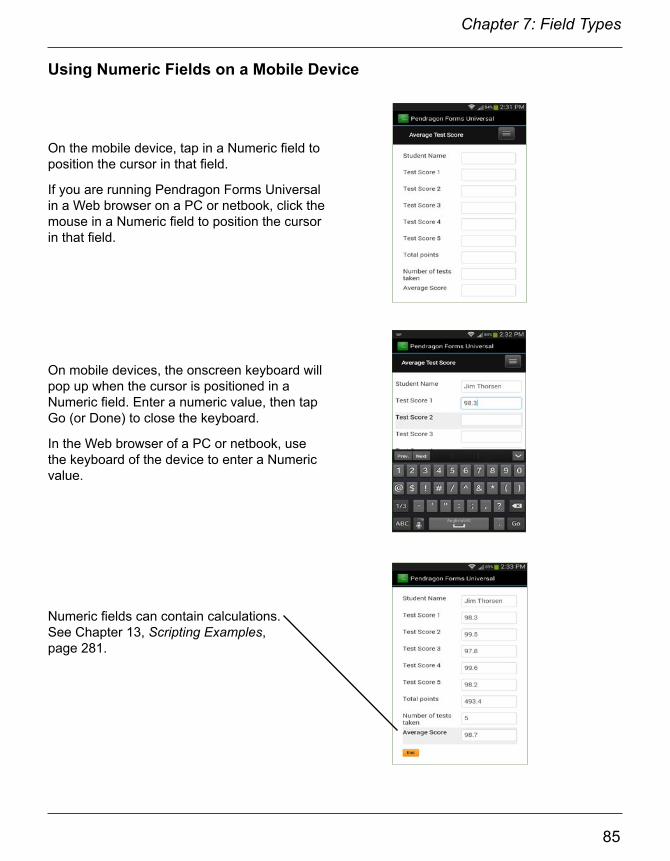
84
Chapter 7: Field Types
85
Chapter 7: Field Types
Using Numeric Fields on a Mobile Device
On the mobile device, tap in a Numeric field to position the cursor in that field.
If you are running Pendragon Forms Universal in a Web browser on a PC or netbook, click the mouse in a Numeric field to position the cursor in that field.
On mobile devices, the onscreen keyboard will pop up when the cursor is positioned in a Numeric field. Enter a numeric value, then tap Go (or Done) to close the keyboard.
In the Web browser of a PC or netbook, use the keyboard of the device to enter a Numeric value.
Numeric fields can contain calculations. See Chapter 13, Scripting Examples,page 281.
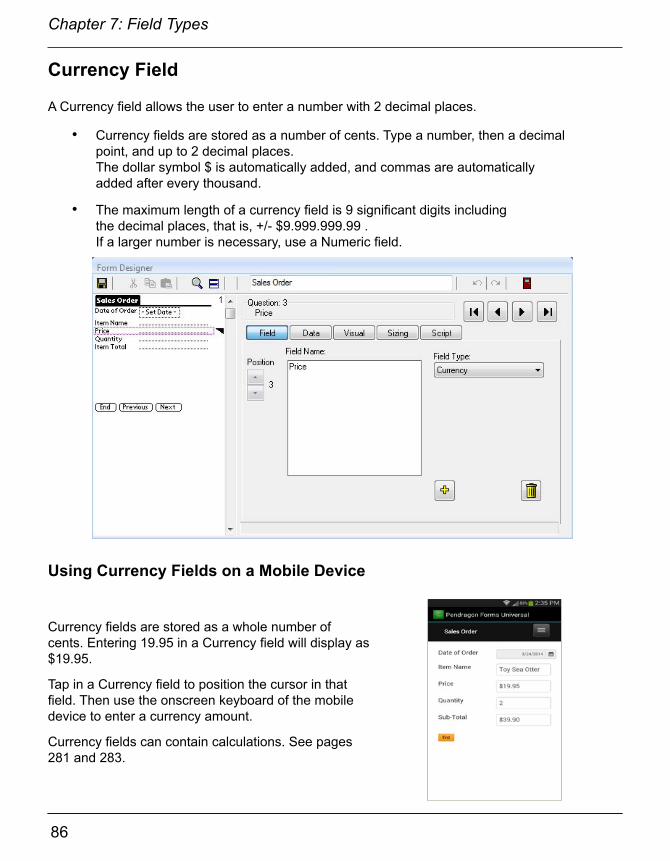
86
Chapter 7: Field Types
87
Chapter 7: Field Types
Currency Field
A Currency field allows the user to enter a number with 2 decimal places.
• Currency fields are stored as a number of cents. Type a number, then a decimal point, and up to 2 decimal places.The dollar symbol $ is automatically added, and commas are automatically added after every thousand.
• The maximum length of a currency field is 9 significant digits including the decimal places, that is, +/- $9.999.999.99 . If a larger number is necessary, use a Numeric field.
Using Currency Fields on a Mobile Device
Currency fields are stored as a whole number of cents. Entering 19.95 in a Currency field will display as $19.95.
Tap in a Currency field to position the cursor in that field. Then use the onscreen keyboard of the mobile device to enter a currency amount.
Currency fields can contain calculations. See pages 281 and 283.
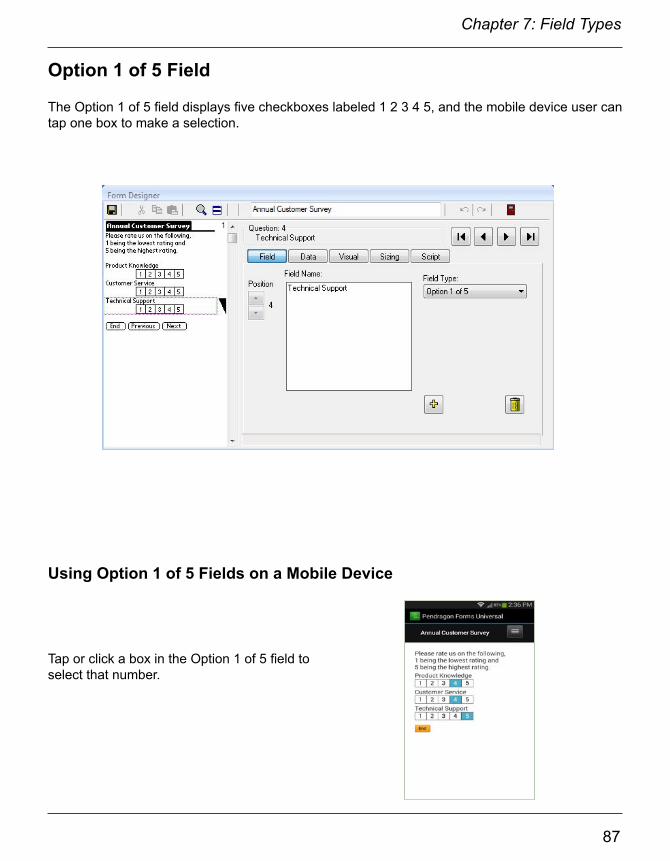
86
Chapter 7: Field Types
87
Chapter 7: Field Types
Option 1 of 5 Field
The Option 1 of 5 field displays five checkboxes labeled 1 2 3 4 5, and the mobile device user can tap one box to make a selection.
Using Option 1 of 5 Fields on a Mobile Device
Tap or click a box in the Option 1 of 5 field to select that number.

88
Chapter 7: Field Types
89
Chapter 7: Field Types
Popup List Field
A Popup List field allows the mobile device user to select only one item from a list of items.
• In the Form Designer window, type each item in the list on a separate line in the List Items section of the screen.
• Each item in the Popup List cannot exceed 30 characters. However, on the mobile device you may only see the first 16 characters.
• The maximum length of the entire Popup List is 512 characters. A carriage return (pressing Enter) counts as 2 characters.
• Important: When you freeze a form, Popup List items are also frozen and cannot be changed. If you need a list that can be modified after the form is frozen, use a Lookup List field instead of a Popup List.
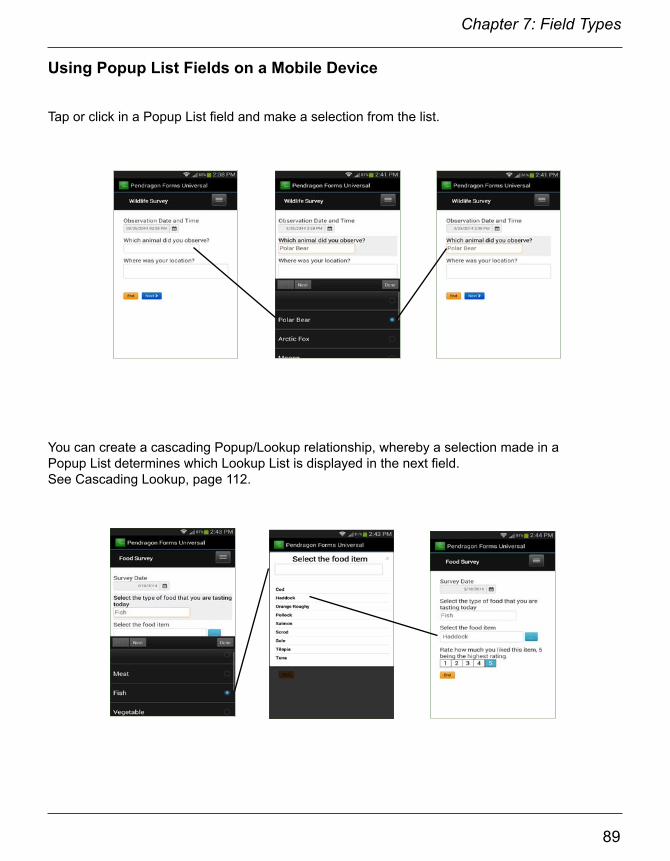
88
Chapter 7: Field Types
89
Chapter 7: Field Types
Using Popup List Fields on a Mobile Device
Tap or click in a Popup List field and make a selection from the list.
You can create a cascading Popup/Lookup relationship, whereby a selection made in a Popup List determines which Lookup List is displayed in the next field. See Cascading Lookup, page 112.

90
Chapter 7: Field Types
91
Chapter 7: Field Types
MultiSelection List Field
A MultiSelection List field allows the mobile device user to select one or more items from a list. A checkbox appears next to each item in the list, and the user can choose which boxes to check.
• In the Form Designer window, type each item in the list on a separate line.
• Each item in the list can be up to 30 characters.
• The maximum number of items in a Multi-Selection List is 32 items.
• When you freeze a form design, the MultiSelection List entries are frozen and cannot be changed. If you need to change a list on a regular basis, use a series of Lookup Lists instead of a MultiSelection List.
Internally, a MultiSelection list is stored as a binary number, with each bit position in the number representing one of the options in the list. For a sample script that ‘decodes’ the binary number, see page 299.
When you create a MultiSelection List field, click the Sizing tab in the Form Designer window to re-size the answer height of the field so that the user can see as many options as can fit on the mobile device screen.
If the list has more entries than can be seen, a scroll arrow in the lower right corner of the list can be used to scroll down.

90
Chapter 7: Field Types
91
Chapter 7: Field Types
When the handheld is synchronized and data is sent to the PC, all the selected items will be listed in the field, separated by semicolons.
Using MulitSelection Lists on a Mobile Device
To make a selection in a MultiSelection List field, tap one or more checkboxes in the field.
If the list contains more items than can be seen, you can scroll to the bottom of the list.

92
Chapter 7: Field Types
93
Chapter 7: Field Types
Date & Time Field
A Date & Time field allows the mobile device user to select a date and a time.
• The default date and time that are displayed are the current date and time on the mobile device.
• A script can be used to pre-fill a Date & Time field with the current date and time. See page 281.
• Scripts can also be used to perform calculations on dates. See Chapter 13, Scripting Examples, pages 287-289.
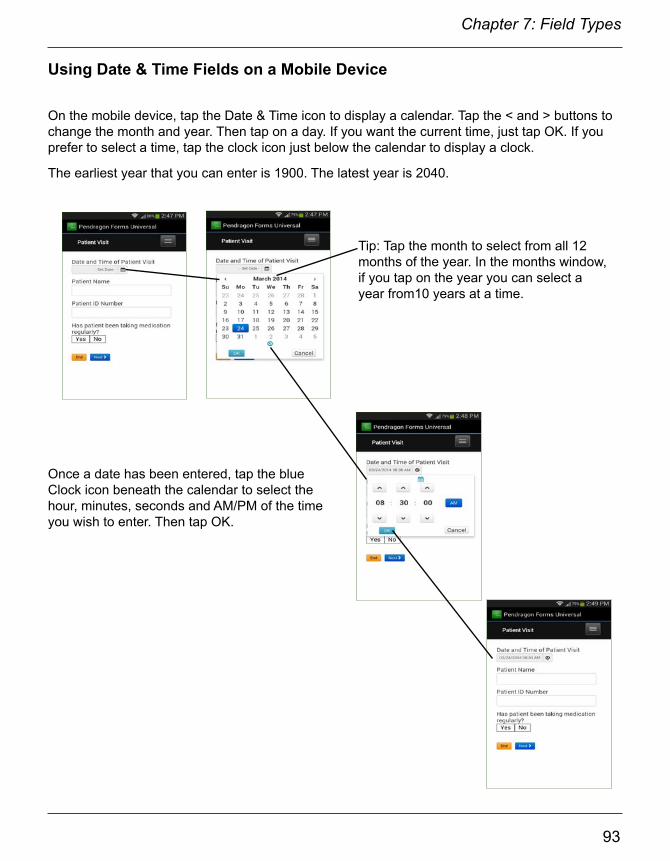
92
Chapter 7: Field Types
93
Chapter 7: Field Types
Using Date & Time Fields on a Mobile Device
On the mobile device, tap the Date & Time icon to display a calendar. Tap the < and > buttons to change the month and year. Then tap on a day. If you want the current time, just tap OK. If you prefer to select a time, tap the clock icon just below the calendar to display a clock.
The earliest year that you can enter is 1900. The latest year is 2040.
Once a date has been entered, tap the blue Clock icon beneath the calendar to select the hour, minutes, seconds and AM/PM of the time you wish to enter. Then tap OK.
Tip: Tap the month to select from all 12 months of the year. In the months window, if you tap on the year you can select a year from10 years at a time.

94
Chapter 7: Field Types
95
Chapter 7: Field Types
Date Field
A Date Only field, called a Date field, allows the mobile device user to select a date.
• The default date is the current date on the mobile device.
• The earliest year that you can enter is 1900. The latest year is 2040.
• A script can be used to pre-fill a Date field with the current date. See page 281.
• Scripts can also be used to perform calculations on dates. See Chapter 13, Scripting Examples, pages 287-289.
Using Date Fields on a Mobile Device
On the mobile device, tap the calendar icon in a Date field to display a calendar. Tap the < and > buttons to change the month and year, and then tap on a day. Then tap OK.
If you tap on the month header, you can select a month from 12 months at a time.
If you do not want to select a date, then tap Cancel.

94
Chapter 7: Field Types
95
Chapter 7: Field Types
Time Field
A Time field allows the mobile device user to select a time.
• The default time is the current time on the mobile device.
• You can use a script to automatically insert the current time into a Time field. See page 287.
Using Time Fields on a Mobile Device
Tap the clock icon in a Time field and select hours, minutes, seconds and AM or PM. Then tap OK.
You can use the arrows to move up or down the hours, minutes and seconds. If you tap on the numbers in the clock you can select from all the hours, or select from samples of minutes or seconds.
If you do not want to select a time, then tap Cancel.
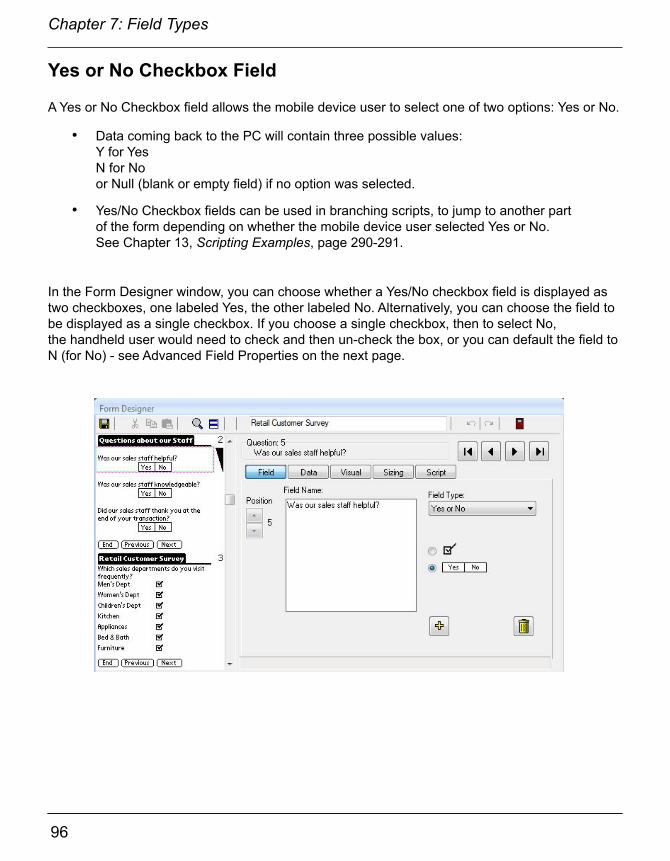
96
Chapter 7: Field Types
97
Chapter 7: Field Types
Yes or No Checkbox Field
A Yes or No Checkbox field allows the mobile device user to select one of two options: Yes or No.
• Data coming back to the PC will contain three possible values:Y for YesN for Noor Null (blank or empty field) if no option was selected.
• Yes/No Checkbox fields can be used in branching scripts, to jump to another part of the form depending on whether the mobile device user selected Yes or No. See Chapter 13, Scripting Examples, page 290-291.
In the Form Designer window, you can choose whether a Yes/No checkbox field is displayed as two checkboxes, one labeled Yes, the other labeled No. Alternatively, you can choose the field to be displayed as a single checkbox. If you choose a single checkbox, then to select No, the handheld user would need to check and then un-check the box, or you can default the field to N (for No) - see Advanced Field Properties on the next page.

96
Chapter 7: Field Types
97
Chapter 7: Field Types
Advanced Field Properties of Yes/No Checkbox FieldsIf the mobile device user leaves a Yes/No checkbox field blank, the data value will be null (blank).If you do not want to allow a null value, you can set a default value so that if the user does not touch the checkbox, the default value will be the value stored in the field.
To set a default value in a Yes/No Checkbox field:
1. Click on the Data tab for the field.
2. In the Default Value field, type N to default to No, or type Y to default to Yes.
Instead of using a default value, another way to avoid a null value is to require the mobile device user to select a value. This approach works best if you are displaying the Yes/No field as two checkboxes, one for Yes and one for No.
To make a field a Required field:
1. Click on the Data tab for the field, and check the Required checkbox.
For more information on Advanced Field Properties, see:Chapter 8, Form Designer & Advanced Field Properties page 146.

98
Chapter 7: Field Types
99
Chapter 7: Field Types
Using Yes/No Checkbox Fields on a Mobile Device
If two separate checkboxes are displayed for Yes and No, tap one of the checkboxes to make a selection.
If neither checkbox is selected, the value is Null.
If only one checkbox is displayed, tap the checkbox for Yes. To register No, check and then un-check the checkbox.
It is possible to set a Default value in a Yes/No checkbox, so that if the user does not make a selection, the field is pre-set to either Yes or No.
See the previous page for information on Default values.
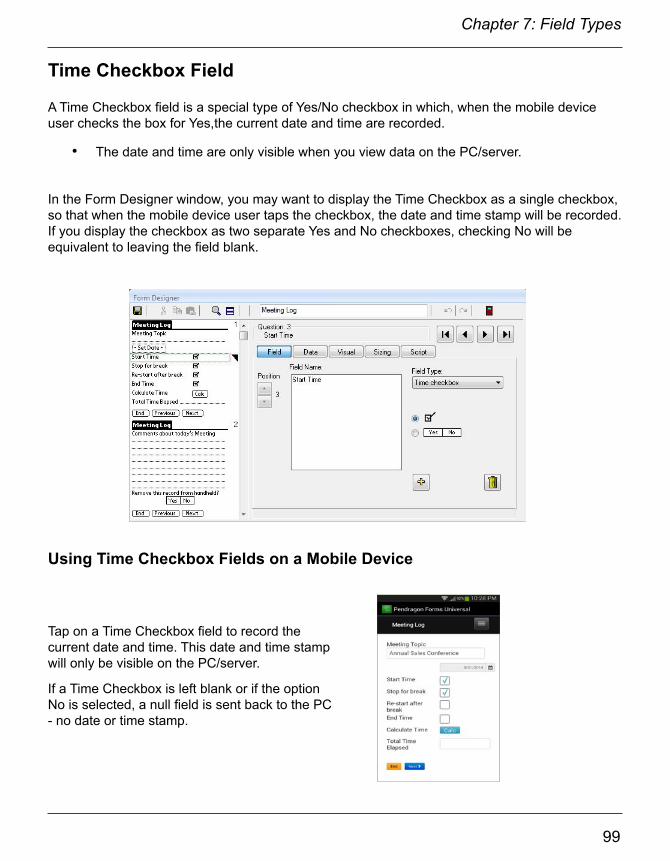
98
Chapter 7: Field Types
99
Chapter 7: Field Types
Time Checkbox Field
A Time Checkbox field is a special type of Yes/No checkbox in which, when the mobile device user checks the box for Yes,the current date and time are recorded.
• The date and time are only visible when you view data on the PC/server.
In the Form Designer window, you may want to display the Time Checkbox as a single checkbox, so that when the mobile device user taps the checkbox, the date and time stamp will be recorded. If you display the checkbox as two separate Yes and No checkboxes, checking No will be equivalent to leaving the field blank.
Using Time Checkbox Fields on a Mobile Device
Tap on a Time Checkbox field to record the current date and time. This date and time stamp will only be visible on the PC/server.
If a Time Checkbox is left blank or if the option No is selected, a null field is sent back to the PC - no date or time stamp.
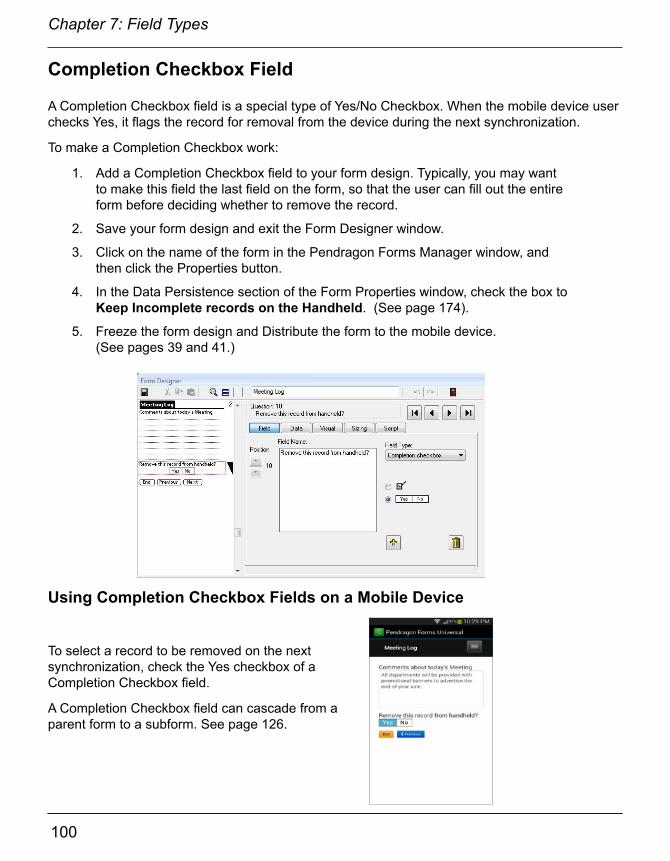
100
Chapter 7: Field Types
101
Chapter 7: Field Types
Completion Checkbox Field
A Completion Checkbox field is a special type of Yes/No Checkbox. When the mobile device user checks Yes, it flags the record for removal from the device during the next synchronization.
To make a Completion Checkbox work:
1. Add a Completion Checkbox field to your form design. Typically, you may want to make this field the last field on the form, so that the user can fill out the entire form before deciding whether to remove the record.
2. Save your form design and exit the Form Designer window.
3. Click on the name of the form in the Pendragon Forms Manager window, and then click the Properties button.
4. In the Data Persistence section of the Form Properties window, check the box to Keep Incomplete records on the Handheld. (See page 174).
5. Freeze the form design and Distribute the form to the mobile device. (See pages 39 and 41.)
Using Completion Checkbox Fields on a Mobile Device
To select a record to be removed on the next synchronization, check the Yes checkbox of a Completion Checkbox field.
A Completion Checkbox field can cascade from a parent form to a subform. See page 126.

100
Chapter 7: Field Types
101
Chapter 7: Field Types
Section Field
A Section field is a read-only topic heading. The mobile device user cannot enter data in a Section field. Instead, the field name of the Section field provides the user with information for filling in the fields that follow the Section field.
• In the Form Designer window, when you select a Section field as your field type, you will need to type a name for the Section in the Section Name field.
• The Section Name can be up to 30 characters.
A Section field has three uses:
1. Section headings can form a visual divider between different categories of questions.
2. Section fields can be used in conjunction with Jump to Section fields to make it possible to jump to a section of a form. Note however that using scripting may be more powerful than using Section fields and Jump to Section fields.
3. A Section field can be used if you need more space for a long question. By placing a Section field ahead of another field, you can double the onscreen space of your question.

102
Chapter 7: Field Types
103
Chapter 7: Field Types
Section fields include a Skip Section button, that allows the mobile device user to skip the current group of questions and jump to the next Section field on the form. If there are no more Section fields, the user ends the record.
If you do not want the mobile device user to skip a section, you can click the Sizing tab of a Section field, and make the Answer Height zero. This will hide the Skip Section button.
You can choose to add a graphic to the field name of a Section field, to help illustrate the purpose of a section. If you click the Visual tab of a Section field, you can click the Get Picture button to select a graphic to use with the Section field. See Chapter 8, Form Designer & Advanced Field Properties, page 160, for more information on adding pictures to fields.
You can also use Section fields containing pictures to act as a “main menu” screen, from which the user can jump to other forms to fill in. See Chapter 15, Custom Main Menu, page 323.

102
Chapter 7: Field Types
103
Chapter 7: Field Types
Using Section Fields on a Mobile Device
A Section field provides information about the question in this section of a form. If a Section field occupies a whole screen, the questions in this section begin after the Section field.
If you are allowed to skip over a section, a Skip Section button will be visible. Tap the Skip Section button to jump to the next Section field on the form. If there are no more Section fields on the form, tapping a Skip Section button will end the record.
Here a Section field includes a graphic image, and has the Skip Section button hidden.
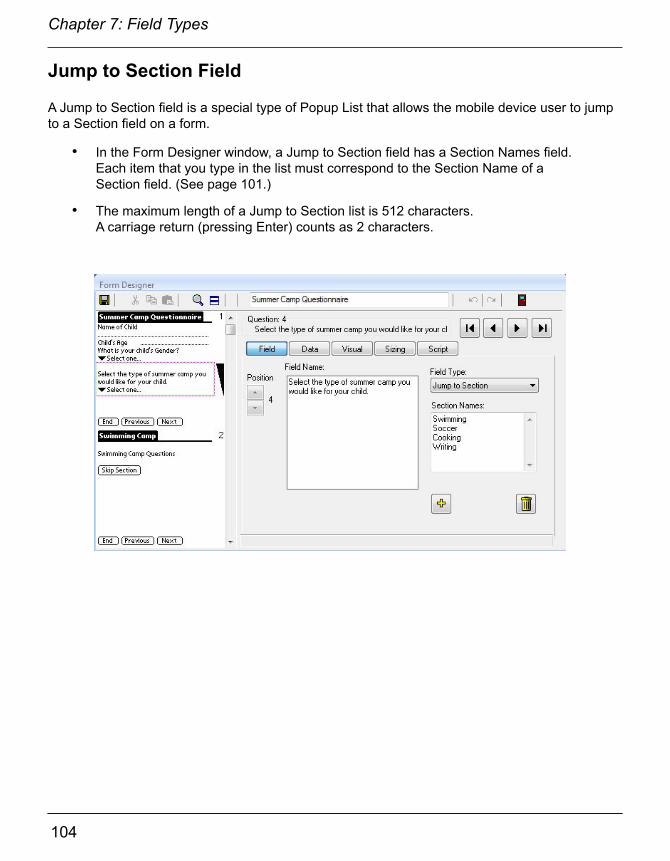
104
Chapter 7: Field Types
105
Chapter 7: Field Types
Jump to Section Field
A Jump to Section field is a special type of Popup List that allows the mobile device user to jump to a Section field on a form.
• In the Form Designer window, a Jump to Section field has a Section Names field. Each item that you type in the list must correspond to the Section Name of a Section field. (See page 101.)
• The maximum length of a Jump to Section list is 512 characters.A carriage return (pressing Enter) counts as 2 characters.

104
Chapter 7: Field Types
105
Chapter 7: Field Types
Using Jump to Section Fields on a Mobile Device
On the mobile device, selecting an item from a Jump to Section list...
...jumps the user to that Section field on the form.
The user can jump forward or backward on the form, depending on where the Section field is located on the form.
You can add a branching script to a form, so that after filling in the fields in a given section of the form, the user is returned to a Jump to Section field to select another section to fill in. If you branch back to a Jump to Section field, you should add an Exit section to your form so that the mobile device user can break out of the loop and end the form. See Chapter 13, Scripting Examples, page 296.

106
Chapter 7: Field Types
107
Chapter 7: Field Types
Lookup List Field
A Lookup List allows the mobile device user to select one item from a list.
Lookup Lists are created separately from the form design, and can be modified even after the form has been frozen. If you think that you will need to add items to your list over time, it is best to use a Lookup List rather than a Popup List or a MultiSelection List.
A Lookup List allows the mobile device user to edit the field after a selection has been made, so that the user can effectively create their own item if nothing in the list matches what they want to enter in the field. The edited item is not stored in the list, just in the current record. The question and answer components of the field must be on two separate lines to allow editing of the field.
An Exclusive Lookup option can be set if you do not want the user to be able to edit the items in the list.
Creating a Lookup List is a two-step process, described in detail below.
Step 1: Create a Lookup ListTo create a Lookup List:
1. In the Pendragon Forms Manager Window, click the Lookups buttonto display the Lookup List Editor.
2. Type a name for the list in the blank row, then click the Edit button next to that Lookup List name. To edit an existing Lookup List, click the Edit button next to the name of that Lookup List.
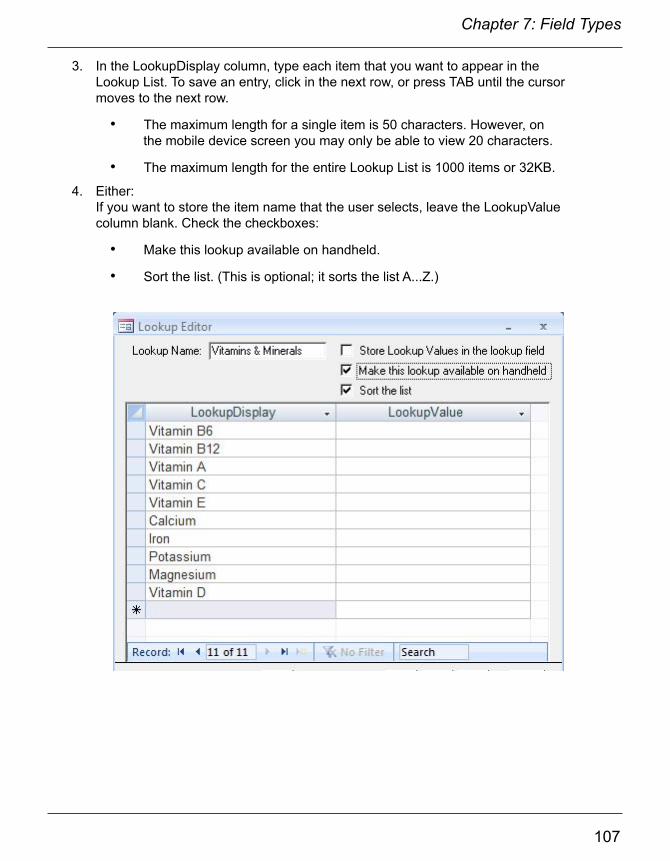
106
Chapter 7: Field Types
107
Chapter 7: Field Types
3. In the LookupDisplay column, type each item that you want to appear in the Lookup List. To save an entry, click in the next row, or press TAB until the cursor moves to the next row.
• The maximum length for a single item is 50 characters. However, on the mobile device screen you may only be able to view 20 characters.
• The maximum length for the entire Lookup List is 1000 items or 32KB.
4. Either:If you want to store the item name that the user selects, leave the LookupValue column blank. Check the checkboxes:
• Make this lookup available on handheld.
• Sort the list. (This is optional; it sorts the list A...Z.)

108
Chapter 7: Field Types
109
Chapter 7: Field Types
4. con’tOR:The LookupValue column can be used if you want the mobile device user to see the item names in the list, but when they make a selection, store an abbreviation or alternate value in the field.
• For example, you may want to display the names of US states in the list, but store the two-letter postal abbreviation for each state.
In this case, type the full name of the items in the LookupDisplay column, and type the corresponding abbreviations in the Lookup Value column. Do not leave any blanks in the LookupValue column. Check the checkboxes:
• Store Lookup Values in Lookup List.
• Make this lookup available on handheld.
• Sort the list. (This is optional; it sorts the list A...Z.)
5. To save and close the Lookup Editor, click the Close button (Exit Door icon) or click the X button in the upper right corner of the Lookup Editor screen. Also close the Lookup List window.

108
Chapter 7: Field Types
109
Chapter 7: Field Types
Step 2: Create a Lookup List FieldOnce you have created a Lookup List, you can create a Lookup List field on your form.
To create a Lookup List field:
1. In the Form Designer window, enter a Field name for your field, and then select Lookup List as the Field Type.
2. In the Lookup List to Display section of the screen, click the arrow and select the name of the Lookup List that you want to display.
3. If you do not want mobile device users to have the ability to edit a selection and create an item that is not in the list, check the Exclusive checkbox.
In the picture above, the State field takes up two lines on the mobile device, the question on one line and the answer on the next line. In this case the Lookup List field appears as a field for storing text, with a Lookup button next to the line. The mobile device user can tap the button to make a selection from the list, and can optionally edit the selection if the list is not exclusive.
In the Shipping State field in the picture, the question and answer components of the field have been put on the same line via the the Sizing tab of the Form Designer. The user can tap the Lookup button to display the Lookup List. No manual editing of the field is possible, whether exclusive is set or not.

110
Chapter 7: Field Types
111
Chapter 7: Field Types
Using Lookup List Fields on a Mobile Device
On the mobile device, tap the Lookup button to display the list. Tap an item in the list to select it.
If the list is too long to fit on one screen, you can scroll up and down the list by swiping a finger on the mobile device screen.
Troubleshooting Lookup Lists
On the mobile device, if you get an error messageLookup list not found, it means that the Lookup List that is mentioned in the error message is not on the mobile device.
On the PC, click the Lookups button in the Pendragon Forms Manager on the PC. If the Available checkbox is not checked, edit the Lookup List and check the Make this lookup available on handheld checkbox.Re-distribute the form and then synchronize the mobile device and see if the Lookup List appears.
If the problem persists, click on the form in the Pendragon Forms Manager, then click the Edit button to open the Form Designer. Display the Lookup List field and re-select the Lookup List that you want to use. Re-distribute the form design, synchronize, and check the mobile device again.

110
Chapter 7: Field Types
111
Chapter 7: Field Types
Modifying a Lookup ListIf you add items to a Lookup List on the PC/server, you will need to re-distribute the form design for the updated Lookup List to take effect the next time the mobile device synchronizes.
Importing/Exporting Lookup ListsIf you want to create a Lookup List based on data in an ASCII file, you can create the Lookup List and then import the data into the list. See page 214 for more information on importing Lookup Lists.
If you are giving someone a form design that you have created, and the form contains Lookup Lists, you will need to export the Lookup Lists separately from the form design. See page 214 for more information on exporting Lookup Lists.
Other Uses for Lookup ListsIt is possible to use two fields to create a Cascading Popup/Lookup relationship, in which a selection in a Popup List field (or a Lookup List) determines which Lookup List the user sees in the next field. See Cascading Lookup, page 301.
A Lookup List field can also be used to perform a lookup to another form, also called a Lookup to a Reference form. See page 116.

112
Chapter 7: Field Types
113
Chapter 7: Field Types
Cascading Lookup
A Cascading Lookup is a relationship between two adjacent fields, such that making a selection from a Popup List or a Lookup List in the first field determines which Lookup List is displayed in the second field.
In the example shown below, selecting a food category in field 2 will display a list of foods within that category in field 3.
Three steps are involved in creating a cascading relationship between two fields. These steps are described on the next few pages.
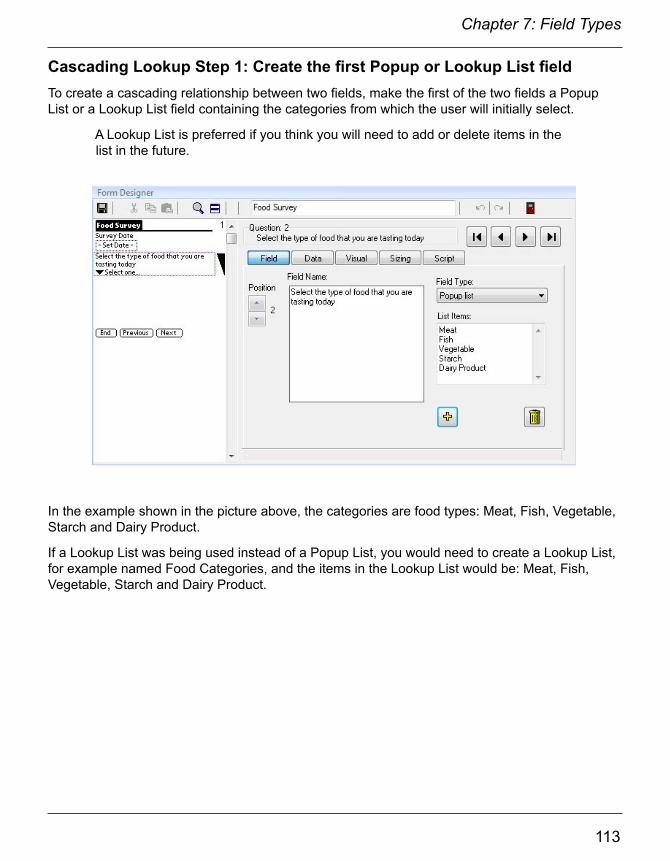
112
Chapter 7: Field Types
113
Chapter 7: Field Types
Cascading Lookup Step 1: Create the first Popup or Lookup List fieldTo create a cascading relationship between two fields, make the first of the two fields a Popup List or a Lookup List field containing the categories from which the user will initially select.
A Lookup List is preferred if you think you will need to add or delete items in the list in the future.
In the example shown in the picture above, the categories are food types: Meat, Fish, Vegetable, Starch and Dairy Product.
If a Lookup List was being used instead of a Popup List, you would need to create a Lookup List, for example named Food Categories, and the items in the Lookup List would be: Meat, Fish, Vegetable, Starch and Dairy Product.
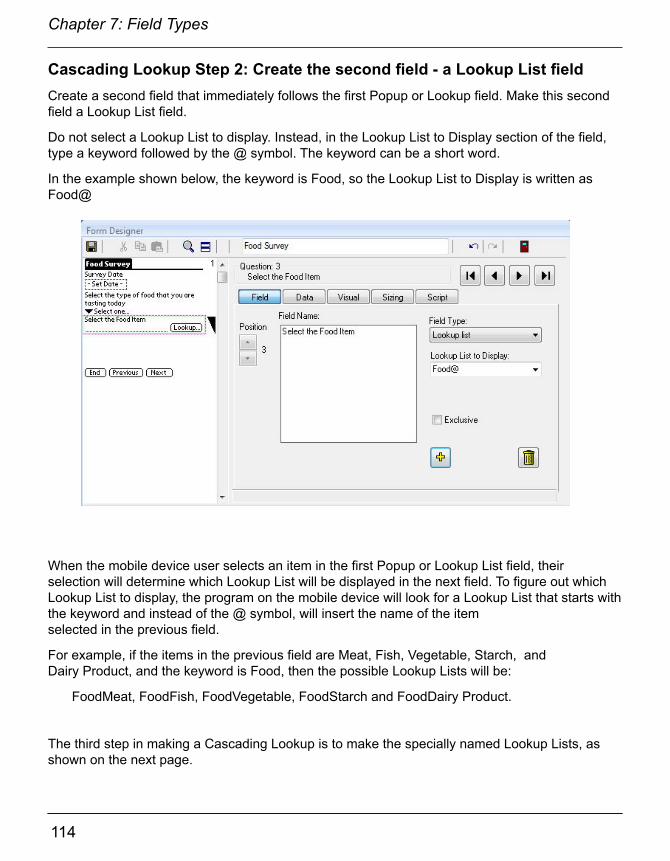
114
Chapter 7: Field Types
115
Chapter 7: Field Types
Cascading Lookup Step 2: Create the second field - a Lookup List fieldCreate a second field that immediately follows the first Popup or Lookup field. Make this second field a Lookup List field.
Do not select a Lookup List to display. Instead, in the Lookup List to Display section of the field, type a keyword followed by the @ symbol. The keyword can be a short word.
In the example shown below, the keyword is Food, so the Lookup List to Display is written as Food@
When the mobile device user selects an item in the first Popup or Lookup List field, their selection will determine which Lookup List will be displayed in the next field. To figure out which Lookup List to display, the program on the mobile device will look for a Lookup List that starts with the keyword and instead of the @ symbol, will insert the name of the item selected in the previous field.
For example, if the items in the previous field are Meat, Fish, Vegetable, Starch, and Dairy Product, and the keyword is Food, then the possible Lookup Lists will be:
FoodMeat, FoodFish, FoodVegetable, FoodStarch and FoodDairy Product.
The third step in making a Cascading Lookup is to make the specially named Lookup Lists, as shown on the next page.

114
Chapter 7: Field Types
115
Chapter 7: Field Types
Cascading Lookup Step 3: Create a Lookup List for each categoryYou will need to create a separate Lookup List for each item in the Popup/Lookup List of the first field. For example, if you have four choices in the first field, you have to make four separate Lookup Lists.
The names of the Lookup Lists are very important in making the cascading relationship work. On the mobile device, when the user makes a selection in the first field, the second field is going to display a Lookup List whose name begins with the keyword followed by the item name selected in the first field.
If the keyword is Food and the item selected is Fish, the name of the corresponding Lookup List is FoodFish.
The Lookup List name must match the same spelling and case sensitivity as the keyword and the item name. Do not put a space between the keyword and the item name.

116
Chapter 7: Field Types
117
Chapter 7: Field Types
Lookup to Another Form (Lookup to a Reference Form)
A Lookup to Another Form, also called a Lookup to a Reference Form, allows you to jump from one form to a second (reference) form, select a record, and copy fields from the reference form into the first form.
You might want to use a Lookup to Another Form if you have reference information that you want to maintain in one form, that you want to access from another form.
In the example below, the mobile device user starts out in one form. Tapping the Lookup button jumps the user to a second (reference) form, where a record is selected. The user is returned to the first form, and several fields on the first form are automatically filled in from the reference form.
The two steps needed to create a Lookup to Another Form are described on the next few pages.

116
Chapter 7: Field Types
117
Chapter 7: Field Types
Lookup to Another Form Step 1: Create the Reference FormTo create a Lookup to Another Form, first create the form that will contain the referenceinformation.
When typing field names, be mindful about the case sensitivity (that is, the use of upper and lower case letters), and the use of spaces and punctuation. Whatever field names and field types you use on the reference form, you will have to use the exact same field names and field types in the form that is doing the lookup.
Freeze the reference form, and populate it with data, either by typing the data into the Edit/View screen (see page 196-197), or by importing the data from another source (see page 215).

118
Chapter 7: Field Types
119
Chapter 7: Field Types
Lookup to Another Form Step 2: Create the Form that does the LookupNext, create the form that will be doing the lookup.
In order to do the lookup, one field on this form must be a Lookup List field type.
In the Lookup List to Display field, instead of selecting a Lookup List, type the exact name of the reference form, using the same upper and lower case letters and spaces.
If you make the Lookup List field match the field name of a Text field on the reference form,up to 50 characters of the Text field will be copied into the Lookup List field, even though the field types are different. This is the only case where field types do not have to match between the reference form and the form doing the lookup.
For all the other fields that you want to copy from the reference form into this form, create a field on this form that has the exact same field name and field type as the reference form. For instance, if a field is Numeric on the reference form, it will only copy into an identically named Numeric field on this form.
In the picture below, the fields that match the reference form on the previous page are:Country, Capital City, Languages and Currency. When the user performs the lookup, data from the reference form will copy into these four fields.
Type the exact name of the reference form here.
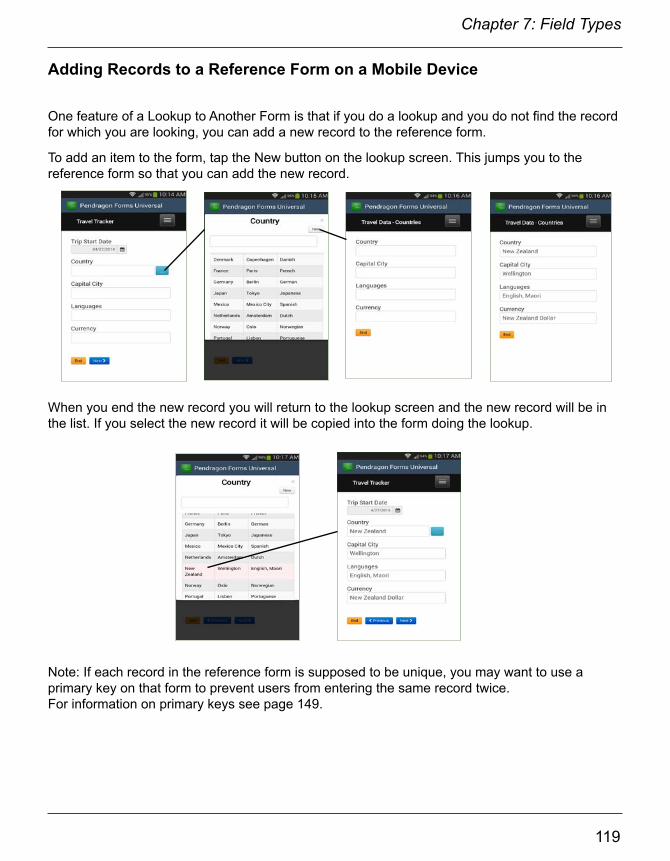
118
Chapter 7: Field Types
119
Chapter 7: Field Types
Adding Records to a Reference Form on a Mobile Device
When you end the new record you will return to the lookup screen and the new record will be in the list. If you select the new record it will be copied into the form doing the lookup.
One feature of a Lookup to Another Form is that if you do a lookup and you do not find the record for which you are looking, you can add a new record to the reference form.
To add an item to the form, tap the New button on the lookup screen. This jumps you to the reference form so that you can add the new record.
Note: If each record in the reference form is supposed to be unique, you may want to use a primary key on that form to prevent users from entering the same record twice. For information on primary keys see page 149.

120
Chapter 7: Field Types
121
Chapter 7: Field Types
Subform Field
If you need to collect information that is related, for example: customer contact information and individual customer visits, you may want to create two forms: a ‘parent’ form and a ‘child’ form. The ‘child’ form is also called a subform.
Parent and subforms are used when you have a one-to-many relationship: for every one record in the parent form, there will be many records in the subform.
Pendragon Forms is not a relational database on the mobile device, but a Subform field on a parent form makes it appear to the user that the parent form and subform are linked, by allowing the user to jump from the parent form to the subform to fill in the subform record. Ending the subform record returns the user to the parent form.
On the PC, data for the parent form and subform are stored in separate database tables.
Subform Step 1: Create a Parent Form1. The parent form should be created first.
2. To connect the parent form to the subform, make at least one field on both the parent form and the subform identical in field name and field type. (Typically the first field.)
3. If you need to copy data from the parent form to the subform every time you create a new subform record, you can make up to the first 10 fields on the parent form and the subform identical in field name and field type.
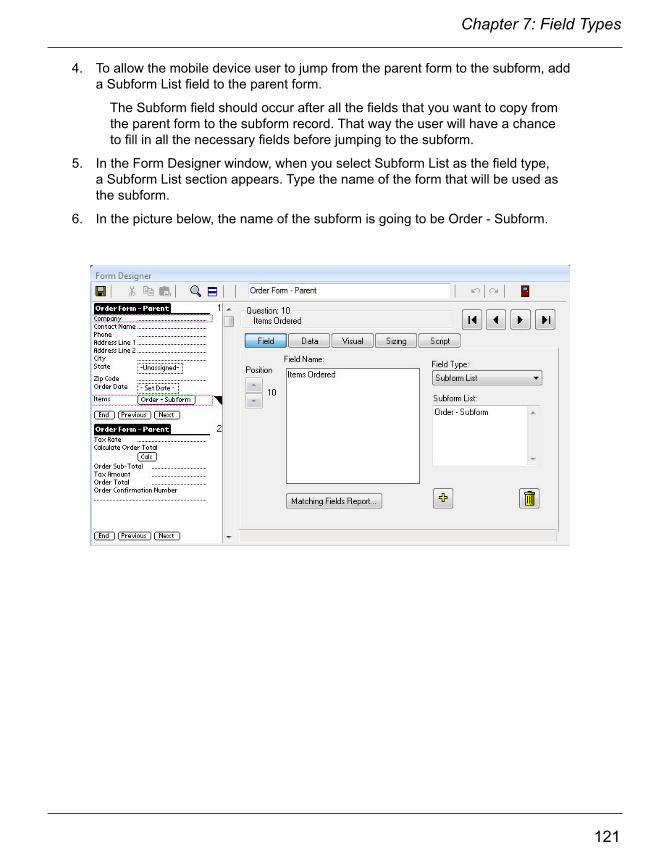
120
Chapter 7: Field Types
121
Chapter 7: Field Types
4. To allow the mobile device user to jump from the parent form to the subform, add a Subform List field to the parent form.
The Subform field should occur after all the fields that you want to copy from the parent form to the subform record. That way the user will have a chance to fill in all the necessary fields before jumping to the subform.
5. In the Form Designer window, when you select Subform List as the field type, a Subform List section appears. Type the name of the form that will be used as the subform.
6. In the picture below, the name of the subform is going to be Order - Subform.

122
Chapter 7: Field Types
123
Chapter 7: Field Types
Subform Step 2: Create a Subform1. Create a new form to be the child form or subform.
When you create the subform, make sure that the name of the form is identical to the name that you referenced in the Subform List field on the parent form (including upper and lower case letters and spaces).
2. At least one field on the subform must be identical in field name and field type to one of the first ten fields on the parent form. The matching field or fields provide the link between parent form and subform.
As a precaution, it is recommended that all the fields on the subform that match fields on the parent form should be made Read-Only on the subform. If you change one of these fields on the subform you will lose the link to the parent form, since Pendragon Forms is looking for an exact match between parent and subform in these fields. For each of the matching fields on the subform, click the Visual tab in the Form Designer window and check the Read-Only checkbox.
3. If you want information from more than one field to copy from parent to subform, you can make up to 10 fields on the subform match the first 10 fields on the parent form. The field names and field types must be identical from parent to subform.
In the picture below, three fields match the parent form: Company, Contact Name and Order Date. The remaining fields are unique to the subform and are not on the parent form.
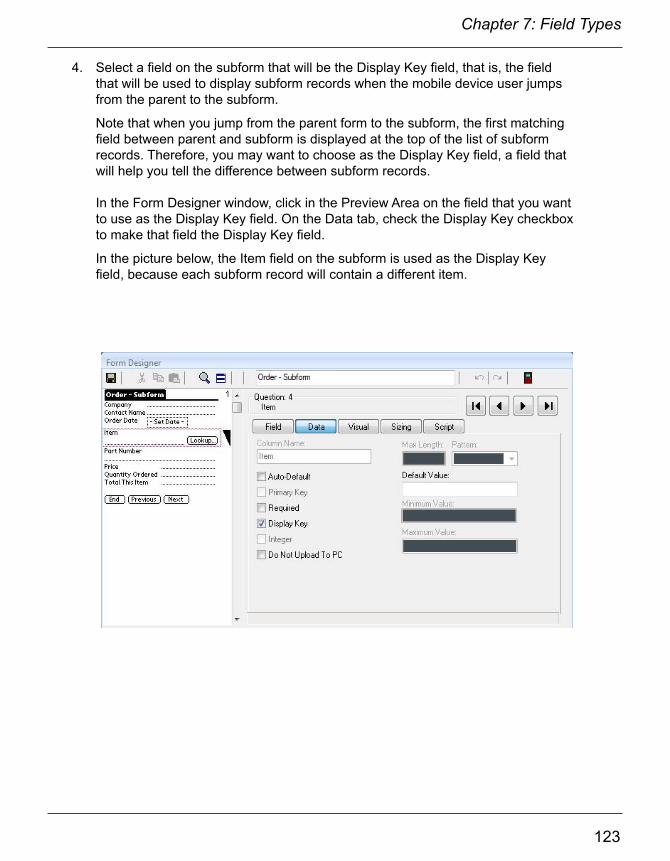
122
Chapter 7: Field Types
123
Chapter 7: Field Types
4. Select a field on the subform that will be the Display Key field, that is, the field that will be used to display subform records when the mobile device user jumps from the parent to the subform.
Note that when you jump from the parent form to the subform, the first matching field between parent and subform is displayed at the top of the list of subform records. Therefore, you may want to choose as the Display Key field, a field that will help you tell the difference between subform records.
In the Form Designer window, click in the Preview Area on the field that you want to use as the Display Key field. On the Data tab, check the Display Key checkbox to make that field the Display Key field.
In the picture below, the Item field on the subform is used as the Display Key field, because each subform record will contain a different item.
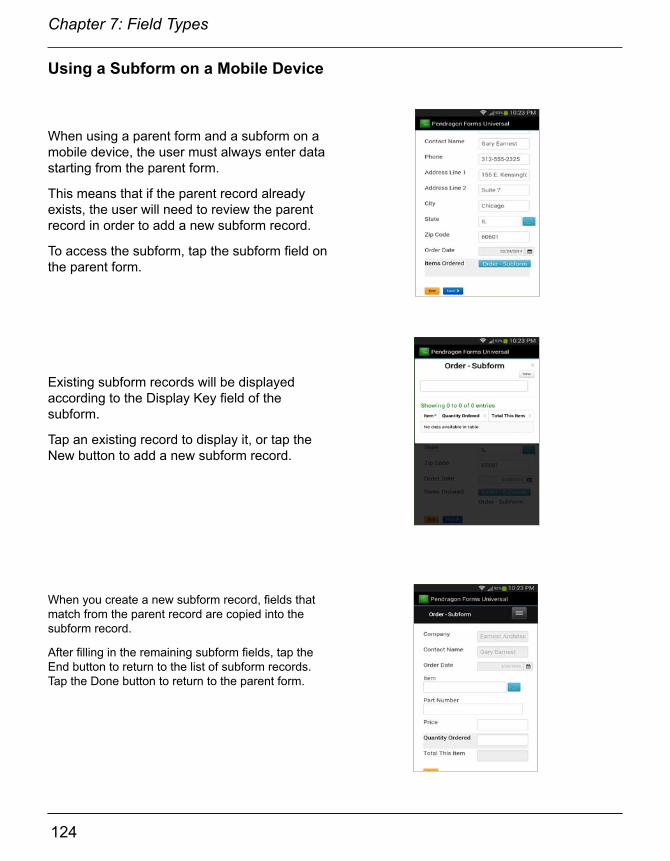
124
Chapter 7: Field Types
125
Chapter 7: Field Types
Using a Subform on a Mobile Device
When using a parent form and a subform on a mobile device, the user must always enter data starting from the parent form.
This means that if the parent record already exists, the user will need to review the parent record in order to add a new subform record.
To access the subform, tap the subform field on the parent form.
Existing subform records will be displayed according to the Display Key field of the subform.
Tap an existing record to display it, or tap the New button to add a new subform record.
When you create a new subform record, fields that match from the parent record are copied into the subform record.
After filling in the remaining subform fields, tap the End button to return to the list of subform records. Tap the Done button to return to the parent form.

124
Chapter 7: Field Types
125
Chapter 7: Field Types
Making a Subform Accessible only via the Parent FormOn the mobile device, it is necessary to enter all data starting from the parent form. By default, however, both the names of the parent form and the subform will be visible on the device.
To make it easier for the mobile device user to use only the parent form, you can choose to a mark a subform so that the user cannot enter new records starting directly from the subform. Or you can hide the subform name from the list of forms entirely.
To mark a form as a subform, or to hide a subform:
1. In the Pendragon Forms Manager, click the name of the subform, then click the Properties button. In the Properties window, click the Advanced Form Properties button.
2. In the Advanced Form Properties window, click the Behavior tab.
• Either: Check the Display as Subform checkbox to mark the form as being a subform. Users will not be able to enter new subform records by going directly into the subform, they will have to enter the parent form first.
• Or: Check the Hide Form in Forms List checkbox so that the subform does not appear in the list of forms on the mobile device.
Troubleshooting Subformsa) If you tap on a subform field and you get a Form Not Found error, check if:
• The subform is not present on the mobile device and needs to be distributed to the device.
• The parent form is referencing the wrong subform name. Click on the name of the parent form in the Pendragon Forms Manager, then click the Edit button to open the Form Designer window. Verify which form the parent form is referencing as the subform. Make corrections and re-distribute the parent.
b) Subform records appear to vanish when reviewed in the parent form.
• This might occur if one of the first 10 fields on the subform accidently matches one of the first 10 fields on the parent without you intending to make that field a matching field. If the user enters different information in that field on the subform, it will break the link to the parent form. The solution is to re-name the field on either the parent or the subform.
c) Data in the parent form is not copying to the subform.
• Only data in the first 10 fields of the parent form will copy to the subform, and only if the field names are identical in spelling and use of upper or lower case and spaces.The field types must also be identical. Correct any mis-matched field names and re-distribute the parent and subform.

126
Chapter 7: Field Types
127
Chapter 7: Field Types
Cascading Completion Checkbox from Parent to Subform
If you have a parent form with several subform records, you might want to have the ability to remove the parent record from the mobile device, and automatically remove all the associated subform records from the mobile device as well. To achieve this, a Completion Checkbox field can be used on both the parent form and the subform.
Other fields only copy from the parent to the subform when a new subform record is created. A Completion Checkbox can cascade from the parent form to already existing subform records. This means that the parent form and subform records can be kept on the mobile device indefinitely, and then at a later date the Completion Checkbox can be checked on the parent record. This value will then be copied to all the related subform records. All records marked as completed are removed from the handheld during synchronization.
Cascading Completion Checkbox Step 1: Create the Parent Form1. First create the parent form. Add a Completion Checkbox field within the first ten
fields of the parent form. In the picture below, Field 5 is the Completion Checkbox field.
2. Also create a Subform List field on the parent form, and type the name of the form that will be used as the subform.

126
Chapter 7: Field Types
127
Chapter 7: Field Types
Cascading Completion Checkbox Step 2: Create the Subform1. Create the subform.
• For the form name, type the exact name referenced by the parent form.
• As with all subforms, one or more fields in the first ten fields must exactly match the field names and field types that you want to copy from the parent form.
• The Completion Checkbox field must NOT be a matching field on the subform.
In the picture below, Field 5 is the Completion Checkbox field on the subform. You can choose to hide the Completion Checkbox field to prevent the mobile device user from accidently checking the box. To hide the field, click on the name of the field in the Preview Area, then click the Visual tab and check the Hidden checkbox.
Cascading Completion Checkbox Step 3: Set Data Persistence optionsFor a Completion Checkbox to work, you must also go to the Data Persistence section of the Form Properties window, and select Keep Incomplete records on the Handheld. (See page 174.) To access the Form Properties window, click on the name of the form in the Pendragon Forms Manager and then click the Properties button.
Set Data Persistence to Keep Incomplete records on the Handheld for both the parent form and the subform. Then freeze and distribute both parent form and subform.
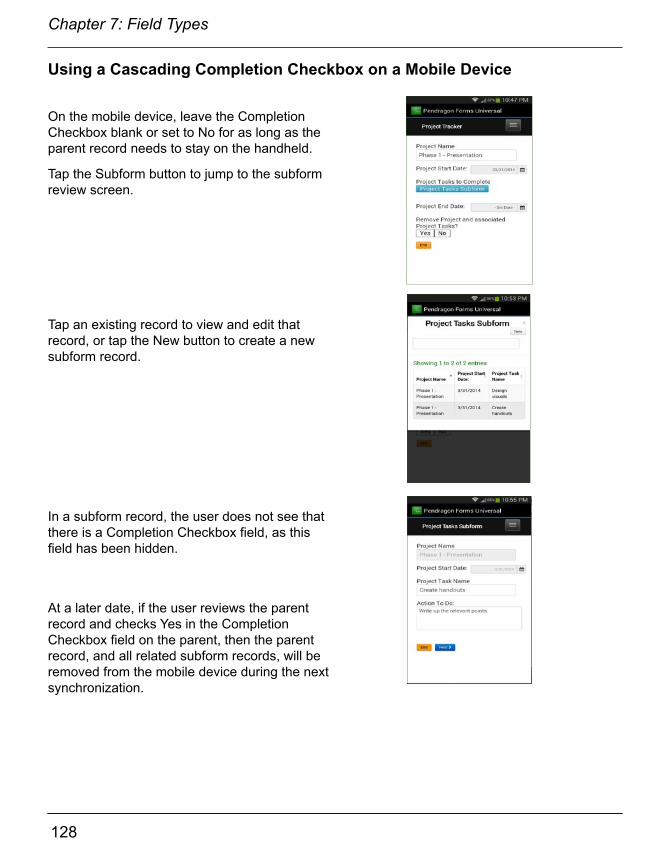
128
Chapter 7: Field Types
129
Chapter 7: Field Types
Using a Cascading Completion Checkbox on a Mobile Device
On the mobile device, leave the Completion Checkbox blank or set to No for as long as the parent record needs to stay on the handheld.
Tap the Subform button to jump to the subform review screen.
Tap an existing record to view and edit that record, or tap the New button to create a new subform record.
At a later date, if the user reviews the parent record and checks Yes in the Completion Checkbox field on the parent, then the parent record, and all related subform records, will be removed from the mobile device during the next synchronization.
In a subform record, the user does not see that there is a Completion Checkbox field, as this field has been hidden.

128
Chapter 7: Field Types
129
Chapter 7: Field Types
Single Subform Field
A Single Subform field is a variation on the regular subform. Whereas you can enter many records in a subform, with a Single Subform you can only enter one record.
A Single Subform offers a way to lengthen a form. The maximum number of fields that you can have on a form is 250 fields (or 100 fields if there are a lot of Text fields on the form). If you need to more than 100 fields, you can split the form into a parent form and one or more single subforms.
All data entry is done from the parent form. A Single Subform field on the parent form allows you to jump to a subform to enter data once, and then return to the parent form.
Single Subform Step 1: Create the Parent Form1. Create the parent form first.
The same rules that apply to subforms apply to single subforms:
• At least one field in the first ten fields on the parent form must be identical in field name and field type on the parent form and on each subform.
• To copy data from the parent form to the single subform, you can make up to the first 10 fields match on both parent and subform.
• A separate database table is created for the parent and each subform.
• On the parent form, create a Single Subform field. In the Subform List section, type the name of the form that will be used as the single subform.
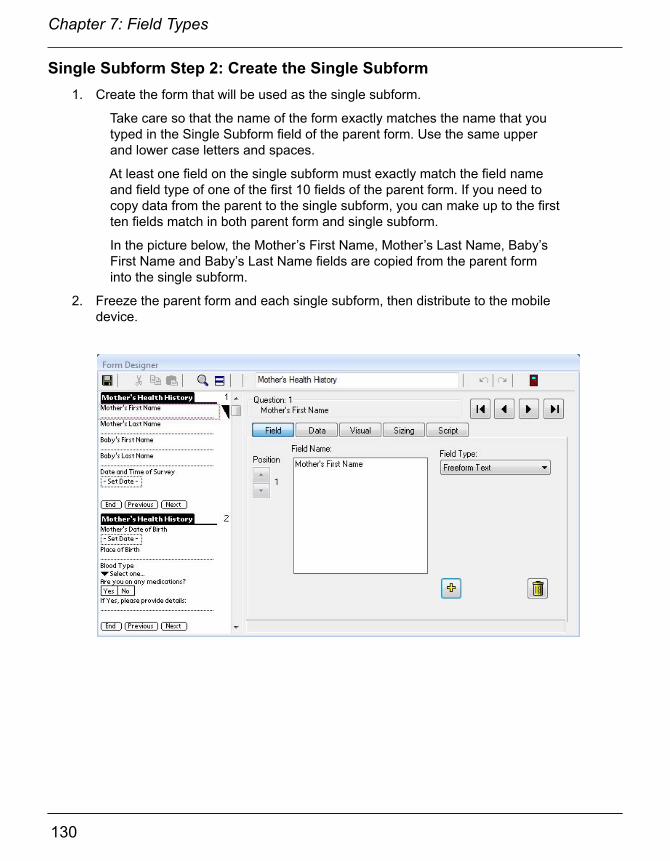
130
Chapter 7: Field Types
131
Chapter 7: Field Types
Single Subform Step 2: Create the Single Subform1. Create the form that will be used as the single subform.
Take care so that the name of the form exactly matches the name that you typed in the Single Subform field of the parent form. Use the same upper and lower case letters and spaces.
At least one field on the single subform must exactly match the field name and field type of one of the first 10 fields of the parent form. If you need to copy data from the parent to the single subform, you can make up to the first ten fields match in both parent form and single subform.
In the picture below, the Mother’s First Name, Mother’s Last Name, Baby’s First Name and Baby’s Last Name fields are copied from the parent form into the single subform.
2. Freeze the parent form and each single subform, then distribute to the mobile device.
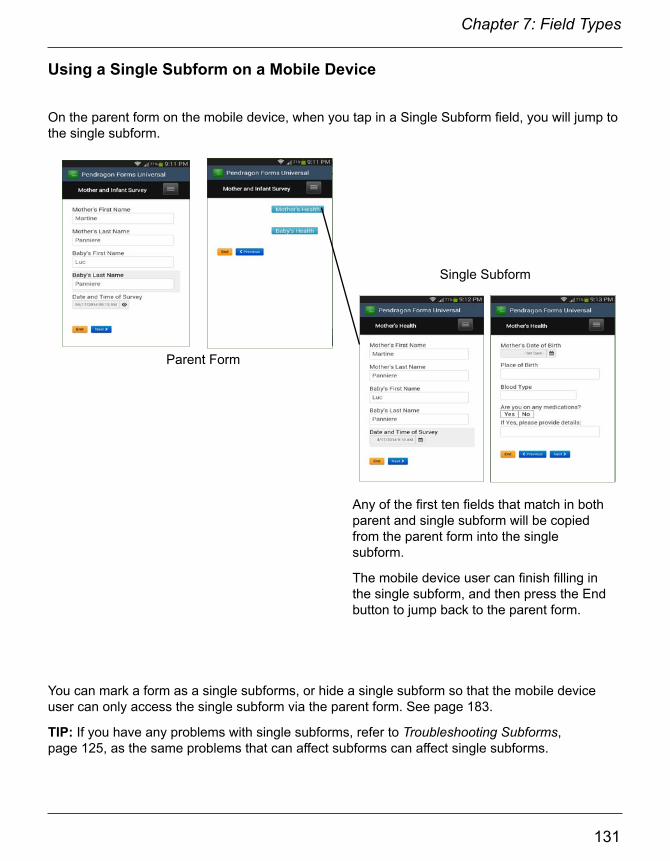
130
Chapter 7: Field Types
131
Chapter 7: Field Types
Using a Single Subform on a Mobile Device
On the parent form on the mobile device, when you tap in a Single Subform field, you will jump to the single subform.
Any of the first ten fields that match in both parent and single subform will be copied from the parent form into the single subform.
The mobile device user can finish filling in the single subform, and then press the End button to jump back to the parent form.
You can mark a form as a single subforms, or hide a single subform so that the mobile device user can only access the single subform via the parent form. See page 183.
TIP: If you have any problems with single subforms, refer to Troubleshooting Subforms, page 125, as the same problems that can affect subforms can affect single subforms.
Parent Form
Single Subform

132
Chapter 7: Field Types
133
Chapter 7: Field Types
Signature Field
A Signature field allows the mobile device user to capture a person's signature.
Signature fields are now available all platforms: Android, iOS, and HTML 5 Web browserplatforms.
• Signature fields are 320 pixels wide x 240 pixels high.
In the Form Designer window, when you select a Signature as the field type, a Legal terms field appears.
• If you want to indicate to the customer that signing implies agreement to certain terms, type the terms in the Legal Terms field.
• If there are no terms to agree to, leave the Legal Terms field blank.
You may need to consult with a legal professional to determine if it is sufficient for you to display legal terms on the mobile device.

132
Chapter 7: Field Types
133
Chapter 7: Field Types
Using a Signature Field on a Mobile Device
On the mobile device, tap the Sign button or tap in the Unsigned box in a Signature field in order to sign.
Sign in the white box. If the signature is satisfactory, tap the OK button. To re-capture the signature, tap the Clear button and then re-sign. Tap OK to save the signature.
To leave this screen without saving any changes, tap Cancel.
If the customer has to read a statement of the terms that are being agreed to, these terms will be displayed. Tap the Agree button to advance to the screen that the customer can sign.
A Signature field displays the message “Signed” if a signature has been entered, and “Unsigned” if the field is blank.

134
Chapter 7: Field Types
135
Chapter 7: Field Types
Viewing a Signature on the PC
After synchronization, each signature is stored as a Long Binary Object in the Pendragon Forms Manager database.
There are two ways to view a signature in the database:
1. Click the name of the form in the Forms Manager database, and then click the Edit/View button to view the records. Signature fields will say Long Binary Data. Double-click in a Long Binary Data cell to open Windows Photo Viewer to view the image. The image can then be saved as a JPEG (.JPG) file if necessary.
OR
2. Click the name of the form in the Forms Manager database. Hold down the CTRL key and click the Edit/View button. This displays an Access form in Form View, showing one record at a time. If you click the Open button next to the signature, you can open Windows Photo Viewer to save the image as a JPEG (.JPG) file if needed.

134
Chapter 7: Field Types
135
Chapter 7: Field Types
Button Field
A Button field allows the mobile device user to click a button in order to perform an action.
Button fields are always used in conjunction with click: event scripts. The click: event determines what happens when the mobile device user taps the button. See Chapter 13, Scripting Examples, page 297-298.
Actions that can be performed using buttons include performing calculations and jumping to subforms.
To add a label to a button, click the Data tab and type a name for the button in the Default Value field. The limit is 11 characters.

136
Chapter 7: Field Types
137
Chapter 7: Field Types
The Scripting tab of the Button field is where you write the click: event script that will run when the mobile device user taps the button. See Chapter 12, Scripting Reference, page 225.
Using a Button Field on a Mobile Device
On a mobile device, tapping a button performs the action associated with the button.
In the example here, the user enters values in all the fields that appear before the button.
Tapping the button labeled ‘Calculate’ performs calculations based on the data that the user has entered.
See page 297 for details on implementing this example.
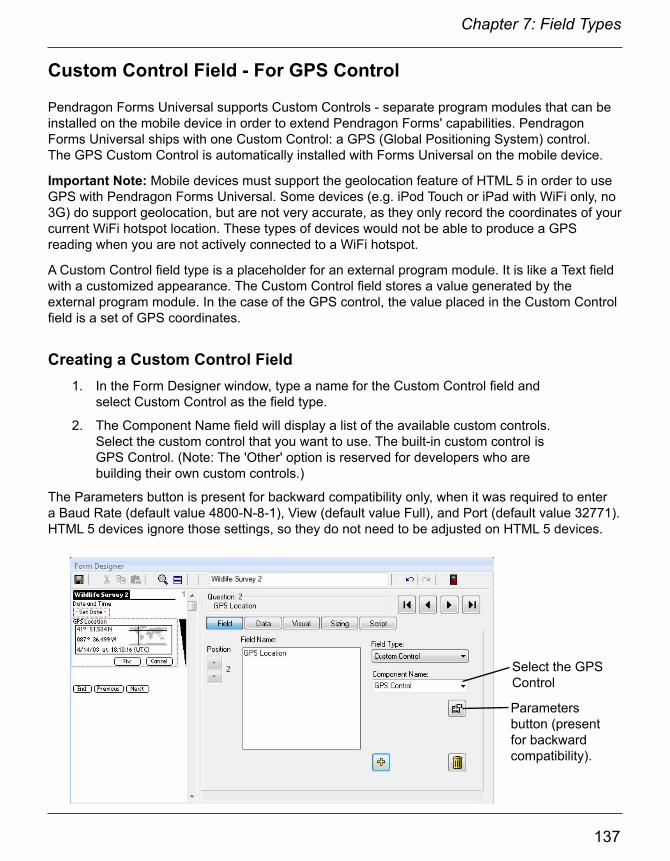
136
Chapter 7: Field Types
137
Chapter 7: Field Types
Custom Control Field - For GPS Control
Pendragon Forms Universal supports Custom Controls - separate program modules that can be installed on the mobile device in order to extend Pendragon Forms' capabilities. Pendragon Forms Universal ships with one Custom Control: a GPS (Global Positioning System) control.The GPS Custom Control is automatically installed with Forms Universal on the mobile device.
Important Note: Mobile devices must support the geolocation feature of HTML 5 in order to use GPS with Pendragon Forms Universal. Some devices (e.g. iPod Touch or iPad with WiFi only, no 3G) do support geolocation, but are not very accurate, as they only record the coordinates of your current WiFi hotspot location. These types of devices would not be able to produce a GPS reading when you are not actively connected to a WiFi hotspot.
A Custom Control field type is a placeholder for an external program module. It is like a Text field with a customized appearance. The Custom Control field stores a value generated by the external program module. In the case of the GPS control, the value placed in the Custom Control field is a set of GPS coordinates.
Creating a Custom Control Field1. In the Form Designer window, type a name for the Custom Control field and
select Custom Control as the field type.
2. The Component Name field will display a list of the available custom controls. Select the custom control that you want to use. The built-in custom control is GPS Control. (Note: The 'Other' option is reserved for developers who are building their own custom controls.)
The Parameters button is present for backward compatibility only, when it was required to enter a Baud Rate (default value 4800-N-8-1), View (default value Full), and Port (default value 32771).HTML 5 devices ignore those settings, so they do not need to be adjusted on HTML 5 devices.
Select the GPS Control
Parametersbutton (present for backward compatibility).

138
Chapter 7: Field Types
139
Chapter 7: Field Types
On the mobile device, tap the Acquire button in a GPS Custom Control field.
Using a GPS Custom Control Field on a Mobile Device
The GPS Custom Control will obtain a reading from the HTML 5 geolocation interface of the device. (On smartphones, the HTML 5 geolocation interface obtains the GPS reading from the GPS receiver in the smartphone.)
Two buttons, Fix and Cancel will be displayed. When you are satisfied that your GPS reading has stabilized, tap the Fix button to save the GPS coordinates into the Custom Control field.
When you tap the Fix button, the GPS Custom Control will store the GPS coordinates of Latitude and Longitude, as well as the Date and Time from the Mobile Device Clock (written in UTC time format) as text in the Custom Control field.
Note that the Date and Time are from the Mobile Device clock, NOT a satellite.
The Acquire button is re-displayed after the coordinates have been saved.
Note: To obtain additional GPS information, such as Altitude, Easting and Northing, it is possible to separate out the GPS information into different fields on your form. See Advanced GPS Features on the next page.
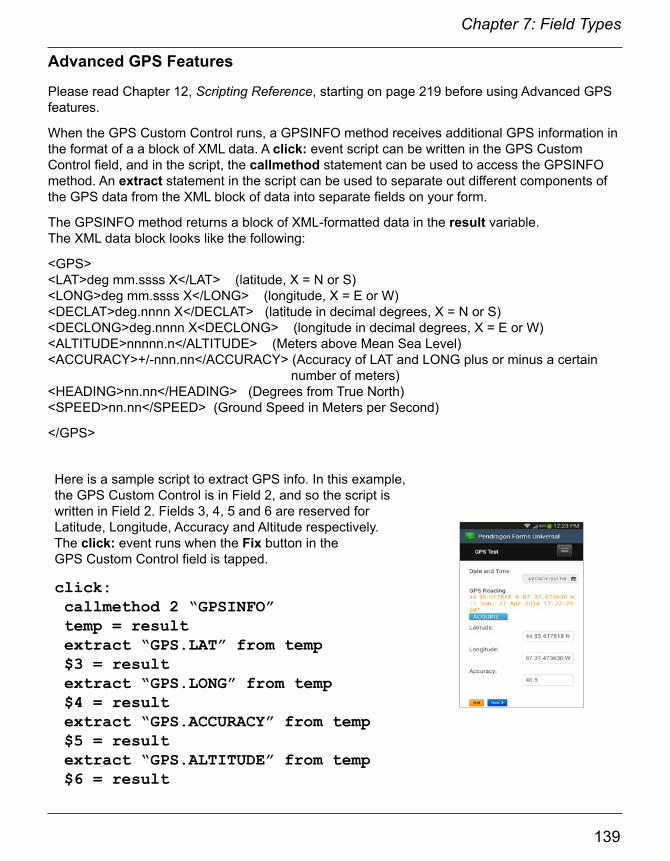
138
Chapter 7: Field Types
139
Chapter 7: Field Types
Advanced GPS Features
Please read Chapter 12, Scripting Reference, starting on page 219 before using Advanced GPS features.
When the GPS Custom Control runs, a GPSINFO method receives additional GPS information in the format of a a block of XML data. A click: event script can be written in the GPS Custom Control field, and in the script, the callmethod statement can be used to access the GPSINFO method. An extract statement in the script can be used to separate out different components of the GPS data from the XML block of data into separate fields on your form.
The GPSINFO method returns a block of XML-formatted data in the result variable. The XML data block looks like the following:
<GPS><LAT>deg mm.ssss X</LAT> (latitude, X = N or S)<LONG>deg mm.ssss X</LONG> (longitude, X = E or W)<DECLAT>deg.nnnn X</DECLAT> (latitude in decimal degrees, X = N or S)<DECLONG>deg.nnnn X<DECLONG> (longitude in decimal degrees, X = E or W)<ALTITUDE>nnnnn.n</ALTITUDE> (Meters above Mean Sea Level)<ACCURACY>+/-nnn.nn</ACCURACY> (Accuracy of LAT and LONG plus or minus a certain number of meters)<HEADING>nn.nn</HEADING> (Degrees from True North)<SPEED>nn.nn</SPEED> (Ground Speed in Meters per Second)
</GPS>
Here is a sample script to extract GPS info. In this example, the GPS Custom Control is in Field 2, and so the script is written in Field 2. Fields 3, 4, 5 and 6 are reserved for Latitude, Longitude, Accuracy and Altitude respectively. The click: event runs when the Fix button in the GPS Custom Control field is tapped.
click: callmethod 2 “GPSINFO” temp = result extract “GPS.LAT” from temp $3 = result extract “GPS.LONG” from temp $4 = result extract “GPS.ACCURACY” from temp $5 = result extract “GPS.ALTITUDE” from temp $6 = result

140
Chapter 7: Field Types
141
Chapter 7: Field Types
Image Field - For Taking Pictures on an Android Device
On Android devices only: Pendragon Forms Universal supports Image fields that allow you to take a picture while in a form on an Android device with a built-in camera, and attach the picture to the record that you are in.
Creating an Image Field1. In the Form Designer window, select Image as the field type.
2. Check the boxes Hi Res and Inline to view a thumbnail of the image in your record after a picture has been taken.
3. On the Sizing tab in the Form Designer, make the answer height as large as possible to be able to view the whole thumbnail image.

140
Chapter 7: Field Types
141
Chapter 7: Field Types
Using an Image Field on an Android Device
An Image field contains two buttons, Take Picture and Clear Image.
Tap the Take Picture button to activate the built-in camera on the Android device. Use the camera’s regular shutter button to take the picture.
You can choose to Discard the image andre-take the picture, or you can choose to Save the picture.
Saving a camera picture will return you to Pendragon Forms Universal, and will display the picture in your record.
If you want to replace the picture, tap the Retake Picture button to return to the camera and take a replacement picture.
If you want to delete the picture and leave the Image field blank, tap the Clear Image button.

142
Chapter 7: Field Types
143
Viewing Images on the PC/ServerAfter the mobile device synchronizes to upload its data to the PC/server, you can view images within the Forms Managaer database.
To view images:
1. Open the Pendragon Forms Manager and click on the name of the form.
2. Click the Edit/View button to view the data for the form. Image fields will contain the words Long Binary Data.
3. Double-click in a Long Binary Data cell to display the image. The image is displayed in a Windows Photo Viewer, and you can choose File...Save if you need to save a separate copy of the image.

142
Chapter 7: Field Types
143
8. Form Designer & Advanced Field Properties
The Form Designer is where you design forms to send to mobile devices. This chapter assumes that you have read the basics of using the Form Designer in Chapter 2 (see page 27).
To open the Form Designer window:
1. Either click the New button in the Pendragon Forms Manager, or click on the name of an existing form and click the Edit button.
The Form Designer Window
Every form must have a Form Name, which is typed into the Form Name field at the top of the Form Designer window.
The Preview Area on the left side of the Form Designer shows which field is currently selected, by displaying a pink dotted-line box around the field. There is also a black triangle to the right of the current field, so if the pink dotted-line box is difficult to see, use the black triangle as your marker for which field is selected.
The five tabs: Field, Data, Visual, Sizing and Script all apply to the selected field.
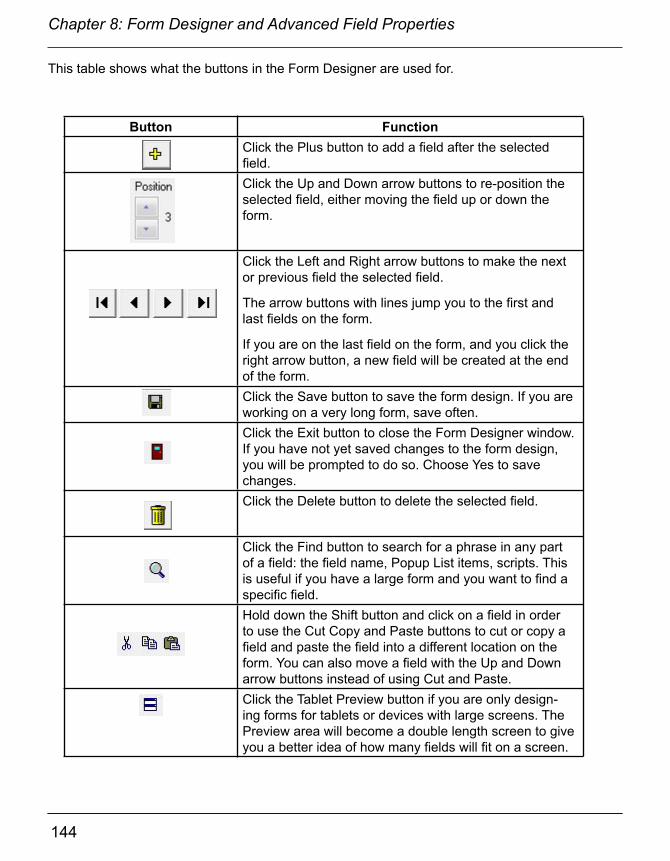
144
Chapter 8: Form Designer and Advanced Field Properties
145
Chapter 8: Form Designer and Advanced Field Properties
This table shows what the buttons in the Form Designer are used for.
Button FunctionClick the Plus button to add a field after the selected field.Click the Up and Down arrow buttons to re-position the selected field, either moving the field up or down the form.
Click the Left and Right arrow buttons to make the next or previous field the selected field.
The arrow buttons with lines jump you to the first and last fields on the form.
If you are on the last field on the form, and you click the right arrow button, a new field will be created at the end of the form.Click the Save button to save the form design. If you are working on a very long form, save often.Click the Exit button to close the Form Designer window. If you have not yet saved changes to the form design, you will be prompted to do so. Choose Yes to save changes.Click the Delete button to delete the selected field.
Click the Find button to search for a phrase in any part of a field: the field name, Popup List items, scripts. This is useful if you have a large form and you want to find a specific field.Hold down the Shift button and click on a field in order to use the Cut Copy and Paste buttons to cut or copy a field and paste the field into a different location on the form. You can also move a field with the Up and Down arrow buttons instead of using Cut and Paste.Click the Tablet Preview button if you are only design-ing forms for tablets or devices with large screens. The Preview area will become a double length screen to give you a better idea of how many fields will fit on a screen.
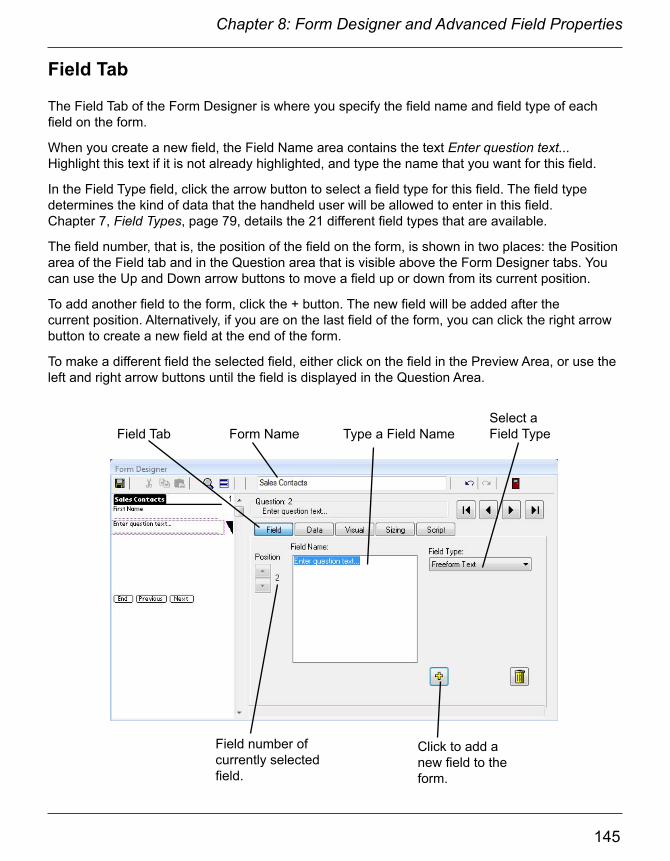
144
Chapter 8: Form Designer and Advanced Field Properties
145
Chapter 8: Form Designer and Advanced Field Properties
Field Tab
The Field Tab of the Form Designer is where you specify the field name and field type of each field on the form.
When you create a new field, the Field Name area contains the text Enter question text...Highlight this text if it is not already highlighted, and type the name that you want for this field.
In the Field Type field, click the arrow button to select a field type for this field. The field type determines the kind of data that the handheld user will be allowed to enter in this field. Chapter 7, Field Types, page 79, details the 21 different field types that are available.
The field number, that is, the position of the field on the form, is shown in two places: the Position area of the Field tab and in the Question area that is visible above the Form Designer tabs. You can use the Up and Down arrow buttons to move a field up or down from its current position.
To add another field to the form, click the + button. The new field will be added after the current position. Alternatively, if you are on the last field of the form, you can click the right arrow button to create a new field at the end of the form.
To make a different field the selected field, either click on the field in the Preview Area, or use the left and right arrow buttons until the field is displayed in the Question Area.
Form Name Type a Field NameSelect aField Type
Field number of currently selected field.
Click to add a new field to the form.
Field Tab
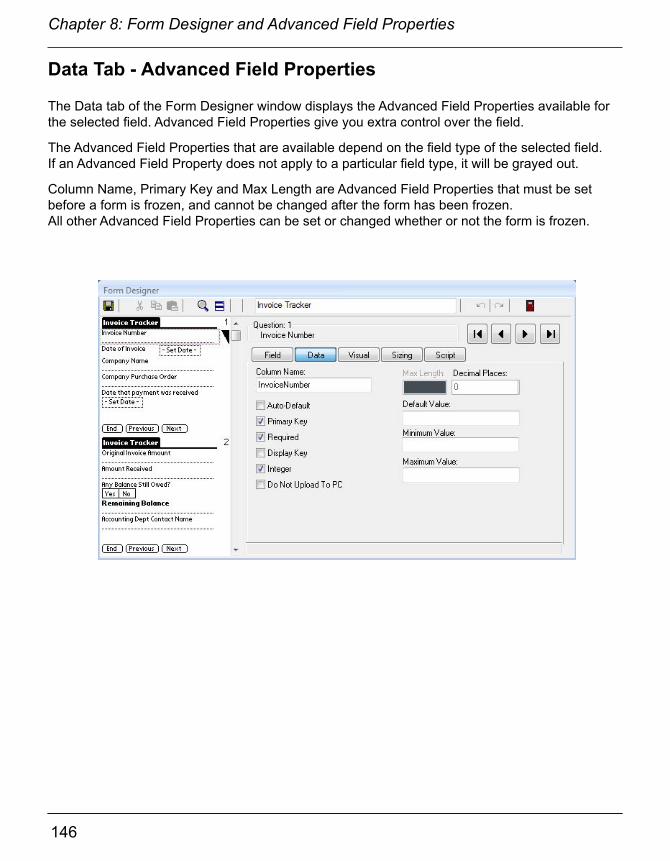
146
Chapter 8: Form Designer and Advanced Field Properties
147
Chapter 8: Form Designer and Advanced Field Properties
Data Tab - Advanced Field Properties
The Data tab of the Form Designer window displays the Advanced Field Properties available for the selected field. Advanced Field Properties give you extra control over the field.
The Advanced Field Properties that are available depend on the field type of the selected field.If an Advanced Field Property does not apply to a particular field type, it will be grayed out.
Column Name, Primary Key and Max Length are Advanced Field Properties that must be set before a form is frozen, and cannot be changed after the form has been frozen. All other Advanced Field Properties can be set or changed whether or not the form is frozen.

146
Chapter 8: Form Designer and Advanced Field Properties
147
Chapter 8: Form Designer and Advanced Field Properties
Data Tab: Column Name
The Column Name on the Data tab of the Form Designer window is the name that the current field will be called in the database table that is created for storing the records for the form design. The database table is created when you freeze the form. You cannot change the column names after the form is frozen, or you will break the ability of the mobile devices to synchronize data to the PC.
• The default is that the Column Name is blank. Then, when you freeze the form design, the Column Name will be based on the name of the field, up to the first 64 characters of the field name. Only alphanumeric characters are used in the Column Name, so spaces and punctuation are ignored. If two fields are identical up to the first 64 characters of the field name, the Column Name will be modified upon freezing the form, so that each database column name is unique. (This is a Microsoft Access requirement.) To view the column names of a frozen form, click on the name of the form and then click the Edit/View button.
• If you prefer to use your own names for the database columns, type a name in the Column Name field. When you freeze the form design, you will be notified if there are any duplicate column names, and if so, you will need to edit the form so that each database column name is unique.
• If you copy a frozen form, the column names from the original form will be retained to make it easier to import data from the original form. If you re-name fields on the form, delete the old column name for each field before freezing the form, so that the new column names will be based on the new names of the fields.
• If you are linking to an external Access database (see page 345), the purpose of field-mapping is to ensure that the Column Name used in Pendragon Forms matches a column name in your external Access database. Without this match, data from mobile devices cannot synchronize to your external Access database.
• Applies to: All fields.
Column names in the database table for a given form are based on the field names in that form.

148
Chapter 8: Form Designer and Advanced Field Properties
149
Chapter 8: Form Designer and Advanced Field Properties
Data Tab: Auto-Default
Turning Auto-Default on means that when the mobile device user creates a new record, any field with Auto-Default on will be filled in with the same value from the previous record entered.
• The Auto-Default option is primarily a time-saving device. You can override the value entered in the field at any time. If you change the value for one record, that value becomes the new autodefault the next time the form is filled in.
• Auto-Default fields default to the last value typed into the field or to the last value set by a script.
• Auto-Default values are not retained if the form is re-distributed from the PC, or if the Forms application is re-installed on the mobile device. In these cases, the mobile device user will have to fill in a new record in order to re-set the Auto-Default values.
• Auto-Default does not work within the fields of a subform.
• Applies to: Text, Numeric, Currency, Yes/No Checkbox, Popup List, Multi-Selection List, Lookup List, Exclusive Lookup List, Option 1-5, Date, Date&Time, Time.
The pictures above show a simple inventory form in which the mobile device user is recording inventory a room at a time. The Date, Building Location, Floor and Room Number all have Auto-Default switched on, so that after the user enters the first record, all subsequent records will keep the same values for these fields. The user can keep these values until the entire room has been inventoried, and then change the values when starting on a new room.
Item Count is a Numeric field which also has the Auto-Default option switched on. A script in the field increments the value by one for each new record, so that the count goes up with each new item. See page 286 for the script required to make a counter.
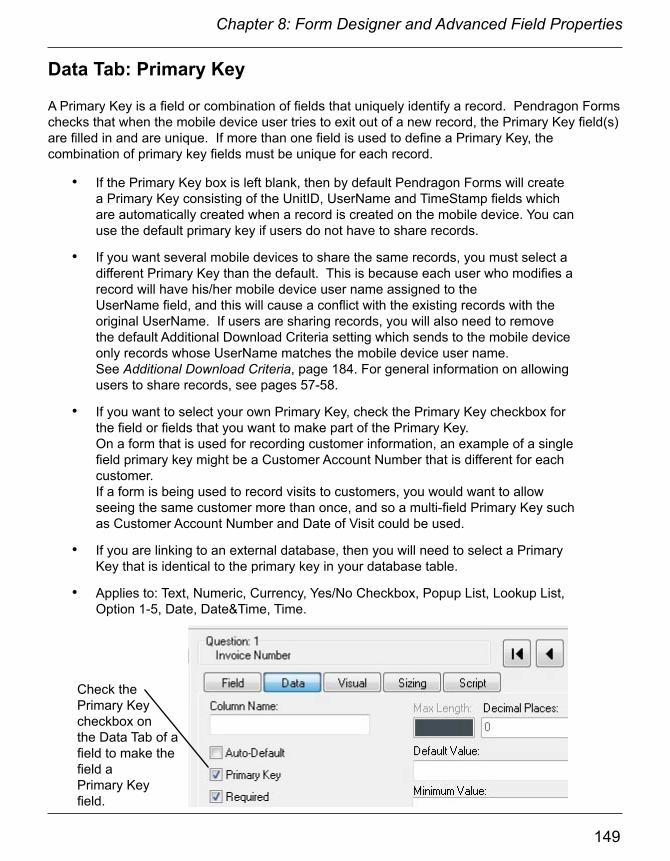
148
Chapter 8: Form Designer and Advanced Field Properties
149
Chapter 8: Form Designer and Advanced Field Properties
Data Tab: Primary Key
A Primary Key is a field or combination of fields that uniquely identify a record. Pendragon Forms checks that when the mobile device user tries to exit out of a new record, the Primary Key field(s) are filled in and are unique. If more than one field is used to define a Primary Key, the combination of primary key fields must be unique for each record.
• If the Primary Key box is left blank, then by default Pendragon Forms will create a Primary Key consisting of the UnitID, UserName and TimeStamp fields which are automatically created when a record is created on the mobile device. You can use the default primary key if users do not have to share records.
• If you want several mobile devices to share the same records, you must select a different Primary Key than the default. This is because each user who modifies a record will have his/her mobile device user name assigned to the UserName field, and this will cause a conflict with the existing records with the original UserName. If users are sharing records, you will also need to remove the default Additional Download Criteria setting which sends to the mobile device only records whose UserName matches the mobile device user name. See Additional Download Criteria, page 184. For general information on allowing users to share records, see pages 57-58.
• If you want to select your own Primary Key, check the Primary Key checkbox for the field or fields that you want to make part of the Primary Key. On a form that is used for recording customer information, an example of a single field primary key might be a Customer Account Number that is different for each customer. If a form is being used to record visits to customers, you would want to allow seeing the same customer more than once, and so a multi-field Primary Key such as Customer Account Number and Date of Visit could be used.
• If you are linking to an external database, then you will need to select a Primary Key that is identical to the primary key in your database table.
• Applies to: Text, Numeric, Currency, Yes/No Checkbox, Popup List, Lookup List, Option 1-5, Date, Date&Time, Time.
Check the Primary Key checkbox on the Data Tab of a field to make the field a Primary Key field.
150
Chapter 8: Form Designer and Advanced Field Properties
151
Chapter 8: Form Designer and Advanced Field Properties
Data Tab: Required
A Required field is a field that the mobile device user must fill in and cannot leave blank. You may want to make certain fields on your form required fields to ensure that the user enters a response.
Note that requiring a user to fill in a field does not mean that the user will fill in correct data, it just means that the field will not be left blank.
Important: If a user does not fill in required fields, and then tries to end the record, they will be prompted to either go back and fill in the required fields, or delete the record if they do not wish to fill in the required fields. If you want to allow a user to leave certain fields blank, do not make them required fields.
• On the Data tab of the Form Designer window, check the Required checkbox to make the selected field a required field.
• The default is that when the user exits a new record on the mobile device, the Forms Universal program will alert the user if any required fields have not yet been filled in. The record cannot be exited until all required fields are filled in. The problem with this default is that the user does not receive any warnings until the very end of the form.
• You can change the default so that when the user moves off a screen containing a required field, the warning message is displayed immediately if the required field is empty. This may be more convenient for the user than waiting until the end of the form to perform the check. To change this default, set the Advanced Form Property of Screen Level Validation - see page 182.
• A script can be used to make a required field optional or an optional field required. See Chapter 2, Scripting Reference, pages 262-263.
• If a field is made a Primary Key field (see previous page), it it also automatically made a Required field, because Primary Key fields cannot be left blank.
• Applies to: Text, Numeric, Yes/No Checkbox, Popup List, Lookup List, Exclusive Lookup List, Option 1-5, Date, Date&Time, Time, Signature, Time Checkbox.

150
Chapter 8: Form Designer and Advanced Field Properties
151
Chapter 8: Form Designer and Advanced Field Properties
Data Tab: Display Key
The Display Key is used to display records on the mobile device. When the user chooses to review records on the mobile device, a list of existing records is displayed on the device. The contents of the Display Key field of each record is shown in the first Review screen column on the mobile device.
• If the Display Key checkbox is left blank, the default is that the first field on the form is used as the Display Key field.
• Only one field can be the Display Key field. The first field on the form with the Display Key checkbox checked will be the Display Key.
• The Display Key field should be a field which is unique for each record. For example, a Text field or a Date field are good fields to use as Display Key fields. A Popup List or a Yes/No checkbox are less appropriate as Display Key fields, because several records can have the same value.
• When using subforms, you can make the Display Key on the subform different from the Display Key on the parent form. For example, the Display Key on the parent form might be ‘Customer Name’, and the Display Key on the subform might be ‘Date of Visit’. Selecting a given customer, and jumping to the subform, displays a list of all visits.
• Applies to: Text, Numeric, Currency, Yes/No Checkbox, Popup, Lookup List, Option 1-5, Date, Date&Time, Time.

152
Chapter 8: Form Designer and Advanced Field Properties
153
Chapter 8: Form Designer and Advanced Field Properties
Data Tab: Default Value
A default value is a value that will be filled in if the mobile device user does not fill in a field.
For example, in a Yes/No checkbox field, if the user leaves the field blank, then the data that goes back to the PC is a null value - blank. If you want to change things so that leaving a Yes/No checkbox blank is the same as responding No, you can enter a default value of N.
• Type a value in the Default Value field if you want a default to apply to the selected field.
• For a Yes/No field, type Y to default to Yes, or type N to default to No. In a Popup or Lookup List field, type one of the options that appears in the list.
• Date Only and Date & Time fields can only be made to default to a specific date or date and time, not the current date and time. Enter the date in the Short Date format setting that you are using in Windows. For example, to default to September 25th 2014, you can enter 09/25/2014 into the Default Value field. To default to the current date or current date&time, see Chapter 13, Scripting Examples, page 287
• To make a Time field default to a specific time, you need to enter a date as well as a time. For instance, to default to 9:00AM, you will need to enter something like 01/01/2009 9:00 AM. To default to the current time, see Scripting Examples, page 287.
• The Default Value field has special meaning on a Button field. Typing a word into the Default Value field creates the label on the button. You can enter up to 11 characters for the name of a button.
• When you exit the Form Designer, a check will be performed to ensure that the default value that you entered is valid. For example, you cannot enter a default of Other in a Yes/No field, or a default of Purple in a popup field whose options are Red, Green, Blue.
• Applies to: Text, Numeric, Currency, Yes/No Checkbox, Popup List, Lookup List, Exclusive Lookup List, Option 1-5, Date, Date&Time, Time.
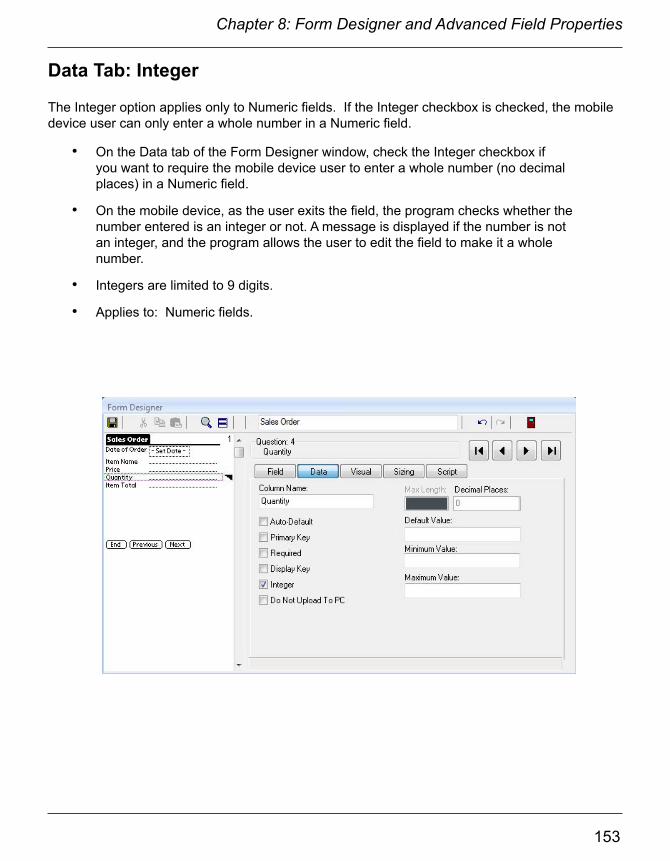
152
Chapter 8: Form Designer and Advanced Field Properties
153
Chapter 8: Form Designer and Advanced Field Properties
Data Tab: Integer
The Integer option applies only to Numeric fields. If the Integer checkbox is checked, the mobile device user can only enter a whole number in a Numeric field.
• On the Data tab of the Form Designer window, check the Integer checkbox if you want to require the mobile device user to enter a whole number (no decimal places) in a Numeric field.
• On the mobile device, as the user exits the field, the program checks whether the number entered is an integer or not. A message is displayed if the number is not an integer, and the program allows the user to edit the field to make it a whole number.
• Integers are limited to 9 digits.
• Applies to: Numeric fields.
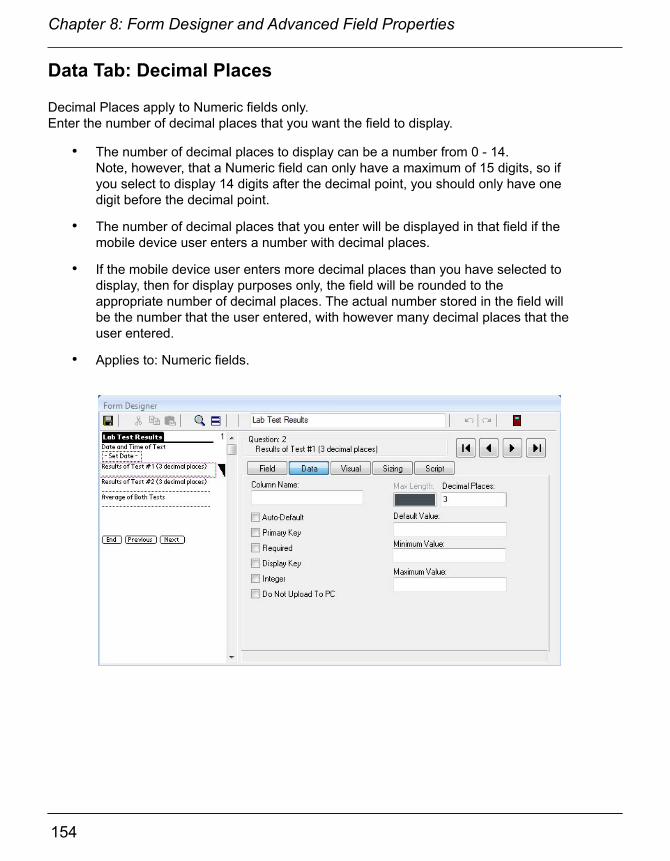
154
Chapter 8: Form Designer and Advanced Field Properties
155
Chapter 8: Form Designer and Advanced Field Properties
Data Tab: Decimal Places
Decimal Places apply to Numeric fields only. Enter the number of decimal places that you want the field to display.
• The number of decimal places to display can be a number from 0 - 14.Note, however, that a Numeric field can only have a maximum of 15 digits, so if you select to display 14 digits after the decimal point, you should only have one digit before the decimal point.
• The number of decimal places that you enter will be displayed in that field if the mobile device user enters a number with decimal places.
• If the mobile device user enters more decimal places than you have selected to display, then for display purposes only, the field will be rounded to the appropriate number of decimal places. The actual number stored in the field will be the number that the user entered, with however many decimal places that the user entered.
• Applies to: Numeric fields.
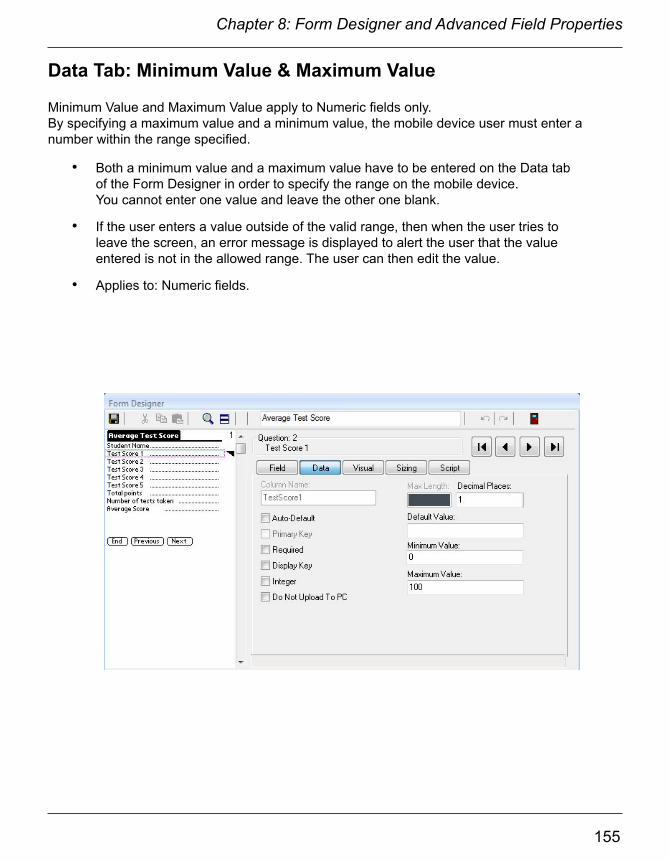
154
Chapter 8: Form Designer and Advanced Field Properties
155
Chapter 8: Form Designer and Advanced Field Properties
Data Tab: Minimum Value & Maximum Value
Minimum Value and Maximum Value apply to Numeric fields only. By specifying a maximum value and a minimum value, the mobile device user must enter a number within the range specified.
• Both a minimum value and a maximum value have to be entered on the Data tab of the Form Designer in order to specify the range on the mobile device. You cannot enter one value and leave the other one blank.
• If the user enters a value outside of the valid range, then when the user tries to leave the screen, an error message is displayed to alert the user that the value entered is not in the allowed range. The user can then edit the value.
• Applies to: Numeric fields.

156
Chapter 8: Form Designer and Advanced Field Properties
157
Chapter 8: Form Designer and Advanced Field Properties
Data Tab: Max Length
The Maximum Length only applies to Text fields.
• By default, the maximum length of a response in a Text field is 255 characters. This is the maximum length allowable in Microsoft Access for a text field which can be sorted.
• You can change the maximum length to a number of characters from 1 to 2000, if you need to allow a shorter or longer response in the field. (Access is very efficient at storing data, so if you do not need long responses, leave the default at 255.) If you change the length of a Text field to more than 255 characters, internally Microsoft Access will store the response as a Memo field which cannot be sorted on the PC.
• When you freeze a form design, a database table is created in the Pendragon Forms Manager for storing the records associated with your form. Each field on your form corresponds to a column in the database table. If you set a Max Length on a Text field, then when you freeze the form, that column will freeze with the specified maximum number of characters. This means that once a form is frozen, you cannot make the Max Length any larger. If you make the Max Length smaller, the database column will not get any smaller, but the mobile device will allow only the smaller number of characters to be entered.
• Applies to: Text fields and Lookup List fields (since the mobile device user can enter text in a Lookup List field).

156
Chapter 8: Form Designer and Advanced Field Properties
157
Chapter 8: Form Designer and Advanced Field Properties
Data Tab: Pattern
Pattern applies to Text fields. You can specify that the mobile device user must enter characters of a certain type.
• Possible character patterns include Alpha characters only, Alphanumeric, Digits only, Printable characters (i.e.: no Tabs or carriage returns), Uppercase or Lowercase.
• If you choose a pattern of Alpha, Alphanumeric or Digits, and the mobile device user enters characters which do not conform to the pattern, a dialog box will warn the user that the text pattern is not valid. Ideally, in your field name you should inform the user of the text pattern that you expect to be entered.
• If you choose Uppercase or Lowercase as the pattern, data entered into the Text field will be converted to upper or lower case as necessary, after the user leaves the field..
• Note that if you specify a character pattern, no characters outside that pattern will be allowed. For example, if you specify Digits only, the user can enter 1234567 but not 123-4567, not 1234.567 and not 123 4567.
• Applies to: Text fields only.
158
Chapter 8: Form Designer and Advanced Field Properties
159
Chapter 8: Form Designer and Advanced Field Properties
Data Tab: Do Not Upload to PC
The Do Not Upload to PC option allows you to choose not to upload data from the mobile device to the PC for the selected field.
• To mark a field as non-uploadable to the PC, check the Do Not Upload to PC checkbox on the Data tab of the Form Designer window.
• You may choose not to upload data for a field if, for example, you are linking to an external Access database that has an AutoNumber field that will be generated on the desktop. A number that is generated on the mobile device in this field does not need to be sent to the PC.
• If there are fields that you want to only be able to update on the PC, you can make these fields non-uploadable. For example, imagine that you have an Appointment Time field into which you enter 9:00am on the PC, and then send the record to the mobile device. Back at the office, the customer calls to change the time to 9:30am. If the mobile device user modifies the record and synchronizes, the old appointment time of 9:00am will be uploaded to the PC. To prevent the mobile device from overwriting the PC in this field, the Appointment Time field can be made non-uploadable.
• You may not want to upload fields that contain calculated results that the desktop PC will calculate.
• Applies to: All fields.

158
Chapter 8: Form Designer and Advanced Field Properties
159
Chapter 8: Form Designer and Advanced Field Properties
Visual Tab
The Visual Tab in the Form Designer window displays various attributes that affect how the field appears visually on the mobile device.
Visual Tab: Making a Field start on a New Screen
When you add a field to a form, if the field can fit on the current screen, the Form Designer will just add the field to the current screen.
In some instances, it is helpful for a group of similar questions to start on a new screen.
• To make a field start on a new screen, click the Visual tab for that field and check the Start Next Screen checkbox.
• In the Caption field, you have the option of typing a new header, so that the new screen has a different header on the mobile device screen. If you leave the Caption field blank, the form name will be used as the default header.
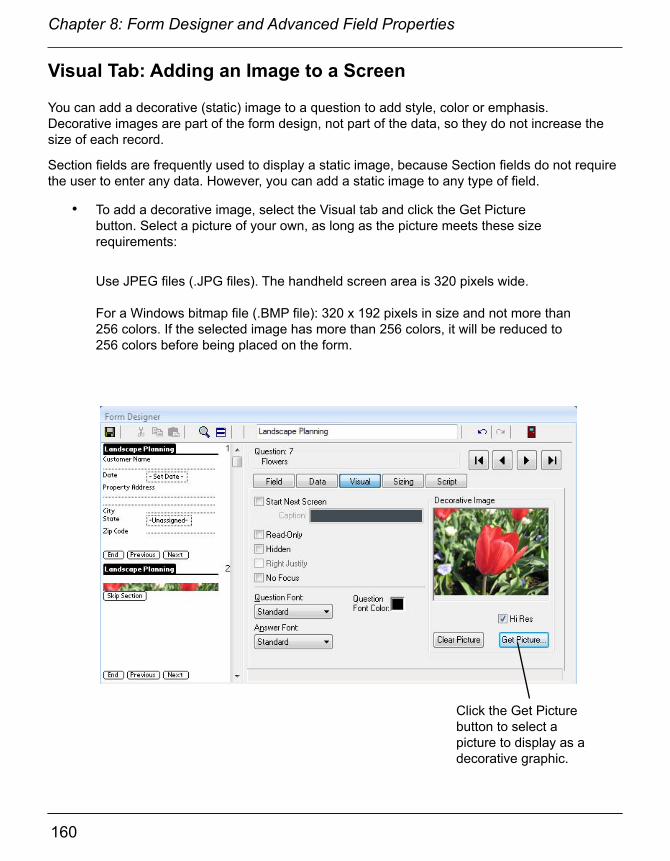
160
Chapter 8: Form Designer and Advanced Field Properties
161
Chapter 8: Form Designer and Advanced Field Properties
Visual Tab: Adding an Image to a Screen
You can add a decorative (static) image to a question to add style, color or emphasis. Decorative images are part of the form design, not part of the data, so they do not increase the size of each record.
Section fields are frequently used to display a static image, because Section fields do not require the user to enter any data. However, you can add a static image to any type of field.
• To add a decorative image, select the Visual tab and click the Get Picture button. Select a picture of your own, as long as the picture meets these size requirements:
Use JPEG files (.JPG files). The handheld screen area is 320 pixels wide.
For a Windows bitmap file (.BMP file): 320 x 192 pixels in size and not more than 256 colors. If the selected image has more than 256 colors, it will be reduced to 256 colors before being placed on the form.
Click the Get Picture button to select a picture to display as a decorative graphic.

160
Chapter 8: Form Designer and Advanced Field Properties
161
Chapter 8: Form Designer and Advanced Field Properties
• On the Sizing tab of the field, make the Question Height bigger so that you can see all of the picture. The field name of the field appears below the picture.
• If you want to hide the field name, and just have the picture visible, adjust the Question Height accordingly.
• For Section fields, you can adjust the Answer Height to zero to hide the Section Skip button.

162
Chapter 8: Form Designer and Advanced Field Properties
163
Chapter 8: Form Designer and Advanced Field Properties
Visual Tab: Changing Font Size and Color
You can change the font of the question or answer component of a field on the Visual tab of the Form Designer.
• Available choices are: Standard font, Bold, Large or Large and Bold.
• The Question Font field controls the font for the field name or question.
• The Answer Font field controls the font for the answer, that is, the mobile device user's response.
• If you change font sizes for questions and answers, you will be able to fit fewer fields on a screen.
When you select font options, it is assumed that you want to continue with these options, and so new fields that are created will have to same font options set. If you only intended one field to have different fonts, change the font options back to Standard on the next field.
In the example shown below, the field name (question font) is set to Bold.
You can change a Question Font to Bold.

162
Chapter 8: Form Designer and Advanced Field Properties
163
Chapter 8: Form Designer and Advanced Field Properties
Question fonts can also be a color other than black. Answer fonts can only be black.
• To change the question font color, click in the Question Font Color field to display a color palette. To choose a basic color, click on the color in the Basic colors section, then click OK.
• Avoid using light colors for the question font color, as they may be hard to read on the mobile device.
• The current field, plus any subsequent new fields, will have the question font in the selected color. If you only want one field to be in a different color, choose black as the question font color of the next field.
• If you do not like your font size or color, you can go back and change fonts even after a form is frozen. Re-distribute your form and synchronize the mobile device for the changes to take effect.
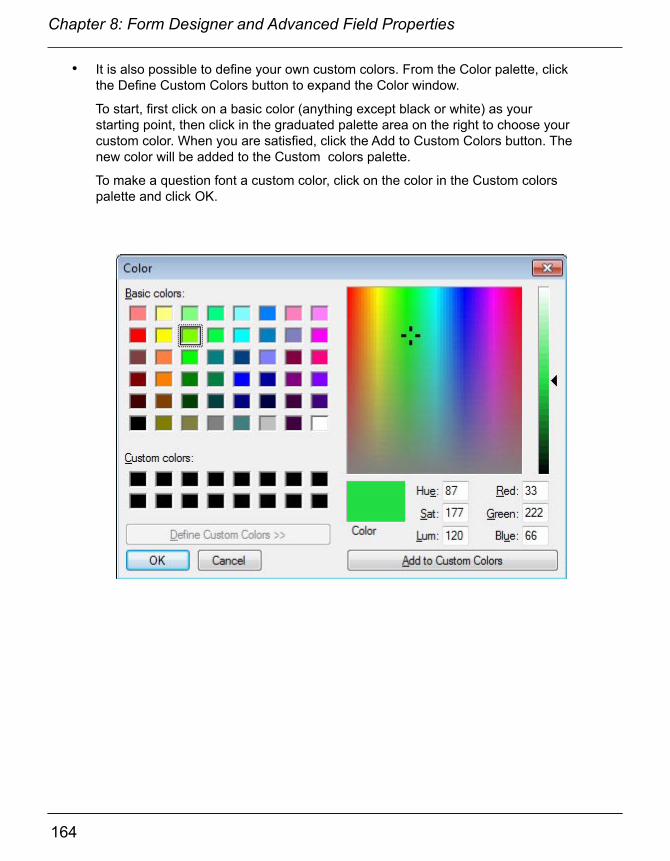
164
Chapter 8: Form Designer and Advanced Field Properties
165
Chapter 8: Form Designer and Advanced Field Properties
• It is also possible to define your own custom colors. From the Color palette, click the Define Custom Colors button to expand the Color window.
To start, first click on a basic color (anything except black or white) as your starting point, then click in the graduated palette area on the right to choose your custom color. When you are satisfied, click the Add to Custom Colors button. The new color will be added to the Custom colors palette.
To make a question font a custom color, click on the color in the Custom colors palette and click OK.

164
Chapter 8: Form Designer and Advanced Field Properties
165
Chapter 8: Form Designer and Advanced Field Properties
Visual Tab: Right-Justifying Numeric and Currency Fields
(May not be implemented in Forms Universal.)
If you have Numeric and Currency fields on your form, you can right-justify the answer field. This is especially useful in Currency fields where the decimal points will line up vertically.
• For each field that you want to right-justify, click the Visual tab and check the

166
Chapter 8: Form Designer and Advanced Field Properties
167
Chapter 8: Form Designer and Advanced Field Properties
Visual Tab: Hidden Fields
If some questions on your form do not apply to everyone filling in the form, you can choose to hide these fields, and then use a script to show the fields under certain conditions.
• To make a field hidden, click the Visual tab for that field and check the Hidden checkbox.
Refer to Chapter 12, Scripting Reference, pages 254 and 272, and Chapter 13, Scripting Examples, page 290, for information on how to write a script to display a hidden field.
Pendragon Forms reserves the on-screen space of a Hidden field, even though the field is not visible. The Preview Area of the Form Designer reflects this by showing the Hidden field as grayed out. If the Hidden field is made visible, it will occupy the same space as seen in the Preview Area.
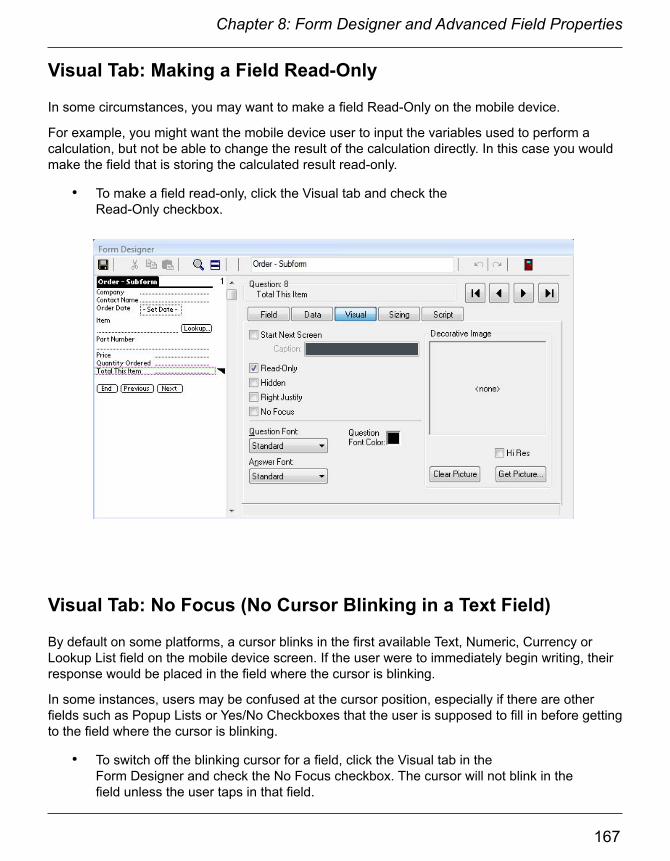
166
Chapter 8: Form Designer and Advanced Field Properties
167
Chapter 8: Form Designer and Advanced Field Properties
Visual Tab: Making a Field Read-Only
In some circumstances, you may want to make a field Read-Only on the mobile device.
For example, you might want the mobile device user to input the variables used to perform a calculation, but not be able to change the result of the calculation directly. In this case you would make the field that is storing the calculated result read-only.
• To make a field read-only, click the Visual tab and check the Read-Only checkbox.
Visual Tab: No Focus (No Cursor Blinking in a Text Field)
By default on some platforms, a cursor blinks in the first available Text, Numeric, Currency or Lookup List field on the mobile device screen. If the user were to immediately begin writing, their response would be placed in the field where the cursor is blinking.
In some instances, users may be confused at the cursor position, especially if there are other fields such as Popup Lists or Yes/No Checkboxes that the user is supposed to fill in before getting to the field where the cursor is blinking.
• To switch off the blinking cursor for a field, click the Visual tab in the Form Designer and check the No Focus checkbox. The cursor will not blink in the field unless the user taps in that field.
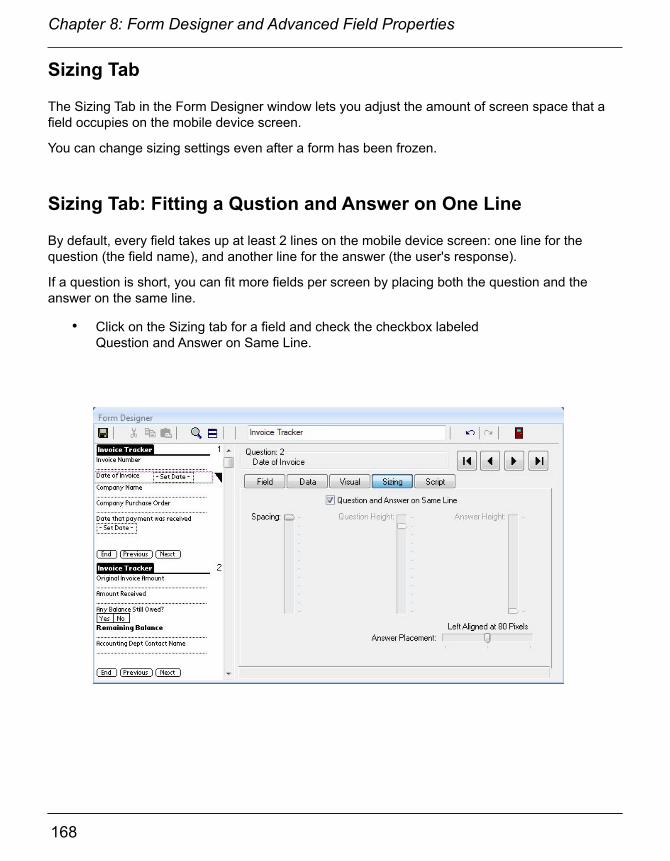
168
Chapter 8: Form Designer and Advanced Field Properties
169
Chapter 8: Form Designer and Advanced Field Properties
Sizing Tab
The Sizing Tab in the Form Designer window lets you adjust the amount of screen space that a field occupies on the mobile device screen.
You can change sizing settings even after a form has been frozen.
Sizing Tab: Fitting a Qustion and Answer on One Line
By default, every field takes up at least 2 lines on the mobile device screen: one line for the question (the field name), and another line for the answer (the user's response).
If a question is short, you can fit more fields per screen by placing both the question and the answer on the same line.
• Click on the Sizing tab for a field and check the checkbox labeled Question and Answer on Same Line.
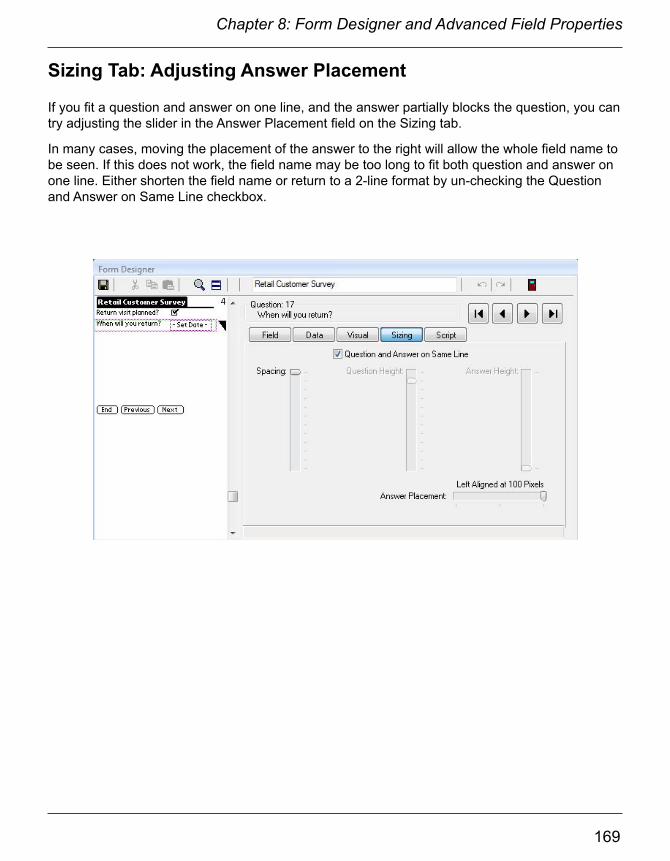
168
Chapter 8: Form Designer and Advanced Field Properties
169
Chapter 8: Form Designer and Advanced Field Properties
Sizing Tab: Adjusting Answer Placement
If you fit a question and answer on one line, and the answer partially blocks the question, you can try adjusting the slider in the Answer Placement field on the Sizing tab.
In many cases, moving the placement of the answer to the right will allow the whole field name to be seen. If this does not work, the field name may be too long to fit both question and answer on one line. Either shorten the field name or return to a 2-line format by un-checking the Question and Answer on Same Line checkbox.

170
Chapter 8: Form Designer and Advanced Field Properties
171
Chapter 8: Form Designer and Advanced Field Properties
Sizing Tab: Sizing Question and Answer Heights
The Spacing, Question Height and Answer Height sliders are used to adjust the amount of space before the question, and the amount of space used by the question and the answer, respectively. The Question and Answer Height sliders are available if a field takes up more than one line.
In the example shown here, a Section field is the only field on a screen, so space is added before the question by adjusting the Spacing slider. That way, the question is not too close to the top of the screen.

170
Chapter 8: Form Designer and Advanced Field Properties
171
Chapter 8: Form Designer and Advanced Field Properties
With some fields, such as Date fields and Date & Time fields, it may not be necessary to give the mobile device user instructions via the field name. In this case, you can make the Question Height zero.
In rare cases, you may want to make both the question height and the answer height zero, so that the field does not appear on the mobile device screen at all. This is different from making a field Hidden (see page 166), because hidden fields still use up space on screen. You may want to have a field with zero height to store a partial calculation, or for use in linking to another form. The Preview Area in the Form Designer shows the zero-height field as a red line. To display a zero-height field, use the Left and Right arrow buttons until the field is displayed.

172
Chapter 8: Form Designer and Advanced Field Properties
173
Script Tab
The Script tab of the Form Designer is where you can write a script in a given field. A script performs an action, such as jumping the user to a particular field, or performing a calculation based on data the user has entered in various fields.
Chapter 12, Scripting Reference, starting on page 219, provides information on the types of scripts you can write.
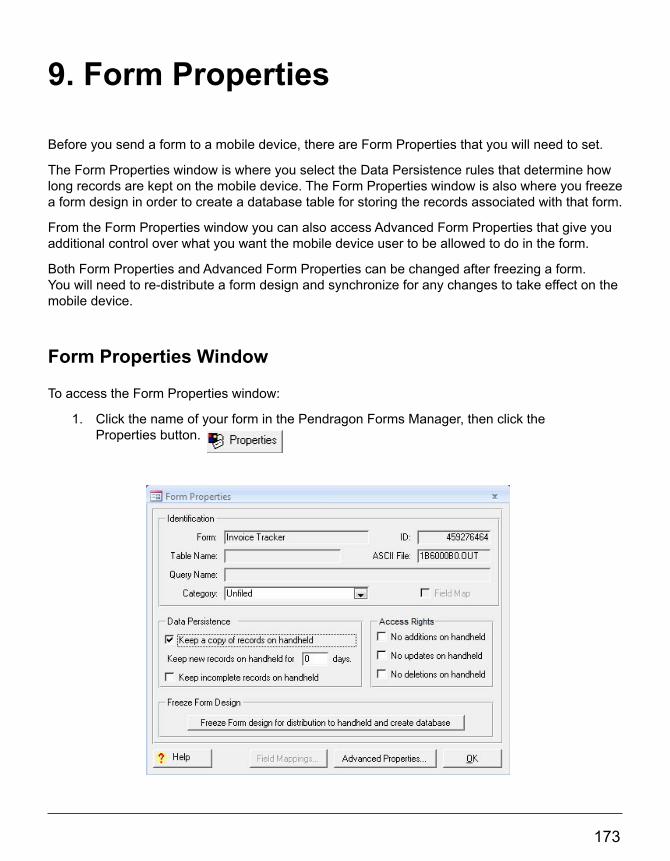
172
Chapter 8: Form Designer and Advanced Field Properties
173
9. Form Properties
Before you send a form to a mobile device, there are Form Properties that you will need to set.
The Form Properties window is where you select the Data Persistence rules that determine how long records are kept on the mobile device. The Form Properties window is also where you freeze a form design in order to create a database table for storing the records associated with that form.
From the Form Properties window you can also access Advanced Form Properties that give you additional control over what you want the mobile device user to be allowed to do in the form.
Both Form Properties and Advanced Form Properties can be changed after freezing a form. You will need to re-distribute a form design and synchronize for any changes to take effect on the mobile device.
Form Properties Window
To access the Form Properties window:
1. Click the name of your form in the Pendragon Forms Manager, then click the Properties button.

174
Chapter 9: Form Properties
175
Chapter 9: Form Properties
Data Persistence
The Data Persistence section of the Form Properties screen allows you to choose how long records remain on the mobile device.
You can change Data Persistence options if needed. Re-distribute the form and synchronize for the changes to take effect on the mobile device.
The Data Persistence options are described here:
Data Persistence Option MeaningDefault option - No checkboxes checked Records are removed from the mobile device
during synchronization.
Keep a Copy of Records on Handheld
Records remain on the handheld (mobile device) after synchronization.
Checking this box overrides the other data persistence options.
If you are linking to an external Access database, you must check this option, and use the Advanced Form Property of Additional Download Criteria to control which records remain on the handheld. See pages 184-188.
Keep New Records on Handheld for X Days
If you leave the Keep a Copy of Records on Handheld checkbox blank, and instead enter a number of days, then after synchronization, records will continue to be stored on the handheld (mobile device) for that number of days.
The number X can be from 0 to 999.
Keep Incomplete Records on Handheld
This option can only be used if you have a Completion Checkbox field on your form. See page 100 for information on Completion Checkbox fields.
If this option is selected, then only records that have the Completion Checkbox field checked as Yes, will be removed from the handheld (mobile device) during synchronization.
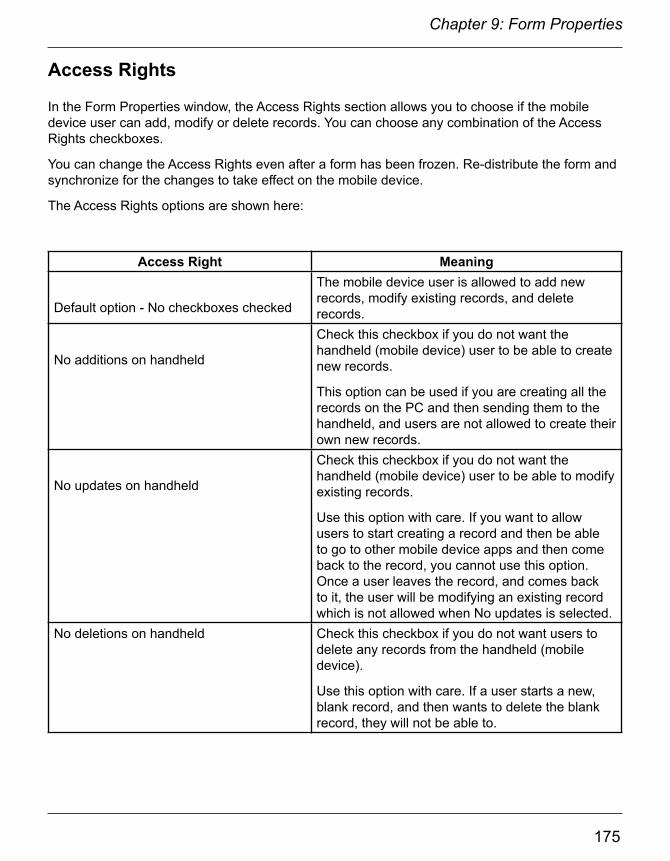
174
Chapter 9: Form Properties
175
Chapter 9: Form Properties
Access Rights
In the Form Properties window, the Access Rights section allows you to choose if the mobile device user can add, modify or delete records. You can choose any combination of the Access Rights checkboxes.
You can change the Access Rights even after a form has been frozen. Re-distribute the form and synchronize for the changes to take effect on the mobile device.
The Access Rights options are shown here:
Access Right Meaning
Default option - No checkboxes checked
The mobile device user is allowed to add new records, modify existing records, and delete records.
No additions on handheld
Check this checkbox if you do not want the handheld (mobile device) user to be able to create new records.
This option can be used if you are creating all the records on the PC and then sending them to the handheld, and users are not allowed to create their own new records.
No updates on handheld
Check this checkbox if you do not want the handheld (mobile device) user to be able to modify existing records.
Use this option with care. If you want to allow users to start creating a record and then be able to go to other mobile device apps and then come back to the record, you cannot use this option. Once a user leaves the record, and comes back to it, the user will be modifying an existing record which is not allowed when No updates is selected.
No deletions on handheld Check this checkbox if you do not want users to delete any records from the handheld (mobile device).
Use this option with care. If a user starts a new, blank record, and then wants to delete the blank record, they will not be able to.
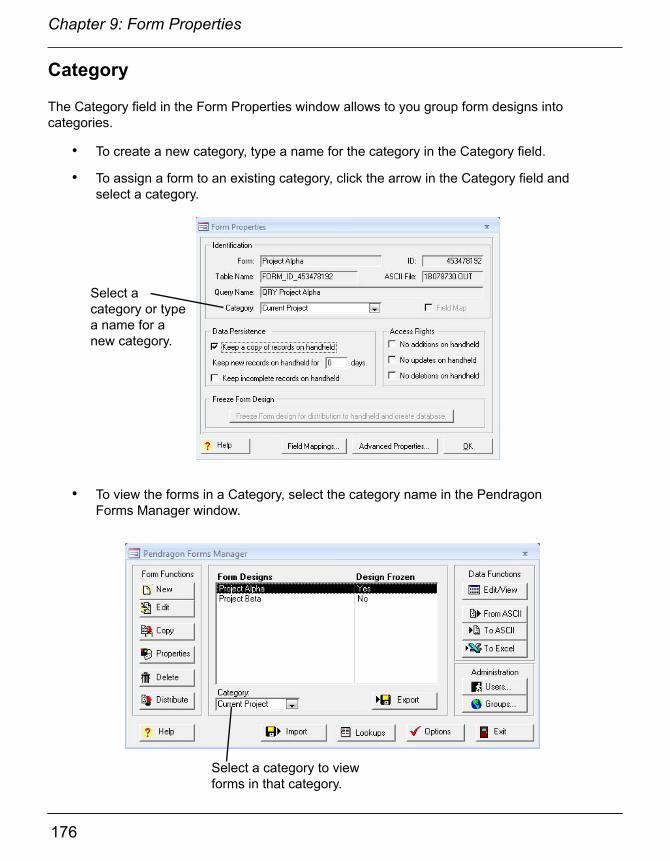
176
Chapter 9: Form Properties
177
Chapter 9: Form Properties
Category
The Category field in the Form Properties window allows to you group form designs into categories.
• To create a new category, type a name for the category in the Category field.
• To assign a form to an existing category, click the arrow in the Category field and select a category.
• To view the forms in a Category, select the category name in the Pendragon Forms Manager window.
Select a category or type a name for a new category.
Select a category to view forms in that category.

176
Chapter 9: Form Properties
177
Chapter 9: Form Properties
• The Recycle Bin is a unique category that stores deleted form designs.
• To take a form out of a category, including the Recycle Bin, first view that category in the Pendragon Forms Manager, then click on the form, and click the Properties button. In the Category field of the Form Properties window, choose Unfiled as the category.
The Recycle Bin category stores deleted forms.

178
Chapter 9: Form Properties
179
Chapter 9: Form Properties
Freezing a Form Design
Freezing a form design creates a database table in the Pendragon Forms Manager database for storing records associated with that form design. You must freeze a form design before you can send it to a mobile device.
Once you freeze a form design, you cannot add fields to the form, delete fields from the form or change the field types. To do any of these things, make a copy of the form and modify the copied form, which will not be frozen. See page 74 for information on copying form designs.
To freeze a form design:
1. Click on the name of the form in the Pendragon Forms Manager, then click the Properties button.
2. In the Form Properties window, click the button labeled:Freeze Form Design for Distribution to Handheld and Create Database.
3. Click the OK button to close the Form Properties window.
4. Typically, the next activity is to distribute the form by clicking the name of the form in the Pendragon Forms Manager, then clicking the Distribute button. Synchronize the mobile device to send the form to the device.
If you click the Freeze Form Design button and receive an error message that prevents the form from being frozen, go back to the Form Designer and edit the form to correct the error. Errors include: Duplicate field names (two fields having the same field name), a Popup List being empty, a Lookup List name (or form name) not being specified, a Section name or Button name being empty, or a field name being a reserved word.
Click the Freeze Form Design button to freeze a form design.

178
Chapter 9: Form Properties
179
Chapter 9: Form Properties
Table Name & Query Name
Once a form design has been frozen, the Table Name and Query Name fields in the Form Properties window are filled in.
• The Table Name is the name of the Access database table that was created to store the records for the form in the Pendragon Forms Manager database. You must NEVER delete the Access database table for a form if the form is still in use on any mobile devices, as deleting the table will break the ability to synchronize the form.
• The Query Name is the name of the query that makes it possible to view the data for the form when you click the Edit/View button in the Pendragon Forms Manager.
Form ID
The ID field in the Form Properties window displays the unique Form ID number that was assigned to the form when the form design was first created. In order for a form to be able to synchronize, the Form ID number on the mobile device must exactly match the Form ID on the PC.
Table Name
Query Name
Form ID

180
Chapter 9: Form Properties
181
Chapter 9: Form Properties
Advanced Form Properties
Advanced Form Properties give you additional control over how a form works on a mobile device.
To access the Advanced Form Properties window:
1. Click on the name of a form in the Pendragon Forms Manager, then click the Properties button.
2. In the Form Properties window, click the Advanced Properties button.
You can change the Advanced Form Properties of a form at any time. In most cases, you will need to re-distribute the form and synchronize for the changes to take effect on the handheld.
Each tab of the Advanced Form Properties window covers a different aspect of the form.
Click the Advanced Propertiesbutton to access the Advanced Form Properties window.
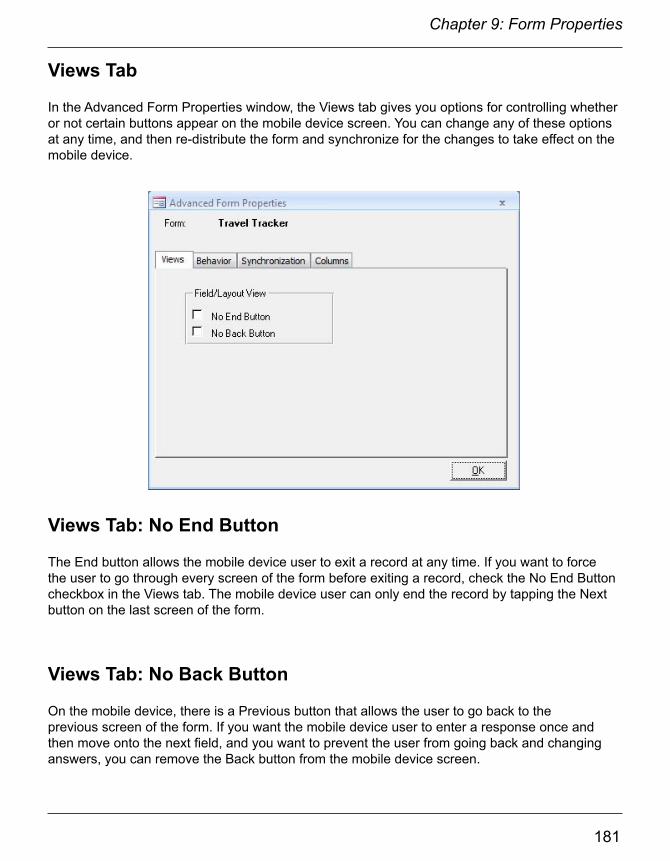
180
Chapter 9: Form Properties
181
Chapter 9: Form Properties
Views Tab: No End Button
The End button allows the mobile device user to exit a record at any time. If you want to force the user to go through every screen of the form before exiting a record, check the No End Button checkbox in the Views tab. The mobile device user can only end the record by tapping the Next button on the last screen of the form.
Views Tab: No Back Button
On the mobile device, there is a Previous button that allows the user to go back to the previous screen of the form. If you want the mobile device user to enter a response once and then move onto the next field, and you want to prevent the user from going back and changing answers, you can remove the Back button from the mobile device screen.
Views Tab
In the Advanced Form Properties window, the Views tab gives you options for controlling whether or not certain buttons appear on the mobile device screen. You can change any of these options at any time, and then re-distribute the form and synchronize for the changes to take effect on the mobile device.

182
Chapter 9: Form Properties
183
Chapter 9: Form Properties
Behavior Tab
The options on the Behavior tab of the Advanced Form Properties window allow you to change the behavior of a form on the mobile device.
You can change Advanced Form Properties on the Behavior tab at any time. Simply re-distribute the form and synchronize for the change to take effect on the mobile device.
Behavior Tab: Screen Level Validation
If you have Required fields on your form (see page 150), you may want to check the Screen Level Validation checkbox. This causes the program on the mobile device to display a warning message if the user leaves a Required field blank and tries to move to the next screen of the form. If Screen Level Validation is not selected, then Required Fields will only be checked when the user exits the record, not on a screen by screen basis.

182
Chapter 9: Form Properties
183
Chapter 9: Form Properties
Behavior Tab: Disable Action Menus
On the mobile device, if the user is in a record and taps on the name of the form, a Delete button will be displayed to allow the user to delete the current record.
Also on the handheld, if the user taps on a form and then taps the Info button followed by the Details button, a Mark All Changed button is available. Tapping Mark All Changed manually flags every record in that form as new, in order to force an update to the PC the next time the mobile device synchronizes.
If you do not want the mobile device user to have access to these menu options (Delete button and Mark All Changed button), check the Disable Action Menus checkbox.
Behavior Tab: Display as Subform
On the mobile device, parent forms and subforms are displayed in the list of forms. To enable data from the parent record to be copied into the subform, it is necessary to always enter data starting from the parent form.
If you check the Display as Subform checkbox, this will ensure that the mobile device user cannot enter new records in the subform by starting from the subform. The subform will still be visible in the Forms List on the mobile device, and the user can review records but not create new subform records except by starting from the parent form.
• Another solution is hiding the subform from the Forms List entirely. See Hide Form in Forms List, below.
Behavior Tab: Hide Form in Forms List
When using a parent form and one or more subforms or single subforms, the mobile device user has to enter data in the parent form first, for the data to be copied to the subform. On the Forms List on the mobile device, the user will see both the parent form and the subforms listed.
If you check the Hide Form in Forms List checkbox for a subform, the subform will not appear in the Forms List on the mobile device, and this give the user the appearance that there is just one form in which to enter data, namely the parent form.

184
Chapter 9: Form Properties
185
Chapter 9: Form Properties
Synchronization Tab
The options on the Synchronization tab of the Advanced Form Properties window allow you to specify which records are sent from the PC/server to the mobiole device, and also provide some control over data going from the mobile device to the PC/server.
Synchronization Tab: Additional Download Criteria
Additional download criteria allow you to select which records from the PC/server are sent to the mobile device.
The default setting is: UserName = ##USERNAME## This means that by default, only records where the UserName field matches the mobile device user name, will be sent to a particular handheld. ##USERNAME## is a wildcard used by Pendragon Forms to refer to the mobile device user name.
When the default setting is on, users cannot share records. If you need several mobile devices to share the same records, you will need to select a different primary key (see Primary Key, page 149) and then delete the UserName = ##USERNAME## statement from the Additional Download Criteria field. Then records from all mobile devices will be sent to all mobile devices.
184
Chapter 9: Form Properties
185
Chapter 9: Form Properties
In general, the selections made in Data Persistence section of the Form Properties window (e.g.: Keep a copy of records on Handheld, or Keep new records on Handheld for X days or Keep incomplete records on Handheld) are sufficient for determining which records are sent to the mobile device. If this is the case, you do not need to specify any Additional Download Criteria.
However, if you are linking to an external database and are not storing the UserName and TimeStamp fields that Pendragon Forms generates for each record, then the Data Persistence options will not apply. In order to select which records go to the mobile device, you must specify Additional Download Criteria before field-mapping to the external database. (See page 345 for information on linking to an external Access database.)
The Additional Download Criteria is an SQL WHERE clause (without the word ‘Where’) which is used to specify the selection criteria for sending records to the mobile device.
The WHERE clause has the format:
[Database-Column-Name] = Criteria
When a form is frozen, each field is assigned a database column name. The database column name for a field can be viewed on the Data tab in the Form Designer window (see page 147). You have to use the database column names of your form when specifying Additional Download Criteria.
Additional Download Criteria: Date CriteriaAdditional Download Criteria can be used to select only the records that meet a date-specific criteria. For example:
[DateofVisit] > now - 30
To send only records within the last 30 days to the mobile device, you will need a Date field or a Date&Time field on your form. In this example, there is a field on the form called Date of Visit. The word now represents the current date and time. This download criteria will send only those records whose Date of Visit field is in the last 30 days.
[AppointmentDate] > #05/15/2014#
In this example, there is a field on the form called Appointment Date. This download criteria will only send records to the mobile device if the value in the Appointment Date field is after May 15th 2014. Enter the date in the Windows short date format used on your PC (see the Control Panel in Windows). The # symbol is used by Access as a quotation symbol when specifying dates in SQL.

186
Chapter 9: Form Properties
187
Chapter 9: Form Properties
Additional Download Criteria: Selection List CriteriaYour Additional Download Criteria can depend on the value in a Yes/No Checkbox, Popup List, or Lookup List. It is not recommended for download criteria to depend on the value in a Text field, because users may not all write the exact same text in the Text field. With a selection list field, however, you can guarantee what the possible values in the field are.
Here is an example of using selection list criteria:
([WorkOrderStatus] = “New”) OR ([WorkOrderStatus] = “In Progress”) In this example, there is a Popup List or Lookup List field called
Work Order Status on the form. Two of the options in the Popup or Lookup List are the phrases New and In Progress.The download criteria sends records to the mobile device if the Work Order Status field is either equal to New or In Progress.
The OR operator allows for either the first criteria (New) or the second criteria (In Progress) to apply.
When selecting download criteria based on a Popup List, Lookup List or Yes/No Checkbox field, it is important to include a download criteria if a field is blank. For example, the above example could be changed to:
[WorkOrderStatus] = “New” OR [WorkOrderStatus] = “In Progress” OR [WorkOrderStatus] is null
The addition of the last statement allows for records which have not been assigned any Work Order Status to be sent to the mobile device.

186
Chapter 9: Form Properties
187
Chapter 9: Form Properties
Additional Download Criteria: Completion Checkbox CriteriaIf you are using a Completion Checkbox field and your data is being stored in the Pendragon Forms Manager database, you can just check the form property to Keep incomplete records on Handheld in the Form Properties window. You do not need to enter any additional download criteria.
However, if you are linking to an external database (see page 345) then you may need to specify download criteria to send incomplete records to the mobile device.
You need to know to which external database field type the Pendragon Forms Completion Checkbox field is mapping. If you are mapping a Pendragon Forms Completion Checkbox to a Text field in an external Access database or an ODBC database, you can actually just use the Data Persistence option of Keep incomplete records on Handheld, and you do not need to specify any additional download criteria.
If you are using an Access Yes/No (Boolean) field in your external database, then you will need to specify additional download criteria in order to remove completed records from the mobile device.
The values used by Access are 0 for No and -1 for Yes. SQL Server uses 0 for No and 1 for Yes. Since both databases use 0 for No, that is what is used to test a Completion Checkbox field.
[RemoveRecord] = 0 OR [RemoveRecord] is null
In this example, there is a Completion Checkbox field called Remove Record on the form. Records are only sent to the mobile device if the value in the field is either null (blank) or 0 (zero). This means that incomplete records are sent back to the mobile device.
([RepairTechnician] = ##USERNAME##) AND ([Completed] is null OR [Completed] = 0)
In this example, the external database has a column called RepairTechnician that maps to the UserName field in Pendragon Forms. The form on the mobile device and a column in the external database also have a field called Completed.
The AND operator means that both the first criteria and the second crite-ria have to be met for the record to be sent to the mobile device. So the mobile device user name has to match the value in the RepairTechnician field, and the Completed field has to be null or 0 (zero) for a record to be sent to the mobile device. This means that a user will receive the incomplete records that have been assigned to him or her.

188
Chapter 9: Form Properties
189
Chapter 9: Form Properties
Criteria for Sorting Records as they Download to a Mobile DevicePendragon Forms creates an internal query to download the appropriate records to a mobile device.
By default the query returns records sorted on primary key columns, but this may vary depending on the version of the database you are using to store records.
To guarantee that records are sent to the mobile device in a specific order, you can use an order by clause in your additional download criteria.
Not every field type can be sorted, however. Text fields longer than 255 characters, Signature, Sketch, and Image fields cannot be sorted. Section, Jump to Section, Subform and Single Subform fields do not usually contain any data that can be sorted.
UserName = ##USERNAME## order by [Company]The order by clause sorts records in ascending order (A..Z) of the specified column.
In this example, records assigned to a given user are sent to the mobile device sorted in alphabetic order by a field on the form calledCompany.
UserName = ##USERNAME## order by [DateofVisit] descThe word desc added to the end of an order by clause sorts the records in descending order.
Since Date fields are stored internally as a number (the number of seconds since 01/01/1904), sorting a date field in descending order will put the most recent dates at the top of the list of records.
In this example records assigned to a given user are sorted by a field on the form called Date of Visit, with the most recent dates at the top of the list.
The order by clause must follow a criteria. If you have your own primary key and users are sharing records, you cannot use UserName = ##USERNAME## as the criteria, because users would not be able to share records. Instead you can use a criteria that will always be true, such as:
1 = 1 order by [LastName]In this example, the criteria 1 = 1 is always true, and the order by clause sends records to the mobile device sorted in ascending order (A..Z) by a field on the form called Last Name.
If you have the full version of Microsoft Access, you can refer to the Access Help on WHERE clauses for additional information on the types of selection criteria that you can specify.
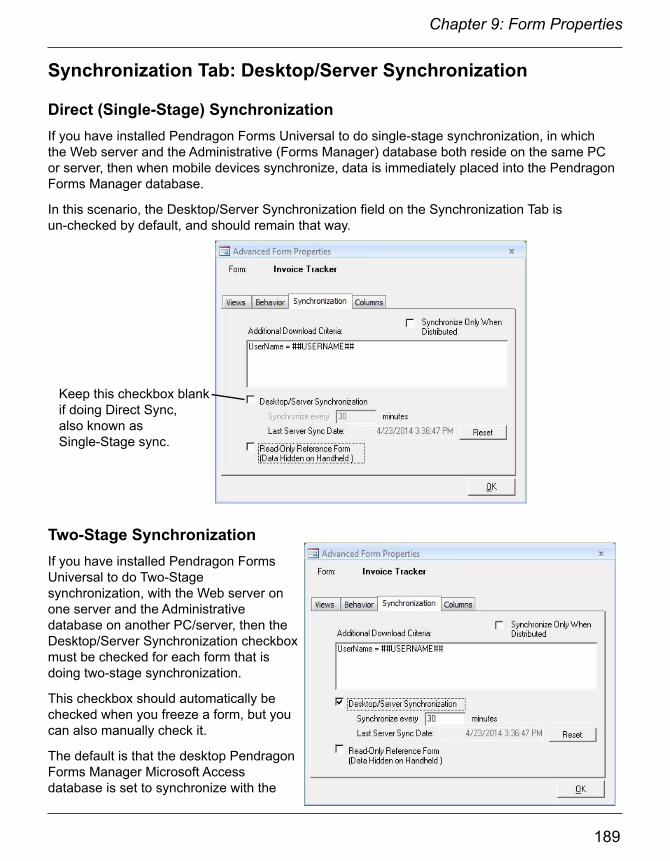
188
Chapter 9: Form Properties
189
Chapter 9: Form Properties
Synchronization Tab: Desktop/Server Synchronization
Direct (Single-Stage) SynchronizationIf you have installed Pendragon Forms Universal to do single-stage synchronization, in which the Web server and the Administrative (Forms Manager) database both reside on the same PC or server, then when mobile devices synchronize, data is immediately placed into the Pendragon Forms Manager database.
In this scenario, the Desktop/Server Synchronization field on the Synchronization Tab is un-checked by default, and should remain that way.
Keep this checkbox blank if doing Direct Sync, also known as Single-Stage sync.
Two-Stage SynchronizationIf you have installed Pendragon Forms Universal to do Two-Stage synchronization, with the Web server on one server and the Administrative database on another PC/server, then the Desktop/Server Synchronization checkbox must be checked for each form that is doing two-stage synchronization.
This checkbox should automatically be checked when you freeze a form, but you can also manually check it.
The default is that the desktop Pendragon Forms Manager Microsoft Access database is set to synchronize with the
190
Chapter 9: Form Properties
191
Chapter 9: Form Properties
Pendragon Forms MYSQL database on the staging server every 30 minutes. This means that once every 30 minutes, the Pendragon Transfer Agent will import data from the Pendragon MYSQL database on the server into the Pendragon Forms Manager Microsoft Access database.
If you click the Edit/View button to view data in the Pendragon Forms Manager, you will be given the option to force an import of records from the server into the Pendragon Forms Manager database. Therefore, you will always be able to view the most up-to-date records when you choose to view data.
In some circumstances, you may want to set the Desktop/Server Synchronization time to a shorter timeframe than the default 30 minutes. For instance, if you want to send records to or receive records from mobile device users as quickly as possible, you may want to change the Desktop/Server synchronization time to a smaller number, such as 10 minutes. This way, data will synchronized between the Pendragon Forms MYSQL database server and the Pendragon Forms Manager Microsoft Access database on a more frequent basis. Note however, that the shorter the Desktop/Server Synchronization time, the more processor power and bandwidth your PC will consume.
If you are comfortable using MYSQL databases, and you prefer to leave the data for a form in the Pendragon Forms MYSQL database, you can un-check the Desktop/Server Synchronization checkbox after synchronizing a form at least once. No data for the form will be imported into the Pendragon Forms Manager Microsoft Access database and you will need to make sure that you backup the data in the Pendragon Forms MYSQL database (see page 373).
Troubleshooting Two-Stage SynchronizationIf you have installed Pendragon Forms Universal to do Two-Stage synchronization, but it appears that your form is doing Direct (One-Stage) synchronization, here are some things to check:
• Click on the name of the form in the Pendragon Forms Manager, then click the Properties button. In the Properties window, hold down the Shift key on your keyboard and click the Advanced Form Properties button. In the lower right corner of the Advanced Mapping Properties window that appears, un-check the checkbox labeled Direct Sync via PHP.
• In the Properties window, make sure that the Desktop/Server Synchronization checkbox (see previous page) is checked.
• In the Pendragon Forms Manager, click the Users button to display the Pendragon Transfer Agent window. In the lower right corner of the Transfer Agent window, click the Setup button. In the Pendragon Transfer Agent Setup window, on the General tab, un-check the Enable Direct Sync checkbox.
190
Chapter 9: Form Properties
191
Chapter 9: Form Properties
Synchronization Tab: Last Server Sync Date Reset Button
This Reset button relates to Two-Stage synchronization only.
The Last Server Sync Date shows the date and time of the most recent synchronization of data from the Pendragon Forms MYSQL database on the server to the Pendragon Forms Manager Microsoft Access database.
If you want to force a synchronization from the server to the Access database, click the Reset button to clear the Last Server Sync Date. Records for this form will be imported from the Pendragon Forms MYSQL database on the server into the Microsoft Access database within the next minute. This applies whether you are storing your data in the Pendragon Forms Manager Access database or whether you are storing your data in an external Access database that has been field-mapped to the Pendragon Forms Manager database.
If you are storing data in the Pendragon Forms Manager Access database, another way to force an import of data from the Pendragon Forms MYSQL database is to click on the name of the form, then click the Edit/View button in the Pendragon Forms Manager. You will be prompted whether you want to synchronize with the server. Choose Yes.
Synchronization Tab: Read-Only Reference Form (Data Hidden on Handheld)
This checkbox is not functional in Pendragon Forms Universal. It was needed in prior versions.
Synchronization Tab: Synchronize Only When Distributed
If you have a reference form with a lot of data, but the records in the form do not change often, you can choose to check the Synchronize Only When Distributed checkbox. This will cause the form not to synchronize unless you distribute the form.
In the case of a form with, for example, a list of inventory items that is only updated once per week, you can reduce the time it takes mobile users to synchronize by distributing the form once per week when the inventory is updated, and then not distributing the form for the remainder of the week. Users will have one long sync time and four short sync times in a five-day week.
The Synchronize Only When Distributed checkbox should never be checked on a form that mobile device users are actively filling out. For backup purposes you would want forms in active use to synchronize every time the mobile device synchronizes, so that users’ data can be uploaded to the server.

192
Chapter 9: Form Properties
193
Chapter 9: Form Properties
Columns Tab
The Columns tab in the Advanced Form Properties window allows you to specify which columns you want to use to display records on the Review screen of the mobile device.
If you leave the Display Template area blank, the default is that the first three fields (or the first three fields marked as Display Key fields - see page 151) of the form are displayed on the Review screen. You can choose to specify alternate columns in the Display Template area of the Columns tab to specify columns other than the first three fields when reviewing records.
Default Review screen showing the first three fields on the form.
Here the Review screen has been customized via the Columns Tab to show four fields.

192
Chapter 9: Form Properties
193
Chapter 9: Form Properties
In the Display Template area of the Columns Tab, type the text that you want to appear in a column header, followed by the field number between @ signs: @FieldNumber@ For example, Date@2@ will display the word Date as the column header, and the data in Field 2 will appear in that column. Press the space bar to leave a blank space, then type the second column header followed by the field number between @ signs of the field whose data you want to appear in the second column.
The Insert a Field section provides a reminder of which field name corresponds to which field number.
You can typically specify 3 or 4 columns. More than that may be difficult to see on a small mobile device screen such as a smartphone screen.
If you make changes on the Columns tab, you must re-distribute your form and synchronize the mobile device for the changes to take effect.
Here the first column on the Review screen will be called Date, and will display data from Field 2 on the form. @2@ means the data in Field 2.
The second column will be called First Name and will display data from Field 3 on the form.
The third column will be Last Name with data from Field 4, and the fourth column is Problem, with data from Field 9.
To remember the field number of a given field, click the arrow in the Insert a Field area.
After the form is distributed and the mobile device synchronizes, this is what the user sees on the Review screen when reviewing records: the four columns of data specified on the Columns tab in Advanced Form Properties.

194
Chapter 9: Form Properties
195
Changing Advanced Form Properties on a Frozen Form
Once a form design has been frozen and distributed to the mobile device, if you change any Advanced Form Properties on any of the tabs: the Views tab, the Behavior tab, the Synchronization tab or the Columns tab, you will need to:
a) Re-distribute the form design, and
b) Synchronize the mobile device for the changes to take effect. Data on the mobile device is not affected by re-distributing the form.
194
Chapter 9: Form Properties
195
10. Managing Data on the PC
Synchronization of Pendragon Forms Universal is either Direct (One-Stage Sync) or Two-Stage Synchronization.
Direct (One-Stage) SynchronizationIn Direct Synchronization, when a mobile device synchronizes, new or changed records on the device are uploaded directly into the Pendragon Forms Manager Access database, and then records (including new records in the Forms Manager database) are written back to the mobile device.
Two-Stage SynchronizationTwo-Stage Synchronization is a two-step process. There are two databases involved. The Pendragon Forms Manager is the Microsoft Access database where you design forms, and where most users also choose to store their data. There is also a Pendragon Forms MYSQL database on a staging server to which the mobile devices synchronize.
Pendragon Forms supports bi-directional synchronization. In Two-Stage synchronizatio, when you synchronize the mobile device, new or changed records on the device are uploaded to the Pendragon Forms MYSQL database, and then records (including new records on the staging server) are written back to the mobile device.
By default, once every 30 minutes, the Pendragon Transfer Agent program synchronizes records between the Pendragon Forms MYSQL database and the Pendragon Forms Manager Access database. Any new or changed records from mobile devices that have been uploaded to the Pendragon Forms MYSQL database on the staging server are sent to the Pendragon Forms Microsoft Access database when the Pendragon Transfer Agent synchronizes. When you choose to view data in the Pendragon Forms Manager Access database, you can choose to force an immediate update from the Pendragon Forms MYSQL database so that you do not have to wait for the next 30-minute interval to view the latest records.
Mobile Device Records Overwrite Server RecordsWhether you do a Direct Sync or a Two-Stage Sync, the records on the mobile device overwrite the records on the server. This means that if the same record is simultaneously modified on both the mobile device and in the Pendragon Forms Manager Access database, the changes from the mobile device will take precedence. (If necessary, it is possible to protect individual fields from being overwritten by the mobile device by setting the Advanced Field Property of Do Not Upload to PC - see page 158. )
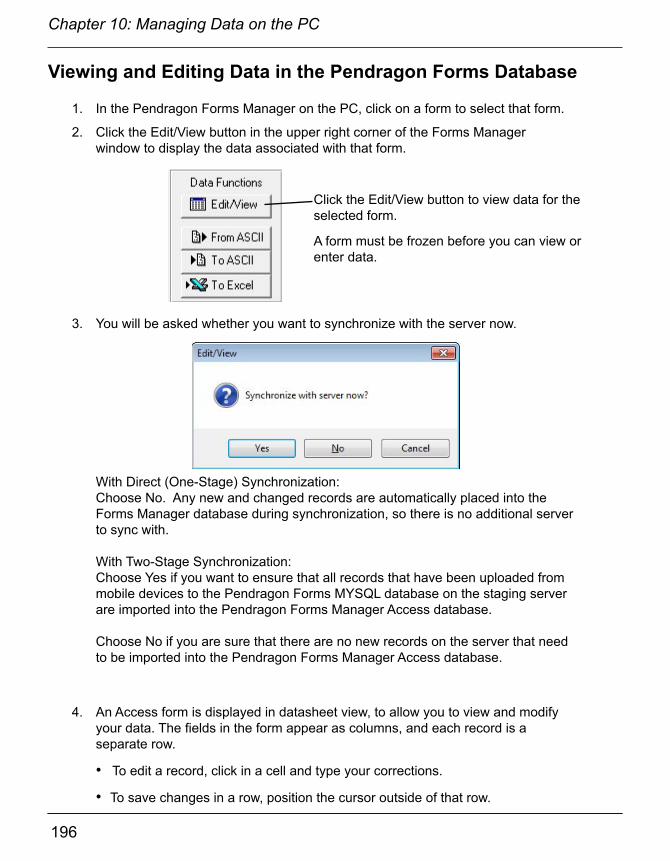
196
Chapter 10: Managing Data on the PC
197
Chapter 10: Managing Data on the PC
4. An Access form is displayed in datasheet view, to allow you to view and modify your data. The fields in the form appear as columns, and each record is a separate row.
• To edit a record, click in a cell and type your corrections.
• To save changes in a row, position the cursor outside of that row.
3. You will be asked whether you want to synchronize with the server now.
Viewing and Editing Data in the Pendragon Forms Database
1. In the Pendragon Forms Manager on the PC, click on a form to select that form.
2. Click the Edit/View button in the upper right corner of the Forms Manager window to display the data associated with that form.
Click the Edit/View button to view data for the selected form.
A form must be frozen before you can view or enter data.
With Direct (One-Stage) Synchronization:Choose No. Any new and changed records are automatically placed into the Forms Manager database during synchronization, so there is no additional server to sync with.
With Two-Stage Synchronization:Choose Yes if you want to ensure that all records that have been uploaded from mobile devices to the Pendragon Forms MYSQL database on the staging server are imported into the Pendragon Forms Manager Access database.
Choose No if you are sure that there are no new records on the server that need to be imported into the Pendragon Forms Manager Access database.

196
Chapter 10: Managing Data on the PC
197
Chapter 10: Managing Data on the PC
The first four fields that you see: Record ID, UnitID, UserName and TimeStamp, are used to uniquely identify each record coming back from the handheld.
If you export data to Excel or to ASCII, the first four columns of data will also be exported. You can delete these columns from your Excel file, but you should NEVER delete these columns from the Pendragon Forms Manager database.
In Popup fields and Lookup List fields, when you click in the cell you can select an item from the list.
Note that this feature does not work for cascading lookup lists.
Lookup Lists will show the LookupDisplay column.
5. To add a record, click in the blank row (the last row in the list of records).
• In the UserName field, select the user who is to receive the record.
• Then enter information in the various cells, pressing TAB to move from one cell to the next. Position the cursor outside of the row to save the record.
• When you close the Edit/View window and synchronize the mobile device, the new record will be sent to the specified device.
Note: Not all of the features of Pendragon Forms that are available on the mobile device are available when editing a record on the PC. For example, cascading lookups do not work when editing on the PC. Similarly, scripts, branching, hidden fields, button fields, jumping to subforms, and checks for required fields or numeric ranges are all features that are present on the mobile device but are not present when editing records on the PC.
Tip: If you want to edit records on the PC and maintain all the features that Pendragon Forms has on the mobile device, you can use the Chrome Web browser (downloadable from www.google.com) on the PC. Opening the Pendragon Forms Universal Web page in a Chrome window on a PC is equivalent to having a mobile device on the PC running Pendragon Forms Universal.
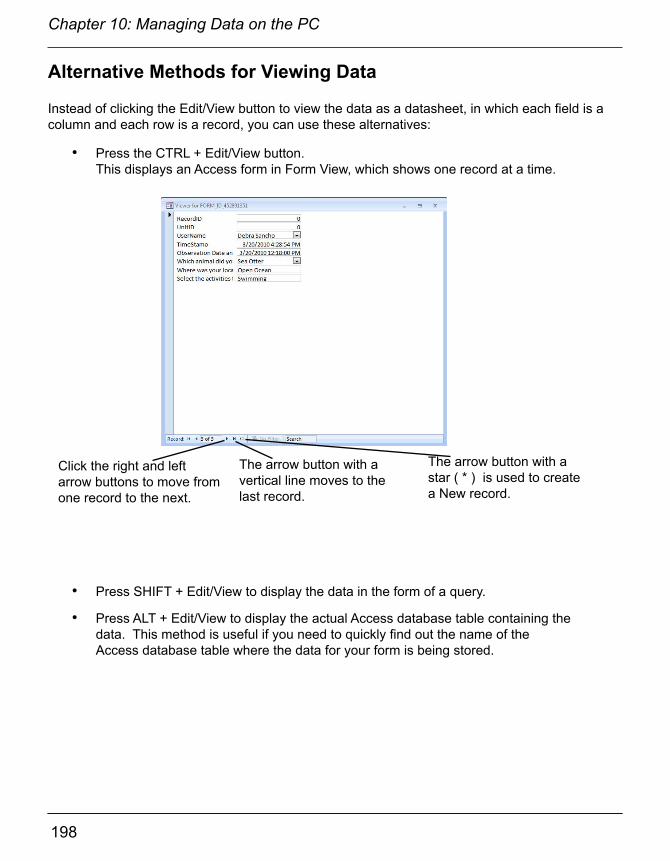
198
Chapter 10: Managing Data on the PC
199
Chapter 10: Managing Data on the PC
• Press SHIFT + Edit/View to display the data in the form of a query.
• Press ALT + Edit/View to display the actual Access database table containing the data. This method is useful if you need to quickly find out the name of the Access database table where the data for your form is being stored.
Alternative Methods for Viewing Data
Instead of clicking the Edit/View button to view the data as a datasheet, in which each field is a column and each row is a record, you can use these alternatives:
• Press the CTRL + Edit/View button.This displays an Access form in Form View, which shows one record at a time.
Click the right and left arrow buttons to move from one record to the next.
The arrow button with a vertical line moves to the last record.
The arrow button with a star ( * ) is used to create a New record.
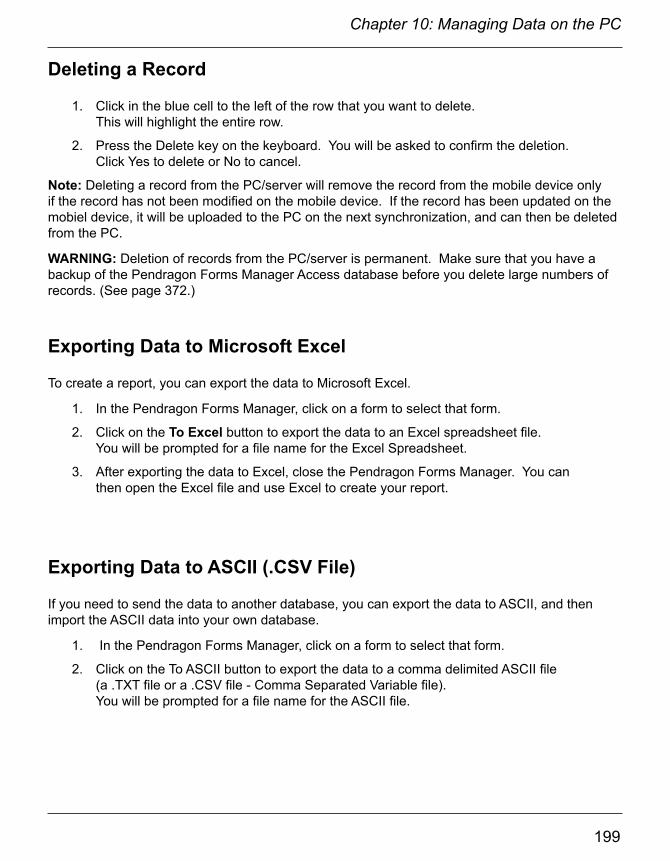
198
Chapter 10: Managing Data on the PC
199
Chapter 10: Managing Data on the PC
Deleting a Record
1. Click in the blue cell to the left of the row that you want to delete. This will highlight the entire row.
2. Press the Delete key on the keyboard. You will be asked to confirm the deletion. Click Yes to delete or No to cancel.
Note: Deleting a record from the PC/server will remove the record from the mobile device only if the record has not been modified on the mobile device. If the record has been updated on the mobiel device, it will be uploaded to the PC on the next synchronization, and can then be deleted from the PC.
WARNING: Deletion of records from the PC/server is permanent. Make sure that you have a backup of the Pendragon Forms Manager Access database before you delete large numbers of records. (See page 372.)
Exporting Data to Microsoft Excel
To create a report, you can export the data to Microsoft Excel.
1. In the Pendragon Forms Manager, click on a form to select that form.
2. Click on the To Excel button to export the data to an Excel spreadsheet file. You will be prompted for a file name for the Excel Spreadsheet.
3. After exporting the data to Excel, close the Pendragon Forms Manager. You can then open the Excel file and use Excel to create your report.
Exporting Data to ASCII (.CSV File)
If you need to send the data to another database, you can export the data to ASCII, and then import the ASCII data into your own database.
1. In the Pendragon Forms Manager, click on a form to select that form.
2. Click on the To ASCII button to export the data to a comma delimited ASCII file (a .TXT file or a .CSV file - Comma Separated Variable file). You will be prompted for a file name for the ASCII file.

200
Chapter 10: Managing Data on the PC
201
Chapter 10: Managing Data on the PC
Viewing Data in the MySQL Database on the Staging Server
The Pendragon Forms MySQL database on the staging server is where records are initially stored when mobile devices synchronize.
If you choose to store data in the Pendragon Forms Manager Access database, or you are linking to your own external Access database, you do not need to view the data in the Pendragon Forms MySQL database since your records will be imported into the Pendragon Forms Manager Access database or your external Access database. The import will happen during synchronization if you are using Direct Sync, or will happen approximately every 30 minutes if you are doing Two-Stage synchronization.
The reasons why you might want to view your data in the MySQL database include:
• If a mobile device has synchronized and no data has been imported into the Pendragon Forms Manager Access database. You can check whether the data has successfully been uploaded to the Pendragon Forms MySQL database in order to troubleshoot where the synchronization problem is occurring.
• If you prefer to keep your data in the MySQL database, you can switch off importing data into the Pendragon Forms Manager Access database. If you do this, you would need to view the Pendragon Forms MySQL database in order to view records from the mobile device. (For information om how to switch off importing records into the Access database, see Advanced Form Properties, Desktop/Server Synchronization, page 189.)
To view data in the Pendragon Forms MySQL database:
1. On the PC where the Pendragon Forms Manager Access database is installed, click Start...All Programs...Pendragon Forms Universal...Staging Server Data.
Click the Staging Server Data option in the Pendragon Forms Universal menu to view the Pendragon Forms MySQL database.

200
Chapter 10: Managing Data on the PC
201
Chapter 10: Managing Data on the PC
2. A Web browser window will open, displaying the initial page of the MySQL database. Click the FormsVI database link to view the list of database tables corresponding to each form design that has been distributed.
Click the FormsVI database.
3. In the Pendragon Forms MySQL database, the database table for each distributed form design is listed by Form ID number. (Note: To check the Form ID number of a form, click on the name of the frozen form in the Pendragon Forms Manager Access database, then click the Properties button. The Form ID is displayed in the upper right corner of the Properties window in the ID field.)
To view the records for a form in the MySQL database, click the Browse icon to the right of the Form ID.
Click the Browse icon to view the records for that form.
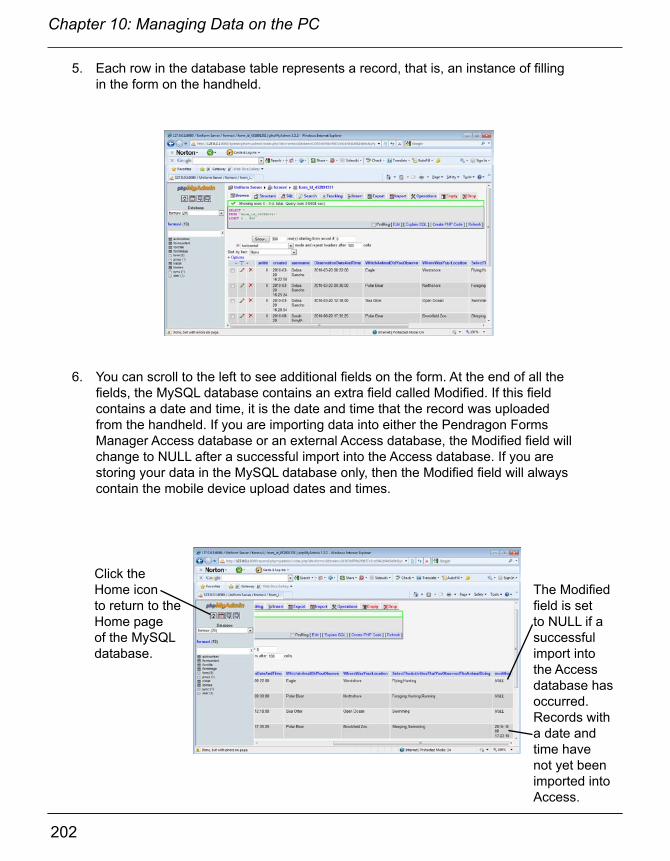
202
Chapter 10: Managing Data on the PC
203
Chapter 10: Managing Data on the PC
5. Each row in the database table represents a record, that is, an instance of filling in the form on the handheld.
6. You can scroll to the left to see additional fields on the form. At the end of all the fields, the MySQL database contains an extra field called Modified. If this field contains a date and time, it is the date and time that the record was uploaded from the handheld. If you are importing data into either the Pendragon Forms Manager Access database or an external Access database, the Modified field will change to NULL after a successful import into the Access database. If you are storing your data in the MySQL database only, then the Modified field will always contain the mobile device upload dates and times.
Click the Home icon to return to the Home page of the MySQL database.
The Modified field is set to NULL if a successful import into the Access database has occurred.Records with a date and time have not yet been imported into Access.

202
Chapter 10: Managing Data on the PC
203
Chapter 10: Managing Data on the PC
Creating a Report in Microsoft Word
Once you receive data from the handheld back on the PC, you can use Microsoft Word to create a report to print out your data.
The following instructions can be used with Microsoft Word 2007.
1. In the Pendragon Forms Manager on the PC, click on a form and then click the To ASCII button.
2. A Save to ASCII window will appear. Select a directory folder and type a name for the Text file to which the data will be exported. Click Save. If prompted that a CSV file has been created, click OK.
3. Close the Pendragon Forms Manager.
4. Open Microsoft Word 2007, and choose to open a New, blank document.
5. In Microsoft Word 2007, click the Mailings tab, then click Start Mail Merge. On the Mail Merge menu, click Step by Step Mail Merge Wizard. A Mail Merge Wizard screen appears on the right-hand side of the screen.
Click the Mailings tab.
Click Start Mail Merge
Click Step by Step Mail Merge
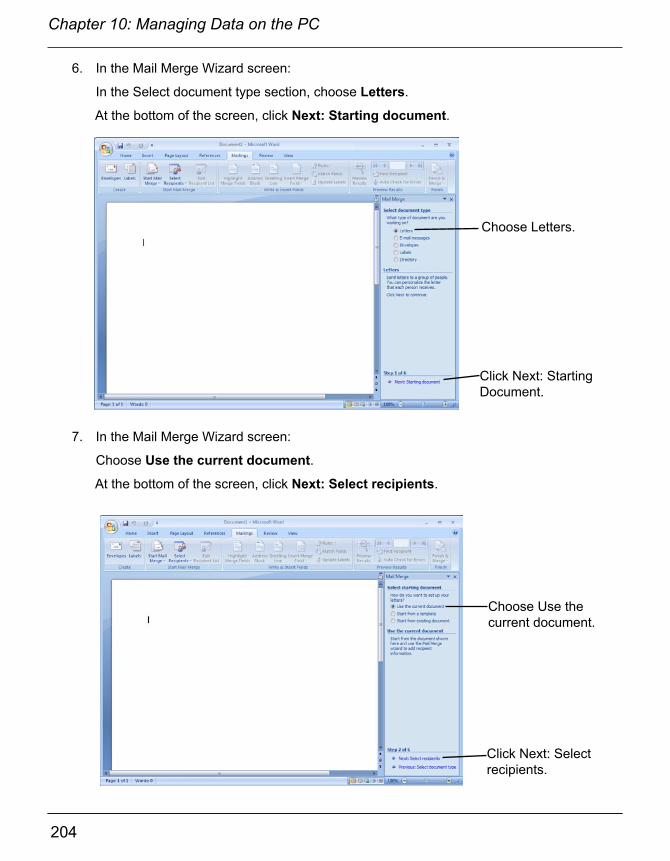
204
Chapter 10: Managing Data on the PC
205
Chapter 10: Managing Data on the PC
6. In the Mail Merge Wizard screen:
In the Select document type section, choose Letters.
At the bottom of the screen, click Next: Starting document.
Choose Letters.
Click Next: Starting Document.
7. In the Mail Merge Wizard screen:
Choose Use the current document.
At the bottom of the screen, click Next: Select recipients.
Choose Use the current document.
Click Next: Select recipients.
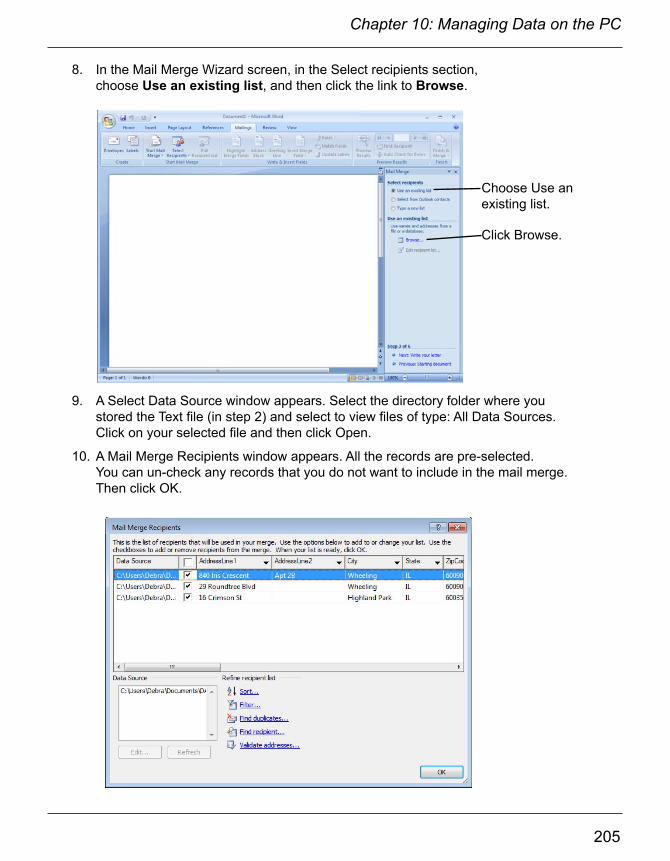
204
Chapter 10: Managing Data on the PC
205
Chapter 10: Managing Data on the PC
8. In the Mail Merge Wizard screen, in the Select recipients section, choose Use an existing list, and then click the link to Browse.
9. A Select Data Source window appears. Select the directory folder where you stored the Text file (in step 2) and select to view files of type: All Data Sources. Click on your selected file and then click Open.
10. A Mail Merge Recipients window appears. All the records are pre-selected. You can un-check any records that you do not want to include in the mail merge.Then click OK.
Choose Use an existing list.
Click Browse.
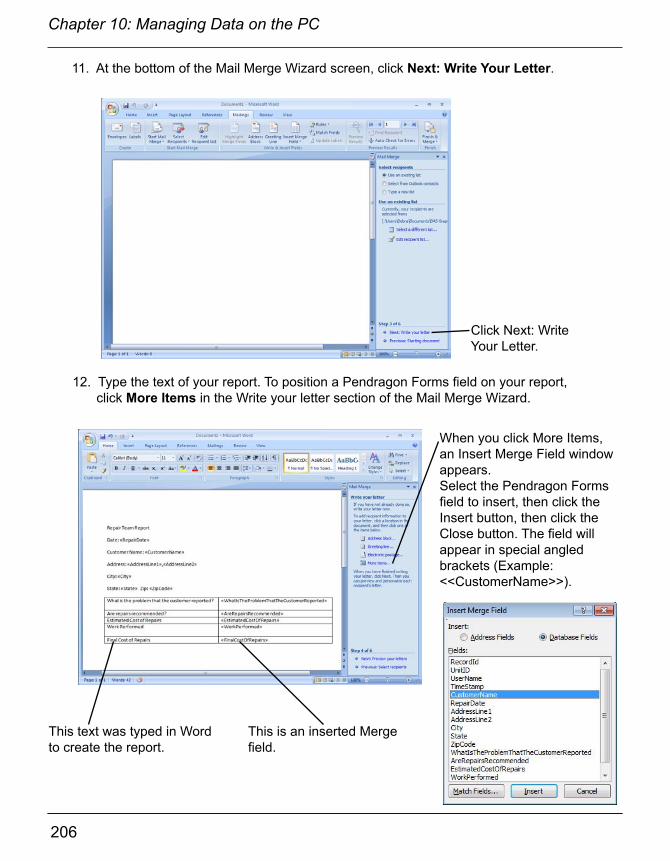
206
Chapter 10: Managing Data on the PC
207
Chapter 10: Managing Data on the PC
11. At the bottom of the Mail Merge Wizard screen, click Next: Write Your Letter.
12. Type the text of your report. To position a Pendragon Forms field on your report, click More Items in the Write your letter section of the Mail Merge Wizard.
When you click More Items, an Insert Merge Field window appears. Select the Pendragon Forms field to insert, then click the Insert button, then click the Close button. The field will appear in special angled brackets (Example: <<CustomerName>>).
This text was typed in Word to create the report.
This is an inserted Merge field.
Click Next: Write Your Letter.
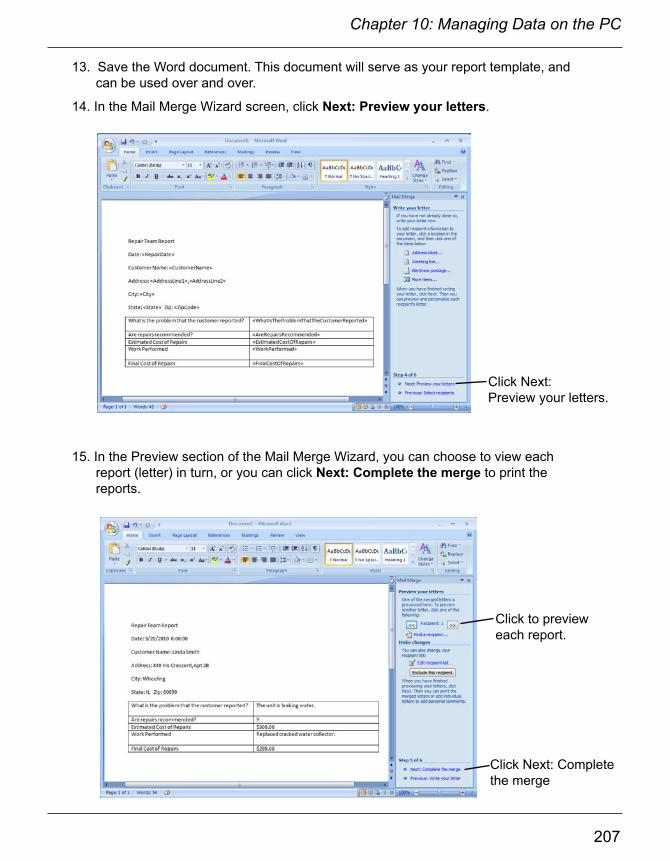
206
Chapter 10: Managing Data on the PC
207
Chapter 10: Managing Data on the PC
13. Save the Word document. This document will serve as your report template, and can be used over and over.
14. In the Mail Merge Wizard screen, click Next: Preview your letters.
15. In the Preview section of the Mail Merge Wizard, you can choose to view each report (letter) in turn, or you can click Next: Complete the merge to print the reports.
Click Next: Preview your letters.
Click to preview each report.
Click Next: Complete the merge
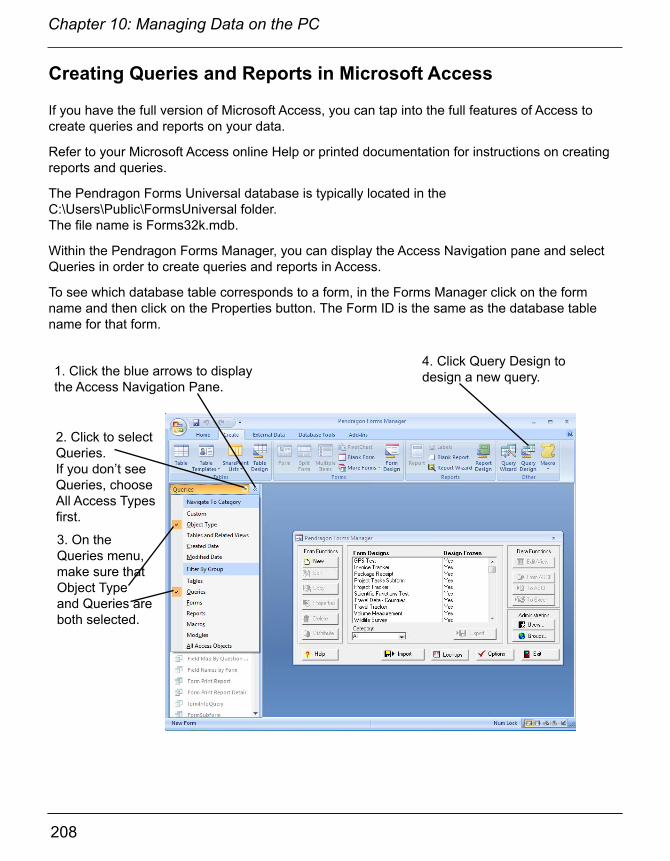
208
Chapter 10: Managing Data on the PC
209
Creating Queries and Reports in Microsoft Access
If you have the full version of Microsoft Access, you can tap into the full features of Access to create queries and reports on your data.
Refer to your Microsoft Access online Help or printed documentation for instructions on creating reports and queries.
The Pendragon Forms Universal database is typically located in the C:\Users\Public\FormsUniversal folder. The file name is Forms32k.mdb.
Within the Pendragon Forms Manager, you can display the Access Navigation pane and select Queries in order to create queries and reports in Access.
To see which database table corresponds to a form, in the Forms Manager click on the form name and then click on the Properties button. The Form ID is the same as the database table name for that form.
1. Click the blue arrows to display the Access Navigation Pane.
2. Click to select Queries. If you don’t see Queries, choose All Access Types first.
3. On the Queries menu, make sure that Object Type and Queries are both selected.
4. Click Query Design to design a new query.

208
Chapter 10: Managing Data on the PC
209
11. Importing & Exporting
Import Button
In the Pendragon Forms Manager, you can click the Import button to access the following screen:
This button allows you to import form designs, data and Lookup Lists from a previous version of Pendragon Forms.
The Import Data button allows you to import data from one form into another. Useful if you copy a form to make changes, but you want to keep the data from the previous form design.
The Import button allows you to import form designs which are in .PFF file format.
You can also create a form design by importing an ASCII Comma Separated Variable file (.CSV file).
These buttons allow you to create form designs from external database tables. See Linking to external databases, page 345 and 368.

210
Chapter 11: Importing & Exporting
211
Chapter 11: Importing & Exporting
Importing from a previous Pendragon Forms Database
If you have been using an earlier version of Pendragon Forms, you can import your form designs, data and lookup lists into the current Pendragon Forms database.
To import from a previous version of Pendragon Forms:
1. In the Pendragon Forms Manager, click the Import button, then click the Import Forms/Data/Lookups button.
2. An Import window will prompt you to select the Forms database to open.
Valid database names to select are shown here:
Note: If you re-install Forms, the database gets renamed, e.g FORMS32K.MDB is re-named to OLDFORMS32K-1.MDB on the first re-install, OLDFORMS32K-2.MDB on the second re-install, etc.
Version of Pendragon Forms Name of DatabasePendragon Forms Universal FORMS32K.MDB (Access 2003/2007/2010/2013)Pendragon Forms VI FORMS32K.MDB (Access 2003/2007/2010)Pendragon Forms version 5.1 FORMS32K.MDB (Access 2000/2002/XP/2003/2007)Pendragon Forms version 5.0 FORMS32K.MDB (Access 2000/2002/XP/2003)Pendragon Forms version 4.0
Pendragon Forms version 3.2
Forms32k.mdb (Access 2000/2002/XP/2003)
Select a database and click Open.
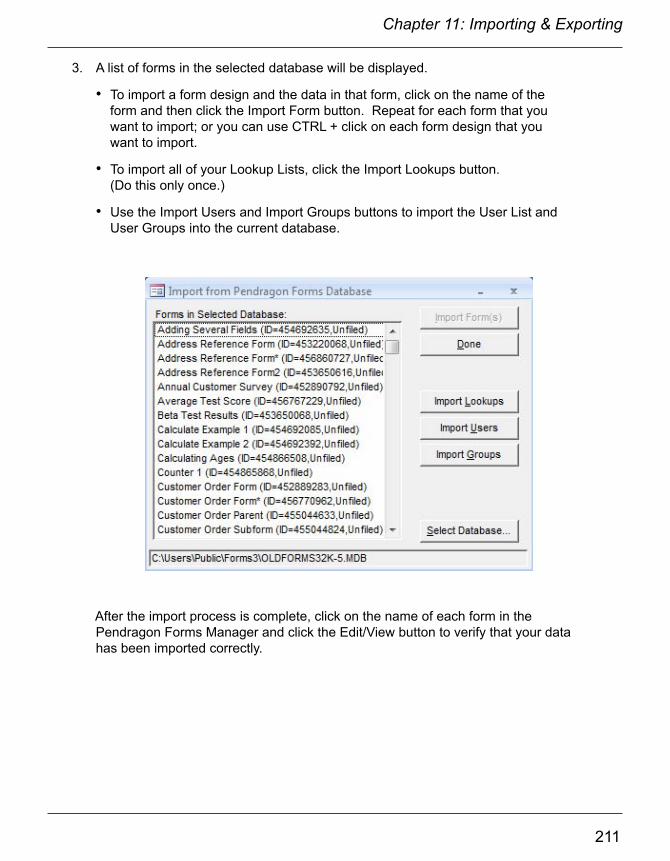
210
Chapter 11: Importing & Exporting
211
Chapter 11: Importing & Exporting
3. A list of forms in the selected database will be displayed.
• To import a form design and the data in that form, click on the name of the form and then click the Import Form button. Repeat for each form that you want to import; or you can use CTRL + click on each form design that you want to import.
• To import all of your Lookup Lists, click the Import Lookups button. (Do this only once.)
• Use the Import Users and Import Groups buttons to import the User List and User Groups into the current database.
After the import process is complete, click on the name of each form in the Pendragon Forms Manager and click the Edit/View button to verify that your data has been imported correctly.

212
Chapter 11: Importing & Exporting
213
Chapter 11: Importing & Exporting
Importing Data from a Different Form Design
When you copy a form in order to make changes to the form design, the data associated with the original form is not automatically copied into the new form. If you need the data from the original form, you can import the data as follows:
1. After you have made the necessary modifications to the copied form, freeze the copied form.
2. In the Pendragon Forms Manager, click on the name of the copied form, then click the Import button, and then the Import Data button.
3. An Import Existing Form Data window appears. Select the form whose data you want to import.
4. Once the original form has been selected, a list of fields will be displayed.
• If the column names of the copied form were kept the same as the original column names, then click the Import button to map data from the original form to the copy.
• If database column names were changed in the copy, then select the old column name for each field, by clicking on the arrow in the Source field for each field on the form. Click the Import button when you have finished mapping the old column names to the new column names. NOTE: If you accidently map a Text field to a Yes/No field or Popup List, data for these fields will not be sent to the mobile device.
212
Chapter 11: Importing & Exporting
213
Chapter 11: Importing & Exporting
Importing & Exporting Form Designs
If you want to design a form on one PC, and then use the form on another PC, you will need to export the form design.
• The Export button in the Pendragon Forms Manager window allows you to export your form design to a file. Form designs are stored in a .PFF file format when exported.
• The Import button in the Pendragon Forms Manager window allows you to import a form design from a .PFF file format.
Limits of Import and Export functionsThe Import and Export buttons only convert form designs into .PFF files. Lookup Lists are not automatically converted. If your form uses Lookup Lists, you will need to import/export the Lookup Lists in addition to the import/export of the form design.
Importing a Form Design1. Click the Import button in the Pendragon Forms Manager window, then click the
Import...button. A Select Pendragon Forms Design File window appears. Pendragon Forms Design files (*.PFF) will be displayed by default.
2. Select the directory where the form to be imported is stored.
3. Select the name of the file to be imported.
4. Click the Open button. The selected form will be imported into your Form Designs List in the Pendragon Forms Manager.
5. If the form that you are importing contains Lookup Lists, you will need to import the Lookup Lists separately. See Importing & Exporting Lookup Lists, page 214.
Exporting a Form Design1. In the Pendragon Forms Manager, click on the form to be exported.
2. Click the Export button. An Export Data window appears.
3. Select the directory where the form to be exported will be stored.
4. Type a file name for the form to be exported. The file will be saved as a Pendragon Forms Design file (.PFF).
5. Click the Save button.
6. If the form that you are exporting contains Lookup Lists, you will need to export the Lookup Lists separately. See Importing & Exporting Lookup Lists, page 214.

214
Chapter 11: Importing & Exporting
215
Chapter 11: Importing & Exporting
Importing & Exporting Lookup Lists
You may want to import a Lookup List if you already have ASCII data that you want to use in a Lookup List. You may also need to import a Lookup List if you are importing a form design, and the form contains Lookup Lists. The Lookup Lists have to be imported separately from the form design. You may need to export a Lookup List if you design a form and want to export your form design. Any Lookup Lists used by the form will have to be exported separately.
Importing Data into a Lookup ListData must be in a CSV file format (see page 217) to be imported into a Lookup List. The CSV file can have one or two columns: one column of data for the Lookup Display field, and a second, optional column of data for the Lookup Value field.
1. In the Pendragon Forms Manager window, click the Lookups button. The Lookup Lists window will appear.
2. In the Lookup Lists window, click in the blank row below all the existing Lookup Lists, and type a name for a new Lookup List. If you are importing a Lookup List for use with a form which is also being imported, the name that you type here for the Lookup List must exactly match the name of the Lookup List in the Lookup List field on the form.
3. Click the Edit button to the right of the Lookup List name.
4. In the Lookup Editor window, click the Import Lookup button.
5. Select the directory where the Lookup List .CSV (ASCII) file is stored.
6. Select the Lookup List .CSV file to be imported.
7. Click Open.
Exporting a Lookup List to an ASCII (CSV) File1. In the Pendragon Forms Manager window, click the Lookups button.
The Lookup Lists window will appear.
2. In the Lookup Lists window, click the Edit button next to the Lookup List that you want to export.
3. Click the Export Lookup button.
4. Select the directory where the Lookup List to be exported will be stored.
5. Type a file name for the exported Lookup List. The file will be saved as a CSV (ASCII) file.
6. Click the Save button.
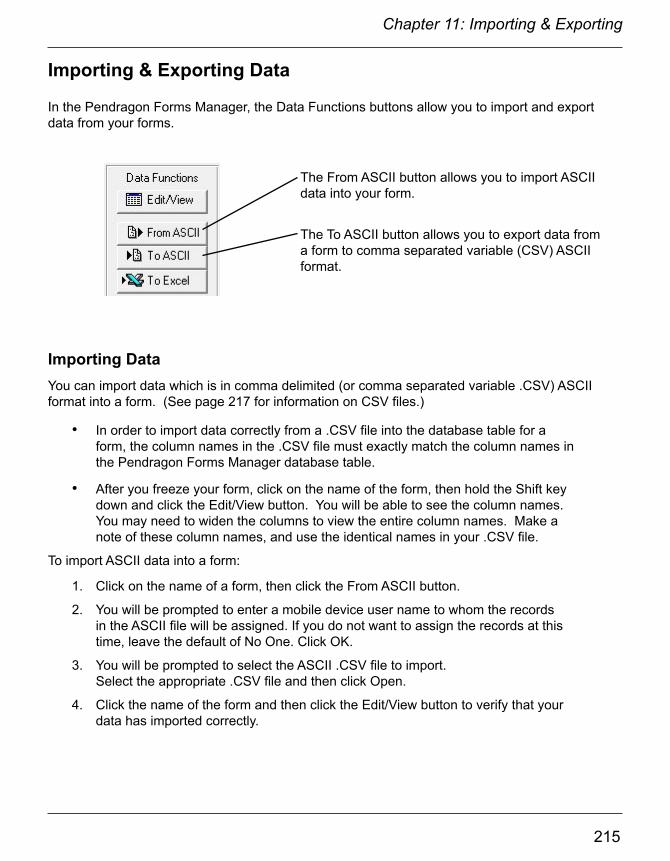
214
Chapter 11: Importing & Exporting
215
Chapter 11: Importing & Exporting
Importing & Exporting Data
In the Pendragon Forms Manager, the Data Functions buttons allow you to import and export data from your forms.
The From ASCII button allows you to import ASCII data into your form.
The To ASCII button allows you to export data from a form to comma separated variable (CSV) ASCII format.
Importing DataYou can import data which is in comma delimited (or comma separated variable .CSV) ASCII format into a form. (See page 217 for information on CSV files.)
• In order to import data correctly from a .CSV file into the database table for a form, the column names in the .CSV file must exactly match the column names in the Pendragon Forms Manager database table.
• After you freeze your form, click on the name of the form, then hold the Shift key down and click the Edit/View button. You will be able to see the column names. You may need to widen the columns to view the entire column names. Make a note of these column names, and use the identical names in your .CSV file.
To import ASCII data into a form:
1. Click on the name of a form, then click the From ASCII button.
2. You will be prompted to enter a mobile device user name to whom the records in the ASCII file will be assigned. If you do not want to assign the records at this time, leave the default of No One. Click OK.
3. You will be prompted to select the ASCII .CSV file to import.Select the appropriate .CSV file and then click Open.
4. Click the name of the form and then click the Edit/View button to verify that your data has imported correctly.
216
Chapter 11: Importing & Exporting
217
Chapter 11: Importing & Exporting
Exporting DataOnce data comes back to the PC from the handheld, you can choose to export the data in two formats:
• Export data to Microsoft Excel.
• Export data to ASCII (.CSV File).
Exporting Data to Microsoft ExcelTo create a report, you can export data to Microsoft Excel.
1. In the Pendragon Forms Manager, click on a form to select that form.
2. Click on the To Excel button to export the data to an Excel spreadsheet file. You will be prompted for a file name for the Excel Spreadsheet.
3. After exporting the data to Excel, close the Pendragon Forms Manager. You can then open the Excel file and use Excel to create your report.
Exporting Data to ASCII (.CSV File)If you need to send the data to another database, you can export the data to ASCII, and then import the ASCII data into your own database.
1. In the Pendragon Forms Manager, click on a form to select that form.
2. Click on the To ASCII button to export the data to a comma delimited ASCII file (a .TXT file or a .CSV file - Comma Separated Variable file). You will be prompted for a file name for the ASCII file.

216
Chapter 11: Importing & Exporting
217
Chapter 11: Importing & Exporting
Creating an ASCII (.CSV) File
If you have data in Excel or in a database, you can use this data to create a form, or to import into the fields on the form. Data has to be in an ASCII format called comma delimited ASCII or comma separated variable ASCII (.CSV file extension) in order to work with Pendragon Forms.
Format of a .CSV FileA CSV File is a text file in which the first row identifies the field names, and all subsequent rows are individual records. Data within each record is separated by a comma (hence the name comma separated variable or CSV). Text is surrounded by double quotes.
Sample CSV File:
Name,Address,IDNumber,FavoriteColor
“John Smith”,”22 Cherry Lane”,45,”Blue”
“Peter Panera”,”418 N. Filmont Ave.”,78,”Green”
“Sarah Jane Smyth”,”71 Barley Lane”,5180,”Purple”
Important:
The column names in the first row of the CSV file must exactly match the column names in the database table of the form. To see the column names used by the form:
1. In the Pendragon Forms Manager, create the form and freeze the form.
2. Click on the name of the form to select it, then hold down the SHIFT key and press the Edit/View button. This will display the columns in the database table for the form.
3. You may need to widen the columns to view the entire column names. Make a note of the exact column names, and use the same column names in your .CSV file.
Creating a .CSV File from Microsoft ExcelRefer to the picture on the next page.
1. In your data file, the first row should contain the name of each column of data. These names must correspond to the column names in your form.
2. Each row should contain a separate data record.
3. Keep your file in its original format (e.g. an Excel worksheet). But also make a copy and save the copy as file type .CSV - comma delimited ASCII.
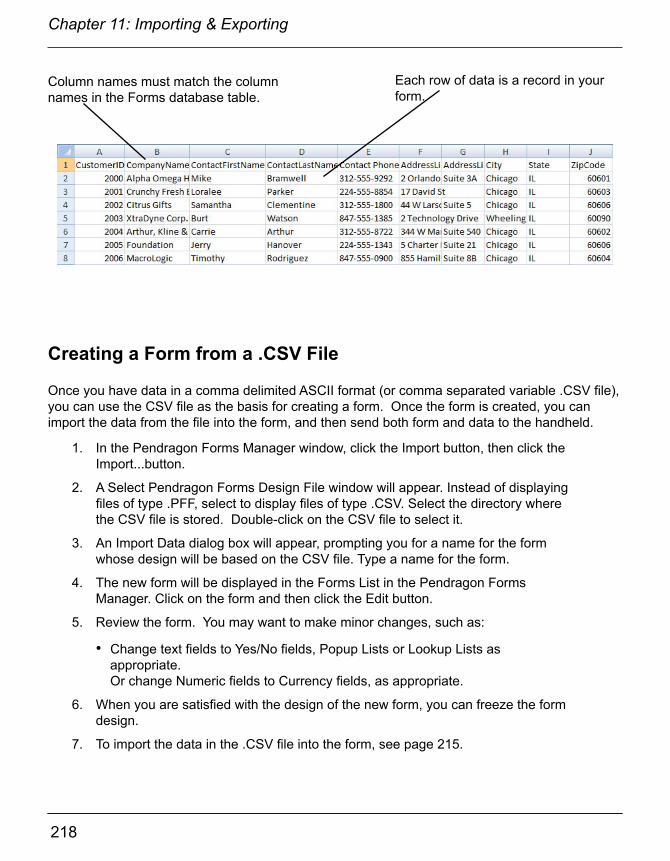
218
Chapter 11: Importing & Exporting
219
Column names must match the column names in the Forms database table.
Each row of data is a record in your form.
Creating a Form from a .CSV File
Once you have data in a comma delimited ASCII format (or comma separated variable .CSV file), you can use the CSV file as the basis for creating a form. Once the form is created, you can import the data from the file into the form, and then send both form and data to the handheld.
1. In the Pendragon Forms Manager window, click the Import button, then click the Import...button.
2. A Select Pendragon Forms Design File window will appear. Instead of displaying files of type .PFF, select to display files of type .CSV. Select the directory where the CSV file is stored. Double-click on the CSV file to select it.
3. An Import Data dialog box will appear, prompting you for a name for the form whose design will be based on the CSV file. Type a name for the form.
4. The new form will be displayed in the Forms List in the Pendragon Forms Manager. Click on the form and then click the Edit button.
5. Review the form. You may want to make minor changes, such as:
• Change text fields to Yes/No fields, Popup Lists or Lookup Lists as appropriate. Or change Numeric fields to Currency fields, as appropriate.
6. When you are satisfied with the design of the new form, you can freeze the form design.
7. To import the data in the .CSV file into the form, see page 215.
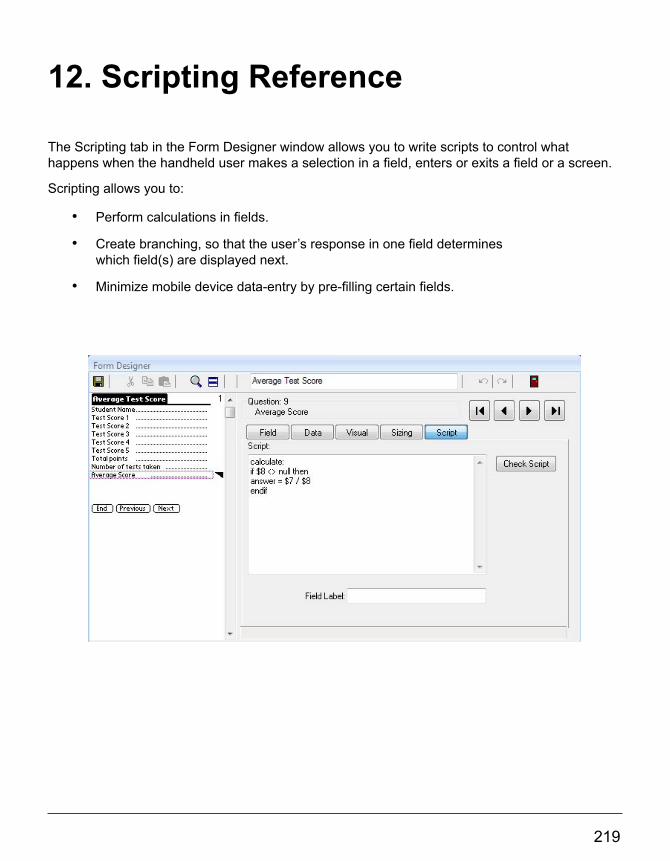
218
Chapter 11: Importing & Exporting
219
12. Scripting Reference
The Scripting tab in the Form Designer window allows you to write scripts to control what happens when the handheld user makes a selection in a field, enters or exits a field or a screen.
Scripting allows you to:
• Perform calculations in fields.
• Create branching, so that the user’s response in one field determines which field(s) are displayed next.
• Minimize mobile device data-entry by pre-filling certain fields.

220
Chapter 12: Scripting Reference
221
Chapter 12: Scripting Reference
Format of a Script
A script consists of at least one event procedure. An event procedure contains:
• An event procedure label + statement(s).
The event procedure label determines when the script will be run.
The statements are the actions which are performed when the script is run.
This is an event procedure label that specifies when the script will run.
These are the statements (i.e. actions) that will be performed when the script runs.
This chapter describes the possible event procedures and statements that you can put in a script.
To create a script for a field:
1. In the Form Designer window, click on a field in the Preview Area to select a field.
2. Click the Script tab.
3. Type the script for the field. A script consists of an event procedure and one or more statements. (See following pages.)
4. Click the Check Script button to check the syntax of the script.
5. You can change a script even after you freeze a form design. This means that if you need to modify a script, you can do so, and then just re-distribute the form to the mobile device. You do not need to copy the form design in order to modify a script.
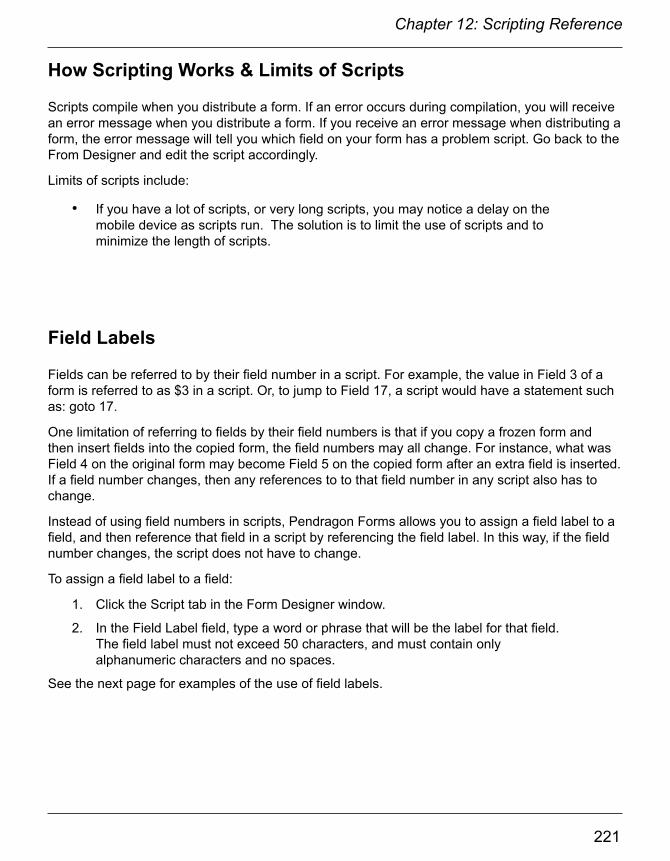
220
Chapter 12: Scripting Reference
221
Chapter 12: Scripting Reference
How Scripting Works & Limits of Scripts
Scripts compile when you distribute a form. If an error occurs during compilation, you will receive an error message when you distribute a form. If you receive an error message when distributing a form, the error message will tell you which field on your form has a problem script. Go back to the From Designer and edit the script accordingly.
Limits of scripts include:
• If you have a lot of scripts, or very long scripts, you may notice a delay on the mobile device as scripts run. The solution is to limit the use of scripts and to minimize the length of scripts.
Field Labels
Fields can be referred to by their field number in a script. For example, the value in Field 3 of a form is referred to as $3 in a script. Or, to jump to Field 17, a script would have a statement such as: goto 17.
One limitation of referring to fields by their field numbers is that if you copy a frozen form and then insert fields into the copied form, the field numbers may all change. For instance, what was Field 4 on the original form may become Field 5 on the copied form after an extra field is inserted. If a field number changes, then any references to to that field number in any script also has to change.
Instead of using field numbers in scripts, Pendragon Forms allows you to assign a field label to a field, and then reference that field in a script by referencing the field label. In this way, if the field number changes, the script does not have to change.
To assign a field label to a field:
1. Click the Script tab in the Form Designer window.
2. In the Field Label field, type a word or phrase that will be the label for that field. The field label must not exceed 50 characters, and must contain only alphanumeric characters and no spaces.
See the next page for examples of the use of field labels.
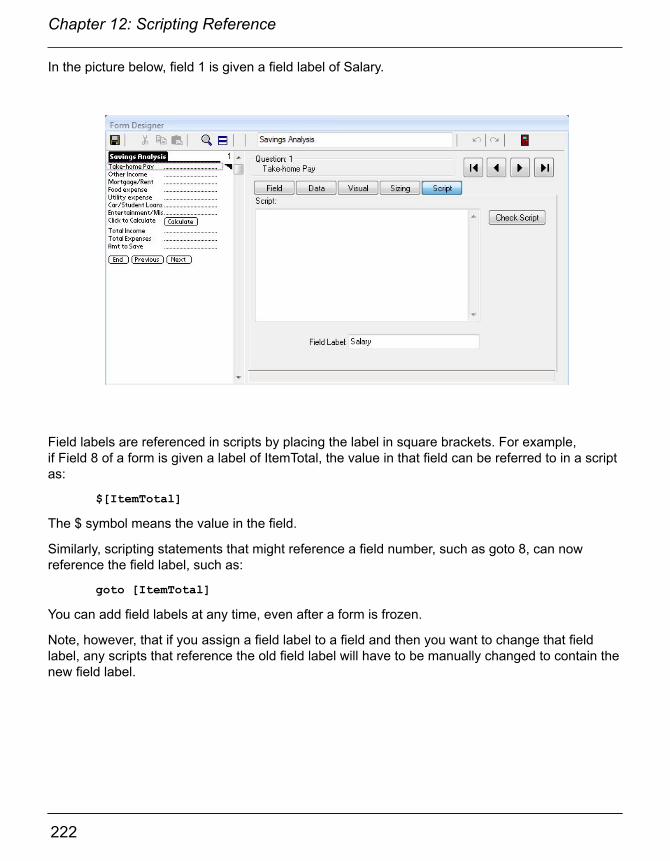
222
Chapter 12: Scripting Reference
223
Chapter 12: Scripting Reference
In the picture below, field 1 is given a field label of Salary.
Field labels are referenced in scripts by placing the label in square brackets. For example, if Field 8 of a form is given a label of ItemTotal, the value in that field can be referred to in a script as:
$[ItemTotal]
The $ symbol means the value in the field.
Similarly, scripting statements that might reference a field number, such as goto 8, can now reference the field label, such as:
goto [ItemTotal]
You can add field labels at any time, even after a form is frozen.
Note, however, that if you assign a field label to a field and then you want to change that field label, any scripts that reference the old field label will have to be manually changed to contain the new field label.
222
Chapter 12: Scripting Reference
223
Chapter 12: Scripting Reference
Adding Comments to Scripts
You can add comments to scripts. Comments help to document the script, but are not sent to the mobile device and are not part of the script instructions.
To add a comment to a script, put the comment is curly brackets { }.
For example: {Here is a comment}
The picture above shows an example of a comment in a script.

224
Chapter 12: Scripting Reference
225
Chapter 12: Scripting Reference
Event Procedures
An event procedure’s label determines when a script will run. Every script must contain at least one event procedure label. There are fourteen event procedures. The table below and continuing on the next few pages describes each event procedure.
EventProcedure
Label
Purpose
enterscreen: The enterscreen: event runs as soon as the user arrives on a screen. The enterscreen: event can be used to pre-fill certain fields on a screen as the user gets to that screen.
exitscreen: The exitscreen: event runs as soon as the user leaves a screen to go to another screen. The user must tap the Next button or End button. The exitscreen: event can be used to pre-fill certain fields on the next screen based on values entered in the current screen. A goto statement (see page 252) in an exitscreen: event lets the user branch to a specified screen.
enter: The enter: event runs only when the cursor enters a Text, Numeric or Currency field. If the first field on a screen is a Text, Numeric or Currency field with an enter: event, the script will run as the mobile device user gets to that screen. If the field with the script is not the first field on the screen, the script will run when the user taps in that field.
exit: The exit: event runs only when the user exits a Text, Numeric or Currency field. This means that the exit: event will run when the user taps in the next field after a Text, Numeric or Currency field, or if the user taps the Next arrow button to move to the next screen. The exit: script is only run when the user is moving ‘forward’, for example from field 8 to field 9, and not ‘backward’ from field 9 to field 8.
select: The select: event occurs when the user selects an option or accepts a dialog associated with a field. The select: event is typically used in branching, so that when the user selects an option, he/she branches to a field depending on the selection made. A select: event is only triggered in fields that allow a selection, such as a Popup List, Lookup List or a checkbox. Leaving a selection field blank will cause the select: script not to run.
Text, Numeric and Currency fields do not trigger a select: event.

224
Chapter 12: Scripting Reference
225
Chapter 12: Scripting Reference
EventProcedure
Label
Purpose
initialize: The initialize: event runs only once when a new record is created. The initialize: event is often used to set values in Date and Date&Time fields, so that when the user creates a new record, these fields are already filled in.
open: The open: event runs only once whenever a record is entered. The open: event is used instead of an initialize: event if you need a script to run every time a record is accessed.
calculate: A calculate: event is used to place the result of a calculation into a field. Typically, the calculated result depends on the values in other fields. The calculate: event is triggered when any field is updated manually or updated via a script. As you exit the updated field, any calculate: script in Field 1 is run, followed by a calculate: script in Field 2, then Field 3, etc.
There is a performance penalty if there are a lot of fields on the form.For example, if you have a form with 100 fields and the form contains one calculate: script, then that script will be run 100 times as you enter data and then exit each field.
click: A click: event is primarily used in Button fields. The click: event allows a script to run when the mobile device user taps on the button in the Button field. See page 297.
A click: event can also run when you tap in a Lookup List field, before the list is displayed. This is useful if you are performing a Lookup to Another Form, and you want to filter the records that are displayed in the list. See pages 312-313.
A click: event can be run in a Section field, if you tap the question area or graphic in a Section field. .
A click: event can run in a Subform field.
A click: event can run in a Custom Control field, provided that the creator of the Custom Control application allows it.

226
Chapter 12: Scripting Reference
227
Chapter 12: Scripting Reference
EventProcedure
Label
Purpose
validate: A validate: event runs when the mobile device user leaves a record. The script in a validate: event can be used to perform additional validation on various fields.

226
Chapter 12: Scripting Reference
227
Chapter 12: Scripting Reference
Variables
Variables are used in scripting statements to represent values in calculations, and to refer to the values of fields.
Pendragon Forms scripts support the following variables:
answer Represents the value of the current field.Example: answer = 10 puts the number 10 in the current field.Example2: answer = $7 puts the value in field 7 into the current field.Example3: answer = result puts the value that is currently in the result variable into the current field.
result Used as a temporary variable for storing intermediate calculations. Several scripting statements also place values into the result variable.
Example: result = 6 + 19 stores the number 25 in the result variable.
Example 2: result = $5 + $6 adds up the values in fields 5 and 6, and places the sum of the two fields in the result variable
Example 3: result = result + $15 adds the existing value in result to the value in field 15, and stores the sum of the two values back in the result variable.
$number $ is a field reference, used to refer to the value in the specified field.
$[label] Example: $5 means the value in field 5.
Example2: $[OrderTotal] means the value in a field with the field label of OrderTotal.
temp temp is a ‘free’ variable that can be used to store data. Whereas scripting statements place values into the result variable, the value in the temp variable can be set in a script and will be preserved until you change this value in a script yourself, or until Pendragon Forms is no longer the active application on the mobile device.

228
Chapter 12: Scripting Reference
229
Chapter 12: Scripting Reference
null Null is a constant which is equivalent to an empty string.Example: $10 = null sets the value of field 10 to null.
Example 2: calculate: if $4 <> null then answer = $3 / $4 endif
In this example, if field 4 is not null, then a calculation is performed.
buffer buffer is another ‘free’ variable that can be used to store data, similar to the temp variable. The buffer variable can be set in a script and will be preserved until you change this value in a script yourself, or until Pendragon Forms is no longer the active application on the mobile device.
lookupname lookupname is a variable that can be used to determine the name of the Lookup List that will be displayed when a user taps in a Lookup List field. Lookupname is set with a setlookupname statement - see page 301.
lookuplocale lookuplocale is another variable that can be used to determine the name of the Lookup List that will be displayed when a user taps in a Lookup List field. Lookuplocale is set with a setlookuplocale statement - see page 301.

228
Chapter 12: Scripting Reference
229
Chapter 12: Scripting Reference
Functions
Functions are like read-only variables that are used to retrieve recently acquired data or information about the state of the system.
Pendragon Forms supports the following functions:
column number If a record is selected with the select statement (see page 266-268), the column function returns the value of the specified column number in the record.
now The function now is used to store the current date and time.For an example, see page 287.
recordtimestamp Returns the creation date and time of the record.
recordmodified Returns 0 if the record is not modified, or returns 1 of the record has been modified.
scandata Stores the value of a bar code that has just been scanned. Used in a scan: event script, the value of scandata can be placed into a Text field.
tapx Stores an X-coordinate (horizontal coordinate) when a user taps in a Section field. On a mobile device (even a high resolution device), the screen has X-coordinates ranging from 0 - 159. The tapx function can be used to determine where on a picture in a Section field a user has tapped horizontally.
tapy Stores a Y-coordinate (vertical coordinate) when a user taps in a Section field. On a mobile device (even a high resolution device), the screen has Y-coordinates ranging from 0 - 159. Pendragon Forms reserves Y-coordinates 0-15 for the title bar, and Y-coordinates 145-159 for the buttons at the bottom of the Layout View screen. Valid values for tapy are therefore in the range 16-144. The tapy function can be used to determine where on a picture in a Section field a user has tapped vertically.
username Username stores user name of the mobile device.

230
Chapter 12: Scripting Reference
231
Chapter 12: Scripting Reference
webdata Stores the HTML data returned by a server after the transmit web statement in a script has sent an HTTP request to the server. If the returned data is in XML format, the extract statement can be used to extract components of the data into different fields on the form.
Scientific Functions
Pendragon Forms supports the use of scientific math functions such as sine, cosine, tangent, square root, exponential and log.
The scientific functions that are supported in scripts start on page 276.
Operators
The Pendragon Forms scripting language contains unary and binary operators that make it possible to perform calculations.
Unary OperatorsUnary operators act on one variable. Unary operators include:
integer value Converts a number to its integer part. For instance, 10.6 is converted to 10. In this example, the answer in the current field is given the value of the integer part of field 5.answer = integer $5
- (Minus sign) Converts a number to a negative number.Example: answer = -$8
length value Returns the number of characters in a value.This example returns the number of characters in field 5. calculate: answer = length $5
230
Chapter 12: Scripting Reference
231
Chapter 12: Scripting Reference
Binary OperatorsBinary operators act on two variables. Binary operators include:
+ (Addition) Adds two values. Example: answer = $4 + $5 adds the value in field 4 to the value in field 5.
- (Subtraction) Subtracts one value from another.Example: result = $18 - 20 subtracts the number 20 from the value in field 18.
* (Multiplication) Multiplies two values.Example: $6 = $5 * $4 multiplies the values in fields 5 and 4, and places the result in field 6.
/ (Division) Divides one value by another.Example: answer = $12 / $13 divides the value in field 12 by the value in field 13.
# (Contains) Looks for a character string.Example: if answer # Red then goto 4 endif looks for the string Red in the answer. Quotation marks are used if the string has spaces, example: if answer # “Critical condition” then require 5 endif
% (Modulo division) Returns the remainder of a division.Example: result = $4 % 12 returns the remainder after dividing field 4 by the number 12.
& (Concatenate) Concatenates two strings. Example: If field 2 contained the word Red, then answer = $2 & “ apples” would put the string “Red apples” into the current field.
AND Performs a bitwise AND operation on a binary number. Used to extract information from Multi-Selection fields. See page 299.
OR Performs a bitwise OR operation. Used to assign a value to a Multi-Selection field.

232
Chapter 12: Scripting Reference
233
Chapter 12: Scripting Reference
Statements
There are three types of statements that can be used in scripts: Assignment statements, Conditional statements and Action statements.
Assignment Statements
Assignment statements place a value into a field or into a temporary variable. A dollar sign before a field number means the value in that field. For example, $7 means the value in field 7, whereas 7 means the number seven.
You can also use field labels to reference a field by a label instead of by field number. If field labels are being used, they must appear in square brackets. A dollar sign in front of a field label means the value in that field, e.g. $[SubTotal] means the value in a field whose field label is SubTotal.
The assignment statements are:
answer = <expression> Places the result of a calculation into the current field. Note that only simple expressions, involving not more than two values and one operator (+ - * /) can be used.In the following example, the value in field 4 is multiplied by the value in field 5, and the calculated result is placed in the current field. calculate: answer = $4 * $5
In this example, the value in field 8 is divided by the number 10, and the result is placed in the current field. calculate: answer = $8 / 10
The Answer statement can be used with field labels.
In this example, one field has a field label called ItemTotal and another field has a label called TaxRate. Clicking a button calculates the tax and places the calculated result into the current field.
click: answer = $[ItemTotal] * $[TaxRate]
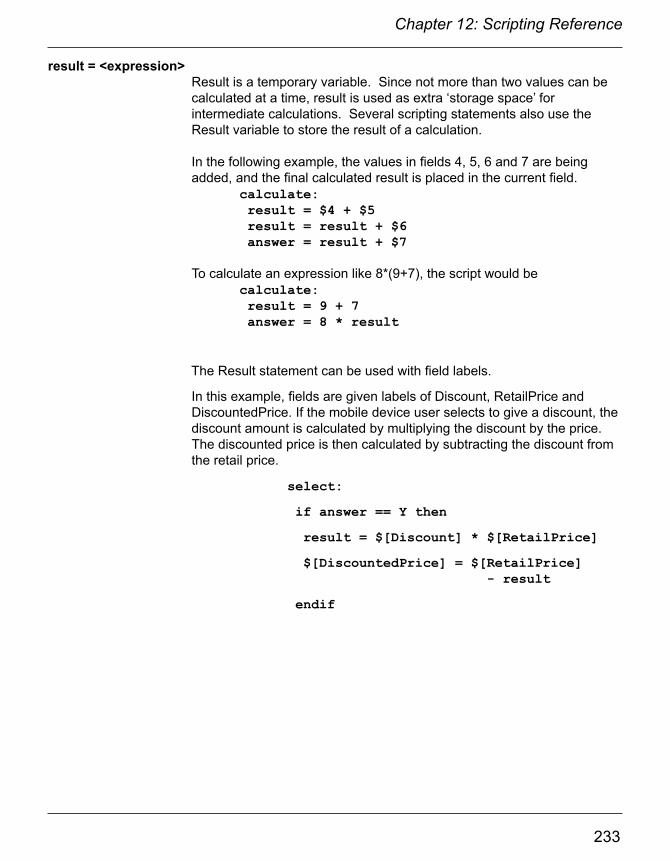
232
Chapter 12: Scripting Reference
233
Chapter 12: Scripting Reference
result = <expression> Result is a temporary variable. Since not more than two values can be calculated at a time, result is used as extra ‘storage space’ for intermediate calculations. Several scripting statements also use the Result variable to store the result of a calculation.
In the following example, the values in fields 4, 5, 6 and 7 are being added, and the final calculated result is placed in the current field. calculate: result = $4 + $5 result = result + $6 answer = result + $7
To calculate an expression like 8*(9+7), the script would be calculate: result = 9 + 7 answer = 8 * result
The Result statement can be used with field labels.
In this example, fields are given labels of Discount, RetailPrice and DiscountedPrice. If the mobile device user selects to give a discount, the discount amount is calculated by multiplying the discount by the price. The discounted price is then calculated by subtracting the discount from the retail price.
select:
if answer == Y then
result = $[Discount] * $[RetailPrice]
$[DiscountedPrice] = $[RetailPrice] - result
endif

234
Chapter 12: Scripting Reference
235
Chapter 12: Scripting Reference
$N = <expression> This assignment statement is used to assign a value to a field from another field.In the following example if the mobile device user selects Yes, then field 15 is set to the number 10; if the user selects No or leaves the field blank, then field 15 is set to the number 5. select: if answer == Y then $15 = 10 else $15 = 5 endif
Field labels can be used when assigning a value to a field.
In this example a field with the label Daily Total is assigned the value of the sum of a field with the label Total and a field with the label Surcharge.
calculate:
$[Daily Total] = $[Total] + $[Surcharge]
temp = <expression> Temp is a temporary variable, similar to Result. However, whereas theResult variable is used by various scripting statements to store a value, the Temp variable is reserved for use by you, the form designer. This means that if you assign a value to the Temp variable, that value will remain until you change that value or until the handheld user exits the Pendragon Forms application on the mobile device.
buffer = <expression> Buffer is another temporary variable. Similar to temp, if you assign a value to buffer, that value is retained until you change the value or until the user exits the Pendragon Forms application on the mobile device.
assign Assigns a value to the current field. Functions in the same way as answer =. However, answer = is preferred because an answer statement is less ambiguous and easier to read.The following script creates a default value of 100 for a numeric field
calculate if answer = null then assign 100 endif
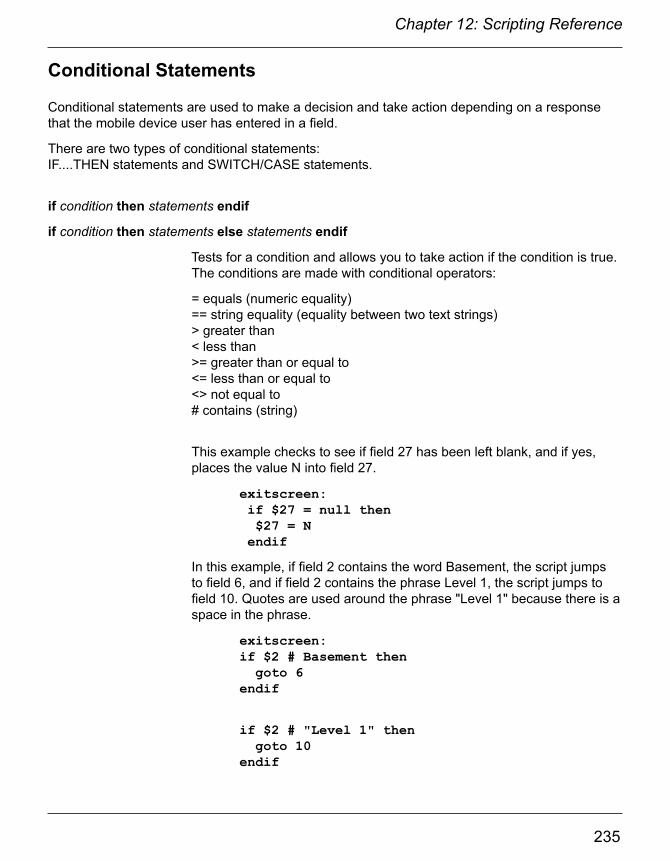
234
Chapter 12: Scripting Reference
235
Chapter 12: Scripting Reference
Conditional Statements
Conditional statements are used to make a decision and take action depending on a response that the mobile device user has entered in a field.
There are two types of conditional statements:IF....THEN statements and SWITCH/CASE statements.
if condition then statements endif
if condition then statements else statements endif
Tests for a condition and allows you to take action if the condition is true. The conditions are made with conditional operators:
= equals (numeric equality)== string equality (equality between two text strings)> greater than< less than>= greater than or equal to<= less than or equal to<> not equal to# contains (string)
This example checks to see if field 27 has been left blank, and if yes, places the value N into field 27.
exitscreen: if $27 = null then $27 = N endif
In this example, if field 2 contains the word Basement, the script jumps to field 6, and if field 2 contains the phrase Level 1, the script jumps to field 10. Quotes are used around the phrase "Level 1" because there is a space in the phrase.
exitscreen: if $2 # Basement then goto 6 endif
if $2 # "Level 1" then goto 10 endif

236
Chapter 12: Scripting Reference
237
Chapter 12: Scripting Reference
In this example, if the answer selected in the current field is High Priority Case, the script will make fields 12 - 18 visible, and jump to field 12. Any other selection in the field causes fields 19 - 21 to be made visible, and causes a jump to field 19. Quotes are used around the phrase “High Priority Case” because there are spaces in the phrase. select: if answer == “High Priority Case” then show from 12 to 18 goto 12 else show from 19 to 21 goto 19 endif
The use of the == (string equality operator) means that the answer selected must exactly match the text string given. String equality is recommended for use in Popup List, Lookup List or Yes/No checkbox fields, where you can exactly predict the possible answers that the user can select.
IF...THEN...ENDIF statements and IF...THEN...ELSE...ENDIF statements can be used with field labels.
In this example, one field has a label TaxExempt, and another field has a label ItemSum. If the TaxExempt field is No, the current field is
calculated as (1 + TaxRate ) * ItemSum. If the TaxExempt field is Yes, the current field is calculated as just the ItemSum.
calculate:
if $[TaxExempt] == N then result = 1 + $[TaxRate] answer = $[ItemSum] * result else answer = $[ItemSum] endif
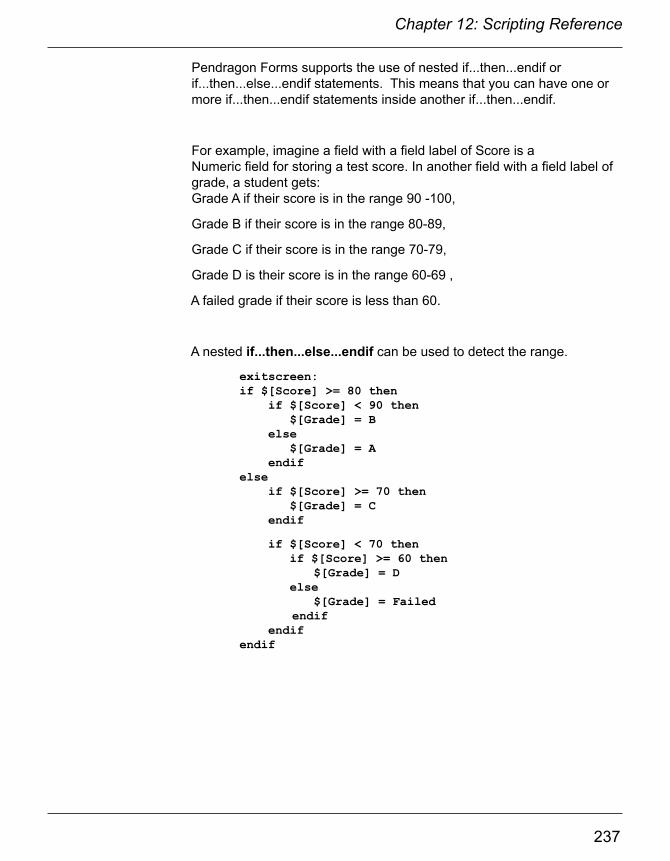
236
Chapter 12: Scripting Reference
237
Chapter 12: Scripting Reference
Pendragon Forms supports the use of nested if...then...endif or if...then...else...endif statements. This means that you can have one or more if...then...endif statements inside another if...then...endif.
For example, imagine a field with a field label of Score is a Numeric field for storing a test score. In another field with a field label of grade, a student gets:Grade A if their score is in the range 90 -100,
Grade B if their score is in the range 80-89,
Grade C if their score is in the range 70-79,
Grade D is their score is in the range 60-69 ,
A failed grade if their score is less than 60.
A nested if...then...else...endif can be used to detect the range.
exitscreen: if $[Score] >= 80 then if $[Score] < 90 then $[Grade] = B else $[Grade] = A endif else if $[Score] >= 70 then $[Grade] = C endif
if $[Score] < 70 then if $[Score] >= 60 then $[Grade] = D else $[Grade] = Failed endif endif endif
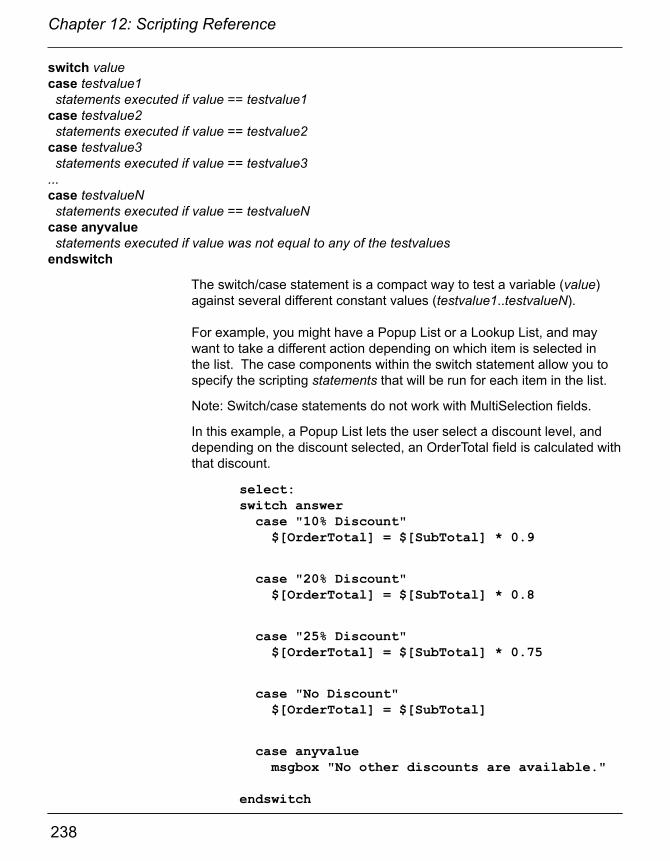
238
Chapter 12: Scripting Reference
239
Chapter 12: Scripting Reference
switch valuecase testvalue1 statements executed if value == testvalue1case testvalue2 statements executed if value == testvalue2case testvalue3 statements executed if value == testvalue3...case testvalueN statements executed if value == testvalueNcase anyvalue statements executed if value was not equal to any of the testvaluesendswitch
The switch/case statement is a compact way to test a variable (value) against several different constant values (testvalue1..testvalueN).
For example, you might have a Popup List or a Lookup List, and may want to take a different action depending on which item is selected in the list. The case components within the switch statement allow you to specify the scripting statements that will be run for each item in the list.
Note: Switch/case statements do not work with MultiSelection fields.
In this example, a Popup List lets the user select a discount level, and depending on the discount selected, an OrderTotal field is calculated with that discount.
select: switch answer case "10% Discount" $[OrderTotal] = $[SubTotal] * 0.9
case "20% Discount" $[OrderTotal] = $[SubTotal] * 0.8
case "25% Discount" $[OrderTotal] = $[SubTotal] * 0.75
case "No Discount" $[OrderTotal] = $[SubTotal]
case anyvalue msgbox "No other discounts are available."
endswitch
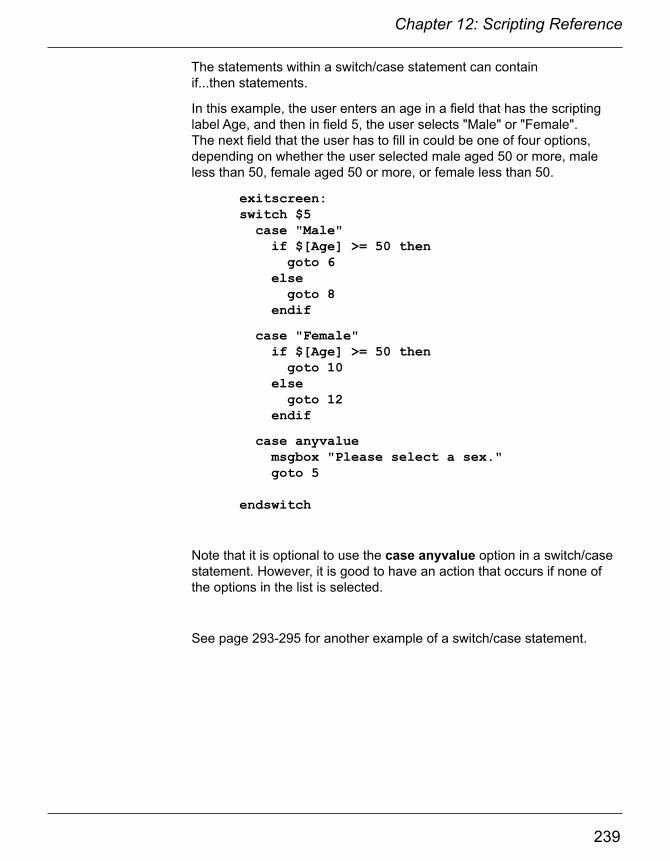
238
Chapter 12: Scripting Reference
239
Chapter 12: Scripting Reference
The statements within a switch/case statement can containif...then statements.
In this example, the user enters an age in a field that has the scripting label Age, and then in field 5, the user selects "Male" or "Female". The next field that the user has to fill in could be one of four options, depending on whether the user selected male aged 50 or more, male less than 50, female aged 50 or more, or female less than 50.
exitscreen: switch $5 case "Male" if $[Age] >= 50 then goto 6 else goto 8 endif
case "Female" if $[Age] >= 50 then goto 10 else goto 12 endif
case anyvalue msgbox "Please select a sex." goto 5 endswitch
Note that it is optional to use the case anyvalue option in a switch/case statement. However, it is good to have an action that occurs if none of the options in the list is selected.
See page 293-295 for another example of a switch/case statement.

240
Chapter 12: Scripting Reference
241
Chapter 12: Scripting Reference
Action Statements
Action statements allow a script to perform an action, such as branching to a different field, showing or hiding a field, or displaying a message. The action statements are listed here.
abortform Aborts the form, deleting the current record from the mobile device. Can be used in Click, Select, Exit and Scan events only. In the following example, the record is deleted and the form is aborted if the value in field 5 is less than zero. exit: if $5 < 0 then abortform endif
also Used to combine select statements for the same form, to narrow the selection of records that are displayed when performing a lookup to another form.
Typically, select statements only work one at a time, meaning that if one select statement is followed by another, the second select statement will cause the first select statement to be discarded. The use of the also statement between two select statements causes the first selection to be kept, and the second selection to be performed on the subset of records from the first selection.
Note: The also statement only works if the select statements are referencing the same form.
As with any lookup to another form, the current form must have a Lookup List field that references the name of the reference form. Also, fields that you want to copy from the reference form to the current form must have the same field name and field type in both the reference form and the current form.
In this example, imagine that Field 2 of the current form contains a State and Field 3 contains a City. The “Employee List” reference form also contains a State and City. The click: event script is placed in the Lookup List of the current form that is doing the lookup to the reference form. The first select statement selects all employees in the specified State. The also statement retains that selection, and the second select state-ment then selects all employees within the selected State who are in the selected City.
click: select “Employee List” where field 1 is $2 also select “Employee List” where field 2 is $3

240
Chapter 12: Scripting Reference
241
Chapter 12: Scripting Reference
call {Javascript} The call statement allows you to call custom Javascript code.The Javascript code can utilize and modify the value of the result variable. The script continues after the call statement with the updated value of the result variable. Typically, the call statement is used to call Javascript functions that perform computations or access Javascript features that are not available directly through Pendragon Forms.

242
Chapter 12: Scripting Reference
243
Chapter 12: Scripting Reference
callmethod field-number "methodname"
For use with custom controls that provide methods for you to call from a script.
A method is a term for a callable function that is built-in to a custom control. The callmethod statement calls the named method in the custom control that is located in the specified field.
A custom control is a separate program from Pendragon Forms. If the custom control is not loaded or visible on the current screen of your form design on the mobile device, then you cannot use callmethod (it will have no effect).
The result variable is passed to the custom control, and the result variable may be modified by the call.
Each custom control will have its own documentation that specifies what methods are available to be called. See page 137 for information on Custom Controls.
In this example, the GPS Custom Control in field 5 has a method called GPSINFO. The GPS Custom Control runs the click: event script written in field 5. The GPSINFO method puts GPS data into the result variable. This data is copied to the temp variable, and then extract statements are used to extract the GPS Latitude and put the value in field 6, the GPS Longitude is put in field 7, etc. (Refer to the GPS Custom Control documentation starting on page 137 for more information.)
click: result = "" callmethod 5 "GPSINFO" if result <> null then temp = result extract "GPS.LAT" from temp $6 = result extract "GPS.LONG" from temp $7 = result extract "GPS.ACCURACY" from temp $8 = result extract "GPS.ALTITUDE" from temp $9 = result endif

242
Chapter 12: Scripting Reference
243
Chapter 12: Scripting Reference
checkflag statements clearflag Checkflag is used in conjunction with clearflag, to enable you to modify a record with a script without marking the record as modified. This is useful when you want to have your form update some fields for cosmetic purposes without causing the changes to be synchronized back to the server.
For instance, the following script:
open: lookup $5 within "Expense Category"
might be used to lookup a value in a reference table every time the form is opened. Such a script is typically used when some of the fields on the form are not synchronized from the desktop to the mobile device, but must be calculated or looked up instead. (Database developers call thisde-normalization.)
While this technique enables the mobile device user to see related values on the screen, it has the side effect of modifying the record. This would mean that the simple act of viewing a record marks that record as modified, and causes it to be sent back to the desktop, overwriting the original record.
To prevent this side effect from occurring, use the checkflag statement to "memorize" the modification state of the record before any unintended modifications are made. After performing the script statements that you do not want changing the record, use the clearflag statement. Clearflag sets the modified flag back to the memorized value that it had when checkflag was called.
Using checkflag and clearflag, the script above would now be:
open: checkflag lookup $5 within "Expense Category" clearflag
NOTE: Any scripting actions that are supposed to modify the record should be made before checkflag or after clearflag. Otherwise the record will not properly be marked as changed , and will not synchronize.

244
Chapter 12: Scripting Reference
245
Chapter 12: Scripting Reference
clone The clone statement saves the current record, then creates a new record with identical values in all the fields as the original record. Scripting statements that occur after the clone statement are applied to the new record.
Clone statements can reduce the need for manual data entry. See page 298 for an example of using a clone statement in a click: event script to make a Clone Button.
When you use the clone statement, no validation is done on the record that you are leaving nor on the new record created by the clone statement. If you are using your own primary key, the combination of the primary key fields has to be unique for every record. You can use the keyunique statement before the clone statement, to check if the record that you are leaving has a unique primary key. If the record that you are leaving does not have a unique primary key, you can display a message to alert the user, and abandon cloning the record.
In this example, if you have a form in which fields 1, 2 and 3 basically remain the same, but fields 4 and 5 vary every time you record data, you might make Field 6 a Yes/No checkbox that asks the user “Do you need to make another reading?” If the user selects Yes in the following script, the record will be cloned and the values in fields 4 - 6 will be made null so that the user can enter the new values for these fields while retaining the existing values in fields 1 - 3. select: if answer == Y then clone $4 = null $5 = null $6 = null endif

244
Chapter 12: Scripting Reference
245
Chapter 12: Scripting Reference
column number Column is a function that is used with a select statement to retrieve the value in a specified field of a selected record in a reference form.
The number is the column number (i.e. the field number) of the reference form.
In this example, a bar code is placed into field 1 of a form, and then a select statement is used to lookup that barcode in a reference form called Inventory. If a match is found, field 2 of the current form is populated with data from column 3 of the reference form. Field 3 of the current form is populated with data from column 5 of the reference form. scan: $1 = scandata select "Inventory" where field 2 is $1 $2 = column 3 $3 = column 5
count field-numberChecks the current record against all the other records in the database, to see how many records have the same value in the specified field. The number of records that match is placed into the Result variable.
Note: For performance reasons, the count statement should not be used in calculate: events.
If you need to check for uniqueness in a primary key, use the keyunique statement instead of count, because keyunique can check for uniqueness even if the primary key is comprised of more than one field.
This example checks to see if field 6 is unique. validate: count 6 if result > 0 then msgbox “This is a duplicate barcode” endif
246
Chapter 12: Scripting Reference
247
Chapter 12: Scripting Reference
delete Used in conjuction with select statements to delete all the selected records in a reference form.
WARNING: Should only be used with extreme caution to avoid accidentally deleting records from a reference form.
Records are selected with a select, select matching or select where statement. Not recommended for use with select all statement, due to the possibility of deleting all records in a reference form.
246
Chapter 12: Scripting Reference
247
Chapter 12: Scripting Reference
disable { endbutton | nextbutton | backbutton | menus }
Note: It may be easier to switch off the use of these options via Advanced Form Properties - see page 181.
In some form designs, you may want to hide certain buttons and menu options that are usually available to the mobile device user. The disable statement will hide the specified button, and the enable statement will display the specified button. Disable can be used in an open: event if you want the button or menu to be hidden in both new and existing records.
The endbutton specifier will hide the End button. You may want to hide the End button to prevent a mobile device user from exiting a form before viewing all the fields on the form. Warning: if you hide the End button on a form, you will have to give the user a way to exit the form, such as a Button field that when tapped, runs a script to end the form.
The nextbutton specifier will hide the Next button or the right arrow button. You may want to hide the Next button on a form that is being used as a 'main menu' from which the user jumps to other forms.
The backbutton specifier will hide the Previous button or the left arrow button. You may want to hide the Previous button on a form that is being used as a 'main menu' from which the user jumps to other forms. Or you may want to hide this button if your form requires users to answer a question and not go back to view or change answers. The menus specifier will hide certain options that normally appear if the user taps the handheld Menu button. The menus that are disabled include: Delete and Mark All Changed. You may want to hide these menu options if your form design does not use them and you do not want to allow the user access to these menu options.
In this example, the End button, Navigation buttons and menu options are all disabled in an open: script in Field 1 of a form:
open: disable endbutton disable navbuttons disable menus
Since the End button is disabled in the above script, a Button field is added to the end of the form to give the mobile device user a way to exit the form. The script in the Button field is: click: endform
248
Chapter 12: Scripting Reference
249
Chapter 12: Scripting Reference
enable { endbutton | nextbutton | backbutton | menus }
Note: It may be easier to switch off the use of these options via Advanced Form Properties - see pages 181.
In some form designs, you may want to hide certain buttons and menu options that are usually available to the mobile device user. The disable statement will hide the specified button, and the enable statement will display the specified button. Disable should be used in an open: event to ensure that the button or menu is hidden in both new and existing record. Enable can be used in a scripting event where it makes sense to do so. For example, if you use the disable statement or Advanced Form Properties to hide an End button, you can have a button field with a click: event that allows the user to tap the button to end the form. Or you can have a Yes/No Checkbox field and use a select: event script that ends the form is the user selects Yes.
The endbutton specifier refers to the End button that allows the user to end a form at any time.
The nextbutton specifier refers to the Next button or the right arrow button.
The backbutton specifier refers to the Previous button or the left arrow button.
The menus specifier refers to certain options that normally appear if the user taps the mobile device Menu button . The menus include:Delete and Mark All Changed.
If you disable the menus via a disable script or Advanced Form Properties, and you want to use a script to enable the menus, you will turn on all the menus. You cannot select a particular menu to enable.
In this example, the End button, Navigation buttons and menu options are all disabled in an open: script in Field 1 of a form:
open: disable endbutton disable menus
Since the End button is disabled in the above script, a Yes/No Checkbox field is added to the end of the form to give the mobile device

248
Chapter 12: Scripting Reference
249
Chapter 12: Scripting Reference
user a way to exit the form. If the user selects yes to end the form, the endbutton appears. The script in the Yes/No field is: select: if answer == Y then enable endbutton endif
Also, see the use of endform as a means of exiting a form that does not have an End button.
endform Equivalent to pressing the End button. Saves relevant data, then exits the form. This statement is only available in click:, select:, exitscreen:, exit: and scan: events.
In the following example, if the answer in the current field contains the word Finished, then the record is saved and the form is exited.
exitscreen: if answer # Finished then endform endif
In this example, a Button field is used to exit a form.
click: endform
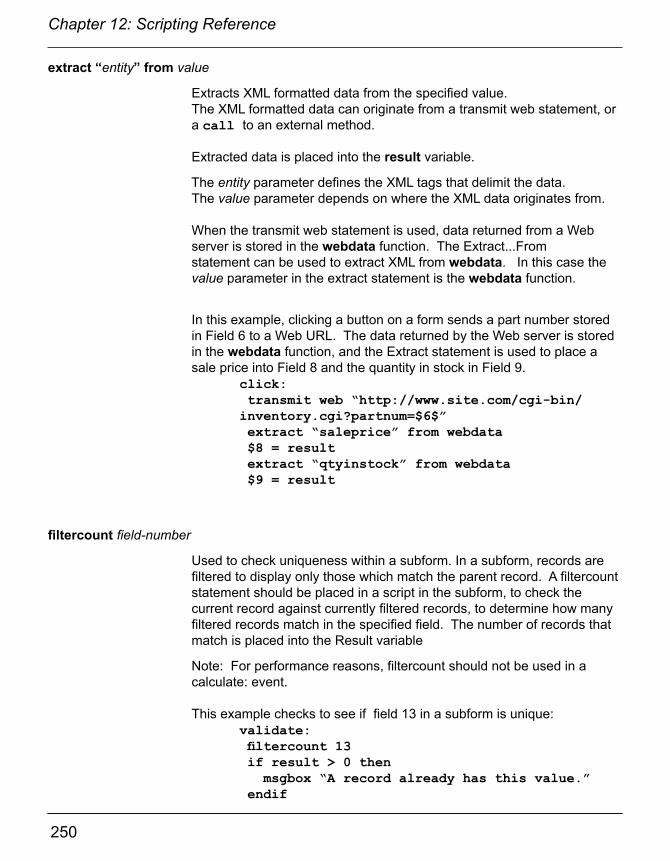
250
Chapter 12: Scripting Reference
251
Chapter 12: Scripting Reference
extract “entity” from value
Extracts XML formatted data from the specified value. The XML formatted data can originate from a transmit web statement, or a call to an external method.
Extracted data is placed into the result variable.
The entity parameter defines the XML tags that delimit the data.The value parameter depends on where the XML data originates from.
When the transmit web statement is used, data returned from a Web server is stored in the webdata function. The Extract...From statement can be used to extract XML from webdata. In this case the value parameter in the extract statement is the webdata function.
In this example, clicking a button on a form sends a part number stored in Field 6 to a Web URL. The data returned by the Web server is stored in the webdata function, and the Extract statement is used to place a sale price into Field 8 and the quantity in stock in Field 9. click: transmit web “http://www.site.com/cgi-bin/ inventory.cgi?partnum=$6$” extract “saleprice” from webdata $8 = result extract “qtyinstock” from webdata $9 = result
filtercount field-number
Used to check uniqueness within a subform. In a subform, records are filtered to display only those which match the parent record. A filtercount statement should be placed in a script in the subform, to check the current record against currently filtered records, to determine how many filtered records match in the specified field. The number of records that match is placed into the Result variable
Note: For performance reasons, filtercount should not be used in a calculate: event.
This example checks to see if field 13 in a subform is unique: validate: filtercount 13 if result > 0 then msgbox “A record already has this value.” endif

250
Chapter 12: Scripting Reference
251
Chapter 12: Scripting Reference
format value {date | time | datetime | currency | fixed | month | day | year }
Internally, Pendragon Forms stores dates and times as a number - the number of seconds since 01/01/1904. Currency fields are stored internally as a number of cents. No special formatting is required if these types of fields are stored in the appropriate field type - for instance, if a currency amount is stored and displayed in a Currency field, no formatting is required.
However, if a Date, Time, Date&Time or Currency field needs to be displayed in a Text field, the format statement can be used to display the field in a way that is readable to the mobile deviceuser. The formatted value is placed in the result variable.
The following example causes the date in Field 1 to be formatted, and the formatted date to be placed in Field 8. calculate: format $1 date $8 = result
The fixed specifier displays a currency without a currency symbol, and the currency specifier displays a currency with a currency symbol. In this example, if Field 7 contains the value of $15.95, then Field 8 will contain 15.95 and Field 9 will contain $15.95. calculate: format $7 fixed $8 = result format $7 currency $9 = result
The month, day and year specifiers can be used to extract the month, day and year from a date.
formsum "name-of-form" fieldnumber
Adds up the values across all records for the specified form and the specified field, and places the calculated result in the Result variable.
In the following example, clicking a button adds up all the values of field 17 across all records in the form "Daily Sales". The result is then put in field 8 of the current form. click: formsum "Daily Sales" 17 $8 = result
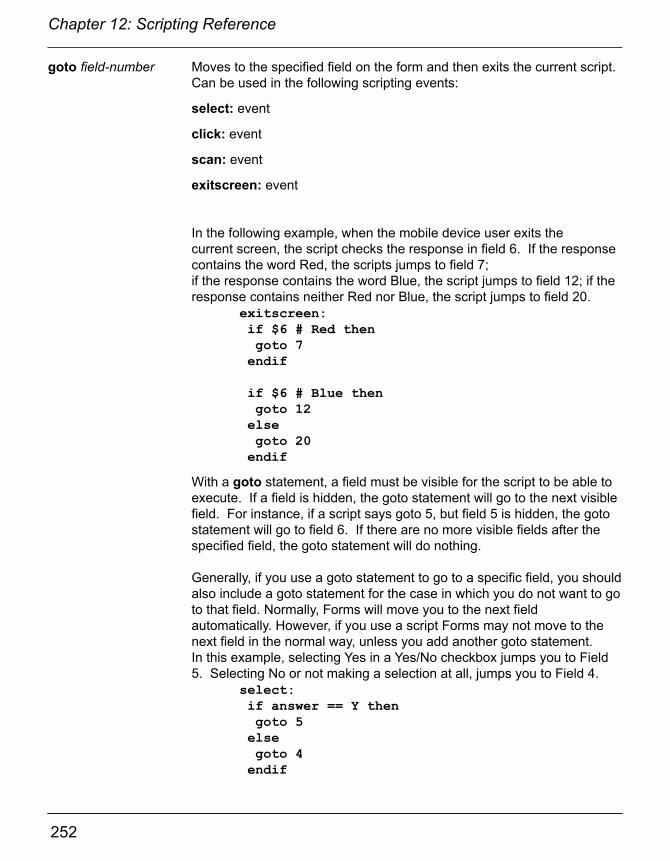
252
Chapter 12: Scripting Reference
253
Chapter 12: Scripting Reference
goto field-number Moves to the specified field on the form and then exits the current script. Can be used in the following scripting events:
select: event
click: event
scan: event
exitscreen: event
In the following example, when the mobile device user exits the current screen, the script checks the response in field 6. If the response contains the word Red, the scripts jumps to field 7;if the response contains the word Blue, the script jumps to field 12; if the response contains neither Red nor Blue, the script jumps to field 20. exitscreen: if $6 # Red then goto 7 endif
if $6 # Blue then goto 12 else goto 20 endif
With a goto statement, a field must be visible for the script to be able to execute. If a field is hidden, the goto statement will go to the next visible field. For instance, if a script says goto 5, but field 5 is hidden, the goto statement will go to field 6. If there are no more visible fields after the specified field, the goto statement will do nothing.
Generally, if you use a goto statement to go to a specific field, you should also include a goto statement for the case in which you do not want to go to that field. Normally, Forms will move you to the next field automatically. However, if you use a script Forms may not move to the next field in the normal way, unless you add another goto statement. In this example, selecting Yes in a Yes/No checkbox jumps you to Field 5. Selecting No or not making a selection at all, jumps you to Field 4. select: if answer == Y then goto 5 else goto 4 endif

252
Chapter 12: Scripting Reference
253
Chapter 12: Scripting Reference
gotosubform formname { new | review | normal | oneway}
The Gotosubform statement allows programmatic jumps to subform records without the use of a Subform List field on the parent form. The Gotosubform statement can be used to make the transition from a parent form to a subform transparent to the mobile device user.
The normal specifier causes the Gotosubform statement to behave just like a regular Subform List field, meaning that a review screen of existing subform records is displayed and the mobile device user can review an existing subform record or to create a new record. In this example, a button field is used to allow the user to access a subform:
click: gotosubform "Customer Contacts" normal
The new specifier causes a new subform record to be created, without the mobile device user seeing a list of existing subform records.
In this example, clicking a button creates a new subform record. click: gotosubform “Item Ordered” new
The review specifier is similar to using a Single Subform field on the parent form, and provides a way to create a form with more than 250 fields by linking together more than one form design. Using the review specifier displays the most recently created subform record, or if none exists, a new subform record will be created.In this example, clicking a button jumps to the next form.
click: gotosubform "Survey2" review
With gotosubform normal, new and review, when the user ends the subform, he/she returns to the parent form. The oneway specifier, however, allows you to return to any form: a parent or a grandparent form. Normally if you go from form A --> B --> C --> D, when you end form D you have to return from D --> C --> B --> A. With gotosubform oneway, you can choose, for example, to go from form A --> B --> C --> D -->A or from form A --> B --> C --> D --> B .The destination form retains any parent-child association (if any) that it had previously, so if you jump from Form D --> B, and B is a subform of A, then when you end form B you would return to form A.In this example, the script is placed in a Button field in Form D.
click: gotosubform "Form B" oneway
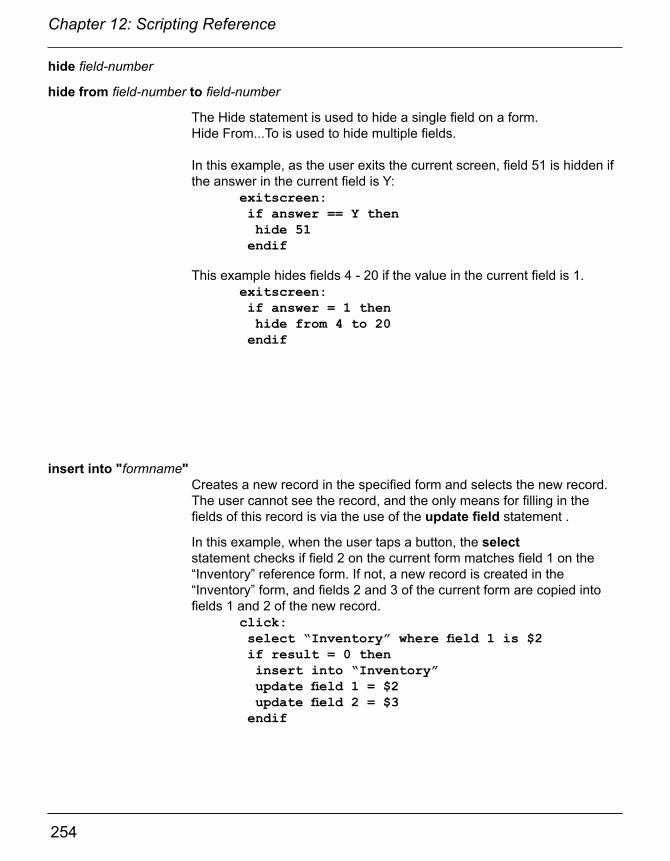
254
Chapter 12: Scripting Reference
255
Chapter 12: Scripting Reference
hide field-number
hide from field-number to field-number
The Hide statement is used to hide a single field on a form. Hide From...To is used to hide multiple fields.
In this example, as the user exits the current screen, field 51 is hidden if the answer in the current field is Y: exitscreen: if answer == Y then hide 51 endif
This example hides fields 4 - 20 if the value in the current field is 1. exitscreen: if answer = 1 then hide from 4 to 20 endif
insert into "formname" Creates a new record in the specified form and selects the new record. The user cannot see the record, and the only means for filling in the fields of this record is via the use of the update field statement .
In this example, when the user taps a button, the select statement checks if field 2 on the current form matches field 1 on the “Inventory” reference form. If not, a new record is created in the “Inventory” form, and fields 2 and 3 of the current form are copied into fields 1 and 2 of the new record. click: select “Inventory” where field 1 is $2 if result = 0 then insert into “Inventory” update field 1 = $2 update field 2 = $3 endif

254
Chapter 12: Scripting Reference
255
Chapter 12: Scripting Reference
invalidate “message” Only used with the validate: event. The invalidate statement flags the record as having an invalid value, and the mobile device user cannot exit the record until the invalid value is corrected. A message is displayed on the screen, with buttons for the user to Edit or Delete the record.
Note that a validate: script only runs when the user exits the form. If the form has a lot of fields, it may be easier to use an exitscreen: script to check that fields contain valid data before the user moves to the next screen.
In this example, when the user tries to exit a record, if field 25 has a value greater than 100, an error message is displayed and the record is invalidated. The user has to edit field 25 or delete the record. validate: if $25 > 100 then invalidate “Grade cannot exceed 100 points” endif
keycolumn number Normally, the lookup value within formname statement (page 258) finds a record in the form formname by matching the specified value to contents of the Display Key field of the form formname. (If no Display Key is specified, field 1 of the form is the Display Key field by default.)
The keycolumn statement allows you to perform a lookup to another form using a field other than the Display Key field of the reference form. The specified number is the alternate column of the reference form that the lookup...within statement will use to search for a matching record. After the lookup...within statement is run, the keycolumn is reset to the Display Key field once more.
In this example, the lookup...within script searches field 5 of a form called “Inventory Form”.
click: keycolumn 5 lookup $3 within “Inventory Form”

256
Chapter 12: Scripting Reference
257
Chapter 12: Scripting Reference
keyunique Determines whether the primary key of the current record is unique on the mobile device.
Keyunique places the value 1 in the Result variable if the primary key of the current record is unique on the mobile device, or places the value 0 in the Result variable if the primary key is not unique.
Keyunique is typically used before a clone statement. For instance, if you have a barcode as a primary key field, and you are using the clone statement to create new records automatically, before you clone a record you can use keyunique to check that the record has a unique primary key. If the record does not have a unique primary key, the user can be prompted to correct the error before making a new record.
In the example below, field 1 is used to store an inventory ID number or barcode. When the user enters an ID number and clicks a button to check that number, if there is already a value in field 1, the keyunique statement is used to check that the existing ID number (primary key) is unique. If it is not unique, a message is displayed to the user and field 1 is erased. If the primary key is unique then the record is cloned and the new ID number is placed in field 1 of the new record. Keyunique is used again to check that the new ID number is unique, and if it is not, then the ID number is erased from field 1.
click: if $1 <> null then keyunique if result = 1 then clone else msgbox "ID Number has already been entered." $1 = null return endif
$1 = scandata keyunique if result = 0 then msgbox "ID Number has already been entered." $1 = null endif

256
Chapter 12: Scripting Reference
257
Chapter 12: Scripting Reference
launch URLThe Launch statement can launch a new Web browser window that goes to the specified URL (Web address). Mobile device users would need to manually return to the Pendragon Forms Universal window when they wish to resume entering data in Pendragon Forms.
left value length Extracts the left-most characters and places the extracted characters into the Result variable.
The value specifier is the value from which the left-most characters are to be extracted. The value can be a text string in double quotation marks, or it can be a field number such as $46 for field 46.
The length specifier is the number of characters to be extracted.
The following example puts the value MXP in the current field.
enter: left “MXP53802” 3 answer = result
This example puts the first 4 characters from field 16 into the Result variable, and then into the current field.
enter: left $16 4 answer = result
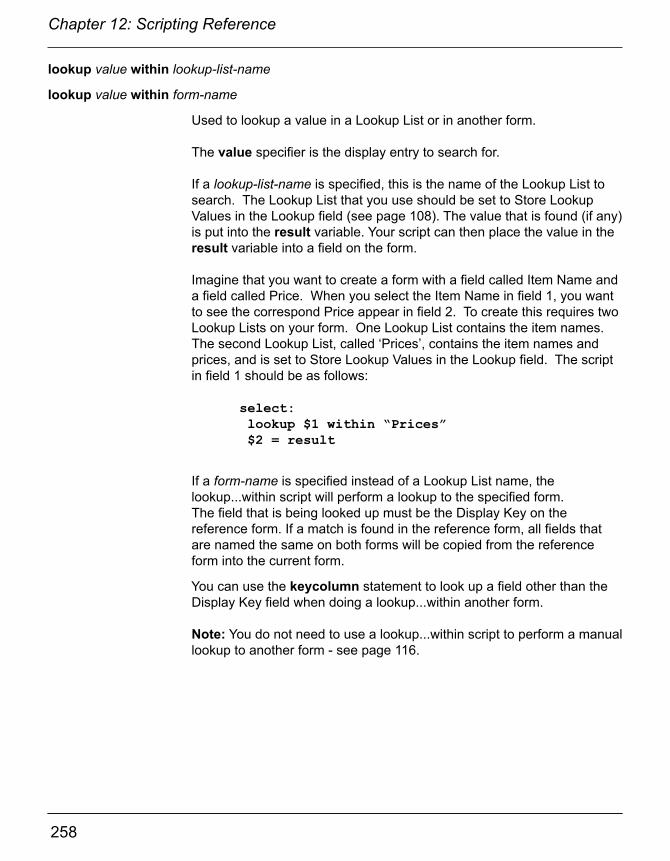
258
Chapter 12: Scripting Reference
259
Chapter 12: Scripting Reference
lookup value within lookup-list-name
lookup value within form-name
Used to lookup a value in a Lookup List or in another form.
The value specifier is the display entry to search for.
If a lookup-list-name is specified, this is the name of the Lookup List to search. The Lookup List that you use should be set to Store Lookup Values in the Lookup field (see page 108). The value that is found (if any) is put into the result variable. Your script can then place the value in the result variable into a field on the form.
Imagine that you want to create a form with a field called Item Name and a field called Price. When you select the Item Name in field 1, you want to see the correspond Price appear in field 2. To create this requires two Lookup Lists on your form. One Lookup List contains the item names. The second Lookup List, called ‘Prices’, contains the item names and prices, and is set to Store Lookup Values in the Lookup field. The script in field 1 should be as follows:
select: lookup $1 within “Prices” $2 = result
If a form-name is specified instead of a Lookup List name, the lookup...within script will perform a lookup to the specified form. The field that is being looked up must be the Display Key on the reference form. If a match is found in the reference form, all fields that are named the same on both forms will be copied from the reference form into the current form.
You can use the keycolumn statement to look up a field other than the Display Key field when doing a lookup...within another form.
Note: You do not need to use a lookup...within script to perform a manual lookup to another form - see page 116.

258
Chapter 12: Scripting Reference
259
Chapter 12: Scripting Reference
mid value start length This function copies length characters from value, starting at position start, and places the characters into the Result variable.
The following example places “123” into the Result variable, and then into the current field. calculate: mid “012345678A” 2 3 answer = result
In this example, 10 characters are extracted from field 5, starting from the 7th character position in field 5. The extracted characters are placed in field 6. calculate: mid $5 7 10 $6 = result

260
Chapter 12: Scripting Reference
261
Chapter 12: Scripting Reference
msgbox “string”
msgbox “prefix+string”
Displays a dialog box on the mobile device. An individual string cannot exceed 512 characters.
This example displays a message if the user enters a value greater than 100 in the current field. exitscreen: if answer > 100 then msgbox “The temperature is very high” endif
If you just use a string, the message box dialog will contain an OK button that the user can tap to clear the dialog window. Alternatively, you can use a special prefix at the start of the text of the string, to add a series of buttons to the message box dialog. The result variable stores a character depending on the button that the user taps.
Prefix included in msgbox string
Labels on Buttons Response stored in Result Variable
?OC? OK, Cancel O, CNo prefix used OK O
You can write a script to take action depending on which button the handheld user taps in the message box dialog.
In this example, if the answer in field 8 is less than zero, a dialog will ap-pear asking if the user wants to continue. The dialog will have two buttons, OK and cancel. If the user taps the OK button, the user will jump to field 12. If the user taps the Cancel button, he/she will jump to field 20. exitscreen: if $8 < 0 then msgbox "?OC?Would you like to continue?" if result == O then goto 12 else goto 20 endif endif

260
Chapter 12: Scripting Reference
261
Chapter 12: Scripting Reference
nullfrom field-number1 to field-number2 Allows a range of fields to be set to NULL.
Field-number1 is the first field in the range and field-number2 is the last field in the range. A field name can be an actual field number, such as 5, or a field label such as [AccountName].
In this example, if the user selects Y in the current field, the record is cloned and fields 5 to 20 are set to null.
select: if answer == Y then clone nullfrom 5 to 20 endif
The words NEXTFIELD and LASTFIELD can be used instead of field numbers. NEXTFIELD means the field immediately after the field con-taining the script. LASTFIELD means the last field on the form.
In this example, if the user selects to erase information, then fields will be erased starting from the field with the field label [CustomerName] and ending with the last field on the form.
exitscreen: if $12 == "Erase" then msgbox "?OC?Are you sure you want to erase this info?"
if result == O then nullfrom [CustomerName] to LASTFIELD endif endif

262
Chapter 12: Scripting Reference
263
Chapter 12: Scripting Reference
optional field-number
optional from field-number to field-number
Makes the specified field optional. Used to override setting the field as Required in the Advanced Field Properties screen. (Note that all fields are optional by default, unless made Required either by setting the Advanced Field Property of Required (page 150), or by making the field Required in a script - page 263.)In this example, if the answer in the current field is Y, then field 7 is optional.
exitscreen: if answer == Y then optional 7 endif
In this example, if the response in field 8 is “Never”, fields 9 to 15 are optional.
exitscreen: if $8 == “Never” then optional from 9 to 15 endif
readonly from field-number to field-number
Used to make a field or a range of fields read-only.
Instead of using a script, you can also make a field read-only in the Form Designer window (see page 167).
In this example, if the value in field 15 is greater than 100, field 16 and fields 20 - 25 are made read-only.
exit: if $15 > 100 then readonly 16 readonly from 20 to 25 endif
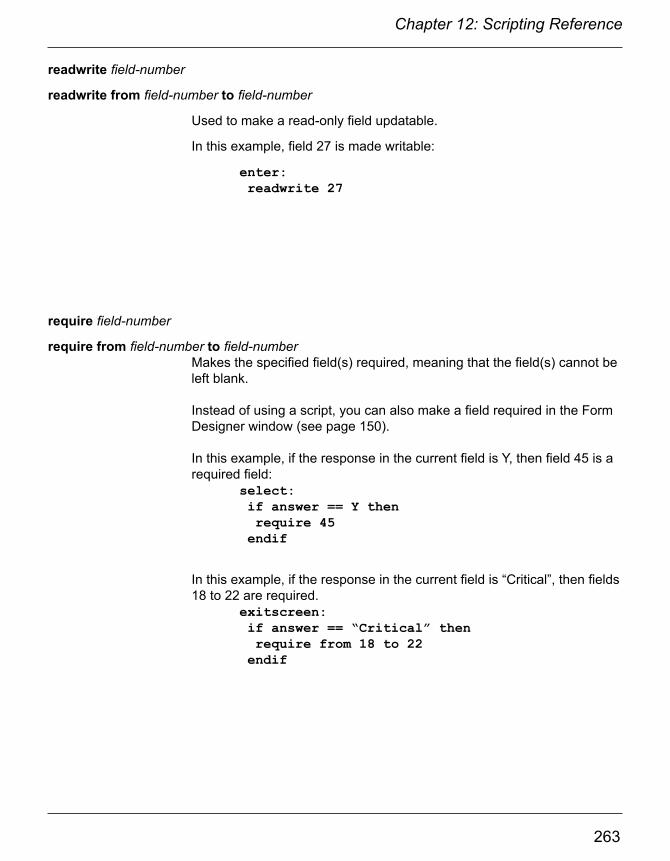
262
Chapter 12: Scripting Reference
263
Chapter 12: Scripting Reference
readwrite field-number
readwrite from field-number to field-number
Used to make a read-only field updatable.
In this example, field 27 is made writable:
enter: readwrite 27
require field-number
require from field-number to field-numberMakes the specified field(s) required, meaning that the field(s) cannot be left blank.
Instead of using a script, you can also make a field required in the Form Designer window (see page 150).
In this example, if the response in the current field is Y, then field 45 is a required field: select: if answer == Y then require 45 endif
In this example, if the response in the current field is “Critical”, then fields 18 to 22 are required. exitscreen: if answer == “Critical” then require from 18 to 22 endif

264
Chapter 12: Scripting Reference
265
Chapter 12: Scripting Reference
right value length Extracts the right-most characters and places the extracted characters into the Result variable.
The value specifier is the value from which the right-most characters are to be extracted. The value can be a text string, or a field, e.g. $50 means the value in field 50.
The length specifier is the number of characters to be extracted.
In this example, the value “129” is placed into the current field.
enterscreen: right “Procedure Code 129” 3 answer = result
Here the last five characters from field 35 are placed into the current field.
exitscreen: right $35 5 answer = result
return Returns from the current script without executing any more instructions. Useful if you want to prevent default instructions from being executed after an IF statement.
In this example, a field with the field label Quantity is to be multiplied by a field labeled Price, and stored in a field labeled Total. However, if the Quantity field is left blank, a message is displayed to the user and the return statement stops the script before the multiplication takes place. calculate: if $[Quantity] is null then msgbox "Please fill in the quantity" return endif
$[Total] = $[Price] * $[Quantity]

264
Chapter 12: Scripting Reference
265
Chapter 12: Scripting Reference
reverselookup value within lookup-list-name
Reverselookup...Within is the opposite of Lookup...Within. Reverselookup takes the lookup value of a Lookup List and returns the corresponding lookup display item, and places the result in the Result variable.
The value specifier is the Lookup List value for which you are searching in the Lookup List. The value can reference a field number, e.g. $15 is the value in field 15.
In this example, imagine that a Lookup List named “Airports” contains the full names of airports as the lookup display items, and the corresponding 3-letter airport codes as the lookup value items. If the user selects an airport code in field 5, making that selection will run the script and place the full airport name in field 6. select: reverselookup $5 within “Airports” $6 = result
review "formname" Used primarily in a click: event or in a scan: event. Used to go to the Review screen for the specified form, so that the user can select and edit a record.
The review statement can be used in conjunction with making your own custom 'Main Menu' that users see when they launch the Forms application. See Chapter 15, Creating a Custom Main Menu, page 326.
The review statement can be used with select statements. A select where statement can select records based on a certain criteria, and then the review statement allows the user to see and edit the filtered records. See page 334.
In this example, tapping a picture in a Section field that is part of a custom 'Main Menu' displays a list of records in a form called Customer Log. click: review "Customer Log"

266
Chapter 12: Scripting Reference
267
Chapter 12: Scripting Reference
select all "formname" Selects all records in the specified form. Might be used to undo a select matching statement or a select where statement, or to show all records in a reference form if a matching criteria was not specified.
The formname is the name of a reference form.
If you are performing a lookup to another form, the current form must have a Lookup List field that references the name of the reference form. If you want to copy records from the reference form into the current form automatically, the field names and field types have to match in both the reference form and the current form.
In this example, the script is written in a Lookup List field that references a reference form. If field 5 of the current form is null (blank), then the select all statement selects all records of the Parts List reference form. If field 5 of the current form is filled in, then the select where statement selects only those records that match field 2 of the Parts List form to field 5 of the current form.
click: if $5 = null then select all “Parts List” else select “Parts List” where field 2 is $5 endif

266
Chapter 12: Scripting Reference
267
Chapter 12: Scripting Reference
select matching formname
Used to perform cascading updates or deletes from a parent form to a subform.
Selects all records in the subform called formname that match the current record of the current (parent) form. The first 10 fields of the current form are used, and the field names and values in those fields must match in the current form and the subform for a record to be selected. The Result variable stores the number of matching records.
Once selected, the subform records can be updated with the update field statement. Alternatively, the selected subform records can be deleted with the delete statement.
WARNING: If you change the values in any fields that are used to match the parent record to the subform records, you will lose the link from parent form to subform and the parent form will appear not to have any subform records.
In this example, a parent form has a Yes/No checkbox field with a field name such as “Do you want to delete this equipment log and all related equipment readings?”. Choosing Yes runs a select: script to delete all the corresponding records on the “Equipment Readings” subform.
select: if answer == Y then select matching “Equipment Readings” delete endif
NOTE: This type of subform record deletion will only work in the case where you are not storing records on the mobile device after synchronization. If you are choosing to keep records on the handheld, deleting subform records only works if the record is a newly created record that has not been backed up to the PC. If records have been backed up to the PC, then those records will be re-sent to the mobile device during the next synchronization. The solution in this case is to either use a Completion Checkbox field within the first 10 fields of the parent and subform, or to have a field for storing the status of the field (e.g.: Active or Deleted), and then use Additional Download Criteria (see page 184) to send only Active records to the mobile device.
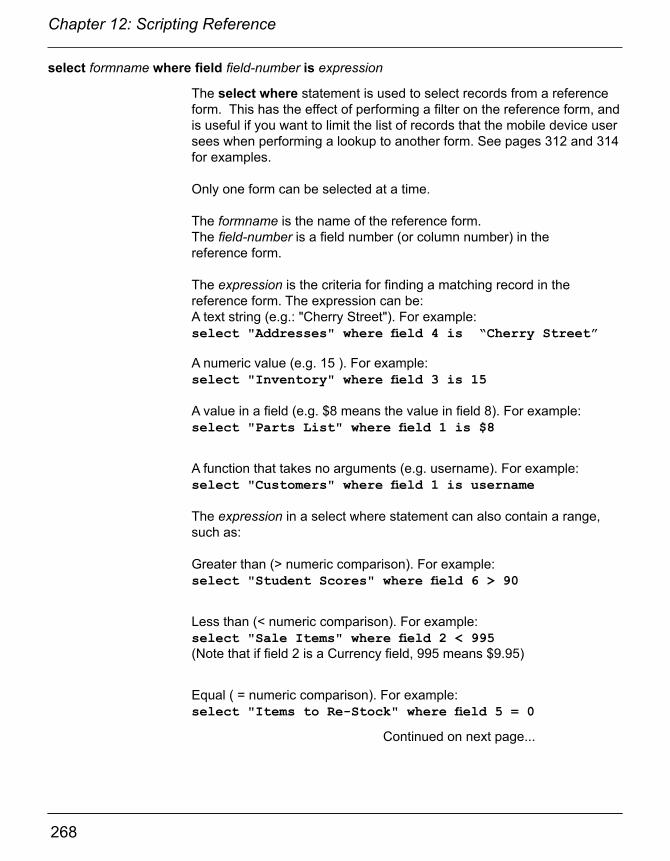
268
Chapter 12: Scripting Reference
269
Chapter 12: Scripting Reference
select formname where field field-number is expression
The select where statement is used to select records from a reference form. This has the effect of performing a filter on the reference form, and is useful if you want to limit the list of records that the mobile device user sees when performing a lookup to another form. See pages 312 and 314 for examples. Only one form can be selected at a time.
The formname is the name of the reference form. The field-number is a field number (or column number) in the reference form.
The expression is the criteria for finding a matching record in the reference form. The expression can be:A text string (e.g.: "Cherry Street"). For example: select "Addresses" where field 4 is “Cherry Street”
A numeric value (e.g. 15 ). For example:select "Inventory" where field 3 is 15
A value in a field (e.g. $8 means the value in field 8). For example:select "Parts List" where field 1 is $8
A function that takes no arguments (e.g. username). For example:select "Customers" where field 1 is username
The expression in a select where statement can also contain a range, such as:
Greater than (> numeric comparison). For example:select "Student Scores" where field 6 > 90
Less than (< numeric comparison). For example:select "Sale Items" where field 2 < 995(Note that if field 2 is a Currency field, 995 means $9.95)
Equal ( = numeric comparison). For example:select "Items to Re-Stock" where field 5 = 0
Continued on next page...

268
Chapter 12: Scripting Reference
269
Chapter 12: Scripting Reference
Contains a character sequence (e.g.: contains "Ave"). For example: select "Addresses" where field 2 contains "Ave"
Starts with a character sequence (e.g.: startswith "Tr"). For example: select "Countries" where field 1 startswith "Tr"
The number of records that match the select where criteria is stored in the result variable.
The also statement can be used to combine selection criteria for the same form.
If a lookup to another form is being performed, then one field on the current form has to be a Lookup List field type that references the name of the reference form. A click: event script in the Lookup List field causes the select where statement to be run when the mobile device user taps in the Lookup List field, so that the user sees the filtered list of records. Fields that are named the same on both the reference form and the current form will automatically copy from the reference form into the current form when the user selects a record from the list.
In this example, the user enters a value in field 2 of the current form. Tapping in a Lookup List displays all the records in the Customers reference form, where field 4 of the reference form matches field 2 of the current form. When the user taps on a record, all the fields named the same in both forms are copied from the reference form into the current form.
click: select "Customers" where field 4 is $2
If you are looking up records automatically via a script, fields can be copied from the reference form to the current form using the column function, or fields on the reference form can be updated or deleted.
In this example, the ID Number on a student badge is entered into field 2 of the current form. The select statement selects the record where field 1 in a form called StudentID matches field 2 in the current form. After the match is found, the value in field 3 of StudentID is copied into field 4 of the current form.
click: select “StudentID” where field 1 is $2 $4 = column 3
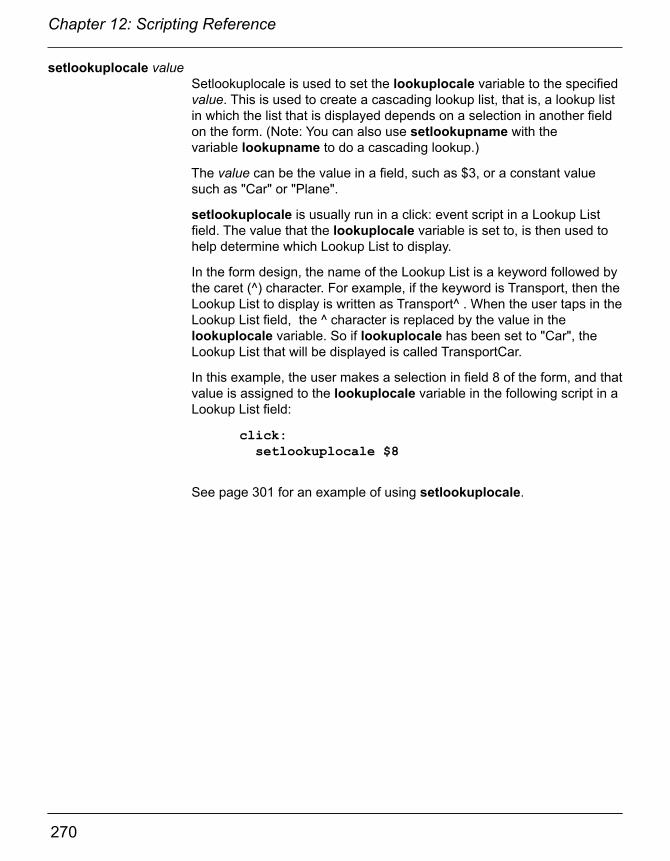
270
Chapter 12: Scripting Reference
271
Chapter 12: Scripting Reference
setlookuplocale valueSetlookuplocale is used to set the lookuplocale variable to the specified value. This is used to create a cascading lookup list, that is, a lookup list in which the list that is displayed depends on a selection in another field on the form. (Note: You can also use setlookupname with the variable lookupname to do a cascading lookup.)
The value can be the value in a field, such as $3, or a constant value such as "Car" or "Plane".
setlookuplocale is usually run in a click: event script in a Lookup List field. The value that the lookuplocale variable is set to, is then used to help determine which Lookup List to display.
In the form design, the name of the Lookup List is a keyword followed by the caret (^) character. For example, if the keyword is Transport, then the Lookup List to display is written as Transport^ . When the user taps in the Lookup List field, the ^ character is replaced by the value in the lookuplocale variable. So if lookuplocale has been set to "Car", the Lookup List that will be displayed is called TransportCar.
In this example, the user makes a selection in field 8 of the form, and that value is assigned to the lookuplocale variable in the following script in a Lookup List field:
click: setlookuplocale $8
See page 301 for an example of using setlookuplocale.

270
Chapter 12: Scripting Reference
271
Chapter 12: Scripting Reference
setlookupname value Setlookupname is used to set the lookupname variable to the specified value. This is used to create a cascading lookup list, that is, a lookup list in which the list that is displayed depends on a selection in another field on the form. (Note: You can also use setlookuplocale with the variable lookuplocale to do a cascading lookup.)
The value can be the value in a field, such as $4, or a constant value such as "Male" or "Female".
setlookupname is usually run in a click: event script in a Lookup List field. The value that the lookupname variable is set to, is then used to help determine which Lookup List to display.
In the form design, the name of the Lookup List is a keyword followed by the tilde (~) character. For example, if the keyword is Adult, then the Lookup List to display is written as Adult~ . When the user taps in the Lookup List field, the ~ character is replaced by the value in the lookupname variable. So if lookupname has been set to "Female", the Lookup List that will be displayed is called AdultFemale.
In this example, the user makes a selection in field 12 of the form, and that value is assigned to the lookupname variable in the following script in a Lookup List field:
click: setlookupname $12
See page 301 for an example of using setlookupname.

272
Chapter 12: Scripting Reference
273
Chapter 12: Scripting Reference
show field-number
show from field-number to field-number
Makes a hidden field or range of hidden fields visible.In this example, if the answer in the current field is N, then field 4 is made visible. select: if answer == N then show 4 endif
In this example, several hidden fields are displayed. exit: if $3 # “More” then show from 8 to 30 endif
subformsum “name-of-subform” field-number
Used to add all values in a specific field across all subform records associated with a given parent record. The Subformsum statement is placed in a script on the parent form, typically a click: event. The calculated sum is placed in the Result variable.
The name-of-subform is the name of the subform. The field-number is the field on the subform which is to be added across all subform records for that parent.
In this example, clicking a button on the parent form adds up the values in Field 6 of the Items Ordered subform. The calculated result is placed in Field 12 of the parent record.
click: subformsum “Item Ordered” 6 $12 = result
See page 300 for an example.

272
Chapter 12: Scripting Reference
273
Chapter 12: Scripting Reference
synchronize
The synchronize statement is typically placed in a click: event script in a Section field or a Button field on a Custom Main Menu form, to provide users with a menu option for initiating a synchronization of Pendragon Forms. (See page 327.)
For example:
click: synchronize
transmit web “URL”
The Transmit Web statement transmits the URL to a Web server and returns data in the webdata function.
To send the value of a field to the Web server, you can reference the field number in the URL by using the field number between $ signs. For instance, $16$ means the value in Field 16.
In this example, clicking a button sends the value in Fields 2 and 7 to the Web server.
click: transmit web “http://www.mycorp.com/cgi-bin/ premium.cgi?age=$2$&smoke=$7$”
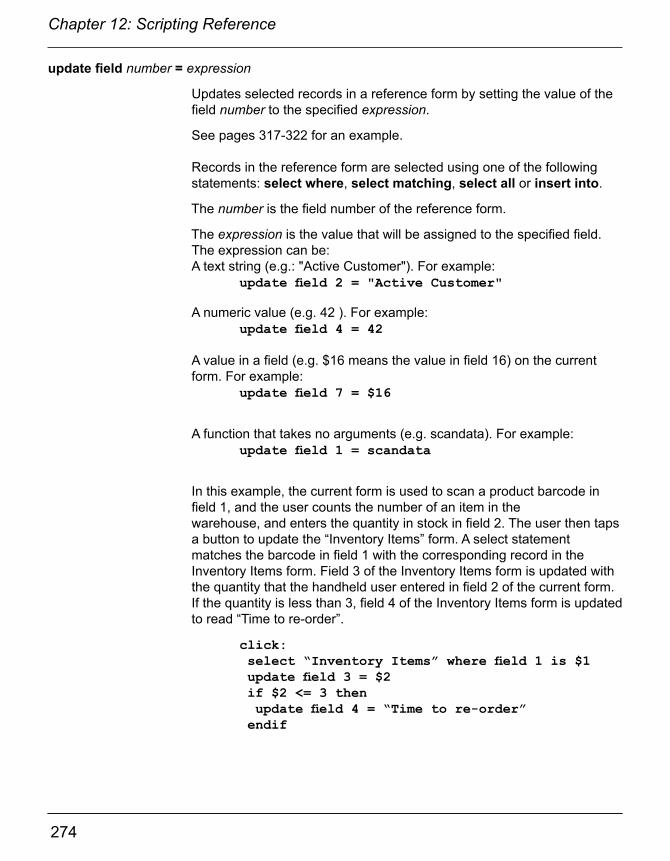
274
Chapter 12: Scripting Reference
275
Chapter 12: Scripting Reference
update field number = expression
Updates selected records in a reference form by setting the value of the field number to the specified expression.
See pages 317-322 for an example.
Records in the reference form are selected using one of the following statements: select where, select matching, select all or insert into.
The number is the field number of the reference form.
The expression is the value that will be assigned to the specified field. The expression can be:A text string (e.g.: "Active Customer"). For example: update field 2 = "Active Customer"
A numeric value (e.g. 42 ). For example: update field 4 = 42
A value in a field (e.g. $16 means the value in field 16) on the current form. For example: update field 7 = $16
A function that takes no arguments (e.g. scandata). For example: update field 1 = scandata
In this example, the current form is used to scan a product barcode in field 1, and the user counts the number of an item in thewarehouse, and enters the quantity in stock in field 2. The user then taps a button to update the “Inventory Items” form. A select statement matches the barcode in field 1 with the corresponding record in the Inventory Items form. Field 3 of the Inventory Items form is updated with the quantity that the handheld user entered in field 2 of the current form. If the quantity is less than 3, field 4 of the Inventory Items form is updated to read “Time to re-order”.
click: select “Inventory Items” where field 1 is $1 update field 3 = $2 if $2 <= 3 then update field 4 = “Time to re-order” endif

274
Chapter 12: Scripting Reference
275
Chapter 12: Scripting Reference
Scripting Errors
Compilation Scripting Errors Can Prevent Distribution of a Form DesignScripts are compiled when you distribute a form.
This means that if there are compilation errors in your scripts, then when you attempt to distribute a form, you may receive error messages on the PC, and your form will not be queued for distribution to the mobile device. The error message that you receive will indicate the field number of the field containing the problem script. You can edit the form and correct the script, and then try re-distributng the form.
Compilation errors mean that a script is invalid in some way. For example, you may have an if-then statement without an endif at the end of the statement.
To reduce scripting compilation errors, you can check each script that you write by clicking theCheck Script button on the Script tab of the Form Designer window. That way you can catch any errors field by field, instead of catching the errors after you have designed the whole form.
Runtime Scripting ErrorsA Runtime error is a scripting error that occurs on the mobile device. If a runtime error occurs, an error message is displayed on the mobile device.
An example of a runtime error is “Lookup List not found: Lookup List name”. If, for example, you have a script is supposed to perform a lookup to another form, but you have not sent the reference form to the mobile device, this error would occur.
Calculate: event scripts run every time a field is updated, so if a calculate: script is causing a runtime error, it will take a little guesswork to determine the problem. For instance, a script in Field 8 is the problem, but the error occurs after Field 4 is filled in. By looking at the scripts that use Field 4, you can find the script with the problem.
Logical Flow Scripting ErrorsAnother type of error that can occur in scripting is an error in the logical flow of the script. This type of error occurs if, for example, your script says goto 5 but you meant it to say goto 6, or if the script says $5 + $8 when it should be $5 * $8. The script will compile and run flawlessly, but it will not do what you had originally intended. The only way to catch this type of error is to go through the form field by field, selecting every possible option in turn, and seeing if the script branches correctly and if all calculated results are correct. Correct any scripts and re-distribute the form.

276
Chapter 12: Scripting Reference
277
Chapter 12: Scripting Reference
Using Scientific Functions in Scripts
Scripts can contain certain scientific math functions. The following scientific functions are supported:
sin value Returns the sine of the angle value, expressed in radians.
To convert degrees to radians, multiply by pi / 180.
Pi is a constant representing the number π.
In this example, an angle in radians is entered into field 5.The sine of the angle is then placed into field 6.
calculate: $6 = sin $5
In this example, an angle in degrees is entered into field 5. The angle is first converted to radians for use with the sin function, and the sine of the angle in radians is placed into field 6.
calculate: result = $5 * pi result = result / 180 $6 = sin result
cos value Returns the cosine of the angle value, expressed in radians.
In this example, an angle in radians is entered into field 7.
The cosine of the angle is placed in the current field.
calculate: answer = cos $7
tan value Returns the tangent of the angle value, expressed in radians.

276
Chapter 12: Scripting Reference
277
Chapter 12: Scripting Reference
asin value Returns the arcsine of the number value. The resulting angle is expressed in radians.
To convert radians to degrees, multiply by 180 / pi. Pi is a constant representing the number π.
In this example, clicking a button calculates the arcsine of a number in field 24, and places the result in field 25. The angle in field 25 is expressed in radians, and so the script then converts the radians to degrees and places the angle in degrees in field 26.
click: $25 = asin $24 result = $25 * 180 $26 = result / pi
acos value Returns the arccosine of the number value. The resulting angle is expressed in radians.
To convert radians to degrees, multiply by 180 / pi.
Pi is a constant representing the number π.
atan value Returns the arctangent of the number value. The resulting angle is ex-pressed in radians.
To convert radians to degrees, multiply by 180 / pi.
Pi is a constant representing the number π.
sinh value Returns the hyperbolic sine of the number value.
cosh value Returns the hyperbolic cosine of the number value.
tanh value Returns the hyperbolic tangent of the number value.

278
Chapter 12: Scripting Reference
279
Chapter 12: Scripting Reference
sqr value Returns the square root of the number value.
In this example, a number is entered in field 12. The square root of the number is placed in the current field.
calculate: answer = sqr $12
value1 pow value2 Pow is a binary operator that calculates the number value1 raised to the power of value2.
For example, the answer in this script would be 10 * 10 * 10 = 1000.
calculate: answer = 10 pow 3
In this example, a number in field 4 is squared.
calculate: answer = $4 pow 2
In this example, a number in field 6 is raised to the power specified in field 7, and the calculated result is placed in field 8.
click: $8 = $6 pow $7
exp value Exp calculates the number e raised to the power value.
e is an irrational number that begins with: e = 2.7182818284590...
In this example, e is squared.
calculate: answer = exp 2
In this example, e is calculated to the power specified in field 3.The calculated answer is placed in field 4.
calculate: $4 = exp $3

278
Chapter 12: Scripting Reference
279
Chapter 12: Scripting Reference
log value Returns the log base e of the number value.
In this example, the current field calculates the log base e of the number in field 5. calculate: answer = log $5
log10 value Returns the log base 10 of the number value.
In this example, the log base 10 of the number in field 3 is placed into field 4.
calculate: $4 = log10 $3
round value Rounds the number value to the nearest whole number.
For example, 20.5 rounds up to the nearest integer, namely 21.
20.49 rounds down to 20.
In this example, field 7 is rounded to the nearest whole number, and the answer is placed in field 9.
calculate: $9 = round $7
In this example, fields 10 and 11 are multiplied together, and then rounded to the nearest whole number.
calculate: result = $10 * $11 answer = round result
trunc value Truncates the number value, discarding any decimal places and leav-ing the integer part of the number. No rounding occurs, so truncating the number 29.9 returns the number 29.
In this example, the number in field 23 is truncated and the integer part of the number is stored in the current field.
calculate: answer = trunc $23

280
Chapter 12: Scripting Reference
281
End of Chapter 12.
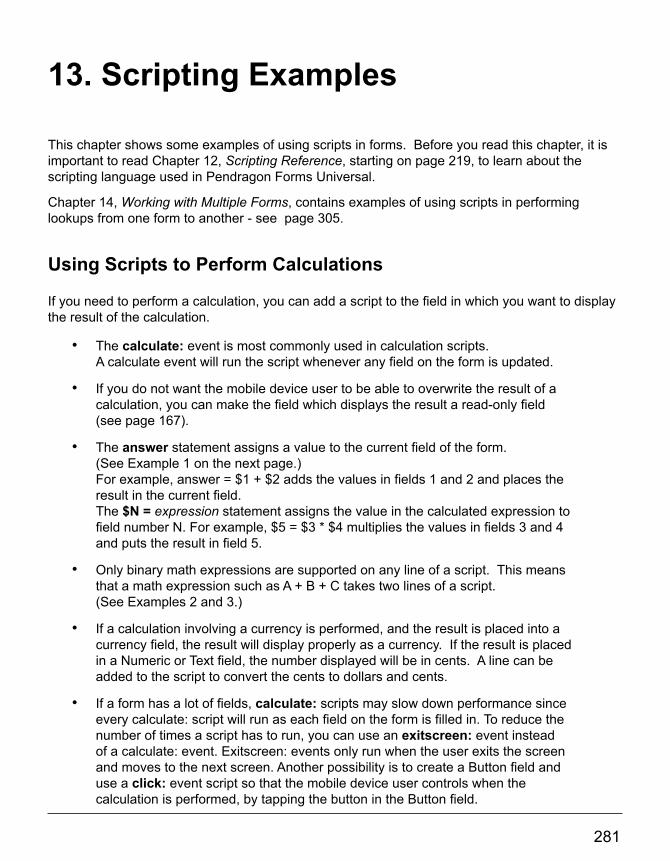
280
Chapter 12: Scripting Reference
281
13. Scripting Examples
This chapter shows some examples of using scripts in forms. Before you read this chapter, it is important to read Chapter 12, Scripting Reference, starting on page 219, to learn about the scripting language used in Pendragon Forms Universal.
Chapter 14, Working with Multiple Forms, contains examples of using scripts in performing lookups from one form to another - see page 305.
Using Scripts to Perform Calculations
If you need to perform a calculation, you can add a script to the field in which you want to display the result of the calculation.
• The calculate: event is most commonly used in calculation scripts. A calculate event will run the script whenever any field on the form is updated.
• If you do not want the mobile device user to be able to overwrite the result of a calculation, you can make the field which displays the result a read-only field (see page 167).
• The answer statement assigns a value to the current field of the form. (See Example 1 on the next page.)For example, answer = $1 + $2 adds the values in fields 1 and 2 and places the result in the current field.The $N = expression statement assigns the value in the calculated expression to field number N. For example, $5 = $3 * $4 multiplies the values in fields 3 and 4 and puts the result in field 5.
• Only binary math expressions are supported on any line of a script. This means that a math expression such as A + B + C takes two lines of a script. (See Examples 2 and 3.)
• If a calculation involving a currency is performed, and the result is placed into a currency field, the result will display properly as a currency. If the result is placed in a Numeric or Text field, the number displayed will be in cents. A line can be added to the script to convert the cents to dollars and cents.
• If a form has a lot of fields, calculate: scripts may slow down performance since every calculate: script will run as each field on the form is filled in. To reduce the number of times a script has to run, you can use an exitscreen: event instead of a calculate: event. Exitscreen: events only run when the user exits the screen and moves to the next screen. Another possibility is to create a Button field and use a click: event script so that the mobile device user controls when the calculation is performed, by tapping the button in the Button field.

282
Chapter 13: Scripting Examples
283
Chapter 13: Scripting Examples
Calculation Example 1: Performing a Simple CalculationIn the form shown below, the user can enter the price of an item and the quantity being purchased, and then calculate the total value of the items being purchased. The script to perform the calculation is in Field 4: calculate: answer = $2 * $3
A calculate: script is used in this case, so that every time the user updates the price or the quantity, the total value will be re-calculated as soon as the user leaves the updated field.
The statement answer = $2 * $3 means that the answer to be placed in Field 4 is the multiplication of the value in Field 2 and the value in Field 3.
On the mobile device, the calculate: script triggers when any field on the form changes. The user has to leave a field for the change in that field to be registered.
When the user fills in the Unit Price and Quantity, he/she will need to tap in another field for the calculation to occur.

282
Chapter 13: Scripting Examples
283
Chapter 13: Scripting Examples
Calculation Example 2: Adding more than two values togetherThe scripting language in Pendragon Forms only supports binary math functions, that is, math functions with two numeric expressions. In order to add more than two values, you can break a calculation into smaller parts, using the result variable as temporary extra storage space for storing intermediate results of a larger calculation.
In the form below, in order to calculate total meal expenses for the day in field 5, the statement result = $2 + $3 stores the sum of Breakfast (field 2) and Lunch (field 3) in the result variable.
The statement answer = result + $4 stores the sum of the result variable + Dinner (field 4) in the current field (field 5, the Meal Total).
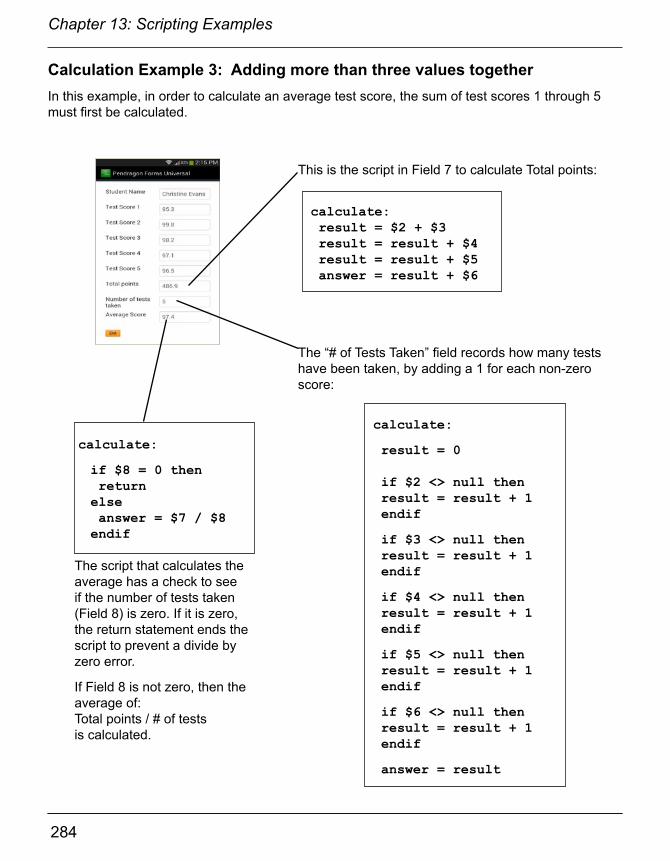
284
Chapter 13: Scripting Examples
285
Chapter 13: Scripting Examples
Calculation Example 3: Adding more than three values togetherIn this example, in order to calculate an average test score, the sum of test scores 1 through 5 must first be calculated.
calculate: result = $2 + $3 result = result + $4 result = result + $5 answer = result + $6
This is the script in Field 7 to calculate Total points:
calculate:
result = 0
if $2 <> null then result = result + 1 endif
if $3 <> null then result = result + 1 endif
if $4 <> null then result = result + 1 endif
if $5 <> null then result = result + 1 endif
if $6 <> null then result = result + 1 endif
answer = result
The “# of Tests Taken” field records how many tests have been taken, by adding a 1 for each non-zero score:
calculate:
if $8 = 0 then return else answer = $7 / $8 endif
The script that calculates the average has a check to see if the number of tests taken (Field 8) is zero. If it is zero, the return statement ends the script to prevent a divide by zero error.
If Field 8 is not zero, then the average of:Total points / # of testsis calculated.
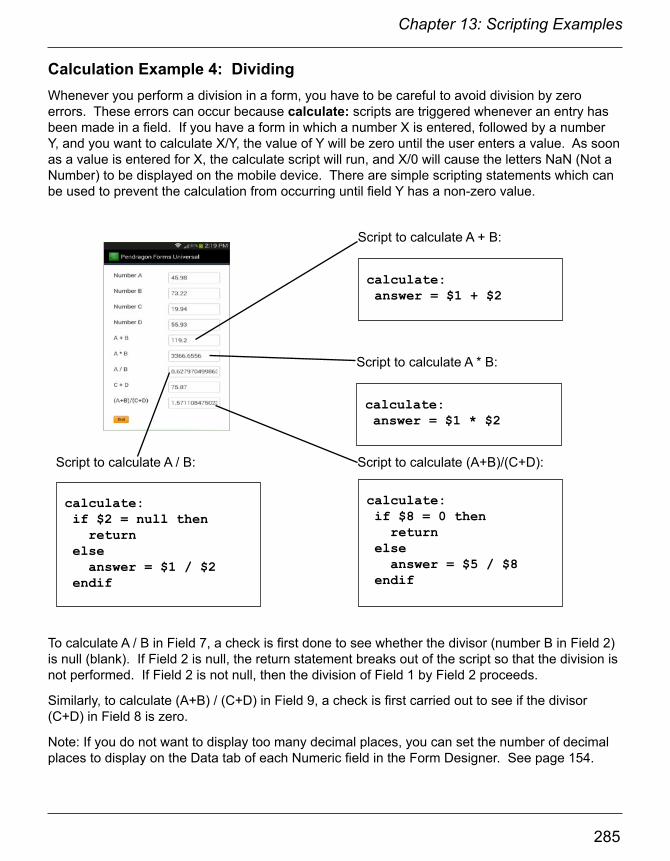
284
Chapter 13: Scripting Examples
285
Chapter 13: Scripting Examples
Calculation Example 4: DividingWhenever you perform a division in a form, you have to be careful to avoid division by zero errors. These errors can occur because calculate: scripts are triggered whenever an entry has been made in a field. If you have a form in which a number X is entered, followed by a number Y, and you want to calculate X/Y, the value of Y will be zero until the user enters a value. As soon as a value is entered for X, the calculate script will run, and X/0 will cause the letters NaN (Not a Number) to be displayed on the mobile device. There are simple scripting statements which can be used to prevent the calculation from occurring until field Y has a non-zero value.
calculate: answer = $1 + $2
Script to calculate A + B:
calculate: answer = $1 * $2
Script to calculate A * B:
calculate: if $2 = null then return else answer = $1 / $2 endif
calculate: if $8 = 0 then return else answer = $5 / $8 endif
To calculate A / B in Field 7, a check is first done to see whether the divisor (number B in Field 2) is null (blank). If Field 2 is null, the return statement breaks out of the script so that the division is not performed. If Field 2 is not null, then the division of Field 1 by Field 2 proceeds.
Similarly, to calculate (A+B) / (C+D) in Field 9, a check is first carried out to see if the divisor (C+D) in Field 8 is zero.
Note: If you do not want to display too many decimal places, you can set the number of decimal places to display on the Data tab of each Numeric field in the Form Designer. See page 154.
Script to calculate (A+B)/(C+D):Script to calculate A / B:

286
Chapter 13: Scripting Examples
287
Chapter 13: Scripting Examples
Calculation Example 5: Counter fieldIf you need to count the number of records in a form, there is a simple initialization script that can be used.
• In addition to the script, it is necessary to make the counter field an Autodefault field on the Advanced Field Properties screen for that field. (See page 148.)
initialize: answer = answer + 1
Setting Field 1 to Autodefault means that when a new record is created, the value of the previous record is retained. The initialize script then adds 1 to increment the counter.
If you need to start the counter from 300, for example, simply enter the number 300 in the first record created. Subsequent records will be 301, 302, 303, etc.
Note that if the form is re-distributed to the mobile device, or if the mobile device is reset, the counter will be reset to 1.

286
Chapter 13: Scripting Examples
287
Chapter 13: Scripting Examples
Working with Dates
Time fields, Date fields and Date & Time Fields can be used in calculations. Some notes:
• Dates are converted to numbers for calculations - the number of seconds since 01/01/1904.
• Results of calculations with dates must be stored in Text fields. It is not possible to subtract two times, for instance, and display the result in a Time field.
• The result of a calculation of two dates is expressed in seconds. The seconds can then be converted back to minutes, hours or days, as appropriate. See Example 1, below.
• An initialize: script can be used to set a default of the current date in a Date field, or the current date and time in a Date&Time field (see Example 1). Note however that the earliest date that you can set as a default is 01/01/1970.
Date Example 1: Today’s Date, and Time ElapsedIn this form, the first field defaults to today’s date, and other fields calculate the time elapsed between a starting and ending time.
initialize: answer = now
The initialize: script in Field 1 only runs once, when the record is created. The answer = now statement places the current date (or date & time) into Field 1.
calculate: answer = $3 - $2
A calculation of dates results in an answer in seconds.
calculate: result = $3 - $2 answer = result / 60
calculate: result = $3 - $2 answer = result / 3600
To calculates minutes, divide the seconds by 60.
To calculate hours, divide the seconds by 3600.(There are 3600 seconds in an hour.)

288
Chapter 13: Scripting Examples
289
Chapter 13: Scripting Examples
Date Example 2: Displaying Time Elapsed in Hours and MinutesSince most people are used to expressing time elapsed in hours and minutes, you may want to display the results of date calculations in this way.
calculate: answer = $3 - $2
In Field 4, the time elapsed is calculated in seconds.
calculate: result = $4 / 3600 answer = integer result
The seconds are converted to hours by dividing by 3600, since there are 3600 seconds in an hour.
The integer statement takes just the whole number of hours, and this is placed in a field for storage.
calculate: result = $4 % 3600 result = result / 60 answer = integer result
calculate: result = $7 & “ hrs and “ result = result & $8 answer = result & “ mins”
The modulo (%) statement records a remainder, in this case the remainder of seconds after the whole number of hours is discarded.
The seconds are converted to minutes, and the whole number of minutes is stored in a field.
Finally, to display the time elapsed as the phrase “ X hrs and Y mins”, the concatenate operator (&) is used to combine the whole number of hours, + the phrase “ hrs and ” + the whole number of minutes + the phrase “ mins”.

288
Chapter 13: Scripting Examples
289
Chapter 13: Scripting Examples
Date Example 3: Calculating AgesA useful calculation is to calculate a person’s age.
calculate: result = now - $3 result = result / 86400 answer = result / 365.25
The statement result = now - $3 calculates the number of seconds from the date of birth to the present time, and put the answer in the result variable.
The result is divided by 86400 to convert seconds to days.
The number of days is divided by 365.25 to convert to years. (There are approx. 365.25 days in a year, accounting for leap years.)
calculate: result = $4 * 100 result = result + 0.5 result = integer result answer = result / 100
The result can be truncated to two decimal places by multiplying by 100 to preserve two decimal places of precision, then adding 0.5 to round up.
The integer statement takes a whole number and discards the excess decimal places, and then dividing by 100 reverts to the correct level of precision.
calculate: result = $4 + 0.5 answer = integer result
To round the present age to the age that the person will be this year, add 0.5 to round up and then the integer statement takes the whole number of years.

290
Chapter 13: Scripting Examples
291
Chapter 13: Scripting Examples
Branching
Scripts can be used in fields to allow branching on a form. With branching, the mobile device user’s response in one field determines which additional fields are displayed.
• Put the extra (or optional) questions on a separate screen, and as the user exits the current screen, branch (jump) to that screen if needed, or jump past that screen if it is not needed.The exitscreen: event is used to branch.A select: event can also be used for branching if you want the user to jump to another part of the form immediately as a selection is made in a Popup List, Yes/No Checkbox or Lookup List field. However, a select: event will not run if the user does not make a selection. An exitscreen: event is therefore more failsafe than a select: event.
• The goto statement is used to branch from one field to another. The goto statement can only be used in select:, exitscreen:, click: and scan: events.
• The hide and show statements are used to hide fields that the user does not need to fill in, and to display fields that the user does need to fill in. A field can be Hidden (see page 166) during the form design process in the Form Designer, and then the show or show from...to statements can be used to display fields as needed.
• Conditional statements, such as IF...THEN...ELSE...ENDIF and SWITCH/CASE are used to determine whether to branch to a question or not.
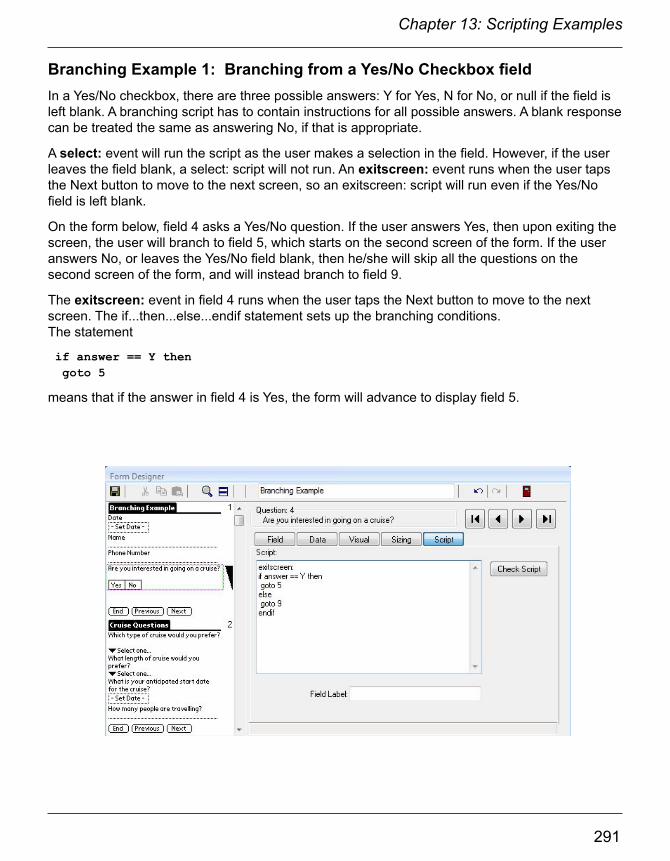
290
Chapter 13: Scripting Examples
291
Chapter 13: Scripting Examples
Branching Example 1: Branching from a Yes/No Checkbox fieldIn a Yes/No checkbox, there are three possible answers: Y for Yes, N for No, or null if the field is left blank. A branching script has to contain instructions for all possible answers. A blank response can be treated the same as answering No, if that is appropriate.
A select: event will run the script as the user makes a selection in the field. However, if the user leaves the field blank, a select: script will not run. An exitscreen: event runs when the user taps the Next button to move to the next screen, so an exitscreen: script will run even if the Yes/No field is left blank.
On the form below, field 4 asks a Yes/No question. If the user answers Yes, then upon exiting the screen, the user will branch to field 5, which starts on the second screen of the form. If the user answers No, or leaves the Yes/No field blank, then he/she will skip all the questions on the second screen of the form, and will instead branch to field 9.
The exitscreen: event in field 4 runs when the user taps the Next button to move to the next screen. The if...then...else...endif statement sets up the branching conditions. The statement
if answer == Y then goto 5
means that if the answer in field 4 is Yes, the form will advance to display field 5.

292
Chapter 13: Scripting Examples
293
Chapter 13: Scripting Examples
The else component of the if...then...else...endif statement covers what happens if the answer is not Yes, that is, if the answer is No or null.
else goto 9 endif
means that if the first condition (answer == Y) is not met, the form will branch to field 9.
On the mobile device, selecting Yes in field 4 jumps the user to the next screen (field 5) when the Next button is tapped and the exitscreen: event runs.
Selecting No in field 4, or leaving field 4 blank causes the user to skip all the questions on the second screen, and jump ahead to field 9 on the third screen.
If the user jumps ahead to field 9, but then taps the Previous button, the screen with the skipped questions will be visible.
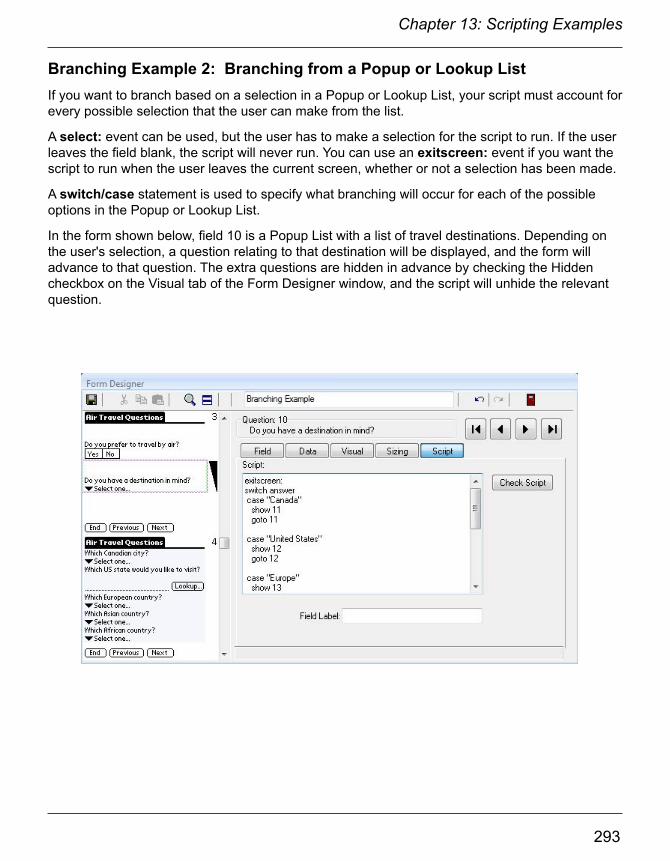
292
Chapter 13: Scripting Examples
293
Chapter 13: Scripting Examples
Branching Example 2: Branching from a Popup or Lookup ListIf you want to branch based on a selection in a Popup or Lookup List, your script must account for every possible selection that the user can make from the list.
A select: event can be used, but the user has to make a selection for the script to run. If the user leaves the field blank, the script will never run. You can use an exitscreen: event if you want the script to run when the user leaves the current screen, whether or not a selection has been made.
A switch/case statement is used to specify what branching will occur for each of the possible options in the Popup or Lookup List.
In the form shown below, field 10 is a Popup List with a list of travel destinations. Depending on the user's selection, a question relating to that destination will be displayed, and the form will advance to that question. The extra questions are hidden in advance by checking the Hidden checkbox on the Visual tab of the Form Designer window, and the script will unhide the relevant question.

294
Chapter 13: Scripting Examples
295
Chapter 13: Scripting Examples
Here is the script in Field 10 in full:
exitscreen: switch answer case “Canada” show 11 goto 11
case “United States” show 12 goto 12
case “Europe” show 13 goto 13
case “Asia” show 14 goto 14
case “Africa” show 15 goto 15
case anyvalue msgbox “Please pick a destination” endswitch
The exitscreen: event script has to contain instructions for each possible selection that the user can make in the Popup List.
exitscreen: switch answer
means that the value in the answer variable (that is, the value selected in the current field, will be compared to each of the options in the case statements.
case “Canada” show 11 goto 11
means that if the value in answer is Canada, field 11 will be displayed (show 11) and the form will branch to field 11 (goto 11). Similarly, each case statement details the actions that will be performed for each option in the Popup List.

294
Chapter 13: Scripting Examples
295
Chapter 13: Scripting Examples
At end of the script is this statement:
case anyvalue msgbox “Please pick a destination”
Adding case anyvalue to the script will cover the actions to take if none of the case statement values match the value in the answer variable. For instance, if the user does make any selection from the list, the case anyvalue actions will be performed.
Adding case anyvalue to a switch/case statement is optional.
The last line of the script is:
endswitch
Every switch statement must end with the word endswitch.
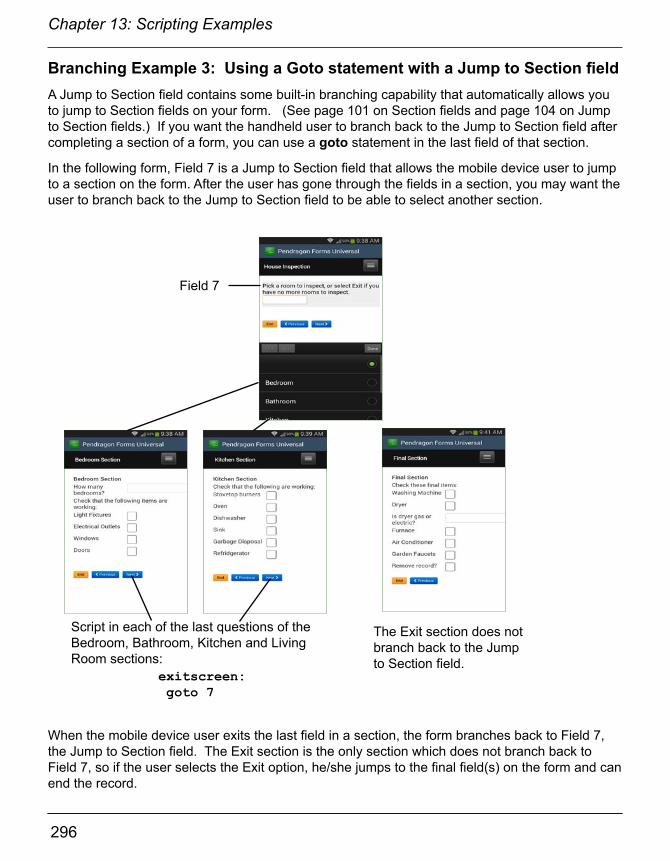
296
Chapter 13: Scripting Examples
297
Chapter 13: Scripting Examples
Branching Example 3: Using a Goto statement with a Jump to Section fieldA Jump to Section field contains some built-in branching capability that automatically allows you to jump to Section fields on your form. (See page 101 on Section fields and page 104 on Jump to Section fields.) If you want the handheld user to branch back to the Jump to Section field after completing a section of a form, you can use a goto statement in the last field of that section.
In the following form, Field 7 is a Jump to Section field that allows the mobile device user to jump to a section on the form. After the user has gone through the fields in a section, you may want the user to branch back to the Jump to Section field to be able to select another section.
exitscreen: goto 7
Script in each of the last questions of the Bedroom, Bathroom, Kitchen and Living Room sections:
When the mobile device user exits the last field in a section, the form branches back to Field 7, the Jump to Section field. The Exit section is the only section which does not branch back to Field 7, so if the user selects the Exit option, he/she jumps to the final field(s) on the form and can end the record.
Field 7
The Exit section does not branch back to the Jump to Section field.

296
Chapter 13: Scripting Examples
297
Chapter 13: Scripting Examples
Using Scripts in Button Fields
Scripts are used to carry out actions when the mobile device user taps on a button in a Button field.
• The label on a button is set by typing in a Default value (up to 11 characters) on the Data tab of the Button field in the Form Designer window (see page 152).
• The click: event is used to activate what happens when a button is tapped. A click: event script runs whenever the button is tapped.
• The label on a button can be changed in a click: event script with the assignment statement: answer = “Name-of-label”
Button Script Example 1: Calculate ButtonCalculate: scripts run whenever a field is updated. This is processor intensive, and may also cause calculations to be performed before the mobile device user is ready. An alternative is to use a button to give the mobile device user control of when the calculation is performed.
click: $9 = $1 + $2 result = $3 + $4 result = result + $5 result = result + $6 $10 = result + $7 $11 = $9 - $10
In the form above, the last three fields on the form (Fields 9, 10 and 11) are not calculated until the user taps the Calculate button.
The advantage of using a button for calculations is that the user does not see intermediate results on screen before all the necessary data is input.
IMPORTANT: The disadvantage to using a button for calculations is that if the user changes a field, the calculated results do not change until the button is tapped again.

298
Chapter 13: Scripting Examples
299
Chapter 13: Scripting Examples
Button Script Example 2: Clone ButtonIn this example, the first few fields on a form will be the same for several records. To save the mobile device user from re-entering the same data multiple times, a Button field is added to the form. Tapping the button clones the record, keeping the common data but erasing the fields that are different for each record.
The user fills out the first record, then clicks the Button field.
The script in the Button field clones the first record, making a copy that keeps the value in the first two fields but nulls the value in the remaining fields on the form.
The user can then fill out the remainder of the second record and click the Button field to create a third record.
The script in the Button field of this form is: click: clone $3 = null $4 = null $5 = null
The clone statement makes a new record that contains all the values from the previous record. The values in fields 1 and 2 (Date and Warehouse Location) are retained. The statements $3 = null, $4 = null and $5 = null cause fields 3, 4 and 5 to be set to null (empty/blank) so that the mobile device user can enter new values in the new record. At any time the user can manually change fields 1 and 2 as well, and subsequently cloned records will contain these changes.

298
Chapter 13: Scripting Examples
299
Chapter 13: Scripting Examples
Using a Script in a MultiSelection field
MultiSelection fields are stored internally as a binary number, with each option in the MultiSelection List being represented by a bit position in the binary number.
For example, the MultiSelection List shown here uses the following bit positions:
32 16 8 4 2 1Yellow Lemon Chocolate Cherry Lemon Meringue Apple Cake Cake Cake Pie Pie Pie
Each checked box in the list sets the corresponding bit position to 1. Internally, the choice of Lemon Meringue Pie and Chocolate cake is stored as the binary number001010.
For a script to react to the selections in a Multi-Selection list, the binary AND operator can be used to check whether a given bit position has been set. In the script shown at right, the answer in the Multi-Selection field is compared to each bit position in turn. If the bit is set, the result of the AND operation is equal to the value of the bit position. If the bit is not set, the result is 0.
For example, the statement result = answer and 2 compares the answer in the Multi-Selection field with the bit position 2, to test if the “Lemon Meringue Pie” checkbox has been checked. If it has been checked, a value of 250 calories is entered in Field 8, otherwise Field 8 is set to null. Field 8, which is on the next screen of the form, stores the calorie value of the Lemon Meringue Pie selection.
exitscreen: result = answer and 1 if result = 1 then $7 = 200 else $7 = null endif
result = answer and 2 if result = 2 then $8 = 250 else $8 = null endif
result = answer and 4 if result = 4 then $9 = 300 else $9 = null endif
result = answer and 8 if result = 8 then $10 = 250 else $10 = null endif
result = answer and 16 if result = 16 then $11 = 250 else $11 = null endif
result = answer and 32 if result = 32 then $12 = 250 else $12 = null endif

300
Chapter 13: Scripting Examples
301
Chapter 13: Scripting Examples
Using Scripts with Parent forms and Subforms
A parent form and a subform are not really linked on the mobile device - they only appear to be connected. Some scripts can be used to further enhance the appearance of a connection between the parent form and subform.
• The subformsum statement can be used to add up the values in a given field on a subform, and place the calculated result in the result variable. The value in the result variable can then be placed into a field on the parent form.
Adding across subform records, and placing the result on the parent form
In the parent form shown here, Field 10 is a Subform field that jumps to a subform used to enter items being ordered.
Field 12 is a Button field on the parent form, that the user taps to run the following script: click: subformsum “Order - Subform” 8 $13 = result temp = $11 / 100 $14 = $13 * temp $15 = $13 + $14
The statement subformsum “Order - Subform” 8 adds up the values in Field 8 of all the subform records that match the parent record. (In this example, Field 8 on the subform contains the total for one item being ordered.) “Order - Subform” is the name of the subform. The result of the calculation is placed in the result variable.
The statement $13 = result then places the calculated result in Field 13 of the parent form. The remainder of the script calculates the tax and the total including tax.
Note that if the mobile device user enters more subform records after the Calc button has been tapped, he/she will need to tap the button again to update the parent form with the new total.

300
Chapter 13: Scripting Examples
301
Chapter 13: Scripting Examples
Using Scripts to do a Cascading Lookup
A Cascading Lookup enables you to display a different Lookup List depending on a selection in another Popup List or Lookup List field. If the two selection fields are adjacent to each other (e.g. field 5 and 6) , no scripting is required to do a cascading lookup - see page 112.
With the lookupname variable and the setlookupname statement, it is possible to do a cascading lookup without the two fields being adjacent to each other.
As with a regular cascading lookup, one field on the form is a Popup List or a Lookup List that allows the user to select some type ofcategory. In the form shown at left, field 3 is a Popup List that lets the user choose from Gold, Silver and Bronze categories.
Field 6 is the Lookup List field that will display a Lookup List that depends on what the user selected in field 3. Instead of referencing the name of an actual Lookup List, the Lookup to Display field references a keyword followed by the tilde symbol (~).
In the example below, the keyword is the word Reward, so the phrase Reward~ is entered as the Lookup List to display.
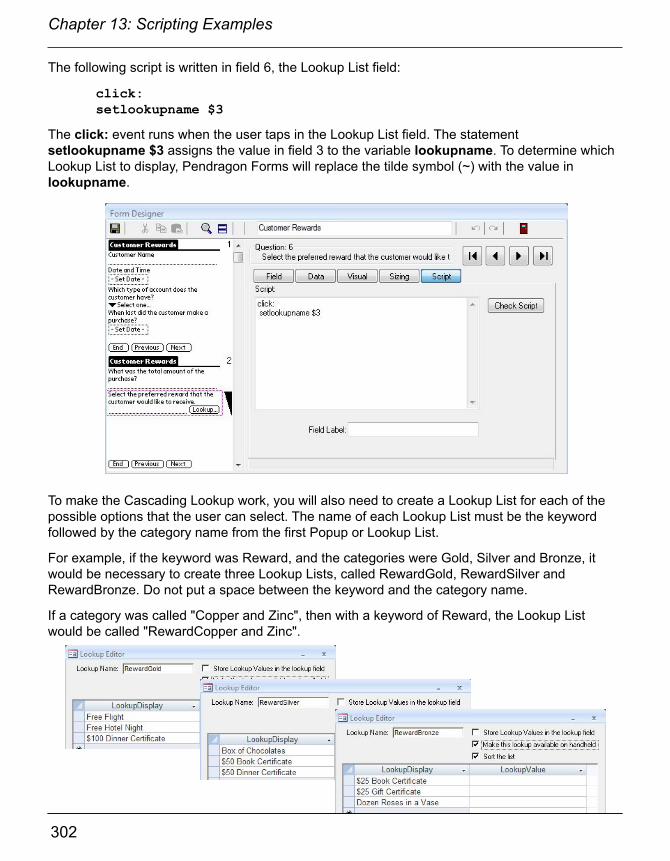
302
Chapter 13: Scripting Examples
303
Chapter 13: Scripting Examples
The following script is written in field 6, the Lookup List field:
click: setlookupname $3
The click: event runs when the user taps in the Lookup List field. The statementsetlookupname $3 assigns the value in field 3 to the variable lookupname. To determine which Lookup List to display, Pendragon Forms will replace the tilde symbol (~) with the value in lookupname.
To make the Cascading Lookup work, you will also need to create a Lookup List for each of the possible options that the user can select. The name of each Lookup List must be the keyword followed by the category name from the first Popup or Lookup List.
For example, if the keyword was Reward, and the categories were Gold, Silver and Bronze, it would be necessary to create three Lookup Lists, called RewardGold, RewardSilver and RewardBronze. Do not put a space between the keyword and the category name.
If a category was called "Copper and Zinc", then with a keyword of Reward, the Lookup List would be called "RewardCopper and Zinc".

302
Chapter 13: Scripting Examples
303
Chapter 13: Scripting Examples
On the mobile device, selecting an option in field 3 determines which Lookup List will be displayed in field 6.
NOTES:
Instead of using the lookupname variable, setlookup statement and the tilde (~) symbol, you can use the lookuplocale variable, setlookuplocale statement and the caret (^) symbol.
So, for example, if you are using setlookuplocale, and your keyword is Reward, the LookupList to display would be Reward^ .
For an even more selective cascading lookup, you can actually have two selection fields followed by the cascading Lookup List field, and for the Lookup List to display, enter the keyword followed by both the tilde and the caret symbols. For example, with a keyword like Reward, the LookupList to display would be Reward~^ . The click: event in the Lookup List field would use both setlookupname and setlookuplocale statements.
Selecting option Gold here
Displays the RewardsGold Lookup List here

304
Chapter 13: Scripting Examples
305
End of Chapter 13.
304
Chapter 13: Scripting Examples
305
14. Working with Multiple Forms
Depending on the application that you are trying to build, you may need more than one form on the mobile device to implement your solution. Pendragon Forms Universal supports the following:
• Parent and SubformA parent form and a subform (or child form) are used if for every parent record, you need to be able to create many child records. Visiting the same customer or patient more than once, or taking several readings from the same piece of equipment may require you to create a parent form for the information that stays constant (e.g. the customer’s name or the equipment serial number), and create a subform for the information that changes (e.g. the details of a customer visit, or the equipment reading on a particular day).Details on creating a parent form and subform start on page 120.
• Lookup to Another FormIf you want to maintain a reference list, such as inventory item numbers and prices, or employee names and addresses, and you want to select from the list and copy the data into a form, then you need to maintain two forms and do a Lookup to Another Form.Details on creating a form that can do a lookup to another form are on page 116.
This chapter illustrates some examples of working with multiple forms. All scripting events and scripting statements mentioned in this chapter are explained in detail in Chapter 12, Scripting Reference, starting on page 219.

306
Chapter 14: Working with Multiple Forms
307
Chapter 14: Working with Multiple Forms
Example: Taking Orders on a Mobile Device
Creating an application to allow mobile device users to take customer orders is an example that requires multiple forms.
To start with, you will need a form for taking orders. However, since you cannot predict whether a given order will be for one item or for several items, you may want to split the order-taking form into two: a parent form for the customer information, and a subform for the line items being ordered. A new subform record is created for each item being ordered.
If you have a list of customers, you may want the user to pick from a list to select a customer. To achieve this, you can do a lookup to a customer form from the order-taking parent form.
If you have a list of items for sale, you may want the mobile device user to pick from the list to select an item being ordered. To achieve this, you can do a lookup from the subform to the list of items form.
The forms needed for this application and their relationship to each other is shown in the diagram below. Further details are on the pages that follow.
LIST OF CUSTOMERS
FORM FOR TAKING ORDERS ITEM
BEING ORDERED
ITEM BEING ORDERED
ITEM BEING ORDERED
LIST OF ITEMS BEING SOLD
1. Select a customer and copy into parent form for taking orders.
2. Create a new subform record for each item being ordered.
3. In each subform record, select an item to order.

306
Chapter 14: Working with Multiple Forms
307
Chapter 14: Working with Multiple Forms
To perform a lookup from the parent form to the reference form:
• Fields that you want to copy from the reference form must have the same field name and same field type as on the parent form. The only exception is that a Text field on the reference form can copy into a Lookup List field on the parent form - but not more than 50 characters.
• To display the list of records in the reference form, one field on the parent form must be a Lookup List field. Instead of referencing a Lookup List, reference the name of the reference form. In the example below, the Company Name field on the parent form is a Lookup List field that references the name of the reference form, which in this case is called List of Customers.
This is the Reference Form.This is the Parent Form.
Starting from the Parent form, tap in the Company Name field.
A list of records from the Reference form is displayed.
Selecting a record from the Reference form copies into the Parent form all the fields that the Reference form has in common with the Parent form.
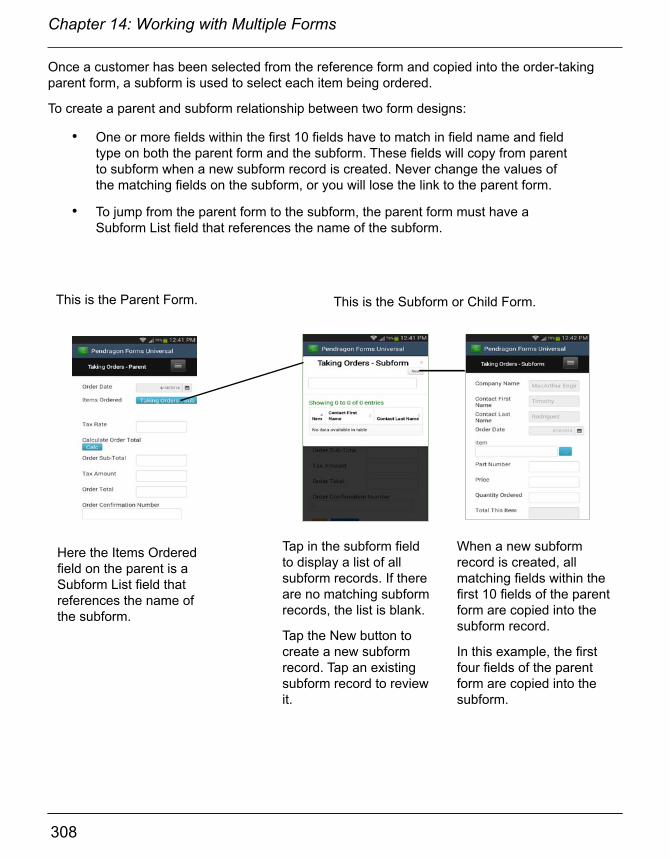
308
Chapter 14: Working with Multiple Forms
309
Chapter 14: Working with Multiple Forms
Once a customer has been selected from the reference form and copied into the order-taking parent form, a subform is used to select each item being ordered.
To create a parent and subform relationship between two form designs:
• One or more fields within the first 10 fields have to match in field name and field type on both the parent form and the subform. These fields will copy from parent to subform when a new subform record is created. Never change the values of the matching fields on the subform, or you will lose the link to the parent form.
• To jump from the parent form to the subform, the parent form must have a Subform List field that references the name of the subform.
This is the Parent Form. This is the Subform or Child Form.
Here the Items Ordered field on the parent is a Subform List field that references the name of the subform.
Tap in the subform field to display a list of all subform records. If there are no matching subform records, the list is blank.
Tap the New button to create a new subform record. Tap an existing subform record to review it.
When a new subform record is created, all matching fields within the first 10 fields of the parent form are copied into the subform record.
In this example, the first four fields of the parent form are copied into the subform.

308
Chapter 14: Working with Multiple Forms
309
Chapter 14: Working with Multiple Forms
To perform a lookup from the subform to a reference form of items in stock:
• Since this is a lookup from one form to another, fields that have to be copied must have the same field name and field type on the reference form and on the subform.
• One field on the Subform has to be a Lookup List field that specifies the name of the reference form.
This is the Subform. This is the Reference form called Taking Orders - Items.
To perform the lookup, the Item field on the subform is a Lookup List field that references the Taking Orders - Items form.
Tap in the Item field to display the list of items in the reference form.
Select an item name from the reference form to copy the Item name,Item Number and Price into the subform.
Once the item details have been copied into the subform, the mobile device user can enter the quantity of items being ordered. To calculate the sub-total for this line item of the order, a script is added in Field 9 of the subform: calculate: if $8 > 0 then answer = $7 * $8 endif

310
Chapter 14: Working with Multiple Forms
311
Chapter 14: Working with Multiple Forms
To place an Order Total on the Parent form:
• A Button field is added to the Parent form, so that user can calculate the order total across subform records.
• A click: event script is written in the Button field, and the subformsum statement is used to add up sub-totals across all subform records, and place the order total on the parent form.
The script in Field 13 (the Cauculate Button field) on the parent form is:click: subformsum “Taking Orders - Subform” 9 $[SubTotal] = result
where 9 is the field number to be added across subform records. The subformsum statement places the result of the addition across subform records into the result variable, and the statement $[SubTotal] = result places the calculated result into Field 14 of the Parent form (this field has been given a field label of SubTotal).
The remainder of the script:temp = $[TaxRate] / 100$[Tax] = $[SubTotal] * temp$[OrderTotal] = $[SubTotal] + $[Tax]
calculates the sales tax for the order, based on a number entered in the Tax Rate field, and calculates the Order Total as the sum of the SubTotal and the Tax. See next page for an example.
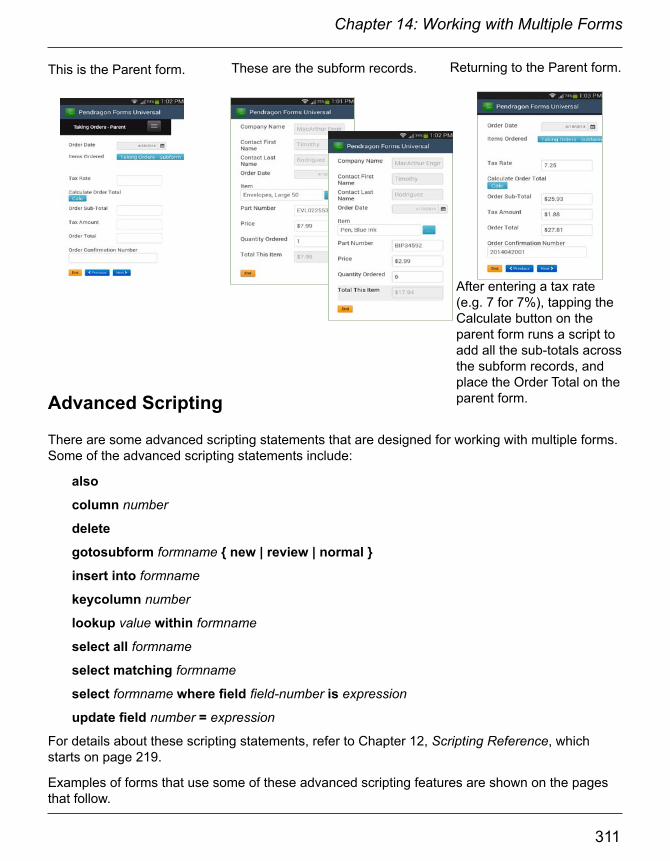
310
Chapter 14: Working with Multiple Forms
311
Chapter 14: Working with Multiple Forms
This is the Parent form. These are the subform records.
After entering a tax rate (e.g. 7 for 7%), tapping the Calculate button on the parent form runs a script to add all the sub-totals across the subform records, and place the Order Total on the parent form.Advanced Scripting
There are some advanced scripting statements that are designed for working with multiple forms. Some of the advanced scripting statements include:
also
column number
delete
gotosubform formname { new | review | normal }
insert into formname
keycolumn number
lookup value within formname
select all formname
select matching formname
select formname where field field-number is expression
update field number = expression
For details about these scripting statements, refer to Chapter 12, Scripting Reference, which starts on page 219.
Examples of forms that use some of these advanced scripting features are shown on the pages that follow.
Returning to the Parent form.

312
Chapter 14: Working with Multiple Forms
313
Chapter 14: Working with Multiple Forms
Performing a Cascading Lookup to Another Form
A Cascading Lookup to Another Form allows you to specify a selection criteria in one field, and then display only the records in a reference form that match the selected criteria. Advanced scripting is required to do this.
In this form, selecting a State in Field 2 determines which companies will be displayed in Field 3.
Selecting a company copies all the exactly named fields from the reference form into the current form.
To achieve the cascading lookup to another form, an extra field has to be added to allow the user to specify the selection criteria. In this example, Field 2 is a regular Lookup List containing a list of all states. The state that the user selects will be the selection criteria.
Selecting the State of OH (Ohio) in Field 2 displays only companies from Ohio when the user taps in Field 3.
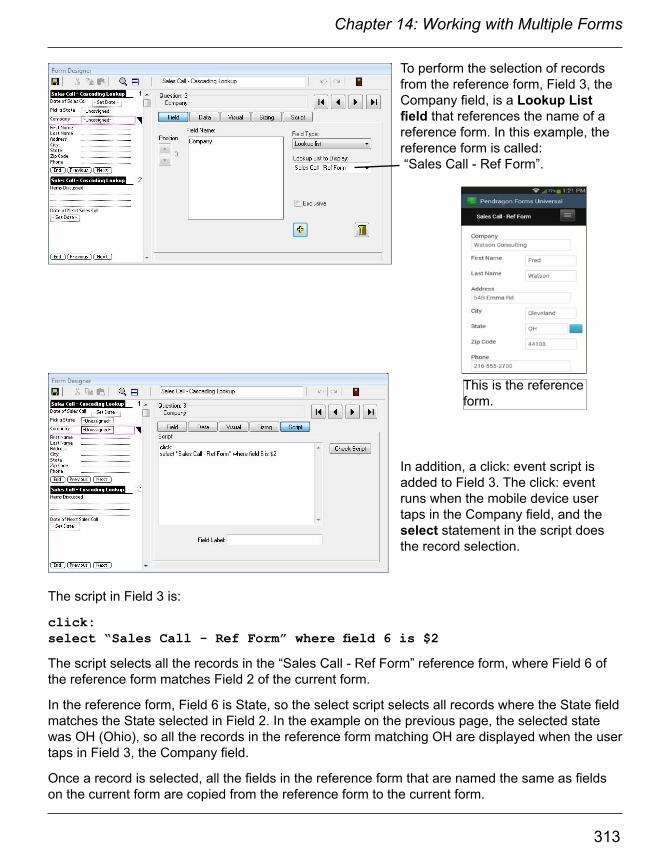
312
Chapter 14: Working with Multiple Forms
313
Chapter 14: Working with Multiple Forms
To perform the selection of records from the reference form, Field 3, the Company field, is a Lookup List field that references the name of a reference form. In this example, the reference form is called: “Sales Call - Ref Form”.
The script in Field 3 is:
click:select “Sales Call - Ref Form” where field 6 is $2
The script selects all the records in the “Sales Call - Ref Form” reference form, where Field 6 of the reference form matches Field 2 of the current form.
In the reference form, Field 6 is State, so the select script selects all records where the State field matches the State selected in Field 2. In the example on the previous page, the selected state was OH (Ohio), so all the records in the reference form matching OH are displayed when the user taps in Field 3, the Company field.
Once a record is selected, all the fields in the reference form that are named the same as fields on the current form are copied from the reference form to the current form.
In addition, a click: event script is added to Field 3. The click: event runs when the mobile device user taps in the Company field, and the select statement in the script does the record selection.
This is the reference form.
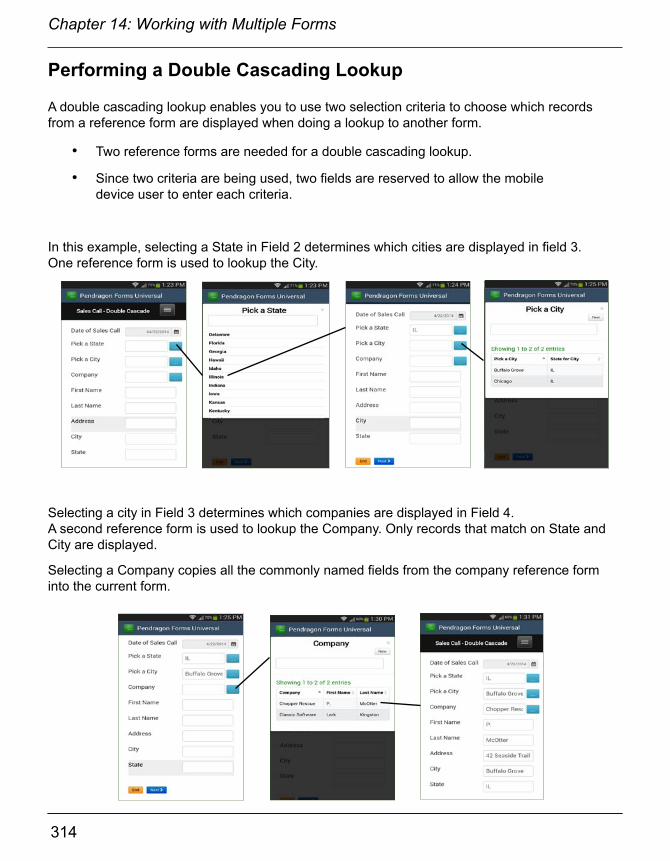
314
Chapter 14: Working with Multiple Forms
315
Chapter 14: Working with Multiple Forms
Performing a Double Cascading Lookup
A double cascading lookup enables you to use two selection criteria to choose which records from a reference form are displayed when doing a lookup to another form.
• Two reference forms are needed for a double cascading lookup.
• Since two criteria are being used, two fields are reserved to allow the mobile device user to enter each criteria.
In this example, selecting a State in Field 2 determines which cities are displayed in field 3. One reference form is used to lookup the City.
Selecting a city in Field 3 determines which companies are displayed in Field 4. A second reference form is used to lookup the Company. Only records that match on State and City are displayed.
Selecting a Company copies all the commonly named fields from the company reference form into the current form.
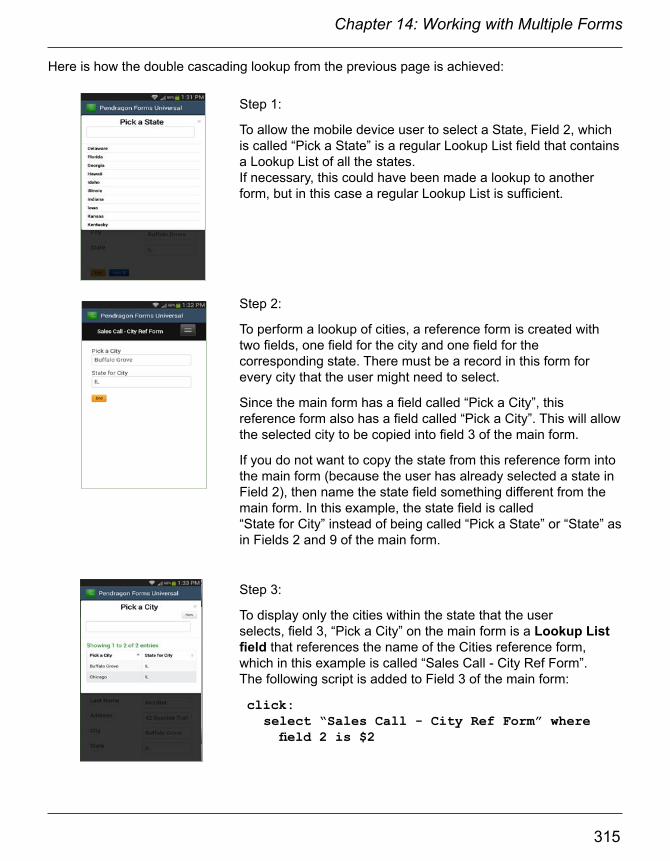
314
Chapter 14: Working with Multiple Forms
315
Chapter 14: Working with Multiple Forms
Here is how the double cascading lookup from the previous page is achieved:
Step 1:
To allow the mobile device user to select a State, Field 2, which is called “Pick a State” is a regular Lookup List field that contains a Lookup List of all the states. If necessary, this could have been made a lookup to another form, but in this case a regular Lookup List is sufficient.
Step 2:
To perform a lookup of cities, a reference form is created with two fields, one field for the city and one field for the corresponding state. There must be a record in this form for every city that the user might need to select.
Since the main form has a field called “Pick a City”, this reference form also has a field called “Pick a City”. This will allow the selected city to be copied into field 3 of the main form.
If you do not want to copy the state from this reference form into the main form (because the user has already selected a state in Field 2), then name the state field something different from the main form. In this example, the state field is called “State for City” instead of being called “Pick a State” or “State” as in Fields 2 and 9 of the main form.
Step 3:
To display only the cities within the state that the user selects, field 3, “Pick a City” on the main form is a Lookup List field that references the name of the Cities reference form, which in this example is called “Sales Call - City Ref Form”. The following script is added to Field 3 of the main form:
click: select “Sales Call - City Ref Form” where field 2 is $2

316
Chapter 14: Working with Multiple Forms
317
Chapter 14: Working with Multiple Forms
Step 4:
To perform a lookup of companies, a reference form is created with fields for all the data that is to be copied into the main form.
To copy the company name into the main form, Field 2 on the reference form is called “Company”, to match the field name of Field 4 on the main form. Other fields to be copied such as Address, City, State, Zip Code and Phone must be named the same and have the same field type on the reference form as on the main form.
Step 5:
To perform the lookup of companies that match both the City and State, Field 4 on the main form is called “Company” and is a Lookup List field that references the name of the reference form, which is called “Sales Call - Ref Form” in this example.
To select only those records that match the City and State, the following script is added to Field 4 of the main form:
click:select “Sales Call - Ref Form” where field 6 is $2alsoselect “Sales Call - Ref Form” where field 5 is $3
Field 6 of the “Sales Call - Ref Form” reference form is State, and Field 2 of the current form is “Pick a State”, so the first select statement selects only the records that match on state.
The also statement means that the selected records are to be used when the next select statement in the script is run.
The second select statement picks only the records where Field 5 (“City”) in the “Sales Call - Ref Form” reference form matches Field 3 of the current form, which is “Pick a City”. Since this statement only runs on the records that have already been selected on state, the effect is that only records matching the selected city and state are displayed.
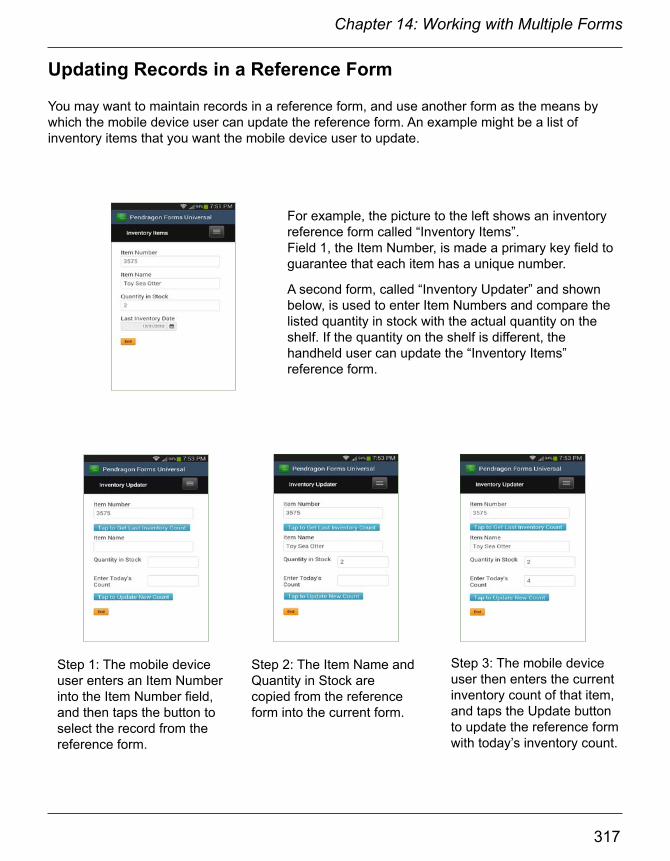
316
Chapter 14: Working with Multiple Forms
317
Chapter 14: Working with Multiple Forms
Updating Records in a Reference Form
You may want to maintain records in a reference form, and use another form as the means by which the mobile device user can update the reference form. An example might be a list of inventory items that you want the mobile device user to update.
For example, the picture to the left shows an inventory reference form called “Inventory Items”. Field 1, the Item Number, is made a primary key field to guarantee that each item has a unique number.
A second form, called “Inventory Updater” and shown below, is used to enter Item Numbers and compare the listed quantity in stock with the actual quantity on the shelf. If the quantity on the shelf is different, the handheld user can update the “Inventory Items”reference form.
Step 1: The mobile device user enters an Item Number into the Item Number field, and then taps the button to select the record from the reference form.
Step 2: The Item Name and Quantity in Stock are copied from the reference form into the current form.
Step 3: The mobile device user then enters the current inventory count of that item, and taps the Update button to update the reference form with today’s inventory count.
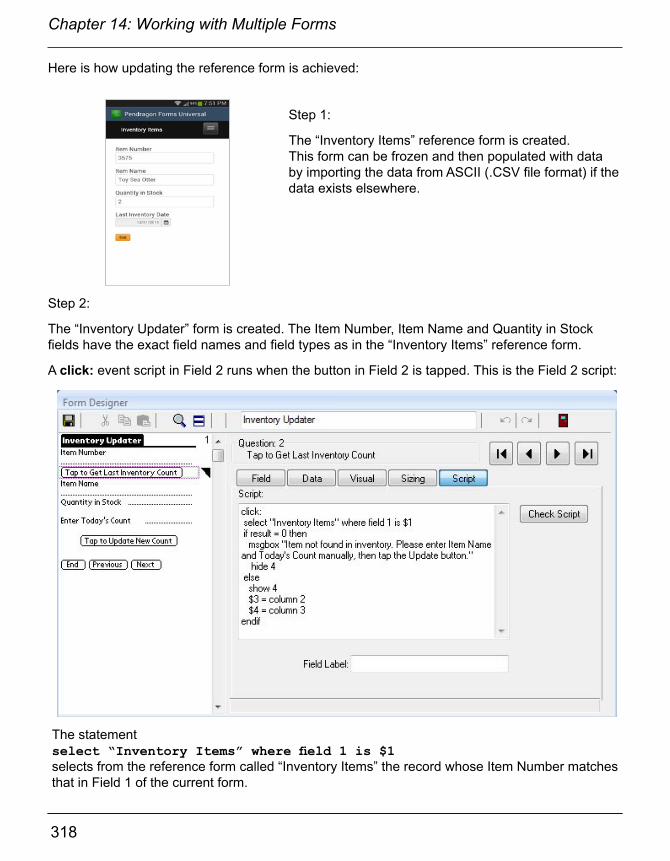
318
Chapter 14: Working with Multiple Forms
319
Chapter 14: Working with Multiple Forms
Here is how updating the reference form is achieved:
Step 1:
The “Inventory Items” reference form is created. This form can be frozen and then populated with data by importing the data from ASCII (.CSV file format) if the data exists elsewhere.
Step 2:
The “Inventory Updater” form is created. The Item Number, Item Name and Quantity in Stock fields have the exact field names and field types as in the “Inventory Items” reference form.
A click: event script in Field 2 runs when the button in Field 2 is tapped. This is the Field 2 script:
The statementselect “Inventory Items” where field 1 is $1 selects from the reference form called “Inventory Items” the record whose Item Number matches that in Field 1 of the current form.

318
Chapter 14: Working with Multiple Forms
319
Chapter 14: Working with Multiple Forms
if result = 0 then msgbox “Item not found in inventory. Please enter the Item name and Today’s Count manually, then tap the Update button.” hide 4
If a matching record in the reference form is not found, a message box is displayed to alert the user that the item has not been found in the inventory reference form, and to notify the user that he/she will have to enter the item name and quantity manually.
Field 4 is hidden to make the handheld user enter the quantity in the Enter Today’s Count field. (Otherwise the user might accidentally fill in the Quantity in Stock field, which is not used for updating the reference form.)
else show 4 $3 = column 2 $4 = column 3endif
On the other hand, if the result variable is not zero, then a matching record has been found in the reference form. (Note that since the Item Number field in the reference form is a primary key, each record has a unique Item Number and so we do not need to be concerned about multiple records matching on the same Item Number.)
If a matching record is found, Field 4 is made visible, and columns 2 and 3 of the reference form record are copied into Fields 3 and 4 of the current form. This copies the Item Name and Quantity in Stock from the reference form into the current form.
When a select statement is performed, the result variable will contain the number of records that were matched. If the result variable is zero, it means that a matching record has not been found in the reference form. If the result variable is 1, then a matching record has been found.
The if...then part of the script advises the user if the Item Number does not exist in the reference form, and the user has to manually enter the Item Name and quantity. The remainder of the script in the else statement will copy a matching record into the current form if a match is found.
New item entered manually.

320
Chapter 14: Working with Multiple Forms
321
Chapter 14: Working with Multiple Forms
Step 3:
If a matching record from the reference form is copied into the current form, the mobile device user can then enter the new inventory count in the Enter Today’s Count field. The user can then tap the Tap to Update New Count button to update the reference form.
click: select “Inventory Items” where field 1 is $1
Once again, the select statement looks for a matching record in the reference form. If the result variable is zero, a match has not been found. If the result variable is 1, a match has been found.
The if...then statement that follows will add a new record to the reference form if no matching record was found, and the else statement will update the existing record in the reference form if a match was found.
Step 4:
The script in Field 6, the Tap to Update New Count button, begins like this:

320
Chapter 14: Working with Multiple Forms
321
Chapter 14: Working with Multiple Forms
if result = 0 then insert into “Inventory Items” update field 1 = $1 update field 2 = $3 update field 3 = $5 update field 4 = now
If a matching record is not found in the “Inventory items” reference form, the insert into statement creates a new record in the reference form. The update statements update fields in the new record with values from the current form. Field 1 of the reference form is given the Item Number value from Field 1 of the current form. Field 2 of the reference form is given the Item Name value in Field 3 of the current form. Field 3 of the reference form is given the Enter Today’s Count value in Field 5 of the current form. Field 4 of the reference form is given the current date (the function now) so that the record in the reference form will reflect the date that this inventory item was counted.
else update field 3 = $5 update field 4 = nowendif
If, however, a matching record had been found, then the Item Number and Item Name already exist in a record in the reference form, and so only the Enter Today’s Count value and the current date have to be updated in the reference form record. An update statement is used to update Field 3 of the reference form with the Enter Today’s Count value in Field 5 of the current form. A second update statement updates Field 4 of the reference form with the current date, which in scripts is the function now.

322
Chapter 14: Working with Multiple Forms
323
Troubleshooting Working with Multiple FormsProblems encountered when working with multiple forms include: a) A Lookup List Failed error might be due to a form referencing the wrong form name, or a reference form not being distributed; b) Data is not copying from one form to another because field names or field types do not match on both forms; c) A select: statement might be referencing the wrong form, or there might be no matching record in the reference form.
In this example, the “Inventory Updater” form is for the purpose of allowing the mobile device user to access and update the reference form. No actual records are being entered or stored in the “Inventory Updater” form. In this case, the end of the script in the Tap to Update field (Field 6) clears the values in the “Inventory Updater” form so that the user is ready to enter the next Item Number to look up.
After the values in the “Inventory Updater” form have been used to update the reference form, the statements:
$1 = null$3 = null$4 = null$5 = null
clear out the Item Number (Field 1), Item Name (Field 3), Quantity in Stock (Field 4) and Enter Today’s Count (Field 5). The mobile device user can then fill in the form again with the Item Number of the next item to be counted.

322
Chapter 14: Working with Multiple Forms
323
15. Creating a Custom Main Menu
A Custom Main Menu is a form that acts as a Main Menu and replaces the standard Pendragon Forms main menu screen that shows the list of form designs.
Standard Pendragon Forms Main Menu Custom Main Menu Form
Features of a Custom Main Menu Form
A Custom Main Menu form is a Pendragon form with one special attribute:
• The name of the form must begin with the word MENU in uppercase.
When a form begins with the word MENU, the form is launched as soon as the user launches Pendragon Forms, so that the mobile device user does not see a list of form designs, they just see the contents of the MENU form. Only one record is created for the MENU form.
Only one form on the mobile device can start with the word MENU in uppercase.
Typically, Custom Main Menu Forms feature Button fields or Section fields (typically with pictures) that are used to direct the user to different forms.
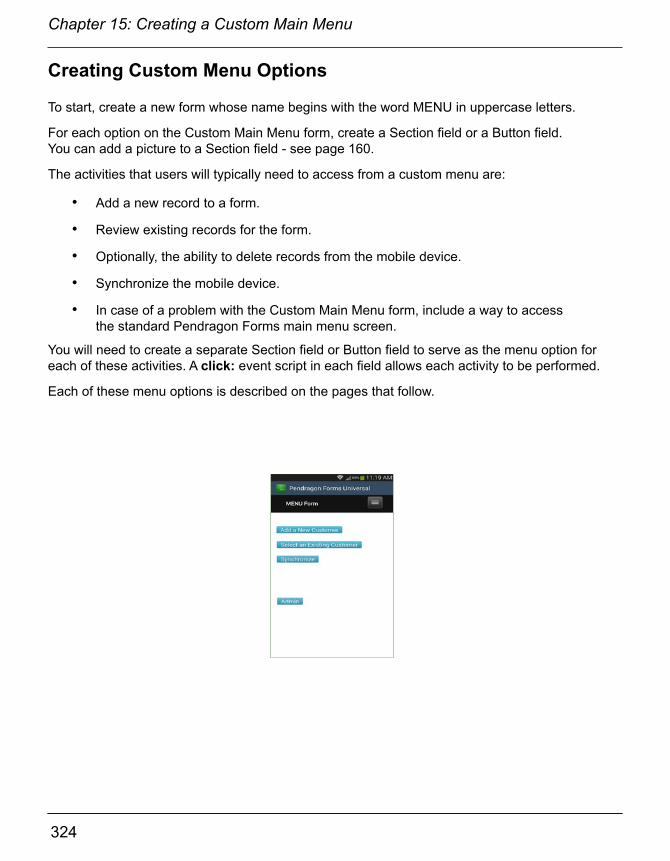
324
Chapter 15: Creating a Custom Main Menu
325
Chapter 15: Creating a Custom Main Menu
Creating Custom Menu Options
To start, create a new form whose name begins with the word MENU in uppercase letters.
For each option on the Custom Main Menu form, create a Section field or a Button field. You can add a picture to a Section field - see page 160.
The activities that users will typically need to access from a custom menu are:
• Add a new record to a form.
• Review existing records for the form.
• Optionally, the ability to delete records from the mobile device.
• Synchronize the mobile device.
• In case of a problem with the Custom Main Menu form, include a way to access the standard Pendragon Forms main menu screen.
You will need to create a separate Section field or Button field to serve as the menu option for each of these activities. A click: event script in each field allows each activity to be performed.
Each of these menu options is described on the pages that follow.

324
Chapter 15: Creating a Custom Main Menu
325
Chapter 15: Creating a Custom Main Menu
Creating a Menu Option for Adding Records
In the MENU Form shown below, a Button field called Add a New Customer is created. A click: event script in the Button field allows users to add a new customer record.
The gotosubform "formname" new statement jumps the user to the specified form, and creates a new record for that form.
The following script is in field 1 of the form shown below (the 'Add a New Customer' menu option):
click: gotosubform "Customer Info" new
means that when the user taps in the Add a Customer button, the script will go to the form named "Customer Info" and create a new record.
After creating the Custom Main Menu form, remember to create all the other forms that the Custom Main Menu form refers to in each script.
Tip:
In this example, the contents of the MENU form that the mobile device user needs to access all fit on one screen. In this case, you can hide the End, Previous and Next buttons so that the MENU form looks like a single screen.
The End and Previous buttons can be hidden via the Advanced Form Properties screen. To hide the Next button, an open: event script is written in Field 1 of the MENU form. An open: event is used as it will run every time the mobile device user opens the MENU form. The script is:
open:disable nextbutton
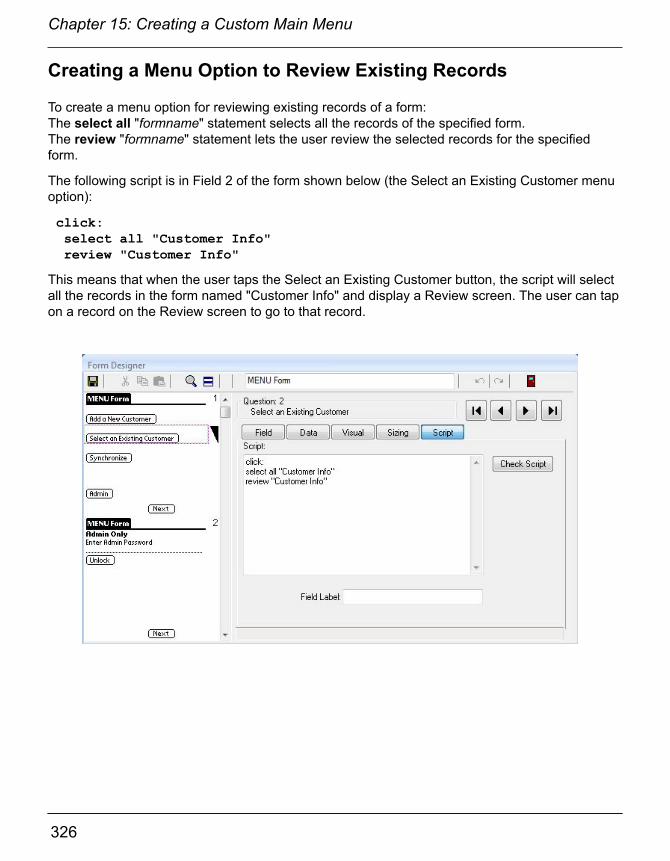
326
Chapter 15: Creating a Custom Main Menu
327
Chapter 15: Creating a Custom Main Menu
Creating a Menu Option to Review Existing Records
To create a menu option for reviewing existing records of a form:The select all "formname" statement selects all the records of the specified form.The review "formname" statement lets the user review the selected records for the specified form.
The following script is in Field 2 of the form shown below (the Select an Existing Customer menu option):
click: select all "Customer Info" review "Customer Info"
This means that when the user taps the Select an Existing Customer button, the script will select all the records in the form named "Customer Info" and display a Review screen. The user can tap on a record on the Review screen to go to that record.

326
Chapter 15: Creating a Custom Main Menu
327
Chapter 15: Creating a Custom Main Menu
Creating a Menu Option to Synchronize Pendragon Forms
If you are using a Custom Main Menu form, you will need to provide mobile device users a way to synchronize their data.
In the example below, a Button field called Synchronize is created to allow users to synchronize the mobile device.
The script in the Button field to start synchronization is:
click: synchronize

328
Chapter 15: Creating a Custom Main Menu
329
Chapter 15: Creating a Custom Main Menu
Creating a way to access the Pendragon Forms main menu
With a Custom Main Menu form, the mobile device user has no way to access the standard Pendragon Forms main menu screen that shows the list of forms.
It is strongly recommended that you add to your Custom Main Menu form a way to access the Pendragon Forms main menu. That way, if there is a problem on the mobile device, you can direct the user to revert to the Pendragon Forms main menu to troubleshoot things like verifying how many form designs are on the mobile device, or verifying what the form ID numbers are.
In the MENU Form example below, the End, Previous and Next buttons have been hidden from the user to make the MENU form appear to occupy a single screen. However, to access the Pendragon Forms main menu, the Next button first needs to be made visible so that the user can go to the second screen.
A Button field named Admin is added to the form, and when the mobile device user taps the Admin button, the Next button at the bottom of the screen is displayed. The script in the Admin button is:
click:enable nextbutton
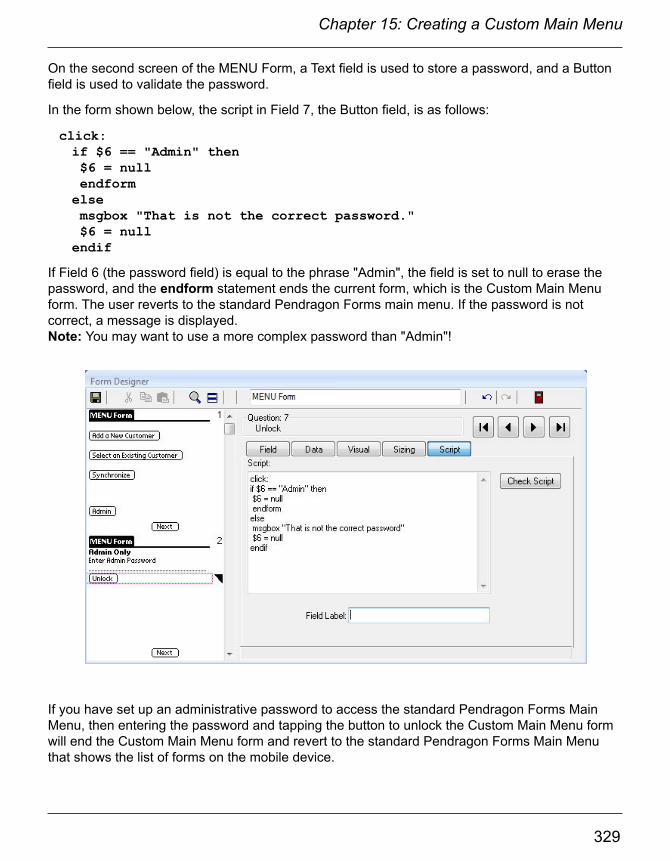
328
Chapter 15: Creating a Custom Main Menu
329
Chapter 15: Creating a Custom Main Menu
If you have set up an administrative password to access the standard Pendragon Forms Main Menu, then entering the password and tapping the button to unlock the Custom Main Menu form will end the Custom Main Menu form and revert to the standard Pendragon Forms Main Menu that shows the list of forms on the mobile device.
On the second screen of the MENU Form, a Text field is used to store a password, and a Button field is used to validate the password.
In the form shown below, the script in Field 7, the Button field, is as follows:
click: if $6 == "Admin" then $6 = null endform else msgbox "That is not the correct password." $6 = null endif
If Field 6 (the password field) is equal to the phrase "Admin", the field is set to null to erase the password, and the endform statement ends the current form, which is the Custom Main Menu form. The user reverts to the standard Pendragon Forms main menu. If the password is not correct, a message is displayed. Note: You may want to use a more complex password than "Admin"!
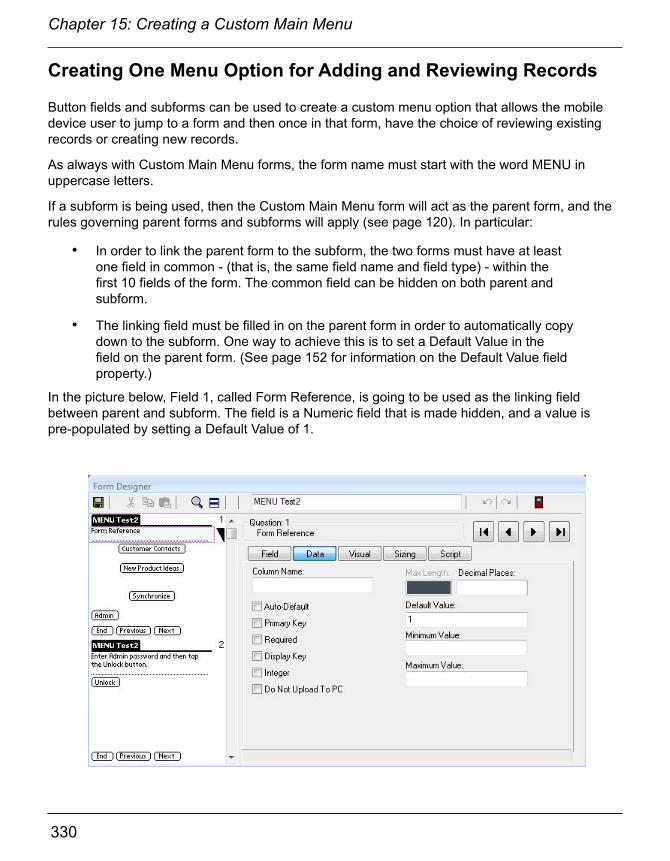
330
Chapter 15: Creating a Custom Main Menu
331
Chapter 15: Creating a Custom Main Menu
Creating One Menu Option for Adding and Reviewing Records
Button fields and subforms can be used to create a custom menu option that allows the mobile device user to jump to a form and then once in that form, have the choice of reviewing existing records or creating new records.
As always with Custom Main Menu forms, the form name must start with the word MENU in uppercase letters.
If a subform is being used, then the Custom Main Menu form will act as the parent form, and the rules governing parent forms and subforms will apply (see page 120). In particular:
• In order to link the parent form to the subform, the two forms must have at least one field in common - (that is, the same field name and field type) - within the first 10 fields of the form. The common field can be hidden on both parent and subform.
• The linking field must be filled in on the parent form in order to automatically copy down to the subform. One way to achieve this is to set a Default Value in the field on the parent form. (See page 152 for information on the Default Value field property.)
In the picture below, Field 1, called Form Reference, is going to be used as the linking field between parent and subform. The field is a Numeric field that is made hidden, and a value is pre-populated by setting a Default Value of 1.
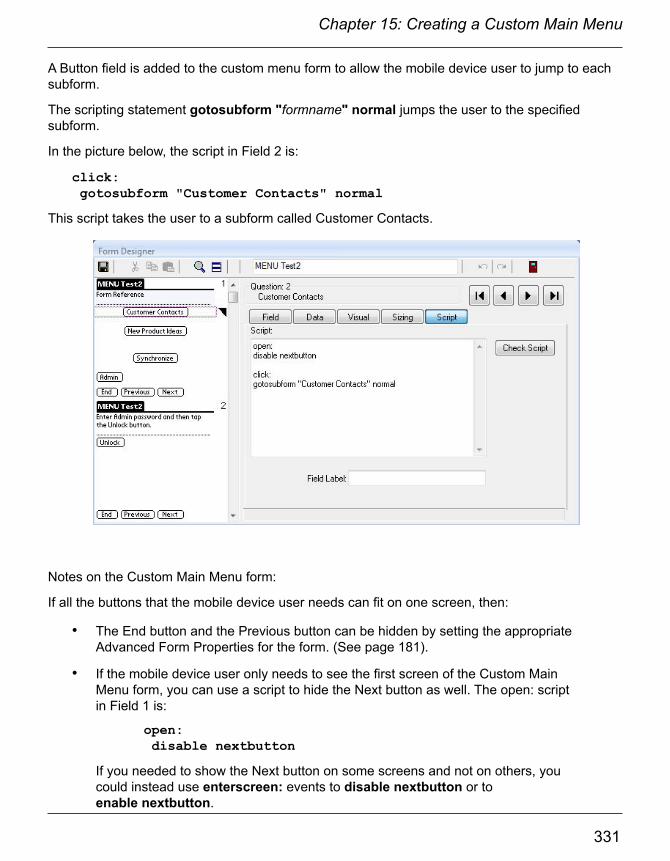
330
Chapter 15: Creating a Custom Main Menu
331
Chapter 15: Creating a Custom Main Menu
A Button field is added to the custom menu form to allow the mobile device user to jump to each subform.
The scripting statement gotosubform "formname" normal jumps the user to the specified subform.
In the picture below, the script in Field 2 is:
click: gotosubform "Customer Contacts" normal
This script takes the user to a subform called Customer Contacts.
Notes on the Custom Main Menu form:
If all the buttons that the mobile device user needs can fit on one screen, then:
• The End button and the Previous button can be hidden by setting the appropriate Advanced Form Properties for the form. (See page 181).
• If the mobile device user only needs to see the first screen of the Custom Main Menu form, you can use a script to hide the Next button as well. The open: script in Field 1 is:
open: disable nextbutton
If you needed to show the Next button on some screens and not on others, you could instead use enterscreen: events to disable nextbutton or to enable nextbutton.
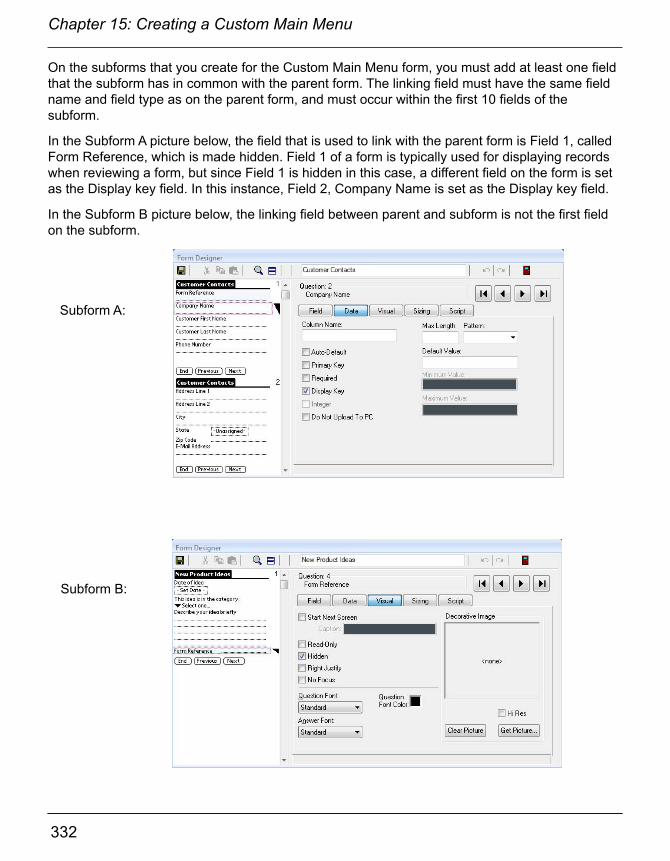
332
Chapter 15: Creating a Custom Main Menu
333
Chapter 15: Creating a Custom Main Menu
On the subforms that you create for the Custom Main Menu form, you must add at least one field that the subform has in common with the parent form. The linking field must have the same field name and field type as on the parent form, and must occur within the first 10 fields of the subform.
In the Subform A picture below, the field that is used to link with the parent form is Field 1, called Form Reference, which is made hidden. Field 1 of a form is typically used for displaying records when reviewing a form, but since Field 1 is hidden in this case, a different field on the form is set as the Display key field. In this instance, Field 2, Company Name is set as the Display key field.
In the Subform B picture below, the linking field between parent and subform is not the first field on the subform.
Subform A:
Subform B:

332
Chapter 15: Creating a Custom Main Menu
333
Chapter 15: Creating a Custom Main Menu
On the mobile device, the user can tap a button to jump to the subform of their choice. The user can tap the New button to add a new record or tap on an existing record to review that record.Tapping the End button on the subform returns the user to the subform review screen, and tapping Done on the review screen returns the user to the Custom Main Menu form.
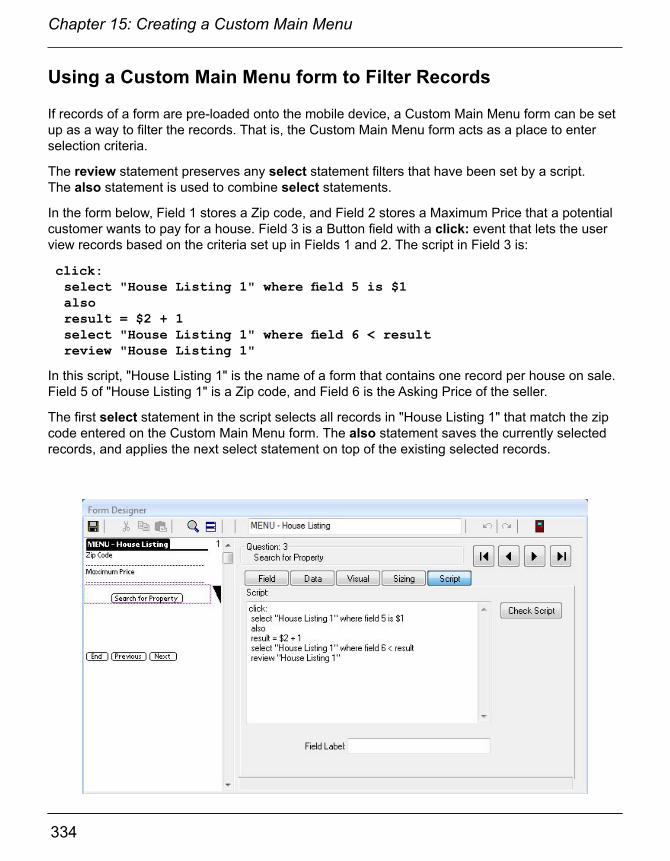
334
Chapter 15: Creating a Custom Main Menu
335
Chapter 15: Creating a Custom Main Menu
Using a Custom Main Menu form to Filter Records
If records of a form are pre-loaded onto the mobile device, a Custom Main Menu form can be set up as a way to filter the records. That is, the Custom Main Menu form acts as a place to enter selection criteria.
The review statement preserves any select statement filters that have been set by a script. The also statement is used to combine select statements.
In the form below, Field 1 stores a Zip code, and Field 2 stores a Maximum Price that a potential customer wants to pay for a house. Field 3 is a Button field with a click: event that lets the user view records based on the criteria set up in Fields 1 and 2. The script in Field 3 is:
click: select "House Listing 1" where field 5 is $1 also result = $2 + 1 select "House Listing 1" where field 6 < result review "House Listing 1"
In this script, "House Listing 1" is the name of a form that contains one record per house on sale. Field 5 of "House Listing 1" is a Zip code, and Field 6 is the Asking Price of the seller.
The first select statement in the script selects all records in "House Listing 1" that match the zip code entered on the Custom Main Menu form. The also statement saves the currently selected records, and applies the next select statement on top of the existing selected records.
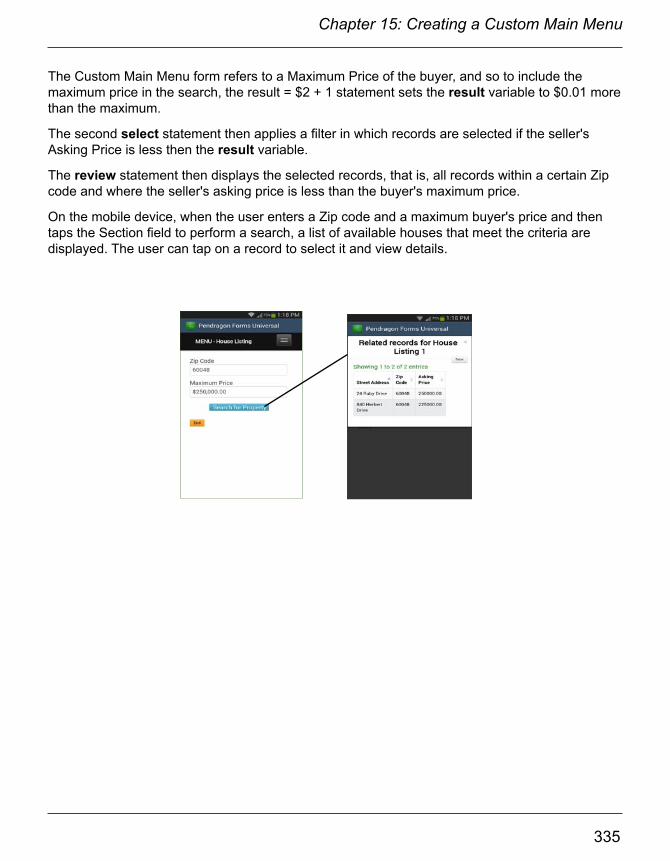
334
Chapter 15: Creating a Custom Main Menu
335
Chapter 15: Creating a Custom Main Menu
The Custom Main Menu form refers to a Maximum Price of the buyer, and so to include the maximum price in the search, the result = $2 + 1 statement sets the result variable to $0.01 more than the maximum.
The second select statement then applies a filter in which records are selected if the seller's Asking Price is less then the result variable.
The review statement then displays the selected records, that is, all records within a certain Zip code and where the seller's asking price is less than the buyer's maximum price.
On the mobile device, when the user enters a Zip code and a maximum buyer's price and then taps the Section field to perform a search, a list of available houses that meet the criteria are displayed. The user can tap on a record to select it and view details.

336
Chapter 15: Creating a Custom Main Menu
337
Advanced Form Properties to Set on the Custom Main Menu
If the Custom Main Menu form fits on one screen, you can set two Advanced Form Properties on the Views tab: you can hide the End button and the Previous (Back) button.
On the Form Properties screen of the Custom Main Menu form, check the Data Persistence option to:Keep a copy of records on handheld.
When this option is set, there will only be one record per user created for the Custom Main Menu form itself.
If you choose to remove records from the mobile device (no checkboxes checked), then a new record will be created each time each mobile device user enters the Custom Main Menu. As the Custom Main Menu form does not usually contain any data, it does not make sense to keep adding records to this form.
On the Synchronization tab of the Advanced Form Properties screen of the Custom Main Menu form, leave the default Additional Download Criteria of:UserName = ##USERNAME##
When this option is set, each mobile device will only receive the one record created in the Custom Main Menu by that user.

336
Chapter 15: Creating a Custom Main Menu
337
16. Working with Bar Codes
On certain supported devices, Pendragon Forms Universal has the ability to scan a bar code into a Text field on a form. This makes it possible to create forms for doing activities such as taking inventory.
Bar Code Devices Supported
Pendragon Forms Universal works with the following bar code scanning devices:
• Honeywell Dolphin 70e This is an Android device with a built-in bar code scanner.
• Socket Mobile: Socket Bluetooth Cordless Hand Scanner (CHS) 7CiThis is a stand-alone bar code scanner that uses Bluetooth to pair with an Android device to scan bar codes. Look on Pendragon Software’s website for additional information on using Forms Universal with this device.
How Bar Code Scanning Works in Pendragon Forms Universal
A scan: event script runs when the bar code scanner is activated. The value of the scanned bar code is placed in a variable called scandata, and a statement in the script places the value of scandata into a Text field on the form. Bar codes can only be stored in Text fields.
The form shown at left might be used for gathering data for an inventory database. The mobile device user can type in the name of an item, then scan the item’s bar code to record the bar code number, and then enter the quantity of the item in stock.
To scan a bar code into field 2 in the form shown at left, the following script is added on the Script tab of Field 2 in the Form Designer when the form is created:
scan:$2 = scandata

Chapter 16: Working with Bar Codes
338
Chapter 16: Working with Bar Codes
339
Repeating Forms
If most of the data on a form is the same for many records at a time, the clone statement can be used in a scan: event script to create a new record based on the existing record. Clone ends the current record, then creates a new record with the same values as the previous record. Fields that are not the same from one record to the next can be set to null on the new record.
Bar Code Clone 1: Creating a New Record on Each Scan
Here is a form for taking inventory. Once the user enters the date, building location and room number, these values do not need to change until the user goes to a new room. The script in Field 4 is:
scan: if answer = null then answer = scandata $[BoxCount] = $[BoxCount] + 1 else clone beep answer = scandata $[BoxCount] = $[BoxCount] + 1 endif
On the very first record, the user fills in fields 1, 2 and 3 and then scans the bar code. Since Field 4 is initially blank (null), the first part of the If...Then...Else statement is true, and the scanned bar code is placed in Field 4. The Box Count field is incremented by 1. (Important: To retain the box count from record to record, this field is set to Autodefault - see page 148.)
If the mobile device user scans another bar code, Field 4 of the current record is not null. Thus the ‘Else’ part of the If...Then...Else...Endif statement runs. The clone statement ends the current record and makes an exact copy of the record, so that Fields 1, 2, and 3 are retained on the new record. The remainder of the script after the Clone statement runs on the new record, so that Field 4 of the new record is assigned the value of the second bar code. The beep statement is added to alert the mobile device user to the fact that a new record has been created, and the Box Count field is incremented by one. The user can continue creating new records each time a bar code is scanned. Tapping the End button after a scan will allow the user to exit the form.
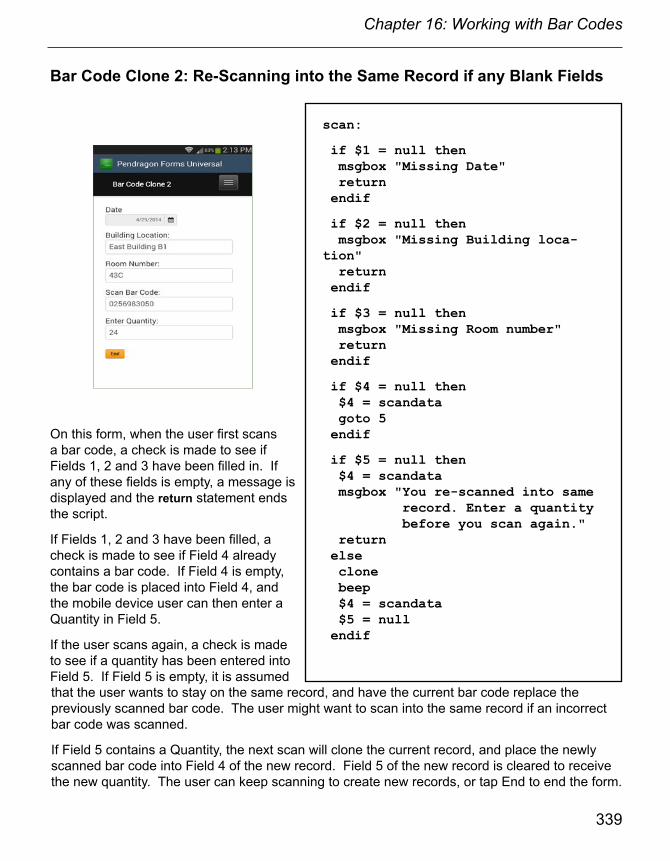
Chapter 16: Working with Bar Codes
338
Chapter 16: Working with Bar Codes
339
Bar Code Clone 2: Re-Scanning into the Same Record if any Blank Fields
scan:
if $1 = null then msgbox "Missing Date" return endif
if $2 = null then msgbox "Missing Building loca-tion" return endif
if $3 = null then msgbox "Missing Room number" return endif
if $4 = null then $4 = scandata goto 5 endif
if $5 = null then $4 = scandata msgbox "You re-scanned into same record. Enter a quantity before you scan again." return else clone beep $4 = scandata $5 = null endif
On this form, when the user first scans a bar code, a check is made to see if Fields 1, 2 and 3 have been filled in. If any of these fields is empty, a message is displayed and the return statement ends the script.
If Fields 1, 2 and 3 have been filled, a check is made to see if Field 4 already contains a bar code. If Field 4 is empty, the bar code is placed into Field 4, and the mobile device user can then enter a Quantity in Field 5.
If the user scans again, a check is made to see if a quantity has been entered into Field 5. If Field 5 is empty, it is assumed that the user wants to stay on the same record, and have the current bar code replace the previously scanned bar code. The user might want to scan into the same record if an incorrect bar code was scanned.
If Field 5 contains a Quantity, the next scan will clone the current record, and place the newly scanned bar code into Field 4 of the new record. Field 5 of the new record is cleared to receive the new quantity. The user can keep scanning to create new records, or tap End to end the form.

Chapter 16: Working with Bar Codes
340
Chapter 16: Working with Bar Codes
341
Looking up Records from a Reference Form
Another approach is to use two forms: one form acts as a reference form and contains, for example, a record for each inventory item. The second form is the form that the user fills in. When the user scans a bar code, a matching record in the reference form is copied into the current form. Since two forms are being used to perform the lookup, there are two steps involved: Step 1 is to create the reference form, and Step 2 is to create the form that is doing the lookup.
There are two types of reference form that you can create:
• A regular form that is acting as a reference form.
• A read-only reference form. Typically you would use a read-only reference form if you have a lot of records (for instance, more than 2000 records). A read-only reference has more restrictions than a regular form (e.g: only Text and Numeric fields are allowed, and Text fields have to be set to the smallest possible Maximum Length), but can be fast for doing lookups. See page 191 for details on how to create a read-only reference form.
Step 1: Create the reference formFirst create the reference form that will store all the inventory records. As mentioned above, the form can be a regular form or it can be a read-only reference form.
Here the reference form contains three fields:
Item Bar Code (the primary key field) Item Name Quantity in Stock.
The reference form can be frozen, and then populated with records. You can import data into the database table from an ASCII file (see page 215), or you can click on the name of the form in the Forms Manager, then click the Edit/View button, and manually enter the records. You can also put the form on a mobile device and manually scan each item and fill in the remaining fields.
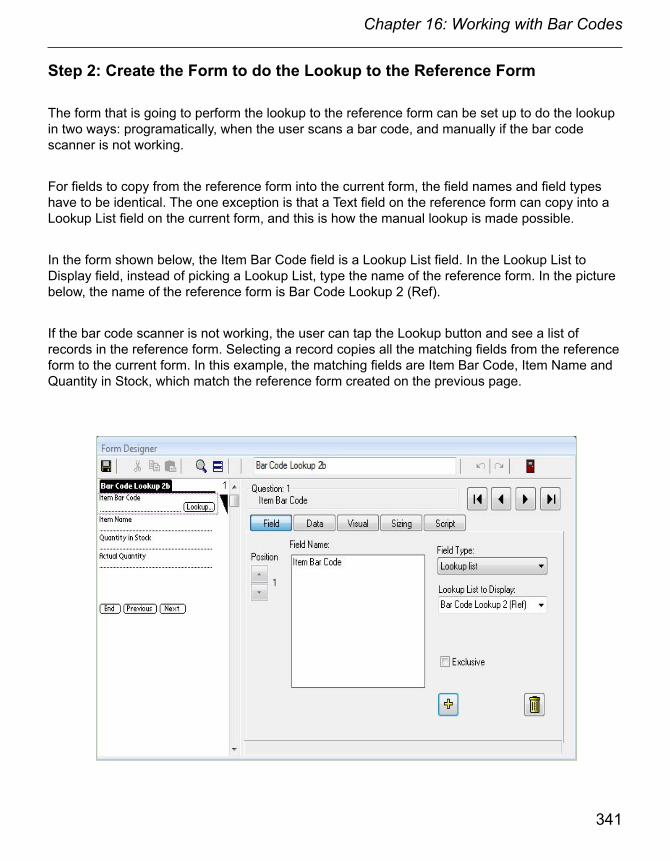
Chapter 16: Working with Bar Codes
340
Chapter 16: Working with Bar Codes
341
Step 2: Create the Form to do the Lookup to the Reference Form
The form that is going to perform the lookup to the reference form can be set up to do the lookup in two ways: programatically, when the user scans a bar code, and manually if the bar code scanner is not working.
For fields to copy from the reference form into the current form, the field names and field types have to be identical. The one exception is that a Text field on the reference form can copy into a Lookup List field on the current form, and this is how the manual lookup is made possible.
In the form shown below, the Item Bar Code field is a Lookup List field. In the Lookup List to Display field, instead of picking a Lookup List, type the name of the reference form. In the picture below, the name of the reference form is Bar Code Lookup 2 (Ref).
If the bar code scanner is not working, the user can tap the Lookup button and see a list of records in the reference form. Selecting a record copies all the matching fields from the reference form to the current form. In this example, the matching fields are Item Bar Code, Item Name and Quantity in Stock, which match the reference form created on the previous page.

Chapter 16: Working with Bar Codes
342
Chapter 16: Working with Bar Codes
343
To make it possible to automatically perform the lookup to the reference form when the user scans a bar code, a scan: event script is added to field 1, the Item Bar Code field.
A lookup...within statement performs the lookup to the named reference form. The default is that a lookup...within statement does the lookup based on the Display Key field of the reference form. The default Display Key field is the first field on the form. If you do not want to perform the lookup based on the Display key field, use the keycolumn statement to select which column of the reference form should be used for the lookup.
scan:
if $1 = null then $1 = scandata lookup $1 within "Bar Code Lookup 2 (Ref)" goto 4 endif
if $4 = null then $1 = scandata $2 = null $3 = null lookup $1 within "Bar Code Lookup 2 (Ref)" msgbox "You re-scanned into same record. Enter a quantity before you scan again." return else clone $1 = scandata $2 = null $3 = null $4 = null lookup $1 within "Bar Code Lookup 2 (Ref)" endif
The above script is in field 1of the form that is doing the lookup to the reference form. When the mobile device user creates the first record, field 1 (the Bar Code field) is null. The script therefore places the bar code into field 1. The statement
lookup $1 within “Bar Code Lookup 2 (Ref)”
performs the lookup to the reference form named Bar Code Lookup 2 (Ref), and copies all fields that match from the reference form into the current form. This fills in the Item Name (field 2) and Quantity in Stock (field 3) for the corresponding Item Bar Code. The Goto statement ends the script and the user can then fill in field 4, the Actual Quantity in Stock.

Chapter 16: Working with Bar Codes
342
Chapter 16: Working with Bar Codes
343
If the user does not fill in field 4, and instead scans another bar code, it is assumed that the user wants to overwrite the same record. If the user does fill in field 4 and then scans another bar code, it is assumed that the user wants to create a new record. The clone statement creates the new record, and another lookup...within statement looks up the new bar code against the refer-ence form.
If the mobile device user scans a bar code that in not in the reference form, the lookup...within statement will not find a match, and fields 2 and 3 will remain blank. The user can then enter this information manually.
With the bar code scanner, the user can repeatedly scan a bar code, find a match and update the actual quantity. Scanning again automatically creates a new record.
If the bar code scanner is not working, the user has to do a manual lookup. After finding a match and updating the actual quantity, the user has to manually tap the End button to end the record, and then tap the New button to create a new record to select again.
NOTE:
In this example, the user never updates the Quantity in Stock on the reference form. All the updates are being entered in the form that is doing the lookup. In this scenario, it is the responsibility of the administrator for the Forms program to update the reference form before the next inventory audit.
It is possible to programatically update the data in a reference form (but NOT a read-only reference form). See page 311 for an example.

Chapter 16: Working with Bar Codes
344345
This page intentionally left blank.

Chapter 16: Working with Bar Codes
344345
17. Linking to an External Access Database
With Pendragon Forms it is possible to link to an external Microsoft Access database instead of the Pendragon Forms database. This feature is particularly useful if you have your own existing Access database and you want to send data from your database to a mobile device.
Issues to Consider when Linking to an External Access Database
Here are some important issues to consider when linking to your own Access database:
Does my database table have a primary key?A primary key is a field or combination of fields that uniquely identify a record. No two records can have the same value for the primary key.
Pendragon Forms uses a primary key to tell if a record on the mobile device is new or if the record already exists in the external Access database. If the primary key field(s) of a record are not in the database, then the record on the mobile device is new and should be added to the da-tabase during synchronization. If the primary key field(s) of a record are in the Access database already, then the record on the mobile device is not new, and during synchronization the existing record in the database should be updated.
Warning: If the database table in your existing Access database does not have a primary key, you will not be able to update any records on the mobile device. Refer to your Microsoft Access documentation on how to select a primary key for a database table.
Whatever primary key you use in your database table, the same primary key must be used in the corresponding Pendragon form. The primary key can be one field such as a Customer ID#, or a combination of fields such as a Customer Account Number and a Date of Visit.
• To prevent primary keys from accidentally being corrupted by the mobile device user, any existing records that are sent from the PC to the mobile device will have the primary key field(s) set to being read-only on the mobile device.

346
Chapter 17: Linking to an External Access Database
347
Chapter 17: Linking to an External Access Database
Will the mobile device users be allowed to create new records?If the user can create new records, the uniqueness of primary keys has to be protected, so that new records on the mobile device do not overwrite existing records on the PC.
• During synchronization, the Pendragon Transfer Agent synchronization software compares new records on the mobile device to existing records in the Pendragon Forms Manager Access database (in direct sync) or in the Pendragon Forms MySQL database in the case of Two-Stage synchronization. If a new record has a primary key that is the same as an existing primary key, the new record will not be sent to the database, and will be flagged on the mobile device. The user can then change the record on the mobile device to have a unique primary key.
How will you limit the number of records that are sent to the mobile device?Since the mobile device has limited memory compared to a PC, there must be a mechanism for removing records from the device, or for determining which mobile device receives which record.
• The Advanced Form Properties screen in the Pendragon Forms Manager Access database allows you to specify the Additional Download Criteria that will determine which records from the database are sent to the mobile device. You will need to specify the Additional Download Criteria before you link the Pendragon form to your external database table.
When linking to a parent form and a subform, the parent form must be created first.If you have referential integrity rules in your Access database, whereby a child record cannot be created before a parent record, you will need to take care with the order in which you create a parent form and subform in Pendragon Forms.
When you create a form design, the Form ID# that is associated with the form is based on the creation date and time of the form. During synchronization, Pendragon Forms synchronizes forms in the order in which they were created, that is, starting with the smallest Form ID#. If you create a subform before a parent form, Pendragon Forms will attempt to synchronize the subform first. If you are linking to an external Access database with referential integrity rules, this is equivalent to creating a child record before the parent record, and Access will give an error during synchronization.
The solution in this case is simply to create your parent form in Pendragon Forms before you create the subform. If you have already created the subform first, make a copy of the subform. The copied subform will have a later creation date than the parent form, and will therefore synchronize after the parent form. In the Subform List field of the parent form, you will need to make sure that you are referencing the copied subform and not the original.

346
Chapter 17: Linking to an External Access Database
347
Chapter 17: Linking to an External Access Database
Compatibility between Pendragon Forms field types andMicrosoft Access field types
Although the Pendragon Forms Manager is an Access database itself, there are more field types in Pendragon Forms than there are in Microsoft Access. This gives you more flexibility when entering data on a mobile device. However, if you want to link your Pendragon form to an external Access database, you will need to make sure that the fields on your Pendragon form are linking to an appropriate Access field type in your database table.
Here are the Access field types and their compatible Pendragon Forms field types:
Access Field Type Compatible Pendragon Forms Field Type
Text (up to 255 characters) Text (up to Max Length 255 characters)Popup ListLookup ListExclusive Lookup ListOption 1 to 5Yes/No CheckboxCompletion CheckboxCustom Control
Memo Text (with Max Length 2000 characters)Custom Control
Number: Byte Numeric (with Min = 0, Max = 255, Integer)
Number: Integer Numeric (with Min = -16384, Max = 16383, Integer )
Number: Long Integer Numeric (with Min = -2147483648, Max = 2147483647, Integer)
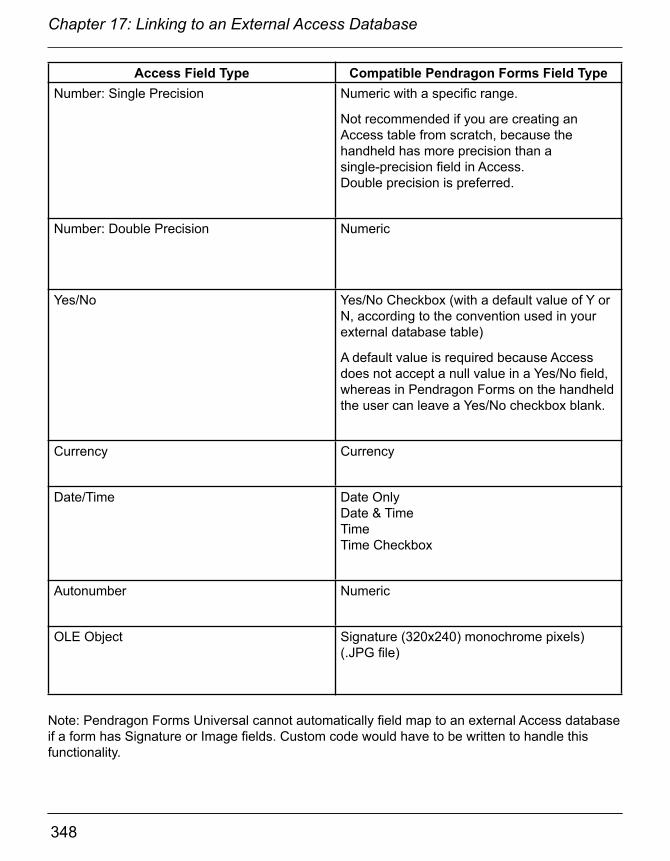
348
Chapter 17: Linking to an External Access Database
349
Chapter 17: Linking to an External Access Database
Access Field Type Compatible Pendragon Forms Field TypeNumber: Single Precision Numeric with a specific range.
Not recommended if you are creating an Access table from scratch, because the handheld has more precision than a single-precision field in Access. Double precision is preferred.
Number: Double Precision Numeric
Yes/No Yes/No Checkbox (with a default value of Y or N, according to the convention used in your external database table)
A default value is required because Access does not accept a null value in a Yes/No field, whereas in Pendragon Forms on the handheld the user can leave a Yes/No checkbox blank.
Currency Currency
Date/Time Date OnlyDate & TimeTimeTime Checkbox
Autonumber Numeric
OLE Object Signature (320x240) monochrome pixels) (.JPG file)
Note: Pendragon Forms Universal cannot automatically field map to an external Access database if a form has Signature or Image fields. Custom code would have to be written to handle this functionality.

348
Chapter 17: Linking to an External Access Database
349
Chapter 17: Linking to an External Access Database
Sample Existing Access Database
In order to illustrate linking Pendragon Forms to an existing Access database, we will consider putting the following simple work order database on the mobile device:
In this database, the Ticket Number field is the primary key and is an Autonumber field. This allows each work order to have a unique number.
In Microsoft Access, a form has been created for someone to enter new work orders into the system. Customer information is entered, and the work order is assigned to a technician.
This information now needs to be sent to the mobile device so that the technician can complete the work order in the field.

350
Chapter 17: Linking to an External Access Database
351
Chapter 17: Linking to an External Access Database
Step 1: Creating a Form from an Existing Database Table
The first step in the process of linking to an existing Access database is to create a Pendragon form which is based on the specific Access database table to which you want to link.
1a. In the Pendragon Forms Manager, click the Import button.
1b. Click the Import Access Table Design button. In the Select Access database window, choose the Access .mdb file or Access .accdb file to which you want to link.

350
Chapter 17: Linking to an External Access Database
351
Chapter 17: Linking to an External Access Database
1c. A Table Selector window appears, displaying a list of the database tables and queries within the selected Access database. Click on a table name and click OK.
1d. An Import Data window appears, prompting you for the name that you want to give the corresponding Pendragon form. Enter a name for the form and click OK.
1e. In the Forms List within the Pendragon Forms Manager, click on the name of the newly created form, then click the Edit button. In Step 2 on the next page, the form design will be edited for displaying on the mobile device.
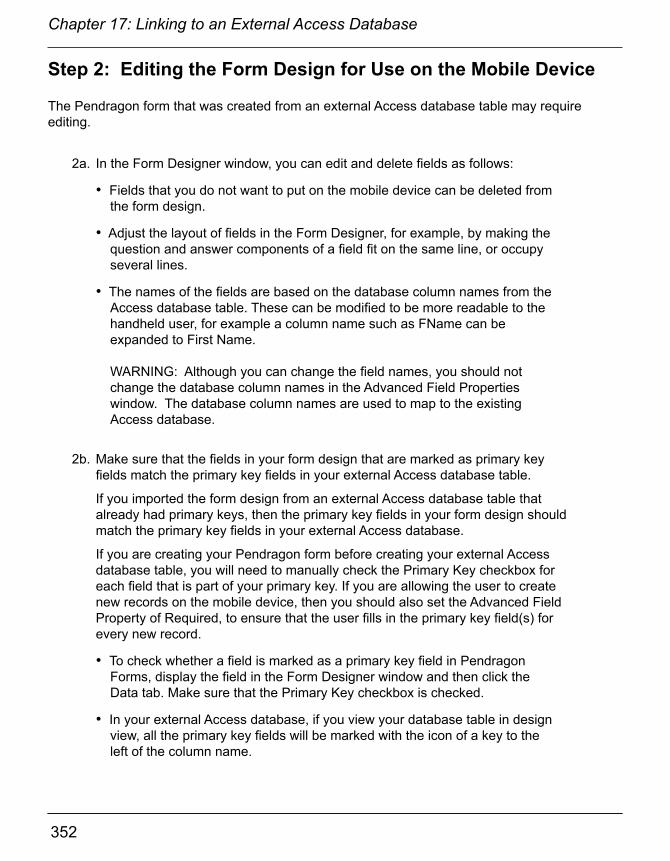
352
Chapter 17: Linking to an External Access Database
353
Chapter 17: Linking to an External Access Database
Step 2: Editing the Form Design for Use on the Mobile Device
The Pendragon form that was created from an external Access database table may require editing.
2a. In the Form Designer window, you can edit and delete fields as follows:
• Fields that you do not want to put on the mobile device can be deleted from the form design.
• Adjust the layout of fields in the Form Designer, for example, by making the question and answer components of a field fit on the same line, or occupy several lines.
• The names of the fields are based on the database column names from the Access database table. These can be modified to be more readable to the handheld user, for example a column name such as FName can be expanded to First Name.
WARNING: Although you can change the field names, you should not change the database column names in the Advanced Field Properties window. The database column names are used to map to the existing Access database.
2b. Make sure that the fields in your form design that are marked as primary key fields match the primary key fields in your external Access database table.
If you imported the form design from an external Access database table that already had primary keys, then the primary key fields in your form design should match the primary key fields in your external Access database.
If you are creating your Pendragon form before creating your external Access database table, you will need to manually check the Primary Key checkbox for each field that is part of your primary key. If you are allowing the user to create new records on the mobile device, then you should also set the Advanced Field Property of Required, to ensure that the user fills in the primary key field(s) for every new record.
• To check whether a field is marked as a primary key field in Pendragon Forms, display the field in the Form Designer window and then click the Data tab. Make sure that the Primary Key checkbox is checked.
• In your external Access database, if you view your database table in design view, all the primary key fields will be marked with the icon of a key to the left of the column name.

352
Chapter 17: Linking to an External Access Database
353
Chapter 17: Linking to an External Access Database
If the primary key in the existing database table is an Autonumber field, Pendragon Forms treats the field as a special case on the form. The Autonumber field will be populated by Microsoft Access when records are sent to the existing database. However, because the Autonumber field is the primary key, records that are created on the mobile device will need to have a unique value in this field at least temporarily until a number is assigned from the PC.
Pendragon Forms automatically makes some special settings in the Advanced Field Properties window to make it possible to store a unique number on the mobile device which will be discarded when a new record is sent to the PC.
Primary key - this option is checked to indicate that the Autonumber field is the primary key on the form.
• More than one field on a form can be primary. For example, a customer database may use Customer Account Number and Date of Visit as the combined primary key.If a primary key field is not an Autonumber field, and you are going to allow the user to create new records on the mobile device, then make the primary key fields Required fields, but do not make them read-only.
• If an Autonumber field is the primary key, and this field is going to be filled in via a script (see next page), you can set the primary key to be Read-Only to prevent accidental corruption of the primary key on the mobile device.
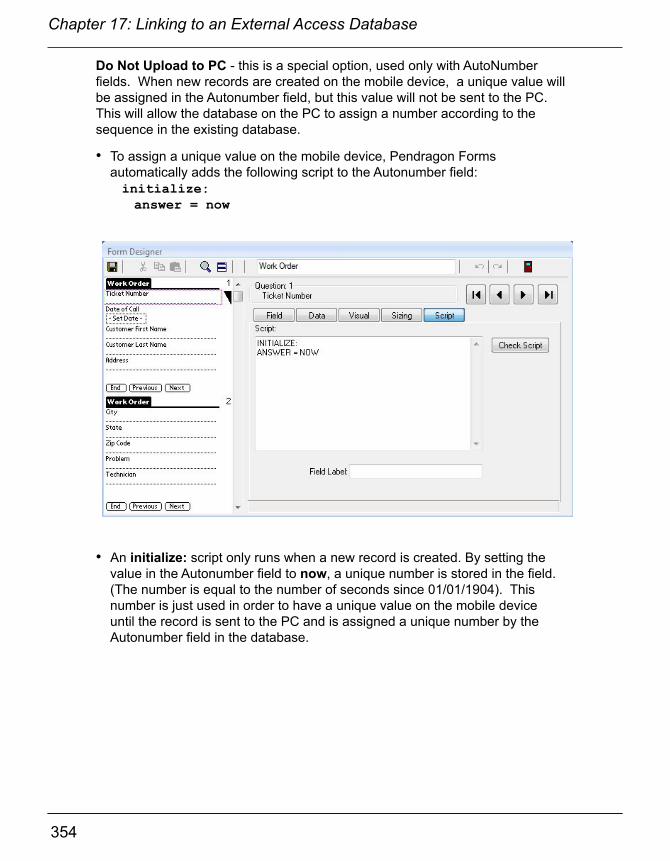
354
Chapter 17: Linking to an External Access Database
355
Chapter 17: Linking to an External Access Database
Do Not Upload to PC - this is a special option, used only with AutoNumber fields. When new records are created on the mobile device, a unique value will be assigned in the Autonumber field, but this value will not be sent to the PC. This will allow the database on the PC to assign a number according to the sequence in the existing database.
• To assign a unique value on the mobile device, Pendragon Forms automatically adds the following script to the Autonumber field: initialize: answer = now
• An initialize: script only runs when a new record is created. By setting the value in the Autonumber field to now, a unique number is stored in the field. (The number is equal to the number of seconds since 01/01/1904). This number is just used in order to have a unique value on the mobile device until the record is sent to the PC and is assigned a unique number by the Autonumber field in the database.

354
Chapter 17: Linking to an External Access Database
355
Chapter 17: Linking to an External Access Database
2c. If you need to control which mobile device user receives which database record, then there should be a column in your existing database for storing the mobile device user name, that is, the name associated with a given mobile device.
In our database example, the Technician field serves this purpose and allows the person entering data on the PC to assign which record will go to which mobile device.
In this example the Technician field is displayed on the form so that the user can see that his/her name has been assigned. (The field can be made Read-Only to prevent the user from assigning someone else.)
It is not actually necessary have a field on the Pendragon form for this information, as long as there is a field in the database that can be used to determine the criteria for downloading records. (See Step 3.)
Every Pendragon form has three fields that are generated automatically: UnitID, UserName and TimeStamp. The UserName field is the mobile device user name, and the TimeStamp field is the creation date and time of each new record on the mobile device.
If your existing database does not have a column for storing the mobile device user name, and you want to create one, you can create a column called UserName.If you also want to store the creation date and time of each mobile device record, create a column in your database called TimeStamp.
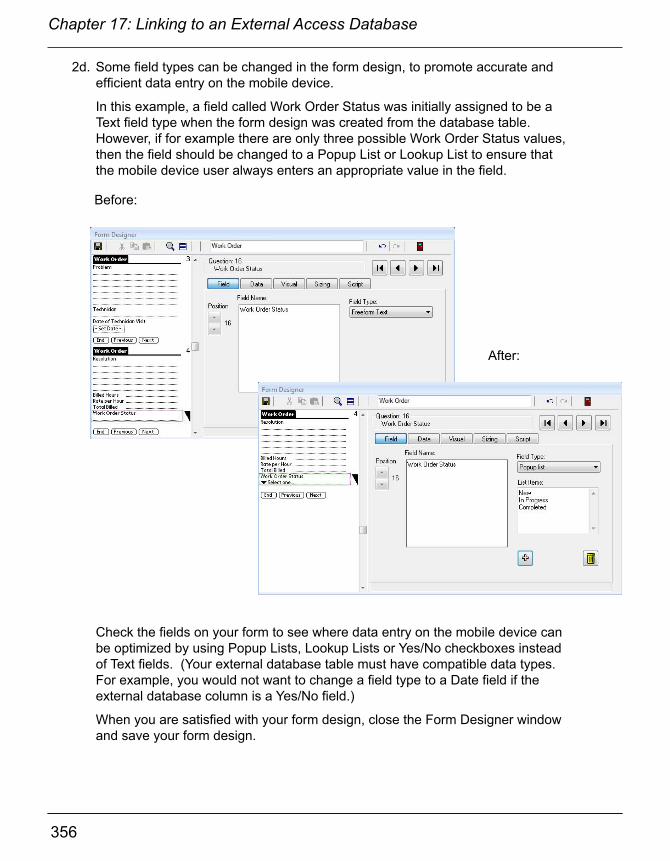
356
Chapter 17: Linking to an External Access Database
357
Chapter 17: Linking to an External Access Database
2d. Some field types can be changed in the form design, to promote accurate and efficient data entry on the mobile device.
In this example, a field called Work Order Status was initially assigned to be a Text field type when the form design was created from the database table.However, if for example there are only three possible Work Order Status values, then the field should be changed to a Popup List or Lookup List to ensure that the mobile device user always enters an appropriate value in the field.
Before:
After:
Check the fields on your form to see where data entry on the mobile device can be optimized by using Popup Lists, Lookup Lists or Yes/No checkboxes instead of Text fields. (Your external database table must have compatible data types. For example, you would not want to change a field type to a Date field if the external database column is a Yes/No field.)
When you are satisfied with your form design, close the Form Designer window and save your form design.

356
Chapter 17: Linking to an External Access Database
357
Chapter 17: Linking to an External Access Database
Step 3: Controlling which Records go to the Mobile Device
Since the storage space on the mobile device is limited, it is very important to specify the rules that will govern which records are sent from the PC to the mobile device, and to specify when records will be removed from the mobile device.
3a. In the Pendragon Forms Manager, click on the name of your form, and then click the Properties button.
In the Data Persistence section, check the box Keep a copy of records on handheld.
This allows records to be sent to the mobile device.
The option Keep new records on handheld for X days can only be used if the external database has a TimeStampcolumn for storing record creation dates.
The option Keep incomplete records on handheld can only be used if the Completion checkbox field on the Pendragon form is mapping to a Text field in the external database.
If you do not want the user to create new records on the mobile device, check the box No additions on handheld. This would be the case if new records are always generated on the PC.
To specify which records are sent to the mobile device, click the Advanced Properties button.

358
Chapter 17: Linking to an External Access Database
359
Chapter 17: Linking to an External Access Database
3b. The Advanced Form Properties window is where you specify the download criteria for selecting which records get sent to the mobile device, and which records are removed from the mobile device.
The Additional Download Criteria field stores an SQL WHERE statement which will restrict the records that get sent to the mobile device.
##USERNAME## is a special wildcard which Pendragon Forms uses to represent the mobile device user name. [Technician] = ##USERNAME## means that the Technician field in the database has to match the mobile device user name for the record to be sent.
[Work Order Status] <> “Completed” means that if a field called Work Order Status is not set to Completed, then the record is sent to the mobile device.
If the handheld user changes the Work Order Status to Completed, the record will be sent to the PC during the next synchronization, and then be removed from the mobile device.
The general format of the WHERE clause is:
[Database-Column-Name] = “Criteria”
See Additional Download Criteria starting on page 184 for more information on WHERE clauses.

358
Chapter 17: Linking to an External Access Database
359
Chapter 17: Linking to an External Access Database
Step 4: Linking the Form to the External Access Database
Up to this point, the form that has been created based on the existing Access database table is not yet linked to the database table. Once the form properties and Advanced form properties have been selected, the form can be frozen and then linked to the external Access database table.
4a. Before you freeze your form design, make sure that the field(s) that you have selected as primary key fields in your form design are also the primary key field(s) in your external Access database.
4b. In the main Pendragon Forms Manager window, under the list of form designs, click the Options button.
The default Bracket Mode is Smart (Default). Leave this default if you are linking to an Access database with a .mdb file extension, or if you are linking to an ODBC database.
However, if you are linking to an external Access database with a file extension of .accdb, set the Bracket Mode to Always (MSAccess).
If you are linking to a .accdb Access database, set the Bracket Mode to Always (MS Access).

360
Chapter 17: Linking to an External Access Database
361
Chapter 17: Linking to an External Access Database
4c. In the Properties window, freeze the form design. Then click the Field Mappings button.
Click on the Freeze form design button to freeze the form design.
IMPORTANT! If you change Advanced Form Properties after doing Field Mappings, you will need to re-do Field Mappings.
Once the form is frozen, the Field Mappings button becomes accessible.
Click the Field Mappings button to link the Pendragon form to your Access database table.
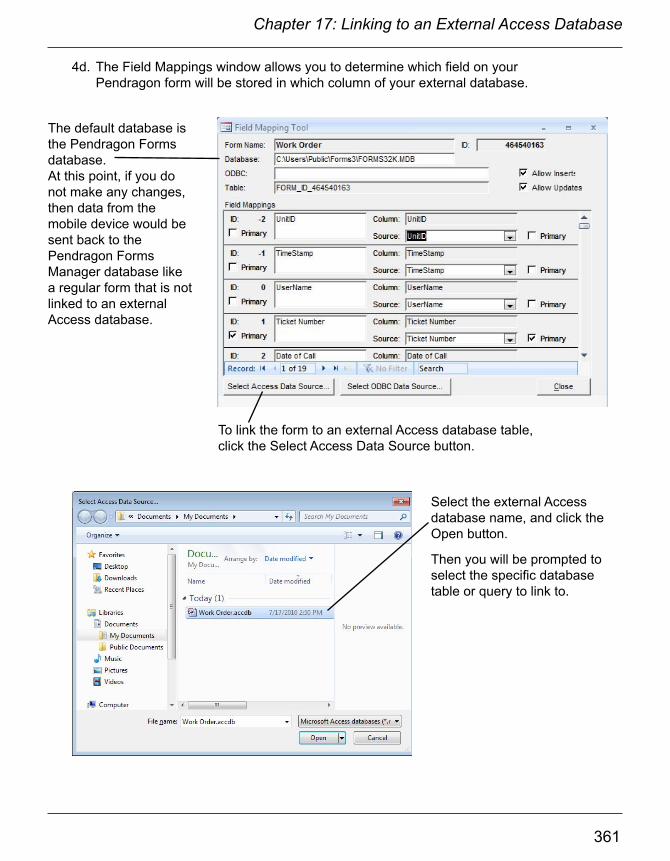
360
Chapter 17: Linking to an External Access Database
361
Chapter 17: Linking to an External Access Database
4d. The Field Mappings window allows you to determine which field on your Pendragon form will be stored in which column of your external database.
The default database is the Pendragon Forms database. At this point, if you do not make any changes, then data from the mobile device would be sent back to the Pendragon Forms Manager database like a regular form that is not linked to an external Access database.
To link the form to an external Access database table, click the Select Access Data Source button.
Select the external Access database name, and click the Open button.
Then you will be prompted to select the specific database table or query to link to.
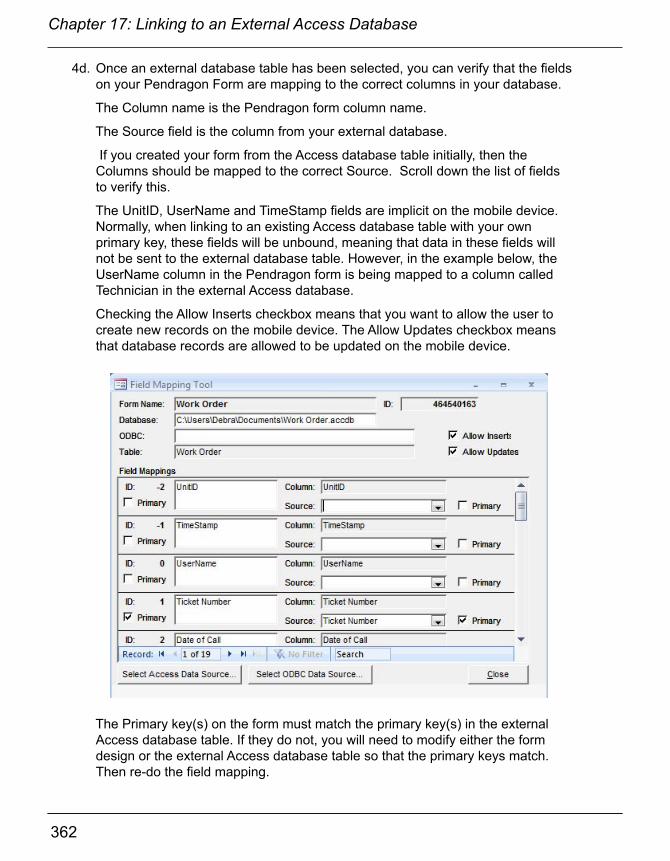
362
Chapter 17: Linking to an External Access Database
363
Chapter 17: Linking to an External Access Database
4d. Once an external database table has been selected, you can verify that the fields on your Pendragon Form are mapping to the correct columns in your database.
The Column name is the Pendragon form column name.
The Source field is the column from your external database.
If you created your form from the Access database table initially, then the Columns should be mapped to the correct Source. Scroll down the list of fields to verify this.
The UnitID, UserName and TimeStamp fields are implicit on the mobile device. Normally, when linking to an existing Access database table with your own primary key, these fields will be unbound, meaning that data in these fields will not be sent to the external database table. However, in the example below, the UserName column in the Pendragon form is being mapped to a column called Technician in the external Access database.
Checking the Allow Inserts checkbox means that you want to allow the user to create new records on the mobile device. The Allow Updates checkbox means that database records are allowed to be updated on the mobile device.
The Primary key(s) on the form must match the primary key(s) in the external Access database table. If they do not, you will need to modify either the form design or the external Access database table so that the primary keys match. Then re-do the field mapping.

362
Chapter 17: Linking to an External Access Database
363
Chapter 17: Linking to an External Access Database
When you click the Close button on the Field Mapping window, you will be prompted to save changes to the field mapping. Choose Yes.
If your database has its own primary key and you do not have columns in your database for storing the UnitID, UserName and Timestamp fields that Pendragon Forms creates with every record, you will also receive the following dialog:
This dialog is informing you that the UnitID, UserName and TimeStamp fields will be unbound, meaning that data in these fields will not be stored in your external Access database. Choose OK. As long as you have your own primary key in the external Access database, and that primary key matches the primary key fields in your Pendragon form design, you do not need to keep the UnitID, UserName and TimeStamp fields. If you want to retain this information, then your external database has to have columns for storing the UnitID, UserName and TimeStamp and you will need to re-do the field mapping.
Another dialog window that is displayed is:
Choose Yes. Pendragon Forms will attempt to link the use of the Edit/View button to your external database, so that if you click Shift + Edit/View you can view the data in your external database from within the Pendragon Forms Manager. There are some limitations - see Viewing Data on the PC, page 365.
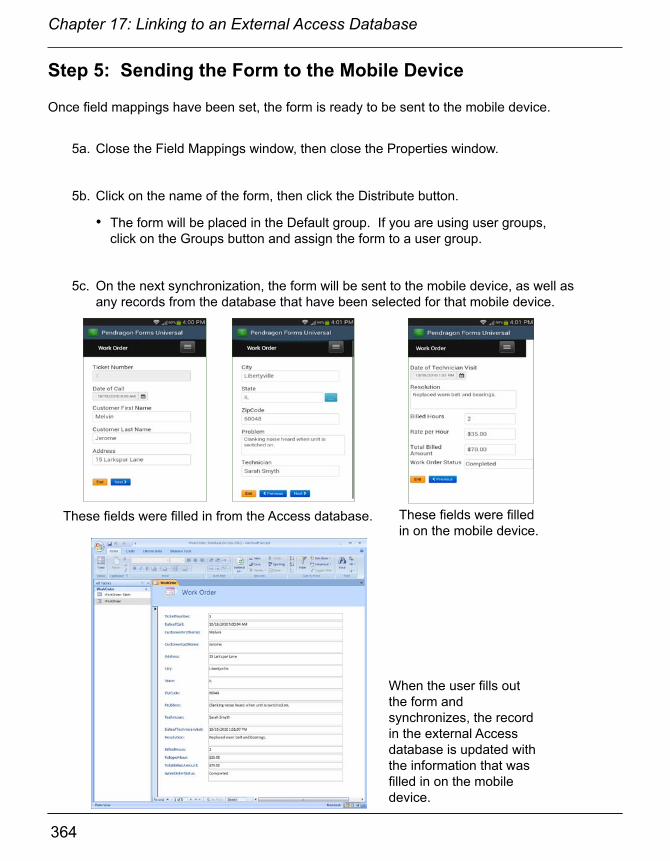
364
Chapter 17: Linking to an External Access Database
365
Chapter 17: Linking to an External Access Database
Step 5: Sending the Form to the Mobile Device
Once field mappings have been set, the form is ready to be sent to the mobile device.
5a. Close the Field Mappings window, then close the Properties window.
5b. Click on the name of the form, then click the Distribute button.
• The form will be placed in the Default group. If you are using user groups, click on the Groups button and assign the form to a user group.
5c. On the next synchronization, the form will be sent to the mobile device, as well as any records from the database that have been selected for that mobile device.
These fields were filled in from the Access database. These fields were filled in on the mobile device.
When the user fills out the form and synchronizes, the record in the external Access database is updated with the information that was filled in on the mobile device.
364
Chapter 17: Linking to an External Access Database
365
Chapter 17: Linking to an External Access Database
Step 6: Viewing Data on the PC
If you are linking to an external database, and during the field-mapping process (see page 363) you selected to update the Pendragon Forms query to point to the new data source (i.e. your external database), then if you click on the name of the form in the Pendragon Forms Manager and use the Shift + Edit/View button, you may be able to view the data in your external database table from within Pendragon Forms.
If you just use the Edit/View button and not Shift + Edit/View, the UnitID, UserName and TimeStamp fields will be visible but will not contain any valid data if your external database does not store the data in these fields. Another limitation of using Edit/View is that if a column name in Pendragon Forms does not match the column name to which you are field mapping, then the data for that column will not be visible from within Pendragon Forms.
Shift + Edit/View hides the UnitID, UserName and TimeStamp fields from view. However, a limitation of using Shift + Edit/View is that if you try to edit a record from within Pendragon Forms, fields that are Popup Lists or Lookup Lists will not display any lists.
• The best way to view the data in the external database is to open the external database directly, instead of trying to view the data from within Pendragon Forms.
Troubleshooting Tips When Linking to an External Database
When linking to an external Access database or an external ODBC database, it is very important to test that data synchronizes from the external database to the mobile device, and the reverse: from the mobile device to the external database.
Pay particular attention to synchronization error messages, as they indicate problems with sending form designs or data to or from the mobile device.
In addition to synchronization error messages, here are some common problems when linking to an external database:
No data from the external database appears to be going to a mobile deviceIf the form design is on the mobile device, but data from your external Access or ODBC database table does not populate down to the mobile device during synchronization, check the Data Persistence settings. In the Pendragon Forms Manager, click the name of the form, then click the Properties button. In the Properties window, the Data Persistence optionKeep a Copy of Records on handheld (see page 174) should be checked in order to allow re-cords from the external database to be sent to the mobile device. If this checkbox is not checked, check the box and then click the Field Mappings button. In the Field Mappings window, click OK to save your changes. Then try synchronizing again.
366
Chapter 17: Linking to an External Access Database
367
Chapter 17: Linking to an External Access Database
New records from the mobile device go to the database, but changes to existing records do notPendragon Forms uses the primary key to uniquely identify records, and to match a changed record on the mobile device with an existing record in the database. If your external database table does not have a primary key, Pendragon Forms will be able to add new records (perform inserts) to the database, but will not be able to update existing records.
If you are linking to a query instead of linking to a database table in the external database, you will also find that you can add records but not update existing records. This is because in Microsoft Access, a query cannot have a primary key.
Unable to Open Database; File Already in UseWhen opening a Microsoft Access database, there is an Exclusive option that allows the database to be used only by the person opening the database. If someone on the PC is using the external database exclusively, and a mobile device user attempts to synchronize, the database will be locked. Error messages will be generated during synchronization will alert you if this occurs. The solution is to close the external database and re-try the synchronization.

366
Chapter 17: Linking to an External Access Database
367
Chapter 17: Linking to an External Access Database
Unable to Append Record - the changes you requested to the table were not successful because they would create duplicate values in the index, primary key or relationshipSince the primary key is used to uniquely define each record, the field (or combination of fields) which make up the primary key has to be unique on the mobile device and in the external database.
A synchronization error message that warns about duplicate primary keys can occur if a record that is marked as new on the mobile device has a primary key that matches an existing record on the PC.
To eliminate the risk of accidentally overwriting an existing record, the new record will not be allowed to be uploaded to the PC. To alert the mobile device user to the fact that a duplicate primary key has been entered, a synchronization error message will be generated. Records that did not get sent to the external Access database will be highlighted in pink on the mobile device.
If the mobile device user has entered a duplicate primary key by accident, the record has to be edited on the mobile device to make the primary key unique, before the record can be uploaded during the next synchronization.
Important Note:
There is another scenario in which the duplicate primary key error might occur.
If synchronization is interrupted, it may be possible for new records to be sent to the PC, but not be flagged as changed on the mobile device. This can also cause the duplicate primary key error to occur. The solution in this case is to check whether the records that are marked on the mobile device as not uploaded are in fact already successfully in the database on the PC. If yes, the solution is:
• Delete the records on the mobile device and synchronize again. (You must be certain that the records are on the PC before you delete them from the mobile device.)
368 369
Chapter 18: Linking to an ODBC Database
18. Linking to an ODBC Database
In addition to being able to link to external Microsoft Access databases, Pendragon Forms supports linking to external ODBC databases such as SQL Server, Oracle, and Informix. The process of linking to an external ODBC database is similar to linking to an Access database, with a few extra steps.
There are two possible ways to link to ODBC databases:
• Option 1: Creating a linked table in Access.
• Option 2: Mapping directly to an ODBC table.
Option 1: Creating a Linked Table in Access
Before a link can be created, a machine Data Source Name has to be created.
To create a machine Data Source Name:
i. In Windows, click the Start button and type ODBC in the Search field.Select teh Control Panel, Set up data sources (ODBC) option.
ii. An ODBC Data Source Administrator window appears. Click on the System DSN tab. Check if a Data Source Name already exists for the database to which you want to link. If a Data Source Name already exists, you do not need to create one.
iii. If you need to create a Data Source Name, click the Add button.
iv. Double-click on a driver (e.g. Oracle driver), enter a name for the Data Source Name, and select the data source (i.e. the path and specific database name to which you want to link.) Different drivers may require different information. ODBC drivers usually ship with a Help file. Refer to the manufacturer of the driver for further information.
For performance reasons, Microsoft recommends creating a linked table in the Access database (i.e. the Pendragon Forms Manager). Once you have created a machine Data Source Name, you can go into the Pendragon Forms program and link to the Data Source Name, as described on the next page.
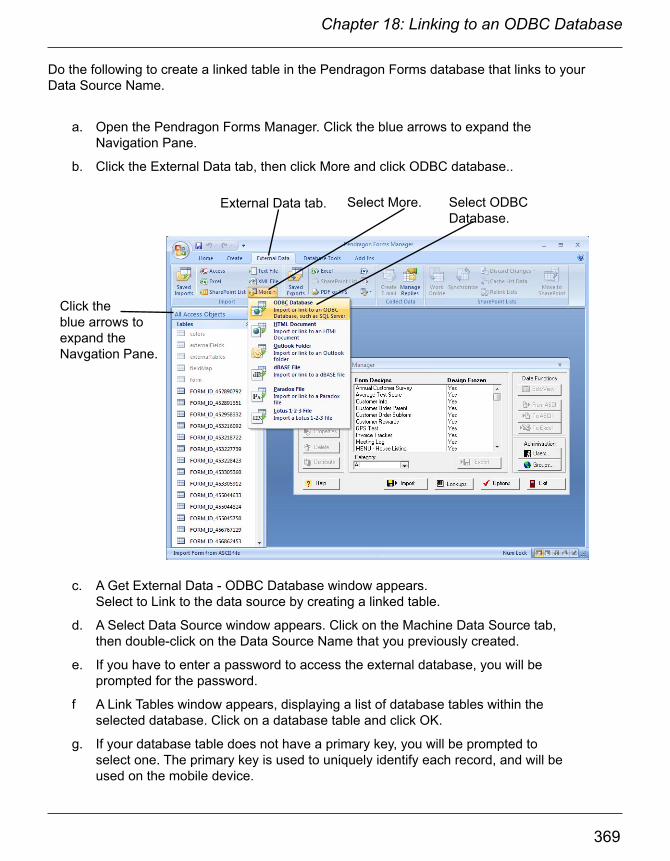
368 369
Chapter 18: Linking to an ODBC Database
Do the following to create a linked table in the Pendragon Forms database that links to your Data Source Name.
a. Open the Pendragon Forms Manager. Click the blue arrows to expand the Navigation Pane.
b. Click the External Data tab, then click More and click ODBC database..
c. A Get External Data - ODBC Database window appears.Select to Link to the data source by creating a linked table.
d. A Select Data Source window appears. Click on the Machine Data Source tab, then double-click on the Data Source Name that you previously created.
e. If you have to enter a password to access the external database, you will be prompted for the password.
f A Link Tables window appears, displaying a list of database tables within the selected database. Click on a database table and click OK.
g. If your database table does not have a primary key, you will be prompted to select one. The primary key is used to uniquely identify each record, and will be used on the mobile device.
Click the blue arrows to expand the Navgation Pane.
External Data tab. Select More. Select ODBC Database.

370
Chapter 18: Linking to an ODBC Database
371
Chapter 18: Linking to an ODBC Database
h. In the Access Navigation Pane, click on the Tables heading. Look for the name of the database table to which you just linked. An arrow next to the name indicates that this is a link.
i. Click on the database table name, then click the Open button to view the database table. Verify that you are linking to the correct table and are able to view the records that you want to send to the mobile device. Then close the database table window.
j. In the Pendragon Forms Manager window , click on the Import button, then click Import Access Table Design.
k. Choose to open C:\Users\Public\FormsUniversal\Forms32k.mdb, and select the name of the linked database table.
l. Follow instructions on pages 351-365, Step 1c to Step 6. When doing Field Mappings in Step 4, click the Select Access database button, and again select C:\Users\Public\FormsUniversal\Forms32k.mdb and the linked table.
Option 2: Mapping directly to an ODBC Table
Mapping directly to an ODBC table is slightly faster to create than a linked table, but may be slower during the synchronization process than using a linked table.
To setup a direct link to ODBC:
a. In the Pendragon Forms Manager, click the Import button, then click the Import ODBC button.
b. Select the machine data source and log on to the external database if prompted.
c. Select a database table within the external database to link to.
d. Follow instructions on pages 351-365, Step 1c to Step 6. When doing Field Mappings in Step 4, click on the Select ODBC Database button, and select the machine data source, enter the password for that database if one is required, and select the database table to which you want to link.
e. As you leave the Field Mappings screen, you will be prompted Would you like to update the query to point to the new data source? If you select Yes, you will be able to use the Pendragon Forms Edit/View button to view data in the external database table. If you select No, then the Edit/View button will not work, and you will need to open the external database to view your data.

370
Chapter 18: Linking to an ODBC Database
371
Chapter 18: Linking to an ODBC Database
Troubleshooting Tips When Linking to an ODBC Database
Problems with Square BracketsOne error that can occur when linking to an ODBC database is related to the way that database columns are named. When database column and table names contain spaces or special symbols, Microsoft Access SQL uses square brackets [ and ] as quotes to mark the beginning and end of the name. However, other dialects of SQL, including ODBC SQL, do not recognize square brackets. Pendragon Forms uses its best judgement when adding square brackets, but it does not always generate SQL that is appropriate for querying ODBC data sources. For this reason, an option is provided to remove the square brackets when generating SQL.
To change the bracket mode, click the Options button in the Forms Manager window. The default option in the Bracket Mode field is Smart, meaning that Pendragon Forms will try to determine when to use square brackets or not. You can change the default to always use brackets or to never use brackets.
Note: If you change the Bracket Mode, you will need to click the Field Mapping button in the Properties window, and re-save the field mapping.
Other ProblemsSee Troubleshooting Tips When Linking to an External Database, pages 365-367 for general troubleshooting tips when linking to an external database.
Security Concerns when using ODBC Databases
All mobile device users will need to have access to the Forms32k.mdb database in order to synchronize. There is therefore a risk that the Forms32k.mdb file can be accidentally deleted by an individual.
• It is extremely important to back up the Forms32k.mdb database on a regular basis. See page 372.
If you are using a linked table in Access to link to an external ODBC database, your data will not be lost if the Forms32k.mdb file is lost, but you will still need to recover your form designs from a backup copy of the Pendragon Forms Manager. To enable mobile device users to synchronize, you will need to restore a backup of the Pendragon Forms Manager database.
Another security concern involves the use of passwords to access the back-end database. If you are using linked tables in Access, the password to access the external ODBC database will be stored in the Pendragon Forms Manager database. If you are mapping directly to ODBC, the password to access the external database will be visible in the Field mappings screen in the Pendragon Forms Manager.

372 373
Chapter 19: Backing Up Pendragon Forms Universal
19. Backing Up Pendragon Forms
Pendragon Forms Universal contains two databases: The Pendragon Forms Manager Access database on an Administrative PC, and the Pendragon Forms MySQL database on a staging server. The two databases may be located on the same machine, or may be located on two separate machines, depending on how the software was initially installed.
Pendragon Forms is designed to be centrally controlled from the Pendragon Forms Manager Access database. In order to synchronize a form on your mobile device, each Form ID# on the mobile device must exactly match the Form ID# of a form in the Pendragon Forms Manager database on your server or PC.
If you lose the program on the mobile device, but you still have the Pendragon Forms Manager database on your PC, you can recover all of your form designs and all data up to the last sync or the last import of data from the Pendragon Forms MySQL database on the staging server.
Warning: If you lose the database on the PC, even if you still have the program on the mobile device you will not be able to synchronize Pendragon Forms unless you can recover the form designs on the PC. It is therefore very important to backup the files on the PC, so that in the event of a hard drive failure you can recover your form designs and data.
Backing up the Pendragon Forms Manager Access Database
On a regular basis, you should backup the entire C:\Users\Public\FormsUniversal folder.
In particular, you should backup the following file within the FormsUniversal folder:
• Forms32k.mdb
This file contains the Pendragon Forms source code, as well as your form designs and all data up to your last successful synchronization (in the case of Direct or One-Stage Sync) or your last import of data from the Pendragon MySQL database on the staging server (in the case of Two-Stage Synchronization). If you are linking to an external Access or ODBC database, you must also backup your external database in order to protect your records.
In Two-Stage Synchronization, when mobile devices synchronize, their data records are uploaded to the Pendragon Forms MySQL database on the staging server. The Pendragon Transfer Agent program imports data from the MySQL database into the Pendragon Forms Manager Access database at regular intervals. The default is that data is imported every 30 minutes.
Before you make a backup of the Pendragon Forms Manager Access database, you can manually request the Pendragon Transfer Agent to do an immediate import from the MySQL database, so that when you backup the Pendragon Forms Manager Access database you have all the current records from the MYSQL database. (See next page for instructions.)
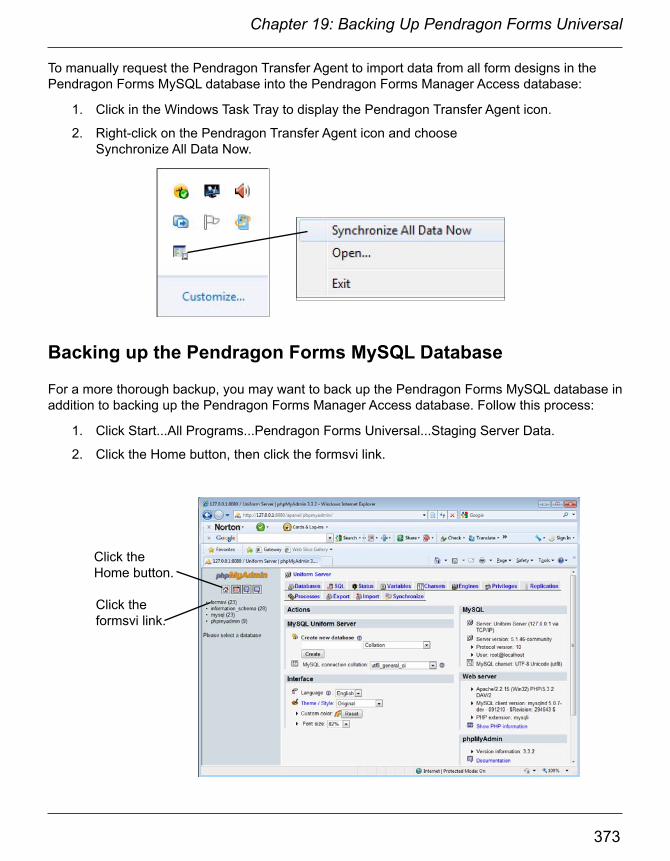
372 373
Chapter 19: Backing Up Pendragon Forms Universal
Backing up the Pendragon Forms MySQL Database
For a more thorough backup, you may want to back up the Pendragon Forms MySQL database in addition to backing up the Pendragon Forms Manager Access database. Follow this process:
1. Click Start...All Programs...Pendragon Forms Universal...Staging Server Data.
2. Click the Home button, then click the formsvi link.
To manually request the Pendragon Transfer Agent to import data from all form designs in the Pendragon Forms MySQL database into the Pendragon Forms Manager Access database:
1. Click in the Windows Task Tray to display the Pendragon Transfer Agent icon.
2. Right-click on the Pendragon Transfer Agent icon and choose Synchronize All Data Now.
Click the Home button.
Click the formsvi link.

374
Chapter 19: Backing Up Pendragon Forms Universal
375
Chapter 19: Backing Up Pendragon Forms Universal
Backing Up Form Designs
As a precaution, whenever you distribute a form to the mobile device, Pendragon Forms makes a backup of the form design in a .PFF file, which is placed in the C:\Users\Public\FormsUniversal\PilotF folder.
You should also backup these .PFF files to a flash drive or a CD-ROM, so that in the event of a hard drive failure, you will be able to re-install Pendragon Forms and then import your form designs into the Pendragon Forms Manager database. To manually make a backup of a single form design, you can export the form to a Pendragon Forms Design (.PFF) file - see pages 213-214.
3. On the formsvi screen, click the Export button.
4. On the Export screen, scroll to the bottom of the screen and click the Go button to export the database. The location of the backup file will be highlighted in green at the top of the screen.

374
Chapter 19: Backing Up Pendragon Forms Universal
375
Chapter 19: Backing Up Pendragon Forms Universal
Recovering Form Designs
If you accidently delete a form design from the Pendragon Forms Manager Access database on the PC, but the form is still on the mobile device, and you need to synchronize the form, first check the Recycle Bin (see page 76) to try to recover the form design on the PC.
If the form design is not in the Recycle Bin, go into Windows Explorer and check whether the form design .PFF file is still in the C:\Users\Public\FormsUniversal\PilotF folder.
To figure out which .PFF file corresponds to your form design, tap on the name of the form on the mobile device, then tap the Info button which is in the upper right corner of the screen, to the right of the Search field. A blue Details button will appear. Tap the Details button to display the form info. The Form ID number will be displayed. The correct form design file will contain the form ID number with an extension .PFF.
If you find the correct .PFF file in the PilotF folder, go into Pendragon Forms and import the .PFF file back into the database. See page 213 for instructions on importing a .PFF file. You will need to re-create lookup lists and freeze the imported form design and re-distribute the form.
IMPORTANT:
Before synchronizing, tap the name of the form on the mobile device, and then on the Review screen, tap the Info button which is in the upper right corner, to the right of the Search field. Tap the blue Details button and then tap the Mark All Changed button. This will force all records on the mobile device to be sent to the PC on the next synchronization.
Backing up Data within an Individual Form
To make a backup of the data within an individual form, you can export the data to ASCII (see page 215) and save the ASCII file to a USB flash drive or an external hard drive.

376 377
IndexDisplay as Subform 183Hide Form in Forms List 183Last Server Sync Date Reset Button 191No Back Button 181No End Button 181Screen Level Validation 182Synchronization Tab 184To set on a Custom Main Menu 336Views Tab 181
ASCII (.CSV) File 217Creating a .CSV File from Microsoft Excel 217Creating a Form from a .CSV File 218Format of 217
Auto-Default 148, 286
BBacking Up
Data within an Individual Form 375Form Designs 374, 375The Pendragon Forms Manager Access Database
372The Pendragon Forms MySQL Database 373
Bar Codes 337Bar Code Devices 337Bar Code Scanning 337
Behavior Tab 182Branching 290
From a Jump to Section field 296From a Popup or Lookup List 293From a Yes/No Checkbox 291
Button Field 135, 297, 298, 310
CCalculations in scripts 281
Addition 282, 283, 284Calculating Ages 289Creating a Counter field 286Date Calculations 287, 288Division 285Multiplication 285Subtraction 287
Cascading Completion Checkbox from Parent to Subform 126
AAccess Database
Backing up the Pendragon Forms Manager Access Database 372
Creating Queries and Reports 208Linking to an External Access Database 337,
345Viewing and Editing Data 196
Access Rights 175Adding
Across subform records 300Addition Calculations in scripts 231, 282, 283,
284A New User Group 66Fields to a Form 31Forms to a Group 68Users to a Group 67
Additional Download Criteria 184Completion Checkbox Criteria 187Date Criteria 185Selection List Criteria 186Sorting Criteria 188
Advanced Field Properties 33, 143, 146Auto-Default 148, 286Column Name 147Decimal Places 154Default Value 152Display Key 151Do Not Upload to PC 158Integer 153Max Length 156Minimum Value & Maximum Value 155Pattern 157Primary Key 149Required 150
Advanced Form Properties 180Additional Download Criteria 184Behavior Tab 182Changing Advanced Form Properties on a
Frozen Form 194Columns Tab 192Desktop/Server Synchronization 189Disable Action Menus 183
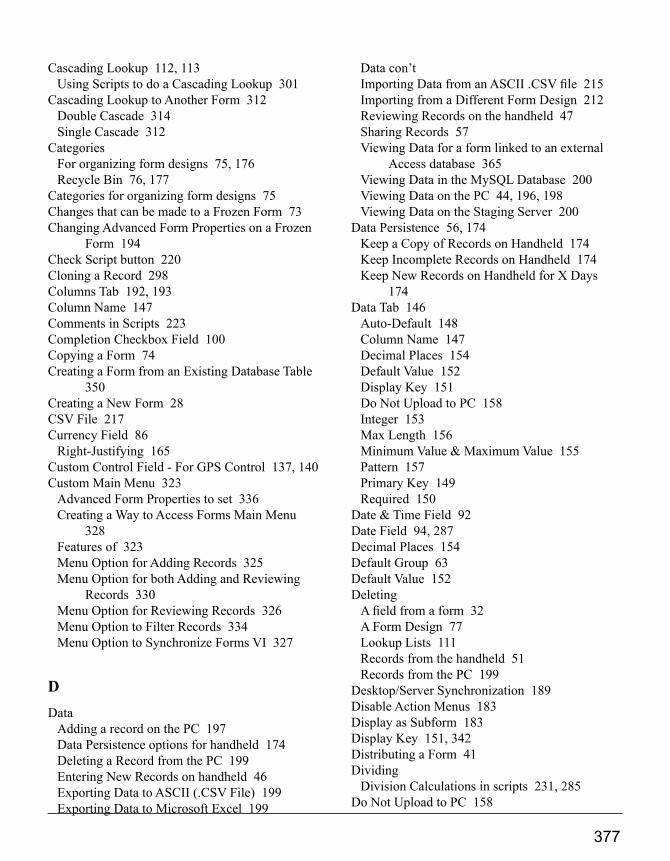
376 377
Cascading Lookup 112, 113Using Scripts to do a Cascading Lookup 301
Cascading Lookup to Another Form 312Double Cascade 314Single Cascade 312
CategoriesFor organizing form designs 75, 176Recycle Bin 76, 177
Categories for organizing form designs 75Changes that can be made to a Frozen Form 73Changing Advanced Form Properties on a Frozen
Form 194Check Script button 220Cloning a Record 298Columns Tab 192, 193Column Name 147Comments in Scripts 223Completion Checkbox Field 100Copying a Form 74Creating a Form from an Existing Database Table
350Creating a New Form 28CSV File 217Currency Field 86
Right-Justifying 165Custom Control Field - For GPS Control 137, 140Custom Main Menu 323
Advanced Form Properties to set 336Creating a Way to Access Forms Main Menu
328Features of 323Menu Option for Adding Records 325Menu Option for both Adding and Reviewing
Records 330Menu Option for Reviewing Records 326Menu Option to Filter Records 334Menu Option to Synchronize Forms VI 327
DData
Adding a record on the PC 197Data Persistence options for handheld 174Deleting a Record from the PC 199Entering New Records on handheld 46Exporting Data to ASCII (.CSV File) 199Exporting Data to Microsoft Excel 199
Data con’tImporting Data from an ASCII .CSV file 215Importing from a Different Form Design 212Reviewing Records on the handheld 47Sharing Records 57Viewing Data for a form linked to an external
Access database 365Viewing Data in the MySQL Database 200Viewing Data on the PC 44, 196, 198Viewing Data on the Staging Server 200
Data Persistence 56, 174Keep a Copy of Records on Handheld 174Keep Incomplete Records on Handheld 174Keep New Records on Handheld for X Days
174Data Tab 146
Auto-Default 148Column Name 147Decimal Places 154Default Value 152Display Key 151Do Not Upload to PC 158Integer 153Max Length 156Minimum Value & Maximum Value 155Pattern 157Primary Key 149Required 150
Date & Time Field 92Date Field 94, 287Decimal Places 154Default Group 63Default Value 152Deleting
A field from a form 32A Form Design 77Lookup Lists 111Records from the handheld 51Records from the PC 199
Desktop/Server Synchronization 189Disable Action Menus 183Display as Subform 183Display Key 151, 342Distributing a Form 41Dividing
Division Calculations in scripts 231, 285Do Not Upload to PC 158

378 379
EEdit/View button 44Editing a form design 38Event Procedures 220
Definitions of 224, 225, 226Exporting
Data 216Data to ASCII (.CSV File) 199Data to Microsoft Excel 199Form Designs 213Lookup Lists 214
FField Labels 221, 222, 310Field Name 79, 145Field Tab 145Field Types 79, 145
Button 135, 297, 298Cascading Lookup 112, 113, 114Completion Checkbox 100, 126Currency 86Custom Control Field - For GPS Control 137,
138, 139, 140Date 94, 287Date & Time 92, 287Freeform Text 80, 81Jump to Section 104, 296Lookup List 106, 107, 108, 109, 110, 111, 307Lookup to Another Form 116, 307, 309Lookup to a Reference Form 116, 307, 309MultiSelection List 90, 299Numeric Field 83, 84Option 1 of 5 87Popup List 88, 112, 293, 301Section 101Signature 132, 133, 134Single Subform 129Subform 120, 122, 126, 308Time 95Time Checkbox 99Yes or No Checkbox 96, 97, 291
Filtering Records on the Mobile Device 50Font Size and Color 162
FormAdding Fields to your Form 29Adding Forms to a Group 68Copying a Form Design 74Creating a Form from a .CSV File 218Creating a New Form 28Field Name 79, 145Field Types 79, 145Filling in a form on the Mobile Device 46Form ID 179Form Name 28, 143Freezing a Form Design 39, 178Importing & Exporting Form Designs 213Importing from a previous Pendragon Forms
Database 210Making Changes to a Frozen Form 73Organizing Form Designs into Categories 75Printing a Form Design 78
FormatOf a .CSV File 217Of a Script 220
Forms Manager 27Creating a New Form 28Distributing a Form 41Editing an existing form design 38Freezing a Form Design 39Recycle Bin 76
Form Designer window 28, 79, 143Adding an Image to a Screen 160Adding fields 31Advanced Field Properties 33, 146Buttons 144Data Tab 33, 146Deleting fields 32Editing a field 32Editing a form design 38Field Tab 145Making a Field start on a New Screen 159Preview Area 30Re-positioning fields on a form 32Saving a form design 38Script Tab 37Sizing Tab 35, 168Visual Tab 34, 159

378 379
Form Properties window 40, 173Access Rights 175Advanced Form Properties 180Category 176Data Persistence 174Form ID 179Freezing a Form Design 39, 178Table Name & Query Name 179
Freeform Text Field 80Freezing a Form Design 39, 40, 178
Changes that can be made to a Frozen Form 73Functions (used in scripts) 229
GGPS Custom Control 137, 139, 140Groups
Adding Forms to a Group 68Adding Users to a Group 67Creating a New Group 66Default Group 63Recovery Groups 71Removing Users from a Group 69
HHandheld
Access Rights 175Data Persistence 174Deleting Records 51Entering Data 41, 42Entering New Records 46Filtering Records 50How Much Space Does Pendragon Forms Use
55How Often Should Users Synchronize 60Installing Forms on a Mobile Device 19, 24Keep a Copy of Records on Handheld 174Keep Incomplete Records on Handheld 174Keep New Records on Handheld for X Days
174Managing the Number of Records 56Receiving Form Designs 41Reviewing Records 47Synchronizing 42, 48
Hidden Fields 166Hide Form in Forms List 183
IImage
Adding an Image to a screen 160Importing
Data 215Data from a Different Form Design 212Form Designs 213From a previous Pendragon Forms Database
210Lookup Lists 214
Import Button 209Installing
Additional Pendragon Forms License Codes 16Pendragon Forms on a Mobile Device 19, 24Pendragon Forms on the PC 14
Integer 153
JJump to Section Field 104, 296
LLast Server Sync Date Reset Button 191Linking to an External Access Database 337, 345
Compatibility of Field Types between Forms and Access 347
Controlling which Records go to the Mobile Device 357
Creating a Form from an Existing Database Table 350
Editing a Form Design for Use on a Mobile Device 352
Field Mapping 359, 361Linking a Pendragon Form to an external Access
database table 359, 361Primary Key 345Sending a Linked Form to the Mobile Device
364Troubleshooting 365Viewing Data 365
Linking to an ODBC Database 368By Mapping directly to an ODBC Table 370Troubleshooting 371Via a Linked Table in Access 368, 369

380 381
Lookup List Field 106, 107, 109, 110Branching from a Lookup List 293Cascading Lookup 112, 301Deleting Lookup Lists 111Importing & Exporting Lookup Lists 214Used to do a Lookup to Another Form 307
Lookup to Another Form 116, 307, 309Adding Records to a Reference Form 119Double Cascading Lookup 314Single Cascading Lookup 312
Lookup to a Reference Form 116, 307, 309Adding Records to a Reference Form 119Double Cascading Lookup 314Single Cascading Lookup 312
MMail Merge to Microsoft Word 203Maximum
Database Size on Mobile Device 55Number of Fields on a Form 55
Max Length (of a Text field) 156Minimum Value & Maximum Value 155Mobile Device
Access Rights 175Data Persistence 174Deleting Records 51Entering Data 41, 42Entering New Records 46Filtering Records 50How Much Space Does Pendragon Forms Use
55How Often Should Users Synchronize 60Installing Forms on a Mobile Device 19, 24Keep a Copy of Records on Handheld 174Keep Incomplete Records on Handheld 174Keep New Records on Handheld for X Days
174Managing the Number of Records 56Receiving Form Designs 41Reviewing Records 47Synchronizing 42, 48
MultiplyingMultiplication Calculations in scripts 231, 285
MultiSelection List Field 90
NNo Back Button 181No End Button 181Numeric Field 83, 84
Right-Justifying 165
OODBC Database
Linking Forms to an ODBC Database 368Linking via a Linked Table in Access 368, 369
Option 1 of 5 Field 87
PParent Form 120
Cascading Completion Checkbox 126Using Scripts with Parent and Subform 300, 310
Password 63, 65Pattern (of a Text field) 157Pendragon Forms Manager 27
Adding or Editing Fields on a form 31Backing up 372Categories for organizing form designs 75Creating a New Form 28Deleting a Field from a Form 32Distributing a Form 41Editing a form design 38Freezing a Form Design 39Installing on the PC 14Re-positioning Fields on a Form 32Recycle Bin 76Viewing Data 44
Pendragon Forms Manager Access DatabaseBacking Up 372Viewing and Editing Data 196
Pendragon Forms MySQL DatabaseBacking Up 373Viewing Data 200
Pendragon Forms on the Mobile DeviceDeleting Records 51Entering New Records 46Filtering Records 50How Much Space Does Forms Use 55
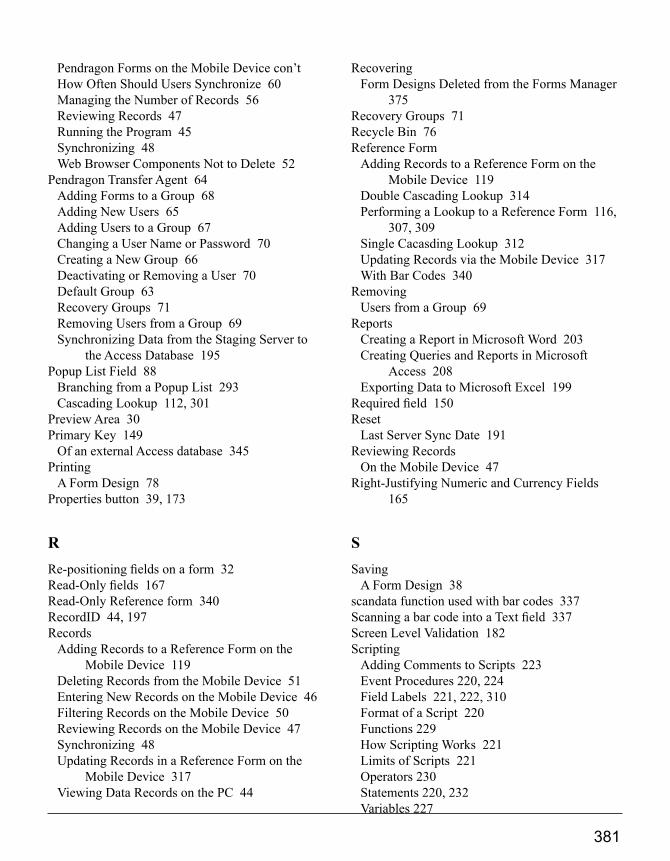
380 381
Pendragon Forms on the Mobile Device con’tHow Often Should Users Synchronize 60Managing the Number of Records 56Reviewing Records 47Running the Program 45Synchronizing 48Web Browser Components Not to Delete 52
Pendragon Transfer Agent 64Adding Forms to a Group 68Adding New Users 65Adding Users to a Group 67Changing a User Name or Password 70Creating a New Group 66Deactivating or Removing a User 70Default Group 63Recovery Groups 71Removing Users from a Group 69Synchronizing Data from the Staging Server to
the Access Database 195Popup List Field 88
Branching from a Popup List 293Cascading Lookup 112, 301
Preview Area 30Primary Key 149
Of an external Access database 345Printing
A Form Design 78Properties button 39, 173
RRe-positioning fields on a form 32Read-Only fields 167Read-Only Reference form 340RecordID 44, 197Records
Adding Records to a Reference Form on the Mobile Device 119
Deleting Records from the Mobile Device 51Entering New Records on the Mobile Device 46Filtering Records on the Mobile Device 50Reviewing Records on the Mobile Device 47Synchronizing 48Updating Records in a Reference Form on the
Mobile Device 317Viewing Data Records on the PC 44
RecoveringForm Designs Deleted from the Forms Manager
375Recovery Groups 71Recycle Bin 76Reference Form
Adding Records to a Reference Form on the Mobile Device 119
Double Cascading Lookup 314Performing a Lookup to a Reference Form 116,
307, 309Single Cacasding Lookup 312Updating Records via the Mobile Device 317With Bar Codes 340
RemovingUsers from a Group 69
ReportsCreating a Report in Microsoft Word 203Creating Queries and Reports in Microsoft
Access 208Exporting Data to Microsoft Excel 199
Required field 150Reset
Last Server Sync Date 191Reviewing Records
On the Mobile Device 47Right-Justifying Numeric and Currency Fields
165
SSaving
A Form Design 38scandata function used with bar codes 337Scanning a bar code into a Text field 337Screen Level Validation 182Scripting
Adding Comments to Scripts 223Event Procedures 220, 224Field Labels 221, 222, 310Format of a Script 220Functions 229How Scripting Works 221Limits of Scripts 221Operators 230Statements 220, 232Variables 227
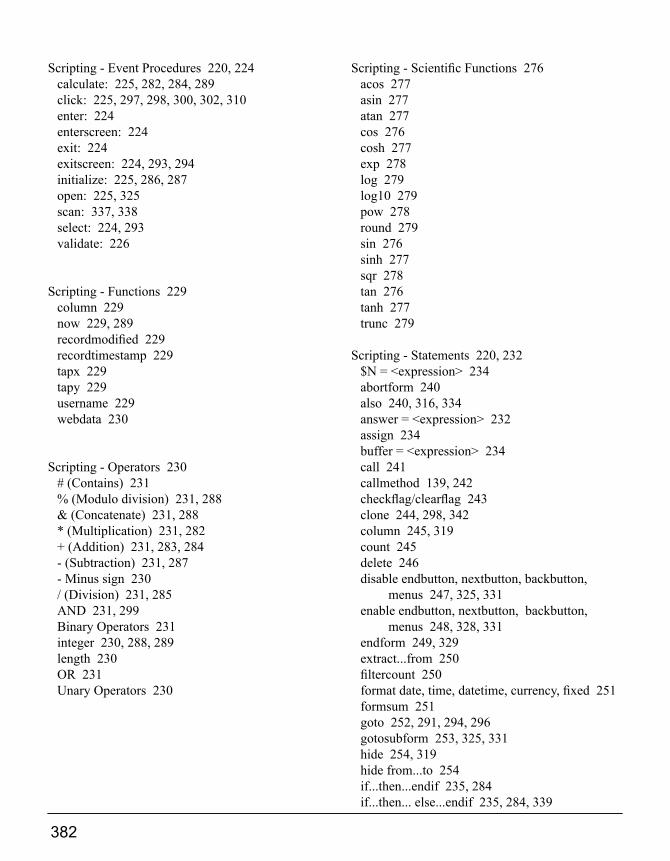
382 383
Scripting - Event Procedures 220, 224calculate: 225, 282, 284, 289click: 225, 297, 298, 300, 302, 310enter: 224enterscreen: 224exit: 224exitscreen: 224, 293, 294initialize: 225, 286, 287open: 225, 325scan: 337, 338select: 224, 293validate: 226
Scripting - Functions 229column 229now 229, 289recordmodified 229recordtimestamp 229tapx 229tapy 229username 229webdata 230
Scripting - Operators 230# (Contains) 231% (Modulo division) 231, 288& (Concatenate) 231, 288* (Multiplication) 231, 282+ (Addition) 231, 283, 284- (Subtraction) 231, 287- Minus sign 230/ (Division) 231, 285AND 231, 299Binary Operators 231integer 230, 288, 289length 230OR 231Unary Operators 230
Scripting - Scientific Functions 276acos 277asin 277atan 277cos 276cosh 277exp 278log 279log10 279pow 278round 279sin 276sinh 277sqr 278tan 276tanh 277trunc 279
Scripting - Statements 220, 232$N = <expression> 234abortform 240also 240, 316, 334answer = <expression> 232assign 234buffer = <expression> 234call 241callmethod 139, 242checkflag/clearflag 243clone 244, 298, 342column 245, 319count 245delete 246disable endbutton, nextbutton, backbutton,
menus 247, 325, 331enable endbutton, nextbutton, backbutton,
menus 248, 328, 331endform 249, 329extract...from 250filtercount 250format date, time, datetime, currency, fixed 251formsum 251goto 252, 291, 294, 296gotosubform 253, 325, 331hide 254, 319hide from...to 254if...then...endif 235, 284if...then... else...endif 235, 284, 339

382 383
Scripting - Statements con’tinsert into 254, 321invalidate 255keycolumn 255, 342keyunique 256launch 257left 257lookup...within 258, 342mid 259msgbox 260, 294, 319, 339nullfrom...to 261optional 262optional from...to 262readonly from...to 262readwrite 263readwrite from...to 263require 263require from...to 263result = <expression> 233return 264, 284, 339reverselookup...within 265review 265right 264select...where field...is 268, 313, 315, 316, 334select all 266, 326select matching 267setlookuplocale 270, 303setlookupname 271, 301show 272, 319show from...to 272subformsum 272, 300, 310switch/case 238, 293, 294synchronize 273, 327temp = <expression> 234transmit web 273update field 274, 321
Scripting - Variables 227$[label] 227$number 227, 282answer 227, 282buffer 228lookuplocale 228, 303lookupname 228, 301null 228result 227, 283, 284, 319temp 227, 300
Scripting Errors 275Script Tab 219Section Field 101
Adding an Image 160Security 16Sharing Records 57Signature Field 132
Viewing on the PC 134Single Subform Field 129Sizing Tab 35, 168
Adding Space Before or After a Question 170Adjusting Answer Placement 169Fitting a Qustion and Answer on One Line 35,
168Sizing Question and Answer Heights 36, 170
Staging ServerViewing Data 200
Starting a Field on a New Screen 159Subform Field 120, 122, 308
Adding across subform records 300Making a Subform Accessible only via the
Parent Form 125Troubleshooting Subforms 125
SubtractingSubtraction Calculations in scripts 231, 287
Synchronization Log 59Synchronization Tab 184
Additional Download Criteria 184Synchronizing the handheld device 42
TTable Name & Query Name of a form in Access
179TimeStamp 44, 197Time Checkbox Field 99Time Field 95Troubleshooting
Linking to an External Database 365Linking to an ODBC Database 371Lookup Lists 110Subforms 125Working with Multiple Forms 322
384
Copyright © 2014 Pendragon Software Corporation.
UUnitID 44, 197Updating Records in a Reference Form 317UserName 44, 197Users
Adding New Users 65Adding Users to a Group 67Changing a User Name or Password 70Deactivating or Removing a User 70First User Name 63Removing Users from a Group 69
User GroupsAdding Forms to a Group 68Adding Users to a Group 67Creating a New Group 66Default Group 63Recovery Groups 71Removing Users from a Group 69
VVariables (used in scripts) 227, 228Viewing
A Signature on the PC 134Data in a form linked to an external Access
database 365Data in the MySQL Database 200Data in the Pendragon Forms Manager on the
PC 44, 196, 198Views Tab 181
No Back Button 181No End Button 181
Visual Tab 34, 159Adding an Image to a Screen 160Changing Font Size and Color 162Hidden Fields 166Making a Field start on a New Screen 159Read-Only 167Right-Justifying Numeric and Currency Fields
165
WWord
Creating a Report in Microsoft Word 203
YYes or No Checkbox Field 96, 97