Google Forms - AWS
13
Google Forms This is a very, very, useful tool for you teachers. I really hope you sit down and try this cause you can save a lot of time on grading papers, help get your material out faster, and make it readily available to students whether they make it to class or not (assuming you’ve adopted google classroom to an extent). With that being said let’s take a look at it. So when you’re in your google drive you can make a new (doc, spreadsheet, form, etc. let's stay on):form, like so. Okay, let's start with changing this from a “Form” to a “Quiz”, So it’s no longer a survey. Let’s click the gear next to the send button in the top right hand side of the window. This should make this window pop up..
-
Upload
khangminh22 -
Category
Documents
-
view
5 -
download
0
Transcript of Google Forms - AWS
Google Forms This is a very, very, useful tool for you teachers. I really hope you sit down and try this cause you can save a lot of time on grading papers, help get your material out faster, and make it readily available to students whether they make it to class or not (assuming you’ve adopted google classroom to an extent). With that being said let’s take a look at it.
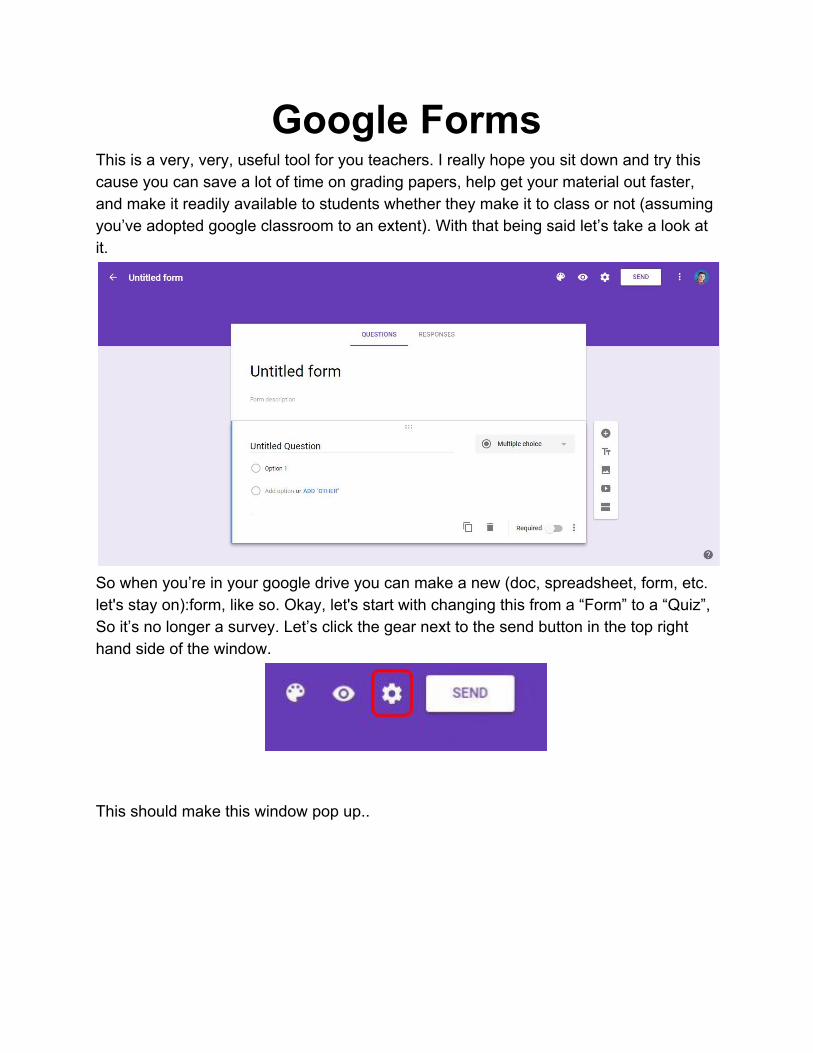
So when you’re in your google drive you can make a new (doc, spreadsheet, form, etc. let's stay on):form, like so. Okay, let's start with changing this from a “Form” to a “Quiz”, So it’s no longer a survey. Let’s click the gear next to the send button in the top right hand side of the window.
This should make this window pop up..
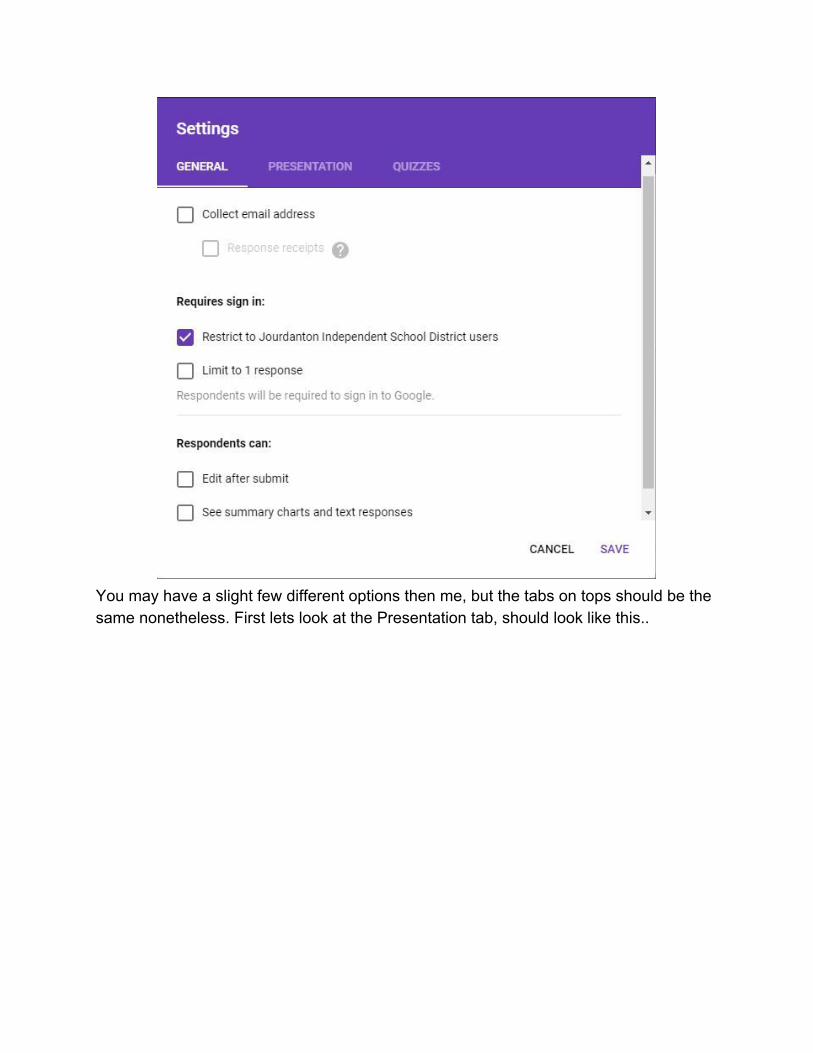
You may have a slight few different options then me, but the tabs on tops should be the same nonetheless. First lets look at the Presentation tab, should look like this..
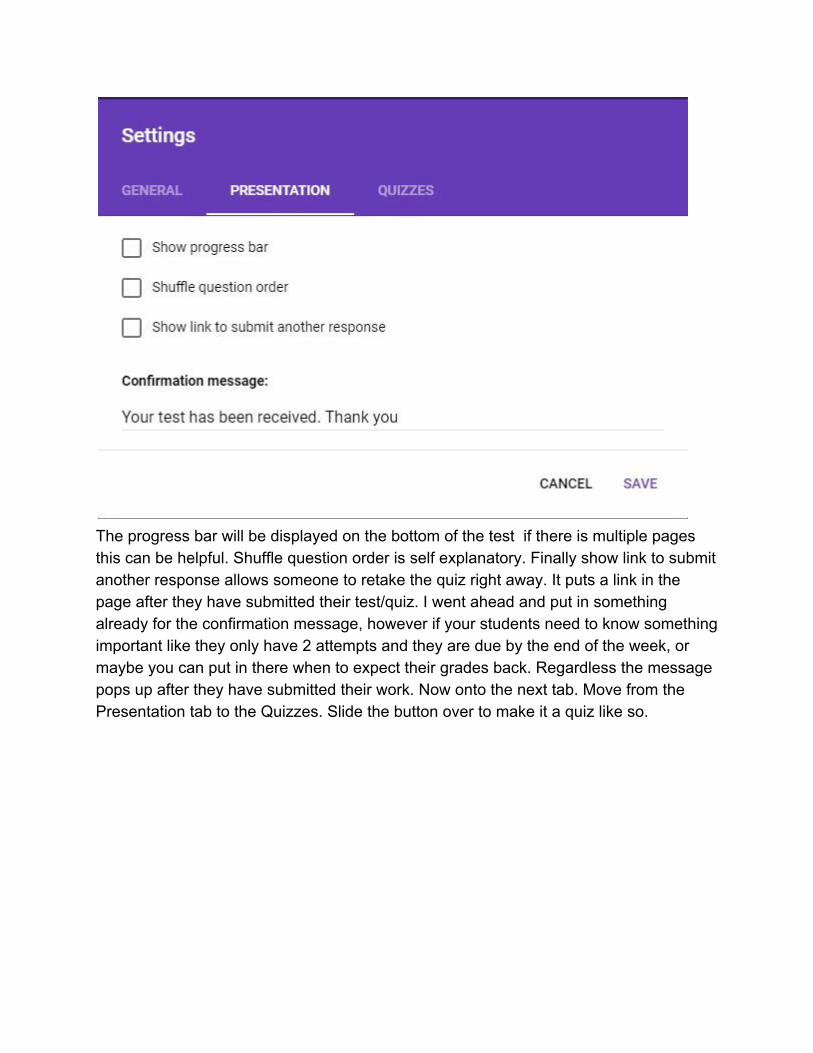
The progress bar will be displayed on the bottom of the test if there is multiple pages this can be helpful. Shuffle question order is self explanatory. Finally show link to submit another response allows someone to retake the quiz right away. It puts a link in the page after they have submitted their test/quiz. I went ahead and put in something already for the confirmation message, however if your students need to know something important like they only have 2 attempts and they are due by the end of the week, or maybe you can put in there when to expect their grades back. Regardless the message pops up after they have submitted their work. Now onto the next tab. Move from the Presentation tab to the Quizzes. Slide the button over to make it a quiz like so.

Now you can change a few settings as to how your quiz gets handled. Depending whether you want your students to see their grade or wait till later after you’ve received it from everyone and release it yourself. The next area is pretty self explanatory if you want them to see the ones they missed, the correct answers, or the point values. The point value is shown in the quiz next to the question as well as afterwards. Now that you’re in the correct mode, let’s get back to making a test or quiz. First let's start off by naming it, click where is says “Untitled form”. This lets you rename it.
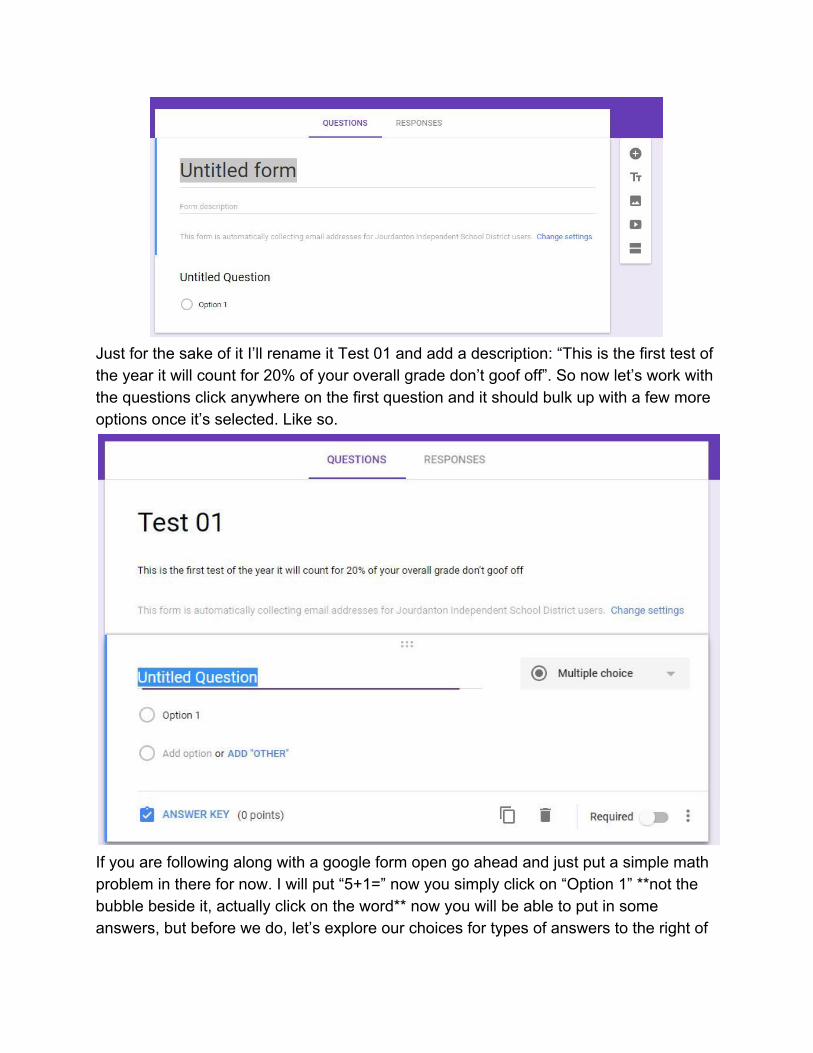
Just for the sake of it I’ll rename it Test 01 and add a description: “This is the first test of the year it will count for 20% of your overall grade don’t goof off”. So now let’s work with the questions click anywhere on the first question and it should bulk up with a few more options once it’s selected. Like so.
If you are following along with a google form open go ahead and just put a simple math problem in there for now. I will put “5+1=” now you simply click on “Option 1” **not the bubble beside it, actually click on the word** now you will be able to put in some answers, but before we do, let’s explore our choices for types of answers to the right of
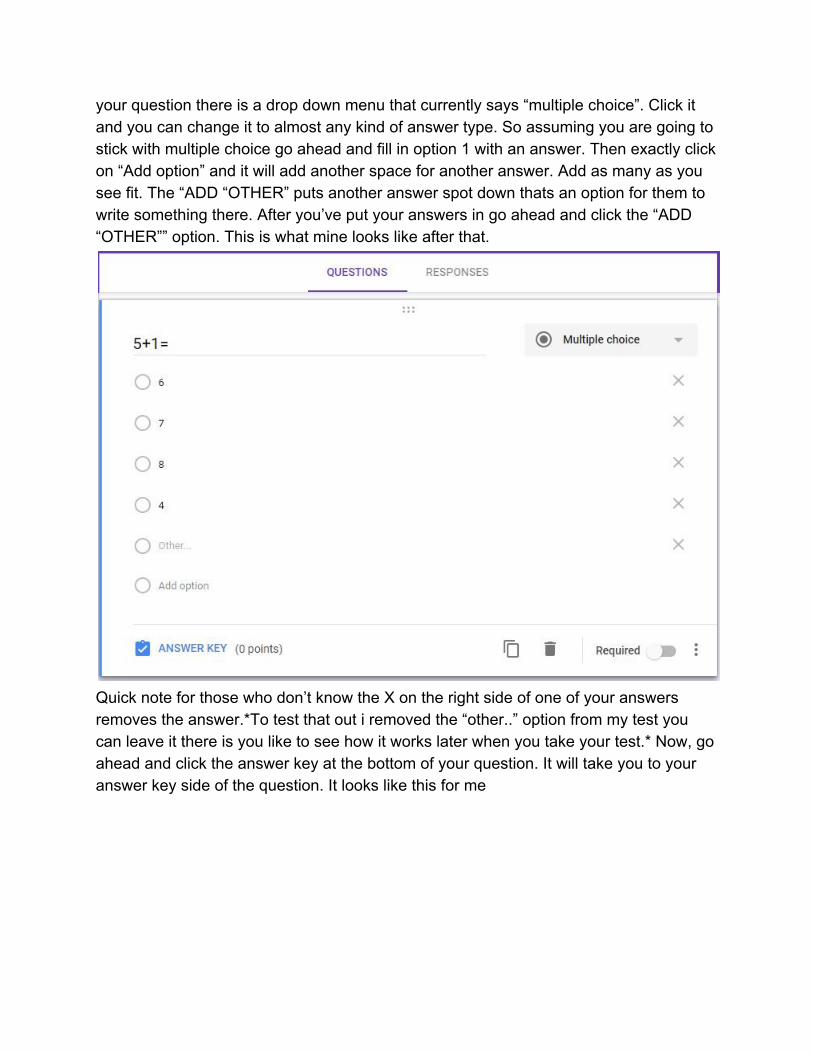
your question there is a drop down menu that currently says “multiple choice”. Click it and you can change it to almost any kind of answer type. So assuming you are going to stick with multiple choice go ahead and fill in option 1 with an answer. Then exactly click on “Add option” and it will add another space for another answer. Add as many as you see fit. The “ADD “OTHER” puts another answer spot down thats an option for them to write something there. After you’ve put your answers in go ahead and click the “ADD “OTHER”” option. This is what mine looks like after that.
Quick note for those who don’t know the X on the right side of one of your answers removes the answer.*To test that out i removed the “other..” option from my test you can leave it there is you like to see how it works later when you take your test.* Now, go ahead and click the answer key at the bottom of your question. It will take you to your answer key side of the question. It looks like this for me
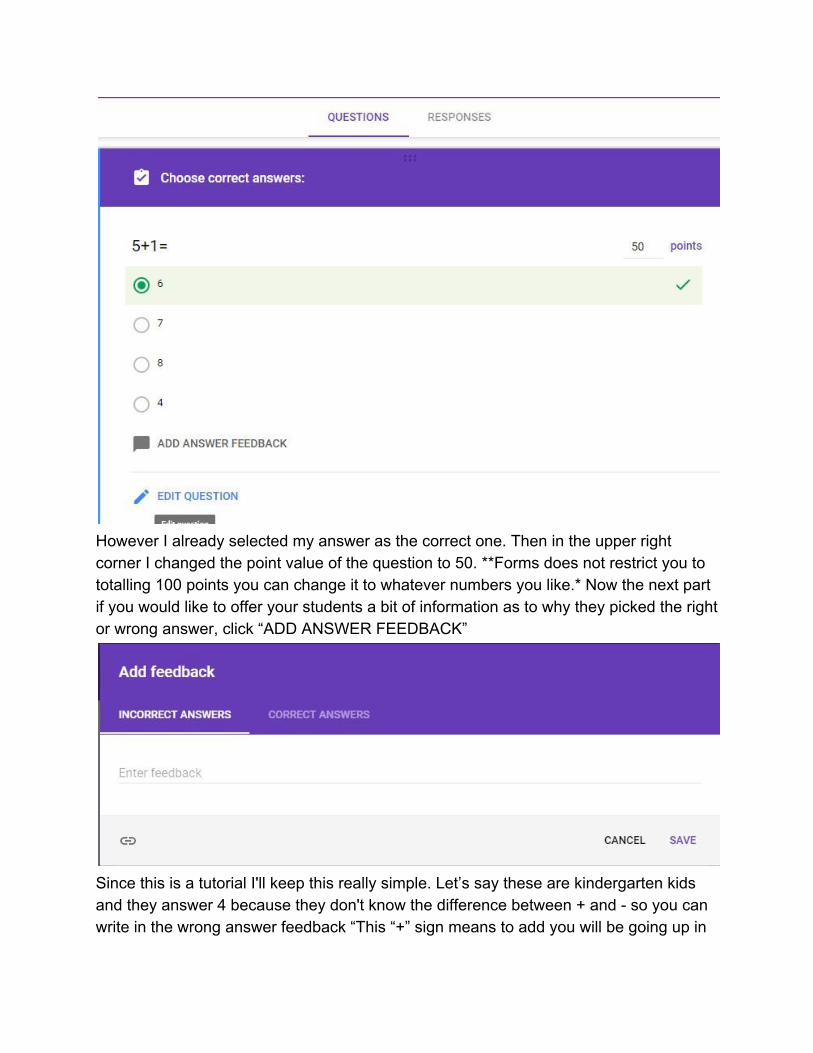
However I already selected my answer as the correct one. Then in the upper right corner I changed the point value of the question to 50. **Forms does not restrict you to totalling 100 points you can change it to whatever numbers you like.* Now the next part if you would like to offer your students a bit of information as to why they picked the right or wrong answer, click “ADD ANSWER FEEDBACK”
Since this is a tutorial I'll keep this really simple. Let’s say these are kindergarten kids and they answer 4 because they don't know the difference between + and - so you can write in the wrong answer feedback “This “+” sign means to add you will be going up in

count not down” given they could just guess and get it wrong and still receive that feedback. There is not a specific wrong answer feedback, If they get it wrong they will receive the same feedback regardless of the answer. Now on the other end of the spectrum if they get it right you can add feedback boosting their moral and reinforcing their answer assurance. We are going to head back to editing the question. In the bottom right part of the questions box, there is a slider bar with the word “Required” by it, this simply means that have to answer the question.
Otherwise they can just not answer it if they so choose. In my opinion it would help avoid the excuse “Oh I didn’t see it”. So now you’ve finished a question. Let’s look at making another.
The Red outlined button adds a fresh new question like when you first opened this form. The Green outlined button will Duplicate the one you currently have selected. Which I find to be a massive time saver because you don’t have to add all the answers slots again, change the point value, however everything is copied and pasted so don’t forget about your feedback if you are going to put that in right away. Try it if you’d like I’m going to use the new question button (Red outline). Let’s switch gears and use a photo for the question.
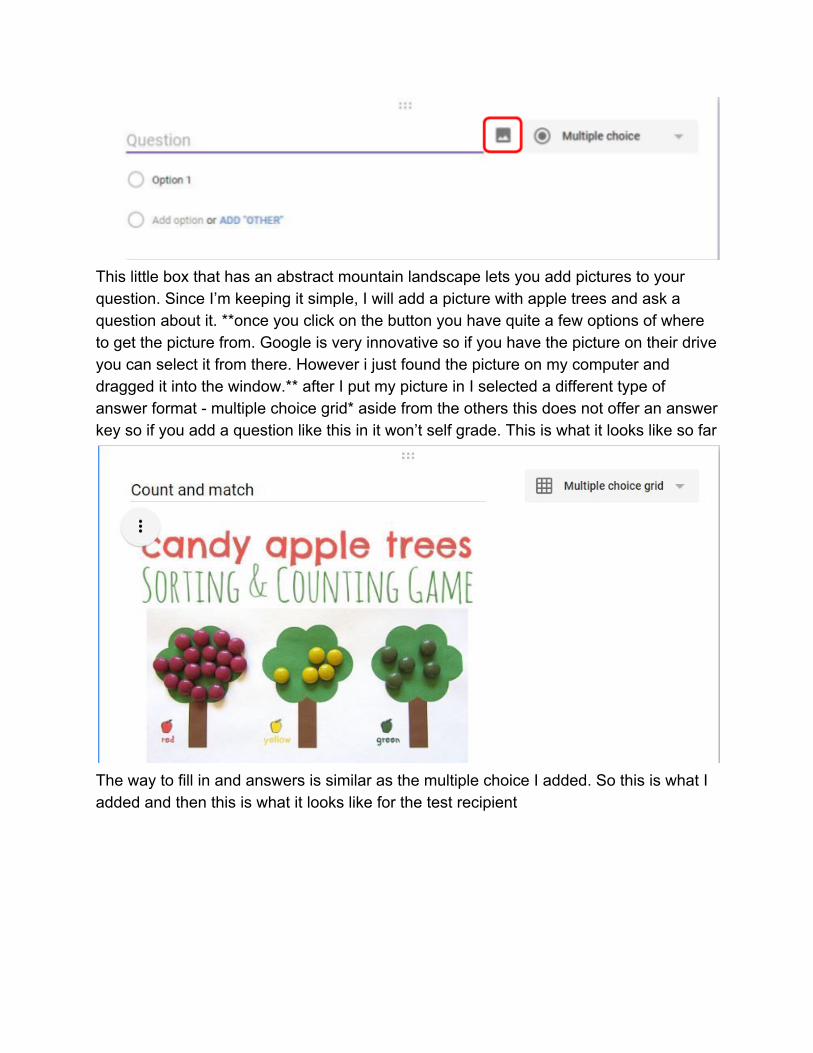
This little box that has an abstract mountain landscape lets you add pictures to your question. Since I’m keeping it simple, I will add a picture with apple trees and ask a question about it. **once you click on the button you have quite a few options of where to get the picture from. Google is very innovative so if you have the picture on their drive you can select it from there. However i just found the picture on my computer and dragged it into the window.** after I put my picture in I selected a different type of answer format - multiple choice grid* aside from the others this does not offer an answer key so if you add a question like this in it won’t self grade. This is what it looks like so far
The way to fill in and answers is similar as the multiple choice I added. So this is what I added and then this is what it looks like for the test recipient

*Top: How it looks for you *Bottom: How it looks for testers
If you’re wondering how I got to look at it from the students point of view i will discuss that later to help stay on course. There is an option menu with 3 vertical dots in the bottom right hand side of this question, that allows you to place more boundaries on the answer so far the only 2 options for this type of answer way is shuffling the rows or limiting the response to only 1 per column. These differ by response type. So now that you are familiar with making questions and answers, let’s start on testing your own test to see how the delivery of data is handled after the students have submitted their work.

This eye button allows you to see what the student will see when taking it, go ahead and try it out on your quiz. Go ahead and take your own quiz real fast. Then exit out of the window and go back to where you are editing the quiz/test. There should be a tab on top of the test saying “Responses [1]” click it and it will give you in depth charts and graphs to show you how everything was answered and by whom in the Summary tab. You can then go to and individuals and look at their quiz/test to see exactly how they answered everything. I took my test 3 times to give it some variety with the points (keep in mind they didn’t allow me to put a answer key on my multi choice grid answer so I’ll have to factor that in later) here’s how mine looks.

I did not include the 2 bar graphs at the bottom. They are just excess info. Let’s cover the releasing of scores now. If you choose at the beginning to hold off on releasing scores then you can either release them one by one as you please or all at once with button above the “Score released” column. If you would like to individually release then you go to the students listed under the email and click them. Then at the top of that new page it will be in the colored header. Easy enough, now let’s say you would like a record of all the grades and answers. Conveniently there is a button for you!
This opens up all the answers and “responses” onto a spreadsheet that you can save on Google drive or anywhere else. Now let’s say you put this quiz out there and give them till the end of the week to take it you can click the 3 vertical dots right next to that spreadsheet button and there are a few more options for you. The only one I will point out since all the other are pretty self explanatory is the select response destination. You can make a new spreadsheet after clicking that button and have all the incoming test results populate that sheet. This is what mine looks like -

So if you set it up to save in this excel like document, it will populate as students take their quiz/test. That about sums up the basics for google forms. If you would like your answers saved to your computer click file then towards the bottom there should be a “download as” button there is no save feature with google because they save everything every time something changes. There are quite a few more options I did not discuss in this since they’re mostly cosmetic. However I will go over them in a later instructional document. Hope this helped you!