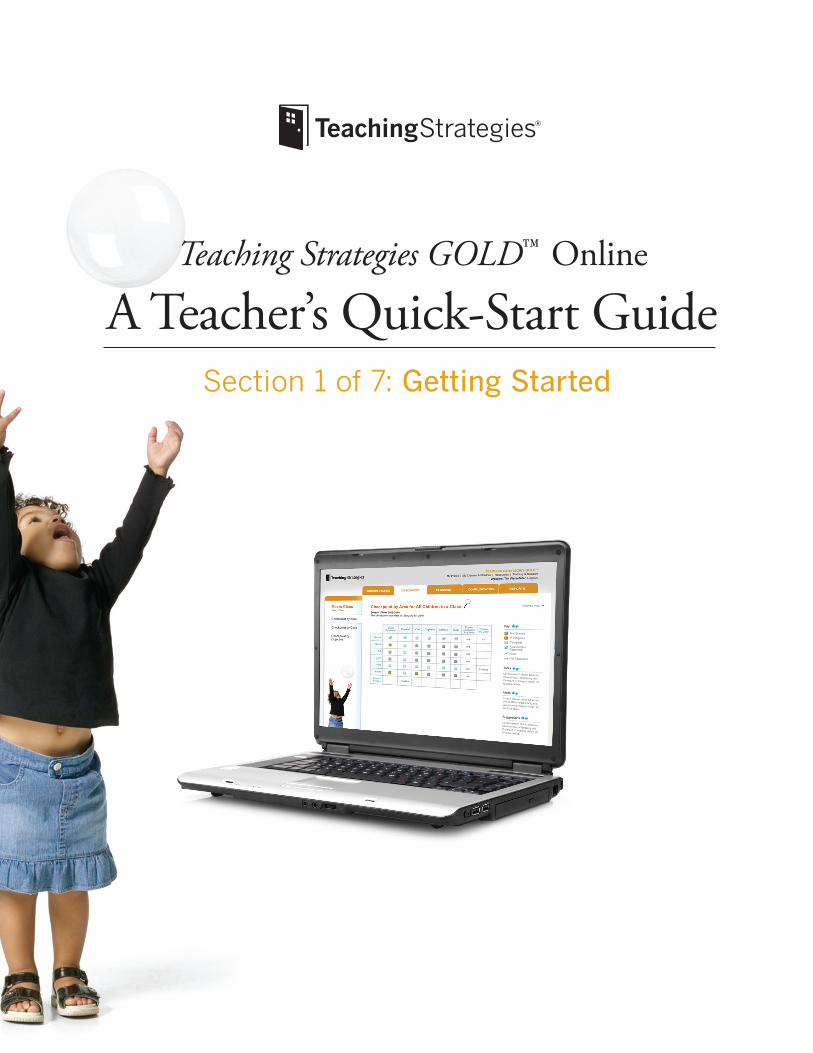
A Teacher's Quick-Start Guide
60
Teaching Strategies GOLD ™ Online A Teacher’s Quick-Start Guide Assessment January 2011
-
Upload
khangminh22 -
Category
Documents
-
view
0 -
download
0
Transcript of A Teacher's Quick-Start Guide
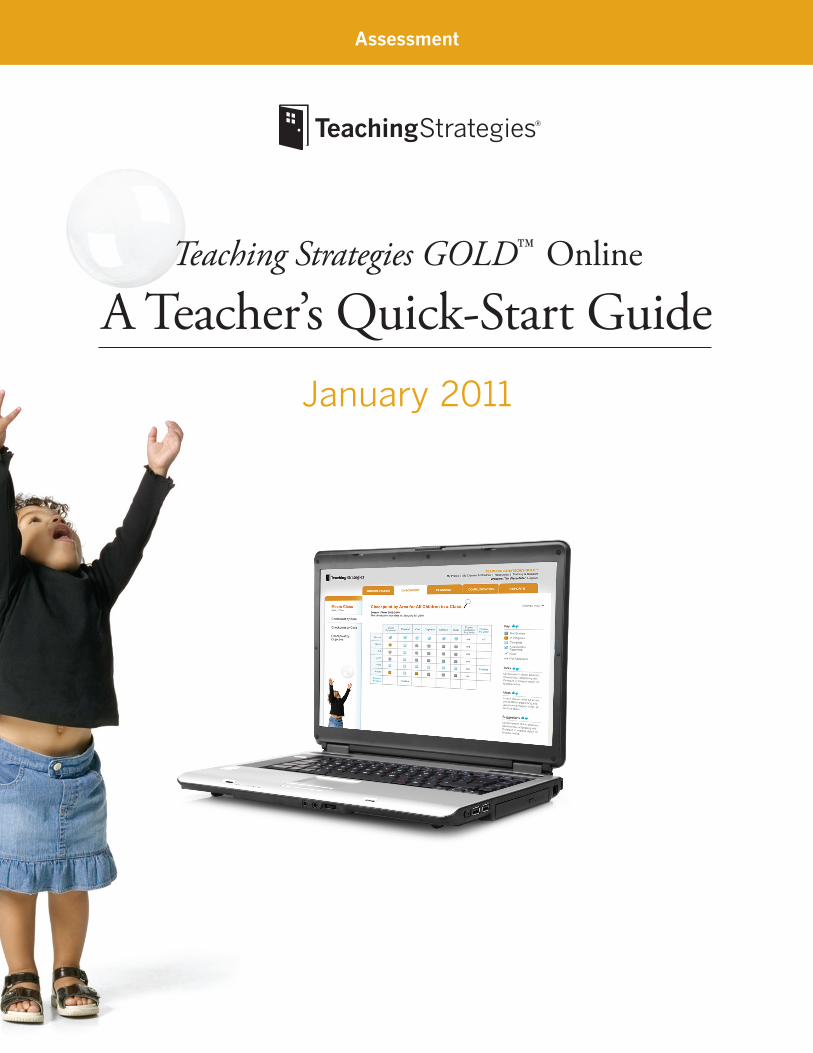
Teaching Strategies GOLD™ Online
A Teacher’s Quick-Start Guide
Assessment
January 2011
Welcome to Teaching Strategies GOLD™ Online: A Teacher’s Quick-Start Guide!
This Guide was created to support your use of Teaching Strategies GOLD™ online.
It offers detailed, screen-by-screen guidance for using the tool effectively. From
logging in and setting up your classes to finalizing data and generating reports,
we’ll walk you through each step. We know it takes time to get used to a brand-new
system, so we hope this Guide jump-starts the process for you.
The table of contents on page 3 shows what the Guide covers. You can read
the entire Guide from start to finish or just choose the sections you need as you
make your way through Teaching Strategies GOLD™ online.
What’s more, the information in this Guide will be updated regularly and
distributed to all GOLD™ users. This ensures that you’ll always have at your
fingertips the latest, most current information.
We hope you’ll find this Guide useful as a handy resource. Remember, at
Teaching Strategies we are always available to provide you with personalized
help. Just e-mail us at [email protected] or call
1.866.736.5913.
Let’s get started!
Contents
4 Getting Started This section explains how to set up your log-in information and profile, navigate
Teaching Strategies GOLD™, and use your Teaching Strategies Dashboard to access professional development support and important Teaching Strategies GOLD™ updates.
14 Class Set-Up This section shows how to set up and edit classes and children’s records in
Teaching Strategies GOLD™.
18 Documentation This section explains how to enter, edit, and view documentation in Teaching Strategies
GOLD™, as well as how to use forms that support the documentation process.
25 Checkpoints This section reviews options for entering checkpoint data, how to access previously
entered documentation, and steps for entering and finalizing checkpoint data.
34 Planning This section shows how to set up and edit weekly planning forms, integrate activities
and individualize plans for children, and share information with families and others in your program.
46 Communication This section presents tools for engaging families and explains how to exchange
messages, send ideas for home activities, and use conference forms.
52 Reports This section introduces the reports most commonly used by teachers.
Teaching Strategies GOLD™ Online
A Teacher’s Quick-Start Guide Section 1 of 7: Getting Started

Checkpoints
Docum
entationC
lass Set-U
pG
etting Started
Reports
Com
munication
Planning
5
Initial Set-Up
Signing In Before you sign in, make sure you have the username and password that you received by e-mail from [email protected] or that you used for CreativeCurriculum.net. Go to TeachingStrategies.com and click on the GOLD Sign In link on the upper right.
When the Log In screen appears, enter your username and password and click SUBmIT.
TIP: Use the Forgot Password? and Forgot Username? links if you forgot the information. Your username and a temporary password will automatically be sent to the e-mail address in your profile. For security reasons, the temporary password expires one hour after it is sent, so log in as soon as you receive the e-mail.
You will see this icon on many screens: . When you hover over or click on it, you will find information about the item or screen you are exploring.
Checkpoints
Docum
entationC
lass Set-U
pG
etting Started
Reports
Com
munication
Planning
6
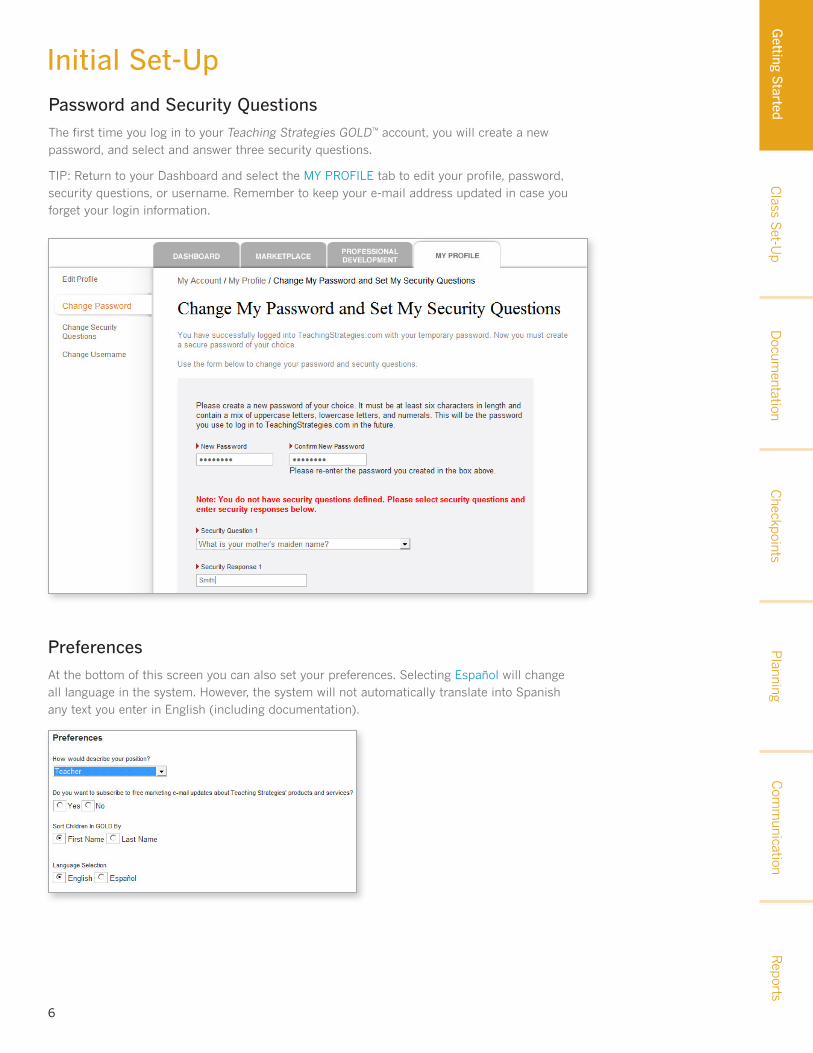
Initial Set-UpPassword and Security Questions The first time you log in to your Teaching Strategies GOLD™ account, you will create a new password, and select and answer three security questions.
TIP: Return to your Dashboard and select the mY PROFILE tab to edit your profile, password, security questions, or username. Remember to keep your e-mail address updated in case you forget your login information.
Preferences At the bottom of this screen you can also set your preferences. Selecting Español will change all language in the system. However, the system will not automatically translate into Spanish any text you enter in English (including documentation).
Checkpoints
Docum
entationC
lass Set-U
pG
etting Started
Reports
Com
munication
Planning
7
GOLD™ Entry and Updates
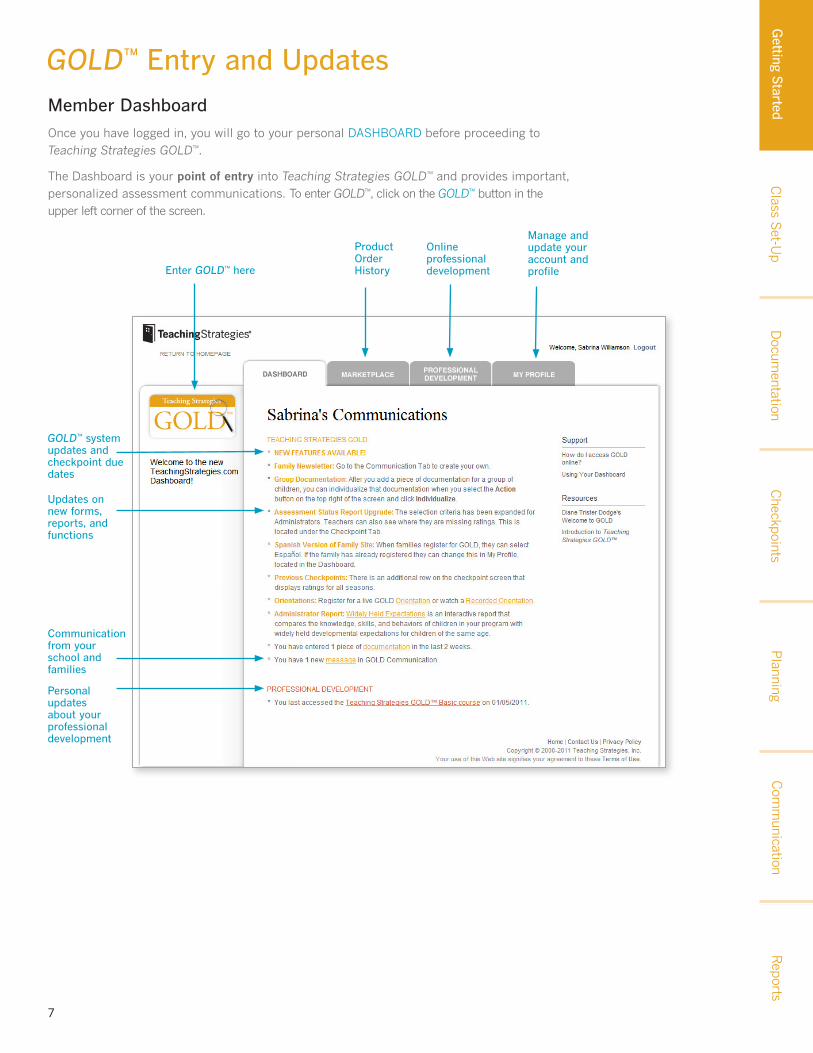
Member Dashboard
Once you have logged in, you will go to your personal DASHBOARD before proceeding to Teaching Strategies GOLD™.
The Dashboard is your point of entry into Teaching Strategies GOLD™ and provides important, personalized assessment communications. To enter GOLD™, click on the GOLD™ button in the upper left corner of the screen.
Product Order HistoryEnter GOLD™ here
Online professional development
Manage and update your account and profile
GOLD™ system updates and checkpoint due dates
Updates on new forms, reports, and functions
Communication from your school and families
Personal updates about your professional development
Checkpoints
Docum
entationC
lass Set-U
pG
etting Started
Reports
Com
munication
Planning
8
Navigation Tips
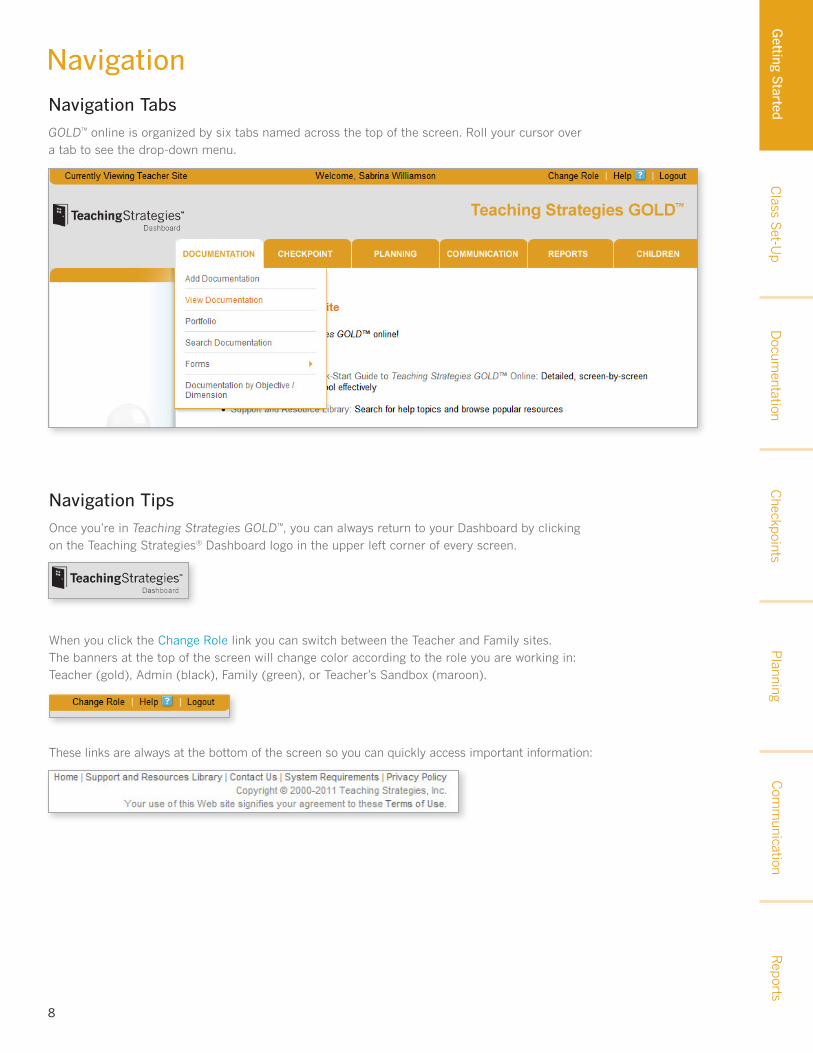
Once you’re in Teaching Strategies GOLD™, you can always return to your Dashboard by clicking on the Teaching Strategies® Dashboard logo in the upper left corner of every screen.
When you click the Change Role link you can switch between the Teacher and Family sites. The banners at the top of the screen will change color according to the role you are working in: Teacher (gold), Admin (black), Family (green), or Teacher’s Sandbox (maroon).
These links are always at the bottom of the screen so you can quickly access important information:
NavigationNavigation Tabs
GOLD™ online is organized by six tabs named across the top of the screen. Roll your cursor over a tab to see the drop-down menu.
Checkpoints
Docum
entationC
lass Set-U
pG
etting Started
Reports
Com
munication
Planning
9
Navigation
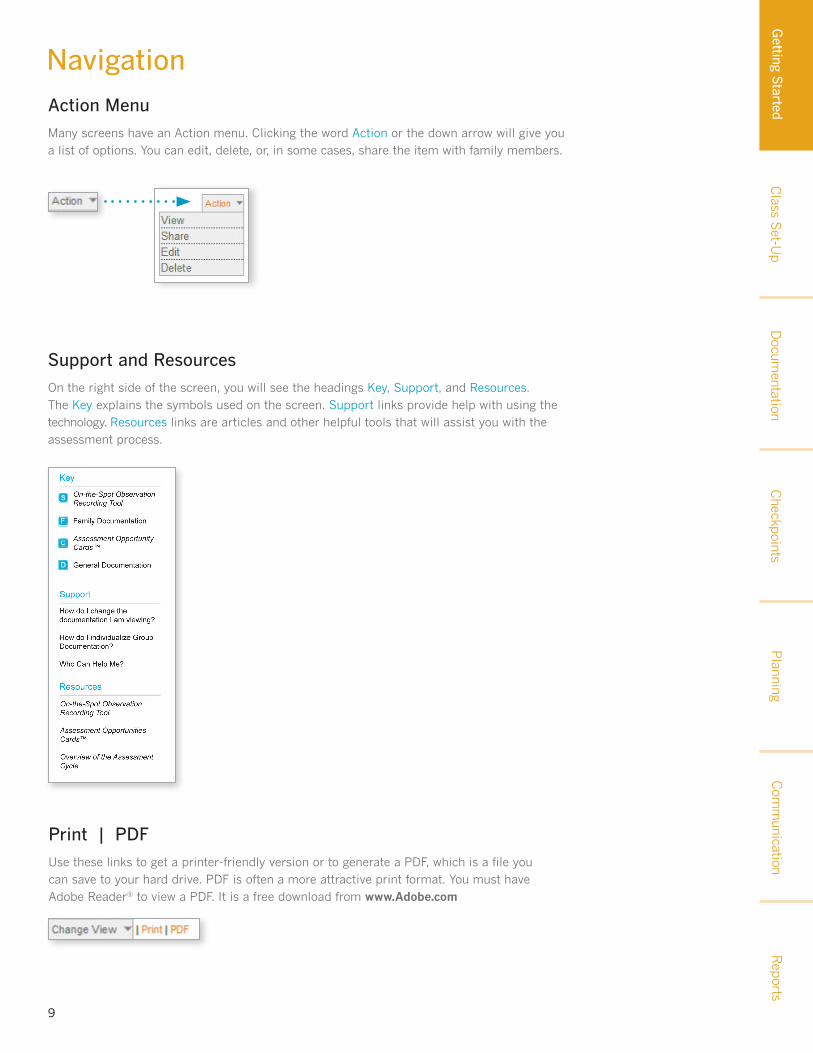
Action Menu many screens have an Action menu. Clicking the word Action or the down arrow will give you a list of options. You can edit, delete, or, in some cases, share the item with family members.
Support and Resources On the right side of the screen, you will see the headings Key, Support, and Resources. The Key explains the symbols used on the screen. Support links provide help with using the technology. Resources links are articles and other helpful tools that will assist you with the assessment process.
Print | PDF Use these links to get a printer-friendly version or to generate a PDF, which is a file you can save to your hard drive. PDF is often a more attractive print format. You must have Adobe Reader® to view a PDF. It is a free download from www.Adobe.com

Checkpoints
Docum
entationC
lass Set-U
pG
etting Started
Reports
Com
munication
Planning
10
Use the Change View link to change the Current View. The checkboxes and drop-down menus will limit or expand what you see.
Navigation
Controlling the View You can choose what to display on each screen. To select a different class, click Switch Class. On most screens, you can only work with information for one class at a time.
The Current View tells you what is being displayed on the screen based on the selections you have made. In the example below, we have limited the View Documentation screen to one child, Alicia morgan, for the Spring 2009/2010 checkpoint.
TIP: Learn more about adding and viewing documentation in the “Documentation” section that begins on page 18.

Checkpoints
Docum
entationC
lass Set-U
pG
etting Started
Reports
Com
munication
Planning
11
Professional Development Support
TIP: For detailed instructions on completing your course(s), download the PDF listed in the center of the screen.
Courses
To take “Teaching Strategies GOLD™ Basic,” the free, four-module, self-paced course that introduces the structure and components of Teaching Strategies GOLD™, select the PROFESSIONAL DEVELOPmENT tab from the Dashboard. Click on the course name to view and access the modules.
View details about your progress to date by using the color-coded boxes that provide information about your work on each module.
Checkpoints
Docum
entationC
lass Set-U
pG
etting Started
Reports
Com
munication
Planning
12
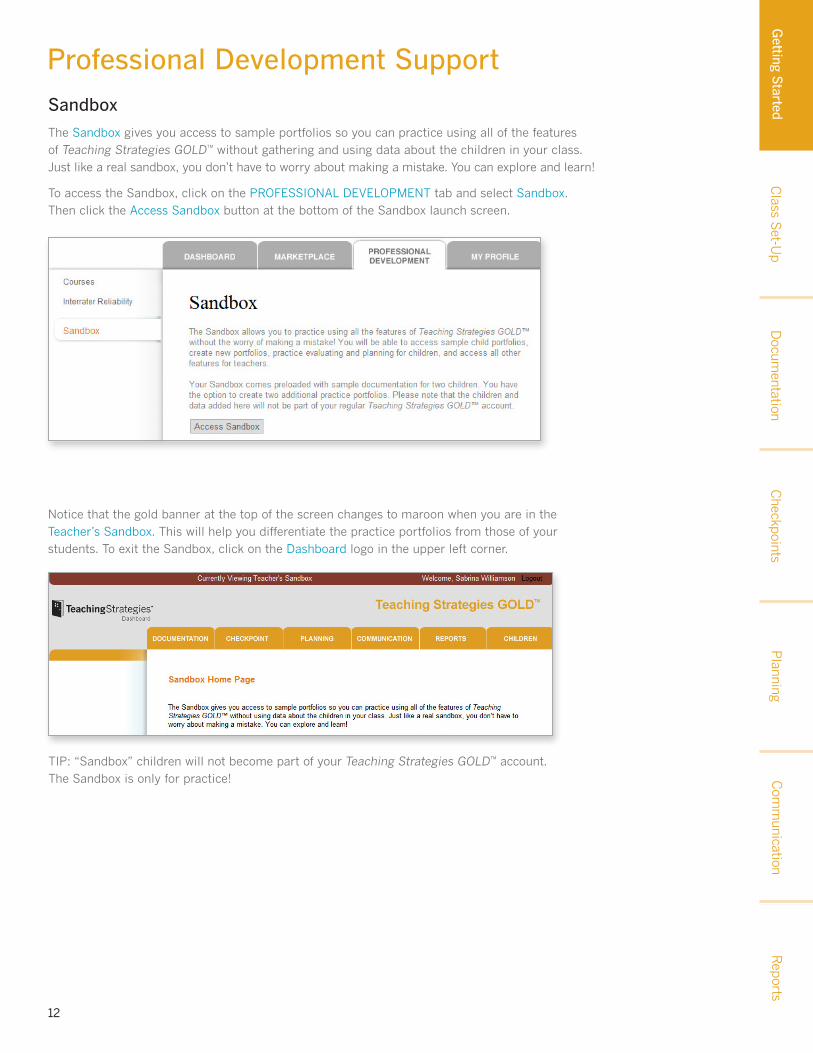
TIP: “Sandbox” children will not become part of your Teaching Strategies GOLD™ account. The Sandbox is only for practice!
Professional Development Support
Sandbox
The Sandbox gives you access to sample portfolios so you can practice using all of the features of Teaching Strategies GOLD™ without gathering and using data about the children in your class. Just like a real sandbox, you don’t have to worry about making a mistake. You can explore and learn!
To access the Sandbox, click on the PROFESSIONAL DEVELOPmENT tab and select Sandbox. Then click the Access Sandbox button at the bottom of the Sandbox launch screen.
Notice that the gold banner at the top of the screen changes to maroon when you are in the Teacher’s Sandbox. This will help you differentiate the practice portfolios from those of your students. To exit the Sandbox, click on the Dashboard logo in the upper left corner.

Checkpoints
Docum
entationC
lass Set-U
pG
etting Started
Reports
Com
munication
Planning
13
Professional Development SupportEmbedded Guidance
You may sometimes want more support while working with Teaching Strategies GOLD™. This is available from the top navigation bar. When you click on Help?, you will have full access to all of the articles in GOLD™ online. Search or browse by topic, or go to Popular Resources to see the most frequently used links. You can also access printable resources under Quick Downloads.

Getting S
tarted
Teaching Strategies GOLD™ Online
A Teacher’s Quick-Start Guide Section 2 of 7: Class Set-Up
Checkpoints
Docum
entationC
lass Set-U
pG
etting Started
Reports
Com
munication
Planning
15
Setting Up a ClassC
lass Set-U
pG
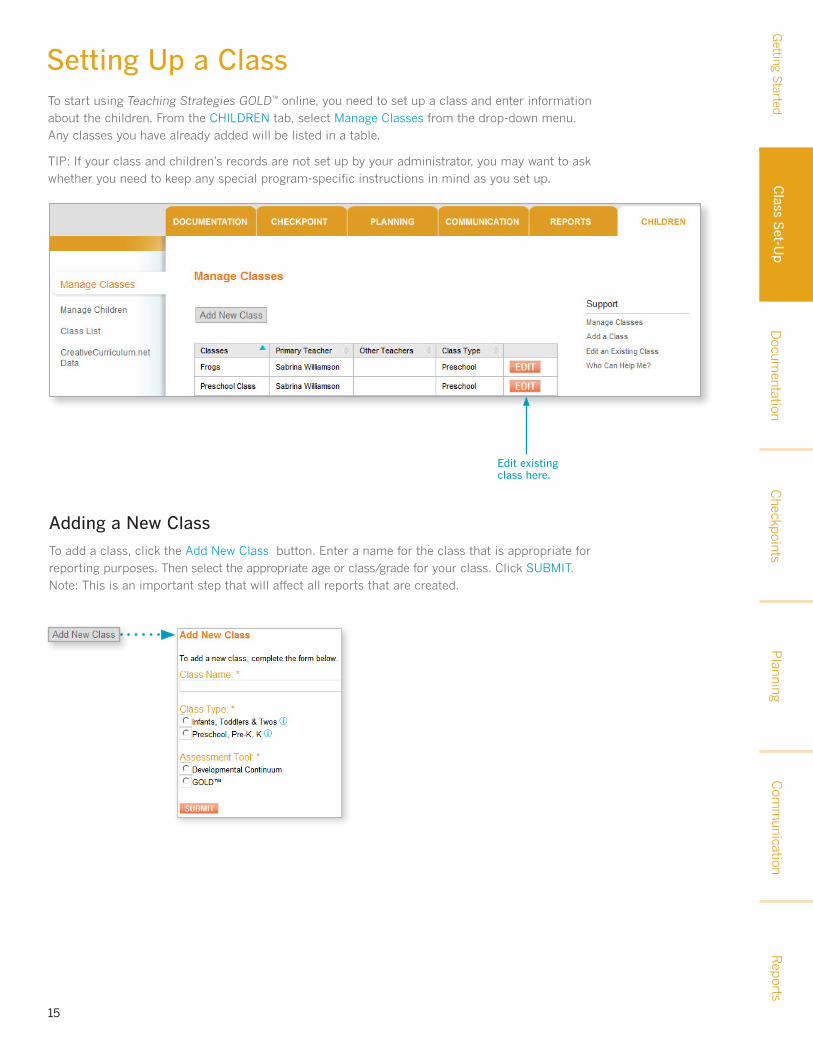
etting StartedTo start using Teaching Strategies GOLD™ online, you need to set up a class and enter information
about the children. From the CHILDREN tab, select manage Classes from the drop-down menu. Any classes you have already added will be listed in a table.
TIP: If your class and children’s records are not set up by your administrator, you may want to ask whether you need to keep any special program-specific instructions in mind as you set up.
Edit existing class here.
Adding a New Class
To add a class, click the Add New Class button. Enter a name for the class that is appropriate for reporting purposes. Then select the appropriate age or class/grade for your class. Click SUBmIT. Note: This is an important step that will affect all reports that are created.
Checkpoints
Docum
entationC
lass Set-U
pG
etting Started
Reports
Com
munication
Planning
16
Children’s RecordsG
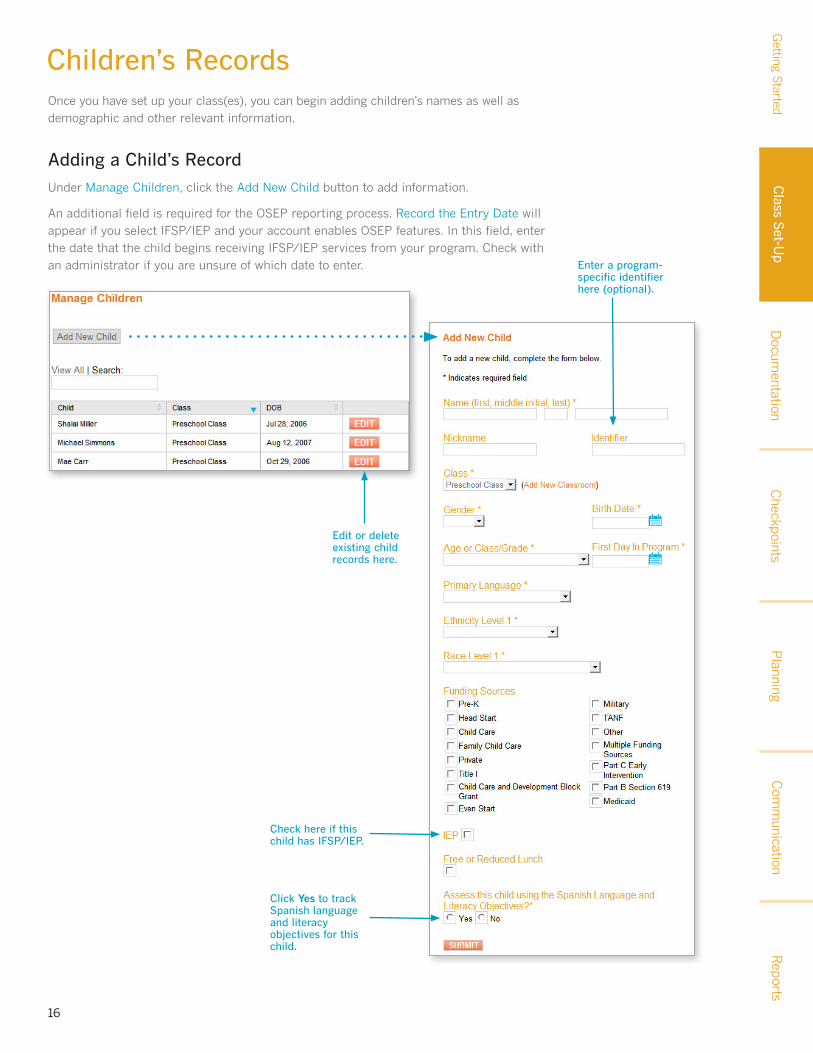
etting StartedOnce you have set up your class(es), you can begin adding children’s names as well as
demographic and other relevant information.
Edit or delete existing child records here.
Adding a Child’s Record
Under manage Children, click the Add New Child button to add information.
An additional field is required for the OSEP reporting process. Record the Entry Date will appear if you select IFSP/IEP and your account enables OSEP features. In this field, enter the date that the child begins receiving IFSP/IEP services from your program. Check with an administrator if you are unsure of which date to enter. Enter a program-
specific identifier here (optional).
Check here if this child has IFSP/IEP.
Click Yes to track Spanish language and literacy objectives for this child.
Class S
et-Up
Checkpoints
Docum
entationR
eportsC
omm
unicationP
lanning
17
Getting S
tarted
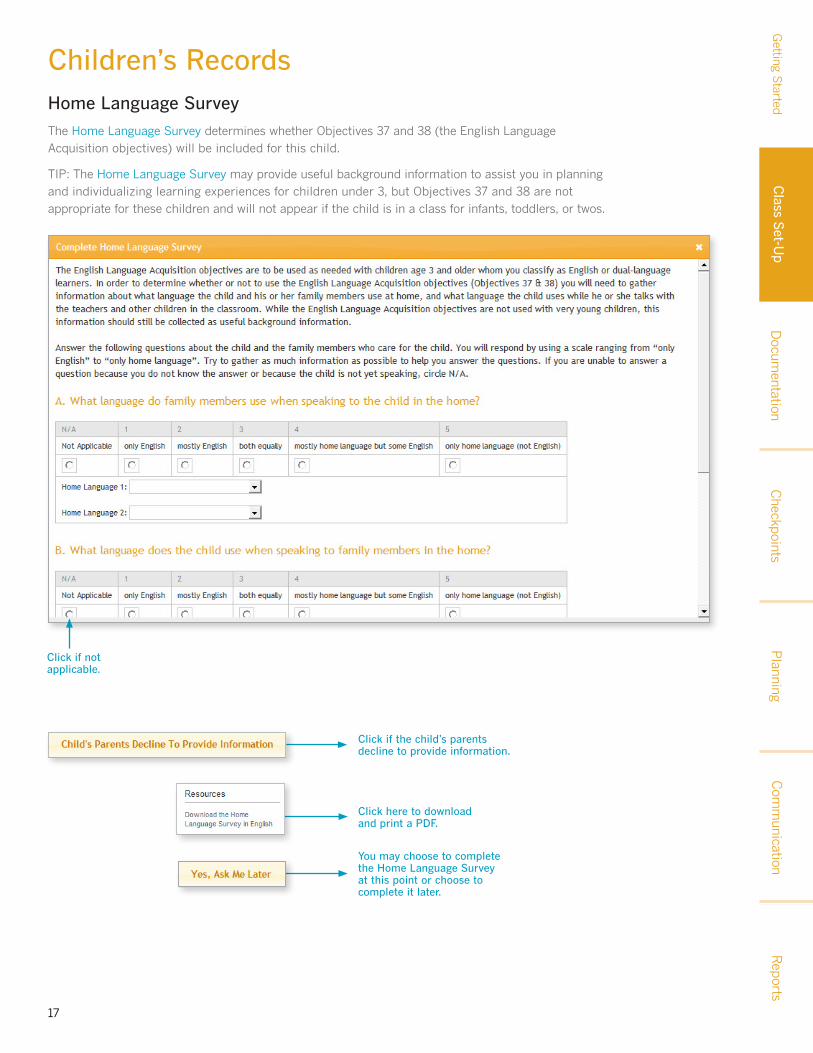
Children’s RecordsHome Language Survey
The Home Language Survey determines whether Objectives 37 and 38 (the English Language Acquisition objectives) will be included for this child.
TIP: The Home Language Survey may provide useful background information to assist you in planning and individualizing learning experiences for children under 3, but Objectives 37 and 38 are not appropriate for these children and will not appear if the child is in a class for infants, toddlers, or twos.
Click if the child’s parents decline to provide information.
You may choose to complete the Home Language Survey at this point or choose to complete it later.
Click here to download and print a PDF.
Click if not applicable.
Class S
et-Up

Getting S
tarted
Teaching Strategies GOLD™ Online
A Teacher’s Quick-Start Guide Section 3 of 7: Documentation
Checkpoints
Reports
Com
munication
Planning
19
Adding Documentation
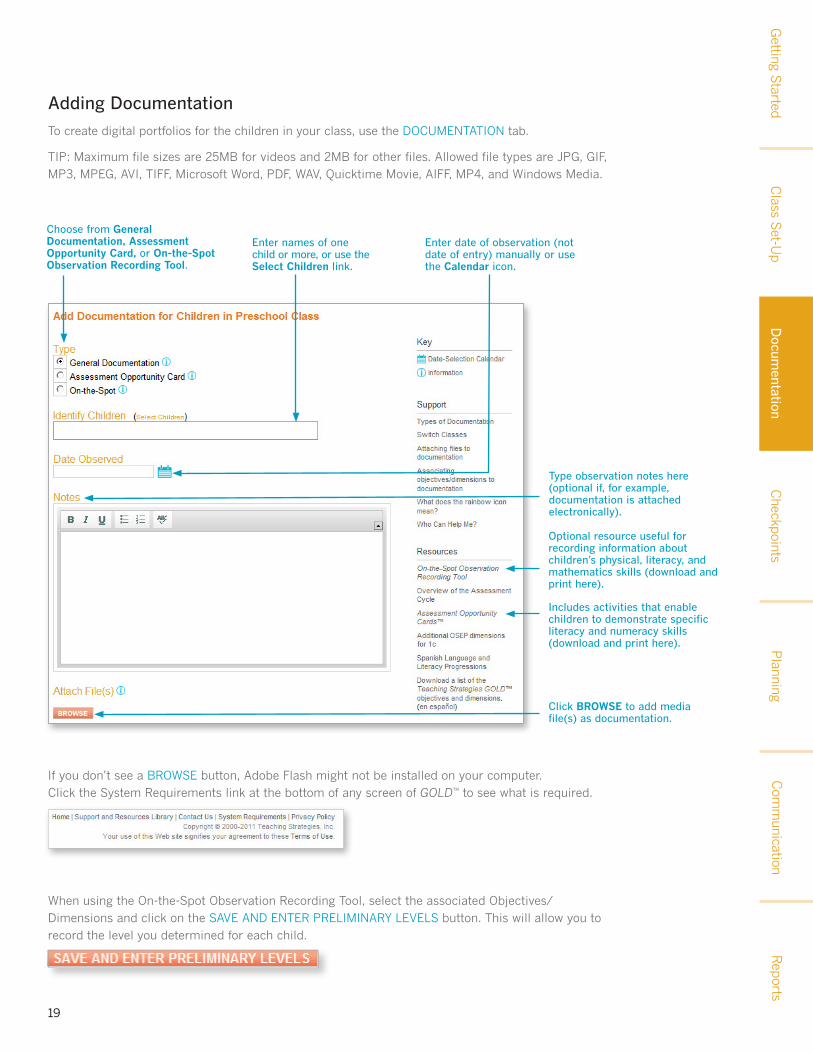
To create digital portfolios for the children in your class, use the DOCUmENTATION tab.
TIP: maximum file sizes are 25mB for videos and 2mB for other files. Allowed file types are JPG, GIF, mP3, mPEG, AVI, TIFF, microsoft Word, PDF, WAV, Quicktime movie, AIFF, mP4, and Windows media.
Enter date of observation (not date of entry) manually or use the Calendar icon.
Includes activities that enable children to demonstrate specific literacy and numeracy skills (download and print here).
Click browSe to add media file(s) as documentation.
Choose from General Documentation, Assessment opportunity Card, or on-the-Spot observation recording Tool.
Enter names of one child or more, or use the Select Children link.
If you don’t see a BROWSE button, Adobe Flash might not be installed on your computer. Click the System Requirements link at the bottom of any screen of GOLD™ to see what is required.
Type observation notes here (optional if, for example, documentation is attached electronically).
When using the On-the-Spot Observation Recording Tool, select the associated Objectives/Dimensions and click on the SAVE AND ENTER PRELImINARY LEVELS button. This will allow you to record the level you determined for each child.
Optional resource useful for recording information about children’s physical, literacy, and mathematics skills (download and print here).
Class S
et-Up
Getting S
tartedD
ocumentation
Checkpoints
Reports
Com
munication
Planning
20
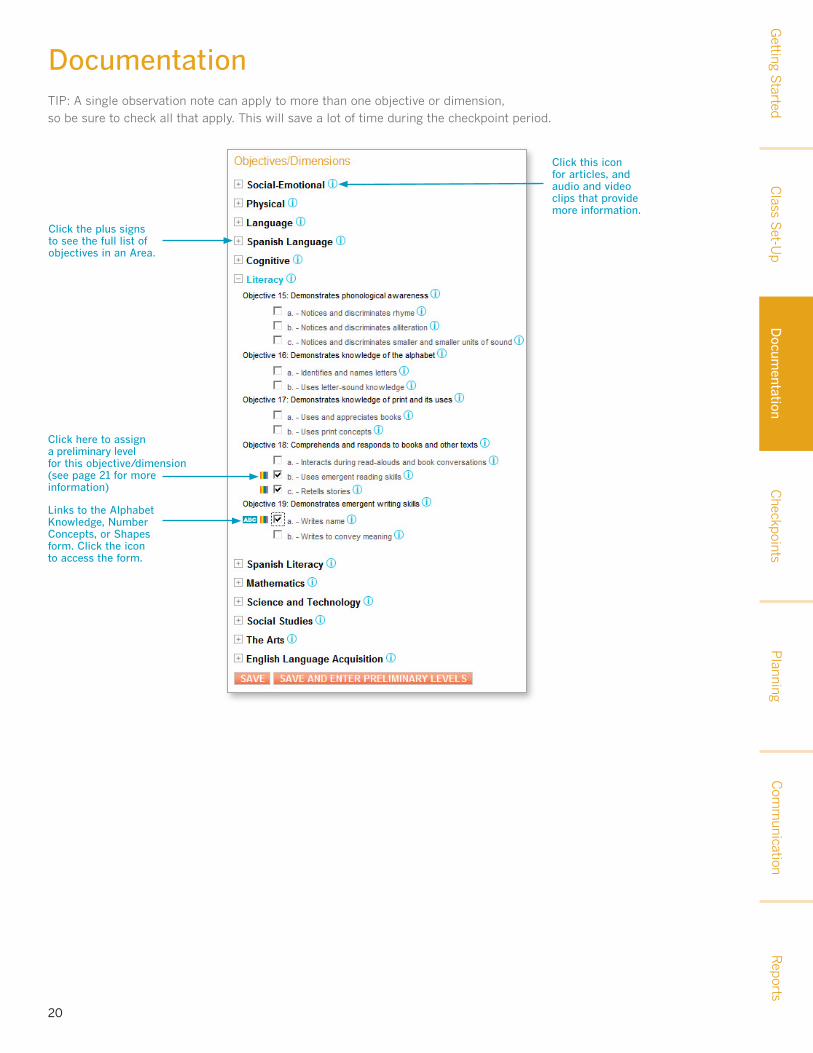
DocumentationTIP: A single observation note can apply to more than one objective or dimension, so be sure to check all that apply. This will save a lot of time during the checkpoint period.
Links to the Alphabet Knowledge, Number Concepts, or Shapes form. Click the icon to access the form.
Click the plus signs to see the full list of objectives in an Area.
Click here to assign a preliminary level for this objective/dimension (see page 21 for more information)
Click this icon for articles, and audio and video clips that provide more information.
Class S
et-Up
Getting S
tartedD
ocumentation
Checkpoints
Docum
entationR
eportsC
omm
unicationP
lanning
21
Selecting a Preliminary Level
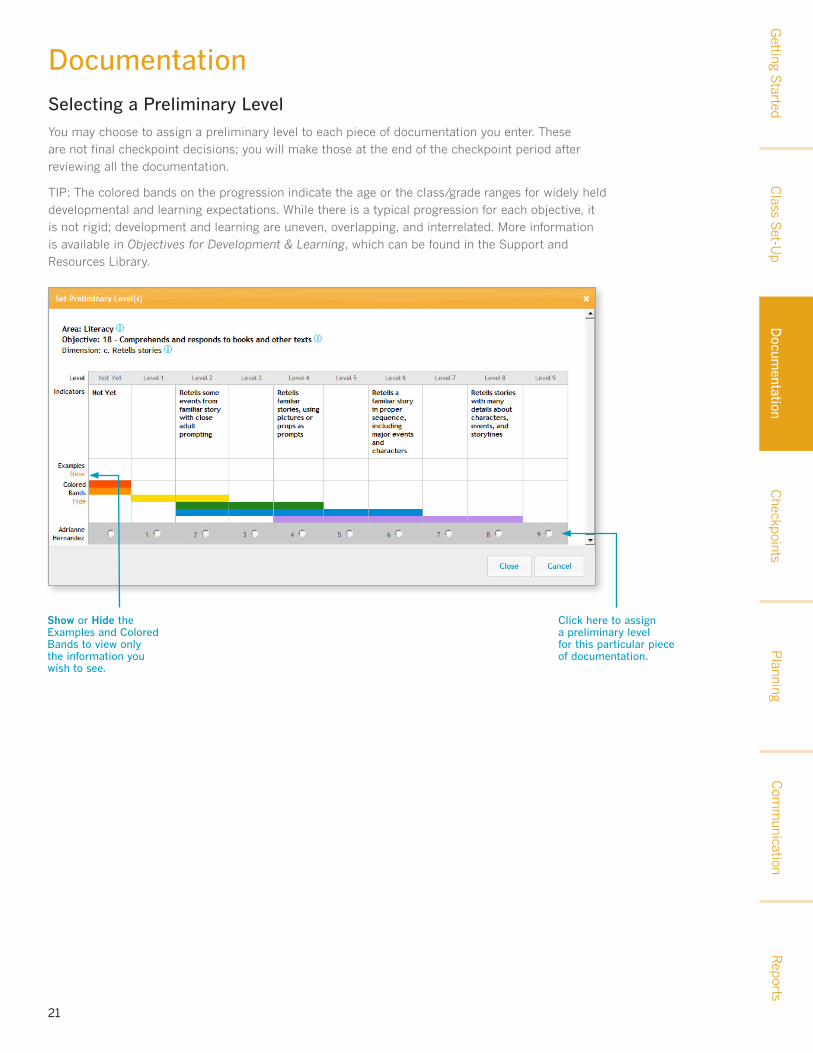
You may choose to assign a preliminary level to each piece of documentation you enter. These are not final checkpoint decisions; you will make those at the end of the checkpoint period after reviewing all the documentation.
TIP: The colored bands on the progression indicate the age or the class/grade ranges for widely held developmental and learning expectations. While there is a typical progression for each objective, it is not rigid; development and learning are uneven, overlapping, and interrelated. more information is available in Objectives for Development & Learning, which can be found in the Support and Resources Library.
Show or Hide the Examples and Colored Bands to view only the information you wish to see.
Click here to assign a preliminary level for this particular piece of documentation.
DocumentationC
lass Set-U
pG
etting Started
Docum
entation

Checkpoints
Reports
Com
munication
Planning
22
DocumentationView Documentation
Click here to navigate through the list of documentation.
TIP: Print and PDF will help you turn what you see on the screen into a nicely formatted document. When you click on one of these choices, a box appears that allows you to customize your printout or PDF. Check or uncheck the checkboxes to include or exclude notes, attachments, associated dimensions and levels, date/time entered, and author.
An Action menu is located next to each piece of documentation.
Click here to narrow the list of documentation or select a particular child.
Select Share to send a message to families (see pages 47–48 for more information).
Class S
et-Up
Getting S
tartedD
ocumentation
Checkpoints
Docum
entationR
eportsC
omm
unicationP
lanning
23
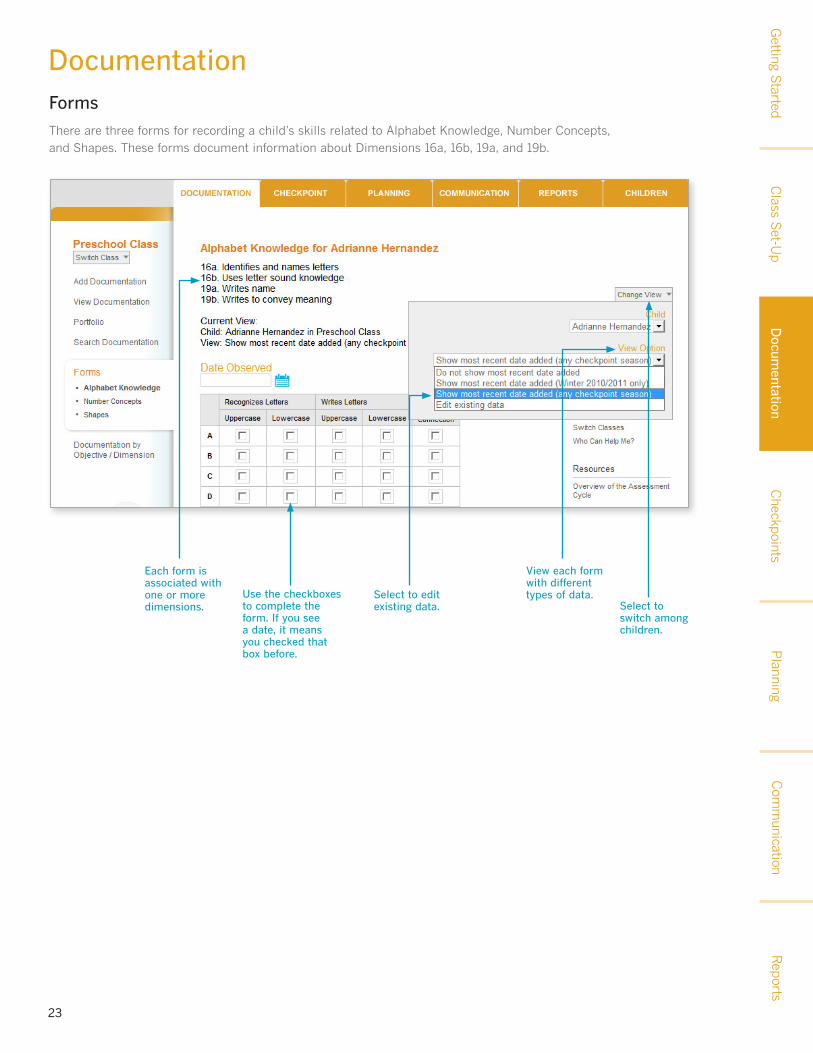
DocumentationForms
There are three forms for recording a child’s skills related to Alphabet Knowledge, Number Concepts, and Shapes. These forms document information about Dimensions 16a, 16b, 19a, and 19b.
Each form is associated with one or more dimensions.
View each form with different types of data.Select to edit
existing data. Select to switch among children.
Use the checkboxes to complete the form. If you see a date, it means you checked that box before.
Class S
et-Up
Getting S
tartedD
ocumentation

Checkpoints
Docum
entationR
eportsC
omm
unicationP
lanning
24
Documentation
Once you select an area (in this case, Cognitive) you will see a table containing data for all the children in your current class (this is the default setting). It shows how many times you have associated the objective/dimension with documentation for individual children.
TIP: It is better to have a few rich pieces of documentation than many less informative ones. Some dimensions need to be documented multiple times; for other dimensions, once may be enough.
Knowing how many times an objective or dimension has been associated with a piece of documentation for one or more children in your class can be helpful when planning activities. It helps you identify where you need more information.
Change the area of development, the checkpoint period, and/or the child/children whose data you are viewing.
View by Objective/Dimension
Click here to view documentation by Objective/Dimension
Click on the area of the objectives/dimensions you wish to view.
Class S
et-Up
Getting S
tartedD
ocumentation

Getting S
tarted
Teaching Strategies GOLD™ Online
A Teacher’s Quick-Start Guide Section 4 of 7: Checkpoints
Checkpoints
Docum
entationC
lass Set-U
pR
eportsC
omm
unicationP
lanning
26
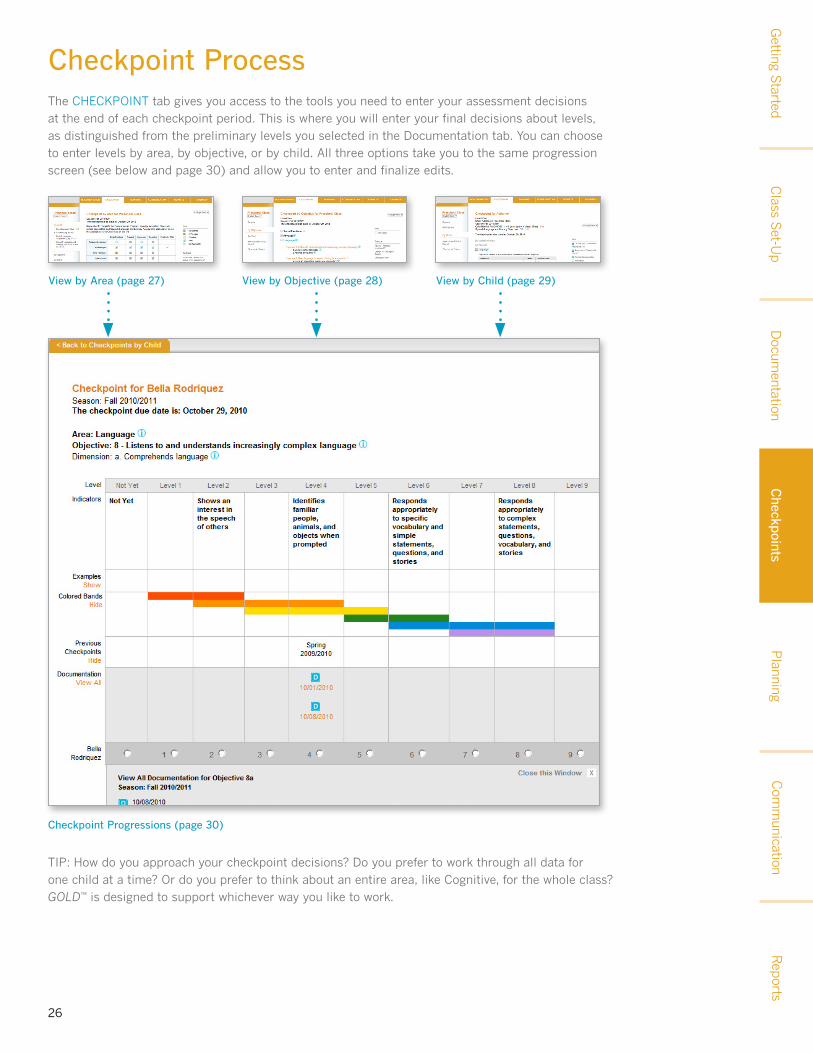
Checkpoint Process
TIP: How do you approach your checkpoint decisions? Do you prefer to work through all data for one child at a time? Or do you prefer to think about an entire area, like Cognitive, for the whole class? GOLD™ is designed to support whichever way you like to work.
The CHECKPOINT tab gives you access to the tools you need to enter your assessment decisions at the end of each checkpoint period. This is where you will enter your final decisions about levels, as distinguished from the preliminary levels you selected in the Documentation tab. You can choose to enter levels by area, by objective, or by child. All three options take you to the same progression screen (see below and page 30) and allow you to enter and finalize edits.
View by Area (page 27) View by Objective (page 28) View by Child (page 29)
Checkpoint Progressions (page 30)
Getting S
tartedC
heckpoints
Docum
entationC
lass Set-U
pR
eportsC
omm
unicationP
lanning
27
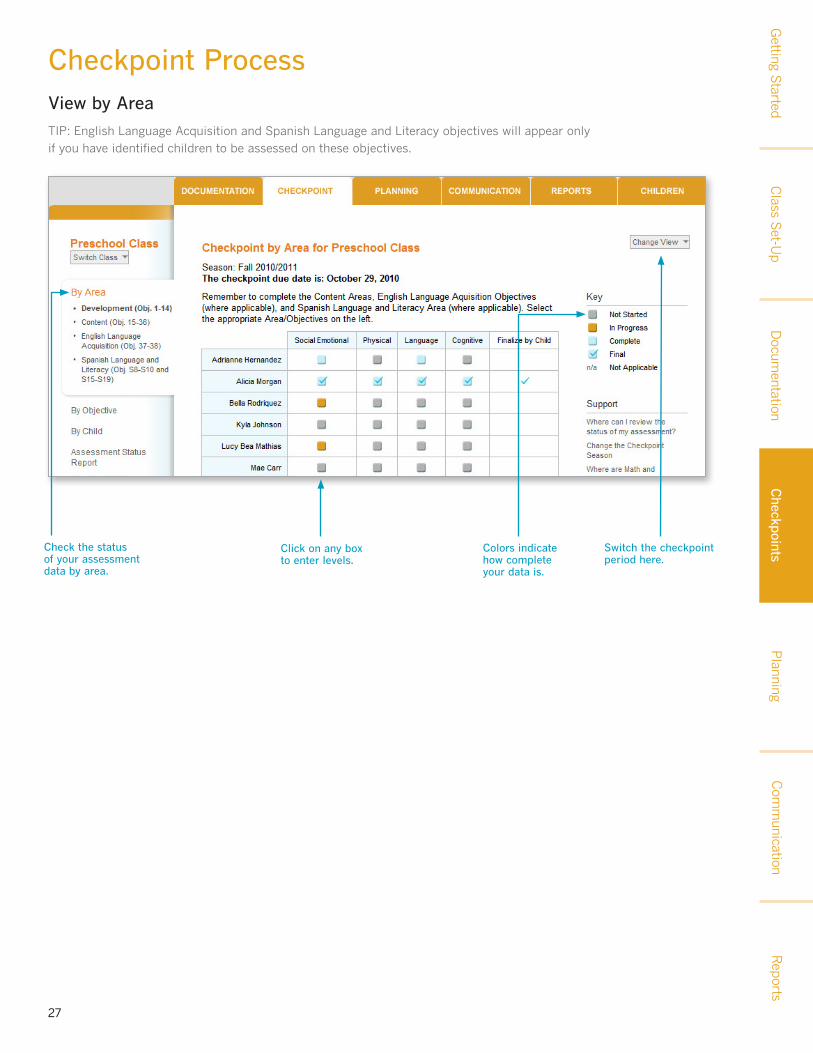
Checkpoint ProcessView by Area
TIP: English Language Acquisition and Spanish Language and Literacy objectives will appear only if you have identified children to be assessed on these objectives.
Check the status of your assessment data by area.
Click on any box to enter levels.
Colors indicate how complete your data is.
Switch the checkpoint period here.
Getting S
tartedC
heckpoints
Checkpoints
Docum
entationC
lass Set-U
pR
eportsC
omm
unicationP
lanning
28
Checkpoint Process
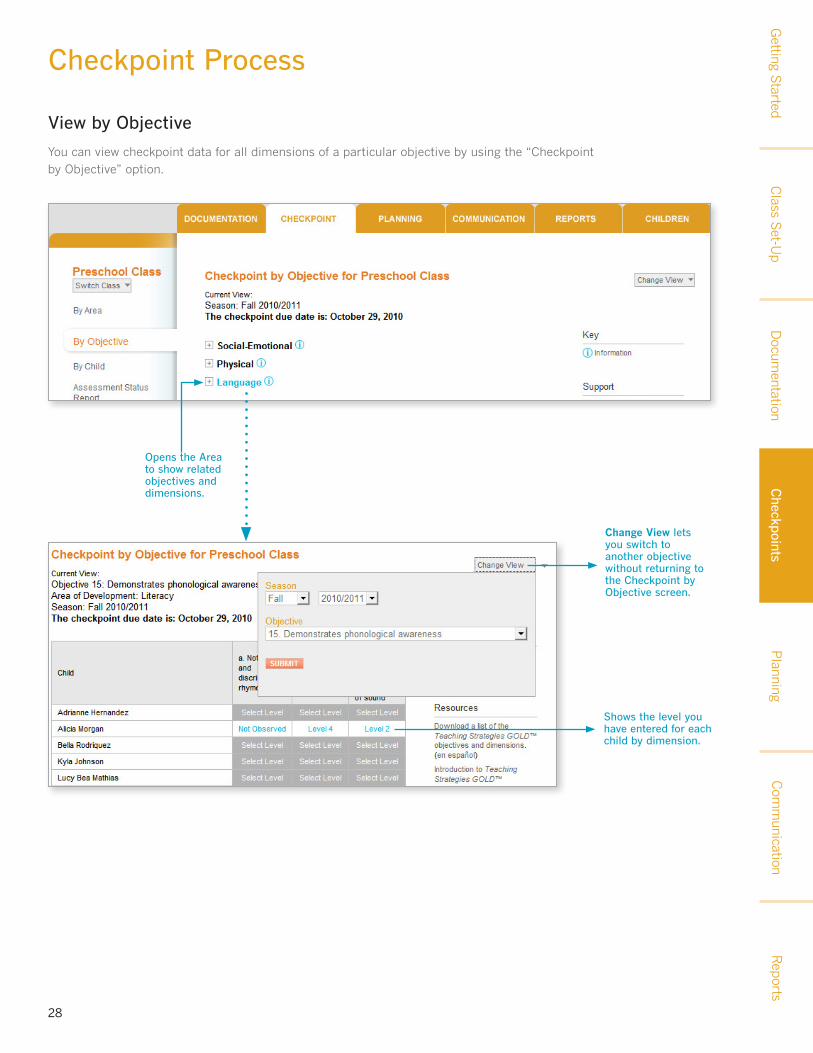
You can view checkpoint data for all dimensions of a particular objective by using the “Checkpoint by Objective” option.
View by Objective
Opens the Area to show related objectives and dimensions.
Change View lets you switch to another objective without returning to the Checkpoint by Objective screen.
Shows the level you have entered for each child by dimension.
Getting S
tartedC
heckpoints

Checkpoints
Docum
entationC
lass Set-U
pR
eportsC
omm
unicationP
lanning
29
Checkpoint Process
To see all the checkpoint data you have entered for an individual child, use the By Child option.
TIP: Did you enter data into the wrong checkpoint period? Any Area that hasn’t been finalized can be moved to another checkpoint period or deleted. Click Unfinalize This Checkpoint if entries were finalized but you need to make changes.
View by Child
View another child or checkpoint period.
Shortcut to edit widely held expectations.
Enter assessment level.
View documentation.
Expands to show the details about objectives and dimensions.
Getting S
tartedC
heckpoints
Checkpoints
Docum
entationC
lass Set-U
pR
eportsC
omm
unicationP
lanning
30
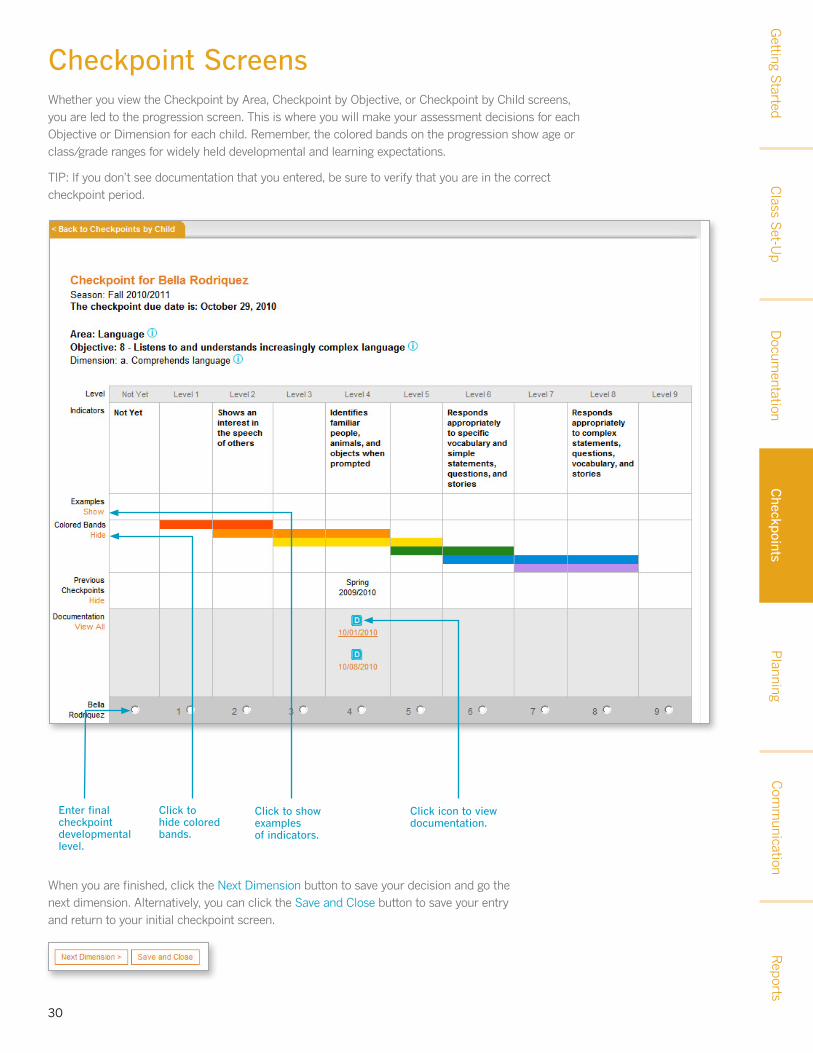
Checkpoint Screens
When you are finished, click the Next Dimension button to save your decision and go the next dimension. Alternatively, you can click the Save and Close button to save your entry and return to your initial checkpoint screen.
Whether you view the Checkpoint by Area, Checkpoint by Objective, or Checkpoint by Child screens, you are led to the progression screen. This is where you will make your assessment decisions for each Objective or Dimension for each child. Remember, the colored bands on the progression show age or class/grade ranges for widely held developmental and learning expectations.
TIP: If you don’t see documentation that you entered, be sure to verify that you are in the correct checkpoint period.
Click to show examples of indicators.
Click to hide colored bands.
Click icon to view documentation.
Enter final checkpoint developmental level.
Getting S
tartedC
heckpoints
Checkpoints
Docum
entationC
lass Set-U
pR
eportsC
omm
unicationP
lanning
31
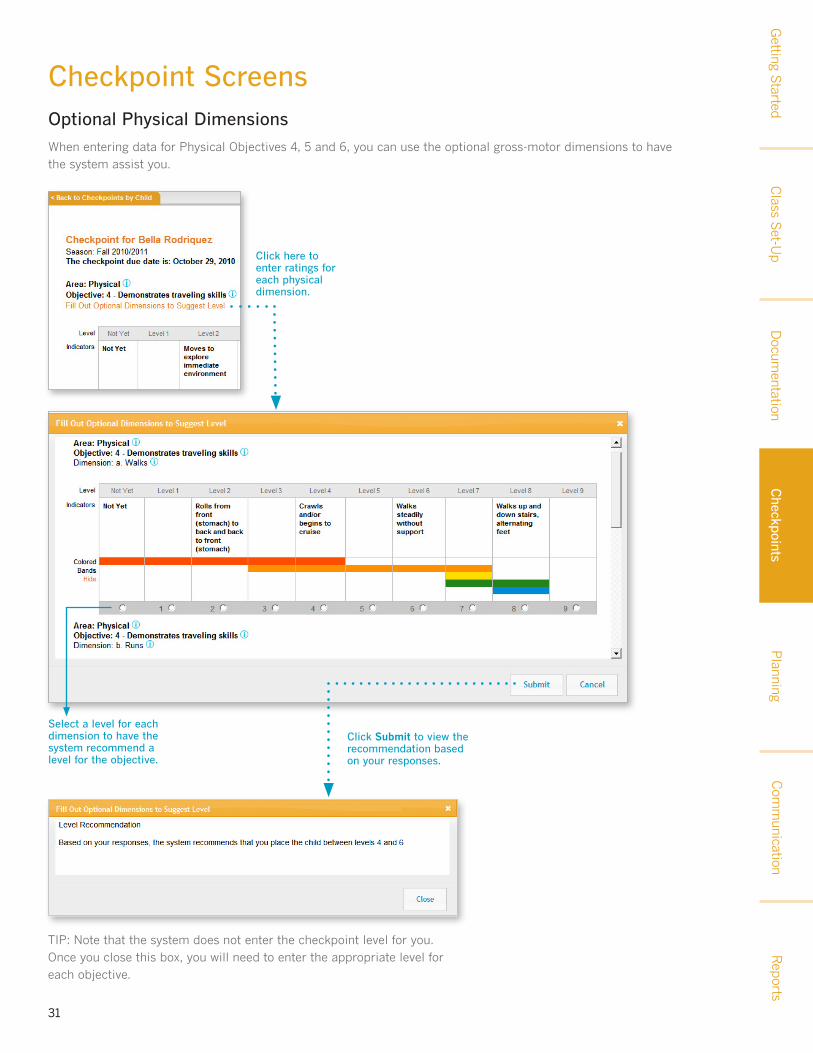
Checkpoint Screens Optional Physical Dimensions
When entering data for Physical Objectives 4, 5 and 6, you can use the optional gross-motor dimensions to have the system assist you.
TIP: Note that the system does not enter the checkpoint level for you. Once you close this box, you will need to enter the appropriate level for each objective.
Click here to enter ratings for each physical dimension.
Select a level for each dimension to have the system recommend a level for the objective.
Click Submit to view the recommendation based on your responses.
Getting S
tartedC
heckpoints

Checkpoints
Docum
entationC
lass Set-U
pR
eportsC
omm
unicationP
lanning
32
TIP: Each program can choose whether or not to assess children in these three areas, as determined by your program administrator. Teaching Strategies GOLD™ does not define the three descriptors. Each program can define these according to their own standards.
Click Content to see Math, Literacy, and the other content areas.
Checkpoint Screens Science and Technology, Social Studies, and the Arts
Science and Technology, Social Studies, and Arts objectives appear in a checklist format. They do not have progressions because current research does not identify widely held expectations for these objectives.
Use checkboxes to rate children in these three areas.
Click to view documentation associated with these objectives.
Scroll down to see all of the objectives.
Getting S
tartedC
heckpoints
Checkpoints
Docum
entationC
lass Set-U
pR
eportsC
omm
unicationP
lanning
33
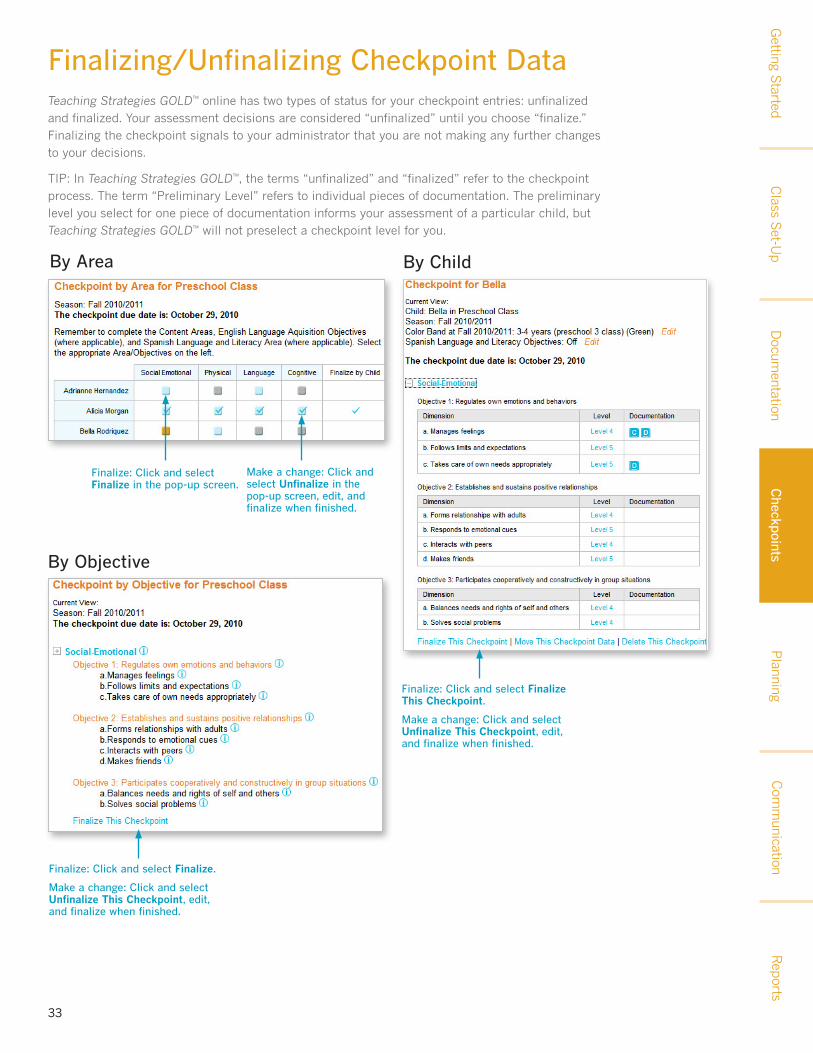
Finalizing/Unfinalizing Checkpoint Data
By Area
By Objective
By Child
Teaching Strategies GOLD™ online has two types of status for your checkpoint entries: unfinalized and finalized. Your assessment decisions are considered “unfinalized” until you choose “finalize.” Finalizing the checkpoint signals to your administrator that you are not making any further changes to your decisions.
TIP: In Teaching Strategies GOLD™, the terms “unfinalized” and “finalized” refer to the checkpoint process. The term “Preliminary Level” refers to individual pieces of documentation. The preliminary level you select for one piece of documentation informs your assessment of a particular child, but Teaching Strategies GOLD™ will not preselect a checkpoint level for you.
Finalize: Click and select Finalize in the pop-up screen.
Make a change: Click and select Unfinalize in the pop-up screen, edit, and finalize when finished.
Finalize: Click and select Finalize.
Make a change: Click and select Unfinalize This Checkpoint, edit, and finalize when finished.
Finalize: Click and select Finalize This Checkpoint.
Make a change: Click and select Unfinalize This Checkpoint, edit, and finalize when finished.
Getting S
tartedC
heckpoints

Getting S
tarted
Teaching Strategies GOLD™ Online
A Teacher’s Quick-Start Guide Section 5 of 7: Planning
Checkpoints
Docum
entationC
lass Set-U
pR
eportsC
omm
unication
35
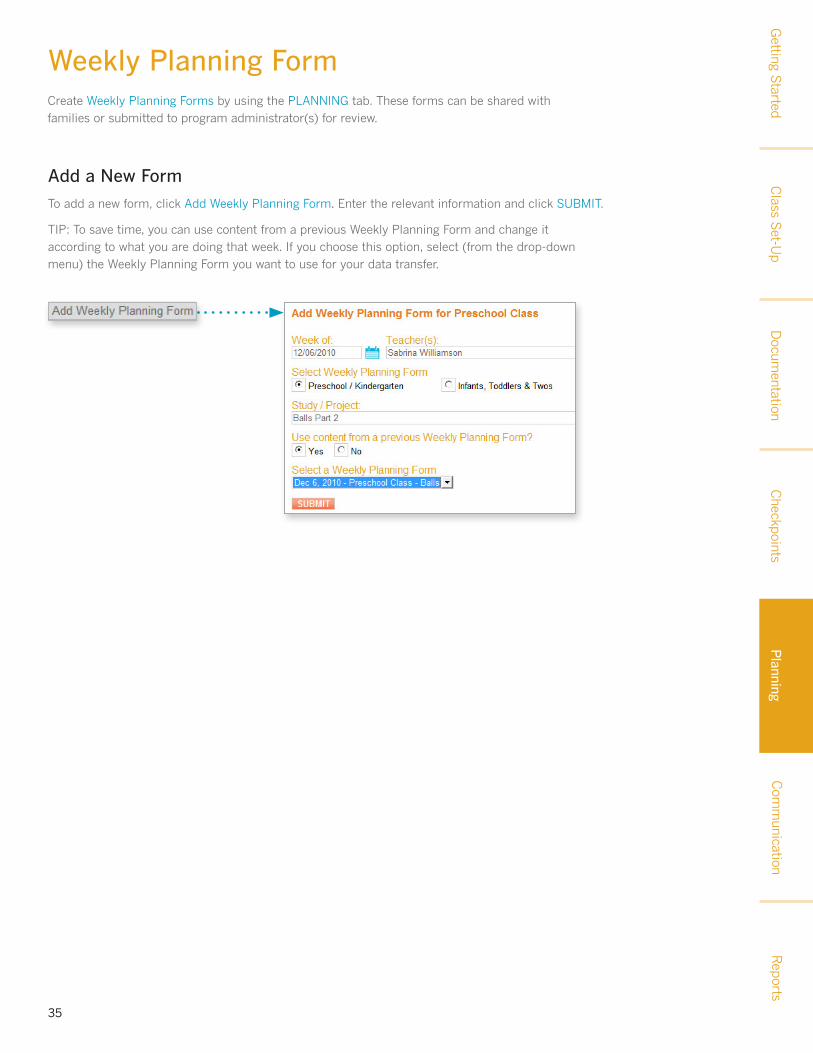
Weekly Planning FormCreate Weekly Planning Forms by using the PLANNING tab. These forms can be shared with families or submitted to program administrator(s) for review.
Add a New Form
To add a new form, click Add Weekly Planning Form. Enter the relevant information and click SUBmIT.
TIP: To save time, you can use content from a previous Weekly Planning Form and change it according to what you are doing that week. If you choose this option, select (from the drop-down menu) the Weekly Planning Form you want to use for your data transfer.
Getting S
tartedPlanning
Checkpoints
Docum
entationC
lass Set-U
pR
eportsC
omm
unicationP
lanning
36
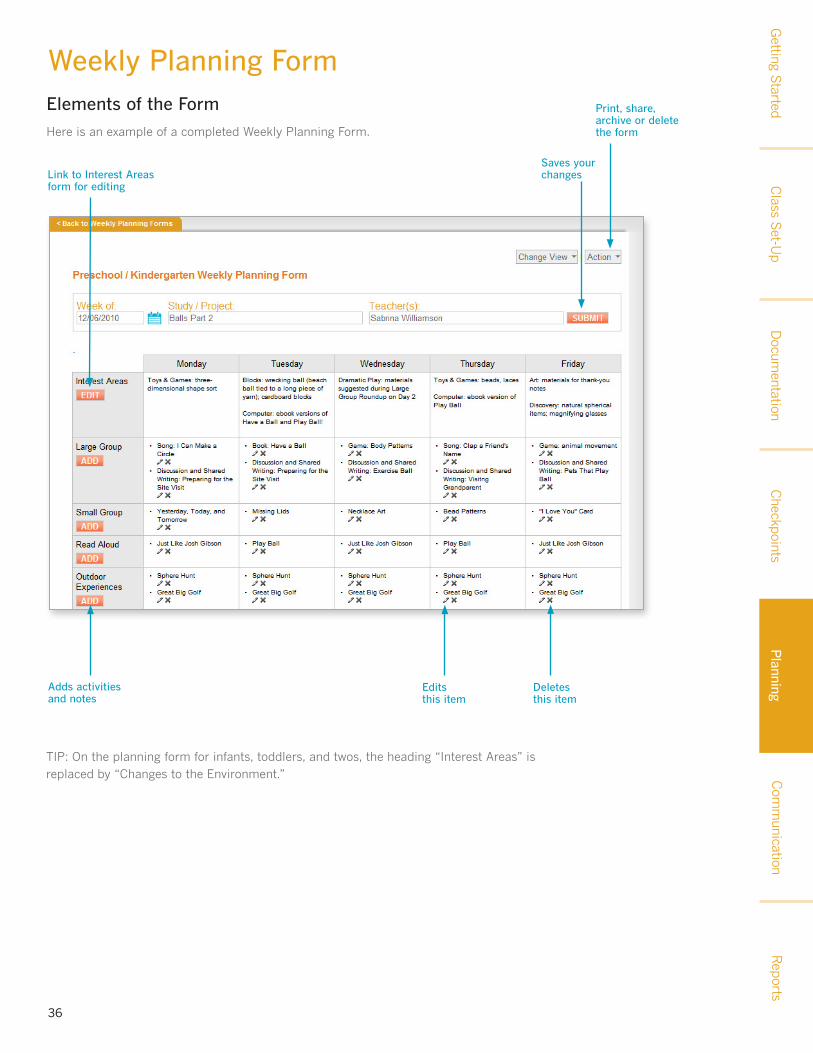
Weekly Planning FormElements of the Form
Here is an example of a completed Weekly Planning Form.
Saves your changes
Print, share, archive or delete the form
Deletes this item
Edits this item
Link to Interest Areas form for editing
Adds activities and notes
TIP: On the planning form for infants, toddlers, and twos, the heading “Interest Areas” is replaced by “Changes to the Environment.”
Getting S
tartedPlanning
Checkpoints
Docum
entationC
lass Set-U
pR
eportsC
omm
unicationP
lanning
37
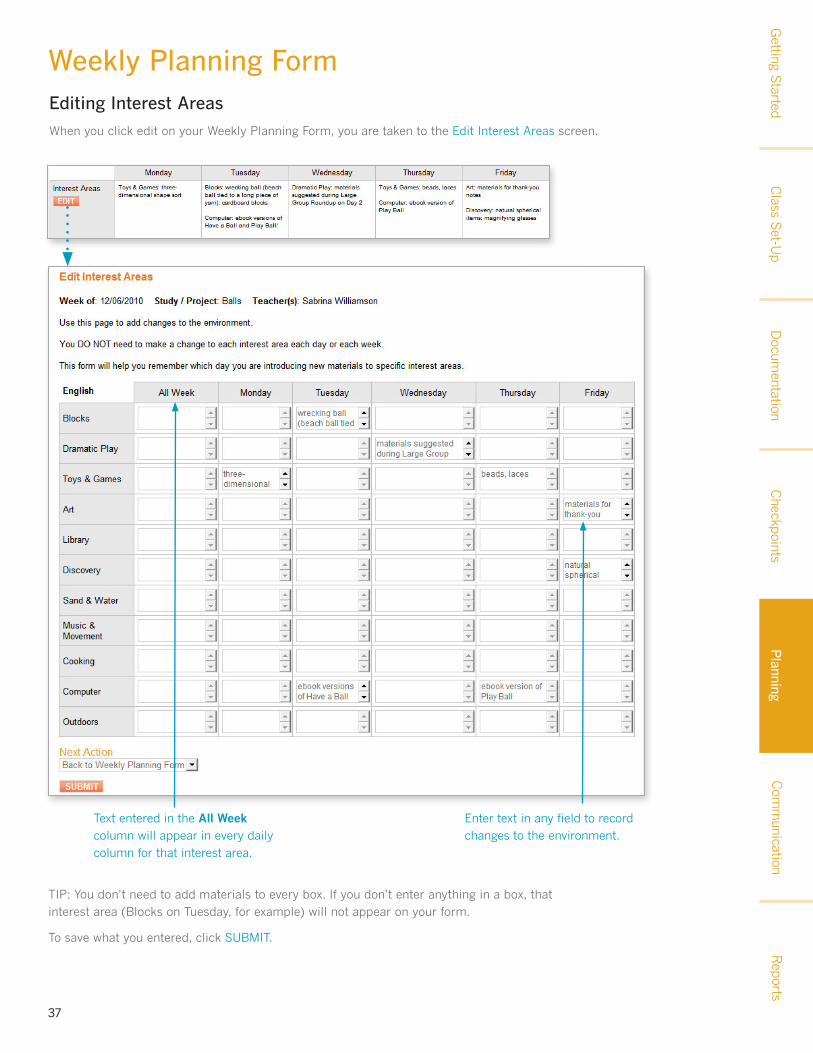
Weekly Planning FormEditing Interest Areas
When you click edit on your Weekly Planning Form, you are taken to the Edit Interest Areas screen.
TIP: You don’t need to add materials to every box. If you don’t enter anything in a box, that interest area (Blocks on Tuesday, for example) will not appear on your form.
To save what you entered, click SUBmIT.
Enter text in any field to record changes to the environment.
Text entered in the All week column will appear in every daily column for that interest area.
Getting S
tartedPlanning
Checkpoints
Docum
entationC
lass Set-U
pR
eportsC
omm
unicationP
lanning
38
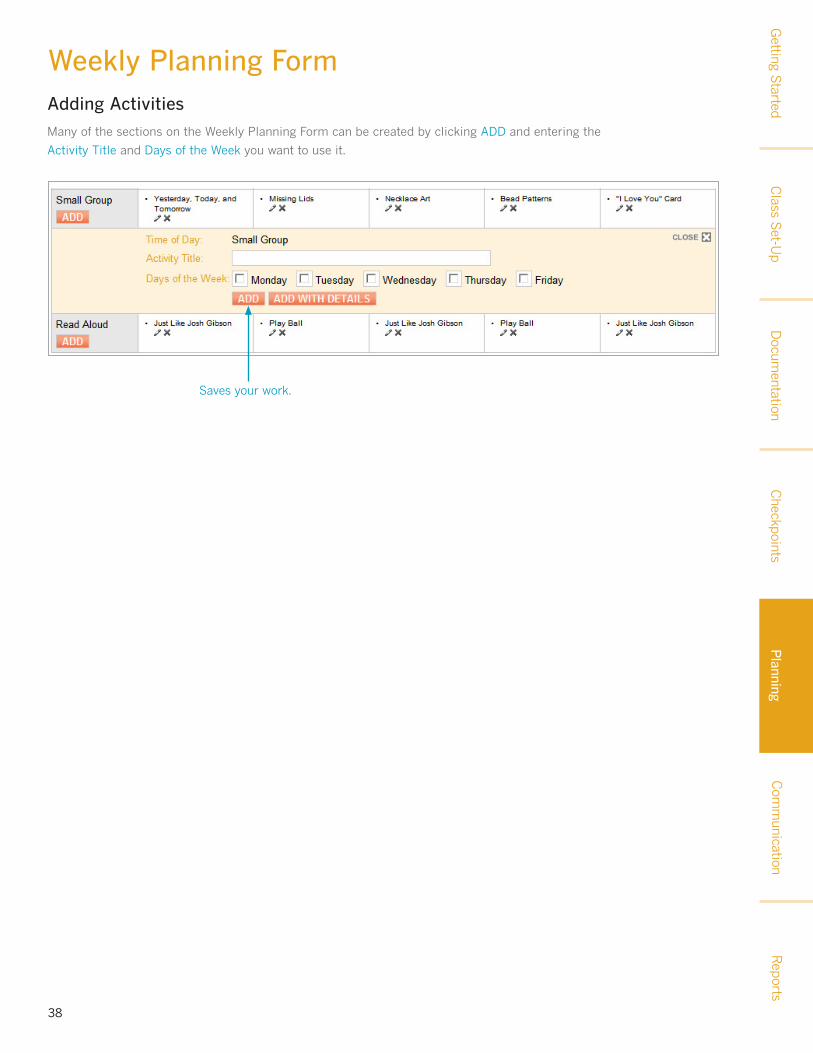
Weekly Planning FormAdding Activities
many of the sections on the Weekly Planning Form can be created by clicking ADD and entering the
Activity Title and Days of the Week you want to use it.
Saves your work.
Getting S
tartedPlanning

Checkpoints
Docum
entationC
lass Set-U
pR
eportsC
omm
unicationP
lanning
39
TIP: The Notes field allows you to enter specific reminders for yourself as you conduct the activity. This is different from the Description field, in which you enter a more general explanation of the activity.
Adding Activities With Details
To enter more information than just the activity title and days, use the ADD WITH DETAILS button to open another screen. Here you can select from a list of activities or create your own.
Weekly Planning Form
Select existing activities or create your own by using the Custom tab.
Select Yes to save.Check this box to expand the screen and customize it for Spanish-speaking families
Getting S
tartedPlanning
Checkpoints
Docum
entationC
lass Set-U
pG
etting Started
Reports
Com
munication
Planning
40
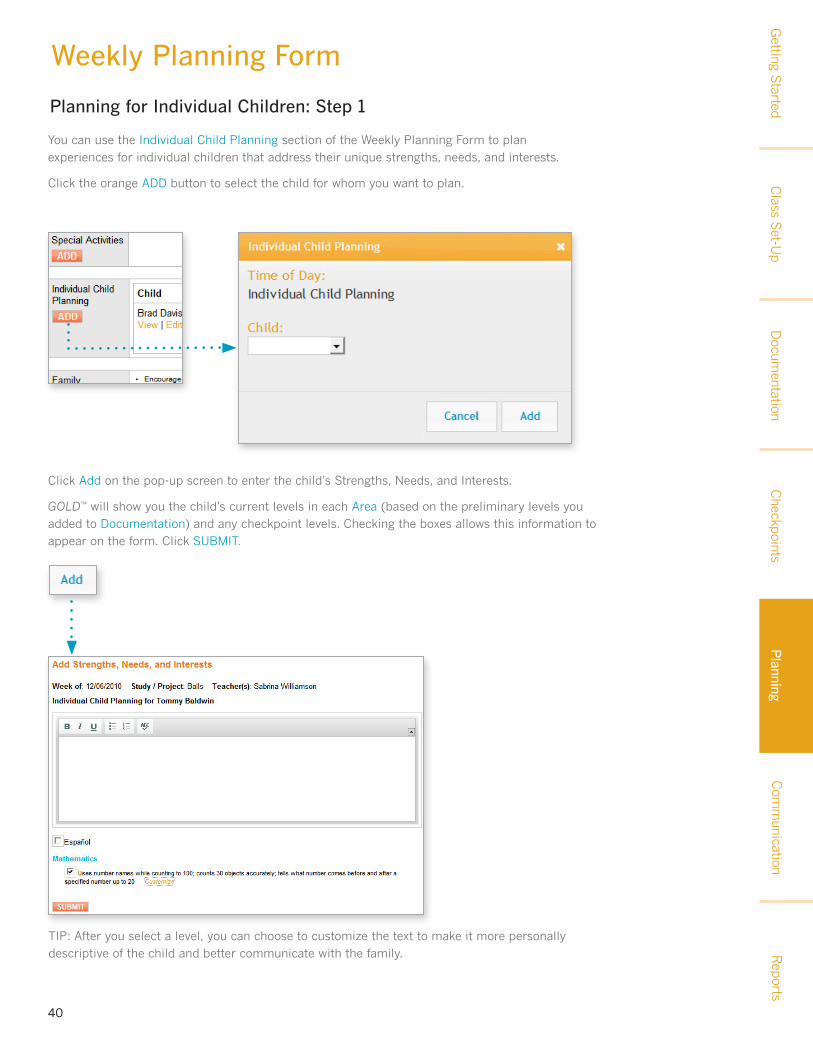
Planning for Individual Children: Step 1
Click Add on the pop-up screen to enter the child’s Strengths, Needs, and Interests.
GOLD™ will show you the child’s current levels in each Area (based on the preliminary levels you added to Documentation) and any checkpoint levels. Checking the boxes allows this information to appear on the form. Click SUBmIT.
You can use the Individual Child Planning section of the Weekly Planning Form to plan experiences for individual children that address their unique strengths, needs, and interests.
Click the orange ADD button to select the child for whom you want to plan.
Weekly Planning Form
TIP: After you select a level, you can choose to customize the text to make it more personally descriptive of the child and better communicate with the family.
Getting S
tartedPlanning
Checkpoints
Docum
entationC
lass Set-U
pR
eportsC
omm
unicationP
lanning
41
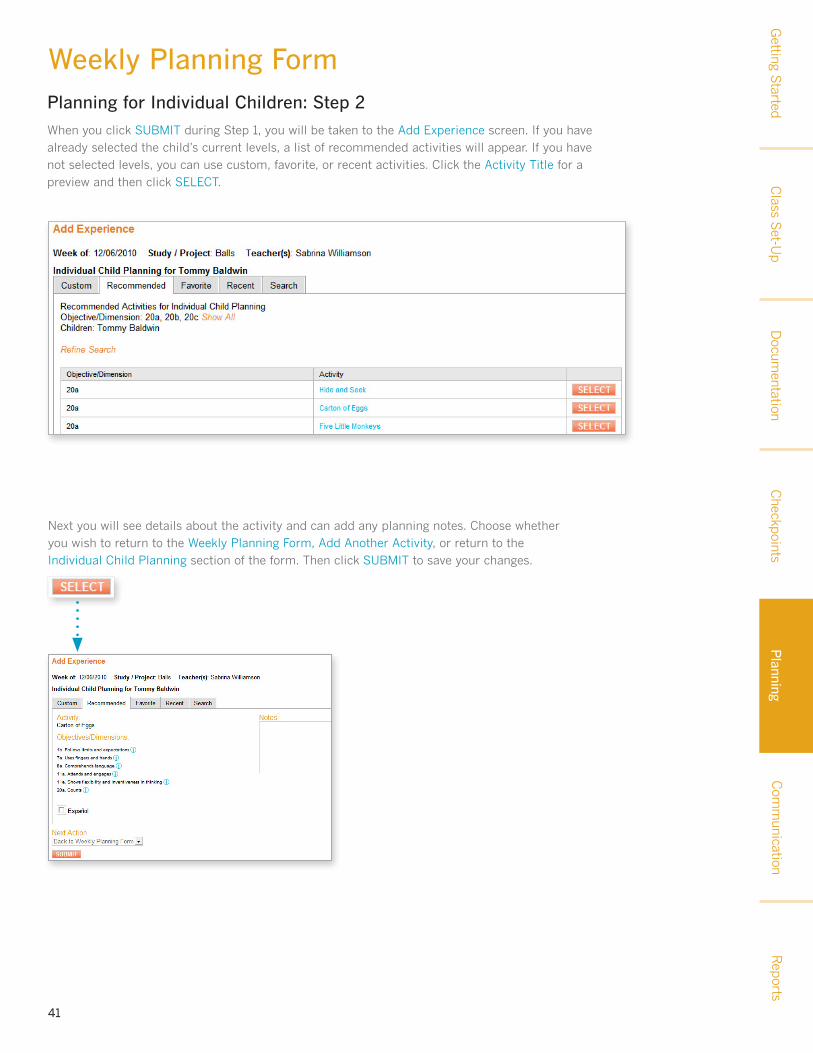
Weekly Planning Form
Next you will see details about the activity and can add any planning notes. Choose whether you wish to return to the Weekly Planning Form, Add Another Activity, or return to the Individual Child Planning section of the form. Then click SUBmIT to save your changes.
Planning for Individual Children: Step 2
When you click SUBmIT during Step 1, you will be taken to the Add Experience screen. If you have already selected the child’s current levels, a list of recommended activities will appear. If you have not selected levels, you can use custom, favorite, or recent activities. Click the Activity Title for a preview and then click SELECT.
Getting S
tartedPlanning
Checkpoints
Docum
entationC
lass Set-U
pR
eportsP
lanning
42
Com
munication
Weekly Planning Form
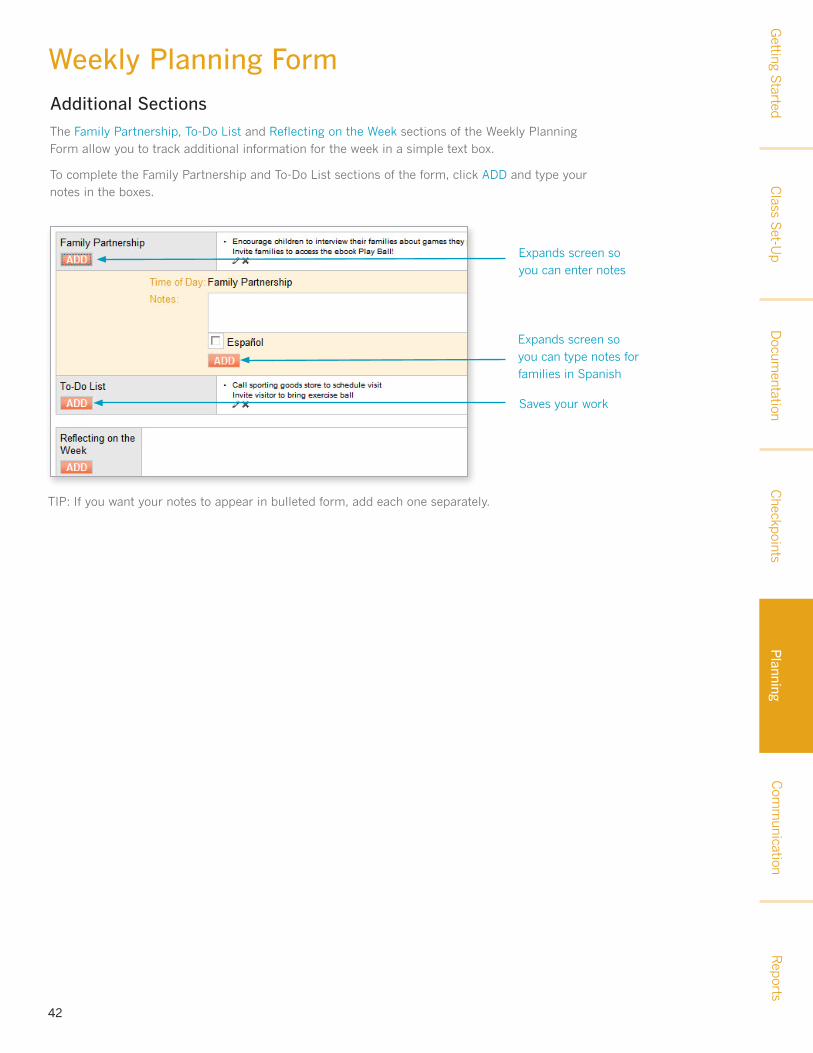
TIP: If you want your notes to appear in bulleted form, add each one separately.
Additional Sections
The Family Partnership, To-Do List and Reflecting on the Week sections of the Weekly Planning Form allow you to track additional information for the week in a simple text box.
To complete the Family Partnership and To-Do List sections of the form, click ADD and type your notes in the boxes.
Expands screen so you can enter notes
Expands screen so you can type notes for families in Spanish
Saves your work
Getting S
tartedPlanning

Checkpoints
Docum
entationC
lass Set-U
pR
eportsC
omm
unicationP
lanning
43
Weekly Planning Form
TIP: If you are concerned about the children’s privacy, deselect Display Children and Print the form.
Finalizing Your Form
Once you have added your activities and notes for the week, you can finalize what will appear on your Weekly Planning Form.
Use the Change View menu and checkboxes to select the information you want to display on the Weekly Planning Form.
If you chose to include any of the GOLD™ activities in your weekly plan, space constraints make it possible to see only the objectives, notes, and included children on the form.
Printing
When printing the form, you may choose to also print all GOLD™ activities in full detail for reference during the week.
Getting S
tartedPlanning
Checkpoints
Docum
entationC
lass Set-U
pR
eportsP
lanning
44
Com
munication
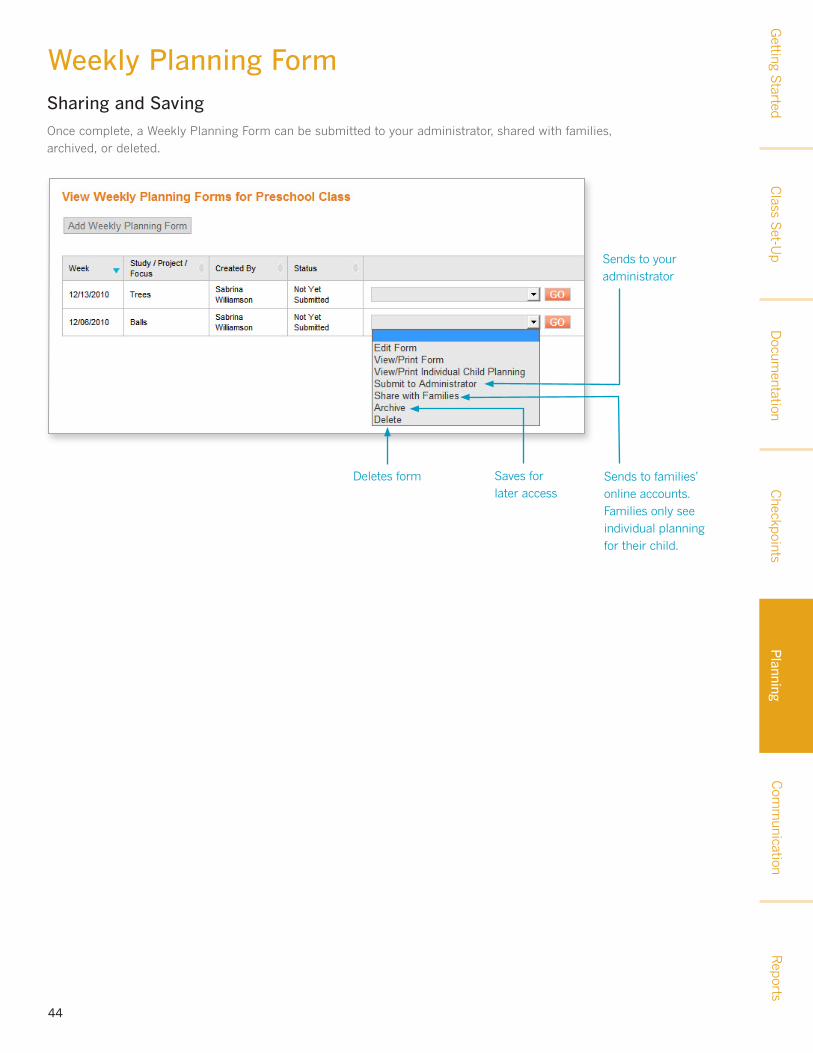
Weekly Planning FormSharing and Saving
Once complete, a Weekly Planning Form can be submitted to your administrator, shared with families, archived, or deleted.
Sends to families’ online accounts. Families only see individual planning for their child.
Saves for later access
Sends to your administrator
Deletes form
Getting S
tartedPlanning
Checkpoints
Docum
entationR
eportsP
lanning
45
Class S
et-Up
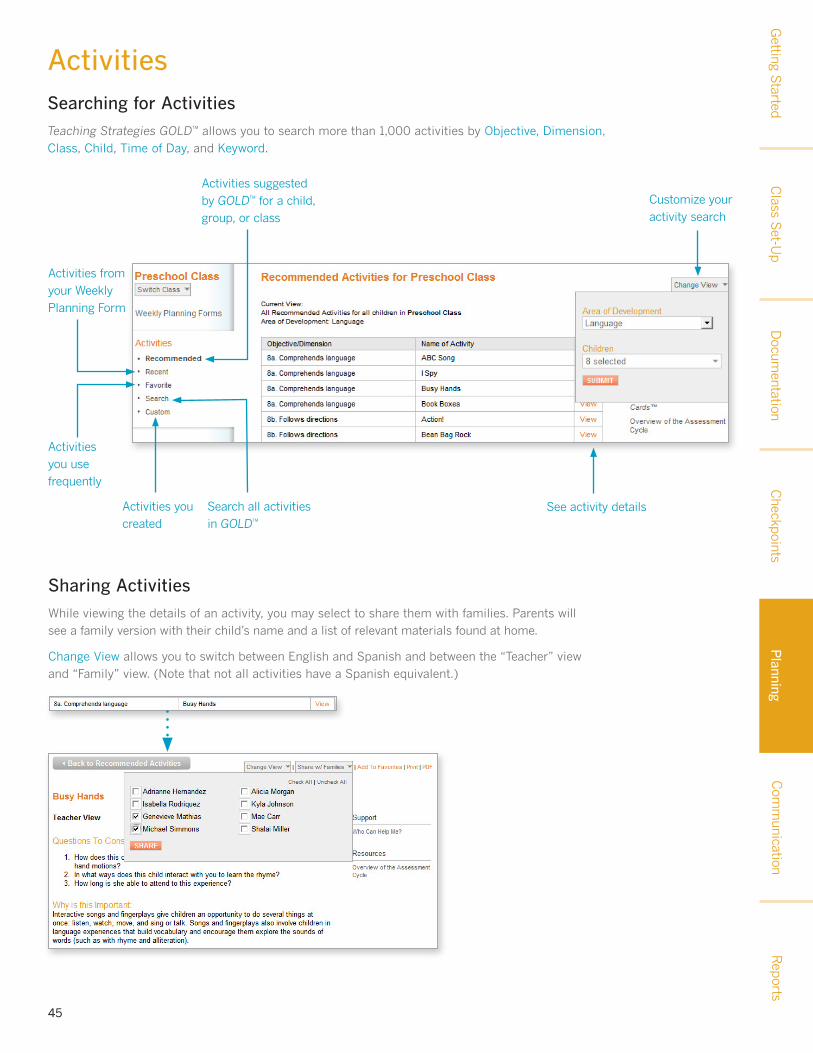
ActivitiesSearching for Activities
Teaching Strategies GOLD™ allows you to search more than 1,000 activities by Objective, Dimension, Class, Child, Time of Day, and Keyword.
Sharing Activities
While viewing the details of an activity, you may select to share them with families. Parents will see a family version with their child’s name and a list of relevant materials found at home.
Change View allows you to switch between English and Spanish and between the “Teacher” view and “Family” view. (Note that not all activities have a Spanish equivalent.)
Customize your activity search
Activities from your Weekly Planning Form
Search all activities in GOLD™
Activities you use frequently
Activities suggested by GOLD™ for a child, group, or class
Activities you created
See activity details
Com
munication
Getting S
tartedPlanning

Getting S
tarted
Teaching Strategies GOLD™ Online
A Teacher’s Quick-Start Guide Section 6 of 7: Communication
Checkpoints
Docum
entationR
eportsP
lanning
47
TIP: If your program purchased access to Team Central, the process for inviting team members is very similar. Your administrator will need to approve the invitation before it is sent.
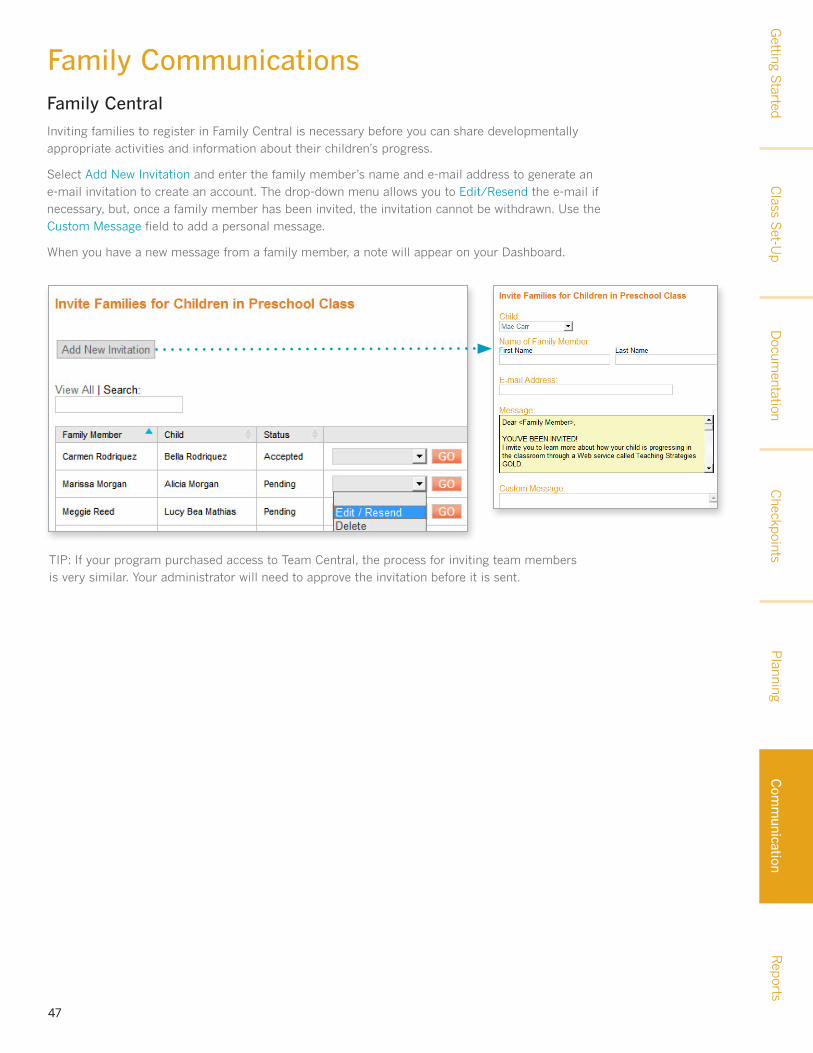
Family CommunicationsFamily Central
Inviting families to register in Family Central is necessary before you can share developmentally appropriate activities and information about their children’s progress.
Select Add New Invitation and enter the family member’s name and e-mail address to generate an e-mail invitation to create an account. The drop-down menu allows you to Edit/Resend the e-mail if necessary, but, once a family member has been invited, the invitation cannot be withdrawn. Use the Custom message field to add a personal message.
When you have a new message from a family member, a note will appear on your Dashboard.
Getting S
tartedC
omm
unicationC
lass Set-U
p

Checkpoints
Docum
entationC
lass Set-U
pR
eportsC
omm
unicationP
lanning
48
TIP: Change View includes an option to show archived messages.
Family CommunicationsSending Messages
Teaching Strategies GOLD™ enables you to send and receive messages to and from family members. The communications are saved and searchable.
Select the Child about whom you would like to send a message and select the family member name(s). When the family member responds, use the Action button to View the message, Reply, mark as Unread, or Archive for later review.
Use Search to find a specific message by using keywords, checkboxes or the drop-down menu.
Getting S
tartedC
omm
unication
Checkpoints
Docum
entationC
lass Set-U
pR
eportsC
omm
unicationP
lanning
49
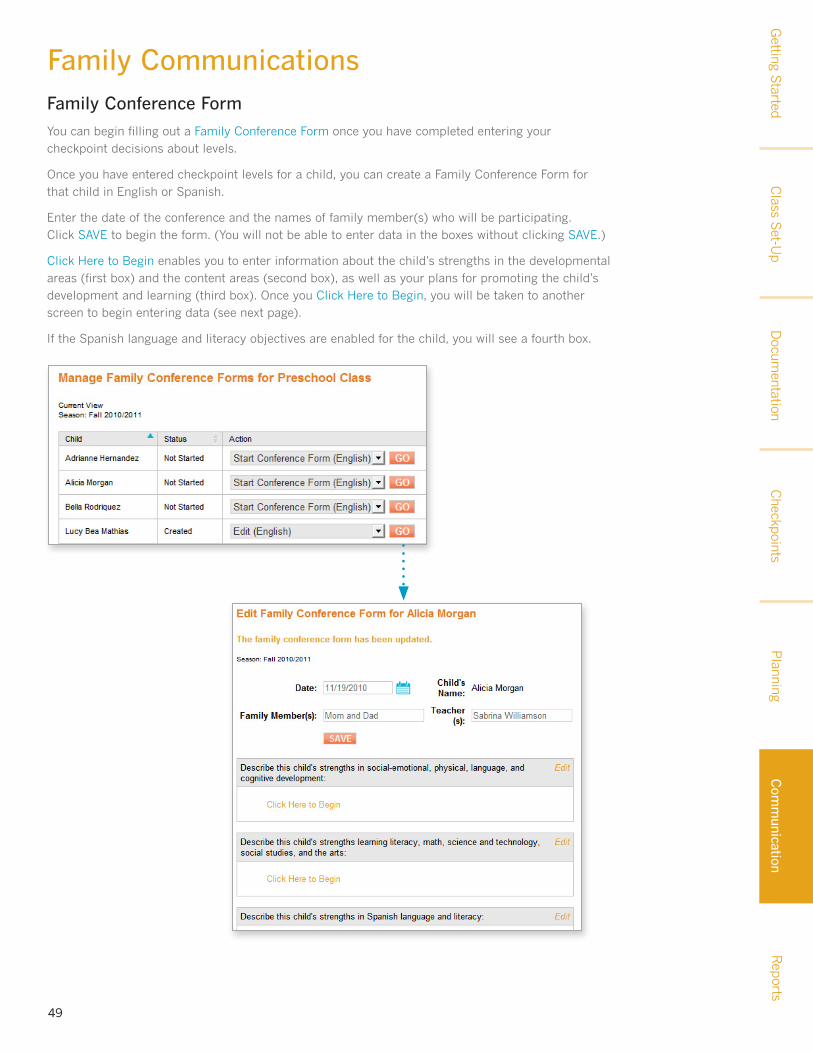
Family CommunicationsFamily Conference Form
You can begin filling out a Family Conference Form once you have completed entering your checkpoint decisions about levels.
Once you have entered checkpoint levels for a child, you can create a Family Conference Form for that child in English or Spanish.
Enter the date of the conference and the names of family member(s) who will be participating. Click SAVE to begin the form. (You will not be able to enter data in the boxes without clicking SAVE.)
Click Here to Begin enables you to enter information about the child’s strengths in the developmental areas (first box) and the content areas (second box), as well as your plans for promoting the child’s development and learning (third box). Once you Click Here to Begin, you will be taken to another screen to begin entering data (see next page).
If the Spanish language and literacy objectives are enabled for the child, you will see a fourth box.
Getting S
tartedC
omm
unication

Checkpoints
Docum
entationC
lass Set-U
pR
eportsC
omm
unicationP
lanning
50
Family CommunicationsEntering Data
Begin entering data by clicking checkboxes in an area. If you would like to include the Objective and Dimension on the form (to help explain the level and the documentation), select Yes.
Attaching Documentation
To decide whether to include a piece of documentation on the form, click on the date or icon in the Documentation column to preview the note. To place it on the form, click on the box by the icon and date.
TIP: So that you do not duplicate the note, the dates turn red when you have also associated the piece of documentation with other objectives and dimensions.
Update the text with specific comments. You will complete these steps again to fill in the second box, which focuses on the child’s strengths in the content areas.
Getting S
tartedC
omm
unication

Checkpoints
Docum
entationC
lass Set-U
pR
eportsC
omm
unicationP
lanning
51
Family CommunicationsPlanning for Development
Click the third box to type your plan and add notes. You can always come back to add the family’s suggestions after you meet with them.
Underneath your notes you will see language that describes the skills and behaviors the child will focus on next. Select the objectives/dimensions that you would like to discuss or those in which you think the family is most interested. Select Customize to edit the text.
Options Upon Completion
Under “Change View,” you can view the form in Spanish, or you can choose to Print, PDF, or Share With Family. (Remember that the plan and notes you entered in English will not automatically be translated into Spanish.)
Getting S
tartedC
omm
unication

Getting S
tarted
Teaching Strategies GOLD™ Online
A Teacher’s Quick-Start Guide Section 7 of 7: Reports
Checkpoints
Docum
entationC
lass Set-U
pC
omm
unicationP
lanning
53
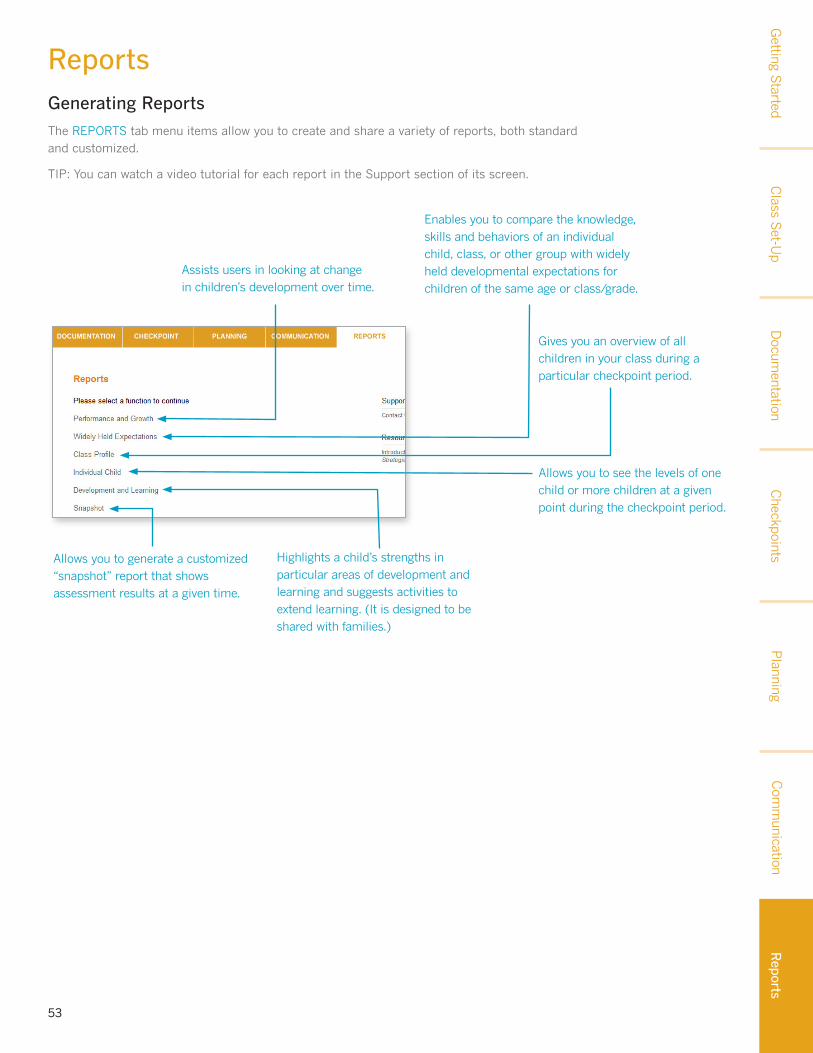
ReportsGenerating Reports
The REPORTS tab menu items allow you to create and share a variety of reports, both standard and customized.
TIP: You can watch a video tutorial for each report in the Support section of its screen.
Gives you an overview of all children in your class during a particular checkpoint period.
Allows you to see the levels of one child or more children at a given point during the checkpoint period.
Allows you to generate a customized “snapshot” report that shows assessment results at a given time.
Highlights a child’s strengths in particular areas of development and learning and suggests activities to extend learning. (It is designed to be shared with families.)
Enables you to compare the knowledge, skills and behaviors of an individual child, class, or other group with widely held developmental expectations for children of the same age or class/grade.
Getting S
tartedR
eports
Assists users in looking at change in children’s development over time.
Checkpoints
Docum
entationC
lass Set-U
pR
eportsC
omm
unicationP
lanning
54
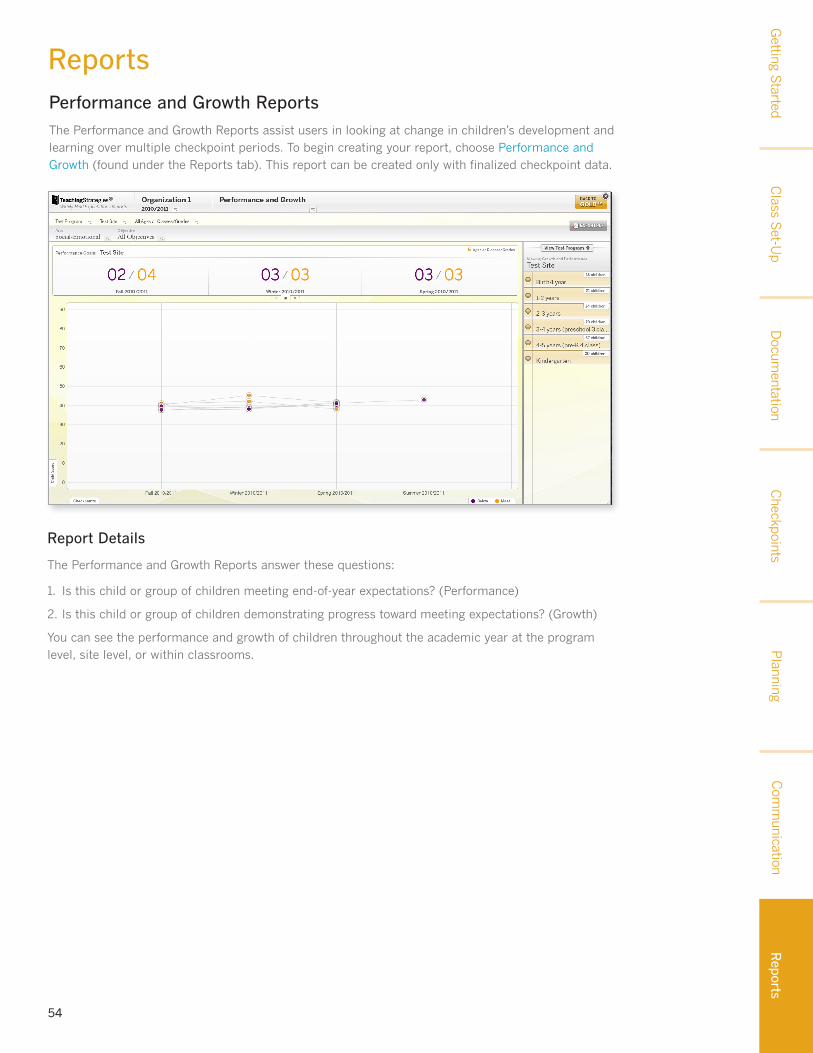
Performance and Growth Reports
The Performance and Growth Reports assist users in looking at change in children’s development and learning over multiple checkpoint periods. To begin creating your report, choose Performance and Growth (found under the Reports tab). This report can be created only with finalized checkpoint data.
Reports
Report Details
The Performance and Growth Reports answer these questions:
1. Is this child or group of children meeting end-of-year expectations? (Performance)
2. Is this child or group of children demonstrating progress toward meeting expectations? (Growth)
You can see the performance and growth of children throughout the academic year at the program level, site level, or within classrooms.
Getting S
tartedR
eports
Checkpoints
Docum
entationC
lass Set-U
pR
eportsC
omm
unicationP
lanning
55
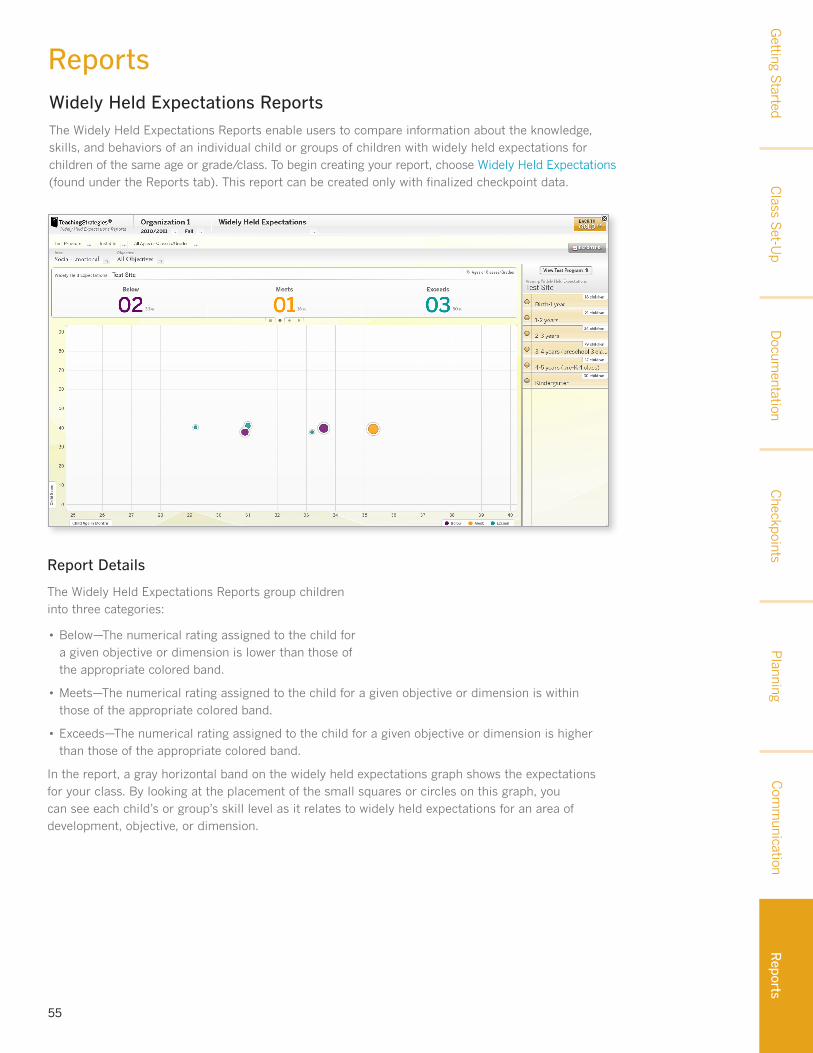
Widely Held Expectations Reports
The Widely Held Expectations Reports enable users to compare information about the knowledge, skills, and behaviors of an individual child or groups of children with widely held expectations for children of the same age or grade/class. To begin creating your report, choose Widely Held Expectations (found under the Reports tab). This report can be created only with finalized checkpoint data.
Reports
Report Details
The Widely Held Expectations Reports group children into three categories:
• Below—The numerical rating assigned to the child for a given objective or dimension is lower than those of the appropriate colored band.
• meets—The numerical rating assigned to the child for a given objective or dimension is within those of the appropriate colored band.
• Exceeds—The numerical rating assigned to the child for a given objective or dimension is higher than those of the appropriate colored band.
In the report, a gray horizontal band on the widely held expectations graph shows the expectations for your class. By looking at the placement of the small squares or circles on this graph, you can see each child’s or group’s skill level as it relates to widely held expectations for an area of development, objective, or dimension.
Getting S
tartedR
eports
Checkpoints
Docum
entationC
lass Set-U
pR
eportsC
omm
unicationP
lanning
56
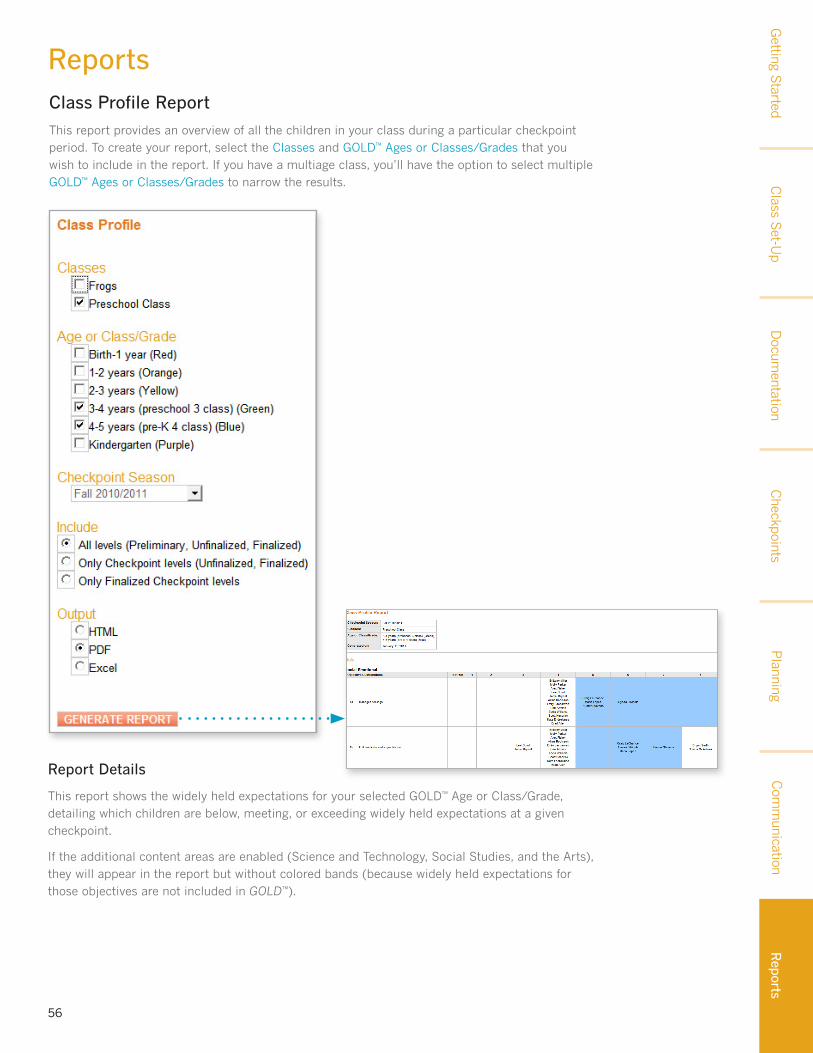
ReportsClass Profile Report
This report provides an overview of all the children in your class during a particular checkpoint period. To create your report, select the Classes and GOLD™ Ages or Classes/Grades that you wish to include in the report. If you have a multiage class, you’ll have the option to select multiple GOLD™ Ages or Classes/Grades to narrow the results.
Report Details
This report shows the widely held expectations for your selected GOLD™ Age or Class/Grade, detailing which children are below, meeting, or exceeding widely held expectations at a given checkpoint.
If the additional content areas are enabled (Science and Technology, Social Studies, and the Arts), they will appear in the report but without colored bands (because widely held expectations for those objectives are not included in GOLD™).
Getting S
tartedR
eports
Checkpoints
Docum
entationC
lass Set-U
pR
eportsC
omm
unicationP
lanning
57
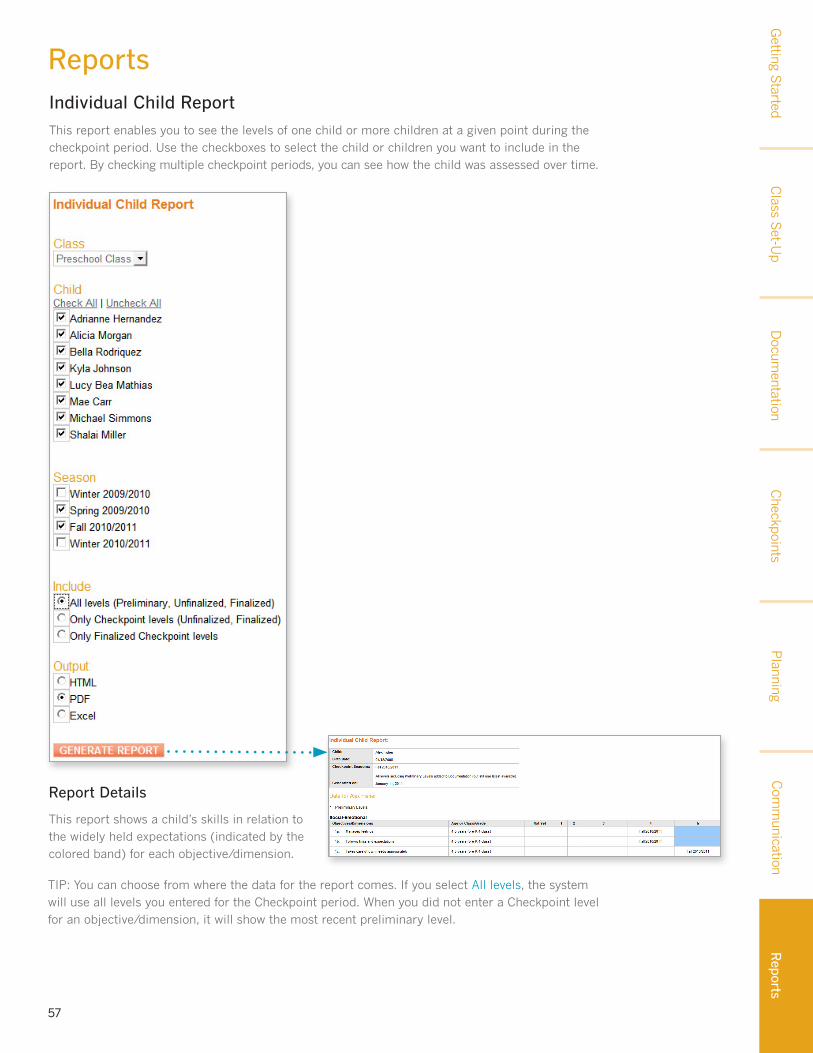
ReportsIndividual Child Report
This report enables you to see the levels of one child or more children at a given point during the checkpoint period. Use the checkboxes to select the child or children you want to include in the report. By checking multiple checkpoint periods, you can see how the child was assessed over time.
Report Details
This report shows a child’s skills in relation to the widely held expectations (indicated by the colored band) for each objective/dimension.
TIP: You can choose from where the data for the report comes. If you select All levels, the system will use all levels you entered for the Checkpoint period. When you did not enter a Checkpoint level for an objective/dimension, it will show the most recent preliminary level.
Getting S
tartedR
eports
Checkpoints
Docum
entationC
lass Set-U
pR
eportsC
omm
unicationP
lanning
58
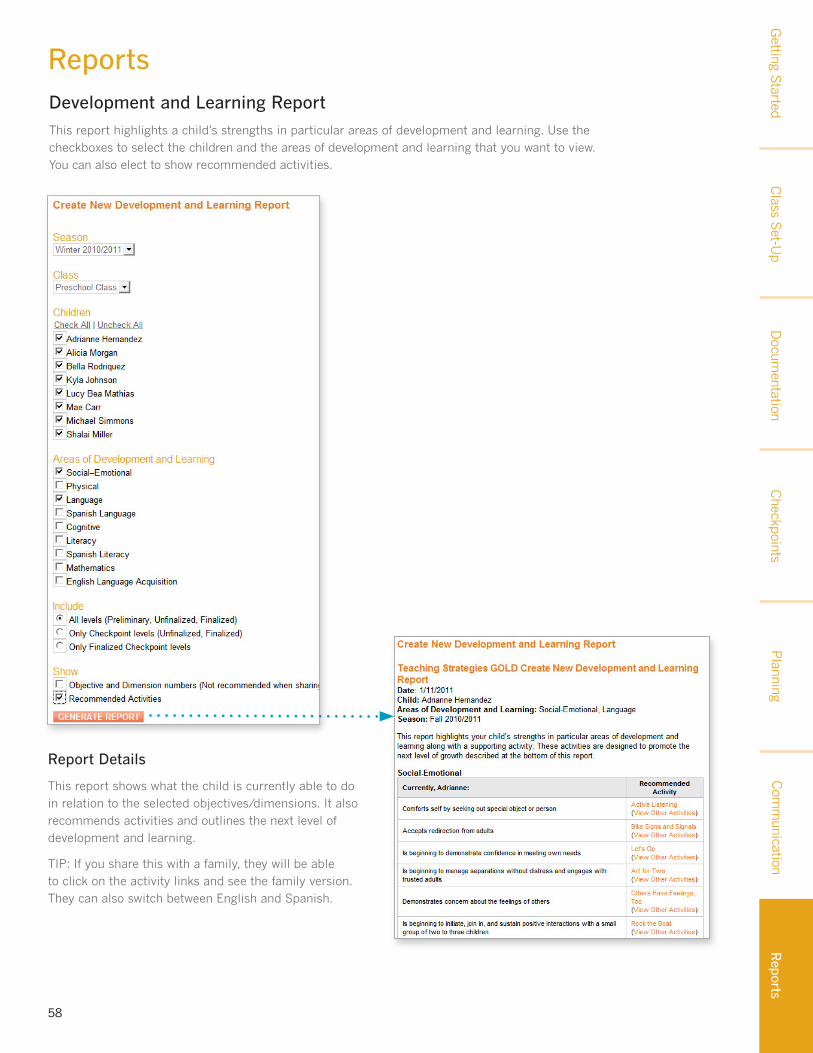
ReportsDevelopment and Learning Report
This report highlights a child’s strengths in particular areas of development and learning. Use the checkboxes to select the children and the areas of development and learning that you want to view. You can also elect to show recommended activities.
Report Details
This report shows what the child is currently able to do in relation to the selected objectives/dimensions. It also recommends activities and outlines the next level of development and learning.
TIP: If you share this with a family, they will be able to click on the activity links and see the family version. They can also switch between English and Spanish.
Getting S
tartedR
eports

Checkpoints
Docum
entationC
lass Set-U
pR
eportsC
omm
unicationP
lanning
59
Snapshot Report
The Snapshot report displays your assessment results at a given point in time. Use the plus sign next to each section to choose your settings. If you have more than one class, you must select a class in order to create the report.
To narrow the group of children in the report, select the options you want. Each section has an icon next to it, to give you more guidance for using it.
Reports
Report Details
The Snapshot Report allows you to see your child outcomes data in two ways: by Age or Class/Grade and GOLD Areas of Development and Learning, and by Dimension.
Getting S
tartedR
eports
We hope that you’ve found this Guide to be useful and informative.
If you have further questions or require additional support, just e-mail us at
[email protected] or call Teaching Strategies GOLD™
support at 1.866.736.5913.
Thank you for using Teaching Strategies GOLD™!