Galactio V8 Quick Start User Guide
120
Galactio V8 User Guide Contact: Galactio Support Centre (Quantum Inventions Private Limited) 25 Kallang Avenue #06-03 Singapore 339416 Mon-Fri: 10am to 7pm Closed for Lunch: 1pm to 2pm Closed on Sat, Sun and PH Tel: +65 6837-1582 Fax: +65 6837-1583 http://www.galactio.com
-
Upload
khangminh22 -
Category
Documents
-
view
0 -
download
0
Transcript of Galactio V8 Quick Start User Guide

Galactio V8 User Guide
Contact: Galactio Support Centre
(Quantum Inventions Private Limited)
25 Kallang Avenue
#06-03
Singapore 339416
Mon-Fri: 10am to 7pm
Closed for Lunch: 1pm to 2pm
Closed on Sat, Sun and PH
Tel: +65 6837-1582
Fax: +65 6837-1583
http://www.galactio.com

Disclaimer
The map data provided by this system is for reference only. The user must verify their current
location based on the actual conditions.
The route plan, voice indication and junction information indicated in this system are
recommendation generated routing algorithms with an electronic map database. They are provided
for reference only and user must follow actual road conditions.
The user is advised to follow local laws and drive safely. Do not operate this system when the vehicle
is in motion.
The GPS positioning results are provided for the user’s reference only. They should not affect the
actual driving behaviour as this system is unable to guarantee accuracy.
The accuracy of GPS positioning may vary due to weather and location (tall buildings / tunnels /
underpasses / trees). Most GPS do not work indoors as the GPS signal cannot pass through buildings
or metallic solar film on car windows. The quality of GPS reception varies depending on individual
hardware characteristics. This system is not capable of determining variances in positioning results
due to hardware differences.
This system is provided only for non-commercial use. Quantum Inventions will accept no liability for
any loss or damage caused by the use of this system to the extent permissible by law.
Use of this system constitutes your consent to the above disclaimer

1. Main Screen
On System start-up, the main window appears after the warning and loading screen.
1. Universal Search (Search POI and Address together, Refer to next page)
2. Detailed map browsing and location based functionality (Refer Section 2)
3. Destination Selection (Refer Section 3)
4. Access User/System settings.
5. Current Vehicle Speed. Click current speed will switch to Trip Meter (Refer to Trip Meter
part in this section)
6. Navigate to user selected Home, or allow user to assign Home from available options
(Refer Section 3)
7. Navigate to user selected Office, or allow user to assign Office from available options
(Refer Section 3)
8. Go to Navigation screen
9. Tap "Route" button will show Journey Planner window if no routed path. (refer Section
20)
10. Scrolling Text displaying TMC incidents currently available (* TMC enabled devices only)
11. Tap on Exit to exit the software
4
1
2
3
6 5 7
8 9
11
10

Universal Search
Universal Search allows you to search across POIs (Refer to Section 7) and Addresses (Refer
to Section 3).
In addition, the search system offers the following to facilitate the search
A keyboard with disappearing keys
Word completion
Out of sequence search
Support for abbreviations
The step by step guide below will help you get started with the new search system.
Let’s suppose you want to go to NATIONAL UNIVERSITY HOSPITAL.
1. As you type, the keys disappear to make sure that you make no mistakes
2. Once you have typed in “HOSP”, the system gives you options that you can complete the word
with – tap on “HOSPITAL”

3. Type “N”, and the system realizes that only a few combinations are possible – you can tap
“NATIONAL” to auto-fill the search term. (By the way, it is already showing the term “NATIONAL
UNIVERSITY HOSPIT..” on the top right – tapping the term will skip searching and show you the
results directly)
4. With the search term as “HOSPITAL NATIONAL”, the system has enough information.
5. Tap “OK” and the search results are shown. Tap the “$” icon* if you want to see Parking rates
at the NUH car park. Tap “Refine” button if you want to further refine the result list (Refer to
Section 16 “Refine Search”).
6. Display direction to POIs from current location on POI result list
7. Start text scrolling on result list for long names/addresses with long tap
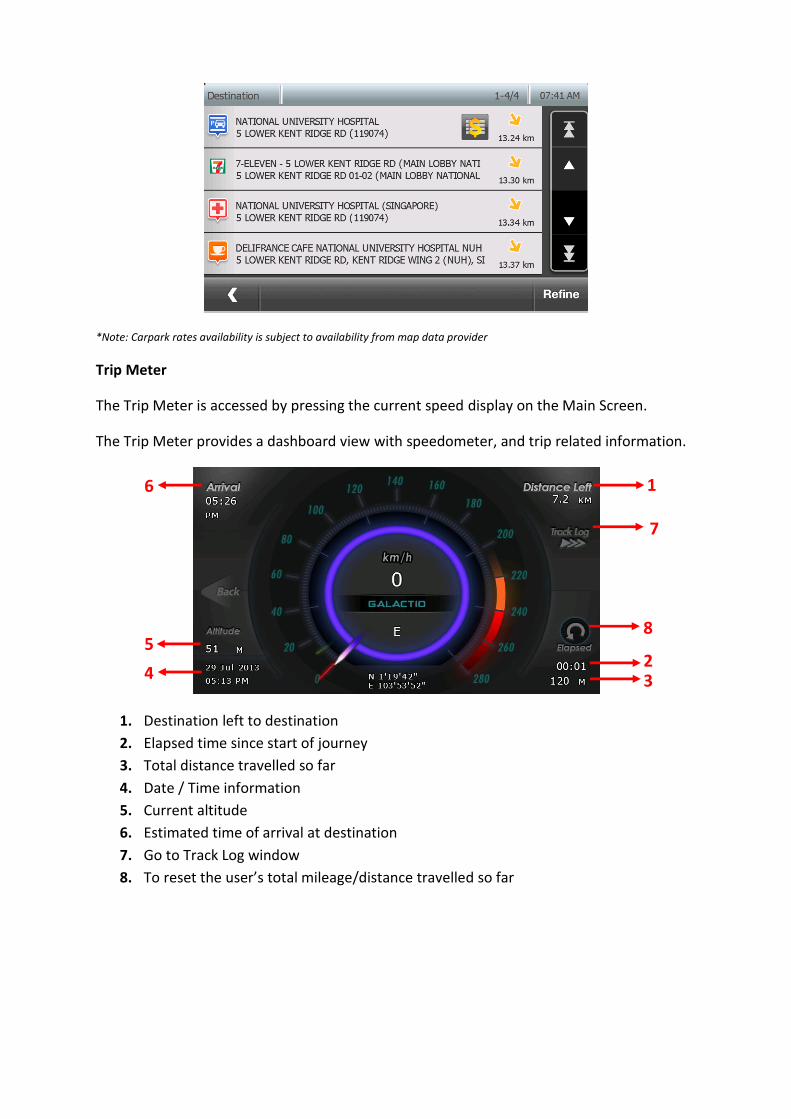
*Note: Carpark rates availability is subject to availability from map data provider
Trip Meter
The Trip Meter is accessed by pressing the current speed display on the Main Screen.
The Trip Meter provides a dashboard view with speedometer, and trip related information.
1. Destination left to destination
2. Elapsed time since start of journey
3. Total distance travelled so far
4. Date / Time information
5. Current altitude
6. Estimated time of arrival at destination
7. Go to Track Log window
8. To reset the user’s total mileage/distance travelled so far
4
5
6
3 2
1
7
8

2. Map View
Accessed through the main window, Map View provides a detailed map view around a
selected location with the following features:
1. Zoom In*
2. Zoom Out*
3. Display/Hide traffic conditions around location (*TMC version only)
4. Current Vehicle speed
5. Starts navigation from current location to the chosen point on Map
6. Simulate to chosen point on Map. User can simulate from current location or choose
a location as Origin from the pop up box.
7. Display preview of route to the chosen point from current location (Refer to Section 17 “Route
Preview”).
8. Speed limit of current road.
9. "Options": Allows user to change map view settings, and access location based
functionality such as search for POI nearby, Add to Favourites, View co-ordinates, etc.
10. Information of currently user selected location
* Refers to Section 19 for details
Further, user may touch on the screen and drag it (Left, Right, Up, Down, and Sideways) to
browse through the map. Clicking on a location would display animation and information
about the selection in the info box
4
1 2
3
5 6 7 9 8
10

3. Choosing a destination
Select destination from main menu
* Destination Menu Page 1 1. Home: Navigate to user selected Home, or allow user to assign Home from available
options If Home is not set, following window opens, when Home is pressed, to allow user to set Home location:

2. Office: Navigate to user selected Office, or allow user to assign Office from available options If Office is not set, following window opens when Office is pressed to allow user to set Office location:
3. Favourites: User Favourites
1. Refine: Press Refine button to access the sorting options windows. User may sort the
favorites list by frequency, distance, date and name. User may also refine favourite
list by category.
1

Sort Options
Tap on Filter by category button to filter the favourites list by category.
4. Recent: User searched recent destinations/POI
Users may add/edit
or delete 12 user-
defined categories.
(Refer Section 8)
Category Name:
Current filtered
category name is
displayed at the
title bar of the
window.

1. Refine: Press Refine button to access the sorting options windows. User may sort the
recent list by frequency, distance, date and alphabet.
Sort Options
5. POI: Navigate to desired subcategory, or choose from available subcategories (Refer section 7)
1
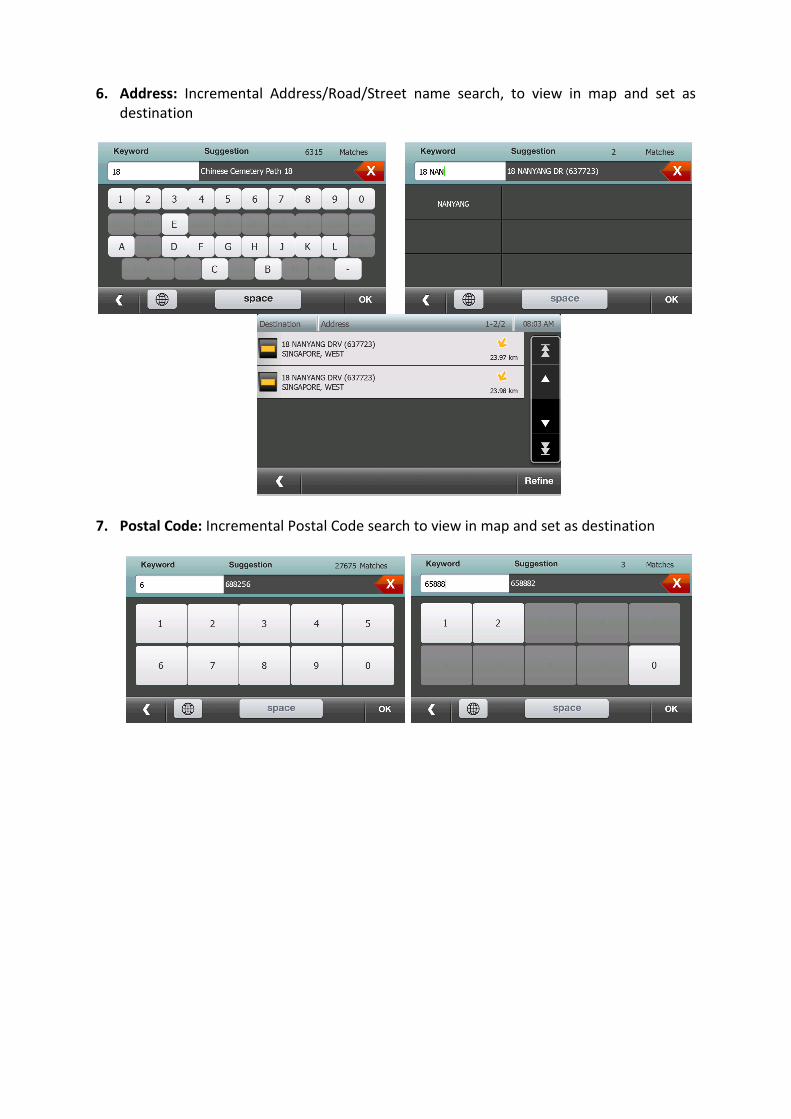
6. Address: Incremental Address/Road/Street name search, to view in map and set as destination
7. Postal Code: Incremental Postal Code search to view in map and set as destination

8. Telephone Search: Enter telephone number to retrieve POI and set as destination
A phone number is searchable with following variations:
1) Phone number without country code and area code
2) Phone number with area code but without country code
3) Phone number with country code and area code
4) Phone number with “00” in front of country code and area code
5) Phone number with “+” in front of country code and area code
For example, user may enter either one of the following to find a telephone with country code
“66”, area code “35”, phone number “350880”:
1) 3550880
2) 035350880
3) 6635350880
4) 006635350880
5) +6635350880
After telephone number is typed and “OK” button is pressed on the keypad window, the list
of POIs with the telephone number will be shown.
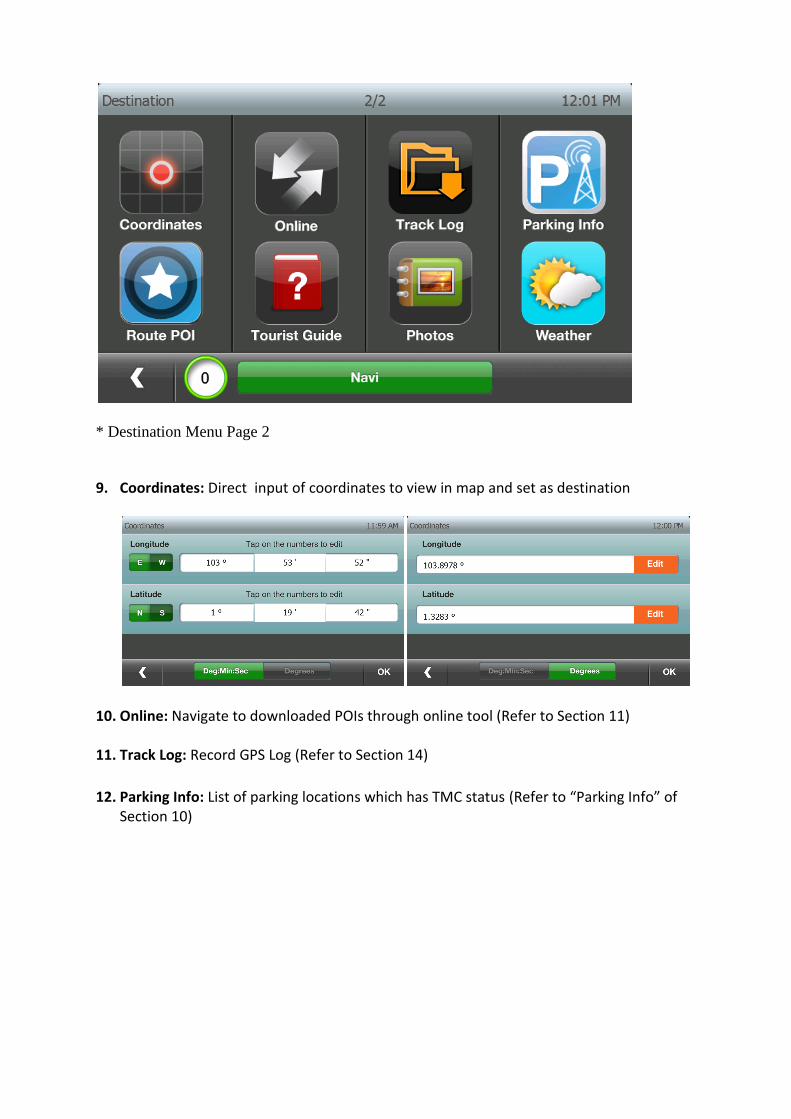
* Destination Menu Page 2
9. Coordinates: Direct input of coordinates to view in map and set as destination
10. Online: Navigate to downloaded POIs through online tool (Refer to Section 11)
11. Track Log: Record GPS Log (Refer to Section 14)
12. Parking Info: List of parking locations which has TMC status (Refer to “Parking Info” of Section 10)

13. Route POI: List the following type of POIs along the route, if route exists
Food
Petrol
Shopping
Recreation
Attraction
Financial
14. Tourist Guide: Navigate to popular tourism locations (Refer to Section 12)
15. Photos: Navigate to locations stored in geo-tag photos (Refer to Section 13)
16. Weather: Display weather status of Singapore, not applicable for other countries (Refer to “Weather Information” of Section 10)

4. Choosing a Mid-Point
After selecting a destination, user may specify a mid point for routing. In such a case, the system will
route through the mid-point selection to the final destination.
The following steps allow user to specify the mid-point:
1. Select a destination (Refer to Section 3)
2. Click “Go” to enter the Navigation screen
3. From the Navigation screen, press Back button

4. You may view the route from the Route window (Refer to Section 1, Point 5)
5. Select a new destination until it is displayed in Map view window (Refer Section 2). Press
“Go” from the map view window
6. Since there is an active destination already selected, system prompts user to specify if new selection should be a Mid-point or Destination

7. Select Mid-Point to select new location as a Mid-point for route
8. The system routes through the new selection to the final destination and enters the
Navigation screen (Refer to Section 6).
9. User may view the new route from the Route window
NOTE: The 2 Destination flags refer to the Mid-Point and final destination
Toll Cost announcement at the start of the Journey: The Total toll for the journey will be
calculated and will be announced during the start of the journey as “The Toll Cost for this
journey is x Currency” if the selected voice is TTS (Text to Speech).

5. Route View
After creating a route, user may view the route through the Route window.
To enter the route window, press “Route” button from the main screen.
1. Show Traffic: Show available traffic conditions
2. Options: Access options for route
3. Stop Navigation: Cancel Current Route
1
2
3

Options Window
The following options are available in “Route Options” window to view the route details.
1. Routing Preferences: View/Modify Current Routing preference 2. Simulate: Run a simulation of currently selected route 3. POI along the route: View POI’s along the route selected 4. Sequence: View the sequence of instructions in the selected route.
5. Route Summary: View summary of major roads to be taken along route
6. Skip Mid Point*: Skip the current mid-point and navigate directly to destination.
* Only available when user has selected mid points
7. Journey Planner: Refer to Section 21

6. Navigation Screen
The Navigation screen shows the navigation instructions when user has chosen a destination for Navigation or essential road/position information when no destination is selected. Navigation screen may be accessed by:
1. “Navigate” button from main screen
2. “Navi” Button from any screen
4
2 1. Current Time 2. GPS Signal Strength (Red if
no/weak signal, Green if good) 3. Digital Compass 4. Zoom In
(Refer to Section 19 for details) 5. Setting for changing between
2D and 3D view 6. Zoom Out
(Refer to Section 19 for details) 7. Quick Options
(Refer to following section for explanation)
8. “Click-n-Save” Favourites (Refer to following section for explanation)
9. Options: Opens new screen with options for Navigation screen
10. Road Speed Limit (Disappear if the current road does not have speed limit)
11. Car Icon at current location 12. Car Speed 13. Back: Exit Navigation Screen 14. Click to switch and see one of
the following status: 1) Time to destination 2) Distance to destination 3) Estimated Time of Arrival 4) Cost to reach the
destination 5) Trip info round robin
fashion(Auto switch 1 to 4 every few second)
Click on the area to change the type of status to be shown
15. Next instruction 16. Instruction after next
instruction 17. Current Road name and
geographical information 18. Road Name for next turning
instruction 19. Type of next turning instruction 20. Enable play back of route
guidance instruction for next junction
1
6
9
11 12 13
18 19
3
17
7 8
14
5
15 16
10
20
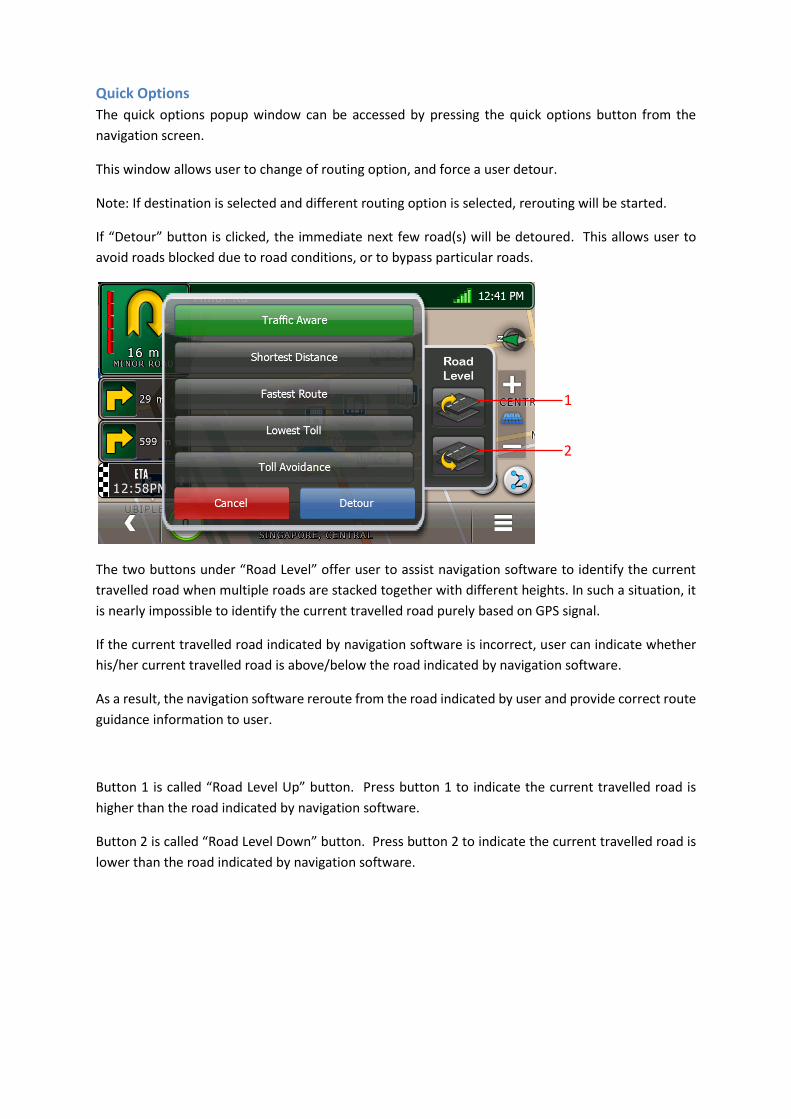
Quick Options
The quick options popup window can be accessed by pressing the quick options button from the
navigation screen.
This window allows user to change of routing option, and force a user detour.
Note: If destination is selected and different routing option is selected, rerouting will be started.
If “Detour” button is clicked, the immediate next few road(s) will be detoured. This allows user to
avoid roads blocked due to road conditions, or to bypass particular roads.
The two buttons under “Road Level” offer user to assist navigation software to identify the current
travelled road when multiple roads are stacked together with different heights. In such a situation, it
is nearly impossible to identify the current travelled road purely based on GPS signal.
If the current travelled road indicated by navigation software is incorrect, user can indicate whether
his/her current travelled road is above/below the road indicated by navigation software.
As a result, the navigation software reroute from the road indicated by user and provide correct route
guidance information to user.
Button 1 is called “Road Level Up” button. Press button 1 to indicate the current travelled road is
higher than the road indicated by navigation software.
Button 2 is called “Road Level Down” button. Press button 2 to indicate the current travelled road is
lower than the road indicated by navigation software.
1
2

For example, create simulation to “150 SIMS DRIVE” from “KEPPEL VIADUCT” (both locations can be
found in Address Search). Then, press the “Quick Routing Option” button.
Then, “Quick Routing Option” window will popup as below.
Press the “Road Level Up” or “Road Level Down” button whenever it is appropriate.

After “Road Level Up” button is pressed, reroute will happen if the road with higher level than the
current identified road can be found.
After “Road Level Down” button is pressed, reroute will happen if the road with lower level than the
current identified road can be found.
If such road cannot be found, the following message window will popup:

“Click-n-Save” Favourites
This allows user to quickly add a favourite while driving on the road. When “Click-n-Save Favourites”
button is clicked, the current location detected by GPS is added as a user favourite.
The naming convention adopted for user added favourites is to combine “Favourite” followed by auto-
generated number.
Note: If the current location is already added with latest auto-generated number, the addition will be
skipped (Refer to Section 8 for management of favourites)

Navigation screen: Full Text Mode
From the navigation screen, click the top-left button to go to the list of text based instructions.
Pressing back on this screen will take you back to the 3D/2D navigation view.

Navigation screen: Split Text Mode
The split text mode can be activated by pressing Options from the navigation menu and selecting Text
as View. In this mode, user can see both the navigation instructions and the navigation view (2D/3D).
1. Click to view previous 3 instructions
2. Click to view next 3 instructions
3. Click on an instruction to view the snapshot of the junction for the instruction
2
1
3

Navigation screen: Drive View mode
Drive view provide the “close” view to the road during navigation.
Drive View mode can be enabled in Navigation Option window.
When the navigation screen is in Drive View mode:
1. The car, origin/destination flag, car-to-destination reference line are not present
2. The zoom buttons and 2D/3D button are not shown
3. The navigation screen cannot be frozen

Tap to enter Full Screen mode
Navigation screen: Full-screen mode
The full screen mode can be enabled by pressing the top-right corner of the navigation screen
The navigation screen will switch to a full screen mode as follows:
This mode will now only contain the following information:
1. Next instruction with distance
To return to the previous display mode, press anywhere on the screen.
1

1 2
3 4
Navigation screen: Traffic Mode
The traffic navigation mode can be activated / deactivated by pressing “Traffic” button from the
Options in the Navigation screen. When this mode is turned on, user can see real-time, colour
coded, traffic conditions on navigation screen.
1. Heavy Traffic/Severe congestion/Road closure (Red Colour Road)
2. Congestion/Slow Traffic (Yellow Colour Road)
3. No Traffic Congestion (Green Colour Road)
4. Minor Roads (Gray Colour Road)
Navigation screen: 3D building
When this mode is turned on, user can see 3D building. When this mode is turned off, user can
see flat building.

Navigation screen: North Facing for map
When this mode is turned on, map is drawn facing north.
When this mode is turned off, map is drawn facing driving direction.

“Click-n-View” Road Names
The road name will be displayed at the bottom-center bar if a road is clicked in Navigation screen.
Camera Angles
When the navigation screen is in frozen mode, the camera panel appears to allow users to manually change the angle.
Tilt-less button : reduce camera tilt angles (change from 3D to 2D)
Tilt-more button : increase camera tilt angles (change from 2D to 3D)
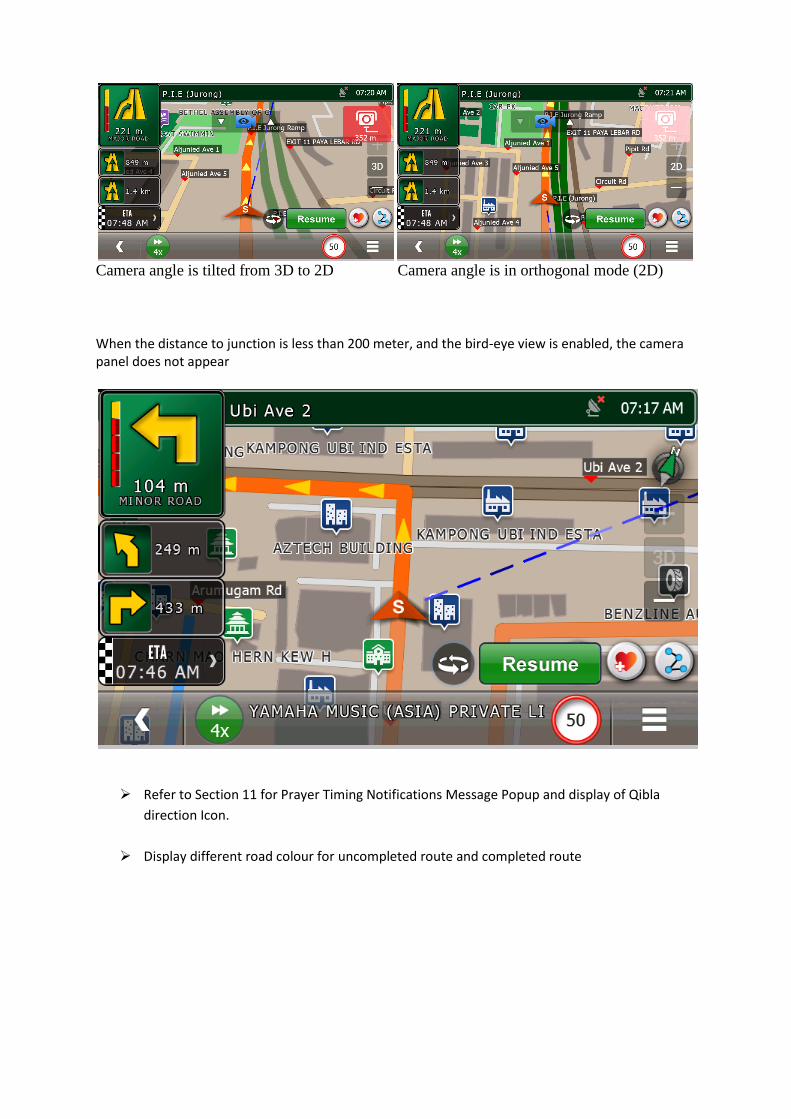
Camera angle is tilted from 3D to 2D Camera angle is in orthogonal mode (2D)
When the distance to junction is less than 200 meter, and the bird-eye view is enabled, the camera panel does not appear
Refer to Section 11 for Prayer Timing Notifications Message Popup and display of Qibla
direction Icon.
Display different road colour for uncompleted route and completed route

7. Searching POI Select POI (1) from the destination screen (Refer Section 3).
By Name
Select “Search” to search for POI by name.
By Category/Keyword/Near Current location/Near Destination/Geo
Select a Category/Sub category to select for POI by type of POI.
Press “Refine” button to refine POI’s of a particular category/sub category by Keyword, near
Current Location, near Destination (if exists) and Geography.

By Keyword
To search POI by Keyword, click on Refine and then “By Keyword”.
On the keypad, type first few characters or full name of POI and click “Ok”.
Near Current Location/Destination
To search POI near current location or destination (when routed path exists), click on Refine and then
“Search near Current Location” or “Search near Destination”.

In a Geographical area/location
To search POI in a particular geographical location, click on Refine and then “By Geography”.
In the next window, select Country/State/City criteria and press “Ok”
Close to a Location
Select location and view on Map. Press options then “Nearby POI”. Select Category or “All
POI” to see list of POI’s close to the selected location.

8. Favourites
Adding a favourite
From Map View, click any position on the map and then press Options. Select the option “Add
to Favourite”
Default category is “General”. Users are allowed to assign other categories to favourites. Tap
on Edit button on Category field to assign category to new favourite.

Edit addresses and telephones no details, if necessary, and then tap “OK” to save new
favourite.
Access/Modify/Delete a favourite
Select Favourites from Destination selection window, click on desired POI to view on Map.
Press options to select and perform desired action.
Managing Categories
Tap on Manage button to enter category management menu.
Tap on “Add New Category” to add new user defined categories.

To edit or delete user defined categories, tap on Edit button to edit that category.
Tap on Delete button to delete a category. User may delete both category and related favourites, or
only category.
Favourites displayed as Star on Navigation Screen and Map View Screen

9. Settings
The settings in Galactio can be accessed by tapping “Setting” from the main screen.
System Status
Tap on System Status from Settings page to access GPS status information
This screen shows the following information:
Battery: Battery percentage level/Status
Altitude: Altitude from Sea Level
Coordinates: Current coordinates
Status: GPS Status
Date: Current System Date
Time: Current System Time
PDOP: Dilution of Precision

Routing
Tap on Routing from Settings page to access routing preference settings
This screen allows user to view and change the routing preference.
The system supports the following types of routing:
Traffic Aware: Time optimized routing with traffic inference
Shortest Distance: Distance optimized routing
Fastest Route: Time optimized routing
Lowest Toll: Cost optimized routing (Toll/ERP minimization)
Toll Avoidance: Routing that avoid toll-cost whenever possible
The default setting is Traffic aware. User may change the setting to his preferred type.

Navi Info
Tap on Navi Info from Settings page to access the Navigation screen information configuration.
Navi info controls the overall display and sounds configuration for the Navigation screen.
Map profile: Controls the colour combinations for the Navigation screen
Auto: Auto Switch between Day/Night mode based on time
Day: Day Mode comprising of light background
Night: Night mode comprising of dark background
Destination Reference Line: Turn On/Off destination reference line
Speed Cam Warning: Controls the type of audible Speed Camera warning
o Alarm: Short system warning beep when approaching Speed Camera

o Voice: Voice guidance when approaching Speed Camera
o Off: Switch off Speed Camera warning
Speed Warning: Controls type of audible warning when user drives above prescribed road
speed limit
o Alarm: Short system warning beep on over speed
o Voice: Voice guidance on over speed
o Off: Switch off over speed warning
Toll Gate Warning: Controls the type of audible Toll Gate warning
Alarm: Short system warning beep when approaching Toll Gate
Voice: Voice guidance when approaching Toll Gate
Off: Switch off Toll Gate warning
Auto Zoom: Turn ON/OFF auto zoom in Navigation mode.
Show POI: Turn ON/OFF icons for POI’s in the vicinity
Show Block No.: Turn ON/OFF display of Block numbers
o NOTE: This feature is Map data dependent, and may not be available for all maps

Destination Reached Popup : Turn ON/OFF Destination reached popped message box
TMC nearby Parking Popup: Turn ON/OFF Live Parking Available popped message box when
car reaches 1km away to destination.
o NOTE: This feature is TMC map and service dependent, and will not be available for non-TMC
supported devices.
3D Landmarks: Turn ON/OFF the display of “3D Landmark”. If “3D Landmark” is turned on
and navigation screen is in 3D mode, 3D views of the landmarks will be shown if they are in
the view.

Driver Alert Icon: Turn ON/OFF the display of “Drive Alert Icon”. If “Drive Alert Icon” is turned
on, blinking icon will appear if alert is found in map on the road.

Driver Alert Warning: Turn ON/OFF the display of “Driver Alert Warning”. If “Driver Alert
Warning” is turned on, warning will be announced if alert is found in map on the road.
Red Light Camera Notification: Turn ON/OFF the display of “Red Light Camera Notification”.
If “Red Light Camera Notification” is turned on, icon will be displayed and warning will be
announced if red light camera is found in map on the road.
Bird’s Eye View: Turn ON/OFF bird-eye view during junction
The Bird’s eye view is an advanced guidance feature that switches to a top level view of the
junction when the car approaches a junction where driver manoeuvre is required.
Show POI names: Turn ON/OFF the display POI names on navigation screen. Different from
road name which is white color font, POI name is black color font.

Highway Info – POI: Select poi category type to be prioritized to display on POI Interchange
Information UI. (Refer to Section 24, the content of this feature is map dependent)
Map Font Size: Select desired font size to be used for road names and POI. The available font
sizes are Small, Medium, Large and Extra Large.
Guidance Frequency: Enable user to the frequency of guidance voice. (Refer to Section 22 for
details)
Background Voice Instructions: Allows user to hear instructions in all the windows instead of
only navigation window and trip meter window. (By Default off)

Auto-switch to Navigation screen: Switches the current window to navigation window after
user idle for 1 minute if destination has been set.
Quick Add to Favourite: Refer to Section 24 for adding and editing favourites in navigation screen.
Prayer Timing Alert: Refer to Section 11 for Prayer Timing Notifications Settings.
Auto-hide Buttons: Hide all buttons when idle on navigation screen (On by default)

TMC Settings
Tap on TMC Settings from Settings page to access the TMC configuration.
RDS TMC Service: Turn ON/OFF TMC Service
Auto Avoid Critical Accident: Turn ON/OFF system auto reroute when critical incident
affects your route

Language
Tap on Language from Settings page to access the Language configuration
Voice: User choice of voice for guidance.
The following options are available as default:
Default Female Eng: Female English voice
TTS [Female Eng]: Text to Speech female voice, with road name pronunciations
Female Chinese: Female Chinese (Mandarin) voice
Female Cantonese: Female Chinese (Cantonese) voice
Female Malay: Female Malay voice
Thai: Female Thai voice
Japanese: Female Japanese voice
Hokkien: Female Hokkien voice
Indonesia: Female Indonesia voice
Male Arab: Male Arabic voice
Female Arab: Female Arabic voice
Korean: Female Korean voice
Male Sinhala: Male Sinhala voice
Female Sinhala: Female Sinhala voice
Tamil: Female Tamil voice

Interface: User choice of user interface language
The following options are available:
Chinese
English
Indonesia
Japanese
Korean
Melayu
Tagalog
Thai
NOTE: Change of user interface language will take effect immediately after clicking BACK button
from the window

Location
Tap on Location from Settings page to access the Location display configuration for Navigation
screen.
Administrative Area: Turn ON/OFF Administrative area (Country/State/City) display
Road Name: Turn ON/OFF Road name display
Compass: Turn ON/OFF compass display

Maps
Tap on Maps from Settings page to access the map selection window.
User may view the current selected map (Green indicator), and access the map information
details by clicking on its name.
User may choose the map for use by clicking on Select button.
Once map is loaded, the indicator next to the map turns green.

System Settings
Tap on System Settings from Settings page to access the system settings window.
Volume: System volume level. Use + or – to increase or decrease the volume
Mute : Turn ON/OFF Mute.
Green indicates that mute is on. Grey indicates that mute is off.
Time Zone: Set the system time zone
Date: Set date format. The following options are available:
DD/MM/YY: Display 20/Jun/2013 for 20 June 2013
MM/DD/YY: Display Jun/20/2013 for 20 June 2013
YY/MM/DD: Display 2013/Jun/20 for 20 June 2013
Time: Set time format
12 HR: 12 Hour format, eg. 12:01 AM
24 HR: 24 Hour format, eg. 00:01

Screen Transitions: Turn ON/OFF screen transition
Button Sound: Turn ON/OFF Button Click Sound
Passcode Lock: Turn ON/OFF passcode lock (Refer to Section 18)
Reset: Reset system to default settings

Petrol Prices Tap on Petrol Prices from Settings page to access the petrol prices information.
1. Last Sync Date *
2. Petrol Brands
3. Petrol Types/Grades
4. Petrol Prices (in S$)
* Note: This feature requires online synchronization (refer Section 11)
User may view the nearby petrol stations by clicking on the petrol brand names.
3
2
4
1

User may click the nearby petrol stations to see on map view screen.

ERP Rates
Tap on ERP Rates from Settings page to access the ERP rates information.
User may select ERP zones to access the ERP gantries in that zone. (ERP gantries are grouped
according to area)
User may click on the ERP gantries to access the ERP rates of that gantry.
User may click Ok button to see the ERP location on map view screen.


Car Icon
Press “Car Icon” menu from the Settings menu to select the Car icon.
“Green” indicator shows the current selected car icon. User may press on the list to select
the desired car icon.
Different car icons represent as follows:
Known GPS Location
Unknown GPS Location
Simulation

POI Display
Press “POI Display” icon from the Settings menu to control the visibility of POI icons in map view and
navigation screen.
Press “On/Off” button to show/hide the related POI icons on the map.
E.g. Only Show Parking Icons
(Before) (After)

NavIQ Info
Tap on NavIQ Info from Settings page to access the software information screen.
Device ID/UUID: Unique device identifier
Model Info: Software Model
Software Version: Current software version running on the system
Copyright: Copyright Information

Reset History
Tap on Reset History from Settings page to reset user data (Favourites/Recent/etc.)
Press “OK” to delete the history, else “Cancel”
Prayer Timings
Tap on Prayer Timings from Settings page to view the day’s prayer timings.
The date may be changed using arrow button(s) to check prayer timings of past and future
dates.
To change the city to your current location, please press “Edit” button to select country and
city of your current location.

Refer to Section 11 for Prayer Timing Notifications.
Exit
Tap on Exit from Settings page to exit the software
Press “OK” to exit the application, else “Cancel”.

10. TMC functionality (* TMC enabled devices/Map only)
Traffic Data
Click on TMC details displayed on the bottom bar of main screen to view list of TMC incidents
currently available on the device
Clicking on any event shows the location of the event on the map. Toggle “Show
Traffic” to see affected links and extent.
Sort option in the TMC events list allows sorting incidents based on Distance, Importance, Road, and Route. View Traffic conditions on Road network
In Map View, toggle “Show Traffic” button to view traffic status in the road networks.
Red colour road on the map indicates Heavy Traffic/Severe congestion/Road closure.

Parking Information
Select Destination ->parking info to access Live Parking information. A list view with parking
name and current status appears.
The Sort button allows sorting by distance/availability
The colour code(s) represent the following status:
Parking Available (Green)
Parking 90% Full (Amber)
Parking Almost Full (Red)
Parking Full (Red)
Weather Information
Select Destination -> Weather info to access Live Weather information.

Smart Route Option
Smart Route option can be switched ON/OFF in Routing Options menu in Settings window.
Smart Route Mode (ON): Route presented to user is always traffic aware. When enabled, the
router will always consider island wide traffic information availability while calculating the
route. This should lead to most optimized traffic route.
Non Smart Route Mode (OFF): First route presented to user will be traffic free. This will ensure
that the initial route presented to user, for the same origin and destination, will always be the
same.
o Pop up upcoming traffic incidents (Refer to next section Traffic update during
Navigation), in the next 10 km of the route, with following information:
Incident type Location (From/To junctions)
Measure of delay (approximation based on time penalties set within the
system)
Ignore/Detour buttons
Ignore: Ignore the incident and do not show pop up until some
conditions related to the incident change (ex. Change in delay)
Detour: Detour the current incident -> Avoid all links associated with
the incident
o Display delay information on the current route, in the navigation dashboard, with an
interface to allow users to detour any/all incidents that affect his route.
NOTE: By default, Smart Route will be OFF in the system. When Smart route option is enabled, the system may generate
a different route between the same O-D pair at different times, due to traffic considerations.

Traffic update during Navigation
User will see colour coded traffic delay button on Navigation screen if there are traffic incidents on
the route to destination.
Tap on Traffic Delay Button to access the traffic incidents list on the route as below.
User may select any multiple traffic incidents and click Detour button to avoid the selected incidents.
Or User may click Detour All button to avoid all traffic incidents.
Traffic
button

The traffic button is colour coded to represent:
Pop up messages will appear when an incident is detected along the selected route, within 20
km, with details of Road/Incident Type and Delay and Distance to Incident
*Note: When Smart route is enabled, pop-up will appear only for critical incidents along route
Clicking Ignore
Event will be ignored and the routing will not avoid this incident.
Clicking Detour
A new route will be calculated to avoid/detour this incident.
No option is selected before message box disappears
If "Avoid critical incident automatically" is enabled in TMC settings window, a critical incident
will be automatically avoided and an alternative route will be calculated.
If "Avoid critical incident automatically" is not enabled, incident will be ignored and routing
will not avoid this incident and continue the original planned route.
Minor traffic on route
Moderate traffic on route
Heavy traffic on route

Parking Assistance
Nearest TMC parking to destination will be displayed as a pop-up message box, along with
information on parking name and availability, in the navigation screen when user is less than
1 km of his destination. If there is no TMC parking available near the destination, no pop-up
message box will appear.
However a grey colour parking status icon will be displayed, to assist user in finding a parking
close to his destination.
User may set the nearest TMC parking as destination or click “See More” button or parking
status icon at top right corner of navigation screen to see other nearby parkings.
User may select one of other nearby parkings and click Go button to route to selected parking.
Parking Status icon is colour coded to represent:
Parking
Status Icon
Parking
Status Icon
Parking Available
Low Parking Available
Parking is Full or Almost Full
No Live Parking Status Available

Bus lane Notification
User will see the blinking bus icon to notify there is a bus lane on their driving way, it helps
the user to avoid the bus lane and keep on the driving lane properly
Simulation Speed Adjustment
You can choose to run simulation at different speeds between 1 and 6, where 1 is the slowest
and 6 is the fastest.
Note: By default, Simulation runs at speed 4

11. Prayer Timing Notification: Tap on Prayer Timings from Settings page to view the present day prayer timings, Qibla
direction and the Mosques Icon.
The Qibla icon direction will change according to the direction of Mecca w.r.to the current
position.
The date may be changed using arrow button(s) to check prayer timings of past and future
dates.
To change the city to your current location, please press “Edit” button to select country and
city of your current location.
Tap on current location icon to get the current GPS Location
Tap on the Mosque Icon to get the list of nearby mosques.

Tap on the edit option to select the country and city.
fs fs ff
s
Qibla
Direction Icon
Mosque Icon

Prayer Timing Notifications Pop Up Message
The Message Box Pop up will be shown when the prayer timing alerts are ON. The alerts for
5Mins, 15 Mins, and 30 Mins can be configured from Navi Info settings Window.
Tap on Settings, and select Navi Info for the Prayer Timing Alerts Options.
The Notifications will be displayed on all windows. The Upcoming Prayer Name, Prayer
Time, Remaining Time, Qibla Direction and the Mosque Icon will be displayed.

Tap on Mosque Icon to display the list of nearby Mosques.
Tap on dismiss button to close the message box.
Qibla Direction Icon will be displayed in the Navigation Screen till the Prayer Timing
and will disappear.

Tap on Qibla Direction Icon to display the prayer timing notification in the Navigation
screen.
During Navigation, the Qibla direction icon will be displayed beside the ETA, cost etc.
Tap on Qibla direction icon to display the prayer timing notification.
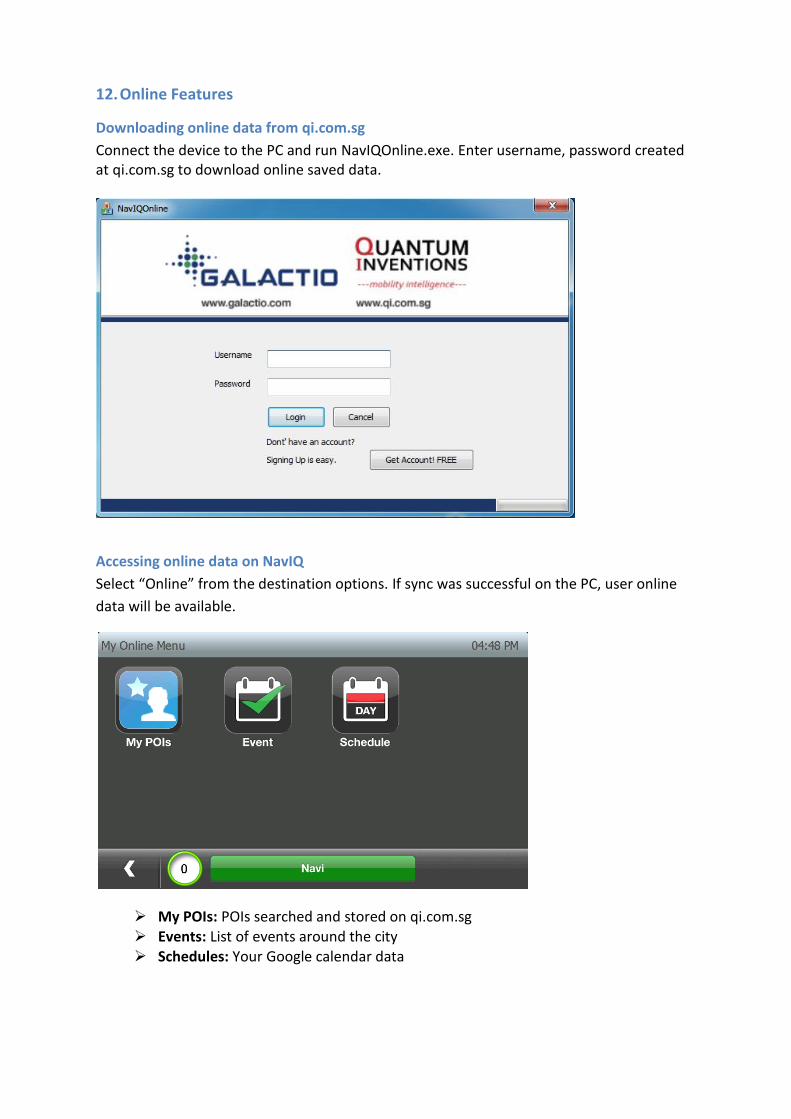
12. Online Features
Downloading online data from qi.com.sg
Connect the device to the PC and run NavIQOnline.exe. Enter username, password created at qi.com.sg to download online saved data.
Accessing online data on NavIQ
Select “Online” from the destination options. If sync was successful on the PC, user online
data will be available.
My POIs: POIs searched and stored on qi.com.sg Events: List of events around the city Schedules: Your Google calendar data

13. Tourist Guide
Select Tourist Guide (10) from the destination screen (Refer Section 1).
By Category
Select a Category to choose Tourism POI from the list.
Click the Tourism POI to view detailed information. Click “Locate” button to view the location
on the map. Click the photo to view more photos of the tourism POI.
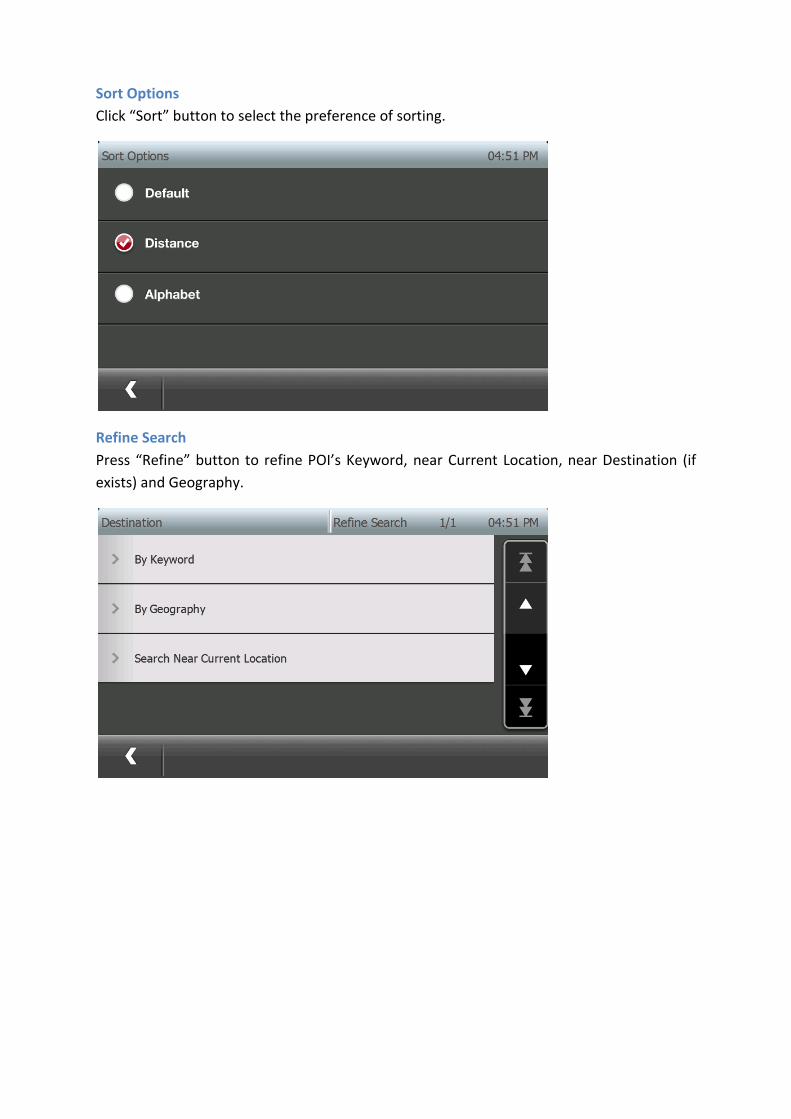
Sort Options
Click “Sort” button to select the preference of sorting.
Refine Search
Press “Refine” button to refine POI’s Keyword, near Current Location, near Destination (if
exists) and Geography.

14. Photo Navigation
The navigation software is capable of showing, and navigating to, locations stored in geo-tagged
photos.
Select Photos (11) from the destination screen (Refer Section 1).
Select Photo from the list. Click “Locate” button to view the location on the map.

The following steps explain how you can use a geo tagged photo in the navigation software.
1) Ensure the photo is geo tagged: Geo tagged photos will have GPS information as file properties
(Refer to following screenshot)
2) Resize the photos to below 100KB
3) Copy the photos to “Photo” directory, on the device.

15. Track Log Visualization
Go to Destination > Track Log > Log List to view the list of GPS Log
Click Play button to enable play-pack of the track log
The track is drawn as purple path on map view window and navigation window

16. Refine Search “Refine Search” feature enables user to further refine the text search by choosing the geographical
area or POI types.
The following demonstrates how to use “Refine Search” feature.
1. Click “Search” button at main screen
2. Enter “Changi Airport” on the keypad and press “OK” button

3. Press “Refine” button to further refine the text search result
4. Press “By Type” to refine the result by type
5.


Press “POI” to display only the results belonged to POI
6. Press “Transport” to further refine the results belonged to “Transport”
7.


Press “Airport” to further refine the results belonged to “Airport”
8. Only airport records are displayed after refined by “Airport”.

9. Press “Refine” button at the above screen to check/change the current refinement
10. Press “By Geography” at above screen to refine by geographical area

11. Click “Edit” button of “City” at above screen to refine by city.
The following screen allows user to select the city. Click the desired city.
12. Click “OK” to confirm the geographical refinement.

13. All the records will be in the desired city (“SINGAPORE, EAST” in this case).
14. The refine conditions can be checked/changed by clicking “Refine” button again at the above
screen.

17. Route Preview
Route Preview allows user to compare the route generated with default routing option against that
with other routing options.
1. At Map View window, press “Preview” button to start route preview
2. After routing complete, the route is displayed and the time taken, distance and cost of the route is
shown.

3. Click the orange add button to add a route option for comparison

4. Maximum 3 options can be compared. The active one is shown in orange color
5. The active one can be switched by pressing the area below the route option (indicated by red
rectangle).

18. Passcode Lock
“Passcode Lock” enables user to prevent personal information on the device to be exposed if the
device is stolen.
To set the passcode, follows the following steps:
(1) Click “Setting” button on the main screen
(2) Click “System Settings” button at the Settings screen
(3) Click Next button

(4) Click the on/off button beside “Passcode Lock” to turn on passcode lock
(5) Enter desired passcode
(6) Reenter passcode

(7) Passcode is turned on after the above steps. It can be turned off by clicking on/off button and
entering passcode that has been set.
After passcode is set, passcode will be requested during device startup.
The following message box will popup if wrong passcode is provided.
Users have 10 attempts to provide the correct passcode.

If users cannot provide correct passcode in 10 attempts, users will be requested to enter “0000” to
restore to factory defaults.

19. Zoom bar & Zoom scale display
This feature allows users to view and change zoom levels more easily
1) When users click zoom button to zoom in(out), the scale bar is displayed to show the current zoom level. Navigation: there are 8 zoom levels Map view: there are 12 zoom levels
2) Users can quickly change the zoom level, e.g. from 11 to 7 by clicking the zoom level on the zoom bar (applied for both map view and navigation screen).
In map view, the zoom scale is displayed at the left bottom corner to display the actual scale of current map drawing.

20. Journey Planner “Journey Planner” feature enables user to create a route plan for their journey. User can specify the
origin and multiple destinations along the journey.
The following demonstrates how to use “Journey Planner” feature.
1. Click “Route” button at main screen
2. Click “Current Location” and “New Position” to choose origin
The destination menu will be displayed to users to allow selecting new origin

3. Click “Add Destination” to add new destination
The destination menu will be displayed to users to allow selecting new destination
Select any destination from Recent list (or from any other menu options)

4. Click on any selected destination, if user wants to modify destinations
Click to delete selected destination
Click to add new destination (before selected destination)

Click or to move the destinations up and down along the journey
5. Click “Go” to navigate through the journey
6. Click “Simulate” to run simulation through the journey
7. Click “Preview” to preview the whole route
a. Route is calculated for the whole journey
b. Routed is displayed on the screen

21. Guidance Frequency This feature allows users to control the frequency at which the voice instructions will be played
during Navigation for the Route Guidance.
By default, the Guidance frequency for Expressway and other roads are all set.
(2) Tap “Navi Info” button on Settings window
(3) Tap Next button until Guidance Frequency.

(4) If the user taps on Guidance Frequency settings button,
(5) The settings options for Guidance frequency will be displayed for Expressway and other roads as
below.
(6) User can be able to configure the settings.

(7) By default, 300m for Expressway and 150m for other roads are ON, user cannot configure these 2
settings.
(8) If user tap on Reset Button, all the settings will be ON

22. Highway POI Information
The maximum number of POIs that can be displayed is 3 for each highway exit. Thus, the maximum preferred categories are set to 3. Note that there is no order of preference among the preferred categories. For each highway exit, POI icons of preferred categories will be displayed first. If there are less than 3 POI icons with preferred categories, the remaining space will be filled by other POI icons.
They will be displayed in the Highway POI Information during Navigation.

23. Adding and Editing Favorites in Navi Screen In the Navigation View, the user can save the favorites by tapping on the “Add Favorite” Button .It
will be saved as the Message [eg: Favorite 1] displayed on the Message box. Now, the user has the
option to edit the favorite name and details similar to Map View.
1) After "Add Favorite" button is tapped on Navi view, a pop up message box is displayed allowing
the user to choose its options as OK, Edit, and Cancel.
2) If "OK" Button is tapped, favorite will be saved with the name displayed on the message box.
3) If "Edit" Button is tapped, it switches the window to Edit the favorites [Similar to Add Favorites
window in Map View].

4) In AddToFavorites window ,if the name field is empty then a message popup will be displayed
with text as “This favorite will be renamed as Favorite<Auto Increment Number>”.
5) If "Cancel" Button is tapped, favorite will not be saved.
"Quick Add Favourite" ON – It will add as Favorite<Auto Increment Number>. (Off by default. Can be
on by turning off "Quck Add Favourite" in "Navi Info" setting menu)
"Quick Add Favourite" OFF – Enable name editing of favourite when adding favourite from
navigation screen.

24. How to Update Galactio
24.1. User Account Registration
24.1.1. Visit Galactio website: http://www.galactio.com.
24.1.2. Click “Register”.
24.1.3. You will need your device ID for our systems to recognize your licenses. If you don’t know
your device ID, please refer to instructions under “How to find your device ID”.
Enter your device ID and click “Register”.
How to find your device ID

(a) Tap “Setting” button in Galactio main window.
(b) Tap “Next” button.
(c) Tap “NavIQ Info” button.
(d) Device ID, model and software version are displayed in “NavIQ Info” window.

24.1.4. Fill your information and click “Register”.
24.1.5. Congratulations! You’ve successfully registered your device ID. You should receive an email
with instructions to activate your account.
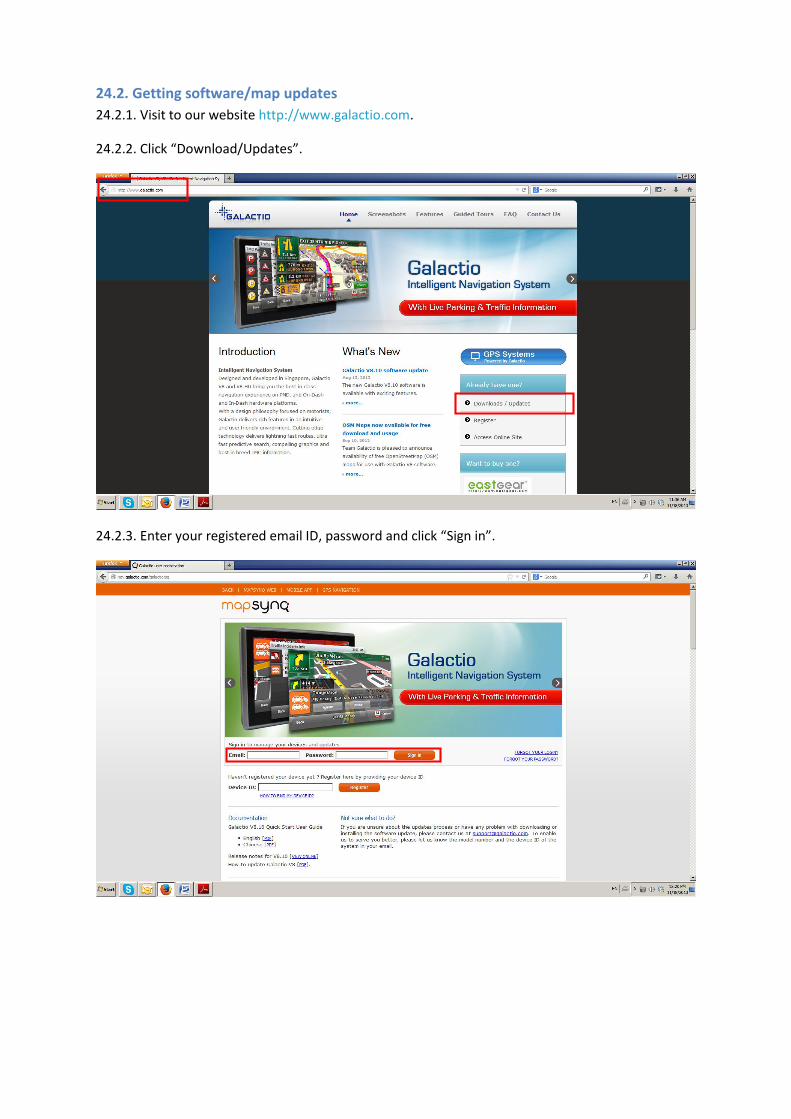
24.2. Getting software/map updates
24.2.1. Visit to our website http://www.galactio.com.
24.2.2. Click “Download/Updates”.
24.2.3. Enter your registered email ID, password and click “Sign in”.

24.2.4. Click “Devices” to see your registered devices.
24.2.5. Click “Download Update” to view available latest software/map updates for your device
model.

24.2.6. Click on the available software/map update links to download the package(s).
24.2.7. Click “Download” to download the software/map update.

24.2.8. In the pop-up, click “OK” to download and save the software/map update zip file to your
computer.

24.3. How to apply software/map updates
24.3.1. If your device is a PND (Portable Navigation Device), please connect your device to your
computer with USB cable. If your device is a head-unit system attached to car dashboard, please
take out the SD card from your device and connect to your computer using an SD card reader.
A removable memory storage drive will be shown in your computer as below.
24.3.2. Unzip/Extract the downloaded software/map update zip file. (You may need to install
WinZip/WinRar/7Zip software into your computer if you don’t have already one.)

24.3.3. Double-click one of the following programs, based on the operating system installed on your
computer, from the unzipped/extracted folder to start updating.
Galactio_Updater.exe (for Windows Vista/7 and later versions)
Galactio_Updater_XP.exe (for Windows XP)
Galactio_Updater_Mac.app (for Mac OSX)
24.3.4. Your connected portable navigation device or SD card (shown as removable memory storage
drive) will be auto-detected and selected as “Galactio Drive” in updater program.

If “Galactio Drive” isn’t detected automatically, the following error message box will be displayed.
24.3.5. Click “Update Now” button to start updating.
24.3.6. A warning message box not to disconnect the device/SD card until the update completes will
be displayed as below. Click “OK” to continue.
24.3.7. While the software or map updates are applied, an updating progress status bar will be
displayed as below.

24.3.8. On successful completion of the update, a “Device updated successfully” message will be
displayed
Congratulations! You’ve successfully updated your Galactio software/map.