Quick Start - Huawei Cloud
33
Scalable File Service Quick Start Issue 03 Date 2019-05-30 HUAWEI TECHNOLOGIES CO., LTD.
-
Upload
khangminh22 -
Category
Documents
-
view
5 -
download
0
Transcript of Quick Start - Huawei Cloud
Scalable File Service
Quick Start
Issue 03
Date 2019-05-30
HUAWEI TECHNOLOGIES CO., LTD.
Copyright © Huawei Technologies Co., Ltd. 2022. All rights reserved.
No part of this document may be reproduced or transmitted in any form or by any means without priorwritten consent of Huawei Technologies Co., Ltd. Trademarks and Permissions
and other Huawei trademarks are trademarks of Huawei Technologies Co., Ltd.All other trademarks and trade names mentioned in this document are the property of their respectiveholders. NoticeThe purchased products, services and features are stipulated by the contract made between Huawei andthe customer. All or part of the products, services and features described in this document may not bewithin the purchase scope or the usage scope. Unless otherwise specified in the contract, all statements,information, and recommendations in this document are provided "AS IS" without warranties, guaranteesor representations of any kind, either express or implied.
The information in this document is subject to change without notice. Every effort has been made in thepreparation of this document to ensure accuracy of the contents, but all statements, information, andrecommendations in this document do not constitute a warranty of any kind, express or implied.
Issue 03 (2019-05-30) Copyright © Huawei Technologies Co., Ltd. i
Contents
1 Step 1: Make Preparations.................................................................................................... 1
2 Step 2: Create a File System................................................................................................. 3
3 Step 3: Mount a File System............................................................................................... 123.1 Mounting an NFS File System to ECSs (Linux)...........................................................................................................123.2 Mounting an NFS File System to ECSs (Windows)................................................................................................... 173.3 Mounting a CIFS File System to ECSs (Windows)..................................................................................................... 233.4 Mounting a File System Automatically......................................................................................................................... 25
4 Step 4: Unmount a File System..........................................................................................28
5 Example: Mounting an NFS File System to ECSs........................................................... 29
6 Change History...................................................................................................................... 30
Scalable File ServiceQuick Start Contents
Issue 03 (2019-05-30) Copyright © Huawei Technologies Co., Ltd. ii
1 Step 1: Make Preparations
Before using SFS, you need to make the following preparations:
● Registering with HUAWEI CLOUD and Completing Real-NameAuthentication
● Topping Up Your Account● Creating an IAM User
Registering with HUAWEI CLOUD and Completing Real-NameAuthentication
If you already have a HUAWEI CLOUD account, skip this part. If you do not have aHUAWEI CLOUD account, perform the following operations to create an account:
1. Visit www.huaweicloud.com/intl/en-us/ and click Register.2. On the displayed Register page, register an account as prompted.
After you have successfully registered, the system automatically redirects youto your personal information page.
Topping Up Your AccountEnsure that your account has sufficient balance.
For details about the SFS price, see Price Details.
For details about how to top up an account, see Topping Up an Account.
Creating an IAM UserIf you want to allow multiple users to manage your resources without sharingyour password or private key, you can create users using IAM and grantpermissions to the users. These users can use specified login links and their ownaccounts to access the public cloud and help you efficiently manage resources. Youcan also set account security policies to ensure the security of these accounts andreduce enterprise information security risks.
If you have registered with the public cloud but have not created an IAM user, youcan create a user on the IAM console. For example, to create an SFS administrator,perform the following steps:
Scalable File ServiceQuick Start 1 Step 1: Make Preparations
Issue 03 (2019-05-30) Copyright © Huawei Technologies Co., Ltd. 1
1. Enter your username and password to log in to the management console.2. In the upper right corner of the page, hover the mouse over the username
and select Identity and Access Management.3. In the navigation pane on the left, select Users.4. On the Users page, click Create User.5. Enter basic user information as prompted.
– Username: Enter a username, for example, sfs_admin.– Credential Type: Select Password.
NO TE
● A password can be used to log in to the management console and enabledevelopment tools (such as APIs, the CLI, and SDKs) that can access cloudservices through password authentication. This is the recommended optionbecause the security administrator manages users.
● Access keys are used to enable development tools (such as APIs, the CLI, andSDKs) that can access cloud services through key authentication.
– In the User Groups area, select admin from the drop-down list. Usergroup admin has all the operation permissions. If you want to grant fine-grained permissions to IAM users, see Creating a User and GrantingPermissions.
– Description: Enter description of the user, for example, SFSadministrator.
6. Click Next.7. Select Set now for Password Type.
NO TE
An SFS administrator can log in to the management console and manage users. Youare advised to select Set now for Password Type when you create an SFSadministrator for your domain. If you create an SFS administrator for another user, youare advised to select Set by user for Password Type instead so that the user can settheir own password.
8. Select Require user to set a new password upon first login to ensure thatthe SFS administrator is forced to change the password on the first login. TheRequire user to set a new password upon first login option is selected bydefault. It is recommended that you retain the default setting to ensure thatthe password of the administrator account is set by the administrator,preventing password leakage.
9. Enter the email address, mobile number, password, and confirm password.10. Click OK.
After the user is created, the login link of the user is displayed above the list.
Scalable File ServiceQuick Start 1 Step 1: Make Preparations
Issue 03 (2019-05-30) Copyright © Huawei Technologies Co., Ltd. 2

2 Step 2: Create a File System
You can create a file system and mount it to multiple ECSs. Then the ECSs canshare this file system. You can create two types of file systems: SFS Capacity-Oriented and SFS Turbo.
Prerequisites1. Before creating a file system, ensure that a VPC is available.
If no VPC is available, create a VPC by referring to Creating a VPC in theVirtual Private Cloud User Guide.
2. Before creating a file system, ensure that ECSs are available and reside withinthe created VPC.If no ECS is available, purchase an ECS by referring to Purchasing andLogging In to a Windows ECS and Purchasing and Logging In to a LinuxECS in the Elastic Cloud Server Getting Started.
Logging In to the Management Console
Step 1 Visit the HUAWEI CLOUD website at www.huaweicloud.com/intl/en-us/.
Step 2 Register an account.
Before using SFS, you need to register a HUAWEI CLOUD account. This accountcan be used to access all HUAWEI CLOUD services, including SFS. If you alreadyhave an account, start from Step 3.
1. In the upper right corner of the page, click Register.2. Complete the registration as instructed.
After you have successfully registered, the system automatically redirects youto your personal information page.
Step 3 Log in to the management console.
1. In the upper right corner of the displayed page, click Console.2. Enter the username and password as prompted, and click Log In.
Step 4 After logging in to the management console, select the region where the service islocated from the drop-down list in the upper left corner of the page.
Scalable File ServiceQuick Start 2 Step 2: Create a File System
Issue 03 (2019-05-30) Copyright © Huawei Technologies Co., Ltd. 3
Step 5 Choose Storage > Scalable File Service. The SFS Console page is displayed.
Step 6 It is recommended that you top up your account and subscribe to SFS so that theservice can be used properly. For details about how to purchase SFS, see How Do IPurchase SFS?
----End
Creating an SFS Capacity-Oriented File System
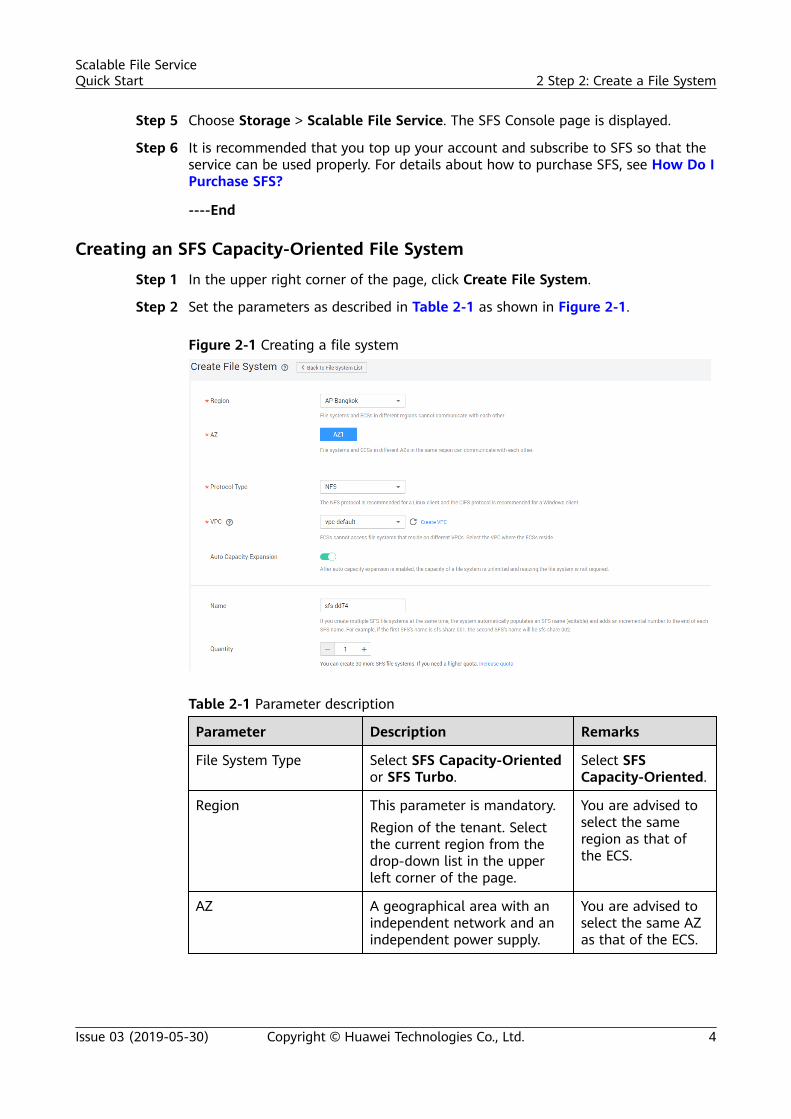
Step 1 In the upper right corner of the page, click Create File System.
Step 2 Set the parameters as described in Table 2-1 as shown in Figure 2-1.
Figure 2-1 Creating a file system
Table 2-1 Parameter description
Parameter Description Remarks
File System Type Select SFS Capacity-Orientedor SFS Turbo.
Select SFSCapacity-Oriented.
Region This parameter is mandatory.Region of the tenant. Selectthe current region from thedrop-down list in the upperleft corner of the page.
You are advised toselect the sameregion as that ofthe ECS.
AZ A geographical area with anindependent network and anindependent power supply.
You are advised toselect the same AZas that of the ECS.
Scalable File ServiceQuick Start 2 Step 2: Create a File System
Issue 03 (2019-05-30) Copyright © Huawei Technologies Co., Ltd. 4
Parameter Description Remarks
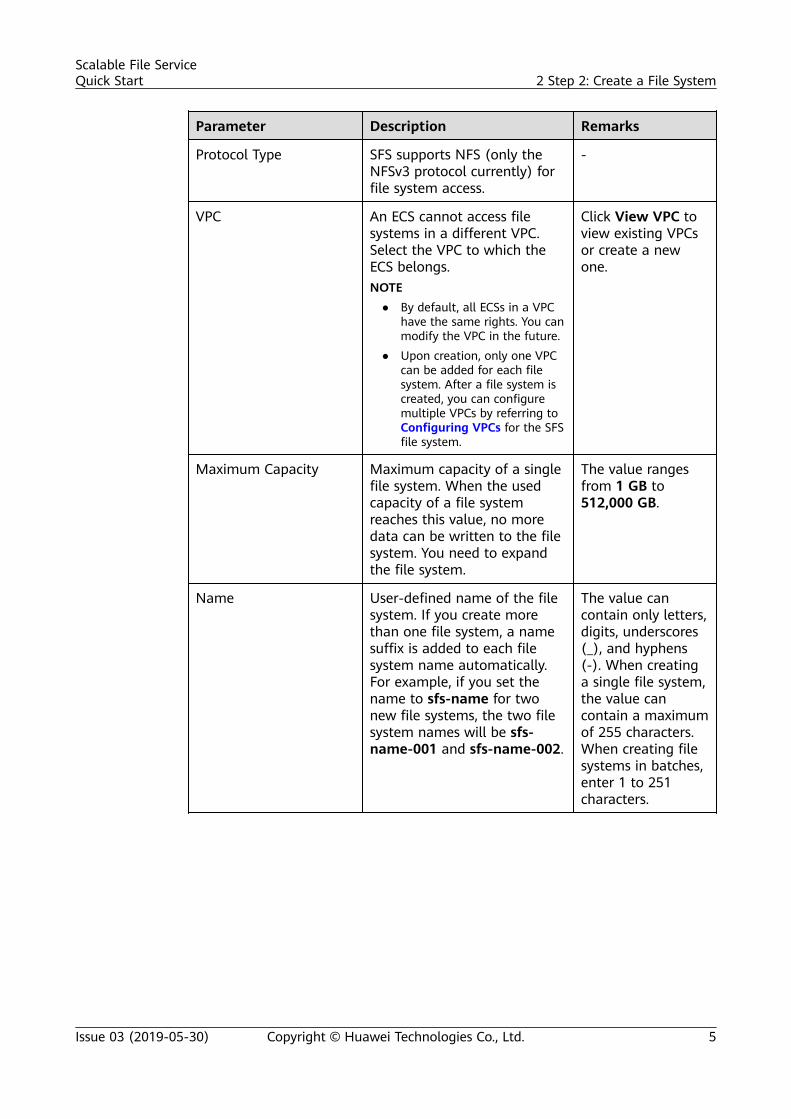
Protocol Type SFS supports NFS (only theNFSv3 protocol currently) forfile system access.
-
VPC An ECS cannot access filesystems in a different VPC.Select the VPC to which theECS belongs.NOTE
● By default, all ECSs in a VPChave the same rights. You canmodify the VPC in the future.
● Upon creation, only one VPCcan be added for each filesystem. After a file system iscreated, you can configuremultiple VPCs by referring toConfiguring VPCs for the SFSfile system.
Click View VPC toview existing VPCsor create a newone.
Maximum Capacity Maximum capacity of a singlefile system. When the usedcapacity of a file systemreaches this value, no moredata can be written to the filesystem. You need to expandthe file system.
The value rangesfrom 1 GB to512,000 GB.
Name User-defined name of the filesystem. If you create morethan one file system, a namesuffix is added to each filesystem name automatically.For example, if you set thename to sfs-name for twonew file systems, the two filesystem names will be sfs-name-001 and sfs-name-002.
The value cancontain only letters,digits, underscores(_), and hyphens(-). When creatinga single file system,the value cancontain a maximumof 255 characters.When creating filesystems in batches,enter 1 to 251characters.
Scalable File ServiceQuick Start 2 Step 2: Create a File System
Issue 03 (2019-05-30) Copyright © Huawei Technologies Co., Ltd. 5
Parameter Description Remarks
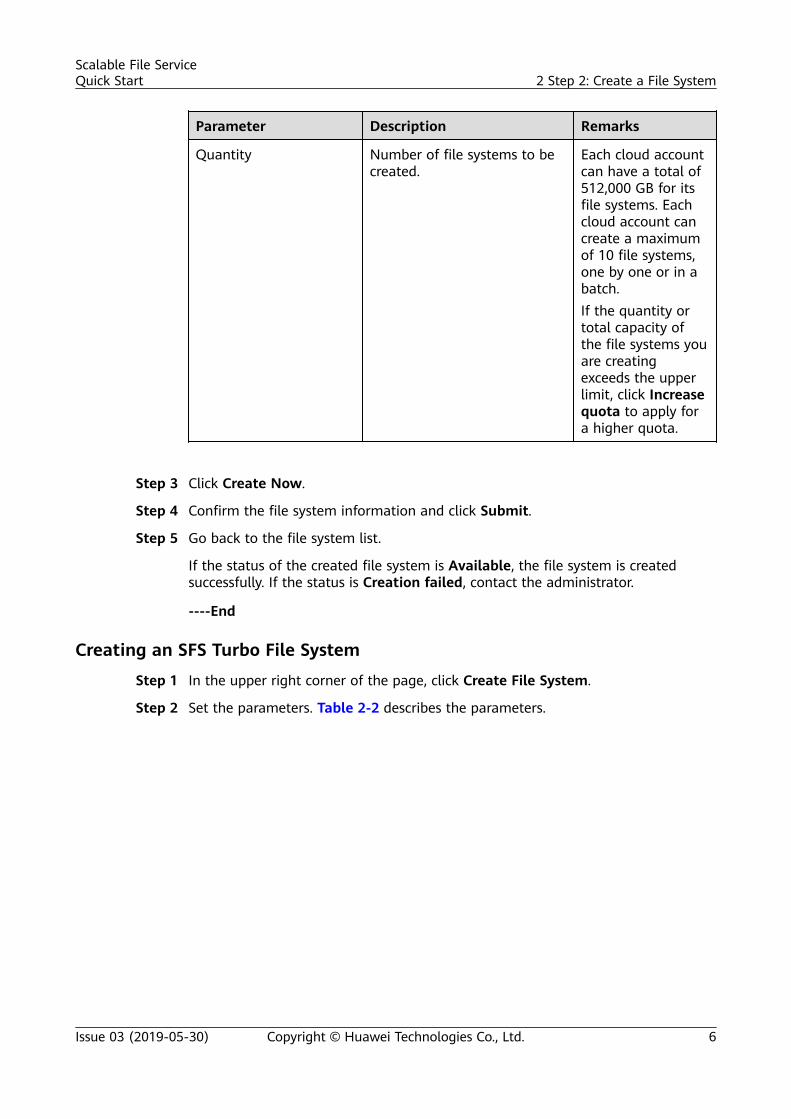
Quantity Number of file systems to becreated.
Each cloud accountcan have a total of512,000 GB for itsfile systems. Eachcloud account cancreate a maximumof 10 file systems,one by one or in abatch.If the quantity ortotal capacity ofthe file systems youare creatingexceeds the upperlimit, click Increasequota to apply fora higher quota.
Step 3 Click Create Now.
Step 4 Confirm the file system information and click Submit.
Step 5 Go back to the file system list.
If the status of the created file system is Available, the file system is createdsuccessfully. If the status is Creation failed, contact the administrator.
----End
Creating an SFS Turbo File System
Step 1 In the upper right corner of the page, click Create File System.
Step 2 Set the parameters. Table 2-2 describes the parameters.
Scalable File ServiceQuick Start 2 Step 2: Create a File System
Issue 03 (2019-05-30) Copyright © Huawei Technologies Co., Ltd. 6
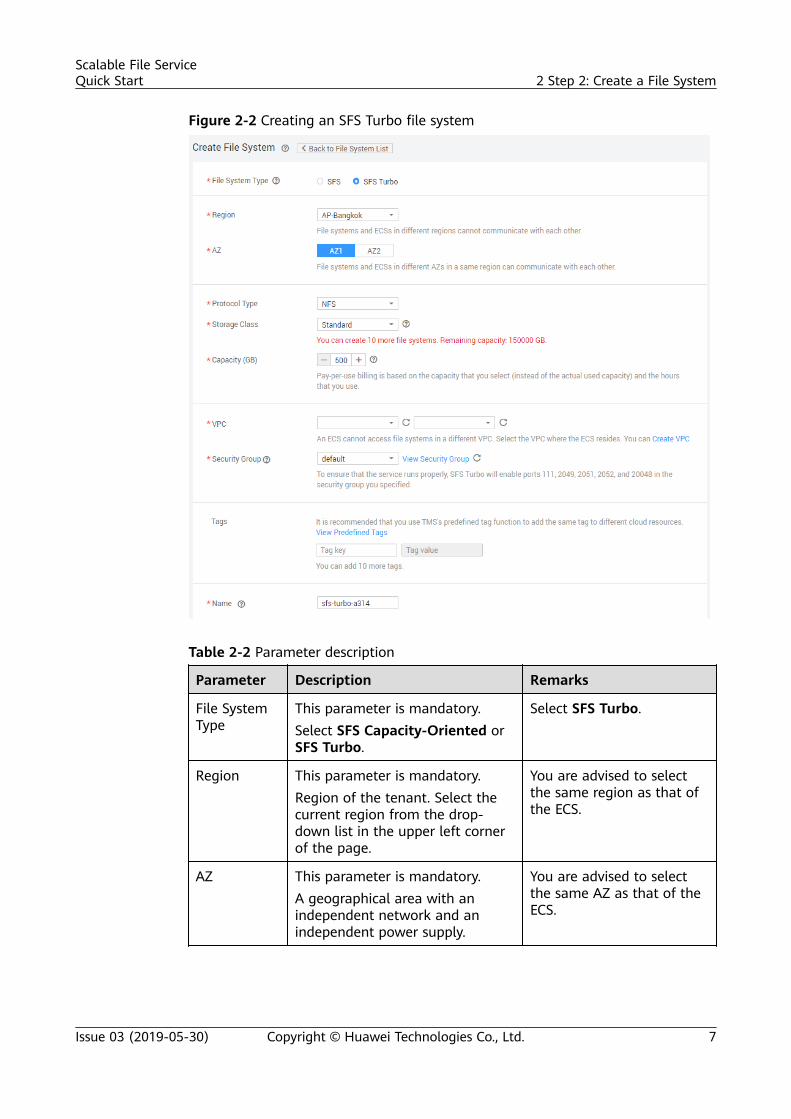
Figure 2-2 Creating an SFS Turbo file system
Table 2-2 Parameter description
Parameter Description Remarks
File SystemType
This parameter is mandatory.Select SFS Capacity-Oriented orSFS Turbo.
Select SFS Turbo.
Region This parameter is mandatory.Region of the tenant. Select thecurrent region from the drop-down list in the upper left cornerof the page.
You are advised to selectthe same region as that ofthe ECS.
AZ This parameter is mandatory.A geographical area with anindependent network and anindependent power supply.
You are advised to selectthe same AZ as that of theECS.
Scalable File ServiceQuick Start 2 Step 2: Create a File System
Issue 03 (2019-05-30) Copyright © Huawei Technologies Co., Ltd. 7
Parameter Description Remarks
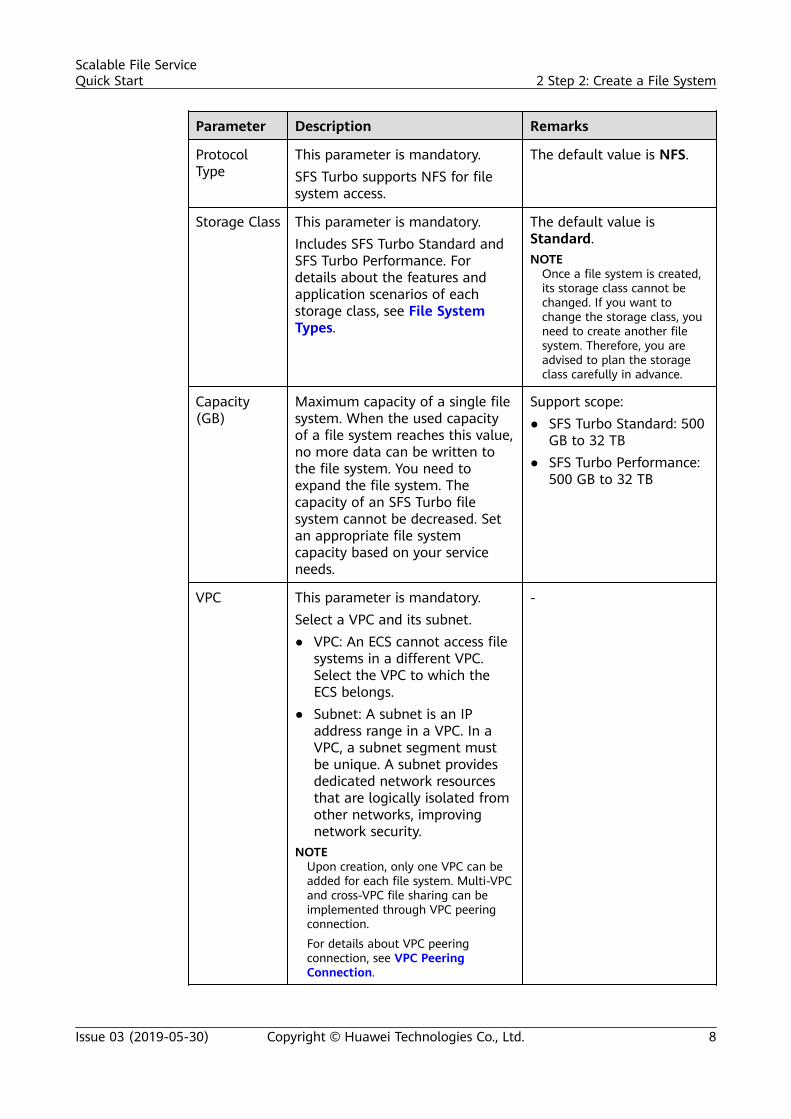
ProtocolType
This parameter is mandatory.SFS Turbo supports NFS for filesystem access.
The default value is NFS.
Storage Class This parameter is mandatory.Includes SFS Turbo Standard andSFS Turbo Performance. Fordetails about the features andapplication scenarios of eachstorage class, see File SystemTypes.
The default value isStandard.NOTE
Once a file system is created,its storage class cannot bechanged. If you want tochange the storage class, youneed to create another filesystem. Therefore, you areadvised to plan the storageclass carefully in advance.
Capacity(GB)
Maximum capacity of a single filesystem. When the used capacityof a file system reaches this value,no more data can be written tothe file system. You need toexpand the file system. Thecapacity of an SFS Turbo filesystem cannot be decreased. Setan appropriate file systemcapacity based on your serviceneeds.
Support scope:● SFS Turbo Standard: 500
GB to 32 TB● SFS Turbo Performance:
500 GB to 32 TB
VPC This parameter is mandatory.Select a VPC and its subnet.● VPC: An ECS cannot access file
systems in a different VPC.Select the VPC to which theECS belongs.
● Subnet: A subnet is an IPaddress range in a VPC. In aVPC, a subnet segment mustbe unique. A subnet providesdedicated network resourcesthat are logically isolated fromother networks, improvingnetwork security.
NOTEUpon creation, only one VPC can beadded for each file system. Multi-VPCand cross-VPC file sharing can beimplemented through VPC peeringconnection.For details about VPC peeringconnection, see VPC PeeringConnection.
-
Scalable File ServiceQuick Start 2 Step 2: Create a File System
Issue 03 (2019-05-30) Copyright © Huawei Technologies Co., Ltd. 8
Parameter Description Remarks
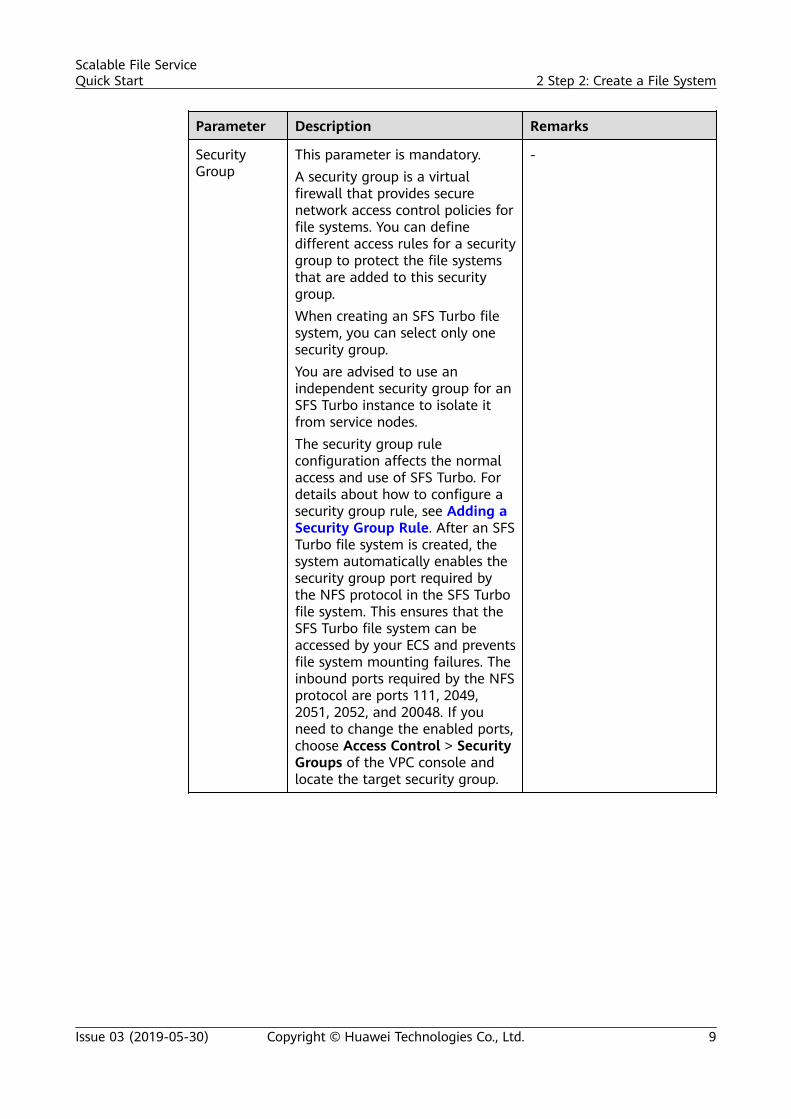
SecurityGroup
This parameter is mandatory.A security group is a virtualfirewall that provides securenetwork access control policies forfile systems. You can definedifferent access rules for a securitygroup to protect the file systemsthat are added to this securitygroup.When creating an SFS Turbo filesystem, you can select only onesecurity group.You are advised to use anindependent security group for anSFS Turbo instance to isolate itfrom service nodes.The security group ruleconfiguration affects the normalaccess and use of SFS Turbo. Fordetails about how to configure asecurity group rule, see Adding aSecurity Group Rule. After an SFSTurbo file system is created, thesystem automatically enables thesecurity group port required bythe NFS protocol in the SFS Turbofile system. This ensures that theSFS Turbo file system can beaccessed by your ECS and preventsfile system mounting failures. Theinbound ports required by the NFSprotocol are ports 111, 2049,2051, 2052, and 20048. If youneed to change the enabled ports,choose Access Control > SecurityGroups of the VPC console andlocate the target security group.
-
Scalable File ServiceQuick Start 2 Step 2: Create a File System
Issue 03 (2019-05-30) Copyright © Huawei Technologies Co., Ltd. 9

Parameter Description Remarks
CloudBackup andRecovery
CBR provides backup protectionfor SFS Turbo and allows you touse backup data to create an SFSTurbo file system. After you setCloud Backup and Recovery, thesystem binds the SFS Turbo filesystem to the cloud backup vaultand associates the file systemwith the selected backup policy toperiodically back up the filesystem.The following options areavailable, among which thedefault value is Do not use:● Buy now:
1. Set the name of the cloudbackup vault, which is acharacter string consistingof 1 to 64 characters,including letters, digits,underscores (_), andhyphens (-), for example,vault-f61e. The defaultnaming rule is vault_xxxx.
2. Enter the vault capacity,which is required forbacking up the SFS Turbofile system. The vaultcapacity cannot be less thanthe size of the file system.Its value ranges from thetotal size of the associatedfile systems to 10,485,760 inthe unit of GB.
3. Select a backup policy fromthe drop-down list, or log into the CBR console andconfigure a desired one.
● Use existing vault:1. Select an existing cloud
backup vault from the drop-down list.
2. Select a backup policy fromthe drop-down list, or log into the CBR console andconfigure a desired one.
● Do not use: Skip thisconfiguration if backup is not
-
Scalable File ServiceQuick Start 2 Step 2: Create a File System
Issue 03 (2019-05-30) Copyright © Huawei Technologies Co., Ltd. 10

Parameter Description Remarks
required. If you need backupprotection after a file systemhas been purchased, log in toCBR Console, locate the desiredvault, and associate the filesystem to the vault.
Name This parameter is mandatory.User-defined name of the filesystem.
The value can contain onlyletters, digits, and hyphens(-). The name of thecreated file system mustcontain more than fourcharacters and less than orequal to 64 characters.
Step 3 Click Create Now.
Step 4 Confirm the file system information and click Submit.
Step 5 Complete the creation and go back to the file system list.
If the status of the created file system is Available, the file system is createdsuccessfully. If the status is Creation failed, contact the administrator.
----End
Scalable File ServiceQuick Start 2 Step 2: Create a File System
Issue 03 (2019-05-30) Copyright © Huawei Technologies Co., Ltd. 11
3 Step 3: Mount a File System
3.1 Mounting an NFS File System to ECSs (Linux)After creating a file system, you need to mount the file system to ECSs so thatthey can share the file system.
Operations on BMSs and containers (CCE) are the same as those on ECSs.
Prerequisites● You have checked the type of the operating system on each ECS. Different
operating systems use different commands to install the NFS client.● You have created a file system and have obtained the mount point of the file
system.● At least one ECS that belongs to the same VPC as the file system exists.● The IP address of the DNS server for resolving the domain names of the file
systems has been configured on the ECS. SFS Turbo file systems do notrequire domain name resolution.
Procedure
Step 1 Log in to the ECS as user root.
Step 2 Install the NFS client.
1. Run the following command to check whether the NFS software package isinstalled.– On CentOS, Red Hat, Oracle Enterprise Linux, SUSE, EulerOS, Fedora, or
OpenSUSE:rpm -qa|grep nfs
– On Debian or Ubuntu:dpkg -l nfs-common
If a command output similar to the following is displayed, the NFS softwarepackage has been installed and you can go to Step 3. If nothing is displayed,go to Step 2.2.
Scalable File ServiceQuick Start 3 Step 3: Mount a File System
Issue 03 (2019-05-30) Copyright © Huawei Technologies Co., Ltd. 12
– On CentOS, Red Hat, EulerOS, Fedora, or Oracle Enterprise Linux:libnfsidmapnfs-utils
– On SUSE or OpenSUSE:nfsidmapnfs-client
– On Debian or Ubuntu:nfs-common
2. Run the following command to install the NFS software package.
NO TE
The following commands require that ECSs be connected to the Internet. Otherwise,the installation will fail.
– On CentOS, Red Hat, EulerOS, Fedora, or Oracle Enterprise Linux:sudo yum -y install nfs-utils
– On Debian or Ubuntu:sudo apt-get install nfs-common
– On SUSE or OpenSUSE:zypper install nfs-client
Step 3 Run the following command to check whether the domain name in the file systemmount point can be resolved. SFS Turbo file systems do not require domain nameresolution. You can skip this step and directly mount the file system.
nslookup File system domain name
NO TE
● A file system domain name is just a part of the mount point, for example, sfs-nas1.xxxx.com. You can obtain a file system domain name from the mount point of afile system. In this step, you are not supposed to enter the entire mount point but onlythe domain name.
● If the nslookup command cannot be used, install the bind-utils software package byrunning the yum install bind-utils command.
● If the domain name can be resolved, go to Step 4.● If the domain name cannot be resolved, configure the DNS server IP address
and then mount the file system. For details, see Configuring DNS.
Step 4 Run the following command to create a local path for mounting the file system:
mkdir Local path
NO TE
If there are resources, such as disks, already mounted on the local path, create a new path.
Step 5 Run the following command to mount the file system to the ECS that belongs tothe same VPC as the file system. Currently, the file system can be mounted to theECS running Linux using NFS v3 only.
Table 3-1 describes the variables.
mount -t nfs -o vers=3,timeo=600,noresvport,nolock Mount point Local path
Scalable File ServiceQuick Start 3 Step 3: Mount a File System
Issue 03 (2019-05-30) Copyright © Huawei Technologies Co., Ltd. 13
NO TICE
After an ECS where file systems have been mounted restarts, it loses the filesystem mount information. You can configure automatic mount in the fstab file toensure that an ECS automatically mounts file systems when it restarts. For details,see Mounting a File System Automatically.
Table 3-1 Parameter description
Parameter Description
vers File system version. Currently, only NFSv3 is supported, sothe value is fixed to 3.
timeo Waiting time before the NFS client retransmits a request. Theunit is 0.1 second. The recommended value is 600.
resvport/noresvport
Whether the confidential source port is used for serverconnection. By default, resvport indicates that theconfidential port is used, and noresvport indicates that theconfidential port is not used. The kernel version is 2.6.28 orlater.You are advised to set this parameter to noresvport so thata new TCP port can be used when the network isreconnected. This ensures that the connection is notinterrupted when the network recovers from a fault.
lock/nolock Whether to lock files on the server using the NLM protocol.If nolock is selected, the lock is valid for applications on onehost. For applications on another host, the lock is invalid. Therecommended value is nolock. If this parameter is notspecified, lock is selected by default. In this case, otherservers cannot write data to the file system.
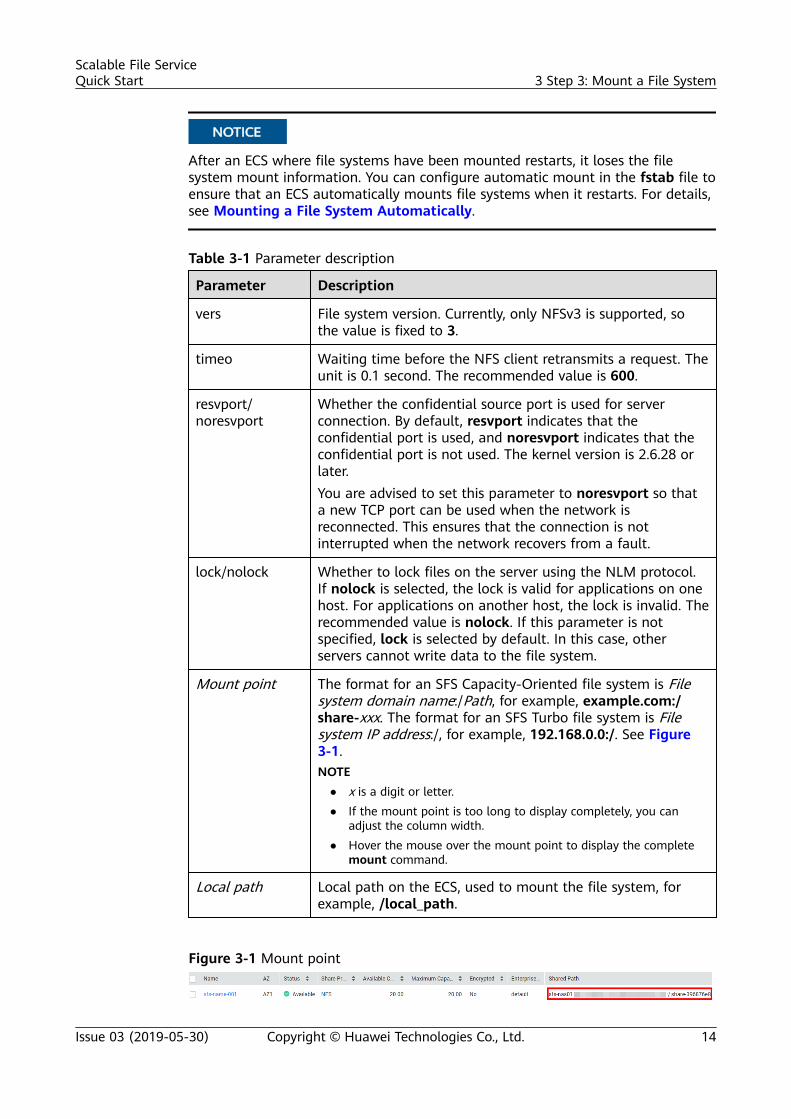
Mount point The format for an SFS Capacity-Oriented file system is Filesystem domain name:/Path, for example, example.com:/share-xxx. The format for an SFS Turbo file system is Filesystem IP address:/, for example, 192.168.0.0:/. See Figure3-1.NOTE
● x is a digit or letter.● If the mount point is too long to display completely, you can
adjust the column width.● Hover the mouse over the mount point to display the complete
mount command.
Local path Local path on the ECS, used to mount the file system, forexample, /local_path.
Figure 3-1 Mount point
Scalable File ServiceQuick Start 3 Step 3: Mount a File System
Issue 03 (2019-05-30) Copyright © Huawei Technologies Co., Ltd. 14
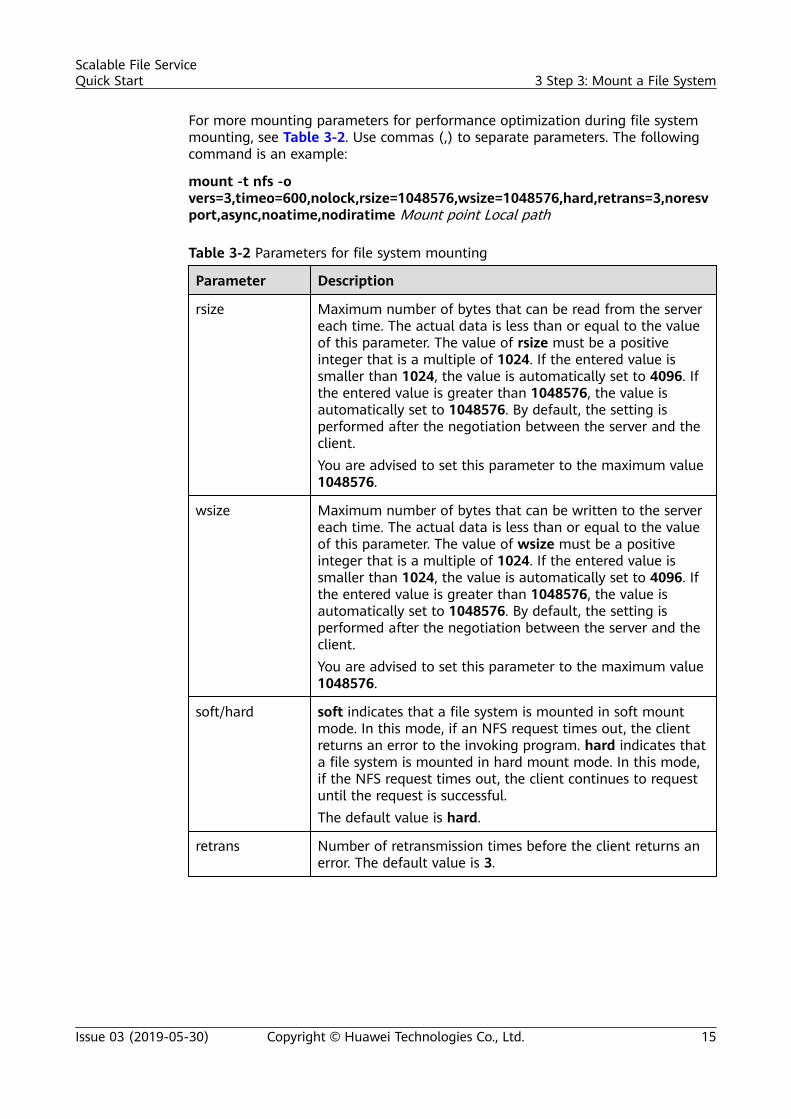
For more mounting parameters for performance optimization during file systemmounting, see Table 3-2. Use commas (,) to separate parameters. The followingcommand is an example:
mount -t nfs -overs=3,timeo=600,nolock,rsize=1048576,wsize=1048576,hard,retrans=3,noresvport,async,noatime,nodiratime Mount point Local path
Table 3-2 Parameters for file system mounting
Parameter Description
rsize Maximum number of bytes that can be read from the servereach time. The actual data is less than or equal to the valueof this parameter. The value of rsize must be a positiveinteger that is a multiple of 1024. If the entered value issmaller than 1024, the value is automatically set to 4096. Ifthe entered value is greater than 1048576, the value isautomatically set to 1048576. By default, the setting isperformed after the negotiation between the server and theclient.You are advised to set this parameter to the maximum value1048576.
wsize Maximum number of bytes that can be written to the servereach time. The actual data is less than or equal to the valueof this parameter. The value of wsize must be a positiveinteger that is a multiple of 1024. If the entered value issmaller than 1024, the value is automatically set to 4096. Ifthe entered value is greater than 1048576, the value isautomatically set to 1048576. By default, the setting isperformed after the negotiation between the server and theclient.You are advised to set this parameter to the maximum value1048576.
soft/hard soft indicates that a file system is mounted in soft mountmode. In this mode, if an NFS request times out, the clientreturns an error to the invoking program. hard indicates thata file system is mounted in hard mount mode. In this mode,if the NFS request times out, the client continues to requestuntil the request is successful.The default value is hard.
retrans Number of retransmission times before the client returns anerror. The default value is 3.
Scalable File ServiceQuick Start 3 Step 3: Mount a File System
Issue 03 (2019-05-30) Copyright © Huawei Technologies Co., Ltd. 15
Parameter Description
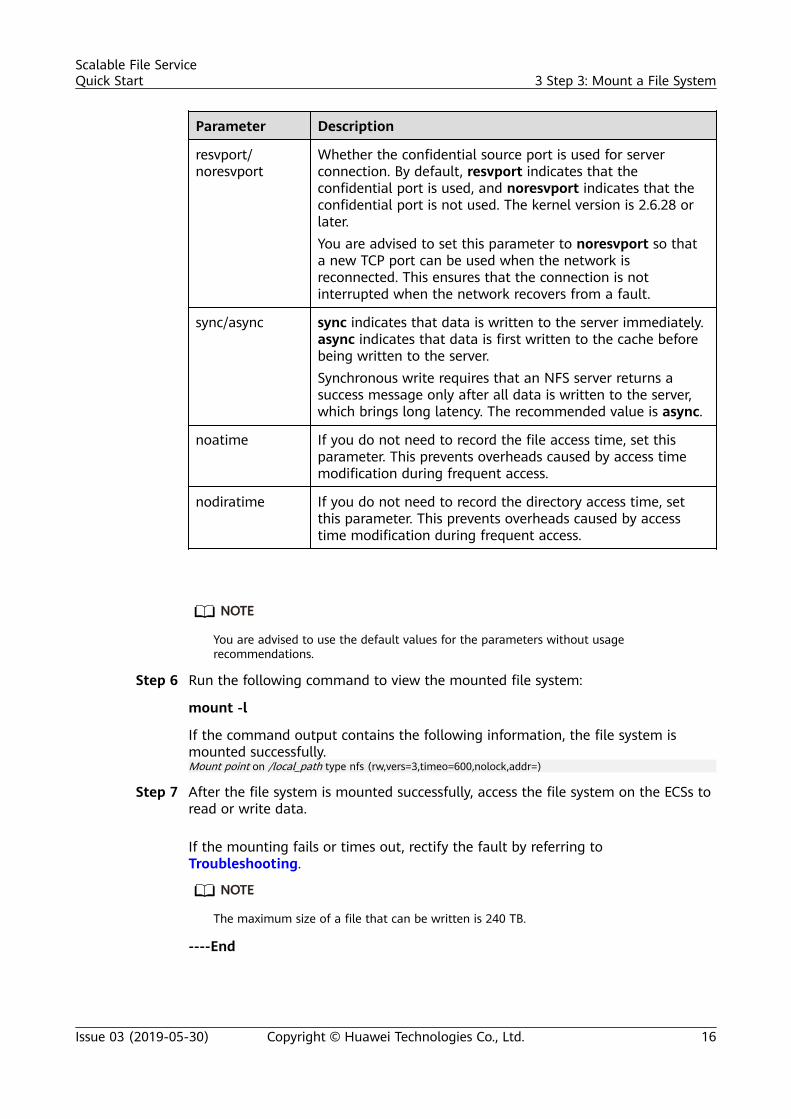
resvport/noresvport
Whether the confidential source port is used for serverconnection. By default, resvport indicates that theconfidential port is used, and noresvport indicates that theconfidential port is not used. The kernel version is 2.6.28 orlater.You are advised to set this parameter to noresvport so thata new TCP port can be used when the network isreconnected. This ensures that the connection is notinterrupted when the network recovers from a fault.
sync/async sync indicates that data is written to the server immediately.async indicates that data is first written to the cache beforebeing written to the server.Synchronous write requires that an NFS server returns asuccess message only after all data is written to the server,which brings long latency. The recommended value is async.
noatime If you do not need to record the file access time, set thisparameter. This prevents overheads caused by access timemodification during frequent access.
nodiratime If you do not need to record the directory access time, setthis parameter. This prevents overheads caused by accesstime modification during frequent access.
NO TE
You are advised to use the default values for the parameters without usagerecommendations.
Step 6 Run the following command to view the mounted file system:
mount -l
If the command output contains the following information, the file system ismounted successfully.Mount point on /local_path type nfs (rw,vers=3,timeo=600,nolock,addr=)
Step 7 After the file system is mounted successfully, access the file system on the ECSs toread or write data.
If the mounting fails or times out, rectify the fault by referring toTroubleshooting.
NO TE
The maximum size of a file that can be written is 240 TB.
----End
Scalable File ServiceQuick Start 3 Step 3: Mount a File System
Issue 03 (2019-05-30) Copyright © Huawei Technologies Co., Ltd. 16

3.2 Mounting an NFS File System to ECSs (Windows)After creating a file system, you need to mount the file system to ECSs so thatthey can share the file system.
This section uses Windows Server 2012 as an example to describe how to mountan NFS file system. For other versions, perform the steps based on the actualsituation.
Operations on BMSs and containers (CCE) are the same as those on ECSs.
Prerequisites● You have created a file system and have obtained the mount point of the file
system.● At least one ECS that belongs to the same VPC as the file system exists.● The IP address of the DNS server for resolving the domain names of the file
systems has been configured on the ECS. For details, see Configuring DNS.
Limitations and Constraints
Procedure
Step 1 Go to the ECS console and log in to the ECS running Windows Server 2012.
Step 2 Install the NFS client.
1. Click Server Manager in the lower left corner. The Server Manager windowis displayed, as shown in Figure 3-2.
Figure 3-2 Server Manager
2. Click Add Roles and Features. See Figure 3-3.
Scalable File ServiceQuick Start 3 Step 3: Mount a File System
Issue 03 (2019-05-30) Copyright © Huawei Technologies Co., Ltd. 17
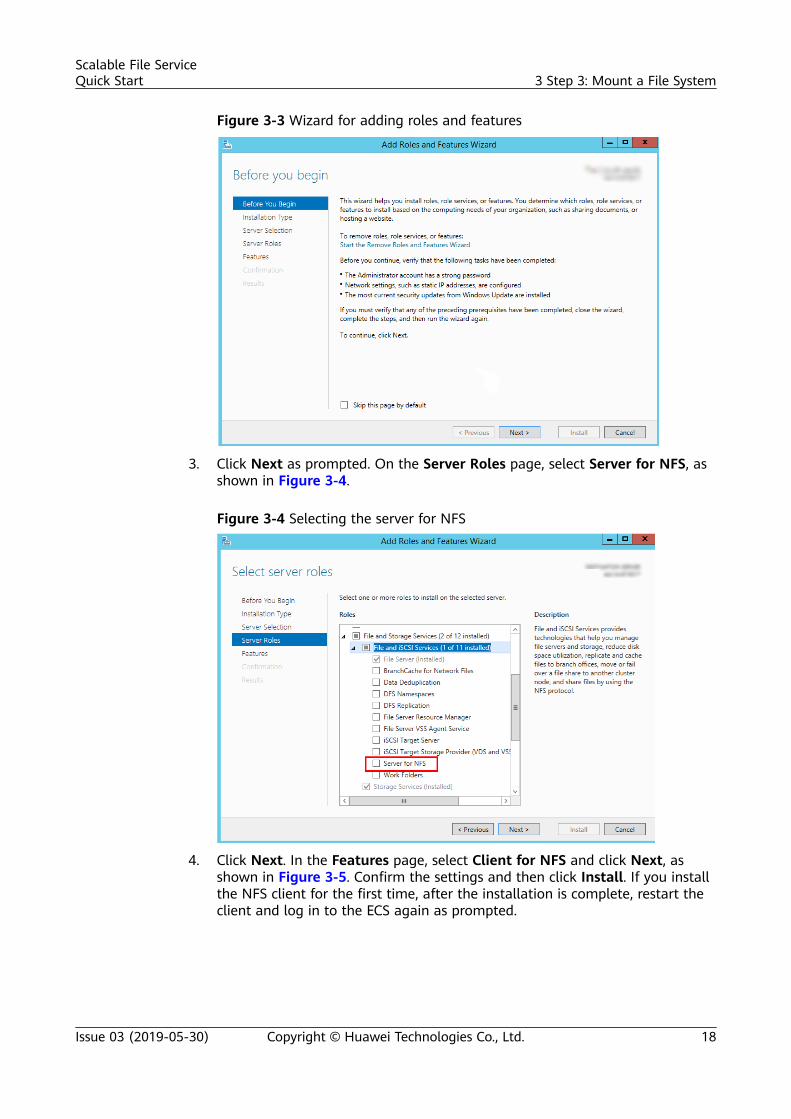
Figure 3-3 Wizard for adding roles and features
3. Click Next as prompted. On the Server Roles page, select Server for NFS, asshown in Figure 3-4.
Figure 3-4 Selecting the server for NFS
4. Click Next. In the Features page, select Client for NFS and click Next, asshown in Figure 3-5. Confirm the settings and then click Install. If you installthe NFS client for the first time, after the installation is complete, restart theclient and log in to the ECS again as prompted.
Scalable File ServiceQuick Start 3 Step 3: Mount a File System
Issue 03 (2019-05-30) Copyright © Huawei Technologies Co., Ltd. 18
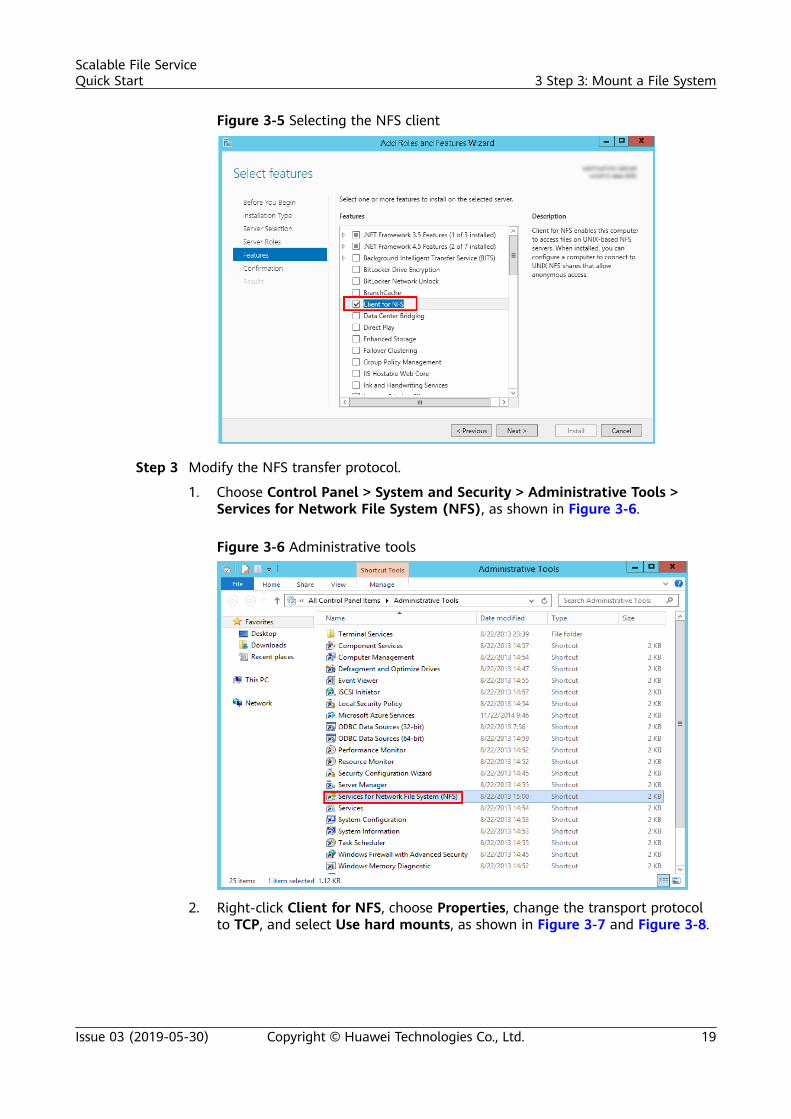
Figure 3-5 Selecting the NFS client
Step 3 Modify the NFS transfer protocol.
1. Choose Control Panel > System and Security > Administrative Tools >Services for Network File System (NFS), as shown in Figure 3-6.
Figure 3-6 Administrative tools
2. Right-click Client for NFS, choose Properties, change the transport protocolto TCP, and select Use hard mounts, as shown in Figure 3-7 and Figure 3-8.
Scalable File ServiceQuick Start 3 Step 3: Mount a File System
Issue 03 (2019-05-30) Copyright © Huawei Technologies Co., Ltd. 19

Figure 3-7 Services for NFS
Figure 3-8 Client for NFS properties
Step 4 Check that the IP address of the DNS server for resolving the domain names ofthe file systems has been configured on the ECS before mounting the file system.For details, see Configuring DNS. SFS Turbo file systems do not require domainname resolution.
Step 5 Run the following command in the Command Prompt of the Windows Server 2012(X is the drive letter of the free disk). Select the ECS that belongs to the same VPCas the file system to mount the file system.
For SFS Capacity-Oriented file systems: mount -o nolock mount point X:
For SFS Turbo file systems: mount -o nolock -o casesensitive=yes IP address:/! X:
Scalable File ServiceQuick Start 3 Step 3: Mount a File System
Issue 03 (2019-05-30) Copyright © Huawei Technologies Co., Ltd. 20

NO TE
● Free drive letter of the disk: A drive letter that is not in use, such as driver letter E or X.● The mount point of an SFS Turbo file system is the root directory. Ensure that an
English exclamation mark (!) is added to the mount point, for example, 127.0.0.1:/!.● casesensitive=yes indicates that file names are case sensitive during file search. If this
parameter is not added, the performance of creating files in a large directory willdeteriorate.
You can move the cursor to the mount point and click next to the mount pointto copy the mount point. For details, see Figure 3-9. If the information shown inFigure 3-10 is displayed, the mounting is successful.
Figure 3-9 Mount point
Figure 3-10 Running the command
Step 6 After the file system is mounted successfully, you can view the mounted filesystem on the This PC window, as shown in Figure 3-11.
If the mounting fails or times out, rectify the fault by referring toTroubleshooting.
Scalable File ServiceQuick Start 3 Step 3: Mount a File System
Issue 03 (2019-05-30) Copyright © Huawei Technologies Co., Ltd. 21
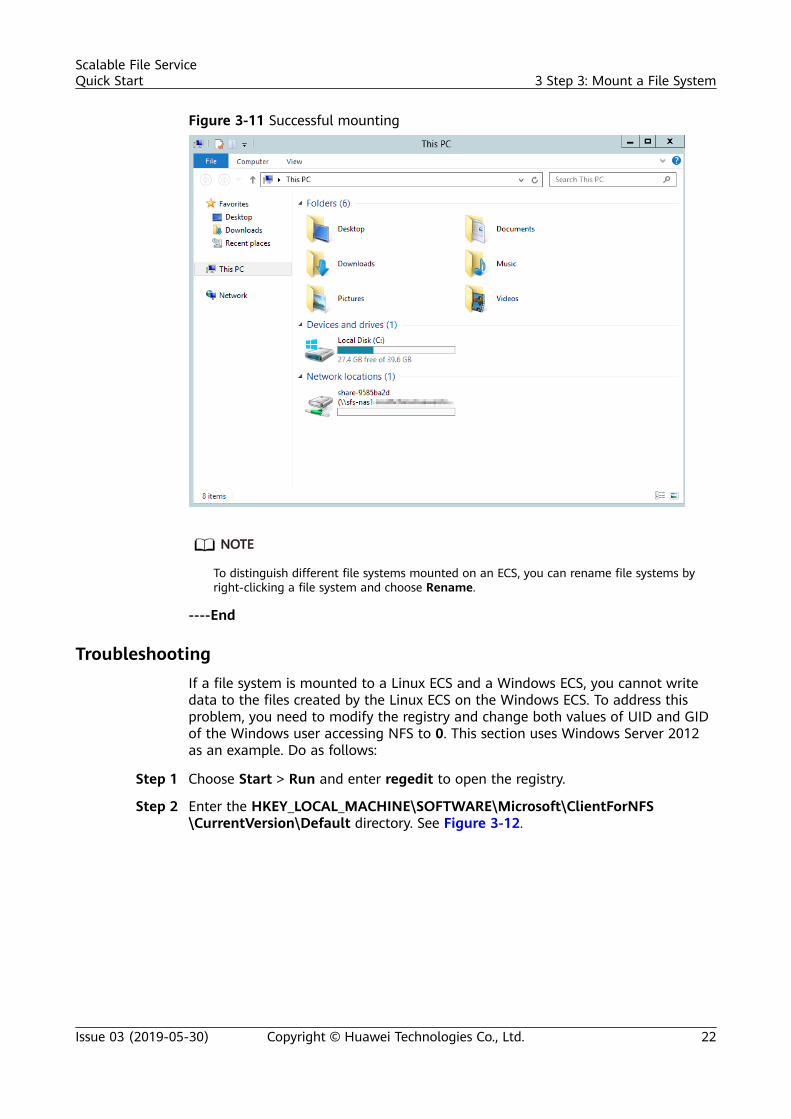
Figure 3-11 Successful mounting
NO TE
To distinguish different file systems mounted on an ECS, you can rename file systems byright-clicking a file system and choose Rename.
----End
TroubleshootingIf a file system is mounted to a Linux ECS and a Windows ECS, you cannot writedata to the files created by the Linux ECS on the Windows ECS. To address thisproblem, you need to modify the registry and change both values of UID and GIDof the Windows user accessing NFS to 0. This section uses Windows Server 2012as an example. Do as follows:
Step 1 Choose Start > Run and enter regedit to open the registry.
Step 2 Enter the HKEY_LOCAL_MACHINE\SOFTWARE\Microsoft\ClientForNFS\CurrentVersion\Default directory. See Figure 3-12.
Scalable File ServiceQuick Start 3 Step 3: Mount a File System
Issue 03 (2019-05-30) Copyright © Huawei Technologies Co., Ltd. 22
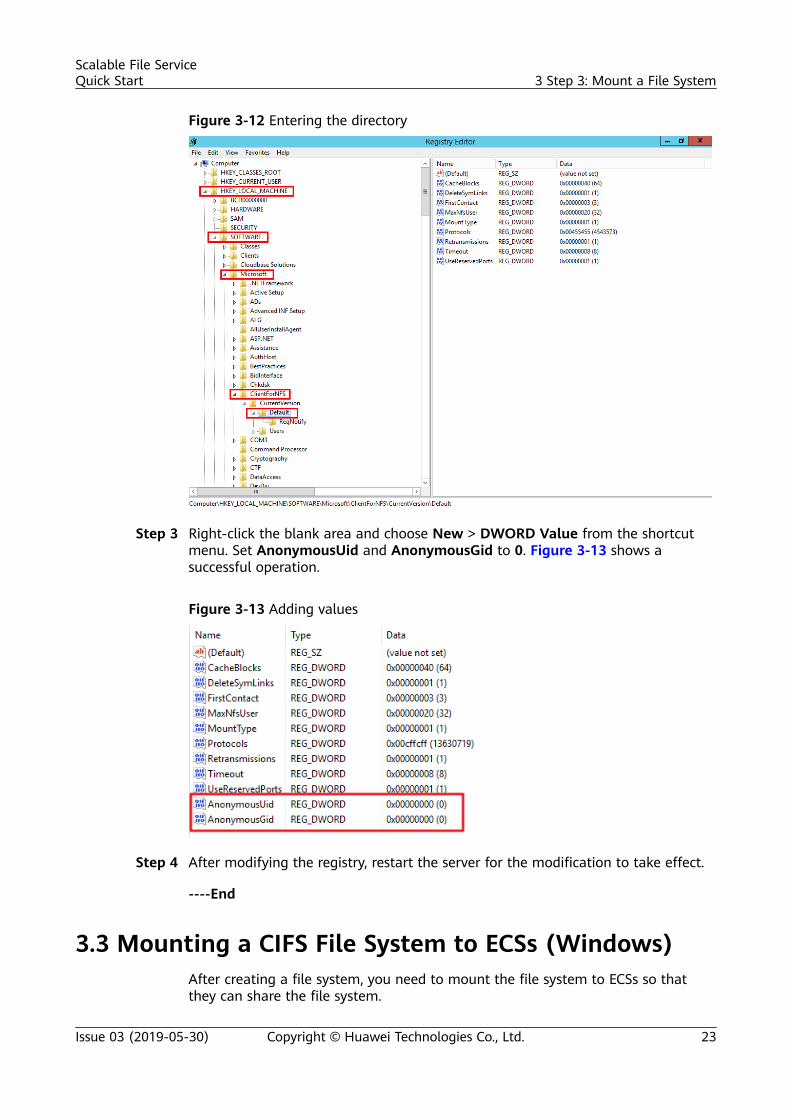
Figure 3-12 Entering the directory
Step 3 Right-click the blank area and choose New > DWORD Value from the shortcutmenu. Set AnonymousUid and AnonymousGid to 0. Figure 3-13 shows asuccessful operation.
Figure 3-13 Adding values
Step 4 After modifying the registry, restart the server for the modification to take effect.
----End
3.3 Mounting a CIFS File System to ECSs (Windows)After creating a file system, you need to mount the file system to ECSs so thatthey can share the file system.
Scalable File ServiceQuick Start 3 Step 3: Mount a File System
Issue 03 (2019-05-30) Copyright © Huawei Technologies Co., Ltd. 23

This section uses Windows Server 2012 as an example to describe how to mount aCIFS file system.
An SFS Capacity-Oriented file system can support either the NFS or CIFS protocol.
Prerequisites● You have created a file system and have obtained the mount point of the file
system.● At least one ECS that belongs to the same VPC as the file system exists.● The IP address of the DNS server for resolving the domain names of the file
systems has been configured on the ECSs. For details, see Configuring DNS.● You need to mount the file system as user Administrator. You cannot switch
to another user to mount the file system.
Limitations and ConstraintsCIFS file systems cannot be mounted to Linux ECSs.
Procedure
Step 1 Go to the ECS console and log in to the ECS running Windows Server 2012.
Step 2 Click Start, right-click Computer, and choose Map network drive.
Step 3 In the dialog box that is displayed, enter the mount point of the file system,specifically, \\File system domain name\Path. See Figure 3-14.
Table 3-3 Variable description
Variable Description
File systemdomain name
Obtain the file system domain name from the file systemmount point. For details about how to obtain the file systemdomain name, see Viewing a File System.
Path The format is share-xxxxxxxx, where x is a digit or letter.
Scalable File ServiceQuick Start 3 Step 3: Mount a File System
Issue 03 (2019-05-30) Copyright © Huawei Technologies Co., Ltd. 24
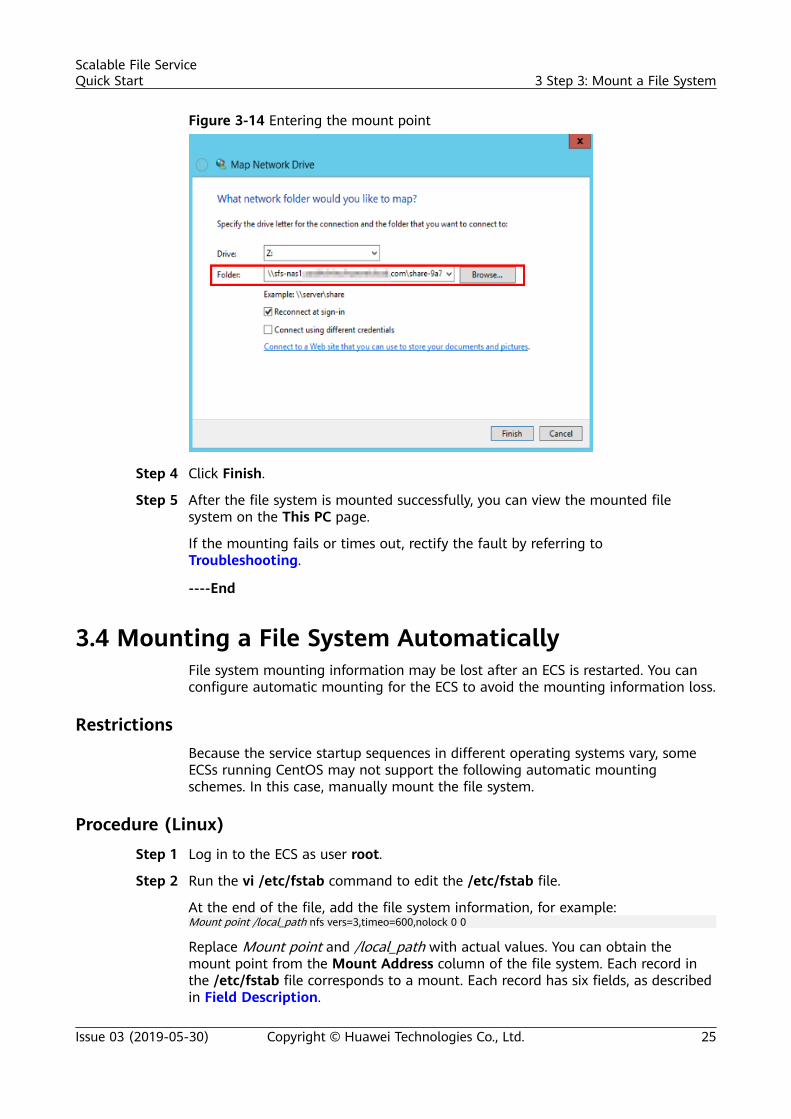
Figure 3-14 Entering the mount point
Step 4 Click Finish.
Step 5 After the file system is mounted successfully, you can view the mounted filesystem on the This PC page.
If the mounting fails or times out, rectify the fault by referring toTroubleshooting.
----End
3.4 Mounting a File System AutomaticallyFile system mounting information may be lost after an ECS is restarted. You canconfigure automatic mounting for the ECS to avoid the mounting information loss.
RestrictionsBecause the service startup sequences in different operating systems vary, someECSs running CentOS may not support the following automatic mountingschemes. In this case, manually mount the file system.
Procedure (Linux)Step 1 Log in to the ECS as user root.
Step 2 Run the vi /etc/fstab command to edit the /etc/fstab file.
At the end of the file, add the file system information, for example:Mount point /local_path nfs vers=3,timeo=600,nolock 0 0
Replace Mount point and /local_path with actual values. You can obtain themount point from the Mount Address column of the file system. Each record inthe /etc/fstab file corresponds to a mount. Each record has six fields, as describedin Field Description.
Scalable File ServiceQuick Start 3 Step 3: Mount a File System
Issue 03 (2019-05-30) Copyright © Huawei Technologies Co., Ltd. 25
NO TICE
For optimal system performance, configure file system information based on theprevious example configuration. If needed, you can customize part of mountparameters. However, the customization may affect system performance.
Step 3 Press Esc, input :wq, and press Enter to save and exit.
After the preceding configurations are complete, the system reads mountinginformation from the /etc/fstab file to automatically mount the file system whenthe ECS restarts.
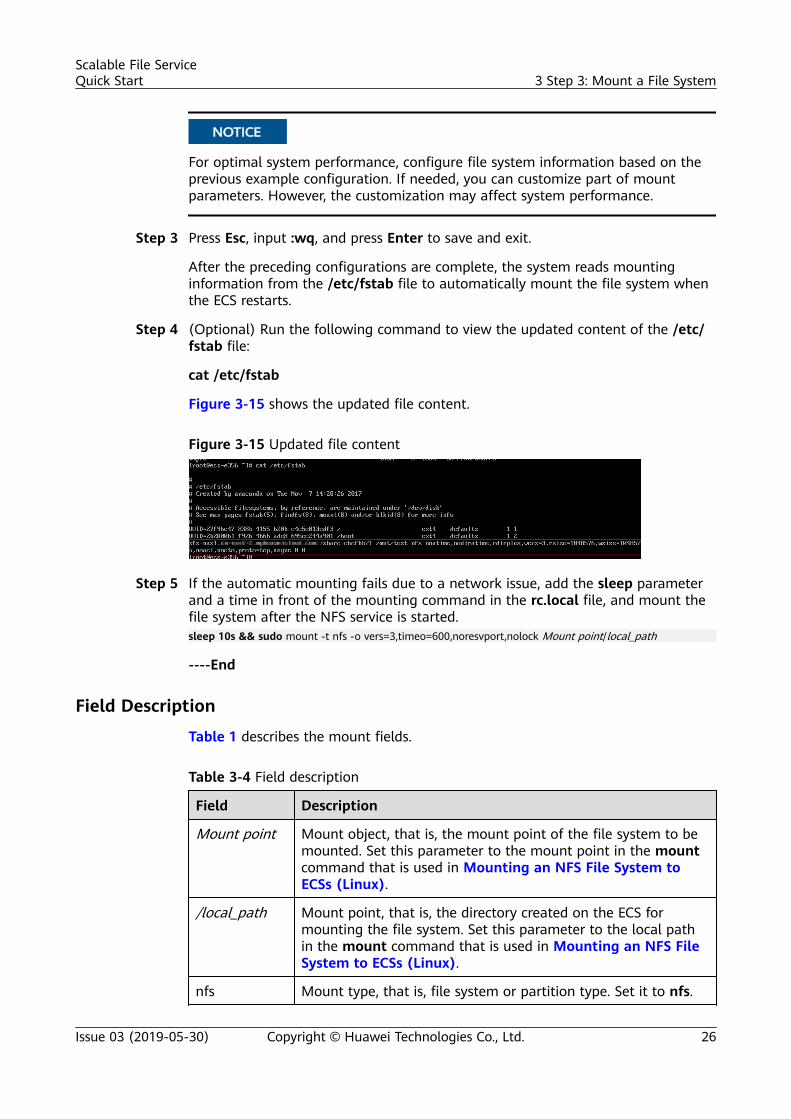
Step 4 (Optional) Run the following command to view the updated content of the /etc/fstab file:
cat /etc/fstab
Figure 3-15 shows the updated file content.
Figure 3-15 Updated file content
Step 5 If the automatic mounting fails due to a network issue, add the sleep parameterand a time in front of the mounting command in the rc.local file, and mount thefile system after the NFS service is started.sleep 10s && sudo mount -t nfs -o vers=3,timeo=600,noresvport,nolock Mount point/local_path
----End
Field Description
Table 1 describes the mount fields.
Table 3-4 Field description
Field Description
Mount point Mount object, that is, the mount point of the file system to bemounted. Set this parameter to the mount point in the mountcommand that is used in Mounting an NFS File System toECSs (Linux).
/local_path Mount point, that is, the directory created on the ECS formounting the file system. Set this parameter to the local pathin the mount command that is used in Mounting an NFS FileSystem to ECSs (Linux).
nfs Mount type, that is, file system or partition type. Set it to nfs.
Scalable File ServiceQuick Start 3 Step 3: Mount a File System
Issue 03 (2019-05-30) Copyright © Huawei Technologies Co., Ltd. 26

Field Description
vers=3,timeo=600,nolock
Mount options, used to set mount parameters. Use commas (,)to separate between multiple options.● vers: file system version. The value 3 indicates NFSv3.● timeo: waiting time before the NFS client retransmits a
request. The unit is 0.1 second. The recommended value is600.
● nolock: specifies whether to lock files on the server usingthe NLM protocol.
0 Choose whether to back up file systems using the dumpcommand.● 0: not to back up file systems● An integer larger than 0: to back up file systems. A file
system with a smaller integer is checked earlier than thatwith a larger integer.
0 Choose whether to check file systems using the fsck commandwhen the ECS is starting and specify the sequence for checkingfile systems.● 0: to check file systems● By default, this field is set to 1 for the root directory
partition. Other partitions start from 2, and a partition witha smaller integer is checked earlier than that with a largerinteger.
Scalable File ServiceQuick Start 3 Step 3: Mount a File System
Issue 03 (2019-05-30) Copyright © Huawei Technologies Co., Ltd. 27

4 Step 4: Unmount a File System
If a file system is no longer used and needs to be deleted, you are advised tounmount the file system and then delete it.
PrerequisitesBefore unmounting a file system, stop the process and the read/write operations.
Linux OS
Step 1 Log in to the ECS.
Step 2 Run the following command:
umount Local path
Local path: Local path used to mount the file system on the ECS, for example, /local_path.
NO TE
Before running the umount command, stop all read and write operations related to the filesystem and exit from the local path. Otherwise, the unmounting will fail.
----End
Scalable File ServiceQuick Start 4 Step 4: Unmount a File System
Issue 03 (2019-05-30) Copyright © Huawei Technologies Co., Ltd. 28
5 Example: Mounting an NFS File Systemto ECSs
Scalable File ServiceQuick Start 5 Example: Mounting an NFS File System to ECSs
Issue 03 (2019-05-30) Copyright © Huawei Technologies Co., Ltd. 29
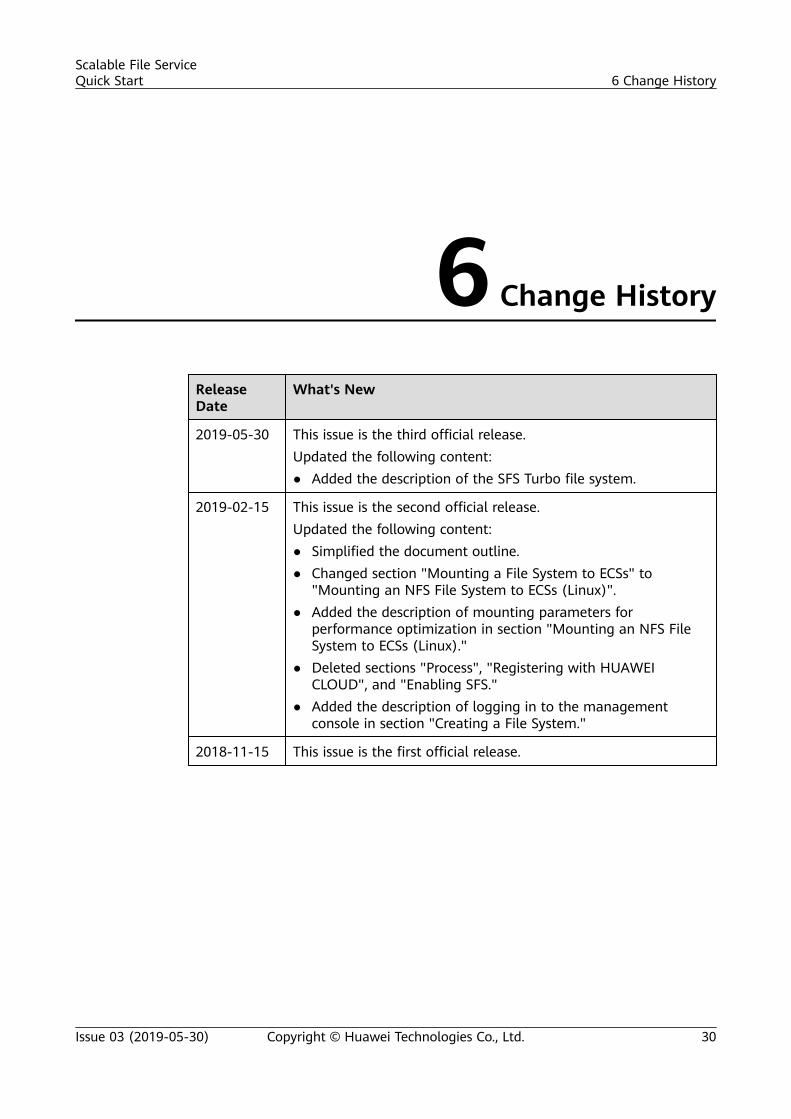
6 Change History
ReleaseDate
What's New
2019-05-30 This issue is the third official release.Updated the following content:● Added the description of the SFS Turbo file system.
2019-02-15 This issue is the second official release.Updated the following content:● Simplified the document outline.● Changed section "Mounting a File System to ECSs" to
"Mounting an NFS File System to ECSs (Linux)".● Added the description of mounting parameters for
performance optimization in section "Mounting an NFS FileSystem to ECSs (Linux)."
● Deleted sections "Process", "Registering with HUAWEICLOUD", and "Enabling SFS."
● Added the description of logging in to the managementconsole in section "Creating a File System."
2018-11-15 This issue is the first official release.
Scalable File ServiceQuick Start 6 Change History
Issue 03 (2019-05-30) Copyright © Huawei Technologies Co., Ltd. 30