Software Quick Start Guide Manual
45
BL00002-201(1) Thank you for purchasing these FUJIFILM products. This “Software Quick Start Guide” describes how to connect the camera to the USB port on your PC and how to install the enclosed software on your PC. It also provides a quick guide to using the software and a section on troubleshooting any problems that may arise. Read this manual carefully to ensure that you make the best possible use of the software. The functions described in this guide are available on FinePixViewer Ver.1.1 or later. However, some functions are not available on FinePixViewer Ver.1.0. For detailed information on using FinePixViewer and DP Editor, refer to the User’s Guide (PDF). E ■ USB Mass Storage Driver ■ USB PC Camera Driver ■ FinePixViewer ■ DP Editor ■ Exif Launcher Software Quick Start Guide Please read this guide carefully before using this software with a PC.
-
Upload
khangminh22 -
Category
Documents
-
view
0 -
download
0
Transcript of Software Quick Start Guide Manual
BL00002-201(1)
Thank you for purchasing these FUJIFILM products.This “Software Quick Start Guide” describes how to connect the camera to theUSB port on your PC and how to install the enclosed software on your PC. Italso provides a quick guide to using the software and a section ontroubleshooting any problems that may arise. Read this manual carefully toensure that you make the best possible use of the software.The functions described in this guide are available on FinePixViewer Ver.1.1or later. However, some functions are not available on FinePixViewer Ver.1.0.For detailed information on using FinePixViewer and DP Editor, refer to theUser’s Guide (PDF).
E
� USB Mass Storage Driver� USB PC Camera Driver� FinePixViewer� DP Editor� Exif Launcher
Software Quick Start Guide
Please read this guide carefully before using this software with a PC.
32
IMPORTANTBe sure to read this page before using the Software.
Please note that this Guide is written on the assumption that you already have a basicunderstanding of how to use your PC (personal computer), Windows and Macintosh.For basic information on using your PC, Windows and Macintosh, refer to the respectivemanuals supplied with your PC.
• Microsoft and Windows are trademarks of the Microsoft Corporation of the U.S. registered inthe U.S. and other countries.Windows is an abbreviated term referring to the Microsoft Windows Operating System.
• Macintosh, iMac, Mac OS and QuickTime™ are registered trademarks of Apple Computer,Inc.
• Adobe Acrobat® Reader™, ActiveShare™ and PhotoDeluxe are trademarks of AdobeSystems Incorporated of the U.S.
• VideoImpression™ is a registered trademark of ArcSoft Inc.• SmartMedia™ is a trademark of Toshiba Corporation.• All other company or product names are trademarks or registered trademarks of the
respective companies.
aDo not attempt to play the CD-ROM enclosed with this product onan audio CD player.Doing so could damage your hearing or could damage yourspeakers or headphones.
This End User License Agreement (“Agreement”) is an agreement between Fuji Photo Film Co., Ltd.(“Fuji”) and you, which sets forth the terms and conditions of the license granted for you to use thesoftware provided by Fuji.The CD-ROM contains third party software. In case a separate agreement is provided by a thirdparty supplier for its software, the provisions of such separate agreement shall apply to the use ofsuch third party software, prevailing over those of this Agreement.
1. Definitions.(a) “Media” means the CD-ROM titled “Software for FinePix EX” which is provided to you together with
this Agreement.(b) “Software” means the software which is recorded on Media.(c) “Documentation” means the operation manuals of Software and other related written materials which
are provided to you together with Media.(d) “Product” means Media (including Software) and Documentation collectively.
2. Use of Software.Fuji grants to you a nontransferable, nonexclusive license:(a) to install one copy of Software onto one computer in binary machine executable form;(b) to use Software on the computer onto which Software is installed; and(c) to make one backup copy of Software.
3. Restrictions.3.1 You shall not distribute, rent, lease or otherwise transfer all or any part of Software, Media or
Documentation to any third party without Fuji’s prior written consent. You also shall not sublicense,assign or otherwise transfer all or any part of the rights granted to you by Fuji under this Agreementwithout Fuji’s prior written consent.
3.2 Except as expressly granted by Fuji hereunder, you shall not copy or reproduce all or any part ofSoftware or Documentation.
3.3 You shall not modify, adapt or translate Software or Documentation. You also shall not alter orremove copyright and other proprietary notices that appear on or in Software or Documentation.
3.4 You shall not, or shall not have any third party, reverse-engineer, decompile, or disassembleSoftware.
4. Ownership.All copyrights and other proprietary rights to Software and Documentation are owned and retained byFuji or the third party suppliers as indicated on or in Software or Documentation. Nothing containedherein shall be construed, expressly or implicitly, as transferring or granting any right, license, or title toyou other than those explicitly granted under this Agreement.
5. Limited Warranty.Fuji warrants to you that Media is free from any defect in material and workmanship under normal use forninety (90) days from the date of your receipt of Media. Should Media not meet the foregoing warranty,Fuji shall replace such defective Media with other Media bearing no defect. Fuji’s entire liability and yoursole and exclusive remedy with regard to any defect in Media shall be expressly limited to such Fuji’sreplacement of Media as provided herein.
NOTICEBEFORE OPENING THE PACKAGE OF CD-ROM PROVIDED BY FUJI PHOTO FILM CO., LTD.,PLEASE READ THIS END USER LICENSE AGREEMENT CAREFULLY. ONLY IF YOU DOAGREE TO THIS AGREEMENT, YOU WILL BE ABLE TO USE THE SOFTWARE RECORDEDON THE CD-ROM. BY OPENING THE PACKAGE, YOU ACCEPT AND AGREE TO BE BOUNDBY THIS AGREEMENT.
End User License Agreement
6. DISCLAIMER OF WARRANTY.EXCEPT AS PROVIDED IN SECTION 5 HEREIN, FUJI PROVIDES PRODUCT “AS IS” ANDWITHOUT WARRANTIES OF ANY KIND, EXPRESS OR IMPLIED. FUJI SHALL MAKE NOWARRANTY, EXPRESS, IMPLIED OR STATUTORY, AS TO ANY OTHER MATTERS, INCLUDING,BUT NOT LIMITED TO NON-INFRINGEMENT OF ANY COPYRIGHT, PATENT, TRADE SECRET, ORANY OTHER PROPRIETARY RIGHTS OF ANY THIRD PARTY, MARCHANTABILITY, OR FITNESSFOR ANY PARTICULAR PURPOSE.
7. LIMITATION OF LIABILITY.IN NO EVENT SHALL FUJI HAVE ANY LIABILITY FOR ANY GENERAL, SPECIAL, DIRECT,INDIRECT, CONSEQUENTIAL, INCIDENTAL, OR OTHER DAMAGES (INCLUDING DAMAGES FORLOSS OF PROFITS OR LOST SAVINGS) INCURRED FROM THE USE OF OR INABILITY TO USEPRODUCT EVEN IF FUJI HAS BEEN ADVISED OF THE POSSIBILITY OF SUCH DAMAGES.
8. No export.You acknowledge that neither Software nor any part thereof, will be transferred, or exported to anycountry or used in any manner in violation of any export control laws and regulations to which Software issubject.
9. Termination.In case you breach any of the terms and conditions hereof, Fuji may immediately terminate thisAgreement without any notice.
10.Term.This Agreement is effective until the date when you cease to use Software, unless earlier terminated inaccordance with Section 9 hereof.
11.Obligation upon termination.Upon termination or expiration of this Agreement, you shall, at your own responsibility and expense,delete or destroy immediately all Software (including its copies), Media and Documentation.
12.Governing Law.This Agreement shall be governed by and construed in accordance with laws of Japan.
54
Win
do
ws
Mac
into
sh
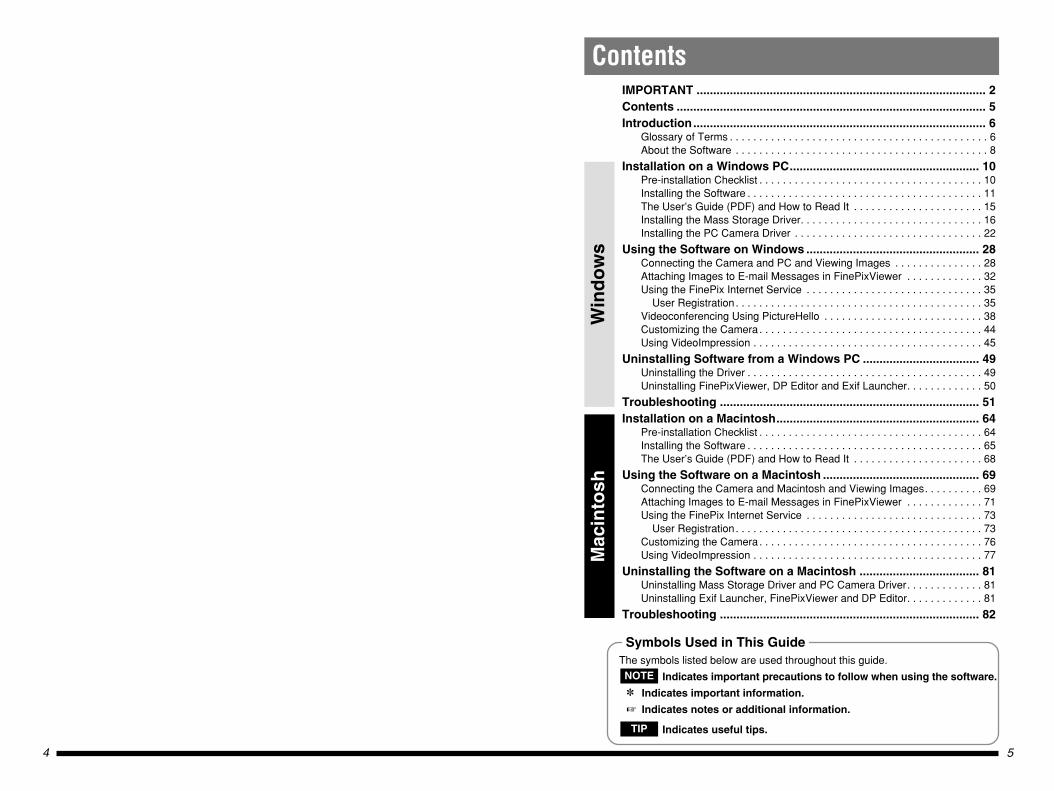
IMPORTANT ....................................................................................... 2Contents ............................................................................................. 5Introduction........................................................................................ 6
Glossary of Terms . . . . . . . . . . . . . . . . . . . . . . . . . . . . . . . . . . . . . . . . . . . . 6About the Software . . . . . . . . . . . . . . . . . . . . . . . . . . . . . . . . . . . . . . . . . . . 8
Installation on a Windows PC......................................................... 10Pre-installation Checklist . . . . . . . . . . . . . . . . . . . . . . . . . . . . . . . . . . . . . . 10Installing the Software . . . . . . . . . . . . . . . . . . . . . . . . . . . . . . . . . . . . . . . . 11The User’s Guide (PDF) and How to Read It . . . . . . . . . . . . . . . . . . . . . . 15Installing the Mass Storage Driver. . . . . . . . . . . . . . . . . . . . . . . . . . . . . . . 16Installing the PC Camera Driver . . . . . . . . . . . . . . . . . . . . . . . . . . . . . . . . 22
Using the Software on Windows .................................................... 28Connecting the Camera and PC and Viewing Images . . . . . . . . . . . . . . . 28Attaching Images to E-mail Messages in FinePixViewer . . . . . . . . . . . . . 32Using the FinePix Internet Service . . . . . . . . . . . . . . . . . . . . . . . . . . . . . . 35
User Registration . . . . . . . . . . . . . . . . . . . . . . . . . . . . . . . . . . . . . . . . . . 35Videoconferencing Using PictureHello . . . . . . . . . . . . . . . . . . . . . . . . . . . 38Customizing the Camera . . . . . . . . . . . . . . . . . . . . . . . . . . . . . . . . . . . . . . 44Using VideoImpression . . . . . . . . . . . . . . . . . . . . . . . . . . . . . . . . . . . . . . . 45
Uninstalling Software from a Windows PC ................................... 49Uninstalling the Driver . . . . . . . . . . . . . . . . . . . . . . . . . . . . . . . . . . . . . . . . 49Uninstalling FinePixViewer, DP Editor and Exif Launcher. . . . . . . . . . . . . 50
Troubleshooting .............................................................................. 51Installation on a Macintosh............................................................. 64
Pre-installation Checklist . . . . . . . . . . . . . . . . . . . . . . . . . . . . . . . . . . . . . . 64Installing the Software . . . . . . . . . . . . . . . . . . . . . . . . . . . . . . . . . . . . . . . . 65The User’s Guide (PDF) and How to Read It . . . . . . . . . . . . . . . . . . . . . . 68
Using the Software on a Macintosh ............................................... 69Connecting the Camera and Macintosh and Viewing Images. . . . . . . . . . 69Attaching Images to E-mail Messages in FinePixViewer . . . . . . . . . . . . . 71Using the FinePix Internet Service . . . . . . . . . . . . . . . . . . . . . . . . . . . . . . 73
User Registration . . . . . . . . . . . . . . . . . . . . . . . . . . . . . . . . . . . . . . . . . . 73Customizing the Camera . . . . . . . . . . . . . . . . . . . . . . . . . . . . . . . . . . . . . . 76Using VideoImpression . . . . . . . . . . . . . . . . . . . . . . . . . . . . . . . . . . . . . . . 77
Uninstalling the Software on a Macintosh .................................... 81Uninstalling Mass Storage Driver and PC Camera Driver. . . . . . . . . . . . . 81Uninstalling Exif Launcher, FinePixViewer and DP Editor. . . . . . . . . . . . . 81
Troubleshooting .............................................................................. 82
The symbols listed below are used throughout this guide.
Indicates important precautions to follow when using the software.✽ Indicates important information.
� Indicates notes or additional information.
Indicates useful tips.TIP
NOTE
Symbols Used in This Guide
Contents
6 7
IntroductionGlossary of Terms
This section provides explanations of the minimum basic operations you mustbe familiar with in order to use your personal computer, along with anintroduction to some other operations that will help you to use your computermore efficiently. For more detailed information on using your computer, referto the user manuals supplied with the computer.
� Application softwareSoftware used for a specific purpose, such as word processing, spreadsheets or imageediting.
� BrowserSoftware used for viewing web pages on the Internet. Examples include InternetExplorer and Netscape Navigator.
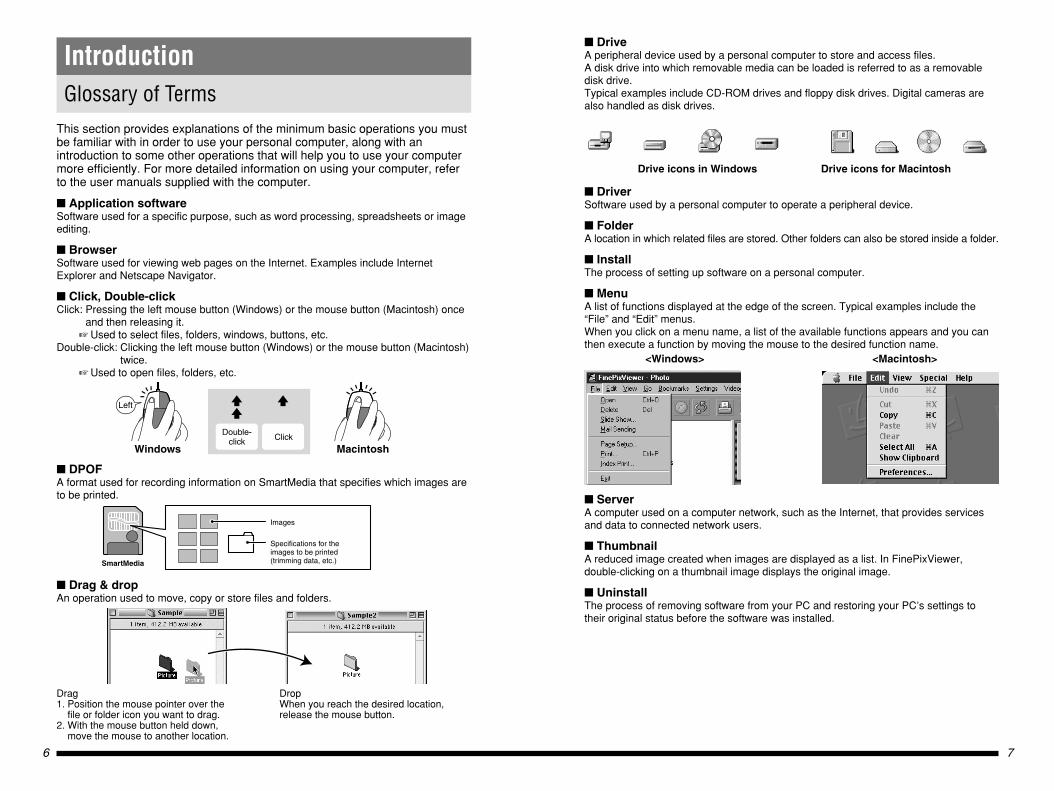
� Click, Double-clickClick: Pressing the left mouse button (Windows) or the mouse button (Macintosh) once
and then releasing it.� Used to select files, folders, windows, buttons, etc.
Double-click: Clicking the left mouse button (Windows) or the mouse button (Macintosh)twice.
� Used to open files, folders, etc.
� DPOFA format used for recording information on SmartMedia that specifies which images areto be printed.
� Drag & dropAn operation used to move, copy or store files and folders.
Left
Double-click Click
Windows Macintosh
� DriveA peripheral device used by a personal computer to store and access files.A disk drive into which removable media can be loaded is referred to as a removabledisk drive.Typical examples include CD-ROM drives and floppy disk drives. Digital cameras arealso handled as disk drives.
Drive icons in Windows Drive icons for Macintosh
� DriverSoftware used by a personal computer to operate a peripheral device.
� FolderA location in which related files are stored. Other folders can also be stored inside a folder.
� InstallThe process of setting up software on a personal computer.
� MenuA list of functions displayed at the edge of the screen. Typical examples include the“File” and “Edit” menus.When you click on a menu name, a list of the available functions appears and you canthen execute a function by moving the mouse to the desired function name.
<Windows> <Macintosh>
� ServerA computer used on a computer network, such as the Internet, that provides servicesand data to connected network users.
� ThumbnailA reduced image created when images are displayed as a list. In FinePixViewer,double-clicking on a thumbnail image displays the original image.
� UninstallThe process of removing software from your PC and restoring your PC’s settings totheir original status before the software was installed.
Specifications for the images to be printed (trimming data, etc.)SmartMedia
Images
Drag1. Position the mouse pointer over the
file or folder icon you want to drag.2. With the mouse button held down,
move the mouse to another location.
DropWhen you reach the desired location,release the mouse button.
98
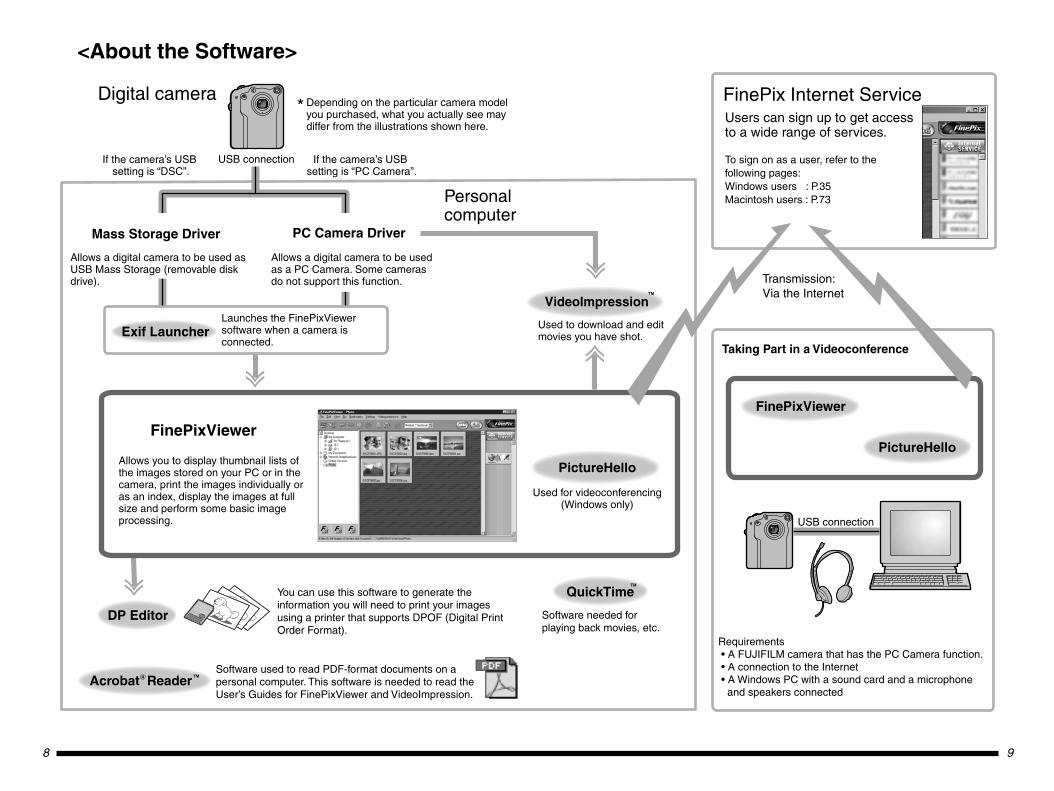
FinePixViewer
QuickTime
DP Editor
Acrobat Reader
FinePix Internet Service
Exif Launcher
VideoImpressionLaunches the FinePixViewer software when a camera is connected.
Allows you to display thumbnail lists of the images stored on your PC or in the camera, print the images individually or as an index, display the images at full size and perform some basic image processing.
Software needed for playing back movies, etc.
You can use this software to generate the information you will need to print your images using a printer that supports DPOF (Digital Print Order Format).
Software used to read PDF-format documents on a personal computer. This software is needed to read the User’s Guides for FinePixViewer and VideoImpression.
TM
TM
R
Users can sign up to get access to a wide range of services.
To sign on as a user, refer to the following pages:Windows users : P.35Macintosh users : P.73
Used to download and edit movies you have shot.
FinePixViewer
TM
PictureHello
PC Camera Driver
PictureHello
Mass Storage Driver
<About the Software>
Digital camera
If the camera’s USB setting is “DSC”.
*
If the camera’s USB setting is “PC Camera”.
USB connection
Allows a digital camera to be used as USB Mass Storage (removable disk drive).
Allows a digital camera to be used as a PC Camera. Some cameras do not support this function.
Requirements • A FUJIFILM camera that has the PC Camera function. • A connection to the Internet • A Windows PC with a sound card and a microphone
and speakers connected
Used for videoconferencing (Windows only)
Transmission:Via the Internet
Taking Part in a Videoconference
Personal computer
Depending on the particular camera model you purchased, what you actually see may differ from the illustrations shown here.
USB connection
10 11
Windows
Pre-installation Checklist
Installation on a Windows PC
� Hardware and software requirementsTo run this software, you must have the hardware and software describedbelow. Check your system before you begin the installation.
Compatible PCs : IBM PC/AT or compatible✽1
Operating System : Windows 98 (including the second edition)Windows Millennium Edition (Windows Me)Windows 2000 Professional(For installation, log in using the Administrator group.)
CPU : Pentium 200 MHz or betterRAM : 64 MB minimumHard disk space : Amount required for installation: 140 MB minimum
Amount required for operation: 300 MB minimumDisplay : 800 × 600 pixels or better, 16-bit color or betterSupported cameras : Fujifilm digital cameras equipped with a USB interfaceInternet connection✽2 : 56 kbps modem connection (recommended) or better
or an ISDN connectionSound functions✽3 : Speakers, microphone and sound card
✽1 Models with a USB interface as a standard feature and one of the aboveoperating systems preinstalled.
✽2 Required to use the FinePix Internet Service and videoconferencing. Thesoftware can still be installed even if you do not have an Internet connection.
✽3 Cameras that feature the “PC Camera” option in the USB settings allow you touse the videoconferencing functions and the VideoImpression capture function.Sound functions are required for audio input/output in VideoImpression andvideoconferencing.
• Connect the camera/cradle directly to the computer using the special USBcable. The software may not operate correctly if you use an extension cable orconnect the camera/cradle via a USB hub.
• If your computer has more than one USB port, the camera can be connected toeither port.
• Push the USB connector fully into the socket to ensure that it is securelyconnected. The software may not operate correctly if the connection is faulty.
• Additional USB interface board is not guaranteed.• Windows 95 cannot be used.• Operation is not guaranteed on home-built computers or on computers running
updated operating system software.• Use the drivers (the Mass Storage Driver and PC Camera Driver) provided on
the enclosed CD-ROM. When older drivers are already installed on your PC,uninstall the old versions and then re-install the drivers provided on theenclosed CD-ROM.
• If your Internet connection is via a router or via a LAN (connecting machines onthe LAN to the Internet), you cannot use videoconferencing.
NOTE
Installing the Software� The following applications are installed by the Installer:
FinePixViewerDP EditorExif LauncherQuickTime™NetMeeting 3.01 (Windows 98 computers must upgrade to this version.)VideoImpression™Windows Media PlayerAcrobat® Reader™ActiveShare™PhotoDeluxe
Have the Owner’s Manual for your camera handy and read itin conjunction with these instructions.
1. Switch on your PC and start up Windows.
2. Quit all other active applications until no applications areshown in the taskbar.
1 Click the right mouse button on the application icon in the taskbar.2 Click “Close” in the menu that appears to quit the application.✽ Refer to the instructions provided with your PC and applications (antivirus
software, etc.) for details.
3. If the following applications are installed on your PC, use“Add/Remove Programs” in the Control Panel to uninstall theapplications. (See P.50.)� Exif Viewer� Exif Launcher (Uninstallation cannot proceed unless you
shut down all resident programs.)� DP Editor
4. Load the enclosed CD-ROM into the CD-ROM drive. Theinstaller starts up automatically.✽ If the installer does not start up automatically, see “Launching the Installer
Manually” on the next page.
Installation Preparations
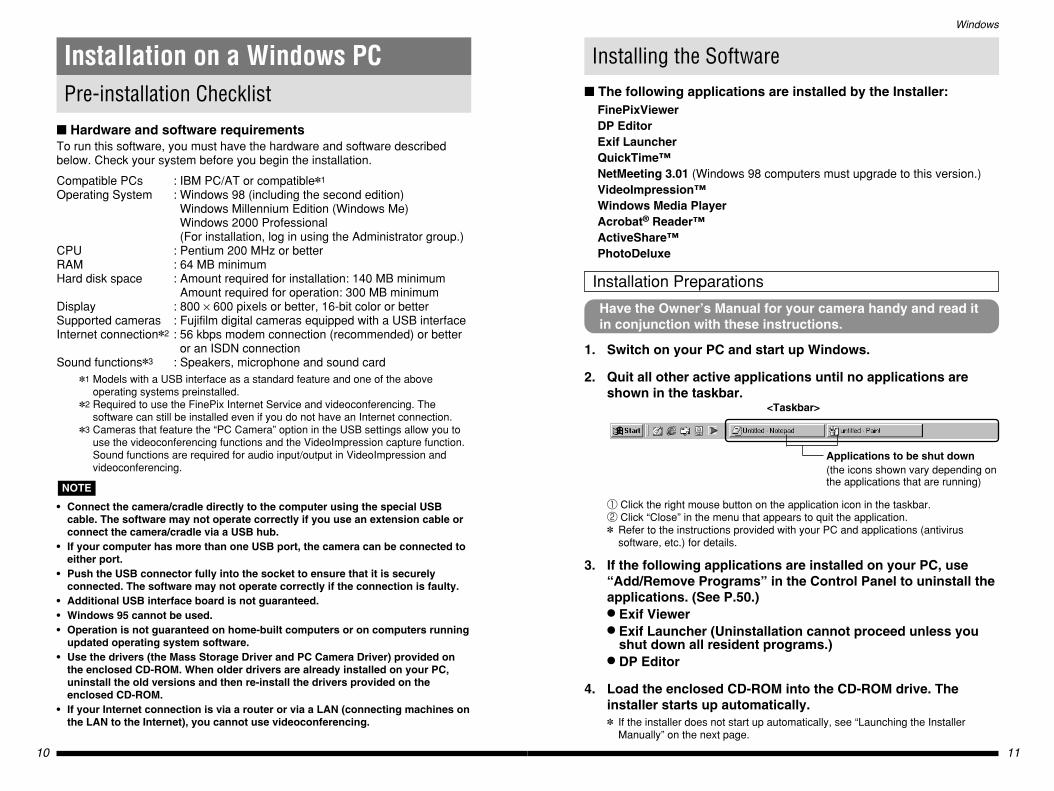
<Taskbar>
Applications to be shut down(the icons shown vary depending onthe applications that are running)
12 13
Windows
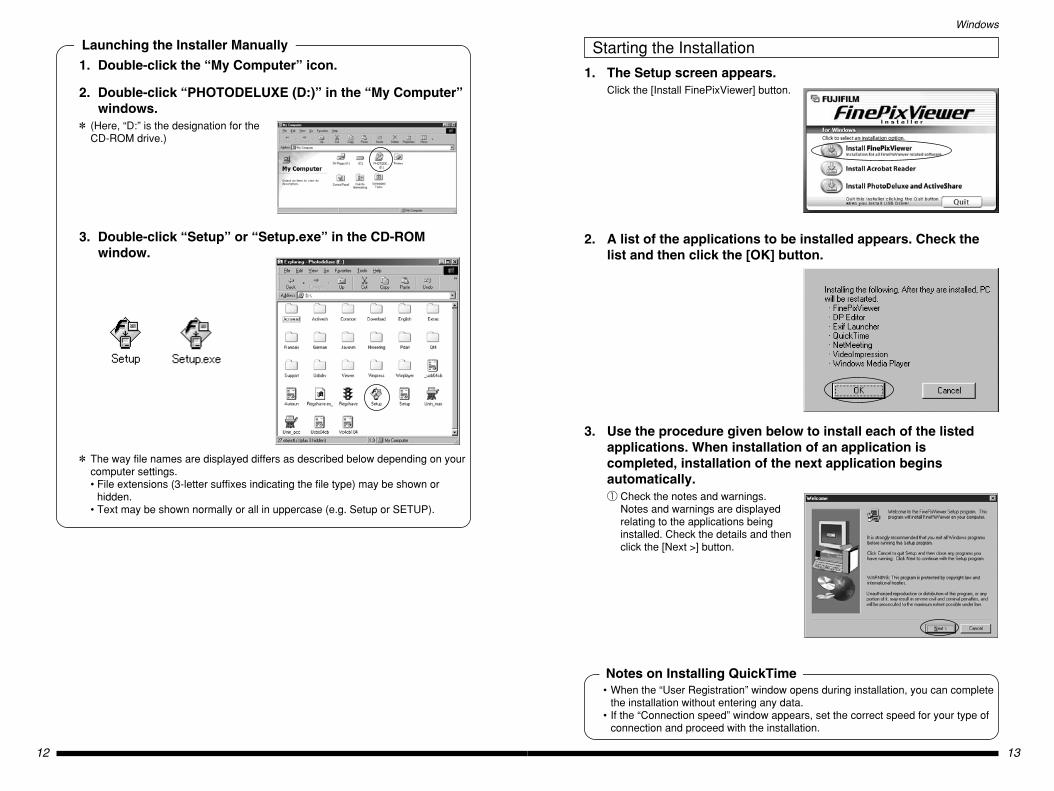
1. The Setup screen appears.Click the [Install FinePixViewer] button.
2. A list of the applications to be installed appears. Check thelist and then click the [OK] button.
3. Use the procedure given below to install each of the listedapplications. When installation of an application iscompleted, installation of the next application beginsautomatically.1 Check the notes and warnings.
Notes and warnings are displayedrelating to the applications beinginstalled. Check the details and thenclick the [Next >] button.
Starting the InstallationLaunching the Installer Manually
1. Double-click the “My Computer” icon.
2. Double-click “PHOTODELUXE (D:)” in the “My Computer”windows.
✽ (Here, “D:” is the designation for theCD-ROM drive.)
3. Double-click “Setup” or “Setup.exe” in the CD-ROMwindow.
✽ The way file names are displayed differs as described below depending on yourcomputer settings.• File extensions (3-letter suffixes indicating the file type) may be shown or
hidden.• Text may be shown normally or all in uppercase (e.g. Setup or SETUP).
• When the “User Registration” window opens during installation, you can completethe installation without entering any data.
• If the “Connection speed” window appears, set the correct speed for your type ofconnection and proceed with the installation.
Notes on Installing QuickTime
14 15
Windows
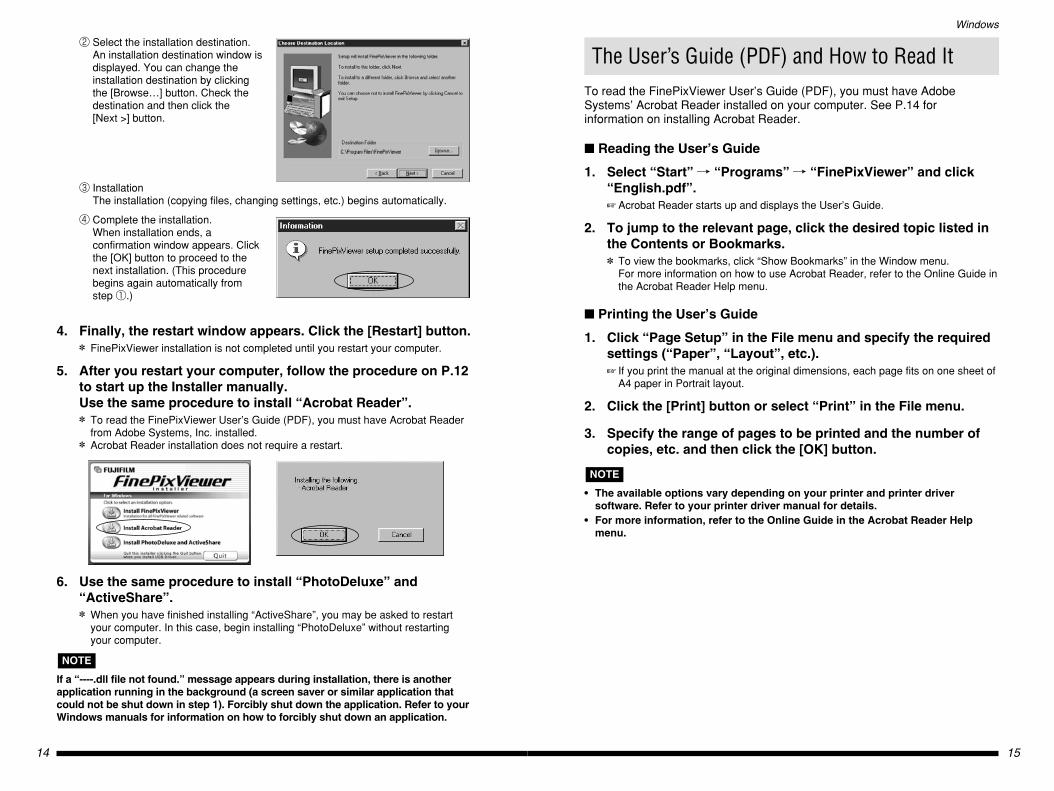
2 Select the installation destination.An installation destination window isdisplayed. You can change theinstallation destination by clickingthe [Browse…] button. Check thedestination and then click the [Next >] button.
3 InstallationThe installation (copying files, changing settings, etc.) begins automatically.
4 Complete the installation.When installation ends, aconfirmation window appears. Clickthe [OK] button to proceed to thenext installation. (This procedurebegins again automatically fromstep 1.)
4. Finally, the restart window appears. Click the [Restart] button.✽ FinePixViewer installation is not completed until you restart your computer.
5. After you restart your computer, follow the procedure on P.12to start up the Installer manually. Use the same procedure to install “Acrobat Reader”.✽ To read the FinePixViewer User’s Guide (PDF), you must have Acrobat Reader
from Adobe Systems, Inc. installed.✽ Acrobat Reader installation does not require a restart.
6. Use the same procedure to install “PhotoDeluxe” and“ActiveShare”.✽ When you have finished installing “ActiveShare”, you may be asked to restart
your computer. In this case, begin installing “PhotoDeluxe” without restartingyour computer.
If a “----.dll file not found.” message appears during installation, there is anotherapplication running in the background (a screen saver or similar application thatcould not be shut down in step 1). Forcibly shut down the application. Refer to yourWindows manuals for information on how to forcibly shut down an application.
NOTE
The User’s Guide (PDF) and How to Read ItTo read the FinePixViewer User’s Guide (PDF), you must have AdobeSystems’ Acrobat Reader installed on your computer. See P.14 forinformation on installing Acrobat Reader.
� Reading the User’s Guide
1. Select “Start” / “Programs” / “FinePixViewer” and click“English.pdf”.� Acrobat Reader starts up and displays the User’s Guide.
2. To jump to the relevant page, click the desired topic listed inthe Contents or Bookmarks.✽ To view the bookmarks, click “Show Bookmarks” in the Window menu.
For more information on how to use Acrobat Reader, refer to the Online Guide inthe Acrobat Reader Help menu.
� Printing the User’s Guide
1. Click “Page Setup” in the File menu and specify the requiredsettings (“Paper”, “Layout”, etc.).� If you print the manual at the original dimensions, each page fits on one sheet of
A4 paper in Portrait layout.
2. Click the [Print] button or select “Print” in the File menu.
3. Specify the range of pages to be printed and the number ofcopies, etc. and then click the [OK] button.
• The available options vary depending on your printer and printer driversoftware. Refer to your printer driver manual for details.
• For more information, refer to the Online Guide in the Acrobat Reader Helpmenu.
NOTE
17
Windows
16
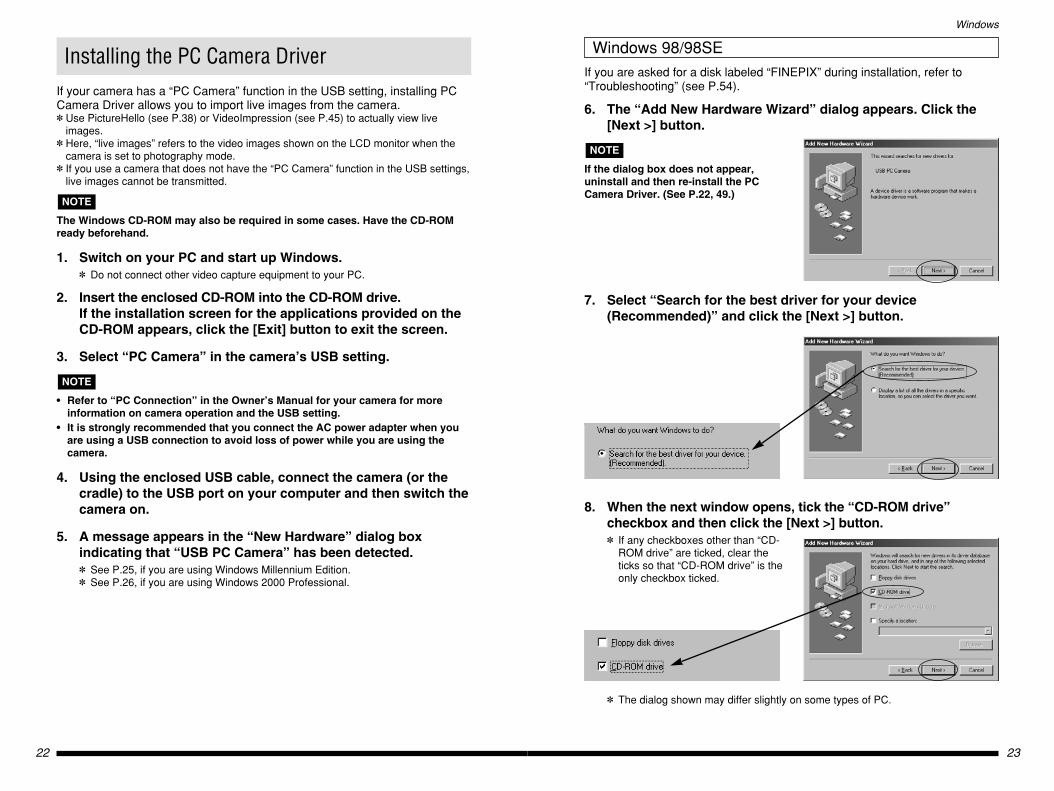
If you are asked for a disk labeled “FINEPIX” during installation, refer to“Troubleshooting” (See P.54).
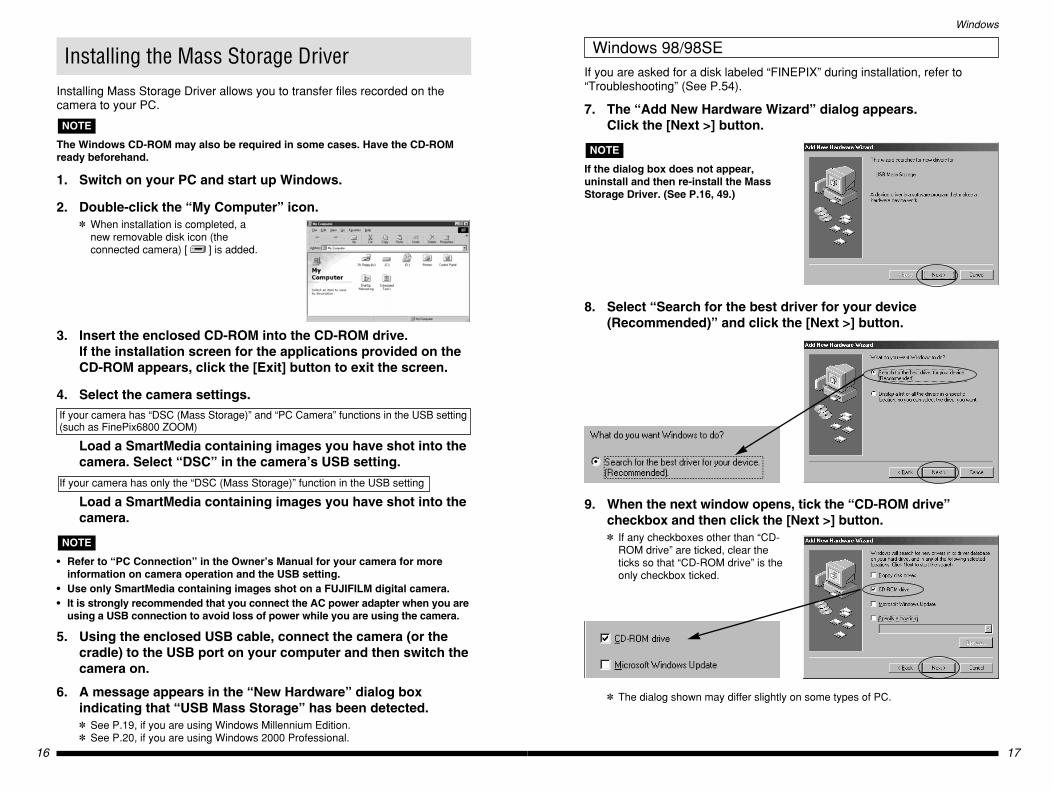
7. The “Add New Hardware Wizard” dialog appears. Click the [Next >] button.
If the dialog box does not appear,uninstall and then re-install the MassStorage Driver. (See P.16, 49.)
8. Select “Search for the best driver for your device(Recommended)” and click the [Next >] button.
9. When the next window opens, tick the “CD-ROM drive”checkbox and then click the [Next >] button.✽ If any checkboxes other than “CD-
ROM drive” are ticked, clear theticks so that “CD-ROM drive” is theonly checkbox ticked.
✽ The dialog shown may differ slightly on some types of PC.
NOTE
Windows 98/98SEInstalling the Mass Storage DriverInstalling Mass Storage Driver allows you to transfer files recorded on thecamera to your PC.
The Windows CD-ROM may also be required in some cases. Have the CD-ROMready beforehand.
1. Switch on your PC and start up Windows.
2. Double-click the “My Computer” icon.✽ When installation is completed, a
new removable disk icon (theconnected camera) [ ] is added.
3. Insert the enclosed CD-ROM into the CD-ROM drive.If the installation screen for the applications provided on theCD-ROM appears, click the [Exit] button to exit the screen.
4. Select the camera settings.If your camera has “DSC (Mass Storage)” and “PC Camera” functions in the USB setting (such as FinePix6800 ZOOM)
Load a SmartMedia containing images you have shot into thecamera. Select “DSC” in the camera’s USB setting.
If your camera has only the “DSC (Mass Storage)” function in the USB setting
Load a SmartMedia containing images you have shot into thecamera.
• Refer to “PC Connection” in the Owner’s Manual for your camera for moreinformation on camera operation and the USB setting.
• Use only SmartMedia containing images shot on a FUJIFILM digital camera.• It is strongly recommended that you connect the AC power adapter when you are
using a USB connection to avoid loss of power while you are using the camera.
5. Using the enclosed USB cable, connect the camera (or thecradle) to the USB port on your computer and then switch thecamera on.
6. A message appears in the “New Hardware” dialog boxindicating that “USB Mass Storage” has been detected.✽ See P.19, if you are using Windows Millennium Edition.✽ See P.20, if you are using Windows 2000 Professional.
NOTE
NOTE
19
Windows
18
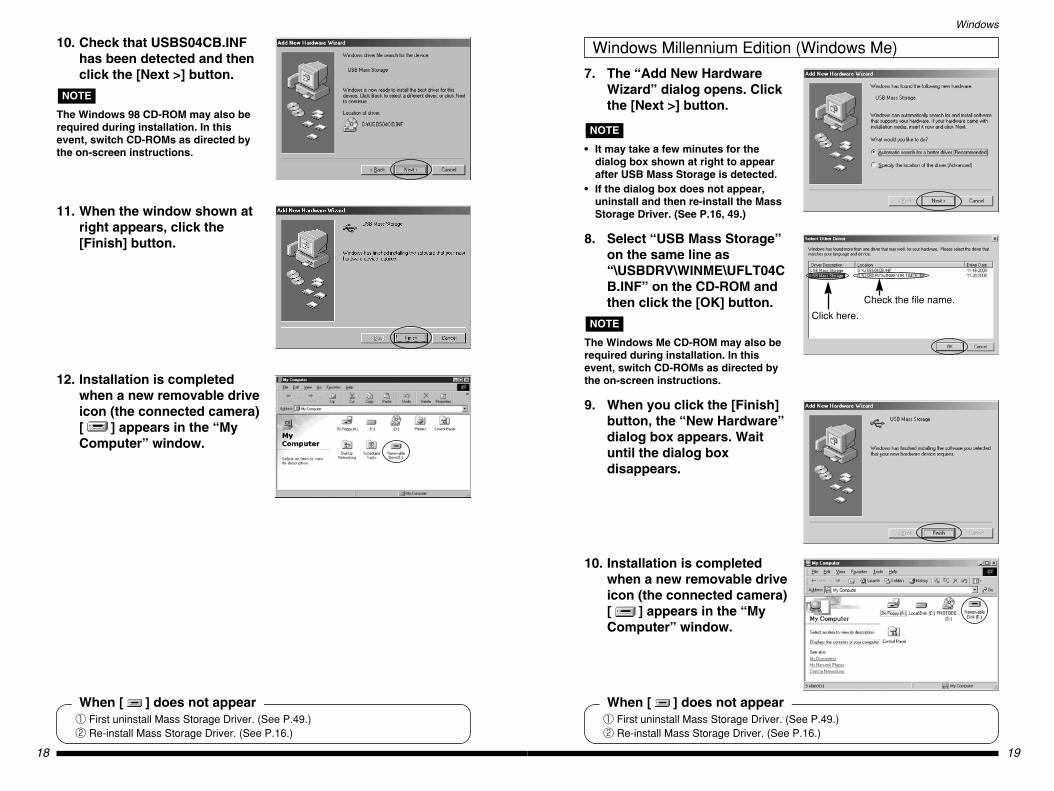
7. The “Add New HardwareWizard” dialog opens. Clickthe [Next >] button.
• It may take a few minutes for thedialog box shown at right to appearafter USB Mass Storage is detected.
• If the dialog box does not appear,uninstall and then re-install the MassStorage Driver. (See P.16, 49.)
8. Select “USB Mass Storage”on the same line as“\USBDRV\WINME\UFLT04CB.INF” on the CD-ROM andthen click the [OK] button.
The Windows Me CD-ROM may also berequired during installation. In thisevent, switch CD-ROMs as directed bythe on-screen instructions.
9. When you click the [Finish]button, the “New Hardware”dialog box appears. Waituntil the dialog boxdisappears.
10. Installation is completedwhen a new removable driveicon (the connected camera)[ ] appears in the “MyComputer” window.
NOTE
NOTE
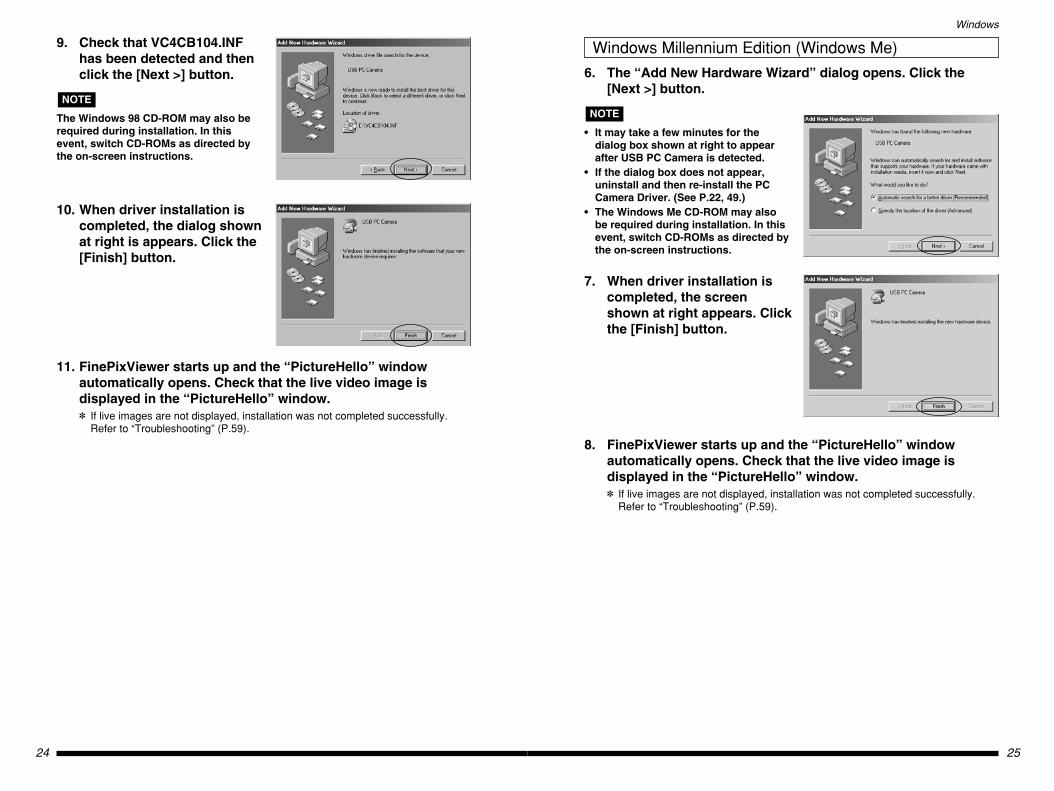
Windows Millennium Edition (Windows Me)10. Check that USBS04CB.INFhas been detected and thenclick the [Next >] button.
The Windows 98 CD-ROM may also berequired during installation. In thisevent, switch CD-ROMs as directed bythe on-screen instructions.
11. When the window shown atright appears, click the[Finish] button.
12. Installation is completedwhen a new removable driveicon (the connected camera)[ ] appears in the “MyComputer” window.
NOTE
1 First uninstall Mass Storage Driver. (See P.49.)2 Re-install Mass Storage Driver. (See P.16.)
When [ ] does not appear1 First uninstall Mass Storage Driver. (See P.49.)2 Re-install Mass Storage Driver. (See P.16.)
When [ ] does not appear
Click here.
Check the file name.

21
Windows
20
10. Check that USBS04CB.INFhas been detected and thenclick the [Next >] button.
11. When driver installation iscompleted, the screenshown at right appears.Click the [Finish] button.
12. Installation is completedwhen a new removable driveicon (the connected camera)[ ] appears in the “MyComputer” window.
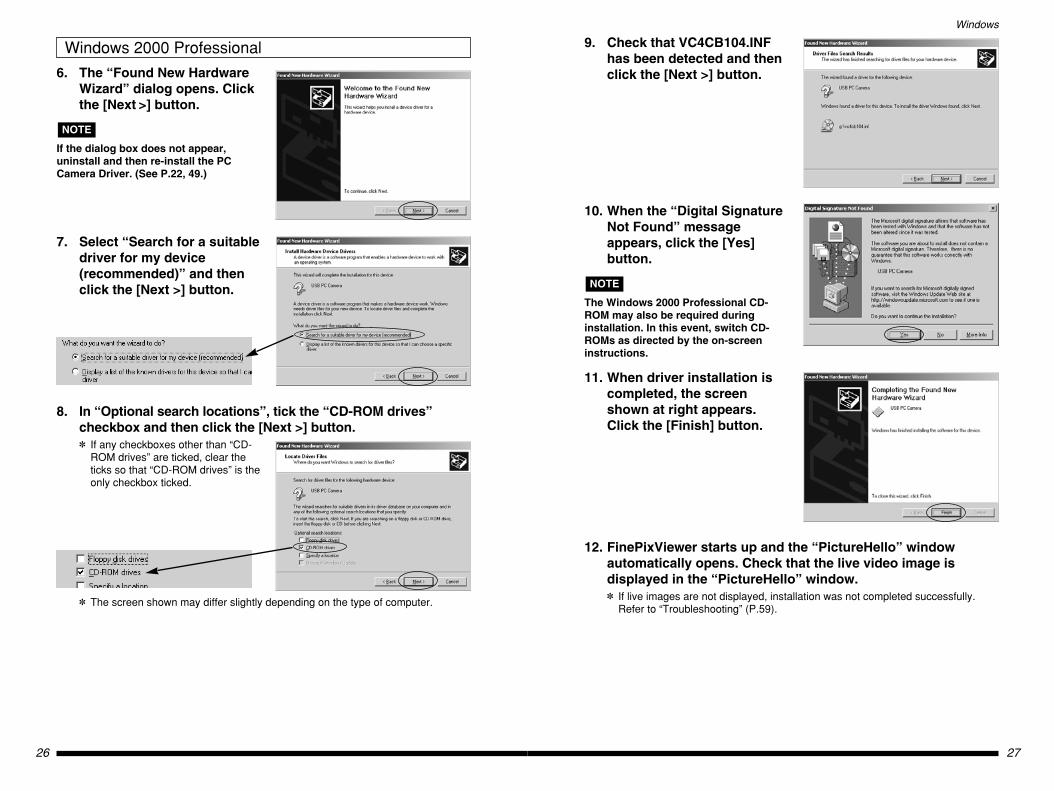
7. The “Found New HardwareWizard” dialog opens. Clickthe [Next >] button.
If the dialog box does not appear,uninstall and then re-install the MassStorage Driver. (See P.16, 49.)
8. Select “Search for a suitabledriver for my device(recommended)” and thenclick the [Next >] button.
9. In “Optional search locations”, tick the “CD-ROM drives”checkbox and then click the [Next >] button.✽ If any checkboxes other than “CD-
ROM drives” are ticked, clear theticks so that “CD-ROM drives” is theonly checkbox ticked.
✽ The screen shown may differ slightly depending on the type of computer.
NOTE
Windows 2000 Professional
1 First uninstall Mass Storage Driver. (See P.49.)2 Re-install Mass Storage Driver. (See P.16.)
When [ ] does not appear
23
Windows
22
Installing the PC Camera DriverIf your camera has a “PC Camera” function in the USB setting, installing PCCamera Driver allows you to import live images from the camera.✽ Use PictureHello (see P.38) or VideoImpression (see P.45) to actually view live
images.✽ Here, “live images” refers to the video images shown on the LCD monitor when the
camera is set to photography mode.✽ If you use a camera that does not have the “PC Camera” function in the USB settings,
live images cannot be transmitted.
The Windows CD-ROM may also be required in some cases. Have the CD-ROMready beforehand.
1. Switch on your PC and start up Windows.✽ Do not connect other video capture equipment to your PC.
2. Insert the enclosed CD-ROM into the CD-ROM drive.If the installation screen for the applications provided on theCD-ROM appears, click the [Exit] button to exit the screen.
3. Select “PC Camera” in the camera’s USB setting.
• Refer to “PC Connection” in the Owner’s Manual for your camera for moreinformation on camera operation and the USB setting.
• It is strongly recommended that you connect the AC power adapter when youare using a USB connection to avoid loss of power while you are using thecamera.
4. Using the enclosed USB cable, connect the camera (or thecradle) to the USB port on your computer and then switch thecamera on.
5. A message appears in the “New Hardware” dialog boxindicating that “USB PC Camera” has been detected.✽ See P.25, if you are using Windows Millennium Edition.✽ See P.26, if you are using Windows 2000 Professional.
NOTE
NOTE
If you are asked for a disk labeled “FINEPIX” during installation, refer to“Troubleshooting” (see P.54).
6. The “Add New Hardware Wizard” dialog appears. Click the[Next >] button.
If the dialog box does not appear,uninstall and then re-install the PCCamera Driver. (See P.22, 49.)
7. Select “Search for the best driver for your device(Recommended)” and click the [Next >] button.
8. When the next window opens, tick the “CD-ROM drive”checkbox and then click the [Next >] button.✽ If any checkboxes other than “CD-
ROM drive” are ticked, clear theticks so that “CD-ROM drive” is theonly checkbox ticked.
✽ The dialog shown may differ slightly on some types of PC.
NOTE
Windows 98/98SE
25
Windows
24
9. Check that VC4CB104.INFhas been detected and thenclick the [Next >] button.
The Windows 98 CD-ROM may also berequired during installation. In thisevent, switch CD-ROMs as directed bythe on-screen instructions.
10. When driver installation iscompleted, the dialog shownat right is appears. Click the[Finish] button.
11. FinePixViewer starts up and the “PictureHello” windowautomatically opens. Check that the live video image isdisplayed in the “PictureHello” window.✽ If live images are not displayed, installation was not completed successfully.
Refer to “Troubleshooting” (P.59).
NOTE
6. The “Add New Hardware Wizard” dialog opens. Click the[Next >] button.
• It may take a few minutes for thedialog box shown at right to appearafter USB PC Camera is detected.
• If the dialog box does not appear,uninstall and then re-install the PCCamera Driver. (See P.22, 49.)
• The Windows Me CD-ROM may alsobe required during installation. In thisevent, switch CD-ROMs as directed bythe on-screen instructions.
7. When driver installation iscompleted, the screenshown at right appears. Clickthe [Finish] button.
8. FinePixViewer starts up and the “PictureHello” windowautomatically opens. Check that the live video image isdisplayed in the “PictureHello” window.✽ If live images are not displayed, installation was not completed successfully.
Refer to “Troubleshooting” (P.59).
NOTE
Windows Millennium Edition (Windows Me)
27
Windows
26
9. Check that VC4CB104.INFhas been detected and thenclick the [Next >] button.
10. When the “Digital SignatureNot Found” messageappears, click the [Yes]button.
The Windows 2000 Professional CD-ROM may also be required duringinstallation. In this event, switch CD-ROMs as directed by the on-screeninstructions.
11. When driver installation iscompleted, the screenshown at right appears.Click the [Finish] button.
12. FinePixViewer starts up and the “PictureHello” windowautomatically opens. Check that the live video image isdisplayed in the “PictureHello” window.✽ If live images are not displayed, installation was not completed successfully.
Refer to “Troubleshooting” (P.59).
NOTE
6. The “Found New HardwareWizard” dialog opens. Clickthe [Next >] button.
If the dialog box does not appear,uninstall and then re-install the PCCamera Driver. (See P.22, 49.)
7. Select “Search for a suitabledriver for my device(recommended)” and thenclick the [Next >] button.
8. In “Optional search locations”, tick the “CD-ROM drives”checkbox and then click the [Next >] button.✽ If any checkboxes other than “CD-
ROM drives” are ticked, clear theticks so that “CD-ROM drives” is theonly checkbox ticked.
✽ The screen shown may differ slightly depending on the type of computer.
NOTE
Windows 2000 Professional

For detailed information on using the FinePixViewer and DP Editor, refer to“English.pdf” in “FinePixViewer” in “Programs” in the “Start” menu.
• Do not perform the operations listed below when a camera (removable disk) fileis open and the camera display indicates that data access is in progress.Performing any of these operations could corrupt the data on the SmartMediaor damage the SmartMedia itself.Switch the camera off/Touch any of the camera control buttons/Disconnect the USB cable/Remove the SmartMedia/Open the SmartMediacover/Remove the camera batteries/Remove the camera from the cradle
• Do not use your computer to format the SmartMedia in the camera as this maymake the card unusable for taking pictures.
1. Start up your PC and double-click the “My Computer” icon.✽ If you are running Windows 2000
Professional, log on using the useraccount you normally use.
2. Select the camera settings.If your camera has “DSC (Mass Storage)” and “PC Camera” functions in the USB setting (such as FinePix6800 ZOOM)
Load a SmartMedia containing images you have shot into thecamera. Select “DSC” in the camera’s USB setting.
If your camera has only the “DSC (Mass Storage)” function in the USB setting
Load a SmartMedia containing images you have shot into thecamera.
• It is strongly recommended that you connect the AC power adapter when youare using a USB connection to avoid loss of power while you are using thecamera.
• Refer to “PC Connection” in the Owner’s Manual for your camera for moreinformation on camera operation and the USB setting.
• Use only SmartMedia containing images shot on a FUJIFILM digital camera.
NOTE
NOTE
TIP
29
Windows
28
• When you install Exif Launcher, it is registered in the startup menu and islaunched automatically when Windows starts up.
• If the icon in the figure is shown in thetaskbar, Exif Launcher is running.
• To quit Exif Launcher, click the right mouse button on the [ ] icon in thetaskbar and select “Exit” from the menu that appears.
� When you quit Exif Launcher, the icon will disappear from the taskbar.
Connecting the Camera and PC and Viewing Images
Using the Software on Windows
To View Images Using FinePixViewer
Thumbnail display area
<FinePixViewer startup window>
Thumbnail images for the image data recorded on the SmartMedia are displayed in the thumbnail display area.
This thumbnail indicates an audio file.
Folder tree display area
Thumbnail
3. Using the enclosed USB cable, connect the camera (or thecradle) to the USB port on your computer and then switch thecamera on.� When the “Removable Drive” icon
appears in the “My Computer”window, the camera and PC arecorrectly connected.
✽ The window actually shown on yourPC may differ from that shown in thefigure.
4. Launch FinePixViewer.
If you are running Exif Launcher
When you connect the camera (or the cradle) to the USB porton your PC, Exif Launcher starts up FinePixViewer.✽ If you have altered the Exif Launcher settings, FinePixViewer will not start up.
If you are not running Exif Launcher
Select “Programs” / “FinePixViewer” / “FinePixViewer” inthe “Start” menu. FinePixViewer then starts up.
If FinePixViewer is slow to start up, refer to “Troubleshooting” (P.56).
NOTE
Exif Launcher
Have the Owner’s Manual for your camera handy and read itin conjunction with these instructions.
31
Windows
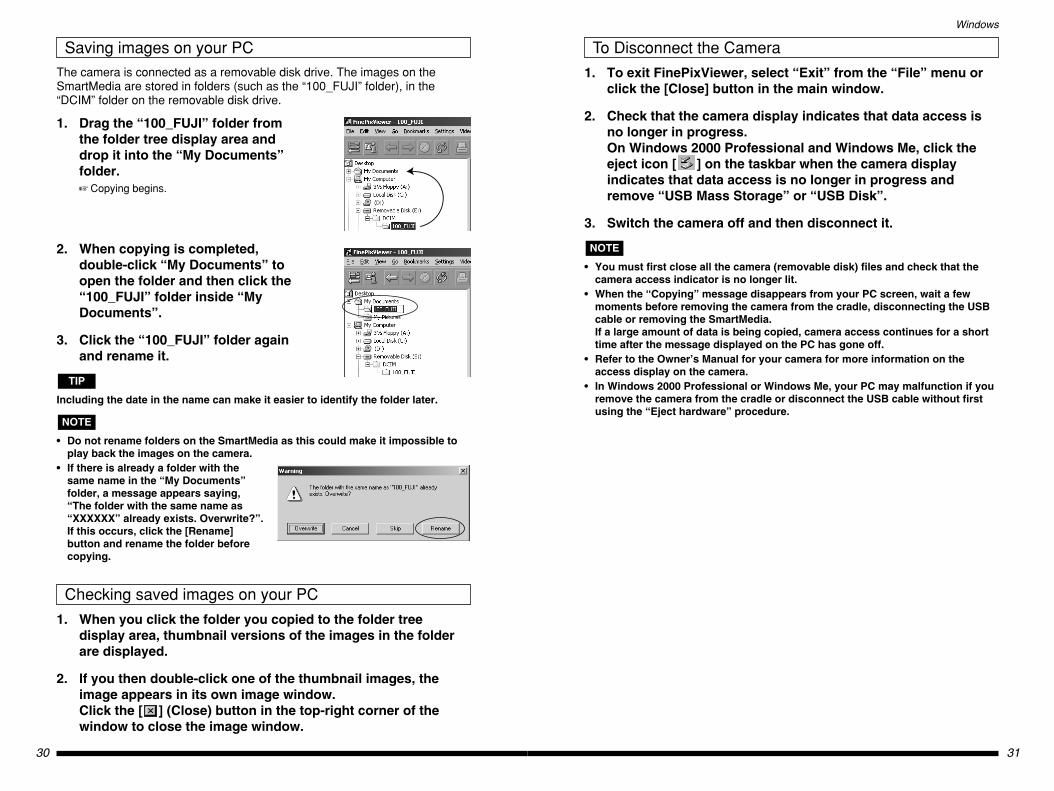
1. To exit FinePixViewer, select “Exit” from the “File” menu orclick the [Close] button in the main window.
2. Check that the camera display indicates that data access isno longer in progress.On Windows 2000 Professional and Windows Me, click theeject icon [ ] on the taskbar when the camera displayindicates that data access is no longer in progress andremove “USB Mass Storage” or “USB Disk”.
3. Switch the camera off and then disconnect it.
• You must first close all the camera (removable disk) files and check that thecamera access indicator is no longer lit.
• When the “Copying” message disappears from your PC screen, wait a fewmoments before removing the camera from the cradle, disconnecting the USBcable or removing the SmartMedia.If a large amount of data is being copied, camera access continues for a shorttime after the message displayed on the PC has gone off.
• Refer to the Owner’s Manual for your camera for more information on theaccess display on the camera.
• In Windows 2000 Professional or Windows Me, your PC may malfunction if youremove the camera from the cradle or disconnect the USB cable without firstusing the “Eject hardware” procedure.
NOTE
To Disconnect the Camera
30
The camera is connected as a removable disk drive. The images on theSmartMedia are stored in folders (such as the “100_FUJI” folder), in the“DCIM” folder on the removable disk drive.
1. Drag the “100_FUJI” folder fromthe folder tree display area anddrop it into the “My Documents”folder.� Copying begins.
2. When copying is completed,double-click “My Documents” toopen the folder and then click the“100_FUJI” folder inside “MyDocuments”.
3. Click the “100_FUJI” folder againand rename it.
Including the date in the name can make it easier to identify the folder later.
• Do not rename folders on the SmartMedia as this could make it impossible toplay back the images on the camera.
• If there is already a folder with thesame name in the “My Documents”folder, a message appears saying,“The folder with the same name as“XXXXXX” already exists. Overwrite?”.If this occurs, click the [Rename]button and rename the folder beforecopying.
NOTE
TIP
Saving images on your PC
1. When you click the folder you copied to the folder treedisplay area, thumbnail versions of the images in the folderare displayed.
2. If you then double-click one of the thumbnail images, theimage appears in its own image window.Click the [ ] (Close) button in the top-right corner of thewindow to close the image window.
Checking saved images on your PC
� Attaching Images
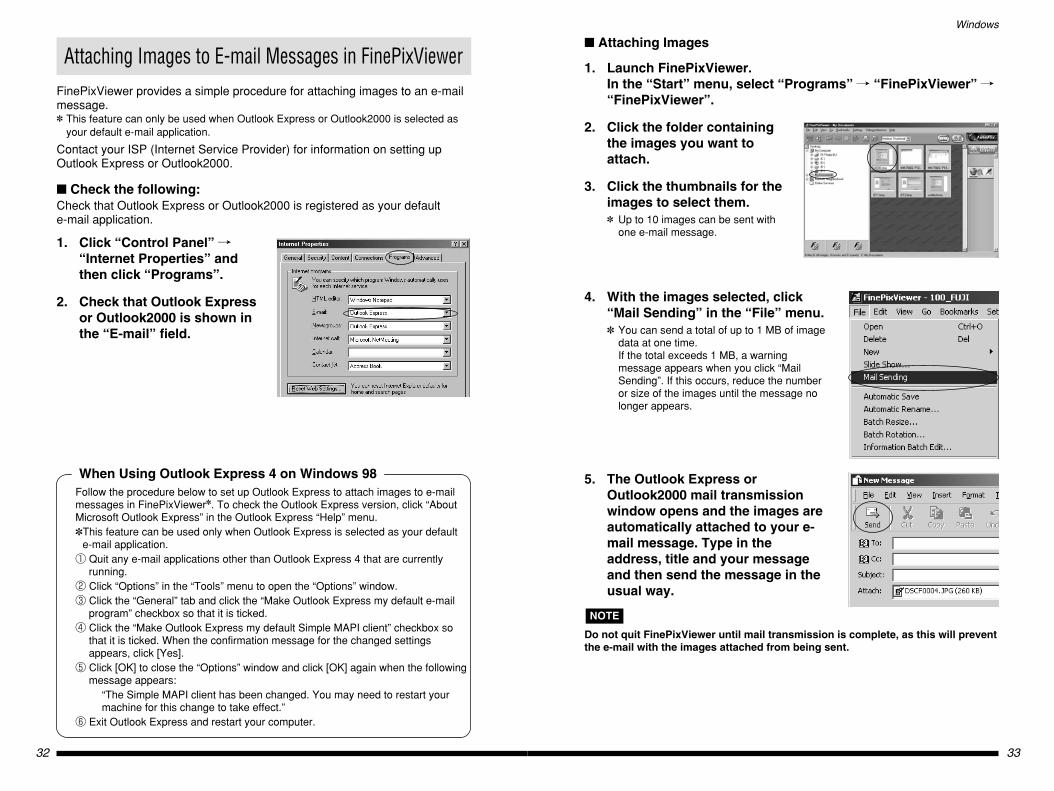
1. Launch FinePixViewer.In the “Start” menu, select “Programs” / “FinePixViewer” /“FinePixViewer”.
2. Click the folder containingthe images you want toattach.
3. Click the thumbnails for theimages to select them.✽ Up to 10 images can be sent with
one e-mail message.
4. With the images selected, click“Mail Sending” in the “File” menu.✽ You can send a total of up to 1 MB of image
data at one time. If the total exceeds 1 MB, a warningmessage appears when you click “MailSending”. If this occurs, reduce the numberor size of the images until the message nolonger appears.
5. The Outlook Express orOutlook2000 mail transmissionwindow opens and the images areautomatically attached to your e-mail message. Type in theaddress, title and your messageand then send the message in theusual way.
Do not quit FinePixViewer until mail transmission is complete, as this will preventthe e-mail with the images attached from being sent.
NOTE
33
Windows
32
Attaching Images to E-mail Messages in FinePixViewerFinePixViewer provides a simple procedure for attaching images to an e-mailmessage.✽ This feature can only be used when Outlook Express or Outlook2000 is selected as
your default e-mail application.
Contact your ISP (Internet Service Provider) for information on setting upOutlook Express or Outlook2000.
� Check the following:Check that Outlook Express or Outlook2000 is registered as your default e-mail application.
1. Click “Control Panel” /“Internet Properties” andthen click “Programs”.
2. Check that Outlook Expressor Outlook2000 is shown inthe “E-mail” field.
Follow the procedure below to set up Outlook Express to attach images to e-mailmessages in FinePixViewer✽. To check the Outlook Express version, click “AboutMicrosoft Outlook Express” in the Outlook Express “Help” menu.✽This feature can be used only when Outlook Express is selected as your default
e-mail application.1 Quit any e-mail applications other than Outlook Express 4 that are currently
running.2 Click “Options” in the “Tools” menu to open the “Options” window.3 Click the “General” tab and click the “Make Outlook Express my default e-mail
program” checkbox so that it is ticked.4 Click the “Make Outlook Express my default Simple MAPI client” checkbox so
that it is ticked. When the confirmation message for the changed settingsappears, click [Yes].
5 Click [OK] to close the “Options” window and click [OK] again when the followingmessage appears:
“The Simple MAPI client has been changed. You may need to restart yourmachine for this change to take effect.”
6 Exit Outlook Express and restart your computer.
When Using Outlook Express 4 on Windows 98
35
Windows
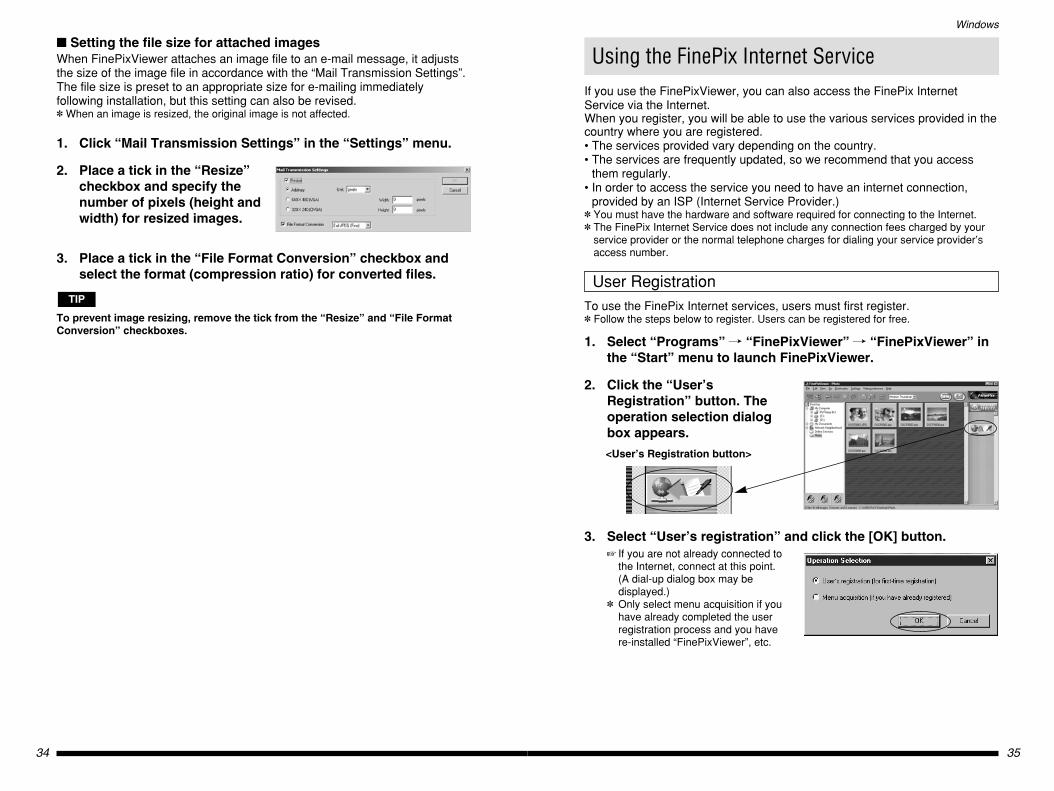
To use the FinePix Internet services, users must first register.✽ Follow the steps below to register. Users can be registered for free.
1. Select “Programs” / “FinePixViewer” / “FinePixViewer” inthe “Start” menu to launch FinePixViewer.
2. Click the “User’sRegistration” button. Theoperation selection dialogbox appears.
<User’s Registration button>
3. Select “User’s registration” and click the [OK] button.� If you are not already connected to
the Internet, connect at this point. (A dial-up dialog box may bedisplayed.)
✽ Only select menu acquisition if youhave already completed the userregistration process and you havere-installed “FinePixViewer”, etc.
User Registration
Using the FinePix Internet ServiceIf you use the FinePixViewer, you can also access the FinePix InternetService via the Internet.When you register, you will be able to use the various services provided in thecountry where you are registered.• The services provided vary depending on the country.• The services are frequently updated, so we recommend that you access
them regularly.• In order to access the service you need to have an internet connection,
provided by an ISP (Internet Service Provider.)✽ You must have the hardware and software required for connecting to the Internet.✽ The FinePix Internet Service does not include any connection fees charged by your
service provider or the normal telephone charges for dialing your service provider’saccess number.
34
� Setting the file size for attached imagesWhen FinePixViewer attaches an image file to an e-mail message, it adjuststhe size of the image file in accordance with the “Mail Transmission Settings”.The file size is preset to an appropriate size for e-mailing immediatelyfollowing installation, but this setting can also be revised.✽ When an image is resized, the original image is not affected.
1. Click “Mail Transmission Settings” in the “Settings” menu.
2. Place a tick in the “Resize”checkbox and specify thenumber of pixels (height andwidth) for resized images.
3. Place a tick in the “File Format Conversion” checkbox andselect the format (compression ratio) for converted files.
To prevent image resizing, remove the tick from the “Resize” and “File FormatConversion” checkboxes.
TIP
37
Windows
36
Once user registration is completed, you can use the FinePix Internetservices.
� Selecting services
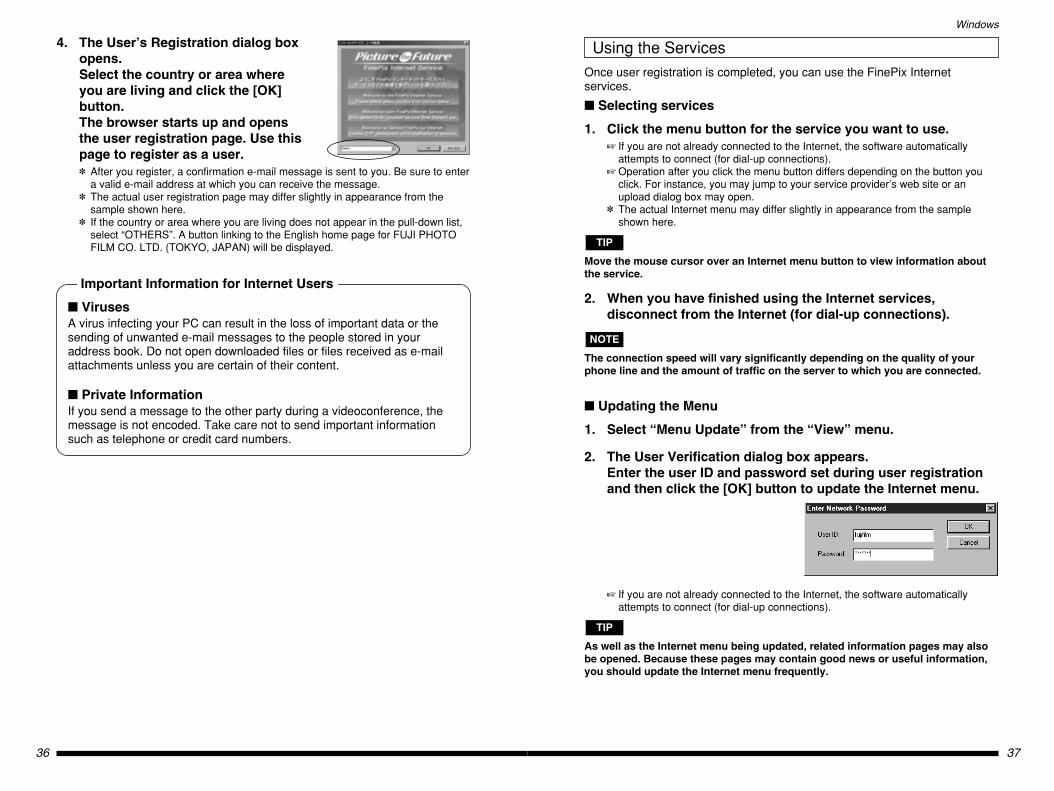
1. Click the menu button for the service you want to use.� If you are not already connected to the Internet, the software automatically
attempts to connect (for dial-up connections).� Operation after you click the menu button differs depending on the button you
click. For instance, you may jump to your service provider’s web site or anupload dialog box may open.
✽ The actual Internet menu may differ slightly in appearance from the sampleshown here.
Move the mouse cursor over an Internet menu button to view information aboutthe service.
2. When you have finished using the Internet services,disconnect from the Internet (for dial-up connections).
The connection speed will vary significantly depending on the quality of yourphone line and the amount of traffic on the server to which you are connected.
� Updating the Menu
1. Select “Menu Update” from the “View” menu.
2. The User Verification dialog box appears.Enter the user ID and password set during user registrationand then click the [OK] button to update the Internet menu.
� If you are not already connected to the Internet, the software automaticallyattempts to connect (for dial-up connections).
As well as the Internet menu being updated, related information pages may alsobe opened. Because these pages may contain good news or useful information,you should update the Internet menu frequently.
TIP
NOTE
TIP
Using the Services4. The User’s Registration dialog boxopens. Select the country or area whereyou are living and click the [OK]button.The browser starts up and opensthe user registration page. Use thispage to register as a user.✽ After you register, a confirmation e-mail message is sent to you. Be sure to enter
a valid e-mail address at which you can receive the message.✽ The actual user registration page may differ slightly in appearance from the
sample shown here.✽ If the country or area where you are living does not appear in the pull-down list,
select “OTHERS”. A button linking to the English home page for FUJI PHOTOFILM CO. LTD. (TOKYO, JAPAN) will be displayed.
� VirusesA virus infecting your PC can result in the loss of important data or thesending of unwanted e-mail messages to the people stored in youraddress book. Do not open downloaded files or files received as e-mailattachments unless you are certain of their content.
� Private InformationIf you send a message to the other party during a videoconference, themessage is not encoded. Take care not to send important informationsuch as telephone or credit card numbers.
Important Information for Internet Users
39
Windows
38
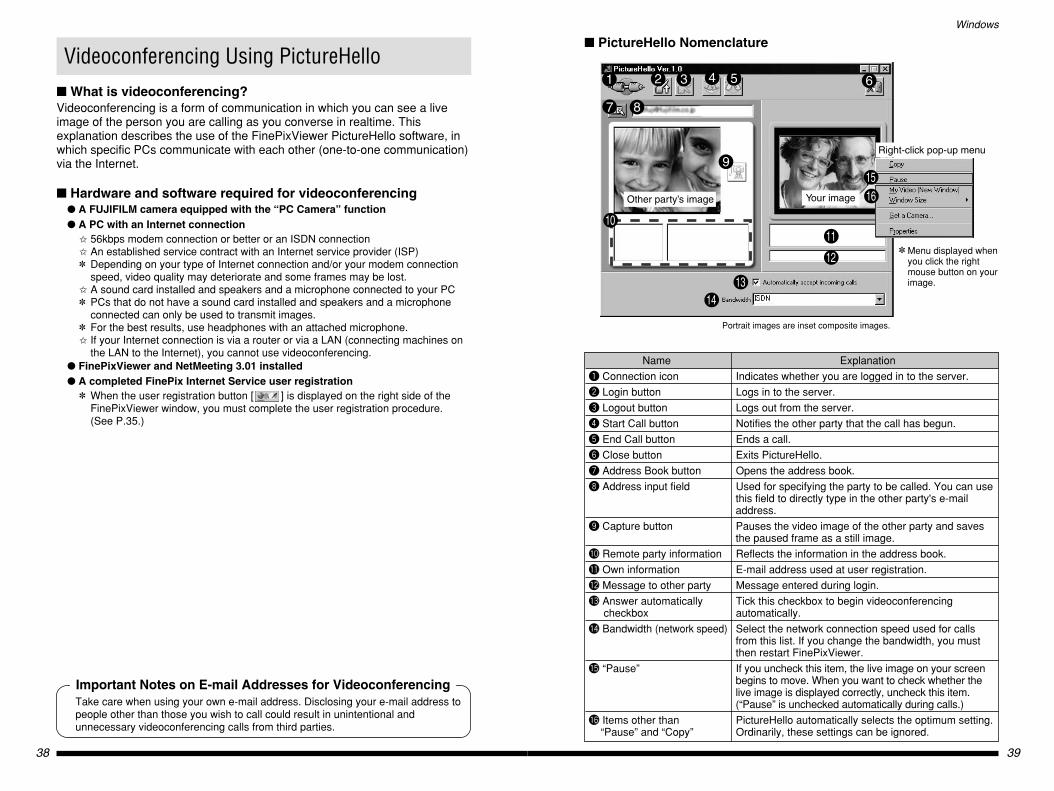
� PictureHello Nomenclature
Other party’s image
Right-click pop-up menu
Your image
9
Portrait images are inset composite images.
Name Explanation
q Connection icon Indicates whether you are logged in to the server.
w Login button Logs in to the server.
e Logout button Logs out from the server.
r Start Call button Notifies the other party that the call has begun.
t End Call button Ends a call.
y Close button Exits PictureHello.
u Address Book button Opens the address book.
i Address input field Used for specifying the party to be called. You can usethis field to directly type in the other party's e-mailaddress.
o Capture button Pauses the video image of the other party and savesthe paused frame as a still image.
!0 Remote party information Reflects the information in the address book.
!1 Own information E-mail address used at user registration.
!2 Message to other party Message entered during login.
!3 Answer automatically Tick this checkbox to begin videoconferencing checkbox automatically.
!4 Bandwidth (network speed) Select the network connection speed used for callsfrom this list. If you change the bandwidth, you mustthen restart FinePixViewer.
!5 “Pause” If you uncheck this item, the live image on your screenbegins to move. When you want to check whether thelive image is displayed correctly, uncheck this item.(“Pause” is unchecked automatically during calls.)
!6 Items other than PictureHello automatically selects the optimum setting.“Pause” and “Copy” Ordinarily, these settings can be ignored.
✽ Menu displayed whenyou click the rightmouse button on yourimage.
Videoconferencing Using PictureHello� What is videoconferencing?Videoconferencing is a form of communication in which you can see a liveimage of the person you are calling as you converse in realtime. Thisexplanation describes the use of the FinePixViewer PictureHello software, inwhich specific PCs communicate with each other (one-to-one communication)via the Internet.
� Hardware and software required for videoconferencing� A FUJIFILM camera equipped with the “PC Camera” function� A PC with an Internet connection
✩ 56kbps modem connection or better or an ISDN connection✩ An established service contract with an Internet service provider (ISP)✽ Depending on your type of Internet connection and/or your modem connection
speed, video quality may deteriorate and some frames may be lost.✩ A sound card installed and speakers and a microphone connected to your PC✽ PCs that do not have a sound card installed and speakers and a microphone
connected can only be used to transmit images.✽ For the best results, use headphones with an attached microphone.✩ If your Internet connection is via a router or via a LAN (connecting machines on
the LAN to the Internet), you cannot use videoconferencing.� FinePixViewer and NetMeeting 3.01 installed� A completed FinePix Internet Service user registration
✽ When the user registration button [ ] is displayed on the right side of theFinePixViewer window, you must complete the user registration procedure. (See P.35.)
Take care when using your own e-mail address. Disclosing your e-mail address topeople other than those you wish to call could result in unintentional andunnecessary videoconferencing calls from third parties.
Important Notes on E-mail Addresses for Videoconferencing
41
Windows
40
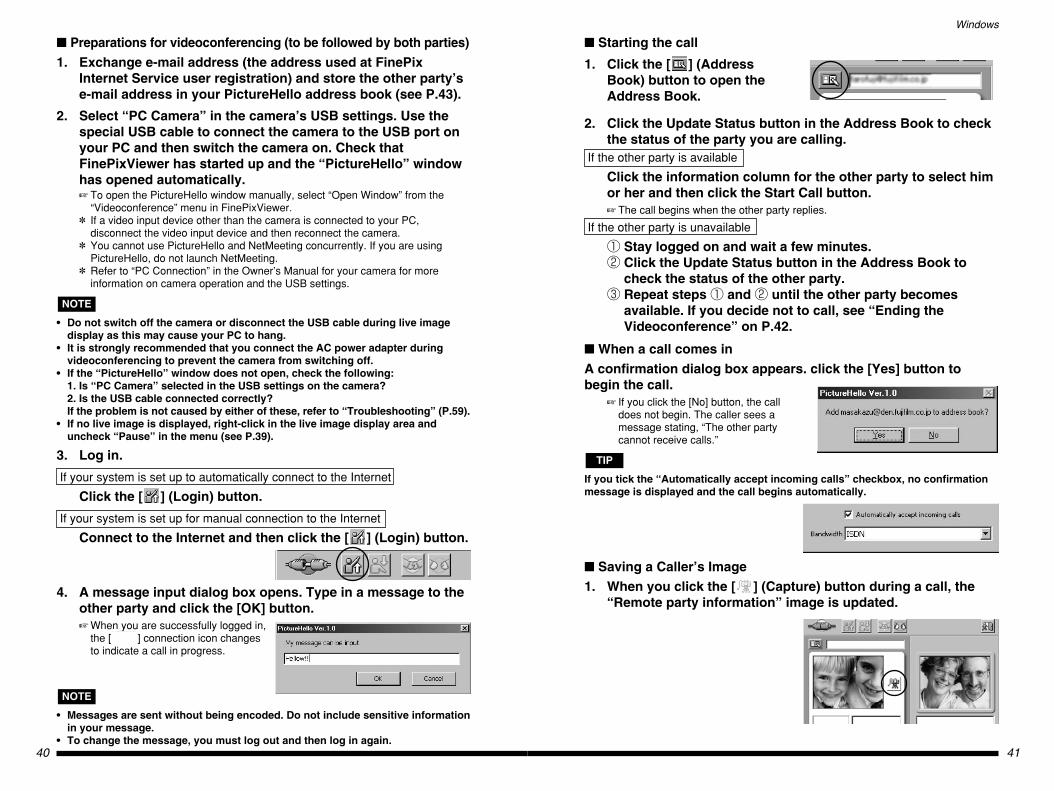
� Starting the call
1. Click the [ ] (AddressBook) button to open theAddress Book.
2. Click the Update Status button in the Address Book to checkthe status of the party you are calling.
If the other party is available
Click the information column for the other party to select himor her and then click the Start Call button.� The call begins when the other party replies.
If the other party is unavailable
1 Stay logged on and wait a few minutes.2 Click the Update Status button in the Address Book to
check the status of the other party.3 Repeat steps 1 and 2 until the other party becomes
available. If you decide not to call, see “Ending theVideoconference” on P.42.
� When a call comes inA confirmation dialog box appears. click the [Yes] button tobegin the call.
� If you click the [No] button, the calldoes not begin. The caller sees amessage stating, “The other partycannot receive calls.”
If you tick the “Automatically accept incoming calls” checkbox, no confirmationmessage is displayed and the call begins automatically.
� Saving a Caller’s Image1. When you click the [ ] (Capture) button during a call, the
“Remote party information” image is updated.
TIP
� Preparations for videoconferencing (to be followed by both parties)1. Exchange e-mail address (the address used at FinePix
Internet Service user registration) and store the other party’se-mail address in your PictureHello address book (see P.43).
2. Select “PC Camera” in the camera’s USB settings. Use thespecial USB cable to connect the camera to the USB port onyour PC and then switch the camera on. Check thatFinePixViewer has started up and the “PictureHello” windowhas opened automatically.� To open the PictureHello window manually, select “Open Window” from the
“Videoconference” menu in FinePixViewer.✽ If a video input device other than the camera is connected to your PC,
disconnect the video input device and then reconnect the camera.✽ You cannot use PictureHello and NetMeeting concurrently. If you are using
PictureHello, do not launch NetMeeting.✽ Refer to “PC Connection” in the Owner’s Manual for your camera for more
information on camera operation and the USB settings.
• Do not switch off the camera or disconnect the USB cable during live imagedisplay as this may cause your PC to hang.
• It is strongly recommended that you connect the AC power adapter duringvideoconferencing to prevent the camera from switching off.
• If the “PictureHello” window does not open, check the following:1. Is “PC Camera” selected in the USB settings on the camera?2. Is the USB cable connected correctly?If the problem is not caused by either of these, refer to “Troubleshooting” (P.59).
• If no live image is displayed, right-click in the live image display area anduncheck “Pause” in the menu (see P.39).
3. Log in.
If your system is set up to automatically connect to the Internet
Click the [ ] (Login) button.
If your system is set up for manual connection to the Internet
Connect to the Internet and then click the [ ] (Login) button.
4. A message input dialog box opens. Type in a message to theother party and click the [OK] button.� When you are successfully logged in,
the [ ] connection icon changesto indicate a call in progress.
• Messages are sent without being encoded. Do not include sensitive informationin your message.
• To change the message, you must log out and then log in again.
NOTE
NOTE
43
Windows
42
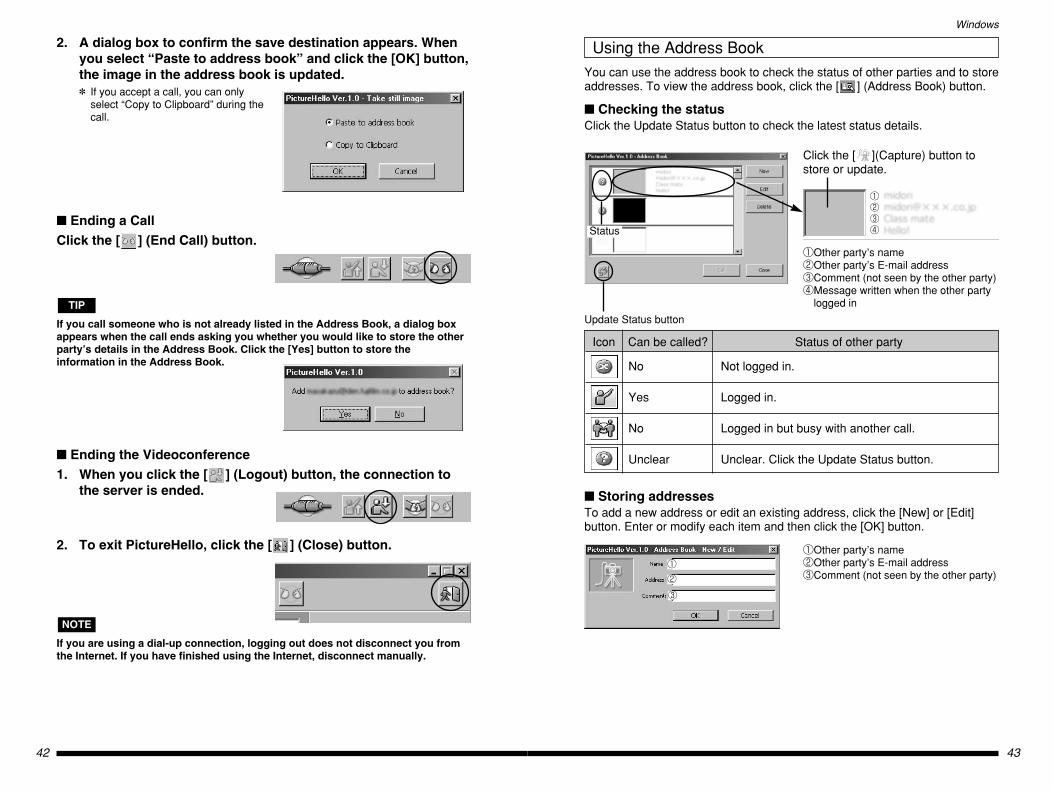
You can use the address book to check the status of other parties and to storeaddresses. To view the address book, click the [ ] (Address Book) button.
� Checking the statusClick the Update Status button to check the latest status details.
Update Status button
Click the [ ](Capture) button tostore or update.
1Other party’s name2Other party’s E-mail address3Comment (not seen by the other party)4Message written when the other party
logged in
Status
1
2
3
4
Icon Can be called? Status of other party
No Not logged in.
Yes Logged in.
No Logged in but busy with another call.
Unclear Unclear. Click the Update Status button.
� Storing addressesTo add a new address or edit an existing address, click the [New] or [Edit]button. Enter or modify each item and then click the [OK] button.
1Other party’s name2Other party’s E-mail address3Comment (not seen by the other party)
1
2
3
2. A dialog box to confirm the save destination appears. Whenyou select “Paste to address book” and click the [OK] button,the image in the address book is updated.✽ If you accept a call, you can only
select “Copy to Clipboard” during thecall.
� Ending a CallClick the [ ] (End Call) button.
If you call someone who is not already listed in the Address Book, a dialog boxappears when the call ends asking you whether you would like to store the otherparty’s details in the Address Book. Click the [Yes] button to store theinformation in the Address Book.
� Ending the Videoconference1. When you click the [ ] (Logout) button, the connection to
the server is ended.
2. To exit PictureHello, click the [ ] (Close) button.
If you are using a dial-up connection, logging out does not disconnect you fromthe Internet. If you have finished using the Internet, disconnect manually.
NOTE
TIP
Using the Address Book
45
Windows
44
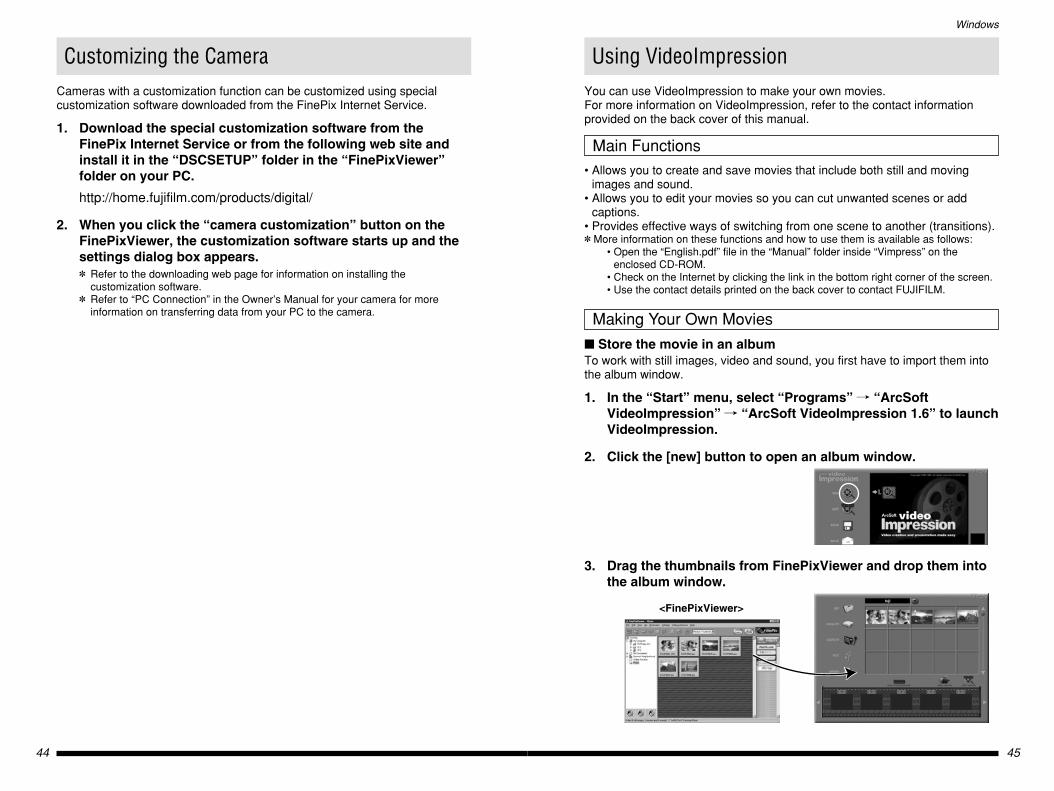
Using VideoImpressionYou can use VideoImpression to make your own movies.For more information on VideoImpression, refer to the contact informationprovided on the back cover of this manual.
• Allows you to create and save movies that include both still and movingimages and sound.
• Allows you to edit your movies so you can cut unwanted scenes or addcaptions.
• Provides effective ways of switching from one scene to another (transitions).✽ More information on these functions and how to use them is available as follows:
• Open the “English.pdf” file in the “Manual” folder inside “Vimpress” on theenclosed CD-ROM.
• Check on the Internet by clicking the link in the bottom right corner of the screen.• Use the contact details printed on the back cover to contact FUJIFILM.
Main Functions
� Store the movie in an albumTo work with still images, video and sound, you first have to import them intothe album window.
1. In the “Start” menu, select “Programs” / “ArcSoftVideoImpression” / “ArcSoft VideoImpression 1.6” to launchVideoImpression.
2. Click the [new] button to open an album window.
3. Drag the thumbnails from FinePixViewer and drop them intothe album window.
Making Your Own Movies
<FinePixViewer>
Customizing the CameraCameras with a customization function can be customized using specialcustomization software downloaded from the FinePix Internet Service.
1. Download the special customization software from theFinePix Internet Service or from the following web site andinstall it in the “DSCSETUP” folder in the “FinePixViewer”folder on your PC.
http://home.fujifilm.com/products/digital/
2. When you click the “camera customization” button on theFinePixViewer, the customization software starts up and thesettings dialog box appears.✽ Refer to the downloading web page for information on installing the
customization software.✽ Refer to “PC Connection” in the Owner’s Manual for your camera for more
information on transferring data from your PC to the camera.
47
Windows
46
Capturing Live Images
If you are using a camera with the “PC Camera” function in the USB settings,you can import live images from the camera.✽ It is strongly recommended that you connect the AC power adapter when you are
using a USB connection to avoid loss of power while you are using the camera.✽ Refer to “PC Connection” in the Owner’s Manual for your camera for more information
on camera operation and the USB settings.
1. Select “PC Camera” in the camera’s USB settings.
2. Using the special USB cable, connect the camera (cradle) tothe USB port on your computer and then switch the cameraon. If you have launched FinePixViewer, exit the program.
3. In the “Start” menu, select “Programs” / “ArcSoftVideoImpression” / “ArcSoft VideoImpression 1.6”.
4. When the startup screen appears,click the [new] button.
5. When the album window opens,click the [capture] button.
3. When you click the [save] button, the Save dialog boxappears. Specify the save location, file name, etc. and savethe movie file.
• If you leave the mouse pointer positioned over a button or image for a fewseconds, information about that button or image is displayed.
• In any window, you can access the online help by clicking “?”.• In addition to “MPEG”, you can choose from a wide range of formats for saved
files.
TIP
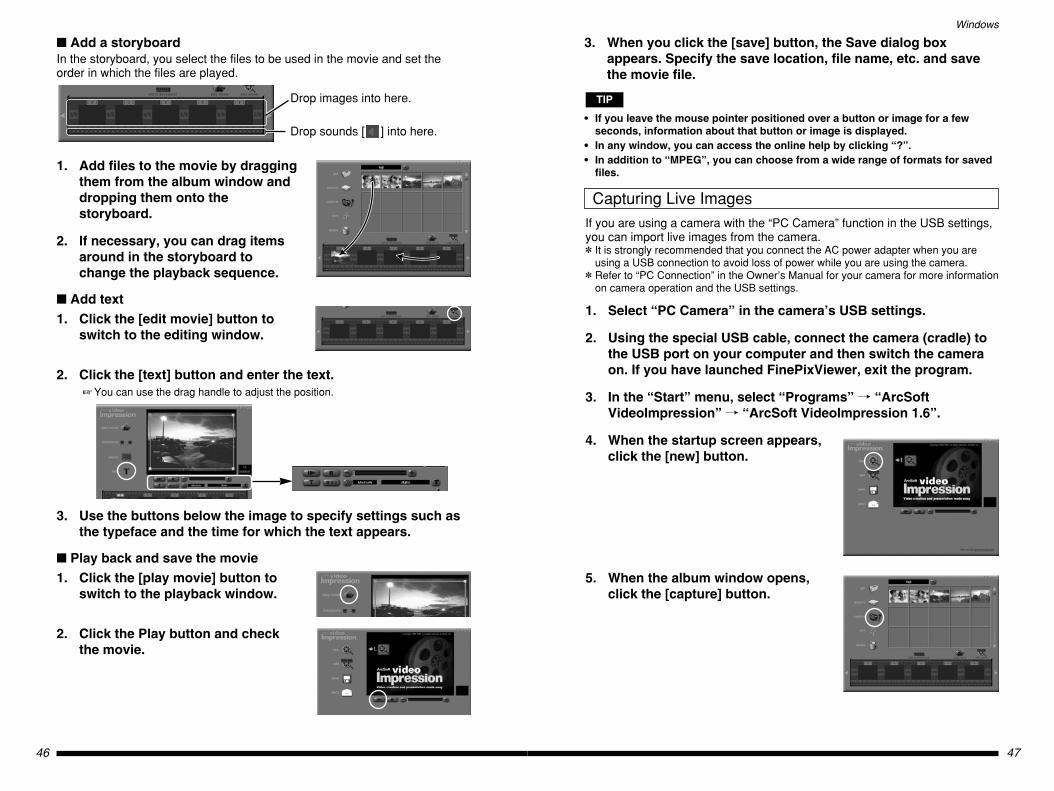
� Add a storyboardIn the storyboard, you select the files to be used in the movie and set theorder in which the files are played.
1. Add files to the movie by draggingthem from the album window anddropping them onto thestoryboard.
2. If necessary, you can drag itemsaround in the storyboard tochange the playback sequence.
� Add text1. Click the [edit movie] button to
switch to the editing window.
2. Click the [text] button and enter the text.� You can use the drag handle to adjust the position.
3. Use the buttons below the image to specify settings such asthe typeface and the time for which the text appears.
� Play back and save the movie1. Click the [play movie] button to
switch to the playback window.
2. Click the Play button and checkthe movie.
Drop images into here.
Drop sounds [ ] into here.
49
Windows
48
Uninstalling Software from a Windows PCUninstalling the Driver
� Uninstall the USB Driver in the following situations:• When you have installed Mass Storage Driver but the camera still does not
appear as a removable disk icon• When you want to remove an unwanted driver• When you are upgrading the driver• When you have installed the driver but it does not work. (Uninstall the driver
and then re-install it.)
• Disconnect the camera beforehand.• Close all files when removing drivers.
1. Switch on your PC and launch Windows.
2. Insert the enclosed CD-ROM into the CD-ROM drive.If the installation screen for the applications provided on theCD-ROM appears, click the [Exit] button to exit the screen.
3. Launch the Uninstaller.For Mass Storage Driver
Open “My Computer”, right-click the CD-ROM icon and select“Open” to display the contents of the CD-ROM. Double-click“UNIN_MAS.EXE” to remove the installed driver.
For PC Camera Driver
Open “My Computer”, right-click the CD-ROM icon and select“Open” to display the contents of the CD-ROM. Double-click“UNIN_PCC.EXE” to remove the installed driver.✽ The way file names are displayed differs as described below depending on your
computer settings.• File extensions (3-letter suffixes indicating the file type) may be shown or
hidden.• Text may be shown normally or all in uppercase (e.g. Setup or SETUP).
4. Reboot your PC to complete the uninstallation process.
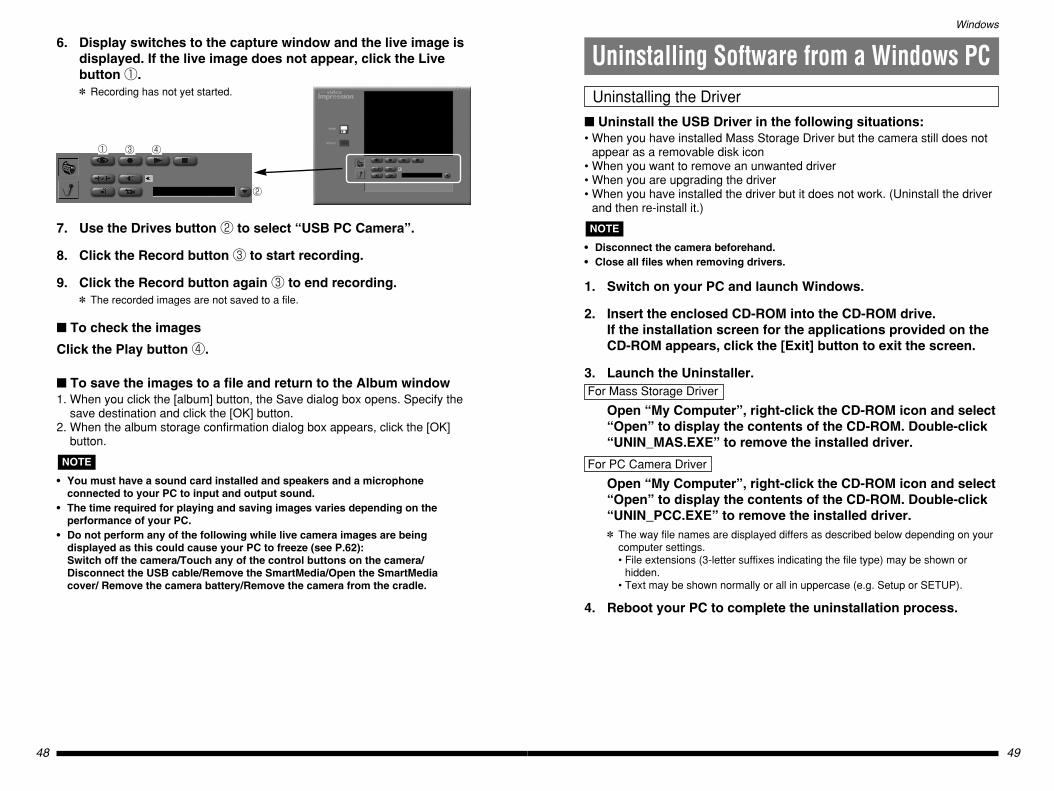
NOTE
6. Display switches to the capture window and the live image isdisplayed. If the live image does not appear, click the Livebutton 1.✽ Recording has not yet started.
7. Use the Drives button 2 to select “USB PC Camera”.
8. Click the Record button 3 to start recording.
9. Click the Record button again 3 to end recording.✽ The recorded images are not saved to a file.
� To check the images
Click the Play button 4.
� To save the images to a file and return to the Album window1. When you click the [album] button, the Save dialog box opens. Specify the
save destination and click the [OK] button.2. When the album storage confirmation dialog box appears, click the [OK]
button.
• You must have a sound card installed and speakers and a microphoneconnected to your PC to input and output sound.
• The time required for playing and saving images varies depending on theperformance of your PC.
• Do not perform any of the following while live camera images are beingdisplayed as this could cause your PC to freeze (see P.62):Switch off the camera/Touch any of the control buttons on the camera/Disconnect the USB cable/Remove the SmartMedia/Open the SmartMediacover/ Remove the camera battery/Remove the camera from the cradle.
NOTE
1 3 4
2
51
Windows
50
TroubleshootingIf the software does not operate correctly but the problem does not match anyof those listed below, check that you are using the correct hardware andsoftware. (See P.10.)If the problem persists even though you are using the correct hardware andsoftware, refer to the table below and then see the reference page listed foryour problem.
Page
52
53
54
55
56
57
58
59
60
61
62
63
Inst
alla
tio
nC
on
nec
tio
n •
Imag
e V
iew
ing
Vid
eoco
nfe
ren
cin
gO
ther
Problemwith
The camera is connected to my PC but the Mass Storage Driver installationwill not start.
The camera is connected to my PC but the PC Camera Driver installation willnot start.
I was asked for a disk labeled “FINEPIX” during Mass Storage Driverinstallation.
I was asked for a disk labeled “FINEPIX” during PC Camera Driver installation.
I was asked for the “WINDOWS” CD-ROM during Mass Storage Driver/PCCamera Driver installation.
When I connect the camera to my PC, the “Add New Hardware Wizard”appears.
When I double-click the removable disk icon, “The device is not ready” errormessage appears.
A warning message appeared when I removed the SmartMedia from thecamera.
“Device disconnection warning” appears when I disconnect the special USBcable.
When I disconnect the special USB cable and double-click the removable diskicon, a message appears and the window does not open.
FinePixViewer automatic startup is slow.
I want to stop the FinePixViewer from launching automatically.
The camera and PC are connected but no removable disk icon is displayed.
The PC hangs when I access the SmartMedia.
The PictureHello (videoconferencing) window does not open.
PictureHello (videoconferencing) does not show video of me.
I clicked the Login button in PictureHello (videoconferencing), but I can’t log in.
The live image of the other party in videoconferencing is very jerky.
There is no live image of the other party during videoconferencing.
Videoconferencing call notifications are not displayed.
I can make calls but I cannot use videoconferencing.
I can’t hear the other party in the videoconference/The other party can’t hear me.
Live images do not appear in the VideoImpression Capture window.
I can’t log in to the “FinePix Internet Service”.
I can’t sign on as a “FinePix Internet Service” user.
My PC does not shut down correctly.
My camera will no longer play back image files.
I can’t play AVI files on Windows Media Player.
I can’t update the Internet menu properly. (The buttons do not line up correctly.)
Uninstalling FinePixViewer, DP Editor and Exif Launcher
You can automatically uninstall these application programs using“Add/Remove Programs” in the Control Panel.
• Use this procedure only when the installed software is no longer required orwhen software installation fails.
• Always quit FinePixViewer, DP Editor and Exif Launcher before beginninguninstallation. For information on shutting down Exif Launcher, refer to thelower half of P.29.
• Uninstall Exif Launcher before uninstalling FinePixViewer.Connecting the camera to your PC with only Exif Launcher left installed couldcause problems.
1. Switch on your PC and start up Windows.
2. Open the “My Computer” window and double-click“Add/Remove Programs” in the Control Panel.
3. Select the application to be uninstalled.The “Add/Remove Programs Properties” window appears.Select the program to be deleted (FinePixViewer, ExifLauncher or DP Editor) and click the [Add/Remove] button.
4. Confirm the deletion. A confirmation dialog box appears. Uninstallation cannot becancelled once it has been confirmed in this dialog box.Check the details carefully.
5. UninstallShield starts up.When uninstallation ends, click the [OK] button.
NOTE
53
Windows
52
Possible cause Solution
� The camera is connected to my PC but the PC Camera Driverinstallation will not start.
Is the camera (cradle) switched on?
Is “PC Camera” selected as thecamera’s USB setting?
Is the special USB cable connected tothe camera (cradle) and to thecomputer?
Are you using a compatible operatingsystem?
If you are using Windows 2000Professional, are you logged on as anAdministrator group?
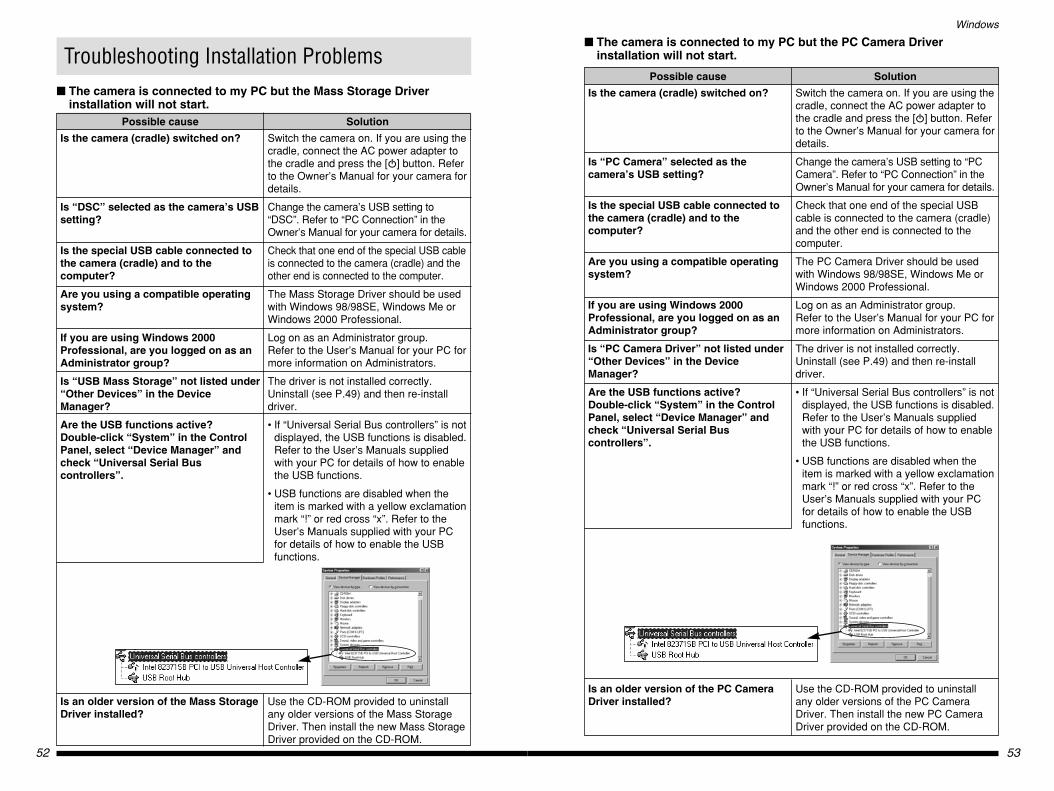
Is “PC Camera Driver” not listed under“Other Devices” in the DeviceManager?
Are the USB functions active?Double-click “System” in the ControlPanel, select “Device Manager” andcheck “Universal Serial Buscontrollers”.
Is an older version of the PC CameraDriver installed?
Switch the camera on. If you are using thecradle, connect the AC power adapter tothe cradle and press the [<] button. Referto the Owner’s Manual for your camera fordetails.
Change the camera’s USB setting to “PCCamera”. Refer to “PC Connection” in theOwner’s Manual for your camera for details.
Check that one end of the special USBcable is connected to the camera (cradle)and the other end is connected to thecomputer.
The PC Camera Driver should be usedwith Windows 98/98SE, Windows Me orWindows 2000 Professional.
Log on as an Administrator group.Refer to the User’s Manual for your PC formore information on Administrators.
The driver is not installed correctly.Uninstall (see P.49) and then re-installdriver.
• If “Universal Serial Bus controllers” is notdisplayed, the USB functions is disabled.Refer to the User’s Manuals suppliedwith your PC for details of how to enablethe USB functions.
• USB functions are disabled when theitem is marked with a yellow exclamationmark “!” or red cross “x”. Refer to theUser’s Manuals supplied with your PCfor details of how to enable the USBfunctions.
Use the CD-ROM provided to uninstallany older versions of the PC CameraDriver. Then install the new PC CameraDriver provided on the CD-ROM.
Possible cause Solution
� The camera is connected to my PC but the Mass Storage Driverinstallation will not start.
Is the camera (cradle) switched on?
Is “DSC” selected as the camera’s USBsetting?
Is the special USB cable connected tothe camera (cradle) and to thecomputer?
Are you using a compatible operatingsystem?
If you are using Windows 2000Professional, are you logged on as anAdministrator group?
Is “USB Mass Storage” not listed under“Other Devices” in the DeviceManager?
Are the USB functions active?Double-click “System” in the ControlPanel, select “Device Manager” andcheck “Universal Serial Buscontrollers”.
Is an older version of the Mass StorageDriver installed?
Switch the camera on. If you are using thecradle, connect the AC power adapter tothe cradle and press the [<] button. Referto the Owner’s Manual for your camera fordetails.
Change the camera’s USB setting to“DSC”. Refer to “PC Connection” in theOwner’s Manual for your camera for details.
Check that one end of the special USB cableis connected to the camera (cradle) and theother end is connected to the computer.
The Mass Storage Driver should be usedwith Windows 98/98SE, Windows Me orWindows 2000 Professional.
Log on as an Administrator group.Refer to the User’s Manual for your PC formore information on Administrators.
The driver is not installed correctly.Uninstall (see P.49) and then re-installdriver.
• If “Universal Serial Bus controllers” is notdisplayed, the USB functions is disabled.Refer to the User’s Manuals suppliedwith your PC for details of how to enablethe USB functions.
• USB functions are disabled when theitem is marked with a yellow exclamationmark “!” or red cross “x”. Refer to theUser’s Manuals supplied with your PCfor details of how to enable the USBfunctions.
Use the CD-ROM provided to uninstallany older versions of the Mass StorageDriver. Then install the new Mass StorageDriver provided on the CD-ROM.
Troubleshooting Installation Problems
55
Windows
54
Possible cause Solution
� When I connect the camera to my PC, the “Add New Hardware Wizard”appears.
Is the USB Driver installed? Use the enclosed CD-ROM to install thedriver. (See P.16, 22.)
Possible cause Solution
� When I double-click the removable disk icon, “The device is notready” error message appears.
Is the SmartMedia loaded in thecamera?
Load a SmartMedia into the camera.Refer to the Owner’s Manual for yourcamera for details.
Possible cause Solution
� A warning message appeared when I removed the SmartMedia fromthe camera.
Did you eject the SmartMedia whiledata access to the camera was still inprogress?
This action can damage the SmartMediaand destroy data on the SmartMedia.Always close all the files on the camera(the removable disk) and wait until thecamera display indicates that data accessis no longer in progress before removingthe SmartMedia.
Possible cause Solution
� “Device disconnection warning” appears when I disconnect thespecial USB cable.
Are you using Windows 2000Professional or Windows Me?
Before disconnecting the special USBcable, click the “ (Eject)” icon in theTaskbar and disconnect the camera.
Troubleshooting Connection and Image Viewing ProblemsSolution
� I was asked for a disk labeled “FINEPIX” during Mass Storage Driverinstallation.
1Click the [Browse] button in the “Copy files” dialog box.2In the dialog box that then appears, select the CD-ROM icon in the drive display
area, refer to the information in the table below and specify the appropriate folderand then click the [OK] button.
3In the “Copy files” dialog box, click the [OK] button to install the driver. Then clickthe [Finish] button.
OS Type Name of Folder Windows 98 D:\Windows Me D:\Usbdrv\WinmeWindows 2000 Professional D:\
� I was asked for a disk labeled “FINEPIX” during PC Camera Driverinstallation.
OS Type Name of FolderWindows 98 D:\win98Windows Me D:\win9xWindows 2000 Professional D:\i386
✽ When using CD-ROM Drive D
✽ When using CD-ROM Drive D
If no Windows CD-ROM was supplied with your PC, contact your PC manufacturer.
NOTE
� I was asked for the “WINDOWS” CD-ROM during Mass Storage Driver/PC Camera Driver installation.
Solution
1Click the [Browse] button in the “Copy files” dialog box.2In the dialog box that then appears, select the CD-ROM icon in the drive display
area and then click the [OK] button.3In the “Copy files” dialog box, click the [OK] button to install the driver. Then click
the [Finish] button.
Solution
1Load the Windows CD-ROM into the CD-ROM drive.2Click the [Browse] button in the “Copy files” dialog box.3In the dialog box that then appears, select the CD-ROM icon in the drive display
area, refer to the information in the table below and specify the appropriate folderand then click the [OK] button.
4In the “Copy files” dialog box, click the [OK] button to install the driver. Then clickthe [Finish] button.
57
Windows
56
Possible cause Solution
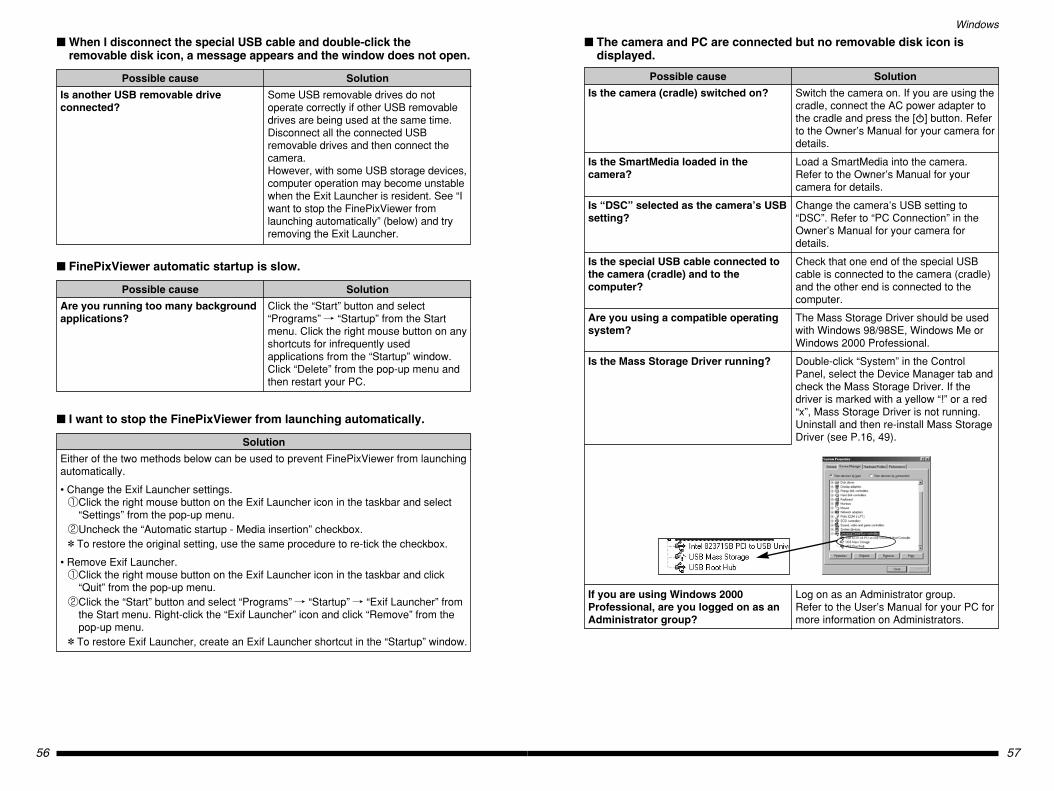
� The camera and PC are connected but no removable disk icon isdisplayed.
Is the camera (cradle) switched on?
Is the SmartMedia loaded in thecamera?
Is “DSC” selected as the camera’s USBsetting?
Is the special USB cable connected tothe camera (cradle) and to thecomputer?
Are you using a compatible operatingsystem?
Is the Mass Storage Driver running?
If you are using Windows 2000Professional, are you logged on as anAdministrator group?
Switch the camera on. If you are using thecradle, connect the AC power adapter tothe cradle and press the [<] button. Referto the Owner’s Manual for your camera fordetails.
Load a SmartMedia into the camera.Refer to the Owner’s Manual for yourcamera for details.
Change the camera’s USB setting to“DSC”. Refer to “PC Connection” in theOwner’s Manual for your camera fordetails.
Check that one end of the special USBcable is connected to the camera (cradle)and the other end is connected to thecomputer.
The Mass Storage Driver should be usedwith Windows 98/98SE, Windows Me orWindows 2000 Professional.
Double-click “System” in the ControlPanel, select the Device Manager tab andcheck the Mass Storage Driver. If thedriver is marked with a yellow “!” or a red“x”, Mass Storage Driver is not running.Uninstall and then re-install Mass StorageDriver (see P.16, 49).
Log on as an Administrator group.Refer to the User’s Manual for your PC formore information on Administrators.
Possible cause Solution
� FinePixViewer automatic startup is slow.
Are you running too many backgroundapplications?
Click the “Start” button and select“Programs” / “Startup” from the Startmenu. Click the right mouse button on anyshortcuts for infrequently usedapplications from the “Startup” window.Click “Delete” from the pop-up menu andthen restart your PC.
Solution
� I want to stop the FinePixViewer from launching automatically.
Either of the two methods below can be used to prevent FinePixViewer from launchingautomatically.
• Change the Exif Launcher settings.1Click the right mouse button on the Exif Launcher icon in the taskbar and select
“Settings” from the pop-up menu.2Uncheck the “Automatic startup - Media insertion” checkbox.✽ To restore the original setting, use the same procedure to re-tick the checkbox.
• Remove Exif Launcher.1Click the right mouse button on the Exif Launcher icon in the taskbar and click
“Quit” from the pop-up menu.2Click the “Start” button and select “Programs” / “Startup” / “Exif Launcher” from
the Start menu. Right-click the “Exif Launcher” icon and click “Remove” from thepop-up menu.
✽ To restore Exif Launcher, create an Exif Launcher shortcut in the “Startup” window.
Possible cause Solution
� When I disconnect the special USB cable and double-click theremovable disk icon, a message appears and the window does not open.
Is another USB removable driveconnected?
Some USB removable drives do notoperate correctly if other USB removabledrives are being used at the same time.Disconnect all the connected USBremovable drives and then connect thecamera.However, with some USB storage devices,computer operation may become unstablewhen the Exit Launcher is resident. See “Iwant to stop the FinePixViewer fromlaunching automatically” (below) and tryremoving the Exit Launcher.
59
Windows
58
Possible cause Solution
� The PictureHello (videoconferencing) window does not open.
Are FinePixViewer and NetMeeting 3.01installed?
Is FinePixViewer running?
Is the camera (cradle) switched on?
Is “PC Camera” selected as the USBsetting on the camera?
Is the special USB cable connected tothe camera (cradle) and PC?
Are you using a compatible operatingsystem?
Is the PC Camera Driver running?
Install FinePixViewer and NetMeeting3.01 from the enclosed CD-ROM. (See P.13.)
In the “Start” menu, select “Programs” /“FinePixViewer” and click “FinePixViewer”.
Switch the camera on. If you are using thecradle, connect the AC power adapter tothe cradle and press the [<] button. Referto the Owner’s Manual for your camera fordetails.
Change the camera’s USB setting to “PCCamera”. Refer to “PC Connection” in theOwner’s Manual for your camera fordetails.
Check that one end of the special USBcable is connected to the camera (cradle)and the other end is connected to your PC.
Use Windows 98, Windows 98SE,Windows Me or Windows 2000Professional.
Double-click “System” in the ControlPanel, select the Device Manager andcheck “USB PC Camera” in “Imaging” or“Other Devices”. If “USB PC Camera” ismarked with a yellow exclamation mark “!”or a red cross “x”, it is not running.Uninstall and then re-install PC CameraDriver (see P.22, 49).
Possible cause Solution
� PictureHello (videoconferencing) does not show video of me.
Is another video input deviceconnected to your PC?
Is another application displaying thelive images from the camera?
Did you disconnect the special USBcable or switch off the camera (cradle)during live image display?
Disconnect all other video input devices.
Quit any other application that isdisplaying live images.
Quit PictureHello and then restart yourPC. Check that the special USB cable isconnected correctly to the camera andyour PC and then switch the camera(cradle) on.
Troubleshooting Videoconferencing ProblemsPossible cause Solution
� The PC hangs when I access the SmartMedia.
When opening the Device Manager,there is a yellow “!” mark next to thedriver in “Universal Serial Buscontrollers”.
When opening the Device Manager,there is a yellow “!” mark next to MassStorage Driver.
Is an older version of the Mass StorageDriver software installed?
You are using a driver or camera thatprevents the driver for the Universal SerialBus controllers from operating. Refer tothe User’s Manual for your PC and checkyour hardware and software setup.
You are using a driver or camera thatprevents the Mass Storage Driver fromoperating. Uninstall and then re-installMass Storage Driver (see P.16, 49).
Use the CD-ROM provided to uninstallany older versions of the Mass StorageDriver. Then install the new Mass StorageDriver provided on the CD-ROM.
61
Windows
60
Possible cause Solution
� I can make calls but I cannot use videoconferencing.
Is the other party able to make oraccept calls?
Are you or the other party trying to calloutside from an in-house LAN?
Are you or the other party trying to calloutside from a home-office LAN?
Open the address book and click theUpdate Status button. If the other partycannot accept calls, try again later. (See P.41.)
Calls cannot be made in either directionbetween a LAN and an external line. Usea dial-up connection.
Calls cannot be made in either directionbetween a LAN and an external line. Usea dial-up connection.
Possible cause Solution
� I can’t hear the other party in the videoconference/The other partycan’t hear me.
Are the speakers set to playbackmode?
Is the microphone operating normally?
You and the other party should use thefollowing procedure to check the speakersetup:1Check that the speakers are
connected correctly to your PC.2In the “Start” menu, select “Programs”/ “Accessories” / “Entertainment”and click “Volume Control”. Thenadjust the volume.
You and the other party should use thefollowing procedure to check themicrophone setup:1Check that the microphone is
connected correctly to your PC.2In the “Start” menu, select “Programs”/ “Accessories” / “Entertainment”and click “Sound Recorder”. Thenadjust the microphone input level.
Possible cause Solution
� I clicked the Login button in PictureHello (videoconferencing), but Ican’t log in.
Are you able to connect to theInternet?
Is the FinePix Internet Serviceundergoing maintenance?
Have you completed the userregistration process?
Check your PC hardware and softwaresetup.
Log in after the maintenance iscompleted.
Sign on as a FinePix Internet Serviceuser. (See P.35.)
Solution
� The live image of the other party in videoconferencing is very jerky.
Use a high-speed line with a connection speed of 56 kbps or better.
Possible cause Solution
� There is no live image of the other party during videoconferencing.
Are you or the other party trying to calloutside from an in-house LAN?
Are you or the other party trying to calloutside from a home-office LAN?
Calls cannot be made in either directionbetween a LAN and an external line. Usea dial-up connection.
Calls cannot be made in either directionbetween a LAN and an external line. Usea dial-up connection.
Possible cause Solution
� Videoconferencing call notifications are not displayed.
Is the “Automatically accept incomingcalls” checkbox ticked?
Are you logged in to the server?
Uncheck the “Automatically acceptincoming calls” checkbox.
Log in to the server.

63
Windows
62
Possible cause Solution
� I can’t log in to the “FinePix Internet Service”.
Are you able to connect to theInternet?
Is the FinePix Internet Serviceundergoing maintenance?
Have you completed the userregistration process?
Check your PC hardware and softwaresetup.
Log in after the maintenance iscompleted.
Click the FinePixViewer user registrationbutton and sign on as a FinePix InternetService user. (See P.35.)
Possible cause Solution
� I can’t sign on as a “FinePix Internet Service” user.
Have you already signed on under thesame e-mail address?
You cannot sign on twice with the sameuser ID or e-mail address.
Possible cause Solution
� My camera will no longer play back image files.
Did you rename any files or foldersinside the DCIM folder?
Did you replace an image file inside theDCIM folder?
Change the file or folder names in theDCIM folder back to the original names.
Do not replace image files in the DCIMfolder.
Solution
� My PC does not shut down correctly.
Disconnect the PC and the camera using the correct procedure and then exitWindows.
Solution
� I can’t play AVI files on Windows Media Player.
If you want to use Windows Media Player, you must install DirectX 8.0. See theMicrosoft homepage or industry-related magazines for information on how to acquireDirectX 8.0.
Solution
� I can’t update the Internet menu properly. (The buttons do not line upcorrectly.)
The menu data is corrupted. Use the procedure below to update the menu:1Quit FinePixViewer.2From the “Start” menu, select “FinePixViewer” in “Programs”. Then right-click on
the “FinePixViewer” icon in the “FinePixViewer” folder and select “Properties”.3Click the “Find link destination” button to display the folder in which FinePixViewer
was installed.4Delete the “FinePixInternetFiles” folder in the FinePixViewer installation folder.5Launch FinePixViewer and click the “Update” button.
� Some types of PC may not shut down correctly while the camera is still connected.
Possible cause Solution
� Live images do not appear in the VideoImpression Capture window.
Do you have Windows Media Playerinstalled?
Is the camera (cradle) switched on?
Is “PC Camera” selected as the USBsetting on the camera?
Is the special USB cable connected tothe camera (cradle) and PC?
Are you using a compatible operatingsystem?
Is the PC Camera Driver running?
Is another video input device selected?
Is another application displaying thelive images?
Did you disconnect the special USBcable or switch off the camera (cradle)during live image display?
Install Windows Media Player from theenclosed CD-ROM. (See P.13.)
Switch the camera on. If you are using thecradle, connect the AC power adapter tothe cradle and press the [<] button. Referto the Owner’s Manual for your camera fordetails.
Change the camera’s USB setting to “PCCamera”. Refer to “PC Connection” in theOwner’s Manual for your camera fordetails.
Check that one end of the special USBcable is connected to the camera (cradle)and the other end is connected to your PC.
Use Windows 98, Windows 98SE,Windows Me or Windows 2000Professional.
Double-click “System” in the ControlPanel, select the Device Manager andcheck “USB PC Camera” in “Imaging” or“Other Devices”. If “USB PC Camera” ismarked with a yellow exclamation mark “!”or a red cross “x”, it is not running.Uninstall and then re-install PC CameraDriver (see P.22, 49).
Select “USB PC Camera”. Refer to theVideoImpression User’s Guide forinformation on how to select the videoinput device.
Quit any other application that isdisplaying live images.
Quit VideoImpression and then restartyour PC. Check that the special USBcable is connected correctly to the cameraand your PC and then switch the camera(cradle) on.
Troubleshooting Other Problems
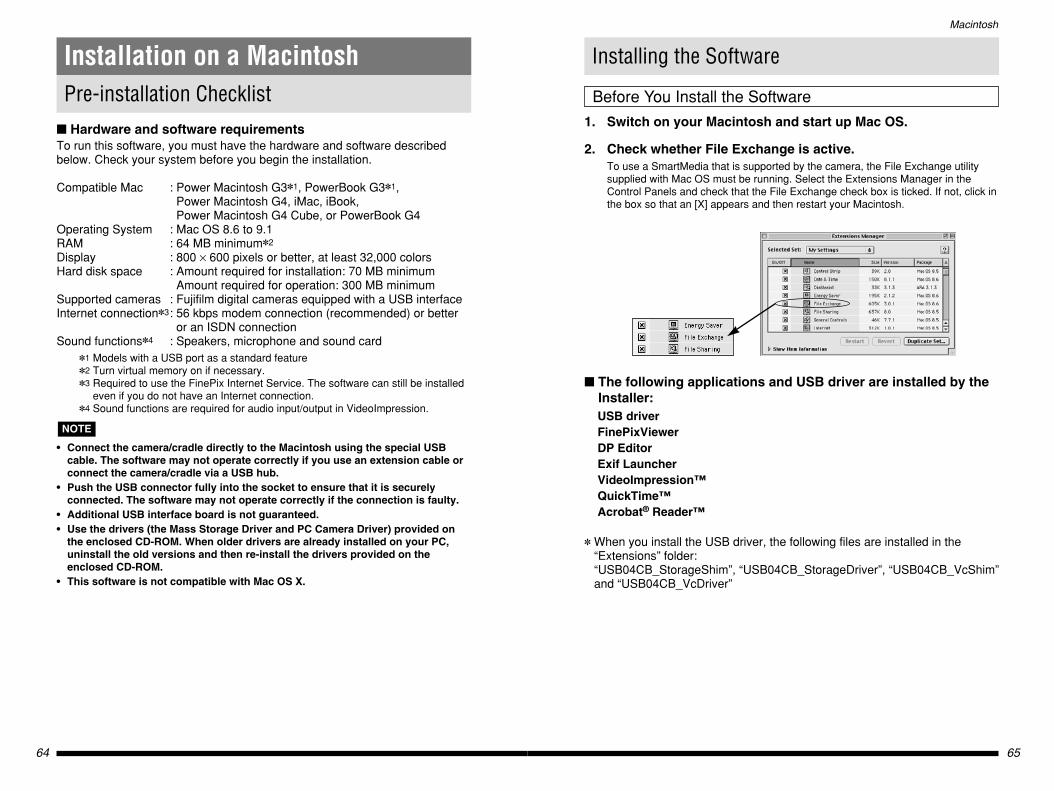
65
Macintosh
64
1. Switch on your Macintosh and start up Mac OS.
2. Check whether File Exchange is active.To use a SmartMedia that is supported by the camera, the File Exchange utilitysupplied with Mac OS must be running. Select the Extensions Manager in theControl Panels and check that the File Exchange check box is ticked. If not, click inthe box so that an [X] appears and then restart your Macintosh.
Installing the Software
Before You Install the Software
� The following applications and USB driver are installed by theInstaller:USB driverFinePixViewerDP EditorExif LauncherVideoImpression™QuickTime™Acrobat® Reader™
✽ When you install the USB driver, the following files are installed in the“Extensions” folder:“USB04CB_StorageShim”, “USB04CB_StorageDriver”, “USB04CB_VcShim”and “USB04CB_VcDriver”
Pre-installation Checklist
Installation on a Macintosh
� Hardware and software requirementsTo run this software, you must have the hardware and software describedbelow. Check your system before you begin the installation.
Compatible Mac : Power Macintosh G3✽1, PowerBook G3✽1, Power Macintosh G4, iMac, iBook, Power Macintosh G4 Cube, or PowerBook G4
Operating System : Mac OS 8.6 to 9.1RAM : 64 MB minimum✽2
Display : 800 × 600 pixels or better, at least 32,000 colorsHard disk space : Amount required for installation: 70 MB minimum
Amount required for operation: 300 MB minimumSupported cameras : Fujifilm digital cameras equipped with a USB interfaceInternet connection✽3: 56 kbps modem connection (recommended) or better
or an ISDN connectionSound functions✽4 : Speakers, microphone and sound card
✽1 Models with a USB port as a standard feature✽2 Turn virtual memory on if necessary.✽3 Required to use the FinePix Internet Service. The software can still be installed
even if you do not have an Internet connection.✽4 Sound functions are required for audio input/output in VideoImpression.
• Connect the camera/cradle directly to the Macintosh using the special USBcable. The software may not operate correctly if you use an extension cable orconnect the camera/cradle via a USB hub.
• Push the USB connector fully into the socket to ensure that it is securelyconnected. The software may not operate correctly if the connection is faulty.
• Additional USB interface board is not guaranteed.• Use the drivers (the Mass Storage Driver and PC Camera Driver) provided on
the enclosed CD-ROM. When older drivers are already installed on your PC,uninstall the old versions and then re-install the drivers provided on theenclosed CD-ROM.
• This software is not compatible with Mac OS X.
NOTE
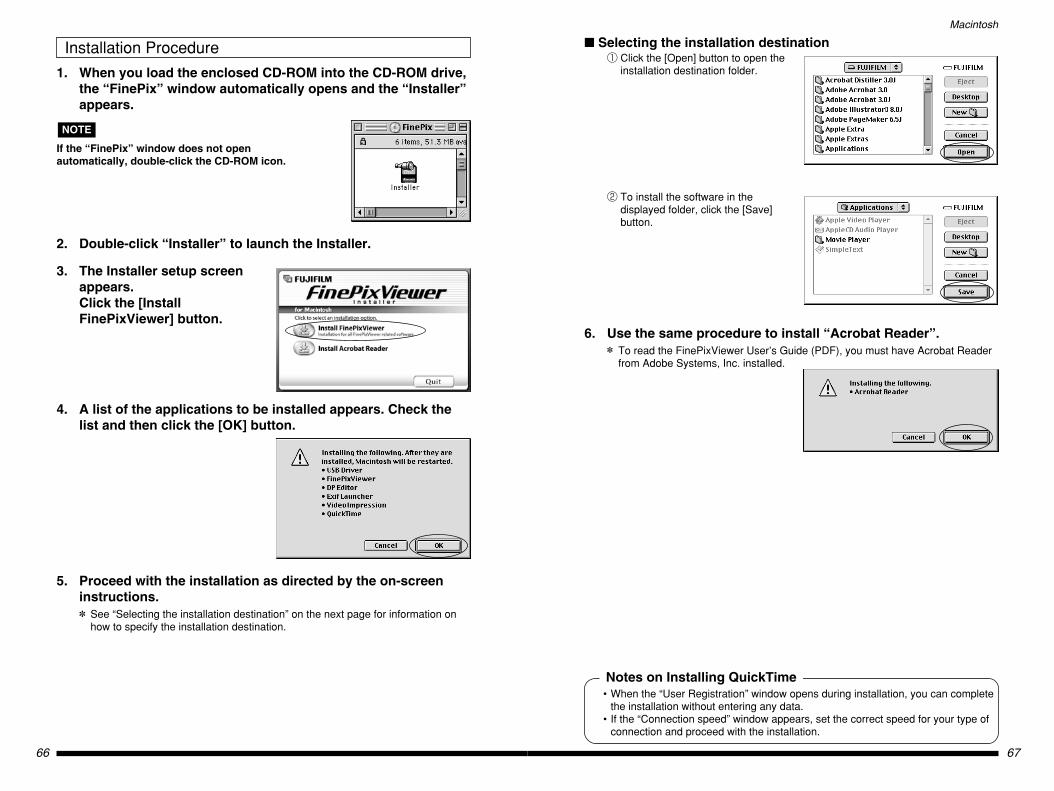
67
Macintosh
66
� Selecting the installation destination1 Click the [Open] button to open the
installation destination folder.
2 To install the software in thedisplayed folder, click the [Save]button.
6. Use the same procedure to install “Acrobat Reader”.✽ To read the FinePixViewer User’s Guide (PDF), you must have Acrobat Reader
from Adobe Systems, Inc. installed.
1. When you load the enclosed CD-ROM into the CD-ROM drive,the “FinePix” window automatically opens and the “Installer”appears.
If the “FinePix” window does not openautomatically, double-click the CD-ROM icon.
2. Double-click “Installer” to launch the Installer.
3. The Installer setup screenappears.Click the [InstallFinePixViewer] button.
4. A list of the applications to be installed appears. Check thelist and then click the [OK] button.
5. Proceed with the installation as directed by the on-screeninstructions.✽ See “Selecting the installation destination” on the next page for information on
how to specify the installation destination.
NOTE
Installation Procedure
• When the “User Registration” window opens during installation, you can completethe installation without entering any data.
• If the “Connection speed” window appears, set the correct speed for your type ofconnection and proceed with the installation.
Notes on Installing QuickTime
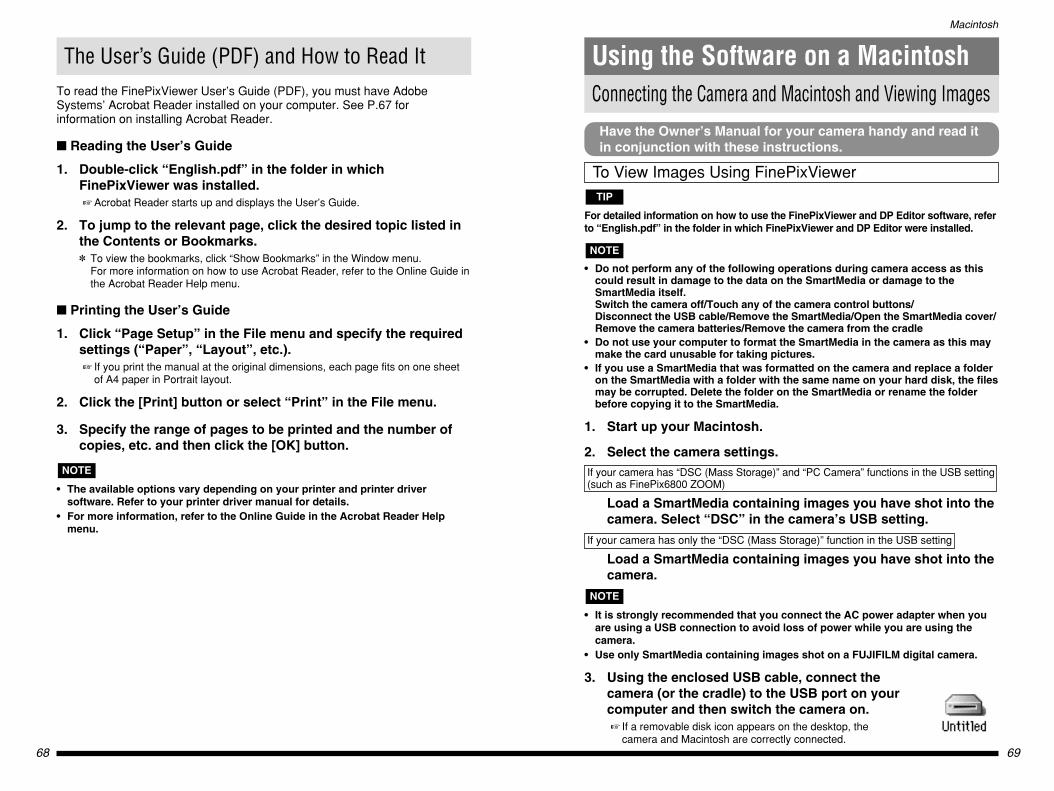
69
Macintosh
68
Connecting the Camera and Macintosh and Viewing Images
Using the Software on a Macintosh
For detailed information on how to use the FinePixViewer and DP Editor software, referto “English.pdf” in the folder in which FinePixViewer and DP Editor were installed.
• Do not perform any of the following operations during camera access as thiscould result in damage to the data on the SmartMedia or damage to theSmartMedia itself.Switch the camera off/Touch any of the camera control buttons/Disconnect the USB cable/Remove the SmartMedia/Open the SmartMedia cover/Remove the camera batteries/Remove the camera from the cradle
• Do not use your computer to format the SmartMedia in the camera as this maymake the card unusable for taking pictures.
• If you use a SmartMedia that was formatted on the camera and replace a folderon the SmartMedia with a folder with the same name on your hard disk, the filesmay be corrupted. Delete the folder on the SmartMedia or rename the folderbefore copying it to the SmartMedia.
1. Start up your Macintosh.
2. Select the camera settings.If your camera has “DSC (Mass Storage)” and “PC Camera” functions in the USB setting (such as FinePix6800 ZOOM)
Load a SmartMedia containing images you have shot into thecamera. Select “DSC” in the camera’s USB setting.
If your camera has only the “DSC (Mass Storage)” function in the USB setting
Load a SmartMedia containing images you have shot into thecamera.
• It is strongly recommended that you connect the AC power adapter when youare using a USB connection to avoid loss of power while you are using thecamera.
• Use only SmartMedia containing images shot on a FUJIFILM digital camera.
3. Using the enclosed USB cable, connect thecamera (or the cradle) to the USB port on yourcomputer and then switch the camera on.� If a removable disk icon appears on the desktop, the
camera and Macintosh are correctly connected.
NOTE
NOTE
TIP
To View Images Using FinePixViewer
The User’s Guide (PDF) and How to Read ItTo read the FinePixViewer User’s Guide (PDF), you must have AdobeSystems’ Acrobat Reader installed on your computer. See P.67 forinformation on installing Acrobat Reader.
� Reading the User’s Guide
1. Double-click “English.pdf” in the folder in whichFinePixViewer was installed.� Acrobat Reader starts up and displays the User’s Guide.
2. To jump to the relevant page, click the desired topic listed inthe Contents or Bookmarks.✽ To view the bookmarks, click “Show Bookmarks” in the Window menu.
For more information on how to use Acrobat Reader, refer to the Online Guide inthe Acrobat Reader Help menu.
� Printing the User’s Guide
1. Click “Page Setup” in the File menu and specify the requiredsettings (“Paper”, “Layout”, etc.).� If you print the manual at the original dimensions, each page fits on one sheet
of A4 paper in Portrait layout.
2. Click the [Print] button or select “Print” in the File menu.
3. Specify the range of pages to be printed and the number ofcopies, etc. and then click the [OK] button.
• The available options vary depending on your printer and printer driversoftware. Refer to your printer driver manual for details.
• For more information, refer to the Online Guide in the Acrobat Reader Helpmenu.
NOTE
Have the Owner’s Manual for your camera handy and read itin conjunction with these instructions.
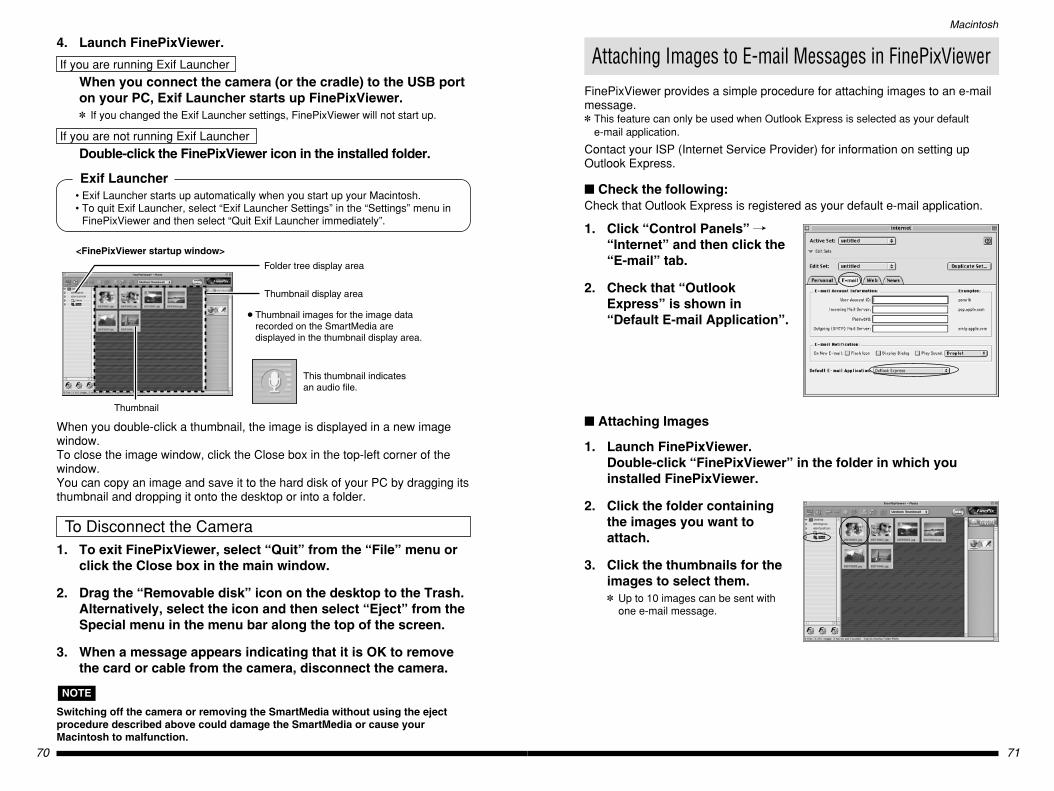
71
Macintosh
70
1. To exit FinePixViewer, select “Quit” from the “File” menu orclick the Close box in the main window.
2. Drag the “Removable disk” icon on the desktop to the Trash.Alternatively, select the icon and then select “Eject” from theSpecial menu in the menu bar along the top of the screen.
3. When a message appears indicating that it is OK to removethe card or cable from the camera, disconnect the camera.
Switching off the camera or removing the SmartMedia without using the ejectprocedure described above could damage the SmartMedia or cause yourMacintosh to malfunction.
NOTE
To Disconnect the Camera
When you double-click a thumbnail, the image is displayed in a new imagewindow.To close the image window, click the Close box in the top-left corner of thewindow.You can copy an image and save it to the hard disk of your PC by dragging itsthumbnail and dropping it onto the desktop or into a folder.
Thumbnail display area
<FinePixViewer startup window>
Thumbnail images for the image data recorded on the SmartMedia are displayed in the thumbnail display area.
This thumbnail indicates an audio file.
Thumbnail
Folder tree display area
Attaching Images to E-mail Messages in FinePixViewerFinePixViewer provides a simple procedure for attaching images to an e-mailmessage.✽ This feature can only be used when Outlook Express is selected as your default
e-mail application.
Contact your ISP (Internet Service Provider) for information on setting upOutlook Express.
� Check the following:Check that Outlook Express is registered as your default e-mail application.
1. Click “Control Panels” /“Internet” and then click the“E-mail” tab.
2. Check that “OutlookExpress” is shown in“Default E-mail Application”.
� Attaching Images
1. Launch FinePixViewer.Double-click “FinePixViewer” in the folder in which youinstalled FinePixViewer.
2. Click the folder containingthe images you want toattach.
3. Click the thumbnails for theimages to select them.✽ Up to 10 images can be sent with
one e-mail message.
4. Launch FinePixViewer.
If you are running Exif Launcher
When you connect the camera (or the cradle) to the USB porton your PC, Exif Launcher starts up FinePixViewer.✽ If you changed the Exif Launcher settings, FinePixViewer will not start up.
If you are not running Exif Launcher
Double-click the FinePixViewer icon in the installed folder.
• Exif Launcher starts up automatically when you start up your Macintosh.• To quit Exif Launcher, select “Exif Launcher Settings” in the “Settings” menu in
FinePixViewer and then select “Quit Exif Launcher immediately”.
Exif Launcher
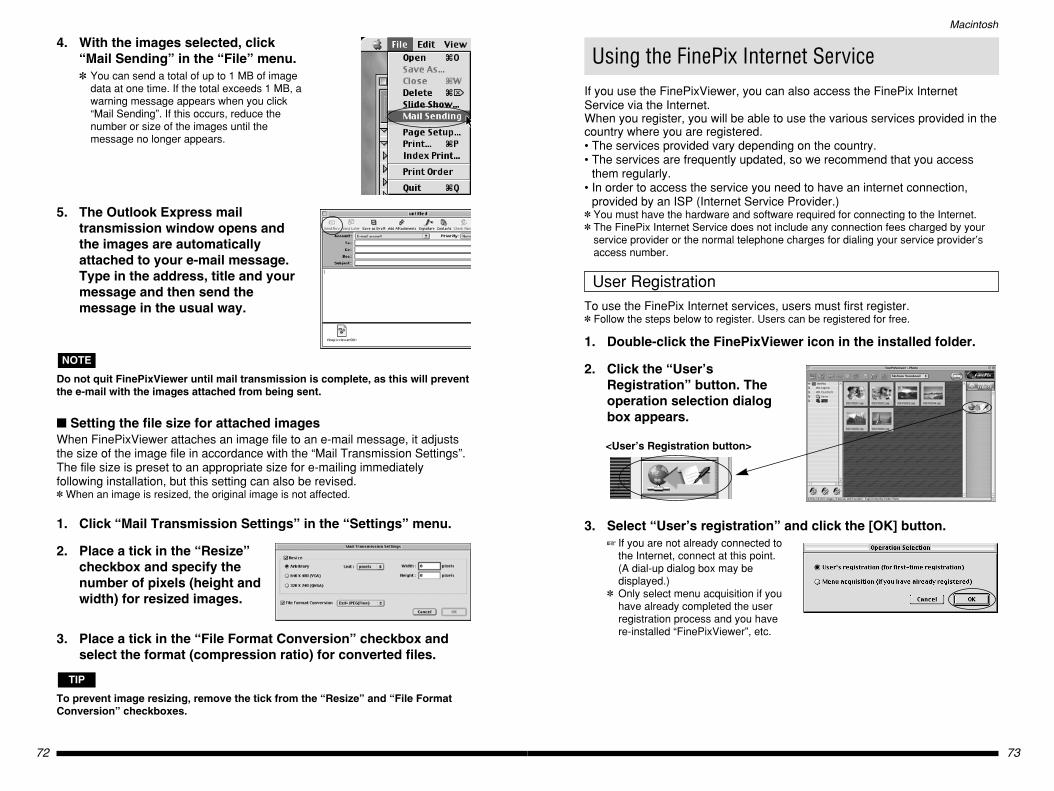
72 73
Macintosh
To use the FinePix Internet services, users must first register.✽ Follow the steps below to register. Users can be registered for free.
1. Double-click the FinePixViewer icon in the installed folder.
2. Click the “User’sRegistration” button. Theoperation selection dialogbox appears.
<User’s Registration button>
3. Select “User’s registration” and click the [OK] button.� If you are not already connected to
the Internet, connect at this point. (A dial-up dialog box may bedisplayed.)
✽ Only select menu acquisition if youhave already completed the userregistration process and you havere-installed “FinePixViewer”, etc.
User Registration
Using the FinePix Internet ServiceIf you use the FinePixViewer, you can also access the FinePix InternetService via the Internet.When you register, you will be able to use the various services provided in thecountry where you are registered.• The services provided vary depending on the country.• The services are frequently updated, so we recommend that you access
them regularly.• In order to access the service you need to have an internet connection,
provided by an ISP (Internet Service Provider.)✽ You must have the hardware and software required for connecting to the Internet.✽ The FinePix Internet Service does not include any connection fees charged by your
service provider or the normal telephone charges for dialing your service provider’saccess number.
4. With the images selected, click“Mail Sending” in the “File” menu.✽ You can send a total of up to 1 MB of image
data at one time. If the total exceeds 1 MB, awarning message appears when you click“Mail Sending”. If this occurs, reduce thenumber or size of the images until themessage no longer appears.
5. The Outlook Express mailtransmission window opens andthe images are automaticallyattached to your e-mail message.Type in the address, title and yourmessage and then send themessage in the usual way.
Do not quit FinePixViewer until mail transmission is complete, as this will preventthe e-mail with the images attached from being sent.
� Setting the file size for attached imagesWhen FinePixViewer attaches an image file to an e-mail message, it adjuststhe size of the image file in accordance with the “Mail Transmission Settings”.The file size is preset to an appropriate size for e-mailing immediatelyfollowing installation, but this setting can also be revised.✽ When an image is resized, the original image is not affected.
1. Click “Mail Transmission Settings” in the “Settings” menu.
2. Place a tick in the “Resize”checkbox and specify thenumber of pixels (height andwidth) for resized images.
3. Place a tick in the “File Format Conversion” checkbox andselect the format (compression ratio) for converted files.
To prevent image resizing, remove the tick from the “Resize” and “File FormatConversion” checkboxes.
TIP
NOTE
75
Macintosh
74
Once user registration is completed, you can use the FinePix Internetservices.
� Selecting services
1. Click the menu button for the service you want to use.� If you are not already connected to the Internet, the software automatically
attempts to connect (for dial-up connections).� Operation after you click the menu button differs depending on the button you
click. For instance, you may jump to your service provider’s web site or anupload dialog box may open.
✽ The actual Internet menu may differ slightly in appearance from the sampleshown here.
Move the mouse cursor over an Internet menu button to view information aboutthe service.
2. When you have finished using the Internet services,disconnect from the Internet (for dial-up connections).
The connection speed will vary significantly depending on the quality of yourphone line and the amount of traffic on the server to which you are connected.
� Updating the Menu
1. Select “Menu Update” from the “View” menu.
2. The User Verification dialog box appears.Enter the user ID and password set during user registrationand then click the [OK] button to update the Internet menu.
� If you are not already connected to the Internet, the software automaticallyattempts to connect (for dial-up connections).
As well as the Internet menu being updated, related information pages may alsobe opened. Because these pages may contain good news or useful information,you should update the Internet menu frequently.
TIP
NOTE
TIP
Using the Services4. The User’s Registration dialog boxopens. Select the country or area whereyou are living and click the [OK]button.The browser starts up and opensthe user registration page. Use thispage to register as a user.
✽ After you register, a confirmation e-mail message is sent to you. Be sure to entera valid e-mail address at which you can receive the message.
✽ The actual user registration page may differ slightly in appearance from thesample shown here.
✽ If the country or area where you are living does not appear in the pull-down list,select “OTHERS”. A button linking to the English home page for FUJI PHOTOFILM CO. LTD. (TOKYO, JAPAN) will be displayed.
VirusesA virus infecting your PC can result in the loss of important data or thesending of unwanted e-mail messages to the people stored in youraddress book. Do not open downloaded files or files received as e-mailattachments unless you are certain of their content.
Important Information for Internet Users
77
Macintosh
76
Using VideoImpressionYou can use VideoImpression to make your own movies.For more information on VideoImpression, refer to the contact informationprovided on the back cover of this manual.
• Allows you to create and save movies that include both still and movingimages and sound.
• Allows you to edit your movies so you can cut unwanted scenes or addcaptions.
• Provides effective ways of switching from one scene to another (transitions).✽ More information on these functions and how to use them is available as follows:
• Open the “English.pdf” file in the “Manual” folder inside “Vimpress” on theenclosed CD-ROM.
• Check on the Internet by clicking the link in the bottom right corner of the screen.• Use the contact details printed on the back cover to contact FUJIFILM.
Main Functions
� Store the movie in an albumTo work with still images, video and sound, you first have to import them intothe album window.
1. Double-click the VideoImpression in the folder in whichVideoImpression was installed to launch VideoImpression.
2. Click the [new] button to open an album window.
3. Drag the thumbnails from FinePixViewer and drop them intothe album window.
Making Your Own Movies
<FinePixViewer>
Customizing the CameraCameras with a customization function can be customized using specialcustomization software downloaded from the FinePix Internet Service.
1. Download the special customization software from theFinePix Internet Service or from the following web site andinstall it in the “DSCSETUP” folder in the “FinePixViewer”folder on your Macintosh computer.
http://home.fujifilm.com/products/digital/
2. When you click the “camera customization” button on theFinePixViewer, the customization software starts up and thesettings dialog box appears.✽ Refer to the downloading web page for information on installing the
customization software.✽ Refer to “PC Connection” in the Owner’s Manual for your camera for more
information on transferring data from your PC to the camera.
79
Macintosh
78
Capturing Live Images
If you are using a camera with the “PC Camera” function in the USB settings,you can import live images from the camera.✽ It is strongly recommended that you connect the AC power adapter when you are
using a USB connection to avoid loss of power while you are using the camera.✽ Refer to “PC Connection” in the Owner’s Manual for your camera for more information
on camera operation and the USB settings.
1. Select “PC Camera” in the camera’s USB settings.
2. Using the special USB cable, connect the camera (cradle) tothe USB port on your computer and then switch the cameraon. If you have launched FinePixViewer, exit the program.
3. Double-click the VideoImpression icon in the folder in whichVideoImpression was installed.
4. When the startup screen appears,click the [new] button.
5. When the album window opens,click the [capture] button.
• If you leave the mouse pointer positioned over a button or image for a fewseconds, information about that button or image is displayed.
• In any window, you can access the online help by clicking “?”.• In addition to “MPEG”, you can choose from a wide range of formats for saved
files.
TIP� Add a storyboardIn the storyboard, you select the files to be used in the movie and set theorder in which the files are played.
1. Add files to the movie by draggingthem from the album window anddropping them onto thestoryboard.
2. If necessary, you can drag itemsaround in the storyboard tochange the playback sequence.
� Add text
1. Click the [edit movie] button toswitch to the editing window.
2. Click the [text] button and enter the text.� You can use the drag handle to adjust the position.
3. Use the buttons below the image to specify settings such asthe typeface and the time for which the text appears.
� Play back the movie
1. Click the [play movie] button toswitch to the playback window.
2. Click the Play button and checkthe movie.
Drop images into here.
Drop sounds [ ] into here.

81
Macintosh
80
Uninstalling the Software on a Macintosh
Use this procedure only when the installed software is no longer required orwhen software installation fails.
NOTE
Uninstalling Mass Storage Driver and PC Camera Driver
First, check that the digital camera is no longer connected. Thenopen the Extensions folder on the hard disk and move thefollowing four files to the Trash:“USB04CB_StorageShim”“USB04CB_StorageDriver”“USB04CB_VcShim”“USB04CB_VcDriver”
Then, restart your Macintosh and select “Empty Trash” from theSpecial menu.
1. After you have quit Exif Launcher in “Exif Launcher Settings”in the FinePixViewer “Settings” menu, move the ExifLauncher file from the “Startup Items” folder in the Systemfolder to the Trash. Then select “Empty Trash” in the“Special” menu.
2. Quit FinePixViewer and DP Editor and move theFinePixViewer and DP Editor files to the Trash. Then select“Empty Trash” from the Special menu.
Uninstalling Exif Launcher, FinePixViewer and DP Editor
6. The Capture window appears and the live image is displayed.✽ Recording has not yet started.
7. Click the [Capture Video] button to begin recording themovie.� The name of the button changes to [Stop Capture]. During recording, only the
[Stop Capture] button can be pressed.
8. Click the [Stop Capture] button to stop recording. The moviedata will be automatically saved to a file and imported to theAlbum.
9. Click the [Done] button to return to the Album window.
• You must have a sound card installed and speakers and a microphoneconnected to your PC to input and output sound.
• The time required for playing and saving images varies depending on theperformance of your PC.
• Do not perform any of the following while live camera images are beingdisplayed as this could cause your PC to freeze (see P.85):Switch off the camera/Touch any of the control buttons on the camera/Disconnect the USB cable/Remove the SmartMedia/Open the SmartMediacover/ Remove the camera battery/Remove the camera from the cradle.
NOTE
<Standby> <Movie recording in progress>
83
Macintosh
82
Possible cause Solution
� The camera and PC are connected but no removable disk icon is displayed.
Is the camera (cradle) switched on?
Is the SmartMedia loaded in thecamera?
Is “DSC” selected as the camera’s USBsetting?
Is the special USB cable connected tothe camera (cradle) and to thecomputer?
Are you using a compatible operatingsystem?
Is the Mass Storage Driver active?
Switch the camera on. If you are using thecradle, connect the AC power adapter tothe cradle and press the [<] button. Referto the Owner’s Manual for your camera fordetails.
Load a SmartMedia into the camera.Refer to the Owner’s Manual for yourcamera for details.
Change the camera’s USB setting to“DSC”. Refer to “PC Connection” in theOwner’s Manual for your camera for details.
Check that one end of the special USBcable is connected to the camera (cradle)and the other end is connected to thecomputer.
The USB Driver should be used with MacOS 8.6 to 9.1. (It is not compatible withMac OS X.)
Enable “USB04CB_StorageShim” and“USB04CB_StorageDriver” in theExtensions Manager and restart yourMacintosh.
Possible cause Solution
� The PC hangs when I access the SmartMedia.
Is the software installed? Install the software on your PC.
Possible cause Solution
� A warning message appears when I remove the SmartMedia ordisconnect the USB cable from the camera.
Did you eject the SmartMedia ordisconnect the USB cable while thecamera was still mounted as a diskdrive?
This action can damage the SmartMediaand destroy data on the SmartMedia.Before ejecting the SmartMedia ordisconnecting the USB cable, alwaysselect the drive and then choose “Eject”from the “Special” menu. Alternatively,you can drag the drive icon to the Trash.
� When I connected the camera to my PC, the “Required software notfound” message or “Required driver cannot be used” messageappears.
TroubleshootingIf the software does not operate correctly but the problem does not match anyof those listed below, check that you are using the correct hardware andsoftware. (See P.64.)If the problem persists even though you are using the correct hardware andsoftware, refer to the table below and then see the reference page listed foryour problem.
Troubleshooting Connection and Image Viewing Problems
Possible cause Solution
Is the software installed? Install the software on your PC.
Page
82
83
84
85
Co
nn
ecti
on
•Im
age
Vie
win
gIn
tern
etO
ther
Problemwith
When I connected the camera to my PC, the “Required software not found”message or “Required driver cannot be used” message appears.
When I connected the USB cable, Mac OS displayed the “Initialize disk?” message.
The PC hangs when I access the SmartMedia.
The camera and PC are connected but no removable disk icon is displayed.
A warning message appears when I remove the SmartMedia or disconnectthe USB cable from the camera.
I can’t log in to the “FinePix Internet Service”.
I can’t sign on as a ”FinePix Internet Service” user.
I can’t update the Internet menu properly. (The buttons do not line up correctly.)
The FinePixViewer Upload dialog box does not appear.
The “Process aborted because error occurred during communication.”message appears while you are using the FinePixViewer Upload dialog box.
Live images do not appear in the VideoImpression Capture window.
My camera will no longer play back image files.
I want to stop the FinePixViewer from launching automatically.
� When I connected the USB cable, Mac OS displayed the “Initializedisk?” message.
Possible cause Solution
Is the SmartMedia formatted? Disconnect the USB cable from the camera,insert the SmartMedia into the camera andformat the SmartMedia. Refer to theOwner’s Manual for your camera for details.
Enable File Exchange. See P.65 for details.
Use a different SmartMedia.� SmartMedia of this size are not recognized by File Exchange and cannot be used with a Mac OS.
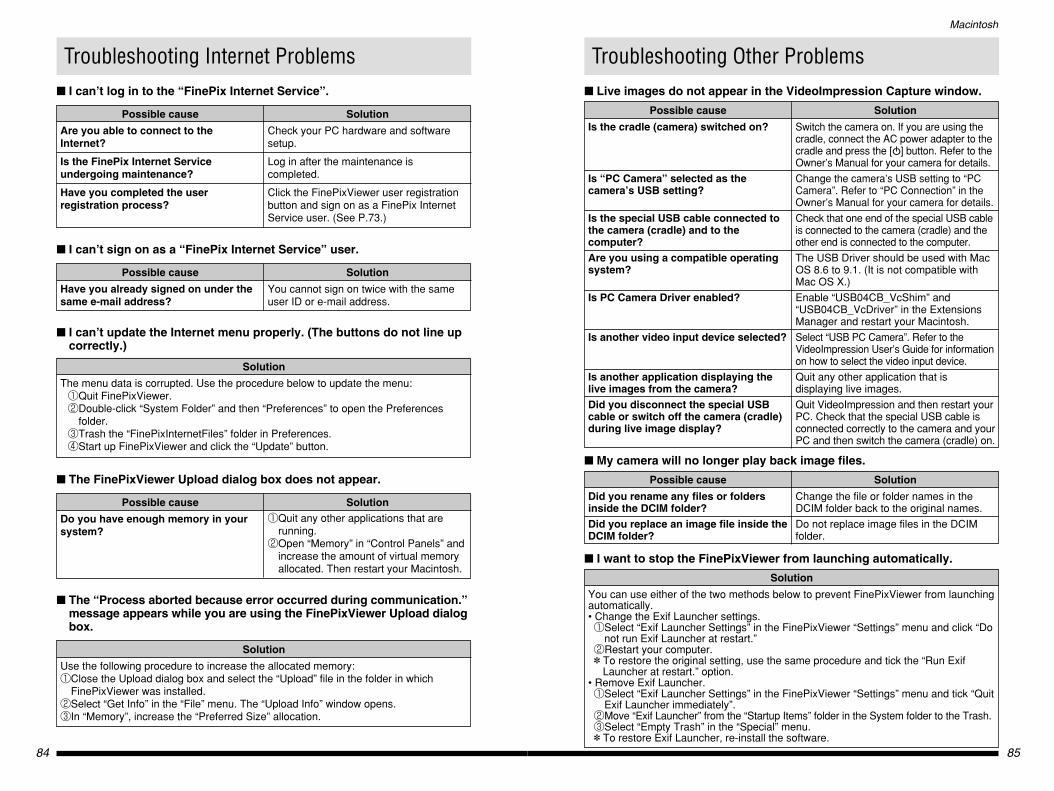
85
Macintosh
84
Possible cause Solution
� Live images do not appear in the VideoImpression Capture window.
Is the cradle (camera) switched on?
Is “PC Camera” selected as thecamera’s USB setting?
Is the special USB cable connected tothe camera (cradle) and to thecomputer?Are you using a compatible operatingsystem?
Is PC Camera Driver enabled?
Is another video input device selected?
Is another application displaying thelive images from the camera?Did you disconnect the special USBcable or switch off the camera (cradle)during live image display?
Switch the camera on. If you are using thecradle, connect the AC power adapter to thecradle and press the [<] button. Refer to theOwner’s Manual for your camera for details.
Change the camera’s USB setting to “PCCamera”. Refer to “PC Connection” in theOwner’s Manual for your camera for details.
Check that one end of the special USB cableis connected to the camera (cradle) and theother end is connected to the computer.
The USB Driver should be used with MacOS 8.6 to 9.1. (It is not compatible withMac OS X.)
Enable “USB04CB_VcShim” and“USB04CB_VcDriver” in the ExtensionsManager and restart your Macintosh.
Select “USB PC Camera”. Refer to theVideoImpression User’s Guide for informationon how to select the video input device.
Quit any other application that isdisplaying live images.
Quit VideoImpression and then restart yourPC. Check that the special USB cable isconnected correctly to the camera and yourPC and then switch the camera (cradle) on.
Troubleshooting Other Problems
Possible cause Solution
� My camera will no longer play back image files.
Did you rename any files or foldersinside the DCIM folder?Did you replace an image file inside theDCIM folder?
Change the file or folder names in theDCIM folder back to the original names.
Do not replace image files in the DCIMfolder.
Solution
� I want to stop the FinePixViewer from launching automatically.
You can use either of the two methods below to prevent FinePixViewer from launchingautomatically.• Change the Exif Launcher settings.1Select “Exif Launcher Settings” in the FinePixViewer “Settings” menu and click “Do
not run Exif Launcher at restart.”2Restart your computer.✽ To restore the original setting, use the same procedure and tick the “Run Exif
Launcher at restart.” option.• Remove Exif Launcher.1Select “Exif Launcher Settings” in the FinePixViewer “Settings” menu and tick “Quit
Exif Launcher immediately”.2Move “Exif Launcher” from the “Startup Items” folder in the System folder to the Trash.3Select “Empty Trash” in the “Special” menu.✽ To restore Exif Launcher, re-install the software.
Possible cause Solution
� I can’t sign on as a “FinePix Internet Service” user.
Have you already signed on under thesame e-mail address?
You cannot sign on twice with the sameuser ID or e-mail address.
Possible cause Solution
� I can’t log in to the “FinePix Internet Service”.
Are you able to connect to theInternet?
Is the FinePix Internet Serviceundergoing maintenance?
Have you completed the userregistration process?
Check your PC hardware and softwaresetup.
Log in after the maintenance iscompleted.
Click the FinePixViewer user registrationbutton and sign on as a FinePix InternetService user. (See P.73.)
Solution
� I can’t update the Internet menu properly. (The buttons do not line upcorrectly.)
The menu data is corrupted. Use the procedure below to update the menu:1Quit FinePixViewer.2Double-click “System Folder” and then “Preferences” to open the Preferences
folder.3Trash the “FinePixInternetFiles” folder in Preferences.4Start up FinePixViewer and click the “Update” button.
Possible cause Solution
� The FinePixViewer Upload dialog box does not appear.
Do you have enough memory in yoursystem?
1Quit any other applications that arerunning.
2Open “Memory” in “Control Panels” andincrease the amount of virtual memoryallocated. Then restart your Macintosh.
Solution
� The “Process aborted because error occurred during communication.”message appears while you are using the FinePixViewer Upload dialogbox.
Use the following procedure to increase the allocated memory:1Close the Upload dialog box and select the “Upload” file in the folder in which
FinePixViewer was installed.2Select “Get Info” in the “File” menu. The “Upload Info” window opens.3In “Memory”, increase the “Preferred Size” allocation.
Troubleshooting Internet Problems


Printed in Japan FGS-103103-FG
This brochure uses recycled paper.
North America and others46601 Fremont Blvd.Fremont, CA 94538U.S.A.
Tel: +1-510-440-9901Fax: +1-510-440-1270Web site: www.arcsoft.comE-Mail: [email protected]
EuropeUnit 14, Shannon Industrial EstateShannon, Co. Clare, Ireland
Tel: +353 (0) 61-702087Fax: +353 (0) 61-702001E-Mail: [email protected]
TaiwanArcSoft Taiwan Representative Office# 1, 5th Floor164 North Fu Shin RoadTaipei, Taiwan
Tel: 886-2-2719-0225Fax: 886-2-2719-0256
For inquiries regarding VideoImpression™
ChinaArcSoft Beijing Representative OfficeNo 6 South Capital Gym Rd.Beijing New Century Hotel, #1910Beijing 100044, P.R. China
Tel: +86-10-6849-1368Fax: +86-10-6849-1367E-Mail: [email protected]
AustraliaMarketing Results Prop Ltd.P.O. Box 6246 BHBCBaulkham Hills,New South Wales 2153Australia
Tel: +61 (2) 9899-5888Fax: +61 (2) 9899-5728E-Mail: [email protected] site: www.marketingresults.com.au