Quick Start Guide - Wisenet
14
English _1 SAMSUNG ALL-IN-ONE SECURITY SYSTEM Quick Start Guide KIT MODEL SDH-B74041/SDH-B74081 DVR MODEL SDR-B74301 Thank you for purchasing the Samsung DVR Security System. Follow the simple steps in this guide to set up and start using your new security system. If you have any questions or need help installing your new product, please contact our free technical support. Telephone: 00800-801-08022 (Toll-free) 9am - 4pm CET, Monday - Friday Web : http//www.hanwha-security.eu/home-security/ ❒ Front ❒ Back Part Name Function 1 Audio output Audio signal output, RCA port 2 Video input Connect with CH1-8 (analog) video input device, standard BNC port 3 VGA port Connect to VGA monitor 4 LAN: Network port Connect with LAN, Ethernet and RJ45 port 5 Power port Connect to the power supply, DC12V 2A, included with the system 6 USB port Connect to USB mouse or device 7 HDMI Connect to HDMI monitor 8 Audio input Connect with CH1-4 audio input signals, RCA port USB REC NET PWR 1 1 3 5 7 3 2 4 2 4 6 8 AUDIO OUTPUT HDMI VGA LAN 12V AUDIO INPUT VIDEO INPUT 1 2 3 4 5 6 7 8
-
Upload
khangminh22 -
Category
Documents
-
view
0 -
download
0
Transcript of Quick Start Guide - Wisenet

English _1
SAMSUNG ALL-IN-ONE SECURITY SYSTEM
Quick Start Guide KIT MODEL SDH-B74041/SDH-B74081
DVR MODEL SDR-B74301
Thank you for purchasing the Samsung DVR Security System. Follow the simple steps in this guide to set up and start using your new security system.
If you have any questions or need help installing your new product, please contact our free technical support. Telephone: 00800-801-08022 (Toll-free) 9am - 4pm CET, Monday - Friday Web : http//www.hanwha-security.eu/home-security/
❒ Front
❒ Back
Part Name Function
1 Audio output Audio signal output, RCA port
2 Video input Connect with CH1-8 (analog) video input device, standard BNC port
3 VGA port Connect to VGA monitor
4 LAN: Network port Connect with LAN, Ethernet and RJ45 port
5 Power port Connect to the power supply, DC12V 2A, included with the system
6 USB port Connect to USB mouse or device
7 HDMI Connect to HDMI monitor
8 Audio input Connect with CH1-4 audio input signals, RCA port
USB
REC NET PWR
1
1 3 5 7
3
2 4 2 4 6 8AUDIO OUTPUT HDMI VGA
LAN
12V
AUDIOINPUT
VIDEOINPUT
1 2 3 4
5678

2_ English
Startup WizardAfter DVR startup is completed, the startup wizard will be displayed. Wizard setting menu includes:• Homepage• Admin password setting• Hard drive management• Video recording schedule• Basic system configuration• Network setup• E-mail setting• DDNS setting
You can click on "Don't show this window next time" if you do not want the setting wizard to start automatically next time.1. Set Admin Password
Please create a username and password for your DVR. Password MUST be 8~13 characters long and include 2 different types of characters (ex. letter and number). Retype password: Re-enter the password set above
2. Hard Drive Management New hard drive(s) connected must be formatted before use. Upon connection, it will indicate to format new hard drive. Click on "Select" to select the unformatted hard drive. Click on "Format HDD" to pop up the user login window and enter the password to log in. A notice window will indicate "Entire Data Will Be Erased. do You Want To Continue?". Click "OK" to format the disk. When the progress bar is complete, the format-ting process is completed.
3. Video Recording Schedule. Select the channel and the date to be set. One week's schedule can be set. The record "sched-ule" of the current channel can be copied to any other channel or all channels.
M ` If there is no color in the record menu and record search, there is no recording saved.
` "Green" stands for normal record and "yellow" stands for motion record.

English _3
4. Basic System Configuration- You can set date, time, date format, time format, language, video format and menu timeout.
5. Network Setup (DHCP). In DHCP mode, the router will automatically allo-cate IP address to the DVR. If the DVR fails to obtain an IP address, refer to the DVR User Manual and Router Guide. If the problem still cannot be solved, contact your nearest technical support to obtain more informa-tion.
6. Email Setting. Receive or Send DVR alarm email and set parameters like email address, SSL, email enable, and interval.• Encryption: Disable, SSL, TLS and Auto optional. Auto means it can
detect the encryption type automatically. It is recommended to set the encryption type as Auto.
• SMTP Port: Mail sending port used by SMTP (Simple Mail Transfer Protocol). Server is generally Port 25 or Port 465 when SSL is used by Gmail.
• SMTP Server: Address of server for the email box in use.• User Name: Enter a server to connect to. For example, email “aaa@
gmail.com” should correspond to server “smtp.gmail.com”• Password: Enter the password of the SMTP server user.• Sender Address: Sender's email address, which must correspond to the server used. For example, email "aaa@gmail.
com" should correspond to server "smtp.gmail.com".• Receiver 1/2/3: Recipient's email address used to receive alarm image and messages from DVR. If the system
continuously emails images, save them in another location or delete them to save space in your inbox.• Time Interval: An email will be sent every three minutes by default. If the notification times are set too closely the server
may classify the emails as spam.• Click on "Test Email". If connection succeeds "Test E-mail" will be sent out.
4_ English
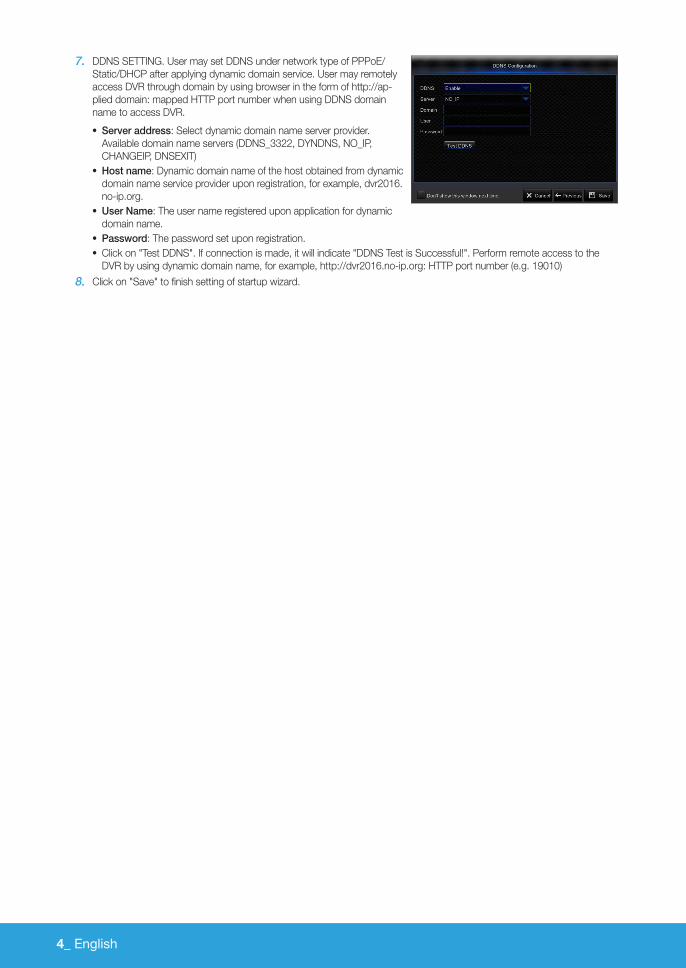
7. DDNS SETTING. User may set DDNS under network type of PPPoE/Static/DHCP after applying dynamic domain service. User may remotely access DVR through domain by using browser in the form of http://ap-plied domain: mapped HTTP port number when using DDNS domain name to access DVR.• Server address: Select dynamic domain name server provider.
Available domain name servers (DDNS_3322, DYNDNS, NO_IP, CHANGEIP, DNSEXIT)
• Host name: Dynamic domain name of the host obtained from dynamic domain name service provider upon registration, for example, dvr2016.no-ip.org.
• User Name: The user name registered upon application for dynamic domain name.
• Password: The password set upon registration.• Click on "Test DDNS". If connection is made, it will indicate "DDNS Test is Successful!". Perform remote access to the
DVR by using dynamic domain name, for example, http://dvr2016.no-ip.org: HTTP port number (e.g. 19010)8. Click on "Save" to finish setting of startup wizard.

English _5
❒ Main InterfaceIn real-time preview mode: right click on any area to access the desired menu. Right click on it to open a context menu. Menu items may vary depending on the condition, such as sign-in, sign-out, split screen mode and various operation conditions.Left click on any channel to access shortcut menu. Image capture, recording and image zoom-in are in this section.
The video recording marks are shown below
R means common Recording. M means Motion detection recording. M means Motion detection without recording.
Component Name Function
1 Camera Type A means AHD camera. Absence of it means 960H camera.
2 Date & Time Display current date and time
3 Channel Name Display channel name
4 SAMSUNG Logo The logo of SAMSUNG will display only when video is loss.
5 Image Capture Make a snapshot of current video
6 Manual Recording Enable or disable manual recording
7 Quick Playback Playback of the last five minutes of the video
8 Digital Zoom-In Hold and drag mouse cursor to select a frame of current video to zoom in.
9 Channel Color Setting Set hue, brightness, contrast and saturation of current channel.
0 Main Menu Access the main menu
! Lock Sign out or access sign-in page.
@ Four-Channel Layout Display four channels of video.
1 2 3 4
5 6789
0 ! @ # $ % ^ &

6_ English
Component Name Function
# Nine-Channel Layout Display nine channels of video.
$ N-Channel LayoutDisplay six channels of video.
Display eight channels of video.
% Polling Start or stop polling.
^ Sound Adjust volume or mute.
& Playback Replay video recorded
Network Settings• DNS: DNS is usually provided by local ISP. Enter the IP address of your domain name server.• UPnP (Plug and Play): function of automatic upload from port. It is important that UPnP function be available on the router and
should be enabled before use. When UPnP is enabled, port does not need to be mapped on router.• Tips: When settings are confirmed and saved, they will be applied after the "Exit" button is clicked.
1. When selecting DHCP, router will allocate IP address to the DVR auto-matically, and the IP address allocated to DVR varies upon each start of the DVR or DHCP server, so the corresponding IP address and port number shall be confirmed and mapped prior to remote access to the DVR each time. The operation procedure is as shown below:
1 Select DHCP and then click on Save. Enter client port and HTTP port (they must be different from each other).
2 Set the IP address obtained by DVR on router and the port set for mapping, as detailed in router setting.
3 Use the IP address to perform remote access to DVR: http://IP in public network: HTTP port (e.g. 00080) http://IP in intranet: HTTP port (e.g. 00080) (available only in one LAN)
2. When choosing Static, you have to set IP address, subnet mask, gate-way and port number. The operation procedure is as shown below:
1 Select Static as network type.
2 Set port (client port), which shall be mapped on router.
3 Enter HTTP port (which must be different from client port), which shall be mapped on router.
4 Enter the specified IP address to this bar, which will become the unique DVR address code in regional network, for example, 192.168.2.128 as shown below.
5 Subnet mask: view the router to set a same mask as that in it, or consult your network operator.
6 DNS: Enter DNS (domain name server) address. View the router to set the same gateway as that , or consult your net-work operator.
7 Click on "Save" to save changes.

English _7
3. Select PPPoE for direct dial-up in the following procedure:
1 Enter Client port.
2 Enter HTTP port (which must be different from Client port).
3 Enter user name and password for PPPoE, which are provided by network operator.
4 Enter DNS (domain name server) address.
5 Click on "Save" to exit and restart it, and then the DVR will obtain an IP address.
6 Perform remote access to the DVR by using the IP address followed by port number (IP: HTTP port number).
Web Application Manager
❒ Download and Installation of Plugin.If you are using Windows 7, you may need to setup the user authority for remote control, or you may be unable to backup or record.Vista System: Start ; Setup ; Control Panel. Set user authority in control panel as shown below.Remove the check mark "√" in front of "Use UAC to help protect your computer" and click "OK".
WIN7
Vista
M ` If the Web plugin is not downloaded successfully, please check if your browser's safety level or firewall setting is set too high. Please open IE browser ; [Menu Bar] Tools ; Internet options ; Security ; Internet ; Custom level ; Enable the options.

8_ English
Download and installation of plugin for IE
Enter IP address plus HTTP port of the DVR in the address bar of IE, for example, http://192.168.2.173:80.
Click "Download" and then "Run" to begin downloading the file.
When you see the dialog box, "Do you want to run this software?", click on "Run".
Click on "Install" in the "Setup-Web Plugin" dialog box.
Close your IE browser and restart it. Enter IP address plus HTTP port of the DVR in address bar to access the login page.
English _9
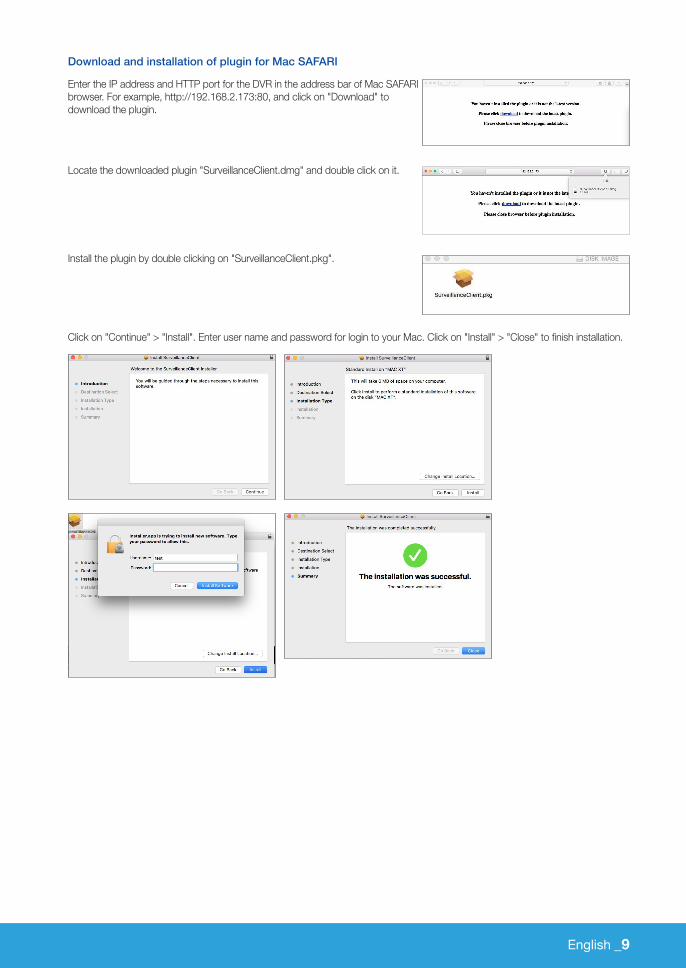
Download and installation of plugin for Mac SAFARI
Enter the IP address and HTTP port for the DVR in the address bar of Mac SAFARI browser. For example, http://192.168.2.173:80, and click on "Download" to download the plugin.
Locate the downloaded plugin "SurveillanceClient.dmg" and double click on it.
Install the plugin by double clicking on "SurveillanceClient.pkg".
Click on "Continue" > "Install". Enter user name and password for login to your Mac. Click on "Install" > "Close" to finish installation.
10_ English
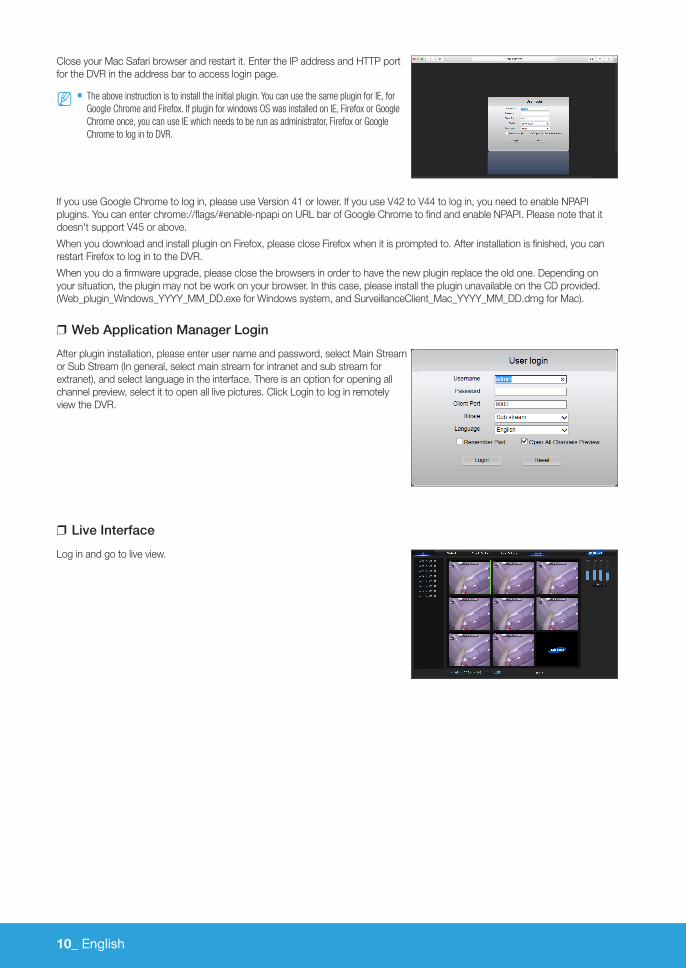
Close your Mac Safari browser and restart it. Enter the IP address and HTTP port for the DVR in the address bar to access login page.
M ` The above instruction is to install the initial plugin. You can use the same plugin for IE, for Google Chrome and Firefox. If plugin for windows OS was installed on IE, Firefox or Google Chrome once, you can use IE which needs to be run as administrator, Firefox or Google Chrome to log in to DVR.
If you use Google Chrome to log in, please use Version 41 or lower. If you use V42 to V44 to log in, you need to enable NPAPI plugins. You can enter chrome://flags/#enable-npapi on URL bar of Google Chrome to find and enable NPAPI. Please note that it doesn't support V45 or above.When you download and install plugin on Firefox, please close Firefox when it is prompted to. After installation is finished, you can restart Firefox to log in to the DVR.When you do a firmware upgrade, please close the browsers in order to have the new plugin replace the old one. Depending on your situation, the plugin may not be work on your browser. In this case, please install the plugin unavailable on the CD provided. (Web_plugin_Windows_YYYY_MM_DD.exe for Windows system, and SurveillanceClient_Mac_YYYY_MM_DD.dmg for Mac).
❒ Web Application Manager LoginAfter plugin installation, please enter user name and password, select Main Stream or Sub Stream (In general, select main stream for intranet and sub stream for extranet), and select language in the interface. There is an option for opening all channel preview, select it to open all live pictures. Click Login to log in remotely view the DVR.
❒ Live InterfaceLog in and go to live view.

English _11
Mobile App
❒ Android Phones/Tablets
1. Open Play Store to search for WiseView and click "INSTALL".
2. After installation, open WiseView and select "Device". Then click [ ] to add new device. Scan QR code under Information page. Then input client port, user name and password, and then click Save to log into the DVR.

12_ English
❒ iPhone/iPad
1. Open App Store to search for WiseView, and click icon [ ] to install.
2. Open WiseView, and go to Device. Click [ ] to add new device. Scan QR code under Information page. Then input client port, user name and password, and then click Save to log into the DVR.

English _13
Camera Installation TemplateTo make camera installation easier, you can tear off this page and adhere it to the place you would like to install your cameras.
This template is used to install the camera on the wall
TEMPLATE
CAMERA FRONT
Screw holes for the Camera installation

MEMO