
Xcode Quick Start Guide Contents
52
Xcode Quick Start Guide
-
Upload
independent -
Category
Documents
-
view
1 -
download
0
Transcript of Xcode Quick Start Guide Contents

Xcode Quick Start Guide

Contents
About Xcode 4At a Glance 4
The Workspace Window Manages Projects 4Contextual Help Provides Focused Assistance 5
How to Use This Document 5See Also 6
Tutorial: Using Xcode to Write “Hello, World!” for OS X 7Create the Cocoa Application Project 8Create the NSView Subclass 10Design the User Interface 13Write the Code 20Run the Application 25View Task and Session Logs 27
Tutorial: Designing a User Interface with Interface Builder 29Use Interface Builder To Create the User Interface 30
Creating the Viewer 30Adding the Pause/Play Button 38Adding the Load Button 41Connecting Actions and Outlets 43
Add Implementation Code to Complete the Application 46Verify the Code Added by Interface Builder 46Add Implementation Code 48Test the Load Button 48
What’s Next? 50
Document Revision History 51
2011-05-07 | © 2011 Apple Inc. All Rights Reserved.
2
Figures and Listings
Tutorial: Using Xcode to Write “Hello, World!” for OS X 7Figure 1-1 The Hello application in action 7Figure 1-2 The Interface Builder dock and canvas 14Figure 1-3 Interface Builder dock in list view 14Figure 1-4 The utility area in the workspace window 16Figure 1-5 The source editor 20Figure 1-6 Hello application stopped at a breakpoint 26Figure 1-7 The log viewer in the workspace window 28Listing 1-1 Initial implementation of the HelloView class 21Listing 1-2 Implementation of the drawRect: method 24
Tutorial: Designing a User Interface with Interface Builder 29Figure 2-1 The QCDemo window 30Listing 2-1 The QCDemoAppDelegate header file 46Listing 2-2 The QCDemoAppDelegate implementation file 47
2011-05-07 | © 2011 Apple Inc. All Rights Reserved.
3
Xcode is a highly customizable integrated development environment (IDE) with many features for creating anefficient and effective working environment.
At a GlanceXcode facilitates the development of software products of all sizes, from iPod games to enterprise solutions.The Xcode application is the main component of the Xcode toolset. It groups most of the tools you need todevelop software in a streamlined and interactive user interface.
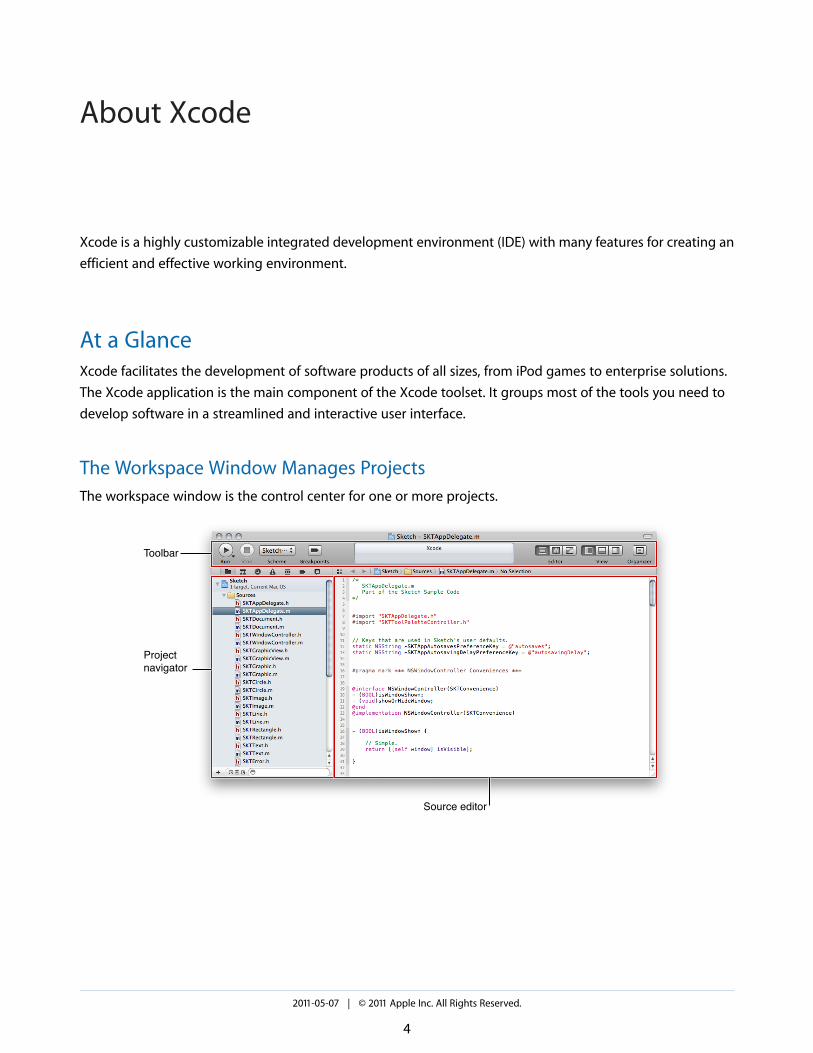
The Workspace Window Manages ProjectsThe workspace window is the control center for one or more projects.
Toolbar
Projectnavigator
Source editor
2011-05-07 | © 2011 Apple Inc. All Rights Reserved.
4
About Xcode
A Project Groups the Resources Needed to Develop Products
A project contains the elements you use to design and build one or more products—including source files,user-interface designs, sounds, images, and links to supporting frameworks and libraries. The most user-visibletype of software product you can create with Xcode is an application, but that’s not the only kind of productyou can create. You can also develop Automator actions, command-line tools, frameworks, plug-ins, kernelextensions, and other types of products.
The Project Navigator is Where You Organize the Main Components of Your Projects
The project navigator lets you find project components quickly. For example, you can add and modify thegroups in the project navigator to reduce clutter.
The Source Editor is Where You Write Code
The source editor has many features to make your job easier, including automatic formatting, code completionand correction, and in-line debugging.
The Toolbar Contains Controls for Common Tasks
The workspace window toolbar provides quick access to project configuration and management tools thatyou use frequently. For example, you can analyze code, run applications, view the progress of various activities,and configure the workspace window to fit the task you are performing.
Contextual Help Provides Focused AssistanceXcode provides help articles tailored to the task you’re performing. The shortcut menu of user-interface elementscontains a Help item that provides essential information about the element and the tasks you can performwith it.
How to Use This DocumentFollow "Tutorial: Using Xcode to Write “Hello, World!” for OS X" (page 7) to get an introduction to the sourceeditor and Interface Builder, the main Xcode facilities you use to develop applications.
Follow "Tutorial: Designing a User Interface with Interface Builder" (page 29) to learn how Interface Builderlets you to graphically create user interfaces using standard user-interface elements.
About XcodeHow to Use This Document
2011-05-07 | © 2011 Apple Inc. All Rights Reserved.
5

See Also ● Xcode 4 User Guide provides information about the essential tasks you perform as you develop your
products.
About XcodeSee Also
2011-05-07 | © 2011 Apple Inc. All Rights Reserved.
6
This short tutorial shows how to create a project for a Mac application that prints text in a window. Workingthrough this tutorial, you get acquainted with the software-creation workflow in Xcode: creating the project,designing the user interface, writing code, and running the application. You also learn how to fix code errorsXcode detects as you write the code, and you get an introduction to the Xcode debugging facilities.
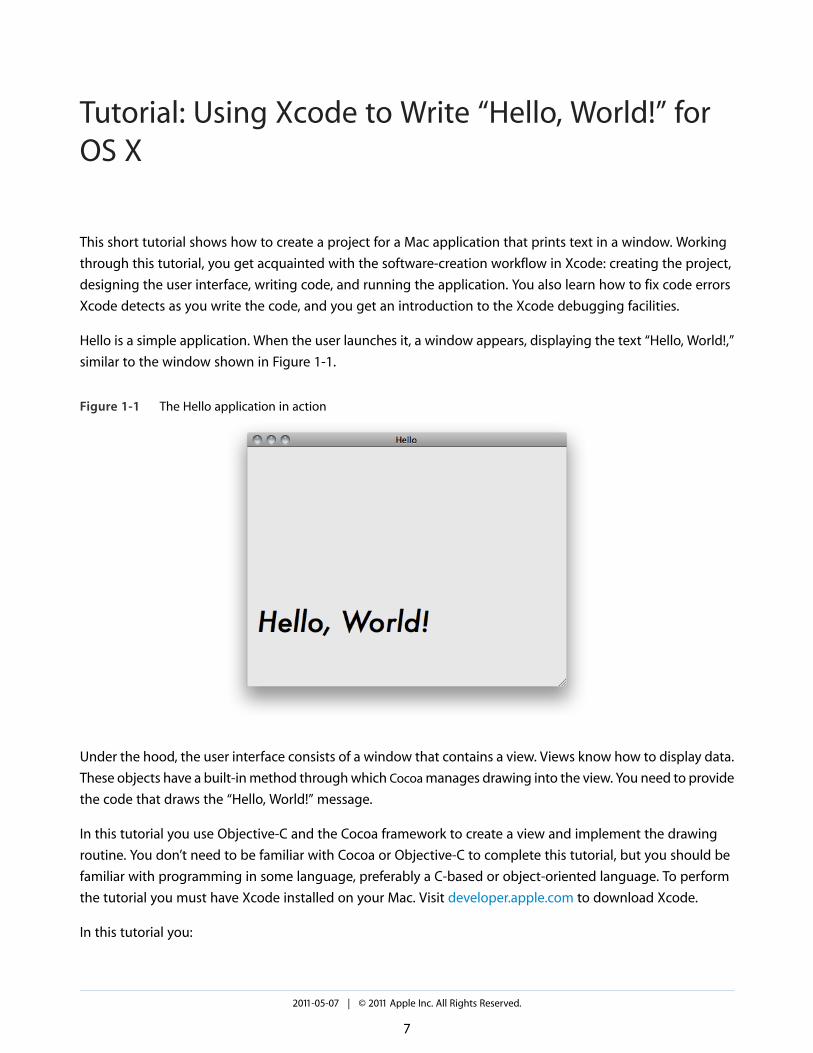
Hello is a simple application. When the user launches it, a window appears, displaying the text “Hello, World!,”similar to the window shown in Figure 1-1.
Figure 1-1 The Hello application in action
Under the hood, the user interface consists of a window that contains a view. Views know how to display data.These objects have a built-in method through which Cocoa manages drawing into the view. You need to providethe code that draws the “Hello, World!” message.
In this tutorial you use Objective-C and the Cocoa framework to create a view and implement the drawingroutine. You don’t need to be familiar with Cocoa or Objective-C to complete this tutorial, but you should befamiliar with programming in some language, preferably a C-based or object-oriented language. To performthe tutorial you must have Xcode installed on your Mac. Visit developer.apple.com to download Xcode.
In this tutorial you:
2011-05-07 | © 2011 Apple Inc. All Rights Reserved.
7
Tutorial: Using Xcode to Write “Hello, World!” forOS X
● Create the Hello project
● Add a source file to the project
● Lay out the user interface of the Hello window
● Write the code that displays the message on the Hello window
● Build and run the Hello application
● View the messages produced by building the Hello application
Create the Cocoa Application ProjectXcode provides project templates that generate several types of products, including applications, frameworks,plug-ins, and static libraries.
To create the Cocoa application project on which the Hello application is based:
1. Launch Xcode, located in the Applications folder of your Xcode installation.
Ensure that there are no Xcode windows open.
2. Choose File > New > New Project.
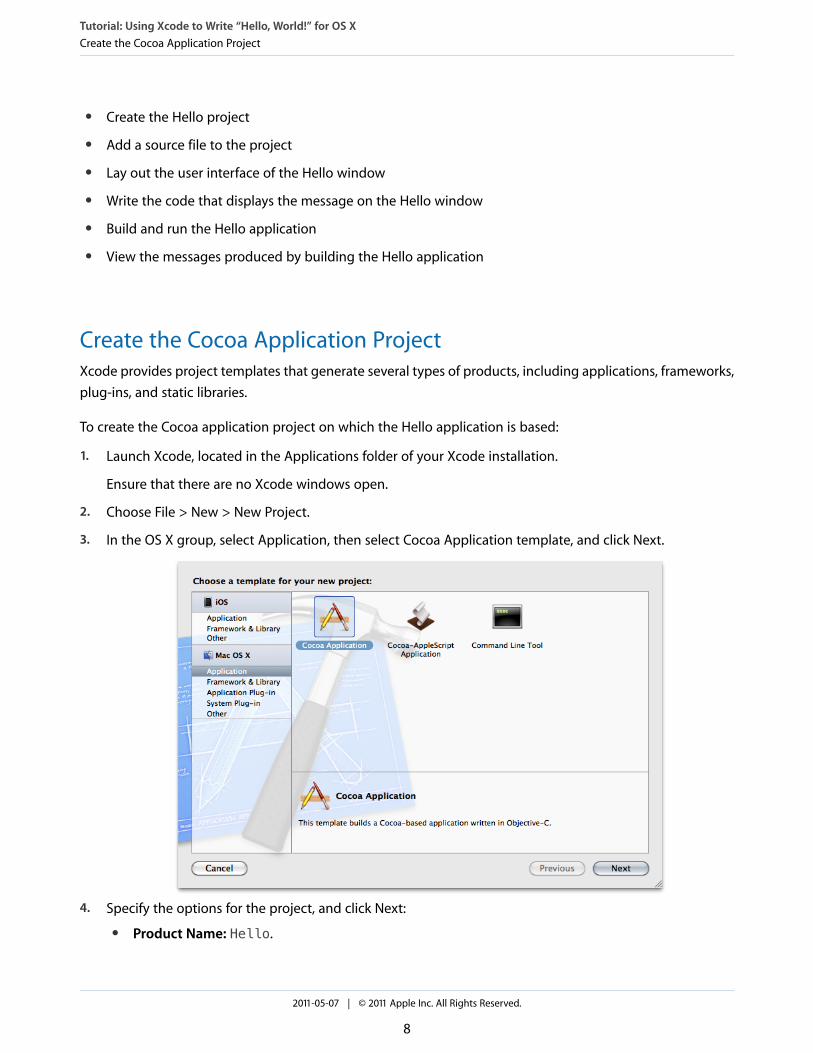
3. In the OS X group, select Application, then select Cocoa Application template, and click Next.
4. Specify the options for the project, and click Next:
● Product Name: Hello.
Tutorial: Using Xcode to Write “Hello, World!” for OS XCreate the Cocoa Application Project
2011-05-07 | © 2011 Apple Inc. All Rights Reserved.
8
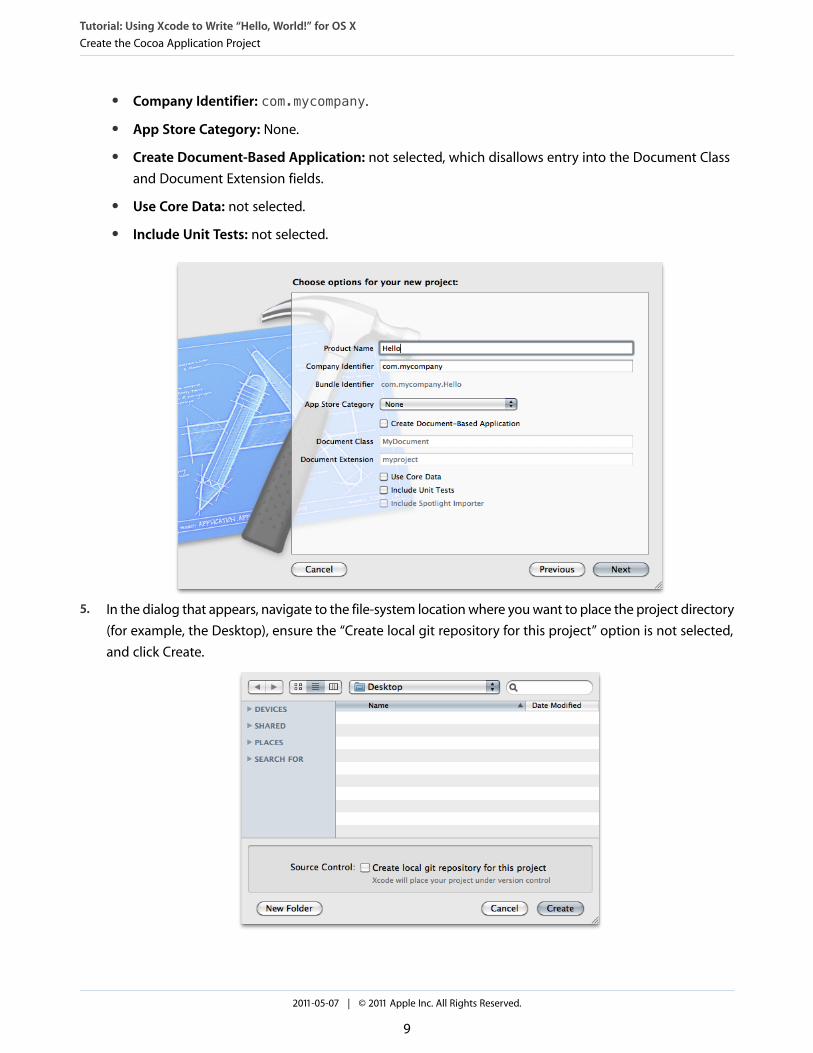
● Company Identifier: com.mycompany.
● App Store Category: None.
● Create Document-Based Application: not selected, which disallows entry into the Document Classand Document Extension fields.
● Use Core Data: not selected.
● Include Unit Tests: not selected.
5. In the dialog that appears, navigate to the file-system location where you want to place the project directory(for example, the Desktop), ensure the “Create local git repository for this project” option is not selected,and click Create.
Tutorial: Using Xcode to Write “Hello, World!” for OS XCreate the Cocoa Application Project
2011-05-07 | © 2011 Apple Inc. All Rights Reserved.
9
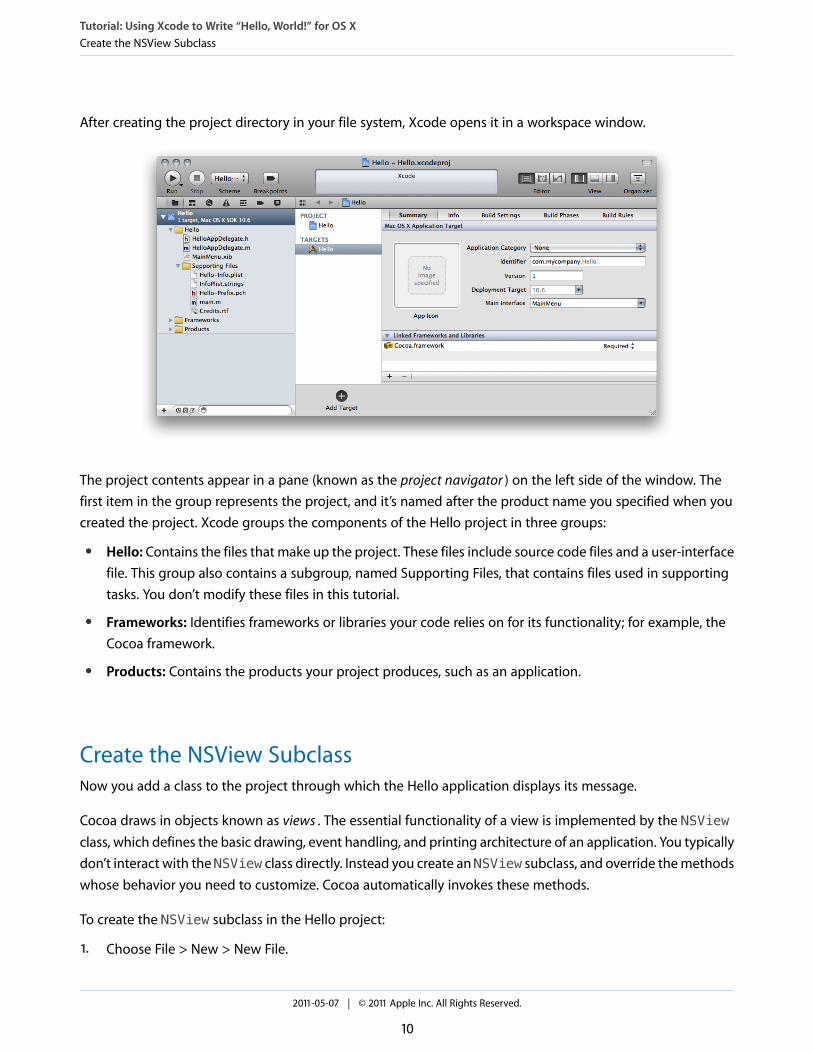
After creating the project directory in your file system, Xcode opens it in a workspace window.
The project contents appear in a pane (known as the project navigator ) on the left side of the window. Thefirst item in the group represents the project, and it’s named after the product name you specified when youcreated the project. Xcode groups the components of the Hello project in three groups:
● Hello: Contains the files that make up the project. These files include source code files and a user-interfacefile. This group also contains a subgroup, named Supporting Files, that contains files used in supportingtasks. You don’t modify these files in this tutorial.
● Frameworks: Identifies frameworks or libraries your code relies on for its functionality; for example, theCocoa framework.
● Products: Contains the products your project produces, such as an application.
Create the NSView SubclassNow you add a class to the project through which the Hello application displays its message.
Cocoa draws in objects known as views . The essential functionality of a view is implemented by the NSViewclass, which defines the basic drawing, event handling, and printing architecture of an application. You typicallydon’t interact with the NSView class directly. Instead you create an NSView subclass, and override the methodswhose behavior you need to customize. Cocoa automatically invokes these methods.
To create the NSView subclass in the Hello project:
1. Choose File > New > New File.
Tutorial: Using Xcode to Write “Hello, World!” for OS XCreate the NSView Subclass
2011-05-07 | © 2011 Apple Inc. All Rights Reserved.
10
Note: If the New File command is dimmed in the New menu, ensure that the Hello workspacewindow has the focus (that it is the frontmost window) by clicking inside it. The commandsXcode makes available in the menu bar depend on the window that has the focus. Manyproject-related commands are not available when a window other than a workspace windowhas the focus.
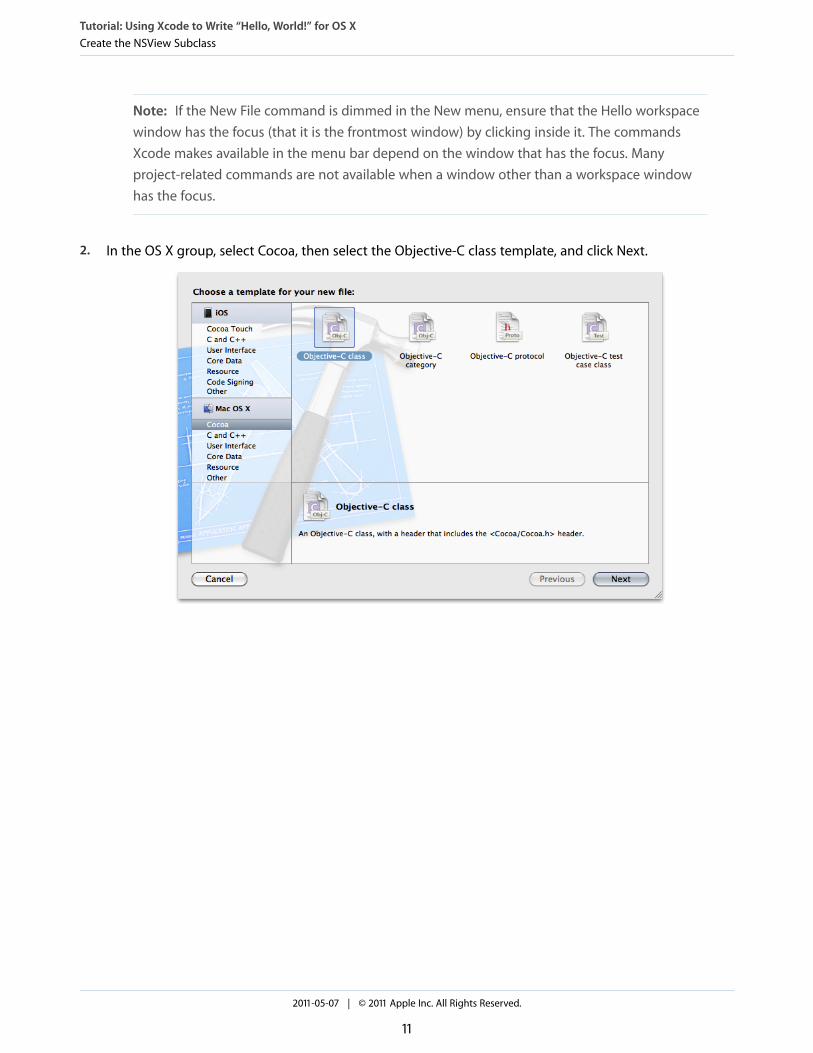
2. In the OS X group, select Cocoa, then select the Objective-C class template, and click Next.
Tutorial: Using Xcode to Write “Hello, World!” for OS XCreate the NSView Subclass
2011-05-07 | © 2011 Apple Inc. All Rights Reserved.
11
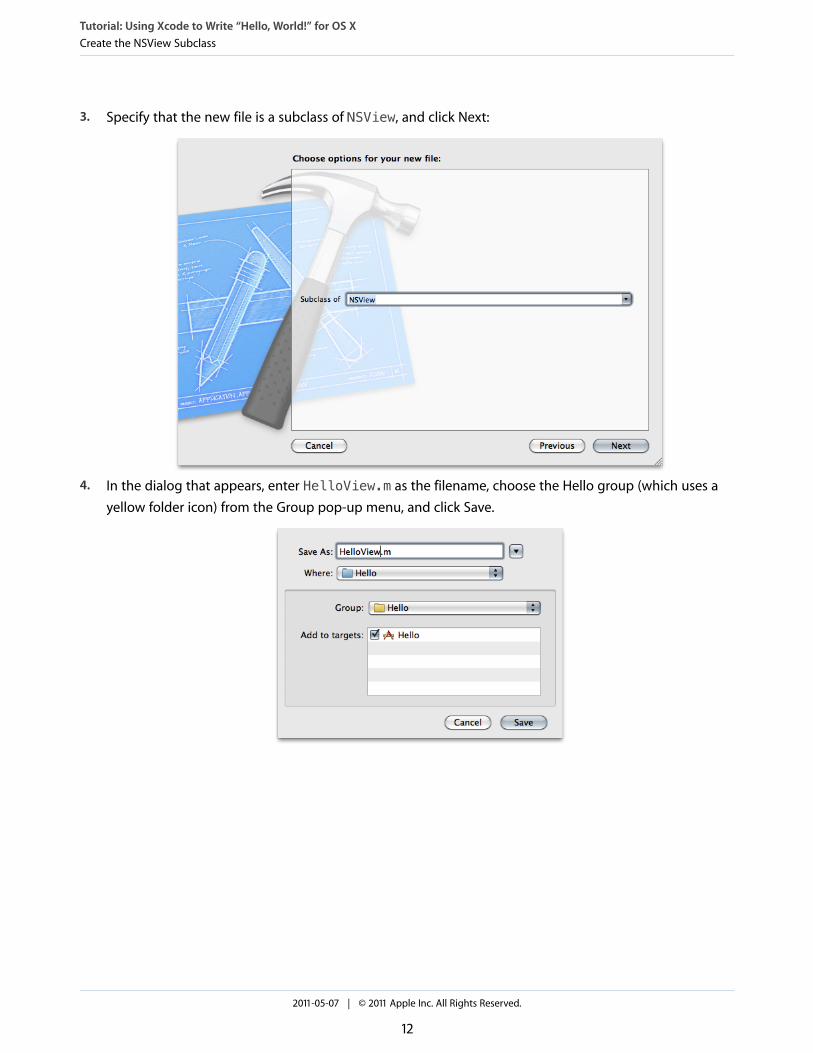
3. Specify that the new file is a subclass of NSView, and click Next:
4. In the dialog that appears, enter HelloView.m as the filename, choose the Hello group (which uses ayellow folder icon) from the Group pop-up menu, and click Save.
Tutorial: Using Xcode to Write “Hello, World!” for OS XCreate the NSView Subclass
2011-05-07 | © 2011 Apple Inc. All Rights Reserved.
12
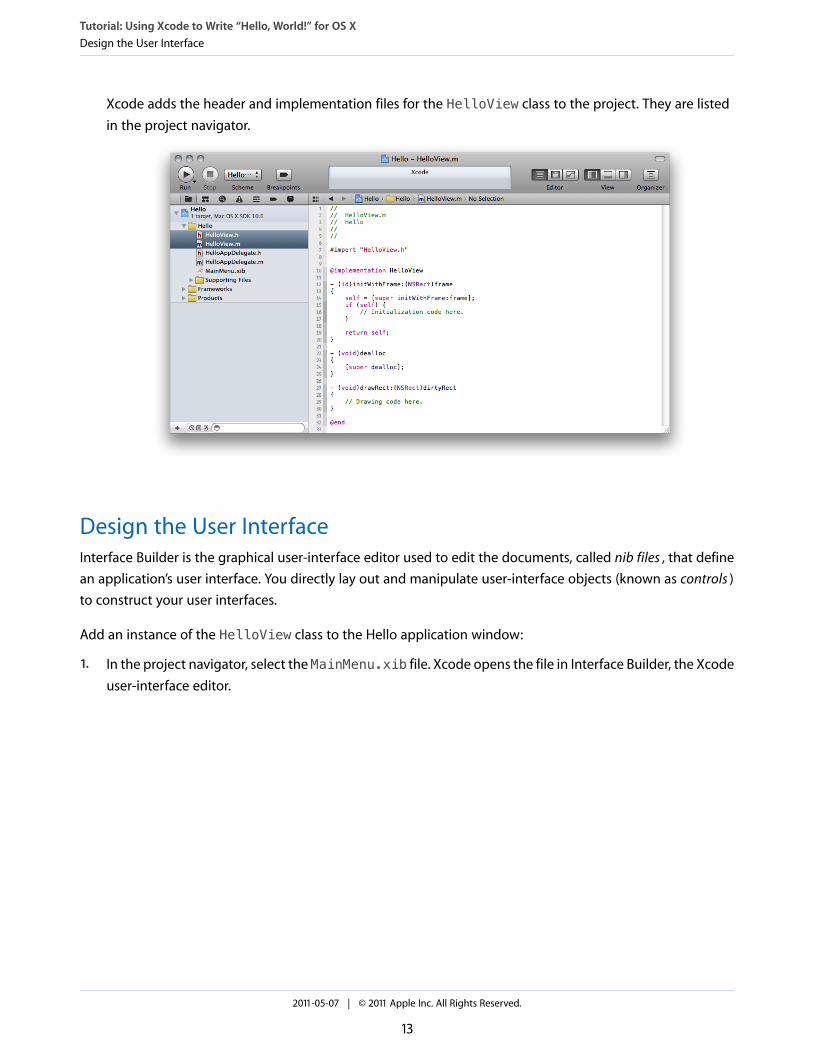
Xcode adds the header and implementation files for the HelloView class to the project. They are listedin the project navigator.
Design the User InterfaceInterface Builder is the graphical user-interface editor used to edit the documents, called nib files , that definean application’s user interface. You directly lay out and manipulate user-interface objects (known as controls )to construct your user interfaces.
Add an instance of the HelloView class to the Hello application window:
1. In the project navigator, select the MainMenu.xib file. Xcode opens the file in Interface Builder, the Xcodeuser-interface editor.
Tutorial: Using Xcode to Write “Hello, World!” for OS XDesign the User Interface
2011-05-07 | © 2011 Apple Inc. All Rights Reserved.
13
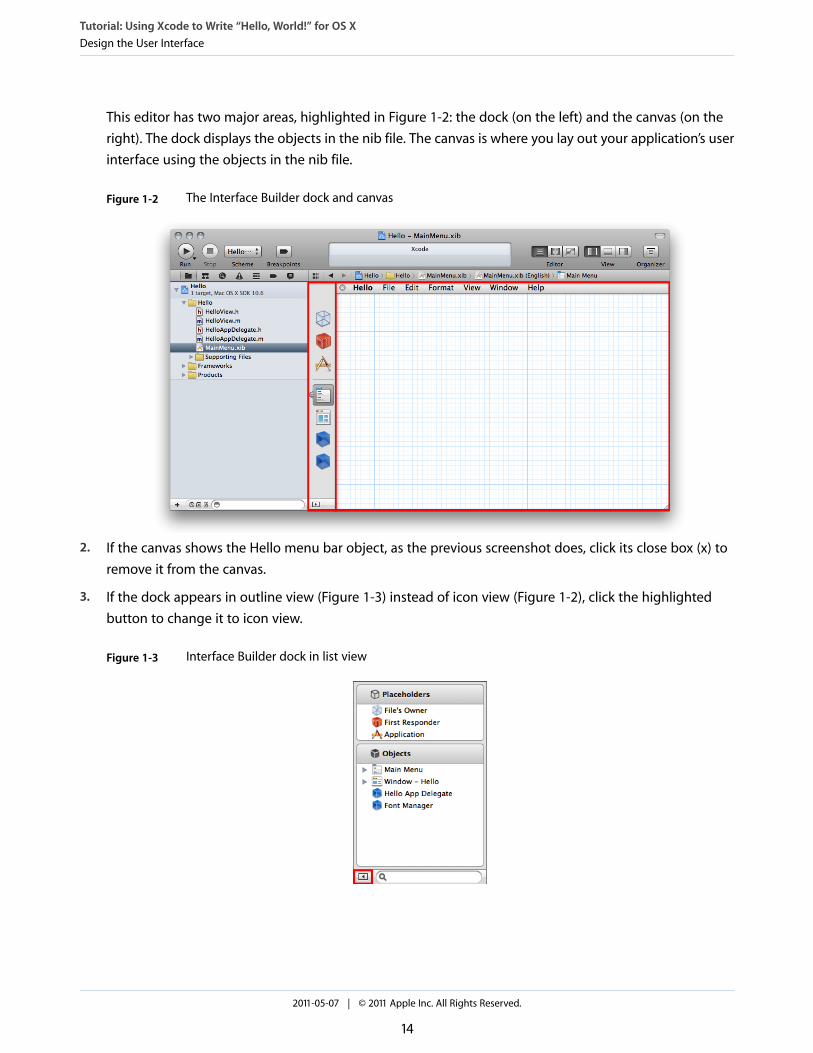
This editor has two major areas, highlighted in Figure 1-2: the dock (on the left) and the canvas (on theright). The dock displays the objects in the nib file. The canvas is where you lay out your application’s userinterface using the objects in the nib file.
Figure 1-2 The Interface Builder dock and canvas
2. If the canvas shows the Hello menu bar object, as the previous screenshot does, click its close box (x) toremove it from the canvas.
3. If the dock appears in outline view (Figure 1-3) instead of icon view (Figure 1-2), click the highlightedbutton to change it to icon view.
Figure 1-3 Interface Builder dock in list view
Tutorial: Using Xcode to Write “Hello, World!” for OS XDesign the User Interface
2011-05-07 | © 2011 Apple Inc. All Rights Reserved.
14
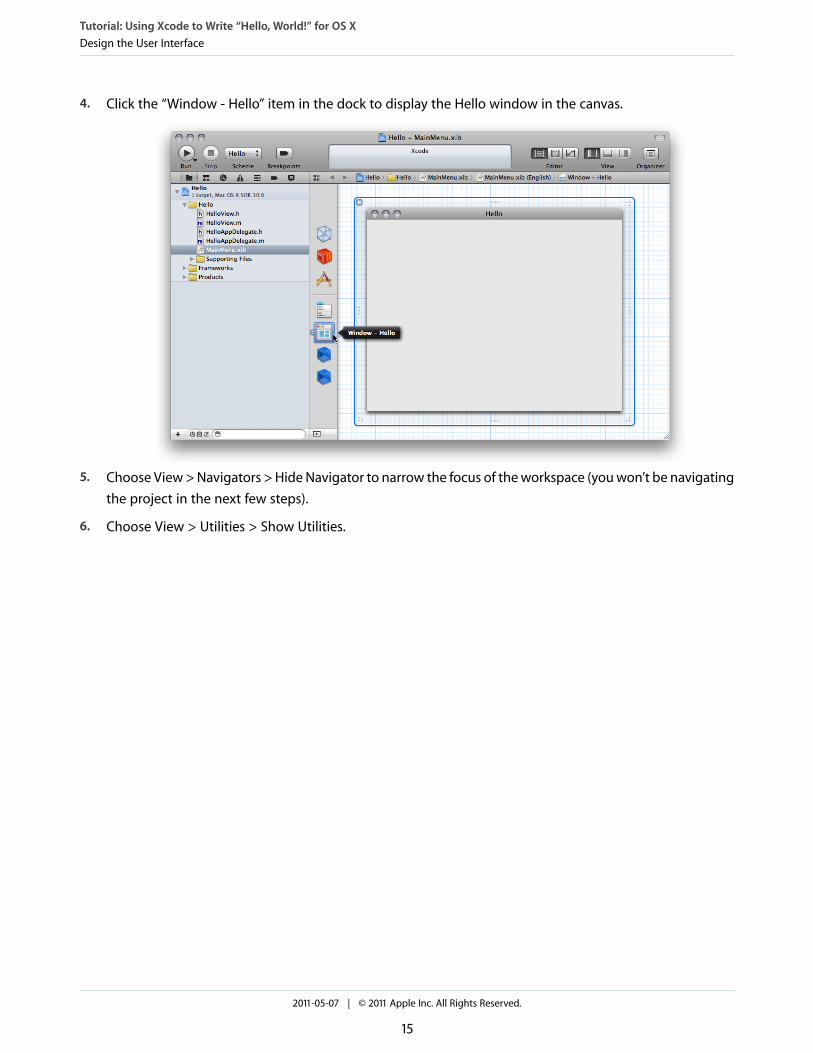
4. Click the “Window - Hello” item in the dock to display the Hello window in the canvas.
5. Choose View > Navigators > Hide Navigator to narrow the focus of the workspace (you won’t be navigatingthe project in the next few steps).
6. Choose View > Utilities > Show Utilities.
Tutorial: Using Xcode to Write “Hello, World!” for OS XDesign the User Interface
2011-05-07 | © 2011 Apple Inc. All Rights Reserved.
15
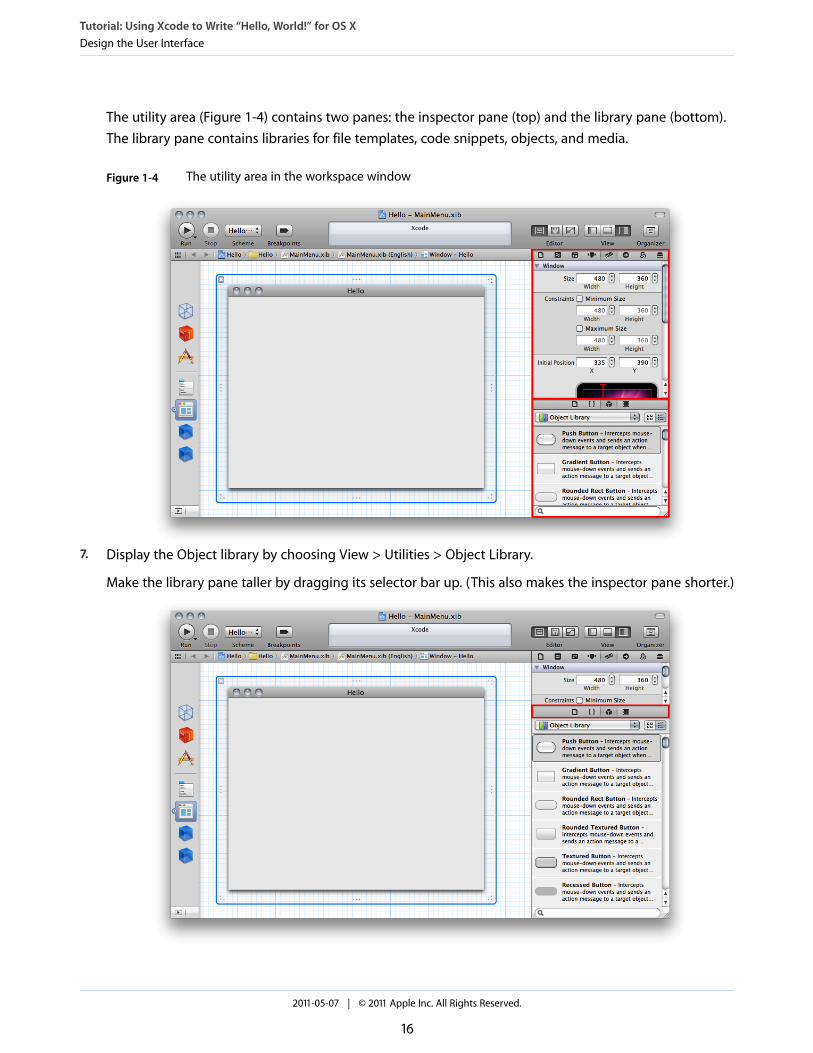
The utility area (Figure 1-4) contains two panes: the inspector pane (top) and the library pane (bottom).The library pane contains libraries for file templates, code snippets, objects, and media.
Figure 1-4 The utility area in the workspace window
7. Display the Object library by choosing View > Utilities > Object Library.
Make the library pane taller by dragging its selector bar up. (This also makes the inspector pane shorter.)
Tutorial: Using Xcode to Write “Hello, World!” for OS XDesign the User Interface
2011-05-07 | © 2011 Apple Inc. All Rights Reserved.
16
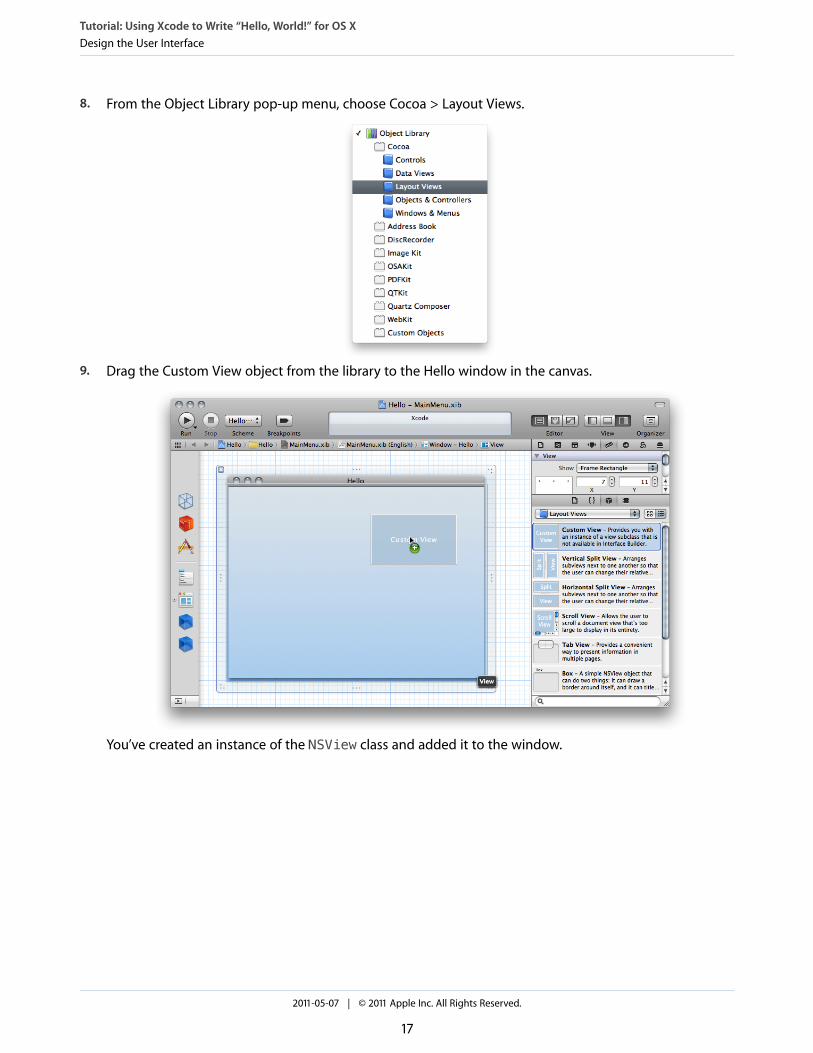
8. From the Object Library pop-up menu, choose Cocoa > Layout Views.
9. Drag the Custom View object from the library to the Hello window in the canvas.
You’ve created an instance of the NSView class and added it to the window.
Tutorial: Using Xcode to Write “Hello, World!” for OS XDesign the User Interface
2011-05-07 | © 2011 Apple Inc. All Rights Reserved.
17
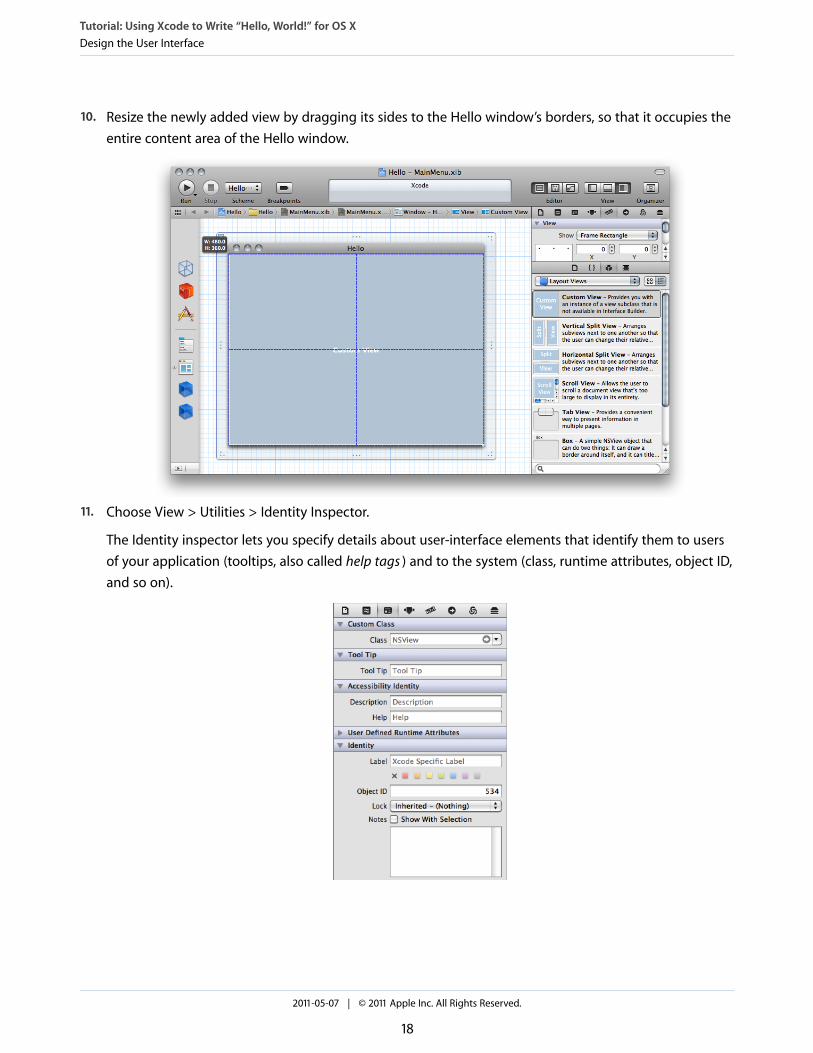
10. Resize the newly added view by dragging its sides to the Hello window’s borders, so that it occupies theentire content area of the Hello window.
11. Choose View > Utilities > Identity Inspector.
The Identity inspector lets you specify details about user-interface elements that identify them to usersof your application (tooltips, also called help tags ) and to the system (class, runtime attributes, object ID,and so on).
Tutorial: Using Xcode to Write “Hello, World!” for OS XDesign the User Interface
2011-05-07 | © 2011 Apple Inc. All Rights Reserved.
18
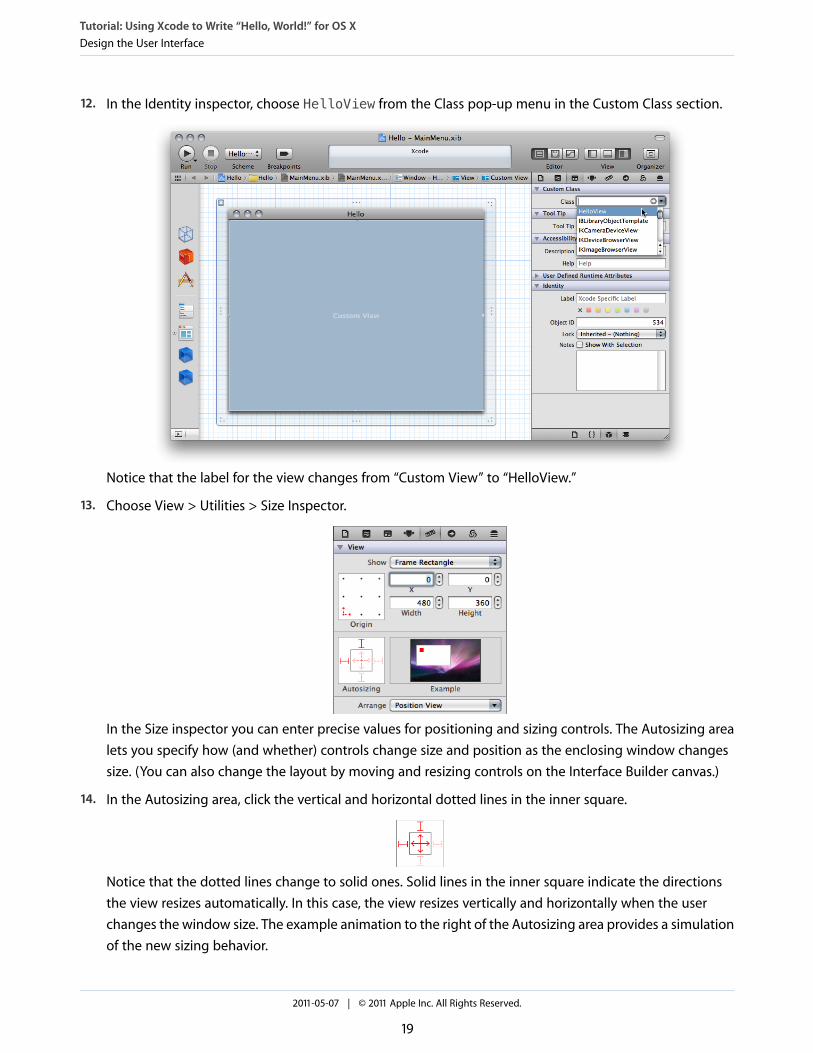
12. In the Identity inspector, choose HelloView from the Class pop-up menu in the Custom Class section.
Notice that the label for the view changes from “Custom View” to “HelloView.”
13. Choose View > Utilities > Size Inspector.
In the Size inspector you can enter precise values for positioning and sizing controls. The Autosizing arealets you specify how (and whether) controls change size and position as the enclosing window changessize. (You can also change the layout by moving and resizing controls on the Interface Builder canvas.)
14. In the Autosizing area, click the vertical and horizontal dotted lines in the inner square.
Notice that the dotted lines change to solid ones. Solid lines in the inner square indicate the directionsthe view resizes automatically. In this case, the view resizes vertically and horizontally when the userchanges the window size. The example animation to the right of the Autosizing area provides a simulationof the new sizing behavior.
Tutorial: Using Xcode to Write “Hello, World!” for OS XDesign the User Interface
2011-05-07 | © 2011 Apple Inc. All Rights Reserved.
19
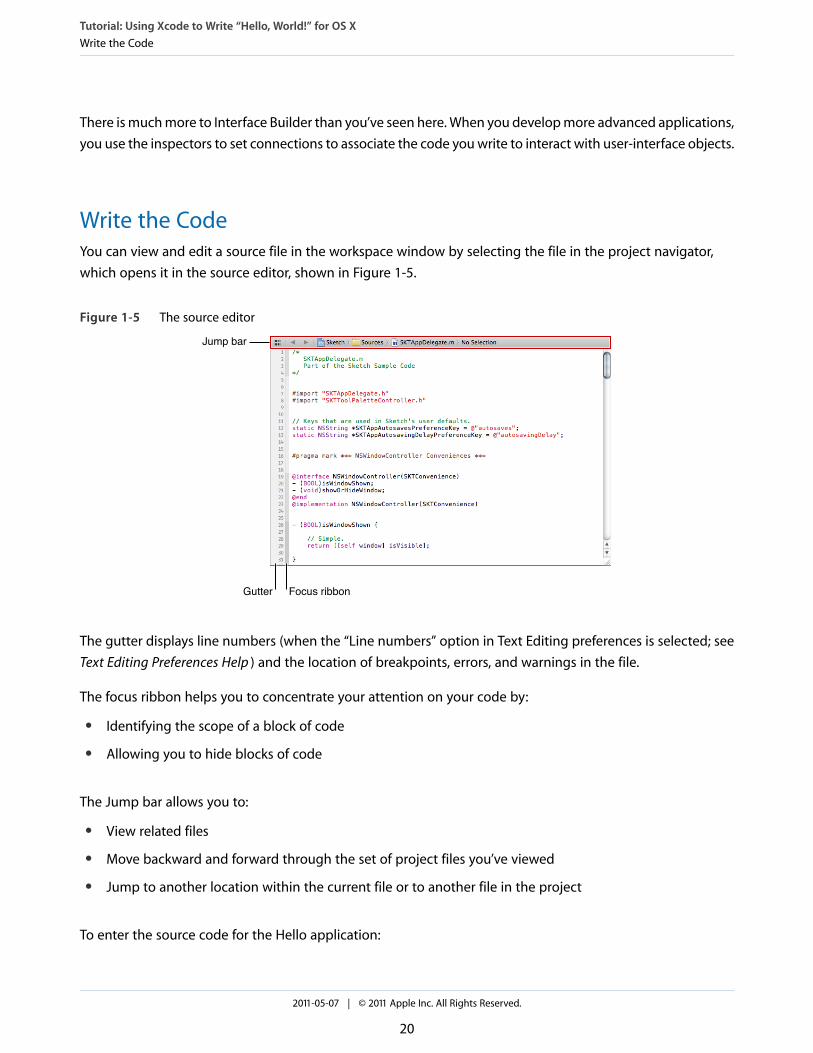
There is much more to Interface Builder than you’ve seen here. When you develop more advanced applications,you use the inspectors to set connections to associate the code you write to interact with user-interface objects.
Write the CodeYou can view and edit a source file in the workspace window by selecting the file in the project navigator,which opens it in the source editor, shown in Figure 1-5.
Figure 1-5 The source editor
Gutter Focus ribbon
Jump bar
The gutter displays line numbers (when the “Line numbers” option in Text Editing preferences is selected; seeText Editing Preferences Help ) and the location of breakpoints, errors, and warnings in the file.
The focus ribbon helps you to concentrate your attention on your code by:
● Identifying the scope of a block of code
● Allowing you to hide blocks of code
The Jump bar allows you to:
● View related files
● Move backward and forward through the set of project files you’ve viewed
● Jump to another location within the current file or to another file in the project
To enter the source code for the Hello application:
Tutorial: Using Xcode to Write “Hello, World!” for OS XWrite the Code
2011-05-07 | © 2011 Apple Inc. All Rights Reserved.
20
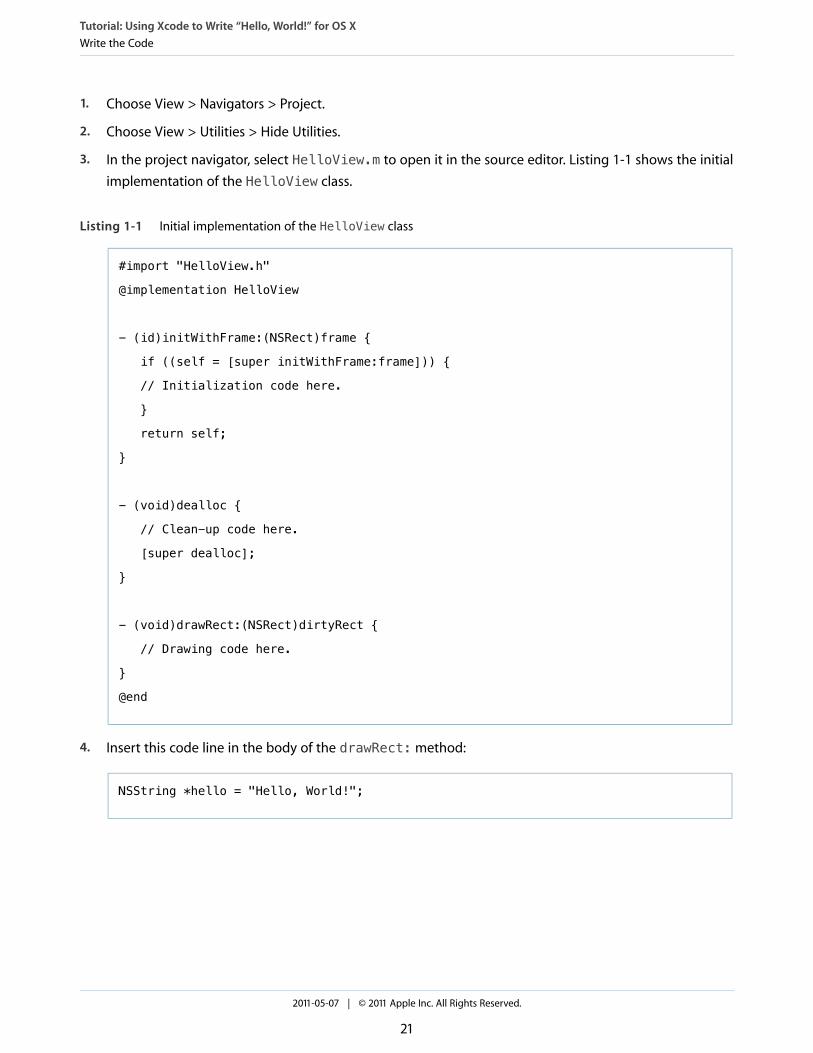
1. Choose View > Navigators > Project.
2. Choose View > Utilities > Hide Utilities.
3. In the project navigator, select HelloView.m to open it in the source editor. Listing 1-1 shows the initialimplementation of the HelloView class.
Listing 1-1 Initial implementation of the HelloView class
#import "HelloView.h"
@implementation HelloView
- (id)initWithFrame:(NSRect)frame {
if ((self = [super initWithFrame:frame])) {
// Initialization code here.
}
return self;
}
- (void)dealloc {
// Clean-up code here.
[super dealloc];
}
- (void)drawRect:(NSRect)dirtyRect {
// Drawing code here.
}
@end
4. Insert this code line in the body of the drawRect: method:
NSString *hello = "Hello, World!";
Tutorial: Using Xcode to Write “Hello, World!” for OS XWrite the Code
2011-05-07 | © 2011 Apple Inc. All Rights Reserved.
21
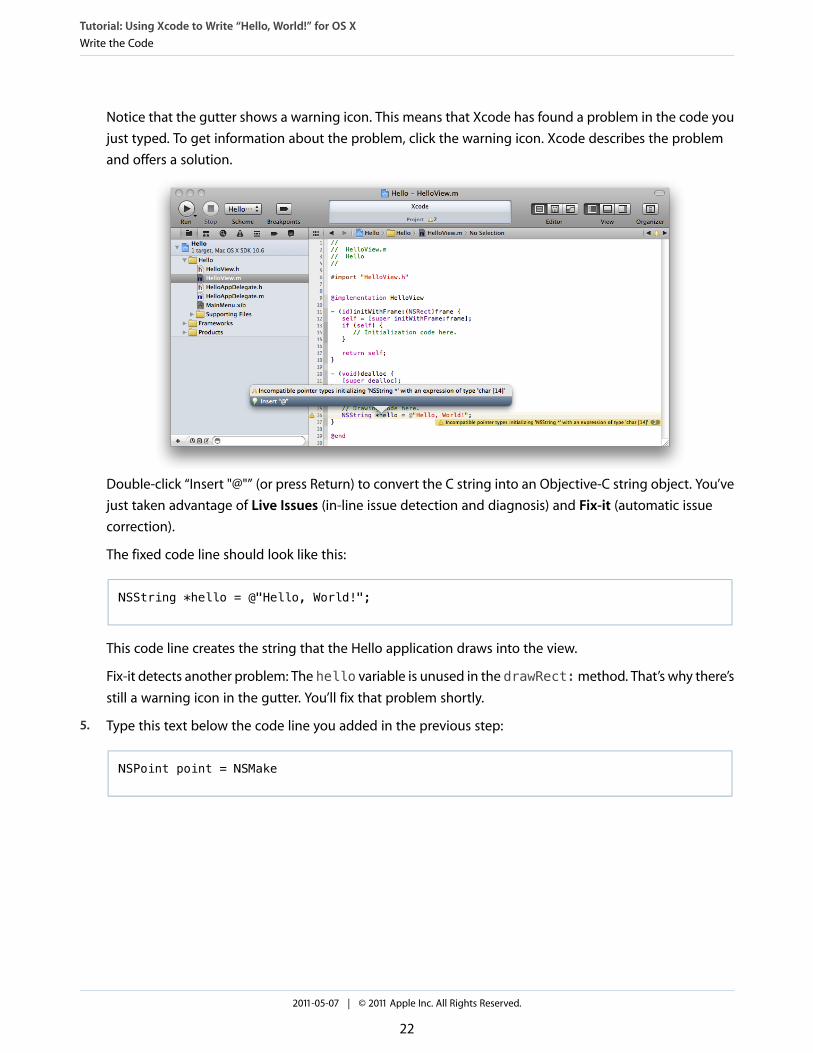
Notice that the gutter shows a warning icon. This means that Xcode has found a problem in the code youjust typed. To get information about the problem, click the warning icon. Xcode describes the problemand offers a solution.
Double-click “Insert "@"” (or press Return) to convert the C string into an Objective-C string object. You’vejust taken advantage of Live Issues (in-line issue detection and diagnosis) and Fix-it (automatic issuecorrection).
The fixed code line should look like this:
NSString *hello = @"Hello, World!";
This code line creates the string that the Hello application draws into the view.
Fix-it detects another problem: The hello variable is unused in the drawRect:method. That’s why there’sstill a warning icon in the gutter. You’ll fix that problem shortly.
5. Type this text below the code line you added in the previous step:
NSPoint point = NSMake
Tutorial: Using Xcode to Write “Hello, World!” for OS XWrite the Code
2011-05-07 | © 2011 Apple Inc. All Rights Reserved.
22
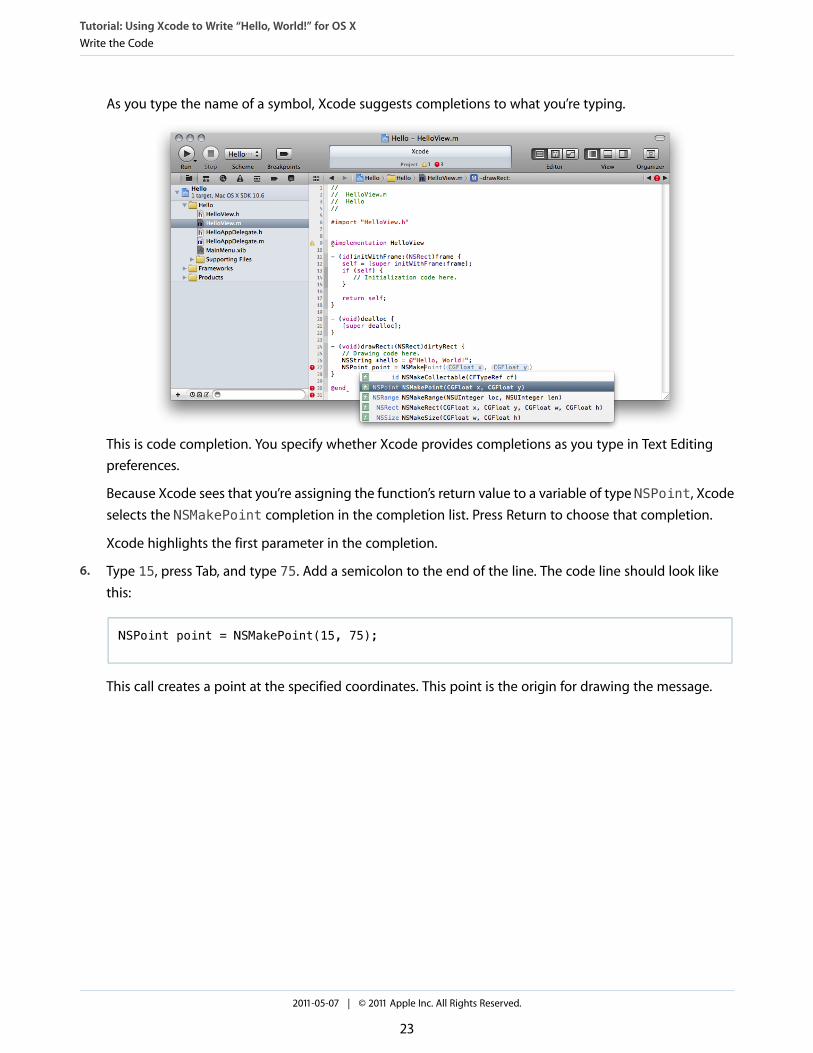
As you type the name of a symbol, Xcode suggests completions to what you’re typing.
This is code completion. You specify whether Xcode provides completions as you type in Text Editingpreferences.
Because Xcode sees that you’re assigning the function’s return value to a variable of type NSPoint, Xcodeselects the NSMakePoint completion in the completion list. Press Return to choose that completion.
Xcode highlights the first parameter in the completion.
6. Type 15, press Tab, and type 75. Add a semicolon to the end of the line. The code line should look likethis:
NSPoint point = NSMakePoint(15, 75);
This call creates a point at the specified coordinates. This point is the origin for drawing the message.
Tutorial: Using Xcode to Write “Hello, World!” for OS XWrite the Code
2011-05-07 | © 2011 Apple Inc. All Rights Reserved.
23
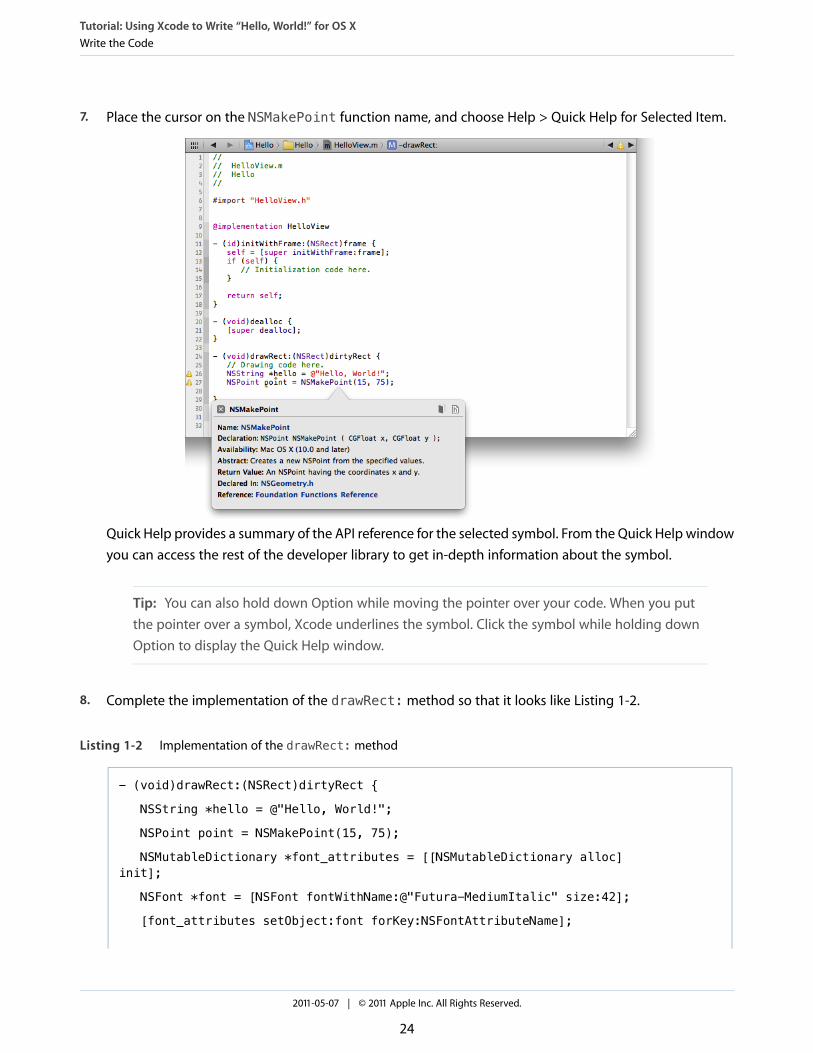
7. Place the cursor on the NSMakePoint function name, and choose Help > Quick Help for Selected Item.
Quick Help provides a summary of the API reference for the selected symbol. From the Quick Help windowyou can access the rest of the developer library to get in-depth information about the symbol.
Tip: You can also hold down Option while moving the pointer over your code. When you putthe pointer over a symbol, Xcode underlines the symbol. Click the symbol while holding downOption to display the Quick Help window.
8. Complete the implementation of the drawRect: method so that it looks like Listing 1-2.
Listing 1-2 Implementation of the drawRect: method
- (void)drawRect:(NSRect)dirtyRect {
NSString *hello = @"Hello, World!";
NSPoint point = NSMakePoint(15, 75);
NSMutableDictionary *font_attributes = [[NSMutableDictionary alloc]init];
NSFont *font = [NSFont fontWithName:@"Futura-MediumItalic" size:42];
[font_attributes setObject:font forKey:NSFontAttributeName];
Tutorial: Using Xcode to Write “Hello, World!” for OS XWrite the Code
2011-05-07 | © 2011 Apple Inc. All Rights Reserved.
24

[hello drawAtPoint:point withAttributes:font_attributes];
[font_attributes release];
}
After typing the code, correct transcribing errors found by Fix-it (the code provided has no problems).
9. Add a breakpoint to the drawRect: method.
Add the breakpoint by clicking the gutter to the left of the code line with the assignment to the fontvariable. Although the drawRect: method has no problems, adding a breakpoint to it allows you tofamiliarize yourself with the Xcode debugging facilities when you run the Hello application.
Notice that adding the breakpoint automatically activates breakpoints for your project—the Breakpointstoolbar button has a pushed-in appearance.
Run the Application1. Choose Product > Run to run the Hello application.
The activity viewer (the LCD-like display in the workspace window toolbar) displays information about thetasks Xcode performs in response, which are to build the Hello application and to launch it in an interactivedebug session.
Tutorial: Using Xcode to Write “Hello, World!” for OS XRun the Application
2011-05-07 | © 2011 Apple Inc. All Rights Reserved.
25
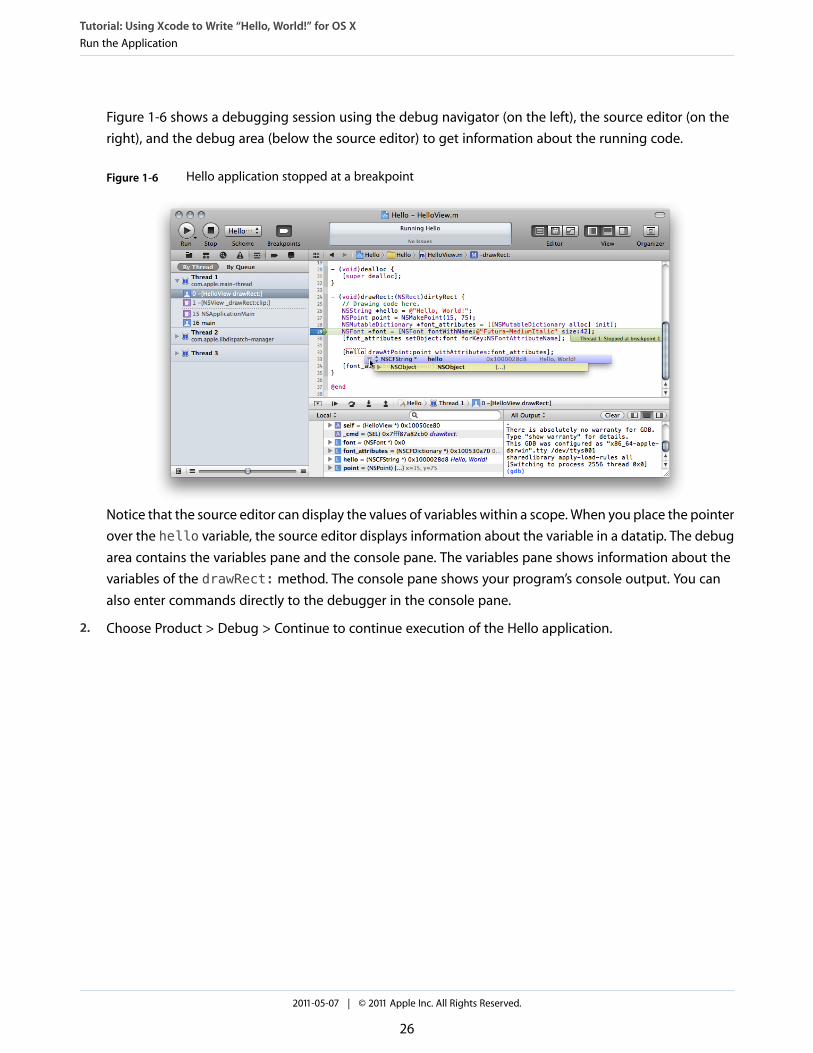
Figure 1-6 shows a debugging session using the debug navigator (on the left), the source editor (on theright), and the debug area (below the source editor) to get information about the running code.
Figure 1-6 Hello application stopped at a breakpoint
Notice that the source editor can display the values of variables within a scope. When you place the pointerover the hello variable, the source editor displays information about the variable in a datatip. The debugarea contains the variables pane and the console pane. The variables pane shows information about thevariables of the drawRect: method. The console pane shows your program’s console output. You canalso enter commands directly to the debugger in the console pane.
2. Choose Product > Debug > Continue to continue execution of the Hello application.
Tutorial: Using Xcode to Write “Hello, World!” for OS XRun the Application
2011-05-07 | © 2011 Apple Inc. All Rights Reserved.
26
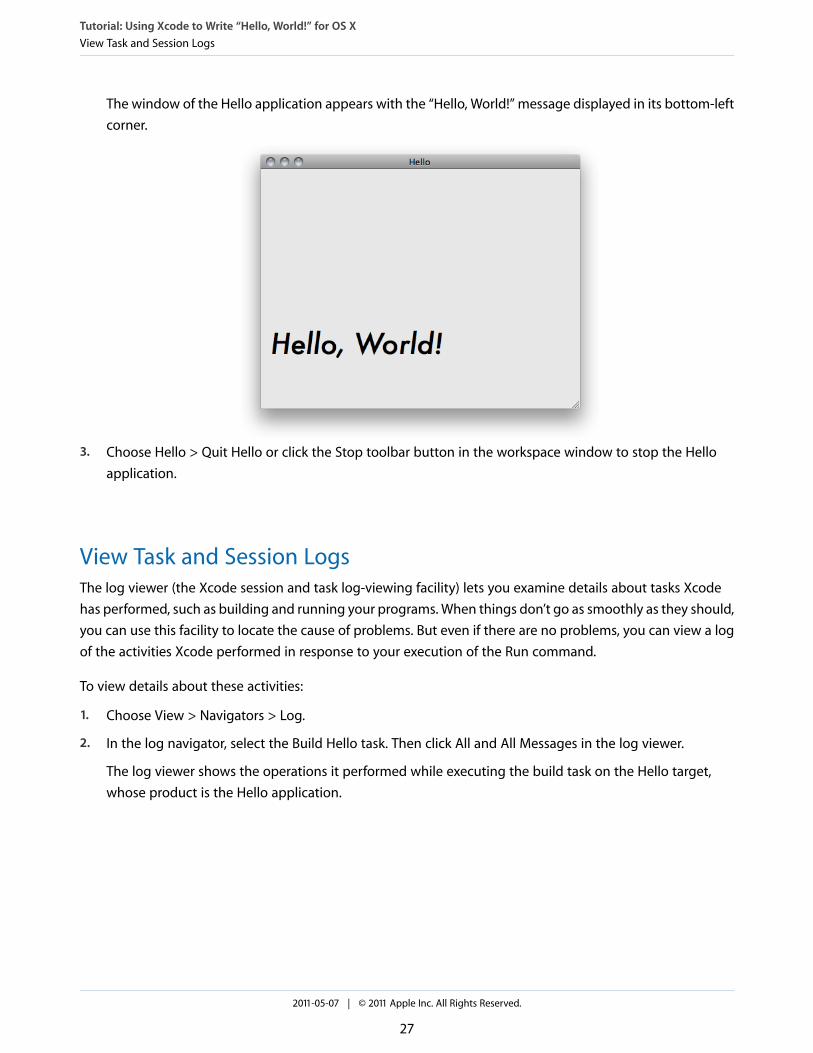
The window of the Hello application appears with the “Hello, World!” message displayed in its bottom-leftcorner.
3. Choose Hello > Quit Hello or click the Stop toolbar button in the workspace window to stop the Helloapplication.
View Task and Session LogsThe log viewer (the Xcode session and task log-viewing facility) lets you examine details about tasks Xcodehas performed, such as building and running your programs. When things don’t go as smoothly as they should,you can use this facility to locate the cause of problems. But even if there are no problems, you can view a logof the activities Xcode performed in response to your execution of the Run command.
To view details about these activities:
1. Choose View > Navigators > Log.
2. In the log navigator, select the Build Hello task. Then click All and All Messages in the log viewer.
The log viewer shows the operations it performed while executing the build task on the Hello target,whose product is the Hello application.
Tutorial: Using Xcode to Write “Hello, World!” for OS XView Task and Session Logs
2011-05-07 | © 2011 Apple Inc. All Rights Reserved.
27

Selecting an operation in the log viewer (Figure 1-7) reveals the transcript button on the right side of theoperation. Click the transcript button to display details about the operation.
Figure 1-7 The log viewer in the workspace window
Tutorial: Using Xcode to Write “Hello, World!” for OS XView Task and Session Logs
2011-05-07 | © 2011 Apple Inc. All Rights Reserved.
28
Interface Builder is a visual design editor that’s integrated into Xcode. You use Interface Builder to create theuser interfaces of your iOS and Mac apps. Using the graphical environment of Interface Builder, you assemblewindows, views, controls, menus, and other elements from a library of configurable objects. You arrange theseitems, set their attributes, establish connections between them, and then save them in a special type of resourcefile, called a nib file. A nib file stores your objects, including their configuration and layout information, in aformat that at runtime can be used to create actual objects in your program.
In this tutorial, you’ll use Interface Builder to create the user interface for a simple Mac app, called QCDemo,for viewing Quartz Composer compositions. Quartz Composer is a development tool for processing andrendering graphical data. The visual programming environment of Quartz Composer lets you develop graphicprocessing modules, called compositions , without writing a single line of graphics code.
2011-05-07 | © 2011 Apple Inc. All Rights Reserved.
29
Tutorial: Designing a User Interface with InterfaceBuilder
Note: To complete this tutorial, you need to have installed OS X v10.6.6 or later and Xcode 4.0 orlater.
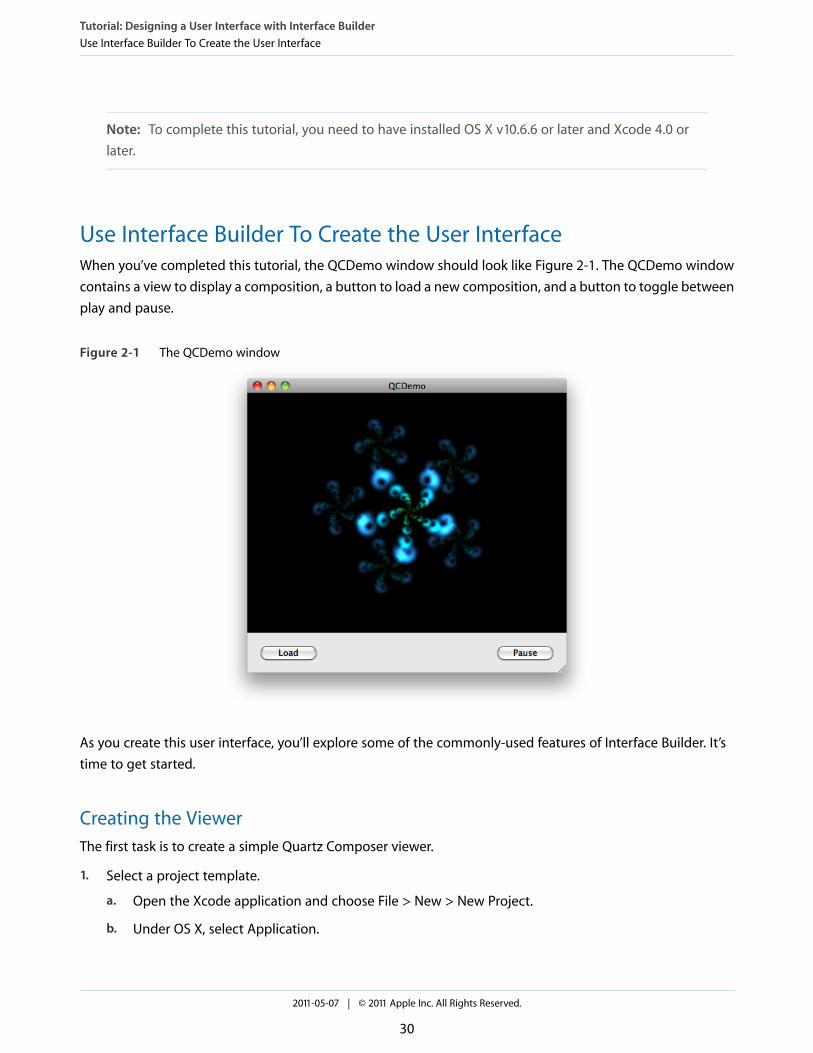
Use Interface Builder To Create the User InterfaceWhen you’ve completed this tutorial, the QCDemo window should look like Figure 2-1. The QCDemo windowcontains a view to display a composition, a button to load a new composition, and a button to toggle betweenplay and pause.
Figure 2-1 The QCDemo window
As you create this user interface, you’ll explore some of the commonly-used features of Interface Builder. It’stime to get started.
Creating the ViewerThe first task is to create a simple Quartz Composer viewer.
1. Select a project template.
a. Open the Xcode application and choose File > New > New Project.
b. Under OS X, select Application.
Tutorial: Designing a User Interface with Interface BuilderUse Interface Builder To Create the User Interface
2011-05-07 | © 2011 Apple Inc. All Rights Reserved.
30
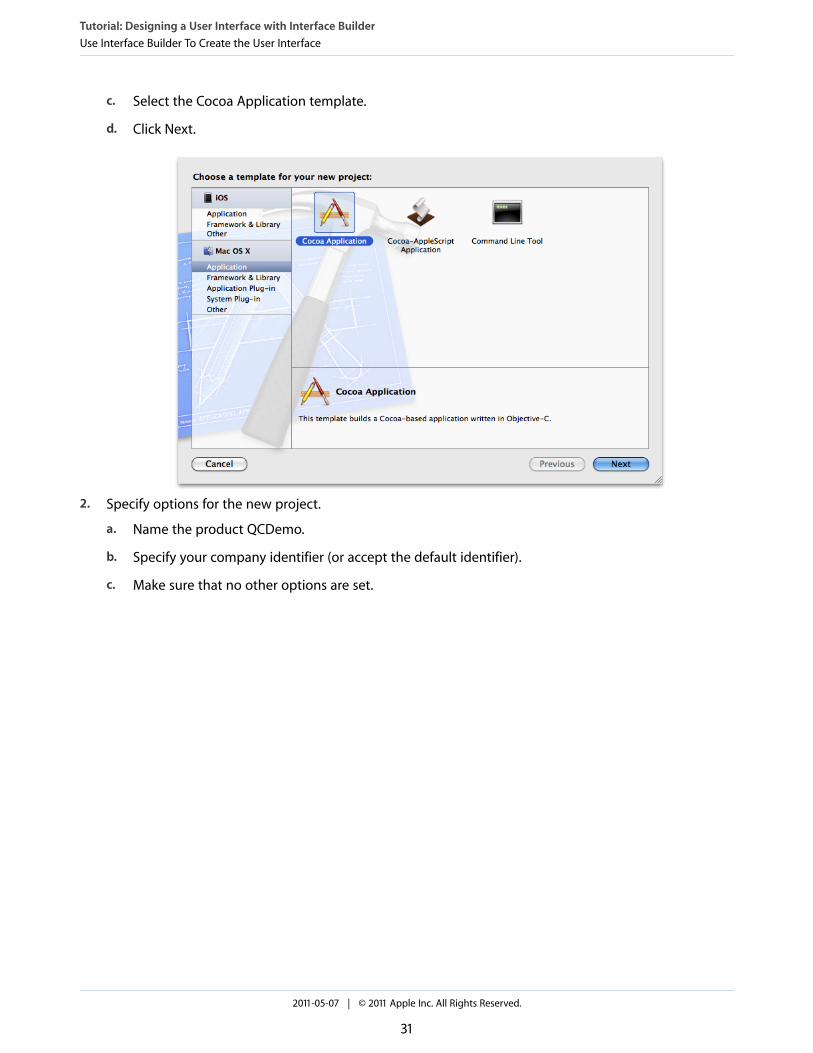
c. Select the Cocoa Application template.
d. Click Next.
2. Specify options for the new project.
a. Name the product QCDemo.
b. Specify your company identifier (or accept the default identifier).
c. Make sure that no other options are set.
Tutorial: Designing a User Interface with Interface BuilderUse Interface Builder To Create the User Interface
2011-05-07 | © 2011 Apple Inc. All Rights Reserved.
31
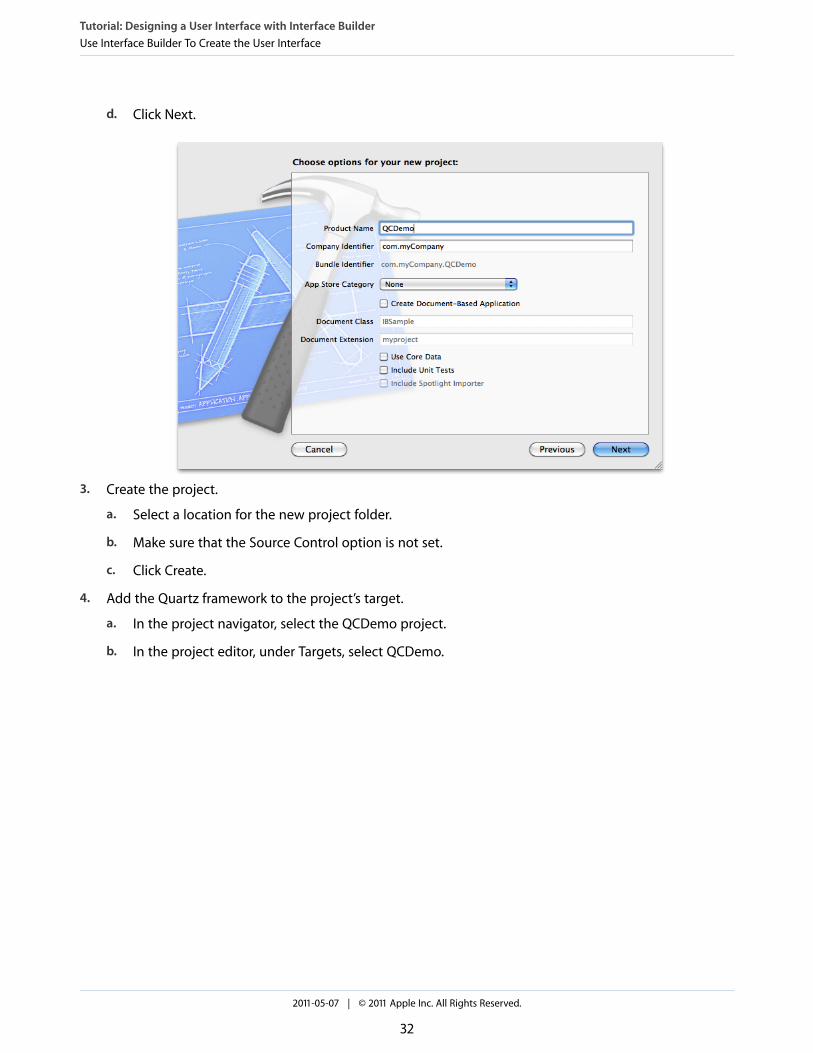
d. Click Next.
3. Create the project.
a. Select a location for the new project folder.
b. Make sure that the Source Control option is not set.
c. Click Create.
4. Add the Quartz framework to the project’s target.
a. In the project navigator, select the QCDemo project.
b. In the project editor, under Targets, select QCDemo.
Tutorial: Designing a User Interface with Interface BuilderUse Interface Builder To Create the User Interface
2011-05-07 | © 2011 Apple Inc. All Rights Reserved.
32
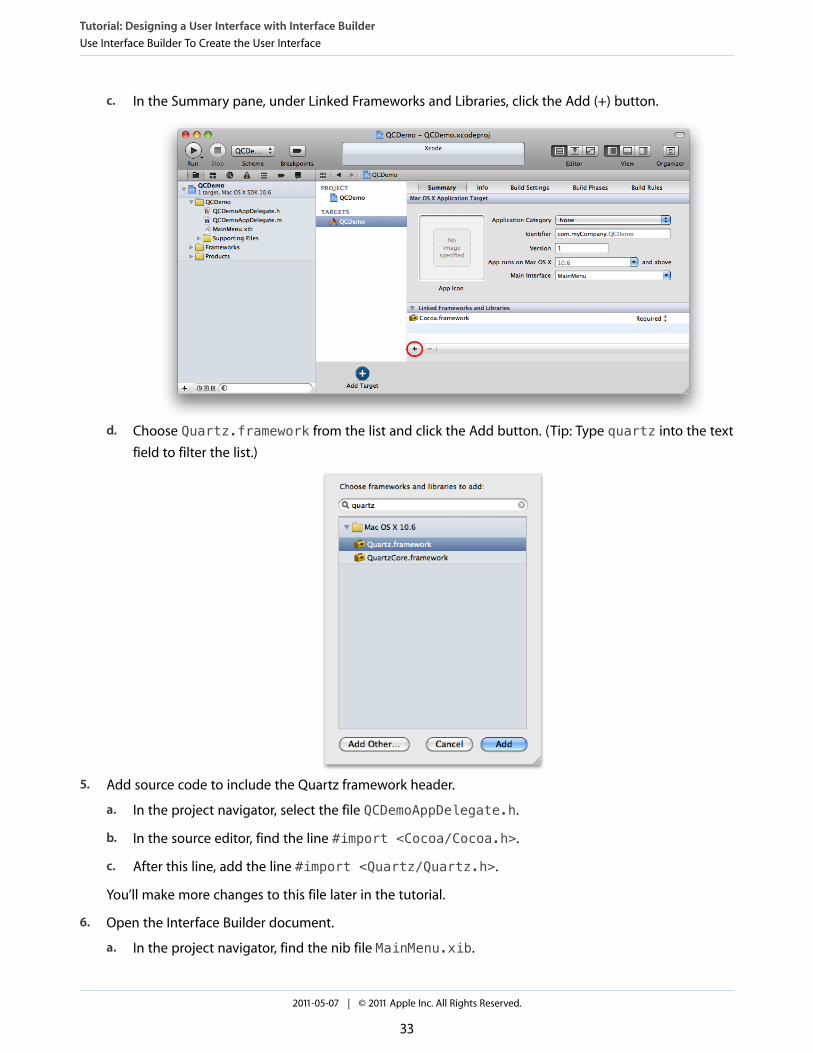
c. In the Summary pane, under Linked Frameworks and Libraries, click the Add (+) button.
d. Choose Quartz.framework from the list and click the Add button. (Tip: Type quartz into the textfield to filter the list.)
5. Add source code to include the Quartz framework header.
a. In the project navigator, select the file QCDemoAppDelegate.h.
b. In the source editor, find the line #import <Cocoa/Cocoa.h>.
c. After this line, add the line #import <Quartz/Quartz.h>.
You’ll make more changes to this file later in the tutorial.
6. Open the Interface Builder document.
a. In the project navigator, find the nib file MainMenu.xib.
Tutorial: Designing a User Interface with Interface BuilderUse Interface Builder To Create the User Interface
2011-05-07 | © 2011 Apple Inc. All Rights Reserved.
33

b. Click MainMenu.xib to open the document in the Interface Builder editor pane.
c. In the Xcode menu bar, choose View > Navigators > Hide Navigator to narrow the focus of theworkspace.
d. If the Interface Builder dock on the left does not look like the figure below, click the button in thelower left corner to switch the dock to outline view.
7. Set the size attributes of the QCDemo window.
a. In the Xcode menu, choose View > Utilities > Size Inspector.
b. In the outline view at the left side of the Interface Builder editor, select the window. Until you selectit, the window does not appear on the Interface Builder canvas.
c. In the Size inspector, set the window’s width to 480 and height to 420. Press Return after enteringthe height.
d. Select the Minimum Size option.
Tutorial: Designing a User Interface with Interface BuilderUse Interface Builder To Create the User Interface
2011-05-07 | © 2011 Apple Inc. All Rights Reserved.
34
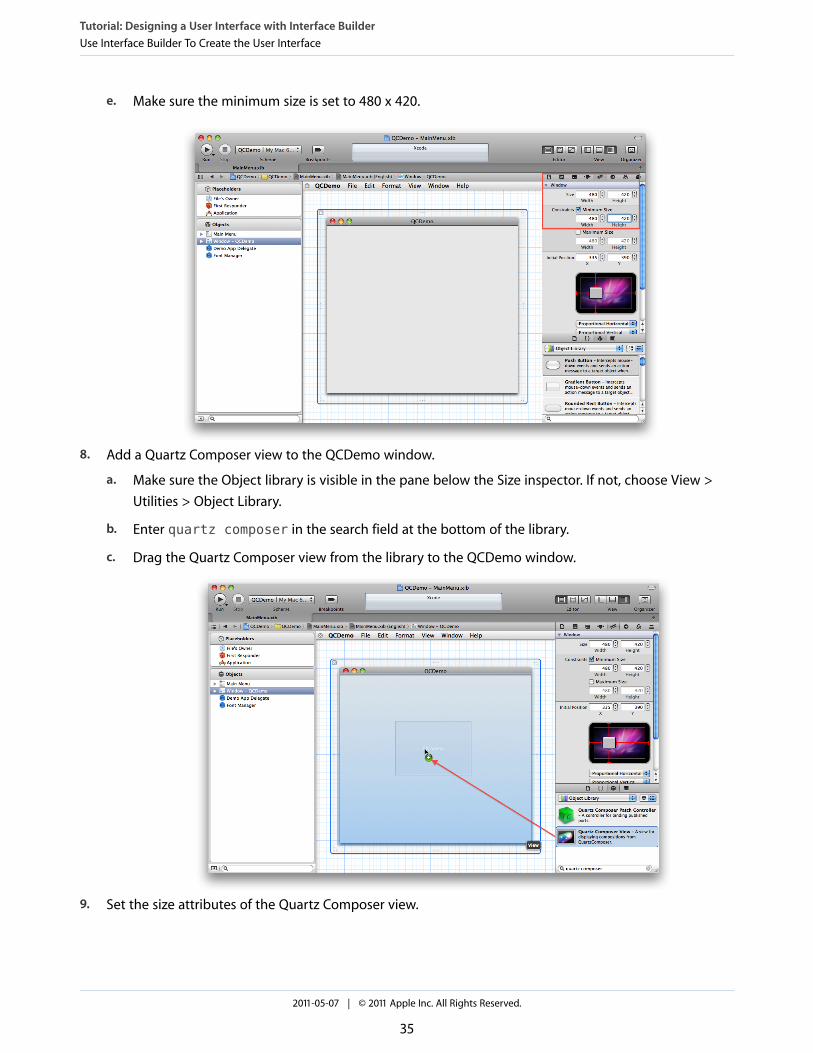
e. Make sure the minimum size is set to 480 x 420.
8. Add a Quartz Composer view to the QCDemo window.
a. Make sure the Object library is visible in the pane below the Size inspector. If not, choose View >Utilities > Object Library.
b. Enter quartz composer in the search field at the bottom of the library.
c. Drag the Quartz Composer view from the library to the QCDemo window.
9. Set the size attributes of the Quartz Composer view.
Tutorial: Designing a User Interface with Interface BuilderUse Interface Builder To Create the User Interface
2011-05-07 | © 2011 Apple Inc. All Rights Reserved.
35
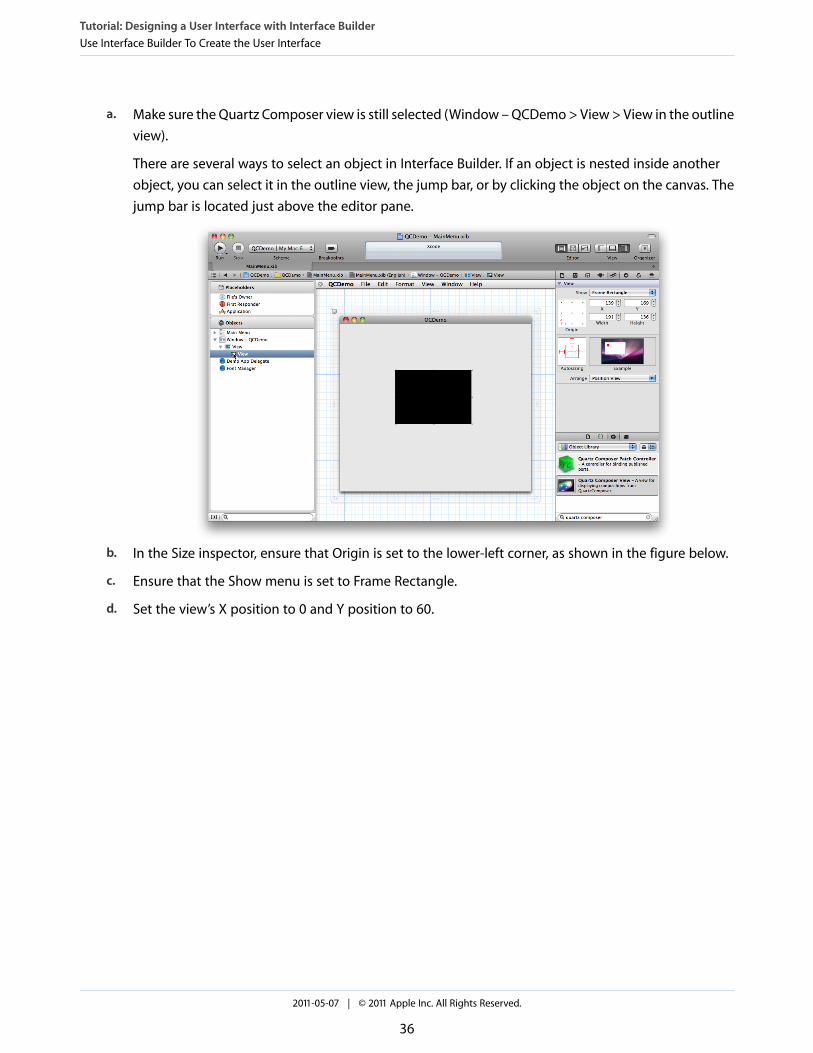
a. Make sure the Quartz Composer view is still selected (Window – QCDemo > View > View in the outlineview).
There are several ways to select an object in Interface Builder. If an object is nested inside anotherobject, you can select it in the outline view, the jump bar, or by clicking the object on the canvas. Thejump bar is located just above the editor pane.
b. In the Size inspector, ensure that Origin is set to the lower-left corner, as shown in the figure below.
c. Ensure that the Show menu is set to Frame Rectangle.
d. Set the view’s X position to 0 and Y position to 60.
Tutorial: Designing a User Interface with Interface BuilderUse Interface Builder To Create the User Interface
2011-05-07 | © 2011 Apple Inc. All Rights Reserved.
36
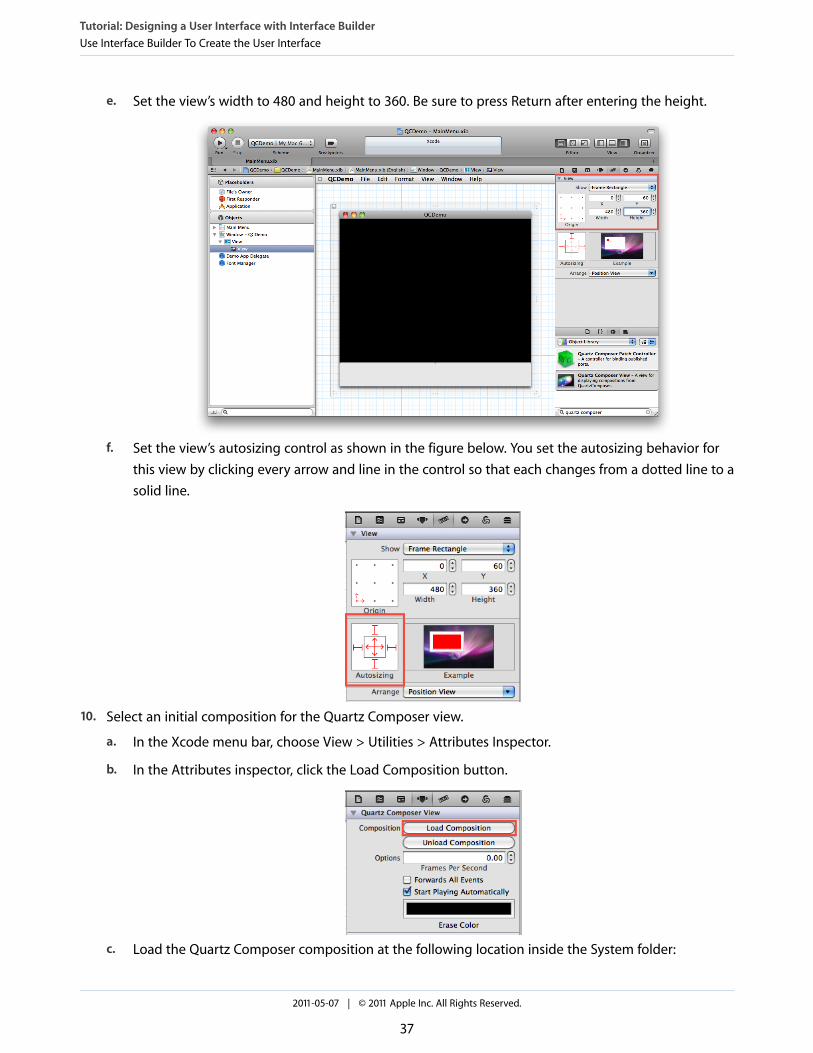
e. Set the view’s width to 480 and height to 360. Be sure to press Return after entering the height.
f. Set the view’s autosizing control as shown in the figure below. You set the autosizing behavior forthis view by clicking every arrow and line in the control so that each changes from a dotted line to asolid line.
10. Select an initial composition for the Quartz Composer view.
a. In the Xcode menu bar, choose View > Utilities > Attributes Inspector.
b. In the Attributes inspector, click the Load Composition button.
c. Load the Quartz Composer composition at the following location inside the System folder:
Tutorial: Designing a User Interface with Interface BuilderUse Interface Builder To Create the User Interface
2011-05-07 | © 2011 Apple Inc. All Rights Reserved.
37
/System/Library/Screen Savers/Shell.qtz
This composition is available as a screen saver in System Preferences.
d. Select the Start Playing Automatically option.
11. Run a simulation of the QCDemo user interface.
Interface Builder includes a separate application called Cocoa Simulator. You can use Cocoa Simulator topreview your user interface as you work on it.
a. Choose Editor > Simulate Document to start the simulation and display the composition.
b. Try enlarging the QCDemo window and observe what happens to the composition. The compositionis automatically resized because of the way you changed the autosizing behavior of the QuartzComposer view.
c. Press Command-Q to quit the simulation.
12. Build and run the QCDemo application.
a. Click the Run button at the left end of the Xcode toolbar.
b. If you’re asked whether you want to save documents before building, click Save.
c. Verify that the application runs correctly by moving and resizing the window.
d. Press Command-Q or click the Stop button to quit the application.
Adding the Pause/Play ButtonThe next task is to add a button that toggles the Quartz Composer view between pause and play.
1. Add a push button to the user interface.
a. Make sure the Object library is still visible. If not, choose View > Utilities > Object Library.
b. In the library pane, type button in the search field.
c. Drag a push button from the library to the open area at the bottom of the QCDemo window.
Tutorial: Designing a User Interface with Interface BuilderUse Interface Builder To Create the User Interface
2011-05-07 | © 2011 Apple Inc. All Rights Reserved.
38
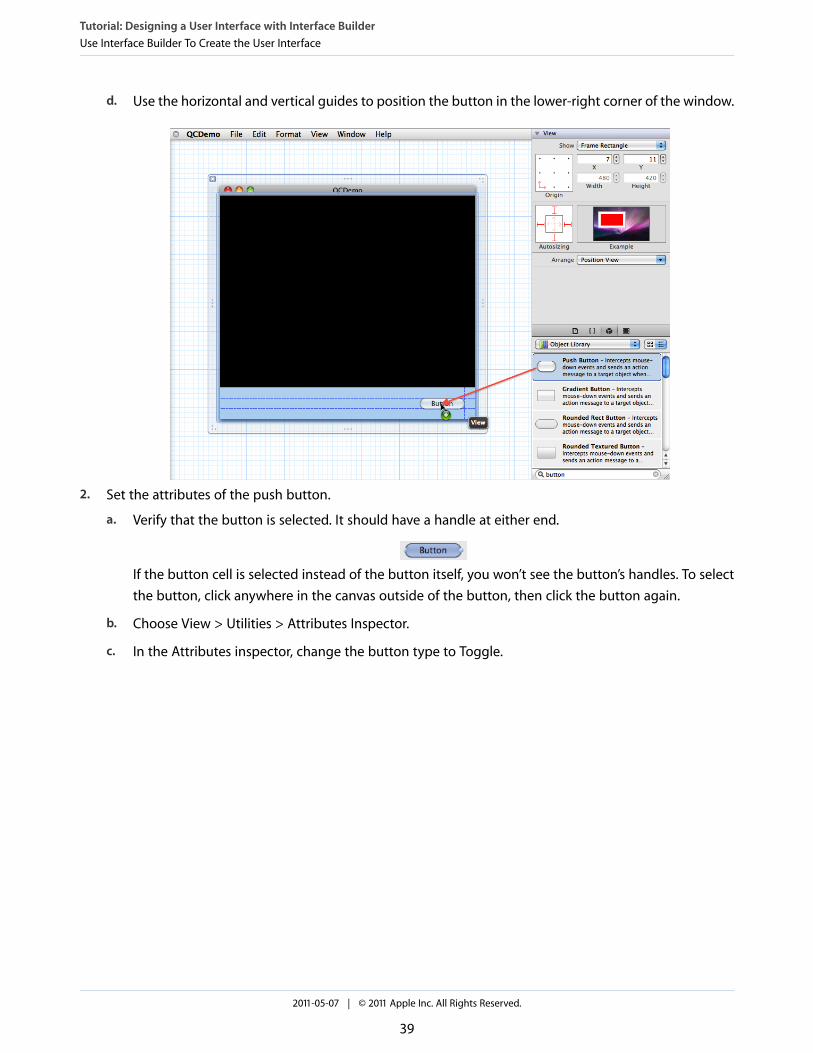
d. Use the horizontal and vertical guides to position the button in the lower-right corner of the window.
2. Set the attributes of the push button.
a. Verify that the button is selected. It should have a handle at either end.
If the button cell is selected instead of the button itself, you won’t see the button’s handles. To selectthe button, click anywhere in the canvas outside of the button, then click the button again.
b. Choose View > Utilities > Attributes Inspector.
c. In the Attributes inspector, change the button type to Toggle.
Tutorial: Designing a User Interface with Interface BuilderUse Interface Builder To Create the User Interface
2011-05-07 | © 2011 Apple Inc. All Rights Reserved.
39
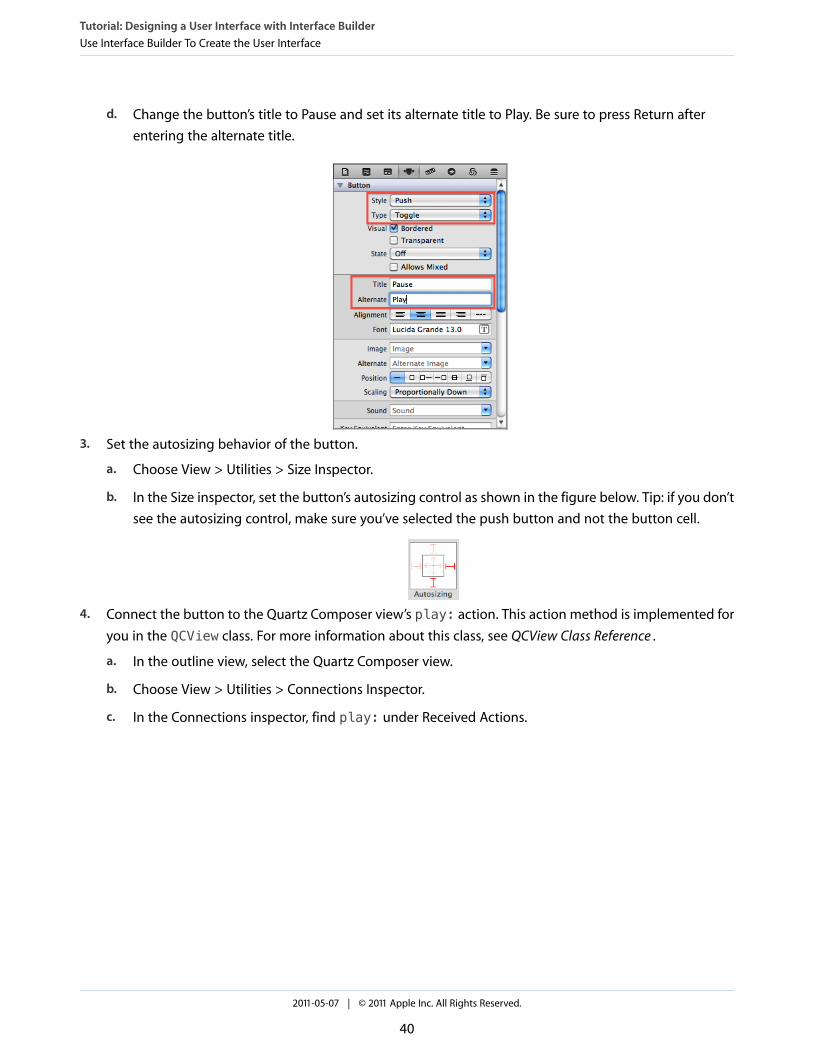
d. Change the button’s title to Pause and set its alternate title to Play. Be sure to press Return afterentering the alternate title.
3. Set the autosizing behavior of the button.
a. Choose View > Utilities > Size Inspector.
b. In the Size inspector, set the button’s autosizing control as shown in the figure below. Tip: if you don’tsee the autosizing control, make sure you’ve selected the push button and not the button cell.
4. Connect the button to the Quartz Composer view’s play: action. This action method is implemented foryou in the QCView class. For more information about this class, see QCView Class Reference .
a. In the outline view, select the Quartz Composer view.
b. Choose View > Utilities > Connections Inspector.
c. In the Connections inspector, find play: under Received Actions.
Tutorial: Designing a User Interface with Interface BuilderUse Interface Builder To Create the User Interface
2011-05-07 | © 2011 Apple Inc. All Rights Reserved.
40

d. Drag from the circle at the right of the play: action to the Pause/Play button. Release the mousebutton to complete the connection.
5. Run a simulation of the QCDemo user interface.
a. Choose Editor > Simulate Document to start the simulation.
b. Try toggling the Pause/Play button to make sure it works as expected.
c. Try enlarging the window to make sure the button stays in the corner where it belongs.
d. Press Command-Q to quit the simulation.
Adding the Load ButtonThe next task is to add a button that allows the user to select and load another composition.
1. Add a second push button to the user interface.
a. Drag a push button from the Library pane to the open area at the bottom of the QCDemo window.
Tutorial: Designing a User Interface with Interface BuilderUse Interface Builder To Create the User Interface
2011-05-07 | © 2011 Apple Inc. All Rights Reserved.
41

b. Use the horizontal and vertical guides to position the button in the lower-left corner of the window.
2. Set the attributes of the push button.
a. Verify that the button in the lower-left corner of the window is selected.
b. In the Attributes inspector, make sure the button’s type is Momentary Push In.
c. Set the button’s title to Load.
3. In the Size inspector, set the button’s autosizing control as shown in the figure below.
4. Run a simulation of the QCDemo user interface.
a. Choose Editor > Simulate Document to start the simulation.
b. Try enlarging the window to make sure the Load button stays in the corner where it belongs.
c. Try clicking the Load button. The button should highlight when clicked.
d. Press Command-Q to quit the simulation.
Tutorial: Designing a User Interface with Interface BuilderUse Interface Builder To Create the User Interface
2011-05-07 | © 2011 Apple Inc. All Rights Reserved.
42
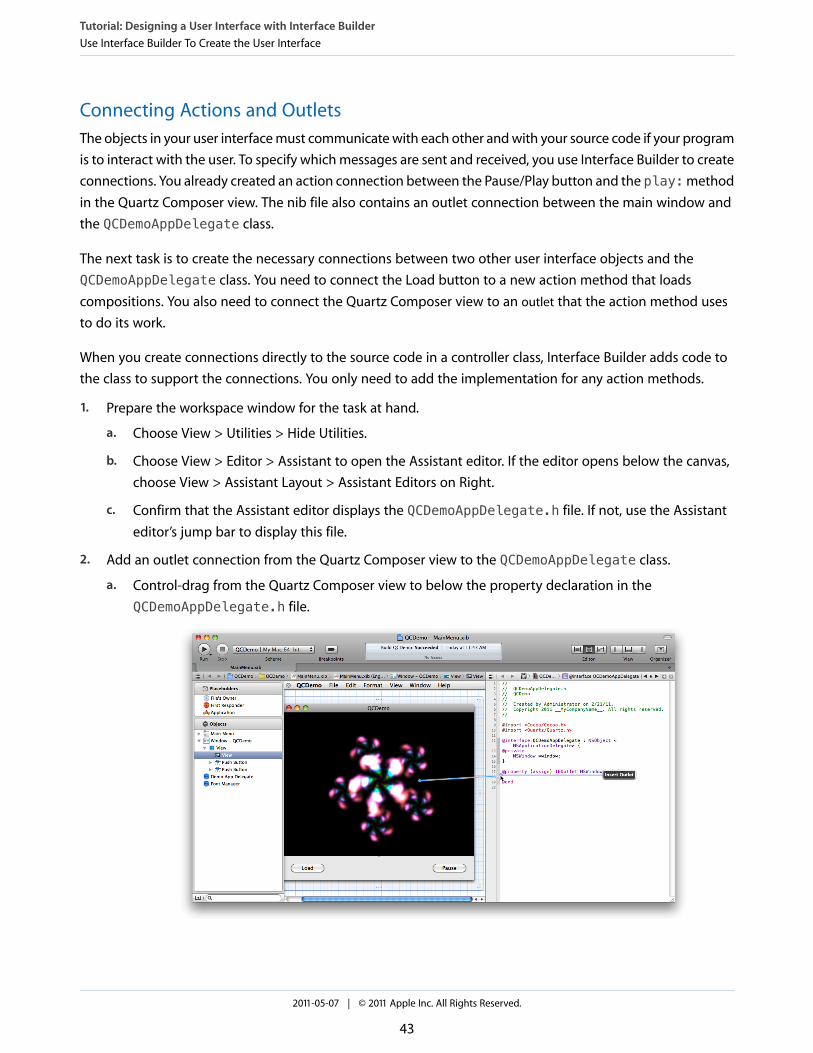
Connecting Actions and OutletsThe objects in your user interface must communicate with each other and with your source code if your programis to interact with the user. To specify which messages are sent and received, you use Interface Builder to createconnections. You already created an action connection between the Pause/Play button and the play:methodin the Quartz Composer view. The nib file also contains an outlet connection between the main window andthe QCDemoAppDelegate class.
The next task is to create the necessary connections between two other user interface objects and theQCDemoAppDelegate class. You need to connect the Load button to a new action method that loadscompositions. You also need to connect the Quartz Composer view to an outlet that the action method usesto do its work.
When you create connections directly to the source code in a controller class, Interface Builder adds code tothe class to support the connections. You only need to add the implementation for any action methods.
1. Prepare the workspace window for the task at hand.
a. Choose View > Utilities > Hide Utilities.
b. Choose View > Editor > Assistant to open the Assistant editor. If the editor opens below the canvas,choose View > Assistant Layout > Assistant Editors on Right.
c. Confirm that the Assistant editor displays the QCDemoAppDelegate.h file. If not, use the Assistanteditor’s jump bar to display this file.
2. Add an outlet connection from the Quartz Composer view to the QCDemoAppDelegate class.
a. Control-drag from the Quartz Composer view to below the property declaration in theQCDemoAppDelegate.h file.
Tutorial: Designing a User Interface with Interface BuilderUse Interface Builder To Create the User Interface
2011-05-07 | © 2011 Apple Inc. All Rights Reserved.
43
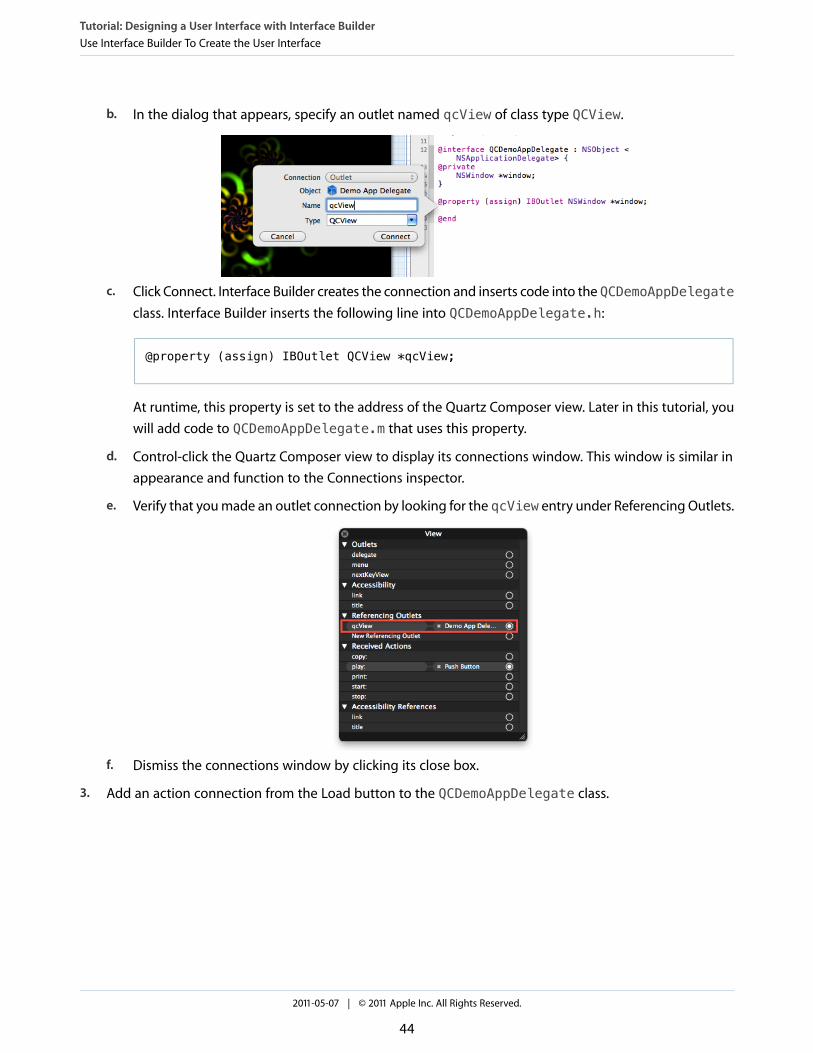
b. In the dialog that appears, specify an outlet named qcView of class type QCView.
c. Click Connect. Interface Builder creates the connection and inserts code into the QCDemoAppDelegateclass. Interface Builder inserts the following line into QCDemoAppDelegate.h:
@property (assign) IBOutlet QCView *qcView;
At runtime, this property is set to the address of the Quartz Composer view. Later in this tutorial, youwill add code to QCDemoAppDelegate.m that uses this property.
d. Control-click the Quartz Composer view to display its connections window. This window is similar inappearance and function to the Connections inspector.
e. Verify that you made an outlet connection by looking for the qcView entry under Referencing Outlets.
f. Dismiss the connections window by clicking its close box.
3. Add an action connection from the Load button to the QCDemoAppDelegate class.
Tutorial: Designing a User Interface with Interface BuilderUse Interface Builder To Create the User Interface
2011-05-07 | © 2011 Apple Inc. All Rights Reserved.
44
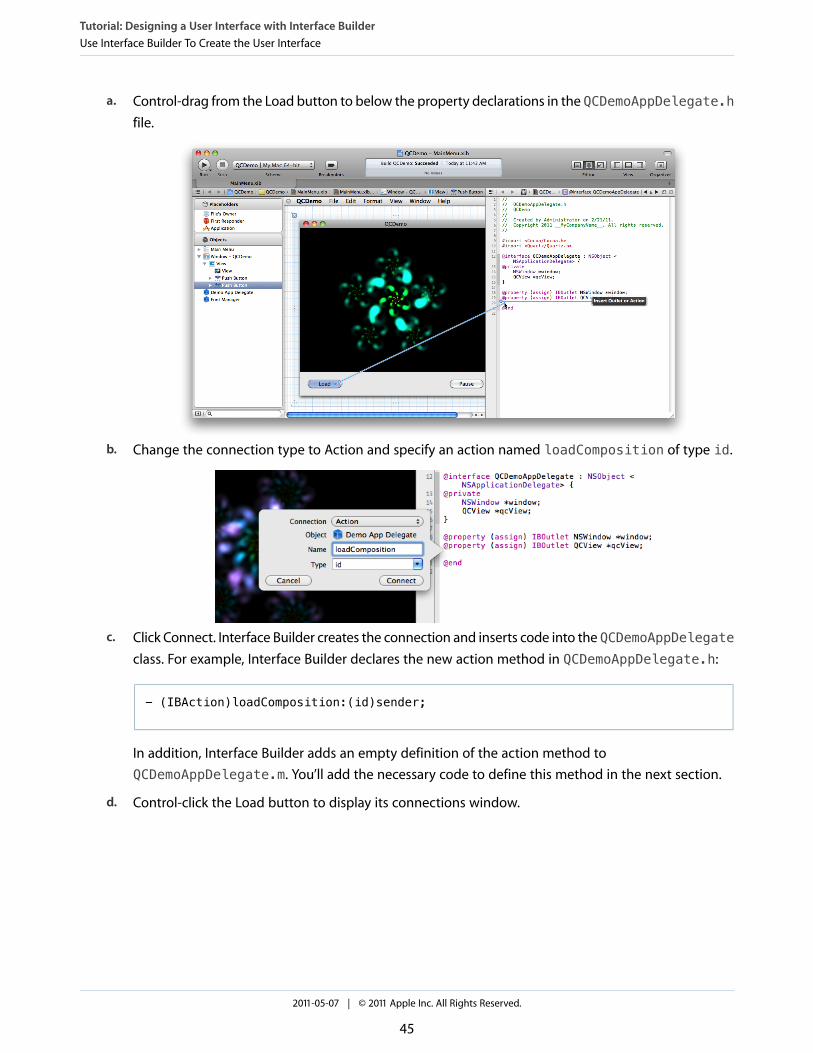
a. Control-drag from the Load button to below the property declarations in the QCDemoAppDelegate.hfile.
b. Change the connection type to Action and specify an action named loadComposition of type id.
c. Click Connect. Interface Builder creates the connection and inserts code into the QCDemoAppDelegateclass. For example, Interface Builder declares the new action method in QCDemoAppDelegate.h:
- (IBAction)loadComposition:(id)sender;
In addition, Interface Builder adds an empty definition of the action method toQCDemoAppDelegate.m. You’ll add the necessary code to define this method in the next section.
d. Control-click the Load button to display its connections window.
Tutorial: Designing a User Interface with Interface BuilderUse Interface Builder To Create the User Interface
2011-05-07 | © 2011 Apple Inc. All Rights Reserved.
45
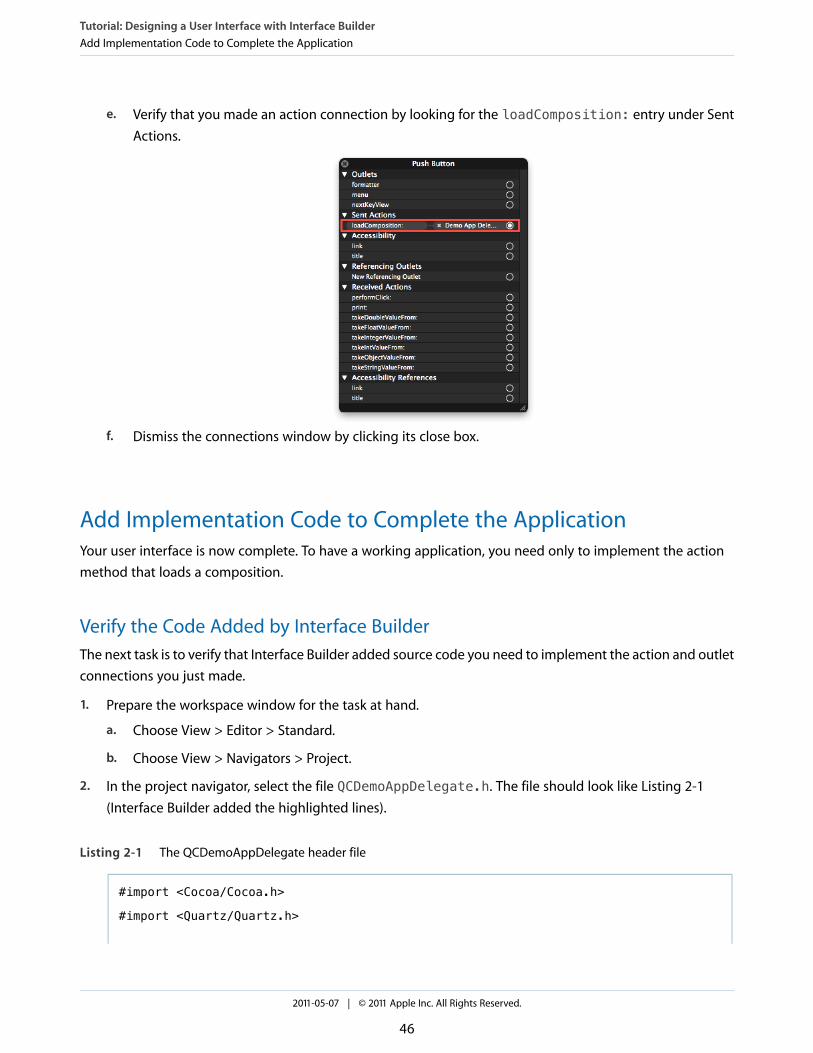
e. Verify that you made an action connection by looking for the loadComposition: entry under SentActions.
f. Dismiss the connections window by clicking its close box.
Add Implementation Code to Complete the ApplicationYour user interface is now complete. To have a working application, you need only to implement the actionmethod that loads a composition.
Verify the Code Added by Interface BuilderThe next task is to verify that Interface Builder added source code you need to implement the action and outletconnections you just made.
1. Prepare the workspace window for the task at hand.
a. Choose View > Editor > Standard.
b. Choose View > Navigators > Project.
2. In the project navigator, select the file QCDemoAppDelegate.h. The file should look like Listing 2-1(Interface Builder added the highlighted lines).
Listing 2-1 The QCDemoAppDelegate header file
#import <Cocoa/Cocoa.h>
#import <Quartz/Quartz.h>
Tutorial: Designing a User Interface with Interface BuilderAdd Implementation Code to Complete the Application
2011-05-07 | © 2011 Apple Inc. All Rights Reserved.
46

@interface QCDemoAppDelegate : NSObject <NSApplicationDelegate> {
@private
NSWindow *window;
QCView *qcView;
}
@property (assign) IBOutlet NSWindow *window;
@property (assign) IBOutlet QCView *qcView;
- (IBAction)loadComposition:(id)sender;
@end
3. Now select the file QCDemoAppDelegate.m. The file should look like Listing 2-2 (Interface Builder addedthe highlighted lines).
Listing 2-2 The QCDemoAppDelegate implementation file
#import "QCDemoAppDelegate.h"
@implementation QCDemoAppDelegate
@synthesize window;
@synthesize qcView;
- (void)applicationDidFinishLaunching:(NSNotification *)aNotification
{
// Insert code here to initialize your application
}
- (IBAction)loadComposition:(id)sender {
}
@end
Tutorial: Designing a User Interface with Interface BuilderAdd Implementation Code to Complete the Application
2011-05-07 | © 2011 Apple Inc. All Rights Reserved.
47
Add Implementation CodeThe final task is to add the code that loads a composition.
1. In the project navigator, select the file QCDemoAppDelegate.m.
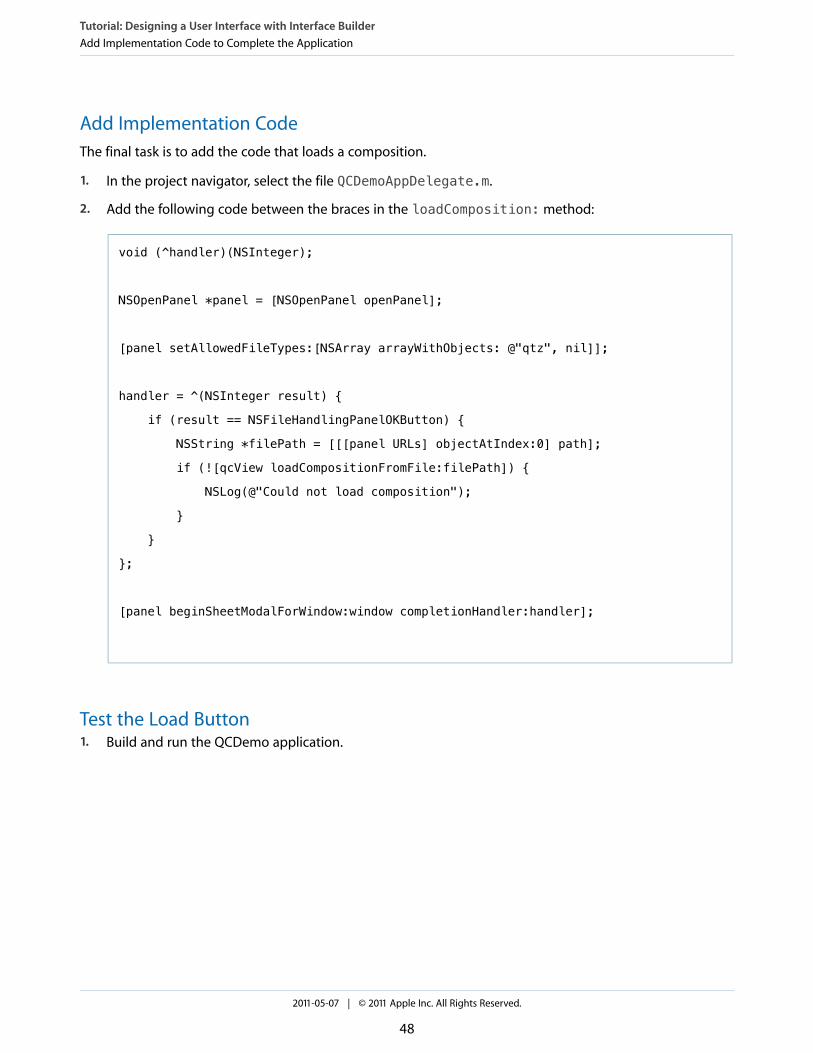
2. Add the following code between the braces in the loadComposition: method:
void (^handler)(NSInteger);
NSOpenPanel *panel = [NSOpenPanel openPanel];
[panel setAllowedFileTypes:[NSArray arrayWithObjects: @"qtz", nil]];
handler = ^(NSInteger result) {
if (result == NSFileHandlingPanelOKButton) {
NSString *filePath = [[[panel URLs] objectAtIndex:0] path];
if (![qcView loadCompositionFromFile:filePath]) {
NSLog(@"Could not load composition");
}
}
};
[panel beginSheetModalForWindow:window completionHandler:handler];
Test the Load Button1. Build and run the QCDemo application.
Tutorial: Designing a User Interface with Interface BuilderAdd Implementation Code to Complete the Application
2011-05-07 | © 2011 Apple Inc. All Rights Reserved.
48
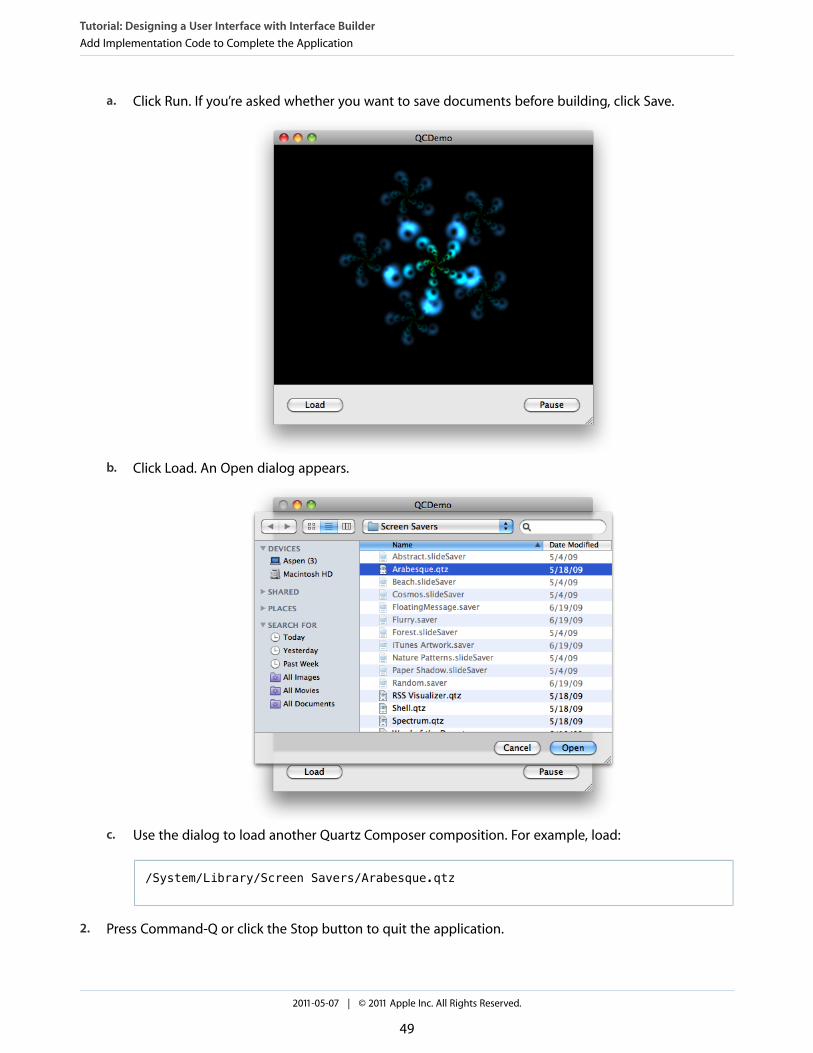
a. Click Run. If you’re asked whether you want to save documents before building, click Save.
b. Click Load. An Open dialog appears.
c. Use the dialog to load another Quartz Composer composition. For example, load:
/System/Library/Screen Savers/Arabesque.qtz
2. Press Command-Q or click the Stop button to quit the application.
Tutorial: Designing a User Interface with Interface BuilderAdd Implementation Code to Complete the Application
2011-05-07 | © 2011 Apple Inc. All Rights Reserved.
49

What’s Next?Now that your project is complete, you may want to do some further reading. To learn more about the conceptsand tasks introduced here, read the chapter on designing user interfaces in Xcode 4 User Guide .
Tutorial: Designing a User Interface with Interface BuilderWhat’s Next?
2011-05-07 | © 2011 Apple Inc. All Rights Reserved.
50

This table describes the changes to Xcode Quick Start Guide .
NotesDate
Updated the Interface Builder tutorial.2011-05-07
New document that provides a hands-on introduction to Xcode.2011-03-02
2011-05-07 | © 2011 Apple Inc. All Rights Reserved.
51
Document Revision History
Apple Inc.© 2011 Apple Inc.All rights reserved.
No part of this publication may be reproduced,stored in a retrieval system, or transmitted, in anyform or by any means, mechanical, electronic,photocopying, recording, or otherwise, withoutprior written permission of Apple Inc., with thefollowing exceptions: Any person is herebyauthorized to store documentation on a singlecomputer for personal use only and to printcopies of documentation for personal useprovided that the documentation containsApple’s copyright notice.
No licenses, express or implied, are granted withrespect to any of the technology described in thisdocument. Apple retains all intellectual propertyrights associated with the technology describedin this document. This document is intended toassist application developers to developapplications only for Apple-labeled computers.
Apple Inc.1 Infinite LoopCupertino, CA 95014408-996-1010
Apple, the Apple logo, Cocoa, iPod, Mac,Objective-C, OS X, Quartz, and Xcode aretrademarks of Apple Inc., registered in the U.S.and other countries.
App Store is a service mark of Apple Inc.
iOS is a trademark or registered trademark ofCisco in the U.S. and other countries and is usedunder license.
Even though Apple has reviewed this document,APPLE MAKES NO WARRANTY OR REPRESENTATION,EITHER EXPRESS OR IMPLIED, WITH RESPECT TO THISDOCUMENT, ITS QUALITY, ACCURACY,MERCHANTABILITY, OR FITNESS FOR A PARTICULARPURPOSE. AS A RESULT, THIS DOCUMENT IS PROVIDED“AS IS,” AND YOU, THE READER, ARE ASSUMING THEENTIRE RISK AS TO ITS QUALITY AND ACCURACY.
IN NO EVENT WILL APPLE BE LIABLE FOR DIRECT,INDIRECT, SPECIAL, INCIDENTAL, OR CONSEQUENTIALDAMAGES RESULTING FROM ANY DEFECT ORINACCURACY IN THIS DOCUMENT, even if advised ofthe possibility of such damages.
THE WARRANTY AND REMEDIES SET FORTH ABOVEARE EXCLUSIVE AND IN LIEU OF ALL OTHERS, ORALOR WRITTEN, EXPRESS OR IMPLIED. No Apple dealer,agent, or employee is authorized to make anymodification, extension, or addition to this warranty.
Some states do not allow the exclusion or limitationof implied warranties or liability for incidental orconsequential damages, so the above limitation orexclusion may not apply to you. This warranty givesyou specific legal rights, and you may also have otherrights which vary from state to state.