
V.24 serial interface (corresponds to RS232C) - Klartext Portal
11
1 V.24 serial interface (corresponds to RS232C) Guidelines for establishing simple program transmission between a control and a PC Contents General information Procedure TNCremo transmission software ME transfer protocol FE transfer protocol LSV-2 transfer protocol Special cases General information HEIDENHAIN controls as of the TNC 124 have this interface. At a baud rate of 9600, cable lengths up to 20 m are permitted. Depending on the control model, maximum transfer rates are 2400 to 115,200 baud. Procedure 1. Determine the exact variant of your control, for example TNC 155A/P or TNC 155B/Q. 2. Download the TNCremo transmission software from our website. 3. Determine what type of port connection you have on your machine (9-pin or 25-pin) and on your PC (9-pin or 25-pin), and then use an appropriate cable to connect them. 4. Select the most powerful protocol that is possible for your control: if you want to operate from the control, choose FE(1) if available; if transmission is to be handled by the PC, use LSV-2. 5. Continue as per the description for the protocol you selected. There you will find information about the preparations necessary on the TNC and the PC, for data transfer, and for running the program. Transfer a Klartext program in both directions. 6. Only attempt special cases, such as blockwise execution or reloading mode, once the complete transfer works in both directions.
-
Upload
khangminh22 -
Category
Documents
-
view
0 -
download
0
Transcript of V.24 serial interface (corresponds to RS232C) - Klartext Portal

1
V.24 serial interface (corresponds to RS232C)
Guidelines for establishing simple program transmission between a control and a PC
Contents
General information Procedure TNCremo transmission software ME transfer protocol FE transfer protocol LSV-2 transfer protocol Special cases
General information
HEIDENHAIN controls as of the TNC 124 have this interface. At a baud rate of 9600, cable lengths up to 20 m are permitted. Depending on the control model, maximum transfer rates are 2400 to 115,200 baud.
Procedure
1. Determine the exact variant of your control, for example TNC 155A/P or TNC 155B/Q. 2. Download the TNCremo transmission software from our website. 3. Determine what type of port connection you have on your machine (9-pin or 25-pin) and on your PC (9-pin or 25-pin), and then use an appropriate cable to connect them. 4. Select the most powerful protocol that is possible for your control: if you want to operate from the control, choose FE(1) if available; if transmission is to be handled by the PC, use LSV-2. 5. Continue as per the description for the protocol you selected. There you will find information about the preparations necessary on the TNC and the PC, for data transfer, and for running the program. Transfer a Klartext program in both directions. 6. Only attempt special cases, such as blockwise execution or reloading mode, once the complete transfer works in both directions.

2
1 Control variants
In order to clarify which possibilities are available for any given control, it must first be clarified exactly which variant the present TNC is: TNC 151 / TNC 155A/P: There is no CR key TNC 151 / TNC 155B/Q: There is a CR key
The variants of the NC software of the TNC 415 can be seen after pressing the MOD key.
2 TNCremo transfer software
The associated data transfer software is TNCremo (previously known as TNC.exe and TNCremo, then TNCremo). You can download this data transfer software from http://www.heidenhain.de at no charge. You will find it under Documentation / Information -> Software -> Download area -> PC Software -> TNCremo. Information you can find in this data transfer software includes, for example, cabling information under Help / Contents / Technical Information / Cable Assembly.

3
3 Cabling
Explanation for connecting the interface to the machine: The connection in the machine to the control ends either at the operating panel or at the outside of the housing in a D-sub connector (male): the adapter block. The interface line is to be connected here. We state that 15 m is a safe length for the cables. Specially shielded cables permit lengths of 20 m to 30 m, but we cannot guarantee this, and also do not offer any such cables. A lower baud rate can be tried if there are problems.
There is an Ethernet2Com adapter for lengths up to 100 m, using network cables.
Fully wired, 25 pins on the machine side permits hardware handshaking
Cable plan 5: 9-pin 25-pin Machine (from the interface description PC PC of the Technical Manual) Adapter
On (older) PCs with 25-pin COM port you connect the cable with the JH ID number 242869-01 or 274545-01 directly to the interface connection on the machine.
On PCs with 9-pin COM port you connect the adapter shown above between them.
PCs with 9-pin COM port with the customer wiring shown at right can be connected directly to the interface connection of the machine.

4
3 Fully wired, 9 pins on the machine side permits hardware handshaking
The cable necessary for the connection to the PC depends on whether the connection within the machine is transposed. You can determine this by checking which machine cable is connected to X27 of the control:
Internal cable External cable 366964 355484 = straight Machine PC
Internal cable External cable 355484 366964 = transposed Machine PC
4 Communications protocols ME Simple protocol, requires operation of the control and the PC (ME = suitable for earlier JH magnetic tape unit), available for TNC 124, TNC 125, TNC 131, TNC 135, TNC 145, TNC 150, TNC 151, TNC 155, TNC 246, TNC 310, TNC 355, TNC 360, TNC 370, TNC 407, TNC 410, TNC 415 / 425
FE Powerful protocol with operation of the control, parity checking, (FE = suitable for earlier JH floppy disk unit), available for TNC 124, TNC 151B/Q, TNC 155B/Q, TNC 246, TNC 310, TNC 355, TNC 360, TNC 370, TNC 407, TNC 410, TNC 415 / 425, TNC 426 / 430, iTNC 530 FE1 After being selected, the control automatically gets the table of contents from the PC.
Available as of TNC 415. FE2 The operator must call the directory.
LSV-2 Powerful protocol with operation of the PC, parity checking, (for connection to Windows PCs), available for TNC 415 as of software 259930, TNC 425, TNC 426 /430, iTNC 530 Note: Controls with LSV-2 also have the FE protocol.

5
5 ME protocol using the TNC 150 as an example On controls up to the TNC155A/P only this protocol is available. Preparations for transmission must be made on the TNC as well as the PC.
Preparing the control In the Programming and Editing mode of operation, press the MOD key (right). Use the vertical arrow keys to select the “Baud rate” dialog, enter the baud rate, pre-select the ME protocol with the arrow keys, confirm with ENTER, and conclude with DEL BLOC.
Preparing the PC
Start TNCserver directly
Or start TNCremo, make sure that the Standard setting is entered,
and open the pull-down menu “TNCserver...”.
Set the following on the PC:
6
Please note: You must set the transmission direction and the baud rate on the PC and the control so that they correlate to one another. The “Protocol” display refers to the PC. This means: in order to transfer a program from the TNC to the PC, you must enter “Data output” on the control and “Receive ME” on the PC. Under “Status” you should now see: “Waiting for request”. This means that the connection is OK.
Starting transmission from the control:
In the Programming and Editing mode of operation, press EXT. With the vertical arrow keys select the transmission direction and the rest, press ENTER, select the program, and press ENTER again.

7
5 FE protocol using the TNC 155B as an example This protocol is available on controls starting with the TNC 155B/Q. Only the TNC is needed to control the transfer.
Preparing the control
In the Programming and Editing mode of operation, press the MOD key. Use the vertical arrow keys to select the “Baud rate” dialog, enter the baud rate, pre-select the FE protocol with the arrow keys, confirm with ENTER, and conclude with DEL BLOC.
This directly ensures blockwise transfer with data checking. On the TNC 155B and TNC 355, an appropriate machine-parameter set is automatically selected for the FE transmission mode.
Preparing the PC
Start TNCserver directly
or TNCremo with the Standard setting,
and open the pull-down menu “TNCserver...”.
Set the following on the PC:
Under “Status” you should now see: “Ready (waiting for request)”. This means that the connection is OK. 9600 baud is permitted for cable lengths up to 20 m. For longer cables you must reduce the baud rate at both ends.

8
Starting transmission
In the Programming and Editing mode of operation, press the EXT key. With the vertical arrow keys select the transmission direction and the rest, press ENTER, then use the arrow keys to select the program, and press ENTER again. See the control’s User’s Manual for more details.
5 FE protocol with the TNC 320 Preparing the control
Determining the interface data In the Programming and Editing mode you press PGM MGT and MOD, then select CfgSerialInterface, and set the following “basic data”:
This way you also select the FE1 protocol and ensure blockwise transfer with data checking. An appropriate machine-parameter set is the activated automatically.
Selecting the interface type RS 232C In the Programming and Editing mode you press PGM MGT and MOD, then select CfgSerialPorts, and set the following:
Prepare the PC as described under the FE protocol.
Starting transmission Press PGM MGT and open the double window. Go to the new window, use the arrow keys to select RS232, and show files.
Copy the programs from the control window to the PC window and vice versa.
Note: Blockwise program run (reloading mode) is not possible
9
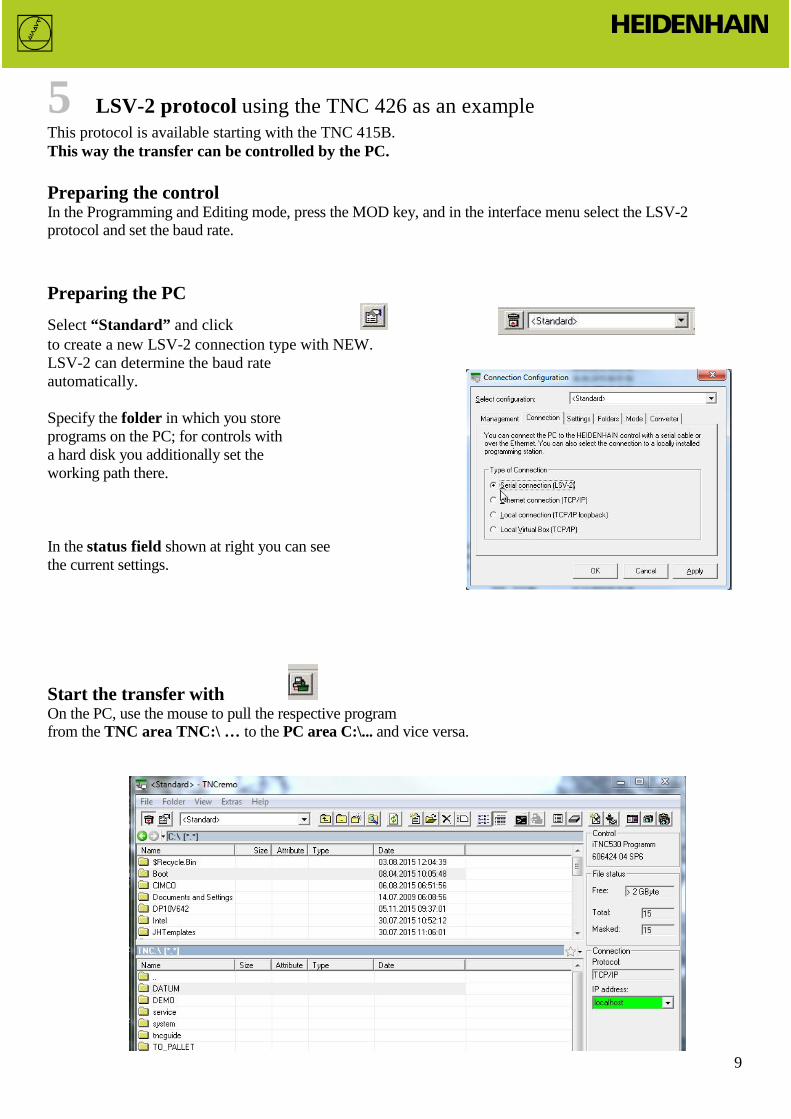
5 LSV-2 protocol using the TNC 426 as an example This protocol is available starting with the TNC 415B. This way the transfer can be controlled by the PC.
Preparing the control In the Programming and Editing mode, press the MOD key, and in the interface menu select the LSV-2 protocol and set the baud rate.
Preparing the PC
Select “Standard” and click to create a new LSV-2 connection type with NEW. LSV-2 can determine the baud rate automatically.
Specify the folder in which you store programs on the PC; for controls with a hard disk you additionally set the working path there.
In the status field shown at right you can see the current settings.
Start the transfer with On the PC, use the mouse to pull the respective program from the TNC area TNC:\ … to the PC area C:\... and vice versa.

10
6 Messages/Special Cases
Typical messages in TNCserver:
Message Meaning, Situation
Ready (waiting for request) Cable and communication are OK (appears before selection of the interface menu)
Waiting After a file has successfully been transferred to the PC, TNCserver shows the status “Waiting,” and thus remains ready for more data transfer. If the EXT mode on the machine is exited with EndBlock/NOENT, the status returns to “Ready.” The first file is fully transferred in any case.
No file name entered Connection OK but communication is not or PC folder is empty No connection Electrical problem with the connection, control is not switched on,
cable is not connected
Behavior particular to TNCs before the TNC 407: No texts of any kind can be read, meaning no program names and no comments. Lines with text are commented as errors, and they are then fully missing from the TNC. Lines with only a semicolon (not followed by a comment) are transferred correctly.
Cable lengths For cable lengths greater than 20 m, start with 9600 baud and test each next higher speed.
Blockwise program run (reloading mode) with the TNC 155/155A Only attempt this after transmission of an entire program has been successful (as described above).
Preparing the control Select the FE protocol if possible, or use the machine parameters to set a protocol similar to FE (without handshake checking): In the Programming and Editing mode of operation, press the MOD key. Select “Baud rate” with the vertical arrow keys, enter a rate, and conclude with DEL BLOC.
Use MOD and the code number to set the following data set for reloading mode: M
V
Meanin
7
5
STX, 2
1
E, H (input as plain-language 2
1
A, H (output as plain-language 2
2
SOH,
2
5
NAK,
2
1
7 data bits, 1 stop bit, even parity, Xon/Xoff 2
1 Blockwise transfer active 22
4 EOT
In order to avoid problems with transmission, clearing the NC memory and setting a lower data transfer rate (e.g. 2400 baud) is recommended.

11
Please contact your machine tool builder for details. Machine manufacturers can find a comprehensive description of our V-24 data interface on our website under “Service Manual.”
Preparing the PC Start TNCserver as described under the FE protocol Please note: Nothing is stored permanently! For example, calling of labels and programs is not permitted. See the User’s Manual for details on programming and operation.
Execution with TNC 155, TNC 355, TNC 360, TNC 310, TNC 370, TNC 407, TNC 415, TNC 425… In the AUTOMATIC mode of operation, select the program to be run with the EXT key, ENTER, START. Execution with TNC 426 / 430, iTNC 530 (Start the data transfer as described under the LSV-2) In the AUTOMATIC mode of operation, select the program to be run with the PGM MGT key, ENTER, START. With larger programs, START is already permitted while they are still being read.
Additional support for special situations
You can find comprehensive instructions in the User’s Manuals of the controls, usually at the end of the description.


![North Carolina register [serial] - NC OAH](https://static.fdokumen.com/doc/165x107/633bb631a24651471c0221d8/north-carolina-register-serial-nc-oah.jpg)


![North Carolina register [serial] - NC.gov](https://static.fdokumen.com/doc/165x107/6327f539e491bcb36c0b8a23/north-carolina-register-serial-ncgov.jpg)


