
Training Report 2 - CORDIS
367
OMWeb - 248687 D 2.2 Training Report OMWeb Open Media Web Deliverable N° D2.2 Training Report 2 December 2011 1
-
Upload
khangminh22 -
Category
Documents
-
view
2 -
download
0
Transcript of Training Report 2 - CORDIS

OMWeb - 248687
D 2.2 Training Report
OMWeb
Open Media Web
Deliverable N° D2.2
Training Report 2
December 2011
1

OMWeb - 248687
D 2.2 Training Report
Project
Grant Agreement number 248687 Project acronym: OMWeb Project title: Open Media Web Funding Scheme: Coordination & Support Action Date of latest version of Annex I against which the assessment will be made:
August 15, 2009
Document
Deliverable number: D2.2 Deliverable title Training Contractual Date of Delivery: M24 Actual Date of Delivery: 24 January 2012 Editor (s): Dr. Marie-Claire Forgue Author (s): Dr. Marie-Claire Forgue Reviewer (s): Dr. Philipp Hoschka Participant(s): ERCIM/W3C Work package no.: 2 Work package title: Training Work package leader: Dr. Marie-Claire Forgue Work package participants: ERCIM/W3C Distribution: PP Version/Revision: 1 Draft/Final: Final Total number of pages (including cover): 367 Keywords: Activity Report, Training Work Package,
Achievements, SVG, HTML5 games, HTML5 audio and video online training courses
2

OMWeb - 248687
D 2.2 Training Report
DISCLAIMER This document contains description of the OMWeb project work and findings. The authors of this document have taken any available measure in order for its content to be accurate, consistent and lawful. However, neither the project consortium as a whole nor the individual partners that implicitly or explicitly participated in the creation and publication of this document hold any responsibility for actions that might occur as a result of using its content. This publication has been produced with the assistance of the European Union. The content of this publication is the sole responsibility of the OMWeb consortium and can in no way be taken to reflect the views of the European Union.
The European Union is established in accordance with the Treaty on European Union (Maastricht). There are currently 27 Member States of the Union. It is based on the European Communities and the member states cooperation in the fields of Common Foreign and Security Policy and Justice and Home Affairs. The five main institutions of the European Union are the European Parliament, the Council of Ministers, the European Commission, the Court of Justice and the Court of Auditors. (http://europa.eu.int/)
OMWeb is a project partly funded by the European Union.
3

OMWeb - 248687
D 2.2 Training Report
TABLE OF CONTENTS 1 Introduction _______________________________________________________ 6
2 Course “Introduction to SVG” ________________________________________ 7 2.1 Selection of trainer ___________________________________________________ 7 2.2 Course dates and price ________________________________________________ 7 2.3 Course content _______________________________________________________ 8 2.4 Course marketing ____________________________________________________ 9 2.5 Participant profile ___________________________________________________ 10 2.6 Student feedback ____________________________________________________ 12 2.7 Student work _______________________________________________________ 15 2.8 Success rates and certificates of completion ______________________________ 16
3 Recruiting HTML5 Rich Media trainers _______________________________ 17 4 Course “HTML5 Audio and Video” ___________________________________ 18
4.1 Selection of trainer __________________________________________________ 18 4.2 Course dates and price _______________________________________________ 18 4.3 Course content ______________________________________________________ 19 4.4 Course marketing ___________________________________________________ 20 4.5 Participant profile ___________________________________________________ 21 4.6 Student feedback ____________________________________________________ 22 4.7 Students’ work ______________________________________________________ 25 4.8 Success rate and certificate of completion _______________________________ 26
5 Course “Game Development in HTML5” _______________________________ 28 5.1 Selection of trainer __________________________________________________ 28 5.2 Course dates and price _______________________________________________ 28 5.3 Course content ______________________________________________________ 28 5.4 Course marketing ___________________________________________________ 29 5.5 Participant profile ___________________________________________________ 30 5.6 Student feedback ____________________________________________________ 32 5.7 Students’ work ______________________________________________________ 35 5.8 Success rate and certificate of completion _______________________________ 37
6 Summary and Outlook ______________________________________________ 39
Appendix 1: Course Material – “Introduction to SVG” (Jan. 2011) ______________ 40 Appendix 2: Feedback Analysis – “Introduction to SVG” (Jan. 2011) ___________ 177
Appendix 3: List of Participants – “Introduction to SVG” (Jan. 2011) __________ 193
4

OMWeb - 248687
D 2.2 Training Report
Appendix 4: Course Material – “HTML5 Audio and Video” (Oct. 2011) _________ 195 Appendix 5: Feedback Analysis – “HTML5 Audio and Video” (Oct. 2011) _______ 254
Appendix 6: List of Participants – “HTML5 Audio and Video” (Oct. 2011) ______ 270 Appendix 7: Course Material – “Game Development in HTML5” (Oct. 2011) ____ 272
Appendix 8: Feedback Analysis – “Game Development in HTML5” (Oct. 2011) __ 349 Appendix 9: List of Participants – “Game Development in HTML5” (Oct. 2011) __ 365
5

OMWeb - 248687
D 2.2 Training Report
1 INTRODUCTION The overall objective of the training work package is to increase the number of developers capable of developing networked media Web content. In 2010, we proposed a new online training course dedicated to Scalable Vector Graphics (SVG). The results of that SVG course were so encouraging that we opened registration for a second run of the course in 2011. Armed with growing experience, we were then in a position to offer further courses during 2011, increasing the number of European developers able to create rich user experiences on the Web. We focused on providing specific HTML5 courses, since industry interest and enthusiasm for using the HTML5 media capabilities to current proprietary approaches is now well established. In this report, we describe
• The 2nd edition of the SVG course • The new online training on HTML5 audio/video • The new online training course on HTML5 games
All OMWeb training courses are listed and described on a dedicated page of the project’s Web site at: http://openmediaweb.eu/training/
To access the actual courses online please visit http://www.w3techcourses.com/and login with the following credentials: user name: omweb-reviewer password: {rev1ewEr} This will allow you to see the complete SVG January 2011, the HTML5 A/V October 2011 and the HTML5 games October 2011 courses.
6

OMWeb - 248687
D 2.2 Training Report
2 COURSE “INTRODUCTION TO SVG” Originally developed and held once in the first reporting period, a second course “Introduction to SVG” was organized in this reporting period. It started in January 20111. The January 2011 SVG course is a revised and improved version from the previous course. Taking on board the first edition’s feedback, several changes have been made:
1. the course ran over 6 weeks (i.e. an extra week was added); 2. participants could choose to end the course after 4 weeks, by which time they will
have covered the basics of creating graphics using SVG including different shapes, fill effects, transformations and possibly an introduction to declarative animation;
3. the final two weeks were optional and covered the various ways to animate graphics and make them interactive;
4. primer material was copied into the lectures rather than included by reference; 5. participants were actively encouraged to share their work through the discussion
forum. The course information and pre-course material were both been updated to reflect these changes.
The only pre-requisite for the course was to have some familiarity with HTML/XML and the ability to edit source code directly. This “Introduction to SVG” course covered the following topics:
• How do you create great-looking graphics using SVG? • How do you transform graphics, add borders, gradients and more? • What can you do with SVG better than any other technology? • An optional further 2 weeks covered animation and user interaction.
2.1 Selection of trainer Professor David Dailey of Slippery Rock University in Pennsylvania had already taught the first SVG online course, and was therefore agreeable to train again new students in 2011. David Dailey is the author of the SVG Primer2 published on the W3C Web site and has included SVG in his teaching for many years.
2.2 Course dates and price We opened the course registration on 8 December 2010, for a course start date on 10 January 2011. An early bird rate price was offered at 125€ until 23 December 2010. This early bird rate was extended to 4 January 2011 to attract more students, since registration was slow during the Christmas period.
1 January 2011 SVG training course page on w3techcourses.com: http://kwz.me/uX 2 SVG Primer: http://www.w3.org/Graphics/SVG/IG/resources/svgprimer.html
7

OMWeb - 248687
D 2.2 Training Report
The course full price was €165.
2.3 Course content Scalable vector Graphics, SVG, allows interactive and dynamic graphical content to be displayed on the Web, whether accessed through a desktop or mobile device. This content is drawn using vectors, meaning that images can be scaled without introducing the graininess associated with zooming in or out on bitmapped graphics and that these vector-based encodings are generally small and efficient. Closely linked with HTML5, W3C's SVG (Scalable Vector Graphics) standard is quickly becoming a key, non-proprietary technology that every Web developer needs to master in the future, especially when creating "rich", interactive sites. Now, all major browsers will include native support for this exciting technology. The course material is available as six weekly sessions as in described below. The full course material (lectures and assignments) is available online3 and in Appendix 1.
2.3.1 Week 1: Let’s get on with it After an overview of SVG subject and a brief look at its history, we quickly get into creating and positioning simple shapes, getting to know the tags and attributes and look at lots of examples. By the end of week 1, you'll be able familiar with <circle>, <ellipse>, <line>, <rect>, <text>, and <image>. Week 1 assignment: the assignment at the end of the week asks you to create a document that reproduces a given set of visual elements, using SVG.
2.3.2 Week 1: The path to power Week 2 introduces the <path> element: an extremely powerful and flexible aspect of SVG. It's so powerful and flexible that it gets a whole week to itself! Week 2 assignment: the assignment this week will ask you to reproduce a set of SVG images.
2.3.3 Week 3: Special effects department This week we begin to get more creative with border effects; transformations: translation, rotation, and scaling; linear and radial gradients. With all the key elements in place we can start to reduce the amount of code necessary by grouping elements and applying the <use> element. Week 3 assignment: for cementing what you've learned so far, please reproduce again a new set of SVG images.
3 SVG online training course on w3techcourses.com: http://kwz.me/uX
8

OMWeb - 248687
D 2.2 Training Report
2.3.4 Week 4: Light and heavy lifting Now that we've learned how to create graphics and add special effects, it's time to tackle some methods for affecting the way in which images are presented. Clip-paths, patterns and filters can be used to create (shaped) picture frames, repeating patterns, different coloration and so on. By the end of week 4 you'll have covered a lot of ground. You'll be able to make professional-looking graphics with a variety of eye-catching effects and that may be as far as you want to go. If so, you can stop here and, if you've successfully completed all the assignments, claim your certificate. Alternatively you can choose to dive into the final two weeks for which familiarity with scripting and core programming concepts will be required.
Week 4 assignments: Students have a choice of which assignments to work on depending on their willingness to continue the course and learn more about advanced SVG. Among four proposed assignments, participants are notably invited to implement all their new knowledge to create rich creative graphics.
2.3.5 Week 5: Dynamism: scripted SVG This week begins by looking at declarative animation. That is, animation defined in the XML markup, not in scripting. You can bend and twist shapes, move one image along the outline of another and so on - all defined by markup. We'll then look at script-based approaches to dynamism, adding new content to images and basic user interaction. Week 5 assignment: the course ends with an assignment designed to allow you to put into practice the skills obtained throughout the course.
2.3.6 Week 6: DOM, DOM and DOM In the final week we examine SVG's Document Object Model and pick up some more techniques for driving user interaction through scripting. The very last lectures lead the way towards you writing scripts that allow you to affect your SMIL animations through scripting and that bridge the gap between the HTML and SVG DOMs.
2.4 Course marketing Several steps were taken to promote the SVG course:
• W3C home page news item4 • E-mail sent to subscribers to the public training mailing list 5(around 580
subscribers at that time) • Twitter announcement (the W3C channel had more than seventeen thousand
followers at that time) • Message sent out by Russ Weakley who runs a highly respected and active Web
developer mailing list at webstandards.org.
4 W3C home page news for the SVG course: http://www.w3.org/News/2010#entry-8973 5 W3C public training list: http://lists.w3.org/Archives/Public/public-mobile-training/
9

OMWeb - 248687
D 2.2 Training Report
We tried to get a sense of how effective each of these channels is by asking participants where they first heard about the course as part of the course feedback questionnaire (see Figure 2.1 below). 85% of enrolments came in via three channels: the dedicated mailing list that people interested in future courses are encouraged to subscribe to, announcements on the W3C homepage and twitter announcements.
Figure 2.1: Answers to: “Where did you first hear about the SVG course?”
2.5 Participant profile 61 students total subscribed to the January 2011 SVG course. The list of participants is available in Appendix 3. Figure 2.2 shows that 43% of the students were based in Europe and Figure 2.3 shows the repartition of students per European country. The majority of EU students were from UK and Germany.
Figure 2.2: SVG students’ distribution by world region
10

OMWeb - 248687
D 2.2 Training Report
Figure 2.3: Number of SVG students per European country
We developed a feedback form that included some questions designed to find out more about participants and their work environment. The data also provides insight into overall market trends and plans for use of SVG on the Web, and information on the size of companies interested in SVG training. Figure 2.4 shows that the majority of students were participating as individuals (almost certainly freelancers) with a little over half working for SMEs.
11

OMWeb - 248687
D 2.2 Training Report
Figure 2.4: Answers to “How many employees does the organization you work for
have?”
In Figure 2.5 below, we show that the profile of students in this course. More than half of the participants describe themselves as a Web developer as opposed to a designer, indicating that they are likely to be conversant with scripting and other programming techniques used in the later stages of the course.
Figure 2.5: Answers to “What is your primary job position?”
2.6 Student feedback We offered a feedback form at the end of the course and received encouraging comments. 26 students (43% of the total participants) took the time to fill in this evaluation form. We are detailing below the most interesting feedback we received. Note that the complete feedback analysis is available in Appendix 2. To the question: “If you'd recommend the course: Can you say why? How would you motivate the recommendation?”, we received the following feedback (Table 2.1 below):
12

OMWeb - 248687
D 2.2 Training Report
“Very good entrance to a new subject one wishes to learn.” “What I really enjoyed about this course was the fact that it only guides you, but eventually you have to do all the thinking. I believe this is the best way to understand the "mechanics" and to evolve, rather than just use copy paste.” “SVG is great. Course if very informative and covers both basic and complex topics. An in-depth introduction to the topic. Teacher is very helpful and into the subject.” “Interactive. Opportunity to experiment with and see how SVG works on today's browsers - warts and all.” “Great way to be introduced to SVG.” “You can learn in your own pace. It's very affordable and you get to know international peers.” “SVG is the new next big thing! It's hard to expect that companies will invest in implementing apps for iOS, Android, Windows, Mac OS X, webOS etc. when it's possible to build web apps in the same way.” “I would tell the person I was recommending it to about how potentially useful SVG is, and how motivating it is to learn about something in a class rather than in isolation.” “I believe any web designer or developer should know the characteristics, practical uses and power of SVG now more than ever.” “I didn't know anything about SVG, beyond its existence. One month after, I feel confident in doing almost everything I want, including animations! It became sometimes a really time consuming task, but it worth it! Thank you.” “The assignments are a very good way to experiment. The support of the teacher and the sharing of work between students is very rewarding. “ “David is someone with not only a lot of practice but he is also very present on the forum helping out students. The course pace is very progressive and the material is good. As far as I see it only the price can be an issue.” “The course points the right way to go and are plenty of resources regarding the SVG technology.” “It's simple and you have the possibility to ask questions to instructor and other students.” “Assignments were very good, I could explore just about everything I was interested in. It takes more time though still (for me) then the estimated 3 hours, but about 10 hrs a week is an reasonable investment for a course. And I like very much the way David is escorting and informing us.”
Table 2.1: Sample answers to: “If you'd recommend the SVG course, can you say why?”
13

OMWeb - 248687
D 2.2 Training Report
We asked several other questions designed to probe participants' attitudes to the course and their overall level of satisfaction. Since these were 'rating' questions we can most readily see the responses as a series of pie charts (Figure 2.6 below). Note that most questions only received “strongly agree” and “agree” ratings when possible answers were “strongly agree”, “agree”, “neither agree or disagree”, “disagree” and “strongly disagree”.
“The course was worth my time”
“The course met my expectations”
“I learnt something that I didn't
previously know”
“I would recommend this course to
others”
Figure 2.6: Feedback measuring overall level of satisfaction of the SVG course
As can be seen from the results, the feedback was overwhelmingly positive. Nevertheless, we wanted to find out why one student (corresponding to 4% of respondents) would not recommend the course. Further investigation revealed that this had nothing to do with the course itself, but rather was related to the demand she sees for actual SVG work in her particular field of work (corporate/government contracting). Other students did obviously not share this sentiment.
Summary of Student feedback In summary, the feedback reveals that:
1. the course is interesting and worth participants' time. There is a high degree of satisfaction with the material
2. tutor feedback is a critical aspect of the course for participants
14

OMWeb - 248687
D 2.2 Training Report
3. students are looking forward to using their new skills in their daily job
2.7 Student work All teachers like to show off their students' best work. Figures 2.7 and 2.8 demonstrate the level of complex and rich SVG work that students were able to achieve in their final assignment, using what they had learned in the course.
Figure 2.7: Complex picture created by Katy Dmitriev
Figure 2.8: Optical Art cubes with gradients, by Phil Brammer (http://kwz.me/YU)
15

OMWeb - 248687
D 2.2 Training Report
2.8 Success rates and certificates of completion To receive a certificate of completion, the students needed to complete the quiz and submit and pass all the four assignments set during the four weeks of the course. We also proposed another certification level for the advanced part of the course for students who successfully completed two more assignments (weeks 5&6). Since there were two levels of certification, we delivered two certificates of completion:
• A “basic” certificate of completion was sent to 21 students – see Figure 2.9 • An “advanced” certificate of completion was sent to 11 students – see Figure
2.10 The overall success rate for the course was 52.4%.
Figure 2.9: "Basic" certificate of completion (4 weeks course)
Figure 2.10: "Advanced" certificate of completion (6 weeks course)
16

OMWeb - 248687
D 2.2 Training Report
3 RECRUITING HTML5 RICH MEDIA TRAINERS One of the training work package goals for the second period was to create and run another training course before the end of the project (December 2011). We decided to develop courses on “HTML5 and rich media” and “HTML5 and games”. To find the appropriate trainers, we issued a “Call for Trainers” that explained what should be the profile of the course(s) to be taught. The announcement was disseminated across many channels (blog post6 on OMWeb’s Web site, tweets, etc.). An extract of this announcement, issued on 30 June, is below:
W3C is looking for trainers to create and teach courses on HTML5-based “rich-media” Web content including:
• Video/audio sites based on HTML5 • Design and development of HTML5-based games • Graphics in HTML5 (SVG, canvas)
The trainers will have to develop and deliver (before the end of year 2011) a new HTML5 online training course, aimed at existing Web developers and designers who need to get up to speed with the new and more complex media features available within HTML. The course will include extensive hands-on practical work, lectures, assignments, and such. Assignments would be based on examples related to application domains such as games, movies, online audio CD packaging, etc.
Please real the full details of this call for HTML5 trainers and send your application to Marie-Claire Forgue, W3C training manager.
This course is expanding W3C’s existing training program as part of the Open Media Web project funded by the European Community’s Seventh Framework programme.
This post received quite a good attention, as it is ranked amongst the five most viewed OMWeb’s articles in 2011. We also researched potential trainer candidates on the Web and once selected, we directly contacted them to find out if they would be interested in developing a course.
6 Blog post “Call for Trainers: "HTML5 for Rich Media": http://kwz.me/um
17

OMWeb - 248687
D 2.2 Training Report
4 COURSE “HTML5 AUDIO AND VIDEO”
In October 2011, we launched of a brand new W3C online training course dedicated to “HTML5 Audio and Video”. The objective of this course was to make students familiar with HTML5 audio and video capabilities so that they can use and manipulate these media types in their Web pages and applications using HTML5 rather than using today’s proprietary media Web technologies. Students were taught:
• about the current state of HTML5 audio and video • how to integrate HTML5 media into their Web pages • how to encode media to make it suitable for the Web • how to build and customize their own media players • how to integrate HTML5 media with other HTML5 elements • how to use HTML5 media in games and other richer experiences • about the integration with mobile platforms
The course lasted 5 weeks, from 17 October to 20 November 2011.
4.1 Selection of trainer While looking for a trainer, we found that Mark Boas, a UK citizen living in Italy, was giving HTML5 Audio&Video presentations to different audiences. We contacted him, and he was very interested in the training aspect. Mark Boas is a Web developer with over 12 years experience of developing sites and applications for the Web. Active in the community he speaks at international and local events and blogs when time permits. Mark divides his day between research and development and is project co-ordinator of jPlayer, the successful JavaScript media library with a growing community of over 1500 developers. Mark Boas creates projects demonstrating the potential of jPlayer and helps out on the community forum. In addition, Mark is involved with the W3C audio group. Recently Mark has been experimenting with a new and interesting technology dubbed hyperaudio. More details of Mark’s work can be found at http://happyworm.com
4.2 Course dates and price We opened the registration on 27 September 2011, for a course start date at about three weeks later. We proposed an early bird rate at 145€ and a full rate of 225€. The course ran from 17 October to 20 November 2011.
18

OMWeb - 248687
D 2.2 Training Report
4.3 Course content Using HTML5, CSS and JavaScript, students learn as they progressively build increasingly comprehensive media players and solutions. By learning about the underlying technology, the aim is that the student will understand the full potential of the media, the tools and the tricks of the trade. Armed with this sound knowledge of HTML5 audio and video and its potential, students will be able to confidently create cross-browser HTML5 based audio/video solutions. Each week ends with a practical assignment. An outline of the course material is described below. The full course material (lectures and assignments) is available online7 and in Appendix 4.
4.3.1 Week 1: Introduction to HTML5 Media We look at the back-story of media on the Web and where we are and then launch into creating our very own media player using HTML5. We’ll start with the basics and take you the various capabilities of the <audio> and <video> tags and the API, while keeping a firm grasp of the pragmatic issues that a developer will need to tackle to create cross browser solutions. Week 1 assignment: “Creating your first basic audio and video player”
4.3.2 Week 2: Tools of the trade HTML5 media must be correctly encoded to ensure maximum compatibility throughout the various target platforms. We explore the various tools and services available to encode and host our media and then delve deeper into the extensive HTML5 media API to take our player to the next level. Week 2 assignment: “Encode your own media”
4.3.3 Week 3: Media player controls We take a look at the various controls and feedback that we need to create to provide a comprehensive media player and explore the mechanisms that lie behind them. Week 3 assignment: “Add a functional progress bar to your audio and video players”
4.3.4 Week 4: Playlists One of the most desired functions for audio and sometimes video players is the ability to have playlists. Playlists allow you to order a number of pieces of media for sequential playback. Week 4 assignment: “Add a playlist to your audio player and add subtitles to your video player”
7 October 2011 HTML5 Audio/Video training course on w3techcourses.com: http://kwz.me/pr
19

OMWeb - 248687
D 2.2 Training Report
4.3.5 Week 5: Integrating Video with other HTML5 Elements One of the great advantages of HTML5 media is that it can interact with other HTML elements. Week 5 assignment: “Integrate canvas or WebGL with video, and create audio spot effects”
4.4 Course marketing We used the following channels of publication to promote the HTML5 Audio/Video online training course:
• Blog post8 on OMWeb’s Web site • W3C home page news item9 • Cordis newsletter • Mail to W3C Offices, asking them to promote the course in their own country
while localizing the marketing text • E-mail sent to subscribers to the public training mailing list10 • Twitter announcements on @w3c, @w3c_omweb and @W3Training, as well as
many personal retweets by the OMWeb team and @maboa (the trainer’s twitter account)
• Message sent out by Russ Weakley who runs a highly respected and active Web developer mailing list at webstandards.org
Note the blog post on OMWeb’s site received a lot of attention, with over 6399 views in total, from September to December 2011, with a peak in October with 4445 views. Through a feedback form, we asked participants where they first heard about the course as part of the course feedback questionnaire (see Figure 4.1 below). Over 50% of the total number of registrations came in via the dedicated mailing list and announcements on the W3C homepage.
Figure 4.1: Answers to "How did you hear about the HTML5 AV course?"
8 Blog post on OMWeb’s Web site: http://openmediaweb.eu/2011/09/27/html5-audio-video-course/ 9 W3C hp news item: http://www.w3.org/News/2011#entry-9213 10 W3C public training list: http://lists.w3.org/Archives/Public/public-mobile-training/
20

OMWeb - 248687
D 2.2 Training Report
4.5 Participant profile 53 participants enrolled in this first W3C HTML5 Audio/Video course (see the list of participants in Appendix 4). Figure 4.2 shows that 57% of the students were based in Europe and Figure 4.3 shows the repartition of students per European country. The majority of EU students were coming from UK, Germany and Belgium.
Figure 4.2: HTML5 AV students’ distribution by world region
Figure 4.3: Number of HTML5 AV students per European country
Figure 4.4 shows a great diversity of work environments for these students. Compared to other courses with different topics, we note a more equal distribution of students over all
21

OMWeb - 248687
D 2.2 Training Report
company sizes (from micro-enterprises over “standard SMEs” to big organizations). In particular, more participants came from big organizations than in other courses.
Figure 4.4: Answers to “How many employees does the organization you work for
have?”
In Figure 4.5 below, we show the profile of these students. The majority of them (68%) are Web developers and designers.
Figure 4.5: Answers to “What is your primary job position?”
4.6 Student feedback We offered a feedback form at the end of the course. Out of 53 participants, 26 students (that is 49%) took the time to fill in this evaluation form. We are detailing below some of the most interesting feedback we received. The complete feedback analysis is available in Appendix 5. To the question: “If you'd recommend the HTML5 AV course: can you say why?”, we received the following feedback (Table 4.1 below):
22

OMWeb - 248687
D 2.2 Training Report
“It's a ideal first step into HTML5 video and Audio. I must admit I already had some experience but I also learned to know new techniques and resources” “Cost-effective, good overview of the topic.” “I'd recommend the course to people that like me started as audio/video newbies.” “Gives a good grounding with plenty of pointers for further research” “Because I think it is a good start to dive into video and audio on web.” “It is concise, and the steps needed to achieve the end assignments are well layed out.” “This was immediately useful, especially in light of Adobe's announcement to discontinue efforts on mobile flash development.”
Table 4.1: Sample answers to “If you'd recommend the HTML5 AV course: can you say why?”
Figure 4.6: Answers to: “Would you recommend this HTML5 AV course to others”
Figure 4.6 shows overwhelmingly positive feedback: over 78% of the participants will recommend this HTML5 Audio and Video course. However, compared to courses with other topics, we had a higher number of respondents that were either “not sure” (16%, 4 respondents) or even disagreed (8%, 2 respondents) with recommending the course. To improve the course for the future, we carefully analyzed this feedback and addressed it with the trainer (as explained later in this Section). We asked several other questions designed to probe participants' attitudes to the course and their overall level of satisfaction. The responses are shown below as a series of pie charts (Figure 4.7). Possible answers were “strongly agree”, “agree”, “neither agree or disagree”, “disagree” and “strongly disagree”.
23

OMWeb - 248687
D 2.2 Training Report
“This course was worth your time”
“The course met my expectations”
“You learnt something that you
previously did not know”
“You will incorporate what you learnt in
your work”
Figure 4.7: Feedback measuring the overall satisfaction of the HTML5 AV course
Again, feedback was overwhelmingly positive, but there was also some minor negative feedback, which was very rare to non-existent in previous courses with other topics. To better understand where the problems were, we analyzed the answers to the feedback question: “What suggestions do you have for improving the course?”. The suggestions can be summarized as follows:
• Should provide more detailed and explanatory course material (respondents suggest “more and better prepared material”, “more detailed course material”, “more extensive course materials”)
• Make it clearer that Javascript knowledge is important and provide more information on Javascript (respondents suggest “didn’t know that much Javascript had to be used”, “point … towards JQuery … will alleviate some of the trouble”)
• “Quicker feedback”, more activity on forum We shared these comments with the trainer, and have implemented the following measures to implement these suggestions:
• More “fleshed out” course material has been produced.
24

OMWeb - 248687
D 2.2 Training Report
• The importance of Javascript will be emphasized more in the course description, and more information on use of Javascript is provided in the “fleshed out” course material.
• A second trainer will be added to the course to improve response time and forum activity.
4.7 Student work Here are some of the best students’ achievements. Figures 4.8 to 4.10 show students have successfully implemented audio progress bars, a playlist application and audio sprites. All of these examples are also available online, and the URL is given in the Figure caption.
Figure 4.8: Progress bars by Sascha Hübner (http://kwz.me/YQ)
Figure 4.9: Playlist by Carlos Solis (http://kwz.me/YR)
25

OMWeb - 248687
D 2.2 Training Report
Students embedded audio and video in the Web page of their choice (such as a “game” shown in Figure 4.9). Progress bars show “progress” of what has been buffered, preloaded or make the content “seekable”. Finally, a playlist helps to select the audio file that plays along the video clip.
Figure 4.10: Video/Canvas and Audio Sprites, by Sandra Vilaro (http://kwz.me/YZ)
Audio sprites are combined audio files on which an audio API is used to play only selected parts of the audio track. The students implemented a capability for "listening" and stopping when one audio should be halted, then seeking through the file and playing another part of it.
4.8 Success rate and certificate of completion 27 students successfully passed all the HTML5 Audio and Video course assignments. This represents a success rate of 51%. We sent certificates of completion to these students. A sample of the certificate design is shown in Figure 4.11 below.
26

OMWeb - 248687
D 2.2 Training Report
Figure 4.11: Certificate of completion for the HTML5 AV course
27

OMWeb - 248687
D 2.2 Training Report
5 COURSE “GAME DEVELOPMENT IN HTML5”
This new W3C online training course dedicated to “Game development in HTML5” was announced on 6 October 2011. The objective of this course was to have students use open Web technologies such as HTML5, CSS3 & JavaScript to create browser based multiplayer games. The course lasted 4 weeks, from 30 October to 27 November 2011.
5.1 Selection of trainer When we were researching HTML5 trainers, we noticed that there were a lot of HTML5 games communities with people passionate about the topic. We contacted the organizer of the 1st HTML5 games conference, “onGameStart” that took place end of September 2011 in Varsaw. Michal Budzynski is a young polish Web developer who frequently gave tutorials and presentations on HTML5 games at conferences and events. He happily accepted our offer to teach methods, tips and tricks of building Web games using HTML5. Michal’s short biography is: Michal is a JavaScript developer from Poland with strong game development background, currently working for GG Network (owner of Gadu-Gadu, the biggest Polish instant messaging client). He has created one of the most popular Canvas HTML5 game tutorials – html5gametutorial.mibbu.eu. He recently organized onGameStart, the first HTML5 games event, in his home country Poland. Michal is also creator of the first PhoneGap implementation for Samsung Bada system. As a Javascript trainer he ran technical workshops in many countries such as France, Bulgaria, Poland, Italy or Brazil.
5.2 Course dates and price We opened the registration on 6 October 2011, for a course start date about three weeks later. Because the topic is both relevant and attractive, we proposed a higher pricing scheme than usual, with an early bird rate at 145€ and a full rate at 225€ for a four week course. The course ran from 30 October to 27 November 2011.
5.3 Course content The pre-requisites are basic knowledge of HTML, JavaScript & CSS. During the course, participants learn how to use Open Web Technologies such as JavaScript, CSS3 & HTML5 to create browser based multiplayer games. Different methods of real-time animation, implementing a game loop, the structure of the code or communication between the players are discussed and compared. The logic of the games is based on an engine that was written for the occasion. This game engine is able to animate sprites, detect collisions, and add basic physics to the game characters and much
28

OMWeb - 248687
D 2.2 Training Report
more. Finally, participants learn how to run their game as a desktop application outside the browser on MacOSX, Linux & Windows, or as a native application on your mobile device. Each week ended with a practical assignment. An outline of the course material is provided below. The full course material (lectures and assignments) is available online11 and in Appendix 7.
5.3.1 Week 1: Introduction to HTML5/JavaScript game development We will give a quick refresher of the basics of JavaScript & HTML5, learn how to manipulate the Document Object Model and how to draw using the canvas element. We will discuss different methods of implementing a game loop and user controls. A history of JavaScript games will also be presented. Week 1 assignment: “Create single object on a scene and control it using mouse or/and keyboard.”
5.3.2 Week 2: Let’s make it move! We will discuss different methods of sprite animation using HTML5 and recall information about basics of physics from high school. We will also learn how to detect collisions between objects. Week 2 assignment: “Create animated character that could jump on the platforms on the scene.”
5.3.3 Week 3: Connecting with other players We will present methods for connecting players. Then, we will check if it is possible to connect two browsers without worrying about server side scripts. We will also learn how to implement multiplayer gameplay in our games. Week 3 assignment: “Add multiplayer support to your game.”
5.3.4 Week 4: Deploying your game Last but not least – we will explore the power of JavaScript, CSS3 & HTML5 outside the desktop browser. We will add native features of your mobile phone like accelerometer or vibrations and how to “package” your game so you can publish it in app stores. Week 4 assignement: “Create a package with your game for mobile devices using described frameworks or publish it as a desktop application for different operating systems.”
5.4 Course marketing We used the main following channels of communication to promote this new course:
• OMWeb Web site post12 • W3C home page news item13
11 HTML5 Games online training course on w3techcourses.com: http://kwz.me/pf 12 OMWeb Web site post: http://openmediaweb.eu/2011/10/06/html5-games-course/
29

OMWeb - 248687
D 2.2 Training Report
• Cordis newsletter • Mail to W3C Offices • Twitter messages from @w3c, @w3c_omweb, @W3Training, @michalbe (the
trainer), and personal retweets were done by OMWeb staff Note that on OMWeb’s Web site, the busiest day of the year was October 10th with 953 views where the most popular post that day was “New training course on Game development in HTML5”. This blog post was viewed 7300 times in total, from October to December 2011, with 5536 views just for the month of October. In Figure 5.1 below, we note that the use of twitter was the most effective way to attract the attention of students for this particular course.
Figure 5.1: Answers to “How did you hear about this HTML5 Games course?”
5.5 Participant profile We targeted both Web developers interested in creating games and game developers who want to create games for Web browsers. 88 participants enrolled in this first W3C HTML5 Games course. Appendix 9 gives the participants’ list. Figure 5.2 shows that 64% of the students were based in Europe.
Figure 5.2: HTML5 Games students’ distribution by world region
13 W3C home page news item: http://www.w3.org/News/2011#entry-9225
30

OMWeb - 248687
D 2.2 Training Report
The majority of EU students came from Spain, The Netherlands, Germany, France, UK and Austria. For this course, we had participants coming from many more different European countries than for other courses. Also, this W3C course for the first time attracted students from Eastern European countries, such as Poland, Romania, Russia and Bulgaria (as shown in Figure 5.3).
Figure 5.3: Number of HTML5 Games students per European country
We also asked questions related to the students’ professional profile (see Figures 5.4 and 5.5). There is a strong “Web developer” profile for 88% of the participants and the majority of them are working for SMEs.
31

OMWeb - 248687
D 2.2 Training Report
Figure 5.4: Answers to “What is your primary job position?”
Figure 5.5: Answers to “How many employees does the organization you work for
have?”
5.6 Student feedback We offered a feedback form at the end of the course. The complete feedback results are available in Appendix 8. In this Section, we will summarize some of the most interesting feedback we received. On the question “What did you like best about this HTML5 Games course?”, we received the following very positive feedback (Table 5.1 below):
“It's very useful to learn new technologies of HTML5” “Challenging, tutor showed inside knowledge, and puts you in touch with a lot of people with similar goals who can help you.” “Concerned with up-to-date and future technology, cross platform
32

OMWeb - 248687
D 2.2 Training Report
techniques, interesting subject matter (games).” “Lots of new things to learn, covered a good range of topics.” “Multiplayer for sure. That's was the most interesting because it was completely new for me.” “The thing i like the most was the objectivity of the lessons…” “To get a succinct overview of the core concepts of game development in a HTML5 environment.” “The content is good and updated. Also it is really nice way of finding people with the same interests. The forum provided nice discussions with good extra content.” “I liked the course, because for me the "pressure" for having to upload the assignments in time have forced me to finally get to develop some advances in the html5 game scene.” “Interesting and fun subject. I learnt a lot, and tried out things I have been wanting to try for a long time, but never got around to.”
Table 5.1: Sample answers to “What did you like best about this HTML5 Games course?”
Figure 5.6: Answers to “Would you recommend this HTML5 Games course to
others?”
Over 50% of the respondents would recommend this course to others (Figure 5.6 above). However, a good portion of the respondents was not really sure about recommending it, and 12% felt they would not recommend it.
33

OMWeb - 248687
D 2.2 Training Report
“This course was worth my time”
“The course met my expectations”
“You learnt something that you previously
did not know”
“You will incorporate what you learnt
in your work”
Figure 5.7: Feedback measuring the overall satisfaction of the HTML5 Games course
Figure 5.7 shows overall level of satisfaction with the course as a series of pie charts. Possible answers were “strongly agree”, “agree”, “neither agree or disagree”, “disagree” and “strongly disagree”. Overall, feedback was less positive than for other courses with different topics. Note, however, that the feedback’s tone was impacted by the fact that the trainer fell sick near the end of the course and was unable to take care of the course (respond to students, correct assignments, etc.) during this time. Many feedback comments came in before the trainer became available again, so should be taken with a grain of salt. To better understand the nature of the problems, we analyzed the answers to the feedback question: “What suggestions do you have for improving the course?”. The suggestions can be summarized as follows:
• Faster and weekly corrections of assignments • Improved presentation of code (downloadable samples, downloadable working
solutions) • Improve quality of writing (the teacher was a non-native English speaker) • Add more material to the course
34

OMWeb - 248687
D 2.2 Training Report
5.7 Student work Students were able to achieve quite impressive results at the end of this HTML5 Games course. In this Section, we provide examples of the final assignments that were mostly targeting mobile devices. To quickly get an impression of student work, a somewhat more rudimentary desktop PC game from an earlier week is available at http://isistv.ro/58bOEdHG/A4/ Students either used the example given in the course (Figure 5.8) or imagined and created their own games (Figures 5.9 to 5.11). All examples are available online, and the URL is given in the figure caption.
Figure 5.8: HTML5 game by Per Quested Aronsson (http://kwz.me/BS)
The game in Figure 5.8 shows a game that runs on mobile phones. To play, hit a red dot to make it pop, and move the player by either tilting the phone or taping on the screen”.
35

OMWeb - 248687
D 2.2 Training Report
Figure 5.9: A multi platform game, by Israel Pastrana (zip file at http://kwz.me/BK)
Figures 5.9 and 5.10 shows HTML5 games that can be uploaded onto the Apple App store and run on iPhones. The student implemented a multi-player game. Every player is allowed to control his or her own object. The game characters are able to jump and to walk left or right. The student also implemented simple collision detection mechanism among either objects or “players”.
Figure 5.10: Multiplayer Mario, by Ho Sun Howard Kwong (zip file at
http://kwz.me/B4)
Figure 5.11 shows a recreation of the famous “Pacman” game, again uploadable on the Apple AppStore.
36

OMWeb - 248687
D 2.2 Training Report
Figure 5.11: Multiplayer Packman, Wolfgang Litzlbauer (zip file at
http://kwz.me/B0)
5.8 Success rate and certificate of completion 39 students succeeded in passing all the HTML5 games course assignments. That represents a 44,3% success rate. A certificate of completion (see sample in Figure 5.12 below) was sent to these 39 students.
37

OMWeb - 248687
D 2.2 Training Report
Figure 5.12: HTML5 Games certificate of completion
38

OMWeb - 248687
D 2.2 Training Report
6 SUMMARY AND OUTLOOK In summary, the OMWeb project created three new W3C online training courses:
1. “Introduction to SVG” –held twice, in October 2010 and January 2011 2. “HTML5 Audio and video”, held in October 2011 3. “Game development with HTML5”, held in October 2011
Within its two year project duration, OMWeb trained a total of 288 individuals, many of which demonstrated their newly acquired skills impressively in their final coursework. In the near future, we are looking at running other editions of specific HTML5 courses in order to train even more European Web developers. These continue to be of high interest to the Web community at large, since HTML5 is now widely adopted and implemented by many industries (mobile, gaming, audiovisual, Web design, etc.). To better help us promote these networked media online courses and associate them with a strong identity, we launched the W3DevCampus portal in December 2011. All W3C online training courses, including the HTML5 Audio Video and the HTML5 Games courses, will be advertised on this new platform in the future.
39

OMWeb - 248687
D 2.2 Training Report
APPENDIX 1: COURSE MATERIAL – “INTRODUCTION TO SVG” (JAN. 2011)
40

Introduction to SVG January 2011 (http://www.w3techcourses.com/course/report/log/index.php?chooselog=1&user=0&date=0&
id=4&modid=67) ◀ Jump to... ▶
W3C (http://www.w3techcourses.com/) ▶ SVG_Jan11 (http://www.w3techcourses.com/course/view.php?id=4) ▶ Resources (http://www.w3techcourses.com/mod/resource/index.php?id=4) ▶ Week 1 material in a Single File
Update this Resource
Introduction
To begin, make sure you've read the Hitchhiker's Guide (http://www.w3.org/2010/09/hhguide.php)from the pre-course notes. Next, read through Chapter One of the SVG Primer(http://www.w3.org/Graphics/SVG/IG/resources/svgprimer.html) . This should give a general sense ofwhat SVG is. We'll be referring to this document as we go through the course but it's just that, adocument. The training environment here is much more interactive and you'll learn more skills,more quickly and more comprehensively, than you would by just reading through the primer.
An issue of concern to all Web developers is the state of support for SVG among the variousbrowsers. See the brief synopsis (http://www.w3.org/2010/09/svg_browser.php) for information onthis. Knowing what cell phones it runs in is a difficult thing to keep track of though I'd certainlywelcome a collaborative effort from students that we could share with others about what you'vefound out about SVG support in various mobile devices. For now I know that the iPhonecertainly supports much of SVG (through Safari) and any cell phone running the Opera browserhas good SVG support. For authoring SVG, though, we'll assume that you have access to acomputer with an editor and a browser.
Authoring environments
In the most primitive case, one can use Notepad for Windows, vi for Linux and something likeTeachText for Mac. They work, albeit with few bells or whistles. Take a look also at Commentson authoring environments (http://www.w3.org/Graphics/SVG/IG/wiki/Authoring_tools_and_editors)for more. If you happen to find an environment you are very happy with, please share yourexperience with the discussion forum. (http://www.w3techcourses.com/mod/forum/view.php?id=58)
Now, armed with a reasonable text editor and a browser, open up Chapter 2 of the SVG Primer(http://www.w3.org/Graphics/SVG/IG/resources/svgprimer.html#SVG_Basics) and get started makingsome SVG! The following lecture will guide you through pretty much all of the topics in thechapter except for <path> which is a bit more complex. Specifically we'll learn about <line>,<circle>, <ellipse>, <rect>, <text>, and <image>.
<line>
The <line> object draws a line between two specified points: (x1,y1) and (x2,y2). In order to seethe line, it must have a stroke (i.e., a color).
41

The code <line x1="10" y1="10" x2="100" y2="100"> draws an invisible line in mostbrowsers, while in ASV+Internet Explorer, a faint hint of a grey line might be seen (which,curiously, does not expand in size when we zoom in on it).
Hence, a sort of minimal line consists of code such as the following:
<line x1="5" y1="5" stroke="red" x2="90" y2="90" />
Another attribute known as "stroke-width" controls the thickness of the line and, by default, isassigned a value of 1.
The stroke and stroke-width attributes as well as the starting and ending points are varied in thefollowing illustration:
SVG code Illustration<line x1="5" y1="10" x2="99" y2="30" stroke-width=".5"
stroke="red"/>
<line x1="5" y1="30" x2="99" y2="50" stroke-width="1"
stroke="red"/>
<line x1="5" y1="50" x2="99" y2="70" stroke-width="2.5"
stroke="red"/>
<line x1="5" y1="70" x2="99" y2="90" stroke-width="4"
stroke="blue"/>The effect of varying stroke widths
A number of other attributes exist for lines, two of which: the stroke-dasharray and the stroke-linecapare worth mentioning in this treatment.
SVG code Illustration<line x1="15" y1="15" x2="140" y2="135" stroke-width="25"
stroke="blue" stroke-linecap="round"/>
<line x1="15" y1="15" x2="140" y2="135" stroke-width="25"
stroke="aqua" stroke-dasharray="8,3,2,18"/>
<line x1="15" y1="155" x2="160" y2="60" stroke-width="25"
stroke="blue"/>
<line x1="15" y1="155" x2="160" y2="60" stroke-width="25"
stroke="orange" stroke-dasharray="8,3,2"/>The effect of other attributes on line elements
The stroke-dasharray gives a flexible way of making dashed lines, shape borders, and paths. In theabove illustration, we have made two pairs each consisting of two identical lines (except for thestroke and its dasharray) one on top of the other. The top line of each pair has had its stroke-dasharrayapplied which takes a sequence of numeric values S=(v1,v2,v3,...,vn) and turns thestroke on and off: on for the first value v1 pixels along the length of the line; off for the next v2pixels and so forth. If the sum of the values vi in S is less than the length of the line, then the
42

values are repeated again as needed. In the case of the first line, the value of stroke-dasharray="8,3,2,18" has an even number of values so the blue and aqua colored bands repeataqua 8 pixels, clear 3 pixels, aqua 2 pixels and clear 18 pixels, starting over again with 8 morepixels of aqua. Since the underlying but identically shaped line is blue, the blue of the underlyingline is what shows. In the case of the second line, the value of stroke-dasharray="8,3,2" has anodd number of values so the repeating sequence goes like this:
(8 orange, 3 clear, 2 orange, 8 clear, 3 orange, 2 clear, ...).
The first of the two pairs of lines has two lines; both use stroke-linecap, having stroke-linecap="round". This makes the end of the line rounded instead of flat, as in the second examplewhich uses the default or flat value of stroke-linecap.
Another useful aspect of lines involves the <marker> tag which can be used to define arrow orother shapes appropriate for attaching to the beginning or ends of lines. The W3C gives a clearexample (http://www.w3.org/Graphics/SVG/IG/resources/svgprimer.html#footnote7sym) for those sointerested, though it is a bit verbose for our treatment here. Another example can be seen athttp://srufaculty.sru.edu/david.dailey/svg/newstuff/simpleshapes.svg (http://srufaculty.sru.edu/david.dailey/svg/newstuff/simpleshapes.svg) .
Lines and Images
Let's get started with a line.
From Chapter 2 we see that the following code creates a line:
<line x1="5" y1="5" stroke="red" x2="90" y2="90" />
Let's wrap it inside the minimal SVG markup (required to make it appear in most viewers,namely browsers and mobile devices):
<svg xmlns="http://www.w3.org/2000/svg" ><line x1="5" y1="5" stroke="red" x2="90" y2="90" /></svg>
Next, we should be able to save the file (with a .svg file extension), as say, simpleRedLine.svg.
Pointing any of the web browsers (IE/ASV, FF, Opera, Safari, or Chrome) at that file should showa diagonal red line running from upper left to lower right.
43

Picture of the file simpleRedLine.svgshown in Firefox.
This week's assignment comes in multiple parts - now would be a good time to do part 1(http://www.w3techcourses.com/mod/assignment/view.php?id=63) !
Now let us play with some of those attributes inside the line tag:
<line x1="50" y1="10" stroke="#880088" x2="290" y2="90" stroke-width="20" stroke-linecap="round"/>
Here's what it should look like:
Picture of the fileroundedPurpleLine.svg shown in
Opera.
Additional aspects of the line should be studied in Chapter 2, since things like dash-array andstroke-width are attributes that will appear in many of the basic SVG objects we see throughoutthe language. With that in mind, now would be a really good time to do part 2 of the assignment(http://www.w3techcourses.com/mod/assignment/view.php?id=63) .
<image>
We now turn to the <image> tag, which is quite like the <img> tag in HTML. As we do, we arelikely to be reminded of the importance, for accessibility, of the "alt" attribute in HTML <img>.
44

This brings up the larger issue of accessibility in SVG (http://www.w3techcourses.com/mod/resource/view.php?id=65) .
You will probably be able to use most of the other drawing primitives without much difficulty,but the <image> tag deserves special attention, so let's look into it a bit. Like the <img> tag inHTML, <image> in SVG refers to an external image file which might be, typically, in .jpg, .png, .gif,or .svg format. [The specification requires support only for PNG and JPG, though, in practice, allbrowsers seem to support GIF as well.] That file exists outside the SVG document itself and caneither be referenced through a "relative" path (a filename, typically within the same directory asthe SVG document itself) or an "absolute" path (typically a URL pointing to a file on theInternet). The oddity is that the reference to the external file requires slightly odd syntax (recallthat SVG is XML) and uses an attribute that looks like:
xlink:href="fireenginefromWebsters1911.gif"
To make matters even odder, the mere use of this external reference is enough (in mostbrowsers) to require more of what some might consider to be mystical incantations in the <svg>tag itself:
<svg xmlns="http://www.w3.org/2000/svg" xmlns:xlink="http://www.w3.org/1999/xlink" >
Wrapping together, the xlink namespace declaration in the SVG tag, the xlink:href inside the<image> tag itself, some presentation attributes for the <image> tag, and a <title> and <desc> toaid accessibility, we have something like the following:
<svg xmlns="http://www.w3.org/2000/svg" xmlns:xlink="http://www.w3.org/1999/xlink" ><title>Illustration of the use of SVG image tag</title><desc>An engraving of a fire engine taken from the 1911 Webster's Dictionary</desc><image x="15%" width="30%" y="15%" height="30%"xlink:href="fireenginefromWebsters1911.gif" /></svg>
The use of percentages in this example is worth explaining: the image's left edge will bepositioned 15% of the way from the left side of the viewing window to the right side, and theimage will have width defined as 30% of the width of the viewing window. The above file will berendered as follows:
45

SVG document with image tag shown in Internet Explorerwith ASV plugin
This may seem like an awfully convoluted way of adding an image to a Web page. But that'sbecause we haven't started adding further graphics on top yet!
We'll do that in the next lecture.
Adding in More Shapes
We're going to pick up where we left off in the previous lecture. You'll recall that we had usedXLink to include an image within an SVG document. Now let's take several steps at once and usethe <rect> , <circle> , <ellipse> , and <image> elements to create a small collage that lookssomething like the file depicted here in the Chrome and Opera browsers (with different windowsizes).
46

Collage involving <rect>, <circle>, <ellipse>, and <image> as seen in Chrome (left) and Opera (right)
First, it is important to note that all of the content seems to be "centered" on the web page, andthat this seems to be true regardless of the dimensions of the browser window. This should be ahint that numeric values of positioning attributes are probably laid out using relative coordinates(like 50%) rather than absolute values (like 500px).
Second, as discussed in the Primer, SVG lays content down into the web page with things definedlater being added physically on top of (that is, in front of) content that was defined earlier. Thatbeing said, there is an apparent "stacking order" in which the purple oval looks to be atop thelight blue rectangle which is, in turn, above, the orange circle that, itself is in front of the pictureof the fire engine. In such a document (in which the stacking order can be uniquely determinedafter the image has been drawn), we can determine the order in which to build our graphicalelements: <image>, <circle>, <rect> and then <ellipse> in that order. So let us begin in thatorder.
We'll begin with a generic template that includes the <svg> tag and the namespace declarationsto make the content work across browsers that require them. Let's also include a <title> tagthat gives people who might read the source code as well as search engines an idea of what weare up to:
<svg xmlns="http://www.w3.org/2000/svg" xmlns:xlink="http://www.w3.org/1999/xlink" ><title>Collage involving rect, circle, ellipse, and image tags </title></svg>
Next, lets try an image tag pointing to our public domain engraving of a fire engine:
47

<image x="15%" width="70%" y="30%" height="15%"xlink:href="fireenginefromWebsters1911.gif" />
We might play with values of the placement attributes of "x", "y", "height" and "width" a bit untilthe image seems to occupy the right position on the page, but estimating those values exactlywith the eye is likely to be a frustrating activity. Let us just try to aim the picture in what lookslike a similar position. As soon as we open the document in any browser other than IE/ASVthough we find that our intention to make the height and width stretched in a this particular wayhas been overridden. This is because, by default, most browsers assume the aspect ratio of animage to be confined by the intrinsic size of the image (given by its height and width informationin the format of the actual file). To accomplish the desired stretching, then, we must add a flag tooverride the browser's wish to override our desire:
<image x="15%" width="70%" y="30%" height="15%"xlink:href="fireenginefromWebsters1911.gif"preserveAspectRatio="none"/>
Next, let us consider the orange circle overlaid atop the image. It may or may not appear to be acircle. It well might be an ellipse with values of rx and ry that are numerically close. It so turnsout though, that the above circle, actually was drawn by a <circle> tag. Since the Opera andChrome variants show that the size of the circle seems to expand with the size of the window,again we will gravitate toward values expressed as a percentage of the viewing window.
<circle cx="50%" cy="50%" r="25%" />
The above code would make a black circle of about the desired size.
Now, how might we make the interior of the circle transparent? Actually there are two ways, butthe simplest would be to use a value of "none" on the fill attribute as follows:
<circle cx="50%" cy="50%" r="25%" fill="none" stroke="#e60" stroke-width="25">
In order to make the circle visible, we had to define a stroke and a stroke-width, since otherwisenothing would be guaranteed to show up.
Turning our attention to the rectangle, we try something like:
<rect x="10%" width="80%" y="50%" height="10%" fill="aqua" stroke="black" stroke-width="6"/>
This seems to work fairly well, though the color might need a bit of adjustment (appearing a mitetoo dark), and the dashed line around the border is missing. The Primer's discussion ofdash-array in the section pertaining to <line> is relevant however.
<rect x="10%" width="80%" y="50%" height="10%" fill="#8ff"stroke-dasharray="4" stroke="black" stroke-width="6" />
The dash-array attribute specifies, in this particular case, that the border will be turned on andthen off again every four pixels.
Just to recap, we now have a document that looks like this:
48

<svg xmlns="http://www.w3.org/2000/svg"xmlns:xlink="http://www.w3.org/1999/xlink" ><title>Collage involving rect, circle, ellipse, and image tags </title><desc>image is an engraving of a fire engine taken from the 1911 Webster's Dictionary</desc><image x="15%" width="70%" y="30%" height="15%"xlink:href="fireenginefromWebsters1911.gif" preserveAspectRatio="none"/><circle cx="50%" cy="50%" r="25%" fill="none" stroke="#e60" stroke-width="25"/><rect x="10%" width="80%" y="50%" height="10%" fill="#8ff" stroke-dasharray="4"stroke="black" stroke-width="6" /></svg>
And it renders like this:
Collage before oval
Just one more tag remains to be developed, and I've provided an effect that has not yet beenintroduced in the book: transparency (referred to in the SVG spec as opacity, which is,unsurprisingly, the opposite of transparency).
We may, easily enough, create an oval atop all the other things, and centered at the center of thepage, thusly:
<ellipse cx="50%" cy="50%" rx="10%" ry="40%" fill="yellow" stroke="purple" stroke-width="15"/>
But while we know that we may either fill the interior with a color (hence making the ovalopaque) or set fill="none" making it completely transparent, we clearly (pardon the pun), wehave an interest in doing something in between. It turns out that for many objects (such as<circle> <ellipse> <rect> and <path>), we may adjust the opacity as follows:
opacity=".5"
We may use values of opacity from 0 (representing transparency) to 1 (representing opacity) orany number in between. This suggests that we try something like:
49

<ellipse cx="50%" cy="50%" rx="10%" ry="40%" fill="yellow" opacity=".45" stroke="purple"stroke-width="15" />
This is close to what we want, however, if you actually try it, you'll find the picture looks like this:
collage with transparent oval
This is not quite what we wanted since the border of the new ellipse is also partly transparent.We want just the interior to be partly transparent.
It so turns out, that in SVG, we may independently vary the fill-opacity and the stroke-opacity. Ifwe want the entire object to have a certain amount of transparency, then we use the opacityattribute, Otherwise, we use fill-opacity and stroke-opacity independently.
<ellipse cx="50%" cy="50%" rx="10%" ry="40%" fill="yellow" fill-opacity=".45"stroke="purple" stroke-width="15" />
In the above code we may assume a default value of stroke-opacity="1".
The final code for our reverse-engineering of this simple collage looks like this:
<svg xmlns="http://www.w3.org/2000/svg" xmlns:xlink="http://www.w3.org/1999/xlink" ><title>Collage involving <rect> , <circle> , <ellipse> , and <image> </title><desc>image is an engraving of a fire engine taken from the 1911 Webster's Dictionary</desc><image x="15%" width="70%" y="30%" height="15%"xlink:href="fireenginefromWebsters1911.gif" preserveAspectRatio="none"/><circle cx="50%" cy="50%" r="25%" fill="none" stroke="#e60" stroke-width="25"/><rect x="10%" width="80%" y="50%" height="10%" fill="#8ff" stroke-dasharray="4"
50

stroke="black" stroke-width="6" /><ellipse cx="50%" cy="50%" rx="10%" ry="40%" fill="yellow" opacity=".45" stroke="purple"stroke-width="15" /></svg>
The rendered SVG can be seen here:
I'd like to cover one more SVG element before closing the week's material: text. That's thesubject of the week's final (short) lecture.
<text>
Putting text on a page is a natural thing to do. Future versions of SVG are likely to offer morepossibilities than we have at the moment and browser support for text seems to be poised forimprovement. Right now one should be aware that there are some problems associated with theappearance of text across browsers.
Nevertheless a few simpler things may be done reliably, simply and consistently. Here's a sort ofsimplest case:
SVG code Illustration
<text x="0" y="100"
font-size="80" fill="red">
Doing text</text>
Layout and size of text
This example can be seen at http://srufaculty.sru.edu/david.dailey/svg/newstuff/text2.svg (http://srufaculty.sru.edu/david.dailey/svg/newstuff/text2.svg) .
51

The dimensions of the text (obtained by using the method getBBox(), discussed in laterchapters) varies a bit between browsers as shown in table 2 below. Interestingly, similardifferences remain in effect even when font-family="monospace" is specified (which wasunsupported in FF1.5).
BrowserLeft Top BottomRightASV+IE 6.15 42.72115.79 359.48FF1.5 6 42 117 358
Opera 9 -0.14 28.47118.53 337.37Table 2: Results returned bydifferent browsers for the
getBBox() function
Similar results would be observed for HTML since a fundamental premise of the web has beenthat font support and layout is a choice left to the browser software.
The W3C SVG specification reveals that SVG fonts should be equivalent to those of CSS-2, but itmay be important to specify generic font families (specifically serif, sans-serif, cursive, fantasy ormonospace) to increase the probability that your visitors' browsers can see them. Even so, as thefollowing illustrates, current browser support for font-families is lagging behind the specifications.
Appearance of fonts in different browsers: ASV+IE, FF1.5 and Opera 9respectively
The specification also provides dozens of other ways of controlling the appearance of text, someof which have been implemented in existing browsers. Below is a sampling of some effects thatare possible in at least some browsers already:
52

Styling and decoration of text
This example may be seen at http://srufaculty.sru.edu/david.dailey/svg/newstuff/text6.svg (http://srufaculty.sru.edu
/david.dailey/svg/newstuff/text6.svg) .
As of Spring 2009 all five of the primary browsers now support text effects such as shownbelow.
SVG code<defs>
<path id="curve" d="M 10 100 C 200 30 300 250 350 50"
stroke="black" fill="none" stroke-width="5" />
</defs>
<text id="T" style="font-family:ariel;font-size:16">
<textPath xlink:href="curve">Hello, here is some text lying along a
bezier curve.</textPath>
</text>Text along a Bézier curve
The path above is defined inside a <defs> tag which serves to define the path but withoutrendering it. Various flags exist which adjust the positioning of the text along the path, many ofwhich seem not yet to be supported by browsers. One exception is the startOffsetattribute ofthe <textPath> which provides a distance in pixels from the beginning of the curve, where thetext will actually begin. When animated with SMIL (see Chapter 4), this attribute makes the textappear to crawl along the curve with speed determined by the SMIL.
The rate at which browser improvement is bringing new features forward would render quiteout-of-date any attempt to state a list of currently supported features, but suffice it to say, thereare major browser differences here at the current time.
Text in SVG
This topic could be treated in more depth than we will attempt here. This is partly because textin SVG is not rendered exactly the same way in different browsers so the resulting size cannotbe predicted. The browsers aren't to blame for this — it's as much due to the fact that differentversions of the SVG specification handle text differently. Work is being undertaken by both theSVG and HTML Working Groups to increase interoperability within HTML 5. This means thatsome of the limitations of SVG 1.1, when it comes to handling flowing text (as into a rectangle)are in the process of being overcome. However, the current status of that progress is markedlydifferent in different browsers and appears likely to remain so for quite some time. We'll justlimit our remarks, then to the <text> tag, making quick mention of the fact that <textArea> ,contentEdittable, <foreignObject>, CSS3, and HTML5 all show some promise for making SVG'shandling of text more sophisticated. At the other extreme, SVG has the ability to define one'sown vector fonts and glyphs with remarkably flexible content that outstrips many of the other
53

technologies for higher end text-handling issues.
Here's the simplest case:
<text x="100" y="50">Hello World!</text>
Unfortunately, here's what it looks like in several browsers:
SVG text tag shown in Opera, Chrome, Firefox andIE/ASV
Note that of the four browsers depicted, only Opera and Chrome have identical (pixel-perfectagreement) on the rendering of this simple tag (as placed in the generic context of the <svg> tagas we've been using it above). In the discussion of Chapter 2, one can see that as of the time ofthose experiments with text (which admittedly was a few years ago), radical differences existedbetween how text looked in different browsers, even when the font-size, the units, and thefont-family were all specified. The situation has improved a bit today, as can be seen in thisexample in which less variation is left to chance by the mark-up:
<svg xmlns="http://www.w3.org/2000/svg"xmlns:xlink="http://www.w3.org/1999/xlink" ><title>example using the text tag</title><text x="20px" y="55px" font-family="Verdana" font-size="43pt">Hello World!</text></svg>
This renders in different browsers as shown below.
54

Text with font-family and font-size specified in four browsers
I've written some further notes on this topic (http://www.w3techcourses.com/mod/resource/view.php?id=66) of browser differences for text display.
Generally, to ensure cross-browser consistency in the appearance of text, the followingsuggestions are made:
specify the font-size in actual pt units;1.specify a font-family known to be supported across browsers (garamond and verdanaseem to work fairly well);
2.
use specified metrics for the x and y values (like px for pixels);3.specify the dimensions of the viewBox (a topic covered in later weeks in this class).4.
And with that, it's time to complete this week's assignment (http://www.w3techcourses.com/mod/assignment/view.php?id=63) .
Additional resources for learning about SVG
Planet SVG (http://www.planetsvg.com/) This site has lots of good information about SVGauthoring.SVG (http://www.w3.org/Graphics/SVG/IG/) Interest Group (http://www.w3.org/Graphics/SVG/IG/) -- This is a W3C chartered group of enthusiasts interested in helping the spec togrow. Please join!SVG developers (http://tech.groups.yahoo.com/group/svg-developers/) -- a yahoo discusssiongroup. If someone doesn't know the answer to your question, then try asking it again in a
55

week or two.Other Sites for Learning about SVG (http://srufaculty.sru.edu/david.dailey/svg/SVGlinks.htm) -- Iput this list together a couple of years ago, so some links may be stale.Note on accessibility in SVG (http://www.w3techcourses.com/mod/resource/view.php?id=65) .Additional notes on <text> in SVG (http://www.w3techcourses.com/mod/resource/view.php?id=66) .
Note on accessibility in SVG
In discussing the <image> tag, which is quite like the <img> tag in HTML, we are likely to bereminded of the importance, for accessibility reasons, of the "alt" attribute in HTML <img>. Thisbrings up the larger issue of accessibility in SVG. It should be noted that the mere fact that SVGis XML, the content is already far more accessible than other image formats like JPEG, BMP, orPNG. But there is more that can and should be done within SVG documents. The followingpublications of the W3C are definitive:
Accessibilty Features of SVG (http://www.w3.org/TR/SVG-access/) (2000); andSVG Content Accessibility Guidelines (http://www.w3.org/TR/SVG/access.html#SVGAccessibilityGuidelines) (2010)Title and desc elements (http://www.w3.org/TR/SVGTiny12/struct.html#TitleAndDescriptionElements) (2008)
We can glean from those documents that the use by authors of <title> and <desc> tags can bevery important for increasing accessibility. Accordingly, the source code of many of theseexamples will contain additional markup that may not be exposed here for brevity and readabilityof the basic text. This does not, however, de-emphasize the importance of their use in actual SVGcontent. From the second reference:
title
Provides a human-readable title for the element that contains it. The title element maybe rendered by a graphical user agent as a tooltip. It may be rendered as speech by aspeech synthesizer.
desc
Provides a longer more complete description of an element that contains it. Authorsshould provide descriptions for complex or other content that has functional meaning.
Here is a simple example of how these might be used at the beginning of an SVG document.They may also be used with other elements within the document, and <image> would be a placethat might seem most appropriate given the nature of the material being referenced.
<svg xmlns="http://www.w3.org/2000/svg" xmlns:xlink="http://www.w3.org/1999/xlink" ><title>Illustration of the use of SVG image tag</title><desc>An engraving of a fire engine taken from the 1911 Webster's Dictionary</desc><image x="15%" width="30%" y="15%" height="30%"xlink:href="fireenginefromWebsters1911.gif" /></svg>
56

Additional notes on <text> in browsers
By taking Calculation of differences into Adobe Photoshop we may overlay each of theserenderings and compare on a pixel by pixel basis by pasting each atop the other using a"difference" calculation on the layers. The results can be visualized here, with identical renderingsshowing uniform blackness.
Visual depiction of browser differences in rendering of text
Note that in this case Chrome and Firefox have identical renderings with Opera least similar tothe other three browsers. The outcome of such experiments is predicted to vary as a functionof the font-family chosen.
It should be added that even when we specify the height and width of the <svg> element as wellas the viewBox and the preserveAspectRatio attributes, these browser differences still seem topersist.
Last modified: Sunday, 9 January 2011, 11:45 AM
Moodle Docs for this page (http://docs.moodle.org/en/mod/resource/view)
You are logged in as Marie-Claire Forgue (http://www.w3techcourses.com/user/view.php?id=476&course=4) (Logout(http://www.w3techcourses.com/login/logout.php?sesskey=nhnMD1zn5S) )
SVG_Jan11 (http://www.w3techcourses.com/course/view.php?id=4)
57

Introduction to SVG January 2011 (http://www.w3techcourses.com/course/report/log/index.php?chooselog=1&user=0&date=0&
id=4&modid=63) ◀ Jump to... ▶
W3C (http://www.w3techcourses.com/) ▶ SVG_Jan11 (http://www.w3techcourses.com/course/view.php?id=4) ▶ Assignments (http://www.w3techcourses.com/mod/assignment/index.php?id=4) ▶ Week 1 Assignment: Creating SVG (http://www.w3techcourses.com/mod/assignment/view.php?id=63) ▶ View submitted assignments
Update this Assignment
View 45 submitted assignments (submissions.php?id=63)
Week 1 Assignment: CreatingSVG
During this assignment you'll be asked to create some SVG contentand present it within an HTML page that you'll upload to your Webspace. If you don't have write access to a Web site, please refer to theHitch Hiker's Guide (http://www.w3.org/2010/09/hhguide.php#assignments)which includes some links to some companies that offer free hosting.
When you've completed all the parts of the assignment, just submitthe URL of the page with any additional comments you wish to make.
Part 1
Make a copy of the simpleRedLine.svg file discussed in the Lines andImages (http://www.w3techcourses.com/mod/resource/view.php?id=60)lecture and embed it in your HTML page. For the purposes of thiscourse you are encouraged to use the <embed> HTML element to dothis, rather than <object> or <iframe>. For an explanation of this(perhaps surprising request) please see this Simple SVG in HTML testpage (http://philarcher.org/diary/svgtest/) . Note: for purposes of thiscourse, embedding the SVG in HTML (via embed or object) is notstrictly required. You can, if you prefer, simply place links (<ahref="yourfile.svg">) inside an HTML document!
Part 2
Use different values for dash-array, stroke-width and stroke-linecap tocreate at least three variants of the line you created in part 1. Includethese in your HTML page.
Part 3
Create an SVG document that looks, as much as you can make it, likethis:
58
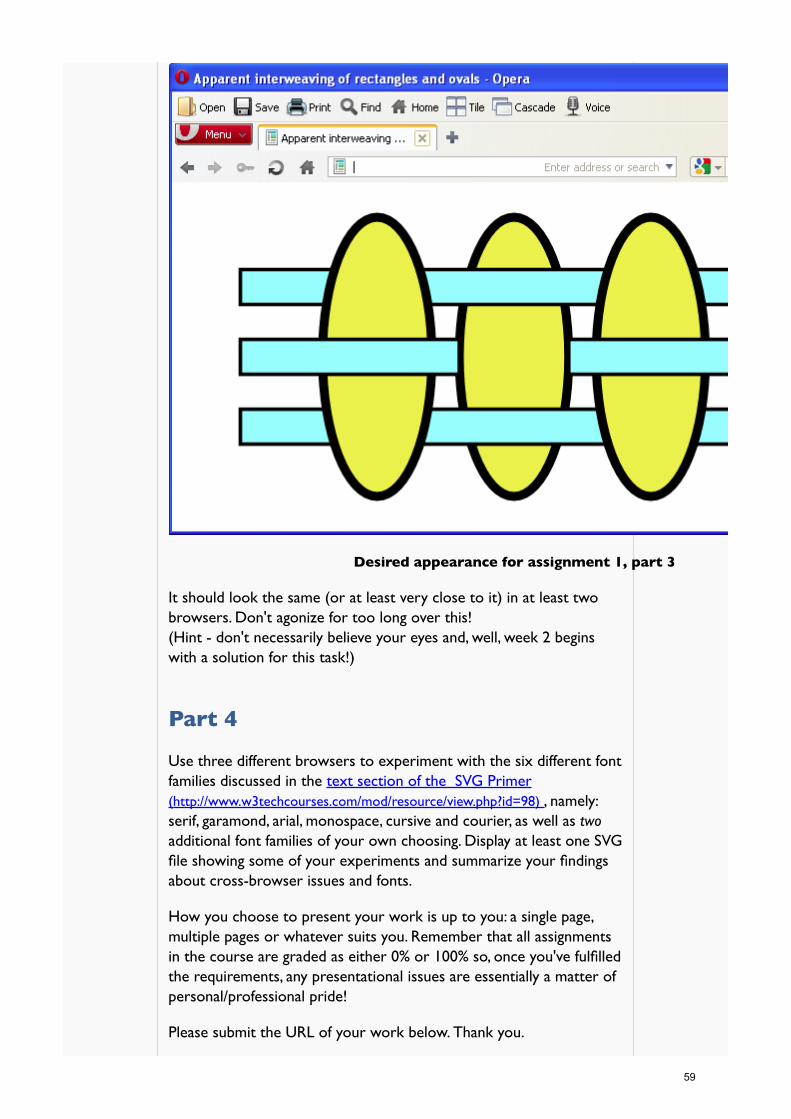
Desired appearance for assignment 1, part 3
It should look the same (or at least very close to it) in at least twobrowsers. Don't agonize for too long over this!(Hint - don't necessarily believe your eyes and, well, week 2 beginswith a solution for this task!)
Part 4
Use three different browsers to experiment with the six different fontfamilies discussed in the text section of the SVG Primer(http://www.w3techcourses.com/mod/resource/view.php?id=98) , namely:serif, garamond, arial, monospace, cursive and courier, as well as twoadditional font families of your own choosing. Display at least one SVGfile showing some of your experiments and summarize your findingsabout cross-browser issues and fonts.
How you choose to present your work is up to you: a single page,multiple pages or whatever suits you. Remember that all assignmentsin the course are graded as either 0% or 100% so, once you've fulfilledthe requirements, any presentational issues are essentially a matter ofpersonal/professional pride!
Please submit the URL of your work below. Thank you.
59

You have not submitted anything yet
Edit my submission
Moodle Docs for this page (http://docs.moodle.org/en/mod/assignment/view)
You are logged in as Marie-Claire Forgue (http://www.w3techcourses.com/user/view.php?id=476&course=4) (Logout(http://www.w3techcourses.com/login/logout.php?sesskey=nhnMD1zn5S) )
SVG_Jan11 (http://www.w3techcourses.com/course/view.php?id=4)
60

Introduction to SVG January 2011 (http://www.w3techcourses.com/course/report/log/index.php?chooselog=1&user=0&date=0&
id=4&modid=77) ◀ Jump to... ▶
W3C (http://www.w3techcourses.com/) ▶ SVG_Jan11 (http://www.w3techcourses.com/course/view.php?id=4) ▶ Resources (http://www.w3techcourses.com/mod/resource/index.php?id=4) ▶ Week 2 Material as a Single File
Update this Resource
Week 2 as a Single File
Introduction and Opening Remarks
First of all, let me warn you that the course material will get a bit more complex and possiblydifficult as the weeks progress. SVG is a big and complex specification. Our hope is to give youan exposure to some of its depth and richness. However, that depth and richness does comewith the price of some complexity. In this week, as you see how paths and gradients are defined,you'll start to get a hint of how expressive the language is!
Next, let me apologize for making a rather difficult Part 3 of the assignment for Week 1. It wasmeant to get you thinking. In a sense, the thing you thought you saw: namely three linesinterwoven with three ellipses, cannot be accomplished in SVG. Yes! It was sort of a trickassignment. My reason was to allow you to learn the lesson that stacking order is defined strictlyin SVG as the order in which objects are defined in the document (or, more technically, withinthe Document Object Model). If A is atop B and B is atop C, then A must be atop C as well! Letme explain and then offer a solution (there are more than one).
In the figure below, I've labeled the three ellipses (E1, E2, and E3) and the various visible parts ofthe rectangles (1a, 1b, 1c, 2a, 2b, 3a, 3b, and 3c). Now assuming that there are just six objectshere: three ellipses and three rectangles, then we have that rectangle one is atop E2 but under E1and E3. Rectangle 2, though (if parts 2a and 2b are part of the same object) is atop E1, and henceits stacking order in the document compels it to be atop E2!. Thus we are left with theconclusion that this picture cannot be drawn in SVG using only six objects! It would take threedimensions as well as curvature of the objects in three space to create such a figure, and SVG isnot a three-dimensional environment (though there has been plenty of talk within thecommunity about 2.5 dimensional effects — or the simulation of 3 dimensional appearances, andSVG 2.0 will likely have a smattering of such capabilities). In fact, if you look closely at the edgeswhere E2 intersects 2a and 2b, you might be able to see that the edge of E2 looks a little thinnerthere.
61

One ellipse under two rectangles and two more ellipses
Adding two more rectangles atop it all
Part 3 of Week 1's assignment appearing to show threeellipses interwoven with three rectangles
So, how then might we do this? Well, how about this approach: we'll lay down E2 first, at thebottom of the stacking order. On top of that we'll put rectangles 1 and 3. On top of those we'llnext add E1 and E3. This gives us the diagram below at left. Next, atop E1 and E3, we'll add TWOrectangles (2a and 2b) as shown below, right. The only task now is to adjust the right edge of 2a,and the left edge of 2b (and the width of both), so as to complete the illusion.
Here's the actual code (http://www.w3techcourses.com/svg_images/weave.svg) I used to generate this
62

nasty exercise:
<svg xmlns="http://www.w3.org/2000/svg"xmlns:xlink="http://www.w3.org/1999/xlink" ><title>Apparent interweaving of rectangles and ovals</title><desc>note that the top two rectangles are not contiguous</desc>
<ellipse cx="50%" cy="50%" rx="8%" ry="40%" fill="#ee4" stroke="black" stroke-width="10" /><rect x="10%" width="80%" y="25%" height="10%" fill="#8ff" stroke="black" stroke-width="4"/><rect x="10%" width="80%" y="65%" height="10%" fill="#8ff" stroke="black" stroke-width="4"/><ellipse cx="30%" cy="50%" rx="8%" ry="40%" fill="#ee4" stroke="black" stroke-width="10" /><ellipse cx="70%" cy="50%" rx="8%" ry="40%" fill="#ee4" stroke="black" stroke-width="10" /><rect x="10%" width="32%" y="45%" height="10%" fill="#8ff" stroke="black" stroke-width="4"/><rect x="58%" width="32%" y="45%" height="10%" fill="#8ff" stroke="black" stroke-width="4"/></svg>
It serves as a warning, perhaps, that some of the exercises may involve thinking outside the loom(http://srufaculty.sru.edu/david.dailey/svg/knots.html) .
The <path> element in SVG
The <path> element is the most flexible of the drawing primitives in SVG. It is so flexible, thattechnically speaking, one would not need any of the others! Why have the others then? we mightask. Well it is easier for we humans to specify a circle than to use the particular subcommand of<path> that would accomplish the same result.
Since <path> is so powerful and flexible, that means it also has a bit more complexity and is,accordingly, a bit trickier to learn.
Like the other drawing primitives such as <rect> and <ellipse>, <path> can take attributeslike fill, stroke, and dash array. On the other hand it uses a special syntax for describing the way itactually visits points in the plane. It borrows some of its origin (at least ideologically) from turtlegraphics (http://en.wikipedia.org/wiki/Turtle_graphics) (used in the Logo programming language tohelp introduced younger children to the basics of computer programming). That is, we move thepen (or drawing point) from position to position, raise it and lower it, and make strokes ofvarying types. These instructions within the path syntax are considered to be the"subcommands" of the path object and are to be found in its d attribute.
We see from the Primer's treatment of the subject, that a path typically begins with the Msubcommand instructing the drawing to begin at a specific (x,y) point such as the point(100,100):
d = "M 100,100 ...
From there, we continue adding points, that is, (x,y) pairs, describing lines segments to be joined
63

along the path.
Here's how it works:
Paths: M and L
We begin by specifying where the drawing will begin by inserting as the first element of "d" anotation such as "M x y" for numbers x and y. We might think of "M x y" as meaning "move pento the coordinate x y." From there, we have options of moving (with pen still down on thecanvas) linearly (L), quadratically (Q), cubically (C) or through an elliptic arc (A). For example,d="M 100 100 L 200 200" would succeed in drawing a diagonal line from the point (100,100) tothe point (200,200), as shown.
SVG code Illustration
<path stroke="black"
d="M 100 100 L 200 200"/>
A diagonal line from (100,00) to (200,200)
The pen-down and line modes stay in effect until turned off, so we might concatenate yet otherpairs of coordinates into the path.
SVG code Illustration
<path d="M 100 100
L 200 200 100 150"/>
Concatenated pairs of coordinates
A couple of things should be noted. First, in the above example, we did not specify a stroke since,by default, the figure is filled with black. Second, if we specify that a path has no fill (usingfill="none") then the path will not appear to loop back to the beginning. Third, we might, for sakeof legibility, be tempted to add commas, between pairs of coordinates. This is just fine, in thegeneral case, though a few cases have been reported in which certain browsers seem to betroubled by large numbers of commas as coordinate delimiters. Fourth, we may assume that L
64
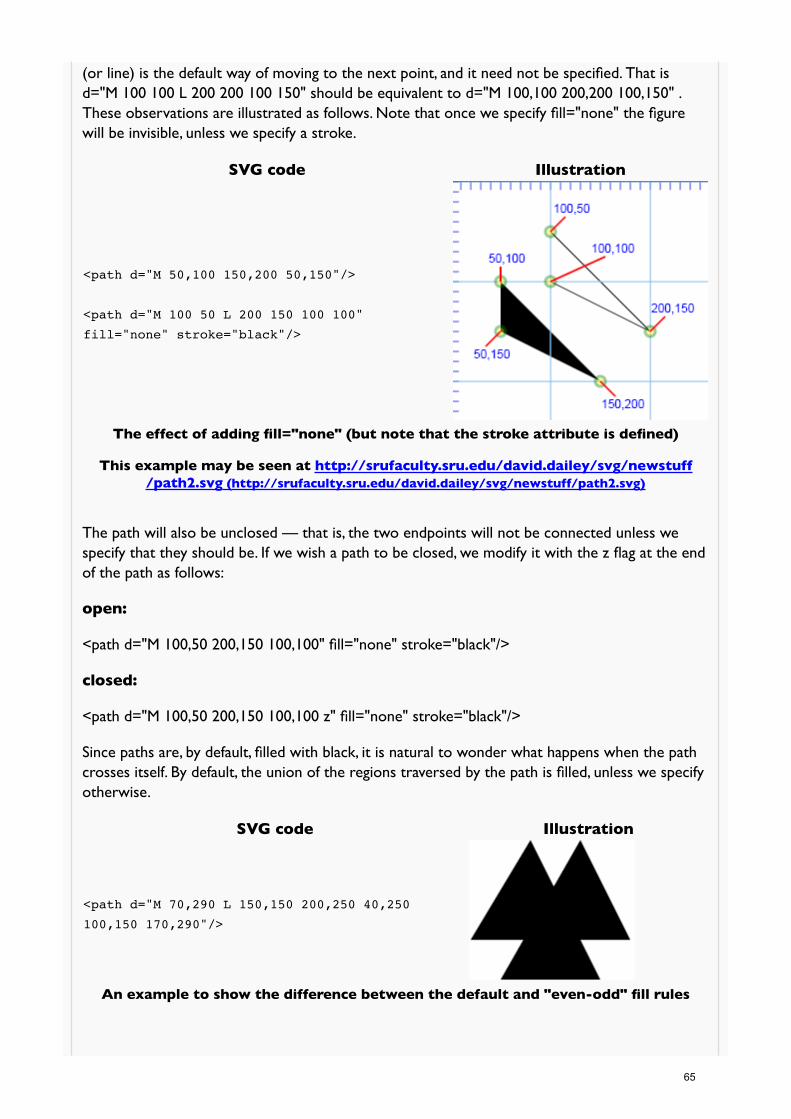
(or line) is the default way of moving to the next point, and it need not be specified. That isd="M 100 100 L 200 200 100 150" should be equivalent to d="M 100,100 200,200 100,150" .These observations are illustrated as follows. Note that once we specify fill="none" the figurewill be invisible, unless we specify a stroke.
SVG code Illustration
<path d="M 50,100 150,200 50,150"/>
<path d="M 100 50 L 200 150 100 100"
fill="none" stroke="black"/>
The effect of adding fill="none" (but note that the stroke attribute is defined)
This example may be seen at http://srufaculty.sru.edu/david.dailey/svg/newstuff/path2.svg (http://srufaculty.sru.edu/david.dailey/svg/newstuff/path2.svg)
The path will also be unclosed — that is, the two endpoints will not be connected unless wespecify that they should be. If we wish a path to be closed, we modify it with the z flag at the endof the path as follows:
open:
<path d="M 100,50 200,150 100,100" fill="none" stroke="black"/>
closed:
<path d="M 100,50 200,150 100,100 z" fill="none" stroke="black"/>
Since paths are, by default, filled with black, it is natural to wonder what happens when the pathcrosses itself. By default, the union of the regions traversed by the path is filled, unless we specifyotherwise.
SVG code Illustration
<path d="M 70,290 L 150,150 200,250 40,250
100,150 170,290"/>
An example to show the difference between the default and "even-odd" fill rules
65
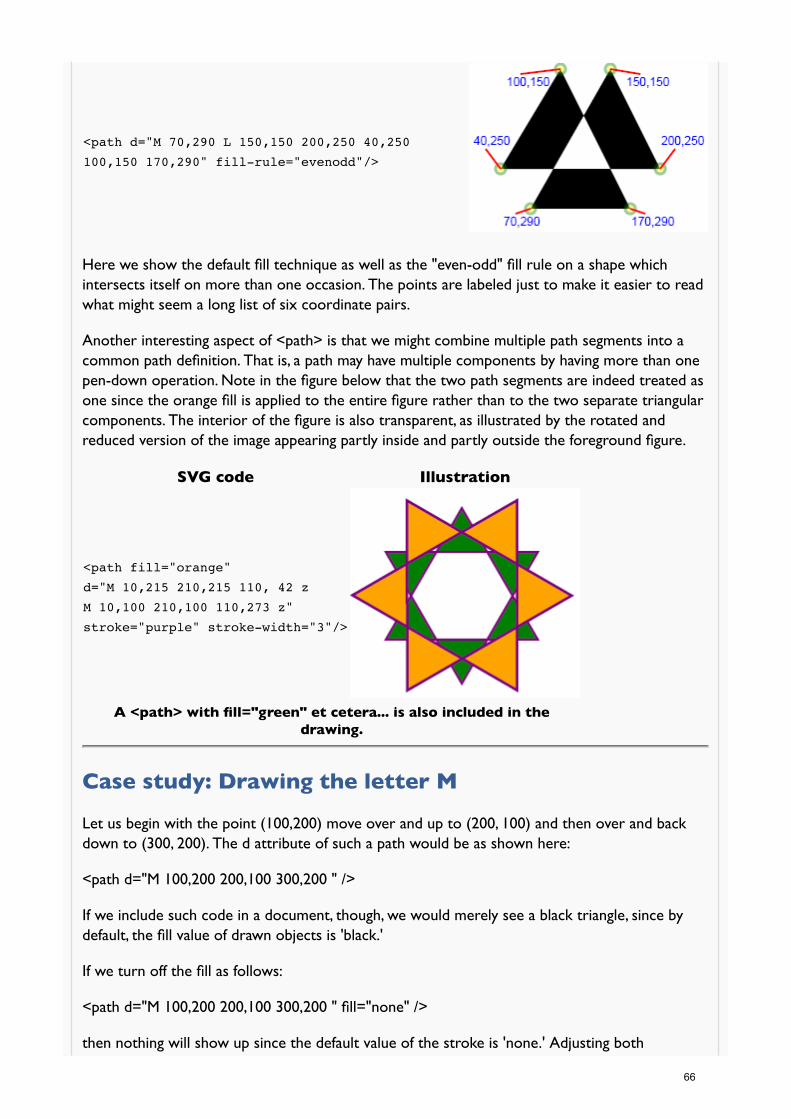
<path d="M 70,290 L 150,150 200,250 40,250
100,150 170,290" fill-rule="evenodd"/>
Here we show the default fill technique as well as the "even-odd" fill rule on a shape whichintersects itself on more than one occasion. The points are labeled just to make it easier to readwhat might seem a long list of six coordinate pairs.
Another interesting aspect of <path> is that we might combine multiple path segments into acommon path definition. That is, a path may have multiple components by having more than onepen-down operation. Note in the figure below that the two path segments are indeed treated asone since the orange fill is applied to the entire figure rather than to the two separate triangularcomponents. The interior of the figure is also transparent, as illustrated by the rotated andreduced version of the image appearing partly inside and partly outside the foreground figure.
SVG code Illustration
<path fill="orange"
d="M 10,215 210,215 110, 42 z
M 10,100 210,100 110,273 z"
stroke="purple" stroke-width="3"/>
A <path> with fill="green" et cetera... is also included in thedrawing.
Case study: Drawing the letter M
Let us begin with the point (100,200) move over and up to (200, 100) and then over and backdown to (300, 200). The d attribute of such a path would be as shown here:
<path d="M 100,200 200,100 300,200 " />
If we include such code in a document, though, we would merely see a black triangle, since bydefault, the fill value of drawn objects is 'black.'
If we turn off the fill as follows:
<path d="M 100,200 200,100 300,200 " fill="none" />
then nothing will show up since the default value of the stroke is 'none.' Adjusting both
66
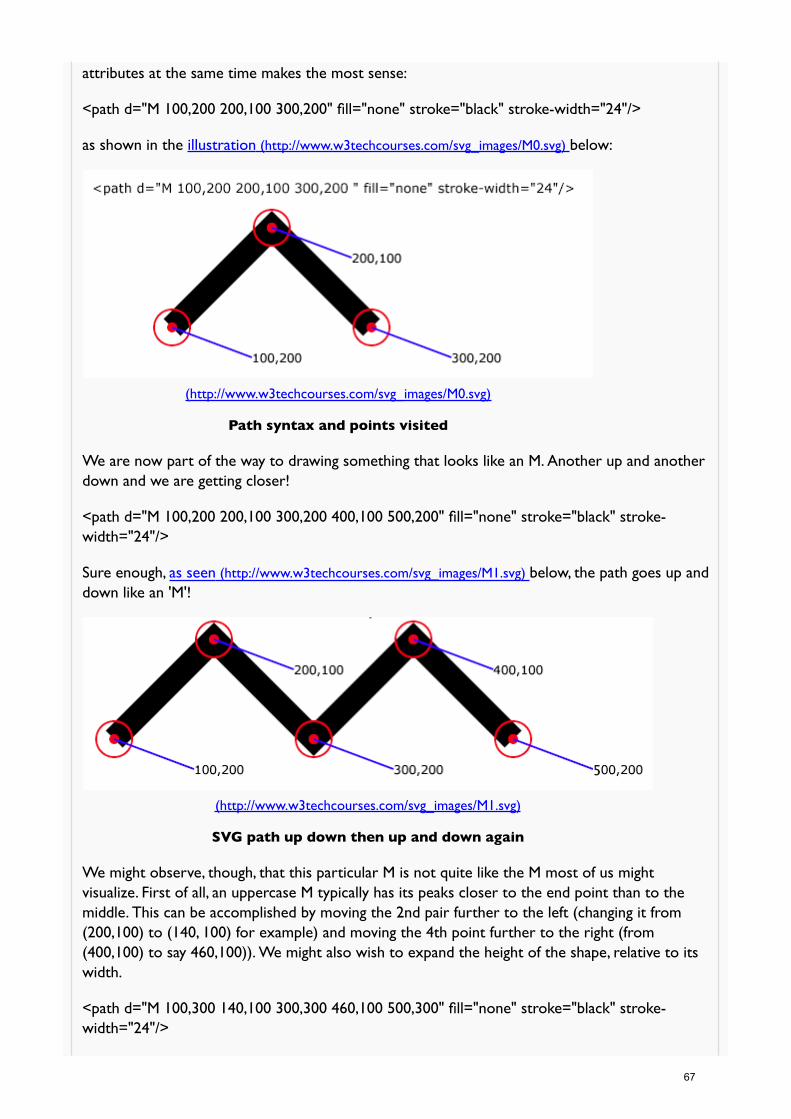
attributes at the same time makes the most sense:
<path d="M 100,200 200,100 300,200" fill="none" stroke="black" stroke-width="24"/>
as shown in the illustration (http://www.w3techcourses.com/svg_images/M0.svg) below:
(http://www.w3techcourses.com/svg_images/M0.svg)
Path syntax and points visited
We are now part of the way to drawing something that looks like an M. Another up and anotherdown and we are getting closer!
<path d="M 100,200 200,100 300,200 400,100 500,200" fill="none" stroke="black" stroke-width="24"/>
Sure enough, as seen (http://www.w3techcourses.com/svg_images/M1.svg) below, the path goes up anddown like an 'M'!
(http://www.w3techcourses.com/svg_images/M1.svg)
SVG path up down then up and down again
We might observe, though, that this particular M is not quite like the M most of us mightvisualize. First of all, an uppercase M typically has its peaks closer to the end point than to themiddle. This can be accomplished by moving the 2nd pair further to the left (changing it from(200,100) to (140, 100) for example) and moving the 4th point further to the right (from(400,100) to say 460,100)). We might also wish to expand the height of the shape, relative to itswidth.
<path d="M 100,300 140,100 300,300 460,100 500,300" fill="none" stroke="black" stroke-width="24"/>
67
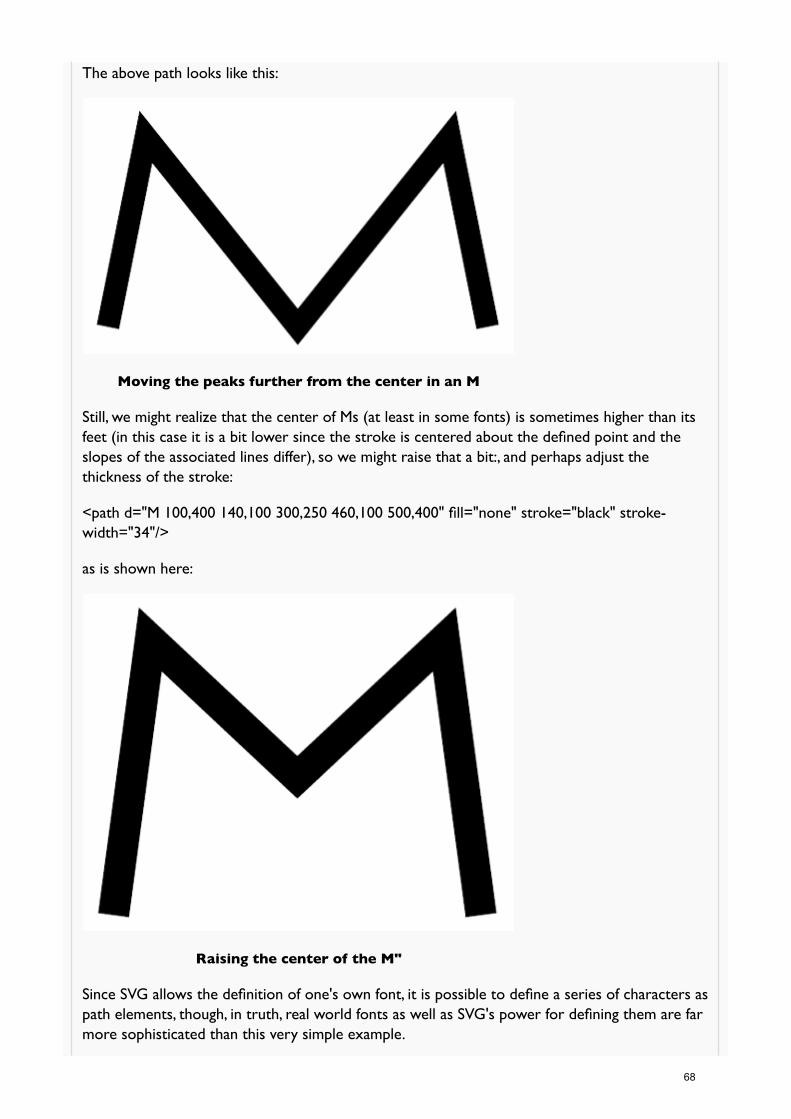
The above path looks like this:
Moving the peaks further from the center in an M
Still, we might realize that the center of Ms (at least in some fonts) is sometimes higher than itsfeet (in this case it is a bit lower since the stroke is centered about the defined point and theslopes of the associated lines differ), so we might raise that a bit:, and perhaps adjust thethickness of the stroke:
<path d="M 100,400 140,100 300,250 460,100 500,400" fill="none" stroke="black" stroke-width="34"/>
as is shown here:
Raising the center of the M"
Since SVG allows the definition of one's own font, it is possible to define a series of characters aspath elements, though, in truth, real world fonts as well as SVG's power for defining them are farmore sophisticated than this very simple example.
68

Multiple Begin-Path Commands
With slight modifications to the 'M' shape developed earlier, we may make two of them next toeach other by simply moving all the x coordinates to the right:
<path d="M 100,350 100,100 200,225 300,100 300,350" fill="none" stroke="black" stroke-width="30"/><path d="M 400,350 400,100 500,225 600,100 600,350" fill="none" stroke="black" stroke-width="30"/>
Now let us introduce a slight variation by using a second 'pen-down' command:
<path d="M 100,350 100,100 200,225 300,100 300,350" fill="none" stroke="black" stroke-width="30"/><path d="M 400,350 400,100 500,225 M 600,100 600,350" fill="none" stroke="black" stroke-width="30"/>
Note that the stroke between the third and fourth coordinate pairs is discontinued but resumed,again, between the fourth and fifth pairs.
Two M's, one further right, but discontinuous
Now, let's do one more experiment with the pen-up and pen-down to make more complexshapes with <path>.
Following are two paths drawn with one apparently "inside" the other (in the sense that thecoordinates of one are contained inside the polygon defined by the other):
<path d="M 100,350 300,100 500,350" fill="none" stroke="black" stroke-width="20"/><path d="M 250,320 250,220 350,220 350,320" fill="none" stroke="black" stroke-width="20"/>
Note how the rectangle (which could also be drawn as a <rect>) is encompassed by the triangle.
69

Two paths, one with 3 pts the other with 4
Next, note that by adding the simple 'z' subcommand (shown below in red) at the end of each ofthe strings, the paths are closed rather than left open between endpoints.
<path d="M 100,350 300,100 500,350 z" fill="none" stroke="black" stroke-width="20"/><path d="M 250,320 250,220 350,220 350,320 z" fill="none" stroke="black" stroke-width="20"/>
The rendered SVG image looks like this:
Adding 'z' to the paths to close them.
Observe that the above appearance can alternatively be accomplished with a single path object(http://www.w3techcourses.com/svg_images/onepath.svg) as follows:
<path d="M 100,350 300,100 500,350 zM 250,320 250,220 350,220 350,320 z"fill="none" stroke="black" stroke-width="20"/>
This can save a bit on markup, with the possible problem of increased cognitive complexity and
70

decreased semantic accessibility of the resultant object. However, there are some additionalbenefits to this approach that are worth considering.
By combining the two shapes above into one complex path, the fill-rule of that path may bedefined as "even-odd." The net effect of this is that whatever color is used as the fill of the shapewill not be applied to the interior region (though it would be to regions inside the interiorregion).
<path d="M 100,350 300,100 500,350 zM 250,320 250,220 350,220 350,320 z"fill="#ff8" stroke="black" stroke-width="15" fill-rule="evenodd"/>
The advantage here can be seen in this example (http://www.w3techcourses.com/svg_images/onepathwithhole.svg) , in which rectangles that underly the triangle may be seen through therectangular hole in the shape. This effect would be difficult to produce if the two parts of thiscompound path were viewed as separate paths, since in order to be visible the rectangle wouldhave to be atop the triangle, but in that case nothing inside it, other than the triangle itself wouldbe visible.
Yellow triangle with rectangular hole showing pinkand green rectangles underneath
Paths: Q — Quadratic Bézier curves.
I became aware of Bézier curves in the mid 1980s when I discovered that Adobe Illustrator hadthe ability to draw amazing curves quickly. I did not know what sort of crazy-fast mathematicswould be able to solve all those equations so quickly. A good treatment of the subject may befound at Wikipedia.
Here's basically how a quadratic Bézier works in SVG. We define an initial point (say 100,200)with a pen-down. From there, we set a course heading toward the next point. Instead of going tothe next point, we just aim that direction. So, for example, while "M 100 200 L 200 400" actuallyarrives at the point "200,400", "M 100 200 Q 200 400 … " merely heads that way. Ultimately, inaddition to a "heading" we also have a final "destination" and that is the final coordinate pair
71
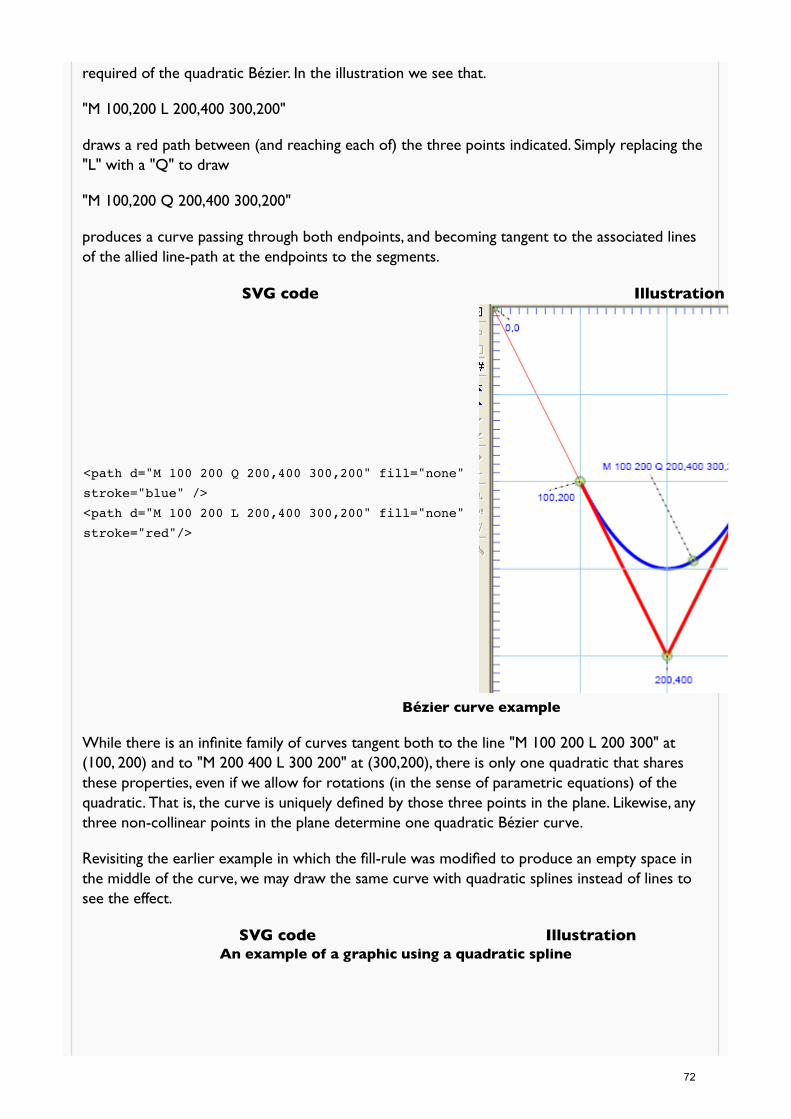
required of the quadratic Bézier. In the illustration we see that.
"M 100,200 L 200,400 300,200"
draws a red path between (and reaching each of) the three points indicated. Simply replacing the"L" with a "Q" to draw
"M 100,200 Q 200,400 300,200"
produces a curve passing through both endpoints, and becoming tangent to the associated linesof the allied line-path at the endpoints to the segments.
SVG code Illustration
<path d="M 100 200 Q 200,400 300,200" fill="none"
stroke="blue" />
<path d="M 100 200 L 200,400 300,200" fill="none"
stroke="red"/>
Bézier curve example
While there is an infinite family of curves tangent both to the line "M 100 200 L 200 300" at(100, 200) and to "M 200 400 L 300 200" at (300,200), there is only one quadratic that sharesthese properties, even if we allow for rotations (in the sense of parametric equations) of thequadratic. That is, the curve is uniquely defined by those three points in the plane. Likewise, anythree non-collinear points in the plane determine one quadratic Bézier curve.
Revisiting the earlier example in which the fill-rule was modified to produce an empty space inthe middle of the curve, we may draw the same curve with quadratic splines instead of lines tosee the effect.
SVG code IllustrationAn example of a graphic using a quadratic spline
72

<path fill-rule="evenodd
d="M 70 140 L 150,0 200,100 L 40,100 100,0 L
170,140 70 140"/>
<path fill="red" fill-rule="evenodd"
d="M 70 140 Q 150,0 200,100 Q 40,100 100,0 Q
170,140 70 140"/>
Note how the above example:
<path id="H" fill="#bbb" fill-rule="evenodd"d="M 70 140 L 150,0 200,100 L 40,100 100,0 L 170,140 70 140"/>
Can have its L's modified to Q's:<path id="X" fill="#b42" fill-rule="evenodd"d="M 70 140 Q 150,0 200,100 Q 40,100 100,0 Q 170,140 70 140"/>
That produces a shape like this (we've changed the colors and added in identifiers to the pathsfor easy reference in the text here).
Two paths with same points: one quadratic(id="X") the other linear (id="H"). See code
above.
Observe that the angles of the reddish shape (X) at which the curves actually meet are sharprather than rounded. Let's look more closely. If you're familiar with a trefoil knot(http://en.wikipedia.org/wiki/Trefoil_knot) , then that is the sort of shape we'll be aiming toward.
First we may observe that if the desired shape were to pass through any of the six points of thelinear path, H, then in order for the parts of the curve that meet there to be smooth and for anyof them to be tangent to lines of H, then the new curve would have to extend beyond thebounds of X. We could extend the lines of X into a larger equilateral triangle and then work onbuilding our trefoil knot. This could be done with cubic Bézier curves by defining a curve thatpasses through the same three endpoints (http://www.w3techcourses.com/svg_images/lineOutCub.svg)
73

it already does but to be "guided" by the control points consisting of the three points of thecircumscribed triangle, shown below as the light green line.
<path fill="#c53" fill-rule="evenodd" opacity=".5"d="M 70 140 C 17.5 ,140 150,0 200,100 C 220, 140 40,100 100,0 C 127,-47 170,140 70 140"/>
cubic trefoil guided by circumscribed triangle
Another approach, that would be more symmetric, would be to form a triangle from the threemidpoints of the outermost edges of the six sided polygon H, and to let the curve pass throughthose three points with the control points of the cubic curves being the six original points of H.
Here we see that by defining those three midpoints {(70,50), (175,50), and (120,140)}andallowing the original points of H to act as control points, we can define a variety of curves thatmove through the midpoints and which are tangent to the curve at those points.
Passing cubic Bézier curves through the midpoints
74

Another solution is similarly given by
<path fill="#ff8" fill-rule="evenodd" stroke="black" stroke-width="2" opacity=".65"d="M 120 140 C 70 140 150,0 175, 50 C 200,100 40,100 70, 50 C 100,0 170,140 120,140"/>
as shown below and at http://www.w3techcourses.com/svg_images/lineQuaCub.svg(http://www.w3techcourses.com/svg_images/lineQuaCub.svg) :
Trefoil guided by vertices and passing throughmidpoints
SVG Transformations: Translate, Rotate andScale
In the Primer, just three of the five classes of transformations that can be used are actuallydiscussed: translate, rotate and scale. There are also skew transformations and matrixtransformations as well, though we will be discussing only the three that most authors are likelyto be interested in. Once armed with a knowledge of how these three are used, however, thereader will be able to glean, directly from the specification, how to use the others. You may beinterested to know that the SVG working group (http://www.w3.org/Graphics/SVG/) is alsoconsidering as a part of its development of SVG 2.0, other classes of transformations includingnon-affine transforms (http://en.wikipedia.org/wiki/3D_projection#Perspective_projection) that wouldenable distortions and perspective effects as well. As a current working example displaying a hintof what those richer transforms may allow, you may wish to take a look at this example(http://srufaculty.sru.edu/david.dailey/svg/clipdrag12.svg) allowing the mouse to be used to simulatenon-affine transformations through the use of matrix transformations.
Translation:
First, the simplest of the transforms is translation. As one becomes more familiar with SVG, itsusefulness may become more apparent, but already we can see an obvious use: we have a shapethat is fairly complex:
75

SVG code Illustration<path fill="#bbb"
fill-rule="evenodd"
d="M 70,140 150,0 200,100
40,100 100,0 170,140 70,140"/>
<path fill="#bbb"
fill-rule="evenodd"
d="M 270,140 350,0 400,100
240,100 300,0 370,140
270,140"/>Modifying each pair of coordinates
In order to make a duplicate drawn to the right of this shape (http://www.w3techcourses.com/svg_images/transformtranslate0.svg) , we could either add a number (in this case, 200) to each ofthe x-coordinates as shown above.
Or we can use a translate=translate(200, 0) to accomplish the same thing(http://www.w3techcourses.com/svg_images/transformtranslate1.svg) .
SVG code Illustration<path fill="#bbb"
fill-rule="evenodd"
d="M 70,140 150,0 200,100
40,100 100,0 170,140 z"/>
<path fill="#bbb"
fill-rule="evenodd"
transform="translate(200,0)"
d="M 70,140 150,0 200,100
40,100 100,0 170,140 z"/>Modifying each pair of coordinates
Observe how much less time would be demanded of a developer to simply add a transformattribute, rather than needing to manually change all of the coordinate values of a complex path!
Rotation:
Perhaps the simplest demonstration of the utility of being able to rotate a curve can be shownwith a simple ellipse.
While many of you may remember learning how to plot the coordinates of an ellipse in gradeschool algebra:
e(x - cx)2 + f(y - cy)2 = r2
it was not until the third semester of calculus that many (at least in the U.S.) learned how to useparametric equations and sinusoidal substitutions to actually rotate that curve by, say, 30 degrees.That is, the mathematics of such a fundamental operation as rotating an ellipse would be beyond
76

the skill of many programmers! The trigonometry involved in rotating a rectangle, thoughtractable to most programmers, is not necessarily a fun exercise!
In SVG you simply do the following to rotate an object by 30 degrees:
SVG code Illustration
<ellipse cx="200" cy="200" rx="20" ry="100"
opacity=".6" fill="#faa" stroke="#806"
stroke-width="4"/>
<ellipse cx="200" cy="200" rx="20" ry="100"
transform="rotate(30,200,200)"
opacity=".6" fill="#faa" stroke="#806"
stroke-width="4"/>
Ellipse rotated about its center
In the above example (http://www.w3techcourses.com/svg_images/transformrotate1.svg) , it should beemphasized that rotation always happens relative to some center point. In this case by sayingrotate(30, 200, 200), we've instructed the 30 degree rotation to be about the point (200,200)which also happens to be the center of the ellipse. We will generally be interested in rotating anobject about its own visual center, though there are situations in which we may wish to rotate anobject about some other centroid (http://srufaculty.sru.edu/david.dailey/svg/ovaling.svg) (this exampleuses SVG/SMIL, hence requiring an appropriate browser.).
Scaling:
As illustrated in the Primer, scaling may not be as intuitive as we might think. That is, we oftenthink of scaling as simply changing something's size. However, the way scaling transformations arehandled in SVG is by multiplying each of the x and y coordinate values by some constant. Thiswill generally result in an apparent movement of the object away from the origin (0,0).
Ellipse, with and without scaling
77

<ellipse
cx="100" cy="50" rx="40" ry="20"
fill="grey" stroke="black" stroke-
width="12" stroke-
dasharray="3,5,2"/>
<ellipse transform="scale(2.5)" cx="100"
cy="50" rx="40" ry="20" fill="grey"
stroke="black" stroke-width="12" stroke-
dasharray="3,5,2"/>
Let's close out this section with one more example exercise: trying to reverse-engineer theillustration below:
Replication of ellipse with rotation (presented here in its actual size)
We might first observe that the illustration appears not to be centered (either vertically orhorizontally) relative to the window. If it were, this would tend to imply that coordinates hadbeen specified as relative coordinates like (50%, 35%). As is, we may, just as conveniently, proceedon the assumption that the coordinates are in pixel values.
[Hint: if we were concerned about matching the image exactly, we might bring the above bitmapinto SVG with the <img> tag and attempt to match the dimensions exactly, or we could dosomething quite similar by drawing atop the bitmap with Inkscape's drawing tools.]
The foreground of the image appears to have six identical figures, all rotated about a commoncenter point that is just below the topmost of the ellipses. The figures are probably ellipses with
78

a dash-array. Let's try to do one of those first. With a bit of experimentation, we may end upwith something like the following:
<ellipse cx="400" cy="120" rx="50" ry="100" stroke-dasharray="6,3" fill="#01d" stroke="black"stroke-width="45" />
or even
<ellipse cx="500" cy="100" rx="40" ry="90" stroke-dasharray="5,3" fill="blue" stroke="black"stroke-width="40" />
Either would be considered good enough for our purposes in this class, I believe.
Since there are six of these objects, we can calculate that each one will be rotated 60 degrees(that is 360/6 ) more than the preceding one, so that the rotation angles will be 0, 60, 120, 180,240 and 300 degrees. The point about which they are all rotated will have the same cx value asthe initial ellipse (let us use the top ellipse with cx equal to 400.
We may play with different values of the transform = rotate() command such as:
transform="rotate(60, 400, 100)"transform="rotate(60, 400, 160)"
or
transform="rotate(60, 400, 350)"
until we decide on a value of transform="rotate(60, 400, 270)" that "looks about right."
Completing the foreground of the picture can be, thusly approximated as
<ellipse cx="400" cy="120" rx="50" ry="100" transform="rotate(60, 400, 270)"stroke-dasharray="6,3" fill="#01d" stroke="black" stroke-width="45" /><ellipse cx="400" cy="120" rx="50" ry="100" transform="rotate(120, 400, 270)"stroke-dasharray="6,3" fill="#01d" stroke="black" stroke-width="45" /><ellipse cx="400" cy="120" rx="50" ry="100" transform="rotate(180, 400, 270)"stroke-dasharray="6,3" fill="#01d" stroke="black" stroke-width="45" /><ellipse cx="400" cy="120" rx="50" ry="100" transform="rotate(240, 400, 270)"stroke-dasharray="6,3" fill="#01d" stroke="black" stroke-width="45" /><ellipse cx="400" cy="120" rx="50" ry="100" transform="rotate(300, 400, 270)"stroke-dasharray="6,3" fill="#01d" stroke="black" stroke-width="45" />
The remainder consists of two more circles centered about the same center of rotation as theother figures namely (400, 270). Adding the following two curves to the beginning of the filecompletes the picture:
<ellipse cx="400" cy="270" rx="240" ry="240" fill="silver" stroke="turquoise" stroke-width="70"/><ellipse cx="400" cy="270" rx="50" ry="50" fill="none" stroke="blue" stroke-width="45" />
An example of the actual file used to generated this exercise can be seen athttp://www.w3techcourses.com/svg_images/multitrans.svg (http://www.w3techcourses.com
79
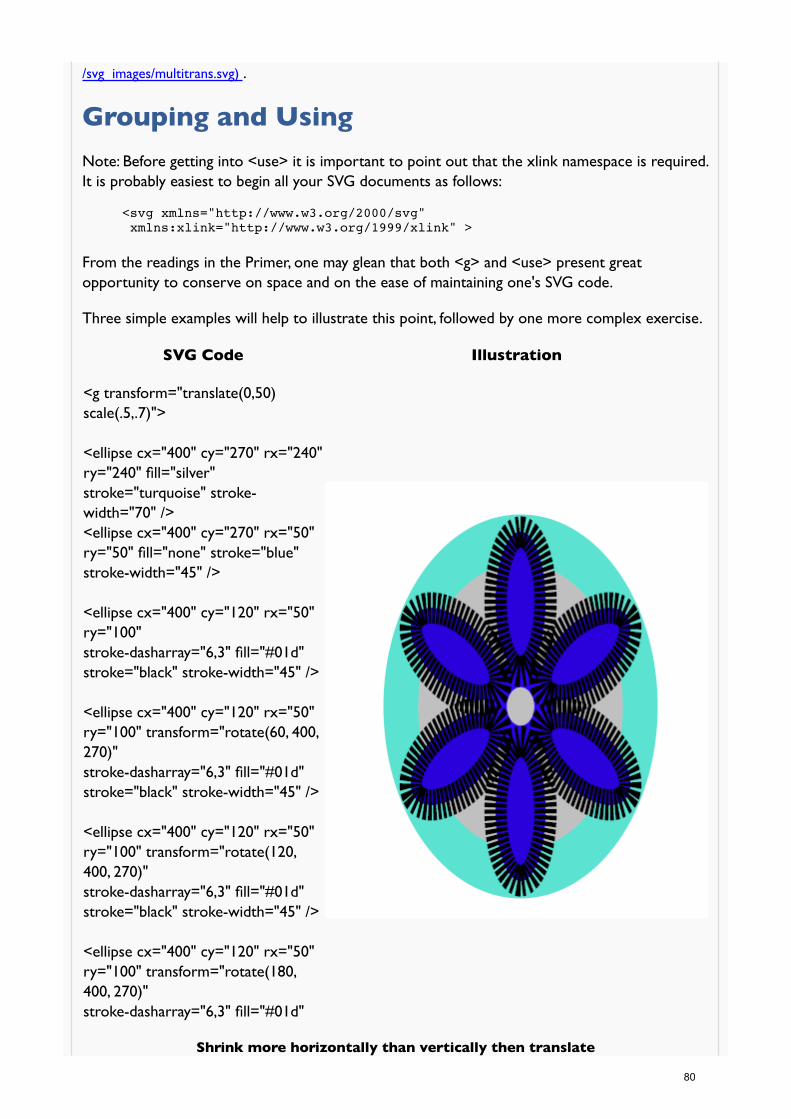
/svg_images/multitrans.svg) .
Grouping and Using
Note: Before getting into <use> it is important to point out that the xlink namespace is required.It is probably easiest to begin all your SVG documents as follows:
<svg xmlns="http://www.w3.org/2000/svg" xmlns:xlink="http://www.w3.org/1999/xlink" >
From the readings in the Primer, one may glean that both <g> and <use> present greatopportunity to conserve on space and on the ease of maintaining one's SVG code.
Three simple examples will help to illustrate this point, followed by one more complex exercise.
SVG Code Illustration
<g transform="translate(0,50)scale(.5,.7)">
<ellipse cx="400" cy="270" rx="240"ry="240" fill="silver"stroke="turquoise" stroke-width="70" /><ellipse cx="400" cy="270" rx="50"ry="50" fill="none" stroke="blue"stroke-width="45" />
<ellipse cx="400" cy="120" rx="50"ry="100"stroke-dasharray="6,3" fill="#01d"stroke="black" stroke-width="45" />
<ellipse cx="400" cy="120" rx="50"ry="100" transform="rotate(60, 400,270)"stroke-dasharray="6,3" fill="#01d"stroke="black" stroke-width="45" />
<ellipse cx="400" cy="120" rx="50"ry="100" transform="rotate(120,400, 270)"stroke-dasharray="6,3" fill="#01d"stroke="black" stroke-width="45" />
<ellipse cx="400" cy="120" rx="50"ry="100" transform="rotate(180,400, 270)"stroke-dasharray="6,3" fill="#01d"
Shrink more horizontally than vertically then translate
80
stroke="black" stroke-width="45" />
<ellipse cx="400" cy="120" rx="50"ry="100" transform="rotate(240,400, 270)"stroke-dasharray="6,3" fill="#01d"stroke="black" stroke-width="45" />
<ellipse cx="400" cy="120" rx="50"ry="100" transform="rotate(300,400, 270)"stroke-dasharray="6,3" fill="#01d"stroke="black" stroke-width="45" />
</g>
In this first example, above, note that the entire object has been shrunken and is no longer aslarge as it was in the previous version (http://www.w3techcourses.com/svg_images/rotation.png) seenin our discussion of transformations.
However, we have shrunken it more horizontally than vertically and more importantly, byapplying a <g> tag that encompasses all of the other content, a single transform statement can beapplied which affects all content inside the group, rather than needing to apply six statementsone to each object. Notice too that we can apply multiple transforms at once by supplying awhite-space separated list of values for the transform attribute.
In the next example, we show how we may reuse an element or a group, without having toduplicate all the code. This results in smaller documents, less transmission time, and mostimportantly, if a change needs to be made to one's code, one can do it once rather than havingto track down all instances of it (which is not only a time saver, but a way of ensuringcorrectness of one's code!).
Let us take the above example and rework it, this time using only five rotations instead of six.We will also rotate clusters of three ellipses (each rotated 360/5=72 degrees more than the last),and demonstrate the <use> tag. This allows us to play with the color of the five ellipses in oneplace, rather than needing to change all occurances of our drawn objects!
81

<g id="one"><ellipse cx="400" cy="120" rx="50"ry="100" fill="white"stroke="black" stroke-dasharray="6,3"stroke-width="45" /><ellipse cx="400" cy="120" rx="37"ry="47" fill="#01d" /><ellipse cx="400" cy="124" rx="30"ry="25" fill="black" /></g>
<use xlink:href="#one"transform="rotate(72, 400, 270)" /><use xlink:href="#one"transform="rotate(144, 400, 270)" /><use xlink:href="#one"transform="rotate(216, 400, 270)" /><use xlink:href="#one"transform="rotate(288, 400, 270)" />
<g id="one"><ellipse cx="400" cy="120" rx="50"ry="100" fill="white"stroke-dasharray="6,3" stroke="black"stroke-width="45" /><ellipse cx="400" cy="120" rx="37"ry="47" fill="#844" /><ellipse cx="400" cy="124" rx="30"ry="25" fill="#400" /></g>
<use xlink:href="#one"transform="rotate(72, 400, 270)" /><use xlink:href="#one"transform="rotate(144, 400, 270)" /><use xlink:href="#one"transform="rotate(216, 400, 270)" /><use xlink:href="#one"transform="rotate(288, 400, 270)" />
Note that in this case we have also placed the group and its four "re-uses" in the context of twoother ellipses (http://w3techcourses.com/svg_images/moreuse.svg) , to complete an aesthetic sense tothe composition. (In that example, you will also see the use of a "viewBox", discussed later, tochange the coordinate system a bit.) The background ellipses had their colors varied separately.
Now, as a final exercise on the topic, let's see if we can make a drawing that looks like this:
82

Rotations of five clusters, varying colors
We begin with the complete code of the bluish composition above:
<ellipse cx="400" cy="270" rx="240" ry="240" fill="silver" stroke="#04c" stroke-width="75" /><ellipse cx="400" cy="270" rx="50" ry="50" fill="none" stroke="#04c" stroke-width="45" /><g id="one"><ellipse cx="400" cy="120" rx="50" ry="100" stroke-dasharray="6,3" fill="white" stroke="black"stroke-width="45" /><ellipse cx="400" cy="120" rx="37" ry="47" fill="#01d" stroke="none" /><ellipse cx="400" cy="124" rx="30" ry="25" fill="black" stroke="none" /></g><use xlink:href="#one" transform="rotate(72, 400, 270)" /><use xlink:href="#one" transform="rotate(144, 400, 270)" /><use xlink:href="#one" transform="rotate(216, 400, 270)" /><use xlink:href="#one" transform="rotate(288, 400, 270)" />
Next we will be interested in duplicating this, but, as we go, in varying the colors of both thestroke of the outermost ellipse and the fill of the five ellipses.
From the discussion of groups in the primer (http://www.w3.org/Graphics/SVG/IG/resources/svgprimer.html#inherit) and in the first example of first example of <use> (http://www.w3.org/Graphics/SVG/IG/resources/svgprimer.html#use) , we see that we may use the value "inherit" for aproperty so that an object may take its properties (more technically its attribute values) from a
83

group or a <use>. This gives us the ability to reuse code, while modifying various features of itsappearance. In the case of the above illustration, we can reason that if we take the twobackground ellipses and change their matching stroke attributes from values of "#04c" to"inherit" then we could allow them to accept the value of the group or use in which they areplaced. Thus we can move from:
<ellipse cx="400" cy="270" rx="240" ry="240" fill="silver" stroke="#04c" stroke-width="75" /><ellipse cx="400" cy="270" rx="50" ry="50" fill="none" stroke="#04c" stroke-width="45" />
to the equivalent:
<g stroke="#04c"><ellipse cx="400" cy="270" rx="240" ry="240" fill="silver" stroke="inherit" stroke-width="75" /><ellipse cx="400" cy="270" rx="50" ry="50" fill="none" stroke="inherit" stroke-width="45" /></g>
Likewise, the second ellipse of the group named "one" could have its fill value changed from"#01d" to "inherit".
<ellipse cx="400" cy="120" rx="37" ry="47" fill="#01d" stroke="none" />
Can be written as:
<ellipse cx="400" cy="120" rx="37" ry="47" fill="inherit" stroke="none" />
If, then, we simply modify the above code as indicated, the resultant code is prepared to receivethe stroke and fill of those particular objects from whatever container we place them inside.
Let's begin by:
Placing the code from the previous example inside a group tag that allows us to change thesize and position.
1.
Changing the fill and stroke attribute values to "inherit".2.For the sake of simplicity, placing the entire group inside a <defs> tag. This tag can be usedto define objects that are not used directly, but which will be used later, by reference, (like<image> referents) in our code.
3.
<defs><g id="two" transform="translate(200,20) scale(.35)"><ellipse cx="400" cy="270" rx="240" ry="240" fill="silver" stroke-width="75" /><ellipse cx="400" cy="270" rx="50" ry="50" fill="none" stroke="inherit" stroke-width="45" />
<g id="one"><ellipse cx="400" cy="120" rx="50" ry="100" stroke-dasharray="6,3" fill="white" stroke="black"stroke-width="45" /><ellipse cx="400" cy="120" rx="37" ry="47" fill="inherit" stroke="none" /><ellipse cx="400" cy="124" rx="30" ry="25" fill="black" stroke="none" /></g>
<use xlink:href="#one" transform="rotate(72, 400, 270)" /><use xlink:href="#one" transform="rotate(144, 400, 270)" /><use xlink:href="#one" transform="rotate(216, 400, 270)" />
84

<use xlink:href="#one" transform="rotate(288, 400, 270)" /></g></defs>
Now by simply adding five instances of this code, rotating and changing colors as we go, we cancreate the effect here as illustrated above:
<use xlink:href="#two" stroke="#0bb" fill="#04c" /><use xlink:href="#two" transform="rotate(72, 340, 280)" stroke="#2500BA" fill="#B100CC"/><use xlink:href="#two" transform="rotate(144, 340, 280)" stroke="#BA0070" fill="#CC0E00"/><use xlink:href="#two" transform="rotate(216, 340, 280)" stroke="#BA7000" fill="#96CC00"/><use xlink:href="#two" transform="rotate(288, 340, 280)" stroke="#25BA00" fill="#00CC5F"/>
Note, the particular color values were chosen to be equidistant across the 360 degrees of thehue spectrum. In this particular case, the values were calculated quite manually by using AdobePhotoshop, adjusting the hues of the particular colors 72 degrees at a time to find the relevanthex codes. Most modern browsers, though, permit the use of HSL color values (http://www.w3.org/TR/css3-color/#hsl-color) , meaning that the work could have been done much more directly as isshown here (http://w3techcourses.com/svg_images/moreuse3.svg) .
Last modified: Sunday, 16 January 2011, 08:25 PM
Moodle Docs for this page (http://docs.moodle.org/en/mod/resource/view)
You are logged in as Marie-Claire Forgue (http://www.w3techcourses.com/user/view.php?id=476&course=4) (Logout(http://www.w3techcourses.com/login/logout.php?sesskey=nhnMD1zn5S) )
SVG_Jan11 (http://www.w3techcourses.com/course/view.php?id=4)
85

Introduction to SVG January 2011 (http://www.w3techcourses.com/course/report/log/index.php?chooselog=1&user=0&date=0&
id=4&modid=73) ◀ Jump to... ▶
W3C (http://www.w3techcourses.com/) ▶ SVG_Jan11 (http://www.w3techcourses.com/course/view.php?id=4) ▶ Assignments (http://www.w3techcourses.com/mod/assignment/index.php?id=4) ▶ Week 2 Assignment (http://www.w3techcourses.com/mod/assignment/view.php?id=73) ▶ View submitted assignments
Update this Assignment
View 40 submitted assignments (submissions.php?id=73)
Assignment for Week 2
Part 1
Begin by making a picture that looks like this (hint: letters may havefills and strokes, so if you find yourself drawing a "W" as a path, pleasejust see if you can find a font that is at least somewhat similar):
Part 2
See next if you can do this, with a rectangle around the result:
86

Part 3
Finally give this a try:
Part 4
If you had trouble getting the placement, orientation, and colorsexactly correct, describe, for each of the objects, the general strategyyou were trying to use.
You have not submitted anything yet
Edit my submission
Moodle Docs for this page (http://docs.moodle.org/en/mod/assignment/view)
You are logged in as Marie-Claire Forgue (http://www.w3techcourses.com/user/view.php?id=476&course=4) (Logout(http://www.w3techcourses.com/login/logout.php?sesskey=nhnMD1zn5S) )
SVG_Jan11 (http://www.w3techcourses.com/course/view.php?id=4)
87

Introduction to SVG January 2011 (http://www.w3techcourses.com/course/report/log/index.php?chooselog=1&user=0&date=0&
id=4&modid=84) ◀ Jump to... ▶
W3C (http://www.w3techcourses.com/) ▶ SVG_Jan11 (http://www.w3techcourses.com/course/view.php?id=4) ▶ Resources (http://www.w3techcourses.com/mod/resource/index.php?id=4) ▶ Week 3 Material as a Single File
Update this Resource
Introduction
What we'll be doing this week is sort of a transition between the basic and the more advancedaspects of SVG. We'll be learning how to fill regions with gradients (smooth transitions betweencolors), with parts of other shapes, with blends of other shapes, and with patterns or replicationsof other shapes. I'll also introduce clip-paths and masks. Among all these options, you have a lotof flexibility in graphic design and we'll just explore some of those options this week.
Let's get started with this material on gradients (http://www.w3techcourses.com/mod/resource/view.php?id=72) .
In the meantime take a look at this solution to the assignment from week 2(http://www.w3techcourses.com/mod/svg_images/assignment2.svg) . Note: The use of the functiongetBBox() was not strictly necessary, but it helps to find the center of the letter W, so that Icould rotate it relative to that center and then move it around from there. Remember thatmultiple transforms can be applied to a shape with those operations being applied, in order, fromright to left.
Gradients in SVG
Gradients are just great! They pretty much always look good, adding a professional feel toyour graphics. This owes much to the way the human eye perceives colors as described byscientists like Helmholtz (http://en.wikipedia.org/wiki/Hermann_von_Helmholtz) and Newton(http://en.wikipedia.org/wiki/Isaac_Newton) . The 19th century artist Georges Seurat(http://en.wikipedia.org/wiki/Georges_Seurat) did a lot to popularize the underlying scientificwork showing how scenes may be simulated by collections of points of colored light. Seurat'spoints are numerous and their size is infinitesimal in the limiting sense. Translated into theworld of computer imagery that implies big file sizes. But if we decompose regions not intomonochromatic points nor regions (a process known as posterization (http://en.wikipedia.org/wiki/Posterization) ) but into regions of smooth transition (namely gradients), the artwork maybecome more realistic as its description becomes more parsimonious. In other words, we cantransmit less data and yet present graphics on any size screen that humans perceive as beingof higher quality. Excitingly, those descriptions can convey semantics as well as renderinginstructions for the browser and it's this that makes SVG amenable to indexing by searchengines in a way that can't readily be applied to things like GIF, JPG or PNG. If you'reinterested in the broader topic of visual perception and information transmission you might
88

like to see some of the work of Marvin Minksy (http://courses.media.mit.edu/2004spring/mas966/Minsky%201974%20Framework%20for%20knowledge.pdf) or the articles here(http://quantombone.blogspot.com/2010/08/beyond-pixel-wise-labeling-blocks-world.html) and here(http://srufaculty.sru.edu/david.dailey/engraver.htm) for a more modern take.
Let's get started with the basics here. (For further reading, you can, of course, see therelevant section (http://www.w3.org/Graphics/SVG/IG/resources/svgprimer.html#gradients) of theSVG primer.)
-----------------------------------------------------------------------------------------------
Gradients applied to a path
<path d="M 100 200 200 200 150 100 z"
stroke="black" stroke-width="2" fill="url(#g)" />
linear radial
<linearGradient id="g"> <stop offset="0" stop-color="white"/> <stop offset="1" stop-color="black"/></linearGradient>
<radialGradient id="g"> <stop offset="0" stop-color="white"/> <stop offset="1" stop-color="black"/></radialGradient>
White is applied from left to rightWhite is applied from center to
outside
The object to which the gradient will be applied uses a local url (similar to the xlink:href wesaw earlier with the <use> object) as the attribute value of the "fill" attribute, hencedemonstrating that an object may have a color or a gradient as its fill, but not both.
Note that in the linear gradient above, two "stops" have been built. This means the gradienthas two colors applied to it, one for each stop. Those colors are determined by thestop-color attribute. The offset attribute determines where between 0% and 1=100% of theway from left to right, the associated color (in this case black or white) should be applied.That is, white is applied at the leftmost part of the triangle, while black is applied to therightmost part. Shades of grey gradually darken as we move to the right, with a grayscalevalue of 128/256 or 50% occurring halfway across the image or along the line where x=150.For the radial gradient, the midpoint of the bounding rectangle around the path is chosen asthe center. From there we apply our first stop-color (zero percent of the way out toward thecorners of the bounding box). Black will be applied to the four corners of the boundingrectangle, with shades of grey gradually lightening as we move toward the center.
More <stop>s
89

The number of stops in a gradient need not be limited to two. The rectangles below are 200pixels wide. That means the linear gradient is white at 0 pixels and 150 pixels from the left,and black at 50 and 200 pixels.
Four stops apiece for linear and radialgradients applied to <rect>
<stop offset="0" stop-color="white"/>
<stop offset=".25" stop-color="black"/>
<stop offset=".75" stop-color="white"/>
<stop offset="1" stop-color="black"/>
Varying angles and centers
Next, we observe that we can change the angle that a linear gradient traverses its fill, or thecenter point from which the waves of the radial gradient ripple outward.
The linear gradient in theunderlying layer has several stopsin black, white and grey. Ordinarilythe color-bands would runvertically. We have rotated theirangle 30 degrees though with agradientTransform, rotated aboutthe center (50%,50%) of the<rect>.
The radial gradient inthe foreground has hadits fx (the x position ofits focus) changed to95% meaning thatinstead of concentricrings being centeredabout the middle of the<rect>, they are nowoffset to its extremeright side.
<linearGradient id="l"
gradientTransform="rotate(30 .5 .5)">
<stop offset=".0" stop-color="black"/>
<stop offset=".1" stop-color="white"/>
<stop offset=".2" stop-color="black"/>
<stop offset=".3" stop-color="grey"/>
<stop offset=".4" stop-color="black"/>
<stop offset=".7" stop-color="white"/>
<stop offset=".9" stop-color="black"/>
</linearGradient>
<rect fill="url(#l)" width="200"
height="200"/>
<radialGradient id="r" fx=".95">
<stop offset=".1"
stop-color="white"/>
<stop offset=".6"
stop-color="black"/>
<stop offset=".9"
stop-color="white"/>
<stop offset="1"
stop-color="black"/>
</radialGradient>
<rect fill="url(#r)" y="60"
width="200" height="80"/>
90

Stop-opacity
In addition to specifying the color of a <stop> within a gradient, we may also specify itsopacity through an attribute known as stop-opacity. We may thus make gradients act likedifferential masks, gradually allowing an image underneath to fade in to view.
<stop offset=".8" stop-color="black" stop-opacity="0.5"/>
Stop-opacity (like regular opacity of drawn objects) takes on values between 0 (transparent)and 1.0 (opaque).
Here are some examples in which stop-opacity has been used with gradients to allowdiffering amounts of what is underneath to be visible along a partly transparent gradient.
A series of examples of using gradients in SVG
Static image (jpg) linked to SVG original Comments and Code
(http://www.w3techcourses.com/svg_images/gradients1.svg)
Two squares with color gradients shownseparately and superimposed
(http://www.w3techcourses.com/svg_images/gradients1.svg)
In this first example we see twodifferent gradients defined and used inseparate images. By superimposing oneatop the other, a tricolor gradient iscreated. Notice the use of thetransform attribute to control thedirection in which the gradient isapplied.
<linearGradient id="r" ><stop offset="0" stop-color="red"/><stop offset="1" stop-color="green"/></linearGradient>
<linearGradient id="t"gradientTransform="rotate(90,.5,.5)"><stop offset="0" stop-color="white"stop-opacity="0"/><stop offset="1" stop-color="#208" /></linearGradient>
<rect x="10" y="10" width="100"height="100" fill="url(#r)" /><rect x="120" y="10" width="100"height="100" fill="url(#t)" />
<rect x="60" y="120" height="100"width="100" fill="url(#r)"/><rect x="60" y="120" height="100"width="100" fill="url(#t)"/>
91

(http://www.w3techcourses.com/svg_images/gradients2.svg)
Three squares with color gradients shownseparately and superimposed
(http://www.w3techcourses.com/svg_images/gradients2.svg)
This is similar to the previous examplebut uses more than two colors in thegradient as well as the stop-opacityattribute.
<linearGradient id="r" ><stop offset="0" stop-color="red"/><stop offset=".5"stop-color="yellow"/><stop offset="1" stop-color="green"/></linearGradient>
<linearGradient id="t"gradientTransform="rotate(90,.5,.5)"><stop offset="0" stop-color="#008" /><stop offset=".4" stop-color="cyan"stop-opacity="0"/><stop offset=".6" stop-color="cyan"stop-opacity="0"/><stop offset="1" stop-color="#22a" /></linearGradient>
<linearGradient id="s"gradientTransform="rotate(45,.5,.5)"><stop offset="0" stop-color="#008" /><stop offset=".45" stop-color="red"stop-opacity="0"/><stop offset=".55" stop-color="green"stop-opacity="0"/><stop offset="1" stop-color="#22a" /></linearGradient>
<rect x="10" y="10" height="100"width="100" fill="url(#r)"/><rect x="120" y="10" height="100"width="100" fill="url(#t)"/><rect x="230" y="10" height="100"width="100" fill="url(#s)"/>
<rect x="120" y="120" height="100"width="100" fill="url(#r)"/><rect x="120" y="120" height="100"width="100" fill="url(#t)"/><rect x="120" y="120" height="100"width="100" fill="url(#s)"/>
92

(http://srufaculty.sru.edu/david.dailey/svg/SVGOpen2008/barberPole.svg)
Moving stripes of red white and blue as on abarber pole (http://srufaculty.sru.edu/david.dailey
/svg/SVGOpen2008/barberPole.svg)
Simulating the appearance of a rotatingcylinder.
From a couple of years ago(http://srufaculty.sru.edu/david.dailey/svg/SVGOpen2007/SVGOpen2007.htm) ,this example is now working as ananimation in IE/ASV, FF4.0b (but notFF3.x), Chrome, Safari, and Opera(although after you've followed the linkyou may have to hit 'refresh' for somereason). Just one simple gradient isused to impart a slightly asymmetricsheen that fades into darkness at thesides.
<linearGradient id="gradient1" ><stop offset="0" stop-color="black"/><stop offset="0.3" stop-color="white"stop-opacity="0"/><stop offset="0.4" stop-color="white"stop-opacity=".8"/><stop offset="0.6" stop-color="white"stop-opacity=".0"/><stop offset="1" stop-color="black"/></linearGradient>
(http://srufaculty.sru.edu/david.dailey/svg/gradientweave.svg)
Weaving green warp with brown weft(http://srufaculty.sru.edu/david.dailey
/svg/gradientweave.svg)
This example shows how theappearance of weaving can beaccomplished with a number of SVGelements linearly related to thenumber of threads (rather than relatedto the square of the number ofthreads as in last week's exercise). Inthe case of the dark green and the tanthreads, a gradient is applied withdiscrete boundaries between opacityand transparency to give the illusion ofthe thread disappearing behind theother. For example:
<stop offset=".20"stop-color="black"/><stop offset=".21"stop-color="#b83"/> (#b83 is thiscolor)<stop offset=".29"stop-color="#b83"/>
93

<stop offset=".30"stop-color="black"/><stop offset=".30" stop-color="#b83"stop-opacity="0"/><stop offset=".40" stop-color="#b83"stop-opacity="0"/><stop offset=".40"stop-color="black"/>
Simulating a complex gradient.Overlaid here are three rectangleseach having different rotations of acommon gradient striated withtransparency.
<linearGradient id="r" fy=".55"gradientTransform="rotate(90,.5,.5)"><stop offset="0" stop-color="red" /><stop offset=".3" stop-color="black"/><stop offset=".5" stop-color="white"/><stop offset=".6" stop-color="black"/><stop offset=".7" stop-color="white"/><stop offset="1"stop-color="brown"/></linearGradient>
<linearGradient id="q"><stop offset="0" stop-color="red"stop-opacity=".4"/><stop offset=".3" stop-color="black"stop-opacity="0"/><stop offset=".5" stop-color="white"stop-opacity=".3"/><stop offset=".7" stop-color="black"stop-opacity=".5"/><stop offset=".8" stop-color="white"stop-opacity=".5"/><stop offset="1"stop-color="brown"/></linearGradient>
<linearGradient id="s"gradientTransform="rotate(135,.5,.5)"><stop offset="0" stop-color="red"stop-opacity=".4"/>
94

<stop offset=".3" stop-color="black"stop-opacity="0"/><stop offset=".5" stop-color="white"stop-opacity=".3"/><stop offset=".7" stop-color="black"stop-opacity=".5"/><stop offset=".8" stop-color="white"stop-opacity=".5"/><stop offset="1"stop-color="brown"/></linearGradient>
<rect x="10" y="10" height="100"width="100" fill="url(#r)"/><rect x="120" y="10" height="100"width="100" fill="url(#q)"/><rect x="230" y="10" height="100"width="100" fill="url(#s)"/>
<rect x="120" y="120" height="100"width="100" fill="url(#r)"/><rect x="120" y="120" height="100"width="100" fill="url(#q)"/><rect x="120" y="120" height="100"width="100" fill="url(#s)"/>
Clip-paths* (http://www.w3techcourses.com/mod/resource/view.php?id=79#footnote) andMasks
Like the slightly more complex <mask> (that we'll introduce later), the <clipPath> tag givesus a way to define a collection of shapes that may be used to carve a given figure into moreinteresting shapes. A clip-path may be applied to any drawn objects in SVG including groupsof objects, and the clip-path itself can consist of many shapes. Masks are a lot like clip-paths,but more flexible. We'll show just one simple example of masks here, and let the SVG Primerlead you further if you are interested.
Some of the experiments with gradients might suggest that we can use stop-opacity of agradient to simulate certain kinds of cropping or clipping.
In particular let's use a radial gradient to restrict the appearance of a rectangular bitmap toan elliptical region.
95

<image x="15%" width="30%" y="15%"height="30%"xlink:href="fireenginefromWebsters1911.gif"/>
<radialGradient id="r" fy=".55" ><stop offset=".3"stop-opacity="0"/><stop offset=".8"stop-color="black" /><stop offset=".9"stop-color="white" /><stop offset="1"stop-color="brown"/></radialGradient><rect x="15%" y="15%"height="30%"width="30%" fill="url(#r)"/>
<radialGradient id="r" fy=".55" ><stop offset=".3" stop-opacity="0"/><stop offset=".8" stop-color="black" /><stop offset=".9" stop-color="white" /><stop offset="1" stop-color="brown"/></radialGradient><image x="15%" width="30%" y="15%"height="30%"xlink:href="fireenginefromWebsters1911.g/><rect x="15%" y="15%" height="30%"width="30%" fill="url(#r)"/>
A simple bitmap imported intoSVG through <image>
A gradient with transparentcenter.
Overlaying the two
This serves to illustrate some of the power of gradients, but it should be fairlystraightforward to conclude that using linear and radial gradients (the only kind available inSVG at present) to "clip" an image down to an arbitrary shape will not be easy!
Here's the above effect but swapping in a different image:
A similar effect can be just as easily accomplished in the following way
96

<clipPath id="CP"><ellipse cx="29%" cy="26%" rx="10%" ry="8%"/></clipPath><image y="0" x="10%" width="40%" height="55%"xlink:href='p17.jpg' clip-path="url(#CP)"/>
Picture of clipped bitmap
Basically, we can see from the above example, that like gradients, tags are put inside a<clipPath> and then the clip-path can be applied (through its "id") to the object or group ofobjects to be clipped.
Let's try something like that with a group of objects:
<clipPath id="CP"><ellipse cx="29%" cy="26%" rx="10%" ry="8%"/></clipPath>
<g clip-path="url(#CP)"><image y="0" x="10%" width="40%" height="55%"xlink:href='p17.jpg' /><rect y="0" x="15%" width="10%" height="55%" fill="purple"opacity=".6" /><rect y="0" x="33%" width="10%" height="55%" fill="yellow"opacity=".8" /></g>
Next, we will see an example that clearly differentiates between what we might accomplishwith clip-paths as opposed to gradients. In the following example we insert numerous ellipsesinto the clip-path showing that the clipped regions may be complex.
<clipPath id="CP"><ellipse cx="19%" cy="25%" rx="2.5%" ry="4%"/><ellipse cx="24%" cy="25%" rx="2.5%" ry="4%"/><ellipse cx="29%" cy="25%" rx="2.5%" ry="4%"/><ellipse cx="34%" cy="25%" rx="2.5%" ry="4%"/><ellipse cx="39%" cy="25%" rx="2.5%" ry="4%"/></clipPath><g clip-path="url(#CP)"><image y="0" x="10%" width="40%" height="55%"xlink:href='p17.jpg' /><rect y="0" x="15%" width="10%" height="55%"fill="purple" opacity=".6" /><rect y="0" x="33%" width="10%" height="55%"fill="yellow" opacity=".8" /></g>
97

Following this example, one might be tempted to try something like the following:
<clipPath id="CP"><g id="U"><ellipse cx="19%" cy="25%" rx="2.5%" ry="4%" /><ellipse cx="24%" cy="25%" rx="2.5%" ry="4%" /><ellipse cx="29%" cy="25%" rx="2.5%" ry="4%" /><ellipse cx="34%" cy="25%" rx="2.5%" ry="4%" /><ellipse cx="39%" cy="25%" rx="2.5%" ry="4%" /></g><use xlink:href="#U" transform="translate(0,40)" /><use xlink:href="#U" transform="translate(0,80)" /></clipPath>
However, by the SVG specification 1.1 (http://www.w3.org/TR/SVG/masking.html#EstablishingANewClippingPath) , the content of a clipPath cannot involve eithergroups (<g>) or complex uses (<use>). A clip-path is limited to either simple drawn objects,or to reuses of simple drawn objects. If we wanted to reuse content as above, we could doso through a <mask> as follows:
<mask id="CP"><g id="U"><ellipse cx="19%" cy="25%" rx="2.5%" ry="4%"fill="white"/><ellipse cx="24%" cy="25%" rx="2.5%" ry="4%"fill="white"/><ellipse cx="29%" cy="25%" rx="2.5%" ry="4%"fill="white"/><ellipse cx="34%" cy="25%" rx="2.5%" ry="4%"fill="white"/><ellipse cx="39%" cy="25%" rx="2.5%" ry="4%"fill="white"/></g>
<use xlink:href="#U" transform="translate(0,40)" /><use xlink:href="#U" transform="translate(0,80)" /></mask>
<g mask="url(#CP)"><image y="0" x="10%" width="40%" height="55%"xlink:href='p17.jpg' /><rect y="0" x="15%" width="10%" height="55%"fill="purple" opacity=".6" /><rect y="0" x="33%" width="10%" height="55%"fill="yellow" opacity=".8" /></g>
In this example the white ellipses act exactly like the positive parts of the clip-path that
98

include content of the affected image. Parts of the images corresponding to black or unfilledparts of the mask are completely excluded.
While a clip-path declares that content is either inside it (and hence visible) or outside it (andhence invisible) a mask allows degrees of visibility, depending on the brightness of the objectsinside the mask. Herewith is a fairly complex example that places a reflected gradient inside amask so that opacity values of the affected image undergo gradual transitions across thebands of the gradient:
<radialGradient id="G1" cx="29%" cy="27%" r="45"fy="50%"spreadMethod="reflect" gradientUnits="userSpaceOnUse"><stop offset="0" stop-color="grey"/><stop offset="0.5" stop-color="white" /><stop offset="1" stop-color="black"/></radialGradient><mask id="M"><ellipse cx="29%" cy="35%" rx="10%" ry="20%"fill="url(#G1)"/></mask>
<rect y="140" x="23%" width="5%" height="55%" fill="cyan"/><rect y="140" x="30%" width="5%" height="55%"fill="green" /><g mask="url(#M)" transform="translate(0,90)"><image y="0" x="10%" width="40%" height="60%"xlink:href='p17.jpg' /><rect y="0" x="15%" width="10%" height="60%" fill="purple"opacity=".6" /><rect y="0" x="33%" width="10%" height="60%" fill="yellow"opacity=".8" /></g>
*I am never quite sure whether to type "clippaths" or "clip-paths." In SVG there is a tag<clipPath> and an attribute clip-path. To my way of thinking , "clip-path" sounds a bit moreconsistent with English spelling (if anyone would be so brave as to suggest that this strangelanguage has anything resembling spelling rules). I probably will not be consistent with myself,though.
Patterns
In one of the last examples (http://www.w3techcourses.com/svg_images/imageClip4.svg) pertaining toclip-paths and masks, we tried to view an image through a series of "holes" aligned in a grid.Rather than building such content manually or even with judicious application of the <use> tag,there is another way of producing "repeating" content: the <pattern> tag.
99

Before we undertake such an exercise, let's take a look at Patterns, as shown in the SVG Primer:
Like a gradient, a pattern defines a fill method that may be applied to a given shape. In the case ofa pattern though, we may specify some graphics that fill a given rectangle within a pattern, andthen allow the pattern to replicate across the region being filled. An example should make itfairly clear.
We define three identical ellipses in close proximity to one another:
<g id="ovals3" fill="#835" stroke-width=".7" stroke="#006"><ellipse cx="16" cy="8" rx="4" ry="2"/><ellipse cx="8" cy="3" rx="4" ry="2"/><ellipse cx="5" cy="11" rx="4" ry="2"/></g>
Note that these ellipses all fit inside the rectangle (0,0) to (22,15) without any of the ellipsesextending past the edges. Now, we will build a pattern-space: a rectangle of size 22 by 15, inwhich the three ovals are placed. (We use the patternUnits attribute to make sure thecoordinates of the pattern conform to the absolute viewing window rather than to fractions ofthe object being filled.)
<pattern id="Oval" patternUnits="userSpaceOnUse" width="22" height="15" ><use xlink:href="ovals3"/></pattern>
We then define a region (in this case another ellipse) and let the pattern called "Oval" be used tofill it.
<ellipse fill="url(#Oval)" cx="50%" cy="50%" rx="20%" ry="14%"/>
Now we put it all together:
The definition and use of a <pattern>
The pattern itself (scale x 6):
<g id="ovals3" fill="#835" stroke-width=".7" stroke="#006"> <ellipse cx="16" cy="8" rx="4" ry="2"/> <ellipse cx="8" cy="3" rx="4" ry="2"/> <ellipse cx="5" cy="11" rx="4" ry="2"/></g>
Applied to a region
<defs> <pattern id="Oval" patternUnits="userSpaceOnUse" width="22" height="15" > <use xlink:href="ovals3"/> </pattern></defs><ellipse fill="#7ac" cx="50%" cy="50%" rx="20%" ry="14%"/><ellipse fill="url(#Oval)" cx="50%" cy="50%" rx="20%" ry="14%"/>
100

This example may be seen at http://srufaculty.sru.edu/david.dailey/svg/newstuff/pattern1d.svg(http://srufaculty.sru.edu/david.dailey/svg/newstuff/pattern1d.svg)
In the above example, note that another ellipse (the blue one) has been placed under the patternjust to help see how the pattern, when not completely filled, is actually transparent.
Next, I will encourage you to try to replicate this first example, as shown above, or below, orhere (http://srufaculty.sru.edu/david.dailey/svg/newstuff/pattern1d.svg) . Next, try to "play" with thespacing (the width and height of the pattern tag as well as the number, size, and placement ofellipses) to see if you can design a pattern which is not so obviously a pattern to the eye. Howabout sharing any designs you can discover which tessellate nicely, but which are not so obviousin their repetition, with the group through the discussion forums? Likewise, if you find anyarticles that discuss the art and science of hiding the repetition of repeating patterns fromobvious detection by the human observer, please share that as well, since the topic oftessellations (http://en.wikipedia.org/wiki/Tessellation) is one that is rather important in art andarchitecture (and it intrigues me)!
<pattern id="OvalPattern"patternUnits="userSpaceOnUse"width="100" height="70" ><g id="ovals3" transform="scale(4)" ><ellipse cx="19" cy="9" rx="5" ry="2"fill="#835"/><ellipse cx="11" cy="3" rx="5" ry="2"fill="#358"/><ellipse cx="6" cy="13" rx="5" ry="2"fill="#583"/></g></pattern><ellipse fill="url(#OvalPattern)"stroke="black" stroke-width="2"cx="50%" cy="50%" rx="30%"ry="25%"/>
Example of <pattern> from SVG Primer: simplified code and (improved?) appearance.I put a stroke around the shape to make the ellipse clearer, gave each of the ellipses
its own color and magnified the pattern through scaling.
See if you can use either the above code or that in the primer to make something like this andthen to improve on it!
101

Here's one more example by way of illustration. Let's use a series of shapes inside a pattern toclip parts out of an image which itself has been clipped down to an ellipse.
Step 1: Let us begin with the first example from the lesson onclip-paths, only expand its size a bit (to prepare for putting patternsinside it):
<clipPath id="CP"><ellipse cx="36.5%" cy="32%" rx="12%" ry="18%"/></clipPath><image y="0" x="10%" width="55%"height="65%"xlink:href='p17.jpg' clip-path="url(#CP)"/>
Step 2: Now let's make another ellipse (placing the code justbelow that of the <image> applying our pattern from above to thenew ellipse:
<pattern id="OvalPattern"patternunits="userSpaceOnUse">width="100" height="70" ><g id="ovals3" transform="scale(4)" ><ellipse cx="19" cy="9" rx="5" ry="2" fill="#835"/><ellipse cx="11" cy="3" rx="5" ry="2" fill="#358"/><ellipse cx="6" cy="13" rx="5" ry="2" fill="#583"/></g></pattern>
<clipPath id="CP"><ellipse cx="36.5%" cy="32%" rx="12%" ry="18%"/></clipPath>
<image y="0" x="10%" width="55%" height="65%"xlink:href='p17.jpg' clip-path="url(#CP)"/>
<ellipse cx="36.5%" cy="32%" rx="12%" ry="18%"fill="url(#OvalPattern)"/>
Step 3: What we might be interested in doing is to take the ellipsefilled with the pattern and move it inside the <clipPath) as follows:
<clipPath id="CP"><ellipse cx="36.5%" cy="32%" rx="12%" ry="18%"fill="url(#OvalPattern)"/></clipPath>
However, a quick check shows that doesn't work! The reason isthat a clip-path cannot contain such complex content. The thingsinside a clip-path are really just the outlines of the shapes. The fillsare ignored!
102

Step 4:So what we do instead is to use a mask instead of aclip-path. Doing that, should result in a series of holes throughwhich we can see the underlying face, but you'll note that the facewill appear quite dim. That's because of the way a mask works. Wewill need to change all the colors from dark blues, purples andgreens to white! I also add another ellipse behind the other, so thata stroke will be visible around the ellipse. Once that is done, theplacement and size of the ellipses is manipulated a bit to make theresult a bit more interesting.
<pattern id="OvalPattern" patternUnits="userSpaceOnUse"width="100" height="70" ><g id="ovals3" transform="scale(4)" fill="white"><ellipse cx="20" cy="10" rx="5" ry="6" /><ellipse cx="10" cy="4" rx="6" ry="4" /><ellipse cx="6" cy="12" rx="5" ry="4" /></g></pattern>
<ellipse cx="36.5%" cy="32%" rx="12%" ry="18%" fill="none"stroke="#d88" stroke-width="5"/>
<mask id="CP"><ellipse cx="36.5%" cy="32%" rx="12%" ry="18%"fill="url(#OvalPattern)"/></mask>
<image y="0" x="10%" width="55%" height="65%"xlink:href='p17.jpg' mask="url(#CP)"/>
To extend these ideas a bit, here are a couple of examples (example1 (http://srufaculty.sru.edu/david.dailey/svg/newstuff/pattern4.svg) , example2 (http://www.w3techcourses.com/svg_images/pattern2.svg) ) of more complex uses of pattern (in conjunction with animation) for your perusaland analysis! One of them takes something much like the last example but then lets the ovalsmove about using SMIL animation.
Last modified: Sunday, 23 January 2011, 11:41 PM
Moodle Docs for this page (http://docs.moodle.org/en/mod/resource/view)
You are logged in as Marie-Claire Forgue (http://www.w3techcourses.com/user/view.php?id=476&course=4) (Logout(http://www.w3techcourses.com/login/logout.php?sesskey=nhnMD1zn5S) )
SVG_Jan11 (http://www.w3techcourses.com/course/view.php?id=4)
103

Introduction to SVG January 2011 (http://www.w3techcourses.com/course/report/log/index.php?chooselog=1&user=0&date=0&
id=4&modid=101) ◀ Jump to... ▶
W3C (http://www.w3techcourses.com/) ▶ SVG_Jan11 (http://www.w3techcourses.com/course/view.php?id=4) ▶ Assignments (http://www.w3techcourses.com/mod/assignment/index.php?id=4) ▶ New Assignment 3 (http://www.w3techcourses.com/mod/assignment/view.php?id=101) ▶ View submitted assignments
Update this Assignment
View 39 submitted assignments (submissions.php?id=101)
Assignment for Week 3
Part 1
Begin with your own submission for the lastpart of the assignment for Week 2 , (or if you prefer, youcan use the example that I used (http://granite.sru.edu/%7Eddailey/week3/assign2.svg) to create that assignment) and using just the shapes(or geometry) of the "letters," fill it gradients thatresemble this.
Part 2
See next if you fill the letters to resemble this (note: itmay look rather different in different browsers, but this is how itshould look, withthis particular instance having been taken from Safari which seems toget it almost right):
http://www.w3techcourses.com/svg_images/A2A.png"(http://www.w3techcourses.com/svg_images/A2A.png") ;src="WoW1.png">
104

Part 3
Finally give this a try:
Part 4 -- optional
If you have time, create something using <clipPath> and/or <mask>
Available from: Wednesday, 26 January 2011, 05:20 PM
You have not submitted anything yet
Edit my submission
105

Introduction to SVG January 2011 (http://www.w3techcourses.com/course/report/log/index.php?chooselog=1&user=0&date=0&
id=4&modid=93) ◀ Jump to... ▶
W3C (http://www.w3techcourses.com/) ▶ SVG_Jan11 (http://www.w3techcourses.com/course/view.php?id=4) ▶ Resources (http://www.w3techcourses.com/mod/resource/index.php?id=4) ▶ Week 4 as a single file
Update this Resource
Week 4: Introductory comments
You'll note that in week 3, clip-paths and masks were introduced, but the assignment did notactually require them. (Though a few students found a way to use them in useful ways.) This wasour attempt to spread the material out into more manageable chunks. I've entitled this week"Light and Heavy Lifting since we'll review clip-paths and masks, and introduce one of the mostelegant ways of doing animation: the light and crisp SVG/SMIL, and also get into one of the mostcomplex of SVG's features: filters.
Let me begin with a personal anecdote that may give a sense of what I mean by complexity inthis context. If you don't like personal anecdotes, please skip. It is not crucial to yourunderstanding!
Three years ago, I went to Tokyo for the 5th International SVG Open(http://www.svgopen.org/2007/) . I had proposed to teach a workshop on SVG Filters atthat conference and was quite pleased that my workshop was accepted! On the dayof the workshop I walked into the room at Tokyo's Keio Univeristy expecting to seea sea of novices. Lo and behold the participants were not at all novices, but insteadwere almost exclusively members of the SVG Working Group! Instead of novices,my students were the world's experts! Nothing like a little pressure to sharpenone's focus. Somewhat to my relief I discovered that at least some of them did notreally know filters "that well." At this year's 8th International SVG Open(http://www.svgopen.org/2010/) , in Paris, I mustered my courage and again offered a"filters workshop." This time, the students were, primarily, novices (with a handful ofexperts — no doubt present to taunt me!). In working through my three hourpresentation, it became clear that not all students knew what Gaussian blur was; notall knew what convolution matriceswere; and not all were conversant in AdobePhotoshop and Adobe Illustrator. Not all knew about RGB channels and alphachannels!
Nor do I expect that you do.
One of the workshop attendees was a friend, Doug Schepers (http://www.w3.org/People/all#schepers) , who happens be the W3C contact to the SVG Working Group(http://www.w3.org/Graphics/SVG/) . Doug said that one of the problems he had withfilters was in knowing which ones to use and how to combine them to producedesired effects. Then it dawned on me! Using filters in SVG is like learning to usefilters in Adobe Photoshop: it takes scores of hours of experimentation to do eithereffectively. And while there are dozens of books on the use of special effects in
106

Photoshop, there are none that focus on filters in SVG. It is a complicated topic,worthy of its own book!
In short, we'll be providing a shallow overview to some of this week's topics. But hopefully, thisoverview will be broad enough to give you a sense of the power that lies within. If successfulyou'll want to start experimenting and learning more. It will take time, so be prepared to testyour own patience. The results though can be quite fascinating!
"Students!" What a funny word. We're all students. I've been learning a lot from what you'vewritten and the work you've submitted! So, how to keep everyone happy, challenged, and yet notoverwhelmed? It is a difficult line to walk for any instructor, and even after one hundred andeight years of college teaching (am I really that old?) I still have not learned the canonical methodfor answering the question.
SVG can be used for so much! As I wrote earlier, I am an enthusiast! My opinions on what SVGcan be (http://srufaculty.sru.edu/david.dailey/svgOpen2009/SVgBigTalk.html) are almosthyperbolic(thankfully, stopping just short of hyperbole). If SVG can help you to bring your ideas (visual orotherwise) forward more quickly than the paintbrush or the novel or the camera then you toomight become an enthusiast!
Review of Clip-paths and Masks
Exercise in solving a clipping problem.
Suppose we're interested in clipping out just a part of some other SVG content, as in thefollowing diagram:
Well, then, last week's lesson on clip-paths (http://www.w3techcourses.com/mod/resource/view.php?id=79) provides the means to solve such a thing.
But suppose, on the other hand, we're interested in reversing the segment that is clipped so that instead of clipping to the inside of a region, we clip to the outside of the region, how might weaccomplish that?
Let's start with some SVG content and apply a clip-Path.
Here's the SVG material before and after clipping it to an ellipse:
before clipping: a face, a purple star and an orange H, all atop a polkadot background. The scene itself has been clipped to an ellipse andoverlaid across a pattern consisting of black and red lines..
after clipping: we clip to an oval, allowing the polkto be visible outside the new clipping region.
107

The original file can be seen here (http://granite.sru.edu/%7Eddailey/svg/W3C/clipMaskExample0.svg)and has been annotated so that you may understand the various things that have been doneinside it. The basic idea is this:
<clipPath id="CP"><ellipse [with attributes]></clipPath>
<g>[background with polka dots and other things that lie in behind the
material to be clipped]</g>
<g clip-path="url(#CQ)"><image[with attributes]/><text [with
attributes]>H</text><path [star shaped.]></g>
The actual example may be seen here (http://granite.sru.edu/%7Eddailey/svg/W3C/clipMaskExample.svg) .
Now suppose that instead of cropping to the material inside the new clipping region, we wantedto clip away that material and instead clip to the material outside the inner ellipse, leaving a holein the old content, throught which the polka-dotted background (or even the checkeredbackground, if we prefer) could be seen, such as in these two examples.
Well, while it might be nice to simply apply a <clipPath> that might have an attribute that sayssomething like clip-region="outside" with the default being clip-region="inside", no such flagexists on clip-paths. Just as in the examples in the previous lesson on clip-paths, we have to turnto the more flexible <mask>.
108

Instead of what we did above with the clip-path, here's the basic idea:<mask id="CP">
<rect x="0" y="0" height="100%" width="100%" fill="white" />
<ellipse fill="black" [other attributes]>
</mask>
<g>[background with polka dots and other things that lie in behind the
material to be clipped]
<[region with crosshatching]>
<[region with polka-dots]>
</g>
<g mask="url(#CQ)"><image[with attributes]/><text [with
attributes]>H</text><path [star shaped.]></g>
This example may be seen here (http://granite.sru.edu/%7Eddailey/svg/W3C/clipMaskExample2.svg) .
Things that are inside a <mask> and colored black will clip away from that portion of the maskedcontent. Things that are colored white will leave the underlying content unaffected (withintermediate shades resulting in varying degrees of transparency). Therefore, we filled the entiremasking region with white, except for the black ellipse which we wish to cut out of the affectedcontent.
To cut a hole all the way through to the crosshatched pattern behind, we merely need to movethe background region with the polka-dots into the group to which the mask is applied:
<mask id="CP">
<rect x="0" y="0" height="100%" width="100%" fill="white" />
<ellipse fill="black" [other attributes]>
</mask>
<g>[background with polka dots and other things that lie in behind the
material to be clipped]
<[region with crosshatching]>
</g>
<g mask="url(#CQ)">
<[region with polka-dots]>
<image[with attributes]/><text [with attributes]>H</text><path [star
shaped.]>
</g>
This example may be seen here (http://granite.sru.edu/%7Eddailey/svg/W3C/clipMaskExample3a.svg) .
Now, of course, one could also apply a complex path (with multiple M commands and either Q,C or A subcommands) but as we learned from last week's lesson, those are not always theeasiest things to design!
Introduction to SVG Filters
As alluded to in this week's introduction, filters are a complex topic. There are many kinds of
109

filters of varying complexity. One may chain filters together in rather complex ways, storingintermediate results in temporary locations and then combine those temporary results togetherusing a variety of methods of blending and composition. Rather than thinking of single filters, oreven chains of filters, think of a flow-chart of filters hooked together in a network.
As in Adobe Photoshop in which one can overlay different layers while applying different filtersto each and then extract color channels from those layers and then calculate difference betweenthe resulting layers, such work can be done in SVG. The difference is that in SVG it can be doneprogrammatically and dynamically on a web page through script or animation.
After reading the first parts of the SVG Primer's treatment of filters and filter primitives, let's getstarted by building a fairly interesting example using the simplest of the filter primitives:<feColorMatrix> and <feGaussianBlur>.
Important Note: Though Firefox (3 and 4 beta) provide fairly good support for filters, andalthough Webkit (Safari and Chrome) are starting to implement filters, you will need eitherOpera or the Adobe plugin (ASV) for Internet Explorer to properly view the most complex ofthese examples! I have put a ——break—— in the document to indicate how far I was able toget using Firefox 4 as my viewer. Beyond that, either Opera or IE/ASV is needed. Safari andChrome users … well you may want to try the recent nightly builds of Webkit and report backon your success in viewing these effects. Also, IE9's first release, Microsoft has said, will not besupporting filters. They are rather hard to implement, it appears!
Let's begin by displaying an unfiltered image next to a filtered version of the same image(http://www.w3techcourses.com/svg_images/filter1.svg) :
<filter id="F"><feColorMatrix type="saturate"values="0" /></filter>
<image id="I" x="0" y="0"width="200" height="200"preserveAspectRatio="none"xlink:href="p17.jpg" />
<use xlink:href="#I"filter="url(#F)"transform="translate(200,0)" />
In this case we have used <feColorMatrix> to simply desaturate a color image and turn it into agreyscale image. Note: I think the Primer has an example which leaves off the values attribute.That still works in IE/ASV, and I believe it used to work in Opera, but to make it work in modernbrowsers the values attribute is required for this to have any effect!
Now, let's make a sort of checkerboard with these two images (http://www.w3techcourses.com/svg_images/filter2.svg) . (I had the idea that juxtapostion of many greyscale and color images mightbe intriguing. You can see if it is!)
110
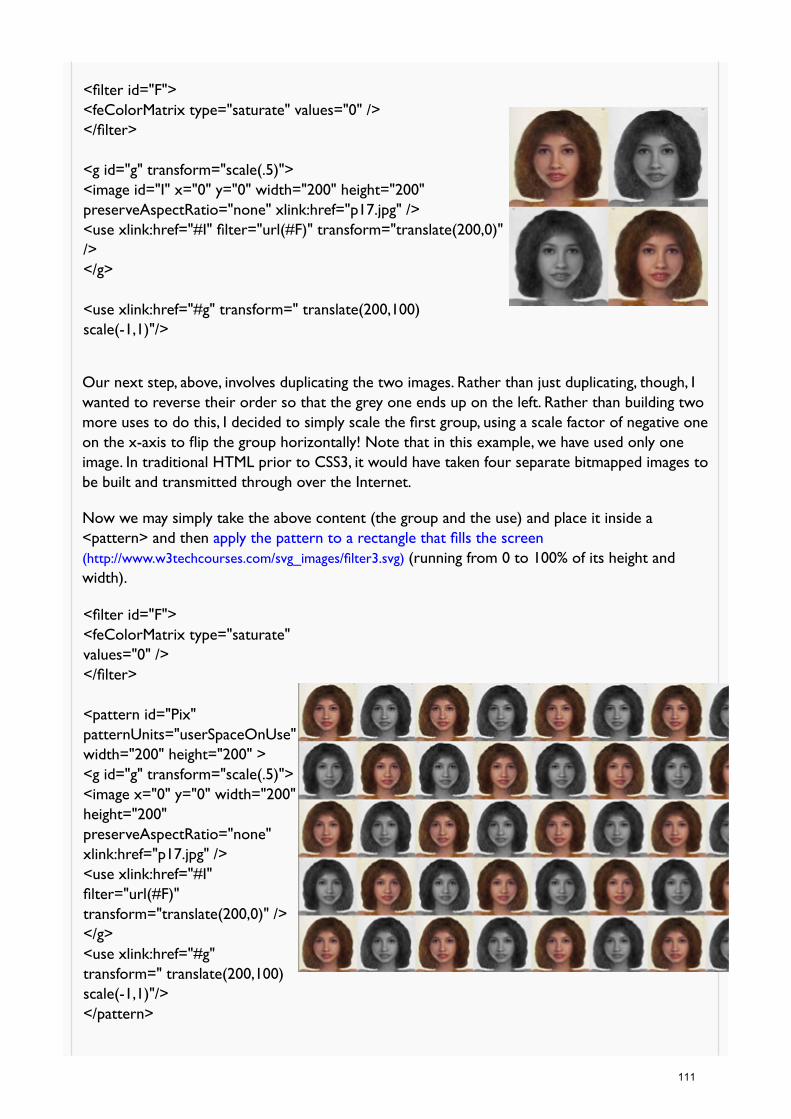
<filter id="F"><feColorMatrix type="saturate" values="0" /></filter>
<g id="g" transform="scale(.5)"><image id="I" x="0" y="0" width="200" height="200"preserveAspectRatio="none" xlink:href="p17.jpg" /><use xlink:href="#I" filter="url(#F)" transform="translate(200,0)"/></g>
<use xlink:href="#g" transform=" translate(200,100)scale(-1,1)"/>
Our next step, above, involves duplicating the two images. Rather than just duplicating, though, Iwanted to reverse their order so that the grey one ends up on the left. Rather than building twomore uses to do this, I decided to simply scale the first group, using a scale factor of negative oneon the x-axis to flip the group horizontally! Note that in this example, we have used only oneimage. In traditional HTML prior to CSS3, it would have taken four separate bitmapped images tobe built and transmitted through over the Internet.
Now we may simply take the above content (the group and the use) and place it inside a<pattern> and then apply the pattern to a rectangle that fills the screen(http://www.w3techcourses.com/svg_images/filter3.svg) (running from 0 to 100% of its height andwidth).
<filter id="F"><feColorMatrix type="saturate"values="0" /></filter>
<pattern id="Pix"patternUnits="userSpaceOnUse"width="200" height="200" ><g id="g" transform="scale(.5)"><image x="0" y="0" width="200"height="200"preserveAspectRatio="none"xlink:href="p17.jpg" /><use xlink:href="#I"filter="url(#F)"transform="translate(200,0)" /></g><use xlink:href="#g"transform=" translate(200,100)scale(-1,1)"/></pattern>
111

<rect x="0" y="0" width="100%"height="100%"fill="url(#Pix)" />
Next, two things came to mind that I thought might be interesting and instructive: blurring theabove pattern, and overlaying several copies of the pattern at different scales so that smallerversions might be visible "behind" the larger versions.
The first of these is quite easy to try. We simply create an <feGaussianBlur> and apply it to therectangle (http://www.w3techcourses.com/svg_images/filter3a.svg) :
<filter id="B" x="0%"y="0%" width="100%"height="100%"><feGaussianBlurstdDeviation="3"/></filter>
…and…later…
<rect x="0" y="0"width="100%"height="100%"fill="url(#Pix)"filter="url(#B)"/>
It should perhaps be noted that when we choose to blur makes a difference, as the followingtable should illustrate. Once the pictures have combined into a pattern and then blurred, the blurbleeds color values between previously separate cells of the pattern space.
Blurring the final result(http://www.w3techcourses.com
/svg_images/filter3b.svg)(stdDeviation="20")
Blurring the image first(http://www.w3techcourses.com
/svg_images/filter3c.svg)(stdDeviation="20")
<pattern id="Pix …<g id="g" transform="scale(.5)" ><image x="0" y="0" …<image x="200" y="0" …</g><use …</pattern>
<rect x="0" y="0" width="100%" height="100%"fill="url(#Pix)" filter="url(#B)"/>
<pattern id="Pix" …<g id="g" transform="scale(.5)"filter="url(#B)"><image x="0" y="0" Hellip;<image x="200" y="0" …</g><use …</pattern>
<rect x="0" y="0" width="100%" height="100%"fill="url(#Pix)" />
112

Beyond here either Opera or ASV is needed
In order, though, to try the second idea, in which background images might be visible underneathforeground ones, we observe that the base image we are given is a JPEG file. JPEG does not havetransparency in the file format though so, how are we to allow background imagery to shinethrough selected parts of foreground imagery?
Well, that is where a more advanced variant of the <feColorMatrix> might come in handy.Suppose we were to take the "white" pixels and turn them transparent. In the original image, alook inside Photoshop or the GIMP would reveal that the background is not exactly white, butnear white. Suppose, then that we were to take the light pixels (those that are high on the Red,Green and Blue channels) and convert that brightness into transparency (namely high values onthe alpha channel). <feColorMatrix> is good at exactly those sort of shifts on color channels.
Note — here is just a hint of how complex filters can become. Please don't despair if whatfollows seems complex — it is! Give it a read. If it makes sense to you, then great! Otherwise,please don't worry!
We begin with the basic code base developed above, but make two copies of the content of thepattern: one shrunken and the other at larger size.
<filter id="F"><feColorMatrix type="saturate" values="0" /></filter><pattern id="BigPix" patternUnits="userSpaceOnUse" width="400" height="400" ><g id="ggg" ><g id="gg"><g id="g"><image id="I" x="0" y="0" width="200" height="200" preserveAspectRatio="none"xlink:href="p17.jpg" /><use xlink:href="#I" filter="url(#F)" transform=" translate(200,0)" /></g><use xlink:href="#g" transform=" translate(400,200) scale(-1,1)"/></g></g></pattern>
<pattern id="Pix" patternUnits="userSpaceOnUse" width="100" height="100" ><use xlink:href="#gg" transform="scale(.25)"/>
113

</pattern><rect x="0" y="0" width="100%" height="100%" fill="url(#Pix)" /><rect x="0" y="0" width="100%" height="100%" fill="url(#BigPix)" />
The above trick of developing one more layer of group nesting ("g3") so that we may reuse thecontent but change one aspect of it is something we've seen before. If you actually put the abovecode in a browser, you will see that the rectangle containing the finer grained pattern is notvisible since the top layer is entirely opaque.
So the next question is how to design a filter (let's call it #F2) to be applied to the last rectangle:
<rect x="0" y="0" width="100%" height="100%" fill="url(#BigPix)" filter="url(#F2)"/>
so that the whitish values in that image are converted to transparent.
Here's the key:
<filter id="F2"><feColorMatrix type="matrix"values="1 0 0 0 00 1 0 0 00 0 1 0 0-.33 -.33 -.33 0 1"/></filter>
Labeling the rows and columns of the above matrix to make some sense of it we have:
ToRedGreenBlueAlphaConstant
From
Red 1 0 0 0 0Green0 1 0 0 0Blue 0 0 1 0 0
Alpha -.33 -.33 -.33 0 1
In this filter, <feComposite> instructs any content to which it is applied to keep its channels R, G,and B unaffected — to multiply their numeric values at each pixel by one. However, we'll beconstructing a new Alpha channel by summing the values on each of the channels R G and B andletting positive values on that channel contribute negatively to the opacity of the image.
alpha = -0.33 ( R + G + B ) + constant.
We add a constant of 1 since if the constant were zero, then the top image would beeverywhere transparent (alpha less than 0). If the constant were 2.0, then the top image wouldbe everywhere opaque (alpha greater than 1). It is in between this range and for values that havehigh brightness that we wish to make transparency.
The result (http://www.w3techcourses.com/svg_images/filter4.svg) :
114

<filter id="F2"><feColorMatrix type="matrix"values="1 0 0 0 00 1 0 0 00 0 1 0 0-.33 -.33 -.33 0 1"/></filter>
<filter id="F"><feColorMatrix type="saturate" values="0"/></filter>
<pattern id="BigPix"patternUnits="userSpaceOnUse"width="400" height="400" ><g id="ggg" ><g id="gg"><g id="g"><image id="I" x="0" y="0" width="200"height="200"preserveAspectRatio="none"xlink:href="p17.jpg" /><use xlink:href="#I"filter="url(#F)"transform="translate(200,0)"/></g><use xlink:href="#g" transform="translate(400,200) scale(-1,1)"/></g></g></pattern>
<pattern id="Pix"patternUnits="userSpaceOnUse"width="100" height="100" ><use xlink:href="#gg"transform="scale(.25)"/></pattern>
<rect x="0" y="0" width="100%"height="100%" fill="url(#Pix)" /><rect x="0" y="0" width="100%"height="100%" fill="url(#BigPix)"filter="url(#F2)"/>
A couple of remarks about the above example:
We could have affiliated the feColorMatrix (assigned by filter="url(#F2)" ) to either the
115
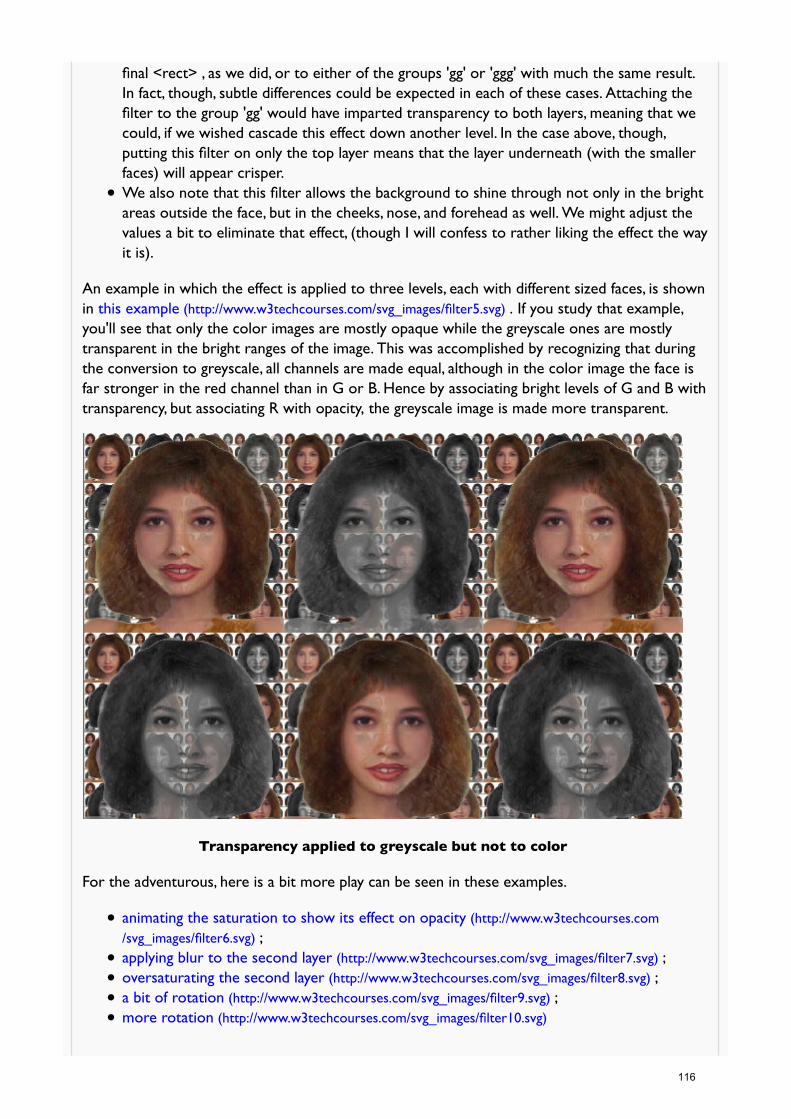
final <rect> , as we did, or to either of the groups 'gg' or 'ggg' with much the same result.In fact, though, subtle differences could be expected in each of these cases. Attaching thefilter to the group 'gg' would have imparted transparency to both layers, meaning that wecould, if we wished cascade this effect down another level. In the case above, though,putting this filter on only the top layer means that the layer underneath (with the smallerfaces) will appear crisper.We also note that this filter allows the background to shine through not only in the brightareas outside the face, but in the cheeks, nose, and forehead as well. We might adjust thevalues a bit to eliminate that effect, (though I will confess to rather liking the effect the wayit is).
An example in which the effect is applied to three levels, each with different sized faces, is shownin this example (http://www.w3techcourses.com/svg_images/filter5.svg) . If you study that example,you'll see that only the color images are mostly opaque while the greyscale ones are mostlytransparent in the bright ranges of the image. This was accomplished by recognizing that duringthe conversion to greyscale, all channels are made equal, although in the color image the face isfar stronger in the red channel than in G or B. Hence by associating bright levels of G and B withtransparency, but associating R with opacity, the greyscale image is made more transparent.
Transparency applied to greyscale but not to color
For the adventurous, here is a bit more play can be seen in these examples.
animating the saturation to show its effect on opacity (http://www.w3techcourses.com/svg_images/filter6.svg) ;applying blur to the second layer (http://www.w3techcourses.com/svg_images/filter7.svg) ;oversaturating the second layer (http://www.w3techcourses.com/svg_images/filter8.svg) ;a bit of rotation (http://www.w3techcourses.com/svg_images/filter9.svg) ;more rotation (http://www.w3techcourses.com/svg_images/filter10.svg)
116

Declarative Animation in SVG
Before getting into this topic, there are several important things that need to be explained:
By declarative animation, we mean animation that is done with markup rather than script.1.The term SMILevokes different meanings in different audiences. Some have used it to referto the subset of SMIL borrowed into and then expanded within SVG. Others use it torefer to the much broader context of SMIL within the SMIL working group of the W3C.The latter is more correct and the former usage has sometimes been known to evokestrong emotions that might surprise the casual speaker! The term "SVG animation" ismore frequently used nowadays to refer to declarative animation in SVG.
2.
While all major browsers have implemented some degree of declarative animation in SVG,Microsoft has indicated that IE9 will not, at least at first, support SVG animation. The SVGWorking Group and other working groups within W3C like the CSS WG and the HTMLWG seem to be interested in harmonizing the animation within CSS so that much of whatis now possible within SVG could also be applied to HTML. It sounds good, in principle,though how scripts which rely on animation being a part of the DOM would react todiscovering it now tucked away in some facet of CSS4 is a bit puzzling to some of us whohave not been closely involved in these discussions.
3.
To work with this material you'll need a browser that handles it well. Opera and the ASVplugin for IE are the best implementations, followed by Firefox 4 beta. Chrome is slightlyahead of Safari at this time. Check to see if this example (http://srufaculty.sru.edu/david.dailey/svg/ovaling.svg) works in your browser. If not, change browsers for this section.
4.
The idiosyncracies of browser support are to be, somewhat expected, since Safari,Chrome and Firefox have all begun their support for SMIL quite recently. Theimprovements within the past year have been dramatic!
5.
There are two JavaScript libraries that provide partial support for SVG animation FakeSMIL (http://leunen.d.free.fr/fakesmile/) and SmilScript (http://schepers.cc/svg/smilscript/) . At SVGOpen 2010, the Microsoft team recently demonstrated this example (http://srufaculty.sru.edu/david.dailey/svg/ovaling.svg) running in IE9 beta with the use of SMILScript.
6.
Almost all attributes of SVG objects can be animated declaratively. This implies thatanimation extends very broadly though the technology in ways that you might not alwaysthink of. Check here (http://srufaculty.sru.edu/david.dailey/svg/#SMIL) and here(http://srufaculty.sru.edu/david.dailey/svg/newstuff/Newlist.htm) for a variety of illustrations.
7.
Not all animation can be done declaratively (at least yet) in SVG. Script is still far morepowerful and, in the following weeks, we will consider examples that cannot be done withSVG's declarative methods alone.
8.
This instructor is very fond of declarative animation! It is easy to use and appears to me(based on my own experience and that of the students I've seen use it for several years) tocut development time down by considerable fractions.
9.
This section will proceed by illustrating
simple examples of <animate>;1.variations in timing;2.<animateTransform>;3.changing colors;4.<animateMotion>;5.
117

and finally,how to vary a complex attribute like the shape of a <path>;6.how to let the user start an animation.7.
For additional reading check out the SVG Primer's treatment of the animate tag(http://www.w3.org/Graphics/SVG/IG/resources/svgprimer.html#SMIL_animations) . We'll start withsomething like that with the following simple example, and start from there. I'll try embedding ithere in the HTML (using an <embed> tag), but I'll put a picture of it with a link to the workingexample next to that in case your browser can't see it:
animated ellipse (http://w3techcourses.com/svg_images/animoval0.svg) (snapshot)
<ellipse id="E" cx="90" cy="90" rx="30" ry="40" fill="#448"><animate attributeName="rx" dur="5s" values="20;90;20" repeatCount="indefinite"/><animate attributeName="ry" dur="5s" values="30;60;30" repeatCount="indefinite"/></ellipse>
In the above, we have put two animate tags inside the ellipse. One controls the width and theother the height of the ellipse. The attributes in this example control the following:
attributeName — selects which attribute or variable of the object will be animated.dur — a measure (by default in seconds) that determines how long the animation will last.values — a semicolon-delimitted list of attribute values. These are often numeric, butneed not be. In this case there are three values with the starting and ending values thesame. This means that the animation will start and stop with the same value.repeatCount — for animations that are to loop continually, "indefinite" is the choice.Otherwise, we could put a positive integer here indicating that we will repeat theanimation a specified number of times.
For those of you who have written scripted animation in JavaScript, using setTimeout orsetInterval, you will probably agree that this "declarative" approach through markup is quitenice.
Just to give you a bit more exposure to the basic concepts, let's try another. We'll duplicate theellipse from above and shift its position a bit. Then let's vary the values attribute of the secondellipse so that as one ellipse expands the other contracts. I've added a rectangle (with roundedcorners) and applied a bit of transparency to the example for fun.
118

Animated ellipses(http://w3techcourses.com/svg_images
/animoval1.svg) (snapshot)
<rect x="100" y="85" rx="12" height="30" width="150" fill="purple" stroke="black" stroke-width="3" />
<ellipse cx="100" cy="100" rx="30" ry="40" fill="#448" opacity=".75" stroke="black" stroke-width="3"><animate attributeName="rx" type="rotate" dur="5s" values="10;70;10"repeatCount="indefinite"/><animate attributeName="ry" type="rotate" dur="5s" values="30;60;30"repeatCount="indefinite"/></ellipse><ellipse cx="250" cy="100" rx="30" ry="40" fill="#448" opacity=".75" stroke="black" stroke-width="3"><animate attributeName="rx" type="rotate" dur="5s" values="70;10;70"repeatCount="indefinite"/><animate attributeName="ry" type="rotate" dur="5s" values="60;30;60"repeatCount="indefinite"/></ellipse>
In these examples, the timing associated with all attributes has been the same: 5 seconds. Let'sconsider what happens when we vary that interval for different attributes. In this example(http://w3techcourses.com/svg_images/animoval2.svg) , we add a stroke-dasharray to the ellipses andlet the center of the second ellipse, as well as the width of the rectangle vary (in synchrony withone another). This demonstrates that de-synchronizing and synchronizing can yield ratherfascinating effects! I would posit that we tend to overlay causal explanations of what we see,when in fact, only covaration is present. The scientific study of the perception of illusions is likelyto have some great advances in coming years due to the reduced difficulty of creating suchdemonstrations.
While the previous example, using stroke-dasharray, appears to present a bit of rotation to theobject, this is simply because the circumference of the ellipse is changing (as rx and ry change),and because dash-arrays are allocated in terms of absolute units (pixel widths), the number ofdash segments needed to cover the ellipse also varies. We might also experiment with theillusion of rotation in the following way: by animating the dash-offset attribute. (The followingexample seems only to work in Chrome, Opera, IE/ASV, and FF4 beta, though Safari is ratherunhappy with the colors of the gradient.)
119

Animated dashoffset (snapshot)(http://w3techcourses.com/svg_images
/animoval3.svg)
<ellipse cx="140" cy="100" rx="50" ry="50" fill="url(#Gold)" stroke="url(#Go)"stroke-width="18" stroke-dasharray="12,12" ><animate attributeName="stroke-dashoffset" repeatCount="indefinite"values="24;1" dur="0.5s" /></ellipse>
It turns out that there is a better way of rotating objects than by animating the stroke.<animateTransform> can be used to change either the scale, position or rotation of an object.Observe this nifty extension of the above example (http://granite.sru.edu/%7Eddailey/svg/animoval4.svg) that appears not to run in Opera, but let's examine a simpler case in moredetail:
Four animated ellipses, two rotating(http://w3techcourses.com/svg_images
/animoval5.svg) (snapshot)
<ellipse id="One" cx="200" cy="100" rx="30" ry="40" fill="#555"><animate attributeName="rx" type="rotate" dur="5s" values="50;20;50" repeatCount="indefinite"/><animate attributeName="ry" type="rotate" dur="5s" values="10;60;10" repeatCount="indefinite"/></ellipse>
<use id="Two" xlink:href="#One" fill-opacity=".35" stroke="#d06" stroke-width="3"><animateTransform attributeName="transform" type="rotate" dur="5s" from="0 200 100" to="360 200100" repeatCount="indefinite"/></use>
<use xlink:href="#One" transform="translate(100,0)" /><use xlink:href="#Two" transform="translate(-100,0)" />
In this example, we've taken a basic ellipse ("One") colored dark grey (#555) and animated bothits x and y radii. We then re-use it three times: once in the same location ("Two"), once to theleft and once to the right. This allows us to see that the two grey ellipses oscillate only verticallyand horizontally. The reddish ellipses, though, both have an animateTransform applied so that
120

they may be rotated as well. This should served to demonstrate that rotation adds a newproperty to the ellipses. Here is a more adventurous example (http://w3techcourses.com/svg_images/animoval4a.svg) (working best in FF4, Opera or IE/ASV) using similar ellipses that both oscillateand rotate as a part of a clipPath applied to an image that is then tiled through a pattern.
SVG also has an <animateColor> tag intended for colors to be gradually changed. However, SVGalso gives the ability to animate non-numeric values, and I have yet to see an example where<animateColor> is needed that simple <animate> with color names would not suffice.*(http://www.w3techcourses.com/mod/resource/view.php?id=82#footnote) This example(http://w3techcourses.com/svg_images/animoval6.svg) uses code such as the following to vary the fillof the grey ellipse above concurrently with some of its other attributes.
<ellipse id="One" cx="200" cy="100" rx="30" ry="40" fill="#555"><animate attributeName="rx" type="rotate" dur="5s" values="50;20;50"repeatCount="indefinite"/><animate attributeName="ry" type="rotate" dur="5s" values="10;60;10"repeatCount="indefinite"/><animate attributeName="fill" type="rotate" dur="5s"repeatCount="indefinite" values="red;mediumvioletred;yellowgreen;red" /></ellipse>
Now let's play a bit more with the positioning of these ellipses by letting them follow a curve,using the <animateMotion> tag.
Snapshot of animation along a path
<path id="curve" stroke="black" fill="inherit" stroke-width="3" opacity=".75"d="M 0,200C 100,200 0, 100, 100,100 C 200,100 100,200 200,200C 300,200 200, 100, 300,100 C 400,100 300,200 400,200C 500,200 400, 100, 500,100 C 600,100 500,200 600,200z" ></path><ellipse id="One" cx="0" cy="0" rx="20" ry="10" fill="inherit" opacity=".75" stroke="black"stroke-width="2"><animateMotion dur="10s" rotate="auto" repeatCount="indefinite"><mpath xlink:href="#curve"/></animateMotion></ellipse>Link to animated example (http://w3techcourses.com/svg_images/animoval7.svg)
In the above example, a series of three identical "mounds" (each 200 pixels to the right of theprevious one) have been drawn and the path has been closed by the "z" subcommand. First, it is
121

important to point out that the locus of the ellipse has been specified to be "on the curve" bysetting its center (cx,cy) = (0, 0).
You will also observe in this example that the ellipse takes its orientation from the curve itself,due to the rotate="auto" attribute. Also, since the distance traversed by the moving ellipse isgreater along the mounds than it is along the straight line (didn't Euclid have something to say onthis topic?). That the shortest distance between two points is a straight line is perhaps illustratedby this example (http://w3techcourses.com/svg_images/animoval7c.svg) that takes the above code andpasses a linear path through the same extremities of the smooth curve above. Another examplethat illlustrates what happens when (cx,cy) = (0, 0) is not true can be seen here(http://w3techcourses.com/svg_images/animoval7b.svg) .
The animateMotion tag allows SVG content to be moved along a given path. If you have doneanimation in programming or scripting languages you will, perhaps, immediately appreciate theelegance of the declarative solution! The amount of code it saves is commendable.
The last kind of animation we demonstrate here is multivalued interpolation. We'll set up aninterpolation between two paths. The only restriction is that they have to have the same numberof coordinates and types of subcommands (like L, Q, C or A) for the animation to work.
Animation of two vertices of a pentagon
<path id="curve" stroke="black" fill="yellowgreen" stroke-width="3" fill-opacity=".5" ><animate attributeName="d" dur="3s"values="M 100,0 0,100 70,50 130,150 200,100 z;M 100,0 0,100 70,150 130, 50 200,100 z;M 100,0 0,100 70,50 130,150 200,100 z"repeatCount="indefinite"/></path>Link to working example (http://w3techcourses.com/svg_images/animoval8.svg) (with some illustrativeadditions)
122

The key to understanding this example is to notice observe that the path's shape, "d", isgoverned by three values (separated from one another by semicolons and typeset for ease ofreading here on separate lines). The first and last of those strings of coordinates are the same aseach other, and each string has exactly five points. That is, we will be animating a pentagon.Furthermore by examing the first, second and last points of the pentagon, you can see that wekeep three of the points unchanged. Only the two points, when x=70 and when x=130 will bechanged. As one moves down the page from (70,50) to (70,150) the other will be moving up thesame distance. The starting and middle values of the path are shown at the right of theanimation.
A couple more examples are shown here (click on the illustrations to see the live examples), butyou may want to use Opera for these since both Webkit and Firefox 4b have certain problems:
(http://w3techcourses.com/svg_images/animoval8b.svg)
Animating three curves (http://w3techcourses.com/svg_images/animoval8b.svg)
(http://srufaculty.sru.edu/david.dailey/svg/SVGOpen2010/Polygons/polygons10.svg)
Transition between random polygons(http://srufaculty.sru.edu/david.dailey
/svg/SVGOpen2010/Polygons/polygons10.svg
(http://granite.sru.edu/%7Eddailey/svg/animoval8.svg)
Several traveling ellipses (http://granite.sru.edu/%7Eddailey/svg/animoval8.svg)
And finally, we conclude with one example in which a series of animations is triggered by a theclick of a user's mouse button. Try clicking on the GO button below. It should be working in FF4,Safari, Chrome, IE/ASV and Opera.Here's the link (http://w3techcourses.com/svg_images/animstart1.svg) .
123

GO
<g><desc>A basic path with two peaks and a trough defined and then twice reused</desc><path id="curve" stroke="black" fill="inherit" stroke-width="3" fill-opacity=".5"d="M 0,100C 50,100 50,50, 100,50 C 150,50 150,150 200,150C 250,150 250,50, 300,50 C 350,50 350,100 400,100"/><use xlink:href="#curve" transform="translate(0,20)" fill="cyan"/><use xlink:href="#curve" transform="translate(0,-20)" fill="blue"/></g>
<ellipse id="One" cx="0" cy="0" rx="16" ry="8" fill="orange" opacity=".85"stroke="black" stroke-width="2"><desc>An ellipse with animation to follow the above path</desc><animateMotion id="AM" dur="3s" rotate="auto" repeatCount="2" begin="G.click+3"><desc>The animation will start 3 seconds after the "go" button is pushed</desc><mpath xlink:href="#curve"/></animateMotion></ellipse>
<g id="G"><desc>A "go" button consisting off an ellipse and a word. The ellipse changescolors when the mouse enters and leaves</desc><set attributeName="opacity" to="0" begin="G.click" /><set attributeName="opacity" to="1" begin="AM.end" /><ellipse cx="205" cy="30" rx="33" ry="15" fill="yellow"stroke="black" stroke-width="2"><set attributeName="fill" to="green" begin="G.mouseover" /><set attributeName="fill" to="yellow" begin="G.mouseout" /></ellipse><text x="180" y="41" font-size="31" fill="black" font-family="arial" >GO</text></g>
<g><desc>A series of text objects that count down from 3 to 1. Each becomes visible for a secondand then disappears.</desc><text x="180" y="40" font-size="35" fill="black" font-family="arial" display="none"><set attributeName="display" to="block" begin="G.click" /><set attributeName="display" to="none" begin="G.click+1" />
124

-3</text><text x="180" y="40" font-size="35" fill="black" font-family="arial" display="none"><set attributeName="display" to="block" begin="G.click+1" /><set attributeName="display" to="none" begin="G.click+2" />-2</text><text x="180" y="40" font-size="35" fill="black" font-family="arial" display="none"><set attributeName="display" to="block" begin="G.click+2" /><set attributeName="display" to="none" begin="G.click+3" />-1</text></g>
Though rather complex, this example shows how we may use events and timers to triggeranimations. In this case several things happen:
the "GO" button responds to mouseover and mouseout events by turning colors.1.when the "GO" button is clicked, it disappears and a countdown begins with the numbers3, 2, and then 1 becoming visible for a second apiece
2.
when the countdown is done (three seconds after it begins) the ellipse (named "One")begins to traverse the path, since its <animateMotion> tag "AM" is activated.
3.
After the ellipse finishes two iterations of its traversal of the path (repeatCount="2") thenthat is used to allow the "GO" button to reappear.
4.
Clearly all of this could be done through script, and some of it could be done with CSS. In factthe changing of the numbers in this way is much less efficient than a scripted solution. But itillustrates some of the power and convenience of declarative animation, since all this is donewithout "programming" in the classical sense.
* Concerning differences between <animate> and <animateColor>, the curious reader isencouraged to look here (http://lists.w3.org/Archives/Public/www-svg/2010Oct/0078.html) and here(http://lists.w3.org/Archives/Public/www-svg/2010Oct/0071.html) for recent remarks on the subject bymembers of the SVG Working Group. It appears that the latter may allow for more complexcolor transitions.
Last modified: Sunday, 30 January 2011, 09:33 PM
Moodle Docs for this page (http://docs.moodle.org/en/mod/resource/view)
You are logged in as Marie-Claire Forgue (http://www.w3techcourses.com/user/view.php?id=476&course=4) (Logout(http://www.w3techcourses.com/login/logout.php?sesskey=nhnMD1zn5S) )
SVG_Jan11 (http://www.w3techcourses.com/course/view.php?id=4)
125

Introduction to SVG January 2011 (http://www.w3techcourses.com/course/report/log/index.php?chooselog=1&user=0&date=0&
id=4&modid=92) ◀ Jump to... ▶
W3C (http://www.w3techcourses.com/) ▶ SVG_Jan11 (http://www.w3techcourses.com/course/view.php?id=4) ▶ Assignments (http://www.w3techcourses.com/mod/assignment/index.php?id=4) ▶ Week 4: Assignment (http://www.w3techcourses.com/mod/assignment/view.php?id=92) ▶ View submitted assignments
Update this Assignment
View 32 submitted assignments (submissions.php?id=92)
Week Four's Assignment
This week represents a decision point for many of you: whether tocontinue and learn the more advanced parts of SVG, includingscripting and DOM, or to call this the final lesson. (You'll still beinvited to stick around and continue working on material if you like,until the six week period is up.) So, this means you'll have a choice ofwhich assignments to work on as well.
Your last work for this course will be to complete Parts 1 and 2 andeither Part 3A or 3B. Part 3A is aimed at those whose interest in SVGis more artistic and graphical. Part 3B is for those who plan tocontinue for the last two weeks.
Those who have never programmed might, therefore aim moretowards Part 3A than Part 3B.
Part 1 (everyone)
Develop an SVG document which has a small SMIL animation of anysort (for example: changing the geometry or size of an ellipse, orchanging the blur of a bitmap, or changing the clip-path applied to acolorful collage of rectangles). After the animation runs some fixednumber of iterations (you can choose a number n between 1 and 6,depending on what seems "best" to you, and set repeatCount equal ton) then it terminates. At that time it activates a process (script or<set>) that changes the color(s) of some feature (and perhaps otheraspects) of your content (either randomly, using script ordeterministically) . Extra credit if you can then have it restart theanimation!
(Note: following some discussion in the forums, I've changed theassignment just a little bit here, to try to avoid the necessity of relyingon JavaScript -- since that, after all, has not yet been introduced yet!)
Part 2 (everyone)
126

Find three interesting examples of the usage of SVG on the Web.Offer a brief description of each and their URL. Let me know if I canshare your recommendations with others.
Part 3A
(Visual extravaganza or sumptuous delight — choose this or 3B)
Different folks have different ideas about what makes goodcomposition, balance, design, color, movement, perspective and thelike. Make something with SVG that you are pleased with!
Part 3B
(Problem solving with SVG — choose this or 3A)
Of the following filter primitives (discussed both in the SVG Primer(http://www.w3.org/Graphics/SVG/IG/resources/svgprimer.html) and theSVG Specification (http://www.w3.org/TR/SVG/) ):
feGaussianBlurfeColorMatrixfeConvolveMatrixfeComponentTransferfeMorphologyfeFloodfeImagefeTurbulencefeDiffuseLightingfeSpecularLightingfeTilefeOffsetfeTilefeOffsetfeMergefeBlendfeCompositefeDisplacementMap
choose three to investigate. Experiment with values of at least twoattributes of each primitive, and attempt the SMIL animation of atleast one attribute for each.
Extra credit will be given to anyone who receives a major award like aNobel Prize for your work!
You have not submitted anything yet
127

Introduction to SVG January 2011 (http://www.w3techcourses.com/course/report/log/index.php?chooselog=1&user=0&date=0&
id=4&modid=102) ◀ Jump to... ▶
W3C (http://www.w3techcourses.com/) ▶ SVG_Jan11 (http://www.w3techcourses.com/course/view.php?id=4) ▶ Resources (http://www.w3techcourses.com/mod/resource/index.php?id=4) ▶ Introduction to Final Weeks
Update this Resource
During these two weeks, we'll be providing an introduction to SVG with JavaScript. This materialis optional and some of you may wish to simply finish your work from the first four weeks! Inwhich case, no rush! Take your time.
Everyone, though, is asked to please fill out the evaluation form (http://www.w3techcourses.com/mod/feedback/view.php?id=94) , as it will help the W3C to figure out if the course was a success,whether to offer it again, and if so what should be changed about it.
Okay, while we are getting into scripting here, we did see a bit of event-handling in the SMILsection (http://www.w3techcourses.com/mod/resource/view.php?id=82) at the end of week 4. That'sone of the things that interactivity brings to the table and which scripting is ordinarily used for.What else might scripting help with? Well, take a look at this little approach to that question(http://www.w3.org/Graphics/SVG/IG/resources/svgprimer.html#why_script) in the SVG Primer. In fact,as I reread that material (written now almost five years ago), I find myself arguing just a bit withsome of it, now feeling that SVG needs more declarative drawing, more declarative event-management and random elements. Nonetheless, the basic premise is still accurate: there aremany categories of complex behavior that cannot be done without scripting in SVG. Take a lookat these examples using JavaScript (http://srufaculty.sru.edu/david.dailey/svg/#JSAnim) and these usingboth SMIL and JavaScript (http://srufaculty.sru.edu/david.dailey/svg/#JSSMIL) to get a sense of some ofthe range of these behaviors.
Next steps
On to Getting Started with JavaScript and SVG (http://www.w3techcourses.com/mod/resource/view.php?id=86)
Last modified: Sunday, 6 February 2011, 03:26 PM
Moodle Docs for this page (http://docs.moodle.org/en/mod/resource/view)
You are logged in as Marie-Claire Forgue (http://www.w3techcourses.com/user/view.php?id=476&course=4) (Logout(http://www.w3techcourses.com/login/logout.php?sesskey=nhnMD1zn5S) )
SVG_Jan11 (http://www.w3techcourses.com/course/view.php?id=4)
128
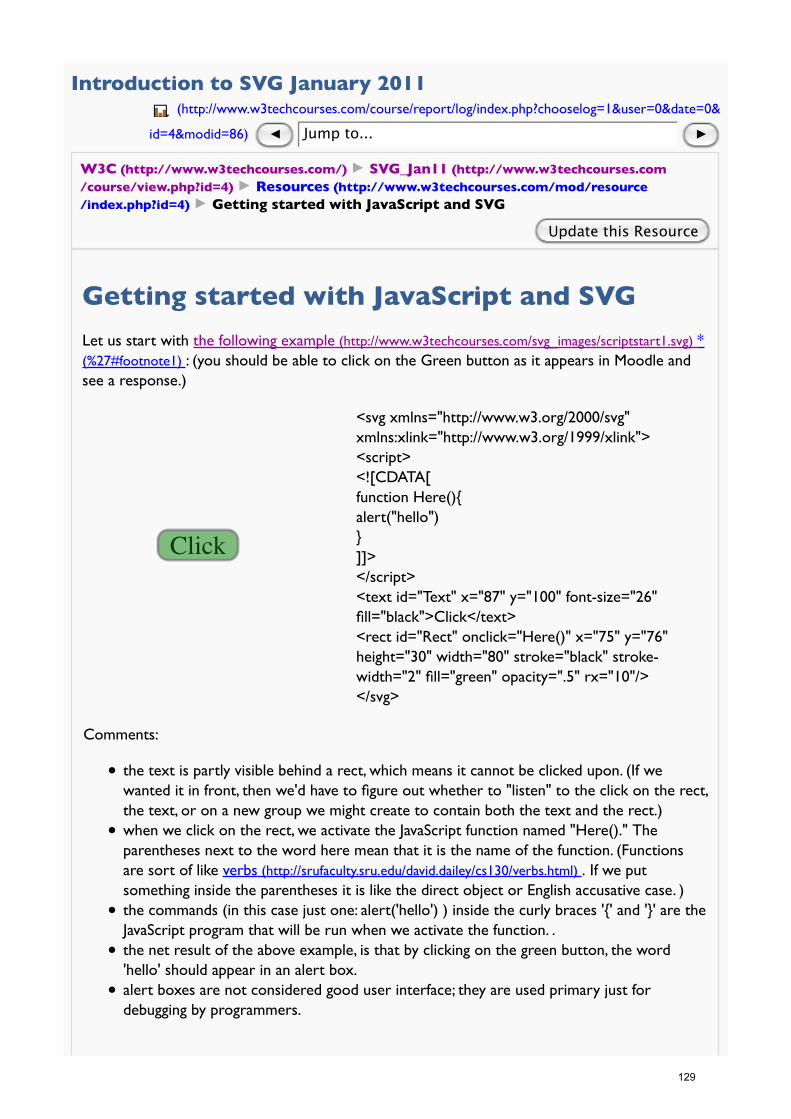
Introduction to SVG January 2011 (http://www.w3techcourses.com/course/report/log/index.php?chooselog=1&user=0&date=0&
id=4&modid=86) ◀ Jump to... ▶
W3C (http://www.w3techcourses.com/) ▶ SVG_Jan11 (http://www.w3techcourses.com/course/view.php?id=4) ▶ Resources (http://www.w3techcourses.com/mod/resource/index.php?id=4) ▶ Getting started with JavaScript and SVG
Update this Resource
Getting started with JavaScript and SVG
Let us start with the following example (http://www.w3techcourses.com/svg_images/scriptstart1.svg) *(%27#footnote1) : (you should be able to click on the Green button as it appears in Moodle andsee a response.)
Click
<svg xmlns="http://www.w3.org/2000/svg"xmlns:xlink="http://www.w3.org/1999/xlink"><script><![CDATA[function Here(){alert("hello")}]]></script><text id="Text" x="87" y="100" font-size="26"fill="black">Click</text><rect id="Rect" onclick="Here()" x="75" y="76"height="30" width="80" stroke="black" stroke-width="2" fill="green" opacity=".5" rx="10"/></svg>
Comments:
the text is partly visible behind a rect, which means it cannot be clicked upon. (If wewanted it in front, then we'd have to figure out whether to "listen" to the click on the rect,the text, or on a new group we might create to contain both the text and the rect.)when we click on the rect, we activate the JavaScript function named "Here()." Theparentheses next to the word here mean that it is the name of the function. (Functionsare sort of like verbs (http://srufaculty.sru.edu/david.dailey/cs130/verbs.html) . If we putsomething inside the parentheses it is like the direct object or English accusative case. )the commands (in this case just one: alert('hello') ) inside the curly braces '{' and '}' are theJavaScript program that will be run when we activate the function. .the net result of the above example, is that by clicking on the green button, the word'hello' should appear in an alert box.alert boxes are not considered good user interface; they are used primary just fordebugging by programmers.
129

We won't belabor, here, the details of why this is a good place to start, but we will, in fact, beginwith this basic prototype for all the examples that follow. We'll just add some things here and afew more there as needed. Usually, when I start on a scripting project I use this simple template(http://srufaculty.sru.edu/david.dailey/svg/simpleTemplate.svg) , since it already has just a bit more of thetypical syntax that I am likely to use. You may wish to do the same.
* I moved the button a bit up and to the left from what appears to fit it into our Moodle<embed> and rounded the rectangle just to improve the aesthetics a bit over what was in thebook. In this example (http://www.w3techcourses.com/svg_images/scriptstart2.svg) , I used a viewBoxto make everything relative to the screen size, for possibly better scalability to mobile devices.
General remarks:
While the above example accomplishes very little, it does serve the purpose of showing how aJavaScript function can be activated from a mouse-click within an SVG document. This is what wein the trade of teaching programming call a gentle introduction: the sort of "HELLO WORLD"program typically found in an introduction to programming. Programming is a big topic (as big asmathematics, indeed, as it holds the theory of computing within it), so we will provide just aglimpse of what can be done with SVG and script working together.
The SVG Primer's section on Dynamic SVG and JavaScript (http://www.w3.org/Graphics/SVG/IG/resources/svgprimer.html#JavaScript) , would provide, I think, a good companion read to this, as itgoes into considerably more detail than our two weeks will allow. We've tried to make theselessons self-contained, but you may wish to refer to the Primer for greater depth and breadth.
Next steps
On to Using script to find an object and change its attributes Resource(http://www.w3techcourses.com/mod/resource/view.php?id=105)Back to Week 5 (http://www.w3techcourses.com/course/view.php?id=4#section-5)
Last modified: Saturday, 5 February 2011, 09:46 PM
Moodle Docs for this page (http://docs.moodle.org/en/mod/resource/view)
You are logged in as Marie-Claire Forgue (http://www.w3techcourses.com/user/view.php?id=476&course=4) (Logout(http://www.w3techcourses.com/login/logout.php?sesskey=nhnMD1zn5S) )
SVG_Jan11 (http://www.w3techcourses.com/course/view.php?id=4)
130

Introduction to SVG January 2011 (http://www.w3techcourses.com/course/report/log/index.php?chooselog=1&user=0&date=0&
id=4&modid=105) ◀ Jump to... ▶
W3C (http://www.w3techcourses.com/) ▶ SVG_Jan11 (http://www.w3techcourses.com/course/view.php?id=4) ▶ Resources (http://www.w3techcourses.com/mod/resource/index.php?id=4) ▶ Using script to find an object and change its attributes
Update this Resource
Using script to find an object and change itsattributes
We'll show two different but effective ways to do this. First we'll begin with the standardtemplate discussed earlier (http://www.w3techcourses.com/svg_images/scriptstart1.svg) and changethe statement alert('Hello') to first retrieve the object named "rect" and then to modify it:
Click
<svg xmlns="http://www.w3.org/2000/svg"xmlns:xlink="http://www.w3.org/1999/xlink"><script><![CDATA[function Here(){
var R=document.getElementById("Rect")R.setAttribute("fill", "red")
}]]></script><text id="Text" x="87" y="100" font-size="26"fill="black">Click</text><rect id="Rect" onclick="Here()" x="75" y="76" height="30"width="80" stroke="black" stroke-width="2" fill="green"opacity=".5" rx="10"/></svg>
Changing the color of a rectangle
Comments:
each tag within an SVG document can be thought of as a "node." This is because we often thinkof the document as having a tree structure and computer scientists like to call the leaves of treesnodes.getElementById() is the method of retrieving a particular node and dealing with it.In this case, we define a new variable, R, to refer to the rectangle named 'Rect.' Think of R as analias for 'Rect'.when the function Here() is activated, the node R will have its fill attribute value changed to "red".It turns out that the simpler statement R.setAttribute("fill", "red")works for SVG, though indocuments using multiple namespaces, we might need the more complex appearingR.setAttributeNS(null, "fill", "red") . Those curious about the issue can follow this thread on svg-developers.
Next we'll show a more general approach that would work for any item in the document for
131

which we wished to change the color of its fill.
Click Click
...beginning same as before...function Here(evt){
var R=evt.targetR.setAttribute("fill", "red")
}]]></script>
<text id="Text" x="67" y="100" font-size="26"fill="black">Click</text><rect onclick="Here(evt)" x="55" y="76" height="30"width="80" stroke="black" stroke-width="2" fill="blue"opacity=".5" rx="10"/>
<g transform="translate(100,0)"><text id="Text" x="87" y="100" font-size="26"fill="black">Click</text><rect onclick="Here(evt)" x="75" y="76" height="30"width="80" stroke="black" stroke-width="2" fill="green"opacity=".5" rx="10"/></g>
Changing the color of whatever <rect> is clicked on
Comments:
each of the two buttons, when clicked, sends a small gift (known as a 'parameter') to the function Here().This parameter is a special thing in SVG (or HTML), evt: namely the "event."
evt.target is a way of referring to the thing that received the event: namely evt.target, in this case, refers towhich ever rectangle was clicked on.once we know what was clicked on, we let R refer to that and then change attributes of R the same waywe did in the previous example.
Observe also that an object does not need to have the particular attribute beforehand to havethat attribute added and then changed.
Click
function Here(evt){var R=evt.targetif (evt.type=="mouseover"){
R.setAttribute("stroke-dasharray", "4,8")R.setAttribute("stroke-width", "10")R.setAttribute("fill", "green")
}else if (evt.type=="mouseout"){
R.setAttribute("stroke-dasharray", null)R.setAttribute("stroke-width", "2")R.setAttribute("fill", "blue")
}}]]></script>
<text id="Text" x="67" y="100" font-size="26" fill="black">Click</text><rect onmouseover="Here(evt)" onmouseout="Here(evt)" x="55" y="76" height="30" width="80" stroke="black" stroke-width="2" fill="blue" opacity=".5" rx="10"/>
132

Rollover effect adding and removing stroke-dasharray attribute.
Comments:
The rectangle has both an onmouseover and an onmouseout defined. Both lead to the same function:Here().We use the type of the event to determine which block of code (inside curly braces {} ) to performWe adjust several attributes at the same time: "fill", "stroke-width" and "stroke-dasharray"When the mouse moves out of the rectangle, we restore attributes to their original values.The <rect> did not need to have its stroke-dasharray defined for its value to be set..We could easily add another block of code, using another "else ... if" to trigger a function when themouse is clicked.
Next we will confirm your suspicion that much of this could be done just using the <set>attribute of SMIL animation.
Click
<text id="Text" x="67" y="100" font-size="26"fill="black">Click</text><rect x="55" y="76" height="30" width="80" stroke="black" stroke-width="2" fill="blue" opacity=".5" rx="10">
<set attributeName="fill" begin="mouseover" to="green"/><set attributeName="stroke-width" begin="mouseover" to="10<set attributeName="stroke-dasharray" begin="mouseover" to<set attributeName="fill" begin="mouseout" to="blue"/><set attributeName="stroke-width" begin="mouseout" to="2"/<set attributeName="stroke-dasharray" begin="mouseout" to=
</rect>
Rollover effect using declarative techniqueComments:
This example works fine in Opera and Firefox, but seems to have the following problems: IE/ASV doesn't animatethe stroke-dasharray properly, and Chrome and Safari do not properly handle the rollover sometimes appearing be confused about whether the mouse has left or entered.I was just guessing when I used to="0" to remove the stroke-dasharray onmouseout. The word "null" doesn't woand the null string "" doesn't work! The issue of how many attributes there are in the DOM after such a processseems to be a matter of disagreement between the behavior of Opera and Firefox as per this example.While this approach runs rather afoul of the popular approach of attempting to separate content, presentation abehavior (into respectively: markup, styles and script), there is something nice about having all aspects of an objecthere with it! It is also not clear, in a graphical language like SVG, what the distinction between the three necessaris.The cross-browser issues associated with the SMIL approach, regardless of its elegance, might recommend thescripted approach for such a thing. My own sense is that the bugs associated with <set> are not being fixed asquickly as those with <animate> since there has been less content developed as yet to explore such issues.
While on the topic of animation, here is a way to animate things using JavaScript. I prefer theSMIL approach, but if your audience needs to reach browsers that don't support some of themore advanced uses of <animate>, then the following approach may be of use to you..
133

Click
// [ key parts of the script ]if (evt.type=="mouseover"){
R.setAttribute("stroke", "green")R.setAttribute("fill", "green")running=trueanimate()
}var w=2var dir=1function animate(){
if (!running) returnw=w+dirR.setAttribute("stroke-width", w)if (w>5||w<1) dir=-dirsetTimeout("animate()", 50)
}
Comments:
If the scripting looks too complicated, please don't worry! It is not crucial that youunderstand as it is a bit of programming that may look complicated.On mouseover, we call a function "animate()" that repeatedly changes the stroke-width.The function animate() uses a JavaScript trick, setTimeout, to repeatedly restartitself and redraw the screen every 50 milliseconds.The size of the number w increases ever 50 milliseconds until it reaches 5 andthen shrinks.A similar effect could be done rather easily using <animate> and would probablybe understandable to more prospective web authors.I am not claiming that this is good interface design -- indeed, it might be a bitannoying!.
Finally, we'll change the text inside a text node. This is something that people often want to do atabout this stage of their learning, but as we can see, the conceptual approach is somewhatdifferent since the words inside a text node are, in fact, not attributes of the text node butrather the contents of its "child" node. We'll learn more about children and parent nodes in alater lesson.
Click
function Here(evt){var R=evt.targetvar T=document.getElementById("Text")if (evt.type=="mouseover"){
R.setAttribute("fill", "green")T.textContent="please"T.setAttribute("font-size","20")
}else if (evt.type=="mouseout"){
R.setAttribute("fill", "blue")T.textContent="Click"T.setAttribute("font-size","26")
}}]]></script><text id="Text" x="67" y="100" font-size="26"fill="black">Click</text><rect onmouseover="Here(evt)" onmouseout="Here(evt)"x="55" y="76" height="30" width="80" stroke="black"stroke-width="2" fill="blue" fill-opacity=".5" rx="10"/>
134

Comments:
As before, we change the color of the <rect>. But this time we also change the font-size of the<text> named "Text." These two things are done the same techniques described in the earlierexamples, above.The content of the <text> node is inside a node considered to be a child of the <text>. As such, thevalue of that node is not an attrbute, so we can set its textContent. Since the node inside is, in fact,the "first" child, we could instead change the content of that firstChild byT.firstChild.nodeValue="please."T.textContent does not work in ASV/IE. If support for that browser matters for youthen, T.firstChild.nodeValue="please" works in all the browsers.
Next steps
On to Adding New Content to an SVG Document(http://www.w3techcourses.com/mod/resource/view.php?id=87)Back to Week 5 (http://www.w3techcourses.com/course/view.php?id=4#section-5)
Last modified: Sunday, 6 February 2011, 02:12 PM
Moodle Docs for this page (http://docs.moodle.org/en/mod/resource/view)
You are logged in as Marie-Claire Forgue (http://www.w3techcourses.com/user/view.php?id=476&course=4) (Logout(http://www.w3techcourses.com/login/logout.php?sesskey=nhnMD1zn5S) )
SVG_Jan11 (http://www.w3techcourses.com/course/view.php?id=4)
135

Introduction to SVG January 2011 (http://www.w3techcourses.com/course/report/log/index.php?chooselog=1&user=0&date=0&
id=4&modid=87) ◀ Jump to... ▶
W3C (http://www.w3techcourses.com/) ▶ SVG_Jan11 (http://www.w3techcourses.com/course/view.php?id=4) ▶ Resources (http://www.w3techcourses.com/mod/resource/index.php?id=4) ▶ Adding new content to an SVG document
Update this Resource
Adding new content to an SVG document
Before focusing on some examples in detail, let's look at a few instances where new content isadded dynamically. Browser support for some of these is spotty, not because of DOM support,but because of the use of SMIL or filters in some of these.
http://srufaculty.sru.edu/david.dailey/svg/createElementBrowser.html (http://srufaculty.sru.edu/david.dailey/svg/createElementBrowser.html)
These particular illustrations are neither as broad nor representative as they could be. Thegeneral technique of adding new content to documents is ultimately as broad a topic as that ofSVG itself. However, these examples illustrate some of the range and complexity of what ispossible, and may give you some ideas for things you might want to accomplish.
There are two main ways of adding new content into an SVG document: createElementNS() andcloneNode(). Their purposes are similar, but their syntax and use cases are bit different. Beforegetting into both of them, let me mention that, for both, the following methods are used:
Create the element, using either createElementNS() and cloneNode()1.establish its properties (typically using setAttribute)2.Insert the object into the SVG document3.
So, let's use a script to create a new element:
Click anywhere to add something
<svg xmlns="http://www.w3.org/2000/svg"width="100%"xmlns:xlink="http://www.w3.org/1999/xlink"><script><
C.setAttributeNS(null, "fill", "red")document.documentElement.appendChild(C)}]]></script><rect width="100%" height="100%"fill="white" onclick="add()"/><text id="Text" x="67" y="90" font-size="17"font-family="arial" fill="black">Click anywhere to add something</text><rect x="55" y="70" height="30" width="285"onclick="add()" stroke="black"stroke-width="2" fill="blue" opacity=".5"rx="10"></rect></svg>
You will note from the above example, that:
onclick="add(evt)" has been added to both the background rectangle and to the buttonitself.
1.
evt is the click event. evt.clientX and evt.clientY refer to the x and y position of the click.2.clicking on any circle that has been added does not result in a new circle being added.3.document.documentElement refers to the drawing canvas within SVG — it correspondsroughly to the <body> in HTML. That is the container to which we're adding each newcircle, and is the same container where the text and the rectangle already exist.
4.
Items 1 and 3, above, could be changed by adding a statement like
document.documentElement.setAttribute("onclick","add(evt)")
or if you prefer the more verbose (and probably standards-compliant):
document.documentElement.addEventListener("click", function(evt){add(evt)}, false)
to <script> at the very beginning.of the script (outside the function) , and then, literally, clicks willbe allowed everywhere, including atop the newly added circles.
In the next example, we show that both declarative and scripted methods may be used togetherin the same document. (In fact, both scripted and declarative animation may be used together,and even in ways that interact with one another!)
Click here to add something
<svg xmlns="http://www.w3.org/2000/svg"width="100%"xmlns:xlink="http://www.w3.org/1999/xlink"><script><
C.setAttributeNS(null, "r", 50)var x=20+Math.random()*300var y=20+Math.random()*150C.setAttributeNS(null, "cx", x)C.setAttributeNS(null, "cy", y)C.setAttributeNS(null, "opacity", .5)C.setAttributeNS(null, "fill", Color())document.getElementById("underlayer").appendChild(C)}function Color(){var R=parseInt(Math.random()*255)var G=parseInt(Math.random()*255)var B=parseInt(Math.random()*255)return "rgb("+R+","+G+","+B+")"}
]]></script><rect width="100%" height="100%" fill="white"/><g id="underlayer" /><text id="Text" x="67" y="90" font-size="17"font-family="arial" fill="black">Click here to add something</text><rect x="55" y="70" height="30" width="250"onclick="add()" stroke="black"stroke-width="2" fill="blue" opacity=".5" rx="10"><set attributeName="fill" begin="mouseover"to="green"/><set attributeName="stroke-width" begin="mouseover"to="5"/><set attributeName="fill" begin="mouseout"to="blue"/><set attributeName="stroke-width" begin="mouseout"to="2"/></rect></svg>
From the above, we observe that:
Only the button (text and rect) activate the function add().1.To prevent the button from being covered with circles (and hence becoming unavailablefor mouseclicks, we've created a group (named "underlayer" that starts out without anycontent but into which content will be added later on. This layer appears before thebutton in the markup and so it will lie "under" the button and not interfere with mouseevents on the button.
2.
We used some declarative techniques from last week to give the button a rollover effect.3.For fun, we've located each new circle at a random location in the rectangle from x=20y=20 to x=320 y=170.
4.
We've added a random color to each circle by independently constructing random valuesfor each of its R,G and B values.
5.
138

Cloning Nodes
Cloning an existing object rather than building a new on can save on a lot of code. I'lldemonstrate with two examples.
Click any blue shape
function add(evt){var C=evt.targetvar N=C.cloneNode(false)N.setAttribute("x",Math.random()*300)N.setAttribute("y",Math.random()*200)document.documentElement.appendChild(N)}
]]></script><text font-size="17" font-family="arial" y="40" x="20" fill="black">Click any blue shape</text><rect x="55" y="50" height="50" width="85" stroke="#503"onmousedown="add(evt)"stroke-width="3" fill="blue" fill-opacity=".5" rx="20" stroke-dasharray="9,5,2,5">
In this relatively simple example, working in all SVG supported browsers, we arm the <rect> tocall the function add() whenever it is clicked. The function first finds the node itself (namely the<rect>) and clones it. The parameter "false" means that it does not copy any child nodes it mayfind inside the rectangle. We then leave most of the object's eleven attribute values intact, butdecide, only, to change the two of them responsible for its positioning namely "x" and "y."
In the next example, the advantages of cloning are even clearer. Unfortunately, it doesn't work inChrome or Safari 5 yet, because of the dynamic SMIL nodes. But it does in Firefox 4(beta), Opera10 and Internet Explorer with ASV.
In this example, we see, that an object with children (in this case the object has an <animate> tagas its first child), can be cloned and in such a way that not only its attributes but also its childrenare cloned.
Click me
<svg xmlns="http://www.w3.org/2000/svg"width="100%"xmlns:xlink="http://www.w3.org/1999/xlink"><script><
var s=(4*Math.random()+1)N.firstChild.setAttribute("dur",s)document.documentElement.appendChild(N)}function Color(){var R=parseInt(Math.random()*255)var G=parseInt(Math.random()*255)var B=parseInt(Math.random()*255)return "rgb("+R+","+G+","+B+")"}
]]></script><g onmousedown="add(evt)" fill="blue"><animateTransform attributeName="transform"type="rotate" dur="5s" values="0,100,100;360,100,100" repeatCount="indefinite"/><text x="67" y="70" font-size="17"font-family="arial" fill="black">Click me</text><rect x="55" y="50" height="30" width="90"stroke="black" stroke-width="2" fill="inherit"opacity=".5" rx="10" /></g></svg>
In this case we have:
Placed the text and the rectangle inside a group <g> that is being rotated by ananimateTransform.
1.
It is the group element. that actually sends the mousedown to the function. (I usedmousedown since the object is moving and it is easier for the user to aim at and clickdown on a moving object than to both click down and up on it.)
2.
It turns out that the target of the evt in this case would actually be the <rect> rather thanthe <g>. This is explained somewhat in the SVG Primer. So we need to use not the targetbut evt.currentTarget which is the object requesting the action rather than the one whichactually received it.
3.
The cloneNode method has an attribute of "true." This means that its children, namely theanimateTransform, the text and the rect are all cloned along with the group.
4.
We then modify the fill of the <g> to a random color, and this is inherited by the <rect>.5.Finally, to separate the various buttons from one another, we find the first child of the <g>namely the <animateTransform> and modify its duration "dur" to be a random amount oftime.
6.
Note that the <animateTransform> is not separated by any white space from the grouptag -- and they are in fact, typed on the same line of text. This is important sinceotherwise, the firstChild of the <g> would actually be a text node consisting of the whitespace.
7.
Evaluating Nodes (getAttribute)
The method getAttribute() gives us a way of asking what the current value of some attribute of a
140

given node is. As an example, to get the x coordinate of the center of a circle with id="C", wemight use syntax like this:
var myCircle=document.getElementById("C")var value=myCircle.getAttribute("cx")
In the following example, we use getAttribute to find the values of a particular object's size, andthen use that to construct slightly smaller objects.
Click the oval
<svg xmlns="http://www.w3.org/2000/svg"width="100%"xmlns:xlink="http://www.w3.org/1999/xlink"><script><![CDATA[xmlns="http://www.w3.org/2000/svg"xlink="http://www.w3.org/1999/xlink"
function add(evt){var C=evt.targetvar N=C.cloneNode(true)var rx=C.getAttribute("rx")var ry=C.getAttribute("ry")var cy=C.getAttribute("cy")//N.setAttribute("cy",cy-5)//above line doesn't work since this value//is overridden by animationN.setAttribute("rx",rx-10)N.setAttribute("ry",ry-5)N.setAttribute("transform","translate(0,"+(62-ry)+")")document.documentElement.appendChild(N)}
]]></script><radialGradient id="r1" cx="50%" cy="90%"r="34%" fy="80%" spreadMethod="reflect"gradientUnits="objectBoundingBox"><stop offset=".1" stop-color="black"stop-opacity="0"/><stop offset=".8" stop-color="orange"/><stop offset=".9" stop-color="white"stop-opacity="0"/><stop offset="1" stop-color="grey"/></radialGradient>
<text font-size="23" font-family="serif"x="20" y="40" fill="black">Click theoval</text><ellipse ry="60" rx="110" fill="url(#r1)"stroke="black" onmousedown="add(evt)"
141

stroke-width="2" ><animate attributeName="cx"type="translate" dur="9s" values="5%;90%;5%" repeatCount="indefinite"/><animate attributeName="cy"type="translate" dur="13s" values="5%;90%;5%" repeatCount="indefinite"/></ellipse></svg>
About this example we should note the following:
The position of the ellipse has been animated with different periodicities for its horizontal(cx) and vertical (cy) movements. Since 9 x 13 = 117 we can expect the animation torepeat every 117 seconds.
1.
The ellipse has been filled with a reflected radial gradient, just for fun!2.We listen for the mousedown on the ellipse since it is easier to mousedown than click ona moving object.
3.
From the mousedown, we call the function add() which recognizes the event that hasactivated it and hence the target of that event: the ellipse that has been clicked down upon(there may be more than one).
4.
We clone the ellipse including its attributes and children.5.We use getAttribute to find the size of the clicked ellipse, so that we can make a smallerone.
6.
We wish to move the new ellipse down just a bit from where its predecessor was, butbecause the value "cy" is controlled by the animation, assigning a value through script hasno effect.
7.
In order to move each new ellipse's center a bit lower, we have to, instead, use atransform.
8.
As the number of ellipses increases, the animation slows considerably. I'll comment a bitmore on this in a moment.
9.
We might expect the effect of this slowing to be lessened greatly, if all the ellipses wereadded into a group that is itself animated (through animateTransform) rather thananimating each ellipse separately. This does not, however seem to be the case.
10.
If we were to use a centralized animateTransform for the group of ellipses, we would notbe able nearly so easily to independently vary the horizontal and verticle periodicities orcycle frequencies.
11.
Issues 9, 10 and 11 are addressed somewhat in this very similar example (http://w3techcourses.com/svg_images/DOMplay0b.svg) . The differences in the code are briefly considered:
function add(evt){var C=evt.targetvar N=C.cloneNode(false)var rx=C.getAttribute("rx")var ry=C.getAttribute("ry")var cy=parseInt(C.getAttribute("cy") )N.setAttribute("cy",cy+5)N.setAttribute("rx",rx-10)N.setAttribute("ry",ry-5)
142

C.parentNode.appendChild(N)}
Since the individual ellipses are merely part of a group that holds the animation we mayuse cloneNode(false) since there are no children to worry about.
1.
In the earlier example we couldn't use "cy" since it was being animated. Here we can,provided it is declared in the markup (though some browsers differ on that requirement).
2.
We have to call parseInt to convert the string value of "cy" to an integer. When wesubtracted in the earlier case, this was not needed since subtraction automatically caststhe result into integer arithmetic. If we don't use parseInt, we'll get a "not a number" error,at least in some browers.
3.
It appears that the browers do not offer significant speedup to this simplified example. TheDOM is smaller, but apparently the screen is updated based on a table of valuesrepresenting where each drawn object moves rather than making a picture of the groupand then moving that. This is apparent by looking at slight pixellation or moire effect thatoccurs within the cluster of objects as the browsers seem to move the objects at slightlydifferent distances during screen updates as the complexity of the group increases.
4.
So this last example has introduced only one new concept, getAttribute, but it has provided achance to explore some earlier ideas in a bit more detail.
Next steps
On to the Final Assignment(http://www.w3techcourses.com/mod/assignment/view.php?id=104)Back to Week 5 (http://www.w3techcourses.com/course/view.php?id=4#section-5)
Last modified: Sunday, 6 February 2011, 02:24 PM
Moodle Docs for this page (http://docs.moodle.org/en/mod/resource/view)
You are logged in as Marie-Claire Forgue (http://www.w3techcourses.com/user/view.php?id=476&course=4) (Logout(http://www.w3techcourses.com/login/logout.php?sesskey=nhnMD1zn5S) )
SVG_Jan11 (http://www.w3techcourses.com/course/view.php?id=4)
143

Introduction to SVG January 2011 (http://www.w3techcourses.com/course/report/log/index.php?chooselog=1&user=0&date=0&
id=4&modid=104) ◀ Jump to... ▶
W3C (http://www.w3techcourses.com/) ▶ SVG_Jan11 (http://www.w3techcourses.com/course/view.php?id=4) ▶ Assignments (http://www.w3techcourses.com/mod/assignment/index.php?id=4) ▶ Final Project (http://www.w3techcourses.com/mod/assignment/view.php?id=104) ▶ View submitted assignments
Update this Assignment
View 14 submitted assignments (submissions.php?id=104)
Final Project
As mentioned in this week's Introduction, I want to reveal the lastassignment now, so that you can be thinking about it as you practicethis week's lessons. At the same time, I wanted to provide someoptions so that you might either do something practical or artistic,and either heavily or lightly scripted.
Choice 1:
Use SVG to illustrate some data (textual or numeric) that has been:
provided from a web site,1.(or) contained in an XML or plaintext document on a server2.(or) bundled as an array or other JavaScript object into yourSVG document.
3.
Consider using any of the conventional ways of illustrating data(charts,figures, graphs, maps, etc.) or consider more experimental ways ofvisualizing data such as shown in the work of Edward Tufte(http://en.wikipedia.org/wiki/Edward_Tufte) or in some of the illustrationsof similarity using OWL (http://en.wikipedia.org/wiki/Web_Ontology_Language) .
Hopefully, your illustration will help guide insights about the data thatmight not be apparent to someone just looking at the raw textual ornumeric data.
Choice 2:
Visual extravaganza or sumptuous delight
Different folks have different ideas about what makes goodcomposition, balance, design, color, movement, perspective and thelike. Make something with SVG that you are pleased with!
144

Introduction to SVG January 2011 (http://www.w3techcourses.com/course/report/log/index.php?chooselog=1&user=0&date=0&
id=4&modid=88) ◀ Jump to... ▶
W3C (http://www.w3techcourses.com/) ▶ SVG_Jan11 (http://www.w3techcourses.com/course/view.php?id=4) ▶ Resources (http://www.w3techcourses.com/mod/resource/index.php?id=4) ▶ SVG DOM
Update this Resource
SVG DOM
To those who have not already programmed with the Document Object Model in HTML orXML, this topic can be fairly complex. After the class ends, I'd encourage you to spend a week ortwo playing with some of the examples in the SVG Primer. If you are not already a programmer,you may want to skip this section. The presentation may seem a bit opaque, and for that Iapologize, but with the explanation that I tried really, really hard to find simple self-containedexamples that might resonate and make sense.
In the final analysis, I think that if you become conversant with the following constructs, you willbe able to do most of what you need. I have put an X next to those topics that we've alreadymentioned in last week's lessons.
setAttribute XgetAttribute XgetElementById XcreateElementNS XappendChild XcloneNode XfirstChild XnextSibling/nextSiblinggetElementsByTagNameparentNoderemoveChildcreateTextNode
In this lesson, though, I'll just cover a few more of these topics: getElementsByTagName,previousSibling, parentNode, removeChild and createTextNode.
We'll continue last week's theme of cloning moving objects for another example, since it allowsus to illustrate the utility of another method of a DOM object called getElementsByTagName.Recall that many browsers consider the white space (space characters, tabs and carriage returns)that lie in between our SVG tags to be separate nodes in the DOM. This is an inconvenience thatsome of us learned about in HTML programming since not all browsers dealt with the issue inthe same way. Well, for a given SVG tag (i.e. a node in the DOM) we can ask for all of its childrenof a given type through getElementsByTagName. Here's an example that is perhaps slightlycontrived. It also has some interesting problems in WebKit at present that are worthy ofdiscussion.
145

Click me
<svg xmlns="http://www.w3.org/2000/svg" width="100%"xmlns:xlink="http://www.w3.org/1999/xlink" ><script><![CDATA[xmlns="http://www.w3.org/2000/svg"xlink="http://www.w3.org/1999/xlink"
function add(evt){var C=evt.currentTarget //C.nodeName is gvar N=C.cloneNode(true)N.setAttribute("fill",Color())var r=Math.random()*95+5var q=Math.random()*50+5var s=7*Math.random()+3var Anims=N.getElementsByTagName("animate")for (i=0;i<4;i++){Anims.item(i).setAttribute("values",r+"%;"+q+"%;"+r+"%")Anims.item(i).setAttribute("dur",s-i%2)}document.documentElement.appendChild(N)}function Color(){var R=parseInt(Math.random()*255)var G=parseInt(Math.random()*255)var B=parseInt(Math.random()*255)return "rgb("+R+","+G+","+B+")"}
]]></script><g onmousedown="add(evt)" fill="orange"><rect height="30" width="80" fill="inherit" rx="10"stroke="black" stroke-width="2" fill-opacity=".7" ><animate attributeName="x" type="translate" dur="7s"values="5%;90%;5%" repeatCount="indefinite"/><animate attributeName="y" type="translate" dur="9s"values="5%;90%;5%" repeatCount="indefinite"/></rect><text font-size="17" font-family="serif"transform="translate(6,20)" fill="black"><animate attributeName="x" type="translate" dur="7s"values="5%;90%;5%" repeatCount="indefinite"/><animate attributeName="y" type="translate" dur="9s"values="5%;90%;5%" repeatCount="indefinite"/>Click me</text></g></svg>
Some notes about the above:
The <rect> and the <text> are each animated with their own <animate> tags. This follows1.
146
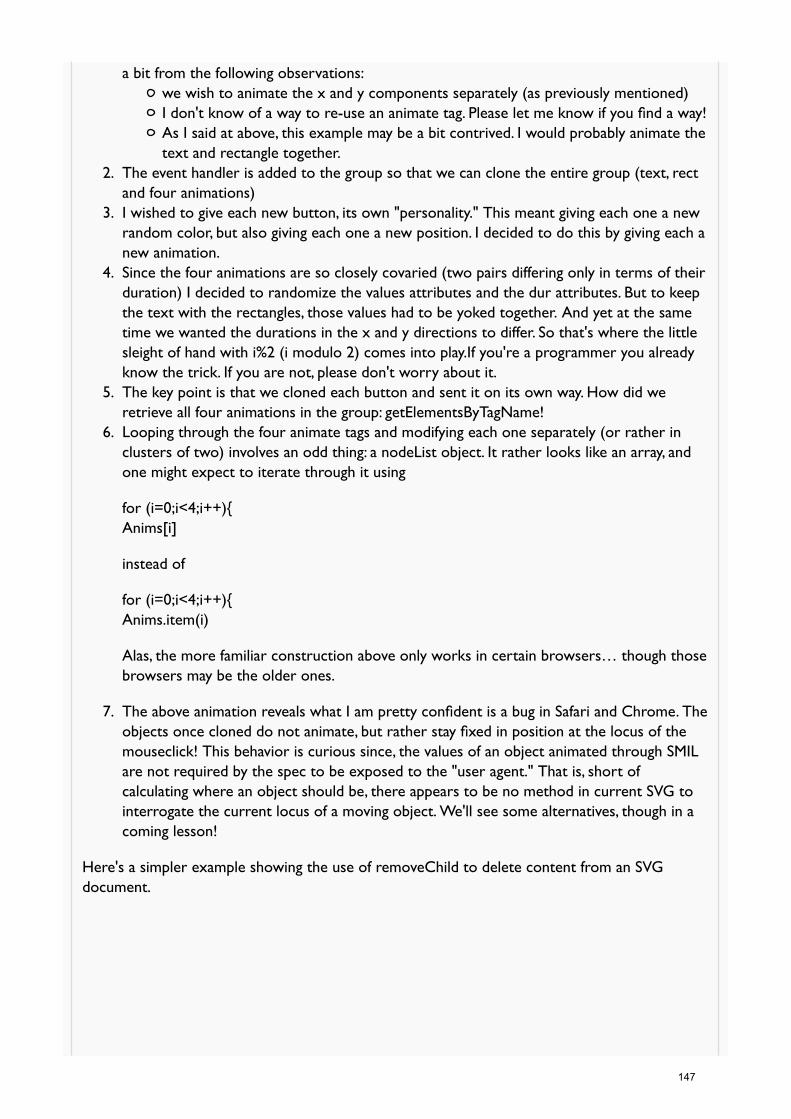
a bit from the following observations:we wish to animate the x and y components separately (as previously mentioned)I don't know of a way to re-use an animate tag. Please let me know if you find a way!As I said at above, this example may be a bit contrived. I would probably animate thetext and rectangle together.
The event handler is added to the group so that we can clone the entire group (text, rectand four animations)
2.
I wished to give each new button, its own "personality." This meant giving each one a newrandom color, but also giving each one a new position. I decided to do this by giving each anew animation.
3.
Since the four animations are so closely covaried (two pairs differing only in terms of theirduration) I decided to randomize the values attributes and the dur attributes. But to keepthe text with the rectangles, those values had to be yoked together. And yet at the sametime we wanted the durations in the x and y directions to differ. So that's where the littlesleight of hand with i%2 (i modulo 2) comes into play.If you're a programmer you alreadyknow the trick. If you are not, please don't worry about it.
4.
The key point is that we cloned each button and sent it on its own way. How did weretrieve all four animations in the group: getElementsByTagName!
5.
Looping through the four animate tags and modifying each one separately (or rather inclusters of two) involves an odd thing: a nodeList object. It rather looks like an array, andone might expect to iterate through it using
for (i=0;i<4;i++){Anims[i]
instead of
for (i=0;i<4;i++){Anims.item(i)
Alas, the more familiar construction above only works in certain browsers… though thosebrowsers may be the older ones.
6.
The above animation reveals what I am pretty confident is a bug in Safari and Chrome. Theobjects once cloned do not animate, but rather stay fixed in position at the locus of themouseclick! This behavior is curious since, the values of an object animated through SMILare not required by the spec to be exposed to the "user agent." That is, short ofcalculating where an object should be, there appears to be no method in current SVG tointerrogate the current locus of a moving object. We'll see some alternatives, though in acoming lesson!
7.
Here's a simpler example showing the use of removeChild to delete content from an SVGdocument.
147

Click on blank space to add something
Click something to get rid of it
<svg xmlns="http://www.w3.org/2000/svg" width="100%"xmlns:xlink="http://www.w3.org/1999/xlink"><script><![CDATA[xmlns="http://www.w3.org/2000/svg"xlink="http://www.w3.org/1999/xlink"var lastOneRoot=document.documentElementfunction Color(){varR=parseInt(Math.random()*255)varG=parseInt(Math.random()*255)varB=parseInt(Math.random()*255)return "rgb("+R+","+G+","+B+")"}function add(evt){varC=document.getElementById("C")var NC=C.cloneNode(false)NC.setAttribute("cx", evt.clientX)NC.setAttribute("cy", evt.clientY)NC.setAttribute("fill", Color())Root.appendChild(NC)}function remove(evt){Root.removeChild(evt.target)}]]></script><defs><circle r="20" fill-opacity=".5"id="C" onclick="remove(evt)"stroke="black" stroke-width="2"stroke-dasharray="8,4" /></defs><rect width="100%"height="100%" fill="white"onclick="add(evt)"/><rect x="25" y="30" height="50"width="235" stroke="#800"stroke-width="2" fill="grey"opacity=".65"></rect><text x="37" y="50"
148

font-size="12" font-family="arial"fill="#800">Click on blank spaceto add something</text><text x="59" y="70"font-size="12" font-family="arial"fill="#800">Click something to getrid of it</text>
</svg>
Just a few comments should be needed here:
Rather than typing document.documentElement whenever we wish to insert or removethings from the SVG DOM, it is common to use the variable Root (or SVGRoot) to referto that entity.
1.
After finding the invisible circle (hidden inside the defs tag) all of its attributes, includingthe onclick event handler are cloned. Its color and postion are determined dynamically.
2.
Each circle as cloned has the built in event handler to call the remove function.3.The remove function uses the evt to determine which object was clicked on. That object,namely the target of the onclick is then removed from Root using Root.removeChild().
4.
There is a slight problem with this script and that is that all cloned circles share the sameid. This could be a problem if for some reason we later wanted to retrieve elements by id.We could either give each element a unique id (by, for example, counting mouseclicks andfolding that number into the id) or by simply not having given the circle an id in the firstplace and by accessing it through other DOM techniques like getElementsByTagName.
5.
Now let's make a button which allows us to recolor the most recent addtion to our drawing.Rather than illustrating the entire document here, we'll just display the relevant code snippetsand let you look at the source of this example (http://w3techcourses.com/svg_images/makeAndTake1.svg) if you need to examine more closely.
Click on blank space to add something
Click something to get rid of it
Click here to change color of last
Root=document.documentElementvar lastOne=Rootfunction add(evt){varC=document.getElementById("C")var NC=C.cloneNode(false)NC.setAttribute("cx", evt.clientX)NC.setAttribute("cy", evt.clientY)NC.setAttribute("fill", Color())Root.appendChild(NC)lastOne=NC}function colorit(){if (lastOne.nodeName!="circle")returnlastOne.setAttribute("fill",Color())}function remove(evt){lastOne=evt.target.previousSibling
149

Root.removeChild(evt.target)}]]></script><defs><!--here would be material that isidentical to last example-->
<text x="50" y="100"font-size="12" font-family="arial"fill="black">Click here to changecolor of last</text><rect x="40" y="80" height="30"width="200" onclick="colorit()"stroke="blue" stroke-width="2"fill="red" opacity=".35" rx="10"></rect>
Here, the primary difference is that we added a function called colorit() that finds the last circleadded and changes its color. However, this brought about the following changes:
We had to make a button to activate the colorit() function.1.It involves keeping track of which circle was last added. So I introduced a variable"lastOne" that points to the last circle when it is created.
2.
However suppose we've removed the last circle, then the variable lastOne would point toa nonexisting object. So upon removal of the object, we redirect the variable to point tothe previously added circle. We do that by finding the previousSibling of the item clickedupon and calling it "lastOne."
3.
Finally, one more little consideration: suppose all the circles have been deleted. Well in thatcase lastOne points to Root or to the last element in the DOM and that will not be acircle! Therefore if we test to see if lastOne points to a circle, then we'll be safe in tryingto change its color.
4.
Now let's expand this example with one more feature, so that it allows text (in this case anumeric digit) to be place "inside" one of the circles after it has been created. This actuallyrequires a bit more reworking of the conceptual model employed and a bit more code. I'll onlyillustrate the parts that change.
Click on blank space to add something
Click something to get rid of it
Click here to add content to last
Click here to change color of last
function add(evt){var G=document.getElementById("C")var NG=G.cloneNode(true)var C=NG.firstChildC.setAttribute("cx", evt.clientX)C.setAttribute("cy", evt.clientY)C.setAttribute("fill", Color())Root.appendChild(NG)lastOne=C}function content(){if (lastOne.nodeName!="circle") returnvar x=lastOne.getAttribute("cx")
150
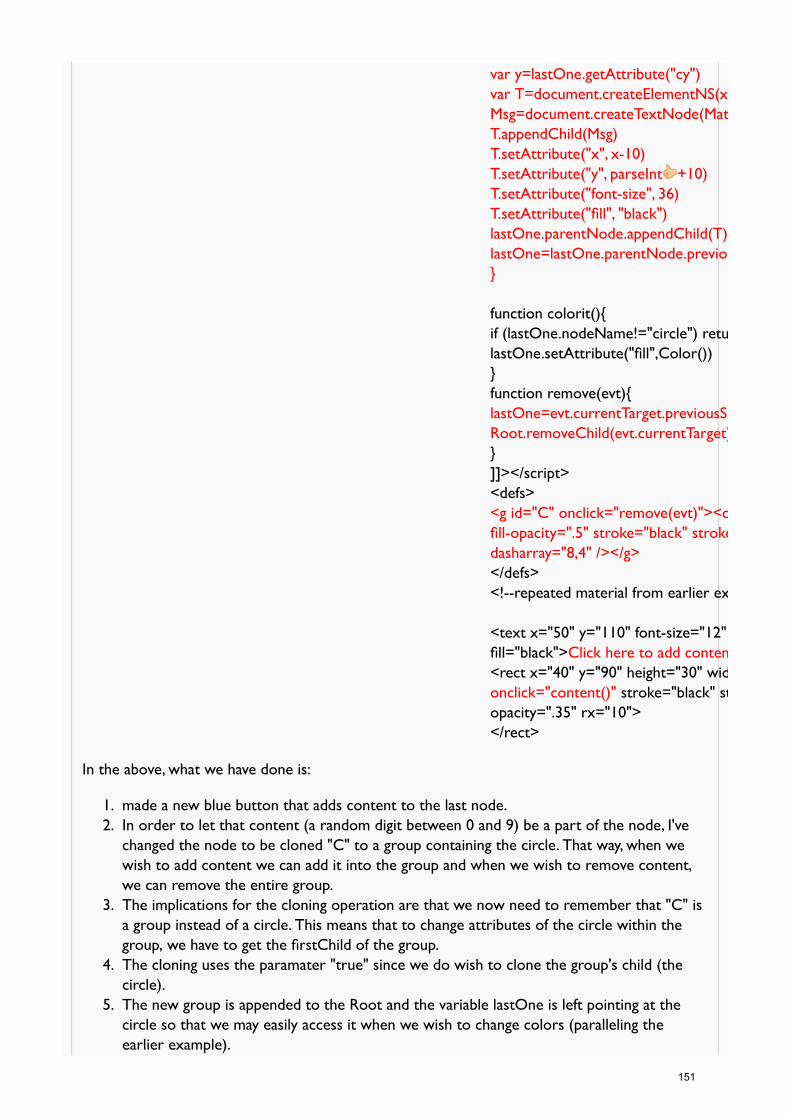
var y=lastOne.getAttribute("cy")var T=document.createElementNS(xmlns,"text")Msg=document.createTextNode(Math.floor(Math.random()*1T.appendChild(Msg)T.setAttribute("x", x-10)T.setAttribute("y", parseInt +10)T.setAttribute("font-size", 36)T.setAttribute("fill", "black")lastOne.parentNode.appendChild(T)lastOne=lastOne.parentNode.previousSibling.firstChild}
function colorit(){if (lastOne.nodeName!="circle") returnlastOne.setAttribute("fill",Color())}function remove(evt){lastOne=evt.currentTarget.previousSibling.firstChildRoot.removeChild(evt.currentTarget)}]]></script><defs><g id="C" onclick="remove(evt)"><circle r="20"fill-opacity=".5" stroke="black" stroke-width="2" stroke-dasharray="8,4" /></g></defs><!--repeated material from earlier example-->
<text x="50" y="110" font-size="12" font-family="arial"fill="black">Click here to add content to last<rect x="40" y="90" height="30" width="200"onclick="content()" stroke="black" stroke-width="2" fill="blueopacity=".35" rx="10"></rect>
In the above, what we have done is:
made a new blue button that adds content to the last node.1.In order to let that content (a random digit between 0 and 9) be a part of the node, I'vechanged the node to be cloned "C" to a group containing the circle. That way, when wewish to add content we can add it into the group and when we wish to remove content,we can remove the entire group.
2.
The implications for the cloning operation are that we now need to remember that "C" isa group instead of a circle. This means that to change attributes of the circle within thegroup, we have to get the firstChild of the group.
3.
The cloning uses the paramater "true" since we do wish to clone the group's child (thecircle).
4.
The new group is appended to the Root and the variable lastOne is left pointing at thecircle so that we may easily access it when we wish to change colors (paralleling theearlier example).
5.
151

The content() function first checks to see if lastOne points to a circle. If not, the functionis exitted.
6.
If the lastOne is a circle then we find out what its coordinates are since those will beneeded to position the text.
7.
A new SVG node of type "text" is created.8.Then a rather odd thing is done: in order to set the textContent of the new node, we haveto create a "textNode" inside it. This is the actual text itself -- that is the typewrittencharacters that appear inside the <text> : as with <text>content of textNode</text> . Itcan be a bit puzzling but the SVG Primer discusses it at some length.
9.
We again have to apply parseInt to the y coordinate before doing our addition so thataddition is not confused with concatenation.
10.
Now, we wish to append the <text> and its contents not into lastOne which you'll recall isa <circle> but rather into the group to which lastOne belongs. That would belastOne.parentNode.
11.
Finally, since we do not (typically) wish to overwrite the contents of this textNode again,we redirect lastOne to point at the circle inside the preceding group within the document.(This is not a foolproof technique since the earlier nodes may have been given textualcontent already, but this is good enough for now. If we wished to go futher, we could checkto see whether the previous node has a text child or not and continue from there.
12.
Next steps
On to Measurements (http://www.w3techcourses.com/mod/resource/view.php?id=89)Back to Week 6 (http://www.w3techcourses.com/course/view.php?id=4#section-6)
Last modified: Sunday, 13 February 2011, 07:07 PM
Moodle Docs for this page (http://docs.moodle.org/en/mod/resource/view)
You are logged in as Marie-Claire Forgue (http://www.w3techcourses.com/user/view.php?id=476&course=4) (Logout(http://www.w3techcourses.com/login/logout.php?sesskey=nhnMD1zn5S) )
SVG_Jan11 (http://www.w3techcourses.com/course/view.php?id=4)
152

Introduction to SVG January 2011 (http://www.w3techcourses.com/course/report/log/index.php?chooselog=1&user=0&date=0&
id=4&modid=89) ◀ Jump to... ▶
W3C (http://www.w3techcourses.com/) ▶ SVG_Jan11 (http://www.w3techcourses.com/course/view.php?id=4) ▶ Resources (http://www.w3techcourses.com/mod/resource/index.php?id=4) ▶ Measurements
Update this Resource
Measurements
Here we'll talk about these topics: getBBox, getTotalLength, getPointAtLength, and viewBox, sinceall are helpful in scripting when we need to be precise about positioning of elements. We will tryto keep this discussion somewhat brief, again referring to the SVG Primer's treatment(http://www.w3.org/Graphics/SVG/IG/resources/svgprimer.html#special_functions) for a more thoroughpresentation.
getBBox — this is used to find the coordinates of the smallest rectangle (parallel to the edges ofthe brower window) that contains the geometry of a given shape.
Given a shape like the 7-pointed purple star, such as:
<path onclick="displayBB(evt)" fill = "#837fc0" id = "P9" stroke = "black" stroke-width = "1" d
we may use getBBox() as follows:
The JavaScript (seen here (http://granite.sru.edu/%7Eddailey/svg/BBox0M.svg) ) that is used to find thebounding box looks like this:
function displayBB(evt){ var P=evt.target var BB=P.getBBox() var msg1="This "+P.nodeName + " ha
Note: Through and onclick event, the path activates the function displayBB(). We use evt.targetto identify the path itself. BB.x, BB.y, BB.width, and BB.height are the four crucial measurementsof the bounding box. We then just call a small function that builds a red rectangle at thosecoordinates.
Armed with that information, now let's consider a classic packing problem, like how to fit abunch of starlike objects together in a box. Let us suppose that we have some SVG stars likethese:
Let's consider a classic packing problem. Like how to fit a bunch of starlike objects together in abox. Let us suppose that we have some SVG stars like these:
153

Let us assume that we don't want the objects to overlap as can be accomplished by this smallscript that produces these results (http://w3techcourses.com/svg_images/BBox1.svg) by applyingrandom transforms:
Clusters of stars placed randomly
We would rather have a bit of space left over than to have them all atop one another. So let'suse the traditional assumption that packers often make, that we can wrap each of them in anicely sized rectangle (with padding to prevent breakage!) and then fit the rectangles togetherinside the screen. (Alternatively, since these shapes are just irregular enough that packing themtruly tightly, by rotating and adjusting them so that the space between them is actually minimizedwe might come up with a more economical packing than a rectangular one. ) Let's furthermoreassume (that since it is SVG after all) that we can resize the stars to fit the boxes. That's howgetBBox() can come in handy.
154

One star per box
The above picture was generated by this JavaScript program embedded in SVG(http://w3techcourses.com/svg_images/BBox2.svg) . The code seems to work everywhere but Firefox(I'm using FF4b), so I will be interested to hear if it works in FF3.6!
There is a bit of algebra here, and some programming, so please realize that it may seem a littleopaque. I'll try to give a general description of the gist of the program.
Description Code
The standard beginning is used to declarenamespaces.
<svg xmlns="http://www.w3.org/2000/svg"width="100%"xmlns:xlink="http://www.w3.org/1999/xlink"
We also immediately activate the startup()function which begins the program anddraws the graphics.
onload="startup()"><script><
We measure the screen using getBBox()var R=document.getElementById("R")var BB=R.getBBox()
and determine the size of the boxesvar littleBoxw=BB.width/Nacrossvar littleBoxh=BB.height/Ndown
Next we develop two nested loops: theouter loop controlled by i works across thescreen while the inner one worksdownward. We could reverse this orderwithouth difficulty.
for (var i=0;i<Nacross;i++){for (var j=0;j<Ndown;j++){
We make one small rectangle with itsheight and width an appropriate fraction ofthe available screen and the startingposition given by multiples of the values of iand j.
var R=document.createElementNS(xmlns,"rect")R.setAttribute("width",littleBoxw)R.setAttribute("height",littleBoxh)R.setAttribute("x",littleBoxw*i)R.setAttribute("y",littleBoxh*j)R.setAttribute("fill",Color())R.setAttribute("stroke","black")R.setAttribute("stroke-width",1)R.setAttribute("fill-opacity",.80)Root.appendChild(R)
A random star is chosen from among thetotal number of paths in the document. Andwe measure it.
var rS=Math.floor(Stars.length*Math.random())var SC=Stars.item(rS)SBB=SC.getBBox()
We now clone the randomly selected starand perform some nasty algebra to rescaleand translate the star from its originalbounding box and location into the cellreserved for it in the grid.
var StarClone=SC.cloneNode(false)varscale="scale("+littleBoxw/SBB.width+","+littleBoxh/SBB.height+") "var trans="translate("+(littleBoxw*i-SBB.x*(littleBoxw/SBB.width))+","trans+=(littleBoxh*j-SBB.y*(littleBoxh/SBB.height))+") "StarClone.setAttribute("transform",trans+scale)
For fun, we change the color and fill-rule ofthe star to make it more interesting
StarClone.setAttribute("fill-rule","evenodd")StarClone.setAttribute("fill",Color())Root.appendChild(StarClone)}}}
]]></script>
The actual Bezier paths have been placedinside a <defs> tag so they are defined butnot drawn. That way they are available toscript. These actual star paths were drawnusing the star tool in the drawing programat my Web site (http://srufaculty.sru.edu/david.dailey/svg/Draw018.html) , smoothingthe result and then viewing source.
<defs><path fill = "#63f721"d = "M 114.5 290.5 Q 213 280 114.5 270 Q 16 260110.5 290.5Q 205 321 119 271.5 Q 33 222 106.5 288.5Q 180 355 121.5 274.5 Q 63 194 103.5 285Q 144 376 123.5 278.5 Q 103 181 103 280.5Q 103 380 123.5 282.5 Q 144 185 104 276Q 64 367 122 286.5 Q 180 206 106.5 272.5Q 33 339 119 289.5 Q 205 240 110.5 270.5
156

Q 16 301 114.5 290.5 z"stroke = "black" stroke-width = "1" /><path fill = "#837fc0"d = "M 96 110.5 Q 191 132 96 154Q 1 176 77.5 115 Q 154 54 111.5 142Q 69 230 69 132.5 Q 69 35 111.5 123Q 154 211 77.5 150Q 1 89 96 110.5 z" id = "P9" stroke="black"stroke-width = "1" /><path fill = "#6fcf96"d = "M 347 442 Q 408 393 347 344.5Q 286 296 252 366.5 Q 218 437 294.5 454.5Q 371 472 371 393.5 Q 371 315 294.5 332.5Q 218 350 252 420.5Q 286 491 347 442 z" id = "P47" stroke = "black"stroke-width = "1" /><path fill = "#d17943"d = "M 239 313.5 Q 329 284 239 255 Q 149 226204.5 303Q 260 380 260 284.5 Q 260 189 204.5 266Q 149 343 239 313.5 z" id = "P3" stroke = "black"stroke-width = "1" /><path fill = "#3b63db"d = "M 193.5 112 Q 290 129 193.5 146.5 Q 97 164182 114.5Q 267 65 204 140.5 Q 141 216 174.5 123.5Q 208 31 208 129.5 Q 208 228 174 135.5Q 140 43 203.5 118.5 Q 267 194 182 144.5 Q 9795 193.5 112 z"stroke = "black" stroke-width = "1" /><path fill = "#c44c80"d = "M 374 192.5 Q 459 157 374 122 Q 289 87324.5 172Q 360 257 395 172 Q 430 87 344.5 122.5 Q 259158 344.5 193Q 430 228 394.5 142.5 Q 359 57 324 142.5Q 289 228 374 192.5 z" stroke = "black"stroke-width = "1" /></defs>
The rect "R" is added to fill the screen sowe can measure it.
<rect id="R" x="0" y="0" width="100%"height="100%" fill="#ddd"/></svg>
Before moving onto getTotalLength and getPointAtLength, let's show one other simplerapplication of a bounding box to a comparatively simple Bezier curve. This will set the stage forwhat follows.
Let's draw a Bezier curve and use a script to draw a bounding box that encloses it.
157

Click
<svg xmlns="http://www.w3.org/2000/svg" width="100%"xmlns:xlink="http://www.w3.org/1999/xlink"onload="initialize()"><script><![CDATA[xmlns="http://www.w3.org/2000/svg"xlink="http://www.w3.org/1999/xlink"Root=document.documentElement
function initialize(){ //some globalvariablesB=document.getElementById("B")BB=B.getBBox()R=document.getElementById("R")}function measure(){Rnew=R.cloneNode(false)Rnew.setAttribute("x", BB.x);Rnew.setAttribute("y", BB.y);Rnew.setAttribute("width",BB.width);Rnew.setAttribute("height",BB.height);Rnew.setAttribute("fill",B.getAttribute("stroke"));Rnew.setAttribute("pointer-events","none")Root.appendChild(Rnew)}function hilight(evt){var P=evt.currentTargetPs=P.childNodes.item(3)if (evt.type=="mouseover")Ps.setAttribute("stroke","red")elsePs.setAttribute("stroke","black")}]]></script>
<path d="M 30 120 C -30 250 35020 420 70" id="B" stroke="#008"fill="none" stroke-width="30"/><g id="H"onmouseover="hilight(evt)"onmouseout="hilight(evt)"onclick="measure()"
158
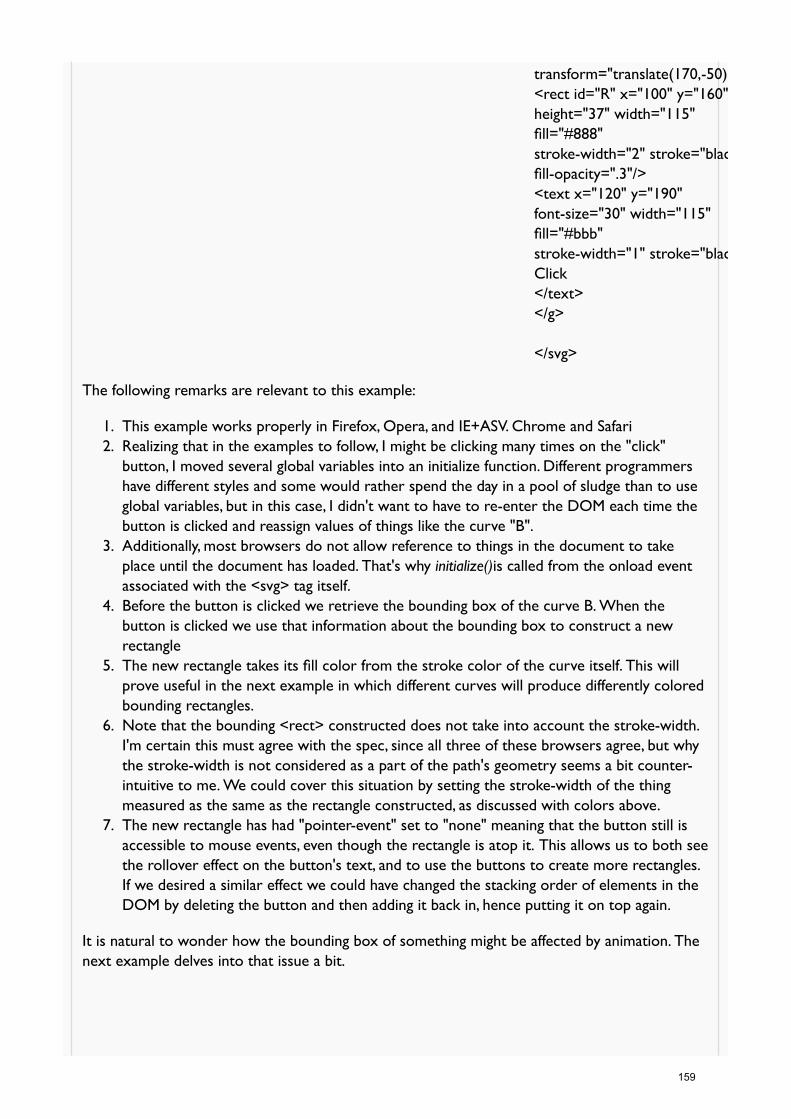
transform="translate(170,-50)"><rect id="R" x="100" y="160"height="37" width="115"fill="#888"stroke-width="2" stroke="black"fill-opacity=".3"/><text x="120" y="190"font-size="30" width="115"fill="#bbb"stroke-width="1" stroke="black">Click</text></g>
</svg>
The following remarks are relevant to this example:
This example works properly in Firefox, Opera, and IE+ASV. Chrome and Safari1.Realizing that in the examples to follow, I might be clicking many times on the "click"button, I moved several global variables into an initialize function. Different programmershave different styles and some would rather spend the day in a pool of sludge than to useglobal variables, but in this case, I didn't want to have to re-enter the DOM each time thebutton is clicked and reassign values of things like the curve "B".
2.
Additionally, most browsers do not allow reference to things in the document to takeplace until the document has loaded. That's why initialize()is called from the onload eventassociated with the <svg> tag itself.
3.
Before the button is clicked we retrieve the bounding box of the curve B. When thebutton is clicked we use that information about the bounding box to construct a newrectangle
4.
The new rectangle takes its fill color from the stroke color of the curve itself. This willprove useful in the next example in which different curves will produce differently coloredbounding rectangles.
5.
Note that the bounding <rect> constructed does not take into account the stroke-width.I'm certain this must agree with the spec, since all three of these browsers agree, but whythe stroke-width is not considered as a part of the path's geometry seems a bit counter-intuitive to me. We could cover this situation by setting the stroke-width of the thingmeasured as the same as the rectangle constructed, as discussed with colors above.
6.
The new rectangle has had "pointer-event" set to "none" meaning that the button still isaccessible to mouse events, even though the rectangle is atop it. This allows us to both seethe rollover effect on the button's text, and to use the buttons to create more rectangles.If we desired a similar effect we could have changed the stacking order of elements in theDOM by deleting the button and then adding it back in, hence putting it on top again.
7.
It is natural to wonder how the bounding box of something might be affected by animation. Thenext example delves into that issue a bit.
159

Click
————————Code : annotated excerpts———————————<svg xmlns="http://www.w3.org/2000/svg" width="100%"xmlns:xlink="http://www.w3.org/1999/xlink"viewBox="0 70 500 250" preserveAspectRatio="none"onload="initialize()">——————————^1^——————^1^—————————————function initialize(){ //some global variablesB=[]BB=[]for (var i=0;i<3;i++){B[i]=document.getElementById("B"+i)BB[i]=B[i].getBBox()}——————————^2^——————^2^—————————————Rnew.setAttribute("x", BB[c].x);Rnew.setAttribute("y", BB[c].y);Rnew.setAttribute("fill", B[c].getAttribute("stroke"));—————————^3^——————^3^—————————————<path d="M 10 150 C 290 60 550 450 450 100"id="B1" stroke="#800" fill="none" stroke-width="4"/>
<path id="B2" d="M 120 90 300 280 400 80 z"stroke="green" fill="none" stroke-width="4"><animate attributeName="d" repeatCount="indefinite"begin="H.click" dur="5s" values="M 10 150 C -50 280 380 50 450 100;M 10 150 C 290 60 550 450 450 100;M 10 150 C -50 280 380 50 450 100" /></path>
<path d="M 10 150 C -50 280 380 50 450 100"id="B0" stroke="#008" fill="none" stroke-width="4"/>—————————^4^——————^4^—————————————
From this experiment it can be concluded that the bounding box of a curve defaults to itspre-animated value and does not follow the animation. This is true even if it had no value tobegin with: its bounding box will not appear (being defined as 0,0,0,0 or at least numbers very
160

close to it, when I tested it). Interesting segments of this code are now discussed, however, weshould first point out that the animation for this example works in Opera, IE+ASV, Chrome andSafari but not yet in FF4b. The Webkit browsers are not (as of this writing) handling thebounding box properly, though FF appears to be. That Chrome's drawing of the red rectangle isaffected by the oscillation of the green curve is particularly interesting!
Here we have defined a viewBox. This has the net effect of translating and scaling theentire graphic in ways that fit the screen better and which scale better to different sizeddevices. In this case, the material I drew was not quite the size I wished and it also did notfit well into the <embed> provided on this page. The reader is invited to read more onviewBox in the Primer, to observe this example of an animated viewBox, and best to trythe above example with and without the viewBox to see its effect. The four coordinatesare x, y, width and height of the coordinate system for the document. By setting theviewBox at (0,0,100,100) (and making sure that preserveAspectRatio is "none") it is likedrawing everything in relative coordinates of the screen size.
1.
Since we will be measuring the BBoxes of three different curves (blue, red and green) itmakes sense to do this work in a loop and to store the results in arrays.
2.
Code much like the previous example is used to assign attribute values, only it is doneusing arrays, indexed by "c" a counter .
3.
The reddish path (#800) and the bluish one (#008) are static, while the green one isanimated to fluctuate between the paths laid by the other two.
4.
Two more allied techniques will now be introduced: getTotalLength and getPointAtLength thatcan be used to calculate positions along complex curves, that might otherwise defy simplearithmetic. The example shown also allows a good lesson in manipulation of the DOM, since wewill be repeatedly filling a group with objects and then deleting them all again. We'll also usescripted rather than SMIL animation in this example.
Click
var animate=falsefunction startup(evt){bunch=document.getElementById("bunch")E=document.getElementById("E")}Col=new Array("red","magenta","blue","cyan","green","yellow","orange")————————————^1^———————^1^——————————————function populate {if ((n>maxn)||(n<minn)) {incr=-incrmaxn=60
161

}var v=n+incrvar p="M 10 150 C 200 "+(5*n)+" 350 "+(300-5*n)+" 450 100"B=document.getElementById("B")B.setAttribute("d",p)var l=B.getTotalLength()
if (bunch.childNodes.length>0) DOs(bunch)
for (i=0;i<n+1;i++){P=B.getPointAtLength(l*i/n)px=Math.ceil(P.x)py=Math.ceil(P.y)Enew=E.cloneNode(false)Enew.setAttribute("cx", px);Enew.setAttribute("cy", py);Enew.setAttribute("fill", Col[i%Col.length]);bunch.appendChild(Enew);}
if (animate) window.setTimeout("populate("+v+")",10)}————————————^2^———————^2^——————————————function DOs(s){num=s.childNodes.lengthfor (i=s.childNodes.length;i>0;i—){s.removeChild(s.childNodes.item(i-1));}}————————————^3^———————^3^——————————————
//]]></script><defs><ellipse id="E" rx="10" ry="6" opacity=".75" stroke="black" stroke-width="2"><animateMotion dur="2s" rotate="auto" repeatCount="indefinite" begin="H.click"><mpath xlink:href="#B"/></animateMotion></ellipse></defs>————————————^4^———————^4^——————————————<g>
<path d="M 10 150 C 200 80 350 300 450 100" id="B"stroke="black" fill="none" stroke-width="4"/><g id="bunch"></g></g><g id="G" onmouseover="hilight(evt)" onmouseout="hilight(evt)"onclick="animate=false;populate(n=n+incr)" transform="translate(60,-170)">
162

<rect x="90" y="393" height="47" width="115" fill="#bbb" stroke-width="2" stroke="black" /><path fill = "#663e16" id = "P6" stroke = "black" stroke-width = "1"transform="translate(93,393) scale(.10,.09)"d =[..... very long path data consisting of handwritten letters....]
<g id="H" onmouseover="hilight(evt)" onmouseout="hilight(evt)" onclick="animate=!animate;populate(7)"><rect x="150" y="283" height="47" width="115" fill="#bbb" stroke-width="2" stroke="black" /><text x="155" y="325" font-size="47" width="115" fill="#bbb" stroke-width="2" stroke="black">Click</text></g></svg>
—————————————^5^————————^5^——————————————
Notes:
A boolean variable "animate" is used to start and stop the animation. When it is false theanimation will be stopped. One of the buttons will turn it on and off by chaning the valueof this variable. We also define an array of colors with Col[0]="red" and so forth, to beable to assign colors deterministically rather than randomly for a change.
1.
The function populate reruns itself and updates the screen every ten milliseconds. This isbecause of how JavaScript will not redraw the screen while functions are still processing.This is a fairly standard trick used in HTML. Each time the animation runs, we will delete allexisting ellipses and introduce n new ones (where n increases for a time and thendecreases). Each new ellipse will be positioned 1/n th of the way along the curve furtherthan the last one was. Oh, and the position of the curve is updated too, just for fun!
2.
In deleting objects, care must be taken to make sure we don't try to delete non-existingnodes. This topic is covered in the SVG Primer under the topic of removeChild.
3.
It is interesting to play with the SMIL animation on the curve of the ellipse itself. Differentbrowsers are very unpredictable here!
4.
One button adds nodes manually to the path, the other starts and stops the animation.5.
Two more footnotes on this topic are left for the reader's perusal: a similar example(http://w3techcourses.com/svg_images/BBox5.svg) attempting to do the animation declaratively. Itseems not to be working very well! And finally, one which shows that at least in some browsers,we may leave ellipses at the loci of an oscillating curve (http://w3techcourses.com/svg_images/BBox3.5.svg) to determine where it was at a given time!
Next steps
On to Messages between SMIL and script Resource (http://www.w3techcourses.com/mod/resource/view.php?id=90)Back to Week 6 (http://www.w3techcourses.com/course/view.php?id=4#section-6)
Last modified: Sunday, 13 February 2011, 08:13 PM
Moodle Docs for this page (http://docs.moodle.org/en/mod/resource/view)
163

Introduction to SVG January 2011 (http://www.w3techcourses.com/course/report/log/index.php?chooselog=1&user=0&date=0&
id=4&modid=90) ◀ Jump to... ▶
W3C (http://www.w3techcourses.com/) ▶ SVG_Jan11 (http://www.w3techcourses.com/course/view.php?id=4) ▶ Resources (http://www.w3techcourses.com/mod/resource/index.php?id=4) ▶ Messages between SMIL and script
Update this Resource
Messages between SMIL and script
There are several issues that could be discussed, but I think the two most important ones thatenable the author great flexibility are:
beginElementto activate SMIL from JavaScript
onendto run a JavaScript function upon completion of a SMIL animation.
We'll keep this section quite brief and refer the avid reader to the SVG Primer for moreinformation. Let's dissect two simple examples:
From SMIL to script(http://w3techcourses.com/svg_images/SMILscript1.svg)
<svg xmlns="http://www.w3.org/2000/svg"width="100%"xmlns:xlink="http://www.w3.org/1999/xlink" ><script><![CDATA[xmlns="http://www.w3.org/2000/svg"xlink="http://www.w3.org/1999/xlink"function stuff(evt){O=evt.target.parentNodeO.setAttribute("fill","red")}]]></script><ellipse fill="lightgreen" cx="40" cy="100" rx="22"ry="14" stroke="#804" stroke-width="5"><animate attributeName="cx" dur="3s"onend="stuff(evt)" values="40;400;40"/></ellipse> </svg>
This shows the general way of invoking JavaScript from SMIL.Comments: the animate tag is the target of the event, so we change an attribute of itsparentNode: the <ellipse>
from script to SMIL(http://w3techcourses.com/svg_images/SMILscript2.svg)
<svg xmlns="http://www.w3.org/2000/svg"width="100%"xmlns:xlink="http://www.w3.org/1999/xlink" ><script><
function start(id){D.getElementById(id).beginElement()}]]></script><ellipse fill="lightpink" onclick="start('A')" cx="40"cy="140" rx="22" ry="14"><animate id="A" attributeName="cx" dur="3s"begin="indefinite" values="40;400;40"/></ellipse></svg>
Using JavaScript to initiate a SMIL animation, using beginElement()Comments: In this case we use the click on an object to send a parameter to script that willidentify which, of possibly, many different animations we might like to trigger. Clearly, the decisioncould be used to select an object at random and vary certain of its attributes before launchingits animation. Also this particular example could be done quite easily with <set> instead ofrelying upon script.
Now, we simply provide a collection of links to other examples, of increasing complexity, withsome notes about what to look for in the example. Most work in Opera, FF4, and IE/ASV, butmany are untested in Chrome and Safari which seem not to have implemented this level ofJavaScript to SMIL communication. If you get stuck with the concepts here, please ask questionsin the forums!
Link NotesStarting and stopping animationswith SMIL and script(http://srufaculty.sru.edu/david.dailey/svg/newstuff/SMIL7g.svg)
This example, from the primer, illustrates pausing andunpausing animation as well as the use of begin and end.
Ellipses on Bézier curve that addnew numbers when the scriptterminates (http://srufaculty.sru.edu/david.dailey/svg/bezierovals.svg)
This fairly short example, discussed at length in the primer,would be very difficult to do without SMIL and which iscurrently not possible without script. Firefox 4 doesn'tseem to follow the curves properly.
Building a random path for ananimateMotion(http://srufaculty.sru.edu/david.dailey/svg/followPath.svg)
Building a random Bézier curve, placing an ellipse on it,starting the animation and then restarting it all when done.
Similar to above but wilder(http://srufaculty.sru.edu/david.dailey/svg/followPath6.svg)
This builds a random path, bisects it and then uses themidpoint as the start point for another random path.
Better yet (http://srufaculty.sru.edu/david.dailey/svg/followPath10.svg)
This grows a random path, but gradually. It is an answer toan SAQ (sometimes asked question)
Bézier starflakes(http://srufaculty.sru.edu/david.dailey/svg/svgopen2008/makestars2.svg)
These stars move along a random path from theuser-selected startpoint. But then at the end of theirlife-cycle they metamorphosize into new forms that sharesome of the color attributes of their bodies in larval state.Hard to do without both SMIL and script.
Falling starflakes(http://srufaculty.sru.edu/david.dailey/svg/stars3.svg)
The paths of the flakes are controlled by JavaScript ratherthan SMIL, so this has been working in many browsers formany years.
165

Starflake expressway(http://srufaculty.sru.edu/david.dailey/svg/swatch3.svg)
Stars moving along random translations of bezier pathsparallel to a clipping region and enjoying reincarnation atthe end. One of my favorite "old" examples, this has onlyrun in IE+ASV until very recently with FF4b and Operahaving consented to do this sort of work only within thelast six months!
Next steps
On to Messages between HTML and SVG (http://www.w3techcourses.com/mod/resource/view.php?id=91)Back to Week 6 (http://www.w3techcourses.com/course/view.php?id=4#section-6)
Last modified: Sunday, 13 February 2011, 10:10 PM
Moodle Docs for this page (http://docs.moodle.org/en/mod/resource/view)
You are logged in as Marie-Claire Forgue (http://www.w3techcourses.com/user/view.php?id=476&course=4) (Logout(http://www.w3techcourses.com/login/logout.php?sesskey=nhnMD1zn5S) )
SVG_Jan11 (http://www.w3techcourses.com/course/view.php?id=4)
166

Introduction to SVG January 2011 (http://www.w3techcourses.com/course/report/log/index.php?chooselog=1&user=0&date=0&
id=4&modid=91) ◀ Jump to...
W3C (http://www.w3techcourses.com/) ▶ SVG_Jan11 (http://www.w3techcourses.com/course/view.php?id=4) ▶ Resources (http://www.w3techcourses.com/mod/resource/index.php?id=4) ▶ Messages between HTML and SVG
Update this Resource
Messages between HTML and SVG
This is not only a big topic and a complex one, but a fun one too! It is a far bigger topic than canbe covered in the final lecture of a six week course.
So let's start gradually and work up. Realize that the examples will build in complexity, and I'mnot really expecting that all but a few of you will finish all of this material!
Remarks on HTML5 and SVG
First. it should be said that HTML5, makes overt mention of the need to have dose integrationbetween HTML and SVG. This means several things, but among the most important is the directintegration of SVG into the HTML, interleaved, as it were, amidst HTML tags, "in-line." The in-linemodel is not yet implemented consistently across browsers (after all HTML5 is still an emergingspecification), and the model of scripting and messaging is quite a bit different. Theimplementation in Chrome seems to be pretty similar to that in Firefox if you are interested inexperimenting. If you are I would offer this conclusion based on my own limited experiments: theDOM and events model seem to follow HTML conventions much more than SVG conventions,which will perhaps please the HTML programmers (until they run into some of the sameobstacles that may have prompted SVG to handle things the way it does!).
On the topic of HTML5, I'd recommend watching this (video) discussion (http://vimeo.com/6691519) about HTML5 and some of its relationship to SVG, given by Brad Neuberg who wasone of the main people responsible for Google's hosting of SVG Open 2009 at theirheadquarters in Mountain View CA.
Putting SVG in HTML
You may recall Phil Archer's notes about <embed>, <object> , <iframe> and <img>. All areacceptable ways of putting SVG in an HTML document. All four are acknowledged in HTML5.<img> for various reasons will not allow script to run, while the others will. <iframe> has certaincross-browser inconsistencies in accessing the SVG DOM from my experience. <embed> hadthe problem that fall-back content for non supporting browsers seems problematic, and<object> has some security problems associated with running script via the Adobe plugin. Toallow things to work in Moodle, <embed> seems to be the only way to go, which is why you mayhave seen it in this course. Otherwise I would probably have used <object>. Inline presentationof SVG in HTML such as
167

<html><head><title>Hello to SVG from HTML5</title></head> <body>Hello to SVG<svg><rect></svg></
is just not mature enough to understand for more than testing purposes, let alone explain how itought to work! Here's a scripted example working in FF and Chrome (http://granite.sru.edu/%7Eddailey/svg/graphReader.html) . It is based on this simple template (http://srufaculty.sru.edu/david.dailey/svg/simpleTemplate.svg) that I often use to start a project, but a careful comparison willshow numerous subtle differences.
Putting HTML in SVG
For the HTML-centric person it is natural to think of putting SVG in HTML. On the other handthe world view of HTML (note the usage of the word "Text" in Hyper-text) is perhaps neither soadaptable nor broad as that of SVG, so in fairness, it is appropriate to mention that one can gothe other way around: and use <foreignObject> from within SVG to embed HTML. This has theadvantage that SVG's powerful filters, masks, clipPaths, and animation can be brought to bearupon the more stodgy and texty HTML! Perhaps I'll find time to dig up some nice examples fromthe web to post to the forums.
Let's Go!
But let's get started with something that works pretty much everywhere: here's a simple thingthat allows us, from HTML, to interrogate properties about an SVG.
HTML + SVG HTML (using embed)
Link to working example(http://srufaculty.sru.edu/david.dailey/W3CCourse/week4/SVGinHTML.html)
<html><script>function peruse(){D=document.getElementById("E")SVGDoc=D.getSVGDocument()VGRoot=SVGDoc.documentElementwho=SVGRoot.firstChild.nextSiblingwhoName="<"+who.nodeNamewhoHow=who.attributes.item(0)whoNow=whoHow.nodeNamewhoWhat=whoHow.nodeValue+">"alert(whoName+" "+whoNow+"="+whoWhat)}</script><body><button onclick="peruse()">open</button><br><embed name="E" id="E" src="simplecircle.svg"width="50" height="50"></body></html>
The SVG<svg xmlns="http://www.w3.org/2000/svg"><circle r="50"/></svg>
The reason this example is not embedded in Moodle, is that I discovered that serving SVGthrough either <embed> or <object> inside HTML inside an iframe inside Moodle doesn't work!If you remove Moodle from the equation (http://srufaculty.sru.edu/david.dailey/W3CCourse/week4
168

/SVGinHTML.html) it does (well except for the idiosyntratic IE/embed pairing).
Here is a link just to the HTML with SVG (http://srufaculty.sru.edu/david.dailey/W3CCourse/week4/peruse.html) .(http://srufaculty.sru.edu/david.dailey/svg/iframeSVG.html)
For a more robust usage of <object> that tends to work in IE/ASV, I recommend studying thisexample (http://srufaculty.sru.edu/david.dailey/svg/objectparamSVG.html) (also from the SVG Primer)that has a slightly more elaborate instance of the <object> object (is object-object redundant?): Ibelieve it works everywhere.The tricky part here is in actually retrieving the SVG documentfrom within the HTML DOM. This is done through setting SVGDOC to getSVGDocument() asgiven by the id of the <embed>. It should be pointed out that a very similar approach workswhether we use <embed>, <iframe>, or <object>.
Now let's extend the concepts here just a bit.
a link to it (http://srufaculty.sru.edu/david.dailey/W3CCourse/week4/wordsput.html)
<HTML><head><style>div.u{float:top;}div.d{float:top;height:80%}td{text-align:center;font-family:impact;width:15%;background:#eee}</style><title>clicking words in HTML and putting them intoSVG</title><script>function init(){var Ds=document.getElementsByTagName("td")for (i in Ds) Ds[i].onclick=function(){add(this)}D=document.getElementById("E")SVGDoc=D.getSVGDocument()SVGRoot=SVGDoc.documentElementsvgns="http://www.w3.org/2000/svg"}function add(o){var word=o.firstChild.nodeValuevar T=SVGDoc.createElementNS(svgns,"text")var MsgNode=SVGDoc.createTextNode(word)var fontratio=0.1234var adj=(1 - fontratio)T.setAttribute("x",Math.random()*adj - fontratio)T.setAttribute("y",Math.random()*adj + fontratio)T.setAttribute("font-size",fontratio)T.setAttribute("font-family","serif")//alert(word)//Safari 5 shows the alert but not what//follows; Chrome doesn't get this farT.appendChild(MsgNode)SVGRoot.appendChild(T)
169

}</script></head><body onload="init()"><div align="center" class="u"><table border=1><tr><td>artichoke</td><td>balustrade</td><td>canteloupe</td><td>dandelion</td></tr><tr><td>elephant</td><td>familiar</td><td>groundhog</td><td>Hydrophlorone</td></tr></table>Click on any word above</div><hr><div class="d"><embed name="E" id="E" src="simplerect.svg"width="100%" height="100%" /></div></body></html>
The SVG<svg xmlns="http://www.w3.org/2000/svg" viewBox="0 0 1 1" preserveAspectRatio="none"><rect x="0" y="0" width="100%" height="100%" fill="#ddd"/></svg>
Notes on the above:
Here is a link to it (http://srufaculty.sru.edu/david.dailey/W3CCourse/week4/wordsput.html) ,again because of Moodle limitations, we can't really embed it here.
1.
It is working fine in Opera, Firefox4b, and IE+ASV, not though in Safari and Chrome (see#2)
2.
I suspect the problem with Safari and Chrome is a browser bug, based on where we putthe alert() in the above code.
3.
And before we get into a very complex example, here's a final relatively small step before we gothere. In it we complete a round-trip from HTML to SVG and back.
Just a link to the working example(http://srufaculty.sru.edu/david.dailey/W3CCourse/week4/wordsput2.html) . (svg inembed inside html inside iframe insidehtml??? yes but not in Moodle!)
Relevant excerpts of HTML script
function init(){var Ds=document.getElementsByTagName("td")for (i=0;i<Ds.length;i++) {Ds[i].onclick=function(){add(this)}Ds[i].id=Ds[i].firstChild.nodeValue}D=document.getElementById("E")SVGDoc=D.getSVGDocument()SVGRoot=SVGDoc.documentElementsvgns="http://www.w3.org/2000/svg"
The SVG document
<svg xmlns="http://www.w3.org/2000/svg"viewBox="0 0 1 1"preserveAspectRatio="none"onload="init()"><script>
170

<![CDATA[function init(){Root=document.documentElementRoot.addEventListener("click", top.respond, false);}]]></script><rect x="0" y="0" width="100%"height="100%" fill="#ddd"/></svg>
}
function respond(evt){var w=evt.target.firstChild.nodeValuedocument.getElementById(w).style.background="red"}
Some brief discussion:
The example is working, as was the earlier one, in Opera, IE+ASV, and FF4 (though Isuspect FF3.6 would run it just fine). Interestingly, Safari allows events in the SVG to getback to their originator in HTML and succeeds in turning the table cells to red, eventhough the <text> in SVG does not appear!
1.
We made a quite minor change to the SVG from the previous example: adding a "init()"function that runs when the document loads. What that function does is to make eachobject responsive to the mouseclick. Better code would do it only to elements of a giventype and exclude the rectangle that is there to simply pad the space to fill the container.
2.
The object clicked upon will actually trigger a function in "top" namely the HTMLcontainer. If the SVG is not inside a container of some sort then clicking on it will throwan exception, so please realize we are just keeping the code simple to illustrate the moreimportant issues.
3.
We use addEventListener instead of Root.setAttribute("onclick", "top.respond") just toshow this technique that was underplayed in an earlier lesson.
4.
In the HTML, this time, instead of just adding an event handler to each <td> of the table,we also give each one an id equal to the text inside it. This allowsthe text in SVG to beable to "find" its parent.
5.
The click inside the SVG document, sends the event back to HTML where the propertiesof the object that instigated the event are then examined and used to relate back to theobject of that name in HTML.
6.
Final example (complicated)
I had three goals for this particular example:
to make a fairly adventurous illustration of the relationships between SVG, AJAX andHTML, and or how each of them would have something essential to bring to the table forthe interaction.
1.
to provide you with a couple of nice little data feeds that could be used as a part of yourfinal projects
2.
to use <object> rather than <embed> to put the SVG into the HTML3.
Let me first provide a link to the working example (http://granite.sru.edu/%7Eddailey/wordtable.html). It works somewhat everywhere, but best in Opera and IE+ASV. Click on one of the ten words. Itshould (in a bit of time) return a definition and at the same time, "launch" the word into SVG
171

space where it begins moving randomly. This part works in all five browsers. As words movearound, connections between them are developed (currently based on physical proximity, buteventually the physical proximity will be governed by semantic proximities calculated from theirdefinitions — or from thesaurus distances (http://granite.sru.edu/%7Eddailey/cgi/hyphens?weave) ).
Let me address the three goals from above and then discuss the actual code, which still doessome pretty cool stuff.
Specifically, what I wanted to build, involved starting with these examples concerning SVG -HTML programming (http://www.w3.org/Graphics/SVG/IG/resources/svgprimer.html#scripting_HTML) from the SVG primer. Next, I would build a server-sidedictionary lookup function that would interactively push user-selected words anddefinitions into an animation that would dynamically calculate "semantic distances"between words as they move around, based on similarities between the words in theirdefinitions. Working in all five browsers, here is an example from a few years back(http://srufaculty.sru.edu/david.dailey/svg/graphs30.svg) , illustrating what I had in mind, (if you'vegot IE here's an even older one (http://granite.sru.edu/%7Eddailey/wordcows.html) from an artexhibit I did some years ago) but with real semantic data being fed into it based on yourchoices made in real-time. After pretty much a 12 hour day working on a parsing suitablefor easy imporation via HTTPRequest into JavaScript in the browser, I woke up thismorning to discover that the roundtrips from client to server and back and again to theserver that were working last night in Firefox, were no longer! Phooey!
1.
The "data feeds" that fuel it come ultimately from the Webster's 1913 dictionary of theEnglish language.* (#fn3) My server-side programs are two: one that simply returns tenwords at random from among those defined in the dictionary (http://granite.sru.edu/%7Eddailey/lookup.php) (try appending a different query string), and another which returnsup to two of a chosen word's definitions (http://granite.sru.edu/%7Eddailey/cgi/onew?realm) .(try appending a different query string — here I've appended the query string "realm").Alas, when I finally moved the stuff onto a server and tried accessing the client-side stufffrom a different domain, I remembered something very important: it is difficult (if notimpossible) to script into AJAX on a page in Domain 1, material being served fromDomain 2! So much as I had hope that my 12 hours of effort on Saturday would haveturned into something you could have used for your final project… at present I don't see away. Perhaps you can tell me something I don't know about this. I should explain that myexperience with AJAX is limited to a few very small experiments in the past!
2.
When it was all said and done, the standard way I've been using <object> with <param> toserve scripted SVG in a way that works across browsers ended up breaking in a fewbrowsers, so, given the interest in moving forward with the project, it was back to thereviled but trusty <embed>!
3.
I'll talk about two pieces of code here: the SVG (largely borrowed from this) and the HTML. Theserver-side parts (PHP and UNIX shell for manipulating a large complex 19MB dictionary) …well, that's a different story, and we'll just consider it to be a black box!
The SVG
Much of the code here is directly reused from this example (http://srufaculty.sru.edu/david.dailey/svg/graphs30.svg) dealing with proximities and connectivity in mobile networks, and based on theexample developed in the book. That way, if you're interested, you can find, right in the book, adetailed description of much of the thinking and principles that went into it. I should say that a
172

student of mine recently took a look at the code in the mobile networks example and in ourattempt at rebuilding the 10 year old VML example into the SVG version presented here(http://srufaculty.sru.edu/david.dailey/grapher/) , recommended that we start from scratch to define asimpler data structure and event-handling module. That is, though both projects are "opensource" I might recommend that the newer SVG code is more modern, better written and moreextensible than either of its predecessors.
This program is really long and has functions that are not strictly needed here. You will not thatany of the moving nodes in the SVG can be dragged to new locations, and that clicking in blankspace results in new nodes being drawn. Neither of those utilities is required by the currentproject, but I didn't want to cut out parts that might actually have mattered!
Since it is so long, it is too long to annotate. So I will just discuss a few of what I consider to beits important points for the learner.
The HTML
The important part of the AJAX and SVG — HTML communicating is done here, and the code is(in contrast with the SVG) finite. So I'll actually go ahead and annotate it in segments.
Annotation Code
Just some styles and so forthto get started
<HTML><head><style>div.u{float:top;height:30%}div.d{float:bottom;height:70%}.def{font-size:12;font-family:arial,sans-serif}</style><title>Dictionary lookups with AJAX</title>
These are just somemessages and strings andexplanatory information. Thelines of text were getting solong that it was easier to doit this way. And, guesswhat— innerHTML is a partof HTML5 and so some ofthe stigma against it may bewaning.
<script>var msg="Click on any word above."var citation=" ‐ based on <b>Webster's Unabridged1913</b>via<a href='http://srufaculty.sru.edu/david.dailey (http://srufaculty.sru.edu/david.dailey) '>Dailey</a>, via<a href='http://www.mso.anu.edu.au/~ralph/OPTED/index.html(http://www.mso.anu.edu.au/%7Eralph/OPTED/index.html) '>Ralph Sutherland's OPTED</a>,via <a href='http://www.promo.net/pg/ (http://www.promo.net/pg/)'>Gutenberg</a>,via<a href='http://srufaculty.sru.edu/dailey/public/public_domain.htm#sources (http://srufaculty.sru.edu/dailey/public/public_domain.htm#sources) '>Noah Webster</a>"var button="<input type='button' value='NewWords' onclick='send()'>"
Here is the guts of the AJAXused. This is a method thatcreates a couple ofXMLHttpRequests. I am toldthat in IE9 the need for
function createRequestObject() {var ro;var browser = navigator.appName;if(browser == "Microsoft Internet Explorer"){ro = new ActiveXObject("Microsoft.XMLHTTP");
173

testing for IE will disappear.
}else{ro = new XMLHttpRequest();}return ro;}var http = createRequestObject();var http2 = createRequestObject();
The body has an onload thatactivates this. I now see Icould have just sent it to"send()"!
function startup(){send()}
This actually sends the firstHTTP /AJAX request. Theprogram lookup.php returnsten words (each in a largeword list of 96,000 wordsknown to be in thedictionary) chosen atrandom. When theasynchronous call is satisfied,the function doSomething(),below, will be activated.
function send() {http.open('get',"http://granite.sru.edu/~ddailey/lookup.php");http.onreadystatechange = doSomething;http.send(null);}
This function tests to see ifthe http request terminatedproperly (e.g. when state is4) and if so then theresponse from lookup.php isreceived and parsed (or"split") into words, based onthe <br> delimitter.
A table is constructed theold-fashioned way withinnerHTML.
For the event managementon the table cells, I had aterrible time getting myserver to be able to parsetriply nested quotationmarks and it was about thenthat I started wishing I haddone this with DOMmethods instead!
fetch(this)sends the tablecell rather than the wordinside it back to the serverfor a definition. lauch(this)
function doSomething() {if(http.readyState == 4){W=http.responseText.split("<br>")tabwidth=Math.floor(100/(W.length-1))var s="<table border=1>"
for (j=0;j<2;j++){s+="<tr>"for (i=0;i<5;i++){word=W[i+5*j]s+="<td valign='top' width='"+tabwidth+"%'>"s+="<div align='center' "s+="onclick='fetch(this);launch(this)'"s+=">"s+=words+="</div>"s+="</td>"}s+="</tr>"}s+="<tr><td colspan=4 id='defn' class='def'/>"s+="<td align=center bgcolor='#00ff00'>"+button+"</td></tr>"s="</table>"document.getElementById("echo").innerHTML =s+msg}}
174

sends the word to SVG.
This takes the table cell(though I would havepreferred the word itself)and sends it back to theserver to a shell scriptlocated at cgi/onew. Whenthat http request is satisfiedthen the function display()will be activated.
function fetch(o){var s=o.innerHTMLs=s.replace(/<.*/,"")//news=s.replace(/\W/g,"")//new//alert(s)//put this back in and Firefox shows the content for a timehttp2.open('get', "http://granite.sru.edu/~ddailey/cgi/onew?"+s);http2.onreadystatechange = display;http2.send(null);}
This makes each word of thedefinition clickable, and (atleast in theory and in Operaand in IE/ASV) allows anyword in the definition to belooked up in the dictionary.For a working example ofthat sort of round-trippingsee this (http://marble.sru.edu/%7Eddailey/cgi/readwebster3?wild) . Ithink this was the first trulyhypertextual dictionary onthe Internet.)
function display(){if(http2.readyState == 4){var W=http2.responseTextA=W.split(" ")var s=""for (var i=0;i<A.length;i++){s+="<span onclick='fetch(this);launch(this)' "s+="onmouseover='roll(this,0)' "s+="onmouseout='roll(this,1)'"s+=">"s+=A[i]s+="</span> "}document.getElementById("defn").innerHTML=s}}
Simple rollover function. if tis 0 it is mouseover, if 1, thenmouseout. It highlights eachword in the definition to letthe user know they areclickable.
function roll(o,t){if (t==0)o.style.background="yellow"} else {o.style.background="white"}}
This receives the table cell,finds the text inside it, stripsout any HTML (andsometimes there is some)and then sends the word toSVG. The SVG DOM isretrieved through methodsdiscussed earlier and thefunction newNodeNamelives inside the SVGdocument but is aliased tohere from there (usingtechniques discussed above).
function launch(o){var s=o.innerHTMLs=s.replace(/<.*/,"")//news=s.replace(/\W/g,"")DE=document.getElementById("E")SVGDoc=DE.getSVGDocument()SnewNodeName(s)}</script></head>
175

"echo" is where the adviceto the user will be held."cite" is for citationinformation (on the originsof the data used in theproject)"defn" is a cell of thedynamically created table inwhich definitions of wordsare usually written.
<body onload="send()"><div align="center" class="u"><span id="echo" style="color:blue" ></span><span id="cite" style="background:#bfb"onclick="document.getElementById('defn').innerHTML=citation">origins</span></div><hr><div class="d">
Ordinarily, <object> usedlike this to the right worksquite well across browsers.Better luck next time, Ihope!
<!--not working except in IE this afternoon<object id="E" type="image/svg+xml" data="ovals.svg"width="100%" height="100%"><param name="src" value="nodes.svg"></object>-->
You can see the functionalityand source code of the filenodes.svg by clicking on thelink to right. You'll note ablank screen. But if you clickon it, nodes come intoexistence. If you drag themaround lines will developbetween them.
<embed id="E" type="image/svg+xml" src"nodes.svg (view-source:http://granite.sru.edu/%7Eddailey/nodes.svg) " width="100%"height="100%"></embed></div>
</body></html>
* It turns out that massaging the 19 megabytes of data from the OPTED project(http://www.mso.anu.edu.au/%7Eralph/OPTED/index.html) is not trivial. The material is broken(mercifully) into 26 separate files and contains etymologies, diacritics, pronunciation guides, andmultiple definitions per word. Even massaging the data to come up with a 96,000 wordvocabulary list of those words defined in the dictionary was nontrivial. If you're interested indictionary projects (English or other languages), send me an email some time and I'd enjoyexchanging some ideas!
Further reading
The relevant chapter from the SVG primer (http://www.w3.org/Graphics/SVG/IG/resources/svgprimer.html#SVG_HTML) .
Next steps
Give us your feedback (http://www.w3techcourses.com/mod/feedback/view.php?id=94)Back to Week 6(http://www.w3techcourses.com/course/view.php?id=4#section-6)
Last modified: Sunday, 13 February 2011, 11:27 PM
Moodle Docs for this page (http://docs.moodle.org/en/mod/resource/view)
You are logged in as Marie-Claire Forgue (http://www.w3techcourses.com/user/view.php?id=476&course=4) (Logout(http://www.w3techcourses.com/login/logout.php?sesskey=nhnMD1zn5S) )
176

OMWeb - 248687
D 2.2 Training Report
APPENDIX 2: FEEDBACK ANALYSIS – “INTRODUCTION TO SVG” (JAN. 2011)
177

Introduction to SVG January 2011 (http://www.w3techcourses.com/course/report/log/index.php?chooselog=1&user=0&date=0&
id=4&modid=94) ◀ Jump to... ▶
W3C (http://www.w3techcourses.com/) ▶ SVG_Jan11 (http://www.w3techcourses.com/course/view.php?id=4) ▶ Feedback (index.php?id=4) ▶ Intro to SVG Feedback
Update this Feedback
Export to ExcelSubmitted answers: 26Questions: 18
How did you hear about this course?- Web Standards List Serv- I catched a gimpse of a W3C message on Twitter.- - twitter- Through the W3C Twitter channel if I can recall correctly- by a Twitter-Feed- Phil Archer at Devsci Bristol in October 2010- Twitter, I believe- I was looking to see if W3C offered any online courses- I don't remember exactly where! it was promotedsomewhere.- email from w3c- W3C web site.- via the w3c pages- It was mentioned in Russ Weakley's WSG announcements towhich I subscribe.- From a colleague.- A colleague gave me the web address.- WSG Announcements- Email from Phil Archer- internet- Twitter I think...- Twitter- Through a mailer
Overview (http://www.w3techcourses.com/mod/feedback/view.php?id=94&do_show=view) Edit questions
(http://www.w3techcourses.com/mod/feedback/edit.php?id=94&do_show=edit) Templates (http://www.w3techcourses.com
/mod/feedback/edit.php?id=94&do_show=templates) Show responses (http://www.w3techcourses.com
/mod/feedback/show_entries.php?id=94&do_show=showentries)
Analysis ()
178

- found it while searching for info about SVG in genal- W3C website- I think I received an email about it.- directly from W3C mailing list
What did you like best about this course?- That you didn't have to be a programmer to learn how to
do all the basics, which are the bits most apt to be used inday to day design first
- The course is very progressive and interesting. The textmaterial is good, the forum is a real advantage to sort outsome difficulties or discuss around SVG with the otherparticipants.
- I enjoyed the examples provided with code. They werecomplex enough to challenge, but not impossible to hurdleas a beginner in SVG.I also appreciated the quick response time to forum postsfrom D.Dailey.
- SVG Primer- That it was given alongside the specification. It did not only
give me information on how to use SVG, it's quirks at thispoint in the development, but also how to read and usespecifications as they are defined by the W3C.
- The Material, the assignments, the forum ... all :-)- Topic- The way participants can interact by using the forum.- The way being in a class motivated me to learn something,
and make things.- The step by step aproach and support from the instructor
and fellow students. There was also a lot of referencematerial.
- Good quality primer and weekly notes. Friendly andenthusiastic teacher.
- Depth of material; knowledge of instructor and creativity ofparticipants.
- Assignments. Seeing how different browsers treat thescripts.
- I enjoyed the feeling of sharing the course with otherstudents, even if I never got to see them.
- Nothing particular, I think the whole SVG spec is reallyinteresting.
- A lot of things. Without hierarchy :* material with many links to illustrate the subject withexamples or to go deeper into the subjects* although lessons tries to be self-contained* the good support of the teacher
179

* the forum (I did not use it enough)- direct access to the author of the SVG primer- Learned all I wanted to learn, just in size- the personal response of a trainer and his encouragement to
develop on your own- I liked the flexibility that you are free when you can deliver
the tasks. That it is web based and you can ask questionswithout being tied to fixed times.
- Depth and opportunity to interact.- - David writes in a very encouraging way, in the forum and in
replies to assignments. that's very motivating- I liked the information provided.- I really liked that it offered another option for creating
graphics on the web using a method that was verylightweight and offered a lot of interesting possibilities that Iwas not aware of. David Daily was very good about trying tomaking it interesting for all the different levels of ability.
- the quality of the pdf manual
What suggestions do you have for improving thecourse?- textual descriptions of the things you're trying to re-create
maybe?? ie: "with a double line behind the square that has atransparency"
I can see wanting people to experiment with different waysto get the look, but maybe a link to the text descriptionavailable for those who want to make sure they interpretedthe representation correctly before turning it in? Just athought.
- May be more "useful" examples. I mean when you buy abook about jQuery animations for instance you hope to seeexamples you can actually reuse. This course is moretheoretical from this point of view, leaving the participantswith their imagination to find out how to actually use SVG.Obviously you need to start somewhere and it can bedifficult to find reusable examples at the very beginning ofthe course.
- Extend the timeframe for the course to 8 weeks. I foundthat I could not complete the indepth study / reading that isreally needed with the responsiblities that exist in theresponsible adult's world. Consequently, I had to decide notto complete the last two weeks.
180

- Special ("normal" ??) attention to students who follows theproposed course rhythm. Those who works without delaysin weekly tasks.
- Multiple times I've wondered myself why my solution wasn'tworking. As we're working on the edges of the browserimplementations, sometimes stuff doesn't work in onebrowser, but it does in another. The only way to figure out isto use all five major browsers and test your code in all ofthem. Perhaps a kind of list (which should of course beupdated regularly) on which browser doesn't support whichfeatures yet could come in handy.On the other hand.. finding out the hard way can sometimesbe the best lesson.
- Perhaps put a warning at the beginning, that svg can be veryfascinating, and that playing with examples and assignments isvery time comsuming!
- More time to get the assignments in. I'm going to continuewith them in my own time after the course, but more timeallowed would have been beter
- - I think the private messages should not be inside theprofile. It is so unintuitive.- Being this a markup related course, I think most of thetimes user wish to write markup in their posts to serve asexamples, rather than format their messages. One is forcedto use HTML entities, or our sample markup will bediscarded silently.
- The Primer has a few errors in it that led to a littleconfusion at times, but it appears to be an organicallyforming document so those creases will iron out in time.
- Maybe some instructional videos.- Cheat sheets listing elements, attributes, possible attribute
values and short explanation of attributes (but clear - thespecification is not always easy to understand).The only part that was very hard to understand was thekeyspline section. If I understand it right it's simpler (lessscary) than conveyed in the primer. This helps understand it:http://www.carto.net/papers/svg/samples/keysplines.svg
- A little more time overall may be helpful. 2-3 hours perweek is a bit conservative for most folks :).The feTile explanation was a bit confusing, although I wasable to adapt the example for my assignment. O'Reilly has anexample that is easier to understand.
- Some of the early work includes scripts. This is a bitconfusing - was not sure if we were supposed to learn andunderstand these or just stick to declarative programming. Iwould suggest there should be no scripting at all in thebeginning - simply so that students can focus on SVG syntax
181

and function.- Can't think of any.- Maybe less focus on multi browsers problem, like fonts for
instance. Browser differences is a problem that shouldn'texist I think.
- On one side, I think the 2 or 3 first weeks could be donequicker, on the other side that filters could be more detailedif it is worth of doing.A break of one week between week 4 and week 5 to digestthe basics before using scripts in week 5 and 6. This is only afeeling as I did not have time to go into weeks 5 and 6 so Icould be wrong.
- utube style video based instruction?- None, it was just fine.- hmm ... maybe video chat and video tutorials- Possible that the instructor be able to follow up the
participants closer together. I have at times been absentfrom the course due to work reasons. But I received noquestions from the instructor if I needed help with anythingor if I had dropped out of the course.
- Assignments were a little too time-intensive for someoneworking a full-time job.
- In my opinion setting more strict homework schedule wouldbe nice. For example, I was caught up in important project atwork and neglected the course just because i had little time.And i regret it now, since i missed a lot of valuable things andwill have to catch up later. If i knew i HAVE to submit myhomework "or else", well, that would make me try harder.
- suggesting group work could be interesting, asking studentsto find on or several partners to work on a small assignmenttogether. that could result in more interaction and closerlook at other people's approaches than just exchangingfinished work.
- The estimated number of hours required for the courseshould be increased, at least doubled. I didn't have the timeto follow through each week. I did the reading, but I'mstarting a company and that took precedence.
- I was a complete newcomer to SVG upon taking this courseso I had a lot of misconceptions about it. I'm primarily adesigner, secondarily a coder. I thought SVG was somethingthat I would use Adobe Illustrator for. After the first week, Iquickly realized that ALL graphics would be coded and Iwould have to use some software that I didn't have. I startedusing Dreamweaver and previewing in Opera, then had toswitch to a demo copy of Oxygen and previewing in Opera. Itried using SVG edit but was too new to it to use it for this
182

class. Inkscape probably would have helped but I also did notknow inkscape so it was easier to just continue with Oxygenand Opera. It's hard to tell what level people are at but Ithink if I had been a little more familiar with the softwarenecessary for the class it would have been an easiertransition.The other thing is that I thought I was going to need to useSVG in the immediate future. Maybe I can, but browsersupport is limited so I don't see being able to use thispractically for the next year or two. I will still continue toplay with it, maybe for personal projects.I should have read up on SVG about a month before theclass. At that time, I wasnt even aware of where to getreading material.
- maybe an integration with some learning videos
I would recommend this course to others- Strongly disagree (1): 1 (3.85 %)- Disagree (2): 0- I might but I'm notsure (3):
1 (3.85 %)
- Agree (4):13 (50.00 %)
- Strongly agree (5): 11 (42.31 %)Average: 4.27
If you'd recommend the course: Can you say why?How would you motivate the recommendation?- For UX people, just understanding how these things work
and what the limitations are as well as the possibilities helpsdesigns in the future. Also learning about issues now withaccessibility. browser implementation before laterpre-production is usually best. Basically everything can beanimated in some way... uh oh as programmers learn to usethis without UX over-seeing.
- David is someone with not only a lot of practice but he isalso very present on the forum helping out students. Thecourse pace is very progressive and the material is good. Asfar as I see it only the price can be an issue.
- The course provides the hands on experimentation that isnecessary to jump into the SVG arena. It's a bit unsettling atfirst - but when you accomplish something unique with asmall set of beginner skills, it helps you see how powerfulSVG really is.
- The course points the right way to go and are plenty ofresources regarding the SVG technology.
183

- Swift responses to forum threads keep your learningmomentum. The learning curve seems steep at the beginning,but you create an offset in just a matter of time which allowsyou to quickly be able to create some nice looking graphics.Its compact (minimal), but strong, syntax is a key element tothis technique and makes it accessible to a broad group ofpeople (not only web developers). The rendering is done bythe client which minimizes server load and will make yoursystem administrator happy.
- - It's a good way in to SVG- I didn't know anything about SVG, beyond its existence. One
month after, I feel confident in doing almost everything Iwant, including animations! It became sometimes a reallytime consuming task, but it worth it! Thank you.
- I would tell the person I was recommending it to about howpotentially useful SVG is, and how motivating it is to learnabout something in a class rather than in isolation.
- I believe any web designer or developer should know thecharacteristics, practical uses and power of SVG now morethan ever.
- SVG is great. Course if very informative and covers bothbasic and complex topics. An in-dept introduction to thetopic. Teacher is very helpful and into the subject.
- Great way to be introduced to SVG.- Interactive. Opportunity to experiment with and see how
SVG works on today's browsers - warts and all.- I'm enthusiastic about SVG and would motivate people by
showing them some cool examples.- SVG is the new next big thing! It's hard to expect that
companies will invest in implementing apps for iOS, Android,Windows, Mac OS X, webOS etc. when it's possible to buildweb apps in the same way.
- I find that the general organisation allows to go into SVGprogressively and can be used as a guide not to get boggeddown during this learning step but also later whenexperimenting deeper in SVG in the next weeks (I hope wewill be able to access to all materials for weeks and weeks).Nevertheless it is not closed at all but opened through manylinks to examples and parts of manuals.The assignments are a very good way to experiment.The support of the teacher and the sharing of workbetween students is very rewarding. (I did not use it enough,I shou have forget about my english)
-
184

- Assignments were very good, I could explore just abouteverything I was interested in. It takes more time though still(for me) then the estomated 3 hours, but about 10 hrs aweek is an reasonable investment for a course. And I likevery much the way David is escorting and informing us.
- You can learn in your own pace. It's very affordable and youget to know international peers
- It's simple and you have the possibility to ask questions toinstructor and other students.
- Even though the content is something I could have picked upwithout a course--either by reading online material (such asthe primer) or a book, having a structured course thatforces you through the material at a particular pace is anexcellent way to learn, even if it can be stressful.
- What i really enjoyed about this course was the fact that itonly guides you, but eventially you have to do all the thinking.I believe this is the best way to understand the "mechanics"and to evolve, rather than just use copy paste.
- very good entrance to a new subject one wishes to learn- I would recommend this course, with the usual caveat that
goes with computer courses --> those who know the mostwill drive the discussions. Those who know the least don'tknow what to ask until the discussion has spiralled outwardsaway from the core information provided by the materials.That's life.
- I would recommend it to programmers. The SVG language isvery easy to understand but I still thinks its too much codingfor most designers.
- because it's a quality introduction into the wide world of svg
I learned something that I previously did notknow- StronglyDisagree(1):
0
- Disagree(2):
0
- Neitheragree nordisagree(3):
0
- Agree(4):
4 (15.38 %)
- Stronglyagree (5): 22 (84.62 %)Average: 4.85
185

The course met my expectations- Strongly Disagree (1): 0- Disagree (2): 0- Neither agree nordisagree (3):
2 (7.69 %)
- Agree (4):11 (42.31 %)
- Strongly agree (5):13 (50.00 %)
Average: 4.42
This course was worth my time- Strongly Disagree(1):
0
- Disagree (2): 0- Neither agree nordisagree (3):
0
- Agree (4): 11 (42.31 %)- Strongly agree (5):
15 (57.69 %)Average: 4.58
I will incorporate what I learned into my work- Strongly Disagree (1): 0- Disagree (2): 0- Neither agree nordisagree (3):
2 (7.69 %)
- Agree (4):11 (42.31 %)
- Strongly agree (5):11 (42.31 %)
Average: 4.04
The course material was- Too difficult andassumed too muchknowledge (1):
0
- Difficult to follow(2):
0
- Challenging attimes but I was ableto follow it (3):
17 (65.38 %)
- Informative andusually easy tofollow (4):
3 (11.54 %)
186

- Helpful and easyto understand (5):
6 (23.08 %)
Average: 3.58
The course material- Wasinsufficienttounderstandthe topic(1):
0
- Wasbarelyenough tounderstandthe topic(2):
1 (3.85 %)
- Providedsufficientinformationto cover thetopic (3):
21 (80.77 %)
- Went intomore detailthan Ineeded tocover thetopic (4):
4 (15.38 %)
- Providedmore detailthan I feltwasnecessary(5):
0
Average: 3.12
We estimated that you'd need to spend about 3hours a week on the course. Was this- A gross underestimate (ittook a lot more most weeks)(1):
8 (30.77 %)
- An under estimate (it tookmore some weeks) (2): 11 (42.31 %)- About right (3): 6 (23.08 %)- An over estimate (it took lessthan 3 hours most weeks) (4):
0
187

- A gross over estimate (Ifinished in much less time eachweek) (5):
0
Average: 1.85
The number of assignments was- Too high, Icould notcompletethem in theavailabletime (1):
1 (3.85 %)
- A littlehigh - it wasdifficult tocompletethem ontime (2):
3 (11.54 %)
- Aboutright (3): 21 (80.77 %)- Too low -I could havehandledmore (4):
1 (3.85 %)
- Much toolow. I wouldlike to havehad moreassignments(5):
0
Average: 2.85
How many employees does the organization youwork for have? (If you work for a government orpublic sector organization, please consider yourdepartment as 'the organization.'- 1: 5 (19.23 %)- 2 to 10: 6 (23.08 %)- 11 to 50: 2 (7.69 %)- 51 to 250: 3 (11.54 %)- 251 to 1000: 3 (11.54 %)- More than 1000: 4 (15.38 %)
Which option best describes your primary jobposition or role related to mobile Web design?- Web developer: 9 (34.62 %)
188

- Web designer: 6 (23.08 %)- Web Project Manager: 1 (3.85 %)- We Content Author: 0- Usability Specialist: 2 (7.69 %)- Other: 6 (23.08 %)
How many Web sites will you responsiblefor/involved in within the next six months thatare likely to use SVG?- None: 10 (38.46 %)- 1-5: 14 (53.85 %)- 6-10: 0- More than10:
0
How many visitors per month do you expectthese sites to have?- None: 3 (11.54 %)- Less than 1000: 7 (26.92 %)- Between 1000 and 10,000: 4 (15.38 %)- Between 10,000 and 100,000: 1 (3.85 %)- Between 100,000 and 1Million:
0
- More than 1 Million: 1 (3.85 %)
Do you have any other comments? Please behonest!- It'll be an interesting future, but in the big
corporate/government contracting world I work in, it'sprobably still a ways off. But I feel the same about most ofHTMl5 and CSS3 except small bits that degrade OK. SVGwill be just another small bit to enhance the have's but can'tcarry any real content value yet.
- Excellent course. It may be a little expensive (I'm used toway cheaper Sitepoint courses for instance), but I'd say it'sworth the price. I guess one can learn SVG by simply readingthe primer or the spec (that's how I learned HTML andCSS) but the course definitely allows to learn way faster.The forum is a real advantage and David a very present andhelping teacher.
- The assignments could be leveraged across the timeframe alittle better - perhaps? I sort of felt as though they built upto a crescendo and felt like it became sink or swim after abit. I think I managed to tread water, that's all. Perhaps anextra week or two to cover the Weeks 4-6?
189

- Thank you.The course was very useful.
- David Dailey is a nice guy :-)Thanks for the course!
- - A useful course, glad I've attended. Thanks to David, and all
students for creating a conducive atmosphere.- I really enjoyed this course. I know about SVG almost since
its initial development (I used to use IE 3, earlier NetscapeNavigator and HotJava!), but was never keen on learning it,since I'm not a graphics guy, but a web applications developerand Unix sysadmin. Lately in my job, however, I was in theneed of plotting data from SQL queries or XMLwebservices, having incorporated Flash/CSS based solutions Ididn't like completely. I have found in SVG the solution Ineed! I also enjoyed the research Professor David Daileyhave done in the SVG field. I really like to investigate,experiment, compare results, come to conclusions, and havefound his personal web page a rich source of informationand experiments. People like him is what pushes theimplementation of the specs by the browsers, I believe.
- I'm no coder or designer - I took this course out of interest,and to challenge myself. It's been great fun! It's also beenreally interesting to follow some of the development of oneof the web's most recent protocols.I think I got different things out of this course than others,and possibly different things to what was originally intended,but it's been great. I've been really impressed with what thereal developers have done, and that's been a fun glimpse intowhat could be possible once I spend more time with thecode. Thanks for a fascinating time!
- This course was an excellent one. I learned a lot from thecourse material and from the students who activelyparticipated in the forums. I will be back for more.
- Nope, that's it. Thanks for a great course.- Just that I thought some of the participants already had
significant experience with SVG, and seemed out of place inan intro course.
- Great course. I wish i had a little bit more time at the endfor weeks 5 and 6. Certainly opened my eyes to thepossibilities of SVG.
- I really enjoyed David's feedback. Thanks!- I'm impressed by the effort the teacher put in to answer
questions and sharing his thoughts on SVG on the courseforum. I like that!
190

- One of the biggest difficulty I had was the language. Either itis american english I am not used to, or it is a moresophisticated english I am used to read.In both case, I think itis my problem but maybe you will guess what my problemwas. You may even have an other idea.
I found that work around filters was too big compared towork of previous weeks and the explanations too light allthe more because the links do not give much more.
A one week break between SVG basics (weeks 1-4) and SVGwith JS (weeks 5-6) seemed to me usefull to assimilate thebasics and to talk about important or difficult points beforegoing deeper with dynamic SVG with DOM.
Thanks for that questionnaire.JP
- Good intro course. I will like ot be able to watch someutube style videos of the instructor completing a particularlearning point.
- I enjoyed it very much, I don't think that in my kind ofwebsites/customers I will be able to use SVG much, but inthe classes I teach it certainly adds usefull information. Thankyou very much for this course, it offers so much for just asmall price.
- please create a visually better designed course interface -this one is ugly :-)
- None- - Thank you!- a follow-up class in some months would be nice- I learned a lot from the readings, but I also learned from
classwork by the advanced graphics artists, but it will taketime for me to unravel what they did so that I cancompletely understand it. There is always a jump betweenthe material and the advanced student's work, so this isn't ashock. I've saved all the emails to read and study over thenext few months.
- I was amazed at how knowledgeable some of the otherstudents were. But they seemed to already have experience.I'm glad I took the course it really opened my eyes to a greattool. I felt inadequate since I was not a programmer it tookme longer to do the assignments. The concept seemedlogical enough but I found assignments 3–4 difficult. It tookme longer to do the assignments so I ended up being late forthe last assignments. It was hard to catch up. I really justneeded more time.
191

- would be interesting for a future edition, to examine somecases of integration of SVG into Web sites, or a case ofintegrating svg in the design process
Moodle Docs for this page (http://docs.moodle.org/en/mod/feedback/analysis)
You are logged in as Marie-Claire Forgue (http://www.w3techcourses.com/user/view.php?id=476&course=4) (Logout(http://www.w3techcourses.com/login/logout.php?sesskey=dtOyr74dlk) )
SVG_Jan11 (http://www.w3techcourses.com/course/view.php?id=4)
192

OMWeb - 248687
D 2.2 Training Report
APPENDIX 3: LIST OF PARTICIPANTS – “INTRODUCTION TO SVG” (JAN. 2011)
First name Surname Country Alberto Asencio Spain Ade Ball UK Agnes Bewer Belgium Joe Llywelyn Griffith Blakesley UK Phil Brammer UK Anne Brüggemann-Klein Germany Gerard Byrne UK Giovanny Alexander Cardenas Gonzalez Colombia Anthony Cintron USA Dana Cottreau Canada Joseph Crowther France Jason Cust USA Frances de Waal Netherlands Katy Dmitriev Israel Lizina Fortino Brazil Pierre Frederiksen Australia Christine Fürst Netherlands Vidhya Gholkar UK John Grazulis USA Susan R Grossman USA markus haist Germany Alexis Hildebrandt Germany Joachim Ivarsson Sweden Heather Johnson New Zealand Tom Kennedy USA James Lynn Puerto Rico Miriam Madsen USA Mark Mallens Netherlands Florence Maurice Germany Alberto Mendoza Mexico Gerri Messinger USA Phillip Moon Korea Jean-Pierre Moreau France David Moulton UK
193

OMWeb - 248687
D 2.2 Training Report
Sivasubramanian Muthusamy India Isaac Nakhla Australia Nick Nichols USA Daniel Nitsche Australia Ricky Onsman Australia Patricia Pardini USA Thadeu Paula Brazil Riccardo Petracchini Italy Cyril Pierron France ramesh reddy India Bonnie Robinson USA Bryan Sammon USA Maurício Samy Silva Brazil José Serralde Mexico Vishwajeet Singh India Susan Spencer Conklin USA Thomas Stegh Germany Ikumi Takahara USA Geir Tunlid Norway Rod Vagg Australia Patrick van Kouteren Netherlands Håkan Vemmenby Sweden Frederic Welterlin USA Christopher Wiedswang Norway kirsten wolf Australia Janice Wood Canada Kellie Zito USA
194

OMWeb - 248687
D 2.2 Training Report
APPENDIX 4: COURSE MATERIAL – “HTML5 AUDIO AND VIDEO” (OCT. 2011)14
14 Note that this is the revised course material since the trainer improved the content, incorporating the feedback comments after the first course as well as material discussed and provided during the forum exchanges. In particular, the trainer added more references, “tips and tricks” as well as code example for people who are less familiar with code development.
195

1 Introduction to HTML5Media
Session 1 (1 hour)
Site: W3C TrainingCourse: HTML5 Audio and Video March 2012Book: 1 Introduction to HTML5 MediaPrinted by: Marie-Claire ForgueDate: Monday, 23 January 2012, 02:10 PM
196

Table of Contents1.1 History of Web Media
1.2 The Story of HTML5
1.3 HTML5 Media Today
1.4 Course objectives
197

1.1 History of Web MediaIn the beginning, the web was largely a silent and static place, animated gifs not withstanding.Bandwidth was lower and so viewing video online was prohibitive. As audio consumed lessbandwidth it was more viable. Plugins emerged to fill the void and allow audio and video tobe embedded in web pages. The <embed> tag was implemented by early browsers and thisallowed us to embed various media.
Old School Embed Example (dragged kicking and screaming from the 90s) :
<EMBED SRC="../sounds/1812over.mid" HEIGHT=60 WIDTH=144>
Note this depended on installed plugins and was not part of the HTML 4 or XHTML 1specifications. Plugin technologies included Apple's QuickTime, RealMedia's RealPlayer andAdobe's Flash. Flash become the dominant media playback and streaming technology.However Flash was not open, viewing the source from the browser was not possible andmedia was relatively isolated in its own black box.
Example of a Flash embed (messy isn't it?) :
<object classid="clsid:D27CDB6E-AE6D-11cf-96B8-444553540000"codebase="http://download.macromedia.com/pub/shockwave/cabs/flash/swflash.cab#version=6,0,40,0" width="500" height="311"><param name="allowfullscreen" value="true" /><param name="movie" value="http://www.somewebsite.net/player.swf" /><param name="flashvars" value="file=http://www.somewebsite.net/trick.flv&image=http://www.somewebsite.net/trick.gif" /><embed width="500" height="311" allowfullscreen="true" type="application/x-shockwave-flash" src="http://www.somewebsite.net/player.swf"pluginspage="http://www.macromedia.com/go/getflashplayer"flashvars="file=http://www.somewebsite.net/trick.flv&image=http://www.somewebsite.net/trick.gif" /></object>
198

1.2 The Story of HTML5HTML5 is a new 'living' standard that aims to make more dynamic web applications possiblethrough standardized markup and JavaScript APIs. It also addresses issues such asaccessibility and provides improved semantics. HTML5 has been designed to be backwardscompatible, that is to say all previous versions of HTML should be valid within an HTML5document. HTML5 emerged from W3C and WHATWG attempts to improve and introducenew features to HTML4.01, both the W3C and WHATWG are currently working on thedevelopment of HTML5 with support from all major browser platforms.
The latest HTML5 specs cover :
New form elementsImproved semanticsAudio and VideoCanvasData StorageOffline capabilitiesDrag and DropGeolocationReal-time Communication
and other capabilities, see http://en.wikipedia.org/wiki/HTML5 for more details.
199

1.3 HTML5 Media TodayWhen we talk about HTML5 media we are refering to the new <audio> and <video> tags andtheir associated APIs. HTML5 media support has matured rapidly over the last two years andwe are certainly at a point that we can begin to use HTML5 media with confidence witharound 70% of browsers being used now supporting it. Note that for the browsers that don'tsupport HTML5 media, we can easily provide fallbacks.
HTML5 Advantages :
uses open standards (browser buy in and better competition)transparency (allows us to build upon other's work)better page integration (quick and easy)better integration with other elements (more possibilities)
To familiarize yourself with browser support, take a look at the following resources :
caniuse.com audio support and video supporthtml5test.comareweplayingyet.org
200

1.4 Course objectivesThe objective of this course is to make students familiar enough with HTML5 media and itscapabilities that they can use and manipulate it in their web pages and applications.
Limitations and workarounds will be addressed and we also hope to promote some usefuldiscussion in our forums.
We'll start with the basics and take you the various capabilities of the <audio> and <video>tags and the API, while keeping a firm grasp of the pragmatic issues that a developer will needto tackle to create cross browser solutions.
We'll look at :
Creating your first basic audio and video playerEncoding media to make it suitable for the webMIME type configurationBuffering, seeking, preloading and other advanced techniquesImproving the User ExperienceAdding commonly requested functionality such as playlistsIntegrating media with other HTML5 elementsUsing media in games and other richer experiencesIntegration with Mobile platforms
Now is a good time to start thinking about what you want from a modern web media player.We start building in the next session!
Here's something we made earlier :
201

202

2 Your First PlayerSession 2 (1 hour) The best way to learn about HTML5 media is to build your own media player. In
this session you'll find out all you need to make your very own basic player. The idea is to buildupon this player in future sessions.
Site: W3C TrainingCourse: HTML5 Audio and Video March 2012Book: 2 Your First PlayerPrinted by: Marie-Claire ForgueDate: Monday, 23 January 2012, 02:10 PM
203

Table of Contents2.1 What you need to know before you start (codecs and browser support)
2.2 Embedding audio in a web page
204

2.1 What you need to know before you start(codecs and browser support)HTML5 audio and video are relatively new developments and so support for thesetechnologies in modern web browsers is evolving very quickly. It's worth taking a look atdifferent browsers and evaluating their level of support.
When we talk about browser 'support' we are talking about support for the <audio> and<video> tag, and reasonable support for the various API methods and events that we can usewith these new elements.
You can test your browser for basic support by visiting this site html5test.com
Browser Support - Desktop
Chrome 10 +Firefox 3.6 +Internet Explorer 9Opera 10 +Safari 5 +
Browser Support - Mobile
Android 2.3 +BlackBerry 6Firefox MobileiOS4 +Opera Mini / Mobile
Audio Codec Support
Codec stands for compresser-decompressor and is the algorithm used to decode a particularfile type. Codecs can loosely be associated with file formats, but actually it is a little bit morecomplicated than that. The file type or file format acts as a container for the codecs. Video fileformats contain two codecs, one for the audio and one for the video. For example the WebMformat is a container for the VP8 video codec and the Vorbis audio codec.
Unfortunately audio/video container (or format) support within browsers varies and there is noone format that works on them all.
Browser Ogg (Vorbis) MP3 AAC WAV
FireFox 3.6 + ✓ ✓
Safari 5 + ✓ ✓
205

Chrome 6 + ✓ ✓ ✓ ✓*9 +
Opera 10.5 + ✓ ✓
Internet Explorer 9 ✓ ✓
iOS3 + ✓ ✓
Android 2.3 + ✓ ✓ ✓ ✓
Video Codec Support
Browser Ogg (TheoraVorbis)
MP4 (H.264AAC)
WebM (VP8Vorbis)
FireFox 3.5 + 4 +
Safari 3.0 +
Chrome 5.0 + 5.0 + 6.0 +
Opera 10.5 + 10.6 +
InternetExplorer 9.0 + 9.0 +VP8 codec
iOS 3 +
Android 2.0 + 2.3 +
A note on containers:
Audio
Ogg* = Vorbis audioMP4 = AAC
Video
WebM = VP8 video + Vorbis audioOgg* = Theora video + Vorbis audioMP4 = H.264 + AAC
206

* .oga is recommended for ogg audio and .ogv for ogg video.
Tip: More than one type of format is valid within certain containers. For simplicity we havespecified the most commonly used. For a complete list of containers and formats visithttp://en.wikipedia.org/wiki/Comparison_of_container_formats and for some more detailedexplanation on codecs and making things work on web, check out http://diveintohtml5.info/video.html.
To ensure maximum browser compatability you need to use two file formats for audio (Oggand MP4) and three file formats for video (WebM, Ogg and MP4)
207

2.2 Embedding audio in a web pageYou embed audio in a web page by using the audio tag. You can specify various attributeswith the audio tag, here we have told it to render controls which include the play button,progress bar etc
Note that we have included two audio files in the enclosed source tag, if one is not supportedthe browser should pick up the other.
As well as allowing you to specify the file you can also specify the file type, this prepares thebrowser for that file type without having to download part of the file to find out. You can alsospecify the codecs inside the type attribute if you like an example would look like <sourcesrc="audio.ogg" type="audio/ogg; codecs=vorbis">
<audio controls> <source src="elvis.mp3" type="audio/mpeg" > <source src="elvis.oga" type="audio/ogg" ></audio>
Will produce something like this in Mozilla Firefox.
2.3 Embedding video in a web page
Video is added to a web page in a similar manner to audio, the difference being that as video isa visual element you can specify a width and height.
<video width="320" height="240" controls> <source src="elvis.mp4" type="video/mp4" > <source src="elvis.ogv" type="video/ogg" > <source src="elvis.webm" type="video/webm" ></video>
Will produce something like this in Google Chrome.
2.4 Simple fallbacks for older browsers
A fallback in this case just means a way of playing the media should the media elements notbe supported by the browser. In the following example if the browser doesn't recognise theaudio tag it ignores it and displays the tags it recognises within it - in this case the <a>.
208

<audio controls> <source src="elvis.mp3" > <source src="elvis.oga" > <!-- place fallback here as <audio> supporting browsers will ignore it --> <a href="elvis.oga">elvis.oga</a></audio>
Note: Many JavaScript media libraries will provide a Flash based fallback. You will not berequired to create one as part of this course, although the curious among you may beinterested in this article from Dev.Opera Simple HTML5 video player with Flash fallback andcustom controls
2.5 HTML5 media attributes
A quick taste of things to come :
Content Attributes :
src - url of mediaautoplay*loopcontrols - display the controlsmutedpreload | none | metadata | auto |typeheight / width (video only)
* Mobile browsers tend to ignore autoplay. This is probably an attempt to save the user fromunrequested downloads of data.
Now take a look at Assignment 1!
209

HTML5 Audio and Video October 2011 (http://www.w3techcourses.com/course/report/log/index.php?chooselog=1&user=0&date=0&
id=7&modid=291) ◀ Jump to... ▶
W3C (http://www.w3techcourses.com/) ▶ HTML5-AV_Oct11(http://www.w3techcourses.com/course/view.php?id=7) ▶ Assignments(http://www.w3techcourses.com/mod/assignment/index.php?id=7) ▶ Assignment 1 - YourFirst Player (http://www.w3techcourses.com/mod/assignment/view.php?id=291) ▶ Viewsubmitted assignments
Update this Assignment
View 46 submitted assignments (submissions.php?id=291)
HTML5 Audio and Video
Assignment 1 - Your First Player
Embed video and audio into a web page with maximum cross-browsercompatibilty and a simple fallback* Media files are provided. Createthe minimal possible markup for an HTML5 web page that containsboth audio and video.
*Just a link to the media file will suffice as a fallback.
Throughout this course we will be linking to media remotely, this is sothat we can be sure that the media files are valid and that they arebeing served with the correct mime type, more about this in session3.
Please use the following media for your assignment:
Audio
http://jPlayer.org/audio/ogg/Miaow-01-Tempered-song.ogg(http://jPlayer.org/audio/ogg/Miaow-01-Tempered-song.ogg)http://jPlayer.org/audio/mp3/Miaow-01-Tempered-song.mp3(http://jPlayer.org/audio/mp3/Miaow-01-Tempered-song.mp3)
Video
http://jPlayer.org/video/webm/Big_Buck_Bunny_Trailer.webm(http://jPlayer.org/video/webm/Big_Buck_Bunny_Trailer.webm)http://jPlayer.org/video/ogv/Big_Buck_Bunny_Trailer.ogv(http://jPlayer.org/video/ogv/Big_Buck_Bunny_Trailer.ogv)http://jPlayer.org/video/m4v/Big_Buck_Bunny_Trailer.m4v(http://jPlayer.org/video/m4v/Big_Buck_Bunny_Trailer.m4v)
210

Note - since Moodle can attempt to render any HTML youmight submit, we are now asking people to upload theirsolution to a host of their choice and simply submit a URL.Sorry for the inconvenience. Feel free to use a servicelike http://jsfiddle.net/ (http://jsfiddle.net/) if it suits youbetter.
Available from: Monday, 17 October 2011, 09:30 AM
You have not submitted anything yet
Edit my submission
Moodle Docs for this page (http://docs.moodle.org/en/mod/assignment/view)
You are logged in as Marie-Claire Forgue (http://www.w3techcourses.com/user/view.php?id=476&course=7) (Logout(http://www.w3techcourses.com/login/logout.php?sesskey=nhnMD1zn5S) )
HTML5-AV_Oct11 (http://www.w3techcourses.com/course/view.php?id=7)
211

3 Tools of the tradeSession 3 (1 hour) HTML5 media must be correctly encoded to ensure maximum compatability
throughout the various target platforms. The good news is that there are tools out there to help you,many of them free and open-source. In this session we will look at the tools available and discuss the
settings you should use.
Site: W3C TrainingCourse: HTML5 Audio and Video March 2012Book: 3 Tools of the tradePrinted by: Marie-Claire ForgueDate: Monday, 23 January 2012, 02:17 PM
212

Table of Contents3.1 Desktop encoding tools and settings
3.2 Online encoding services and media hosting
3.3 Server configuration
213

3.1 Desktop encoding tools and settings
3.1 Desktop encoding tools and settings
Better results with Constant Bitrate (mostly in case you are going to use a Flash fallback).44.1kHZ works well, but any multiple of 11.025kHz should work.
Tools and services
Many of these tools will encode your media in the format you require, they all have theirstrengths and weaknesses and you will probably end up using more than one tool.
Audacity audacity.sourceforge.netMiro getmiro.comFirefogg firefogg.orgFFmpeg2theora v2v.cc/~j/ffmpeg2theoraHandbrake handbrake.fr handbrake.fr
214

3.2 Online encoding services and mediahostingThese services will both encode and host your media, be sure to check out the terms andconditions and/or pricing to see if it suits your needs.
Archive.org Archive.org (Audio and Video)Vid.ly vid.ly (Video only)YouTube.com YouTube.com (Video - MP4 and WebM only)
215

3.3 Server configurationAlthough HTML5 is a client-side technology, there are a few things you should do to ensurethat media is delivered correctly from your server.
MIME Type
Your domain's server must give the correct MIME* type for all media URLs.
*Sometimes referred to as content type or internet media type.
Failure to give the correct MIME type will stop the media from working on some browsers.This is a common cause of problems that tends to affect Firefox and Opera. Other browsersare less strict, but the MIME type should always be correct for maximum robustness.
Tip: To test that your media is compatible, encoded correctly and being served as the rightMIME type, paste the URL of the media file into your browser's address bar. The media shouldbe playable directly through a default player. If you see a series of strange characters this is asign of incorrect MIME type configuration.
MP3: audio/mpegMP4: audio/mp4 video/mp4OGG: audio/ogg video/oggWebM: audio/webm video/webmWAV: audio/wav
If you use a common extension for both audio and video media, for example audio.mp4 andvideo.mp4, then simply use the video version of the MIME type for both of them. ie.,video/mp4
On Apache servers, you can use the .htaccess file to set the MIME type based on the fileextension:
# AddType TYPE/SUBTYPE EXTENSION
AddType audio/mpeg mp3AddType audio/mp4 m4aAddType audio/ogg oggAddType audio/ogg ogaAddType audio/webm webmaAddType audio/wav wav
AddType video/mp4 mp4AddType video/mp4 m4vAddType video/ogg ogvAddType video/webm webmAddType video/webm webmv
Tip: We recommend that you disable GZIP encoding of all the media files. Most media filesare already compressed and the GZIP will just waste CPU on your server.
Investigate these tools, sites and services and experiment with encoding and your server setup.
216

4 Introduction to theMedia API
Session 4 (1 hour) The media elements are supported by an extensive JavaScript API : Let's take alook at a few of the methods.
Site: W3C TrainingCourse: HTML5 Audio and Video March 2012Book: 4 Introduction to the Media APIPrinted by: Marie-Claire ForgueDate: Monday, 23 January 2012, 02:17 PM
217

Table of Contents4.1 Play, Pause, SetMedia, CanPlayType
4.2 Creating your first audio player
4.3 Creating your first video player
218

4.1 Play, Pause, SetMedia, CanPlayTypeIn order to create your own player you will probably need to use all of these methods, here'san <audio> example created entirely in JavaScript. See if you can figure out what is going onhere ...
var myAudio = document.createElement('audio');
if (myAudio.canPlayType('audio/mpeg')) { myAudio.setAttribute('src','http://jPlayer.org/audio/mp3/Miaow-07-Bubble.mp3');}
if (myAudio.canPlayType('audio/ogg')) { myAudio.setAttribute('src','http://jPlayer.org/audio/ogg/Miaow-07-Bubble.ogg');}
alert('play');
myAudio.play();
alert('stop');
myAudio.pause();
Some explanation: if we use JavaScript, the <audio> tag need not exist on the page. Wesimply create it and assign the element to a variable, in this case myAudio.
Next we use the canPlayType method to check support of the mime type type by the browser.The browser will return 'probably', 'maybe' or an empty string. As an empty string counts asfalse and 'probably and 'maybe' count as true, for our purposes it's enough to wrap thecanPlayType method in an if statement. We then set the media appropriately by setting the srcattribute of the audio element.
Finally in this example, we use the alert statement to halt the flow of the program and wait foruser input to first play the media and then pause it. We are using alert to help us create thesimplest possible example, note you probably wouldn't use it unless you were creating anexample.
219

4.2 Creating your first audio playerOf course you could combine HTML with JavaScript to produce something like this :
HTML Snippet :
<audio id="my-audio"> <source src="http://jPlayer.org/audio/mp3/Miaow-07-Bubble.mp3" > <source src="http://jPlayer.org/audio/ogg/Miaow-07-Bubble.ogg" > <!-- place fallback here as <audio> supporting browsers will ignore it --> <a href="elvis.oga">http://jPlayer.org/audio/ogg/Miaow-07-Bubble.ogg</a></audio>
<!-- we create our play and pause button next --><a id="play" href="#">play</a><a id="pause" href="#">pause</a>
JavaScript Snippet :
window.onload=function(){
var myAudio = document.getElementById('my-audio'); var play = document.getElementById('play'); var pause = document.getElementById('pause');
// associate functions with the 'onclick' events
play.onclick = playAudio; pause.onclick = pauseAudio;
function playAudio() { myAudio.play(); }
function pauseAudio() { myAudio.pause(); }
}
This time we markup our audio element in HTML and link to the media sources. Once we aresure that the page has loaded (window.onload) We create variables to represent our variouselements (referencing them by Id), then we detect the onclick events generated by clicking onour play and pause buttons and take the appropriate action.
220

4.3 Creating your first video playerA simple video player can be created almost identically to that of an audio player, althoughyou can specify width and height of the video and also provide a poster image, which displaysbefore the video if played.
Adding a Poster and specifying dimensions of your video player:
<video width="480" height="270" poster="http://www.jplayer.org/video/poster/Big_Buck_Bunny_Trailer_480x270.png"> <source src="http://jPlayer.org/video/webm/Big_Buck_Bunny_Trailer.webm " > <source src="http://jPlayer.org/video/ogv/Big_Buck_Bunny_Trailer.ogv" > <source src="http://jPlayer.org/video/m4v/Big_Buck_Bunny_Trailer.m4v " ></video>
Now take a look at Assignment 2!
221

HTML5 Audio and Video October 2011 (http://www.w3techcourses.com/course/report/log/index.php?chooselog=1&user=0&date=0&
id=7&modid=296) ◀ Jump to... ▶
W3C (http://www.w3techcourses.com/) ▶ HTML5-AV_Oct11(http://www.w3techcourses.com/course/view.php?id=7) ▶ Assignments(http://www.w3techcourses.com/mod/assignment/index.php?id=7) ▶ Assignment 2 -Custom Player, Custom Media (http://www.w3techcourses.com/mod/assignment/view.php?id=296) ▶ View submitted assignments
Update this Assignment
View 43 submitted assignments (submissions.php?id=296)
HTML5 Audio and Video
Assignment 2 - Custom Player, Custom Media
Encode your own media. Create a custom* video and audio playerwith play and pause buttons.
*Do not use the controls attribute.
Try and create with maximum x-browser compatibilty and simplelinks to your media as fallbacks. Raw media files are provided.
Note. You will need to host your media somewhere.
http://happyworm.com/temp/w3c/Assignment2Media.zip(http://happyworm.com/temp/w3c/Assignment2Media.zip)
Available from: Friday, 21 October 2011, 04:25 PM
You have not submitted anything yet
Edit my submission
Moodle Docs for this page (http://docs.moodle.org/en/mod/assignment/view)
You are logged in as Marie-Claire Forgue (http://www.w3techcourses.com/user/view.php?id=476&course=7) (Logout(http://www.w3techcourses.com/login/logout.php?sesskey=nhnMD1zn5S) )
HTML5-AV_Oct11 (http://www.w3techcourses.com/course/view.php?id=7)
222

5 Buffering, Seeking,Preloading and the User
ExperienceWe're going to move on and cover aspects that affect the user experience while consuming media.
Session 5 (1 hour)
Site: W3C TrainingCourse: HTML5 Audio and Video March 2012Book: 5 Buffering, Seeking, Preloading and the User ExperiencePrinted by: Marie-Claire ForgueDate: Monday, 23 January 2012, 02:23 PM
223

Table of Contents5.1 Buffering, seeking and preloading
5.2 Displaying time and progress
224

5.1 Buffering, seeking and preloadingThere are several methods for improving the user experience that the developer should beaware of:
Preloading
Preloading requests that the media be downloaded (but not played) as soon as the page isloaded.
To preload add the preload attribute to your audio or video tag, for example :
<audio preload="auto">
Note the preload attribute can take 3 values:
none (do not preload)auto (let the browser decide - for example mobile browsers may decide not to, to savebandwidth)metadata (preload the metadata only, duration, first frame etc)
More info can be found in the W3C Spec
The API provides attributes called buffered and seekable that can be used in situations wherewe want to ascertain what part of the media has been buffered, preloaded or can just bejumped to and played without delay (in the case of seekable).
Both the buffered and seekable attributes return a TimeRanges object. The TimeRanges objectis a list of time periods containing start and end times that can be referenced by their indexes.
Buffered
The buffered attribute will return the time ranges that have been completely downloaded,however if the browser supports it, it makes more sense to use the seekable attribute todetermine what parts of the media can be jumped to and played immediately.
var buffered = myAudio.buffered; // returns TimeRanges object of bufferedmediavar bufferedEnd = myAudio.buffered.end(); // returns time in ms until whichthe media is buffered
Seeking and Seekable
Seeking is the act of looking forward (or backward in the media file). The seeking attributecan be used in situations to determine whether that part of the media is being actively 'seeked'.If true it means the media the user is seeking is still being loaded.
Seekable returns a TimeRanges object of time ranges that can be played immediately. Thisuses a technology known as byte-range requests which allows part of the content to nerquested over HTTP. In short we don't have to wait for all the data up to the point requested tobe able to play it.
Example:
225

var isSeeking = myAudio.seeking; // the player is currently seekingvar isSeekable = myAudio.seekable; // is the media seekablevar seekableEnd = myAudio.seekable.end(); // the time in ms within which themedia is seekable
Remember, media being in seekable state is subtley different to the media being in a bufferedstate as it is not a requirement that the media be buffered to be seekable.
226

5.2 Displaying time and progressIt is useful for a user to both see what part of the media is being played (progress) what hasbeen buffered, preloaded or seekable. The buffered amount is useful so that the user can knowin advance if the file has completely downloaded, seekable tells the user that if they click on apart of it whether it will play immediately.
The bad news is that different browsers implement these features to varying degrees. You cantry out various browsers with this HTML5 Media Inspector.
Tip: Most HTML5 browsers enable seeking to new file positions during a download, to allowthis Range requests must be enabled on your server. Although enabled by default onwebservers such as Apache you can verify by checking that the server response includes theAccept-Ranges in its header.
227

6 Progress bars<p>Session 6 (1 hour)</p>
Site: W3C TrainingCourse: HTML5 Audio and Video March 2012Book: 6 Progress barsPrinted by: Marie-Claire ForgueDate: Monday, 23 January 2012, 02:23 PM
228

Table of Contents6.2 Anatomy of a progress bar
6.3 Implementing visual feedback
229

6.2 Anatomy of a progress barProgress bars are an integral part of a media player and come in many shapes and sizes.
Example of a circular progress indicator
Progress can be displayed in a number of ways, at it's simplest you could just represent it as anumber.
You can go further and display a progress bar that not only allows users to better gauge theprogress but also acts as a method of input.
For the purposes of this example we are going to keep the progress, buffered and inputmechanism separate.
So we have this HTML to define the 3 bars :
<div id="played-bar">00</div><div id="buffer-bar">00</div><div id="control-bar"> <a href='0'>00</a> <a href='10'>10</a> <a href='20'>20</a> <ahref='30'>30</a> <a href='40'>40</a> <a href='50'>50</a> <a href='60'>60</a><a href='70'>70</a> <a href='80'>80</a> <a href='90'>90</a></div>
230

6.3 Implementing visual feedbackHTML to define the audio:
<audio id="my-audio" preload="auto" > <source src="http://jPlayer.org/audio/mp3/Miaow-07-Bubble.mp3" > <source src="http://jPlayer.org/audio/ogg/Miaow-07-Bubble.ogg" > <!-- place fallback here as <audio> supporting browsers will ignore it --> <a href="http://jPlayer.org/audio/ogg/Miaow-07-Bubble.ogg">http://jPlayer.org/audio/ogg/Miaow-07-Bubble.ogg</a></audio>
Note the preload attribute.
Our JavaScript :
window.onload=function(){
var myAudio = document.getElementById('my-audio');var controlBar = document.getElementById('control-bar');
// we add our listeners
myAudio.addEventListener('timeupdate', updatePlayed, false);myAudio.addEventListener('progress', updateBuffered, false);
function updatePlayed() { var played = parseInt(((myAudio.currentTime / myAudio.duration) * 100),10); // gives us a percentage addBars(played,'played-bar');}
function updateBuffered() { var loaded = parseInt(((myAudio.buffered.end(0) / myAudio.duration) *100), 10); // gives us a percentage addBars(loaded,'buffer-bar');}
function addBars(amount,element) { var bars = "00"; // since our bars are in increments of 10 for (i=10; i < 100; i = i + 10) { if (i <= amount) { bars = bars + " " + i; } }
var bar = document.getElementById(element); bar.innerHTML = bars;}
6.4 Grabbing input from the progress bar
JavaScript :
controlBar.onclick = setTime;
function setTime(e) { var playPosition = e.target.getAttribute('href'); // from 0 to 90 myAudio.currentTime = (myAudio.duration * playPosition)/100;
231

myAudio.play(); return false;}
These are the basics but you can achieve a lot with CSS and a bit of imagination, for example :http://jplayer.org/latest/demo-05/
232
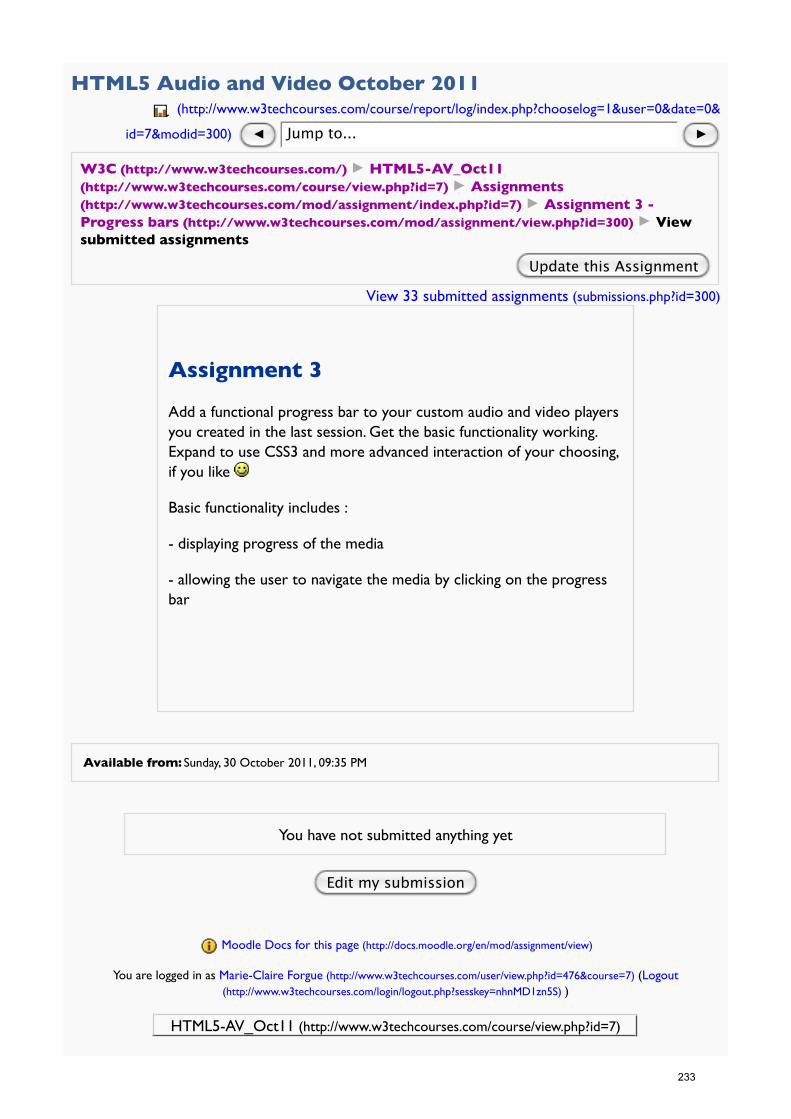
HTML5 Audio and Video October 2011 (http://www.w3techcourses.com/course/report/log/index.php?chooselog=1&user=0&date=0&
id=7&modid=300) ◀ Jump to... ▶
W3C (http://www.w3techcourses.com/) ▶ HTML5-AV_Oct11(http://www.w3techcourses.com/course/view.php?id=7) ▶ Assignments(http://www.w3techcourses.com/mod/assignment/index.php?id=7) ▶ Assignment 3 -Progress bars (http://www.w3techcourses.com/mod/assignment/view.php?id=300) ▶ Viewsubmitted assignments
Update this Assignment
View 33 submitted assignments (submissions.php?id=300)
Assignment 3
Add a functional progress bar to your custom audio and video playersyou created in the last session. Get the basic functionality working.Expand to use CSS3 and more advanced interaction of your choosing,if you like
Basic functionality includes :
- displaying progress of the media
- allowing the user to navigate the media by clicking on the progressbar
Available from: Sunday, 30 October 2011, 09:35 PM
You have not submitted anything yet
Edit my submission
Moodle Docs for this page (http://docs.moodle.org/en/mod/assignment/view)
You are logged in as Marie-Claire Forgue (http://www.w3techcourses.com/user/view.php?id=476&course=7) (Logout(http://www.w3techcourses.com/login/logout.php?sesskey=nhnMD1zn5S) )
HTML5-AV_Oct11 (http://www.w3techcourses.com/course/view.php?id=7)
233

7 PlaylistsOne of the most desired functions for audio and sometimes video players is the ability to have
playlists. Playlists allow you to order a number of pieces of media for sequential playback. Session 7(1 hour)
Site: W3C TrainingCourse: HTML5 Audio and Video March 2012Book: 7 PlaylistsPrinted by: Marie-Claire ForgueDate: Monday, 23 January 2012, 02:24 PM
234

Table of Contents7.1 Marking up a playlist
7.3 Adding loop and successive play
235

7.1 Marking up a playlistHTML:
<ul id="tracklist"> <li class="playlist" > <a class="playlist-item" href="Miaow-01-Tempered-song">Miaow - TemperedSong</a> </li> <li class="playlist" > <a class="playlist-item" href="Miaow-02-Hidden">Miaow - Hidden</a> </li> <li class="playlist" > <a class="playlist-item" href="Miaow-03-Lentement">Miaow -Lentement</a> </li></ul>
You can mark up your playlist in a variety of ways. Here we have created a list of anchorelements (<a>) containing the name of the track and a reference to the corresponding file isplaced in the href element.
7.2 Linking a playlist to your player
At this point we introduce a new method, canPlayType. This is useful for determining whatcodecs the browser being used supports, if any.
JavaScript:
// assuming you have created an audio object called myAudio
var playlistItems = document.getElementsByClassName('playlist-item');var playlist = document.getElementsByClassName('playlist');var currentTrack = "";
// we loop through the playlist assigning a click handler to each item
for(i = 0; i < playlistItems.length; i++) { playlistItems[i].onclick = playTrackHandler;}
// the handler gets called every time we click on a playlist item, we grabthe track from the href set it and play it
function playTrackHandler() { var src = this.getAttribute('href'); currentTrack = src; playTrack(src); return(false);// stops the event going any further}
// we check what format the browser can play, set the media sourceaccordingly and then play
function playTrack(id) {
var src = "";
if (myAudio.canPlayType('audio/ogg; codecs="vorbis"')) { src = "http://jPlayer.org/audio/ogg/" + id + ".ogg";
236
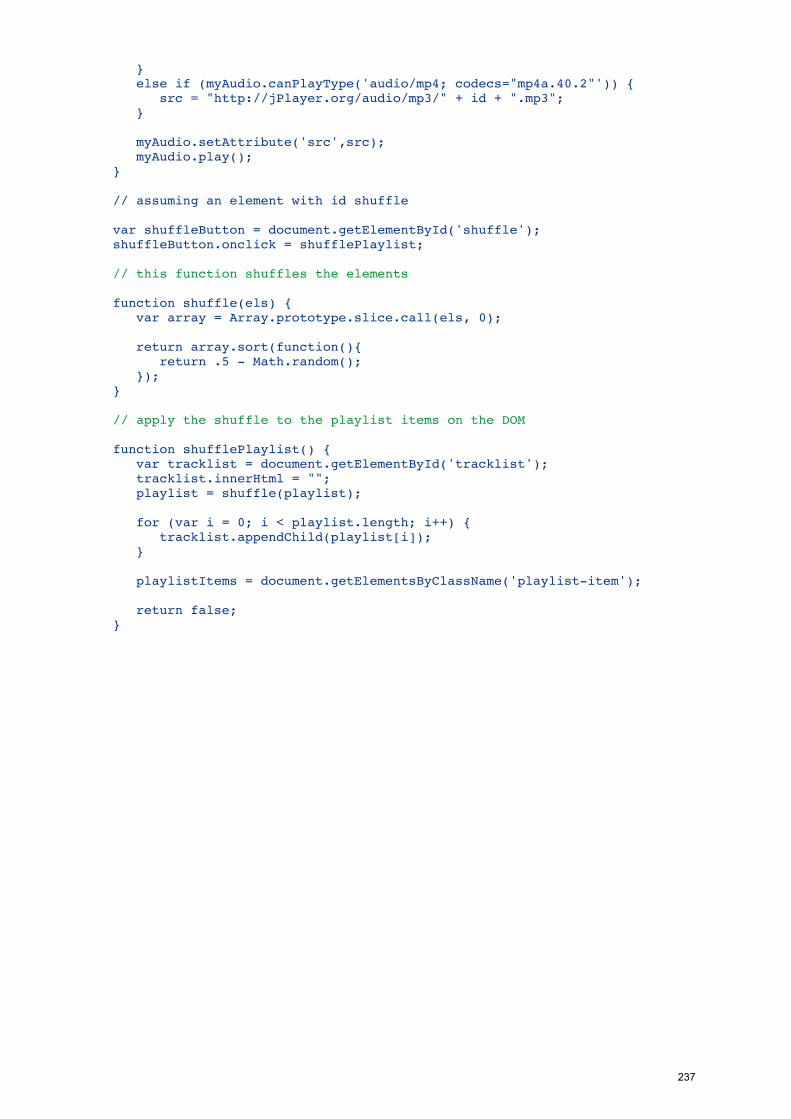
} else if (myAudio.canPlayType('audio/mp4; codecs="mp4a.40.2"')) { src = "http://jPlayer.org/audio/mp3/" + id + ".mp3"; }
myAudio.setAttribute('src',src); myAudio.play();}
// assuming an element with id shuffle
var shuffleButton = document.getElementById('shuffle');shuffleButton.onclick = shufflePlaylist;
// this function shuffles the elements
function shuffle(els) { var array = Array.prototype.slice.call(els, 0);
return array.sort(function(){ return .5 - Math.random(); });}
// apply the shuffle to the playlist items on the DOM
function shufflePlaylist() { var tracklist = document.getElementById('tracklist'); tracklist.innerHtml = ""; playlist = shuffle(playlist);
for (var i = 0; i < playlist.length; i++) { tracklist.appendChild(playlist[i]); }
playlistItems = document.getElementsByClassName('playlist-item');
return false;}
237

7.3 Adding loop and successive playTwo commonly requested features of a playlist are the ability to loop and succesively playtracks.
JavaScript :
// the ended event fires when the media has finished playing
myAudio.addEventListener('ended', function() { for(i = 0; i < playlistItems.length; i++) { // locate the current track if (playlistItems[i].getAttribute('href') == currentTrack) { if (i < (playlistItems.length - 1)) { playTrack(playlistItems[i+1].getAttribute('href')); } else { // start from the beginning (loop) playTrack(playlistItems[0].getAttribute('href')); } } }}, false);
The above code makes up most of what is required to create a simple playlist with loop andshuffle functionality. It's worth taking the time to look through, experiment and understandwhat is going on here.
Most playlists will load up the first track by default, so that pressing play immediately playsthe tracks from the start. This is an example of functionality you could add to make thesolution more comprehensive.
238

8 SubtitlesSession 8 (1 hour)
Site: W3C TrainingCourse: HTML5 Audio and Video March 2012Book: 8 SubtitlesPrinted by: Marie-Claire ForgueDate: Monday, 23 January 2012, 02:25 PM
239

Table of Contents8.1 Explore subtitling formats and possibilities
8.2 Add subtitles using WebVTT
240

8.1 Explore subtitling formats andpossibilitiesSubtitles are a useful addition to both audio and video, there are many ways of skinning thisrabbit, you could take a standard format such as .srt, read the timings and output andsynchronize with the media.
Below you will find a number of solutions on how to implement subtitles with HTML5 Video.You are encouraged to explore the techniques.
JavaScript: HTML5 Video with SRT Subtitleshttp://blog.gingertech.net/wp-content/uploads/2010/11/WebSRT/
Accessible HTML5 Video with JavaScripted captionshttp://dev.opera.com/articles/view/accessible-html5-video-with-javascripted-captions/
WebSRT : Overview of a time-synchronized text format for HTML5http://www.storiesinflight.com/js_videosub/
JavaScript: HTML5 Video with SRT Subtitleshttp://blog.gingertech.net/wp-content/uploads/2010/11/WebSRT/
and some inspiration for taking things further:
RadioLab Player demo:http://hyper-audio.org/r/
241

8.2 Add subtitles using WebVTTHopefully you've seen that there are many ways to roll your own subtitles playing mechanism.
Luckily a new standard is emerging that can save us a lot of trouble - it is called WebVTT andis currently being specified by the WebVTT W3C working group.
WebVTT (Video Text Tracks) is based on and will effectively replace WebSRT, which in turnis based on the popular SRT format.
The WebVTT standard can be used for:
Subtitles - dialogueCaptions - sound effects, relevant musical cues, and other relevant audio informationDescriptions - textual descriptions of the video component of the media resourceChapters - intended to be used for navigating the media resourceMetadata - tracks intended for use from script. Not displayed by the user agent
An example of a WebVTT file:
WEBVTT
100:00:13.000 --> 00:00:16.100I heard about this arduino project, and I saw it online -
200:00:16.100 --> 00:00:20.100- and I said 'Wow! a lot of people are starting to talk about this.I should check it out!'
242

Note:
The very first line of your WebVTT file should be WEBVTT.
The number above the timings is optional.
Timings are accurate to a millisecond and specify the time the subtitle will be displayed andwhen it disappears.
The text underneath the timings is associated with those timings.
We can use the usual text formatting tags such as <b> (bold), <i> (italics) and <u> (underline).
WEBVTT
100:00:13.000 --> 00:00:016.100Ich hörte von dieser arduino Projekt, und ich sah es online -
200:00:16.100 --> 00:00:20.100- und ich sagte "Wow! eine Menge Leute fangen an, darüber zu reden.Ich check it out!"
243

You can also define caption positioning.
WEBVTT
100:00:13.000 --> 00:00:16.100 A:middle L:10%I heard about this arduino project, and I saw it online -
200:00:16.100 --> 00:00:20.100- and I said 'Wow! a lot of people are starting to talk about this. A:middleL:60%I should check it out!'
L: line position
T: text position
A: [start | middle | end] alignment
D: [horizontal | vertical] direction
Speaker semantics.
WEBVTT
00:11.000 --> 00:13.000<v Roger Bingham>We are in New York City
00:30.500 --> 00:32.500<v Neil DeGrass Tyson>Didn't we talk about enough in that conversation?
The <v> tag defines the voice or speaker.
244

Chapters and Navigation
We can also use WebVTT to define chapters of a video for easier navigation
chapter-100:00:00.000 --> 00:00:18.000Introductory Titles
chapter-200:00:18.001 --> 00:01:10.000The Jack Plugs
chapter-300:01:10.001 --> 00:02:30.000Robotic Birds
Using CSS pseudo elements for styling
WEBVTT
100:00:13.000 --> 00:00:16.100I heard about this <c.arduino>arduino</c> project, and I saw it online -
200:00:16.100 --> 00:00:20.100- and I said 'Wow! a lot of people are starting to talk about this.I should check it out!'
For the intrepid, more details of this rapidly evolving spec can be found here :http://www.whatwg.org/specs/web-apps/current-work/webvtt.html.
Once we have our VTT file we need to associate it with the media.
Example HTML to embed the WebVTT file :
<video> <source src='http://happyworm.com/w3c/h5AVcourse/remix.ogv '> <source src='http://happyworm.com/w3c/h5AVcourse/remix.mpeg'> <track label="English subtitles" kind="subtitles" srclang="en" src="upc-video-subtitles-en.vtt" default></video>
Note that no browser currently supports WebVTT. So you will need to use a polyfill.
Include captionator.js in your code and you should be good to go. For example :
<script type="text/javascript" src="/js/captionator.js"></script>
Now look at Assignment 4!
245

HTML5 Audio and Video October 2011 (http://www.w3techcourses.com/course/report/log/index.php?chooselog=1&user=0&date=0&
id=7&modid=304) ◀ Jump to... ▶
W3C (http://www.w3techcourses.com/) ▶ HTML5-AV_Oct11(http://www.w3techcourses.com/course/view.php?id=7) ▶ Assignments(http://www.w3techcourses.com/mod/assignment/index.php?id=7) ▶ Assignment 4 -Playlists and Subtitling (http://www.w3techcourses.com/mod/assignment/view.php?id=304)▶ View submitted assignments
Update this Assignment
View 28 submitted assignments (submissions.php?id=304)
Assignment 4
Add a playlist to your audio player and subtitles to your video player.VTT file is provided.
Resources provided :
http://happyworm.com/video/m4v/arduino.m4v (http://happyworm.com/video/m4v/arduino.m4v)
http://happyworm.com/video/ogv/arduino.ogv (http://happyworm.com/video/ogv/arduino.ogv)
http://happyworm.com/video/webm/arduino.webm(http://happyworm.com/video/webm/arduino.webm)
http://happyworm.com/video/vtt/arduino-en.vtt (http://happyworm.com/video/vtt/arduino-en.vtt)
( https://github.com/cgiffard/Captionator (https://github.com/cgiffard/Captionator) )
Available from: Monday, 7 November 2011, 09:50 PM
You have not submitted anything yet
Edit my submission
246

HTML5 Audio and Video March 2012 (http://www.w3techcourses.com/course/report/log/index.php?chooselog=1&user=0&date=0&id=18&
modid=565) ◀ Jump to... ▶
W3C (http://www.w3techcourses.com/) ▶ HTML5-AV_Mar12(http://www.w3techcourses.com/course/view.php?id=18) ▶ Books(http://www.w3techcourses.com/mod/book/index.php?id=18) ▶ 9 Integrating Video withother HTML5 Elements
Update this Book Turn editing on
(print.php?id=565) (print.php?id=565&chapterid=93) (generateimscp.php?id=565
(view.php?id=565&chapterid=94Table ofContents
9.1 Videowith Canvas
9.2 Video withWebGL(view.php?id=565&chapterid=94)
247

9.1 Video with Canvas
Canvas is a new way of drawing into web pages, it is very powerful and can be coupledtightly with video.
The general technique is to :
Write a frame from the video element to an intermediary canvas element1.Read the data from the intermediary canvas element and manipulate it2.Write the manipulated data to your 'display' canvas3.Pause and repeat.4.
To write a frame of a video element to a canvas element you use the following command:
canvasElement.drawImage(videoElement,0,0,width,height);
Here's an example of how we would convert a colour video to black and white, in realtime!:
First let's define our video, canvase and a switch in HTML
<video id="video" controls="true" width="480" height="270">
<source src="http://jplayer.org/video
/webm/Big_Buck_Bunny_Trailer.webm" type="video/webm"/>
<source src="http://jplayer.org/video/ogv/Big_Buck_Bunny_Trailer.ogv"
type="video/ogg"/>
<source src="http://jplayer.org/video/m4v/Big_Buck_Bunny_Trailer.m4v"
type="video/mp4"/>
</video>
<canvas id="c1" width="480" height="270"></canvas>
<label for="cb1">Black & White</label><input id="cb1" name="cb1"
248

type="checkbox"/>
Now the idea is to copy the data from the video, manipulate it and paint the data to thecanvas.
var processor = {
timerCallback: function() {
if (this.video.paused || this.video.ended) {
return;
}
this.computeFrame();
var self = this;
setTimeout(function () {
self.timerCallback();
}, 0);
},
doLoad: function() {
this.video = document.getElementById("video");
this.c1 = document.getElementById("c1");
this.ctx1 = this.c1.getContext("2d");
this.cb1 = document.getElementById("cb1");
var self = this;
this.video.addEventListener("play", function() {
self.width = self.video.width;
self.height = self.video.height;
self.timerCallback();
}, false);
},
computeFrame: function() {
this.ctx1.drawImage(this.video, 0, 0, this.width, this.height);
var frame = this.ctx1.getImageData(0, 0, this.width, this.height);
var l = frame.data.length / 4;
if(this.cb1.checked) {
for (var i = 0; i < l; i++) {
var grey = (frame.data[i * 4 + 0] + frame.data[i * 4 + 1] +
frame.data[i * 4 + 2]) / 3;
frame.data[i * 4 + 0] = grey;
frame.data[i * 4 + 1] = grey;
frame.data[i * 4 + 2] = grey;
}
this.ctx1.putImageData(frame, 0, 0);
}
return;
249

(view.php?id=565&chapterid=94
}
};
Other Examples:
video + canvas = magichttp://html5doctor.com/video-canvas-magic/ (http://html5doctor.com/video-canvas-magic/
Manipulating video using canvashttps://developer.mozilla.org/En/Manipulating_video_using_canvas (https://developer.mozilla.org/En/Manipulating_video_using_canvas)
Moodle Docs for this page (http://docs.moodle.org/en/mod/book/view)
You are logged in as Marie-Claire Forgue (http://www.w3techcourses.com/user/view.php?id=476&course=18) (Logout(http://www.w3techcourses.com/login/logout.php?sesskey=nnDUizmO6C) )
HTML5-AV_Mar12 (http://www.w3techcourses.com/course/view.php?id=18)
250

HTML5 Audio and Video March 2012 (http://www.w3techcourses.com/course/report/log/index.php?chooselog=1&user=0&date=0&id=18&
modid=566) ◀ Jump to...
W3C (http://www.w3techcourses.com/) ▶ HTML5-AV_Mar12(http://www.w3techcourses.com/course/view.php?id=18) ▶ Books(http://www.w3techcourses.com/mod/book/index.php?id=18) ▶ 10 Audio for Games
Update this Book Turn editing on
(print.php?id=566) (print.php?id=566&chapterid=95)
(generateimscp.php?id=566) (view.php?id=566&chapterid=96)Table of Contents
10.1 Limitations
10.2 Working around thelimitations (view.php?id=566&chapterid=96)
10.1 Limitations
When the browser based version of Angry Birds(http://chrome.angrybirds.com (http://chrome.angrybirds.com/) ) wasreleased in May 2011, it was recreated using HTML5, apart from theaudio which was Flash based.
There are several limitations when it comes to using HTML5 audiowithin games:
Mobile platforms disable autoplay and insist thataudio is triggered by a user initiated event
The reason given for disabling autoplay (automatic playing of mediawhen visiting a web-page) is that as mobile devices are often onmetered internet connections, it us felt that user consent should begiven before downloading media.
Various browsers do not handle short soundsvery well
This affects both desktop and mobile browsers, in some cases theaudio fails to play and in other cases we cannot play the audio more
251

(view.php?id=566&chapterid=96)
than once, ie looping becomes ineffectual.
Latency between triggering the audio and itactually being played
With various HTML5 audio browser implementations there aredelays between issuing the play command and the audio actuallyplaying. In games this is often unnacceptable.
Moodle Docs for this page (http://docs.moodle.org/en/mod/book/view)
You are logged in as Marie-Claire Forgue (http://www.w3techcourses.com/user/view.php?id=476&course=18) (Logout(http://www.w3techcourses.com/login/logout.php?sesskey=nnDUizmO6C) )
HTML5-AV_Mar12 (http://www.w3techcourses.com/course/view.php?id=18)
252

HTML5 Audio and Video October 2011 (http://www.w3techcourses.com/course/report/log/index.php?chooselog=1&user=0&date=0&
id=7&modid=309) ◀ Jump to... ▶
W3C (http://www.w3techcourses.com/) ▶ HTML5-AV_Oct11(http://www.w3techcourses.com/course/view.php?id=7) ▶ Assignments(http://www.w3techcourses.com/mod/assignment/index.php?id=7) ▶ Assignment 5 - Pushthe Limits! (http://www.w3techcourses.com/mod/assignment/view.php?id=309) ▶ Viewsubmitted assignments
Update this Assignment
View 24 submitted assignments (submissions.php?id=309)
Assignment 5
1. Integrate WebGL or Canvas with your video player somehow.Looking forward to seeing some imaginative solutions
2. Create working audio spot effects*
*spot effects are small pieces if audio that should play almost instantlyon the occurrence of an event. Useful for games or adding soundeffects to web apps.
Hint - audiosprites are a great way of achieving spot effects. You canuse free software like Audacity to create your audiosprite.
Available from: Monday, 14 November 2011, 09:45 AM
You have not submitted anything yet
Edit my submission
Moodle Docs for this page (http://docs.moodle.org/en/mod/assignment/view)
You are logged in as Marie-Claire Forgue (http://www.w3techcourses.com/user/view.php?id=476&course=7) (Logout(http://www.w3techcourses.com/login/logout.php?sesskey=nhnMD1zn5S) )
253

OMWeb - 248687
D 2.2 Training Report
APPENDIX 5: FEEDBACK ANALYSIS – “HTML5 AUDIO AND VIDEO” (OCT. 2011)
254

HTML5 Audio and Video October 2011 (http://www.w3techcourses.com/course/report/log/index.php?chooselog=1&user=0&date=0&
id=7&modid=308) ◀ Jump to... ▶
W3C (http://www.w3techcourses.com/) ▶ HTML5-AV_Oct11(http://www.w3techcourses.com/course/view.php?id=7) ▶ Feedback (index.php?id=7) ▶Feedback, please!
Update this Feedback
Export to ExcelSubmitted answers: 25Questions: 26
How did you hear about this course?- Announcement mailinglist: 8 (32.00 %)- W3C Web site: 5 (20.00 %)- My manager told me: 3 (12.00 %)- A friend told me: 2 (8.00 %)- Twitter: 4 (16.00 %)- W3C newsletter: 1 (4.00 %)- Other: 2 (8.00 %)
If "other", please specify- - - Announced at the Webinos EU-project mailing list.- - - - - - - - - -
Overview (http://www.w3techcourses.com/mod/feedback/view.php?id=308&do_show=view) Edit questions
(http://www.w3techcourses.com/mod/feedback/edit.php?id=308&do_show=edit) Templates (http://www.w3techcourses.com
/mod/feedback/edit.php?id=308&do_show=templates) Show responses (http://www.w3techcourses.com
/mod/feedback/show_entries.php?id=308&do_show=showentries)
Analysis ()
255

- the Open Media Web site-
What did you like best about this course?- Our teacher's friendly attentiveness
An interesting and innovative curriculum- The self exploring, self timing experience.
The concept of a initiating a part with the necessaryresources in combination with a assignment is a perfectway of learning to know new content
- HTML Audio and Video and its problems and solutions- clear assignments. right information per assignment.- The topic and the possibility to do the course work at
any time.- learn new html5 stuff- Learning new information- I was totally new to HTML5 audio/video and this course
has provided a good introduction to the topic. What Iappreciated a lot is that now I'm able to create my owncustomized players. And also that I got the basics to delveinto the topic in autonomy.
- The way you are encouraged to go a step ot two beyondwhat is strictly required to pass.
- - Forum, Qualified Trainer, Updated Curriculum,- It was good. The resources were useful, the trainer
responsive and the other participants helpful.- Getting some hands on experiences with video and audio.- There were a few useful links to resources that I hadn't
heard of.- The new knowledge of js in HTML audio and video tags- - Discovering audio and video- Low stress way of learning more about HTML video and
audio.- Is a practical course and you have the chance of see other
people programming style.- Getting stuck into the javascript API- Exploration, freeform exploring- The progressive content and information that is on the
cutting-edge.- - it was all great but I enjoyed spending the time playing
with HTML5 as well as researching and testing. I also likeusing canvas for the first time...
256

- Immediate and practical application.
You would recommend this course to others- Strongly agree (5): 6 (24.00 %)- Agree (4):
13 (52.00 %)- I might but I amnot sure (3):
4 (16.00 %)
- Disagree (2): 1 (4.00 %)- Strongly disagree(1):
1 (4.00 %)
Average: 3.88
If you'd recommend the course: can you saywhy?- The course is best suited for those interested in getting
acquainted with the multimedia settings of HTML5- It's a ideal first step into HTML5 video and Audio.
I must admit I already had some experience but I alsolearned to know new techniques and resources
- It's an really interesting topic- it's a w3c course :)- Cost-effective, good overview of the topic.- interesting- - I'd recommend the course to people that like me started
as audio/video newbies. I'm not sure I'd suggest it tosomeone already confident with this technology.
- Gives a good grounding with plenty of pointers forfurther research
- - Best way to learn to New technologies and w3c
certification.- It is concise, and the steps needed to achieve the end
assignments are well layed out.- - - The thing is that you need to know all about new
languages but only If they are well teached- - As a first contact.- I've taken a couple w3c courses and have gotten a lot out
of each. The instructors have been knowledgable and theother students have been a resource as well.
257

- Because I think it is a good start to dive into video andaudio on web.
- - I actually ended up with more JavaScript practice above
everything else. I'm quite weak at JS so it was goodtraining for me.
- Content and practices are cutting-edge ... helps guide auser/student to the advanced information with real worldlinks to current information for real-time resources ... itsteps you through the training, with each assignmentbuilding upon and advancing.
- - It's a great chance to experiment with HTML5 Audio and
video and discover some of the great things that can bedone as well as some of the issues.
- This was immediately useful, especially in light of Adobe'sannouncement to discontinue efforts on mobile flashdevelopment.
What suggestions do you have for improvingthe course?- The course is a bit fast-paced, but also very challenging.- No suggestion- More and better prepared material - I had to really get
along to get my informations to know what each sessionwas about. There were to few examples to get along. Anddidn't know that much javascript has to be used.
- more clear deadlines (or be more clear about loosedeadlines). i currently work 40hrs/week + university study30hrs/week. so for me it's important to know when thedeadline is set per assignment.
- There have been a few typos and dead links. No big deal,but it helps if you can avoid that.
I would like more detailed feedback on the code I havewritten, but I suppose that would also increase the cost ofthe course, so that's a trade-off.
- I did a few w3c courses before (svg , mobile) and thereare some aspects that I liked better in that formercourses:There was a bit more going on in the forum (maybebecause there were more participants) and the coursematerial was more detailed and explanatory (backgroundinformation, more detailed examples). Also the teacherswere more present, faster responds and help in theforum.
258

So I think the price/performance ration of this course isnot as good as in the previous courses I took..
But it was not bad, again I learned a lot, which I'am goingto use in my job!
- - - - It probably would be easier to let the example audio and
video files be hosted by W3C.- May include video podcast with text instructions- Some of the scripting knowledge needed, should be
outlined and maybe some resources suggested to getpeople up to speed with scripting would be helpful.
- - Quite honestly, I found this course extremely
disappointing. The weekly course material contained verylittle information that an intelligent web developercouldn't find independently through searching theinternet. I have participated in two previous W3Ccourses, which provided me with detailed backgroundinformation that would have been difficult to find on myown.
The course material needs to be fleshed out substantially.Charging participants €225 for such sparse material doesnot constitute value for money. "HTML5 Multimedia:Develop and Design" by Ian Devlin costs a fraction of theprice, is up to date, and covers more topics.
- In a W3C course, I'm expecting lessons well structured, Imean, with enough or very good resources to teach theirstudents. My impression is that this course was poor offeedback. I missed a teacher with enough time to respondto his students at least, 4 days ago from the request sent, Imissed comprehensive teaching texts (demos were betterresoures to explain some parts of the exersices), I don'tknow...It seems It was a course prepared in few hours andmy impression was that teacher was very occupied totake time for this student's course.
- - Taking a more didactic approach : step by step, with
working example. More comprehensive and consolidatedmaterial
- Stronger outline at the beginning.
259

- Give more examples of what it is possible to do with theaudiovisual content with HTML5
- More extensive course materials, they were very lightcompared to the previous W3C SVG and Mobile BestPractices course I've been on, yet this was the mostexpensive course of the three.
- I know learning JavaScript fundamentals is important, butfor beginners maybe you could point them towardsjQuery or a similar JS library as I'm sure that will alleviatesome of their troubles when doing the assignments.
- Quicker feedback (which might not be an option); finishedexamples of assignments and code provided at the end ofthe course for future reference, along with a resource listof links.
- - I would recommend that students are encouraged to use
a script library like jquery to start with and thenexperiment from there. The free form nature of thecourse was great but amount of scripting required andnumerous cross browser issues made it more timeconsuming. The estimate of 2 to 3 hours per lesson (onOMweb) was a bit short.
- Course is fine as is.
This course was worth your time- Strongly agree(5):
9 (36.00 %)
- Agree (4):14 (56.00 %)
- Neither agree nordisagree (3):
2 (8.00 %)
- Disagree (2): 0- Strongly disagree(1):
0
Average: 4.28
The course met your expectations- Strongly agree(5):
3 (12.00 %)
- Agree (4):15 (60.00 %)
- Neither agreenor disagree (3):
5 (20.00 %)
- Disagree (2): 1 (4.00 %)- Stronglydisagree (1):
1 (4.00 %)
260

Average: 3.72
You learnt something that you previously didnot know- Strongly agree(5): 15 (60.00 %)- Agree (4): 9 (36.00 %)- Neither agreenor disagree (3):
0
- Disagree (2): 1 (4.00 %)- Stronglydisagree (1):
0
Average: 4.52
You will incorporate what you learnt into yourwork- Strongly agree (5):
11 (44.00 %)- Agree (4):
11 (44.00 %)- Neither agree nordisagree (3):
3 (12.00 %)
- Disagree (2): 0- Strongly disagree (1): 0Average: 4.32
The course material was ...- Helpful and easy tounderstand (5):
5 (20.00 %)
- Informative and usuallyeasy to follow (4): 11 (44.00 %)- Challenging at times but Iwas able to follow it (3):
7 (28.00 %)
- Difficult to follow (2): 0- Too difficult and assumedtoo much knowledge (1):
0
Average: 3.60
The course material ...- Provided more detailthan I felt was necessary(5):
0
- Went into more detailthan I needed to coverthe topic (4):
2 (8.00 %)
261

- Provided sufficientinformation to cover thetopic (3):
13 (52.00 %)
- Was barely enough tounderstand the topic(2):
5 (20.00 %)
- Was insufficient tounderstand the topic(1):
3 (12.00 %)
Average: 2.40
The number of assignments was ...- Much too low.I would like tohave had moreassignments (5):
0
- Too low - Icould havehandled more(4):
1 (4.00 %)
- About right(3): 17 (68.00 %)- A little high -it was difficult tocomplete themon time (2):
6 (24.00 %)
- Too high, Icould notcomplete themin the availabletime (1):
1 (4.00 %)
Average: 2.72
We estimated that you would need to spendabout 3-4 hours a week on the course. Was this...- A gross underestimate (ittook a lot more most weeks)(5):
4 (16.00 %)
- An under estimate (it tookmore some weeks) (4): 9 (36.00 %)- About right (3):
10 (40.00 %)- An over estimate (it tookless than 4 hours most weeks)(2):
1 (4.00 %)
262

- A gross over estimate (Ifinished in much less time eachweek) (1):
0
Average: 3.52
Introduction to HTML5 Media and creation of afirst player (Week 1)- 5 (5): 9 (36.00 %)- 4 (4): 9 (36.00 %)- 3 (3): 1 (4.00 %)- 2 (2): 4 (16.00 %)- 1 (1): 1 (4.00 %)Average: 3.72
Learning the Tools and Media API (Week 2)- 5 (5): 7 (28.00 %)- 4 (4): 12 (48.00 %)- 3 (3): 4 (16.00 %)- 2 (2): 1 (4.00 %)- 1 (1): 0Average: 3.88
Controls and the User Interface (Week 3)- 5 (5): 7 (28.00 %)- 4 (4): 13 (52.00 %)- 3 (3): 3 (12.00 %)- 2 (2): 1 (4.00 %)- 1 (1): 0Average: 3.92
Playlists and subtitles (Week 4)- 5 (5): 5 (20.00 %)- 4 (4): 11 (44.00 %)- 3 (3): 2 (8.00 %)- 2 (2): 4 (16.00 %)- 1 (1): 0Average: 3.32
Integrating video with other HTML5 Elements(Week 5)- 5 (5): 5 (20.00 %)- 4 (4): 8 (32.00 %)- 3 (3): 7 (28.00 %)- 2 (2): 1 (4.00 %)- 1 (1): 1 (4.00 %)
263

Average: 3.24
Can you explain your evaluation for each of thesessions? Thx!- The sessions I completed were interesting and rewarding.
I still have to complete the last two sessions.- - Frist to sessions were really basics - and with only few
javascript. Okay one has to play along with manyconverters and get along alone which is best for one. Butit was to manage.Week 3 was the beginning of javascript - I could get alongwith it. But there were to few examples and workingones. Only Javascript code with small explanations.
Playlist and subtitles was quite the same problems asbefore. Only small information and you have to get alongsomehow.
Week 5 is the weakest one, you get only links to dosomething with video and canvas, webgl and this audiosprites. I never used any of time. So I have to spend 1 dayto get along with this topics. to know how to get aassignment done ...
- week 1 to 4 was great. the goal for week 5 is not veryclear. i can implement an easy canvas or webglcomponent, but if I had enough time I could implement amuch better component. I'ts not very clear what isexpected in this assignment.
- - - - Week 1: Easy to follow audio/video history, especially
useful the codecs support tables.
Week 2: find the right encoding tool has been a nightmareand too time consuming. A little more info about whichtool to use for what would have been appreciated. FinallyI found this: http://www.online-convert.com.
Week 3: I don't really know if it was your fault or mine,but the JS example in "Progress bars" didn't work onFirefox and I had to implement the functionality ex-novo.
Week 4: good explanation but I had problems with the JScode for the shuffle (finally I used this code fromstackoverflow http://bit.ly/vsm6n2)
264

- I found the introductory session a little basic, but they gota lot more interesing as we delved deeper
- - This course was best fit for developers...But some of the
participants are web designers including me, Means weare very well at HTML,CSS but starting level in Java Script.Personally i felt little difficult to learn the JavaScript...Butanyway...end of the course it helped me to learnJavaScript little bit:)
- - - The subjects were fine, but the quality of the course
material was very poor. It usually took less than 15minutes to read through the material and study the code.I frequently found myself having to read the media chapterof the HTML5 specification to get sufficient informationto complete the weekly assignments. The main value ofdoing this course came from doing the assignments, whichtook a lot of time to complete. I usually spent a couple ofdays trying to work out how to get the code to work inmultiple browsers.
- - - Weeks 3,4,5 will beneficiate from providing more
consolidate material, with didactic approach (step by step)- The first week was too simple. Felt like we should get
more into the heart of the material earlier so we hadmore time to digest it and experiment with our projects. Ithink the fifth week could've been split in two, giving timefor more examples by the instructor and moreexperimentation by the students.
- First Assignments may be are more trivial than the lastones.
- Course materials felt very light. Some bugs were found inthe code samples that complicated things.
- - - Generally the right level of detail was provided.
For the last session, I thought the contents were muchmore difficult to understand and I would have neededmore background information on canvas and WebGL tobe able to really understand it.
- I enjoyed all of the sessions when I did them but as I wassick for 3 weeks and then very busy at work, I had to rushthrough and had a few issues with creating accessiblexbrowser controls for week 2 and with the playlist in
265

week 4 without using a script library.-
Which option best describes your primary jobposition?- Web developer:
12 (48.00 %)- Web designer: 5 (20.00 %)- Web projectmanager:
1 (4.00 %)
- Web contentauthor:
1 (4.00 %)
- Usabilityspecialist:
0
- Other: 6 (24.00 %)
How many employees does the organizationyou work for have?- 1: 5 (20.00 %)- 2 to 10: 3 (12.00 %)- 11 to 50: 5 (20.00 %)- 51 to 250: 1 (4.00 %)- 251 to 1000: 4 (16.00 %)- More than 1000: 5 (20.00 %)
Do you think it would be beneficial to run anadvanced audio and video course continuingfrom where this course finishes?- Yes(2): 18 (72.00 %)- No(1):
6 (24.00 %)
Average: 1.68
Would you be interested in taking such anadvanced HTML5 AV course?- Yes(2):
15 (60.00 %)
- No(1):
9 (36.00 %)
Average: 1.56
Do you have any other comments? Please behonest!- No additional comments to the ones I already made.-
266

- I am learning now javascript to get along with html5 - sothese course was really a good signal for me to do this. :)
- I already told everything =)- I am a bit disappointed with the current state of HTML5
itself. There are several problems, which keeps us fromusing it in a professional context:1) You need several media formats to be cross-browser-compatible2) There doesn't seem to be any good way to protect themedia files3) Limited support for http streaming
My company has developed and operates a musicstreaming service. It's subscription-based with unlimitedstreaming of audio and music videos. We have 10 milliontracks in our storage, so keeping multiple formats is notan option. On-the-fly transcoding is too slow.
We have to follow the security requirements of therecord labels. DRM is not a requirement in a streamingsolution, but it mustn't be possible to grab the files viacode inspection, and anything cached locally must be wellencrypted and obfuscated.
- - - Q: Would you be interested in taking such an advanced
HTML5 AV course?A: Knowing the program in advance I'll surely evaluate thepossibility.-------
Q: Do you have any other comments? Please be honest!A: When you read something like "World Wide WebConsortium (W3C) announces a new online trainingcourse on "HTML5 Audio&Video" and you decide toenroll the course, the expectations are very high (theW3C part plays a big role on this). I admit, I'm pedantic,but sincerely I thought to find more attention for thedetails. Apart from this, the course helped a lot and Idon't regret having followed it.
- Actually I would be interested in an advanced course, butI don't think I can justify it to my bosses.But I may be able to talk them into a general HTML5course :)
- - I feel happy about this course!
267

- I enjoyed the course! TBH, I have managed to devote verylittle time to it as I am swamped with work. However,when things calm down and I have a few spare hours I willlook at the materials and complete the exercises. I'd liketo see more about creating accessible video players, andmaterials provided or coding methods explicitlysupporting accessibility. This is very important to me.
- - An advanced AV course might be a good idea, but I would
be extremely reluctant to sign up after my experiencewith this one.
Nothing further to add. I've been brutally honest in myearlier answers.
- Just one thing: I expect a very professional courses fromthe W3C and this time...I thing It wasn't
- - - - I would like to have had more time to take more
advantage of the course. I hadn't got enough time fordoing the assignments because i had to do a lot of thingto do at work. I will see deeper all the information when Ihave time.
- V enjoyable, thanks Mark.- - I may be interested in an advanced course in the future,
but right now I am digesting what I currently have learned,therefore I am not ready for the advanced course.
- - I think I would like to do a javascript refresher before
attempting an advanced course! Also it would have beennice for the training to include some css3 and canvas.
- I failed to complete the coursework, and thus have asense of self loathing that diminishes the otherwise greatexperience of taking the course.
Will you likely attend OTHER W3C trainingcourses in the future?- Yes (3):
16 (64.00 %)- May be(2):
9 (36.00 %)
- No (1): 0Average: 2.64
268

Moodle Docs for this page (http://docs.moodle.org/en/mod/feedback/analysis)
You are logged in as Marie-Claire Forgue (http://www.w3techcourses.com/user/view.php?id=476&course=7) (Logout(http://www.w3techcourses.com/login/logout.php?sesskey=dtOyr74dlk) )
HTML5-AV_Oct11 (http://www.w3techcourses.com/course/view.php?id=7)
269

OMWeb - 248687
D 2.2 Training Report
APPENDIX 6: LIST OF PARTICIPANTS – “HTML5 AUDIO AND VIDEO” (OCT. 2011)
First name Surname Country Philip Ackermann Germany Francesc Arribas Spain Francois Beaufort Canada Giovanny Alexander Cardenas Gonzalez Colombia Antonio Coppola Italy Paolo Dina Italy Mike Downey USA Sylvia Egger Germany Maringa Emons - de Vries Netherlands Kasal Eva France Jorge Fernandes Portugal Kay Fix UK Cathalina Fontenelle USA Michael Forton Belgium Yosuke Funahashi Japan Juan Ignacio García Menéndez Spain Louise Giles UK Kevin Greene USA Susan R Grossman USA Theresa Hemmen USA Tjeerd Hes Netherlands Alexander Hofmeister Germany Charlie Hoover USA Sascha Hübner Germany Patrice Jacquot France tshitshi kia ntoni Belgium Sharon Kitching Australia Christine Kowalski USA Lindsey Lauria USA Charles Mason USA Kevin McCormick New Zealand David Moulton UK Sivasubramanian Muthusamy India Claes Nilsson Sweden Joshue O Connor Ireland Serena Pastore Italy David Powers UK Gerry Quach Australia
270

OMWeb - 248687
D 2.2 Training Report
Per Quested Aronsson Sweden Mike Randrup USA OMWeb reviewer Belgium Maurício Samy Silva Brazil Jorge Sandoval Colombia Vilaro Sandra USA Sophie Schuermans Belgium Ramesh Selvam India Denver Sessink Netherlands Marco Sinacore UK carlos Solis Costa Rica Balázs Suhajda Sweden Jill VandenDriessche Belgium Di Virgils Australia Tsam Wachenhauzer Israel Christopher Wiedswang Norway
271

OMWeb - 248687
D 2.2 Training Report
APPENDIX 7: COURSE MATERIAL – “GAME DEVELOPMENT IN HTML5” (OCT. 2011)
272

Let's make it move!During the second week of our course we will discuss different methods of sprite animation using
HTML5 and remind information about basics of physics from high school. We will also learn how todetect collisions between objects.
Site: W3C TrainingCourse: Game Development in HTML5 October 2011Book: Let's make it move!Printed by: Marie-Claire ForgueDate: Monday, 23 January 2012, 01:28 PM
273

Table of Contents1 Methods of HTML5 animation
2 Introduction to CSS3 transform
3 Collision Detection
4 Simple physics implementation
274

1 Methods of HTML5 animationQuoting Wikipedia:
Animation is the rapid display of a sequence of images in order to create anillusion of movement.
So basically everything we have to do is just displaying different parts of an image (called'sprite') at different time. There are couple of methods to achieve this effect in JS, and we willdiscuss them below.
1. Using Canvas elementAs an example, let's use this Odysseus sprite from my Open Odyssey Game:
Before stating any animation related stuff it's necessary to define few variables common for allmethods.
view plain print ?
var width = 80,01.height = 90,02.frames = 3,03.//sprite has 4 frames, but we count from 0 04. 05.actualFrame = 0,06. 07.canvas = document.createElement('canvas'),08.//'canvas' variable will be always main element of an animation, not always<canvas> type
09.
canvasStyle = canvas.style,10.ctx = canvas.getContext("2d"),11.image = document.createElement('img');12. 13.image.src = 'sprite.png';14. 15.
275

canvas.width = width;16.canvas.height = height;17.//width & height are assigned directly to the canvas, not to the canvasStylebecause in the other case it would stretch the element, not change its size.
18.
document.body.appendChild(canvas);19.</canvas>20.
view plain print ?
var width = 80, height = 90, frames = 3, //sprite has 4 frames, but we count from 0 actualFrame = 0, 01.
view plain print ?
var width = 80, height = 90, frames = 3, //sprite has 4 frames, but we count from 0 actualFrame = 0, 01.
view plain print ?
var width = 80, height = 90, frames = 3, //sprite has 4 frames, but we count from 0 actualFrame = 0, 01.
To animate our character we need just to display next frames (next parts of the source image)of the sprite on the canvas. The draw function will looks like this:
view plain print ?
var draw = function(){01.ctx.clearRect(0, 0, width, height);02.ctx.drawImage(image, 0, height * actualFrame, width, height, 0, 0, width,height);
03.
//the attributes are: image to draw, X coord of the source image, Y coord of thesource image,
04.
//width & height of the cut piece (frame size), X & Y destination coords (ourcanvas) and
05.
//destination frame size (not always the same as the source one, eg in case ofscaling the frame)
06.
07.if (actualFrame == frames) {08.actualFrame = 0;09.} else {10.actualFrame++;11.}12.//looping the frames, it is also the common part of all draw() function in thislesson
13.
}14.
view plain print ?
var draw = function(){ ctx.clearRect(0, 0, width, height); ctx.drawImage(image, 0, height * actualFra01.
view plain print ?
var draw = function(){ ctx.clearRect(0, 0, width, height); ctx.drawImage(image, 0, height * actualFra01.
view plain print ?
var draw = function(){ ctx.clearRect(0, 0, width, height); ctx.drawImage(image, 0, height * actualFra01.
You can use any of timing functions from previous examples to animate it. So that is the firstmethod of JavaScript animation. It is worth to study it, because canvas is probably the futureof HTML5 games. It gives you the possibility of scaling, rotating, fliping, etc. the frames inbrowsers that support canvas but no CSS3. Unfortunatelly, you need to clear whole canvas todraw another frame - it is quite easy now, but becomes more complex when you will have toanimate more objects. It is also not supported in old browsers - we will need a JavaScriptfallback for this.
276

2. Background loopingI think this was one of the first methods of sprite animation in web browsers. It is quitesimple. Just create a div element with background, and change the backgroundPosition oneach frame. A piece of cake. Try it::
view plain print ?
var canvas = document.createElement('div'),01.//div element is now our 'canvas' 02.canvasStyle = canvas.style;03. 04.canvasStyle.backgroundImage = "url(sprite.jpg)";05.//and our image is just it's background 06. 07.canvasStyle.width = width + 'px';08.canvasStyle.height = height + 'px';09.//width & height are now assigned to the 'style', not directly to the element 10.document.body.appendChild(canvas);11. 12.var draw = function(){13.canvasStyle.backgroundPosition = "0 -‐"+height * actualFrame;14.//each frame background image moves up, that's why there is minus sign before thevalue, you can multiply (height * actualFrame) by negative one, it gives the sameeffect
15.
16.if (actualFrame == frames) {17.actualFrame = 0;18.} else {19.actualFrame++;20.}21. 22.}23.
view plain print ?
var canvas = document.createElement('div'), //div element is now our 'canvas' canvasStyle = canvas.st01.
view plain print ?
var canvas = document.createElement('div'), //div element is now our 'canvas' canvasStyle = canvas.st01.
view plain print ?
var canvas = document.createElement('div'), //div element is now our 'canvas' canvasStyle = canvas.st01.
Really simple, isn't it? And it works everywhere.
3. Clip-rect methodHmm, but what if we want our game to run full screen, or on different devices with variousresolutions? Changing the size of the div from the second example just looks ugly. So this iswhere I introduce the clip:rec(), Css attribute of the img element. It lets you specify thedimensions of an absolutely positioned element that should be visible, and the element isclipped into this shape.
Let's try:
view plain print ?
var canvas = document.createElement('img'),01.//image is now the canvas -‐ I know it could be little confusing, but it is easierto store your 'canvas' (surface you want to animate, not HTML5 element) in onevariable in all examples.
02.
canvasStyle = canvas.style;03. 04.
277

canvas.src = 'sprite.jpg';05.(...)//rest of the attributes from previous examples 06.var draw = function(){07.var frameTop = height * actualFrame,08.frameLeft = 0,09.frameRight = width,10.frameBottom = frameTop + height;11.//a little math here for each frame 12. 13.canvasStyle.clip = "rect(" 14.+frameTop +"px " //top 15.+frameRight +"px " //right 16.+frameBottom +"px " //bottom 17.+frameLeft +"px )"; //left 18. 19.canvasStyle.position = 'absolute';20.canvasStyle.top = posY -‐ height * actualFrame + 'px';21.//IMPORTANT: even if we crop piece of source image, it's top & left attrs dontchange -‐ it's necessarily to move it to the fixed position. That's what I madeabove.
22.
view plain print ?
var canvas = document.createElement('img'), //image is now the canvas -‐ I know it could be little con01.
view plain print ?
var canvas = document.createElement('img'), //image is now the canvas -‐ I know it could be little con01.
view plain print ?
var canvas = document.createElement('img'), //image is now the canvas -‐ I know it could be little con01.
This solution is based on only one DOM element, but it needs a lot of math on eachmove/frame changing.
4. Div with overflow:hiddenThis solution is simpler than the 3rd one, better than the 2nd, and doesn't use canvas. Thewhole philosophy is to create one div element bigger than appended image inside, displayonly part visible in div, and move the image appropriately. Like this:
view plain print ?
var canvas = document.createElement('div'),01.canvasStyle = canvas.style,02.image = document.createElement('img'),03.imageStyle = image.style;04. 05.image.src = 'sprite.jpg';06.//div is the 'canvas' now, but it has an image inside 07. 08.canvasStyle.position = imageStyle.position = "absolute";09.canvasStyle.top = posX + 'px';10.canvasStyle.left = posY + 'px';11.canvasStyle.overflow = "hidden";12.//this is very important 13.canvasStyle.width = width + 'px';14.canvasStyle.height = height; + 'px'v15. 16.imageStyle.top = 0;17.imageStyle.left = 0;18.canvas.appendChild(image);19.document.body.appendChild(canvas);20.//put image in the canvas/div and add it all to the body of the document. 21.var draw = function(){22. 23.imageStyle.top = -‐1*height * actualFrame + 'px';24.
278

//as in the 3rd example -‐ direction of the move must be negative. Otherwiseanimation will be played backwards
25.
if (actualFrame == frames) {26.actualFrame = 0;27.}28.else {29.actualFrame++;30.}31. 32.}33.
view plain print ?
var canvas = document.createElement('div'), canvasStyle = canvas.style, image = document.createElemen01.
view plain print ?
var canvas = document.createElement('div'), canvasStyle = canvas.style, image = document.createElemen01.
view plain print ?
var canvas = document.createElement('div'), canvasStyle = canvas.style, image = document.createElemen01.
Unfortunatelly, even if this solution provides the possibility of scaling without CSS3, works inevery browser, and is much simpler than clip:rect(), it's main disadvantage is that it needs twoDOM elements (img & div) to animate. But what about new CSS3 features?
5. Different types of CSS animationsCSS animations make it possible to animate transitions from one CSS style configuration toanother. You can set keyframes and configure its properties in CSS stylesheet. Example:
view plain print ?
@-‐moz-‐keyframes blinkblink { /* again -‐ vendor prefixes in here.*/ 01.0% { opacity: 0;02.50% { opacity: 0.3; }03.100% { opacity: 0; }04.}05. 06..blink {07.-‐moz-‐animation: blinkblink 0.8s linear 0s infinite;08.}09.
view plain print ?
@-‐moz-‐keyframes blinkblink { /* again -‐ vendor prefixes in here.*/ 0% { opacity: 0; 50% { opacity: 0.3; } 1
01.
view plain print ?
@-‐moz-‐keyframes blinkblink { /* again -‐ vendor prefixes in here.*/ 0% { opacity: 0; 50% { opacity: 0.3; } 1
01.
view plain print ?
@-‐moz-‐keyframes blinkblink { /* again -‐ vendor prefixes in here.*/ 0% { opacity: 0; 50% { opacity: 0.3; } 1
01.
Using the -moz-animation property we describe the animation name (defined after @-moz-keyframes), the duration, the timing function (linear, ease, or bezier curve), the delay, theiteration count and the direction. Now every element with the 'blink' class will change it'sopacity. But it will switch from one keyframe to another using smooth, linear change of all theattributes. How we can use it to animate sprites like in previous examples? We can define theframes so close to each other, that the transition will be impossible to notice. Using our
279

Odysseus sprite:
view plain print ?
<html>01.<head>02.<style>03. 04.@-‐moz-‐keyframes move {05.0% { background-‐position: 0 0; }06.24.99% { background-‐position: 0 0; }07.25% { background-‐position: 0 -‐90px; }08.49.99% { background-‐position: 0 -‐90px; }09.50% { background-‐position: 0 -‐180px; }10.74.99% { background-‐position: 0 -‐180px; }11.75% { background-‐position: 0 -‐270px; }12.99.99% { background-‐position: 0 -‐270px; }13.100% { background-‐position: 0 0; }14.}15..player {16.width: 80px;17.height: 90px;18.background-‐image: url('odys.png');19.-‐moz-‐animation: move 0.5s linear 0s infinite;20.}21.</style>22.</head>23.<body>24.<div class="player"></div>25.</body>26.</html>27.
view plain print ?
<html> <head> <style> @-‐moz-‐keyframes move { 0% { background-‐position: 0 0; } 24.99% { background-‐position: 0 0; } 25% { background-‐position: 0 -‐90px; } 49.99% { background-‐position: 0 -‐90px; } 50% { background-‐position: 0 -‐180px; } 74.99% { background-‐position: 0 -‐180px; } 75% { background-‐position: 0 -‐270px; } 99.99% { background-‐position: 0 -‐270px; } 100% { background-‐position: 0 0; } } .player { width: 80px; height: 90px; background-‐image: url('odys.png'); -‐moz-‐animation: move 0.5s linear 0s infinite; } </style> </head> <body> <div </div> </body> </html>
01.
But since it is hard and inefficient to write every single animation in a CSS file, we can use
280

this code snippet to construct keyframes for us:
view plain print ?
var constructAnimationClass = function(prefix, animationName, frames, height){01. 02.var animationClass = "@" + prefix + "keyframes "+ animationName +" {\n",03.step = 100/(frames+1),04.str = "% { " + prefix + "background-‐position: 0 -‐";05.for (var i = 0; i < frames+1; i++) {06.animationClass += ~~((step*i)*100) / 100 + "% { " + prefix + 'background-‐position: 0 -‐' + i * height + 'px); }\n';
07.
animationClass += ~~((step*(i+1)-‐0.01)*100)/100 + "% { " + prefix + 'background-‐position: 0 -‐' + i * height + 'px); }\n';
08.
}09. 10.return animationClass += '100'+ "% { " + prefix + 'background-‐position: 0 0}\n}';
11.
12.};13.
view plain print ?
var constructAnimationClass = function(prefix, animationName, frames, height){ var animationClass = position: 0 -‐"; for (var i = 0; i < frames+1; i++) { animationClass += ~~((step*i)*100) / 100 + position: 0 -‐' + i * height + 'px); }\n'; animationClass += ~~((step*(i+1)-‐0.01)*100)/100 + "% { " + prefix + 'background-‐position: 0 -‐' + i * height + 'px); }\n'; } return animationClass += '100'+ "% { " + prefix + position: 0 0 }\n}'; };
01.
You just need to call the function using a browser prefix (css format - '-moz-' instead of 'Moz',but you can use the same function for recognition of the prefixes), an animation name you willuse in -moz-animation property, number of frames & height of a single frame. It is really easyto implement now:
view plain print ?
var animStyle = document.createElement('style');01.animStyle.innerHTML = constructAnimationClass('-‐moz-‐', 'move', 3, 90);02.document.getElementsByTagName('head')[0].appendChild(animStyle);03. 04.player.style.MozAnimation = "move 0.5s linear 0s infinite";05.
view plain print ?
var animStyle = document.createElement('style'); animStyle.innerHTML = constructAnimationClass(moz-‐', 'move', 3, 90); document.getElementsByTagName('head')[0].appendChild(animStyle); player.style.MozAnimation = "move 0.5s linear 0s infinite"
01.
281

view plain print ?
var animStyle = document.createElement('style'); animStyle.innerHTML = constructAnimationClass(moz-‐', 'move', 3, 90); document.getElementsByTagName('head')[0].appendChild(animStyle); player.style.MozAnimation = "move 0.5s linear 0s infinite"
01.
view plain print ?
var animStyle = document.createElement('style'); animStyle.innerHTML = constructAnimationClass(moz-‐', 'move', 3, 90); document.getElementsByTagName('head')[0].appendChild(animStyle); player.style.MozAnimation = "move 0.5s linear 0s infinite"
01.
282

2 Introduction to CSS3 transformTo understand why CSS transformations are so importantin html5 game development, we need to first say a fewwords about refreshing & repainting webpages bybrowsers. When you modify DOM properties like width,height, margins, paddings, position, top, left or float, thebrowser's engine needs to repaint whole viewport - eventhe elements that are not directly affected by themodification. It is really expensive from a browserengine's point of view - repainting costs time andresources. The best way to avoid this issue is to use CSStransformations.Before we will implement anything we have to remembertwo things - new CSS3 features are not implemented inolder browsers (we will need to make a fallback toabsolute positioning) and each vendor provides new CSSfeatures with prefixes - '-ms-' for Internet Explorer, '-moz-' in Firefox, '-webkit-' in Chrome &Safari and '-o-' in Opera. That's why when you want to construct a stylesheet for your page,you have to remember all of the properties, like this:
view plain print ?
.scale { 01. 02. -‐moz-‐transform : scale(2); 03. -‐ms-‐transform : scale(2); 04. -‐webkit-‐transform : scale(2); 05. -‐o-‐transform : scale(2); 06.} 07.
view plain print ?
.scale { 01. 02. -‐moz-‐transform : scale(2); 03. -‐ms-‐transform : scale(2); 04. -‐webkit-‐transform : scale(2); 05. -‐o-‐transform : scale(2); 06.} 07.
view plain print ?
.scale { 01. 02. -‐moz-‐transform : scale(2); 03. -‐ms-‐transform : scale(2); 04. -‐webkit-‐transform : scale(2); 05. -‐o-‐transform : scale(2); 06.} 07.
We can access the properties from JavaScript using capital letters prefixes (MozTransforminstead of -moz-transform):
view plain print ?
object.style.MozTransform = 'scale(2)'; 01.object.style.MsTransform = 'scale(2)'; 02.object.style.WebkitTransform = 'scale(2)'; 03.object.style.OTransform = 'scale(2)'; 04.
283

view plain print ?
object.style.MozTransform = 'scale(2)'; 01.object.style.MsTransform = 'scale(2)'; 02.object.style.WebkitTransform = 'scale(2)'; 03.object.style.OTransform = 'scale(2)'; 04.
view plain print ?
object.style.MozTransform = 'scale(2)'; 01.object.style.MsTransform = 'scale(2)'; 02.object.style.WebkitTransform = 'scale(2)'; 03.object.style.OTransform = 'scale(2)'; 04.
We don't need to use them all - we can first detect which one is proper for our browser and useonly that one. The easiest way to test this is by checking the 'style' collection of any DOMelement. If the attribute is supported and not set it will be an empty string.
view plain print ?
var detectPropertyPrefix = function(property) { 01. var prefixes = ['Moz', 'Ms', 'Webkit', 'O']; 02. for (var i=0, j=prefixes.length; i < j; i++) { 03. if (typeof document.body.style[prefixes[i]+property] !== 'undefined') { 04. return prefixes[i]+property; 05. } 06. } 07. return false; 08.}; 09.
We have different types of transformations:rotatetransform: rotate(angle);Rotates the element clockwise around its origin, specified by the transform-origin property, bythe specified angle.
scaletransform: scale(sx, sy);Scale by [sx, sy]. If sy isn't specified, it is assumed to be equal to sx.
284

skewtransform: skew(ax[, ay])Skews the element around the X and Y axes by the specified angles. If ay isn't provided, noskew is performed on the Y axis.
translatetransform: translate(tx[, ty])Moves object by the vector [tx, ty]. If ty isn't specified, its value is assumed to be zero. That ismost interesting property for us.
Let's now prepare a 'translate based' movement function for objects in our game, andimplement fallback to absolute position manipulation if there are no CSS transformations(notice that I removed the 'else' statement from the 'else if' statements from last week'sexamples - now if you press for example the down and right arrow keys at the same time theplayer will move in SE direction):
view plain print ?
var moveSprite = function(x, y, object) { 01. var transformSupport = detectPropertyPrefix('Transform'); 02. if (transformSupport === false) { 03. object.style.top = y + "px"; 04. object.style.left = x + "px"; 05. } else { 06. object.style[transformSupport] = 'translate(' + x + 'px, ' + y + 'px)'; 07. } 08.} 09.
We can include it into our assignment from last week to check if it works:
view plain print ?
var GF = function () { 01. var mainScreen = null, 02. //main screen is the place where we will render our game, it will be independent from the fpsCon03. states = {}, 04. //we will store currently pressed keys in the states object 05. frameCount = 0, 06. fps = 0, 07.
285

lastTime = +(new Date()), 08. fpsContainer = null, 09. player = null, //player element 10. playerPosition = { //player position 11. x: 0, 12. y: 0 13. }, 14. transformSupport = null, //method of moving player 15. step = 10; //how many pixel player will move on each frame 16. 17. var MeasureFPS = function () { 18. var newTime = +(new Date()); 19. var diffTime = ~~ ((newTime -‐ lastTime)); 20. 21. if (diffTime >= 1000) { 22. fps = frameCount; 23. frameCount = 0; 24. lastTime = newTime; 25. } 26. 27. fpsContainer.innerHTML = 'FPS: ' + fps; 28. frameCount++; 29. }; 30. 31. var detectPropertyPrefix = function(property) { 32. var prefixes = ['Moz', 'Ms', 'Webkit', 'O']; 33. for (var i=0, j=prefixes.length; i < j; i++) { 34. if (typeof document.body.style[prefixes[i]+property] !== 'undefined') { 35. return prefixes[i]+property; 36. } 37. } 38. return false; 39. }; 40. 41. var movePlayer = function(x, y) { 42. if (transformSupport === false) { 43. player.style.top = y + "px"; 44. player.style.left = x + "px"; 45. } else { 46. player.style[transformSupport] = 'translate(' + x + 'px, ' + y + 'px)'; 47. } 48. } 49. 50. var mainLoop = function () { 51. MeasureFPS(); 52. 53. //update player position on each frame 54. if (states.left) { 55. playerPosition.x -‐= step; 56. } 57. if (states.up) { 58. playerPosition.y -‐= step; 59. } 60. if (states.right) { 61. playerPosition.x += step; 62. } 63. if (states.down) { 64. playerPosition.y += step; 65. } 66. movePlayer(playerPosition.x, playerPosition.y) 67. loop(mainLoop); 68. } 69. 70. var loop = (function () { 71. return window.requestAnimationFrame || window.webkitRequestAnimationFrame || window.mozRequestAn72. function ( /* function */ callback, /* DOMElement */ element) { 73. window.setTimeout(callback, 1000 / 60); 74. }; 75. })(); 76. 77. var start = function () { 78.
286

//create main screen 79. mainScreen = document.createElement('div'); 80. document.body.appendChild(mainScreen); 81. 82. //create player 83. player = document.body.appendChild(document.createElement('div')); 84. player.id = 'player'; 85. 86. //features detection 87. transformSupport = detectPropertyPrefix('Transform'); 88. 89. //add the listener to the main, window object, and update the states 90. window.addEventListener('keydown', function (event) { 91. if (event.keyCode === 37) { 92. states.left = true; 93. } 94. if (event.keyCode === 38) { 95. states.up = true; 96. } 97. if (event.keyCode === 39) { 98. states.right = true; 99. } 100. if (event.keyCode === 40) { 101. states.down = true; 102. } 103. }, false); 104. 105. //if the key will be released, change the states object 106. window.addEventListener('keyup', function (event) { 107. if (event.keyCode === 37) { 108. states.left = false; 109. } 110. if (event.keyCode === 38) { 111. states.up = false; 112. } 113. if (event.keyCode === 39) { 114. states.right = false; 115. } 116. if (event.keyCode === 40) { 117. states.down = false; 118. } 119. }, false); 120. 121. fpsContainer = document.createElement('div'); 122. document.body.appendChild(fpsContainer); 123. loop(mainLoop); 124. }; 125. 126. //our GameFramework returns public API visible from outside scope 127. return { 128. start: start 129. } 130. } 131. 132. 133.var game = new GF(); 134.game.start(); 135.
view plain print ?
var GF = function () { 01. var mainScreen = null, 02. //main screen is the place where we will render our game, it will be independent from the fpsCon03. states = {}, 04. //we will store currently pressed keys in the states object 05. frameCount = 0, 06. fps = 0, 07. lastTime = +(new Date()), 08. fpsContainer = null, 09. player = null, //player element 10.
287

playerPosition = { //player position 11. x: 0, 12. y: 0 13. }, 14. transformSupport = null, //method of moving player 15. step = 10; //how many pixel player will move on each frame 16. 17. var MeasureFPS = function () { 18. var newTime = +(new Date()); 19. var diffTime = ~~ ((newTime -‐ lastTime)); 20. 21. if (diffTime >= 1000) { 22. fps = frameCount; 23. frameCount = 0; 24. lastTime = newTime; 25. } 26. 27. fpsContainer.innerHTML = 'FPS: ' + fps; 28. frameCount++; 29. }; 30. 31. var detectPropertyPrefix = function(property) { 32. var prefixes = ['Moz', 'Ms', 'Webkit', 'O']; 33. for (var i=0, j=prefixes.length; i < j; i++) { 34. if (typeof document.body.style[prefixes[i]+property] !== 'undefined') { 35. return prefixes[i]+property; 36. } 37. } 38. return false; 39. }; 40. 41. var movePlayer = function(x, y) { 42. if (transformSupport === false) { 43. player.style.top = y + "px"; 44. player.style.left = x + "px"; 45. } else { 46. player.style[transformSupport] = 'translate(' + x + 'px, ' + y + 'px)'; 47. } 48. } 49. 50. var mainLoop = function () { 51. MeasureFPS(); 52. 53. //update player position on each frame 54. if (states.left) { 55. playerPosition.x -‐= step; 56. } 57. if (states.up) { 58. playerPosition.y -‐= step; 59. } 60. if (states.right) { 61. playerPosition.x += step; 62. } 63. if (states.down) { 64. playerPosition.y += step; 65. } 66. movePlayer(playerPosition.x, playerPosition.y) 67. loop(mainLoop); 68. } 69. 70. var loop = (function () { 71. return window.requestAnimationFrame || window.webkitRequestAnimationFrame || window.mozRequestAn72. function ( /* function */ callback, /* DOMElement */ element) { 73. window.setTimeout(callback, 1000 / 60); 74. }; 75. })(); 76. 77. var start = function () { 78. //create main screen 79. mainScreen = document.createElement('div'); 80. document.body.appendChild(mainScreen); 81.
288

82. //create player 83. player = document.body.appendChild(document.createElement('div')); 84. player.id = 'player'; 85. 86. //features detection 87. transformSupport = detectPropertyPrefix('Transform'); 88. 89. //add the listener to the main, window object, and update the states 90. window.addEventListener('keydown', function (event) { 91. if (event.keyCode === 37) { 92. states.left = true; 93. } 94. if (event.keyCode === 38) { 95. states.up = true; 96. } 97. if (event.keyCode === 39) { 98. states.right = true; 99. } 100. if (event.keyCode === 40) { 101. states.down = true; 102. } 103. }, false); 104. 105. //if the key will be released, change the states object 106. window.addEventListener('keyup', function (event) { 107. if (event.keyCode === 37) { 108. states.left = false; 109. } 110. if (event.keyCode === 38) { 111. states.up = false; 112. } 113. if (event.keyCode === 39) { 114. states.right = false; 115. } 116. if (event.keyCode === 40) { 117. states.down = false; 118. } 119. }, false); 120. 121. fpsContainer = document.createElement('div'); 122. document.body.appendChild(fpsContainer); 123. loop(mainLoop); 124. }; 125. 126. //our GameFramework returns public API visible from outside scope 127. return { 128. start: start 129. } 130. } 131. 132. 133.var game = new GF(); 134.game.start(); 135.
view plain print ?
var GF = function () { 01. var mainScreen = null, 02. //main screen is the place where we will render our game, it will be independent from the fpsCon03. states = {}, 04. //we will store currently pressed keys in the states object 05. frameCount = 0, 06. fps = 0, 07. lastTime = +(new Date()), 08. fpsContainer = null, 09. player = null, //player element 10. playerPosition = { //player position 11. x: 0, 12. y: 0 13.
289

}, 14. transformSupport = null, //method of moving player 15. step = 10; //how many pixel player will move on each frame 16. 17. var MeasureFPS = function () { 18. var newTime = +(new Date()); 19. var diffTime = ~~ ((newTime -‐ lastTime)); 20. 21. if (diffTime >= 1000) { 22. fps = frameCount; 23. frameCount = 0; 24. lastTime = newTime; 25. } 26. 27. fpsContainer.innerHTML = 'FPS: ' + fps; 28. frameCount++; 29. }; 30. 31. var detectPropertyPrefix = function(property) { 32. var prefixes = ['Moz', 'Ms', 'Webkit', 'O']; 33. for (var i=0, j=prefixes.length; i < j; i++) { 34. if (typeof document.body.style[prefixes[i]+property] !== 'undefined') { 35. return prefixes[i]+property; 36. } 37. } 38. return false; 39. }; 40. 41. var movePlayer = function(x, y) { 42. if (transformSupport === false) { 43. player.style.top = y + "px"; 44. player.style.left = x + "px"; 45. } else { 46. player.style[transformSupport] = 'translate(' + x + 'px, ' + y + 'px)'; 47. } 48. } 49. 50. var mainLoop = function () { 51. MeasureFPS(); 52. 53. //update player position on each frame 54. if (states.left) { 55. playerPosition.x -‐= step; 56. } 57. if (states.up) { 58. playerPosition.y -‐= step; 59. } 60. if (states.right) { 61. playerPosition.x += step; 62. } 63. if (states.down) { 64. playerPosition.y += step; 65. } 66. movePlayer(playerPosition.x, playerPosition.y) 67. loop(mainLoop); 68. } 69. 70. var loop = (function () { 71. return window.requestAnimationFrame || window.webkitRequestAnimationFrame || window.mozRequestAn72. function ( /* function */ callback, /* DOMElement */ element) { 73. window.setTimeout(callback, 1000 / 60); 74. }; 75. })(); 76. 77. var start = function () { 78. //create main screen 79. mainScreen = document.createElement('div'); 80. document.body.appendChild(mainScreen); 81. 82. //create player 83. player = document.body.appendChild(document.createElement('div')); 84.
290

player.id = 'player'; 85. 86. //features detection 87. transformSupport = detectPropertyPrefix('Transform'); 88. 89. //add the listener to the main, window object, and update the states 90. window.addEventListener('keydown', function (event) { 91. if (event.keyCode === 37) { 92. states.left = true; 93. } 94. if (event.keyCode === 38) { 95. states.up = true; 96. } 97. if (event.keyCode === 39) { 98. states.right = true; 99. } 100. if (event.keyCode === 40) { 101. states.down = true; 102. } 103. }, false); 104. 105. //if the key will be released, change the states object 106. window.addEventListener('keyup', function (event) { 107. if (event.keyCode === 37) { 108. states.left = false; 109. } 110. if (event.keyCode === 38) { 111. states.up = false; 112. } 113. if (event.keyCode === 39) { 114. states.right = false; 115. } 116. if (event.keyCode === 40) { 117. states.down = false; 118. } 119. }, false); 120. 121. fpsContainer = document.createElement('div'); 122. document.body.appendChild(fpsContainer); 123. loop(mainLoop); 124. }; 125. 126. //our GameFramework returns public API visible from outside scope 127. return { 128. start: start 129. } 130. } 131. 132. 133.var game = new GF(); 134.game.start(); 135.
And the HTML for testing this example could look like this:
view plain print ?
<html> 01. <head> 02. <style> 03. #player { 04. border: 4px solid #bada55; 05. width: 50px; 06. height: 50px; 07. box-‐shadow: 1px 1px 30px 4px #000; 08. border-‐radius: 25px; 09. } 10. </style> 11. </head> 12. <body> 13. <script src="game.js"></script> 14.
291

</body> 15.</html> 16.
view plain print ?
<html> 01. <head> 02. <style> 03. #player { 04. border: 4px solid #bada55; 05. width: 50px; 06. height: 50px; 07. box-‐shadow: 1px 1px 30px 4px #000; 08. border-‐radius: 25px; 09. } 10. </style> 11. </head> 12. <body> 13. <script src="game.js"></script> 14. </body> 15.</html> 16.
view plain print ?
<html> 01. <head> 02. <style> 03. #player { 04. border: 4px solid #bada55; 05. width: 50px; 06. height: 50px; 07. box-‐shadow: 1px 1px 30px 4px #000; 08. border-‐radius: 25px; 09. } 10. </style> 11. </head> 12. <body> 13. <script src="game.js"></script> 14. </body> 15.</html> 16.
292

3 Collision DetectionBasically, a collision detection algorithm responds to the question whether the movement ofan object in a given direction is possible, or whether there are some obstacles or othermovable or immovable objects on the way. For example, if your objects are circles, you canjust compare the total length of their radiuses and compare them to the distance between thecircle's central points. If the sum of the radiuses is lower than the distance, we have collision.But since most of our sprites have have a more rectangular than circular shape, we have toimplement Rectangular Collision Detection. Every frame we have to calculate collisionsbetween all of the objects. And if some of them collide, we can react in a way we want.
This image shows one of the situations when two objects are colliding.
Collision detection is easy to implement using this function:
view plain print ?
if (!( 01. (object1Top > object2Bottom) || 02. (object1Bottom < object2Top) || 03. (object1Left > object2Right) || 04. (object1Right < object2Left) 05.)){ 06. //Collides! 07.} 08.
view plain print ?
if (!( 01. (object1Top > object2Bottom) || 02. (object1Bottom < object2Top) || 03. (object1Left > object2Right) || 04. (object1Right < object2Left) 05.)){ 06. //Collides! 07.} 08.
293

The 'top' of the object is the the 'top' edge of it, and since 0, 0 point in DOM positioning is intop, left corner, the top egde is just the CSS top value. 'Bottom' is equal to 'top' + 'height', leftis just 'left', and you have to add 'width' to it to get 'right' edge value. If we want to implementit in our previous example it would looks like this:
view plain print ?
var GF = function () { 01. var mainScreen = null, 02. //main screen is the place where we will render our game, it will be independent from the fpsCont03. states = {}, 04. //we will store currently pressed keys in the states object 05. frameCount = 0, 06. fps = 0, 07. lastTime = +(new Date()), 08. fpsContainer = null, 09. player = null, //player element 10. playerPosition = { //player position & size 11. x: 0, 12. y: 0, 13. width: 50, 14. height: 50 15. }, 16. transformSupport = null, //method of moving player 17. step = 10, //how many pixel player will move on each frame 18. platform = null, 19. platformPosition = { //platform position & size 20. x: 200, 21. y: 200, 22. width: 150, 23. height: 150 24. }; 25. 26. var MeasureFPS = function () { 27. var newTime = +(new Date()); 28. var diffTime = ~~ ((newTime -‐ lastTime)); 29. 30. if (diffTime >= 1000) { 31. fps = frameCount; 32. frameCount = 0; 33. lastTime = newTime; 34. } 35. 36. fpsContainer.innerHTML = 'FPS: ' + fps; 37. frameCount++; 38. }; 39. 40. var detectPropertyPrefix = function(property) { 41. var prefixes = ['Moz', 'Ms', 'Webkit', 'O']; 42. for (var i=0, j=prefixes.length; i<j; i++) { 43. if (typeof document.body.style[prefixes[i]+property] !== 'undefined') { 44. return prefixes[i]+property; 45. } 46. } 47. return false; 48. }; 49. 50. var moveObject = function(object, x, y) { //we change 'movePlayer' to 'moveObject' with object as51. if (transformSupport === false) { 52. object.style.top = y + "px"; 53. object.style.left = x + "px"; 54. } else { 55. object.style[transformSupport] = 'translate(' + x + 'px, ' + y + 'px)'; 56. } 57. } 58. 59. var mainLoop = function () { 60. MeasureFPS(); 61. 62.
294

if (checkCollision(playerPosition, platformPosition)) { //if objects collide, change color of p63. player.style.backgroundColor = "#F00"; 64. } else { 65. player.style.backgroundColor = "transparent"; 66. } 67. //update player position on each frame 68. if (states.left) { 69. playerPosition.x -‐= step; 70. } 71. if (states.up) { 72. playerPosition.y -‐= step; 73. } 74. if (states.right) { 75. playerPosition.x += step; 76. } 77. if (states.down) { 78. playerPosition.y += step; 79. } 80. moveObject(player, playerPosition.x, playerPosition.y) 81. loop(mainLoop); 82. } 83. 84. var loop = (function () { 85. return window.requestAnimationFrame || window.webkitRequestAnimationFrame || window.mozRequestAni86. function ( /* function */ callback, /* DOMElement */ element) { 87. window.setTimeout(callback, 1000 / 60); 88. }; 89. })(); 90. 91. 92. var checkCollision = function(object1, object2) { //return 'true' if colliding, 'false' if not. 93. if (!( 94. (object1.y > object2.y+object2.height) || 95. (object1.y+object1.height < object2.y) || 96. (object1.x > object2.x+object2.width) || 97. (object1.x+object1.width < object2.x) 98. )){ 99. return true; 100. } 101. 102. return false; 103. } 104. var start = function () { 105. 106. //features detection 107. transformSupport = detectPropertyPrefix('Transform'); 108. 109. 110. //create main screen 111. mainScreen = document.createElement('div'); 112. document.body.appendChild(mainScreen); 113. 114. //create player 115. player = document.body.appendChild(document.createElement('div')); 116. player.id = 'player'; 117. 118. //create platform 119. platform = document.body.appendChild(document.createElement('div')); 120. platform.id = 'platform'; 121. platform.style.width = platformPosition.width + "px"; 122. platform.style.height = platformPosition.height + "px"; 123. moveObject(platform, platformPosition.x, platformPosition.y); 124. 125. //add the listener to the main, window object, and update the states 126. window.addEventListener('keydown', function (event) { 127. if (event.keyCode === 37) { 128. states.left = true; 129. } 130. if (event.keyCode === 38) { 131. states.up = true; 132. } 133.
295

if (event.keyCode === 39) { 134. states.right = true; 135. } 136. if (event.keyCode === 40) { 137. states.down = true; 138. } 139. }, false); 140. 141. //if the key will be released, change the states object 142. window.addEventListener('keyup', function (event) { 143. if (event.keyCode === 37) { 144. states.left = false; 145. } 146. if (event.keyCode === 38) { 147. states.up = false; 148. } 149. if (event.keyCode === 39) { 150. states.right = false; 151. } 152. if (event.keyCode === 40) { 153. states.down = false; 154. } 155. }, false); 156. 157. fpsContainer = document.createElement('div'); 158. document.body.appendChild(fpsContainer); 159. loop(mainLoop); 160. }; 161. 162. //our GameFramework returns public API visible from outside scope 163. return { 164. start: start 165. } 166.} 167. 168. 169.var game = new GF(); 170.game.start(); 171.
view plain print ?
var GF = function () { 01. var mainScreen = null, 02. //main screen is the place where we will render our game, it will be independent from the fpsCont03. states = {}, 04. //we will store currently pressed keys in the states object 05. frameCount = 0, 06. fps = 0, 07. lastTime = +(new Date()), 08. fpsContainer = null, 09. player = null, //player element 10. playerPosition = { //player position & size 11. x: 0, 12. y: 0, 13. width: 50, 14. height: 50 15. }, 16. transformSupport = null, //method of moving player 17. step = 10, //how many pixel player will move on each frame 18. platform = null, 19. platformPosition = { //platform position & size 20. x: 200, 21. y: 200, 22. width: 150, 23. height: 150 24. }; 25. 26. var MeasureFPS = function () { 27. var newTime = +(new Date()); 28. var diffTime = ~~ ((newTime -‐ lastTime)); 29.
296
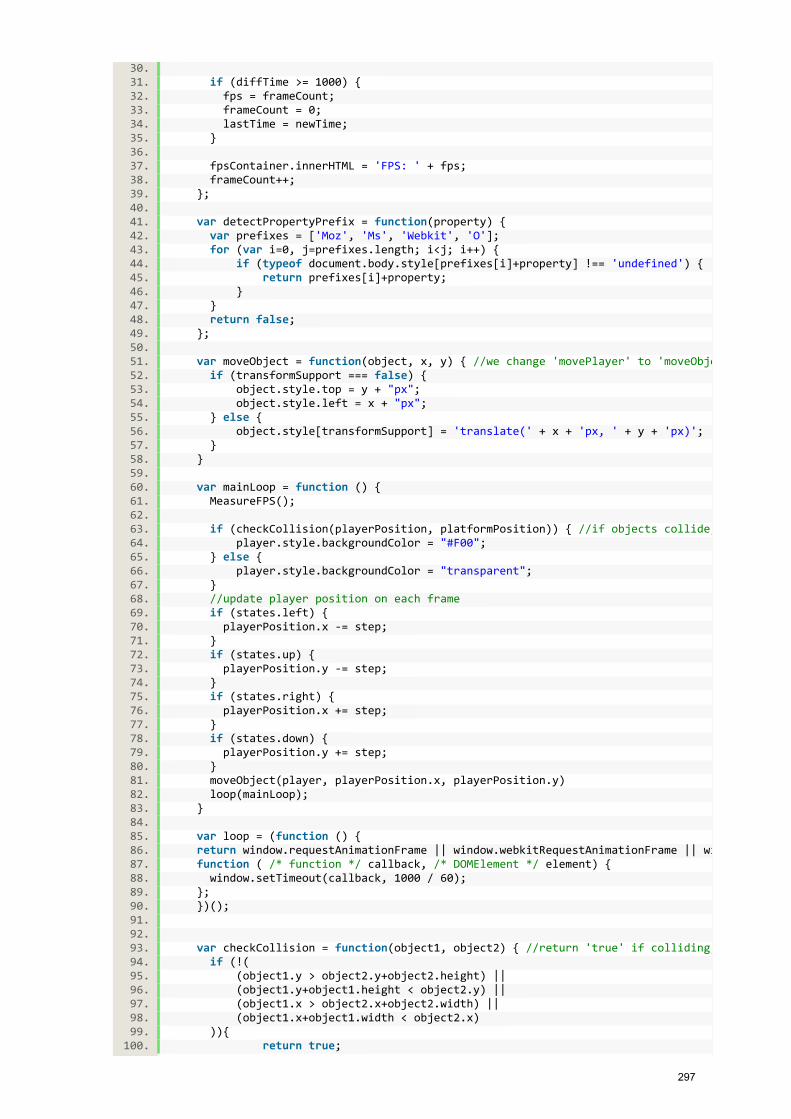
30. if (diffTime >= 1000) { 31. fps = frameCount; 32. frameCount = 0; 33. lastTime = newTime; 34. } 35. 36. fpsContainer.innerHTML = 'FPS: ' + fps; 37. frameCount++; 38. }; 39. 40. var detectPropertyPrefix = function(property) { 41. var prefixes = ['Moz', 'Ms', 'Webkit', 'O']; 42. for (var i=0, j=prefixes.length; i<j; i++) { 43. if (typeof document.body.style[prefixes[i]+property] !== 'undefined') { 44. return prefixes[i]+property; 45. } 46. } 47. return false; 48. }; 49. 50. var moveObject = function(object, x, y) { //we change 'movePlayer' to 'moveObject' with object as51. if (transformSupport === false) { 52. object.style.top = y + "px"; 53. object.style.left = x + "px"; 54. } else { 55. object.style[transformSupport] = 'translate(' + x + 'px, ' + y + 'px)'; 56. } 57. } 58. 59. var mainLoop = function () { 60. MeasureFPS(); 61. 62. if (checkCollision(playerPosition, platformPosition)) { //if objects collide, change color of p63. player.style.backgroundColor = "#F00"; 64. } else { 65. player.style.backgroundColor = "transparent"; 66. } 67. //update player position on each frame 68. if (states.left) { 69. playerPosition.x -‐= step; 70. } 71. if (states.up) { 72. playerPosition.y -‐= step; 73. } 74. if (states.right) { 75. playerPosition.x += step; 76. } 77. if (states.down) { 78. playerPosition.y += step; 79. } 80. moveObject(player, playerPosition.x, playerPosition.y) 81. loop(mainLoop); 82. } 83. 84. var loop = (function () { 85. return window.requestAnimationFrame || window.webkitRequestAnimationFrame || window.mozRequestAni86. function ( /* function */ callback, /* DOMElement */ element) { 87. window.setTimeout(callback, 1000 / 60); 88. }; 89. })(); 90. 91. 92. var checkCollision = function(object1, object2) { //return 'true' if colliding, 'false' if not. 93. if (!( 94. (object1.y > object2.y+object2.height) || 95. (object1.y+object1.height < object2.y) || 96. (object1.x > object2.x+object2.width) || 97. (object1.x+object1.width < object2.x) 98. )){ 99. return true; 100.
297

} 101. 102. return false; 103. } 104. var start = function () { 105. 106. //features detection 107. transformSupport = detectPropertyPrefix('Transform'); 108. 109. 110. //create main screen 111. mainScreen = document.createElement('div'); 112. document.body.appendChild(mainScreen); 113. 114. //create player 115. player = document.body.appendChild(document.createElement('div')); 116. player.id = 'player'; 117. 118. //create platform 119. platform = document.body.appendChild(document.createElement('div')); 120. platform.id = 'platform'; 121. platform.style.width = platformPosition.width + "px"; 122. platform.style.height = platformPosition.height + "px"; 123. moveObject(platform, platformPosition.x, platformPosition.y); 124. 125. //add the listener to the main, window object, and update the states 126. window.addEventListener('keydown', function (event) { 127. if (event.keyCode === 37) { 128. states.left = true; 129. } 130. if (event.keyCode === 38) { 131. states.up = true; 132. } 133. if (event.keyCode === 39) { 134. states.right = true; 135. } 136. if (event.keyCode === 40) { 137. states.down = true; 138. } 139. }, false); 140. 141. //if the key will be released, change the states object 142. window.addEventListener('keyup', function (event) { 143. if (event.keyCode === 37) { 144. states.left = false; 145. } 146. if (event.keyCode === 38) { 147. states.up = false; 148. } 149. if (event.keyCode === 39) { 150. states.right = false; 151. } 152. if (event.keyCode === 40) { 153. states.down = false; 154. } 155. }, false); 156. 157. fpsContainer = document.createElement('div'); 158. document.body.appendChild(fpsContainer); 159. loop(mainLoop); 160. }; 161. 162. //our GameFramework returns public API visible from outside scope 163. return { 164. start: start 165. } 166.} 167. 168. 169.var game = new GF(); 170.game.start(); 171.
298
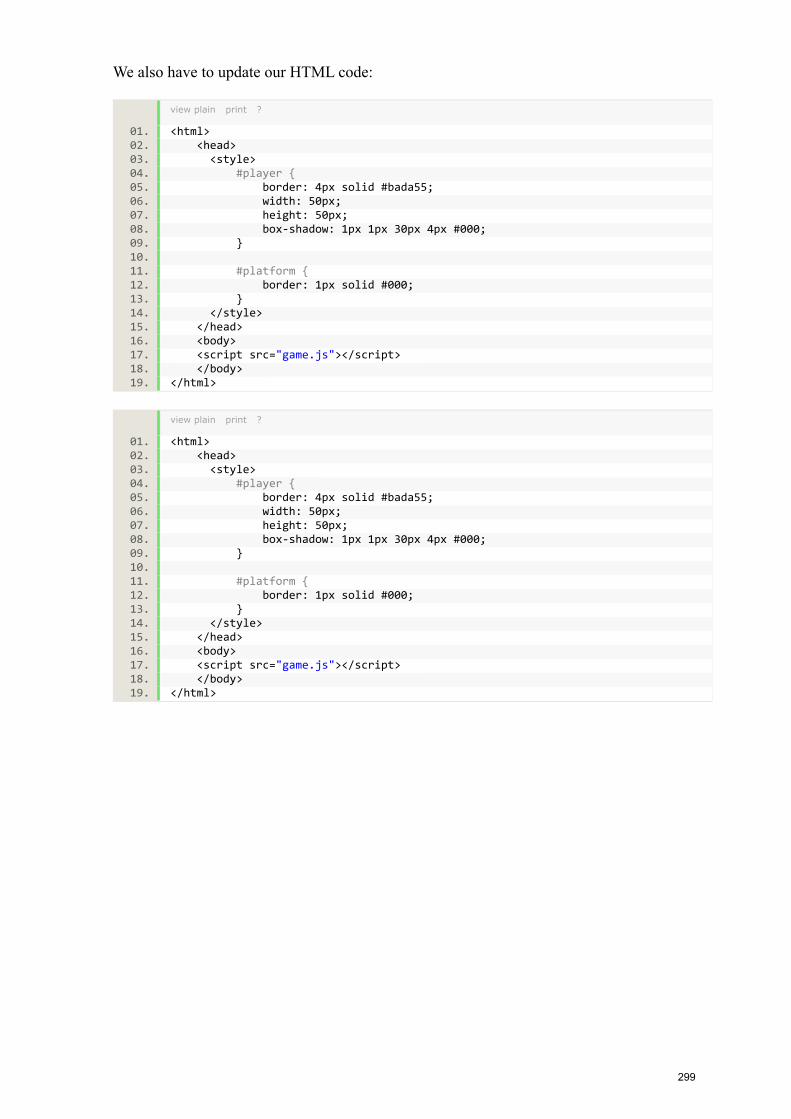
We also have to update our HTML code:
view plain print ?
<html> 01. <head> 02. <style> 03. #player { 04. border: 4px solid #bada55; 05. width: 50px; 06. height: 50px; 07. box-‐shadow: 1px 1px 30px 4px #000; 08. } 09. 10. #platform { 11. border: 1px solid #000; 12. } 13. </style> 14. </head> 15. <body> 16. <script src="game.js"></script> 17. </body> 18.</html> 19.
299

4 Simple physics implementationWhen we consider adding physics to our game, we have two possibilities to implement this. Ifit's just a simple jump'n'run game, there's no need to use heavy physics engines as we caneasily do it by ourselves. But if we're building physics-based game like Angry Birds, it may bea good solution to use the Box2D physics engine. Jumping in game is really an easy task, sowe will implement it by ourselves. But first let's divide the problem to two opposite tasks -jumping and falling.
First let's consider jumping. When an object begins it's move up, it has some initial velocitythat will be decreased with time because of gravity. This phase finishes, when velocity reacheszero and automatically we're starting the second phase - falling. The second movement startsat the maximum height with zero speed, and then our object is constantly accelereated untilmovement stops at ground level.
Let's start with some basic object that will be taught how to jump. Everything is constructedwith the simple functions we used before. We add negtive acceleration to our object bydecreading the 'jumpSpeed' variable, and adding a little bit less to the final possition in eachframe. It works in the same way when the object is falling.
view plain print ?
<html> 01. <head> 02. <style> 03. #player { 04. border: 4px solid #bada55; 05. width: 50px; 06. height: 50px; 07. box-‐shadow: 1px 1px 30px 4px #000; 08. border-‐radius: 25px; 09. } 10. </style> 11. </head> 12. <body> 13. <div id="player"></div> 14. <script> 15. player = document.getElementById('player'); 16. 17. var playerPosition = { 18. x: 100, 19. y: 300 20. }; 21. 22. var isJumping = false, 23. isFalling = false, 24. jumpSpeed = 0, 25. fallSpeed = 0, 26. 27. jump = function() { 28. if (!isJumping && !isFalling) { 29. fallSpeed = 0; 30. isJumping = true; 31. jumpSpeed = 20; 32. } 33. }, 34. 35. checkJump = function() { 36. playerPosition.y -‐= jumpSpeed; 37. jumpSpeed-‐-‐; 38. if (jumpSpeed == 0) { 39. isJumping = false; 40.
300
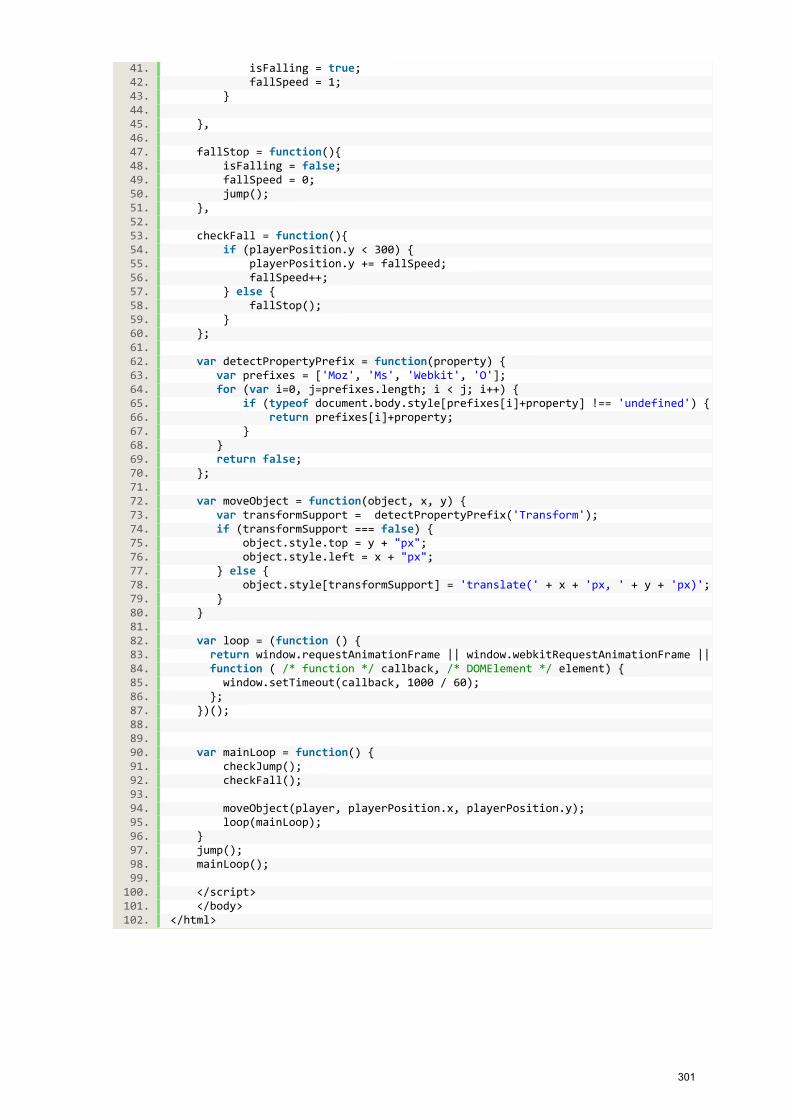
isFalling = true; 41. fallSpeed = 1; 42. } 43. 44. }, 45. 46. fallStop = function(){ 47. isFalling = false; 48. fallSpeed = 0; 49. jump(); 50. }, 51. 52. checkFall = function(){ 53. if (playerPosition.y < 300) { 54. playerPosition.y += fallSpeed; 55. fallSpeed++; 56. } else { 57. fallStop(); 58. } 59. }; 60. 61. var detectPropertyPrefix = function(property) { 62. var prefixes = ['Moz', 'Ms', 'Webkit', 'O']; 63. for (var i=0, j=prefixes.length; i < j; i++) { 64. if (typeof document.body.style[prefixes[i]+property] !== 'undefined') { 65. return prefixes[i]+property; 66. } 67. } 68. return false; 69. }; 70. 71. var moveObject = function(object, x, y) { 72. var transformSupport = detectPropertyPrefix('Transform'); 73. if (transformSupport === false) { 74. object.style.top = y + "px"; 75. object.style.left = x + "px"; 76. } else { 77. object.style[transformSupport] = 'translate(' + x + 'px, ' + y + 'px)'; 78. } 79. } 80. 81. var loop = (function () { 82. return window.requestAnimationFrame || window.webkitRequestAnimationFrame || window.mozRequestA83. function ( /* function */ callback, /* DOMElement */ element) { 84. window.setTimeout(callback, 1000 / 60); 85. }; 86. })(); 87. 88. 89. var mainLoop = function() { 90. checkJump(); 91. checkFall(); 92. 93. moveObject(player, playerPosition.x, playerPosition.y); 94. loop(mainLoop); 95. } 96. jump(); 97. mainLoop(); 98. 99. </script> 100. </body> 101.</html> 102.
301

Game Development in HTML5 October 2011 (http://www.w3techcourses.com/course/report/log/index.php?chooselog=1&user=0&date=0&
id=9&modid=299) ◀ Jump to... ▶
W3C (http://www.w3techcourses.com/) ▶ HTML5-Games_Oct11(http://www.w3techcourses.com/course/view.php?id=9) ▶ Assignments(http://www.w3techcourses.com/mod/assignment/index.php?id=9) ▶ Assignment 1(http://www.w3techcourses.com/mod/assignment/view.php?id=299) ▶ View submittedassignments
Update this Assignment
View 54 submitted assignments (submissions.php?id=299)
Create a single object on a sceneand control it using mouseor/and keyboard
Time to get practical with our first assignment.
Please create a single element on a scene and control it using mouseor/and keyboard.
Remember about:
Pattern of creating object with private functions & methodsHow to create simple element (like div or span) and add it toour scene (document's body)?How to catch the keyboard & mouse events? What about IEbrowsers?How to change the the possition (top & left attributes) of theelement?
Due date: Sunday, 6 November 2011, 11:55 PM
Moodle Docs for this page (http://docs.moodle.org/en/mod/assignment/view)
302

MultiplayerWe will start third week of our course with review of methods of connecting players. Then we willcheck if it is possible to connect two browsers without worrying about the server side scripts. We
will also learn how to implement multiplayer gameplay in our games.
Site: W3C TrainingCourse: Game Development in HTML5 October 2011Book: MultiplayerPrinted by: Marie-Claire ForgueDate: Monday, 23 January 2012, 01:29 PM
303

Table of Contents1 node.js introduction
2 Ajax
3 Design patterns in multiplayer games
4 Other methods of communication
5 Connecting browsers without a server
304

1 node.js introductionBy now, we know how to manipulate game elements, to animate players, to implement simplephysics and to detect collisions. But the real fun in the gaming world starts when you canshare your experiences together with other players - your friends, workmates or even strangersfrom all over the world. So, time to create multiplayer connections!
Remember what was said in this course’s introduction. Back in 2005, there was the AJAXrevolution, where the developers community discovered that it was possible to update the dataon a given Web page, without actually reloading that page. This was made possible because ofXmlHttpRequest (XHR), a native browser object introduced by Mozilla back in 2002.
NODE.JSTo get the data from the server, you need to first create a server. And, since we are frontenddevelopers, and since most of us don't really enjoy writing PHP, Python or Java, we will usenode.js, an event driven server written on a top of V8 (Google JavaScript engine). You candownload it from http://nodejs.org. It is mostly suited for Linux & MacOsX, but its lastversion has also a Windows installer (that should be easy to install).After installing node, please create a new JavaScript file, and call it 'server.js'. In it, pleasepaste this following piece of code:
view plain print ?
var http = require('http'); 01. 02.http.createServer(function (request, response) { 03. 04. response.writeHead(200, {'Content-‐Type': 'text/plain'}); 05. response.end('W3C GameDev Course by @michalbe is awesome.'); 06. 07.}).listen(1337, "127.0.0.1"); 08. 09.console.log('Server running at http://127.0.0.1:1337/'); 10.
305

view plain print ?
var http = require('http'); 01. 02.http.createServer(function (request, response) { 03. 04. response.writeHead(200, {'Content-‐Type': 'text/plain'}); 05. response.end('W3C GameDev Course by @michalbe is awesome.'); 06. 07.}).listen(1337, "127.0.0.1"); 08. 09.console.log('Server running at http://127.0.0.1:1337/'); 10.
Let’s first declare that we will use basic http functionality from 'http' module. So, let’s assignthe content of this module to a http variable. Now, every method of http module is accessiblefrom our main program by the methods and attributes of an http object. One of these methodsallows us to create an http server. It's called 'createServer'. To create a simple server, we needto provide createServer a callback with two parameters: request and response. Every data thatgoes from the browser to the server, such as domain URLs, headers, etc., are stored in therequest parameter. For every action we want to make in opposite direction, we make aresponse object. That is why we send headers first (200 means everything is ok, and the‘text/plain content type’ informs the browser that we will only serve text) and that send thecontent - simple plain text while ending the connection. Now our server will listen to the'1337' port on the '127.0.0.1' IP address. You can check it simply by calling node server.jsfrom the command line, and checking http://127.0.0.1:1337 in your browser. Easy!
But, this is just text. What webserver needs to do is to serve files (a basic feature). Let's createindex.html file, and teach our server to display it's content. This index page could be reallysimple:
view plain print ?
<!DOCTYPE html> 01.<html> 02. <head> 03. <title>W3C HTML5 Gamedev course -‐ Multiplayer</title> 04. </head> 05. <body> 06. <script src="client.js"></script> 07. </body> 08.</html> 09.
view plain print ?
<!DOCTYPE html> 01.<html> 02. <head> 03. <title>W3C HTML5 Gamedev course -‐ Multiplayer</title> 04. </head> 05. <body> 06. <script src="client.js"></script> 07.
306

</body> 08.</html> 09.
view plain print ?
<!DOCTYPE html> 01.<html> 02. <head> 03. <title>W3C HTML5 Gamedev course -‐ Multiplayer</title> 04. </head> 05. <body> 06. <script src="client.js"></script> 07. </body> 08.</html> 09.
view plain print ?
<!DOCTYPE html> 01.<html> 02. <head> 03. <title>W3C HTML5 Gamedev course -‐ Multiplayer</title> 04. </head> 05. <body> 06. <script src="client.js"></script> 07. </body> 08.</html> 09.
view plain print ?
<!DOCTYPE html> 01.<html> 02. <head> 03. <title>W3C HTML5 Gamedev course -‐ Multiplayer</title> 04. </head> 05. <body> 06. <script src="client.js"></script> 07. </body> 08.</html> 09.
We include client.js file for future examples, now it could be empty. And we need toimplement file serving in our server:
view plain print ?
//we need to use more modules in this example: 01.var http = require("http"), //main http module as in previous example02. url = require("url"), //url tools 03. path = require("path"), //file tools 04. qs = require("querystring"), //module for reading GET querystrings (like ?foo=bar&ala=makota)
05.
fs = require("fs"); //file system module, for reading and writing files06. 07.http.createServer(function(request, response) { 08. 09. var uri = url.parse(request.url).pathname; //we take the 'url' part from te request object10. var filename = path.join(process.cwd(), uri); //because nonrelative paths looks different on d11. 12. path.exists(filename, function(exists) { //is the file exists? 13. if(!exists) { //if not 14. response.writeHeader(404, {"Content-‐Type": "text/plain"}); 15. response.write("404 Not Found\n"); 16. response.end(); 17. return; //send headers and error information18. } 19. 20. fs.readFile(filename, "binary", function(err, file) { //if the file exists21. 22. response.writeHeader(200); //send '200' header -‐ it's HTTP for OK23. response.write(file, "binary"); //send the file in binary form 24.
307

response.end(); //and close connection 25. }); 26. }); 27. 28.}).listen(1337, '127.0.0.1'); //our server is listening on http://127.0.0.1:1329. 30.console.log('Server is running'); 31.
view plain print ?
//we need to use more modules in this example: 01.var http = require("http"), //main http module as in previous example02. url = require("url"), //url tools 03. path = require("path"), //file tools 04. qs = require("querystring"), //module for reading GET querystrings (like ?foo=bar&ala=makota)
05.
fs = require("fs"); //file system module, for reading and writing files06. 07.http.createServer(function(request, response) { 08. 09. var uri = url.parse(request.url).pathname; //we take the 'url' part from te request object10. var filename = path.join(process.cwd(), uri); //because nonrelative paths looks different on d11. 12. path.exists(filename, function(exists) { //is the file exists? 13. if(!exists) { //if not 14. response.writeHeader(404, {"Content-‐Type": "text/plain"}); 15. response.write("404 Not Found\n"); 16. response.end(); 17. return; //send headers and error information18. } 19. 20. fs.readFile(filename, "binary", function(err, file) { //if the file exists21. 22. response.writeHeader(200); //send '200' header -‐ it's HTTP for OK23. response.write(file, "binary"); //send the file in binary form 24. response.end(); //and close connection 25. }); 26. }); 27. 28.}).listen(1337, '127.0.0.1'); //our server is listening on http://127.0.0.1:1329. 30.console.log('Server is running'); 31.
view plain print ?
//we need to use more modules in this example: 01.var http = require("http"), //main http module as in previous example02. url = require("url"), //url tools 03. path = require("path"), //file tools 04. qs = require("querystring"), //module for reading GET querystrings (like ?foo=bar&ala=makota)
05.
fs = require("fs"); //file system module, for reading and writing files06. 07.http.createServer(function(request, response) { 08. 09. var uri = url.parse(request.url).pathname; //we take the 'url' part from te request object10. var filename = path.join(process.cwd(), uri); //because nonrelative paths looks different on d11. 12. path.exists(filename, function(exists) { //is the file exists? 13. if(!exists) { //if not 14. response.writeHeader(404, {"Content-‐Type": "text/plain"}); 15. response.write("404 Not Found\n"); 16. response.end(); 17. return; //send headers and error information18. } 19. 20. fs.readFile(filename, "binary", function(err, file) { //if the file exists21. 22. response.writeHeader(200); //send '200' header -‐ it's HTTP for OK23. response.write(file, "binary"); //send the file in binary form 24.
308
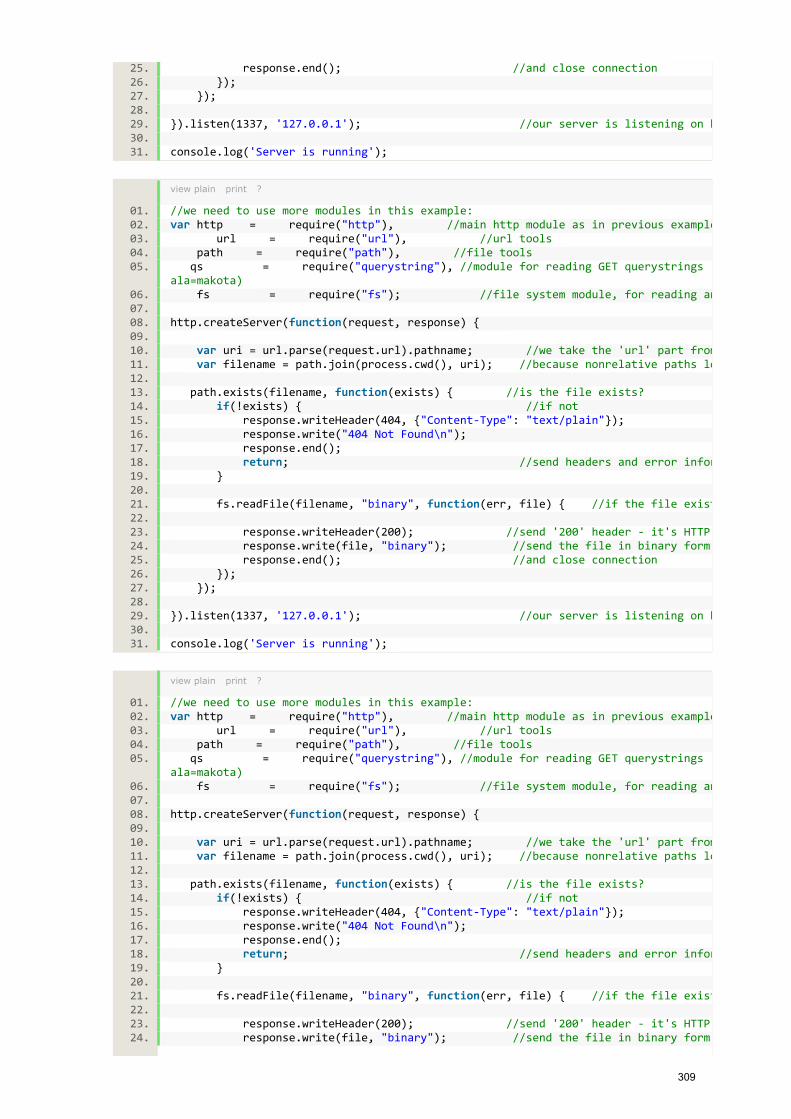
response.end(); //and close connection 25. }); 26. }); 27. 28.}).listen(1337, '127.0.0.1'); //our server is listening on http://127.0.0.1:1329. 30.console.log('Server is running'); 31.
view plain print ?
//we need to use more modules in this example: 01.var http = require("http"), //main http module as in previous example02. url = require("url"), //url tools 03. path = require("path"), //file tools 04. qs = require("querystring"), //module for reading GET querystrings (like ?foo=bar&ala=makota)
05.
fs = require("fs"); //file system module, for reading and writing files06. 07.http.createServer(function(request, response) { 08. 09. var uri = url.parse(request.url).pathname; //we take the 'url' part from te request object10. var filename = path.join(process.cwd(), uri); //because nonrelative paths looks different on d11. 12. path.exists(filename, function(exists) { //is the file exists? 13. if(!exists) { //if not 14. response.writeHeader(404, {"Content-‐Type": "text/plain"}); 15. response.write("404 Not Found\n"); 16. response.end(); 17. return; //send headers and error information18. } 19. 20. fs.readFile(filename, "binary", function(err, file) { //if the file exists21. 22. response.writeHeader(200); //send '200' header -‐ it's HTTP for OK23. response.write(file, "binary"); //send the file in binary form 24. response.end(); //and close connection 25. }); 26. }); 27. 28.}).listen(1337, '127.0.0.1'); //our server is listening on http://127.0.0.1:1329. 30.console.log('Server is running'); 31.
view plain print ?
//we need to use more modules in this example: 01.var http = require("http"), //main http module as in previous example02. url = require("url"), //url tools 03. path = require("path"), //file tools 04. qs = require("querystring"), //module for reading GET querystrings (like ?foo=bar&ala=makota)
05.
fs = require("fs"); //file system module, for reading and writing files06. 07.http.createServer(function(request, response) { 08. 09. var uri = url.parse(request.url).pathname; //we take the 'url' part from te request object10. var filename = path.join(process.cwd(), uri); //because nonrelative paths looks different on d11. 12. path.exists(filename, function(exists) { //is the file exists? 13. if(!exists) { //if not 14. response.writeHeader(404, {"Content-‐Type": "text/plain"}); 15. response.write("404 Not Found\n"); 16. response.end(); 17. return; //send headers and error information18. } 19. 20. fs.readFile(filename, "binary", function(err, file) { //if the file exists21. 22. response.writeHeader(200); //send '200' header -‐ it's HTTP for OK23. response.write(file, "binary"); //send the file in binary form 24.
309

response.end(); //and close connection 25. }); 26. }); 27. 28.}).listen(1337, '127.0.0.1'); //our server is listening on http://127.0.0.1:1329. 30.console.log('Server is running'); 31.
Now, please run the file from the command line (node server.js), open your browser and go tohttp://127.0.0.1:1337/index.html. If the file is in the same directory, it will be displayed in abrowser. OK, but we want this default domain address (http://127.0.0.1:1337) to be interpretedas a connection to index.html. So, we need to make an additional filter in our server. Thesimplest way is to analyze the pathname returned by parsing the url. Check the example aboveand 'uri' variable, and add the following lines just after that:
view plain print ?
if (uri === '/') { 01. 02. filename += 'index.html'; 03. 04.} 05.
view plain print ?
if (uri === '/') { 01. 02. filename += 'index.html'; 03. 04.} 05.
view plain print ?
if (uri === '/') { 01. 02. filename += 'index.html'; 03. 04.} 05.
view plain print ?
if (uri === '/') { 01. 02. filename += 'index.html'; 03. 04.} 05.
view plain print ?
if (uri === '/') { 01. 02. filename += 'index.html'; 03. 04.} 05.
Now if our URI is just '/', it means that our client connects to the server with the'http://127.0.0.1:1337/' address, and will serve the index.html file.
The next lesson is about serving some JSON to the static page using AJAX requests.
310

2 AjaxFirst of all, we need to teach our server how to construct JSON objects. We need to addadditional filter, in the same way as before with default index.html serving. The easiest way toachieve this is as follows:
view plain print ?
if (uri === '/') { 01. 02. filename += 'index.html'; 03. 04.} else if (uri.indexOf('/ajax/') !== -‐1) { //if our URL contains /ajax/ strin05. 06. response.writeHeader(200, {"Content-‐Type": "text/plain"}); //then sent proper headers
07.
response.write(JSON.stringify( //and put string constructed from Ja08. { //into our response09. ourVariable: 'Congratz! This is text directly from the server! ' + Math.random() 10. } 11. )); 12. 13. response.end(); //after that close connection.14. 15.} 16.
311
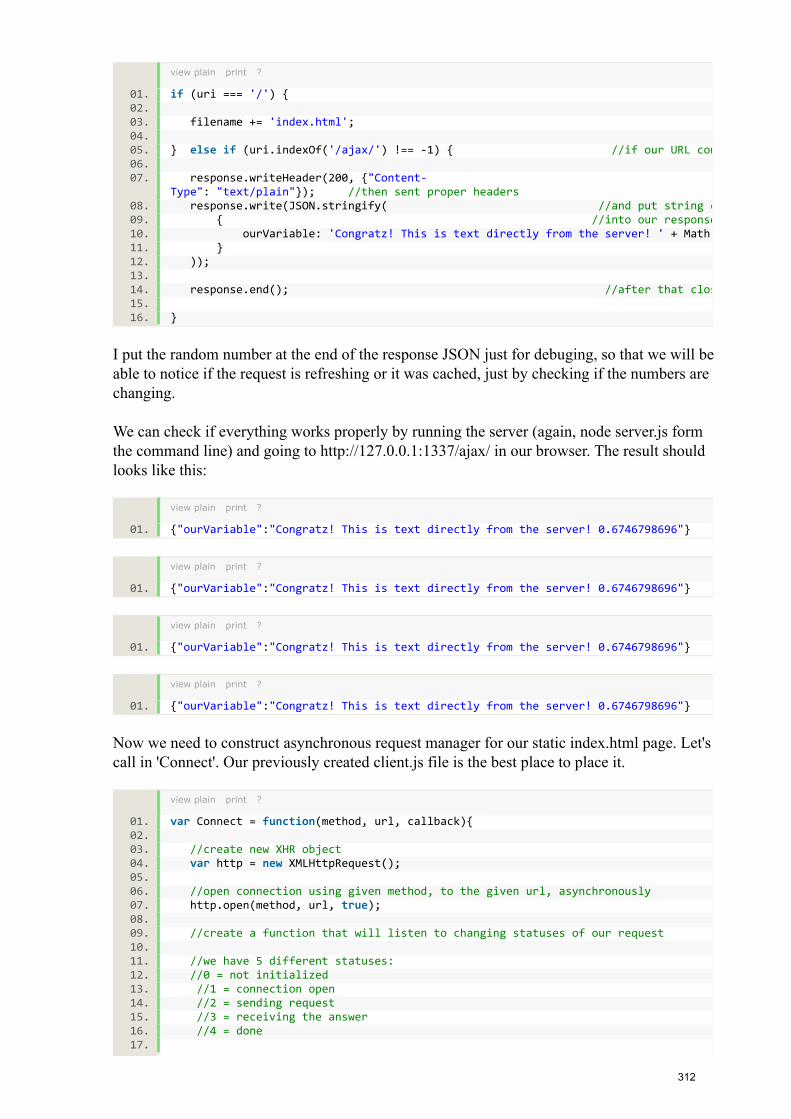
view plain print ?
if (uri === '/') { 01. 02. filename += 'index.html'; 03. 04.} else if (uri.indexOf('/ajax/') !== -‐1) { //if our URL contains /ajax/ strin05. 06. response.writeHeader(200, {"Content-‐Type": "text/plain"}); //then sent proper headers
07.
response.write(JSON.stringify( //and put string constructed from Ja08. { //into our response09. ourVariable: 'Congratz! This is text directly from the server! ' + Math.random() 10. } 11. )); 12. 13. response.end(); //after that close connection.14. 15.} 16.
I put the random number at the end of the response JSON just for debuging, so that we will beable to notice if the request is refreshing or it was cached, just by checking if the numbers arechanging.
We can check if everything works properly by running the server (again, node server.js formthe command line) and going to http://127.0.0.1:1337/ajax/ in our browser. The result shouldlooks like this:
view plain print ?
{"ourVariable":"Congratz! This is text directly from the server! 0.6746798696"} 01.
view plain print ?
{"ourVariable":"Congratz! This is text directly from the server! 0.6746798696"} 01.
view plain print ?
{"ourVariable":"Congratz! This is text directly from the server! 0.6746798696"} 01.
view plain print ?
{"ourVariable":"Congratz! This is text directly from the server! 0.6746798696"} 01.
Now we need to construct asynchronous request manager for our static index.html page. Let'scall in 'Connect'. Our previously created client.js file is the best place to place it.
view plain print ?
var Connect = function(method, url, callback){ 01. 02. //create new XHR object 03. var http = new XMLHttpRequest(); 04. 05. //open connection using given method, to the given url, asynchronously 06. http.open(method, url, true); 07. 08. //create a function that will listen to changing statuses of our request 09. 10. //we have 5 different statuses: 11. //0 = not initialized 12. //1 = connection open 13. //2 = sending request 14. //3 = receiving the answer 15. //4 = done 16. 17.
312

http.onreadystatechange = function(event) { 18. 19. //and we are interested only when the whole query is finished 20. //we can use predefined constants or just numbers 21. //I'd preffered event.target.DONE that just 4 because it's more readable 22. if (event.target.readyState === event.target.DONE) { 23. 24. if (typeof callback === "function") { 25. //in this example we are only interested in JSON served by the server26. //so we simply parse it to the JavaScript object and 27. //send as an argument to our callback function 28. callback(JSON.parse(event.target.responseText)); 29. } 30. 31. } 32. }; 33. http.send(); 34.} 35.
view plain print ?
var Connect = function(method, url, callback){ 01. 02. //create new XHR object 03. var http = new XMLHttpRequest(); 04. 05. //open connection using given method, to the given url, asynchronously 06. http.open(method, url, true); 07. 08. //create a function that will listen to changing statuses of our request 09. 10. //we have 5 different statuses: 11. //0 = not initialized 12. //1 = connection open 13. //2 = sending request 14. //3 = receiving the answer 15. //4 = done 16. 17. http.onreadystatechange = function(event) { 18. 19. //and we are interested only when the whole query is finished 20. //we can use predefined constants or just numbers 21. //I'd preffered event.target.DONE that just 4 because it's more readable 22. if (event.target.readyState === event.target.DONE) { 23. 24. if (typeof callback === "function") { 25. //in this example we are only interested in JSON served by the server26. //so we simply parse it to the JavaScript object and 27. //send as an argument to our callback function 28. callback(JSON.parse(event.target.responseText)); 29. } 30. 31. } 32. }; 33. http.send(); 34.} 35.
view plain print ?
var Connect = function(method, url, callback){ 01. 02. //create new XHR object 03. var http = new XMLHttpRequest(); 04. 05. //open connection using given method, to the given url, asynchronously 06. http.open(method, url, true); 07. 08. //create a function that will listen to changing statuses of our request 09. 10. //we have 5 different statuses: 11.
313

//0 = not initialized 12. //1 = connection open 13. //2 = sending request 14. //3 = receiving the answer 15. //4 = done 16. 17. http.onreadystatechange = function(event) { 18. 19. //and we are interested only when the whole query is finished 20. //we can use predefined constants or just numbers 21. //I'd preffered event.target.DONE that just 4 because it's more readable 22. if (event.target.readyState === event.target.DONE) { 23. 24. if (typeof callback === "function") { 25. //in this example we are only interested in JSON served by the server26. //so we simply parse it to the JavaScript object and 27. //send as an argument to our callback function 28. callback(JSON.parse(event.target.responseText)); 29. } 30. 31. } 32. }; 33. http.send(); 34.} 35.
view plain print ?
var Connect = function(method, url, callback){ 01. 02. //create new XHR object 03. var http = new XMLHttpRequest(); 04. 05. //open connection using given method, to the given url, asynchronously 06. http.open(method, url, true); 07. 08. //create a function that will listen to changing statuses of our request 09. 10. //we have 5 different statuses: 11. //0 = not initialized 12. //1 = connection open 13. //2 = sending request 14. //3 = receiving the answer 15. //4 = done 16. 17. http.onreadystatechange = function(event) { 18. 19. //and we are interested only when the whole query is finished 20. //we can use predefined constants or just numbers 21. //I'd preffered event.target.DONE that just 4 because it's more readable 22. if (event.target.readyState === event.target.DONE) { 23. 24. if (typeof callback === "function") { 25. //in this example we are only interested in JSON served by the server26. //so we simply parse it to the JavaScript object and 27. //send as an argument to our callback function 28. callback(JSON.parse(event.target.responseText)); 29. } 30. 31. } 32. }; 33. http.send(); 34.} 35.
Now let's try to ask our server for some data, and update the page without reloading. UseConnect function just after creating it, in client.js file:
view plain print ?
Connect("GET", "/ajax/", function(data) { 01.
314

document.body.innerHTML += " 02.Server response: " + data.ourVariable; 03.}); 04.
view plain print ?
Connect("GET", "/ajax/", function(data) { 01. document.body.innerHTML += " 02.Server response: " + data.ourVariable; 03.}); 04.
view plain print ?
Connect("GET", "/ajax/", function(data) { 01. document.body.innerHTML += " 02.Server response: " + data.ourVariable; 03.}); 04.
view plain print ?
Connect("GET", "/ajax/", function(data) { 01. document.body.innerHTML += " 02.Server response: " + data.ourVariable; 03.}); 04.
It works! But what if we want to send some data to the server? In game development, we needto communicate both ways. Usually we construct query strings in URL, but working withstrings when there is a lot of data to send to our server is not the best solution. It simply looksugly:
view plain print ?
Connect("GET", "/ajax/?variableone=valueofvariableone&flashisdead=true&openwebtechnologies=ftw&bestconferenceever=ongamestart.com&blahblahbla=yup&itisreallylongvariablename=iknow,itisuglyashell", function(data) {
01.
document.body.innerHTML += " 02.Server response: " + data.ourVariable; 03.}); 04.
view plain print ?
Connect("GET", "/ajax/?variableone=valueofvariableone&flashisdead=true&openwebtechnologies=ftw&bestconferenceever=ongamestart.com&blahblahbla=yup&itisreallylongvariablename=iknow,itisuglyashell", function(data) {
01.
document.body.innerHTML += " 02.Server response: " + data.ourVariable; 03.}); 04.
We don't want our code to look like this. It could be really awesome if we would just send a
315

JavaScript object to our Connect function, and all the magic will happen inside. Like this:
view plain print ?
var Connect = function(method, url, data, callback){ 01. var formatedData = []; //array for our data 02. 03. if (data) { 04. 05. //for everything stored in the data object 06. for (var i in data) { 07. //construct URL-‐friendly string 'foo=bar', and add it to the Array 08. formatedData.push(encodeURIComponent(i) + "=" + encodeURIComponent(data[i])); 09. } 10. 11. //then check if our URL already contains question mark at the end. 12. //if not, add it and all the variables by joining the array with '&' sign 13. //if it is, just add everything as another variables 14. //and append this to the URL 15. url += (url.match(/\?/) ? "&": "?") + formatedData.join("&").replace(/%20/g, 16. } 17. 18. var http = new XMLHttpRequest(); 19. http.open(method, url, true); 20. http.onreadystatechange = function(event) { 21. if (event.target.DONE === event.target.readyState) { 22. if (typeof callback === "function") { 23. callback(JSON.parse(event.target.responseText)); 24. } 25. } 26. }; 27. http.send(); 28.} 29.
view plain print ?
var Connect = function(method, url, data, callback){ 01. var formatedData = []; //array for our data 02.
316

03. if (data) { 04. 05. //for everything stored in the data object 06. for (var i in data) { 07. //construct URL-‐friendly string 'foo=bar', and add it to the Array 08. formatedData.push(encodeURIComponent(i) + "=" + encodeURIComponent(data[i])); 09. } 10. 11. //then check if our URL already contains question mark at the end. 12. //if not, add it and all the variables by joining the array with '&' sign 13. //if it is, just add everything as another variables 14. //and append this to the URL 15. url += (url.match(/\?/) ? "&": "?") + formatedData.join("&").replace(/%20/g, 16. } 17. 18. var http = new XMLHttpRequest(); 19. http.open(method, url, true); 20. http.onreadystatechange = function(event) { 21. if (event.target.DONE === event.target.readyState) { 22. if (typeof callback === "function") { 23. callback(JSON.parse(event.target.responseText)); 24. } 25. } 26. }; 27. http.send(); 28.} 29.
view plain print ?
var Connect = function(method, url, data, callback){ 01. var formatedData = []; //array for our data 02. 03. if (data) { 04. 05. //for everything stored in the data object 06. for (var i in data) { 07. //construct URL-‐friendly string 'foo=bar', and add it to the Array 08. formatedData.push(encodeURIComponent(i) + "=" + encodeURIComponent(data[i])); 09. } 10. 11. //then check if our URL already contains question mark at the end. 12. //if not, add it and all the variables by joining the array with '&' sign 13. //if it is, just add everything as another variables 14. //and append this to the URL 15. url += (url.match(/\?/) ? "&": "?") + formatedData.join("&").replace(/%20/g, 16. } 17. 18. var http = new XMLHttpRequest(); 19. http.open(method, url, true); 20. http.onreadystatechange = function(event) { 21. if (event.target.DONE === event.target.readyState) { 22. if (typeof callback === "function") { 23. callback(JSON.parse(event.target.responseText)); 24. } 25. } 26. }; 27. http.send(); 28.} 29.
Looks great. Now we can change the place in which we generate our random number form theserver to the client. The New Connect request will look like this:
view plain print ?
Connect("GET", 01. "/ajax/", 02. { 03. number: Math.random() 04.
317
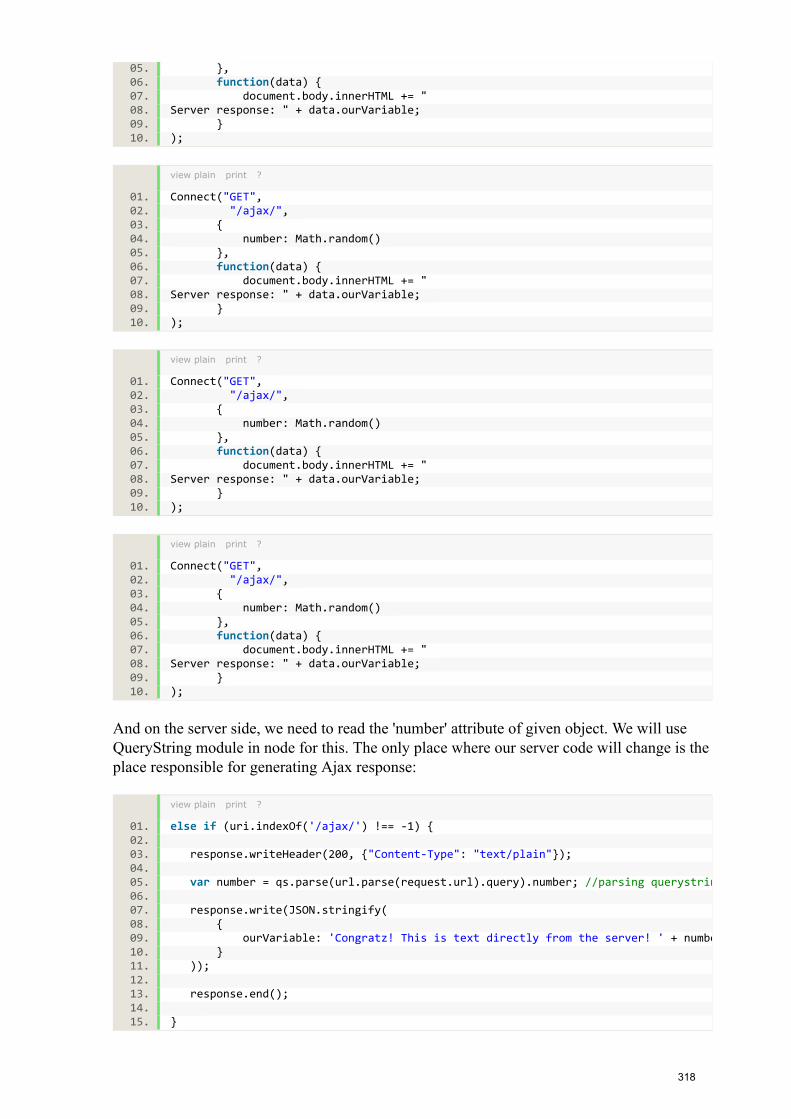
}, 05. function(data) { 06. document.body.innerHTML += " 07.Server response: " + data.ourVariable; 08. } 09.); 10.
view plain print ?
Connect("GET", 01. "/ajax/", 02. { 03. number: Math.random() 04. }, 05. function(data) { 06. document.body.innerHTML += " 07.Server response: " + data.ourVariable; 08. } 09.); 10.
view plain print ?
Connect("GET", 01. "/ajax/", 02. { 03. number: Math.random() 04. }, 05. function(data) { 06. document.body.innerHTML += " 07.Server response: " + data.ourVariable; 08. } 09.); 10.
view plain print ?
Connect("GET", 01. "/ajax/", 02. { 03. number: Math.random() 04. }, 05. function(data) { 06. document.body.innerHTML += " 07.Server response: " + data.ourVariable; 08. } 09.); 10.
And on the server side, we need to read the 'number' attribute of given object. We will useQueryString module in node for this. The only place where our server code will change is theplace responsible for generating Ajax response:
view plain print ?
else if (uri.indexOf('/ajax/') !== -‐1) { 01. 02. response.writeHeader(200, {"Content-‐Type": "text/plain"}); 03. 04. var number = qs.parse(url.parse(request.url).query).number; //parsing querystring changes it to th05. 06. response.write(JSON.stringify( 07. { 08. ourVariable: 'Congratz! This is text directly from the server! ' + number 09. } 10. )); 11. 12. response.end(); 13. 14.} 15.
318

view plain print ?
else if (uri.indexOf('/ajax/') !== -‐1) { 01. 02. response.writeHeader(200, {"Content-‐Type": "text/plain"}); 03. 04. var number = qs.parse(url.parse(request.url).query).number; //parsing querystring changes it to th05. 06. response.write(JSON.stringify( 07. { 08. ourVariable: 'Congratz! This is text directly from the server! ' + number 09. } 10. )); 11. 12. response.end(); 13. 14.} 15.
Now you know how to send and receive information from the server using Ajax methods.Let's build our first example on that base.
319

3 Design patterns in multiplayer gamesTo present how multiplayer looks in real games, let's build a simple demo. There will be oneobject (player) on the scene, created using the framework we built during past weeks of thiscourse. The first player connected to the game will control the player with arrows, and theother players will see it moving in the real time. To achieve this, we need to divide our gameto different states.
1. Hello!When you are connecting to the server, you send a short 'hello' message, and the server willrespond with information about already logged players. If you are the first one to connect,than you will be the player which control the moves. If not, you will be only able to observehow the other player moves.
2. Move!If you are the one who will control the player, you have to send your position to the serverevery couple of milliseconds.
3. Get!And if you are only observing, you have to ask the server for the player’s coordinates. XHR issingle directional connection, so the server cannot push you notification about changing theposition. We will discuss solutions to this problem later.
4. Bye!When the main player leaves the game, we need to inform the server about this. The nextconnected player will get control.
Full code of this example looks like this:
server.js
view plain print ?
var http = require("http"), 01. url = require("url"), 02. path = require("path"), 03. qs = require("querystring"), 04. fs = require("fs"), 05. boss = true, 06. lastPosition = {}; 07. 08.http.createServer(function(request, response) { 09. 10. var uri = url.parse(request.url).pathname; 11. var filename = path.join(process.cwd(), uri); 12. 13. if (uri === '/') { 14. 15. filename += 'index.html'; 16. 17. } else if (uri.indexOf('/hello/') !== -‐1) { 18. 19. response.writeHeader(200, {"Content-‐Type": "text/json"}); 20. response.write(JSON.stringify( 21. { 22. daBoss: boss, 23. } 24. )); 25.
320

26. response.end(); 27. 28. boss = false; 29. 30. } else if (uri.indexOf('/move/') !== -‐1) { 31. 32. var position = qs.parse(url.parse(request.url).query); 33. 34. lastPosition = { 35. x: position.x, 36. y: position.y 37. } 38. 39. response.writeHeader(200, {"Content-‐Type": "text/json"}); 40. response.write(JSON.stringify( 41. { 42. ok: 'ok', 43. } 44. )); 45. response.end(); 46. 47. } else if (uri.indexOf('/bye/') !== -‐1) { 48. 49. response.writeHeader(200, {"Content-‐Type": "text/json"}); 50. response.end(); 51. boss = true; 52. 53. } else if (uri.indexOf('/get/') !== -‐1) { 54. 55. response.writeHeader(200, {"Content-‐Type": "text/json"}); 56. response.write(JSON.stringify( 57. { 58. x: lastPosition.x, 59. y: lastPosition.y 60. } 61. )); 62. 63. response.end(); 64. } 65. 66. 67. path.exists(filename, function(exists) { 68. if(!exists) { 69. response.writeHeader(404, {"Content-‐Type": "text/plain"}); 70. response.write("404 Not Found\n"); 71. response.end(); 72. return; 73. } 74. 75. fs.readFile(filename, "binary", function(err, file) { 76. 77. if(err) { 78. response.writeHeader(500, {"Content-‐Type": "text/plain"}); 79. response.write(err + "\n"); 80. response.end(); 81. return; 82. } 83. 84. response.writeHeader(200); 85. response.write(file, "binary"); 86. response.end(); 87. }); 88. }); 89. 90.}).listen(1337); 91. 92.console.log("Server running..."); 93.
321

view plain print ?
var http = require("http"), 01. url = require("url"), 02. path = require("path"), 03. qs = require("querystring"), 04. fs = require("fs"), 05. boss = true, 06. lastPosition = {}; 07. 08.http.createServer(function(request, response) { 09. 10. var uri = url.parse(request.url).pathname; 11. var filename = path.join(process.cwd(), uri); 12. 13. if (uri === '/') { 14. 15. filename += 'index.html'; 16. 17. } else if (uri.indexOf('/hello/') !== -‐1) { 18. 19. response.writeHeader(200, {"Content-‐Type": "text/json"}); 20. response.write(JSON.stringify( 21. { 22. daBoss: boss, 23. } 24. )); 25. 26. response.end(); 27. 28. boss = false; 29. 30. } else if (uri.indexOf('/move/') !== -‐1) { 31. 32. var position = qs.parse(url.parse(request.url).query); 33. 34. lastPosition = { 35. x: position.x, 36. y: position.y 37. } 38. 39. response.writeHeader(200, {"Content-‐Type": "text/json"}); 40. response.write(JSON.stringify( 41. { 42. ok: 'ok', 43. } 44. )); 45. response.end(); 46. 47. } else if (uri.indexOf('/bye/') !== -‐1) { 48. 49. response.writeHeader(200, {"Content-‐Type": "text/json"}); 50. response.end(); 51. boss = true; 52. 53. } else if (uri.indexOf('/get/') !== -‐1) { 54. 55. response.writeHeader(200, {"Content-‐Type": "text/json"}); 56. response.write(JSON.stringify( 57. { 58. x: lastPosition.x, 59. y: lastPosition.y 60. } 61. )); 62. 63. response.end(); 64. } 65. 66. 67. path.exists(filename, function(exists) { 68. if(!exists) { 69.
322

response.writeHeader(404, {"Content-‐Type": "text/plain"}); 70. response.write("404 Not Found\n"); 71. response.end(); 72. return; 73. } 74. 75. fs.readFile(filename, "binary", function(err, file) { 76. 77. if(err) { 78. response.writeHeader(500, {"Content-‐Type": "text/plain"}); 79. response.write(err + "\n"); 80. response.end(); 81. return; 82. } 83. 84. response.writeHeader(200); 85. response.write(file, "binary"); 86. response.end(); 87. }); 88. }); 89. 90.}).listen(1337); 91. 92.console.log("Server running..."); 93.
view plain print ?
var http = require("http"), 01. url = require("url"), 02. path = require("path"), 03. qs = require("querystring"), 04. fs = require("fs"), 05. boss = true, 06. lastPosition = {}; 07. 08.http.createServer(function(request, response) { 09. 10. var uri = url.parse(request.url).pathname; 11. var filename = path.join(process.cwd(), uri); 12. 13. if (uri === '/') { 14. 15. filename += 'index.html'; 16. 17. } else if (uri.indexOf('/hello/') !== -‐1) { 18. 19. response.writeHeader(200, {"Content-‐Type": "text/json"}); 20. response.write(JSON.stringify( 21. { 22. daBoss: boss, 23. } 24. )); 25. 26. response.end(); 27. 28. boss = false; 29. 30. } else if (uri.indexOf('/move/') !== -‐1) { 31. 32. var position = qs.parse(url.parse(request.url).query); 33. 34. lastPosition = { 35. x: position.x, 36. y: position.y 37. } 38. 39. response.writeHeader(200, {"Content-‐Type": "text/json"}); 40. response.write(JSON.stringify( 41. { 42. ok: 'ok', 43.
323

} 44. )); 45. response.end(); 46. 47. } else if (uri.indexOf('/bye/') !== -‐1) { 48. 49. response.writeHeader(200, {"Content-‐Type": "text/json"}); 50. response.end(); 51. boss = true; 52. 53. } else if (uri.indexOf('/get/') !== -‐1) { 54. 55. response.writeHeader(200, {"Content-‐Type": "text/json"}); 56. response.write(JSON.stringify( 57. { 58. x: lastPosition.x, 59. y: lastPosition.y 60. } 61. )); 62. 63. response.end(); 64. } 65. 66. 67. path.exists(filename, function(exists) { 68. if(!exists) { 69. response.writeHeader(404, {"Content-‐Type": "text/plain"}); 70. response.write("404 Not Found\n"); 71. response.end(); 72. return; 73. } 74. 75. fs.readFile(filename, "binary", function(err, file) { 76. 77. if(err) { 78. response.writeHeader(500, {"Content-‐Type": "text/plain"}); 79. response.write(err + "\n"); 80. response.end(); 81. return; 82. } 83. 84. response.writeHeader(200); 85. response.write(file, "binary"); 86. response.end(); 87. }); 88. }); 89. 90.}).listen(1337); 91. 92.console.log("Server running..."); 93.
client.js
view plain print ?
var Connect = function(method, url, data, callback){ 01. var formatedData = []; 02. 03. if (data) { 04. 05. for (var i in data) { 06. formatedData.push(encodeURIComponent(i) + "=" + encodeURIComponent(data[i])); 07. } 08. 09. url += (url.match(/\?/) ? "&": "?") + formatedData.join("&").replace(/%20/g, 10. } 11. 12. var http = new XMLHttpRequest(); 13. http.open(method, url, true); 14. http.onreadystatechange = function(event) { 15.
324

if (event.target.DONE === event.target.readyState) { 16. if (typeof callback === "function") { 17. callback(JSON.parse(event.target.responseText)); 18. } 19. } 20. }; 21. http.send(); 22.} 23. 24.var GF = function () { 25. var mainScreen = null, 26. //main screen is the place where we will render our game, it will be independent from the fpsCon27. states = {}, 28. //we will store currently pressed keys in the states object 29. frameCount = 0, 30. fps = 0, 31. lastTime = +(new Date()), 32. fpsContainer = null, 33. player = null, //player element 34. playerPosition = { //player position & size 35. x: 0, 36. y: 0, 37. width: 50, 38. height: 50 39. }, 40. transformSupport = null, //method of moving player 41. step = 10, //how many pixel player will move on each frame 42. platform = null, 43. platformPosition = { //platform position & size 44. x: 200, 45. y: 200, 46. width: 150, 47. height: 150 48. }; 49. 50. var MeasureFPS = function () { 51. var newTime = +(new Date()); 52. var diffTime = ~~ ((newTime -‐ lastTime)); 53. 54. if (diffTime >= 1000) { 55. fps = frameCount; 56. frameCount = 0; 57. lastTime = newTime; 58. } 59. 60. fpsContainer.innerHTML = 'FPS: ' + fps; 61. frameCount++; 62. }; 63. 64. var detectPropertyPrefix = function(property) { 65. var prefixes = ['Moz', 'Ms', 'Webkit', 'O']; 66. for (var i=0, j=prefixes.length; i<j; i++) { 67. if (typeof document.body.style[prefixes[i]+property] !== 'undefined') { 68. return prefixes[i]+property; 69. } 70. } 71. return false; 72. }; 73. 74. var moveObject = function(object, x, y) { //we change 'movePlayer' to 'moveObject' with object as 75. if (transformSupport === false) { 76. object.style.top = y + "px"; 77. object.style.left = x + "px"; 78. } else { 79. object.style[transformSupport] = 'translate(' + x + 'px, ' + y + 'px)'; 80. } 81. } 82. 83. var mainLoop = function () { 84. MeasureFPS(); 85. 86.
325

//update player position on each frame 87. if (states.left) { 88. playerPosition.x -‐= step; 89. } 90. if (states.up) { 91. playerPosition.y -‐= step; 92. } 93. if (states.right) { 94. playerPosition.x += step; 95. } 96. if (states.down) { 97. playerPosition.y += step; 98. } 99. moveObject(player, playerPosition.x, playerPosition.y) 100. loop(mainLoop); 101. } 102. 103. var loop = (function () { 104. return window.requestAnimationFrame || window.webkitRequestAnimationFrame || window.mozRequestAn105. function ( /* function */ callback, /* DOMElement */ element) { 106. window.setTimeout(callback, 1000 / 60); 107. }; 108. })(); 109. 110. 111. var sendMoves = function(){ 112. Connect("GET", "/move/", { 113. x: playerPosition.x, 114. y: playerPosition.y 115. }); 116. } 117. 118. var getMoves = function(callback){ 119. Connect("GET", "/get/", {}, callback); 120. } 121. 122. var start = function () { 123. 124. //features detection 125. transformSupport = detectPropertyPrefix('Transform'); 126. 127. Connect("GET", 128. "/hello/", 129. { 130. id: ~~(Math.random()*87236584) 131. }, 132. function (data) { 133. if (data.daBoss === true) { 134. 135. //add the listener to the main, window object, and update the states136. window.addEventListener('keydown', function (event) { 137. if (event.keyCode === 37) { 138. states.left = true; 139. } 140. if (event.keyCode === 38) { 141. states.up = true; 142. } 143. if (event.keyCode === 39) { 144. states.right = true; 145. } 146. if (event.keyCode === 40) { 147. states.down = true; 148. } 149. }, false); 150. 151. //if the key will be released, change the states object 152. window.addEventListener('keyup', function (event) { 153. if (event.keyCode === 37) { 154. states.left = false; 155. } 156. if (event.keyCode === 38) { 157.
326

states.up = false; 158. } 159. if (event.keyCode === 39) { 160. states.right = false; 161. } 162. if (event.keyCode === 40) { 163. states.down = false; 164. } 165. }, false); 166. 167. setInterval(sendMoves, 1000/60); 168. 169. window.onunload = function(){ 170. Connect("GET", "/bye/"); 171. }; 172. 173. } else { 174. 175. setInterval(function() { 176. getMoves(function(data){ 177. playerPosition.x = data.x; 178. playerPosition.y = data.y; 179. }); 180. }, 1000/60); 181. } 182. 183. } 184. ); 185. 186. mainScreen = document.createElement('div'); 187. document.body.appendChild(mainScreen); 188. 189. fpsContainer = document.createElement('div'); 190. document.body.appendChild(fpsContainer); 191. 192. //create player 193. player = mainScreen.appendChild(document.createElement('div')); 194. player.id = 'player'; 195. 196. loop(mainLoop); 197. 198. }; 199. 200. //our GameFramework returns public API visible from outside scope 201. return { 202. start: start 203. } 204. } 205. 206. 207.var game = new GF(); 208.game.start(); 209.
view plain print ?
var Connect = function(method, url, data, callback){ 01. var formatedData = []; 02. 03. if (data) { 04. 05. for (var i in data) { 06. formatedData.push(encodeURIComponent(i) + "=" + encodeURIComponent(data[i])); 07. } 08. 09. url += (url.match(/\?/) ? "&": "?") + formatedData.join("&").replace(/%20/g, 10. } 11. 12. var http = new XMLHttpRequest(); 13. http.open(method, url, true); 14. http.onreadystatechange = function(event) { 15.
327

if (event.target.DONE === event.target.readyState) { 16. if (typeof callback === "function") { 17. callback(JSON.parse(event.target.responseText)); 18. } 19. } 20. }; 21. http.send(); 22.} 23. 24.var GF = function () { 25. var mainScreen = null, 26. //main screen is the place where we will render our game, it will be independent from the fpsCon27. states = {}, 28. //we will store currently pressed keys in the states object 29. frameCount = 0, 30. fps = 0, 31. lastTime = +(new Date()), 32. fpsContainer = null, 33. player = null, //player element 34. playerPosition = { //player position & size 35. x: 0, 36. y: 0, 37. width: 50, 38. height: 50 39. }, 40. transformSupport = null, //method of moving player 41. step = 10, //how many pixel player will move on each frame 42. platform = null, 43. platformPosition = { //platform position & size 44. x: 200, 45. y: 200, 46. width: 150, 47. height: 150 48. }; 49. 50. var MeasureFPS = function () { 51. var newTime = +(new Date()); 52. var diffTime = ~~ ((newTime -‐ lastTime)); 53. 54. if (diffTime >= 1000) { 55. fps = frameCount; 56. frameCount = 0; 57. lastTime = newTime; 58. } 59. 60. fpsContainer.innerHTML = 'FPS: ' + fps; 61. frameCount++; 62. }; 63. 64. var detectPropertyPrefix = function(property) { 65. var prefixes = ['Moz', 'Ms', 'Webkit', 'O']; 66. for (var i=0, j=prefixes.length; i<j; i++) { 67. if (typeof document.body.style[prefixes[i]+property] !== 'undefined') { 68. return prefixes[i]+property; 69. } 70. } 71. return false; 72. }; 73. 74. var moveObject = function(object, x, y) { //we change 'movePlayer' to 'moveObject' with object as 75. if (transformSupport === false) { 76. object.style.top = y + "px"; 77. object.style.left = x + "px"; 78. } else { 79. object.style[transformSupport] = 'translate(' + x + 'px, ' + y + 'px)'; 80. } 81. } 82. 83. var mainLoop = function () { 84. MeasureFPS(); 85. 86.
328

//update player position on each frame 87. if (states.left) { 88. playerPosition.x -‐= step; 89. } 90. if (states.up) { 91. playerPosition.y -‐= step; 92. } 93. if (states.right) { 94. playerPosition.x += step; 95. } 96. if (states.down) { 97. playerPosition.y += step; 98. } 99. moveObject(player, playerPosition.x, playerPosition.y) 100. loop(mainLoop); 101. } 102. 103. var loop = (function () { 104. return window.requestAnimationFrame || window.webkitRequestAnimationFrame || window.mozRequestAn105. function ( /* function */ callback, /* DOMElement */ element) { 106. window.setTimeout(callback, 1000 / 60); 107. }; 108. })(); 109. 110. 111. var sendMoves = function(){ 112. Connect("GET", "/move/", { 113. x: playerPosition.x, 114. y: playerPosition.y 115. }); 116. } 117. 118. var getMoves = function(callback){ 119. Connect("GET", "/get/", {}, callback); 120. } 121. 122. var start = function () { 123. 124. //features detection 125. transformSupport = detectPropertyPrefix('Transform'); 126. 127. Connect("GET", 128. "/hello/", 129. { 130. id: ~~(Math.random()*87236584) 131. }, 132. function (data) { 133. if (data.daBoss === true) { 134. 135. //add the listener to the main, window object, and update the states136. window.addEventListener('keydown', function (event) { 137. if (event.keyCode === 37) { 138. states.left = true; 139. } 140. if (event.keyCode === 38) { 141. states.up = true; 142. } 143. if (event.keyCode === 39) { 144. states.right = true; 145. } 146. if (event.keyCode === 40) { 147. states.down = true; 148. } 149. }, false); 150. 151. //if the key will be released, change the states object 152. window.addEventListener('keyup', function (event) { 153. if (event.keyCode === 37) { 154. states.left = false; 155. } 156. if (event.keyCode === 38) { 157.
329

states.up = false; 158. } 159. if (event.keyCode === 39) { 160. states.right = false; 161. } 162. if (event.keyCode === 40) { 163. states.down = false; 164. } 165. }, false); 166. 167. setInterval(sendMoves, 1000/60); 168. 169. window.onunload = function(){ 170. Connect("GET", "/bye/"); 171. }; 172. 173. } else { 174. 175. setInterval(function() { 176. getMoves(function(data){ 177. playerPosition.x = data.x; 178. playerPosition.y = data.y; 179. }); 180. }, 1000/60); 181. } 182. 183. } 184. ); 185. 186. mainScreen = document.createElement('div'); 187. document.body.appendChild(mainScreen); 188. 189. fpsContainer = document.createElement('div'); 190. document.body.appendChild(fpsContainer); 191. 192. //create player 193. player = mainScreen.appendChild(document.createElement('div')); 194. player.id = 'player'; 195. 196. loop(mainLoop); 197. 198. }; 199. 200. //our GameFramework returns public API visible from outside scope 201. return { 202. start: start 203. } 204. } 205. 206. 207.var game = new GF(); 208.game.start(); 209.
view plain print ?
var Connect = function(method, url, data, callback){ 01. var formatedData = []; 02. 03. if (data) { 04. 05. for (var i in data) { 06. formatedData.push(encodeURIComponent(i) + "=" + encodeURIComponent(data[i])); 07. } 08. 09. url += (url.match(/\?/) ? "&": "?") + formatedData.join("&").replace(/%20/g, 10. } 11. 12. var http = new XMLHttpRequest(); 13. http.open(method, url, true); 14. http.onreadystatechange = function(event) { 15.
330

if (event.target.DONE === event.target.readyState) { 16. if (typeof callback === "function") { 17. callback(JSON.parse(event.target.responseText)); 18. } 19. } 20. }; 21. http.send(); 22.} 23. 24.var GF = function () { 25. var mainScreen = null, 26. //main screen is the place where we will render our game, it will be independent from the fpsCon27. states = {}, 28. //we will store currently pressed keys in the states object 29. frameCount = 0, 30. fps = 0, 31. lastTime = +(new Date()), 32. fpsContainer = null, 33. player = null, //player element 34. playerPosition = { //player position & size 35. x: 0, 36. y: 0, 37. width: 50, 38. height: 50 39. }, 40. transformSupport = null, //method of moving player 41. step = 10, //how many pixel player will move on each frame 42. platform = null, 43. platformPosition = { //platform position & size 44. x: 200, 45. y: 200, 46. width: 150, 47. height: 150 48. }; 49. 50. var MeasureFPS = function () { 51. var newTime = +(new Date()); 52. var diffTime = ~~ ((newTime -‐ lastTime)); 53. 54. if (diffTime >= 1000) { 55. fps = frameCount; 56. frameCount = 0; 57. lastTime = newTime; 58. } 59. 60. fpsContainer.innerHTML = 'FPS: ' + fps; 61. frameCount++; 62. }; 63. 64. var detectPropertyPrefix = function(property) { 65. var prefixes = ['Moz', 'Ms', 'Webkit', 'O']; 66. for (var i=0, j=prefixes.length; i<j; i++) { 67. if (typeof document.body.style[prefixes[i]+property] !== 'undefined') { 68. return prefixes[i]+property; 69. } 70. } 71. return false; 72. }; 73. 74. var moveObject = function(object, x, y) { //we change 'movePlayer' to 'moveObject' with object as 75. if (transformSupport === false) { 76. object.style.top = y + "px"; 77. object.style.left = x + "px"; 78. } else { 79. object.style[transformSupport] = 'translate(' + x + 'px, ' + y + 'px)'; 80. } 81. } 82. 83. var mainLoop = function () { 84. MeasureFPS(); 85. 86.
331
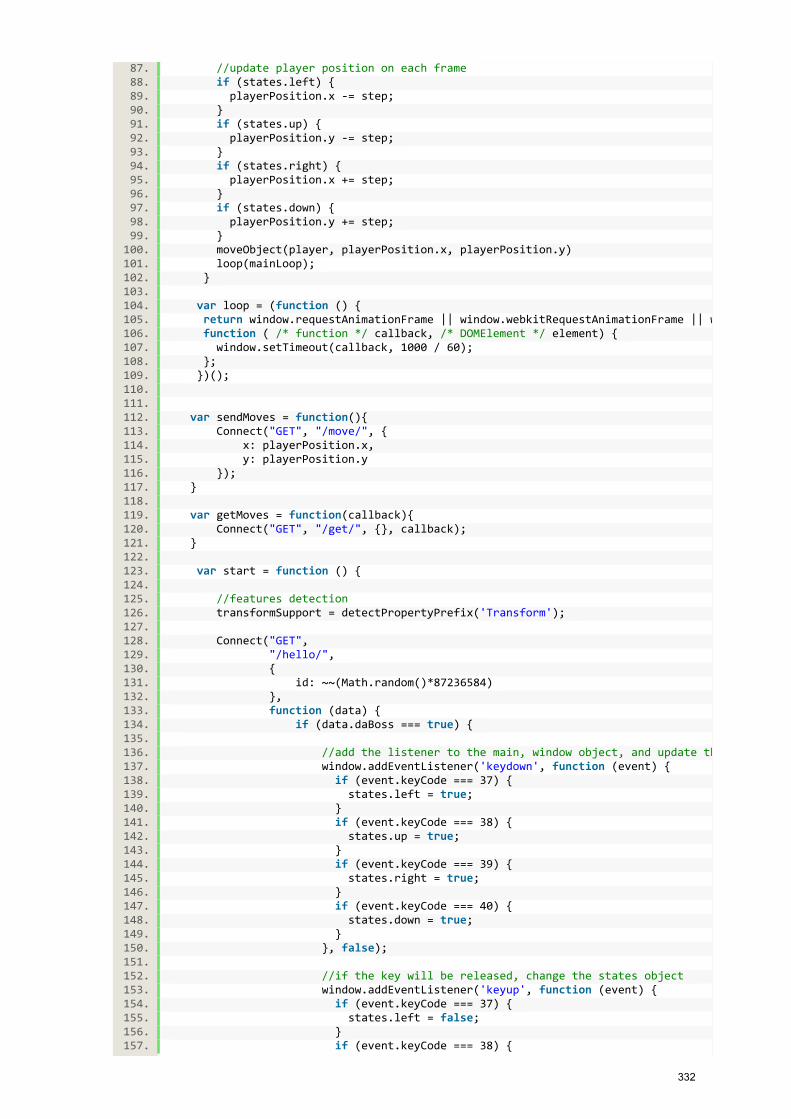
//update player position on each frame 87. if (states.left) { 88. playerPosition.x -‐= step; 89. } 90. if (states.up) { 91. playerPosition.y -‐= step; 92. } 93. if (states.right) { 94. playerPosition.x += step; 95. } 96. if (states.down) { 97. playerPosition.y += step; 98. } 99. moveObject(player, playerPosition.x, playerPosition.y) 100. loop(mainLoop); 101. } 102. 103. var loop = (function () { 104. return window.requestAnimationFrame || window.webkitRequestAnimationFrame || window.mozRequestAn105. function ( /* function */ callback, /* DOMElement */ element) { 106. window.setTimeout(callback, 1000 / 60); 107. }; 108. })(); 109. 110. 111. var sendMoves = function(){ 112. Connect("GET", "/move/", { 113. x: playerPosition.x, 114. y: playerPosition.y 115. }); 116. } 117. 118. var getMoves = function(callback){ 119. Connect("GET", "/get/", {}, callback); 120. } 121. 122. var start = function () { 123. 124. //features detection 125. transformSupport = detectPropertyPrefix('Transform'); 126. 127. Connect("GET", 128. "/hello/", 129. { 130. id: ~~(Math.random()*87236584) 131. }, 132. function (data) { 133. if (data.daBoss === true) { 134. 135. //add the listener to the main, window object, and update the states136. window.addEventListener('keydown', function (event) { 137. if (event.keyCode === 37) { 138. states.left = true; 139. } 140. if (event.keyCode === 38) { 141. states.up = true; 142. } 143. if (event.keyCode === 39) { 144. states.right = true; 145. } 146. if (event.keyCode === 40) { 147. states.down = true; 148. } 149. }, false); 150. 151. //if the key will be released, change the states object 152. window.addEventListener('keyup', function (event) { 153. if (event.keyCode === 37) { 154. states.left = false; 155. } 156. if (event.keyCode === 38) { 157.
332

states.up = false; 158. } 159. if (event.keyCode === 39) { 160. states.right = false; 161. } 162. if (event.keyCode === 40) { 163. states.down = false; 164. } 165. }, false); 166. 167. setInterval(sendMoves, 1000/60); 168. 169. window.onunload = function(){ 170. Connect("GET", "/bye/"); 171. }; 172. 173. } else { 174. 175. setInterval(function() { 176. getMoves(function(data){ 177. playerPosition.x = data.x; 178. playerPosition.y = data.y; 179. }); 180. }, 1000/60); 181. } 182. 183. } 184. ); 185. 186. mainScreen = document.createElement('div'); 187. document.body.appendChild(mainScreen); 188. 189. fpsContainer = document.createElement('div'); 190. document.body.appendChild(fpsContainer); 191. 192. //create player 193. player = mainScreen.appendChild(document.createElement('div')); 194. player.id = 'player'; 195. 196. loop(mainLoop); 197. 198. }; 199. 200. //our GameFramework returns public API visible from outside scope 201. return { 202. start: start 203. } 204. } 205. 206. 207.var game = new GF(); 208.game.start(); 209.
Now please run http://127.0.0.1:1337 in two browser windows and enjoy . The result shouldlook like this:
333
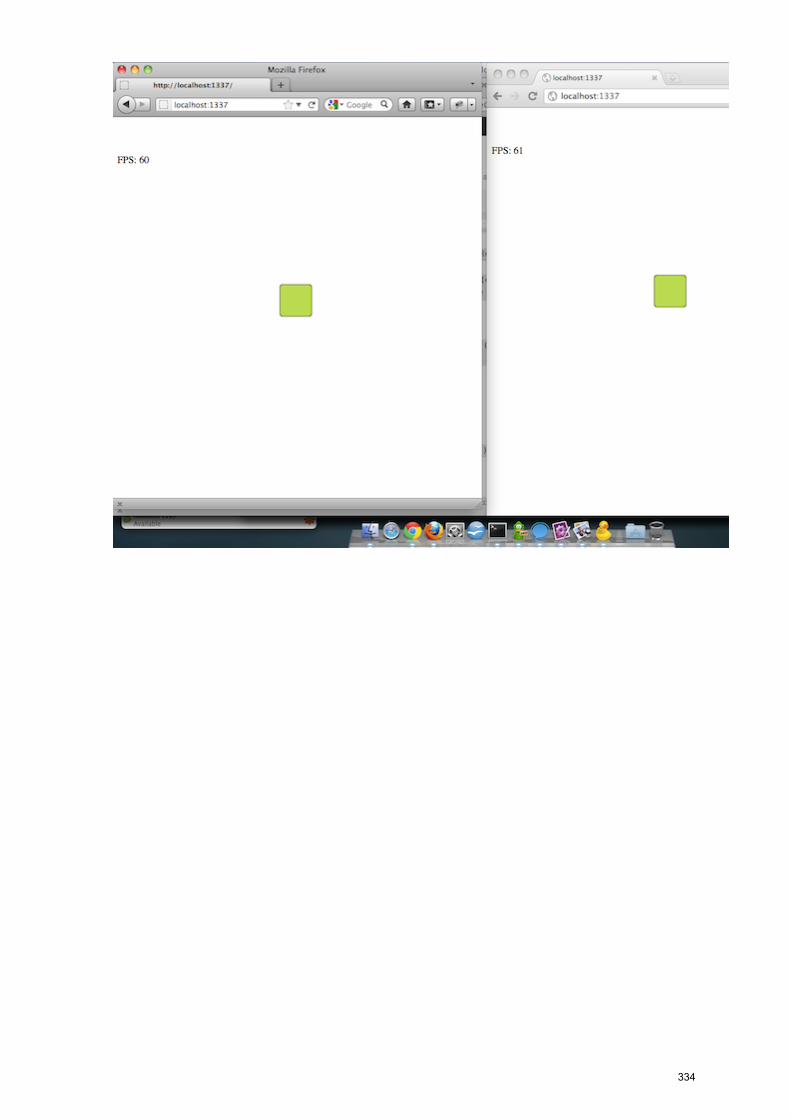
334

4 Other methods of communicationXHR is not the only method of connecting a browser with the server in an asynchronous way.In old times, when it wasn't even supported in most popular browsers, we used hidden iframesto communicate with the server without reloading page. Only iframes were reloaded, and itwas possible to get the data from it using JavaScript functions. It is still used as a fallback tothe old browsers that have no XHR support.You can also use long polling or JSONP polling. Instead of asking a server about the data allthe time, you can just keep the connection open (if you don’t send the closing package, thenthe browser will always wait for it). But the only real bidirectional method of communicationuses sockets. We have two types of sockets in a browser: FlashSockets and WebSockets. Andeven if Flash is not a part of the stack of Open Web Technologies, it is still very popular inmodern browsers with WebSockets. That is why it is used as a fallback for older browsers.
Using WebSockets is really simple. You just create a new WS object, set the connection URLin constructor and add event handlers for 'onmessage' events. These events are called whenour socket will receive a message form the server. It looks like this:
view plain print ?
var socket = new WebSocket('http://example.com'); 01. 02.socket.onopen = function(){ 03. socket.send('send it to the server!'); 04.}; 05. 06.socket.onmessage = function(data){ 07. alert('received: ' + data); 08.}; 09.
view plain print ?
var socket = new WebSocket('http://example.com'); 01. 02.socket.onopen = function(){ 03. socket.send('send it to the server!'); 04.}; 05. 06.socket.onmessage = function(data){ 07. alert('received: ' + data); 08.}; 09.
So since we have so many communication methods, and also many different browsers thatsupport different of them, we could build a feature detection manager for detecting thatsupport and manage the fallbacks. But it is already written, together with node.js module. Letme introduce Socket.io.
SOCKET.IOThe Socket.io library (http://socket.io) detects if your browser supports any of the methodsmentioned above and provides a simple API to receiving, sending and broadcasting data fromthe server to one and many clients. It is really simple. An exampleclient code looks like this:
view plain print ?
<script src="/socket.io/socket.io.js"></script> 01.<script> 02. var socket = io.connect('http://example.xom'); 03. 04. socket.on('eventName', function (data) { 05.
335

06. //here you can manipulate received data 07. 08. }); 09. 10.</script> 11.
view plain print ?
<script src="/socket.io/socket.io.js"></script> 01.<script> 02. var socket = io.connect('http://example.xom'); 03. 04. socket.on('eventName', function (data) { 05. 06. //here you can manipulate received data 07. 08. }); 09. 10.</script> 11.
And on the server:
view plain print ?
var sio = require('socket.io'); 01.var io = sio.listen(http /* our previously created http server */); 02. 03.io.sockets.on('connection', function (socket) { 04. socket.on('eventName', function (msg) { 05. socket.broadcast.emit('eventName', socket, msg); 06. }); 07.}); 08.
view plain print ?
var sio = require('socket.io'); 01.var io = sio.listen(http /* our previously created http server */); 02. 03.io.sockets.on('connection', function (socket) { 04. socket.on('eventName', function (msg) { 05. socket.broadcast.emit('eventName', socket, msg); 06. }); 07.}); 08.
Using Socket.io for multiplayer communication is one of the best solution for now. But that isnot the only one.
336

5 Connecting browsers without a serverIt is also possible to connect two browsers without even setting the server. Jerome Etienne(@jerome_etienne) creates Easy Web Socket library for frontend developers who don't like tocode server-side stuff. It allows you to broadcast messages to Web pages using Google AppEngine, so you don't need to think about the server. The API is almost the same as in regularWebSockets:
view plain print ?
<script src="http://easywebsocket.org/easyWebSocket.min.js"></script> 01.<script> 02. var socket = new EasyWebSocket("idString"); 03. socket.onopen = function(){ 04. socket.send("hello world!") 05. } 06. socket.onmessage = function(event){ 07. alert("received "+ event.data) 08. } 09.</script> 10.
It will broadcast data to all the users connected with the same idString.
337

Game Development in HTML5 October 2011 (http://www.w3techcourses.com/course/report/log/index.php?chooselog=1&user=0&date=0&
id=9&modid=302) ◀ Jump to... ▶
W3C (http://www.w3techcourses.com/) ▶ HTML5-Games_Oct11(http://www.w3techcourses.com/course/view.php?id=9) ▶ Assignments(http://www.w3techcourses.com/mod/assignment/index.php?id=9) ▶ Assignment 2(http://www.w3techcourses.com/mod/assignment/view.php?id=302) ▶ View submittedassignments
Update this Assignment
View 44 submitted assignments (submissions.php?id=302)
Create an animated character that could jump on a platform on thescene.
Detect the features and use the new CSS attributes describedin this week's lecture with JavaScript fallbacksOne platform is enough - just create it and detect collision withthe player when jumping on it.
Available from: Monday, 7 November 2011, 02:45 PMDue date: Sunday, 13 November 2011, 02:45 PM
Moodle Docs for this page (http://docs.moodle.org/en/mod/assignment/view)
You are logged in as Marie-Claire Forgue (http://www.w3techcourses.com/user/view.php?id=476&course=9) (Logout(http://www.w3techcourses.com/login/logout.php?sesskey=nhnMD1zn5S) )
HTML5-Games_Oct11 (http://www.w3techcourses.com/course/view.php?id=9)
338

Deploying of your gameLast but not least - explore the power of JavaScript, CSS3 & HTML5 outside the desktop browser.
Add native features of your mobile phone like accelerometer or vibrations and publish your game inthe AppStore. Learn how to run your game as a native, desktop application on Windows, MacOSX
and Linux, using Mozilla XULRunner runtime.
Site: W3C TrainingCourse: Game Development in HTML5 October 2011Book: Deploying of your gamePrinted by: Marie-Claire ForgueDate: Monday, 23 January 2012, 01:31 PM
339

Table of Contents1 Introduction to the mobile frameworks
2 Mobile features useful in games
3 Phonegap Build
4 Desktop
340

1 Introduction to the mobile frameworksSince there are more than fivemajor mobile operating systemsnow, porting a game to all ofthem is really a lot of work -writing a game for iOS (iPhone,iPad, iWhatever) requires us tobe familiar with Objective C, if wefocus on Android or BlackBerrywe need to use Java, bada,Symbian, Maemo & Meego appsare based on C. You can writeyour game using WebTechnologies only for WebOs fornow. It wasn't a big deal coupleof months ago, but now HP(owner of Palm, which produces WebOS devices) sold ten million Touch Pad tablets withdiscount price of $99 in just two months. That means WebOs users are now number two intablet market share, just behind the iPad!But we don't want to focus only on WebOs. We want our game to work on all of the mobileOSes. And we don't want to learn all of the necessary languages. That is where we canuse Web Technologies with one of the mobile framework. I choose PhoneGap.Using PhoneGap we can install our web application on the mobile phone in the same wayas we install native apps, dedicated to the given system. It also provides an API for usingnative phone features, like vibrations, accelerometer or address book, from our JavaScriptcode. PhoneGap will take care about the rest - from the JavaScript point of view, forexample reading from accelerometer looks the same on each system - all the magichappens in PhoneGap's abstract layer inserted between our HTML documents and thenative browser wrapper.
We need a dedicated mobile OS SDK to work with PhoneGap. Everything you need to startis described in the 'Get Started Guide'. Go to http://phonegap.com/start and select yourplatform. Then follow all the steps to prepare your workspace to compiling PhoneGapapplications.
341

2 Mobile features useful in gamesFirst of all, we have to remember one basic thing while running our game on mobile - we don'thave a mouse or keyboard anymore. But since almost every new device has a touchscreen, thisis not a problem anymore - mouse events are recognized by the mobile browsers as touchevents. Of course we only have 'mouseDown' & 'mouseUp' events, it is not possible to checkif user's finger is just above the screen (like in 'mouseOver').
But is this the only option?No - almost all smartphones are equipped with an accelerometer - a tilt sensor with the abilityto determine the position of the phone in third dimensional plane. So using PhoneGap we canimplement user control without touch, mouse or keyboard events - we can control our playerby simply tilting our phone.
To set an accelerometer listener, we need to be sure that our device is ready. PhoneGap sendsnotification event 'deviceready' when it is (it's like DOMContentLoaded on desktop browsers).So we need to insert all our code (related to the framework) into such an event handler:
view plain print ?
document.addEventListener("deviceready", function () { 01. //native mobile magic in here 02.}, false); 03.
view plain print ?
document.addEventListener("deviceready", function () { 01. //native mobile magic in here 02.}, false); 03.
Now, when we are sure that our device is ready, we can teach our game how to read theaccelerometer position. PhoneGap uses a watchAcceleration() method for this. It needs threeparameters:
view plain print ?
navigator.accelerometer.watchAcceleration(success, failure, options); 01.
view plain print ?
navigator.accelerometer.watchAcceleration(success, failure, options); 01.
success() is the function called when everything runs without any problems, failure() whensomething went wrong, and options is just and object with configuration parameters. Real lifeexample could looks like this:
view plain print ?
document.addEventListener("deviceready", function () { 01. navigator.accelerometer.watchAcceleration( 02. function(tilt){ //success 03. 04. document.body.innerHTML = 'X: ' + tilt.x + "Y: " + tilt.y + "Z: " +tilt.z; 05. 06. }, 07. function(){ //failure 08. alert('NEWFAGS CANT TRIFORCE') 09. }, 10. { //options 11.
342

frequency: 100 12. }); 13.}, false); 14.
view plain print ?
document.addEventListener("deviceready", function () { 01. navigator.accelerometer.watchAcceleration( 02. function(tilt){ //success 03. 04. document.body.innerHTML = 'X: ' + tilt.x + "Y: " + tilt.y + "Z: " +tilt.z; 05. 06. }, 07. function(){ //failure 08. alert('NEWFAGS CANT TRIFORCE') 09. }, 10. { //options 11. frequency: 100 12. }); 13.}, false); 14.
Now each time we will move, rotate or tilt our phone, it will display its position. I think I don'tneed to explain how useful is this? And how easy it will be to attach this listener to ourpreviously developed game examples?
One more thing I really enjoy in mobile games is vibration. Using it you can give your playerfeedback, for example when an object the player controls collides with another one, or when itwas shooted. You can use vibrations in PhoneGap in just one line of code:
view plain print ?
navigator.notification.vibrate(0); 01.
view plain print ?
navigator.notification.vibrate(0); 01.
343

3 Phonegap BuildIt is really easier to build crossplatform mobile applications using PhoeGap, but you stillhave to remember about installing all the SDKs. It could be a problem when you have onlyone platform - for example iOS SDKs runs only on MacOSX, and bada or BlackBerry onlyon Windows. That's why you should check out PhoneGap build.
PhoneGap build is web service for compiling PhoneGap projects in the cloud, withoutinstalling anything on your computer. You need to prepare all the JavaScript files, uploadthem in a.zip file, or push them to given git repo, and PGBuild will make everything else.After a couple of minutes you will be able to download native files for all the platforms youneed.
344

4 DesktopSo we know now how to run our HTML5 games as a native, but what about desktop? Dopeople really try to build serious desktop applications with web technologies? The answer is'yes', and more over - you probably use one of those applications daily. Have you ever heardof Firefox ?Yes, all the logic in Firefox is written in JavaScript. The visual layer (GUI) is described inHTML-like language called XUL (XML User interface Language) and styled using CSS. Therun time environment of XUL is called XulRunner. It helps you run your web application onWindows, MacOsX and Linux without any changes in your code. You we have 'write once,run everywhere' patter also for desktops. That are screens of simple To-do application writtenin JavaScript & XUL on different systems:
345

To start playing with XULRunner, just download newest version for your system fromhttp://releases.mozilla.org/pub/mozilla.org/xulrunner/releases/, and simple app from here: <!--SIMPLEAPP -->. To run your Xulrunner application, simply type in your command line (cmdor .bat file on Windows, Terminal on Mac & Linux):
view plain print ?
win: xulrunner.exe application.ini 01.lin: xulrunner application.ini 02.mac: xulrunner-‐bin ~/full/path/to/application.ini 03. xulrunner-‐bin -‐-‐install-‐app ~/path/to/app/folder 04.
view plain print ?
win: xulrunner.exe application.ini 01.lin: xulrunner application.ini 02.mac: xulrunner-‐bin ~/full/path/to/application.ini 03. xulrunner-‐bin -‐-‐install-‐app ~/path/to/app/folder 04.
Put all your application file into /chrome/content folder, and render everything in frame inmain.xul file:
view plain print ?
<?xml version="1.0"?> 01. 02.<?xml-‐stylesheet href="chrome://global/skin/" type="text/css"?> 03.<?xml-‐stylesheet href="chrome://todo/skin/main.css" type="text/css"?> 04. 05.<!DOCTYPE overlay SYSTEM "chrome://todo/locale/todo.dtd"> 06. 07.<window id="exampleWindow" 08. title="mainwindow.title;" 09. xmlns:html="http://www.w3.org/1999/xhtml" 10. xmlns="http://www.mozilla.org/keymaster/gatekeeper/there.is.only.xul" 11. persist="screenX screenY width height sizemode" 12. width="600" height="600"> 13. 14.<iframe src="path.to.your.main.html.file" type="content" flex="1"></iframe> 15. 16.</window> 17.
346

view plain print ?
<?xml version="1.0"?> 01. 02.<?xml-‐stylesheet href="chrome://global/skin/" type="text/css"?> 03.<?xml-‐stylesheet href="chrome://todo/skin/main.css" type="text/css"?> 04. 05.<!DOCTYPE overlay SYSTEM "chrome://todo/locale/todo.dtd"> 06. 07.<window id="exampleWindow" 08. title="mainwindow.title;" 09. xmlns:html="http://www.w3.org/1999/xhtml" 10. xmlns="http://www.mozilla.org/keymaster/gatekeeper/there.is.only.xul" 11. persist="screenX screenY width height sizemode" 12. width="600" height="600"> 13. 14.<iframe src="path.to.your.main.html.file" type="content" flex="1"></iframe> 15. 16.</window> 17.
Done! You can run your application on every system now. It is possible to pack it as astandalone application (like .exe on windows and .app on Mac), but since Mozilla is releasingFirefox (and Xulrunner) every couple of weeks, the methods are slightly changing. You canalways find current info & details on Xulrunner pages in Mozilla Developer Network.
347

Game Development in HTML5 October 2011 (http://www.w3techcourses.com/course/report/log/index.php?chooselog=1&user=0&date=0&
id=9&modid=316) ◀ Jump to... ▶
W3C (http://www.w3techcourses.com/) ▶ HTML5-Games_Oct11(http://www.w3techcourses.com/course/view.php?id=9) ▶ Assignments(http://www.w3techcourses.com/mod/assignment/index.php?id=9) ▶ Assignment 4(http://www.w3techcourses.com/mod/assignment/view.php?id=316) ▶ View submittedassignments
Update this Assignment
View 28 submitted assignments (submissions.php?id=316)
Pack your game as a native for any mobile or desktop platformusing described platforms. A BlackBerry version is optional at thispoint, because my Blackberry is currently broken and I will not beable to run and test your apps on that system
Available from: Tuesday, 22 November 2011, 11:10 PMDue date: Tuesday, 29 November 2011, 11:10 PM
Moodle Docs for this page (http://docs.moodle.org/en/mod/assignment/view)
You are logged in as Marie-Claire Forgue (http://www.w3techcourses.com/user/view.php?id=476&course=9) (Logout(http://www.w3techcourses.com/login/logout.php?sesskey=nhnMD1zn5S) )
HTML5-Games_Oct11 (http://www.w3techcourses.com/course/view.php?id=9)
348

OMWeb - 248687
D 2.2 Training Report
APPENDIX 8: FEEDBACK ANALYSIS – “GAME DEVELOPMENT IN HTML5” (OCT. 2011)
349

Game Development in HTML5 October 2011 (http://www.w3techcourses.com/course/report/log/index.php?chooselog=1&user=0&date=0&
id=9&modid=313) ◀ Jump to...
W3C (http://www.w3techcourses.com/) ▶ HTML5-Games_Oct11(http://www.w3techcourses.com/course/view.php?id=9) ▶ Feedback (index.php?id=9) ▶Feedback, please!
Update this Feedback
Export to ExcelSubmitted answers: 25Questions: 23
How did you hear about this course?- Announcement mailing list: 1 (4.00 %)- W3C Web site: 5 (20.00 %)- My manager told me: 3 (12.00 %)- A friend told me: 2 (8.00 %)- Twitter: 9 (36.00 %)- W3C newsletter: 1 (4.00 %)- Other: 4 (16.00 %)
If "other", please specify- - - - - - - - http://blog.end3r.com/- - - - - -
Overview (http://www.w3techcourses.com/mod/feedback/view.php?id=313&do_show=view) Edit questions
(http://www.w3techcourses.com/mod/feedback/edit.php?id=313&do_show=edit) Templates (http://www.w3techcourses.com
/mod/feedback/edit.php?id=313&do_show=templates) Show responses (http://www.w3techcourses.com
/mod/feedback/show_entries.php?id=313&do_show=showentries)
Analysis ()
350

- Hackerspace- dailyjs blog- - - - coworker told me- - - - -
What did you like best about this course?- Having a chance to play around with EasyWebSockets and
PhoneGap- Tips for performance, for design patterns...- The topic- It was online- - Concerned with up-to-date and future technology, cross
platform techniques, interesting subject matter (games).Hopefully enough latitude so that everyone produced gameswhich were slightly different, using personal strengths, I guess.
- The assignments, easy to follow for less tehnical inclined folks .- It has motivated me for my own practice- Understanding basic concepts like game loop and animating
characters (with CSS).- Lots of new things to learn, covered a good range of topics.- the code snippets- Multiplayer for sure. That's was the most interesting becouse
it was completly new for me.- Interesting and fun subject. I learnt a lot, and tried out things I
have been wanting to try for a long time, but never got aroundto.
- That Multiplayer and Deployment was also covered- Learning new technologies.- to have a supportive community on a same subject (html5
gaming)- The name of the course- The thing i like the most was the objectivity of the lessons,- The content is really updated- The course wasn't what I expected to be honest- Topics (game dev)
351

- i liked, that i was forced to use new technologies, like csssprite animations, sockets and phonegap. i think it is also good,that the assignments could be done in a couple of hours.
- To get a succinct overview of the core concepts of gamedevelopment in a HTML5 environment.
- Get more knowledge about game development!- Comprehensive but all important topics covered
You would recommend this course to others- Strongly agree (5): 2 (8.00 %)- Agree (4):
11 (44.00 %)- I might but I am not sure(3):
9 (36.00 %)
- Disagree (2): 1 (4.00 %)- Strongly disagree (1): 2 (8.00 %)Average: 3.40
If you'd recommend the course: can you say why?- - - I liked the course, because for me the "pressure" for having to
upload the assignments in time have forced me to finally get todevelop some advances in the html5 game scene.
In the 2 first weeks some good advices where given, and as ageneral overview it was more than fine. Week 3 was a niceintroduction to Node.js, but in reality an excuse for us to dig iton our own, and Week 4 actually were just a pair of links tolook them up.I have no problem, because I wanted to try Node andPhoneGap, so for me was great, and also I'm a web dev, so noworries on these technologies. But I guess anyone not familiarwith these would be overwhelmed for the lack of info.
What I'd really loved, is to have a deeper knowledge of how toorganize code for a mini-game-engine, we had to do ours, andas long as the exercises weren't corrected during the course, Idon't even know if my first attempt of game-engine is correct,and I carried it on in the next exercises, so I had to tweak itwhen something seemed wrong and again without knowing ifthat change was for good or a hack.
Ok, but that's me. My expectations, surely none of the anotherhundred students who took this course. But knowing knowthat the amount of documentation provided in the course is
352

really short (like 3 chapters of an O'Reilly book), I think thecourses should be more focused than general.
- It\'s very useful to learn new thecnologies of HTML5- - Challenging, tutor showed inside knowledge, and puts you in
touch with a lot of people with similar goals who can help you.- - Good knowledge; however the course requires a lot of self
work and good background in JavaScript- - Lots to learn from it :)- Because it's a good base to start from, a good explanation and
refreshment. You see how others code. Which is interesting.- - Useful and fun- Because a lot of different topics are covered. Michal is a true
expert ;-)- - it's a good introduction course on html5 gaming- - was a short time expended and a lot of knowledge aquired, a
very good thing nowadays when our time is short.- The content is good and updated. Also it is really nice way of
finding people with the same interests. The forum providednice discussions with good extra content.
- - A large number of diverse knowledge.- i would recommend it to somebody who hasn't startet at
programming games at all. it is a good start point. it may alsobe good for someone who needs a structure like a course forgetting in touch with new technologies.
- See: _What did you like best about this course?_ : )- I's a good way to learn new things. I like to learn!- It's a good boot camp if you want to start with html5 games.
What suggestions do you have for improving thecourse?- 1. The course should be written in correct english.
2. The example code should not contain obvious bugs. Thewriter didn't even try to run it, for crying out loud!3. The assignments should be checked before the deadline ofthe next assignment. That way you can use the feedback.4. If the course leader becomes ill, there should be asubstitute. Better yet, all of the course content should havebeen written in advance.
353

5. Saying that the work will not be tested on Blackberrybecause your BB is broken is unacceptable! We pay a lot ofmoney for this course, buy a new one! (I haven't developed forBB myself, but I felt this remark was highly unprofessional.)
All in all, I feel the entire course was very unprofessional.- Be more especific in assignment. Give the sprites and a guide
to expected result- I mixed this answer with the previous one, sorry!- The assignments should be corrected weekly in order to have
feedback.I would want to there was any session where describe levelson games.
- A documented final sample application with recomandedpattern to use as reference in the future developpement...
- I think that the course was well described except that it didnot explain what you needed to set up in your developmentenvironment beforehand, which would have been useful to doin the week before the course started (although some thingsneeded real content before you knew your developmentenvironment was working). I had some pain points setting upnode.js and clearing enough space on my laptop beforedownloading IOS SDK, although both were useful to do.
- More in depth game arhitecture ( more about best practices,physics ... ).
- More granular attitude. More and shorter excercises- The first few weeks I have not been able to devote much time
to the course, I have been able to really work with the coursematerial only the last 2 weeks.
That being said, I have found it difficult to follow this course.Most of the material consists of javascript code snippets. Theexperienced javascript programmer might find it easy to dealwith these snippets. I have only basic js knowledge (as wasrequired for attending the course). I would have found it veryhelpful if every snippet would have been provided with anexample of its application, or with a download of the javascriptplus html as working examples. Much of my time wasconsumed by trying to build the code snippets into workingscripts. Besides, many snippets contain typo's or other bugs.
Week 3 asks to download and install a javascript enginewithout explaining what the engine does, or whether it mightadd any security risks to my computer. It would have been niceto see a working multiplayer example to play with at thebeginning of week 3, that would have motivated me muchmore to download the engine.
354

Furthermore, it would have been nice to see some examplesof games which have been developed with html5, or somereferences to good practice in game design.
Michal answered very quickly to forum posts which is positive.Unfortunately, when he was sick the 4th week, nobodyannounced how long he would be away, when he would beback, what it would mean re extension of deadlines, and so on.In a purely online environment, communication to theparticipants is vital.
Earlier courses I've attended at W3C were much betterorganised in terms of communication.
- I couldn't get the week 4 (packaging an app) working atall—more instructions to walk through that would have beenhelpful.
Better code formatting in the material would also help. Wouldhave been nice to be able to clone the example code from agit repo.
- Maybe the lesson about node.js a bit more details. We had todo a multiplayer assignment but no documentation on how tohandles this. I failed at the task. I don't like feedback by forum, Iwan't to look for the answer myself but the documentation onthat topic was rather limited.
- One week is not enought for assigment. Secound thing isdividing material. First and secound part of course were veryeasy for me and I made it in a few minutes. Third one wasreally hard. In my opinion it should be divided in two parts.More discribtions about multiplayer id needed too.
- There were some typos in the course material which added tothe complexity of assignments. Also, if an assignment requiresa public server with a certain configuration, would it bepossible to provide that from the organiser?
- Downloadable samples. So you can start working right away.Also all pages as one pdf for after course rereadings.
- More time to complete tasks.- the touch points on actually html5 tag usages are less than
expected. it would be great if more info and tips can beprovided. like localstorage, audio in gaming and more gameflow and design patterns
- Quality, resources, wiki.- Examples in the end of each chapter with all the code working,
the most of the material was this way, but some parts did not.This could be because of michal's sick so i did not mind so
355

much about this point.
The course was great to me, i am a web developer with nocontact to game devel before and i could manage someassignments well while my job let me did.
- There should be working examples after each week, showingwhat was considered. Also think the content could go deeperon matters specific for game programming (techniques foraccomplishing some task) instead of letting the student findout about it in the homework.The course is quite expensive for the content you get aboutthe subject.
- 1. I would have expected to find material beyond what couldbe found for free on the Internet. Improving the depth of thematerial would be a good start, I don't think jumping alone canbe referred as "physics" for a game, for example, also thejumping function was a bit careless and not optimizedaccording to physics of jumping at all.2. It would be ideal to explain what the scope of each sectionis, because the names of the 4 modules made me think therewould be a lot more to each of them, and in the end theywere very basic. If I had been aware of the actual contents ofthe module I wouldn't have signed up.3. Setting realistic expectations about time allotment. Thiscourse didn't require 2/3 hours a week, from reading thematerial, to debugging, to optimizing the code, testing on allbrowsers, etc, it took me more than 2 or 3 hours a week(except for the first week, in which there was not muchmaterial or stuff to do). I know it says "to most people" butapart form having a background in javascript programming, Ihave a background in robot programming so I've done similararchitecture before, and it didn't take me 2 or 3 hours,sometimes because I bumped into bugs or browser quirks thatrequired more exploring online, other times because thingswere not explained at all (socket.io being one of them) and Ihad to read the up from other sites.
- Maybe a little longer to see more topics.- i think the books could improve. there were bugs in the code
and they looked very differnt from week to week. there'sroom for improvement. i'd also like to see more focus on codepatterns in game design. the course master could show a littlemore presence. we pay money and i expect there will be ananswer, tipp or what ever at least once a day.
- Understandably a course of this length can't cover all conceptsat depth but more links to further resources would be nice.
356

- I thought that the provided material was a little poor! It wasreally expected that there are more material to be used as asource!
It seems that each assigment stuff was made a few hoursbefore delivery to students! I suppose that it's a good practicetake a few more time to do it!
- - Clearer guidance about the delivery of assignments.- Instead of a textfield it should be possible to upload a bunchof files.- Although I don't think there is time left during the course(because it's such a huge topic) advanced topics would beinteresting (Debugging, WebGL, class-oriented design inJavascript, code compressors, GWT, game engines,..)
This course was worth your time- Strongly agree (5): 6 (24.00 %)- Agree (4):
15 (60.00 %)- Neither agree nordisagree (3):
2 (8.00 %)
- Disagree (2): 2 (8.00 %)- Strongly disagree(1):
0
Average: 4.00
The course met your expectations- Strongly agree (5): 5 (20.00 %)- Agree (4): 7 (28.00 %)- Neither agree nor disagree(3): 9 (36.00 %)- Disagree (2): 1 (4.00 %)- Strongly disagree (1): 3 (12.00 %)Average: 3.40
You learnt something that you previously did notknow- Strongly agree (5):
13 (52.00 %)- Agree (4):
12 (48.00 %)- Neither agree nordisagree (3):
0
- Disagree (2): 0- Strongly disagree (1): 0Average: 4.52
357

You will incorporate what you learnt into yourwork- Strongly agree (5): 8 (32.00 %)- Agree (4):
14 (56.00 %)- Neither agree nordisagree (3):
3 (12.00 %)
- Disagree (2): 0- Strongly disagree (1): 0Average: 4.20
The course material was ...- Helpful and easy to understand(5):
4 (16.00 %)
- Informative and usually easy tofollow (4):
5 (20.00 %)
- Challenging at times but I wasable to follow it (3): 10 (40.00 %)- Difficult to follow (2): 4 (16.00 %)- Too difficult and assumed toomuch knowledge (1):
0
Average: 3.12
The course material ...- Provided more detail than Ifelt was necessary (5):
0
- Went into more detail thanI needed to cover the topic(4):
0
- Provided sufficientinformation to cover the topic(3):
12 (48.00 %)
- Was barely enough tounderstand the topic (2): 10 (40.00 %)- Was insufficient tounderstand the topic (1):
1 (4.00 %)
Average: 2.28
The number of assignments was ...- Much too low. Iwould like to have hadmore assignments (5):
1 (4.00 %)
- Too low - I couldhave handled more(4):
3 (12.00 %)
358

- About right (3):16 (64.00 %)
- A little high - it wasdifficult to completethem on time (2):
3 (12.00 %)
- Too high, I could notcomplete them in theavailable time (1):
1 (4.00 %)
Average: 2.88
We estimated that you would need to spend about3-4 hours a week on the course. Was this ...- A gross underestimate (ittook a lot more mostweeks) (5):
4 (16.00 %)
- An under estimate (it tookmore some weeks) (4): 13 (52.00 %)- About right (3): 6 (24.00 %)- An over estimate (it tookless than 4 hours mostweeks) (2):
0
- A gross over estimate (Ifinished in much less timeeach week) (1):
1 (4.00 %)
Average: 3.64
Introduction to HTML5/JavaScript gamedevelopment (Week 1)- 5 (5): 10 (40.00 %)- 4 (4): 5 (20.00 %)- 3 (3): 8 (32.00 %)- 2 (2): 1 (4.00 %)- 1 (1): 1 (4.00 %)Average: 3.88
Let's make it move! (Week 2)- 5 (5): 8 (32.00 %)- 4 (4): 8 (32.00 %)- 3 (3): 4 (16.00 %)- 2 (2): 3 (12.00 %)- 1 (1): 1 (4.00 %)Average: 3.64
Multiplayer (Week 3)- 5 (5): 6 (24.00 %)
359

- 4 (4): 8 (32.00 %)- 3 (3): 6 (24.00 %)- 2 (2): 3 (12.00 %)- 1 (1): 1 (4.00 %)Average: 3.48
Deploying of your game (Week 4)- 5 (5): 1 (4.00 %)- 4 (4): 8 (32.00 %)- 3 (3): 8 (32.00 %)- 2 (2): 4 (16.00 %)- 1 (1): 2 (8.00 %)Average: 2.84
Can you explain your evaluation for each of thesessions? Thx!- - - Week 1. Good for noobs, they need this.
Week 2. Liked all the options of moving sprites, veryimportant on the subjectWeek 3. Good to try Node, although very introductory.Week 4. I liked to try PhoneGap, but did it on my own. Thecontent this week was very poor (a pair of links almost)
- Session 1 was very easy.Session 4 was not very useful and I couldn\'t test because Idon\'t have those mobiles
- - - - I have no remarks in 1-3. The 4th lecture was in my opinion
empty inside - deploying on the mobile platforms is anothertopic not related to HTML5 games
- See earlier comments. Gave up after week 2.- I think, especially as the weeks went on, the material does a
good job of introducing topics, but needs to go into muchmore depth on them. More focus on "this is how you do X"rather than "this is X". I definitely struggled to understand howto use XUL.
More exercises to work through would have really helped me.- I felt that the first two weeks were the basis of everything.
These things are the ones you will be using often. Themultiplayer is a nice feature, but hard assignment in myopinion. The 4th is interesting but I'd like to spend more time
360

on animation, hittests, physics,shooting,...- More descriptions about multiplayers code id needed.- - Lots of the provided samples were buggy. Downloadable
sample files would have improved the whole course.Nevertheless I learnt a lot although I was very busy at workand couldn't play around with the assignments as I wanted.
- Week 1: Good introduction, although I felt the code lackedstructureWeek 2: The explanation of animations while being good wasdifficult understand and incorporate because of the codestructure.Week 3: Node was well explain, but there was not enoughinformation on web sockets are was initially labelled in thecourse.Week 4. Well explained, good end to the course.
- - General: no feedback from assigments and messy code. Poor
documentation and not enough resources.- Very good material about in the week 1 and 2 in the week 3 i
have some dificult to manage with server and the stepsshowed into material of week 4 did not worked to me,especially xulrunner.
- - Most of the material was provided unexplained and just for
copy-paste. So even if I know where it comes from, I find thisnot a good way of learning and would not recommed this toanother person.
I think week 1 was poor due to lack of explanation of thecontent and just providing some copy-pasting material. Weektwo's content lacked breadth and depth, movement are notcovered, just a jump is not "let's make it move" or "physics".Week three has more content, and here I found the only thingnew to me (socket.io) but was not explained *at all* so I hadto read up from the socket.io website. Week 4 was not fullyrelevant to me, but I expected this.
- In the last week we could do more with this topic.- in the first two weeks i'd expected more in the last two
weeks, the topic what nice, but i'd like to here more what todo with the things we learned.
- - - Course1: More Javascript basics needed in the introduction.
Course4: Deployement was interesting but other topics mightalso have been cool.
361

Which option best describes your primary jobposition?- Webdeveloper: 22 (88.00 %)- Webdesigner:
0
- Webprojectmanager:
0
- Webcontentauthor:
0
- Usabilityspecialist:
0
- Other: 3 (12.00 %)
How many employees does the organization youwork for have?- 1: 1 (4.00 %)- 2 to 10: 3 (12.00 %)- 11 to 50: 6 (24.00 %)- 51 to 250: 8 (32.00 %)- 251 to 1000: 4 (16.00 %)- More than 1000: 1 (4.00 %)
Do you have any other comments? Please behonest!- - Thanks for opportunity :)- Expensive for the contents.
A good excuse to try a tech, but might have get moreknowledge (and cheaper) in a pair of books.No feedback at all in the exercisesHey, but I liked the teacher and the possibility of contactinghim
- - Personaly I hoped to have more information abut game
development paterns and best practices.
But it was still a very intersant course.- I think that although the course stuck closely to the
description I read beforehand, my expectations weresomewhat different (for example, I thought that the canvaselement would play a more central role).I probably needed to brush up on JavaScript before the coursestarted, which was my own fault.
362
I learnt most when I got really stuck around week 3, and hadto work quite closely through the code. I think this was wherethe learning curve (quite rightly) steepened in the course afterthe relatively easy first week or two.I was a bit disappointed in the some of the browser support(even now with double-figure versions) for some of the thingsthat I was trying to do, but this is no reflection on the coursewhich went into this topic in some detail, and things shouldonly get better (for a while at least).I was sorry to hear that Michal was sick during the course. Ido agree with others that a bit quicker feedback on earlyassignments would be useful to check that we were on theright path (patterns and practices).When I was struggling in the middle of the course, I did notenjoy it, but towards the end I was getting the hang of some ofthe debugging techniques and making better progress, and feltmore sense of achievement, as well as a sense of how far I stillhave to go.
- It was fun, however i expected more tehnical stuff involved.- Good job! I want another interesting course from cutting-edge
technologies- See earlier comments.- Thanks for offering these courses. They are complex topics
and it's great to have some guidance when get started onthem.
I think the SVG course (I took it last year) is a great example.That was also a complex, but there was a lot more material towork with and that really helped.
I enjoyed this course, but was frustrated by the difficultly ofthe final assignment. I think the difficulty is not inunderstanding the topic, but simply in going through theabsolute correct motions to package up an app.
- - Thanks for really good adventure :)- The feedback on assignments was much too late and very
sparse. Early feedback would have helped to make a better jobof the later assignments.
- I liked it! Especially the multiplayer topic was very wellcovered. Maybe it would be helpful also to provide some helpfrom the beginning how to structure the code best. I know it'sonly a side topic but would be appreciated by manyparticipants. Hope to see more HTML5 gaming courses in thefuture!
363

- The content of the course was interesting and well thoughtout, but I think more importance should have been put oncode quality. I think this was over looked, which madeunderstanding the material more difficult then necessary.
- - I'm very disappointed with this course and i'd like a refund.- I think have comment all i need in the previous text areas, was
a time very well expended and a money well employed.
Nice job!- I liked the course, the forum but think the course could go
deeper on some subjects and the homeworks more specific.- - Good job and I hope see soon again.- i think over all i expected more in terms of feedback,
interaction, materials and so on. there should also be aplattform where the code could be shared.
- The course was a nice introduction to game development.Further pointers to deepen the knowledge gained during thecourse would be helpful.
- ;)- Interesting course but a little bit more background knowledge
would be nice.
Will you likely attend OTHER W3C trainingcourses in the future?- Yes (3): 9 (36.00 %)- May be(2):
14 (56.00 %)
- No (1): 2 (8.00 %)Average: 2.28
Moodle Docs for this page (http://docs.moodle.org/en/mod/feedback/analysis)
You are logged in as Marie-Claire Forgue (http://www.w3techcourses.com/user/view.php?id=476&course=9) (Logout(http://www.w3techcourses.com/login/logout.php?sesskey=dtOyr74dlk) )
HTML5-Games_Oct11 (http://www.w3techcourses.com/course/view.php?id=9)
364

OMWeb - 248687
D 2.2 Training Report
APPENDIX 9: LIST OF PARTICIPANTS – “GAME DEVELOPMENT IN HTML5” (OCT. 2011)
First name Surname Country Philip Ackermann Germany Sergey Alifanov Germany Monika Andergassen Austria Laurent Auneau France Aydin Baltaci USA Ricardo Bin Brazil Sergio Luiz Bitti Martins de Oliveira Filho Brazil Bartosz Borowski Poland Ben Boyle Australia Anne Brüggemann-Klein Germany Luz Caballero USA Nate Cain USA Dale Cantwell Ireland Karel Cardinaels Belgium Cesare Cesari Italy Damian Dadswell UK Racheet Dave UK Joshua DeVinney USA Andrew Dickson Australia Poelinca Dorin Romania Mike Downey USA Michael Flanagan Ireland Igor France Netherlands Martijn Frazer Netherlands Yosuke Funahashi Japan Vladimir Georgiev Bulgaria alex gerber USA Jeroen Gijsman Netherlands Julien Gilli Canada Carlos Roberto Gomes Junior Brazil Bora Gonul Turkey Matias Gonzalez Spain Johan Huijkman Netherlands Nicolas Jacquemin France Rod Jazinski UK jerome jerome USA Bjorn Thor Jonsson Iceland maciek kanski Poland tshitshi kia ntoni Belgium Damian Kobiałka Poland Matt Krawczyk USA
365

OMWeb - 248687
D 2.2 Training Report
Ho Sun Howard Kwong Hong Kong Filipe La Ruina Brazil Stefan Lemmen Netherlands Yun Zhi Lin Australia Wolfgang Litzlbauer Austria Eduardo Lopez Spain Jorge López Herranz Spain Jesús López Sandoval Spain patrick lowman USA Jay Margalus USA Shane Marks Iceland Rosario Martínez Spain Sergio Martínez Montes Spain Charles Mason USA Victor Matekole Netherlands Aaron Maturen USA Clemens Mautner Markhof Austria Henry Maxwell USA elias Medawar Switzerland Victor Molero Spain Axel Monse Germany Johannes Moser Austria Daniele Orler Italy Israel Pastrana Spain Thomas Pellegrini Portugal Juan Francisco Pereira Corral Spain Adrian Perez Jorge Spain Jose Manuel Perez Sevilla Spain Nils Perret Norway Mike Pifalo USA Ciprian Porumbescu Romania Per Quested Aronsson Sweden Mike Randrup USA Tavis Reddick UK OMWeb reviewer Belgium Andrew Roach USA Viacheslav Rodionov Russia Mário Rodrigues Portugal Christopher Rozitis Canada Jorge Sandoval Colombia Slim SOUSSI France Rogério Taques Japan Anatoli Vassilina Denmark Jean-Denis Vauguet France seth vincent USA Jelle Visser Netherlands
366

OMWeb - 248687
D 2.2 Training Report
Chris Waalberg Netherlands Brad Walker South Africa
367