Towards an Organisational Readness Framework for Emerging Technologie
Upload
khangminh22Category
view
1download
0
BAB TECHNOLOGIE GmbH
ThemeEditor Documentation
Documentation version V State 02/2021 Date: 4. February 2021
EN
TABLE OF CONTENTS Documentation ThemeEditor
2 BAB TECHNOLOGIE GmbH
BAB TECHNOLOGIE GmbH
Hörder Burgstraße 18 D-44263 Dortmund, Germany
Tel.: +49 (0) 231 – 476 425 - 30 Fax.: +49 (0) 231 – 476 425 - 59 www.bab-tec.de
Documentation ThemeEditor TABLE OF CONTENTS
BAB TECHNOLOGIE GmbH 3
TABLE OF CONTENTS 1 Introduction ......................................................................................................................................... 4
2 General .................................................................................................................................................. 4
3 Download theme from EIBPORT ........................................................................................................ 5
3.1 Construction and folder structure of themes .............................................................................. 6
4 Editing graphics ................................................................................................................................... 8
5 Sets ..................................................................................................................................................... 10
5.1 append a new set ...................................................................................................................... 10 5.2 Remove a set ............................................................................................................................. 12
6 Determining Colours for the Theme .............................................................................................. 13
7 Saving and loading of themes ......................................................................................................... 14
7.1 Encrypted Theme ....................................................................................................................... 14
8 Import des Themes in the EIBPORT ................................................................................................ 15
8.1 Erasing imported themes .......................................................................................................... 17
9 Results ................................................................................................................................................ 18
LIST OF FIGURES Figure 1: ThemeEditor ......................................................................................................................................................4 Figure 2: Initiate download of the theme … ...................................................................................................................5 Figure 3: Download Theme from… .................................................................................................................................5 Figure 4: Selection of theme type ....................................................................................................................................5 Figure 5: Theme Details ...................................................................................................................................................6 Figure 6: Structure of the theme types ............................................................................................................................6 Figure 7: Folder structure of CONTROL S .........................................................................................................................7 Figure 8: Editor functions .................................................................................................................................................8 Figure 9: Push button with a new graphic .......................................................................................................................9 Figure 10: New push button ............................................................................................................................................9 Figure 11: Append a new set ........................................................................................................................................ 10 Figure 12: A new set without any graphics .................................................................................................................. 11 Figure 13: Push button with different sets.................................................................................................................... 11 Figure 14 Remove on set .............................................................................................................................................. 12 Figure 15: Determine the theme colors for the CONTROL S ........................................................................................ 13 Figure 16: Determine colours for visualisation and editor ........................................................................................... 13 Figure 18 Encrypted theme. Keyword dialogue ........................................................................................................... 14 Figure 18 Important one themes .................................................................................................................................. 15 Figure 19 Import dialogue of themes ........................................................................................................................... 15 Figure 20 Importing on theme ..................................................................................................................................... 16 Figure 21 Erasing one theme ........................................................................................................................................ 17 Figure 22 Graphic for the new Set ................................................................................................................................ 18

Introduction Documentation ThemeEditor
4 BAB TECHNOLOGIE GmbH
1 INTRODUCTION
By ThemeEditor it is possible to substitute all icons graphics and animated graphics of EIBPORT, with self-selected ones. In this way the customer can create his own “library“ to adapt visualization according to his liking.
2 GENERAL
With the ThemeEditor you can configure two types of themes:
“editor and visualization“ and
“Control S“.
Theme “editor and visualization“ includes nearly all visualization elements and icons of EIBPORT visualization- and job editor. “Control S“ Theme contains all visualization elements for Control S visualization.
Figure 1 shows the ThemeEditor directly after starting the programme
Figure 1: ThemeEditor
Documentation ThemeEditor Download theme from EIBPORT
BAB TECHNOLOGIE GmbH 5
3 DOWNLOAD THEME FROM EIBPORT
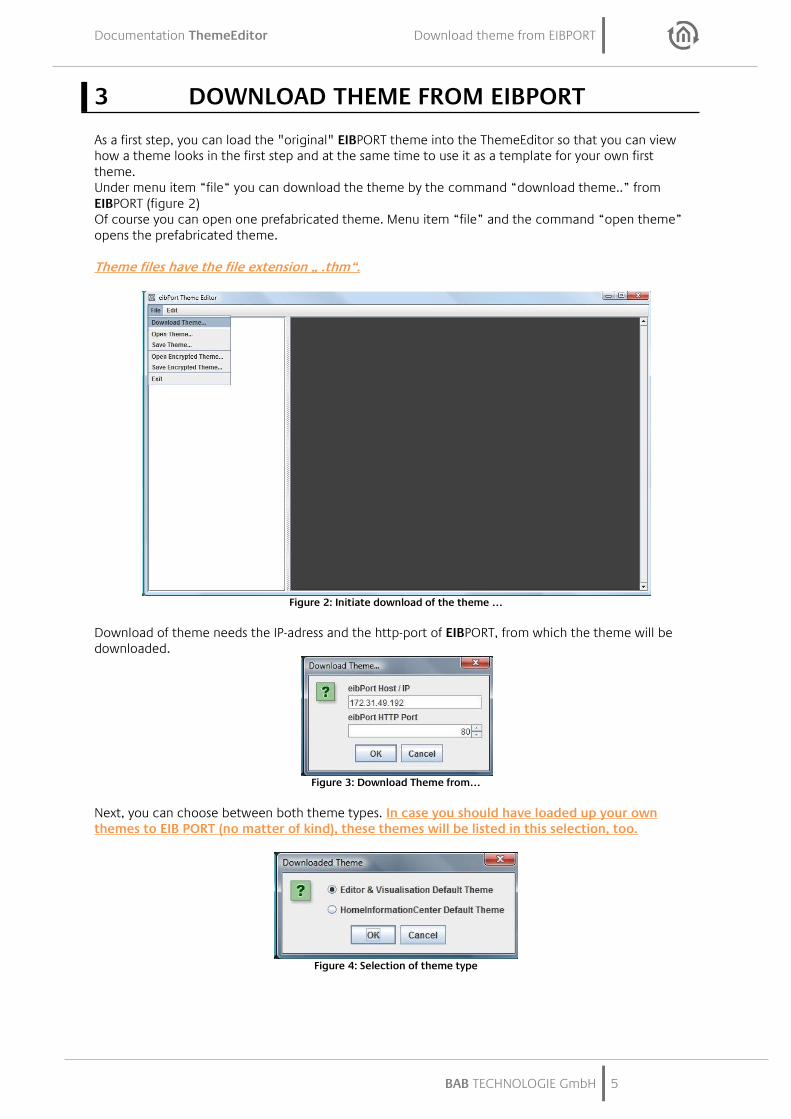
As a first step, you can load the "original" EIBPORT theme into the ThemeEditor so that you can view how a theme looks in the first step and at the same time to use it as a template for your own first theme. Under menu item “file“ you can download the theme by the command “download theme..” from EIBPORT (figure 2) Of course you can open one prefabricated theme. Menu item “file” and the command “open theme” opens the prefabricated theme. Theme files have the file extension „ .thm“.
Figure 2: Initiate download of the theme …
Download of theme needs the IP-adress and the http-port of EIBPORT, from which the theme will be downloaded.
Figure 3: Download Theme from…
Next, you can choose between both theme types. In case you should have loaded up your own themes to EIB PORT (no matter of kind), these themes will be listed in this selection, too.
Figure 4: Selection of theme type
Download theme from EIBPORT Documentation ThemeEditor
6 BAB TECHNOLOGIE GmbH
In a final step, you have to personalize the theme by labelling and by entering of an author name (Figure 5).
3.1 CONSTRUCTION AND FOLDER STRUCTURE OF THEMES
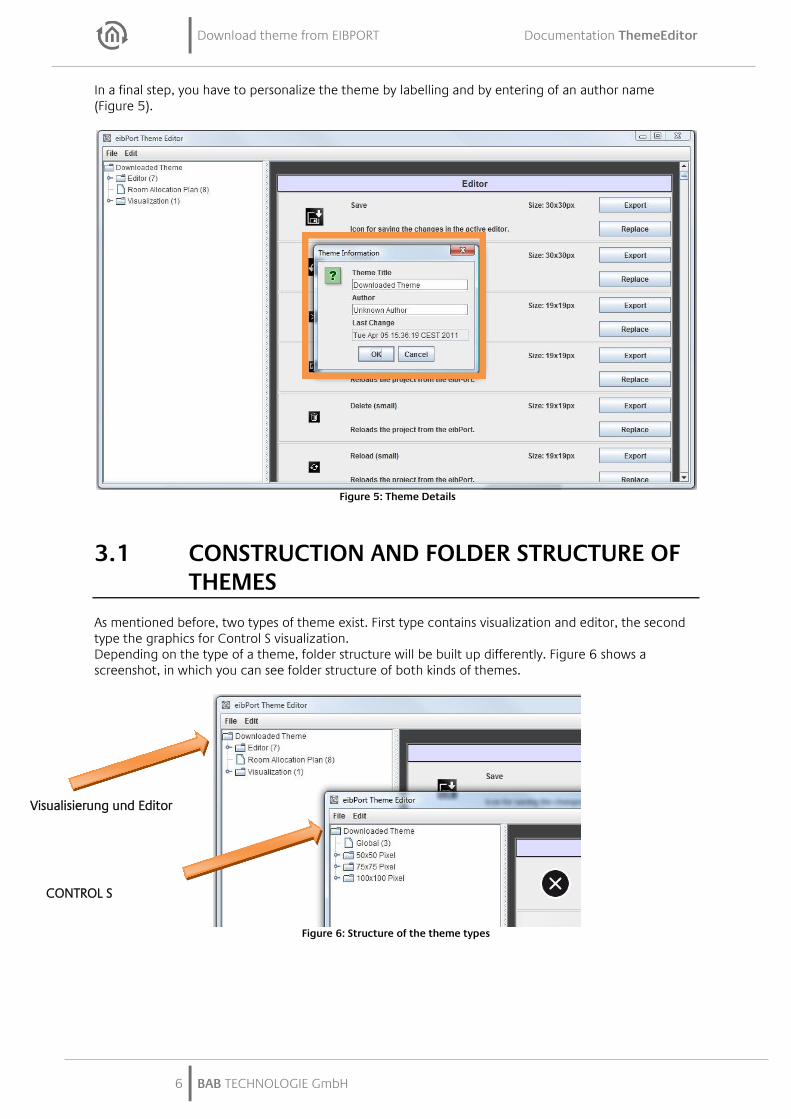
As mentioned before, two types of theme exist. First type contains visualization and editor, the second type the graphics for Control S visualization. Depending on the type of a theme, folder structure will be built up differently. Figure 6 shows a screenshot, in which you can see folder structure of both kinds of themes.
Figure 6: Structure of the theme types
Figure 5: Theme Details
Visualisierung und Editor
CONTROL S
Documentation ThemeEditor Download theme from EIBPORT
BAB TECHNOLOGIE GmbH 7
The ThemeEditor type visualization and editor (figure 6): The name of the folder points out, which categories of graphics it is. For example, if you choose the folder “editor” on the left side, the cursor will mark at once the corresponding graphic on the list in the right window. All graphics will be divided in three arrays:
Editor
Room Allocation Plan
Visualization
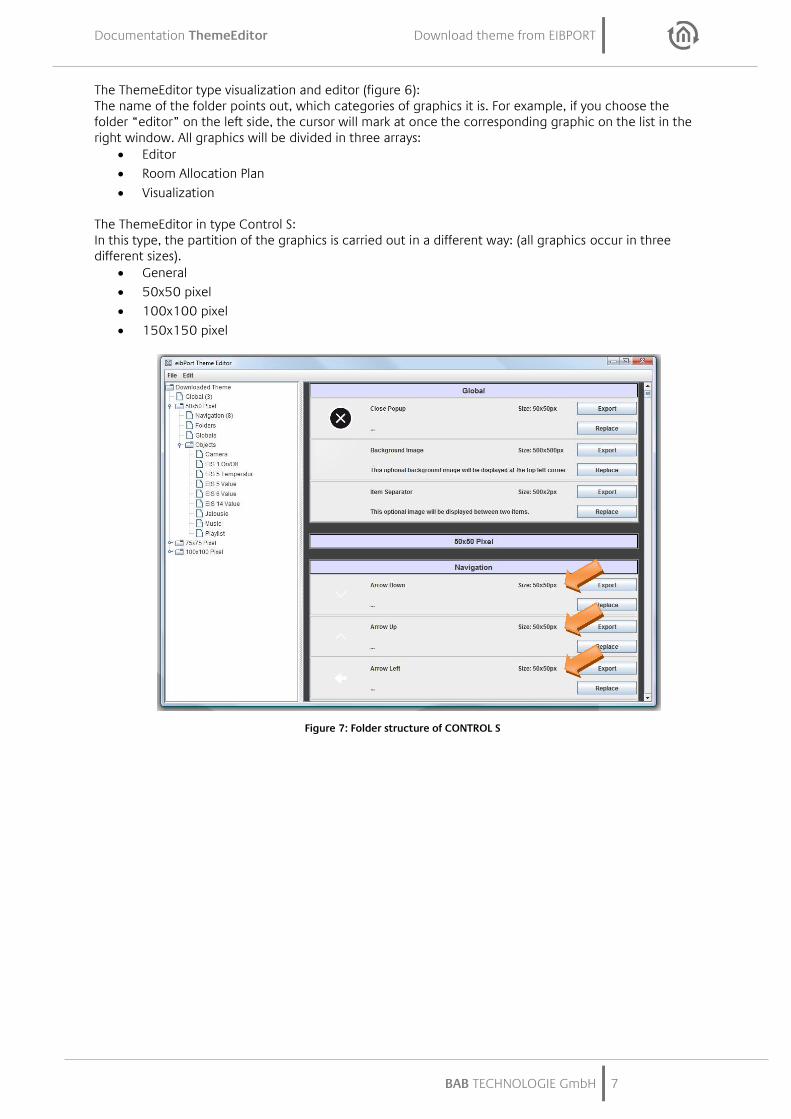
The ThemeEditor in type Control S: In this type, the partition of the graphics is carried out in a different way: (all graphics occur in three different sizes).
General
50x50 pixel
100x100 pixel
150x150 pixel
Figure 7: Folder structure of CONTROL S
Editing graphics Documentation ThemeEditor
8 BAB TECHNOLOGIE GmbH
4 EDITING GRAPHICS
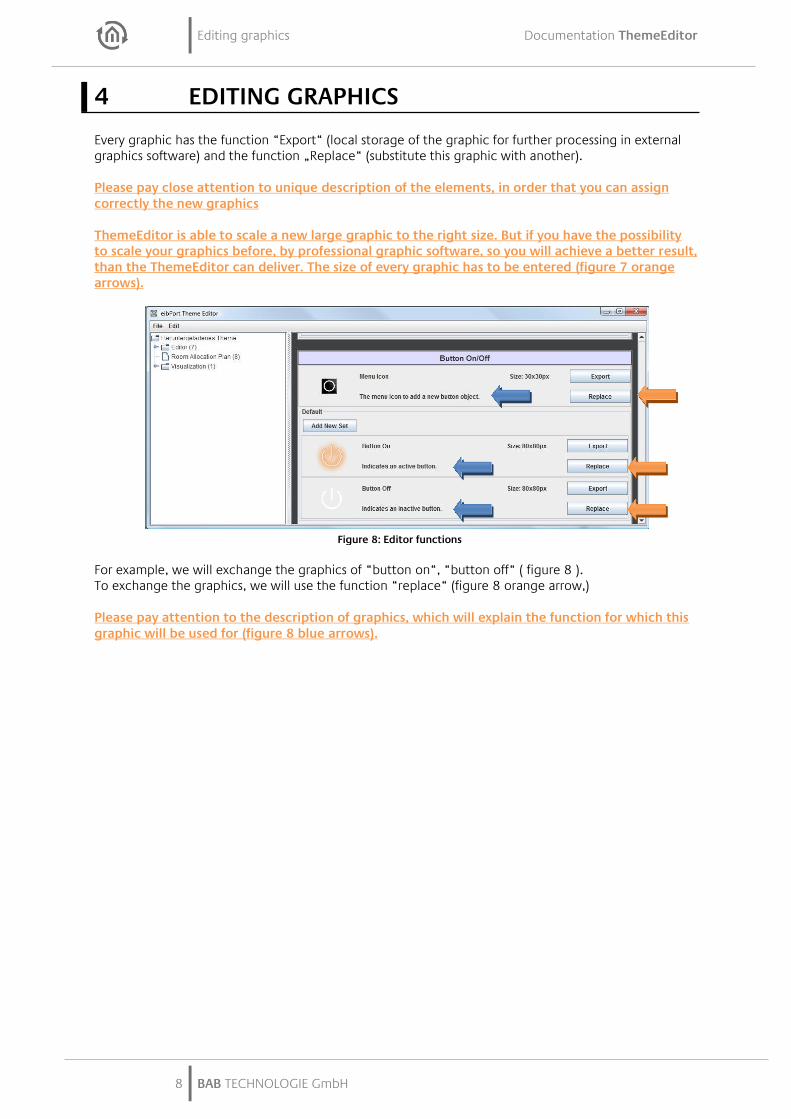
Every graphic has the function “Export“ (local storage of the graphic for further processing in external graphics software) and the function „Replace“ (substitute this graphic with another). Please pay close attention to unique description of the elements, in order that you can assign correctly the new graphics ThemeEditor is able to scale a new large graphic to the right size. But if you have the possibility to scale your graphics before, by professional graphic software, so you will achieve a better result, than the ThemeEditor can deliver. The size of every graphic has to be entered (figure 7 orange arrows).
For example, we will exchange the graphics of “button on“, “button off“ ( figure 8 ). To exchange the graphics, we will use the function “replace“ (figure 8 orange arrow,) Please pay attention to the description of graphics, which will explain the function for which this graphic will be used for (figure 8 blue arrows).
Figure 8: Editor functions
Documentation ThemeEditor Editing graphics
BAB TECHNOLOGIE GmbH 9
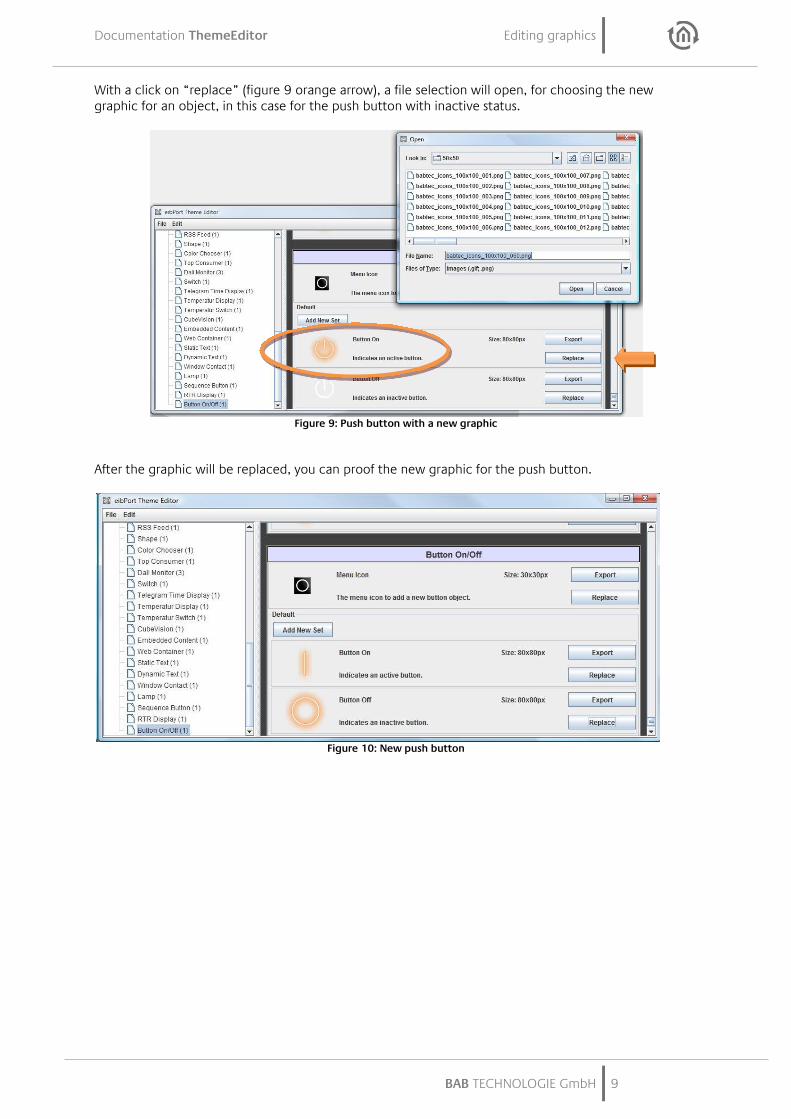
With a click on “replace” (figure 9 orange arrow), a file selection will open, for choosing the new graphic for an object, in this case for the push button with inactive status.
Figure 9: Push button with a new graphic
After the graphic will be replaced, you can proof the new graphic for the push button.
Figure 10: New push button
Sets Documentation ThemeEditor
10 BAB TECHNOLOGIE GmbH
5 SETS
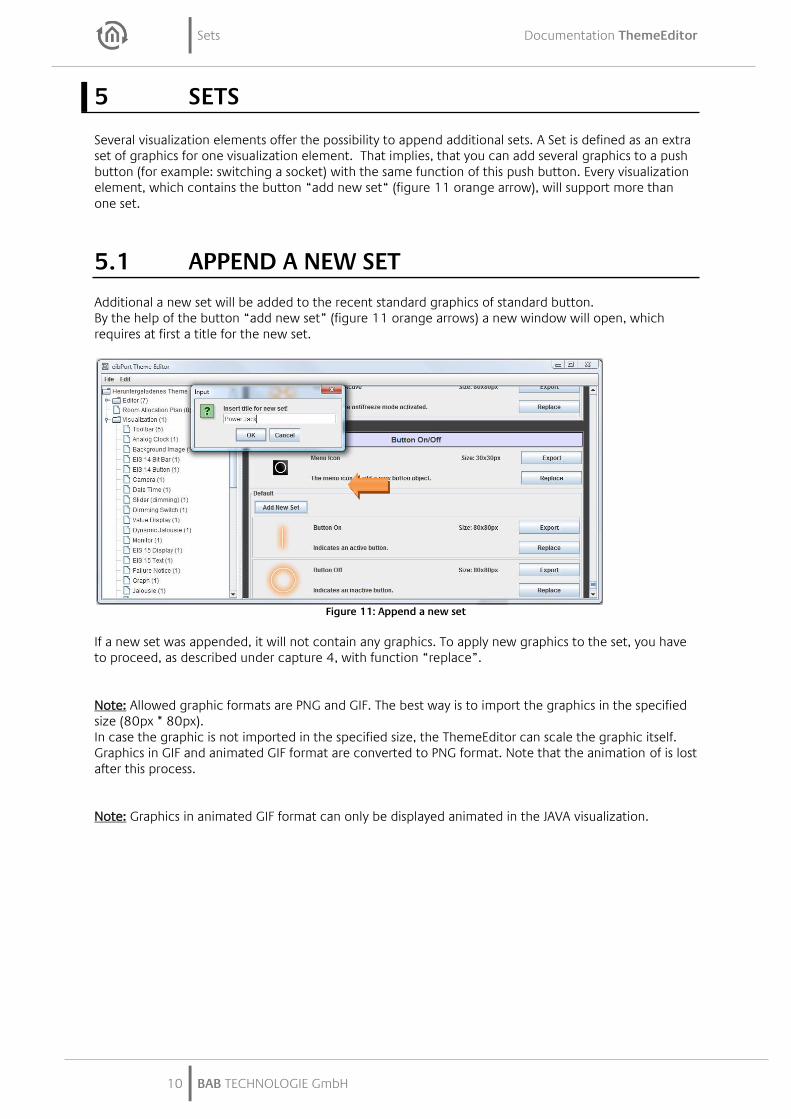
Several visualization elements offer the possibility to append additional sets. A Set is defined as an extra set of graphics for one visualization element. That implies, that you can add several graphics to a push button (for example: switching a socket) with the same function of this push button. Every visualization element, which contains the button “add new set“ (figure 11 orange arrow), will support more than one set.
5.1 APPEND A NEW SET
Additional a new set will be added to the recent standard graphics of standard button. By the help of the button “add new set” (figure 11 orange arrows) a new window will open, which requires at first a title for the new set.
Figure 11: Append a new set
If a new set was appended, it will not contain any graphics. To apply new graphics to the set, you have to proceed, as described under capture 4, with function “replace”. Note: Allowed graphic formats are PNG and GIF. The best way is to import the graphics in the specified size (80px * 80px). In case the graphic is not imported in the specified size, the ThemeEditor can scale the graphic itself. Graphics in GIF and animated GIF format are converted to PNG format. Note that the animation of is lost after this process. Note: Graphics in animated GIF format can only be displayed animated in the JAVA visualization.
Documentation ThemeEditor Sets
BAB TECHNOLOGIE GmbH 11
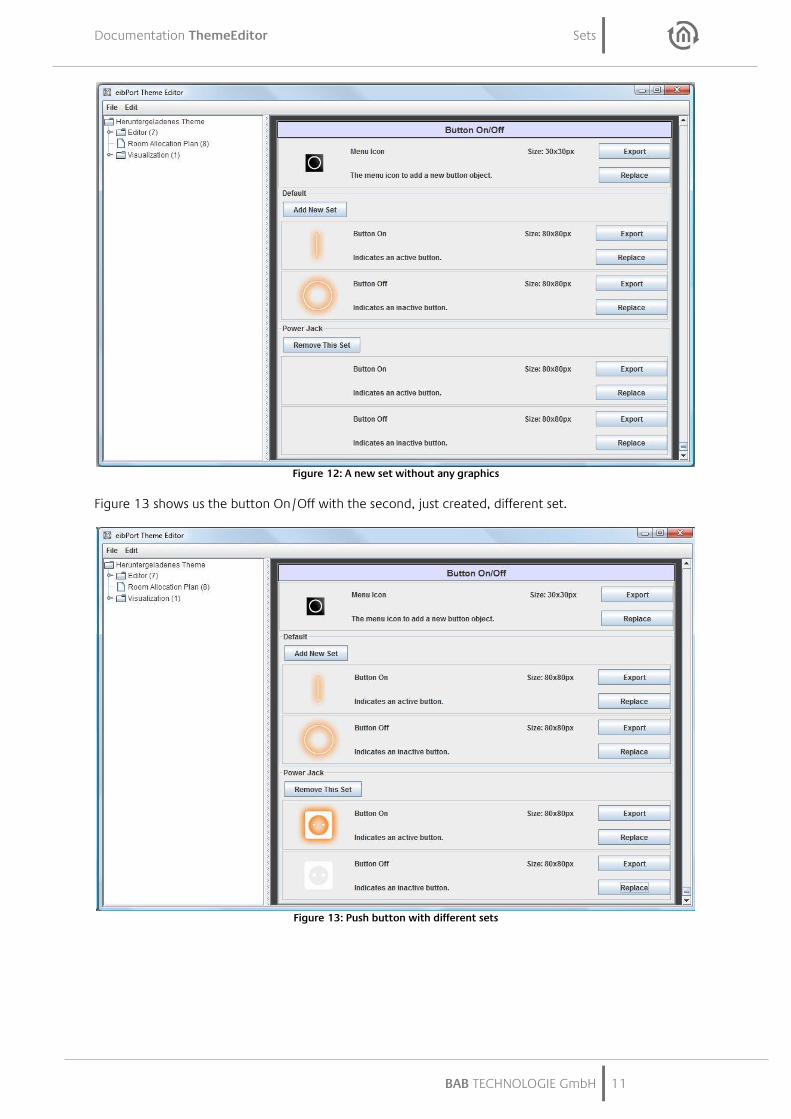
Figure 12: A new set without any graphics
Figure 13 shows us the button On/Off with the second, just created, different set.
Figure 13: Push button with different sets
Sets Documentation ThemeEditor
12 BAB TECHNOLOGIE GmbH
5.2 REMOVE A SET
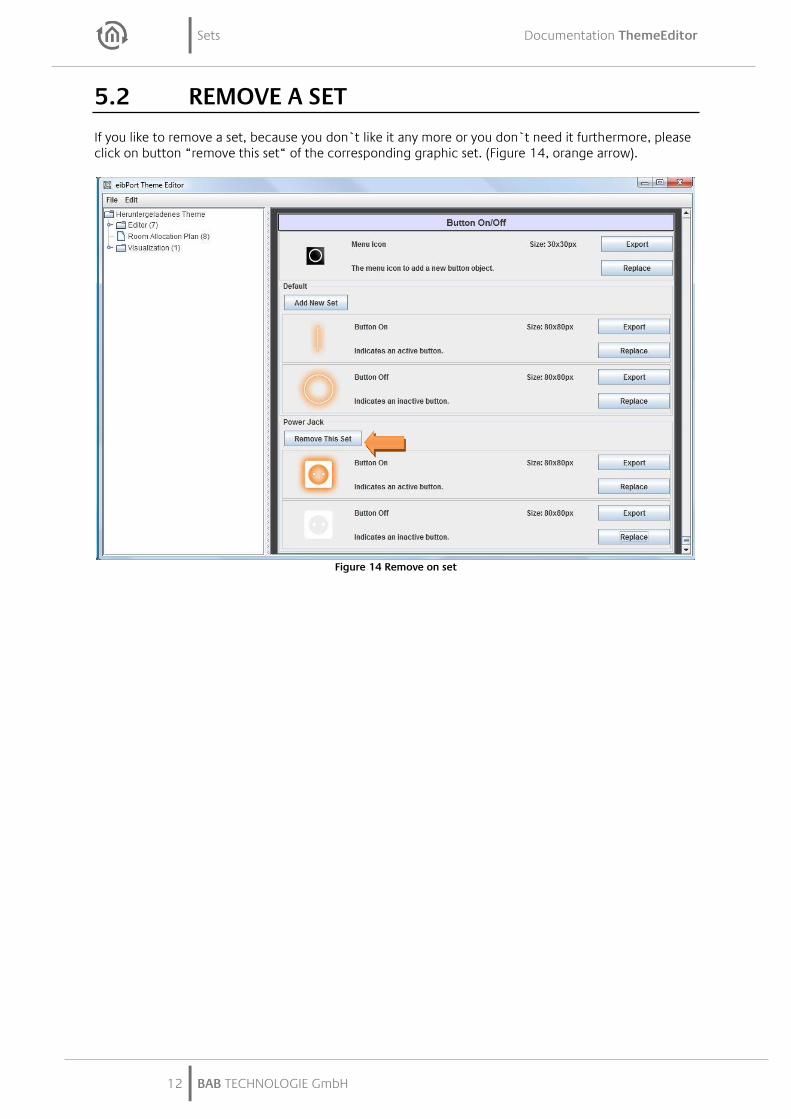
If you like to remove a set, because you don`t like it any more or you don`t need it furthermore, please click on button “remove this set“ of the corresponding graphic set. (Figure 14, orange arrow).
Figure 14 Remove on set
Documentation ThemeEditor Determining Colours for the Theme
BAB TECHNOLOGIE GmbH 13
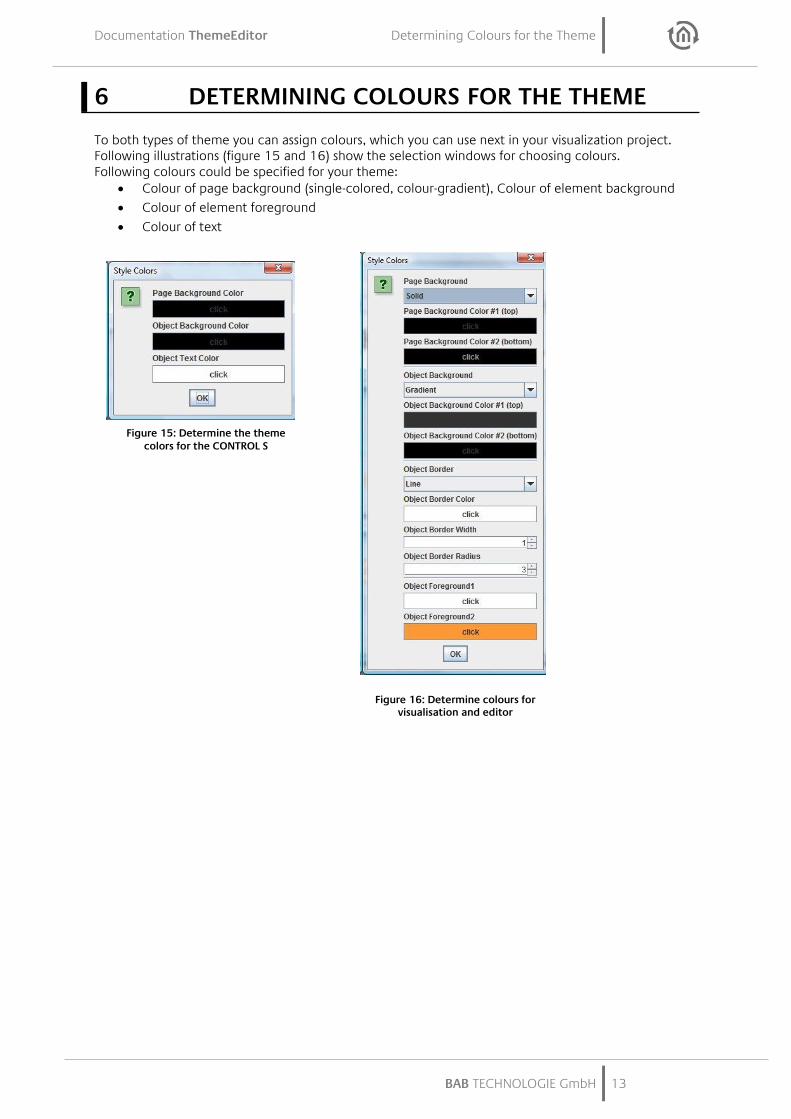
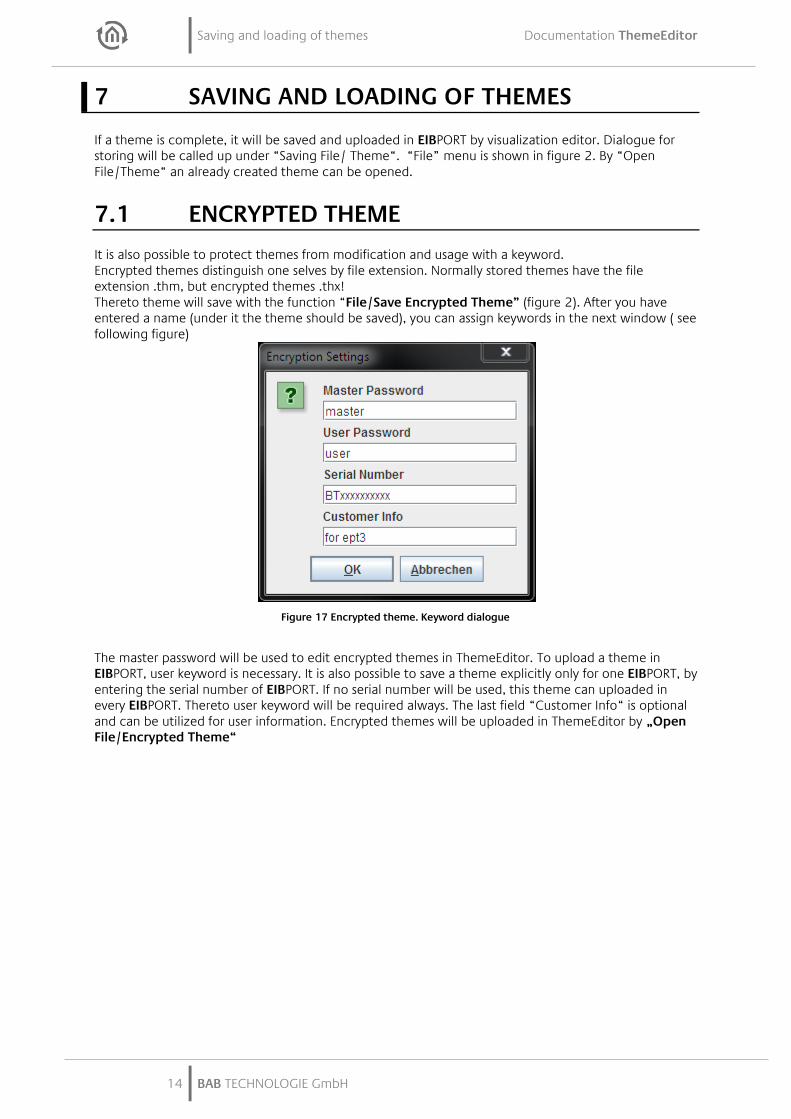
6 DETERMINING COLOURS FOR THE THEME
To both types of theme you can assign colours, which you can use next in your visualization project. Following illustrations (figure 15 and 16) show the selection windows for choosing colours. Following colours could be specified for your theme:
Colour of page background (single-colored, colour-gradient), Colour of element background
Colour of element foreground
Colour of text
Figure 16: Determine colours for visualisation and editor
Figure 15: Determine the theme colors for the CONTROL S
Saving and loading of themes Documentation ThemeEditor
14 BAB TECHNOLOGIE GmbH
7 SAVING AND LOADING OF THEMES
If a theme is complete, it will be saved and uploaded in EIBPORT by visualization editor. Dialogue for storing will be called up under “Saving File/ Theme“. “File” menu is shown in figure 2. By “Open File/Theme“ an already created theme can be opened.
7.1 ENCRYPTED THEME
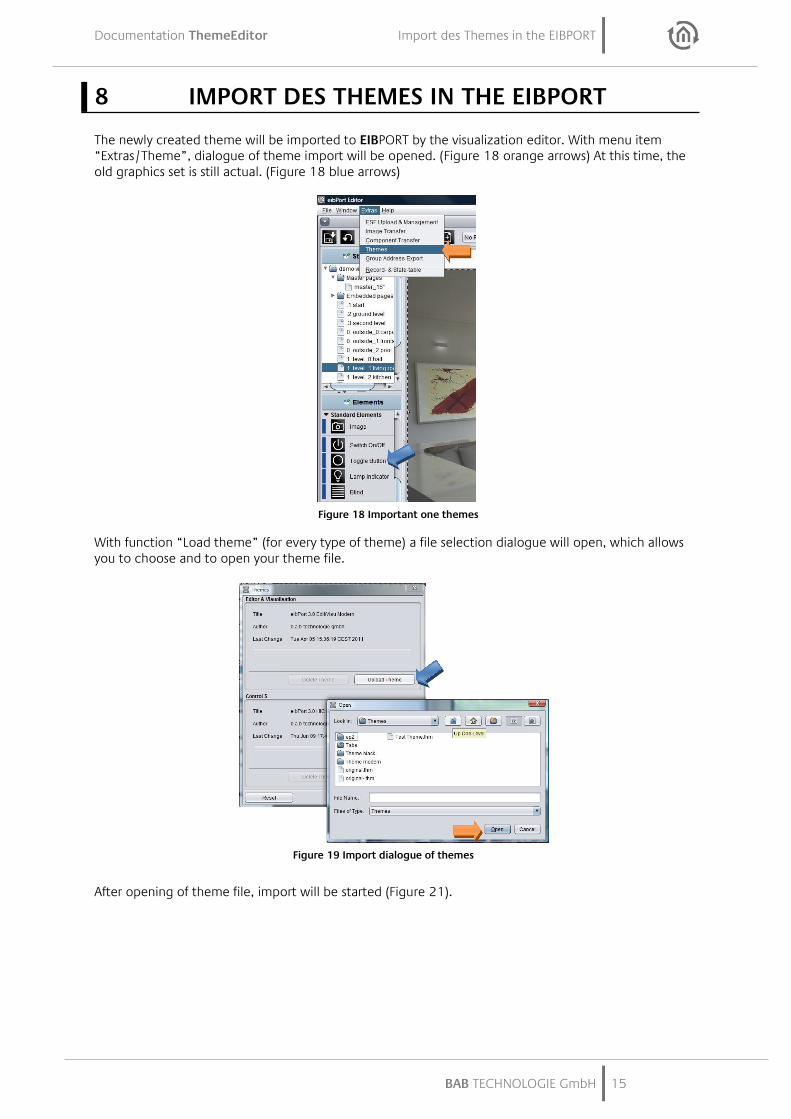
It is also possible to protect themes from modification and usage with a keyword. Encrypted themes distinguish one selves by file extension. Normally stored themes have the file extension .thm, but encrypted themes .thx! Thereto theme will save with the function “File/Save Encrypted Theme” (figure 2). After you have entered a name (under it the theme should be saved), you can assign keywords in the next window ( see following figure)
The master password will be used to edit encrypted themes in ThemeEditor. To upload a theme in EIBPORT, user keyword is necessary. It is also possible to save a theme explicitly only for one EIBPORT, by entering the serial number of EIBPORT. If no serial number will be used, this theme can uploaded in every EIBPORT. Thereto user keyword will be required always. The last field “Customer Info“ is optional and can be utilized for user information. Encrypted themes will be uploaded in ThemeEditor by „Open File/Encrypted Theme“
Figure 17 Encrypted theme. Keyword dialogue
Documentation ThemeEditor Import des Themes in the EIBPORT
BAB TECHNOLOGIE GmbH 15
8 IMPORT DES THEMES IN THE EIBPORT
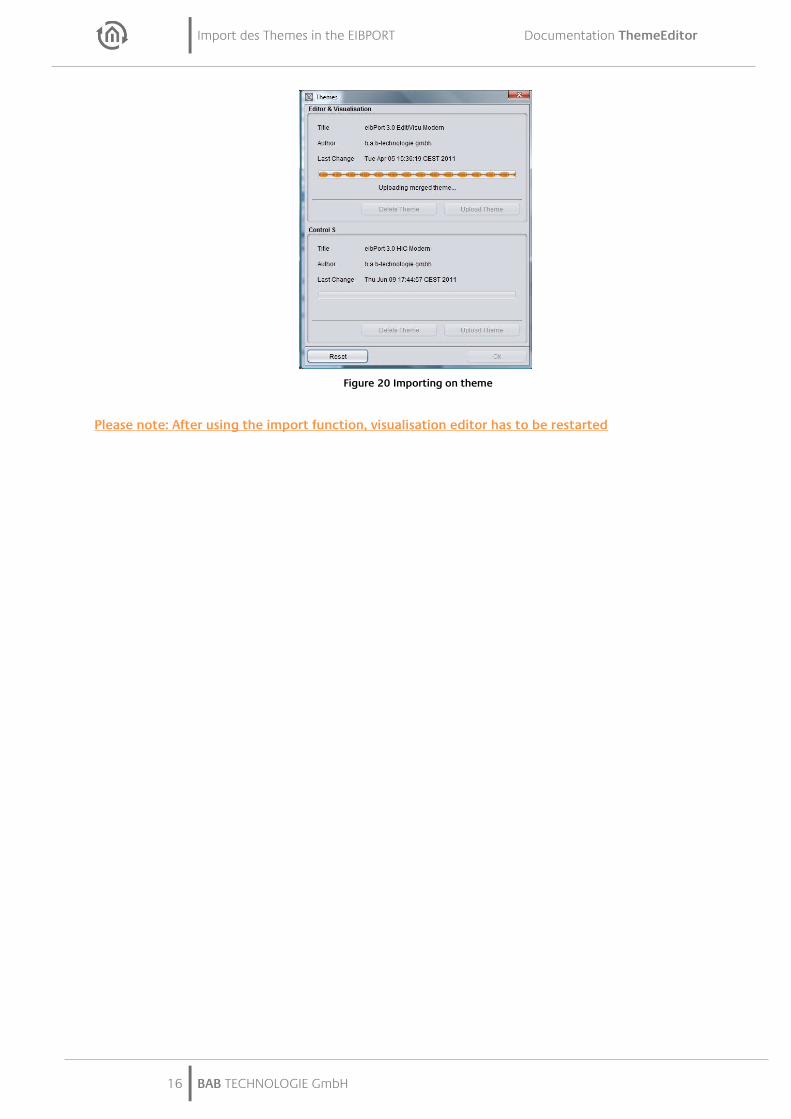
The newly created theme will be imported to EIBPORT by the visualization editor. With menu item “Extras/Theme”, dialogue of theme import will be opened. (Figure 18 orange arrows) At this time, the old graphics set is still actual. (Figure 18 blue arrows)
With function “Load theme” (for every type of theme) a file selection dialogue will open, which allows you to choose and to open your theme file.
After opening of theme file, import will be started (Figure 21).
Figure 18 Important one themes
Figure 19 Import dialogue of themes
Import des Themes in the EIBPORT Documentation ThemeEditor
16 BAB TECHNOLOGIE GmbH
Please note: After using the import function, visualisation editor has to be restarted
Figure 20 Importing on theme

Documentation ThemeEditor Import des Themes in the EIBPORT
BAB TECHNOLOGIE GmbH 17
8.1 ERASING IMPORTED THEMES
To delete imported themes, please open the theme dialogue window. Imported themes can be erased out of EIBPORT by using the function “Delete theme” (Figure 21, orange arrow). All graphics will be replaced with the standard ones. In case all themes should be removed from EIBPORT, you can use the function „Remove“(Figure 21, b arrow)., which will work for both kind of themes at the same time.
Figure 21 Erasing one theme
Results Documentation ThemeEditor
18 BAB TECHNOLOGIE GmbH
9 RESULTS
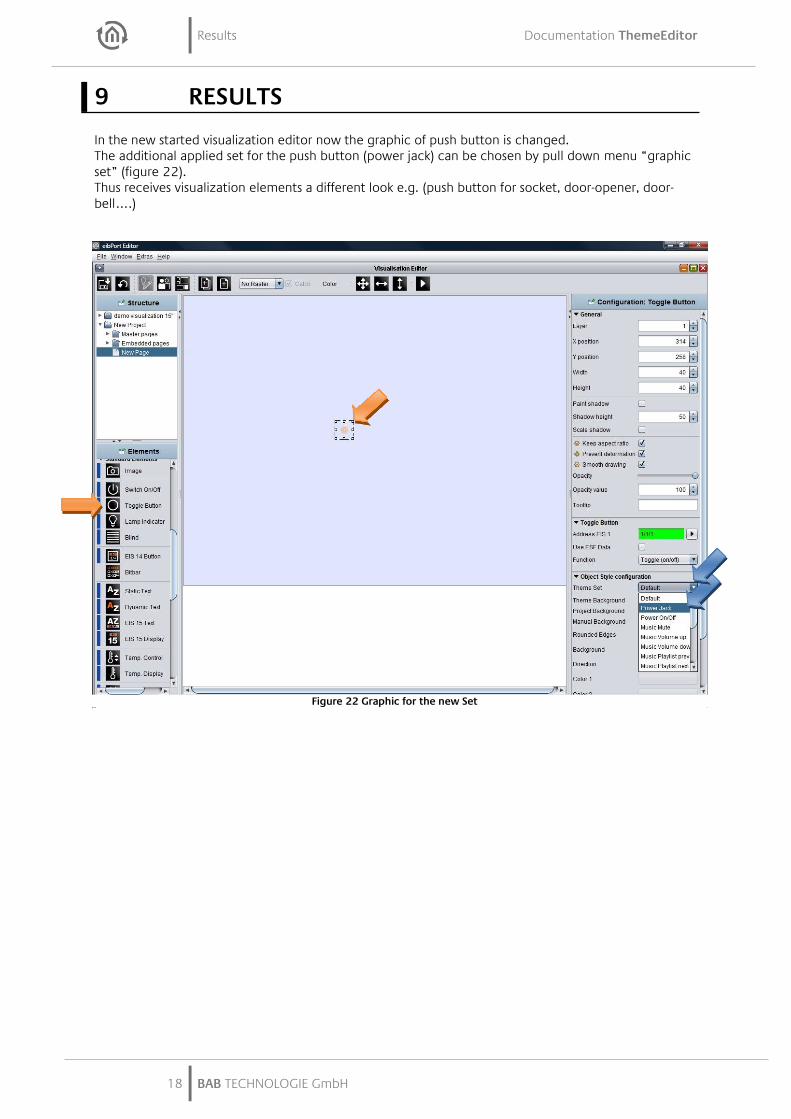
In the new started visualization editor now the graphic of push button is changed. The additional applied set for the push button (power jack) can be chosen by pull down menu “graphic set” (figure 22). Thus receives visualization elements a different look e.g. (push button for socket, door-opener, door-bell….)
Figure 22 Graphic for the new Set
Copyright © 2022 FDOKUMEN