The Strength Coach's Guide to Shoulder Training
86
The Strength Coach’s Guide to Shoulder Training Injury Prevention at Its Best! Andrew Paul
-
Upload
khangminh22 -
Category
Documents
-
view
0 -
download
0
Transcript of The Strength Coach's Guide to Shoulder Training

The Strength Coach’sGuide to ShoulderTrainingInjury Prevention at Its Best!
Andrew Paul

This book may not be reproduced or recorded in any form
without permission from the author.
Copyright: © 2009 by Andrew Paul. All rights reserved.
Editing and page design/layout by E. Pirrung.

Acknowledgments
I would like to thank anyone who has had an impact on me as a coach, starting
with my family for giving me a great base of values that I try to instill in all of my
athletes. Thank you to all of my mentors and coaches. All of you have played a
major part in my development as a person. Without Kevin Kinney and Bob
Bunton, two of the best high school coaches anywhere, I would not be doing
what I do today. And last, but not least, to all of the professionals and coaches
who are sharing information in order to advance this field. Thank you.

Table of Contents
Chapter 1: Shoulder Complex Anatomy/Kinesiology ........................................ 1
Chapter 2: Dysfunctions of the Shoulder ........................................................ 10
Chapter 3: Acromioclavicular Injuries .............................................................. 18
Chapter 4: Labrum Tears ................................................................................ 20
Chapter 5: Identifying Shoulder Dysfunction ................................................... 22
Chapter 6: Training the Shoulder Complex ..................................................... 25
Chapter 7: Exercises to Improve Long, Weak, Inhibited Musculature ............. 28
Chapter 8: Exercises to Improve Short, Overactive Musculature .................... 50
Chapter 9: Targeting the Thoracic Spine ........................................................ 60
Chapter 10: Training the Mobile Thoracic Spine ............................................. 66

The Strength Coach’s Guide to Shoulder Training
1
Chapter 1: Shoulder Complex Anatomy/Kinesiology
When discussing the shoulder complex, it is important to call it just that—a
complex, not a joint. This is because the shoulder is one of the most complex
structures in the human body. It requires the cooperation of several articulations
and a host of muscles and muscle groups in order to move appropriately—hence
the term, complex.
Understanding the shoulder complex goes beyond a single joint and single
muscle creating a single movement. All articulations become involved, and when
dysfunction in the shoulder complex is present, injury or pain is inevitable,
especially in competitive athletes. Using proper training programs and technique
can seriously reduce the risk of injury and allow the shoulder complex to work in
exactly the way that it was designed, thereby vastly improving performance.
We will start with the boring stuff—functional shoulder anatomy. It is impossible
to understand why the shoulder complex sustains injuries without first having a
good level of knowledge of how the shoulder functions. We’ll start with the
articulations of the shoulder.
There are four main articulations that are impacted during shoulder movement.
Sternoclavicular joint (SC): This joint serves as the only true connection
between the shoulder and the axial skeleton. It binds the clavicle to the
sternum in the front of the chest.
Acromioclavicular joint (AC): You may have heard of this joint as a
result of an athlete having an “AC” sprain. This joint is the point at which
the acromion process meets the clavicle.

Andrew Paul
2
Glenohumeral joint (GH): At this joint, the humeral head meets the
shallow glenoid fossa of the scapula. The glenoid labrum assists to help
deepen the fossa and stabilize the humeral head.
Scapulothoracic joint (ST): This joint may be the most important in terms
of athletic development and injury prevention. This joint is not actually a
joint at all but the point at which the scapula glides against the thoracic
skeleton.
That was the easy stuff.
Understanding the bones and
articulations is fairly simple.
However, understanding the
muscles that make them move
proves to be a little more difficult.
Take a minute to analyze figure
1. There is one part of the
shoulder that I want you to pay
particular attention to because it
will become very important later.
Look just above the humeral head.
There is a gap between the head of
the humerus and the acromion process of the scapula.
Have you ever heard of impingement of the shoulder? This occurs when that gap
is cut down and the range of motion (ROM) of the humerus is restricted. In
addition, the tendons that attach to the head of the humerus are irritated.
Impingement is an extremely common occurrence among athletes and regular
gym goers. I’ll explain how to avoid this later.
Figure 1

The Strength Coach’s Guide to Shoulder Training
3
Movement of the Shoulder
When looking at the movement of the shoulder complex, we will focus on two
articulations and how those two articulations interact. The GH and ST joints are
the two of primary emphasis. It is important to understand that the humerus
never moves independently of the scapula or vice versa. They move in
cooperation with one another. This has been termed “scapulo-humeral rhythm.”
Simply put, the movement of the humerus requires movement of the scapula to
maintain functional ROM. If one of the two is out of synch, the whole movement
is compromised.
Movements of the humerus
Flexion: Forward movement in the sagittal plane (front raise)
Extension: Return from flexion to anatomical position (dumbbell pull-over)
Hyperextension: Continued extension past anatomical position
(downward phase of a dip)
Abduction: Lateral movement in the frontal plane (lateral raise)
Adduction: Movement in the frontal plane toward the midline (pull-down)
Horizontal abduction: Movement away from the midline in the transverse
plane; humerus is flexed (rear raise)
Horizontal adduction: Movement toward the midline; humerus is flexed
(bench pressing with bad form)
Internal rotation: Rotation medially in transverse plane (palm facing
behind you)

Andrew Paul
4
External rotation: Rotation laterally in transverse plane (palms facing in
front of you)
Movements of the scapula
Upward rotation: Movement of the acromion process upward and inward
(toward the skull) in the frontal plane
Downward rotation: Movement of the acromion process downward
(toward the feet) in the frontal plane
Adduction (retraction): Movement of the scapula toward the midline
(spine)
Abduction (protraction): Movement of the scapula away from the midline
(spine); this movement is accompanied by lateral tilt of the scapula in the
transverse plane
Anterior tilt: Movement of the scapular spine forward in the sagittal plane
Posterior tilt: A return from anterior tilt (holding the scapula down)
Elevation: Movement of the scapula upward in the frontal plane
Depression: Movement of the scapula downward in the frontal plane
Scapulo-Humeral Rhythm
Knowing what kind of movements the humerus and scapula are capable of
making is all well and good, but in the real world, the two do not move
independently of one another. Having a good understanding of corresponding
scapular and humeral movements is crucial.

The Strength Coach’s Guide to Shoulder Training
5
Here is a basic list to develop an understanding of what the scapula should be
doing when the humerus is in action.
Humeral movement Scapular movement
Flexion Abduction, upward rotation, and posterior tilt
ExtensionAnterior tilt, downward rotation, adduction, andelevation
Abduction Upward rotation and abduction
Adduction Downward rotation and adduction
This is the general relationship between the scapula and the humerus. The best
example of scapulo-humeral rhythm occurs during abduction of the humerus. As
the humerus abducts, the scapula must go into upward rotation to maintain room
for the humeral head under the acromion process (remember the gap between
the two in figure 1).
The scapula should rotate one degree for every two degrees of humeral
abduction. This means that when the humerus is abducted 15 degrees, ten of
those degrees are created by abduction at the GH joint while five of those
degrees are due to the upward rotation of the scapula. Likewise, in a healthy
shoulder, a full 180-degree abduction of the humerus is due to 120 degrees at
the GH joint and 60 degrees of upward rotation of the scapula. This gives you a
good idea of how the scapula and humerus move in conjunction with one
another.
Force Couples of the Scapula
When it comes to joints as complex as the shoulder joint, it is never as easy as
just memorizing which musculature is responsible for which movement.
Everything in the shoulder works in what are called force couples.

Andrew Paul
6
A force couple is simply combined forces of pull to create a certain movement.
For example, set a pen on your desk. Take your right index finger and push the
top end of the pen to the left while simultaneously using your left index finger to
push the bottom of the pen to the right. The result should have been the pen
moving in a circular motion and the center point of the pen not moving at all.
Although neither force was pushing in a circle, their combined force was circular.
Your scapula works pretty much the same way. The scapula sits almost on an
axis, and a combined effort of many muscles creates the proper movement at the
proper time. If one muscle is out of whack, it throws everything off.
Here are the force couples and their corresponding scapular motion.
Movement Muscles*
Upward rotation Middle, upper, and lower traps; serratus anterior
Downward rotation Levator scapulae, rhomboids
Adduction Rhomboids, middle and lower trapezius
Abduction Serratus anterior
Anterior tilt Pectoralis minor, biceps brachii, carocobrachialis
Posterior tilt Serratus anterior, rhomboids
Elevation Upper trap, levator scapulae
Depression Latissimus dorsi, lower trapezius
*It’s important to note that some experts debate the amount of involvement eachmuscle has on the action.
Now, it’s time to use a little bit of commonsense in combination with the chart
above. We know that a common injury in a throwing athlete is impingement of the
shoulder. This occurs with excessive anterior tilt or downward rotation of the

The Strength Coach’s Guide to Shoulder Training
7
scapula. Let’s stick with anterior tilt. We know from our length-tension
relationships that if the scapula is stuck in anterior tilt, one of the opposing force
couples is beating the other into submission.
In this case, the anterior tilt musculature (pectoralis minor, biceps brachii, and
caracobrachialis) are overactive. They have become shorter because the
musculature in charge of keeping the scapula pinned back (serratus anterior and
rhomboids) have been lengthened due to weakness and inhibition. Make sense?
Good. Now we can move to a more interesting topic.
Understanding the Rotator Cuff
Up until now, we’ve discussed the force couples that move the scapula. We
haven’t discussed much about which muscles move the humerus. I won’t insult
your intelligence by telling
you that the pec major
creates extension, horizontal
adduction, and internal
rotation of the humerus nor
will I tell you that the
latissimus dorsi creates
extension, adduction, and
horizontal abduction and also
assists with internal rotation.
I think I just did.
In actuality, it might help you
to know exactly what the largest two muscle groups touching the shoulder girdle
do. However, I will spend much time explaining the exact role of the most
commonly referenced but least understood muscles of the shoulder—the rotator
cuff.
Figure 2

Andrew Paul
8
If you train overhead athletes and can’t name the four muscles of the rotator cuff
in five seconds, shame on you. The muscles can easily be remembered using
the acronym SITS—supraspinatus, infraspinatus, teres minor, and subscapularis.
Supraspinatus: This muscle is in charge of assisting with abduction of the
humerus, especially the first 15 degrees. This is important and will be on the test.
Because of its position between the head of the humerus and the acromion
process, it is the most commonly injured muscle. This is important mainly
because this muscle is largely involved in avoiding subluxation (head of humerus
moving out of the glenoid fossa) of the shoulder during overhead movements.
Infraspinatus: This is a posterior muscle that is largely responsible for external
rotation of the humerus, horizontal abduction of the humerus, and extension. As
a stabilizer, its responsibility lies in posterior stability, meaning it pulls the
humeral head anteriorly to prevent it from moving posteriorly. That is also
important.
Teres minor: This muscle is very similar to the infraspinatus. It is located just
inferior to it and has the same responsibilities (external rotation, extension, and
horizontal abduction). It also assists the infraspinatus in the posterior stability of
the humeral head.
Subscapularis: This muscle covers the anterior side of the scapula and is
responsible for internal rotation and extension. It stabilizes the anterior portion of
the GH joint. That is, it prevents the humeral head from moving anteriorly (it
directly opposes the infraspinatus and teres minor). This is the rotator cuff
muscle with the largest cross-sectional area. We will discuss why in further
sections.

The Strength Coach’s Guide to Shoulder Training
9
These muscles are extremely important for one very good reason. They are in
charge of stabilizing the already unstable shoulder joint. Because the shoulder
joint is designed for incredible mobility, it becomes very unstable. The only joint
connecting the shoulder to the axial skeleton is the SC joint, and only the glenoid
labrum and rotator cuff musculature are in charge of holding the humeral head in
place. That makes this muscle group crucial to shoulder health.
We will discuss how to strengthen this muscle group in later sections, but it is
important to remember their primary purpose—stabilization.

Andrew Paul
10
Chapter 2: Dysfunctions of the Shoulder
When we examine the length-tension relationships among muscle groups, we
see that agonist and antagonist have interdependent qualities. They rely upon
one another to supply balance to the body. Over time, a disruption in this balance
can cause pain and eventual injury.
Vladamir Janda, a Soviet physical therapist, became world renowned for his
research in these interactions among body parts. Janda found that the body
compensates in a predictable pattern in which certain muscles become tight or
overactive and others become long and weak. This process is what Janda called
“upper crossed syndrome” in the upper body and “lower crossed syndrome” in
the lower body. We will discuss upper crossed syndrome in detail later. For now,
let’s use a common example from the lower body involving the ankle joint.
Very commonly, the plantar flexors of the ankle become very tight
(gastrocnemius and soleus). The body’s natural reaction to protect itself is to
lengthen and weaken the antagonists of the plantar flexors (dorsiflexors—tibialis
anterior in particular). This can cause many problems with movement patterns
and eventually lead to an ankle injury or knee pain.
There are four ways to deal with this type of problem. The first and most
commonly used method is to simply do calf stretches pre- and post-workout in an
attempt to lengthen the plantar flexors. This may prove to be successful in some
situations, but when an athlete is continually under large loads, more often they
tend to tighten right back up again.
The second solution is somewhat outside the box. We know that if we have tight,
short, overactive, plantar flexors, something has to give. In an attempt to avoid
injury, that means your dorsiflexors will lengthen, weaken, and become inhibited.
By activating and strengthening the dorsiflexors, we thereby force our plantar

The Strength Coach’s Guide to Shoulder Training
11
flexors to lengthen. By creating balance instead of incredible strength in one area
and not the other, we put our body in a much better position to perform.
The third solution is my personal favorite. It is also the most proactive approach.
We can lengthen the tight, overactive, plantar flexors while simultaneously
activating and strengthening the long, weak dorsiflexors. This is a more
aggressive approach, which I will discuss in detail later.
The fourth solution may even be more commonly used than the first—simply
insulting the athlete’s manhood (assuming the athlete is a male) by ignoring the
issue all together. However, I assume you wouldn’t do that if you were actually
taking the time to read this stuff.
Now, let’s apply this idea to the shoulder. If the shoulder is stuck in anterior tilt
(very common among overhead athletes and lifters who use bodybuilding
approaches), what is the issue? We have tight and overactive anterior tilt
musculature (pec minor, brachialis, caracobrachialis) and long and weak
posterior tilt musculature (serratus anterior, rhomboids).
Using the analogy of the ankle, how would you treat this condition? By using
exercises that strengthen the serratus anterior and rhomboids musculature while
simultaneously stretching the pec minor and biceps musculature, we can attempt
to move the scapula back into proper position and out of harm’s way.
A Good Offense Is Your Best Defense
As the heading suggests, a properly structured program is your best defense
against injuries. As a strength and conditioning coach, my goal is to make the job
easy for the athletic trainer for my teams. So let’s discuss the common shoulder
injuries that we as strength coaches can prevent from occurring in the first place.

Andrew Paul
12
Impingement of the Shoulder
You’ve probably heard of this
dysfunction. Impingement of the
shoulder may be the most commonly
referenced injury in any gym across the
country. Any pain, discomfort of the
shoulder, or anal leakage is always
because of shoulder impingement.
Because of genetics, poor posture, poor
training, and the demands of daily life
(working at the computer), many
people put themselves (and their
scapula) in a position that predisposes
them to certain kinds of impingement of the shoulder.
Impingement is simply a narrowing of the gap between the acromion process and
humeral head (see figure 3). In figure 3, the bursa of the shoulder is pinched
between the head of the humerus and the acromion process of the scapula.
Under the bursa is an inflamed rotator cuff tendon. This condition can cause pain
and, if it persists, could eventually cause a tear of the rotator cuff tendon. So let’s
try and understand what a strength and conditioning coach can do to prevent
athletes (particularly overhead athletes) from getting this condition.
First, we have to identify the different types of impingement that may occur.
There are three main types of impingement syndromes that occur in the
shoulder—primary impingement, secondary impingement, and internal
impingement. Primary and secondary impingements are what we call hyper-
mobility injuries. Internal impingement is what we call a hypo-mobility injury.
Figure 3

The Strength Coach’s Guide to Shoulder Training
13
Hyper-Mobility Impingement
Primary and secondary impingements are very similar and, therefore, can be
prevented in a very similar manner. Hyper-mobility means that the humerus is
too mobile and has too much wiggle room within the glenoid fossa. Remember
that the rotator cuff’s main job is to stabilize the humeral head. Having a weak
rotator cuff complex causes severe instability of the joint and eventually pain.
Primary impingement
Primary impingement syndrome is a condition where the deltoid overpowers the
rotator cuff. The pull of a strong deltoid muscle pulls the humeral head upward.
This must be counteracted by the rotator cuff musculature pulling downward to
hold the humeral head in place. If the rotator cuff is weak when compared to the
deltoid, the humeral head will be pulled into the acromion process of the scapula
and will pinch the bursa of the shoulder and rotator cuff tendon.
This is a prime example of why all the weekend warriors at the gym who are
doing Ronnie Coleman’s shoulder routine that they found in Muscle and Fitness
magazine are prime candidates for this type of injury. They can do all the lateral
raises and military presses in the world, but what they are creating is a strength
imbalance between their deltoid and rotator cuff, which creates a very painful
shoulder.
Secondary impingement
Secondary impingement is believed to be very similar to primary impingement. It
occurs after the rotator cuff weakens and allows the ligaments of the humeral
head to be stretched out, thus creating enhanced laxity within the shoulder joints.
Again, pain with overhead movements is due to the tendons of the rotator cuff
coming into contact with the acromion process. Weakness in the rotator cuff is
the primary cause of the instability.
Preventing primary and secondary impingement

Andrew Paul
14
This is where strength and conditioning coaches make their big bucks. We
already know that a weak rotator cuff
leads to shoulder instability. Now,
let’s think a little more outside the
box.
Figure 4 provides a good look at the
bony structures of the shoulder
complex. Look at the space between
the humeral head and the acromion
process. In a perfect world, this space
would be the same in everyone’s
shoulder. However, due to genetics,
daily life, and poor training habits, this
isn’t the case.
I first mentioned genetics. Due to genetics, each person’s acromion process
develops differently. Some are flat (type I), allowing for maximal space between it
and the humeral head. These individuals are at a lower risk for impingement. On
the other hand, some are curved down or beaked (type III), placing them at
greater risk for impingement. Type II acromion processes lie somewhere in the
middle. Genetics and even daily lifestyle may be out of our control. However,
proper training habits can move the scapula into a more ideal position.
Let’s look at figure 4 again. Imagine that someone had short, overactive,
downward rotators of the scapula and long, weak, inhibited, upward rotators.
What would this look like? If you said that the acromion process would shift
downward and the inferior border of the scapula would shift medially, you’re
correct! If you have a great imagination, you would see that by the scapula going
into downward rotation, the humeral head has less room to move.
Figure 4

The Strength Coach’s Guide to Shoulder Training
15
Now, let’s imagine one more scenario. Imagine a person had overactive, short,
internal rotators of the humerus and long, weak, inhibited, external rotators of the
humerus. Also, imagine that the person had short, overactive, anterior tilt
musculature of the scapula and long, weak, posterior tilt musculature. What you
have is internal rotation of the humerus combined with anterior tilt of the scapula.
The gap for the humeral head gets smaller as we speak.
What I’ve just described to you are some of the most commonly found problems
in the shoulder, not just in the athletic population but also in the general public.
Overactive and short pec majors (internal rotation), pec minors (anterior tilt), and
levator scapulae (downward rotation) combined with long and weak
infraspinatus, teres minor (both external rotators), serratus anterior (upward
rotation and posterior tilt), and middle and lower trapezius muscles (upward
rotation) leave the scapula in a position of anterior and downward tilt and the
humerus internally rotated. Can you picture this scenario? How much more room
can we take away?
By lengthening the short, overactive musculature and strengthening the long,
weak musculature, we can reposition the scapula into a better, less injury prone
position. This doesn’t mean that we should never strengthen an overhead
athlete’s internal rotators. That would take benching, pull-ups, and rows out of
the picture. It also doesn’t insinuate that we should never strengthen a muscle
like the levator scapulae. That would take all the Olympic lifts out as well. This
just means that we must understand the mechanisms and train accordingly. This
brings us to the third type of impingement.
Hypo-Mobility Impingement
Hypo-mobility is another way of saying “tight” or “lack of mobility.” This type of
impingement is different from the other two. It occurs not because of instability
but because certain regions of the shoulder capsule have become tight causing
posterior shoulder pain. While slightly less common than primary or secondary

Andrew Paul
impingement, internal impingement is still caused by overhead motions. Internal
impingement can actually be made worse by continuing to strengthen the
external rotators of the shoulder. Here’s why…
Take a look at the amount
of external rotation this
baseball pitcher gets during
the throwing motion in
figure 5. During this
movement, the internal
rotators of the shoulder are
undergoing huge eccentric
forces. This can cause
damage and eventually
weaken the subscapularis.
charge of internal rot
rotator cuff muscle.
You might think that h
acceptable considerin
think again.
What is the major job
primary rotator cuff m
subscapularis. Now,
muscles are pulling th
minor (external rotato
moving posteriorly. W
the pull of the pecs. T
16
Remember, this is the only
rotator cuff muscle in
ation and also has the largest cross-sectional area of any
aving a little weakness in the internal rotators would be
g what we talked about in the hyper-mobile section but
of the rotator cuff muscles? Stabilization. What is the
uscle preventing anterior glide of the humeral head? The
think about benching. While benching, the large pectoralis
e humeral head anteriorly. The infraspinatus and teres
rs) exaggerate that by preventing the humeral head from
ith a weak, inhibited subscapularis, very little is opposing
he subscapularis also has to depress the humeral head. If it
Figure 5

The Strength Coach’s Guide to Shoulder Training
17
is not firing correctly, the infraspinatus and teres minor begin to work overtime.
What we get is a stiff posterior capsule, a glenohumeral internal rotation deficit
(GIRD) and impingement of the superior, posterior surface of the glenoid and
glenoid labrum. Athletes who have this will lack internal rotational range of
motion (ROM).
Again, by strengthening the subscapularis and lengthening our external rotators,
we will gain ROM in internal rotation, and posterior shoulder pain can be
diminished. If the condition is allowed to continue, it can progress into a tear of
the posterior labrum. Remember, the labrum of the shoulder is connective tissue
that helps to stabilize the shoulder joint.
You can easily observe GIRD by asking your athlete to do a posterior capsule
stretch. There will be an obvious difference
between the arms when an athlete is tight. The test
is also a treatment. This stretch can be performed
daily in order to resist anterior glide of the humerus.
Be sure to maintain proper posture when doing this
exercise. Never allow the scapula to fall into
anterior tilt.
Figure 6
Andrew Paul
18
Chapter 3: Acromioclavicular (AC) Injuries
Let’s take another look at the bony structures of the shoulder girdle. On the front
view, you can clearly see where the acromion process and the clavicle meet.
This is the very fragile
acromioclavicular (AC) joint. Ever
hear of a dislocated shoulder? This is
not a dislocation of the humeral head
(separated shoulder) but rather a
dislocation of the acromion from the
clavicle. These types of injuries can
also be less severe and are called
AC sprains.
This joint seems to be particularly
predisposed to shoulder injury because
there isn’t much hiding it. Often in
collision sports such as football, AC sprains occur through a direct blow or falling
on an outstretched arm when trying to get the extra yard or reaching for the first
down. This seems unavoidable, but once it occurs, it can be severely limiting to
performance. There isn’t much our athletic trainers can do for it.
So the question is, how can we keep this from happening in the first place?
Interestingly enough, the answer is quite similar to what we discussed in the
hyper-mobility impingement section. Take a look at the guys on your teams who
have a history of AC joint injuries. Chances are these athletes have scapulae (or
possibly only the injured shoulder) that lay with more of an anterior tilt and an
internally rotated humerus. We’ll talk more about how to spot this later, but this
position exposes an already fragile joint. By keeping the scapulae better
retracted and depressed, we can hide this joint and reduce the risk of AC injury.
Figure 7

The Strength Coach’s Guide to Shoulder Training
19
Just like the hyper-mobility injuries, we must train the rotator cuff to help stabilize
the humeral head. When an athlete falls on an outstretched arm, the humeral
head is pushed up into the acromion process, which causes a dislocation or
sprain of the AC joint. Remember that our rotator cuff muscles help to depress
the humeral head and keep it away from the acromion. By strengthening them as
stabilizers, we can help them depress the humerus more effectively, thereby
protecting the joint from injury.
Andrew Paul
20
Chapter 4: Labrum Tears
Let’s go back and try to remember the purpose for the glenoid labrum in our
shoulder capsule. The shoulder is a ball and socket joint in which the humeral
head is large and sits on top of a shallow glenoid fossa. It has commonly drawn
the analogy of a golf ball sitting on a golf tee. The labrum then serves to deepen
that fossa, thereby increasing stability of the joint. Labrum injuries are more
common among overhead athletes who continually put large amounts of stress
on their shoulder capsules.
Superior labrum from anterior to posterior (SLAP) is an injury that can be
debilitating for an overhead athlete or an athlete involved in contact sports such
as football. Again, our focus shifts to prevention. I will continue to harp on the
importance of the rotator cuff, but this time we are going to discuss training the
rotator cuff. Without a doubt, a strong rotator cuff will help prevent labrum tears.
Let’s first take a look at the mechanism for a SLAP tear.
The most common mechanism for a labrum tear is falling on an outstretched
arm. Think about a football player diving for a tackle. His arms are outstretched
as he reaches for the opponent. As he dives, he is hit from behind and lands on
his side with his arms in an overhead position.
Think about the running back trying to break that tackle. He may lose his balance
and try to gain an extra yard by using his hand to keep his feet. As his hand is
planted on the ground and his arm is straight, he is hit from behind, forcing his
body weight to be supported by his outstretched arm.
These are two common mechanisms for labrum tears. So how do we avoid it? In
the first example, the athlete had his arms in an overhead position when the
injury occurred. The solution is simple. We need to make the athlete’s shoulders
strong in that position. What I’m suggesting is what many coaches stay away

The Strength Coach’s Guide to Shoulder Training
21
from—overhead pressing. If done correctly, overhead pressing movements have
a ton of benefits including the improvement of scapulo-humeral rhythm and
improvements in the mobility of the thoracic spine. If done incorrectly, they can
cause some damage.
There are two things to stay away from when using overhead lifts. The first is the
use of a back support. This compresses the scapula and restricts its mobility.
The second is behind the neck variations. This puts the humerus in abduction,
horizontal extension, and external rotation. That is the formula for pain.
In the second scenario, the athlete was put in a position that resulted in massive
compressive forces in the shoulder capsule. Our shoulders can handle that to
some degree, but we must train them to do so. This means push-up variations
and a lot of them. Alter hand positions and surfaces to allow the shoulder to
adapt to a ton of different positions. With all the new training tools, it’s easy to
forget that push-ups may still be the best exercises out there.
Now, let’s talk about posterior labrum tears. As I mentioned in the internal
impingement section, untreated internal impingement usually turns to a posterior
labrum tear. Prevent internal impingement and more than likely you will prevent
posterior labrum tears. Just remember, external rotation is a great exercise to
target the rotator cuff, but it isn’t the only exercise. Be balanced in rotator cuff
training. Not doing so can create imbalances in the rotator cuff itself, thereby
creating more problems.

Andrew Paul
22
Chapter 5: Identifying Shoulder Dysfunction
Before we begin describing exercises, we will spend a brief amount of time
identifying a couple common dysfunctions. Most of this can be done by simple
static assessment. Let’s start with the most common abnormalities. I’ll take that
back. This may be so common that it has become a normality.
An internally rotated humerus and anteriorly tilted scapula have become the
norm in today’s athletes. Think about our lifestyles. How am I typing this right
now? My arms are internally rotated, and my posture is slightly kyphotic, which
leads to anterior tilted scapulae.
Think about the musculature that is involved with the movements described:
Internal rotation (pectoralis major, latissimus dorsi)
Anterior tilt (pec minor, biceps brachii)
Think about the antagonistic musculature:
External rotation (infraspinatus, teres minor)
Posterior tilt (serratus anterior, rhomboids)
I haven’t heard many gym rats walk into the gym and say, “Today is my rhomboid
and serratus anterior day. Tomorrow is my ass and head day.” The fact of the
matter is many football coaches don’t want to hear about how strong their
athletes’ low traps are. The big lifts (bench, pull-ups) produce the big muscles
(pecs, lats). These muscles become stronger in those areas, thus producing

The Strength Coach’s Guide to Shoulder Training
dominant muscles (short, overactive) and weaker muscles (long, weak, and
inhibited). Who wins?
Figure 8A and 8B are a bit
exaggerated, but you get the point. On
the left is someone with good posture
and scapular lay. When looking
straight ahead, you should be able to
see the knuckles of his index and
middle finger but no more.
with
know
Ante
than
seal
posi
and
abou
typin
Eric
post
stren
alter
Figu
activ
athle
tight lats and pecs. B
that he is in humer
rior tilt is best seen f
likely anteriorly tilted
the deal. This indica
tion is very common
pecs while strengthe
t your lifestyle. Mos
g on the computer).
Cressey refers to thi
ure and one hour tra
gthen muscle group
ing your posture thro
re 9 shows winging o
e while the right is w
tes because very m
Figure 8A
23
On the right is the posture of someone
ecause you can see more than just two knuckles, you
al internal rotation.
rom the side. If his shoulders tilt forward, he is more
as well. Seeing the scapula “winging” in the back will
tes weakness of the serratus anterior. This scapular
and not easily fixed. We know we can stretch the lats
ning the lower traps and serratus anterior, but think
t of the time you’re internally rotated and kyphotic (me
s as his 23:1 rule. We spend 23 hours a day with bad
ining good posture. What wins? We will discuss ways to
s like the lower traps and serratus, but consciously
ughout the day is your best remedy.
f the scapula. The left serratus anterior is strong and
eak and inhibited. This may not be as apparent in many
uscular backs will hide it well. This case is probably
Figure 8B

Andrew Paul
24
more severe (possibly a temporary paralysis of the serratus) than most that we
see in athletes.
When it comes down to it, identifying shoulder issues usually has more to do with
understanding the force couples of the shoulder than memorizing pictures of
possible dysfunctions. To make it
easier, the next section will give a list
of commonly short, overactive
musculature and commonly long,
weak, and inhibited musculature
along with the exercises to improve
them.
Figure 9

The Strength Coach’s Guide to Shoulder Training
25
Chapter 6: Training the Shoulder Complex
So far, we have discussed the anatomy of the shoulder and the various types of
movements it is capable of. We have also been reminded that due to lifestyle,
training habits, and genetics, we have some muscles that are what we call short,
overactive musculature and long, weak, and inhibited musculature.
Short, overactive musculature are usually strong muscles that we tend to work
more than their antagonists. They then overpower the antagonists and become
shortened while the antagonists become lengthened. Over time, this becomes
reinforced, creating deficiencies.
Below is a list created by Vladamir Janda in his book, Muscle Function Testing.
This list includes the most common long, weak musculature in the upper body
and the short, overactive musculature. Also included are the movements for
which they are responsible.
Long, weak, inhibited musculature
Rhomboids: Scapular adduction, downward rotation
Infraspinatus: Humeral external rotation, horizontal abduction, extension,
and humeral head stabilization
Teres minor: Humeral external rotation, horizontal abduction, extension,
and humeral head stabilization
Middle trapezius: Scapular elevation, retraction, upward rotation
Lower trapezius: Scapular depression, adduction, upward rotation,
posterior tilt

Andrew Paul
26
Posterior deltoid: Humeral horizontal abduction, extension, abduction,
and external rotation
Serratus anterior: Scapular protraction, upward rotation, and posterior tilt
Short, overactive musculature
Pectoralis major: Humeral extension (sternal fibers), horizontal
extension, flexion (clavicular fibers), horizontal adduction, internal rotation,
adduction, and abduction
Latissimus dorsi: Humeral extension, adduction, internal rotation,
horizontal abduction, scapular depression, retraction, downward rotation,
and posterior tilt
Teres major: Humeral extension, internal rotation, and adduction
Anterior deltoid: Humeral abduction, flexion, horizontal adduction, and
internal rotation
Subscapularis: Humeral internal rotation, adduction, extension, and
humeral head stabilization
Upper trapezius: Scapular elevation, upward rotation, and retraction
(sometimes)
Levator scapula: Scapular elevation, downward rotation, and anterior tilt
Pectoralis minor: Scapular abduction, downward rotation, depression,
and anterior tilt
Take a look at the groupings. Experts like Eric Cressey, Mike Robertson, and Bill
Hartmann do a great job of pointing out common themes in the book, The Inside-

The Strength Coach’s Guide to Shoulder Training
27
Out Manual, as well as in many of the articles that they have written. Former
Oakland A’s physical therapist, Daniel Cassidy, confirmed these findings. In
working with overhead throwing athletes (the Oakland A’s are a baseball team),
he finds that their upper traps are more active than their lower traps, and they
have overactive levator scapulae and short pec minors. Contrary to Cressey and
Robertson, Cassidy sees that his clients have short, overactive rhomboids (which
are downward rotators), and maybe most importantly, they have underactive
serratus anteriors.
Take one final look at the charts above. Remember, we want to keep the scapula
out of downward rotation and anterior tilt and keep the humerus out of internal
rotation. This proves to be a difficult challenge.

Andrew Paul
28
Chapter 7: Exercises to Improve Long, Weak, Inhibited
Musculature
Training the Rotator Cuff
We have already discussed
the importance of the rotator
cuff at length, but let’s recap
anyway. We know that the
rotator cuff consists of the
four muscles (SITS—
supraspinatus, infraspinatus,
teres minor, and
subscapularis). We also
know that the main role of
the rotator cuff is to depress
and stabilize (in all directions) the humeral head. The
the deltoid, which has an upward pull of the humeral
will succumb to the pull of the very strong deltoid, cau
acromion process and the humeral head to shrink. Th
involved in internal and external rotation and abductio
But wait, there’s more! The human body is interesting
hurt. This is the weakest link theory at work. Your bod
become stronger than it can handle. Once something
factor, progress halts. In most cases, weak joint stabi
weight that you can lift. Nowhere in the body is this m
effect that rotator cuff strength has on your bench pre
Charles Poliquin once reported adding 50 lbs to a clie
simply by adding external rotations into his daily work
y are in direct opposition to
head. A weak rotator cuff
sing the space between the
e SITS muscles are also
n of the humerus.
. It won’t allow itself to get
y won’t allow itself to
becomes your limiting
lizers limit the amount of
ore evident than in the
ss.
nt’s bench in six weeks
out. If that doesn’t sound
Figure 10

The Strength Coach’s Guide to Shoulder Training
crazy enough, he also reported that this particular client didn’t even bench during
that six weeks. This is a lesson learned in body balance. That particular client
was severely limited by stabilizer strength in his shoulder. Needless to say,
hitting the rotator cuff is critical to training any athlete.
Let’s get down to it. There are two ways we can go about training the rotator cuff.
The first is directly strengthening the SITS musculature by hitting them in
isolation exercises. This works very well. The second is to train them
proprioceptively using their roles as stabilizers and decelerators (as in throwing).
This also works well. See what I’m getting at? We must train the rotator cuff in a
multitude of ways in order to ensure that this will not be our limiting factor.
Strengthening the Teres Minor and Infraspinatus
Exercise #1: External rotation
The best way to isolate and
strengthen these muscles is
through external rotation. This
exercise uses the infraspinatus
and teres minor as the prime
movers (posterior deltoid
assists also) and also recruits
the subscapularis and
supraspinatus as stabilizers in
the movement.
this exercise, but
this movement in
do this movemen
fine, except some
extension.
29
There are several ways to do
let’s just stick with one (see figure 11A and 11B). I like to do
the transverse plane because less can go wrong. Some like to
t in the sagittal plane with the humerus abducted, which works
athletes compensate for rotator cuff weakness with lumbar
Figure 11A

Andrew Paul
30
This is an easy exercise that can
be done as a warm-up to activate
the stabilizers before benching.
Put simply, if you aren’t doing this
now, start.
Exercise #2: Cuban press
variations
This exercise is very similar to the
external rotation exercise as far as
recruitment patterns go (see
figures 12A, 12B, and 12C). It can be done with barbells
and it can be done standing or face down on an incline.
scapular anterior tilt in the elbows up position, which allo
over and the scapula to wing in the back.
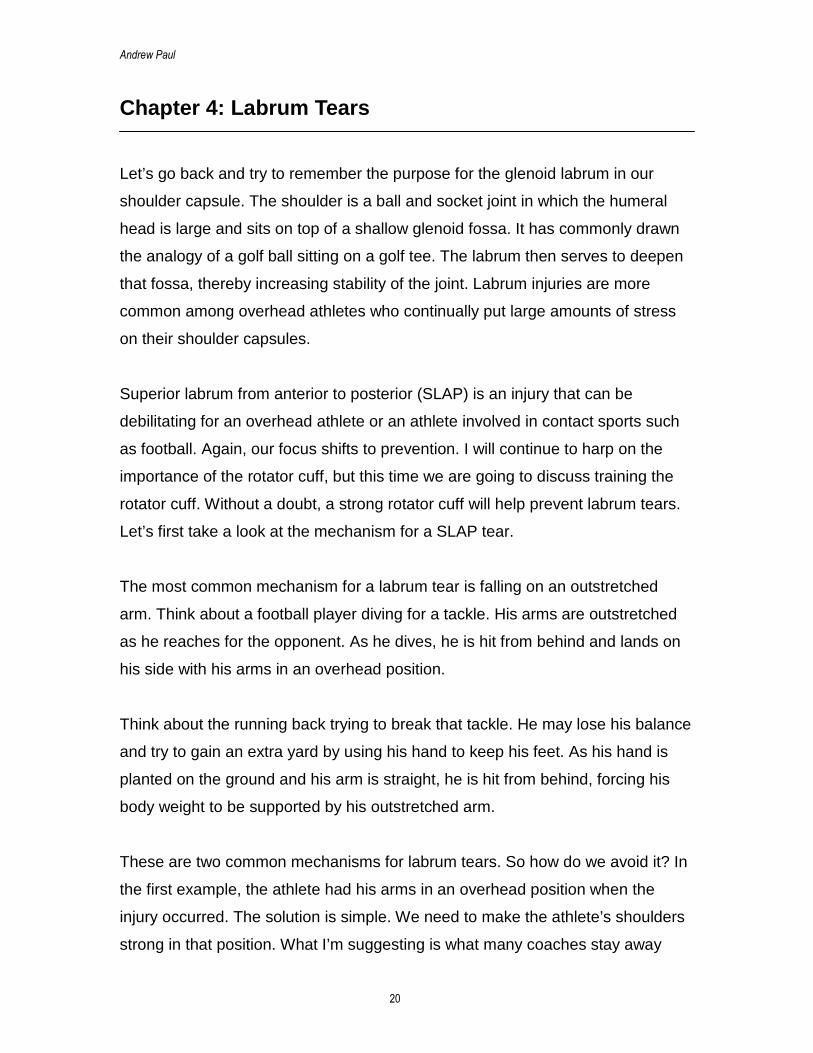
Exercise #3: L-lateral raise
This is a great exercise to hit both the supraspinatus (vi
external rotators (see figures 13A, 13B, and 13C). While
explanatory, it should be mentioned that doing lateral ra
bend at the elbow changes the lever arm so that it place
rotator cuff.
Figure 12A Figure 12B
, dumbbells, or plates,
The key is to stay out of
ws the shoulders to roll
a abduction)
this exercis
ises with a 9
s a greater lo
Figure 11B
and the
e is self-
0-degree
ad on the
Figure 12C
The Strength Coach’s Guide to Shoulder Training
All of these exercises target the
infraspinatus and the teres minor,
which are both very important.
However, let’s talk about ways in which
we can target the subscapularis.
Although this muscle is in our short,
overactive column, it needs to continue
to be strengthened. It works in internal
rotation and sometimes can become
weak because the large pectoris
muscles and lats are the prime movers
in internal rotation.
A weak subscapularis can result in
internal impingement or a strained
pectoralis major or minor. It also must
sustain heavy eccentric forces in
Figure 13A
overhead throwing athletes so it must
be strengthened. Although these types
of exercises may not deserve the same
attention that external rotation receives,
they should be recognized as
important.
Figure 13B
Figure 13C
31

Andrew Paul
32
Strengthening the Subscapularis
Exercise #1: Prone internal
rotation
You may be thinking, “Why
prone?” Many people do this
exercise in the transverse plane
(much like external rotations),
which works well, and many do
it in the sagittal plane with the
humerus abducted. Figure 14
shows the latter performed with
a miniband.
Here the athlete can only go from zero to ninety degre
movers tend to be the pectoralis major, latissimus dor
subs
for th
Perf
cons
rotat
15B
lats
and
to sh
hum
anter
tilt is an attempt to gain range of motion (ROM). In this
Wrist flexion is another attempt to gain ROM.
Figure 15A
es. In this case, the major
si, and teres major with the
capularis just going along
e ride.
ormed prone, this exercise
ists of 90–180 degrees of
ion (see figures 15A and
). In this zone, the pecs and
have already shortened,
it’s the subscapularis’ time
ine. Be sure that the
Figure 14
erus is supported and
ior tilt is avoided. Anterior
exercise, ROM is small.

The Strength Coach’s Guide to Shoulder Training
33
Exercise #2: Subscapularis pull
The name of this exercise lacks creativity, but don’t count it out just yet. Due to
the difficulty that some athletes’ may have with this exercise, you will most likely
need to use a theraband. This is another attempt at reaching maximal internal
rotation and avoiding the pecs and lats. Remember to maintain good posture
throughout the entire movement (see figures 16A and 16B)
Figure 15B
Figure 16A Figure 16B

Andrew Paul
34
Finally, we’ll hit the supraspinatus.
This muscle assists in abduction
of the humerus, but it’s important
to note that its major role is only in
the first 15 degrees of abduction.
This is important because of
compensation patterns seen in
lifters with a weak supraspinatus.
In a regular lateral raise, the lifter
will compensate by elevating the
scapula and using the upper traps to reach 15 degrees of abduction (figure 17)
so that the strong deltoid can take over the movement from there.
Strengthening the Supraspinatus
In order to avoid compensation by elevating the scapula and using the upper
traps, we need to strengthen the supraspinatus. The exercises that follow will do
just that.
Exercise #1: Leaning lateral
raise
If performed in a leaning
position, elevation of the
scapula proves to be
unsuccessful in creating
abduction. The lifter is forced to
use the supraspinatus. The
ROM may be less, but at least
we’re using the correct
musculature.
Figure 17
Figure 18

The Strength Coach’s Guide to Shoulder Training
35
I’ve found this exercise to be awesome for athletes just out of shoulder
rehabilitation. It does a great job of activating a dormant supraspinatus (figure
18).
Exercise #2: Empty can
This isn’t my favorite exercise
to hit the supraspinatus, but it
deserves mention (figure 19).
It’s performed in a plane called
the scapular plane. This is the
natural plane of the scapula
and is about 30–45 degrees in
front of the frontal plane (lateral
raise). By internally rotating the
humerus, we can better target
the supraspinatus. However, internal rotation also cuts down on the subacromial
space.
Some individuals may have issues with this lift, especially those with tight pec
minors.
Exercise #3: Scaption
In my opinion, this movement is
the better option over the empty
cans exercise. With the thumbs
pointed upward, the subacromial
space remains. In the scapular
plane, the shoulder should
function optimally. It hits all three
heads of the deltoid about
equally and recruits all four of the
Figure 19
Figure 20

Andrew Paul
36
rotator cuff muscles. Throw in upward rotation of the scapula and you have a
great exercise (see figure 20).
This is a much better option than front raises, which place the humeral head
anterior to the acromion process and greatly increase the likelihood of
impingement.
Exercise #4: Not the upright row
Eric Cressey is famous for his hatred of the upright row. By internally rotating the
humerus and abducting it, it may seem as though we want to have impingement
issues. By simply internally rotating, we cut down on subacromial space, and
now we want to fire up our deltoid in abduction. It is a recipe for pain. It should be
noted that due to scapular type (type I, II, or III acromion process), some people
are more susceptible to shoulder pain than others.
So I agree with Cressey. There are just better ways to hit the delts and traps than
using the upright row. I’m not even going to give you an image for this one. If you
don’t know what it is, great! Just keep not doing it.
Now, let’s discuss how to train the rotator cuff proprioceptively. The answer may
make some strength coaches a bit angry. This is where I condone instability
training. I’m not a strength coach who centers a strength training routine around
Swiss balls and 3-lb dumbbells. Most of the time, those who do use these
implements do so incorrectly. While performing Swiss ball push-ups and
medicine ball push-ups as exercises to fire up the stabilizers have merit and
should be used, they should not be used as strength exercises.
Dumbbell variations do a great job of walking the line between stability and
strength exercises. You will find that for an unstable athlete, dumbbell work is
almost exclusively stability work. However, in a very well-trained, stable athlete,
dumbbell work is almost exclusively strength work.

The Strength Coach’s Guide to Shoulder Training
37
The other way in which we train the rotator cuff proprioceptively is in deceleration
training. Doing medicine ball decelerations is a great way to train the rotator cuff
eccentrically. This mimics the muscle action while throwing in not only the rotator
cuff musculature but also the middle traps and rhomboids.
Another rarely used method is Inno Sport’s reflexive isometric lateral, rear, and
front raise. To do these, use light weight (1–2 lbs) in a drop and catch manner so
that the shoulder must respond to sudden changes in tension and length. Think
of it as plyometrics for the rotator cuff.
Rhomboids and Middle Trapezius
These two muscles are easy to group together
because of their position on the skeleton. The
rhomboids lay deep to the middle traps and
have similar but not identical lines of pull. While
the rhomboids assist in downward rotation of
the scapula (something we want to stay away
from) because of their line of pull (see figure 21
and 22), they also retract the
scapula and assist in posterior tilt
by pinning down the medial border
of the scapula.
The middle trap is part of a force
couple that upwardly rotates the
scapula (something that we want to
work toward).
Figure 21
Figure 22

Andrew Paul
38
Like the rhomboids, the middle traps retract the scapula but also assist in
elevation of the scapula.
The key with hitting these two muscle groups is retraction or, more importantly,
retraction without elevation. While elevating, we also activate our upper traps.
Remember, this muscle is already short and overactive. We need to learn how to
recruit our rhomboids and our middle traps separate from the upper traps.
Exercise #1: Retraction
We’ll start simple. This is as basic as any exercise gets for the rhomboid and
middle trap region. There are numerous variations of this exercise. It can be
done with bands (standing or bent over) or dumbbells (like a bent over row or
lying prone on a bench), on a machine, or like an inverted row. The key to this
exercise is just as described above—retraction without elevation. This may
sound easy, but it proves more difficult than you think. Figures 23A and 23B
show correct retraction while figure 23C shows retraction done with elevation.
The difference is subtle but important.
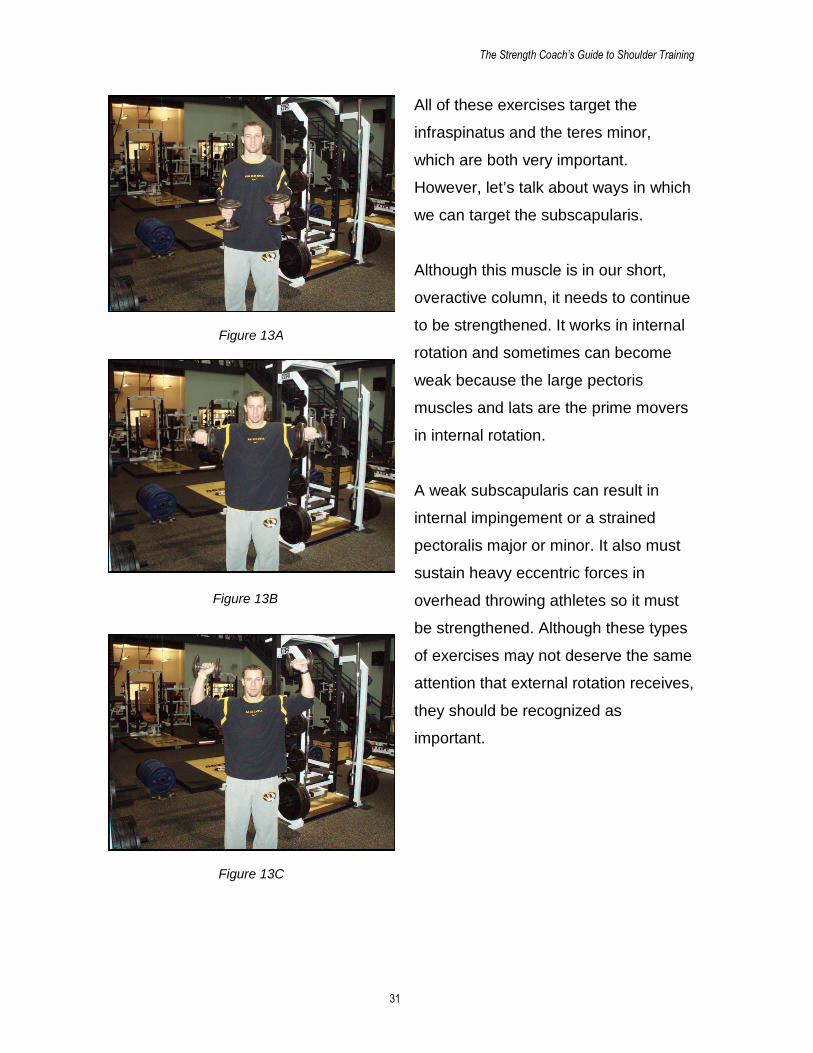
Exercise #2: Wall slides
In my opinion, this might be the best exercise for recruiting the rhomboid and the
middle trap dynamically. You will also get some good low trap recruitment out of
the deal as well. This exercise is actually a glenohumeral ROM exercise and
scapular stability exercise all in one.
Figure 23A Figure 23B Figure 23C

The Strength Coach’s Guide to Shoulder Training
39
To do this exercise, make sure the feet are about 10–12 inches from the wall
(see figures 24A and 24B). The athlete’s head and upper, middle, and lower back
as well as the back of the hands and forearms should stay in contact with the
wall. Start with both elbows at 90 degrees and slowly move the arms up and
down the wall, keeping all points in contact. Again, the key is to keep the
shoulders depressed. This is another simple exercise with big results.
Figure 24A
Figure 24B

Andrew Paul
40
Exercise #3: Prone T
This exercise has two
variations, each able to
preferably target either
the middle trap or the
rhomboids. This is done
very simply by lying
prone while keeping the
arms straight,
performing a version of
a rear raise. The two
versions differ by the
rotation of the humerus.
When targeting the rhomboid, the scapula should be elevated slightly (the
rhomboids are a weak elevator even though they’re not on the earlier list),
rotated downward
slightly, and adducted
(see figure 25). We
can reach this
scapular position
simply by turning our
thumbs down (internal
rotation of the
humerus).
On the other hand,
the middle trap can
better be reached by
Figure 25
Figure 26

The Strength Coach’s Guide to Shoulder Training
41
pointing the thumbs up (external rotation of the humerus). This position puts the
scapula in an upwardly tilted, depressed, and adducted (retracted) position (see
figure 26).
Exercise #4: Rowing the right way
We know that there are virtually limitless versions of a horizontal row—bent over
barbell rows, seated cable rows, single arm dumbbell rows, and more. The key is
to make sure they’re done correctly (see figures 27A, 27B, and 27C).
The first movement in any row should be retraction of the scapulae. Again, this
involves depression, not elevation. There are a few compensation patterns for
weak retractors that can be seen when observing an athlete performing rows.
None of them are more obvious than the head bob. This is when the athlete
looks like he is bobbing for apples while doing a row. The athlete is usually using
too much weight and needs to focus on holding the bar on his chest for a count
before allowing it to come down.
The other major compensation pattern is elevation of the shoulders. This allows
the athlete to feel as if he is keeping his back tight but by using the upper traps in
elevation. This is something we want to avoid.
Figure 27A Figure 27B Figure 27C

Andrew Paul
42
Exercise #4: Face pulls
This is another one of my favorite exercises. This is done by retracting and then
horizontally abducting the humerus. By doing this, we can recruit the posterior
delt and external rotators (see
figures 28A and 28B). Again,
keep the shoulder out of
elevation. As seen in figure
28A, go with a neutral grip to
better hit the external rotators.
This is a must have auxiliary
exercise in just about every
program.
Exercise #5: Prone Y, T, and
W
This is another exercise that
has made its way into many
shoulder programs and warm
ups and for good reason (see
figures 29A, 29B, and 29C).
Some of you may have heard
of it under the name
Blackburns, but it’s the same
idea.
To perform this movement, go into retraction and put the humerus at different
joint angles in order to recruit slightly different musculature. Always remember to
squeeze with the scapulae. Those are your money makers. Figures 29A, 29B,
and 29C are done on the ground. Ask your athletes to keep their noses close to
Figure 28A
Figure 28B

The Strength Coach’s Guide to Shoulder Training
43
the ground to avoid lumbar hyperextension. These can be done as isometric
holds or for repetitions.
Lower Traps
The lower traps become a very important muscle group by playing a few different
roles (see figure 30). First, they play a major role in upward rotation of the
scapula. This gives our humeral head room to breathe. Second, they play a
major role in depression of the scapula, a movement usually overshadowed by
their antagonist in that motion—the very sexy upper traps. Finally, they play a
major role in extension of the thoracic spine.
The lower traps are an odd
muscle group to get to, but there
are a few exercises that do a good
job at firing them up.
Exercise #1: Prone Y
This exercise is just like the prone
T, except the arms are raised in a
Y shape and the thumbs are
pointed upward (see figure 31). By
doing this, we put the arms in line
with the line of pull from the lowerFigure 30
Figure 29A Figure 29B Figure 29C

Andrew Paul
44
traps, and we also put the scapula in an adducted, upwardly rotated, and
depressed position. On this exercise and in exercises like the prone T, you may
feel your upper traps activating. This is because they are major stabilizers in the
movement, not prime movers. This action, which we’ll discuss later, serves them
well.
Exercise #2: Sit, roll, and reach
This exercise looks awkward, but it hits the lower traps very well by depressing
the scapula and getting the body into thoracic extension unilaterally (see the
thoracic region chapter), much like an overhead athlete (see figures 32A and
32B). It is performed on the knees.
Sit your butt on your heels and rest your elbows on the ground. From this
position, keep one elbow on the ground. Take the other hand and roll the palm so
that it faces up. Then, extend your arm and reach your palm to the ceiling. I
Figure 31

The Strength Coach’s Guide to Shoulder Training
45
promise that this works, and I
warned you from the beginning
that it looks awkward.
Exercise #3: Dip depressions
This exercise actually uses the
lats as the major prime mover
but hits the lower traps as well
(see figures 33A, 33B, 33C,
33D, and 33E). Think about all
the shoulder elevation work
that our athletes do (shrugs,
Olympic lifts, etc.).
We need to balance it out a
little. Luckily, our body was
smart enough to put a huge
muscle—the latissimus dorsi—
in charge of opposing those
forces. However, our lower
traps play a large role also.
This exercise can be done in two ways. For the first way, sit on a bench and put
your hands down directly on each side of your butt. This is important. Do not
allow your butt to go over the front of the bench (see figure 33B). This puts you in
humeral hyperextension and takes away from your ability to retract your
shoulders. Your chest should be tall, and your scapulae should be retracted to
truly target your lower trap.
Do you see the difference between the correct start position (figure 33A) and the
incorrect start position (figure 33B)?
Figure 32A
Figure 32B

Andrew Paul
46
The second way is performed like a regular dip. Again, the chest is up and the
scapulae are retracted. All movement is done at the shoulder (see figures 33D
and 33E).
Exercise #4: Pull-up depressions
This exercise takes dip depressions to the next level by doing it from a chin-up
position (see figures 34A and 34B). By externally rotating the humerus (as in a
chin-up grip) and putting the humerus in full flexion, we can lengthen the lats to
the extent that the lower and middle traps must take charge of this lift.
By pulling the chest up, we work retraction and depression at the same time. This
is a “can’t lose” exercise. However, we must not rely solely on this version.
Figure 33A Figure 33B Figure 33C
Figure 33D Figure 33E

The Strength Coach’s Guide to Shoulder Training
47
Start in a full hang and then depress the shoulders with no elbow flexion. The
chest should come up, and the scapulae should retract and depress.
Serratus Anterior
This muscle may be one of the most important muscles in the upper body. Its
main role is to protract the scapula. However, it also plays major roles in upward
rotation and posterior tilt (by locking the scapula to the ribs). As we know, both of
those are desired positions for the
scapula.
This muscle also seems to be the first
muscle to “shut down” in the face of
trouble. For example, if the pectoralis
minor is strong and tight, it pulls the
scapula into anterior tilt. To avoid injury,
the serratus anterior lengthens and
becomes inhibited to allow the scapula to
follow the path of least resistance. The
body thinks that it is helping, but actually,
it is aiding the problem.Figure 35
Figure 34A Figure 34B

Andrew Paul
48
Studies show that serratus anterior dysfunction is a huge indicator of shoulder
issues, especially in overhead athletes. Hitting this muscle is hard but a must.
Unfortunately, there is only one real way to target the serratus anterior and that is
through protraction of the scapula. Here are a few tips to strengthen this
forgotten muscle.
Exercise #1: Push-ups
Serratus activation is far higher when doing push-ups than while benching (it’s
pretty much dormant when benching). The key is protraction at the top of the
push-up. This is sometimes called a “push-up plus.” My thought is why don’t we
just call this a push-up and perform our push-ups correctly? Can you see the
difference at the top in figures 36A and 36B?
Exercise #2: Scap push-up
This is just like above, only it takes the push-up out of it. It just becomes a
shoulder movement. Look at figures
36B and 36C and you have a scap
push-up.
Exercise #3: Single arm medicine
ball push-up
This is a push-up variation that
allows you to get extra abduction on
the down arm, as you can see in
Figure 36A Figure 36B Figure 36C
Figure 37A Figure 37B

The Strength Coach’s Guide to Shoulder Training
49
figure 37B. Be sure to make your
athlete get all the way up on their
down arm (see figures 37A and
37B).
Exercise #4: Supine single arm
dumbbell protraction
This is virtually the same
exercise. However, it can be
done if the issue is unilateral (the
injury or dysfunction is present in
only one arm). See figures 38A
and 38B.
Exercise #5: Bridges
This concept can be reinforced
while doing other exercises as
well. Bridges are well known as
one of the best core exercises
out there (see figures 39A and
39B). However, simple
modifications can make these
more than just a core
exercise.
Figure 39A shows the athlete
doing bridges with an
unstable shoulder capsule.
In figure 39B, the athlete
engages the serratus anterior
and makes the exercise much more shoulder friendly.
Figure 38A
Figure 38B
Figure 39A Figure 39B

Andrew Paul
50
Chapter 8: Exercises to Improve Short, Overactive
Musculature
Take another look at the short, overactive musculature list in Chapter 6. Most of
these are major muscle groups that will be trained enough in regular training
programs. They should be kept that way. I would never tell anyone that bench
pressing or pull-ups are overrated exercises. Both, or some variation of the two,
are must haves in a quality training program. However, make sure that you keep
these movements loose.
A majority of the issues that athletes have can be solved by doing full range of
motion (ROM) exercises. This creates strength in the entire ROM. However,
doing extra dynamic or static stretching certainly helps. Self-massage techniques
(foam roller, tennis ball) and active release therapy (ART) work is also very
helpful in loosening chronically tight tissue.
Pectoralis Major and Minor
Figure 40 shows the pectoralis major, and figure 41 shows the pectoralis minor.
The pectoralis minor lies deep in relation to the pectoralis major and assists in
Figure 40 Figure 41

The Strength Coach’s Guide to Shoulder Training
51
many of the same movements. However, note the different insertion points. The
pectoralis major connects to the humerus and also broadly along the clavicle
while the pectoralis minor attaches to the coracoid process of the scapula. You
can see how tight pecs could very easily lead to humeral internal rotation and
anterior scapular tilt.
Keeping these often overworked muscles long is key. Simple standing pec
stretches can do wonders. However, getting a tennis ball or a lacrosse ball (for
bold individuals only) on the pec minor can do unbelievable things. It will hurt like
hell but does loosen up the pec.
Exercise #1: Tennis ball massage
Lie on your stomach with your arm out to the side and place a tennis ball under
one pec. Put some body weight on it and roll it around while digging the tennis
ball in. This is quite painful but does a great job of loosening up tight tissue.
Exercise #2:
Bar hangs
As simple and
ridiculous as this
exercise looks,
it’s a great way
to loosen up
your pecs and
lats (see figure
42). The key is
to relax. Other
than that, it’s
exactly what it
sounds like. Figure 42

Andrew Paul
52
Exercise #3: Bar
dislocates
This is my favorite
shoulder ROM
exercise (see figures
43A, 43B, and 43C).
The key with this one
is smooth movement.
Don’t cheat by going
into lumbar extension
and swaying back and
forth.
Exercise #4: Pec wall stretches
These are simple yet effective (see figure 44). Put the elbow at 90 degrees and
the shoulder in horizontal abduction and external rotation to get a maximal
stretch. Then, let it ride.
Figure 43A
Figure 43B Figure 43C

The Strength Coach’s Guide to Shoulder Training
53
Levator Scapulae
This muscle is rarely mentioned but very important (figure
45). You can tell by the line of pull that this muscle
contributes significantly to scapular downward rotation
and assists the upper traps in elevation of the scapula.
Due to lifestyle, this
muscle becomes
shortened and therefore
pulls the scapula into downward tilt. Again, we
want to avoid this. There is also a high incidence
with chronic headaches due to tight levators. By
simply stretching this muscle daily, you can
avoid many problems.
Exercise #1: Levator
scapulae stretch
The variation in figure 46A
targets the levator scap while the variation in figure 46B
targets the upper trap. Both are great stretches and should
be done daily with overhead athletes.
Upper Trapezius (Special Case)
The upper traps (see figure 47) create a special problem
for us. Athletes tend to have overactive upper traps (ask
them to retract without elevating). However, the muscle is
extremely important in preventing brachial plexus type
injuries such as “stingers.” It does a great job of protecting
the cervical spine and oddly enough assists the levator
scap and rhomboids in downward rotation. It also is a major
part of the upward rotation force couple.
Figure 45
Figure 44
Figure 46A
Figure 46B

Andrew Paul
54
In almost every
training program, the
traps are trained by
doing some shrug
variation. How an
athlete performs
shrugs has a great
impact on how the
athlete’s entire
trapezius complex
functions. Let’s start
with simple shrugs.
Exercise #1: Shrugs
This exercise is
seemingly simple,
but as Paul Chek and
Mike Robertson point
out, it can have bad consequences in athletes if performed incorrectly. There is a
right way and a wrong way to
shrug. Most people do it
incorrectly. The key to a good
shrug is scapular retraction.
This keeps all muscle groups
functioning optimally.
Take a look at figures 48A and
48B. That’s a nice shrug!
Figure 47
Figure 48A

The Strength Coach’s Guide to Shoulder Training
Now, notice the difference in
figures 49A and 49B. The
athlete carries the dumbbells in
front of his body. This creates
an internally rotated humerus
and an anteriorly tilted scapula.
This lengthens an already long,
weak middle trap and rhomboid
region, which isn’t good.
(figure 49B). It’s no
retracting.
Exercise #2: Ove
Enter my favorite t
points out, regular
makes them less e
scapula. Doing thi
position, thereby le
55
Notice the barbell shrug as well
t as bad, but it still isn’t as good as using dumbbells while
rhead shrugs
rap exercise (see figures 50A and 50B). As Eric Cressey
shrugs have a tendency to lengthen the upper traps, which
ffective upward rotators and balls up an already tight levator
s style of shrug puts the scapula in an already upwardly rotated
ngthening the levator scapulae.
Figure 49A Figure 49B
Figure 48B

Andrew Paul
56
This exercise also has great input from the middle and lower traps as well as the
serratus anterior. Don’t be afraid to load this exercise.
Latissimus Dorsi (Special Case)
The lats may be one of the most important muscles in the upper body. They take
part in numerous humeral motions as well as scapular depression (see figure
51). They also attach to the lumbar spine and play a huge role in lumbar stability.
While the lats need to be stretched regularly and kept at length, they also need to
be incredibly strong. Exercises such as bar hangs can be helpful in keeping them
long. Standing lat stretches are also useful.
To do these exercises, stand tall with your
arms extended over your head as far
as possible. From there, slowly bend
side to side. These types of stretches
should be done on every training day.
Here are a couple exercises to help you
Figure 51
Figure 50A Figure 50B

The Strength Coach’s Guide to Shoulder Training
57
optimally train the lats. As you will see, the lats are vital to athletic performance.
Exercise #1: Pull-up the right way
The major mistake that most individuals make when performing pull-ups is they
don’t go through a full range of motion. By not going through a full range of
motion, we reinforce short lats, which causes the problems that we’ve discussed.
Another mistake is the absence of scapular depression. There should be two
distinct motions when performing a pull-up (see figures 52A, 52B, and 52C). The
first motion is scapular depression (the arms stay straight and the head rises),
and the second motion is the pull. Keeping the scapulae depressed is key.
Bringing not just the chin but the sternum to the bar also helps.
We all know that our lats
can help us do more pull-ups and make us look
jacked, but Eric Cressey points out how important
this muscle actually is in his article, “Lats: Not Just for Pull-downs!” Take a look
at figure 53, which was taken from Cressey’s article on t-nation.
In this diagram, the number “1” marks the thoracolumbar fascia by which the lats
connect to the lumbar spine. Number “2” is gluteus maximus muscle fiber. Note
the striation of the muscle fibers (direction of pull). Number “3” is the latissimus
dorsi muscle fiber. Again, note the striation of the muscle fibers. Both connect to
the thoracolumbar (TL) fascia.
Figure 52A
Figure 52B Figure 52C

Andrew Paul
58
Now, imagine that the TL fascia wasn’t there. It appears as though the gluteus
maximus and latissimus doris muscle fibers could be a continuation of one
another running diagonally
across your back. Imagine
them as one muscle (this takes
some imagination) connecting
contra-lateral hips and
shoulders in a diagonal
pattern. Lengthen one of the
diagonals and what do you
get? Arm flexion and hip
flexion of the opposite hip and
shoulder.
Now, shorten the other
diagonal at the same time.
What do you get? Arm
extension and hip extension of the opposite hip and shoulder. Do you see what
I’m getting at? If you’re having trouble imagining this, take a look at figure 54.
Figure 53

The Strength Coach’s Guide to Shoulder Training
59
Figure 54

Andrew Paul
60
Chapter 9: Targeting the Thoracic Spine
When looking at the human body, it becomes very clear that there is a large
amount of interdependence between the various parts of the body. Nowhere in
the body is this more evident than in the overlap between the shoulder and the
thoracic spine (t-spine). It’s important to note that the t-spine also overlaps with
the lumbar spine and even the hips.
The t-spine may be one of the most
overlooked parts of the body when
it comes to training. When we
discuss anatomy, it will become
very clear as to how much of an
impact the t-spine has on the rest of
the body, especially when
discussing shoulder health. It wasn’t
until recently when physical
therapists like Shirley Sahrmann
started to pay attention to t-spine
mobility that the region got attention
from strength and conditioning
coaches such as Bill Hartmann and
Mike Robertson.
T-Spine anatomy
The bony anatomy of the thoracic spine is very simple yet very important. It really
involves two structures that have a huge impact on a structure discussed in
Chapter 1.
Figure 55

The Strength Coach’s Guide to Shoulder Training
61
The thoracic region of the spine is 12 vertebrae long and is built for maximum
stability. The reason for such stability is the attached ribcage. These two
structures are designed to protect the vital organs of the body. There is one joint
that isn’t shown in figure 55 but is very important. It’s also the joint that bridges
this chapter with Chapter 1. That joint is the scapulothoracic joint. Let’s play a
little game of six degrees of separation with the thoracic cavity.
If the thoracic spine is connected to the ribs and the ribs interact with the
scapula, the structure of the spine will affect the structure of the ribs, which will
affect the lay of the scapula that we’ve already identified as being vital to
shoulder health.
Normal structure of the t-spine
When looking at the structure of the t-spine, it is important to note the natural
kyphotic arch. Kyophosis refers to the forward sway of the spine in this region.
Figure 56 shows this curve.
While a natural kyphotic
curve is healthy,
problems occur when it
becomes exaggerated.
This can be caused by
a number of factors
(which we’ll hit on later),
but for now, we will
focus on how important
it is to keep this area in
an optimal position.
Look at figure 56 and
imagine where the
Figure 56

Andrew Paul
62
scapula lays. In the picture on the right, we have a healthy kyphotic curve, and
the scapula will normally lay accordingly. In the picture on the left, the kyphotic
curve is exaggerated. Again, the scapula will lay accordingly. This puts them at
an extremely anterior tilted position.
Think back to Chapter 2. This is something that we try to stay away from.
Because of this, we end up with the same type of muscle imbalances that we
discussed in that chapter. Short pectoralis muscles and long, weak rhomboid,
middle, and lower trapezius muscles will then become a problem.
Other problems caused by a kyphotic posture are outside the scope of this
writing and my expertise, but if you talk to a chiropractor or neurologist, they will
tell you that poor posture puts a ton of pressure on nerves and can disrupt many
motor recruitment patterns. Shoulder health may be secondary.
Thoracic mobility
When looking at the structure of the spine, we can learn a lot about what our
thoracic spine is meant to do. After all, the old cliché tells us, “structure dictates
function, and function dictates
dysfunction.”
The area of the spine that is
built to be mobile is the thoracic
spine. It is in this area that
flexion, extension, and rotation
are meant to occur, not at the
lumbar spine. Training to
mobilize your thoracic spine
can have some major benefits.Figure 57

The Strength Coach’s Guide to Shoulder Training
63
In the example of kyphosis, the t-spine lacks the ability to extend. This becomes
a huge problem, especially when lifting, and has major implications with shoulder
health as well as with the health of the lumbar spine. As a general rule of thumb,
the lack of
mobility in one
area will lead
to compen-
satory mobility
in another. In
this case, an
immobile
thoracic cavity
leads to
unwanted
movement in
the lumbar
region.
It is also important to understand that the spine is unlike most joints in that it is
built to move on all planes. Therefore, a stiff t-spine region does not just lack the
ability to extend but also lacks the ability to laterally flex and maybe, most
importantly, rotate.
Let’s take a look at a lifter in figure 57 with the inability to extend his t-spine. This
lifter has a hard time getting his chest up tall. Any attempt to do so leads to
lumbar hyperextension. Again, an immobile t-spine leads to compensatory
motion elsewhere.
In this situation, we can continue to tell the athlete to get his chest up, but we
aren’t doing his low back any favors. Attacking him with t-spine mobility exercises
is our best bet. Figure 58 shows a lifter with good thoracic extension.
Figure 58

Andrew Paul
64
In the Inside-Out Manual,
Hartmann and Robertson do a
great job of emphasizing the role
of the t-spine in rotation. When
looking at the degrees of
freedom of the spine, a majority
of rotation occurs in the thoracic
region (about eight degrees on
average) when compared to the
lumbar region.
Let’s do one more example.
Take a look at figure 59, which
shows Tiger Woods in the middle
of a golf swing. Compare the
difference in rotation between
the lumbar spine and the
thoracic spine. A majority of the
rotation occurs in the thoracic
region. The lumbar region remains stable for most of the movement. Because
Tiger Woods is about to uncoil and put the ball 450 yards down the fairway, we
can assume that he is doing things correctly.
As we can see, having proper mobility of the thoracic region is essential, not only
to shoulder and low back health but to our overall performance as well.
Figure 59

The Strength Coach’s Guide to Shoulder Training
65
Chapter 10: Training the Mobile Thoracic Spine
Thoracic Extension
We’ve already briefly discussed why mobility of the thoracic region is so
important. We’ve also discussed the difference between a healthy kyphotic curve
and an exaggerated kyphotic curve (figure 56). Now, we can begin to think about
how this relates to shoulder and lumbar health.
Imagine going into a full 180-degree shoulder flexion. We know from Chapter 1
that many things go on in our shoulder that we don’t have to think about. Our
scapula will go into posterior tilt in order to create room for our humerus. If it
doesn’t, the humerus meets with the acromion process, which causes the pain
from impingement.
Now, imagine that you have a kyphotic and immobile thoracic region. Remember,
your rib cage structure is set by the structure of your spinal cord, and your
scapula lies on
your posterior rib
cage. Even if our
serratus anterior
and rhomboids
are doing a good
job of pinning our
scapulae down,
they still have to
go into posterior
tilt in order to go
into full humeral
flexion. Where
can the scapulae
Figure 60

Andrew Paul
66
go if the thoracic spine is immobile? They certainly won’t be able to make room
for the humerus.
One of two things will happen. The first is impingement of the shoulder due to the
lack of the ability for the thoracic region to go into extension. The other option is
for our lumbar region to pick up the slack and go into extension in order to give
the humerus room to move. What we have are two scenarios, each of which
ends up in an injury or pain in the area above (the shoulder) and below (the
lumbar spine) the actual cause of the dysfunction (the thoracic spine). We
haven’t even discussed the effects the lumbar motion will have on the hips and
the hips on the knees and so on down the kinetic chain.
You can test this on yourself. Sit in a chair with good posture. Have one arm
straight and the hand in a neutral position (thumb up). Keeping your arm straight,
go into full (180 degree)
extension. Notice if one
of two things happen—
use of your upper trap
or lumbar extension. If
you use your upper
trap, your shoulder will
travel toward your ear. If
you have to lean back
(evident by your chest
getting big and your
stomach going out) in
order to get your arm in
full flexion, you may
have identified an issue. Chances are it isn’t a huge problem, but it’s worth taking
into consideration. Imagine the implications on overhead lifts.
Figure 61

The Strength Coach’s Guide to Shoulder Training
67
As stated earlier, the implications of a stiff kyphotic thoracic spine go beyond the
thoracic region and spread up and down the kinetic chain. The most affected
areas are the ones closest to the t-spine as well as the shoulder and the lumbar
spine. Let’s take a look at how the lumbar spine compensates for a stiff kyphotic
t-spine during static posture.
Take a look at figure 61. Imagine that the thoracic spine had a more kyphotic
curve to it and no other part of the spine moved. What would happen? If no other
part of the spine moved, the individual would be looking straight at the ground.
Obviously, that doesn’t happen. In order to compensate, the lumbar spine goes
into a hyperlordotic curve along with the cervical spine. This puts a great amount
of stress and pain in these areas, not to mention the disruption of nerve signals.
By simply icing and massaging the lumbar spine, we are ignoring the problem. If
we adjust the thoracic spine, we can return to normal spine alignment.
Training Thoracic Extension
Before I begin with the exercises, let me explain the process by which we will
achieve thoracic extension. The first group of exercises is meant to target the
muscles that act in extension. By strengthening the weak musculature (erector
spinae, trap complex, rhomboids), we will enable the body to pull the spine back
into alignment. The second group of exercises is meant to mobilize the t-spine.
These exercises put us in exaggerated thoracic extension. By putting our t-spine
in these positions, we loosen the area and decrease its ability to resist the
musculature that we are strengthening. Both of these methods are
interdependent and necessary.
Exercise #1: Overhead squat
This lift may be one of the best exercises for the total body. At first glance, it may
not look like much of a workout for the thoracic area, and with light weight it may
not be. However, once you begin loading this exercise, you can quickly identify

Andrew Paul
68
weaknesses within the kinetic chain. Doing a proper overhead squat progression
can help tremendously (figures 62A and 62B). This may include beginning with a
simple overhead squat and working toward more complex lifts such as a squat
and press or a snatch balance.
Figure 62C shows someone who may
need more thoracic mobility work. His
upper body is unable to get full
extension. In this case, adding a light
amount of weight to the lift may work
but caution should be used. Adding too
much weight will make the lift
impossible to perform correctly.
Figure 62A
Figure 62B
The Strength Coach’s Guide to Shoulder Training
69
Exercise #2: Wall slides
I told that you this was one of
my favorite exercises (see
figures 63A and 63B).
See Chapter 7.
Exercise #3: Sit, roll, and reach
This exercise was also described in Chapter 7. This is another exercise that may
not look difficult but really does a good job of targeting the often ignored and
weak lower trap (see figures 64A and 64B).
Figure 62C
Figure 63A Figure 63B
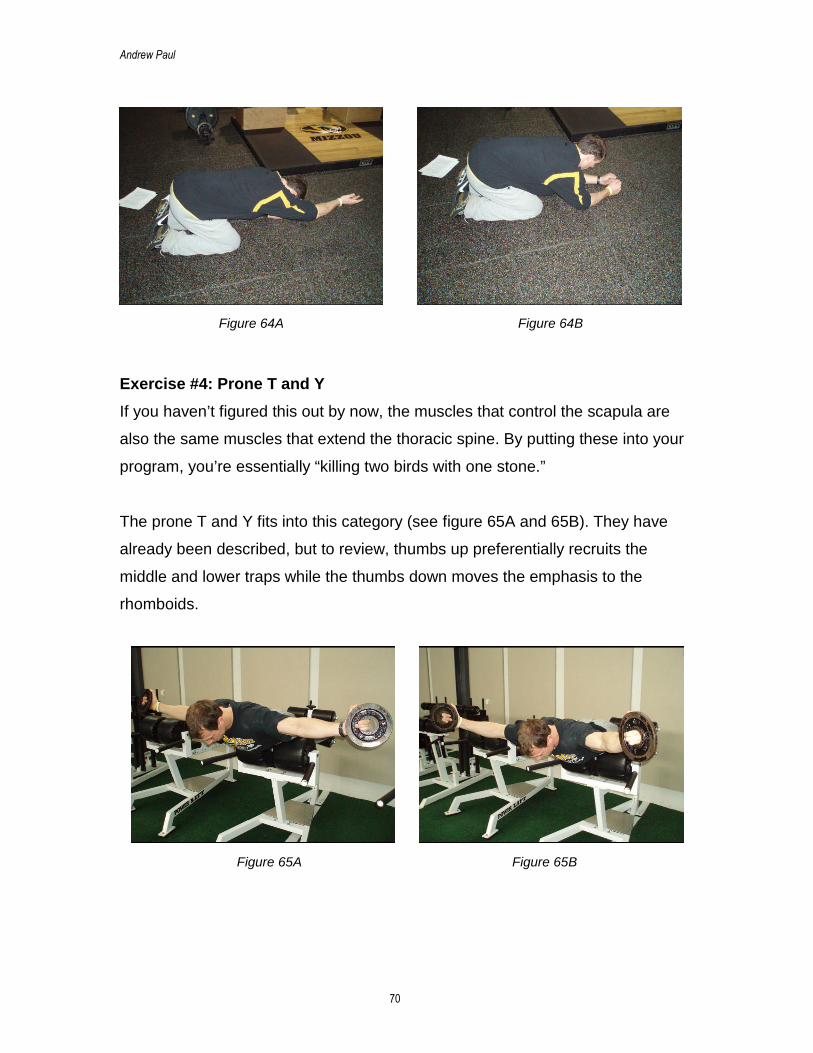
Andrew Paul
70
Exercise #4: Prone T and Y
If you haven’t figured this out by now, the muscles that control the scapula are
also the same muscles that extend the thoracic spine. By putting these into your
program, you’re essentially “killing two birds with one stone.”
The prone T and Y fits into this category (see figure 65A and 65B). They have
already been described, but to review, thumbs up preferentially recruits the
middle and lower traps while the thumbs down moves the emphasis to the
rhomboids.
Figure 64A Figure 64B
Figure 65A Figure 65B

The Strength Coach’s Guide to Shoulder Training
71
Exercise #5: Overhead Romanian deadlifts
This is much more difficult than it looks (see figures 66A and 66B). Hold a light
weight directly overhead with your arms locked and then proceed to do a
Romanian deadlift. Be sure to keep the weight directly overhead by not letting it
drop down. It’s easier said than done. And just like a Romanian deadlift, your
lower back stays tight.
Exercise #6: Overhead pressing
correctly
Doing overhead lifts may be a bit of
a controversial subject. Personally,
I believe that the pain associated
with overhead lifts has more to do
with genetics (see the three types
of acromion processes) than
anything. Regardless, we can force
our thoracic spine to extend correctly by doing these types of exercises correctly.
The first mistake is using a back support to perform an overhead press (see
figures 67A and 67B). Using these back supports disrupts the normal
stabilization of the thoracic spine and makes people want to turn the overhead
press into an incline press.
Figure 66BFigure 66A
Figure 67A Figure 67B

Andrew Paul
72
The second big mistake is
hyperextension of the lumbar
spine (figure 68). This is a
natural compensation for those
who lack the ability to extend
the thoracic spine and is an
unconscious attempt to use the
stronger musculature of the
chest. It also teaches the
lumbar spine to become mobile
while putting it in a risky position.
The correct way to overhead press is to keep the lumbar tight and in a neutral
position (see figures 69A and 69B). Preferably it should be done standing.
However, some beginning lifters may have an easier time seated with no back
support because of the lack of stability.
Mobilizing the Thoracic Spine
While those exercises are meant to strengthen the often ignored musculature of
the thoracic cavity, the next group of exercises is meant to mobilize the thoracic
spine. These should be used in combination with the strengthening exercises.
Figure 68
Figure 69A Figure 69B

The Strength Coach’s Guide to Shoulder Training
73
Exercise #1: Foam roller crunch
This exercise is simply an active extension of the t-spine (see figures 70A and
70B). By using the foam roller, we are able to separate the thoracic spine from
the lumbar spine and give our t-spine a fulcrum on which to extend. The key is to
keep your glutes in contact with the ground and avoid extra lumbar extension by
bracing with the abdominals. The hands are placed behind the head or are
extended overhead. Other variations of this exercise can be done seated by
using the back of the chair as a fulcrum.
Exercise #2: Tennis ball crunches
This is a Mike Boyle exercise and is very similar to exercise number one. The
contraption in figure 71A is simply two tennis balls duct taped together. The
exercise is done by placing the tennis balls so that one is on each side of your
spine (see figures 71B and 71C).
Start by placing the tennis balls at the thoracic and lumbar junction and perform
5–10 crunches. Then, move the tennis balls up an inch or two and perform 5–10
more. Repeat this process all the way up the thoracic spine. It doesn’t feel good,
but it does a great job of loosening up the thoracic musculature.
Figure 70BFigure 70A

Andrew Paul
74
Exercise #3: Cats and camels
This exercise has been done for a while, but most people do it incorrectly (figure
72A and 72B). It’s performed to loosen the thoracic spine, not the lumbar spine.
A large, overexaggerated hump
should be seen in the upper back.
This is immediately followed by
extension of the spine. Do not go into
full extension or flexion ranges of
motion. Instead, stop just before that
point. Each position should only be
held for a second or two. Switch from
motion to motion slowly.
Training Thoracic Rotation
Earlier, we mentioned the importance
of rotation of the thoracic spine. This
may be the most underestimated role
of the thoracic spine.
Let’s go back and look at the picture
of Tiger Woods in his backswing
(figure 59).
Figure 71A Figure 71B Figure 71C
Figure 72A
Figure 72B

The Strength Coach’s Guide to Shoulder Training
75
Looking at figure 59, you can tell that there isn’t much rotation in the lumbar
region. A majority of his rotation takes place in the thoracic region of his spine.
Indeed, this is how the spine is designed to work.
Let’s look at another example.
Figures 73 and 74 are of Albert Pujols (figure 73) and Derek Jeter (figure 74).
Both are in about the point in their swing in which their bodies are coiled and
about to produce some
impressive power.
Take a look at their
mid-sections. For the
most part, their lumbar
regions move with their
hips. Their hips and
lower abdominals (belly
button region) are
square to the pitcher. It
is their thoracic region
that travels behind. This changes our idea of rotational training. Doing Russian
twists may not be the best idea after all.
These types of exercises teach our lumbar spine to be mobile. If we teach our
lumbar spine to resist rotation and teach our thoracic spine to mobilize
rotationally, we can create the same type of coil that Albert Pujols, Derek Jeter,
and Tiger Woods have produced.
Here are some simple exercises that can mobilize the spine rotationally.
Figure 73 Figure74

Andrew Paul
76
Exercise #1: High step rotations
These are done with very light weight (PVC pipe). Place one foot up on a box or
bench so that the femur is elevated slightly above parallel. This position puts the
hips in a laterally tilted position.
In this position, the lumbar
spine becomes locked into
place, putting all the rotation in
the hands of the thoracic spine.
Simply twist and look over the
shoulder of your “up” leg, hold
for a couple seconds, and
return back to the starting
position. Try to go further the
next time. Seems pretty simple,
right? It can also be done in a
lunge position as long as the
front foot is elevated and the
hips are laterally tilted (see
figures 75A and 75B).
Exercise #2: Seated twists
Again, here’s another easy one
(see figures 76A, 76B, 76C,
76D, and 76E). Sit with your
legs crossed, your chest up tall, and your arms out in front of you. Twist one
direction and hold. When you have gone as far as you can laterally flex, return
upright and then rotate further.
By laterally flexing (figures 76C and 76E), we can force the vertebrae to loosen,
thereby enabling us to increase the range of motion. Do this exercise about three
Figure 75A
Figure 75B
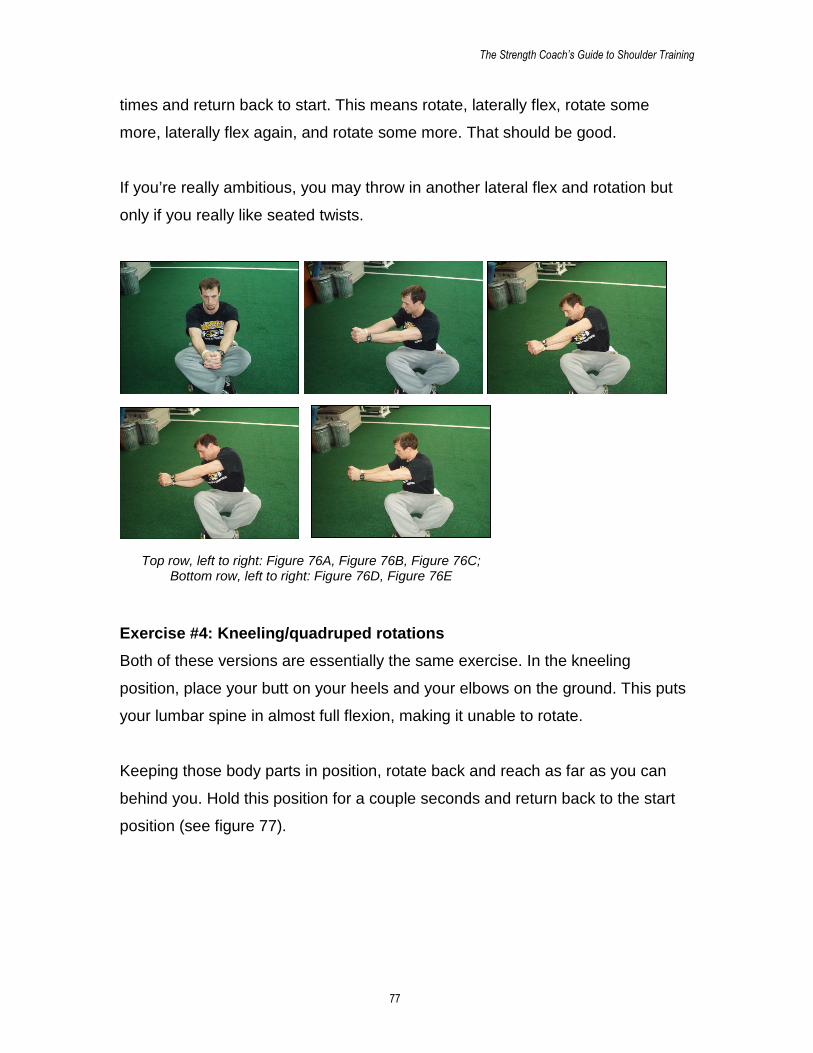
The Strength Coach’s Guide to Shoulder Training
77
times and return back to start. This means rotate, laterally flex, rotate some
more, laterally flex again, and rotate some more. That should be good.
If you’re really ambitious, you may throw in another lateral flex and rotation but
only if you really like seated twists.
Exercise #4: Kneeling/quadruped rotations
Both of these versions are essentially the same exercise. In the kneeling
position, place your butt on your heels and your elbows on the ground. This puts
your lumbar spine in almost full flexion, making it unable to rotate.
Keeping those body parts in position, rotate back and reach as far as you can
behind you. Hold this position for a couple seconds and return back to the start
position (see figure 77).
Top row, left to right: Figure 76A, Figure 76B, Figure 76C;Bottom row, left to right: Figure 76D, Figure 76E

Andrew Paul
78
Clearly, the thoracic spine is
often ignored in most strength
and conditioning programs.
Incorporating very simple
exercises into your warm up or
pre-lift activities can help
enormously.
These exercises can decrease
the incidence of shoulder and
low back pain and at the same
time, improve performance on
the field and in the weight room.
You can’t beat that!
Figure 77

The Strength Coach’s Guide to Shoulder Training
79
References
Borich M, Bright J, Lorello D, Cieminski C, Buisman T, Ludewig P (2006)
Scapular Angular Position at End Range Internal Rotation in Cases of
Glenohumeral Internal Rotation Deficit. Journal of Orthapaedic and Sports
Physical Therapy 36:926–934.
Boyle M (2004) Functional Training for Sport. Champaign, IL: Human Kinetics.
Cressey, E (2003). Cracking the Rotator Cuff Conundrum. Testosterone LLC.
http://www.t-nation.com/portal_includes/articles/2004/280rotator2.html (accessed
January 23, 2008).
Cressey E (2006) Lats: Not Just for Pulldowns! Testosterone LLC. http://www.t-
nation.com/portal_includes/articles/2006/06-186-training.html (accessed January
27, 2008).
Cressey E (2006) Shoulder Savers: Part I. Testosterone LLC. http://www.t-
nation.com/portal_includes/articles/2006/06-074-training.html (accessed January
23, 2008).
Cressey E (2006) Shoulder Savers: Part II. Testosterone LLC. http://www.t-
nation.com/portal_includes/articles/2006/06-111-training.html (accessed January
23, 2008).
Cressey E (2007) If It Looked Good on Paper. Testosterone LLC. http://www.t-
nation.com/portal_includes/articles/2007/07-216-training.html (accessed January
10, 2008).

Andrew Paul
80
Ellenbecker TS, Mattalino AJ (1997) Concentric Isokinetic Shoulder Internal and
External Rotation Strength in Professional Baseball Pitchers. Journal of
Orthopaedic and Sports Physical Therapy 25:323–28.
Hartman B, Robertson M (2006) Inside-Out: The Ultimate Upper Body Warm-Up.
Hartman B, Robertson M (2007) Push-Ups, Face Pulls, and Shrugs...for Strong
and Healthy Shoulders! Testosterone LLC. http://www.t-
nation.com/portal_includes/articles/2007/07-016-training.html (accessed January
24, 2008).
Hess SA, Richardson C, Darnell R, Friis P, Lisle D, Myers P (2005) Timing of
Rotator Cuff Activation During Shoulder External Rotation in Throwers With and
Without Symptons of Pain. Journal of Orthopaedic and Sports Physical Therapy
35:812–20.
Kendall F, McCreary E, Provance P, Rodgers M (2005) Muscles: Testing and
Function with Posture and Pain. Baltimore, MD: Lippincott Williams & Williams.
Lewis J, Wright C, Green A (2005) Subacromial Impingement Syndrome: The
Effect of Changing Posture on Shoulder Range of Motion. Journal of Orthopaedic
and Sports Physical Therapy 35:72–87.
Lukasiewicz AC, McClure P, Michener L, Pratt N, Sennett B (1999) Comparison
of 3-Dimensional Scapular Position and Orientation Between Subjects With and
Without Shoulder Impingement. Journal of Orthopaedic and Sports Physical
Therapy 29:574–86.
Meister K (1993) Classification and Treatment of Rotator Cuff Injuries in the
Overhead Athlete. Journal of Orthopaedic and Sports Physical Therapy 18:413–
21.

The Strength Coach’s Guide to Shoulder Training
81
Reinold RM, Wilk KE, Fleisig N, Barrentine SW, Chmielewski T, Cody RC (2004)
Electromyographic Analysis of the Rotator Cuff and Deltoid Musculature during
Common Shoulder External Rotation Exercises. Journal of Orthopaedic and
Sports Physical Therapy 34: 385–94.
Sahrmann S (2002) Diagnosis and Treatment of Movement Impairement
Syndromes. St. Louis, MO: Mosby.
Siff M (2003) Supertraining. Denver, CO: Supertraining Institute.
Figures
All diagrams were obtained from internet image searches on www.google.com. In
addition, figure 3 was obtained from www.safepitching4youth.com; figure 53 was
used with permission from Eric Cressey; figure 55 was obtained from
www.maturespine.com; figure 56 was obtained from www.drchengmd.com; figure
60 was obtained from www.oldtimestrongman.com; and figure 61 was obtained
from www.drchengmd.com.

Andrew Paul
82
About the Author
Andrew Paul currently serves as the
assistant director of strength and
conditioning at the University of Missouri.
As an athlete, he was a standout as an
Olympic weightlifter at the junior level. A
three time Joe Joseph Award winner,
Paul was also a Junior National and
Junior Olympic Medalist. Paul also
enjoyed a successful career in college baseball, lacrosse, and football. At the
University of Missouri (Mizzou), he is in charge of the development and
implementation of strength and conditioning programs for the football, softball,
and volleyball programs. He has also developed a functional movement
screening system that is used for numerous sports at Mizzou. His work was been
greatly influenced by professionals such as Mike Boyle, Eric Cressey, Mike
Robertson, Bill Hartmann, and Vladimir Janda as well as numerous Eastern Bloc
legends in the field.