System upgrade procedures : HCI - Product Documentation
69
System upgrade procedures HCI NetApp May 30, 2022 This PDF was generated from https://docs.netapp.com/us- en/hci/docs/task_hcc_update_management_services.html on May 30, 2022. Always check docs.netapp.com for the latest.
-
Upload
khangminh22 -
Category
Documents
-
view
2 -
download
0
Transcript of System upgrade procedures : HCI - Product Documentation

System upgrade proceduresHCINetAppMay 30, 2022
This PDF was generated from https://docs.netapp.com/us-en/hci/docs/task_hcc_update_management_services.html on May 30, 2022. Always checkdocs.netapp.com for the latest.

Table of Contents
System upgrade procedures . . . . . . . . . . . . . . . . . . . . . . . . . . . . . . . . . . . . . . . . . . . . . . . . . . . . . . . . . . . . . . . . 1
Update management services . . . . . . . . . . . . . . . . . . . . . . . . . . . . . . . . . . . . . . . . . . . . . . . . . . . . . . . . . . . . . 1
Run Element storage health checks prior to upgrading storage . . . . . . . . . . . . . . . . . . . . . . . . . . . . . . . . . . . 5
Upgrade Element software. . . . . . . . . . . . . . . . . . . . . . . . . . . . . . . . . . . . . . . . . . . . . . . . . . . . . . . . . . . . . . . 10
Upgrade storage firmware . . . . . . . . . . . . . . . . . . . . . . . . . . . . . . . . . . . . . . . . . . . . . . . . . . . . . . . . . . . . . . . 22
Upgrade a management node . . . . . . . . . . . . . . . . . . . . . . . . . . . . . . . . . . . . . . . . . . . . . . . . . . . . . . . . . . . . 34
Upgrade the Element Plug-in for vCenter Server. . . . . . . . . . . . . . . . . . . . . . . . . . . . . . . . . . . . . . . . . . . . . . 37
Run compute node health checks prior to upgrading compute firmware. . . . . . . . . . . . . . . . . . . . . . . . . . . . 41
Update compute node drivers . . . . . . . . . . . . . . . . . . . . . . . . . . . . . . . . . . . . . . . . . . . . . . . . . . . . . . . . . . . . 48
Upgrade compute node firmware. . . . . . . . . . . . . . . . . . . . . . . . . . . . . . . . . . . . . . . . . . . . . . . . . . . . . . . . . . 49
Automate compute node firmware upgrades with Ansible . . . . . . . . . . . . . . . . . . . . . . . . . . . . . . . . . . . . . . . 65

System upgrade procedures
Update management services
You can update your management services to the latest bundle version after you have
installed management node 11.3 or later.
Beginning with the Element 11.3 management node release, the management node design has been changed
based on a new modular architecture that provides individual services. These modular services provide central
and extended management functionality for NetApp HCI systems. Management services include system
telemetry, logging, and update services, the QoSSIOC service for Element Plug-in for vCenter Server, NetApp
Hybrid Cloud Control, and more.
About this task
• You must upgrade to the latest management services bundle before upgrading your Element software.
For the latest management services release notes describing major services, new features, bug
fixes, and workarounds for each service bundle, see the management services release notes
What you’ll need
Beginning with management services 2.20, you must accept and save the End User License Agreement
(EULA) before using the NetApp Hybrid Cloud Control UI or API to upgrade management services:
1. Open the IP address of the management node in a web browser:
https://<ManagementNodeIP>
2. Log in to NetApp Hybrid Cloud Control by providing the storage cluster administrator credentials.
3. Select Upgrade near the top right of the interface.
4. The EULA pops up. Scroll down, select I accept for current and all future updates, and select Save.
When you accept the EULA, it is recorded for all future updates and the automatic download
feature is enabled. You will receive updates on NetApp software updates and upgrades,
which you can install at your discretion and convenience. You can disable the automatic
download feature by disabling network connectivity to the NetApp online software repository.
Update options
You can update management services using the NetApp Hybrid Cloud Control UI or the management node
REST API:
• Update management services using Hybrid Cloud Control (Recommended method)
• Update management services using the management node API
• Update management services using the management node API for dark sites
1

Update management services using Hybrid Cloud Control
You can update your NetApp management services using NetApp Hybrid Cloud Control.
Management service bundles provide enhanced functionality and fixes to your installation outside of major
releases.
Before you begin
• You are running management node 11.3 or later.
• If you are updating management services to version 2.16 or later and you are running a management node
11.3 to 11.8, you will need to increase your management node VM’s RAM prior to updating management
services:
a. Power off the management node VM.
b. Change the RAM of the management node VM from 12GB to 24GB RAM.
c. Power on the management node VM.
• Your cluster version is running NetApp Element software 11.3 or later.
• You have upgraded your management services to at least version 2.1.326. NetApp Hybrid Cloud Control
upgrades are not available in earlier service bundles.
For a list of available services for each service bundle version, see the Management Services
Release Notes.
Steps
1. Open the IP address of the management node in a web browser:
https://<ManagementNodeIP>
2. Log in to NetApp Hybrid Cloud Control by providing the storage cluster administrator credentials.
3. Select Upgrade near the top right of the interface.
4. On the Upgrades page, select the Management Services tab.
The Management Services tab shows the current and available versions of management services
software.
If your installation cannot access the internet, only the current software version is shown. If
you have external connectivity but NetApp HCI is unable to access the NetApp online
repository, check your proxy configuration.
5. If your installation can access the internet and if a management services upgrade is available, select Begin
Upgrade.
6. If your installation cannot access the internet, do the following:
a. Follow the instructions on the page to download and save a management services upgrade package to
your computer.
b. Select Browse to locate the package you saved and upload it.
After the upgrade begins, you can see the upgrade status on this page. During the upgrade, you might lose
2

connection with NetApp Hybrid Cloud Control and have to log back in to see the results of the upgrade.
Update management services using the management node API
Users should ideally perform management services updates from NetApp Hybrid Cloud Control. You can
however manually update management services using the REST API UI from the management node.
Before you begin
• You are running management node 11.3 or later.
• If you are updating management services to version 2.16 or later and you are running a management node
11.3 to 11.8, you will need to increase your management node VM’s RAM prior to updating management
services:
a. Power off the management node VM.
b. Change the RAM of the management node VM from 12GB to 24GB RAM.
c. Power on the management node VM.
• Your cluster version is running NetApp Element software 11.3 or later.
• You have upgraded your management services to at least version 2.1.326. NetApp Hybrid Cloud Control
upgrades are not available in earlier service bundles.
For a list of available services for each service bundle version, see the Management Services
Release Notes.
Steps
1. Open the REST API UI on the management node: https://<ManagementNodeIP>/mnode
2. Select Authorize and complete the following:
a. Enter the cluster user name and password.
b. Enter the client ID as mnode-client if the value is not already populated.
c. Select Authorize to begin a session.
d. Close the window.
3. (Optional) Confirm available versions of management node services: GET /services/versions
4. (Optional) Get detailed information about the latest version: GET /services/versions/latest
5. (Optional) Get detailed information about a specific version: GET
/services/versions/{version}/info
6. Perform one of the following management services update options:
a. Run this command to update to the most recent version of management node services: PUT
/services/update/latest
b. Run this command to update to a specific version of management node services: PUT
/services/update/{version}
7. Run GET/services/update/status to monitor the status of the update.
A successful update returns a result similar to the following example:
3

{
"current_version": "2.10.29",
"details": "Updated to version 2.14.60",
"status": "success"
}
Update management services using the management node API for dark sites
Users should ideally perform management services updates from NetApp Hybrid Cloud Control. You can
however manually upload, extract, and deploy a service bundle update for management services to the
management node using the REST API. You can run each command from the REST API UI for the
management node.
Before you begin
• You have deployed a NetApp Element software management node 11.3 or later.
• If you are updating management services to version 2.16 or later and you are running a management node
11.3 to 11.8, you will need to increase your management node VM’s RAM prior to updating management
services:
a. Power off the management node VM.
b. Change the RAM of the management node VM from 12GB to 24GB RAM.
c. Power on the management node VM.
• Your cluster version is running NetApp Element software 11.3 or later.
• You have downloaded the service bundle update from the NetApp Support Site to a device that can be
used in the dark site.
Steps
1. Open the REST API UI on the management node: https://<ManagementNodeIP>/mnode
2. Select Authorize and complete the following:
a. Enter the cluster user name and password.
b. Enter the client ID as mnode-client if the value is not already populated.
c. Select Authorize to begin a session.
d. Close the window.
3. Upload and extract the service bundle on the management node using this command: PUT
/services/upload
4. Deploy the management services on the management node: PUT /services/deploy
5. Monitor the status of the update: GET /services/update/status
A successful update returns a result similar to the following example:
4

{
"current_version": "2.10.29",
"details": "Updated to version 2.17.52",
"status": "success"
}
Find more information
• NetApp Element Plug-in for vCenter Server
• NetApp HCI Resources Page
Run Element storage health checks prior to upgradingstorage
You must run health checks prior to upgrading Element storage to ensure all storage
nodes in your cluster are ready for the next Element storage upgrade.
What you’ll need
• Management services: You have updated to the latest management services bundle (2.10.27 or later).
You must upgrade to the latest management services bundle before upgrading your Element
software.
• Management node: You are running management node 11.3 or later.
• Element software: Your cluster version is running NetApp Element software 11.3 or later.
• End User License Agreement (EULA): Beginning with management services 2.20, you must accept and
save the EULA before using the NetApp Hybrid Cloud Control UI or API to run Element storage health
checks:
1. Open the IP address of the management node in a web browser:
https://<ManagementNodeIP>
2. Log in to NetApp Hybrid Cloud Control by providing the storage cluster administrator credentials.
3. Select Upgrade near the top right of the interface.
4. The EULA pops up. Scroll down, select I accept for current and all future updates, and select Save.
When you accept the EULA, it is recorded for all future updates and the automatic
download feature is enabled. You will receive updates on NetApp software updates and
upgrades, which you can install at your discretion and convenience. You can disable the
automatic download feature by disabling network connectivity to the NetApp online
software repository.
Health check options
5

You can run health checks using the NetApp Hybrid Cloud Control UI or the NetApp Hybrid Cloud Control API:
• Use NetApp Hybrid Cloud Control to run Element storage health checks prior to upgrading storage
(Preferred method)
• Use API to run Element storage health checks prior to upgrading storage
You can also find out more about storage health checks that are run by the service:
• Storage health checks made by the service
Use NetApp Hybrid Cloud Control to run Element storage health checks prior toupgrading storage
Using NetApp Hybrid Cloud Control (HCC), you can verify that a storage cluster is ready to be upgraded.
Steps
1. Open the IP address of the management node in a web browser:
https://<ManagementNodeIP>
2. Log in to NetApp Hybrid Cloud Control by providing the storage cluster administrator credentials.
3. Select Upgrade near the top right of the interface.
4. On the Upgrades page, select the Storage tab.
5.
Select the health check for the cluster you want to check for upgrade readiness.
6. On the Storage Health Check page, select Run Health Check.
7. If there are issues, do the following:
a. Go to the specific KB article listed for each issue or perform the specified remedy.
b. If a KB is specified, complete the process described in the relevant KB article.
c. After you have resolved cluster issues, select Re-Run Health Check.
After the health check completes without errors, the storage cluster is ready to upgrade. See storage node
upgrade instructions to proceed.
Use API to run Element storage health checks prior to upgrading storage
You can use REST API to verify that a storage cluster is ready to be upgraded. The health check verifies that
there are no obstacles to upgrading, such as pending nodes, disk space issues, and cluster faults.
Steps
1. Locate the storage cluster ID:
a. Open the management node REST API UI on the management node:
https://<ManagementNodeIP>/mnode
6

b. Select Authorize and complete the following:
i. Enter the cluster user name and password.
ii. Enter the client ID as mnode-client if the value is not already populated.
iii. Select Authorize to begin a session.
iv. Close the authorization window.
c. From the REST API UI, select GET /assets.
d. Select Try it out.
e. Select Execute.
f. From the response, copy the "id" from the "storage" section of the cluster you intend to check for
upgrade readiness.
Do not use the "parent" value in this section because this is the management node’s
ID, not the storage cluster’s ID.
"config": {},
"credentialid": "12bbb2b2-f1be-123b-1234-12c3d4bc123e",
"host_name": "SF_DEMO",
"id": "12cc3a45-e6e7-8d91-a2bb-0bdb3456b789",
"ip": "10.123.12.12",
"parent": "d123ec42-456e-8912-ad3e-4bd56f4a789a",
"sshcredentialid": null,
"ssl_certificate": null
2. Run health checks on the storage cluster:
a. Open the storage REST API UI on the management node:
https://<ManagementNodeIP>/storage/1/
b. Select Authorize and complete the following:
i. Enter the cluster user name and password.
ii. Enter the client ID as mnode-client if the value is not already populated.
iii. Select Authorize to begin a session.
iv. Close the authorization window.
c. Select POST /health-checks.
d. Select Try it out.
e. In the parameter field, enter the storage cluster ID obtained in Step 1.
7

{
"config": {},
"storageId": "123a45b6-1a2b-12a3-1234-1a2b34c567d8"
}
f. Select Execute to run a health check on the specified storage cluster.
The response should indicate state as initializing:
{
"_links": {
"collection": "https://10.117.149.231/storage/1/health-checks",
"log": "https://10.117.149.231/storage/1/health-checks/358f073f-
896e-4751-ab7b-ccbb5f61f9fc/log",
"self": "https://10.117.149.231/storage/1/health-checks/358f073f-
896e-4751-ab7b-ccbb5f61f9fc"
},
"config": {},
"dateCompleted": null,
"dateCreated": "2020-02-21T22:11:15.476937+00:00",
"healthCheckId": "358f073f-896e-4751-ab7b-ccbb5f61f9fc",
"state": "initializing",
"status": null,
"storageId": "c6d124b2-396a-4417-8a47-df10d647f4ab",
"taskId": "73f4df64-bda5-42c1-9074-b4e7843dbb77"
}
g. Copy the healthCheckID that is part of response.
3. Verify the results of the health checks:
a. Select GET /health-checks/{healthCheckId}.
b. Select Try it out.
c. Enter the health check ID in the parameter field.
d. Select Execute.
e. Scroll to the bottom of the response body.
If all health checks are successful, the return is similar to the following example:
"message": "All checks completed successfully.",
"percent": 100,
"timestamp": "2020-03-06T00:03:16.321621Z"
4. If the message return indicates that there were problems regarding cluster health, do the following:
8

a. Select GET /health-checks/{healthCheckId}/log
b. Select Try it out.
c. Enter the health check ID in the parameter field.
d. Select Execute.
e. Review any specific errors and obtain their associated KB article links.
f. Go to the specific KB article listed for each issue or perform the specified remedy.
g. If a KB is specified, complete the process described in the relevant KB article.
h. After you have resolved cluster issues, run GET /health-checks/{healthCheckId}/log again.
Storage health checks made by the service
Storage health checks make the following checks per cluster.
Check Name Node/Cluster Description
check_async_results Cluster Verifies that the number of
asynchronous results in the
database is below a threshold
number.
check_cluster_faults Cluster Verifies that there are no upgrade
blocking cluster faults (as defined in
Element source).
check_upload_speed Node Measures the upload speed
between the storage node and the
management node.
connection_speed_check Node Verifies that nodes have
connectivity to the management
node serving upgrade packages
and estimates connection speed.
check_cores Node Checks for kernel crash dump and
core files on the node. The check
fails for any crashes in a recent
time period (threshold 7 days).
check_root_disk_space Node Verifies the root file system has
sufficient free space to perform an
upgrade.
check_var_log_disk_space Node Verifies that /var/log free space
meets some percentage free
threshold. If it does not, the check
will rotate and purge older logs in
order to fall under threshold. The
check fails if it is unsuccessful at
creating sufficient free space.
check_pending_nodes Cluster Verifies that there are no pending
nodes on the cluster.
9

Find more information
• NetApp Element Plug-in for vCenter Server
• NetApp HCI Resources Page
Upgrade Element software
To upgrade NetApp Element software, you can use the NetApp Hybrid Cloud Control UI
or REST API. Certain operations are suppressed during an Element software upgrade,
such as adding and removing nodes, adding and removing drives, and commands
associated with initiators, volume access groups, and virtual networks, among others.
Beginning with Element 12.5, NetApp HealthTools is no longer supported for Element software
upgrades. If you are running Element 11.0 or 11.1, you must first upgrade to Element 12.3 using
HealthTools and then upgrade to Element 12.5 using NetApp Hybrid Cloud Control.
What you’ll need
• Admin privileges: You have storage cluster administrator permissions to perform the upgrade.
• Valid upgrade path: You have checked upgrade path information for the Element version you are
upgrading to and verified that the upgrade path is valid.
NetApp KB: Upgrade matrix for storage clusters running NetApp Element Software
• System time sync: You have ensured that the system time on all nodes is synced and that NTP is
correctly configured for the storage cluster and nodes. Each node must be configured with a DNS
nameserver in the per-node web UI (https://[IP address]:442) with no unresolved cluster faults
related to time skew.
• System ports: If you are using NetApp Hybrid Cloud Control for upgrades, you have ensured that the
necessary ports are open. See Network ports for more information.
• Management node: For NetApp Hybrid Cloud Control UI and API, the management node in your
environment is running version 11.3.
• Management services: You have updated your management services bundle to the latest version.
You must upgrade to the latest management services bundle before upgrading your Element
software to version 12.5. If you are updating your Element software to version 12.5, you need
management services 2.20.69 or later to proceed.
• Cluster health: You have verified that the cluster is ready to be upgraded. See Run Element storage
health checks prior to upgrading storage.
• Updated baseboard management controller (BMC) for H610S nodes: You have upgraded the BMC
version for your H610S nodes. See the release notes and upgrade instructions.
• Upgrade process time: You have scheduled sufficient time to perform your upgrade. When you upgrade
to Element software 12.5, the upgrade process time varies depending on your current Element software
version and firmware updates.
10

Storage Node Current Element
software version
Approximate
software and
firmware install
time per node1
Approximate data
synchronization
time per node2
Approximate total
upgrade time per
node
All SolidFire and
NetApp H-series
nodes with up-to-
date firmware
12.x 15 minutes 10 to 15 minutes 20 to 30 minutes
H610S and H410S 12.x and 11.8 60 minutes 30 to 60 minutes 90 to 120 minutes
H610S 11.7 and earlier 90 minutes 40 to 70 minutes 130 to 160 minutes
You must also
perform a complete
node shutdown and
power disconnect
for each H610S
node.
1For a complete matrix of firmware and driver firmware for your hardware, see this KB article (login
required).
2If you combine a cluster with a heavy write IOPS load with a longer firmware update time, the data
synchronization time will increase.
• End User License Agreement (EULA): Beginning with management services 2.20, you must accept and
save the EULA before using the NetApp Hybrid Cloud Control UI or API to upgrade Element software:
1. Open the IP address of the management node in a web browser:
https://<ManagementNodeIP>
2. Log in to NetApp Hybrid Cloud Control by providing the storage cluster administrator credentials.
3. Select Upgrade near the top right of the interface.
4. The EULA pops up. Scroll down, select I accept for current and all future updates, and select Save.
When you accept the EULA, it is recorded for all future updates and the automatic
download feature is enabled. You will receive updates on NetApp software updates and
upgrades, which you can install at your discretion and convenience. You can disable the
automatic download feature by disabling network connectivity to the NetApp online
software repository.
Upgrade options
Choose one of the following Element software upgrade options:
• Use NetApp Hybrid Cloud Control UI to upgrade Element storage
• Use NetApp Hybrid Cloud Control API to upgrade Element storage
11

If you are upgrading an H610S series node to Element 12.5 and the node is running a version of
Element software earlier than 11.8, you will need to perform the additional upgrade steps in this
KB article for each storage node. If you are running Element 11.8 or later, the additional upgrade
steps are not required.
Use NetApp Hybrid Cloud Control UI to upgrade Element storage
Using the NetApp Hybrid Cloud Control UI, you can upgrade a storage cluster.
What you’ll need
If your management node is not connected to the internet, you have downloaded the NetApp HCI software
package for NetApp HCI storage clusters.
For potential issues while upgrading storage clusters using NetApp Hybrid Cloud Control and
their workarounds, see this KB article.
Steps
1. Open the IP address of the management node in a web browser:
https://<ManagementNodeIP>
2. Log in to NetApp Hybrid Cloud Control by providing the storage cluster administrator credentials.
3. Select Upgrade near the top right of the interface.
4. On the Upgrades page, select Storage.
The Storage tab lists the storage clusters that are part of your installation. If a cluster is inaccessible by
NetApp Hybrid Cloud Control, it will not be displayed on the Upgrades page.
5. Choose from the following options and perform the set of steps that are applicable to your cluster:
12

Option Steps
Your management node has external connectivity. 1. Select the drop-down arrow next to the cluster
you are upgrading, and select from the upgrade
versions available under the Element tab.
2. Select Begin Upgrade.
The Upgrade Status changes during
the upgrade to reflect the status of
the process. It also changes in
response to actions you take, such
as pausing the upgrade, or if the
upgrade returns an error. See
Upgrade status changes.
While the upgrade is in progress, you
can leave the page and come back to
it later to continue monitoring the
progress. The page does not
dynamically update status and
current version if the cluster row is
collapsed. The cluster row must be
expanded to update the table or you
can refresh the page.
You can download logs after the upgrade is
complete.
Your management node is within a dark site without
external connectivity.
1. Select Browse to upload the upgrade package
that you downloaded.
2. Wait for the upload to complete. A progress bar
shows the status of the upload.
The file upload will be lost if you
navigate away from the browser
window.
An on-screen message is displayed after the file is
successfully uploaded and validated. Validation
might take several minutes. If you navigate away
from the browser window at this stage, the file
upload is preserved.
13

Option Steps
You are upgrading an H610S cluster running
Element version earlier than 11.8.
1. Select the drop-down arrow next to the cluster
you are upgrading, and select from the upgrade
versions available.
2. Select Begin Upgrade.
After the upgrade is complete, the UI prompts
you to perform additional upgrade steps.
3. Complete the additional steps required in the
KB article, and acknowledge in the UI that you
have completed them.
You can download logs after the upgrade is
complete. For information about the various
upgrade status changes, see Upgrade status
changes.
Upgrade status changes
Here are the different states that the Upgrade Status column in the UI shows before, during, and after the
upgrade process:
Upgrade state Description
Up to Date The cluster was upgraded to the latest Element
version available.
Versions Available Newer versions of Element and/or storage firmware
are available for upgrade.
In Progress The upgrade is in progress. A progress bar shows the
upgrade status. On-screen messages also show
node-level faults and display the node ID of each
node in the cluster as the upgrade progresses. You
can monitor the status of each node using the
Element UI or the NetApp Element plug-in for vCenter
Server UI.
Upgrade Pausing You can choose to pause the upgrade. Depending on
the state of the upgrade process, the pause operation
can succeed or fail. You will see a UI prompt asking
you to confirm the pause operation. To ensure that the
cluster is in a safe spot before pausing an upgrade, it
can take up to two hours for the upgrade operation to
be completely paused. To resume the upgrade, select
Resume.
Paused You paused the upgrade. Select Resume to resume
the process.
14

Upgrade state Description
Error An error has occurred during the upgrade. You can
download the error log and send it to NetApp Support.
After you resolve the error, you can return to the page,
and select Resume. When you resume the upgrade,
the progress bar goes backwards for a few minutes
while the system runs the health check and checks
the current state of the upgrade.
Unable to Detect NetApp Hybrid Cloud Control shows this status
instead of Versions Available when it does not have
external connectivity to reach the online software
repository. If you have external connectivity but still
see this message, check your proxy configuration.
Complete with Follow-up Only for H610S nodes upgrading from Element
version earlier than 11.8. After phase 1 of the upgrade
process is complete, this state prompts you to perform
additional upgrade steps (see the KB article). After
you complete these additional steps and acknowledge
that you have completed it, the status changes to Up
to Date.
Use NetApp Hybrid Cloud Control API to upgrade Element storage
You can use APIs to upgrade storage nodes in a cluster to the latest Element software version. You can use an
automation tool of your choice to run the APIs. The API workflow documented here uses the REST API UI
available on the management node as an example.
Steps
1. Do one of the following depending on your connection:
15

Option Steps
Your management node has external connectivity. 1. Verify the repository connection:
a. Open the management node REST API UI
on the management node:
https://<ManagementNodeIP>/
package-repository/1/
b. Select Authorize and complete the
following:
i. Enter the cluster user name and
password.
ii. Enter the client ID as mnode-client.
iii. Select Authorize to begin a session.
iv. Close the authorization window.
c. From the REST API UI, select GET
/packages/remote-repository/connection.
d. Select Try it out.
e. Select Execute.
f. If code 200 is returned, go to the next step.
If there is no connection to the remote
repository, establish the connection or use
the dark site option.
2. Find the upgrade package ID:
a. From the REST API UI, select GET
/packages.
b. Select Try it out.
c. Select Execute.
d. From the response, copy and save the
package ID for use in a later step.
16

Option Steps
Your management node is within a dark site without
external connectivity.
1. Download the storage upgrade package to a
device that is accessible to the management
node; go to the NetApp HCI software downloads
page and download the latest storage node
image.
2. Upload the storage upgrade package to the
management node:
a. Open the management node REST API UI
on the management node:
https://<ManagementNodeIP>/
package-repository/1/
b. Select Authorize and complete the
following:
i. Enter the cluster user name and
password.
ii. Enter the client ID as mnode-client.
iii. Select Authorize to begin a session.
iv. Close the authorization window.
c. From the REST API UI, select POST
/packages.
d. Select Try it out.
e. Select Browse and select the upgrade
package.
f. Select Execute to initiate the upload.
g. From the response, copy and save the
package ID ("id") for use in a later step.
3. Verify the status of the upload.
a. From the REST API UI, select GET
/packages/{id}/status.
b. Select Try it out.
c. Enter the package ID you copied in the
previous step in id.
d. Select Execute to initiate the status request.
The response indicates state as SUCCESS
when complete.
2. Locate the storage cluster ID:
a. Open the management node REST API UI on the management node:
17

https://<ManagementNodeIP>/inventory/1/
b. Select Authorize and complete the following:
i. Enter the cluster user name and password.
ii. Enter the client ID as mnode-client.
iii. Select Authorize to begin a session.
iv. Close the authorization window.
c. From the REST API UI, select GET /installations.
d. Select Try it out.
e. Select Execute.
f. From the response, copy the installation asset ID ("id").
g. From the REST API UI, select GET /installations/{id}.
h. Select Try it out.
i. Paste the installation asset ID into the id field.
j. Select Execute.
k. From the response, copy and save the storage cluster ID ("id") of the cluster you intend to upgrade
for use in a later step.
3. Run the storage upgrade:
a. Open the storage REST API UI on the management node:
https://<ManagementNodeIP>/storage/1/
b. Select Authorize and complete the following:
i. Enter the cluster user name and password.
ii. Enter the client ID as mnode-client.
iii. Select Authorize to begin a session.
iv. Close the authorization window.
c. Select POST /upgrades.
d. Select Try it out.
e. Enter the upgrade package ID in the parameter field.
f. Enter the storage cluster ID in the parameter field.
The payload should look similar to the following example:
18

{
"config": {},
"packageId": "884f14a4-5a2a-11e9-9088-6c0b84e211c4",
"storageId": "884f14a4-5a2a-11e9-9088-6c0b84e211c4"
}
g. Select Execute to initiate the upgrade.
The response should indicate the state as initializing:
{
"_links": {
"collection": "https://localhost:442/storage/upgrades",
"self": "https://localhost:442/storage/upgrades/3fa85f64-1111-
4562-b3fc-2c963f66abc1",
"log": https://localhost:442/storage/upgrades/3fa85f64-1111-4562-
b3fc-2c963f66abc1/log
},
"storageId": "114f14a4-1a1a-11e9-9088-6c0b84e200b4",
"upgradeId": "334f14a4-1a1a-11e9-1055`-6c0b84e2001b4",
"packageId": "774f14a4-1a1a-11e9-8888-6c0b84e200b4",
"config": {},
"state": "initializing",
"status": {
"availableActions": [
"string"
],
"message": "string",
"nodeDetails": [
{
"message": "string",
"step": "NodePreStart",
"nodeID": 0,
"numAttempt": 0
}
],
"percent": 0,
"step": "ClusterPreStart",
"timestamp": "2020-04-21T22:10:57.057Z",
"failedHealthChecks": [
{
"checkID": 0,
"name": "string",
"displayName": "string",
"passed": true,
19

"kb": "string",
"description": "string",
"remedy": "string",
"severity": "string",
"data": {},
"nodeID": 0
}
]
},
"taskId": "123f14a4-1a1a-11e9-7777-6c0b84e123b2",
"dateCompleted": "2020-04-21T22:10:57.057Z",
"dateCreated": "2020-04-21T22:10:57.057Z"
}
h. Copy the upgrade ID ("upgradeId") that is part of the response.
4. Verify the upgrade progress and results:
a. Select GET /upgrades/{upgradeId}.
b. Select Try it out.
c. Enter the upgrade ID from the previous step in upgradeId.
d. Select Execute.
e. Do one of the following if there are problems or special requirements during the upgrade:
Option Steps
You need to correct cluster health issues due to
failedHealthChecks message in the response
body.
1. Go to the specific KB article listed for each
issue or perform the specified remedy.
2. If a KB is specified, complete the process
described in the relevant KB article.
3. After you have resolved cluster issues,
reauthenticate if needed and select PUT
/upgrades/{upgradeId}.
4. Select Try it out.
5. Enter the upgrade ID from the previous step in
upgradeId.
6. Enter "action":"resume" in the request
body.
{
"action": "resume"
}
7. Select Execute.
20

Option Steps
You need to pause the upgrade because the
maintenance window is closing or for another
reason.
1. Reauthenticate if needed and select PUT
/upgrades/{upgradeId}.
2. Select Try it out.
3. Enter the upgrade ID from the previous step in
upgradeId.
4. Enter "action":"pause" in the request
body.
{
"action": "pause"
}
5. Select Execute.
If you are upgrading an H610S cluster running an
Element version earlier than 11.8, you see the
state finishedNeedsAck in the response body.
You must perform additional upgrade steps for
each H610S storage node.
1. Complete the additional upgrade steps in this
KB article for each node.
2. Reauthenticate if needed and select PUT
/upgrades/{upgradeId}.
3. Select Try it out.
4. Enter the upgrade ID from the previous step in
upgradeId.
5. Enter "action":"acknowledge" in the
request body.
{
"action": "acknowledge"
}
6. Select Execute.
f. Run the GET /upgrades/{upgradeId} API multiple times, as needed, until the process is complete.
During the upgrade, the status indicates running if no errors are encountered. As each node is
upgraded, the step value changes to NodeFinished.
The upgrade has finished successfully when the percent value is 100 and the state indicates
finished.
What happens if an upgrade fails using NetApp Hybrid Cloud Control
If a drive or node fails during an upgrade, the Element UI will show cluster faults. The upgrade process does
not proceed to the next node, and waits for the cluster faults to resolve. The progress bar in the UI shows that
21

the upgrade is waiting for the cluster faults to resolve. At this stage, selecting Pause in the UI will not work,
because the upgrade waits for the cluster to be healthy. You will need to engage NetApp Support to assist with
the failure investigation.
NetApp Hybrid Cloud Control has a pre-set three-hour waiting period, during which one of the following
scenarios can happen:
• The cluster faults get resolved within the three-hour window, and upgrade resumes. You do not need to
take any action in this scenario.
• The problem persists after three hours, and the upgrade status shows Error with a red banner. You can
resume the upgrade by selecting Resume after the problem is resolved.
• NetApp Support has determined that the upgrade needs to be temporarily aborted to take corrective action
before the three-hour window. Support will use the API to abort the upgrade.
Aborting the cluster upgrade while a node is being updated might result in the drives being
ungracefully removed from the node. If the drives are ungracefully removed, adding the drives
back during an upgrade will require manual intervention by NetApp Support. The node might be
taking longer to do firmware updates or post update syncing activities. If the upgrade progress
seems stalled, contact NetApp Support for assistance.
Find more information
• NetApp Element Plug-in for vCenter Server
• NetApp HCI Resources Page
Upgrade storage firmware
Starting with Element 12.0 and management services version 2.14, you can perform
firmware-only upgrades on your storage nodes using the NetApp Hybrid Cloud Control UI
and REST API. This procedure does not upgrade Element software and enables you to
upgrade storage firmware outside of a major Element release.
What you’ll need
• Admin privileges: You have storage cluster administrator permissions to perform the upgrade.
• System time sync: You have ensured that the system time on all nodes is synced and that NTP is
correctly configured for the storage cluster and nodes. Each node must be configured with a DNS
nameserver in the per-node web UI (https://[IP address]:442) with no unresolved cluster faults
related to time skew.
• System ports: If you are using NetApp Hybrid Cloud Control for upgrades, you have ensured that the
necessary ports are open. See Network ports for more information.
• Management node: For NetApp Hybrid Cloud Control UI and API, the management node in your
environment is running version 11.3.
• Management services: You have updated your management services bundle to the latest version.
For H610S storage nodes running Element software version 12.0, you should apply D-patch
SUST-909 before you upgrade to storage firmware bundle 2.27. Contact NetApp Support to
obtain the D-patch before you upgrade. See Storage Firmware Bundle 2.27 Release Notes.
22

You must upgrade to the latest management services bundle before upgrading the firmware on
your storage nodes. If you are updating your Element software to version 12.2 or later, you need
management services 2.14.60 or later to proceed.
To update your iDRAC/BIOS firmware, contact NetApp Support. For additional information, see
this KB article.
• Cluster health: You have run health checks. See Run Element storage health checks prior to upgrading
storage.
• Updated baseboard management controller (BMC) for H610S nodes: You have upgraded the BMC
version for your H610S nodes. See release notes and upgrade instructions.
For a complete matrix of firmware and driver firmware for your hardware, see this KB article
(login required).
• Upgrade process time: You have scheduled sufficient time to perform your upgrade. When you upgrade
to Element software 12.5, the upgrade process time varies depending on your current Element software
version and firmware updates.
Storage Node Current Element
software version
Approximate
software and
firmware install
time per node1
Approximate data
synchronization
time per node2
Approximate total
upgrade time per
node
All SolidFire and
NetApp H-series
nodes with up-to-
date firmware
12.x 15 minutes 10 to 15 minutes 20 to 30 minutes
H610S and H410S 12.x and 11.8 60 minutes 30 to 60 minutes 90 to 120 minutes
H610S 11.7 and earlier 90 minutes 40 to 70 minutes 130 to 160 minutes
You must also
perform a complete
node shutdown and
power disconnect
for each H610S
node.
1For a complete matrix of firmware and driver firmware for your hardware, see this KB article (login
required).
2If you combine a cluster with a heavy write IOPS load with a longer firmware update time, the data
synchronization time will increase.
• End User License Agreement (EULA): Beginning with management services 2.20, you must accept and
save the EULA before using the NetApp Hybrid Cloud Control UI or API to upgrade storage firmware:
1. Open the IP address of the management node in a web browser:
https://<ManagementNodeIP>
23

2. Log in to NetApp Hybrid Cloud Control by providing the storage cluster administrator credentials.
3. Select Upgrade near the top right of the interface.
4. The EULA pops up. Scroll down, select I accept for current and all future updates, and select Save.
When you accept the EULA, it is recorded for all future updates and the automatic
download feature is enabled. You will receive updates on NetApp software updates and
upgrades, which you can install at your discretion and convenience. You can disable the
automatic download feature by disabling network connectivity to the NetApp online
software repository.
Upgrade options
Choose one of the following storage firmware upgrade options:
• Use NetApp Hybrid Cloud Control UI to upgrade storage firmware
• Use NetApp Hybrid Cloud Control API to upgrade storage firmware
Use NetApp Hybrid Cloud Control UI to upgrade storage firmware
You can use the NetApp Hybrid Cloud Control UI to upgrade the firmware of the storage nodes in your cluster.
What you’ll need
If your management node is not connected to the internet, you have downloaded the Storage firmware
package for NetApp HCI storage clusters.
For potential issues while upgrading storage clusters using NetApp Hybrid Cloud Control and
their workarounds, see the KB article.
The upgrade process takes approximately 30 minutes per storage node. If you are upgrading an
Element storage cluster to storage firmware newer than version 2.76, individual storage nodes
will only reboot during the upgrade if new firmware was written to the node.
Steps
1. Open the IP address of the management node in a web browser:
https://<ManagementNodeIP>
2. Log in to NetApp Hybrid Cloud Control by providing the storage cluster administrator credentials.
3. Select Upgrade near the top right of the interface.
4. On the Upgrades page, select Storage.
24

The Storage tab lists the storage clusters that are part of your installation. If a cluster is
inaccessible by NetApp Hybrid Cloud Control, it will not be displayed on the Upgrades
page. If you have clusters running Element 12.0 or later, you will see the current firmware
bundle version listed for these clusters. If the nodes in a single cluster have different
firmware versions on them or as the upgrade progresses, you will see Multiple in the
Current Firmware Bundle Version column. You can select Multiple to navigate to the
Nodes page to compare firmware versions. If all your clusters are running Element versions
earlier than 12.0, you will not see any information about firmware bundle version numbers.
This information is also available on the Nodes page. See View your inventory.
If the cluster is up to date and/or no upgrade packages are available, the Element and
Firmware Only tabs are not displayed. These tabs are also not displayed when an upgrade
is in progress. If the Element tab is displayed, but not the Firmware Only tab, no firmware
packages are available.
5. Choose from the following options and perform the set of steps that are applicable to your cluster:
Option Steps
Your management node has external connectivity. 1. Select the drop-down arrow next to the cluster
you are upgrading.
2. Select Firmware Only, and select from the
upgrade versions available.
3. Select Begin Upgrade.
The Upgrade Status changes during
the upgrade to reflect the status of
the process. It also changes in
response to actions you take, such
as pausing the upgrade, or if the
upgrade returns an error. See
Upgrade status changes.
While the upgrade is in progress, you
can leave the page and come back to
it later to continue monitoring the
progress. The page does not
dynamically update status and
current version if the cluster row is
collapsed. The cluster row must be
expanded to update the table or you
can refresh the page.
You can download logs after the upgrade is
complete.
25

Option Steps
Your management node is within a dark site without
external connectivity.
1. Select the drop-down arrow next to the cluster
you are upgrading.
2. Select Browse to upload the upgrade package
that you downloaded.
3. Wait for the upload to complete. A progress bar
shows the status of the upload.
The file upload will be lost if you
navigate away from the browser
window.
An on-screen message is displayed after the file is
successfully uploaded and validated. Validation
might take several minutes. If you navigate away
from the browser window at this stage, the file
upload is preserved.
You can download logs after the upgrade is
complete. For information about the various
upgrade status changes, see Upgrade status
changes.
Upgrade status changes
Here are the different states that the Upgrade Status column in the UI shows before, during, and after the
upgrade process:
Upgrade state Description
Up to Date The cluster was upgraded to the latest Element
version available or the firmware was upgraded to the
latest version.
Unable to Detect NetApp Hybrid Cloud Control shows this status
instead of Versions Available when it does not have
external connectivity to reach the online software
repository. This status is also displayed when the
storage service API returns an upgrade status that is
not in the enumerated list of possible upgrade
statuses.
Versions Available Newer versions of Element and/or storage firmware
are available for upgrade.
In Progress The upgrade is in progress. A progress bar shows the
upgrade status. On-screen messages also show
node-level faults and display the node ID of each
node in the cluster as the upgrade progresses. You
can monitor the status of each node using the
Element UI or the NetApp Element plug-in for vCenter
Server UI.
26

Upgrade state Description
Upgrade Pausing You can choose to pause the upgrade. Depending on
the state of the upgrade process, the pause operation
can succeed or fail. You will see a UI prompt asking
you to confirm the pause operation. To ensure that the
cluster is in a safe spot before pausing an upgrade, it
can take up to two hours for the upgrade operation to
be completely paused. To resume the upgrade, select
Resume.
Paused You paused the upgrade. Select Resume to resume
the process.
Error An error has occurred during the upgrade. You can
download the error log and send it to NetApp Support.
After you resolve the error, you can return to the page,
and select Resume. When you resume the upgrade,
the progress bar goes backwards for a few minutes
while the system runs the health check and checks
the current state of the upgrade.
What happens if an upgrade fails using NetApp Hybrid Cloud Control
If a drive or node fails during an upgrade, the Element UI will show cluster faults. The upgrade process does
not proceed to the next node, and waits for the cluster faults to resolve. The progress bar in the UI shows that
the upgrade is waiting for the cluster faults to resolve. At this stage, selecting Pause in the UI will not work,
because the upgrade waits for the cluster to be healthy. You will need to engage NetApp Support to assist with
the failure investigation.
NetApp Hybrid Cloud Control has a pre-set three-hour waiting period, during which one of the following
scenarios can happen:
• The cluster faults get resolved within the three-hour window, and upgrade resumes. You do not need to
take any action in this scenario.
• The problem persists after three hours, and the upgrade status shows Error with a red banner. You can
resume the upgrade by selecting Resume after the problem is resolved.
• NetApp Support has determined that the upgrade needs to be temporarily aborted to take corrective action
before the three-hour window. Support will use the API to abort the upgrade.
Aborting the cluster upgrade while a node is being updated might result in the drives being
ungracefully removed from the node. If the drives are ungracefully removed, adding the drives
back during an upgrade will require manual intervention by NetApp Support. The node might be
taking longer to do firmware updates or post update syncing activities. If the upgrade progress
seems stalled, contact NetApp Support for assistance.
Use NetApp Hybrid Cloud Control API to upgrade storage firmware
You can use APIs to upgrade storage nodes in a cluster to the latest Element software version. You can use an
automation tool of your choice to run the APIs. The API workflow documented here uses the REST API UI
available on the management node as an example.
Steps
27

1. Do one of the following depending on your connection:
Option Steps
Your management node has external connectivity. 1. Verify the repository connection:
a. Open the management node REST API UI
on the management node:
https://<ManagementNodeIP>/
package-repository/1/
b. Select Authorize and complete the
following:
i. Enter the cluster user name and
password.
ii. Enter the client ID as mnode-client.
iii. Select Authorize to begin a session.
iv. Close the authorization window.
c. From the REST API UI, select GET
/packages/remote-repository/connection.
d. Select Try it out.
e. Select Execute.
f. If code 200 is returned, go to the next step.
If there is no connection to the remote
repository, establish the connection or use
the dark site option.
2. Find the upgrade package ID:
a. From the REST API UI, select GET
/packages.
b. Select Try it out.
c. Select Execute.
d. From the response, copy and save the
firmware package ID for use in a later step.
28

Option Steps
Your management node is within a dark site without
external connectivity.
1. Download the latest storage firmware upgrade
package to a device that is accessible to the
management node; go to the Element software
storage firmware bundle page and download the
latest storage firmware image.
2. Upload the storage firmware upgrade package
to the management node:
a. Open the management node REST API UI
on the management node:
https://<ManagementNodeIP>/
package-repository/1/
b. Select Authorize and complete the
following:
i. Enter the cluster user name and
password.
ii. Enter the client ID as mnode-client.
iii. Select Authorize to begin a session.
iv. Close the authorization window.
c. From the REST API UI, select POST
/packages.
d. Select Try it out.
e. Select Browse and select the upgrade
package.
f. Select Execute to initiate the upload.
g. From the response, copy and save the
package ID ("id") for use in a later step.
3. Verify the status of the upload.
a. From the REST API UI, select GET
/packages/{id}/status.
b. Select Try it out.
c. Enter the firmware package ID you copied in
the previous step in id.
d. Select Execute to initiate the status request.
The response indicates state as SUCCESS
when complete.
2. Locate the installation asset ID:
a. Open the management node REST API UI on the management node:
29
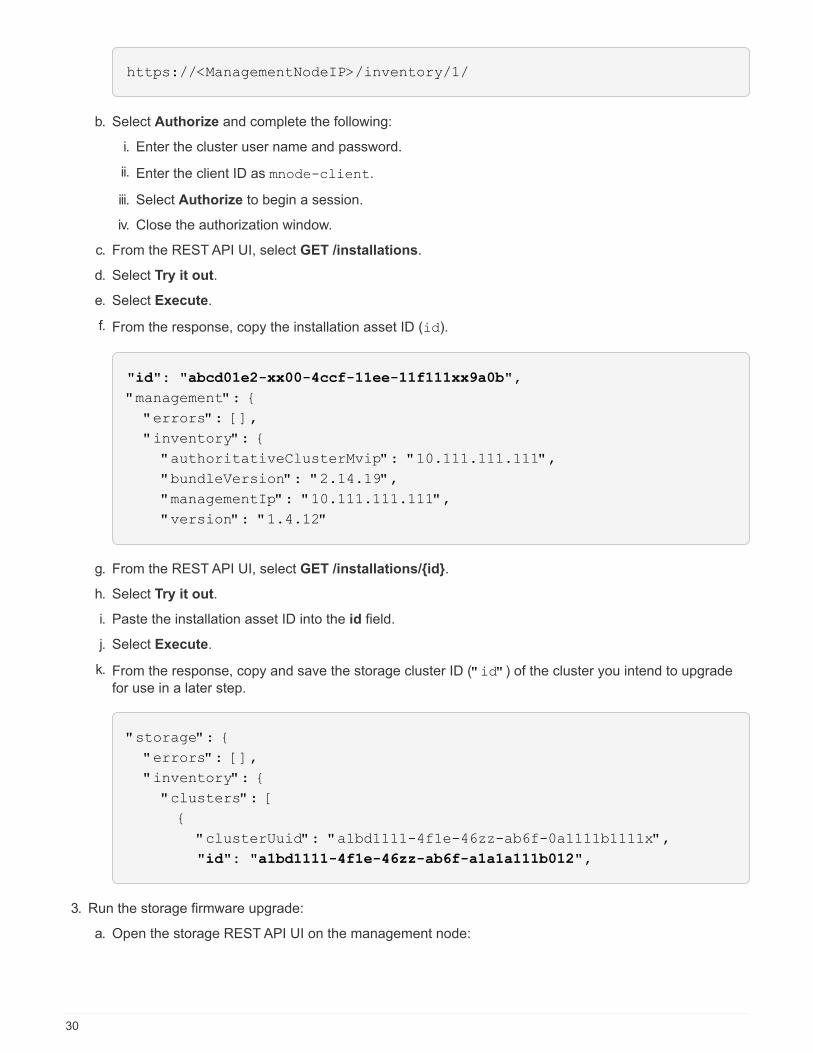
https://<ManagementNodeIP>/inventory/1/
b. Select Authorize and complete the following:
i. Enter the cluster user name and password.
ii. Enter the client ID as mnode-client.
iii. Select Authorize to begin a session.
iv. Close the authorization window.
c. From the REST API UI, select GET /installations.
d. Select Try it out.
e. Select Execute.
f. From the response, copy the installation asset ID (id).
"id": "abcd01e2-xx00-4ccf-11ee-11f111xx9a0b",
"management": {
"errors": [],
"inventory": {
"authoritativeClusterMvip": "10.111.111.111",
"bundleVersion": "2.14.19",
"managementIp": "10.111.111.111",
"version": "1.4.12"
g. From the REST API UI, select GET /installations/{id}.
h. Select Try it out.
i. Paste the installation asset ID into the id field.
j. Select Execute.
k. From the response, copy and save the storage cluster ID ("id") of the cluster you intend to upgrade
for use in a later step.
"storage": {
"errors": [],
"inventory": {
"clusters": [
{
"clusterUuid": "a1bd1111-4f1e-46zz-ab6f-0a1111b1111x",
"id": "a1bd1111-4f1e-46zz-ab6f-a1a1a111b012",
3. Run the storage firmware upgrade:
a. Open the storage REST API UI on the management node:
30

https://<ManagementNodeIP>/storage/1/
b. Select Authorize and complete the following:
i. Enter the cluster user name and password.
ii. Enter the client ID as mnode-client.
iii. Select Authorize to begin a session.
iv. Close the window.
c. Select POST /upgrades.
d. Select Try it out.
e. Enter the upgrade package ID in the parameter field.
f. Enter the storage cluster ID in the parameter field.
g. Select Execute to initiate the upgrade.
The response should indicate state as initializing:
{
"_links": {
"collection": "https://localhost:442/storage/upgrades",
"self": "https://localhost:442/storage/upgrades/3fa85f64-1111-
4562-b3fc-2c963f66abc1",
"log": https://localhost:442/storage/upgrades/3fa85f64-1111-4562-
b3fc-2c963f66abc1/log
},
"storageId": "114f14a4-1a1a-11e9-9088-6c0b84e200b4",
"upgradeId": "334f14a4-1a1a-11e9-1055-6c0b84e2001b4",
"packageId": "774f14a4-1a1a-11e9-8888-6c0b84e200b4",
"config": {},
"state": "initializing",
"status": {
"availableActions": [
"string"
],
"message": "string",
"nodeDetails": [
{
"message": "string",
"step": "NodePreStart",
"nodeID": 0,
"numAttempt": 0
}
],
"percent": 0,
31

"step": "ClusterPreStart",
"timestamp": "2020-04-21T22:10:57.057Z",
"failedHealthChecks": [
{
"checkID": 0,
"name": "string",
"displayName": "string",
"passed": true,
"kb": "string",
"description": "string",
"remedy": "string",
"severity": "string",
"data": {},
"nodeID": 0
}
]
},
"taskId": "123f14a4-1a1a-11e9-7777-6c0b84e123b2",
"dateCompleted": "2020-04-21T22:10:57.057Z",
"dateCreated": "2020-04-21T22:10:57.057Z"
}
h. Copy the upgrade ID ("upgradeId") that is part of the response.
4. Verify the upgrade progress and results:
a. Select GET /upgrades/{upgradeId}.
b. Select Try it out.
c. Enter the upgrade ID from the previous step in upgradeId.
d. Select Execute.
e. Do one of the following if there are problems or special requirements during the upgrade:
32

Option Steps
You need to correct cluster health issues due to
failedHealthChecks message in the response
body.
1. Go to the specific KB article listed for each
issue or perform the specified remedy.
2. If a KB is specified, complete the process
described in the relevant KB article.
3. After you have resolved cluster issues,
reauthenticate if needed and select PUT
/upgrades/{upgradeId}.
4. Select Try it out.
5. Enter the upgrade ID from the previous step in
upgradeId.
6. Enter "action":"resume" in the request
body.
{
"action": "resume"
}
7. Select Execute.
You need to pause the upgrade because the
maintenance window is closing or for another
reason.
1. Reauthenticate if needed and select PUT
/upgrades/{upgradeId}.
2. Select Try it out.
3. Enter the upgrade ID from the previous step in
upgradeId.
4. Enter "action":"pause" in the request
body.
{
"action": "pause"
}
5. Select Execute.
f. Run the GET /upgrades/{upgradeId} API multiple times, as needed, until the process is complete.
During the upgrade, the status indicates running if no errors are encountered. As each node is
upgraded, the step value changes to NodeFinished.
The upgrade has finished successfully when the percent value is 100 and the state indicates
finished.
Find more information
33

• NetApp Element Plug-in for vCenter Server
• NetApp HCI Resources Page
Upgrade a management node
You can upgrade your management node to management node 12.5 from version 12.3.x.
Upgrading the management node operating system is no longer required to upgrade Element software on the
storage cluster. You can simply upgrade the management services to the latest version to perform Element
upgrades using NetApp Hybrid Cloud Control. Follow the management node upgrade procedure for your
scenario if you would like to upgrade the management node operating system for other reasons, such as
security remediation.
If you require information on upgrading management nodes 12.2 or earlier, see the NetApp HCI
1.9 management node upgrade documentation.
Upgrade options
Choose one of the following options:
• Upgrade a management node to version 12.5 from 12.3.x
• Reconfigure authentication using the management node REST API
Choose this option if you have sequentially updated (1) your management services version and (2) your
Element storage version and you want to keep your existing management node:
If you do not sequentially update your management services followed by Element storage, you
cannot reconfigure reauthentication using this procedure. Follow the appropriate upgrade
procedure instead.
Upgrade a management node to version 12.5 from 12.3.x
You can perform an in-place upgrade of the management node from version 12.3.x to version 12.5 without
needing to provision a new management node virtual machine.
The Element 12.5 management node is an optional upgrade. It is not required for existing
deployments.
What you’ll need
• The RAM of the management node VM is 24GB.
• The management node you are intending to upgrade is version 12.0 and uses IPv4 networking. The
management node version 12.5 does not support IPv6.
To check the version of your management node, log in to your management node and view
the Element version number in the login banner.
• You have updated your management services bundle to the latest version using NetApp Hybrid Cloud
Control. You can access NetApp Hybrid Cloud Control from the following IP:
https://<ManagementNodeIP>
34
• If you are updating your management node to version 12.5, you need management services 2.20.69 or
later to proceed.
• You have configured an additional network adapter (if required) using the instructions for configuring an
additional storage NIC.
Persistent volumes might require an additional network adapter if eth0 is not able to be
routed to the SVIP. Configure a new network adapter on the iSCSI storage network to allow
the configuration of persistent volumes.
• Storage nodes are running Element 12.3 or later.
Steps
1. Log in to the management node virtual machine using SSH or console access.
2. Download the management node ISO for Element software from the NetApp Support Site to the
management node virtual machine.
The name of the ISO is similar to solidfire-fdva-<Element release>-patchX-
XX.X.X.XXXX.iso
3. Check the integrity of the download by running md5sum on the downloaded file and compare the output to
what is available on the NetApp Support Site for Element software, as in the following example:
sudo md5sum -b <path to iso>/solidfire-fdva-<Element release>-patchX-
XX.X.X.XXXX.iso
4. Mount the management node ISO image and copy the contents to the file system using the following
commands:
sudo mkdir -p /upgrade
sudo mount <solidfire-fdva-<Element release>-patchX-XX.X.X.XXXX.iso>
/mnt
sudo cp -r /mnt/* /upgrade
5. Change to the home directory, and unmount the ISO file from /mnt:
sudo umount /mnt
6. Delete the ISO to conserve space on the management node:
sudo rm <path to iso>/solidfire-fdva-<Element release>-patchX-
XX.X.X.XXXX.iso
35

7. On the management node that you are upgrading, run the following command to upgrade your
management node OS version. The script retains all necessary configuration files after the upgrade, such
as Active IQ collector and proxy settings.
sudo /sf/rtfi/bin/sfrtfi_inplace
file:///upgrade/casper/filesystem.squashfs sf_upgrade=1
The management node reboots with a new OS after the upgrade process completes.
After you run the sudo command described in this step, the SSH session is killed. Console
access is required for continued monitoring. If no console access is available to you when
performing the upgrade, retry the SSH login and verify connectivity after 15 to 30 minutes.
Once you log in, you can confirm the new OS version in the SSH banner that indicates that
the upgrade was successful.
8. On the management node, run the redeploy-mnode script to retain previous management services
configuration settings:
The script retains previous management services configuration, including configuration from
the Active IQ collector service, controllers (vCenters), or proxy, depending on your settings.
sudo /sf/packages/mnode/redeploy-mnode -mu <mnode user>
If you had previously disabled SSH functionality on the management node, you need to disable
SSH again on the recovered management node. SSH capability that provides NetApp Support
remote support tunnel (RST) session access is enabled on the management node by default.
Reconfigure authentication using the management node REST API
You can keep your existing management node if you have sequentially upgraded (1) management services
and (2) Element storage. If you have followed a different upgrade order, see the procedures for in-place
management node upgrades.
Before you begin
• You have updated your management services to 2.20.69 or later.
• Your storage cluster is running Element 12.3 or later.
• You have sequentially updated your management services followed by upgrading your Element storage.
You cannot reconfigure authentication using this procedure unless you have completed upgrades in the
sequence described.
Steps
1. Open the management node REST API UI on the management node:
https://<ManagementNodeIP>/mnode
36

2. Select Authorize and complete the following:
a. Enter the cluster user name and password.
b. Enter the client ID as mnode-client if the value is not already populated.
c. Select Authorize to begin a session.
3. From the REST API UI, select POST /services/reconfigure-auth.
4. Select Try it out.
5. For the load_images parameter, select true.
6. Select Execute.
The response body indicates that reconfiguration was successful.
Find more information
• NetApp Element Plug-in for vCenter Server
• NetApp HCI Resources Page
Upgrade the Element Plug-in for vCenter Server
For existing vSphere environments with a registered NetApp Element Plug-in for vCenter
Server, you can update your plug-in registration after you first update the management
services package that contains the plug-in service.
You can update the plug-in registration on vCenter Server Virtual Appliance (vCSA) or Windows using the
registration utility. You must change your registration for the vCenter Plug-in on every vCenter Server where
you need to use the plug-in.
This upgrade procedure covers the following upgrade scenarios:
• You are upgrading to Element Plug-in for VMware vCenter Server 4.9, 4.8, 4.7, 4.6, 4.5, or 4.4.
• You are upgrading to a 7.0, 6.7, or 6.5 HTML5 vSphere Web Client.
The plug-in is not compatible with VMware vCenter Server 6.5 for Element Plug-in for
VMware vCenter Server 4.6, 4.7, and 4.8.
• You are upgrading to a 6.7 Flash vSphere Web Client.
The plug-in is not compatible with version 6.7 U2 build 13007421 of the HTML5 vSphere
Web Client and other 6.7 U2 builds released prior to update 2a (build 13643870). For more
information about supported vSphere versions, see the release notes for your version of the
plug-in.
What you’ll need
• Admin privileges: You have vCenter Administrator role privileges to install a plug-in.
• vSphere upgrades: You have performed any required vCenter upgrades before upgrading the NetApp
Element Plug-in for vCenter Server. This procedure assumes that vCenter upgrades have already been
completed.
37
• vCenter Server: Your vCenter Plug-in version 4.x is registered with a vCenter Server. From the registration
utility (https://[management node IP]:9443), select Registration Status, complete the necessary
fields, and select Check Status to verify that the vCenter Plug-in is already registered and the version
number of the current installation.
• Management services updates: You have updated your management services bundle to the latest
version. Updates to the vCenter plug-in are distributed using management services updates that are
released outside of major product releases for NetApp HCI.
• Management node upgrades: You are running a management node that has been upgraded to version
11.3 or later. vCenter Plug-in 4.4 or later requires a an 11.3 or later management node with a modular
architecture that provides individual services. Your management node must be powered on with its IP
address or DHCP address configured.
• Element storage upgrades: You have a cluster running NetApp Element software 11.3 or later.
• vSphere Web Client: You have logged out of the vSphere Web Client before beginning any plug-in
upgrade. The web client will not recognize updates made during this process to your plug-in if you do not
log out.
Steps
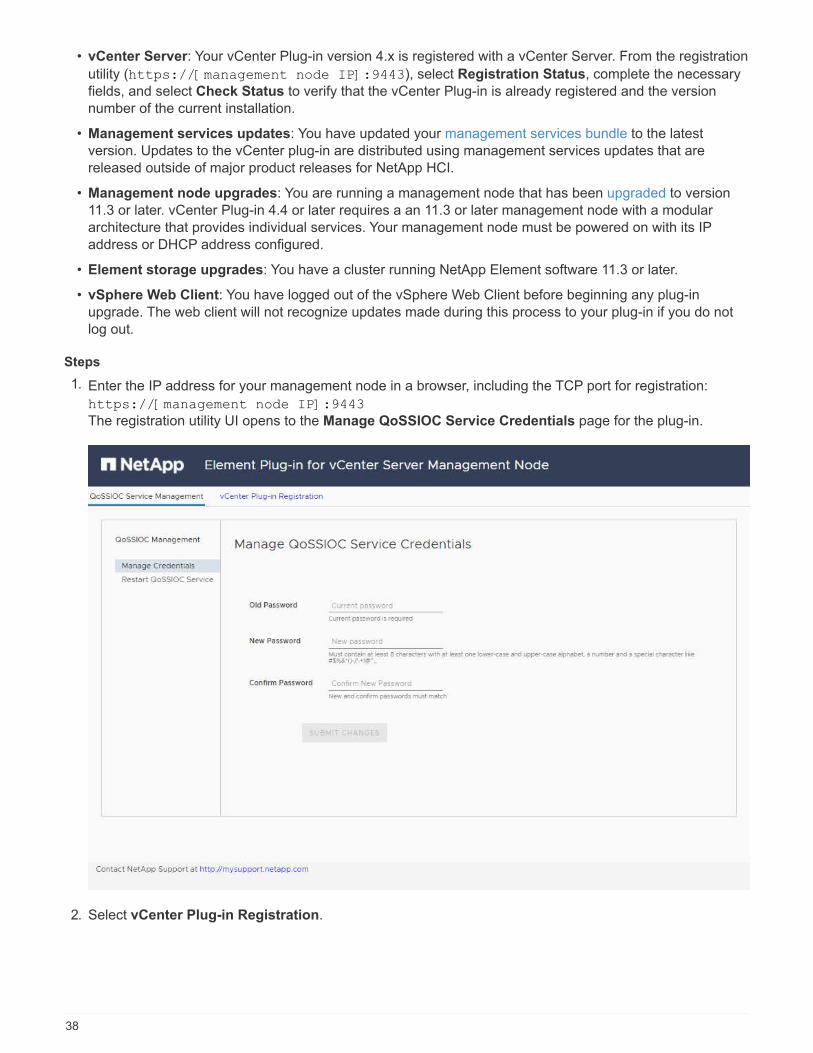
1. Enter the IP address for your management node in a browser, including the TCP port for registration:
https://[management node IP]:9443
The registration utility UI opens to the Manage QoSSIOC Service Credentials page for the plug-in.
2. Select vCenter Plug-in Registration.
38

3. Within Manage vCenter Plug-in, select Update Plug-in.
4. Confirm or update the following information:
a. The IPv4 address or the FQDN of the vCenter service on which you will register your plug-in.
b. The vCenter Administrator user name.
The user name and password credentials you enter must be for a user with vCenter
Administrator role privileges.
c. The vCenter Administrator password.
d. (For in-house servers/dark sites) A custom URL for the plug-in ZIP.
You can select Custom URL to customize the URL if you are using an HTTP or HTTPS
server (dark site) or have modified the ZIP file name or network settings. For additional
configuration steps if you intend to customize a URL, see Element Plug-in for vCenter
Server documentation about modifying vCenter properties for an in-house (dark site)
HTTP server.
5. Select Update.
A banner appears in the registration utility UI when the registration is successful.
6. Log in to the vSphere Web Client as a vCenter Administrator. If you are already logged in to the vSphere
Web Client, you must first log out, wait two to three minutes, and then log in again.
39
This action creates a new database and completes the installation in the vSphere Web
Client.
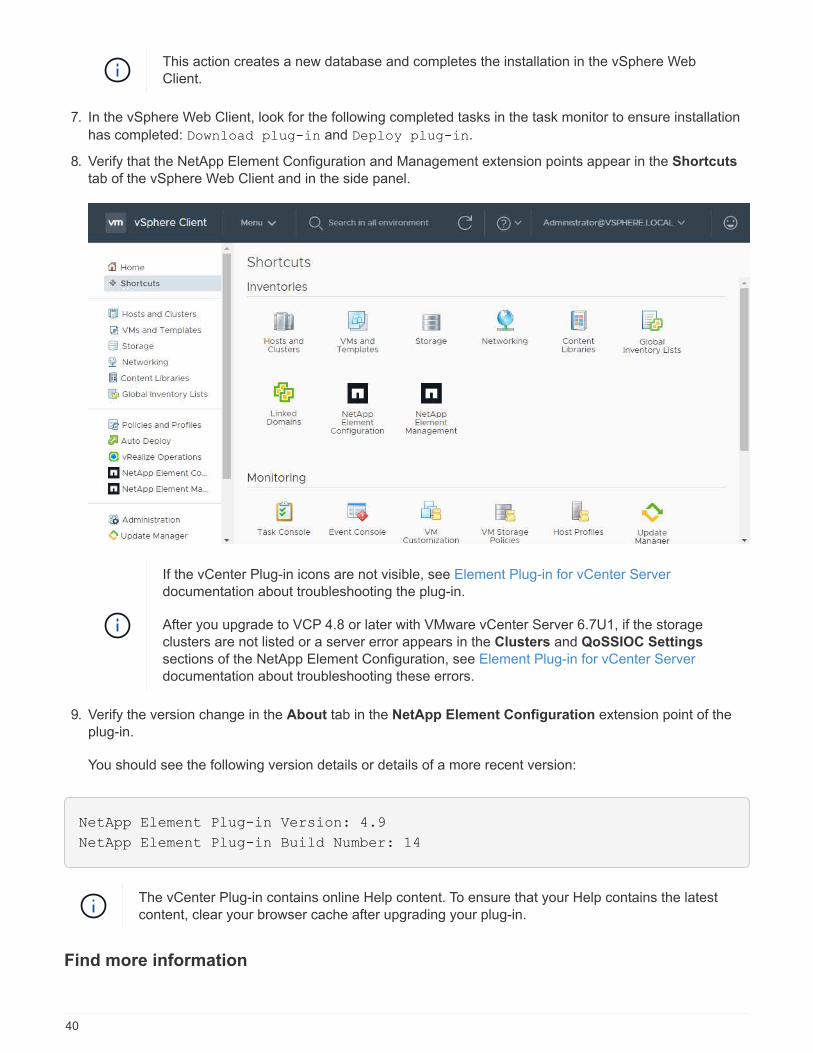
7. In the vSphere Web Client, look for the following completed tasks in the task monitor to ensure installation
has completed: Download plug-in and Deploy plug-in.
8. Verify that the NetApp Element Configuration and Management extension points appear in the Shortcuts
tab of the vSphere Web Client and in the side panel.
If the vCenter Plug-in icons are not visible, see Element Plug-in for vCenter Server
documentation about troubleshooting the plug-in.
After you upgrade to VCP 4.8 or later with VMware vCenter Server 6.7U1, if the storage
clusters are not listed or a server error appears in the Clusters and QoSSIOC Settings
sections of the NetApp Element Configuration, see Element Plug-in for vCenter Server
documentation about troubleshooting these errors.
9. Verify the version change in the About tab in the NetApp Element Configuration extension point of the
plug-in.
You should see the following version details or details of a more recent version:
NetApp Element Plug-in Version: 4.9
NetApp Element Plug-in Build Number: 14
The vCenter Plug-in contains online Help content. To ensure that your Help contains the latest
content, clear your browser cache after upgrading your plug-in.
Find more information
40

• NetApp Element Plug-in for vCenter Server
• NetApp HCI Resources Page
Run compute node health checks prior to upgradingcompute firmware
You must run health checks prior to upgrading compute firmware to ensure all compute
nodes in your cluster are ready to be upgraded. Compute node health checks can only be
run against compute clusters of one or more managed NetApp HCI compute nodes.
What you’ll need
• Management services: You have updated to the latest management services bundle (2.11 or later).
• Management node: You are running management node 11.3 or later.
• Element software: Your storage cluster is running NetApp Element software 11.3 or later.
• End User License Agreement (EULA): Beginning with management services 2.20, you must accept and
save the EULA before using the NetApp Hybrid Cloud Control UI or API to run compute node health
checks:
1. Open the IP address of the management node in a web browser:
https://<ManagementNodeIP>
2. Log in to NetApp Hybrid Cloud Control by providing the storage cluster administrator credentials.
3. Select Upgrade near the top right of the interface.
4. The EULA pops up. Scroll down, select I accept for current and all future updates, and select Save.
When you accept the EULA, it is recorded for all future updates and the automatic
download feature is enabled. You will receive updates on NetApp software updates and
upgrades, which you can install at your discretion and convenience. You can disable the
automatic download feature by disabling network connectivity to the NetApp online
software repository.
Health check options
You can run health checks using NetApp Hybrid Cloud Control UI or NetApp Hybrid Cloud Control API:
• Use NetApp Hybrid Cloud Control to run compute node health checks prior to upgrading firmware
(Preferred method)
• Use API to run compute node health checks prior to upgrading firmware
You can also find out more about compute node health checks that are run by the service:
• Compute node health checks made by the service
41

Use NetApp Hybrid Cloud Control to run compute node health checks prior toupgrading firmware
Using NetApp Hybrid Cloud Control, you can verify that a compute node is ready for a firmware upgrade.
If you have multiple two-node storage cluster configurations, each within their own vCenter,
Witness Nodes health checks might not report accurately. Therefore, when you are ready to
upgrade ESXi hosts, you must only shut down the Witness Node on the ESXi host that is being
upgraded. You must ensure that you always have one Witness Node running in your NetApp
HCI installation by powering off the Witness Nodes in an alternate fashion.
Steps
1. Open the IP address of the management node in a web browser:
https://<ManagementNodeIP>/hcc
2. Log in to NetApp Hybrid Cloud Control by providing the storage cluster administrator credentials.
3. Select Upgrade near the top right of the interface.
4. On the Upgrades page, select the Compute firmware tab.
5.
Select the health check for the cluster you want to check for upgrade readiness.
6. On the Compute Health Check page, select Run Health Check.
7. If there are issues, the page provides a report. Do the following:
a. Go to the specific KB article listed for each issue or perform the specified remedy.
b. If a KB is specified, complete the process described in the relevant KB article.
c. After you have resolved cluster issues, select Re-Run Health Check.
After the health check completes without errors, the compute nodes in the cluster are ready to upgrade. See
Update compute node firmware to proceed.
Use API to run compute node health checks prior to upgrading firmware
You can use REST API to verify that compute nodes in a cluster are ready to be upgraded. The health check
verifies that there are no obstacles to upgrading, such as ESXi host issues or other vSphere issues. You will
need to run compute node health checks for each compute cluster in your environment.
Steps
1. Locate the controller ID and cluster ID:
a. Open the inventory service REST API UI on the management node:
https://<ManagementNodeIP>/inventory/1/
b. Select Authorize and complete the following:
i. Enter the cluster user name and password.
42

ii. Enter the client ID as mnode-client if the value is not already populated.
iii. Select Authorize to begin a session.
c. From the REST API UI, select GET /installations.
d. Select Try it out.
e. Select Execute.
f. From the code 200 response body, copy the "id" for the installation you plan to use for health checks.
g. From the REST API UI, select GET /installations/{id}.
h. Select Try it out.
i. Enter the installation ID.
j. Select Execute.
k. From the code 200 response body, copy the IDs for each of the following:
i. The cluster ID ("clusterID")
ii. A controller ID ("controllerId")
{
"_links": {
"collection":
"https://10.117.187.199/inventory/1/installations",
"self":
"https://10.117.187.199/inventory/1/installations/xx94f6f0-12a6-
412f-8b5e-4cf2z58329x0"
},
"compute": {
"errors": [],
"inventory": {
"clusters": [
{
"clusterId": "domain-1",
"controllerId": "abc12c3a-aa87-4e33-9f94-xx588c2cdcf6",
"datacenterName": "NetApp-HCI-Datacenter-01",
"installationId": "xx94f6f0-12a6-412f-8b5e-
4cf2z58329x0",
"installationName": "test-nde-mnode",
"inventoryType": "managed",
"name": "NetApp-HCI-Cluster-01",
"summary": {
"nodeCount": 2,
"virtualMachineCount": 2
}
}
],
43

2. Run health checks on the compute nodes in the cluster:
a. Open the compute service REST API UI on the management node:
https://<ManagementNodeIP>/vcenter/1/
b. Select Authorize and complete the following:
i. Enter the cluster user name and password.
ii. Enter the client ID as mnode-client if the value is not already populated.
iii. Select Authorize to begin a session.
c. Select POST /compute/{CONTROLLER_ID}/health-checks.
d. Select Try it out.
e. Enter the "controllerId" you copied from the previous step in the Controller_ID parameter field.
f. In the payload, enter the "clusterId" that you copied from the previous step as the "cluster"
value and remove the "nodes" parameter.
{
"cluster": "domain-1"
}
g. Select Execute to run a health check on the cluster.
The code 200 response gives a "resourceLink" URL with the task ID appended that is needed to
confirm the health check results.
{
"resourceLink":
"https://10.117.150.84/vcenter/1/compute/tasks/[This is the task ID
for health check task results]",
"serviceName": "vcenter-v2-svc",
"taskId": "ab12c345-06f7-42d7-b87c-7x64x56x321x",
"taskName": "VCenter service health checks"
}
h. Copy the task ID portion of the "resourceLink" URL to verify the task result.
3. Verify the result of the health checks:
a. Return to the compute service REST API UI on the management node:
https://<ManagementNodeIP>/vcenter/1/
b. Select GET /compute/tasks/{task_id}.
44

c. Select Try it out.
d. Enter the task ID portion of the "resourceLink" URL from the POST /compute
/{CONTROLLER_ID}/health-checks code 200 response in the task_id parameter field.
e. Select Execute.
f. If the status returned indicates that there were problems regarding compute node health, do the
following:
i. Go to the specific KB article (KbLink) listed for each issue or perform the specified remedy.
ii. If a KB is specified, complete the process described in the relevant KB article.
iii. After you have resolved cluster issues, run POST /compute/{CONTROLLER_ID}/health-checks
again (see step 2).
If health checks complete without issues, the response code 200 indicates a successful result.
Compute node health checks made by the service
Compute health checks, whether performed by NetApp Hybrid Cloud Control or API methods, make the
following checks per node. Depending on your environment, some of these checks might be skipped. You
should re-run health checks after resolving any detected issues.
Check description Node/cluster Action needed to
resolve
Knowledgebase article
with procedure
Is DRS enabled and fully
automated?
Cluster Turn on DRS and make
sure it is fully automated.
See this KB. NOTE: If you
have standard licensing,
put the ESXi host into
maintenance mode and
ignore this health check
failure warning.
Is DPM disabled in
vSphere?
Cluster Turn off Distributed Power
Management.
See this KB.
Is HA admission control
disabled in vSphere?
Cluster Turn off HA admission
control.
See this KB.
Is FT enabled for a VM on
a host in the cluster?
Node Suspend Fault Tolerance
on any affected virtual
machines.
See this KB.
Are there critical alarms in
vCenter for the cluster?
Cluster Launch vSphere and
resolve and/or
acknowledge any alerts
before proceeding.
No KB needed to resolve
issue.
Are there generic/global
informational alerts in
vCenter?
Cluster Launch vSphere and
resolve and/or
acknowledge any alerts
before proceeding.
No KB needed to resolve
issue.
45

Check description Node/cluster Action needed to
resolve
Knowledgebase article
with procedure
Are management services
up to date?
HCI system You must update
management services
before you perform an
upgrade or run pre-
upgrade health checks.
No KB needed to resolve
issue. See this article for
more information.
Are there errors on the
current ESXi node in
vSphere?
Node Launch vSphere and
resolve and/or
acknowledge any alerts
before proceeding.
No KB needed to resolve
issue.
Is virtual media mounted
to a VM on a host in the
cluster?
Node Unmount all virtual media
disks (CD/DVD/floppy)
from the VMs.
No KB needed to resolve
issue.
Is BMC version the
minimum required version
that has RedFish support?
Node Manually update your
BMC firmware.
No KB needed to resolve
issue.
Is ESXi host up and
running?
Node Start your ESXi host. No KB needed to resolve
issue.
Do any virtual machines
reside on local ESXi
storage?
Node/VM Remove or migrate local
storage attached to virtual
machines.
No KB needed to resolve
issue.
Is BMC up and running? Node Power on your BMC and
ensure it is connected to a
network this management
node can reach.
No KB needed to resolve
issue.
Are there partner ESXi
host(s) available?
Node Make one or more ESXi
host(s) in cluster available
(not in maintenance
mode) to migrate virtual
machines.
No KB needed to resolve
issue.
Are you able to connect
with BMC via IPMI
protocol?
Node Enable IPMI protocol on
Baseboard Management
Controller (BMC).
No KB needed to resolve
issue.
Is ESXi host mapped to
hardware host (BMC)
correctly?
Node The ESXi host is not
mapped to the Baseboard
Management Controller
(BMC) correctly. Correct
the mapping between
ESXi host and hardware
host.
No KB needed to resolve
issue. See this article for
more information.
46

Check description Node/cluster Action needed to
resolve
Knowledgebase article
with procedure
What is the status of the
Witness Nodes in the
cluster? None of the
witness nodes identified
are up and running.
Node A Witness Node is not
running on an alternate
ESXi host. Power on the
Witness Node on an
alternate ESXi host and
re-run the health check.
One Witness Node must
be running in the HCI
installation at all times.
See this KB
What is the status of the
Witness Nodes in the
cluster? The witness node
is up and running on this
ESXi host and the
alternate witness node is
not up and running.
Node A Witness Node is not
running on an alternate
ESXi host. Power on the
Witness Node on an
alternate ESXi host. When
you are ready to upgrade
this ESXi host, shut down
the witness node running
on this ESXi host and re-
run the health check. One
Witness Node must be
running in the HCI
installation at all times.
See this KB
What is the status of the
Witness Nodes in the
cluster? Witness node is
up and running on this
ESXi host and the
alternate node is up but is
running on the same ESXi
host.
Node Both Witness Nodes are
running on this ESXi host.
Relocate one Witness
Node to an alternate ESXi
host. When you are ready
to upgrade this ESXi host,
shut down the Witness
Node remaining on this
ESXi host and re-run the
health check. One
Witness Node must be
running in the HCI
installation at all times.
See this KB
What is the status of the
Witness Nodes in the
cluster? Witness node is
up and running on this
ESXi host and the
alternate witness node is
up and running on another
ESXi host.
Node A Witness Node is running
locally on this ESXi host.
When you are ready to
upgrade this ESXi host,
shut down the Witness
Node only on this ESXi
host and re-run the health
check. One Witness
Node must be running in
the HCI installation at all
times.
See this KB
Find more information
47

• NetApp Element Plug-in for vCenter Server
• NetApp HCI Resources Page
Update compute node drivers
For any H-series compute node, you can update the drivers used on the nodes using
VMware Update Manager.
What you’ll need
See the firmware and driver matrix for your hardware in this NetApp KB article (login required).
About this task
Perform only one of these update operations at a time.
You should check the current ESXi driver version before you attempt compute firmware upgrades. If the driver
is out of date, upgrade the driver first. Then upgrade the compute firmware for your compute nodes.
Steps
1. Browse to the NetApp HCI software downloads page and select the download link for correct version of
NetApp HCI.
2. Select ESXI_drivers from the drop-down list.
3. Accept the End User License Agreement.
4. Download the driver package for your node type and ESXi version.
5. Extract the downloaded driver bundle on your local computer.
The NetApp driver bundle includes one or more VMware Offline Bundle ZIP files; do not
extract these ZIP files.
6. Go to VMware Update Manager in VMware vCenter.
7. Import the driver offline bundle file for the compute nodes into the Patch Repository.
◦ For VMware ESXi 7.0, all the necessary drivers for NetApp H610C, H615C, H410C, and Hx00E
compute nodes and their build-in system components are included in the standard VMware ESXi 7.0
installation ISO image. You do not require additional or updated drivers for NetApp HCI compute nodes
running VMware ESXi 7.0 (and updates).
◦ For VMware ESXi 6.x, perform the following steps to import the driver offline bundle file:
a. Select the Updates tab.
b. Select UPLOAD FROM FILE.
c. Browse to the offline bundle that was previously downloaded and select IMPORT.
8. Create a new host baseline for the compute node.
9. Choose Host Extension for Name and Type and select all imported driver packages to be included in the
new baseline.
10. In the Host and Clusters menu in vCenter, select the cluster with the compute nodes you would like to
update and navigate to the Update Manager tab.
11. Select Remediate and the select the newly created host baseline. Ensure that drivers included in the
baseline are selected.
48

12. Proceed through the wizard to the Host Remediation Options and ensure that the Do Not Change VM
Power State option is selected to keep virtual machines online during the driver update.
If VMware Distributed Resource Scheduler (DRS) is enabled on the cluster (this is the
default in NetApp HCI installations), virtual machines will automatically be migrated to other
nodes in the cluster.
13. Proceed to the Ready to Complete page in the wizard and select Finish.
The drivers for all compute nodes in the cluster are updated one node at a time while virtual machines stay
online.
Find more information
• NetApp Element Plug-in for vCenter Server
• NetApp HCI Resources Page
Upgrade compute node firmware
For H-series compute nodes, you can upgrade the firmware for hardware components
such as the BMC, BIOS, and NIC. To upgrade compute node firmware, you can use the
NetApp Hybrid Cloud Control UI, REST API, a USB drive with the latest firmware image,
or the BMC UI.
After the upgrade, the compute node boots into ESXi and works as before, retaining the configuration.
What you’ll need
• Compute drivers: You have upgraded your compute node drivers. If compute node drivers are not
compatible with the new firmware, the upgrade will not start. See the Interoperability Matrix Tool (IMT) for
driver and firmware compatibility information, and check the latest compute node firmware release notes
for important late-breaking firmware and driver details.
• Admin privileges: You have cluster administrator and BMC administrator permissions to perform the
upgrade.
• System ports: If you are using NetApp Hybrid Cloud Control for upgrades, you have ensured that the
necessary ports are open. See Network ports for more information.
• Minimum BMC and BIOS versions: The node you intend to upgrade using NetApp Hybrid Cloud Control
meets the following minimum requirements:
Model Minimum BMC version Minimum BIOS version
H410C All versions supported (no
upgrade required)
All versions supported (no
upgrade required)
H610C 3.96.07 3B01
H615C 4.68.07 3B08.CO
H615C compute nodes must update BMC firmware to version 4.68 using the compute
firmware bundle 2.27 to enable NetApp Hybrid Cloud Control to perform future firmware
upgrades.
49

For a complete matrix of firmware and driver firmware for your hardware, see this KB article
(login required).
• BIOS boot order: Manually change the boot order in the BIOS setup for each node to ensure USB
CD/DVD appears in the boot list. See this article for more information.
• BMC credentials: Update the credentials NetApp Hybrid Cloud Control uses to connect to the compute
node BMC. You can do this using either the NetApp Hybrid Cloud Control UI or API. Updating BMC
information prior to upgrade refreshes the inventory and ensures that management node services are
aware of all hardware parameters needed to complete the upgrade.
• Attached media: Disconnect any physical USB or ISO before starting a compute node upgrade.
• KVM ESXi console: Close all open Serial-Over-LAN (SOL) sessions and active KVM sessions in the BMC
UI before starting a compute node upgrade.
• Witness Node requirements: In two- and three-node storage clusters, one Witness Node must be running
in the NetApp HCI installation at all times.
• Compute node health check: You have verified that the node is ready to be upgraded. See Run compute
node health checks prior to upgrading compute firmware.
• End User License Agreement (EULA): Beginning with management services 2.20, you must accept and
save the EULA before using the NetApp Hybrid Cloud Control UI or API to upgrade compute node
firmware:
1. Open the IP address of the management node in a web browser:
https://<ManagementNodeIP>
2. Log in to NetApp Hybrid Cloud Control by providing the storage cluster administrator credentials.
3. Select Upgrade near the top right of the interface.
4. The EULA pops up. Scroll down, select I accept for current and all future updates, and select Save.
When you accept the EULA, it is recorded for all future updates and the automatic
download feature is enabled. You will receive updates on NetApp software updates and
upgrades, which you can install at your discretion and convenience. You can disable the
automatic download feature by disabling network connectivity to the NetApp online
software repository.
About this task
In production environments, upgrade the firmware on one compute node at a time.
The ESXi host must be taken out of lockdown mode prior to running a health check and
proceeding with the firmware upgrade. See How to disable lockdown mode on ESXi host and
VMware lockdown mode behavior for more information.
For NetApp Hybrid Cloud Control UI or API upgrades, your ESXi host will be automatically placed in
maintenance mode during the upgrade process if you have the DRS feature and required licensing. The node
will be rebooted and after the upgrade process is complete, the ESXi host will be taken out of maintenance
mode. For USB and BMC UI options, you will need to place the ESXi host in maintenance mode manually, as
described in each procedure.
50

Before upgrading, make sure you check the current ESXi driver version. If the driver is out of
date, upgrade the driver first. Then upgrade the compute firmware for your compute nodes.
Upgrade options
Choose the option that is relevant to your upgrade scenario:
• Use NetApp Hybrid Cloud Control UI to upgrade a compute node (Recommended)
• Use NetApp Hybrid Cloud Control API to upgrade a compute node
• Use a USB drive imaged with the latest compute node firmware bundle ISO
• Use the Baseboard Management Controller (BMC) user interface (UI)
Use NetApp Hybrid Cloud Control UI to upgrade a compute node
Starting with management services 2.14, you can upgrade a compute node using the NetApp Hybrid Cloud
Control UI. From the list of nodes, you must select the node to upgrade. The Current Versions tab shows the
current firmware versions and the Proposed Versions tab shows the available upgrade versions, if any.
For a successful upgrade, ensure that the health check on the vSphere cluster is successful.
For dark site upgrades, you can reduce upload time if the upgrade package and the
management node are both local.
Upgrading the NIC, BIOS, and BMC can take approximately 60 minutes per node depending on
the speed of network connectivity between the management node and the BMC host.
Using the NetApp Hybrid Cloud Control UI to upgrade compute firmware on
H300E/H500E/H700E compute nodes is no longer supported. To upgrade, it is recommended
that you use a USB drive or the BMC UI to mount the compute firmware ISO.
What you’ll need
• If your management node is not connected to the internet, you have downloaded the compute node
firmware package from the NetApp Support Site.
You should extract the TAR.GZ file to a TAR file, and then extract the TAR file to the ISO.
Steps
1. Open the IP address of the management node in a web browser:
https://<ManagementNodeIP>
2. Log in to NetApp Hybrid Cloud Control by providing the storage cluster administrator credentials.
3. Select Upgrade near the top right of the interface.
4. On the Upgrades page, select Compute firmware.
5. Choose from the following options and perform the set of steps that are applicable to your cluster:
51

Option Steps
Your management node has external connectivity. 1. Select the cluster you are upgrading.
You will see the nodes in the cluster listed along
with the current firmware versions and newer
versions, if available for upgrade.
2. Select the upgrade package.
3. Select Begin Upgrade.
After you select Begin Upgrade, the window
shows failed health checks, if any.
The upgrade cannot be paused
after you begin. Firmware will be
updated sequentially in the
following order: NIC, BIOS, and
BMC. Do not log in to the BMC
UI during upgrade. Logging into
the BMC terminates the Hybrid
Cloud Control Serial-Over-LAN
(SOL) session that monitors
upgrade process.
4. If the health checks at the cluster or node level
passed with warnings, but without critical
failures, you will see Ready to be Upgraded.
Select Upgrade Node.
While the upgrade is in progress, you
can leave the page and come back to
it later to continue monitoring the
progress. During the upgrade, the UI
shows various messages about the
status of the upgrade.
While upgrading the firmware on
H610C and H615S compute nodes,
do not open the Serial-Over-LAN
(SOL) console through the BMC web
UI. This might cause the upgrade to
fail.
The UI displays a message after the upgrade is
complete. You can download logs after the upgrade
is complete.
52
Option Steps
Your management node is within a dark site without
external connectivity.
1. Select the cluster you are upgrading.
2. Select Browse to upload the upgrade package
that you downloaded from the
NetApp Support Site.
3. Wait for the upload to complete. A progress bar
shows the status of the upload.
The file upload will happen in the
background if you navigate away
from the browser window.
An on-screen message is displayed after the file is
successfully uploaded and validated. Validation
might take several minutes.
You can download logs after the upgrade is
complete. For information about the various
upgrade status changes, see Upgrade status
changes.
If a failure happens during the upgrade, NetApp Hybrid Cloud Control will reboot the node, take
it out of maintenance mode, and display the failure status with a link to the error log. You can
download the error log, which contains specific instructions or links to KB articles, to diagnose
and correct any issue. For additional insight into compute node firmware upgrade issues using
NetApp Hybrid Cloud Control, see this KB article.
Upgrade status changes
Here are the different states that the UI shows before, during, and after the upgrade process:
Upgrade state Description
Node failed one or more health checks. Expand to
view details.
One or more health checks failed.
Error An error has occurred during the upgrade. You can
download the error log and send it to NetApp Support.
Unable to Detect NetApp Hybrid Cloud Control does not have external
connectivity to reach the online software repository.
This status is also displayed if NetApp Hybrid Cloud
Control is unable to query the compute node when the
compute node asset does not have the hardware tag.
Ready to be Upgraded. All the health checks passed successfully, and the
node is ready to be upgraded.
An error has occurred during the upgrade. The upgrade fails with this notification when a critical
error occurs. Download the logs by selecting the
Download Logs link to help resolve the error. You
can try upgrading again after you resolve the error.
53

Upgrade state Description
Node upgrade is in progress. The upgrade is in progress. A progress bar shows the
upgrade status.
Use NetApp Hybrid Cloud Control API to upgrade a compute node
You can use APIs to upgrade each compute node in a cluster to the latest firmware version. You can use an
automation tool of your choice to run the APIs. The API workflow documented here uses the REST API UI
available on the management node as an example.
Using the NetApp Hybrid Cloud Control UI to upgrade compute firmware on
H300E/H500E/H700E compute nodes is no longer supported. To upgrade, it is recommended
that you use a USB drive or the BMC UI to mount the compute firmware ISO.
What you’ll need
Compute node assets, including vCenter and hardware assets, must be known to management node assets.
You can use the inventory service APIs to verify assets (https://<ManagementNodeIP>/inventory/1/).
Steps
1. Do one of the following depending on your connection:
54

Option Steps
Your management node has external connectivity. 1. Verify the repository connection:
a. Open the package service REST API UI on
the management node:
https://<ManagementNodeIP>/
package-repository/1/
b. Select Authorize and complete the
following:
i. Enter the cluster user name and
password.
ii. Enter the client ID as mnode-client.
iii. Select Authorize to begin a session.
iv. Close the authorization window.
c. From the REST API UI, select GET
/packages/remote-repository/connection.
d. Select Try it out.
e. Select Execute.
f. If code 200 is returned, go to the next step.
If there is no connection to the remote
repository, establish the connection or use
the dark site option.
2. Find the upgrade package ID:
a. From the REST API UI, select GET
/packages.
b. Select Try it out.
c. Select Execute.
d. From the response, copy and save the
upgrade package name ("packageName")
and package version (
"packageVersion") for use in a later
step.
55

Option Steps
Your management node is within a dark site without
external connectivity.
1. Go to the NetApp HCI software download page
and download the latest compute node firmware
image to a device that is accessible to the
management node.
For dark site upgrades, you can
reduce upload time if the upgrade
package and the management
node are both local.
2. Upload the compute firmware upgrade package
to the management node:
a. Open the management node REST API UI
on the management node:
https://<ManagementNodeIP>/
package-repository/1/
b. Select Authorize and complete the
following:
i. Enter the cluster user name and
password.
ii. Enter the client ID as mnode-client.
iii. Select Authorize to begin a session.
iv. Close the authorization window.
c. From the REST API UI, select POST
/packages.
d. Select Try it out.
e. Select Browse and select the upgrade
package.
f. Select Execute to initiate the upload.
g. From the response, copy and save the
package ID ("id") for use in a later step.
3. Verify the status of the upload.
a. From the REST API UI, select GET
/packages/{id}/status.
b. Select Try it out.
c. Enter the package ID you copied in the
previous step in id.
d. Select Execute to initiate the status request.
The response indicates state as SUCCESS
when complete.
From the response, copy and save the
upgrade package name ("name") and
package version ("version") for use in a
56
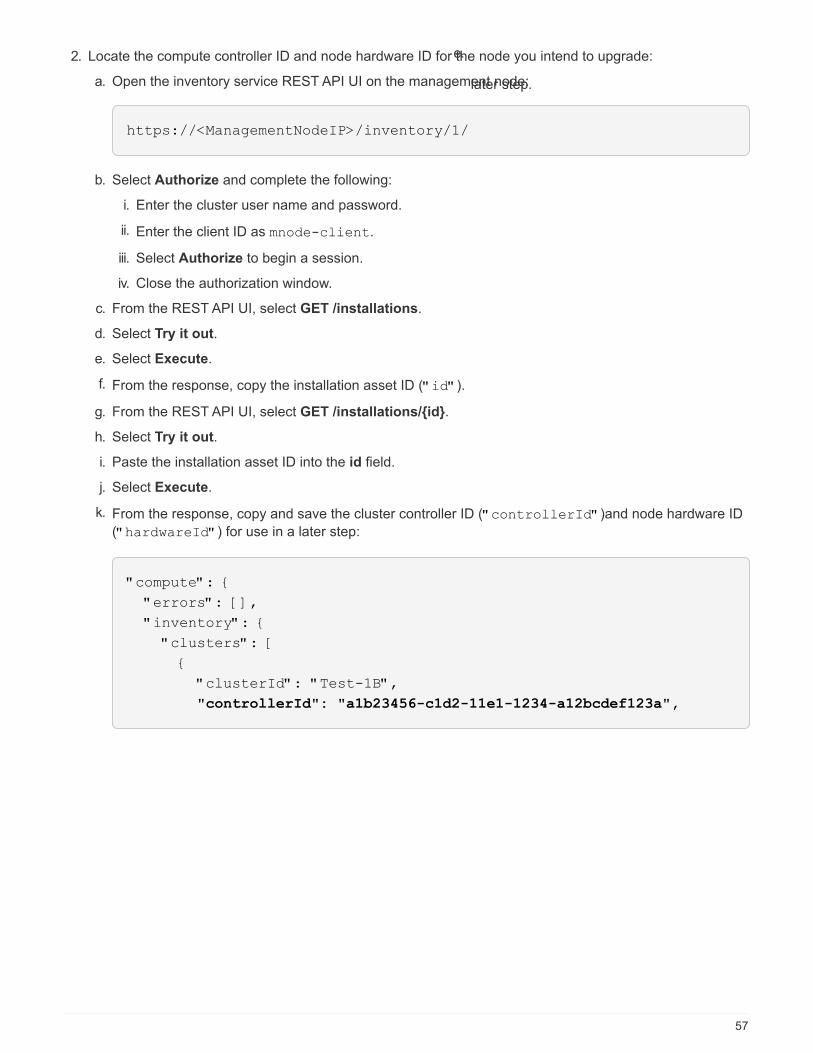
e.
later step.
2. Locate the compute controller ID and node hardware ID for the node you intend to upgrade:
a. Open the inventory service REST API UI on the management node:
https://<ManagementNodeIP>/inventory/1/
b. Select Authorize and complete the following:
i. Enter the cluster user name and password.
ii. Enter the client ID as mnode-client.
iii. Select Authorize to begin a session.
iv. Close the authorization window.
c. From the REST API UI, select GET /installations.
d. Select Try it out.
e. Select Execute.
f. From the response, copy the installation asset ID ("id").
g. From the REST API UI, select GET /installations/{id}.
h. Select Try it out.
i. Paste the installation asset ID into the id field.
j. Select Execute.
k. From the response, copy and save the cluster controller ID ("controllerId")and node hardware ID
("hardwareId") for use in a later step:
"compute": {
"errors": [],
"inventory": {
"clusters": [
{
"clusterId": "Test-1B",
"controllerId": "a1b23456-c1d2-11e1-1234-a12bcdef123a",
57

"nodes": [
{
"bmcDetails": {
"bmcAddress": "10.111.0.111",
"credentialsAvailable": true,
"credentialsValidated": true
},
"chassisSerialNumber": "111930011231",
"chassisSlot": "D",
"hardwareId": "123a4567-01b1-1243-a12b-11ab11ab0a15",
"hardwareTag": "00000000-0000-0000-0000-ab1c2de34f5g",
"id": "e1111d10-1a1a-12d7-1a23-ab1cde23456f",
"model": "H410C",
3. Run the compute node firmware upgrade:
a. Open the hardware service REST API UI on the management node:
https://<ManagementNodeIP>/hardware/2/
b. Select Authorize and complete the following:
i. Enter the cluster user name and password.
ii. Enter the client ID as mnode-client.
iii. Select Authorize to begin a session.
iv. Close the authorization window.
c. Select POST /nodes/{hardware_id}/upgrades.
d. Select Try it out.
e. Enter the hardware host asset ID ("hardwareId" saved from a previous step) in the parameter field.
f. Do the following with the payload values:
i. Retain the values "force": false and "maintenanceMode": true" so that health checks
are performed on the node and the ESXi host is set to maintenance mode.
ii. Enter the cluster controller ID ("controllerId" saved from a previous step).
iii. Enter the package name and package version you saved from a previous step.
58

{
"config": {
"force": false,
"maintenanceMode": true
},
"controllerId": "a1b23456-c1d2-11e1-1234-a12bcdef123a",
"packageName": "compute-firmware-12.2.109",
"packageVersion": "12.2.109"
}
g. Select Execute to initiate the upgrade.
The upgrade cannot be paused after you begin. Firmware will be updated sequentially in
the following order: NIC, BIOS, and BMC. Do not log in to the BMC UI during upgrade.
Logging into the BMC terminates the Hybrid Cloud Control Serial-Over-LAN (SOL)
session that monitors upgrade process.
h. Copy the upgrade task ID that is part of the resource link ("resourceLink") URL in the response.
4. Verify the upgrade progress and results:
a. Select GET /task/{task_id}/logs.
b. Select Try it out.
c. Enter the task ID from the previous step in task_Id.
d. Select Execute.
e. Do one of the following if there are problems or special requirements during the upgrade:
Option Steps
You need to correct cluster health issues due to
failedHealthChecks message in the response
body.
1. Go to the specific KB article listed for each
issue or perform the specified remedy.
2. If a KB is specified, complete the process
described in the relevant KB article.
3. After you have resolved cluster issues,
reauthenticate if needed and select POST
/nodes/{hardware_id}/upgrades.
4. Repeat the steps as described previously in
the upgrade step.
The upgrade fails and the mitigation steps are not
listed in upgrade log.
1. See this KB article (login required).
f. Run the GET /task/{task_id}/logs API multiple times, as needed, until the process is complete.
During the upgrade, the status indicates running if no errors are encountered. As each step
finishes, the status value changes to completed.
The upgrade has finished successfully when the status for each step is completed and the
59

percentageCompleted value is 100.
5. (Optional) Confirm upgraded firmware versions for each component:
a. Open the hardware service REST API UI on the management node:
https://<ManagementNodeIP>/hardware/2/
b. Select Authorize and complete the following:
i. Enter the cluster user name and password.
ii. Enter the client ID as mnode-client.
iii. Select Authorize to begin a session.
iv. Close the authorization window.
c. From the REST API UI, select GET /nodes/{hardware_id}/upgrades.
d. (Optional) Enter date and status parameters to filter the results.
e. Enter the hardware host asset ID ("hardwareId" saved from a previous step) in the parameter field.
f. Select Try it out.
g. Select Execute.
h. Verify in the response that firmware for all components has been successfully upgraded from the
previous version to the latest firmware.
Use a USB drive imaged with the latest compute node firmware bundle ISO
You can insert a USB drive with the latest compute node firmware ISO downloaded to a USB port on the
compute node. As an alternative to using the USB thumb drive method described in this procedure, you can
mount the ISO on the compute node using the Virtual CD/DVD option in the Virtual Console in the Baseboard
Management Controller (BMC) interface. The BMC method takes considerably longer than the USB thumb
drive method. Ensure that your workstation or server has the necessary network bandwidth and that your
browser session with the BMC does not time out.
Steps
1. Browse to the NetApp software downloads page, select NetApp HCI, and select the download link for
correct version of NetApp HCI.
2. Accept the End User License Agreement.
3. Under the Compute and Storage Nodes section, download the compute node image.
4. Use the Etcher utility to flash the compute node firmware ISO to a USB drive.
5. Place the compute node in maintenance mode using VMware vCenter, and evacuate all virtual machines
from the host.
If VMware Distributed Resource Scheduler (DRS) is enabled on the cluster (this is the
default in NetApp HCI installations), virtual machines will automatically be migrated to other
nodes in the cluster.
6. Insert the USB thumb drive into a USB port on the compute node and reboot the compute node using
VMware vCenter.
60

7. During the compute node POST cycle, press F11 to open the Boot Manager. You may need to press F11
multiple times in quick succession. You can perform this operation by connecting a video/keyboard or by
using the console in BMC.
8. Select One Shot > USB Flash Drive from the menu that appears. If the USB thumb drive does not appear
in the menu, verify that USB Flash Drive is part of the legacy boot order in the BIOS of the system.
9. Press Enter to boot the system from the USB thumb drive. The firmware flash process begins.
After firmware flashing is complete and the node reboots, it might take a few minutes for ESXi to start.
10. After the reboot is complete, exit maintenance mode on the upgraded compute node using vCenter.
11. Remove the USB flash drive from the upgraded compute node.
12. Repeat this task for other compute nodes in your ESXi cluster until all compute nodes are upgraded.
Use the Baseboard Management Controller (BMC) user interface (UI)
You must perform the sequential steps to load the compute node firmware ISO and reboot the node to the ISO
to ensure that the upgrade is successful. The ISO should be located on the system or virtual machine (VM)
hosting the web browser. Ensure that you have downloaded the ISO before you start the process.
The recommendation is to have the system or VM and the node on the same network.
It takes approximately 25 to 30 minutes for the upgrade via the BMC UI.
• Upgrade firmware on H410C and H300E/H500E/H700E nodes
• Upgrade firmware on H610C/H615C nodes
Upgrade firmware on H410C and H300E/H500E/H700E nodes
If your node is part of a cluster, you must place the node in maintenance mode before the upgrade, and take it
out of maintenance mode after the upgrade.
Ignore the following informational message you see during the process: Untrusty Debug
Firmware Key is used, SecureFlash is currently in Debug Mode
Steps
1. If your node is part of a cluster, place it in maintenance mode as follows. If not, skip to step 2.
a. Log in to the VMware vCenter web client.
b. Right-click the host (compute node) name and select Maintenance Mode > Enter Maintenance
Mode.
c. Select OK.
VMs on the host will be migrated to another available host. VM migration can take time depending on
the number of VMs that need to be migrated.
Ensure that all the VMs on the host are migrated before you proceed.
2. Navigate to the BMC UI, https://BMCIP/#login, where BMCIP is the IP address of the BMC.
3. Log in using your credentials.
61

4. Select Remote Control > Console Redirection.
5. Select Launch Console.
You might have to install Java or update it.
6. When the console opens, select Virtual Media > Virtual Storage.
7. On the Virtual Storage screen, select Logical Drive Type, and select ISO File.
8. Select Open Image to browse to the folder where you downloaded the ISO file, and select the ISO file.
9. Select Plug In.
10. When the connection status shows Device#: VM Plug-in OK!!, select OK.
11. Reboot the node by pressing F12 and selecting Restart or selecting Power Control > Set Power Reset.
12. During reboot, press F11 to select the boot options and load the ISO. You might have to press F11 a few
times before the boot menu is displayed.
You will see the following screen:
13. On the above screen, press Enter. Depending on your network, it might take a few minutes after you press
Enter for the upgrade to begin.
62

Some of the firmware upgrades might cause the console to disconnect and/or cause your
session on the BMC to disconnect. You can log back into the BMC, however some services,
such as the console, may not be available due to the firmware upgrades. After the upgrades
have completed, the node will perform a cold reboot, which can take approximately five
minutes.
14. Log back in to the BMC UI and select System to verify the BIOS version and build time after booting to the
OS. If the upgrade completed correctly, you see the new BIOS and BMC versions.
The BIOS version will not show the upgraded version until the node has finished fully
booting.
15. If the node is part of a cluster, complete the steps below. If it is a standalone node, no further action is
needed.
a. Log in to the VMware vCenter web client.
b. Take the host out of maintenance mode. This might show a disconnected red flag. Wait until all
statuses are cleared.
c. Power on any of the remaining VMs that were powered off.
Upgrade firmware on H610C/H615C nodes
The steps vary depending on whether the node is standalone or part of a cluster. The procedure can take
approximately 25 minutes and includes powering the node off, uploading the ISO, flashing the devices, and
powering the node back on after the upgrade.
Steps
1. If your node is part of a cluster, place it in maintenance mode as follows. If not, skip to step 2.
a. Log in to the VMware vCenter web client.
b. Right-click the host (compute node) name and select Maintenance Mode > Enter Maintenance
Mode.
c. Select OK.
VMs on the host will be migrated to another available host. VM migration can take time depending on
the number of VMs that need to be migrated.
Ensure that all the VMs on the host are migrated before you proceed.
2. Navigate to the BMC UI, https://BMCIP/#login, where BMC IP is the IP address of the BMC.
3. Log in using your credentials.
4. Select Remote Control > Launch KVM (Java).
5. In the console window, select Media > Virtual Media Wizard.
6. Select Browse and select the compute firmware .iso file.
63

7. Select Connect.
A popup indicating success is displayed, along with the path and device showing at the bottom. You can
close the Virtual Media window.
8. Reboot the node by pressing F12 and selecting Restart or selecting Power Control > Set Power Reset.
9. During reboot, press F11 to select the boot options and load the ISO.
10. Select AMI Virtual CDROM from the list displayed and select Enter. If you do not see AMI Virtual CDROM
in the list, go into the BIOS and enable it in the boot list. The node will reboot after you save. During the
reboot, press F11.
11. On the screen displayed, select Enter.
Some of the firmware upgrades might cause the console to disconnect and/or cause your
session on the BMC to disconnect. You can log back into the BMC, however some services,
such as the console, might not be available due to the firmware upgrades. After the
upgrades have completed, the node will perform a cold reboot, which can take
approximately five minutes.
12. If you get disconnected from the console, select Remote Control and select Launch KVM or Launch
KVM (Java) to reconnect and verify when the node has finished booting back up. You might need multiple
reconnects to verify that the node booted successfully.
64

During the powering on process, for approximately five minutes, the KVM console displays
No Signal.
13. After the node is powered on, select Dashboard > Device Information > More info to verify the BIOS and
BMC versions. The upgraded BIOS and BMC versions are displayed. The upgraded version of the BIOS
will not be displayed until the node has fully booted up.
14. If you placed the node in maintenance mode, after the node boots to ESXi, right-click the host (compute
node) name, and select Maintenance Mode > Exit Maintenance Mode, and migrate the VMs back to the
host.
15. In vCenter, with the host name selected, configure and verify the BIOS version.
Find more information
• NetApp Element Plug-in for vCenter Server
• NetApp HCI Resources Page
Automate compute node firmware upgrades with Ansible
You can update system firmware on NetApp HCI compute nodes, including firmware for
components such as the BMC, BIOS, and NIC using workflows in NetApp Hybrid Cloud
Control. For installations with large compute clusters, you can automate the workflows by
using Ansible to perform a rolling upgrade of the entire cluster.
While the Ansible role to automate compute node firmware upgrades is made available by
NetApp, the automation is an auxiliary component that requires additional set up and software
components to run. Modification of the Ansible automation is supported only on a best effort
basis.
The Ansible role for upgrades works only on NetApp HCI H-series compute nodes. You cannot
use this role to upgrade third-party compute nodes.
What you’ll need
• Readiness and prerequisites for firmware upgrades: Your NetApp HCI installation must be ready for
firmware upgrade as outlined in the instructions for performing firmware upgrades.
• Readiness to run automation on Ansible control node: A physical or virtual server to run firmware
update automation in Ansible.
About this task
In a production environment, you should update compute nodes in a cluster in a NetApp HCI installation in a
rolling fashion; one node after the other, one node at a time. APIs in NetApp Hybrid Cloud Control orchestrate
the overall compute node firmware upgrade process for a single compute node, including running health
checks, placing ESXi on the compute nodes into maintenance, and rebooting the compute node to apply the
firmware upgrades. The Ansible role provides the option to orchestrate the firmware upgrade for a group of
compute nodes or entire clusters.
Get started with firmware upgrade automation
To get started, navigate to the NetApp Ansible repository on GitHub and download the
nar_compute_nodes_firmware_upgrades role and documentation.
65

Find more information
• NetApp HCI Resources Page
66

Copyright Information
Copyright © 2022 NetApp, Inc. All rights reserved. Printed in the U.S. No part of this document
covered by copyright may be reproduced in any form or by any means-graphic, electronic, or
mechanical, including photocopying, recording, taping, or storage in an electronic retrieval system-
without prior written permission of the copyright owner.
Software derived from copyrighted NetApp material is subject to the following license and disclaimer:
THIS SOFTWARE IS PROVIDED BY NETAPP “AS IS” AND WITHOUT ANY EXPRESS OR IMPLIED
WARRANTIES, INCLUDING, BUT NOT LIMITED TO, THE IMPLIED WARRANTIES OF
MERCHANTABILITY AND FITNESS FOR A PARTICULAR PURPOSE, WHICH ARE HEREBY
DISCLAIMED. IN NO EVENT SHALL NETAPP BE LIABLE FOR ANY DIRECT, INDIRECT,
INCIDENTAL, SPECIAL, EXEMPLARY, OR CONSEQUENTIAL DAMAGES (INCLUDING, BUT NOT
LIMITED TO, PROCUREMENT OF SUBSTITUTE GOODS OR SERVICES; LOSS OF USE, DATA, OR
PROFITS; OR BUSINESS INTERRUPTION) HOWEVER CAUSED AND ON ANY THEORY OF
LIABILITY, WHETHER IN CONTRACT, STRICT LIABILITY, OR TORT (INCLUDING NEGLIGENCE OR
OTHERWISE) ARISING IN ANY WAY OUT OF THE USE OF THIS SOFTWARE, EVEN IF ADVISED OF
THE POSSIBILITY OF SUCH DAMAGE.
NetApp reserves the right to change any products described herein at any time, and without notice.
NetApp assumes no responsibility or liability arising from the use of products described herein,
except as expressly agreed to in writing by NetApp. The use or purchase of this product does not
convey a license under any patent rights, trademark rights, or any other intellectual property
rights of NetApp.
The product described in this manual may be protected by one or more U.S. patents,
foreign patents, or pending applications.
RESTRICTED RIGHTS LEGEND: Use, duplication, or disclosure by the government is subject to
restrictions as set forth in subparagraph (c)(1)(ii) of the Rights in Technical Data and
Computer Software clause at DFARS 252.277-7103 (October 1988) and FAR 52-227-19 (June 1987).
Trademark Information
NETAPP, the NETAPP logo, and the marks listed at http://www.netapp.com/TM are trademarks of
NetApp, Inc. Other company and product names may be trademarks of their respective owners.
67