R300 PHD/Experion Link Installation and Configuration Guide ...
192
Uniformance® PHD Experion Link Installation and Configuration Guide R300
-
Upload
khangminh22 -
Category
Documents
-
view
1 -
download
0
Transcript of R300 PHD/Experion Link Installation and Configuration Guide ...

Uniformance®
PHD Experion Link Installation and Configuration Guide
R300

ii • Uniformance - PHD/Experion Link Installation and Configuration Guide
Copyright, Notices, and Trademarks © Honeywell International Inc. 2010. All Rights Reserved.
While this information is presented in good faith and believed to be accurate, Honeywell disclaims the implied warranties of merchantability and fitness for a particular purpose and makes no express warranties except as may be stated in its written agreement with and for its customers.
In no event is Honeywell liable to anyone for any indirect, special or consequential damages. The information and specifications in this document are subject to change without notice.
Honeywell, Experion, PlantScape, TotalPlant, Uniformance PHD, and Business FLEX are U.S. registered trademarks of Honeywell International Inc.
Other brand or product names are trademarks of their respective owners.
Release Information Uniformance Document Revision: 15 Document Revision Date: January, 2010 Document ID: rdi4101
Honeywell Process Solutions
1860 W. Rose Garden Ln
Phoenix, Arizona 85027-2708 USA

iii • Uniformance - PHD/Experion Link Installation and Configuration Guide
Support and Other Contacts
United States and Canada Contact: Honeywell Solution Support Center Phone: 1-800 822-7673. Calls are answered by dispatcher between 6:00 A.M. and 4:00 P.M.
Mountain Standard Time. Emergency calls outside normal working hours are received by an answering service and returned within one hour.
Mail: Honeywell HPS TAC, MS L17 1860 W Rose Garden Ln Phoenix, Arizona 85027-2708
Europe Contact: Honeywell TAC-EMEA Phone: +32-2-728-2732 Facsimile: +32-2-728-2696 Mail: TAC-BE02 Hermes Plaza Hermeslaan, 1H B-1831 Diegem, Belgium
Pacific Contact: Honeywell Global TAC – Pacific Phone: 1300-300-4822 (toll free within Australia) +61-8-9362-9559 (outside Australia) Facsimile: +61-8-9362-9564 Mail: Honeywell Limited Australia 5 Kitchener Way Burswood 6100, Western Australia Email: [email protected]
India Contact: Honeywell Global TAC – India Phone: +91-20- 66039400 Facsimile: +91-20- 66039800 Mail: Honeywell Automation India Ltd. 56 and 57, Hadapsar Industrial Estate Hadapsar, Pune –411 013, India Email: [email protected]

Support and Other Contacts
iv • Uniformance - PHD/Experion Link Installation and Configuration Guide
Korea Contact: Honeywell Global TAC – Korea Phone: +82-2-799-6317 +82-11-9227-6324 Facsimile: +82-2-792-9015 Mail: Honeywell Co., Ltd 4F, Sangam IT Tower B4-4 Block 1590, DMC Sangam-dong, Mapo-gu, Seoul, 121-836, Korea Email: [email protected]
People’s Republic of China Contact: Honeywell Global TAC – China Phone: +86- 21-52574568 Mail: Honeywell (China) Co., Ltd 33/F, Tower A, City Center, 100 Zunyi Rd. Shanghai 200051, People’s Republic of China Email: [email protected]
Singapore Contact: Global TAC – South East Asia Phone: +65-6580-3500 Facsimile: +65-6580-3501 +65-6445-3033 Mail: Honeywell Private Limited Honeywell Building 17, Changi Business Park Central 1 Singapore 486073 Email: [email protected]
Taiwan Contact: Global TAC – Taiwan Phone: +886- 7- 536 2567 Facsimile: +886-7-536 2039 Mail: Honeywell Taiwan Ltd. 17F-1, No. 260, Jhongshan 2nd Road. Cianjhen District Kaohsiung, Taiwan, ROC Email: [email protected]

Support and Other Contacts
Uniformance - PHD/Experion Link Installation and Configuration Guide • v
Japan Contact: Global TAC – Japan Phone: +81-3-6730-7160 Facsimile: +81-3-6730-7228 Mail: Honeywell Japan Inc. New Pier Takeshiba, South Tower Building, 20th Floor, 1-16-1 Kaigan, Minato-ku, Tokyo 105-0022, Japan Email: [email protected]
Elsewhere Call your nearest Honeywell office.
World Wide Web Honeywell Solution Support Online: http://www.honeywell.com/ps
Training Classes Honeywell Automation College: http://www.automationcollege.com

Support and Other Contacts
vi • Uniformance - PHD/Experion Link Installation and Configuration Guide

Uniformance - PHD/Experion Link Installation and Configuration Guide • vii
Contents
1. Introducing the PHD-Experion Integration...................................................... 13 1.1 About This Document ............................................................................. 13 1.2 Overview of PHD-Experion Integration Functions.................................. 13 1.3 Overview of PHD Experion Link ............................................................. 16 1.4 Overview of Redirection Manager .......................................................... 21 1.5 Overview of Experion History ................................................................. 22
Categories of Experion tag history....................................................... 22 Tag history assignments ...................................................................... 22 Maximum parameters assigned to Experion history............................ 23 Tools for assigning TPS point parameters to Experion history............ 23 Tags not assigned to Experion history................................................. 23
1.6 Overview of Tag Synchronization........................................................... 24 1.7 Overview of PHD Point Server ............................................................... 26
2. Overview of Requirements for PHD-Experion Integration ............................ 27 2.1 Licensing and Packaging........................................................................ 27 2.2 Prerequisites for PHD-Experion Integration ........................................... 27 2.3 Checklist for PHD-Experion Integration.................................................. 28 2.4 How to Obtain Software Patches and Documentation Updates............. 37 2.5 Overview of Security Requirements for PHD-Experion Integration........ 38
Domain requirements........................................................................... 38 Windows account requirements........................................................... 38 SQLServer user for Tag Synchronization ............................................ 39 Recommendation if firewall exists between Shadow PHD Server and Experion Server ................................................................................... 42
3. Prepare Domain Account, Experion Servers, and SQLServer User for PHD-Experion Integration.......................................................................................... 43 3.1 Create Domain Account for RDI Server and Tag Synchronization ........ 43
On Domain Controller - Create domain account for RDI Server ......... 43

Contents
viii • Uniformance - PHD/Experion Link Installation and Configuration Guide
On Domain Controller – Create domain account for Tag Synchronization (optional) ....................................................................45
3.2 On Experion Servers - Add RDI Server Domain User to ‘Distributed COM Users’ Local Group .................................................................................46
3.3 On Experion Servers – Modify Default DCOM Settings .........................47 3.4 On Experion Servers – Configure Windows Firewall..............................66 3.5 Assign Windows User for Tag Synchronization Database Access.........66
Configure Tag Synchronization Database Access user.......................66
4. Prepare PHD Server for PHD-Experion Integration ........................................69 4.1 Add mngr Local Windows Account .........................................................69 4.2 On PHD Server – Configure Windows Firewall ......................................69 4.3 On PHD Server - Modify DCOM Settings ...............................................69 4.4 On PHD Server – Configure Logon Account for RDIServer Service ......76 4.5 On PHD Server – Update HOSTS File ...................................................78 4.6 On PHD Server – Update Services File (Optional) .................................81 4.7 On PHD Server – Increase the Maximum PHD Tags (PhdParams.Dat) 82
5. Install Software for PHD-Experion Integration................................................83 5.1 On PHD Server - Install RDM and System Management Display
(Optional).................................................................................................83 5.2 On PHD Server - Install PHD Point Server (Optional) ............................86 5.3 On PHD Server - Install Tag Synchronization (Optional)........................88
Tag Synchronization upgrades/patches ...............................................91
6. Configure PHD-Experion Integration ...............................................................93 6.1 On PHD Server - Configure System Management Display (Optional) ...93 6.2 On PHD Server - Configure RDM (Optional) ..........................................94 6.3 In PHD Configuration Tool – Configure PHD Experion Link...................96 6.4 On PHD Server - Create Registry and File Entries for PHD Experion Link100
Add parameter to registry and change default value .........................104 6.5 In PHD Configuration Tool - Configure Tag Synchronization Rules.....106
What Tag Sync rules are needed?.....................................................106

Contents
Uniformance - PHD/Experion Link Installation and Configuration Guide • ix
To view and evaluate the default rule ................................................ 106 To view and evaluate the default parent tag...................................... 107 To configure a new rule ..................................................................... 107 Honeywell-supplied default rule text for Experion.............................. 109 Honeywell-supplied default Parent Tag for Experion......................... 112 Rule examples for Experion............................................................... 113 Tag name considerations................................................................... 116 Tips for regular expressions............................................................... 117 Tag Sync variables ............................................................................ 118 To view synchronized tags in staging table before sending tag definitions to PHD .............................................................................. 120
6.6 Configure PHD Point Server................................................................. 121 On Experion Servers - Configure Experion to communicate with PHD Point Server ....................................................................................... 121 On PHD Server - Configure registry settings, as needed, for PHD Point Server................................................................................................. 123
7. Startup PHD-Experion Integration Components .......................................... 125 7.1 On PHD Server - Start and Monitor PHD Experion Link ...................... 125 7.2 Start and Monitor Tag Synchronization ................................................ 126 7.3 In PHD Configuration Tool – Acknowledge Changes in Tag
Synchronization Staging Table (Optional)............................................ 129 Overview ............................................................................................ 129 Fields.................................................................................................. 131 Statuses and actions.......................................................................... 132 To take action..................................................................................... 133 To view Tag Sync log......................................................................... 134
7.4 Tasks to Perform After Initial Tag Synchronization .............................. 136 Complete PHD engineering unit configuration................................... 136 Enable/Disable continuous Automatic Tag Synchronization (Optional)139 Set DEBUG registry parameter back to 1.......................................... 139 Set Tag Synchronization service to Automatic startup ...................... 140
7.5 On PHD Server – Start PHD Point Server Service .............................. 141 7.6 On Experion Server – View PHD Point Server Status ......................... 141 7.7 On Experion Server – View PHD Point Server Trend Data ................. 143
8. Configure PHD Tags on PHD Experion Link................................................. 145 8.1 General PHD Tag Configuration Guidelines ........................................ 145

Contents
x • Uniformance - PHD/Experion Link Installation and Configuration Guide
8.2 Manually Configure a New PHD Tag ....................................................146 Before you begin ................................................................................146 To manually configure a new PHD tag...............................................146
8.3 Deleting an Experion point or removing it from Experion history..........147 8.4 Disable Tag Synchronization for a PHD Tag ........................................148 8.5 Update or Migrate Existing PHD Tags ..................................................149 8.6 Tag Field Usage for PHD Tags on PHD Experion Link ........................150
Tag Name...........................................................................................150 Active ..................................................................................................150 Parent Tag Name ...............................................................................150 Tag Units ............................................................................................150 Enable Collection................................................................................151 Data Store ..........................................................................................151 Digital Enumeration ............................................................................151 Automatic Tag Synchronization..........................................................151 Source Tag Specification Source Tag Index......................................152 Source System Type ..........................................................................152 Source Tag Type ................................................................................152 Source Tag Attribute...........................................................................152 Source Tag Units................................................................................152 Collector Name...................................................................................153 Scan Frequency .................................................................................153 Digital Enumeration List Name...........................................................154 PHD Link Name..................................................................................154 Extended Source Tag Name ..............................................................155 Scale High Extreme Scale Low Extreme ...........................................155 Quantum.............................................................................................155 Synchronization Rule Name...............................................................155 Asset Name ........................................................................................155 Item Name ..........................................................................................155
8.7 Collect and Access Enumeration Data .................................................156 Collect enumeration data....................................................................156 Enable PHD to return either strings or ordinals to clients ..................156 Client access of enumeration strings or ordinals ...............................157
8.8 Configure Manual Input Tags on PHD Experion Link ...........................157
9. Monitor and Troubleshoot PHD-Experion Integration .................................159 9.1 Troubleshoot the PHD Experion Link....................................................159
View logs related to data collection ....................................................159 Procedure to restart PHD Experion Link ............................................159

Contents
Uniformance - PHD/Experion Link Installation and Configuration Guide • xi
Procedure to view PHD/Link Status................................................... 159 Interpret status and log messages..................................................... 160 Common installation problems........................................................... 162 Symptom - Missing history data on PHD Server after history recovery163
9.2 Troubleshoot Redirection Manager (RDM) .......................................... 164 View logs related to RDM .................................................................. 164 View RDM auxiliary status display..................................................... 164
9.3 Troubleshooting Tag Synchronization.................................................. 166 To view logs related to Tag Synchronization ..................................... 166 To view Tag Synchronization Status and Tuning display .................. 166 To locate PHD tags with range errors after executing Tag Sync....... 168 To handle tag configuration errors..................................................... 170 To handle rule compilation errors ...................................................... 170 To force a resync ............................................................................... 170
9.4 Troubleshoot PHD Point Server ........................................................... 171 View log related to PHD Point Server and Experion trends .............. 171 Interpret PHD Point Server Status display......................................... 171 Symptom - Connection problems....................................................... 172 Symptom - Data missing from Experion trend ................................... 173 Recommendations - minimize PHD CPU usage and trend data callup time .................................................................................................... 174
9.5 PHD Confidence and OPC Quality....................................................... 175
10. Appendix A – PHD Server Registry Settings for PHD-Experion Integration177 10.1 PHD Experion Link Registry Settings................................................... 177 10.2 Tag Synchronization Registry Settings ................................................ 179 10.3 PHD Point Server Registry Settings..................................................... 180
Average and Snapshot retrieval settings ........................................... 182
11. Appendix B – Overview of RDISetup............................................................. 185 11.1 RDISetup Data Flow............................................................................. 185

Contents
xii • Uniformance - PHD/Experion Link Installation and Configuration Guide
Table of Figures Figure 1 – PHD-Experion Integration - Function Diagram .............................................15 Figure 2 – PHD-Experion Integration - Example Topology............................................17 Figure 3 – History Recovery by PHD Experion Link ......................................................19 Figure 4 – Example Shadow System Topology .............................................................20 Figure 5 – Diagram of PHD Experion Link with RDM ....................................................21 Figure 6 –Experion History Assignment.........................................................................22 Figure 7 –Tag Synchronization Process ........................................................................25 Figure 8 – PHD Point Server Components ....................................................................26 Figure 9 – Firewall between Shadow PHD Server and Experion ..................................42 Figure 10 – TCP/IP Name and "Target Host Name"......................................................80 Figure 11 – PHD Point Server Status Display .............................................................142 Figure 17 – Link Status Display – With RDM...............................................................160 Figure 18 – Link Status Display – Non-Redundant Experion Server...........................162 Figure 19 – Redirection Manager Auxiliary Status Display..........................................165 Figure 20 – Tag Synchronization Status Display .........................................................167 Figure 21 – PHDMAN Confidence Report Indicates Problem Tags ............................169 Figure 22 – PHD Point Server Status Display .............................................................171 Figure 23 – Configuration of PHD Experion Links through RDISetup .........................185
Tables Table 1 – Description of PHD-Experion Integration Functions ......................................14 Table 2 – PHD Links Configuration Form Entries ..........................................................97 Table 3 – RDISetup Indicators and Checkboxes .........................................................103 Table 4 – Fields on Tag Sync Acknowledgment form..................................................131 Table 5 – Statuses on Tag Sync Acknowledgment Form............................................132 Table 6 – Buttons on Tag Sync Acknowledgment form...............................................133

Uniformance - PHD/Experion Link Installation and Configuration Guide • 13
1. Introducing the PHD-Experion Integration
1.1 About This Document This document describes the software installation and configuration procedures to provide integration between the Honeywell Process History Database (PHD) historian and the Honeywell Experion Server embedded historian.
1.2 Overview of PHD-Experion Integration Functions PHD-Experion integration comprises the following key functions.
• PHD Experion Link
• Tag Synchronization
• PHD Point Server
The PHD Experion Link collects history from Experion for long term storage in PHD. This data link function minimizes the impact of history collection on data providers, such as controllers – it imposes no additional load when collecting history for PHD that is also collected by Experion. The history collected by PHD matches the Experion history. The PHD Experion Link supports history recovery from Experion after a communication failure, and it has the ability to write values to Experion point parameters.
The Tag Synchronization function eliminates duplicate engineering by automatically building PHD tags that match the point parameters assigned to Experion history. Tag Synchronization also reduces the effort required to maintain the synchronized systems, especially when dealing with large tag databases. When a point parameter assigned to Experion history is modified (for example, the range or engineering units is changed), the corresponding PHD tags are updated as well.
If you remove a point parameter from Experion history assignment or delete the point from the Experion system, PHD history collection is automatically disabled, but the tag and history data are still available from PHD (for details see section 8.3, "Deleting an Experion point or removing it from Experion history").
On a parameter-by-parameter basis, you can stop PHD from synchronizing tag definitions or from collecting history values.
The PHD Point Server function allows an Experion Server to access PHD tag history data for non-synchronized tags, so that you can include tags that are not historized in Experion but are historized in PHD on Experion trend displays.
The following table briefly describes the PHD-Experion integration functions, which are illustrated in Figure 1.

1 Introducing the PHD-Experion Integration 1.2 Overview of PHD-Experion Integration Functions
14 • Uniformance - PHD/Experion Link Installation and Configuration Guide
Table 1 – Description of PHD-Experion Integration Functions
Functions Components Purpose
1 Tag Synchronization
Uniformance Tag Sync
Uniformance Tag Synchronization runs as a Windows service on the PHD Server and initiates Tag Synchronization with the Experion Server.
Experion Tag Sync
The Experion Tag Synchronization server running on the Experion Server sends history tag definitions to the PHD Server. Any subsequent updates/modifications to the history tags are sent to PHD as they occur.
2 Data collection PHD Experion Link
The PHD Experion Link, running on the PHD Server, requests history data from the Experion OPC HDA Server for all of its assigned PHD tags (those that have been synchronized and those that have been manually created).
Experion OPC HDA Server
The Experion OPC HDA Server sends requested history values to the PHD Experion Link. In this role, the Experion Server acts as the history cache to the PHD Server.
Uniformance RDI Server
The PHD Experion Link runs under a Windows service named ‘Uniformance RDI Server'.
Redirection Manager (RDM)
The PHD Experion Link uses the Redirection Manager (RDM) to direct it to the active Experion Server in a redundant pair.
3 PHD data on Experion trends
Experion PHD System Interface
The Experion Server's 'PHD System Interface' requests history data from PHD when an operator displays an Experion trend that references non-synchronized PHD history tags (that is, tags that are not assigned to Experion history).
PHD Point Server
The Experion PKS PHD Point Server, running as a Windows service on the PHD Server, sends the PHD history data to the Experion Server as requested.

1 Introducing the PHD-Experion Integration 1.2 Overview of PHD-Experion Integration Functions
Uniformance - PHD/Experion Link Installation and Configuration Guide • 15
Figure 1 – PHD-Experion Integration - Function Diagram

1 Introducing the PHD-Experion Integration 1.3 Overview of PHD Experion Link
16 • Uniformance - PHD/Experion Link Installation and Configuration Guide
1.3 Overview of PHD Experion Link The PHD Experion Link is an OPC HDA client designed to interface and collect data from the Experion Server history database for storage of the data to a Uniformance PHD Server. The PHD Experion Link has the following standard functionality: • Runs in Exception mode for reading single values.
• Optionally writes single values from PHD through the user-enabled Put-Download mechanism.
• Performs history recovery.
The PHD Experion Link is managed by the RDI (real-time data interface) Server, which runs on the PHD Server node as a Windows service.
You configure the PHD Experion Link through the PHD Configuration Tool and the PHD RDI Configuration tool (RDISetup), and use the PHDMAN command line utility to view the status and start/stop the PHD Experion Link.
The PHD Experion Link can use the Redirection Manager (RDM) to support failover when connected to redundant Experion Servers.
The Uniformance Tag Sync service can be used to automatically create PHD tags from Experion tags that have history assignment, and assign those PHD tags to a PHD Experion Link for data collection. You can also create PHD tags manually.
Data throughput and constraints Maximum throughput between Experion Server and PHD Server is as follows:
• History collection - 1200 history values/second - dependent upon the underlying data owner (based on maximum average values per second for history collection by the Experion Server data acquisition function).
• History recovery - 2500 history values/second (based on ReadRaw limit of Experion OPC HDA server).
ATTENTION
Honeywell recommends that all numeric and enumerated (ordinal) data that is to be collected by the PHD Experion Link be assigned to Experion history and automatically Tag Synchronized to PHD.

1 Introducing the PHD-Experion Integration 1.3 Overview of PHD Experion Link
Uniformance - PHD/Experion Link Installation and Configuration Guide • 17
Tag capacity limitations
The Experion Server's software licensing defines the Experion tag capacity limitations. On the PHD Server, the user specifies the maximum number of PHD tags. An Experion tag represents multiple parameters. A PHD tag represents a single parameter, such as PV, SP, or OP.
Concurrent interface limitations
You define only a single PHD Experion Link between a PHD Server and an Experion Server. An Experion Server connects to only one PHD Server. Honeywell does not support multiple PHD Experion Links to a single Experion Server or redundant pair.
A PHD Server running R210.1.3 or greater supports seven (7) maximum PHD Experion Links. Prior PHD releases support three (3) maximum PHD Experion Links.
Figure 2 – PHD-Experion Integration - Example Topology

1 Introducing the PHD-Experion Integration 1.3 Overview of PHD Experion Link
18 • Uniformance - PHD/Experion Link Installation and Configuration Guide
If there are more than three Experion Servers, the following requirements must be met: Minimum PHD Server hardware: 4 GigaBytes of physical memory and Dual Core Xeon processor of 3.0 GHz or more. Minimum Experion Server software release: R301.1.002 Note: PHD R210 releases earlier than R210.1.3 support up to three PHD Experion Links.
If there is a requirement for more than seven PHD Experion links, Honeywell recommends that you use multiple PHD Servers and define the PHD Experion Links across these nodes.
History Recovery
History Recovery is the retrieval of data from the Experion Server by the PHD Experion Link for the period of time during which the Link was unable to collect data directly from the Experion Server. The recovered data eliminates the data gaps that result from non-collection of data. For history recovery, the Experion Server returns data from its fastest history collection group for each tag. For example, if an Experion tag is assigned to one-minute and one-hour Experion history collection, then the Experion Server returns one-minute data to the Link.
The PHD Experion Link parameter MAX_HISTRECMN specifies the oldest time the Link should use for history recovery.
The Link uses the OPC HDA interface ‘ReadRaw’ for History Recovery. The ReadRaw call accepts one timestamp for all the items requested. Since the Link can specify only one timestamp to the ReadRaw call, it uses the oldest time across all the tags.
As illustrated in the following figure, the Link finds the oldest of the most recent value for each tag, and if that value is earlier than MAX_HISTRECMN minutes ago, then it starts history recovery from MAX_HISTRECMN minutes ago.

1 Introducing the PHD-Experion Integration 1.3 Overview of PHD Experion Link
Uniformance - PHD/Experion Link Installation and Configuration Guide • 19
Figure 3 – History Recovery by PHD Experion Link
PHD Experion Link data for Shadow system
An “upper” PHD Server can obtain data from a “lower” PHD Server. This is called “shadowing.” The interface to the shadow is done using RDC (Robust Data Collection) mechanism. To configure a link in RDC mode, refer to the “Robust Data Collection Users Guide” (pim350).
Alternatively, the previous mechanism was to utilise the Gateway RDI and RemotePeer server. This option can still be used and is discussed below.
PHD Experion Link data for Shadow system using GatewayRDI An "upper" PHD Server can obtain data from a "lower" PHD Server. This is called "shadowing." The interface to the shadow is the Gateway/Remote Peer RDI.
To shadow the PHD Experion Link, you configure a Gateway RDI on the "upper" node and install the RemotePeer Server as a Windows service on the "lower" node. The Gateway RDI connects to the RemotePeer Server on a specified port. The Gateway RDI requests data from the Remote Peer Server, which answers that request by retrieving data from its PHD Server.

1 Introducing the PHD-Experion Integration 1.3 Overview of PHD Experion Link
20 • Uniformance - PHD/Experion Link Installation and Configuration Guide
The Gateway RDI runs in either SHADOW or PEER mode. In SHADOW mode (as illustrated in the following figure), both PHD Servers share the same database. In PEER mode, the PHD Servers have separate databases.
REFERENCE
For additional PHD topologies, refer to the Uniformance Network Security and Planning Guide (am0651).
Figure 4 – Example Shadow System Topology
Tag Synchronization for Shadow system
When implemented in a Shadow system, Tag Synchronization occurs to both the PHD Shadow Server and the PHD Collector Server. The approach Honeywell recommends is to send configuration updates to the PHD Shadow Server, which should be configured to inform all of the PHD Collector Servers of the updates.
After updating the Uniformance database, the Tag Synchronization service informs the Shadow PHD Server (specified in the Primary PHD Server property of the UDB Server). Note: This is the same mechanism used by the PHD Configuration Tool for user updates.
The PHD Shadow Server informs all of the PHD Collector Servers listed in its PHD Server Host List tab of the PHD Server properties page.

1 Introducing the PHD-Experion Integration 1.4 Overview of Redirection Manager
Uniformance - PHD/Experion Link Installation and Configuration Guide • 21
1.4 Overview of Redirection Manager Redirection Manager (RDM) is required on the PHD Server if the PHD Experion Link is to connect to a redundant pair of Experion Servers.
In such a case, the PHD Experion Link is configured to connect to Redirection Manager instead of the Experion OPC HDA server.
RDM forwards requests to the active Experion Server of a configured redundant pair. Redirection occurs whenever a failure is detected in the active Experion Server.
RDM operates in passive redundancy mode when the target OPC servers are Experion Servers. This means that the redundant server node platform initiates the failover, not the RDM.
RDM blocks all OPC calls until after the failover completes or after a user-configured timeout.
Figure 5 – Diagram of PHD Experion Link with RDM

1 Introducing the PHD-Experion Integration 1.5 Overview of Experion History
22 • Uniformance - PHD/Experion Link Installation and Configuration Guide
1.5 Overview of Experion History Categories of Experion tag history
The Experion Server collects tag data from controllers and stores different categories of tag history in its local history database files. The Experion Server can be configured to store three different categories of tag history in its local history database, as follows:
Category History Database
Fast history 1-second to 30-second snapshots (one user-configurable interval per Experion Server)
Standard history
1-minute snapshots 6-minute, 1-hour, 8-hour, and 24-hour averages
Extended 1-hour, 8-hour, and 24-hour snapshots Tag history assignments
The PHD Experion Link and Tag Synchronization depend on Experion Server history assignments.
Point.parameters assigned to Experion history will get added to PHD through tag synchronization.
The Experion Server returns tag data to PHD from its fastest history collection group. For example, if an Experion tag is assigned to Standard and Extended history, then the Experion Server will return one-minute data from Standard history to PHD.
As shown in the following figure, you can assign an individual Experion tag parameter to any, all, or none of the Experion history categories. The following figure shows the Experion history assignment for a control module named 11_AC12.
Figure 6 –Experion History Assignment

1 Introducing the PHD-Experion Integration 1.5 Overview of Experion History
Uniformance - PHD/Experion Link Installation and Configuration Guide • 23
Maximum parameters assigned to Experion history
The Experion Server has a default maximum number of parameters for each category of history – for example, Fast collection is limited to "n" parameters. The limit can be increased to a qualified number.
REFERENCE
For details on the Experion Server history sizing, refer to the Experion Server Specification, which is available on the Honeywell Online Solutions web site.
Tools for assigning TPS point parameters to Experion history
For LCN-connected Experion systems, you can use the following tools to assign TPS point parameters to Experion history:
• TPS History Configuration Import tool
• ptbuild command line utility
REFERENCE
For details on how to use the above tools, refer to the following documents:
Experion R301 book set:
• Experion Server and Client Configuration Guide, section “Integrating PHD, Assigning TPS point parameters to history".
Experion R310 book set:
• Integrated Experion TPS Nodes User's Guide, section "Importing TPS History Configuration".
Tags not assigned to Experion history The Experion Server stores history data only for numerical parameters (including ordinals for enumeration data).
If PHD requests a parameter that is not assigned to Experion history (for example, string data, which Experion cannot historize), then the Experion Server returns current cached data established through standard Experion data access mechanisms.
PHD Experion Tag Synchronization does not examine PointName.Parameters that you did not assign to Experion history.
Any numerical data that is to be collected/synchronized in PHD should be assigned to Experion history.

1 Introducing the PHD-Experion Integration 1.6 Overview of Tag Synchronization
24 • Uniformance - PHD/Experion Link Installation and Configuration Guide
1.6 Overview of Tag Synchronization Uniformance Tag Synchronization runs as a Windows service on the PHD Server to automatically create and (if needed) continuously synchronize PHD tag definitions to the Experion history point configuration. Tag Synchronization is made up of components running on both the primary and backup Experion Servers and the PHD Server. These components perform as follows:
1. When started, the Uniformance Tag Sync service uses RPC (Remote Procedure Calls) to ask the Experion Server for the definitions of tags in its history assignment. The Experion Server sends (using RPC) the full tag definition, server name, point name, parameter description, and timestamp of when the tag definition was sent to Tag Sync.
2. From the information received, Tag Sync creates PHD tag definitions (based on user-configured rules) and writes the definitions to a "staging table" in the PHD SQLServer database.
3. After the user acknowledges the definitions in the "staging table", Tag Sync updates the existing tag definitions in the PHD SQLServer database or creates new tags, and automatically updates the PHD Server with a copy of the tag definitions. The user can configure Tag Sync to automatically acknowledge the tag definitions in the staging table. The default configuration requires user acknowledgement.
4. Uniformance Tag Sync requests updated and new definitions from the Experion Server every 60 seconds.

1 Introducing the PHD-Experion Integration 1.6 Overview of Tag Synchronization
Uniformance - PHD/Experion Link Installation and Configuration Guide • 25
Figure 7 –Tag Synchronization Process
Tag Synchronization Rules Tag Sync examines each returned Experion history PointName.Parameter against the optional regular expression of each Tag Sync Rule (user-configured rules and a default rule), and tries to find a match. When it finds a match, it creates a PHD tag definition using that Rule's text.
Note: Tag sync only examines PointName.Parameters that you assign to Experion history.
Note: If a single Experion tag has multiple parameters assigned to history (for example, PV, SP, and OP), then Tag Sync will correspondingly create multiple PHD tags.
The default installation of Tag Sync provides one default rule and a default PHD parent tag. This may be satisfactory for integration of an Experion system into new PHD systems that do not have existing PHD tags. The user may create new rules and parent tags or modify the Honeywell-supplied default.

1 Introducing the PHD-Experion Integration 1.7 Overview of PHD Point Server
26 • Uniformance - PHD/Experion Link Installation and Configuration Guide
1.7 Overview of PHD Point Server PHD Point Server (running as a Windows service named Experion PKS PHD Point Server) allows you to view PHD data in Experion Trends. After you add PHD tags to Experion trends, the history data requests for points that exist only on the PHD system (for example, lab data tags) are made to the PHD Point Server. By default, the PHD Point Server returns PHD data for non-synchronized tags; that is, tags that are not historized on Experion. Return of synchronized tags can be enabled through a registry setting (see Appendix A – PHD Server Registry Settings for PHD-Experion Integration).
The PHD Point Server responds to PHD history data requests from the Experion trend subsystem by way of GDA (General Database Access).
• PHD Point Server, running on the PHD Server, can communicate with a single PHD Server and a single Experion Server (or a redundant pair).
• Only one Experion Server (or a redundant pair) can connect and retrieve data from a PHD Point Server. Additional Experion Servers may access the same trend data through configuration of Experion DSA (Distributed System Architecture).
Figure 8 – PHD Point Server Components

Uniformance - PHD/Experion Link Installation and Configuration Guide • 27
2. Overview of Requirements for PHD-Experion Integration
2.1 Licensing and Packaging No additional licenses or software are required for Experion-PHD integration. Experion-PHD Integration is enabled in all PHD and Experion systems.
Experion Redirection Manager (RDM) and the Experion PHD Point Server are packaged on the Experion media, but need to be installed on the PHD Server.
No additional OPC connection license is required on the Experion Server for the Experion-PHD integration.
2.2 Prerequisites for PHD-Experion Integration Verify that the following prerequisites have been completed before continuing.
Prerequisite Reference
Compatible version of Experion Server is installed, (including appropriate operating system service packs), and system is operative.
Any applicable patches have been applied.
Experion Software Installation User's Guide
Patch release lettersSee NOTE
Complete the point history assignments on the Experion Server for points that are to be synchronized or collected in PHD.
Note: For LCN-connected Experion Servers, there are procedures for assigning TPS points to Experion history (refer to section "Importing HM history assignment into Experion" or "Creating an LCN-connected server point build file").
Experion Server and Client Configuration Guide
The appropriate release of Uniformance Database and PHD Server is installed, configured, and running.
Any applicable patches have been applied.
Attention: RDM is an Experion component and therefore falls under Experion restrictions. The PHD-compliant server that will run RDM must run a Windows operating system that is Experion-compliant.
Uniformance Security and Network Planning Guide (am0651)
Uniformance Installation Guide (in6001)
Patch release lettersSee NOTE

2 Overview of Requirements for PHD-Experion Integration 2.3 Checklist for PHD-Experion Integration
28 • Uniformance - PHD/Experion Link Installation and Configuration Guide
Prerequisite Reference
The PHD Configuration Tool is installed and operable on the computer you plan to use for entering/viewing configuration data.
Any applicable patches have been applied
Uniformance Installation Guide (in6001)
Patch release lettersSee NOTE
A DVD drive is available to install the optional RDM and PHD Point Server software from the Experion Applications DVD.
If using Windows 2000, you cannot map to a network DVD drive, you must use a local drive.
The system-wide impact of the Honeywell system management infrastructure required by RDM is known.
Experion Redirection Manager User's Guide in the Experion book set.
Experion System Management Configuration Guide in the Experion book set.
NOTE:
Read the latest Uniformance SCN for your release and any associated patch release letters – look for notifications related to software components that are required for PHD Experion integration.
See section 2.4 of this guide, "How to Obtain Software Patches and Documentation Updates".
2.3 Checklist for PHD-Experion Integration
Task Go to Notes
PREPARATION
PREPARATION - General
Obtain the software media:
• Uniformance DVD
• Experion PKS Applications DVD
The Experion Applications DVD is required only if installing RDM or PHD Point Server.

2 Overview of Requirements for PHD-Experion Integration 2.3 Checklist for PHD-Experion Integration
Uniformance - PHD/Experion Link Installation and Configuration Guide • 29
Task Go to Notes
Ensure the prerequisites have been met.
This guide – section 2.2, Prerequisites for PHD-Experion Integration
Check the Honeywell online support web site to obtain PHD software patches and the latest version of this document.
This guide – section 2.4, How to Obtain Software Patches and Documentation Updates
Review the security requirements. This guide – section 2.5, Overview of Security Requirements for PHD-Experion Integration.
PREPARATION - On the Domain Controller
Create domain account(s) to be used by these services:
• Uniformance RDI Server service
• (Optional) Uniformance Tag Sync service
This guide – section 3.1, Create Domain Account for RDI Server and Tag Sync
You may use the same account for Tag Sync as RDI Server, or create separate accounts.
PREPARATION - On the Experion Servers nodes
Add the domain account to be used by the Uniformance RDI Server service to the Experion Server's local ‘Distributed COM Users’ group.
This guide – section 3.2, On Experion Servers - Add RDI Server Domain User to ‘Distributed COM Users’ Local Group
Perform this task on both the Primary and Secondary nodes.
Complete the DCOM configuration. This guide – section 3.3, On Experion Servers – Modify Default DCOM Settings
Perform this task on both the Primary and Secondary Experion Server nodes
Configure Windows Firewall. This guide – section 0,
On Experion Servers – Configure Windows Firewall
Perform this task on both the Primary and Secondary Experion Server nodes

2 Overview of Requirements for PHD-Experion Integration 2.3 Checklist for PHD-Experion Integration
30 • Uniformance - PHD/Experion Link Installation and Configuration Guide
Task Go to Notes
PREPARATION – Database user for Tag Synchronization (Optional)
(Optional) Using the Uniformance System Console (USC), configure a SQLServer user for the Tag Synchronization service to use to log on to SQLServer:
This guide – section 3.5, Assign Windows User for Tag Synchronization
Required if the PHD Server is to have Tag Synchronization from the Experion Server's history point database.
PREPARATION - On the PHD Collector Server
Add mngr as a local user on the PHD Server node.
This guide – section 4.1, Add mngr Local Windows Account
The user must be configured on the PHD Server node exactly as it is defined on the Experion PKS OPC Server node.
Configure Windows Firewall. This guide – section 4.2, On PHD Server – Configure Windows Firewall
Applies to Windows 2003 Server.
Complete the DCOM configuration.
Verify that the Experion Server is reachable by DCOM communication from the PHD Server.
This guide – section 4.3, On PHD Server - Modify DCOM Settings
Use a Honeywell or third-party OPC client to test the communication.
Configure the existing Uniformance RDI Server to use a domain account.
Assign the domain account to the required local groups and policies.
This guide – section 4.4, On PHD Server – Configure Logon Account for RDIServer Service
Update the HOSTS file to include the Experion servers.
Ensure the primary and secondary Experion Servers are reachable by TCP/IP communication from the PHD Server.
This guide – section 4.5, On PHD Server – Update HOSTS File
Use "ping".

2 Overview of Requirements for PHD-Experion Integration 2.3 Checklist for PHD-Experion Integration
Uniformance - PHD/Experion Link Installation and Configuration Guide • 31
Task Go to Notes
Update the Services file to include the port number used by the Experion Tag Synchronization component.
This guide – section 4.6, On PHD Server – Update Services File (Optional)
(Optional) Modify the maximum number of PHD tags specified for the PHD Server in its PhdParams.Dat file, if you anticipate the current maximum to be exceeded by the automatic Tag Sync service or manual tag creation.
This guide – section 4.7, On PHD Server – Increase the Maximum PHD Tags (PhdParams.Dat)
<install directory> PHDServer \NtSite\PhdParams.Dat
INSTALLATION
INSTALLATION – On the PHD Collector Server (Optional)
(Optional) Install Redirection Manager (RDM) on the PHD Server that is to run the PHD Experion Link.
(Optional) Install System Management Display on the PHD Server that is to run the PHD Experion Link.
Install applicable patches, if any.
This guide – section 5.1, On PHD Server - Install RDM and System Management Display (Optional)
The RDM is required if the PHD Experion Link is to have failover support for redundant Experion Servers.
The System Management Display is optional, but is useful for troubleshooting the RDM.
Use Experion Applications DVD.
For patches, see HPS online support web site.
(Optional) Install PHD Point Server on the PHD Server.
Install applicable patches, if any.
This guide, section 5.2, On PHD Server - Install PHD Point Server (Optional)
Required if the PHD Server is to support data retrieval of non-synchronized PHD tags by Experion Server trends.
Use Experion Applications DVD.
For patches, see HPS online support web site.

2 Overview of Requirements for PHD-Experion Integration 2.3 Checklist for PHD-Experion Integration
32 • Uniformance - PHD/Experion Link Installation and Configuration Guide
Task Go to Notes
(Optional) Install Tag Synchronization on the PHD Server that is to run the PHD Experion Link.
Install applicable patches, if any.
This guide, section 5.3, On PHD Server - Install Tag Synchronization (Optional)
Required if the PHD Server is to have automatic PHD tag creation from the Experion Server's history point database.
Use Uniformance CD.
For patches, see HPS online support web site.
CONFIGURATION
CONFIGURATION – RDM and System Management Display (Optional)
(Optional) On the PHD Server node, configure the System Management Display.
This guide – section 6.1, On PHD Server - Configure System Management Display (Optional)
Required only if the System Management Display was installed on the PHD Server node.
(Optional) On the PHD Server node, use the Experion Configuration Utility or the System Management Display to configure the RDM, if it was installed.
This guide – section 6.2, On PHD Server - Configure RDM (Optional)
Required only if the RDM was installed on the PHD Server node.
CONFIGURATION – PHD Experion Link
Use the PHD Configuration Tool to complete the Interfaces 9RDI’s and Links) Configuration form.
This guide – section 6.3, In PHD Configuration Tool – Configure PHD Experion Link
Start>Programs> Uniformance> PHD Configuration Tool>PHD Configuration Tool>Interfaces> Interfaces (RDI’s and Links) form.
On the PHD Server node, create the registry and file entries for the PHD Experion Link.
This guide – section 46.4, On PHD Server - Create Registry and File Entries for PHD Experion Link
Start>Programs> Uniformance>PHD Server> PHD RDI Configuration Use Regedit as needed.

2 Overview of Requirements for PHD-Experion Integration 2.3 Checklist for PHD-Experion Integration
Uniformance - PHD/Experion Link Installation and Configuration Guide • 33
Task Go to Notes
CONFIGURATION – Tag Synchronization (Optional)
Use the PHD Configuration Tool to evaluate the default Tag Synchronization rule and default parent tag for suitability on your site. Configure new rules/parents and/or modify the existing Honeywell-supplied defaults, as needed.
This guide – section 6.5, In PHD Configuration Tool - Configure Tag Synchronization
Required if the PHD Server is to have automatic PHD tag creation from the Experion Server's history point database.
Use the arrow key in the Tag Synchronization Rule Configuration form to move the Default Rule to the bottom of the list of Configured Rules.
This guide – section 6.5, In PHD Configuration Tool - Configure Tag Synchronization
This step is critical to ensure that applicable rules get processed before the default rule
CONFIGURATION – PHD Point Server (Optional)
The following tasks are required only if the PHD Point Server was installed on the PHD Server node.
On the Experion Server, configure the system interface for the PHD Point Server.
This guide – section 6.6, On Experion Servers - Configure Experion to communicate with PHD Point Server
On PHD Server - Configure registry settings, as needed to enable or disable PHD Point Server functionality.
This guide – section 6.6, On PHD Server - Configure registry settings, as needed, for PHD Point Server

2 Overview of Requirements for PHD-Experion Integration 2.3 Checklist for PHD-Experion Integration
34 • Uniformance - PHD/Experion Link Installation and Configuration Guide
Task Go to Notes
CONFIGURATION – Shadow Link using Gateway RDI/RemotePeer (Optional)
The following tasks are required only if a shadow ("upper") PHD Server is to acquire data from a collector ("lower") PHD Server that is running a PHD Experion Link. The interface to the shadow is the Gateway/Remote Peer RDI.
Use the PHD Configuration Tool to configure the Gateway RDI to run on the "upper" PHD Server.
Remote Peer RDI Installation Guide (rdi1001)
Start>Programs> Uniformance> PHD Configuration Tool>PHD Configuration Tool>Interfaces> Interfaces (RDI’s and Links) form.
Note: The following parameters are required as remote RDI parameters on the Gateway RDI:
• XHIST (Exception History Recovery)
• /L (to disable local interface checking)
On the "upper" PHD Server, run RDISetup and Interfaces.Dat to create the registry and file entries for the Gateway RDI.
Remote Peer RDI Installation Guide (rdi1001)
(Optional) On the "upper" PHD Server, enter the hostname of the PHD Collector Server in the NtSite\phdserver.hosts file.
Required if using Tag Synchronization.
On the "lower" PHD Server, install and configure the Remote Peer service.
Remote Peer RDI Installation Guide (rdi1001)

2 Overview of Requirements for PHD-Experion Integration 2.3 Checklist for PHD-Experion Integration
Uniformance - PHD/Experion Link Installation and Configuration Guide • 35
Task Go to Notes
STARTUP
STARTUP – Start PHD-Experion integration components
On the PHD Server that is to run the PHD Experion Link, use PHDMAN to start the Link and verify its status
This guide – section 7.1, On PHD Server - Start and Monitor PHD Experion Link
PHDMAN STA INT <linkname>
PHDMAN SHO INT <linkname>
(Optional) On the PHD Server, start the 'Uniformance Tag Synchronization' Windows service.
This guide – section 7.2, Start and Monitor Tag Synchronization
Required only if using Tag Synchronization.
(Optional) Use the PHD Configuration Tool to view the synchronized PHD tag definitions in the staging table.
This guide – section 7.3, In PHD Configuration Tool – Acknowledge Changes in Tag Synchronization Staging Table (Optional)
Required only if Tag Synchronization Rules were configured to require explicit user acknowledgement.
Start>Programs> Uniformance> PHD Configuration Tool>PHD Configuration Tool>Applications > Tag Synchronization Acknowledgement form.
(Optional) Perform configuration required after initial Tag Synchronization:
• Use the PHD Configuration Tool to complete engineering unit configuration, as needed.
• Use the PHD Configuration Tool to enable or disable Automatic Synchronization for each synchronized PHD tag, as needed.
• On the PHD Server, configure automatic startup of the 'Uniformance Tag Synchronization' Windows service.
This guide – section 7.4, Tasks to Perform After Initial Tag Synchronization
Required only if using Tag Synchronization.

2 Overview of Requirements for PHD-Experion Integration 2.3 Checklist for PHD-Experion Integration
36 • Uniformance - PHD/Experion Link Installation and Configuration Guide
Task Go to Notes
(Optional) On the PHD Server, start the 'Experion PKS PHD Point Server' Windows service.
This guide – section 7.5, On PHD Server – Start PHD Point Server Service
Required only if PHD Point Server was installed on the PHD Server.
(Optional) On the Experion Server, view the PHD Point Server status display.
This guide – section 7.6, On Experion Server – View PHD Point Server Status
Required only if the PHD Point Server was installed on the PHD Server.
(Optional) On the Experion Server, create a PHD Point Server Experion Trend and verify that the PHD Point Server returns PHD data.
This guide – section 7.7, On Experion Server – View PHD Point Server Trend Data
Required only if the PHD Point Server was installed on the PHD Server.

2 Overview of Requirements for PHD-Experion Integration 2.4 How to Obtain Software Patches and Documentation Updates
Uniformance - PHD/Experion Link Installation and Configuration Guide • 37
2.4 How to Obtain Software Patches and Documentation Updates
Updates available on HPS Online Support web site
Before installing Uniformance software for PHD Experion integration, please perform the following steps to check the Honeywell Process Solutions (HPS) Online Support web site for patches to the software. At the same location, you should obtain the Uniformance software change notice (SCN) document.
Uniformance documentation is updated when PARs (Product Anomaly Reports) are received – the newest documents are posted to the Online Support web site. Honeywell recommends that you download and review the latest documents.
To check HPS Online Support web site
Step Action
1 Go to www.honeywell.com\ps.
2 If you are a registered user, click Login to My Account.
Type your USER LOGIN and PASSWORD, and then click Login.
Note: If you are a new user, you can click Register Now to register for access to the site.
3 Select Support > System Products.
4 Select Information Management from the System Products list.
5 Select Uniformance PHD from the Information Management list.
6 From the Uniformance PHD page, you can access any of the following:
Notifications: Priority Notifications and BeAware Advisories
Software Downloads: Software patches and hot fixes
Product documentation: Software Change Notices and other documentation
TIP: To be notified by email of updates to the web page content, click the content category of interest (Notifications, Software Downloads, or Product Documentation), and then click SUBSCRIBE.

2 Overview of Requirements for PHD-Experion Integration 2.5 Overview of Security Requirements for PHD-Experion Integration
38 • Uniformance - PHD/Experion Link Installation and Configuration Guide
2.5 Overview of Security Requirements for PHD-Experion Integration Domain requirements
Honeywell strongly recommends that the Experion Server and the PHD Server be members of the same domain.
ATTENTION
If you plan to use Workgroups instead of Domains, please call Honeywell TAC for assistance.
Windows account requirements
Uniformance RDI Server and Tag Synchronization run as Windows services but may be run under the Network Service account to limit access to system resources. When configured in this manner, the Uniformance System Console (USC) must be used to configure the Windows user account the Tag Synchronization service should use to access the SQLServer database and to connect to the PHD server. These entries are stored encrypted in the registry for use by the service when connecting to the database and to PHD.
You may use the same Windows accounts for both RDI Server and Tag Synchronization services, or you may create separate accounts.
Honeywell strongly recommends that domain accounts be used.
If an account local to the PHD server is used, then a corresponding local account (with matching name and password) must exist on the Experion Servers, so authentication can take place. You may be able to implement authentication using equivalent local accounts, but be aware that experience has proven this not to work 100% of the time with Windows Server 2003.
RDI Server account requirements
For data collection by the PHD Experion Link, the Experion Server node must be able to authenticate the account used by the Uniformance RDI Server service.
The RDI Server is configured to run as the Network Service account by default. However DCOM communications requires that the server be run as the specific user account in order for authentication to work properly. You must change the RDI Server's logon account and grant the account the required privileges.

2 Overview of Requirements for PHD-Experion Integration 2.5 Overview of Security Requirements for PHD-Experion Integration
Uniformance - PHD/Experion Link Installation and Configuration Guide • 39
The account used by RDI Server requires the following local privileges on the PHD Server node:
• Local Groups – member of local Product Administrators group
• Local Policy – assigned local user right to "log on as a service" and to "act as part of the operating system."
Asynchronous callbacks are made from the Experion OPC Server to the Uniformance RDI Server. This requires that the PHD Server node be able to authenticate the user that the Experion PKS OPC Server runs under. By default, this is the mngr account.
If using Redirection Manager (RDM), callback security in the form of account authentication will need to be considered as well. (Refer to the patch release letters for information related to RDM issues.)
Tag Synchronization account requirements
RPC (Remote Procedure Call) connection level authentication is used between the Tag Sync client running on the PHD Server and the Tag Sync server running on the Experion Server (only when the Tag Sync client establishes a relationship with the Tag Sync server).
If run as the Network Service Account, Uniformance Tag Synchronization on the PHD Server requires the following local privileges on the PHD Server node:
• Local Policy – assigned local user right to "log on as a service"
The service must then have a database and PHD user configured through the Uniformance System Console (USC). These users must valid window users that can be authenticated to the system using Windows Authentication. The database user must be assigned to the “Local Engineers” role.
SQLServer user for Tag Synchronization
Uniformance Tag Synchronization, running as a Windows service, must access SQLServer to make changes to PHD tag definitions. The following SQLServer configuration is required for Uniformance Tag Synchronization to be able to access the SQLServer database:
• The Windows user name that the Uniformance Tag Sync uses to connect to the database must be recognized by SQLServer as a valid Windows user.
• The SQLServer user used by the Uniformance Tag Sync service to connect to SQLServer must be assigned to the “Local Engineers” role in order to have read/write privilege to the SQLServer Tag Synchronization tables.

2 Overview of Requirements for PHD-Experion Integration 2.5 Overview of Security Requirements for PHD-Experion Integration
40 • Uniformance - PHD/Experion Link Installation and Configuration Guide
How Tag Synchronization logs on to SQLServer
When Uniformance Tag Synchronization logs on to SQLServer, it does so by first creating a local logon token for the specified Windows Database User. This user must be assigned to the “Local Engineers” role to provide the necessary Read/Write access to the Tag Synchronization database tables. Once the Windows user has been successfully, that thread then connects to the SQLServer database and appears to the database as the specified user with that users’s rights. It is therefore important that the database user specified for Tag Synchronization to user has the necessary rights in order to read and write to the SQLServer database.

2 Overview of Requirements for PHD-Experion Integration 2.5 Overview of Security Requirements for PHD-Experion Integration
Uniformance - PHD/Experion Link Installation and Configuration Guide • 41
DCOM configuration and Windows Firewall
PHD Link
DCOM security configuration must be configured to open the communications between the PHD Server node and the primary and backup Experion Server nodes. Because the PHD Experion Link runs under a Windows service named ‘Uniformance RDI Server,' the OPC client (in this case, the account used by the Uniformance RDI Server) must be granted access in DCOM configuration on the Experion PKS OPC Server machine to Access and Launch the Experion PKS OPC Server, either explicitly through its Windows logon user name or through a Windows group containing it.
Windows XP and Windows 2003 Server
Windows XP SP2 and Windows 2003 SP1 introduce improvements that directly impact OPC though DCOM and that may prevent proper functioning of OPC clients or servers.
Windows XP SP2 and Windows 2003 SP1 add new DCOM limit settings and turn on the Windows Firewall by default, thereby causing OPC communication through DCOM to fail.
To re-enable OPC communication, it is necessary to do the following:
• Configure the Windows Firewall appropriately or disable the Windows Firewall (not recommended unless the machine is already behind a corporate firewall).
• Reconfigure DCOM.
REFERENCE
For full details on the actions required to re-enable OPC communication on Windows XP SP2 and Windows 2003 SP1, download the following white paper from http://opcfoundation.org/: Using OPC via DCOM with XP SP2.pdf.
Tag Synchronization
The Windows Firewall settings on the Experion Servers must be modified to allow the optional Uniformance Tag Sync service to be able to connect to the Experion Server’s Tag Synchronization component (htsserver.exe).

2 Overview of Requirements for PHD-Experion Integration 2.5 Overview of Security Requirements for PHD-Experion Integration
42 • Uniformance - PHD/Experion Link Installation and Configuration Guide
Recommendation if firewall exists between Shadow PHD Server and Experion Server
The PHD Experion Link uses OPC to obtain data from Experion Servers; consequently, it is not firewall friendly. In situations where a firewall is required between a PHD Shadow Server and the Experion Servers, Honeywell recommends that a PHD Server be installed on the Experion-side of the firewall to run the PHD Experion Links.
The following figure shows the recommended approach when a firewall exists between the PHD Shadow Server and Experion Servers.
Figure 9 – Firewall between Shadow PHD Server and Experion

Uniformance - PHD/Experion Link Installation and Configuration Guide • 43
3. Prepare Domain Account, Experion Servers, and SQLServer User for PHD-Experion Integration
3.1 Create Domain Account for RDI Server and Tag Synchronization
Note: Typically the services will be run as the “Network Service” account. In these cases, the domain account is necessary for the Tag Synchronization service to be able to successfully connect to the SQLServer database.
On Domain Controller - Create domain account for RDI Server If the Experion Server is in a domain, but the PHD Server’s RDI Server service is not yet configured to run under a domain account, then perform the following steps to create a domain account to be used for that purpose.
Step Action
1 On the Domain Controller, create a user account (for example CGY\PHDExpLink).

3 Prepare Domain Account, Experion Servers, and SQLServer User for PHD-Experion Integration 3.1 Create Domain Account for RDI Server and Tag Synchronization
44 • Uniformance - PHD/Experion Link Installation and Configuration Guide
Step Action

3 Prepare Domain Account, Experion Servers, and SQLServer User for PHD-Experion Integration
3.1 Create Domain Account for RDI Server and Tag Synchronization
Uniformance - PHD/Experion Link Installation and Configuration Guide • 45
Step Action
2 Select the ‘Password Never Expires’ and the User ‘Cannot Change Password’ options.
Clear the ‘User Must Change Password At Next Logon’ option.
On Domain Controller – Create domain account for Tag Synchronization (optional)
If you want to use a separate domain account for the Uniformance Tag Sync service, repeat the previous steps to create a separate domain account – for example, CGY\RunTS.
Ensure this user is assigned to the “Local Engineers” role in order for it to have the necessary permissions to read and write to the SQLServer database tables.

3 Prepare Domain Account, Experion Servers, and SQLServer User for PHD-Experion Integration 3.2 On Experion Servers - Add RDI Server Domain User to ‘Distributed COM Users’ Local Group
46 • Uniformance - PHD/Experion Link Installation and Configuration Guide
3.2 On Experion Servers - Add RDI Server Domain User to ‘Distributed COM Users’ Local Group
On the primary and backup Experion Servers, perform the following steps to add the user that is used by the Uniformance RDI Server to the local Windows group named 'Distributed COM Users.' The domain user must be the same domain user that the Uniformance RDI Server will run as on the PHD Server machine.
Step Action
1 On the Experion Server, right-click My Computer and choose Manage.
2 Expand Local Users and Groups, open Groups, and then open Distributed COM Users.
3 Add the user (for example CGY\PHDExpLink) to the group and click OK.
TIP: The 'Distributed COM Users' local group will not exist on some Windows operating systems that do not have the required service pack installed.

3 Prepare Domain Account, Experion Servers, and SQLServer User for PHD-Experion Integration
3.3 On Experion Servers – Modify Default DCOM Settings
Uniformance - PHD/Experion Link Installation and Configuration Guide • 47
Step Action
ATTENTION
Perform this configuration on both the Primary and Secondary Experion Server nodes.
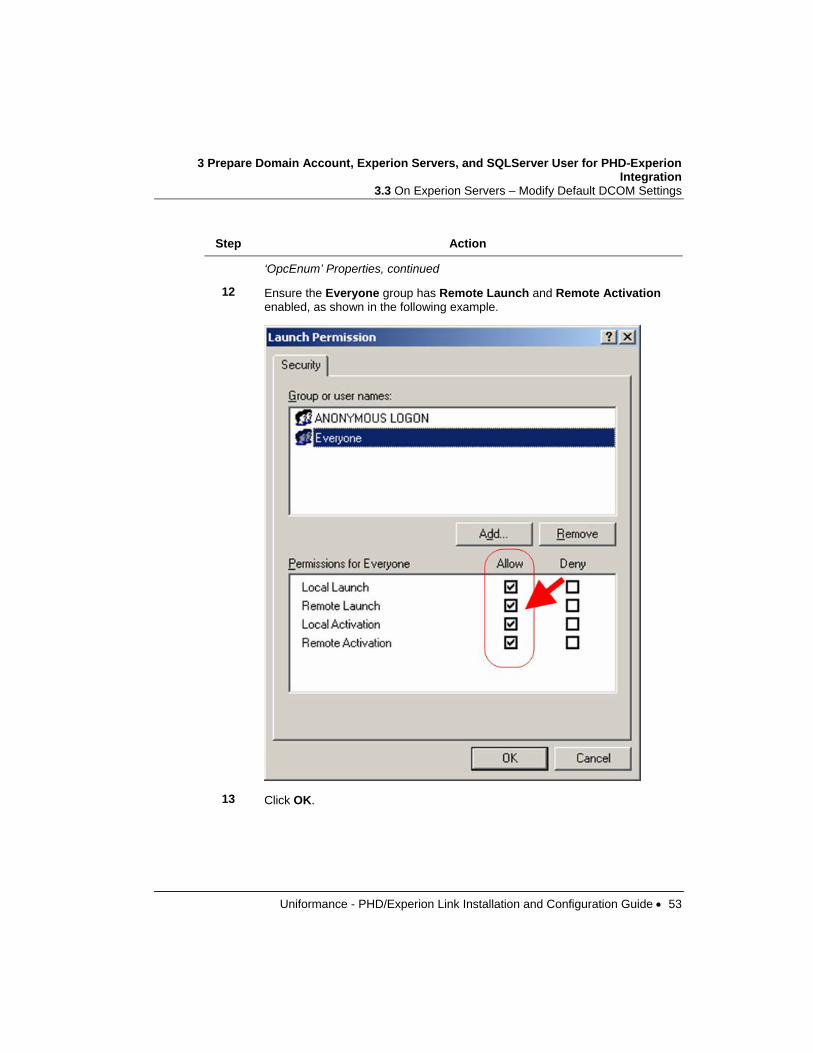
3.3 On Experion Servers – Modify Default DCOM Settings On the primary and backup Experion Servers, perform the following steps to configure the default DCOM settings. Note: Do not attempt to modify DCOM configuration information without a thorough understanding of the impact it may have on your system.
Step Action
1 Click Start, click Run, type DCOMCNFG, and click OK.
2 The Component Services window appears. Expand Component Services, expand Computers, right-click My Computer, and choose Properties.
3 Click the Default Properties tab.

3 Prepare Domain Account, Experion Servers, and SQLServer User for PHD-Experion Integration 3.3 On Experion Servers – Modify Default DCOM Settings
48 • Uniformance - PHD/Experion Link Installation and Configuration Guide
Step Action
4 Set the Default Properties as shown in the following screen example.

3 Prepare Domain Account, Experion Servers, and SQLServer User for PHD-Experion Integration
3.3 On Experion Servers – Modify Default DCOM Settings
Uniformance - PHD/Experion Link Installation and Configuration Guide • 49
Step Action
5 Click the Default Protocols tab.
6 Ensure that Connection-oriented TCP I/P is listed as the first protocol.
7 Click OK to close the window.
3 Prepare Domain Account, Experion Servers, and SQLServer User for PHD-Experion Integration 3.3 On Experion Servers – Modify Default DCOM Settings
50 • Uniformance - PHD/Experion Link Installation and Configuration Guide
Step Action
Edit the properties of the ‘OpcEnum’ DCOM Object:
8 In the Component Services window, expand My Computer.
Expand DCOM Config, right-click OpcEnum, and choose Properties.
9 In the General tab, edit the properties as shown in the following screen example.
Note: This screen will appear slightly different in cases where OpcEnum was not installed as a service.

3 Prepare Domain Account, Experion Servers, and SQLServer User for PHD-Experion Integration
3.3 On Experion Servers – Modify Default DCOM Settings
Uniformance - PHD/Experion Link Installation and Configuration Guide • 51
Step Action
10 Click the Location tab. Edit the properties as shown in the following screen example:

3 Prepare Domain Account, Experion Servers, and SQLServer User for PHD-Experion Integration 3.3 On Experion Servers – Modify Default DCOM Settings
52 • Uniformance - PHD/Experion Link Installation and Configuration Guide
Step Action
11 Click the Security tab.
Under ‘Launch and Activation Permissions’, select Customize and click Edit.
3 Prepare Domain Account, Experion Servers, and SQLServer User for PHD-Experion Integration
3.3 On Experion Servers – Modify Default DCOM Settings
Uniformance - PHD/Experion Link Installation and Configuration Guide • 53
Step Action
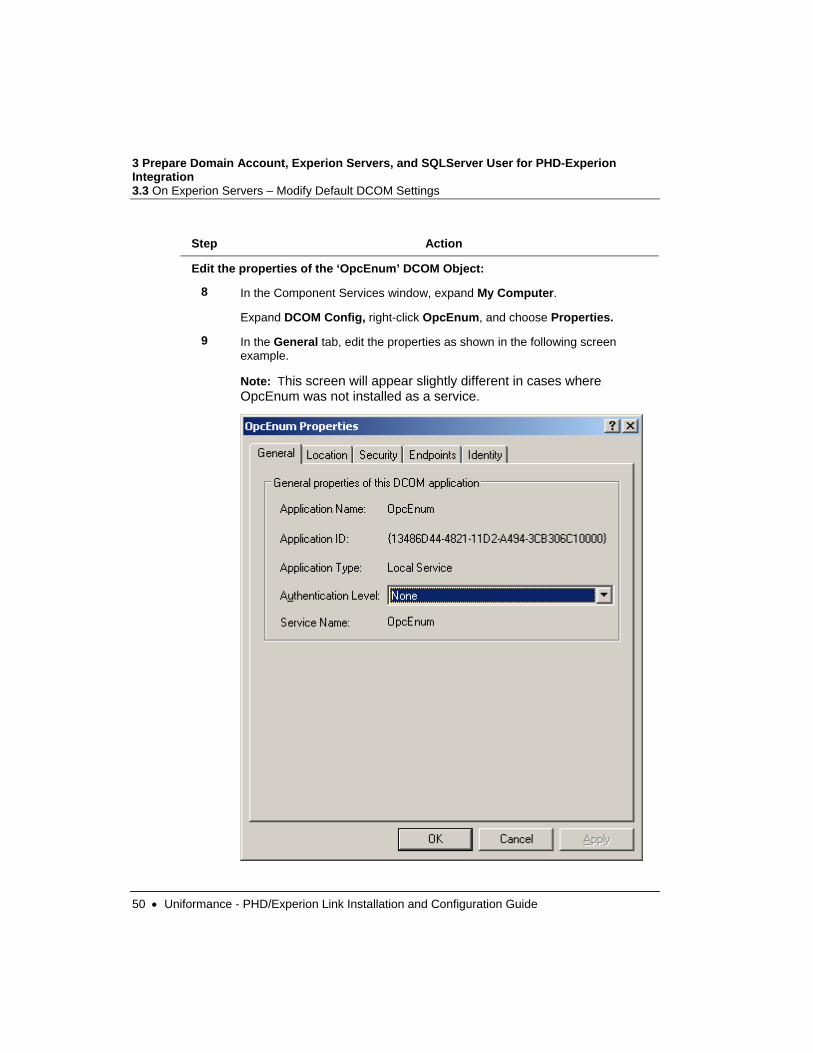
‘OpcEnum’ Properties, continued
12 Ensure the Everyone group has Remote Launch and Remote Activation enabled, as shown in the following example.
13 Click OK.

3 Prepare Domain Account, Experion Servers, and SQLServer User for PHD-Experion Integration 3.3 On Experion Servers – Modify Default DCOM Settings
54 • Uniformance - PHD/Experion Link Installation and Configuration Guide
Step Action
‘OpcEnum’ Properties, continued
14 On the Security tab, under Access Permissions, select Customize and click Edit.

3 Prepare Domain Account, Experion Servers, and SQLServer User for PHD-Experion Integration
3.3 On Experion Servers – Modify Default DCOM Settings
Uniformance - PHD/Experion Link Installation and Configuration Guide • 55
Step Action
‘OpcEnum’ Properties, continued
15 Ensure the Everyone group has Remote Access enabled, as shown in the following screen example.
16 Click OK.

3 Prepare Domain Account, Experion Servers, and SQLServer User for PHD-Experion Integration 3.3 On Experion Servers – Modify Default DCOM Settings
56 • Uniformance - PHD/Experion Link Installation and Configuration Guide
Step Action
‘OpcEnum’ Properties, continued
17 Click the Endpoints tab and set the properties as shown in the following screen example:

3 Prepare Domain Account, Experion Servers, and SQLServer User for PHD-Experion Integration
3.3 On Experion Servers – Modify Default DCOM Settings
Uniformance - PHD/Experion Link Installation and Configuration Guide • 57
Step Action
‘OpcEnum’ Properties, continued
18 Click the Identify tab and set the properties as shown in the following screen example.
ATTENTION:
The ‘system account’ radio button will be grayed-out if OpcEnum was not registered as a service. In such a case, run OpcEnum -service from a command prompt, and then reopen DCOMCNFG, return to this dialog box, and select ‘The system account’.

3 Prepare Domain Account, Experion Servers, and SQLServer User for PHD-Experion Integration 3.3 On Experion Servers – Modify Default DCOM Settings
58 • Uniformance - PHD/Experion Link Installation and Configuration Guide
Step Action
19 Click OK.
Edit the properties of the ‘Experion PKS OPC Server’ DCOM Object
20 In Component Services, under DCOM Config, right-click Experion PKS OPC Server and choose Properties.
21 In the General tab, edit the properties as shown in the following screen example:

3 Prepare Domain Account, Experion Servers, and SQLServer User for PHD-Experion Integration
3.3 On Experion Servers – Modify Default DCOM Settings
Uniformance - PHD/Experion Link Installation and Configuration Guide • 59
Step Action
‘Experion PKS OPC Server' Properties, continued
22 Click the Location tab. Edit the properties as shown in the following screen example:

3 Prepare Domain Account, Experion Servers, and SQLServer User for PHD-Experion Integration 3.3 On Experion Servers – Modify Default DCOM Settings
60 • Uniformance - PHD/Experion Link Installation and Configuration Guide
Step Action
‘Experion PKS OPC Server' Properties, continued
23 Click the Security tab.
Under Launch and Activation Permissions, select Customize and click Edit.

3 Prepare Domain Account, Experion Servers, and SQLServer User for PHD-Experion Integration
3.3 On Experion Servers – Modify Default DCOM Settings
Uniformance - PHD/Experion Link Installation and Configuration Guide • 61
Step Action
‘Experion PKS OPC Server' Properties, continued
24 Add the Distributed COM Users group to the list if it is not there already.
Ensure the Distributed COM Users local group has Remote Launch and Remote Activation enabled, as shown in the following screen example.
25 Click OK.

3 Prepare Domain Account, Experion Servers, and SQLServer User for PHD-Experion Integration 3.3 On Experion Servers – Modify Default DCOM Settings
62 • Uniformance - PHD/Experion Link Installation and Configuration Guide
Step Action
‘Experion PKS OPC Server' Properties, continued
26 On the Security tab, under Access Permissions, select Customize and click Edit.

3 Prepare Domain Account, Experion Servers, and SQLServer User for PHD-Experion Integration
3.3 On Experion Servers – Modify Default DCOM Settings
Uniformance - PHD/Experion Link Installation and Configuration Guide • 63
Step Action
‘Experion PKS OPC Server' Properties, continued
27 Add the Distributed COM Users group to the list if it is not there already.
Ensure the Distributed COM Users group has Remote Access enabled, as shown in the following screen example.
28 Click OK.

3 Prepare Domain Account, Experion Servers, and SQLServer User for PHD-Experion Integration 3.3 On Experion Servers – Modify Default DCOM Settings
64 • Uniformance - PHD/Experion Link Installation and Configuration Guide
Step Action
‘Experion PKS OPC Server' Properties, continued
29 Click the Endpoints tab and set the properties as shown in the following screen example:

3 Prepare Domain Account, Experion Servers, and SQLServer User for PHD-Experion Integration
3.3 On Experion Servers – Modify Default DCOM Settings
Uniformance - PHD/Experion Link Installation and Configuration Guide • 65
Step Action
‘Experion PKS OPC Server' Properties, continued
30 Click the Identify tab and set the properties as shown in the following screen example (<local machine>\<user>), where user is the Experion Server local mngr account.
31 Click OK.
ATTENTION
Perform this DCOM configuration (described in section 3.3) on both the Primary and Secondary Experion Server nodes.
3 Prepare Domain Account, Experion Servers, and SQLServer User for PHD-Experion Integration 3.4 On Experion Servers – Configure Windows Firewall
66 • Uniformance - PHD/Experion Link Installation and Configuration Guide
3.4 On Experion Servers – Configure Windows Firewall Turn off the Windows firewall on the Experion Server or, if the Windows Firewall is configured on the Experion Server, then refer to the white paper Using OPC via DCOM with XP SP2.pdf, available at http:\opcfoundation.org. This white paper applies to Windows 2003 SP1 as well.
Perform this configuration on both the Primary and Secondary Experion Server nodes.
3.5 Assign Windows User for Tag Synchronization Database Access Perform this procedure if you created a new Windows user for use by Tag Synchronization for connecting to the database.
Configure Tag Synchronization Database Access user The PHD administrator must perform the following configuration through the PHD Configuration Tool ADMIN shortcut.
Step Action
1
2
3
Click the UniformanceSystem Console shortcut to open the Uniformance System Console window.
Connect to the local server and click on the Uniformance Tag Synchronzation item and then click on Properties
When the dialog opens, click on the Tag Synchronization Users tab

3 Prepare Domain Account, Experion Servers, and SQLServer User for PHD-Experion Integration
3.5 Assign Windows User for Tag Synchronization Database Access
Uniformance - PHD/Experion Link Installation and Configuration Guide • 67
Step Action
Define Database user
4 Click the Database User Account button
5 Enter the user details in the dialog box that appears;

3 Prepare Domain Account, Experion Servers, and SQLServer User for PHD-Experion Integration 3.5 Assign Windows User for Tag Synchronization Database Access
68 • Uniformance - PHD/Experion Link Installation and Configuration Guide
Step Action

Uniformance - PHD/Experion Link Installation and Configuration Guide • 69
4. Prepare PHD Server for PHD-Experion Integration
4.1 Add mngr Local Windows Account The PHD Server node must be able to validate the user that the Experion PKS OPC Server runs under - by default, this is mngr.
Add mngr as a local user on the PHD Server node.
To function properly, the mngr account must be configured on the PHD Server node exactly as it is defined on the Experion PKS OPC Server node.
4.2 On PHD Server – Configure Windows Firewall For Windows 2003 Server, turn off the Windows firewall on the PHD Server or, if the Windows Firewall is configured on the PHD Server, then refer to the white paper Using OPC via DCOM with XP SP2.pdf, available for download at http:\opcfoundation.org. Note: This white paper applies to Windows 2003 as well as Windows XP.
4.3 On PHD Server - Modify DCOM Settings This section provides instructions for configuring the DCOM security to open the communications between the PHD Server node and the primary and backup Experion Server nodes.
TIP
Wrong settings here are the most common reason why an OPC client will be able to do one-time reads of the remote OPC server, but will NOT get exception data when it is subscribed and expecting the OPC server to send back data only when it changes.
The user that the Experion PKS OPC server runs under must be granted DCOM access on the machine running the OPC client. Failure to grant DCOM access to the proper user prevents the OPC client from receiving callbacks on subscription/exception reads from the OPC server.
On the PHD Server where the PHD Experion Link is to run, perform the following steps to configure the default DCOM settings.

4 Prepare PHD Server for PHD-Experion Integration 4.3 On PHD Server - Modify DCOM Settings
70 • Uniformance - PHD/Experion Link Installation and Configuration Guide
Step Action
1 Click Start, click Run, type DCOMCNFG, and click OK.
2 Windows 2000: The default menu appears showing all the installed DCOM applications.
Windows 2003: The Component Services window appears.
Expand Component Services, expand Computers, right-click My Computer, and choose Properties.
3 Click the Default Properties tab.
4 Set the Default Properties as shown in the following screen example:
Note: For Windows 2000, the “Distributed COM Configuration Properties’ screen appears slightly different than the Windows 2003 ‘My Computer Properties’ screen shown here.

4 Prepare PHD Server for PHD-Experion Integration 4.3 On PHD Server - Modify DCOM Settings
Uniformance - PHD/Experion Link Installation and Configuration Guide • 71
Step Action
Default Properties , continued
5 Click the Default Protocols tab.
6 Ensure that Connection-oriented TCP/IP is the first protocol listed.
7 Windows 2000: Click the Default Security tab.
Windows 2003: Click the COM Security tab.

4 Prepare PHD Server for PHD-Experion Integration 4.3 On PHD Server - Modify DCOM Settings
72 • Uniformance - PHD/Experion Link Installation and Configuration Guide
Step Action
COM Security –Access Permissions - Edit Limits – To Allow Callbacks to work
8 Windows 2000: This procedure is not applicable. (Note: Enabling the PHD Server to authenticate the mngr user meets the requirements of this step.) - skip to Step 11.
Windows 2003: Under ‘Access Permissions’, click Edit Limits.

4 Prepare PHD Server for PHD-Experion Integration 4.3 On PHD Server - Modify DCOM Settings
Uniformance - PHD/Experion Link Installation and Configuration Guide • 73
Step Action
Windows 2003: COM Security – Access Permissions - Edit Limits, continued
9 Add NETWORK to the list and make sure Remote Access is selected, as shown in the following screen example.
10 Click OK.

4 Prepare PHD Server for PHD-Experion Integration 4.3 On PHD Server - Modify DCOM Settings
74 • Uniformance - PHD/Experion Link Installation and Configuration Guide
Step Action
COM Security - Access Permissions - Edit Default – To Allow Callbacks to work
11 Windows 2000: Under ‘Default Access Permissions’ click Edit Default.
Windows 2003: Under ‘Access Permissions’ click Edit Default.
Note: For Windows 2000, the “Distributed COM Configuration Properties’ screen appears slightly different than the Windows 2003 ‘My Computer Properties’ screen shown here.

4 Prepare PHD Server for PHD-Experion Integration 4.3 On PHD Server - Modify DCOM Settings
Uniformance - PHD/Experion Link Installation and Configuration Guide • 75
Step Action
COM Security - Access Permissions - Edit Default, continued
12 Windows 2000: On the ‘Registry Value Permissions’ window, ensure that the Everyone group has Allow Access selected for ‘Type of Access’.
Windows 2003: Ensure that the Everyone group has permissions as shown in the following screen example.
13 Click OK.
14 Click OK to close the window.

4 Prepare PHD Server for PHD-Experion Integration 4.4 On PHD Server – Configure Logon Account for RDIServer Service
76 • Uniformance - PHD/Experion Link Installation and Configuration Guide
4.4 On PHD Server – Configure Logon Account for RDIServer Service
Perform the following steps to configure the Uniformance RDI Server to run as a domain user account and assign that account the required local security policies and local groups.
Step Action
1 Log on to the PHD Server node as a domain administrator.
Note: Depending on the default domain policy, you may need to log on to the PHD Server machine as a user with domain administration privileges – this will allow you to specify a domain account as a service's logon account and to be able to assign local policy rights to a domain account.
2 Configure RDI Server service's logon account:
a) Go to the Microsoft Services window.
b) Go to the Properties of the Uniformance RDI Server service.
c) Configure the service to Log On as the domain account that you created previously (<domain>\<username>). For example CGY\PHDEXPLINK.
d) Enter the password of the domain account.
3 Configure the local policies for the RDI Server's account:
a) Go to Local Security Policy under Administrative Tools.
b) Under Local Policies>User Rights Assignment, double-click the policy Act as part of the operating system.
c) Click Add User and add the RDI Server's domain account this local user right.
Note: The operating system automatically assigns the user the 'Logon as a service right', so you do not have to configure it.
4 Add the RDI Server's account to local groups:
a) Right-click My Computer and choose Manage.
b) Expand Local Users and Groups and open Groups.
c) Open the Product Administrators group and Add the RDI Server's user (<domain>\<username>) to the group. For example CGY\PHDEXPLINK.
d) Click OK.
5 The configuration of the logon for the Uniformance RDI Server service will not

4 Prepare PHD Server for PHD-Experion Integration 4.4 On PHD Server – Configure Logon Account for RDIServer Service
Uniformance - PHD/Experion Link Installation and Configuration Guide • 77
Step Action take effect until you restart the service or reboot the PHD Server node.
NOTE: If you plan to use a separate Windows account for the Uniformance Tag Sync Service, then at this time you can assign that domain account to the required local groups and policies also:
• Local Policy – assign the user the local user right to "log on as a service".
• Local Groups – add the user to the local Product Administrators groups.

4 Prepare PHD Server for PHD-Experion Integration 4.5 On PHD Server – Update HOSTS File
78 • Uniformance - PHD/Experion Link Installation and Configuration Guide
4.5 On PHD Server – Update HOSTS File The Hosts file on the PHD Server (Windows\system32\drivers\etc) requires specific entries for the PHD Experion Link and RDM to collect from a backup Experion Server in the event of a redundant Experion Server fail-over. The same entries are in the Hosts file on the Experion Server.
For redundant Experion Servers with FTE, list the Hostname twice after its IP address with the second listing ending with a zero (0).
For a server with a dual network - that is, a second NIC (network interface card), add the second IP address with the Hostname ending with a one (1).
Procedure to update Hosts file Perform the following steps to add the required references to Experion Servers in the Hosts file on the PHD Server.
ATTENTION
Do NOT delete "127.0.0.1 localhost" from the Hosts file. This entry (created during Windows installation) is used by PHD Server functions.
Step Action
1 On the PHD Server computer, open the Hosts file in Notepad: Windows\system32\drivers\etc
2 Modify the Hosts file. Substitute the IP addresses and Hostnames shown in the examples with those on your system.
3 Save the modified Hosts file.
4 At a command prompt on the PHD Server, verify that you can ping the Experion Servers by Hostname: PING <hostname><n> Where: n is blank, 0, or 1

4 Prepare PHD Server for PHD-Experion Integration 4.5 On PHD Server – Update HOSTS File
Uniformance - PHD/Experion Link Installation and Configuration Guide • 79
Step Action
5 Verify that the ping returns OK and it returns the correct IP address.
Note: Verify that you can ping serverA, serverA0, serverA1 (if present), serverB, serverB0 and serverB1 (if present), substituting your Hostnames.
Example: For a redundant Experion Server with FTE enabled, these commands should display the IP address of the primary (Yellow) link: ping LSTB-EXPA ping LSTB-EXPA0 ping LSTB-EXPB ping LSTB-EXPB0
Example HOSTS file entries
Non-redundant Experion Server:
10.1.0.1 lstb-exp
Redundant Experion Server:
# TCP/IP address for the primary
10.1.0.1 lstb-expa lstb-expa0
# TCP/IP address for the backup 10.1.0.2 lstb-expb lstb-expb0
Redundant Experion Server with FTE (IP address of FTE yellow link):
# TCP/IP address for the primary
10.1.0.1 lstb-expa lstb-expa0
# TCP/IP address for the backup 10.1.0.3 lstb-expb lstb-expb0
Dual Network, Redundant Experion Server:
# First TCP/IP link of the primary
10.1.0.1 lstb-expa lstb-expa0
# Second TCP/IP link of the primary
10.1.1.1 lstb-expa1
# First TCP/IP link of the backup 10.1.0.2 lstb-expb lstb-expb0
# Second TCP/IP link of the backup 10.1.1.2 lstb-expb1

4 Prepare PHD Server for PHD-Experion Integration 4.5 On PHD Server – Update HOSTS File
80 • Uniformance - PHD/Experion Link Installation and Configuration Guide
TCP/IP Hostname and "Target Host Name"
When you configure the PHD Experion Link, you will specify a "Target Host Name" in the PHD Links Configuration form. The "Target Host Name" is the base hostname of the Experion Server, without the A/B or the 1/0 characters.
Note: You will be able to ping the TCP/IP names; but if the PHD Experion Link is configured for a redundant or FTE Experion Server, you will not be able to ping the "Target Host Name."
The following figure compares IP names in the HOSTS file to the "Target Host Name" of the PHD Links Configuration form.
Figure 10 – TCP/IP Name and "Target Host Name" Experion Server IP
Non-redundant Experion Server:
TCP/IP Name: LSTB-EXP 10.1.0.1
"Target Host Name" LSTB-EXP
Redundant Experion Server:
1- TCP/IP Name: LSTB-EXPA 10.1.0.1
2- TCP/IP Name: LSTB-EXPB 10.1.0.2
"Target Host Name" LSTB-EXP
Redundant Experion Server with FTE:
1- TCP/IP Name: LSTB-EXPA 10.1.0.1
2- TCP/IP Name: LSTB-EXPB 10.1.0.3
"Target Host Name" LSTB-EXP
Dual Network, Redundant Experion Server:
1- TCP/IP Name: LSTB-EXPA 10.1.0.1 10.1.1.1
2- TCP/IP Name: LSTB-EXPB 10.1.0.2 10.1.1.2
"Target Host Name" LSTB-EXP

4 Prepare PHD Server for PHD-Experion Integration 4.6 On PHD Server – Update Services File (Optional)
Uniformance - PHD/Experion Link Installation and Configuration Guide • 81
4.6 On PHD Server – Update Services File (Optional) By default, the Experion Tag Synchronization server listens on TCP port 49999. Before installing Uniformance Tag Synch Server on the PHD Server, update the PHD Server's \WINDOWS\system32\drivers\etc\ Services file to reserve this port number, which the Uniformance TagSync Service will use to connect to the Experion Server.
Example lines in the Services file on a PHD Server are as follows – in this example, the last line applies to Tag Synchronization: # <service name> <port number>/<protocol> [aliases...] [#<comment>]
Unfphd 2000/tcp phdserver # Uniformance PHD Server
Unfleg 3000/tcp legacyapi # Uniformance Legacy API Server
Unfapi 3100/tcp apiserver # Uniformance API Server
Unfapitel 3101/tcp apitelnet # Uniformance API Server Telnet
Unfrapi 3150/tcp rapiserver # Uniformance RAPI Server
Unfrapi 3151/tcp rapitelnet # Uniformance RAPI Server Telnet
Unfrdi 4100/tcp rdiserver # Uniformance RDI Server
Unfrditel 4101/tcp rditelnet # Uniformance RDI Server Telnet
myrdi1_Active 4200/tcp # Uniformance RDC
myrdi1_Standby 4201/tcp # Uniformance RDC
Unfmon 41000/tcp phdstart # Uniformance PHD Startup Server
Unfts 49999/tcp htsserver # Uniformance Tag Synchronization
ATTENTION
• The ports in the Services file must be in ascending numerical order.
• Reboot the computer after updating the Services file.

4 Prepare PHD Server for PHD-Experion Integration 4.7 On PHD Server – Increase the Maximum PHD Tags (PhdParams.Dat)
82 • Uniformance - PHD/Experion Link Installation and Configuration Guide
4.7 On PHD Server – Increase the Maximum PHD Tags (PhdParams.Dat)
The number of Experion tags assigned to history + the existing number of PHD tags should not exceed the PHD system parameter MAX_TAGS.
You should ensure that tags built against the new PHD Experion Link (either manually or by the Tag Synchronization service) will not exceed the specified maximum for the PHD Server.
Note: The number of PHD tags that will be built automatically by the Tag Synchronization service, if installed, depends on the number of point parameters assigned to Experion history collection and the Tag Synchronization Rules. For example, Tag Synchronization may build three PHD tags (PV, OP, and SP) for each Experion history point that matches the expression of a specific rule.
Perform the following steps to view or modify the maximum number of tags configured for the PHD System, to ensure that tags built against the new PHD Experion Link do not exceed the specified maximum.
Step Action
1 Open the file <install directory>PHDServer\NtSite\PhdParams.Dat.
2 If necessary, increase the values of the following parameters:
• MAX_TAGS - Maximum number of defined tags.
• MAX_TAGNO - Maximum possible tag numbers.
3 Save the file.
4 If you modified the above parameters, then you need to Stop and Cold Start the PHD Server in order to resize its global memory sections.
To restart the PHD Server, execute the following commands at a command prompt:
PHDCTL STOP
PHDCTL START COLD

Uniformance - PHD/Experion Link Installation and Configuration Guide • 83
5. Install Software for PHD-Experion Integration
5.1 On PHD Server - Install RDM and System Management Display (Optional)
If the PHD Experion Link is to connect to redundant Experion Servers, install the Redirection Manager (RDM) software on the PHD Server machine that will run the PHD Experion Link. The RDM supports failover of the PHD data collection interface with redundant Experion Servers.
RDM installation includes installation of the Honeywell System Management Runtime software package, which provides the base infrastructure for Honeywell System Management. You install System Management Runtime on every node that is to be integrated into a system of "managed nodes."
The Honeywell System Management Display can be installed optionally on the PHD Server node to aid in monitoring and troubleshooting the RDM.
The Honeywell System Management Display is a Microsoft Management Console (MMC) snap-in that exposes the tools necessary to configure and monitor a system of nodes – it can be installed on one or more nodes in the system. The System Management Display interacts with each node's System Management Runtime components to determine the status of each "managed" node.
ATTENTION
This guide provides a basic software installation procedure for RDM and the System Management Display, but it does not address the larger implications for configuring the Honeywell system management infrastructure.
Make sure you are aware of your system's configuration requirements for Honeywell system management.
REFERENCE
For details on Redirection Manager, refer to the Experion Redirection Manager User's Guide in the Experion book set.
For details on Honeywell System Management, refer to the Experion System
Management Configuration Guide in the Experion book set.

5 Install Software for PHD-Experion Integration 5.1 On PHD Server - Install RDM and System Management Display (Optional)
84 • Uniformance - PHD/Experion Link Installation and Configuration Guide
Prerequisites RDM is an Experion component and therefore falls under Experion restrictions. The PHD-compliant server that will run RDM must run a Windows operating system that is Experion-compliant.
Procedure to install RDM and System Management Display
Step Action
1 On the PHD Server node that will run the PHD Experion Link, insert the Experion Applications DVD.
2 Review the information about installing software, license agreements, and third-party compatibility. On each screen, click Next to continue.
3 On the User Information screen, type your Name and Company details.
For PHD, accept the default for License and Authorization numbers (blank).
Click Next to continue.
4 On the Package Selection screen,
Click Redirection Manager.
To select the optional System Management Display, hold-down the Ctrl key and click Honeywell System Management Display.
5 Click Install Package. RESULT: The following components should appear selected: Honeywell Packaged Redistributable Files Honeywell HCI Runtime Honeywell System Management Runtime Honeywell Admin Support Files Honeywell Redirection Manager Honeywell System Management Status Display
ATTENTION
The PHD Server and Experion Servers must run the same version of the following components, which are common to RDM and the System Management Display: Honeywell Packaged Redistributable Files Honeywell HCI Runtime Honeywell System Management Runtime Honeywell Admin Support Files

5 Install Software for PHD-Experion Integration 5.1 On PHD Server - Install RDM and System Management Display (Optional)
Uniformance - PHD/Experion Link Installation and Configuration Guide • 85
Step Action
6 Click OK.
7 After a successful installation, the screen in the previous step appears.
Click Exit and Yes to end the Installation process.

5 Install Software for PHD-Experion Integration 5.2 On PHD Server - Install PHD Point Server (Optional)
86 • Uniformance - PHD/Experion Link Installation and Configuration Guide
5.2 On PHD Server - Install PHD Point Server (Optional) Install the Experion PHD Point Server on the PHD Server node if it is to support retrieval of PHD data by an Experion Server for native Experion trends.
Prerequisites for Experion PHD Point Server installation • The installing user must be an Administrator.
• The password of the Experion Server's local Windows mngr account must be known.
• Microsoft .NET Framework must be installed.See NOTE
• PHD .NET Wrapper must be installed. See NOTE
NOTE: Experion PHD Point Server R3xx installer requires .NET version 1.1. (The Experion PHD Point Server installation program checks for the prerequisite software, but does not install it.)
PHD R21x Tag Sync requires .NET version 2.0.
Installing the minimum Uniformance Desktop also installs the following items: - Microsoft .NET Framework - PHD .NET Wrapper - DAO 3.6
Installing the minimum Uniformance Desktop R210.1.3 or R215 will install .NET version 2.0.
Alternatively, you can download .NET from www.Microsoft.com.
Procedure to install PHD Point Server Note: The installation program may ask for a reboot.
Step Action
1 Install prerequisite software on the PHD Server.
2 On the PHD Server, insert the Experion Applications DVD.
3 Browse to the Server-Client\PHDPointServer folder on the DVD and run the Experion PHD Point Server.msi installation application.

5 Install Software for PHD-Experion Integration 5.2 On PHD Server - Install PHD Point Server (Optional)
Uniformance - PHD/Experion Link Installation and Configuration Guide • 87
Step Action
4 When prompted to enter the Central Name, type the base name of the Experion Server that will communicate with the PHD Server.
Note: If the Experion Server is non-redundant, type the full name. If the Experion Server is redundant, type the base name (for example, if the names of the redundant pair are SERVERA and SERVERB, the base name is SERVER.
5 Click Next to continue.
6 When prompted for the mngr password, type the same password as the Windows local mngr account on the Experion Server.
7 Click Install to complete the installation.
Note: The PHD Point Server installation program will check for the prerequisite software, but it will not install it.
Result: The PHD Point Server is installed, but not started.
5 Install Software for PHD-Experion Integration 5.3 On PHD Server - Install Tag Synchronization (Optional)
88 • Uniformance - PHD/Experion Link Installation and Configuration Guide
5.3 On PHD Server - Install Tag Synchronization (Optional)
Tag Sync installation requirements
• The system that will host Uniformance Tag Synchronization requires Microsoft’s .NET framework. Uniformance R210.1.2 and later Tag Sync requires .NET version 2.0. Installing the minimum Uniformance Desktop from R210.1.3, R215 or R300 will install .NET version 2.0.
• Install the Uniformance Tag Synchronization software on the PHD Collector Server that is to run the PHD Experion Link.
• The installation of Uniformance Tag Sync Server requires a Windows account that the Uniformance Tag Sync Service will use to access the database (see section 2.5, "RDI Server account requirements"). The Experion Server will need to be able to authenticate this account. Honeywell recommends that this be a domain account. The PHD Server and Experion Server must be in the same domain.
• The Uniformance SQLServer Database server will need to be able to recognize the Tag Synchronization service's Windows username as valid Windows user (see section 2.5, "SQLServer user for Tag Synchronization").
• The database user must be assigned to the “Local Engineers” Role that has permission to insert/update to the database.

5 Install Software for PHD-Experion Integration 5.3 On PHD Server - Install Tag Synchronization (Optional)
Uniformance - PHD/Experion Link Installation and Configuration Guide • 89
Procedure to install Tag Synchronization
ATTENTION
Before you start the installation: To be able to run the setup installation program, you must be logged on to the local node as a user that has local administration privileges.
Perform the following steps to install Uniformance Tag Synch Server on the PHD Server.
Step Action
1 Insert Uniformance DVD-ROM.
2 If the Uniformance menu launches automatically, go to the Step 3.
If the Uniformance menu does not launch, launch it manually:
a) Open Windows Explorer.
b) Right-click on the CD-drive and then click Auto Play. Or Browse the CD-ROM drive and in the Documentation directory double-click launch.exe.
3 From the Honeywell Uniformance menu, click Software Installations.

5 Install Software for PHD-Experion Integration 5.3 On PHD Server - Install Tag Synchronization (Optional)
90 • Uniformance - PHD/Experion Link Installation and Configuration Guide
Step Action
4 The Uniformance Software Installations menu will be displayed.
Double click Uniformance Tag Synchronisation Server.
5 On the 'Destination Folder' window, click Next, unless you need to change the Destination Folder.
Honeywell recommends that you keep the default (Program Files \Honeywell \Uniformance).
6 Click Finish to complete the installation.
Result: The Uniformance TagSync Service is installed, but not started.

5 Install Software for PHD-Experion Integration 5.3 On PHD Server - Install Tag Synchronization (Optional)
Uniformance - PHD/Experion Link Installation and Configuration Guide • 91
ATTENTION
To prevent premature PHD tag creation, do not start the Uniformance TagSync Service.
If you have existing PHD tags or you wish to build PHD tags in your Uniformance system prior to activating the Uniformance TagSync Service (such as parent tags to be used by Tag Synchronization), then ensure that the Uniformance TagSync Service is not started.
Do not start the Uniformance TagSync Service until you have evaluated the Default Tag Synchronization rule and Default parent tags and determined them to be satisfactory or modified or added rules that are suitable for your site.
Tag Synchronization upgrades/patches
Note: If you reinstall Tag Synchronization, you must also ensure the Experion host name list in the registry has the correct hostnames of the Experion Servers. This registry key is located at
HKLM\System\CurrentControlSet\Services\UniformanceTagSync\Parameters\SystemList\Experion\Machines

5 Install Software for PHD-Experion Integration 5.3 On PHD Server - Install Tag Synchronization (Optional)
92 • Uniformance - PHD/Experion Link Installation and Configuration Guide

Uniformance - PHD Experion Link Configuration Guide • 93
6. Configure PHD-Experion Integration
6.1 On PHD Server - Configure System Management Display (Optional)
If you installed the optional System Management Display, then perform the required steps to configure it.
REFERENCE
For details about configuring the System Management Display, refer to the Experion System Management Configuration Guide in the Experion book set.

6 Configure PHD-Experion Integration 6.2 On PHD Server - Configure RDM (Optional)
94 • Uniformance - PHD/Experion Link Installation and Configuration Guide
6.2 On PHD Server - Configure RDM (Optional) If you installed the optional Redirection Manager (RDM) software, perform the following steps to configure the RDM as an HCI (Honeywell Communications Interface) component.
REFERENCE
For details about RDM configuration, see the Experion Redirection Manager User Guide in the Experion book set.
Step Action
1 Go to the HCI Component Configuration Page using one of these methods:
• Method 1: Open the Honeywell Configuration Utility and select HCI Component from the Configure menu.
• Method 2: In a Honeywell Experion PKS>System Management> System Management Display, right-click the PHD node and select Configure>HCI Component.
2 From the HCI Component Page, click the Base PROGID drop-down list and select an available component ID (for example, Honeywell.Redirect1).
3 Enter a Component Name for your Redirection Manager and then click Check Name to ensure the name is not already in use.
4 Click the Enter/Edit Server Specific Configuration button.
5 Respond to the message dialogs by clicking Yes.
6 From the Redirection Manager Device Specific Configuration page, select the primary and secondary Experion Server nodes using the drop down lists, or click Browse and navigate to the nodes.
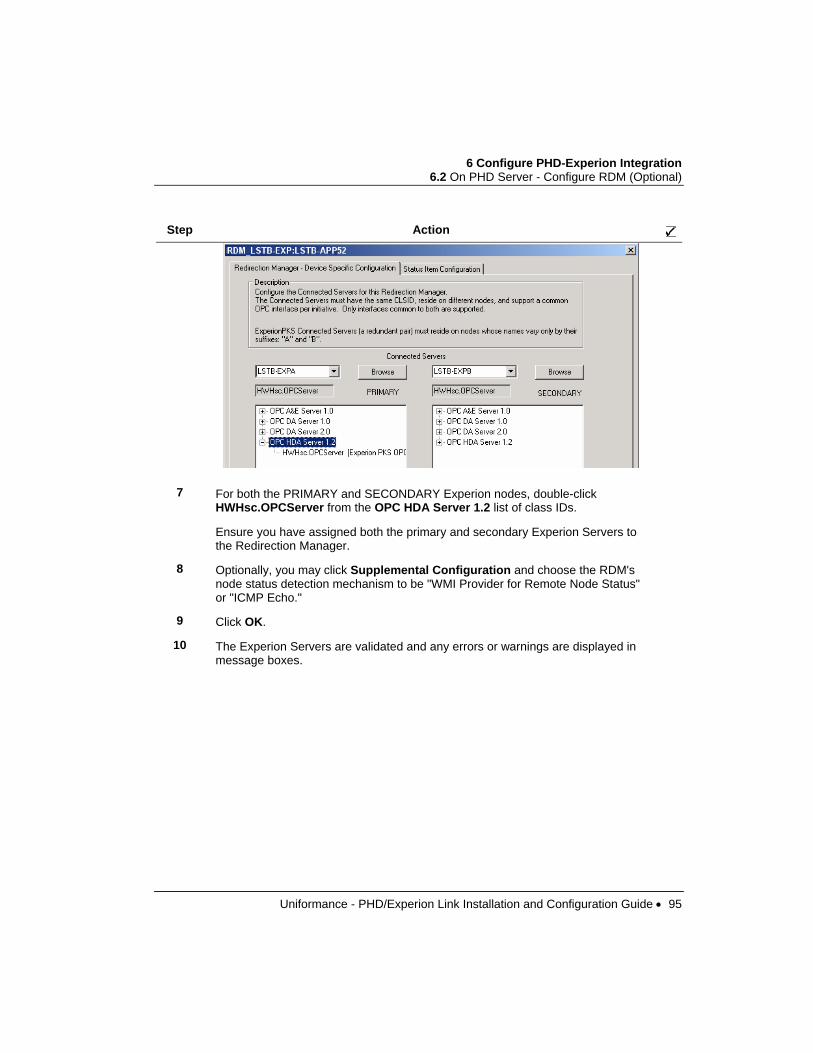
6 Configure PHD-Experion Integration 6.2 On PHD Server - Configure RDM (Optional)
Uniformance - PHD/Experion Link Installation and Configuration Guide • 95
Step Action
7 For both the PRIMARY and SECONDARY Experion nodes, double-click HWHsc.OPCServer from the OPC HDA Server 1.2 list of class IDs.
Ensure you have assigned both the primary and secondary Experion Servers to the Redirection Manager.
8 Optionally, you may click Supplemental Configuration and choose the RDM's node status detection mechanism to be "WMI Provider for Remote Node Status" or "ICMP Echo."
9 Click OK.
10 The Experion Servers are validated and any errors or warnings are displayed in message boxes.

6 Configure PHD-Experion Integration 6.3 In PHD Configuration Tool – Configure PHD Experion Link
96 • Uniformance - PHD/Experion Link Installation and Configuration Guide
6.3 In PHD Configuration Tool – Configure PHD Experion Link
You must complete the PHD Links Configuration form to define the information about the servers to which the PHD Experion Link will communicate and the name of the optional Redirection Manager (RDM).
Perform the following steps to complete the PHD Links Configuration form.
Step Action
1 Launch the PHD Configuration Tool: Start>Programs> Uniformance> PHD Configuration Tool > PHD Configuration Tool
2 Under Interfaces, open the form Interfaces (RDI’s and Links).
3 Enter data in the fields as required for the new Link. For descriptions of the fields, refer to Table 2.
4 After entering the required data, close the form.

6 Configure PHD-Experion Integration 6.3 In PHD Configuration Tool – Configure PHD Experion Link
Uniformance - PHD/Experion Link Installation and Configuration Guide • 97
Table 2 – PHD Links Configuration Form Entries
Field in form Description
* RDI/Link Name
Enter a name for this link. Limited to 10 characters.
The Link Name and Target Host Name combination must be a unique identifier that will be used to identify data parameters to be collected by the Link.
* Host Name Select or type the host name of the PHD Server that is to run this link. Must be uppercase.
Primary TDA Host Check if this PHD Server is the main server holding these tags.
* Description Enter a description for this Link.
Enabled Check this option to enable the Link.
* RDI Type Name
EXPERION – Select ‘Experion’ if the link is to communicate to an Experion Server.
PHDLINK – Not implemented.
Remote RDI Type Name Not Used
Source System Select OPC
Parameter
HOSTNAME
Host name of the Experion Server. Specify localhost if using RDM.
Parameter
RDMNUMBER
Select the Base PROGID number of the Redirection Manager that was specified through the HCI Component dialog box (shown below) when the RDM was configured on the PHD Server. E.G. 1 in the below example.

6 Configure PHD-Experion Integration 6.3 In PHD Configuration Tool – Configure PHD Experion Link
98 • Uniformance - PHD/Experion Link Installation and Configuration Guide
Field in form Description
Maximum History Recovery Interval
Enter the maximum number of minutes of history to recover. Default is 10080 minutes, which is 7 days (7 * 1440 minutes/day). This field should be set to a value less than or equal to the maximum history stored on the Experion Server.
Practically speaking, the MAX_HISTRECMN should be set to a number that will capture the maximum time that the interfaces between the PHD Server and the Experion Server may be down. Normally, one week (10080) is a good number to use.
Note: You may choose to use a larger number for initial history recovery (for example, to recover 6 months of history from an existing Experion Server's history database), and then (after the initial history recovery has completed), change the value to the actual number wanted for ongoing operations.
0 = No History Recovery For details on how History Recovery works, see section 1.3, "History Recovery".
Check For Download Set the frequency in seconds that RDI Server should check for new values to be written to the Experion Server. Default is every 2 seconds.
Maximum Queue Overwrite Log
Default to 0.
Statistics ON – PHD will collect scan rate statistics for the Link.
OFF – PHD will not collect statistics. Default is OFF.

6 Configure PHD-Experion Integration 6.3 In PHD Configuration Tool – Configure PHD Experion Link
Uniformance - PHD/Experion Link Installation and Configuration Guide • 99
Field in form Description
Tag Update on Range Change
Indicates whether the Link should trigger a PHD tag update when a change occurs to the low or high range value on Experion Server points.
ON – PHD will perform a tag update based on a tag high/low range change event from the Experion Server.
OFF – PHD will not perform a tag update based on a tag high/low range change event from the Experion Server. Synchronized tag definitions will be changed in the database, but this Link on the PHD Server will not be updated.
Default is OFF.
This should be left OFF in most cases.
* The asterisks (*) in the table indicate mandatory fields.

6 Configure PHD-Experion Integration 6.4 On PHD Server - Create Registry and File Entries for PHD Experion Link
100 • Uniformance - PHD/Experion Link Installation and Configuration Guide
6.4 On PHD Server - Create Registry and File Entries for PHD Experion Link
Before you begin
Consider performing the following steps on the PHD Server that is to run the PHD Experion Link.
Step Action
1 Make a backup copy of the following files located at <install directory> \PHDServer\NtSite\:
Interfaces.Dat
Start_Interfaces.Dat.
2 If the Link was previously created in error, execute the PHDMAN command to shutdown the Link:
PHDMAN SHUT INT <linkname>
Procedure to run RDISetup The RDISetup utility reads the database configuration of the PHD Experion Link and, upon user selection of the Save RDI/Link Configuration command, creates entries for the new Link in the registry, the Interfaces.Dat file, and the Start_Interfaces.Dat file.
Perform the following steps to run RDISetup.
ATTENTION
• Perform the following procedure on the PHD Server machine on which the Link is to run.
• Log on to the operating system as a user that is a member of the Product Administrators group.
• If you change a local right (for example, if you add the logon user to the local Product Administrators group), you must log off and log back on to the machine to establish the change.

6 Configure PHD-Experion Integration 6.4 On PHD Server - Create Registry and File Entries for PHD Experion Link
Uniformance - PHD/Experion Link Installation and Configuration Guide • 101
Step Action
1 On the PHD Server where the Link is to execute, select Start>Programs>Uniformance>PHD Server>PHD RDI Configuration
TIP: Alternatively, you can Run rdisetup (Start>Run) or double-click on RDISetup.exe.
RESULT: The RDISetup user interface is displayed.
2 In the left pane, select the Link of interest.
RESULT: The link parameters appear in the right pane, as shown in the following screen example for link EXPTEST1.
For definitions of the fields, refer to Table 3 – RDISetup Indicators and Checkboxes.

6 Configure PHD-Experion Integration 6.4 On PHD Server - Create Registry and File Entries for PHD Experion Link
102 • Uniformance - PHD/Experion Link Installation and Configuration Guide
Step Action
3 Ensure the following checkbox is checked if it is not checked, RDISetup will not save the configuration for this Link to the local registry and files):
4 Select File and choose Save RDI/Link Configuration.
RESULT:
• The Interfaces.Dat and the Start_Interfaces.Dat files now contain SET commands to define the Link parameters to PHD (see following screens).
• The PHD Experion Link is registered under the specified RDI Server:
HKLM\ SYSTEM\ CurrentControlSet\ Services\ <RDI Server>\ Parameters\ LinkList\ <linkname>
• If Tag Synchronization is present on this machine, then the value of the following registry key is populated with the Experion "Target Hostname":
HKLM\ SYSTEM\ CurrentControlSet\ Services\ UniformanceTagSync\ Parameters\ SystemList\ Experion\ Machines
TIP: If you install Tag Synchronization at a later time, then you must ensure 'Machines' registry key has the names of the Experion hosts to be Tag Synch’d.

6 Configure PHD-Experion Integration 6.4 On PHD Server - Create Registry and File Entries for PHD Experion Link
Uniformance - PHD/Experion Link Installation and Configuration Guide • 103
Table 3 – RDISetup Indicators and Checkboxes
Indicator/ Field Description
Folders The left pane shows the names of RDIs and Links read from the database and local data. Bold letters: Indicates that differences exist between the local and the database data.
Parameter Name/ Value
After you select a PHD Experion Link in the left pane, the right pane shows its configuration data. The parameter list can show either the database or local data, depending on your selected state of the "Use Local Parameter Values" checkbox. If you need to change a value, double-click the parameter and enter the new value. Red color: Indicates that the local value and the database value are different.
Checkbox
The following checkbox determines whether or not RDISetup will save configuration for this Link when you execute the 'Save RDI/Link Configuration' command:
If checked, then RDISetup will save the Link configuration to the files and registry.
If unchecked, then RDISetup will not save the configuration, and will discard any changes.
The following checkbox determines what values are displayed in the right pane
parameter list and what data (local or database) will be saved to the files and registry when you select the File>Save RDI/Link Configuration command:
If checked, the parameter list in the right pane shows local data, and RDISetup will use the local data when it saves the configuration of this Link to the files and registry.
If unchecked, the parameter list in the right pane shows the database data, and RDISetup will use the database data when it saves the configuration of this Link to the files and registry.
If you used RDISetup to make changes to values for this PHD Experion Link and you want RDISetup to save those previous locally-resident changes, make sure the checkbox contains a checkmark before you select the 'Save' command.
Note: RDISetup does not write to the database. For details on the data flow of the RDISetup utility, refer to Appendix B.
RDI Server Instance
Specifies the RDI Server service that runs this Link. Note: Most PHD systems require only one instance of RDI Server. All PHD Experion Links running on a PHD Server can use the same RDI Server instance and port number.
RDI Server Specifies the RDI Server port used by this Link.

6 Configure PHD-Experion Integration 6.4 On PHD Server - Create Registry and File Entries for PHD Experion Link
104 • Uniformance - PHD/Experion Link Installation and Configuration Guide
Indicator/ Field Description Port
Procedure to run Interfaces.Dat After you run RDISetup, you need to execute the Interfaces.Dat file to define the new Link to the PHD Server.
In a running PHD system, perform the following steps to manually execute the Interfaces.Dat file through the PHDMAN utility, which completes the definition of PHD Experion Link.
Note: If the PHD system is not running, a startup of the PHD system (PHDCTL Start or PHDCTL Start Cold) causes the Interfaces.Dat file to be executed automatically.
Step Action
1 On the PHD Server where the PHD Experion Link is to run, open a command prompt and enter the following command:
PHDMAN EXECUTE %PHD_ROOT%\NTSITE\INTERFACES.DAT
Note: Alternatively, you can use the PHDMAN shortcut on the desktop, which defaults to the path of the NtSite directory.
RESULT: The configuration is written to the PHD Server's SCON memory section.
2 Verify that the new PHD Experion Link is now available:
PHDMAN SHO INT <linkname> Add parameter to registry and change default value
ATTENTION
Because the default behavior of the PHD Experion Link will negatively impact history recovery performance, Honeywell recommends that you add the parameter IgnoreNegativeConfidence to the registry and set it to a value of 1.
This disables the insertion of a 0 (zero) tag value with a -1 confidence whenever the Link is started, shutdown, or every 24 hours when the Link resynchronizes its time.

6 Configure PHD-Experion Integration 6.4 On PHD Server - Create Registry and File Entries for PHD Experion Link
Uniformance - PHD/Experion Link Installation and Configuration Guide • 105
HKEY_LOCAL_MACHINE\ SYSTEM\ CurrentControlSet\ Services\ <RDI Server>\ Parameters\ LinkList\ <linkname>\ IgnoreNegativeConfidence
REFERENCE: For other registry settings, refer to Appendix A –PHD Experion Link Registry Settings, in this guide.

6 Configure PHD-Experion Integration 6.5 In PHD Configuration Tool - Configure Tag Synchronization Rules
106 • Uniformance - PHD/Experion Link Installation and Configuration Guide
6.5 In PHD Configuration Tool - Configure Tag Synchronization Rules What Tag Sync rules are needed?
To determine what Tag Sync rules are needed, you must understand the fields coming from the Experion Server to determine if the values that will come in can be used "as is".
For example, each point.parameter will have a high and low range. These may be valid to use with PHD or they may need to be modified. If the range values can be used "as is", then the rule is simple, because incoming fields are moved directly into the corresponding PHD tag field.
The second factor to consider is whether or not the PHD tags already exist. This can affect what PHD tag fields you should allow Tag Sync to change.
• You may not want to allow Tag Sync to change the current PHD high and low range.
• If the existing PHD tag names are considerably different from the Experion point.parameter names, then the Tag Sync rule needs to take this into account, so that it does not change the PHD tag name.
Before performing Tag Sync, create any required parent tags in the Tag Configuration form, and the required rules in the Tag Synchronization Rule Configuration form
For any given tag, only one rule will execute. The staging table indicates which rule was applied. The staging table is viewed through the PHD Tag Synchronization Acknowledgement form.
To view and evaluate the default rule The default rule is the rule that executes if no other rules match or if no other rules are present. Perform the following steps to view the Honeywell-supplied default rule.
Step Action
1 Open the PHD Configuration Tool.
2 Under Interfaces > select RDI Types.
3 In the Current list of RDI Types, select EXPERION.
4 On the Tag Synchronization Rules tab, click DEFAULT_RULE.
Result: The default rule displays.
5 Configure the default rule to suit your needs.

6 Configure PHD-Experion Integration 6.5 In PHD Configuration Tool - Configure Tag Synchronization Rules
Uniformance - PHD/Experion Link Installation and Configuration Guide • 107
REFERENCE: For a description of the default rule, refer to the subsection "Honeywell-supplied default rule text for Experion" in this guide.
To view and evaluate the default parent tag The default rule assigns the Parent Tag to be EXP_PARENT
Perform the following steps to view the Honeywell-supplied default Parent Tag.
Step Action
1 Open the PHD Configuration Tool.
2 Select the Tags form.
3 Enter EXP_PARENT in the search box and click Go.
Result: The Honeywell-supplied default Parent Tag displays.
Determine whether the default Parent Tag is suitable for your site. You may need to modify it and/or configure additional Parent Tags.
REFERENCE: For a description of the default Parent Tag, refer to the subsection "Honeywell-supplied default Parent Tag for Experion" in this guide. For guidelines on Parent Tags, refer to the section "Rule examples for Experion", subsection "General considerations."
To configure a new rule Perform the following steps to configure a new rule. The examples shown in the steps will create a rule for configuring MODE tags.
Step Action
1 Open the RDI Types configuration form.
2 In the Current list of RDI Type records, select EXPERION.
3 Click New RDI Type > New Tag Synchronization Rule.
4 Enter the name for the new rule.
For example, enter MODE_RULE.

6 Configure PHD-Experion Integration 6.5 In PHD Configuration Tool - Configure Tag Synchronization Rules
108 • Uniformance - PHD/Experion Link Installation and Configuration Guide
Step Action
5 In the Variable Name box, select the incoming Experion tag variable that you want Tag Sync to examine:
ASSET DISPLAYTYPE (ESVT Only) ENTITYTYPE EXTENDEDHIGHRANGE EXTENDEDLOWRANGE HISTORYINTERVAL ITEM MACHINENAME PARAMETER POINTNAME SOURCETAGATTRIB SOURCETAGTYPE RANGE_HI RANGE_LO EXPDESCRIPTION
For example, select PARAMETER
6 In the Regular Expression box, enter the expression on which the rule can match.
For example, enter MODE.
ATTENTION: By default, Regular Expressions are case sensitive.
7 In the Rule Text box, enter the logic that you want.
For example, copy/paste the Rule Text from the DEFAULT_RULE to the MODE_RULE, and then modify it as follows: TagUnits = ""
8 (Optional) To check rule syntax, you may choose to select Export Rule to export the rule text to a file.
Then you can insert the rule text into a Visual Studio 2005 project and compile it there.
After syntax checking is completed (solution builds), copy/paste the rule text back into the Tag Synchronization Rule Configuration form.

6 Configure PHD-Experion Integration 6.5 In PHD Configuration Tool - Configure Tag Synchronization Rules
Uniformance - PHD/Experion Link Installation and Configuration Guide • 109
Step Action
9 Move the DEFAULT_RULE to the bottom of the list, as follows:
a) Click DEFAULT_RULE.
b) Click the down arrow until DEFAULT_RULE displays at the bottom of Configured Rules, as shown below:
10 Add more rules, as needed.
ATTENTION
Ensure that the DEFAULT_RULE is always at the bottom of the list.
REFERENCE: For more rule examples, refer to the subsection "Rule examples for Experion" in this guide.
Honeywell-supplied default rule text for Experion Tag Sync executes the default rule if no other match is found or if no other rules are present. The default rule should be the last rule in the list.
PHD software release updates do not overwrite the default rule text, so any customer changes to the default rule will not be discarded during an upgrade - consequently, Honeywell improvements to the default rule are not supplied in the database.
Please manually enter the improved default rule text, if you want to use it.
Default rule text provided in the database // Set the Parent to the standard EXP_PARENT
ParentTagName = "EXP_PARENT"
Active = "X"
Quantum = -1
TagName = PointName + "." + Parameter
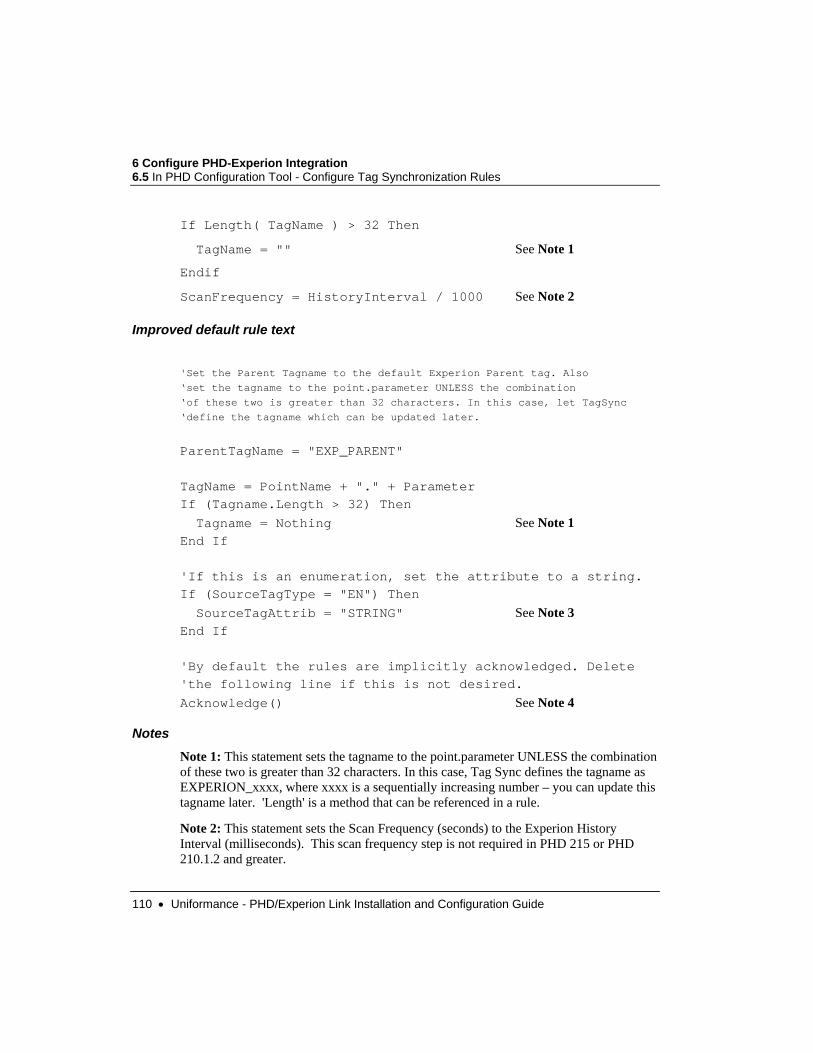
6 Configure PHD-Experion Integration 6.5 In PHD Configuration Tool - Configure Tag Synchronization Rules
110 • Uniformance - PHD/Experion Link Installation and Configuration Guide
If Length( TagName ) > 32 Then
TagName = "" See Note 1
Endif
ScanFrequency = HistoryInterval / 1000 See Note 2
Improved default rule text
'Set the Parent Tagname to the default Experion Parent tag. Also ‘set the tagname to the point.parameter UNLESS the combination ‘of these two is greater than 32 characters. In this case, let TagSync ‘define the tagname which can be updated later. ParentTagName = "EXP_PARENT" TagName = PointName + "." + Parameter If (Tagname.Length > 32) Then Tagname = Nothing See Note 1 End If 'If this is an enumeration, set the attribute to a string. If (SourceTagType = "EN") Then SourceTagAttrib = "STRING" See Note 3 End If 'By default the rules are implicitly acknowledged. Delete 'the following line if this is not desired. Acknowledge() See Note 4
Notes
Note 1: This statement sets the tagname to the point.parameter UNLESS the combination of these two is greater than 32 characters. In this case, Tag Sync defines the tagname as EXPERION_xxxx, where xxxx is a sequentially increasing number – you can update this tagname later. 'Length' is a method that can be referenced in a rule.
Note 2: This statement sets the Scan Frequency (seconds) to the Experion History Interval (milliseconds). This scan frequency step is not required in PHD 215 or PHD 210.1.2 and greater.

6 Configure PHD-Experion Integration 6.5 In PHD Configuration Tool - Configure Tag Synchronization Rules
Uniformance - PHD/Experion Link Installation and Configuration Guide • 111
Note 3: This statement configures PHD to historize the enumeration string instead of the ordinal value. See section 8.7, "Collect and Access Enumeration Data".
Note 4: This statement automatically acknowledges any tag definition changes. See section 6.5, "To view synchronized tags in staging table before sending tag definitions to PHD".

6 Configure PHD-Experion Integration 6.5 In PHD Configuration Tool - Configure Tag Synchronization Rules
112 • Uniformance - PHD/Experion Link Installation and Configuration Guide
Honeywell-supplied default Parent Tag for Experion The default rule for EXPERION assigns the Parent Tag to be EXP_PARENT. The Honeywell-supplied Tag Configuration of EXP_PARENT is as follows: Description: Experion parent tag Collection X Demand Calculation Manual Input Put Download Data Store X Data Edit Archive Resample Digital Enumeration Automatic Synchronization X Data Collection Source Tag Specification Source Tag Index Source System Type EXPERION Source Tag Type AS Source Tag Attribute VALUE Source Tag Units Collector Name Scan Frequency 60 Scan Timestamp Unit s Tolerance, Type Digital Enumeration List Name PHD Link Name PHD Link Point Name PHD Link Parameter Name Data Processing Gross Error Sigma Limit Gross Error Samples Smoothing Constant Noise Gate Level Compression Tolerance Factor -1 Min Compression Tolerance Scale High Extreme Scale Low Extreme Quantum General Data Type C Data Length 80 Spec Queue Size

6 Configure PHD-Experion Integration 6.5 In PHD Configuration Tool - Configure Tag Synchronization Rules
Uniformance - PHD/Experion Link Installation and Configuration Guide • 113
Resample Method Extrapolation Damping Interpolation Method Percent Record Fill User Defined 1 User Defined 2 Synchronization Rule Name Asset Name Item Name
Rule examples for Experion
General considerations
PHD tag attributes are either
• Set by Tag Sync (default value or explicit rule value), or
• Inherited from the parent tag.
Attributes that can be set by a PHD parent tag include the following:
• Enable flags
• Tolerance related attributes
• Interpolation Method
You will be able to manually change the tag configuration of these inherited attributes after the tag has been created.
To aid in ongoing PHD tag maintenance, you may choose to assign each class of tags to a different parent tag. ParentTagname = "EXP_FLOAT_OP" ParentTagname = "EXP_FLOAT_LIN" ParentTagname = "EXP_FLOAT_STEP" ParentTagname = "EXP_FLOAT_PUT" ParentTagname = "EXP_ENUM_MODE" ParentTagname = "EXP_INT"
The Active flag cannot be inherited from a parent tag, so it should be placed in each rule.
Active = "X"
You may choose to specify Quantum in each rule; otherwise PHD sometimes calculates its own values, which you may not want.
Quantum = n

6 Configure PHD-Experion Integration 6.5 In PHD Configuration Tool - Configure Tag Synchronization Rules
114 • Uniformance - PHD/Experion Link Installation and Configuration Guide
MODE
The default Tag Sync rule sets the engineering units of MODE to the same units as PV. If needed, create a rule to set the units of MODE to "nothing":
TagUnits = ""
Note: The TagUnits rule text is not required for synchronization of Experion systems running software release R310 and greater, because for those versions the Experion Server sends TagSync the appropriate units value for .OP and .MODE tags.
In the following example, the user created the rule MODE_RULE. The Variable Name is PARAMETER and the Regular Expression is MODE.
ATTENTION: After you add rules, use the Arrow button to move DEFAULT_RULE to the bottom of the Configured Rules list.
OP
• The default Tag Sync rule sets the engineering units of OP to the same units as PV. If needed, create a rule to set the units of OP to "%":

6 Configure PHD-Experion Integration 6.5 In PHD Configuration Tool - Configure Tag Synchronization Rules
Uniformance - PHD/Experion Link Installation and Configuration Guide • 115
TagUnits = %
Note: The TagUnits rule text is not required for synchronization of Experion systems running software release R310 and greater, because the Experion Server sends TagSync the appropriate units value for .OP and .MODE tags.
• You may choose to put information about parameter type in the tag description.
Description = Description + "Output"
• You may choose to adjust the ranges on OP tags to always be -10 to 110.
HighExtreme = 110
LowExtreme = -10
ATTENTION: After you add rules, use the Arrow button to move DEFAULT_RULE to the bottom of the Configured Rules list.

6 Configure PHD-Experion Integration 6.5 In PHD Configuration Tool - Configure Tag Synchronization Rules
116 • Uniformance - PHD/Experion Link Installation and Configuration Guide
PV
PHD uses the standard high and low range of the Experion point during Tag Synchronization. The Experion extended range is not returned by the Experion server to the PHD Tag Synchronization. If the value for an Experion point is above/below the standard range in Experion, but within the extended range in Experion, then the value is good in Experion but clamped in PHD (because it is out of range). Values sent to PHD that are outside the range are not stored.
You can create/adjust a Tag Sync rule to increase the range of the PHD tags. The following example increases the PHD tag range by 10%.
Dim Adjustment As Decimal Adjustment = (HighExtreme - LowExtreme) * 0.1 HighExtreme = HighExtreme + Adjustment LowExtreme = LowExtreme – Adjustment
Note: The Dim operator (Dim VariableName As DataType) creates a variable named Adjustment. In this example, it can be either Decimal or Double.
Ordinals (EN)
By default, TagSync sets the PHD tag definition of ordinals to EN/VALUE, as follows, so PHD historizes the ordinal values: SourceTagType = EN SourceTagAttribute = VALUE
If you want PHD to historize the enumeration strings instead of the ordinal values, create a rule to set the tag definitions to EN/STRING.
If (SourceTagType = "EN") Then SourceTagAttrib = "STRING" End If
REFERENCE: For additional information on enumerations, refer to section 8.7 "Collect and Access Enumeration Data".
Tag name considerations The default TagSync rule assigns the PHD tagname to be the following:
• For a controller point – Tagname.FunctionBlock.Parameter (for example TIC100.PIDA.SP)
• For a SCADA point – Tagname.Parameter (for example TIC100.PV)
If the length of the Experion source "tagname.parameter" is greater than 32 characters, then Tag Sync will set the tagname of the PHD tag to EXPERION_xxxx, where xxxx is a sequentially increasing number.

6 Configure PHD-Experion Integration 6.5 In PHD Configuration Tool - Configure Tag Synchronization Rules
Uniformance - PHD/Experion Link Installation and Configuration Guide • 117
Tips for regular expressions • Regular expressions are case sensitive. Tag Sync does not convert regular
expressions to uppercase - this can cause issues with the syntax for POINT and PARAMETER variables. To address this, you may choose to modify regular expressions as follows:
(?i) - Ignore Case
To ignore case, prefix the string with (?i)
Examples:
(?i)OP Will match any string that contains OP in any case (OP,op,Op,oP,xop,ops)
(?i)SP Will match any string that contains SP in any case
• By default, regular expressions look for a match anywhere in the string. For example, MODE will match MODE and MODESTR. To address this, you may find the following options useful:
^ - Match from the start of the string
To force the match to the start of the string, place ^ at the start of the expression.
Examples: ^OP Will match any string that starts with OP in uppercase (OP, OPS).
(?i)^OP Will match any string that starts with OP in any case. $ - Match to the end of the string
To force the match to the end of the string, place $ at the end of the expression.
Examples: OP$ Will match any string that that ends with OP in uppercase (OP, XOP).
(?i)OP$ Will match any string that ends with OP in any case.
(?i)^OP$ Will match any string that starts or ends with OP in any case (OP, op, Op, oP, XOP, xop, xoP).

6 Configure PHD-Experion Integration 6.5 In PHD Configuration Tool - Configure Tag Synchronization Rules
118 • Uniformance - PHD/Experion Link Installation and Configuration Guide
Tag Sync variables Each Tag Sync rule executes as a method of a tag definition. Within this tag definition, there are a set of member variables (properties) and methods that are common to all source system types. There is also a set of member variables that are specific to Experion. You can use rules to configure common and Experion-specific variables.
You can base rule execution on any of the variables shown in bold.
Pre-initialized common member variables
Tag Sync ALWAYS sets these variables to match the incoming configuration. This helps minimize the configuration that you need to place in the rules.
Member Variable Name Description of incoming
configuration from Experion system Comment
SourceSystem “EXPERION”
MachineName <Experion Server Name>
PointName <Experion Point>
Parameter <Experion Parameter>
TimeStamp <Time of definition change on Experion>
Description <Experion point description>
Asset <Experion Asset>
Item <Experion Item>
TagUnits <Units for Experion Point.Parameter>
LowExteme <Experion Minimum Range>
HighExtreme <Experion Maximum Range>
ScanFrequency <Experion History Interval> In seconds if possible
ScanTimeStampUnit “ms” If ScanFrequency is in ms
SourceTagType “I4” “L8” “US” “F4” “EN”
Integer datatype Long Integer datatype String datatype Floating Point datatype Enumeration datatype
SourceTagAttrib “STRING” "VALUE”
String datatype All other datatypes

6 Configure PHD-Experion Integration 6.5 In PHD Configuration Tool - Configure Tag Synchronization Rules
Uniformance - PHD/Experion Link Installation and Configuration Guide • 119
ATTENTION
You should never manually overwrite the tag configuration of these attributes through the PHD Tag Configuration form, unless you configured them to be inherited from a Parent Tag, because the next Tag Sync will overwrite the value again. Inheritance takes precedence over tag sync, so you can manually overwrite inherited values through the Tag Configuration form.
Experion-specific member variables
All of the incoming data from the Experion server can be used in a rule – this includes common member variables and the following Experion-specific member variables that provide additional information for an Experion tag.
All of the Experion-specific member variables are strings, but can be used as double-precision numbers or integers in a rule if needed (with the exception of ExpDescription, EntityType, and DisplayType). See the PV example in the "Rule examples for Experion" in this section.
Member Variable Name Description of incoming
configuration from Experion system Comment
ExpDescription <Experion point description>
Range_Lo <Experion low range for point.parameter>
This is parameter specific.
Range_Hi <Experion high range for the point.parameter.
This is parameter specific.
HistoryInterval <Experion history interval of the point.parameter specified in milliseconds>
This is parameter specific.
ExtendedHighRange <Experion extended low range for the point.parameter>
This is parameter specific. ESVT Only
ExtendedLowRange <Experion extended high range for the point.parameter>
This is parameter specific. ESVT Only
EntityType <Experion entity type for the point> ESVT Only DisplayType <Experion display type for the point> ESVT Only

6 Configure PHD-Experion Integration 6.5 In PHD Configuration Tool - Configure Tag Synchronization Rules
120 • Uniformance - PHD/Experion Link Installation and Configuration Guide
To view synchronized tags in staging table before sending tag definitions to PHD By default, Tag Sync does not automatically acknowledge the synchronized tag definitions in its staging table. This allows the user to view the tags in the staging table before sending them to PHD.
The staging table is viewed through the PHD Tag Synchronization Acknowledgement form.
Initially, you may want to leave automatic acknowledgement off, so you can view tag configuration in the staging table. Later, you may choose to turn on automatic acknowledgement, if it is wanted.
When you start the Tag Sync service, the automatic acknowledgement immediately applies Tag Sync tag definitions to the PHD tag table.
Possible reasons to leave automatic acknowledgement off are as follows:
• To ensure that Tag Sync does not automatically overwrite existing PHD tag configuration until you are comfortable that the rules execute as expected.
• To allow you to validate that the Tag Sync tag definitions will not overwrite important data in the existing tag definitions.
• To allow you to be aware of all changes that Tag Sync will make to existing tags.
After initial tag synchronization, you may add the following line to your rules to turn on automatic acknowledgement, if it is wanted:
Acknowledge()

6 Configure PHD-Experion Integration 6.6 Configure PHD Point Server
Uniformance - PHD/Experion Link Installation and Configuration Guide • 121
REFERENCE
For details on Tag Synchronization rules, refer to the following sections in the PHD User Guide (pim0201):
• Section 5 – “Configuring PHD Tag Synchronization Rules”
• Section 2.30 – “Tag Synchronization Rule Configuration Form”
• Section 3.13 – "Tag Synchronization Rule Configuration Report" For details on PHD tag configuration fields, refer to the following:
• This guide, section 8.6, Tag Field Usage for PHD Tags on PHD Experion Link
• PHD User Guide (pim0201), section 2.24 "Tag Configuration Form" and section 2.25 "Advanced Tag Configuration".
•
6.6 Configure PHD Point Server On Experion Servers - Configure Experion to communicate with PHD Point Server
If the optional PHD Point Server has been installed on the PHD Server to support Experion trends, perform the following steps to configure the Experion Server to communicate to the PHD Point Server.
Step Action
1 Start the Station application on an Experion client PC or on the Experion Server. Log on to Station as a user with administrator (MNGR) access.
2 In the Station application, choose Configure > System Hardware > PHD Server.
RESULT: The Configuration tab of the PHD Server Configuration display appears.
3 (Optional) In the Alias box, enter an alias for the PHD system interface. The default is PHD.

6 Configure PHD-Experion Integration 6.6 Configure PHD Point Server
122 • Uniformance - PHD/Experion Link Installation and Configuration Guide
Step Action
TIP: When you build an Experion trend, you will select this Alias as the Point Name and then enter the PHD tagname as the Parameter. The result is shown below:
4 Click the checkbox This server connects to the PHD Point Server.
5 In the Network Name box, type the hostname of the PHD Server node where the PHD Point Server will run.
You cannot use an IP address.
Press Enter before leaving the port.
6 (Optional) In the Assignable Asset box, if an Asset has been configured to represent the PHD Server, select it from the drop down list.
Press Enter before leaving the port.
TIP: To configure assets in Experion, from the Experion Configuration Studio, select the System name, then select Configure Assets for this system.

6 Configure PHD-Experion Integration 6.6 Configure PHD Point Server
Uniformance - PHD/Experion Link Installation and Configuration Guide • 123
On PHD Server - Configure registry settings, as needed, for PHD Point Server When started, the PHD Point Server reads a set of configurable registry settings on the PHD Server node.
Certain registry settings disable/enable specific PHD Point Server functionality. Other registry settings may be used to tune the PHD Point Server for the purpose of reducing CPU usage and improving trend callup times.
You may change the registry settings as needed for your site.
The registry settings include the following:
• AllowTagSyncTags - determines whether to allow synchronized PHD tags (tags that are in both PHD and Experion history) to be retrieved on Experion trends, or only allow non-synchronized PHD tags to be retrieved (tags that are only in PHD history). This bypasses data security and provides read access to all PHD data.
• HistoryTimeout - sets the timeout for PHD history requests from PHD Point Server.
• MinConfidence - defines the minimum confidence value required for data to be plotted on Experion trends.
• AverageRetrievalSettings and SnapshotRetrievalSettings - defines the PHD retrieval attributes – maps the Experion history data requests to PHD data requests.
For detailed descriptions of the registry settings, refer to Appendix A, PHD Point Server Registry Settings.

6 Configure PHD-Experion Integration 6.6 Configure PHD Point Server
124 • Uniformance - PHD/Experion Link Installation and Configuration Guide

Uniformance - PHD/Experion Link Installation and Configuration Guide • 125
7. Startup PHD-Experion Integration Components
7.1 On PHD Server - Start and Monitor PHD Experion Link In a running PHD system, perform the following steps to start the PHD Experion Link.
Note: If the PHD system is not running, a startup of the PHD system (PHDCTL Start or PHDCTL Start Cold) causes the Start_Interfaces.Dat file to be executed automatically, which starts all non-running interfaces.
Step Action
1 Enter the following command to start the PHD Experion Link:
PHDMAN START INT <linkname>
2 Enter the following command to view the PHD Experion Link status display with continuous updating:
PHDMAN MON INT <linkname>
3 The status should be ACTIVE ACTIVE.
If there are startup problems, view the output file generated by the Link:
<install directory>Honeywell\Uniformance\Log Files\Link<linkname>.OUT
For additional information, see section 9.1, Troubleshoot the PHD Experion Link.
Next Step
To implement PHD data collection, the next step is to add PHD tags to the PHD Experion Link, either manually or through the automated Tag Synchronization service.
Before starting Tag Synchronization, you may choose to manually configure a test tag to confirm successful data collection for that one tag. See section 8.2, Manually Configure a New PHD Tag.

7 Startup PHD-Experion Integration Components 7.2 Start and Monitor Tag Synchronization
126 • Uniformance - PHD/Experion Link Installation and Configuration Guide
7.2 Start and Monitor Tag Synchronization
Before you start Tag Synchronization
Check Machines registry parameter
Ensure that the Experion\ Machines registry parameter has been populated with the Experion Server name(s) from the PHD Links Configuration form(s).
If the key has not been created or populated, run RDISetup and execute its Save RDI/Link Configuration command. See Appendix A for registry information.
Change DEBUG registry parameter (optional)
For the initial Tag Synchronization, it may be useful to change the value of the DEBUG registry parameter of the Tag Synchronization service to 2, to increase the amount of detail it outputs to its log.
See Appendix A for registry information.
Change deleted tags collector name (optional)
If a synchronized tag has its point.parameter removed from history on Experion, either explicitly or through the deletion of the Experion point, Tag Synchronization places the tag on the NONE collector. This can be overridden if you specify a different Collector Name for the “DELETED TAG COLLECTOR” attribute.
To specify a different Collector Name, open the PHD Configuration Tool, select the Plant Reference Model application, open the Application Attribute Configuration form, go to the “TAGSYNC APPLICATION” attribute type, add the "DELETED TAG COLLECTOR” attribute (it is not present, by default), and then change the attribute.
REFERENCE
For details to configure the Tag Synchronization attribute, refer to the following section in the Process History Database User Guide (pim0201):
• “Application Attributes”

7 Startup PHD-Experion Integration Components 7.2 Start and Monitor Tag Synchronization
Uniformance - PHD/Experion Link Installation and Configuration Guide • 127
Disable "Check for publisher's certificate revocation" (optional)
With Uniformance R210 and greater, all Uniformance PHD executables and DLLs are signed with a digital certificate. An integrity check is executed each time any of the applications are started. Part of the integrity check is the verification of the digital certificate, which may involve an attempt to connect to the internet.
If no connection to the internet exists, or if the connection to the internet is extremely slow, the verification of the digital certificate may not complete in the time frame required by the service control manager. In such a case, the Uniformance Tag Sync service fails to start and the message notification indicates that the service failed to respond in a timely fashion.
To prevent/resolve this problem do the following:
Step Action
1 Using the account that the service is going to be running as, launch the Internet Options application in Control Panel.
2 Within the application, navigate to the Advanced tab.
Under Security, disable the "Check for publisher's certificate revocation" (remove checkmark from checkbox).

7 Startup PHD-Experion Integration Components 7.2 Start and Monitor Tag Synchronization
128 • Uniformance - PHD/Experion Link Installation and Configuration Guide
Procedure to start Tag Synchronization and monitor its progress
Step Action
1 From the Microsoft Services window on the PHD Server, start the Uniformance Tag Sync service.
2 To verify that the Tag Synchronization service successfully connected to the Experion Server, go to the Experion Server's Station application and view the PHD Server status display :
In Station, choose View>System Status>PHD Server.
The Tag Synchronization Status should become SYNCHRONIZING and the LED should be green.
3 Every 60 seconds, Uniformance Tag Synchronization requests definitions from the Experion Server. The statistics indicate the progress.
When the synchronization completes, the Status will be SYCHRONIZED.
For definitions of the statistics, see section 9.3, To view Tag Synchronization Status and Tuning display.
For guidelines on troubleshooting Tag Synchronization, see section 9.3, Troubleshooting Tag Synchronization.

7 Startup PHD-Experion Integration Components 7.3 In PHD Configuration Tool – Acknowledge Changes in Tag Synchronization Staging Table
(Optional)
Uniformance - PHD/Experion Link Installation and Configuration Guide • 129
7.3 In PHD Configuration Tool – Acknowledge Changes in Tag Synchronization Staging Table (Optional) Overview
If there are configuration errors, or if a Tag Sync Rule has been configured to require explicit user acknowledge, then you must use the Tag Synchronization Acknowledgment form to take action on tag definitions that Tag Sync created in the staging table. The form displays tags that are either unacknowledged or incorrectly configured.
To view/take action on tags in the staging table
Step Action
1 On the Home tab of the ribbon bar, choose Applications > Tag Synchronization Acknowledgement from the PHD Configuration Menu.
2 Either enter a partial/complete tag name or click Advanced Search link to filter the list of displayed tags.
Tip: • To view tags with a specific Tag Sync status, or all but a specific status, use the Tag Synchronization Status field.
• To retrieve all tags in the staging table, leave all the fields blank.
• To view a single tag, enter its Tag Name.

7 Startup PHD-Experion Integration Components 7.3 In PHD Configuration Tool – Acknowledge Changes in Tag Synchronization Staging Table (Optional)
130 • Uniformance - PHD/Experion Link Installation and Configuration Guide
Step Action
Tips for entering a Query:
• Use an asterisk (*) to indicate a wildcard search.
• To search on the underscore (_) character, enclose it in square brackets ([ ]). For example, searching for EXPERION[_]* (with square brackets around the underscore) will return results for EXPERION_. An underscore is interpreted in the database as a single-wildcard character, so querying on EXPERION* and EXPERION_* will return the same results. This also applies to the percent (%) character, which is a multi-character wildcard in the database.
• To retrieve records that are NULL or not NULL, select the operator 'Value is NULL' or 'Value is not NULL'.
3
Click OK. The query returns the tags that match the specified criteria.
4 Refer to Table 4 for descriptions of the fields on the Tag Synchronization Acknowledgement form.
Depending on the message in the Status field, take the appropriate action, as

7 Startup PHD-Experion Integration Components 7.3 In PHD Configuration Tool – Acknowledge Changes in Tag Synchronization Staging Table
(Optional)
Uniformance - PHD/Experion Link Installation and Configuration Guide • 131
Step Action described in Table 5.
Fields
The following fields either exist only in the Tag Synchronization Acknowledge form or have a different meaning than in the Tag Configuration form.
All fields on the form are read only.
Table 4 – Fields on Tag Sync Acknowledgment form
Field Description
Tag Name The PHD tagname. It is valid for the Tag Name field to be empty. If it is empty, the Tag Sync process assigns a unique tagname.
The default is <source system>_xxxx. Where: xxxx is a sequentially increasing number.
Example: EXPERION_1111
Status The status of the operation. This indicates if the definition is valid or if there was a problem with the definition of the PHD tag.
In general, the user can use Discard or Reprocess for any status.
For a status of Tag Valid, the user can also Acknowledge the tag to have it created/updated in PHD.
Existing Tag Name Displays the name of the existing PHD tag in the database that this definition will overwrite.
Click View Tag to display the definition of the existing tag.
Action The action that Tag Sync undertook for this tag. Displayed values are UPDATE, CREATE, DELETE and RENAME.
Note: For descriptions of the fields that are the same as those in the Tag Configuration form, refer to section 8.6, Tag Field Usage for PHD Tags on PHD Experion Link in this guide.

7 Startup PHD-Experion Integration Components 7.3 In PHD Configuration Tool – Acknowledge Changes in Tag Synchronization Staging Table (Optional)
132 • Uniformance - PHD/Experion Link Installation and Configuration Guide
Statuses and actions
Depending on the message in the Status field, take the appropriate action, as described in the following table.
Table 5 – Statuses on Tag Sync Acknowledgment Form
Status Description/ACTION
An exception has occurred during the processing of the rule for the tag
An unhandled exception occurred in the execution of the rule.
ACTION: Review log file to determine problem with rule.
Database failure
There is a problem with the configuration data in SQLServer.
ACTION: Review log file and contact Honeywell TAC.
Datatype does not match existing tag
The datatype of the existing tag does not match the datatype for the Tag Synchronization definition.
ACTION: The user should do either of the following:
• Modify rule so that datatype matches existing tag, or
• Manually change Source Tag Type and/or Source Tag Attribute of existing tag to match datatype in Tag Synchronization. Doing this will result in existing data for the tag being lost (unreadable).
Invalid Tag This error should not appear on the acknowledgement form. It implies that an unknown error occurred in the processing of the tag.
ACTION: Review log file and contact Honeywell TAC.
Multiple synchronization tag exist
There are multiple tags in PHD that match the tag definition and have Tag Synchronization enabled.
ACTION: You need to modify the tag database. This may mean that you need to delete one of the tags or change one of the tags to be non-sync enabled (only if they are different tag types, such as a Collection tag and a Manual Input tag for Put Download).

7 Startup PHD-Experion Integration Components 7.3 In PHD Configuration Tool – Acknowledge Changes in Tag Synchronization Staging Table
(Optional)
Uniformance - PHD/Experion Link Installation and Configuration Guide • 133
Status Description/ACTION
Non-synchronized tag exists
A tag that is not synchronized already exists for PHD.
ACTION: Modify the existing tag so that it is synchronized.
Tag acknowledged
This is a temporary condition that should not remain for a long period of time. This occurs after a tag has been acknowledged through the form or implicitly through the execution of a rule.
Tag discarded The tag has been discarded either through the acknowledgement form or implicitly through a rule.
Tag reprocessing
The tag is scheduled to be reprocessed. This is a temporary condition.
Tag source information invalid
The tag source information specified is not valid for the source system. For Experion, this means that either the Point or Parameter is unspecified.
ACTION: Modify the Point or Parameter in the rule.
Tag Valid The tag is confirmed to be valid.
ACTION: Click Acknowledge Selected to create/update the tag.
Note: Additional statuses may display that are not listed here – those statuses correspond to the same errors that are seen on the Tag Configuration form (for example, Invalid Parent Tag Name specified).
To take action
You must use the Acknowledge Selected, Acknowledge All, Discard Selected, or Reprocess Selected buttons to take an action. The following table describes these buttons.
Table 6 – Buttons on Tag Sync Acknowledgment form
Button Description

7 Startup PHD-Experion Integration Components 7.3 In PHD Configuration Tool – Acknowledge Changes in Tag Synchronization Staging Table (Optional)
134 • Uniformance - PHD/Experion Link Installation and Configuration Guide
Button Description
Acknowledge Selected Select one or more staging Tags from the Current list of Staging Tag records.
If the displayed tag has a valid definition, the Acknowledge button will be enabled.
Click Acknowledge to cause Tag Sync to either update the existing tag definition in the database or create the new tag.
After acknowledgement, the form shows the next tag in the staging table.
Acknowledge All
Select one or more staging Tags from the Current list of Staging Tag records.
If any of the queried tags have a valid definition, the Acknowledge All button will be enabled.
Click this button to acknowledge all of the queried tag records that have Acknowledge enabled.
Discard Selected Select one or more staging Tags from the Current list of Staging Tag records.
Click Discard if the tag is not to be saved to the database. The tag will remain in the staging table.
Generally, this action is used if the tag is available in Experion history, but is of no interest to PHD. After you click Discard, Tag Sync will still be aware of the definition, so it will not continually identify the tag as a missing definition from the source system.
Reprocess Selected Select one or more staging Tags from the Current list of Staging Tag records.
Click Reprocess if you want Tag Sync to reprocess the tag.
Generally, this action is used if there was an error in the tag definition and you have modified either the rule or the parent tag definition to resolve the problem.
To view Tag Sync log
The Tag Sync log shows the tags being received by PHD.

7 Startup PHD-Experion Integration Components 7.3 In PHD Configuration Tool – Acknowledge Changes in Tag Synchronization Staging Table
(Optional)
Uniformance - PHD/Experion Link Installation and Configuration Guide • 135
To view the log: \Program Files \Honeywell \Uniformance \Logfiles \UniformanceTagSync.log
Use the InformationLevel registry parameter to increase the level of detail in the log, if needed to troubleshoot Tag Sync issues (see Appendix A).

7 Startup PHD-Experion Integration Components 7.4 Tasks to Perform After Initial Tag Synchronization
136 • Uniformance - PHD/Experion Link Installation and Configuration Guide
7.4 Tasks to Perform After Initial Tag Synchronization Complete PHD engineering unit configuration
If the source unit of an Experion tag is not defined in the PHD Engineering Unit configuration form, then Tag Synchronization creates a record for the source unit in the PHD Engineering Unit configuration form under the TAGSYNC Unit Type.
For each Source Unit in the TAGSYNC Unit Type, you should either move the unit to an existing Unit Type and configure its’ conversion factors or create a new Tag Synch Unit Mapping.
Perform the following steps to complete the unit configuration.
Step Action
1 From the Main Menu of the PHD Configuration Tool, select System Data > Engineering Units.
Note: Tag Synchronization populates units in the TAGSYNC Unit Type, based on values received from Experion that do not match existing PHD Units.

7 Startup PHD-Experion Integration Components 7.4 Tasks to Perform After Initial Tag Synchronization
Uniformance - PHD/Experion Link Installation and Configuration Guide • 137
Step Action
To map the Source Unit to existing PHD Unit
2 First select the TAGSYNC Unit Type from the Current list of Engineering Unit Type records and then choose an individual Engineering Unit. Next, choose Tag Sync Unit Mapping from the menu. The Source Unit should be populated based on the unit you selected. Choose a corresponding PHD Unit from the drop down list of existing Engineering units. Click Save and then click Close.
For example:
Source Unit PHD Unit
Deg C DEGC
Deg F DEGF
Barrels BBL
Cubic Meters M3
When finished, skip to step 7.
If the PHD unit you need does not exist in the drop down list, and then create a new PHD Unit as described in the following steps.
To move the Source Unit to an Existing Unit Type
3 First select the TAGSYNC unit type from the Current list of Engineering Unit Type records and then choose an individual Engineering Unit. Next, choose Move Unit from the menu.
Select the Source Unit. Select the Unit Type you wish to move the Source Unit to. Click Move and then click Close.
Note: Close the form and reopen it to refresh the underlying data cache.
4 Select the appropriate Unit Type master record.
Select the Experion source unit. Enter the Pre-Add factor, the Multiplication factor and the Post-Add factor to define how this unit relates to the base unit of the Unit Type.
REFERENCE: For details on how to create new PHD engineering units, refer to the Process History Database User Guide (pim0201).

7 Startup PHD-Experion Integration Components 7.4 Tasks to Perform After Initial Tag Synchronization
138 • Uniformance - PHD/Experion Link Installation and Configuration Guide
Step Action
5 When complete, select Update PHD.
REFERENCE
For more information, refer to the PHD User Guide (pim0201):
• Section 2.31 – "Tag Synchronization Unit Cross Reference Configuration Form"
• Section 3.14 – "Tag Synchronization Unit Cross Reference Configuration Report"

7 Startup PHD-Experion Integration Components 7.4 Tasks to Perform After Initial Tag Synchronization
Uniformance - PHD/Experion Link Installation and Configuration Guide • 139
Enable/Disable continuous Automatic Tag Synchronization (Optional) It may be undesirable to have Tag Synchronization continuously overwrite PHD tag definitions. If you want continuous automatic Tag Synchronization, then enable the Automatic Synchronization flag. Disable the flag on those tags for which you do not want continuous synchronization.
Set DEBUG registry parameter back to 1
If you modified the InformationLevel parameter, then after successful Tag Synchronization, return the parameter value to 1, which outputs the least amount of information to the log.

7 Startup PHD-Experion Integration Components 7.4 Tasks to Perform After Initial Tag Synchronization
140 • Uniformance - PHD/Experion Link Installation and Configuration Guide
Set Tag Synchronization service to Automatic startup Finally, at some time, you may want to set the Uniformance Tag Sync service to startup automatically upon reboot of the PHD Server.
Step Action
1 On the PHD Server, go to the Microsoft Services window: Control Panel> Administrative Tools> Services,
2 Right-click Uniformance Tag Sync service and choose Properties.
3 Change the Startup type to Automatic and click OK.

7 Startup PHD-Experion Integration Components 7.5 On PHD Server – Start PHD Point Server Service
Uniformance - PHD/Experion Link Installation and Configuration Guide • 141
7.5 On PHD Server – Start PHD Point Server Service Start and stop the PHD Point Server through the Microsoft Services window.
Step Action
1 On the PHD Server, go to the Services window: Control Panel> Administrative Tools> Services,
2 Right-click and Start the Experion PKS PHD Point Server service.
3 (Optional) If you want the PHD Point Server to start automatically upon reboot, right click Experion PKS PHD Point Server and choose Properties.
Change the Startup type to Automatic and click OK.
4 To verify the connection to the Experion Server, go to the Experion Server's Station application and view the PHD Point Server Status (see section 7.6, On Experion Server – View PHD Point Server Status).
7.6 On Experion Server – View PHD Point Server Status
Step Action
1 Logon to Station as a user with mngr security level. In Station, choose Configure>System Hardware>PHD Server.
2 Click the Status tab to check if the PHD Point Server is communicating with the Experion Server.
3 Both LEDs for the PHD Point Server Network Link should be green (see Figure 11):
• Check that the Link Status LED is OK and green.
• Check that the Data Status LED is OK and green.
4 If the status is not OK, refer to section 9.4, Troubleshoot PHD Point Server.

7 Startup PHD-Experion Integration Components 7.6 On Experion Server – View PHD Point Server Status
142 • Uniformance - PHD/Experion Link Installation and Configuration Guide
Figure 11 – PHD Point Server Status Display

7 Startup PHD-Experion Integration Components 7.7 On Experion Server – View PHD Point Server Trend Data
Uniformance - PHD/Experion Link Installation and Configuration Guide • 143
7.7 On Experion Server – View PHD Point Server Trend Data
To check the operation of the PHD Point Server, create an Experion Trend that contains a non-synchronized PHD tag. Note: The PHD tag must exist on the PHD Server.
Perform the following steps to configure an Experion Trend.
Step Action
1 On an Experion node, go to the Experion Configuration Explorer of Configuration Studio, click Trends and Groups, and then click the Configure Trends task.
2 For the Point ID, enter the PHD Point Server's Alias and press Enter.
3 Change the Display parameter to display as an Alphanumeric.
4 For the Parameter, enter the tag name of a PHD tag.
Note: The PHD tag may need to be a non-synchronized PHD tag (not in Experion history), depending on how the PHD Point Server is configured. (For details, see section 10.3, PHD Point Server Registry Settings, AllowTagSyncTags.)
5 For guidelines on troubleshooting the trend and optimizing trend performance, see section 9.4, Troubleshoot PHD Point Server.
REFERENCE
For details on configuring Experion trends, refer to the Experion Server and Client Configuration Guide in the Experion book set.

7 Startup PHD-Experion Integration Components 7.7 On Experion Server – View PHD Point Server Trend Data
144 • Uniformance - PHD/Experion Link Installation and Configuration Guide

Uniformance - PHD/Experion Link Installation and Configuration Guide • 145
8. Configure PHD Tags on PHD Experion Link
8.1 General PHD Tag Configuration Guidelines
ATTENTION
It is possible to manually build tags in PHD on the PHD Experion Link and/or use automatic Tag Synchronization.
You must manually build tags to historize in PHD any point parameters that are not assigned to Experion history. Honeywell supports this functionality for character (string) parameters only.
All numeric and enumerated (ordinal) data to be collected by the PHD Experion Link should be assigned to Experion history and automatically Tag Synchronized.
ATTENTION
Tag Synchronization only examines points with Experion history assignment.

8 Configure PHD Tags on PHD Experion Link 8.2 Manually Configure a New PHD Tag
146 • Uniformance - PHD/Experion Link Installation and Configuration Guide
8.2 Manually Configure a New PHD Tag Before you begin
Read section 8.1, General PHD Tag Configuration Guidelines. Note: Instead of manually creating PHD tags for numeric or enumerated parameters, you should assign the parameters to Experion history and Tag Synchronize them to PHD.
To manually configure a new PHD tag Perform the following steps to manually configure a PHD tag to collect Experion strings.
Step Action
1 In the PHD Configuration Tool, open the Tag Configuration form.
2 Configure a collected tag. For minimum required fields to collect a string, see below. For descriptions of the tag fields, see section 8.6, Tag Field Usage for PHD Tags on PHD Experion Link.
3 After entering the required fields, click Send Changes to PHD.
4 From a command prompt on the PHD Server where the PHD Experion Link is running, enter the following command.
PHDMAN MON QUE <phdtagname>
5 Verify that values are coming into the tag's data queue.
Example PHD tag configuration
Minimum PHD tag fields to collect a string parameter from Experion are as follows:
Tag Name MYPHDTAG Active X Collection X Source System Type EXPERION Source Tag Type AS Source Tag Attribute VALUE40 Scan Frequency 60 PHD Link Name LSTB-EXP PHD Link Point Name 11_AC12 PHD Link Parameter Name DESC

8 Configure PHD Tags on PHD Experion Link 8.3 Deleting an Experion point or removing it from Experion history
Uniformance - PHD/Experion Link Installation and Configuration Guide • 147
8.3 Deleting an Experion point or removing it from Experion history
At some time after initial Tag Synchronization and recovery of the Experion history into PHD, you may want to remove an Experion point from Experion history or delete the point from the Experion system.
Deleted Experion points are implicitly acknowledged by Tag Sync.
Before deleting an Experion point or removing it from Experion history, consider whether you should disable Automatic Tag Synchronization on the PHD tag first:
• If Automatic Tag Synchronization is Enabled on the PHD tag at the time you disable history collection on the Experion point:
− PHD stops collecting data for the tag, but still returns requested data for the tag.
− Data Store is disabled on the PHD tag,
− Collector Name is set to NONE, and
− Link Name is set to NONE.
− If the Experion point is re-added to Experion history, Data Store is enabled, the Collector Name is set by the Rule, and the Link Name is set to the correct link.
• If Automatic Tag Synchronization is Disabled on the PHD tag at the time history collection is disabled on the Experion point:
− PHD continues to collect data for the tag. Additional load is placed on the Experion Server, because the data for the tag is not cached in Experion history.
− No tag configuration changes are made to the PHD tag. − If the Experion point is re-added to Experion history, Tag Sync reports an error
that a non-synchronized PHD tag was detected during the PHD matching of the Experion point.parameter. Tag Sync does not change the configuration of the existing PHD tag. At this time, the user could re-enable Automatic Tag Synchronization on the PHD tag, and Tag Sync would start maintaining the PHD tag configuration.
ATTENTION
If you want to remove a point.parameter from Experion history, Honeywell recommends that you disable Automatic Tag Synchronization on the PHD tag before removing the Experion point’s history assignment from Experion.

8 Configure PHD Tags on PHD Experion Link 8.4 Disable Tag Synchronization for a PHD Tag
148 • Uniformance - PHD/Experion Link Installation and Configuration Guide
8.4 Disable Tag Synchronization for a PHD Tag The default Tag Synchronization rule/parent tag enables the “Automatic Tag Synchronization” flag - however, it may be undesirable for Tag Synchronization to continuously overwrite the PHD tag definitions.
This flag can be disabled to stop continuous Tag Synchronization on a per tag basis, if wanted; and then any changes to the point definition on the Experion system will not be reflected in PHD.
Perform the following steps to disable continuous Tag Synchronization of a PHD tag.
Step Action
1 In the PHD Configuration Tool, open the Tag Configuration form.
2 Enter the tag name of interest in the Search entry box. Click Go.
3 On the Tag Configuration form for the tag of interest, disable (remove checkmark from) the Auto Synchronization flag.
4 Save the record.
5 Click Send Changes to PHD.

8 Configure PHD Tags on PHD Experion Link 8.5 Update or Migrate Existing PHD Tags
Uniformance - PHD/Experion Link Installation and Configuration Guide • 149
8.5 Update or Migrate Existing PHD Tags If PHD tags are already built, but are not yet assigned to a PHD Experion Link, configure the following fields in the Tag Configuration form and then click Send Changes to PHD:
- PHD Link Name - PHD Link Point Name - PHD Link Parameter Name
For example, if you performed Tag Synchronization before configuring the PHD Experion Link and running RDISetup, Tag Synchronization will not have assigned the synchronized tags to a PHD Experion Link. You can manually assign them through the above fields.
If existing PHD tags are currently assigned to an LxS RDI, Experion/PlantScape RDI, or OPC RDI, and you want to reassign them to a PHD Experion Link, the following steps must be undertaken:
• Configure PHD Experion Link(s)
• Validate/modify Tag Source Configuration
• Modify Tag Configuration
• Configure Shadow Server Peer RDI, if applicable
REFERENCE
Contact Honeywell for more information on how to migrate PHD tags from existing RDIs to the PHD Experion Link, including enabling Tag Synchronization.

8 Configure PHD Tags on PHD Experion Link 8.6 Tag Field Usage for PHD Tags on PHD Experion Link
150 • Uniformance - PHD/Experion Link Installation and Configuration Guide
8.6 Tag Field Usage for PHD Tags on PHD Experion Link
ATTENTION
This section does not repeat the complete definition of every PHD tag field – it only describes how Tag Synchronization affects each field and how the field should be handled to support Experion tags that are collected by a PHD Experion Link.
For additional data entry guidelines, for example, if you want to create tags manually, also refer to the PHD User Guide (pim020s), section "Tag Configuration Form."
Tag Name
If using Tag Synchronization, the default Tag Synchronization rule assigns the tagname to be the Experion “point.parameter”. If the Experion point.parameter length is greater than 32 characters, and you have not created a rule to compensate for it, then the PHD tagname will be EXPERION_xxxx, where xxxx is a sequentially increasing number.
Active This flag must be enabled to make the tag usable. The default Tag Synchronization rule enables this flag. An inactive tag does not collect or store data; and references to the tag prompt a message indicating the tagname is unknown. When you need to take a PHD tag out of service, disable the Active flag.
Parent Tag Name The default Tag Synchronization rule assigns the parent tag to be EXP_PARENT. If Tag Synchronization is to be used to maintain the tags for the PHD Experion Link, then use of the EXP_PARENT parent tag should be sufficient.
Tag Units Tag Synchronization checks to see if the “Source Unit” from the Experion Server is defined in PHD (Engineering Unit Configuration form in the Plant Reference Model). If the unit is defined, Tag Synchronization uses this unit for the newly created tag. If the unit is not defined, it checks the Tag Synchronization Unit Cross Reference form. Tag Synchronization populates the form based on “Source Units” it receives from the Experion Server that do not match existing “PHD Units.” These auto-populated records will have a null (blank) PHD Unit. For records that have a null PHD Unit, you should take action to complete the configuration (see 7.4, Tasks to Perform After Initial Tag Synchronization).

8 Configure PHD Tags on PHD Experion Link 8.6 Tag Field Usage for PHD Tags on PHD Experion Link
Uniformance - PHD/Experion Link Installation and Configuration Guide • 151
Enable Collection This flag enables continuous data collection by the PHD Experion Link defined in the PHD Link Name field.
The default Tag Synchronization Rule/Parent Tag enables the Collection flag.
Data Store This flag enables continuous storage of incoming data by the PHD Server to the PHD archive files. If this field is blank, any tag data collected is retained only in PHD's memory queues and will not be stored in archive files on disk. As a result, if unexpected system outages occur, this data is lost. In most circumstances, setting the Data Store flag is recommended.
The default Tag Synchronization Rule/Parent Tag enables the Data Store flag.
If the Experion Server notifies Tag Synchronization of an Experion history point deletion, then PHD disables the Data Store enable flag for any PHD tag(s) associated with that Experion point.
Digital Enumeration This flag enables additional handling of this tag's digital value by the PHD Server - the tag will be able to return either Ordinal integer values or Enumeration String values upon client request. The mapping of ordinals to strings is specified through the Digital Enumeration List Name field.
Automatic Tag Synchronization The default Tag Synchronization rule/parent tag enables the “Automatic Tag Synchronization” flag; however, it may not be desirable for Tag Synchronization to continuously overwrite the PHD tag definitions.
If needed, this flag can be disabled to stop continuous Tag Synchronization for the tag; and then any changes to the history point definition on the Experion system will not be reflected in PHD.
A PHD tag must be Active and have Automatic Synchronization enabled before Tag Synchronization can take place.
If you enable Automatic Tag Synchronization, Honeywell recommends that before removing an Experion point’s history assignment from Experion, you disable Automatic Tag Synchronization on the associated PHD tag(s).

8 Configure PHD Tags on PHD Experion Link 8.6 Tag Field Usage for PHD Tags on PHD Experion Link
152 • Uniformance - PHD/Experion Link Installation and Configuration Guide
Source Tag Specification Source Tag Index
Not Used.
Source System Type EXPERION
Source Tag Type This field defines the data type requested from or downloaded to the source system. The following table shows the PHD Source Tag Type that is required to collect or download data types supported by the Experion Server, and how PHD tags store the value in PHD.
Source Tag
Type Source Tag
Attribute PHD
Data Type Description
F4 VALUE F Four byte float
D8 VALUE D Eight byte float (double-precision)
I4 VALUE I Four byte integer
L8 VALUE L Eight byte integer (long)
EN VALUE I Four byte integer
(Enumeration Ordinal)
EN STRING U 80 character string(see NOTE2)
(Enumeration String)
AS VALUE40 C 40 character string(see NOTE 1)
US VALUE80 U 80 character UNICODE string(see NOTE 1)
NOTE 1: Tag Synchronization does not use this tag type, but you may use them to manually configure PHD tags to historize strings, such as point descriptions.
NOTE 2: If you specify EN/STRING, the Experion OPC Server will convert its historized Ordinal value to a String and return the String to the PHD Experion Link. For more information on enumerations, refer to the section 8.7, Collect and Access Enumeration Data.
Source Tag Attribute
VALUE or STRING
Source Tag Units For data entry details, refer to the PHD User Guide.

8 Configure PHD Tags on PHD Experion Link 8.6 Tag Field Usage for PHD Tags on PHD Experion Link
Uniformance - PHD/Experion Link Installation and Configuration Guide • 153
Collector Name The Link name is not defined here, it is defined in the Interfaces form.
Note: If Tag Synchronization detects the removal of the Experion Point Parameter from Experion history, it sets the Collector Name to the default "NONE".
Note: If tags defined on the PHD Experion Link are to be collected on the PHD Collector Server node and then shadowed to a remote PHD Server shadow node, the Collector Name must be set to the same value as the PHD Link Name. If tags are not to be shadowed, then the Collector Name should be cleared (set to NULL).
Scan Frequency For tags that are collecting point-dot-parameters that are defined in Experion History, the Scan Frequency must match the fastest Experion history file that the point-dot-parameter is configured in. The default Tag Synchronization Rule will set the Scan Frequency appropriately.
ATTENTION
Honeywell advises that you should not change the Scan Frequency after Tag Sync has set it to the appropriate interval.
When a point-dot-parameter is defined in Experion History, PHD has no control over how often the tag is scanned. Changes to Scan Frequency on the PHD tag will not result in a change to the Experion history collection rate or the actual data collection rate from the source by Experion.
As with all types of PHD tags, the Scan Frequency affects the size of the tag’s Data Queue on the PHD Server. Configuring the Scan Frequency slower than the fastest history file can result in a degradation of performance in the PHD Server due to the data queue for the tag being created too small. Conversely, configuring the Scan Frequency faster than the fastest history file can result in increased memory usage in the PHD Server due to a larger than required data queue size for the tag.
For PHD tags that are not historized on Experion, (such as strings), the Experion OPC HDA Server will report the tags by exception, but no faster than the PHD tag’s Scan Frequency.
Scan Frequency in terms of OPC HDA
The PHD Experion Link sets the UpdateInterval property of the AdviseRaw method on the Experion OPC HDA server to the value of the PHD tag's Scan Frequency.

8 Configure PHD Tags on PHD Experion Link 8.6 Tag Field Usage for PHD Tags on PHD Experion Link
154 • Uniformance - PHD/Experion Link Installation and Configuration Guide
The PHD Experion Link uses the AdviseRaw method for continuous collection (updates from Experion to PHD). The AdviseRaw method causes Experion to send blocks (batches) of values as they are about to be written to the Experion history files. The UpdateInterval property defines how often callbacks are made to the PHD Experion Link.
The PHD Experion Link uses the ReadRaw method on the Experion OPC HDA server for initial History Recovery. ReadRaw causes a read of the Experion history files.
How Scan Frequency affects compression
Whether or not PHD performs post processing (data compression) depends on whether PHD receives the data in a block or as a single value. When PHD gets data in a block, it treats it like a History Recovery request and does NOT perform post processing. When PHD receives a single value, it treats it as a collected value and post-processes the data. For example:
• If the Scan Frequency of the PHD tag is 60 seconds, but the Experion Server sends the data every 5 seconds, then PHD gets the data in blocks of 12 values. Post-processing, such as data compression, is not performed.
• If the Scan Frequency of the PHD tag is 5 seconds, and the Experion Server sends the data at 5 second intervals, then PHD gets the data as single values. Post-processing, such as data compression, is performed.
Digital Enumeration List Name This field specifies the list that maps this tag's Ordinal integer values to Enumeration Strings. This field, together with the Digital Enumeration enable flag, enables PHD to return either ordinals or enumerations to clients accessing this tag's value.
If you historize the enumeration string (Source Tag Type = EN and Source Tag Attribute = STRING), a client will still be able to obtain the ordinal value from PHD if needed.
The same is true if you historize the ordinal (Source Tag Type = EN and Source Tag Attribute = VALUE) - a client will be able to obtain the enumeration string if needed.
REFERENCE
For information on the Digital Enumeration Configuration Form that you use to create lists of enumerations, refer to the PHD User's Guide (pim0201)
PHD Link Name
This field specifies the Experion Server name (Target Host entries in the PHD Links Configuration forms populate the dropdown list).

8 Configure PHD Tags on PHD Experion Link 8.6 Tag Field Usage for PHD Tags on PHD Experion Link
Uniformance - PHD/Experion Link Installation and Configuration Guide • 155
Extended Source Tag Name This field specifies the Experion point.parameter that a PHD Experion Link will request data from the Experion Server. 300 characters max. Case sensitive - may be upper and lower case. The function block(s) are included in the information that Tag Synchronization sees as the Experion PARAMETER variable. Controller point: FunctionBlock.Parameter (Ex: PIDA.SP). SCADA point: Parameter.
Scale High Extreme
Scale Low Extreme
These fields specifies the lowest and highest values for F, D, L and I data type tags. If the tag value is outside of the range, then PHD clamps the data to the limit and sets the confidence of the value to 0. For details, refer to the PHD User Guide.
The default Tag Synchronization rule sets these values to the Experion high range and low range values.
Quantum If a quantum is specified, incoming values are rounded to the nearest quantum (step). A larger quantum yields greater PHD data storage compression, but reduces the precision of the stored value. Compression is disabled if the Quantum is set to -1. For details, refer to the PHD User Guide.
Synchronization Rule Name This read-only field indicates the Tag Sync Rule that created the PHD tag definition.
Asset Name Tagname of an asset defined through the Experion Enterprise Model Builder. For example, if Enterprise Model Builder>Assets shows the following configuration: Tag Name – E110_H11 Item Name – Condenser_H11 Full Item Name – Assets\D_H11\Condenser_H11 Then the Asset Name synchronized to PHD is E100_H11.
Item Name
Item Name defined through Experion Control Builder or Quick Builder. For example, if Control Builder>Control Module shows the following configuration: Tag Name – 11_AC12 Item Name – 11_AC12_item Then the Item Name synchronized to PHD is 11_AC12_item.

8 Configure PHD Tags on PHD Experion Link 8.7 Collect and Access Enumeration Data
156 • Uniformance - PHD/Experion Link Installation and Configuration Guide
8.7 Collect and Access Enumeration Data Collect enumeration data
The PHD Experion Link can be configured to collect either the ordinal or the string representation of enumerations from the Experion Server and return it to the PHD Server for archiving. The Source Tag Type and Source Tag Attribute fields, as follows, determine whether the PHD Experion Link collects the Ordinal or the String:
If the Source Tag
Type is this… And the Source Tag
Attribute is this… Then the Link collects this…
EN VALUE Enumeration Ordinal
EN STRING Enumeration String
Note: The Experion Server always places enumeration data types (such as MODE) into Experion history by the ordinal value. If you specify EN and STRING, then the PHD Experion Link automatically appends /ENUM to the item name. The Experion OPC Server interprets /ENUM to mean that the client wants the enumeration string instead of the ordinal value. The Experion OPC Server converts the historized Ordinal value to a String and returns the String to the PHD Experion Link.
Note: When using Tag Synchronization, you may choose to add text to the default rule to set the PHD tag definition of Ordinals to EN/VALUE. If needed, you can define a Tag Synchronization rule to set tag definitions to EN/STRING.
Enable PHD to return either strings or ordinals to clients If Ordinals are archived in PHD, you can enable PHD to return either Ordinal or String data to clients by configuring the “digital enumeration handling”. This involves configuring tables that allow PHD to map Ordinals to Strings, and then enabling the Digital Enumeration flag on a per tag basis:
1. Complete the Digital Enumeration String Configuration Form (creates a list of all the strings that are to be used by PHD to convert ordinals to strings).
2. Complete the Digital Enumeration Configuration form (creates a named list that maps ordinals to corresponding enumeration strings).
3. Enable the Digital Enumeration flag in the Tag Configuration form.
4. Assign a Digital Enumeration List Name in the Tag Configuration form.

8 Configure PHD Tags on PHD Experion Link 8.8 Configure Manual Input Tags on PHD Experion Link
Uniformance - PHD/Experion Link Installation and Configuration Guide • 157
Client access of enumeration strings or ordinals Uniformance Desktop clients (including Visual PHD OLE Server, Visual PHD controls, Excel Companion, PowerPoint Companion, and ModTag) can access enumeration string data by specifying a suffix on the tagname:
tagname/enum or tagname(enum).
Example:
If Ordinals are being archived, but Digital Enumeration handling has been enabled for a tag, then specifying the tagname without the suffix returns Ordinal data, and specifying the suffix returns Enumeration String data.
A100.MODE returns <ordinal>
A100.MODE(enum) returns <string>
Note: Clients of the PHD OPC Server can specify tagname(enum)
Note: With ModTag and Excel Companion, uses may select their default preference to be Ordinals or Enumerations.
8.8 Configure Manual Input Tags on PHD Experion Link To Put Download (write) a manually entered PHD value to an Experion tag, enter the following PHD tag configuration:
1. Choose new Manual Input tag instead of the new Collected tag.
2. Enable the Put Download flag.
3. Choose the Experion Link in the RDI/Link Collector field.
4. Fill in the mandatory fields.
5. Specify the destination Experion point.parameter in the Extended Source Tag field.

8 Configure PHD Tags on PHD Experion Link 8.8 Configure Manual Input Tags on PHD Experion Link
158 • Uniformance - PHD/Experion Link Installation and Configuration Guide

Uniformance - PHD/Experion Link Installation and Configuration Guide • 159
9. Monitor and Troubleshoot PHD-Experion Integration
9.1 Troubleshoot the PHD Experion Link Note: The Uniformance System Monitor (USM), a separately purchased application, can be used to monitor PHD performance, including Uniformance Tag Synchronization.
View logs related to data collection
Function Log
PHD Experion Link – on PHD Server
\Program Files \Honeywell \Uniformance \Logfiles \LINK<linkname>.OUT Gives information about the Initialization of PHD tags, poll groups, and errors during these actions, and outgoing and incoming data packages.
Uniformance RDI Server service – on PHD Server:
\Program Files \Honeywell \Uniformance \Logfiles \RDIServer.LOG
PHD integrity monitor – on PHD Server
\Program Files \Honeywell \Uniformance \Logfiles \PHD_EVENT.LOG
Experion OPC HDA Server– on Experion Server
Program Files \Honeywell \Experion PKS \server \data \log.txt Paranoid OPCHDA for hscopcserv.exe (HDA-specific paranoid group for Experion OPC Server) Note: A paranoid is a debug group whose debug level can be modified.
Procedure to restart PHD Experion Link
From a command prompt or through the PHDMAN shortcut:
PHDMAN SHUT INT <linkname> PHDMAN START INT <linkname>
Procedure to view PHD/Link Status
Use PHDMAN to view status of a Link: PHDMAN SHO INT <linkname> To view the status with continuous updating: PHDMAN MON INT <linkname>

9 Monitor and Troubleshoot PHD-Experion Integration 9.1 Troubleshoot the PHD Experion Link
160 • Uniformance - PHD/Experion Link Installation and Configuration Guide
Interpret status and log messages The normal Link status indications are: State: ACTIVE Interface: ACTIVE
Figure 12 – Link Status Display – With RDM
How to recognize normal history recovery messages (LINK<linkname>.OUT)
When the PHD Experion Link starts, it looks for the oldest of the most recent values in the PHD data queues of all tags configured on the Link, and uses this timestamp to determine how far back it is going to do history recovery.
When it performs history recovery, the Link outputs messages to the LINK<linkname>.OUT file.
The Link submits the initial call for data (ReadRaw) and waits for data to be returned by the Experion Serve – these messages are normal and indicate the Link works as intended: [date/time] ID: 0: Info: ReadRaw() Start Time: [date/time] [date/time] ID: 0: Info: ReadRaw() End Time : [date/time] [date/time] ID: 0: Info: ReadRaw() Transaction ID: 0x00000001 (0 of 7 Failed)
After history recovery completes, the following normal messages indicate that the Link switched to OnAdvise and is in "normal collection mode" (still asynchronous HDA reads, but different from the initial call for data):

9 Monitor and Troubleshoot PHD-Experion Integration 9.1 Troubleshoot the PHD Experion Link
Uniformance - PHD/Experion Link Installation and Configuration Guide • 161
[date/time] ID: 0: Info: OnReadComplete() Received For: 7 Items ... [date/time] ID: 0: Info: OnReadComplete() Switching To AdviseRaw For: 7 Items
Note: When the Link performs history recovery, its status shows ACTIVE ACTIVE, but the history data may not come in until several minutes later.
System state
The top portion of the Link status display indicates the current system state, the current local system time, and the current time of the real-time system, as given by current local time plus the Link's Delta clock seconds.
REAL TIME DATA INTERFACE
The REAL-TIME DATA INTERFACE portion of the Link status display shows Link states and Link statistics. Note: PHD collects average rate statistics for the Link only when the STATISTICS parameter is 1 (ON). The <No stats> indicator appears when the STATISTICS parameter is 0 (OFF). There is overhead associated with the statistics collection, and as a result, you must explicitly enable statistics collection, when needed, using PHDMAN or RDISetup.
RDI PARAMETERS
The RDI PARAMETERS portion of the Link status display shows the current parameter values. If the Link has been configured to support redundant Experion Servers, HOSTNAME indicates "RDM: n" (see Figure 12). For non-redundant Experion Servers, HOSTNAME indicates the Target Host Name (see Figure 13).

9 Monitor and Troubleshoot PHD-Experion Integration 9.1 Troubleshoot the PHD Experion Link
162 • Uniformance - PHD/Experion Link Installation and Configuration Guide
Figure 13 – Link Status Display – Non-Redundant Experion Server
RDI FLAGS
The RDI FLAGS portion of the display contains the NEWTAGS or SHUTDOWN flag parameters, indicating the presence of a new tag update or a shutdown request.
REFERENCE
For definitions of states, statistics, and parameters, refer to the PHD System Manual (pim0301), section "Monitoring the RDIs and Links".
Common installation problems
In most cases, installation problems are due to the following:
• The interface startup parameters from PHD are incorrectly defined (PHD Links Configuration form).
• The interface has not been defined to PHD (RDISetup and Interfaces.Dat have not been run).
• Hosts file on PHD Server is not correct: - Hostnames of redundant system are not correct. - IP addresses are not correct.

9 Monitor and Troubleshoot PHD-Experion Integration 9.1 Troubleshoot the PHD Experion Link
Uniformance - PHD/Experion Link Installation and Configuration Guide • 163
Symptom - Missing history data on PHD Server after history recovery After the PHD Experion Link performs history recovery, if there are missing samples or if a PHD tag recovered no history samples, but other PHD tags are fine, perform the following steps to troubleshoot the problem.
Step Action
1 On the Experion Server, check to see if the samples exist.
2 On the PHD Server, check RDIServer.LOG to see if any errors are reported for any of the samples.
3 If necessary, Honeywell TAC can instruct you on how to turn up the Experion OPCHDA paranoid for hscopcserv.exe and then ask you to reproduce the problem.

9 Monitor and Troubleshoot PHD-Experion Integration 9.2 Troubleshoot Redirection Manager (RDM)
164 • Uniformance - PHD/Experion Link Installation and Configuration Guide
9.2 Troubleshoot Redirection Manager (RDM) View logs related to RDM
Location Log
PHD Server The Redirection Manager logs its events and errors into the Windows Event Log. The log includes the same status changes seen in a Honeywell System Management Display or an Experion System Status Display. Typical log entries include the following:
• Switchovers to the secondary Experion Server.
• Errors returned during OPC calls made to the alternate server.
• “Out of sync” error messages on the alternate server. If you see this message, check the event log for more information.
View RDM auxiliary status display
When the PHD Experion Link successfully connects to RDM, the connection status automatically appears in the Honeywell System Management display and the Experion System Status display. At that time, you can callup the Redirection Manager Auxiliary Status Display to view details of the connection.
The System Management Display example in the following figure shows the status for RDM_10 in the left pane. The right pane shows the Redirection Manager Auxiliary Status Display.
A disconnect causes the connection to disappear from the system displays.
REFERENCE
For details on Redirection Manager status, refer to the Experion Redirection Manager User's Guide in the Experion book set.

9 Monitor and Troubleshoot PHD-Experion Integration 9.2 Troubleshoot Redirection Manager (RDM)
Uniformance - PHD/Experion Link Installation and Configuration Guide • 165
Figure 14 – Redirection Manager Auxiliary Status Display

9 Monitor and Troubleshoot PHD-Experion Integration 9.3 Troubleshooting Tag Synchronization
166 • Uniformance - PHD/Experion Link Installation and Configuration Guide
9.3 Troubleshooting Tag Synchronization To view logs related to Tag Synchronization
Function – Location Log
Uniformance Tag Sync service – on PHD Server
\Program Files \Honeywell \Uniformance \Logfiles \UniformaceTagSync.log
Shows the tags being received by PHD. You can increase the level of detail that is output by using the registry parameter (see Appendix A).
Experion History Tag Synchronization Server – on Experion Server
Program Files \Honeywell \Experion PKS \server \data \log.txt Paranoid HTS for htsserver.exe (general paranoid group for Tag Synchronization server)
Paranoid HTSTAG for htsserver.exe (displays tag information sent to PHD)
To view Tag Synchronization Status and Tuning display
Step Action
1 On Experion Server, logon to Station as a user with administrator access.
2 In Station, choose Configure>System Hardware>PHD Server.
The possible Tag Synchronization statuses are: Not Synchronized, Synchronizing, Synchronized, Failed.

9 Monitor and Troubleshoot PHD-Experion Integration 9.3 Troubleshooting Tag Synchronization
Uniformance - PHD/Experion Link Installation and Configuration Guide • 167
Figure 15 – Tag Synchronization Status Display
Tag Synchronization Statistics
Description
History Parameters Count
Number of unique point.parameters currently assigned to Experion history. PHD should have this many tags built (synchronized) from this server.
Total tags output Number of tag updates that PHD retrieved.
Transaction Count Count of network calls. Note: An increasing number confirms connectivity.
Queue Size Count of changes currently queued and waiting for PHD to retrieve.
Average Rate Rolling average throughput calculated over last 30 minutes.
Maximum Rate Peak throughput

9 Monitor and Troubleshoot PHD-Experion Integration 9.3 Troubleshooting Tag Synchronization
168 • Uniformance - PHD/Experion Link Installation and Configuration Guide
The Tuning tab shows the following Tag Synchronization settings.
Tag Sync Tuning Description
List Fragment Size The number of history point.parameter definitions that the Experion server will process per subscription period. Default is 100. Note: Do not increase this value without consultation with Honeywell TAC, to ensure the load on the Experion Server and PHD Server is not excessive.
Subscription Period Defines the period for how often the PHD Server should poll the Experion Server for history tag definition changes. Default is 60 seconds.
Timeout Interval Specifies the amount of time before the Experion tag sync server causes the connection to timeout, after no transactions are received from PHD Server. Default is 180 seconds. Note: The value must be at least three times the Subscription Period.
History Rate Update Period
Defines the maximum amount of time for the Experion Server to identify a change to Experion history configuration for tag synchronization. Default is 60 seconds.
The History Rate Update Period + the history rate configured on the parameter is the maximum amount of time for the Experion Server to report a point.parameter history assignment change to the PHD Server.
This setting applies only to Experion R310 and greater.
ATTENTION
Only experienced personnel should change the Tag Synchronization tuning. If the entered settings are not suitable, they automatically adjust to be compatible with this Experion Server's global cache settings.
To locate PHD tags with range errors after executing Tag Sync
If Tag Sync is already done, and PHD clamped a value due to a range error, it assigns zero (0) confidence to the value. Tags with a confidence greater than zero may have a different problem.
You can view tags with bad confidence through the following command: PHDManager> report conf nnn Where nnn is the number of tags to include in the report (default is 10). Figure 16 shows example results.

9 Monitor and Troubleshoot PHD-Experion Integration 9.3 Troubleshooting Tag Synchronization
Uniformance - PHD/Experion Link Installation and Configuration Guide • 169
Figure 16 – PHDMAN Confidence Report Indicates Problem Tags

9 Monitor and Troubleshoot PHD-Experion Integration 9.3 Troubleshooting Tag Synchronization
170 • Uniformance - PHD/Experion Link Installation and Configuration Guide
To handle tag configuration errors If incorrect data is being set in the PHD tag configuration, then it is up to you to identify the problem.
To fix PHD tags with range errors, build a rule for range, and then force a resync. You may want to restrict the resync to the tags with zero (0) confidence.
If you have problems in your PHD tag configuration, then after you fix the rules, it may be better to rerun all tags through Tag Sync; that is, force a resync.
To handle rule compilation errors If a Tag Sync rule has a syntax error, the rule will not compile in Tag Sync.
You can increase the Debug level of Tag Sync to 10 or above to output the rule text to the file and show the compilation error. Use the registry parameter to increase the Debug level (see Appendix A).
Alternatively, you can use Visual Studio to check rule syntax. In the PHD Configuration Tool, select Export Rule on the Tag Synchronization Rule Configuration form to export the rule text to a file. Insert the rule text into a Visual Studio 2005 project and compile it there. After syntax checking is completed (solution builds), insert the rule text back into the PHD Configuration Tool form for use by Tag Sync.
To force a resync
The easiest way to force a resync is through an update of the LAST_UPDT_FILETM column in the database, as described below:
• To force a resync of tags with zero (0) confidence, execute either of the following statements at a SQL prompt:
UPDATE IP_TAG SET LAST_UPDT_FILETM=1000 Where TAGNO In (List of Tagnos with bad confidence)
UPDATE IP_TAG SET LAST_UPDT_FILETM=1000 Where TAGNAME In (List of Tagnames with bad confidence)
• To force a resync of all tags, execute the following statement at a SQL prompt:
UPDATE IP_TAG SET LAST_UPDT_FILETM=1000 Where LAST_UPDT_FILETM is Not Null

9 Monitor and Troubleshoot PHD-Experion Integration 9.4 Troubleshoot PHD Point Server
Uniformance - PHD/Experion Link Installation and Configuration Guide • 171
9.4 Troubleshoot PHD Point Server View log related to PHD Point Server and Experion trends
Function – Location Log
Experion PKS PHD Point Server service – on PHD Server
\Program Files \Honeywell \LogFiles \logps.txt
Interpret PHD Point Server Status display
On the Experion Server, check the LEDs on the PHD Server Status display - the Network Status LED and the Data Status LED should be OK and green.
Step Action
1 On the Experion Server, logon to Station as a user with administrator access.
2 In Station, choose Configure>System Hardware>PHD Server.
Result: The PHD Server display appears.
Figure 17 – PHD Point Server Status Display

9 Monitor and Troubleshoot PHD-Experion Integration 9.4 Troubleshoot PHD Point Server
172 • Uniformance - PHD/Experion Link Installation and Configuration Guide
As shown in the previous figure, the right-hand section of the display is associated with the PHD Point Server.
If the PHD Point Server is not configured on the Experion Server, then the entire “right-hand” section of the screen is blank.
Symptom - Connection problems If the Network Link Status LED is not OK, then check the network connectivity between the Experion and PHD Servers. Try to ping the PHD Server from the Experion Server(s) and ping the Experion Server(s) from the PHD Server.
On the PHD Server, in the Services window, check that the "Experion PKS PHD Point Server" service is running.
On the PHD Server, check the log file (logps.txt) for errors.

9 Monitor and Troubleshoot PHD-Experion Integration 9.4 Troubleshoot PHD Point Server
Uniformance - PHD/Experion Link Installation and Configuration Guide • 173
Symptom - Data missing from Experion trend If PHD data is missing from an Experion trend, perform the following actions to troubleshoot the problem.
Diagnostic check On the Experion Server, call up the PHD Point Server Status display and check the status.
Cause If both of the PHD Point Server LEDs are not green, then the trend data is not available because the PHD Point Server has failed.
Solution On the PHD Server, restart the Experion PKS PHD Point Server service.
Diagnostic check On your Experion trend, does the PHD data appear if you reduce the number of PHD tags in the trend?
Cause The PHD Point Server measures the time it takes to read a single PHD tag and then estimates the time required to read all of the PHD tags on the trend. If this time exceeds the HistoryTimeout value (see 10.3, PHD Point Server Registry Settings, HistoryTimeout), then the request is canceled and no data is returned.
Solution On your Experion trend, reduce the number of PHD tags in the trend until the PHD Point Server does not exceed its HistoryTimeout value.
Diagnostic check On your Experion trend, does the PHD data appear if you change the interval from an average to a snapshot?
Cause The PHD Point Server checks all data returned from PHD and determines if the values are below the minimum confidence value (see 10.3, PHD Point Server Registry Settings, MinConfidence). If the values are below the confidence value, then the data is not plotted on the trend. Missing data due to this situation is more likely to occur when you use average intervals in your trend.
Solution On your Experion trend, change the interval from an average to a snapshot.

9 Monitor and Troubleshoot PHD-Experion Integration 9.4 Troubleshoot PHD Point Server
174 • Uniformance - PHD/Experion Link Installation and Configuration Guide
Recommendations - minimize PHD CPU usage and trend data callup time
Consider This…
Recommendation Comment
Trend Interval
Avoid trends of PHD tags at the Experion Fast history interval.
Trends with Average interval type
Avoid calling up trends of PHD tags with averages of PHD tags at fast Scan Frequencies.
Trends with average interval types (such as 1 hr avg and 8 hr avg) request average reductions from the PHD Point Server, which can cause:
Increased CPU usage – due to PHD having to average its raw data before returning it to the PHD Point Server. Larger intervals relative to the PHD tag’s Scan Frequency will cause more CPU usage. For example, calling up a 24 hour average trend on PHD tags that have a 5 second Scan Frequency will cause increased CPU usage by the PHD software.
Increased call up time – due to the calculations that PHD has to perform to average the data.
Number of traces
Avoid configuring too many traces of PHD tags on a single Experion trend.
Requests for more tags from PHD can cause:
Increased CPU usage – due to more data and values having to be retrieved from PHD
Increased call up time – due to the amount of values that PHD has to process and the number of values that have to be passed back from PHD to the PHD Point Server to Experion. There is a fairly linear relationship between the number of traces and the call up time.
Call up time versus Live Update mode
After the initial callup of a trend, click Play to put the trend into Live Update mode.
Initial trend call up causes a data request for all traces for the entire Time Period of the trend, leading to significant CPU usage and call up time. For example, calling up a 1 min interval trend for 1 day of 10 PHD tags causes retrieval of 14400 values (60 minutes X 24 hours X 10 tags) immediately on call up.
If you put a trend into Live Update mode, it updates at the Interval rate, and only retrieves the last (newest) values, minimizing the amount of CPU usage. For example, viewing a 1 min interval trend of 10 PHD tags causes retrieval of only 10 values (1 value X 10 tags) every minute.

9 Monitor and Troubleshoot PHD-Experion Integration 9.5 PHD Confidence and OPC Quality
Uniformance - PHD/Experion Link Installation and Configuration Guide • 175
9.5 PHD Confidence and OPC Quality
If OPC Quality is… Then PHD Confidence is…
BAD
UNCERTAIN
GOOD
–1
0
100

9 Monitor and Troubleshoot PHD-Experion Integration 9.5 PHD Confidence and OPC Quality
176 • Uniformance - PHD/Experion Link Installation and Configuration Guide

Uniformance - PHD/Experion Link Installation and Configuration Guide • 177
10. Appendix A – PHD Server Registry Settings for PHD-Experion Integration
10.1 PHD Experion Link Registry Settings The location of the registry key for the PHD Experion Link is as follows:
HKEY_LOCAL_MACHINE \ SYSTEM \ CurrentControlSet \ Services \ <RDI Server> \ Parameters \ LinkList \ <linkname>\ <parameter>
If needed, you can use regedit to add the following parameters:
Parameter Description
IgnoreMaxClockDelta DWORD. Enter 1 to specify that the Link should ignore the clock delta difference in time stamps received from the Experion Server. Default is 0.
IgnoreNegativeConfidence DWORD. Enter 1 to disable the insertion of a 0 (zero) tag value with a -1 confidence when the Link is started, shutdown, or every 24 hours when the Link resynchronizes its time.
During startup, the default behavior will insert a 0 tag value with a -1 confidence – this negatively impacts data recovery performance.
Attention: Honeywell recommends that you add this parameter to the registry and set it to a value of 1.
InformationLevel DWORD. Sets the debug level for information messages from the Link. Leave at default - other values are for troubleshooting purposes only.
OutputFile STRING. Specifies name of .OUT file where Link outputs information (in 'Log Files' directory). Default is LINK<linkname>.OUT.

10 Appendix A – PHD Server Registry Settings for PHD-Experion Integration 10.1 PHD Experion Link Registry Settings
178 • Uniformance - PHD/Experion Link Installation and Configuration Guide
Parameter Description
TagUpRange DWORD. Specifies whether the Link should trigger a PHD tag update when a change occurs to the low or high range value on Experion Server points.
1 – Trigger PHD tag update.
0 – Do not trigger PHD tag update. Tag Sync will still change the tag definitions in the database, but this Link on the PHD Server will not be updated.
Default is 0. In most cases, you should leave the value at default of 0.
Note: If you change the parameters for a running PHD Experion Link, you may have to restart the Link for the changes to be implemented.

10 Appendix A – PHD Server Registry Settings for PHD-Experion Integration 10.2 Tag Synchronization Registry Settings
Uniformance - PHD/Experion Link Installation and Configuration Guide • 179
10.2 Tag Synchronization Registry Settings The location of the registry key for Tag Synchronization is as follows:
HKEY_LOCAL_MACHINE\ SYSTEM\ CurrentControlSet\ Services\ UniformanceTagSync\ Parameters
The following table describes the Tag Synchronization registry parameters.
Parameter Description
InformationLevel
The debug level. Controls the amount of information logged to the log file (UTSxxx.log). The value can be from 1 to 10. One (1) creates the least amount of logged information. Use 2 for the initial Tag Sync. Use 6 for troubleshooting problems. Use 10 or above to output the rule text to the file and show any compilation errors. Default : 1.
SystemList\ Experion\ Machines
List of "Target Hostnames" of Experion Servers to be used for PHD Tag Synchronization by Tag Synchronization.
Attention: After configuring the PHD Experion Link, you must execute the Save RDI/Link Configuration command through the RDISetup utility to cause 'Machines' to be created in the registry and populated with the names of the Experion Servers (Target Hostnames) specified in the PHD Links Configuration form(s).
If the parameter is not present and populated, rerun RDISetup and execute the Save Configuration command.
MaximumLogFiles MaximumLogSize Maximum number of log files to keep
Maximum log file size in KBytes

10 Appendix A – PHD Server Registry Settings for PHD-Experion Integration 10.3 PHD Point Server Registry Settings
180 • Uniformance - PHD/Experion Link Installation and Configuration Guide
10.3 PHD Point Server Registry Settings The PHD Point Server reads a set of configuration settings stored in the registry as follows:
HKEY_LOCAL_MACHINE \ SOFTWARE \ Honeywell \ PHDPointServer\
The following table describes some of the configurable settings. These are read only when the PHD Point Server service is first started. Note: The service will need to be restarted to allow any changed settings to take effect
Key Description
AllowTagSyncTags By default, this setting is not created. This key contains a flag to allow the PHD Point Server to read PHD tags that have been set up through Tag Synchronization with Experion.
0 - Do not allow Tag Sync tags to be accessed. (Default)
1 - Allow Tag Sync tags to be accessed.
Attention: If you wish to allow Experion operators to view the history of PHD tags that are Tag Synchronized to Experion point parameters, then create this registry string value and set the value to “1”.
Attention: Be aware that setting the value to "1" bypasses any PHD tag READ security or Experion operator security that has been associated with the PHD tag or the originating Experion point parameter.
Operators who are restricted from viewing history data from assets in the Experion security system will have read access to all the data in PHD.
No tag values on PHD or values of the source Experion point parameter can be changed through the PHD Point Server.
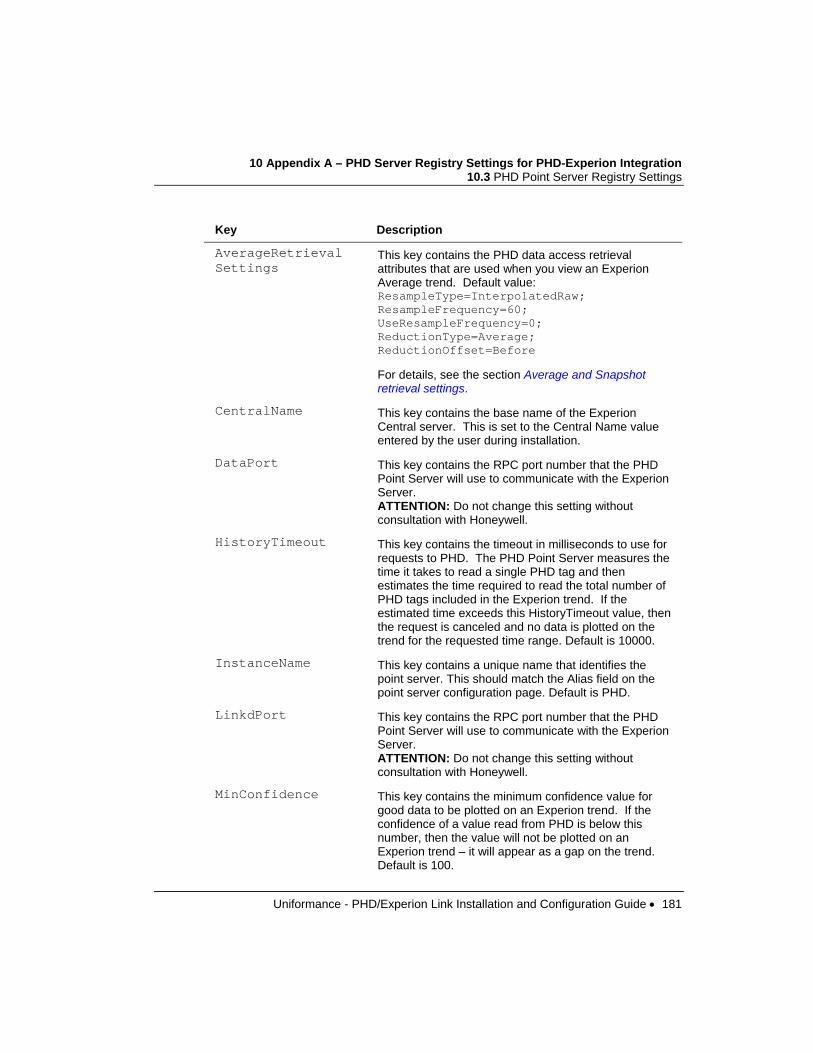
10 Appendix A – PHD Server Registry Settings for PHD-Experion Integration 10.3 PHD Point Server Registry Settings
Uniformance - PHD/Experion Link Installation and Configuration Guide • 181
Key Description
AverageRetrieval Settings
This key contains the PHD data access retrieval attributes that are used when you view an Experion Average trend. Default value: ResampleType=InterpolatedRaw; ResampleFrequency=60; UseResampleFrequency=0; ReductionType=Average; ReductionOffset=Before
For details, see the section Average and Snapshot retrieval settings.
CentralName This key contains the base name of the Experion Central server. This is set to the Central Name value entered by the user during installation.
DataPort This key contains the RPC port number that the PHD Point Server will use to communicate with the Experion Server. ATTENTION: Do not change this setting without consultation with Honeywell.
HistoryTimeout This key contains the timeout in milliseconds to use for requests to PHD. The PHD Point Server measures the time it takes to read a single PHD tag and then estimates the time required to read the total number of PHD tags included in the Experion trend. If the estimated time exceeds this HistoryTimeout value, then the request is canceled and no data is plotted on the trend for the requested time range. Default is 10000.
InstanceName This key contains a unique name that identifies the point server. This should match the Alias field on the point server configuration page. Default is PHD.
LinkdPort This key contains the RPC port number that the PHD Point Server will use to communicate with the Experion Server. ATTENTION: Do not change this setting without consultation with Honeywell.
MinConfidence This key contains the minimum confidence value for good data to be plotted on an Experion trend. If the confidence of a value read from PHD is below this number, then the value will not be plotted on an Experion trend – it will appear as a gap on the trend. Default is 100.

10 Appendix A – PHD Server Registry Settings for PHD-Experion Integration 10.3 PHD Point Server Registry Settings
182 • Uniformance - PHD/Experion Link Installation and Configuration Guide
Key Description
NotifPort This key contains the RPC port number that the PHD Point Server will use to communicate with the Experion Server. ATTENTION: Do not change this setting without consultation with Honeywell.
PHDServerName By default, this key is not created. The default value that is used for the name of the PHD Server with which the PHD Point Server will communicate is “localhost”. To change the value, create this registry string value and set the value to the PHD Server name.
SnapshotRetrievalSettings
This key contains the PHD data access retrieval attributes that are used on an Experion Snapshot trend. Default value: ResampleType=Resampled; UseResampleFrequency=1; ReductionType=None; ReductionFrequency=60; ReductionOffset=Before
For details, see the section Average and Snapshot retrieval settings.
Average and Snapshot retrieval settings
The Experion Trend currently supports two types of data aggregation – Snapshot and Average. For example, Fast history, 1 minute, 1 hour, 8 hour and 24 hour intervals use Snapshots. The 6 minute average, 1 hour average, 8 hour average and 24 hour average intervals use Average.
The PHD Point Server maps these types of requests to PHD data request properties. You can configure this mapping through the following registry keys:
• AverageRetrievalSettings
• SnapshotRetrievalSettings
You can modify the mapping through the string value of each key. The string value takes the following form: ResampleType=#;ResampleFrequency=#;UseResampleFrequency=#; ReductionType=#;ReductionOffset=#;ReductionFrequency=#

10 Appendix A – PHD Server Registry Settings for PHD-Experion Integration 10.3 PHD Point Server Registry Settings
Uniformance - PHD/Experion Link Installation and Configuration Guide • 183
The following table describes the PHD data request properties contained in each string value.
Property Description
Resample Type
The type of resampling. Valid values are: AVERAGE, INTERPOLATEDRAW, RAW, RESAMPLED, SNAPSHOT.
Resample Frequency
The value stored here is currently ignored. If UseResampleFrequency is 1 (TRUE), then the ResampleFrequency will be set to the interval period of the trend. For example, a 1 minute trend will use a 1 minute (60 second) resample frequency for the PHD data request.
UseResample Frequency
This value specifies whether to set the PHD Resample frequency or Reduction frequency to the interval period of the trend:
1 (TRUE) – Sets the PHD resample frequency to the interval period of the trend.
0 (FALSE) – Sets the PHD reduction frequency to the interval period of the trend.
Example - 1 hour interval trend: UseResampleFrequency = 1 (TRUE) The PHD data request will use a resample frequency of 1 hour (3600 seconds) and a reduction frequency of 0.
UseResampleFrequency = 0 (FALSE). The PHD data request will use a resample frequency of 0 and a reduction frequency of 1 hour (3600 seconds).
Reduction Type
The type of reduction. Valid values are: AVERAGE, DELTA, FIRST, LAST, MAXIMUM, MINIMUM, NONE, REGRESSIONCONSTANT, REGRESSIONDEVIATION, REGRESSIONSLOPE, STANDARDDEVIATION.

10 Appendix A – PHD Server Registry Settings for PHD-Experion Integration 10.3 PHD Point Server Registry Settings
184 • Uniformance - PHD/Experion Link Installation and Configuration Guide
Property Description
Reduction Offset
The Reduction Offset defines how the reduction value timestamp relates to the data in the interval over which the reduction is performed. Valid values are: AFTER, BEFORE, AROUND.
Reduction Frequency
The value stored here is currently ignored. If UseResampleFrequency is 0 (FALSE), then ReductionFrequency will be set to the interval period of the trend. For example, a 1 minute trend will use a 1 minute (60 second) reduction frequency for the PHD data request.
REFERENCE
For detailed information on the PHD data retrieval properties, refer to Appendix B of the Uniformance OLE DB Provider User Guide (PIM2401) in the PHD book set.

Uniformance - PHD/Experion Link Installation and Configuration Guide • 185
11. Appendix B – Overview of RDISetup
11.1 RDISetup Data Flow The PHD RDI Configuration utility (RDISetup.exe) is used to create/update the configuration of PHD Experion Links and RDIs on the PHD Server node. The following figure illustrates the RDISetup functionality.
Figure 18 – Configuration of PHD Experion Links through RDISetup

11 Appendix B – Overview of RDISetup 11.1 RDISetup Data Flow
186 • Uniformance - PHD/Experion Link Installation and Configuration Guide

Uniformance - PHD/Experion Link Installation and Configuration Guide • 187
Glossary
Collector Node A collector node is a PHD Server that performs data collection from a source system such as a DCS. The PHD Server that runs the PHD Experion Link interface is a collector node. Also known as "PHD Collector Server node".
History Recovery The retrieval of data from a source system by an interface (such as the PHD Experion Link) for the period of time during which the interface was unable to collect data directly from the source system. The recovered data will eliminate the data gaps that result from non-collection of data.
Link PHD interface to a Honeywell Experion Server. One Link is used to collect data from one redundant or non-redundant Experion Server.
RDC Robust Data Collection. Provides a method to transfer data from a PHD Collector Server node to a PHD Shadow Server node. It also provides a method to transfer the data collection duties from an Active RDI to a Standby RDI if the Active RDI fails or is taken out of service - this is typically used for an interface that does not have source system history recovery capability.
RDC uses a SHADOW type of interface to transfer data from a Collector node to a Shadow node.
Note: Although the PHD Experion Link does not support RDC and the SHADOW type of interface, you can use a GATEWAY type of interface to transfer data from a PHD Experion Link to a Shadow server.

Glossary
188 • Uniformance - PHD/Experion Link Installation and Configuration Guide
RDI Real-time Data Interface. An interface used to collect data from a source system for storage in the PHD database. PHD includes several types of RDIs and others are available from Honeywell for many types of DCS, PLC, SCADA, and other real-time sources of data.
Shadow A remote PHD Server node used to gather and store process information from one or more PHD Collector Server nodes.
Source System The system that provides the real-time data to the PHD system. This can be another PHD system or a DCS system.
Tag A distinct value residing in the source system and collected by a PHD interface (RDI or PHD Experion Link).

Uniformance - PHD/Experion Link Installation and Configuration Guide • 189
Index attribute mapping
understanding, 152
case, 108
Configuration
Interfaces.Dat, 104
PHD Links Configuration Form, 96
PHD Server Hosts File, 78
Registry, 177, 180
D8.. See eight byte float.
data types
D8 or eight byte float, 152
F4 or four byte float, 152
I4 or four byte integer, 152
requesting specific types, 152
DCOM
running DCOMCNFG, 47
DCOMCNFG, running, 47
default rule, 107, 109
Default Rule, 109
eight byte float data type, 152
Export, 108, 170
F4.. See four byte float.
four byte float data type, 152
four byte integer data type, 152
History
Experion History Assignment, 22
History Recovery
Log Messages, 161
Hosts file
PHD Server, 78
I4.. See four byte integer.
Local Groups, 39
Local Policy, 39
Log
History Recovery Messages, 161
OUT
Link Output File messages, 161
PHD tag definitions
tag source type/attribute mapping, 152
Registry
Link, 177, 180
Restart
link, 159
Status
link, 159
syntax, 108, 170
tag source type/attribute mapping:, 152

Index
190 • Uniformance - PHD/Experion Link Installation and Configuration Guide
troubleshooting
link, 162

Index
Uniformance - PHD/Experion Link Installation and Configuration Guide • 191

Honeywell International Process Solutions 1860 W Rose Garden Ln Phoenix, AZ 85027-2708 USA