OWNER´S MANUAL
111
OWNER´S MANUAL ŠKODA KUSHAQ Digital version of the Owner's Manual http://go.skoda.eu/owners-manuals ŠKODA KUSHAQ 05.2021 Angličtina/English V2, R1, Indie, en_GB 6JM012791HA
-
Upload
khangminh22 -
Category
Documents
-
view
1 -
download
0
Transcript of OWNER´S MANUAL

OWNER´S MANUALŠKODA KUSHAQ
Digital version of the Owner's Manual
http://go.skoda.eu/owners-manuals
ŠKODA KUSHAQ 05.2021Angličtina/EnglishV2, R1, Indie, en_GB
6JM012791HA

Documentation of vehicle deliveryVehicle Identification Number (VIN)
Date of vehicle delivery ________ / ________ / ________________ ŠKODA Partner
Stamp and signature of the vendor
I confirm that I have taken delivery of the vehicle in good condition, have received information on how tooperate it correctly, and have had the terms of the warranty explained to me.
Signature of the customer
Does the vehicle have an extended warranty?
YES
NO
Limitations of the ŠKODA extended warrantya)
_______________
or
_______________
or
_______________a) Depending on which comes first.
Years:
km:
Miles:
Reprinting, reproduction or translation, either in whole or in part, is not permitted without the written consentof ŠKODA AUTO a.s..
ŠKODA AUTO a.s. expressly reserves all rights relating to copyright laws.
Subject to change.
Issued by: ŠKODA AUTO a.s.
© ŠKODA AUTO a.s. 20216JM012791HA

Vehicle owner
1. Vehicle owner 2. Vehicle ownerThis vehicle with the official registration number __________________________________________belongs to (Title, Name / Company) __________________________________________ __________________________________________Address: __________________________________________ __________________________________________ __________________________________________Telephone: __________________________________________ ŠKODA Partner Service consultant: __________________________________________Telephone: __________________________________________
This vehicle with the official registration number __________________________________________belongs to (Title, Name / Company) __________________________________________ __________________________________________Address: __________________________________________ __________________________________________ __________________________________________Telephone: __________________________________________ ŠKODA Partner Service consultant: __________________________________________Telephone: __________________________________________
1Vehicle owner
6JM012791HA

Table of Contents
1 Vehicle owner
4 About the Owner's Manual
4 Explanations
5 Vehicle overviews5 Front vehicle area6 Rear vehicle area7 Driver's seat7 Centre console and passenger seat8 Engine compartment
8 Warning lights8 Functionality8 Warning lights overview
10 Correct and safe10 Introductory notes for correct use10 New vehicle or new parts10 Regular checks10 Improper vehicle adjustments10 Keep sensors and cameras functional11 Engine compartment11 Handling operating fluids11 12 volt vehicle battery11 Electrical sockets in the vehicle11 Before your journey12 Sitting safely12 Correct belt webbing arrangement12 Correct steering wheel position12 Securing children properly13 Transporting objects safely13 Safe driving14 Stop the vehicle safely!14 Exiting the vehicle14 Different weather conditions14 After an accident
16 Keys, locks and alarm system16 Key16 Central locking18 Keyless locking (KESSY)18 Alarm system
19 Doors, windows and boot lid19 Doors19 Child safety lock on the rear doors20 Window - with electrical operation21 Sliding/tilting roof21 Sunblind - with manual operation21 Sun visors22 Boot lid - with manual operation22 Unlocking the boot lid
23 Seats, steering wheel and mirror23 Front seat - with manual operation23 Rear seats23 Headrests
24 Front armrest24 Rear armrest24 Steering wheel25 Interior rear-view mirror25 Wing mirror
26 Restraint systems and airbags26 Seat belts26 Child seat28 Fasteners for child seats31 Airbags
32 Lighting, windscreen wipers andwashers
32 Exterior lighting33 Daylight running lights33 Automatic driving lights function33 High beam and headlight flasher33 Turn signal34 Fog light34 Hazard warning lights function34 Parking light function34 CORNER function35 Function COMING HOME, LEAVING HOME35 Replace light bulbs38 Interior lighting39 Interior ambient light39 Windscreen wipers and washers
41 Heating and air conditioning system41 Manual air conditioning41 Climatronic automatic air conditioning system42 Heated windscreen43 Seat ventilation
43 Driver information system43 Analogue instrument cluster45 Driving data46 Speed limit warning46 Vehicle status
47 7” infotainment47 Infotainment overview47 System47 Screen47 Radio48 Media51 Mobile device management51 Telephone53 SmartLink
54 10” infotainment54 Infotainment overview54 System55 Screen55 Infotainment keyboard56 Radio57 Media59 Mobile device management60 Telephone
2 Table of Contents

61 Wi-Fi62 SmartLink64 Personalisation64 SKODA Play Apps
65 Online Services65 MyŠKODA Connect65 MyŠKODA Connect Application65 Personal Data Protection65 Vehicle Status Report
66 Starting and driving66 Starting with the key66 Start at the push of a button67 Starting issues67 START STOP68 Manual gearbox68 Automatic gearbox69 Economical driving style70 Towing eye and towing procedure71 Brakes71 Handbrake
72 Driver assist systems72 Braking and stabilising systems73 Cruise control system
74 Park Assist systems74 Park Pilot parking aid74 Rear view camera
75 Engine, exhaust system and fuel75 Bonnet75 Engine oil76 Coolant77 Engine electronics78 Exhaust control system78 Fuel filler flap78 Petrol
79 12 volt vehicle battery and fuses79 12 volt vehicle battery80 Using the jump-starting cable81 Fuses82 Fuses in the dash panel83 Fuses in the engine compartment
84 Wheels84 Tyres and rims85 All-season or winter tires86 Spare wheel86 Changing the wheel and raising the vehicle88 Tyre pressure88 Tyre pressure monitor89 Wheel bolt cover caps89 Full wheel frame
90 Storage space and interior equipment90 Emergency equipment90 Tool kit90 Fasteners in the boot
90 Rigid boot cover91 Interior equipment front92 Utility recess on the dashboard92 Interior equipment rear92 Phonebox93 Cup holder93 12-Volt power socket
94 Roof rack94 Overview
94 Maintaining and cleaning94 Service events94 Service work, adjustments and technical
changes95 Interior96 Exterior
98 Technical data and specifications98 Requirements for the technical data98 Vehicle identification data98 Maximum permissible weights98 Operating weight99 Vehicle dimensions99 Accident data recorder (Event Data Recorder)100 Personal data100 Information about the radio systems in the
vehicle100 Rights arising from defective performance,
ŠKODA warranties
104 Engine specifications104 1.0 l/85 kW TSI engine104 1.5 l/110 kW TSI engine
105 Index
3Table of Contents

About the Owner's Manual
General pointsThis Owner's Manual applies to all chassis variantsof the vehicle, including all models and trim levels.
All possible trim levels are described here withoutidentifying them as special trims, model variants ormarket-dependent equipment. This means that notall the trim components described in this Owner'sManual are available in your vehicle.
The Illustrations in these operating instructions arepurely illustrative and are to be understood as gener-al information. The illustrations may differ from yourvehicle.
ŠKODA AUTO is constantly working on the furtherdevelopment of all vehicles. It is therefore possiblefor changes to be made at any time to the scope ofdelivery in terms of shape, equipment and technolo-gy. The information contained in this Owner's Man-ual corresponds to the information available at thetime of going to press.
No legal claims can therefore be derived from thetechnical data, illustrations and information in thisOwner’s Manual.
Digital version of the Owner's ManualKeeping environmental protection in mind, the prin-ted Owner’s Manual only contains the most impor-tant information regarding vehicle operation and ve-hicle maintenance.
The digital version of the Owner's Manual includesfull information regarding vehicle operation.
The digital version is available on the ŠKODA webpages.
http://go.skoda.eu/owners-manuals
Explanations
Terms used- a workshop that carries out
specialist service tasks for ŠKODA vehicles. Aspecialist company can do both a ŠKODA Serv-ice partner or a ŠKODA Be a partner who is au-thorized to provide services as well as an inde-pendent workshop.
- A workshop that hasbeen contractually authorised by ŠKODA AUTOor its sales partner to service ŠKODA vehiclesand to sell ŠKODA Genuine Parts.
- A company that has been con-tractually authorised by ŠKODA AUTO or its dis-tribution partner to sell new ŠKODA vehiclesand, when applicable, to service them usingŠKODAGenuine Parts and sell ŠKODAGenuineParts.
Text notes- short press (e.g. a button) within 1 second
- Long press (e.g. a button) for more than 1 s
Direction indicationsAll direction indications such as “left”, “right”, “front”,“rear” relate to the forward direction of travel of thevehicle.
DANGERTexts with this symbol indicate dangerous situationswhich, if the safety instructions are not observed,will result in death or serious injury.
WARNINGTexts with this symbol indicate dangerous situationswhich, if the safety instructions are not observed,could result in death or serious injury.
CAUTIONTexts marked with this symbol indicate dangeroussituations which, if the safety instructions are notobserved, could result in minor or moderate injury.
NOTICETexts with this symbol indicate situations which, ifthe corresponding instructions are not observed, willresult in damage to the vehicle.
Texts with this symbol contain additional informa-tion.
“Specialist garage”
“ŠKODA Service partner”
“ŠKODA Partner”
“Press”“Hold”
4 About the Owner's Manual

Vehicle overviews
Front vehicle area
A Under the windscreen (depending on the vehicle equipment):▶ Light sensor for automatic driving light circuit » page 33▶ Rain sensor for automatic wiping » page 39
B Exterior mirror - operation » page 25
C Windscreen wiper – operation » page 39
D Bonnet release lever (under the flap) » page 75
E Cover for screw-in towing eye socket » page 70
F Wheels:▶ Tyres and rims » page 84▶ Changing the wheel and raising the vehicle » page 86▶ Tyre pressure » page 88▶ Tyre pressure monitor » page 88
G Headlights:▶ Operation » page 32▶ Replace light bulbs » page 35
H Door handles (depending on vehicle equipment):▶ Open door » page 19▶ Keyless locking (KESSY)» page 18.
I Side door windows - operation » page 20.
J Roof rack » page 94
Functionality of the sensors and cameras› Keep the sensors and cameras for the assist systems clean » page 10.
5Vehicle overviews › Front vehicle area
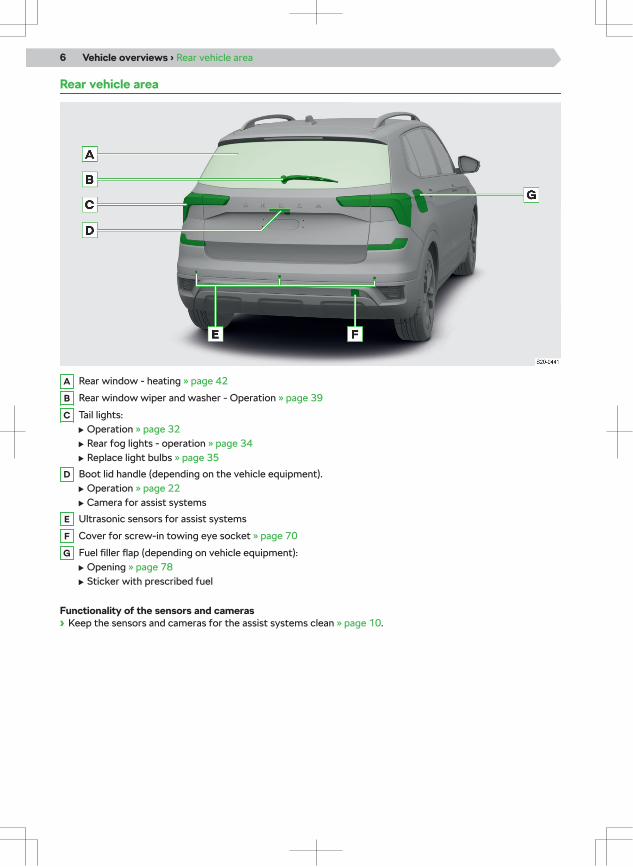
Rear vehicle area
A Rear window - heating » page 42
B Rear window wiper and washer - Operation » page 39
C Tail lights:▶ Operation » page 32▶ Rear fog lights - operation » page 34▶ Replace light bulbs » page 35
D Boot lid handle (depending on the vehicle equipment).▶ Operation » page 22▶ Camera for assist systems
E Ultrasonic sensors for assist systems
F Cover for screw-in towing eye socket » page 70
G Fuel filler flap (depending on vehicle equipment):▶ Opening » page 78▶ Sticker with prescribed fuel
Functionality of the sensors and cameras› Keep the sensors and cameras for the assist systems clean » page 10.
6 Vehicle overviews › Rear vehicle area

Driver's seat
A Air outlet nozzle
B Control lever (depending on vehicle equipment):▶ Turn signal » page 33▶ Main beam » page 33▶ Speed regulating system » page 73
C Analogue instrument cluster » page 43
D Buttons/dials on the multifunction steeringwheel » page 24
E Operating lever:▶ Windscreen wipers and washers » page 39
F Door opening lever » page 19
G Window operation » page 20.
H Exterior mirror operation » page 25
I Light switch » page 32
J Bonnet release lever » page 75
K Headlight range adjustment of the head-lights » page 32
L Depending upon vehicle equipment:▶ Ignition lock » page 66▶ Starter button » page 66
M Steering wheel with horn/with driver's front air-bag » page 31
N Safety lever for steering wheel adjust-ment » page 24
Centre console and passenger seat
A Door opening lever » page 19
B Air outlet nozzle
C Infotainment (depending on vehicle equipment):▶ 10“ Infotainment » page 54▶ 7“ Infotainment » page 47
D 12-Volt power socket » page 93
E Depending upon vehicle equipment:▶ Gearshift lever (manual gearbox) » page 68▶ Selector lever (automatic gearbox) » page 68
F Parking brake » page 71
G Operation (depending on vehicle equipment):▶ Manual air conditioning » page 41.▶ Climatronic » page 42
H Keys (depending on vehicle equipment):▶ Seat ventilation on the left » page 43▶ Tyre pressure monitor » page 88▶ Hazard warning lights function » page 34▶ Central locking » page 17▶ Seat ventilation on the right » page 43▶ Traction control TCS » page 72▶ START-STOP » page 67
I Window operation in the passengerdoor » page 20
7Vehicle overviews › Driver's seat

Engine compartment
A Coolant expansion reservoir » page 77
B Brake fluid reservoir » page 71
C Engine oil dipstick » page 75
D Engine oil filler opening » page 75
E 12 volt vehicle battery » page 79
F Fuse box » page 83
G Windscreen washer fluid reservoir » page 40
Warning lights
Functionality
WARNINGDisregarding the lighting up of the warning lights andthe associated messages on the display of the instru-ment cluster can lead to accidents, serious injuries ordamage to the vehicle.
The warning lights in the instrument cluster indicatecertain functions or faults.
The illumination of some of the indicator lights maybe accompanied by acoustic signals and messages inthe instrument cluster display.
Additional indicator lightsThe additional indicator light will also light up in thedisplay along with some of the indicator lights:
- Hazard
- Warning
Warning lights overview
After switching on the ignition, some indicator lightslight up briefly as a function test of the vehicle sys-tems. If the tested systems are in order, the respec-tive indicator lights go out a few seconds after theignition is switched on or after the engine has beenstarted.
For further details » page 8, Functionality.
Symbol Meaning
Indicates a warning together withanother warning light » page 8.
Front seat belt not fas-tened » page 26.
12-volt vehicle battery is not charg-ing » page 80.
Along with - Enginefault » page 80.
Brake fluid level is toolow » page 71.
Together with - Brake system andABS faulty » page 73.
Illuminates - parking brake switchedon » page 72.
Illuminates - Power assisted steeringfaulty » page 24.
Flashing - Steering lock faul-ty » page 24.
8 Vehicle overviews › Engine compartment

Symbol Meaning
Automatic gearbox im-paired » page 69.
Automatic gearbox overhea-ted » page 69.
Indicates a warning along with an-other warning light » page 8.
The fuel supply has reached the re-serve area. » page 79.
Bulb faulty » page 32.
ABS faulty » page 73.
Automatic gearbox overhea-ted » page 69.
Automatic gearbox im-paired » page 69.
Tyre pressure control system faul-ty » page 89.
Tyre pressurechange » page 85, » page 88.
Illuminates - Power assisted steeringfaulty » page 24.
Flashing - Steering lock not un-locked » page 25.
Flashing - Steering lock faul-ty » page 25.
KESSY - starting prob-lem » page 67.
KESSY - no key found » page 18.
Petrol engine control faul-ty » page 77.
Emission control system faul-ty » page 78.
Airbag system faulty » page 32.
Illuminates for 4 seconds and thenflashes - Airbag or belt tensioner de-activated with diagnostic de-vice » page 32.
ASR deactivated » page 73.
Illuminates - ESC or ASR faul-ty » page 73.
Flashing - ESC or ASR is engag-ed » page 72.
Turn signal light,left » page 33, » page 34.
Symbol Meaning
Turn signal light,right » page 33, » page 34.
Front fog lights switchedon » page 34.
The selector lever islocked » page 68.
The cruise control system controlsthe driving speed » page 73.
High beam or flasher activa-ted » page 33.
Rear seat belt not fas-tened » page 26.
A rear seat belt is fas-tened » page 26.
Low outside tempera-ture » page 44.
Charging of the 12-volt vehicle bat-tery » page 77.
Engine oil pressure toolow » page 76.
Engine oil level too high or engine oillevel sensor impaired » page 76.
Engine oil level too low » page 76.
Coolant temperature toohigh » page 77.
Coolant level is too low » page 77.
Service event » page 94.
Engine was switched off automati-cally by START-STOP » page 67.
Engine was not automaticallyswitched off via START-STOP » page 67.
Cruise control system faul-ty » page 73.
Cruise control activated » page 73.
9Warning lights › Warning lights overview

Correct and safe
Introductory notes for correct use
▶ Read this Owner's Manual carefully, as proceedingin accordance with this manual is a prerequisite forthe correct use of the vehicle. This Owner's Manualshould therefore always be in the vehicle.
▶ When using the vehicle, the generally binding legalprovisions that are specific to the country must beobserved. Such as those for transporting children,switching off airbags, using tyres, road traffic andthe like.
▶ Do not exceed the maximum permissible weightsand loads.
▶ Do not exceed the maximum permissible roof load.▶ Use the specified fuel and operating fluids.▶ Drive on roads that meet the technical vehicle pa-
rameters. Obstacles that exceed the ground clear-ance of the vehicle » page 99 can damage the ve-hicle when driving over them.
▶ Care must be taken during operations related tooperation, maintenance and self-help to avoiddamage to the vehicle or injury. If required, seekthe help of a specialised garage.
▶ All work on the vehicle’s safety systems may onlybe carried out by a specialist garage. This concernse.g. the seat belts or the airbag system.
▶ When using accessories, please note the instruc-tions in the accessory manufacturer’s instructionmanual. These include child seats, roof racks, com-pressors etc.
▶ Please note the service intervals.
New vehicle or new parts
New vehicle - Running in the engineDriving style during the first 1500 km determinesthe quality of the engine run-in process.
▶ During the first 1000 km, rev the engine to max.3/4 of the highest permissible engine speed andavoid using a trailer.
▶ Over the next 500 km, the engine speed can beslowly increased.
Depending on driving style and operating conditions,the engine consumes some oil, up to 0.5 l/1000 km.Consumption may be higher over the next 5000 km.
New brake padsNew brake pads do not provide the optimum brakingeffect during the first 200 km, they have to be wornin first. Therefore, drive very carefully.
New tyresNew tyres do not have optimum grip for the first500 km. Therefore, drive very carefully.
Regular checks
What should be taken into account before driving?A vehicle with technical defects can increase the riskof accidents and injuries.
Eliminate any defects before driving. If required,seek the help of a specialised garage.
Pay special attention to the following points:
▶ Is the tyre undamaged?▶ Is the tyre tread sufficient?▶ Is the tyre pressure sufficient?▶ Do the headlamps, brake and turn signals work?▶ Is the windscreen in good condition?▶ Is the engine oil, brake fluid and coolant level OK?▶ Is the air intake in the engine compartment free
from obstruction?▶ Are the air outlet nozzles or air intake in front of
the windscreen free from obstruction?▶ Are the windscreen wiper and washer system and
windscreen wiper blades functional?▶ Is the windscreen washer fluid level sufficient?▶ Are the windscreen wiper blades in good condi-
tion?▶ Are all seatbelt system components in good work-
ing order? Are the seatbelts clean and have thebuckles been unclogged?
▶ Is the spoiler working properly?▶ Are parts and components of the vehicle still visi-
bly attached?▶ Are there no oil stains or other operating fluids un-
der the vehicle?
Improper vehicle adjustments
Improper changes and maintenance can cause mal-functions and affect safety-relevant and other func-tions of the vehicle.
▶ Adjustments, repairs and technical changes to thevehicle should only be carried out by a specialistgarage.
▶ Never cover the engine with additional insulationmaterial, e.g. with a cover.
Keep sensors and cameras functional
Some functions of your vehicle are supported bysensors and cameras inside and outside the vehicle.
Accessories additionally installed on the vehicle rear,such as bicycle carriers, can impair the functioning ofthe sensors and cameras.
▶ Do not cover or stick over the sensors and cam-eras and keep them clean.
10 Correct and safe › Introductory notes for correct use

▶ If you suspect damaged sensors or cameras, seekthe help of a specialist company.
Engine compartment
Before opening the engine compartment flapRisk of scalding! Do not open the engine compart-ment flap if steam or coolant comes out of the en-gine compartment.
▶ Stop the engine and allow it to cool.▶ Remove the ignition key. On vehicles with a key-
less locking system, open the driver's door.
Explanation of the warning symbols on the stickerin the engine compartment
Do not touch the engine compartment!
Be careful of hot parts!
Be careful of rotating parts!
Risk of electric shock!
Use prescribed engine oil.
Note the instructions in the owner’s manual!
When working in the engine compartment▶ Keep children away from the engine compartment.▶ Do not touch the radiator fan. The radiator fan can
turn itself on, even when the ignition is off.▶ Do not touch electrical cables. Avoid short circuits
in the electrical system, especially on the 12 Voltvehicle battery.
▶ Do not smoke near the vicinity of the engine andrefrain from handling open flames or sparks.
▶ If you need to work in the engine compartmentwith the engine running, be mindful of rotating en-gine parts and electrical equipment.
▶ Do not leave any objects in the engine compart-ment.
Handling operating fluids
Your vehicle uses various operating fluids to operatethat can affect health or the environment when theyare emitted. These are fuel, oils, battery acid fromthe 12-volt vehicle battery, coolant and brake fluid.
▶ Only use operating fluids outdoors or in well-venti-lated areas. If required, wear protective equipment.
▶ Do not use or check operating fluids with the en-gine running.
▶ In the event of contact with operating fluids, washaffected areas with warm water. If required, seekmedical help.
▶ The leaked engine oil in the engine compartmentcan cause a fire, so wipe it off with a cloth.
▶ Store cloths soiled by brake fluids in a well-ventila-ted place until disposal. Cloths with residues of en-gine oil can ignite and cause a fire.
12 volt vehicle battery
Handling the 12-volt vehicle batteryThe battery acid of the 12-volt vehicle battery isvery caustic. Improper handling of the 12 volt vehiclebattery can cause an explosion, fire, chemical burnsor poisoning!
▶ When handling the 12-volt vehicle battery, eye andskin protection must be worn.
▶ Do not tilt the 12-volt vehicle battery, as it mayleak battery acid.
▶ If battery acid comes into contact with skin, washthe affected areas with water for a few minutes.Seek medical assistance without delay.
▶ Do not charge a frozen or thawed 12-volt vehiclebattery. Replace a frozen 12-volt vehicle battery.
▶ Do not use a damaged 12-volt vehicle battery.▶ Short circuit! The battery poles of the 12-volt vehi-
cle battery are not connected.
Electrical sockets in the vehicle
Improper use of the sockets can lead to life-threat-ening electric shock or fire.
▶ The sockets can get warm during operation. Donot touch sockets that have become warm.
▶ Protect sockets from liquids.▶ If fluid does manage to get into the power socket,
completely dry out the socket before reuse.▶ Do not insert any objects into the contacts of the
socket.
Before your journey
Adults and children, cargo and objects - everythinghas its place in the vehicle. Observe the following in-structions so that all occupants are protected in thebest possible way in the event of an accident.
Before you go▶ Ensure that you have a good view of outside the
vehicle. Attach external devices (e.g. navigation
11Correct and safe › Engine compartment
system) so that they do not restrict the view exter-nally.
▶ Adjust the rearview mirrors.▶ Close all doors and the engine compartment and
boot flap.▶ Take up the correct sitting position, adjust the
seats correctly and fasten the seat belt properly.Ensure that passengers do likewise. Always leavethe seat belt on while driving.
▶ Only one person can be secured with a seat belt.▶ Make sure that the seat belts are not trapped, e.g.
in the door or in the seat.▶ Check seat belts, their locks and attachment points
for damage.
Sitting safely
For the safety of the occupants and to reduce therisk of injury in the event of an accident, the follow-ing instructions must be observed:
▶ Stand the backrests upright. If the front passengerseat backrest has been folded forward, only theseat behind the driver's seat may be used for trans-porting passengers.
▶ Engage the rear seat backrests correctly.▶ Adjust the height-adjustable headrest so that the
top of the headrest is as close as possible to thetop of the head.
▶ On the occupied rear seat, the headrest should notbe in the lower position although the upper edge ofthe headrest should be at the same height as thetop of the head.
▶ Keep your feet in the footwell.▶ Use the entire seat.▶ Do not lean forward or sit to the side.▶ Do not hold your limbs out the window.
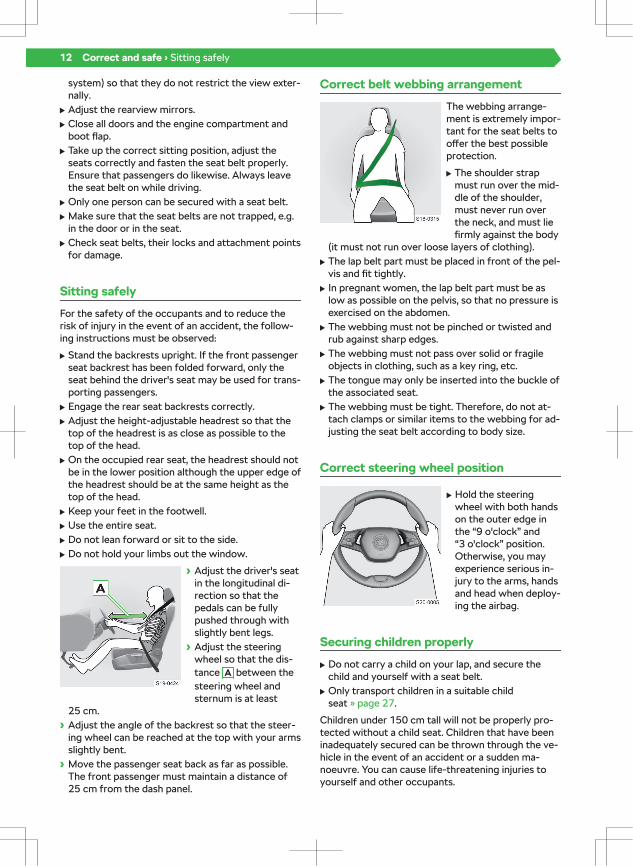
› Adjust the driver's seatin the longitudinal di-rection so that thepedals can be fullypushed through withslightly bent legs.
› Adjust the steeringwheel so that the dis-tance A between thesteering wheel andsternum is at least
25 cm.› Adjust the angle of the backrest so that the steer-
ing wheel can be reached at the top with your armsslightly bent.
› Move the passenger seat back as far as possible.The front passenger must maintain a distance of25 cm from the dash panel.
Correct belt webbing arrangement
The webbing arrange-ment is extremely impor-tant for the seat belts tooffer the best possibleprotection.
▶ The shoulder strapmust run over the mid-dle of the shoulder,must never run overthe neck, and must liefirmly against the body
(it must not run over loose layers of clothing).▶ The lap belt part must be placed in front of the pel-
vis and fit tightly.▶ In pregnant women, the lap belt part must be as
low as possible on the pelvis, so that no pressure isexercised on the abdomen.
▶ The webbing must not be pinched or twisted andrub against sharp edges.
▶ The webbing must not pass over solid or fragileobjects in clothing, such as a key ring, etc.
▶ The tongue may only be inserted into the buckle ofthe associated seat.
▶ The webbing must be tight. Therefore, do not at-tach clamps or similar items to the webbing for ad-justing the seat belt according to body size.
Correct steering wheel position
▶ Hold the steeringwheel with both handson the outer edge inthe “9 o'clock” and“3 o'clock” position.Otherwise, you mayexperience serious in-jury to the arms, handsand head when deploy-ing the airbag.
Securing children properly
▶ Do not carry a child on your lap, and secure thechild and yourself with a seat belt.
▶ Only transport children in a suitable childseat » page 27.
Children under 150 cm tall will not be properly pro-tected without a child seat. Children that have beeninadequately secured can be thrown through the ve-hicle in the event of an accident or a sudden ma-noeuvre. You can cause life-threatening injuries toyourself and other occupants.
12 Correct and safe › Sitting safely

If children lean forward or assume a wrong sittingposition while driving, they are more likely to be in-jured in the event of an accident. This is especiallytrue for children who are carried in the passengerseat - when the airbag system triggers, they can beseriously injured or killed!
A child that has been incorrectly secured in thewrong sitting position - endangered by the sideairbag
The child should not bein the deployment areaof the side airbag.
A child that has been properly secured in a childseat
There must be enoughroom between the childand the exit area of theside airbag for the sideairbag to offer the bestpossible protection.
Transporting objects safely
When moving heavy objects, there is a shift in em-phasis. Thus, the driving behaviour of the vehiclechanges.
▶ Adjust driving speed and driving style to thischanged driving behaviour.
Unsecured or misplaced items may be thrownaround in the event of an accident or sudden ma-noeuvre. There is a risk of serious injury and loss ofcontrol of the vehicle!
In a rear-end collision at 50 km/h unsecured objectsare thrown forward with up to 50 times their weight.A 1.5 litre water bottle is thrown with up to 75 kg.
▶ Transport objects securely.▶ Stow objects so they do not hinder the driver.
Keep the driver footwell clear.▶ Stow small items in the storage compartments.▶ Do not leave lockable storage compartments open.▶ Do not let items protrude out of the slots. This
note does not apply to bottles in bottle trays.
▶ Do not place any objects on the dash panel or onthe luggage compartment cover.
▶ Do not exceed the maximum permissible load offasteners and shelves.
▶ Distribute the load evenly in the luggage compart-ment and secure it, so that it cannot slip.
▶ Place heavy objects in the luggage compartmentas far forward as possible.
Safe driving
Introductory notes▶ Pay attention when you are driving! As a driver, you
are fully responsible for road safety.▶ Always adjust driving speed to the road conditions
as well as the traffic and weather conditions.
Paying attention to warning signalsThe driver information system warns you with indi-cator lights and messages in the event of any faults.
Failure to follow the warnings may increase the riskof accidents and injuries.
▶ If the vehicle issues a warning signal, then park thevehicle safely and follow the information in the in-strument cluster, and in this Owner's Manual.
Use assistance systemsThe assistance systems are only for support and donot absolve you from your responsibility for drivingthe vehicle.
The assistance systems are subject to physical andtechnical limitations. Therefore, in certain situations,system reactions may be perceived as undesirable ordelayed.
▶ Stay alert and be ready to intervene.▶ Familiarise yourself with the assistance systems,
their limitations and operating conditions.▶ Activate, deactivate and adjust the assistance sys-
tems so that you have full control of the vehicle inany traffic situation.
Driving with a substitute spare wheel or emergen-cy wheelA substitute spare wheel or emergency wheel is onlyused to reach the nearest specialist garage.
▶ Inflate the wheel with the max. prescribed inflationpressure.
▶ Follow the instructions on the warning label on therim.
▶ Do not cover the warning sign.▶ Avoid full accelerations, strong braking and fast
cornering.▶ Do not drive with more than one mounted spare
wheel.▶ Avoid using snow chains on the temporary spare
wheel.
13Correct and safe › Transporting objects safely

Driving with a loaded roof rackWhen transporting objects on the roof rack, the ve-hicle’s driving behaviour changes.
▶ Adapt your speed and driving style to this.
Driving through waterThere must be no water ingress into the vehicle sys-tems e.g. into the engine’s air intake system!
▶ Therefore, determine the water depth before driv-ing through water. The water level must not ex-ceed the lower edge of the lower beam.
▶ Drive at max. walking speed. Otherwise, a wavemay form in front of the vehicle, increasing the wa-ter level.
▶ Never stop in the water, do not drive backwardsand never stop the engine.
Is something wrong?▶ Pay attention to changes in vehicle handling.▶ If in doubt about safety, stop driving and seek the
help of a specialist garage.▶ Unusual vibrations or the vehicle ‘pulling’ to the
side may indicate a puncture.▶ If tyre pressure loss is very quick, try to stop the
vehicle carefully without heavy steering or heavybraking.
▶ Immediately remove foreign bodies stuck in thetyre tread.
▶ Do not remove foreign objects that have penetra-ted into the tyre. Check the tyre pressure and seekthe help of a specialised garage.
▶ Immediately remove any objects jammed underthe floor of the vehicle. These can damage the ve-hicle or ignite and cause a fire.
Stop the vehicle safely!
A vehicle that has not been secured may roll awayand cause accidents.
▶ For parking, look for a place with suitable ground.Do not park the vehicle on flammable materialssuch as dried leaves, spilt fuel. Hot vehicle partscan cause a fire.
Carry out the following activities in the specified or-der when parking.
› Stop the vehicle and keep the brake pedal de-pressed.
› Secure the vehicle with the parking brake.› For vehicles with an automatic gearbox, put the se-
lector lever in the position.› Turn off the engine.› For vehicles with manual transmission, engage
1st gear or reverse gear.› Release the brake pedal.
Exiting the vehicle
Do not leave children or other people or animalsunattended in the vehicle!
▶ Injuries can occur when handling seats, releasingthe parking brake etc.
▶ In emergency situations, one is not able to leavethe vehicle on their own or help themselves.
▶ At very high or very low temperatures, there isdanger to life!
Different weather conditions
If you wish to operate your vehicle in countries withdifferent weather conditions from those specified,please contact a ŠKODA partner. They will adviseyou if certain precautions need to be taken to ensurethe full functioning of the vehicle or to prevent dam-age (e.g. coolant, 12 volt vehicle battery replace-ment, etc.).
After an accident
What to do after an accidentWhere possible, please observe the following in-structions:
› Switch off the ignition.› Turn on the hazard warning lights.› Put on the reflective vest.› Set up the warning triangle to warn other road
users.› Stay at a safe distance from the vehicle, along with
any passengers.› Report the accident to the emergency services.› Wait for the emergency services to arrive.
Safety systemsAfter an accident, the safety systems of the vehicle,e.g. seatbelts and airbag system, may be out of ac-tion.
▶ Have the vehicle's safety systems checked by aspecialist garage, even if no load or trip has occur-red.
▶ Have damaged, loaded or triggered components ofthe safety systems replaced by a specialist garage.
What to do in the event of a fireWhere possible, please observe the following in-structions:
› Switch off the ignition.› Turn on the hazard warning lights.› Put on the reflective vest.› Set up the warning triangle to warn other road
users.
14 Correct and safe › Stop the vehicle safely!

› Stay at a safe distance from the vehicle, along withany passengers.
› Report the fire to the emergency services.› Wait for the emergency services to arrive.
15Correct and safe › After an accident

Keys, locks and alarm system
Key
Key Overview
Locking the vehicleOperating the bootlidUnlocking the vehi-cle
A Battery status warn-ing light
B Locking button forfolding the key bitin/out
NOTICE▶ Protect the key from moisture and strong vibra-
tions.▶ Keep the grooves in the key clean.
The effective range of the key signal is about30 m. The effective range can be reduced, e.g. due tosignal interference from other transmitters.
Troubleshooting
The battery in the key is almost empty▶ After pressing a button on the key, the warning
light does not flash.
Or:
▶ A message stating it is necessary to change thebattery will be displayed.
› Replace the battery » page 16.
The vehicle cannot be unlocked or locked with theremote controlThere may be the following reasons:
▶ The battery in the key is empty.
› Replace the battery » page 16.
▶ The key is not synchronized.
Synchronize the key as follows:
› Press any button on the key.› Unlock the door within 1 minute with the key via
the locking cylinder » page 17.
If necessary, the key must be synchronized if afavoured button on the key has been repeatedlypressed outside of the effective range of the remotecontrol.
Changing the key battery
The new battery must comply with the specificationof the original battery.
› Fold out the key bit.› Release the battery
cover with yourthumbnail or by insert-ing a flat-head screw-driver at the markedpoints.
› Open the battery cov-er.
› Remove the battery.› Press any button on
the remote key to re-set the key.
› Insert the new battery.› Fit the battery cover
and press until it clicksinto place.
WARNINGRisk of death!If the battery is swallowed, serious or even fatal inju-ries can result from burns in the digestive tract.▶ Always keep children away from the vehicle key
and batteries.▶ If the battery is swallowed, seek medical help im-
mediately.
Environment▶ Discharged battery must not be disposed off in
household waste.▶ Dispose off discharged battery in an environment-
friendly manner.
Dispose off the vehicle key in accordance withall applicable disposal regulations.
Central locking
Functionality
Central locking systemThe system unlocks and locks all doors, the fuel fillerflap and the boot lid at the same time.
Unlock indicator: double flashing of the indicatorlights.
Lock indicator: single flashing of the indicator lights.
The warning light in the driver's door will flash forabout 2 seconds in quick succession after the vehicleis locked, then it will start flashing regularly at longerintervals.
If none of the doors or the boot lid is openedwithin 45 seconds of unlocking, the vehicle automat-ically locks again.
16 Keys, locks and alarm system › Key

Operation
Ways in which central locking operatesDepending upon vehicle equipment:
▶ Key » page 16▶ Keyless locking (KESSY) » page 18▶ Central locking button
Lock/unlock using the central locking button› The button in the middle part of the control pan-
el.
The symbol in the button comes on when locked.
The button locks/unlocks all of the doors and theboot lid.
Unlocking of the vehicle also takes place when open-ing a door from the inside or when removing the keyfrom the ignition.
WARNINGA locked vehicle with a central locking button makesit difficult for responders to enter the vehicle in anemergency.
Open the doors from the inside when the vehicle islockedApplies to the driver door:
▶ Pulling the door opening lever once: Unlocking andopening the door
Applies to front passenger door and rear doors:
▶ First pull on the door opening lever: Unlocking thedoor
▶ Second pull on the door opening lever: Open door
Setting the unlocking and locking function
› In Infotainment, select the following menu:
Applies to the 10″ Infotainment system: Car Opening and Closing
All doorsUnlocking of all doors, the boot lid and the fuel fillerflap.
Single doorUsing the button on the key, the driver's door andthe fuel filler flap are unlocked.
When unlocked again, the other doors and the bootlid are unlocked.
In vehicles equipped with a keyless locking system,the door near to which the key is located and thefuel filler flap are unlocked by pressing the button onthe door handle.
Doors on one side of the vehicleUsing the button on the key, the doors on the driv-er’s side and the fuel filler flap are unlocked.
When unlocked again, the other doors and the bootlid are unlocked.
In vehicles equipped with a keyless locking system,the doors on the passenger’s side near to which thekey is located and the fuel filler flap are unlocked bypressing the button on the door handle.
Automatic locking after startingAll doors and the boot lid are locked when a speed of15 km/h is reached.
Unlocking of the vehicle takes place when opening adoor from the inside or when removing the key fromthe ignition.
Applies to the 10″ Infotainment systemThe function can be deactivated/activated in the In-fotainment system.
WARNINGAn automatically locked vehicle makes it difficult forresponders to enter the vehicle in an emergency.
Troubleshooting
Central locking fault▶ The warning light in the driver's door first flashes
for 2 secs in quick succession.▶ Then it lights up continuously.▶ After 30 secs, it flashes slowly.
› Seek the help of a specialist garage.
Mechanically unlocking and locking the door
Unlocking and locking the door with the lock cylin-der
Remove the cover› Pull on the door handle
of the vehicle and holdit.
› Insert the key into therecess on the under-side of the cover.
› Lift the cover in the di-rection of the arrow.
› Release the door han-dle.
Locking and unlocking› Insert the key into the
lock cylinder and un-lock or lock it.
Install cover› Pull on the door handle
and hold it.› Replace the cover.› Release the door han-
dle.
17Keys, locks and alarm system › Central locking

Locking the door without the lock cylinder
› Open the door.› Insert the key or a flat-head screwdriver into the
slot.› Use the key or a flat-blade screwdriver to push it in
towards the door.
After closing, the door is locked.
Keyless locking (KESSY)
Usage
The keyless locking system (KESSY) enables unlock-ing and locking of the vehicle without actively usingthe remote control key.
Operation
Keep the key with you when unlocking and locking.
Release
› Grab the door handle.› Press the button.› Open the door.
Lock
› Close the door.› Press the button.
After locking, it is notpossible to unlock thedoor within 2 seconds bypressing the button.
Unlocking the boot lid› Press the handle of the boot lid.
Protection against inadvertently locking the key inthe vehicleIf the key is locked inside the vehicle, the vehicle willunlock itself automatically. If no door is opened with-in 45 seconds, the vehicle automatically locks again.
If the key is locked in the boot, the boot lid will auto-matically unlock itself.
Settings
Deactivate keyless locking› Lock the vehicle with the button on the key.› Press the button on the door handle within 5 sec-
onds.
Deactivation is confirmed by a single flash of thedirection indicators.
› To check the deactivation, wait at least 10 secondsand then press the button on the door handle.
The door must remain locked.
Keyless locking is automatically activated once againafter the vehicle is unlocked.
Troubleshooting
The vehicle cannot be unlocked or locked usingthe button on the handle› Lock or unlock the vehicle with the button on the
key.› Then try to unlock or lock the vehicle using the
button on the handle.› If keyless locking does not work, seek the help of a
specialist garage.
If the vehicle is not unlocked for a longer periodof time, the function can be deactivated automati-cally.
When the ignition was switched on, no key wasfound
illuminatesMessage that no key was found in the vehicle
› Insert the key into the vehicle.
Alarm system
Functionality
The alarm system triggers audible and visual signalsduring a break-in or towing attempt.
The alarm system is activated automatically approxi-mately 30 seconds after the vehicle is locked.
The alarm system is automatically deactivated afterthe vehicle is unlocked.
18 Keys, locks and alarm system › Keyless locking (KESSY)

Alarm triggeringThe activated alarm system triggers an alarm whenthe following events occur:
▶ Opening the bonnet▶ Opening the boot lid▶ Opening the door▶ Manipulation of the ignition lock▶ Opening the door unlocked via the lock cylinder
Switching off the triggered alarm› Unlock the vehicle.
Or:
› Turn on the ignition.
Operating conditions
For the correct functioning of the alarm system, allwindows must be closed.
Doors, windows and boot lid
Doors
Opening/closing the door
Opening from the outside
› Unlock the vehicle andpull on the door handle.
Opening from the inside
› Pull the door openinglever and push thedoor away from you.
Closing from the inside› Grasp the pull handle and close the door.
Reflective safety tape
Child safety lock on the rear doors
Operation
The child lock prevents the rear doors from beingopened from the inside.
19Doors, windows and boot lid › Doors

Switching on and off
› Turn the child lock with the vehicle key or a flat-head screwdriver.
A Child lock switched off
B Child lock switched on
Window - with electrical operation
What you should be mindful of
Force limiterThe driver's window has a force limiter.
If there is an obstacle, the closing process is inter-rupted and the glass pane retracts by several centi-metres.
If the obstacle prevents it from being closed for thenext 10 seconds, the closing process is interruptedonce again and the window goes down by severalcentimetres.
If you attempt to close the window again within10 seconds of the window being moved down forthe second time, even though the obstacle was notyet been removed, the closing process is only stop-ped.
The force limiter is only not operational if you at-tempt to close the window again within the next10 seconds – the window will now close with fullforce! If you wait longer than 10 seconds, the forcelimiter is switched on again.
CAUTIONRisk of injury!▶ Even though the driver’s window has a force limit-
er, close the window carefully.
Overview of the operating buttons on thedriver's door
Depending upon vehicleequipment:
A Front left window
B Front right window
C Rear left window
D Rear right window
E Deactivation/activa-tion of the buttons inthe rear doors
Operation
When the windows are open, irritating noisesmay occur at certain speeds.
OpeningApplies to models with electric window in the driv-er's door.
› Press the corresponding button until it stops; thewindow opens automatically. Pressing the buttonagain will stop the opening process.
ClosingApplies to models with electric window in the driv-er's door.
› Pull the corresponding button until it stops; thewindow closes automatically. By pressing the but-ton again, the closing process is stopped.
After switching off the ignition, the windows canstill open and close for about 10 minutes so long asnone of the doors are opened.
Troubleshooting
The window regulator has stopped working afterrepeated opening and closingThe window regulator mechanism could have over-heated.
› Allow the window regulator mechanism to cooldown.
The window operation does not work after discon-necting the 12 volt vehicle battery› Enable window operation » page 20.
Activation after disconnecting the vehiclebattery
Activate automatic window operation› Turn on the ignition.› Pull the corresponding button upwards and the
window closes.
20 Doors, windows and boot lid › Window - with electrical operation

› Release the button.› Pull up the respective button and hold for 1 sec-
ond.
Sliding/tilting roof
What you should be mindful of
To reduce the risk of pinch injuries when closing thetilt/slide sunroof, the vehicle has a force limiter.
If the switch is held in the closed position and theclosing process is hindered by an obstacle, themovement of the glass pane is stopped and the panemoves back a few centimetres.
If the obstacle prevents it from being closed for thenext 10 seconds, the closing process is interruptedonce again and the window goes down by severalcentimetres.
If the obstacle is not removed, the power limit is de-activated when the switch is held again when thedoor is closed again (if the time span between theclosing attempts is less than 3 s). The sliding/tiltingroof will then close with full force.
CAUTIONRisk of injury!▶ Close the sliding/tilting roof carefully, even though
there is a force limiter.
NOTICE▶ During winter time, if necessary, remove any ice
and snow around the area of the sliding/tilting roofbefore opening.
Operating conditions
✓ Ignition on
Operation
The sliding/tilting roof can be moved or opened.
Slide open/close the sliding/tilting roof
A Slide open gradually
B Slide open com-pletely
C Slide close gradually
D Slide close com-pletely
Open/slide back the sliding/tilting roof
A Gradual opening
B Complete opening
C Gradually reset
D Fully reset
The sliding/tilting roof can only be opened whenit is closed.
CAUTION▶ Use the sliding/tilting roof only for ventilation.▶ Do not bring any parts of your body out of the slid-
ing/tilting roof.
Troubleshooting
The sliding/tilting roof cannot be closed whiledriving› Change your driving style or stop and close the
sliding/tilting roof.
Sunblind - with manual operation
Operation
› Pull the handle in theappropriate direction.
Sun visors
Folding up and folding down
1 Swivel the front visor towards the windscreen
21Doors, windows and boot lid › Sliding/tilting roof

2 Swivel the visor towards the door
CAUTIONObjects attached to the sun visors can restrict theview to the outside.In the event of sudden braking or an impact, thesecan also cause injuries.▶ Do not attach a bike rack to the tailgate.
Boot lid - with manual operation
What you should be mindful of
NOTICE▶ Do not attach a bike rack to the tailgate.
Operation
Opening
› Press the handle andlift the lid.
The option to open by pressing the handle is deacti-vated once a speed of 5 km/h is reached. This is acti-vated again after the vehicle has stopped and a dooris opened.
Closing
› Grasp the fixture Aand pull the lid down.
CAUTIONDanger of opening the tailgate while driving!▶ Make sure that the latch engages after the flap is
closed.
Set a delayed lid lock
If the lid is unlocked with the button on the key,the lid is automatically locked again after closing.
The period after which the lid is locked automaticallycan be extended by a specialist garage.
Unlocking the boot lid
Release
If the boot lid does not open, it can be unlockedmanually by the following procedure.
› Insert a screwdriver in-to the opening in thepanel.
› Release the tailgate bymoving it in the direc-tion of the arrow.
22 Doors, windows and boot lid › Boot lid - with manual operation

Seats, steering wheel and mirror
Front seat - with manual operation
Controls on the seat
A Adjust in a longitudinal directionAfter releasing the control lever the latch mustengage audibly.
B Adjusting the height
C Adjusting the angle of the seat backrestDo not lean against the backrest during adjust-ment.
After a certain time, play can develop within theadjustment mechanism of the backrest angle.
Rear seats
Folding down the seat backs
Before folding down› Insert the rear headrests as far as they will go or
remove them.› Adjust the position of the front seats in such a way
that they are not damaged by the folded-downseat backrests.
› Pull the outer seat belt to the side trim.
Folding down
› Press the release han-dle and fold the seatforwards.
Folding back up
› Pull the outer seat beltto the side trim.
› Fold the seat backrestback up.
The release handle mustaudibly click into place.
› Check that the seatbackrest has locked inplace. The pin A mustnot be visible.
Headrests
HeadrestsAdjusting the height
Front headrestsAdjustment of the headrest heights is the same inthe front and rear.
› Move the headrest inthe desired direction.
When pushing down,press and hold thesafety button.
Removing and inserting the rear headrests
Removing
› Partially fold the re-spective seat back for-wards.
› Move the headrest upto the stop.
› Press the safety but-tons and remove thesupport.
Inserting› Insert the headrest into the seat backrest.
The safety button must click into place.
23Seats, steering wheel and mirror › Front seat - with manual operation

Front armrest
Settings
› Move the backrest tothe desired position.
Rear armrest
Settings
› Fold down the armrest.
The folded-down arm-rest can be used as astorage table.
Steering wheel
Buttons/dials on the multifunction steeringwheel
Depending on the equipment:▶ Switch voice control on/off▶ Out of operation
A Rotate - Adjust the volumePress - Switch the sound off/on
Switch to the next track/station played
Switch to the previous track/station played
Out of operation
B Operate instrument cluster display » page 44
Operate instrument cluster display » page 44
Operate instrument cluster display » page 44
Setting the steering wheel position
WARNINGRisk of an accident!▶ Do not adjust the steering wheel while driving.
› Swing the safety leverdownwards.
› Adjust the steeringwheel to the desiredposition.
› Press the safety leveras far as it will go.
Troubleshooting
Power assisted steering faultyilluminates - total failure of the power assistedsteering, failure of steering assistance
› Turn off the ignition, start the engine and drive afew meters.
› If the indicator light does not go out, do notcontinue. Seek the help of a specialist garage.
illuminates - partial failure of the power assis-ted steering, possible reduction in power
steering
› Turn off the ignition, start the engine and drive afew meters.
› If the indicator light If the warning light doesnot go out, you can drive on, exercising appropriatecaution. Seek the help of a specialist garage.
Steering column lock faultyflashesMessage regarding a fault in the steering col-
umn lock
› Stop the vehicle.› Seek the help of a specialist garage.
24 Seats, steering wheel and mirror › Front armrest

After switching off the ignition, it is then no longerpossible to switch on the ignition, to lock the steer-ing and to switch on the electrical components.
flashesMessage regarding a fault in the steering lock
› You may continue driving, exercising appropriatecaution. Seek the help of a specialist garage.
Steering column lock not unlockedflashesMessage concerning the required steering
wheel movement
› Move the steering wheel slightly back and forth.› If the steering does not unlock, stop the vehicle
and seek the help of a specialist garage.
Interior rear-view mirror
Operation
Interior mirror with manual darkening
A Mirror is not dark-ened
B Mirror darkens
Interior mirror with automatic darkeningDarkening of the mirror is automatically controlledthrough the sensors in the mirror once the engine isstarted.
CAUTIONRisk of an accident!A glowing display e.g. a mobile phone or navigationdevice may affect the function of the automatic mir-ror darkening.▶ Do not attach these devices close to the mirror.
Wing mirror
Operation
Depending on the equipment, the mirrors can be fol-ded in manually or electrically.
Adjust the left-handexterior mirrorSwitch off operationAdjust the right-hand exterior mirrorFold mirror in elec-trically (to fold backout, select a differ-ent position)
Adjusting the mirror surface› Select position or .› Turn the rotary knob in the direction of the arrows.
Folding electrically folding mirrors automaticallyIf this function is activated, the mirrors are folded inwhen the vehicle is locked and folded back when it isunlocked.
Locking of the vehicle is not indicated by the factthat the mirrors fold in. Locking of the vehicle is indi-cated by the turn signal lights flashing.
Manually foldable mirrors› Fold the mirror towards the side window by apply-
ing pressure with your hand.
WARNINGRisk of an accident!The exterior mirrors make objects appear fartheraway.▶ Use the rear-view mirror to determine the distance
from vehicles behind.
NOTICEDanger of mirror damage!▶ If the electrically foldable mirror is swung out by
external influences (e.g. due to an impact duringmanoeuvring), fold the mirror in using the rotaryknob and wait for an audible folding sound.
Settings
Automatic folding of the exterior mirrors is activatedor deactivated in the following menu in the Infotain-ment system:
Applies to the 10″ Infotainment system: Car Mir-rors and wipers
Troubleshooting
Electrical operation of mirror surfaces disturbed› Press lightly on the edge of the mirror surface with
your fingers to adjust it.
25Seats, steering wheel and mirror › Interior rear-view mirror

Restraint systems and airbags
Seat belts
Functionality
Seat belts that are fastened correctly offer verygood protection in the event of an accident. They re-duce the risk of an injury and increase the chance ofsurvival in the event of a major accident.
WARNING▶ The seat belts must not be removed or altered in
any other way.▶ If the driver's seat belt is damaged, stop driving.▶ If another seat belt is damaged, the seat must not
be occupied.▶ Do not repair damaged seat belts yourself.▶ Have a damaged seat belt replaced immediately by
a specialist garage.
Automatic belt retractorThe automatic retractor locks the belt in the eventof a jerky pull on the belt. The belts lock, for example,when full braking, when the car accelerates, whendriving downhill and when cornering.
WARNING▶ If the seat belt does not lock when pulled jerkily,
have the retractor checked by a specialist garage.
Belt tensionersSafety for the driver and front passenger wearingtheir seat belts is enhanced by the belt tensionersfitted to the inertia reels of the front seat belts.
If there is a collision with a certain severity, the seatbelt is tightened by the belt tensioner so that unwan-ted body movement is prevented.
The belt tensioner can also be deployed when theseat belt is not fastened.
Belt tensioners are not activated in the event of mi-nor collisions or in accidents in which no majorforces are produced.
Smoke is released when the belt tensioner is de-ployed. This does not indicate a vehicle fire.
Status display in the instrument cluster displayDepending on the type of display, the display can beas follows:
illuminated – a front seat belt is not fastened
illuminated – a rear seat belt is not fastened
illuminated – a rear seat belt is fastened.
Operation
Fastening the seat belt
› Grasp the buckle latchand slowly pull the beltover the chest and pel-vis towards the buckle.
› Insert the buckle latchinto the buckle untilthere is an audibleclick.
› Pull on the belt to en-sure that the buckle issecurely fastened.
Unfastening the seat belt
› Grasp the buckle latchand release it by press-ing the red button.
› Hold the belt so it doesnot twist when rollingup.
Troubleshooting
Blocked belt retractor
› Grasp the strap in themiddle and pull quicklyin the direction of thearrow.
› Hold the strap and letit roll up slowly.
› Pull on the strap to seeif the retractor isworking properly.
› If the strap is stillblocked, repeat the un-
locking procedure once or twice.› If the strap is still blocked, seek the help of a spe-
cialist garage.
Child seat
What you should be mindful of
For how to install and use the child seat, please notethe instructions in this Owner's Manual as well as theinstructions of the child seat manufacturer.
For safety reasons, we always recommend that chil-dren are transported on the back seats. Carry chil-dren on the front passenger seat only in exceptionalcases.
26 Restraint systems and airbags › Seat belts

Use child seats in accordance with the ECE-R 44 andECE-R 129 standards of the European EconomicCommission as well as in accordance with theAIS072 and GSO 1709/2005 standards.
Child seats according to standard ECE-R 44 andECE-R 129 are marked with the test symbol: large Ein a circle, with the test number below.
We recommend using child seats from the ŠKODAOriginal Accessories range. These child seats havebeen developed and tested for use in ŠKODA vehi-cles. They satisfy the standard ECE-R 44 or ECE-R129.
NOTICEAn improper procedure when attaching the childseat or the installation of a non-approved type ofchild seat can cause irreversible damage to the ISO-FIXSystem, on the retaining lugs and on other vehicleparts.
WARNING▶ When installing the child seat on the rear seat, ad-
just the front seat so that there is no contact be-tween the front seat and the child seat or the childcarried in the child seat.
▶ Before installing a forward-facing child seat, adjustthe headrest so that it is as low as possible.
▶ If the headrest prevents the child seat from beingfitted, adjust the headrest to the highest position.
▶ When installing the child seat, avoid contact be-tween the roof and the rear pillar. If the head air-bag is deployed, there is a risk of injury.
▶ If using a separate child seat cushion, adjust theheadrest so that the child's head is flush with, butnot protruding above the height of the top edge ofthe headrest.
Using a child seat on the front passenger seat
When using a child seat on the passenger seat, anycountry-specific regulations must be observed.
WARNINGRisk of death or serious injury to the child!The front passenger airbag cannot be switched off.▶ Never use a rear-facing child seat on the front pas-
senger seat.
This is also indicated by the following sticker on thefront passenger’s sun visor:
The following instructions must be followed whenusing a child seat on the front passenger seat:
▶ If possible, adjust the front passenger seat back-rest so that it is vertical, to ensure that there is se-cure contact between the backrest and the childseat.
▶ If possible, move the front passenger seat back-wards so that there is no contact between thefront passenger seat and the child seat behind it.
▶ Adjust the height-adjustable front passenger seatas much as possible.
▶ Set the front passenger seat belt as high up as pos-sible.
WARNINGRisk of the seat belt causing a neck injury to thetransported child!▶ For child seats in groups 2 and 3, ensure that the
guide fitting attached to the child seat headrest ispositioned in front of or at the same height as theseat belt height adjuster on the central body pillar.
▶ Adjust the height of the front passenger seat beltso that the belt passes through the guide fittingwithout kinking and is not bent over the edge ofthe guide fitting.
Recommended child seats
Grouping of child seats according to the ECE-R 44 and AIS072 standards.
Group Weight of the child
0 up to 10 kg0+ up to 13 kg1 9-18 kg2 15-25 kg3 22-36 kg
Grouping of child seats according to standard GSO 1709/2005.
27Restraint systems and airbags › Child seat

Group Weight of the child
0 up to 10 kg1 9-18 kg2 15-25 kg3 22-36 kg
Recommended child seatsRecommended child seats according to the ECE-R 44 and AIS072 standards.
Group Manufacturer Type Order numberApproval number
(E1 ...)
0+(up to 13 kg)
Britax RömerBaby Safe Plus i-
Size00019906T 129R00/05 0008
1(9-18 kg)
Britax Römer Duo Plus TT 00019906AA 44R04/15 301133
2-3(15-36 kg)
Britax Römer R BR2Kidfix 00019906AB 44R04/14 301304
Recommended child seats according to the GSO 1709/2005 standards.
Group Manufacturer Type Order numberApproval number
(E1 ...)
0(up to 10 kg)
Britax RömerBaby Safe Plus i-
Size00019906T 129R00/05 0008
1(9-18 kg)
Britax Römer Duo Plus TT 00019906AA 44R04/15 301133
2-3(15-36 kg)
Britax Römer R BR2Kidfix 00019906AB 44R04/14 301304
Fasteners for child seats
Use of child seats
Child seats that use the ISOFIX SystemOverview of usability of child seats according to the ECE-R 16 and AIS072 standards.
28 Restraint systems and airbags › Fasteners for child seats
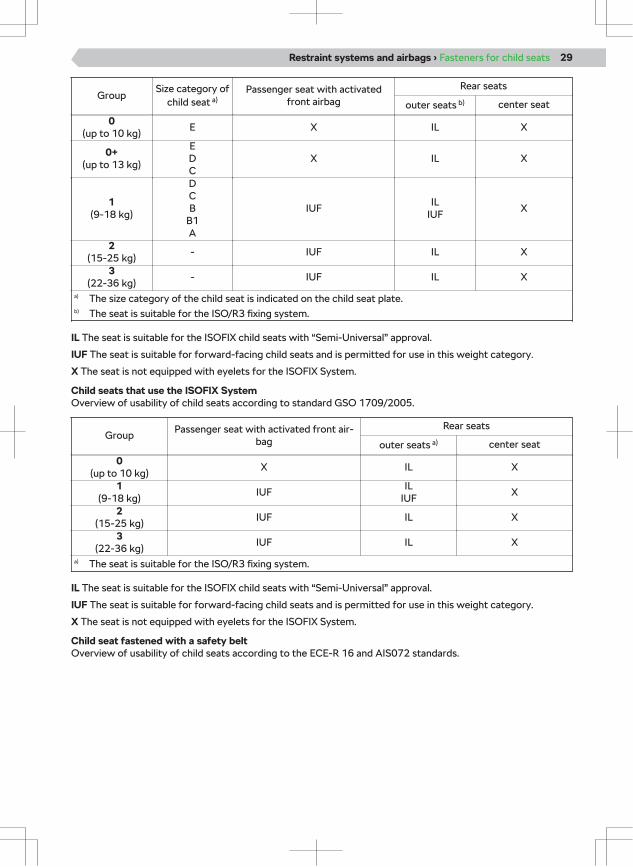
GroupSize category of
child seat a)Passenger seat with activated
front airbag
Rear seats
outer seats b) center seat
0(up to 10 kg)
E X IL X
0+(up to 13 kg)
EDC
X IL X
1(9-18 kg)
DCB
B1A
IUFIL
IUFX
2(15-25 kg)
- IUF IL X
3(22-36 kg)
- IUF IL X
a) The size category of the child seat is indicated on the child seat plate.b) The seat is suitable for the ISO/R3 fixing system.
IL The seat is suitable for the ISOFIX child seats with “Semi-Universal” approval.
IUF The seat is suitable for forward-facing child seats and is permitted for use in this weight category.
X The seat is not equipped with eyelets for the ISOFIX System.
Child seats that use the ISOFIX SystemOverview of usability of child seats according to standard GSO 1709/2005.
GroupPassenger seat with activated front air-
bag
Rear seats
outer seats a) center seat
0(up to 10 kg)
X IL X
1(9-18 kg)
IUFIL
IUFX
2(15-25 kg)
IUF IL X
3(22-36 kg)
IUF IL X
a) The seat is suitable for the ISO/R3 fixing system.
IL The seat is suitable for the ISOFIX child seats with “Semi-Universal” approval.
IUF The seat is suitable for forward-facing child seats and is permitted for use in this weight category.
X The seat is not equipped with eyelets for the ISOFIX System.
Child seat fastened with a safety beltOverview of usability of child seats according to the ECE-R 16 and AIS072 standards.
29Restraint systems and airbags › Fasteners for child seats

Group Passenger seat with activated front airbag a)Rear seats
outer seats center seat
0(up to 10 kg)
X U U
0+(up to 13 kg)
X U U
1(9-18 kg)
UF U U
2(15-25 kg)
UF U U
3(22-36 kg)
UF U U
a) Adjust the height-adjustable front passenger seat as much as possible.
U The seat is suitable for the child seat category "“Universal”” and is permitted for use in this weight group.
UF The seat is suitable for forward-facing child seats in the “Universal” category and is permitted for use inthis weight group.
X The seat is not suitable for children in this weight group.
Child seat fastened with a safety beltOverview of usability of child seats according to standard GSO 1709/2005.
Group Passenger seat with activated front airbag a)Rear seats
outer seats center seat
0(up to 10 kg)
X U U
1(9-18 kg)
UF U U
2(15-25 kg)
UF U U
3(22-36 kg)
UF U U
a) Adjust the height-adjustable front passenger seat as much as possible.
U The seat is suitable for the child seat category "“Universal”” and is permitted for use in this weight group.
UF The seat is suitable for forward-facing child seats in the “Universal” category and is permitted for use inthis weight group.
X The seat is not suitable for children in this weight group.
Overview
Follow the instructions and notes at the beginning ofthis chapter » page 26, What you should be mindfulof.
ISOFIX
WARNING▶ On the retaining eyelets that are used to install the
child seat with the ISOFIXSystem provided, do notattach any other child seats, belts or objects.
The ISOFIX system allows for the fast and secure in-stallation of the child seat. The eyelets for installingthe child seat using the ISOFIX system are locatedon the outer rear seats.
A child seat that uses the ISOFIX system can only beinstalled in the vehicle if it is approved for this vehi-cle type. Further information can be obtained from aŠKODA partner or from a list of vehicles enclosedwith the child seat.
30 Restraint systems and airbags › Fasteners for child seats

Holding eyes for instal-ling the child seat usingthe ISOFIX system.
TOP TETHER
WARNING▶ Child seats with the TOP TETHER- Only use the
system on the seats with the eyelets TOP TETH-ERSymbol are provided.
▶ Only attach one belt from the child seat to a lock-ing eye TOP TETHER-Fasten the system.
▶ When attaching the child seat with the TOP TETH-ER- No other object may be attached to the eyeletTOP TETHERSystem.
Holding eyelets on the rear seats
The belt fastened into the TOP TETHER system re-stricts the movement of the upper part of the childseat. The holding eyelets for attaching the belt arelocated on the outer rear seats A .
Airbags
Usage
The airbag system provides, as a supplement to theseat belts, additional occupant protection during se-vere frontal and side-on collisions.
The best possible protective effect of the airbag isachieved only when the seat belt is also worn. Theairbag system is no substitute for the seat belts.
What you should be mindful of
Airbag systems can only properly protect if all occu-pants have been secured and they are in the correctseating position.
No persons, animals or objects such as cup holdersor hangers for clothes may be in the deploymentarea of the airbags » page 31.
▶ Do not cover or stick anything over the steeringwheel or the dash panel. The front airbags werenot able to deploy.
Functionality
When sinking into the inflated airbag, the forwardmovement of the body is damped and the risk of in-jury is reduced.
As the airbags inflate, smoke is released. Thisdoes not indicate a vehicle fire.
Airbag deployment in the event of an accidentAirbag deployment is influenced by many factors.The deceleration rate at the time of impact is crucial.
WARNINGDanger of serious or fatal injuries!▶ Maintain the correct seating position.▶ Do not keep your limbs in the deployment area of
the airbags.
In the following situations, no airbags are deployed:
▶ Minor frontal and side collisions▶ Rear-end collision▶ Vehicle rollover
If the measured deceleration rate is below the refer-ence values programmed into the control unit, theairbags will not be deployed despite possible seriousvehicle damage.
Airbag overview
The installation location of the airbags is markedwith the lettering .
A Front airbags
B Side airbags - front
C Head airbags
31Restraint systems and airbags › Airbags

WARNINGDanger of a functional restriction of the side airbags!▶ Do not exert excessive forces, e.g. impacts, on the
seat backs.▶ Do not use seat covers that have not been ap-
proved by ŠKODA.▶ Have damaged seat covers at the installation loca-
tion of the side airbags repaired by a specialist ga-rage.
Deactivating the airbagsWe recommend that you ask a ŠKODA service part-ner to deactivate any other airbags as appropriate.
illuminates for 4 seconds after the ignition isswitched on and then flashes for 12 seconds
- Airbag or belt tensioner deactivated with the diag-nostic deviceMessage regarding the deactivated airbag or belttensioner
Deactivation of the airbags should be considered incases such as the ones below:
▶ If the driver's seat adjustment is correct, the dis-tance of at least 25 cm between the centre of thesteering wheel and the sternum cannot be main-tained.
▶ Additional operating controls for a physically disad-vantaged driver are installed in the vehicle.
▶ The vehicle has special seats, e.g. orthopaedicseats without side airbags.
WARNINGIf an airbag is deactivated during the sale of the vehi-cle, inform the buyer!
Requirements
✓ Ignition on
Troubleshooting
Airbag system faultyilluminatesMessage regarding an airbag fault
› Seek the help of a specialist garage.
Lighting, windscreen wipers andwashers
Exterior lighting
Functionality
Unless otherwise stated, the light works when theignition is switched on.
Operation
Positions of the lightswitch (depending onthe vehicle equipment):
Switching off thelights except thedaytime runninglightsSwitching the lowbeam on/off auto-matically » page 33
Switching on the parking lightsSwitching on the low beam
As the basic position of the light switch, use posi-tion .
Settings
Headlight range controlApplies to headlights without adaptive functions
› Select the position of the control according to thevehicle's current load status.
Front seats occu-pied, boot emptyAll seats occupied,boot emptyAll seats occupied,boot loaded
Driver's seat occupied, boot loaded
WARNINGRisk of an accident!An incorrectly adjusted headlight range can cause in-sufficient vehicle lighting or can dazzle other roadusers.▶ Adjust the headlight range correctly.
Troubleshooting
Light bulb or LED bulb is defectiveor illuminatesInformation appears in the display regarding
the defective lights.
32 Lighting, windscreen wipers and washers › Exterior lighting

› Replace the defective bulb.› In case of a defective LED bulb, contact a specialist
garage for help.
The headlights are misted up on the insideInside the headlights, moisture may occur. This is nota defect.
Malfunction of the automatic headlight circuit› Clean the windscreen in the area of the rain/light
sensor.
Beam of light in front of the vehicle has shortenedHeadlight defective.
› Seek the help of a specialist garage.
Driving lights defectiveIf a message regarding the failed driving lights is dis-played, the light will work in emergency mode.
› Drive on, exercising appropriate caution.› Seek the help of a specialist garage.
Daylight running lights
Functionality
The daytime running lights illuminate the area infront of the vehicle.
In vehicles for certain markets, this also provideslighting for the rear area of the vehicle.
Operating conditions
✓ The lights switch is in position , or .
Automatic driving lights function
Functionality
Switching low beam on automatically in low-lightThe low beam is automatically switched on or off de-pending on the lighting conditions.
Switching low beam on automatically in rainThe low beam is switched on automatically when thewindscreen wipers are switched on.
The automatic headlight circuit is indicated by the il-lumination of the symbol in the light switch.
Operating conditions
Switching low beam on/off automatically in dark✓ The light switch is in the position.
Switching low beam on automatically in rain✓ The light switch is in the position.✓ The function is activated.
✓ The windscreen wipers are switched on for lon-ger than 30 seconds.
Settings
The automatic driving lights function is set in the fol-lowing menu in the Infotainment system:
Applies to the 10″ Infotainment system: Car Lightssettings
High beam and headlight flasher
Operation
A Switch on high beam
B Switch off mainbeam / switch onheadlight flasher
When the main beam orheadlight flasher isswitched on, the indica-
tor lamp lights up in the instrument cluster .
CAUTIONRisk of an accident!▶ Do not dazzle other road users with the high beam.
Turn signal
Operation
A Switching on theturn signal light onthe right - the warn-ing light flashes inthe instrument clus-ter
B Switching on theturn signal light onthe left - the warn-ing light flashes inthe instrument clus-
ter
Turn signal - convenience signallingConvenience signalling enables three flashes of theturn signal lights without having to move the leverup or down.
› Tap the control lever up or down.
The corresponding turn signal lights flash threetimes.
Tap the lever in the opposite direction ahead oftime to stop signalling.
33Lighting, windscreen wipers and washers › Daylight running lights

Settings
Activating/deactivating convenience signallingThe function is activated or deactivated in the fol-lowing menu in the Infotainment system:
Applies to the 10″ Infotainment system: Car Lightssettings
Troubleshooting
Turn signal light defectiveflashes faster - turn signal light on the right de-fective
› Check the turn signal light on the right.
flashes faster - turn signal light on the left de-fective
› Check the turn signal light on the left.
Fog light
Operation
Fog lights
› Turn the light switch toposition , or .
› Pull out the lightswitch.
The indicator light inthe switch lights up on
Hazard warning lights function
Operation
› Press the button to switch on or off in the mid-dle part of the control panel.
The hazard warning lights can be switched on auto-matically during hard braking. The hazard warninglights are then switched off again automaticallywhen starting off or accelerating.
When the hazard warning system is on and theturn signal is switched on, the hazard warning lightswill be switched off temporarily and only the turnsignal will flash on the relevant side of the vehicle.
Parking light function
Usage
Double-sided parking light The two-sided parking light helps the parked vehicleto be illuminated through activation of the sidelights.
One-sided parking light The one-sided parking light helps in illuminating oneside of the parked vehicle through activation of thecorresponding sidelights.
Operation
Double-sided parking light › Turn on the ignition.› Turn the light switch to position .› Switch off the ignition.› Lock the vehicle.
When the parking light is switched on, an acousticwarning signal sounds after the ignition is switchedoff and the driver's door is opened. After a few sec-onds or after the driver's door is closed, the warningsignal will stop.
The light may switch off automatically if the 12-voltvehicle battery is too low. If the parking lights onboth sides are switched on with the ignition off, thelights will not be switched off automatically and the12 volt vehicle battery may be discharged.
One-sided parking light
A Switch on the side-lights on the right
B Switch on the side-lights on the left
› Switch off the ignition.› Move the lever to the
appropriate position.› Lock the vehicle.
When the parking light isswitched on, an acoustic warning signal sounds andthe driver's door is opened. After a few seconds orafter the driver's door is closed, the warning signalwill stop.
CORNER function
Functionality
The CORNER function is intended for turning or ma-noeuvring (e.g. when parking).
The function illuminates the vicinity of the vehiclefront in the direction of travel.
34 Lighting, windscreen wipers and washers › Fog light

Operating conditions
✓ The turn signal is switched on or the front wheelsare steered sharply.
✓ The low beam is switched on.✓ The fog lights are not switched on.✓ The driving speed is lower than 40 km/h.
Function COMING HOME, LEAVINGHOME
Functionality
Version 1Applies to vehicles with automatic driving lightswitch function.
The COMING HOME function turns on the light afterturning off the ignition and opening the driver's doorautomatically. The light switches off automaticallyafter the set lighting time has elapsed.
The LEAVING HOME function switches on the lightwhen unlocking the vehicle with the wireless remotecontrol automatically.
Version 2Applies to vehicles without automatic driving lightswitch function.
The COMING HOME function turns on the light afterturning off the ignition, manually activating the func-tion and opening the driver's door. The light switchesoff automatically after a few seconds.
The LEAVING HOME function switches on the lightwhen unlocking the vehicle with the wireless remotecontrol automatically.
Operating conditions
Version 1Applies to vehicles with automatic driving lightswitch function.
✓ Visibility has worsened.✓ The light switch is in the position.
Version 2Applies to vehicles without automatic driving lightswitch function.
✓ The light switch is in the position.
Operation
Activate COMING HOME function manuallyApplies to vehicles without automatic driving lightswitch function.
› Switch off the ignition.
› Briefly hold the left lever under the steering wheelin position (switching on the headlight flash-er).
› Open the driver door.
Settings
This function is set in the following menu in the Info-tainment system:
Applies to the 10″ Infotainment system: Car Lightssettings
Replace light bulbs
What you should be mindful of
DIY replacement of the following bulbs is possible.Have the remaining light sources replaced by a spe-cialist garage.
The new bulb must conform to the specification ofthe original light bulb. The name of the bulb ismarked on the bulb socket.
After changing a bulb in the low beam light, the mainbeam or fog light, have the headlights adjusted by aspecialist garage.
CAUTIONHalogen lamps are pressurised and can burst duringreplacement!▶ Wear gloves and safety goggles.
NOTICEContamination of the halogen lamp reduces the lifeof the lamp!▶ Do not touch the glass of the light bulb with your
bare fingers.
NOTICEDanger of headlight damage due to the ingress ofwater and dirt!▶ Always fit the protective cap on the headlight cor-
rectly after changing a bulb.
Conditions for changing a bulb
✓ Ignition off✓ Light switched off
35Lighting, windscreen wipers and washers › Function COMING HOME, LEAVING HOME

Low beam
Removing the defective light bulb
› Remove the protectivecap from the headlight.
› Remove the base withthe bulb.
Insert a new bulb› Change the bulb in the socket.
› Insert the socket withthe new light bulb intothe headlight, so thatthe fixing lug A ispointing up.
› Fit the protective capon the headlight again.
Front turn signal
› Turn and remove thesocket with the bulb.
The headlight on the left
The headlight on the left
› Turn the defective bulbin the socket and re-move it.
› Insert a new light bulbinto the socket and se-cure the light bulb byturning it in the direc-tion of .
› Insert the socket withthe new bulb into theheadlight so that the
guide lugs on the socket are aligned with the cor-responding openings in the headlight.
› Turn the socket clockwise to secure.
Main beam
Removing the defective light bulb
› Remove the protectivecap from the headlight.
› Unhook the springbracket of the bulb to-wards the inside of theheadlight and to theright.
› Fold down the springbracket of the lightbulb.
› Remove the connectorfrom the bulb.
Left headlight
36 Lighting, windscreen wipers and washers › Replace light bulbs

› Remove the defectivebulb.
Insert a new bulb
› Insert the new bulb in-to the headlight sothat the flattened sideof the socket A. ispointing up.
› Attach the connectorto the bulb.
› Fold the spring bracketon the bulb and hook itin.
› Fit the protective cap on the headlight again.
Fog lights
To reach the light bulb, the wheel housing shell mustbe loosened.
Loosen the wheel housing shell
› Unscrew the screwsA .
Replacing the light bulb
› Fold down the wheelarch shell.
› Remove the rubberprotective cap fromthe headlight.
› Turn the bulb and re-move it.
› Release the connectorand remove it from thebulb.
› Insert the plug into thenew bulb until it clicksinto place.
› Insert the new bulb in-to the headlight so thatthe guide lugs on thebulb are aligned with
the corresponding openings in the headlight.› Turn the bulb clockwise to secure.› Replace the rubber protective cap on the headlight.
Secure the wheel arch liner› Reinstalling the wheel arch liner.
› Screw in the screwsA .
37Lighting, windscreen wipers and washers › Replace light bulbs

Tail light assembly
Loosen and remove the light
› Unscrew the screwsA .
› Remove the light.
› Press the lock mecha-nisms on the connec-tor and remove theconnector.
Replacing the light bulb
› Unlock and remove thelamp holder A .
› Change the bulb in thesocket.
› Check whether plug Ais securely connected.
› Insert the bulb holderinto the light and snapinto place.
NOTICERisk of damage to the electrical system!▶ Make sure that no cables are trapped when insert-
ing the holder into the lamp.
Insert and fix the light› Insert the connector into the light until it clicks into
place.
› Insert the pins A of the light into the openings Bin the body.
NOTICERisk of damage to the electrical system!▶ Make sure that the lines between the lamp and the
body are not pinched when the lamp is inserted.
› Screw the light into place.
Interior lighting
Operation
Switching on automaticallyThe lighting switches on when one of the followingevents occurs.
▶ The vehicle is unlocked▶ One of the doors is opened▶ The ignition key is removed (vehicle without start-
er button)
Automatic switch offThe lighting switches off when one of the followingevents occurs:
▶ The vehicle is locked▶ The ignition is switched on▶ About 30 seconds after all the doors have been
closed
Operation of the lightingMiddle
positionof the
switches
Automatically switch on and switch off
Turn the front and rear lights on/off
Deactivation of automatic activation
Reading lamp left
Reading lamp right
If a door remains open and the ignition is switch-ed off, the lights will turn off automatically after 10minutes.
38 Lighting, windscreen wipers and washers › Interior lighting

Settings
The brightness setting of the switching and instru-ment lighting is done in the Infotainment in the fol-lowing menu:
Applies to the 10″ Infotainment system: Car Lightssettings
Interior ambient light
Usage
The ambient lighting ensures a comfortable atmos-phere in the vehicle interior.
The lighting only works when the dipped or parkinglights are on.
The lighting is also switched on automatically afteropening the door.
Settings
The background lighting brightness settings are setin the Infotainment system, in the following menu:
Applies to the 10″ Infotainment system: Car Lightssettings
Windscreen wipers and washers
Operating conditions
Operating conditions for windscreen wipers✓ Engine compartment flap closed✓ Boot lid closed✓ Ignition on
Operating conditions for the windscreen washersystem✓ Engine compartment flap closed✓ Boot lid closed
Operation
WARNINGRisk of an accident!At low temperatures, windscreen washer fluid canfreeze on the windscreen and restrict visibility.▶ Only use the windscreen washer when the wind-
screen is warm.
Wipe and wash the windscreen
Fast wiping
Slow wiping
Depending upon vehicle equipment:▶ Intermittent wiping▶ Automatic wiping controlled by the rain sensor
Switching off
Tip-wiping (spring-loaded position)
A Setting the wiping speed for the position
Washing and wiping (spring-loaded position)
Wipe and wash the rear window
Washing and wiping (spring-loaded position)
Wiping
Switching off
Automatic rear window wiping functionWhen the windscreen wipers are switched on, therear window is automatically wiped when the re-verse gear is engaged.
Settings
The automatic window wiping function is activatedor deactivated in the following menu in the Infotain-ment system:
Applies to the 10″ Infotainment system: Car Mir-rors and wipers
39Lighting, windscreen wipers and washers › Interior ambient light

Refilling windscreen washer fluid
WARNINGRisk of an accident!▶ Use windscreen washer fluid that is suitable for the
weather conditions.
NOTICERisk of damage to the windscreen washer system!▶ When refilling the washer fluid, do not remove the
strainer from the neck of the container.
NOTICERisk of damage to the headlights!▶ Only use washer fluid that does not attack polycar-
bonates.
NOTICERisk of damage to engine compartment compo-nents!▶ Close the container after refilling the windscreen
washer fluid.
The windscreen washer tank is located in the enginecompartment » page 8.
The reservoir capacity is 3.5 l.
› Open the engine compartment lid » page 75.› Gently open the top of the sealing cap.› Top up the windscreen washer fluid.› Close the sealing cap of the tank.
Troubleshooting
Windscreen washer fluid level too lowilluminates together with
› Top up the windscreen washer fluid.
Frozen windscreen wipers› Carefully remove frozen windscreen wipers from
the windscreen before switching on the ignitionand free them from snow and ice.
Folding down windscreen wiper arms andreplacing windscreen wiper blades
NOTICERisk of damage to the windscreen wipers and theengine compartment lid!▶ Close the bonnet before lowering the wiper arms
from the window.▶ Do not turn on the ignition when the windscreen
wiper arms are folded away.
CAUTIONRisk of accident!▶ Change the windscreen wiper blades once or twice
a year.
› Fold the windscreen wiper arm away from thewindscreen.
› Press the lock A slide the windscreen wiper bladeB out of the holder and remove it from the wind-
screen wiper arm.› Place the new windscreen wiper blade on the
windscreen wiper arm and push it into the mountuntil it clicks into place.
› Fold the windscreen wiper arm back onto thewindscreen.
40 Lighting, windscreen wipers and washers › Windscreen wipers and washers

Heating and air conditioningsystem
Manual air conditioning
What you should be mindful of
▶ We recommend keeping the interior temperatureno more than 5 ° C lower than the outdoor tem-perature.
▶ We recommend switching the cooling system offabout 10 minutes before the end of the journey toprevent odour formation.
▶ Annual disinfection of the air conditioning is rec-ommended.
WARNINGDanger of misting!▶ Always keep the fan on.
WARNINGRisk of accident!In recirculation mode, there is no fresh air supplyfrom the outside. This can result in loss of driver at-tention and fogging up of windows.▶ Keep the recirculation mode switched on for a
short time only.
Operating conditions for the cooling system
✓ Outside temperature above 2 ° C✓ Running engine✓ Fan switched on
Overview of the controls for the manual airconditioning
A Set the temperature
B Set the blower speed
C Set the direction of the air outlet
Switch the cooling system on/off
Switch recirculated air mode on/off
Cooling systemWhen the cooling system is switched on, the tem-perature and humidity in the vehicle will drop.
Switching on the cooling system prevents the win-dows from misting up.
After pressing the button, the indicator lightin the button illuminates, even if the conditions forswitching on the cooling system are not met. Thecooling system switches on when the conditions forswitching on the cooling system are met.
Automatic activation of the cooling systemAutomatic activation of the cooling system preventsthe windows from misting up. The system switcheson in the following cases.
▶ When the fan is on and the air distribution control-ler is in the position.
In this case, the recirculation mode is switched offand cannot be switched on.
▶ When the air distribution controller is not in the position, and recirculated air mode is switched on.
Recirculated air modeThe recirculation mode prevents contaminated out-side air getting into the interior of the vehicle.
Briefly switching on recirculation mode can increasethe cooling effect.
Under certain circumstances, the recirculationmode may be switched on or off automatically.
When the air conditioner is operating, the engineidle speed may increase automatically.
Troubleshooting
Water under the vehicleWhen the cooling system is switched on, water candrip off the air conditioning system. This is not a leak.
Fogging› Increase the blower speed, switch on the cooling
system, and set the air distribution to the wind-screen.
Automatic switch-off of the cooling systemIf the coolant temperature is too high, the coolingsystem may switch off automatically. This ensuressufficient engine cooling.
Climatronic automatic air conditioningsystem
What you should be mindful of
▶ We recommend keeping the interior temperatureno more than 5 ° C lower than the outdoor tem-perature.
▶ We recommend switching the cooling system offabout 10 minutes before the end of the journey toprevent odour formation.
▶ Annual disinfection of the air conditioning is rec-ommended.
41Heating and air conditioning system › Manual air conditioning

WARNINGDanger of misting!▶ Always keep the fan on.
WARNINGRisk of accident!In recirculation mode, there is no fresh air supplyfrom the outside. This can result in loss of driver at-tention and fogging up of windows.▶ Keep the recirculation mode switched on for a
short time only.
Operating conditions for the cooling system
✓ Outside temperature above 2 ° C✓ Running engine✓ Fan switched on
Operation
A Climatronic display
B Set the temperature
C Interior temperature sensor
D Set the blower speed
E Set the direction of the air outlet
Switch the windscreen ventilation/defrostingmode on/off
Switching the rear window heateron/off » page 42, Operation
Switch the cooling system on/offWhen the cooling system is switched on, thetemperature and humidity in the vehicle willdrop.Switching on the cooling system prevents thewindows from misting up.
Switch automatic mode onThis function keeps the temperature constantand prevents the windows from misting.
Switch recirculated air mode on/offThe recirculation mode prevents contaminatedoutside air getting into the interior of the vehi-cle.
After pressing the button, the indicator lightin the button illuminates, even if the conditions forswitching on the cooling system are not met. The
cooling system switches on when the conditions forswitching on the cooling system are met.
With a temperature setting outside of the numberrange, one of the following icons will be displayed inthe Climatronic display:
Maximum cooling powerMaximum heating power
When the air conditioner is operating, the engineidle speed may increase automatically.
Troubleshooting
Water under the vehicleWhen the cooling system is switched on, water candrip off the air conditioning system. This is not a leak.
Fogging› Switch on automatic mode.
Or:
› Increase the blower speed, switch on the coolingsystem, and set the air distribution to the wind-screen.
Automatic switch-off of the cooling systemIf the coolant temperature is too high, the coolingsystem may switch off automatically. This ensuressufficient engine cooling.
Heated windscreen
Usage
Windscreen heating is used for defrosting or venti-lating the windscreen.
Requirements
✓ Running engine✓ Outside temperature approximately below 35 ° C
Operation
Heated rear window› Press the button on the operating part of the air
conditioning.
Windscreen heating switches off automatically aftersome time.
If the engine is switched off when the heating is onand turned back on again within about 10 minutes,the heating is continued.
LOHI
42 Heating and air conditioning system › Heated windscreen

Troubleshooting
The indicator light in the button or below the but-ton flashesThe heating does not work as the battery charginglevel of the 12 volt vehicle battery is too low.
Seat ventilation
What you should be mindful of
NOTICERisk of seat damage!▶ Do not kneel on the seats or otherwise apply con-
centrated pressure to them.▶ Do not turn on ventilation in the following situa-
tions:▶ The seat is not occupied.▶ There are objects on the seat, such as a child
seat.▶ There are additional seat covers or protective
covers on the seat.
Requirements
✓ Running engine
Operation
› Press the or button under the Infotainment.
Ventilation is switched on with maximum ventilationoutput. By repeatedly pressing the button, the venti-lation output is reduced until it is switched off.
Ventilation output is indicated by the number of illu-minated indicator lights in the button.
Ventilation output can be adjusted with the igni-tion on. Ventilation is only switched on after the en-gine has been started.
Driver information system
Analogue instrument cluster
Overview
Overview of instrument cluster
A Tachometer with indicator lights
B Display (depending on vehicle equipment):▶ Segment display▶ MAXI DOT
C Speedometer with indicator lights
D Bar with indicator lights
E Coolant temperature gauge
F Multifunction button :▶ Setting the time▶ Display service interval
G Multifunction button :▶ Reset odometer (trip)
H Fuel gauge
NOTICERisk of serious damage to the engine and the ex-haust system!▶ Never run the fuel tank completely empty!
In poor visibility and with dipped headlights off,the brightness of the instrument cluster lighting isreduced to remind the driver to turn on the light.
Segment display overviewThe following information is shown on the display:
A Time
B Selected gear/gearrecommendationAlso included de-pending on vehicleequipment:▶ Automatic gearbox
selector lever posi-tions
C Menus, indicatorlightsOutside temperature
43Heating and air conditioning system › Seat ventilation

- low outside temperatureSelected driving data memory▶ 1 - from the start▶ 2 - long-term▶ 3 - from refuelling
D Total distance travelledtrip – distance travelled after resetting the mem-oryInformation messages
E Coolant temperature gauge
F Fuel gauge
MAXI DOT-Display overviewThe following information is shown on the display:
A Time
B Selected gear/gearrecommendationAlso included de-pending on vehicleequipment:▶ Compass direction
display▶ Automatic gearbox
selector lever posi-tions
C Menu, indicator lights and information
D Outside temperature - low outside temperature
E Total distance travelled
F trip – distance travelled after resetting the mem-ory
Overview of the main menu items of the MAXIDOT display▶ Driving data » page 45, Overview▶ Assist systems - Activate/deactivate assist sys-
tems▶ Audio - Using radio and media▶ Telephone - Call list, accept or reject an incoming
call▶ Vehicle - Vehicle condition » page 46, Display.
Operation
Operation via the multifunction steering wheel
A Turn - Switch be-tween menuitems/set valuesPress - Confirm themenu itemPress - Return to themenu one level high-erHold - Show mainmenu
Press - Show previous menu (if one has been se-lected) / Show telephone menu
Settings
Setting the languageThe language is set in the following menu in the Info-tainment system:
Applies to the 7″ Infotainment system: General Language
Applies to the 10″ Infotainment system: System Language selection
Resetting the odometer› Briefly press the button in the instrument
cluster.
Display service interval› Press the button twice in the instrument clus-
ter.› Press the button to display the service in-
terval.› Press the button again to exit the menu.
Setting the time› Briefly press the button in the instrument
cluster.› Briefly press the button in the instrument
cluster.
The hour setting is shown on the display.› Press the button repeatedly to set the
hours.› Press the button and change to the minute
setting.› Press the button repeatedly to set the mi-
nutes.
The time is set in the Infotainment system in the fol-lowing menu:
Applies to the 10″ Infotainment system: System Time and Date
44 Driver information system › Analogue instrument cluster

Setting the brightness of the instrument clusterlightingThe brightness of the instrument lighting is adjustedautomatically according to the given lighting condi-tions.
When low beam is switched on, the brightness ofthe instruments lighting can be adjusted in the fol-lowing menu in the Infotainment system:
Applies to the 10″ Infotainment system: Car In-strument cluster
Driving data
Overview
The driving data display works with the ignitionswitched on.
In the instrument cluster displayDepending on the equipment, the display of the in-strument cluster shows information such as speed,fuel consumption, range, etc.
In InfotainmentApplies to the 10″ Infotainment system:
A Average fuel consumption
B Driving time
C Distance travelled
D Average speed
E Range
MemoryThe system saves the driving data in the followingmemories:
From start or "1" (depending on display type)▶ Driving data from the time of switching on the ig-
nition until the ignition is switched off again is stor-ed in the memory. If the journey is interrupted formore than 2 hours, the memory will be reset.
Long term or "2" (depending on display type)▶ The driving data of all trips up to a total of 99
hours and 59 minutes driving time or 9999 kmdriving distance is stored in the memory. If one ofthe listed values is exceeded, the memory is reset.
From refuelling or "3" (depending on display type)▶ Driving data from the time the fuel tank was lastfilled is stored in the memory. The memory is resetthe next time the tank is filled.
Operation
Display driving data in the display of the instru-ment cluster via the multi-functional steeringwheel› In the MAXI DOT display, select the menu item for
driving data in the main menu first.
A Turn: Select infor-mation/Set valuesPress: Confirm infor-mation
Displaying driving data in the infotainment systemApplies to the 10″ Infotainment system:
› Tap on .› By moving your finger sideways, choose the screen
with the menu item for driving data.› Select the menu item for driving data.
Select memory for driving data in the display ofthe instrument cluster via the multifunction steer-ing wheel and reset it
› To select the memoryfor the displayed driv-ing data, press controlwheel A repeatedly.
› To resetthe memory,hold the dial A .
Selecting the memory in the infotainment systemApplies to the 10″ Infotainment system:
› Tap on .› By moving your finger sideways, choose the screen
with the menu item for driving data.› Select the menu item for driving data and memory.
Resetting the memory in the infotainment systemApplies to the 10″ Infotainment system: Car In-strument cluster
45Driver information system › Driving data

Settings
Select driving data to be displayedApplies to the 10″ Infotainment system: Car In-strument cluster
Setting unitsApplies to the 10″ Infotainment system: System Units
Speed limit warning
Usage
The system offers the possibility to set a speed limitbeyond which an acoustic warning signal will soundand the following warning message appears in thedisplay of the instrument cluster.
Settings
Setting the speed limit› Select Warning at or (depending on the display type)
and confirm.› When the vehicle is stationary, set the desired
speed limit and confirm.› While driving, drive at the desired speed and con-firm it as the speed limit.
Resetting the speed limit› Select Warning at or (depending on the display type)
and confirm.› To reset the speed limit, confirm the stored value.
If the journey is interrupted for more than 2 hours,the set limit is deactivated, but the set value remainsstored.
Vehicle status
Display
Applies to the 10″ Infotainment system:
The vehicle status is displayed in the following menuin the infotainment system:
› Tap on .› By moving your finger sideways, choose the screen
with the menu item for vehicle status.› Select the menu item for vehicle status.
The following information is displayed:
▶ Vehicle status related warning messages▶ Display of information about the status of the
START-STOPP system
Functionality
In the event of a system fault, messages regardingthe fault in question are displayed on the instrumentcluster display when the ignition is switched on.
Messages in relation to faults can also be displayed inthe Infotainment.
The warning messages will continue to be dis-played until the malfunctions have been remedied.After the first display of the message, only the indi-cator lights (Hazard) or (Warning) are dis-played.
46 Driver information system › Speed limit warning

7” infotainment
Infotainment overview
A Touchscreen
B USB-connection
C Microphone
NOTICEDanger of screen damage!▶ The Infotainment screen is operated by touching it
lightly with your finger.
System
Restriction
For safety reasons, operation of some Infotainmentfunctions while driving is not possible or is restricted.
The Infotainment system indicates this by means ofa message in the screen.
Basic settings
Setting basic functionsThe following Infotainment functions are set in the menu: general:
▶ Language▶ Set date▶ Factory reset
Adjust soundThe Infotainment sound is set in the menu Audio.
The following menu items can be set:
▶ Bal. & Faders▶ Equalizer▶ SDVC ()▶ Volume:
System update
We recommend having the system update carriedout by a specialist company.
The system update ensures optimal function of theInfotainment system, e.g. compatibility with newphones.
Determine system version› general System info .
Screen
Overview
A Bar with functional surfaces
Operation
NOTICEDanger of screen damage!▶ The Infotainment screen is operated by touching it
lightly with your finger.
In principle, operation by touch is identical to the op-eration of a mobile phone.
Settings
The following basic screen functions are set in themenu . Display:
▶ Brightness▶ Display clock
Radio
Overview
Display menu› Tap on .
477” infotainment › Infotainment overview

Analog Radio
A Select frequency range
B Station buttons for stations
C List of available stations
D Manual station search
Settings
List of available stations› Cunning .
If the list of available channels is not displayed, Tap to update the channel list.
Played stationStation stored on the presetsA traffic radio station is setManual update of the station listSettings
Operation
Select station
A List of available stations
B Station buttons for stations
Settings
› Tap or at the top of the screen.
Or:
› Tap a station on a station button.
Find stations manually› In the menu Radio TUN .› For sequential search tap on / .
Or:
› Hold down the scroll mark on the frequency rangescale and move it to the desired value.
Restriction
▶ Car parks, tunnels, tall buildings or mountains canrestrict radio reception.
▶ The ŠKODA AUTO company assumes no responsi-bility for the availability, correct functioning andbroadcast information of the RDS service.
Settings
Store the current station to a preset button forpreferred stations› Hold the desired station key for preferred stations
until the station is stored.
Overwrite the station button for the station withthe station currently being listened to› Hold the desired station key for preferred stations
until the station is stored.
Switch RDS on / offThe menu item is only available for some countries.
› Radio RDS .
Switch on/switch off traffic reception (TP) for FMstationsThe menu item is only available for some countries.
› Radio Traffic announcements .
Switch on/switch off automatic frequency change(AF)The menu item is only available for some countries.
When the function is switched on and the signal ofthe FM station currently being listened to is weak,Infotainment automatically sets the same station toa different frequency with a better signal.
› Radio Switch to AF .
Media
What you should be mindful of
▶ Do not save any important data or that which hasnot been backed up on the connected audio sour-
48 7” infotainment › Media
ces. ŠKODA assumes no responsibility for lost ordamaged files or connected audio sources.
▶ When changing or connecting an audio source, thismay cause sudden changes in volume. Reduce thevolume before changing or connecting an audiosource.
▶ When connecting an audio source, the source in-formation messages can be displayed. These mes-sages must be observed and, if necessary, con-firmed.
▶ The national copyright laws that apply in yourcountry must be observed.
Overview
Display menuDepending on the source on which the file to beplayed is stored, or tap.
If the menu Telephone is not displayed, checkwhether the mobile device is connected.
A Source
Multimedia database
Settings
Player controls
Operation - Basics
A Album image / symbol of the connected source
Tap: start playback
Tap: pause
Within 3 seconds of starting playback, tap: playthe previous song
After 3 seconds from the start of playback, tap:to play the current title from the beginning
Hold: fast rewind within the title
Tap: play the next song
Hold: fast forward within the title
Movement within the title is also possible by drag-ging the finger over the timeline.
Advanced operationTurn on / off repeat playback of the currenttrackTurn on / off repeat playback of the current al-bum / folderTurn on / off random playback of the currentalbum / folder
Restriction
The availability of some media operation functions isdependent on the connected source and the soft-ware being used.
Supported sources and files
497” infotainment › Media

Supported sourcesSource Interface Type Specification File system
USBUSB 1.x; 2.x, 3.x
or higher with USBUSB 2.x support
MSC
USB stick
VFATFAT16FAT32exFAT
HDD(without special
software)USB devices thatsupport the USB
Mass Storage pro-tocol
Apple
Devices runningthe iOS operatingsystem and iAP2
protocol
HFS+
Bluetooth® player Bluetooth® -
Bluetooth® proto-cols
A2DP and AVRCP(1.0 - 1.6)
-
The Apple-iAP1 protocol is not supported by Infotainment.
Compatibility of mobile devicesIt is possible to check the ŠKODAweb pages to see if Infotainment is compatible with the selected mobiledevice being tested. This check is carried out by using the following reference or by reading the QR code:
https://www.skoda-auto.co.in/aid/mobile-compatibility-list
All information given is incidental and serves as information.
The ŠKODA AUTO company cannot guarantee full functionality and compatibility, e.g. due to a software up-date of the Infotainment and the mobile devices.
Supported audio filesCodec type File extension
MPEG 1 Layer 3mp3MPEG 2 Layer 3
MPEG 2.5 Layer 3Windows Media Audio 9 and 9.1
wmaWindows Media Audio 9.2Windows Media Audio 10
WAV wavBluetooth A2DP -
For files in MP4 format, only the soundtrack playback is carried out.
Files that are protected by DRM and iTunes® technology cannot be played back by Infotainment.
Supported playlistsCodec type File extension
M3U m3uM3U8 m3u8
PLS plsWPL wplASX asx
50 7” infotainment › Media

Mobile device management
Overview
Using mobile device management, devices can beconnected, disconnected, and interchanged.
Display mobile device management› Bluetooth Paired device .
Available devices
The device enables a connection via the Blue-tooth®-“Freisprechprofil”The device is connected via the Bluetooth®-“Freisprechprofil”The device enables a connection via the Blue-tooth® audio profileThe device is connected via the Bluetooth® audioprofile
Limitations of mobile devices and applications
Availability of featuresThe availability of certain features depends on thetype of mobile device, as well as that of the applica-tions installed.
Compatibility of mobile devicesIt is possible to check the ŠKODAweb pages to see ifInfotainment is compatible with the selected mobiledevice being tested. This check is carried out by us-ing the following reference or by reading the QRcode:
https://www.skoda-auto.co.in/aid/mobile-compatibility-list
All information given is incidental and serves as in-formation.
The ŠKODA AUTO company cannot guarantee fullfunctionality and compatibility, e.g. due to a softwareupdate of the Infotainment and the mobile devices.
Compatibility of mobile devicesDue to the large number of mobile devices, it is notpossible to guarantee full Bluetooth® compatibilitywith infotainment. Bluetooth® compatibility depends
A
on the Bluetooth® version and the implementation ofthe Bluetooth® protocols on the part of the manu-facturer of the mobile device.
Applications in mobile devicesApplications can be installed in external devices mak-ing it possible to display additional information onthe Infotainment screen or to operate Infotainment.
Due to the variety of applications as well as their on-going development, the available applications maynot work in all external devices. ŠKODA AUTO as-sumes no liability for their proper function.
The range of available applications and their func-tionality is dependent on the Infotainment model, ve-hicle and region.
Information about ŠKODAapplicationsFor detailed information about ŠKODA applications,refer to the ŠKODA internet pages.
Connection set-up
Connect a mobile device to Infotainment› Find available Bluetooth® devices in the mobile de-
vice.› Select the Infotainment Bluetooth® unit.
The name of the unit can be found in menu itemBluetooth Contact_type_name .
Connect Infotainment to a mobile device that is al-ready paired› Bluetooth Add device Start scan .
SmartLink connectionInfotainment provides the ability to connect Smar-tLink to compatible mobile devices using the follow-ing connection types:
Android AutoApple CarPlay
Mobile devices can be connected to the Infotain-ment via a USB cable.
› Connect the mobile device to the Infotainment us-ing a USB cable.
› Tap the icon of the supported connection.
Telephone
Overview
Display menu› Tap on .
If the menu Telephone is not displayed, checkwhether the mobile device is connected.
517” infotainment › Mobile device management

A Contact list
Displaying an error
Display multiple phone numbers of the contact
Conditions for connecting a telephone withInfotainment
✓ The phone's Bluetooth® function is switched on.✓ Visibility of the Infotainment is switched on.
The visibility of the Infotainment is switched on inthe menu item Bluetooth Visibility.
✓ The telephone is within signal range of the Info-tainment's Bluetooth® unit.
✓ The telephone is compatible with Infotainment.
Telephone operation
Enter telephone number› In the Telephone menu Dialpad .› Enter the telephone number using the numeric
keypad that is displayed.
List of telephone contactsThe list of telephone contacts is imported from theconnected main telephone.
› To display the contact list in the phone menu, tapon . Contacts .
› To search within the list Tap and enter the infor-mation for the search.
› To establish a connection with a contact, tap thefunctional area showing the desired contact.
If a contact has multiple telephone numbers, selectthe telephone number from the displayed list.
› To display the details for a contact, tap .
Telephone conversationDepending on the context of the telephone conver-sation, the following functions can be selected:
Establish a connection to the voice mailbox num-berend conversationHold a callSwitch calls
To switch the call tone from the speakers to thephone, tap onSwitch the microphone off / on
Numeric keypad
Conference callA conference call is a joint telephone conversationwith a minimum of three and a maximum of six par-ticipants.
› Make the next call during an ongoing conversation/conference.
Or:
› Answer a new incoming call.
During an ongoing conference call, the followingfunctions can be selected depending on the context:
Hold a conference call - leave the conferencetemporarily (the conference continues in yourabsence)End conference callTo switch the call tone from the speakers to thephone, tap onSwitch the microphone off / on
Numeric keypadAdd another conversationMerge calls into a conferenceDisconnect the call from the conference
Settings for Infotainment telephone functions
Connect the telephone to Infotainment› Find available Bluetooth® devices on the phone.› Select the Infotainment Bluetooth® unit.
The name of the unit can be found in menu itemBluetooth Contact_type_name .
› Confirm the PIN; enter it if necessary and thenconfirm.
Connect Infotainment to a previously paired tele-phone› Bluetooth Add device Start scan .
Import telephone contactsAfter first connecting the main telephone with Info-tainment, telephone contacts will start to be impor-ted into the Infotainment memory.
Infotainment can import up to 1000 telephone con-tacts together with contact pictures. Each contactcan include max. 5 telephone numbers.
Depending on the type of telephone, import confir-mation may be required.
Sort contacts in the phone book› Phone User profile Sort By Name Tap and select the
sorting type.
/
/
52 7” infotainment › Telephone

RingtoneSome phones do not allow the use of the telephoneringtone; instead, the Infotainment ringtone is used.
› For setting the infotainment ringtone Phone Userprofile Ringtone Tap and select the ringtone.
SmartLink
Functionality
SmartLink offers the ability to display and operatecertified applications from a connected mobile de-vice in the Infotainment screen.
Certification may be conditional upon the use of thelatest update to the particular SmartLink application.
Applications include, for example, apps for routeguidance, telephoning, listening to music, etc.
Mobile devices can be connected via a USB cable.
Supported connection typesSmartLink supports the following connection types:
▶ Android Auto▶ Apple CarPlay
Overview of the SmartLinkconnection
Menu SmartLink› Tap on .
Or:
› Tap on .
If the menu Telephone is not displayed, checkwhether the mobile device is connected.
Android Auto
Overview of running applications, phone calls, in-coming text messages, and more.
Turn on voice control (Google Assistant)
Apple CarPlay
A List of available applications
B Depending on the duration of operation:▶ Tap: Return to the menu Apple CarPlay▶ Hold: Turn on Siri voice control
Connection conditions
General connection conditions✓ The mobile device supports the type of Smar-
tLink connection Android Auto, Apple CarPlay orApple CarPlay.
✓ Mobile devices, as well as the type of SmartLinkconnection, are supported in the respective mar-ket.
✓ Some connected mobile devices require the mo-bile device to be “unlocked”.
Conditions for Android Auto✓ The device to be connected must have Android
Auto connection.
A list of devices, supported regions and applica-tions that support the Android Auto connectioncan be found on the Google, Inc. website.
✓ The Android Auto application needs to be instal-led on the mobile device.
✓ Some applications require the data connection inthe mobile device to be turned on.
✓ Connect the mobile device for the first timewhen the vehicle is stationary.
Conditions for Apple CarPlay✓ The device to be connected must have Apple
CarPlay connection.
A list of devices, supported regions and applica-tions that support the Apple CarPlay connectioncan be found on the Apple Inc website.
✓ Siri voice control is on.✓ The data connection in the mobile device is
switched on.
537” infotainment › SmartLink

Restriction
Restriction of SmartLink applications while drivingFor reasons of safety, the operation of some Smar-tLink applications while driving is not possible or onlylimited.
SmartLink settings
Apple CarPlay - connection via USB› Turn on the Infotainment.› Switch on the mobile device.› Connect the mobile device to the USB input using
a cable.› Select connection via Apple CarPlay.
Apple CarPlay - Disconnect› In the Apple CarPlay menu, tap on the function
area “ŠKODA”.› Tap on .
Android Auto - connection via USB› Turn on the Infotainment.› Switch on the mobile device.› Connect the mobile device to the USB input using
a cable.› Select connection via Android Auto.
Android Auto - Disconnect› In the menu Android Auto tap “Exit”.› Tap on .
10” infotainment
Infotainment overview
A Touchscreen
NOTICEDanger of screen damage!▶ The Infotainment screen is operated by touching it
lightly with your finger.
System
Restriction
For safety reasons, operation of some Infotainmentfunctions while driving is not possible or is restricted.
The Infotainment system indicates this by means ofa message in the screen.
Basic settings
Setting basic functionsThe following Infotainment functions are set in the menu: System:
▶ Units▶ Language selection▶ Time and Date▶ System reset
Adjust soundThe Infotainment sound is set in the menu System Audio.
It is the volume setting of the individual infotainmentfunctions, e.g. B. one of the following menu items ispossible:
▶ Setting the maximum volume when Infotainment isturned on
▶ Speed-dependent volume setting▶ Volume setting of the acoustic driving recommen-
dations
54 10” infotainment › Infotainment overview

First start of infotainmentWhen starting the infotainment for the first time orafter resetting to the factory settings, the infotain-ment system prompts you to set the basic functions.
› For the correct setting, follow the instructions onthe screen.
Set up menu HOMEThe HOME menu is used for the quick start of pre-ferred functions.
With the functional surfaces for the Quick Access-Func-tions, the arrangement can be changed.
The arrangement of the functional surfaces is adjus-ted as follows:
› Press and hold the desired functional surface untilit is free.
› Select the desired region.
Safely disconnect the connected USB device
NOTICERisk of damage to the data on the connected USBdevice!To safely disconnect a USB device, proceed as fol-lows:› Media Unmount Safely .› Select the desired device.› Disconnect the USB device.
If it is not possible to safely disconnect the de-vice, switch off the infotainment and disconnect thedevice.
System update
We recommend having the system update carriedout by a specialist company.
The system update ensures optimal function of theInfotainment system, e.g. compatibility with newphones.
Determine system version› System System information .
Screen
Overview
A Status bar
B Bar with functional surfaces
C Other pages of the menu
HOME functional surface
Settings
Operation
NOTICEDanger of screen damage!▶ The Infotainment screen is operated by touching it
lightly with your finger.
In principle, operation by touch is identical to the op-eration of a mobile phone.
Settings
The following basic screen functions are set in themenu Display:
▶ Screen off (in 10s)▶ Brightness▶ Skins▶ Touchscreen sound▶ Automatic valet mode
Infotainment keyboard
Keypad overview
A Input line▶ Delete characters before the cursor
▶ Tap: delete the last character▶ Hold: delete all characters in sequence
B Keypad functional surfaces▶ Switch to lowercase/uppercase▶ / Switch to other character variants▶ Show additional keypad languages▶ Confirm the characters that have been en-
tered
C Enter spaces
5510” infotainment › Screen

Operation
The infotainment keyboard is used to enter charac-ters, letters and numbers.
The keyboard will be displayed automaticallywhenthe infotainment prompts for characters.
SearchWhen entering characters, corresponding entries aresearched for.
Show additional keypad languages› For using the additional languages Tap and select
the language keyboard you want.
Radio
Overview
Display menu› Tap on .
Or:
› Tap on .
Analog Radio
A Select source
B Select frequency range
C Preset buttons for preferred stations
D Enter the station frequency manually
Manual station search
Settings
List of available stations› Tap on .
Station stored on the presetsManual update of the station listREFRESH
Operation
Select station
› or .
Or:
› Tap a station on a station button.
SCAN functionThe function plays receivable stations of the selec-ted frequency range in succession for a few secondseach.
› To start the function, Media Tuner settings Scan sta-tions .
Find stations manually› In the Radio main menu, tap .› For sequential search tap on / .
Or:
› Hold down the scroll mark on the frequency rangescale and move it to the desired value.
Restriction
▶ Car parks, tunnels, tall buildings or mountains canrestrict radio reception.
▶ The ŠKODA AUTO company assumes no responsi-bility for the availability, correct functioning andbroadcast information of the RDS service.
Settings
Store the current station to a preset button forpreferred stations› Hold the desired station key for preferred stations
until the station is stored.
Overwrite the station button for the station withthe station currently being listened to› Hold the desired station key for preferred stations
until the station is stored.
Delete from the station button for station› Media Tuner settings Delete presets .› Select the station to be deleted and tap.
56 10” infotainment › Radio

Function surfaces The variant for changing stations using the functionsurface in the Radio menu is set as follows:
› Media Tuner settings Arrow buttons .› Choose the change variant.
Sort channelsThe variant for station sorting is set in the Radiomenu as follows:
› Media Tuner settings Sorting .› Select the sorting variant.
Media
What you should be mindful of
▶ Do not save any important data or that which hasnot been backed up on the connected audio sour-ces. ŠKODA assumes no responsibility for lost ordamaged files or connected audio sources.
▶ When changing or connecting an audio source, thismay cause sudden changes in volume. Reduce thevolume before changing or connecting an audiosource.
▶ When connecting an audio source, the source in-formation messages can be displayed. These mes-sages must be observed and, if necessary, con-firmed.
▶ The national copyright laws that apply in yourcountry must be observed.
Overview
Display menu› Tap and select a source to play.
A Sources menu
B Played source
Display the player
Settings
Player controls
Operation - Basics
A Selection of the source to be played back
Tap: start playback
Tap: pause
Within 3 seconds of starting playback, tap: playthe previous song
After 3 seconds from the start of playback, tap:to play the current title from the beginning
Tap: play the next song
Movement within the title is also possible by drag-ging the finger over the timeline.
Advanced operationTurn on / off repeat playback of the currenttrackTurn on / off repeat playback of the current al-bum / folderTurn on / off random playback of the currentalbum / folder
Safely disconnect the connected USB device
NOTICERisk of damage to the data on the connected USBdevice!To safely disconnect a USB device, proceed as fol-lows:› Media Unmount Safely .› Select the desired device.› Disconnect the USB device.
Restriction
The availability of some media operation functions isdependent on the connected source and the soft-ware being used.
Supported sources and files
5710” infotainment › Media
Supported sourcesSource Interface Type Specification File system
USBUSB 1.x; 2.x, 3.x
or higher with USBUSB 2.x support
MSC
USB stick
VFATFAT16FAT32exFATNTFS
HDD(without special
software)USB devices thatsupport the USB
Mass Storage pro-tocol
Bluetooth® player Bluetooth® -
Bluetooth® proto-cols
A2DP and AVRCP(1.0 - 1.6)
-
Compatibility of mobile devicesIt is possible to check the ŠKODAweb pages to see if Infotainment is compatible with the selected mobiledevice being tested. This check is carried out by using the following reference or by reading the QR code:
https://www.skoda-auto.co.in/aid/mobile-compatibility-list
All information given is incidental and serves as information.
The ŠKODA AUTO company cannot guarantee full functionality and compatibility, e.g. due to a software up-date of the Infotainment and the mobile devices.
Supported audio filesCodec type File extension
MPEG 1 Layer 2mp2
MPEG 2 Layer 2MPEG 1 Layer 3
mp3MPEG 2 Layer 3MPEG 2.5 Layer 3
Windows Media Audio 7
wmaWindows Media Audio 8
Windows Media Audio 9 and 9.1Windows Media Audio 9.2
AAC LCaacAAC HE
AAC HEv2M4A LC
m4aM4A HEM4A HEv2
OGG-Vorbis oggFLAC flacWAV wav
Monkey's apeBluetooth® A2DP -
OPUS OPUS
Files that are protected by DRM and iTunes® technology cannot be played back by Infotainment.
58 10” infotainment › Media

Supported video filesCodec type File extension
MPEG 2mpg
mpegMPEG 4 (H.264) mp4
m4vmovMPEG 4 (ISO)
WMV9wmvasf
Webm (VP9/VP8) webm
Mobile device management
Overview
Using mobile device management, devices can beconnected, disconnected, and interchanged.
Display mobile device management› Quick settings Connect Devices .
Available devices
The device enables a connection via the Blue-tooth®-“Freisprechprofil”The device is connected via the Bluetooth®-“Freisprechprofil”The device enables a connection via the Blue-tooth® audio profileThe device is connected via the Bluetooth® audioprofileThe device enables a SmartLink connection tobe made via Android AutoThe device enables a SmartLink connection tobe made via Apple CarPlay
Limitations of mobile devices and applications
Availability of featuresThe availability of certain features depends on thetype of mobile device, as well as that of the applica-tions installed.
Compatibility of mobile devicesIt is possible to check the ŠKODAweb pages to see ifInfotainment is compatible with the selected mobiledevice being tested. This check is carried out by us-ing the following reference or by reading the QRcode:
A
https://www.skoda-auto.co.in/aid/mobile-compatibility-list
All information given is incidental and serves as in-formation.
The ŠKODA AUTO company cannot guarantee fullfunctionality and compatibility, e.g. due to a softwareupdate of the Infotainment and the mobile devices.
Compatibility of mobile devicesDue to the large number of mobile devices, it is notpossible to guarantee full Bluetooth® compatibilitywith infotainment. Bluetooth® compatibility dependson the Bluetooth® version and the implementation ofthe Bluetooth® protocols on the part of the manu-facturer of the mobile device.
Applications in mobile devicesApplications can be installed in external devices mak-ing it possible to display additional information onthe Infotainment screen or to operate Infotainment.
Due to the variety of applications as well as their on-going development, the available applications maynot work in all external devices. ŠKODA AUTO as-sumes no liability for their proper function.
The range of available applications and their func-tionality is dependent on the Infotainment model, ve-hicle and region.
Information about ŠKODAapplicationsFor detailed information about ŠKODA applications,refer to the ŠKODA internet pages.
Connection set-up
Connect a mobile device to Infotainment› Find available Bluetooth® devices in the mobile de-
vice.› Select the Infotainment Bluetooth® unit.
The name of the unit can be found in menu itemSystem Bluetooth → Bluetooth → Surname: .
5910” infotainment › Mobile device management

Connect Infotainment to a non-paired mobile de-vice› Quick settings Connect Devices Add device .› Select the desired device from the list of available
devices.› Select the desired Bluetooth® profile.› Confirm the PIN; enter it if necessary and thenconfirm.
› If two devices are connected to the Infotainment,select the device to be replaced.
Connect Infotainment to a previously connectedmobile device› Quick settings Connect Devices .› Select the desired device from the list of previous-
ly connected devices.
The selected device is connected via the most re-cently used Bluetooth® profile.
› If two devices are connected to the Infotainment,select the device to be replaced.
SmartLink connectionInfotainment provides the ability to connect Smar-tLink to compatible mobile devices using the follow-ing connection types:
Android AutoApple CarPlay
Mobile devices can be connected to the Infotain-ment via USB cable or Wi-Fi, as long as the mobiledevice supports it.
› Connect the mobile device to the Infotainment viaa USB cable or browse and connect to a wirelessnetwork.
› Tap the icon of the supported connection.
Telephone
Overview
Display menu› Tap on .
If the menu Telephone is not displayed, checkwhether the mobile device is connected.
A Name of the connected telephone
B Change the main phone to the extension tele-phone
Contact list
Conditions for connecting a telephone withInfotainment
✓ The Bluetooth® function of the Infotainment andthe telephone needs to be switched on.
✓ Visibility of the Infotainment is switched on.
The visibility of the Infotainment is switched on inthe menu item System Bluetooth Visibility.
✓ The telephone is within signal range of the Info-tainment's Bluetooth® unit.
✓ The telephone is compatible with Infotainment.
Telephone operation
Enter telephone number› Enter the telephone number using the numeric
keypad in the Telephone menu.
The displayed numeric keypad can also be usedfor searching for contacts.For example, if you enter 32, the unit will displaycontacts with the letter combination DA, FA, EB, etc.next to the numerical keypad.
List of telephone contactsThe list of telephone contacts is imported from theconnected main telephone.
› To display the contact list in the phone menu, tapon .
› To search within the list, enter the information forthe search.
› To establish a connection to a contact, select thedesired contact and tap the number.
If a contact has multiple telephone numbers, selectthe telephone number from the displayed list.
› To view the contact details, tap the desired con-tact.
Telephone conversationDepending on the context of the telephone conver-sation, the following functions can be selected:
End connection / reject incoming call / end callAnswer an incoming call / return to the held call
To switch the call tone from the speakers tothe phone, tap on
Hold a callSwitch the microphone off / on
Numeric keypadEstablish a connection to the next call
/
/
60 10” infotainment › Telephone

Settings for Infotainment telephone functions
Telephone-Infotainment-Connection typesThe way in which the telephone is connected de-pends on the number of phones currently connectedto the Infotainment:
▶ No telephone - The telephone is connected as amain telephone.
▶ One telephone - The telephone is connected as anadditional telephone.
▶ Two telephones - Select the telephone to be re-placed.
› To switch between the main telephone and the ad-ditional telephone, tap on in the Phone menu. Re-place .
Connect the telephone to Infotainment› Find available Bluetooth® devices on the phone.› Select the Infotainment Bluetooth® unit.
The name of the unit can be found in menu itemSystem Bluetooth → Bluetooth → Surname: .
› Confirm the PIN; enter it if necessary and thenconfirm.
Connect Infotainment to a previously paired tele-phone› Quick settings Connect Devices Add device .› Select the desired device from the list of available
devices.› Select the desired Bluetooth® profile.› Confirm the PIN; enter it if necessary and thenconfirm.
› If two devices are connected to the Infotainment,select the device to be replaced.
Connect Infotainment to a previously paired tele-phone› Quick settings Connect Devices .› Select the desired device from the list of previous-
ly connected devices.
The selected device is connected via the most re-cently used Bluetooth® profile.
› If two devices are connected to the Infotainment,select the device to be replaced.
Manage preset buttons for preferred contactsThe preferred contact is displayed at the top of thecontact list and has the symbol marked.
A Search contacts
B Update contacts
› For storage tap.› To delete from favorites tap.
Import telephone contactsAfter first connecting the main telephone with Info-tainment, telephone contacts will start to be impor-ted into the Infotainment memory.
Infotainment can import up to 1000 telephone con-tacts together with contact pictures. Each contactcan include max. 10 telephone numbers.
Depending on the type of telephone, import confir-mation may be required.
Update telephone contactsWhen the telephone reconnects with Infotainment,the list is automatically updated.
› For manual update of the list in the phone menu RE-SYNC .
Sort contacts in the phone book› in the menu the option System Phone Contacts sort or-
der Tap and select the sorting type.
RingtoneSome phones do not allow the use of the telephoneringtone; instead, the Infotainment ringtone is used.
› To set the Infotainment ringtone in the phonemenu, tap System Phone Internal ringtones Tap and se-lect the ringtone.
Wi-Fi
Functionality
Wi-Fi can be used for the SmartLink connection.
By connecting to another hotspot, the infotain-ment functions are extended to online functions, e.g.B. SKODA Play Apps, expanded.
Restriction
Restriction of the Wi-Fi connectionIn some countries, the Wi-Fi connection is restric-ted for legal reasons. When crossing the border ofthe country in question, the connection with a mo-bile device connected via Wi-Fi can be ended orrestricted.
Find out about country-specific legal restrictions.If necessary, switch off the Wi-Fi manually.
6110” infotainment › Wi-Fi

Settings
Connect Infotainment to the mobile device hot-spot› Turn on the Wi-Fi on the mobile device.› Switch the hotspot on/off in menu item → System
Wi-Fi: Find hotspot to seek out.› Select the Infotainment hotspot and enter the re-
quired password.› Confirm the connection.
Change password for connection to Infotainmenthotspot› System Wi-Fi: Generate security key .
SmartLink
Functionality
SmartLink offers the ability to display and operatecertified applications from a connected mobile de-vice in the Infotainment screen.
Certification may be conditional upon the use of thelatest update to the particular SmartLink application.
Applications include, for example, apps for routeguidance, telephoning, listening to music, etc.
Mobile devices can be connected via a USB cable orWiFi.
Supported connection typesSmartLink supports the following connection types:
▶ Android Auto▶ Apple CarPlay
Overview of the SmartLinkconnection
Menu SmartLink› Tap on .
Or:
› Tap on .
If the menu Telephone is not displayed, checkwhether the mobile device is connected.
A Connected devices
Connecting a Carstick device
The device enables a Android Auto connection tobe made via Android Auto
The device enables a Apple CarPlay connectionto be made via <eigenname translate="no">An-droid Auto</eigenname>
Settings
Android Auto
Overview of running applications, phone calls, in-coming text messages, and more.
Turn on voice control (Google Assistant)
Apple CarPlay
A List of available applications
B Depending on the duration of operation:▶ Tap: Return to the menu Apple CarPlay▶ Hold: Turn on Siri voice control
Connection conditions
General connection conditions✓ The mobile device supports the type of Smar-
tLink connection Android Auto, Apple CarPlay orApple CarPlay.
✓ Mobile devices, as well as the type of SmartLinkconnection, are supported in the respective mar-ket.
✓ Some connected mobile devices require the mo-bile device to be “unlocked”.
Conditions for Android Auto✓ The device to be connected must have Android
Auto connection.
A list of devices, supported regions and applica-tions that support the Android Auto connectioncan be found on the Google, Inc. website.
62 10” infotainment › SmartLink

✓ The Android Auto application needs to be instal-led on the mobile device.
✓ Some applications require the data connection inthe mobile device to be turned on.
✓ Connect the mobile device for the first timewhen the vehicle is stationary.
Conditions for Apple CarPlay✓ The device to be connected must have Apple
CarPlay connection.
A list of devices, supported regions and applica-tions that support the Apple CarPlay connectioncan be found on the Apple Inc website.
✓ Siri voice control is on.✓ The data connection in the mobile device is
switched on.
Restriction
Restriction of the Wi-Fi connectionIn some countries, the Wi-Fi connection is restric-ted for legal reasons. When crossing the border ofthe country in question, the connection with a mo-bile device connected via Wi-Fi can be ended orrestricted.
Find out about country-specific legal restrictions.If necessary, switch off the Wi-Fi manually.
Restriction of SmartLink applications while drivingFor reasons of safety, the operation of some Smar-tLink applications while driving is not possible or onlylimited.
SmartLink settings
Apple CarPlay connection via USB› Turn on the Infotainment.› Switch on the mobile device.› Connect the mobile device to the USB input using
a cable.› Select connection via Apple CarPlay.
Apple CarPlay - Connect via Wi-Fi from Infotain-ment› Turn on Bluetooth® and Bluetooth® visibility in the
mobile device.› Connect Add device .› In the displayed list, look for the desired device and
select it.› Follow the instructions on the Infotainment screen
and confirm the Bluetooth® pairing.› From the list of known devices, select the desired
device with the symbol.
Apple CarPlay - Connect via Wi-Fi from mobile de-vicesTo establish a connection, the following conditionsmust be met:
✓ The minimum iOS version is 9.✓ Wi-Fi and Bluetooth® functionality is switched on
in the Infotainment system.
› In the mobile device, turn on the CarPlay function.› The Infotainment screen displays a connection
message with the name of the Bluetooth® unit ofthe Infotainment.
› Find available Bluetooth® devices on the phone.› Select the Infotainment Bluetooth® unit.› If necessary, confirm the PIN.› In the Infotainment screen, select the connection
type Apple CarPlay.
Apple CarPlay - Disconnect› In the Apple CarPlay menu, tap on the function
area “ŠKODA”.› Tap on .
Android Auto connection via USB› Turn on the Infotainment.› Switch on the mobile device.› Connect the mobile device to the USB input using
a cable.› Select connection via Android Auto.
Android Auto - Connect via Wi-Fi from Infotain-ment› Turn on Bluetooth® and Bluetooth® visibility in the
mobile device.› Connect Add device .› Look for the desired device from the list of availa-
ble devices and select it.› Select the Bluetooth®-Freisprechprofil.› Confirm the PIN; enter it if necessary and thenconfirm.
› From the list of known devices, select the desireddevice with the symbol.
Android Auto - Connect via Wi-Fi from mobile de-vicesTo establish a connection, the following conditionsmust be met:
✓ The minimum Android version is 6.✓ No other mobile device can be connected via
SmartLink.✓ Wi-Fi and Bluetooth® functionality is switched on
in the Infotainment system.
› Find available Bluetooth® devices on the phone.› Select the Infotainment Bluetooth® unit.› If necessary, confirm the PIN.› In the Infotainment screen, select the connection
type Android Auto.
6310” infotainment › SmartLink

Android Auto - Disconnect› In the menu Android Auto tap “Exit”.› Tap on .
Change to another device / connection typeInfotainment allows you to switch between currentlyconnected devices and the connection type.
› Quick settings Connect Devices .› Select the desired device or connection type.
Personalisation
Usage
The personalisation service allows you to set, set andstore vehicle settings.
The personalisation service is connected to the useraccounts. Any change to the set personalised func-tions is automatically stored in the active user ac-count.
Settings
create AccountTo create a user account, Quick settings Profiles andfollow the instructions on the screen.
SecurityPIN to change Quick settings Profiles Edit security PIN .
Operation Valet mode on / offWhen the function is switched on, the infotainmentscreen is locked by means of a safety lock.
By entering the securityPIN the screen is unlockedagain.
› To lock the screen, Quick settings Valet mode tap andto confirm the securityPIN enter.
› To unlock the screen, tap the screen, and then clickthe securityPIN enter.
SKODA Play Apps
Usage
In infotainment in the menu SKODA Play Apps newapplications can be downloaded and installed in theinfotainment.
The installed applications are tied to the selecteduser profile.
Overview
Display menu› Tap on .
Requirements
The availability of the services and functions de-pends on the vehicle and Infotainment type as wellas being country-specific.
In order to manage the user accounts online, the fol-lowing conditions must be met.
✓ The infotainment supports the installation of thenew applications.
✓ The function is activated.✓ The user is registered and has logged into the
SKODA Play Apps Registered.✓ The vehicle has an internet connection.✓ There is free storage space in the infotainment.✓ The charge state of the 12-volt vehicle battery is
sufficient.
Restriction
The functions are linked to the vehicle, not to themain user account. These cannot be transferred toany other vehicle in which the user logs on.
For reasons of safety, the operation of some applica-tions while driving is not possible or only limited.
Settings
Users of the SKODA Play Apps to register› Tap on .› The QRScan the code with the mobile phone.
Or:› Enter the reference given in the infotainment
screen in the web browser.› Follow the instructions on the display of the mobile
phone and complete the registration.
A successful user registration is completed by re-ceiving a confirmation email.
64 10” infotainment › Personalisation

Online Services
MyŠKODA Connect
Regulations
The rights and obligations of the contracting partieswith regard to the provision of services are regulatedin Terms & Condition and EULA document whichmay be found in the application developed for My-ŠKODA Connect.
Functionality
MyŠKODA Connect is an intelligent solution thatprovides a safe, convenient and smart driving experi-ence to stay connected with your car and your fami-ly.
The MyŠKODA Connect services are part of the ve-hicle's equipment.
Requirements
Availability of the ŠKODA Connect services✓ The MyŠKODA Connect services are available.✓ The user has a paired car with a phone number.
Availability depends on the following conditions:
▶ Cellular networks through which the connection tothe MyŠKODA Connect services is ensured areavailable.▶ The availability, functioning, connection speed
and technology used in the mobile network canbe different in the respective countries and aredependent on the mobile network operator.
▶ In areas where there is insufficient signal, e.g. inunderground garages etc., functionality may belimited.
MyŠKODA Connect Application
Functionality
MyŠKODA Connect ApplicationThe MyŠKODA Connect application enables featureslike Real Time Vehicle Tracking, Driving Behavior,Safety & Security, Trip analysis etc.
The application can be downloaded to the mobile de-vice from the Google Play Store or Apple App Store.
Requirements
✓ The MyŠKODA Connect services are available.✓ The user has a paired car with a phone number.
Settings
User Registration› Open the MyŠKODA Connect application on your
mobile device and enter the phone number.› Enter the OTP code from the received SMS and
log in.
Personal Data Protection
Functionality
The User as well as Vehicle data is collected whileusing MyŠKODA Connect which is well protected byservice provider as per the guidelines laid by theGovernment of India.
Personal Data
Personal customer data is collected, processed andused by ŠKODA AUTO in accordance with the provi-sions of the generally binding legal provisions.
The current declaration on the protection of person-al data can be found in the MyŠKODA Connect appli-cation.
As a contracting party with regard to the use of theMyŠKODA Connect services, you must ensure theprotection of personal data and the right to privacy.
Inform the vehicle user and passengers that the vehi-cle is transmitting user data and using localizationservices. Failure to provide this information can vio-late the rights of vehicle users and passengers.
Localisation services include, for example, informa-tion on the last parking position, area notification orspeed notification.
Vehicle Status Report
Usage
The vehicle status report function allows you to haveonline control over the conditions of the vehicle.
The service is available in the MyŠKODA Connect ap-plication.
The available vehicle data includes vehicle status andvehicle health.
Requirements
The service and the coupled functions are availabledepending on the following conditions:
✓ The MyŠKODA Connect services are available.✓ The user has a paired car with a phone number.
65Online Services › MyŠKODA Connect

Starting and driving
Starting with the key
Notes on starting
DANGERDanger of poisoning by exhaust gases!▶ Do not run the engine in an enclosed space.
Positions of the key in the ignition lock
1 Ignition off
2 Ignition on
3 Start the engine
Starting the vehicle with manual transmission› Secure the vehicle with the parking brake.› Move the shift lever to the neutral position.› Keep the clutch pedal depressed.› Turn key to position 3 .
› Release the key.
Starting the vehicle with automatic transmission› Secure the vehicle with the parking brake.› Keep the brake pedal depressed.› Move the selector lever to position or .› Turn key to position 3 .
› Release the key.
CAUTIONDanger of unexpected vehicle movement!▶ At temperatures below -10°C, start the vehicle
with the selector lever in the position.
Stopping the engine› Secure the vehicle with the parking brake.› Turn key to position 1 .
On vehicles with automatic transmission, the key canonly be removed when the selector lever is in the position.
WARNINGSteering lock hazard!▶ During a journey with the engine stopped, the igni-
tion must always be switched on.
NOTICERisk of engine overheating!▶ Do not switch the engine off immediately at the
end of your journey after the engine has been run-ning at high loads. Leave it to run at an idling speedfor about 1 minute.
Start at the push of a button
Notes on starting
DANGERDanger of poisoning by exhaust gases!▶ Do not run the engine in an enclosed space.
Operating conditions✓ The vehicle key is located in the vehicle interior.
NOTICERisk of key loss, possibly of key damage!The system can detect the key even if it has beenforgotten on the vehicle roof.▶ Always keep the key with you.
Switching the ignition on and off
› Press the starter button.
Starting the vehicle with manual transmission› Secure the vehicle with the parking brake.› Move the shift lever to the neutral position.› Keep the clutch pedal depressed.› Press the starter button.
Starting the vehicle with automatic transmission› Secure the vehicle with the parking brake.› Keep the brake pedal depressed.› Move the selector lever to position or .› Press the starter button.
CAUTIONDanger of unexpected vehicle movement!▶ At temperatures below -10°C, start the vehicle
with the selector lever in the position.
Stopping the engine› Secure the vehicle with the parking brake.› Press the starter button.
WARNINGSteering lock hazard!▶ During a journey with the engine stopped, the igni-
tion must always be switched on.
NOTICERisk of engine overheating!▶ Do not switch the engine off immediately at the
end of your journey after the engine has been run-ning at high loads. Leave it to run at an idling speedfor about 1 minute.
66 Starting and driving › Starting with the key

Starting issues
Troubleshooting
NOTICEDanger of engine damage!▶ Do not start the vehicle by towing.
The engine does not start› Switch off the ignition.› Wait 30 seconds and repeat the starting proce-
dure.› If the engine does not start, use the jump start ca-
bles with the 12 volt vehicle battery of another ve-hicle » page 81 or seek the help of a specialist ga-rage.
The engine does not start, the display shows amessage regarding the immobilizer› Use the other vehicle key.› If the engine does not start, seek the help of a spe-
cialist garage.
The key cannot be turned in the ignition› Move the steering wheel back and forth while
turning the key.
Starting is not possible with the starter button, thesystem did not detect the key
illuminates
› Press the starter but-ton with the key.
› If the engine does notstart, seek the help of aspecialist garage.
The key might not be detected if the battery inthe key is nearly discharged or the signal is faulty.
The engine cannot be turned off with the starterbutton› Hold the starter button or press twice.
The radiator fan keeps running even after the en-gine has stoppedThe radiator fan can continue to run for approxi-mately 10 minutes after the engine is stopped. Thisis not a defect.
The engine makes noises after the cold startThe increased running noise is due to the briefly in-creased engine speed. This is not a defect.
START STOP
Usage
The START-STOPP system reduces polluting emis-sions and the CO2emissions and saves fuel.
Functionality
If the system determine that the engine is not nee-ded when the vehicle stops, it turns off the engineand starts it again when moving off.
Vehicle with manual transmissionA system-related engine switch-off occurs whenstopping, when switching the gear lever into theneutral position, and when releasing the clutch pedal.
A system-related engine start occurs when theclutch pedal is pressed down.
Vehicle with automatic transmissionA system-related engine switch-off occurs when thebrake pedal is actuated and the engine is stopped.
A system-related engine start takes place after re-leasing the brake pedal.
Status display in the instrument cluster display- Engine is switched off via the START-STOPPsystem
- Engine is not switched off via the START-STOPP system due to operating conditions
that are not met
Operating conditions
Some conditions are systemic and can neither be in-fluenced nor recognised. Therefore, the system mayreact differently in situations which seem identicalfrom the driver's perspective.
The driver must fulfil the following conditions:
✓ The driver's door is closed.✓ The driver has fastened the seat belt.✓ The driving speed was higher than 4 km/h after
the last stop.
Settings
Automatic activation▶ Upon start-up of the engine.
Deactivate/activate system› Press the button.
When the system is deactivated, the symbol illumi-nates in the button .
If a system-related engine switch-off occurs and thesystem is deactivated, the engine will start.
67Starting and driving › Starting issues

Troubleshooting
The engine does not switch off when stopping, orit starts before starting upThe system has detected that the engine is running.
Manual gearbox
Operation
NOTICEDanger of engine damage!▶ Shift into higher gear before reaching the red area
of the rev counter scale.
NOTICEDanger of gearbox damage!▶ Depress the clutch pedal all the way down.▶ If not in the process of changing gear, do not leave
your hand on the gearshift lever.
Engaging reverse gear› Stop the vehicle.› Depress the clutch pedal completely.› Move the shift lever to the neutral position.› Push the gearshift lever down.› Set this completely to the left.› Wait briefly.› Engage reverse gear.
Automatic gearbox
Lever positions
Parked vehicleThe drive wheels arelocked. Only set the posi-
tion when the vehi-cle is stationary.Reverse gear
Only set the posi-tion when the vehi-cle is stationary.
NeutralThere is no transmission of engine power to thewheels.Forward drive / sports programThe gear is changed automatically.In mode, the gear is changed at higher speedsthan in mode.Choose between and (spring-loaded posi-tion)
Moving the selector lever out of the or positionlights up - the selector lever is locked
› Press the brake pedal,and at the same time,press the button in theselector lever.
WARNINGRisk of the stationary vehicle rolling away automati-cally!▶ When the selector lever is in the position, po-
sition or in manual shift mode, secure the vehiclewith the brake.
Operation
Starting up› Keep the brake pedal depressed.› Start the engine.› Press the button in the selector lever and set it to
the desired position.› Release the brake pedal and press the accelerator
pedal lightly.
Accelerating to the maximum speed while driving(Kick-down)› Fully depress the accelerator.
Stopping temporarily (e.g. at a junction)› Leave the selector lever in the position and se-
cure the vehicle with the brake pedal.
Stopping› Keep the brake pedal depressed.› Secure the vehicle with the parking brake.› Press the button in the selector lever and set it to
the position.› Turn off the engine.
Driving in neutralIf the system detects that no gear is engaged whiledriving, it automatically switches to neutral position.
will be displayed in the instrument cluster.
Requirements for driving in neutral position✓ mode is chosen.✓ Neither the accelerator nor the brake pedal is
pressed.✓ The vehicle speed is 20-130 km/h.
Manually switching gear with the selector lever› To turn on, put the selector lever in the posi-
tion to the right.› To turn off, put the selector lever back in the
position.
68 Starting and driving › Manual gearbox

+ Changing up a gear
- Changing down agear
Manually changing gear with the shift paddles onthe steering wheel
- Changing down agear
+ Changing up a gear
› To switch on the shiftpaddle, press - or + .
› To turn off the shiftpaddle, hold + .
If none of the shift pad-dles are pressed for a
certain time, manual shift mode turns off automati-cally.
If the engine threatens to over-rev▶ The gearbox automatically changes to the next
higher gear.▶ The transmission prevents changing to the next
lower gear.
Troubleshooting
The selector lever cannot be moved out of posi-tion in the normal way› Manually unlock the selector lever » page 69.
Gearbox overheatedilluminates together with
or
illuminates together with Message regarding the gearbox overheating
› You may continue driving, exercising appropriatecaution.
illuminates together with
or
illuminates together with Message regarding the gearbox overheating
› Stop driving! Stop the vehicle and stop the engine.› After the indicator light goes out, your journey can
continue.
› If the warning light does not go out, stop driving!Seek the help of a specialist garage.
Gearbox impairedilluminates together with
or
illuminates together with Message regarding the gearbox in emergency
mode
› You may continue driving, exercising appropriatecaution.
› Immediately seek the help of a specialist garage.
illuminates together with
or
illuminates together with Message regarding a gearbox fault
› Stop driving! Seek the help of a specialist garage.
Starting up a vehicle that is stuck› Adjust the selector lever between and . The
vehicle will then start to rock and be easier to free.
Manual release of automatic gearbox
› Secure the vehicle with the parking brake.
› Insert a flat-headscrewdriver or push asimilar tool into thegap in the area of ar-row A .
› Carefully loosen andlift the quadrant cover.
› Push the foam insertaway until the yellowrelease lever is visible.
› Press with the vehiclekey on the release lev-er, and at the sametime, press the key inthe selector lever.
› Put the selector leverin position.
Economical driving style
Tips for economical driving
▶ Avoid unnecessary acceleration and braking.
69Starting and driving › Economical driving style

▶ Follow the gear recommendation in the display ofthe instrument cluster.
▶ Avoid full acceleration and too high speeds.▶ Avoid engine idling during longer periods of sta-
tionary time.▶ Do not warm up the engine while the vehicle is sta-
tionary. If possible, start your journey as soon asthe engine starts.
▶ Observe the prescribed tyre pressure » page 88.▶ Remove unnecessary ballast.▶ Remove the roof rack when it is not needed.▶ Switch on electric consumers only for as long as
necessary.▶ Do not leave the windows open while driving.
Towing eye and towing procedure
Conditions for towing
✓ The technical condition of the vehicle enables thetowing process.
✓ The ignition is switched on.✓ The shift lever is in the neutral position or the se-
lector lever is in the position.
Restriction
▶ Towing speed max. 50 km/h▶ Towing distance max. 50 km
Towing lug
Removing the front cap
› Press on the cap andremove it.
Removing the rear cap
› Press on the cap andremove it.
Installing the towing eye
› Screw in the towingeye.
› Insert the wheelwrench or similar ob-ject through the tow-ing eye.
› Tighten the towingeye.
After the towing process› Unscrew the towing eye.› Insert the cover cap.
Towing the vehicle
When towing, observe the country-specific legalregulations.
Towing takes practice. Both drivers should be famili-ar with the specific features of the towing process.
WARNINGWhen the ignition is switched off, the brake boosterand the power steering do not work. In addition,there is a risk that the steering lock will engage.▶ If it is not possible to start the engine, switch on
the ignition!
WARNING▶ The tow rope must not be twisted.▶ Use a braided synthetic fibre rope for towing. Do
not use a twisted tow rope.
NOTICE▶ Always keep the tow rope taut during the towing
procedure.
NOTICEDanger of gearbox damage!▶ If the gearbox no longer contains any oil, the vehi-
cle must only be towed with the front axle raisedclear of the ground or transported on a specialbreakdown vehicle.
▶ Vehicles with automatic transmission must not betowed without the ignition switched on or with therear axle raised.
70 Starting and driving › Towing eye and towing procedure

Where should the tow rope or the tow bar be se-cured?▶ At the front towing eye▶ At the rear towing eye
Information for the driver of the towing vehicle› Drive slowly and smoothly.› Only accelerate once the rope is taut.
Information for the driver of the towed vehicle› Move the shift lever to the neutral position or the
selector lever to the position.
Brakes
What you should be mindful of
WARNINGProblems and faults with the brake system can ex-tend the braking distance of the vehicle!
DANGERDanger of a functional restriction of the brake boos-ter!▶ When braking in a vehicle with manual transmis-
sion, when the vehicle is in gear and at low revs,depress the clutch pedal.
DANGERDanger of the brakes overheating!▶ Do not depress the brake pedal unless braking is
required.▶ If the original front spoiler is damaged, ensure the
air supply to the front brakes is guaranteed.
Inspecting the brake fluid level
Test conditions✓ The vehicle is on a horizontal surface✓ The engine is off
Checking
The fill level must bewithin the marked range.
› If the level is below themark , do not con-tinue.
› Do not refill liquid.› Seek the help of a spe-
cialist garage.
If the brake fluid level istoo low, this will be indi-
cated in the instrument cluster by the illumination of is displayed in the status bar. Nevertheless, we
recommend checking the brake fluid level regularlydirectly at the reservoir.
WARNINGDanger of brake failure!If the fluid level falls significantly within a short timeor drops below the mark , the brake system mayhave become leaky.▶ Stop driving! Seek the help of a specialist garage.
SpecificationThe brake fluid must comply with standardVW 501 14. This standard complies with the re-quirements of the FMVSS 116 DOT4 standard.
ChangingHave the brake fluid replaced by a specialist garage.
WARNINGDanger of brake failure!If the brake fluid change date is exceeded, heavybraking may cause vapour bubbles to form in thebrake system.
Troubleshooting
Brake fluid level is too lowilluminates
› Stop driving! Seek the help of a specialist ga-rage.
Brake system and anti-lock braking system faultyilluminates together with
› Stop driving! Seek the help of a specialist ga-rage.
Reduced braking effectDamp, frozen, salt-affected or corroded brakes canimpair the braking effect.
› Clean the brakes by braking several times if trafficconditions allow it.
When the engine is stopped, the brake boosterdoes not work› Depress the brake pedal more forcefully.
Handbrake
Operation
WARNINGRisk of an accident!An insufficiently released parking brake will impairthe function of the brake system.▶ Fully release the parking brake before driving.
71Starting and driving › Brakes

Applying
› Pull the lever up to thestop position.
Illuminates from theisolation box.
Loosening› Pull the lever up a little and push in the lock button.› Press and hold the lock button and pull the lever
completely down.
Driver assist systems
Braking and stabilising systems
Overview
Stabilisation control (ESC)ESC helps to stabilize the vehicle in borderline situa-tions (e.g. when the vehicle starts to skid). ESCbrakes the individual wheels to maintain the direc-tion of travel.
flashes - ESC is engaged
Traction control (TCS)ASR helps to stabilize the vehicle when acceleratingor driving on low-grip roads. ASR reduces the drivepower transmitted to the wheels when the wheelsspin.
flashes - ASR is engaged
Antilock braking system (ABS)ABS helps maintain control of the vehicle duringemergency braking. An ABS intervention is noticea-ble by pulsating movements of the brake pedal.
Motor Slip Regulation (MSR)MSR helps to maintain control of the vehicle in theevent of a sudden reduction in speed, e.g. on icyroads. If wheels of the driven axle lock, MSR increa-ses the engine speed. This reduces the braking effectof the engine and the wheels can rotate freely again.
Electronic Differential Lock (EDL)EDL helps to stabilize the vehicle when driving onroad surfaces with different grip under the individualwheels. EDL brakes a spinning wheel and transmitspower to a different drive wheel.
Electronic Differential Lock (XDL+)XDS+ helps to keep the vehicle on the turn by effec-tively braking the wheels on the inner side of theturn.
Hill Hold ControlHill Hold Control helps when starting off on uphillgradients by braking the vehicle for about 2 secondsafter the brake pedal is released.
Operating conditions✓ The gradient is at least 5%.✓ The driver's door is closed.
Multi-Collision Brake (MCB)MCB helps to decelerate and stabilize the vehicle af-ter a collision with an obstacle. This reduces the riskof further collisions.
Operating conditions✓ There has been a frontal, side and rear collision of
a certain severity.
72 Driver assist systems › Braking and stabilising systems

✓ The impact speed was greater than 10 km/h.✓ The brakes, ESC and other required systems re-
mained functional after the impact.✓ The accelerator pedal is not pressed.
Settings
Deactivating/activating ASR› Press the button under the Infotainment.
Or:
Applies to the 10″ Infotainment system:
› Car Tap .
When deactivated, lights up in the instrumentcluster.
goes out on renewed activation.
Deactivating the ASR may be helpful in the followingsituations:
▶ Driving with snow chains▶ Driving in deep snow or on very loose ground▶ Starting up a vehicle that is stuck
Troubleshooting
ESC or ASR faulty/deactivated by the systemilluminates
› Stop the engine and start again.› If the indicator light does not go out after covering
a short distance, seek the help of a specialist ga-rage.
ABS faultyilluminates
› You may continue driving, exercising appro-priate caution. Seek the help of a specialist garage.
Brake system and anti-lock braking system faultyilluminates together with
› Stop driving! Seek the help of a specialist ga-rage.
Cruise control system
Functionality
The cruise control system maintains the set speedwithout the accelerator pedal having to be operated.
This, however, is only possible to the extent permit-ted by the engine output and braking power of thevehicle.
WARNINGRisk of the cruise control system starting uninten-tionally!▶ Deactivate cruise control after use.
Status display in the instrument cluster displayilluminated - the cruise control system is acti-vated
illuminated - cruise control is activeWhen cruise control starts, the set speed is
displayed.
Operating conditions
✓ The driving speed is higher than 20 km/h.
Operation
Operating with the lever
A Activate cruise control (cruise control deacti-vated)
Deactivate cruise control
Interrupt control (sprung position)
B Resume cruise control1)/Increase speed
C Start control with current speed/Reducelimit
Accelerate temporarily› Depress the accelerator pedal.
Releasing the accelerator pedal will cause the speedto drop again to the set speed.
Interrupting cruise control▶ After pressing the brake pedal▶ After an ESC intervention
Troubleshooting
Cruise control system faultyilluminates
› Seek the help of a specialist garage.
1) If no speed is set, the current speed is adopted.
73Driver assist systems › Cruise control system

Park Assist systems
Park Pilot parking aid
Functionality
If an obstacle is detected, an acoustic signal sounds.
The interval between the signals becomes shorter asthe clearance is reduced. At a distance of less than30 cm from the obstacle, a continuous tone sounds.
Operating conditions
✓ The driving speed is lower than 15 km/h.
Turn on/turn off
Switching on› Engage reverse gear.
Switching off› Disengage reverse gear.
Function restriction
In the following cases, the system does not have toissue a warning of an obstacle, or the warning maybe issued incorrectly:
▶ If the weather conditions are unfavourable.▶ The detected obstacles are moving.▶ Sensor signals are not reflected by the surface of
the obstacles.▶ It is a small obstacle, e.g. a stone or a pillar.▶ An obstacle of max. 30 cm height is too close be-
hind the vehicle (approx. 50 cm and less).
Troubleshooting
After switching on, an audible signal sounds for 3seconds and there is no obstacle near the vehicle› Seek the help of a specialist garage.
Rear view camera
Functionality
When reversing, the area behind the vehicle is dis-played in the Infotainment screen complete with ori-entation lines.
Orientation lines
A Distance about 40 cm
B Distance about 100 cm
C Distance about 200 cm
The distance between the side lines corresponds ap-proximately to the vehicle width including mirrors.
Operating conditions
✓ Boot lid closed✓ Ignition on✓ Driving speed less than 15 km/h
Operation
Switching on› Engage reverse gear.
Switching off› Disengage reverse gear.
Restriction
The camera image is distorted in contrast to the nak-ed eye. The display may only be used to estimate thedistance.
Some items may not be displayed properly on thescreen. These include narrow columns, wire meshfences, grids or road bumps.
74 Park Assist systems › Park Pilot parking aid

Engine, exhaust system and fuel
Bonnet
Opening the bonnet
Before opening› Make sure the windscreen wiper arms are folded
down onto the windscreen.› Keep everyone away from the engine compart-
ment.
Opening
› Pull the release lever underneath the dash panel.
› Release the lock.
› Open the bonnet.› Remove the bonnet stay from the holder and insert
the end of the stay into the opening in the bonnet.
Closing› Lift the bonnet.› Unhook the bonnet stay and insert it into the hold-
er.› Fold the bonnet down and release it with a dis-
tance of 30 cm remaining.› Check that the bonnet is closed.
NOTICE▶ Do not press down on an unclosed bonnet.▶ Open and close the flap again.
Engine oil
Checking the fill level and topping up
Test conditions✓ The vehicle is on a horizontal surface✓ The parked engine is warm
Checking the level› Wait a few minutes for the engine oil to flow back
into the oil sump.› Remove the dipstick and wipe with a clean cloth.› Insert the dipstick as far as it will go and pull it out
again.› Read the oil level and push the dipstick back in
again.
The oil level must bewithin the marked range.
NOTICERisk of damage to the engine and the exhaust sys-tem!▶ The oil level must not be outside the marked range.
If it is not possible to top up the engine oil or if theoil level is above the marked range, do not continuedriving. Stop the engine and seek the help of a spe-cialist garage.
▶ Do not use any oil additives.
ConsumptionDepending on driving style and operating conditions,the engine consumes some oil, up to 0.5 l/1000 km.Consumption may be higher over the next 5000 km.
Refilling› Unscrew the cover of the engine oil filler opening.› Top up the oil to the correct specification in 0.5 li-
tre portions.› Check the oil level.› Screw on the cover of the engine oil filler opening.
75Engine, exhaust system and fuel › Bonnet

Specification
Engine oil sticker
A Engine oil specifications
B Engine oil viscosity
The engine oil sticker is located in the front of theengine compartment.
Applies to vehicles with an engine oil sticker:
If the engine oil needs to be topped up, use the oilmentioned on the sticker. The sticker with the pre-scribed standard is located in the front of the enginecompartment. When using this engine oil, the engineoil level can be adjusted as often as required.
Applies to vehicles without an engine oil sticker:
You can obtain information about the engine oilspecification prescribed for your vehicle from a spe-cialist garage. If the engine oil needs to be toppedup, use this oil. When using the prescribed engine oil,the engine oil level can be adjusted as often as re-quired.
If engine oil of the prescribed specification is notavailable, engine oil with following specifications canbe topped up once up to max. 0.5 l in an emergencyuntil the next regular oil change:
▶ VW 504 00, ACEA C3 and API SP, viscosity 0W-30
ŠKODA AUTO recommends that oil change be car-ried out by a specialist company » page 4.
NOTICEŠKODA AUTO recommends use of approved engineoils always in accordance with the relevant VWstandard. Use of engine oils that do not comply withthis regulation could damage the engine.
ŠKODA AUTO recommends engine oils from theproduct range of ŠKODA original parts.
Troubleshooting
Engine oil pressure too lowflashes, lights up at the same time
› Check the engine oil level.
The oil level is OK, the warning light continues toflash:
› Stop the engine and seek the help of a specialistgarage.
Engine oil level too lowilluminates together with Message regarding required engine oil top up
› Check the engine oil level, top up with oil if re-quired.
Engine oil level too highilluminates together with Message regarding the need to reduce the
engine oil level
› Check the engine oil level.
The oil level is too high:
› Drive on, exercising appropriate caution.› Seek the help of a specialist garage.
Engine oil level sensor impairedilluminates together with Message regarding the engine oil sensor
› Drive on, exercising appropriate caution.› Seek the help of a specialist garage.
Coolant
Coolant temperature gauge
A Cold area› Avoid high engine speed.
B Operating range
C High temperature range
76 Engine, exhaust system and fuel › Coolant

Checking the fill level and topping up
Test conditions✓ The vehicle is on a horizontal surface✓ The engine is turned off and cooled
Checking the level
The fill level must bewithin the marked range.
› If the fill level is belowthe mark , top upthe coolant.
NOTICEDanger of damage to the engine compartment!▶ Do not top up the coolant above the marked area.
The coolant could be forced out of the cooling sys-tem when heated.
NOTICEThere must be a small quantity of coolant in the tank.▶ Do not add coolant when the tank is empty.▶ Stop driving! Seek the help of a specialist garage.
Refilling
CAUTIONRisk of scalding!The cooling system is pressurised.▶ Do not open the cap of the coolant expansion tank
while the engine is warm. Let the engine cooldown.
› Place a wipe on the lid of the tank and carefully un-screw the lid.
› Refill with coolant of the correct specification.› Screw on the cap until it clicks into place.
SpecificationTo refill the coolant additive use G12evo (TL 774 L).
NOTICERisk of damage to the cooling system and the en-gine!Adding coolant that does not conform to the correctspecification can reduce the corrosion protection ofthe cooling system.
Troubleshooting
Coolant level is too lowilluminates together with Message concerning the required coolant
check
› Check the coolant level.
If the coolant level is OK:
› Check the fuse for radiator fan, replace if re-quired » page 82, Replacing a fuse.
If the fuse is OK but the indicator light lights upagain:
› Stop driving! Seek the help of a specialist garage.
Coolant temperature too highilluminates together with Report regarding the engine overheating
› Stop driving.› Stop the engine and allow it to cool.› Drive on after the indicator light goes out.
Engine faultilluminates together with
› Stop driving!› Stop the engine and seek the help of a specialist
garage.
There is no coolant of the correct specificationavailable› Top up with distilled or demineralised water.› Have the correct coolant mixing ratio corrected by
a specialist garage as soon as possible.
Another substance was used for topping up, otherthan distilled or demineralised water:
› Have the coolant changed by a specialist garage.
It is not possible to top up with a sufficient amountof coolant› Stop driving.› Stop the engine and seek the help of a specialist
garage.
There is a loss of coolant› Top up the coolant and seek the help of a specialist
garage.
Engine electronics
Troubleshooting
Fault in the engine control systemilluminatesDriving in emergency mode is possible - a
noticeable reduction in engine performance may oc-cur.
› Continue driving, exercising appropriate caution,and seek the help of a specialist garage.
77Engine, exhaust system and fuel › Engine electronics

Exhaust control system
Troubleshooting
Emission control system faultyilluminatesDriving in emergency mode is possible - a no-
ticeable reduction in engine performance may occur.
› Continue driving, exercising appropriate caution,and seek the help of a specialist garage.
Fuel filler flap
Opening the fuel filler flap
› Press the flap and open it.
Petrol
What you should be mindful of
DANGERRisk of death!Fuel and fuel vapours are explosive.
NOTICERisk of serious damage to the engine and the ex-haust system!▶ Never run the fuel tank completely empty!
If you would like to operate your vehicle in a countryother than that intended for vehicle operation,please contact a ŠKODA Partner. They will let youknow whether a suitable fuel is offered in the associ-ated country.
Regulations
StandardsThe petrol must correspond to the European stand-ards EN 228.
Only use unleaded petrol that contains max 10% bi-oethanol (E10).
We recommend using petrol with additives,which is available at petrol stations at the petrolpumps.
Octane numberUse the petrol with the octane number prescribedfor your vehicle.
Petrol with an octane number that is one higher thanthe one prescribed for your vehicle can be usedwithout restriction.
NOTICERisk of damage to the engine and the exhaust sys-tem!▶ When petrol with a lower than the prescribed oc-
tane is used, only continue driving at mid-range en-gine speeds and with minimal strain on the engine.
▶ Refuel using petrol of the prescribed octane num-ber as soon as possible.
▶ Do not use petrol with an octane number that low-er than 91!
Specified petrol is unleaded, min. 95 RON / ROZUse min. 95 ROZ petrol.
Using higher octane petrol than 95 RON may resultin improved performance and lower fuel consump-tion.
In an emergency 91. 92 or. 93 RON may be used(low power loss, slightly increased fuel consump-tion).
Additive
NOTICERisk of damage to the engine and the exhaust sys-tem!▶ Do not use petrol containing metal-based addi-
tives, e.g. manganese, iron, lead, and do not use, forexample, any LRP-petrol - lead replacement petrol.
▶ Do not add any additional additives to the petrol inaccordance with EN 228.
▶ If petrol is not used in accordance with EN 228, werecommend obtaining information from a specialistcompany regarding the possible use of petrol addi-tives approved by ŠKODA AUTO.
Requirements for refuelling
✓ Vehicle unlocked✓ Ignition off
Refilling
› Open the tank flap.
78 Engine, exhaust system and fuel › Exhaust control system
› Turn the tank cap in the direction of the arrow andremove it.
› Place the tank cap on the tank flap.› Insert the fuel nozzle into the fuel filler neck up to
the stop and refuel.› Do not continue refuelling after the fuel nozzle
switches off.› Remove the fuel nozzle and put it back on the pet-
rol pump.› Place the fuel cap on the fuel filler neck and turn it
in the opposite direction to the arrow until it clicksinto place.
› Close the tank flap and click into place.
Troubleshooting
If fuel other than unleaded petrol has been used asper standards applicable to your vehicle› Neither start the engine nor switch on the ignition.› Seek the help of a specialist garage.
Technical data
The fuel prescribed for your vehicle is indicated on asticker on the inside of the fuel filler flap.
A Unleaded petrol
B Organic share as apercentage
The fuel tank has a capacity of about 50 litres, in-cluding a reserve of approx. 7 litres.
illuminates - the fuel level has reached the re-serve area.
12 volt vehicle battery and fuses
12 volt vehicle battery
What you should be mindful of
Explanation of the warning symbols on the 12-voltvehicle battery
Wear safety goggles!
The battery acid of the 12-volt vehicle bat-tery is very caustic. Wear gloves and eye pro-tection.
Keep fire, sparks and open light away fromthe 12 volt vehicle battery! Do not smoke!
When charging the 12 volt vehicle battery, ahighly explosive gas mixture is produced!
Keep children away from the 12 volt vehiclebattery!
Refer to the owner’s manual!
Functionality - Protection against discharge ofthe 12 volt vehicle battery
Possible causes for the discharge of the 12 voltvehicle battery▶ Worn 12 volt vehicle battery▶ Frequent short journeys▶ Low temperatures▶ Vehicle stationary for a long period of time
Automatic system-related discharge protectionmeasure with regard to the 12 volt vehicle battery▶ Increasing the engine idling speed▶ Switching off certain consumers or limiting their
power
Recommended measure to be taken when vehicleis stationary for more than three weeks› Disconnect the terminal of the 12 volt vehicle
battery.
Checking and charging the 12 volt vehiclebattery
Checking the conditionThe condition of the 12 volt vehicle battery ischecked by a specialist garage during servicing.
Checking the acid levelApplies to a 12 volt vehicle battery with an acid levelindicator.
7912 volt vehicle battery and fuses › 12 volt vehicle battery

› Tap on the indicatorbefore testing, to clearair bubbles.
▶ Black colour - the acidlevel is OK.
▶ Colourless or pale yel-low colour - acid levelis too low, the 12 voltvehicle battery mustbe replaced.
Requirements for charging a 12 volt vehicle bat-tery✓ Ignition off✓ Power consumers switched off
12 volt vehicle battery chargingTo charge the 12 volt vehicle battery fully, set acharging current of max. of 0.1 times the battery ca-pacity.
› Connect the termi-nal of the charger tothe terminal of the12 volt vehicle battery.
› Connect the termi-nal of the charger tothe earth point A .
› Plug the charger'spower cable into thesocket and switch onthe device.
› After charging, switch off the charger and unplugthe power cable from the socket.
› Disconnect the charger terminals from the 12 voltvehicle battery.
WARNINGRisk of explosion!▶ During charging, hydrogen is released. An explo-
sion can also be caused by sparks, for example,when disconnecting or loosening the cable con-nector.
▶ Never charge a frozen or thawed 12 volt vehiclebattery.
▶ Do not carry out the so-called quick charging ofthe 12 volt vehicle battery yourself, but have it car-ried out by a specialist garage.
NOTICEA flat 12 volt vehicle battery can freeze easily!
Troubleshooting
The 12 volt vehicle battery does not charge whilethe engine is running
or illuminates
› Seek the help of a specialist garage.
Earth point
Engine faultor illuminates
› Stop driving!› Stop the engine and seek the help of a specialist
garage.
Disconnecting, connecting and replacing
CAUTIONRisk of fire!▶ Do not mix up the connection cables.
Disconnecting› Close all electrically operated windows.› Switch off the ignition and any connected power
consumers.› Disconnect the terminal and then the termi-
nal.
Connecting› Connect the terminal and then the terminal.
After switching on the ignition, the indicator lightslight up from the isolation box.
› If, after a short distance, one of the above-men-tioned indicator lights does not go out, seek thehelp of a specialist garage.
Operate these vehicle functions after disconnect-ing and connecting the 12 volt vehicle battery▶ Time setting of the analogue instrument clus-
ter » page 44.▶ Window operation » page 20.
ChangingThe new 12 volt vehicle battery must have the sameparameters as the original battery. Have the replace-ment carried out by a specialist garage.
Using the jump-starting cable
Usage
With the help of jump start cables, a vehicle with adischarged or defective 12-volt vehicle battery canbe started using the 12-volt vehicle battery of an-other vehicle.
80 12 volt vehicle battery and fuses › Using the jump-starting cable

What you should be mindful of
WARNINGRisk of explosion and chemical burns!▶ Do not jump start with the 12 volt vehicle battery
of another vehicle under the following conditions:▶ The discharged 12 volt vehicle battery is fro-
zen. A discharged 12 volt vehicle battery mayalready freeze at temperatures just below 0 °C.
▶ The acid level of the 12-volt vehicle battery istoo low » page 79.
Use jump leads with a sufficient cross section and in-sulated terminal clamps.
The rated voltage of both batteries must be 12V. Thecapacity (in Ah) of the 12 volt charging vehicle bat-tery must not be significantly lower than the capaci-ty of the discharged 12 volt vehicle battery.
Use another vehicle's 12 volt vehicle batteryto operate the vehicle
WARNINGRisk of injury! Danger of damage to vehicle!▶ Lay the jump start cables so that they cannot be-
come caught by rotating parts in the engine com-partment.
NOTICEShort circuit!▶ The non-insulated parts of the terminal clamps
must not touch each other.▶ The cable connected to the positive pole of the 12
volt vehicle battery must not come into contactwith electrically conductive vehicle parts.
▶ The vehicles must not touch each other.
Connect the jump start cable› Switch off the ignition.› Connect the terminal clamps of the jump start ca-
bles in the order shown in the legend.
discharged 12 volt vehicle battery
current-supplying 12 volt vehicle battery
1 -pole of the discharged 12-volt vehicle battery
2 -pole of the current-supplying 12 volt vehiclebattery
3 -pole of the current-supplying 12 volt vehiclebattery (or earth point)
4 Earth point of the vehicle with discharged 12volt vehicle battery
Start the engine› Start the engine of the current-giving vehicle and
let it idle.› Start up the vehicle with the discharged 12 volt
vehicle battery.› If the engine of the vehicle with the discharged 12
volt vehicle battery does not start within 10 sec-onds, repeat the starting procedure after approxi-mately 30 seconds.
Disconnecting the cable› Disconnect the cables in the reverse order from
connection.
Fuses
What you should be mindful of
NOTICEFire hazard and risk of damage to the electrical sys-tem.
▶ Do not repair fuses or replace them with strongerfuses.
▶ Replace the defective fuse with a new fuse withthe same amperage.
▶ We recommend using replacement fuses from theŠKODA Genuine Accessories range. These guaran-tee reliable and safe protection of the vehicle’selectric system.
▶ If a newly inserted fuse blows again, seek the helpof a specialist garage.
One fuse may belong to several consumers. Oneconsumer may have several fuses.
Functionality
Fuses protect the vehicle systems from damagecaused by excessive current. The fuse blows whenthe current is exceeded.
Earth point
8112 volt vehicle battery and fuses › Fuses

Blown fuse
Conditions for replacing a fuse
✓ Ignition key removed (vehicle without starterbutton)
✓ Ignition switched off and driver's door open (vehi-cle with starter button)
✓ All consumers switched off
Replacing a fuse
› Replace the fuse withthe clamp located onthe inside of the fusebox cover in the enginecompartment.
› Use the appropriateend of the clamp ac-cording to the fuse di-mensions.
Fuses in the dash panel
Overview
Access to the fuses
› Loosen and open thelid of the storage com-partment on the driv-er's side.
› Change the fuse.› Place the lid of the
storage compartmentin its original positionand lock it into place.
Fuses overview
Fusenumber
Consumer
1 Not used2 Not used3 Music amplifier4 Not used5 Sliding/tilting roof6 Central locking7 Seat ventilation8 Not used9 Not used
10 Not used11 Not used12 Not used13 Light switch, diagnosis connection, rain
sensor, control lever under the steeringwheel
14 Windscreen wipers and washers15 Instrument cluster16 Light17 Electric power windows - driver win-
dow + rear right window18 Windscreen wiper19 Infotainment20 Heated rear window21 Not used22 Not used23 Rear view camera24 USB connections25 Control lever under the steering wheel26 Databus27 Not used28 Not used29 Not used
82 12 volt vehicle battery and fuses › Fuses in the dash panel

Fusenumber
Consumer
30 Ignition (ignition lock, starter button)31 Air conditioning, heating32 Not used33 Electric power windows - front passen-
ger window + rear left window34 Not used35 Light36 Horn37 Not used38 Interior lighting, button lighting, back-
ground lighting, manual air conditioning,heating
39 Parking aid, cruise control system40 Light switch, headlights, headlight level-
ling, diagnostic connection, reversinglight switch, control lever under thesteering wheel, interior mirror dimming
41 Exterior mirror adjustment, electricpower windows - driver
42 Clutch pedal switch43 Rear window wiper44 Airbag system, airbag control lamp45 Sliding/tilting roof46 Cooling system47 Diagnostic connection, radio48 Electric steering column lock, Kessy
(keyless lock and start system)49 Not used50 USB connections51 Diagnostic connection52 12 volt socket53 Ignition key trigger lock, automatic
transmission54 Not used55 Not used56 Not used57 Not used58 Windscreen washer system59 Not used60 Ventilation61 Air conditioning
Fuses in the engine compartment
Overview
Access to the fuses
› Simultaneously pressthe locking buttons onthe fuse box cover andremove the cover.
› Change the fuse.› Fit the cover and click
into place.
NOTICEDanger of water entering the fuse box.▶ Fit the cover correctly and click into place secure-
ly.
Fuses overview
Fusenumber
Consumer
1 Engine control unit2 Coolant pump3 Lambda probes4 Fuel pump5 Radiator fan, oil level and oil tempera-
ture sensor6 Ignition coils7 Brake system (vacuum pump)8 Fuel injection9 Brake light switch
10 Battery data module11 Not used12 Air conditioning13 Not used14 ESC, engine control system, engine
components15 Automatic gearbox16 Not used17 Engine control system18 Starter19 Not used
8312 volt vehicle battery and fuses › Fuses in the engine compartment

Fusenumber
Consumer
20 ESC21 ESC22 Not used23 Not used24 Not used25 Not used27 Not used28 Not used
Wheels
Tyres and rims
What you should be mindful of
NOTICE▶ Protect tyres from contact with lubricants and
fuel.▶ Always store wheels or tyres in a cool, dry and,
where possible, dark place. Tyres without rimsshould be stored in an upright position.
▶ Alloy rims can be damaged by grit.▶ Do not use light alloy rims with a ground surface in
wintry weather conditions or with snow chains
Causes of uneven tyre wear▶ Improper tyre pressure▶ Driving style (e.g. fast cornering, rapid acceleration
and deceleration)▶ Wheel alignment errors▶ Incorrect wheel balancing
Wheel changes
For uniform wear on alltyres, we recommendthat you change thewheels every 10,000 kmaccording to the sched-ule.
Advice for tyre assembly› With directional tyres, observe the correct direc-
tion of rotation. The direction of rotation of thetyres is marked by arrows on the wall of the tyre.The directional tyre tread pattern usually appearswith winter and all-season tyres.
› Always replace the tyres by the axle.
Additional informationOnly fit radial tyres of the same type, size (rolling cir-cumference) and the same tread pattern on one axle.
Approved tyre sizes are specified in the technical ve-hicle documentation and in the declaration of con-formity (in the so-called COC Document).
The declaration of conformity can be obtained froma ŠKODA Partner (valid for some countries and somemodels).
Overview of tyre labelling
Explanation of tyre markingse.g. 205/55 R 17 91 H
Tyre width in mmHeight/width ratio in %Code letter for the type of tyre - RadialDiameter of wheel in inches
20555R17
84 Wheels › Tyres and rims

Load indexSpeed symbol
Load indexThe load index indicates the maximum permissibleload for each individual tyre.
615 kg630 kg
Speed symbolThe speed symbol indicates the maximum permissi-ble speed for a vehicle fitted with tyres in the cate-gory concerned.
210 km/h
WARNING▶ Do not exceed the maximum permissible load and
speed for the mounted tires.
Tread wear indicators
Wear indicators are loca-ted in the profile of thetyres that display thepermissible minimumtread depth.
Markings on the walls ofthe tyres with the lettersTWI or other symbols(e.g. ) indicate the po-sition of the wear indica-tors.
A tyre is to be regarded as worn out when this wearindicator is flush with the tread.
WARNINGRisk of accident!▶ Do not use worn tires.
Tyre manufacturing dateThe date of manufacture is indicated on the tyresidewall.
For instance, DOT ... 18 21 means that the tyreswere produced in the 18th week of the year 2021.
WARNINGRisk of an accident!▶ Do not use tyres that are older than 6 years.
Troubleshooting
Help with a flat tyre▶ Spare wheel » page 86▶ Changing the wheel and raising the vehi-
cle » page 86
Change of tyre pressureilluminates
› Stop the vehicle.› Check the tyres and tyre pressures.
91H
9192
H
Show tyres with modified pressureApplies to the 10″ Infotainment system:
› Tap on .› By moving your finger sideways, choose the screen
with the menu item for vehicle status.› Select the menu item for vehicle status.› Select the menu item for tyres.
All-season or winter tires
Usage
All-season or winter tyres improve handling in winterweather conditions. They are characterised by ‘M+S’and a mountaintop and snowflake symbol .
The symbol on the tyre provides informationabout the grip on snow.
The symbol on the tyre manufacturer's stickerprovides information about the grip on ice.
What you should be mindful of
For the best possible handling, use tyres on all fourwheels with a minimum tread depth of 4 mm.
Change winter tyres to summer tyres at the appro-priate time. Summer tyres have better driving andbraking characteristics on snow- and ice-free roadsand at temperatures above 7 °C.
Usage conditions
If all-season or winter tyres are installed that have alower speed category than the actual specified maxi-mum vehicle speed, then proceed as follows:
› In Infotainment, set the speed limit according tothe category of tyres fitted.
› In the driver's field of view, affix a warning labelwith the maximum value of the speed category in-tended for the tyres fitted (applies only to certaincountries).
Settings
The speed limit setting for tyres is set in the Infotain-ment in the following menu item:
Applies to the 10″ Infotainment system: Car Tires
Applies to the Bolero Infotainment system:
85Wheels › All-season or winter tires

Spare wheel
Overview
The dimensions of a standard spare wheel corre-spond to the dimensions of the wheels mounted onthe vehicle.
Remove the wheel on vehicles without soundsystem and replace
The spare wheel is mounted in a recess under thefloor covering or the variable loading floor in theboot.
Removing
› Unscrew the lock nut.› Take out the wheel.
Inserting› Insert the wheel into the wheel well with the out-
side facing downwards.› Screw in the locknut until it stops.
Remove the wheel on vehicles with soundsystem and replace
Removing
› Press the safety buttonand remove the plug.
› Unscrew the lock nut.› Remove the bass loud-
speaker.› Take out the wheel.
Inserting› Insert the wheel into the wheel well with the out-
side facing downwards.› Insert the bass loudspeaker.› Screw in the locknut until it stops.› Insert the connector in the bass loudspeaker.
Changing the wheel and raising thevehicle
What you should be mindful of
Before changing› Park the vehicle securely and secure it from rolling
away.
Block the wheel that is diagonally opposite thewheel to be changed at the front and rear usingsuitable tools.
› Turn off the engine.› Let all of the occupants get out. During the wheel
change they should not stand on the road, e.g. be-hind the crash barriers.
› Close all doors, the boot and bonnet.
Raise vehicle
WARNINGAlways ensure the base plate of the lifting jack can-not slip!▶ Provide a wide and firm base under the jack on
loose surfaces.▶ Create a non-slip base (e.g. a rubber floor mat) un-
der the jack on a smooth surface.▶ Always raise the vehicle with the doors closed.▶ Do not insert any body parts under the raised vehi-
cle.▶ Do not start the engine of the lifted vehicle.
NOTICEDanger of damage to vehicle!▶ Make sure that the jack is attached correctly to the
bridge of the sill.
After having been changed› Check the tyre pressure on the mounted wheel
and adjust if necessary.› In vehicles with a tyre indicator, save the tyre pres-
sure values in the system.› Have the tightening torque of the wheel bolts of
the mounted tyres checked with a torque wrenchas soon as possible.
The specified tightening torque is 140 Nm.
Drive carefully until the tightening torque is checked.
Replace the damaged tyre. It is not recommended torepair the tyre.
86 Wheels › Spare wheel

WARNINGRisk of an accident!▶ Too low a tightening torque may cause the wheel
to disengage while driving.▶ Too high a tightening torque can damage the
threads and cause the rim to deform.
WARNINGRisk of an accident!▶ Do not grease or lubricate screws.▶ Do not use corroded or damaged screws.
Changing the wheel and raising the vehicle
Release screws› If the vehicle has covers over the wheel bolts or
wheel trims, remove them.
WARNING▶ If you step on the key end when loosening the
screw, hold on to the vehicle for better stability.
Some vehicles may haveanti-theft wheel boltsthat protect the wheelsfrom theft.
› Insert the upper sec-tion on the anti-theftwheel bolt until itstops.
› Place the key on thewheel bolt or on theattachment piece.
› Turn the screw a maxi-mum of half a turn sothat the wheel doesnot come loose and falloff.
Jacking points for the jackThe jacking points are located on the lower sill of thevehicle.
A 15 cm
B 26 cm
Position the jack and lift the vehicle› Use the jack from the tool kit.
› Position the jack at the jacking point closest to thewheel to be replaced.
› Support the base plate of the jack with its full arearesting on level ground and ensure that the jack islocated in a vertical position at the jacking point.
› Use the crank to raise the jack until its claw enclo-ses the bar.
› Continue to lift the vehicle until the wheel is justoff the floor.
Changing a wheel› Unscrew the screws and place them on a clean
surface.› Remove the wheel carefully.› Attach the wheel.› Slightly screw in the screws.› Lower the vehicle.
NOTICEApplies to factory built or original accessory wheeltrims from ŠKODA.▶ Install the anti-theft wheel bolt according to the
position marked on the back of the wheel trim.
Tighten screws› Tighten the opposite wheel bolts including the an-
ti-theft wheel bolt one after the other.› Reinstall the cover caps of the wheel bolts or the
full wheel covers.
Keep the label with the code number of the anti-theft wheel bolts. A replacement upper section canbe acquired from ŠKODA original parts based onthis.
87Wheels › Changing the wheel and raising the vehicle

Tyre pressure
What you should be mindful of
NOTICE▶ Always adjust the tyre pressure to the load.▶ Check the pressure in all tyres at least once a
month and before each longer ride.▶ Check the pressure when the tyres are cold. Do
not reduce the higher pressure of warm tyres.▶ After each change in tyre pressure, save the new
values in the tyre control display.
WARNINGRisk of an accident!▶ If tyre pressure loss is very quick, try to stop the
vehicle carefully without heavy steering or heavybraking.
Sticker with prescribed tyre pressures
The sticker with the prescribed tyre pressure valuesis located in the centre body pillar on the driver’sside.
A Tyre pressure in caseof partial load
B Tyre pressure whenfully loaded
C Prescribed tyrepressure value forthe spare wheelTyre diameter in in-chesThis information on-
ly serves as information for the prescribed tyrepressure. This is not a listing of approved tyresizes for your vehicle. These are in the vehicle'stechnical documentation, as well as in the decla-ration of conformity (in the so-called COC docu-ment).
D Tyre pressure reading for the front axle tyres inbar in case of partial load
E Tyre pressure reading for the front axle tyres inpsi in case of partial load
F Tyre pressure reading for the rear axle tyres inbar in case of partial load
G Tyre pressure reading for the rear axle tyres inpsi in case of partial load
H Tyre pressure reading for the front axle tyres inbar when fully loaded
I Tyre pressure reading for the front axle tyres inpsi when fully loaded
J Tyre pressure reading for the rear axle tyres inbar when fully loaded
K Tyre pressure reading for the rear axle tyres inpsi when fully loaded
Tyre pressure monitor
Functionality
The tyre pressure monitoring indicator indicates achange in tyre pressure.
Warning when pressure changesilluminates
› Stop the vehicle.› Check the tyres and tyre pressures.
Show tyres with modified pressureApplies to the 10″ Infotainment system:
› Tap on .› By moving your finger sideways, choose the screen
with the menu item for vehicle status.› Select the menu item for vehicle status.› Select the menu item for tyres.
Function restriction
The system is unable to provide a warning in theevent of a very rapid tyre pressure loss, e.g. suddenpuncture.
The system function may be restricted in the follow-ing cases:
▶ Uneven load on the wheels▶ Sporty driving style▶ Driving on dirt roads
Saving tyre pressure values
› Inflate the tyres to the prescribed inflation pres-sure.
› Turn on the ignition.
Save tyre pressures with the button › Press and hold the button on the button bar.
The warning light in the instrument cluster illumi-nates from the isolation box. After storing thetyre pressure values, an acoustic signal sounds andthe warning light goes out.
› Release the button .
Store the tyre pressure values in the infotainmentApplies to the 10″ Infotainment system:
In the following menu, select the menu item for dis-playing the vehicle condition:
› Tap on .› By moving your finger sideways, choose the screen
with the menu item for vehicle status.› Select the menu item for vehicle status.› Select the menu item for tyres.› Press the button.
88 Wheels › Tyre pressure

› Then follow the instructions on the screen.
Save the tyre pressures in the following cases:
▶ Change of tyre pressure▶ Change of one or more wheels▶ Change of position of a wheel on the vehicle▶ Always after covering a distance of 10,000 km or
once a year
Sticker for storing tyre pressure readingThe sticker for storing tyre pressure reading is loca-ted on the centre body pillar on the driver’s side.
1 Inflate the tyres tothe prescribed infla-tion pressure.
2 Store the values.
Troubleshooting
Tyre pressure display faultyflashes for about 1 minute and stays on
› Stop the vehicle, switch off the ignition andstart the engine.
If the symbol flashes again after starting the en-gine, there is a system fault.
› Continue driving, exercising appropriate caution,and seek the help of a specialist garage.
Wheel bolt cover caps
Remove cover caps and install
Disconnecting
› Push the pull-off clamponto the cover cap upto the stop.
› Remove the cover cap.
Installing› Push the cover cap onto the wheel bolt to the stop.
Full wheel frame
Removing and installing the trim
Applies to factory built or original accessory trimsfrom ŠKODA.
Disconnecting› Hang the clamps for removing the wheel trims at
the edge of one of the openings in the trim.› Push the wheel wrench through the clamp, support
on the tyre and pull off the wheel trim.
Installing› Press the wheel trim onto the wheel rim at the
designated valve opening.
When using an anti-theft wheel bolt, it must be lo-cated at the location indicated on the bezel.
› Press the trim, starting at the valve, into the rim onboth sides until it engages around the entire cir-cumference.
NOTICE▶ Use hand pressure, do not hit the wheel cover.
89Wheels › Wheel bolt cover caps

Storage space and interiorequipmentThe following topics can only be found in the digitalversion of the Owner's Manual.
▶ Bag hooks in the boot ▶ Storage pocket for phone ▶ Car park ticket holder ▶ Rubber band in the door trim ▶ USB-connections ▶ Glasses compartment ▶ Cup holder Easy Open ▶ Storage compartment with air outlet nozzle
Emergency equipment
Overview
Emergency equipment in the luggage compart-ment
A Positioning of the warning triangle (dependingon equipment)
B Placing of the first-aid kit
C Tool kit (depending on equipment)
Storage compartment for the reflective vestThe storage compartment for the reflective vest is inthe storage compartment of the front door.
Fire extinguisher under the passenger seatOnly valid for some countries.
Tool kit
Overview
Depending on the equipment, not all of the followingcomponents may be included in the tool kit.
A Towing lug
B Bracket for removing the full wheel covers
C Jack with sign and crank
D Wheel wrench
E Removal clip for the wheel bolt cover caps
F Screwdriver
The declaration of conformity is enclosed with thejack or the logbook folder.
Fasteners in the boot
Overview
A Hook for securing the fastening netsMax. load 1.5 kg
B Bag hooksMax. load 3.5 kg
Rigid boot cover
Removing and inserting
The maximum load of the other fastening nets is1 kg.
90 Storage space and interior equipment › Emergency equipment

Removing
› Unhook the straps.
› Hold the raised coverin place and press theunderside of the coveron both sides.
› Remove the cover.
Inserting
› Insert the mount A
opposite the holder Bon both sides of theboot.
› Press on the coverfrom above until it en-gages.
› Hook in the retainingstraps.
Interior equipment front
Overview
A Glasses compartmentMax. load 0.25 kg› Press on the lid to open.
B Car park ticket holder
C Make up mirror
D Storage tray▶ Bottle holder with a capacity of max. 1.5 l▶ Storage compartment for the reflective vest▶ Rubber strip
E Openable and adjustable armrest with storagecompartment› To open the compartment, lift the armrest.
F Storage tray
G Storage compartment (depending on vehicleequipment):12-Volt power socket, USB connections, Phone-box.The USB connections can be used for chargingand for data transfer.
H Storage compartment with air outlet nozzleMax. load 3 kg› Pull the handle to open the compartment.› Turn the knob to position to open the air
outlet nozzle.
WARNINGRisk of an accident!A parking ticket in the holder restricts the outsideview.▶ Use a parking ticket holder only when the vehicle is
stationary.
NOTICE▶ Do not leave heat-sensitive objects behind in the
glasses compartment A .
91Storage space and interior equipment › Interior equipment front

Utility recess on the dashboard
Interior equipment rear
Overview
A Coat hookMax. load 2 kg
B Storage tray▶ Bottle holder with a capacity of max. 1 l▶ Storage compartment for the reflective vest
C Storage pocket▶ Telephone pocket
D USB-connectionsThe USB connections are for charging only.
WARNING▶ Only hang light clothing on the hooks. Do not leave
heavy and sharp objects in the pockets of theclothing.
▶ Do not use hangers to hang clothes.
Phonebox
What you should be mindful of
CAUTIONRisk of burns during charging!▶ The phone may get warm, remove it carefully from
the storage compartment.▶ Do not leave any metal objects in the compartment
under the phone. If there is a metallic object in thestorage compartment, which has become hot, re-move the phone and let it cool down in the storagecompartment!
Functionality
Phonebox functions▶ Wireless charging of phones.
Depending on the type of phone, charging is possibleat a standard or higher speed.
The Phonebox is located in the storage compartmentin the centre console at the front.
Insert a telephone with a maximum size of 158x90mm into the storage compartment.
Start the charging process› Place the phone in the compartment.› Confirm the starting of the charging process on
the Infotainment screen.
If the selection is not confirmed on the screenwithin 30 s, the charging process starts automatical-ly.
Charging IndicatorThe charging status is indicated by the colour of thesymbol in the status bar on the Infotainment screen.
▶ - the phone is in the storage compartment, isdetected and is charging at the normal speed.
▶ - the phone is in the storage compartment, isdetected and is charging at fast speed.
Recommendations for optimal function▶ The phone is positioned with the screen facing up.▶ Insert the phone without the protective case.▶ Position the phone centrally on the phone symbol
on the pad.
Operating conditions
Conditions for wireless charging✓ The ignition is switched on.✓ The phone supports the Qi standard.
92 Storage space and interior equipment › Utility recess on the dashboard

✓ There is no object between the pad and thephone.
Troubleshooting
The mobile phone is not charging.
▶ Check that there is no object between the supportand the phone to be charged. If this is the case, re-move the phone and the item. Place the phonecentrally on the phone symbol on the pad again.
▶ Check that the position of the phone to be chargedhas not changed. If this is the case, remove thephone and put it back in the centre of the phonesymbol on the pad.
Cup holder
Overview
Cup holder at the front
In the front holder area, abottle can be openedwith one hand.
› Press the bottle intothe holder and un-screw the cap.
Rear cup holder
CAUTIONRisk of scalding!▶ Never put hot beverage containers in the drinks
holder.
NOTICEDanger of damage to the electrical system and thepanels from spilled drinks.
12-Volt power socket
What you should be mindful of
NOTICERisk of damage to the electrical system of the vehi-cle!▶ Use the sockets only for the connection of ap-
proved electrical accessories with a total powerconsumption of up to 120 watts.
NOTICEDanger of damage to the connected consumers!▶ Switch off the consumers before switching the ig-
nition on or off and before starting the engine.
93Storage space and interior equipment › Cup holder

Roof rack
Overview
The maximum weight of the load incl. roof rack is50 kg.
The roof cross beams are attached to the roofrail.
Maintaining and cleaning
Service events
service intervalsCompliance with service intervals is crucial for thelife and value of the vehicle.
You will be notified of the due date for service withthe symbol and the corresponding message on thedisplay of the instrument cluster.
The specialist garage will inform you of the type ofservice interval, the option of changing this and thescope of service.
All services and the replacement or refilling of op-erating fluids are chargeable to the customer, evenduring the warranty period, unless the ŠKODA AUTOwarranty conditions or other binding agreements de-termine otherwise.
Proof of serviceA specialist garage stores the proof of service in theinformation system called Digital Service Plan.
The proof of service can be printed out.
Displaying the service due date in the Infotainmentsystem› In Infotainment, select the following menu:
Applies to the 10″ Infotainment system: Car Serv-ice settings.
Resetting informationWe recommend that you do not reset the informa-tion regarding service events on your own. It canlead to incorrect setting of the service intervals andthus also to possible faults in the vehicle.
For vehicles with a variable service interval, newservice interval values calculated according to theprevious operating conditions will be displayed afterthe oil change service indicator is reset. These valueswill then continue to be adjusted according to thecurrent operating conditions.
Service work, adjustments and technicalchanges
The instructions and guidelines from ŠKODA AUTOmust be observed when carrying out any modifica-tions, repairs or technical alterations to the vehicle.
Adhering to these instructions and guidelines helpsensure road safety and helps keep the vehicle in agood technical condition.
We advise only using ŠKODA Original Accessoriesand ŠKODA Original Parts which have been expresslyapproved for use on your vehicle. Reliability, safetyand suitability for your vehicle are guaranteed withthese.
94 Roof rack › Overview

ŠKODA Service partnerAll ŠKODA service partners work according to theinstructions and guidelines from ŠKODA AUTO.Service and repair work is therefore carried out ontime and at the appropriate quality. Adhering tothese instructions and guidelines helps ensure roadsafety and helps keep the vehicle in a good technicalcondition.
We therefore advise having all modifications, repairsand technical alterations to the vehicle carried out bya ŠKODA Service Partner.
ŠKODA original partsWe recommend the use of ŠKODA Genuine Parts foryour vehicle, as these parts are approved by ŠKODAAUTO. These parts comply wholly with ŠKODA AU-TO regulations and are identical to the parts used inseries production.
ŠKODA AUTO is able to warrant the safety, suitabili-ty, and long life of these products.
ŠKODA Service Partners are liable for any defects ofŠKODA Genuine Parts for a period of 2 years aftersale in accordance with the materials defect liability,unless agreed otherwise in the purchase agreement.
ŠKODA original accessoriesWe recommend that you use ŠKODA Genuine Ac-cessories in your vehicle. With these accessories,ŠKODA AUTO stands for safety, reliability and thesuitability for your vehicle type.
ŠKODA Service Partners are liable for any defects ofŠKODA Genuine Accessories for a period of 2 yearsafter installation or delivery in accordance with thematerials defect liability, unless agreed otherwise inthe purchase agreement or any other agreements.
Spoiler
WARNINGRisk of an accident!▶ Only use the original spoiler on the front bumper in
combination with the original spoiler on the bootlid.
▶ The original spoiler on the front bumper cannot beleft on its own without the spoiler on the luggagecompartment lid or in combination with an unsuita-ble spoiler on the luggage compartment lid.
▶ We recommend that you consult the ŠKODA Serv-ice Partner for any repairs to or replacement, addi-tion or removal of spoilers.
Component protectionSome electronic vehicle components (such as the in-strument cluster) are factory-equipped with compo-nent protection. This component protection ensuresthe functional limitation of these components in anon-legitimate installation in another vehicle (e.g. af-ter a theft) or operation outside the vehicle.
Interior
What you should be mindful of
NOTICE▶ Use cleaning agents intended for cleaning and care
of the individual materials.▶ Do not use aggressive cleaning agents or chemical
solvents.
Natural leather / Faux leather / Alcantara ® / Sue-dia / material
NOTICE▶ Remove impurities as soon as possible.▶ Do not use solvents, floor wax, shoe cream, stain
remover or similar agents on Alcantara® and Suediasuede seat upholstery.
▶ Make sure that natural leather is not moistenedwhen cleaning and that no water seeps into theseams.
▶ Do not clean the roof cladding with a brush.
NOTICERisk of fading to the cover fabric!▶ If necessary, do not leave the covers for long peri-
ods in the blazing sun.
▶ During use, the leather and Alcantara®- and Suediaand materials may show minor changes (e.g. foldsor discolouration). This does not constitute a mate-rial defect.
▶ Some clothing fabrics, e.g. dark denim, sometimesdo not have sufficient colour fastness. As a result,discolouration that is clearly visible on the seat up-holstery can occur. This is not a defect in the fab-ric.
▶ Sharp-edged zippers, rivets, clamps and similargarments can damage the upholstery in the vehi-cle. Such damages cannot be subsequently recog-nised as a justified complaint.
Plastic parts
NOTICERisk of damaging the dash panel!▶ Do not attach fragrances and air fresheners to the
dash panel.
Windows
NOTICERisk of damage to the filaments or the glass antenna!▶ Do not stick stickers on the heating filaments.▶ Do not use sharp objects (such as pot scrapers,
etc.) to clean the windows.
95Maintaining and cleaning › Interior

Seat belts
NOTICERisk of damage to the seat belts!▶ Do not dry clean the seat belts.▶ Allow cleaned belts to dry before rolling up.
Instructions for cleaning
Natural leather / Faux leather / Alcantara ® / Sue-dia / material› Remove dust and dirt on the surface with a vac-
uum cleaner.› Remove fresh impurities with water, slightly mois-
tened cotton cloth or woollen cloth; if necessary,use a mild soap solution 1) and wipe with a drycloth.
› Remove stubborn stains with a suitable cleaningagent.
› For regular care of natural leather, use the equip-ment provided for this purpose. After each clean,use a care cream with light protection and impreg-nation effect.
› When looking after Alcantara®-, Suedia and andfabric surfaces, remove stubborn hair with a clean-ing brush. Remove pills from materials with abrush.
Plastic parts› Remove impurities with water, slightly moistened
cloth or sponge with a suitable cleaning agent ifnecessary.
Windows› Remove impurities with clean water and dry with a
cloth provided for this purpose.
Infotainment screen› Remove any impurities on the screen using the
cleaning agents provided.
NOTICEDanger of screen damage!▶ When removing dirt, do not press on the screen.
Seat belts› Remove impurities with a soft cloth and mild soap
solution.1)
Exterior
What you should be mindful of
WARNINGRisk of accident!
After washing the vehicle, the functionality of thebrake system may be affected by moisture and, inwinter, by ice.▶ Dry and clean the brakes by braking several times.
NOTICE▶ Bird droppings, insect residues, litter and sea salt
residues, overflowed fuel etc. are to be removed assoon as possible.
▶ Do not use rough sponges, scourers or similar toremove dirt.
▶ Use cleaning agents intended for cleaning and careof the individual materials.
▶ Do not use aggressive cleaning agents or chemicalsolvents.
▶ Do not polish the vehicle in a dusty environment.
NOTICE▶ Paint damage should be repaired as soon as possi-
ble.▶ Do not treat matt lacquered parts with polish or
hard wax.▶ Do not polish foils.▶ We recommend treating door seals and window
guides with the appropriate tools from ŠKODAoriginal accessories. These ensure that the protec-tive lacquer layer of the seals and window guides isnot attacked.
▶ Do not use abrasive cleaning agents to clean therear view camera.
Before driving through a car wash› Observe the usual specifications of the car wash,
e.g. close all windows, fold the mirrors, unscrewthe antenna rod, etc.
› Move the windscreen wiper lever to position to adjust.
› If there are special attachments on your vehicle,observe the instructions of the car wash operator.
After washing with a wax preservation› Wipe off the windscreen wiper blades with a dry
cloth.
1) A mild soap solution consisting of 2 tablespoons of white neutral soap to 1 litre of lukewarm water.
96 Maintaining and cleaning › Exterior

Wash with a pressure washer
NOTICE▶ Follow the operating instructions for the high-
pressure cleaner, in particular the instructions re-lating to the pressure and the spray distance to thevehicle surface.
▶ Do not direct the water jet directly at the followingvehicle parts:▶ Films▶ Lock cylinder▶ Columns on the vehicle▶ Camera lenses and sensors▶ Plastic, chromed and anodised parts
Remove snow and ice
NOTICE▶ Remove snow and ice with a plastic scraper or a
suitable deicing agent.▶ Clean the cameras with a hand brush.▶ Only move the scraper in one direction.▶ Do not use scratchers or other sharp objects for
foils.▶ Do not remove snow and ice with hot or warm wa-
ter.▶ Do not remove snow and ice from surfaces with
coarse dirt.
Instructions for cleaning
Handwash› Wash the vehicle from top to bottom with a soft
sponge or wash glove and plenty of water, if nec-essary with additional suitable cleaning agents.
› Use a mild soap solution for foils and headlights 1).› Use a glass cleaner for the windscreen wiper
blades.› Wash the cameras with clean water and dry with a
suitable clean wipe.
NOTICE▶ Wash out the sponge or wash mitt regularly.▶ Use a different sponge for wheels, sills and the
lower part of the vehicle than that used for theother vehicle parts.
▶ Do not wash the vehicle in the blazing sun.▶ Do not dry the headlights or use sharp objects.▶ Do not put pressure on the bodywork when wash-
ing.▶ The temperature of the washing water may be a
max. 60 °C.
After hand washing› Rinse the vehicle and wipe it with a suitable clean
cloth.
Vehicle paint› Preserve the varnish at least twice a year with hard
wax.› Use a polish for matt lacquers.
FilmsFilms will age and become brittle – this is entirelynormal: this is not an error.
The following factors have a negative effect on thelife or colour fastness of the films:
▶ Sun rays▶ moisture▶ Air pollution▶ Stones, e.g. due to the rebound of the cargo during
transport on the roof rack
Protection of hollow spacesCorrosion-prone cavities of the vehicle are perma-nently protected by preservative wax at the factory.
› Remove spilled wax with a plastic scraper, cleanstains with mineral spirits.
UndersealThe underside is permanently protected by the fac-tory against chemical and mechanical influences.
› Have the protective coating checked by a special-ist garage before starting and at the end of thecold season.
Wheels› After washing, preserve the wheels with suitable
means.
WARNINGRisk of an accident!▶ Severe dirt on the wheels can result in the wheels
unbalancing.
Car jack› If necessary, treat moving parts with suitable
grease.
1) A mild soap solution consisting of 2 tablespoons of white neutral soap to 1 litre of lukewarm water.
97Maintaining and cleaning › Exterior

Technical data and specifications
Requirements for the technical data
The emission standard, information on fuel con-sumption and other information pertaining to yourvehicle can be found listed in the technical vehicledocumentation and in the declaration of conformity(in the so-called COC Document).
The information listed was determined in accord-ance with rules and under conditions that are stipula-ted by legal or technical regulations.
This and other information about your vehicle andthe declaration of conformity can be obtained from aŠKODA Partner.
The details in the technical vehicle documentationand in the declaration of conformity take prece-dence over the information in this Owner's Manual.These specifications and values apply to your vehiclein its condition and configuration at the time of deliv-ery from the manufacturer. Retrofitting an accessorycan have a negative impact on this information andvalues, in particular the values regarding fuel con-sumption and carbon dioxide (CO2), which are speci-fied in the vehicle documentation and in the declara-tion of conformity.
The performance values listed were determinedwithout performance-reducing equipment, e.g. airconditioning system.
Vehicle identification data
Vehicle identification number (VIN)The vehicle identification number is found at the fol-lowing locations:
▶ on right in engine compartment▶ On a plate under the windscreen in the lower left
corner▶ On the type plate at the bottom of the middle
body pillar of the vehicle
Type plate
A Vehicle manufacturers
B Vehicle identification number (VIN)
DisplayThe display of the VIN takes place in the infotain-ment in the following menu item:
Applies to 10 ″ infotainment: Car Service settings
Engine numberThe engine number is embossed on the engine block.
Maximum permissible weights
The maximum permissible weights are listed on thenameplate.
The type plate is located at the bottom of the rightmiddle body pillar of the vehicle.
A Maximum permissible gross weight
B Maximum permissible front axle load
C Maximum permissible rear axle load
PayloadsIt is possible to calculate the approximate maximumpayload from the difference between the permissibletotal weight and the operating weight.
The payload consists of the following components:
▶ The weight of the passenger▶ The weight of all luggage and other loads▶ The weight of the roof, including the roof rack sys-
tem▶ The weight of the equipment that is excluded from
the operating weight
WARNINGRisk of accident and danger of vehicle damage!▶ Do not exceed the specified values for the maxi-
mum permissible weights.
Operating weight
Information about the operating weight
The specification corresponds to the lowest possibleoperating weight without additional weight-increas-ing equipment. This includes 75 kg driver's weight,the weight of the operating fluids and the on-boardtool kit and a fuel tank filled to min. 90%.
98 Technical data and specifications › Requirements for the technical data

Operating weight
Engine type Gearbox Operating weight (kg)
1.0 l/85 kW TSIManual gearbox 1259
Automatic gearbox 1315
1.5 l/110 kW TSIManual gearbox - a)
DSG b) - a)
a) The values were not available at the time of going to press.b) Automatic dual-clutch transmission.
Ask for the exact vehicle weight in a specialist garage.
Vehicle dimensions
Dimensions
Specification Value (in mm)
Vehicle height 1612Vehicle width with folded-in mirrors 1760Vehicle width with folded-out mirrors 1975Ground clearance of the vehicle 188Vehicle length 4225
Accident data recorder (Event DataRecorder)
The vehicle is equipped with an accident data re-corder, hereinafter called as “EDR”. The purpose ofthe EDR lies in the data recording during a traffic ac-cident or another extraordinary traffic situation,hereinafter called as “accident”.
Data is only recorded in the event of an accident inwhich the restraint systems are triggered.
The EDR records the accident in a short time (ap-proximately 10 s), by showing the following informa-tion, for example:
▶ The function of certain systems in the vehicle.▶ The seat belt status of the driver and front passen-
ger.▶ The actuation of the brake and accelerator pedals.▶ The speed of the vehicle at the time of the acci-
dent.
The recorded data support the analysis of how thevehicle systems behaved shortly before, during andafter the accident. This enables them to clarify thecircumstances of the accident.
The data relating to assist systems in the vehicle isalso recorded. Whether for instance the affectedsystems were switched on or off at the correspond-ing time, whether they were only partially available
or were inactive. There is also the possibility oftracking whether these vehicle functions controlled,accelerated or decelerated the vehicle during the ac-cident. Depending on the equipment, these functionsare, e.g:
▶ Adaptive Cruise Control (ACC)▶ Lane Assist (Lane Assist)▶ Park steering assistant▶ Emergency braking function (Front Assist)
Under normal driving conditions, data is not recor-ded. There is no audio or video recording from thevehicle interior or surroundings. Personal data suchas name, gender, age or place where the accidentoccurred is not stored in the EDR. However, thirdparties such as law enforcement authorities may usecertain resources to connect EDR content to otherdata sources, and therefore deduce the identificationof some of the people involved in the accident wheninvestigating the causes of the accident.
For reading the EDR-Data, special equipment is re-quired and the ignition switched on.
ŠKODA AUTO will not read or otherwise process anyaccident data from the EDR without the approval ofthe vehicle owner or other person authorised for useof the vehicle. Exceptions are specified in the con-tractual arrangements, or these are subject to gener-ally binding regulations.
99Technical data and specifications › Vehicle dimensions

Personal data
Personal customer data is collected, processed andused by ŠKODA AUTO in accordance with the provi-sions of the generally binding legal provisions in thearea of personal data protection.
The current declaration on the protection of person-al data can be found on the following website:
Information about the radio systems inthe vehicle
Your vehicle has various radio systems.
The manufacturers of these radio systems declarethat these systems comply with the requirements ofDirective 2014/53/EU.
The display of information about the Directive2014/53 / EU, to harmonize the legal regulations ofthe member states with regard to the marketing ofradio systems as well as for Declaration of Con-formity, takes place by means of the following refer-ence or by reading in the QR-Codes:
https://www.skoda-auto.com/services/red-doc
After this, proceed as follows:
1. Select the desired region.2. Select Download Declaration of conformity
against the desired model, to receive the certifi-cates.
Examples of labelling of radio systems
A Serbia
B Australia and New Zealand
C Europe (countries that approve radio equipmentas per EU guidelines)
D Armenia
E Russia
F Vietnam
G Mongolia
H Ukraine
I Philippines
J Taiwan
K Belarus
L Great Britain
M Singapore
N Ghana
Rights arising from defectiveperformance, ŠKODA warranties
Liability for defects and ŠKODA Warranty for newcarsWarranty periodBy means of the ŠKODA partner, ŠKODA AUTOVolkswagen India Private Limited provides a 4 year /100,000 km1) new car warranty from the date ofsale.
1) Promotional offer, subsequent warranty in the third and fourth year.
100 Technical data and specifications › Personal data

Warranty coverageThis warranty extends to the repair or replacementof all parts that need to be repaired or replaced dueto inadequate workmanship or the parts being de-fective; This is in order to restore the vehicle to itsoriginal production specifications while adhering todeadlines and the requirements set out in this Own-er's Manual.
The ŠKODA partner decides on the type of repair,taking into account economic aspects as regards tothe technologies recommended by ŠKODA AUTOVolkswagen India Private Limited.
An adequate period of time should be provided forthe completion of the warranty repair after the noti-fication of the vehicle with a ŠKODA partner.
Where can you claim warrantyThe warranty is provided by a ŠKODA partner.
Beginning and end of the warranty periodThe warranty period begins on the date of deliveryof the new vehicle to the original purchaser or les-see.
This new vehicle warranty is automatically transfer-red free of charge when ownership of the vehicletakes place during the warranty period.
In terms of the repairs made, or parts built-in duringthe warranty period, the warranty expires at the endof the warranty period of the respective vehicle.
Tires and vehicle batteriesSome parts with which ŠKODA vehicles are equip-ped, such as tires, batteries, etc., are not producedby ŠKODA AUTO Volkswagen India Private Limited,but are provided by other suppliers. These parts areexcluded from the ŠKODA warranty, but the vehiclepurchaser can make a warranty claim with the re-spective manufacturer / supplier. If there are anyproblems with the provision of the guarantee bythese manufacturers, an authorized ŠKODA dealerwill assist you in finding a solution.
Maintenance implementation and mechanical cus-tomizationsThis warranty does not apply to the costs of con-sumables or work as part of regular maintenance. Atire change, a wheel alignment and balancing are alsoconsidered to be scheduled maintenance.
This warranty does not apply to the change of sparkplugs, oils, lubricants, fluids or refrigerants, as long astheir exchange is not an integral part of the warrantywith respect to the relevant part.
Defective light bulbs1), wiper blades, brake shoes orbrake pads, tires, air, gas, pollen and fuel filters whichoccur within six months can be repaired due to defi-
cient workmanship or the parts being defective. Af-ter expiry of the time limit mentioned above theseare regarded as natural wear and tear and are exclu-ded from the warranty.
Taking care of the minor vehicle parts, such as thecleaning of fabrics / leather upholstery inside the ve-hicle, the protective wax covering of various bodyparts, are considered maintenance and are excludedfrom the warranty. A damaged or fading of trim, softelements and leather parts due to the effect ofweather conditions or usage are excluded from thewarranty.
The term "normal wear and tear" cannot be prede-fined, because different types of use leads to differ-ent defects or types of wear. Particularly sensitivecomponents, such as spark plugs, clutch plates andrelated components, are easily identifiable and areexcluded from the warranty.
Mechanical adjustments that are not material orworkmanship related (especially doors, flaps andheadlight settings) are excluded from the guaranteeafter six months. After this period, these faults areconsidered normal wear and tear.
Immaterial errors that do not affect the vehicle func-tion, including noise or vibration, and anything simi-lar, are excluded from the warranty.
Damage or failure due to the misuse, neglect, al-teration, accident or in the event of a fireThis warranty does not relate to:
▶ Damage or failure due to improper vehicle repair,such as by the installation of non-original parts oraccessories that have an effect on the specifica-tions of the vehicle performance compared to thespecifications of the vehicle manufacturer (unwar-ranted changes are excluded from the warranty).
▶ Cases in which in the vehicle parts, especially elec-tronic components, have been installed, whichhave not been released by the manufacturer ŠKO-DA AUTO Volkswagen India Private Limited.
▶ Damage or failure due to the use of contaminatedor incorrect / falsified fuels, intentional or uninten-tional incorrectly refueled.
▶ Damage or failure due to vehicle use for competi-tions or for record attempts, driving schools or fordriving generally in unsuitable places or as a resultof an accident or fire.
▶ Damage or failure due to the permanent vehicleoperation in spite of the indication of a mechanicalor operational problem by means of a warninglight, a measuring instrument or other warning.
▶ Damaged, or due to the declaration of an insurancecompany, fully written off vehicles or vehicles that
1) Exception is for the bi-xenon gas discharge lamps in the headlights, they are covered by a 2 year warranty.Damaged bulbs in the headlights caused by external influences are excluded from the warranty.
101Technical data and specifications › Rights arising from defective performance, ŠKODA warranties

were essentially assembled or repaired with partsfrom other cannibalized used vehicles.
▶ Vehicles where the damage is due to improperstorage, intentional or fraudulent conduct on thepart of the owner or driver.
▶ Vehicles where the damage is due to operating incontradiction to the instructions in the vehicleowner's manual.
▶ Repairs or regular / recommended service workthat is performed other than by an authorized spe-cialist garage.
Damage or failure due to the lack of maintenanceThis warranty does not apply to damage or failuredue to a failure to implement the recommendedmaintenance and operational requirements set out inthis Owner's Manual.
Damage caused by environmental influencesThis warranty does not cover damage caused byhighly atmospheric industrial pollution (eg acid rain),bad weather, fire, theft or terrorist activities, frost orheat, floods including any immersion, flooding and /or hydrostatic obstacles and other damage due towater soaking , earthquakes, natural disasters,strikes, riots, civil unrest, nuclear threat, bird drop-pings, stone chips, tree resin or other similar externalmechanical or chemical events of any kind.
Damage caused by external influences are not con-sidered faults and are excluded from the warranty.
Manipulation of the odometerThis warranty does not apply to repairs of ŠKODAvehicles in which the odometer has been tamperedwith or where the actual mileage cannot be read di-rectly.
Other costsThis warranty does not refer to the incidental or con-sequential damages mentioned below that are dueto a fault or a warranty / advertising repair by a deal-er.
Costs related to communication, loading, parking inthe garage and other services due to a vehicle break-down in a remote location or in the city.
All costs relating to personal injury or property dam-age.
Psychological damage caused by the breakdown andduring the period in which the vehicle is in a repairshop.
Reimbursement of lost time, loss of business or forhiring a replacement product during the repair peri-od.
Legal obligations with respect to deaths, injuries orproperty damage, etc.
Other terms and conditionsThis warranty explicitly does not cover a vehicle ex-change or money refund.
ŠKODA AUTO Volkswagen India Private Limited re-serves the right to enhance or make design changesto all models of the ŠKODA brand without having tomake similar changes to previously sold vehicles.
All replaced faulty parts under this warranty becomethe property of ŠKODA AUTO Volkswagen India Pri-vate Limited.
The place of jurisdiction for the negotiation and pro-cessing of any legal disputes is the city of Auranga-bad (Maharashtra State).
Paintwork and body warrantyIn addition to the warranty conditions listed in thepurchase contract for new ŠKODA vehicles, to au-thorized ŠKODA dealer additionally ensures that thevehicle has the following warranty:
▶ 3 years against paint defects1),▶ 6 years against the corrosion of the bodywork1).
This type of damage will be repaired by any author-ized ŠKODA dealer free of charge.
The warranty does not relate to:
▶ Damage due to external factors or inappropriate /insufficient care.
▶ Body and paint damage, whereby the repair wasnot carried out promptly and professionally in ac-cordance with the manufacturer's instructions andusing ŠKODA genuine parts.
▶ Corrosion perforation due to the use of parts otherthan ŠKODA Genuine Parts or the application oftechnologies other than those authorized by themanufacturer or due to an incorrectly performedrepair contrary to the manufacturer's instructions.
Customer NoticeThe vehicle owner has the right and the duty to bringthe vehicle during the warranty period to an author-ized ŠKODA dealer for a service check / regularmaintenance according to the instructions listed inthe service schedule and in the owner's manual.
If a fault or problem is detected on the vehicle thenearest authorized ŠKODA dealer must be informedimmediately. Should the customer violate these in-structions, use the vehicle and thus increase the ex-tent of damage, the warranty may be limited or pos-sibly even revoked.
For repair under this warranty the vehicle should beregistered with the authorized ŠKODA dealer duringnormal working hours.
The authorized ŠKODA dealer may refuse warrantyservice if it is not detectable with the service forms
1) From the date of delivery of the new vehicle.
102 Technical data and specifications › Rights arising from defective performance, ŠKODA warranties

or repair orders / invoices that regular maintenancehas been performed at the right time.
Should the original purchaser sell the vehicle duringthe warranty period, the subsequent purchaser is ob-liged to inform the authorized ŠKODA dealer fromwhich the vehicle was purchased about this factwithin 30 days of purchase, and fill out an item in thismanual.
The customer must present an invoice to the seller inorder to claim the spare parts warranty for theseparts.
103Technical data and specifications › Rights arising from defective performance, ŠKODA warranties

Engine specifications
1.0 l/85 kW TSI engine
Output (kW at rpm) 85/5000-5500Highest torque (Nm at rpm) 178/1750-4500Number of cylinders/displacement(cm3)
3/999
Gearbox Manual gearbox Automatic gearboxMaximum speed (km/h) 186 181With specified gear engaged 5 5Acceleration 0-100 km/h (s) 10.6 11.7
1.5 l/110 kW TSI engine
Output (kW at rpm) 110/5000-6000Highest torque (Nm at rpm) 250/1500-3500Number of cylinders/displacement(cm3)
4/1498
Gearbox Manual gearbox DSG a)
Maximum speed (km/h) - b) - b)
With specified gear engaged - b) - b)
Acceleration 0-100 km/h (s) - b) - b)
a) Automatic dual-clutch transmission.b) The values were not available at the time of going to press.
104 Engine specifications › 1.0 l/85 kW TSI engine

Index
Numbers and symbols
10” infotainment 5412 volt vehicle battery 79
Charge 79Checking the condition 79Discharge protection 79Disconnecting and connecting 80Fault: 80Safety 11see 12 volt vehicle battery 79
7” infotainment 47
A
ABS 72Accident data recorder 99Air conditioning
see Climatronic 41see Manual air conditioning 41
Airbag 31Deactivating the airbags 32Fault: 32Installation locations 31Release 31Safety 31
Alarm system 18All-season tyres 85Ambient lighting 39Analogue instrument cluster 43Android Auto
10” infotainment 627” infotainment 53see digital version of the manual 4
Apple CarPlay10” infotainment 627” infotainment 53see digital version of the manual 4
Armrestfront 24rear 24
ASR 72Assist systems
Driver assist 72Park Assist 74Safety 13
Automatic gearbox 68Manually changing gear with the shift paddles on
the steering wheel 69Manually switching gear with the selector lever
68Automatic gearbox modes 68
B
Battery acid 79
Bonnet 75Boot
Boot storagesee boot lid 22Fasteners 90Rigid cover 90Transporting objects safely 13
Boot cover 90Boot lid
Automatic locking 22manual operation 22unlock manually 22
Brake fluid 71Safety 11
Brakes 71Handbrake 71
Bulbs 35BulbsFront turn signal - Replacing 36Fog lights - Replacing 37Low beam - replace 36Main beam - replacing 36Rear light - change 38
C
Car adaptationsRecommendations 94Safety 10
Central locking 16Central locking button 17Centre console 7Charging your phone wirelessly 92Check the vehicle before your journey 11Child lock 19Child seat 26
Child seatFastening using a belt 29, 30Grouping 27ISOFIX 28, 29Keyword child seat 26on the passenger seat 27Recommended child seats 28Securing children properly 12TOP TETHER 31Types of attachment 30
Climatronic 41Comfort flasher 33COMING HOME 35
Switching on 35Commissioning the vehicle
Using the jump-starting cable 80Compartments 91, 92Coolant 76
Checking 77Refilling 77Safety 11Specification 77Temperature display 76Troubleshooting 77
105Index

Warning lights 77Cooling system 41, 42Cruise control system 73Cup holder 93
D
Daylight running lights 33Door
Open/close 19Driver's seat 7Driving data 45Driving in neutral 68
E
Earth point 81Economical driving style 69EDL 72Electric windows 20
Activation 20Force limiter 20Operation 20Troubleshooting 20
EmergencyUsing the jump-starting cable 80What to do after an accident 14What to do in the event of a fire 14
Emergency equipment 90Car jack 90Tool kit 90
Emergency wheelsafe driving 13
Engine compartment 8Coolant 76Engine oil 75Flap 75Safety 11
Engine number 98Engine oil 75
Indicator light 76Refilling 75Safety 11Specification 76
EPC 77ESC 72Exhaust gas control system 78Explanations 4Exterior
lighting 32Exterior mirrors 25Extinguisher 90
F
Fasteners in the boot 90First aid kit 90Fog lights 34
front 34Fogged windows 41, 42Force limiter 21
FreewheelFree-wheelingSee Driving in neutral 68
Front seatsManually operated boot lid 23
Front vehicle area 5Fuel
Petrol 78Fuel tank
Open bonnet 78Fuel tank lid 78
H
Handbrake 71Hazard warning light system 34Headlights
Headlight range control 32Headrests 23Heated windscreen 42HHC
see Hill Hold Control 72Hill Hold Control 72Hook
in interior 92in the luggage compartment 90
I
Ignition lock 66Immobilizer 67Infotainment keyboard
see digital version of the manual 4Infotainment overview
10” infotainment 547” infotainment 47
Infotainment screen10” infotainment 557” infotainment 47
Infotainment settings10” infotainment 547” infotainment 47
Instrument clusteranalogue 43Instrument cluster display 43, 44
Instrument cluster display 43, 44Interior
lighting 38Interior fittings
12 volt socket 91, 93Car park ticket holder 91Coat hook 92Cup holder 93Glasses compartment 91Make up mirror 91Map pockets 92Storage compartments 91, 92
Interior lighting 38Ambient lighting 39
Interior rear-view mirror 25ISOFIX 30
106 Index

Holding eyes 30Placement on the seat 28, 29
J
Jump start cables 81
K
Key 16Keyboard
10” infotainment 55Keyless locking (KESSY) 18Kick-down 68
L
LEAVING HOME 35Lever
Main beam 33Turn signal 33Windscreen wipers and washers 39
Liability for defects 100see warranty 100
Light 32Automatically switch on and switch off 33Change bulbs 35CORNER function 34Fog light 34Hazard warning light system 34Headlamp flasher 33Headlight range adjustment of headlights 32Indicator light 34Main beam 33Operation 32Parking light 34Replace light bulbs 35Troubleshooting 33Turn signal 33
Light switch 32Lighting
Ambient lighting 39outer 32
Lighting range 32Lock 16, 18Locking elements 81
Change 82in dash panel 82in engine compartment 83
Low beam 33
M
Main beam 33Manual air conditioning 41Manual gearbox 68MCB 72Media
10” infotainment 577” infotainment 48see digital version of the manual 4
Mirrorsee exterior mirror 25
MirrorLinksee digital version of the manual 4
Mobile device management10” infotainment 597” infotainment 51
MSR 72Multi-collision brake
see MCB 72
N
Notes on starting 66
O
Oilsee engine oil 75
Online ServicesMyŠKODA Connect 65MyŠKODA Connect application 65vehicle status report 65
P
Park Assist systems 74Parking
Rear view camera 74Stop the vehicle safely! 14
Parking aid 74Parking brake 71Parking light 34Passenger seat 7Personal data 65, 100Personalisation
User account 64Petrol 78
other fuel filled 79prescribed petrol 78Refilling 78Requirements for refuelling 78Standards 78Tank capacity 79
Phonebox 92Power sockets
12 volt socket 93Safety 11
Power-assisted steering 24
R
Radio10” infotainment 567” infotainment 47see digital version of the manual 4
Radio systems in the vehicle 100Raise vehicle 87Rear fog light 34
rear 34Rear seats
107Index

Folding down 23Rear vehicle area 6Rear view camera 74
Operation 74Recirculated air mode 41, 42Refilling
Coolant 77Engine oil 75Petrol 78Windscreen washer fluid 40
Reflective vest 90Release 16, 18Rights arising from defective performance
see warranty 100Roof rack 94
Roof load 94safe driving 14
S
Safe driving 13Safety
Before your journey 10Car adaptations 10Child seat 12Driving through water 14Exiting the vehicle 14New brake pads 10New tyres 10safe driving 13SafetyRunning in the engine 10Sensors and cameras 10sit properly 12Transport cargo and objects 13Warning lights 13Weather conditions 14Webbing route 12What to do after an accident 14What to do in the event of a fire 14
Seat belts 26Automatic belt retractor 26Belt tensioners 26correct arrangement 12Fastening and unfastening 26Seat beltsBlocked strap 26Status display 26
Seat ventilation 43Seats 23
Folding down 23ISOFIX 30sit safely 12TOP TETHER 31Ventilation 43
Selector lever 68Service events 94
Interval 94Resetting information 94Show service appointment 94
Service work 94
Set tyre pressure values 88Side light 33
see Parking light 34SKODA Play Apps 64Sliding/tilting roof 21SmartLink
10” infotainment 627” infotainment 53see digital version of the manual 4
Spare wheel 86safe driving 13
Speed limit 46Reset to default 46Setting 46
Speed limit warning 46Setting 46
Start 66START STOP 67Start the engine 66Starter button 66Steering column lock 24Steering wheel 24
Buttons / dial 44Buttons/dial: 24correct position 12Manually changing gear with the shift paddles on
the steering wheel 69Stopping the engine 66Storage 91, 92Sun protection 21Supported media files
see digital version of the manual 4Supported media sources
see digital version of the manual 4Switching low beam on automatically 33Switching process
Manual gearbox 68System
10” infotainment 547” infotainment 47
T
Tank capacityPetrol 79
Technical data 98Dimensions 99
Telephone10” infotainment 607” infotainment 51
Tips for economical driving 69Tiptronic 68, 69Tool 90TOP TETHER 31
Holding eyes 31Touch operation
10” infotainment 557” infotainment 47
Tow rope 70
108 Index

Towing lug 70Towing the vehicle 70Traffic accident
Data recorder 99What to do after an accident 14
TransportRoof rack 94Transporting objects safely 13
Transporting children 12Turn signal 33Type plate 98Tyre pressure monitor 88Tyres 84, 85
Labelling overview 84Pressure 88Tread wear indicators 85Tyre pressure monitor 88Wear indicator 84
U
Update of the system and infotainmentsee digital version of the manual 4
Updating infotainment10” infotainment 557” infotainment 47
USB 91, 92
V
Valet mode 64Vehicle cleaning
Exterior 96Instructions for cleaning the interior 96Instructions for cleaning the outer area 97Interior 95
Vehicle dimensions 99Vehicle height 99Vehicle Identification Number (VIN) 98Vehicle length 99Vehicle status 46Vehicle width 99Vest
see reflective vest 90VIN
see vehicle identification number 98
W
Warning lightsForeword 8Overview 8
Warning triangle 90Warranty 100Weight 98Wheels 84
Breakdown 85Change 86, 87Cover caps for screws 89Full wheel cover 89Overview of tyre labelling 84
Pressure change 85Spare wheel 86Tread wear indicators 85Tyre pressure 88Tyre pressure monitor 88Wear indicator 84
Wi-Fi10” infotainment 61see digital version of the manual 4
Window 20Heating 42
Windscreen washer fluidWindscreen washer fluidHow is the washer fluidrefilled? 40
Windscreen washer fluidLevel too low 40Windscreen washer system
see windscreen wiper and washer 39Windscreen wipers and washers
automatic rear window wiping 39automatic wiping 39Refilling windscreen washer fluid 40Replace the windscreen wiper blade 40Unfold the windscreen wiper arms 40Windscreen washer fluid level too low 40
Winter tyres 85
X
XDL + 72
109Index