2004 GMC T-Series Owner Manual M
298
Seats and Restraint Systems ........................... 1-1 Front Seats ............................................... 1-2 Safety Belts .............................................. 1-4 Child Restraints ....................................... 1-18 Restraint System Check ............................ 1-29 Features and Controls ..................................... 2-1 Keys ........................................................ 2-2 Doors and Locks ....................................... 2-3 Windows .................................................. 2-4 Starting and Operating Your Vehicle .......................................... 2-6 Mirrors .................................................... 2-25 Storage Areas ......................................... 2-26 Instrument Panel ............................................. 3-1 Instrument Panel Overview .......................... 3-4 Climate Controls ...................................... 3-18 Warning Lights, Gages and Indicators ......... 3-21 Audio System(s) ....................................... 3-39 Driving Your Vehicle ....................................... 4-1 Your Driving, the Road, and Your Vehicle ..... 4-2 Towing ................................................... 4-32 Service and Appearance Care .......................... 5-1 Service ..................................................... 5-3 Fuel ......................................................... 5-5 Checking Things Under the Hood ............... 5-14 Rear Axle ............................................... 5-49 Cab Tilting .............................................. 5-50 Noise Control System ............................... 5-56 Windshield Wiper Blade Replacement ......... 5-57 Other Service Items .................................. 5-58 Tires ...................................................... 5-59 Appearance Care ..................................... 5-69 Vehicle Identification ................................. 5-77 Electrical System ...................................... 5-77 Capacities and Specifications ..................... 5-84 Normal Maintenance Replacement Parts ...... 5-87 Maintenance Schedule ..................................... 6-1 Maintenance Schedule ................................ 6-2 Customer Assistance Information .................... 7-1 Customer Assistance Information .................. 7-2 Reporting Safety Defects ............................ 7-4 Index ................................................................ 1 2004 GMC T-Series Owner Manual M
-
Upload
khangminh22 -
Category
Documents
-
view
0 -
download
0
Transcript of 2004 GMC T-Series Owner Manual M
Seats and Restraint Systems ........................... 1-1Front Seats ............................................... 1-2Safety Belts .............................................. 1-4Child Restraints ....................................... 1-18Restraint System Check ............................ 1-29
Features and Controls ..................................... 2-1Keys ........................................................ 2-2Doors and Locks ....................................... 2-3Windows .................................................. 2-4Starting and Operating
Your Vehicle .......................................... 2-6Mirrors .................................................... 2-25Storage Areas ......................................... 2-26
Instrument Panel ............................................. 3-1Instrument Panel Overview .......................... 3-4Climate Controls ...................................... 3-18Warning Lights, Gages and Indicators ......... 3-21Audio System(s) ....................................... 3-39
Driving Your Vehicle ....................................... 4-1Your Driving, the Road, and Your Vehicle ..... 4-2Towing ................................................... 4-32
Service and Appearance Care .......................... 5-1Service ..................................................... 5-3Fuel ......................................................... 5-5Checking Things Under the Hood ............... 5-14Rear Axle ............................................... 5-49Cab Tilting .............................................. 5-50Noise Control System ............................... 5-56Windshield Wiper Blade Replacement ......... 5-57Other Service Items .................................. 5-58Tires ...................................................... 5-59Appearance Care ..................................... 5-69Vehicle Identification ................................. 5-77Electrical System ...................................... 5-77Capacities and Specifications ..................... 5-84Normal Maintenance Replacement Parts ...... 5-87
Maintenance Schedule ..................................... 6-1Maintenance Schedule ................................ 6-2
Customer Assistance Information .................... 7-1Customer Assistance Information .................. 7-2Reporting Safety Defects ............................ 7-4
Index ................................................................ 1
2004 GMC T-Series Owner Manual M
GENERAL MOTORS, GM, the GM Emblem, GMC, andthe GMC Truck Emblem are registered trademarksof General Motors Corporation.
This manual includes the latest information at the time itwas printed. We reserve the right to make changesafter that time without further notice. For vehicles firstsold in Canada, substitute the name “General Motors ofCanada Limited” for GM Medium Duty Truck Divisionwhen it appears in this manual.
Please keep this manual in your vehicle, so it will bethere if you ever need it when you’re on the road. If yousell the vehicle, please leave this manual in it so thenew owner can use it.
Litho in U.S.A.Part No. X2403 A First Edition
©Copyright General Motors Corporation 04/22/03All Rights Reserved
Canadian OwnersYou can obtain a French copy of this manual from yourdealer or from:
Helm, IncorporatedP.O. Box 07130Detroit, MI 48207
How to Use This ManualMany people read their owner’s manual from beginning toend when they first receive their new vehicle. If you dothis, it will help you learn about the features and controlsfor your vehicle. In this manual, you’ll find that picturesand words work together to explain things.
IndexA good place to look for what you need is the Index inback of the manual. It’s an alphabetical list of what’sin the manual, and the page number where you’ll find it.
ii

Safety Warnings and SymbolsYou will find a number of safety cautions in this book.We use a box and the word CAUTION to tell you aboutthings that could hurt you if you were to ignore thewarning.
{CAUTION:
These mean there is something that could hurtyou or other people.
In the caution area, we tell you what the hazard is.Then we tell you what to do to help avoid or reduce thehazard. Please read these cautions. If you don’t, youor others could be hurt.
You will also find a circlewith a slash through it inthis book. This safetysymbol means “Don’t,”“Don’t do this” or “Don’t letthis happen.”
iii

Vehicle Damage WarningsAlso, in this book you will find these notices:
Notice: These mean there is something that coulddamage your vehicle.
A notice will tell you about something that can damageyour vehicle. Many times, this damage would not becovered by your warranty, and it could be costly. But thenotice will tell you what to do to help avoid the damage.
When you read other manuals, you might seeCAUTION and NOTICE warnings in different colorsor in different words.
You’ll also see warning labels on your vehicle.They use the same words, CAUTION or NOTICE.
Vehicle SymbolsYour vehicle has components and labels that usesymbols instead of text. Symbols, used on your vehicle,are shown along with the text describing the operationor information relating to a specific component, control,message, gage or indicator.
If you need help figuring out a specific name of acomponent, gage or indicator, reference thefollowing topics:
• Seats and Restraint Systems in Section 1
• Features and Controls in Section 2
• Instrument Panel Overview in Section 3
• Climate Controls in Section 3
• Warning Lights, Gages and Indicators in Section 3
• Audio System(s) in Section 3
• Engine Compartment Overview in Section 5
iv

These are some examples of vehicle symbols you may find on your vehicle:
v

Model ReferenceThis manual contains information which covers tilt cabmodels as shown. Most models are unfinished fromthe factory.
Since T-Series models delivered from the factory arefinished in a variety of ways by a number of companies,you’ll probably find other manuals in your vehicle.These manuals are put there by the companies thathave added components or equipment to the T-Seriesmodels. Read all these materials — as well as thismanual — carefully, to get all of the information onyour vehicle.
vi

Front Seats ......................................................1-2Bucket Seats .................................................1-2Center Seat ...................................................1-3
Safety Belts .....................................................1-4Safety Belts: They Are for Everyone .................1-4Questions and Answers About Safety Belts ........1-8How to Wear Safety Belts Properly ...................1-8Driver Position ...............................................1-8Safety Belt Use During Pregnancy ..................1-15Right Passenger Position ...............................1-16Center Passenger Position .............................1-16Safety Belt Extender .....................................1-17
Child Restraints .............................................1-18Older Children ..............................................1-18Infants and Young Children ............................1-20Child Restraint Systems .................................1-24Top Strap ....................................................1-27Securing a Child Restraint in a
Center Seat Position ..................................1-27Restraint System Check ..................................1-29
Checking Your Restraint Systems ...................1-29Replacing Restraint System Parts
After a Crash ............................................1-30
Section 1 Seats and Restraint Systems
1-1

Front Seats
Bucket Seats
Your vehicle has bucketseats. You can adjust thedriver’s seat with theselevers located at the frontof the seat.
Slide lever A to the left to unlock the seat and slide theseat to where you want it. Then, release the leverand try to move the seat with your body, to make surethe seat is locked into place.
To adjust the lower seat cushion forward or backward,pull up on lever B and slide the cushion to whereyou want it. Then release the lever.
To tilt the seatback, turnthe backrest tilt knob. Theknob is located on thelower cushion, onthe outboard side of thedriver’s seat and theinboard side of thepassenger’s seat.
To get more support in thelumbar area of your back,turn the lumbar adjustmentknob. The knob islocated on the uppercushion, on the inboardside of the driver’sseat and the outboard sideof the passenger’s seat.
1-2

{CAUTION:
You can lose control of the vehicle if you try toadjust the seat while the vehicle is moving.The sudden movement could startle andconfuse you, or make you push a pedal whenyou don’t want to. Adjust the driver’s seat onlywhen the vehicle is not moving.
Center SeatYour vehicle may have a center seat.
To fold the seatback down, pull the lever, located on theright side of the seat.
Then lower the seatback forward and push down firmlyto lock in position. A storage compartment is locatedon the rear of the seatback for use when the seatback isin the fully lowered position.
Push the lever on the right side of the seat and pull onthe seatback when you are ready to raise it.
{CAUTION:
If the seatback isn’t locked, it could moveforward in a sudden stop or crash. That couldcause injury to the person sitting there. Alwayspress rearward on the seatback to be sure it islocked.
1-3

Safety Belts
Safety Belts: They Are for EveryoneThis part of the manual tells you how to use safetybelts properly. It also tells you some things you shouldnot do with safety belts.
{CAUTION:
Don’t let anyone ride where he or she can’twear a safety belt properly. If you are in acrash and you’re not wearing a safety belt,your injuries can be much worse. You can hitthings inside the vehicle or be ejected from it.You can be seriously injured or killed. In thesame crash, you might not be, if you arebuckled up. Always fasten your safety belt,and check that your passengers’ belts arefastened properly too.
{CAUTION:
It is extremely dangerous to ride in a cargoarea, inside or outside of a vehicle. In acollision, people riding in these areas are morelikely to be seriously injured or killed. Do notallow people to ride in any area of your vehiclethat is not equipped with seats and safetybelts. Be sure everyone in your vehicle is in aseat and using a safety belt properly.
Your vehicle has a lightthat comes on as areminder to buckle up. SeeSafety Belt ReminderLight on page 3-24.
1-4

In most states and all Canadian provinces, the law saysto wear safety belts. Here’s why: They work.
You never know if you’ll be in a crash. If you do have acrash, you don’t know if it will be a bad one.
A few crashes are mild, and some crashes can be soserious that even buckled up a person would notsurvive. But most crashes are in between. In many ofthem, people who buckle up can survive and sometimeswalk away. Without belts they could have been badlyhurt or killed.
After more than 30 years of safety belts in vehicles, thefacts are clear. In most crashes buckling up doesmatter... a lot!
Why Safety Belts Work
Q: Aren’t safety belts for kids?
A: Yes. And they are for adult truckers, and anyoneelse who rides in your vehicle.
Here’s why: when your vehicle goes, say, 30 mph(50 km/h), so do you and your passengers.
1-5

If the vehicle hits something, it stops – right then. Butnothing stops the people. They keep moving.
Then something will stop them. It could be thewindshield.
1-6

Or it could be the instrument panel.
Now, what if you and your passengers were to give thatbig vehicle a chance to deal with the force of theimpact, instead of you?
With belts, you slow down as the vehicle does. You getmore time to stop.
You stop over more distance, and your strongest bonestake the forces. Safety belts are for everyone.
1-7

Questions and Answers AboutSafety Belts
Q: Won’t I be trapped in the vehicle after anaccident if I’m wearing a safety belt?
A: You could be – whether you’re wearing a safetybelt or not. But you can unbuckle a safety belt,even if you’re upside down. And your chanceof being conscious during and after an accident,so you can unbuckle and get out, is much greater ifyou are belted.
Q: If I’m a good driver, and I never drive far fromhome, why should I wear safety belts?
A: You may be an excellent driver, but if you’re in anaccident – even one that isn’t your fault – you andyour passengers can be hurt. Being a gooddriver doesn’t protect you from things beyond yourcontrol, such as bad drivers.
Most accidents occur within 25 miles (40 km) ofhome. And the greatest number of serious injuriesand deaths occur at speeds of less than40 mph (65 km/h).
Safety belts are for everyone.
How to Wear Safety Belts ProperlyThis part is only for people of adult size.
Be aware that there are special things to know aboutsafety belts and children. And there are differentrules for smaller children and babies. If a child will beriding in your vehicle, see Older Children on page 1-18or Infants and Young Children on page 1-20. Followthose rules for everyone’s protection.
First, you’ll want to know which restraint systems yourvehicle has.
We’ll start with the driver position.
Driver PositionThis part describes the driver’s restraint system.
Lap-Shoulder BeltThe driver has a lap-shoulder belt. Here’s how to wear itproperly.
1. Close and lock the door.
2. Adjust the seat so you can sit up straight. To seehow, see “Seats” in the Index.
1-8

3. Pick up the latch plate and pull the belt across you.Don’t let it get twisted. The shoulder belt may lock ifyou pull the belt across you very quickly. If thishappens, let the belt go back slightly to unlock it.Then pull the belt across you more slowly.There is a clip on the lap portion of the lap-shoulderbelt. Make sure this clip is not too close to thelatch plate when you wear your safety belt, so youcan make the belt snug.
4. Push the latch plate into the buckle until it clicks.Pull up on the latch plate to make sure it is secure.If the belt isn’t long enough, see Safety BeltExtender on page 1-17.Make sure the release button on the buckle ispositioned so you would be able to unbuckle thesafety belt quickly if you ever had to.
5. To make the lap part tight, pull down on the buckleend of the belt as you pull up on the shoulder belt.
1-9

The lap part of the belt should be worn low and snug onthe hips, just touching the thighs. In a crash, thisapplies force to the strong pelvic bones. And you’d beless likely to slide under the lap belt. If you slid under it,the belt would apply force at your abdomen. Thiscould cause serious or even fatal injuries. The shoulderbelt should go over the shoulder and across thechest. These parts of the body are best able to take beltrestraining forces.
The safety belt locks if there’s a sudden stop or crash,or if you pull the belt very quickly out of the retractor.
1-10

Q: What’s wrong with this?
A: The shoulder belt is too loose. It won’t give nearlyas much protection this way.
{CAUTION:
You can be seriously hurt if your shoulder beltis too loose. In a crash, you would moveforward too much, which could increase injury.The shoulder belt should fit against your body.
1-11

Q: What’s wrong with this?
A: The belt is buckled in the wrong place.
{CAUTION:
You can be seriously injured if your belt isbuckled in the wrong place like this. In a crash,the belt would go up over your abdomen. Thebelt forces would be there, not at the pelvicbones. This could cause serious internalinjuries. Always buckle your belt into thebuckle nearest you.
1-12

Q: What’s wrong with this?
A: The shoulder belt is worn under the arm. It shouldbe worn over the shoulder at all times.
{CAUTION:
You can be seriously injured if you wear theshoulder belt under your arm. In a crash, yourbody would move too far forward, which wouldincrease the chance of head and neck injury.Also, the belt would apply too much force tothe ribs, which aren’t as strong as shoulderbones. You could also severely injure internalorgans like your liver or spleen.
1-13

Q: What’s wrong with this?
A: The belt is twisted across the body.
{CAUTION:
You can be seriously injured by a twisted belt.In a crash, you wouldn’t have the full width ofthe belt to spread impact forces. If a belt istwisted, make it straight so it can workproperly, or ask your dealer to fix it.
1-14

To unlatch the belt, just push the button on the buckle.The belt should go back out of the way.
Before you close the door, be sure the belt is out of theway. If you slam the door on it, you can damageboth the belt and your vehicle.
Safety Belt Use During PregnancySafety belts work for everyone, including pregnantwomen. Like all occupants, they are more likely to beseriously injured if they don’t wear safety belts.
A pregnant woman should wear a lap-shoulder belt, andthe lap portion should be worn as low as possible,below the rounding, throughout the pregnancy.
1-15

The best way to protect the fetus is to protect themother. When a safety belt is worn properly, it’s morelikely that the fetus won’t be hurt in a crash. Forpregnant women, as for anyone, the key to makingsafety belts effective is wearing them properly.
Right Passenger PositionThe right passenger’s safety belt works the same wayas the driver’s safety belt. See Driver Position onpage 1-8.
Center Passenger Position
Lap BeltIf your vehicle has a center seat, someone can sit in thecenter position.
When you sit in a center seating position, you have alap safety belt, which has no retractor. To make the beltlonger, tilt the latch plate and pull it along the belt.
1-16

To make the belt shorter, pull its free end as shownuntil the belt is snug.
Buckle, position and release it the same way as the lappart of a lap-shoulder belt. If the belt isn’t longenough, see Safety Belt Extender on page 1-17.
Make sure the release button on the buckle is positionedso you would be able to unbuckle the safety beltquickly if you ever had to.
Safety Belt ExtenderIf the vehicle’s safety belt will fasten around you, youshould use it.
But if a safety belt isn’t long enough to fasten, yourdealer will order you an extender. It’s free. When you goin to order it, take the heaviest coat you will wear, sothe extender will be long enough for you. The extenderwill be just for you, and just for the seat in yourvehicle that you choose. Don’t let someone else use it,and use it only for the seat it is made to fit. To wearit, just attach it to the regular safety belt.
1-17

Child Restraints
Older Children
Older children who have outgrown booster seats shouldwear the vehicle’s safety belts.
If you have the choice, a child should sit next to awindow so the child can wear a lap-shoulder belt andget the additional restraint a shoulder belt can provide.
Q: What is the proper way to wear safety belts?
A: If possible, an older child should wear alap-shoulder belt and get the additional restraint ashoulder belt can provide. The shoulder beltshould not cross the face or neck. The lap beltshould fit snugly below the hips, just touching thetop of the thighs. It should never be worn overthe abdomen, which could cause severe or evenfatal internal injuries in a crash.
In a crash, children who are not buckled up can strikeother people who are buckled up, or can be thrownout of the vehicle. Older children need to use safetybelts properly.
1-18

{CAUTION:
Never do this.
Here two children are wearing the same belt.The belt can’t properly spread the impactforces. In a crash, the two children can becrushed together and seriously injured. A beltmust be used by only one person at a time.
Q: What if a child is wearing a lap-shoulder belt,but the child is so small that the shoulder beltis very close to the child’s face or neck?
A: Move the child toward the center of the vehicle,but be sure that the shoulder belt still is on thechild’s shoulder, so that in a crash the child’s upperbody would have the restraint that belts provide.
If the child is so small that the shoulder belt is stillvery close to the child’s face or neck, you mightwant to place the child in a seat that has a lap belt,if your vehicle has one.
1-19

{CAUTION:
Never do this.
Here a child is sitting in a seat that has alap-shoulder belt, but the shoulder part isbehind the child. If the child wears the belt inthis way, in a crash the child might slide underthe belt. The belt’s force would then be appliedright on the child’s abdomen. That could causeserious or fatal injuries.
Wherever the child sits, the lap portion of the beltshould be worn low and snug on the hips, just touchingthe child’s thighs. This applies belt force to the child’spelvic bones in a crash.
Infants and Young ChildrenEveryone in a vehicle needs protection! This includesinfants and all other children. Neither the distancetraveled nor the age and size of the traveler changesthe need, for everyone, to use safety restraints. In fact,the law in every state in the United States and inevery Canadian province says children up to some agemust be restrained while in a vehicle.
1-20

Every time infants and young children ride in vehicles,they should have the protection provided by appropriaterestraints. Young children should not use the vehicle’sadult safety belts alone, unless there is no other choice.Instead, they need to use a child restraint.
{CAUTION:
People should never hold a baby in their armswhile riding in a vehicle. A baby doesn’t weighmuch -- until a crash. During a crash a babywill become so heavy it is not possible to holdit. For example, in a crash at only 25 mph(40 km/h), a 12-lb. (5.5 kg) baby will suddenlybecome a 240-lb. (110 kg) force on a person’sarms. A baby should be secured in anappropriate restraint.
1-21

Q: What are the different types of add-on childrestraints?
A: Add-on child restraints, which are purchased bythe vehicle’s owner, are available in four basictypes. Selection of a particular restraint should takeinto consideration not only the child’s weight,height, and age but also whether or not therestraint will be compatible with the motor vehiclein which it will be used.
For most basic types of child restraints, there aremany different models available. When purchasing achild restraint, be sure it is designed to be usedin a motor vehicle. If it is, the restraint will have alabel saying that it meets federal motor vehiclesafety standards.
The restraint manufacturer’s instructions that comewith the restraint state the weight and heightlimitations for a particular child restraint. In addition,there are many kinds of restraints available forchildren with special needs.
1-22
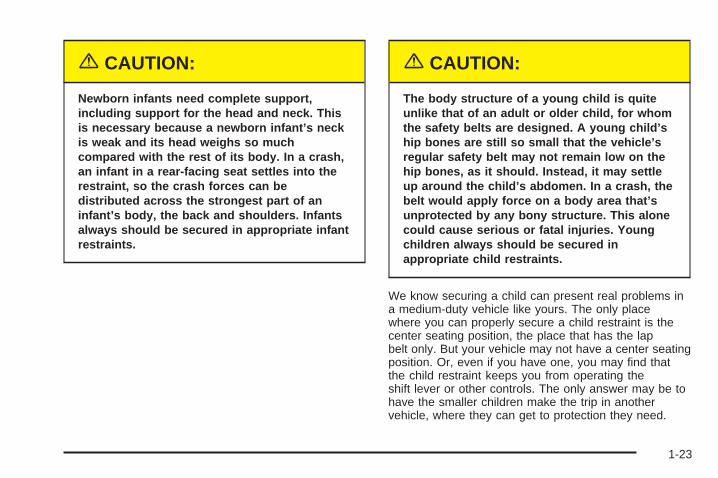
{CAUTION:
Newborn infants need complete support,including support for the head and neck. Thisis necessary because a newborn infant’s neckis weak and its head weighs so muchcompared with the rest of its body. In a crash,an infant in a rear-facing seat settles into therestraint, so the crash forces can bedistributed across the strongest part of aninfant’s body, the back and shoulders. Infantsalways should be secured in appropriate infantrestraints.
{CAUTION:
The body structure of a young child is quiteunlike that of an adult or older child, for whomthe safety belts are designed. A young child’ship bones are still so small that the vehicle’sregular safety belt may not remain low on thehip bones, as it should. Instead, it may settleup around the child’s abdomen. In a crash, thebelt would apply force on a body area that’sunprotected by any bony structure. This alonecould cause serious or fatal injuries. Youngchildren always should be secured inappropriate child restraints.
We know securing a child can present real problems ina medium-duty vehicle like yours. The only placewhere you can properly secure a child restraint is thecenter seating position, the place that has the lapbelt only. But your vehicle may not have a center seatingposition. Or, even if you have one, you may find thatthe child restraint keeps you from operating theshift lever or other controls. The only answer may be tohave the smaller children make the trip in anothervehicle, where they can get to protection they need.
1-23

Child Restraint Systems
An infant car bed (A), a special bed made for use in amotor vehicle, is an infant restraint system designedto restrain or position a child on a continuous flatsurface. Make sure that the infant’s head rests towardthe center of the vehicle.
A rear-facing infant seat (B) provides restraint with theseating surface against the back of the infant. Theharness system holds the infant in place and, in a crash,acts to keep the infant positioned in the restraint.
1-24

A forward-facing child seat (C-E) provides restraint forthe child’s body with the harness and also sometimeswith surfaces such as T-shaped or shelf-like shields.
A booster seat (F-G) is a child restraint designed toimprove the fit of the vehicle’s safety belt system. Somebooster seats have a shoulder belt positioner, andsome high-back booster seats have a five-point harness.A booster seat can also help a child to see out thewindow.
1-25

Q: How do child restraints work?
A: A child restraint system is any device designed foruse in a motor vehicle to restrain, seat, or positionchildren. A built-in child restraint system is apermanent part of the motor vehicle. An add-onchild restraint system is a portable one, whichis purchased by the vehicle’s owner.
For many years, add-on child restraints have usedthe adult belt system in the vehicle. To helpreduce the chance of injury, the child also has to besecured within the restraint. The vehicle’s beltsystem secures the add-on child restraint in thevehicle, and the add-on child restraint’s harnesssystem holds the child in place within the restraint.
One system, the three-point harness, has straps thatcome down over each of the infant’s shoulders andbuckle together at the crotch. The five-point harnesssystem has two shoulder straps, two hip straps and acrotch strap. A shield may take the place of hipstraps. A T-shaped shield has shoulder straps thatare attached to a flat pad which rests low against thechild’s body. A shelf- or armrest-type shield hasstraps that are attached to a wide, shelf-like shieldthat swings up or to the side.
When choosing a child restraint, be sure the childrestraint is designed to be used in a vehicle. If it is, itwill have a label saying that it meets federal motorvehicle safety standards.
Then follow the instructions for the restraint. You mayfind these instructions on the restraint itself or in abooklet, or both. These restraints use the belt system inyour vehicle, but the child also has to be securedwithin the restraint to help reduce the chance of personalinjury. When securing an add-on child restraint, referto the instructions that come with the restraint which maybe on the restraint itself or in a booklet, or both, andto this manual. The child restraint instructions areimportant, so if they are not available, obtain areplacement copy from the manufacturer.
The child restraint must be secured properly in thecenter seat, if your vehicle has one.
Keep in mind that an unsecured child restraint canmove around in a collision or sudden stop and injurepeople in the vehicle. Be sure to properly secureany child restraint in your vehicle – even when no childis in it.
1-26

Top StrapSome child restraints have a top strap, or “top tether,”which can help hold the child restraint during acrash. For it to work, a top strap must be properlyanchored to the vehicle. Some child restraints with a topstrap are designed to be used whether or not the topstrap is anchored. Others require that the top strapbe anchored. Also, a national or local law may requirethat the top strap be anchored.
If your child restraint top strap must be anchored, thendon’t use the restraint in this vehicle, because in it,a top strap cannot be properly anchored.
Securing a Child Restraint in aCenter Seat Position
If your vehicle has a center seat, you can secure a childrestraint here.
You’ll be using the lap belt. Be sure to follow theinstructions that came with the child restraint. Securethe child in the child restraint when and as theinstructions say. But do not use this position if the childrestraint interferes with shifting gears.
See Top Strap on page 1-27 if the child restraint has one.
1-27

1. Make the belt as long as possible by tilting the latchplate and pulling it along the belt.
2. Put the restraint on the seat.
3. Run the vehicle’s safety belt through or around therestraint. The child restraint instructions will showyou how.
4. Buckle the belt. Make sure the release button ispositioned so you would be able to unbuckle thesafety belt quickly if you ever had to.
1-28

5. To tighten the belt, pull its free end while you pushdown on the child restraint. If you are using aforward-facing child restraint, you may find it helpfulto use your knee to push down on the childrestraint as you tighten the belt.
6. Push and pull the child restraint in differentdirections to be sure it is secure.
To remove the child restraint, just unbuckle the vehicle’ssafety belt. It will be ready to work for an adult orlarger child passenger.
Restraint System Check
Checking Your Restraint SystemsNow and then, make sure the safety belt reminder lightand all your belts, buckles, latch plates, retractorsand anchorages are working properly. Look for any otherloose or damaged safety belt system parts. If you seeanything that might keep a safety belt system from doingits job, have it repaired.
Torn or frayed safety belts may not protect you in acrash. They can rip apart under impact forces. If a beltis torn or frayed, get a new one right away.
1-29

Replacing Restraint System PartsAfter a Crash
{CAUTION:
A crash can damage the restraint systems inyour vehicle. A damaged restraint system maynot properly protect the person using it,resulting in serious injury or even death in acrash. To help make sure your restraintsystems are working properly after a crash,have them inspected and any necessaryreplacements made as soon as possible.
If you have had a crash, do you need new belts?
After a very minor collision, nothing may be necessary.But if the belts were stretched, as they would be if wornduring a more severe crash, then you need new parts.
If belts are cut or damaged, replace them. Collisiondamage also may mean you will need to have safetybelt or seat parts repaired or replaced. New partsand repairs may be necessary even if the belt was notbeing used at the time of the collision.
1-30

Keys ...............................................................2-2Doors and Locks .............................................2-3
Door Locks ....................................................2-3Windows .........................................................2-4
Manual Windows ............................................2-4Power Windows .............................................2-4Passenger Side Door Glass .............................2-5
Starting and Operating Your Vehicle .................2-6New Vehicle Break-In ......................................2-6Ignition Positions ............................................2-6Starting Your DURAMAX™ Diesel Engine ..........2-7Engine Checks Before Operating ....................2-10Engine Coolant Heater ..................................2-12Diesel Engine Exhaust Brake .........................2-13
Two-Speed Rear Axle Electric Shift Control .........2-14Automatic Transmission Operation ...................2-16Manual Transmission Operation ......................2-17Parking .......................................................2-19Parking Over Things That Burn .......................2-23Engine Exhaust ............................................2-23Running Your Engine While You Are Parked .......2-24
Mirrors ...........................................................2-25Manual Rearview Mirror .................................2-25Outside Manual Mirrors ..................................2-25Outside Convex Mirrors .................................2-25Outside Heated Mirrors ..................................2-26
Storage Areas ................................................2-26Center Console Storage Area .........................2-27
Section 2 Features and Controls
2-1

Keys
{CAUTION:
Leaving children in a vehicle with the ignitionkey is dangerous for many reasons. A child orothers could be badly injured or even killed.
They could operate the power windows orother controls or even make the vehicle move.
Don’t leave the keys in a vehicle with children.
One key operates all locks, including the ignition switch.
The key has a code on it that tells your dealer or aqualified locksmith how to make extra keys. Record andkeep the key code in a safe place. If you lose your key,you’ll be able to have a new one made easily usingthis code.
Notice: Your vehicle has a number of features thatcan help prevent theft. You can have a lot of troublegetting into your vehicle if you ever lock your keysinside. You may even have to damage your vehicleto get in. So be sure you have spare keys.
2-2

Doors and Locks
Door Locks
{CAUTION:
Unlocked doors can be dangerous.• Passengers — especially children — can
easily open the doors and fall out of amoving vehicle. When a door is locked,the handle won’t open it. You increase thechance of being thrown out of the vehiclein a crash if the doors aren’t locked.So, wear safety belts properly and lockthe doors whenever you drive.
• Young children who get into unlockedvehicles may be unable to get out. A childcan be overcome by extreme heat and cansuffer permanent injuries or even deathfrom heat stroke. Always lock your vehiclewhenever you leave it.
• Outsiders can easily enter through anunlocked door when you slow down orstop your vehicle. Locking your doorscan help prevent this from happening.
A manual door lock is located above each door handle.
To lock your door from the inside, push the manual lockin. To unlock the door, pull the manual lock out.
When the doors are locked, they can’t be opened usingthe inside handles until the manual lock is pulled out.
2-3

Windows
{CAUTION:
Leaving children in a vehicle with the windowsclosed is dangerous. A child can be overcomeby the extreme heat and can suffer permanentinjuries or even death from heat stroke. Neverleave a child alone in a vehicle, especially withthe windows closed in warm or hot weather.
Manual WindowsTurn the hand crank on each door to raise or lowerthe window.
Power WindowsIf your vehicle has this feature, the passenger powerwindow switches are located on each door.
Push the switch down to lower the passenger powerwindow and pull the switch up to raise it. The driver’sdoor also has a LOCK button. When the LOCK button ispressed down, the passenger’s window will not operatewith either switch. Push LOCK again to return thepassenger’s power window to normal operation.The lock button does not affect the driver’s manualwindow operation.
The passenger’s power window will not move unless theignition switch has been turned to ON.
The passenger’s power window can be operated forup to 30 seconds after the ignition switch has beenturned to LOCK.
Driver Side Passenger Side
2-4

Passenger Side Door Glass
If your vehicle has this feature, the passenger’s sidedoor window will open to allow the inner glass tobe cleaned.
To open this window, pull out on the latch at the rear ofthe window and swing the window open. When closingthe window, push firmly at the latch to close completely.
{CAUTION:
Never open the passenger side door glasswith the ignition on. You can be injured if thewindow linkage moves. Open this glass onlywith the ignition off.
2-5

Starting and OperatingYour VehicleNew Vehicle Break-InNotice: Your vehicle doesn’t need an elaborate″break-in. ″ But it will perform better in the long runif you follow these guidelines:• Let your engine warm up before you operate
your vehicle under load.• Keep your speed at 55 mph (88 km/h) or less
for the first 500 miles (805 km).• Don’t drive at any one speed — fast or
slow — for the first 500 miles (805 km).Don’t make full-throttle starts.
• Avoid making hard stops for the first 200 miles(322 km) or so. During this time your newbrake linings aren’t yet broken in. Hard stopswith new linings can mean premature wear andearlier replacement. Follow this breaking-inguideline every time you get new brake linings.
• Use the lowest gear you can when you start aloaded vehicle in motion and when going uphills to avoid overloading the engine.
• Check and adjust engine and transmission fluidlevels often and be sure tires are properlyinflated for the load you’re carrying.
Ignition Positions
Use your ignition key tostart your vehicle. You canturn the ignition switchto four different positions.
LOCK: This position allows you to insert and removethe ignition key.
ACC (Accessory): This position lets you useaccessories when the engine is off.
ON: This is the position for driving.
START: This position starts your engine.
2-6

Starting Your DURAMAX™Diesel Engine
Automatic TransmissionMove your shift lever to PARK (P) or NEUTRAL (N).Your engine won’t start in any other position – that’s asafety feature. To restart when you’re already moving,use NEUTRAL (N) only.
Notice: Don’t try to shift to PARK (P) if yourvehicle is moving. If you do, you could damage thetransmission. Shift to PARK (P) only when yourvehicle is stopped.
Manual TransmissionMove your shift lever to neutral and hold the clutch pedalto the floor while starting the engine. Your vehicle won’tstart if the clutch pedal is not all the way down – that’s asafety feature.
Starting Your Engine1. Turn your ignition key to RUN.
Observe the wait to start light.
2. As soon as the wait to start light goes off,immediately turn the ignition key to START.When the engine starts, let go of the key.
Notice: Holding your key in START for longer than15 seconds at a time will cause your battery tobe drained much sooner. And the excessive heatcan damage your starter motor.
Notice: If the WAIT TO START light stays on, itmeans that your vehicle could have one of severalproblems, so you should have it serviced right away.
3. If the engine does not start after 15 seconds ofcranking, turn the ignition key to OFF. Wait oneminute for the starter to cool, then try the samesteps again.
When your engine is cold, let it run for a few minutesbefore you move your vehicle. This lets oil pressurebuild up. Your engine will sound louder when it’s cold.
Notice: If you’re not in an idling vehicle and theengine overheats, you wouldn’t be there to see theoverheated engine indication. This could damageyour vehicle. Don’t let your engine run when you’renot in your vehicle.
2-7

Cold Weather StartingThe following tips will help you get good starting incold weather.
Use the recommended engine oil when the outsidetemperature drops below freezing. See Engine Oil(DURAMAX™ Diesel) on page 5-14. When the outsidetemperature drops below 0°F (−18°C), use of theengine coolant heater is recommended.
If you experience longer cranking times, notice anunusual amount of exhaust smoke or are at higheraltitudes (over 7,000 ft. or 2 135 m), you may use yourengine coolant heater. See Engine Coolant Heateron page 2-12.
See What Fuel to Use on page 5-5 for information onwhat fuel to use in cold weather.
Engine Alarm and Automatic ShutdownIf your vehicle has this feature, your check gages lightwill come on if the system senses high enginetemperature or low engine oil pressure. If high enginetemperature or low engine oil pressure is detected, youwill also hear a tone alarm at two beats per second.The alarm and the light will remain on until the conditionis fixed. If the engine temperature or oil pressurecondition worsens, the tone alarm will go to five beatsper second.
If the system senses low engine oil coolant, the alarmand the low coolant warning light will come on.
The alarm means that your engine will shut down.See Engine Shutdown Warning Light on page 3-34 formore information.
Pull off the road and shut off the engine. Don’t start ituntil the vehicle is repaired. If the engine shutsdown when you are still in traffic, you can restart theengine and get another 25–30 seconds of operation.
Notice: If you try to operate the vehicle afterthe engine automatically shuts down, you maydamage the vehicle. Have your vehicle repairedas soon as possible.
2-8

Manual High Idle System
If your vehicle has thisfeature, the manual highidle switch is located inthe instrument panelswitchbank.
This system can be used to increase your engine idlespeed whenever the following conditions are met:
• The brake pedal is not pressed.
• The vehicle is at a complete stop.
• The manual transmission (if equipped) clutch pedalis not pressed or, the automatic transmission(if equipped) is in NEUTRAL (N) or PARK (P).
The manual high idle feature is activated by pressingthe switch on the instrument panel. When the switch ispressed again, or any of the previous conditions arenot met, manual high idle will be deactivated.
Exhaust RestrictorIf your vehicle is equipped with this feature, there is anexhaust restrictor valve located in the exhaust stream.The valve closes to provide back pressure to the enginefor the purpose of warming the engine quickly.The exhaust restrictor operates:• while the engine is running.• while the vehicle is not moving.• while the accelerator, brake and clutch pedals
are not pressed.• while idling or driving in cold temperatures.• when the shift lever is in NEUTRAL (N) or PARK (P).
On vehicles equipped with a diesel engine exhaust brake,the exhaust brake switch must be on. The indicator inthe exhaust brake switch will be lit when the exhaustrestrictor is active. The exhaust brake indicator light in thecenter of the instrument panel will also be lit wheneverthe exhaust restrictor is active.
When the engine coolant temperature is below 149°F(65°C) and the outside temperature is below 50°F (10°C),the exhaust restrictor will come on within 45 seconds ofstarting the engine. After running the engine for anadditional 45 seconds, the engine idle will increase.
The exhaust restrictor will shut off and engine idle willreturn to normal once the engine is warmed up, orthe transmission is shifted into range.
2-9

If Your Engine Won’t StartIf you’re not out of fuel, and your engine won’t start,do this:
Turn your ignition key to RUN. Immediately after thewait to start light goes off, turn the ignition key toSTART.
If the light doesn’t go off, wait a few seconds, then trystarting your engine again. And, see your dealer as soonas you can for a starting system check.
If the light comes on and then goes off and you knowyour batteries are charged, but your engine stillwon’t start, your vehicle needs service.
If the light does not come on when the engine is cold,your vehicle needs service.
If your batteries don’t have enough charge to start yourengine, see Battery on page 5-43 for more information.
Be sure you have the right oil for your engine, andthat you’ve changed the oil at the proper times. If youuse the wrong oil, your engine may be harder to start.
Be sure you are using the proper fuel for existingweather conditions. See What Fuel to Use on page 5-5.
If the engine starts, runs a short time, then stops,your vehicle needs service.
{CAUTION:
Do not use gasoline or starting “aids” such asether, in the air intake. They could damageyour engine. There could also be a fire, whichcould cause serious personal injury.
Engine Checks Before OperatingWhen you’ve started your engine, let it run for20 to 30 seconds before you put a load on the engine.But don’t leave the vehicle while the engine is running.
Avoid unnecessary idling of diesel engine equippedvehicles.
If the engine idles too long, the temperature of theengine coolant will fall below the normal operatingrange. Low engine operating temperature causesseveral conditions which affect engine operation andreduce engine life.
2-10

The engine should be permitted to go through awarm-up period. Operate the vehicle at a minimum of600 rpm during the warm-up period. During thisperiod and during operation, the following observationsshould be made.
During this warm-up period, check your warning lightsand gages:
• If oil pressure doesn’t begin to rise within15 seconds of starting, stop the engine and find thecause.
• If the engine coolant temperature gage needle goesinto the hot area on the gage, stop the engine andfind the cause of the overheating.
• If you have air brakes, the dual-needle air pressuregage should read at least 115 psi (790 kPa) forboth service systems before you try to movethe vehicle. When air pressure is below 60 psi(420 kPa), the LOW AIR light will come on and youwill hear a tone alarm. If the pressure doesn’tbuild up or drops during warm-up, stop the engineand find the cause before you try to move thevehicle. Recommended air pressure before actuallydriving away is 120 psi (830 kPa). See AirPressure Gage on page 3-38 for more information.
• The charging system light should come on whenthe ignition key is turned to RUN or START andshould go out when the engine is running aboveidle. If the light doesn’t go out or comes backon during normal engine operation, have thecharging system checked right away. (This lighttells you if the generator is not charging; it doesn’treflect the condition of the battery.)
• The voltmeter charge indicator gage tells you thecondition of your battery’s charge. The gageshould be in the center area during engineoperation. The red area on the left indicates anundercharge condition; the red area on theright indicates an overcharge. If the gage is ineither red area, have the battery and chargingsystem checked right away.
Notice: For diesel engines, don’t allow the engineto operate at low idle for more than five minutes.This can cause low engine operating temperatureswhich can affect engine operation and reduceengine life. Engine idle speed should be increasedto 1200 rpm whenever extended idle is required.Once started, the engine should be placed underload to allow the engine coolant temperatureto reach 150°F (66°C) before shutting off the engine.
2-11

Engine Coolant HeaterIn very cold weather, 0°F (−18°C) or colder, the enginecoolant heater can help. You’ll get easier startingand better fuel economy during engine warm-up.Usually, the coolant heater should be plugged in aminimum of four hours prior to starting your vehicle.
To Use the Engine Coolant Heater1. Turn off the engine.
2. Find the plug-in receptacle (either behind the frontbumper or in the component box).
3. Plug a heavy-duty, three-prong extension cord(rated for at least 15 amps) into the vehicle’splug-in receptacle first. Then plug the extensioncord into a normal, grounded 110-volt AC outlet.
{CAUTION:
Plugging the cord into an ungrounded outletcould cause an electrical shock. Also, thewrong kind of extension cord could overheatand cause a fire. You could be seriouslyinjured. Plug the cord into a properly groundedthree-prong 110-volt AC outlet. Use aheavy-duty three-prong extension cord ratedfor at least 15 amps.
4. Before starting the engine, be sure to unplugthe cord.
How long should you keep the coolant heater plugged in?The answer depends on the outside temperature.From 32°F to −10° F (0°C to −23°C), keep the coolantheater plugged in at least two hours. Below −10°F(−23°C), keep the coolant heater plugged in for aminimum of eight hours or overnight. It will not harmeither the coolant heater or the vehicle to leave thecoolant heater plugged in longer than the times stated.Be sure to remove and store the cord before starting theengine. See What Fuel to Use on page 5-5 forinformation on what fuel to use in cold weather.
2-12

Diesel Engine Exhaust BrakeThe exhaust brake is used to help slow the vehicle andmay assist the vehicle’s foundation brakes. The use ofthe exhaust brake will assist the braking of the vehicleand prolong the life of the foundation brake liningmaterial.
The exhaust brake switchis located in the instrumentpanel switchbank.
Push the bottom of the switch to turn the exhaust brakeon. When you push the top of the switch, the exhaustbrake will turn off.
There is an indicator light on the instrument panelsimilar to the symbol on the switch, that will come onwhen the exhaust brake is active.
When using the exhaust brake, the proper gear rangeselection is important. The exhaust brake will bemost effective if the gear range selected is the lowestpossible range that does not allow the engine rpm togo more than 200 rpm above rated (full load) rpm.Do not exceed 2400 rpm.
If you have an automatic transmission and press thisbutton, the transmission will downshift to a factorydefault setting of fourth gear. To change the defaultsetting, or for more information on factory defaultsettings, contact your dealer for assistance.
The accelerator and clutch pedals must be released inorder for the exhaust brake to engage. The exhaustbrake will not function when the cruise control featureis active, and will automatically shut off when theanti-lock brake system is active.
2-13

Two-Speed Rear Axle ElectricShift ControlIf your vehicle has this feature, you’ll find a label onthe headliner above the windshield or in another placenear the driver that shows how to use it.
Automatic Transmission
The switch is located on theinstrument panel to theright of the climate controls.
When the switch is up, the rear axle is in the highrange. Push it down to get the low range.
The two-speed axle should be in low range when youpark the vehicle. Apply the parking brake, shift toPARK (P) or NEUTRAL (N) and shut off the engine.
To operate off-road or under a heavy load, shift into lowrange when the vehicle is standing still and thenoperate the transmission normally.
On the highway, with the rear axle in low range and thetransmission in top gear, you may shift the rear axleto high range by raising the switch and releasingthe accelerator momentarily. Reapply the acceleratorafter you shift.
Under light load conditions, first shift the rear axle intothe high range with the vehicle at a standstill andthen operate the transmission normally.
2-14

Air SuspensionYour vehicle may have air suspension which is designedfor a single-axle on-highway use.
Rear Air Suspension Dump ControlIf your vehicle is equipped with single-axle airsuspension, you may have this control. The airsuspension dump control allows the operator to lowerthe deck height approximately 4.5 inches (11.5 cm) fromthe normal frame height.
The switch to deflate andinflate the air suspensionis located in the instrumentpanel switchbank.
Press the bottom of the switch to deflate the airsuspension and lower the deck height. Press the topof the switch to return the suspension to normaldeck height.
An indicator light will come on and stay on wheneverthe switch is in the dumped position.
2-15

Automatic Transmission OperationWe build vehicles with five and six-speed automatictransmissions. This part of the manual covers the basicsof these. With these transmissions, you will find anAllison® Transmission Operator’s Manual in your vehiclethat goes into more detail. On the headliner, in frontof and above the driver, or in some other place near thedriver, you will see a label that describes importantoperating facts about the automatic transmission inyour vehicle. Make sure you follow the instructions onthis label.
{CAUTION:
It can be dangerous to get out of yourvehicle without the parking brake firmly set.Your vehicle can roll. If you’ve left the enginerunning, the vehicle can move suddenly.You or others could be injured. To be sureyour vehicle won’t move, even when you’reon fairly level ground, always set the parkingbrake.
{CAUTION:
Shifting into a drive gear while your engine is“racing” (running at high speed) is dangerous.Unless your foot is firmly on the brake pedal,your vehicle could move very rapidly. Youcould lose control and hit people or objects.Don’t shift into a drive gear while your engineis racing.
Automatic Transmission ThirdGear HoldIf your vehicle has this feature, your range selector hasa 2–3 position. You can’t shift up to the next highergear when the transmission is in this position unlessyour engine-governed speed is exceeded, such as whengoing downhill.
This feature is used for certain load and traffic conditionsor when plowing snow. See the Allison® TransmissionOperator’s Manual in your vehicle for more informationabout this.
2-16

Overdrive DefeatIf your vehicle has this feature, you can select to limitthe transmission to fourth gear. This may be useful whenoperating at a higher Gross Vehicle Weight (GVW) orwhere operating conditions do not require fifth gear.
The overdrive defeatswitch is located in theinstrument panel tothe right of the steeringcolumn.
The indicator light in the switch will come on wheneveroverdrive defeat is active.
Manual Transmission Operation
Using the ClutchWhen you’re starting to move the vehicle, it’s importantto begin with the engine speed at idle. Then start toengage the clutch and listen for an engine speed dropof about 100 rpm. At this point, the clutch is engaging,so you should increase the engine speed and fullyengage the clutch. It’s important not to increasethe engine speed sooner or before the clutch begins it’sengagement. If you do, you can cause damage toyour vehicle.
Six-Speed TransmissionThe transmission has gears that automaticallysynchronize when you shift up or down. Choose thegear which will maintain the road speed you want whilekeeping the engine above two-thirds of the governedspeed. When the engine speed drops below two-thirdsof the governed speed, shift into the next lower gearbefore your engine begins to lug. When you shift down,be sure to double-clutch if required.
2-17

Eaton ® Fuller ® Nine and Ten-SpeedNon-Synchronized ManualTransmissionsIf your vehicle has one of these non-synchronizedtransmissions, it’s naturally somewhat complicated.The label above the windshield will tell you the operatingbasics you need to know.
The following are driving tips.• Always choose an initial starting gear suitable for
the load and terrain.• Always use double-clutching procedures when
shifting.• Never move the range shift lever to the LO speed
gear position after HI range preselection, oranytime the transmission is in the HI range.
• Never move the range knob or lever with the shiftlever in NEUTRAL while the vehicle is moving.
• Never make a range shift while moving inREVERSE (R).
Double-ClutchingYou must use the double-clutching method when youshift an unsynchronized gear set. Disengage the clutch,shift to neutral and engage the clutch. When upshifting,slow the engine until the engine rpm and road speed
match. When downshifting, accelerate the engine untilthe engine rpm and road speed match. Then quicklydisengage the clutch and move the shift lever to the nextgear position and engage the clutch.
Clutch Brake (Vehicles withNon-Synchronized Transmission)A clutch brake is used to stop transmission input shaftrotation so that FIRST (1) or REVERSE (R) gearselection can be initiated when the vehicle is at astandstill and the engine is idling.
Press the clutch pedal all the way down to the floorboardto apply the clutch brake.
When using the clutch brake, disengage the clutchpedal and shift the transmission into either the initialstarting gear or REVERSE (R). If the tooth-buttingoccurs between the clutching teeth, re-engage the clutchwhile applying light pressure to the shift lever. Thiswill provide for a smooth shift into either FIRST (1) orREVERSE (R) gear.
Notice: After engaging FIRST (1) or REVERSE (R)gear, do not use the clutch brake for upshiftingand downshifting. To do so will shorten the servicelife of the clutch brake and gear selection shiftefforts may be increased.
2-18

Parking
{CAUTION:
If you don’t park your vehicle properly, it canroll. If you’ve left the engine running, it canmove very quickly. You or others could beinjured. To be sure your vehicle won’t move,even when you’re on level ground, follow thesteps below.
Two-Speed Rear Axle1. With the engine running, shift the two-speed rear
axle into low. To be sure it’s in low, you’ll need tomove the vehicle in gear just a little.
2. Hold the regular brake pedal down with yourright foot.
3. Apply the parking brake.
4. Shift the transmission to NEUTRAL or PARK (P).
Hydraulic BrakesIf your vehicle has hydraulic brakes, it has a parkingbrake lever. The lever is located in the center console.
Your vehicle may also be equipped with an automatictransmission which has a center console shift lever.This lever will have a PARK (P) position on the shiftindicator. Even when PARK (P) is selected, be sure toapply the parking brake firmly so the vehicle won’t move.
Propshaft Brake Burnish ProcedureIt is recommended that the propshaft-mounted parkingbrake be burnished as part of the new vehiclebreak-in. The parking brake will work best after it hasbeen burnished following these instructions:
Make 10 stops, using the parking brake hand lever,from 20 mph (32 km/h) about 2 1/2 miles (4 km) apart.Between stops, drive the vehicle at 20 mph (32 km/h).
2-19

Parking BrakeTo apply the parking brake, pull the lever all the way up.The park brake light will come on when the parkingbrake is applied. Then shift the transmission toNEUTRAL (N) or PARK (P). The vehicle must bestationary when applying the parking brake, except whileburnishing the parking brake linings. See “PropshaftBrake Burnish Procedure” earlier in this section.
If your parking brake doesn’t hold the vehicle whenapplied, see your dealer to adjust your parking brakeproperly.
To release the parking brake, first push down theregular brake pedal. Then, while pressing in therelease button, push the parking brake lever all the waydown and shift the transmission to NEUTRAL (N).The park brake light will stay on if the parking brake isnot fully released.
Notice: Driving with the parking brake on canoverheat the parts in the system. You may have toreplace them, and you could also damage otherparts of your vehicle.
2-20

Air Brake
{CAUTION:
When the yellow SYSTEM PARK and the redTRAILER AIR SUPPLY knobs are both pushedin, your rig will be free to move. It could strikesomeone or something. When both of theseknobs are pushed in, hold the regular brakepedal down to keep your rig from moving.
If your vehicle has air brakes, you may have thesecontrols.
Pulling the system park (yellow) knob out applies theparking brake. The park brake light will not comeon when the air parking brake is applied.
Vehicles built for use as tractors or towing vehicles mayalso have the trailer air supply (red) knob.
To charge a trailer’s air brake system do the following:
1. Move your tractor into the proper position.
2. Apply the parking brake by pulling the system park(yellow) knob out.
3. Hook up the trailer air system properly.
4. Get into the tractor.
5. Push and hold down the regular brake pedal.
6. Push in both the system park (yellow) and the trailerair supply (red) knobs. This will charge your trailer’sair system.
After a few minutes, the trailer system should be fullycharged. When it is, the air pressure gage will showabout 125 to 135 psi (862 to 931 kPa).
Yellow Red
2-21

For driving with a trailer, the yellow and red knobs mustbe pushed in. It’s the same when you’re not pulling atrailer except that the trailer air supply (red) knobmust be pulled out.
{CAUTION:
If you apply any one of the air brake parkingcontrols while the vehicle is moving, your rigwill stop suddenly. If you are not ready forthis, you or others could be injured. Don’tapply any one of these controls while you’redriving, unless you have to make anemergency stop.
If the air pressure drops below 60 to 70 psi(413 to 482 kPa), the primary brake light will come on.If the air pressure drops to 40 to 45 psi (275 to 310 kPa),the system park (yellow) knob will automatically popout and apply the spring brakes on the trailer.
If you ever have a complete loss of air so that yourair brakes automatically apply, the tow operatorcan release the parking brakes to tow the vehicle.
{CAUTION:
If your vehicle is left in gear, the engine canstart if the vehicle starts to roll. This can easilyhappen if you have the diesel engine. Shift thetransmission into NEUTRAL (N) before youleave the vehicle.
2-22

Parking Over Things That Burn
{CAUTION:
Things that can burn could touch hot exhaustparts under your vehicle and ignite. Don’t parkover papers, leaves, dry grass or other thingsthat can burn.
Engine Exhaust
{CAUTION:
Engine exhaust can kill. It contains the gascarbon monoxide (CO), which you can’t see orsmell. It can cause unconsciousness and death.
You might have exhaust coming in if:• Your exhaust system sounds strange or
different.• Your vehicle gets rusty underneath.• Your vehicle was damaged in a collision.• Your vehicle was damaged when driving
over high points on the road or over roaddebris.
• Repairs weren’t done correctly.• Your vehicle or exhaust system had been
modified improperly.
If you ever suspect exhaust is coming intoyour vehicle:
• Drive it only with all the windows down toblow out any CO; and
• Have your vehicle fixed immediately.
2-23

Running Your Engine While YouAre ParkedIt’s better not to park with the engine running. But if youever have to, here are some things to know.
{CAUTION:
Idling the engine with the climate controlsystem off could allow dangerous exhaust intoyour vehicle. See the earlier Caution under“Engine Exhaust.”
Also, idling in a closed-in place can let deadlycarbon monoxide (CO) into your vehicle even ifthe climate control fan is at the highest setting.One place this can happen is a garage.Exhaust — with CO — can come in easily.NEVER park in a garage with the enginerunning.
Another closed-in place can be a blizzard.See “Winter Driving” in the Index.
{CAUTION:
It can be dangerous to get out of your vehicleif the shift lever is not fully in PARK (P) withthe parking brake firmly set. Your vehicle canroll. Don’t leave your vehicle when the engineis running unless you have to. If you’ve leftthe engine running, the vehicle can movesuddenly. You or others could be injured.To be sure your vehicle won’t move, evenwhen you’re on fairly level ground, always setyour parking brake and move the shift leverto PARK (P).
{CAUTION:
It can be dangerous to get out of yourvehicle without the parking brake firmly set.Your vehicle can roll. If you’ve left the enginerunning, the vehicle can move suddenly.
CAUTION: (Continued)
2-24

CAUTION: (Continued)
You or others could be injured. To be sureyour vehicle won’t move, even when you’re onfairly level ground, always set the parkingbrake.
Follow the proper steps to be sure your vehiclewon’t move.
MirrorsManual Rearview MirrorIf your vehicle has this feature, pull the tab under themirror toward you to reduce glare from headlampsbehind you after dark. Push the tab away from you torestore the mirror to the daytime position.
Outside Manual MirrorsAdjust the outside rearview mirrors so you can see alittle of the side of your vehicle, and the area beside yourvehicle from a comfortable driving position. Somemirrors can be folded in to enter narrow passageways.
If the mirrors have the clearance lamps, they’ll beon when your headlamps or parking lamps are on.
Outside Convex MirrorsYour vehicle has convex mirrors on the lower quarter ofboth the driver’s and passenger’s side rearviewmirrors. A convex mirror’s surface is curved so you cansee more from the driver’s seat.
{CAUTION:
A convex mirror can make things (like othervehicles) look farther away than they really are.If you cut too sharply into the right or left lane,you could hit a vehicle. Check your regularoutside mirrors (or your inside mirror, if youhave one) before changing lanes.
2-25

Outside Heated Mirrors
If your vehicle has thisfeature, the switch islocated in the instrumentpanel switchbank.
Push the bottom of the switch to turn the outside heatedrearview mirrors on. The switch indicator light willcome on and stay on whenever the outside heatedrearview mirrors are activated.
Storage AreasOverhead Storage
An overhead storage compartment is provided aboveeach of the driver’s and passenger’s seats. Push thecompartment doors all the way up to lock in position.Be sure the doors are securely closed before movingthe vehicle.
2-26

Center Seat Storage
A storage compartment is located behind the seatbackin the center seat. To access the compartment, foldthe seat all the way forward.
To open, squeeze bothsides of the latch.
Center Console Storage AreaThere are additional storage areas for small items in thecenter console to the right of the driver’s seat.
2-27

✍ NOTES
2-28

Instrument Panel Overview ...............................3-4Hazard Warning Flashers ................................3-6Other Warning Devices ...................................3-6Horn .............................................................3-6Power Tilt Wheel and Telescopic
Steering Column .........................................3-6Turn Signal/Multifunction Lever .........................3-7Exterior Lamps .............................................3-14Interior Lamps ..............................................3-16Auxiliary Power Jacks ....................................3-17Ashtrays and Cigarette Lighter ........................3-17
Climate Controls ............................................3-18Climate Control System .................................3-18Outlet Adjustment .........................................3-20
Warning Lights, Gages and Indicators .............3-21Instrument Panel Cluster ................................3-22Speedometer and Odometer ...........................3-23Tachometer .................................................3-23Safety Belt Reminder Light .............................3-24Safety Belt Reminder Tone ............................3-24Charging System Light ..................................3-24Voltmeter Gage ............................................3-25
Service Transmission Warning Light ................3-25Range Inhibit Warning Indicator ......................3-26Brake System Warning Light ..........................3-26Parking Brake Warning Light ..........................3-29Anti-Lock Brake System Warning Light .............3-29Trailer Anti-Lock Brake System
Warning Light ...........................................3-30Engine Coolant Temperature Gage ..................3-30Low Coolant Warning Light ............................3-31Wait to Start Indicator ...................................3-31Malfunction Indicator Lamp .............................3-32Oil Pressure Gage ........................................3-32Low Oil Level Light .......................................3-33Change Engine Oil Light ................................3-34Engine Overspeed Warning Light ....................3-34Engine Shutdown Warning Light .....................3-34Exhaust Brake Indicator Light .........................3-35Differential Lock Indicator Light .......................3-35Reduced Engine Power Light .........................3-36Daytime Running Lamps Indicator Light ...........3-36Check Gages Warning Light ...........................3-37Fuel Gage ...................................................3-37Air Pressure Gage ........................................3-38
Section 3 Instrument Panel
3-1

Audio System(s) .............................................3-39Setting the Time ...........................................3-39AM-FM Radio ...............................................3-40Radio with Cassette ......................................3-43Radio with CD ..............................................3-47Theft-Deterrent Feature (Non-RDS Radios) .......3-51
Understanding Radio Reception ......................3-51Care of Your Cassette Tape Player .................3-52Care of Your CDs .........................................3-53Care of Your CD Player ................................3-53Fixed Mast Antenna ......................................3-53Chime Level Adjustment ................................3-53
Section 3 Instrument Panel
3-2

✍ NOTES
3-3

Instrument Panel Overview
3-4

The main components of your instrument panel are the following:
A. Rear Lamp Switch. See “Rear Lamp” under InteriorLamps on page 3-16.
B. Cruise Control Switch. See “Cruise Control” underTurn Signal/Multifunction Lever on page 3-7.
C. Air Outlets. See “Air Outlets” under OutletAdjustment on page 3-20.
D. Multifunction Lever. See Turn Signal/MultifunctionLever on page 3-7.
E. Instrument Panel Cluster. See Instrument PanelCluster on page 3-22.
F. Windshield Wiper/Washer Controls. See “WindshieldWipers” under Turn Signal/Multifunction Lever onpage 3-7.
G. Climate Control System. See Climate ControlSystem on page 3-18.
H. Exhaust Brake Switch. See Diesel Engine ExhaustBrake on page 2-13.
I. High Idle Switch. See “Manual High Idle Switch”under Starting Your DURAMAX™ Diesel Engine onpage 2-7.
J. Heated Mirror Switch. See Outside Heated Mirrorson page 2-26.
K. Front Panel Release. See Lifting the Front Panelon page 5-55.
L. Tilt Steering Column. See Power Tilt Wheel andTelescopic Steering Column on page 3-6.
M. Horn. See Horn on page 3-6.N. Air Brake Controls (If Equipped). See “Air Brake”
under Parking on page 2-19.O. Audio System. See Audio System(s) on page 3-39.P. Marker and Clearance Lamp Switch. See “Marker
and Clearance Lamp Switch” under Exterior Lampson page 3-14.
Q. Overdrive Defeat Switch. See “Overdrive Defeat”under Automatic Transmission Operation onpage 2-16.
R. Cigarette Lighter. See Ashtrays and CigaretteLighter on page 3-17.
S. Traction Control Switch. See Traction ControlSystem (TCS) on page 4-11.
T. Two Speed Axle Switch. See “AutomaticTransmission” under Two-Speed Rear Axle ElectricShift Control on page 2-14.
3-5

Hazard Warning FlashersYour hazard warning flashers let you warn others.They also let police know you have a problem.Your front and rear turn signal lamps will flash onand off.
Your hazard warningflashers are controlled bythe lever located to theright of the steeringcolumn. Move the leverup to start the hazardflashers. Move the leverdown again to turnthe flashers off.
The hazard warning flashers work no matter whatposition your key is in, and even if the key isn’t in.
When the hazard warning flashers are on, your turnsignals won’t work. The hazard warning flashers will notflash if the brakes are applied.
Other Warning DevicesIf you carry reflective triangles, you can set one upat the side of the road behind your vehicle in therecommended manner per Federal Motor Carrier SafetyRegulation (FMCSR) Section 392.22, to warn others.
HornSound the horn by firmly pressing the pad in the centerof the steering wheel.
Tilt Wheel and TelescopicSteering ColumnA tilt steering column allows you to adjust the steeringwheel before you drive. You can also raise it to thehighest level to give your legs more room whenyou enter or exit the vehicle.
3-6
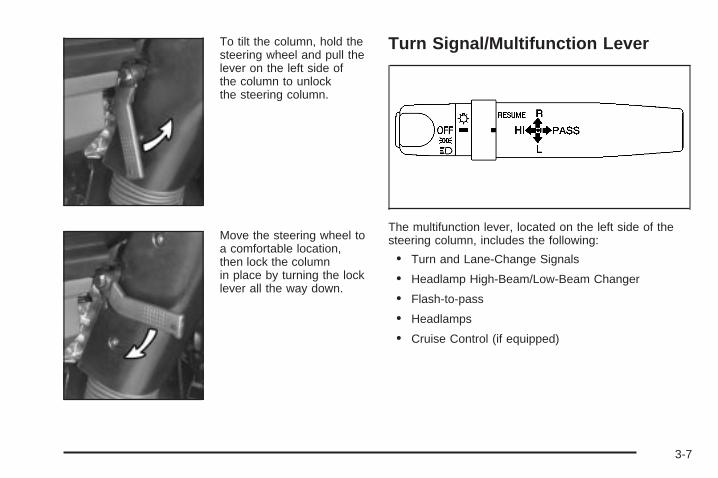
To tilt the column, hold thesteering wheel and pull thelever on the left side ofthe column to unlockthe steering column.
Move the steering wheel toa comfortable location,then lock the columnin place by turning the locklever all the way down.
Turn Signal/Multifunction Lever
The multifunction lever, located on the left side of thesteering column, includes the following:
• Turn and Lane-Change Signals
• Headlamp High-Beam/Low-Beam Changer
• Flash-to-pass
• Headlamps
• Cruise Control (if equipped)
3-7

Turn and Lane-Change SignalsThe turn signals are controlled by the multifunctionlever.
To signal a turn, move the lever all the way up for rightor down for left and release it. When the turn isfinished, the lever will return automatically.
To signal a lane change, raise or lower the lever untilthe arrow on the instrument panel starts to flash.Hold the lever in this position until the lane change hasbeen completed.
An arrow on the instrumentpanel cluster will flash inthe direction of theturn or lane change.
If you signal a turn or a lane change and the arrowson the instrument panel turn on but do not flash,check the turn signal flasher and circuit breaker.
If a bulb is burned out, replace it to help avoid anaccident. If the arrows don’t go on at all when you signala turn, check for burned-out bulbs and a blown fuse.See Fuses and Circuit Breakers on page 5-78.
Headlamp High/Low-Beam Changer
3(Headlamp High/Low Beam Changer): To changethe headlamps from low to high beam, push themultifunction lever toward the instrument panel.To return to low-beam headlamps, pull the multifunctionlever toward you. Then release it.
While the high beams areon, this indicator light onthe instrument panelcluster will also be on.
3-8

Flash-to-PassThis feature lets you use the high-beam headlamps tosignal a driver in front of you that you want to pass.It works even if the headlamps are in the automaticposition.
To use it, pull the multifunction lever toward you, thenrelease it.
If the headlamps are in the automatic position or onlow beam, the high-beam headlamps will turn on.They’ll stay on as long as you hold the lever towardyou. The high-beam indicator on the instrument panelcluster will come on. Release the lever to return tonormal operation.
HeadlampsThe multifunction lever operates the exterior lamps.
O(Exterior Lamps): Turn the band on themultifunction lever with this symbol to operate theexterior lamps.
The exterior lamp band has three positions:
OFF: Turn the band to this position to turn off all lamps,except the daytime running lamps (DRL).
;(Parking Lamps): Turn the band to this position toturn on the parking lamps, together with the following:
• Marker Lamps (unless your vehicle has themarker and clearance lamps switch)
• Tail Lamps
• License Plate Lamps
• Instrument Panel Lights
3(Headlamps): Turn the band to this position to turnon all the headlamps, together with the previouslylisted lamps and lights.
A circuit breaker protects the headlamps. If you have anelectrical overload, the headlamps will flicker on andoff. Have the headlamp wiring checked right away if thisever happens.
Headlamps On ReminderIf your vehicle has this feature, an alarm will soundwhen the headlamps and/or parking lamps are turnedon and the ignition is in LOCK or ACC.
3-9
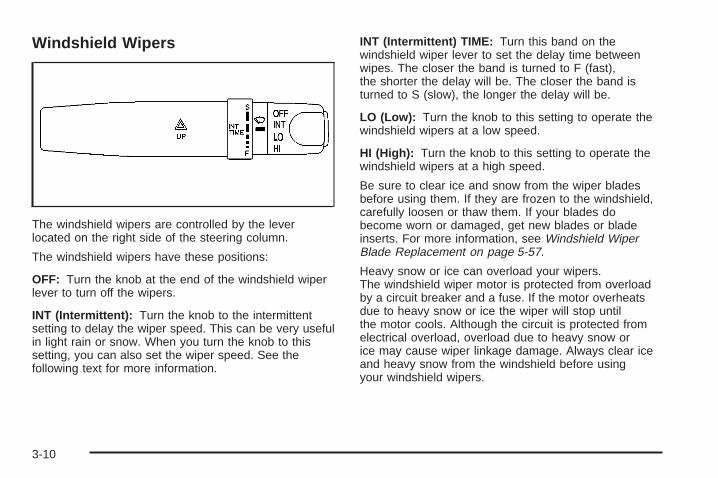
Windshield Wipers
The windshield wipers are controlled by the leverlocated on the right side of the steering column.
The windshield wipers have these positions:
OFF: Turn the knob at the end of the windshield wiperlever to turn off the wipers.
INT (Intermittent): Turn the knob to the intermittentsetting to delay the wiper speed. This can be very usefulin light rain or snow. When you turn the knob to thissetting, you can also set the wiper speed. See thefollowing text for more information.
INT (Intermittent) TIME: Turn this band on thewindshield wiper lever to set the delay time betweenwipes. The closer the band is turned to F (fast),the shorter the delay will be. The closer the band isturned to S (slow), the longer the delay will be.
LO (Low): Turn the knob to this setting to operate thewindshield wipers at a low speed.
HI (High): Turn the knob to this setting to operate thewindshield wipers at a high speed.
Be sure to clear ice and snow from the wiper bladesbefore using them. If they are frozen to the windshield,carefully loosen or thaw them. If your blades dobecome worn or damaged, get new blades or bladeinserts. For more information, see Windshield WiperBlade Replacement on page 5-57.
Heavy snow or ice can overload your wipers.The windshield wiper motor is protected from overloadby a circuit breaker and a fuse. If the motor overheatsdue to heavy snow or ice the wiper will stop untilthe motor cools. Although the circuit is protected fromelectrical overload, overload due to heavy snow orice may cause wiper linkage damage. Always clear iceand heavy snow from the windshield before usingyour windshield wipers.
3-10
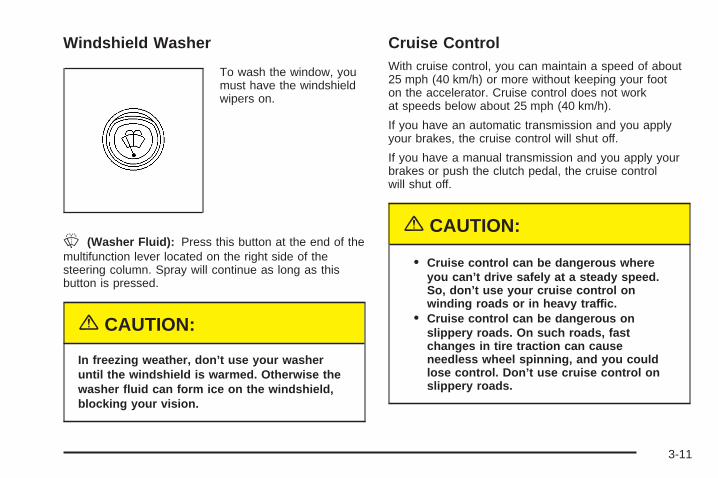
Windshield Washer
To wash the window, youmust have the windshieldwipers on.
L (Washer Fluid): Press this button at the end of themultifunction lever located on the right side of thesteering column. Spray will continue as long as thisbutton is pressed.
{CAUTION:
In freezing weather, don’t use your washeruntil the windshield is warmed. Otherwise thewasher fluid can form ice on the windshield,blocking your vision.
Cruise ControlWith cruise control, you can maintain a speed of about25 mph (40 km/h) or more without keeping your footon the accelerator. Cruise control does not workat speeds below about 25 mph (40 km/h).
If you have an automatic transmission and you applyyour brakes, the cruise control will shut off.
If you have a manual transmission and you apply yourbrakes or push the clutch pedal, the cruise controlwill shut off.
{CAUTION:
• Cruise control can be dangerous whereyou can’t drive safely at a steady speed.So, don’t use your cruise control onwinding roads or in heavy traffic.
• Cruise control can be dangerous onslippery roads. On such roads, fastchanges in tire traction can causeneedless wheel spinning, and you couldlose control. Don’t use cruise control onslippery roads.
3-11

Setting Cruise Control
If your vehicle has thisfeature, the controlsare located on themultifunction lever on theleft side of the steeringcolumn.
This button is located atthe lower left side of theinstrument panel. It turnsthe cruise control onand off. When the cruisecontrol is on, the lampinside the button isilluminated.
SET: Press this button at the end of the multifunctionlever to set the cruise control speed.
RESUME: Move the band to this position to resume theset speed.
{CAUTION:
If you leave your cruise control on when you’renot using cruise, you might hit a button and gointo cruise when you don’t want to. You couldbe startled and even lose control. Keep thecruise control switch off until you want to usecruise control.
1. Press the AUTO CRUISE button to turn the cruisecontrol on. The light inside the switch will turn on.
2. Get up to the speed you want.
3. Press in the set button at the end of the lever andrelease it.
4. Take your foot off the accelerator pedal.
3-12

Resuming a Set SpeedSuppose you set your cruise control at a desired speedand then you apply the brake or the clutch. This, ofcourse, shuts off the cruise control. But you don’t needto reset it.
Using the accelerator pedal, increase your vehicle’sspeed to 25 mph (40 km/h) or more. The cruise controldoes not work below this speed.
Turn the band on the lever to the RESUME position andrelease it. Your vehicle will accelerate to the previouslyset speed.
Increasing Speed While Using CruiseControlThere are two ways to go to a higher speed:
• Use the accelerator pedal to get to the higherspeed. Press the button at the end of the lever,then release the button and the accelerator pedal.You’ll now cruise at the higher speed.
• Turn the band on the multifunction lever to theRESUME position. Hold it there until you getup to the speed you want, and then release it.To increase your speed in very small amounts, turnthe band on the multifunction lever to the RESUMEposition and release it. Each time you do this,your vehicle will go about 1 mph (1.6 km/h) faster.
Reducing Speed While Using CruiseControlPress in the button at the end of the lever until youreach the lower speed you want, then release it.
To slow down in very small amounts, tap the buttonbriefly. Each time you do this, you’ll go about 1 mph(1.6 km/h) slower.
Passing Another Vehicle While UsingCruise ControlUse the accelerator pedal to increase your speed.When you take your foot off the pedal, your vehicle willslow down to the cruise control speed you set earlier.
3-13
Using Cruise Control on HillsThe use of cruise control in mountainous or hilly areasis not recommended.
Ending Cruise ControlThere are four different ways to turn off the cruisecontrol:
• Step lightly on the brake pedal(manual and automatic transmissions).
• Press the clutch pedal to the floor(manual transmissions).
• Turn off cruise control by pressing the AUTOCRUISE button again.
• Shift the transmission to NEUTRAL (N).
Erasing Speed MemoryWhen you turn off the ignition, your cruise control setspeed memory is erased.
Exterior Lamps
Daytime Running LampsDaytime Running Lamps (DRL) can make it easier forothers to see the front of your vehicle during theday. DRL can be helpful in many different drivingconditions, but they can be especially helpful in the shortperiods after dawn and before sunset. Fully functionaldaytime running lamps are required on all vehiclesfirst sold in Canada.
The DRL system will make your headlamps come onat reduced brightness when the following conditionsare met:
• The ignition is on.
• The headlamp band is in the OFF position.
• The parking brake is released.
3-14

When the DRL are on, only your low-beam headlampswill be on. The exterior lamps won’t be lit up either.
When it begins to get dark,your DRL indicator light isa reminder to turn yourheadlamp switch on. Theother lamps that comeon with your headlamps,will also come on.
When you turn the headlamp band to OFF, the regularlamps will go off, and your low-beam headlamps willchange to the reduced brightness of DRL.
To idle your vehicle with the DRL off, set the parkingbrake. The DRL will stay off until you release theparking brake.
As with any vehicle, you should turn on the regularheadlamp system when you need it.
Marker and Clearance Lamps Switchif your vehicle is designed for trailer towing, this buttonwill operate the marker and clearance lamps.
The marker and clearancelamp button is located inthe instrument panelswitchbank.
Press the button to turn the lamps on and press it againto turn them off.
If your vehicle has this button, the headlamp band willnot operate these lamps.
3-15

Interior Lamps
Instrument Panel Brightness Control
If your vehicle has thisfeature, the knob islocated on the lower rightof the instrument panel.
Turn the knob counterclockwise to brighten theinstrument panel lights or clockwise to dim them.
Dome LampsThe dome lamp switch can be set to three differentpositions: DOOR, OFF, and ON.
When the switch is set to DOOR, the dome lamp willcome on only when the driver’s door is open. If theswitch is set in the OFF position, the dome lamp will notilluminate, even when the door is opened. The domelamp will remain on whether or not the door is openif the switch is placed in the ON position.
Rear Lamp
Your vehicle may have arear lamp button whichis located on the lowerleft side of the instrumentpanel. When pressed in,an indicator light inside thebutton will illuminate.
Because your truck may be finished in a variety ofdifferent ways by a number of companies, the functionof this switch depends on how your vehicle wasfinished after it left the factory. Refer to the othermanuals that came with your vehicle to learn more aboutthis switch, or see your dealer for more information.
3-16

Auxiliary Power Jacks
If your vehicle has thesepower jacks, you’ll find thenin the console to the right ofthe driver’s seat.
These jacks provide 12-volt power so you can operatethings such as a citizen’s band (CB) radio or acellular phone. You’ll see positive (red) and negative(black) outlets. They are protected by a 15-amp circuitbreaker.
Notice: Whether or not your vehicle has the poweroutlets, don’t plug in FM communications gear atthe ashtray area. FM equipment creates highheat, and over time the area could get so hot thatwires could be damaged or a fire could break out.
Ashtrays and Cigarette LighterYour vehicle may have an ashtray and a cigarettelighter located in the center floor console. To open theremoveable ashtray, flip open the top.
Notice: Don’t put papers or other flammableitems into your ashtrays. Hot cigarettes or othersmoking materials could ignite them, causinga damaging fire.
To use the cigarette lighter, push it in all the way andlet it go. When it’s ready, it will pop back out by itself.
Notice: Don’t hold a cigarette lighter in withyour hand while it is heating. If you do, it won’tbe able to back away from the heating element whenit’s ready. That can make it overheat, damagingthe lighter and the heating element.
3-17

Climate Controls
Climate Control SystemWith this climate control system, you can control theheating, cooling, and ventilation for your vehicle.
Slide the temperature lever to the left toward COLD forcooler air. Slide it to the right toward HOT for warmer air.
To change the current mode, select one of the following:
H (Vent): This mode directs air to the instrumentpanel outlets.
) (Bi-Level): This mode directs about half of the airto the instrument panel outlets, and then directsmost of the remaining air to the floor outlets. Some airmay be directed toward the windshield.
6 (Floor): This mode directs most of the air to thefloor outlets with some air directed to the outboardoutlets for the side windows and some air directed tothe windshield.
9(Fan): The fan has five speed settings: OFF, 1, 2,3, and 4. Slide the fan lever to OFF to turn thesystem off. Outside air will still come out of the flooroutlets whenever the vehicle is moving.
A (Recirculation): If you press this button, the airinside the cab will be recirculated. If your vehicle has airconditioning, using recirculation will give you maximumcooling. It can also be used in all modes to keepdust out of the cab.
3-18

A/C (Air Conditioning): If your vehicle has this feature,you can use your air conditioner by selecting one ofthe mode buttons, selecting a fan speed and pressingthe A/C button.
On hot days, open the windows to let hot inside airescape; then close them. This helps to reduce the timeit takes for your vehicle to cool down. It also helpsthe system to operate more efficiently.
For quick cool down on hot days:
1. Select the vent mode.
2. Select the recirculation mode.
3. Select A/C.
4. Select the coolest temperature.
5. Select the highest fan speed.
Using these settings together for long periods of timemay cause the air inside of your vehicle to becometoo dry. To prevent this from happening, after the air inyour vehicle has cooled, turn the recirculation modeoff. The air-conditioning system removes moisture fromthe air, so you may sometimes notice a small amountof water dripping underneath your vehicle while idling orafter turning off the engine. This is normal.
Defogging and DefrostingThere are two modes to clear fog or frost from yourwindshield. Use the defog mode to clear the windowsof fog or moisture and warm the passengers. Use thedefrost mode to remove fog or frost from the windshieldmore quickly. Turn the center knob to select thedefog or defrost mode.
/(Defog): This mode directs the air equally betweenthe windshield and the floor outlets. When you selectthis mode, the system turns off recirculation and runsthe air-conditioning compressor unless the outsidetemperature is at or below freezing. The recirculationmode cannot be selected while in the defog mode.
0(Defrost): Pressing this button directs most of theair to the windshield and the side window outlets,with some air directed to the floor outlets. In this mode,the system will automatically turn off recirculationand run the air-conditioning compressor, unless theoutside temperature is at or below freezing.Recirculation cannot be selected while in thedefrost mode.
3-19

Outlet Adjustment
The air outlets are located in the center and on thesides of your instrument panel. You can move the ventsto direct the flow of air or close the outlets altogether.When you close a vent, it will increase the flow ofair coming out of any vents that are open.
Operation Tips• Clear away any ice, snow or leaves from the air
inlets at the base of the windshield that mayblock the flow of air into your vehicle.
• Use of non-GM approved hood deflectors mayadversely affect the performance of the system.
• Keep the path under the front seats clear of objectsto help circulate the air inside of your vehicle moreeffectively.
3-20

Warning Lights, Gages andIndicatorsThis part describes the warning lights and gages thatmay be on your vehicle. The pictures will help youlocate them.
Warning lights and gages can signal that something iswrong before it becomes serious enough to causean expensive repair or replacement. Paying attention toyour warning lights and gages could also save youor others from injury.
Warning lights come on when there may be or is aproblem with one of your vehicle’s functions. As youwill see in the details on the next few pages, somewarning lights come on briefly when you start the enginejust to let you know they’re working. If you are familiarwith this section, you should not be alarmed whenthis happens.
Gages can indicate when there may be or is a problemwith one of your vehicle’s functions. Often gagesand warning lights work together to let you know whenthere’s a problem with your vehicle.
When one of the warning lights comes on and stays onwhen you are driving, or when one of the gagesshows there may be a problem, check the sectionthat tells you what to do about it. Please follow thismanual’s advice. Waiting to do repairs can becostly – and even dangerous. So please get to knowyour warning lights and gages. They’re a big help.
3-21

Instrument Panel ClusterYour instrument panel cluster is designed to let you know at a glance how your vehicle is running. You’ll know howfast your going, about how much fuel is left and many other things you’ll need to drive safely and economically.
United States shown, Canada similar
3-22

Speedometer and OdometerYour speedometer lets you see your speed in bothmiles per hour (mph) and kilometers per hour (km/h).
Your odometer shows how far your vehicle hasbeen driven, in either miles (used in the United States)or kilometers (used in Canada).
Trip OdometerThe trip odometer can tell you how far your vehicle hasbeen driven since you last set the trip odometer to zero.
While the engine is running, press the reset button,located to the right of the trip odometer, to togglebetween the trip odometer and the regular odometer.Holding the reset button for two seconds while theengine is running and the trip odometer is displayed,will reset it.
To display the odometer reading with the ignition off,press the reset button.
Engine Speed LimitingAll engines have electronic engine speed limiting.The engine limited speed is 2,900 rpm.
Engine Road Speed GovernorThis system controls maximum vehicle speedautomatically and reduces engine power until vehiclespeed gets down to maximum governed speed.
A 75 mph (120 km/h) road speed governor is standardfor most models, but can be programmed to anyspeed below that default setting. Other models havea default setting of 80 to 85 mph (128 to 136 km/h).You may have a label on the headliner of your vehiclewith more information on your engine road speedgovernor. See your dealer for assistance withprogramming your engine limited speed.
TachometerThis gage shows theengine speed inrevolutions perminute (rpm).
3-23

Safety Belt Reminder LightWhen the key is turned to RUN or START, a light willcome on for several seconds to remind people to fastentheir safety belts.
The safety belt light willalso come on and stay onfor several seconds.
Safety Belt Reminder ToneIf your vehicle has this feature, turn your key to RUN orSTART. A tone will sound for several seconds toremind people to fasten their safety belts.
Charging System Light
The charging systemindicator light may belocated in the instrumentpanel cluster, or withthe auxiliary warning lightsin the center of theinstrument panel.
It should come on briefly when you turn on the ignition,before the engine is running, as a check to showthat it is working.
If it stays on, or comes on while you are driving, have itchecked right away. You could have a loose generatordrive belt or some other problem.
Driving while this light is on will drain your battery. If youmust drive a short distance with the light on, turn offyour radio and other accessories. Sustained driving witha generator failure could result in a lack of back-upbraking if the engine quits or the power steering pumpshould fail.
3-24

Voltmeter GageWhen your engine isrunning, the voltmetergage, at the right side ofthe instrument panelcluster, shows the chargingsystem voltage.
Readings in either warning zone indicate a possibleproblem in the electrical system.
Readings in the low warning zone may occur when alarge number of electrical accessories are operating inthe vehicle and the engine is left at an idle for anextended period. This condition is normal since thecharging system may not be able to provide full powerat engine idle. As engine speeds are increased, thiscondition should correct itself because higher enginespeeds allow the charging system to create maximumpower.
You can only drive a short time on the battery. Be sureto shut off the radio, the fan or any unnecessaryaccessories and have the system serviced.
Service Transmission Warning LightIf your vehicle has an Allison automatic transmission,certain transmission malfunctions will turn this light on.
This light is located withthe auxiliary warning lightsin the center of theinstrument panel.
If this light comes on while you are driving, do not usethe transmission shift control. Using the transmissionshift control may result in the loss of forward gears.The computer for the transmission senses a problemand chooses a gear to stay in so that you can drive thevehicle in that gear. You may not be able to drive asfast or back up when this light is on.
Notice: If the service transmission warning lightcomes on while you are driving, it is a warning thatmaking a transmission “range” change could leaveyou stranded. The vehicle may not continue to moveif you change gears with the transmission shiftcontrol. The transmission can’t operate in all gearsbecause something is wrong. Leave the shift controlalone, and drive directly to a GM dealer for service.If you can’t go in for service immediately, have thevehicle towed.
3-25

Range Inhibit Warning IndicatorIf your vehicle is equipped with an Allison1000/2000/2400 series automatic transmission,a lighted bar under the current gear selected will flash.
If your vehicle is equipped with an Allison MD automatictransmission, the current gear selected on thepushbutton display will flash.
The flashing bar or gear selection indicates thattransmission range shifts may not occur.
For detailed information on shift inhibit limitations, seethe Allison Automatic Transmission Operator’s Manual inyour vehicle for further information.
Brake System Warning LightYour vehicle has either hydraulic or air brakes.Each system has different warning lights.
Hydraulic Brake System WarningLightsVehicles with hydraulic brake systems have two brakesystem warning lights on the instrument panel.
If the BRAKE warning lightcomes on, it means that thefluid level in the mastercylinder reservoir is low orthere is another problemwith your hydraulic brakes.
When it comes on, you will also hear a warning tone.
3-26

The BRAKE warning light may come on, and thewarning tone may sound, when you’re turning andbraking at the same time. This is normal. See HydraulicBrake Systems under Braking on page 4-6.
If the amber servicebrakes soon warning lightcomes on, it meansthere is something wrongin the brake system.
When this light comes on, you will also hear a warningtone. If this light comes on, have the system repairedimmediately.
Both of these lights should come on briefly every timeyou start your engine. If they don’t come on then,have them fixed so they will be ready to warn you ifthere’s a problem. If one or both of these warning lightsstay on after you start the engine, there could be abrake problem. Have your brake system inspectedright away.
If one or both of these lights come on while you aredriving, pull off the road and stop carefully. Youmay notice that the pedal is harder to push. Or, thepedal may go closer to the floor. It may take longer tostop. If the BRAKE light is still on, have the vehicletowed for service. See Towing Your Vehicle onpage 4-32. See Hydraulic Brake Systems underBraking on page 4-6 for further information.
3-27

Air Brake System Warning LightVehicles with air brake systems have one brake systemwarning light on the instrument panel.
The LOW AIR warning light should come on, as acheck, whenever you start the engine. However, it isdesigned to come on, and stay on, when brake reservoirpressure has dropped below 60 psi (410 kPa).
When the warning light comes on while you are driving,you should drive only as far as the nearest point ofsafety and then stop the vehicle. Here’s a very importantthing for you to know:
{CAUTION:
If the LOW AIR warning light comes on andthe warning tone sounds, the vehicle canstop suddenly and without further warning.This is because the parking brake will comeon if the pressure falls below 35 to 45 psi(240 to 310 kPa). You or others could be injured.If the LOW AIR warning light comes on and thewarning tone sounds, stop as soon as you can.You won’t know how quickly the system islosing pressure, so be aware that the parkingbrake may come on suddenly.
United States Canada
3-28

Parking Brake Warning Light
Your vehicle has a brakeindicator light. When theignition is on, this light willcome on when you setyour parking brake.
The light will stay on if your parking brake doesn’trelease fully.
This light should also come on when you turn theignition key to START. If it doesn’t come on then, haveit fixed so it will be ready to remind you if the parkingbrake is applied or hasn’t released fully.
Anti-Lock Brake System WarningLight
With the anti-lock brakesystem, this light will comeon when you start yourengine and it may stay onfor several seconds.That’s normal.
If the light stays on, or comes on when you’re driving,your vehicle needs service. If the BRAKE or LOWAIR warning light isn’t on, you still have brakes, but youdon’t have the anti-lock brake feature. If the BRAKEand/or LOW AIR warning light is on, you don’thave anti-lock brakes and there’s a problem with yourregular brakes. See Brake System Warning Lighton page 3-26.
The anti-lock brake system warning light should come onbriefly when you start the engine. If the light doesn’tcome on then, have it fixed so it will be ready to warn youif there is a problem.
3-29

Trailer Anti-Lock Brake SystemWarning Light
If your vehicle is connectedto an anti-lock brakesystem equipped trailer,this light should comeon briefly, as a check,when you turn onthe ignition.
When this light comes on and stays on, it means thereis something wrong in the trailer anti-lock brakesystem. Have the system repaired immediately.
If an anti-lock brake system equipped trailer is notconnected, this light is not functional.
Engine Coolant Temperature Gage
This gage shows the engine coolant temperature. If thegage pointer moves into the red area, your enginecoolant might have overheated and your engine may betoo hot. You should pull off the road, stop your vehicleand turn off the engine as soon as possible. See EngineOverheating on page 5-26 for more information.
United States Canada
3-30

Low Coolant Warning Light
You have a low coolantwarning light. If this lightcomes on, your system islow on coolant and theengine may overheat.
The warning light should come on briefly, as a check,when you turn on the ignition.
When it comes on, you will also hear a warning tone atseveral beats per second for 10 seconds. See EngineCoolant on page 5-22 and have your vehicle serviced assoon as you can.
This light may also come on if your vehicle is equippedwith the automatic engine shutdown system andengine shutdown has begun.
Wait to Start Indicator
This light in the center ofthe instrument panel willcome on when theglow plug is on and theignition key is in RUN.
Wait until the indicator light turn off before turning theignition key to START.
When the temperature is below 32°F (0°C), you shouldwait no more than 10 seconds to start your vehicle.See Ignition Positions on page 2-6 for more information.
3-31

Malfunction Indicator Lamp
Service Engine Soon Light
If this light comes on orflashes while you aredriving, two thingsmay happen.
First, you won’t notice any difference in engineperformance, but your tail pipe emissions may increase.Second, your engine may not run properly or maystall without warning. If either of these things happen,drive or tow your vehicle to your dealer for service.
This light should come on when the ignition is on,but the engine is not running, as a check to show you itis working. If it doesn’t come on at all, have it repaired.
Notice: If you keep driving your vehicle withthis light on, after a while, your emission controlsmay not work as well, your fuel economy may not beas good and your engine may not run as smoothly.This could lead to costly repairs thatmay not be covered by your warranty.
Oil Pressure Gage
The engine oil pressure gage, on the lower right portionof your instrument panel cluster, shows engine oilpressure in psi (pounds per square inch) or inkPa (kilopascals). Oil pressure may vary withoutside temperature and oil viscosity, but readings of30 to 40 psi (205 to 275 kPa) on gasoline enginesat operating temperature and moderate road speedsare normal. The normal operating range should bebetween 35 and 70 psi (240 to 480 kPa).
United States Canada
3-32

A reading in the low pressure zone may be caused bya dangerously low oil level or other problem.
{CAUTION:
Don’t keep driving if the oil pressure is low.If you do, your engine can become so hot thatit catches fire. You or others could be burned.Check your oil as soon as possible and haveyour vehicle serviced.
Notice: Damage to your engine from neglectedoil problems can be costly and is not coveredby your warranty.
Low Oil Level Light
This light should come onas a check, when you startyour engine.
If the light fails to come on, have it repaired as soonas possible so you will be aware when the oil levelis low.
If this light comes on and stays on, it means yourengine is low on oil. You need to check the oil levelright away. See Engine Oil (DURAMAX™ Diesel)on page 5-14 for further information.
3-33

Change Engine Oil LightThe change engine oil lightshould come on briefly asa bulb check when youstart the engine. If the lightdoesn’t come on, have itserviced.
If the change engine oil light comes on and stays onafter you start the engine, have the oil changed.
For additional information on when to change engine oilfor gasoline engines or DURAMAX™ diesel engines,see Engine Oil (DURAMAX™ Diesel) on page 5-14.To reset the change engine oil light, see EngineOil (DURAMAX™ Diesel) on page 5-14.
Engine Overspeed Warning LightIf your vehicle has thislight, it will come on if yourengine is operating attoo many revolutions perminute (rpm).
It will also come on for a moment as a check when youstart your engine.
If it comes on when you’re driving, it means that yourrpm are too great. Reduce your engine speed at once.
Engine Shutdown Warning LightIf your vehicle has theengine shutdown feature,this light will come onwhen engine shutdownis active.
3-34

Exhaust Brake Indicator Light
If your vehicle is equippedwith an exhaust brake,you will have thislight, located above thecomfort controls inthe center of theinstrument panel.
The exhaust brake indicator light will come on andstay on whenever the diesel engine exhaust brake orexhaust restrictor is active. For more information,see Diesel Engine Exhaust Brake on page 2-13.
Differential Lock Indicator Light
If your vehicle has thisfeature, this light islocated in the center ofthe instrument panel.The light is on when theinter-axle differentiallock system is in use.
The light will come on momentarily during starting.If the light fails to come on, have it repaired as soonas possible so you will be aware when the lock systemis in use.
3-35

Reduced Engine Power Light
If the check engine andreduced engine powerlights are on, the throttlemay be disabled, anda noticeable reduction inthe vehicle’s performancemay occur.
If the reduced engine power light is on, but there is noreduction in performance, proceed to your destination.The performance may be reduced the next timethe vehicle is driven. The vehicle may be driven at areduced speed while the reduced engine power light ison, but acceleration and speed may be reduced.
Anytime the check engine light stays on, the vehicleshould be taken to an authorized GM dealer as soonas possible for service.
Daytime Running LampsIndicator Light
This light is located on theinstrument panel cluster.It goes on wheneverthe Daytime RunningLamps are on.
See Daytime Running Lamps under Exterior Lamps onpage 3-14 for further information.
When it begins to get dark, the DRL indicator light is areminder to turn on your headlamps.
3-36

Check Gages Warning Light
This light will come on asyou’re starting the engine,just as a check.
If it ever comes on and stays on while you are driving,however, it means that either your engine coolanttemperature gage or your engine oil pressure gage maybe showing a reading in the warning zone.
When the check gages light comes on, you will alsohear a warning tone. The tone and the light willstay activated until the problem is corrected.
Fuel Gage
Your fuel gage is locatedon the right side of yourinstrument panel cluster.
When the ignition is on, your fuel gage lets you knowabout how much fuel you have left. When the gage firstshows empty, you’ll still have a little fuel left, but youshould get more fuel soon.
If your vehicle has dual fuel tanks, the reading on thegage is the total fuel left in both tanks.
3-37

Here are four concerns of some operators. None ofthese shows a problem with your fuel gage:
• The gage moves a little when you turn a corner orspeed up.
• The gage doesn’t go back to empty when you turnoff the ignition.
• At the gas station, the pump shuts off before thegage reads full.
• It takes a little more or less fuel to fill up than thegage indicated.
Air Pressure Gage
If your vehicle has airbrakes, this gage showsthe air pressure forboth your front and rearbrake systems.
If the needle on the gage indicates that the air pressureis below 60 psi (415 kPa), the primary brake light willcome on. An alarm will also sound if this happens.
The top pointer shows the pressure available for thefront system, while the bottom pointer shows pressurefor the rear. There should be no more than 4 psi(28 kPa) difference showing between the systems.
Don’t drive until both pointers are showing at least120 psi (830 kPa), so you’ll have enough air if youneed to apply your brakes.
3-38

Audio System(s)Notice: Before you add any sound equipment toyour vehicle – like a tape player, CB radio, mobiletelephone or two-way radio – be sure you canadd what you want. If you can, it’s very importantto do it properly. Added sound equipment mayinterfere with the operation of your vehicle’s engine,radio or other systems, and even damage them.Your vehicle’s systems may interfere with theoperation of sound equipment that has been addedimproperly.
So, before adding sound equipment, check withyour dealer and be sure to check federal rulescovering mobile radio and telephone units.
Your audio system has been designed to operate easilyand to give years of listening pleasure. You will getthe most enjoyment out of it if you acquaint yourself withit first. Figure out which radio you have in your vehicle,find out what your audio system can do and how tooperate all of its controls to be sure you’re getting themost out of the advanced engineering that went into it.
Your vehicle may have a feature called RetainedAccessory Power (RAP). With RAP, you can play youraudio system even after the ignition is turned off.See “Retained Accessory Power (RAP)” under IgnitionPositions on page 2-6.
Setting the TimePress and hold the HR or MIN arrow for two seconds.Then press the HR (down) arrow until the correct hourappears on the display. Press and hold the MIN (up)arrow until the correct minute appears on the display.The time may be set with the ignition on or off.
3-39

AM-FM Radio
Playing the Radio
PWR (Power): Press this knob to turn the systemon and off.
VOL (Volume): Turn the knob to increase or todecrease volume.
RCL (Recall): Press this knob to switch the displaybetween time and radio station frequency. Time displayis available with the ignition turned off.
Finding a Station
AM FM: Press this button to switch the display betweentime and radio station frequency. Time display isavailable with the ignition turned off.
TUNE: Turn this knob to tune in radio stations.
o SEEKp: Press the right or the left arrow to seekto the next or to the previous station and stay there.
To scan stations, press and hold one of the SEEKarrows for two seconds until you hear a beep. The radiowill go to a station, play for a few seconds and flashthe station frequency, then go on to the next station.Press one of the SEEK arrows again to stop scanning.
To scan preset stations, press and hold one of theSEEK arrows for more than four seconds until you heartwo beeps. The radio will go to the first preset stationstored on the pushbuttons, play for a few secondsand flash the station frequency, then go on to the nextpreset station. Press one of the SEEK arrows againto stop scanning presets.
This radio will seek and scan only to stations that are inthe selected band and only to those with a strong signal.
3-40

Setting Preset StationsThe six numbered pushbuttons let you return to yourfavorite stations. You can set up to 18 stations (six AM,six FM1 and six FM2) by performing the following steps:
1. Turn the radio on.
2. Press AM FM to select AM, FM1 or FM2.
3. Tune in the desired station.
4. Press and hold one of the six numberedpushbuttons until you hear a beep. Whenever youpress that numbered pushbutton, the stationyou set will return.
5. Repeat the steps for each pushbutton.
Setting the Tone (Bass/Treble)AUDIO: To adjust bass and treble, press and releaseAUDIO repeatedly until BAS or TRE appears onthe display. Then press and hold the up or the downarrow to increase or to decrease. If a station is weak ornoisy, you may want to decrease the treble.
To adjust bass or treble to the middle position, selectBAS or TRE. Then press and hold AUDIO for more thantwo seconds until you hear a beep. B and a zero or Tand a zero will appear on the display.
To adjust both tone controls and both speaker controlsto the middle position, end out of audio by waitingfor the display to change to the time display. Then pressand hold AUDIO for more than two seconds until youhear a beep. CEN will appear on the display.
3-41
Adjusting the Speakers (Balance/Fade)
AUDIO: To adjust the balance between the rightand the left speakers, press and release AUDIO untilBAL appears on the display. Then press and hold the upor the down arrow to move the sound toward the rightor the left speakers.
To adjust the fade between the front and the rearspeakers, press and release AUDIO until FAD appearson the display. Then press and hold the up or thedown arrow to move the sound toward the front or therear speakers.
To adjust balance or fade to the middle position, selectBAL or FAD. Then press and hold AUDIO for morethan two seconds until you hear a beep. L and a zeroor F and a zero will appear on the display.
To adjust both tone controls and both speaker controlsto the middle position, end out of audio by waitingfor the display to change to the time display. Then pressand hold AUDIO for more than two seconds until youhear a beep. CEN will appear on the display.
Fade may not be available if you have a regular cabmodel.
Radio Messages
CAL (Calibrated): Your audio system has beencalibrated for your vehicle from the factory. If CALappears on the display it means that your radio has notbeen configured properly for your vehicle and mustbe returned to the dealership for service.
LOC (Locked): This message is displayed when theTheftlock® system has locked up. Your vehicle must bereturned to the dealership for service.
3-42

Radio with Cassette
Playing the Radio
PWR (Power): Press this knob to turn the systemon and off.
VOL (Volume): Turn this knob to increase or todecrease volume.
RCL (Recall): Press this knob to switch the displaybetween time and radio station frequency. Time displayis available with the ignition turned off.
Finding a Station
AM FM: Press this button to switch between AM, FM1and FM2. The display will show your selection.
TUNE: Turn this knob to choose radio stations.
o SEEKp: Press the right or the left arrow to seekto the next or to the previous station and stay there.
To scan stations, press and hold one of the SEEKarrows for two seconds until you hear a beep. The radiowill go to a station, play for a few seconds and flashthe station frequency, then go on to the next station.Press one of the SEEK arrows again to stop scanning.
To scan preset stations, press and hold one of theSEEK arrows for more than four seconds until you heartwo beeps. The radio will go to the first preset stationstored on the pushbuttons, play for a few secondsand flash the station frequency, then go on to the nextpreset station. Press one of the SEEK arrows againto stop scanning presets.
The radio will seek and scan only to stations that are inthe selected band and only to those with a strong signal.
3-43

Setting Preset StationsThe six numbered pushbuttons let you return to yourfavorite stations. You can set up to 18 stations (six AM,six FM1 and six FM2) by performing the following steps:
1. Turn the radio on.2. Press AM FM to select AM, FM1 or FM2.3. Tune in the desired station.4. Press and hold one of the six numbered pushbuttons
until you hear a beep. Whenever you press thatnumbered pushbutton, the station you set will return.
5. Repeat the steps for each pushbutton.
Setting the Tone (Bass/Treble)AUDIO: To adjust bass and treble, press and releaseAUDIO until BAS or TRE appears on the display.Then press and hold the up or the down arrow toincrease or to decrease. If a station is weak or noisy,you may want to decrease the treble.
To adjust bass or treble to the middle position, selectBAS or TRE. Then press and hold AUDIO for more thantwo seconds until you hear a beep. B and a zero orT and a zero will appear on the display.
To adjust both tone controls and both speaker controlsto the middle position, end out of audio by waitingfor the display to change to the clock display. Thenpress and hold AUDIO for more than two seconds untilyou hear a beep. CEN will appear on the display.
Adjusting the Speakers (Balance/Fade)AUDIO: To adjust the balance between the rightand the left speakers, press and release AUDIO untilBAL appears on the display. Then press and hold the upor the down arrow to move the sound toward the rightor the left speakers.
To adjust the fade between the front and the rearspeakers, press and release AUDIO until FAD appearson the display. Then press and hold the up or thedown arrow to move the sound toward the front or therear speakers.
To adjust balance or fade to the middle position, selectBAL or FAD. Then press and hold AUDIO for morethan two seconds until you hear a beep. L and a zeroor F and a zero will appear on the display.
To adjust both tone controls and both speaker controlsto the middle position, end out of audio by waitingfor the display to change to the time display. Then pressand hold AUDIO for more than two seconds until youhear a beep. CEN will appear on the display.
Fade may not be available if you have a regularcab model.
3-44

Radio Messages
CAL (Calibration): Your audio system has beencalibrated for your vehicle from the factory. If CALappears on the display it means that your radio has notbeen configured properly for your vehicle and mustbe returned to the dealership for service.
LOC (Locked): This message is displayed when theTheftlock® system has locked up. Your vehicle must bereturned to the dealership for service.
Playing a CassetteYour tape player is built to work best with tapes that areup to 30 to 45 minutes long on each side. Tapeslonger than that are so thin they may not work well inthis player. The longer side with the tape visible shouldface to the right. If the ignition is on, but the radio isoff, the tape can be inserted and will begin playing.If you hear nothing but a garbled sound, the tape maynot be in squarely. Press the eject button to remove thetape and start over.
While the tape is playing, use the VOL, AUDIO andSEEK controls just as you do for the radio. The radiowill display UP if the top side of the tape is playing.DN (Down) will appear if the bottom side is playing.
If you want to insert a tape while the ignition is off,first press the eject button or the RCL knob.
If an error appears on the display, see “Cassette TapeMessages” later in this section.
1 PREV (Previous): Your tape must have at least threeseconds of silence between each selection for previousto work. Press this pushbutton to go to the previousselection on the tape if the current selection has beenplaying for less than 3 seconds. If pressed whenthe current selection has been playing from 3 to13 seconds, it will go to the beginning of the previousselection or the beginning of the current selection,depending on the position on the tape. If pressed whenthe current selection has been playing for more than13 seconds, it will go to the beginning of the currentselection. Pressing this pushbutton multiple times willincrease the number of selections to be searched back,up to -9. Pressing the NEXT pushbutton will cancelthe selections.
2 NEXT: Your tape must have at least three secondsof silence between each selection for next to work.Press this pushbutton to go to the next selection on thetape. Pressing this pushbutton multiple times in thenext mode will increase the number of selectionsto searched forward. Pressing the PREV pushbuttonwill cancel the selections.
3-45

3 REV (Reverse): Press this pushbutton to reverse thetape rapidly. FR will appear on the display. Press itagain to return to playing the tape. The radio will playwhile the tape reverses. You may select stations duringreverse operation by using the TUNE or SEEKcontrols or by using the scan or preset scan features.
4 FWD (Forward): Press this pushbutton to advancequickly to another part of the tape. FF will appear onthe display. Press this pushbutton again to returnto playing the tape. The radio will play while the tapeadvances. You may select stations during forwardoperation by using the TUNE or SEEK controls or byusing the scan or preset scan features.
5 SIDE: Press this pushbutton to play the other side ofthe tape.
6 RPT (Repeat): Your tape must have at least threeseconds of silence between each selection for repeat towork. Press this pushbutton once to hear a selectionover again. RPT will appear on the display. Press thisbutton again to turn off repeated play. OFF will appearon the display.
o SEEKp: The right arrow is the same as theNEXT pushbutton, and the left arrow is the same as thePREV pushbutton. If the arrows are held or pressedmore than once, the player will continue moving forwardor backward through the tape.
AM FM: Press this button to listen to the radio when atape is playing. The inactive tape will remain safelyinside the radio for future listening.
TAPE: Press this button to play a cassette tape whenlistening to the radio. CAS will appear on the display.
Z (EJECT): Press this button to eject a tape.Eject may be activated with the radio off. Cassette tapesmay be loaded with the radio and vehicle off if thisbutton is pressed first.
Cassette Tape Messages
ERR (Error): If the player detects a tight or brokentape, this message will appear on the display and theplayer will eject the tape. The radio will go back toplaying the last station selected.
CLN (Clean): If this message appears on the display,the cassette tape player needs to be cleaned. It willstill play tapes, but you should clean it as soon aspossible to prevent damage to the tapes and player.See Care of Your Cassette Tape Player on page 3-52.
3-46

CD Adapter KitsIt is possible to use a portable CD player adapter kitwith your cassette tape player after deactivatingthe tight/loose tape sensor feature on your tape player.
To deactivate this feature, use the following steps:
1. Turn the ignition on.
2. Turn the radio off.
3. Press and hold the TAPE button for two secondsuntil one beep is produced. CAS will flash on thedisplay, showing that the TIGHT/LOOSE TAPEsensor is no longer active.
4. Insert the adapter into the cassette slot.
The override feature will remain active until the ejectbutton is pressed.
Radio with CD
Playing the Radio
PWR (Power): Press this knob to turn the systemon and off.
VOL (Volume): Turn this knob to increase or todecrease volume.
RCL (Recall): Press this knob to switch the displaybetween the radio station frequency and the time.Time display is available with the ignition turned off.
3-47

Finding a Station
AM FM: Press this button to switch between AM, FM1and FM2. The display will show your selection.
TUNE: Turn this knob to choose radio stations.
o SEEKp: Press the right or the left arrow to seekto the next or to the previous station and stay there.
To scan stations, press and hold one of the SEEKarrows for two seconds until you hear a beep. The radiowill go to a station, play for a few seconds and flashthe station frequency, then go on to the next station.Press one of the SEEK arrows again to stop scanning.
To scan preset stations, press and hold one of theSEEK arrows for more than four seconds until you heara double beep. The radio will go to the first presetstation stored on the pushbuttons, play for a fewseconds and flash the station frequency, then go on tothe next preset station. Press one of the SEEKarrows again to stop scanning presets.
The radio will seek and scan only to the stations thatare in the selected band and only to those with a strongsignal.
Setting Preset StationsThe six numbered pushbuttons let you return to yourfavorite stations. You can set up to 18 stations (six AM,six FM1 and six FM2) by performing the following steps:
1. Turn the radio on.2. Press AM FM to select AM, FM1 or FM2.3. Tune in the desired station.4. Press and hold one of the six numbered pushbuttons
until you hear a beep. Whenever you press thatnumbered pushbutton, the station you set will return.
5. Repeat the steps for each pushbutton.
Setting the Tone (Bass/Treble)AUDIO: To adjust the bass and treble, press andrelease AUDIO until BAS or TRE appears on thedisplay. Then press and hold the up or the down arrowto increase or to decrease. If a station is weak ornoisy, you may want to decrease the treble.
To adjust bass or treble to the middle position, selectBAS or TRE. Then press and hold AUDIO for more thantwo seconds until you hear a beep. B and a zero orT and a zero will appear on the display.
To adjust both tone controls and both speaker controlsto the middle position, end out of audio mode bywaiting for the display to change to the time display.Then press and hold AUDIO for more than two secondsuntil you hear a beep. CEN will appear on the display.
3-48

Adjusting the Speakers (Balance/Fade)
AUDIO: To adjust the balance between the rightand the left speakers, press and release AUDIO untilBAL appears on the display. Then press and hold the upor the down arrow to move the sound toward the rightor the left speakers.
To adjust the fade between the front and rear speakers,press and release AUDIO until FAD appears on thedisplay. Then press and hold the up or the down arrowto move the sound toward the front or the rearspeakers.
To adjust balance or fade to the middle position, selectBAL or FAD. Then press and hold AUDIO for morethan two seconds until you hear a beep. L and a zeroor F and a zero will appear on the display.
To adjust both tone controls and both speaker controlsto the middle position, end out of audio mode bywaiting for the display to change to the time display.Then press and hold AUDIO for more than two secondsuntil you hear a beep. CEN will appear on the display.
Fade may not be available if you have a regularcab model.
Radio Messages
CAL (Calibrated): Your audio system has beencalibrated for your vehicle from the factory. If CALappears on the display it means that your radio has notbeen configured properly for your vehicle and mustbe returned to the dealership for service.
LOC (Locked): This message is displayed when theTheftlock® system has locked up. Your vehicle must bereturned to the dealership for service.
Playing a Compact DiscInsert a disc partway into the slot, label side up.The player will pull it in. The disc should begin playing.The display will show CD. If you want to insert acompact disc with the ignition off, first press RCL or theeject button.
The integral CD player can play the smaller 8 cm singlediscs with an adapter ring. Full-size compact discsand the smaller discs are loaded in the same manner.
If playing a CD-R the sound quality may be reduced dueto CD-R quality, the method of recording, the qualityof the music that has been recorded and the waythe CD-R has been handled. You may experience anincrease in skipping, difficulty in finding tracks and/ordifficulty in loading and ejecting. If these problems occurtry a known good CD.
3-49

Do not add paper labels to discs, they could get caughtin the CD player.
Do not play 3 inch discs without a standard adapter disc.
If an error appears on the display, see “Compact DiscMessages” later in this section.
1 PREV (Previous): Press this pushbutton to go to theprevious track if the current track has been playingfor less than eight seconds. If pressed when the currenttrack has been playing for more than eight seconds,it will go to the beginning of the current track. The tracknumber will appear on the display. If you hold thispushbutton or press it more than once, the player willcontinue moving back through the disc.
2 NEXT: Press this pushbutton to go to the next track.The track number will appear on the display. If youhold this pushbutton or press it more than once,the player will continue moving forward through the disc.
3 REV (Reverse): Press and hold this pushbuttonto reverse quickly within a track. Release it to play thepassage. The display will show elapsed time whilereversing.
4 FWD (Forward): Press and hold this pushbutton toadvance quickly within a track. Release it to playthe passage. The display will show elapsed time whileforwarding.
5 RDM (Random): Press this pushbutton to hear thetracks in random, rather than sequential, order. RND willappear on the display. Press this pushbutton again toturn off random play. OFF will appear on the display.
6 RPT (Repeat): Press this pushbutton once to heara track over again. RPT will appear on the display.The current track will continue to repeat. Pressthis pushbutton again to turn off repeated play.OFF will appear on the display.
o SEEKp: The right arrow is the same as theNEXT pushbutton, and the left arrow is the same as thePREV pushbutton. If the arrows are held or pressedmore than once, the player will continue moving forwardor backward through the tracks.
RCL (Recall): Press this button to see the current tracknumber or how long the current track has been playing.
AM FM: Press this button to listen to the radio whena CD is playing. The inactive CD will remain safelyinside the radio for future listening.
CD: Press this button to play a compact disc whenlistening to the radio. CD will appear on the display.
Z (Eject): Press this button to eject a CD. Eject maybe activated with either the ignition or radio off.CDs may be loaded with the radio and ignition off if thisbutton is pressed first.
3-50

Compact Disc MessagesIf the disc comes out, it could be for one of the followingreasons:
• You’re driving on a very rough road. When the roadbecomes smoother, the disc should play.
• It’s very hot. When the temperature returns tonormal, the disc should play.
• The disc is dirty, scratched, wet or upside down.
• The air is very humid. If so, wait about an hourand try again.
• There may have been a problem while burningthe CD.
• The label may be caught in the CD player.
If the CD is not playing correctly, for any of the abovereasons, try a known good CD.
If any error occurs repeatedly or if an error can’t becorrected, contact your dealer.
Theft-Deterrent Feature(Non-RDS Radios)THEFTLOCK® is designed to discourage theft of yourradio. The feature works automatically by learninga portion of the Vehicle Identification Number (VIN).If the radio is moved to a different vehicle, it willnot operate and LOC will be displayed.
With THEFTLOCK® activated, your radio will notoperate if stolen.
Understanding Radio Reception
AMThe range for most AM stations is greater than for FM,especially at night. The longer range, however, cancause stations to interfere with each other. AM can pickup noise from things like storms and power lines. Tryreducing the treble to reduce this noise if you ever get it.
FMFM stereo will give you the best sound, but FM signalswill reach only about 10 to 40 miles (16 to 65 km).Tall buildings or hills can interfere with FM signals,causing the sound to come and go.
3-51

Care of Your Cassette Tape PlayerA tape player that is not cleaned regularly can causereduced sound quality, ruined cassettes or a damagedmechanism. Cassette tapes should be stored in theircases away from contaminants, direct sunlight andextreme heat. If they aren’t, they may not operateproperly or may cause failure of the tape player.
Your tape player should be cleaned regularly afterevery 50 hours of use. Your radio may display CLNto indicate that you have used your tape playerfor 50 hours without resetting the tape clean timer.If this message appears on the display, your cassettetape player needs to be cleaned. It will still playtapes, but you should clean it as soon as possible toprevent damage to your tapes and player. If younotice a reduction in sound quality, try a known goodcassette to see if the tape or the tape player is at fault.If this other cassette has no improvement in soundquality, clean the tape player.
For best results, use a scrubbing action, non-abrasivecleaning cassette with pads which scrub the tapehead as the hubs of the cleaner cassette turn. Therecommended cleaning cassette is available throughyour dealer (GM Part No. 12344789).
The cut tape detection feature of your cassette tapeplayer may identify the cleaning cassette as a damagedtape. To prevent the cleaning cassette from beingejected, use the following steps:
1. Turn the ignition on.
2. Turn the radio off.
3. Press and hold the TAPE button for two secondsuntil the radio produces one beep. CAS will flashon the display for five seconds.
4. Insert the scrubbing action cleaning cassette.
5. Eject the cleaning cassette after the manufacturer’srecommended cleaning time.
After the cleaning cassette is ejected, the cut tapedetection feature will be active again.
You may also choose a non-scrubbing action, wet-typecleaner which uses a cassette with a fabric belt toclean the tape head. This type of cleaning cassette willnot eject on its own. A non-scrubbing action cleanermay not clean as thoroughly as the scrubbing typecleaner. The use of a non-scrubbing action, dry-typecleaning cassette is not recommended.
3-52
After you clean the player, press and hold the ejectbutton for three seconds to reset the CLN indicator.The radio will display --- to show the indicator was reset.
Cassettes are subject to wear and the sound qualitymay degrade over time. Always make sure the cassettetape is in good condition before you have your tapeplayer serviced.
Care of Your CDsHandle discs carefully. Store them in their original casesor other protective cases and away from direct sunlightand dust. If the surface of a disc is soiled, dampena clean, soft cloth in a mild, neutral detergent solutionand clean it, wiping from the center to the edge.
Be sure never to touch the side without writing whenhandling discs. Pick up discs by grasping the outeredges or the edge of the hole and the outer edge.
Care of Your CD PlayerThe use of CD lens cleaner discs is not advised, due tothe risk of contaminating the lens of the CD opticswith lubricants internal to the CD mechanism.
Fixed Mast AntennaThe fixed mast antenna can withstand most car washeswithout being damaged. If the mast should ever becomeslightly bent, you can straighten it out by hand. If themast is badly bent, as it might be by vandals, you shouldreplace it.
Check occasionally to be sure the mast is still tightenedto the fender. If tightening is required, tighten byhand, then with a wrench one quarter turn.
Chime Level AdjustmentThe radio is the vehicle chime producer. The chime isproduced from the driver’s side front door speakers.To change the volume level, press and holdpushbutton 6 with the ignition on and the radio poweroff. The chime volume level will change from the normallevel to loud, and HI will be displayed on the radio.To change back to the default or normal setting, pressand hold pushbutton 6 again. The chime level willchange from the loud level to normal, and LO will bedisplayed. Each time the chime volume is changed,three chimes will sound as an example of the newvolume selected. Removing the radio and not replacingit with a factory radio or chime module will disablevehicle chimes.
3-53

✍ NOTES
3-54
Your Driving, the Road, and Your Vehicle ..........4-2Defensive Driving ...........................................4-2Drunken Driving .............................................4-3Control of a Vehicle ........................................4-6Braking .........................................................4-6Trailer Brake Hand Control Valve ....................4-10Traction Control System (TCS) .......................4-11Steering ......................................................4-12Off-Road Recovery .......................................4-14Passing .......................................................4-14Loss of Control .............................................4-16Driving at Night ............................................4-17Driving in Rain and on Wet Roads ..................4-18
City Driving ..................................................4-21Freeway Driving ...........................................4-22Highway Hypnosis ........................................4-23Hill and Mountain Roads ................................4-24Winter Driving ..............................................4-26If You Are Stuck: In Sand, Mud,
Ice or Snow ..............................................4-30Towing ..........................................................4-32
Towing Your Vehicle .....................................4-32Loading Your Vehicle ....................................4-37Trailer Connections .......................................4-39Power Take-Off (PTO) ...................................4-39
Section 4 Driving Your Vehicle
4-1

Your Driving, the Road, andYour Vehicle
Defensive DrivingThe best advice anyone can give about driving is:Drive defensively.
Please start with a very important safety device in yourvehicle: Buckle up. See “Safety Belts.”
Defensive driving really means “be ready for anything.”On city streets, rural roads or freeways, it means“always expect the unexpected.”
Assume that pedestrians or other drivers are going tobe careless and make mistakes. Anticipate whatthey might do. Be ready for their mistakes.
Rear-end collisions are about the most preventable ofaccidents. Yet they are common. Allow enough followingdistance. It’s the best defensive driving maneuver,in both city and rural driving. You never know when thevehicle in front of you is going to brake or turn suddenly.
Defensive driving requires that a driver concentrate onthe driving task. Anything that distracts from thedriving task — such as concentrating on a cellulartelephone call, reading, or reaching for something onthe floor — makes proper defensive driving more difficultand can even cause a collision, with resulting injury.Ask a passenger to help do things like this, or pull off theroad in a safe place to do them yourself. These simpledefensive driving techniques could save your life.
4-2

Drunken DrivingDeath and injury associated with drinking and driving isa national tragedy. It’s the number one contributor tothe highway death toll, claiming thousands of victimsevery year.
Alcohol affects four things that anyone needs to drivea vehicle:
• Judgment
• Muscular Coordination
• Vision
• Attentiveness.
Police records show that almost half of all motorvehicle-related deaths involve alcohol. In most cases,these deaths are the result of someone who wasdrinking and driving. In recent years, more than16,000 annual motor vehicle-related deaths have beenassociated with the use of alcohol, with more than300,000 people injured.
Many adults — by some estimates, nearly half the adultpopulation — choose never to drink alcohol, so theynever drive after drinking. For persons under 21,it’s against the law in every U.S. state to drink alcohol.There are good medical, psychological anddevelopmental reasons for these laws.
The obvious way to eliminate the leading highwaysafety problem is for people never to drink alcoholand then drive. But what if people do? How much is“too much” if someone plans to drive? It’s a lot less thanmany might think. Although it depends on each personand situation, here is some general information onthe problem.
The Blood Alcohol Concentration (BAC) of someonewho is drinking depends upon four things:
• The amount of alcohol consumed
• The drinker’s body weight
• The amount of food that is consumed before andduring drinking
• The length of time it has taken the drinker toconsume the alcohol.
4-3

According to the American Medical Association,a 180 lb (82 kg) person who drinks three 12 ounce(355 ml) bottles of beer in an hour will end up with aBAC of about 0.06 percent. The person would reach thesame BAC by drinking three 4 ounce (120 ml) glassesof wine or three mixed drinks if each had 1-1/2 ounces(45 ml) of liquors like whiskey, gin or vodka.
It’s the amount of alcohol that counts. For example,if the same person drank three double martinis(3 ounces or 90 ml of liquor each) within an hour,the person’s BAC would be close to 0.12 percent.A person who consumes food just before or duringdrinking will have a somewhat lower BAC level.
There is a gender difference, too. Women generallyhave a lower relative percentage of body waterthan men. Since alcohol is carried in body water, thismeans that a woman generally will reach a higher BAClevel than a man of her same body weight will wheneach has the same number of drinks.
The law in an increasing number of U.S. states, andthroughout Canada, sets the legal limit at 0.08 percent.In some other countries, the limit is even lower. Forexample, it is 0.05 percent in both France and Germany.The BAC limit for all commercial drivers in the UnitedStates is 0.04 percent.
The BAC will be over 0.10 percent after three tosix drinks (in one hour). Of course, as we’ve seen,it depends on how much alcohol is in the drinks,and how quickly the person drinks them.
4-4

But the ability to drive is affected well below a BAC of0.10 percent. Research shows that the driving skillsof many people are impaired at a BAC approaching0.05 percent, and that the effects are worse at night.All drivers are impaired at BAC levels above0.05 percent. Statistics show that the chance of beingin a collision increases sharply for drivers who havea BAC of 0.05 percent or above. A driver with a BAClevel of 0.06 percent has doubled his or her chanceof having a collision. At a BAC level of 0.10 percent,the chance of this driver having a collision is 12 timesgreater; at a level of 0.15 percent, the chance is25 times greater!
The body takes about an hour to rid itself of the alcoholin one drink. No amount of coffee or number of coldshowers will speed that up. “I’ll be careful” isn’t the rightanswer. What if there’s an emergency, a need totake sudden action, as when a child darts into thestreet? A person with even a moderate BAC might notbe able to react quickly enough to avoid the collision.
There’s something else about drinking and driving thatmany people don’t know. Medical research showsthat alcohol in a person’s system can make crashinjuries worse, especially injuries to the brain, spinalcord or heart. This means that when anyone whohas been drinking — driver or passenger — is in acrash, that person’s chance of being killed orpermanently disabled is higher than if the personhad not been drinking.
{CAUTION:
Drinking and then driving is very dangerous.Your reflexes, perceptions, attentiveness andjudgment can be affected by even a smallamount of alcohol. You can have a serious — oreven fatal — collision if you drive after drinking.Please don’t drink and drive or ride with a driverwho has been drinking. Ride home in a cab; or ifyou’re with a group, designate a driver who willnot drink.
4-5

Control of a VehicleYou have three systems that make your vehicle go whereyou want it to go. They are the brakes, the steering andthe accelerator. All three systems have to do their work atthe places where the tires meet the road.
Sometimes, as when you’re driving on snow or ice,it’s easy to ask more of those control systems than thetires and road can provide. That means you canlose control of your vehicle.
BrakingBraking action involves perception time andreaction time.
First, you have to decide to push on the brake pedal.That’s perception time. Then you have to bring up yourfoot and do it. That’s reaction time.
Average reaction time is about 3/4 of a second. But that’sonly an average. It might be less with one driver and aslong as two or three seconds or more with another.Age, physical condition, alertness, coordination andeyesight all play a part. So do alcohol, drugs andfrustration. But even in 3/4 of a second, a vehicle movingat 60 mph (100 km/h) travels 66 feet (20 m). That couldbe a lot of distance in an emergency, so keeping enoughspace between your vehicle and others is important.
And, of course, actual stopping distances vary greatlywith the surface of the road (whether it’s pavementor gravel); the condition of the road (wet, dry, icy);tire tread; the condition of your brakes; the weight of thevehicle and the amount of brake force applied.
4-6
Avoid needless heavy braking. Some people drivein spurts — heavy acceleration followed by heavybraking — rather than keeping pace with traffic. This isa mistake. Your brakes may not have time to coolbetween hard stops. Your brakes will wear out muchfaster if you do a lot of heavy braking. If you keep pacewith the traffic and allow realistic following distances,you will eliminate a lot of unnecessary braking.That means better braking and longer brake life.
If your engine ever stops while you’re driving, brakenormally but don’t pump your brakes. If you do,the pedal may get harder to push down. If your enginestops, you will still have some power brake assist.But you will use it when you brake. Once the powerassist is used up, it may take longer to stop andthe brake pedal will be harder to push.
Hydraulic Brake SystemsIf your engine stops running, or if your primary brakesystem stops working, your vehicle has a reserve powerassist system to help you slow down. Just slowly andsteadily apply the brake pedal until you can safely get offthe road. The pedal will seem harder to push down.Don’t pump the pedal; the system won’t work well or atall that way.
You may find that the steering wheel seems hard to turnwhen you’re turning and braking at the same time. Also,the PRIMARY BRAKE warning light may come on andthe warning tone may sound. This is normal because themain hydraulic brake system and power steering both usethe power steering pump. If this ever happens, let up onthe brake pedal a little. When you let up on the brakepedal in that situation, it lets the steering get a little morehelp from the pump.
4-7

Anti-lock Brake System (ABS)Your vehicle has anti-lock brakes. ABS is an advancedelectronic braking system that will help prevent abraking skid.
When you start your engine and begin to drive away,your anti-lock brake system will check itself.You may hear a momentary motor or clicking noisewhile this test is going on. This is normal.
If there’s a problem withthe anti-lock brake system,this warning light willstay on. See Anti-LockBrake System WarningLight on page 3-29.
Let’s say the road is wet and you’re driving safely.Suddenly, an animal jumps out in front of you.You slam on the brakes and continue braking.Here’s what happens with ABS:
A computer senses that wheels are slowing down.If one of the wheels is about to stop rolling, the computerwill separately work the brakes at each wheel.
4-8

The anti-lock system can change the brake pressurefaster than any driver could. The computer isprogrammed to make the most of available tire and roadconditions. This can help you steer around the obstaclewhile braking hard.
As you brake, your computer keeps receiving updateson wheel speed and controls braking pressureaccordingly.
Remember: Anti-lock doesn’t change the time you needto get your foot up to the brake pedal or alwaysdecrease stopping distance. If you get too close to thevehicle in front of you, you won’t have time to applyyour brakes if that vehicle suddenly slows or stops.Always leave enough room up ahead to stop, eventhough you have anti-lock brakes.
Using Anti-LockDon’t pump the brakes. Just hold the brake pedal downfirmly and let anti-lock work for you. You may feelthe brakes pulsate, or you may hear air exhausting,but this is normal.
Braking in EmergenciesWith anti-lock, you can steer and brake at the sametime. In many emergencies, steering can help you morethan even the very best braking.
4-9

Trailer Brake Hand Control ValveIf your vehicle has this control, it is mounted onthe console to the right of the driver’s seat.
This control lets you applythe trailer brakes withoutapplying the tractor brakes.You can apply the trailerbrakes a little or applythem all the way ifyou have to. Use thiscontrol only when you’redriving. Don’t use itfor parking or to hold therig on a hill.
{CAUTION:
Using the trailer brake hand control for parkingor for holding the vehicle on a hill may notkeep the vehicle from rolling. This can happenif someone hits the valve by accident, or if airpressure bleeds from the system. If the vehiclerolls, you or others could be injured. To parkthe vehicle or hold it on a hill, use the parkingbrake properly.
4-10

Traction Control System (TCS)Your vehicle may have a traction control system thatlimits wheel spin. This is especially useful in slipperyroad conditions. The system operates only if it sensesthat one or both of the rear wheels are spinning orbeginning to lose traction. When this happens,the system applies the brake(s) at the affected wheel(s).
The bottom light on the TCS on/off button will comeon when the TCS is limiting wheel spin. You may feel orhear the system working, but this is normal. The TCSwill function at speeds up to about 25 mph (42 km/h).
The TCS may operate on dry roads under someconditions. When this happens, you may notice areduction in acceleration. This is normal and doesn’tmean there’s a problem with your vehicle. Examples ofthese conditions include a hard acceleration in aturn, an abrupt upshift or downshift of the transmissionor driving on rough roads.
When the light in the top of the TCS button is on, theTCS is off and will not limit wheel spin. Adjust yourdriving accordingly.
The light in the top of the TCS button will come on if theTCS is turned off by pressing the TCS on/off button.
The light may also come on if a problem has beendetected in either the traction control system orthe anti-lock brake system.
The traction control system automatically comes onwhenever you start your vehicle. To limit wheel spin,especially in slippery road conditions, you should alwaysleave the system on. But you can turn the traction controlsystem off if you ever need to. You should turn thesystem off if your vehicle ever gets stuck in sand, mud orsnow and rocking the vehicle is required. See RockingYour Vehicle To Get it Out under If You Are Stuck:In Sand, Mud, Ice or Snow on page 4-30.
To turn the system on oroff, press the tractioncontrol button located inthe instrument panelswitchbank.
If you used the TCS button to turn the system off, thelight in the top of the button will come on and stayon. You can turn the TCS back on at any time bypressing the button again; the light should go off.
4-11

Steering
Power SteeringIf you lose power steering assist because the enginestops or the system is not functioning, you can steer butit will take much more effort.
On vehicles with hydraulic brakes, the power steeringand main hydraulic brake system both use thepower steering pump. See Braking on page 4-6.
Steering TipsDriving on CurvesIt’s important to take curves at a reasonable speed.
A lot of the “driver lost control” accidents mentioned onthe news happen on curves. Here’s why:
Experienced driver or beginner, each of us is subject tothe same laws of physics when driving on curves.The traction of the tires against the road surface makesit possible for the vehicle to change its path whenyou turn the front wheels. If there’s no traction, inertiawill keep the vehicle going in the same direction.If you’ve ever tried to steer a vehicle on wet ice,you’ll understand this.
The traction you can get in a curve depends on thecondition of your tires and the road surface, the angle atwhich the curve is banked, and your speed. While you’rein a curve, speed is the one factor you can control.
Suppose you’re steering through a sharp curve. Then yousuddenly accelerate. Both control systems — steeringand acceleration — have to do their work where the tiresmeet the road. Adding the sudden acceleration candemand too much of those places. You can lose control.See “Traction Control System (TCS)” in the Index.
What should you do if this ever happens? Ease up onthe accelerator pedal, steer the vehicle the way youwant it to go, and slow down.
Speed limit signs near curves warn that you shouldadjust your speed. Of course, the posted speedsare based on good weather and road conditions.Under less favorable conditions you’ll want to go slower.
If you need to reduce your speed as you approach acurve, do it before you enter the curve, while your frontwheels are straight ahead.
Try to adjust your speed so you can “drive” through thecurve. Maintain a reasonable, steady speed. Wait toaccelerate until you are out of the curve, and thenaccelerate gently into the straightaway.
4-12

Steering in EmergenciesThere are times when steering can be more effectivethan braking. For example, you come over a hill and finda truck stopped in your lane, or a car suddenly pullsout from nowhere, or a child darts out from betweenparked cars and stops right in front of you. You canavoid these problems by braking — if you can stop intime. But sometimes you can’t; there isn’t room.That’s the time for evasive action — steering around theproblem.
Your vehicle can perform very well in emergencies likethese. First apply your brakes.
See Braking on page 4-6. It is better to remove as muchspeed as you can from a possible collision. Then steeraround the problem, to the left or right depending on thespace available.
An emergency like this requires close attention and aquick decision. If you are holding the steering wheel atthe recommended 9 and 3 o’clock positions, youcan turn it a full 180 degrees very quickly withoutremoving either hand. But you have to act fast, steerquickly, and just as quickly straighten the wheelonce you have avoided the object.
The fact that such emergency situations are alwayspossible is a good reason to practice defensive drivingat all times and wear safety belts properly.
4-13

Off-Road RecoveryYou may find that your right wheels have dropped off theedge of a road onto the shoulder while you’re driving.
If the level of the shoulder is only slightly below thepavement, recovery should be fairly easy. Ease off theaccelerator and then, if there is nothing in the way,steer so that your vehicle straddles the edge ofthe pavement. You can turn the steering wheel up toone-quarter turn until the right front tire contactsthe pavement edge. Then turn your steering wheel to gostraight down the roadway.
PassingThe driver of a vehicle about to pass another on atwo-lane highway waits for just the right moment,accelerates, moves around the vehicle ahead, thengoes back into the right lane again. A simple maneuver?
Not necessarily! Passing another vehicle on a two-lanehighway is a potentially dangerous move, since thepassing vehicle occupies the same lane as oncomingtraffic for several seconds. A miscalculation, an error injudgment, or a brief surrender to frustration or angercan suddenly put the passing driver face to face with theworst of all traffic accidents — the head-on collision.
So here are some tips for passing:
• A vehicle like yours takes a longer time to reachpassing speed, so you’ll need a longer stretchof clear road ahead than you would with apassenger car.
• “Drive ahead.” Look down the road, to the sides andto crossroads for situations that might affect yourpassing patterns. If you have any doubt whatsoeverabout making a successful pass, wait for abetter time.
4-14

• Watch for traffic signs, pavement markings and lines.If you can see a sign up ahead that might indicate aturn or an intersection, delay your pass. A brokencenter line usually indicates it’s all right to pass(providing the road ahead is clear). Never cross asolid line on your side of the lane or a double solidline, even if the road seems empty of approachingtraffic.
• Do not get too close to the vehicle you want to passwhile you’re awaiting an opportunity. For one thing,following too closely reduces your area of vision,especially if you’re following a larger vehicle. Also,you won’t have adequate space if the vehicle aheadsuddenly slows or stops. Keep back a reasonabledistance.
• When it looks like a chance to pass is coming up,start to accelerate but stay in the right lane and don’tget too close. Time your move so you will beincreasing speed as the time comes to move into theother lane. If the way is clear to pass, you will have a“running start” that more than makes up for thedistance you would lose by dropping back. And ifsomething happens to cause you to cancel yourpass, you need only slow down and drop back againand wait for another opportunity.
• If other cars are lined up to pass a slow vehicle, waityour turn. But take care that someone isn’t trying topass you as you pull out to pass the slow vehicle.
• Check your mirrors and start your left lane changesignal before moving out of the right lane to pass.When you are far enough ahead of the passedvehicle to see its front in your right outside mirror,activate your right lane change and move back intothe right lane. (Remember that if your right outsidemirror is convex, the vehicle you just passed mayseem to be further away from you than it really is.)
• Try not to pass more than one vehicle at a time ontwo-lane roads. Reconsider before passing thenext vehicle.
• Don’t overtake a slowly moving vehicle too rapidly.Even though the brake lamps are not flashing, it maybe slowing down or starting to turn.
• If you’re being passed, make it easy for the followingdriver to get ahead of you. Perhaps you can ease alittle to the right.
4-15

Loss of ControlLet’s review what driving experts say about whathappens when the three control systems (brakes,steering and acceleration) don’t have enough frictionwhere the tires meet the road to do what the driverhas asked.
In any emergency, don’t give up. Keep trying to steerand constantly seek an escape route or area ofless danger.
SkiddingIn a skid, a driver can lose control of the vehicle.Defensive drivers avoid most skids by taking reasonablecare suited to existing conditions, and by not “overdriving”those conditions. But skids are always possible.
The three types of skids correspond to your vehicle’sthree control systems. In the braking skid, your wheelsaren’t rolling. In the steering or cornering skid, too muchspeed or steering in a curve causes tires to slip and losecornering force. And in the acceleration skid, too muchthrottle causes the driving wheels to spin.
A cornering skid is best handled by easing your foot offthe accelerator pedal.
If you have the Traction Control System, remember:It helps avoid only the acceleration skid. If you do nothave this system, or if the system is off, then anacceleration skid is also best handled by easing yourfoot off the accelerator pedal.
Of course, traction is reduced when water, snow, ice,gravel or other material is on the road. For safety, you’llwant to slow down and adjust your driving to theseconditions. It is important to slow down on slipperysurfaces because stopping distance will be longer andvehicle control more limited.
While driving on a surface with reduced traction,try your best to avoid sudden steering, acceleration orbraking (including engine braking by shifting to alower gear). Any sudden changes could cause the tiresto slide. You may not realize the surface is slipperyuntil your vehicle is skidding. Learn to recognize warningclues — such as enough water, ice or packed snowon the road to make a “mirrored surface” — and slowdown when you have any doubt.
If you have the anti-lock braking system, remember:It helps avoid only the braking skid. If you do not haveanti-lock, then in a braking skid (where the wheelsare no longer rolling), release enough pressure on thebrakes to get the wheels rolling again. This restoressteering control. Push the brake pedal down steadilywhen you have to stop suddenly. As long as the wheelsare rolling, you will have steering control.
4-16

Driving at Night
Night driving is more dangerous than day driving.One reason is that some drivers are likely to beimpaired — by alcohol or drugs, with night visionproblems, or by fatigue.
Here are some tips on night driving.
• Drive defensively.
• Don’t drink and drive.
• Since you can’t see as well, you may need to slowdown and keep more space between you andother vehicles.
• Slow down, especially on higher speed roads. Yourheadlamps can light up only so much road ahead.
• In remote areas, watch for animals.
• If you’re tired, pull off the road in a safe placeand rest.
No one can see as well at night as in the daytime.But as we get older these differences increase.A 50-year-old driver may require at least twice as muchlight to see the same thing at night as a 20-year-old.
What you do in the daytime can also affect your nightvision. For example, if you spend the day in brightsunshine you are wise to wear sunglasses. Your eyes willhave less trouble adjusting to night. But if you’re driving,don’t wear sunglasses at night. They may cut down onglare from headlamps, but they also make a lot of thingsinvisible.
4-17

You can be temporarily blinded by approachingheadlamps. It can take a second or two, or even severalseconds, for your eyes to readjust to the dark. When youare faced with severe glare (as from a driver who doesn’tlower the high beams, or a vehicle with misaimedheadlamps), slow down a little. Avoid staring directly intothe approaching headlamps.
Keep your windshield and all the glass on your vehicleclean — inside and out. Glare at night is made muchworse by dirt on the glass. Even the inside of the glasscan build up a film caused by dust. Dirty glass makeslights dazzle and flash more than clean glass would,making the pupils of your eyes contract repeatedly.
Remember that your headlamps light up far less of aroadway when you are in a turn or curve. Keep youreyes moving; that way, it’s easier to pick out dimlylighted objects. Just as your headlamps should bechecked regularly for proper aim, so should your eyesbe examined regularly. Some drivers suffer fromnight blindness — the inability to see in dim light — andaren’t even aware of it.
Driving in Rain and on Wet Roads
Rain and wet roads can mean driving trouble. On a wetroad, you can’t stop, accelerate or turn as well becauseyour tire-to-road traction isn’t as good as on dry roads.And, if your tires don’t have much tread left, you’ll geteven less traction. It’s always wise to go slower andbe cautious if rain starts to fall while you are driving.The surface may get wet suddenly when your reflexesare tuned for driving on dry pavement.
4-18

The heavier the rain, the harder it is to see. Even if yourwindshield wiper blades are in good shape, a heavyrain can make it harder to see road signs andtraffic signals, pavement markings, the edge of the roadand even people walking.
It’s wise to keep your wiping equipment in good shapeand keep your windshield washer tank filled withwasher fluid. Replace your windshield wiper insertswhen they show signs of streaking or missing areason the windshield, or when strips of rubber startto separate from the inserts.
Driving too fast through large water puddles or evengoing through some vehicle washes can causeproblems, too. The water may affect your brakes.Try to avoid puddles. But if you can’t, try to slow downbefore you hit them.
{CAUTION:
Wet brakes can cause accidents. They won’twork as well in a quick stop and may causepulling to one side. You could lose control ofthe vehicle.
After driving through a large puddle of wateror a vehicle wash, apply your brake pedallightly until your brakes work normally.
4-19

HydroplaningHydroplaning is dangerous. So much water can build upunder your tires that they can actually ride on thewater. This can happen if the road is wet enough andyou’re going fast enough. When your vehicle ishydroplaning, it has little or no contact with the road.
Hydroplaning doesn’t happen often. But it can ifyour tires do not have much tread or if the pressure inone or more is low. It can happen if a lot of water isstanding on the road. If you can see reflectionsfrom trees, telephone poles or other vehicles, andraindrops “dimple” the water’s surface, there could behydroplaning.
Hydroplaning usually happens at higher speeds.There just isn’t a hard and fast rule about hydroplaning.The best advice is to slow down when it is raining.
Driving Through Deep Standing WaterNotice: If you drive too quickly through deeppuddles or standing water, water can come inthrough your engine’s air intake and badly damageyour engine. Never drive through water that isslightly lower than the underbody of your vehicle.If you can’t avoid deep puddles or standingwater, drive through them very slowly.
Driving Through Flowing Water
{CAUTION:
Flowing or rushing water creates strong forces.If you try to drive through flowing water, as youmight at a low water crossing, your vehiclecan be carried away. As little as six inches offlowing water can carry away a smaller vehicle.If this happens, you and other vehicleoccupants could drown. Don’t ignore policewarning signs, and otherwise be very cautiousabout trying to drive through flowing water.
Some Other Rainy Weather Tips• Turn on your low-beam headlamps and your marker
and clearance lamps, if your vehicle has them — notjust your parking lamps — to help make you morevisible to others.
• Besides slowing down, allow some extra followingdistance. And be especially careful when you passanother vehicle. Allow yourself more clear roomahead, and be prepared to have your view restrictedby road spray.
• Have good tires with proper tread depth. See Tireson page 5-59.
4-20
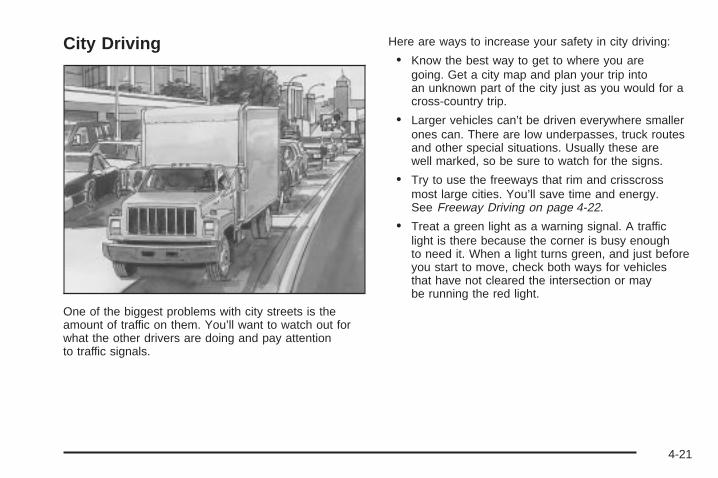
City Driving
One of the biggest problems with city streets is theamount of traffic on them. You’ll want to watch out forwhat the other drivers are doing and pay attentionto traffic signals.
Here are ways to increase your safety in city driving:
• Know the best way to get to where you aregoing. Get a city map and plan your trip intoan unknown part of the city just as you would for across-country trip.
• Larger vehicles can’t be driven everywhere smallerones can. There are low underpasses, truck routesand other special situations. Usually these arewell marked, so be sure to watch for the signs.
• Try to use the freeways that rim and crisscrossmost large cities. You’ll save time and energy.See Freeway Driving on page 4-22.
• Treat a green light as a warning signal. A trafficlight is there because the corner is busy enoughto need it. When a light turns green, and just beforeyou start to move, check both ways for vehiclesthat have not cleared the intersection or maybe running the red light.
4-21

Freeway Driving
Mile for mile, freeways (also called thruways, parkways,expressways, turnpikes or superhighways) are thesafest of all roads. But they have their own special rules.
The most important advice on freeway driving is:Keep up with traffic and keep to the right. Drive at thesame speed most of the other drivers are driving.Too-fast or too-slow driving breaks a smooth traffic flow.Treat the left lane on a freeway as a passing lane.
At the entrance, there is usually a ramp that leads tothe freeway. If you have a clear view of the freeway asyou drive along the entrance ramp, you should beginto check traffic. Try to determine where you expectto blend with the flow. Try to merge into the gap at closeto the prevailing speed. Switch on your turn signal,check your mirrors and try to blend smoothly with thetraffic flow.
Once you are on the freeway, adjust your speed tothe posted limit or to the prevailing rate if it’s slower.Stay in the right lane unless you want to pass. On somefreeways, larger vehicles aren’t allowed to use somelanes. These places usually are well-marked.
Before changing lanes, check your mirrors. Then useyour turn signal.
Once you are moving on the freeway, make certain youallow a reasonable following distance. Expect tomove slightly slower at night.
4-22

When you want to leave the freeway, move to theproper lane well in advance. If you miss your exit,do not, under any circumstances, stop and back up.Drive on to the next exit.
The exit ramp can be curved, sometimes quite sharply.The exit speed for cars — but not larger vehicles — isusually posted. You should go more slowly.
Reduce your speed according to your speedometer, notto your sense of motion. After driving for any distanceat higher speeds, you may tend to think you aregoing slower than you actually are.
Highway HypnosisIs there actually such a condition as “highway hypnosis”?Or is it just plain falling asleep at the wheel? Call ithighway hypnosis, lack of awareness, or whatever.
When you drive the vehicle for a long distance, there issomething about an easy stretch of road with the samescenery, along with the hum of the tires on the road, thedrone of the engine, and the rush of the wind against thevehicle that can make you sleepy. Don’t let it happen toyou! If it does, your vehicle can leave the road in less thana second, and you could crash and be injured.
What can you do about highway hypnosis? First, beaware that it can happen.
Then here are some tips:
• Make sure your vehicle is well ventilated, with acomfortably cool interior.
• Keep your eyes moving. Scan the road ahead andto the sides. Check your mirrors and yourinstruments frequently.
• If you get sleepy, pull off the road into a rest,service or parking area and take a nap, get someexercise, or both. For safety, treat drowsinesson the highway as an emergency.
4-23

Hill and Mountain Roads
Driving on steep hills or mountains is different fromdriving in flat or rolling terrain.
Here are some tips that can make your drive throughsteep country safer:
• Keep the vehicle in good shape. Check all fluidlevels and also the brakes, tires, cooling systemand transmission. These parts can work hardon mountain roads.
• Know how to go down hills. The most importantthing to know is this: let your engine do some ofthe slowing down. Shift to a lower gear when you godown a steep or long hill.
{CAUTION:
If you don’t shift down, your brakes could getso hot that they wouldn’t work well. You wouldthen have poor braking or even none goingdown a hill. You could crash. Shift down to letyour engine assist your brakes on a steepdownhill slope.
4-24

{CAUTION:
Coasting downhill in NEUTRAL (N) or with theignition off is dangerous. Your brakes will haveto do all the work of slowing down. They couldget so hot that they wouldn’t work well. Youwould then have poor braking or even nonegoing down a hill. You could crash. Alwayshave your engine running and your vehicle ingear when you go downhill.
• Know how to go uphill. Use lower gears. They helpcool your engine and transmission, and you canclimb the hill better.
• Stay in your own lane when driving on two-laneroads in hills or mountains. Don’t swing wide orcut across the center of the road. Drive at speedsthat let you stay in your own lane.
• As you go over the top of a hill, be alert. Therecould be something in your lane, like a stalled caror an accident.
• You may see highway signs on mountains that warnof special problems. Examples are long grades,passing or no-passing zones, a falling rocks area,winding roads and special truck lanes. Be alert tothese and take appropriate action.
4-25

Winter Driving
Here are some tips for winter driving:
• Be sure the vehicle is in good shape for winter.
• You may want to put winter emergency supplies inyour vehicle.
Include an ice scraper, a small brush or broom, asupply of windshield washer fluid, a rag, some winterouter clothing, a small shovel, a flashlight, a redcloth and reflective warning triangles. And, if you will bedriving under severe conditions, include a small bagof sand, a piece of old carpet or a couple of burlap bagsto help provide traction. Be sure you properly securethese items in your vehicle.
Driving on Snow or IceMost of the time, those places where your tires meetthe road probably have good traction.
However, if there is snow or ice between your tiresand the road, you can have a very slippery situation.You’ll have a lot less traction or “grip” and will need to bevery careful.
4-26

What’s the worst time for this? “Wet ice.” Very coldsnow or ice can be slick and hard to drive on. But wetice can be even more trouble because it may offerthe least traction of all. You can get wet ice when it’sabout freezing (32°F; 0°C) and freezing rain beginsto fall. Try to avoid driving on wet ice until salt and sandcrews can get there.
Whatever the condition – smooth ice, packed, blowingor loose snow – drive with caution.
If you have traction control, keep the system on. It willimprove your ability to accelerate when driving on aslippery road. But you can turn the traction system off ifyou ever need to. You should turn the system off ifyour vehicle ever gets stuck in sand, mud, ice or snow.See If You Are Stuck: In Sand, Mud, Ice or Snow onpage 4-30. Even though your vehicle has a tractionsystem, you’ll want to slow down and adjust your drivingto the road conditions. See Traction Control System(TCS) on page 4-11.
If you don’t have a traction system, accelerate gently.Try not to break the fragile traction. If you accelerate toofast, the drive wheels will spin and polish the surfaceunder the tires even more.
Unless you have the anti-lock braking system, you’llwant to brake very gently, too. If you do have anti-lock,see Braking on page 4-6. This system improves yourvehicle’s stability when you make a hard stop on aslippery road. Whether you have the anti-lock brakingsystem or not, you’ll want to begin stopping sooner thanyou would on dry pavement. Without anti-lock brakes,if you feel your vehicle begin to slide, let up on thebrakes a little. Push the brake pedal down steadily toget the most traction you can.
4-27

Remember, unless you have anti-lock, if you brake sohard that your wheels stop rolling, you’ll just slide. Brakeso your wheels always keep rolling and you can still steer.
• Whatever your braking system, allow greaterfollowing distance on any slippery road.
• Watch for slippery spots. The road might be fineuntil you hit a spot that’s covered with ice. On anotherwise clear road, ice patches may appear inshaded areas where the sun can’t reach: aroundclumps of trees, behind buildings or under bridges.Sometimes the surface of a curve or an overpassmay remain icy when the surrounding roads areclear, If you see a patch of ice ahead of you, brakebefore you are on it. Try not to brake while you’reactually on the ice, and avoid sudden steeringmaneuvers.
If You’re Caught in a Blizzard
If you are stopped by heavy snow, you could be in aserious situation. You should probably stay withyour vehicle unless you know for sure that you are nearhelp and you can hike through the snow. Here aresome things to do to summon help and keep yourselfand your passengers safe:
• Turn on your hazard flashers.
• Tie a red cloth to your mirror arm to alert police thatyou’ve been stopped by the snow.
4-28

• Put on extra clothing or wrap a blanket around you.If you have no blankets or extra clothing, makebody insulators from newspapers, burlap bags, rags,floor mats – anything you can wrap aroundyourself or tuck under your clothing to keep warm.
You can run the engine to keep warm, but be careful.
{CAUTION:
Snow can trap exhaust gases under yourvehicle. This can cause deadly CO (carbonmonoxide) gas to get inside. CO couldovercome you and kill you. You can’t see it orsmell it, so you might not know it is in yourvehicle. Clear away snow from around the baseof your vehicle if any is blocking your exhaustpipe. And check around again from time to timeto be sure snow doesn’t collect there.
Open a window just a little on the side of thevehicle that’s away from the wind. This will helpkeep CO out.
4-29

Run your engine only as long as you must. This savesfuel. When you run the engine, make it go a little fasterthan just idle. That is, push the accelerator slightly.This uses less fuel for the heat that you get and it keepsthe battery (or batteries) charged. You will need awell-charged battery (or batteries) to restart the vehicle,and possibly for signaling later on with your headlamps.Let the heater run for a while.
If you have a diesel engine, you may have to run it at ahigher speed to get enough heat.
Then, shut the engine off and close the window almost allthe way to preserve the heat. Start the engine again andrepeat this only when you feel really uncomfortable fromthe cold. But do it as little as possible. Preserve the fuelas long as you can. To help keep warm, you can get outof the vehicle and do some fairly vigorous exercisesevery half hour or so until help comes.
If You Are Stuck: In Sand, Mud,Ice or SnowIn order to free your vehicle when it is stuck, you will needto spin the wheels, but you don’t want to spin your wheelstoo fast. The method known as “rocking” can help you getout when you’re stuck, but you must use caution.
{CAUTION:
If you let your tires spin at high speed,they can explode, and you or others could beinjured. And, the transmission or other parts ofthe vehicle can overheat. That could cause anengine compartment fire or other damage.When you’re stuck, spin the wheels as little aspossible. Don’t spin the wheels above 35 mph(55 km/h) as shown on the speedometer.
Notice: Spinning your wheels can destroy parts ofyour vehicle as well as the tires. If you spin thewheels too fast while shifting your transmissionback and forth, you can destroy your transmission.
4-30

Rocking Your Vehicle To Get It OutFirst, turn your steering wheel left and right. That willclear the area around your front wheels. If your vehiclehas traction control, you should turn the tractioncontrol system off. See Traction Control System (TCS)on page 4-11. Then shift back and forth betweenREVERSE (R) and a forward gear (or with a manualtransmission, between FIRST (1) or SECOND (2)and REVERSE (R)), spinning the wheels as little aspossible. Release the accelerator pedal while you shift,and press lightly on the accelerator pedal when thetransmission is in gear. By slowly spinning your wheelsin the forward and reverse directions, you will causea rocking motion that may free your vehicle. If thatdoesn’t get you out after a few tries, you may need tobe towed out. If you do need to be towed out, seeTowing Your Vehicle on page 4-32.
Using the Tow Hooks (Option)If your vehicle is equipped with tow hooks, the hooksare provided at the front of your vehicle. You may needto use them if you’re stuck off-road and need to bepulled to some place where you can continue driving.
{CAUTION:
These hooks, when used, are under a lot offorce. Always pull the vehicle straight out.Never pull on the hooks at a sideways angle.The hooks could break off and you or otherscould be injured from the chain or cablesnapping back.
Notice: Never use tow hooks to tow the vehicle.Your vehicle could be damaged and it would not becovered by warranty.
4-31

Towing
Towing Your Vehicle
{CAUTION:
To help avoid serious personal injury to youor others:
• Never let passengers ride in a vehicle thatis being towed.
• Never tow faster than safe or posted speeds.• Never tow with damaged parts not fully
secured.• Never get under your vehicle after it has
been lifted by the tow truck.• Always secure the vehicle on each side with
separate safety chains when towing it.
CAUTION: (Continued)
CAUTION: (Continued)
• Working on air brakes without first usingthe release studs to compress the springscan lead to injury. Never work on the airbrakes chambers without first using therelease studs to compress the brakesprings.
• When the brake springs are manuallycompressed, you will have no brakes.Release your air-operated parking brakesmanually only to tow the vehicle. Neverdrive the vehicle with the brakes released.
Consult your dealer or a professional towing service ifyou need to have your vehicle towed. They can providethe right equipment and know-how to tow it withoutdamage. See Roadside Assistance Program onpage 7-4.
4-32

Before you do anything, turn on the hazard warningflashers (if they have not been damaged).
When you call, tell the towing service:
• That your vehicle has rear-wheel drive.
• The make, model and year of your vehicle.
• Whether you can still move the shift lever.
• If there was an accident, what was damaged.
When the towing service arrives, let the tow operatorknow that this manual contains towing instructions.The operator may want to see them.
Here are specific towing instructions:
Towing Your Vehicle From the Front(Front Wheels Off the Ground)
Before TowingBlock the rear wheels of the disabled vehicle. On vehicleswith air brakes, release the emergency brake system bycompressing the brake chamber springs as outlined inthis section. (This is to prevent the possibility of theemergency brake being applied during towing.)
On vehicles with hydraulic brakes, release the parkingbrake fully by moving the lever to the fully-releasedposition.
4-33
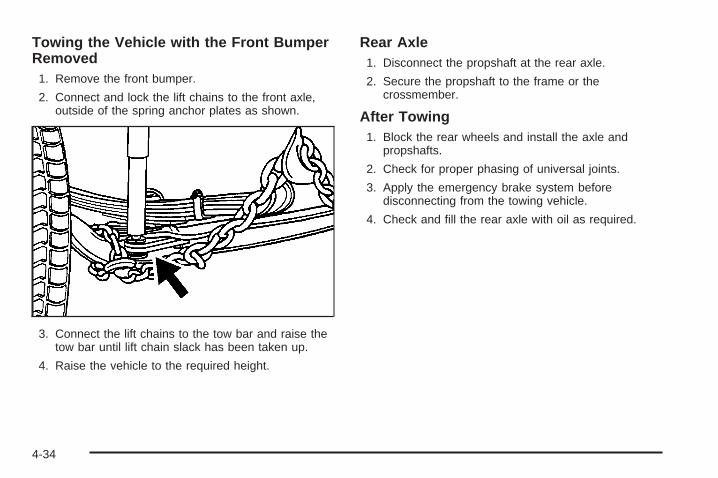
Towing the Vehicle with the Front BumperRemoved
1. Remove the front bumper.
2. Connect and lock the lift chains to the front axle,outside of the spring anchor plates as shown.
3. Connect the lift chains to the tow bar and raise thetow bar until lift chain slack has been taken up.
4. Raise the vehicle to the required height.
Rear Axle1. Disconnect the propshaft at the rear axle.
2. Secure the propshaft to the frame or thecrossmember.
After Towing1. Block the rear wheels and install the axle and
propshafts.
2. Check for proper phasing of universal joints.
3. Apply the emergency brake system beforedisconnecting from the towing vehicle.
4. Check and fill the rear axle with oil as required.
4-34

Towing Your Vehicle From the Front(All Wheels On the Ground)Your vehicle may be towed on all wheels provided thesteering is working. Remember that the power brakesand power steering will not have power assist. Vehicleswith air brakes will not have brakes. There must be a towbar installed between the towing vehicle and the disabledvehicle.
Before TowingBlock the wheels of the disabled vehicle. On vehicleswith air brakes, release the emergency brake system bycompressing the brake chamber springs as outlinedin this section. (This is to prevent the possibility of theemergency brake being applied during towing.)
On vehicles with hydraulic brakes, release the parkingbrake fully by moving the lever to the fully-releasedposition.
If there is damage or suspected damage to the axle(s),remove the axle shafts. Cover the hub openings toprevent the loss of lubricant or entry of dirt or foreignobjects.
After Towing1. Block the rear wheels and install axle and
propshafts.
2. Check for proper phasing of universal joints.
3. Apply the parking brake system beforedisconnecting from the towing vehicle.
4. Check and fill rear axle with oil as required.
Towing Your Vehicle From the Rear(Rear Wheels Off the Ground)
Before TowingSecure the steering wheel to maintain a straight-aheadposition. Make certain that the front axle is not loadedabove the front axle Gross Axle Weight Rating (GAWR)as indicated on the vehicle’s Gross Vehicle WeightRating (GVWR) label. See Loading Your Vehicleon page 4-37 for more information.
After Towing1. Block the rear wheels and release the steering
wheel.
2. Apply the parking brake system beforedisconnecting from the towing vehicle.
3. Check and fill the rear axle with oil as required.
4-35

Releasing Air-Operated Parking BrakesIf your vehicle has air brakes, you could have a specialtowing problem. If your vehicle has to be towed becauseof a complete loss of air pressure from both systems, theparking brakes will have automatically engaged. The towoperator can release the brakes manually by using thefollowing steps. Then your vehicle can be towed with allwheels or only the rear wheels on the ground.
1. Block the wheels of the vehicle.
2. Remove the release stud and nut from the side ofthe brake chamber. Some chambers have studswhich are visible at all times.
3. Remove the rubbercap from the rear ofthe chamber.
4. Put the release stud, nut and flat washer into thechamber.
5. Turn the stud clockwise one quarter of a turn.
4-36

6. Turn the stud nutclockwise several turnsto release the brakes.Follow the sameprocedure to releasethe other brake.
7. At the repair facility, apply air pressure of at least70 psi (480 kPa) to the brake chambers, eitherfrom an external air supply or the vehicle’sair system.
8. Turn the stud nut counterclockwise several turns.Remove the stud from the chamber.
9. Replace the stud and washer and tighten the nutinto the side of the chamber.
10. Replace the rubber cap.
Loading Your VehicleThere is a GVW Rating label on your vehicle that showshow much weight it may properly carry. It also shows thesize of your original tires and the inflation pressuresneeded to obtain the gross weight capacity of yourvehicle. This is called the Gross Vehicle WeightRating (GVWR).
The GVWR includes the weight of the vehicle,all occupants, fuel and cargo.
The GVW Rating label is provided by the finalmanufacturer and should be on the door or door jamb.It also tells you the maximum weights for the front andrear axles, called Gross Axle Weight Rating (GAWR).
4-37

To find out the actual loads on your front and rear axles,you need to go to a weigh station and weigh your vehicle.Your dealer can help you with this. Be sure to spread outyour load equally on both sides of the center line.
Never exceed the GVWR for your vehicle, or the GAWRfor either the front or rear axle.
And, if you do have a heavy load, you should spreadit out.
{CAUTION:
Do not load your vehicle any heavier than theGVWR, or either the maximum front or rearGAWR. If you do, parts on your vehicle canbreak, and it can change the way your vehiclehandles. These could cause you to losecontrol and crash. Also, overloading canshorten the life of your vehicle.
Using heavier suspension components to get addeddurability might not change your weight ratings. Ask yourdealer to help you load your vehicle the right way.
Notice: Your warranty does not cover partsor components that fail because of overloading.
If you put things inside your vehicle – like suitcases,tools, packages or anything else – they will go as fast asthe vehicle goes. If you have to stop or turn quickly,or if there is a crash, they’ll keep going.
{CAUTION:
Things you put inside your vehicle can strikeand injure people in a sudden stop or turn,or in a crash.
• Put things in the cargo area of yourvehicle. Try to spread the weight evenly.
• Never stack heavier things, like suitcases,inside the vehicle so that some of themare above the tops of the seats.
• Don’t leave an unsecured child restraint inyour vehicle.
• When you carry something inside thevehicle, secure it whenever you can.
• Don’t leave a seat folded down unless youneed to.
4-38

Trailer Connections
Heavy-Duty Trailer Wiring PackageYour vehicle may be equipped with an eight-wire trailertowing harness. This harness, with a seven-pin universalheavy-duty trailer connector, is attached to a bracket onthe platform hitch.
The Center High-Mounted Stoplamp (CHMSL) wire istied next to the trailer wiring harness for use with atrailer.
The eight-wire harness contains the following trailercircuits:
• Yellow: Left Stop/Turn Signal
• Dark Green: Right Stop/Turn Signal
• Brown: Taillamps
• White: Ground
• Light Green: Back-up Lamps
• Light Blue: CHMSL
• Red: Battery Feed
• Dark Blue: Trailer Brake
Power Take-Off (PTO)Your vehicle may be equipped with power take-off(PTO). The PTO switch is located in the instrumentpanel switchbank. See Instrument Panel Overview onpage 3-4 for location.
Before using a PTO, refer to the manufacturer’s orinstaller’s instructions.
4-39

✍ NOTES
4-40

Service ............................................................5-3Doing Your Own Service Work .........................5-3Two Safety Cautions about Engine Fan
Breakage ...................................................5-4Fuel ................................................................5-5
Diesel Engine Fuel .........................................5-5What Fuel to Use ...........................................5-5Very Cold Weather Operation ...........................5-6Water in Fuel .................................................5-6Running Out of Fuel .....................................5-12Filling Your Tank ..........................................5-13Filling a Portable Fuel Container .....................5-14
Checking Things Under the Hood ....................5-14Engine Oil (DURAMAX™ Diesel) .....................5-14Engine Air Cleaner/Filter ................................5-18Automatic Transmission Fluid .........................5-20Manual Transmission Fluid .............................5-20Hydraulic Clutch ...........................................5-21Engine Coolant .............................................5-22Coolant Surge Tank Pressure Cap ..................5-25Engine Overheating .......................................5-26Cooling System ............................................5-28
Power Steering Fluid .....................................5-33Windshield Washer Fluid ................................5-34Brakes ........................................................5-35Battery ........................................................5-43Jump Starting ...............................................5-44
Rear Axle .......................................................5-49Rear Axle Shift Motor ....................................5-49
Cab Tilting .....................................................5-50Before You Tilt the Cab .................................5-50Tilting the Cab .............................................5-50Lowering the Cab .........................................5-53Lifting the Front Panel ...................................5-55
Noise Control System .....................................5-56Tampering with Noise Control System
Prohibited .................................................5-56Windshield Wiper Blade Replacement ..............5-57Other Service Items ........................................5-58
Fuel Filter ....................................................5-58Primary Fuel Filter and Water Separator ..........5-58Secondary Fuel Filter and Water
Separator/Heater .......................................5-58
Section 5 Service and Appearance Care
5-1

Tires ..............................................................5-59Inflation — Tire Pressure ...............................5-60Wheel Loading .............................................5-60Dual Tire Operation .......................................5-61When It Is Time for New Tires .......................5-61Wheel Alignment and Tire Balance ..................5-62Tightening the Wheel Nuts .............................5-62Wheel Replacement ......................................5-66If a Tire Goes Flat ........................................5-67
Appearance Care ............................................5-69Cleaning the Inside of Your Vehicle .................5-69Care of Safety Belts ......................................5-71Weatherstrips ...............................................5-72Cleaning the Outside of Your Vehicle ..............5-72Sheet Metal Damage .....................................5-74Finish Damage .............................................5-75
Underbody Maintenance ................................5-75Chemical Paint Spotting .................................5-75Vehicle Care/Appearance Materials ..................5-76
Vehicle Identification ......................................5-77Vehicle Identification Number (VIN) .................5-77
Electrical System ............................................5-77Add-On Electrical Equipment ..........................5-77Headlamp Wiring ..........................................5-77Windshield Wiper Fuses ................................5-78Fusible Links ................................................5-78Power Windows and Other Power Options .......5-78Fuses and Circuit Breakers ............................5-78
Capacities and Specifications ..........................5-84Capacities and Specifications .........................5-84
Normal Maintenance Replacement Parts ..........5-87
Section 5 Service and Appearance Care
5-2

ServiceYour dealer knows your vehicle best and wants you tobe happy with it. We hope you’ll go to your dealerfor all your service needs. You’ll get genuine GM partsand GM-trained and supported service people.
We hope you’ll want to keep your GM vehicle all GM.Genuine GM parts have one of these marks:
Doing Your Own Service WorkIf you want to do some of your own service work, you’llwant to use the proper service manual. It tells you muchmore about how to service your vehicle than this manualcan. To order the proper service manual, see ServicePublications Ordering Information on page 7-5.
You should keep a record with all parts receipts and listthe mileage and the date of any service work youperform. See Part D: Maintenance Record on page 6-30.
{CAUTION:
You can be injured and your vehicle could bedamaged if you try to do service work on avehicle without knowing enough about it.
• Be sure you have sufficient knowledge,experience, the proper replacement partsand tools before you attempt any vehiclemaintenance task.
• Be sure to use the proper nuts, bolts andother fasteners. “English” and “metric”fasteners can be easily confused. If youuse the wrong fasteners, parts can laterbreak or fall off. You could be hurt.
5-3

Two Safety Cautions about EngineFan Breakage
{CAUTION:
Changing the Fan Drive Ratio or EngineGoverned Speed
If you change the fan drive ratio or increase thegoverned speed of the engine, you mayincrease stress and the fan could eventually fail.If the fan breaks apart while it is rotating, piecescan cause severe injury to anyone — such as aservice technician — who is nearby. And, ofcourse, the pieces can severely damage thevehicle. Don’t change the fan drive ratio orincrease the governed speed of the vehiclewithout getting the necessary information fromyour dealer.
CAUTION: (Continued)
CAUTION: (Continued)
Winter Fronts, Grille Covers or Obstructions
Winter Fronts, grille covers or other add-onequipment causing obstructions in front orbehind the fan should not be used on thisvehicle. If this causes the fan to eventuallybreak apart while it is rotating, the pieces cancause severe injury to anyone nearby, such asa service technician working on the engine,and of course the pieces can severely damagethe vehicle.
5-4

Fuel
Diesel Engine FuelNotice: Diesel fuel or fuel additives notrecommended in this manual could damage yourfuel system and engine. Your warranty wouldn’tcover this damage. And:• Diesel fuel that has been mixed with engine oil
could damage your engine and emissioncontrols.
• If you ever run out of diesel fuel, it can be difficultto restart your engine. To avoid all this, never letyour tank get empty.
If you run out of fuel,Running Out of Fuel on page 5-12,tells you how to restart your engine.
What Fuel to UseIn the United States, for best results use Number 2–Ddiesel fuel year-round (above and below freezingconditions) as oil companies blend Number 2–D fuel toaddress climate differences. Number 1–D diesel fuel maybe used in very cold temperatures (when it stays below0°F or −18°C); however, it will produce a power and fueleconomy loss. Avoid the use of Number 1–D diesel fuelin warm or hot climates. It may result in stalling, poorstarting when the engine is hot and may damage thefuel injection system.
At a minimum, the diesel fuel you use should meetspecifications ASTM D975-02 (Grade Low Sulfur) in theUnited States. In addition, the Engine ManufacturersAssociation (EMA) has identified properties of animproved diesel fuel for better engine performance anddurability. Diesel fuels corresponding to the EMARecommended Guideline on Premium Diesel Fuel(FQP-1A) could provide better starting, less noise andbetter vehicle performance. If there are questionsabout the fuel you are using, contact your fuel supplier.
Diesel fuel may foam when you fill your tank. This cancause the automatic pump nozzle to shut off, eventhough your tank isn’t full. If this happens, just wait forthe foaming to stop and then continue to fill your tank.
{CAUTION:
Heat coming from the engine may cause the fuelto expand and force the fuel out of your tank.If something ignites the fuel, a fire could startand people could be burned. To help avoid this,fill your fuel tank only until the automatic nozzleshuts off. Don’t try to ″top it off. ″
5-5

What Fuel to Use in CanadaCanadian fuels are blended for seasonal changes.Diesel Type ”A” fuel is blended for better cold weatherstarting (below 0°F or −18°C); however, you maynotice some power and fuel economy loss. If Type ”A”fuel is used in warmer temperatures, stalling andhard starting may occur. Diesel Type ”B” fuel is blendedfor temperatures above 0°F (−18°C). The emissioncontrol system requires the use of diesel fuel withlow-sulfur (.05% by weight) content. Both low- andhigher-sulfer fuels will be available in Canada. Onlylow-sulfur diesel fuels are available in the United States.It is important that diesel-powered trucks are refueledonly with low-sulfur fuel. Use of fuels with higher-sulfurcontent will affect the function of the emissioncomponents and may cause reduced performance,excessive smoke and unpleasant odor.
At a minimum, the diesel fuel you use should meetspecifications CAN/CGSB–3.517–2000 (Low SulfurDiesel) in Canada. In addition, the Engine ManufacturersAssociation (EMA) has identified properties of animproved diesel fuel for better engine performance anddurability (FQP-1A). Diesel fuels corresponding tothe EMA description could provide better starting, lessnoise and better vehicle performance. If there arequestions about the fuel you are using, contact your fuelsupplier.
Very Cold Weather OperationFollow the instructions listed previously under theheading “What Fuel to Use.”
Notice: Never use home heating oil or gasoline inyour diesel engine. They can cause engine damage.
In cold weather, your fuel filter may become clogged(waxed). To unclog it, move the vehicle to a warmgarage area and warm the filter to between 32°F and50°F (0°C to 10°C). You won’t need to replace it.Additional information on the fuel filter follows.
Water in Fuel
{CAUTION:
Diesel fuel containing water is still flammable.You could be burned. If you ever try to drainwater from your fuel, keep sparks, flames andsmoking materials away from the mixture.
5-6

Notice: If there is water in your diesel fuel and theweather is warm or humid, fungus and bacteriacan grow in the fuel. They can damage yourfuel system. You’ll need a diesel fuel biocide tosterilize your fuel system. Your dealer can adviseyou if you ever need this.
If your fuel tank needs to be purged to removewater, see your dealer or a qualified technician.Improper purging can damage your fuel system.
Sometimes, water can be pumped into your fueltank along with your diesel fuel. This can happen if aservice station doesn’t regularly inspect and cleanits fuel tanks, or if it gets contaminated fuel from itssuppliers.
If this happens, awater-in-fuel indicatorwill come on. If it does, thewater must be drained.Your dealer can show youhow to do this.
If it comes on, use this chart.
Water In Fuel Light ChartProblem Recommended Action
Light comes onintermittently. Drain water from fuel filter.
Light stays on:
• At temperaturesabove freezing.
Drain fuel filter immediately.If no water can be drainedand light stays on, see youdealer for assistance.
• At temperaturesbelow freezing.
Drain fuel filter immediately.If no water can be drained,water may be frozen inwater drain system. Watermay be frozen in the fuellines. Move the vehicle to awarm location to thaw out,and then drain filter system.
• Immediately afterrefueling, largeamount of waterpossibly pumpedinto fuel tank.
Fuel tank purging required.See your dealer forassistance.
5-7

Notice: If you drive when this warning indicator ison, you can damage your fuel injection systemand your engine. If the indicator comes on right afteryou refuel, it means water was pumped into yourfuel tank. Turn off your engine immediately.Then, have the water drained at once.
The frequency of water draining or element replacementis determined by the contamination level in the fuel.Inspect or service the collection bowl for water daily andreplace the element every 10,000 miles or at leastevery other oil change or whichever comes first.
To drain water, do the following:1. Loosen the self-venting
drain to empty the bowlof water.
2. Tighten the drain. Run the engine and checkfor leaks.
To replace the element, do the following:1. Disconnect the element electrical connector from
the bowl.2. Loosen the self-venting drain to empty the bowl
of water.3. Remove the filter element from the mounting head
with the bowl connected.4. Remove the bowl from the filter element. Clean the
bowl and the O-ring gland and save them for re-use.5. Lubricate the O-ring with clean diesel fuel or motor
oil and place it in the bowl gland.6. Spin the bowl onto the new filter element snugly by
hand. Do not use tools to tighten them together.7. Lubricate the filter top seal with clean diesel fuel
or motor oil.8. Fill the filter element/bowl assembly with clean
diesel fuel and attach it onto the mounting head.Hand tighten an additional one-third to one-half turnafter full seal contact is made.
9. Complete the priming procedure. See “Fuel Priming”following.
10. Start your engine and check that there are no leaks.
If the water-in-fuel light comes on again after driving ashort distance or if the engine runs rough or stalls,a large amount of water has probably been pumpedinto the fuel tank. The fuel tank should be purged.
5-8

Fuel PrimingIn order for the DURAMAX™ diesel engine fuel systemto work properly, the fuel lines must be full of fuel andcontain no air. If air gets into the fuel lines, it will benecessary to prime the fuel lines to eliminate air beforeoperating the vehicle.
Air can get into the fuel lines any of the following ways:
• The vehicle ran out of fuel.
• The fuel filter was removed for servicing orreplacement.
• The fuel lines were removed or disconnected forservicing.
• The fuel filter water drain valve was opened whilethe engine was running.
Air in the fuel lines will not harm the engine or thevehicle, however, the engine may not be able to startuntil the fuel system is primed and the air is removed.
For vehicles with cruise control, the following procedurewill show you how:
1. Loosen the fuel filter eye bolt (A) which is locatedon the driver’s side of the vehicle toward the frontof the engine compartment.
2. Push down on the plunger at the top of the primingpump which is located at the top of the fuel filter.Be sure that there are no bubbles in fuel flowingfrom the eye bolt.
3. Tighten the eye bolt to 41Y (30 ft. lbs).
5-9

4. Loosen the air bleeding plug (B) which is located atthe side of the fuel supply pump on the driver’s sideof the vehicle toward the cab.
5. Push down on the plunger at the top of the primingpump. Be sure that there are no bubbles in the fuelflowing from the air bleeding plug.
6. Tighten the air bleeding plug to 6Y (52 in. lbs).
7. Push down on the plunger at the top of the primingpump about 60 more times.
8. Turn the ignition switch to the ON position. Do notstart the engine.
9. Press the cruise control main switch (if equipped)which is located on the lower left side of theinstrument panel to activate the fuel injectors.The light inside of the switch will turn on. You willhear the sound of the injectors. Allow the fuelinjectors to operate for five minutes.
10. Push down on the plunger at the top of the primingpump about 60 more times during this period.
11. Press the cruise control switch (if equipped) againto stop the injectors.
12. Start the engine and allow it to idle for a fewminutes.
If you are unable to start the engine, repeat this airbleeding procedure.
5-10
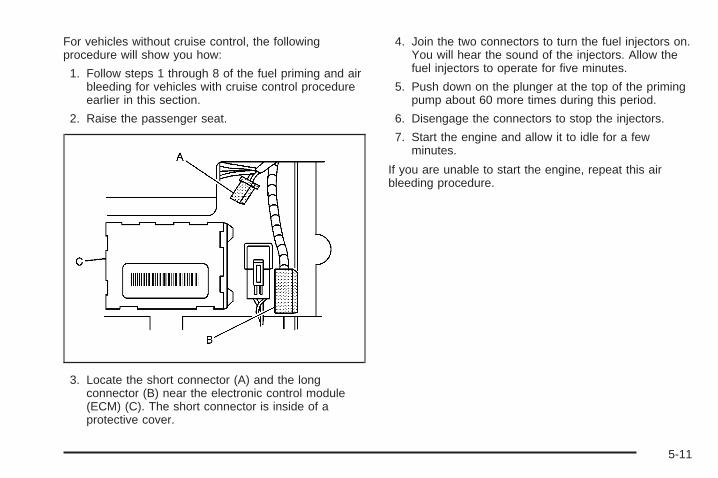
For vehicles without cruise control, the followingprocedure will show you how:
1. Follow steps 1 through 8 of the fuel priming and airbleeding for vehicles with cruise control procedureearlier in this section.
2. Raise the passenger seat.
3. Locate the short connector (A) and the longconnector (B) near the electronic control module(ECM) (C). The short connector is inside of aprotective cover.
4. Join the two connectors to turn the fuel injectors on.You will hear the sound of the injectors. Allow thefuel injectors to operate for five minutes.
5. Push down on the plunger at the top of the primingpump about 60 more times during this period.
6. Disengage the connectors to stop the injectors.
7. Start the engine and allow it to idle for a fewminutes.
If you are unable to start the engine, repeat this airbleeding procedure.
5-11

Running Out of FuelIf the engine stalls and you think that you’ve run outof fuel, do this:
{CAUTION:
Diesel fuel is flammable. It could start a fireif it gets on hot engine parts. You could beburned. Don’t let too much fuel flow from theair bleed valve, and wipe up any spilled fuelwith a cloth.
To restart your engine:
1. If you’re parked on a level surface, add at leasttwo gallons of fuel. However, if you’re parked ona slope, you may need to add up to five gallonsof fuel.
2. Follow the fuel priming procedure earlier in thissection to prime the fuel filter.
3. Close the air bleed valve.
4. Turn the ignition key to START for 10 to 15 secondsat a time until your engine starts. If the engine tries torun, but does not run smoothly, increase the rpm alittle using the accelerator pedal. This will help forceair through the system.
5-12

Filling Your Tank
{CAUTION:
Fuel vapor is highly flammable. It burnsviolently, and that can cause very bad injuries.Don’t smoke if you’re near fuel or refuelingyour vehicle. Keep sparks, flames and smokingmaterials away from fuel.
The fuel cap can be on either or both sides of yourvehicle depending on option content.
To take off the cap, turn it slowly to the left(counterclockwise).
{CAUTION:
If you get fuel on yourself and then somethingignites it, you could be badly burned. Fuel canspray out on you if you open the fuel cap tooquickly. This spray can happen if your tank isnearly full, and is more likely in hot weather.Open the fuel cap slowly and wait for any“hiss” noise to stop. Then unscrew the cap allthe way.
When you put the cap back on, turn it to the right(clockwise) until it is tight.
Notice: If you need a new fuel cap, be sure to getthe right type. Your dealer can get one for you.If you get the wrong type, it may not fit properly.This may cause your malfunction indicator lamp tolight and may damage your fuel tank and emissionssystem. See “Malfunction Indicator Lamp” in theIndex.
5-13

Filling a Portable Fuel Container
{CAUTION:
Never fill a portable fuel container while it is inyour vehicle. Static electricity discharge fromthe container can ignite the gasoline vapor.You can be badly burned and your vehicledamaged if this occurs. To help avoid injury toyou and others:
• Dispense gasoline only into approvedcontainers.
• Do not fill a container while it is inside avehicle, in a vehicle’s trunk, pickup bed oron any surface other than the ground.
• Bring the fill nozzle in contact with theinside of the fill opening before operatingthe nozzle. Contact should be maintaineduntil the filling is complete.
• Don’t smoke while pumping gasoline.
Checking Things Underthe Hood
Engine Oil (DURAMAX™ Diesel)
Checking Engine OilIt’s a good idea to check your engine oil level everytime you get fuel. In order to get an accurate reading,the oil must be warm and the vehicle must be onlevel ground.
The engine oil dipstick islocated behind the cab onthe driver’s side of thevehicle (it can be reachedwithout tilting the cab).
In order to get an accurate reading, the oil must bewarm (at normal operating temperature) and the vehiclemust be on level ground.
5-14

Turn off the engine and give the oil at least five minutesto drain back into the oil pan. With a cool engine,allow 30 minutes. If you don’t, the oil dipstick might notshow the actual level.
Pull out the dipstick and clean it with a paper towel ora cloth, then push it back in all the way. Remove itagain, keeping the tip down.
When to Add Engine OilIf the oil is at or below the lower hole at the tip of thedipstick, then you’ll need to add at least one quart of oil.But you must use the right kind. This section explainswhat kind of oil to use. For engine oil crankcasecapacity, see Capacities and Specifications onpage 5-84.
Notice: Don’t add too much oil. If your enginehas so much oil that the oil level gets above theupper hole that shows the proper operating range,your engine could be damaged.
Be sure to add enough oilto put the level somewherein the proper operatingrange. Push the dipstickall the way back inwhen you’re through.
5-15

What Kind of Engine Oil to UseLook for these two things:
• CI-4 or CH-4
Oils designated as API CI-4 or CH-4 arerecommended for your vehicle. The CI-4 or CH-4designations may appear either alone, together or incombination with other API designations, such asAPI CI-4/SL.These letters show American Petroleum Institute(API) levels of quality.
Notice: If you use oil that doesn’t have thisdesignation, CH-4, you can cause engine damagenot covered by your warranty.Notice: Use only engine oils that have one of thesedesignations CI-4 or CH-4 for the DURAMAX™ dieselengine. Failure to use the recommended oils canresult in engine damage not covered by yourwarranty.
• SAE 15W-40
As shown in the viscosity chart, SAE 15W-40 isbest for your vehicle. However, you can useSAE 10W-30 at temperatures above 0°F (−18°C).When it’s very cold, below 0°F (−18°C), you shoulduse SAE 5W-40 to improve cold starting.These numbers on the oil container show itsviscosity, or thickness. Do not use other viscosityoils such as SAE 10W-40 or SAE 20W-50.
This doughnut-shapedlogo (symbol) is used onmost oil containers tohelp you select the correctoil. It means that the oilhas been certified bythe American PetroleumInstitute.
You should look for this on the oil container, and useonly those oils that display this logo.
GM Goodwrench® oil of the recommended viscositygrades meets all the requirements for your vehicle.
5-16

Engine Oil AdditivesDon’t add anything to your oil. The recommended oilswith the API service symbol are all you will needfor good performance and engine protection.
When to Change Engine OilChange engine oil and filter every 10,000 miles(16 000 km) or every 12 months, whichever occurs first.
What to Do with Used OilUsed engine oil contains certain elements that may beunhealthy for your skin and could even cause cancer.Don’t let used oil stay on your skin for very long. Cleanyour skin and nails with soap and water, or a goodhand cleaner. Wash or properly throw away clothing orrags containing used engine oil. See the manufacturer’swarning about the use and disposal of oil products.
Used oil can be a threat to the environment. If youchange your own oil, be sure to drain all the oil from thefilter before disposal. Never dispose of oil by putting itin the trash, pouring it on the ground, into sewers,or into streams or bodies of water. Instead, recycle it bytaking it to a place that collects used oil. If you havea problem properly disposing of your used oil, ask yourdealer, a service station or a local recycling centerfor help.
5-17

Engine Air Cleaner/FilterThe engine air cleaner/filter is located behind the cab onthe passenger’s side.
When to Inspect the Engine AirCleaner/Filter
If your vehicle is equippedwith a filter changeindicator, it lets you knowwhen the filter needsto be replaced.
Vehicles without a change indicator, inspect the aircleaner/filter every 15,000 miles (25 000 km) andreplace the filter every 30,000 miles (50 000 km).If you are driving in dusty/dirty conditions, inspect thefilter at each engine oil change.
5-18

How to Inspect the Engine AirCleaner/FilterLocate the filter change indicator. When the changeindicator turns black or is in the red/orange “change″zone, replace the filter and reset the indicator.To inspect the air cleaner/filter, remove the filter fromthe vehicle and lightly shake filter to release loose dustand dirt. If the filter remains “caked” with dirt, a newfilter is required.To inspect or replace remove and reinstall the filter andreset the indicator (if equipped), do the following:
1. To access the engine air cleaner/filter, remove allthree finger screws and carefully remove the cover.
2. The engine air cleaner/filter can then be removed.
3. Be sure that all three finger screws are tightenedsecurely when replacing the engine air cleaner/filterand reinstalling the housing cover.
{CAUTION:
Operating the engine with the air cleaner/filteroff can cause you or others to be burned.The air cleaner not only cleans the air, it helpsto stop flame if the engine backfires. If it isn’tthere and the engine backfires, you couldbe burned. Don’t drive with it off, and becareful working on the engine with the aircleaner/filter off.
Notice: If the air cleaner/filter is off, a backfirecan cause a damaging engine fire. And, dirtcan easily get into your engine, which willdamage it. Always have the air cleaner/filter in placewhen you’re driving.
5-19

Automatic Transmission Fluid
When to CheckA good time to have it checked is when the engine oilis checked. See your Allison Automatic TransmissionOperator’s Manual to find out when to change yourtransmission fluid and filters.
How to Check and What to UseThe Allison Automatic Transmission Operator’s Manualthat came with the vehicle shows how to check theautomatic transmission fluid and what fluid to use.
Automatic Transmission External FilterYour automatic transmission filter requires periodicreplacement.
Consult the Allison Automatic Transmission Operator’sManual that came with the vehicle for proper changeintervals.
Manual Transmission FluidRefer to the Maintenance Schedule to determine howoften to check the lubricant and when to change it.See Scheduled Maintenance on page 6-5.
Refer to the Maintenance Schedule to determine whatkind of fluid to use. See Part C: RecommendedFluids and Lubricants on page 6-28.
When to CheckA good time to have it checked is when the engine oil ischecked. See your Maintenance Schedule to find outwhen to change your transmission fluid.
How to Check and What to UseCheck the fluid level only when your engine is off, thevehicle is parked on a level place and the transmissionis cool enough for you to rest your fingers on thetransmission case.
Then, follow these steps:
1. Remove the filler plug.
2. Check to be sure that the lubricant level is up tothe bottom of the fill opening. On heavy dutytransmissions (an inch of oil level equals aboutone gallon of fluid.)
3. If the fluid level is good, install the plug and be sureit is fully seated. If the fluid level is low, add morefluid as described in the next steps.
5-20

How to Add FluidHere’s how to add fluid. Refer to the MaintenanceSchedule to determine the proper fluid to use. See PartC: Recommended Fluids and Lubricants on page 6-28.
1. Remove the filler plug.
2. Add fluid at the filler plug hole. Add only enoughfluid to bring the fluid level up to the bottom of thefill opening.
3. Install the filler plug. Be sure the plug is fullyseated.
Hydraulic ClutchIt is not necessary to regularly check clutch fluid unlessyou suspect there is a leak in the system. Addingfluid won’t correct a leak.
A fluid loss in this system could indicate a problemHave the system inspected and repaired.
When to Check and What to Use
The hydraulic clutch fluidreservoir is located behindthe front panel on thedriver’s side of the vehicle.
Refer to the maintenance schedule to determine howoften you should check the fluid level in your clutchmaster cylinder reservoir and for the proper fluid.See “Owner Checks and Services” and “RecommendedFluids and Lubricants” in the Index.
How to Check and Add FluidThe proper fluid should be added if the fluid level is notbetween the MAX and MIN marks.
5-21

Engine CoolantThe cooling system in your vehicle is filled withDEX-COOL® engine coolant. This coolant is designedto remain in your vehicle for 5 years or 150,000 miles(240 000 km), whichever occurs first, if you addonly DEX-COOL® extended life coolant.
The following explains your cooling system and how toadd coolant when it is low. If you have a problemwith engine overheating, see Engine Overheating onpage 5-26.
A 50/50 mixture of clean, drinkable water andDEX-COOL® coolant will:
• Give freezing protection down to −34°F (−37°C).
• Give boiling protection up to 252°F (122°C).
• Protect against rust and corrosion.
• Help keep the proper engine temperature.
• Let the warning lights and gages work as theyshould.
Notice: When adding coolant, it is important thatyou use only DEX-COOL ® (silicate-free) coolant.If coolant other than DEX-COOL ® is added tothe system, premature engine, heater core orradiator corrosion may result. In addition, the enginecoolant will require change sooner -- at 30,000 miles(50,000 km) or 24 months, whichever occurs first.Damage caused by the use of coolant otherthan DEX-COOL ® is not covered by your newvehicle warranty.
5-22

What to UseUse a mixture of one-half clean, drinkable water andone-half DEX-COOL® coolant which won’t damagealuminum parts. If you use this coolant mixture,you don’t need to add anything else.
{CAUTION:
Adding only plain water to your coolingsystem can be dangerous. Plain water, orsome other liquid such as alcohol, can boilbefore the proper coolant mixture will. Yourvehicle’s coolant warning system is set for theproper coolant mixture. With plain water or thewrong mixture, your engine could get too hotbut you wouldn’t get the overheat warning.Your engine could catch fire and you or otherscould be burned. Use a 50/50 mixture of clean,drinkable water and DEX-COOL ® coolant.
Notice: If you use an improper coolant mixture,your engine could overheat and be badly damaged.The repair cost wouldn’t be covered by yourwarranty. Too much water in the mixture can freezeand crack the engine, radiator, heater core andother parts.
If you have to add coolant more than four times a year,have your dealer check your cooling system.
Notice: If you use the proper coolant, you don’thave to add extra inhibitors or additives which claimto improve the system. These can be harmful.
5-23

Checking Coolant
The coolant surge tank pressure cap can be accessedwithout tilting the cab.
{CAUTION:
Turning the surge tank pressure cap when theengine and radiator are hot can allow steamand scalding liquids to blow out and burn youbadly. Never turn the surge tank pressurecap — even a little — when the engine andradiator are hot.
The vehicle must be on a level surface. When yourengine is cold, the coolant level should be at theCOLD FILL mark or higher.
If the low coolant lightcomes on and stays on,it means you’re lowon engine coolant.
See Low Coolant Warning Light on page 3-31 for furtherinformation.
5-24

Adding CoolantIf you need more coolant, add the proper DEX-COOL®
coolant mixture at the surge tank, but only when theengine is cool.
{CAUTION:
You can be burned if you spill coolant on hotengine parts. Coolant contains ethylene glycol,and it will burn if the engine parts are hotenough. Don’t spill coolant on a hot engine.
When replacing the pressure cap, make sure it ishand-tight.
Coolant Surge Tank Pressure Cap
The surge tank pressurecap is located behind thecab on the driver’sside of the vehicle.
Notice: Your surge tank pressure cap is apressure-type cap for use with medium duty coolingsystems only. It must be tightly installed to preventcoolant loss and possible engine damage fromoverheating.
5-25

Engine OverheatingYou will find a coolant temperature warning gage onyour vehicle’s instrument panel, as well as a low coolantwarning light. Your vehicle also has a check gageswarning light on the instrument panel.
If Steam Is Coming From Your Engine
{CAUTION:
Steam from an overheated engine can burnyou badly, even if you just open the hood.Stay away from the engine if you see or hearsteam coming from it. Just turn it off and geteveryone away from the vehicle until it coolsdown. Wait until there is no sign of steam orcoolant before you open the hood.
If you keep driving when your engine isoverheated, the liquids in it can catch fire.You or others could be badly burned. Stopyour engine if it overheats, and get out of thevehicle until the engine is cool.
Notice: If your engine catches fire because youkeep driving with no coolant, your vehicle canbe badly damaged. The costly repairs would notbe covered by your warranty.
5-26

If No Steam Is Coming From YourEngineAn overheat warning, along with a low coolant light, canindicate a serious problem. See Low Coolant WarningLight on page 3-31 for more information.
If you get an engine overheat warning with no lowcoolant light, but see or hear no steam, the problem maynot be too serious. Sometimes the engine can get alittle too hot when you:
• Climb a long hill on a hot day.
• Stop after high-speed driving.
• Idle for long periods in traffic.
If you get the overheat warning with no sign of steam,try this for a minute or so:
1. In heavy traffic, let the engine idle in neutral whilestopped. If it is safe to do so, pull off the road, shiftto park or neutral and let the engine idle.
2. Turn on your heater to full hot at the highest fanspeed and open the window as necessary.
3. If climbing a hill, downshift to raise engine and fanspeeds.
If you no longer have the overheat warning, you candrive. Just to be safe, drive slower for about 10 minutes.If the warning doesn’t come back on, you can drivenormally.
If the warning continues and you have not stopped,pull over, stop, and park your vehicle right away.
If there’s still no sign of steam, you can push down theaccelerator until the engine speed is about twice asfast as normal idle speed for at least three minutes whileyou’re parked. If you still have the warning, turn offthe engine and get everyone out of the vehicle until itcools down.
You may decide not to lift the hood but to get servicehelp right away.
5-27

Cooling System
{CAUTION:
If your vehicle has air conditioning, theauxiliary electric fan under the hood can startup even when the engine is not running andcan injure you. Keep hands, clothing and toolsaway from any underhood electric fan.
If the coolant inside the coolant surge tank is boiling,don’t do anything else until it cools down. The vehicleshould be parked on a level surface. When the engine is cold, the coolant level should be at
the COLD FULL mark. If it isn’t, you may have a leakat the pressure cap or in the radiator hoses, heaterhoses, radiator, water pump or somewhere else in thecooling system.
5-28

{CAUTION:
Heater and radiator hoses, and other engineparts, can be very hot. Don’t touch them.If you do, you can be burned.
Don’t run the engine if there is a leak. If yourun the engine, it could lose all coolant. Thatcould cause an engine fire, and you could beburned. Get any leak fixed before you drive thevehicle.
If there seems to be no leak, start the engine again.The engine cooling fan speed should increase when idlespeed is doubled by pushing the accelerator pedaldown. If it doesn’t, your vehicle needs service. Turn offthe engine.
Notice: Engine damage from running your enginewithout coolant isn’t covered by your warranty.
Notice: When adding coolant, it is important thatyou use only DEX-COOL ® (silicate-free) coolant.If coolant other than DEX-COOL ® is added tothe system, premature engine, heater core orradiator corrosion may result. In addition, the enginecoolant will require change sooner — at 30,000 miles(50 000 km) or 24 months, whichever occurs first.Damage caused by the use of coolant otherthan DEX-COOL ® is not covered by your newvehicle warranty.
5-29

How to Add Coolant to the CoolantSurge TankIf you haven’t found a problem yet, but the coolant levelisn’t at the COLD FULL mark, add a 50/50 mixture ofclean, drinkable water and DEX-COOL® coolant atthe coolant surge tank, but be sure the cooling system,including the coolant surge tank pressure cap, is coolbefore you do it. See Engine Coolant on page 5-22 formore information.
If no coolant is visible in the surge tank, add coolantas follows:
{CAUTION:
Steam and scalding liquids from a hot coolingsystem can blow out and burn you badly. Theyare under pressure, and if you turn the coolantsurge tank pressure cap — even a little — theycan come out at high speed. Never turn thecap when the cooling system, including thecoolant surge tank pressure cap, is hot. Waitfor the cooling system and coolant surge tankpressure cap to cool if you ever have to turnthe pressure cap.
{CAUTION:
Adding only plain water to your coolingsystem can be dangerous. Plain water, orsome other liquid such as alcohol, can boilbefore the proper coolant mixture will. Yourvehicle’s coolant warning system is set for theproper coolant mixture. With plain water or thewrong mixture, your engine could get too hotbut you wouldn’t get the overheat warning.Your engine could catch fire and you or otherscould be burned. Use a 50/50 mixture of clean,drinkable water and DEX-COOL ® coolant.
Notice: In cold weather, water can freeze and crackthe engine, radiator, heater core and other parts.Use the recommended coolant and the propercoolant mixture.
5-30

{CAUTION:
You can be burned if you spill coolant on hotengine parts. Coolant contains ethylene glycoland it will burn if the engine parts are hotenough. Don’t spill coolant on a hot engine.
1. Park the vehicle on a level surface. You canremove the coolant surge tank pressure capwhen the cooling system, including the coolantsurge tank pressure cap and upper radiator hose,is no longer hot. Turn the pressure cap slowlycounterclockwise (left) about one full turn. If youhear a hiss, wait for that to stop. A hiss means thereis still some pressure left.
2. Then keep turning the pressure cap slowly, andremove it.
3. Then fill the coolant surge tank with the propermixture, to the COLD FULL mark.
5-31

4. With the coolant surge tank pressure cap off, startthe engine and let it run until you can feel theupper radiator hose getting hot. Watch out for theengine cooling fan.By this time, the coolant level inside the coolantsurge tank may be lower. If the level is lower, addmore of the proper mixture to the coolant surge tankuntil the level reaches slightly above the COLDFULL mark.
5. Then replace thepressure cap. Be surethe pressure cap ishand-tight andfully seated.
5-32

Power Steering FluidSee your Maintenance Schedule for when to check yourpower steering fluid.
How To Check Power Steering FluidCheck your power steering fluid only when the engineis warm. If the engine isn’t warm, you probably won’t getan accurate reading.
If the fluid level is betweenthe MIN and MAX marks,you have enough.If you need fluid, add onlyenough of the properfluid to bring it into viewin the sight glass.
If your power steering fluid level is low, this can causethe brake or service brake soon warning lights tocome on. If either light remains on after you have addedpower steering fluid to the proper level, then shut offthe engine for 10 seconds. This should reset the brakewarning lights. If one or both lights stay on though,see “Hydraulic Brake System Warning Lights” underBrake System Warning Light on page 3-26 formore information.
What to UseTo determine what kind of fluid to use, see Part C:Recommended Fluids and Lubricants on page 6-28.
Notice: When adding power steering fluid ormaking a complete fluid change, always use theproper fluid. Failure to use the proper fluid cancause leaks and damage hoses and seals.
5-33

Windshield Washer Fluid
What to UseWhen you need windshield washer fluid, be sure to readthe manufacturer’s instructions before use. If you will beoperating your vehicle in an area where the temperaturemay fall below freezing, use a fluid that has sufficientprotection against freezing.
Adding Washer Fluid
The windshield washerreservoir is located behindthe front panel on thedriver’s side of the vehicle.
Open the cap with the washer symbol on it. Add washerfluid until the tank is full.
Notice:
• When using concentrated washer fluid, followthe manufacturer’s instructions for addingwater.
• Don’t mix water with ready-to-use washer fluid.Water can cause the solution to freeze anddamage your washer fluid tank and other partsof the washer system. Also, water doesn’tclean as well as washer fluid.
• Fill your washer fluid tank only three-quartersfull when it’s very cold. This allows forexpansion if freezing occurs, which coulddamage the tank if it is completely full.
• Don’t use engine coolant (antifreeze) in yourwindshield washer. It can damage yourwasher system and paint.
5-34

Brakes
Brake Fluid
If your vehicle has hydraulic brakes, there’s a brakemaster cylinder. Refer to the Maintenance Schedule todetermine when to check your brake fluid.
{CAUTION:
Don’t add brake fluid before you check thelevel. If you do, you could get too much brakefluid. Brake fluid could spill on the hot engineand it can catch fire. You could be burned andyour vehicle could be damaged. See “CheckingBrake Fluid” in this section.
5-35

Checking Brake FluidApply the brake pedal several times with the ignition off.Then clean one of the reservoir caps and the areaaround the cap, and remove it. The fluid level should beeven with the bottom ring of the filler opening.
If it’s low, add enough fluidto fill the reservoir to theproper level.
What to AddUse the proper fluid listed in your Maintenance Schedule.Use new brake fluid from a sealed container only.
Always clean the brake fluid reservoir cap and the areaaround the cap before removing it. This will helpkeep dirt from entering the reservoir.
{CAUTION:
With the wrong kind of fluid in your brakesystem, your brakes may not work well, or theymay not even work at all. This could cause acrash. Always use the proper brake fluid.
Notice:
• Using the wrong fluid can badly damage brakesystem parts. For example, just a few drops ofmineral-based oil, such as engine oil, in yourbrake system can damage brake systemparts so badly that they’ll have to be replaced.Don’t let someone put in the wrong kind of fluid,and don’t use DOT-5 silicone brake fluid.
• If you spill brake fluid on your vehicle’s paintedsurfaces, the paint finish can be damaged.Be careful not to spill brake fluid on yourvehicle. If you do, wash it off immediately.See “Appearance Care” in the Index.
5-36

Four-Wheel Drum Brakes (Air Only)The brake drums should be removed and inspectedeach time the tires are removed for rotation or changing.When you have the front brakes replaced, have therear brakes inspected, too.
Brake linings should always be replaced as completeaxle sets.
Brake Pedal TravelSee your dealer if the brake pedal does not return tonormal height, or if there is a rapid increase inpedal travel. This could be a sign of brake trouble.
Brake AdjustmentEvery time you make a brake stop, your brakes adjustfor wear.
Four-Wheel Disc Brakes(Hydraulic Only)Your vehicle has four-wheel disc brakes.
Some driving conditions or climates may cause a brakesqueal when the brakes are first applied or lightlyapplied. This does not mean something is wrong withyour brakes.
Brake linings should always be replaced as completeaxle sets.
Replacing Brake System PartsThe braking system on a vehicle is complex. Its manyparts have to be of top quality and work well together ifthe vehicle is to have really good braking. Your vehiclewas designed and tested with top-quality GM brake parts.When you replace parts of your braking system — forexample, when your brake linings wear down and youneed new ones put in — be sure you get new approvedGM replacement parts. If you don’t, your brakes may nolonger work properly. For example, if someone puts inbrake linings that are wrong for your vehicle, the balancebetween your front and rear brakes can change — for theworse. The braking performance you’ve come to expectcan change in many other ways if someone puts in thewrong replacement brake parts.
Air Brake SystemsIf your vehicle has air brakes, it is important to get rid ofmoisture in your system. Moisture will damage yoursystem if it isn’t removed daily.
There are two ways to do this. One is automatic if yourair-brake vehicle has the optional moisture ejector.If your vehicle doesn’t have that option, you must drainthe air reservoirs everyday.
Drain them at full system pressure. To be sure you’re atfull pressure, check your air pressure gage. It shouldread at least 100 psi (692 kPa).
5-37
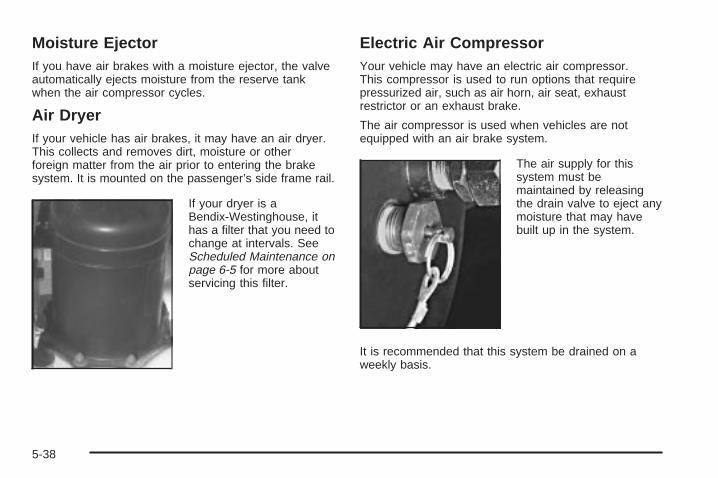
Moisture EjectorIf you have air brakes with a moisture ejector, the valveautomatically ejects moisture from the reserve tankwhen the air compressor cycles.
Air DryerIf your vehicle has air brakes, it may have an air dryer.This collects and removes dirt, moisture or otherforeign matter from the air prior to entering the brakesystem. It is mounted on the passenger’s side frame rail.
If your dryer is aBendix-Westinghouse, ithas a filter that you need tochange at intervals. SeeScheduled Maintenance onpage 6-5 for more aboutservicing this filter.
Electric Air CompressorYour vehicle may have an electric air compressor.This compressor is used to run options that requirepressurized air, such as air horn, air seat, exhaustrestrictor or an exhaust brake.
The air compressor is used when vehicles are notequipped with an air brake system.
The air supply for thissystem must bemaintained by releasingthe drain valve to eject anymoisture that may havebuilt up in the system.
It is recommended that this system be drained on aweekly basis.
5-38

Clutch Pedal Free TravelIf you have a manual transmission, your clutch will needadjustment when pedal free travel gets down to about1/4 inch (32 mm), as measured at the clutch pedal pad.You should have 1 1/2 to 2 inches (38 to 51 mm) ofclutch pedal free travel. See Scheduled Maintenance onpage 6-5 for more information.
If your clutch ever needs service, be sure to use onlyGM clutch replacement parts.
Electric/Hydraulic Parking Brake FluidIf you have an electric/hydraulic parking brake,a good time to check the fluid level is when you checkthe fluid levels under the tilt cab. The fluid reservoiris located in the component box beneath the driver’sside of the cab on the frame rail.
If you need to add fluid, use Dexron® III AutomaticTransmission Fluid. See Scheduled Maintenanceon page 6-5.
How to Check and Add FluidFirst, apply the parking brake. To check the fluid level,look at the MAX and MIN lines on the side of thereservoir. If the level is below the MAX line, add fluid.To add fluid, clean away any dirt around the reservoircap. Remove the reservoir cap and add enough fluid tobring it up to the MAX level.
5-39

Chassis Lubrication
5-40
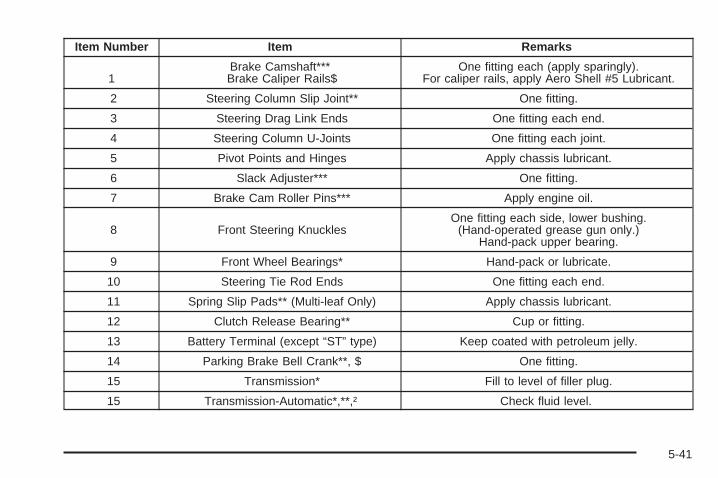
Item Number Item Remarks
1Brake Camshaft***Brake Caliper Rails$
One fitting each (apply sparingly).For caliper rails, apply Aero Shell #5 Lubricant.
2 Steering Column Slip Joint** One fitting.
3 Steering Drag Link Ends One fitting each end.
4 Steering Column U-Joints One fitting each joint.
5 Pivot Points and Hinges Apply chassis lubricant.
6 Slack Adjuster*** One fitting.
7 Brake Cam Roller Pins*** Apply engine oil.
8 Front Steering KnucklesOne fitting each side, lower bushing.
(Hand-operated grease gun only.)Hand-pack upper bearing.
9 Front Wheel Bearings* Hand-pack or lubricate.
10 Steering Tie Rod Ends One fitting each end.
11 Spring Slip Pads** (Multi-leaf Only) Apply chassis lubricant.
12 Clutch Release Bearing** Cup or fitting.
13 Battery Terminal (except “ST” type) Keep coated with petroleum jelly.
14 Parking Brake Bell Crank**, $ One fitting.
15 Transmission* Fill to level of filler plug.
15 Transmission-Automatic*,**,† Check fluid level.
5-41

Item Number Item Remarks
16 Propshaft Slip Joints One fitting each joint; lubricate withGM Part No. 1051344 Wheel Bearing Lubricant.
17 Propshaft U-joints
One fitting each joint (1480 and 1550 Series);lubricate with GM part NO. 1051344 Wheel BearingLubricant. Two fittings each joint (1610) Series andlarger); lubricate with GM Part No. 1051344 Wheel
Bearing Lubricant.
18 Rear Wheel Bearings* Hand-pack or lubricate.
19 Rear Axle* Fill to level of filler plug.
20 Parking Brake Clevis Pin$ Apply chassis lubricant.
21 Master Cylinder$ Fill 1/4 inch (6 mm) below opening.
22 Parking Brake Lever Pivot**, $ Apply chassis lubricant.
23 Clutch Release Cross Shaft** One fitting each.
* Refer to Maintenance Schedule.** Applies to some vehicles.*** Applies to air brakes only.† Refer to Allison Transmission® Operator’s Manual.$ Applies to hydraulic brakes only.
5-42

BatteryYour new vehicle comes with one or more maintenancefree ACDelco® batteries. When it’s time for a newbattery, be sure it has the replacement number shownon the original battery’s label. We recommend anACDelco® battery.Warning: Battery posts, terminals and relatedaccessories contain lead and lead compounds,chemicals known to the State of California to causecancer and reproductive harm. Wash hands afterhandling.
Vehicle StorageIf you’re not going to drive your vehicle for 25 days ormore, remove the black, negative (−) cable from thebattery. This will help keep your battery from runningdown. (If your vehicle has more than one battery,be sure to remove the negative (−) battery cable fromeach battery.)
{CAUTION:
Batteries have acid that can burn you and gasthat can explode. You can be badly hurt if youaren’t careful. See “Jump Starting” next fortips on working around a battery withoutgetting hurt.
When you are ready to use the vehicle again, refer tothe engine starting procedure in the Index.
Contact your dealer to learn how to prepare yourvehicle for longer storage periods.
5-43

Jump StartingIf your batteries have run down, you may want to useanother vehicle and some jumper cables to start yourvehicle. Be sure to follow the steps below to do it safely.
{CAUTION:
Batteries can hurt you. They can be dangerousbecause:
• They contain acid that can burn you.• They contain gas that can explode or ignite.• They contain enough electricity to burn you.
If you don’t follow these steps exactly, some orall of these things can hurt you.
Notice: Ignoring these steps could result in costlydamage to your vehicle that wouldn’t be coveredby your warranty.
Trying to start your vehicle by pushing or pulling itwon’t work, and it could damage your vehicle.
1. Check the other vehicle. It must have a 12-voltbattery (or batteries) with a negative groundsystem.
Notice: If the other system isn’t a 12-volt systemwith a negative ground, both vehicles can bedamaged.
In diesel engine vehicles with two batteries (or more),you may not be able to get enough power from asingle battery in another vehicle to start your dieselengine, especially in cold weather.If your vehicle has more than one battery, use theone closest to the starter – this will reduce electricalresistance.
2. Get the vehicles close enough so the jumper cablescan reach, but be sure the vehicles aren’t touchingeach other. If they are, it could cause a groundconnection you don’t want. You wouldn’t be able tostart your vehicle, and the bad grounding coulddamage the electrical systems.To avoid the possibility of the vehicles rolling, setthe parking brake firmly on both vehicles involvedin the jump start procedure. Put an automatictransmission in PARK (P) or a manual transmissionin neutral before setting the parking brake.
5-44

Notice: If you leave your radio on, it could be badlydamaged. The repairs wouldn’t be covered byyour warranty.
3. Turn off the ignition on both vehicles. Unplugunnecessary accessories plugged into the cigarettelighter or accessory power outlets. Turn off theradio and all lamps that aren’t needed. This willavoid sparks and help save both batteries, and itcould save your radio!
4. Locate the batteries on each vehicle. Find thepositive (+) and negative (-) terminals on eachbattery.
{CAUTION:
Using a match near a battery can cause batterygas to explode. People have been hurt doingthis, and some have been blinded. Use aflashlight if you need more light.
CAUTION: (Continued)
CAUTION: (Continued)
Be sure the batteries have enough water.You don’t need to add water to the ACDelco ®
battery (or batteries) installed in your newvehicle. But if a battery has filler caps, be surethe right amount of fluid is there. If it is low,add water to take care of that first. If you don’t,explosive gas could be present.
Battery fluid contains acid that can burn you.Don’t get it on you. If you accidentally get it inyour eyes or on your skin, flush the place withwater and get medical help immediately.
{CAUTION:
Fans or other moving engine parts can injureyou badly. Keep your hands away from movingparts once the engine is running.
5-45

5. Check that the jumper cables don’t have loose ormissing insulation. If they do, you could get ashock. The vehicles could be damaged, too.Before you connect the cables, here are somebasic things you should know. Positive (+) will go topositive (+) or to a remote positive (+) terminal ifthe vehicle has one. Negative (−) will go to a heavy,unpainted metal engine part or to a remotenegative (−) terminal if the vehicle has one.Don’t connect the positive (+) to negative (−) oryou’ll get a short that would damage the battery andmaybe other parts too. And don’t connect thenegative (−) cable to the negative (−) terminal onthe dead battery because this can cause sparks.
6. Connect the redpositive (+) cable to thepositive (+) terminal ofthe dead battery. Use aremote positive (+)terminal if the vehiclehas one.
7. Don’t let the other endtouch metal. Connect itto the positive (+)terminal of the goodbattery. Use a remotepositive (+) terminalif the vehicle has one.
5-46

8. Now connect the blacknegative (−) cable tothe negative (−)terminal of the goodbattery. Use a remotenegative (−) terminalif the vehicle has one.
9. Don’t let the other end touch anything until thenext step. The other end of the negative (−)cable doesn’t go to the dead battery. It goes to aheavy, unpainted metal engine part or to the remotenegative (−) terminal on the vehicle with the deadbattery.
10. Connect the other endof the negative (−)cable at least 18 inches(45 cm) away fromthe dead battery,but not near engineparts that move.The electricalconnection is just asgood there, andthe chance of sparksgetting back to thebattery is much less.
11. Now start the vehicle with the good batteries andrun the engine for one or two minutes. If yourvehicle has the high idle option, use it.
12. Try to start the vehicle with the dead batteries.If it won’t start after a few tries, it probably needsservice.
5-47

Notice: Damage to your vehicle may result fromelectrical shorting if jumper cables are removedincorrectly. To prevent electrical shorting, take carethat the cables don’t touch each other or anyother metal. The repairs wouldn’t be covered byyour warranty.
A. Heavy, Unpainted Metal Engine Part or RemoteNegative (−) Terminal
B. Good Battery or Remote Positive (+) and RemoteNegative (−) Terminals
C. Dead Battery or Remote Positive (+) Terminal
To disconnect the jumper cables from both vehicles,do the following:
1. Disconnect the black negative (−) cable from thevehicle that had the dead batteries.
2. Disconnect the black negative (−) cable from thevehicle with the good batteries.
3. Disconnect the red positive (+) cable from thevehicle with the good batteries.
4. Disconnect the red positive (+) cable from theother vehicle.
Jumper Cable Removal
5-48

Rear AxleWhen to Check and Change LubricantRefer to the Maintenance Schedule to determinehow often to check the lubricant and when to change it.See Scheduled Maintenance on page 6-5.
How to Check Lubricant
To get an accurate reading, the vehicle should be on alevel surface.If the level is below the bottom of the filler plug hole,you’ll need to add some lubricant. Add enough lubricantto raise the level to the bottom of the filler plug hole.
What to UseRefer to the Maintenance Schedule to determine whatkind of lubricant to use. See Part C: RecommendedFluids and Lubricants on page 6-28.
Rear Axle Shift Motor
When to Check and Change FluidIf you have an optional air-shift two-speed, controlledtraction, or locking differential type rear axle, a good timeto check the fluid level in the axle shift motor is whenthe rear axle lubricant is checked. Use refrigerantoil (shift motor only).
How to Check FluidRemove the plug on the front plate of the axle shiftmotor, add enough fluid to raise the level to the bottomof the filler plug hole, then replace the plug.
What to UseRefer to your Maintenance Schedule to determine whatkind of lubricant to use. See Part C: RecommendedFluids and Lubricants on page 6-28.
5-49

Cab Tilting
Before You Tilt the CabMost fluids and lubricants requiring regular checking canbe accessed at the back of the cab. If you need togain access to components under the cab, follow thisentire procedure carefully.
• Find a level place to tilt the cab.
• Secure all loose articles in the cab and close thecab door.
• Check for adequate clearance in front and abovethe cab.
To help prevent the vehicle from moving:
1. Apply the parking brake.
2. Place the automatic transmission in PARK (P) orshift the manual transmission to NEUTRAL.
3. Turn the engine off.
4. Block the front and rear wheels.
Tilting the CabTo tilt the cab, do the following:
1. Locate the lever pin at the rear of the cab, on thepassenger’s side.
2. Turn the lever pin sothat the tab is alignedwith the slot. Removethe lever pin.
5-50

3. Move the primary tilt lever all the way down.
4. Pull the secondary latchlever to release thehook from the catch atthe back of the cab.
5. Using the handle located at the bottom of the cabat the back, tilt the cab forward.
5-51

6. Tilt the cab all the wayforward until the cabsupport under thecab locks fully.
A. Safety Lock PinB. Cab Support
7. Remove the safety lockpin from its retainer onthe cab support. Insertthe pin into the hole inthe cab support byaligning the tab withthe slot.
{CAUTION:
A cab not properly locked in the tilted positioncould fall, causing serious injury. To ensurethat the cab is securely locked in position andwon’t move, the safety lock pin (A) mustalways be inserted into the cab support (B)when the cab is in the tilted position.
{CAUTION:
Things that burn can get on hot engine partsand start a fire. These include liquids like fuel,oil, coolant, brake fluid, windshield washer andother fluids, and plastic or rubber. You orothers could be burned. Be careful not to dropor spill things that will burn onto a hot engine.
5-52

Lowering the CabWhen the cab is ready to be lowered, follow theinstructions below carefully. Before lowering the cab,be sure all filler caps ar on properly.
1. Remove the safety lockpin from the cabsupport by turning itand pulling it out.
2. Squeeze the lever onthe cap support torelease the detent.
5-53

3. Using the handle located at the bottom of the cabtoward the back, lower the cab until the hookcatches and the cab is held down.
4. Push the primary tilt lever upward fully to lock thecab to the chassis.
5. Reinstall the pin andturn it to keep theprimary tilt lever frommoving downward.
{CAUTION:
An unsecured cab could move suddenlycausing an accident or an injury. Be sure thetilt cab is properly secured to the chassisbefore moving the vehicle.
5-54
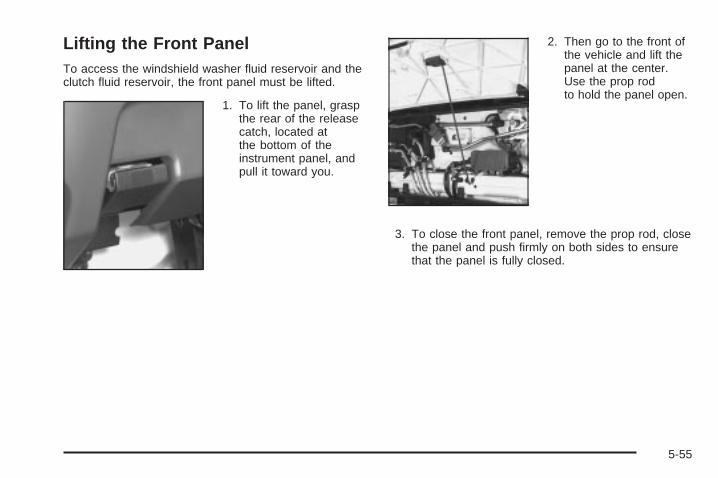
Lifting the Front PanelTo access the windshield washer fluid reservoir and theclutch fluid reservoir, the front panel must be lifted.
1. To lift the panel, graspthe rear of the releasecatch, located atthe bottom of theinstrument panel, andpull it toward you.
2. Then go to the front ofthe vehicle and lift thepanel at the center.Use the prop rodto hold the panel open.
3. To close the front panel, remove the prop rod, closethe panel and push firmly on both sides to ensurethat the panel is fully closed.
5-55

Noise Control System
Tampering with Noise ControlSystem ProhibitedThe following information relates to compliance withfederal noise emission standards for vehicles with aGross Vehicle Weight Rating (GVWR) of more than10,000 lbs (4 536 kg). The Maintenance Scheduleprovides information on maintaining the noise controlsystem to minimize degradation of the noise emissioncontrol system during the life of your vehicle. The noisecontrol system warranty is given in your warranty booklet.
These standards apply only to vehicles sold in theUnited States.
Federal law prohibits the following acts or the causingthereof:
1. The removal or rendering inoperative by any person,other than for purposes of maintenance, repair orreplacement, of any device or element of designincorporated into any new vehicle for the purpose ofnoise control, prior to its sale or delivery to theultimate purchaser or while it is in use; or
2. The use of the vehicle after such device or elementof design has been removed or rendered inoperativeby any person.
Among those acts presumed to constitute tampering arethe acts listed below.
Insulation:• Removal of the noise shields or any underhood
insulation.
Engine:• Removal or rendering engine speed governor
(if equipped) inoperative so as to allow enginespeed to exceed manufacturer specifications.
Fan and Drive:• Removal of fan clutch (if equipped) or rendering
clutch inoperative.
• Removal of the fan shroud (if equipped).
Air Intake:• Removal of the air cleaner silencer.
• Modification of the air cleaner.
Exhaust:• Removal of the muffler and/or resonator.
• Removal of the exhaust pipes and exhaust pipeclamps.
5-56

Windshield Wiper BladeReplacementWindshield wiper blades should be inspected at leasttwice a year for wear or cracking. See Wiper BladeCheck under At Least Twice a Year on page 6-24 formore information.Replacement blades come in different types and areremoved in different ways.
Here’s how to remove the Shephard’s Hook type:
1. Pull the windshield wiper arm away from thewindshield.
2. Push the release lever and slide the wiper assemblytoward the driver’s side of the vehicle.
3. Install a new blade by reversing Steps 1 and 2.
5-57

Other Service ItemsFuel FilterYour fuel filter is located in the engine compartment onthe driver’s side of the vehicle, or along the driver’sside frame rail. See Fuel Filter Replacement earlier inthis section for further information.Also see Scheduled Maintenance on page 6-5 forrecommended service intervals.
Primary Fuel Filter and WaterSeparator
Your vehicle may have thisspin-on filter. It is located onthe driver’s side frame rail.It has a clear plastic drainbowl at the bottom. Checkthe drain bowl occasionallyfor any water or particles.To drain the water or toreplace the element, followthe water draining andelement replacementprocedure under Water inFuel on page 5-6.
Secondary Fuel Filter and WaterSeparator/Heater
Your vehicle may havethis spin-on filter andfuel separator/heater.It is mounted on theleft side of the engine.It has a metal drainbowl at the bottom.Occasionally, check thebowl for any water orparticles.
To check or drain the bowl, shut off the engine.Then push up on the spring-loaded drain valve untilclear fuel is flowing from the valve. The particlesor water will drain out first.
5-58

TiresYour new vehicle comes with high-quality tires made bya leading tire manufacturer. If you ever have questionsabout your tire warranty and where to obtain service,see your GMC Warranty booklet for details.
{CAUTION:
Poorly maintained and improperly used tiresare dangerous.
• Overloading your tires can causeoverheating as a result of too muchfriction. You could have an air-out and aserious accident. See “Loading YourVehicle” in the Index.
CAUTION: (Continued)
CAUTION: (Continued)
• Underinflated tires pose the same dangeras overloaded tires. The resulting accidentcould cause serious injury. Check all tiresfrequently to maintain the recommendedpressure. Tire pressure should be checkedwhen your tires are cold.
• Overinflated tires are more likely to becut, punctured or broken by a suddenimpact — such as when you hit a pothole.Keep tires at the recommended pressure.
• Worn, old tires can cause accidents.If your tread is badly worn, or if your tireshave been damaged, replace them.
5-59

Inflation — Tire PressureThe GVW Rating label, which is on the driver’s doorframe, shows the correct inflation pressures foryour tires when they’re cold. “Cold” means your vehiclehas been sitting for at least three hours or driven nomore than 1 mile (1.6 km).
Notice: Don’t let anyone tell you that underinflationor overinflation is all right. It’s not. If your tiresdon’t have enough air (underinflation), you can getthe following:
• Too much flexing
• Too much heat
• Tire overloading
• Bad wear
• Bad handling
• Bad fuel economy
If your tires have too much air (overinflation),you can get the following:
• Unusual wear
• Bad handling
• Rough ride
• Needless damage from road hazards
When to CheckCheck your tires once a month or more.
Also, check the tire pressure of the spare tire(if equipped).
How to CheckUse a good quality pocket-type gage to check tirepressure. You can’t tell if your tires are properly inflatedsimply by looking at them. Radial tires may lookproperly inflated even when they’re underinflated.
Be sure to put the valve caps back on the valve stems.They help prevent leaks by keeping out dirt andmoisture.
Wheel LoadingWheels are stamped with a maximum load and coldinflation rating. Be sure you don’t exceed these. If youever think you need to, first contact the rim andwheel maker to get their advice.
5-60

Dual Tire OperationWhen the vehicle is new, check the wheel nut tightnesson all wheels with a torque wrench after your first100 miles (160 km) and then 1,000 miles (1 600 km)after that. Whenever a wheel, wheel bolt or wheel nut isremoved or serviced, repeat the 100 miles (160 km), andthen 1,000 mile (1 600 km) wheel nut tightness check.
See Tightening the Wheel Nuts on page 5-62 for wheelnut tightening information and proper torque values.
{CAUTION:
If you operate your vehicle with a tire that isbadly underinflated, the tire can overheat.An overheated tire can lose air suddenly orcatch fire. You or others could be injured.Be sure all tires (including the spare, if any)are properly inflated.
See Tires on page 5-59 and Inflation — Tire Pressureon page 5-60 for more information on proper tireinflation.
When It Is Time for New TiresReplace your tires when the tread depth is down to 1/8 ofan inch (3.2 mm) for the front tires, or 1/16 of an inch(1.6 mm) for a rear tire. Also, you need a new tire if:• You can see cord or fabric showing through the
tire’s rubber.• The tread or sidewall is cracked, cut or snagged
deep enough to show cord or fabric.• The tire has a bump, bulge or split.• The tire has a puncture, cut or other damage that
can’t be repaired well because of the size or locationof the damage.
{CAUTION:
Mixing tires could cause you to lose controlwhile driving. If you mix tires of differenttypes — like radial and bias-belted tires — thevehicle may not handle properly, and youcould have a crash. Be sure to use the sametype of tires all around.
When you replace tires, make sure they are the samesize, load range, speed rating and construction type(bias, bias-belted or radial) as your original tires.
5-61

Wheel Alignment and Tire BalanceThe wheels on your vehicle were aligned at thefactory to give you the longest tire life and best overallperformance.
Proper front wheel alignment must be maintained inorder to ensure efficient steering, good directionalstability, and prevent abnormal tire wear. If you noticeunusual tire wear or your vehicle is pulling one wayor the other, the alignment may need to be reset. If younotice your vehicle vibrating when driving on a smoothroad, your wheels may need to be balanced.
Tightening the Wheel Nuts
{CAUTION:
Wheel nuts that are not tight can work loose.If all the nuts on a wheel come off, the wheelcan come off the vehicle, causing a crash.All wheel nuts must be properly tightened.Follow the rules in this section to be surethey are.
This section lets you know how often to check thetightness of the wheel nuts on your vehicle and how tightthey must be.
5-62

First, use these pictures to decide what kind of wheelsyou have.
Then, follow the steps below for the wheels you have.
Hub-Piloted Wheels, 8-Hole or 10-HoleThe studs and nuts used with these wheels haveright-hand threads.
1. With intermittent pilot pads, position a pad at12 o’clock to center the wheel and reduce run-out.
2. Put the tire and rim assembly on the axle hub.Install the outer rear tire and rim assembly sothat its valve stem is exactly opposite the valvestem on the inner tire and rim assembly.
3. Put on the wheel nuts.
4. Finger-tighten the nuts.
5. Oil the surfacesbetween the nuts andwashers. Do not oilthe studs or the threadsof the nut.
Hub-Piloted Type,8-Hole
Hub-Piloted Type,10-Hole
5-63

1. Tighten the nuts to 400 lb-ft (542 N-m) if an 8-holestud or 480 lb-ft (650 N-m) if a 10-hole stud, usingthe following diagrams. {CAUTION:
Never use oil or grease on studs or thethreads of the wheel nuts. If you do, the wheelnuts might come loose and the wheel couldfall off, causing a crash.
{CAUTION:
If wheel studs are damaged, they can break.If all the studs on a wheel broke, the wheelcould come off and cause a crash. If any studis damaged because of a loose-running wheel,it could be that all of the studs are damaged.To be sure, replace all studs on the wheel.If the stud holes in a wheel have becomelarger, the wheel could collapse in operation.
CAUTION: (Continued)
8-Hole
10–Hole (Front) 10–Hole (Rear)
5-64

CAUTION: (Continued)
Replace any wheel if its stud holes havebecome larger or distorted in any way.Inspect hubs and hub piloted wheels fordamage. Because of loose running wheels,piloting pad damage may occur and requirereplacement of the entire hub, for propercentering of the wheels. When replacing studs,hubs, wheel nuts or wheels, be sure to use GMoriginal equipment parts.
{CAUTION:
Rust or dirt on a wheel, or on the parts towhich it is fastened, can make wheel nutsbecome loose after a time. The wheel couldcome off and cause a crash. When you change
CAUTION: (Continued)
CAUTION: (Continued)
a wheel, remove any rust or dirt from placeswhere the wheel attaches to the vehicle. In anemergency, you can use a cloth or a papertowel to do this; but be sure to use a scraperor wire brush later, if you need to, to get all therust or dirt off.
How Often to CheckWheel tightness is so important you should have atechnician check nut tightness on all wheels witha torque wrench after your first 100 miles (160 km),and then 1,000 miles (1 600 km) after that. Be sure torepeat this service whenever you have a tire removed orserviced. See Scheduled Maintenance on page 6-5for further information.
5-65

Wheel ReplacementReplace any wheel that is bent, cracked or badly rustedor corroded. If wheel nuts keep coming loose, replacethe wheel. If the wheel leaks air, replace it.
Your dealer will know the kind of wheel you need.
Each new wheel should have the same load-carryingcapacity, diameter, width, offset and be mountedthe same way as the one it replaces.
If you need to replace any of your wheels, wheel boltsor wheel nuts, replace them only with new GMoriginal equipment parts. This way, you will be sure tohave the right wheel, wheel bolts and wheel nutsfor your vehicle.
{CAUTION:
A leaking wheel could fail without warning.A wheel designed for tubeless tires could beleaking because it is damaged. Don’t use aninner tube or some other thing to try to stop theleaking. Get a new wheel or the proper type.
{CAUTION:
Without the correct wheel, you may not be ableto stop properly, and you could have otherproblems like a tire air-out. You could have acollision. If you don’t go to your dealer to get anew wheel, be sure you get the correct one.Each new wheel should match the originalwheel in load-carrying capacity, inflationpressure capacity, diameter, width, offset andmounting configuration.
Using wheels and tires with higher load-carrying limitsthan the original wheels and tires doesn’t changethe GAWR or the GVWR of your vehicle. See “LoadingYour Vehicle” for more information.
Notice: The wrong wheel can cause trouble inbearing life, brake cooling, speedometer/odometercalibration, headlamp aim, bumper height, vehicleground clearance, stopping distance and tireclearance to the body and chassis. You could alsohave other problems like a tire air-out.
5-66

Used Replacement Wheels
{CAUTION:
Putting a used wheel on your vehicle isdangerous. You can’t know how it’s been usedor how far it’s been driven. It could failsuddenly and cause a crash. If you have toreplace a wheel, use a new GM originalequipment wheel.
If a Tire Goes FlatIt’s unusual for a tire to “blow out” while you’re driving,especially if you maintain your tires properly. If airgoes out of a tire, it’s much more likely to leak outslowly. But if you should ever have a “blow out,” hereare a few tips about what to expect and what to do:
If a front tire fails, the flat tire will create a drag that pullsthe vehicle toward that side. Take your foot off theaccelerator pedal and grip the steering wheel firmly.Steer to maintain lane position, and then gently brake toa stop well out of the traffic lane.
A rear blowout, particularly on a curve, acts much like askid and may require the same correction you’d usein a skid. In any rear blowout, remove your foot from theaccelerator pedal. Get the vehicle under control bysteering the way you want the vehicle to go. It may bevery bumpy and noisy, but you can still steer. Gentlybrake to a stop –– well off the road if possible.
If a tire goes flat, avoid further tire and wheel damage bydriving slowly to a level place and turn on your hazardwarning flashers. The next part tells you what to do.
5-67

Your truck, when new, did not include tire changingequipment or a place to store a tire in the vehicle.Few drivers of these vehicles have the necessaryequipment aboard to be able to change a flat tire safely.For example, you would need a truck jack that can liftseveral thousand pounds and a torque wrench thatcan generate several hundred foot-pounds (Y)of twisting force.
{CAUTION:
If you try to put air back into a tire that has runflat, even a tire that was quite low on air, thetire can have a sudden air-out. This couldcause you to lose control of the vehicle andhave a serious crash. Don’t refill a flat or verylow tire with air without first having the tiretaken off the wheel and checked for damage.
So if you’re stopped somewhere by a flat or damagedtire or wheel, you should get expert help. See RoadsideAssistance Program on page 7-4.
{CAUTION:
Your vehicle, when new, did not include tirechanging equipment or a place to store a tirein the vehicle. Special tools and proceduresare required if a tire needs to be serviced.If these tools and procedures aren’t used,you others could be injured or killed whiletrying to change or service a truck tire.
5-68

Appearance CareRemember, cleaning products can be hazardous.Some are toxic. Others can burst into flames if youstrike a match or get them on a hot part of the vehicle.Some are dangerous if you breathe their fumes ina closed space. When you use anything from acontainer to clean your vehicle, be sure to follow themanufacturer’s warnings and instructions. And alwaysopen your doors or windows when you’re cleaningthe inside.
Never use these to clean your vehicle:
• Gasoline
• Benzene
• Naphtha
• Carbon Tetrachloride
• Acetone
• Paint Thinner
• Turpentine
• Lacquer Thinner
• Nail Polish Remover
They can all be hazardous – some more thanothers – and they can all damage your vehicle, too.
Don’t use any of these unless this manual says youcan. In many uses, these will damage your vehicle:
• Alcohol
• Laundry Soap
• Bleach
• Reducing Agents
Cleaning the Inside of Your VehicleUse a vacuum cleaner often to get rid of dust andloose dirt. Wipe vinyl, leather, plastic and paintedsurfaces with a clean, damp cloth.
Cleaning Fabric/CarpetYour dealer has cleaners for the cleaning of fabricand carpet. They will clean normal spots and stainsvery well.
You can get GM-approved cleaning products from yourdealer. See Vehicle Care/Appearance Materials onpage 5-76.
5-69

Here are some cleaning tips:
• Always read the instructions on the cleaner label.
• Clean up stains as soon as you can – beforethey set.
• Carefully scrape off any excess stain.
• Use a clean cloth or sponge, and change to a cleanarea often. A soft brush may be used if stains arestubborn.
• If a ring forms on fabric after spot cleaning, cleanthe entire area immediately or it will set.
Using Cleaner on Fabric1. Vacuum and brush the area to remove any loose dirt.
2. Always clean a whole trim panel or section.Mask surrounding trim along stitch or welt lines.
3. Follow the directions on the container label.
4. Apply cleaner with a clean sponge. Don’t saturatethe material and don’t rub it roughly.
5. As soon as you’ve cleaned the section, use asponge to remove any excess cleaner.
6. Wipe cleaned area with a clean, water-dampenedtowel or cloth.
7. Wipe with a clean cloth and let dry.
Special Fabric Cleaning ProblemsStains caused by such things as catsup, coffee (black),egg, fruit, fruit juice, milk, soft drinks, vomit, urineand blood can be removed as follows:
1. Carefully scrape off excess stain, then sponge thesoiled area with cool water.
2. If a stain remains, follow the cleaner instructionsdescribed earlier.
3. If an odor lingers after cleaning vomit or urine,treat the area with a water/baking soda solution:1 teaspoon (5 ml) of baking soda to 1 cup (250 ml)of lukewarm water.
4. Let dry.
Stains caused by candy, ice cream, mayonnaise, chilisauce and unknown stains can be removed as follows:
1. Carefully scrape off excess stain.
2. First, clean with cool water and allow to drycompletely.
3. If a stain remains, follow the cleaner instructionsdescribed earlier.
5-70

Cleaning VinylUse warm water and a clean cloth.
• Rub with a clean, damp cloth to remove dirt.You may have to do this more than once.
• Things like tar, asphalt and shoe polish will stain ifyou don’t get them off quickly. Use a clean clothand vinyl cleaner. See your dealer for this product.
Cleaning the Top of the InstrumentPanelUse only mild soap and water to clean the top surfacesof the instrument panel. Sprays containing siliconesor waxes may cause annoying reflections in thewindshield and even make it difficult to see throughthe windshield under certain conditions.
Cleaning Interior Plastic ComponentsUse only a mild soap and water solution on a soft clothor sponge. Commercial cleaners may affect thesurface finish.
Cleaning Glass SurfacesGlass should be cleaned often. GM Glass Cleaneror a liquid household glass cleaner will remove normaltobacco smoke and dust films on interior glass.See Vehicle Care/Appearance Materials on page 5-76.Notice: Don’t use abrasive cleaners on glass,because they may cause scratches. Avoid placingdecals on the inside rear window, since theymay have to be scraped off later. If abrasivecleaners are used on the inside of the rear window,an electric defogger element may be damaged.Any temporary license should not be attachedacross the defogger grid.
Care of Safety BeltsKeep belts clean and dry.
{CAUTION:
Do not bleach or dye safety belts. If you do,it may severely weaken them. In a crash,they might not be able to provide adequateprotection. Clean safety belts only with mildsoap and lukewarm water.
5-71

WeatherstripsSilicone grease on weatherstrips will make them lastlonger, seal better, and not stick or squeak. Applysilicone grease with a clean cloth at least every sixmonths. During very cold, damp weather more frequentapplication may be required. See Part C: RecommendedFluids and Lubricants on page 6-28.
Cleaning the Outside of YourVehicleThe paint finish on your vehicle provides beauty, depthof color, gloss retention and durability.
Washing Your VehicleThe best way to preserve your vehicle’s finish is to keep itclean by washing it often with lukewarm or cold water.
Don’t wash your vehicle in the direct rays of the sun.Use a car washing soap. Don’t use strong soapsor chemical detergents. Be sure to rinse the vehiclewell, removing all soap residue completely. You can getGM-approved cleaning products from your dealer.See Vehicle Care/Appearance Materials on page 5-76.Don’t use cleaning agents that are petroleum based,or that contain acid or abrasives. All cleaning agentsshould be flushed promptly and not allowed to dry on the
surface, or they could stain. Dry the finish with a soft,clean chamois or an all-cotton towel to avoid surfacescratches and water spotting.
High pressure car washes may cause water to enteryour vehicle.
Cleaning Exterior Lamps/LensesUse only lukewarm or cold water, a soft cloth and acar washing soap to clean exterior lamps and lenses.Follow instructions under “Washing Your Vehicle.”
Finish CareOccasional waxing or mild polishing of your vehicle byhand may be necessary to remove residue from thepaint finish. You can get GM-approved cleaning productsfrom your dealer. See Vehicle Care/AppearanceMaterials on page 5-76.
If your vehicle has a “basecoat/clearcoat” paint finish.The clearcoat gives more depth and gloss to the coloredbasecoat. Always use waxes and polishes that arenon-abrasive and made for a basecoat/clearcoatpaint finish.
Notice: Machine compounding or aggressivepolishing on a basecoat/clearcoat paint finish maydull the finish or leave swirl marks.
5-72

Foreign materials such as calcium chloride and othersalts, ice melting agents, road oil and tar, tree sap, birddroppings, chemicals from industrial chimneys, etc.,can damage your vehicle’s finish if they remainon painted surfaces. Wash the vehicle as soon aspossible. If necessary, use non-abrasive cleaners thatare marked safe for painted surfaces to removeforeign matter.
Exterior painted surfaces are subject to aging, weatherand chemical fallout that can take their toll over aperiod of years. You can help to keep the paint finishlooking new by keeping your vehicle garaged or coveredwhenever possible.
Protecting Exterior Bright Metal PartsBright metal parts should be cleaned regularly to keeptheir luster. Washing with water is all that is usuallyneeded. However, you may use chrome polish onchrome or stainless steel trim, if necessary.
Use special care with aluminum trim. To avoid damagingprotective trim, never use auto or chrome polish,steam or caustic soap to clean aluminum. A coating ofwax, rubbed to high polish, is recommended for allbright metal parts.
Windshield and Wiper BladesIf the windshield is not clear after using the windshieldwasher, or if the wiper blade chatters when running,wax, sap or other material may be on the blade orwindshield.
Clean the outside of the windshield with a full-strengthglass cleaning liquid. The windshield is clean if beadsdo not form when you rinse it with water.
Grime from the windshield will stick to the wiper bladesand affect their performance. Clean the blade by wipingvigorously with a cloth soaked in full-strength windshieldwasher solvent. Then rinse the blade with water.
Check the wiper blades and clean them as necessary;replace blades that look worn.
5-73

Aluminum or Chrome-Plated WheelsYour vehicle may be equipped with either aluminum orchrome-plated wheels.
Keep your wheels clean using a soft clean clothwith mild soap and water. Rinse with clean water.After rinsing thoroughly, dry with a soft clean towel.A wax may then be applied.
The surface of these wheels is similar to the paintedsurface of your vehicle. Don’t use strong soaps,chemicals, abrasive polishes, abrasive cleaners,cleaners with acid, or abrasive cleaning brushes onthem because you could damage the surface. Do notuse chrome polish on aluminum wheels.
Use chrome polish only on chrome-plated wheels, butavoid any painted surface of the wheel, and buff offimmediately after application.
Don’t take your vehicle through an automatic car washthat has silicone carbide tire cleaning brushes. Thesebrushes can also damage the surface of these wheels.
TiresTo clean your tires, use a stiff brush with tire cleaner.
Notice: When applying a tire dressing, always takecare to wipe off any overspray or splash from allpainted surfaces on the body or wheels of thevehicle. Petroleum-based products may damage thepaint finish and tires.
Sheet Metal DamageIf your vehicle is damaged and requires sheet metalrepair or replacement, make sure the body repair shopapplies anti-corrosion material to parts repaired orreplaced to restore corrosion protection.
Original manufacturer replacement parts will provide thecorrosion protection while maintaining the warranty.
5-74
Finish DamageAny stone chips, fractures or deep scratches in thefinish should be repaired right away. Bare metalwill corrode quickly and may develop into major repairexpense.
Minor chips and scratches can be repaired with touch-upmaterials avaliable from your dealer. Larger areas offinish damage can be corrected in your dealer’sbody and paint shop.
Underbody MaintenanceChemicals used for ice and snow removal and dustcontrol can collect on the underbody. If these are notremoved, accelerated corrosion (rust) can occur onthe underbody parts such as fuel lines, frame, floor panand exhaust system even though they have corrosionprotection.
At least every spring, flush these materials from theunderbody with plain water. Clean any areas where mudand debris can collect. Dirt packed in close areas ofthe frame should be loosened before being flushed.Your dealer or an underbody car washing system cando this for you.
Chemical Paint SpottingSome weather and atmospheric conditions can create achemical fallout. Airborne pollutants can fall upon andattack painted surfaces on your vehicle. This damagecan take two forms: blotchy, ring-shaped discolorations,and small, irregular dark spots etched into the paintsurface.
Although no defect in the paint job causes this, GM willrepair, at no charge to the owner, the surfaces ofnew vehicles damaged by this fallout condition within12 months or 12,000 miles (20 000 km) of purchase,whichever occurs first.
5-75

Vehicle Care/Appearance MaterialsSee your GM dealer for more information on purchasingthe following products.
Vehicle Care/Appearance MaterialsDescription Usage
Polishing ClothWax-Treated
Interior and exteriorpolishing cloth.
Tar and RoadOil Remover
Removes tar, road oiland asphalt.
Chrome Cleanerand Polish
Use on chrome orstainless steel.
White SidewallTire Cleaner
Removes soil and blackmarks from whitewalls.
Vinyl CleanerCleans vinyl tops,upholstery and convertibletops.
Glass Cleaner Removes dirt, grime, smokeand fingerprints.
Chrome and WireWheel Cleaner
Removes dirt and grimefrom chrome wheels andwire wheel covers.
Finish EnhancerRemoves dust, fingerprints,and surface contaminants,Spray on wipe off.
Vehicle Care/Appearance Materials(cont’d)
Description Usage
Swirl Remover PolishRemoves swirl marks, finescratches and other lightsurface contamination.
Cleaner Wax Removes light scratchesand protects finish.
Foaming Tire ShineLow Gloss
Cleans, shines and protectsin one easy step, no wipingnecessary.
Wash Wax Concentrate
Medium foaming shampoo.Cleans and lightly waxes.Biodegradable andphosphate free.
Spot Lifter
Quickly and easily removesspots and stains fromcarpets, vinyl and clothupholstery.
Odor Eliminator
Odorless spray odoreliminator used on fabrics,vinyl, leatherand carpet.
See your General Motors parts department for theseproducts. See Part C: Recommended Fluids andLubricants on page 6-28.
5-76

Vehicle Identification
Vehicle Identification Number (VIN)
This is the legal identifier for your vehicle. It appears ona plate in the front corner of the instrument panel, onthe driver’s side. You can see it if you look through thewindshield from outside your vehicle. The VIN alsoappears on the Vehicle Certification and Service Partslabels and the certificates of title and registration.
Engine IdentificationThe 8th character in your VIN is the engine code. Thiscode will help you identify your engine, specificationsand replacement parts.
Electrical System
Add-On Electrical EquipmentNotice: Don’t add anything electrical to yourvehicle unless you check with your dealer first.Some electrical equipment can damage your vehicleand the damage wouldn’t be covered by yourwarranty. Some add-on electrical equipment cankeep other components from working as theyshould.
Headlamp WiringThe headlamp wiring is protected by a circuit breaker inthe light switch. An electrical overload will cause thelights to go on and off, or in some cases to remain off.If this happens, have your headlamp wiring checkedright away.
5-77

Windshield Wiper FusesThe windshield wiper motor is protected by a circuitbreaker inside the motor and a circuit breaker or fuse inthe fuse block. If the motor overheats, the wipers willstop until the motor cools. If the overload is caused byan electrical problem, be sure to get it fixed.
Fusible LinksA fusible link is a short piece of wire that is covered byan insulated cover. It is several gage sizes smallerthan the circuit it protects. It will melt in an overloadsituation, opening the circuit.
Your starter and other circuits have these fusible links.The size is printed on the insulation. If the insulationis burned beyond recognition, consult your GM dealerfor the proper size. Replace a fusible link with one of thesame size and insulation type. Fusible link insulationis a special purpose high-temperature material.
Power Windows and OtherPower OptionsCircuit breakers in the fuse panel protect the powerwindows and other power accessories. When thecurrent load is too heavy, the circuit breaker opens.This protects the circuit until the current load returns tonormal or the problem is fixed.
Fuses and Circuit BreakersThe wiring circuits in your vehicle are protected fromshort circuits by a combination of fuses, circuit breakers,maxi-fuses and fusible links. This greatly reduces thechance of a fire caused by an electrical problem.There may be a fuse taped to the wiring harness nearthe hydraulic brake booster.
5-78

Instrument Panel Fuse Block andMaxi-Fuse BlockThere are two fuse blocks in your vehicle: the instrumentpanel fuse block and the maxi-fuse block.
The fuse block is located on the top of the instrumentpanel on the passenger’s side of the vehicle.
To access the fuse block, remove the cover by lifting upon the front and turning it backward.
To reinstall the cover, put the tabs at the rear of thecover into the slots on the instrument panel and lowerthe cover down to snap into place.
If you ever have a problem on the road and don’t havea spare fuse, you can borrow one of the correctvalue. Just pick some feature of your vehicle that youcan get along without, like the radio or cigarette lighter,and use its fuse if it is the value you need. Rememberto replace the fuse as soon as you can.
These fuses are non-cycling; do not replace themwith cycling fuses. Also, do not use fuses of a higheramperage than those listed on the circuit breaker block.
5-79

Fuses Usage1 Ignition Switch2 Cigarette Lighter3 ECM Ignition 14 Truck Body Controller5 ALDL Connector
6Warning Lamp, Ignition Relay, BlowerMotor, Motor Relay, Auxiliary Relay,Power Window Relay, INT Relay
7Room Lamp, Horn, Electric ParkingBrake, Radio Back Up, Rear BodyDome Lamp
Fuses Usage8 Power Window
9
Exhaust Brake Back Up, Air SuspensionDump, Differential Lock, Air Dryer,Moisture Ejection Heater, Electric AirCompressor, Power Take Off
10 ECM Ignition Power11 Trailer Turn (LH) Lamp12 Auxiliary (Ignition ON)13 Auxiliary (Battery Direct)14 Headlamp (LH)15 Headlamp (RH)16 Headlamp17 Heated Fuel18 Meter Truck Body Controller
19 ID Lamp, Marker Lamp, Tail Lamp,Lighted Mirror, Illumination Lamp
20 Cool Condenser Fan Motor, CoolerCompressor
21 Wiper Motor, Washer Motor22 Heated Mirror, Two-Speed Axle Relay23 Empty24 Blower Motor, Air Conditioner Relay25 Trailer Turn (RH) Lamp, Flasher Unit26 Power Post (Consent)
5-80

Maxi-Fuse BlockWhen a fuse goes out, first check the instrument panelfuse block. If there are no fuses out, the problemcould be in the maxi-fuse block.
The maxi-fuse block outside of the cab on the driver’sside of the vehicle. To access the maxi-fuse block,remove the four screws from the front of the box andremove the cover.
Power is fed through these fuses to devices such as theheadlamp switch, ignition switch feed circuits and theauxiliary brake pump (hydraulic brake vehicles).
Do not use maxi-fuses of higher amperage than thoseindicated on the maxi-fuse block.
Fuses UsageST/TURN/HAZ Stoplamp, Turn Signals/Hazard
Warning FlashersIGN SW 3 Air Conditioner, Axle, ChassisINT/EXTLIGHTS
Parking Lamps, dome Lamp,Instrument Panel Lights
HEAD LAMP Headlamps, Daytime Running LampsAUX WRG Auxiliary, Parking Brake
IGN SW 1 Ignition Switch, Washer/Wiper,Crank, Radio
HYD PUMP Hydraulic Brake, Brake Pump MotorABS Anti-Lock Brake System ModuleELECT TRANS Ignition RelayPARK BRAKE Parking Brake MotorBLOWERHORN
Blower, Horn, Cigarette Lighter,Auxiliary
TRAILER ABS Trailer Anti-Lock Brake System,Trailer Stoplamps
PWR WDO/LOCKS
Power Window, Power Door Locks
5-81

Relay Blocks
There are three relay blocks in your vehicle:A. Relay Block AB. Relay Block BC. Relay Block C
Relay Block A Usage1 Power Window2 Back Lamp (Reverse)3 High Beam4 Lighting5 Lighting (Low, High)6 Trailer Turn Signal (Left Headlamp)7 Tail Lamp8 Marker Lamp9 Trailer Turn Signal (Right Headlamp)
Relay Block A
5-82

Relay Block B Usage1 Air Conditioning Condenser2 Air Conditioning Compressor3 Heater Fan4 Ignition Accessory5 Ignition 16 Ignition 27 Auxiliary8 Horn9 Ignition 3
10 Dome Lamp11 Exhaust Brake12 Power Take Off Control
Relay Block C Usage1 Parking Brake2 Daytime Running Lamps On3 Daytime Running Lamp Off
4Parking Lamps/Daytime RunningLamps
5 Neutral6 Stop Lamp
Relay Block B Relay Block C
5-83

Capacities and SpecificationsEngine Specifications
Engine RPO Type Firing Order
7.8L LG4 V6 1–5–3–6–2–4
Capacities and Specifications
Application
Capacities
English Metric
Cooling System 32.0 quarts 30.3 L
Air Conditioning Refrigerant R134a 2.0 lbs. 0.9 kg
Use Refrigerant Oil, R134a Systems
All capacities are approximate.
Crankcase Capacity
Application
Capacity
Capacity w/o filter Capacity w/ filter
7.8L 11.0 quarts (10.4 liters) 14.0 quarts (13.2 liters)
Capacities (volumes) shown are for normal refill. Add oil as indicated when the oil filter element is changed.Capacities given are approximate — keep level within the operating range. Do not operate with fluid level belowthe ADD line.
5-84

Fuel Tank Capacity
ApplicationCapacities
English MetricStandard 50.0 gallons 189.3 litersOptional* 100.0 gallons 378.5 liters*Two 50-gallon (189 L) tanksAbove capacities are approximate.
Transmission Fluid Capacity
ApplicationCapacities
English MetricManual Transmission
RT8709B 25.1 pints 11.8 litersFS5406 18.4 pints 8.7 litersFS6406 18.4 pints 8.7 liters
Automatic Transmission2000 Series 35.0 pints 13.5 liters*2400 Series 35.0 pints 13.5 liters*MD 3060 P 52.0 pints 24.6 litersMD 3560 P 52.0 pints 24.6 liters
*Add two pints (one liter) when changing spin-on or remote filter.Capacities (volumes) are approximate. For manual transmissions, the correct fluid level is to the bottom ofthe fluid fill plug opening. The fluid capacity will vary, due to the angle of the transmission, with the vehicle.For automatic transmissions, see the Allison Automatic Transmission Operator’s Manual for fluid check andmaintenance information.
5-85

Rear Axle Lubricant Capacity
Application
Capacities
English Metric
Single Speed Axle
15040S 21.0 pints 10.3 liters
19060S 28.0 pints 13.0 liters
21060S 28.0 pints 13.0 liters
23090S 40.0 pints 19.0 liters
26105S 56.0 pints 26.5 liters
Two-Speed Axle
19060T 34.0 pints 16.0 liters
21060T 34.0 pints 16.0 liters
23080T 40.0 pints 19.8 liters
Tandem Axles
DS404 (front) 31.0 pints 14.5 liters
RS404 (rear) 28.0 pints 13.0 liters
Above capacities (volumes) are approximate.
5-86

Normal Maintenance Replacement Parts
Service Replacement Part and Filter RecommendationsRPO 7.8L LG4
Oil Filter* GM Part No. 94392475
Engine Air Cleaner /Filter* Donaldson P533930
Fuel Filter Racor (NWB) B32002 Primary
Secondary Fuel Filter GM Part No. 94392474 (engine mounted)
Pressure Caps GM Part No. 15997145
5-87

✍ NOTES
5-88

Maintenance Schedule ......................................6-2Introduction ...................................................6-2Maintenance Requirements ..............................6-2Your Vehicle and the Environment ....................6-2How This Section is Organized .........................6-3Part A: Scheduled Maintenance Services ...........6-4Using Your Maintenance Schedule ....................6-4Scheduled Maintenance Supplements ................6-4
Scheduled Maintenance ...................................6-5Part B: Owner Checks and Services ................6-23At Each Fuel Fill ..........................................6-23At Least Twice a Year ...................................6-24At Least Once a Year ...................................6-27Part C: Recommended Fluids and
Lubricants ................................................6-28Part D: Maintenance Record ..........................6-30
Section 6 Maintenance Schedule
6-1

Maintenance Schedule
IntroductionImportant: Keep engine oil at the proper level andchange as recommended.
Have you purchased the GM Protection Plan? The Plansupplements your new vehicle warranties. See yourWarranty and Owner Assistance booklet or your dealerfor details.
Maintenance RequirementsMaintenance intervals, checks, inspections andrecommended fluids and lubricants as prescribed in thismanual are necessary to keep your vehicle in goodworking condition. Any damage caused by failureto follow scheduled maintenance may not be covered bywarranty.
Your Vehicle and the EnvironmentProper vehicle maintenance not only helps to keep yourvehicle in good working condition, but also helps theenvironment. Improper vehicle maintenance caneven affect the quality of the air we breathe. Improperfluid levels or the wrong tire inflation can increasethe level of emissions from your vehicle. To help protectour environment, and to keep your vehicle in goodcondition, be sure to maintain your vehicle properly.
6-2

How This Section is OrganizedThis maintenance schedule is divided into four parts:
Part A: Scheduled Maintenance Services”: explainswhat to have done and how often. Some of theseservices can be complex, so unless you are technicallyqualified and have the necessary equipment, you shouldlet your GM dealer’s service department do these jobs.
Your GM dealer has GM-trained and supported servicepeople that will perform the work using genuine GM parts.
{CAUTION:
Performing maintenance work on a vehiclecan be dangerous. In trying to do some jobs,you can be seriously injured. Do your ownmaintenance work only if you have therequired know-how and the proper tools andequipment for the job. If you have any doubt,have a qualified technician do the work.
If you want to get the service information, see ServicePublications Ordering Information on page 7-5.
“Part B: Owner Checks and Services”: tells you whatshould be checked and when. It also explains whatyou can easily do to keep your vehicle in good condition.
“Part C: Recommended Fluids and Lubricants”:lists some recommended products necessary tohelp keep your vehicle properly maintained. Theseproducts, or their equivalents, should be used whetheryou do the work yourself or have it done.
“Part D: Maintenance Record”: is a place for you torecord and keep track of the maintenance performedon your vehicle. Keep your maintenance receipts.They may be needed to qualify your vehicle forwarranty repairs.
6-3

Part A: Scheduled MaintenanceServicesIn this part are scheduled maintenance services whichare to be performed at the mileage intervals specified.
Using Your Maintenance ScheduleWe at General Motors want to help keep your vehicle ingood working condition. But we don’t know exactlyhow you’ll drive it. You may drive very short distancesonly a few times a week. Or you may drive longdistances all the time in very hot, dusty weather.You may use your vehicle in making deliveries or inmany other ways.
Because of all the different ways people use theirvehicles, maintenance needs vary. You may need morefrequent checks and replacements. So please readthe following and note how you drive. If you have anyquestions on how to keep your vehicle in good condition,see your dealer.
This part tells you the maintenance services you shouldhave done and when to schedule them.
When you go to your dealer for your service needs,you’ll know that GM-trained and supported servicepeople will perform the work using genuine GM parts.
The proper fluids and lubricants to use are listed inPart C. Make sure whoever services your vehicle usesthese. All parts should be replaced and all necessaryrepairs done before you or anyone else drives thevehicle.
This schedule is for vehicles that:
• carry passengers and cargo within recommendedlimits. You will find limits on your vehicle’s GVWRating label. See Loading Your Vehicle onpage 4-37.
• are driven on reasonable road surfaces within legaldriving limits.
• use the recommended fuel. See What Fuel to Useon page 5-5.
Scheduled MaintenanceSupplementsIf your vehicle has an Allison transmission, your owner’smanual is supplemented by an AllisonTransmission® Operator’s Manual. Always refer to thesemanuals for related maintenance services.
6-4

Scheduled MaintenanceThe services shown in this schedule up to 100,000 miles(166 000 km) should be repeated after 100,000 miles(166 000 km) at the same intervals for the life ofthis vehicle. The services shown after 100,000 miles(166 000 km) should be repeated at the same miles (km)after those intervals for the life of this vehicle.
The “Footnotes” at the end of this MaintenanceSchedule further explain maintenance services.
See Service Publications Ordering Information onpage 7-5.
100 Miles (160 km)❑ Wheel stud nut service. (46)
1,000 Miles (1 600 km)❑ Wheel stud nut service.(46)❑ Rear axle air shift motor service.(11)
7,500 Miles (12 000 km)❑ Check fluid levels (or every 3 months, whichever
occurs first).(1) (6)❑ Chassis lubrication service (or every 6 months,
whichever occurs first).(12)❑ Wheels and tires service.(15)
❑ Hydraulic brake service (or every 6 months,whichever occurs first).(7) (46)
❑ Parking brake service (or every 6 months, whicheveroccurs first).(8)
❑ Air brake service (or every 6 months, whicheveroccurs first).(39)
❑ Air brake automatic slack adjuster service (or every500 hours, whichever occurs first). (40)
❑ Check air brake relay valve operation and check forleaks (or every month, or every 300 hours, whicheveroccurs first).
❑ Clean air brake application valve (or every 3 months,or every 300 hours, whichever occurs first). Lubricatelinkage.
❑ Air brake chamber service (or every 2 months,whichever occurs first). (41)
❑ Trailer brake hand control valve service (or every3 months, or every 900 hours, whichever occursfirst). (42)
10,000 Miles (16 000 km)❑ Change engine oil and filter (or every 12 months,
whichever occurs first).(2) (3)
6-5

15,000 Miles (24 000 km)❑ Inspect engine air cleaner filter change indicator.
If necessary, replace the filter. If vehicle is drivenin dusty/dirty conditions, inspect filter changeindicator at every engine oil change. See Engine AirCleaner/Filter on page 5-18 for more information.An Emission Control Service. (See footnote †.)
❑ Chassis lubrication service (or every 6 months,whichever occurs first).(12)
❑ Check fluid levels (or every 3 months, whicheveroccurs first). (1) (6)
❑ Replace fuel filter. (3)❑ Steering system service. (13)❑ Front and rear suspension service. (14)❑ Spring-to-axle U-bolts and shackle bolts service. (16)❑ Exhaust system service (or every 6 months,
whichever occurs first).(3) (4) (17)❑ Wheels and tires service.(15)❑ Hydraulic brake service (or every 6 months,
whichever occurs first).(7) (46)❑ Parking brake service (or every 6 months, whichever
occurs first).(8)❑ Air brake service (or every 6 months, whichever
occurs first).(39)
❑ Air brake automatic slack adjuster service (or every500 hours, whichever occurs first). (40)
❑ Check air brake relay valve operation and check forleaks (or every month, or every 300 hours, whicheveroccurs first).
❑ Clean air brake application valve (or every 3 months,or every 300 hours, whichever occurs first). Lubricatelinkage.
❑ Air brake chamber service (or every 2 months,whichever occurs first). (41)
❑ Trailer brake hand control valve service (or every3 months, or every 900 hours, whichever occursfirst). (42)
❑ Thermostatically controlled engine cooling fanservice. (4) (20)
❑ Shields and underhood insulation service. (4) (5) (21)
20,000 Miles (32 000 km)❑ Change engine oil and filter (or every 12 months,
whichever occurs first).(2) (3)❑ Air compressor dry element pleated paper air strainer
service (or every 2 months or every 800 hours,whichever occurs first).
6-6

22,500 Miles (36 000 km)❑ Check fluid levels (or every 3 months, whichever
occurs first). (1) (6)❑ Chassis lubrication service (or every 6 months,
whichever occurs first).(12)❑ Inspect door hinge pins and bushings and replace as
necessary.❑ Cooling system service. Clean the cooling system
filter cap with clean water, clean the core, pressuretest the cap and the system for proper pressurecapability and inspect condition of cooling and heaterhoses and clamps. Replace hoses if cracked,swollen or damaged.
❑ Wheel bearing (grease type) service (or every24 months, whichever occurs first, and wheneverhubs are removed).(23) (46)
❑ Wheels and tires service.(15)❑ Hydraulic brake service (or every 6 months,
whichever occurs first).(7) (46)❑ Parking brake service (or every 6 months, whichever
occurs first).(8)
❑ Air brake service (or every 6 months, whicheveroccurs first).(39)
❑ Air brake automatic slack adjuster service (or every500 hours, whichever occurs first). (40)
❑ Check air brake relay valve operation and check forleaks (or every month, or every 300 hours, whicheveroccurs first).
❑ Clean air brake application valve (or every 3 months,or every 300 hours, whichever occurs first). Lubricatelinkage.
❑ Air brake chamber service (or every 2 months,whichever occurs first). (41)
❑ Trailer brake hand control valve service (or every3 months, or every 900 hours, whichever occursfirst). (42)
❑ Air intake system service (or every 24 months,whichever occurs first).(4) (5) (24)
❑ Rear axle air shift motor service. (11)
6-7

30,000 Miles (48 000 km)❑ Change engine oil and filter (or every 12 months,
whichever occurs first). (2) (3)❑ Inspect engine air cleaner filter change indicator.
If necessary, replace the filter. If vehicle is drivenin dusty/dirty conditions, inspect filter changeindicator at every engine oil change. See Engine AirCleaner/Filter on page 5-18 for more information.An Emission Control Service. (See footnote †.)
❑ Check fluid levels (or every 3 months, whicheveroccurs first). (1) (6)
❑ Replace fuel filter. (3)❑ Chassis lubrication service (or every 6 months,
whichever occurs first).(12)❑ Steering system service. (13)❑ Front and rear suspension service. (14)❑ Spring-to-axle U-bolts and shackle bolts service. (16)❑ Exhaust system service (or every 6 months,
whichever occurs first).(3) (4) (17)❑ Wheels and tires service.(15)❑ Hydraulic brake service (or every 6 months,
whichever occurs first).(7) (46)
❑ Parking brake service (or every 6 months, whicheveroccurs first).(8)
❑ Air brake service (or every 6 months, whicheveroccurs first).(39)
❑ Air brake automatic slack adjuster service (or every500 hours, whichever occurs first). (40)
❑ Check air brake relay valve operation and check forleaks (or every month, or every 300 hours, whicheveroccurs first).
❑ Clean air brake application valve (or every 3 months,or every 300 hours, whichever occurs first). Lubricatelinkage.
❑ Air brake chamber service (or every 2 months,whichever occurs first). (41)
❑ Trailer brake hand control valve service (or every3 months, or every 900 hours, whichever occursfirst). (42)
❑ Thermostatically controlled engine cooling fanservice. (4) (20)
❑ Shields and underhood insulation service. (4) (5) (21)
6-8

37,500 Miles (60 000 km)❑ Check fluid levels (or every 3 months, whichever
occurs first). (1) (6)❑ Chassis lubrication service (or every 6 months,
whichever occurs first). (12)❑ Wheels and tires service. (15)❑ Hydraulic brake service (or every 6 months,
whichever occurs first).(7) (46)❑ Parking brake service (or every 6 months, whichever
occurs first).(8)❑ Air brake service (or every 6 months, whichever
occurs first).(39)❑ Air brake automatic slack adjuster service (or every
500 hours, whichever occurs first). (40)❑ Check air brake relay valve operation and check for
leaks (or every month, or every 300 hours, whicheveroccurs first).
❑ Clean air brake application valve (or every 3 months,or every 300 hours, whichever occurs first). Lubricatelinkage.
❑ Air brake chamber service (or every 2 months,whichever occurs first). (41)
❑ Trailer brake hand control valve service (or every3 months, or every 900 hours, whichever occursfirst). (42)
40,000 Miles (64 000 km)❑ Change engine oil and filter (or every 12 months,
whichever occurs first). (2) (3)❑ Air compressor dry element pleated paper air strainer
service (or every 2 months or every 800 hours,whichever occurs first).
45,000 Miles (72 000 km)❑ Inspect engine air cleaner filter change indicator.
If necessary, replace the filter. If vehicle is drivenin dusty/dirty conditions, inspect filter changeindicator at every engine oil change. See Engine AirCleaner/Filter on page 5-18 for more information.An Emission Control Service. (See footnote †.)
❑ Check fluid levels (or every 3 months, whicheveroccurs first). (1) (6)
❑ Replace fuel filter. (3)❑ Chassis lubrication service (or every 6 months,
whichever occurs first).(12)❑ Cooling system service. Clean the cooling system
filler cap with clean water, clean the core, pressuretest the cap and the system for proper pressurecapability and inspect condition of cooling and heaterhoses and clamps. Replace hoses if cracked,swollen or damaged.
6-9

❑ Wheel bearing (grease type) service (or every24 months, whichever occurs first, and wheneverhubs are removed.) (23) (46)
❑ Inspect door hinge pins and bushings and replaceas necessary.
❑ Steering system service. (13)❑ Front and rear suspension service. (14)❑ Spring-to-axle U-bolts and shackle bolts service. (16)❑ Exhaust system service (or every 6 months,
whichever occurs first).(3) (4) (17)❑ Wheels and tires service.(15)❑ Hydraulic brake service (or every 6 months,
whichever occurs first).(7) (46)❑ Parking brake service (or every 6 months, whichever
occurs first).(8)❑ Air brake service (or every 6 months, whichever
occurs first).(39)❑ Air brake automatic slack adjuster service (or every
500 hours, whichever occurs first). (40)
❑ Check air brake relay valve operation and check forleaks (or every month, or every 300 hours, whicheveroccurs first).
❑ Clean air brake application valve (or every 3 months,or every 300 hours, whichever occurs first). Lubricatelinkage.
❑ Air brake chamber service (or every 2 months,whichever occurs first). (41)
❑ Trailer brake hand control valve service (or every3 months, or every 900 hours, whichever occursfirst). (42)
❑ Thermostatically controlled engine cooling fanservice. (4) (20)
❑ Shields and underhood insulation service. (4) (5) (21)❑ Rear axle air shift motor service. (11)❑ Air intake system service (or every 24 months,
whichever occurs first). (4) (5) (24)
6-10

50,000 Miles (80 000 km)❑ Change engine oil and filter (or every 12 months,
whichever occurs first).(2) (3)❑ Inspect air compressor discharge port (or every
6 months or every 1,800 hours, whichever occursfirst.)
52,500 Miles (84 000 km)❑ Check fluid levels (or every 3 months, whichever
occurs first). (1) (6)❑ Chassis lubrication service (or every 6 months,
whichever occurs first). (12)❑ Wheels and tires service. (15)❑ Hydraulic brake service (or every 6 months,
whichever occurs first).(7) (46)❑ Parking brake service (or every 6 months, whichever
occurs first).(8)❑ Air brake service (or every 6 months, whichever
occurs first).(39)
❑ Air brake automatic slack adjuster service (or every500 hours, whichever occurs first). (40)
❑ Check air brake relay valve operation and check forleaks (or every month, or every 300 hours, whicheveroccurs first).
❑ Clean air brake application valve (or every 3 months,or every 300 hours, whichever occurs first). Lubricatelinkage.
❑ Air brake chamber service (or every 2 months,whichever occurs first). (41)
❑ Trailer brake hand control valve service (or every3 months, or every 900 hours, whichever occursfirst). (42)
6-11

60,000 Miles (96 000 km)❑ Change engine oil and filter (or every 12 months,
whichever occurs first). (2) (3)❑ Inspect engine air cleaner filter change indicator.
If necessary, replace the filter. If vehicle is drivenin dusty/dirty conditions, inspect filter changeindicator at every engine oil change. See Engine AirCleaner/Filter on page 5-18 for more information.An Emission Control Service. (See footnote †.)
❑ Check fluid levels (or every 3 months, whicheveroccurs first). (1) (6)
❑ Replace fuel filter. (3)❑ Chassis lubrication service (or every 6 months,
whichever occurs first).(12)❑ Inspect door hinge pins and bushings and replace
as necessary.❑ Steering system service. (13)❑ Front and rear suspension service. (14)❑ Spring-to-axle U-bolts and shackle bolts service. (16)❑ Exhaust system service (or every 6 months,
whichever occurs first).(3) (4) (17)❑ Wheels and tires service.(15)❑ Hydraulic brake service (or every 6 months,
whichever occurs first).(7) (46)
❑ Parking brake service (or every 6 months, whicheveroccurs first).(8)
❑ Air brake service (or every 6 months, whicheveroccurs first).(39)
❑ Air brake automatic slack adjuster service (or every500 hours, whichever occurs first). (40)
❑ Check air brake relay valve operation and check forleaks (or every month, or every 300 hours, whicheveroccurs first).
❑ Clean air brake application valve (or every 3 months,or every 300 hours, whichever occurs first). Lubricatelinkage.
❑ Air brake chamber service (or every 2 months,whichever occurs first). (41)
❑ Trailer brake hand control valve service (or every3 months, or every 900 hours, whichever occursfirst). (42)
❑ Thermostatically controlled engine cooling fanservice. (4) (20)
❑ Shields and underhood insulation service. (4) (5) (21)❑ Air compressor dry element pleated paper air
strainer service (or every 2 months or every800 hours, whichever occurs first).
6-12

67,500 Miles (108 000 km)❑ Check fluid levels (or every 3 months, whichever
occurs first). (1) (6)❑ Chassis lubrication service (or every 6 months,
whichever occurs first). (12)❑ Cooling system service. Clean the cooling system
filler cap with clean water, clean the core, pressuretest the cap and the system for proper pressurecapability and inspect condition of cooling and heaterhoses and clamps. Replace hoses if cracked,swollen or damaged.
❑ Wheel bearing (grease type) service (or every24 months, whichever occurs first, and wheneverhubs are removed). (23) (46)
❑ Wheels and tires service.(15)❑ Hydraulic brake service (or every 6 months,
whichever occurs first).(7) (46)❑ Parking brake service (or every 6 months, whichever
occurs first).(8)❑ Air brake service (or every 6 months, whichever
occurs first).(39)
❑ Air brake automatic slack adjuster service (or every500 hours, whichever occurs first). (40)
❑ Check air brake relay valve operation and check forleaks (or every month, or every 300 hours, whicheveroccurs first).
❑ Clean air brake application valve (or every 3 months,or every 300 hours, whichever occurs first). Lubricatelinkage.
❑ Air brake chamber service (or every 2 months,whichever occurs first). (41)
❑ Trailer brake hand control valve service (or every3 months, or every 900 hours, whichever occursfirst). (42)
❑ Rear axle air shift motor service. (11)❑ Air intake system service (or every 24 months,
whichever occurs first). (4) (5) (24)
70,000 Miles (112 000 km)❑ Change engine oil and filter (or every 12 months,
whichever occurs first). (2) (3)
6-13

75,000 Miles (120 000 km)❑ Inspect engine air cleaner filter change indicator.
If necessary, replace the filter. If vehicle is drivenin dusty/dirty conditions, inspect filter changeindicator at every engine oil change. See Engine AirCleaner/Filter on page 5-18 for more information.An Emission Control Service. (See footnote †.)
❑ Chassis lubrication service (or every 6 months,whichever occurs first). (12)
❑ Check fluid levels (or every 3 months, whicheveroccurs first). (1) (6)
❑ Replace fuel filter. (3)❑ Steering system service. (13)❑ Front and rear suspension service. (14)❑ Spring-to-axle U-bolts and shackle bolts service. (16)❑ Exhaust system service (or every 6 months,
whichever occurs first). (3) (4) (17)❑ Wheels and tires service.(15)❑ Hydraulic brake service (or every 6 months,
whichever occurs first).(7) (46)❑ Parking brake service (or every 6 months, whichever
occurs first).(8)
❑ Air brake service (or every 6 months, whicheveroccurs first).(39)
❑ Air brake automatic slack adjuster service (or every500 hours, whichever occurs first). (40)
❑ Check air brake relay valve operation and check forleaks (or every month, or every 300 hours, whicheveroccurs first).
❑ Clean air brake application valve (or every 3 months,or every 300 hours, whichever occurs first). Lubricatelinkage.
❑ Air brake chamber service (or every 2 months,whichever occurs first). (41)
❑ Trailer brake hand control valve service (or every3 months, or every 900 hours, whichever occursfirst). (42)
❑ Fuel tank, fuel cap and fuel lines service (or every72 months, whichever occurs first). (3) (30) †
❑ Thermostatically controlled engine cooling fanservice. (4) (20)
❑ Shields and underhood insulation service. (4) (5) (21)
6-14
80,000 Miles (128 000 km)❑ Change engine oil and filter (or every 12 months,
whichever occurs first). (2) (3)❑ Air compressor dry element pleated paper air strainer
service (or every 2 months or every 800 hours,whichever occurs first).
82,500 Miles (132 000 km)❑ Check fluid levels (or every 3 months, whichever
occurs first). (1) (6)❑ Chassis lubrication service (or every 6 months,
whichever occurs first). (12)❑ Wheels and tires service. (15)❑ Hydraulic brake service (or every 6 months,
whichever occurs first).(7) (46)❑ Parking brake service (or every 6 months, whichever
occurs first).(8)
❑ Air brake service (or every 6 months, whicheveroccurs first).(39)
❑ Air brake automatic slack adjuster service (or every500 hours, whichever occurs first). (40)
❑ Check air brake relay valve operation and check forleaks (or every month, or every 300 hours, whicheveroccurs first).
❑ Clean air brake application valve (or every 3 months,or every 300 hours, whichever occurs first). Lubricatelinkage.
❑ Air brake chamber service (or every 2 months,whichever occurs first). (41)
❑ Trailer brake hand control valve service (or every3 months, or every 900 hours, whichever occursfirst). (42)
❑ Wheel bearings service – Eaton Axle (oil-filled) (orevery 24 months, whichever occurs first). (23) (46)
6-15
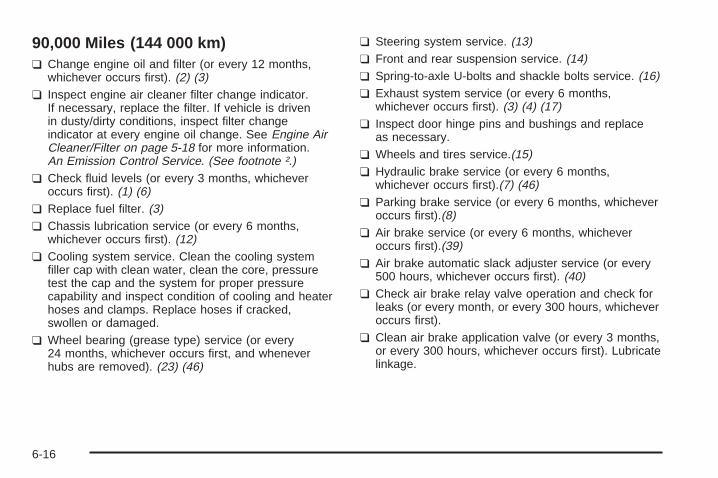
90,000 Miles (144 000 km)❑ Change engine oil and filter (or every 12 months,
whichever occurs first). (2) (3)❑ Inspect engine air cleaner filter change indicator.
If necessary, replace the filter. If vehicle is drivenin dusty/dirty conditions, inspect filter changeindicator at every engine oil change. See Engine AirCleaner/Filter on page 5-18 for more information.An Emission Control Service. (See footnote †.)
❑ Check fluid levels (or every 3 months, whicheveroccurs first). (1) (6)
❑ Replace fuel filter. (3)❑ Chassis lubrication service (or every 6 months,
whichever occurs first). (12)❑ Cooling system service. Clean the cooling system
filler cap with clean water, clean the core, pressuretest the cap and the system for proper pressurecapability and inspect condition of cooling and heaterhoses and clamps. Replace hoses if cracked,swollen or damaged.
❑ Wheel bearing (grease type) service (or every24 months, whichever occurs first, and wheneverhubs are removed). (23) (46)
❑ Steering system service. (13)❑ Front and rear suspension service. (14)❑ Spring-to-axle U-bolts and shackle bolts service. (16)❑ Exhaust system service (or every 6 months,
whichever occurs first). (3) (4) (17)❑ Inspect door hinge pins and bushings and replace
as necessary.❑ Wheels and tires service.(15)❑ Hydraulic brake service (or every 6 months,
whichever occurs first).(7) (46)❑ Parking brake service (or every 6 months, whichever
occurs first).(8)❑ Air brake service (or every 6 months, whichever
occurs first).(39)❑ Air brake automatic slack adjuster service (or every
500 hours, whichever occurs first). (40)❑ Check air brake relay valve operation and check for
leaks (or every month, or every 300 hours, whicheveroccurs first).
❑ Clean air brake application valve (or every 3 months,or every 300 hours, whichever occurs first). Lubricatelinkage.
6-16

❑ Air brake chamber service (or every 2 months,whichever occurs first). (41)
❑ Trailer brake hand control valve service (or every3 months, or every 900 hours, whichever occursfirst). (42)
❑ Thermostatically controlled engine cooling fanservice. (4) (20)
❑ Shields and underhood insulation service. (4) (5) (21)❑ Rear axle air shift motor service. (11)❑ Air intake system service (or every 24 months,
whichever occurs first). (4) (5) (24)
97,500 Miles (156 000 km)❑ Check fluid levels (or every 3 months, whichever
occurs first). (1) (6)❑ Chassis lubrication service (or every 6 months,
whichever occurs first). (12)❑ Wheels and tires service. (15)
100,000 Miles (160 000 km)❑ Change engine oil and filter (or every 12 months,
whichever occurs first). (2) (3)❑ Inspect engine drive belt; replace as necessary.❑ Change power steering fluid (or every 36 months,
whichever occurs first). (13)
❑ Replace power steering reservoir filter element(or every 24 months, whichever occurs first).
❑ Front axle service. (38)❑ Rear axle service – Eaton, Rockwell, Spicer Axles
(or every 12 months, whichever occurs first). (37)❑ Exhaust brake service (if equipped). Check for
excessive spindle free play and smooth operation.Lubricate ball joint cap.
❑ Air compressor dry element pleated paper air strainerservice (or every 2 months or every 800 hours,whichever occurs first).
❑ Inspect air compressor discharge port (or every6 months or every 1,800 hours, whichever occursfirst).
❑ Manual transmission (ZF 6-speed only) fluidreplacement (or every 48 months, whicheveroccurs first).
150,000 Miles (240 000 km)❑ Cooling system service (or every 60 months since
last service, whichever occurs first). (3) (35)❑ Inspect engine drive belt; replace as necessary.
6-17

200,000 Miles (320 000 km)❑ Remove, disassemble, clean and inspect the air
brake trailer supply valve (or every 2 years, orevery 7,200 hours, whichever occurs first).
❑ Inspect engine drive belt; replace as necessary.
250,000 Miles (400 000 km)❑ Rear axle service – Eaton, Rockwell, Spicer Axles
(or every 36 months, whichever occurs first). (37)
300,000 Miles (480 000 km)❑ Remove, disassemble, clean and inspect the air
brake air dryer (or every 3 years, or 10,800 hours,whichever occurs first). Replace desiccant onBendix-Westinghouse units.
Footnotes† = The U.S. Environmental Protection Agency or theCalifornia Air Resources Board has determined that thefailure to perform this maintenance item will not nullifythe emission warranty or limit recall liability prior tothe completion of the vehicle’s useful life. We, however,urge that all recommended maintenance services beperformed at the indicated intervals and themaintenance be recorded.
(1) = If your vehicle has an Allison automatictransmission, your GM owner’s manual is supplementedby an Allison Transmission Operator’s Manual. Alwaysrefer to these manuals for related maintenance services.
(3) = An Emission Control Service.
(4) = A Noise Emission Control Device.
(5) = Applies only to vehicles sold in the United States.
(6) = Check fluid level in brake master cylinder,power steering pump, axle, transmission and hydraulicspring parking brake pump (if equipped). A low fluidlevel in the brake master cylinder can indicateworn brake linings and should be checked accordingly.
(7) = Inspect brake lines and hoses for properhook-up, binding, leaks, cracks, chafing, etc. Inspectdisc brake pads for wear and rotors for surfacecondition. Inspect caliper assemblies. Check brakepedal for excessive free play or travel (or every6 months, whichever occurs first) and have serviced ifneeded. Check brakes more often if driving habitsand conditions result in frequent braking.
(8) = Inspect parking brake drum and linings for wear orcracks and check linkage and adjustment.
6-18

(11) = Inspect rear axle air shift motor for fluid leaks.Remove plug to check fluid level. Inspect air linesand hoses for proper hook-up, binding, leaks, etc.Inspect at 1,000 miles (1 600 km) and 22,500 miles(36 000 km) and then every 22,500 miles (36 000 km)thereafter.
(12) = Chassis Lubrication Service: Lubricate all greasefittings in front suspension, front axle and steeringlinkage. DO NOT lubricate kingpin bushings with airpressure equipment; instead, use a hand grease gun toensure complete purge and eliminate sealer capdistortion. Front axle tie rod ends, both upper and lowerkingpin fittings and both steering linkage relay rod endsahould be greased with the vehicle loaded on the groundand wheels turned straight ahead, NOT with the vehicleon a hoist. Apply kingpin bushing lubricant to both upperand lower kingpin grease fittings until new lubricantpurges from between the upper shim pack and thrustbearing. Lubricate transmission and shift linkage, hoodlatches and hood hinges, parking brake lever pivot, clevispins and linkage, disc brake caliper rails, clutch linkageand release bearing (if equipped), bearing pads,propshaft universal joints, brake camshaft bracket, slackadjusters, pedal shaft, clutch cross shaft, clutch pedalsprings and clutch cable bushing at transmission.Lubricate suspension, axle and steering linkage moreoften when operating under dusty or muddy conditionsand in excessive off-road use. Frequently power-washedvehicles will require more frequent lubrication.
(13) = Check steering system:
• Look for damaged, loose or missing parts. Inspectthe steering linkage relay rod and tie rod ends forlooseness or lack of lubricant. Also look forparts showing signs of wear or lack of lubrication.Replace parts as needed. Also check steering gearmounting bolts, pitman arm nut, gear housingupper cover and side cover attaching bolts, steeringcolumn mounting bolts and cardan joint clampbolts; tighten if necessary. (See service manual.)
• Inspect power steering hoses, tubes and fittings forleaks. Hoses and lines must not be twisted, kinkedor tightly bent. Make sure clips, clamps, supportingtubes and hoses are in place and properlysecured.
• Check steering gear for leakage around pitmanshaft and housing. If leakage is evident (lubricantoozing out, not just oily film), leak should becorrected immediately.
(14) = Check front and rear suspension. Look fordamaged, loose or missing parts or parts showing signsof wear or lack of lubrication. Replace parts as needed.
6-19

(15) = Adjust tire pressures as indicated on the GVWRating label for optimum tire life. See Tires on page 5-59for further details. Check tires for excessive orabnormal wear or damage. Also check for damagedwheels. Replace wheels and/or tires as needed.
(16) = Check spring-to-axle U-bolts and shackle boltsfor proper torque. See the service manual for torquesequence and specifications. When parts are replaced,the torque must be checked and adjusted more oftenduring the first 6,000 miles (10 000 km). Check torque at500 miles (800 km) and 2,000 miles (3 000 km) afterfirst use of parts.
(17) = Check complete exhaust system and cab areasnear the exhaust system for broken, damaged,missing or out-of-position parts. Also inspect for openseams, holes, loose connections or other conditionswhich could let exhaust fumes seep into the drivercompartment. Needed repairs should be made at once.To help maintain system integrity, replace exhaustpipes whenever a new muffler is put on.
(20) = With the engine off and below normal operatingtemperature, check to see that the thermostaticallycontrolled engine cooling fan can be rotated by hand onviscous-operated drives. Replace as needed.
(21) = Check shields and underhood insulation fordamage or looseness. Adjust or replace as needed.
23) = Wheel bearing service:
• Grease type – Clean, inspect and lubricate with theproper wheel bearing grease at designated intervalsor when hubs are removed. See Part C:Recommended Fluids and Lubricants on page 6-28.
• Oil-filled type – Some wheel bearings are lubricatedby rear axle lubricant. When you have oil-filledhubs, use lubricant identical to that used in your rearaxle. Lubricant change intervals are the same forfront and rear axles. However, you must maintain oillevel at the OIL LEVEL mark between changeintervals. See Part C: Recommended Fluids andLubricants on page 6-28.
(24) = Check the air intake system installation to seethat gaskets are seated properly and all hoseconnections, fasteners and other components are tight.Tighten connections and fasteners or replace partsas required.
(26) = Evaporative Control System Service (if equipped):Check all fuel and vapor lines and hoses for properconnections and correct routing (or every 24 months,whichever occurs first). Replace parts as needed.
6-20

(30) = Check the fuel tank, fuel cap and fuel lines fordamage which could cause leakage. Inspect fuel cap forcorrect sealing ability and any indications of damage.Check fuel cap gasket for even filler neck imprint.Replace parts as needed.
(31) = Check EGR system as described in the servicemanual. See Service Publications Ordering Informationon page 7-5.
(32) = Inspect Electronic Vacuum Regulator Valve(EVRV) filter for excessive contamination or plugging.If needed, clean filter with solution of soap and water,let dry and install.
(35) = Drain, flush and refill cooling system. See Part C:Recommended Fluids and Lubricants on page 6-28for what to use. Inspect hoses. Clean radiator,condenser, pressure cap and neck. Pressure testcooling system and pressure cap.
(37) = Rear axle service: Change the lubricant. SeePart C: Recommended Fluids and Lubricants onpage 6-28.
(38) = Front axle service: Re-pack upper kingpin rollerbearing.
(39) = Air brake service:
• Inspect brake lines and hoses for proper hook-up,binding, leaks, cracks, chafing, etc. Inspect drumbrake linings for wear or cracks. Inspect other brakeparts at each wheel, including drums, wheelcylinders and piston heat shields, boots and wheelspeed sensor wiring. Check brake pedal forexcessive free play or travel (or every 6 months,whichever occurs first) and have serviced if needed.Check brakes more often if driving habits andconditions result in frequent braking. Replace airdryer cartridge only if excessive oil or moistureis present. A small amount of oil in the system isnormal and should not be considered as a reason toreplace the cartridge.
• Test air lines for leaks; tighten as needed. Replacecompressor filter.
• Inspect air parking brake chamber for leaks anddamage. Inspect lines and hoses for leaks,cracks, chafing, etc. Also check all attachments fortightness, wear or damage. Note: The springbrake section of the rear brake diaphragms arenon-serviceable.
6-21

• Replace the air compressor filter element, mountedon the air compressor. For remote air compressorintake service, refer to engine air cleaner filterreplacement.
• Remove, disassemble, clean and inspect the safetyvalve, standard brake chamber, quick release valve,quick release/double check valve combination,parking brake control valve, double check valve,pressure protection valve and alcohol injector.
• Remove, disassemble and clean the applicationvalve; replace parts showing wear.
• Remove, disassemble, clean and inspect the springbrake control valve; replace rubber parts.
(40) = Clean and lubricate air brake automatic slackadjuster. Check pushrod travel and auto adjustmentoperation. Have serviced if needed.
(41) = Air brake chamber service: Check operation,mounting, clamps and air lines and check for leaks.
(42) = Trailer brake hand control valve service: Checkoperation; lubricate cam and follower.
(46) = Tighten the wheel stud nuts to the specifiedtorque values at 100 miles (160 km). Thereafter, tightenthem 1,000 miles (1 600 km) after each time thewheel is removed. See Tightening the Wheel Nuts onpage 5-62.
6-22

Part B: Owner Checks and ServicesListed in this part are owner checks and serviceswhich should be performed at the intervals specified tohelp ensure the safety, dependability and emissioncontrol performance of your vehicle.
For your safety and that of others, any of thesafety-related components that may have beendamaged in an accident should be checked and anyneeded repairs made before operating the vehicle.
At the minimum, these routine checks should be madeevery 6 months or 6,000 miles (10 000 km), whicheveroccurs first. Whenever repairs are needed, havethem completed before operating the vehicle.
At Each Fuel FillIt is important for you or a service station attendant toperform these underhood checks at each fuel fill.
Engine Oil Level CheckCheck the engine oil level and add the proper oil ifnecessary. See Engine Oil (DURAMAX™ Diesel) onpage 5-14 for further details.
Engine Coolant Level CheckCheck the engine coolant level and add DEX-COOL®
coolant mixture if necessary. See Engine Coolanton page 5-22 for further details.
Windshield Washer Fluid Level CheckCheck the windshield washer fluid level in the windshieldwasher tank and add the proper fluid if necessary.See Cleaning the Outside of Your Vehicle on page 5-72for further details.
Tire Inflation CheckCheck tire inflation cold. Make sure tires are inflated tothe pressures specified on the GVW Rating label.See Loading Your Vehicle on page 4-37 and Tires onpage 5-59 for further details.
6-23

At Least Twice a Year
Restraint System CheckMake sure the safety belt reminder light (if equipped) andall your belts, buckles, latch plates, retractors andanchorages are working properly. Look for any otherloose or damaged safety belt system parts. If you seeanything that might keep a safety belt system from doingits job, have it repaired. Have any torn or frayed safetybelts replaced.
Wiper Blade CheckInspect wiper blades for wear or cracking. Replaceblade inserts that appear worn or damaged or thatstreak or miss areas of the windshield. Also seeCleaning the Outside of Your Vehicle on page 5-72.
Weatherstrip LubricationSilicone grease on weatherstrips will make them lastlonger, seal better, and not stick or squeak. Applysilicone grease with a clean cloth. During very cold,damp weather more frequent application may berequired. Part C tells you what to use.
Body Lubrication ServiceLubricate all exposed surfaces such as door checks,door lock bolts, lock strike plates, door hinge bushings,latches and dovetail bumper wedges. Where oilholes are provided a dripless oil can be used. The seatadjusters, seat track, door weatherstrips and rubbercap bumpers should also be lubricated. Part C tells youwhat to use. More frequent lubrication may be requiredwhen exposed to a corrosive environment.
Parking Brake CheckPark on a fairly steep hill and hold the vehicle with theparking brake only. This checks holding ability.
6-24

Starter Switch Check
{CAUTION:
When you are doing this check, the vehiclecould move suddenly. If it does, you or otherscould be injured. Follow the steps below.
1. Before you start, be sure you have enough roomaround the vehicle.
2. Firmly apply both the parking brake and the regularbrakes. See “Parking Brake” if necessary.Do not use the accelerator pedal, and be ready toturn off the engine immediately if it starts.
3. On automatic transmission vehicles, try to start theengine in each gear. The starter should work onlyin PARK (P), if equipped, or NEUTRAL (N). Ifthe starter works in any other position, your vehicleneeds service.
Automatic Transmission ShiftIndicator CheckCheck that the indicator points to the gear chosen.
Steering CheckBe alert for any changes in steering action, abnormalfront tire wear or steering wheel position. An inspectionor service is needed when the steering wheel isharder to turn or has too much free play, or if there arestrange sounds when turning or parking.
Brake System CheckBe alert to illumination of the low air warning lamp or forthe tone alarm, or changes in braking action, such asrepeated pulling to one side, unusual sounds whenbraking or increased brake pedal travel. Make sure airbrake system reservoirs are drained daily with fullsystem air pressure, and check system for leaks. Any ofthese conditions could indicate the need for brakesystem inspection and/or service.
6-25

Engine Cooling System ServiceInspect the hoses and have them replaced if they arecracked, swollen or deteriorated. Inspect all pipes,fittings and clamps; replace as needed. Clean theoutside of the radiator and air conditioning condenser.To help ensure proper operation, a pressure test ofthe cooling system and pressure cap is recommendedat least once a year.
Exhaust System CheckBe alert for any changes in the sound of the exhaustsystem or any smell of fumes. These are signs thesystem may be leaking. Have it checked and/or repairedat once. Refer to Engine Exhaust on page 2-23 andRunning Your Engine While You Are Parked onpage 2-24.
Windshield Wipers and Washers CheckCheck operation and condition of the wiper blades.Check the flow of the washer spray.
Defroster CheckMove the control to the defrost symbol and the fan to HIor the high symbol. Then check the airflow from theducts at the inside base of the windshield.
Mirrors and Sun Visors CheckCheck that friction joints hold mirrors and sun visorsin place.
Seat Adjuster CheckWhen adjusting a manual seat, be sure seat adjusterslatch by attempting to move the seat after latching.
Lamps CheckCheck panel lighting, warning lights, indicator lights andinterior lamps. On the outside, check: license platelamps, sidemarker lamps, reflectors or lights on outsidemirrors, headlamps, parking lamps, identification andclearance lamps, taillamps, brake lamps, turn signals,backup lamps and hazard warning flashers. Haveheadlamp aim checked at once if beams seemimproperly aimed.
Glass, Mirrors, Lamps and/orReflectors Condition CheckLook for broken, scratched, dirty or damaged glass,mirrors, lamps or reflectors that could reduce the viewor visibility or cause injury. Replace, clean or repairpromptly.
6-26

Door Latches CheckCheck that doors close, latch and lock tightly. Check forbroken, damaged or missing parts that might preventtight latching.
Cab Latches CheckCheck that the cab closes firmly. Check for broken,damaged, loose or missing parts that might prevent tightlatching.
Fluid Leaks CheckCheck for fuel, coolant, oil or other fluid leaks by lookingat the surface beneath the vehicle after it has beenparked for awhile.
Underbody InspectionCorrosive materials used for ice, snow removal and dustcontrol can collect on the underbody. If these materialsare not removed, accelerated corrosion (rust) can occuron underbody parts such as fuel lines, frame, floor panand exhaust system. At least every spring, flush thesematerials from the underbody with plain water. Take careto clean well any areas where mud and other debris cancollect. Sediment packed in closed areas of the frameshould be loosened before being flushed.
Engine Cover CheckCheck that the cab’s engine cover and seal (if equipped)are not torn or damaged. Be sure that the cover isclamped down firmly to the floor.
At Least Once a Year
Key Lock Cylinders ServiceLubricate the key lock cylinders with the lubricantspecified in Part C.
Underbody Flushing ServiceAt least every spring, use plain water to flush anycorrosive materials from the underbody. Take care toclean thoroughly any areas where mud and other debriscan collect.
Tractor Protection (Breakaway) ValveCheckOn air brake models, remove, disassemble, clean andinspect the tractor protection (breakaway) valve.
6-27

Part C: Recommended Fluids andLubricantsFluids and lubricants identified below by name, partnumber or specification may be obtained from yourdealer.
Usage Fluid/Lubricant
Engine Oil
Engine oil with the letters CI-4 orCH-4 is best for your vehicle.The CI-4 or CH-4 designationmay appear either alone or incombination with other APIdesignations, such as API CI-4/SL.These letters show AmericanPetroleum Institute levels of quality.To determine the preferred viscosityfor your vehicle’s diesel engine, seeEngine Oil (DURAMAX™ Diesel) onpage 5-14.
Engine Coolant
50/50 mixture of clean, drinkablewater and use only DEX-COOL®
Coolant. See Engine Coolant onpage 5-22.
Usage Fluid/Lubricant
Hydraulic BrakeSystem
Delco Supreme 11 Brake Fluid orequivalent DOT-3 brake fluid.
WindshieldWasher Solvent GM Optikleen® Washer Solvent.
Clutch BearingLubricant
Clutch Bearing Lubricant (GM PartNo. 12378484 or equivalent NLGI #3consistency).
Exhaust BrakeBall Joint Cap
Lubricant
High-Temperature Grease (GM PartNo. U.S. 1051344, in Canada903037) or NLGI #3 consistency.
Power SteeringSystem
DEXRON®-III AutomaticTransmission Fluid.
ManualTransmission
Synthetic Manual Transmission Fluid(GM Part No. U.S. 12345724,in Canada 10953510).
AutomaticTransmission
See the Allison Transmission®
Operator’s Manual for correcttransmission fluid.
6-28

Usage Fluid/Lubricant
Key LockCylinders
Multi-Purpose Lubricant, Superlube(GM Part No. U.S. 12346241,in Canada 10953474).
ChassisLubrication
Chassis Lubricant (GM PartNo. U.S. 12377985, in Canada88901242) or lubricant meetingrequirements of NLGI #2, CategoryLB or GC-LB.
Front WheelBearing Grease
(Except OilFilled Hubs)
Wheel bearing lubricant meetingrequirements of NLGI #2, CategoryGC or GC-LB (GM Part No.U.S. 1051344, in Canada 993037).
Front WheelBearing Greasewith Oil Filled
Hubs
SAE 75W-90 Synthetic AxleLubricant for Medium Duty Trucks(GM Part No. U.S. 12345841,in Canada 10953512).
Rear Axle andRear Hubs
SAE 75W-90 Synthetic AxleLubricant for Medium Duty Trucks(GM Part No. U.S. 12345841,in Canada 10953512).
Usage Fluid/Lubricant
Rear Axle ShiftMotor Lubricant
Refrigerant Oil (GM Part No.U.S.5416939, in Canada 10953496).
Propshafts andSplines
Wheel bearing lubricant meetingrequirements of NLGI #2, CategoryGC or GC-LB (GM Part No. U.S.1051344, in Canada 993037).
Cab — DoorHinges and
Latches
Multi-Purpose Lubricant, Superlube(GM Part No. U.S. 12346241,in Canada 10953474).
WeatherstripConditioning
Dielectric Silicone Grease (GM PartNo. U.S. 12345579, in Canada10953014).
WeatherstripSqueaks
Synthetic Grease with Teflon,Superlube (GM Part No. U.S.12371287, in Canada 10953437).
6-29

Part D: Maintenance RecordAfter the scheduled services are performed, record the date, odometer reading and who performed the service andany additional information from “Owner Checks and Services” on the following record pages. Also, you should retainall maintenance receipts.
Date OdometerReading Serviced By Maintenance Record
6-30

Date OdometerReading Serviced By Maintenance Record
6-31

Date OdometerReading Serviced By Maintenance Record
6-32

Customer Assistance Information ......................7-2Customer Satisfaction Procedure ......................7-2Customer Assistance for Text Telephone
(TTY) Users ...............................................7-2Customer Assistance Offices ............................7-3Roadside Assistance Program ..........................7-4
Reporting Safety Defects ..................................7-4Reporting Safety Defects to the United States
Government ...............................................7-4Reporting Safety Defects to the Canadian
Government ...............................................7-5Reporting Safety Defects to
General Motors ...........................................7-5Service Publications Ordering Information ...........7-5
Section 7 Customer Assistance Information
7-1

Customer AssistanceInformation
Customer Satisfaction ProcedureYour satisfaction and goodwill are important toyour dealer and to GMC. Normally, any concerns withthe sales transaction or the operation of your vehiclewill be resolved by your dealer’s sales or servicedepartments. Sometimes, however, despite the bestintentions of all concerned, misunderstandings canoccur. If your concern has not been resolved to yoursatisfaction, the following steps should be taken:
STEP ONE: Discuss your concern with a member ofdealership management. Normally, concerns canbe quickly resolved at that level. If the matter hasalready been reviewed with the sales, service or partsmanager, contact the owner of the dealership orthe general manager.
STEP TWO: If after contacting a member of dealershipmanagement, it appears your concern cannot beresolved by the dealership without further help, contactthe GMC or Chevrolet Consumer Relations Manager bycalling 1-800-862-4389, Customer Assistance prompt.In Canada, contact GM of Canada CustomerCommunication Centre in Oshawa by calling1-800-263-3777 (English) or 1-800-263-7854 (French).
We encourage you to call the toll-free number in order togive your inquiry prompt attention. Please have thefollowing information available to give the CustomerAssistance Representative:
• Vehicle Identification Number (This is available fromthe vehicle registration or title, or the plate at the topleft of the instrument panel and visible through thewindshield.)
• Dealership name and location
• Vehicle delivery date and present mileage
When contacting GMC, please remember that yourconcern will likely be resolved at a dealer’s facility.That is why we suggest you follow Step One firstif you have a concern.
Customer Assistance for TextTelephone (TTY) UsersTo assist customers who are deaf, hard of hearing, orspeech-impaired and who use the Text Telephones(TTYs), GMC has TTY equipment available at itsCustomer Assistance Center. Any TTY user cancommunicate with GMC by dialing: 1-800-GMC-8583(462-8583). (TTY users in Canada can dial1-800-263-3830.)
7-2

Customer Assistance OfficesGMC encourages customers to call the toll-free numberfor assistance. If a U.S. customer wishes to write toGMC, the letter should be addressed to GMC’s MediumDuty Truck Customer Assistance Center.
United States – Customer AssistanceGMC Medium Duty TruckCustomer Assistance CenterP.O. Box 44947Detroit,, MI 48244
1-800-862-43891-800-462-8583 (For Text Telephone devices (TTYs))Roadside Assistance: 1-800-GMC-8782Fax Number: 313-381-0022
From Puerto Rico1-800-496-9992 (English)1-800-496-9993 (Spanish)Fax Number: 313-381-0022
U.S. Virgin Islands:1-800-496-9994Fax Number: 313-381-0022
Canada – Customer AssistanceGeneral Motors of Canada LimitedCustomer Communication Centre, 163-0051908 Colonel Sam DriveOshawa, Ontario L1H 8P7
1-800-263-3777 (English)1-800-263-7854 (French)1-800-263-3830 (For Text Telephone devices (TTYs))Roadside Assistance: 1-800-268-6800
Overseas – Customer AssistancePlease contact the local General Motors Business Unit.
Mexico, Central America andCaribbean Islands/Countries(Except Puerto Rico and U.S. VirginIslands) – Customer Assistance
General Motors de Mexico, S. de R.L. de C.V.Customer Assistance CenterPaseo de la Reforma # 2740Col. Lomas de BezaresC.P. 11910, Mexico, D.F.01-800-508-0000Long Distance: 011-52-53 29 0 800
7-3

Roadside Assistance ProgramGM Medium Duty Truck’s Roadside Assistanceprovides stranded owners with towing service fordisabled vehicles.
This service combines the efforts of trained telephonerepresentatives with a network of GM Medium DutyTruck’s dealer services.
Just dial GM Medium Duty Truck Roadside Assistanceat 1-800-862-4389 to reach a qualified representativewho can assist you in a repair or arrange a tow.Other recommended services can also be arranged forsituations such a retrieving locked-in keys, changinga tire or delivering gasoline, at a charge to the owner.We also provide dealer information at no chargesuch as location of the nearest authorized medium dutyGM Truck dealer and their hours of operation.
Roadside Assistance is available 24 hours a day,7 days a week, 365 days a year, including weekendsand holidays. Should you have any questions aboutRoadside Assistance, call the GM Medium Duty TruckRoadside Assistance Center or contact your dealer.
Reporting Safety Defects
Reporting Safety Defects to theUnited States GovernmentIf you believe that your vehicle has a defect which couldcause a crash or could cause injury or death, youshould immediately inform the National Highway TrafficSafety Administration (NHTSA), in addition to notifyingGeneral Motors.
If NHTSA receives similar complaints, it may open aninvestigation, and if it finds that a safety defect exists ina group of vehicles, it may order a recall and remedycampaign. However, NHTSA cannot become involved inindividual problems between you, your dealer orGeneral Motors.
To contact NHTSA, you may either call the Auto SafetyHotline toll-free at 1-800-424-9393 (or 366-0123 inthe Washington, D.C. area) or write to:
NHTSA, U.S. Department of TransportationWashington, D.C. 20590
You can also obtain other information about motorvehicle safety from the hotline.
7-4

Reporting Safety Defects to theCanadian GovernmentIf you live in Canada, and you believe that your vehiclehas a safety defect, you should immediately notifyTransport Canada, in addition to notifying GeneralMotors of Canada Limited. You may write to:
Transport Canada330 Sparks StreetTower COttawa, Ontario K1A 0N5
Reporting Safety Defects toGeneral MotorsIn addition to notifying NHTSA (or Transport Canada) ina situation like this, we certainly hope you’ll notify us.Please call us at 1-800-862-4389, or write:
GM Medium Duty TruckCustomer Assistance CenterP.O. Box 44947Detroit, MI 48244
In Canada, please call us at 1-800-263-3777 (English)or 1-800-263-7854 (French). Or, write
General Motors of Canada LimitedCustomer Communication Centre, 163-0051908 Colonel Sam DriveOshawa, Ontario L1H 8P7
Service Publications OrderingInformation
Service ManualsService Manuals have the diagnosis and repairinformation on engines, transmission, axle, suspension,brakes, electrical, steering, body, etc.
RETAIL SELL PRICE: $120.00
Service BulletinsService Bulletins give technical service informationneeded to knowledgeably service General Motors carsand trucks. Each bulletin contains instructions toassist in the diagnosis and service of your vehicle.
In Canada, information pertaining to Product ServiceBulletins can be obtained by contacting your GeneralMotors dealer or by calling 1-800-GM-DRIVE(1-800-463-7483).
7-5

Owner’s InformationOwner publications are written specifically for ownersand intended to provide basic operational informationabout the vehicle. The owner’s manual will includethe Maintenance Schedule for all models.
In-Portfolio: Includes a Portfolio, Owner’s Manual andWarranty Booklet.
RETAIL SELL PRICE: $35.00
Without Portfolio: Owner’s Manual only.
RETAIL SELL PRICE: $25.00
Current and Past Model Order FormsService Publications are available for current andpast model GM vehicles. To request an order form,please specify year and model name of the vehicle.
ORDER TOLL FREE: 1-800-551-4123Monday-Friday 8:00 AM - 6:00 PMEastern TimeFor Credit Card Orders Only(VISA-MasterCard-Discover), visit Helm, Inc. on theWorld Wide Web at: www.helminc.com
Or you can write to:
Helm, IncorporatedP. O. Box 07130Detroit, MI 48207
Prices are subject to change without notice and withoutincurring obligation. Allow ample time for delivery.
Note to Canadian Customers: All listed prices arequoted in U.S. funds. Canadian residents are to makechecks payable in U.S. funds.
7-6

AAdding Washer Fluid ....................................... 5-34Add-On Electrical Equipment ............................ 5-77Adjusting the Speakers
(Balance/Fade) ............................ 3-42, 3-44, 3-49Air Brake ....................................................... 2-21Air Brake System Warning Light ........................ 3-28Air Brake Systems .......................................... 5-37Air Cleaner/Filter, Engine ................................. 5-18Air Dryer ....................................................... 5-38Air Pressure Gage .......................................... 3-38Air Suspension ............................................... 2-15Aluminum or Chrome-Plated Wheels .................. 5-74AM-FM Radio ................................................. 3-40AM ............................................................... 3-51Antenna, Fixed Mast ....................................... 3-53Anti-lock Brake System (ABS) ............................ 4-8Anti-Lock Brake, System Warning Light .............. 3-29Anti-Lock Brakes, Trailer System
Warning Light ............................................. 3-30Appearance Care ............................................ 5-69
Care of Safety Belts .................................... 5-71Chemical Paint Spotting ............................... 5-75Cleaning the Inside of Your Vehicle ................ 5-69Cleaning the Outside of Your Vehicle .............. 5-72Finish Damage ............................................ 5-75Sheet Metal Damage ................................... 5-74
Appearance Care (cont.)Underbody Maintenance ............................... 5-75Vehicle Care/Appearance Materials ................ 5-76Weatherstrips .............................................. 5-72
Ashtrays ........................................................ 3-17Audio System(s) ............................................. 3-39
AM-FM Radio ............................................. 3-40Care of Your Cassette Tape Player ................ 3-52Care of Your CD Player ............................... 3-53Care of Your CDs ........................................ 3-53Chime Level Adjustment ............................... 3-53Fixed Mast Antenna ..................................... 3-53Radio with Cassette ..................................... 3-43Radio with CD ............................................ 3-47Setting the Time .......................................... 3-39Theft-Deterrent Feature ................................ 3-51Understanding Radio Reception ..................... 3-51
Automatic Transmission ............................. 2-7, 2-14Fluid .......................................................... 5-20Operation ................................................... 2-16
Automatic Transmission External Filter ............... 5-20Automatic Transmission Shift
Indicator Check ........................................... 6-25Automatic Transmission Third
Gear Hold .................................................. 2-16Auxiliary Power Jacks ...................................... 3-17Axle, Two-Speed Rear Axle Electric
Shift Control ............................................... 2-14
1

BBattery .......................................................... 5-43Body Lubrication Service .................................. 6-24Brake ............................................................ 2-13
Diesel Engine Exhaust ................................. 2-13Exhaust Indicator Light ................................. 3-35Parking Warning Light .................................. 3-29System Warning Light .................................. 3-26Trailer Hand Control Valve ............................ 4-10
Brake Adjustment ............................................ 5-37Brake Fluid .................................................... 5-35Brake Pedal Travel ......................................... 5-37Brake System Check ....................................... 6-25Brakes .......................................................... 5-35Braking in Emergencies ..................................... 4-9Braking ........................................................... 4-6Break-In, New Vehicle ....................................... 2-6Bucket Seats ................................................... 1-2
CCab Latches Check ......................................... 6-27Cab Tilting ..................................................... 5-50
Before You Tilt the Cab ................................ 5-50Lifting the Front Panel .................................. 5-55Lowering the Cab ........................................ 5-53Tilting the Cab ............................................ 5-50
Canada – Customer Assistance .......................... 7-3
Canadian Owners ................................................ iiCapacities and Specifications ............................ 5-84Carbon Monoxide ................................... 4-26, 2-23Care of ......................................................... 5-71
Safety Belts ................................................ 5-71Your Cassette Tape Player ............................ 3-52Your CD Player ........................................... 3-53Your CDs ................................................... 3-53
Cassette Tape Messages ................................. 3-46CD Adapter Kits ............................................. 3-47Center Console Storage Area ........................... 2-27Center Passenger Position, Safety Belts ............. 1-16Center Seat Storage ....................................... 2-27Center Seat ..................................................... 1-3Charging System Light .................................... 3-24Chassis Lubrication ......................................... 5-40Check ........................................................... 3-32
Engine Light ............................................... 3-32Gages Warning Light ................................... 3-37
Checking Coolant ............................................ 5-24Checking Engine Oil ........................................ 5-14Checking Your Restraint Systems ...................... 1-29Chemical Paint Spotting ................................... 5-75Child Restraints .............................................. 1-24
Child Restraint Systems ............................... 1-24Infants and Young Children ........................... 1-20Older Children ............................................. 1-18Securing a Child Restraint in a Center
Seat Position ........................................... 1-27Top Strap ................................................... 1-27
2
Chime Level Adjustment .................................. 3-53Cigarette Lighter ............................................. 3-17Cleaning Exterior Lamps/Lenses ....................... 5-72Cleaning Fabric/Carpet .................................... 5-69Cleaning Glass Surfaces .................................. 5-71Cleaning Interior Plastic Components ................. 5-71Cleaning the Top of the Instrument Panel ........... 5-71Cleaning ........................................................ 5-69
Inside of Your Vehicle .................................. 5-69Outside of Your Vehicle ................................ 5-72Underbody Maintenance ............................... 5-75Weatherstrips .............................................. 5-72
Cleaning Vinyl ................................................ 5-71Climate Control System ................................... 3-18
Outlet Adjustment ........................................ 3-20Clutch Brake (Vehicles with Non-Synchronized
Transmission) .............................................. 2-18Clutch, Hydraulic ............................................. 5-21Clutch Pedal Free Travel ................................. 5-39Cold Weather Starting ....................................... 2-8Compact Disc Messages .................................. 3-51Control of a Vehicle .......................................... 4-6Coolant ......................................................... 3-30
Engine Temperature Gage ............................ 3-30Heater, Engine ............................................ 2-12Low Warning Light ....................................... 3-31Surge Tank Pressure Cap ............................. 5-25
Cooling System .............................................. 5-28Cruise Control ................................................ 3-11
Current and Past Model Order Forms .................. 7-6Customer Assistance Information ........................ 7-2
Customer Assistance for Text Telephone (TTY)Users ....................................................... 7-2
Customer Assistance Offices ........................... 7-3Customer Satisfaction Procedure ..................... 7-2Reporting Safety Defects to
General Motors .......................................... 7-5Reporting Safety Defects to the
Canadian Government ................................ 7-5Reporting Safety Defects to the
United States Government .......................... 7-4Roadside Assistance Program ......................... 7-4Service Publications Ordering Information ......... 7-5
DDaytime Running Lamps .................................. 3-14Daytime Running Lamps Indicator Light ............. 3-36Defensive Driving ............................................. 4-2Defogging and Defrosting ................................. 3-19Defroster Check .............................................. 6-26Diesel Engine ................................................. 2-13
Exhaust Brake ............................................ 2-13Fuel ............................................................ 5-5Starting Your DURAMAX™ ............................. 2-7
Differential Lock Indicator Light ......................... 3-35Doing Your Own Service Work ........................... 5-3
3

Dome Lamps ................................................. 3-16Door ............................................................... 2-3
Locks .......................................................... 2-3Door Latches Check ........................................ 6-27Double-Clutching ............................................. 2-18Driver ............................................................. 1-8
Position, Safety Belt ...................................... 1-8Driving on Snow or Ice .................................... 4-26Driving Through Deep Standing Water ............... 4-20Driving Through Flowing Water ......................... 4-20Driving .......................................................... 4-17
At Night ..................................................... 4-17City ........................................................... 4-21Defensive ..................................................... 4-2Drunken ....................................................... 4-3Freeway ..................................................... 4-22Hill and Mountain Roads .............................. 4-24In Rain and on Wet Roads ........................... 4-18Winter ........................................................ 4-26
Dual Tire Operation ......................................... 5-61
EEaton® Fuller® Nine and Ten-Speed
Non-Synchronized Manual Transmissions ........ 2-18Electric Air Compressor ................................... 5-38Electrical System ............................................ 5-77
Add-On Equipment ...................................... 5-77Fuses and Circuit Breakers ........................... 5-78
Electrical System (cont.)Fusible Links .............................................. 5-78Headlamp Wiring ......................................... 5-77Power Windows and Other Power Options ...... 5-78Windshield Wiper Fuses ............................... 5-78
Electric/Hydraulic Parking Brake Fluid ................ 5-39Engine .......................................................... 5-18
Air Cleaner/Filter ......................................... 5-18Battery ....................................................... 5-43Change Engine Oil Light ............................... 3-34Check and Service Engine Soon Light ............ 3-32Checks Before Operating .............................. 2-10Coolant Heater ............................................ 2-12Coolant Temperature Gage ........................... 3-30Coolant ...................................................... 5-22Diesel Engine Exhaust Brake ........................ 2-13Exhaust ..................................................... 2-23Oil ............................................................. 5-14Overheating ................................................ 5-26Overspeed Warning Light .............................. 3-34Reduced Power Light ................................... 3-36Shutdown Warning Light ............................... 3-34Starting Your DURAMAX™ Diesel .................... 2-7
Engine Alarm and Automatic Shutdown ................ 2-8Engine Coolant Level Check ............................. 6-23Engine Cooling System Service ........................ 6-26Engine Cover Check ....................................... 6-27Engine Oil Additives ........................................ 5-17Engine Oil Level Check ................................... 6-23
4

Engine Road Speed Governor .......................... 3-23Engine Speed Limiting ..................................... 3-23Exhaust Brake Indicator Light ........................... 3-35Exhaust Restrictor ............................................ 2-9Exhaust System Check .................................... 6-26Extender, Safety Belt ....................................... 1-17Exterior Lamps ............................................... 3-14
FFilter ............................................................. 5-18
Engine Air Cleaner ...................................... 5-18Finding a Station ............................ 3-40, 3-43, 3-48Finish Care .................................................... 5-72Finish Damage ............................................... 5-75Fixed Mast Antenna ........................................ 3-53Flash-to-Pass ................................................... 3-9Flat Tire ........................................................ 5-67Fluid ............................................................. 5-20
Automatic Transmission ................................ 5-20Manual Transmission .................................... 5-20Power Steering ........................................... 5-33Windshield Washer ...................................... 5-34
Fluid Leaks Check .......................................... 6-27FM ............................................................... 3-51Footnotes ...................................................... 6-18Four-Wheel Disc Brakes (Hydraulic Only) ........... 5-37Four-Wheel Drum Brakes (Air Only) .................. 5-37
Fuel ............................................................... 5-5Diesel Engine Fuel ........................................ 5-5Filling a Portable Fuel Container .................... 5-14Filling Your Tank .......................................... 5-13Filter .......................................................... 5-58Gage ......................................................... 3-37Primary Filter and Water Separator ................ 5-58Running Out of Fuel .................................... 5-12Secondary Filter and Water Separator/Heater .... 5-58Very Cold Weather Operation .......................... 5-6Water in Fuel ............................................... 5-6What Fuel to Use .......................................... 5-5
Fuel Priming .................................................... 5-9Fuses ........................................................... 5-78
Fuses and Circuit Breakers ........................... 5-78Windshield Wiper ......................................... 5-78
GGage ............................................................ 3-38
Air Pressure ............................................... 3-38Check Gages Warning Light .......................... 3-37Engine Coolant Temperature ......................... 3-30Fuel .......................................................... 3-37Oil Pressure ............................................... 3-32Speedometer .............................................. 3-23Tachometer ................................................. 3-23Voltmeter Gage ........................................... 3-25
Glass, Mirrors, Lamps and/or ReflectorsCondition Check .......................................... 6-26
5

HHazard Warning Flashers ................................... 3-6Headlamp High/Low-Beam Changer .................... 3-8Headlamp Wiring ............................................ 5-77Headlamps ...................................................... 3-9Headlamps On Reminder ................................... 3-9Heavy-Duty Trailer Wiring Package .................... 4-39Highway Hypnosis ........................................... 4-23Hill and Mountain Roads .................................. 4-24Horn ............................................................... 3-6How to Add Coolant to the Coolant
Surge Tank ................................................. 5-30How to Add Fluid ............................................ 5-21How to Check ................................................ 5-60How to Check and Add Fluid ............................ 5-39How to Check and What to Use ....................... 5-20How to Check Fluid ........................................ 5-49How to Check Lubricant ................................... 5-49How To Check Power Steering Fluid .................. 5-33How to Inspect the Engine Air Cleaner/Filter ....... 5-19How to Use This Manual ...................................... iiHow to Wear Safety Belts Properly ..................... 1-8Hydraulic Brake System Warning Lights ............. 3-26Hydraulic Brake Systems ................................... 4-7Hydraulic Brakes ............................................. 2-19Hydraulic Clutch ............................................. 5-21Hydroplaning .................................................. 4-20
IIf No Steam Is Coming From Your Engine .......... 5-27If Steam Is Coming From Your Engine ............... 5-26If You Are Stuck in Sand, Mud, Ice or Snow ....... 4-30If Your Engine Won’t Start ................................ 2-10If You’re Caught in a Blizzard ........................... 4-28Ignition Positions .............................................. 2-6Infants and Young Children, Restraints ............... 1-20Inflation — Tire Pressure ................................. 5-60Instrument Panel ............................................. 3-22
Cluster ....................................................... 3-22Overview ..................................................... 3-4
Instrument Panel Brightness Control .................. 3-16Instrument Panel Fuse Block and
Maxi-Fuse Block .......................................... 5-79Interior Lamps ................................................ 3-16
JJacks, Auxiliary Power ..................................... 3-17Jump Starting ................................................. 5-44
KKey Lock Cylinders Service .............................. 6-27Keys ............................................................... 2-2
6
LLamps ........................................................... 3-14
Exterior ...................................................... 3-14Interior ....................................................... 3-16
Lamps Check ................................................. 6-26Lap Belt ........................................................ 1-16Lap-Shoulder Belt ............................................. 1-8Light ............................................................. 3-29
Anti-Lock Brake System Warning ................... 3-29Brake System Warning ................................. 3-26Change Engine Oil ...................................... 3-34Charging System ......................................... 3-24Check Gages Warning ................................. 3-37Daytime Running Lamps Indicator .................. 3-36Differential Lock Indicator .............................. 3-35Engine Overspeed Warning ........................... 3-34Engine Shutdown Warning ............................ 3-34Exhaust Brake Indicator ................................ 3-35Low Coolant Warning ................................... 3-31Low Oil Level ............................................. 3-33Malfunction Indicator .................................... 3-32Parking Brake Warning ................................. 3-29Range Inhibit Warning Indicator ..................... 3-26Reduced Engine Power ................................ 3-36Safety Belt Reminder Tone ........................... 3-24Safety Belt Reminder ................................... 3-24Service Transmission Warning ....................... 3-25
Light (cont.)Trailer Anti-Lock Brake System Warning .......... 3-30Wait to Start Indicator .................................. 3-31
Loading Your Vehicle ....................................... 4-37Locks ............................................................. 2-3
Door ........................................................... 2-3Loss of Control ............................................... 4-16Low Coolant Warning Light .............................. 3-31
MMaintenance, Normal Replacement Parts ............ 5-87Maintenance Schedule ..................................... 6-23
At Each Fuel Fill ......................................... 6-23At Least Once a Year .................................. 6-27At Least Twice a Year .................................. 6-24How This Section is Organized ....................... 6-3Introduction .................................................. 6-2Maintenance Requirements ............................. 6-2Part A - Scheduled Maintenance Services ......... 6-4Part B - Owner Checks and Services ............. 6-23Part C - Recommended Fluids and
Lubricants ............................................... 6-28Part D - Maintenance Record ........................ 6-30Scheduled Maintenance Supplements ............... 6-4Scheduled Maintenance ................................. 6-5Using Your ................................................... 6-4Your Vehicle and the Environment ................... 6-2
7

Malfunction Indicator Light ................................ 3-32Manual High Idle System ................................... 2-9Manual Transmission ......................................... 2-7
Fluid .......................................................... 5-20Operation ................................................... 2-17
Manual Windows .............................................. 2-4Marker and Clearance Lamps Switch ................. 3-15Maxi-Fuse Block ............................................. 5-81Mexico, Central America and Caribbean Islands/
Countries (Except Puerto Rico and U.S. VirginIslands) – Customer Assistance ........................ 7-3
Mirrors .......................................................... 2-25Manual Rearview Mirror ................................ 2-25Outside Convex Mirrors ................................ 2-25Outside Heated Mirrors ................................ 2-26Outside Manual Mirrors ................................ 2-25
Mirrors and Sun Visors Check .......................... 6-26Model Reference ................................................ viMoisture Ejector .............................................. 5-38
NNew Vehicle Break-In ........................................ 2-6Noise Control System, Tampering ...................... 5-56Normal Maintenance Replacement Parts ............ 5-87
OOdometer ...................................................... 3-23Off-Road Recovery .......................................... 4-14Oil ................................................................ 3-34
Change Engine Oil Light ............................... 3-34Engine ....................................................... 5-14Low Oil Level Light ...................................... 3-33Pressure Gage ............................................ 3-32
Older Children, Restraints ................................ 1-18Other Service Items ........................................ 5-58
Fuel Filter ................................................... 5-58Primary Fuel Filter and Water Separator ......... 5-58Secondary Fuel Filter and Water
Separator/Heater ...................................... 5-58Other Warning Devices ...................................... 3-6Outlet Adjustment ............................................ 3-20Outside ......................................................... 2-25
Convex Mirrors ............................................ 2-25Heated Mirrors ............................................ 2-26Manual Mirrors ............................................ 2-25
Overdrive Defeat ............................................. 2-17Overhead Storage ........................................... 2-26Overseas – Customer Assistance ........................ 7-3Overspeed Warning Light ................................. 3-34Owners, Canadian ............................................... iiOwner’s Information .......................................... 7-6
8

PParking ......................................................... 2-19
Brake Warning Light .................................... 3-29Over Things That Burn ................................. 2-23
Parking Brake ................................................ 2-20Parking Brake Check ....................................... 6-24Part A - Scheduled Maintenance Services ............ 6-4Part B - Owner Checks and Services ................ 6-23Part C - Recommended Fluids and
Lubricants .................................................. 6-28Part D - Maintenance Record ........................... 6-30Passenger Position, Safety Belts ....................... 1-16Passing ......................................................... 4-14Playing a Cassette .......................................... 3-45Playing a Compact Disc ................................... 3-49Playing the Radio ........................... 3-40, 3-43, 3-47Power ........................................................... 3-17
Auxiliary Jacks ............................................ 3-17Electrical System ......................................... 5-78Reduced Engine Light .................................. 3-36Steering Fluid ............................................. 5-33Windows ...................................................... 2-4
Power Steering ............................................... 4-12Propshaft Brake Burnish Procedure ................... 2-19
QQuestions and Answers About Safety Belts .......... 1-8
RRadio Messages ............................. 3-42, 3-45, 3-49Radios .......................................................... 3-39
AM-FM Radio ............................................. 3-40Care of Your Cassette Tape Player ................ 3-52Care of Your CD Player ............................... 3-53Care of Your CDs ........................................ 3-53Radio with Cassette ..................................... 3-43Radio with CD ............................................ 3-47Setting the Time .......................................... 3-39Theft-Deterrent ............................................ 3-51Understanding Reception .............................. 3-51
Range Inhibit Warning Indicator ........................ 3-26Rear Axle ...................................................... 5-49
Shift Motor ................................................. 5-49Two-Speed Electric Shift Control .................... 2-14
Rear Lamp .................................................... 3-16Rearview Mirrors ............................................. 2-25Reduced Engine Power Light ............................ 3-36Relay Blocks .................................................. 5-82
9

Releasing Air-Operated Parking Brakes .............. 4-36Replacing Brake System Parts .......................... 5-37Replacing Restraint System Parts
After a Crash .............................................. 1-30Reporting Safety Defects ................................... 7-5
Canadian Government ................................... 7-5General Motors ............................................. 7-5United States Government .............................. 7-4
Restraint System Check ................................... 6-24Checking Your Restraint Systems ................... 1-29Replacing Restraint System Parts
After a Crash .......................................... 1-30Restraint Systems ........................................... 1-29
Checking .................................................... 1-29Replacing Parts ........................................... 1-30
Roadside ......................................................... 7-4Assistance Program ....................................... 7-4
Rocking Your Vehicle To Get It Out ................... 4-31Running Out of Fuel ........................................ 5-12Running Your Engine While You Are Parked ....... 2-24
SSafety Belt ..................................................... 3-24
Reminder Light ............................................ 3-24Reminder Tone ............................................ 3-24
Safety Belts ................................................... 5-71Care of ...................................................... 5-71Center Passenger Position ............................ 1-16Driver Position .............................................. 1-8How to Wear Safety Belts Properly .................. 1-8Questions and Answers About
Safety Belts .............................................. 1-8Right Passenger Position .............................. 1-16Safety Belt Extender .................................... 1-17Safety Belt Use During Pregnancy ................. 1-15Safety Belts Are for Everyone ......................... 1-4
Safety Warnings and Symbols .............................. iiiScheduled Maintenance Supplements .................. 6-4Scheduled Maintenance ..................................... 6-5Seat Adjuster Check ........................................ 6-26
10

Seats .............................................................. 1-2Bucket Seats ................................................ 1-2Center Seat .................................................. 1-3
Securing a Child Restraint ................................ 1-27Center Seat Position .................................... 1-27
Service Bulletins ............................................... 7-5Service Engine Soon Light ............................... 3-32Service Manuals ............................................... 7-5Service ........................................................... 5-3
Doing Your Own Work ................................... 5-3Engine Soon Light ....................................... 3-32Publications Ordering Information ..................... 7-5Transmission Warning Light .......................... 3-25Two Safety Cautions about Engine Fan
Breakage .................................................. 5-4Setting Preset Stations .................... 3-41, 3-44, 3-48Setting the Time ............................................. 3-39Setting the Tone (Bass/Treble) .......... 3-41, 3-44, 3-48
Sheet Metal Damage ....................................... 5-74Side Door Glass ............................................... 2-5Six-Speed Transmission ................................... 2-17Skidding ........................................................ 4-16Some Other Rainy Weather Tips ....................... 4-20Special Fabric Cleaning Problems ..................... 5-70Specifications, Capacities ................................. 5-84Speedometer .................................................. 3-23Starter Switch Check ....................................... 6-25Starting Your DURAMAX™ Diesel Engine ............ 2-7Starting Your Engine ......................................... 2-7Steering ........................................................ 4-12Steering Check ............................................... 6-25Steering in Emergencies .................................. 4-13Steering Tips .................................................. 4-12Storage Areas ................................................ 2-26
Center Console Storage Area ........................ 2-27Stuck in Sand, Mud, Ice or Snow ...................... 4-30
11

TTachometer .................................................... 3-23Telescopic Steering Column, Tilt Wheel ................ 3-6Theft-Deterrent, Radio ..................................... 3-51Tilt Wheel and Telescopic Steering Column .......... 3-6Tire Inflation Check ......................................... 6-23Tires ..................................................... 5-59, 5-74
Dual Tire Operation ..................................... 5-61If a Tire Goes Flat ....................................... 5-67Inflation — Tire Pressure .............................. 5-60Tightening the Wheel Nuts ............................ 5-62Wheel Alignment and Tire Balance ................. 5-62Wheel Loading ............................................ 5-60Wheel Replacement ..................................... 5-66When It Is Time for New Tires ...................... 5-61
To Use the Engine Coolant Heater .................... 2-12Top Strap ...................................................... 1-27Towing Your Vehicle From the Front
(All Wheels On the Ground) .......................... 4-35Towing Your Vehicle From the Front
(Front Wheels Off the Ground) ...................... 4-33Towing Your Vehicle From the Rear
(Rear Wheels Off the Ground) ....................... 4-35
Towing .......................................................... 4-39Power Take-Off (PTO) .................................. 4-39Your Vehicle ............................................... 4-32
Traction ......................................................... 4-11Control System (TCS) .................................. 4-11
Tractor Protection (Breakaway) Valve Check ....... 6-27Trailer ........................................................... 4-39
Connections ................................................ 4-39Trailer Brake Hand Control Valve ...................... 4-10Transmission .................................................. 5-20
Fluid, Automatic ........................................... 5-20Fluid, Manual .............................................. 5-20Service Warning Light .................................. 3-25
Transmission Operation,Automatic ................................................... 2-16
Transmission Operation,Manual ...................................................... 2-17
Trip Odometer ................................................ 3-23Turn and Lane-Change Signals .......................... 3-8Turn Signal/Multifunction Lever ........................... 3-7Two-Speed Rear Axle Electric
Shift Control ............................................... 2-14Two-Speed Rear Axle ...................................... 2-19
12

UUnderbody Flushing Service ............................. 6-27Underbody Inspection ...................................... 6-27Understanding Radio Reception ........................ 3-51United States – Customer Assistance .................. 7-3Used Replacement Wheels .............................. 5-67Using Cleaner on Fabric .................................. 5-70Using the Clutch ............................................. 2-17Using the Tow Hooks (Option) .......................... 4-31
VVehicle Identification ........................................ 5-77
Number (VIN) ............................................. 5-77Vehicle ............................................................ 4-6
Control ........................................................ 4-6Damage Warnings ........................................... ivLoading ...................................................... 4-37Symbols ......................................................... iv
Vehicle Storage .............................................. 5-43Ventilation Adjustment ...................................... 3-20Voltmeter Gage .............................................. 3-25
WWait to Start Indicator ...................................... 3-31Warning Lights, Gages and Indicators ................ 3-21Warnings ......................................................... 3-6
Hazard Warning Flashers ............................... 3-6Other Warning Devices .................................. 3-6Safety and Symbols ......................................... iiiVehicle Damage .............................................. iv
Washing Your Vehicle ...................................... 5-72Water ............................................................. 5-6
Fuel ............................................................ 5-6Weatherstrip Lubrication ................................... 6-24What Fuel to Use in Canada .............................. 5-6What Fuel to Use ............................................. 5-5What Kind of Engine Oil to Use ........................ 5-16What to Do with Used Oil ................................ 5-17What to Use .......................... 5-23, 5-33, 5-34, 5-49Wheels .......................................................... 5-62
Alignment and Tire Balance .......................... 5-62Loading ...................................................... 5-60Replacement ............................................... 5-66Tightening the Wheel Nuts ............................ 5-62
13

When to Add Engine Oil .................................. 5-15When to Change Engine Oil ............................. 5-17When to Check ...................................... 5-20, 5-60When to Check and Change Fluid ..................... 5-49When to Check and Change Lubricant ............... 5-49When to Inspect the Engine Air
Cleaner/Filter .............................................. 5-18Why Safety Belts Work ..................................... 1-5Windows ......................................................... 2-4
Manual ........................................................ 2-4Passenger Side Door Glass ............................ 2-5Power ......................................................... 2-4
Windshield and Wiper Blades ........................... 5-73Windshield Washer ......................................... 3-11
Fluid .......................................................... 5-34
Windshield Washer (cont.)Windshield Washer Fluid Level Check ................ 6-23Windshield Wiper ............................................ 5-57
Blade Replacement ...................................... 5-57Fuses ........................................................ 5-78
Windshield Wipers and Washers Check ............. 6-26Windshield Wipers .......................................... 3-10Winter Driving ................................................ 4-26Wiper Blade Check ......................................... 6-24
YYour Vehicle and the Environment ....................... 6-2
14