Oracle CX Sales
434
Oracle CX Sales Getting Started with Your Sales Implementation 21D
-
Upload
khangminh22 -
Category
Documents
-
view
1 -
download
0
Transcript of Oracle CX Sales
Oracle CX Sales
Getting Started with Your SalesImplementation
21D
Oracle CX SalesGetting Started with Your Sales Implementation
21DPart Number F46215-01Copyright © 2011, 2021, Oracle and/or its affiliates.
Author: Jiri Weiss, Brian Casey, Debjit Nag, Jacqueline Wood, Judy Wood
Contributor: Ellen Beres, Steve Buchan, Brian Casey, Josephine Cassidy, Cheryl Dajczak, Damien Joly, Ruth Kale-Fok, Virinder Kaur, Srikanth Mattegunta, Carmen Y Myrick, Sayuri Nagase, Brian Oden, Muhammad Rehman, Anne Romano, Indrajit Sen, Krasimir Sofijski, Jaya Sridhar, Abhishek Sura, Vijay Tiwary, Sudeep Vaidyanathan, John Vakoc, Padmaja Varanasi, Nicholas Vautier, Catherine You, Waldemar Zdanowicz
This software and related documentation are provided under a license agreement containing restrictions on use and disclosure and are protectedby intellectual property laws. Except as expressly permitted in your license agreement or allowed by law, you may not use, copy, reproduce, translate,broadcast, modify, license, transmit, distribute, exhibit, perform, publish, or display any part, in any form, or by any means. Reverse engineering,disassembly, or decompilation of this software, unless required by law for interoperability, is prohibited.
The information contained herein is subject to change without notice and is not warranted to be error-free. If you find any errors, please reportthem to us in writing.
If this is software or related documentation that is delivered to the U.S. Government or anyone licensing it on behalf of the U.S. Government, thenthe following notice is applicable:
U.S. GOVERNMENT END USERS: Oracle programs (including any operating system, integrated software, any programs embedded, installed oractivated on delivered hardware, and modifications of such programs) and Oracle computer documentation or other Oracle data delivered to oraccessed by U.S. Government end users are "commercial computer software" or "commercial computer software documentation" pursuant to theapplicable Federal Acquisition Regulation and agency-specific supplemental regulations. As such, the use, reproduction, duplication, release, display,disclosure, modification, preparation of derivative works, and/or adaptation of i) Oracle programs (including any operating system, integratedsoftware, any programs embedded, installed or activated on delivered hardware, and modifications of such programs), ii) Oracle computerdocumentation and/or iii) other Oracle data, is subject to the rights and limitations specified in the license contained in the applicable contract. Theterms governing the U.S. Government's use of Oracle cloud services are defined by the applicable contract for such services. No other rights aregranted to the U.S. Government.
This software or hardware is developed for general use in a variety of information management applications. It is not developed or intended foruse in any inherently dangerous applications, including applications that may create a risk of personal injury. If you use this software or hardwarein dangerous applications, then you shall be responsible to take all appropriate fail-safe, backup, redundancy, and other measures to ensure its safeuse. Oracle Corporation and its affiliates disclaim any liability for any damages caused by use of this software or hardware in dangerous applications.
Oracle and Java are registered trademarks of Oracle and/or its affiliates. Other names may be trademarks of their respective owners.
Intel and Intel Inside are trademarks or registered trademarks of Intel Corporation. All SPARC trademarks are used under license and are trademarksor registered trademarks of SPARC International, Inc. AMD, Epyc, and the AMD logo are trademarks or registered trademarks of Advanced MicroDevices. UNIX is a registered trademark of The Open Group.
This software or hardware and documentation may provide access to or information about content, products, and services from third parties. OracleCorporation and its affiliates are not responsible for and expressly disclaim all warranties of any kind with respect to third-party content, products, andservices unless otherwise set forth in an applicable agreement between you and Oracle. Oracle Corporation and its affiliates will not be responsiblefor any loss, costs, or damages incurred due to your access to or use of third-party content, products, or services, except as set forth in an applicableagreement between you and Oracle.
The business names used in this documentation are fictitious, and are not intended to identify any real companies currently or previously in existence.
Oracle CX SalesGetting Started with Your Sales Implementation
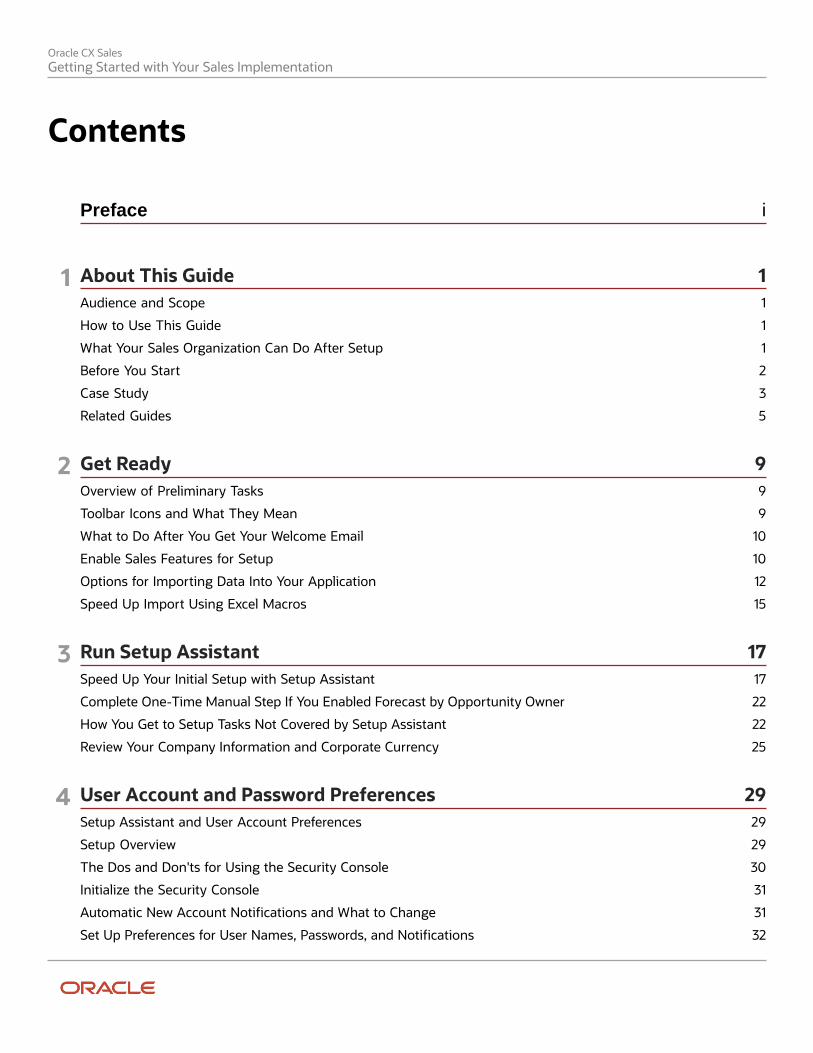
Contents
Preface i
1 About This Guide 1Audience and Scope ..................................................................................................................................................................... 1
How to Use This Guide ................................................................................................................................................................ 1
What Your Sales Organization Can Do After Setup ............................................................................................................... 1
Before You Start ............................................................................................................................................................................ 2
Case Study ...................................................................................................................................................................................... 3
Related Guides ............................................................................................................................................................................... 5
2 Get Ready 9Overview of Preliminary Tasks ................................................................................................................................................... 9
Toolbar Icons and What They Mean ........................................................................................................................................ 9
What to Do After You Get Your Welcome Email .................................................................................................................. 10
Enable Sales Features for Setup .............................................................................................................................................. 10
Options for Importing Data Into Your Application ............................................................................................................... 12
Speed Up Import Using Excel Macros .................................................................................................................................... 15
3 Run Setup Assistant 17Speed Up Your Initial Setup with Setup Assistant ............................................................................................................... 17
Complete One-Time Manual Step If You Enabled Forecast by Opportunity Owner ..................................................... 22
How You Get to Setup Tasks Not Covered by Setup Assistant ......................................................................................... 22
Review Your Company Information and Corporate Currency ........................................................................................... 25
4 User Account and Password Preferences 29Setup Assistant and User Account Preferences ................................................................................................................... 29
Setup Overview ........................................................................................................................................................................... 29
The Dos and Don'ts for Using the Security Console .......................................................................................................... 30
Initialize the Security Console ................................................................................................................................................... 31
Automatic New Account Notifications and What to Change ............................................................................................. 31
Set Up Preferences for User Names, Passwords, and Notifications ................................................................................ 32
Oracle CX SalesGetting Started with Your Sales Implementation
5 Setup Users 37Setup Overview ........................................................................................................................................................................... 37
About Setup Users and Security ............................................................................................................................................. 38
Create Setup Users .................................................................................................................................................................... 40
Provide the Initial User the Same Permissions as Other Setup Users ............................................................................ 42
Reset User Passwords and Update Email Addresses ......................................................................................................... 43
Give Users the Permission to View All Scheduled Processes ........................................................................................... 45
6 Accounting Calendar 49How the Accounting Calendar Impacts Forecasting and Other Sales Features ........................................................... 49
Accounting Calendar Setup Tasks Setup Assistant Completes for You .......................................................................... 49
Review the Accounting Calendar and Generate Additional Forecasting Periods ......................................................... 49
7 Geography Data 51Setup Overview ............................................................................................................................................................................ 51
Setup Assistant and Geography Data .................................................................................................................................... 52
Import Geography Reference Data ......................................................................................................................................... 53
List of Available Countries with Loqate Geography Reference Data ............................................................................... 54
Set Up Geography Validation ................................................................................................................................................... 59
Enable Address Mapping .......................................................................................................................................................... 62
8 Search 67Search Types ................................................................................................................................................................................ 67
What are the differences between the different types of search in the sales application? ......................................... 68
Setup Assistant and Search ..................................................................................................................................................... 70
Overview of Optional Setup for Adaptive Search and Global Search .............................................................................. 71
Global Search ............................................................................................................................................................................... 72
Make Additional Fields Searchable in Workspace and Global Search ............................................................................. 83
9 Workspace 89Workspace .................................................................................................................................................................................... 89
Overview of Initial Workspace Configuration ....................................................................................................................... 92
Create Workspace Saved Searches ......................................................................................................................................... 93
Overview of the Manage Saved Searches Page .................................................................................................................. 95
Specify the List of Saved Searches for Different Job Roles .............................................................................................. 98
Specify What Users See When They Open Workspace .................................................................................................... 100
Oracle CX SalesGetting Started with Your Sales Implementation
10 Get Ready to Create Sales Users 103How Setup Assistant Gets You Ready to Create Sales Users .......................................................................................... 103
A Few Setups to Complete Before You Create Sales Users ............................................................................................. 104
Create Additional Resource Roles ........................................................................................................................................... 111
Create Role-Provisioning Rules for the Additional Resource Roles ................................................................................. 111
11 Create Sales Users in the UI 113Setup Overview ........................................................................................................................................................................... 113
Example of a Sales Resource Hierarchy ............................................................................................................................... 114
Create Sales Users in the UI .................................................................................................................................................... 114
Can I change the user name after creating a user? ........................................................................................................... 117
Reset Passwords for Others ..................................................................................................................................................... 117
12 Import Sales Users 119Overview of Sales User Import ............................................................................................................................................... 119
Synchronize Your Sales Application with the LDAP Directory .......................................................................................... 121
Download the User Import Macro and Import Sales Users .............................................................................................. 121
Run the Refresh Territories from Resources Process ........................................................................................................ 129
How can I update the sales organization hierarchy? ......................................................................................................... 129
How can I change the name of the top resource organization and other resource organizations? ......................... 129
13 Sales Catalog 131Setup Overview ........................................................................................................................................................................... 131
The Sales Catalog ...................................................................................................................................................................... 133
Review Units of Measure for Products ................................................................................................................................. 137
Import Products and Product Groups .................................................................................................................................. 138
Enable Sales Catalog Browsing in Opportunities ............................................................................................................... 147
Validate the Sales Catalog in the Application ..................................................................................................................... 148
Oracle CX SalesGetting Started with Your Sales Implementation
14 Accounts and Contacts 149Account and Contact Basics ................................................................................................................................................... 149
Account Addresses .................................................................................................................................................................... 152
Overview of Account and Contact Setup ............................................................................................................................. 153
Add to the List of Available Industry Classification Categories ...................................................................................... 156
Specify the Industry Classification Category for Accounts .............................................................................................. 156
Enable Duplicate Checking ..................................................................................................................................................... 156
Enable Multiple Account Addresses ..................................................................................................................................... 159
Display the Account at the Top of the Account Hierarchy in the Account Overview Tab .......................................... 163
Manage Address Types ............................................................................................................................................................ 165
15 Import Accounts and Contacts 167Overview of Account and Contact Import ........................................................................................................................... 167
What You're Importing ............................................................................................................................................................. 168
Download the Files for Account and Contact Import ....................................................................................................... 174
View the Industry Codes for Accounts ................................................................................................................................. 175
Import Accounts and Account Hierarchies Using the Account Import Macro ............................................................. 176
Import Contacts ........................................................................................................................................................................ 180
Import Additional Addresses .................................................................................................................................................. 184
16 Import Data with Custom Fields 187Setup Overview .......................................................................................................................................................................... 187
Create the Custom Field and Expose It in the UI ............................................................................................................... 187
Enable the Custom Field for Import ..................................................................................................................................... 190
Add the Field to the Account Import Macro and Import Your Data .............................................................................. 190
17 Mass Update and Inline Editing 193Setup Overview .......................................................................................................................................................................... 193
Enable Mass Update in Individual Work Areas ................................................................................................................... 193
Enable Inline Editing of Records Displayed in Lists ........................................................................................................... 197
Enable Mass Update in Workspace ....................................................................................................................................... 198
Oracle CX SalesGetting Started with Your Sales Implementation
18 Sales Territories and Assignment 199Setup Overview ......................................................................................................................................................................... 199
Sales Territories and Assignment .......................................................................................................................................... 201
Address Dimension .................................................................................................................................................................. 203
How Sales Territories Support Assignment and Forecasting ......................................................................................... 207
Sales Territory UIs for Different Uses .................................................................................................................................... 211
Sales Territory Use Cases ........................................................................................................................................................ 215
Sales Territory and Assignment Setup for the Vision Corp. Use Case ........................................................................... 231
Enable Sales Territory Dimensions ....................................................................................................................................... 235
Create the Sales Territory Hierarchy ..................................................................................................................................... 236
Enable Automatic Assignment of Imported Accounts ..................................................................................................... 243
Make Opportunity Assignment Automatic ......................................................................................................................... 244
Run Assignment Processes .................................................................................................................................................... 244
19 Leads 249How to Handle Leads You Get from Trade Shows, the Web, and Other Outside Sources ........................................ 249
Setup Overview ......................................................................................................................................................................... 253
Configure the Leads UI ........................................................................................................................................................... 255
Set Up the Assignment Rule for Assigning Leads ............................................................................................................. 261
Enable Lead Assignment ........................................................................................................................................................ 264
Change the Values for Lead Rank and Lead Channel ...................................................................................................... 265
Import Leads Using the Import Macro ................................................................................................................................ 266
Run the Lead Assignment Process ...................................................................................................................................... 269
Create a List of Unaccepted Leads ...................................................................................................................................... 270
Create a Lead Qualification Template .................................................................................................................................. 272
Select Default Lead Qualification Templates ...................................................................................................................... 274
Test Your Leads Setup ............................................................................................................................................................. 275
20 Competitors 277About Competitors ................................................................................................................................................................... 277
Review the List of Competitors and Create Additional Ones ......................................................................................... 278
Oracle CX SalesGetting Started with Your Sales Implementation
21 Opportunities 279Guided Sales Process ............................................................................................................................................................... 279
Setup Assistant and Opportunities ...................................................................................................................................... 282
Setup Overview ......................................................................................................................................................................... 283
What Opportunity Behavior You Can Configure and Where .......................................................................................... 284
Configure Basic Opportunity Behavior ................................................................................................................................ 285
Create and Edit Sales Methods and Stages ....................................................................................................................... 286
Modify Opportunity Statuses ................................................................................................................................................ 288
Modify the List of Reasons Opportunities Are Won or Lost ........................................................................................... 289
22 Import Opportunities 291Opportunity Import Steps ....................................................................................................................................................... 291
Import Opportunity Information Minus the Opportunity Revenue ................................................................................ 291
Import Opportunity Revenue Lines ...................................................................................................................................... 295
Validate the Imported Opportunities ................................................................................................................................... 297
23 Sales Quotas 299Overview of Sales Quota Setup ............................................................................................................................................ 299
Set Up Sales Quotas ................................................................................................................................................................ 300
Schedule Quota Processes ..................................................................................................................................................... 302
24 Forecasting 305Two Forecasting Scenarios ..................................................................................................................................................... 305
Setup Overview ......................................................................................................................................................................... 305
How Forecasting Works and How You Can Change It ..................................................................................................... 307
Enable Forecasting If You Use Sales Territories for Assignment .................................................................................... 314
Overview of the Sales Forecasting Options Page .............................................................................................................. 315
Adjust Forecasting Windows and Set Forecasting Options ............................................................................................. 315
Specify the Types of Forecast Adjustments Sales Managers Can Use .......................................................................... 318
25 Configure the Navigator and Home Page 321A Single Page for All Your Sales Activities ........................................................................................................................... 321
Workspace Infolets ................................................................................................................................................................... 324
Setup Overview ......................................................................................................................................................................... 326
Configure Home Page Appearance ...................................................................................................................................... 328
Configure Navigation ............................................................................................................................................................... 329
Enable and Configure Workspace Infolets .......................................................................................................................... 346
Oracle CX SalesGetting Started with Your Sales Implementation
26 Microsoft 365 355Overview of Microsoft 365 for Sales .................................................................................................................................... 355
Setup Overview ......................................................................................................................................................................... 355
Enable Microsoft 365 Integration .......................................................................................................................................... 356
Synchronize Data Between CX Sales and Microsoft 365 ................................................................................................. 373
Open the Add-In from Outlook for the First Time ............................................................................................................ 374
27 Mobile 377Overview of CX Sales Mobile ................................................................................................................................................. 377
Which mobile devices are supported? ................................................................................................................................. 379
Get Started with Your CX Sales Mobile Implementation ................................................................................................. 379
Set Up the Maps Feature ........................................................................................................................................................ 381
Implementation Considerations ............................................................................................................................................ 382
28 Account Data Enrichment and Verification 385Three Services to Enrich and Verify Your Data and Save Salespeople Time ............................................................... 385
Enrichment and Verification You Can Start Using Right Away ....................................................................................... 387
Three Ways to Enrich Data .................................................................................................................................................... 390
Overview of Data Enrichment and Verification Setup ...................................................................................................... 392
Integrate the Account Enrichment and Verification Services ......................................................................................... 394
Enable the Verification of Addresses, Emails, and Phone Numbers ............................................................................. 395
Enable the Verify Address Button ......................................................................................................................................... 397
Add Enriched Fields to the UI ............................................................................................................................................... 398
Configure Enrichment Preferences ....................................................................................................................................... 416
Enable the Integration with Oracle DataFox ....................................................................................................................... 417

Oracle CX SalesGetting Started with Your Sales Implementation
Oracle CX SalesGetting Started with Your Sales Implementation
Preface
i
PrefaceThis preface introduces information sources that can help you use the application.
Using Oracle Applications
HelpUse help icons to access help in the application. If you don't see any help icons on your page, click your user imageor name in the global header and select Show Help Icons. Not all pages have help icons.
If you don't see Show Help Icons in the Settings and Actions menu, you can access the Oracle Help Center to findguides and videos.
Watch: This video tutorial shows you how to find and use help.
You can also read about it instead.
Additional Resources
• Community: Use Oracle Cloud Customer Connect to get information from experts at Oracle, the partnercommunity, and other users.
• Training: Take courses on Oracle Cloud from Oracle University.
ConventionsThe following table explains the text conventions used in this guide.
Convention Meaning
boldface Boldface type indicates user interface elements, navigation paths, or values you enter or select.
monospace Monospace type indicates file, folder, and directory names, code examples, commands, and URLs.
> Greater than symbol separates elements in a navigation path.
Oracle CX SalesGetting Started with Your Sales Implementation
Preface
ii
Documentation AccessibilityFor information about Oracle's commitment to accessibility, visit the Oracle Accessibility Program website.
Videos included in this guide are provided as a media alternative for text-based help topics also available in this guide.
Diversity and InclusionOracle is fully committed to diversity and inclusion. Oracle respects and values having a diverse workforce that increasesthought leadership and innovation. As part of our initiative to build a more inclusive culture that positively impacts ouremployees, customers, and partners, we're working to remove insensitive terms from our products and documentation.We're also mindful of the necessity to maintain compatibility with our customers' existing technologies and the need toensure continuity of service as Oracle's offerings and industry standards evolve. Because of these technical constraints,our effort to remove insensitive terms is ongoing and will take time and external cooperation.
Contacting Oracle
Access to Oracle SupportOracle customers that have purchased support have access to electronic support through My Oracle Support. Forinformation, visit My Oracle Support or visit Oracle Accessibility Learning and Support if you are hearing impaired.
Comments and SuggestionsPlease give us feedback about Oracle Applications Help and guides! You can send an e-mail to:[email protected].
Oracle CX SalesGetting Started with Your Sales Implementation
Chapter 1About This Guide
1
1 About This Guide
Audience and ScopeThis guide provides you with the concepts and procedures you need to implement a sales automation solution in a testenvironment. You learn how to quickly implement a simple solution for a business selling to other businesses. We don'tgive you a comprehensive explanation of all the available features and options that you can find in other guides. Rather,we focus on key setups and leverage the default settings and onboarding tools that Oracle provides to get you going.You use the Setup Assistant rather than individual setup tasks to quickly set up the basic structures of your applicationand you speed up data import by using Excel import macros rather than using Import Management directly.
We are dealing with a stand-alone sales implementation here. So, if you're implementing sales together with anotherservice, you must follow a different set of steps for your initial setup. For Oracle Partner Relationship Management, startwith the Getting Started with Oracle Partner Relationship Management guide. If you're implementing sales with OracleGlobal Human Resources Cloud, Oracle Procurement Cloud, and Oracle Financials Cloud, you must implement thosecloud services first according to their respective implementation guides.
How to Use This GuideEach chapter in this guide assumes that you completed the steps in the previous chapters. We assume that you useSetup Assistant to complete many of the initial setup tasks. Setup Assistant automates setups only in a subset of thechapters. Even when it does, it doesn't necessarily complete all the steps you need for each feature. For example, SetupAssistant sets up the root product group in your sales catalog, but you have to create the rest of the catalog manuallyin the UI or using import. Each chapter in this guide mentions what, if anything, Setup Assistant sets up for you andprovides instructions for the tasks you must complete manually. For the tasks Setup Assistant does automate, you canfind manual setup instructions in the Implementing Sales guide. Here's how to use this guide:
1. Familiarize yourself with Setup Assistant.2. If you need to understand what's being set up, read the conceptual topics in each chapter.3. The setup overview in each chapter provides a list of the additional manual setup steps.
Each setup step includes a brief description and navigation paths. You can follow the references to procedureselsewhere in the guide to get the full step-by-step details.
4. Gather the required information and enter it in Setup Assistant.5. Make sure the information is correct before clicking the run button. While you can run Setup Assistant multiple
times to add information, you can't use it to change some of the initial setups.6. Complete the remaining steps as described in the chapters.7. Refer to other guides for full explanations of the different features and options.
Unless specified otherwise, you must be signed in as a setup user to complete the setups. A setup user has a broader setof security privileges than the initial user provided to you by Oracle.
Oracle CX SalesGetting Started with Your Sales Implementation
Chapter 1About This Guide
2
What Your Sales Organization Can Do After SetupHere are all the things your sales organization can do after you complete the setups in this guide:
• Manage account and contact information:
◦ Track your team's interactions with account contacts.
◦ Schedule meetings, calls, and demonstrations for the whole team.
◦ Always know who else in the organization is interacting with customers.
• Share and collaborate on sales documents:
◦ Share documents, images, and other rich media between people and groups.
◦ Make it possible for everyone to annotate and discuss each document.
• Manage opportunities:
◦ Automatically assign the right salespeople to each opportunity.
◦ Follow a standard sales process.
◦ Use social interactions to leverage the experience of your entire organization.
• Manage the sales team:
◦ Assign tasks and deadlines to ensure the work is done.
◦ Provide management with reports on your team's activities.
• Forecast your revenue:
◦ Your salespeople submit their forecasts every month.
◦ Managers can adjust the forecasts and pass them up the management chain.
• Import and qualify leads:
◦ The sales organization can follow a standard process for qualifying leads.
◦ You can easily set up an inside sales group to verify the information in leads before passing them on tofield sales for follow-up and conversion to opportunities.
• Work on multiple devices:
◦ Manage all your customer-facing information, forecasts, and other activities on mobile devices and inMicrosoft 365 (formerly called Office 365).
Setting up Microsoft 365 and mobile devices is optional. You can leave this setup for later.
• Enrich account and contact information. Verify addresses. (You must subscribe to additional cloud services forthis functionality.)
Oracle CX SalesGetting Started with Your Sales Implementation
Chapter 1About This Guide
3
Before You StartWe assume that you have subscribed to the service and have received the email with your environment and initial sign-on information.
Case StudyThis guide uses a case study to define the scope of the implementation tasks and illustrate their interdependence. Thecase study is based on a fictitious company named Vision Corp, a global high-tech company which sells laptops andmultiple server product lines to businesses and other organizations. The company is introducing a product line of greenservers that are energy efficient, eco-friendly, and will further help it to remain competitive in the server market.
Oracle CX SalesGetting Started with Your Sales Implementation
Chapter 1About This Guide
4
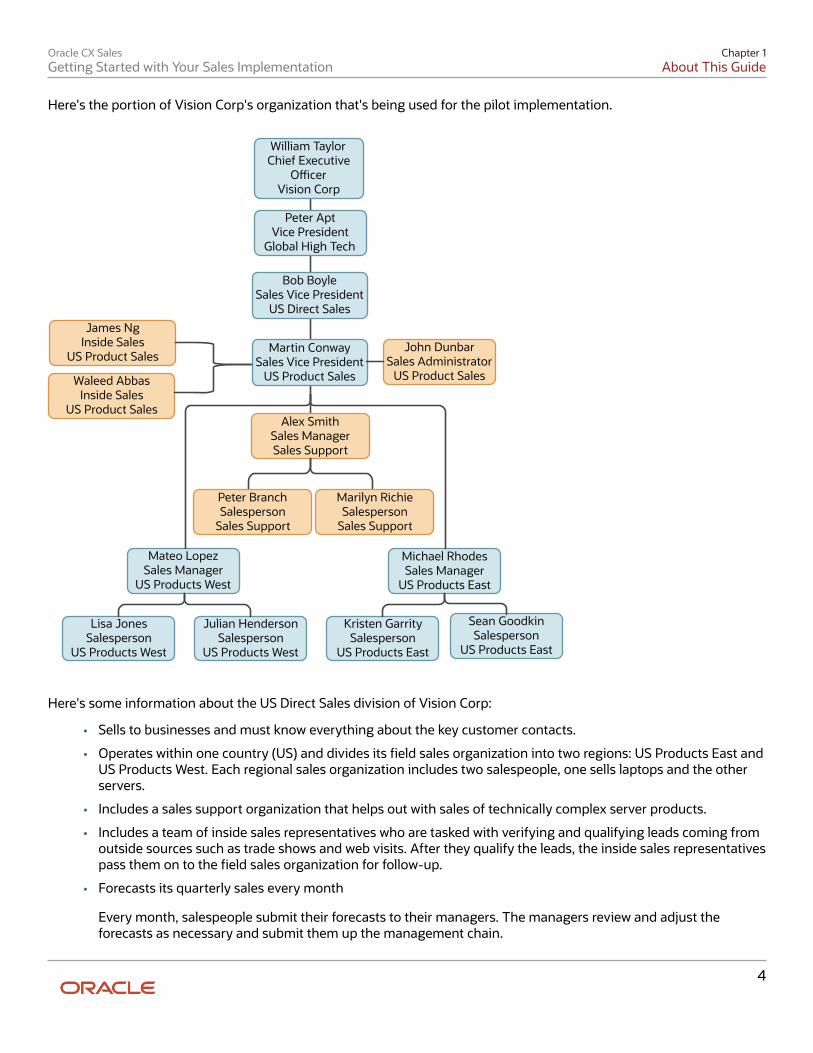
Here's the portion of Vision Corp's organization that's being used for the pilot implementation.
Lisa JonesSalesperson
US Products West
Julian HendersonSalesperson
US Products West
Sean GoodkinSalesperson
US Products East
Kristen GarritySalesperson
US Products East
Mateo LopezSales Manager
US Products West
Michael RhodesSales Manager
US Products East
Peter BranchSalesperson
Sales Support
Marilyn RichieSalesperson
Sales Support
Alex SmithSales Manager Sales Support
Martin ConwaySales Vice President
US Product Sales
John DunbarSales Administrator
US Product Sales
Bob BoyleSales Vice President
US Direct Sales
Peter AptVice President
Global High Tech
William TaylorChief Executive
OcerVision Corp
James NgInside Sales
US Product Sales
Waleed AbbasInside Sales
US Product Sales
Here's some information about the US Direct Sales division of Vision Corp:
• Sells to businesses and must know everything about the key customer contacts.
• Operates within one country (US) and divides its field sales organization into two regions: US Products East andUS Products West. Each regional sales organization includes two salespeople, one sells laptops and the otherservers.
• Includes a sales support organization that helps out with sales of technically complex server products.
• Includes a team of inside sales representatives who are tasked with verifying and qualifying leads coming fromoutside sources such as trade shows and web visits. After they qualify the leads, the inside sales representativespass them on to the field sales organization for follow-up.
• Forecasts its quarterly sales every month
Every month, salespeople submit their forecasts to their managers. The managers review and adjust theforecasts as necessary and submit them up the management chain.
Oracle CX SalesGetting Started with Your Sales Implementation
Chapter 1About This Guide
5
• Sets up sales force automation initially without any integrations with other Oracle Cloud offerings.
How You Assign Accounts and Opportunities Determines What's Requiredfor ForecastingIf, like Vision Corp., you want to automatically assign salespeople to opportunities by geography, products, or otherdimensions, you must set up sales territories as described in the Sales Territories chapter. If managers assign accountsand opportunities to individual salespeople manually and those salespeople own and forecast those opportunities, thenyou can skip sales territory setup entirely and instead set up the Forecasting by Opportunity Owner scenario describedin the Forecasting chapter.
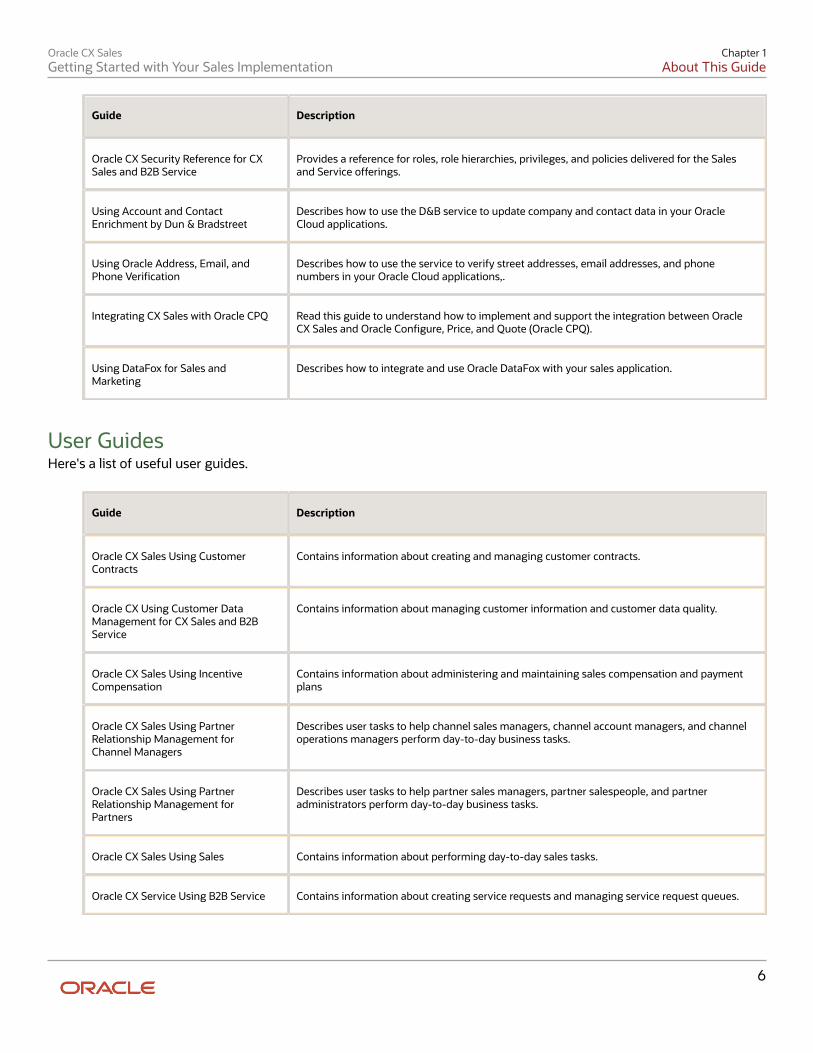
Related GuidesRefer to the following guides for additional information related to your sales implementation.
Implementation GuidesHere's a list of related implementation guides.
Guide Description
Oracle CX Sales Getting Startedwith Your Partner RelationshipManagement Implementation
Describes how to set up Oracle Partner Relationship Management features to support commonuse cases.
Oracle CX Implementing CustomerData Management for CX Sales andB2B Service
Contains information to help implementors define the setup for managing customerinformation and the configuration for customer hub deployment.
Oracle CX Sales ImplementingEnterprise Contracts
Contains conceptual information and procedures needed to implement contract managementfeatures.
Oracle CX Sales ImplementingIncentive Compensation
Contains information about implementing sales compensation and payment plans.
Oracle CX Sales Implementing Sales Contains conceptual information and procedures needed to implement sales components andfeatures.
Oracle CX Service Implementing B2BService
Contains conceptual information and procedures needed to implement the service requestcomponents and features.
Oracle CX Securing CX Sales and B2BService
Contains information to help setup users and sales administrators configure access to salesfunctionality and data.
Oracle CX SalesGetting Started with Your Sales Implementation
Chapter 1About This Guide
6
Guide Description
Oracle CX Security Reference for CXSales and B2B Service
Provides a reference for roles, role hierarchies, privileges, and policies delivered for the Salesand Service offerings.
Using Account and ContactEnrichment by Dun & Bradstreet
Describes how to use the D&B service to update company and contact data in your OracleCloud applications.
Using Oracle Address, Email, andPhone Verification
Describes how to use the service to verify street addresses, email addresses, and phonenumbers in your Oracle Cloud applications,.
Integrating CX Sales with Oracle CPQ Read this guide to understand how to implement and support the integration between OracleCX Sales and Oracle Configure, Price, and Quote (Oracle CPQ).
Using DataFox for Sales andMarketing
Describes how to integrate and use Oracle DataFox with your sales application.
User GuidesHere's a list of useful user guides.
Guide Description
Oracle CX Sales Using CustomerContracts
Contains information about creating and managing customer contracts.
Oracle CX Using Customer DataManagement for CX Sales and B2BService
Contains information about managing customer information and customer data quality.
Oracle CX Sales Using IncentiveCompensation
Contains information about administering and maintaining sales compensation and paymentplans
Oracle CX Sales Using PartnerRelationship Management forChannel Managers
Describes user tasks to help channel sales managers, channel account managers, and channeloperations managers perform day-to-day business tasks.
Oracle CX Sales Using PartnerRelationship Management forPartners
Describes user tasks to help partner sales managers, partner salespeople, and partneradministrators perform day-to-day business tasks.
Oracle CX Sales Using Sales Contains information about performing day-to-day sales tasks.
Oracle CX Service Using B2B Service Contains information about creating service requests and managing service request queues.
Oracle CX SalesGetting Started with Your Sales Implementation
Chapter 1About This Guide
7
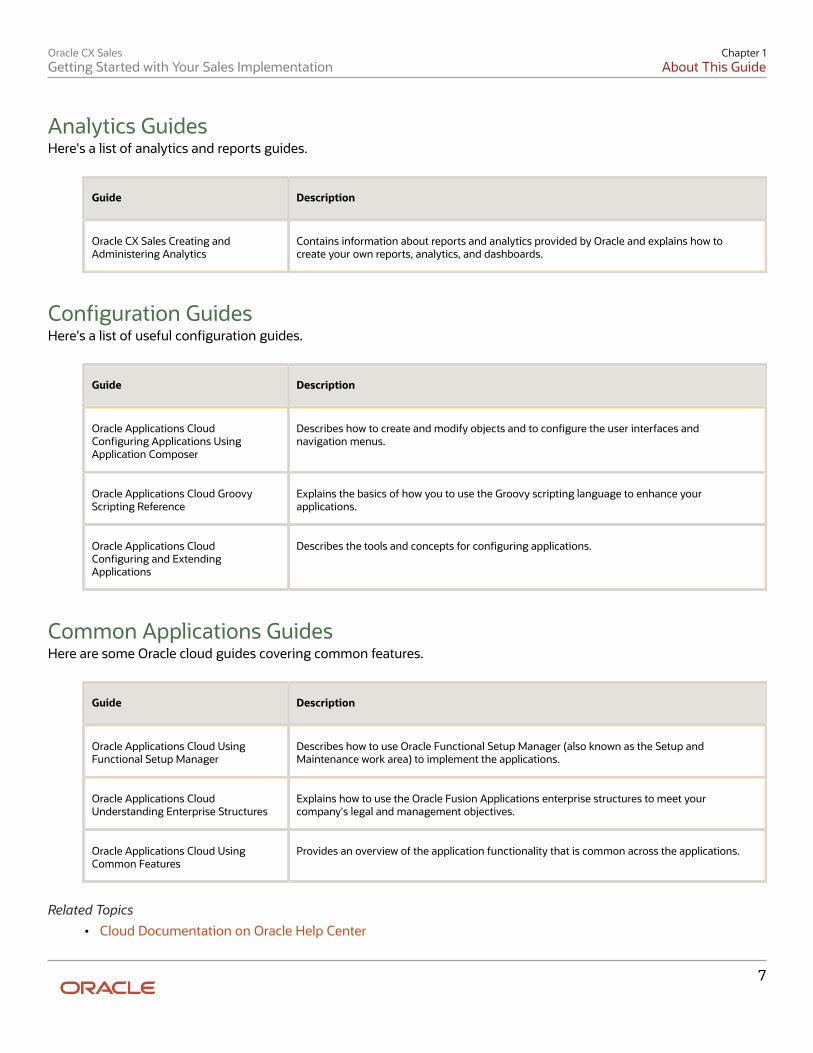
Analytics GuidesHere's a list of analytics and reports guides.
Guide Description
Oracle CX Sales Creating andAdministering Analytics
Contains information about reports and analytics provided by Oracle and explains how tocreate your own reports, analytics, and dashboards.
Configuration GuidesHere's a list of useful configuration guides.
Guide Description
Oracle Applications CloudConfiguring Applications UsingApplication Composer
Describes how to create and modify objects and to configure the user interfaces andnavigation menus.
Oracle Applications Cloud GroovyScripting Reference
Explains the basics of how you to use the Groovy scripting language to enhance yourapplications.
Oracle Applications CloudConfiguring and ExtendingApplications
Describes the tools and concepts for configuring applications.
Common Applications GuidesHere are some Oracle cloud guides covering common features.
Guide Description
Oracle Applications Cloud UsingFunctional Setup Manager
Describes how to use Oracle Functional Setup Manager (also known as the Setup andMaintenance work area) to implement the applications.
Oracle Applications CloudUnderstanding Enterprise Structures
Explains how to use the Oracle Fusion Applications enterprise structures to meet yourcompany's legal and management objectives.
Oracle Applications Cloud UsingCommon Features
Provides an overview of the application functionality that is common across the applications.
Related Topics• Cloud Documentation on Oracle Help Center

Oracle CX SalesGetting Started with Your Sales Implementation
Chapter 1About This Guide
8
Oracle CX SalesGetting Started with Your Sales Implementation
Chapter 2Get Ready
9
2 Get Ready
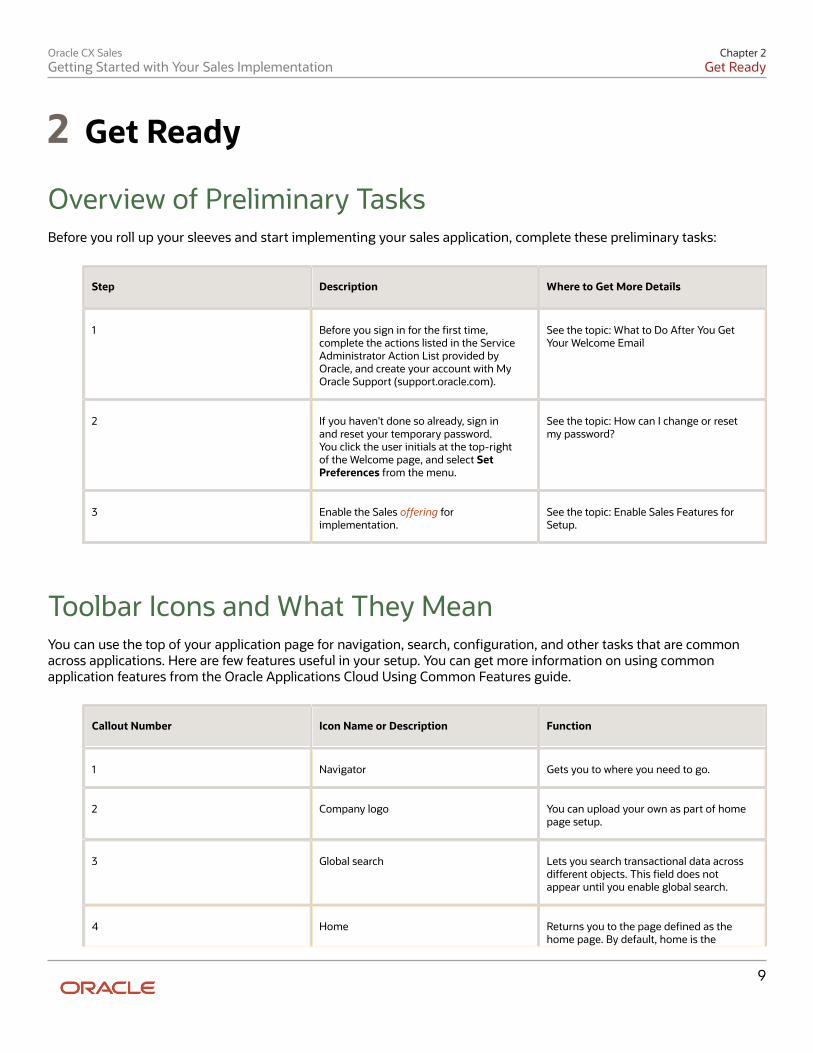
Overview of Preliminary TasksBefore you roll up your sleeves and start implementing your sales application, complete these preliminary tasks:
Step Description Where to Get More Details
1 Before you sign in for the first time,complete the actions listed in the ServiceAdministrator Action List provided byOracle, and create your account with MyOracle Support (support.oracle.com).
See the topic: What to Do After You GetYour Welcome Email
2 If you haven't done so already, sign inand reset your temporary password.You click the user initials at the top-rightof the Welcome page, and select SetPreferences from the menu.
See the topic: How can I change or resetmy password?
3 Enable the Sales offering forimplementation.
See the topic: Enable Sales Features forSetup.
Toolbar Icons and What They MeanYou can use the top of your application page for navigation, search, configuration, and other tasks that are commonacross applications. Here are few features useful in your setup. You can get more information on using commonapplication features from the Oracle Applications Cloud Using Common Features guide.
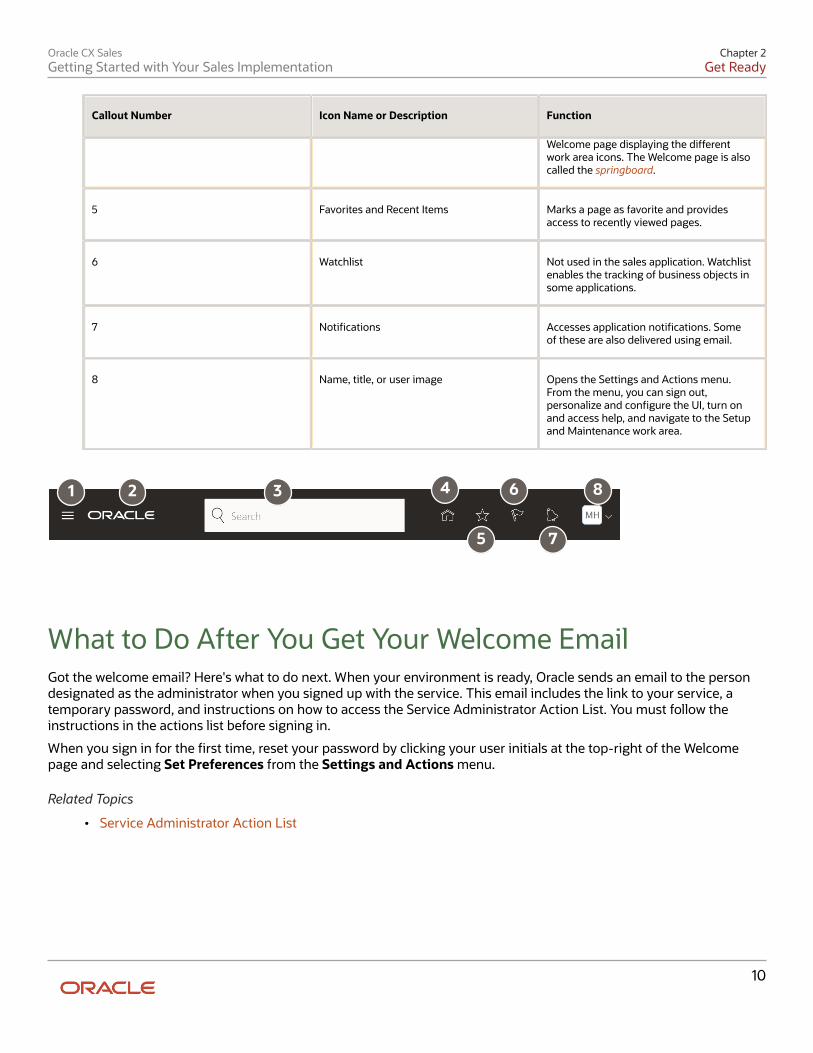
Callout Number Icon Name or Description Function
1 Navigator Gets you to where you need to go.
2 Company logo You can upload your own as part of homepage setup.
3 Global search Lets you search transactional data acrossdifferent objects. This field does notappear until you enable global search.
4 Home Returns you to the page defined as thehome page. By default, home is the
Oracle CX SalesGetting Started with Your Sales Implementation
Chapter 2Get Ready
10
Callout Number Icon Name or Description Function
Welcome page displaying the differentwork area icons. The Welcome page is alsocalled the springboard.
5 Favorites and Recent Items Marks a page as favorite and providesaccess to recently viewed pages.
6 Watchlist Not used in the sales application. Watchlistenables the tracking of business objects insome applications.
7 Notifications Accesses application notifications. Someof these are also delivered using email.
8 Name, title, or user image Opens the Settings and Actions menu.From the menu, you can sign out,personalize and configure the UI, turn onand access help, and navigate to the Setupand Maintenance work area.
1 2 3 4
5
6
7
8
What to Do After You Get Your Welcome EmailGot the welcome email? Here's what to do next. When your environment is ready, Oracle sends an email to the persondesignated as the administrator when you signed up with the service. This email includes the link to your service, atemporary password, and instructions on how to access the Service Administrator Action List. You must follow theinstructions in the actions list before signing in.
When you sign in for the first time, reset your password by clicking your user initials at the top-right of the Welcomepage and selecting Set Preferences from the Settings and Actions menu.
Related Topics
• Service Administrator Action List
Oracle CX SalesGetting Started with Your Sales Implementation
Chapter 2Get Ready
11
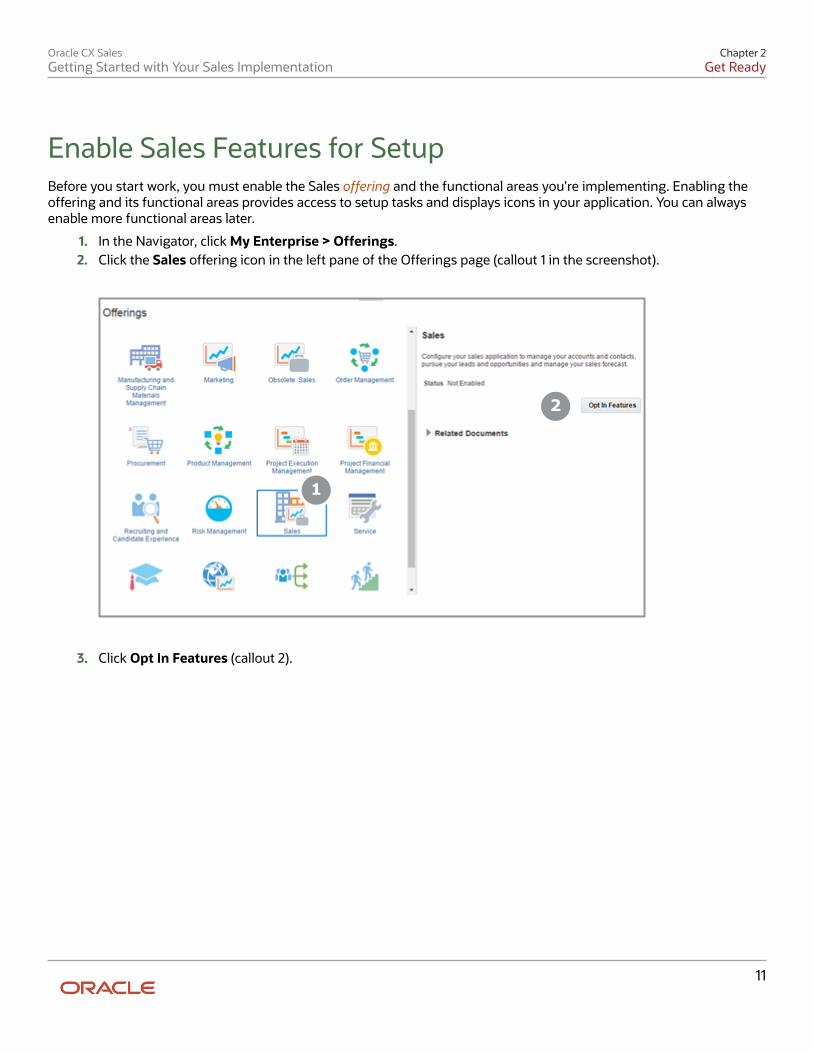
Enable Sales Features for SetupBefore you start work, you must enable the Sales offering and the functional areas you're implementing. Enabling theoffering and its functional areas provides access to setup tasks and displays icons in your application. You can alwaysenable more functional areas later.
1. In the Navigator, click My Enterprise > Offerings.2. Click the Sales offering icon in the left pane of the Offerings page (callout 1 in the screenshot).
1
2
3. Click Opt In Features (callout 2).
Oracle CX SalesGetting Started with Your Sales Implementation
Chapter 2Get Ready
12
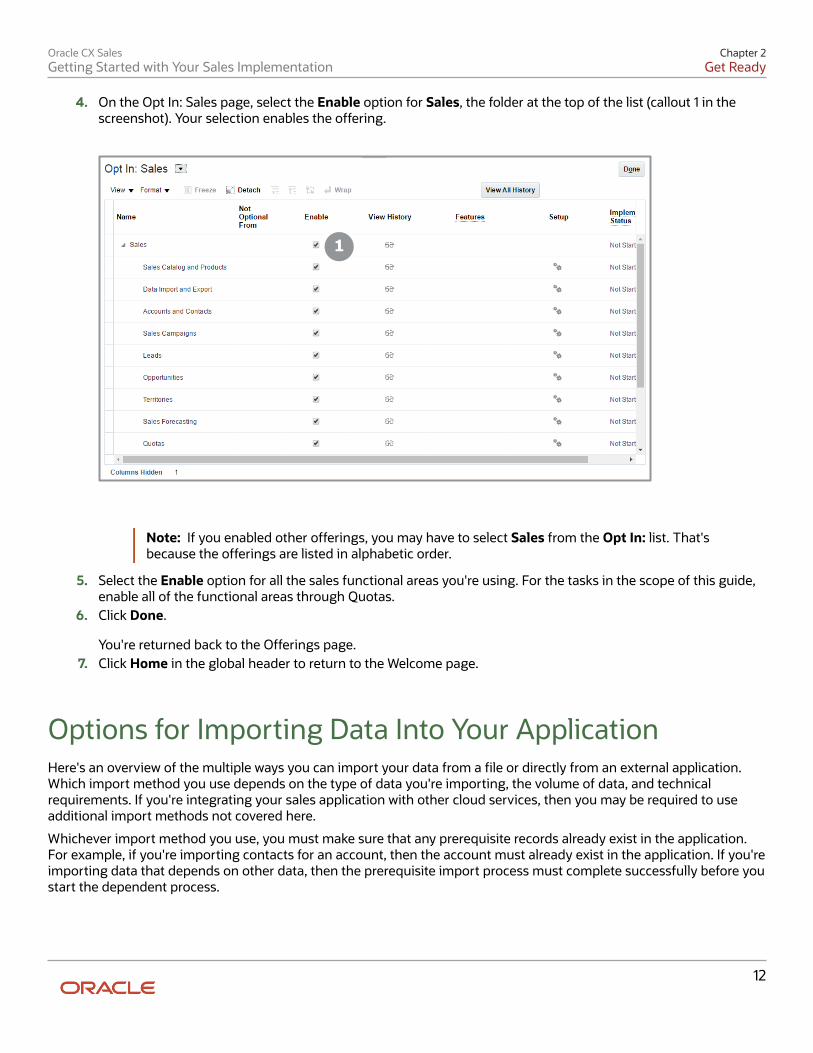
4. On the Opt In: Sales page, select the Enable option for Sales, the folder at the top of the list (callout 1 in thescreenshot). Your selection enables the offering.
1
Note: If you enabled other offerings, you may have to select Sales from the Opt In: list. That'sbecause the offerings are listed in alphabetic order.
5. Select the Enable option for all the sales functional areas you're using. For the tasks in the scope of this guide,enable all of the functional areas through Quotas.
6. Click Done.
You're returned back to the Offerings page.7. Click Home in the global header to return to the Welcome page.
Options for Importing Data Into Your ApplicationHere's an overview of the multiple ways you can import your data from a file or directly from an external application.Which import method you use depends on the type of data you're importing, the volume of data, and technicalrequirements. If you're integrating your sales application with other cloud services, then you may be required to useadditional import methods not covered here.
Whichever import method you use, you must make sure that any prerequisite records already exist in the application.For example, if you're importing contacts for an account, then the account must already exist in the application. If you'reimporting data that depends on other data, then the prerequisite import process must complete successfully before youstart the dependent process.
Oracle CX SalesGetting Started with Your Sales Implementation
Chapter 2Get Ready
13
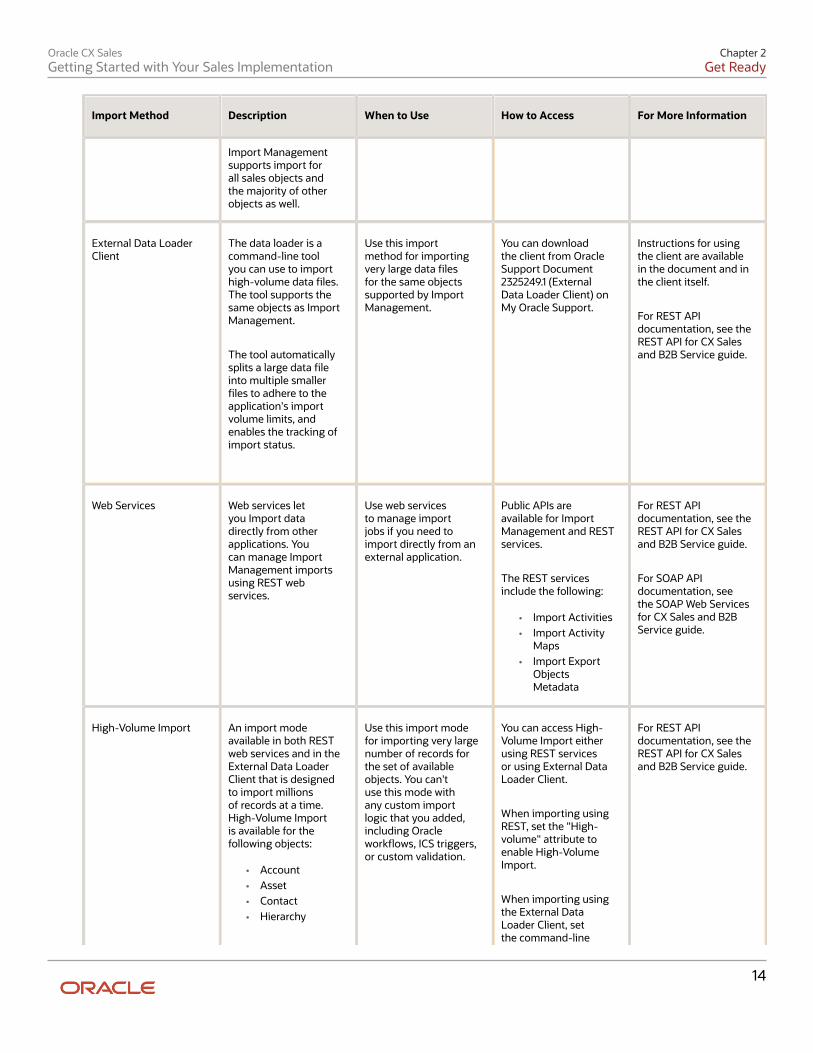
Import Method Description When to Use How to Access For More Information
Import Macros The Excel macrosspeed up and simplifythe import of up to5,000 records at a timefor some objects. Themacros help you byvalidating your dataentries, providinglists of values,and automaticallypopulating constantvalues.
The macros create datafiles that are importedautomatically.
Macros are available toimport the followingtypes of salesinformation:
• Sales users• Products• Product groups• Accounts and
the accounthierarchy
• Contacts• Leads• Opportunities• Opportunity
revenue lines
Use the import macrosfor importing data inyour initial deployment.
The macros aretargeted to the simpleproof of concept salesautomation use casecovered in the GettingStarted with YourSales Implementationguide. For example, theimport macros assumethat you're importingaccount, contact, andlead records for onecountry at a time.
The macros generatelog files of the actualdata that's imported,including the valuespopulated for you. Thelog files can serve as alearning tool for morecomplex import.
You can downloadthe Excel macros andany required mappingfiles from the OracleCX Sales: GettingStarted with YourSales Implementation:Import Macros(Document ID2229503.1) article onMy Oracle Support.
The different chaptersin this guide providedetailed instructionsfor using the macros.
Import Management Use ImportManagement to importdata files (.csv) with upto 50,000 records.
Import Managementimproves definition,error handling, andperformance. Forexample, you can dragand drop attributeswhile creating importmappings. The importalso validates the firstten records in your datafile before you importthe rest. You don't haveto wait around to seeif your data meets theimport requirements.
Use ImportManagement forimporting data outsidethe scope of theGetting Started withYour Implementationguide (this guide).
Click ImportManagement in theNavigator.
See the UnderstandingImport and ExportManagement guide forinstructions on usingthe import.
Oracle CX SalesGetting Started with Your Sales Implementation
Chapter 2Get Ready
14
Import Method Description When to Use How to Access For More Information
Import Managementsupports import forall sales objects andthe majority of otherobjects as well.
External Data LoaderClient
The data loader is acommand-line toolyou can use to importhigh-volume data files.The tool supports thesame objects as ImportManagement.
The tool automaticallysplits a large data fileinto multiple smallerfiles to adhere to theapplication's importvolume limits, andenables the tracking ofimport status.
Use this importmethod for importingvery large data filesfor the same objectssupported by ImportManagement.
You can downloadthe client from OracleSupport Document2325249.1 (ExternalData Loader Client) onMy Oracle Support.
Instructions for usingthe client are availablein the document and inthe client itself.
For REST APIdocumentation, see theREST API for CX Salesand B2B Service guide.
Web Services Web services letyou Import datadirectly from otherapplications. Youcan manage ImportManagement importsusing REST webservices.
Use web servicesto manage importjobs if you need toimport directly from anexternal application.
Public APIs areavailable for ImportManagement and RESTservices.
The REST servicesinclude the following:
• Import Activities• Import Activity
Maps• Import Export
ObjectsMetadata
For REST APIdocumentation, see theREST API for CX Salesand B2B Service guide.
For SOAP APIdocumentation, seethe SOAP Web Servicesfor CX Sales and B2BService guide.
High-Volume Import An import modeavailable in both RESTweb services and in theExternal Data LoaderClient that is designedto import millionsof records at a time.High-Volume Importis available for thefollowing objects:
• Account• Asset• Contact• Hierarchy
Use this import modefor importing very largenumber of records forthe set of availableobjects. You can'tuse this mode withany custom importlogic that you added,including Oracleworkflows, ICS triggers,or custom validation.
You can access High-Volume Import eitherusing REST servicesor using External DataLoader Client.
When importing usingREST, set the "High-volume" attribute toenable High-VolumeImport.
When importing usingthe External DataLoader Client, setthe command-line
For REST APIdocumentation, see theREST API for CX Salesand B2B Service guide.
Oracle CX SalesGetting Started with Your Sales Implementation
Chapter 2Get Ready
15
Import Method Description When to Use How to Access For More Information
• HierarchyMember
parameter "-high-volume" to enableHigh-Volume Import.
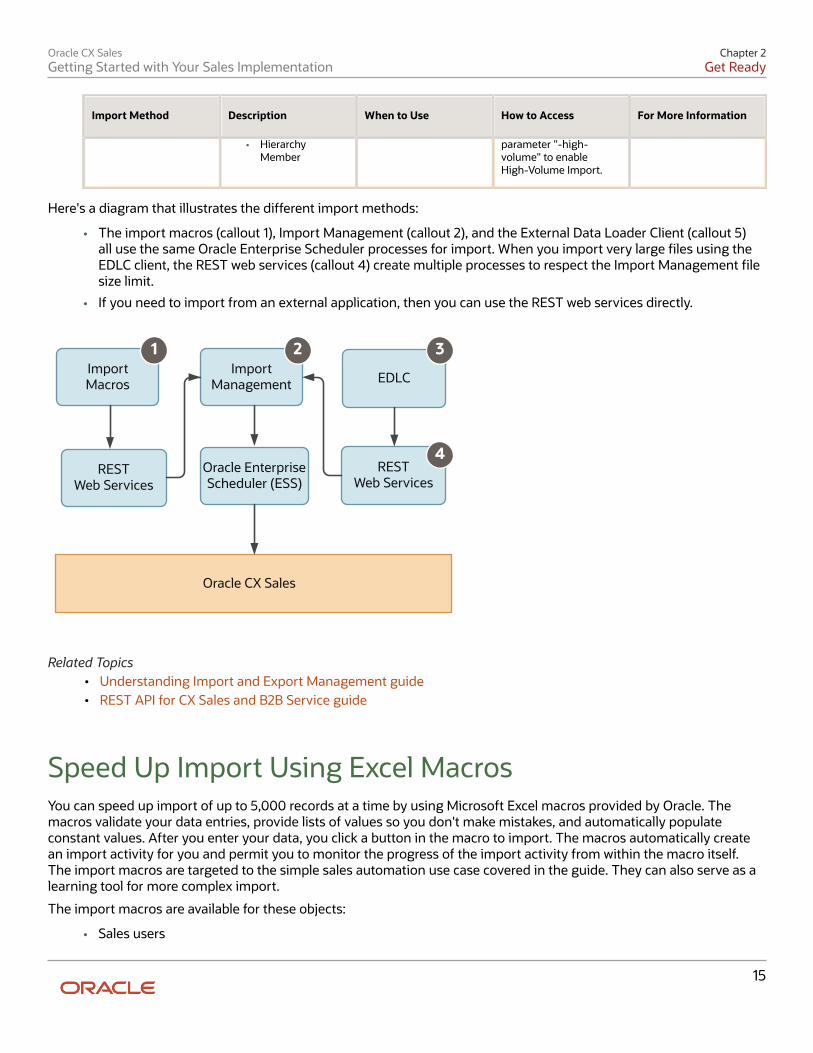
Here's a diagram that illustrates the different import methods:
• The import macros (callout 1), Import Management (callout 2), and the External Data Loader Client (callout 5)all use the same Oracle Enterprise Scheduler processes for import. When you import very large files using theEDLC client, the REST web services (callout 4) create multiple processes to respect the Import Management filesize limit.
• If you need to import from an external application, then you can use the REST web services directly.
Import Macros
Import Management EDLC
Oracle CX Sales
REST Web Services
Oracle Enterprise Scheduler (ESS)
1 2 3
4REST
Web Services
Related Topics• Understanding Import and Export Management guide• REST API for CX Sales and B2B Service guide
Speed Up Import Using Excel MacrosYou can speed up import of up to 5,000 records at a time by using Microsoft Excel macros provided by Oracle. Themacros validate your data entries, provide lists of values so you don't make mistakes, and automatically populateconstant values. After you enter your data, you click a button in the macro to import. The macros automatically createan import activity for you and permit you to monitor the progress of the import activity from within the macro itself.The import macros are targeted to the simple sales automation use case covered in the guide. They can also serve as alearning tool for more complex import.
The import macros are available for these objects:
• Sales users
Oracle CX SalesGetting Started with Your Sales Implementation
Chapter 2Get Ready
16
• Products
• Product groups
• Accounts
• Account hierarchy
• Contacts
• Addresses
• Leads
• Opportunities
• Opportunity revenue lines
All of the available macros use the new Import Management import feature.
The Import Data with Custom Fields chapter explains how to use the macros to import additional fields, includingcustom fields you created in Application Composer. You download the Excel macros from the Oracle CX Sales: GettingStarted with Your Sales Implementation: Import Macros (Document ID 2229503.1) article on My Oracle Support.
Note: While you can import additional fields by appending columns to the import macros, you can't make any otherchanges. You can't edit the Visual Basic for Applications (VBA) code or other functions.
Oracle CX SalesGetting Started with Your Sales Implementation
Chapter 3Run Setup Assistant
17
3 Run Setup Assistant
Speed Up Your Initial Setup with Setup AssistantWatch video
Use the Setup Assistant to automate many of the initial setups in your sales application. You enter the minimumrequired information directly in Setup Assistant or gather the information offline using an Excel template. SetupAssistant then runs background processes that complete many of the initial tasks for you.
Make sure the information you enter is correct before clicking the run button. While you can run Setup Assistantmultiple times to add information, you can't use it to change much of what you enter the first time around. For example,on subsequent runs you can't update the corporate currency, the accounting calendar periods, the root of your salescatalog, or the person you designate as the top of the resource hierarchy. You must use manual setup tasks to makethese corrections.
1. Sign in as the initial user provided by Oracle.
To run Setup Assistant, you must have the following job roles:
◦ Application Implementation Consultant
◦ Application Diagnostics Administrator
◦ IT Security Manager
2. In Setup and Maintenance, go to the Setup Assistant task:
◦ Offering: Sales
◦ Functional Area: Company Profile
◦ Task: Setup Assistant
3. On the Setup Assistant page, click Use Excel Spreadsheet to download a spreadsheet for collecting dataoffline, or click Use Application to enter the data directly. Both the spreadsheet and the application include thesame basic instructions.
Note: The Excel spreadsheet is provided in English only. However, you can enter data in any of thelanguages supported by CX Sales.
If you used the spreadsheet to collect your data, you must upload the data into Setup Assistant. Here's how::
a. Click Create Import File in the spreadsheet and save the file to your desktop.b. In the Setup Assistant, upload the file.c. Click Import Data.
4. Enter and verify the information in Setup Assistant. You can make changes until you run the setup process fromthe last setup page.
5. Click Run Setup Process and monitor the process progress by clicking Refresh.
Oracle CX SalesGetting Started with Your Sales Implementation
Chapter 3Run Setup Assistant
18
The process takes approximately five minutes to complete. Contact support if you run into errors. Commonerrors involve web service time-outs, so you can also try running the process again to see if that fixes the error.
6. You can add more data and run the process as many as five times by clicking Load More Data. You can usethese subsequent runs to create additional setup users, import geographies for additional countries, addcompetitors, add resource roles, and so on. After each iteration you can click View Setup History to review thechanges you made in your last run.
7. If you enabled Forecast by Opportunity Owner in Setup Assistant, then you must complete the manual setupstep described in the topic: Complete One-Time Manual Step If You Enabled Forecast by Opportunity Owner.
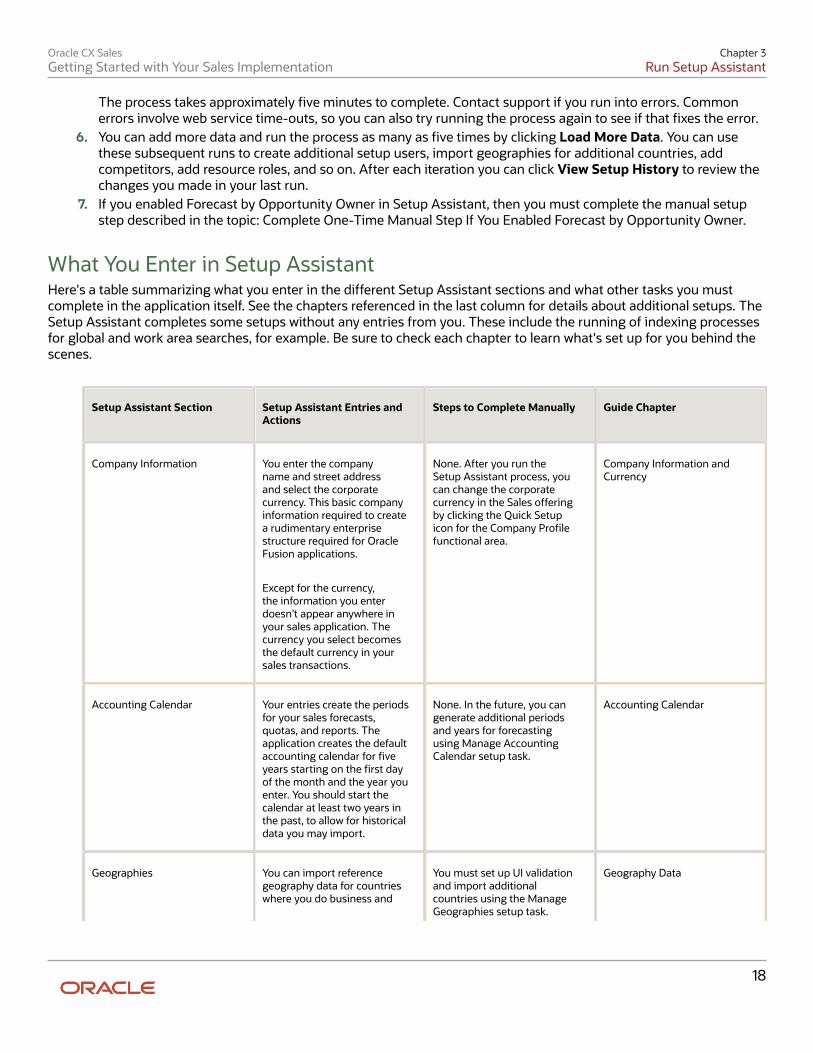
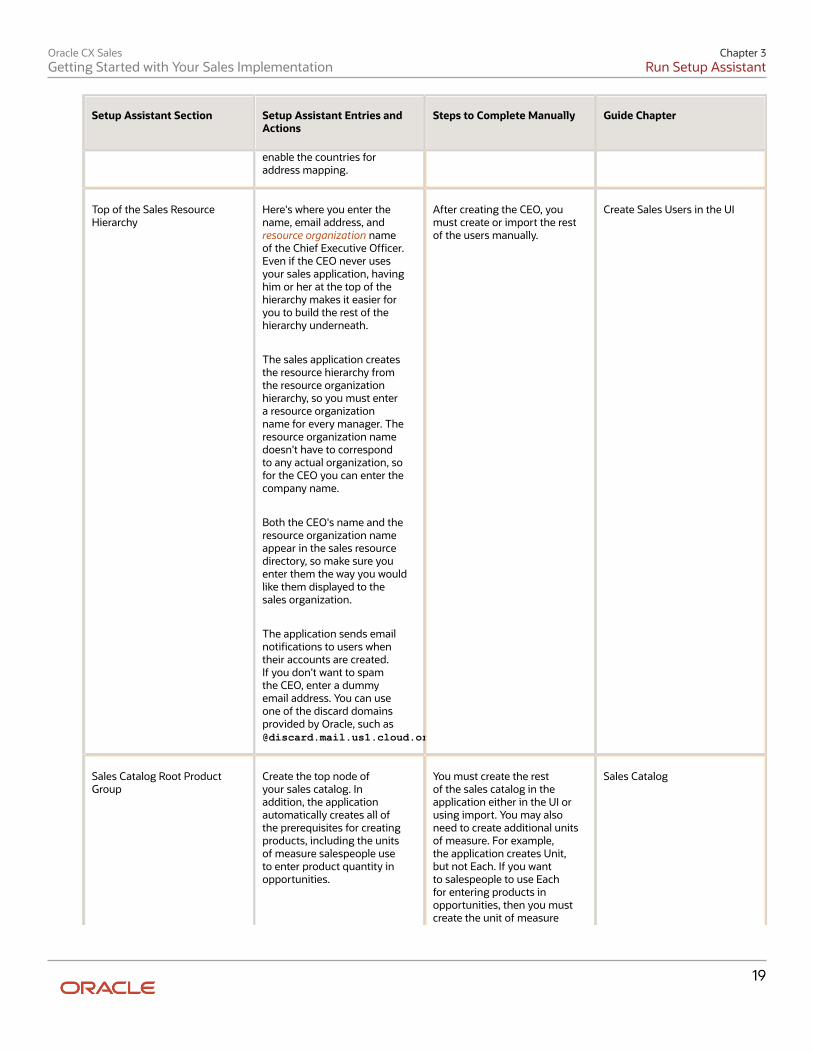
What You Enter in Setup AssistantHere's a table summarizing what you enter in the different Setup Assistant sections and what other tasks you mustcomplete in the application itself. See the chapters referenced in the last column for details about additional setups. TheSetup Assistant completes some setups without any entries from you. These include the running of indexing processesfor global and work area searches, for example. Be sure to check each chapter to learn what's set up for you behind thescenes.
Setup Assistant Section Setup Assistant Entries andActions
Steps to Complete Manually Guide Chapter
Company Information You enter the companyname and street addressand select the corporatecurrency. This basic companyinformation required to createa rudimentary enterprisestructure required for OracleFusion applications.
Except for the currency,the information you enterdoesn't appear anywhere inyour sales application. Thecurrency you select becomesthe default currency in yoursales transactions.
None. After you run theSetup Assistant process, youcan change the corporatecurrency in the Sales offeringby clicking the Quick Setupicon for the Company Profilefunctional area.
Company Information andCurrency
Accounting Calendar Your entries create the periodsfor your sales forecasts,quotas, and reports. Theapplication creates the defaultaccounting calendar for fiveyears starting on the first dayof the month and the year youenter. You should start thecalendar at least two years inthe past, to allow for historicaldata you may import.
None. In the future, you cangenerate additional periodsand years for forecastingusing Manage AccountingCalendar setup task.
Accounting Calendar
Geographies You can import referencegeography data for countrieswhere you do business and
You must set up UI validationand import additionalcountries using the ManageGeographies setup task.
Geography Data
Oracle CX SalesGetting Started with Your Sales Implementation
Chapter 3Run Setup Assistant
19
Setup Assistant Section Setup Assistant Entries andActions
Steps to Complete Manually Guide Chapter
enable the countries foraddress mapping.
Top of the Sales ResourceHierarchy
Here's where you enter thename, email address, andresource organization nameof the Chief Executive Officer.Even if the CEO never usesyour sales application, havinghim or her at the top of thehierarchy makes it easier foryou to build the rest of thehierarchy underneath.
The sales application createsthe resource hierarchy fromthe resource organizationhierarchy, so you must entera resource organizationname for every manager. Theresource organization namedoesn't have to correspondto any actual organization, sofor the CEO you can enter thecompany name.
Both the CEO's name and theresource organization nameappear in the sales resourcedirectory, so make sure youenter them the way you wouldlike them displayed to thesales organization.
The application sends emailnotifications to users whentheir accounts are created.If you don't want to spamthe CEO, enter a dummyemail address. You can useone of the discard domainsprovided by Oracle, such [email protected].
After creating the CEO, youmust create or import the restof the users manually.
Create Sales Users in the UI
Sales Catalog Root ProductGroup
Create the top node ofyour sales catalog. Inaddition, the applicationautomatically creates all ofthe prerequisites for creatingproducts, including the unitsof measure salespeople useto enter product quantity inopportunities.
You must create the restof the sales catalog in theapplication either in the UI orusing import. You may alsoneed to create additional unitsof measure. For example,the application creates Unit,but not Each. If you wantto salespeople to use Eachfor entering products inopportunities, then you mustcreate the unit of measure
Sales Catalog
Oracle CX SalesGetting Started with Your Sales Implementation
Chapter 3Run Setup Assistant
20
Setup Assistant Section Setup Assistant Entries andActions
Steps to Complete Manually Guide Chapter
using the task Manage Unitsof Measure.
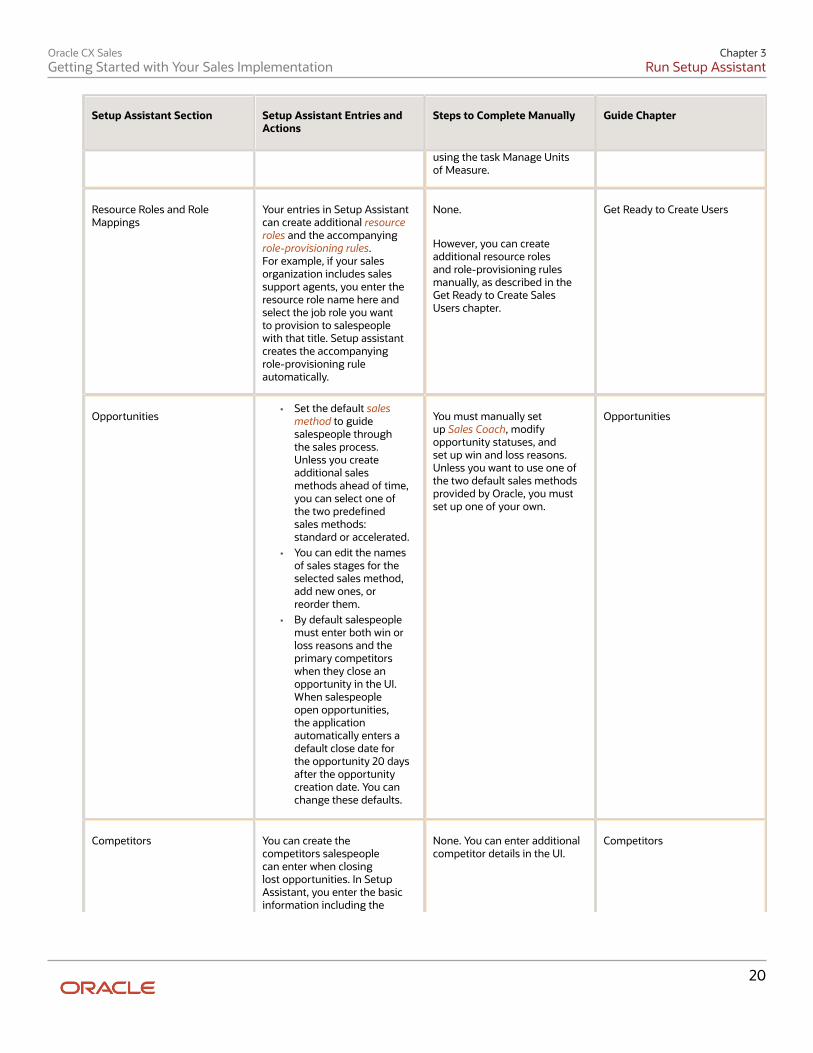
Resource Roles and RoleMappings
Your entries in Setup Assistantcan create additional resourceroles and the accompanying role-provisioning rules.For example, if your salesorganization includes salessupport agents, you enter theresource role name here andselect the job role you wantto provision to salespeoplewith that title. Setup assistantcreates the accompanyingrole-provisioning ruleautomatically.
None.
However, you can createadditional resource rolesand role-provisioning rulesmanually, as described in theGet Ready to Create SalesUsers chapter.
Get Ready to Create Users
Opportunities• Set the default sales
method to guidesalespeople throughthe sales process.Unless you createadditional salesmethods ahead of time,you can select one ofthe two predefinedsales methods:standard or accelerated.
• You can edit the namesof sales stages for theselected sales method,add new ones, orreorder them.
• By default salespeoplemust enter both win orloss reasons and theprimary competitorswhen they close anopportunity in the UI.When salespeopleopen opportunities,the applicationautomatically enters adefault close date forthe opportunity 20 daysafter the opportunitycreation date. You canchange these defaults.
You must manually setup Sales Coach, modifyopportunity statuses, andset up win and loss reasons.Unless you want to use one ofthe two default sales methodsprovided by Oracle, you mustset up one of your own.
Opportunities
Competitors You can create thecompetitors salespeoplecan enter when closinglost opportunities. In SetupAssistant, you enter the basicinformation including the
None. You can enter additionalcompetitor details in the UI.
Competitors
Oracle CX SalesGetting Started with Your Sales Implementation
Chapter 3Run Setup Assistant
21
Setup Assistant Section Setup Assistant Entries andActions
Steps to Complete Manually Guide Chapter
organization size, line ofbusiness, and threat level.
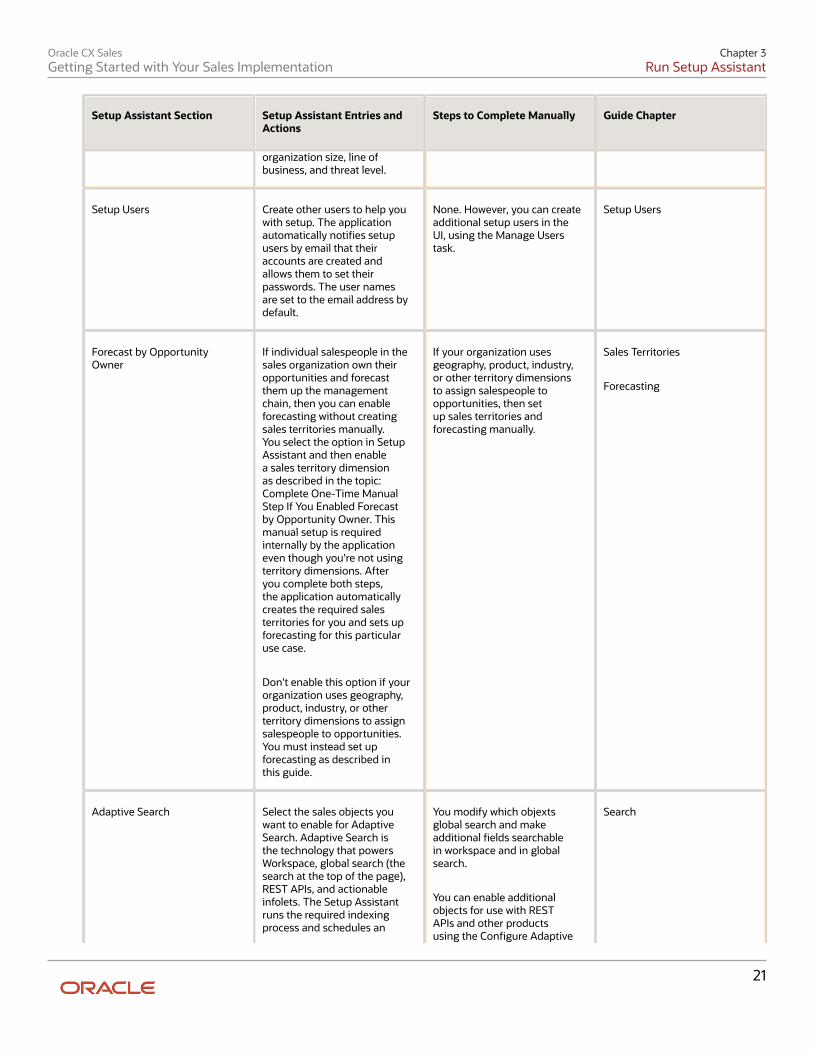
Setup Users Create other users to help youwith setup. The applicationautomatically notifies setupusers by email that theiraccounts are created andallows them to set theirpasswords. The user namesare set to the email address bydefault.
None. However, you can createadditional setup users in theUI, using the Manage Userstask.
Setup Users
Forecast by OpportunityOwner
If individual salespeople in thesales organization own theiropportunities and forecastthem up the managementchain, then you can enableforecasting without creatingsales territories manually.You select the option in SetupAssistant and then enablea sales territory dimensionas described in the topic:Complete One-Time ManualStep If You Enabled Forecastby Opportunity Owner. Thismanual setup is requiredinternally by the applicationeven though you're not usingterritory dimensions. Afteryou complete both steps,the application automaticallycreates the required salesterritories for you and sets upforecasting for this particularuse case.
Don't enable this option if yourorganization uses geography,product, industry, or otherterritory dimensions to assignsalespeople to opportunities.You must instead set upforecasting as described inthis guide.
If your organization usesgeography, product, industry,or other territory dimensionsto assign salespeople toopportunities, then setup sales territories andforecasting manually.
Sales Territories
Forecasting
Adaptive Search Select the sales objects youwant to enable for AdaptiveSearch. Adaptive Search isthe technology that powersWorkspace, global search (thesearch at the top of the page),REST APIs, and actionableinfolets. The Setup Assistantruns the required indexingprocess and schedules an
You modify which objextsglobal search and makeadditional fields searchablein workspace and in globalsearch.
You can enable additionalobjects for use with RESTAPIs and other productsusing the Configure Adaptive
Search
Oracle CX SalesGetting Started with Your Sales Implementation
Chapter 3Run Setup Assistant
22
Setup Assistant Section Setup Assistant Entries andActions
Steps to Complete Manually Guide Chapter
hourly index refresh. (Thisis the equivalent of clickingPublish for Adaptive Searchquick setup.)
Search task in Setup andMaintenance. For this andother advanced setup, seethe Adaptive Search andWorkspace chapter in theImplementing Sales guide.
Related Topics
• Enable Workspace and Other Features That Use Adaptive Search
Complete One-Time Manual Step If You EnabledForecast by Opportunity OwnerIf you enabled Forecast by Opportunity Owner in Setup Assistant, then you must complete a one-time manual setuprequired internally by the application: you must enable a sales territory dimension even though you aren't using anydimensions. Here's how:
1. Open the task Enable Dimensions and Metrics from the Setup and Maintenance work area:
◦ Offering: Sales
◦ Functional Area: Territories
◦ Task: Enable Dimensions and Metrics
2. On the Enable Dimensions and Metrics page, click Edit.3. In the Dimensions region, click Select and Add.4. Select Account Type and click OK.5. From the Actions menu at the page level, select Load and Activate.
Your selection runs a process that loads the required data.
You can select Refresh Status from the Actions menu at the page level to monitor the process progress. When theprocess completes successfully, you're done.
How You Get to Setup Tasks Not Covered by SetupAssistantThere are two ways to get to setup tasks not covered by Setup Assistant:
• Open tasks from the Sales offering Setup page in the Setup and Maintenance work area
• Use the Navigator
Oracle CX SalesGetting Started with Your Sales Implementation
Chapter 3Run Setup Assistant
23
Get to Your Tasks Using the Setup PageAfter you enable the offering, you can open implementation tasks, including those not covered in this guide, from theSetup and Maintenance work area Setup page. Here is how:
1. In the Navigator, click My Enterprise > Setup and Maintenance
You can also click Setup and Maintenance icon on your desktop. It's available in the My Enterprise tab.2. If you enabled more than one offering, you may have to select Sales from the Setup list. The Setup page
displays offerings in alphabetic order.3. In the Functional Areas column, select the functional area you want to set up.
Here's a rundown of the features on the Setup: Sales page.
Callout Number Description
1 Select a functional area to set up in the left pane.
2 The application lists the required tasks for that functional in the right pane.
3 You may need to show All Tasks to see the task you want.
4 You can search for tasks in the offering using the Search Tasks field.
5 Quick Setup (gear icons) in the Functional Areas column open pages that you can use forbasic setup. In Sales, Setup Assistant takes care of these for you.
6 Clicking the Shared link lists other offerings using the same functional area.
7 If you can't find the task you are looking for in the Sales offering, you can search for tasksacross offerings using the Tasks side panel.
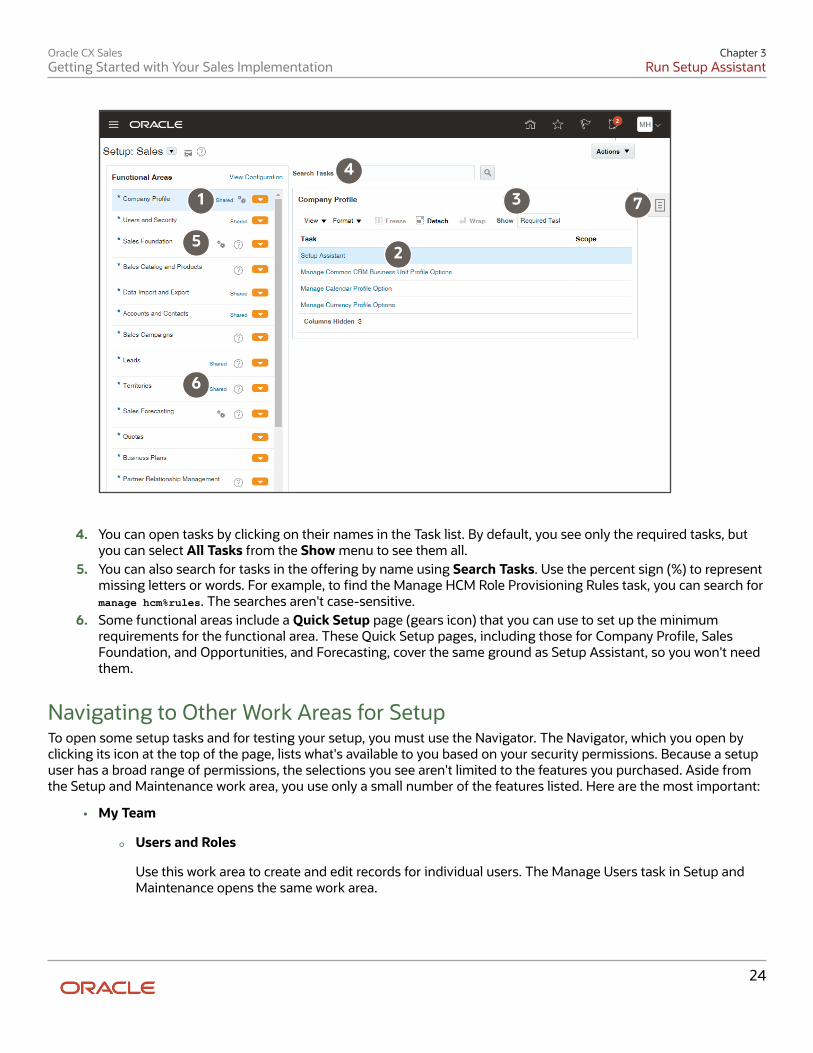
Oracle CX SalesGetting Started with Your Sales Implementation
Chapter 3Run Setup Assistant
24
1
2
3
4
5
6
7
4. You can open tasks by clicking on their names in the Task list. By default, you see only the required tasks, butyou can select All Tasks from the Show menu to see them all.
5. You can also search for tasks in the offering by name using Search Tasks. Use the percent sign (%) to representmissing letters or words. For example, to find the Manage HCM Role Provisioning Rules task, you can search formanage hcm%rules. The searches aren't case-sensitive.
6. Some functional areas include a Quick Setup page (gears icon) that you can use to set up the minimumrequirements for the functional area. These Quick Setup pages, including those for Company Profile, SalesFoundation, and Opportunities, and Forecasting, cover the same ground as Setup Assistant, so you won't needthem.
Navigating to Other Work Areas for SetupTo open some setup tasks and for testing your setup, you must use the Navigator. The Navigator, which you open byclicking its icon at the top of the page, lists what's available to you based on your security permissions. Because a setupuser has a broad range of permissions, the selections you see aren't limited to the features you purchased. Aside fromthe Setup and Maintenance work area, you use only a small number of the features listed. Here are the most important:
• My Team
◦ Users and Roles
Use this work area to create and edit records for individual users. The Manage Users task in Setup andMaintenance opens the same work area.
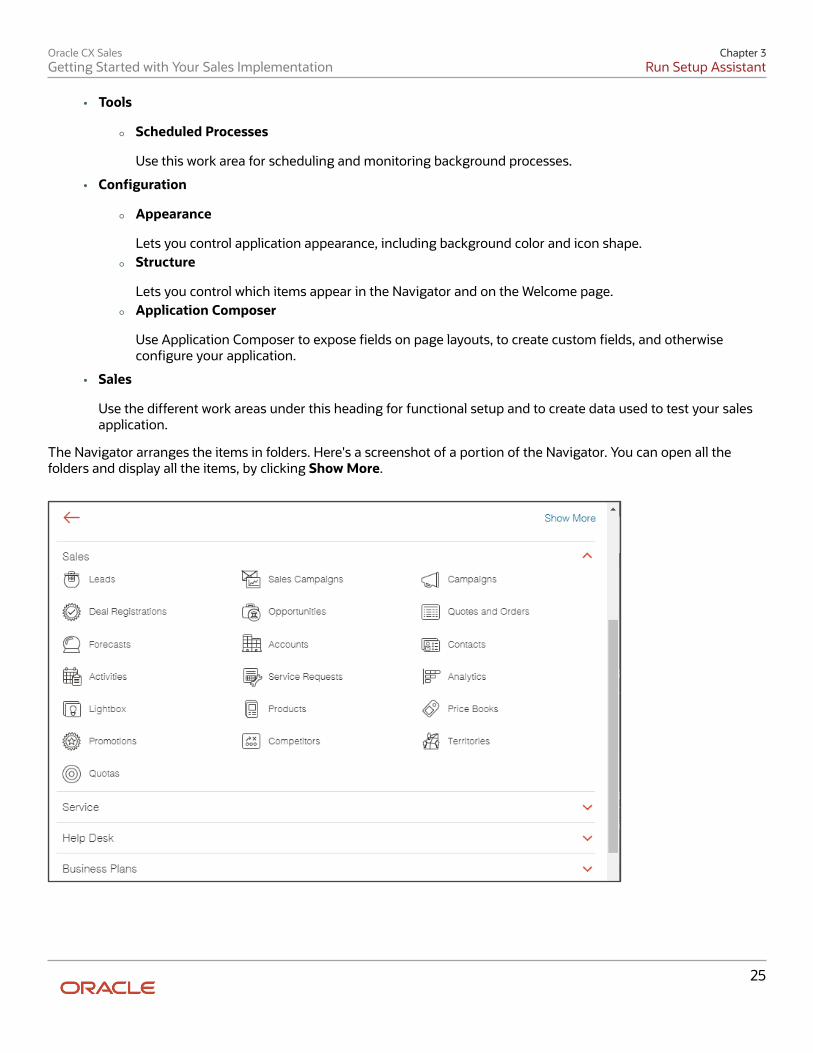
Oracle CX SalesGetting Started with Your Sales Implementation
Chapter 3Run Setup Assistant
25
• Tools
◦ Scheduled Processes
Use this work area for scheduling and monitoring background processes.
• Configuration
◦ Appearance
Lets you control application appearance, including background color and icon shape.
◦ Structure
Lets you control which items appear in the Navigator and on the Welcome page.
◦ Application Composer
Use Application Composer to expose fields on page layouts, to create custom fields, and otherwiseconfigure your application.
• Sales
Use the different work areas under this heading for functional setup and to create data used to test your salesapplication.
The Navigator arranges the items in folders. Here's a screenshot of a portion of the Navigator. You can open all thefolders and display all the items, by clicking Show More.
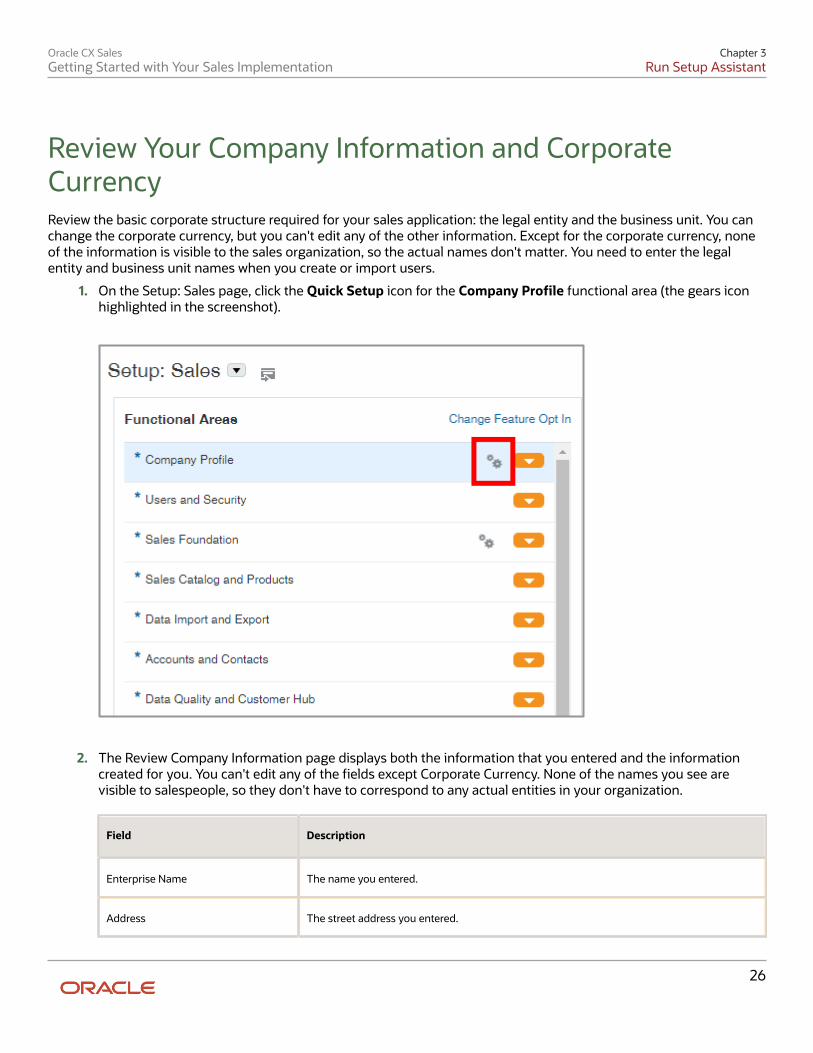
Oracle CX SalesGetting Started with Your Sales Implementation
Chapter 3Run Setup Assistant
26
Review Your Company Information and CorporateCurrencyReview the basic corporate structure required for your sales application: the legal entity and the business unit. You canchange the corporate currency, but you can't edit any of the other information. Except for the corporate currency, noneof the information is visible to the sales organization, so the actual names don't matter. You need to enter the legalentity and business unit names when you create or import users.
1. On the Setup: Sales page, click the Quick Setup icon for the Company Profile functional area (the gears iconhighlighted in the screenshot).
2. The Review Company Information page displays both the information that you entered and the informationcreated for you. You can't edit any of the fields except Corporate Currency. None of the names you see arevisible to salespeople, so they don't have to correspond to any actual entities in your organization.
Field Description
Enterprise Name The name you entered.
Address The street address you entered.
Oracle CX SalesGetting Started with Your Sales Implementation
Chapter 3Run Setup Assistant
27
Field Description
Legal Entity The enterprise name followed by the letters LE.
Business Unit The enterprise name followed by the letters LE BU.
Initial User Name of the user who is signed in.
Corporate Currency By default, the corporate currency is US Dollar. You can select a different corporate currency.
3. Jot down the Legal Entity and Business Unit names. You must enter these names when importing users.4. Click Save and Close.

Oracle CX SalesGetting Started with Your Sales Implementation
Chapter 3Run Setup Assistant
28
Oracle CX SalesGetting Started with Your Sales Implementation
Chapter 4User Account and Password Preferences
29
4 User Account and Password Preferences
Setup Assistant and User Account PreferencesSetup Assistant uses the default settings when creating setup users and the CEO at the top of the resource hierarchy.You can change the default behavior for the rest of your setup. Here are the default settings:
• User names are set to email addresses.
• Passwords must be at least 8 characters long and include a number
• The application automatically notifies users when their accounts are created, when passwords need to bechanged, and so on
Setup OverviewReview the settings for user name format and password strength and set up notifications before you create users. Bydefault, the application uses the email address to create user names and requires passwords with eight letters andone number. You may want shorter user names and stronger passwords. You must also create your own versions ofthe notifications users receive regarding their accounts. Oracle provides sample notifications, but they include Oracle-specific language and may not include all of the information users need.
The Security Console you use for all these tasks includes many advanced features. Some don't even apply to your salesapplication. So, limit your use of the Security Console to the scope listed here.
Here's a list of the setup tasks covered in this chapter. You can open the tasks from the Setup and Maintenance workarea, Sales offering, and Users and Security functional area. Remember that you may have to show All Tasks to see thetask you want.
Step Description Navigation Where to Get More Details
1 Initialize the Security Console. Setup and Maintenance >Sales > Users and Security >Import Users and Roles intoApplication Security
See the topic: Initialize theSecurity Console
2 Set up preferences for username format, passwords, andcreate your own versions ofthe notifications that usersreceive about their accountsand passwords.
Setup and Maintenance >Sales > Users and Security> Manage ApplicationsSecurity Preferences, thenselect the User Categoriestab.
To understand the notificationprocess for new accountsand recommendations on thekinds of notification changesyou may want to make, seethe topic: Automatic NewAccount Notifications andWhat to Change.
For setup instructions,including a list of tokens youcan use in your notifications,see the topic Set Up
Oracle CX SalesGetting Started with Your Sales Implementation
Chapter 4User Account and Password Preferences
30
Step Description Navigation Where to Get More Details
Preferences for User Names,Passwords, and Notifications.
The Dos and Don'ts for Using the Security ConsoleThe Security Console is a powerful tool, but you don't need all of its power for your initial setup. Here's an overview ofthe Security Console tabs and their uses. Only setup users, or other users with the IT Security Manager job role, canaccess the Security Console.
Tab Dos and Don'ts
Roles Create your own roles as described in Securing Sales and Service guide.
Users• Don't create users or provision job roles here. For sales, you must create users as
resources using the Manage Users task, resource import, and REST web services. Followthe instructions in the rest of this guide to create users and provision job roles. If you docreate user accounts in the Security Console, then you must create the users again asresources using the Manage Users task and link the accounts you created in the CreateUsers page.
• Use this tab only to manage user passwords and update user email addresses. Note thatall users, even members of the sales organization who can't access the Security Console,can reset their own passwords. That's done by clicking the user name in the welcomepage and selecting the Preferences option from the Settings and Actions menu.
• While you can use this tab to change user names, doing so requires some extra setupfor Oracle BI Answers, the embedded reporting tool for building and modifying reports.Oracle BI Answers creates a separate GUID from the user ID when you create a user.If you change the user ID, then you must update the BI Answers GUID by running theRename Accounts Self-Service utility. You can download the utility from My OracleSupport, article Oracle Fusion BI: Self Service Forget Accounts and Rename AccountsTools (Doc ID 2635720.1).
Analytics Review role assignments and compare roles. This advanced security functionality is covered inthe Securing Sales and Service guide.
Certificates The sales application doesn't use this functionality.
User Categories Specify password policies and manage notifications users receive about their accounts andpasswords. You can specify different behavior for different categories of users. For the salesapplication, all the users you create are initially assigned to the Default category. But you cancreate additional user categories and move users to them.
Single Sign-On Configure single sign-on.
API Authentication Used for defining JSON Web Tokens other applications can use to validate themselves withOracle CX Sales and B2B Service.
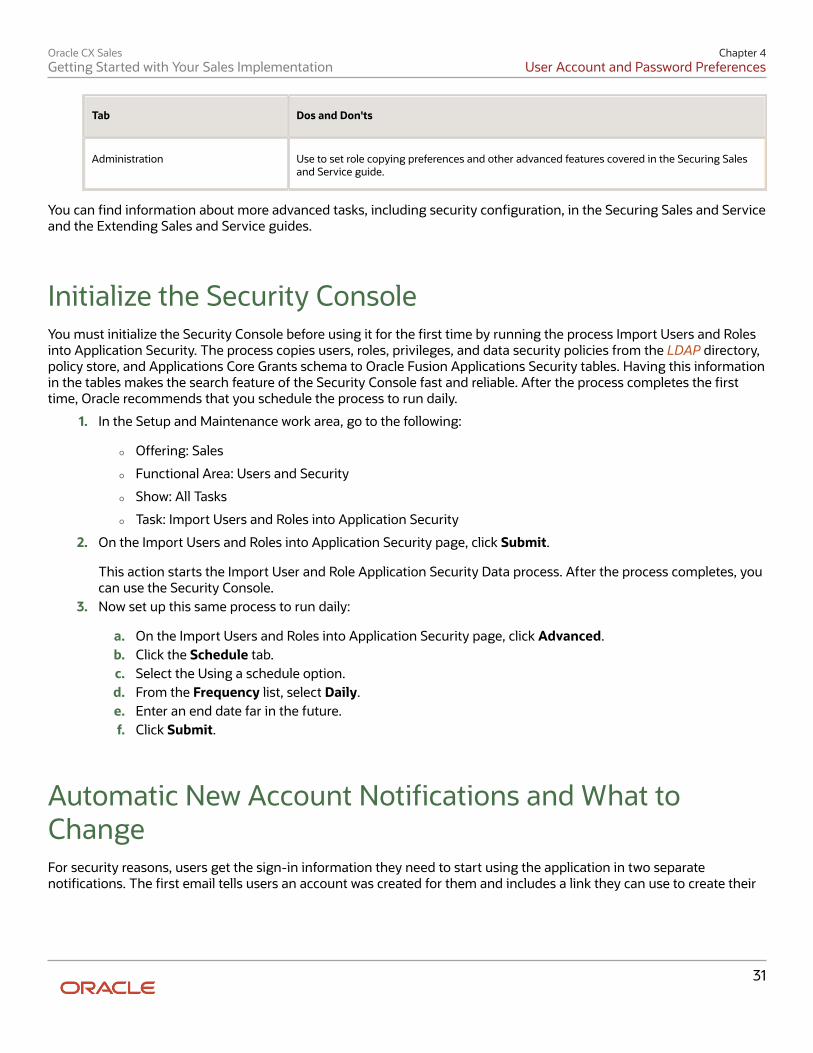
Oracle CX SalesGetting Started with Your Sales Implementation
Chapter 4User Account and Password Preferences
31
Tab Dos and Don'ts
Administration Use to set role copying preferences and other advanced features covered in the Securing Salesand Service guide.
You can find information about more advanced tasks, including security configuration, in the Securing Sales and Serviceand the Extending Sales and Service guides.
Initialize the Security ConsoleYou must initialize the Security Console before using it for the first time by running the process Import Users and Rolesinto Application Security. The process copies users, roles, privileges, and data security policies from the LDAP directory,policy store, and Applications Core Grants schema to Oracle Fusion Applications Security tables. Having this informationin the tables makes the search feature of the Security Console fast and reliable. After the process completes the firsttime, Oracle recommends that you schedule the process to run daily.
1. In the Setup and Maintenance work area, go to the following:
◦ Offering: Sales
◦ Functional Area: Users and Security
◦ Show: All Tasks
◦ Task: Import Users and Roles into Application Security
2. On the Import Users and Roles into Application Security page, click Submit.
This action starts the Import User and Role Application Security Data process. After the process completes, youcan use the Security Console.
3. Now set up this same process to run daily:
a. On the Import Users and Roles into Application Security page, click Advanced.b. Click the Schedule tab.c. Select the Using a schedule option.d. From the Frequency list, select Daily.e. Enter an end date far in the future.f. Click Submit.
Automatic New Account Notifications and What toChangeFor security reasons, users get the sign-in information they need to start using the application in two separatenotifications. The first email tells users an account was created for them and includes a link they can use to create their
Oracle CX SalesGetting Started with Your Sales Implementation
Chapter 4User Account and Password Preferences
32
passwords. The second email, which confirms the password reset, includes the user name. Here's how the processworks by default:
1. The application sends the new account notification. The email includes only the link to reset your password. Itdoesn't list the user name.
2. Users click the link in the email and create their passwords.3. If users already know their user names, they can sign in to the application right away.4. The application sends the second password reset confirmation, which includes the user name.5. If users don't know their user names, they can get the user names from the second notification.
You can view the default notification text by opening the two templates provided by Oracle: ORA New Account Templateand ORA Password Reset Confirmation Template in the Security Console. When you create your own templates, the textof the Oracle notification templates is copied automatically to your new template. You can edit the text or replace it withyour own.
As set up by Oracle, the application also notifies the user's manager when a user account gets created and whenpasswords get reset. If you don't want to spam sales managers, you can disable these notifications or replace them withtext of your own.
Suggested ChangesAt a minimum, change the text of sample notifications to replace Oracle-specific language. You may also want to clarifythe process:
• New Account Template:
Add language that makes it clear that to users that they can get the user name from the notification theyreceive immediately after they create their passwords.
• Password Reset Confirmation Template
Modify the text to highlight the user name, so it's easy to spot in the email. When making the edits, rememberthat users receive this notification every time they reset their passwords, not just the first time they create theirpassword.
For navigation and setup details, including available tokens, see the topic: Set Up Preferences for User Names,Passwords, and Notifications.
Set Up Preferences for User Names, Passwords, andNotificationsUse the Security Console to set your preferences for user names, passwords, and user notifications. For example, youcan require users to set stronger passwords, implement shorter user names, change the text of the notifications yourusers receive, or turn notifications off completely.
Oracle provides only sample notifications. You must change the Oracle-specific language in the notifications and addadditional information users may need. For example, the initial notification users receive about their new accountincludes a link to create your password. But, for security reasons, Oracle doesn't include the user name. In that initialnew account notification, you may want to explain that you get the user name from the subsequent password resetconfirmation.
Oracle CX SalesGetting Started with Your Sales Implementation
Chapter 4User Account and Password Preferences
33
Set Preferences for User Names and Passwords1. Open the Security Console from the Setup and Maintenance work area:
◦ Offering: Sales
◦ Functional Area: Users and Security
◦ Show: All Tasks
◦ Task: Manage Applications Security Preferences
Alternatively, click Tools > Security Console on the home page.2. Click User Categories.
On the User Categories tab, you can set up different preferences and notifications for different categories ofusers. Since all of the sales users you create and import are created in the Default category, you set preferencesfor that category only.
3. Click DEFAULT.
On the DEFAULT User Category: Details page, you can set the user-name format.4. Click Edit.5. Select the user-name format you want to use from the User Name Generation Rule list.
The application uses your selection to generate user names unless you enter the user names manually orimport them from a file. By default, the application uses the email address as the user name.
If you're implementing Partner Relationship Management, then you must use email for creating partnercontacts. Otherwise, you can use any of the three following options:
◦ First name.last name
◦ First initial and last name
Don't use Person or party number because numbers aren't easily remembered by users. For example, if theperson number generated by the application for John Smith is 100000000178803, then the user name is100000000178803 as well.
6. Selecting the Generate system user name when generation rule fails option ensures the applicationgenerates a user name even if there is no information available for the option you selected.
7. Click Save and Close.8. Click the Password Policy subtab.9. Here you can specify password strength and expiration. For example, you can require users to use special
characters in passwords and specify how frequently passwords must be changed.10. Selecting the Administrator Can Manually Reset Password option, makes it possible for administrators to
manually create new passwords for users.11. Click Save and Close.
Configure Email Notifications and Change the Oracle-Specific TextIn the Notifications subtab on the DEFAULT User Category tab, you can specify which email notifications, if any, are sentto users and the text of those notifications. At present, the application supports text-only notifications in one language.
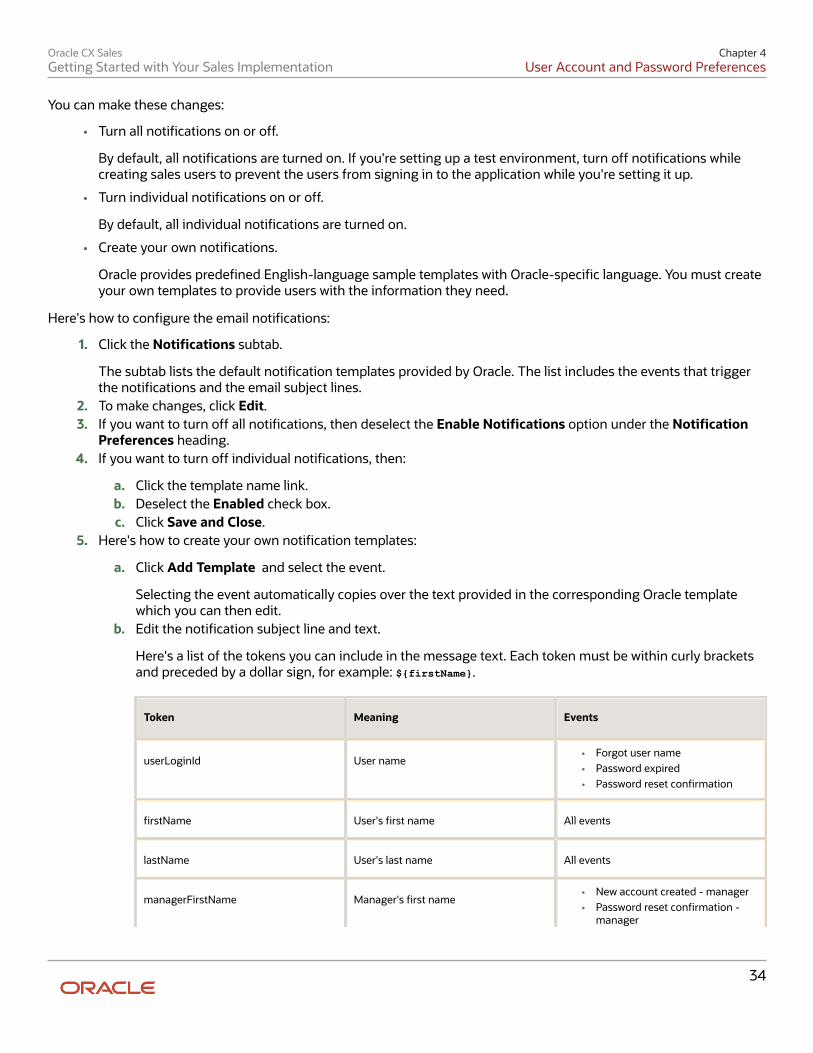
Oracle CX SalesGetting Started with Your Sales Implementation
Chapter 4User Account and Password Preferences
34
You can make these changes:
• Turn all notifications on or off.
By default, all notifications are turned on. If you're setting up a test environment, turn off notifications whilecreating sales users to prevent the users from signing in to the application while you're setting it up.
• Turn individual notifications on or off.
By default, all individual notifications are turned on.
• Create your own notifications.
Oracle provides predefined English-language sample templates with Oracle-specific language. You must createyour own templates to provide users with the information they need.
Here's how to configure the email notifications:
1. Click the Notifications subtab.
The subtab lists the default notification templates provided by Oracle. The list includes the events that triggerthe notifications and the email subject lines.
2. To make changes, click Edit.3. If you want to turn off all notifications, then deselect the Enable Notifications option under the Notification
Preferences heading.4. If you want to turn off individual notifications, then:
a. Click the template name link.b. Deselect the Enabled check box.c. Click Save and Close.
5. Here's how to create your own notification templates:
a. Click Add Template and select the event.
Selecting the event automatically copies over the text provided in the corresponding Oracle templatewhich you can then edit.
b. Edit the notification subject line and text.
Here's a list of the tokens you can include in the message text. Each token must be within curly bracketsand preceded by a dollar sign, for example: ${firstName}.
Token Meaning Events
userLoginId User name• Forgot user name• Password expired• Password reset confirmation
firstName User's first name All events
lastName User's last name All events
managerFirstName Manager's first name• New account created - manager• Password reset confirmation -
manager
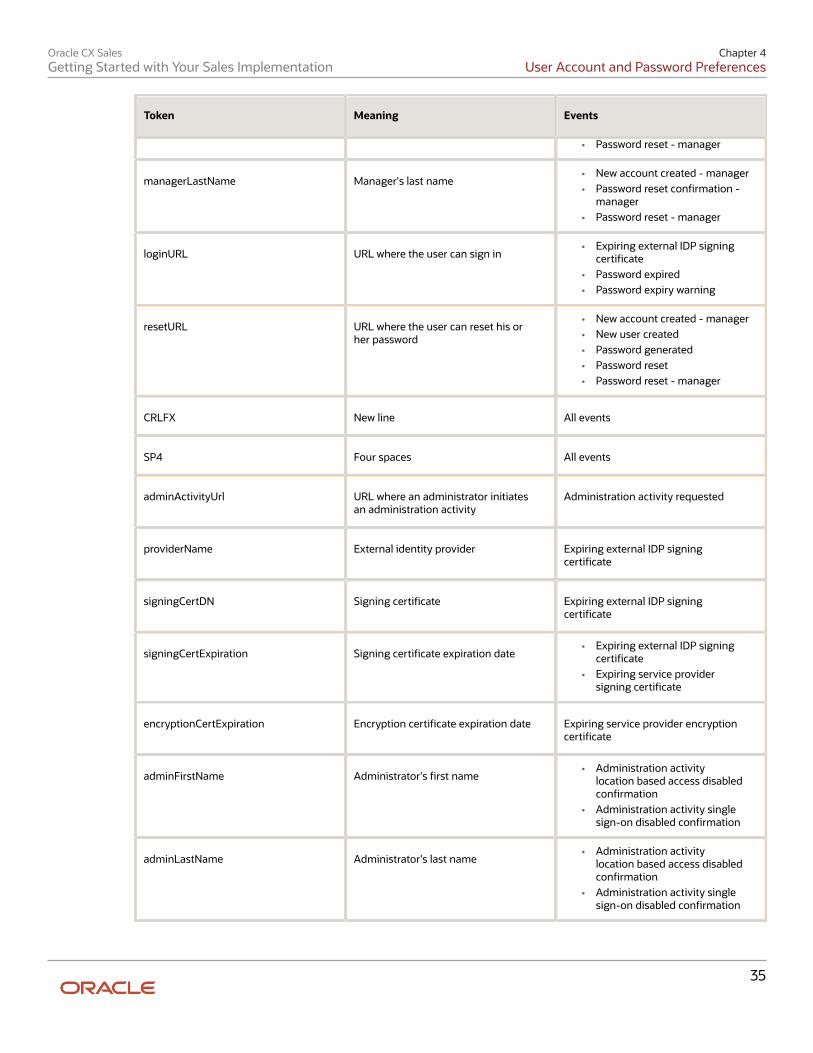
Oracle CX SalesGetting Started with Your Sales Implementation
Chapter 4User Account and Password Preferences
35
Token Meaning Events
• Password reset - manager
managerLastName Manager's last name• New account created - manager• Password reset confirmation -
manager• Password reset - manager
loginURL URL where the user can sign in• Expiring external IDP signing
certificate• Password expired• Password expiry warning
resetURL URL where the user can reset his orher password
• New account created - manager• New user created• Password generated• Password reset• Password reset - manager
CRLFX New line All events
SP4 Four spaces All events
adminActivityUrl URL where an administrator initiatesan administration activity
Administration activity requested
providerName External identity provider Expiring external IDP signingcertificate
signingCertDN Signing certificate Expiring external IDP signingcertificate
signingCertExpiration Signing certificate expiration date• Expiring external IDP signing
certificate• Expiring service provider
signing certificate
encryptionCertExpiration Encryption certificate expiration date Expiring service provider encryptioncertificate
adminFirstName Administrator's first name• Administration activity
location based access disabledconfirmation
• Administration activity singlesign-on disabled confirmation
adminLastName Administrator's last name• Administration activity
location based access disabledconfirmation
• Administration activity singlesign-on disabled confirmation
Oracle CX SalesGetting Started with Your Sales Implementation
Chapter 4User Account and Password Preferences
36
c. Select the Enabled option.d. Click Save and Close.
The predefined template provided by Oracle is automatically disabled. You can only have one template for eachevent.
6. On the DEFAULT Category: Notifications page, click Done.
Set the Synchronization Process Frequency WarningIf you don't like warning messages, read on. Whenever you navigate to the Security Console, you get a warning if theImport User and Role Application Security Data process was not run in the last six hours. If you scheduled the process torun daily, then it makes good sense to change the value of the warning as well.
1. Click the Administration subtab.2. Change the value for the Hours Since Last Synchronization Job Run Warning.
Related Topics
• Manage User-Name and Password Notifications
Oracle CX SalesGetting Started with Your Sales Implementation
Chapter 5Setup Users
37
5 Setup Users
Setup OverviewUsing the Setup Assistant, you can set up to 15 users to help you with setup. Use this chapter to:
• Create additional setup users.
• Enable the initial user created by Oracle to participate in the setup process.The initial user can perform security tasks, such as creating other users and granting setup permissions, butneeds the additional privileges granted to setup users.
• Enable setup users to monitor all background processes
• Learn how to reset passwords for users
Here's a list of the setup tasks. You can open the tasks from the Sales offering in the Setup and Maintenance work area.Tasks are organized by functional areas. Remember that you may have to show All Tasks to see the task you want.
Step Description Navigation Where to Get More Details
1 Create other setup users. Setup and Maintenance >Sales > Users and Security >Manage Users
See the topic: Create SetupUsers
2 Provision the initial user withthe same permissions as theother setup users.
Setup and Maintenance >Sales > Users and Security >Manage Users
See the topic: Providethe Initial User the SamePermissions as Other SetupUsers
3 Any setup users you createreceive an email notificationwith a link they can use toreset their passwords. Ifthey don't receive the emailfor some reason, you canreset user passwords andupdate email addressesin the Security Console.(You can open the SecurityConsole using the taskManage Applications SecurityPreferences)
Setup and Maintenance >Sales > Users and Security> Manage ApplicationsSecurity Preferences
See the section: Reset UserPasswords and Update EmailAddresses
To understand the notificationprocess for new accountsand recommendations on thekinds of notification changesyou may want to make, seethe topic: Automatic NewAccount Notifications andWhat to Change.
For setup instructions, seeSet Up Preferences for UserNames, Passwords, andNotifications
4 By default, setup users canonly see the scheduledprocesses they themselves
Setup and Maintenance >Sales > Users and Security
See the topic: Give Usersthe Permission to View AllScheduled Processes
Oracle CX SalesGetting Started with Your Sales Implementation
Chapter 5Setup Users
38
Step Description Navigation Where to Get More Details
submit. Use the SecurityConsole to provide all of thesetup users the ability to seewhat processes are runningand their status, no matterwho submitted them.
> Manage ApplicationsSecurity Preferences
Related Topics
• Automatic New Account Notifications and What to Change
• Set Up Preferences for User Names, Passwords, and Notifications
About Setup Users and SecurityProviding users with the security permissions they need to complete the setup tasks in this guide is very simple if youused Setup Assistant for your initial setup. You just make a couple of entries and click Save. Provisioning rules providedby Oracle do the rest. This topic provides a brief overview of Oracle's security model, lists the permissions that setupusers need, and explains how the provisioning process works.
How Permissions Are Grouped and ProvisionedOracle uses the Role Based Access Control (RBAC) security industry standard. The permissions are grouped in two typesof roles:
• Job roles, which provide users with the permissions to carry out tasks specific to a job, such as a sales manageror sales administrator
• Abstract roles, which permit users to complete tasks that are common to all employees or resources
You typically provision salespeople with the job roles corresponding to the roles they play in the sales organization (theirresource roles), as well as the employee and resource abstract roles. The employee abstract role provides access toreports and personal profile information. Without the resource abstract role, users can't participate in the sales process,create accounts and opportunities, or be assigned to sales teams. You can find the description of each job and abstractrole Oracle provides and all the duties that come with it in security reference guides.
When you create users, the application automatically provisions them with the required job roles and abstract rolesusing role-provisioning rules. Each role-provisioning rule is made up of the rule conditions and the names of the jobroles and abstract roles that are assigned to the user if the conditions are met. In the sales application, the job role andthe resource abstract role are assigned to a user based on the resource role. The employee abstract role is provisionedto all users of type employee.
As long as you used Setup Assistant, the application creates all the role-provisioning rules you need for setup users andall the standard sales users. If you set up the company information in a different way, then you must create all the roleprovisioning rules yourself. That's true if you're setting up the application together with Oracle HCM Cloud or anothercloud service. You must also create role-provisioning rules for any additional resource roles you create. You can learnmore about role-provisioning rules in the Get Ready to Create Sales Users chapter and in the Securing CX Sales and B2BService guide.
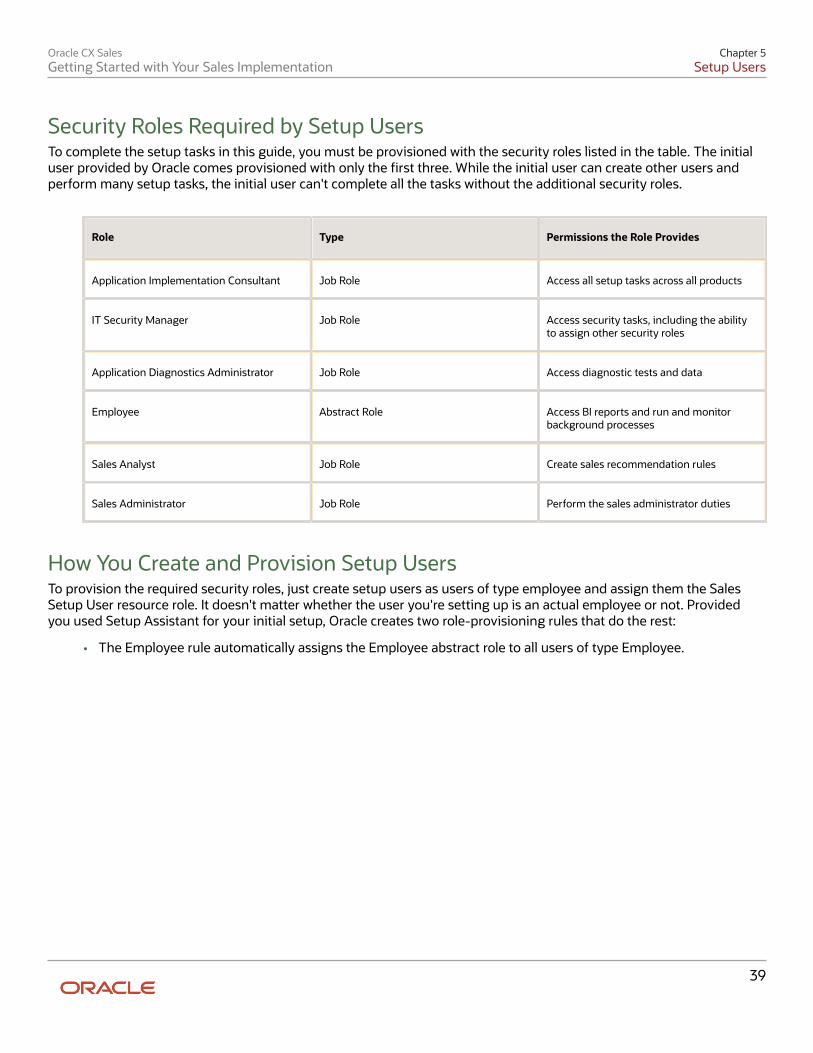
Oracle CX SalesGetting Started with Your Sales Implementation
Chapter 5Setup Users
39
Security Roles Required by Setup UsersTo complete the setup tasks in this guide, you must be provisioned with the security roles listed in the table. The initialuser provided by Oracle comes provisioned with only the first three. While the initial user can create other users andperform many setup tasks, the initial user can't complete all the tasks without the additional security roles.
Role Type Permissions the Role Provides
Application Implementation Consultant Job Role Access all setup tasks across all products
IT Security Manager Job Role Access security tasks, including the abilityto assign other security roles
Application Diagnostics Administrator Job Role Access diagnostic tests and data
Employee Abstract Role Access BI reports and run and monitorbackground processes
Sales Analyst Job Role Create sales recommendation rules
Sales Administrator Job Role Perform the sales administrator duties
How You Create and Provision Setup UsersTo provision the required security roles, just create setup users as users of type employee and assign them the SalesSetup User resource role. It doesn't matter whether the user you're setting up is an actual employee or not. Providedyou used Setup Assistant for your initial setup, Oracle creates two role-provisioning rules that do the rest:
• The Employee rule automatically assigns the Employee abstract role to all users of type Employee.
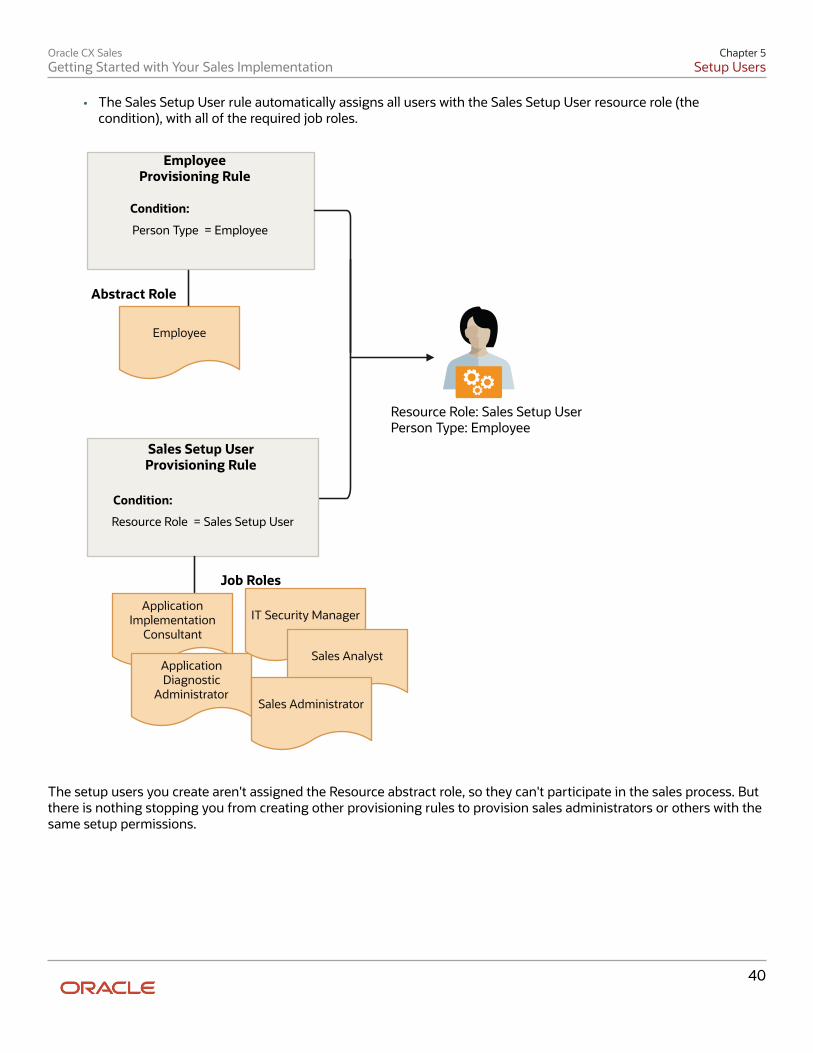
Oracle CX SalesGetting Started with Your Sales Implementation
Chapter 5Setup Users
40
• The Sales Setup User rule automatically assigns all users with the Sales Setup User resource role (thecondition), with all of the required job roles.
Resource Role: Sales Setup UserPerson Type: Employee
Person Type = Employee
Employee Provisioning Rule
Resource Role = Sales Setup User
Sales Setup User Provisioning Rule
Condition:
Job Roles
Abstract Role
Application Implementation
Consultant
Application Diagnostic
Administrator
IT Security Manager
Sales Analyst
Sales Administrator
Employee
Condition:
The setup users you create aren't assigned the Resource abstract role, so they can't participate in the sales process. Butthere is nothing stopping you from creating other provisioning rules to provision sales administrators or others with thesame setup permissions.
Oracle CX SalesGetting Started with Your Sales Implementation
Chapter 5Setup Users
41
Create Setup UsersFollow this procedure to create users who can perform the sales setup discussed in this guide.
1. I the Setup and Maintenance work area, go to the following:
◦ Offering: Sales
◦ Functional Area: Users and Security
◦ Task: Manage Users
Alternatively, click Navigator > My Team > Users and Roles.2. On the Search Person page, click Create.3. On the Create User page, in the Personal Details region, enter the user's name and a unique email address.
The application automatically sends user notifications to this email address unless you disable notifications inthe Security Console.
4. In the User Details region, you can enter a user name.
If you leave the User Name field blank, the application automatically creates a user name for you. By default,the application uses the email unless you made changes in the Security Console.
5. To automatically send an email notification to the user, select the Send user name and password option inUser Notification Preferences. The email includes a link to create a password in the application.
Note: If this option isn't available, notifications may be disabled. Check the notification settings inthe Security Console.
6. Select these values in the Employment Information region:
Field Value to Select Comments
Person Type Employee For setup only. The user need not be anemployee.
Legal Employer Your company name followed by theletters LE
The legal employer name is used forsetup only, so doesn't have to correspondto any actual entity.
Business Unit Your company name followed by theletters LE BU
The business unit name, like the legalemployer name, is used for setup only.
7. In the Resource Information section, select Sales Setup User from the Resource Role list.8. Click Autoprovision Roles.
The Role Requests region displays the following roles:
◦ Application Diagnostics Administrator
◦ Application Implementation Consultant
Oracle CX SalesGetting Started with Your Sales Implementation
Chapter 5Setup Users
42
◦ IT Security Manager
◦ Employee
◦ Sales Analyst
◦ Sales Administrator
The role request process may take a few minutes to complete because it's set to run periodically. You can viewthe status of the request any time you edit the user.
9. Click Save and Close.
If you selected the Send user name and password option and notifications are enabled, the application sendsthe new account notification email. If you didn't select this option, then you must reset the password for theuser using the procedure described in the Resetting User Passwords topic. After you create the user, you canno longer update the email address in this UI. You can instead update the email address on the Users tab in theSecurity Console.
Related Topics
• Set Up Preferences for User Names, Passwords, and Notifications
• Automatic New Account Notifications and What to Change
Provide the Initial User the Same Permissions as OtherSetup UsersUse this procedure to grant the initial user the same permissions as the other setup users.
1. Click Navigator > My Team > Users and Roles.
Alternatively, you can open this task from the Setup and Maintenance work area:
◦ Offering: Sales
◦ Functional Area: Users and Security
◦ Task: Manage Users
2. On the Search Person page, enter the first name of the initial user in the Keywords field and click Search (theright-arrow icon).
3. Select the name link in the Search Results.4. On the Edit User page, in the Resource Information region, select Sales Setup User from the Resource Role
list.5. Click Autoprovision Roles.
The Role Requests region displays these roles:
◦ Sales Analyst
◦ Employee
◦ Sales Administrator
Your role request process may take a few minutes to complete because it's set to run periodically. You can viewthe status of the request any time you edit this user.
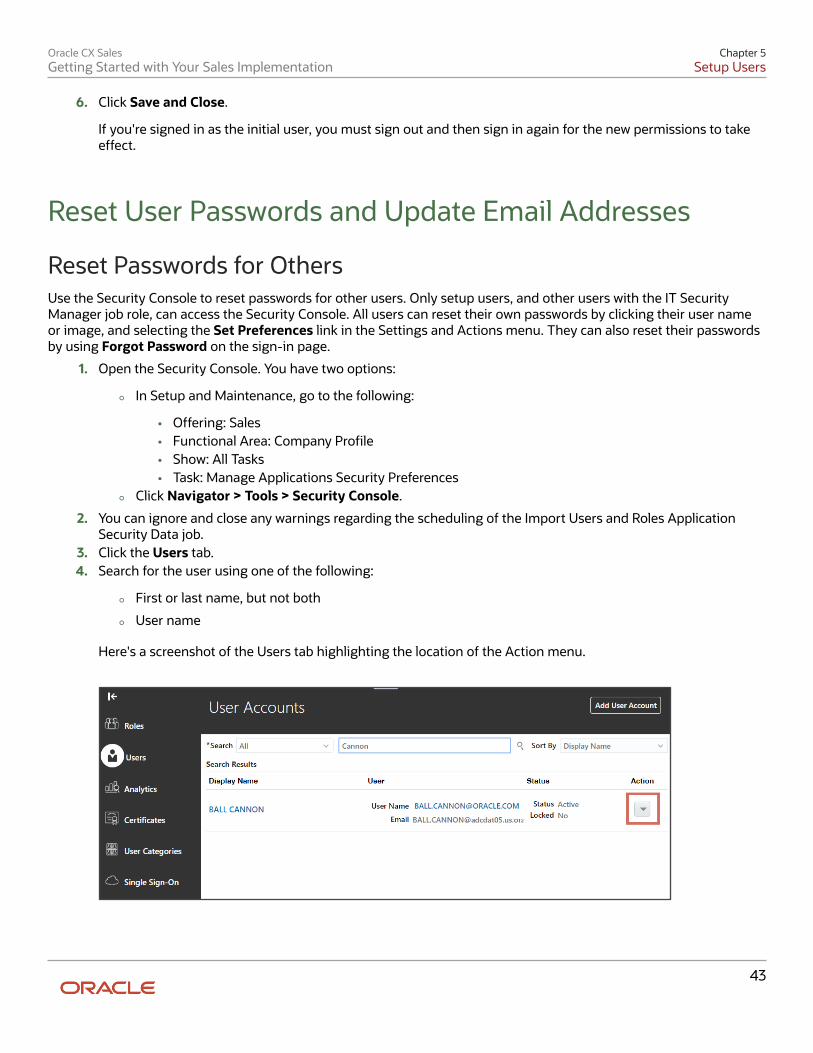
Oracle CX SalesGetting Started with Your Sales Implementation
Chapter 5Setup Users
43
6. Click Save and Close.
If you're signed in as the initial user, you must sign out and then sign in again for the new permissions to takeeffect.
Reset User Passwords and Update Email Addresses
Reset Passwords for OthersUse the Security Console to reset passwords for other users. Only setup users, and other users with the IT SecurityManager job role, can access the Security Console. All users can reset their own passwords by clicking their user nameor image, and selecting the Set Preferences link in the Settings and Actions menu. They can also reset their passwordsby using Forgot Password on the sign-in page.
1. Open the Security Console. You have two options:
◦ In Setup and Maintenance, go to the following:
• Offering: Sales• Functional Area: Company Profile• Show: All Tasks• Task: Manage Applications Security Preferences
◦ Click Navigator > Tools > Security Console.
2. You can ignore and close any warnings regarding the scheduling of the Import Users and Roles ApplicationSecurity Data job.
3. Click the Users tab.4. Search for the user using one of the following:
◦ First or last name, but not both
◦ User name
Here's a screenshot of the Users tab highlighting the location of the Action menu.
Oracle CX SalesGetting Started with Your Sales Implementation
Chapter 5Setup Users
44
5. From the Action menu, select Reset Password.6. In the Reset Password page, you have two options:
◦ To send an email to users with a link they can use to create their own passwords, select theAutomatically generate password option.
◦ Reset the password yourself:i. Select the Manually change the password option.
ii. Enter the new password twice.
Note: The manual option is available only if you selected the Administrator can manuallyreset password option while editing the password policy for the DEFAULT user category inthe Security Console.
7. Click Reset Password.
Related Topics• Set Up Preferences for User Names, Passwords, and Notifications
Change a User's Email AddressTo change a sales user's email address, use the same import process you used to create them or use REST services.While you can also use these steps to change email addresses on the Users tab in the Security Console work area, thismethod is not always foolproof:
1. Navigate to the Security Console.2. Click the Users tab.3. Search for the user using one of the following:
◦ First or last name, but not both
◦ User name
4. Click the user name link.5. On the User Account Details window, click Edit.6. In the Edit User Account window, edit the email address.
Note: Don't edit any of the other information available on the Edit User Account page. Use theManage Users task instead.
7. Click Save and Close.
Change Your PasswordAfter you sign in, you can change your password for better security.
Note: You can't change your Single Sign-On (SSO) password using these steps.
1. Click your user image or name in the global header, and on the Settings and Actions menu, select SetPreferences.
2. In the General Preferences section, click Password, and enter your password details.3. Click Save and Close.
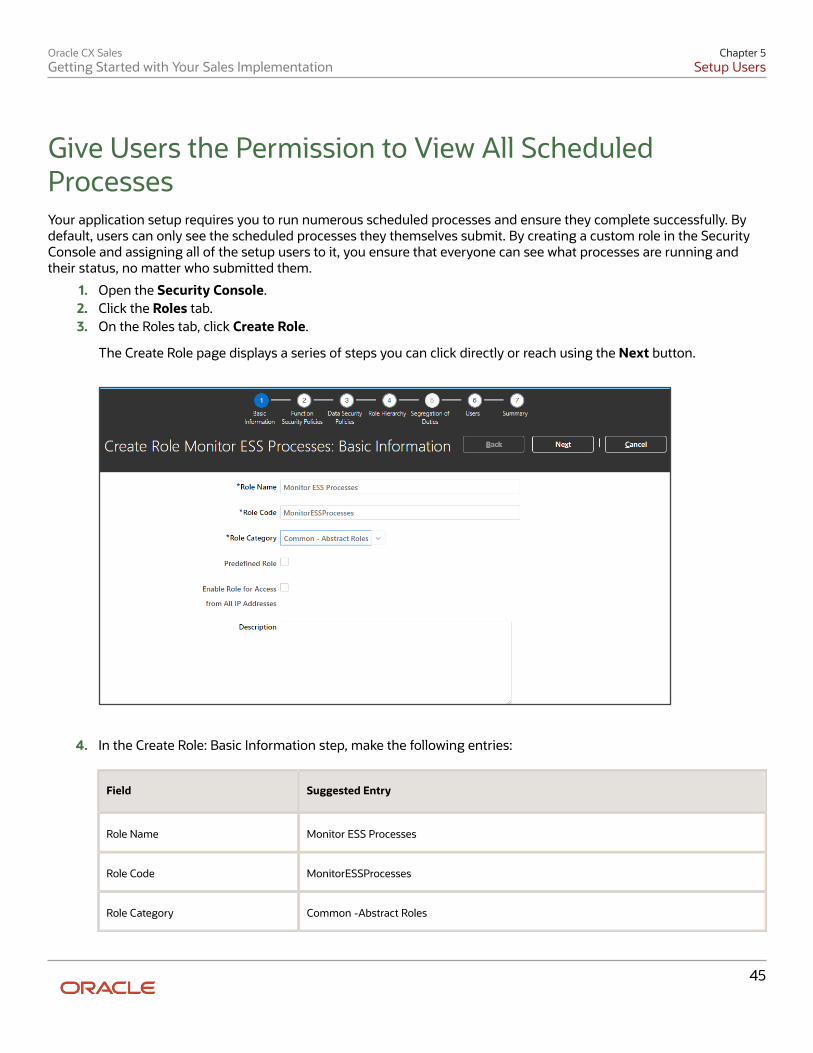
Oracle CX SalesGetting Started with Your Sales Implementation
Chapter 5Setup Users
45
Give Users the Permission to View All ScheduledProcessesYour application setup requires you to run numerous scheduled processes and ensure they complete successfully. Bydefault, users can only see the scheduled processes they themselves submit. By creating a custom role in the SecurityConsole and assigning all of the setup users to it, you ensure that everyone can see what processes are running andtheir status, no matter who submitted them.
1. Open the Security Console.2. Click the Roles tab.3. On the Roles tab, click Create Role.
The Create Role page displays a series of steps you can click directly or reach using the Next button.
4. In the Create Role: Basic Information step, make the following entries:
Field Suggested Entry
Role Name Monitor ESS Processes
Role Code MonitorESSProcesses
Role Category Common -Abstract Roles
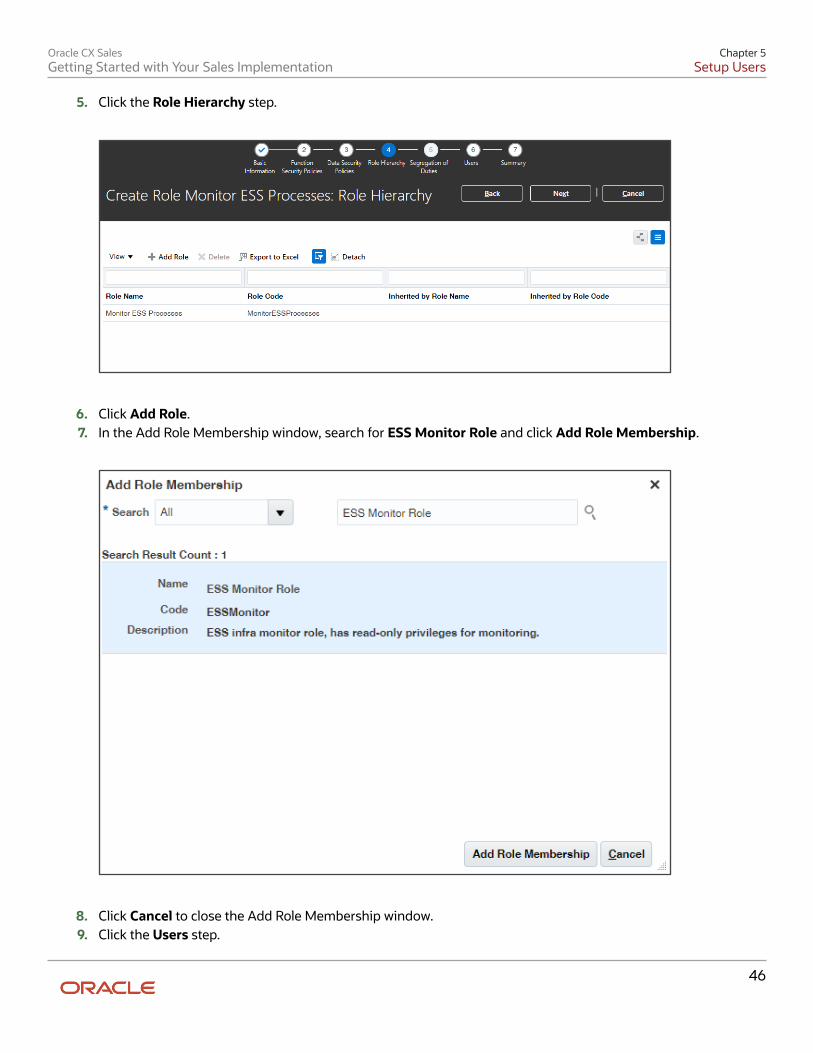
Oracle CX SalesGetting Started with Your Sales Implementation
Chapter 5Setup Users
46
5. Click the Role Hierarchy step.
6. Click Add Role.7. In the Add Role Membership window, search for ESS Monitor Role and click Add Role Membership.
8. Click Cancel to close the Add Role Membership window.9. Click the Users step.
Oracle CX SalesGetting Started with Your Sales Implementation
Chapter 5Setup Users
47
10. Click Add User and add all of the setup users by searching for each by name and clicking Add User to Role.11. Click Cancel when you are done.
The Users step should list all of the users you added.12. Click Next to get to the Summary and Impact Report step.13. Click Save and Close.
The users you added to the role can now monitor all of the scheduled processes in the Schedule Processeswork area.

Oracle CX SalesGetting Started with Your Sales Implementation
Chapter 5Setup Users
48
Oracle CX SalesGetting Started with Your Sales Implementation
Chapter 6Accounting Calendar
49
6 Accounting Calendar
How the Accounting Calendar Impacts Forecasting andOther Sales FeaturesThe accounting calendar defines the start and end of your fiscal year and the time periods in that calendar, includingthe exact dates for each time period. Your sales application uses these defined periods, often called enterprise periods,for multiple purposes. Here are some examples:
• Reports that provide amounts by enterprise period, such as a sales pipeline analysis
• Metrics calculations by period for territory analysis
• The ability to adjust forecast amounts by time period
• Distribution of quota amounts by time period
The period frequency set in your fiscal calendar is the shortest period you can use. Most sales organizations selectmonthly (the default setting in Setup Assistant). A monthly period frequency enables you to generate monthlyforecasting windows that permit your organization to update quarterly forecasts. And you can break down activitiesand reports by month and summarize by quarter and year. If you set the period frequency to yearly, then you can createreports and activities for the year, but cannot break them down by month. If you set the period frequency to weekly,then you can perform activities and generate reports by week, quarter, and year, but not by month because the numberof weeks varies by month.
Accounting Calendar Setup Tasks Setup AssistantCompletes for YouThe entries you make in Setup Assistant completes all of the tasks you need to create the accounting calendar andenable it for use in your sales application:
• Creates the accounting calendar itself.
• Creates the forecasting periods for five years from the year you entered.
• Enables the calendar for use by setting the profile Accounting Calendar Default.
• Enables the calendar to be used in analytics and report by running the Refresh Denormalized Time DimensionTable for BI process.
Follow the procedures in this chapter to review the accounting calendar that was created for you and, if required, tocreate additional forecast periods in the future.
Oracle CX SalesGetting Started with Your Sales Implementation
Chapter 6Accounting Calendar
50
Review the Accounting Calendar and GenerateAdditional Forecasting PeriodsYou can review the accounting calendar Setup Assistant created for you. Optionally, you can generate forecastingperiods for additional years in the future in your review. If you need to make other changes to the accounting calendar,for example, if you need to start the calendar in an earlier year, you must create a new accounting calendar. See theCreate Accounting Calendar topic in the Implementing Sales guide. You can't create a different accounting calendarafter you start using your calendar for forecasting and reporting.
1. In Setup and Maintenance, go to the following:
◦ Offering: Sales
◦ Functional Area: Company Profile
◦ Task: Manage Accounting Calendars
2. On the Manage Accounting Calendars page, click the name of the calendar created for you by Setup Assistant.3. The Edit Accounting Calendar page displays the periods created for you by year from the starting date you
entered in Setup Assistant. You can change the year format and generate periods for additional years.4. Here's how to generate periods for additional years. For each year, do the following:
a. On the Edit Accounting Calendar page, click Add Year.b. Click Save.
5. When you complete adding all the years, click Save and Close.6. Click Done.
Related Topics
• Create the Accounting Calendar
Oracle CX SalesGetting Started with Your Sales Implementation
Chapter 7Geography Data
51
7 Geography Data
Setup OverviewImport and set up reference geography data for the countries where you do business. Importing the referencegeography data makes it possible for you to set up validation for address elements such as states and cities to preventaddress data entry errors. For example, if you're setting up sales territories by states in the US, it's a good idea to havesalespeople select the states from a list rather than entering them manually. Preventing address entry errors ensuresthat the accounts are assigned to the correct territory and that opportunities are included in forecasts. If you subscribeto the Oracle Address, Email, and Phone Verification service, you don't really need the validation. Using the service,salespeople can look up and enter valid addresses for most countries in the world at a fraction of a penny a piece.However, it's a good idea to import and set up the geography data anyway. An extra bit of validation can't hurt. Besides,the geography data you import is a shared resource that's used by HCM, supply chain, and financials cloud services, andit's free!
Oracle licenses geography data from Loqate that you can import, at no additional cost. Alternatively, you can licensegeography data from another supplier and import it from a file. For more information about importing third partygeography data, see the guide Understanding Import and Export Management for CX Sales and B2B Service.
Here's a list of the setup tasks. You can open the tasks from the Sales offering in the Setup and Maintenance work area.Tasks are organized by functional areas. Remember that you may have to show All Tasks to see the task you want.
Step Description Functional Area and TaskName
Where to Get More Details
1 You can import geographiesfor up to three countriesusing Setup Assistant.You can import additionalcountries using the ManageGeographies task.
Setup and Maintenance >Sales > Sales Foundation >Manage Geographies
See the topic: ImportGeography Reference Data
2 For the countries youimported using either method,enable validation and lists ofvalues for address elementsthat you're using for salesterritories. For example, ifyou're assigning accounts bystates in the US, then set upthe lists of values for states.
When you enable validationon an address element,the application suggestsalternatives during addressentry. Enabling a list of valuesrequires the user to makea selection from a list. Both
Setup and Maintenance >Sales > Sales Foundation >Manage Geographies
See the topic: Set UpGeography Validation
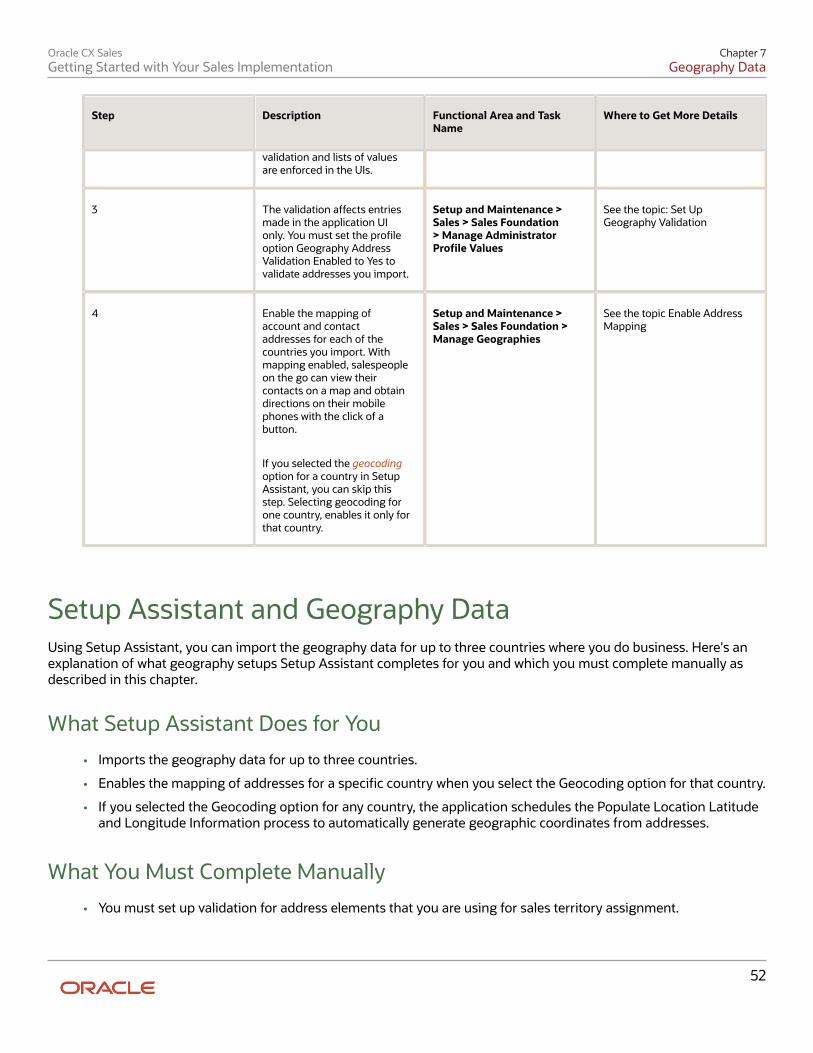
Oracle CX SalesGetting Started with Your Sales Implementation
Chapter 7Geography Data
52
Step Description Functional Area and TaskName
Where to Get More Details
validation and lists of valuesare enforced in the UIs.
3 The validation affects entriesmade in the application UIonly. You must set the profileoption Geography AddressValidation Enabled to Yes tovalidate addresses you import.
Setup and Maintenance >Sales > Sales Foundation> Manage AdministratorProfile Values
See the topic: Set UpGeography Validation
4 Enable the mapping ofaccount and contactaddresses for each of thecountries you import. Withmapping enabled, salespeopleon the go can view theircontacts on a map and obtaindirections on their mobilephones with the click of abutton.
If you selected the geocodingoption for a country in SetupAssistant, you can skip thisstep. Selecting geocoding forone country, enables it only forthat country.
Setup and Maintenance >Sales > Sales Foundation >Manage Geographies
See the topic Enable AddressMapping
Setup Assistant and Geography DataUsing Setup Assistant, you can import the geography data for up to three countries where you do business. Here's anexplanation of what geography setups Setup Assistant completes for you and which you must complete manually asdescribed in this chapter.
What Setup Assistant Does for You
• Imports the geography data for up to three countries.
• Enables the mapping of addresses for a specific country when you select the Geocoding option for that country.
• If you selected the Geocoding option for any country, the application schedules the Populate Location Latitudeand Longitude Information process to automatically generate geographic coordinates from addresses.
What You Must Complete Manually
• You must set up validation for address elements that you are using for sales territory assignment.
Oracle CX SalesGetting Started with Your Sales Implementation
Chapter 7Geography Data
53
If you're assigning accounts to salespeople by state, for example, having a list of values for States ensures thatsalespeople don't make mistakes during manual address entry.
• Import geographies for additional countries.
• Enable geocoding for additional countries.
• If you didn't turn on geocoding in Setup Assistant, you must run the Populate Location Latitude and LongitudeProcess on a regular schedule.
Import Geography Reference DataHere's how to import geography reference data licensed by Oracle.
1. In Setup and Maintenance, go to the Manage Geographies task:
◦ Offering: Sales
◦ Functional Area: Sales Foundation
◦ Task: Manage Geographies
2. In the Manage Geographies page, enter either the country name in the Country Name field or the two-letterISO code of the country in the Country Code field.
Examples of ISO country codes include US (United States) and AT (Austria).3. Click Search.4. Select the country in the search results. Don't click the link.5. Select Import Geography Data from the Actions menu.
Note: The Import Geography Data action is disabled if the country isn't available from DaaS Loqateor if the country data is already imported.
6. Click OK to close the warning message.7. Click OK to close the confirmation message.
The import of larger countries may require several hours to complete. You can track the progress of the import processby selecting Scheduled Processes from the Navigator menu.
After the import completes successfully, the Completed icon (check mark) replaces Go to Task icon in the StructureDefined and Hierarchy Defined columns on the Manage Geographies page.
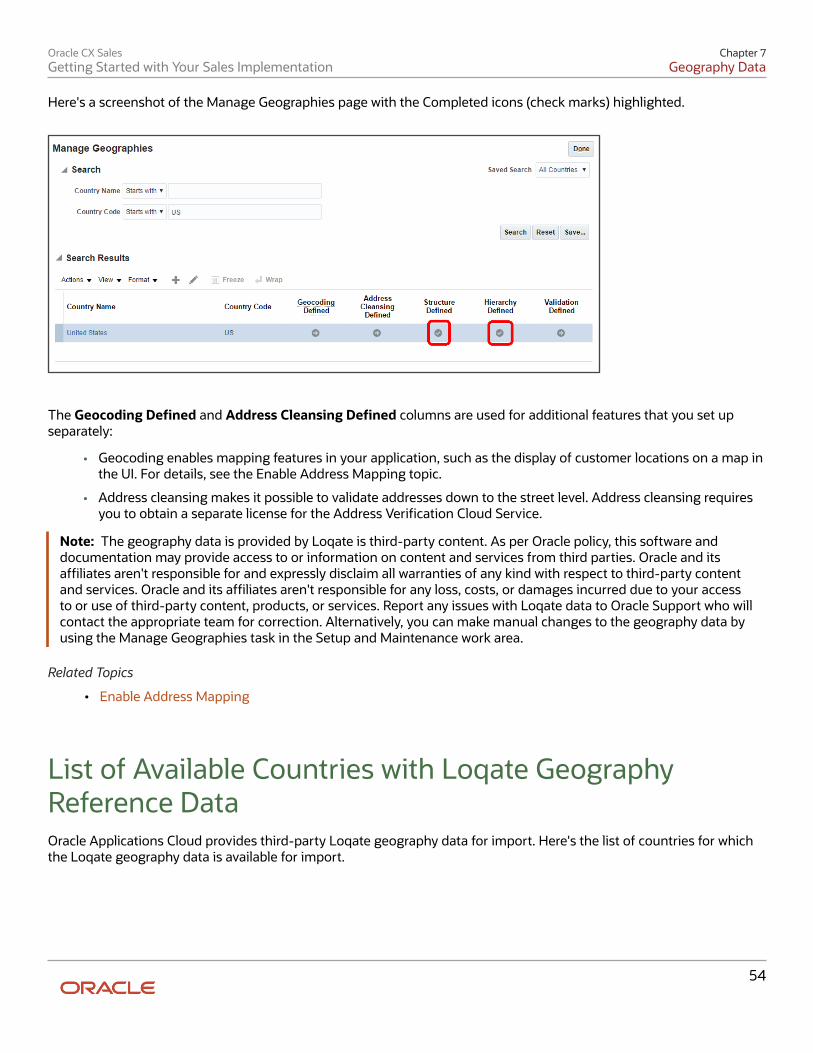
Oracle CX SalesGetting Started with Your Sales Implementation
Chapter 7Geography Data
54
Here's a screenshot of the Manage Geographies page with the Completed icons (check marks) highlighted.
The Geocoding Defined and Address Cleansing Defined columns are used for additional features that you set upseparately:
• Geocoding enables mapping features in your application, such as the display of customer locations on a map inthe UI. For details, see the Enable Address Mapping topic.
• Address cleansing makes it possible to validate addresses down to the street level. Address cleansing requiresyou to obtain a separate license for the Address Verification Cloud Service.
Note: The geography data is provided by Loqate is third-party content. As per Oracle policy, this software anddocumentation may provide access to or information on content and services from third parties. Oracle and itsaffiliates aren't responsible for and expressly disclaim all warranties of any kind with respect to third-party contentand services. Oracle and its affiliates aren't responsible for any loss, costs, or damages incurred due to your accessto or use of third-party content, products, or services. Report any issues with Loqate data to Oracle Support who willcontact the appropriate team for correction. Alternatively, you can make manual changes to the geography data byusing the Manage Geographies task in the Setup and Maintenance work area.
Related Topics
• Enable Address Mapping
List of Available Countries with Loqate GeographyReference DataOracle Applications Cloud provides third-party Loqate geography data for import. Here's the list of countries for whichthe Loqate geography data is available for import.

Oracle CX SalesGetting Started with Your Sales Implementation
Chapter 7Geography Data
55
Country Name Country Code
Andorra AD
Angola AO
Argentina AR
Australia AU
Austria AT
Belgium BE
Bolivia BO
Bosnia and Herzegovina BA
Brazil BR
Bulgaria BG
Canada CA
Cayman Islands KY
Chile CL
China CN
Croatia HR
Cuba CU
Cyprus CY
Czech Republic CZ
Denmark DK
Dominican Republic DO
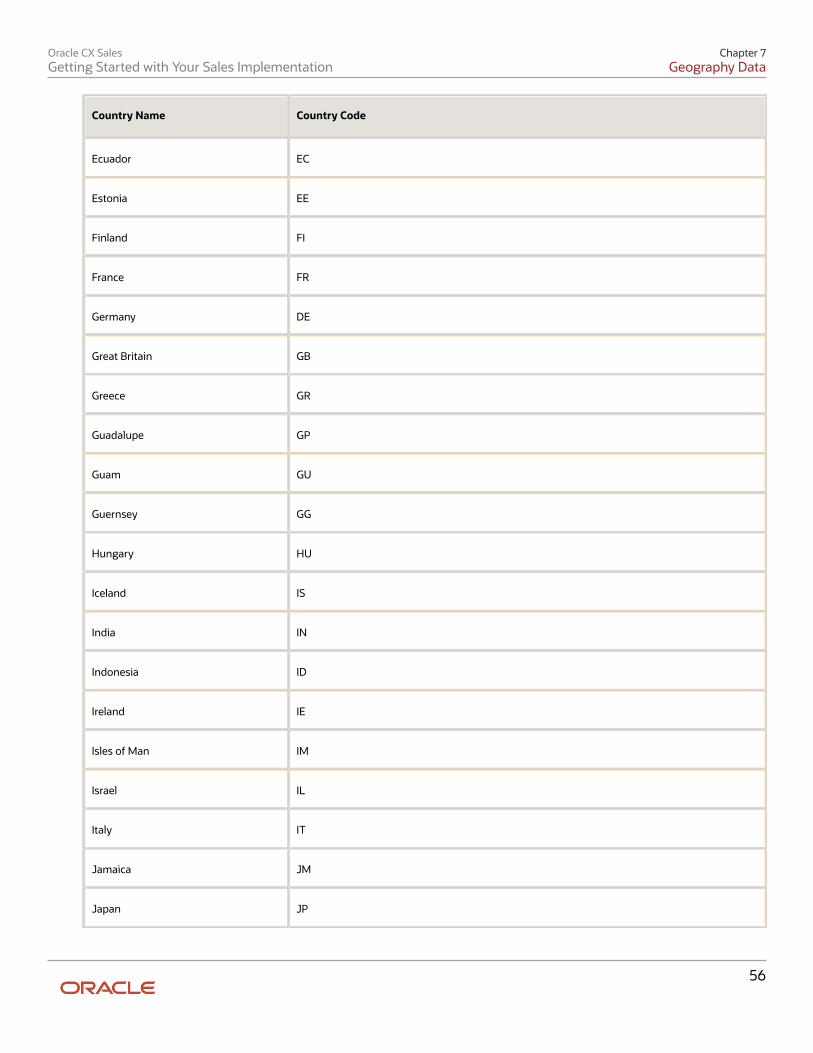
Oracle CX SalesGetting Started with Your Sales Implementation
Chapter 7Geography Data
56
Country Name Country Code
Ecuador EC
Estonia EE
Finland FI
France FR
Germany DE
Great Britain GB
Greece GR
Guadalupe GP
Guam GU
Guernsey GG
Hungary HU
Iceland IS
India IN
Indonesia ID
Ireland IE
Isles of Man IM
Israel IL
Italy IT
Jamaica JM
Japan JP
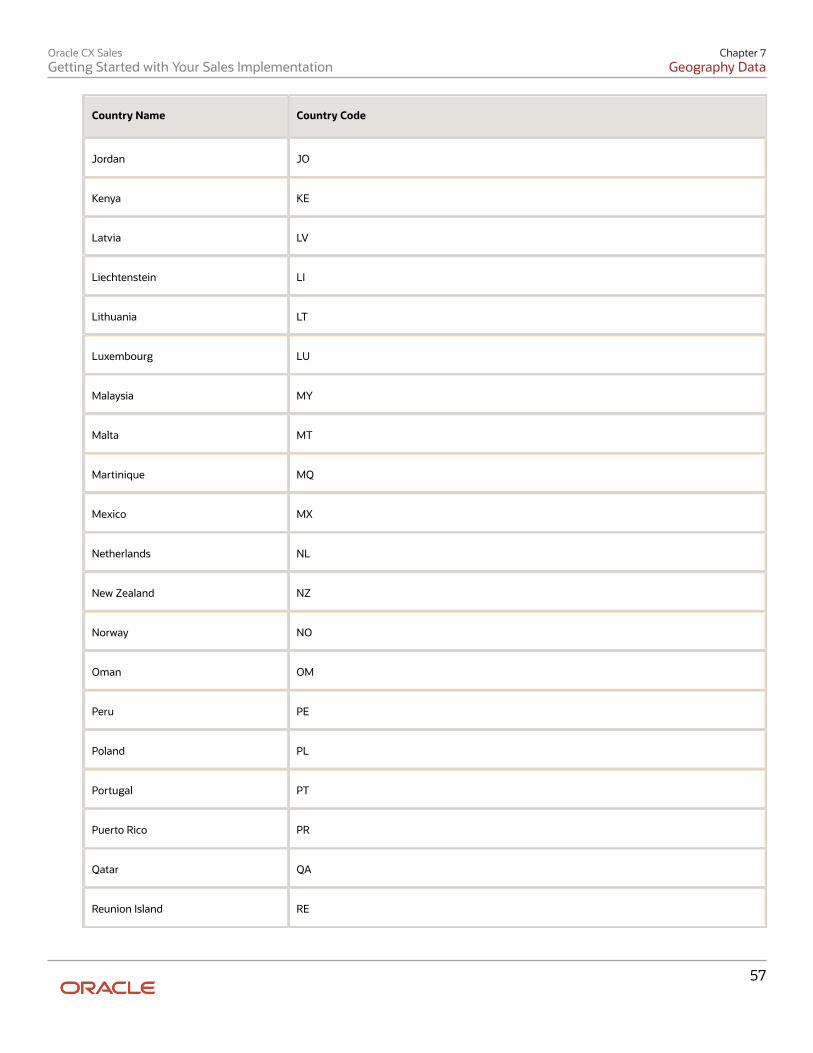
Oracle CX SalesGetting Started with Your Sales Implementation
Chapter 7Geography Data
57
Country Name Country Code
Jordan JO
Kenya KE
Latvia LV
Liechtenstein LI
Lithuania LT
Luxembourg LU
Malaysia MY
Malta MT
Martinique MQ
Mexico MX
Netherlands NL
New Zealand NZ
Norway NO
Oman OM
Peru PE
Poland PL
Portugal PT
Puerto Rico PR
Qatar QA
Reunion Island RE
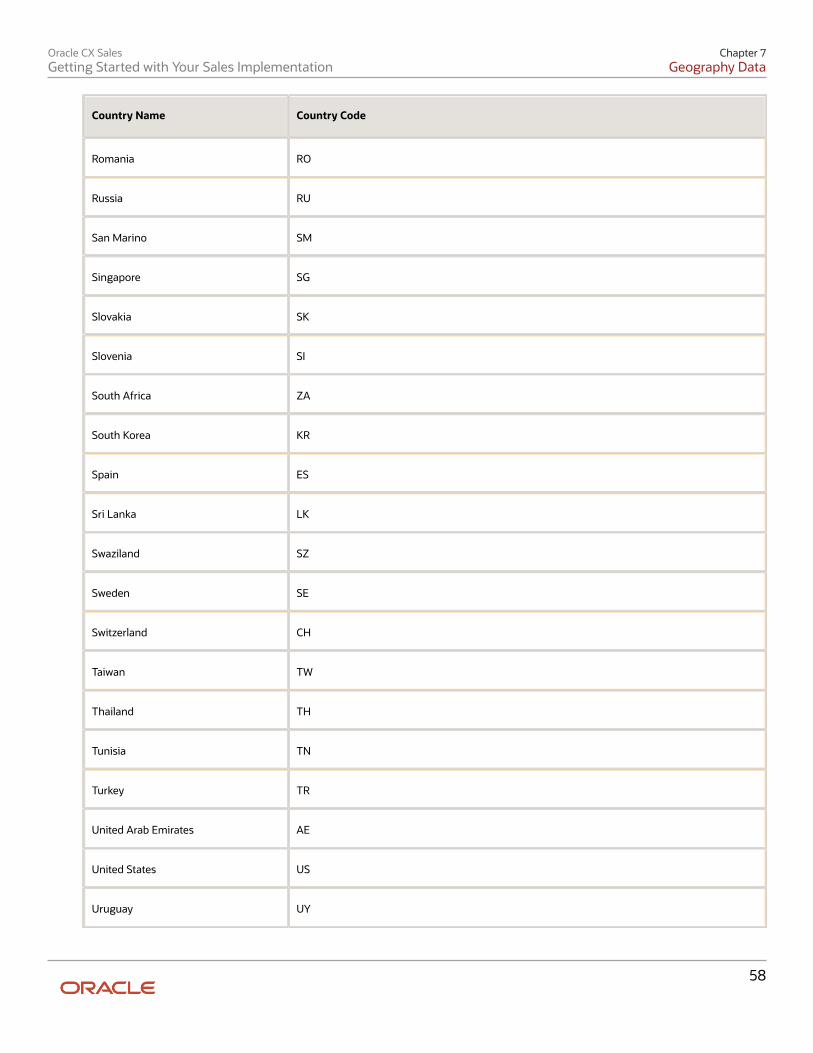
Oracle CX SalesGetting Started with Your Sales Implementation
Chapter 7Geography Data
58
Country Name Country Code
Romania RO
Russia RU
San Marino SM
Singapore SG
Slovakia SK
Slovenia SI
South Africa ZA
South Korea KR
Spain ES
Sri Lanka LK
Swaziland SZ
Sweden SE
Switzerland CH
Taiwan TW
Thailand TH
Tunisia TN
Turkey TR
United Arab Emirates AE
United States US
Uruguay UY
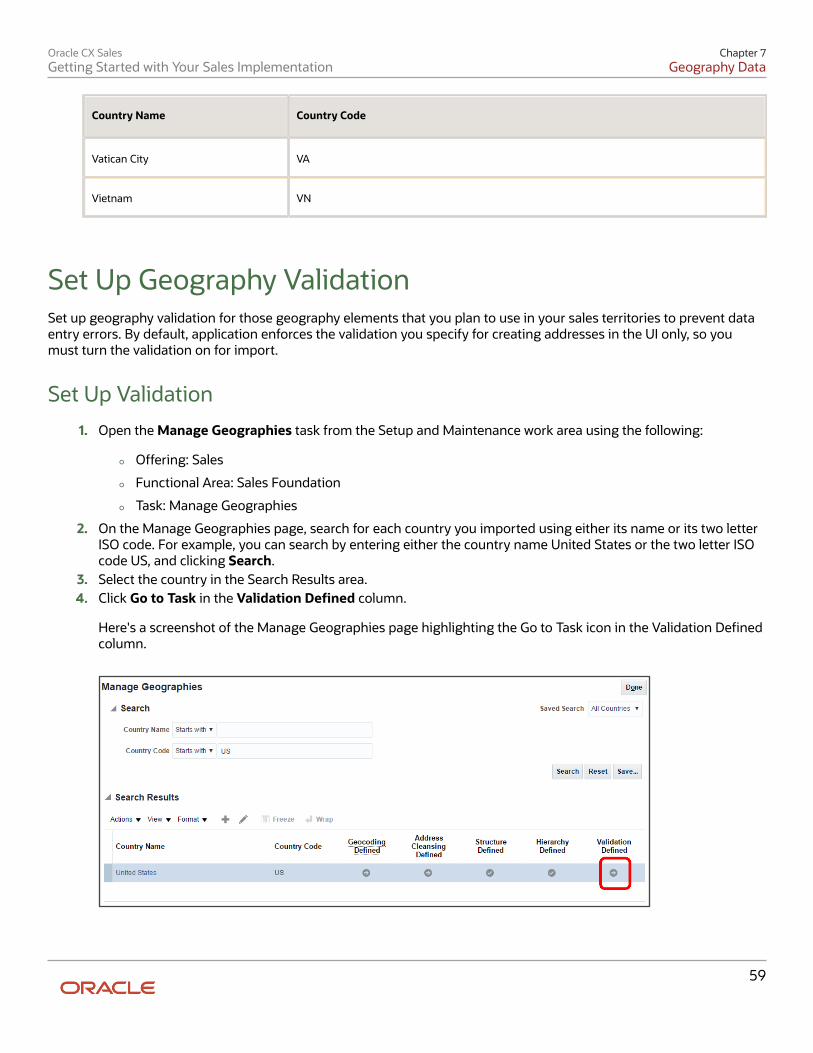
Oracle CX SalesGetting Started with Your Sales Implementation
Chapter 7Geography Data
59
Country Name Country Code
Vatican City VA
Vietnam VN
Set Up Geography ValidationSet up geography validation for those geography elements that you plan to use in your sales territories to prevent dataentry errors. By default, application enforces the validation you specify for creating addresses in the UI only, so youmust turn the validation on for import.
Set Up Validation
1. Open the Manage Geographies task from the Setup and Maintenance work area using the following:
◦ Offering: Sales
◦ Functional Area: Sales Foundation
◦ Task: Manage Geographies
2. On the Manage Geographies page, search for each country you imported using either its name or its two letterISO code. For example, you can search by entering either the country name United States or the two letter ISOcode US, and clicking Search.
3. Select the country in the Search Results area.4. Click Go to Task in the Validation Defined column.
Here's a screenshot of the Manage Geographies page highlighting the Go to Task icon in the Validation Definedcolumn.
Oracle CX SalesGetting Started with Your Sales Implementation
Chapter 7Geography Data
60
5. On the Manage Geography Validation page. Address Style section, ensure that the No Styles Format addressstyle is selected. Defining validation for the No Styles Format address style ensures the validations areperformed for all addresses in the country.
6. Select Enable List of Values in the Geography Mapping and Validation section to display a list of values duringaddress entry in the UI. For example, to have users select states from a list, select Enable List of Values forState.
Vision Corp. enables the list of values for State. The company uses states for its sales territories and wants toensure that state names are always entered correctly.
7. Select Geography Validation for all the geography types that you plan to use in territories.
In our example, Vision Corp. plans to set up sales territories by state, so it selects Geography Validation forState.
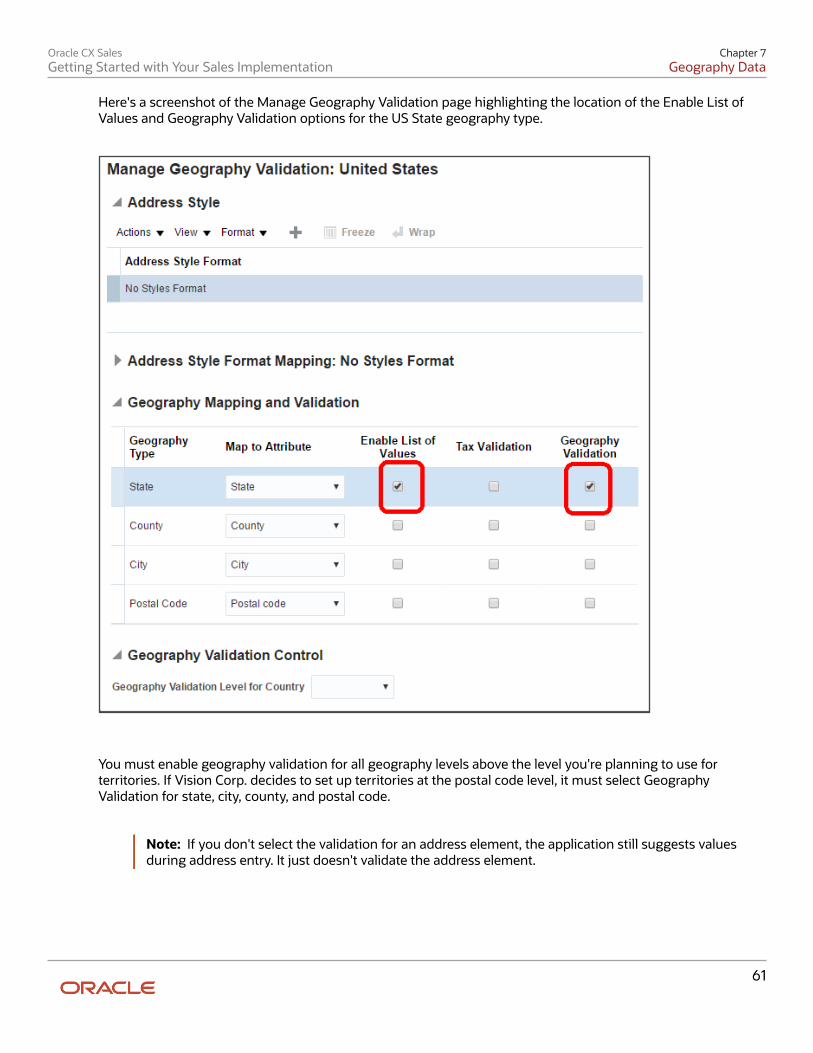
Oracle CX SalesGetting Started with Your Sales Implementation
Chapter 7Geography Data
61
Here's a screenshot of the Manage Geography Validation page highlighting the location of the Enable List ofValues and Geography Validation options for the US State geography type.
You must enable geography validation for all geography levels above the level you're planning to use forterritories. If Vision Corp. decides to set up territories at the postal code level, it must select GeographyValidation for state, city, county, and postal code.
Note: If you don't select the validation for an address element, the application still suggests valuesduring address entry. It just doesn't validate the address element.

Oracle CX SalesGetting Started with Your Sales Implementation
Chapter 7Geography Data
62
8. Specify if you want to allow users to save incomplete or invalid addresses by making a selection from theGeography Validation Level for Country list.
◦ No validation: permits users to save incomplete or incorrect addresses.
◦ Error: permits only valid addresses to be saved.
Vision Corp. wants to save all addresses, including incomplete and invalid addresses, so it selects Novalidation.
9. Click Save and Close.10. Click Done in the Manage Geographies page.
Turn on Validation for Address ImportYou must set a system profile option Geography Address Validation Enabled to Yes for the validation to be enforcedduring import.
1. Open the Manage Administrator Profile Values task from the Setup and Maintenance work area:
◦ Offering: Sales
◦ Functional Area: Sales Foundation
◦ Task: Manage Administrator Profile Values
2. On the Manage Administrator Profile Values page, search for the profile option by entering Geography AddressValidation Enabled in the Profile Display Name.
3. Select Yes as the Profile Value.4. Click Save and Close.
Enable Address MappingYou can quite literally put your accounts and contacts on the map by enabling geocoding as described in this topic.Geocoding turns the addresses you enter or import into longitude and latitude coordinates so that the locations can bedisplayed on a map.
Enabling address mapping involves two steps:
1. You enable the generation of geographic coordinates for a country2. You run a process that converts the addresses into geographic coordinates
Salespeople must enter valid postal addresses for geocoding to work, so it's a good idea for you to validate theaddresses in your application by subscribing to Oracle Address Verification Cloud Service.
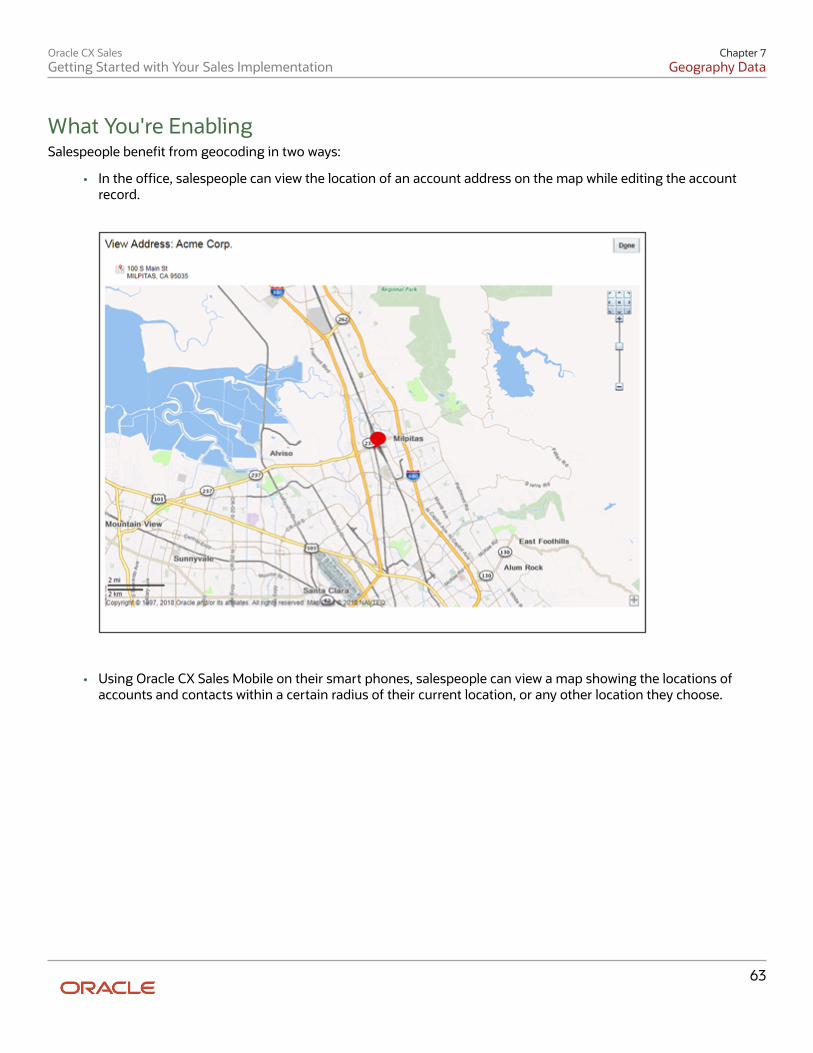
Oracle CX SalesGetting Started with Your Sales Implementation
Chapter 7Geography Data
63
What You're EnablingSalespeople benefit from geocoding in two ways:
• In the office, salespeople can view the location of an account address on the map while editing the accountrecord.
• Using Oracle CX Sales Mobile on their smart phones, salespeople can view a map showing the locations ofaccounts and contacts within a certain radius of their current location, or any other location they choose.
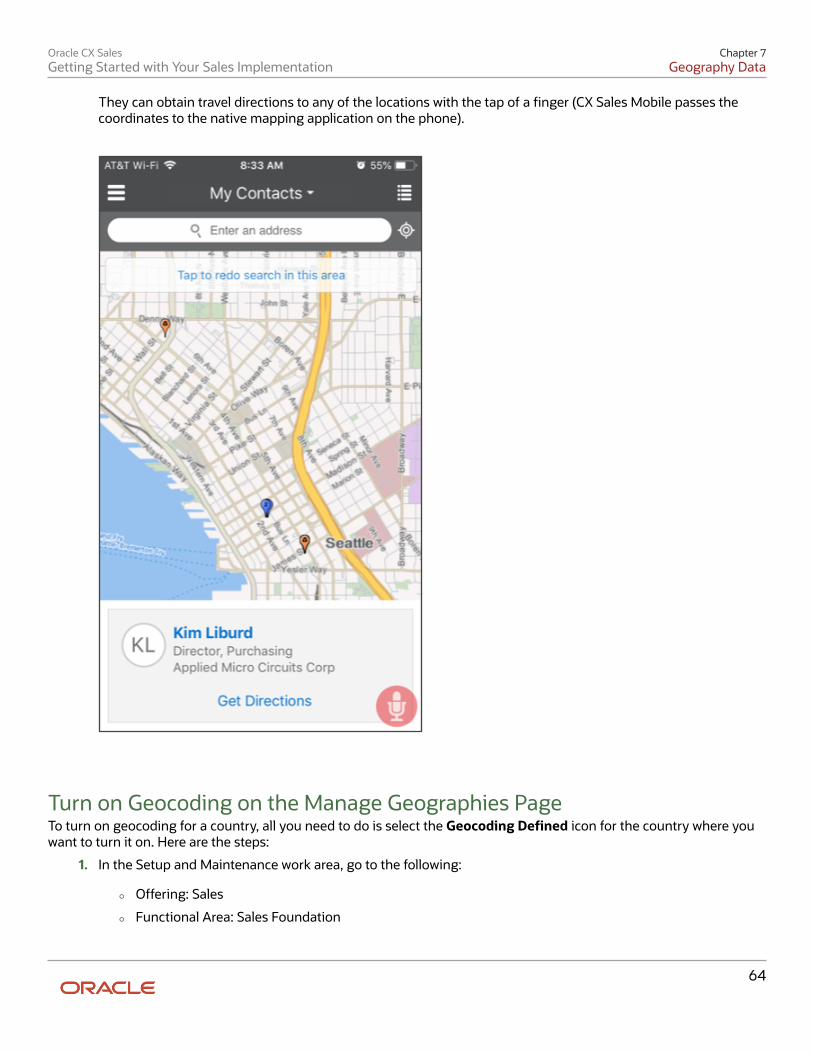
Oracle CX SalesGetting Started with Your Sales Implementation
Chapter 7Geography Data
64
They can obtain travel directions to any of the locations with the tap of a finger (CX Sales Mobile passes thecoordinates to the native mapping application on the phone).
Turn on Geocoding on the Manage Geographies PageTo turn on geocoding for a country, all you need to do is select the Geocoding Defined icon for the country where youwant to turn it on. Here are the steps:
1. In the Setup and Maintenance work area, go to the following:
◦ Offering: Sales
◦ Functional Area: Sales Foundation
Oracle CX SalesGetting Started with Your Sales Implementation
Chapter 7Geography Data
65
◦ Task: Manage Geographies
2. On the Manage Geographies page, search for a country you imported using either its name or its two letter ISOcode. For example, you can search by entering either the country name United States or the two letter ISO codeUS, and clicking Search.
3. Click the Geocoding Defined icon.4. Click Done
Run the Populate Location Latitude and Longitude ProcessRun the process that converts the addresses to the location latitude and longitude regularly and each time you import.Addresses that salespeople enter or addresses that you import don't show up on the map until the process completes,so schedule the process to run as frequently as necessary. If you imported geography data using Setup Assistant andturned on geocoding for any country, the process is already scheduled to run for you. Here's how to run the process:
1. In the Navigator, click Scheduled Processes under the Tools heading.2. Click Schedule New Process.3. Click the Name drop-down list icon and the Search link at the bottom of the list.4. In the Search and Select: Name window, search for "Populate Location Latitude and Longitude Information".5. Select the process name in the search results and click OK.6. In the Schedule new Process dialog box, click OK to confirm your selection.7. In the Process Details window, click Advanced to view the advanced options.8. You can make the following entries on the Parameters Tab:
Parameter What to Enter
Country Code Leave this field blank if you want to generate the coordinates for all the countries youenabled for geocoding, or enter a specific country code.
Start Date, End Date, andRegenerate Geocode
Leave these fields blank. The geocoding process picks up any addresses that have not beengeocoded previously.
Batch Size Leave this field blank unless you're geocoding more than 50,000 addresses at a time. Ifyou're processing a large number of addresses, then enter 1000. By default, the applicationlaunches a subprocess for each batch of 500 addresses. There's a maximum of 10subprocesses, so, if you're processing more than 50,000 addresses, then you must run theprocess multiple times. You can increase the batch size up to a maximum of 1,000.
9. Schedule the process to run regularly:
a. Click the Schedule tab.b. Select Using a Schedule and specify the frequency.
10. Click Submit.
The application confirms your process was submitted.11. You can monitor the process completion on the Overview page.
The process spawns multiple processes, depending on the batch size and the number of addresses you need toprocess.

Oracle CX SalesGetting Started with Your Sales Implementation
Chapter 7Geography Data
66
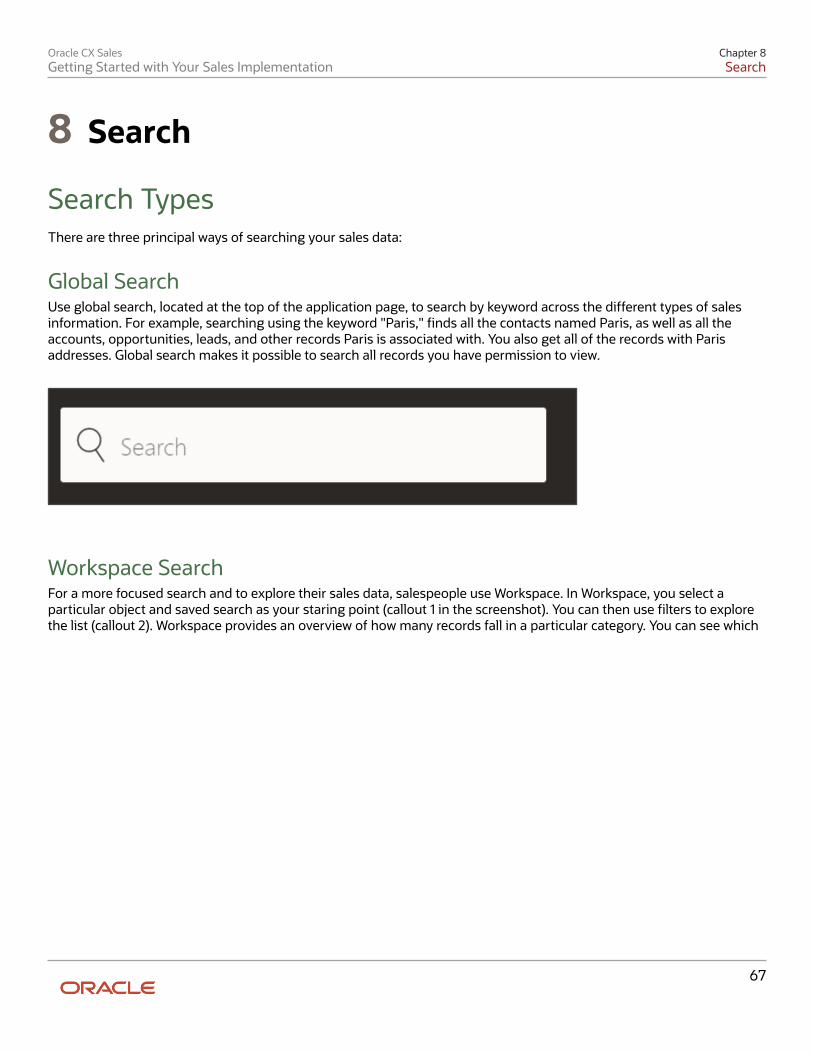
Oracle CX SalesGetting Started with Your Sales Implementation
Chapter 8Search
67
8 Search
Search TypesThere are three principal ways of searching your sales data:
Global SearchUse global search, located at the top of the application page, to search by keyword across the different types of salesinformation. For example, searching using the keyword "Paris," finds all the contacts named Paris, as well as all theaccounts, opportunities, leads, and other records Paris is associated with. You also get all of the records with Parisaddresses. Global search makes it possible to search all records you have permission to view.
Workspace SearchFor a more focused search and to explore their sales data, salespeople use Workspace. In Workspace, you select aparticular object and saved search as your staring point (callout 1 in the screenshot). You can then use filters to explorethe list (callout 2). Workspace provides an overview of how many records fall in a particular category. You can see which
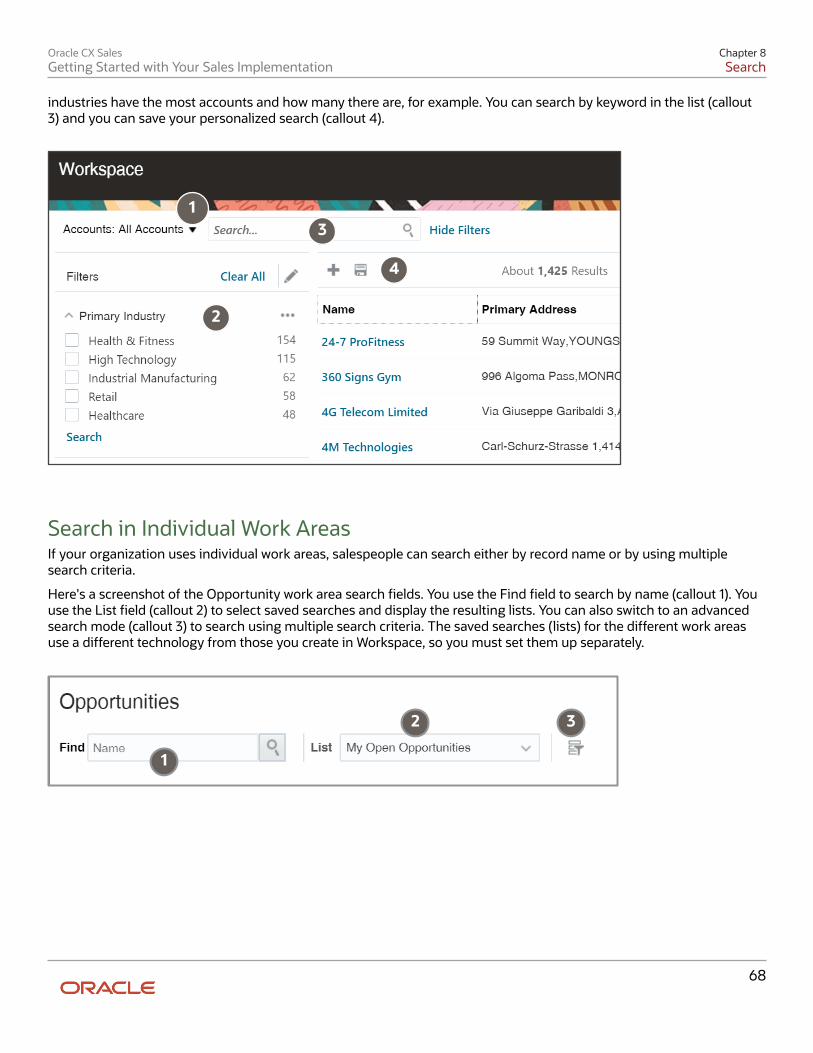
Oracle CX SalesGetting Started with Your Sales Implementation
Chapter 8Search
68
industries have the most accounts and how many there are, for example. You can search by keyword in the list (callout3) and you can save your personalized search (callout 4).
1
2
3
4
Search in Individual Work AreasIf your organization uses individual work areas, salespeople can search either by record name or by using multiplesearch criteria.
Here's a screenshot of the Opportunity work area search fields. You use the Find field to search by name (callout 1). Youuse the List field (callout 2) to select saved searches and display the resulting lists. You can also switch to an advancedsearch mode (callout 3) to search using multiple search criteria. The saved searches (lists) for the different work areasuse a different technology from those you create in Workspace, so you must set them up separately.
1
2 3
Oracle CX SalesGetting Started with Your Sales Implementation
Chapter 8Search
69
What are the differences between the different types ofsearch in the sales application?Here are the key differences between the different search methods:
Feature Workspace Search Global Search Work Area Searches
Search Scope You select the saved search foran object you want to searchand enter the search terms.You can search using relatedinformation.
For example, searching on acontact name retrieves notjust the contact record, butalso related opportunities,leads, activities, and otherobjects.
Searches key fields in multiplesales objects.
Searching on a contact nameretrieves not just the contactrecord, but also relatedopportunities, leads, activities,and other objects.
You select the saved searchand search by name or usingmultiple search criteria.
Searching on a contact nameretrieves the contact record,for example.
Indexing Frequency
Until a new record is indexed,it's not available for search.
Records you create andupdate in the UI areautomatically indexed andmade searchable withinseconds. Imported recordsor records updated bybackground processes aren'tavailable for search until theprocess completes.
Same as Workspace search:pretty much immediate foritems you update in the UI.A little longer for importedbatches of records.
Usually every five minutes.
List of Recent Items
Lists records you recentlycreated, edited, or accessed.This includes records thathaven't been indexed yet.
You get a list of up to ten mostrecent items for each object.In addition, selecting a SmartList, displays up to 50 itemsyou recently accessed rankedby the number of times youaccessed them.
Displays recent items andsearches for all of the objectsavailable for search.
Displays the recent itemsrelevant the work area.
Wildcards and Operators Use an asterisk (*) at theend or middle of a word toindicate missing letters andthe question mark (?) toindicate a single missing letter.You can also use operators ORand NOT, and quotation marks(") for exact phrases.
Workspace also includesmultiple numeric and textoperators you can use for
Use an asterisk (*) at theend or middle of a word toindicate missing letters andthe question mark (?) toindicate a single missing letter.You can also use operators ORand NOT, and quotation marks(") for exact phrases.
Use a percent sign (%) at thebeginning, end or middle ofa word to indicate missingletters.

Oracle CX SalesGetting Started with Your Sales Implementation
Chapter 8Search
70
Feature Workspace Search Global Search Work Area Searches
advanced search. For example,you can search on a range ofvalues, on all the words, wordsin a specific order, and you canfind records with no values.
Data Filtering Extensive ability to usefilters to explore your data.For example, Workspaceautomatically shows you themost frequent values in a filterand how many records appearin each.
For example, adding theprimary industry as a filterwhen searching accounts,automatically displays themost frequent industriesand the number of recordsfor each. A search ofopportunities using winprobability as a filter, displaysdifferent ranges of winprobabilities and the numberof records in each range.
You can filter search results todisplay results from specificobjects and date ranges.
You can filter your results byadding new search terms andrerunning yours search.
Saved Searches (Lists) You can create personalsaved searches and salesadministrators can also createsaved searches for differentroles in the organization.You can reuse the sameWorkspace saved searches inWorkspace infolets, and CXSales Mobile.
No saved searches areavailable.
You can create personalsaved searches and salesadministrators can createsaved searches for differentroles. Because the savedsearches are built on adifferent technology fromWorkspace, you can't usethem in Workspace infolets.
Underlying Technology Adaptive Search Adaptive Search CRM Search
Setup Assistant and SearchSetup Assistant sets up everything your sales organization needs to start using search in the individual work areas,Workspace, and the Gobal Search field at the top of the page.
What Setup Assistant Does for You
• Enables the objects you selected for Adaptive Search and runs the indexing process at the recommendedintervals. (The Setup Assistant enables the search configuration provided by Oracle, the equivalent of clicking
Oracle CX SalesGetting Started with Your Sales Implementation
Chapter 8Search
71
Publish on the Configure Adaptive Search page, Quick setup tab.) Adaptive Search is the search technologythat powers Workspace, Workspace infolets, global search, and REST APIs
• Displays the global search field at the top of the page. (Behind the scenes, it sets the system profile GlobalSearch Enabled to Yes)
• Enables the work area searches in the different individual work areas. These searches use a different CRM-specific search technology.
• Runs the Synchronize CRM Search Indexes process every five minutes. This process sets up the search index forwork area searches.
• Runs the Optimize CRM Search Indexes process weekly. This process keeps the work-area search index fromgetting fragmented.
Note: If your implementation requires indexing processes to run at different intervals, you must schedule theprocesses separately using individual tasks available from the Scheduled Processes page (Navigator > Tools >Scheduled Processes). For details, see the topic Schedule Work Area Search Processes topic in the ImplementingSales guide.
What You Can Set Up Manually• Modify the way global search works.
• Configure the way keyword searches work.
• Add additional objects to Adaptive Search.
• Create saved searches for Workspace.
• Create any saved searches for the individual work areas and modify search behavior. See the ImplementingSales guide and the Configuring Applications Using Application Composer guide for details.
Note: You must create separate saved searches for Workspace and for the individual work areas.Workspace uses different search technology from the individual work areas and different methods ofcreating the saved searches.
Related Topics• Modify Work Area Search Behavior• Adaptive Search and Workspace chapter in the Implementing Sales guide• Create Work Area Lists for Others in the Organization• Create Workspace Saved Searches
Overview of Optional Setup for Adaptive Search andGlobal SearchSetup Assistant enables the Adaptive Search configuration provided by Oracle for the objects you selected. In thischapter, you learn optional setups: how to restrict the number of objects searchable by global search and makeadditional keywords available for search. For additional advanced configuration and for information on how to configuresearch in individual work areas, see the Adaptive Search and Workspace chapter in the Implementing Sales guide.
Here's a list of optional tasks you can use to configure the way search works in your application:
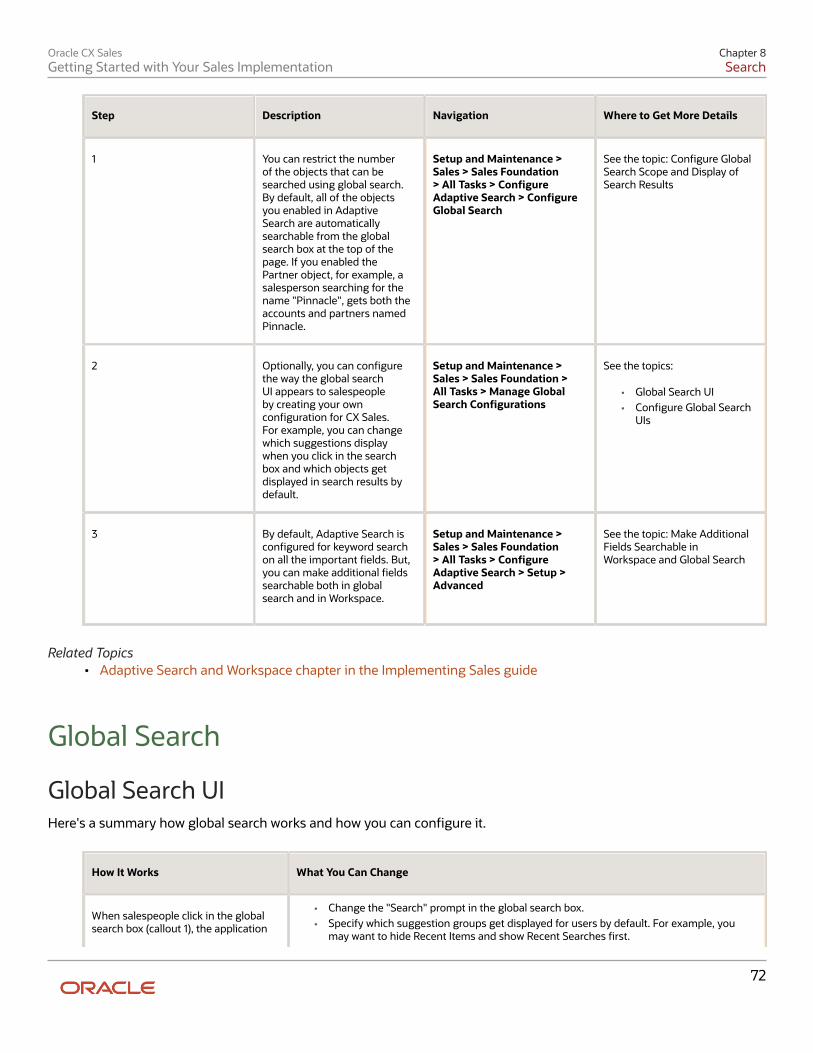
Oracle CX SalesGetting Started with Your Sales Implementation
Chapter 8Search
72
Step Description Navigation Where to Get More Details
1 You can restrict the numberof the objects that can besearched using global search.By default, all of the objectsyou enabled in AdaptiveSearch are automaticallysearchable from the globalsearch box at the top of thepage. If you enabled thePartner object, for example, asalesperson searching for thename "Pinnacle", gets both theaccounts and partners namedPinnacle.
Setup and Maintenance >Sales > Sales Foundation> All Tasks > ConfigureAdaptive Search > ConfigureGlobal Search
See the topic: Configure GlobalSearch Scope and Display ofSearch Results
2 Optionally, you can configurethe way the global searchUI appears to salespeopleby creating your ownconfiguration for CX Sales.For example, you can changewhich suggestions displaywhen you click in the searchbox and which objects getdisplayed in search results bydefault.
Setup and Maintenance >Sales > Sales Foundation >All Tasks > Manage GlobalSearch Configurations
See the topics:
• Global Search UI• Configure Global Search
UIs
3 By default, Adaptive Search isconfigured for keyword searchon all the important fields. But,you can make additional fieldssearchable both in globalsearch and in Workspace.
Setup and Maintenance >Sales > Sales Foundation> All Tasks > ConfigureAdaptive Search > Setup >Advanced
See the topic: Make AdditionalFields Searchable inWorkspace and Global Search
Related Topics• Adaptive Search and Workspace chapter in the Implementing Sales guide
Global Search
Global Search UIHere's a summary how global search works and how you can configure it.
How It Works What You Can Change
When salespeople click in the globalsearch box (callout 1), the application
• Change the "Search" prompt in the global search box.• Specify which suggestion groups get displayed for users by default. For example, you
may want to hide Recent Items and show Recent Searches first.
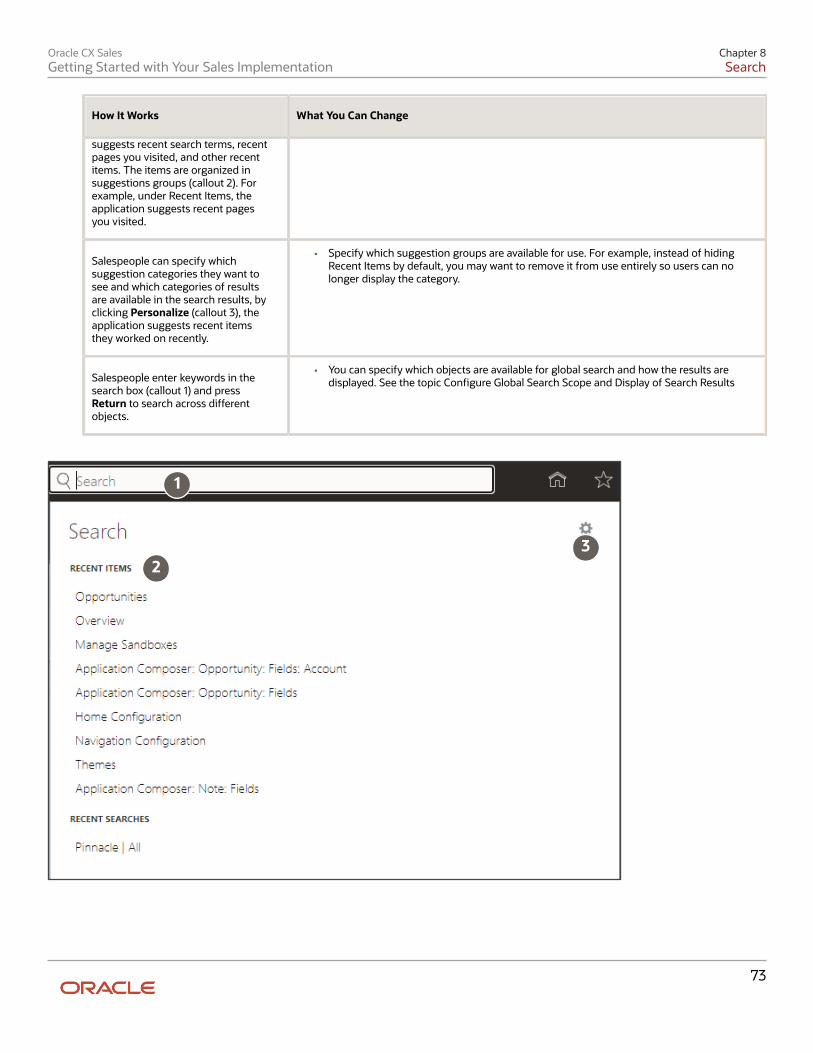
Oracle CX SalesGetting Started with Your Sales Implementation
Chapter 8Search
73
How It Works What You Can Change
suggests recent search terms, recentpages you visited, and other recentitems. The items are organized insuggestions groups (callout 2). Forexample, under Recent Items, theapplication suggests recent pagesyou visited.
Salespeople can specify whichsuggestion categories they want tosee and which categories of resultsare available in the search results, byclicking Personalize (callout 3), theapplication suggests recent itemsthey worked on recently.
• Specify which suggestion groups are available for use. For example, instead of hidingRecent Items by default, you may want to remove it from use entirely so users can nolonger display the category.
Salespeople enter keywords in thesearch box (callout 1) and pressReturn to search across differentobjects.
• You can specify which objects are available for global search and how the results aredisplayed. See the topic Configure Global Search Scope and Display of Search Results
1
23
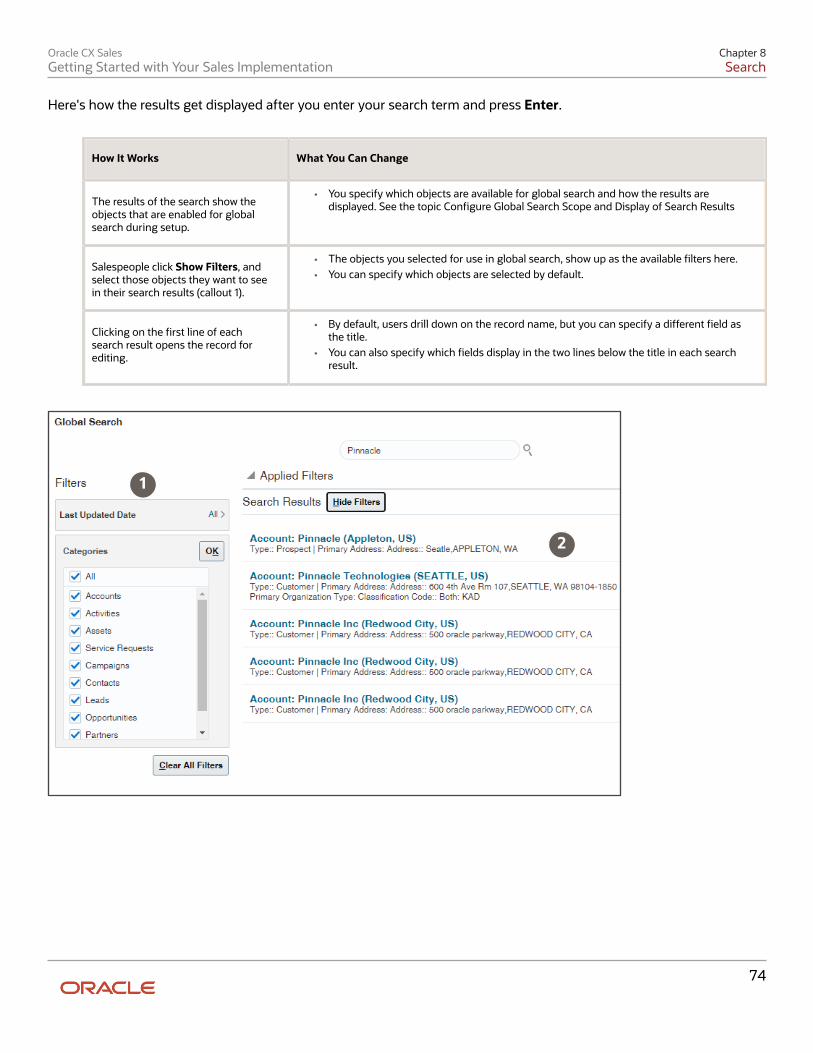
Oracle CX SalesGetting Started with Your Sales Implementation
Chapter 8Search
74
Here's how the results get displayed after you enter your search term and press Enter.
How It Works What You Can Change
The results of the search show theobjects that are enabled for globalsearch during setup.
• You specify which objects are available for global search and how the results aredisplayed. See the topic Configure Global Search Scope and Display of Search Results
Salespeople click Show Filters, andselect those objects they want to seein their search results (callout 1).
• The objects you selected for use in global search, show up as the available filters here.• You can specify which objects are selected by default.
Clicking on the first line of eachsearch result opens the record forediting.
• By default, users drill down on the record name, but you can specify a different field asthe title.
• You can also specify which fields display in the two lines below the title in each searchresult.
1
2
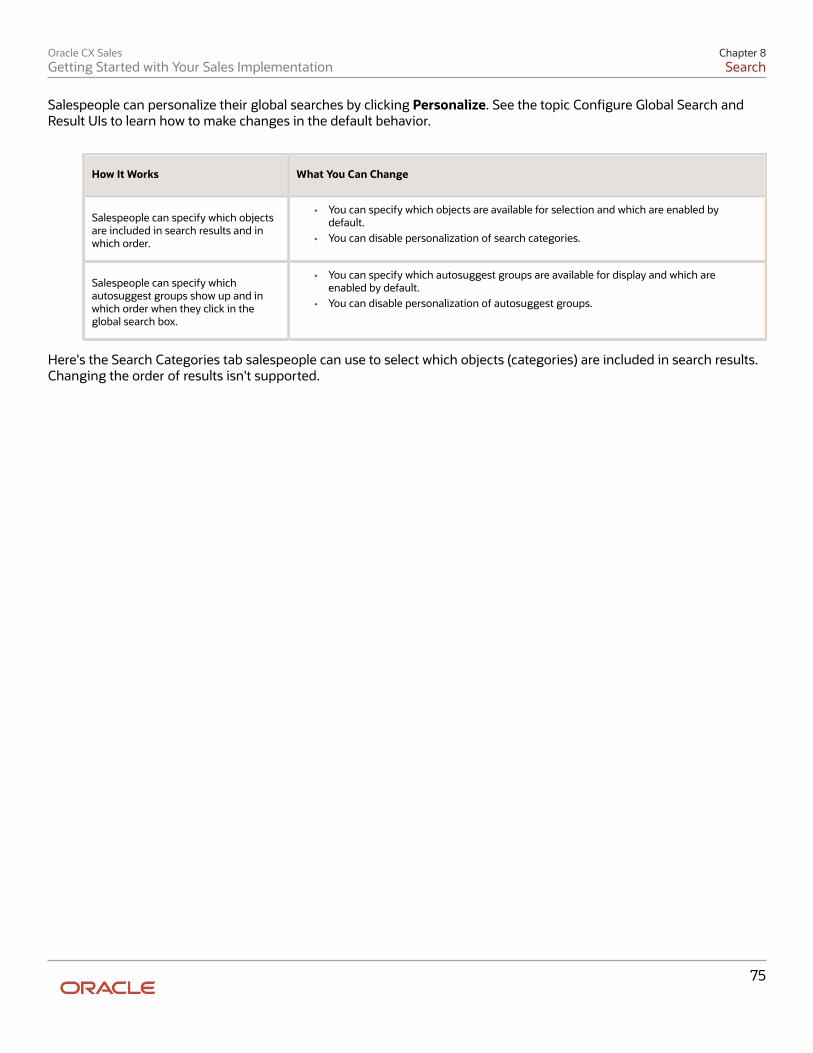
Oracle CX SalesGetting Started with Your Sales Implementation
Chapter 8Search
75
Salespeople can personalize their global searches by clicking Personalize. See the topic Configure Global Search andResult UIs to learn how to make changes in the default behavior.
How It Works What You Can Change
Salespeople can specify which objectsare included in search results and inwhich order.
• You can specify which objects are available for selection and which are enabled bydefault.
• You can disable personalization of search categories.
Salespeople can specify whichautosuggest groups show up and inwhich order when they click in theglobal search box.
• You can specify which autosuggest groups are available for display and which areenabled by default.
• You can disable personalization of autosuggest groups.
Here's the Search Categories tab salespeople can use to select which objects (categories) are included in search results.Changing the order of results isn't supported.
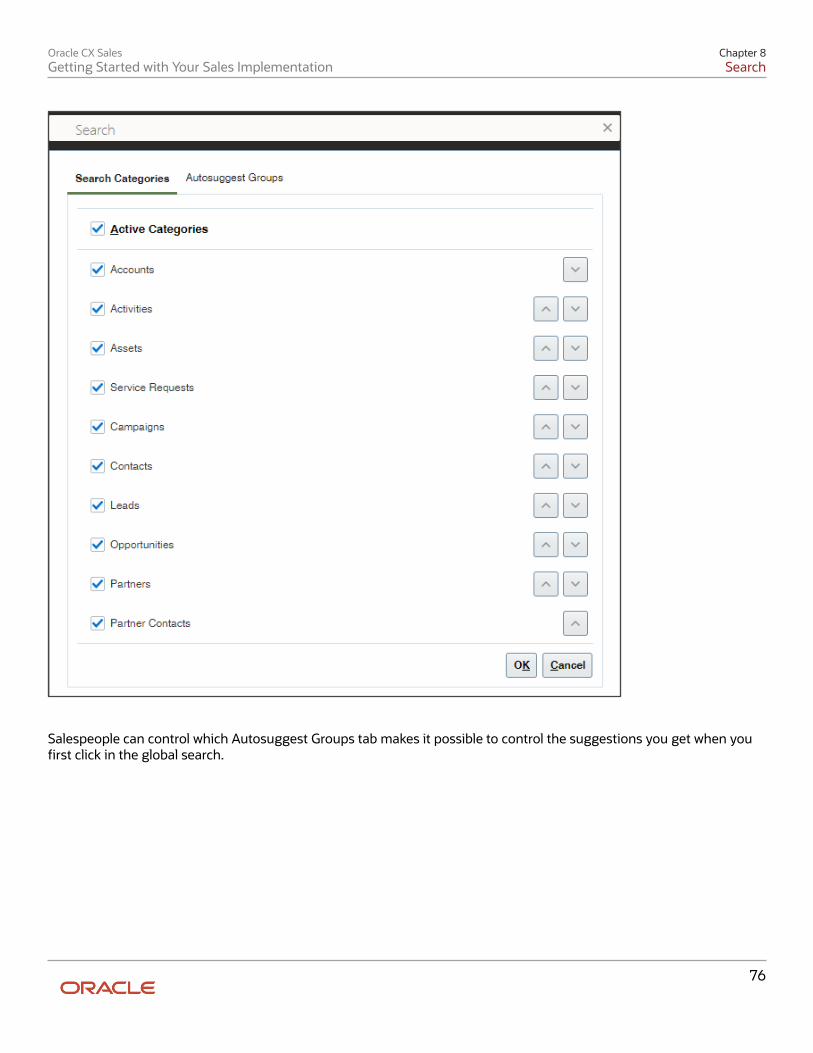
Oracle CX SalesGetting Started with Your Sales Implementation
Chapter 8Search
76
Salespeople can control which Autosuggest Groups tab makes it possible to control the suggestions you get when youfirst click in the global search.
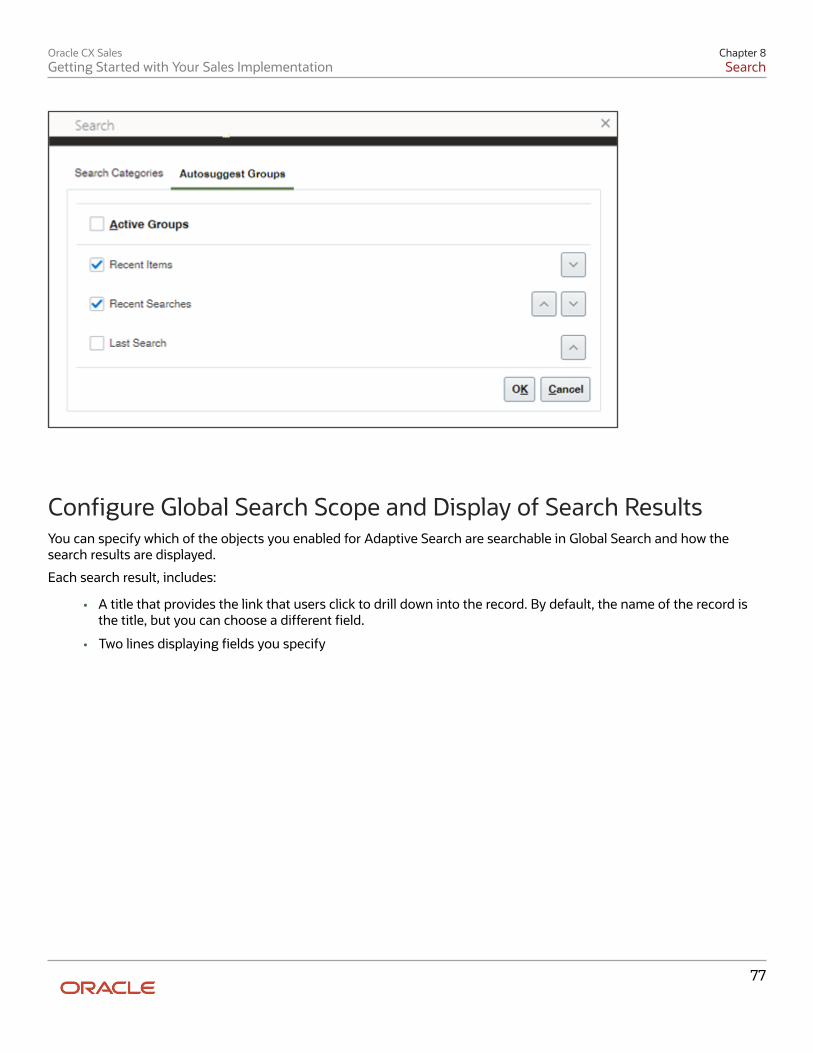
Oracle CX SalesGetting Started with Your Sales Implementation
Chapter 8Search
77
Configure Global Search Scope and Display of Search ResultsYou can specify which of the objects you enabled for Adaptive Search are searchable in Global Search and how thesearch results are displayed.
Each search result, includes:
• A title that provides the link that users click to drill down into the record. By default, the name of the record isthe title, but you can choose a different field.
• Two lines displaying fields you specify
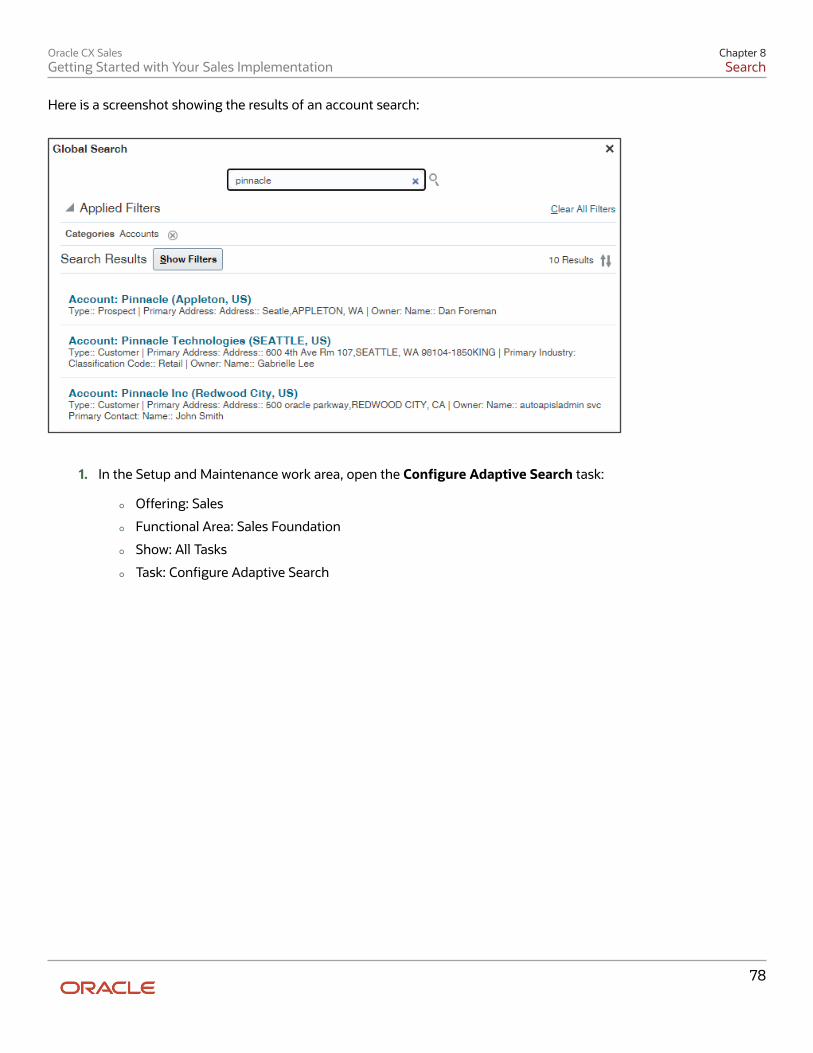
Oracle CX SalesGetting Started with Your Sales Implementation
Chapter 8Search
78
Here is a screenshot showing the results of an account search:
1. In the Setup and Maintenance work area, open the Configure Adaptive Search task:
◦ Offering: Sales
◦ Functional Area: Sales Foundation
◦ Show: All Tasks
◦ Task: Configure Adaptive Search
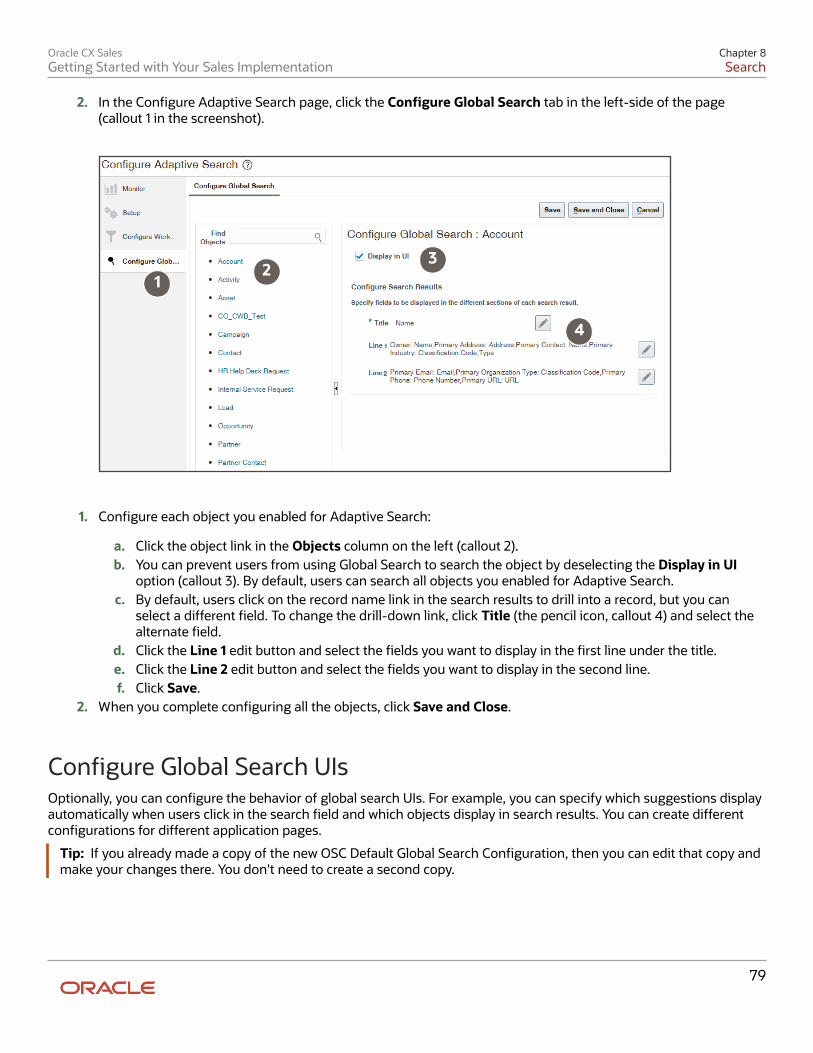
Oracle CX SalesGetting Started with Your Sales Implementation
Chapter 8Search
79
2. In the Configure Adaptive Search page, click the Configure Global Search tab in the left-side of the page(callout 1 in the screenshot).
12
3
4
1. Configure each object you enabled for Adaptive Search:
a. Click the object link in the Objects column on the left (callout 2).b. You can prevent users from using Global Search to search the object by deselecting the Display in UI
option (callout 3). By default, users can search all objects you enabled for Adaptive Search.c. By default, users click on the record name link in the search results to drill into a record, but you can
select a different field. To change the drill-down link, click Title (the pencil icon, callout 4) and select thealternate field.
d. Click the Line 1 edit button and select the fields you want to display in the first line under the title.e. Click the Line 2 edit button and select the fields you want to display in the second line.f. Click Save.
2. When you complete configuring all the objects, click Save and Close.
Configure Global Search UIsOptionally, you can configure the behavior of global search UIs. For example, you can specify which suggestions displayautomatically when users click in the search field and which objects display in search results. You can create differentconfigurations for different application pages.
Tip: If you already made a copy of the new OSC Default Global Search Configuration, then you can edit that copy andmake your changes there. You don't need to create a second copy.
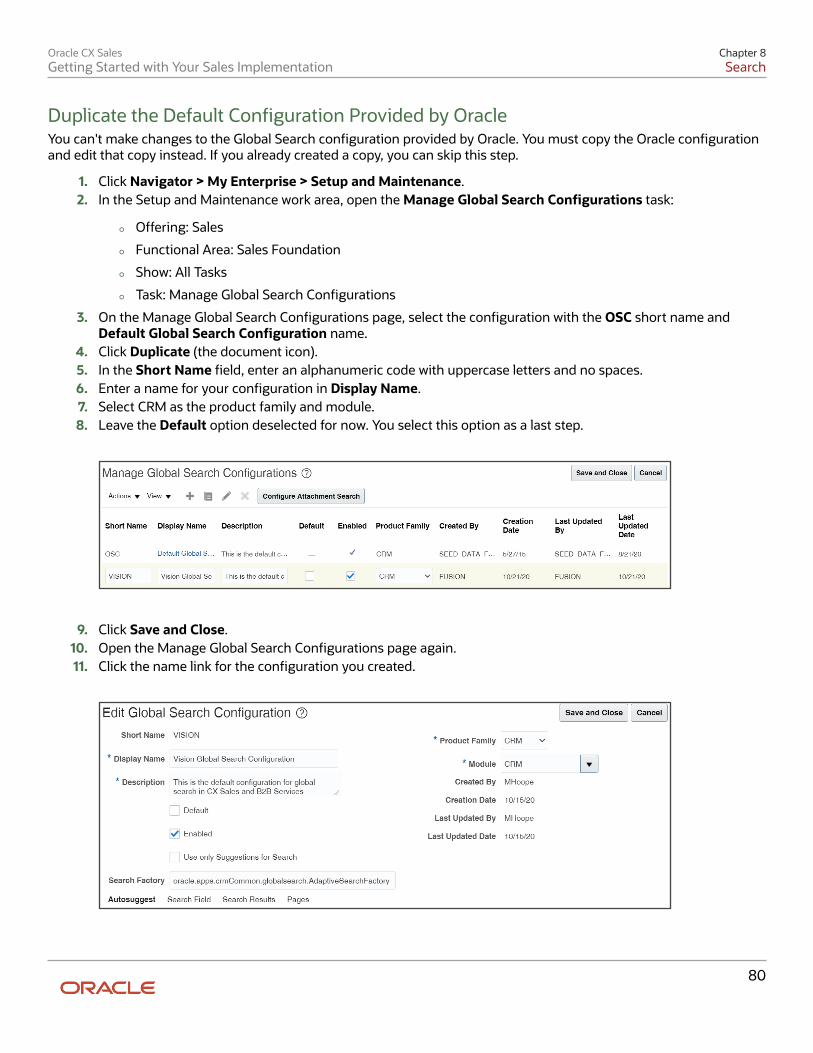
Oracle CX SalesGetting Started with Your Sales Implementation
Chapter 8Search
80
Duplicate the Default Configuration Provided by OracleYou can't make changes to the Global Search configuration provided by Oracle. You must copy the Oracle configurationand edit that copy instead. If you already created a copy, you can skip this step.
1. Click Navigator > My Enterprise > Setup and Maintenance.2. In the Setup and Maintenance work area, open the Manage Global Search Configurations task:
◦ Offering: Sales
◦ Functional Area: Sales Foundation
◦ Show: All Tasks
◦ Task: Manage Global Search Configurations
3. On the Manage Global Search Configurations page, select the configuration with the OSC short name andDefault Global Search Configuration name.
4. Click Duplicate (the document icon).5. In the Short Name field, enter an alphanumeric code with uppercase letters and no spaces.6. Enter a name for your configuration in Display Name.7. Select CRM as the product family and module.8. Leave the Default option deselected for now. You select this option as a last step.
9. Click Save and Close.10. Open the Manage Global Search Configurations page again.11. Click the name link for the configuration you created.
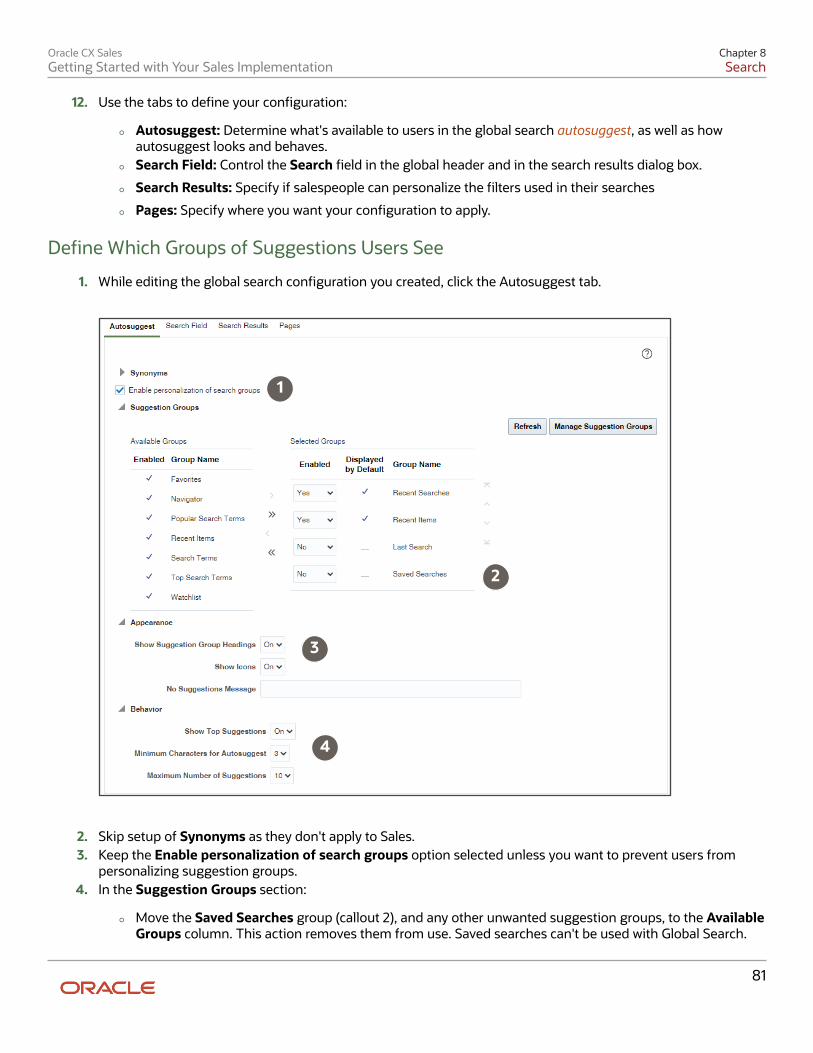
Oracle CX SalesGetting Started with Your Sales Implementation
Chapter 8Search
81
12. Use the tabs to define your configuration:
◦ Autosuggest: Determine what's available to users in the global search autosuggest, as well as howautosuggest looks and behaves.
◦ Search Field: Control the Search field in the global header and in the search results dialog box.
◦ Search Results: Specify if salespeople can personalize the filters used in their searches
◦ Pages: Specify where you want your configuration to apply.
Define Which Groups of Suggestions Users See
1. While editing the global search configuration you created, click the Autosuggest tab.
1
2
3
4
2. Skip setup of Synonyms as they don't apply to Sales.3. Keep the Enable personalization of search groups option selected unless you want to prevent users from
personalizing suggestion groups.4. In the Suggestion Groups section:
◦ Move the Saved Searches group (callout 2), and any other unwanted suggestion groups, to the AvailableGroups column. This action removes them from use. Saved searches can't be used with Global Search.
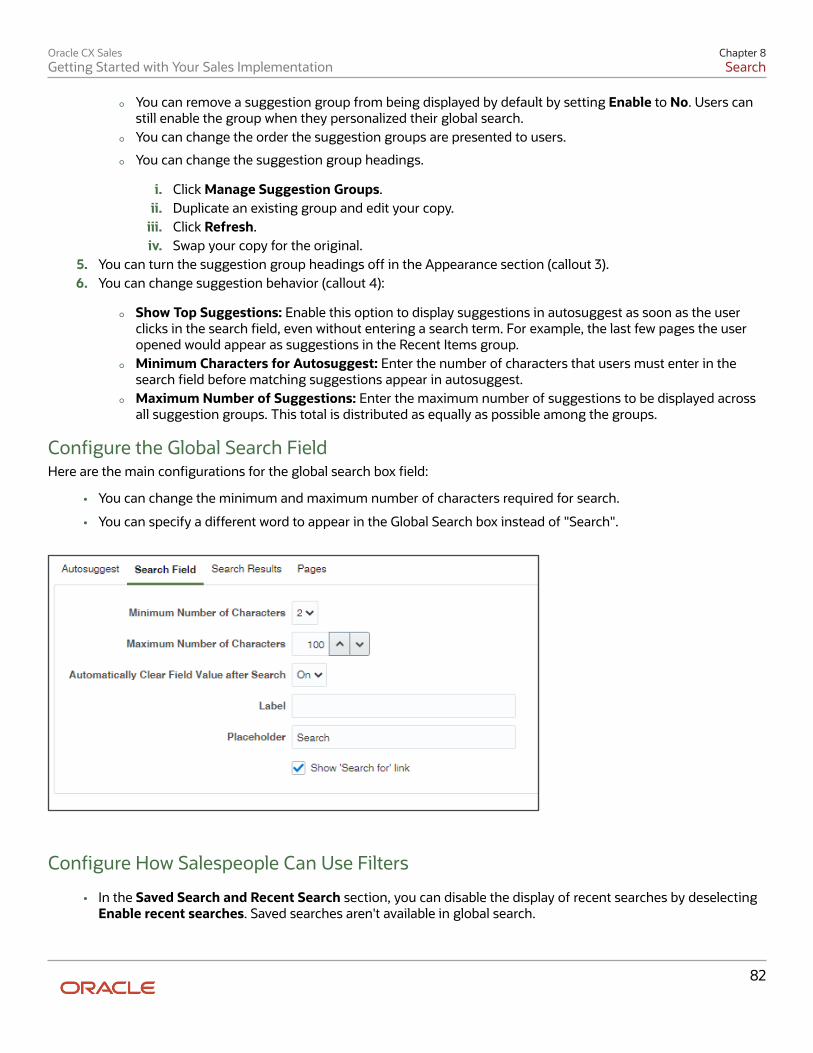
Oracle CX SalesGetting Started with Your Sales Implementation
Chapter 8Search
82
◦ You can remove a suggestion group from being displayed by default by setting Enable to No. Users canstill enable the group when they personalized their global search.
◦ You can change the order the suggestion groups are presented to users.
◦ You can change the suggestion group headings.
i. Click Manage Suggestion Groups.ii. Duplicate an existing group and edit your copy.
iii. Click Refresh.iv. Swap your copy for the original.
5. You can turn the suggestion group headings off in the Appearance section (callout 3).6. You can change suggestion behavior (callout 4):
◦ Show Top Suggestions: Enable this option to display suggestions in autosuggest as soon as the userclicks in the search field, even without entering a search term. For example, the last few pages the useropened would appear as suggestions in the Recent Items group.
◦ Minimum Characters for Autosuggest: Enter the number of characters that users must enter in thesearch field before matching suggestions appear in autosuggest.
◦ Maximum Number of Suggestions: Enter the maximum number of suggestions to be displayed acrossall suggestion groups. This total is distributed as equally as possible among the groups.
Configure the Global Search FieldHere are the main configurations for the global search box field:
• You can change the minimum and maximum number of characters required for search.
• You can specify a different word to appear in the Global Search box instead of "Search".
Configure How Salespeople Can Use Filters
• In the Saved Search and Recent Search section, you can disable the display of recent searches by deselectingEnable recent searches. Saved searches aren't available in global search.
Oracle CX SalesGetting Started with Your Sales Implementation
Chapter 8Search
83
• In the Filters section:
◦ Keep Enable personalization of search categories selected unless you want to prevent users fromspecifying which objects they see in the search results. You determine the objects that show up as filtersin global search while setting up Adaptive Search (see the topic Configure Global Search Scope andDisplay of Search Results).
◦ Enable clear all filters: Allow users to clear all filters by clicking the Clear All Filters button in searchresults.
◦ Show applied filters: Show all the filters that have been applied
• The Search Categories section and the rest of the sections on this tab don't apply to CX Sales.
Specify the Sales Pages Where Your Configuration Applies and Complete theConfigurationEntering the application pages is a one-time setup. If you're editing a configuration you created, then you don't need toreenter the page codes again. You can skip this step.
1. Enter codes (view IDs) for the applications or pages where you want your configuration to apply. Here are theentries for CX Sales:
View Type View ID
Application CRMPerformanceApp%
Application ORA_CRM_SERVICESAPP%
Application ORA_CRM_UIAPP%
Application ORA_SERVICEAPP%
Application SalesApp%
Application ORA_FSCM_UIAPP%
You can obtain other codes in Setup and Maintenance, using the Manage Taxonomy Hierarchy task asdescribed the linked topic: Specify the Pages or Applications That a Global Search Configuration Applies To.
2. At the top of the page, select the Default option.3. Click Save and Close.4. Clear your browser cache and navigate to any of the sales pages to test your configuration.
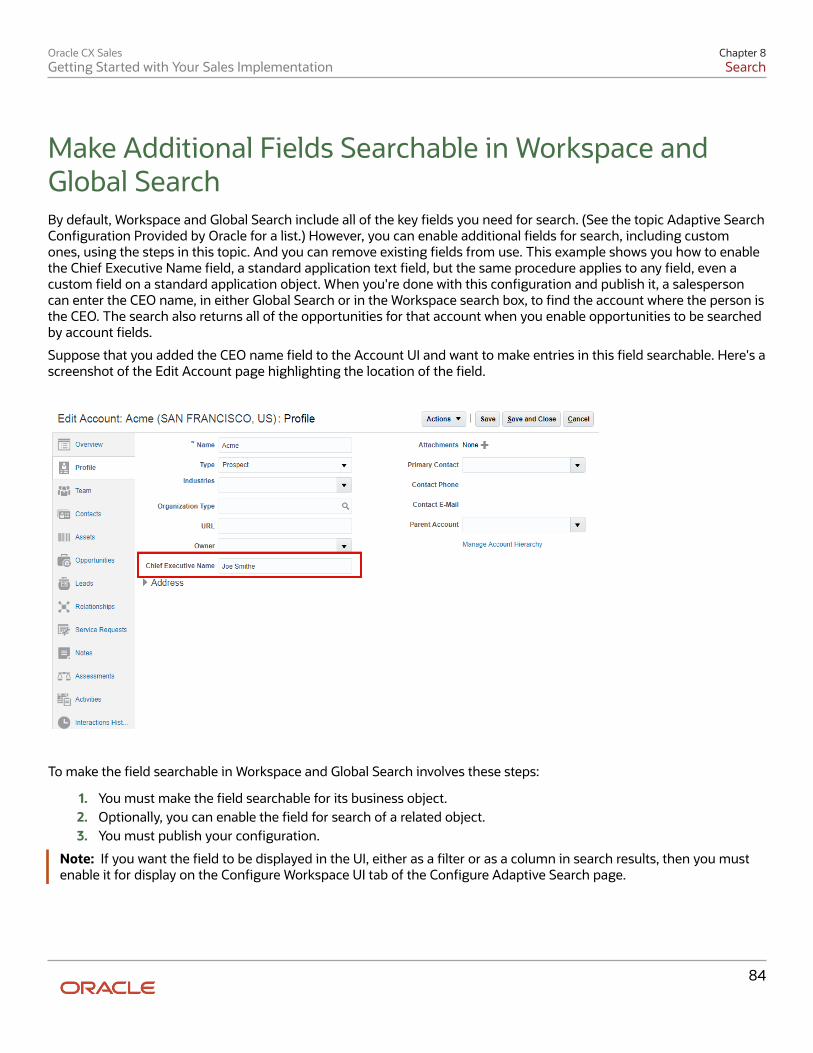
Oracle CX SalesGetting Started with Your Sales Implementation
Chapter 8Search
84
Make Additional Fields Searchable in Workspace andGlobal SearchBy default, Workspace and Global Search include all of the key fields you need for search. (See the topic Adaptive SearchConfiguration Provided by Oracle for a list.) However, you can enable additional fields for search, including customones, using the steps in this topic. And you can remove existing fields from use. This example shows you how to enablethe Chief Executive Name field, a standard application text field, but the same procedure applies to any field, even acustom field on a standard application object. When you're done with this configuration and publish it, a salespersoncan enter the CEO name, in either Global Search or in the Workspace search box, to find the account where the person isthe CEO. The search also returns all of the opportunities for that account when you enable opportunities to be searchedby account fields.
Suppose that you added the CEO name field to the Account UI and want to make entries in this field searchable. Here's ascreenshot of the Edit Account page highlighting the location of the field.
To make the field searchable in Workspace and Global Search involves these steps:
1. You must make the field searchable for its business object.2. Optionally, you can enable the field for search of a related object.3. You must publish your configuration.
Note: If you want the field to be displayed in the UI, either as a filter or as a column in search results, then you mustenable it for display on the Configure Workspace UI tab of the Configure Adaptive Search page.
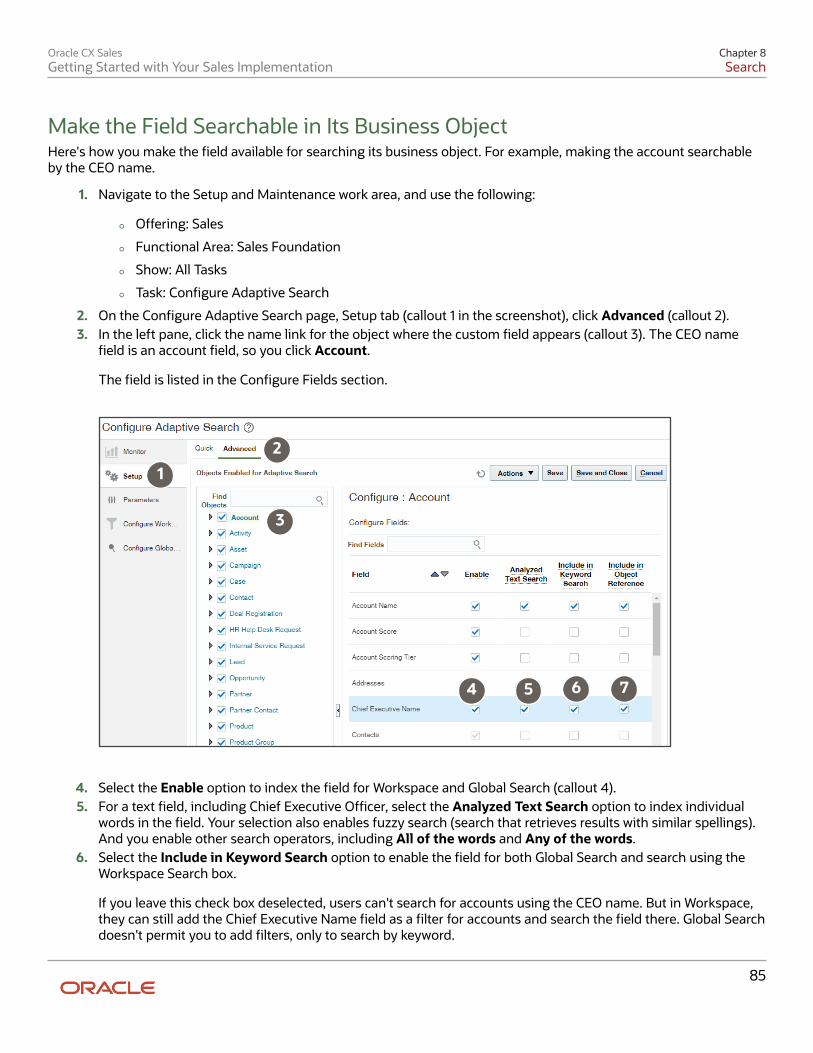
Oracle CX SalesGetting Started with Your Sales Implementation
Chapter 8Search
85
Make the Field Searchable in Its Business ObjectHere's how you make the field available for searching its business object. For example, making the account searchableby the CEO name.
1. Navigate to the Setup and Maintenance work area, and use the following:
◦ Offering: Sales
◦ Functional Area: Sales Foundation
◦ Show: All Tasks
◦ Task: Configure Adaptive Search
2. On the Configure Adaptive Search page, Setup tab (callout 1 in the screenshot), click Advanced (callout 2).3. In the left pane, click the name link for the object where the custom field appears (callout 3). The CEO name
field is an account field, so you click Account.
The field is listed in the Configure Fields section.
12
3
4 5 6 7
4. Select the Enable option to index the field for Workspace and Global Search (callout 4).5. For a text field, including Chief Executive Officer, select the Analyzed Text Search option to index individual
words in the field. Your selection also enables fuzzy search (search that retrieves results with similar spellings).And you enable other search operators, including All of the words and Any of the words.
6. Select the Include in Keyword Search option to enable the field for both Global Search and search using theWorkspace Search box.
If you leave this check box deselected, users can't search for accounts using the CEO name. But in Workspace,they can still add the Chief Executive Name field as a filter for accounts and search the field there. Global Searchdoesn't permit you to add filters, only to search by keyword.
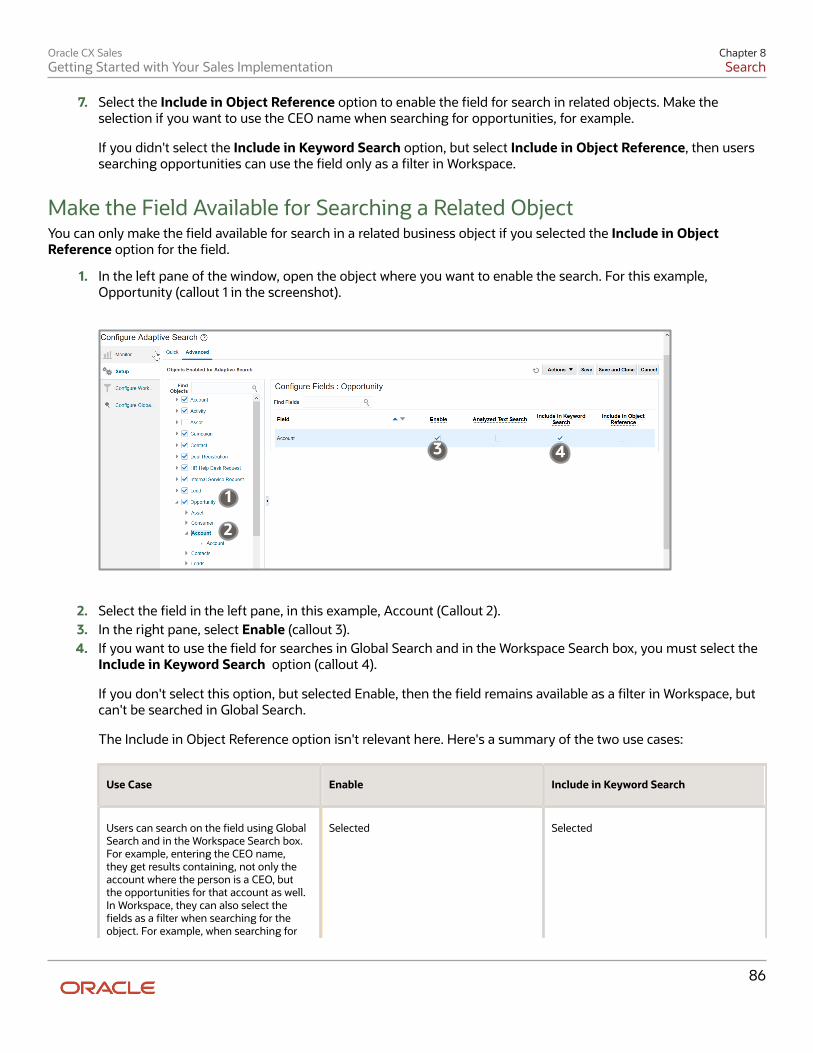
Oracle CX SalesGetting Started with Your Sales Implementation
Chapter 8Search
86
7. Select the Include in Object Reference option to enable the field for search in related objects. Make theselection if you want to use the CEO name when searching for opportunities, for example.
If you didn't select the Include in Keyword Search option, but select Include in Object Reference, then userssearching opportunities can use the field only as a filter in Workspace.
Make the Field Available for Searching a Related ObjectYou can only make the field available for search in a related business object if you selected the Include in ObjectReference option for the field.
1. In the left pane of the window, open the object where you want to enable the search. For this example,Opportunity (callout 1 in the screenshot).
1
2
3 4
2. Select the field in the left pane, in this example, Account (Callout 2).3. In the right pane, select Enable (callout 3).4. If you want to use the field for searches in Global Search and in the Workspace Search box, you must select the
Include in Keyword Search option (callout 4).
If you don't select this option, but selected Enable, then the field remains available as a filter in Workspace, butcan't be searched in Global Search.
The Include in Object Reference option isn't relevant here. Here's a summary of the two use cases:
Use Case Enable Include in Keyword Search
Users can search on the field using GlobalSearch and in the Workspace Search box.For example, entering the CEO name,they get results containing, not only theaccount where the person is a CEO, butthe opportunities for that account as well.In Workspace, they can also select thefields as a filter when searching for theobject. For example, when searching for
Selected Selected
Oracle CX SalesGetting Started with Your Sales Implementation
Chapter 8Search
87
Use Case Enable Include in Keyword Search
opportunities in Workspace, they canfilter by CEO name.
Users can add the field as a filter inWorkspace, but can't search on it usingthe Search box or using Global Search.
Selected Deselected
Publish Your ConfigurationAfter making your option selections, click Publish.
Publishing triggers an indexing process that you can monitor on the Monitor tab, Publish subtab. Your newconfiguration becomes available after the indexing process completes. If the process completes with errors for somereason, contact your help desk.
Enable the Field for Use As a Filter in the Workspace UIFor the field to be used as a filter and added as a column in search results, you must enable it for display on the UI:
1. In the Configure Adaptive Search page, click Configure Workspace UI.2. To enable the field for use as a filter on its object (for example, to enable the account field to be used as a filter
when searching accounts), do the following:
a. Select the object in the left pane of the Configure Workspace UI tab.b. Select the Display in UI option for the field.
3. To enable the field for use in the UI of other related objects (for example, to enable the account field as a filter inopportunity searches), do the following:
a. Display the related object hierarchy for the object where you want to enable the filter in the left pane ofthe Configure Workspace UI tab. For example, select Opportunity (callout 1 in the following screenshot).
b. Locate and select the field's object in the object hierarchy. For example, select Account (callout 2).
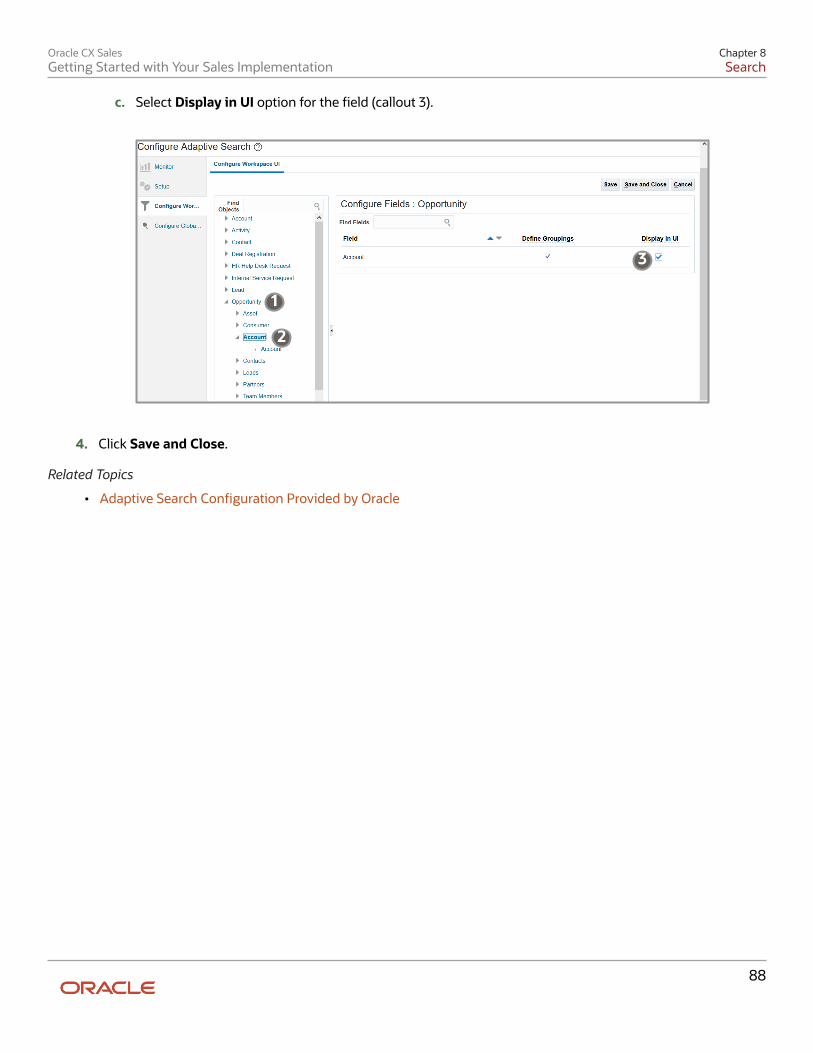
Oracle CX SalesGetting Started with Your Sales Implementation
Chapter 8Search
88
c. Select Display in UI option for the field (callout 3).
1
2
3
4. Click Save and Close.
Related Topics
• Adaptive Search Configuration Provided by Oracle
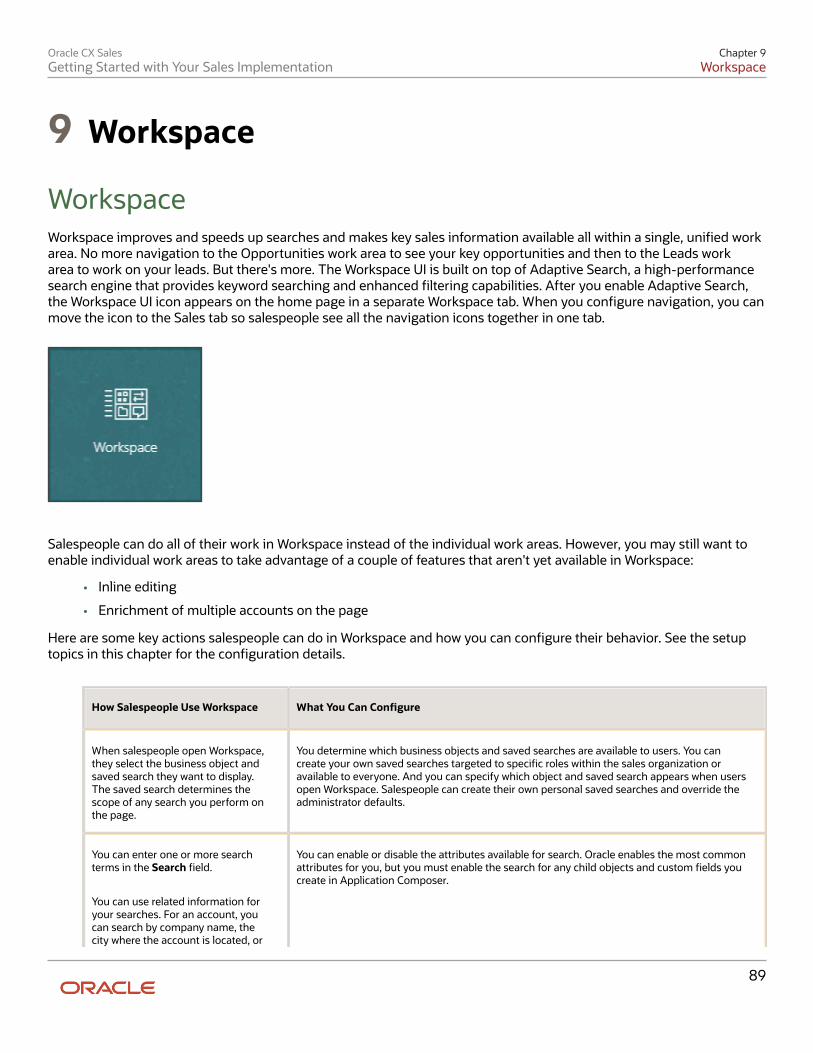
Oracle CX SalesGetting Started with Your Sales Implementation
Chapter 9Workspace
89
9 Workspace
WorkspaceWorkspace improves and speeds up searches and makes key sales information available all within a single, unified workarea. No more navigation to the Opportunities work area to see your key opportunities and then to the Leads workarea to work on your leads. But there's more. The Workspace UI is built on top of Adaptive Search, a high-performancesearch engine that provides keyword searching and enhanced filtering capabilities. After you enable Adaptive Search,the Workspace UI icon appears on the home page in a separate Workspace tab. When you configure navigation, you canmove the icon to the Sales tab so salespeople see all the navigation icons together in one tab.
Salespeople can do all of their work in Workspace instead of the individual work areas. However, you may still want toenable individual work areas to take advantage of a couple of features that aren't yet available in Workspace:
• Inline editing
• Enrichment of multiple accounts on the page
Here are some key actions salespeople can do in Workspace and how you can configure their behavior. See the setuptopics in this chapter for the configuration details.
How Salespeople Use Workspace What You Can Configure
When salespeople open Workspace,they select the business object andsaved search they want to display.The saved search determines thescope of any search you perform onthe page.
You determine which business objects and saved searches are available to users. You cancreate your own saved searches targeted to specific roles within the sales organization oravailable to everyone. And you can specify which object and saved search appears when usersopen Workspace. Salespeople can create their own personal saved searches and override theadministrator defaults.
You can enter one or more searchterms in the Search field.
You can use related information foryour searches. For an account, youcan search by company name, thecity where the account is located, or
You can enable or disable the attributes available for search. Oracle enables the most commonattributes for you, but you must enable the search for any child objects and custom fields youcreate in Application Composer.
Oracle CX SalesGetting Started with Your Sales Implementation
Chapter 9Workspace
90
How Salespeople Use Workspace What You Can Configure
the primary contact at the company,for example. You can even searchfor an account by the name of thesalesperson on the sales team.
The search results match wholeterms, but you can use the (*)wildcard for partial words. Forsearches with multiple terms, you canuse the OR and NOT operators. Forexample, searching for "Oracle NOTPortland" returns Oracle locations notin Portland.
The saved search you selectdetermines the scope of yoursearch. For example, if you selectAll Accounts, you are searching allaccounts you can view. If you selectMy Accounts, then you are searchingonly the accounts that you own.
You can view the filters used in thesaved search by clicking the ShowFilters link. You can also add filters ofyour own.
You can specify which additional fields users can add as filters and you can set up groupings ofvalues the filters show. For example, you can break down opportunities by revenue ranges: 0 to10,000, 10,000 to 100,000, 100,000 to 500,000, and 500,000 and up.
Filters show the most commonvalues and the number of recordsin each. For example, a search ofaccounts with the primary industryas a filter, automatically displays themost frequent industries and thenumber of records for each. A searchof opportunities using win probabilityas a filter, displays different ranges ofwin probabilities and the number ofrecords in each range.
Your filter selections are additive, ifyou select Health Care as the primaryindustry and then Lisa Jones as theowner, Workspace displays only thoseHealth Care accounts Lisa owns.
You can configure value ranges for numeric, corporate currency, percent and date filters. Forexample, you can configure value ranges for the opportunity win probability filter and othersimilar filters.
Salespeople can save any searchcriteria they enter as their ownpersonal saved search.
You can create saved searches for use by the whole sales organization and you can tailor themto different roles.
You can expose the Workspace saved searches as filters in Workspace infolets to display keysales information right on the home page.
Sales administrators and salesmanagers can download searchresults into an Excel spreadsheet.
You can remove the Export List button from the page using Application Composer. Youcan also enable other custom sales roles to use the button, by granting the privilegeZCA_WORKSPACE_EXPORT.
Oracle CX SalesGetting Started with Your Sales Implementation
Chapter 9Workspace
91
How Salespeople Use Workspace What You Can Configure
Salespeople can update multiplerecords at the same time from the listpage.
You must turn this feature on as described in the Mass Update and Inline Editing chapter.
Here's a screenshot of the Workspace UI highlighting some of its key features.
Callout Number Feature Description
1 Select the object and saved search you want to display in Workspace.
2 Use the Search field to search within the constraints of the saved search you selected. If youselected My Accounts, you get to view and search only the accounts where you are on theterritory or in the sales team. Selecting All Accounts, makes it possible for you to search themall.
3 Control the display of filters by clicking Display Filters and Hide Filters.
4 View the number of records in your search results.
5 Use filters to understand your search results and to narrow down your search further. Filtersshow you the items with the highest number of results, for example, the industries with mostaccounts or salespeople who own the most opportunities.
6 Log calls, take notes, create tasks, and take other actions on search results without having todrill down into them. For accounts, you can even create an opportunity.
Oracle CX SalesGetting Started with Your Sales Implementation
Chapter 9Workspace
92
1 2 34
5
6
Overview of Initial Workspace ConfigurationIn this chapter, you learn how to configure Workspace, including the saved searches that salespeople use to view keysales information both in Workspace and in the different actionable infolets on the home page.
Step Description Navigation Where to Get More Details
1 Review the saved searchesprovided by Oracle inWorkspace and in the ManageSaved Searches page. Eachbusiness object has its ownlist of saved searches and youcan enable different savedsearches for different job roles.Plan the saved searches thatyou want to enable and createfor each role.
Remember that savedsearches show up in thelist users see in ascendingalphabetic order by name.For example, if you don'twant the All Accounts savedsearch to be the first userssee, you must either create a
Workspace > Manage SavedSearches
See the topics:
• Overview of theManage SavedSearches Page
• Specify the List ofSaved Searches forDifferent Job Roles
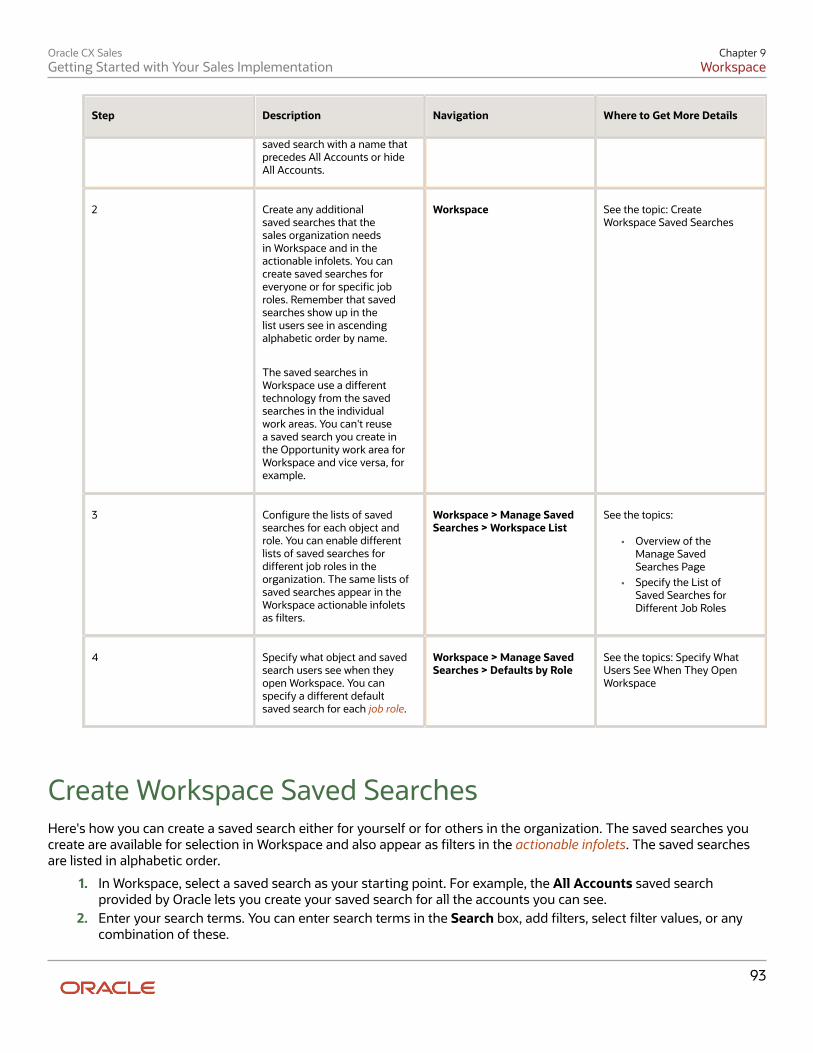
Oracle CX SalesGetting Started with Your Sales Implementation
Chapter 9Workspace
93
Step Description Navigation Where to Get More Details
saved search with a name thatprecedes All Accounts or hideAll Accounts.
2 Create any additionalsaved searches that thesales organization needsin Workspace and in theactionable infolets. You cancreate saved searches foreveryone or for specific jobroles. Remember that savedsearches show up in thelist users see in ascendingalphabetic order by name.
The saved searches inWorkspace use a differenttechnology from the savedsearches in the individualwork areas. You can't reusea saved search you create inthe Opportunity work area forWorkspace and vice versa, forexample.
Workspace See the topic: CreateWorkspace Saved Searches
3 Configure the lists of savedsearches for each object androle. You can enable differentlists of saved searches fordifferent job roles in theorganization. The same lists ofsaved searches appear in theWorkspace actionable infoletsas filters.
Workspace > Manage SavedSearches > Workspace List
See the topics:
• Overview of theManage SavedSearches Page
• Specify the List ofSaved Searches forDifferent Job Roles
4 Specify what object and savedsearch users see when theyopen Workspace. You canspecify a different defaultsaved search for each job role.
Workspace > Manage SavedSearches > Defaults by Role
See the topics: Specify WhatUsers See When They OpenWorkspace
Create Workspace Saved SearchesHere's how you can create a saved search either for yourself or for others in the organization. The saved searches youcreate are available for selection in Workspace and also appear as filters in the actionable infolets. The saved searchesare listed in alphabetic order.
1. In Workspace, select a saved search as your starting point. For example, the All Accounts saved searchprovided by Oracle lets you create your saved search for all the accounts you can see.
2. Enter your search terms. You can enter search terms in the Search box, add filters, select filter values, or anycombination of these.
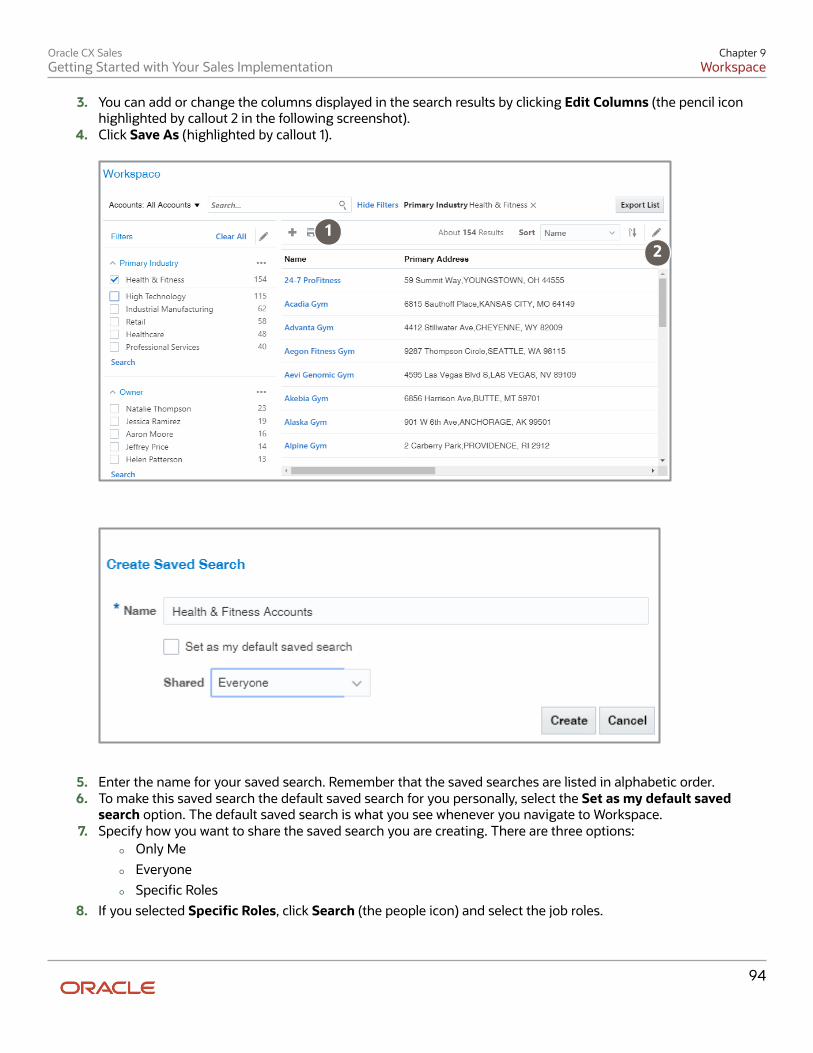
Oracle CX SalesGetting Started with Your Sales Implementation
Chapter 9Workspace
94
3. You can add or change the columns displayed in the search results by clicking Edit Columns (the pencil iconhighlighted by callout 2 in the following screenshot).
4. Click Save As (highlighted by callout 1).
12
5. Enter the name for your saved search. Remember that the saved searches are listed in alphabetic order.6. To make this saved search the default saved search for you personally, select the Set as my default saved
search option. The default saved search is what you see whenever you navigate to Workspace.7. Specify how you want to share the saved search you are creating. There are three options:
◦ Only Me
◦ Everyone
◦ Specific Roles
8. If you selected Specific Roles, click Search (the people icon) and select the job roles.
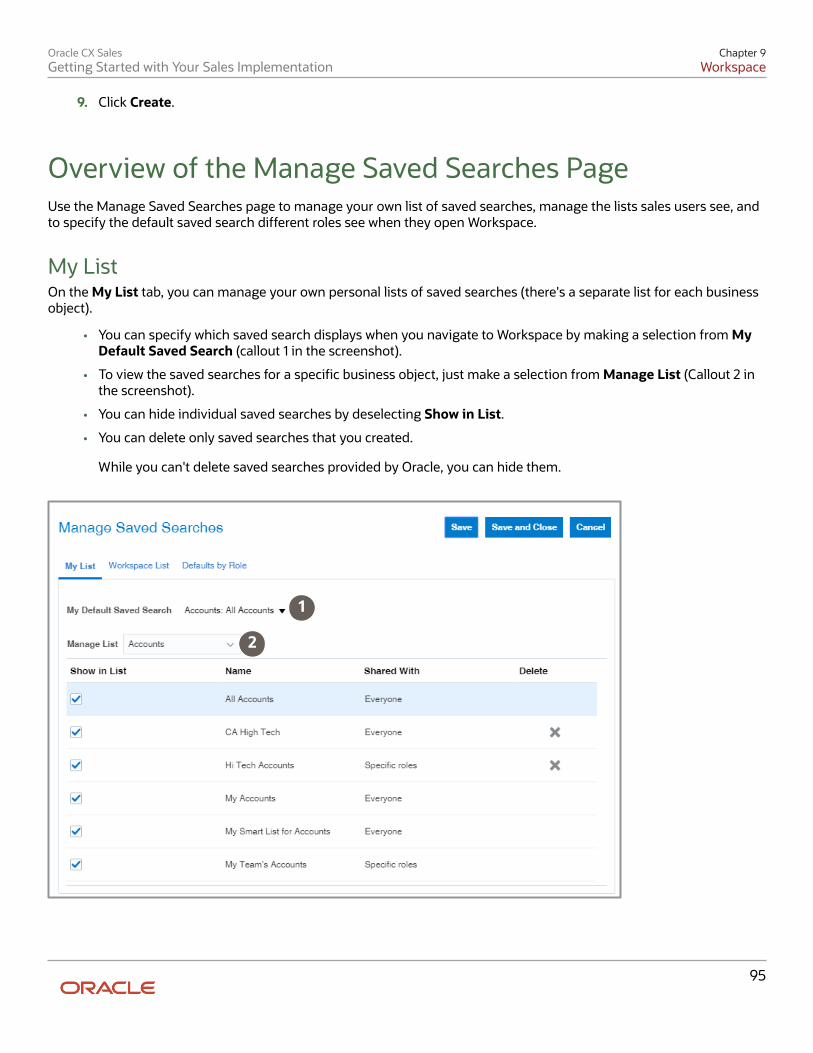
Oracle CX SalesGetting Started with Your Sales Implementation
Chapter 9Workspace
95
9. Click Create.
Overview of the Manage Saved Searches PageUse the Manage Saved Searches page to manage your own list of saved searches, manage the lists sales users see, andto specify the default saved search different roles see when they open Workspace.
My ListOn the My List tab, you can manage your own personal lists of saved searches (there's a separate list for each businessobject).
• You can specify which saved search displays when you navigate to Workspace by making a selection from MyDefault Saved Search (callout 1 in the screenshot).
• To view the saved searches for a specific business object, just make a selection from Manage List (Callout 2 inthe screenshot).
• You can hide individual saved searches by deselecting Show in List.
• You can delete only saved searches that you created.
While you can't delete saved searches provided by Oracle, you can hide them.
1
2
Oracle CX SalesGetting Started with Your Sales Implementation
Chapter 9Workspace
96
Workspace ListOn the Workspace List tab, you can share saved searches with everyone, with specific user roles, or with no one.
For each business object that you select from Manage List (callout 1 in the following screenshot), you can:
• Specify who can view each saved search by specifying a value in the Shared With column (callout 2 in thescreenshot).
◦ For saved searches provided by Oracle, you can either share the saved search with everyone or not shareit at all, effectively hiding it from use.
◦ For saved searches created by you or other administrators, you can select one of the following:
• Only Me
Makes the saved search a personal saved search that you can manage on the My List tab.• Everyone
Makes the search available to all roles.• Specific Roles
Makes it possible for you to specify one or more specific job roles that can see the saved search.• Not Shared
Removes the search from use.
• You can delete only saved searches that you created (callout 3 in the screenshot).

Oracle CX SalesGetting Started with Your Sales Implementation
Chapter 9Workspace
97
While you can't delete saved searches provided by Oracle, you can remove it from use by selecting the NotShared value in the Shared With column.
1
2
3
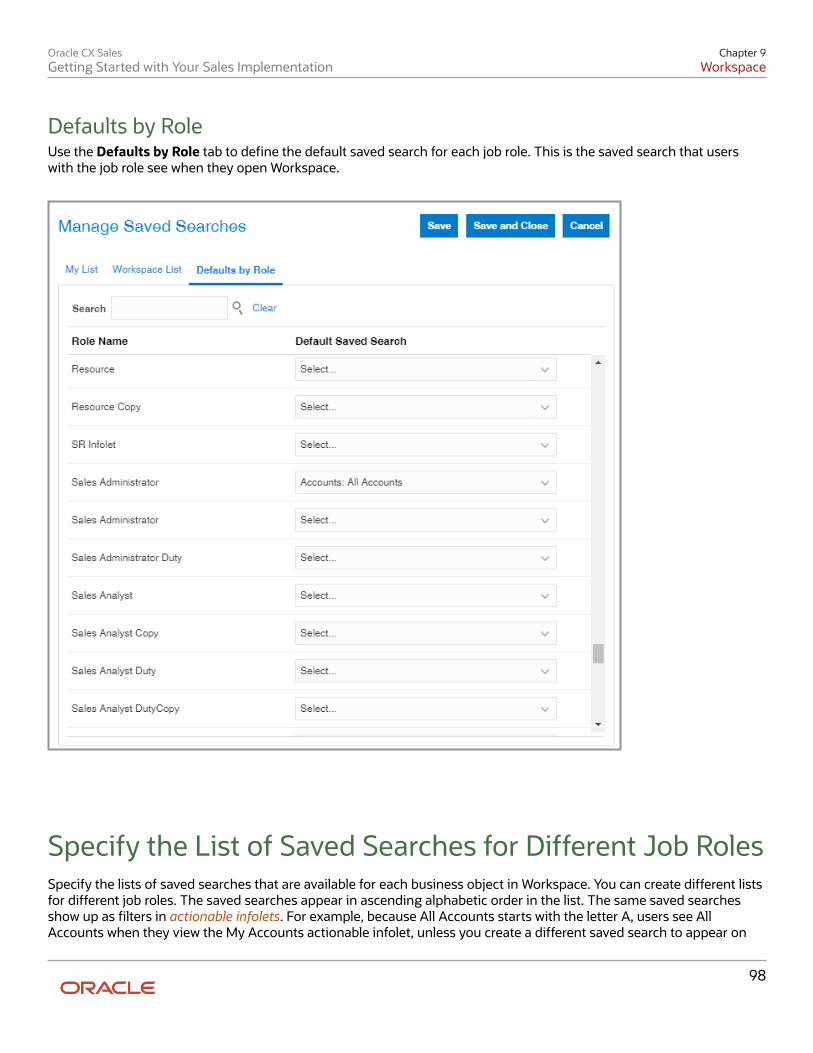
Oracle CX SalesGetting Started with Your Sales Implementation
Chapter 9Workspace
98
Defaults by RoleUse the Defaults by Role tab to define the default saved search for each job role. This is the saved search that userswith the job role see when they open Workspace.
Specify the List of Saved Searches for Different Job RolesSpecify the lists of saved searches that are available for each business object in Workspace. You can create different listsfor different job roles. The saved searches appear in ascending alphabetic order in the list. The same saved searchesshow up as filters in actionable infolets. For example, because All Accounts starts with the letter A, users see AllAccounts when they view the My Accounts actionable infolet, unless you create a different saved search to appear on
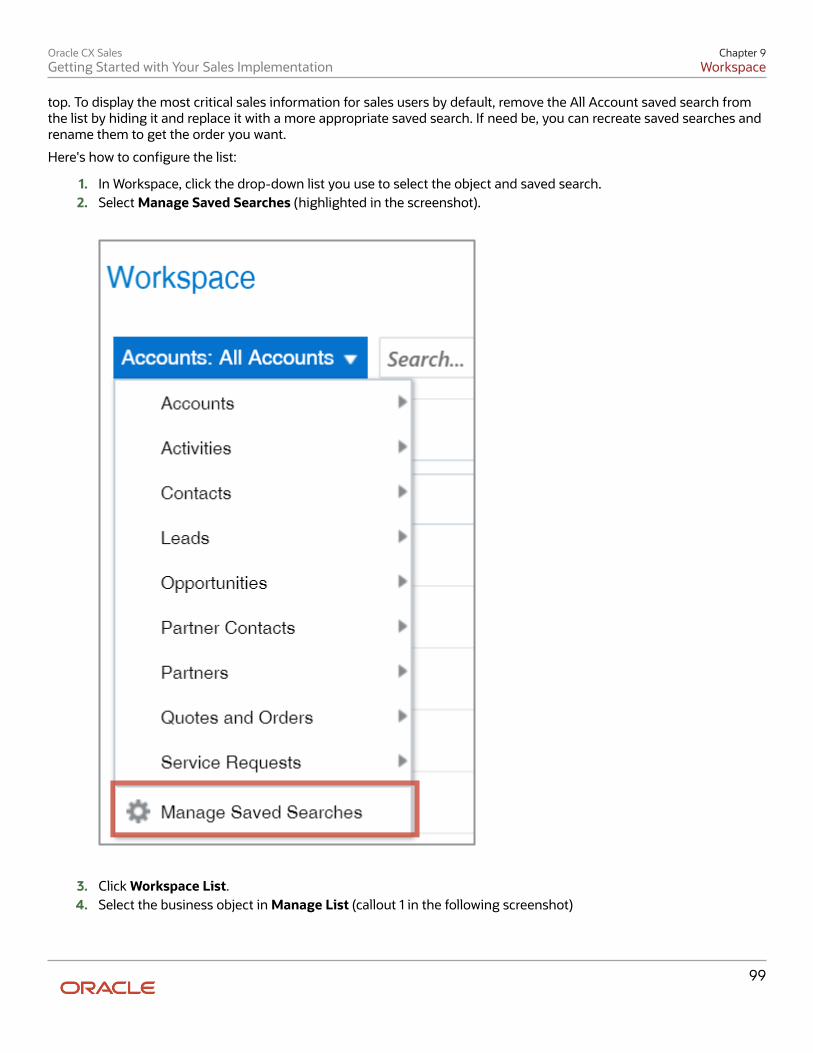
Oracle CX SalesGetting Started with Your Sales Implementation
Chapter 9Workspace
99
top. To display the most critical sales information for sales users by default, remove the All Account saved search fromthe list by hiding it and replace it with a more appropriate saved search. If need be, you can recreate saved searches andrename them to get the order you want.
Here's how to configure the list:
1. In Workspace, click the drop-down list you use to select the object and saved search.2. Select Manage Saved Searches (highlighted in the screenshot).
3. Click Workspace List.4. Select the business object in Manage List (callout 1 in the following screenshot)
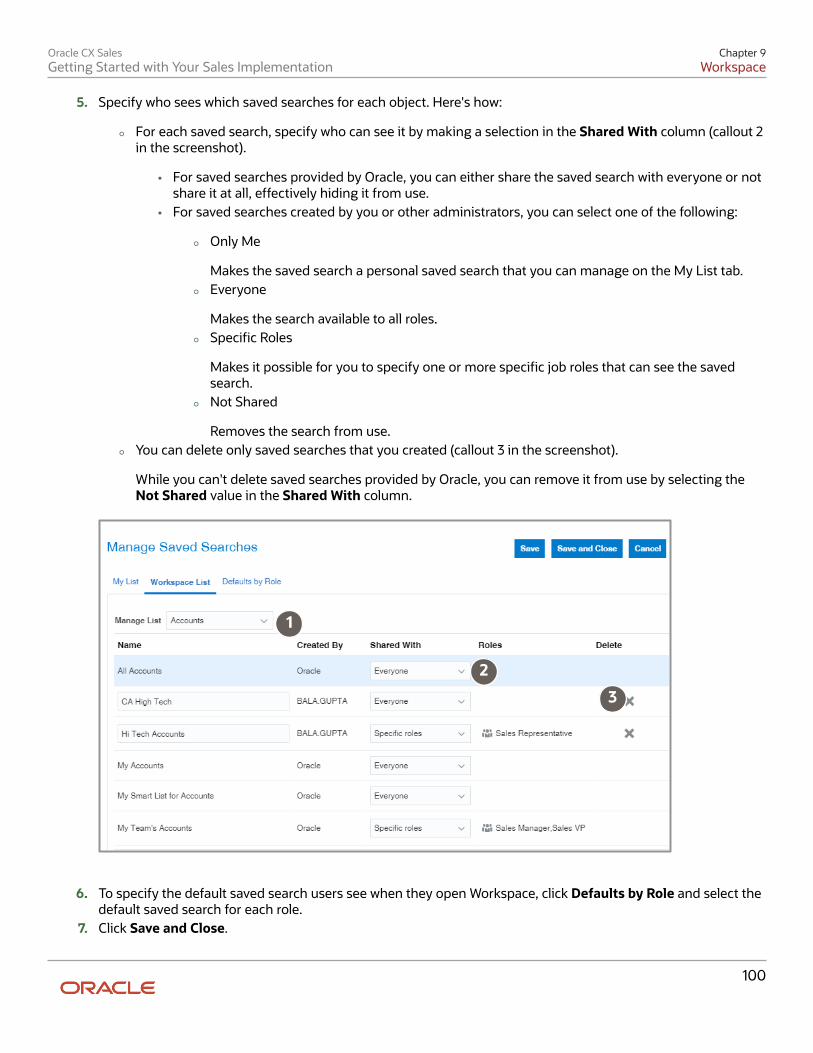
Oracle CX SalesGetting Started with Your Sales Implementation
Chapter 9Workspace
100
5. Specify who sees which saved searches for each object. Here's how:
◦ For each saved search, specify who can see it by making a selection in the Shared With column (callout 2in the screenshot).
• For saved searches provided by Oracle, you can either share the saved search with everyone or notshare it at all, effectively hiding it from use.
• For saved searches created by you or other administrators, you can select one of the following:
◦ Only Me
Makes the saved search a personal saved search that you can manage on the My List tab.
◦ Everyone
Makes the search available to all roles.
◦ Specific Roles
Makes it possible for you to specify one or more specific job roles that can see the savedsearch.
◦ Not Shared
Removes the search from use.
◦ You can delete only saved searches that you created (callout 3 in the screenshot).
While you can't delete saved searches provided by Oracle, you can remove it from use by selecting theNot Shared value in the Shared With column.
1
2
3
6. To specify the default saved search users see when they open Workspace, click Defaults by Role and select thedefault saved search for each role.
7. Click Save and Close.
Oracle CX SalesGetting Started with Your Sales Implementation
Chapter 9Workspace
101
Specify What Users See When They Open WorkspaceFor each job role, you can specify which business object and saved search they see when they open Workspace.
1. In Workspace, click the drop-down list you use to select objects and saved searches.2. Select Manage Saved Searches.3. In the Manage Saved Searches page, click Defaults by Role.4. Select the default saved search for each role5. Click Save and Close.
Oracle CX SalesGetting Started with Your Sales Implementation
Chapter 9Workspace
102
Oracle CX SalesGetting Started with Your Sales Implementation
Chapter 10Get Ready to Create Sales Users
103
10 Get Ready to Create Sales Users
How Setup Assistant Gets You Ready to Create SalesUsersHere's how Setup Assistant helps you get ready to create sales users and the setups you may need to completemanually:
What Setup Assistant Does for You What You May Need to Do Manually
Creates additional resource roles. Allyou do is enter their names.
After you run Setup Assistant, you can create additional resource roles manually in Setup andMaintenance, using the Manage Resource Roles task:
• Offering: Sales• Functional Area: Users and Security• Task: Manage Resource Roles
Creates the role-provisioning rules forthe standard resource roles providedby Oracle and for the additionalresource roles you created in SetupAssistant.
Create additional provisioning rules for any resource roles you create outside Setup Assistantin Setup and Maintenance, using the task Manage HCM Role Provisioning Rules:
• Offering: Sales• Functional Area: Users and Security• Task: Manage HCM Role Provisioning Rules
Sets the resource organization youentered for the CEO as the top of theresource organization hierarchy.
Setup Assistant eliminates twomanual steps: creating the resourceorganization and then using theManage Resource OrganizationHierarchies task to specify thatresource organization as the top ofthe Internal Resource OrganizationHierarchy.
If you need to change the name of the resource organization after you run Setup Assistant,you can edit it in Setup and Maintenance, using the Manage Internal Resource Organizationstask:
• Offering: Sales• Functional Area: Users and Security• Task: Manage Internal Resource Organizations
Prevents you from accidentallyentering duplicate email addressesfor users by setting the system profileEnable Validation of User Work Email.
Nothing.
Related Topics• Create a Resource Organization• Designate an Organization as the Top of the Sales Hierarchy• How can I change the name of the top resource organization and other resource organizations
Oracle CX SalesGetting Started with Your Sales Implementation
Chapter 10Get Ready to Create Sales Users
104
• Create Additional Resource Roles
A Few Setups to Complete Before You Create Sales UsersSales users are a step above setup users and users that you can create in the Security Console, and not just becausesalespeople get bonuses. You must create sales users as resources who are part of the sales resource hierarchy. Youcan create sales users either in the Manage Users task UI or by resource import, but you can't create resources inthe Security Console. Creating sales users actually creates rudimentary Human Resources records, even if you aren'timplementing HCM. Before you create sales users, you must create the elements of resource hierarchy. And you mustcreate the provisioning rules that automatically provide the sales users you create with the security permissions theyneed to do their jobs.
Sales Resource HierarchyThe sales resource hierarchy shows up as the org chart in the Resource Directory. But the hierarchy is more than a prettypicture. It determines who can see what sales information and forms the basis of your forecasting setup. For example,sales managers can view and forecast the opportunities of their subordinates, but not the opportunities managed byothers. Oracle supports matrix management, so the resource hierarchy you build doesn't have to match the formalreporting hierarchy in the Oracle Global Human Resources Cloud or other Human Resources applications.
To give you an idea of what a sales resource hierarchy looks like, here's a screenshot of a portion of Vision Corp.'sResource Directory. Aside from their names, all users in the hierarchy must have:
• A resource role (highlighted by callout 1)
The resource role describes the role each resource plays in the organization. It displays right underneath theuser name in the Resource Directory and elsewhere in the UI. Resource roles are also used as the primarycondition in the role-provisioning rules. You can create resource roles either in Setup Assistant or manually,using the setup task Manage Resource Roles.
• A resource organization (callout 2)
You must create a resource organization for every manager. Each individual contributor who isn't a managerautomatically inherits the manager's organization. The name of the resource organization need not be anyformal department name, but you should avoid using manager names to accommodate hierarchy changes. You
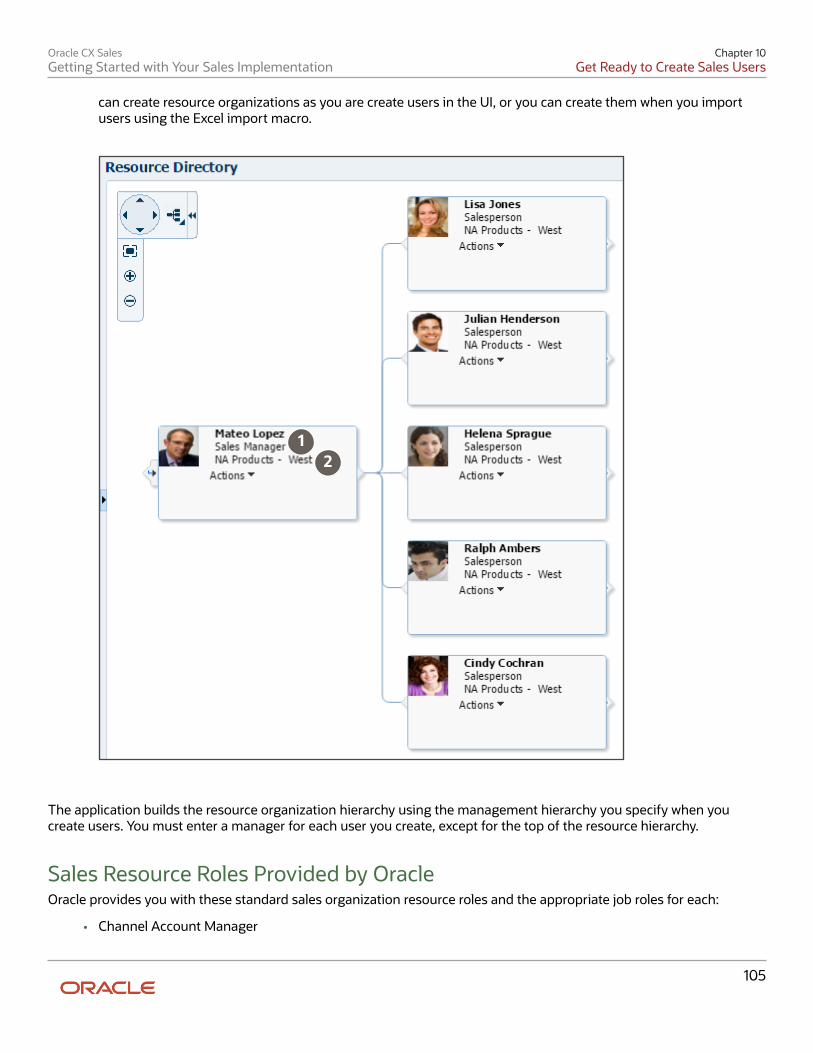
Oracle CX SalesGetting Started with Your Sales Implementation
Chapter 10Get Ready to Create Sales Users
105
can create resource organizations as you are create users in the UI, or you can create them when you importusers using the Excel import macro.
12
The application builds the resource organization hierarchy using the management hierarchy you specify when youcreate users. You must enter a manager for each user you create, except for the top of the resource hierarchy.
Sales Resource Roles Provided by OracleOracle provides you with these standard sales organization resource roles and the appropriate job roles for each:
• Channel Account Manager
Oracle CX SalesGetting Started with Your Sales Implementation
Chapter 10Get Ready to Create Sales Users
106
• Channel Administrator
• Channel Operations Manager
• Channel Partner Administrator
• Channel Sales Director
• Channel Sales Manager
• Chief Executive Officer
• Contract Administrator
• Contract Manager
• Customer Data Steward
• Data Steward Manager
• Master Data Management Application Administrator
• Partner Administrator
• Partner Sales Manager
• Partner Salesperson
• Sales Administrator
• Sales Lead Qualifier
• Sales Manager
• Salesperson
• Sales Restricted User
• Sales Setup User
• Sales Vice President
Note: Except for the Chief Executive Officer and the Salesperson, there's a corresponding job role with the samename for each of the resource roles provided by Oracle. The job role corresponding to the Salesperson resource role isSales Representative. The Chief Executive Officer is usually assigned the Sales Vice President job role.
Oracle Digital Sales Resource RolesThe list of sales roles includes two resource roles intended specifically for implementing Oracle Digital Sales. Eachcomes with its own job role.
Caution: Don't use these roles for CX Sales.
Resource Role Name Job Role Name
CX Inside Sales Manager Inside Sales Manager
CX Inside Sales Representative Inside Sales Representative
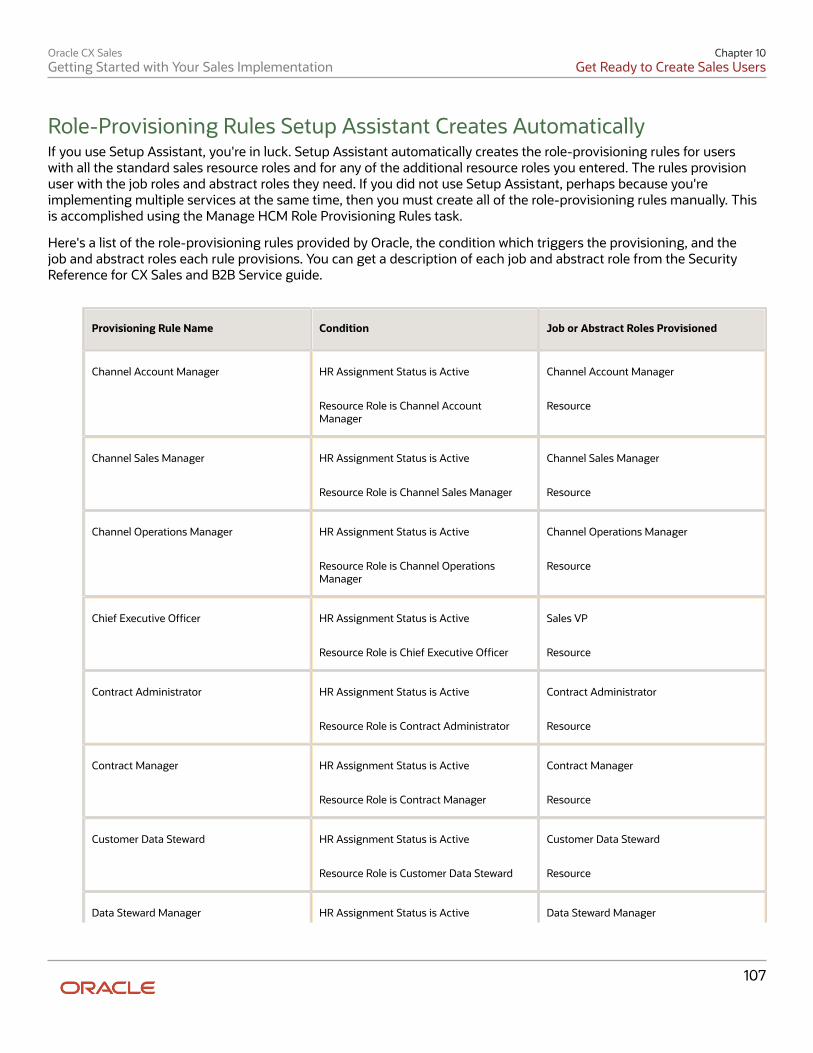
Oracle CX SalesGetting Started with Your Sales Implementation
Chapter 10Get Ready to Create Sales Users
107
Role-Provisioning Rules Setup Assistant Creates AutomaticallyIf you use Setup Assistant, you're in luck. Setup Assistant automatically creates the role-provisioning rules for userswith all the standard sales resource roles and for any of the additional resource roles you entered. The rules provisionuser with the job roles and abstract roles they need. If you did not use Setup Assistant, perhaps because you'reimplementing multiple services at the same time, then you must create all of the role-provisioning rules manually. Thisis accomplished using the Manage HCM Role Provisioning Rules task.
Here's a list of the role-provisioning rules provided by Oracle, the condition which triggers the provisioning, and thejob and abstract roles each rule provisions. You can get a description of each job and abstract role from the SecurityReference for CX Sales and B2B Service guide.
Provisioning Rule Name Condition Job or Abstract Roles Provisioned
Channel Account Manager HR Assignment Status is Active
Resource Role is Channel AccountManager
Channel Account Manager
Resource
Channel Sales Manager HR Assignment Status is Active
Resource Role is Channel Sales Manager
Channel Sales Manager
Resource
Channel Operations Manager HR Assignment Status is Active
Resource Role is Channel OperationsManager
Channel Operations Manager
Resource
Chief Executive Officer HR Assignment Status is Active
Resource Role is Chief Executive Officer
Sales VP
Resource
Contract Administrator HR Assignment Status is Active
Resource Role is Contract Administrator
Contract Administrator
Resource
Contract Manager HR Assignment Status is Active
Resource Role is Contract Manager
Contract Manager
Resource
Customer Data Steward HR Assignment Status is Active
Resource Role is Customer Data Steward
Customer Data Steward
Resource
Data Steward Manager HR Assignment Status is Active Data Steward Manager
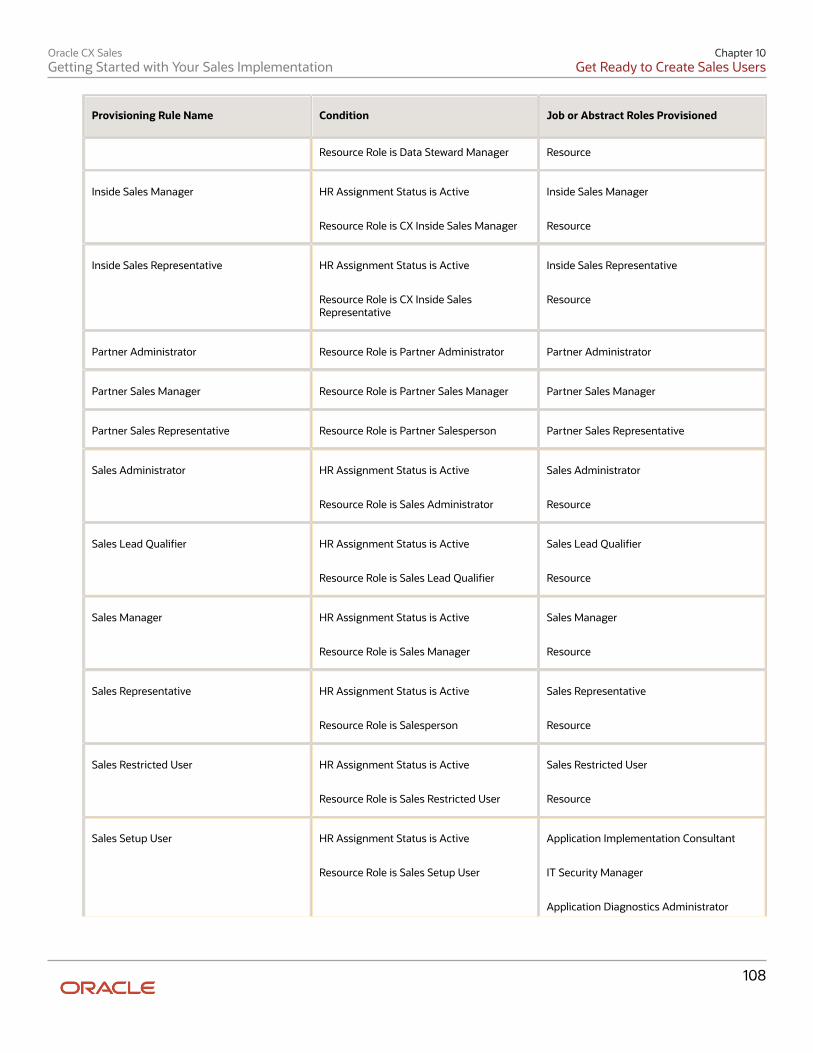
Oracle CX SalesGetting Started with Your Sales Implementation
Chapter 10Get Ready to Create Sales Users
108
Provisioning Rule Name Condition Job or Abstract Roles Provisioned
Resource Role is Data Steward Manager Resource
Inside Sales Manager HR Assignment Status is Active
Resource Role is CX Inside Sales Manager
Inside Sales Manager
Resource
Inside Sales Representative HR Assignment Status is Active
Resource Role is CX Inside SalesRepresentative
Inside Sales Representative
Resource
Partner Administrator Resource Role is Partner Administrator Partner Administrator
Partner Sales Manager Resource Role is Partner Sales Manager Partner Sales Manager
Partner Sales Representative Resource Role is Partner Salesperson Partner Sales Representative
Sales Administrator HR Assignment Status is Active
Resource Role is Sales Administrator
Sales Administrator
Resource
Sales Lead Qualifier HR Assignment Status is Active
Resource Role is Sales Lead Qualifier
Sales Lead Qualifier
Resource
Sales Manager HR Assignment Status is Active
Resource Role is Sales Manager
Sales Manager
Resource
Sales Representative HR Assignment Status is Active
Resource Role is Salesperson
Sales Representative
Resource
Sales Restricted User HR Assignment Status is Active
Resource Role is Sales Restricted User
Sales Restricted User
Resource
Sales Setup User HR Assignment Status is Active
Resource Role is Sales Setup User
Application Implementation Consultant
IT Security Manager
Application Diagnostics Administrator
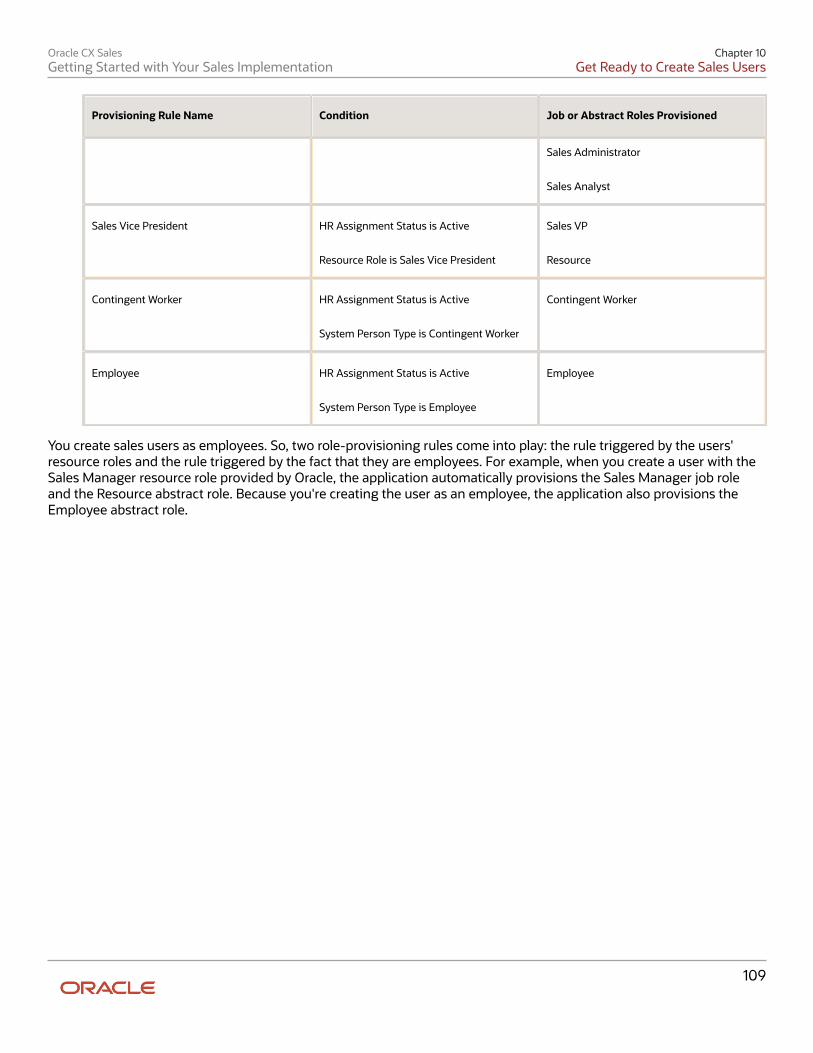
Oracle CX SalesGetting Started with Your Sales Implementation
Chapter 10Get Ready to Create Sales Users
109
Provisioning Rule Name Condition Job or Abstract Roles Provisioned
Sales Administrator
Sales Analyst
Sales Vice President HR Assignment Status is Active
Resource Role is Sales Vice President
Sales VP
Resource
Contingent Worker HR Assignment Status is Active
System Person Type is Contingent Worker
Contingent Worker
Employee HR Assignment Status is Active
System Person Type is Employee
Employee
You create sales users as employees. So, two role-provisioning rules come into play: the rule triggered by the users'resource roles and the rule triggered by the fact that they are employees. For example, when you create a user with theSales Manager resource role provided by Oracle, the application automatically provisions the Sales Manager job roleand the Resource abstract role. Because you're creating the user as an employee, the application also provisions theEmployee abstract role.
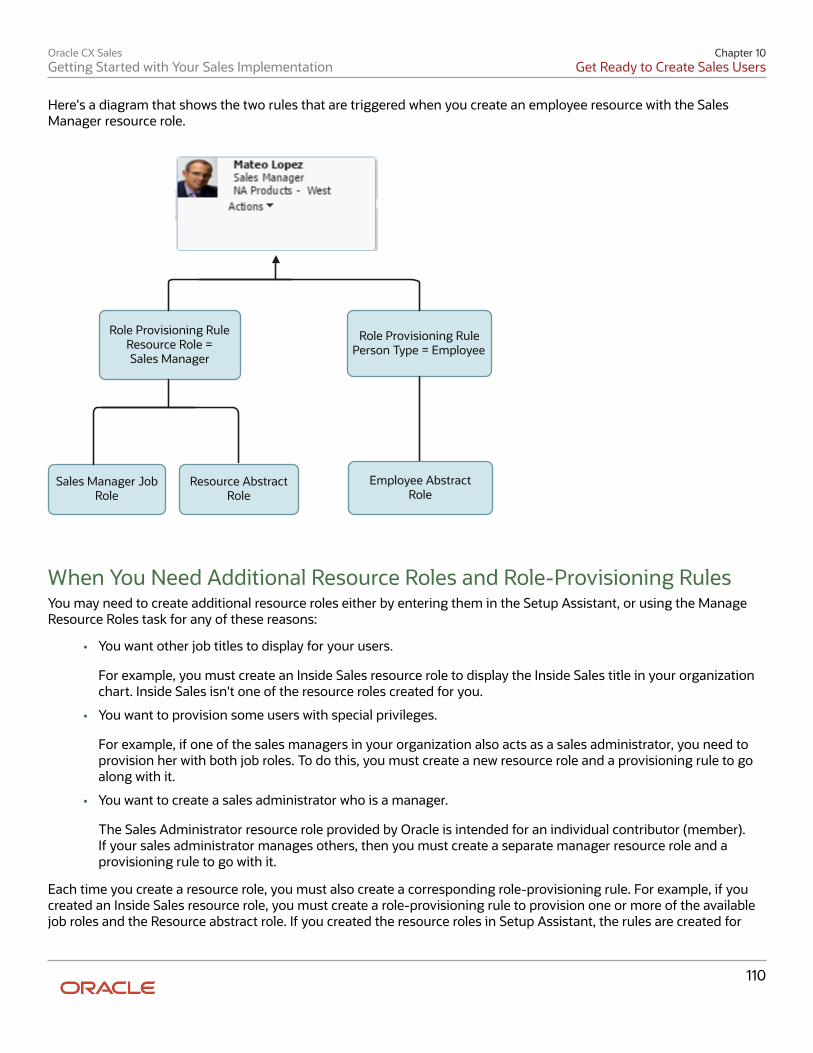
Oracle CX SalesGetting Started with Your Sales Implementation
Chapter 10Get Ready to Create Sales Users
110
Here's a diagram that shows the two rules that are triggered when you create an employee resource with the SalesManager resource role.
Sales Manager Job Role
Role Provisioning RuleResource Role = Sales Manager
Resource Abstract Role
Employee Abstract Role
Role Provisioning RulePerson Type = Employee
When You Need Additional Resource Roles and Role-Provisioning RulesYou may need to create additional resource roles either by entering them in the Setup Assistant, or using the ManageResource Roles task for any of these reasons:
• You want other job titles to display for your users.
For example, you must create an Inside Sales resource role to display the Inside Sales title in your organizationchart. Inside Sales isn't one of the resource roles created for you.
• You want to provision some users with special privileges.
For example, if one of the sales managers in your organization also acts as a sales administrator, you need toprovision her with both job roles. To do this, you must create a new resource role and a provisioning rule to goalong with it.
• You want to create a sales administrator who is a manager.
The Sales Administrator resource role provided by Oracle is intended for an individual contributor (member).If your sales administrator manages others, then you must create a separate manager resource role and aprovisioning rule to go with it.
Each time you create a resource role, you must also create a corresponding role-provisioning rule. For example, if youcreated an Inside Sales resource role, you must create a role-provisioning rule to provision one or more of the availablejob roles and the Resource abstract role. If you created the resource roles in Setup Assistant, the rules are created for
Oracle CX SalesGetting Started with Your Sales Implementation
Chapter 10Get Ready to Create Sales Users
111
you automatically. If you create the resource role using the Manage Resource Roles task, then you must create the role-provisioning rules manually.
Create Additional Resource RolesUse these steps to review the resource roles provided by Oracle and to create any additional resource roles you need.Remember that the resource role is only a title. So, if you create a resource role, you must also create the provisioningrule to go with it.
1. Open the task Manage Resource Roles from the Setup and Maintenance work area:
◦ Offering: Sales
◦ Functional Area: Users and Security
◦ Task: Manage Resource Roles
2. To review all the existing resource roles, click Search without entering any search criteria.
All the available resource roles are listed. Roles that are predefined by Oracle are labeled System.3. Here's how to create a resource role:
a. Click Create.b. In the Role Name field, enter the name of the resource role as you want it to appear in the application UI,
for example, Inside Sales.c. In the Role Code field, enter a unique internal name in capital letters. No spaces are permitted, but you
can use the underscore character (_) instead. For example, enter INSIDE_SALES.d. If the resource role belongs to a manager, select the Manager option. If the resource role belongs to an
individual contributor, such as an inside sales representative, then select the Member option.e. From the Role Type list, select Sales to classify the role that you are creating.
4. Click Save and Close.
Create Role-Provisioning Rules for the AdditionalResource RolesCreate the rules that provision the required security permissions for any new resource roles you created outside theSetup Assistant. For all internal sales users, including sales administrators, you must add the Resource abstract role inaddition to the required job roles. The Resource abstract role permits the users to access the Resource Directory. Don'tadd the Resource abstract role for partner roles.
1. In Setup and Maintenance, go to the following:
◦ Offering: Sales
◦ Functional Area: Users and Security
◦ Task: Manage HCM Role Provisioning Rules
2. On the Manage Role Mappings page, click Create.3. On the Create Role Mapping page, Mapping Name field, enter a name that helps you identify the mapping.4. In the Conditions section, enter these conditions:
Oracle CX SalesGetting Started with Your Sales Implementation
Chapter 10Get Ready to Create Sales Users
112
Field Entry
Resource Role Select the resource role you want to provision.
HR Assignment Status Select Active. This additional condition ensures that the provisioned roles are automaticallyremoved if the user is terminated in Global Human Resources.
5. In the Associated Roles region, click Add to add the job roles you want to provision.6. For all internal sales users, add the Resource abstract role. Don't add this role for partner roles.7. Make sure the Autoprovision option is selected for all the roles.8. Click Save and Close.
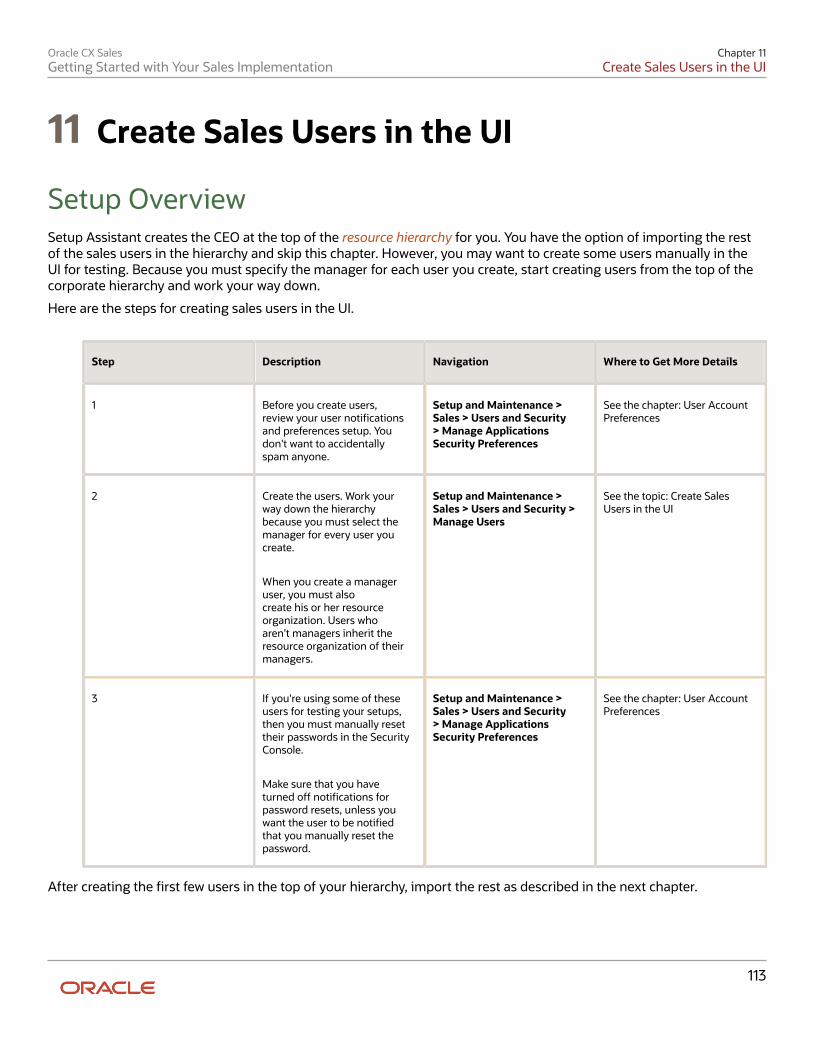
Oracle CX SalesGetting Started with Your Sales Implementation
Chapter 11Create Sales Users in the UI
113
11 Create Sales Users in the UI
Setup OverviewSetup Assistant creates the CEO at the top of the resource hierarchy for you. You have the option of importing the restof the sales users in the hierarchy and skip this chapter. However, you may want to create some users manually in theUI for testing. Because you must specify the manager for each user you create, start creating users from the top of thecorporate hierarchy and work your way down.
Here are the steps for creating sales users in the UI.
Step Description Navigation Where to Get More Details
1 Before you create users,review your user notificationsand preferences setup. Youdon't want to accidentallyspam anyone.
Setup and Maintenance >Sales > Users and Security> Manage ApplicationsSecurity Preferences
See the chapter: User AccountPreferences
2 Create the users. Work yourway down the hierarchybecause you must select themanager for every user youcreate.
When you create a manageruser, you must alsocreate his or her resourceorganization. Users whoaren't managers inherit theresource organization of theirmanagers.
Setup and Maintenance >Sales > Users and Security >Manage Users
See the topic: Create SalesUsers in the UI
3 If you're using some of theseusers for testing your setups,then you must manually resettheir passwords in the SecurityConsole.
Make sure that you haveturned off notifications forpassword resets, unless youwant the user to be notifiedthat you manually reset thepassword.
Setup and Maintenance >Sales > Users and Security> Manage ApplicationsSecurity Preferences
See the chapter: User AccountPreferences
After creating the first few users in the top of your hierarchy, import the rest as described in the next chapter.
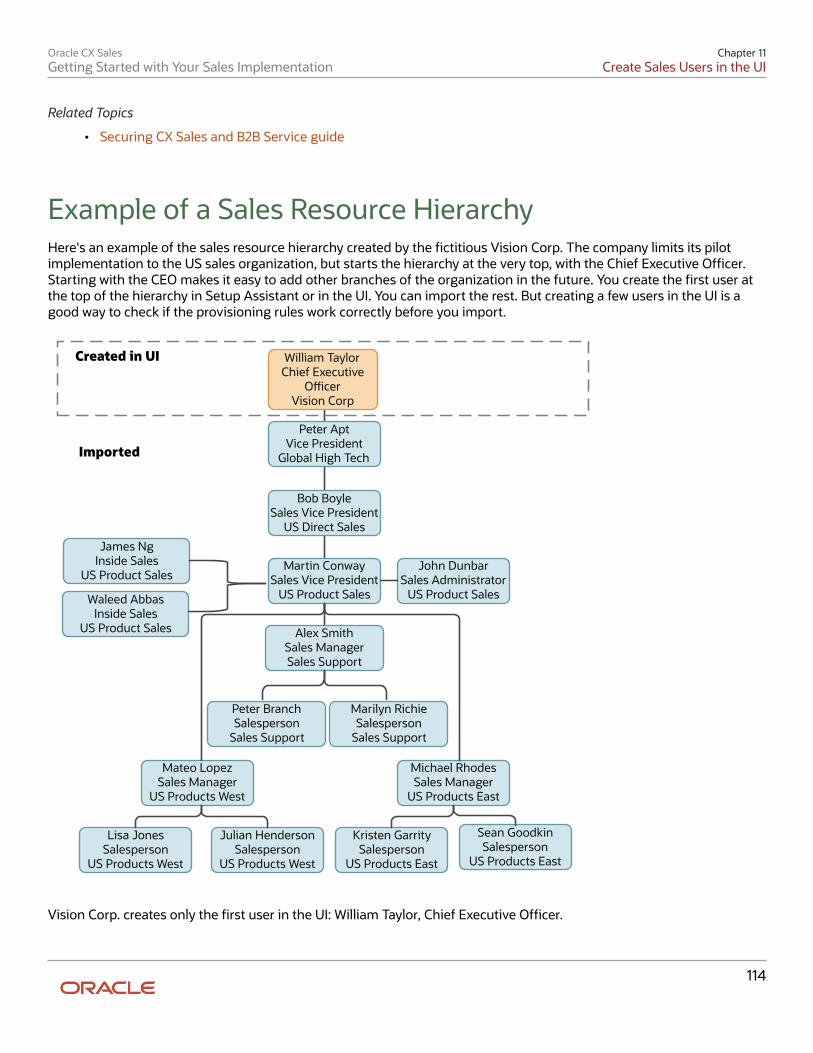
Oracle CX SalesGetting Started with Your Sales Implementation
Chapter 11Create Sales Users in the UI
114
Related Topics
• Securing CX Sales and B2B Service guide
Example of a Sales Resource HierarchyHere's an example of the sales resource hierarchy created by the fictitious Vision Corp. The company limits its pilotimplementation to the US sales organization, but starts the hierarchy at the very top, with the Chief Executive Officer.Starting with the CEO makes it easy to add other branches of the organization in the future. You create the first user atthe top of the hierarchy in Setup Assistant or in the UI. You can import the rest. But creating a few users in the UI is agood way to check if the provisioning rules work correctly before you import.
Lisa JonesSalesperson
US Products West
Julian HendersonSalesperson
US Products West
Sean GoodkinSalesperson
US Products East
Kristen GarritySalesperson
US Products East
Mateo LopezSales Manager
US Products West
Michael RhodesSales Manager
US Products East
Peter BranchSalesperson
Sales Support
Marilyn RichieSalesperson
Sales Support
Alex SmithSales Manager Sales Support
Martin ConwaySales Vice President
US Product Sales
John DunbarSales Administrator
US Product Sales
Bob BoyleSales Vice President
US Direct Sales
Peter AptVice President
Global High Tech
William TaylorChief Executive
OcerVision Corp
James NgInside Sales
US Product Sales
Waleed AbbasInside Sales
US Product Sales
Created in UI
Imported
Vision Corp. creates only the first user in the UI: William Taylor, Chief Executive Officer.
Oracle CX SalesGetting Started with Your Sales Implementation
Chapter 11Create Sales Users in the UI
115
Create Sales Users in the UIHere's how to create sales users in the UI. The procedure is slightly different for managers and individual contributors:
• You must assign each manager with his or her own resource organization. You can create the resourceorganization while creating the manager.
• Each individual contributor automatically inherits the manager's resource organization.
The application determines who's a manager from the resource role you assign to the user.
1. There are two ways to get to the UI where you create sales users:
◦ In Setup and Maintenance, go to the following:
• Offering: Sales• Functional Area: Users and Security• Task: Manage Users
◦ In the Navigator, click Users and Roles under the My Team heading.
2. On the Search Person page, click Create.3. On the Create User page, Personal Details region, enter the user's name and a unique email address.
The application sends all notifications regarding the user account to this email address unless you turn offnotifications in the Security Console work area.
Tip: If you want ensure that users are never notified by email, you can change the domain of theemail addresses to any of the special discard email domains provided by Oracle. For example, youcan substitute @discard.mail.us1.cloud.oracle.com. See the Implementing Sales guide for details.
After you create the user, you can no longer update the email address in the Manage Users work area. Youmust instead update the email address on the Users tab in the Security Console work area or using ImportManagement.
4. The application prepopulates today's date in the Hire Date field and uses that date as the start date for theresource.
If you're planning to use quotas, then you must make sure that the hire date is a date before the start of the firstquota period. For example, if you're allocating monthly quotas for fiscal year July 01, 2019 to June 30, 2020,then you must enter a hire date of 7-1-2019 or earlier. You can't change the hire date after you create the user.
5. In the User Details region, enter the user name.
If you leave the User Name field blank, then the application automatically creates a user name for you. Bydefault, the application uses the email as the user name. You can select other default user name formats, suchas first name initial and last name, in the Security Console work area.
6. If you didn't disable notifications in the Security Console, you can select the Send user name and passwordoption. Selecting the option sends users a URL they can use to reset their password and sign in. The applicationsends the email notification immediately after you save the user record for the first time. This option is availableonly before you save. After you save the record, you must instead use the Security Console to reset thepassword and send the notification.
7. Make these selections in the Employment Information region:
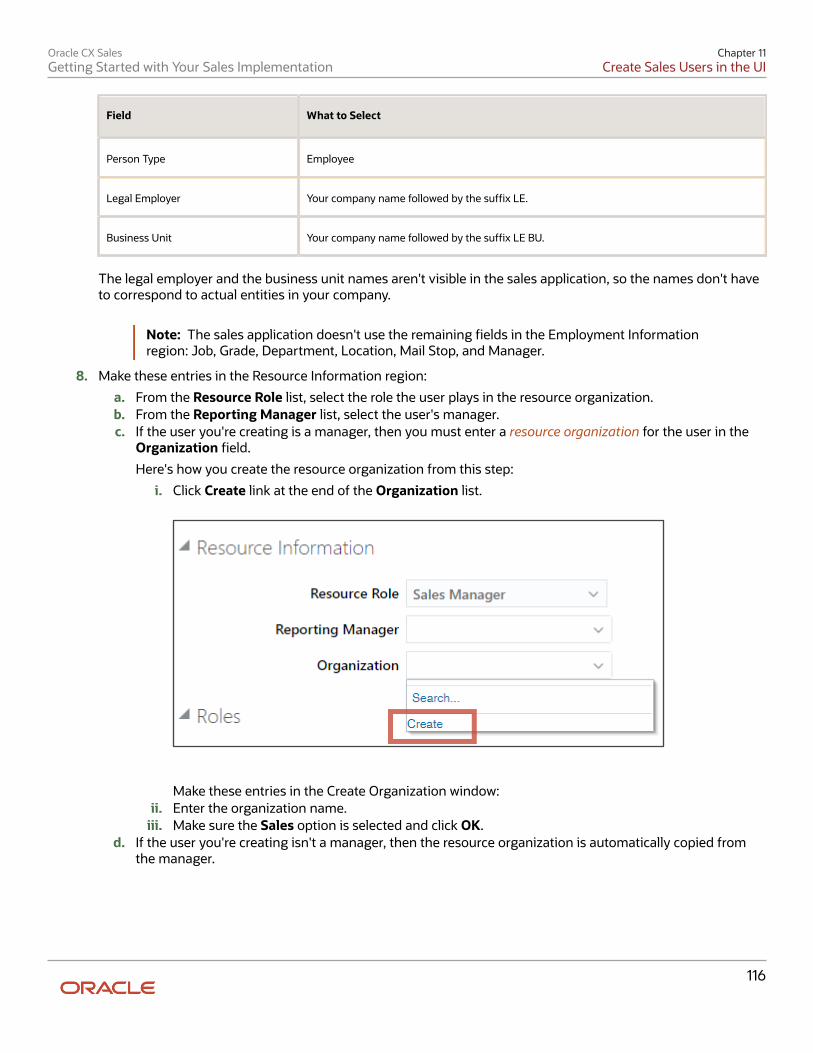
Oracle CX SalesGetting Started with Your Sales Implementation
Chapter 11Create Sales Users in the UI
116
Field What to Select
Person Type Employee
Legal Employer Your company name followed by the suffix LE.
Business Unit Your company name followed by the suffix LE BU.
The legal employer and the business unit names aren't visible in the sales application, so the names don't haveto correspond to actual entities in your company.
Note: The sales application doesn't use the remaining fields in the Employment Informationregion: Job, Grade, Department, Location, Mail Stop, and Manager.
8. Make these entries in the Resource Information region:
a. From the Resource Role list, select the role the user plays in the resource organization.b. From the Reporting Manager list, select the user's manager.c. If the user you're creating is a manager, then you must enter a resource organization for the user in the
Organization field.
Here's how you create the resource organization from this step:
i. Click Create link at the end of the Organization list.
Make these entries in the Create Organization window:ii. Enter the organization name.
iii. Make sure the Sales option is selected and click OK.d. If the user you're creating isn't a manager, then the resource organization is automatically copied from
the manager.
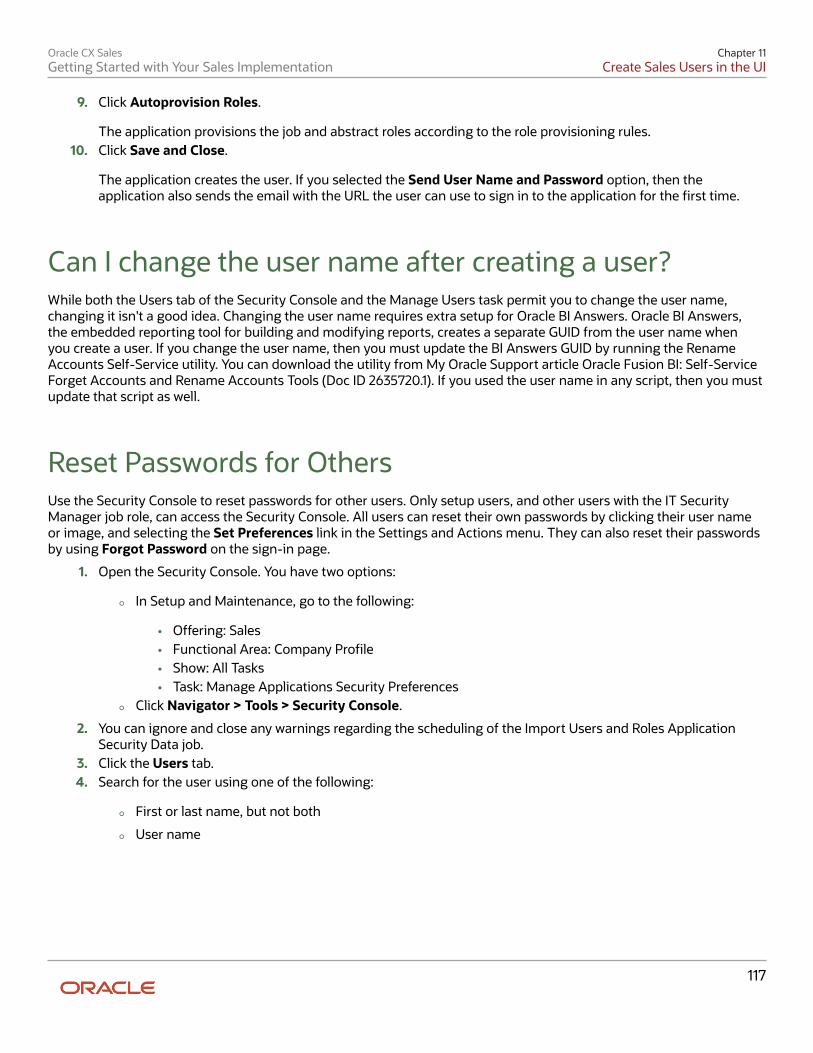
Oracle CX SalesGetting Started with Your Sales Implementation
Chapter 11Create Sales Users in the UI
117
9. Click Autoprovision Roles.
The application provisions the job and abstract roles according to the role provisioning rules.10. Click Save and Close.
The application creates the user. If you selected the Send User Name and Password option, then theapplication also sends the email with the URL the user can use to sign in to the application for the first time.
Can I change the user name after creating a user?While both the Users tab of the Security Console and the Manage Users task permit you to change the user name,changing it isn't a good idea. Changing the user name requires extra setup for Oracle BI Answers. Oracle BI Answers,the embedded reporting tool for building and modifying reports, creates a separate GUID from the user name whenyou create a user. If you change the user name, then you must update the BI Answers GUID by running the RenameAccounts Self-Service utility. You can download the utility from My Oracle Support article Oracle Fusion BI: Self-ServiceForget Accounts and Rename Accounts Tools (Doc ID 2635720.1). If you used the user name in any script, then you mustupdate that script as well.
Reset Passwords for OthersUse the Security Console to reset passwords for other users. Only setup users, and other users with the IT SecurityManager job role, can access the Security Console. All users can reset their own passwords by clicking their user nameor image, and selecting the Set Preferences link in the Settings and Actions menu. They can also reset their passwordsby using Forgot Password on the sign-in page.
1. Open the Security Console. You have two options:
◦ In Setup and Maintenance, go to the following:
• Offering: Sales• Functional Area: Company Profile• Show: All Tasks• Task: Manage Applications Security Preferences
◦ Click Navigator > Tools > Security Console.
2. You can ignore and close any warnings regarding the scheduling of the Import Users and Roles ApplicationSecurity Data job.
3. Click the Users tab.4. Search for the user using one of the following:
◦ First or last name, but not both
◦ User name
Oracle CX SalesGetting Started with Your Sales Implementation
Chapter 11Create Sales Users in the UI
118
Here's a screenshot of the Users tab highlighting the location of the Action menu.
5. From the Action menu, select Reset Password.6. In the Reset Password page, you have two options:
◦ To send an email to users with a link they can use to create their own passwords, select theAutomatically generate password option.
◦ Reset the password yourself:
i. Select the Manually change the password option.ii. Enter the new password twice.
Note: The manual option is available only if you selected the Administrator can manuallyreset password option while editing the password policy for the DEFAULT user category inthe Security Console.
7. Click Reset Password.
Related Topics
• Set Up Preferences for User Names, Passwords, and Notifications
Oracle CX SalesGetting Started with Your Sales Implementation
Chapter 12Import Sales Users
119
12 Import Sales Users
Overview of Sales User ImportAfter you create a couple of sales users in the UI to test your setup, you're ready to import the rest using the resourceimport Excel macro provided by Oracle. The import creates the resource organizations for each manager, creates thesales resource organization hierarchy, and provisions the users with the job roles and abstract roles they need. You canimport up to 5,000 users at a time using the macro. If you import multiple batches of users, you must ensure that eachimport completes before starting another.
Note:• Use the import macro only for sales users. You can't use it to import service users or contracts users, for example.• You can import additional attributes by appending columns to the import macro, but you can't make any other
changes. You can't edit the Visual Basic for Applications (VBA) code or other functions.
Here's an overview of the setup steps for importing users using the import macro.
Step Description Navigation Where to Get More Details
1 Synchronize sales securityinformation with the LDAPdirectory before you importsales users for the first timeand also after creating anyof your own job roles. Toretrieve the latest securityinformation, you run theRetrieve Latest LDAP Changesprocess using the Run Userand Roles SynchronizationProcess task.
Setup and Maintenance >Sales > Users and Security> Run User and RolesSynchronization Process
See the topic: SynchronizeYour Sales Application with theLDAP Directory
2 From article Oracle CX Sales:Getting Started with YourSales Implementation: ImportMacros (Doc ID 2229503.1) onsupport.oracle.com, downloadthe Resource Import Macroand the .jar file into thesame desktop folder.
None. See the topic Download theMacro for Importing SalesUsers
3 Here's what to enter in themacro:
1. Enter the business unitand the legal entity. Youcan obtain these fromthe Review CompanyInformation task youcompleted earlier.
None. See the topic: Enter Sales UserData into the Resource ImportMacro and Import.
For steps to obtain the namesof the business unit and legalentity, see the topic: ReviewYour Company Informationand Corporate Currency topic

Oracle CX SalesGetting Started with Your Sales Implementation
Chapter 12Import Sales Users
120
Step Description Navigation Where to Get More Details
2. Download anyadditional resourceroles you created byclicking a button on theRole Details worksheet.
3. Enter the userinformation in theResource worksheet,starting from the top ofthe user hierarchy.
4. Click Create ImportActivity to import.
in the Run Setup Assistantchapter.
4 After each import, you mustrun 4 processes to completeresource and resourcehierarchy creation:
• Send Pending LDAPRequests
• Update Person SearchKeywords
• Reporting HierarchyGeneration
This process requiresyou to selectparameters when yourun it. For the others,you just submit.
• Synchronize User GUID
Navigator > Tools >Scheduled Processes
See the topic: Run Processesto Complete Resource andResource Hierarchy Creation
5 In the Security Console workarea reset the password for asales user you want to use fortesting.
Setup and Maintenance >Sales > Users and Security> Manage ApplicationsSecurity Preferences
See the topic Reset Passwordsfor Others.
6 Sign in as the test userand review the resourcehierarchy you created bynavigating to the ResourceDirectory and displaying agraphical representation of thehierarchy.
You can upload user imagesin the Resource page in theResource Directory; youcannot import them. Use theManage Users task to correctany minor errors. Alternatively,you can make corrections inthe macro and import again.
Navigator > ResourceDirectory
See the Review the ResourceHierarchy You Created andUpload Users Images topic inthis chapter.
7 If, and only if, you enabledforecasting by opportunityowner in Setup Assistant, then
Navigator > Tools >Scheduled Processes
See the topic Run the RefreshTerritories from ResourcesProcess.
Oracle CX SalesGetting Started with Your Sales Implementation
Chapter 12Import Sales Users
121
Step Description Navigation Where to Get More Details
you must run the RefreshTerritories from Resourcesprocess to build the territoriesfor the resources you justimported. If you're usingsales territories to assignopportunities by address,product or other dimensions,then you can skip this step.
Synchronize Your Sales Application with the LDAPDirectoryYou must run the Retrieve Latest LDAP Changes process before you import sales users for the first time and aftercreating any of your own job roles. The process retrieves the latest security information from the LDAP directory.
1. Open the task Run User and Role Synchronization Process from the Setup and Maintenance work area:
◦ Offering: Sales
◦ Functional Area: Users and Security
◦ Task: Run User and Roles Synchronization Process
2. On the Retrieve Latest LDAP Changes page, click Submit.
Download the User Import Macro and Import Sales Users
Download the Macro for Importing Sales UsersHere's how to download the Microsoft Excel macro for importing users from My Oracle Support.
1. Sign in to support.oracle.com.2. Search for 2229503.1.3. Scroll down in the article to the Details section.4. Download the .Jar file and the Resource Import Macro file to the same directory on your desktop.
The application saves import logs to the same folder.
Oracle CX SalesGetting Started with Your Sales Implementation
Chapter 12Import Sales Users
122
Enter Sales User Data into the Resource Import Macro and ImportHere's how to enter data into the Resource Import Macro and import. You can import up to 5,000 users at a time. If youimport multiple batches of users, you must ensure that each import completes before starting another.
1. Confirm that you have the following information:
◦ Legal entity name (usually your company name followed by LE)
◦ Business unit name (usually your company name followed by BU)
◦ The name of the resource organization that belongs to the resource who manages the first user or usersyou're importing.
The resource organization name forms the link between the resources you created and those you'reabout to import. If you're importing users who report to the CEO you created in the Setup Assistant, forexample, then you must enter the resource organization name you entered in Setup Assistant for thatCEO. Remember that, because the resource hierarchy is different from the human resources hierarchy,the manager in the resource hierarchy isn't necessarily the same person as the actual manager in the HRorganization.
2. Open the Resource Import Macro file you downloaded earlier.3. Enable macros in Microsoft Excel, if required.4. Click the Role Details worksheet. The standard sales roles are listed:
◦ Chief Executive Officer
◦ Sales Administrator
◦ Sales Manager
◦ Sales Vice President
◦ Salesperson
5. If you created additional resource roles in Setup Assistant or manually, click Populate Roles from Server andenter the following details in the Login window:
◦ Host information for your environment.
The host name is the portion of the URL of your environment between https:// and the next forwardslash, /. You can get the correct host name from the URL by signing in to your application. Don't copy thehost name from your application sign-in page because the URL is different.
◦ Your user name
◦ Your password
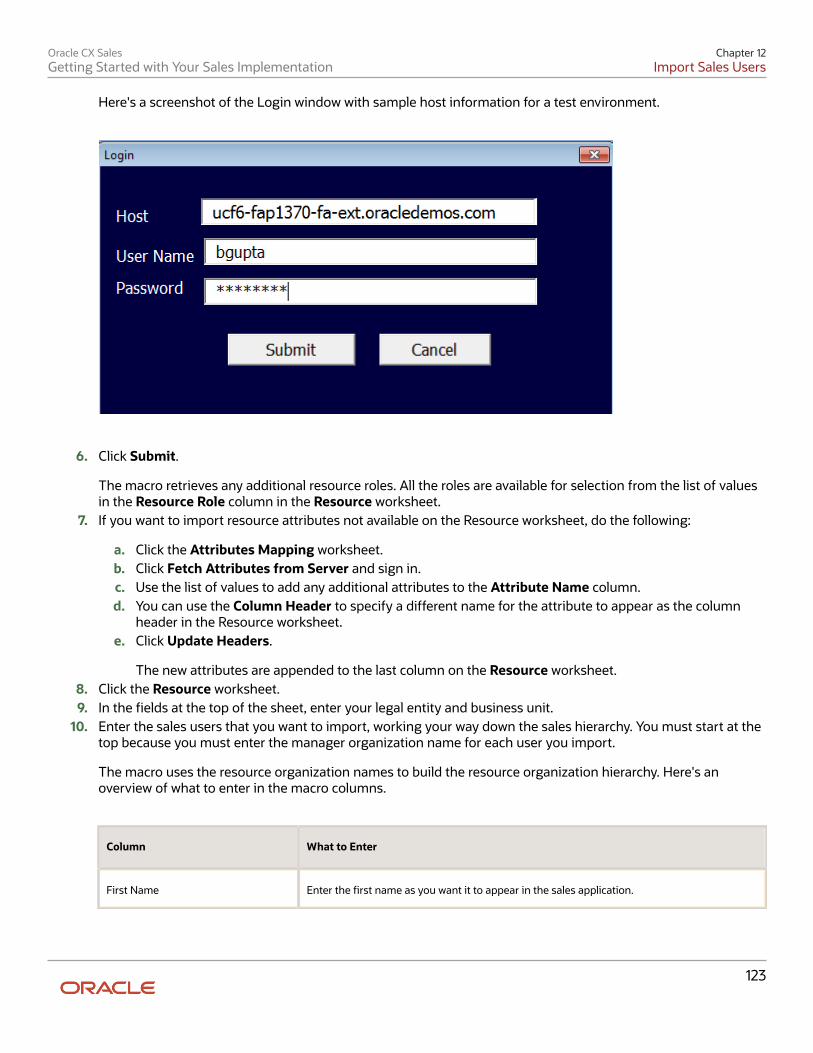
Oracle CX SalesGetting Started with Your Sales Implementation
Chapter 12Import Sales Users
123
Here's a screenshot of the Login window with sample host information for a test environment.
6. Click Submit.
The macro retrieves any additional resource roles. All the roles are available for selection from the list of valuesin the Resource Role column in the Resource worksheet.
7. If you want to import resource attributes not available on the Resource worksheet, do the following:
a. Click the Attributes Mapping worksheet.b. Click Fetch Attributes from Server and sign in.c. Use the list of values to add any additional attributes to the Attribute Name column.d. You can use the Column Header to specify a different name for the attribute to appear as the column
header in the Resource worksheet.e. Click Update Headers.
The new attributes are appended to the last column on the Resource worksheet.8. Click the Resource worksheet.9. In the fields at the top of the sheet, enter your legal entity and business unit.
10. Enter the sales users that you want to import, working your way down the sales hierarchy. You must start at thetop because you must enter the manager organization name for each user you import.
The macro uses the resource organization names to build the resource organization hierarchy. Here's anoverview of what to enter in the macro columns.
Column What to Enter
First Name Enter the first name as you want it to appear in the sales application.
Oracle CX SalesGetting Started with Your Sales Implementation
Chapter 12Import Sales Users
124
Column What to Enter
Last Name Enter the last name as you want it to appear in the sales application.
Email You must enter a unique email address.
Resource Role From the list, select the name of the resource role that you're assigning to the user. If youpaste your data into the worksheet, it gets verified when you import.
Organization Name For each manager, enter the name of his or her resource organization. Entry is disabled forindividual contributors because they inherit the organizations of their managers.
The organization names you enter here appear in the Resource Directory and elsewhere inthe UI.
Manager Organization Name Enter the organization name of the user's manager. You must enter the exact name youentered for the manager. Even an extra period or change in capitalization can throw theimport off.
11. When you're done with your entries, click Create Import Activity.12. If you're asked to correct errors in your entries, do the following:
a. Click OK
The Error worksheet displays your errors.b. Click each error link in column D and make the correction on the Resource worksheet.
Note: After you correct an error, you must click outside the field for the correction to berecognized.
c. Click Create Import Activity again.13. On the Login page, enter the host, user name, and password if required.
If you previously entered these details on the Role Details worksheet when retrieving roles from the server, thenthe same values appear here.
14. Click Submit.
The application displays one of the messages listed in the following table.
Message Meaning
The file import activitywas submitted successfully.
Your import has started. If the file import activity is submitted successfully, then theconfirmation message displays the job ID.
Unable to connect to theserver at this time.
You may have entered an incorrect host.
Oracle CX SalesGetting Started with Your Sales Implementation
Chapter 12Import Sales Users
125
Message Meaning
Unable to submit the fileimport activity. Check logfor details.
Open the Errors work sheet to view the error details.
15. If your import activity was submitted successfully, then click Activity Details to monitor its progress.The Activity Details window lists the import activity name, its ID, and its status.The import may take a few minutes to complete.
◦ You can refresh the status periodically by clicking Refresh.
◦ If your import completed successfully, then the status listed is Completed.
16. If the import activity completes with errors, here's how to correct them:a. Click Generate Log to display any error messages.b. On the Errors worksheet, click the value in the Location column (D) to navigate to the record, correct the
issue, and click Submit again to create a new import activity.17. After the import completes with the status of Completed, you can click Generate Log to save a file that lists the
imported sales users.The file is saved to the destination folder where you saved the macro.
18. Save the macro file with your data for updates at a later time. You can use the macro to make both minorupdates such as misspelling of names. With a bit of extra work, you can even use the macro to change the saleshierarchy.
19. Now that you have completed creating users, verify the import from the Manage Users page or from theResource Directory.
Run Processes to Complete Resource and Resource HierarchyCreationAfter you import sales users, you must run four processes to complete the resource and resource hierarchy creation:
• Send Pending LDAP Requests
• Update Person Search Keywords
• Reporting Hierarchy Generation
• Synchronize User GUID
Here's how to run the processes:
1. Navigate to Navigator > Tools > Scheduled Processes.2. Click Schedule New Process.3. In the Schedule New Process window, Name field, click Search: Name, the down arrow.4. At the bottom and click Search.5. In the Search and Select: Name window, enter the name of the process and click Search.6. Select the process name in the search results and click OK. The Schedule New Process window now displays the
name of your process.7. In the Schedule New Process window, click OK.
Oracle CX SalesGetting Started with Your Sales Implementation
Chapter 12Import Sales Users
126
8. In the Process Details window, you must enter parameters only for the Reporting Hierarchy Generation process.The other processes don't require parameters. Here's what to enter for Reporting Hierarchy Generation:
a. In Tree Structure Code, select RESOURCE_ORG_TREE_STRUCTURE.b. In Tree Code, select GLOBAL_SALES_MARKETING.c. In Tree Version ID, select the ACTIVE version (the only one displayed).
9. Click Submit.
Review the Resource Hierarchy You Created and Upload UserImagesNow that you have created users, you can verify the resource hierarchy in the Resource Directory and upload userimages. The Resource Directory displays a visual representation of the hierarchy and lets you view and edit details foreach resource. The Resource Directory is part of the HCM application, so much of the detailed information you see isonly used if you implement sales together with HCM. For example, your sales application doesn't track or use resourceskills and doesn't use resource teams, so you can ignore these.
Verify the Resource Hierarchy
1. Click Resource Directory in the Navigator.2. In the Resource Directory page, search for the top user (the CEO) by first name using the Search: Resources
panel on the left of the page.3. Click the user name link in the Search Results.4. Here's what you can do on the Resource page:
◦ View the visual representation of the resource hierarchy by clicking Show Reporting Hierarchy (callout 1in the screenshot).
◦ Upload a picture of the user by clicking Upload Picture (callout 2).
◦ Review the job and abstract roles provisioned to the user on the Roles tab.
Here's a screenshot of the Resource page showing details for the CEO. Because this screenshot was taken in anenvironment with both sales and human resources implemented, the page includes detail you don't see in asales-only implementation. The Job Title, Department, and Manager fields are more important for HCM, so isthe information on all of the tabs except Roles. Remember that the resource hierarchy in sales is different fromthe HCM hierarchy. The resource hierarchy displays the resource role that's in the Role field and the resourceorganization shown in the Organization field, not the job title and department. In this UI, you can maintain

Oracle CX SalesGetting Started with Your Sales Implementation
Chapter 12Import Sales Users
127
information about team membership, skills, and so on, but this information isn't used elsewhere in the salesapplication.
1
2
3
5. Click Show Reporting Hierarchy.
The application displays a box for the resource.
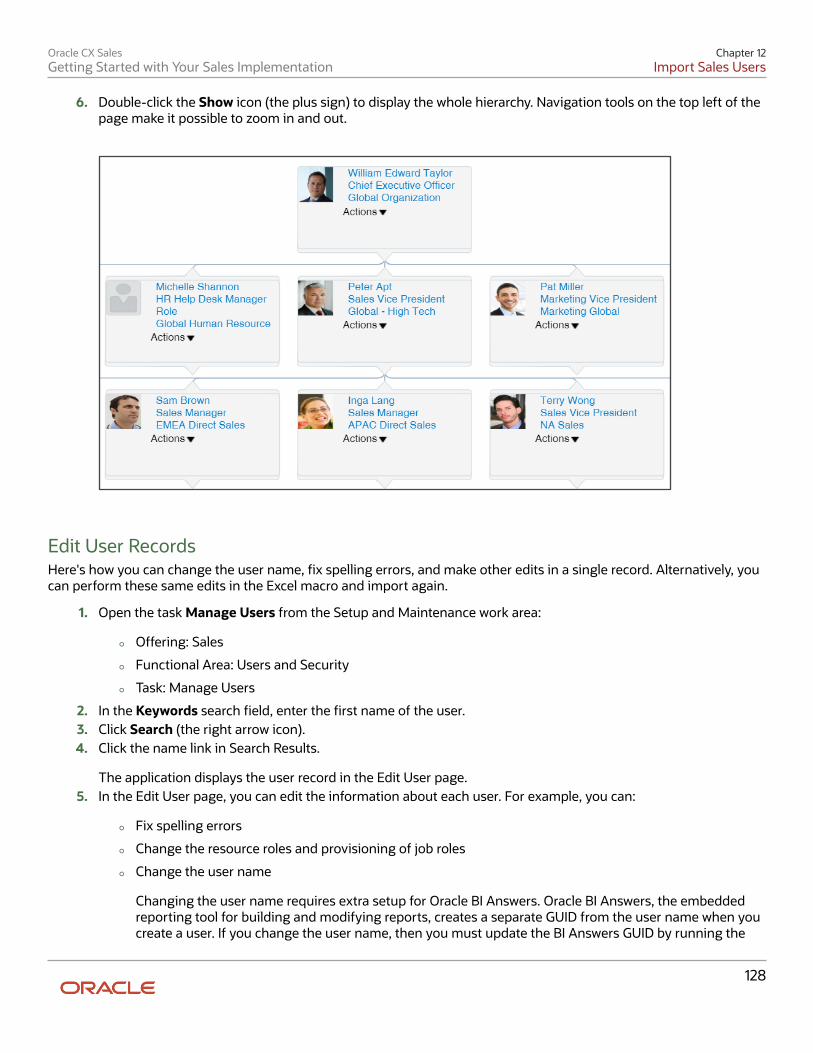
Oracle CX SalesGetting Started with Your Sales Implementation
Chapter 12Import Sales Users
128
6. Double-click the Show icon (the plus sign) to display the whole hierarchy. Navigation tools on the top left of thepage make it possible to zoom in and out.
Edit User RecordsHere's how you can change the user name, fix spelling errors, and make other edits in a single record. Alternatively, youcan perform these same edits in the Excel macro and import again.
1. Open the task Manage Users from the Setup and Maintenance work area:
◦ Offering: Sales
◦ Functional Area: Users and Security
◦ Task: Manage Users
2. In the Keywords search field, enter the first name of the user.3. Click Search (the right arrow icon).4. Click the name link in Search Results.
The application displays the user record in the Edit User page.5. In the Edit User page, you can edit the information about each user. For example, you can:
◦ Fix spelling errors
◦ Change the resource roles and provisioning of job roles
◦ Change the user name
Changing the user name requires extra setup for Oracle BI Answers. Oracle BI Answers, the embeddedreporting tool for building and modifying reports, creates a separate GUID from the user name when youcreate a user. If you change the user name, then you must update the BI Answers GUID by running the
Oracle CX SalesGetting Started with Your Sales Implementation
Chapter 12Import Sales Users
129
Rename Accounts Self-Service utility. You can download the utility from My Oracle Support article OracleFusion BI: Self-Service Forget Accounts and Rename Accounts Tools (Doc ID 2635720.1)
6. Click Save and Close when you are done.
Run the Refresh Territories from Resources ProcessIf you're using address, product or another sales territory dimension to assign opportunities, then you can skip thissetup entirely. If you enabled forecasting by territory owner in Setup Assistant, this topic is for you: you must refreshthe territories whenever you import sales users (resources) by running the Refresh Territories from Resources process.While this process runs automatically before each forecasting window, running the process immediately after importingsales users assures that users get to see forecasts immediately rather than having to wait for the next forecastingperiod. The process updates the territory hierarchy to match your resource hierarchy, with the resources as territoryowners.
1. Click Navigator > Tools > Scheduled Processes.2. On the Overview page, click Schedule New Process.3. In the Schedule New Process window, enter Refresh Territories from Resources in the Name field and press
Return.4. Select the process and click OK.
How can I update the sales organization hierarchy?You can use the import Excel macro to update the sales organization hierarchy, but you have to make somemodifications first:
1. You must add a column to the macro for ResourcePartyNumber. The Resource Party Number is required toidentify each resource.
2. You must export the Resource Party Number for your resources and add them to the column.
Importing your updates takes care of many steps that you would have to perform manually in the Manage Resources UI.For example, if a sales representative gets promoted to a manager, then the import completes these actions for you:
• Automatically end-dates her Sales Representative job role
• Assigns her the Sales Manager resource role
• Automatically provisions her the Sales Manager job role
The import doesn't reassign a manager's reports if the manager moves to a different organization. If you do makeresource hierarchy changes and want these changes reflected immediately in your sales forecasts, you must run theRefresh Territories from Resources process.
Related Topics
• Securing CX Sales and B2B Service guide
• Export Data
Oracle CX SalesGetting Started with Your Sales Implementation
Chapter 12Import Sales Users
130
How can I change the name of the top resourceorganization and other resource organizations?You can change the name of the top resource organization or any other resource organization by editing the nameusing the Manage Internal Resource Organizations task.
1. In Setup and Maintenance, go to the Manage Internal Resource Organizations task:
◦ Offering: Sales
◦ Functional Area: Users and Security
◦ Task: Manage Internal Resource Organizations
2. You can search for the organization by name, or select Sales as the Usage for your search.3. Edit the organization name and save your changes.
Oracle CX SalesGetting Started with Your Sales Implementation
Chapter 13Sales Catalog
131
13 Sales Catalog
Setup OverviewThe Setup Assistant completes all the prerequisites for creating your sales catalog, so you're ready to import theproduct groups and products and publish the catalog. Here's an overview.
What Setup Assistant Completes for You• Creates the root product group.
• Creates all the prerequisites for creating and importing products. This includes creating the required itemmaster organization and the units of measure provided by Oracle Fusion Product Model.
• Enables the sales catalog for use by selecting the root node as the "base usage". This step tells the applicationwhich product groups to display in the sales catalog.
• Runs the scheduled process Refresh Denormalized Product Catalog Table for BI. This process must be run eachtime you change the base usage.
Overview of Steps to Perform ManuallyHere's an overview of the setups you must complete manually.
Step Description Navigation Where to Get More Details
2 Review the units of measureto make sure you have all youneed.
Setup and Maintenance >Sales > Sales Catalog andProducts > Manage Units ofMeasure
See the topic: Review the Unitsof Measure
3 From My Oracle Support,download the Excel macrosand the .jar file you need toimport products and productgroups to a folder on yourdesktop.
Importing the sales cataloginvolves four steps usingseparate macros:
1. You import theproducts
2. You import the productgroups
3. You import therelationship betweenthe products andproduct groups,
In your browser, navigate tosupport.oracle.com and searchfor the document (Doc ID2229503.1).
See the topic: Download theMacros for Importing Productsand Product Groups
Oracle CX SalesGetting Started with Your Sales Implementation
Chapter 13Sales Catalog
132
Step Description Navigation Where to Get More Details
specifying whichproducts belong inwhich product groups
4. You import thestructure of the productgroups in the catalog
4 Enter product informationin the product import macro(Product_Import_Macro.xslm)and import the products.
You carry out this task in theExcel macro.
See the topic: Enter Data intothe Product Import Macro andImport
5 Verify the products youimported in the Productswork area and, optionally, addproduct images.
In your application, navigateto the Products work area andsearch for each product youwant to edit.
See the topic: Verify ImportedProducts and Add ProductImages
6 Import the relationshipsbetween product groupsand products usingthe product group andproduct relationship macro(ProductGroupItem_Import_Macro.xslm).
You carry out this task in theExcel macro.
See the topic: Import theRelationships BetweenProduct Groups and Products
7 Obtain the reference numberfor the root product groupSetup Assistant created foryou. You need the referencenumber to create the linkbetween the root and theproduct groups you import.
Setup and Maintenance >Sales > Sales Catalog andProducts > Manage ProductGroups
See the topic: Obtain theReference Number for theRoot Product Group
8 Enter the product grouphierarchy informationin the product grouprelationship macro(ProductGroupRelationSetup_Import_Macro.xslm).
You carry out this task in theExcel macro.
See the topic: Import ProductGroup Hierarchy Information
9 Validate the sales catalog onthe Manage Product Groupspage.
Setup and Maintenance >Sales > Sales Catalog andProducts > Manage ProductGroups
None
10 Enable browsing of thesales catalog while editingopportunities by settingthe system profile optionBrowse Sales Catalog inOpportunities Enabled(MOO_ENABLE_BROWSE_CATALOG),to Yes.
Setup and Maintenance> Sales > Opportunities >Manage Opportunity ProfileOptions
See the topic: EnableSales Catalog Browsing inOpportunities
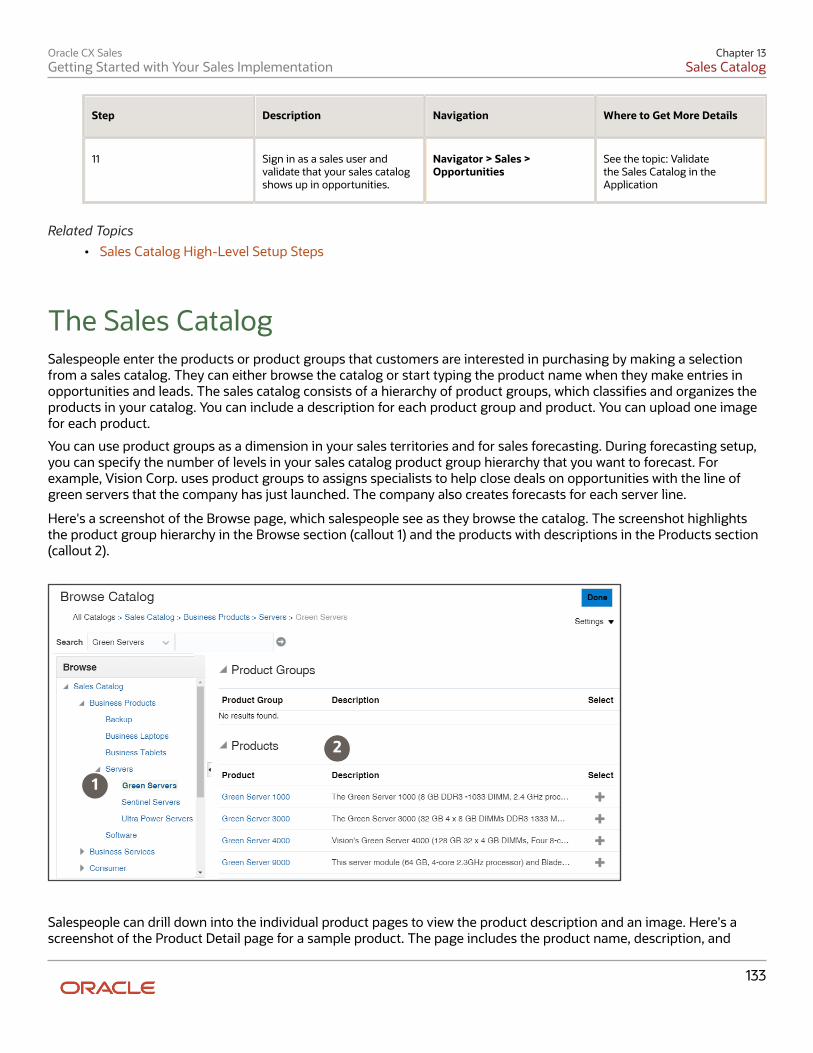
Oracle CX SalesGetting Started with Your Sales Implementation
Chapter 13Sales Catalog
133
Step Description Navigation Where to Get More Details
11 Sign in as a sales user andvalidate that your sales catalogshows up in opportunities.
Navigator > Sales >Opportunities
See the topic: Validatethe Sales Catalog in theApplication
Related Topics• Sales Catalog High-Level Setup Steps
The Sales CatalogSalespeople enter the products or product groups that customers are interested in purchasing by making a selectionfrom a sales catalog. They can either browse the catalog or start typing the product name when they make entries inopportunities and leads. The sales catalog consists of a hierarchy of product groups, which classifies and organizes theproducts in your catalog. You can include a description for each product group and product. You can upload one imagefor each product.
You can use product groups as a dimension in your sales territories and for sales forecasting. During forecasting setup,you can specify the number of levels in your sales catalog product group hierarchy that you want to forecast. Forexample, Vision Corp. uses product groups to assigns specialists to help close deals on opportunities with the line ofgreen servers that the company has just launched. The company also creates forecasts for each server line.
Here's a screenshot of the Browse page, which salespeople see as they browse the catalog. The screenshot highlightsthe product group hierarchy in the Browse section (callout 1) and the products with descriptions in the Products section(callout 2).
1
2
Salespeople can drill down into the individual product pages to view the product description and an image. Here's ascreenshot of the Product Detail page for a sample product. The page includes the product name, description, and
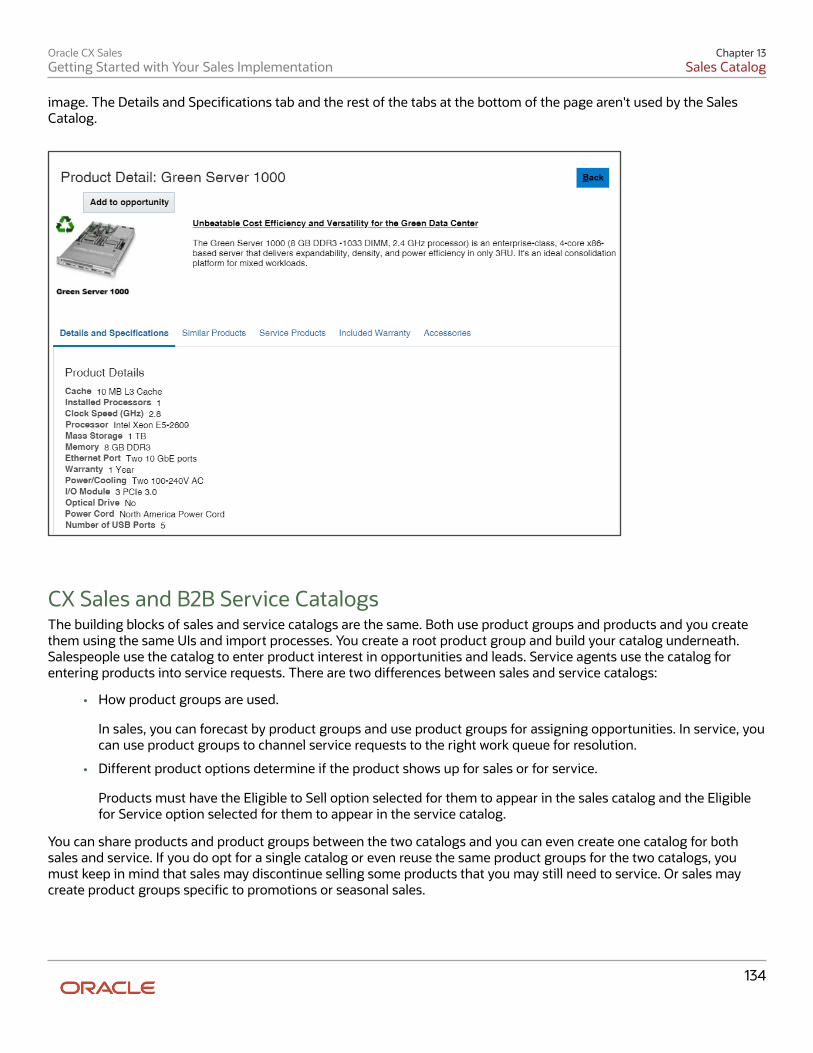
Oracle CX SalesGetting Started with Your Sales Implementation
Chapter 13Sales Catalog
134
image. The Details and Specifications tab and the rest of the tabs at the bottom of the page aren't used by the SalesCatalog.
CX Sales and B2B Service CatalogsThe building blocks of sales and service catalogs are the same. Both use product groups and products and you createthem using the same UIs and import processes. You create a root product group and build your catalog underneath.Salespeople use the catalog to enter product interest in opportunities and leads. Service agents use the catalog forentering products into service requests. There are two differences between sales and service catalogs:
• How product groups are used.
In sales, you can forecast by product groups and use product groups for assigning opportunities. In service, youcan use product groups to channel service requests to the right work queue for resolution.
• Different product options determine if the product shows up for sales or for service.
Products must have the Eligible to Sell option selected for them to appear in the sales catalog and the Eligiblefor Service option selected for them to appear in the service catalog.
You can share products and product groups between the two catalogs and you can even create one catalog for bothsales and service. If you do opt for a single catalog or even reuse the same product groups for the two catalogs, youmust keep in mind that sales may discontinue selling some products that you may still need to service. Or sales maycreate product groups specific to promotions or seasonal sales.
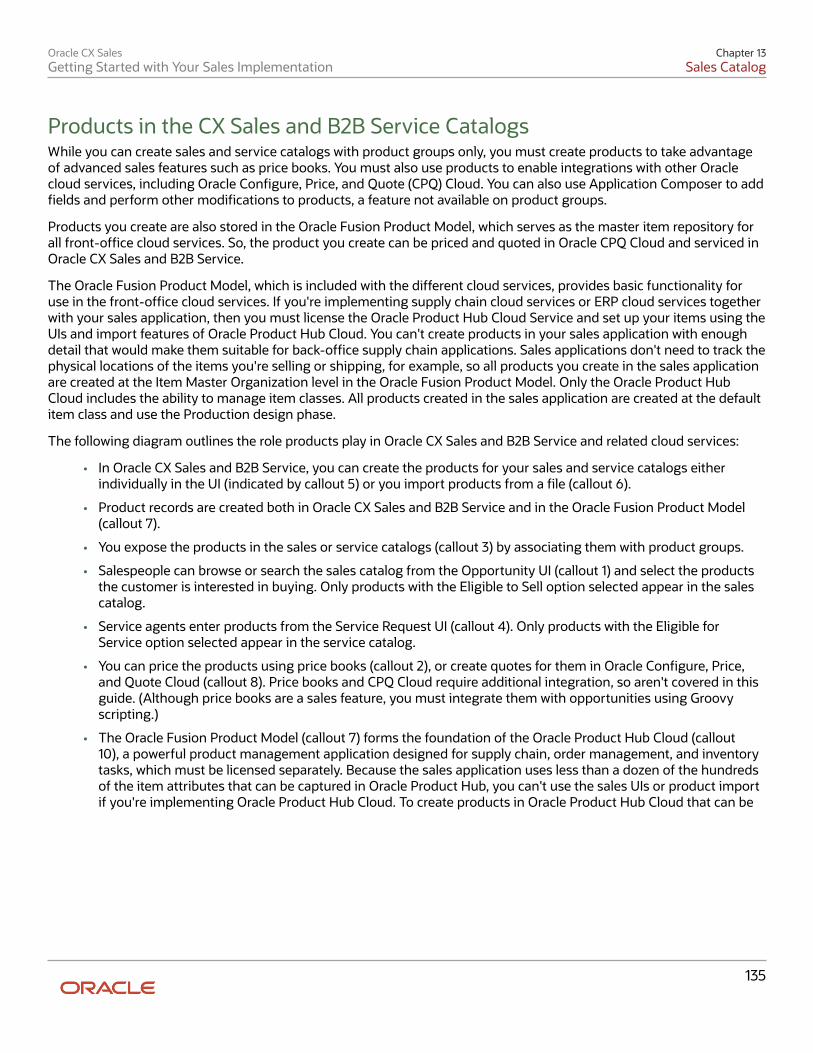
Oracle CX SalesGetting Started with Your Sales Implementation
Chapter 13Sales Catalog
135
Products in the CX Sales and B2B Service CatalogsWhile you can create sales and service catalogs with product groups only, you must create products to take advantageof advanced sales features such as price books. You must also use products to enable integrations with other Oraclecloud services, including Oracle Configure, Price, and Quote (CPQ) Cloud. You can also use Application Composer to addfields and perform other modifications to products, a feature not available on product groups.
Products you create are also stored in the Oracle Fusion Product Model, which serves as the master item repository forall front-office cloud services. So, the product you create can be priced and quoted in Oracle CPQ Cloud and serviced inOracle CX Sales and B2B Service.
The Oracle Fusion Product Model, which is included with the different cloud services, provides basic functionality foruse in the front-office cloud services. If you're implementing supply chain cloud services or ERP cloud services togetherwith your sales application, then you must license the Oracle Product Hub Cloud Service and set up your items using theUIs and import features of Oracle Product Hub Cloud. You can't create products in your sales application with enoughdetail that would make them suitable for back-office supply chain applications. Sales applications don't need to track thephysical locations of the items you're selling or shipping, for example, so all products you create in the sales applicationare created at the Item Master Organization level in the Oracle Fusion Product Model. Only the Oracle Product HubCloud includes the ability to manage item classes. All products created in the sales application are created at the defaultitem class and use the Production design phase.
The following diagram outlines the role products play in Oracle CX Sales and B2B Service and related cloud services:
• In Oracle CX Sales and B2B Service, you can create the products for your sales and service catalogs eitherindividually in the UI (indicated by callout 5) or you import products from a file (callout 6).
• Product records are created both in Oracle CX Sales and B2B Service and in the Oracle Fusion Product Model(callout 7).
• You expose the products in the sales or service catalogs (callout 3) by associating them with product groups.
• Salespeople can browse or search the sales catalog from the Opportunity UI (callout 1) and select the productsthe customer is interested in buying. Only products with the Eligible to Sell option selected appear in the salescatalog.
• Service agents enter products from the Service Request UI (callout 4). Only products with the Eligible forService option selected appear in the service catalog.
• You can price the products using price books (callout 2), or create quotes for them in Oracle Configure, Price,and Quote Cloud (callout 8). Price books and CPQ Cloud require additional integration, so aren't covered in thisguide. (Although price books are a sales feature, you must integrate them with opportunities using Groovyscripting.)
• The Oracle Fusion Product Model (callout 7) forms the foundation of the Oracle Product Hub Cloud (callout10), a powerful product management application designed for supply chain, order management, and inventorytasks, which must be licensed separately. Because the sales application uses less than a dozen of the hundredsof the item attributes that can be captured in Oracle Product Hub, you can't use the sales UIs or product importif you're implementing Oracle Product Hub Cloud. To create products in Oracle Product Hub Cloud that can be
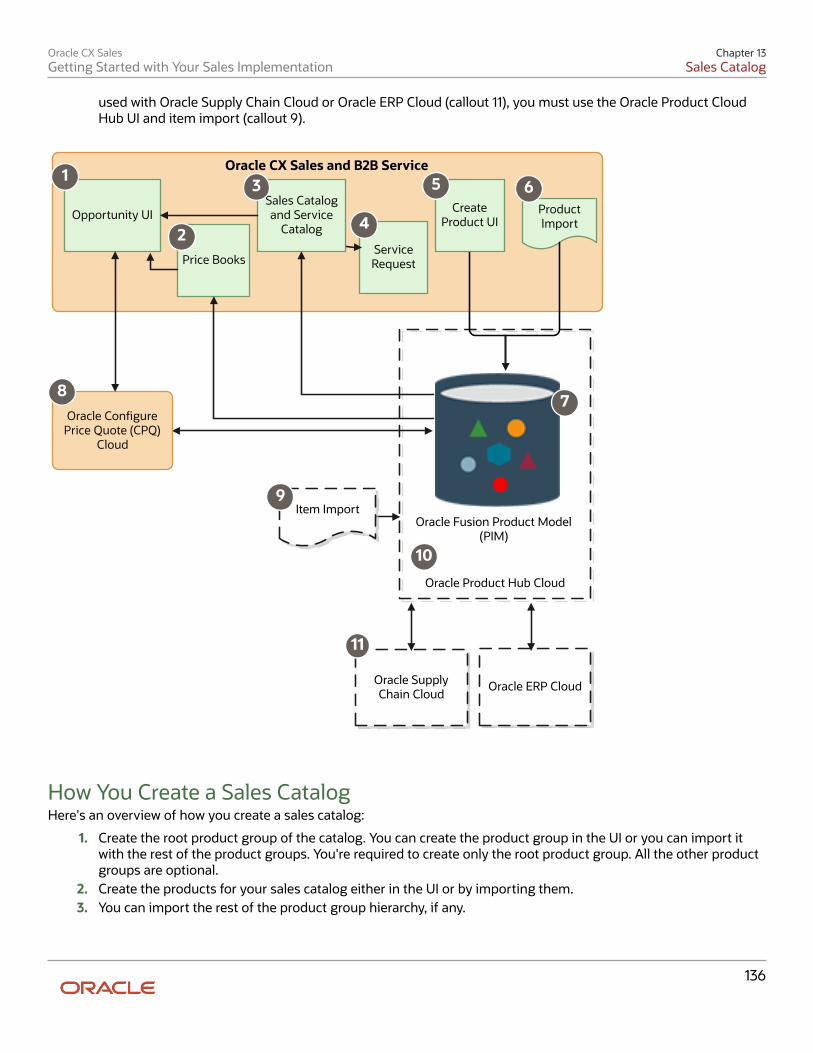
Oracle CX SalesGetting Started with Your Sales Implementation
Chapter 13Sales Catalog
136
used with Oracle Supply Chain Cloud or Oracle ERP Cloud (callout 11), you must use the Oracle Product CloudHub UI and item import (callout 9).
7
Item Import
Product Import
Sales Catalog and Service
Catalog
Oracle CX Sales and B2B Service
Oracle Product Hub Cloud
Opportunity UI
Oracle Congure Price Quote (CPQ)
Cloud
Oracle ERP Cloud
Create Product UI
Price Books
Oracle Supply Chain Cloud
Oracle Fusion Product Model (PIM)
11
Service Request
7
1
2
3
4
5 6
8
9
10
How You Create a Sales CatalogHere's an overview of how you create a sales catalog:
1. Create the root product group of the catalog. You can create the product group in the UI or you can import itwith the rest of the product groups. You're required to create only the root product group. All the other productgroups are optional.
2. Create the products for your sales catalog either in the UI or by importing them.3. You can import the rest of the product group hierarchy, if any.
Oracle CX SalesGetting Started with Your Sales Implementation
Chapter 13Sales Catalog
137
4. To display individual products in the sales catalog, you must associate the product groups with the products.You can create the association by editing each product group in the UI and selecting the products it contains.Alternatively, you can create the association between product groups and the products in your import.
Sample Sales Catalog Structure
Here's a diagram of the Vision Corp. sales catalog structure. The company sells laptops and two types of servers: GreenServers and Sentinel Servers. To create the catalog, Vision Corp:
1. Creates Vision Products as the root product group in the UI.2. Imports the products using the product import macro.3. Imports the remaining product groups and their associations with the products using the product group import
macro.
Sentinel Servers
Servers
Sentinel Server 1500
Sentinel Server 3000
Sentinel Server 7000
Ultra Z15Laptop
Ultra Z17 Laptop
Ultra ZX15
Laptop
Green Server 3000
Green Server 6000
Green Server 9000
Green Servers Ultra Laptops
Products
Product Groups Vision Products
Laptops
Review Units of Measure for ProductsThe sales organization uses units of measure to sell and price the products in the sales catalog. The Setup Assistantautomatically creates the default units of measure provided by Oracle SCM Cloud for you. Use this step to review thedefaults. To set up additional units of measure and classes, follow the instructions in the Implementing CommonFeatures for SCM guide. For example, if you are selling goods that are priced by the box, then you may want to add Boxto the Count class of measure.
1. In Setup and Maintenance, go to the following:
◦ Offering: Sales
◦ Functional Area: Sales Catalog and Products
◦ Task: Manage Units of Measure
2. On the Manage Units of Measure page, review the list of classes in the Class Name list in the Search section.You can view the units of measure for each class by clicking Search.
Oracle CX SalesGetting Started with Your Sales Implementation
Chapter 13Sales Catalog
138
Related Topics
• How Units of Measure, Unit of Measure Classes, and Base Units of Measure Relate to Each Other
Import Products and Product Groups
Download the Macros for Importing Products and Product GroupsDownload the four macros for importing products and product groups from My Oracle Support.
Note: In this guide, we're focusing on importing your data using import Excel macros. See the Understanding Importand Export Management for CX Sales and B2B Service guide to learn how to import data without the macros.
1. Sign in to My Oracle Support.2. Search for the document Oracle CX Sales: Getting Started with Your Sales Implementation: Import Macros (Doc
ID 2229503.1)3. In the Details section of the document, locate the portion appropriate to your application update, and download
these files to a folder on your computer. You can create different folders for the different macros provided thatthe Product Import Macro folder includes the .jar file.
File Name Description
oracle_ucm_client_11.1.1.jar You must include this file in the same directory as the import macro.
Product_Import_Macro.xslm Import products.
ProductGroup_Import_Macro.xslm Import product groups.
ProductGroupRelationSetup_Import_Macro.xslmImport the product group hierarchy.
ProductGroupItem_Import_Macro.xslm Import the relationship between product groups and products.
Related Topics
• Understanding Import and Export Management guide
Enter Data into the Product Import Macro and ImportFollow these steps to enter data into the Product Import Macro and perform the import. You can import up to 5,000product records at a time.
1. Open the Product Import Macro file you downloaded earlier.2. Make sure macros are enabled in Excel.3. On the UOM worksheet, click Populate UOM from Server.
Oracle CX SalesGetting Started with Your Sales Implementation
Chapter 13Sales Catalog
139
4. On the Login page, enter the following:
◦ Host information for your environment. The host name is the portion of the URL of your environmentbetween https:// and /.
◦ Your user name
◦ Your password
5. Click Submit.
The macro retrieves the units of measure you set up from your environment and enters them into theworksheet so they are available as the list of values in the Primary UOM field in the Template worksheet.
6. The Product Type worksheet lists the product types you can use to classify your products supplied by Oracle.You can update this list using the following steps. Unless you created new product type values in lookup typeQSC_SALES_PRODUCT_TYPE (not covered in this guide), then you can skip this step.
a. Click Populate Product Type from Serverb. The Login window still contains the host, user name, and password you entered previously, so click
Submit.
The macro retrieves the latest product types from your environment and enters them into the worksheetso they are available as the list of values in the Product Type field in the Template worksheet.
7. If you want to import additional fields, then do the following:
a. Click the Attributes Mapping tab.b. Click Fetch Attributes from Server.c. In the Login window, enter the following:
• Host information for your environment. The host name is the portion of the URL of yourenvironment between https:// and /.
• Your user name• Your password
The macro fetches available product attributes, including any custom attributes you created, from theapplication.
d. Add the additional attributes you want to import as follows:
i. In the Attribute Name column, select the field you want to import.ii. In the Column Header column, enter the name you want to appear as the column header in the
Product worksheet.e. Click Update Headers.
8. In the Template worksheet, enter your product data. The macro requires just three pieces of information:
◦ Product number
◦ Name
◦ Primary UOM
Here are the details for each existing product attribute:
Oracle CX SalesGetting Started with Your Sales Implementation
Chapter 13Sales Catalog
140
Column What to Enter
Product Number You can enter the unique product number of the product or leave this required columnblank. If you don't enter a product number, then the macro generates the product numberautomatically using the date and time. The product number displays in the product recordsvisible in the Products work area and the application uses the product number to identify theproduct record for updates.
Name The product name as it appears in the sales catalog.
Description Enter a text description.
Primary UOM Unit of measure. One of the values in the UOM worksheet.
Product Type Product type. One of the values in the Product Type worksheet.
Eligible to Sell Enter Y to make the product appear in the sales catalog and to associate it with productcategories.
If you don't make an entry in this column, then the macro automatically populates the valueof Y.
A value of N imports the product, but doesn't show it in the catalog or make it available forselection by salespeople.
Eligible for Service This column is used only if you're integrating with the Oracle B2B Service. A value of Yenables service requests for this product. If the product is not eligible for service, then enterN.
If you leave this column blank, then the macro automatically populates the value of Y.
Enable Customer Self-Service This column is used only if you're integrating with the Oracle B2B Service. Enter Y to enablecustomers to view the product on the self-service portal. Otherwise enter N.
If you leave this column blank, then the application populates an N for products of thefollowing product types:
◦ Extended Warranty
◦ Included Warranty
◦ Preventive Maintenance
◦ Service Level Agreement
◦ Software Maintenance
You can't enter a value of Y for these product types into the macro.

Oracle CX SalesGetting Started with Your Sales Implementation
Chapter 13Sales Catalog
141
Column What to Enter
The macro enters a Y for the rest of the product types supplied by Oracle. You must providea value for any product types you created.
9. When you're done with your entries, click Create Import Activity.10. If you're prompted to correct errors, here's what to do:
a. Click OK
The Error worksheet displays your errors.b. Click each error link in column D and make the correction on the Template worksheet.
Note: After you correct an error, you must click outside the field for the correction to berecognized.
c. Click Create Import Activity again.11. On the Login page, enter the host, user name, and password if required.12. Click Submit.
The application displays one of these messages:
Message Meaning
The file import activitywas submitted successfully.
Your import has started. If the file import activity is submitted successfully, then theconfirmation message displays the job ID.
Unable to connect to theserver at this time.
You may have entered an incorrect host.
Unable to submit the fileimport activity. Check logfor details.
Open the Errors work sheet to view the error details.
13. If your import activity was submitted successfully, then click Activity Details.
The Activity Details window appears, listing the import activity name, its ID and its status.
◦ If the import activity is still in progress, you can refresh the status periodically by clicking Refresh.
◦ If your import completed successfully, then the status listed is Completed.
14. Optionally, click Generate Log to save a file listing the products that were imported.
Verify Imported Products and Add Product ImagesYou can verify the products you imported and add images in the Products work area.
1. Navigate to the Products work area.
Oracle CX SalesGetting Started with Your Sales Implementation
Chapter 13Sales Catalog
142
2. Search for the product by product number or product name:
a. Click Advanced Search.b. In the Advanced Search pane, click Add and select Name from the list.c. Enter the product name or the first few letters of the name in the field.d. Click Search.
3. Click the product number link for the product4. Here are the steps to add a product image on the Edit Product page:
a. Click Manage Attachments (plus sign icon) under the Images heading.b. In the Attachments window, click Choose File and select the image.
You can only include one image for each product.c. Click OK.
5. Click Save and Close.
Import Product GroupsHere's how to import product groups. You can import as many as 5,000 records at a time. Each import must completebefore you start another.
1. Open the Product Group Import Macro you downloaded earlier.2. Make sure macros are enabled in Excel.3. In the ProductGroup worksheet, enter the product groups in your sales catalog hierarchy starting at the top of
the hierarchy, right underneath the root product group you created earlier. You must enter the parent for eachproduct group.
Here are the details of each column:
Column What to Enter
Product Group Reference Number Enter a unique alphanumeric ID up to 50 characters in length. You can enter the productgroup name without any spaces. For example, if your product group is Green Servers, youcan enter GreenServers. The macro enters this value as the Product Group Internal Namefor each product group. The Product Group Internal Name is visible in the Manage ProductGroups task UIs.
Product Group Internal Name Optionally, enter a product group internal name of up to 150 characters in length, whichis also visible in the Manage Product Groups task UI. This field is included for customerswho may have lengthy internal IDs for their products. If you leave this field blank, the macrocopies the Product Group Reference number into this field.
Product Group Display Name The name of the product group as it will appear in the sales catalog.
Product Group Description Enter a text description. This text is not visible to salespeople while making productselections.
Allow Selection Flag A Y value in this column means that salespeople can select the product group when enteringa customer's product interest in opportunity revenue lines. An N value means they can't.
Oracle CX SalesGetting Started with Your Sales Implementation
Chapter 13Sales Catalog
143
4. When you're done with your entries, click Create Import Activity.5. On the Login page, enter the following:
◦ Host information for your environment. The host name is the portion of the URL of your environmentbetween https:// and /sales.
◦ Your user name
◦ Your password
6. Here's what to do if you're prompted to correct errors in your entries:
a. Click OK.
The Error worksheet displays your errors.b. Click each error link and make the correction.
Note: After you correct an error, you must click outside the field for the correction to berecognized.
c. Click Create Import Activity again.7. Click Submit.
The application displays one of these messages:
Message Meaning
The file import activitywas submitted successfully.
Your import has started. If the file import activity is submitted successfully, then theconfirmation message displays the job ID.
Unable to connect to theserver at this time.
You may have entered an incorrect host.
Unable to submit the fileimport activity. Check logfor details.
You most likely entered the wrong mapping number or the user doesn't have the correctpermissions. Open the Errors work sheet to view the error details.
8. If your import activity was submitted successfully, then click Activity Details.
The Activity Details window appears, listing the import activity name, its ID and its status.
◦ If the import activity is still in progress, you can refresh the status periodically by clicking Refresh.
◦ If your import completed successfully, then the status listed is Completed.
9. Optionally, click Generate Log to save a file listing the product groups that were imported.
Import the Relationships Between Product Groups and ProductsImport the relationship between product groups and products.
Note: You can only relate a product to a product group if the product has the Eligible to Sell option set to Y.
Oracle CX SalesGetting Started with Your Sales Implementation
Chapter 13Sales Catalog
144
1. Open the file ProductGroup_Import_Macro.xlsm with the product groups you just imported. You use theproduct group reference numbers to identify the product groups.
2. Open the Product_Import_Macro.xlsm file with the products you imported. You use the product numbers in thisfile to identify the products.
3. Open ProductGroupItem_Import_Macro.xlsm.4. Make sure macros are enabled in Excel.5. In the ProductGroupItem_Import_Macro.xlsm file, for each product, enter the product group reference number
and the product number.6. When you're done with your entries, click Create Import Activity.7. On the Login page, enter the following:
◦ Host information for your environment. The host name is the portion of the URL of your environmentbetween https:// and /sales.
◦ Your user name
◦ Your password
8. Here's what to do if you're prompted to correct errors in your entries:a. Click OK.
The Error worksheet displays your errors.b. Click each error link and make the correction.
Note: After you correct an error, you must click outside the field for the correction to berecognized.
c. Click Create Import Activity again.9. Click Submit.
The application displays one of these messages:
Message Meaning
The file import activitywas submitted successfully.
Your import has started. If the file import activity is submitted successfully, then theconfirmation message displays the job ID.
Unable to connect to theserver at this time.
You may have entered an incorrect host.
Unable to submit the fileimport activity. Check logfor details.
You most likely don't have the correct permissions. Open the Errors work sheet to view theerror details.
10. If your import activity was submitted successfully, then click Activity Details.The Activity Details window appears, listing the import activity name, its ID and its status.
◦ If the import activity is still in progress, you can refresh the status periodically by clicking Refresh.
◦ If your import completed successfully, then the status listed is Completed.
11. Optionally, click Generate Log to save a file listing the product groups that were imported.
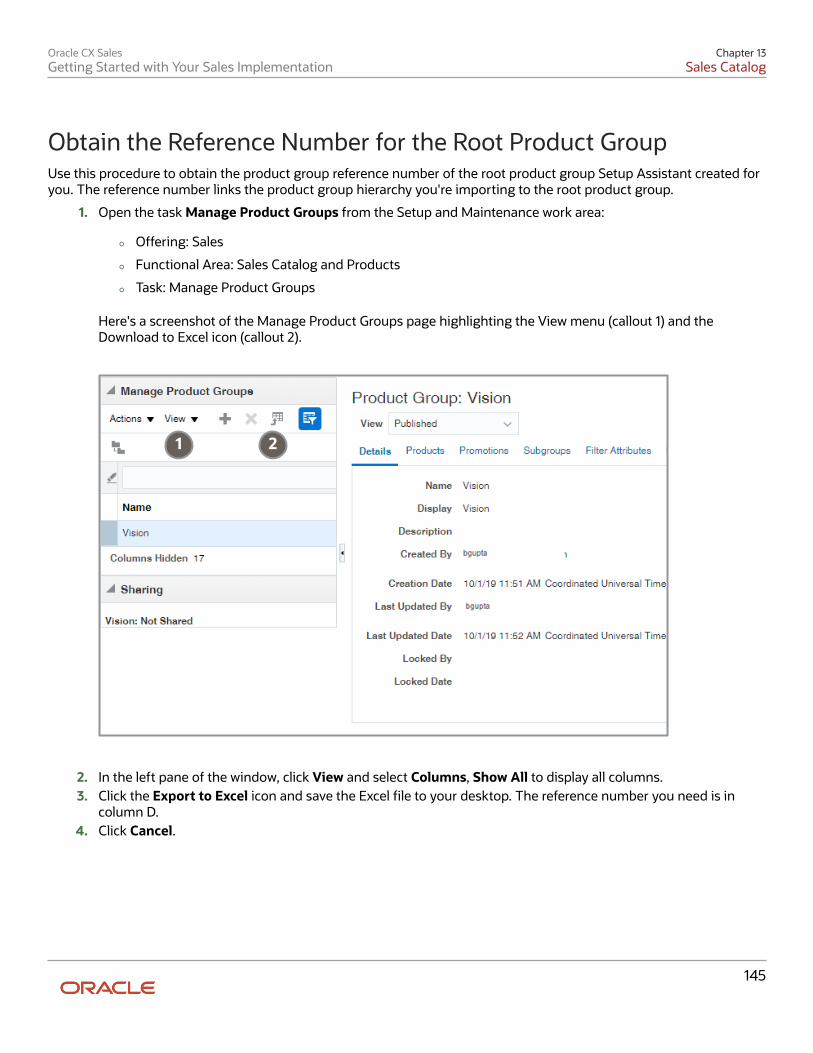
Oracle CX SalesGetting Started with Your Sales Implementation
Chapter 13Sales Catalog
145
Obtain the Reference Number for the Root Product GroupUse this procedure to obtain the product group reference number of the root product group Setup Assistant created foryou. The reference number links the product group hierarchy you're importing to the root product group.
1. Open the task Manage Product Groups from the Setup and Maintenance work area:
◦ Offering: Sales
◦ Functional Area: Sales Catalog and Products
◦ Task: Manage Product Groups
Here's a screenshot of the Manage Product Groups page highlighting the View menu (callout 1) and theDownload to Excel icon (callout 2).
1 2
2. In the left pane of the window, click View and select Columns, Show All to display all columns.3. Click the Export to Excel icon and save the Excel file to your desktop. The reference number you need is in
column D.4. Click Cancel.
Oracle CX SalesGetting Started with Your Sales Implementation
Chapter 13Sales Catalog
146
Import Product Group Hierarchy InformationAfter importing the product groups themselves, you must import the relationships between them to build the cataloghierarchy.
1. Open the file ProductGroup_Import_Macro.xlsm with the product groups you just imported. You use theproduct group reference numbers to build the hierarchy.
2. Open ProductGroupRelationSetup_Import_Macro.xlsm.3. Make sure macros are enabled in Excel.4. In the ProductGroupRelationSetup_Import_Macro, enter the reference number for each product group and the
reference number for its parent. For the product groups immediately under the root product group, you mustenter the root product group reference number you got from the UI.
5. When you're done with your entries, click Create Import Activity.6. On the Login page, enter the following:
◦ Host information for your environment. The host name is the portion of the URL of your environmentbetween https:// and /sales.
◦ Your user name
◦ Your password
7. Here's what to do if you're prompted to correct errors in your entries:
a. Click OK.
The Error worksheet displays your errors.b. Click each error link and make the correction.
Note: After you correct an error, you must click outside the field for the correction to berecognized.
c. Click Create Import Activity again.8. Click Submit.
The application displays one of these messages:
Message Meaning
The file import activitywas submitted successfully.
Your import has started. If the file import activity is submitted successfully, then theconfirmation message displays the job ID.
Unable to connect to theserver at this time.
You may have entered an incorrect host.
Unable to submit the fileimport activity. Check logfor details.
You most likely don't have the correct permissions. Open the Errors work sheet to view theerror details.
9. If your import activity was submitted successfully, then click Activity Details.
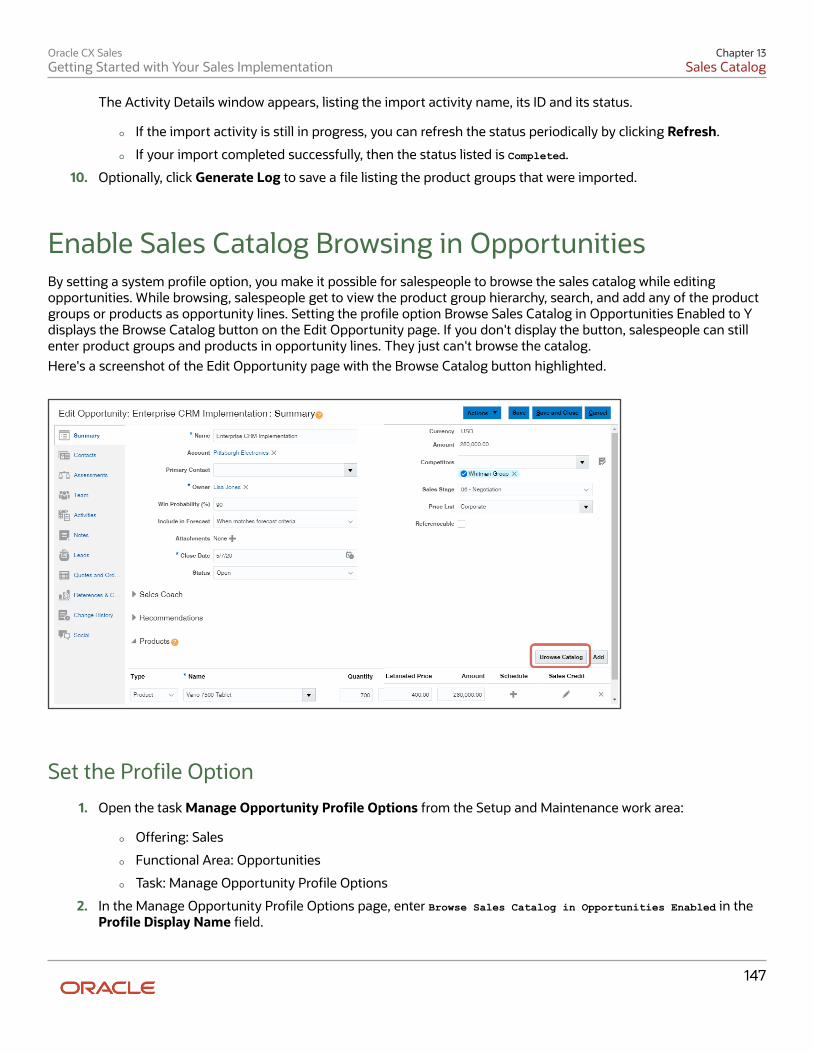
Oracle CX SalesGetting Started with Your Sales Implementation
Chapter 13Sales Catalog
147
The Activity Details window appears, listing the import activity name, its ID and its status.
◦ If the import activity is still in progress, you can refresh the status periodically by clicking Refresh.
◦ If your import completed successfully, then the status listed is Completed.
10. Optionally, click Generate Log to save a file listing the product groups that were imported.
Enable Sales Catalog Browsing in OpportunitiesBy setting a system profile option, you make it possible for salespeople to browse the sales catalog while editingopportunities. While browsing, salespeople get to view the product group hierarchy, search, and add any of the productgroups or products as opportunity lines. Setting the profile option Browse Sales Catalog in Opportunities Enabled to Ydisplays the Browse Catalog button on the Edit Opportunity page. If you don't display the button, salespeople can stillenter product groups and products in opportunity lines. They just can't browse the catalog.Here's a screenshot of the Edit Opportunity page with the Browse Catalog button highlighted.
Set the Profile Option
1. Open the task Manage Opportunity Profile Options from the Setup and Maintenance work area:
◦ Offering: Sales
◦ Functional Area: Opportunities
◦ Task: Manage Opportunity Profile Options
2. In the Manage Opportunity Profile Options page, enter Browse Sales Catalog in Opportunities Enabled in theProfile Display Name field.
Oracle CX SalesGetting Started with Your Sales Implementation
Chapter 13Sales Catalog
148
3. Click Search.4. In the search results, click on the profile option name link.5. Set the profile option value to Y.6. Save your changes.
Validate the Sales Catalog in the ApplicationAfter you publish and enable your catalog, you can check that the product groups are visible in opportunities.
1. Sign in as a sales manager or a salesperson.2. Navigate to the Opportunities work area.3. Click Create Opportunity.4. On the Create Opportunity page, enter the opportunity name and click Save and Continue.5. In the Products region, click Add.6. For Type, select Group.7. Verify that your product groups display in the Name list.
Oracle CX SalesGetting Started with Your Sales Implementation
Chapter 14Accounts and Contacts
149
14 Accounts and Contacts
Account and Contact BasicsSome basic terminology first. Your sales application is set up for business-to-business sales, so accounts are theorganizations you sell to. The account Type field indicates if an account is a prospect or a customer. You can createcontacts for a specific account or you can create standalone contacts.
You can track lots of information for accounts in the various tabs, but most of the information comes from otherbusiness objects. For account-specific information, you use the Overview and Profile tabs. Here's what you can tellabout the sample account in the screenshot just by looking at the Overview tab:
• You know this account is an existing customer because the account Type field (callout 1) is set to Customer.
• The Industry field displays the primary industry for this customer (callout 2).
You can add multiple industries for each account, but, if you're assigning accounts by industry, then theaccount gets assigned using the primary industry.
Tip: If you're planning to assign accounts by industry, you may want to make entry in the Industry fieldrequired when salespeople create accounts. While you can use Application Composer to make most fieldsrequired, Industry isn't one of them. For Industry, you must use a combination of Page Composer andsome Groovy scripting. See these Oracle Support documents: 2261254.1 and 2193779.1.
• The tab displays the primary address (callout 3) and information about the primary contact (callout 4).
• The account owner (callout 5) is usually the person who created the account, but can be reassigned.
• If you're tracking account relationships, clicking the Ultimate Parent field (callout 6) gets you to the top of theaccount hierarchy. You must expose this field during setup.
• The Parent Account (callout 7) just gets you to the immediate parent account.
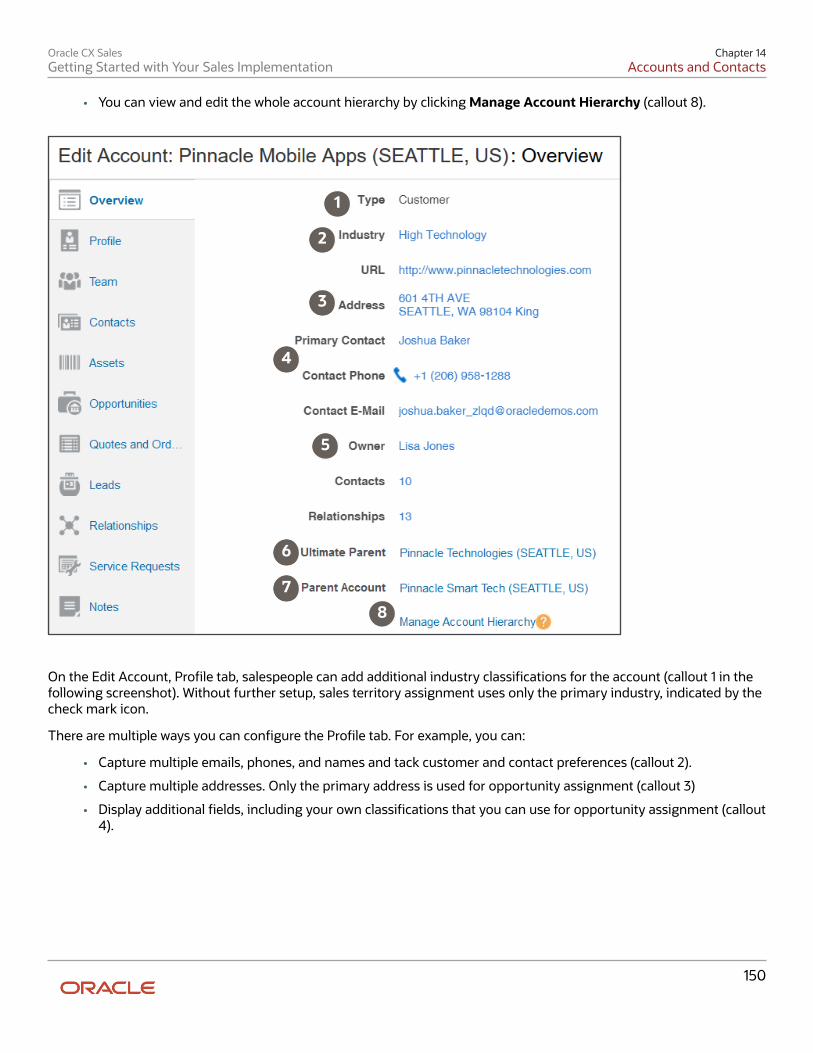
Oracle CX SalesGetting Started with Your Sales Implementation
Chapter 14Accounts and Contacts
150
• You can view and edit the whole account hierarchy by clicking Manage Account Hierarchy (callout 8).
1
2
3
4
5
6
78
On the Edit Account, Profile tab, salespeople can add additional industry classifications for the account (callout 1 in thefollowing screenshot). Without further setup, sales territory assignment uses only the primary industry, indicated by thecheck mark icon.
There are multiple ways you can configure the Profile tab. For example, you can:
• Capture multiple emails, phones, and names and tack customer and contact preferences (callout 2).
• Capture multiple addresses. Only the primary address is used for opportunity assignment (callout 3)
• Display additional fields, including your own classifications that you can use for opportunity assignment (callout4).
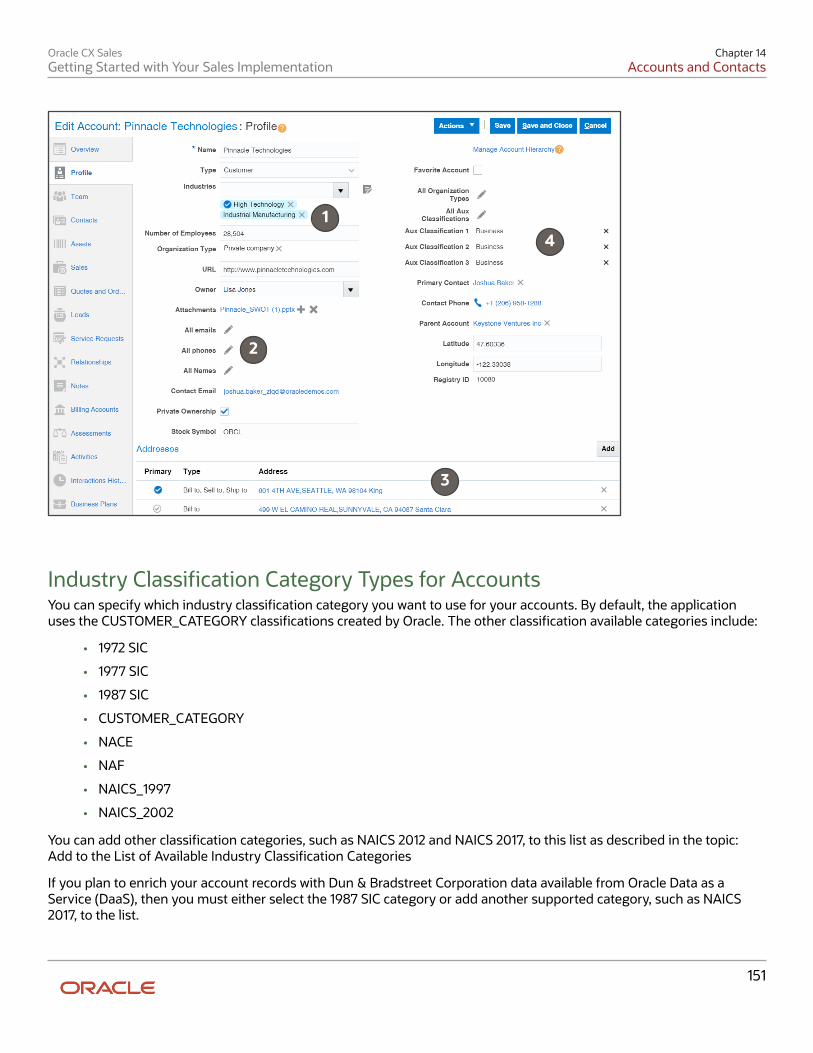
Oracle CX SalesGetting Started with Your Sales Implementation
Chapter 14Accounts and Contacts
151
1
2
3
4
Industry Classification Category Types for AccountsYou can specify which industry classification category you want to use for your accounts. By default, the applicationuses the CUSTOMER_CATEGORY classifications created by Oracle. The other classification available categories include:
• 1972 SIC
• 1977 SIC
• 1987 SIC
• CUSTOMER_CATEGORY
• NACE
• NAF
• NAICS_1997
• NAICS_2002
You can add other classification categories, such as NAICS 2012 and NAICS 2017, to this list as described in the topic:Add to the List of Available Industry Classification Categories
If you plan to enrich your account records with Dun & Bradstreet Corporation data available from Oracle Data as aService (DaaS), then you must either select the 1987 SIC category or add another supported category, such as NAICS2017, to the list.
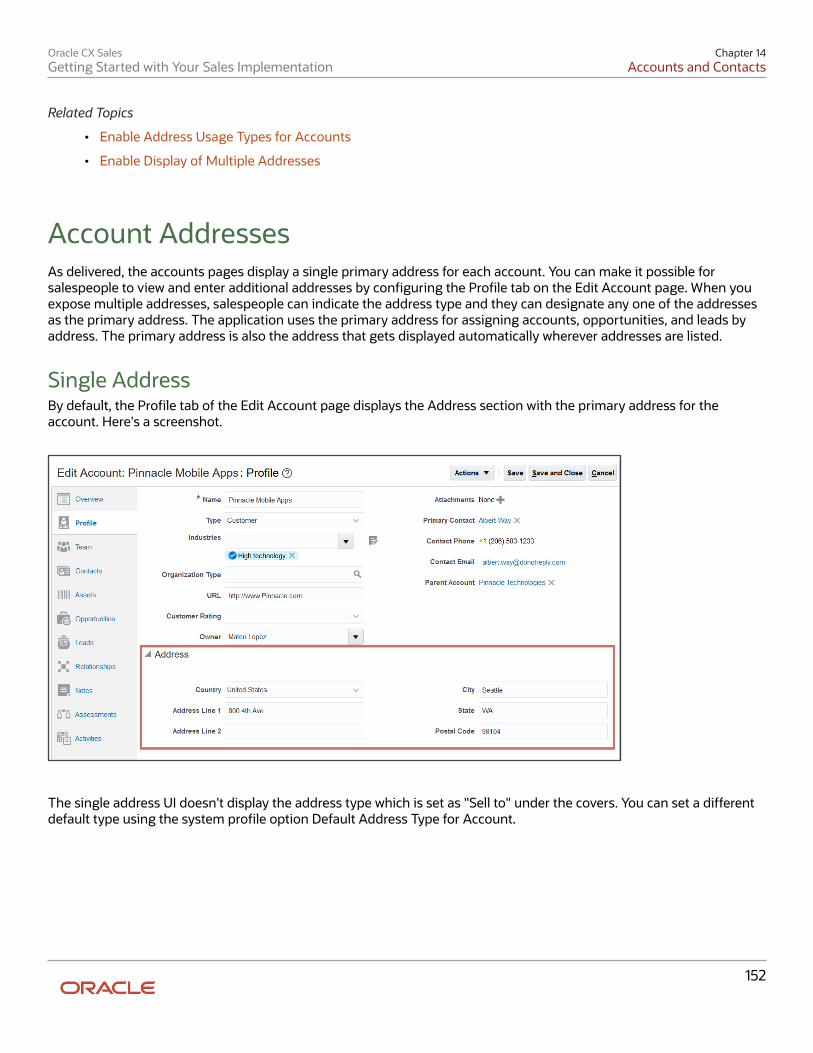
Oracle CX SalesGetting Started with Your Sales Implementation
Chapter 14Accounts and Contacts
152
Related Topics
• Enable Address Usage Types for Accounts
• Enable Display of Multiple Addresses
Account AddressesAs delivered, the accounts pages display a single primary address for each account. You can make it possible forsalespeople to view and enter additional addresses by configuring the Profile tab on the Edit Account page. When youexpose multiple addresses, salespeople can indicate the address type and they can designate any one of the addressesas the primary address. The application uses the primary address for assigning accounts, opportunities, and leads byaddress. The primary address is also the address that gets displayed automatically wherever addresses are listed.
Single AddressBy default, the Profile tab of the Edit Account page displays the Address section with the primary address for theaccount. Here's a screenshot.
The single address UI doesn't display the address type which is set as "Sell to" under the covers. You can set a differentdefault type using the system profile option Default Address Type for Account.
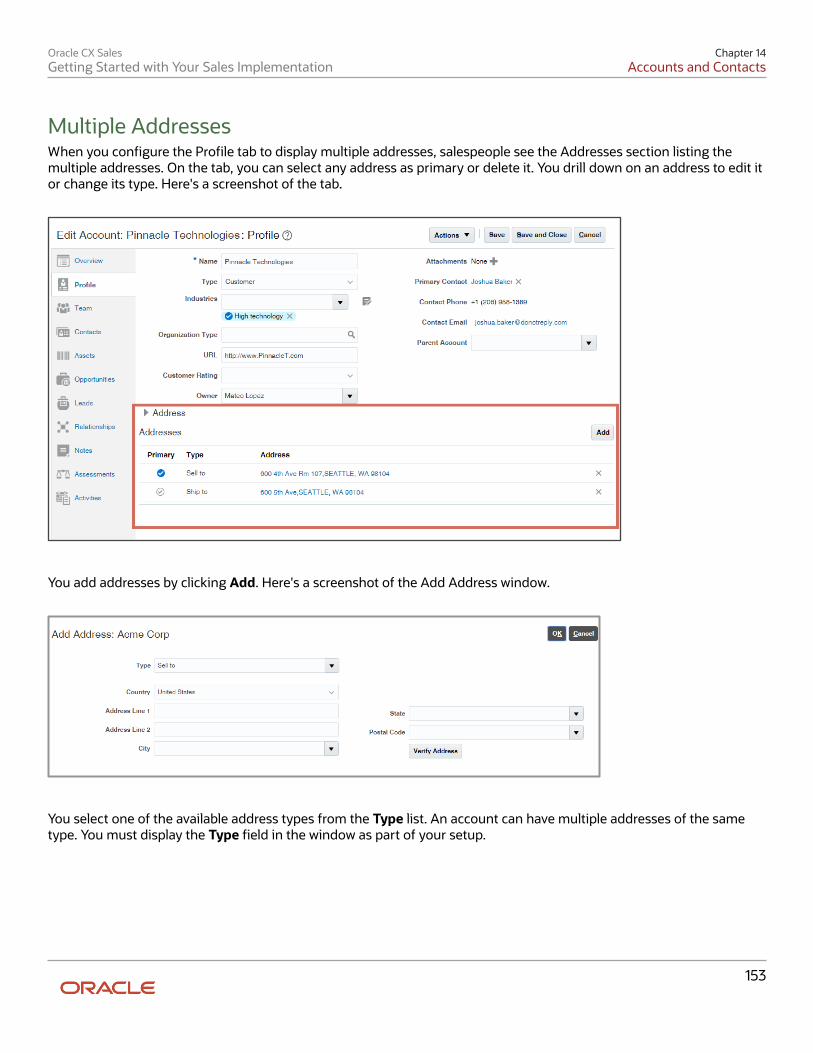
Oracle CX SalesGetting Started with Your Sales Implementation
Chapter 14Accounts and Contacts
153
Multiple AddressesWhen you configure the Profile tab to display multiple addresses, salespeople see the Addresses section listing themultiple addresses. On the tab, you can select any address as primary or delete it. You drill down on an address to edit itor change its type. Here's a screenshot of the tab.
You add addresses by clicking Add. Here's a screenshot of the Add Address window.
You select one of the available address types from the Type list. An account can have multiple addresses of the sametype. You must display the Type field in the window as part of your setup.
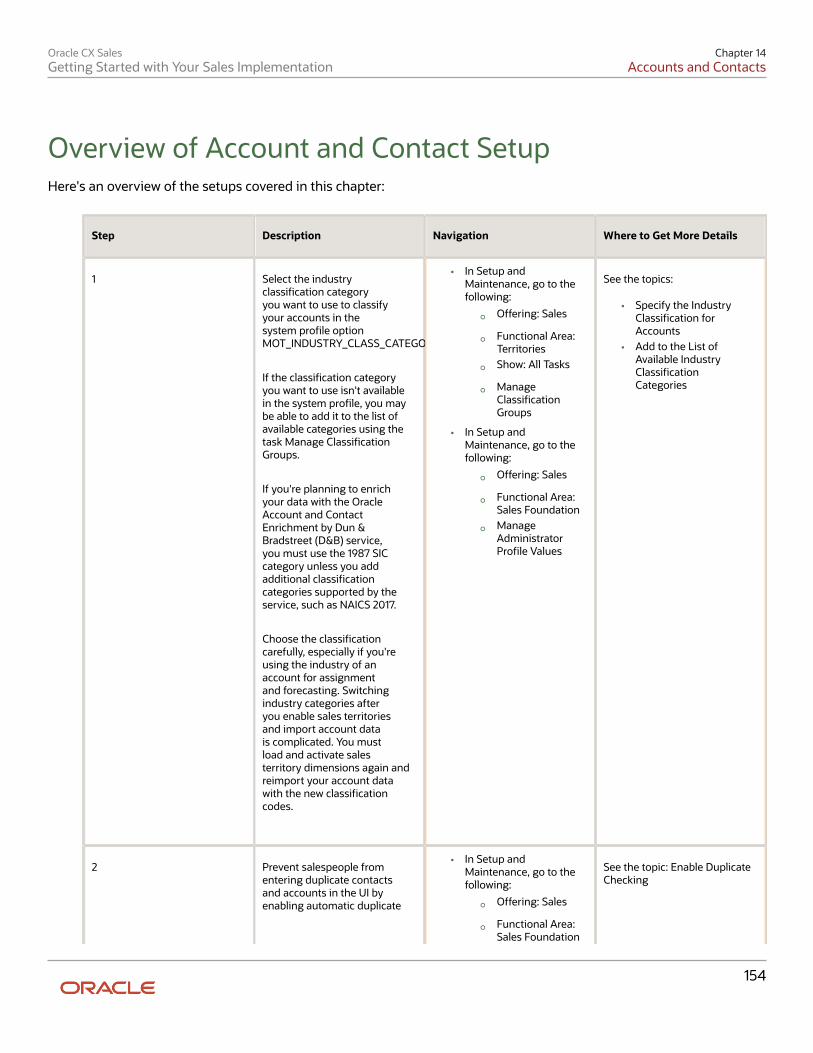
Oracle CX SalesGetting Started with Your Sales Implementation
Chapter 14Accounts and Contacts
154
Overview of Account and Contact SetupHere's an overview of the setups covered in this chapter:
Step Description Navigation Where to Get More Details
1 Select the industryclassification categoryyou want to use to classifyyour accounts in thesystem profile optionMOT_INDUSTRY_CLASS_CATEGORY.
If the classification categoryyou want to use isn't availablein the system profile, you maybe able to add it to the list ofavailable categories using thetask Manage ClassificationGroups.
If you're planning to enrichyour data with the OracleAccount and ContactEnrichment by Dun &Bradstreet (D&B) service,you must use the 1987 SICcategory unless you addadditional classificationcategories supported by theservice, such as NAICS 2017.
Choose the classificationcarefully, especially if you'reusing the industry of anaccount for assignmentand forecasting. Switchingindustry categories afteryou enable sales territoriesand import account datais complicated. You mustload and activate salesterritory dimensions again andreimport your account datawith the new classificationcodes.
• In Setup andMaintenance, go to thefollowing:
◦ Offering: Sales
◦ Functional Area:Territories
◦ Show: All Tasks
◦ ManageClassificationGroups
• In Setup andMaintenance, go to thefollowing:
◦ Offering: Sales
◦ Functional Area:Sales Foundation
◦ ManageAdministratorProfile Values
See the topics:
• Specify the IndustryClassification forAccounts
• Add to the List ofAvailable IndustryClassificationCategories
2 Prevent salespeople fromentering duplicate contactsand accounts in the UI byenabling automatic duplicate
• In Setup andMaintenance, go to thefollowing:
◦ Offering: Sales
◦ Functional Area:Sales Foundation
See the topic: Enable DuplicateChecking
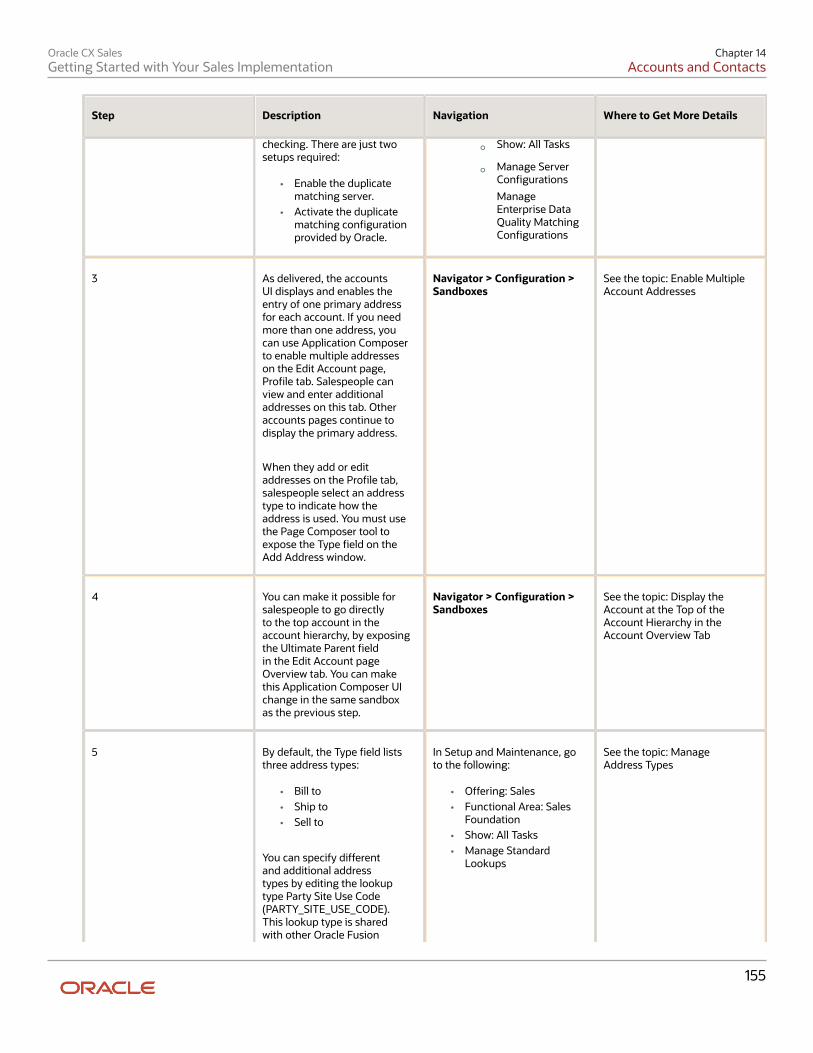
Oracle CX SalesGetting Started with Your Sales Implementation
Chapter 14Accounts and Contacts
155
Step Description Navigation Where to Get More Details
checking. There are just twosetups required:
• Enable the duplicatematching server.
• Activate the duplicatematching configurationprovided by Oracle.
◦ Show: All Tasks
◦ Manage ServerConfigurations
ManageEnterprise DataQuality MatchingConfigurations
3 As delivered, the accountsUI displays and enables theentry of one primary addressfor each account. If you needmore than one address, youcan use Application Composerto enable multiple addresseson the Edit Account page,Profile tab. Salespeople canview and enter additionaladdresses on this tab. Otheraccounts pages continue todisplay the primary address.
When they add or editaddresses on the Profile tab,salespeople select an addresstype to indicate how theaddress is used. You must usethe Page Composer tool toexpose the Type field on theAdd Address window.
Navigator > Configuration >Sandboxes
See the topic: Enable MultipleAccount Addresses
4 You can make it possible forsalespeople to go directlyto the top account in theaccount hierarchy, by exposingthe Ultimate Parent fieldin the Edit Account pageOverview tab. You can makethis Application Composer UIchange in the same sandboxas the previous step.
Navigator > Configuration >Sandboxes
See the topic: Display theAccount at the Top of theAccount Hierarchy in theAccount Overview Tab
5 By default, the Type field liststhree address types:
• Bill to• Ship to• Sell to
You can specify differentand additional addresstypes by editing the lookuptype Party Site Use Code(PARTY_SITE_USE_CODE).This lookup type is sharedwith other Oracle Fusion
In Setup and Maintenance, goto the following:
• Offering: Sales• Functional Area: Sales
Foundation• Show: All Tasks• Manage Standard
Lookups
See the topic: ManageAddress Types
Oracle CX SalesGetting Started with Your Sales Implementation
Chapter 14Accounts and Contacts
156
Step Description Navigation Where to Get More Details
applications. Only valuestagged with SALES_CLOUDare available for use in thesales application.
Add to the List of Available Industry ClassificationCategoriesUse these steps to add to the list of available industry classification categories. For example, if you want to use NAICS2017 for your accounts, you can add it as described here.
1. In Setup and Maintenance, go to the following:
◦ Offering: Sales
◦ Functional Area: Accounts and Contacts
◦ Task: Manage Classification Groups
2. Click Search without entering any search criteria.3. Highlight the row for Industrial Categories in the search results.4. Click Edit (the pencil icon).5. On the Edit Classification Category Group: Industrial Categories page, click Add Row (the plus sign icon).6. From the Classification Category list, select the classification category you want to add, for example,
ORA_HZ_NAICS_2017.7. Click Save and Close.8. On the Manage Classification Category Groups page, click Done.
Specify the Industry Classification Category for AccountsSpecify the type of industry classifications you want to use for accounts.
1. Open the task Manage Administrator Profile Values from the Setup and Maintenance work area:
◦ Offering: Sales
◦ Functional Area: Sales Foundation
◦ Task: Manage Administrator Profile Values
2. In the Search: Profile Option region, Profile Option Code field, enter MOT_INDUSTRY_CLASS_CATEGORY.3. Click Search.4. If you don't see the classification category you need, try adding additional classification categories to this list as
described in the topic: Add to the List of Available Industry Classification Categories.5. Select the classification category from the Profile Value list.6. Click Save and Close.
Oracle CX SalesGetting Started with Your Sales Implementation
Chapter 14Accounts and Contacts
157
Enable Duplicate CheckingYou can have the application automatically check for possible duplicates whenever a salesperson creates an accountor a contact. Salespeople see the possible duplicates in a separate window and get to decide if they want to continuecreating the new record or edit an existing one instead. Setup is simple: just enable the duplicate checking sever,activate the built-in duplicate matching, and you're ready to go.
Here's a screenshot of the window salespeople see when the attempt to create an account with possible duplicates.
In the background, the application uses sets of rules, called matching configurations, to identify potential accountand contact duplicates. If you license Oracle Customer Data Management, you can create matching configurations ofyour own and you can also check for duplicates in your data in batches. Oracle Customer Data Management includesindustrial-strength data cleansing features, but the basic duplicate checking you are enabling here is available free ofadditional charges.
Enable the Server Used for Duplicate Matching
1. In Setup and Maintenance, go to the following:
◦ Offering: Sales
◦ Functional Area: Sales Foundation
◦ Task: Manage Server Configurations
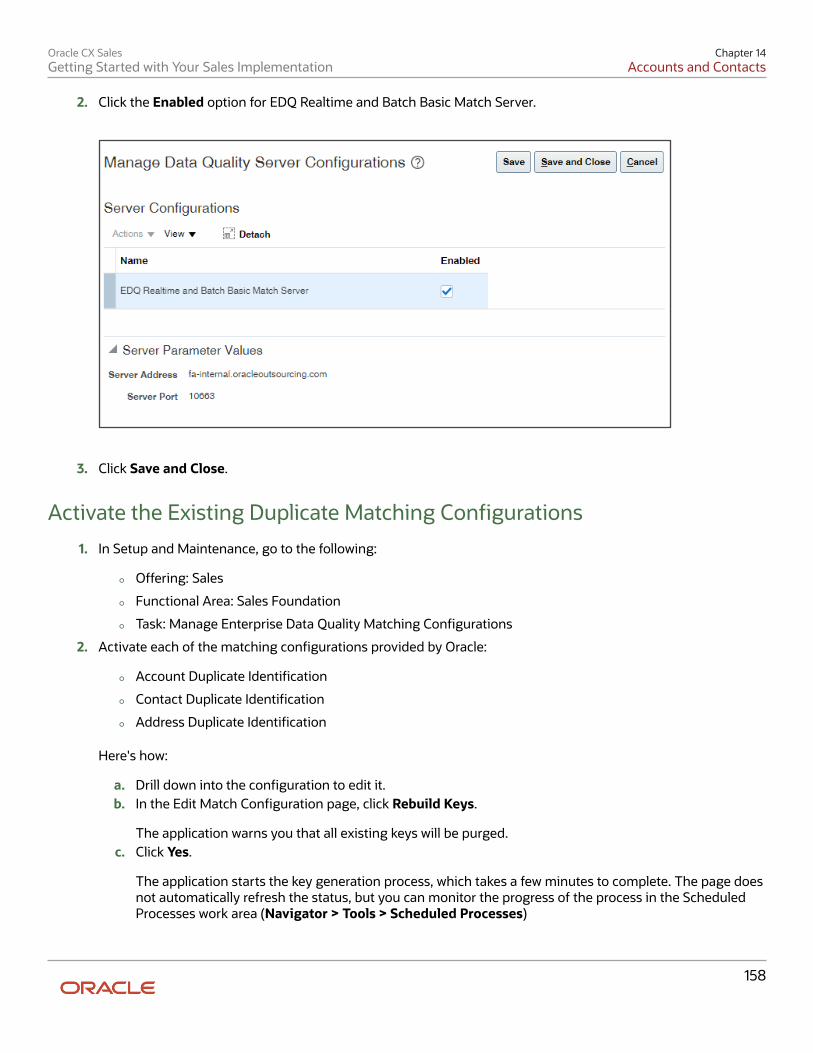
Oracle CX SalesGetting Started with Your Sales Implementation
Chapter 14Accounts and Contacts
158
2. Click the Enabled option for EDQ Realtime and Batch Basic Match Server.
3. Click Save and Close.
Activate the Existing Duplicate Matching Configurations
1. In Setup and Maintenance, go to the following:
◦ Offering: Sales
◦ Functional Area: Sales Foundation
◦ Task: Manage Enterprise Data Quality Matching Configurations
2. Activate each of the matching configurations provided by Oracle:
◦ Account Duplicate Identification
◦ Contact Duplicate Identification
◦ Address Duplicate Identification
Here's how:
a. Drill down into the configuration to edit it.b. In the Edit Match Configuration page, click Rebuild Keys.
The application warns you that all existing keys will be purged.c. Click Yes.
The application starts the key generation process, which takes a few minutes to complete. The page doesnot automatically refresh the status, but you can monitor the progress of the process in the ScheduledProcesses work area (Navigator > Tools > Scheduled Processes)
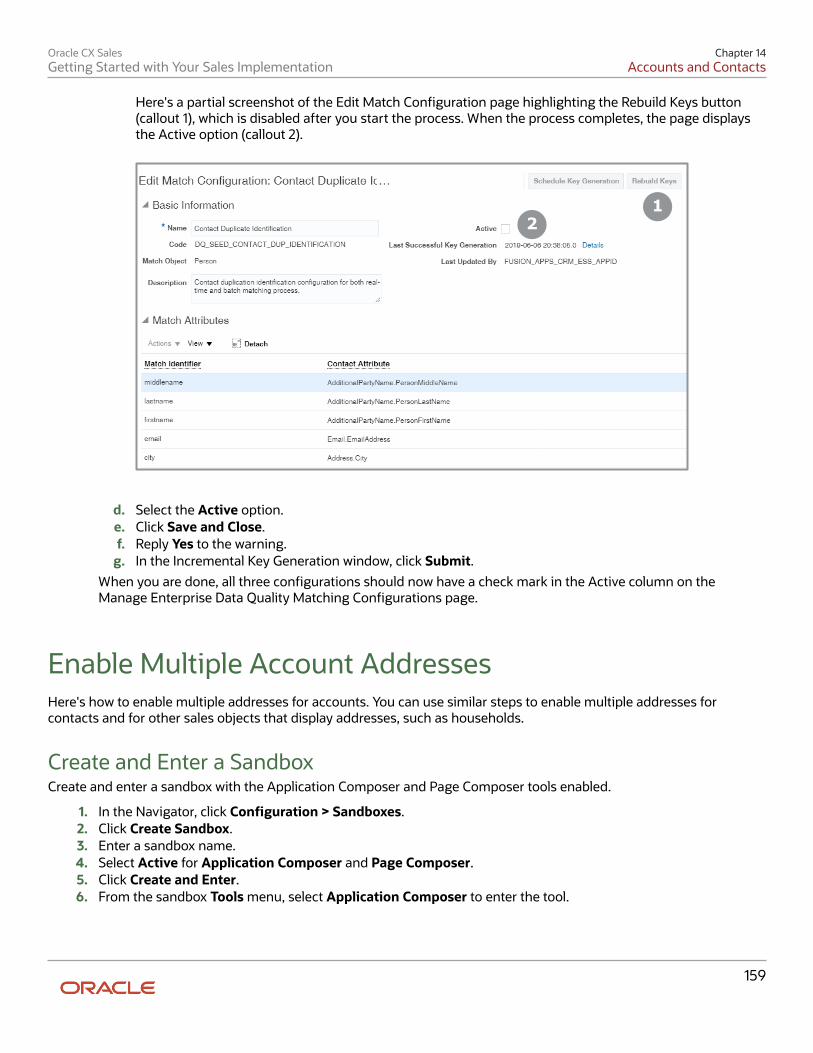
Oracle CX SalesGetting Started with Your Sales Implementation
Chapter 14Accounts and Contacts
159
Here's a partial screenshot of the Edit Match Configuration page highlighting the Rebuild Keys button(callout 1), which is disabled after you start the process. When the process completes, the page displaysthe Active option (callout 2).
12
d. Select the Active option.e. Click Save and Close.f. Reply Yes to the warning.
g. In the Incremental Key Generation window, click Submit.
When you are done, all three configurations should now have a check mark in the Active column on theManage Enterprise Data Quality Matching Configurations page.
Enable Multiple Account AddressesHere's how to enable multiple addresses for accounts. You can use similar steps to enable multiple addresses forcontacts and for other sales objects that display addresses, such as households.
Create and Enter a SandboxCreate and enter a sandbox with the Application Composer and Page Composer tools enabled.
1. In the Navigator, click Configuration > Sandboxes.2. Click Create Sandbox.3. Enter a sandbox name.4. Select Active for Application Composer and Page Composer.5. Click Create and Enter.6. From the sandbox Tools menu, select Application Composer to enter the tool.
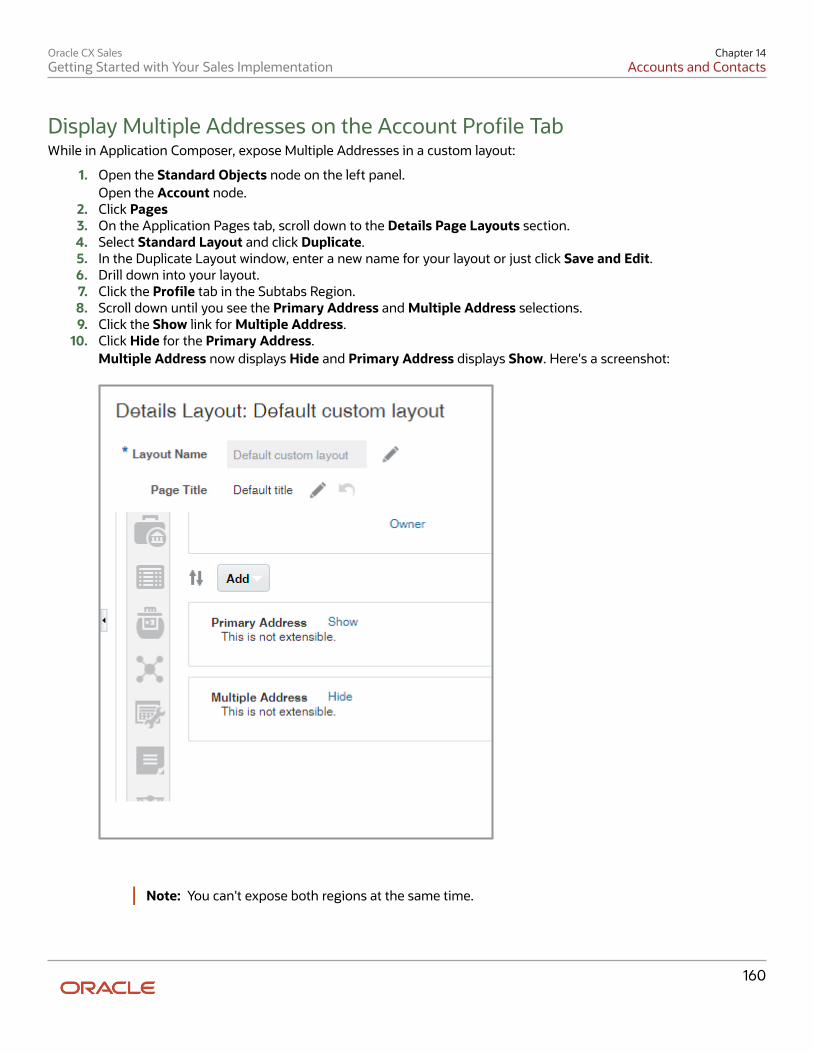
Oracle CX SalesGetting Started with Your Sales Implementation
Chapter 14Accounts and Contacts
160
Display Multiple Addresses on the Account Profile TabWhile in Application Composer, expose Multiple Addresses in a custom layout:
1. Open the Standard Objects node on the left panel.Open the Account node.
2. Click Pages3. On the Application Pages tab, scroll down to the Details Page Layouts section.4. Select Standard Layout and click Duplicate.5. In the Duplicate Layout window, enter a new name for your layout or just click Save and Edit.6. Drill down into your layout.7. Click the Profile tab in the Subtabs Region.8. Scroll down until you see the Primary Address and Multiple Address selections.9. Click the Show link for Multiple Address.
10. Click Hide for the Primary Address.Multiple Address now displays Hide and Primary Address displays Show. Here's a screenshot:
Note: You can't expose both regions at the same time.
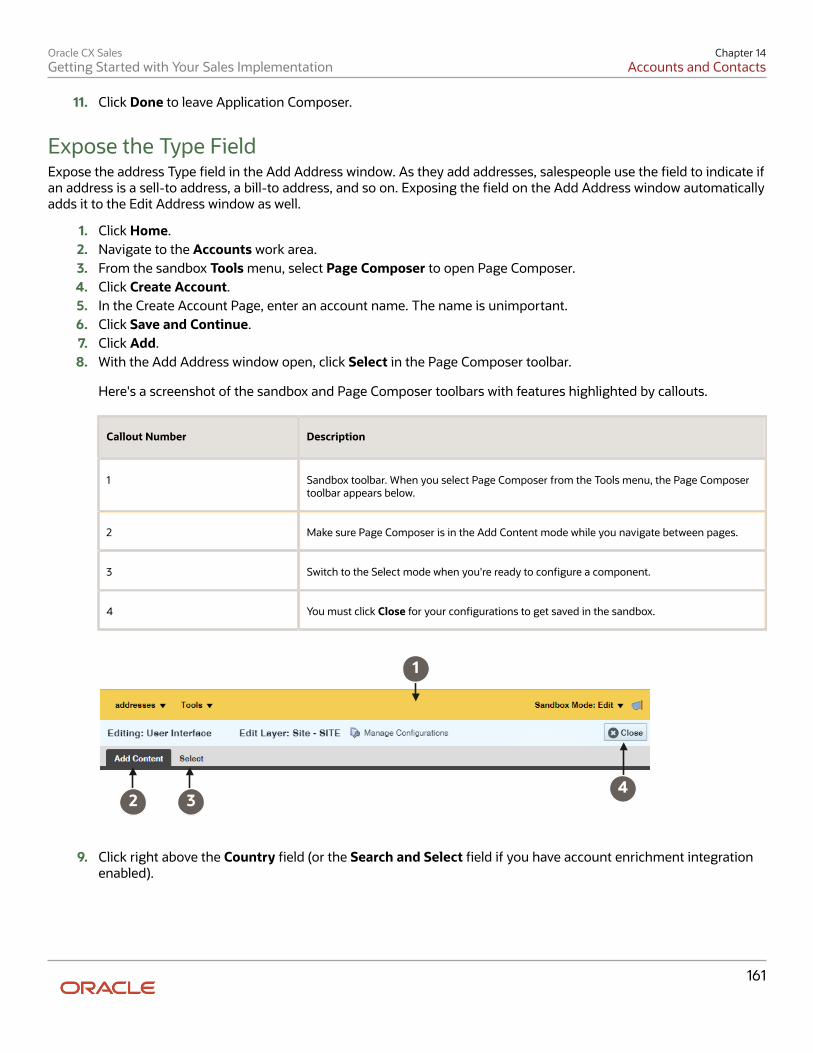
Oracle CX SalesGetting Started with Your Sales Implementation
Chapter 14Accounts and Contacts
161
11. Click Done to leave Application Composer.
Expose the Type FieldExpose the address Type field in the Add Address window. As they add addresses, salespeople use the field to indicate ifan address is a sell-to address, a bill-to address, and so on. Exposing the field on the Add Address window automaticallyadds it to the Edit Address window as well.
1. Click Home.2. Navigate to the Accounts work area.3. From the sandbox Tools menu, select Page Composer to open Page Composer.4. Click Create Account.5. In the Create Account Page, enter an account name. The name is unimportant.6. Click Save and Continue.7. Click Add.8. With the Add Address window open, click Select in the Page Composer toolbar.
Here's a screenshot of the sandbox and Page Composer toolbars with features highlighted by callouts.
Callout Number Description
1 Sandbox toolbar. When you select Page Composer from the Tools menu, the Page Composertoolbar appears below.
2 Make sure Page Composer is in the Add Content mode while you navigate between pages.
3 Switch to the Select mode when you're ready to configure a component.
4 You must click Close for your configurations to get saved in the sandbox.
1
2 34
9. Click right above the Country field (or the Search and Select field if you have account enrichment integrationenabled).
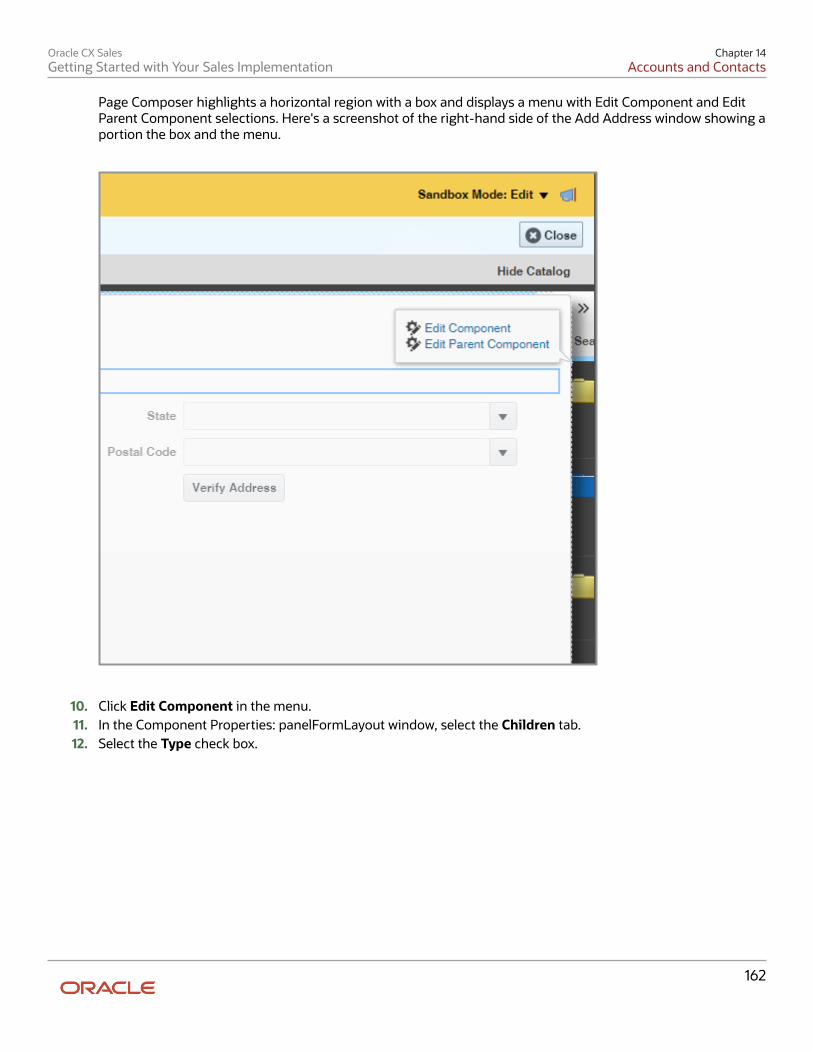
Oracle CX SalesGetting Started with Your Sales Implementation
Chapter 14Accounts and Contacts
162
Page Composer highlights a horizontal region with a box and displays a menu with Edit Component and EditParent Component selections. Here's a screenshot of the right-hand side of the Add Address window showing aportion the box and the menu.
10. Click Edit Component in the menu.11. In the Component Properties: panelFormLayout window, select the Children tab.12. Select the Type check box.
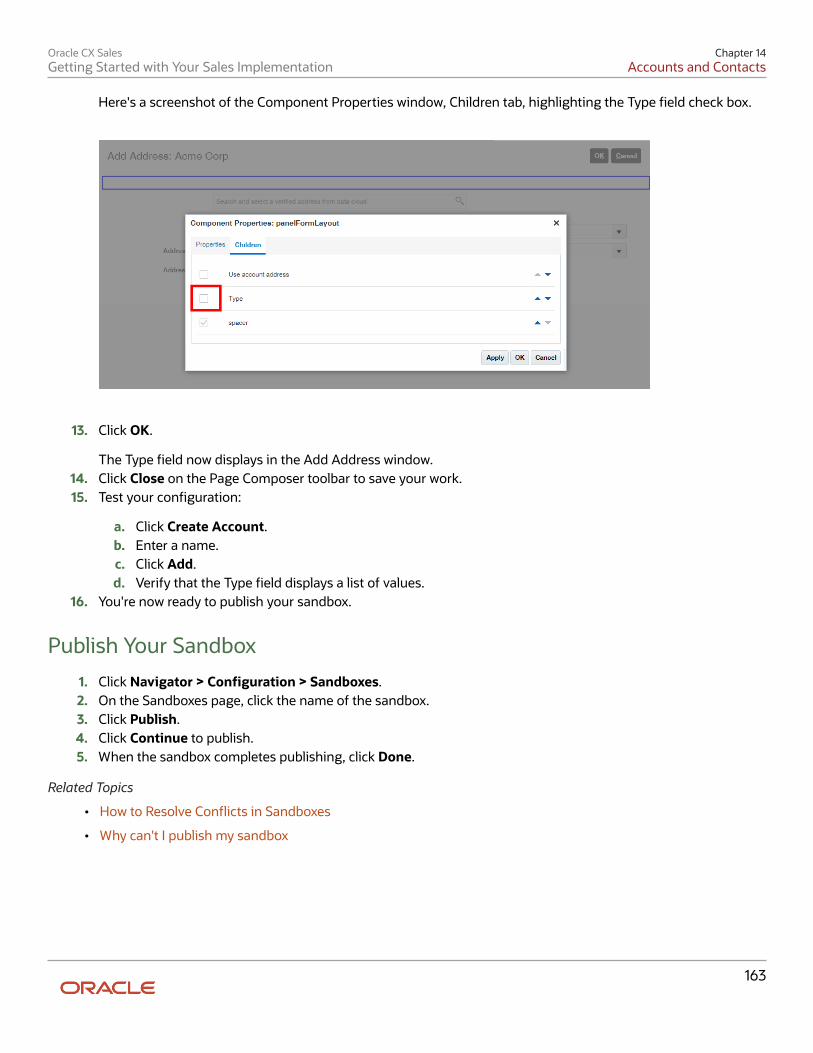
Oracle CX SalesGetting Started with Your Sales Implementation
Chapter 14Accounts and Contacts
163
Here's a screenshot of the Component Properties window, Children tab, highlighting the Type field check box.
13. Click OK.
The Type field now displays in the Add Address window.14. Click Close on the Page Composer toolbar to save your work.15. Test your configuration:
a. Click Create Account.b. Enter a name.c. Click Add.d. Verify that the Type field displays a list of values.
16. You're now ready to publish your sandbox.
Publish Your Sandbox
1. Click Navigator > Configuration > Sandboxes.2. On the Sandboxes page, click the name of the sandbox.3. Click Publish.4. Click Continue to publish.5. When the sandbox completes publishing, click Done.
Related Topics
• How to Resolve Conflicts in Sandboxes
• Why can't I publish my sandbox
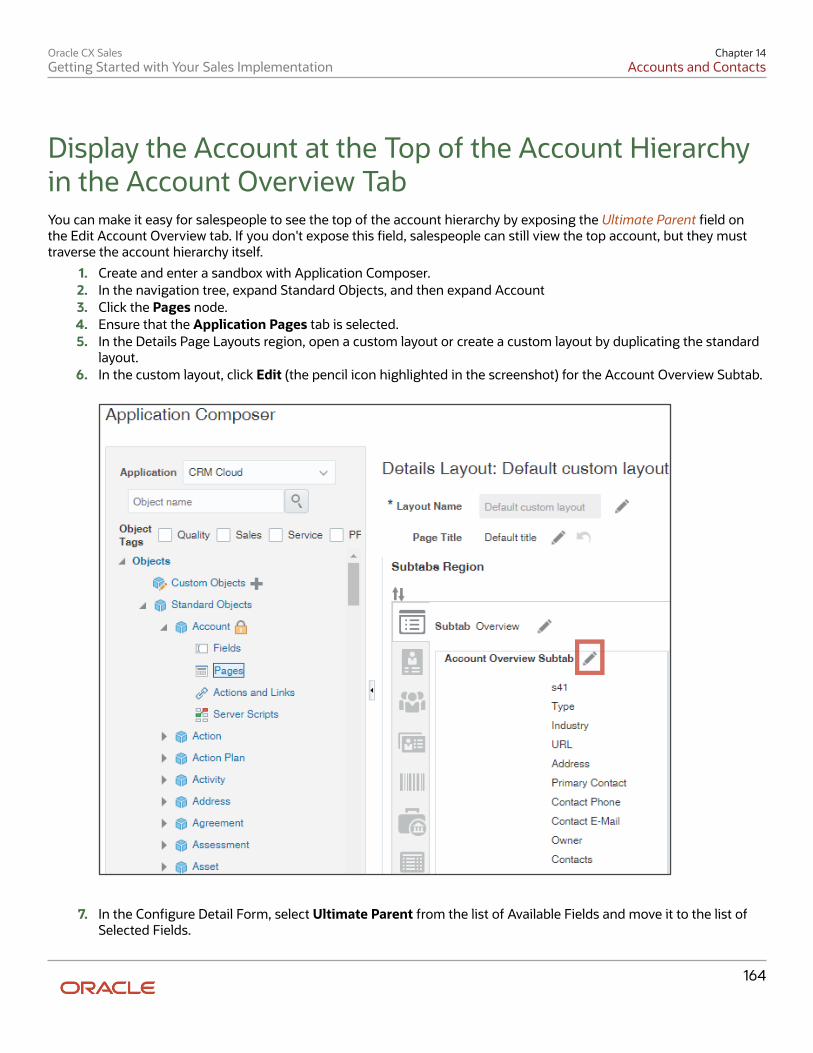
Oracle CX SalesGetting Started with Your Sales Implementation
Chapter 14Accounts and Contacts
164
Display the Account at the Top of the Account Hierarchyin the Account Overview TabYou can make it easy for salespeople to see the top of the account hierarchy by exposing the Ultimate Parent field onthe Edit Account Overview tab. If you don't expose this field, salespeople can still view the top account, but they musttraverse the account hierarchy itself.
1. Create and enter a sandbox with Application Composer.2. In the navigation tree, expand Standard Objects, and then expand Account3. Click the Pages node.4. Ensure that the Application Pages tab is selected.5. In the Details Page Layouts region, open a custom layout or create a custom layout by duplicating the standard
layout.6. In the custom layout, click Edit (the pencil icon highlighted in the screenshot) for the Account Overview Subtab.
7. In the Configure Detail Form, select Ultimate Parent from the list of Available Fields and move it to the list ofSelected Fields.
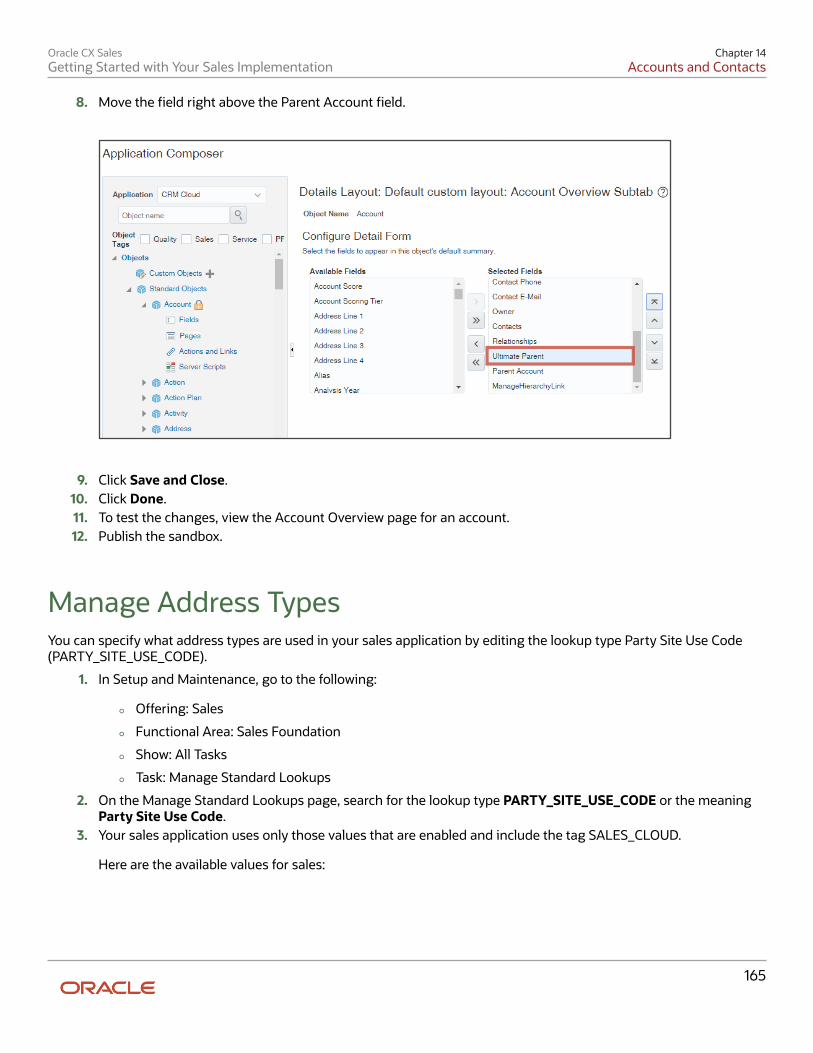
Oracle CX SalesGetting Started with Your Sales Implementation
Chapter 14Accounts and Contacts
165
8. Move the field right above the Parent Account field.
9. Click Save and Close.10. Click Done.11. To test the changes, view the Account Overview page for an account.12. Publish the sandbox.
Manage Address TypesYou can specify what address types are used in your sales application by editing the lookup type Party Site Use Code(PARTY_SITE_USE_CODE).
1. In Setup and Maintenance, go to the following:
◦ Offering: Sales
◦ Functional Area: Sales Foundation
◦ Show: All Tasks
◦ Task: Manage Standard Lookups
2. On the Manage Standard Lookups page, search for the lookup type PARTY_SITE_USE_CODE or the meaningParty Site Use Code.
3. Your sales application uses only those values that are enabled and include the tag SALES_CLOUD.
Here are the available values for sales:
Oracle CX SalesGetting Started with Your Sales Implementation
Chapter 14Accounts and Contacts
166
Lookup Code Meaning
BILL_TO Bill to
SELL_TO Sell to
SHIP_TO Ship to
4. You can enable additional values for your sales application by entering SALES_CLOUD in the Tag field.5. You can also create address types of your own using the New button.6. Click Save and Close.
Oracle CX SalesGetting Started with Your Sales Implementation
Chapter 15Import Accounts and Contacts
167
15 Import Accounts and Contacts
Overview of Account and Contact ImportUse the Excel macros provided by Oracle to import some of your existing sales data so that you can test your salesterritory assignment and other features. You import accounts (including account hierarchies) and contacts in separatefiles, first the accounts and then the contacts. You can import up to 5,000 records at a time, but you must ensure eachimport completes before you start another.
Note: While you can import additional fields by appending columns to import macros, you can't make any otherchanges. You can't edit the Visual Basic for Applications (VBA) code or other functions.
Here's an overview of your import tasks.
Step Description Navigation Where to Get More Details
1. From Oracle Supportdocument 2229503.1,download to the same folderthe Excel macros and .jar filerequired for import:
• oracle_ucm_client_11.1.1.jar• Account Import Macro• Contact Import Macro• Address Import Macro
My Oracle Support See the topic: Download theFiles for Account and ContactImport
2. If you're classifying theaccounts by industry in yourimport, then you must obtaina list of the industry codes forthe industry category you'reusing. You enter the codesalong with your account data.
Setup and Maintenance> Sales > Accounts andContacts > ManageClassification Categories
See the topic: View IndustryCodes for Accounts
3. Import your accounts andaccount hierarchies.
Complete this step in theAccount Import Macro
See the topic and video:Import Accounts and AccountHierarchies Using the AccountImport Macro
4. Import account contacts aswell as stand-alone contacts.
Complete this step in theContact Import Macro
See the topic: Import Contacts
5. Import additional accountand contact addresses. Toview the additional addresses,you must have the multipleaddresses regions exposed inthe UI.
Complete this step in theAddress Import Macro
See these topics:
• Import AdditionalAddresses
• Enable MultipleAccount Addresses,
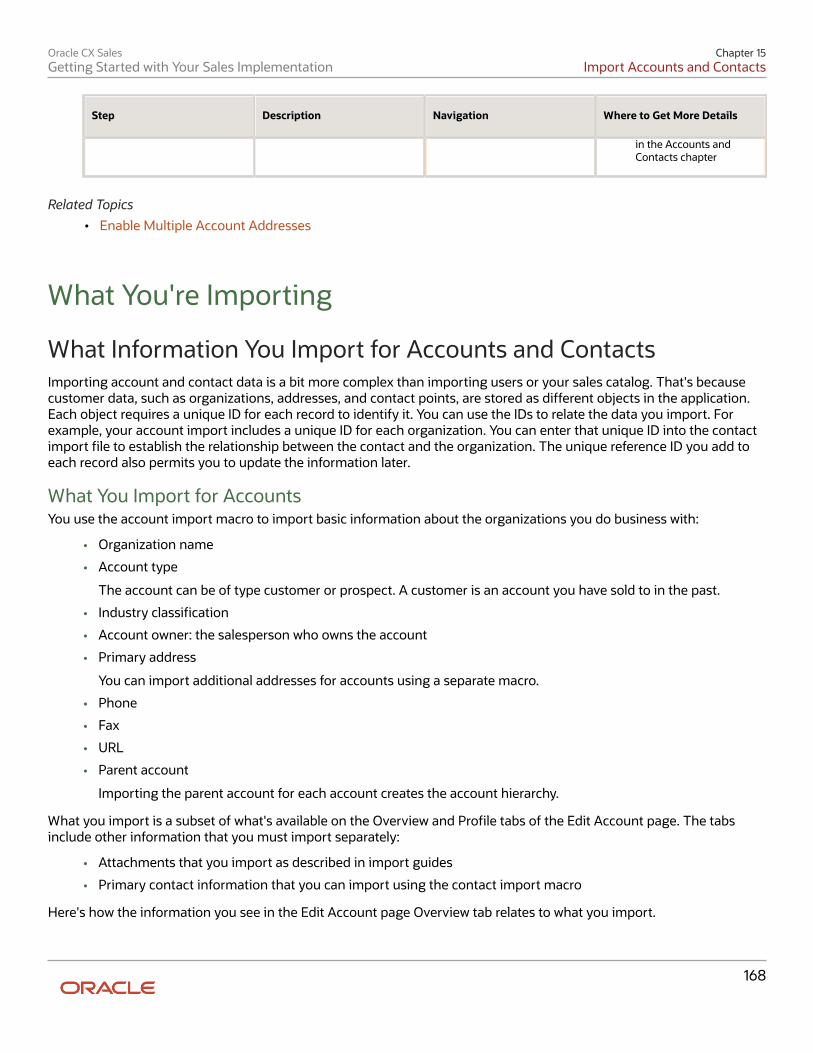
Oracle CX SalesGetting Started with Your Sales Implementation
Chapter 15Import Accounts and Contacts
168
Step Description Navigation Where to Get More Details
in the Accounts andContacts chapter
Related Topics• Enable Multiple Account Addresses
What You're Importing
What Information You Import for Accounts and ContactsImporting account and contact data is a bit more complex than importing users or your sales catalog. That's becausecustomer data, such as organizations, addresses, and contact points, are stored as different objects in the application.Each object requires a unique ID for each record to identify it. You can use the IDs to relate the data you import. Forexample, your account import includes a unique ID for each organization. You can enter that unique ID into the contactimport file to establish the relationship between the contact and the organization. The unique reference ID you add toeach record also permits you to update the information later.
What You Import for AccountsYou use the account import macro to import basic information about the organizations you do business with:
• Organization name
• Account type
The account can be of type customer or prospect. A customer is an account you have sold to in the past.
• Industry classification
• Account owner: the salesperson who owns the account
• Primary address
You can import additional addresses for accounts using a separate macro.
• Phone
• Fax
• URL
• Parent account
Importing the parent account for each account creates the account hierarchy.
What you import is a subset of what's available on the Overview and Profile tabs of the Edit Account page. The tabsinclude other information that you must import separately:
• Attachments that you import as described in import guides
• Primary contact information that you can import using the contact import macro
Here's how the information you see in the Edit Account page Overview tab relates to what you import.
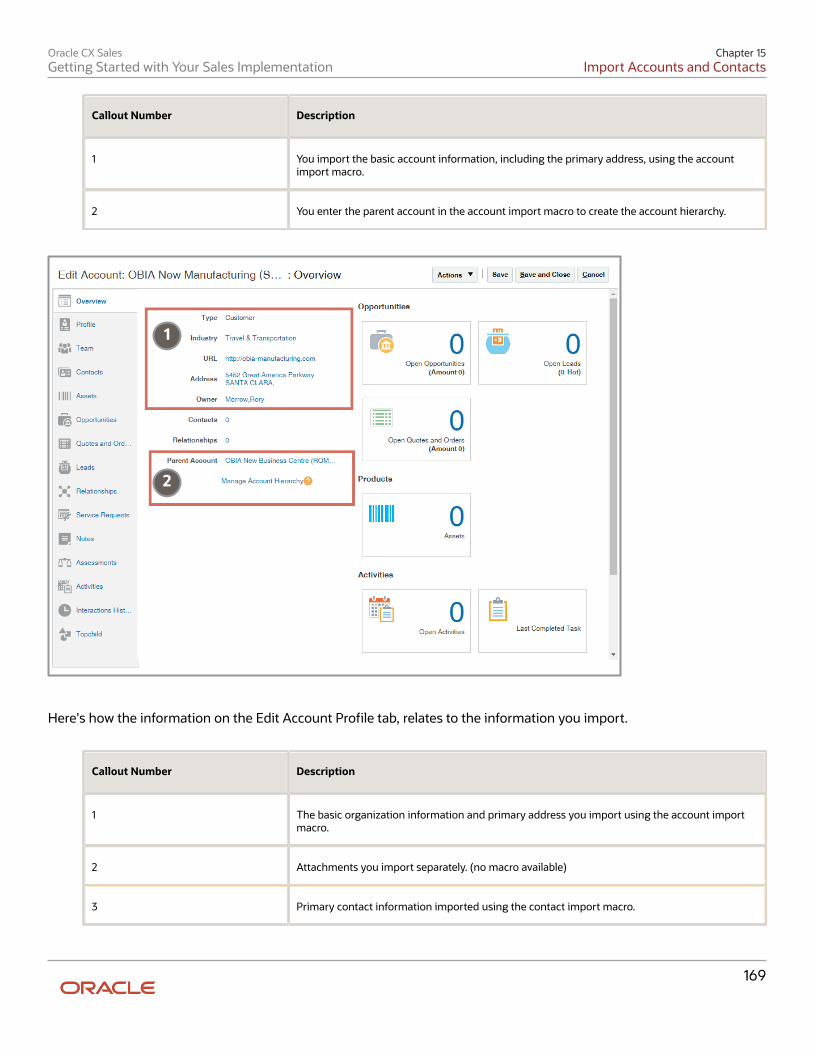
Oracle CX SalesGetting Started with Your Sales Implementation
Chapter 15Import Accounts and Contacts
169
Callout Number Description
1 You import the basic account information, including the primary address, using the accountimport macro.
2 You enter the parent account in the account import macro to create the account hierarchy.
1
2
Here's how the information on the Edit Account Profile tab, relates to the information you import.
Callout Number Description
1 The basic organization information and primary address you import using the account importmacro.
2 Attachments you import separately. (no macro available)
3 Primary contact information imported using the contact import macro.
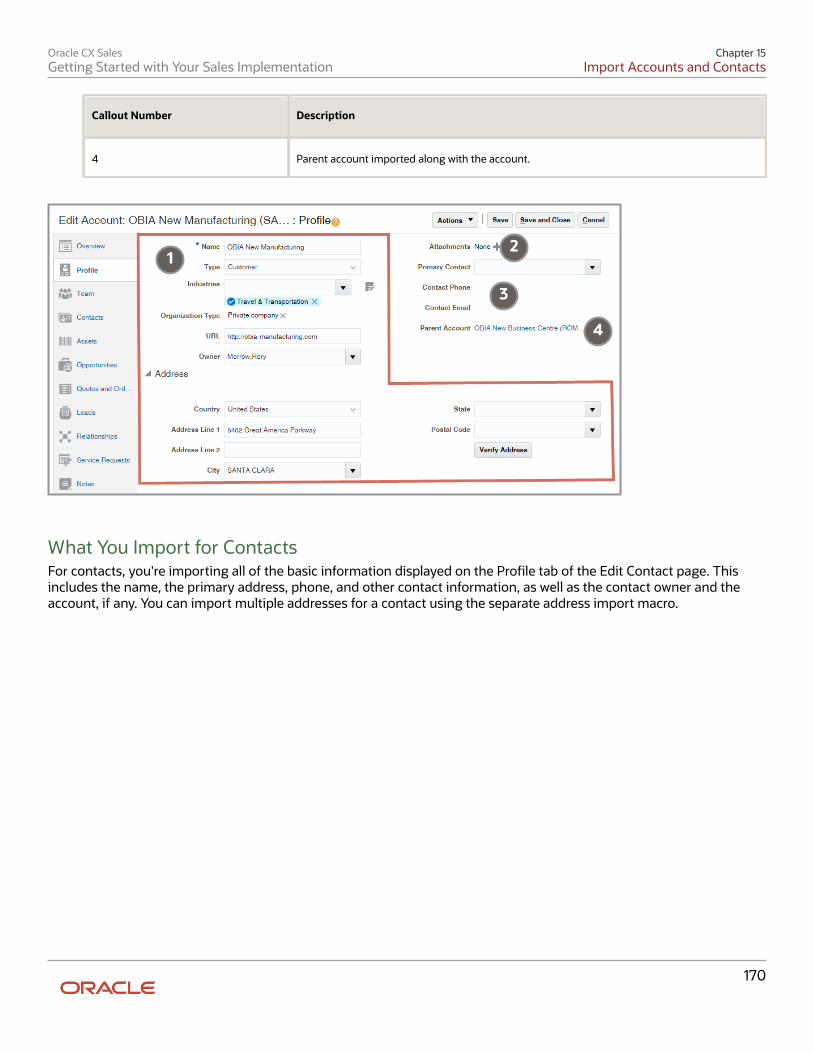
Oracle CX SalesGetting Started with Your Sales Implementation
Chapter 15Import Accounts and Contacts
170
Callout Number Description
4 Parent account imported along with the account.
12
3
4
What You Import for ContactsFor contacts, you're importing all of the basic information displayed on the Profile tab of the Edit Contact page. Thisincludes the name, the primary address, phone, and other contact information, as well as the contact owner and theaccount, if any. You can import multiple addresses for a contact using the separate address import macro.
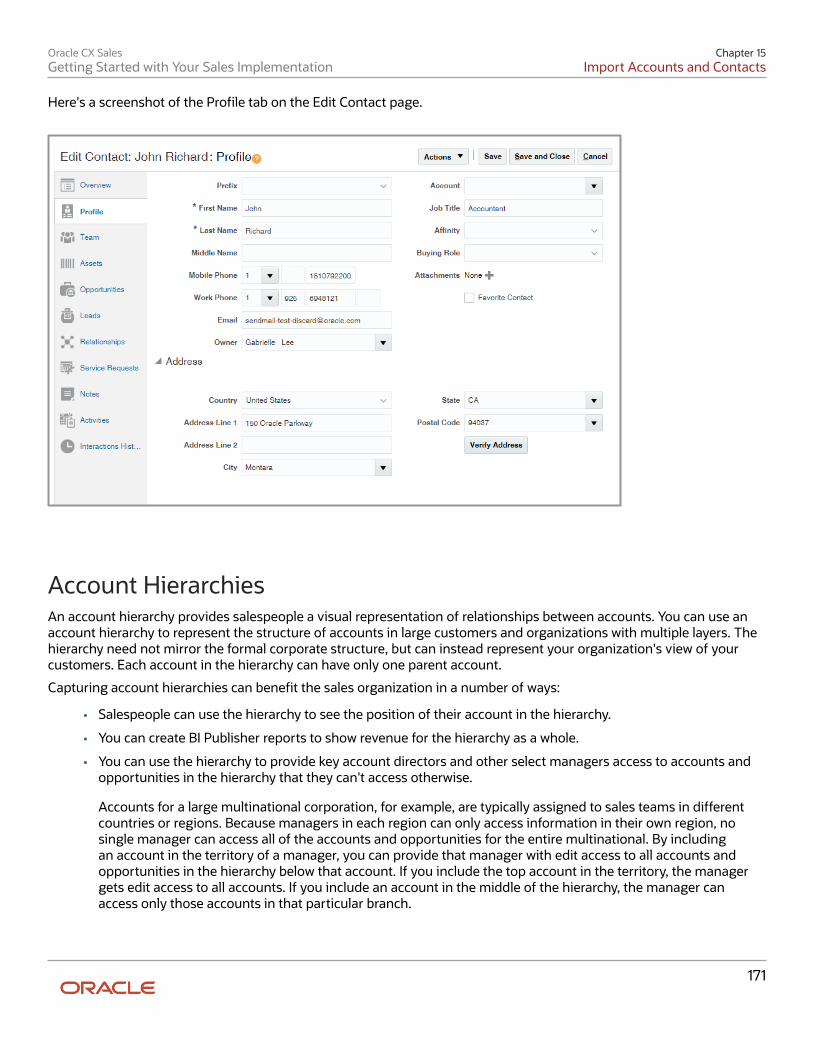
Oracle CX SalesGetting Started with Your Sales Implementation
Chapter 15Import Accounts and Contacts
171
Here's a screenshot of the Profile tab on the Edit Contact page.
Account HierarchiesAn account hierarchy provides salespeople a visual representation of relationships between accounts. You can use anaccount hierarchy to represent the structure of accounts in large customers and organizations with multiple layers. Thehierarchy need not mirror the formal corporate structure, but can instead represent your organization's view of yourcustomers. Each account in the hierarchy can have only one parent account.
Capturing account hierarchies can benefit the sales organization in a number of ways:
• Salespeople can use the hierarchy to see the position of their account in the hierarchy.
• You can create BI Publisher reports to show revenue for the hierarchy as a whole.
• You can use the hierarchy to provide key account directors and other select managers access to accounts andopportunities in the hierarchy that they can't access otherwise.
Accounts for a large multinational corporation, for example, are typically assigned to sales teams in differentcountries or regions. Because managers in each region can only access information in their own region, nosingle manager can access all of the accounts and opportunities for the entire multinational. By includingan account in the territory of a manager, you can provide that manager with edit access to all accounts andopportunities in the hierarchy below that account. If you include the top account in the territory, the managergets edit access to all accounts. If you include an account in the middle of the hierarchy, the manager canaccess only those accounts in that particular branch.
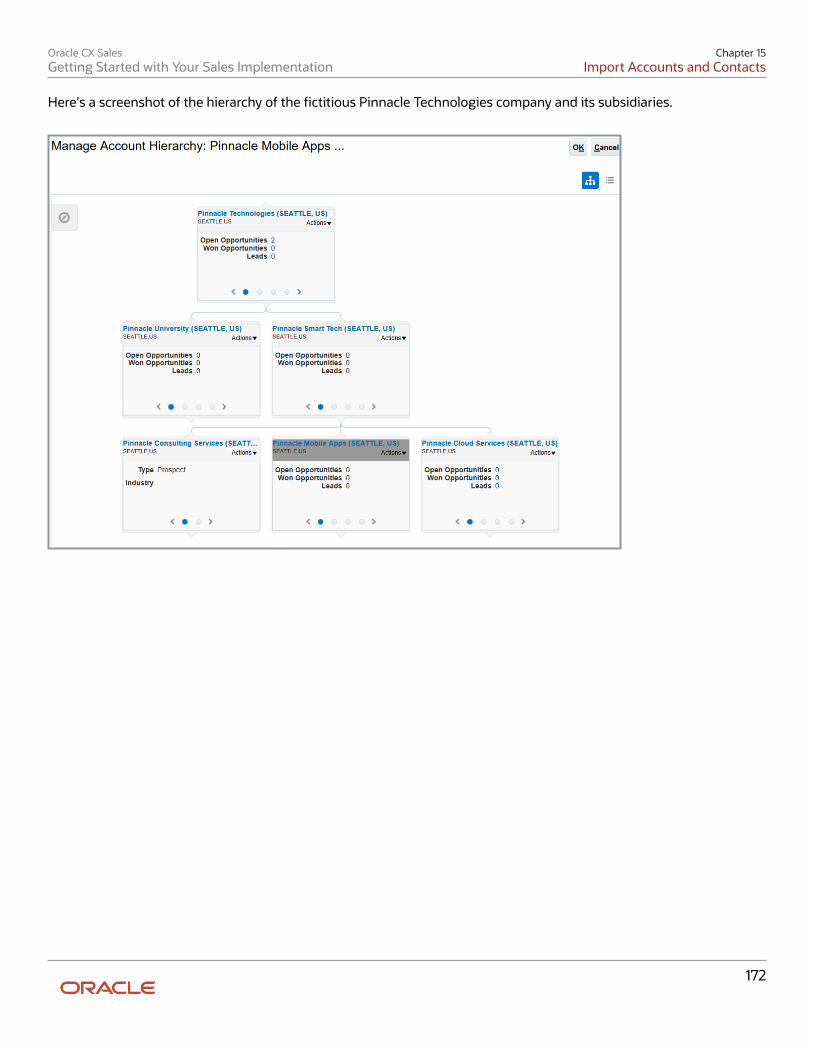
Oracle CX SalesGetting Started with Your Sales Implementation
Chapter 15Import Accounts and Contacts
172
Here's a screenshot of the hierarchy of the fictitious Pinnacle Technologies company and its subsidiaries.
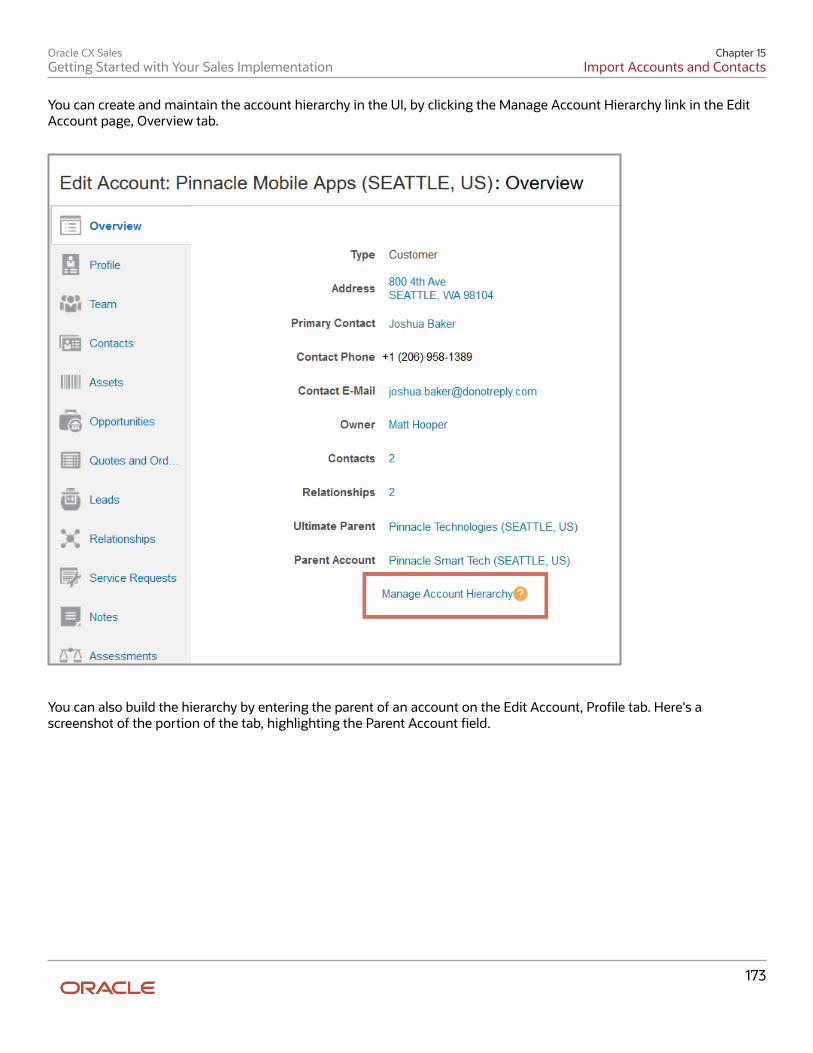
Oracle CX SalesGetting Started with Your Sales Implementation
Chapter 15Import Accounts and Contacts
173
You can create and maintain the account hierarchy in the UI, by clicking the Manage Account Hierarchy link in the EditAccount page, Overview tab.
You can also build the hierarchy by entering the parent of an account on the Edit Account, Profile tab. Here's ascreenshot of the portion of the tab, highlighting the Parent Account field.
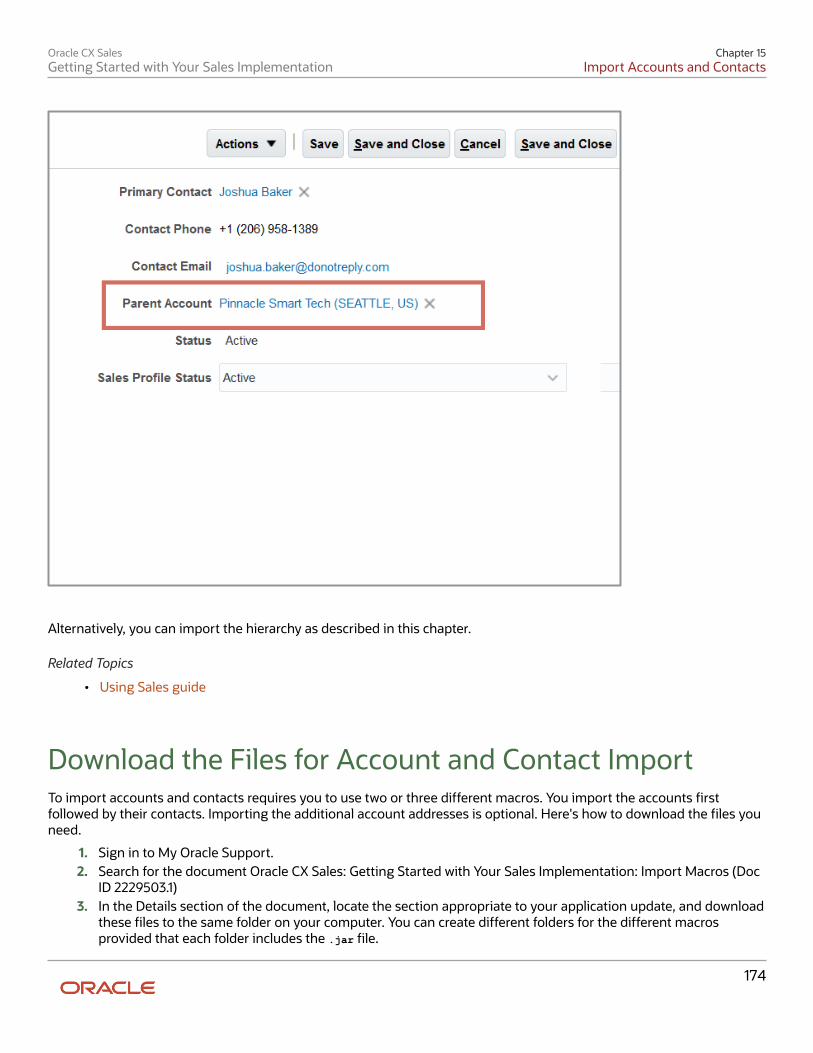
Oracle CX SalesGetting Started with Your Sales Implementation
Chapter 15Import Accounts and Contacts
174
Alternatively, you can import the hierarchy as described in this chapter.
Related Topics
• Using Sales guide
Download the Files for Account and Contact ImportTo import accounts and contacts requires you to use two or three different macros. You import the accounts firstfollowed by their contacts. Importing the additional account addresses is optional. Here's how to download the files youneed.
1. Sign in to My Oracle Support.2. Search for the document Oracle CX Sales: Getting Started with Your Sales Implementation: Import Macros (Doc
ID 2229503.1)3. In the Details section of the document, locate the section appropriate to your application update, and download
these files to the same folder on your computer. You can create different folders for the different macrosprovided that each folder includes the .jar file.
Oracle CX SalesGetting Started with Your Sales Implementation
Chapter 15Import Accounts and Contacts
175
File Name Description
oracle_ucm_client_11.1.1.jar You must include this file in the same directory as the import macro.
Account Import Macro The Excel macro that you populate with the account data
Contact Import Macro The Excel macro that you populate with the contact data
Address Import Macro Enables you to import additional addresses for both accounts and contacts. You mustexpose the multiple address region in the account and contact pages before you import.
View the Industry Codes for AccountsHere's how to find the account classification codes to use in the Industry Code column in the account import macro.
1. In Setup and Maintenance, go to the following:
◦ Offering: Sales
◦ Functional Area: Accounts and Contacts
◦ Task: Manage Classification Categories
2. In the Search region of the Manage Classification Categories page, enter the classification category name in theClassification Category field. For the default category provided by Oracle, enter CUSTOMER_CATEGORY.
3. Click Search.4. Click the classification category name.
Use the classification codes listed in the Classification Code column on the page for entries in the import macro.
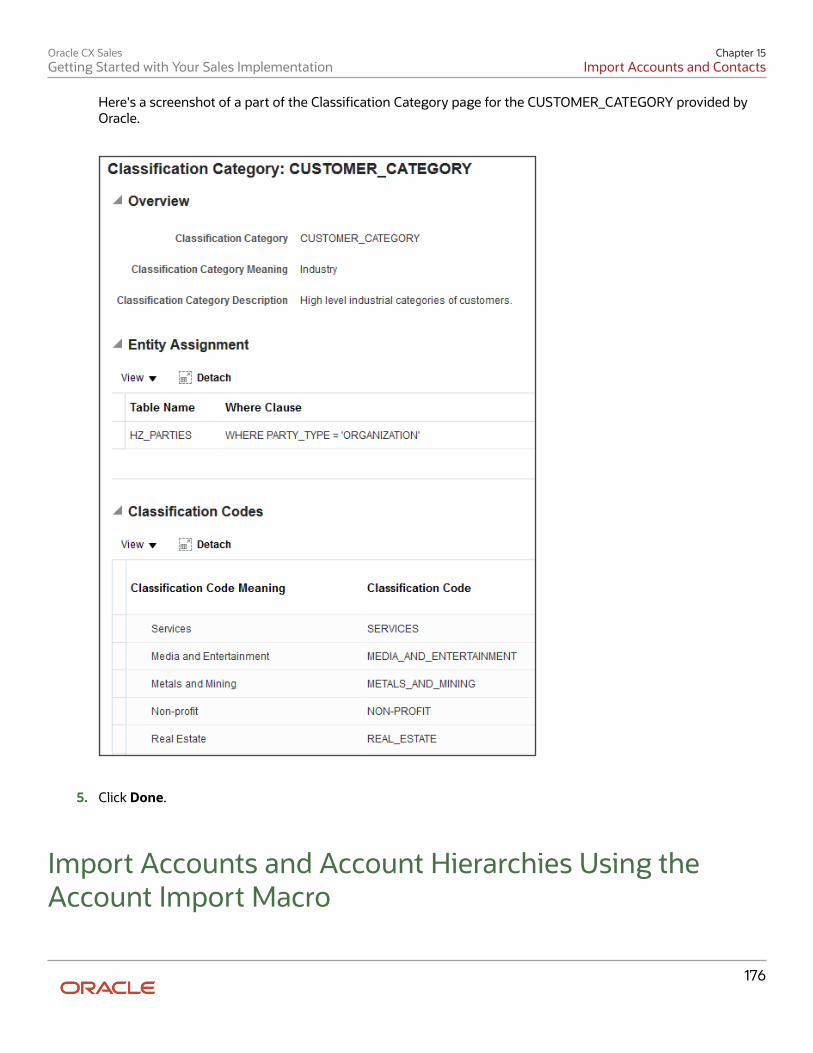
Oracle CX SalesGetting Started with Your Sales Implementation
Chapter 15Import Accounts and Contacts
176
Here's a screenshot of a part of the Classification Category page for the CUSTOMER_CATEGORY provided byOracle.
5. Click Done.
Import Accounts and Account Hierarchies Using theAccount Import Macro
Oracle CX SalesGetting Started with Your Sales Implementation
Chapter 15Import Accounts and Contacts
177
Watch video
Here's how you populate the account import macro with your data and import. You can enter and import a maximum of5,000 records at a time. You must wait until a previous import is complete before using the macro again.
Note: You can modify the macro to import additional fields, including any custom fields you created, using theAttributes Mapping worksheet in the macro. The steps for modifying macros are covered in the Import Data withCustom Fields chapter.
1. Open the Account Import Macro.2. If you receive a security warning that macros have been disabled, you must enable macros.3. Click the Resource EMail to ID Mapping worksheet.4. Click Populate Resource Attributes from Server to populate the worksheet with information about the
resources who are the owners of the accounts you're importing.
The Login window appears.5. In the Login window, do the following:
a. Enter the host name. The host name is in the portion of the URL between https:// and /sales.b. Enter the user name and password.c. Click Submit.
6. If you're importing additional fields, including custom fields, then do the following:
a. Click the Attributes Mapping worksheet.b. Click Fetch Attributes from Server.c. In an empty row in the worksheet, select the attribute from the Attribute Name column.d. Enter the name you want displayed as the column heading in the Account worksheet. This name displays
only in the macro.e. Click Update Headers to add the column to the Account worksheet.
7. Click the Account worksheet, and enter the account data in the columns.
The address you enter in the worksheet becomes the primary address for the account. If you create salesterritories by address, the assignment process uses the primary address to assign territories.
Column What to Enter
Account Number Required unique ID for the organization. You can leave this field blank and generate the IDslater by clicking Generate Account Number.
Account Name The name of the organization. Entry in this column is required.
D-U-N-S number The data universal numbering system (D-U-N-S) number from Dun & BradstreetCorporation.
Account Type Enter either ZCA_CUSTOMER or ZCA_PROSPECT.
◦ ZCA_CUSTOMER for organizations you have sold to in the past.
◦ ZCA_PROSPECT for potential customers. If an organization still requires qualification,then you should consider importing the record as a lead instead.
Oracle CX SalesGetting Started with Your Sales Implementation
Chapter 15Import Accounts and Contacts
178
Column What to Enter
If you leave this column blank, then the macro enters ZCA_PROSPECT.
Owner E-Mail Enter the email address of the salesperson who is the account owner. The email addressmust be listed on the Resource EMail to ID Mapping worksheet. Entry in this column isrequired.
Address Number A unique identifier for the address. If you leave this column blank, then the macro generatesthe number for you when you import.
If you want to reuse an address from another account, then you can enter the addressnumber from that address and skip the rest of the address fields.
Address 1 Enter the street address for the primary account address.
Address 2 Enter additional address information, such as the suite number.
City City.
State For the US, enter one of the two-letter state codes.
Postal Code Postal code.
Country Code The two-letter ISO code for a country. For example, enter US for the United States, and IN forIndia. Entry is required.
Address Type Address types indicate how an address is used. For example, a customer gets billed at thebill-to address and receives the goods at the ship-to address. Address types are displayedonly if you enable the display of multiple addresses for accounts.
You can import any of the address type codes entered in the lookup type Party Site UseCode (PARTY_SITE_USE_CODE) with the tag SALES_CLOUD. By default, these are the codesavailable for import:
◦ BILL_TO
◦ SELL_TO
◦ SHIP_TO
The sales application by itself doesn't use the address type to drive any logic, but differentapplications you integrate may. By default, every account address you create in theapplication is set to the sell-to address.
Phone Country Code Country code for the main phone for the organization.
Phone Number Main phone number. No spaces or delimiters.
Oracle CX SalesGetting Started with Your Sales Implementation
Chapter 15Import Accounts and Contacts
179
Column What to Enter
Fax Country Code Fax number country code.
Fax Number Fax number. No spaces or delimiters.
Email Email address.
URL The URL.
Industry Code The industry code that you retrieved from the application for the classification category thatyou're using. You can obtain a list of the codes using the Manage Classification Categoriestask as described in the Viewing Classification Categories for Accounts topic.
Named Flag A Y entry indicates the account is a named account. You can create special assignment fornamed accounts.
Parent Account Number Enter the account number of a parent account to create an account hierarchy. You can copyover the IDs from the Account Number column.
8. In the account import macro, click Create Import Activity.
The Login window is already populated with the information you provided earlier.9. Click Submit.
10. Here's what to do if you're prompted to correct errors in your entries:
a. Click OK
The Error worksheet displays your errors.b. Click each error link in column D and make the correction on the Account worksheet.
Note: After you correct an error, you must click outside the field for the correction to berecognized.
c. Click Create Import Activity and Submit again.11. If the macro data is validated without errors, then the macro displays one of the following messages.
Message Meaning
The file import activitywas submitted successfully.
Your import has started. If the file import activity is submitted successfully, then theconfirmation message displays the job ID.
Unable to connect to theserver at this time.
You may have entered an incorrect host.
Oracle CX SalesGetting Started with Your Sales Implementation
Chapter 15Import Accounts and Contacts
180
Message Meaning
Unable to submit the fileimport activity. Check logfor details.
Open the Errors work sheet to view the error details.
12. If your import activity was submitted successfully, then click Activity Details.
The Activity Details window lists the import activity name, ID, and its status.
◦ If the import activity is still in progress, you can refresh the status periodically by clicking Refresh.
◦ A status of "Completed" means your import completed successfully.
Import ContactsAfter the account import process completes, you can import the account contacts. You can import multiple contactsfor each account, but you must specify one of the contacts as the primary contact. If you don't identify an account for acontact, the contact gets imported as a stand-alone contact. Using the macro, you can import up to 5,000 contacts at atime. You must ensure each import completes before starting another.
1. Open the Contact Import Macro.2. Enable macros in Microsoft Excel, if required.3. Select the Resource EMail to ID Mapping worksheet.4. Click Populate Resource Attributes from Server to populate the worksheet with information about the
resources you will assign as owners of the contacts you're importing. The contact owner is usually the resourcewho created the record. Owner entry is required.
5. Sign in on the Login window:
a. Enter the host name. The host name is in the portion of the URL between https:// and /sales.b. Enter the user name and password.c. Click Submit.
The worksheet now includes both IDs and email addresses of the sales resources in your application. The emaildoesn't get imported; it just helps you enter the owner.
6. If you're importing additional fields, including custom fields, then do the following:
a. Click the Attributes Mapping worksheet.b. Click Fetch Attributes from Server.c. In an empty row in the worksheet, select the attribute from the Attribute Name column.d. Enter the name you want displayed as the column heading in the Contact worksheet. This name displays
only in the macro.e. Click Update Headers to add the column to the Contact worksheet.
7. Enter the contact information in the Contact worksheet. Here's a description of the columns:
Oracle CX SalesGetting Started with Your Sales Implementation
Chapter 15Import Accounts and Contacts
181
Column What to Enter
Contact Number Unique ID for the contact. If you leave this required ID blank, the macro automaticallygenerates it for you from the date and time when you import. The application uses thecontact number to identify the contact for updates.
Prefix Enter the contact name prefix. Here are the valid values:
◦ DR.
◦ MISS
◦ MR.
◦ MRS.
◦ SIR
First Name Contact first name. Entry is required.
Last Name Contact last name. Entry is required.
Job Title Contact job title.
Owner E-Mail Enter the email of the account owner. The email must be one of the email addresses on theResource EMail to ID Mapping worksheet. An owner is required for every record.
Work Phone Country Code Country code for the work phone.
If you import a work phone and no mobile phone, then the application displays the workphone as the primary phone in the contact and account UI.
Work Phone Number Phone number without spaces.
Mobile Country Code Country code for the contact's mobile phone number.
If you import a mobile phone number, it automatically becomes the contact's primarynumber in the contact and account UI.
Mobile Number Phone number without spaces.
E-mail Email address.
Address Number If you don't have a unique ID to plug in this required field, you can leave it blank. The macrogenerates it for you automatically.
Address 1 Enter a street address unless you're using the account address.
Oracle CX SalesGetting Started with Your Sales Implementation
Chapter 15Import Accounts and Contacts
182
Column What to Enter
Address 2 Second address line.
Address 3 This column is hidden in the macro.
City City.
State State.
Postal Code ZIP or other postal code.
Country Code Two-letter ISO country code. You must enter a country even if you don't enter an address.
Account Number The account number links the contact to the account. Copy the account number for thecontact's organization from the Account Number column in the account import macro file. Ifyou leave this column blank, then the contact is imported as a standalone contact.
Primary Contact Flag Each account must have one and only one primary contact. You must select Y for one of thecontacts for each account. The other contacts must have a value of N.
8. Click Create Import Activity.
The Login window appears already populated with the information you provided.9. Click Submit.
10. If you're prompted to correct errors, here's what to do:
a. Click OK
The Error worksheet displays your errors.b. Click each error link in column D and make the correction on the Template worksheet.
Note: After you correct an error, you must click outside the field for the correction to berecognized.
c. Click Create Import Activity and Submit again.11. If the macro data is validated without errors, then the macro displays one of the messages listed in the
following table:
Message Meaning
The file import activitywas submitted successfully.
Your import has started. If the file import activity is submitted successfully, then theconfirmation message displays the job ID.
Oracle CX SalesGetting Started with Your Sales Implementation
Chapter 15Import Accounts and Contacts
183
Message Meaning
Unable to connect to theserver at this time.
You may have entered an incorrect host.
Unable to submit the fileimport activity. Check logfor details.
You most likely entered the wrong mapping number or the user does not have the correctpermissions. Open the Errors work sheet to view the error details.
12. If your import activity was submitted successfully, then click Activity Details.
The Activity Details window appears, listing the import activity name, its ID and its status.
◦ If the import activity is still in progress, you can refresh the status periodically by clicking Refresh.
◦ If your import completed successfully, then the status listed is Completed.
13. Optionally, click Generate Log to save a file listing the contacts that were imported.
Validate the Imported ContactsYou can validate the imported contacts either in the Contacts work area or in Workspace. Here's how to do it in theContacts work area.
You can view the primary contacts of the accounts you imported from the list of accounts. Here's another way that youcan view a list of contacts for the country you imported:
1. Make sure that you're signed in as a sales administrator in the sales organization. Sales administrators havebroad access to sales data.
2. Open the Contacts work area.
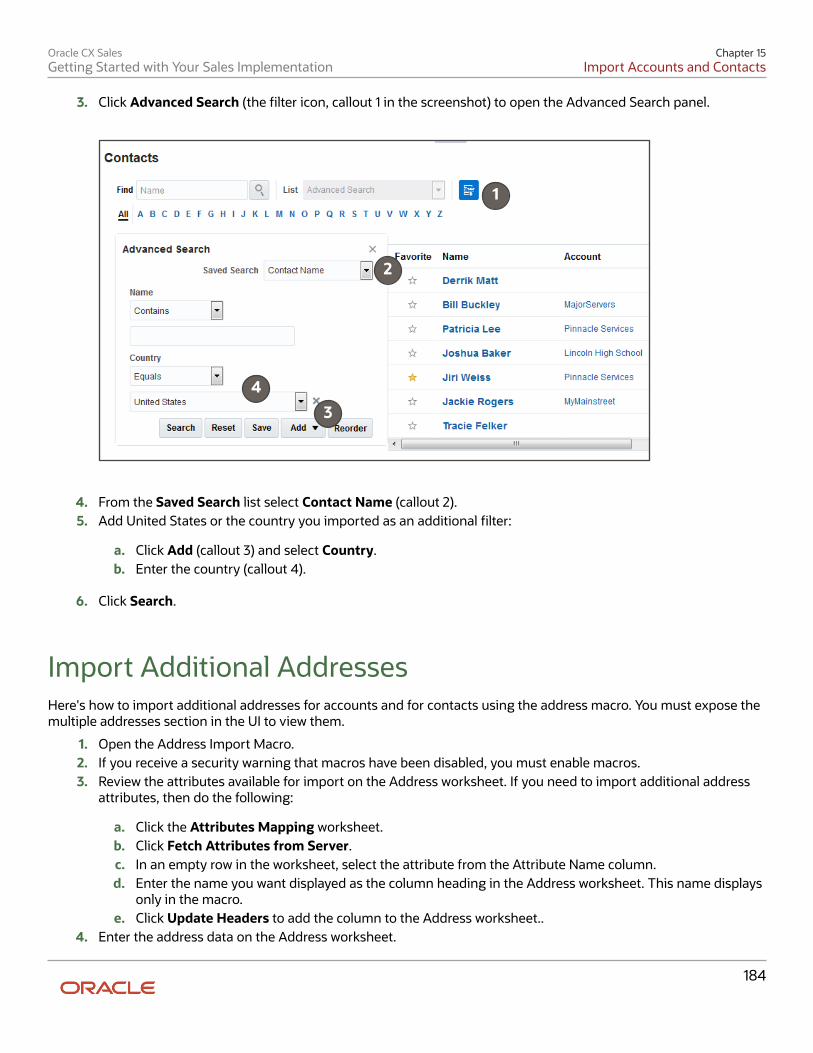
Oracle CX SalesGetting Started with Your Sales Implementation
Chapter 15Import Accounts and Contacts
184
3. Click Advanced Search (the filter icon, callout 1 in the screenshot) to open the Advanced Search panel.
1
2
34
4. From the Saved Search list select Contact Name (callout 2).5. Add United States or the country you imported as an additional filter:
a. Click Add (callout 3) and select Country.b. Enter the country (callout 4).
6. Click Search.
Import Additional AddressesHere's how to import additional addresses for accounts and for contacts using the address macro. You must expose themultiple addresses section in the UI to view them.
1. Open the Address Import Macro.2. If you receive a security warning that macros have been disabled, you must enable macros.3. Review the attributes available for import on the Address worksheet. If you need to import additional address
attributes, then do the following:
a. Click the Attributes Mapping worksheet.b. Click Fetch Attributes from Server.c. In an empty row in the worksheet, select the attribute from the Attribute Name column.d. Enter the name you want displayed as the column heading in the Address worksheet. This name displays
only in the macro.e. Click Update Headers to add the column to the Address worksheet..
4. Enter the address data on the Address worksheet.
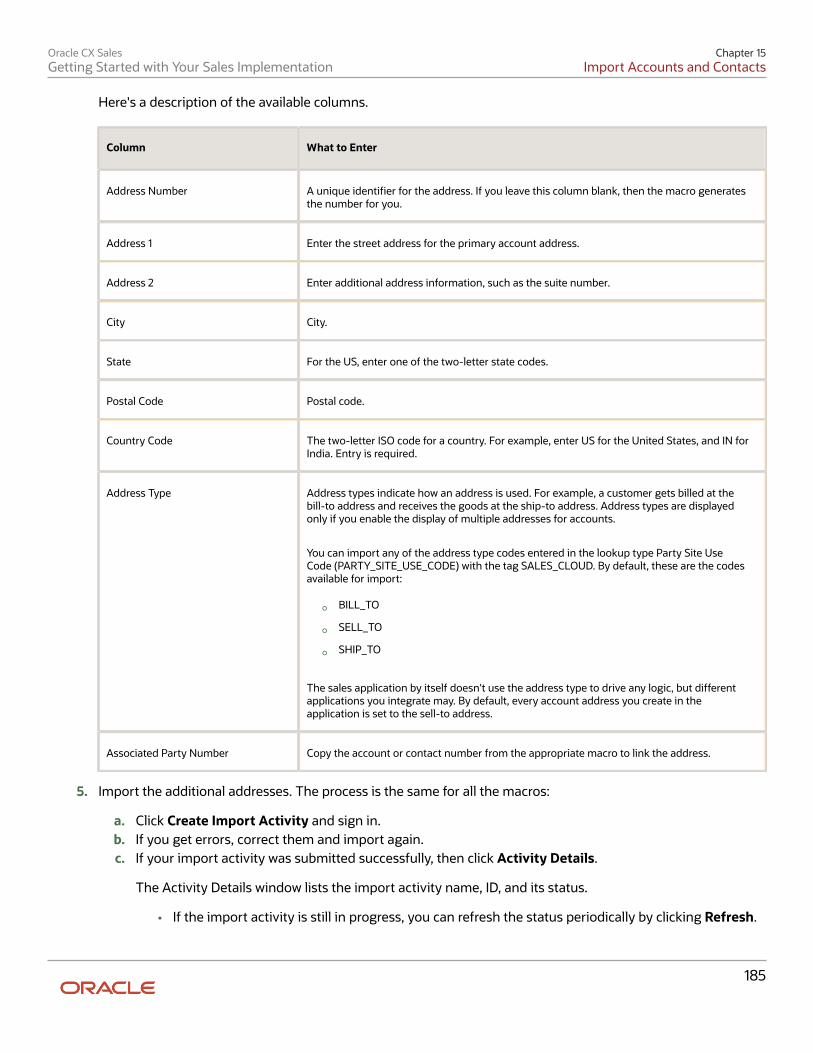
Oracle CX SalesGetting Started with Your Sales Implementation
Chapter 15Import Accounts and Contacts
185
Here's a description of the available columns.
Column What to Enter
Address Number A unique identifier for the address. If you leave this column blank, then the macro generatesthe number for you.
Address 1 Enter the street address for the primary account address.
Address 2 Enter additional address information, such as the suite number.
City City.
State For the US, enter one of the two-letter state codes.
Postal Code Postal code.
Country Code The two-letter ISO code for a country. For example, enter US for the United States, and IN forIndia. Entry is required.
Address Type Address types indicate how an address is used. For example, a customer gets billed at thebill-to address and receives the goods at the ship-to address. Address types are displayedonly if you enable the display of multiple addresses for accounts.
You can import any of the address type codes entered in the lookup type Party Site UseCode (PARTY_SITE_USE_CODE) with the tag SALES_CLOUD. By default, these are the codesavailable for import:
◦ BILL_TO
◦ SELL_TO
◦ SHIP_TO
The sales application by itself doesn't use the address type to drive any logic, but differentapplications you integrate may. By default, every account address you create in theapplication is set to the sell-to address.
Associated Party Number Copy the account or contact number from the appropriate macro to link the address.
5. Import the additional addresses. The process is the same for all the macros:
a. Click Create Import Activity and sign in.b. If you get errors, correct them and import again.c. If your import activity was submitted successfully, then click Activity Details.
The Activity Details window lists the import activity name, ID, and its status.
• If the import activity is still in progress, you can refresh the status periodically by clicking Refresh.
Oracle CX SalesGetting Started with Your Sales Implementation
Chapter 15Import Accounts and Contacts
186
• A status of "Completed" means your import completed successfully.
Oracle CX SalesGetting Started with Your Sales Implementation
Chapter 16Import Data with Custom Fields
187
16 Import Data with Custom Fields
Setup OverviewIf you need to import custom fields, this chapter is for you. You learn how to modify both the import macro and therelevant UI, so you're ready to import a custom field. The example here shows you how to create a custom account field,called Customer Rating, as an example. Salespeople use the field to rate their accounts as Low, Medium, or High. Youcan use similar steps to modify any of the macros provided by Oracle.
Note: While you can import additional fields by appending columns to the import macro, you can't make any otherchanges. You can't edit the Visual Basic for Applications (VBA) code or other functions.
This chapter builds on what you already learned in the previous chapter. Here's an overview:
Step Description Navigation Where to Get More Details
1. Use Application Composer tocreate the custom field.
Navigator > Configuration >Sandboxes
Navigator > Configuration >Application Composer
See the topic: Create a CustomField
2. In Application Composer, addthe field to the appropriateUIs. After testing yourchanges, publish thesandbox to make the changepermanent.
Navigator > Configuration >Application Composer
Navigator > Configuration >Sandboxes
See the topic: Add the CustomField to Page Layouts
3. If you created a custom field,you must enable it for importby opening the Import andExport section of ApplicationComposer and clickingGenerate.
Navigator > Configuration >Application Composer
See the topic: Enable theCustom Field for Import
4. Add the field to the accountimport macro and import yourdata.
If the field is validated bya lookup, then you mustimport the lookup Code ratherthan the Meaning (the valuedisplayed in the UI).
Complete this step in theimport macro
See the topic: Add the Field tothe Account Import Macro andImport Your Data
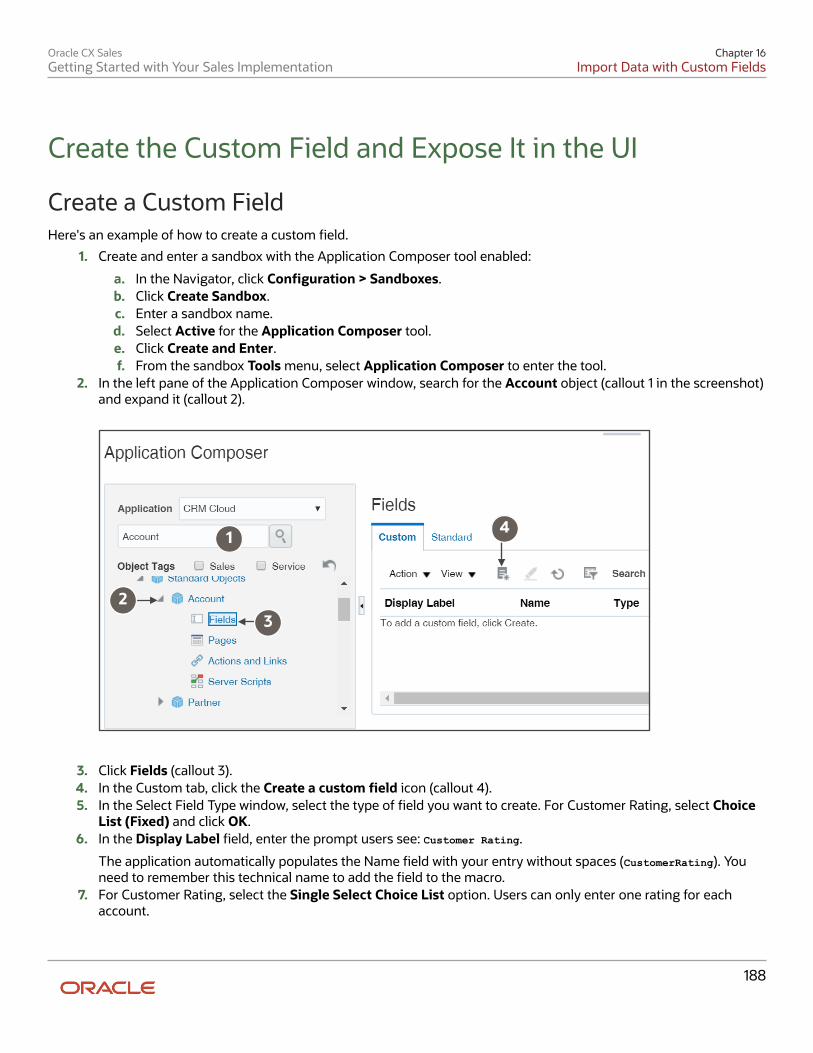
Oracle CX SalesGetting Started with Your Sales Implementation
Chapter 16Import Data with Custom Fields
188
Create the Custom Field and Expose It in the UI
Create a Custom FieldHere's an example of how to create a custom field.
1. Create and enter a sandbox with the Application Composer tool enabled:
a. In the Navigator, click Configuration > Sandboxes.b. Click Create Sandbox.c. Enter a sandbox name.d. Select Active for the Application Composer tool.e. Click Create and Enter.f. From the sandbox Tools menu, select Application Composer to enter the tool.
2. In the left pane of the Application Composer window, search for the Account object (callout 1 in the screenshot)and expand it (callout 2).
1
23
4
3. Click Fields (callout 3).4. In the Custom tab, click the Create a custom field icon (callout 4).5. In the Select Field Type window, select the type of field you want to create. For Customer Rating, select Choice
List (Fixed) and click OK.6. In the Display Label field, enter the prompt users see: Customer Rating.
The application automatically populates the Name field with your entry without spaces (CustomerRating). Youneed to remember this technical name to add the field to the macro.
7. For Customer Rating, select the Single Select Choice List option. Users can only enter one rating for eachaccount.
Oracle CX SalesGetting Started with Your Sales Implementation
Chapter 16Import Data with Custom Fields
189
8. Now create the list. In the List of Values section, click the Create a New Lookup Type icon.9. In the Create Lookup Type page, Meaning field, enter a name for your lookup. The name isn't seen by users but
must be unique in the application.
In our example, Vision enters Vision Sales Customer Ratings.10. In the Lookup Type field, enter a name in capital letters. You can use underlines but no spaces. For example,
enter VISION_CUSTOMER_RATINGS.11. Add the values in the Lookup Codes section:
a. Click the Create Lookup Code icon.b. Enter the value salespeople see in the Meaning field.c. Enter the Lookup Code in capital letters. You can use underlines but no spaces. This is the value you use
in the import file.d. Enter a number to indicate the display sequence in the list.
Here are the values for the Customer Ratings lookup:
Meaning Lookup Code Display Sequence
High HIGH 1
Medium MEDIUM 2
Low LOW 3
12. Click Save.13. Because salespeople may not know the customer rating for every customer, do not enter a default value. This
permits a blank value for the field.14. Click Save and Close.
Your new field displays in the Custom tab in the right pane. You're now ready to add the field to the UI.
Add the Custom Field to Page LayoutsHere's how to add the custom field you created, or any other field for that matter, to the Account pages.
1. With the Account object selected in Application Composer, click Pages.2. Expose the custom field on the pages where you need it. In this example, you add it to the Account landing
page, the Create Account page, and the Edit Account page (called "Details" page in Application Composer).
Note: If you want the custom field to display in Workspace search results, then you must edit theindividual saved searches to add the field as a column. Workspace saved searches determine whatinformation gets displayed in search results. You can't use Application Composer to add the field tothe Workspace UI.
a. Locate the page.b. Click Duplicate.c. In the Duplicate Layout window, enter a new name for your layout or just click Save and Edit.
Oracle CX SalesGetting Started with Your Sales Implementation
Chapter 16Import Data with Custom Fields
190
d. On the Layout page, click Edit.e. Scroll down in the Available Fields column to locate the custom field and move it to the Selected Fields
column.f. Use the arrow buttons to move the field where you want it
g. Click Save and Close.
You are returned to the Layout page, which reflects your changes.h. Click Done.
You are returned to the Application Composer page.3. Review the pages where you added the field:
a. With the sandbox still open, click Home to return to the springboard.b. Open the Account work area.c. Review each of the pages to make sure the field is where you want it and works the way you want.
4. You are ready to publish the sandbox.
Related Topics
• Create Workspace Saved Searches
Publish the SandboxYour changes look great, so you're ready to roll them out into the application by publishing your sandbox. Here's how.
1. Click Navigator > Configuration > Sandboxes.2. On the Sandboxes page, click the name of the sandbox.3. Click Publish.4. Click Continue to publish.5. When the sandbox completes publishing, click Done.
Related Topics
• How to Resolve Conflicts in Sandboxes
• Why can't I publish my sandbox
Enable the Custom Field for ImportHere's how to enable the custom field you created for import.
1. Open Application Composer in a sandbox-free session.2. Click Import and Export.3. On the Import and Export page, click Generate.
The application launches a process to create the import and export artifacts for any custom fields.4. The custom field is ready for import after the process completes. You can click Refresh under the Status
heading to see the latest status.

Oracle CX SalesGetting Started with Your Sales Implementation
Chapter 16Import Data with Custom Fields
191
Add the Field to the Account Import Macro and ImportYour DataHere's how to add the custom field to the account import macro.
1. Open the Account Import Macro.2. If you receive a security warning that macros have been disabled, you must enable macros by clicking Enable
Content.3. Select the Attributes Mapping worksheet.4. Click Fetch Attributes from Server.5. If requested, sign in.6. In an empty row, select the attribute you are adding from the Attribute Name list.
In our example, you select CustomerRating (the technical name of the field you created).
You can only add attributes at the end of the list and you can't modify the order of the existing attributes in themacro.
7. Enter a name in the Column Header column. Your entry appears as the column name in the Accountworksheet.
8. Click Update Headers.9. Enter your data on the Account worksheet and import. The process is the same as for the macro without any
additional fields. There's no validation in the macro for the custom field, so the values you enter must matchthe custom field you created. In our example, the Customer Rating field is a fixed-choice list field with threevalues: Low, Medium, and High. The values come from a lookup type. Each value in the lookup type includesa Meaning (what's displayed in the UI) and a unique Code for each value. If your field is validated by a lookup,make sure you enter the value in the Code field for import. Here are the values for Customer Rating:
Code Meaning
LOW Low
MEDIUM Medium
HIGH High
In your import file, you can enter three values for Customer Rating: LOW, MEDIUM, and HIGH.
Related Topics
• Import Accounts and Account Hierarchies Using the Account Import Macro

Oracle CX SalesGetting Started with Your Sales Implementation
Chapter 16Import Data with Custom Fields
192
Oracle CX SalesGetting Started with Your Sales Implementation
Chapter 17Mass Update and Inline Editing
193
17 Mass Update and Inline Editing
Setup OverviewIn this chapter, you learn how to set up two features to improve productivity. You can enable salespeople to updatemultiple records at the same time (mass update) and you can make it possible for them to edit records inline, directly inwork area lists. Mass update is available in both the individual work areas and in Workspace. Inline editing is availableonly in the different work areas outside of Workspace.
Step Description Navigation Where to Get More Details
1 Enable mass update ofaccounts, opportunities, andother objects in the differentwork areas by adding theUpdate action to a customlayout of the landing page inApplication Composer. Thelanding page is the searchpage that opens when younavigate to a work area. Youcan also specify the maximumnumber of records users canupdate in a system profileoption.
• Navigator >Configuration >Application Composer
• Setup andMaintenance > Sales> Sales Foundation >Manage AdministratorProfile Values
See the topic: Enable MassUpdate in Individual WorkAreas
2 You enable the inline editingof records in individual workareas, by setting systemprofile option Click-to-Edit onLanding Page Enabled to Yes.
Setup and Maintenance >Sales > Sales Foundation> Manage AdministratorProfile Values
See the topic: Enable InlineEditing of Records Displayedin Lists
3 Enable mass update of recordsin Workspace.
Setup and Maintenance >Sales > Sales Foundation >Configure Adaptive Search >Parameters
See the topic: Enable MassUpdate in Workspace.
Enable Mass Update in Individual Work Areas
Mass UpdateWith mass update, salespeople can update multiple records at the same time with a few clicks. No need to drill into andedit each record individually. Just click the Update action on the landing page, select the records on the page, and enteryour updates. That's all there's to it.
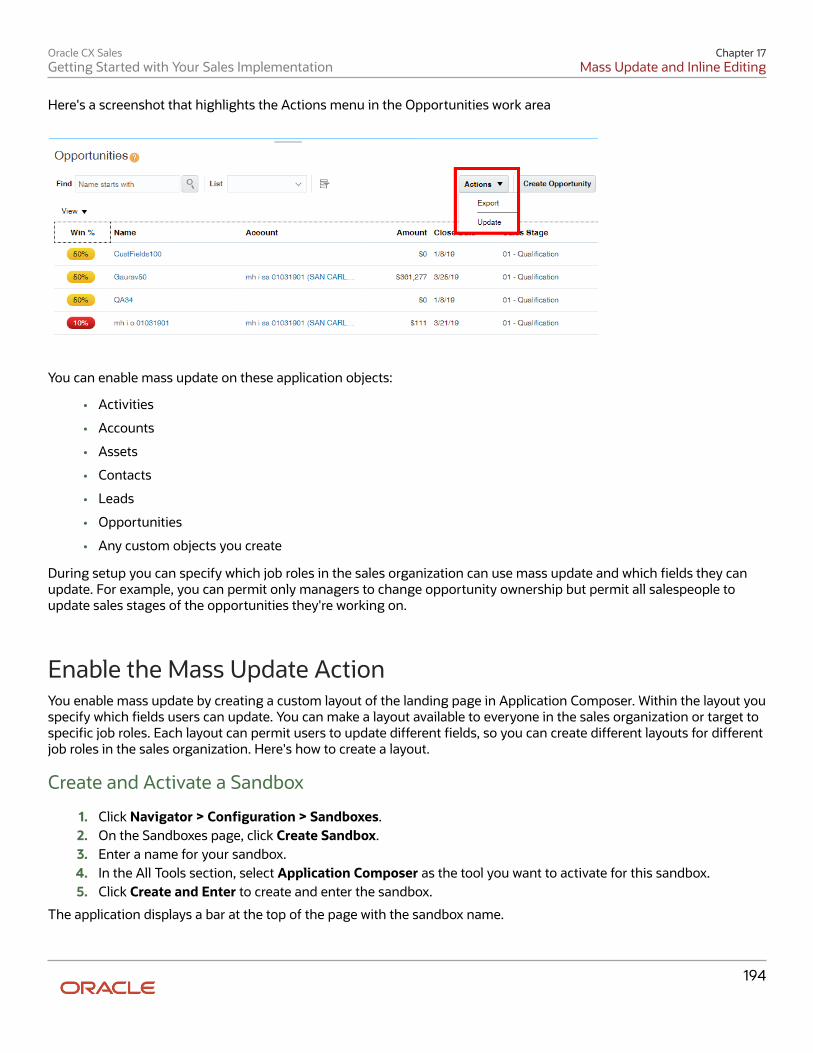
Oracle CX SalesGetting Started with Your Sales Implementation
Chapter 17Mass Update and Inline Editing
194
Here's a screenshot that highlights the Actions menu in the Opportunities work area
You can enable mass update on these application objects:
• Activities
• Accounts
• Assets
• Contacts
• Leads
• Opportunities
• Any custom objects you create
During setup you can specify which job roles in the sales organization can use mass update and which fields they canupdate. For example, you can permit only managers to change opportunity ownership but permit all salespeople toupdate sales stages of the opportunities they're working on.
Enable the Mass Update ActionYou enable mass update by creating a custom layout of the landing page in Application Composer. Within the layout youspecify which fields users can update. You can make a layout available to everyone in the sales organization or target tospecific job roles. Each layout can permit users to update different fields, so you can create different layouts for differentjob roles in the sales organization. Here's how to create a layout.
Create and Activate a Sandbox
1. Click Navigator > Configuration > Sandboxes.2. On the Sandboxes page, click Create Sandbox.3. Enter a name for your sandbox.4. In the All Tools section, select Application Composer as the tool you want to activate for this sandbox.5. Click Create and Enter to create and enter the sandbox.
The application displays a bar at the top of the page with the sandbox name.
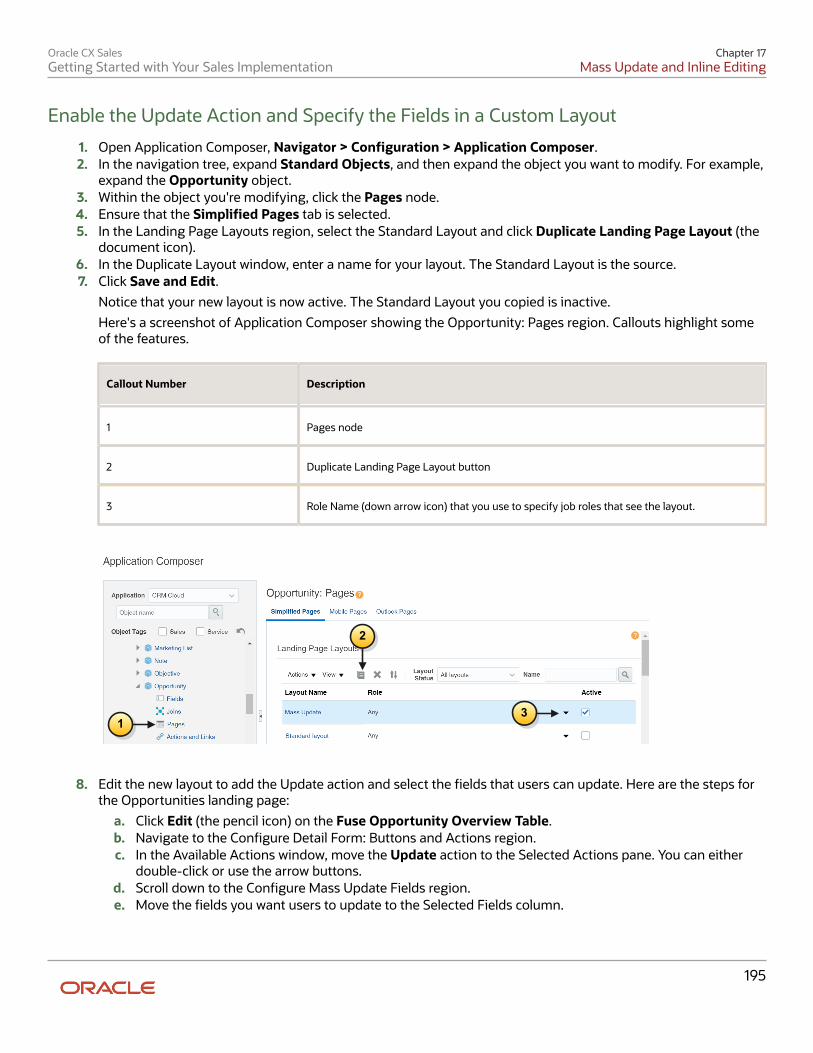
Oracle CX SalesGetting Started with Your Sales Implementation
Chapter 17Mass Update and Inline Editing
195
Enable the Update Action and Specify the Fields in a Custom Layout
1. Open Application Composer, Navigator > Configuration > Application Composer.2. In the navigation tree, expand Standard Objects, and then expand the object you want to modify. For example,
expand the Opportunity object.3. Within the object you're modifying, click the Pages node.4. Ensure that the Simplified Pages tab is selected.5. In the Landing Page Layouts region, select the Standard Layout and click Duplicate Landing Page Layout (the
document icon).6. In the Duplicate Layout window, enter a name for your layout. The Standard Layout is the source.7. Click Save and Edit.
Notice that your new layout is now active. The Standard Layout you copied is inactive.
Here's a screenshot of Application Composer showing the Opportunity: Pages region. Callouts highlight someof the features.
Callout Number Description
1 Pages node
2 Duplicate Landing Page Layout button
3 Role Name (down arrow icon) that you use to specify job roles that see the layout.
1
2
3
8. Edit the new layout to add the Update action and select the fields that users can update. Here are the steps forthe Opportunities landing page:
a. Click Edit (the pencil icon) on the Fuse Opportunity Overview Table.b. Navigate to the Configure Detail Form: Buttons and Actions region.c. In the Available Actions window, move the Update action to the Selected Actions pane. You can either
double-click or use the arrow buttons.d. Scroll down to the Configure Mass Update Fields region.e. Move the fields you want users to update to the Selected Fields column.
Oracle CX SalesGetting Started with Your Sales Implementation
Chapter 17Mass Update and Inline Editing
196
Tip: If entry in a field depends on the value of another field, you must expose both fields. Forexample, users can't enter a sales stage unless they select the sales method first.
f. Click Save and Close, then Done.9. By default, your custom layout is available to everyone. Here's how to restrict use of layout to specific job roles:
a. Select the layout and click Role Name (the down arrow icon).b. In the Select: Roles window, click Show available predefined roles and Specific Roles.c. Move the job roles to the Selected Roles column and click OK.
Test and Publish the SandboxTest your new layout in the work area where you enabled it and publish the sandbox.
1. Click on the sandbox name in the sandbox toolbar and select Publish.2. Click OK in the dialog box to navigate to the Sandbox Detail page.3. In the Sandbox Detail page, click Publish again.4. Click Continue to Publish in the warning message to confirm that you want to publish.
Specify the Maximum Number or Records Users Can Update atthe Same TimeYou can specify the maximum records users can update at the same time by setting two profile options.
Note the following:
• By default, users can update a maximum of 25 records at the same time.
• The maximum number of records you can update is 500.
• For custom objects, the maximum number is set to 25 records. You cannot change this number.
Application Object Profile Option
Activities Activity Mass Update Threshold Value (ZMM_MASS_UPDATE_THRESHOLD)
• Accounts• Assets• Contacts• Leads• Opportunities
Mass Update Threshold Value (ZBS_MASS_UPDATE_THRESHOLD)
Set the Profile OptionsHere's how to set the profile options:
1. In Setup and Maintenance, go to the following:
◦ Offering: Sales
◦ Functional Area: Sales Foundation
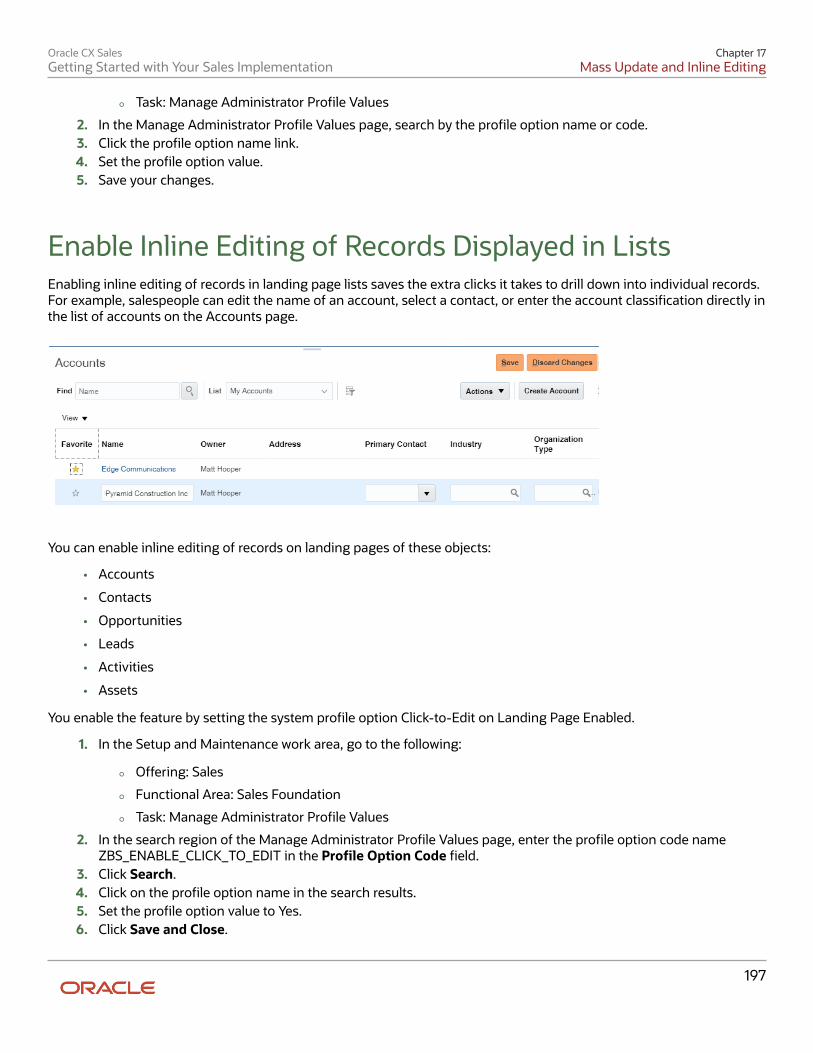
Oracle CX SalesGetting Started with Your Sales Implementation
Chapter 17Mass Update and Inline Editing
197
◦ Task: Manage Administrator Profile Values
2. In the Manage Administrator Profile Values page, search by the profile option name or code.3. Click the profile option name link.4. Set the profile option value.5. Save your changes.
Enable Inline Editing of Records Displayed in ListsEnabling inline editing of records in landing page lists saves the extra clicks it takes to drill down into individual records.For example, salespeople can edit the name of an account, select a contact, or enter the account classification directly inthe list of accounts on the Accounts page.
You can enable inline editing of records on landing pages of these objects:
• Accounts
• Contacts
• Opportunities
• Leads
• Activities
• Assets
You enable the feature by setting the system profile option Click-to-Edit on Landing Page Enabled.
1. In the Setup and Maintenance work area, go to the following:
◦ Offering: Sales
◦ Functional Area: Sales Foundation
◦ Task: Manage Administrator Profile Values
2. In the search region of the Manage Administrator Profile Values page, enter the profile option code nameZBS_ENABLE_CLICK_TO_EDIT in the Profile Option Code field.
3. Click Search.4. Click on the profile option name in the search results.5. Set the profile option value to Yes.6. Click Save and Close.

Oracle CX SalesGetting Started with Your Sales Implementation
Chapter 17Mass Update and Inline Editing
198
Enable Mass Update in WorkspaceHere's how to make it possible for salespeople to update multiple records at the same time while using Workspace.
1. Navigate to the Setup and Maintenance work area, open the Configure Adaptive Search task:
◦ Offering: Sales
◦ Functional Area: Sales Foundation
◦ Show: All Tasks
◦ Task: Configure Adaptive Search
2. On the Configure Adaptive Search page, click Parameters (callout 1).3. Click Edit.
Here's a screenshot of the page after you click Edit.
1
2
4. In the Enable Mass Update row, Current Value column, enter Y (callout 2).5. Click Save and Close.
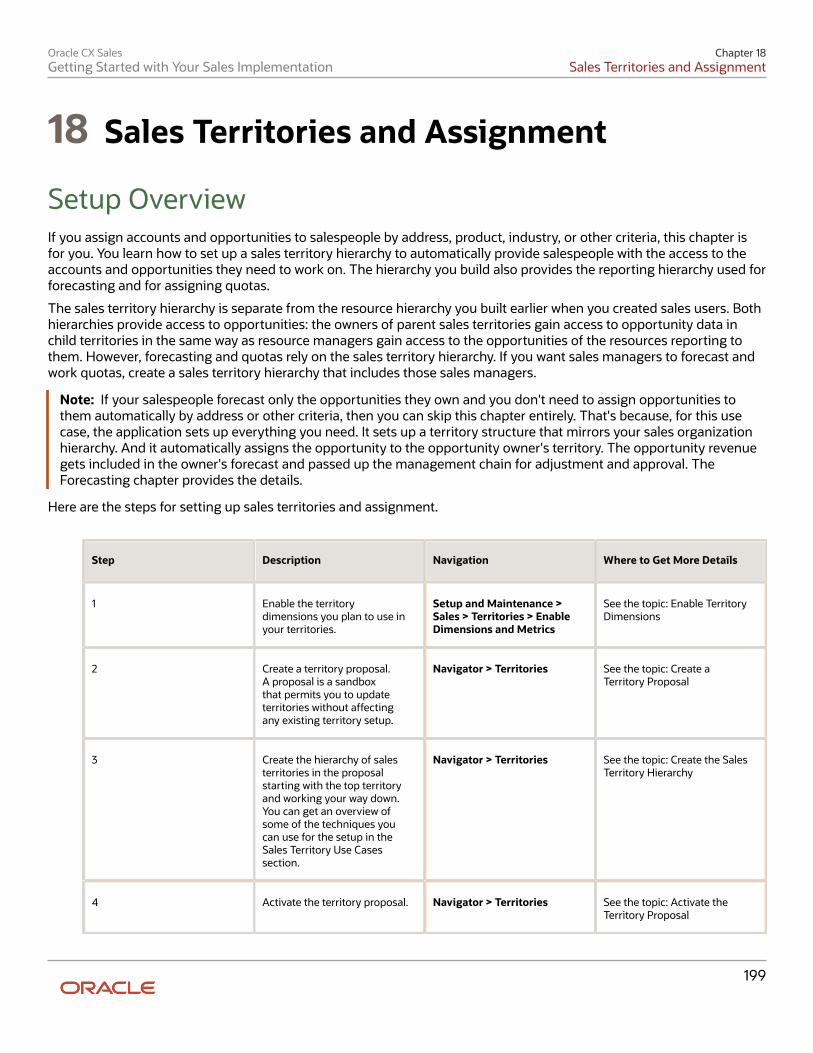
Oracle CX SalesGetting Started with Your Sales Implementation
Chapter 18Sales Territories and Assignment
199
18 Sales Territories and Assignment
Setup OverviewIf you assign accounts and opportunities to salespeople by address, product, industry, or other criteria, this chapter isfor you. You learn how to set up a sales territory hierarchy to automatically provide salespeople with the access to theaccounts and opportunities they need to work on. The hierarchy you build also provides the reporting hierarchy used forforecasting and for assigning quotas.
The sales territory hierarchy is separate from the resource hierarchy you built earlier when you created sales users. Bothhierarchies provide access to opportunities: the owners of parent sales territories gain access to opportunity data inchild territories in the same way as resource managers gain access to the opportunities of the resources reporting tothem. However, forecasting and quotas rely on the sales territory hierarchy. If you want sales managers to forecast andwork quotas, create a sales territory hierarchy that includes those sales managers.
Note: If your salespeople forecast only the opportunities they own and you don't need to assign opportunities tothem automatically by address or other criteria, then you can skip this chapter entirely. That's because, for this usecase, the application sets up everything you need. It sets up a territory structure that mirrors your sales organizationhierarchy. And it automatically assigns the opportunity to the opportunity owner's territory. The opportunity revenuegets included in the owner's forecast and passed up the management chain for adjustment and approval. TheForecasting chapter provides the details.
Here are the steps for setting up sales territories and assignment.
Step Description Navigation Where to Get More Details
1 Enable the territorydimensions you plan to use inyour territories.
Setup and Maintenance >Sales > Territories > EnableDimensions and Metrics
See the topic: Enable TerritoryDimensions
2 Create a territory proposal.A proposal is a sandboxthat permits you to updateterritories without affectingany existing territory setup.
Navigator > Territories See the topic: Create aTerritory Proposal
3 Create the hierarchy of salesterritories in the proposalstarting with the top territoryand working your way down.You can get an overview ofsome of the techniques youcan use for the setup in theSales Territory Use Casessection.
Navigator > Territories See the topic: Create the SalesTerritory Hierarchy
4 Activate the territory proposal. Navigator > Territories See the topic: Activate theTerritory Proposal
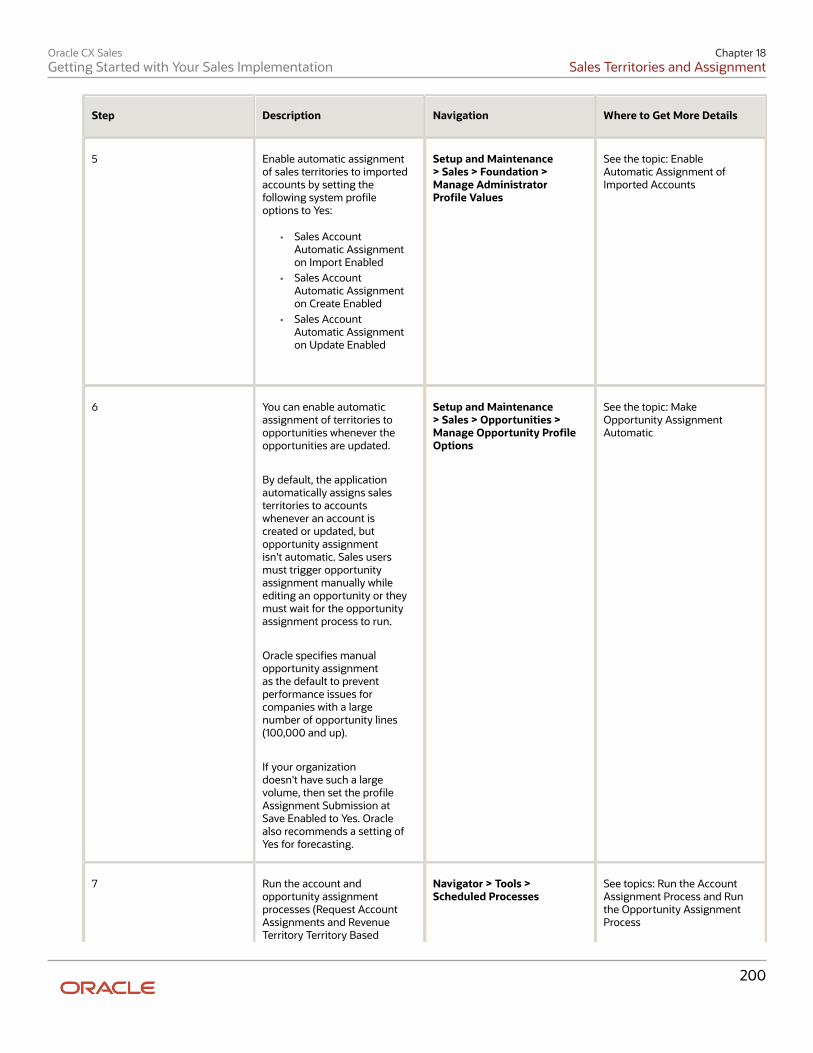
Oracle CX SalesGetting Started with Your Sales Implementation
Chapter 18Sales Territories and Assignment
200
Step Description Navigation Where to Get More Details
5 Enable automatic assignmentof sales territories to importedaccounts by setting thefollowing system profileoptions to Yes:
• Sales AccountAutomatic Assignmenton Import Enabled
• Sales AccountAutomatic Assignmenton Create Enabled
• Sales AccountAutomatic Assignmenton Update Enabled
Setup and Maintenance> Sales > Foundation >Manage AdministratorProfile Values
See the topic: EnableAutomatic Assignment ofImported Accounts
6 You can enable automaticassignment of territories toopportunities whenever theopportunities are updated.
By default, the applicationautomatically assigns salesterritories to accountswhenever an account iscreated or updated, butopportunity assignmentisn't automatic. Sales usersmust trigger opportunityassignment manually whileediting an opportunity or theymust wait for the opportunityassignment process to run.
Oracle specifies manualopportunity assignmentas the default to preventperformance issues forcompanies with a largenumber of opportunity lines(100,000 and up).
If your organizationdoesn't have such a largevolume, then set the profileAssignment Submission atSave Enabled to Yes. Oraclealso recommends a setting ofYes for forecasting.
Setup and Maintenance> Sales > Opportunities >Manage Opportunity ProfileOptions
See the topic: MakeOpportunity AssignmentAutomatic
7 Run the account andopportunity assignmentprocesses (Request AccountAssignments and RevenueTerritory Territory Based
Navigator > Tools >Scheduled Processes
See topics: Run the AccountAssignment Process and Runthe Opportunity AssignmentProcess
Oracle CX SalesGetting Started with Your Sales Implementation
Chapter 18Sales Territories and Assignment
201
Step Description Navigation Where to Get More Details
Assignment) immediatelyafter setting up salesterritories and on a regularschedule, perhaps once everyday during off-peak hours.
Sales Territories and AssignmentGetting assigned to a sales territory provides salespeople with access to accounts and opportunities. Sales territoriesalso provide the framework for forecasting. Salespeople can forecast only opportunity lines in their territories andforecasts roll up the territory hierarchy.
How You Gain Access to Sales DataAll salespeople can view basic account information, including customer names, contacts, and addresses. You musthave additional access to view the opportunities on the account, and to share all the details you need to collaborateduring the sales process. Information that requires additional access includes customer interactions, to-do lists,and appointments. Without the additional access, you can't share collateral, and collaborate on presentations. If youimplement Microsoft 365 or Mobile, then only the accounts that are part of a salesperson's territory are downloadedand synchronized. Here's how you get access to additional sales information:
• You're the owner of the record.Each record must have an owner. You automatically become the owner of any record you create. The owner,who is automatically a member of the team on the record, has full privileges, including the ability to edit therecord and add others to the team. The record owner or the sales administrator can reassign ownership ofindividual records. The sales administrator can also reassign ownership of multiple records at the same timeusing the Mass Transfer feature available in the Navigator. Users converting a lead to an opportunity, can alsoassign the owners of the resulting accounts and opportunities.
• You're a member of the team on the record.The owner can add members manually and assign different levels of access to them: view only, edit, or full (theability to add others). For opportunity and lead teams, you can also assign team members automatically usingassignment rules.
• You're the owner or a member of a sales territory assigned to the record or owner or member of the parentterritories in the sales territory hierarchy.Being the owner of a territory makes gives you additional privileges over a member: owners can review andsubmit forecasts up the sales territory hierarchy.
Note: While the territory name is always listed in each record that's assigned to a territory, opportunitiesalso copy over the names of the territory members to the opportunity team. Lead teams and accountteams don't include the territory team members. If you want to make the opportunity team behaviorconsistent with leads and accounts, you can set the system profile option Territory Based ResourceAssignment Style as described in the Opportunity Profile Options Default Values and Effects topic in theImplementing Sales guide.
• You're a manager in the resource hierarchy of the resource with access.
Oracle CX SalesGetting Started with Your Sales Implementation
Chapter 18Sales Territories and Assignment
202
Managers in a salesperson's resource management hierarchy have automatic visibility to their team's set ofaccounts, contacts, opportunities, leads, and other information. They don't have to be explicitly assigned toeach territory or team. The resource hierarchy provides you access to sales data, but not to forecasts. Onlyterritory owners can view forecasts. Most Oracle customers create a sales territory hierarchy that matches theresource hierarchy, so a manager is also the owner of the territory, but the two can be different.
• You're assigned to an access group.
Access groups provide an alternate way of providing access to sales data based on conditions you define. Forexample, you can use access groups to grant specific users access to all open opportunities, or all accounts inthe UK, and so on. Access groups aren't replacements for sales territories, but they provide a good way to grantaccess to people who assist with sales. For example, you may need to provide the legal department with accessto certain opportunities.
• You're a sales administrator (a user with the Sales Administrator job role).
Sales administrators have access to everything.
• The implementation team configures and assigns job roles with different privileges.
You can change the default access levels, by copying and modifying the existing job roles. See the Create andEdit Job, Abstract, and Duty Roles chapter of the Securing CX Sales and B2B Service guide for more details.
How You Grant Additional Access AutomaticallyYou can provide salespeople access by manually reassigning record ownership or adding someone to the team on therecord, or you can automate the process using one or both of the following methods:
• Assign access using sales territories.
You can set up the sales territory boundaries based on a wide variety of factors, called dimensions. The mostcommon dimensions include address, product, customer size, customer type, and industry. Many Oraclecustomers also define their own additional dimensions.
When you assign salespeople using territories, the territories themselves become associated with the account,opportunity, or lead. If you later realign your sales territories or if there's a turnover in your sales organization,then the assignments reflect those changes automatically after you run the assignment process.
The application assigns territories for each individual opportunity line separately. If an opportunity line getsassigned to your territory, you automatically gain access to the whole opportunity. If Lisa Jones' territoryincludes servers and Julian Henderson's laptops, both salespeople get access to an opportunity that includesservers and laptops.
• Assign opportunity and lead access to specific individuals by creating assignment rules.
You can use rules to assign individual salespeople you specify to lead and opportunity teams if the ruleconditions are met. Rules are the primary way of assigning salespeople to leads, and so rule setup is coveredin the Leads chapter. For opportunities, you can create rules to assign additional salespeople using factorsthat aren't covered by sales territories, such as deal size or product knowledge. Creating rules to supplementterritory assignment requires additional setup, including the setting of system profile options not covered inthis guide. See the Implementing Sales guide for details.
Salespeople can trigger assignment manually or you can assign leads, accounts, and opportunities automatically byrunning assignment processes.
Oracle CX SalesGetting Started with Your Sales Implementation
Chapter 18Sales Territories and Assignment
203
Sales Territory BoundariesYou define sales territory boundaries by the values you assign to their dimensions. For accounts, the territorydimensions provided by Oracle include:
• Address
Define territories by address elements such as city, state, and postal code.
• Geography
Legacy dimension that existing customers are using for geographical territories. While you can still useGeography to set up territories by states and other address elements, new Oracle customers should use theAddress dimension instead. You can't use this dimension together with the Address dimension.
• Account type
The account type specifies if the account is named or not.
• Customer size
• Industry
• Organization type
You can also create classification categories to define up to three additional dimensions.
Because opportunities are associated with an account, you can use the account dimensions to assign opportunities aswell. Opportunities and leads have these additional dimensions:
• Business unit
• Product
You can enter product groups or individual products from the sales catalog.
• Sales channel
The available sales channels are: Direct, Indirect, and Partner.
Related Topics
• Opportunity Profile Options Default Values and Effects
Address DimensionUse the Address dimension to set up sales territories by a combination of address elements, such as state, city, andpostal code. The application uses pattern matching for assignment, so you must include all variations of spellings thatexist in your data in the territory definition. The cleaner and the more consistent your data, the less work you have todo.
When you define each territory, you can enter multiple rows of address elements:
• All the entries in a row must match for assignment (AND operator)
• If you enter multiple rows, one of the rows must match for assignment (OR operator)
Oracle CX SalesGetting Started with Your Sales Implementation
Chapter 18Sales Territories and Assignment
204
Here's how the entries are matched:
• For all of the address attributes except Postal Code, the application uses exact matches. When you define thecoverage for a territory, you must include all the possible spellings that exist in your address data. The matchmust be exact, but matches aren't case-sensitive, so you don't have to include TX and Tx as separate spellings,for example.
If you're creating a territory for the state of Texas, you may need to include these different spellings, dependingon what's in your data: TX, Tex, Tex., and Texas.
You enter these spelling variations as four separate lines in the Texas state territory definition. The country isalways required.
Country State
United States TX
United States Tex
United States Tex.
United States Texas
Here's how you could define a territory for the city of Dallas, Texas:
◦ You need both state and city to match.
◦ Dallas must be spelled correctly in your data every time.
Country State City
United States TX Dallas
United States Tex Dallas
United States Tex. Dallas
United States Texas Dallas
• To match by postal codes, such as US ZIP codes, you can enter ranges of values or partial values. Here are therules:
◦ You can enter ranges of values and the ranges don't have to be valid postal codes. For example:94501-94599.
◦ Use the percent sign (%) at the end of an entry to indicate partial matches. For example, you can enter940% to indicate all the postal codes starting with 940.
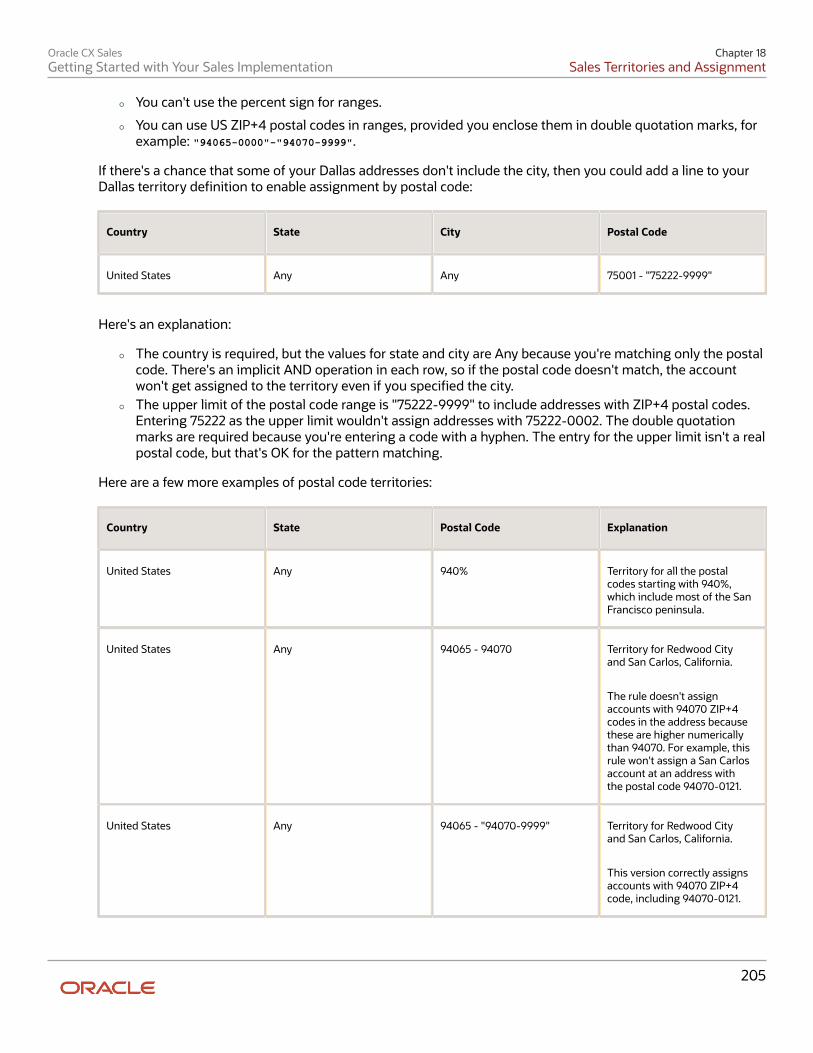
Oracle CX SalesGetting Started with Your Sales Implementation
Chapter 18Sales Territories and Assignment
205
◦ You can't use the percent sign for ranges.
◦ You can use US ZIP+4 postal codes in ranges, provided you enclose them in double quotation marks, forexample: "94065-0000"-"94070-9999".
If there's a chance that some of your Dallas addresses don't include the city, then you could add a line to yourDallas territory definition to enable assignment by postal code:
Country State City Postal Code
United States Any Any 75001 - "75222-9999"
Here's an explanation:
◦ The country is required, but the values for state and city are Any because you're matching only the postalcode. There's an implicit AND operation in each row, so if the postal code doesn't match, the accountwon't get assigned to the territory even if you specified the city.
◦ The upper limit of the postal code range is "75222-9999" to include addresses with ZIP+4 postal codes.Entering 75222 as the upper limit wouldn't assign addresses with 75222-0002. The double quotationmarks are required because you're entering a code with a hyphen. The entry for the upper limit isn't a realpostal code, but that's OK for the pattern matching.
Here are a few more examples of postal code territories:
Country State Postal Code Explanation
United States Any 940% Territory for all the postalcodes starting with 940%,which include most of the SanFrancisco peninsula.
United States Any 94065 - 94070 Territory for Redwood Cityand San Carlos, California.
The rule doesn't assignaccounts with 94070 ZIP+4codes in the address becausethese are higher numericallythan 94070. For example, thisrule won't assign a San Carlosaccount at an address withthe postal code 94070-0121.
United States Any 94065 - "94070-9999" Territory for Redwood Cityand San Carlos, California.
This version correctly assignsaccounts with 94070 ZIP+4code, including 94070-0121.
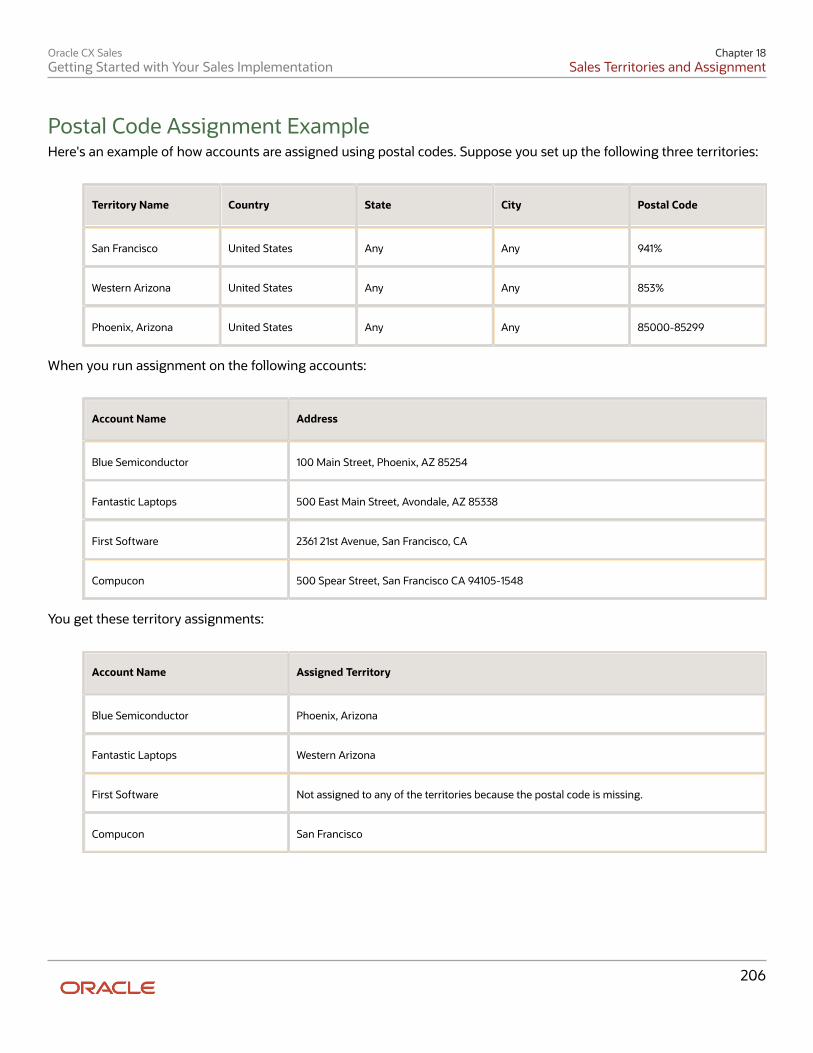
Oracle CX SalesGetting Started with Your Sales Implementation
Chapter 18Sales Territories and Assignment
206
Postal Code Assignment ExampleHere's an example of how accounts are assigned using postal codes. Suppose you set up the following three territories:
Territory Name Country State City Postal Code
San Francisco United States Any Any 941%
Western Arizona United States Any Any 853%
Phoenix, Arizona United States Any Any 85000-85299
When you run assignment on the following accounts:
Account Name Address
Blue Semiconductor 100 Main Street, Phoenix, AZ 85254
Fantastic Laptops 500 East Main Street, Avondale, AZ 85338
First Software 2361 21st Avenue, San Francisco, CA
Compucon 500 Spear Street, San Francisco CA 94105-1548
You get these territory assignments:
Account Name Assigned Territory
Blue Semiconductor Phoenix, Arizona
Fantastic Laptops Western Arizona
First Software Not assigned to any of the territories because the postal code is missing.
Compucon San Francisco
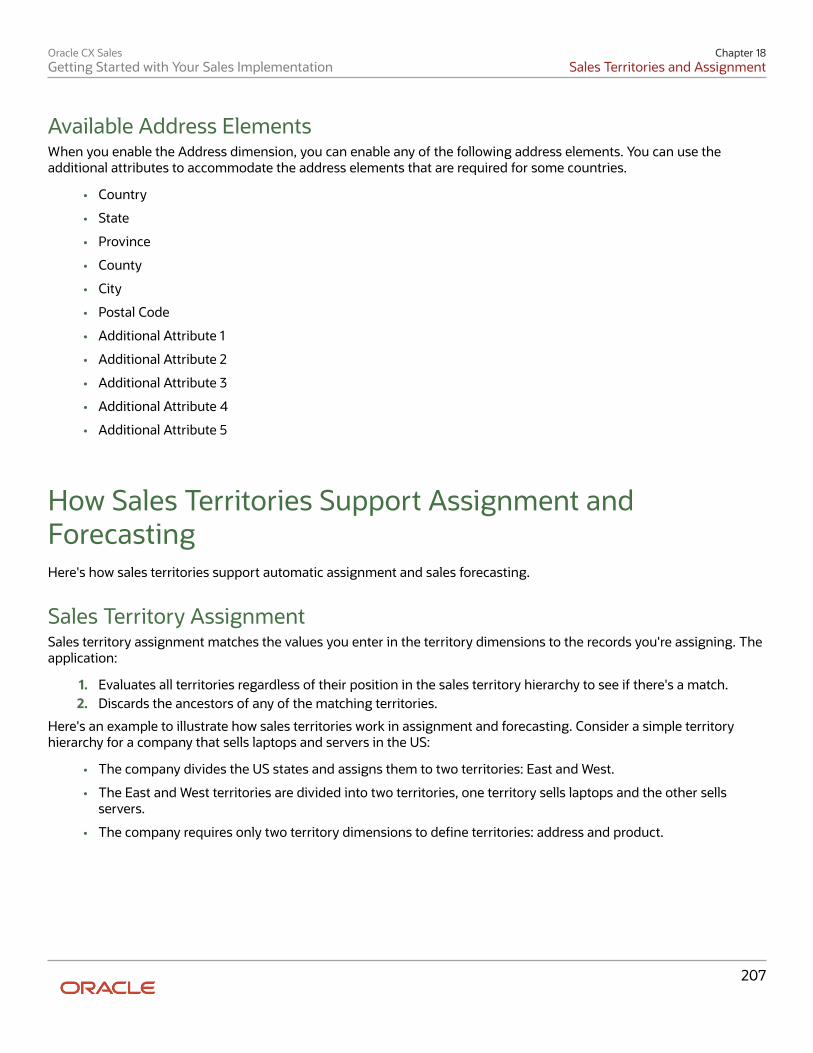
Oracle CX SalesGetting Started with Your Sales Implementation
Chapter 18Sales Territories and Assignment
207
Available Address ElementsWhen you enable the Address dimension, you can enable any of the following address elements. You can use theadditional attributes to accommodate the address elements that are required for some countries.
• Country
• State
• Province
• County
• City
• Postal Code
• Additional Attribute 1
• Additional Attribute 2
• Additional Attribute 3
• Additional Attribute 4
• Additional Attribute 5
How Sales Territories Support Assignment andForecastingHere's how sales territories support automatic assignment and sales forecasting.
Sales Territory AssignmentSales territory assignment matches the values you enter in the territory dimensions to the records you're assigning. Theapplication:
1. Evaluates all territories regardless of their position in the sales territory hierarchy to see if there's a match.2. Discards the ancestors of any of the matching territories.
Here's an example to illustrate how sales territories work in assignment and forecasting. Consider a simple territoryhierarchy for a company that sells laptops and servers in the US:
• The company divides the US states and assigns them to two territories: East and West.
• The East and West territories are divided into two territories, one territory sells laptops and the other sellsservers.
• The company requires only two territory dimensions to define territories: address and product.
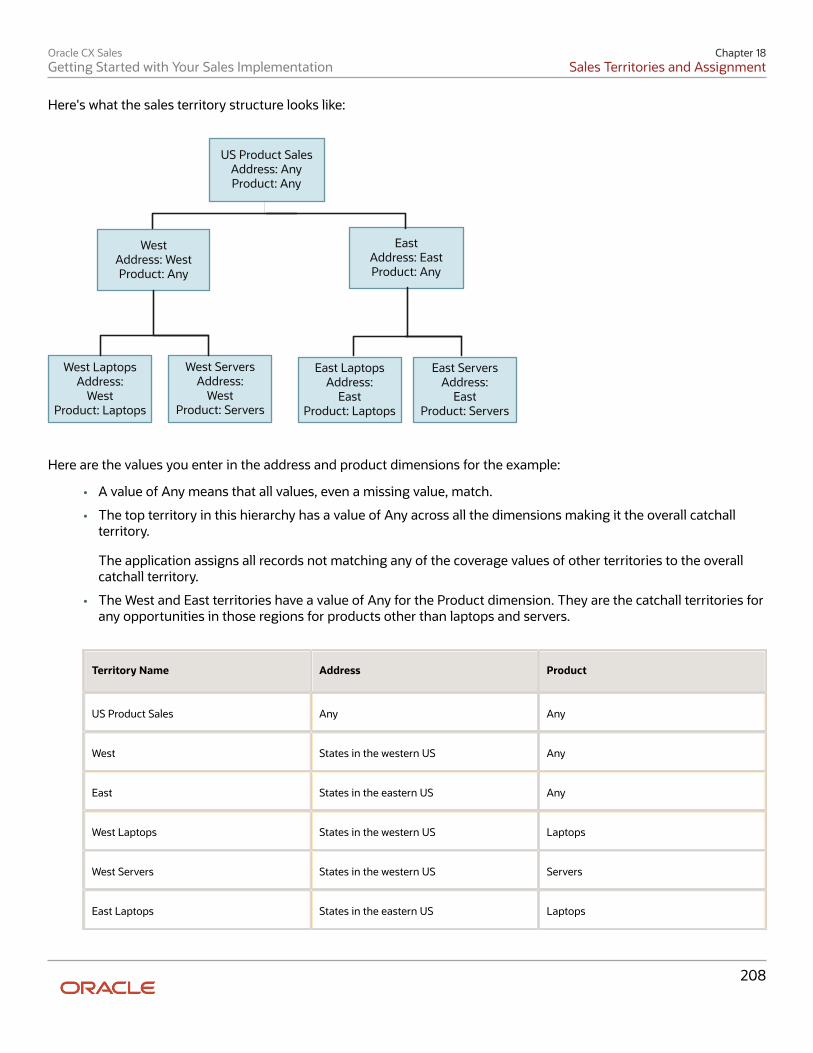
Oracle CX SalesGetting Started with Your Sales Implementation
Chapter 18Sales Territories and Assignment
208
Here's what the sales territory structure looks like:
West LaptopsAddress:
WestProduct: Laptops
US Product SalesAddress: AnyProduct: Any
EastAddress: EastProduct: Any
WestAddress: WestProduct: Any
West ServersAddress:
WestProduct: Servers
East ServersAddress:
EastProduct: Servers
East LaptopsAddress:
EastProduct: Laptops
Here are the values you enter in the address and product dimensions for the example:
• A value of Any means that all values, even a missing value, match.
• The top territory in this hierarchy has a value of Any across all the dimensions making it the overall catchallterritory.
The application assigns all records not matching any of the coverage values of other territories to the overallcatchall territory.
• The West and East territories have a value of Any for the Product dimension. They are the catchall territories forany opportunities in those regions for products other than laptops and servers.
Territory Name Address Product
US Product Sales Any Any
West States in the western US Any
East States in the eastern US Any
West Laptops States in the western US Laptops
West Servers States in the western US Servers
East Laptops States in the eastern US Laptops
Oracle CX SalesGetting Started with Your Sales Implementation
Chapter 18Sales Territories and Assignment
209
Territory Name Address Product
East Servers States in the eastern US Servers
To assign accounts, assignment uses the address of the account only (there's no product information available inaccounts). Here's how the application assigns an account with an address in New York:
1. Finds the following matching territories: East Laptops, East Servers, East, US Product Sales.
East Laptops, East Servers, and East territories include New York explicitly in the list of states. US Product Saleshas the value of Any in the address dimension.
2. Discards East and US Product Sales because these are parents and grandparents of the East Laptops and EastServers.
The application assigns the account to the East Laptops and East Servers territories.
For assigning opportunities, the application assigns each opportunity line separately. The assignment process uses theaddress of the account (each opportunity must be associated with an account). For example, here's how the applicationassigns an opportunity for servers and laptops in a New York account.
Here's how the application assigns the servers opportunity line:
1. Finds these matching territories: East Servers, East, and US Product Sales
East Servers includes the correct product and state. East includes the state and Any as the value for theproduct. US Product Sales matches because it has Any for both dimensions.
2. Discards East and US Product Sales because these are parents and grandparents of East Servers.
The application assigns the opportunity line to the East Servers territory. The application uses the same process toassign the laptop opportunity line to the East Laptops territory.
For the matching territories, assignment gives each territory owner edit access to the opportunity as a whole, and bothterritories are listed on the opportunity Team tab. Only the matching opportunity line is included in forecasts for thatterritory, however.
Here's a diagram that illustrates the different effects of territory assignment on opportunity access and forecasting. Thediagram shows an opportunity for laptops and servers. Here's what happens when agent A owns the laptops territoryand agent B owns the servers territory:
• Both agents gain edit access to the opportunity as a whole.
• Agent A can only forecast laptops.
• Agent B can only forecast servers.
• Agent A's and Agent B's managers (who are also the owners of the parent territories) gain access to theopportunity as a whole, but they get to view and adjust only the forecasts submitted by their subordinates.
• The colleagues of agents A and B don't have any visibility into the opportunity unless they have edit access tothe account.
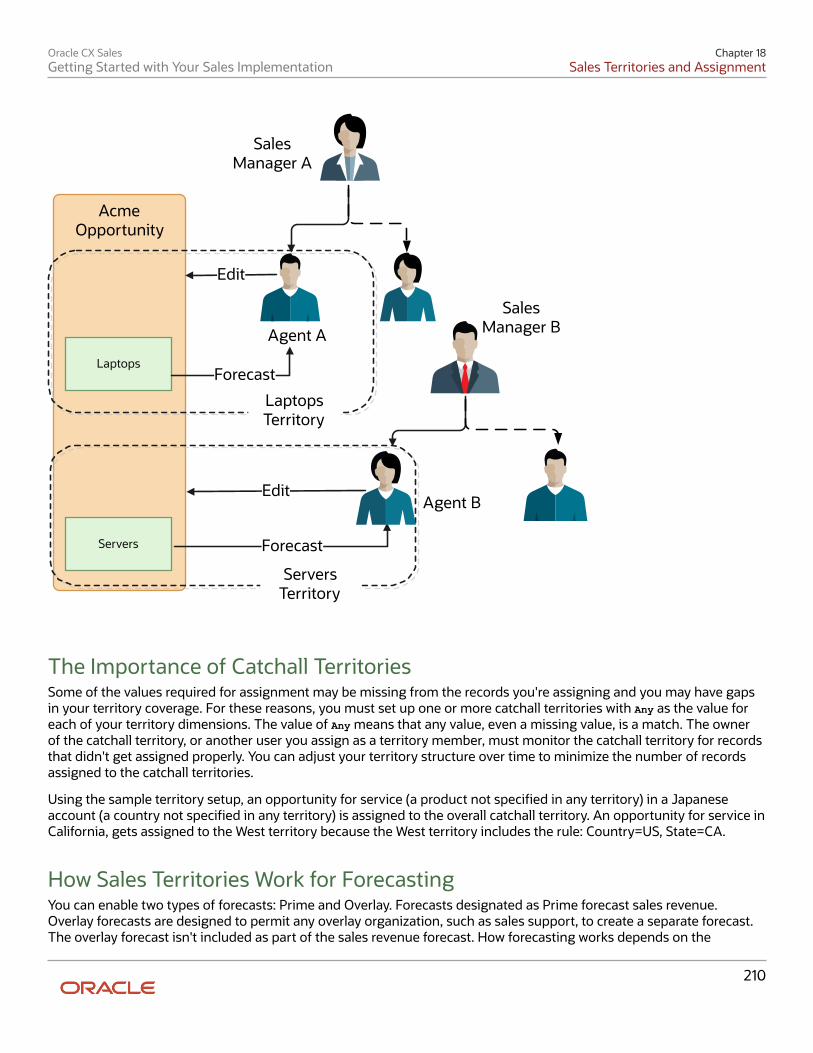
Oracle CX SalesGetting Started with Your Sales Implementation
Chapter 18Sales Territories and Assignment
210
Edit
Sales Manager A
Edit
Sales Manager BAgent A
Agent B
Laptops
Servers
Forecast
Forecast
Acme Opportunity
Laptops Territory
Servers Territory
The Importance of Catchall TerritoriesSome of the values required for assignment may be missing from the records you're assigning and you may have gapsin your territory coverage. For these reasons, you must set up one or more catchall territories with Any as the value foreach of your territory dimensions. The value of Any means that any value, even a missing value, is a match. The ownerof the catchall territory, or another user you assign as a territory member, must monitor the catchall territory for recordsthat didn't get assigned properly. You can adjust your territory structure over time to minimize the number of recordsassigned to the catchall territories.
Using the sample territory setup, an opportunity for service (a product not specified in any territory) in a Japaneseaccount (a country not specified in any territory) is assigned to the overall catchall territory. An opportunity for service inCalifornia, gets assigned to the West territory because the West territory includes the rule: Country=US, State=CA.
How Sales Territories Work for ForecastingYou can enable two types of forecasts: Prime and Overlay. Forecasts designated as Prime forecast sales revenue.Overlay forecasts are designed to permit any overlay organization, such as sales support, to create a separate forecast.The overlay forecast isn't included as part of the sales revenue forecast. How forecasting works depends on the
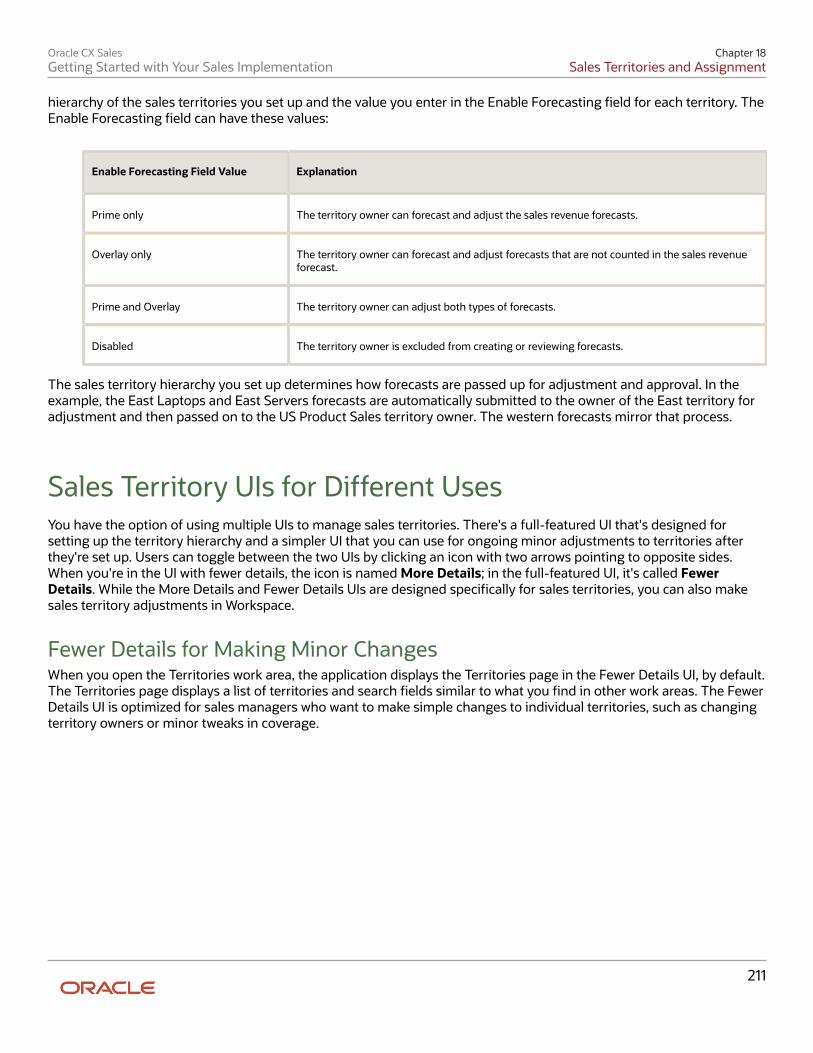
Oracle CX SalesGetting Started with Your Sales Implementation
Chapter 18Sales Territories and Assignment
211
hierarchy of the sales territories you set up and the value you enter in the Enable Forecasting field for each territory. TheEnable Forecasting field can have these values:
Enable Forecasting Field Value Explanation
Prime only The territory owner can forecast and adjust the sales revenue forecasts.
Overlay only The territory owner can forecast and adjust forecasts that are not counted in the sales revenueforecast.
Prime and Overlay The territory owner can adjust both types of forecasts.
Disabled The territory owner is excluded from creating or reviewing forecasts.
The sales territory hierarchy you set up determines how forecasts are passed up for adjustment and approval. In theexample, the East Laptops and East Servers forecasts are automatically submitted to the owner of the East territory foradjustment and then passed on to the US Product Sales territory owner. The western forecasts mirror that process.
Sales Territory UIs for Different UsesYou have the option of using multiple UIs to manage sales territories. There's a full-featured UI that's designed forsetting up the territory hierarchy and a simpler UI that you can use for ongoing minor adjustments to territories afterthey're set up. Users can toggle between the two UIs by clicking an icon with two arrows pointing to opposite sides.When you're in the UI with fewer details, the icon is named More Details; in the full-featured UI, it's called FewerDetails. While the More Details and Fewer Details UIs are designed specifically for sales territories, you can also makesales territory adjustments in Workspace.
Fewer Details for Making Minor ChangesWhen you open the Territories work area, the application displays the Territories page in the Fewer Details UI, by default.The Territories page displays a list of territories and search fields similar to what you find in other work areas. The FewerDetails UI is optimized for sales managers who want to make simple changes to individual territories, such as changingterritory owners or minor tweaks in coverage.
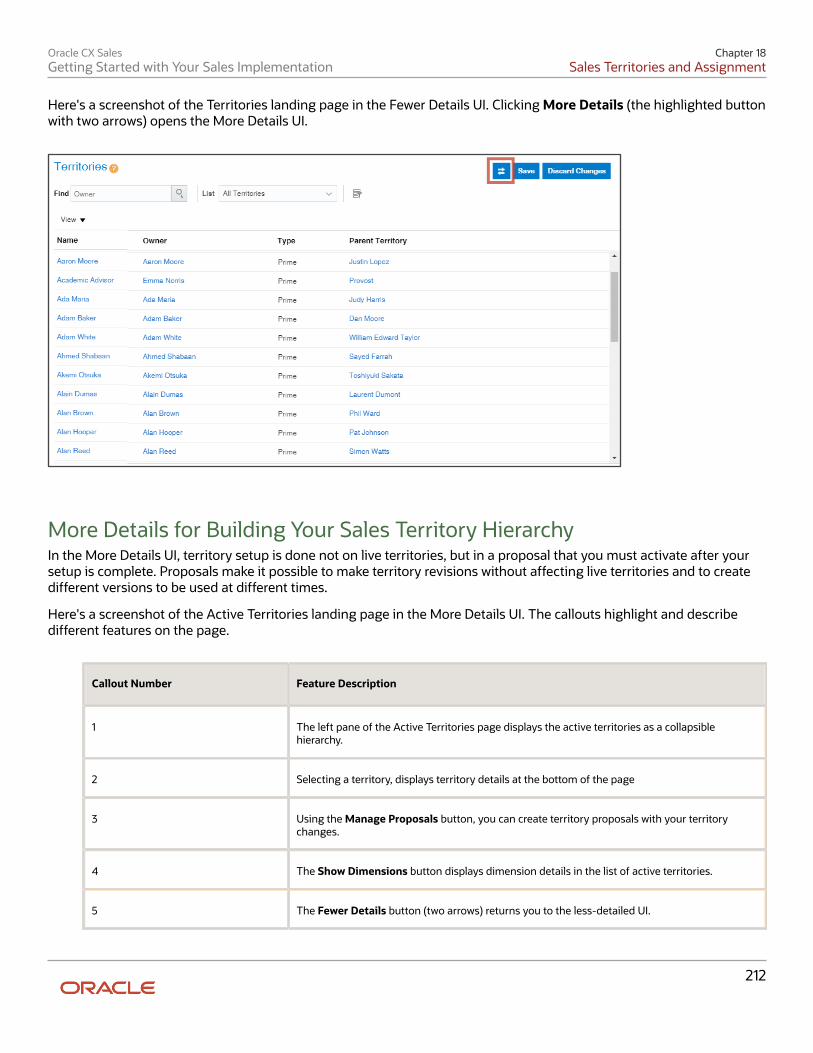
Oracle CX SalesGetting Started with Your Sales Implementation
Chapter 18Sales Territories and Assignment
212
Here's a screenshot of the Territories landing page in the Fewer Details UI. Clicking More Details (the highlighted buttonwith two arrows) opens the More Details UI.
More Details for Building Your Sales Territory HierarchyIn the More Details UI, territory setup is done not on live territories, but in a proposal that you must activate after yoursetup is complete. Proposals make it possible to make territory revisions without affecting live territories and to createdifferent versions to be used at different times.
Here's a screenshot of the Active Territories landing page in the More Details UI. The callouts highlight and describedifferent features on the page.
Callout Number Feature Description
1 The left pane of the Active Territories page displays the active territories as a collapsiblehierarchy.
2 Selecting a territory, displays territory details at the bottom of the page
3 Using the Manage Proposals button, you can create territory proposals with your territorychanges.
4 The Show Dimensions button displays dimension details in the list of active territories.
5 The Fewer Details button (two arrows) returns you to the less-detailed UI.
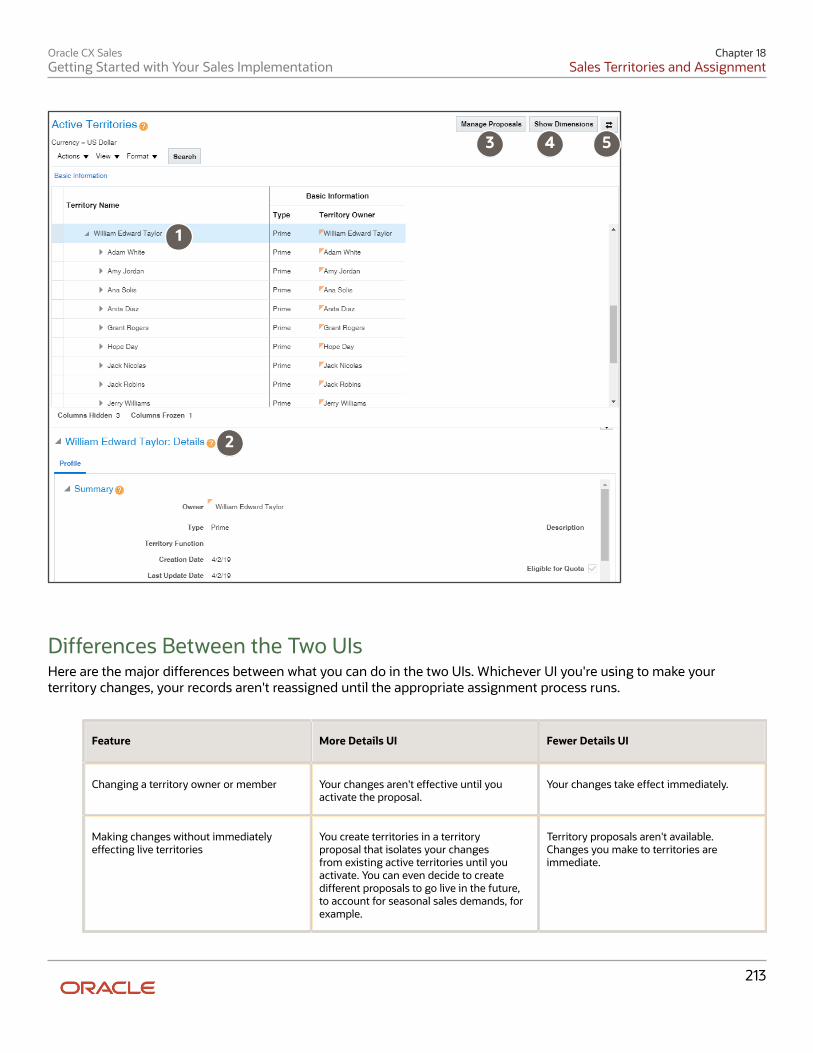
Oracle CX SalesGetting Started with Your Sales Implementation
Chapter 18Sales Territories and Assignment
213
1
2
3 4 5
Differences Between the Two UIsHere are the major differences between what you can do in the two UIs. Whichever UI you're using to make yourterritory changes, your records aren't reassigned until the appropriate assignment process runs.
Feature More Details UI Fewer Details UI
Changing a territory owner or member Your changes aren't effective until youactivate the proposal.
Your changes take effect immediately.
Making changes without immediatelyeffecting live territories
You create territories in a territoryproposal that isolates your changesfrom existing active territories until youactivate. You can even decide to createdifferent proposals to go live in the future,to account for seasonal sales demands, forexample.
Territory proposals aren't available.Changes you make to territories areimmediate.
Oracle CX SalesGetting Started with Your Sales Implementation
Chapter 18Sales Territories and Assignment
214
Feature More Details UI Fewer Details UI
Inheriting the properties of parentterritories
When you create child territories in bothUIs, the child territories automaticallyinherit the properties and coverage of theparent territories. In the More Details UI,you can also link territories so that anysubsequent change in coverage for theparent territory is automatically reflectedin the linked territory.
At creation, the child territoriesautomatically inherit the propertiesand coverage of the parent territories.However, in the Fewer Details UI, you can'tlink the territories to make subsequentcoverage changes reflected automatically.
How You Can Make the Details UI the Default and Only UIWhen users open the Territories work area, they see the Fewer Details UI and must click the More Details button toopen the More Details UI. Also by default, users can toggle between both UIs. You can make the More Details UI thedefault UI and you can remove the button to prevent access to the Fewer Details UI. To change the defaults, all you haveto do is set the system profile option Default to Territory Classic Interface (MOT_DEFAULT_CLASSIC_INTERFACE) to Yes.The setting, which is made at the site level, affects all users. You can edit the system profile value option from the Setupand Maintenance work area using the following:
• Offering: Sales
• Functional Area: Sales Foundation
• Task: Manage Administrator Profile Values
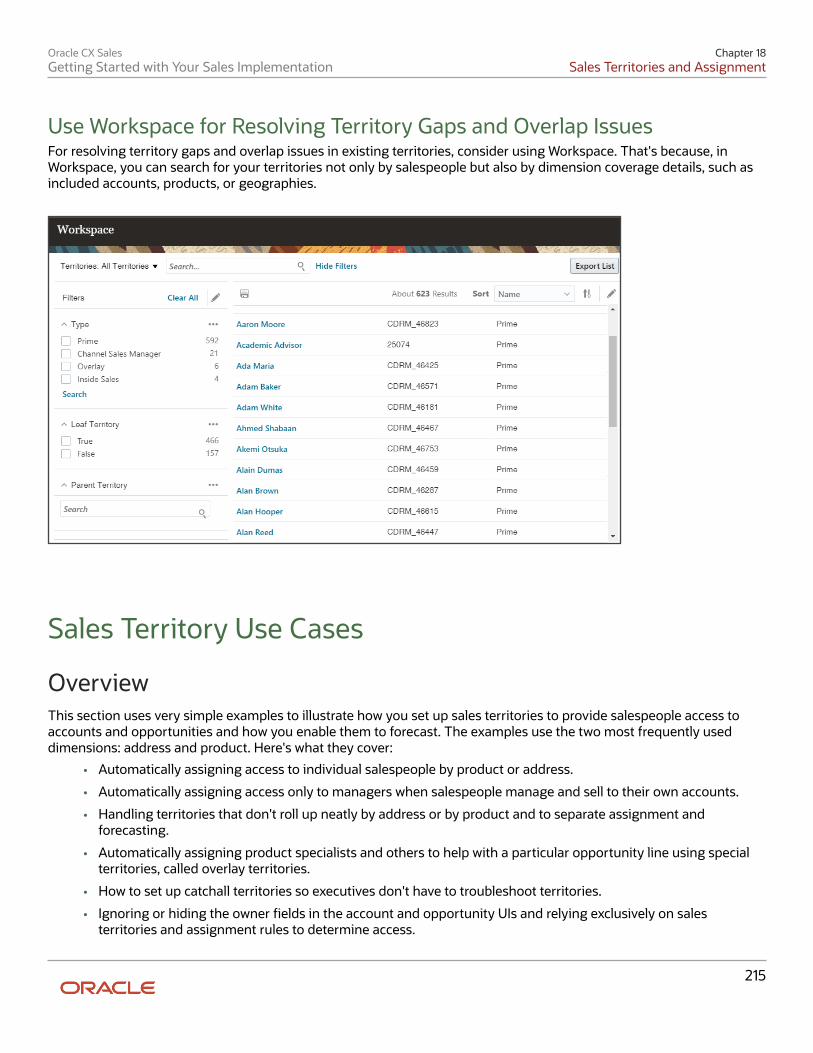
Oracle CX SalesGetting Started with Your Sales Implementation
Chapter 18Sales Territories and Assignment
215
Use Workspace for Resolving Territory Gaps and Overlap IssuesFor resolving territory gaps and overlap issues in existing territories, consider using Workspace. That's because, inWorkspace, you can search for your territories not only by salespeople but also by dimension coverage details, such asincluded accounts, products, or geographies.
Sales Territory Use Cases
OverviewThis section uses very simple examples to illustrate how you set up sales territories to provide salespeople access toaccounts and opportunities and how you enable them to forecast. The examples use the two most frequently useddimensions: address and product. Here's what they cover:
• Automatically assigning access to individual salespeople by product or address.
• Automatically assigning access only to managers when salespeople manage and sell to their own accounts.
• Handling territories that don't roll up neatly by address or by product and to separate assignment andforecasting.
• Automatically assigning product specialists and others to help with a particular opportunity line using specialterritories, called overlay territories.
• How to set up catchall territories so executives don't have to troubleshoot territories.
• Ignoring or hiding the owner fields in the account and opportunity UIs and relying exclusively on salesterritories and assignment rules to determine access.
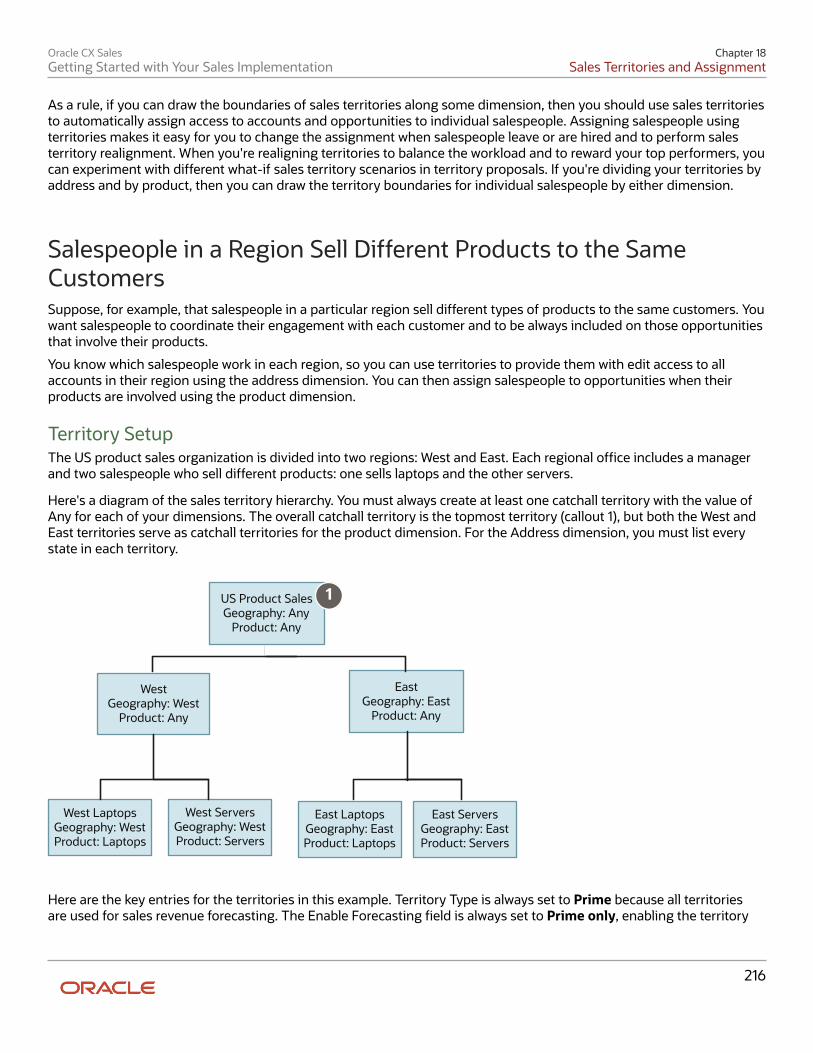
Oracle CX SalesGetting Started with Your Sales Implementation
Chapter 18Sales Territories and Assignment
216
As a rule, if you can draw the boundaries of sales territories along some dimension, then you should use sales territoriesto automatically assign access to accounts and opportunities to individual salespeople. Assigning salespeople usingterritories makes it easy for you to change the assignment when salespeople leave or are hired and to perform salesterritory realignment. When you're realigning territories to balance the workload and to reward your top performers, youcan experiment with different what-if sales territory scenarios in territory proposals. If you're dividing your territories byaddress and by product, then you can draw the territory boundaries for individual salespeople by either dimension.
Salespeople in a Region Sell Different Products to the SameCustomersSuppose, for example, that salespeople in a particular region sell different types of products to the same customers. Youwant salespeople to coordinate their engagement with each customer and to be always included on those opportunitiesthat involve their products.
You know which salespeople work in each region, so you can use territories to provide them with edit access to allaccounts in their region using the address dimension. You can then assign salespeople to opportunities when theirproducts are involved using the product dimension.
Territory SetupThe US product sales organization is divided into two regions: West and East. Each regional office includes a managerand two salespeople who sell different products: one sells laptops and the other servers.
Here's a diagram of the sales territory hierarchy. You must always create at least one catchall territory with the value ofAny for each of your dimensions. The overall catchall territory is the topmost territory (callout 1), but both the West andEast territories serve as catchall territories for the product dimension. For the Address dimension, you must list everystate in each territory.
West LaptopsGeography: WestProduct: Laptops
US Product SalesGeography: Any
Product: Any
EastGeography: East
Product: Any
WestGeography: West
Product: Any
West ServersGeography: WestProduct: Servers
East ServersGeography: EastProduct: Servers
East LaptopsGeography: EastProduct: Laptops
1
Here are the key entries for the territories in this example. Territory Type is always set to Prime because all territoriesare used for sales revenue forecasting. The Enable Forecasting field is always set to Prime only, enabling the territory
Oracle CX SalesGetting Started with Your Sales Implementation
Chapter 18Sales Territories and Assignment
217
owner to participate in sales revenue forecasting. For the Address dimension coverage, you must enter a separate linefor every state.
Territory Name Territory Type Address Product Enable Forecasting
US Product Sales Prime Any Any Prime only
East Prime• Country: United
States, State: NY• Country: United
States, State: NJ• Country: United
States, State: MA
And entries for all theremaining 22 states inthe eastern half of theUS
Any Prime only
East Laptops Prime• Country: United
States, State: NY• Country: United
States, State: NJ• Country: United
States, State: MA
And entries for all theremaining 22 states inthe eastern half of theUS
Laptops Prime only
East Servers Prime• Country: United
States, State: NY• Country: United
States, State: NJ• Country: United
States, State: MA
And entries for all theremaining 22 states inthe eastern half of theUS
Servers Prime only
West Prime• Country: United
States, State: CA• Country: United
States, State: NV• Country: United
States, State: AZ
And entries for all theremaining 22 states in
Any Prime only
Oracle CX SalesGetting Started with Your Sales Implementation
Chapter 18Sales Territories and Assignment
218
Territory Name Territory Type Address Product Enable Forecasting
the western half of theUS
West Laptops Prime• Country: United
States, State: CA• Country: United
States, State: NV• Country: United
States, State: AZ
And entries for all theremaining 22 states inthe western half of theUS
Laptops Prime only
West Servers Prime• Country: United
States, State: CA• Country: United
States, State: NV• Country: United
States, State: AZ
And entries for all theremaining 22 states inthe western half of theUS
Servers Prime only
How Assignment Works for This ScenarioWhen a lead comes in for a potential customer with an address in California who is interested in purchasing laptops, theinside sales team converts the qualified lead into an account and opportunity. The application does the following:
• Assigns the West Laptops and West Server territories to the account because California matches the addressdimension. The owners of the territories gain full access to the account and can share information about theirinteractions with the customer. Full access means they can add other team members in addition to editing theaccount information itself.
• If the account is missing the state in the address, the application assigns the account to the catchall territory, USProduct Sales.
• Assigns the West Laptops territory to the opportunity line using the product dimension and the address of theaccount. The laptop revenue can now be forecast by the West Laptops territory owner.
• If the opportunity line for the California account is for products other than laptops and servers, then theapplication assigns the opportunity line to the West territory.
Salespeople Sell All Products to Customers in Their RegionIf you draw boundaries purely by address elements in a geographical region, then each salesperson handles customersin their particular region and sells all of the products into that region.
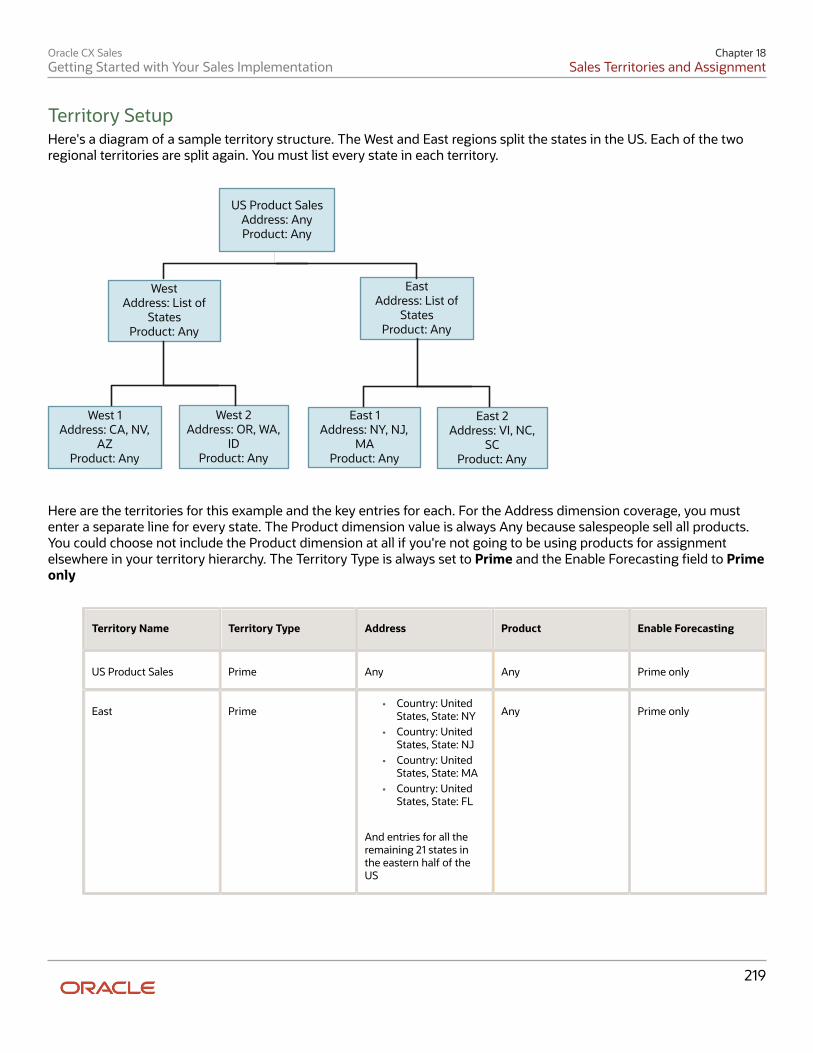
Oracle CX SalesGetting Started with Your Sales Implementation
Chapter 18Sales Territories and Assignment
219
Territory SetupHere's a diagram of a sample territory structure. The West and East regions split the states in the US. Each of the tworegional territories are split again. You must list every state in each territory.
West 1Address: CA, NV,
AZProduct: Any
US Product SalesAddress: AnyProduct: Any
EastAddress: List of
StatesProduct: Any
WestAddress: List of
States Product: Any
West 2Address: OR, WA,
IDProduct: Any
East 2Address: VI, NC,
SCProduct: Any
East 1Address: NY, NJ,
MAProduct: Any
Here are the territories for this example and the key entries for each. For the Address dimension coverage, you mustenter a separate line for every state. The Product dimension value is always Any because salespeople sell all products.You could choose not include the Product dimension at all if you're not going to be using products for assignmentelsewhere in your territory hierarchy. The Territory Type is always set to Prime and the Enable Forecasting field to Primeonly
Territory Name Territory Type Address Product Enable Forecasting
US Product Sales Prime Any Any Prime only
East Prime• Country: United
States, State: NY• Country: United
States, State: NJ• Country: United
States, State: MA• Country: United
States, State: FL
And entries for all theremaining 21 states inthe eastern half of theUS
Any Prime only
Oracle CX SalesGetting Started with Your Sales Implementation
Chapter 18Sales Territories and Assignment
220
Territory Name Territory Type Address Product Enable Forecasting
East 1 Prime A subset of the statesin the east: NY ,NJ, MA,RI, and so on.
Any Prime only
East 2 Prime A subset of the statesin the east: VI, NC, SC,FL, and so on.
Any Prime only
West Prime• Country: United
States, State: CA• Country: United
States, State: NV• Country: United
States, State: AZ• Country: United
States, State: NM
And entries for all theremaining 21 states inthe western half of theUS
Any Prime only
West 1 Prime A subset of the statesin the west: CA, NV, AZ,and so on.
Any Prime only
West 2 Prime A subset of the statesin the west: OR, WA, ID,MT, UT, NM, and so on.
Any Prime only
How Assignment Works for This ScenarioWhen a lead comes in for a potential California customer who's interested in purchasing laptops, the inside sales teamconverts the qualified lead into an account and an opportunity. Here's what the application does:
• Assigns the West 1 territory to the account because California is in the West 1 territory. The salesperson in theterritory gains edit access as does her management chain.
• Assigns the West 1 territory to any opportunity line for the California account using the account address.
• If the account is missing the state in the address or is located in another country, then the application assignsthe account to the catchall territory: US Product Sales.
Salespeople in Each Region Manage Their Own Accounts and SellAll Products to Those AccountsIf individual salespeople in each region manage their own customer relationships and sell all products to thosecustomers, then there may be no way of drawing sales territories to assign new accounts to them directly. Instead, youcan automatically assign access to the managers in each region and have the managers distribute the accounts to the
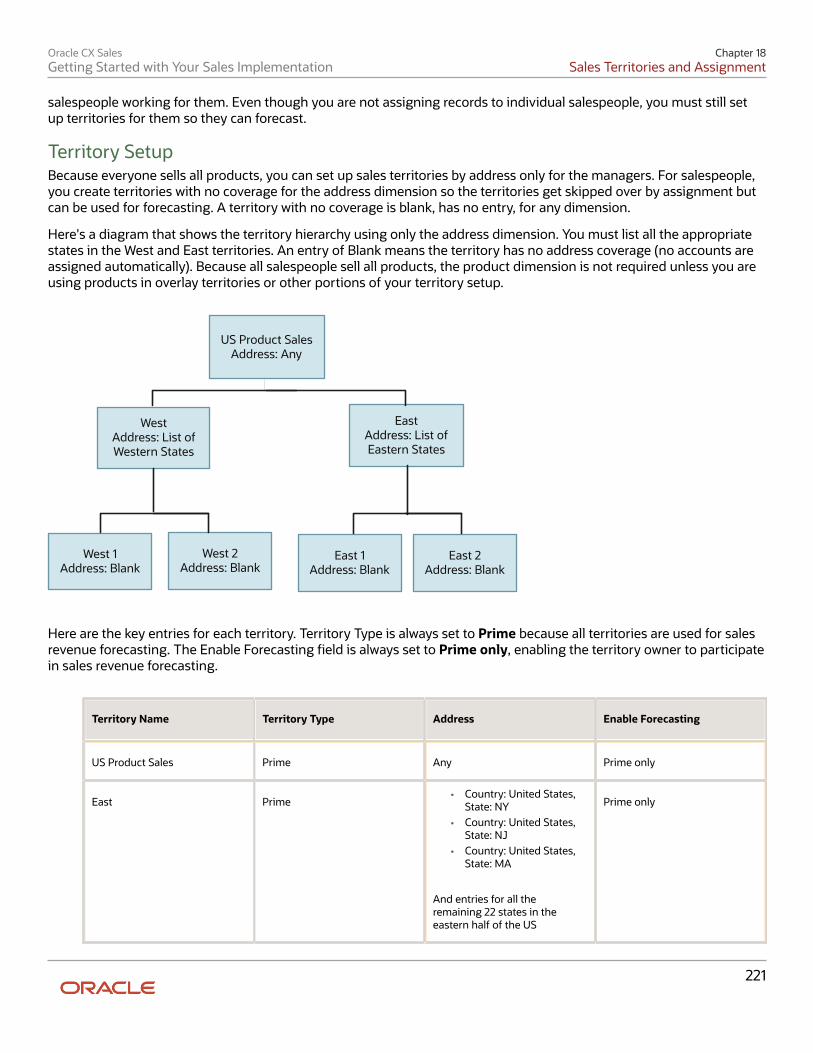
Oracle CX SalesGetting Started with Your Sales Implementation
Chapter 18Sales Territories and Assignment
221
salespeople working for them. Even though you are not assigning records to individual salespeople, you must still setup territories for them so they can forecast.
Territory SetupBecause everyone sells all products, you can set up sales territories by address only for the managers. For salespeople,you create territories with no coverage for the address dimension so the territories get skipped over by assignment butcan be used for forecasting. A territory with no coverage is blank, has no entry, for any dimension.
Here's a diagram that shows the territory hierarchy using only the address dimension. You must list all the appropriatestates in the West and East territories. An entry of Blank means the territory has no address coverage (no accounts areassigned automatically). Because all salespeople sell all products, the product dimension is not required unless you areusing products in overlay territories or other portions of your territory setup.
West 1Address: Blank
US Product SalesAddress: Any
EastAddress: List of Eastern States
WestAddress: List of Western States
West 2Address: Blank
East 2Address: Blank
East 1Address: Blank
Here are the key entries for each territory. Territory Type is always set to Prime because all territories are used for salesrevenue forecasting. The Enable Forecasting field is always set to Prime only, enabling the territory owner to participatein sales revenue forecasting.
Territory Name Territory Type Address Enable Forecasting
US Product Sales Prime Any Prime only
East Prime• Country: United States,
State: NY• Country: United States,
State: NJ• Country: United States,
State: MA
And entries for all theremaining 22 states in theeastern half of the US
Prime only
Oracle CX SalesGetting Started with Your Sales Implementation
Chapter 18Sales Territories and Assignment
222
Territory Name Territory Type Address Enable Forecasting
East 1 Prime Blank Prime only
East 2 Prime Blank Prime only
West Prime• Country: United States,
State: CA• Country: United States,
State: NV• Country: United States,
State: AZ
And entries for all theremaining 22 states in thewestern half of the US
Prime only
West 1 Prime Blank Prime only
West 2 Prime Blank Prime only
Child territories automatically inherit the coverage of their parent when you create them, so you must delete theinherited coverage to make them blank. For details on how to delete the coverage for a territory, see the Creating aTerritory with No Coverage topic.
How Assignment Works for This ScenarioWhen a lead comes in for a potential customer with an address in California who is interested in purchasing laptops, theinside sales team converts the qualified lead into an account and opportunity. Here's the assignment process:
1. The application automatically assigns the new account to the West territory using the address dimension.2. The manager who owns the West territory (or a sales administrator working on the manager's behalf), edits the
salesperson's territory and includes the account by name.3. Running territory assignment automatically assigns the opportunity lines for that account to the same
salesperson as well.
If an account is missing the state information or the account is in a country other than the US, then the account isassigned to the catchall territory, US Product Sales.
Note: Because the accounts are assigned by name to the territories, administrators must manually move theaccounts during territory realignment.
Irregular Territory Hierarchies Where Territories Don't Roll Up tothe Same ParentNormally, the coverage values in the child territories roll up to the parent. For example, the territory selling laptops inHawaii and the territory selling servers in Hawaii both roll up to the territory selling products in the western US. Butwhat if the VP of US sales decides to take over the Hawaii servers territory for herself so she can play golf? Now thetwo Hawaii territories roll up to different levels in the territory hierarchy. You could end up with wrong assignments
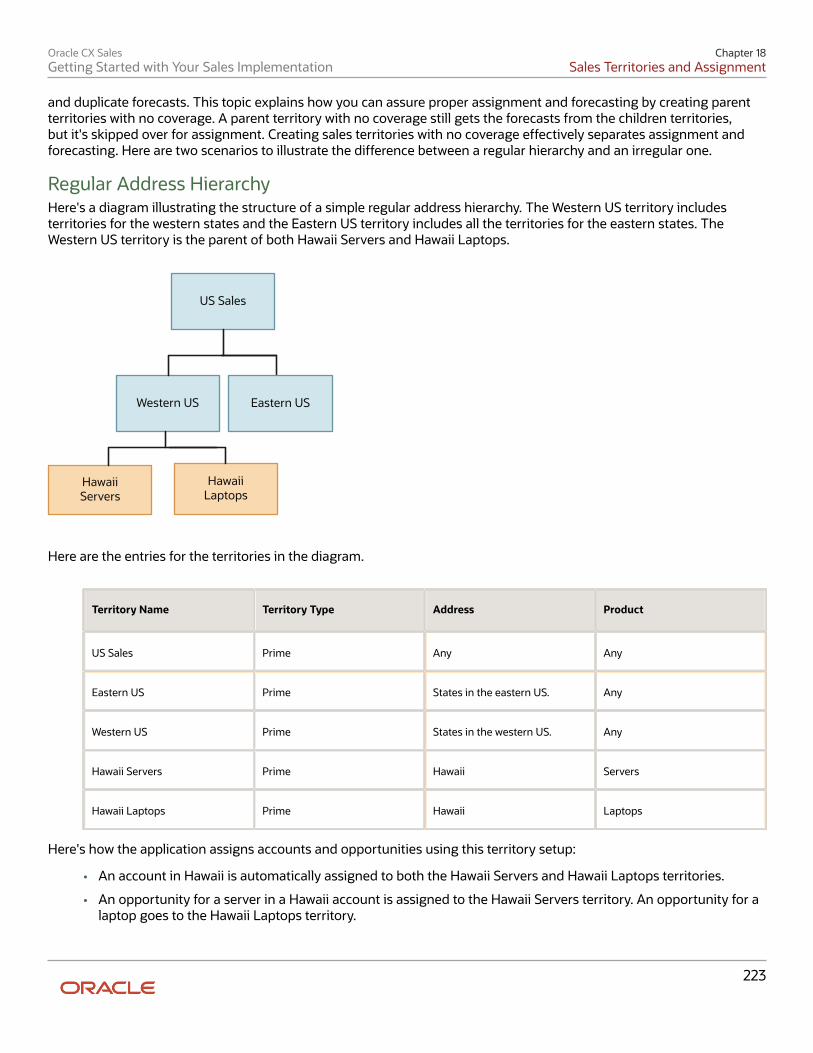
Oracle CX SalesGetting Started with Your Sales Implementation
Chapter 18Sales Territories and Assignment
223
and duplicate forecasts. This topic explains how you can assure proper assignment and forecasting by creating parentterritories with no coverage. A parent territory with no coverage still gets the forecasts from the children territories,but it's skipped over for assignment. Creating sales territories with no coverage effectively separates assignment andforecasting. Here are two scenarios to illustrate the difference between a regular hierarchy and an irregular one.
Regular Address HierarchyHere's a diagram illustrating the structure of a simple regular address hierarchy. The Western US territory includesterritories for the western states and the Eastern US territory includes all the territories for the eastern states. TheWestern US territory is the parent of both Hawaii Servers and Hawaii Laptops.
US Sales
Western US
HawaiiServers
Eastern US
HawaiiLaptops
Here are the entries for the territories in the diagram.
Territory Name Territory Type Address Product
US Sales Prime Any Any
Eastern US Prime States in the eastern US. Any
Western US Prime States in the western US. Any
Hawaii Servers Prime Hawaii Servers
Hawaii Laptops Prime Hawaii Laptops
Here's how the application assigns accounts and opportunities using this territory setup:
• An account in Hawaii is automatically assigned to both the Hawaii Servers and Hawaii Laptops territories.
• An opportunity for a server in a Hawaii account is assigned to the Hawaii Servers territory. An opportunity for alaptop goes to the Hawaii Laptops territory.
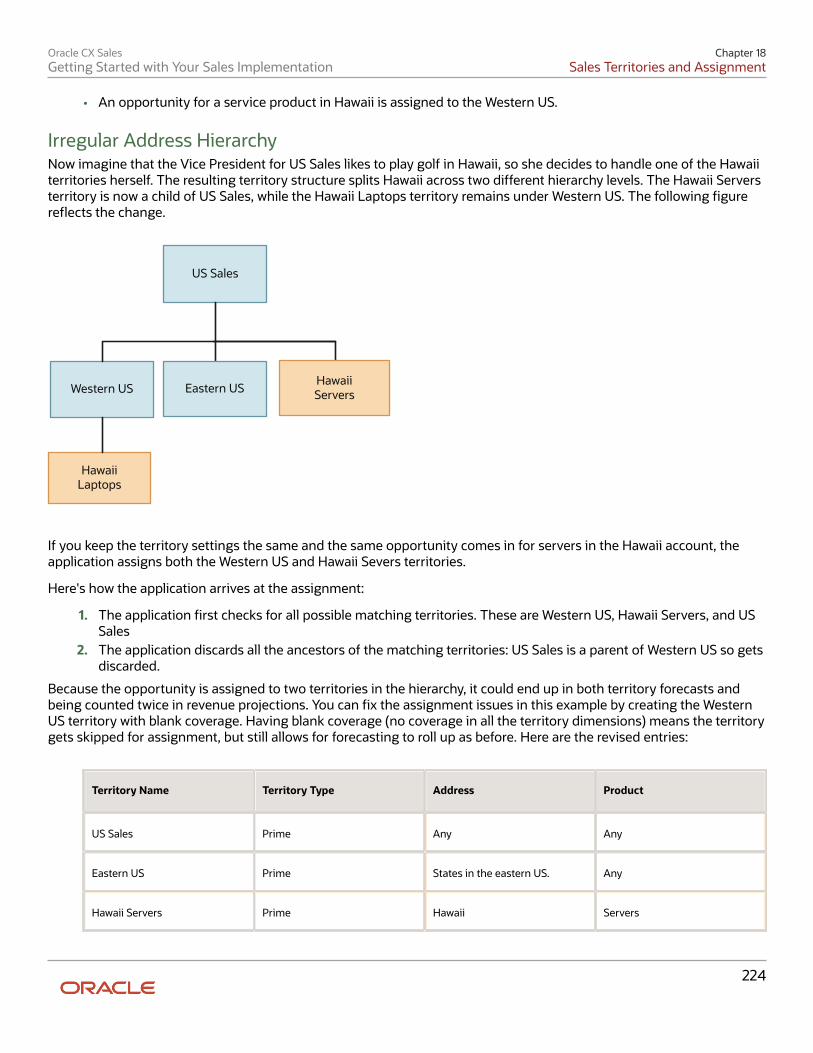
Oracle CX SalesGetting Started with Your Sales Implementation
Chapter 18Sales Territories and Assignment
224
• An opportunity for a service product in Hawaii is assigned to the Western US.
Irregular Address HierarchyNow imagine that the Vice President for US Sales likes to play golf in Hawaii, so she decides to handle one of the Hawaiiterritories herself. The resulting territory structure splits Hawaii across two different hierarchy levels. The Hawaii Serversterritory is now a child of US Sales, while the Hawaii Laptops territory remains under Western US. The following figurereflects the change.
US Sales
Western USHawaiiServersEastern US
HawaiiLaptops
If you keep the territory settings the same and the same opportunity comes in for servers in the Hawaii account, theapplication assigns both the Western US and Hawaii Severs territories.
Here's how the application arrives at the assignment:
1. The application first checks for all possible matching territories. These are Western US, Hawaii Servers, and USSales
2. The application discards all the ancestors of the matching territories: US Sales is a parent of Western US so getsdiscarded.
Because the opportunity is assigned to two territories in the hierarchy, it could end up in both territory forecasts andbeing counted twice in revenue projections. You can fix the assignment issues in this example by creating the WesternUS territory with blank coverage. Having blank coverage (no coverage in all the territory dimensions) means the territorygets skipped for assignment, but still allows for forecasting to roll up as before. Here are the revised entries:
Territory Name Territory Type Address Product
US Sales Prime Any Any
Eastern US Prime States in the eastern US. Any
Hawaii Servers Prime Hawaii Servers
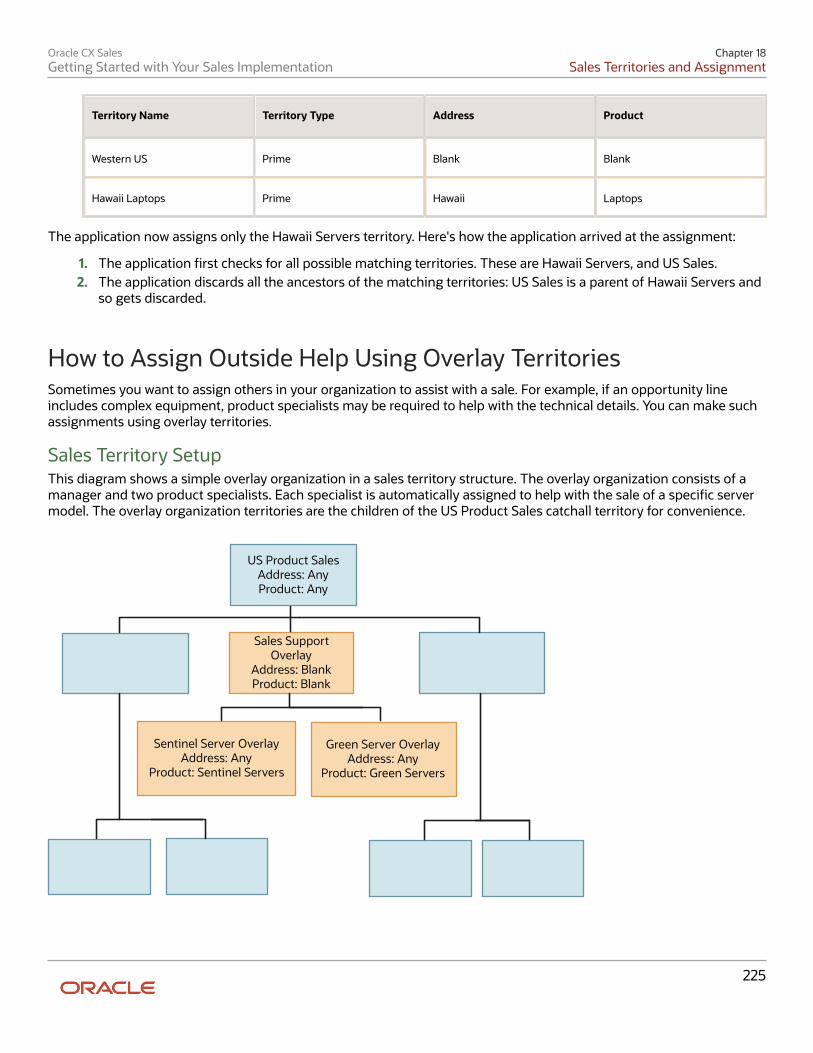
Oracle CX SalesGetting Started with Your Sales Implementation
Chapter 18Sales Territories and Assignment
225
Territory Name Territory Type Address Product
Western US Prime Blank Blank
Hawaii Laptops Prime Hawaii Laptops
The application now assigns only the Hawaii Servers territory. Here's how the application arrived at the assignment:
1. The application first checks for all possible matching territories. These are Hawaii Servers, and US Sales.2. The application discards all the ancestors of the matching territories: US Sales is a parent of Hawaii Servers and
so gets discarded.
How to Assign Outside Help Using Overlay TerritoriesSometimes you want to assign others in your organization to assist with a sale. For example, if an opportunity lineincludes complex equipment, product specialists may be required to help with the technical details. You can make suchassignments using overlay territories.
Sales Territory SetupThis diagram shows a simple overlay organization in a sales territory structure. The overlay organization consists of amanager and two product specialists. Each specialist is automatically assigned to help with the sale of a specific servermodel. The overlay organization territories are the children of the US Product Sales catchall territory for convenience.
US Product SalesAddress: AnyProduct: Any
Sales SupportOverlay
Address: BlankProduct: Blank
Green Server OverlayAddress: Any
Product: Green Servers
Sentinel Server OverlayAddress: Any
Product: Sentinel Servers
Oracle CX SalesGetting Started with Your Sales Implementation
Chapter 18Sales Territories and Assignment
226
The table lists the key entries for each overlay territory. Note the following:
• The Territory Type is always set to Overlay.
• For the Sales Support Overlay territory, the values of both dimensions are blank. This ensures the territory isnot assigned to any account or opportunity.
• The Enable Forecasting column for the overlay territories can be set to Disabled or Overlay Only.
◦ Use Disabled if you're not forecasting overlay territories.
◦ Use Overlay Only if your overlay organization creates its own forecasts for the sales where they'reinvolved. Such overlay forecasts are not counted as part of the sales organization forecasts to preventdouble counting. If you do enable overlay forecasting, then you must set the value for manager territoriesthat approve or adjust forecasts for both prime and overlay territories, such as US Product Sales, to Primeand Overlay. Enabling forecasts by overlay territories also requires additional setup so salespeople canspecify overlay credit on the opportunity UI itself. See the Implementing Sales guide for details.
Territory Name Territory Type Address Product Enable Forecasting
US Product Sales Prime Any Any Prime or Prime andOverlay
Sales Support Overlay Overlay Blank Blank Disabled or OverlayOnly
Sentinel Server Overlay Overlay Any Sentinel Servers Disabled or OverlayOnly
Green Server Overlay Overlay Any Green Servers Disabled or Overlayonly
Child territories automatically inherit the coverage of their parent when you create them, so, for the Sales SupportOverlay territory, you must delete the inherited coverage as described in Creating a Territory with No Coverage topic.
How Assignment Works for This ScenarioThe application assigns both the prime and overlay territories at the same time. Here is the detail for the assignment ofoverlay territories:
• The application assigns both the Sentinel Server Overlay and Green Server Overlay territories to all accountsbecause the Address dimension is set to Any. This provides the overlay team access to account notes, activities,and other details they need if they engage with the account.
• The application assigns the Sentinel Server Overlay and Green Server Overlay territories only to opportunitieswith server products in those two product groups.
Oracle CX SalesGetting Started with Your Sales Implementation
Chapter 18Sales Territories and Assignment
227
What to Do When You Don't Want Executives Handling CatchallTerritoriesIf you don't want your execs troubleshooting account and opportunity assignment, read on. Catchall territories areterritories high up in the territory hierarchy that have a value of Any for some or all of the territory dimensions. Yourorganization must monitor the catchall territories to identify and reassign records with incomplete data and to adjustfor any gaps in your territory structure. The territories at the top of your hierarchy are usually owned by sales executiveswho aren't involved in territory troubleshooting. You can make it possible for others to manage the troubleshooting ineither one of two ways:
• You can add the sales administrator as a member of the top catchall territory. As a territory member, the salesadministrator can troubleshoot assignment, but she also gains access to all the forecasts the executive isreviewing.
• You can create two territories: one for the executive and one for the administrator right underneath in thehierarchy. The executive's territory gets a blank coverage (no coverage), so no accounts or opportunities areassigned. The administrator gets the catchall territory, with Any as the value for the appropriate dimensions.
When you create separate territories, the executive can review and adjust all the forecasts from the sales team. Theowner of the catchall territory gets to troubleshoot any accounts or opportunities that aren't properly assigned. Youcan turn off forecasting for the catchall, so that the catchall territory owner doesn't see the forecasts the executive isapproving.
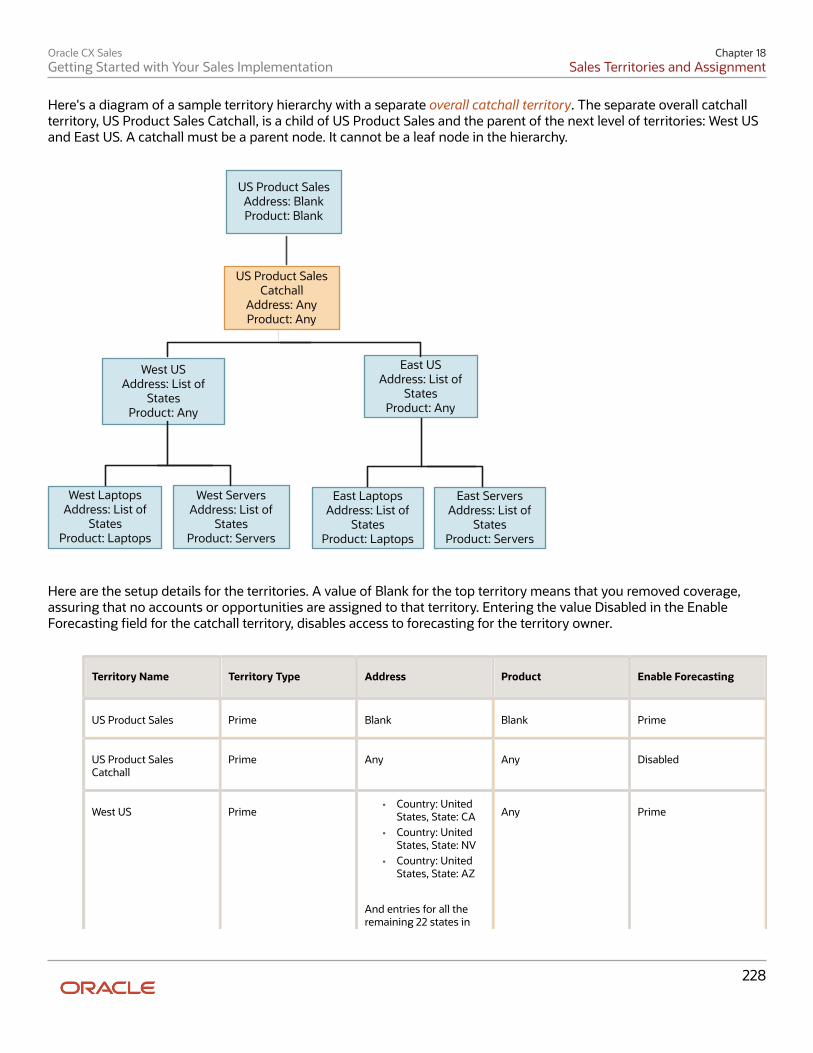
Oracle CX SalesGetting Started with Your Sales Implementation
Chapter 18Sales Territories and Assignment
228
Here's a diagram of a sample territory hierarchy with a separate overall catchall territory. The separate overall catchallterritory, US Product Sales Catchall, is a child of US Product Sales and the parent of the next level of territories: West USand East US. A catchall must be a parent node. It cannot be a leaf node in the hierarchy.
West LaptopsAddress: List of
StatesProduct: Laptops
US Product SalesAddress: BlankProduct: Blank
East USAddress: List of
StatesProduct: Any
West USAddress: List of
StatesProduct: Any
West ServersAddress: List of
StatesProduct: Servers
East ServersAddress: List of
StatesProduct: Servers
East LaptopsAddress: List of
StatesProduct: Laptops
US Product Sales Catchall
Address: AnyProduct: Any
Here are the setup details for the territories. A value of Blank for the top territory means that you removed coverage,assuring that no accounts or opportunities are assigned to that territory. Entering the value Disabled in the EnableForecasting field for the catchall territory, disables access to forecasting for the territory owner.
Territory Name Territory Type Address Product Enable Forecasting
US Product Sales Prime Blank Blank Prime
US Product SalesCatchall
Prime Any Any Disabled
West US Prime• Country: United
States, State: CA• Country: United
States, State: NV• Country: United
States, State: AZ
And entries for all theremaining 22 states in
Any Prime
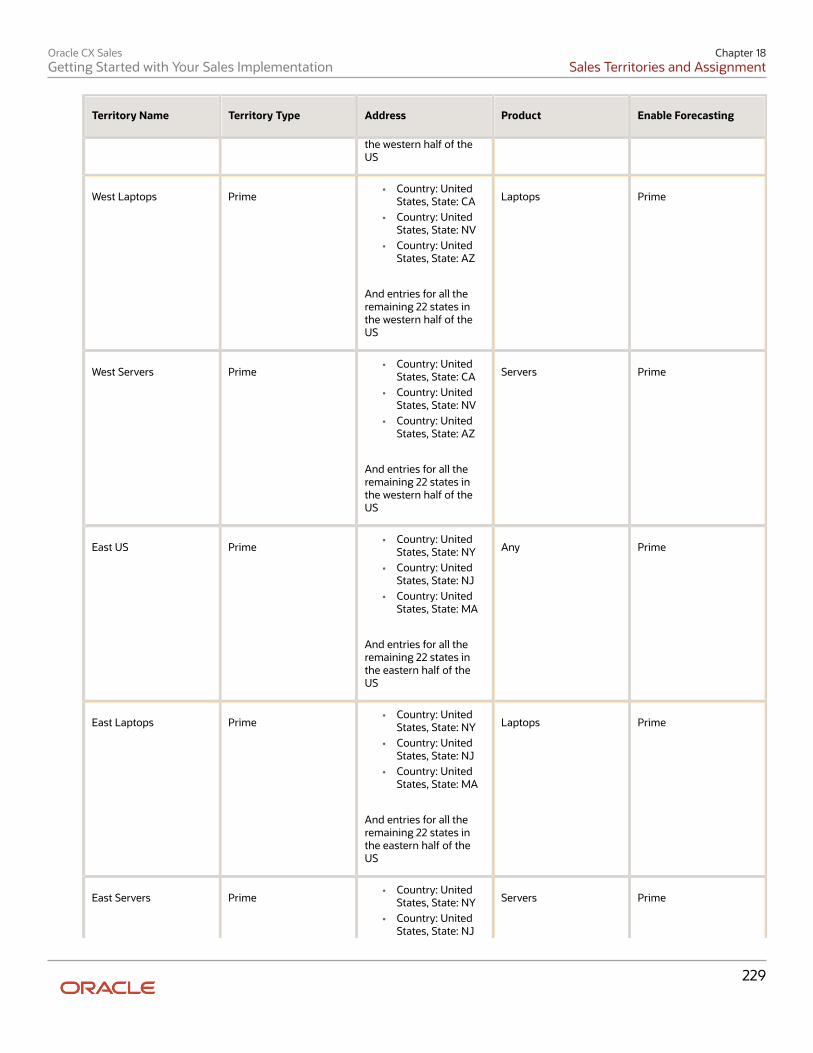
Oracle CX SalesGetting Started with Your Sales Implementation
Chapter 18Sales Territories and Assignment
229
Territory Name Territory Type Address Product Enable Forecasting
the western half of theUS
West Laptops Prime• Country: United
States, State: CA• Country: United
States, State: NV• Country: United
States, State: AZ
And entries for all theremaining 22 states inthe western half of theUS
Laptops Prime
West Servers Prime• Country: United
States, State: CA• Country: United
States, State: NV• Country: United
States, State: AZ
And entries for all theremaining 22 states inthe western half of theUS
Servers Prime
East US Prime• Country: United
States, State: NY• Country: United
States, State: NJ• Country: United
States, State: MA
And entries for all theremaining 22 states inthe eastern half of theUS
Any Prime
East Laptops Prime• Country: United
States, State: NY• Country: United
States, State: NJ• Country: United
States, State: MA
And entries for all theremaining 22 states inthe eastern half of theUS
Laptops Prime
East Servers Prime• Country: United
States, State: NY• Country: United
States, State: NJ
Servers Prime
Oracle CX SalesGetting Started with Your Sales Implementation
Chapter 18Sales Territories and Assignment
230
Territory Name Territory Type Address Product Enable Forecasting
• Country: UnitedStates, State: MA
And entries for all theremaining 22 states inthe eastern half of theUS
How to Get Rid of the Owner Field and Rely on AutomaticAssignment ExclusivelyIf you want to rely on sales territories or assignment rules to provide access to accounts, opportunities, and leads, youhave to get rid of the owner field somehow. That's because you can't automatically assign ownership of accounts,opportunities, and leads. Whoever creates a record becomes its owner and ownership provides edit access to data,including the ability to assign others to the sales team and reassign ownership. Here's how to get rid of the field fromthe UI:
• By default, each work area displays a list of records owned by the user, called My Opportunities, My Accountsand so on. You can replace these default lists with your own lists displaying records in user territories.
• You can also remove the infolets summarizing owned records from the Sales Infolet page.
• You can hide the field itself in the UI by creating custom layouts in Application Composer.
If you're concerned about unauthorized access by owners, you can create a dummy user and assign ownership of allrecords to that dummy resource. Whatever solution you explore, you must keep in mind that the owner field assuresthat the creator of a record retains access to that record.
How to Provide Managers in Completely Different Sales Regionswith Access to EverythingAccounts for large multinational corporations are typically assigned to sales teams in different countries or regions.That creates a problem. By default, managers in each region can only access information in their own region. No singlemanager can access all of the accounts and opportunities for the entire multinational. You can use a combination ofaccount hierarchies and sales territory setup to provide access. By including the account at the top of the multinationalhierarchy in the territory of a manager, you provide edit access to all accounts and opportunities in the hierarchy,regardless of where the're located. Managers get access to the account you include in the territory, and to all theaccounts below it in the hierarchy. So, you can also use this method to provide access to a subset of the hierarchy.
Setup Summary
1. Create the account hierarchy either directly in the Edit Account UI or by importing the hierarchy as described inthis guide.
2. Include the top account or another account in the hierarchy:
a. Create the territory in a territory proposal.b. On the Coverages tab in the Included Customers, Selected Customers region, click Select and Add.
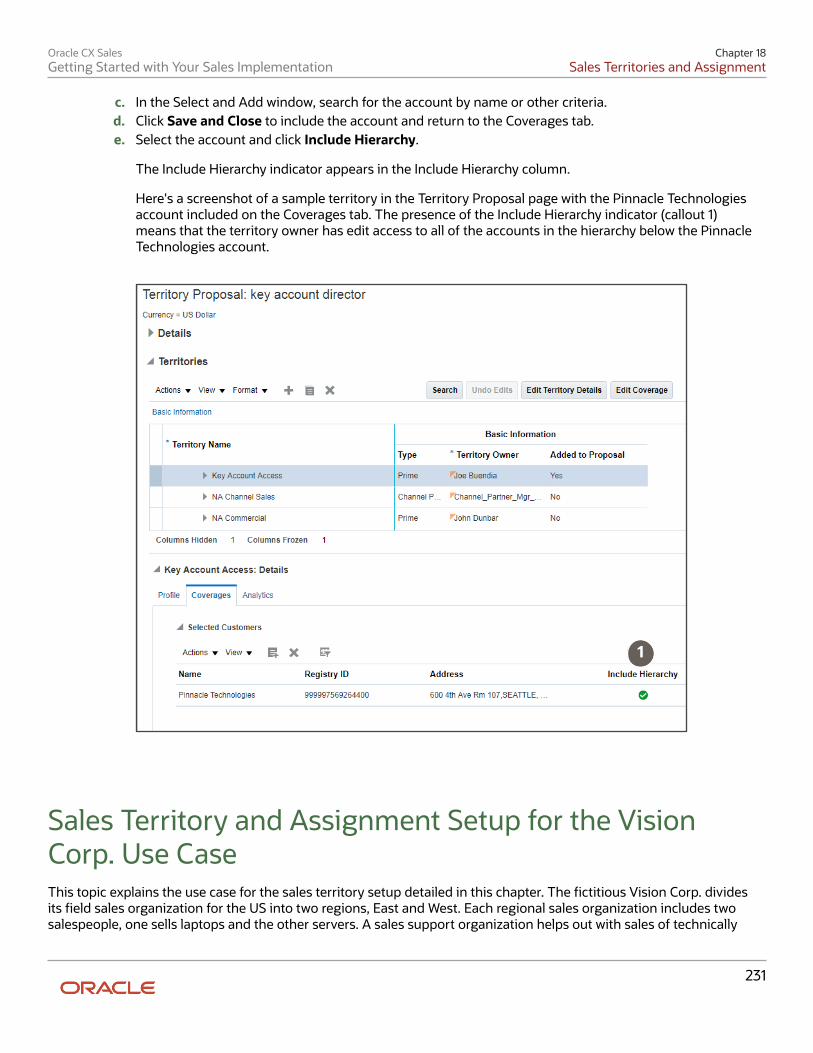
Oracle CX SalesGetting Started with Your Sales Implementation
Chapter 18Sales Territories and Assignment
231
c. In the Select and Add window, search for the account by name or other criteria.d. Click Save and Close to include the account and return to the Coverages tab.e. Select the account and click Include Hierarchy.
The Include Hierarchy indicator appears in the Include Hierarchy column.
Here's a screenshot of a sample territory in the Territory Proposal page with the Pinnacle Technologiesaccount included on the Coverages tab. The presence of the Include Hierarchy indicator (callout 1)means that the territory owner has edit access to all of the accounts in the hierarchy below the PinnacleTechnologies account.
1
Sales Territory and Assignment Setup for the VisionCorp. Use CaseThis topic explains the use case for the sales territory setup detailed in this chapter. The fictitious Vision Corp. dividesits field sales organization for the US into two regions, East and West. Each regional sales organization includes twosalespeople, one sells laptops and the other servers. A sales support organization helps out with sales of technically
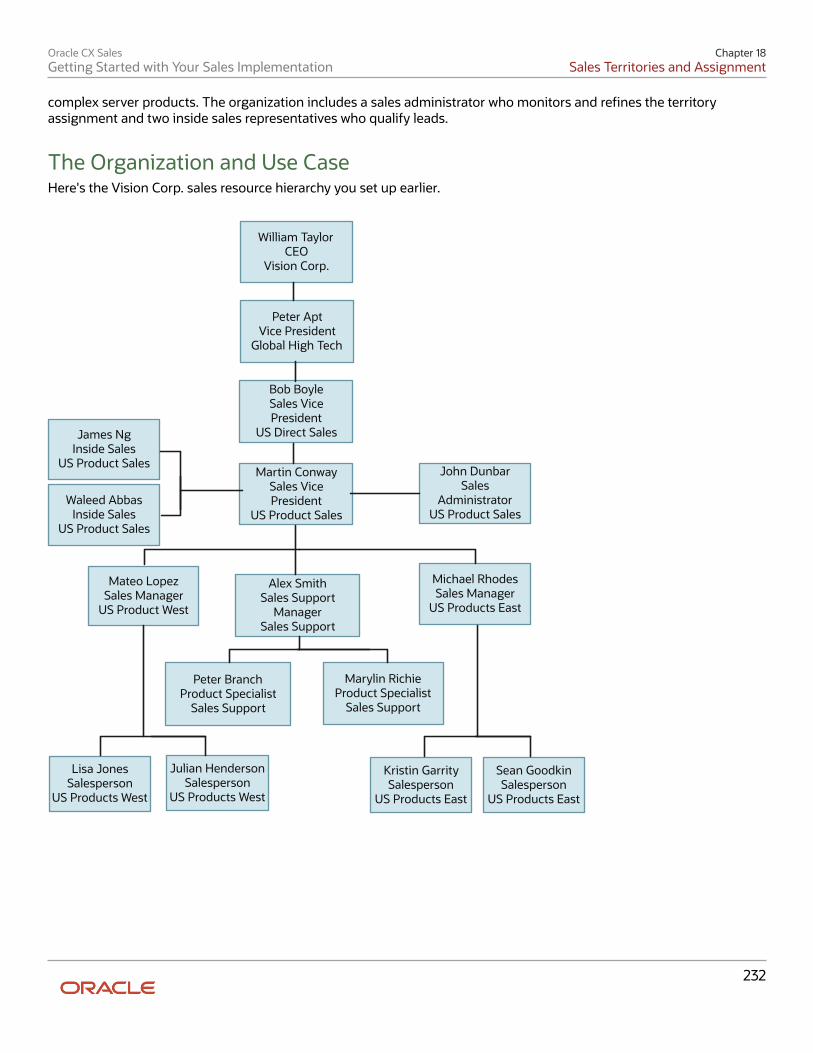
Oracle CX SalesGetting Started with Your Sales Implementation
Chapter 18Sales Territories and Assignment
232
complex server products. The organization includes a sales administrator who monitors and refines the territoryassignment and two inside sales representatives who qualify leads.
The Organization and Use CaseHere's the Vision Corp. sales resource hierarchy you set up earlier.
Lisa JonesSalesperson
US Products West
Martin ConwaySales Vice President
US Product Sales
Michael RhodesSales Manager
US Products East
Mateo LopezSales Manager
US Product West
Alex SmithSales Support
ManagerSales Support
Marylin RichieProduct Specialist
Sales Support
Peter BranchProduct Specialist
Sales Support
Julian HendersonSalesperson
US Products West
Sean GoodkinSalesperson
US Products East
Kristin GarritySalesperson
US Products East
Bob BoyleSales Vice President
US Direct Sales
Peter AptVice President
Global High Tech
William TaylorCEO
Vision Corp.
John DunbarSales
AdministratorUS Product Sales
Waleed AbbasInside Sales
US Product Sales
James NgInside Sales
US Product Sales
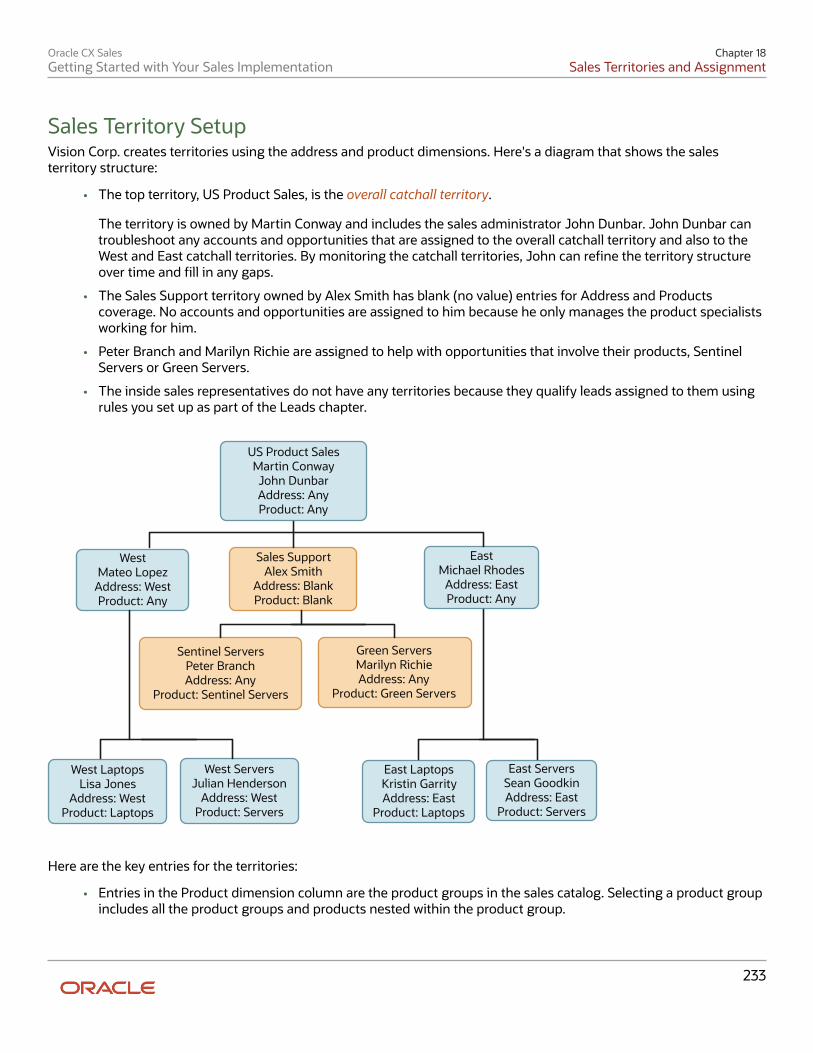
Oracle CX SalesGetting Started with Your Sales Implementation
Chapter 18Sales Territories and Assignment
233
Sales Territory SetupVision Corp. creates territories using the address and product dimensions. Here's a diagram that shows the salesterritory structure:
• The top territory, US Product Sales, is the overall catchall territory.
The territory is owned by Martin Conway and includes the sales administrator John Dunbar. John Dunbar cantroubleshoot any accounts and opportunities that are assigned to the overall catchall territory and also to theWest and East catchall territories. By monitoring the catchall territories, John can refine the territory structureover time and fill in any gaps.
• The Sales Support territory owned by Alex Smith has blank (no value) entries for Address and Productscoverage. No accounts and opportunities are assigned to him because he only manages the product specialistsworking for him.
• Peter Branch and Marilyn Richie are assigned to help with opportunities that involve their products, SentinelServers or Green Servers.
• The inside sales representatives do not have any territories because they qualify leads assigned to them usingrules you set up as part of the Leads chapter.
West LaptopsLisa Jones
Address: WestProduct: Laptops
US Product SalesMartin ConwayJohn DunbarAddress: AnyProduct: Any
EastMichael Rhodes
Address: EastProduct: Any
WestMateo Lopez
Address: WestProduct: Any
Sales SupportAlex Smith
Address: BlankProduct: Blank
Green ServersMarilyn RichieAddress: Any
Product: Green Servers
Sentinel ServersPeter BranchAddress: Any
Product: Sentinel Servers
West ServersJulian Henderson
Address: WestProduct: Servers
East ServersSean GoodkinAddress: East
Product: Servers
East LaptopsKristin GarrityAddress: East
Product: Laptops
Here are the key entries for the territories:
• Entries in the Product dimension column are the product groups in the sales catalog. Selecting a product groupincludes all the product groups and products nested within the product group.
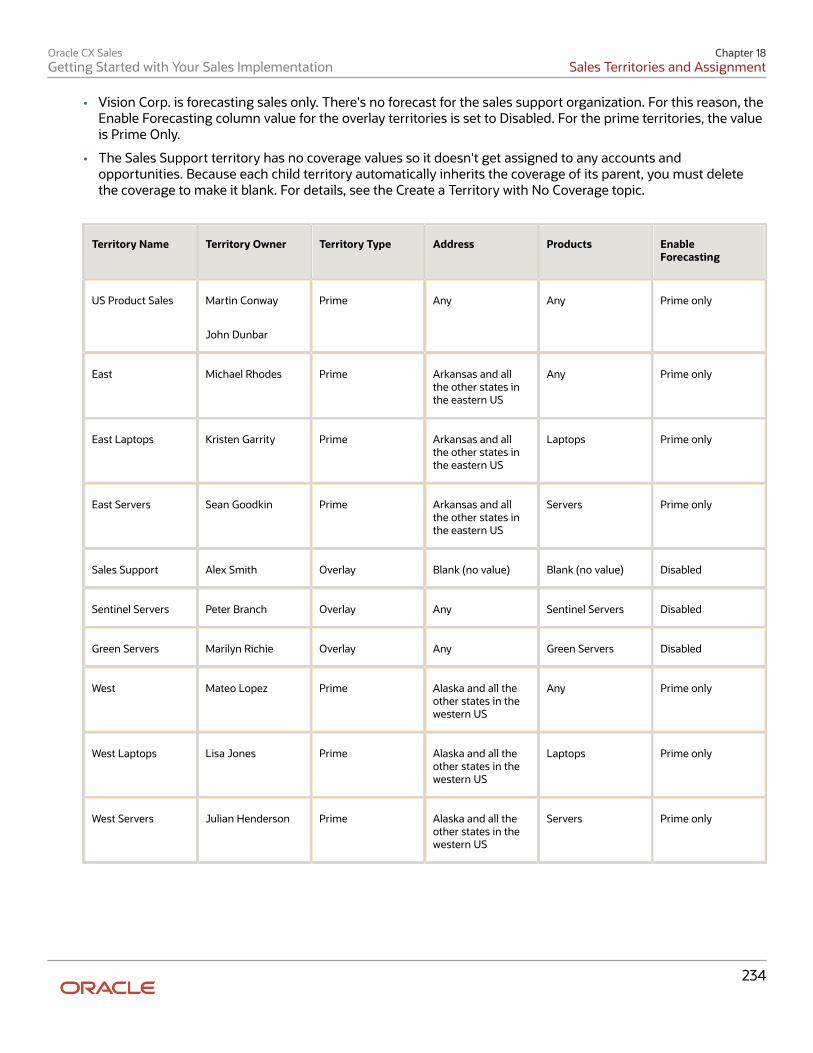
Oracle CX SalesGetting Started with Your Sales Implementation
Chapter 18Sales Territories and Assignment
234
• Vision Corp. is forecasting sales only. There's no forecast for the sales support organization. For this reason, theEnable Forecasting column value for the overlay territories is set to Disabled. For the prime territories, the valueis Prime Only.
• The Sales Support territory has no coverage values so it doesn't get assigned to any accounts andopportunities. Because each child territory automatically inherits the coverage of its parent, you must deletethe coverage to make it blank. For details, see the Create a Territory with No Coverage topic.
Territory Name Territory Owner Territory Type Address Products EnableForecasting
US Product Sales Martin Conway
John Dunbar
Prime Any Any Prime only
East Michael Rhodes Prime Arkansas and allthe other states inthe eastern US
Any Prime only
East Laptops Kristen Garrity Prime Arkansas and allthe other states inthe eastern US
Laptops Prime only
East Servers Sean Goodkin Prime Arkansas and allthe other states inthe eastern US
Servers Prime only
Sales Support Alex Smith Overlay Blank (no value) Blank (no value) Disabled
Sentinel Servers Peter Branch Overlay Any Sentinel Servers Disabled
Green Servers Marilyn Richie Overlay Any Green Servers Disabled
West Mateo Lopez Prime Alaska and all theother states in thewestern US
Any Prime only
West Laptops Lisa Jones Prime Alaska and all theother states in thewestern US
Laptops Prime only
West Servers Julian Henderson Prime Alaska and all theother states in thewestern US
Servers Prime only
Oracle CX SalesGetting Started with Your Sales Implementation
Chapter 18Sales Territories and Assignment
235
How It WorksVision Corp. runs the assignment process once a day in off-peak periods to assign new accounts or opportunities andqualified leads. Here's an outline of how assignment works for accounts:
• The application assigns an account to both the prime and overlay territories using the state the account islocated in. A new account in Alaska gets assigned to West Laptops, West Servers, Sentinel Servers, and GreenServers territories. The owners and members of these territories gain access.
• If the account information is missing a state for some reason or is in a country other than the US, then theapplication assigns the account to the US Product Sales. Sales administrator John Dunbar reviews andtroubleshoots the accounts assigned to this catchall territory.
The application assigns opportunities and qualified leads using the address information from the account and theproduct in each opportunity. For forecasting purposes, each opportunity line is assigned individually to territories andthe territory owner gets to forecast only that line, but the territory owner gains edit access to the whole opportunity andthe territory is listed on the opportunity Sales Team tab:
• An opportunity for green servers in an Alaska account, gets assigned to the West Servers prime territory and tothe Green Servers overlay territory.
• An opportunity for laptops in the same Alaska account, gets assigned to the West Laptops prime territory only.
• An opportunity for both green servers and laptops in the same Alaska account, gets assigned the West Laptops,West Servers prime territories and the Green Servers overlay territory. All three territory owners gain edit accessto the opportunity and the territories show up in the opportunity Sales Team tab. Although each territorymember gains access to the opportunity as a whole, the forecasts for each of the prime territories include onlytheir specific products.
• If an opportunity for the Alaska account includes a product not included in any of the territory coverages, thenthe application assigns the West territory.
Enable Sales Territory DimensionsYou must enable the sales territory dimensions that you plan to use for your sales territories. Make sure you completeany prerequisites for the dimension you want to use. For example, if you want to enable the product dimension, thenyou must first create the sales catalog and you must run the Refresh Denormalized Product Catalog Table for BI process.
1. Open the task Enable Dimensions and Metrics from the Setup and Maintenance work area:
◦ Offering: Sales
◦ Functional Area: Territories
◦ Task: Enable Dimensions and Metrics
2. On the Enable Dimensions and Metrics page, click Edit.3. In the Dimensions region, click Select and Add.4. Select the dimensions that you want to use and click OK.
Vision Corporation adds Address and Product.
Note: If you add the Address dimension, the application displays a warning that you can't useterritory metrics. Click Yes because you don't need these features.
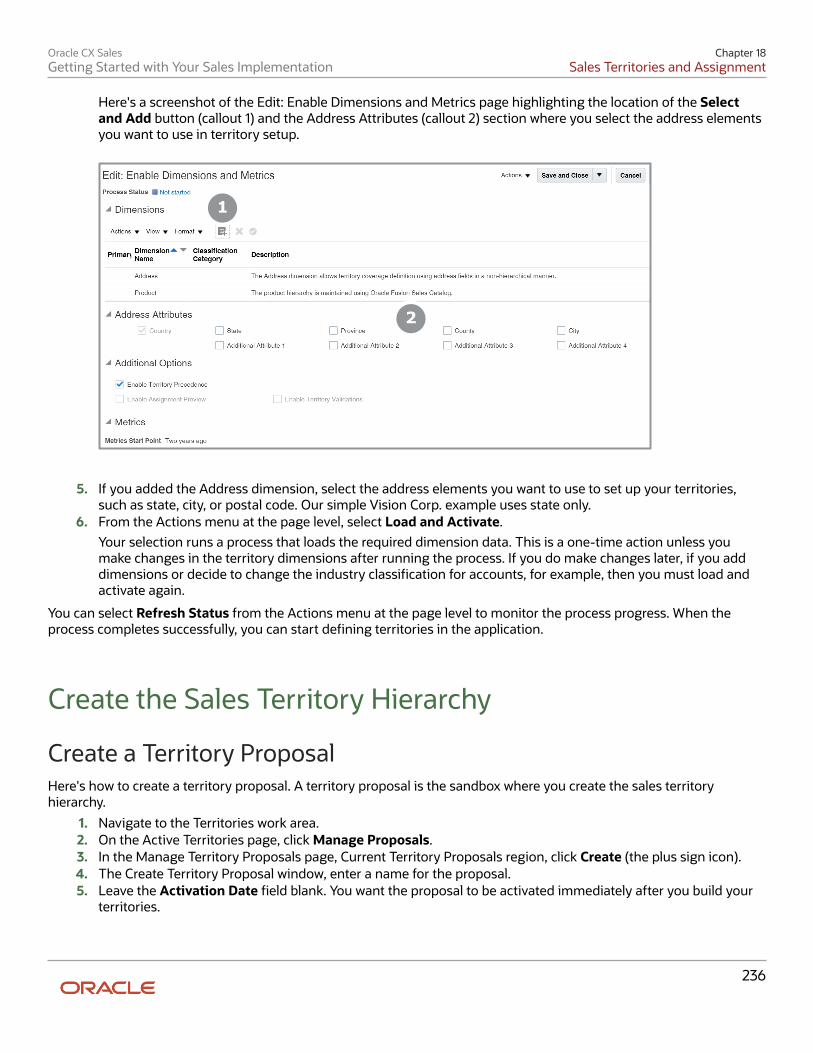
Oracle CX SalesGetting Started with Your Sales Implementation
Chapter 18Sales Territories and Assignment
236
Here's a screenshot of the Edit: Enable Dimensions and Metrics page highlighting the location of the Selectand Add button (callout 1) and the Address Attributes (callout 2) section where you select the address elementsyou want to use in territory setup.
1
2
5. If you added the Address dimension, select the address elements you want to use to set up your territories,such as state, city, or postal code. Our simple Vision Corp. example uses state only.
6. From the Actions menu at the page level, select Load and Activate.Your selection runs a process that loads the required dimension data. This is a one-time action unless youmake changes in the territory dimensions after running the process. If you do make changes later, if you adddimensions or decide to change the industry classification for accounts, for example, then you must load andactivate again.
You can select Refresh Status from the Actions menu at the page level to monitor the process progress. When theprocess completes successfully, you can start defining territories in the application.
Create the Sales Territory Hierarchy
Create a Territory ProposalHere's how to create a territory proposal. A territory proposal is the sandbox where you create the sales territoryhierarchy.
1. Navigate to the Territories work area.2. On the Active Territories page, click Manage Proposals.3. In the Manage Territory Proposals page, Current Territory Proposals region, click Create (the plus sign icon).4. The Create Territory Proposal window, enter a name for the proposal.5. Leave the Activation Date field blank. You want the proposal to be activated immediately after you build your
territories.
Oracle CX SalesGetting Started with Your Sales Implementation
Chapter 18Sales Territories and Assignment
237
6. Click Save and View.
Your territory proposal opens and you can start building your territory hierarchy.
Create the Sales Territory HierarchyWith your territory proposal open, create the sales territory hierarchy starting with the top territory. For each territoryyou create, enter the name of the salesperson or manager who owns the territory, and the values for the dimensionsthat form the territory boundaries. When you create child territories, the application automatically copies all thedimension values from the parent territories to speed up entry.
Create the Overall Catchall as the Top of the HierarchyHere's how to create the territory at the top of the sales territory hierarchy as the overall catchall territory. The topterritory is usually owned by a senior manager or executive. Because you don't want executives troubleshootingterritory assignment, you must add a second resource to do the troubleshooting.
1. In the Territories region of your territory proposal, click Create.2. On the Create Territory page, enter the territory name, for example, US Product Sales.3. Enter the resource who is the owner of the top territory, most likely the VP of Sales:
a. From the Owner list, select Search.b. Search for the resource name using any of the criteria.c. Select the name and click OK.
The owner is now listed on the Territory Team tab in the Additional Information section at the bottom of theCreate Territory page.
4. From the Type list, select Prime.5. From the Enable Forecasting list, select Prime only. This setting enables the territory to be used for
forecasting.6. Now add the sales administrator or another resource for troubleshooting any accounts and opportunities that
get assigned to the catchall territory.
a. In the Territory Team tab in the Additional Information region, click Select and Add (the document iconwith a plus sign).
b. Search for the resource using any of the fields.c. Select the resource from the search results and click OK.
7. Click Save and Close.
Your new territory appears in the Territories table of your proposal.
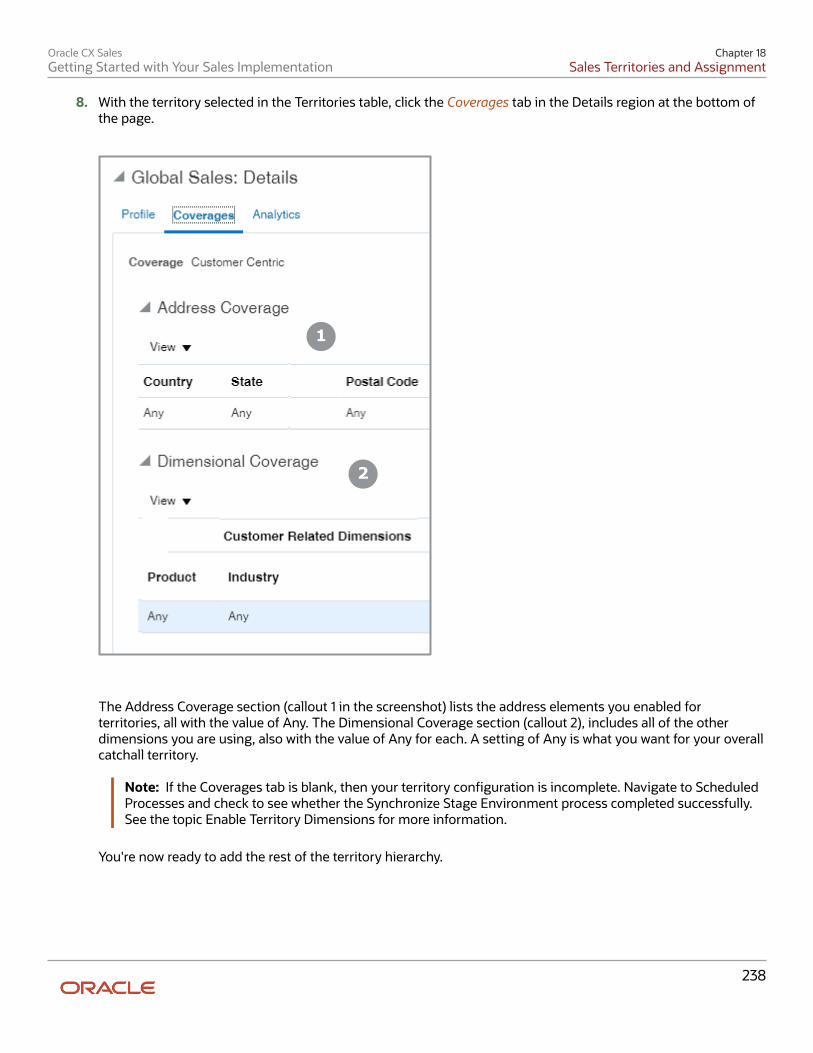
Oracle CX SalesGetting Started with Your Sales Implementation
Chapter 18Sales Territories and Assignment
238
8. With the territory selected in the Territories table, click the Coverages tab in the Details region at the bottom ofthe page.
1
2
The Address Coverage section (callout 1 in the screenshot) lists the address elements you enabled forterritories, all with the value of Any. The Dimensional Coverage section (callout 2), includes all of the otherdimensions you are using, also with the value of Any for each. A setting of Any is what you want for your overallcatchall territory.
Note: If the Coverages tab is blank, then your territory configuration is incomplete. Navigate to ScheduledProcesses and check to see whether the Synchronize Stage Environment process completed successfully.See the topic Enable Territory Dimensions for more information.
You're now ready to add the rest of the territory hierarchy.
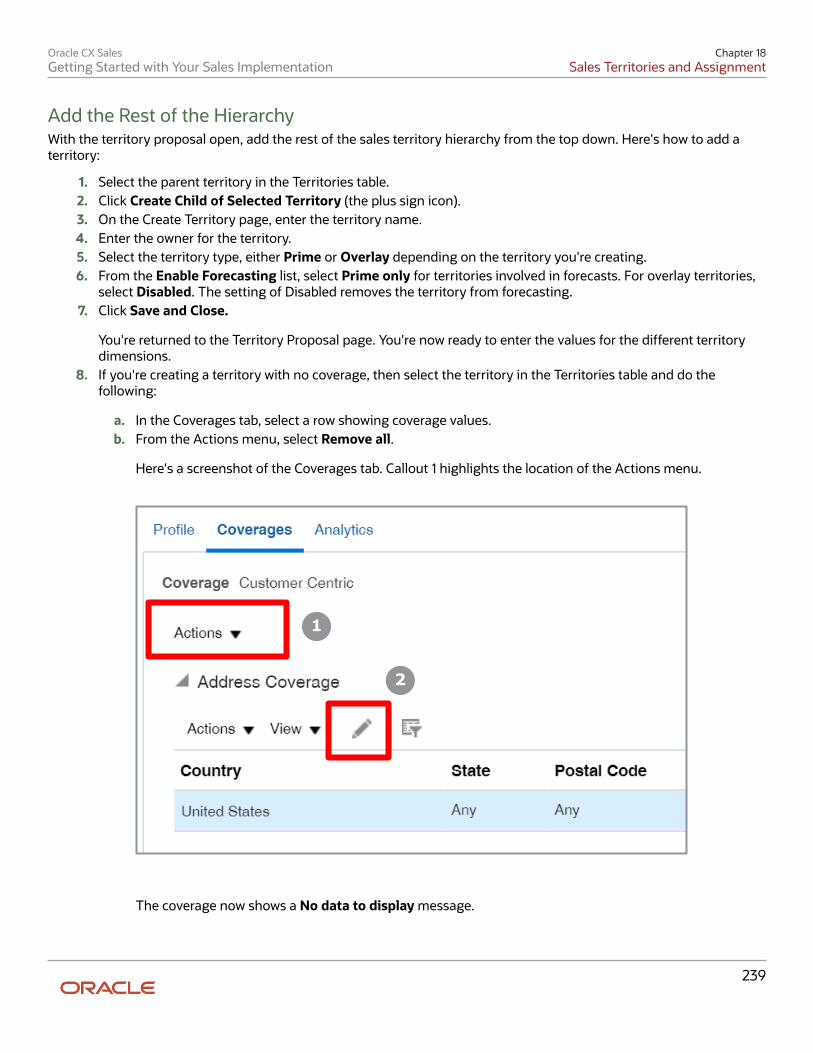
Oracle CX SalesGetting Started with Your Sales Implementation
Chapter 18Sales Territories and Assignment
239
Add the Rest of the HierarchyWith the territory proposal open, add the rest of the sales territory hierarchy from the top down. Here's how to add aterritory:
1. Select the parent territory in the Territories table.2. Click Create Child of Selected Territory (the plus sign icon).3. On the Create Territory page, enter the territory name.4. Enter the owner for the territory.5. Select the territory type, either Prime or Overlay depending on the territory you're creating.6. From the Enable Forecasting list, select Prime only for territories involved in forecasts. For overlay territories,
select Disabled. The setting of Disabled removes the territory from forecasting.7. Click Save and Close.
You're returned to the Territory Proposal page. You're now ready to enter the values for the different territorydimensions.
8. If you're creating a territory with no coverage, then select the territory in the Territories table and do thefollowing:
a. In the Coverages tab, select a row showing coverage values.b. From the Actions menu, select Remove all.
Here's a screenshot of the Coverages tab. Callout 1 highlights the location of the Actions menu.
1
2
The coverage now shows a No data to display message.
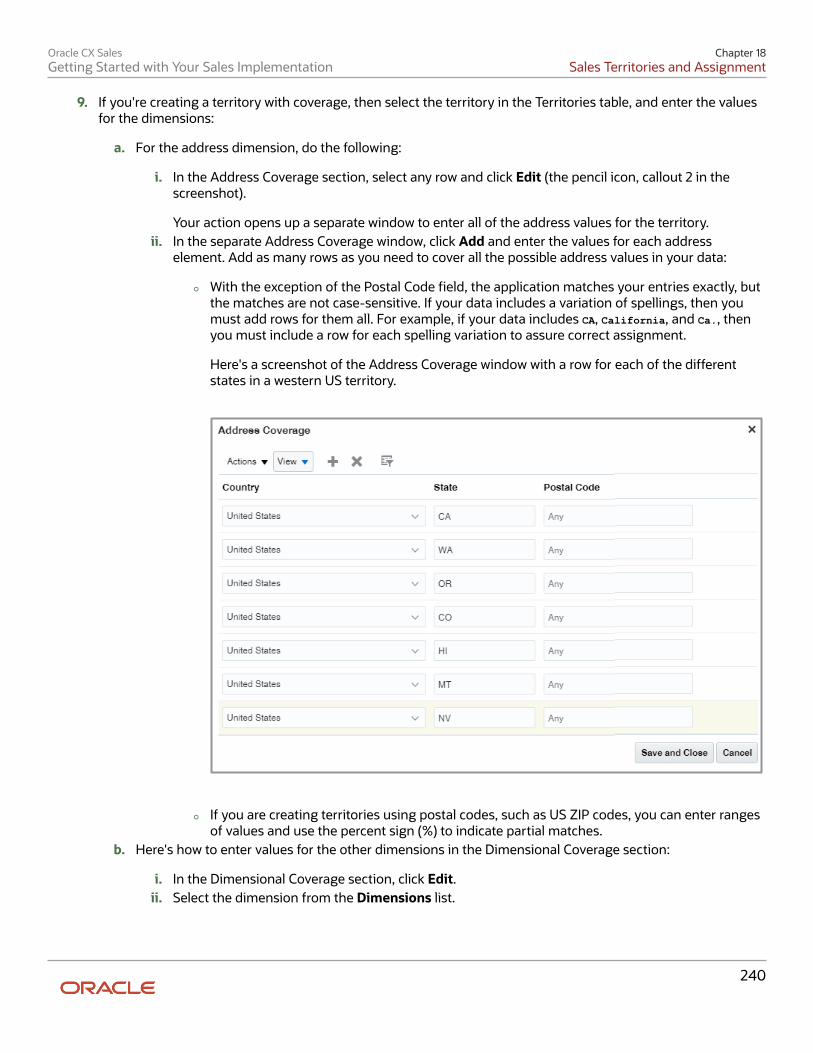
Oracle CX SalesGetting Started with Your Sales Implementation
Chapter 18Sales Territories and Assignment
240
9. If you're creating a territory with coverage, then select the territory in the Territories table, and enter the valuesfor the dimensions:
a. For the address dimension, do the following:
i. In the Address Coverage section, select any row and click Edit (the pencil icon, callout 2 in thescreenshot).
Your action opens up a separate window to enter all of the address values for the territory.ii. In the separate Address Coverage window, click Add and enter the values for each address
element. Add as many rows as you need to cover all the possible address values in your data:
◦ With the exception of the Postal Code field, the application matches your entries exactly, butthe matches are not case-sensitive. If your data includes a variation of spellings, then youmust add rows for them all. For example, if your data includes CA, California, and Ca., thenyou must include a row for each spelling variation to assure correct assignment.
Here's a screenshot of the Address Coverage window with a row for each of the differentstates in a western US territory.
◦ If you are creating territories using postal codes, such as US ZIP codes, you can enter rangesof values and use the percent sign (%) to indicate partial matches.
b. Here's how to enter values for the other dimensions in the Dimensional Coverage section:
i. In the Dimensional Coverage section, click Edit.ii. Select the dimension from the Dimensions list.
Oracle CX SalesGetting Started with Your Sales Implementation
Chapter 18Sales Territories and Assignment
241
The Edit Coverage window shows a list of available values in the left Available Dimension Memberspane.
iii. Move the values you want to use for the territory to the Selected Dimension Members pane on theright.
Tip: If the Product dimension shows the wrong products, go to the Scheduled Processeswork area and run the Refresh Denormalized Product Catalog Table for BI process. The wrongproducts may show up if you changed the root of your sales catalog.
iv. Click Save and Close.
You're returned to the Territory Proposal page.
After you complete adding territories and specifying coverages, you're ready to activate your territory proposal.
Activate the Territory ProposalYou can activate your territory proposal right away after you complete building your territory hierarchy. Just clickActivate while still editing the territory proposal. If you didn't, no worries. You can activate the proposal from theManage Territory Proposals page. Here's how:
1. Navigate to the Territories work area.2. Click the Manage Territory Proposals link.3. If the proposal you want to activate doesn't appear on the Manage Territory Proposals page, in the Current
Territory Proposals table, select All Proposals from the Proposals list.4. Select the proposal and click Activate.
The application displays the proposal in the Completed Territory Proposals region. You can refresh the page todisplay the most recent status and navigate to the Territories page to view the territories after they are active.
Create a Territory with No CoverageSometimes you need to create a territory to group other territories for forecasting or you want to forecast accountsthat are included in a territory by name. In these cases, you don't want any accounts or opportunities assigned to theterritory. You can create territories that are skipped by the assignment process by deleting the coverage across allterritory dimensions. You can only delete coverage while you're in a territory proposal and you must delete coverageacross all the dimensions in a territory. You can't delete coverage for individual dimensions.
Here's how to create a territory with no coverage:
1. In the territory proposal, Territories region, select the territory you want to turn into a territory with no coverage.Make sure it's added to the proposal.
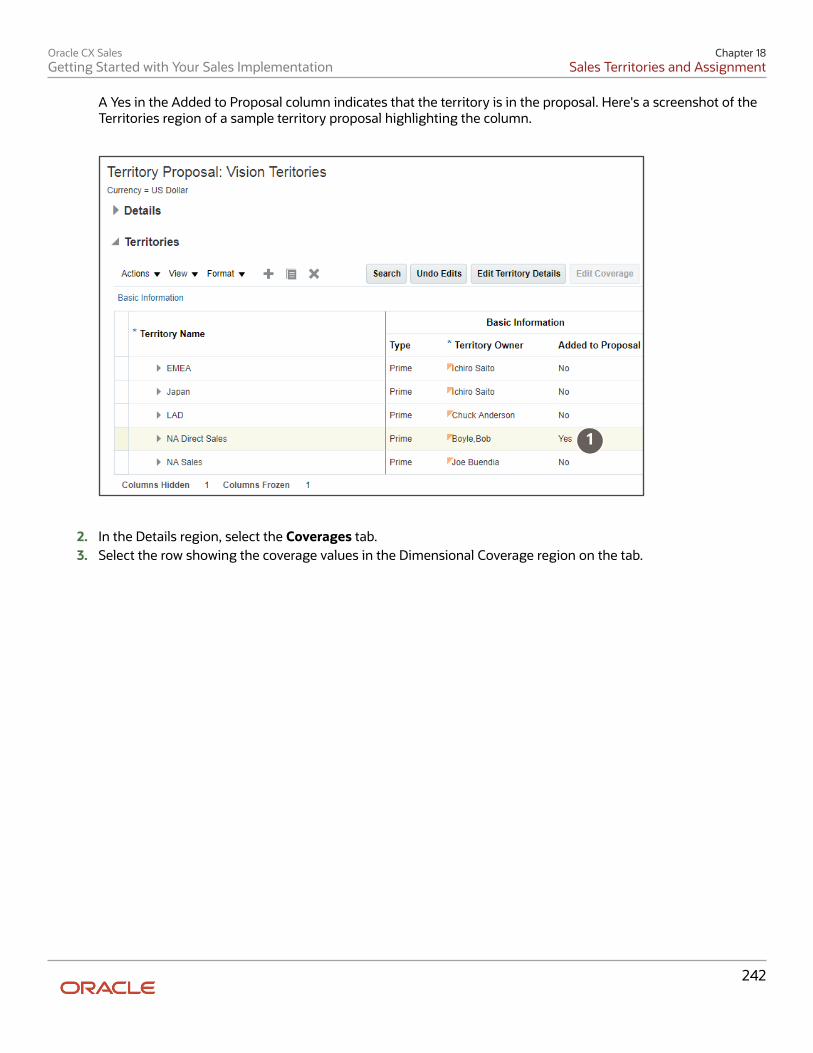
Oracle CX SalesGetting Started with Your Sales Implementation
Chapter 18Sales Territories and Assignment
242
A Yes in the Added to Proposal column indicates that the territory is in the proposal. Here's a screenshot of theTerritories region of a sample territory proposal highlighting the column.
1
2. In the Details region, select the Coverages tab.3. Select the row showing the coverage values in the Dimensional Coverage region on the tab.
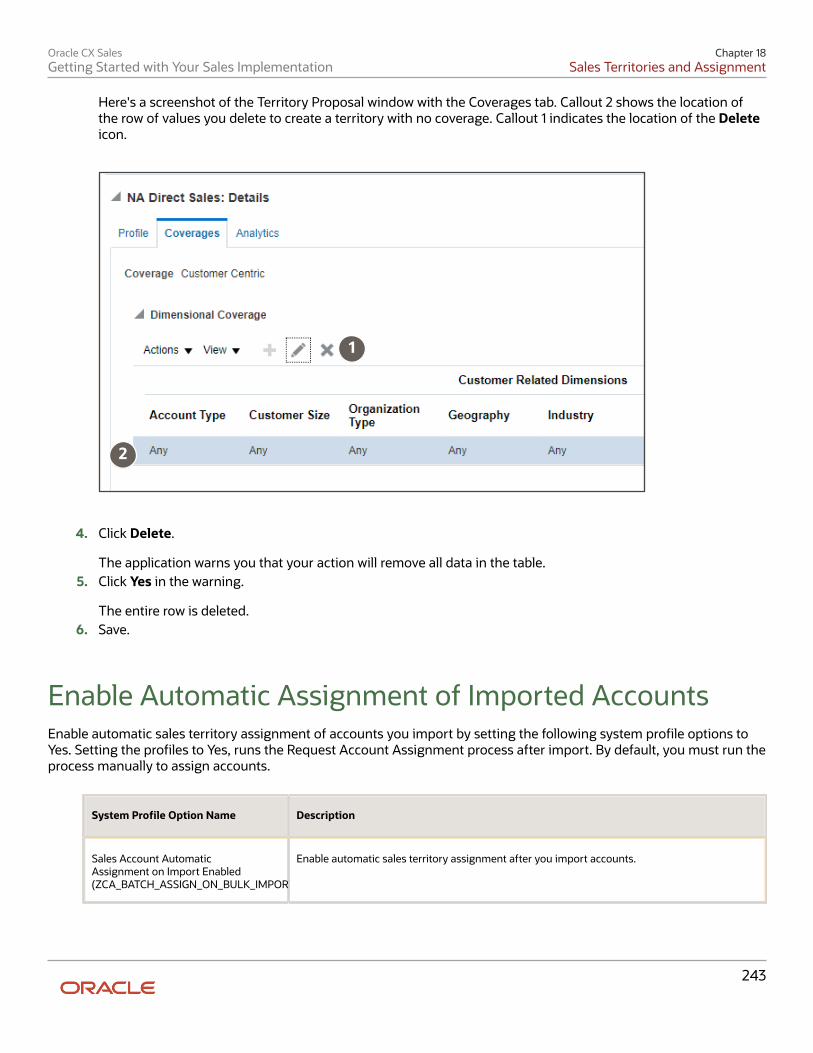
Oracle CX SalesGetting Started with Your Sales Implementation
Chapter 18Sales Territories and Assignment
243
Here's a screenshot of the Territory Proposal window with the Coverages tab. Callout 2 shows the location ofthe row of values you delete to create a territory with no coverage. Callout 1 indicates the location of the Deleteicon.
1
2
4. Click Delete.
The application warns you that your action will remove all data in the table.5. Click Yes in the warning.
The entire row is deleted.6. Save.
Enable Automatic Assignment of Imported AccountsEnable automatic sales territory assignment of accounts you import by setting the following system profile options toYes. Setting the profiles to Yes, runs the Request Account Assignment process after import. By default, you must run theprocess manually to assign accounts.
System Profile Option Name Description
Sales Account AutomaticAssignment on Import Enabled(ZCA_BATCH_ASSIGN_ON_BULK_IMPORT)
Enable automatic sales territory assignment after you import accounts.
Oracle CX SalesGetting Started with Your Sales Implementation
Chapter 18Sales Territories and Assignment
244
System Profile Option Name Description
Sales Account AutomaticAssignment on Create Enabled(ZCA_SA_AUTO_ASSIGN_ON_CREATE)
Enable automatic sales territory assignment of new accounts after you import accounts.
Sales Account AutomaticAssignment on Update Enabled(ZCA_SA_AUTO_ASSIGN_ON_UPDATE)
Enable automatic sales territory assignment whenever accounts are updated when you import.
1. In Setup and Maintenance, go to the Manage Administrator Profile Values task:
◦ Offering: Sales
◦ Functional Area: Sales Foundation
◦ Task: Manage Administrator Profile Values
2. Search for each of the profile options.3. Set the Profile Value to Yes.4. Click Save and Close.
Make Opportunity Assignment AutomaticYou can make the assignment of opportunities automatic by setting the system profile option Assignment Submissionat Save Enabled. By default, sales users must assign opportunities manually when they edit each opportunity.
1. In Setup and Maintenance, go to the Manage Opportunity Profile Options task:
◦ Offering: Sales
◦ Functional Area: Opportunities
◦ Task: Manage Opportunity Profile Options
2. In the Manage Opportunity Profile Options page, search for the profile option by entering AssignmentSubmission at Save Enabled in the Profile Display Name field.
3. In the MOO-OPTY_ENABLE_AUTO_ASGN: Profile Values region, select Yes from the Profile Value list.4. Click Save and Close.
Run Assignment Processes
Run the Account Assignment ProcessYou must run the Request Account Assignment process to assign territories to accounts each time you activate aterritory proposal. You must also schedule this process to run regularly to ensure that all territories are assignedproperly.
1. Click Navigator > Tools > Scheduled Processes.2. On the Overview page, click Schedule New Process.3. In the Schedule New Process window, enter Request Account Assignment in the Name field and press Return.
Oracle CX SalesGetting Started with Your Sales Implementation
Chapter 18Sales Territories and Assignment
245
4. Select the process and click OK.5. On the Process Details page, make these entries to assign all records:
Field Entry
Work Object Account
Candidate Object Account Territory
Assignment Mode Territory
View Criteria Name AllSalesAccountsVC.
Note: You can run the assignment process on a subset of records by entering different parametersin the View Criteria Name and View Criteria Bind Values fields.
6. The first time you run the process click Submit to run it immediately.7. You must also set up the process to run regularly, perhaps once a day:
a. Click Advanced.b. Click the Schedule tab.c. Select the Using a schedule option.
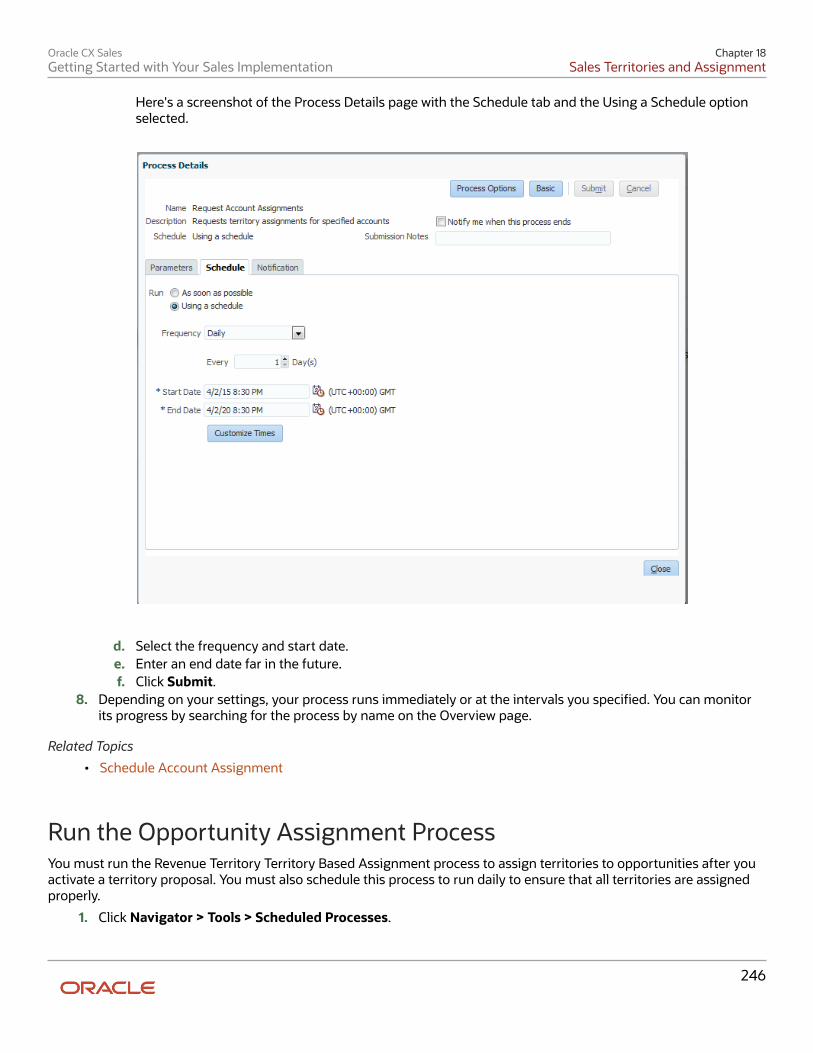
Oracle CX SalesGetting Started with Your Sales Implementation
Chapter 18Sales Territories and Assignment
246
Here's a screenshot of the Process Details page with the Schedule tab and the Using a Schedule optionselected.
d. Select the frequency and start date.e. Enter an end date far in the future.f. Click Submit.
8. Depending on your settings, your process runs immediately or at the intervals you specified. You can monitorits progress by searching for the process by name on the Overview page.
Related Topics
• Schedule Account Assignment
Run the Opportunity Assignment ProcessYou must run the Revenue Territory Territory Based Assignment process to assign territories to opportunities after youactivate a territory proposal. You must also schedule this process to run daily to ensure that all territories are assignedproperly.
1. Click Navigator > Tools > Scheduled Processes.
Oracle CX SalesGetting Started with Your Sales Implementation
Chapter 18Sales Territories and Assignment
247
2. In the Scheduled Processes page, click Schedule New Process.3. In the Schedule New Process dialog, Name field, click Search: Name icon (down arrow) and select the Search
link at the bottom of the list.4. In the Search and Select dialog, enter the process name Revenue Territory, and click Search. You can search by
a partial name, but note that the search is case-sensitive.5. Select the process name in the results and click OK.6. Click OK again, if required.
7. Enter these process parameters:
Field Entry
View Criteria Name Enter OpenOpportunitiesByCreationDate.
View Criteria Bind Values You can have the option of assigning territories to those open opportunities created since acertain date or those created for a range of dates:
◦ For a specific date, enter BindOptyCreationDateFrom=YYYY-MM-DD whereYYYY-MM-DD is the date you started implementing the application. For example,BindOptyCreationDateFrom=2014-01-01 assigns all open opportunities createdsince January 1, 2014.
◦ To use a date range, enter BindOptyCreationDateFrom=<date>,BindOptyCreationDateTo=<date>. Note that the From and To values areseparated by a comma.
Note: You can find information about additional process parameters in the Implementing Salesguide.
8. You must also run this same process periodically to assign new opportunities
a. Click Advanced.b. Select the Schedule tab.c. Select the Using a schedule option.d. Select the frequency and start date.
9. Click Submit.10. Unless you specified a schedule, your process runs immediately. You can monitor its progress by searching for
the process by name on the Overview page.
Related Topics
• Recommendations for Assignment Processes for Opportunities
Oracle CX SalesGetting Started with Your Sales Implementation
Chapter 18Sales Territories and Assignment
248
Oracle CX SalesGetting Started with Your Sales Implementation
Chapter 19Leads
249
19 Leads
How to Handle Leads You Get from Trade Shows, theWeb, and Other Outside SourcesThe leads you get from the web, from trade shows, from marketing campaigns, or from lists you purchased aren'talways of the highest quality. You want to contact the potential customer and verify the information before creating newaccount and contact records in your application. And you don't want to pass worthless leads to your highly-paid andbusy field sales. This chapter outlines how you can set up a process for creating, verifying, and qualifying these kinds ofnet new leads. We are calling these leads "net new" leads because the account and contact information stays in the leaduntil the lead is qualified and converted. Our use case follows the common practice of using inside sales to do the initiallead qualification. But there's nothing stopping you from modifying the use case to suit your needs.
Use Case OverviewThe fictitious company, Vision Corp., uses a team of inside sales representatives to verify the information in leads. Allqualified leads are automatically assigned to field sales representatives for further assessment and conversion intoopportunities. Here's an overview of the process:
1. Net new leads can get created in one of three ways:
◦ The leads are imported, perhaps by a sales administrator using the import macro you download from MyOracle Support.
◦ The leads get created from an integration with a marketing application, such as Oracle Eloqua.
◦ A salesperson can also create net new leads manually in the UI.
2. Using an assignment rule you create, the application automatically assigns all inside sales representatives tothe sales team on each of the imported leads. Being on the sales team, makes it possible for the inside salesrepresentatives to view and update the leads, but it doesn't assign them ownership of the leads. Salespeoplebecome owners of a lead only when they accept a lead.
3. Individual inside sales representatives review the list of leads and accept the leads they want to work on.Accepting a lead lists you as the lead's owner.
4. The inside sales representatives verify the information in each lead. They check for potential duplicates, contactthe customer, and answer a standard list of questions in a qualification template that you set up for them.
5. When leads meet the qualification criteria, the inside sales representatives set the leads to the qualified status.6. If the leads don't meet the criteria, the inside sales representatives retire them instead.7. The application automatically assigns the qualified lead to sales territories in the field sales organization.8. Field sales representatives review the individual leads assigned to them, and convert the promising ones to
opportunities.
The representative doing the conversion becomes the owner of the new opportunity.9. During the conversion process, the application creates new account and contact records of type prospect. The
lead is automatically set to a converted status and linked to the account and opportunity records.

Oracle CX SalesGetting Started with Your Sales Implementation
Chapter 19Leads
250
Here's a diagram that illustrates the processes:
Accept Lead
Evaluate Lead
No
Yes
Import Leads
Qualied?
Retire Lead
Convert to Opportunity
Work Opportunity
New Account or Contact?
Yes
Create Account and Contact
Inside Sales Field Sales Application
Create Opportunity
Close Opportunity
No
Create Lead
Administrator or
Marketing Application
How Inside Sales Accesses and Works Leads
1. To find the imported leads to work on, the inside sales representatives select the Unaccepted Leads list (callout1 in the screenshot).
You create the saved search for this list during setup.2. Representatives accept ownership of the leads they want to work on, either by:
◦ Selecting the Accept from the Actions list (callout 2).
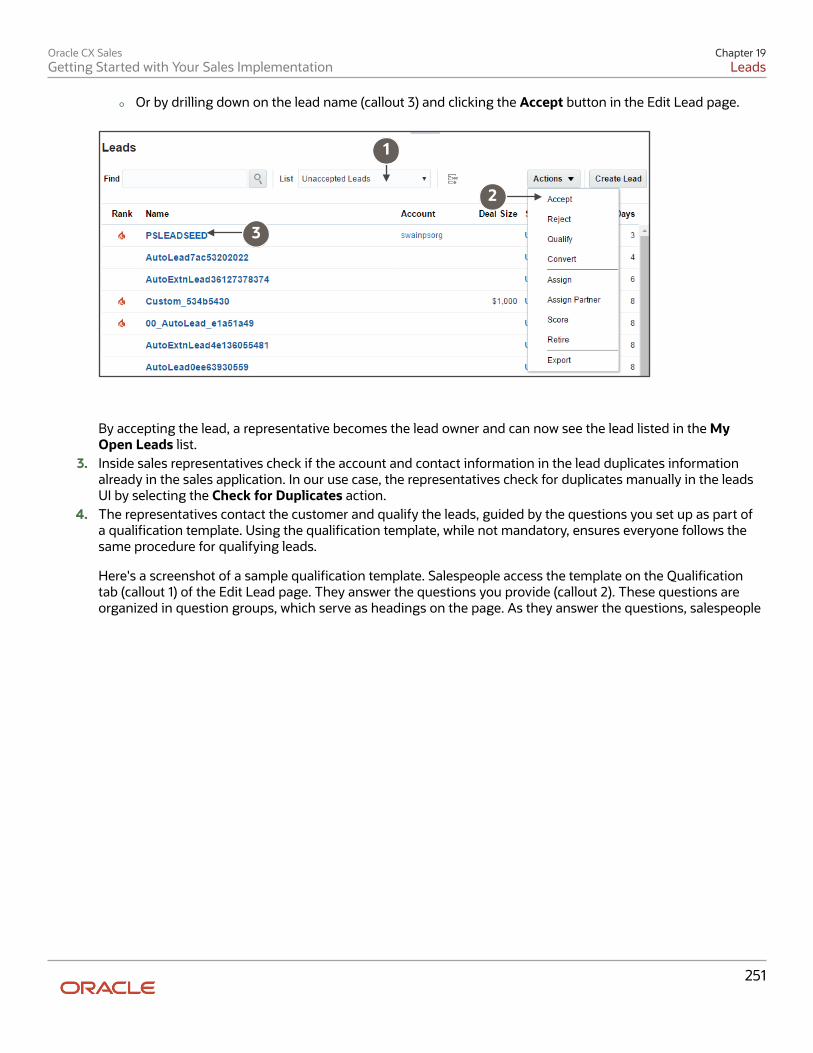
Oracle CX SalesGetting Started with Your Sales Implementation
Chapter 19Leads
251
◦ Or by drilling down on the lead name (callout 3) and clicking the Accept button in the Edit Lead page.
1
2
3
By accepting the lead, a representative becomes the lead owner and can now see the lead listed in the MyOpen Leads list.
3. Inside sales representatives check if the account and contact information in the lead duplicates informationalready in the sales application. In our use case, the representatives check for duplicates manually in the leadsUI by selecting the Check for Duplicates action.
4. The representatives contact the customer and qualify the leads, guided by the questions you set up as part ofa qualification template. Using the qualification template, while not mandatory, ensures everyone follows thesame procedure for qualifying leads.
Here's a screenshot of a sample qualification template. Salespeople access the template on the Qualificationtab (callout 1) of the Edit Lead page. They answer the questions you provide (callout 2). These questions areorganized in question groups, which serve as headings on the page. As they answer the questions, salespeople
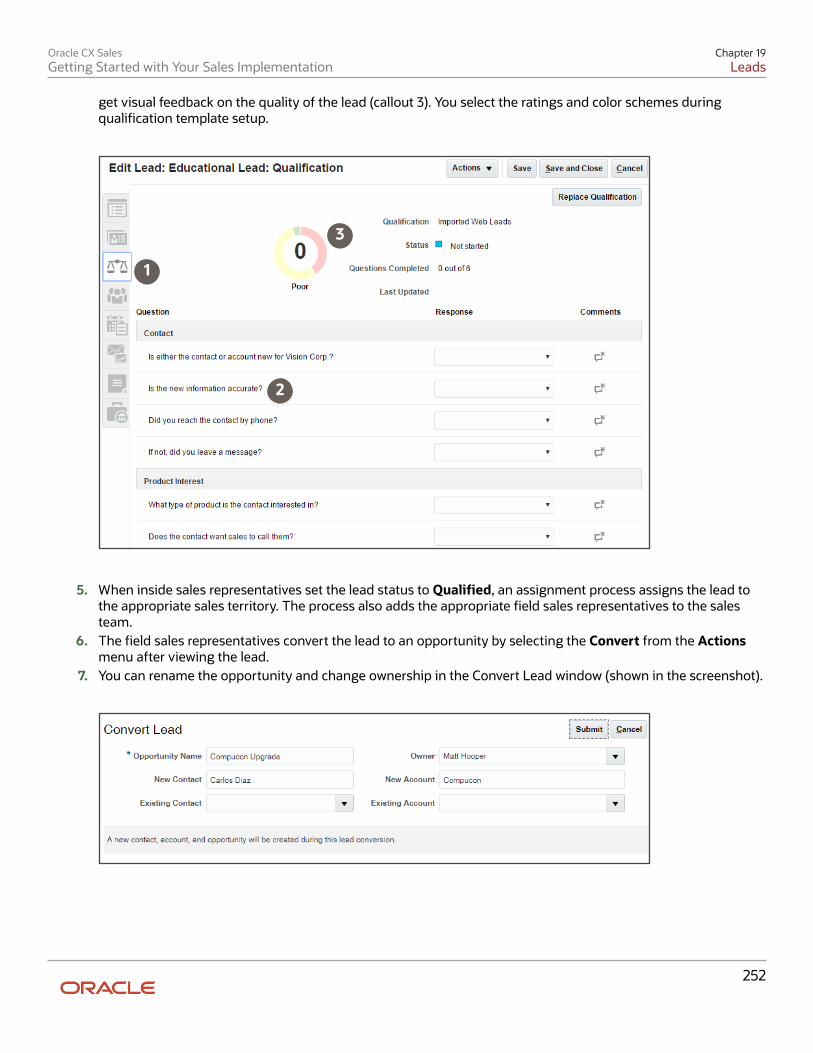
Oracle CX SalesGetting Started with Your Sales Implementation
Chapter 19Leads
252
get visual feedback on the quality of the lead (callout 3). You select the ratings and color schemes duringqualification template setup.
1
2
3
5. When inside sales representatives set the lead status to Qualified, an assignment process assigns the lead tothe appropriate sales territory. The process also adds the appropriate field sales representatives to the salesteam.
6. The field sales representatives convert the lead to an opportunity by selecting the Convert from the Actionsmenu after viewing the lead.
7. You can rename the opportunity and change ownership in the Convert Lead window (shown in the screenshot).
Oracle CX SalesGetting Started with Your Sales Implementation
Chapter 19Leads
253
How You Import Leads Depends on the Lead TypeHow you import leads depends on whether you're importing the net new leads described in this chapter or leads linkedto existing accounts and contacts. Here are the main differences:
• Net new leadsYou import the account and contact as part of the lead business object. Account and contact records arecreated only when the sales representatives convert the leads to opportunities. You can use the Excel macroprovided by Oracle to import these types of leads.
• Leads linked to existing accounts and contactsYou must use IDs to reference the existing accounts and contact record in your import file. You can use the IDsyou generated in your account and contact import files or you can export IDs from your application. You cannotuse the leads import Excel macro for this type of import.
This guide discusses only the import of net new leads using the import macro. See the Understanding Import andExport Management guide to understand how to import the other types of leads.
Related Topics• Understanding Import and Export Management guide
Setup OverviewHere are the setup steps required to set up the Vision Corp. leads use case covered in this chapter.
Step Description Task Where to Get More Details
1 Expose two fields, NewAccount and New Contact, onthe appropriate lead pages.To display net new leads youimport, you must display thefields on the Edit Lead page.If you want salespeople tocreate net new leads, youmust enable the fields on theCreate Lead page. You mayalso want to display the fieldson the UIs used to convertleads to opportunities and inthe list page.
Application Composer See the topic: Configure theLeads UI
2 Create the assignment rule toassign the leads to the insidesales representatives who willqualify them.
Manage Sales LeadAssignment Rules
See the topic: Set Up theAssignment Rule for AssigningLeads
3 Set two system profileoptions to enable leadassignment. Setting Lead
Manage Sales Lead ProfileOptions
See the topic: Enable LeadAssignment

Oracle CX SalesGetting Started with Your Sales Implementation
Chapter 19Leads
254
Step Description Task Where to Get More Details
Assignment Mode to Bothturns on both rule-based andterritory-based assignment.Setting the AssignmentRule for Rule Based LeadAssignment profile optiontells the application which rulecategory to use.
4 Before importing your leads,you can optionally change thevalues provided by Oracle forlead rank and the lead sourcechannel. Salespeople can uselead rank, for example, hotor cold, to prioritize leads towork on next. The lead sourcechannel indicates if the leadcame from the web, an email,and so on.
Manage Set Enabled Lookups See the topic: Change theValues for Lead Rank and LeadChannel
5 Import leads using the leadimport macro. You can importup to 5,000 leads at a time.
None. You import from theExcel macro itself.
See the topic: Import LeadsUsing the Import Macro
6 Run the lead assignmentprocess twice: the first time toassign the imported leads toinside sales and the secondtime to assign qualified leadsto field sales. You can alsoschedule assignment processto run at regular intervals.
Manage Lead ProcessingActivities
See the topic: Run the LeadAssignment Process topic inthis chapter.
7 Create a list that inside salesrepresentatives use to viewthe imported leads that areavailable for them to work on.
None See the topic: Create a List ofUnaccepted Leads
8 Create lead qualificationtemplates. Each templateincludes questionnaire youwant inside sales to use as aguideline for qualifying thelead.
You can create one templatefor all leads or differenttemplates for different usersor products.
Manage Sales LeadQualification Templates
See the topic: Create a LeadQualification Template
9 Specify which qualificationtemplate you want to appearin a lead by default by settingthe system profile option
Manage Sales LeadAdministrator Profile Values
See the topic: Select DefaultLead Qualification Templates
Oracle CX SalesGetting Started with Your Sales Implementation
Chapter 19Leads
255
Step Description Task Where to Get More Details
Advanced Lead QualificationEnabled. You can specify onetemplate as the default forall leads, or have differentdefaults for different users andproducts.
10 Sign in as one of the insidesales representativesand one of the field salesrepresentatives to test yoursetup.
None See the topic: Test Your LeadsSetup
Configure the Leads UI
Changes You're Making to the Leads PagesIf your sales organization handles large volumes of unqualified leads and you want to prevent your sales data fromgetting cluttered with unverified account and contact information, read on. With a bit of setup, you can store accountand contact names in the lead as text and create the account and contact records only after salespeople verify theinformation is legitimate and accurate. If a lead doesn't pan out, the information just stays in the lead.
Lead Pages Handle Only Leads for Existing AccountsHere's how the application behaves by default:
• When creating a lead in the UI, salespeople can only enter accounts and contacts that already exist in theapplication. If they want to create leads for completely new accounts and contacts, they must first create theappropriate account and contact records.
• If you import completely new leads, as you do using the import macro, the leads get imported, but the newaccounts and new contacts names don't show up on the Edit page.
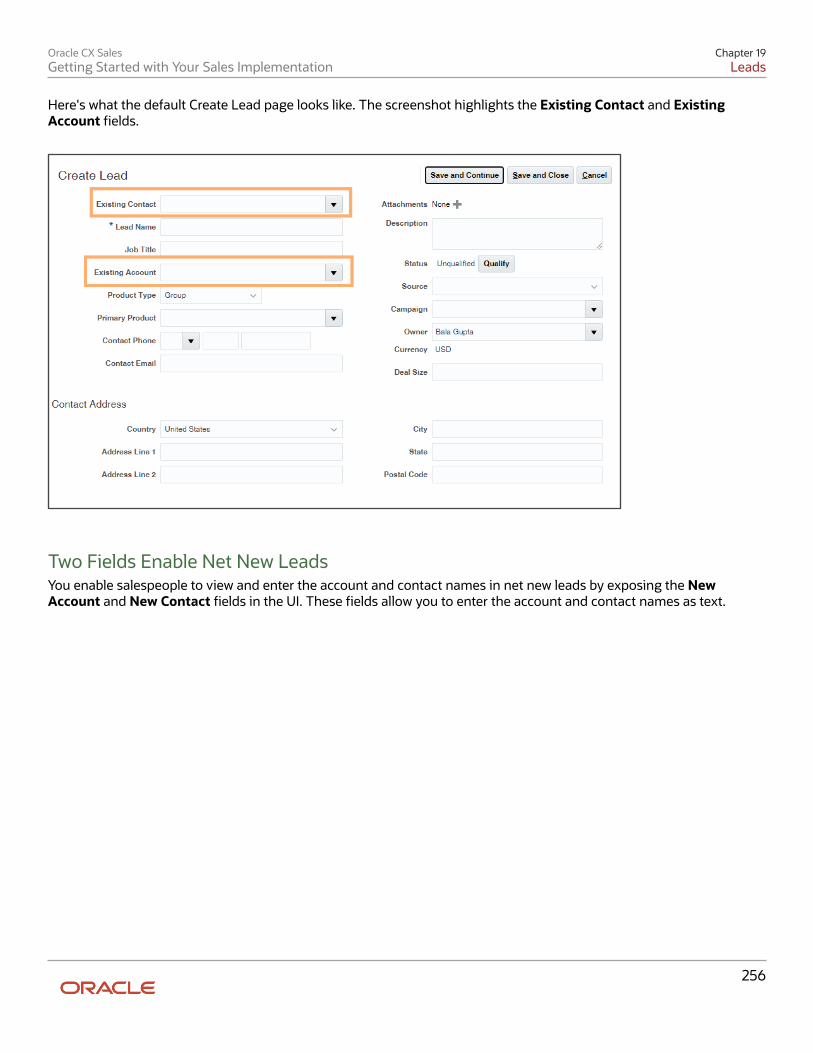
Oracle CX SalesGetting Started with Your Sales Implementation
Chapter 19Leads
256
Here's what the default Create Lead page looks like. The screenshot highlights the Existing Contact and ExistingAccount fields.
Two Fields Enable Net New LeadsYou enable salespeople to view and enter the account and contact names in net new leads by exposing the NewAccount and New Contact fields in the UI. These fields allow you to enter the account and contact names as text.
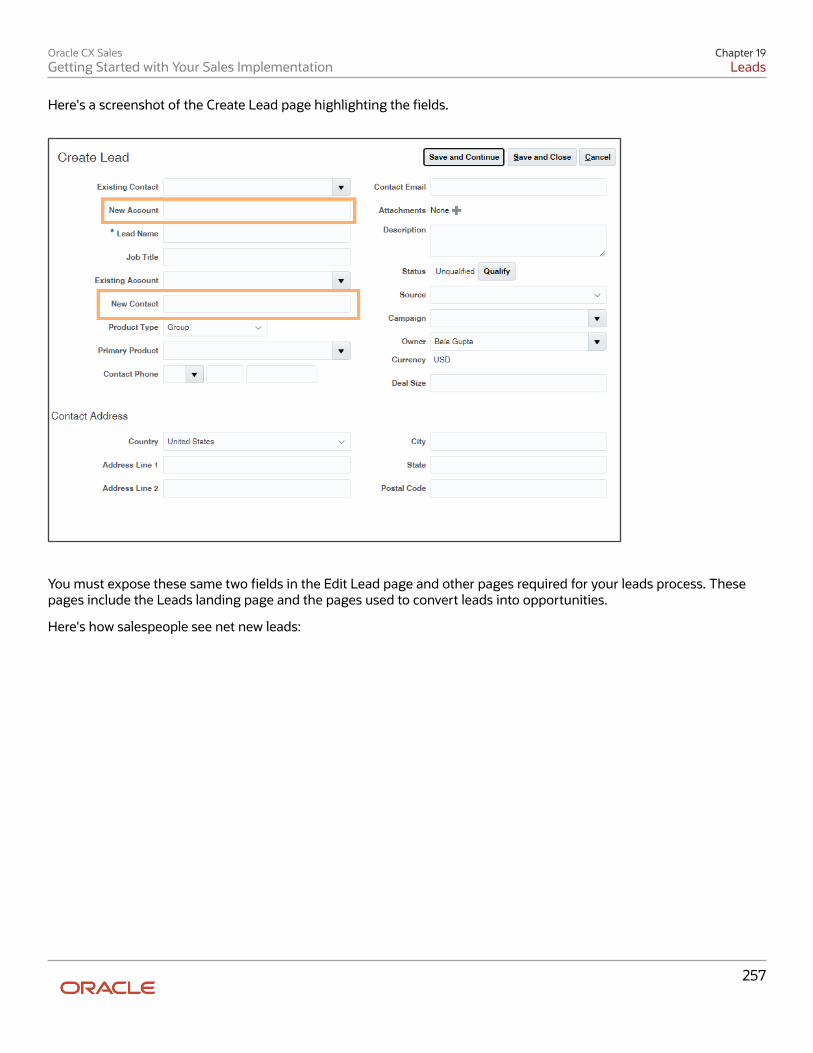
Oracle CX SalesGetting Started with Your Sales Implementation
Chapter 19Leads
257
Here's a screenshot of the Create Lead page highlighting the fields.
You must expose these same two fields in the Edit Lead page and other pages required for your leads process. Thesepages include the Leads landing page and the pages used to convert leads into opportunities.
Here's how salespeople see net new leads:
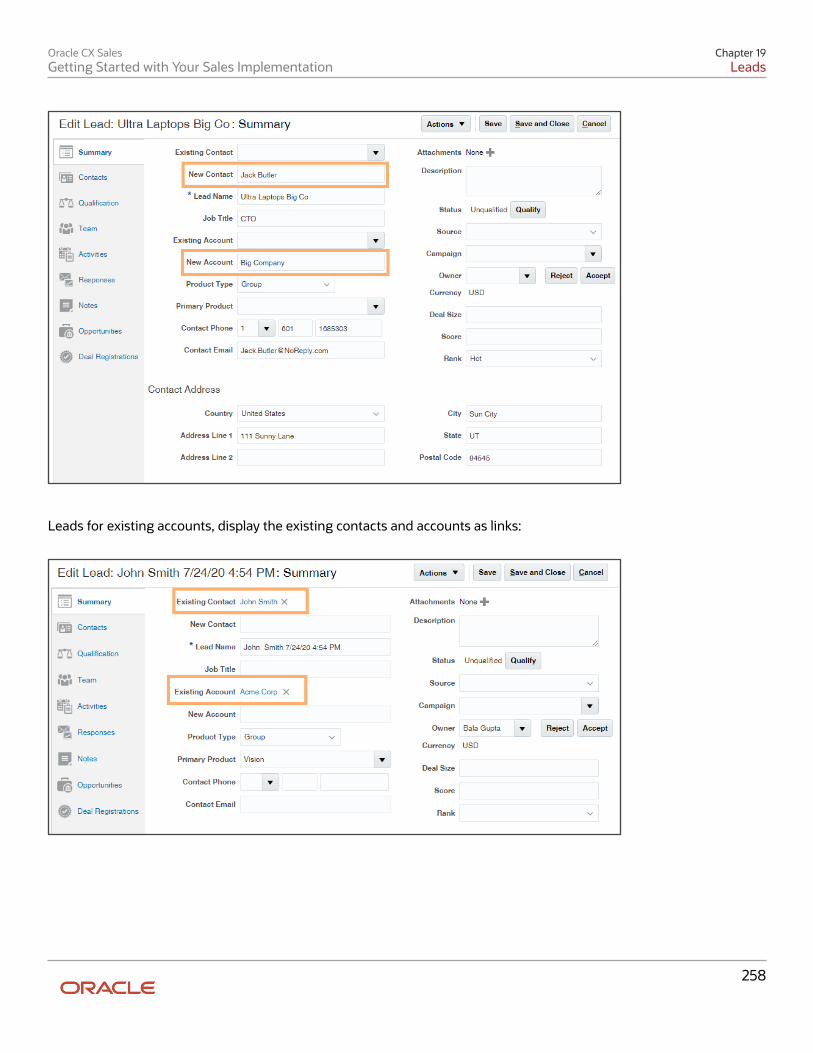
Oracle CX SalesGetting Started with Your Sales Implementation
Chapter 19Leads
258
Leads for existing accounts, display the existing contacts and accounts as links:
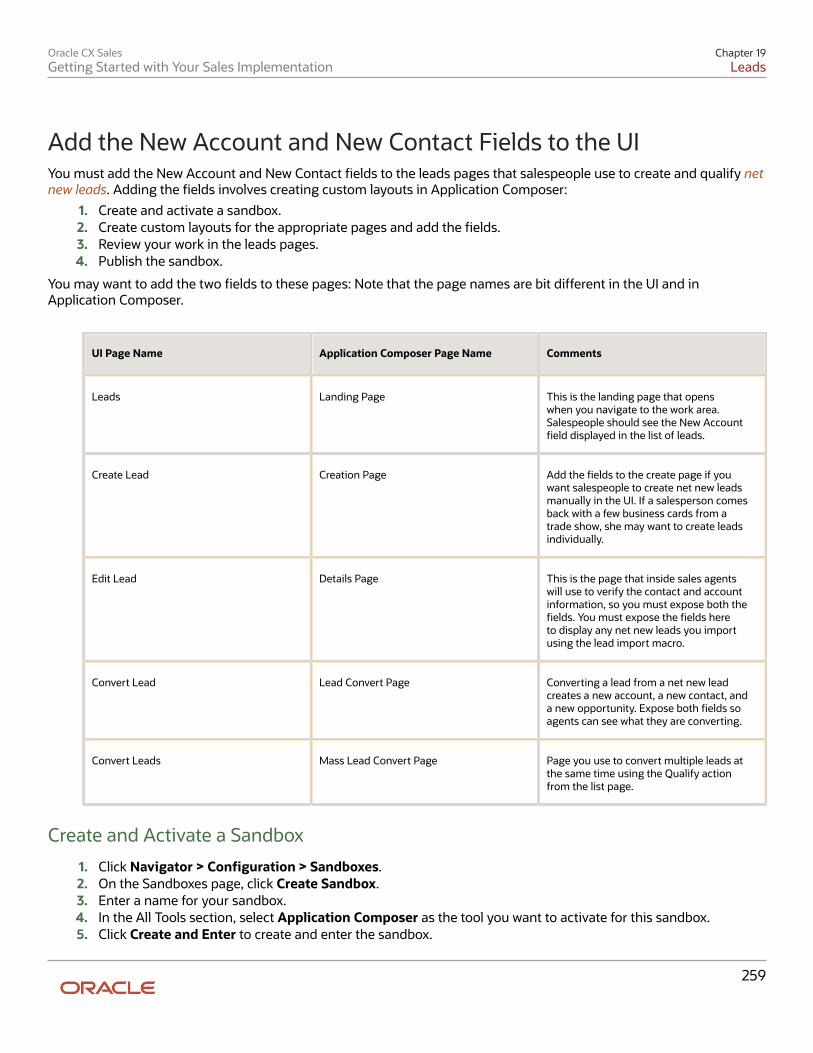
Oracle CX SalesGetting Started with Your Sales Implementation
Chapter 19Leads
259
Add the New Account and New Contact Fields to the UIYou must add the New Account and New Contact fields to the leads pages that salespeople use to create and qualify netnew leads. Adding the fields involves creating custom layouts in Application Composer:
1. Create and activate a sandbox.2. Create custom layouts for the appropriate pages and add the fields.3. Review your work in the leads pages.4. Publish the sandbox.
You may want to add the two fields to these pages: Note that the page names are bit different in the UI and inApplication Composer.
UI Page Name Application Composer Page Name Comments
Leads Landing Page This is the landing page that openswhen you navigate to the work area.Salespeople should see the New Accountfield displayed in the list of leads.
Create Lead Creation Page Add the fields to the create page if youwant salespeople to create net new leadsmanually in the UI. If a salesperson comesback with a few business cards from atrade show, she may want to create leadsindividually.
Edit Lead Details Page This is the page that inside sales agentswill use to verify the contact and accountinformation, so you must expose both thefields. You must expose the fields hereto display any net new leads you importusing the lead import macro.
Convert Lead Lead Convert Page Converting a lead from a net new leadcreates a new account, a new contact, anda new opportunity. Expose both fields soagents can see what they are converting.
Convert Leads Mass Lead Convert Page Page you use to convert multiple leads atthe same time using the Qualify actionfrom the list page.
Create and Activate a Sandbox
1. Click Navigator > Configuration > Sandboxes.2. On the Sandboxes page, click Create Sandbox.3. Enter a name for your sandbox.4. In the All Tools section, select Application Composer as the tool you want to activate for this sandbox.5. Click Create and Enter to create and enter the sandbox.
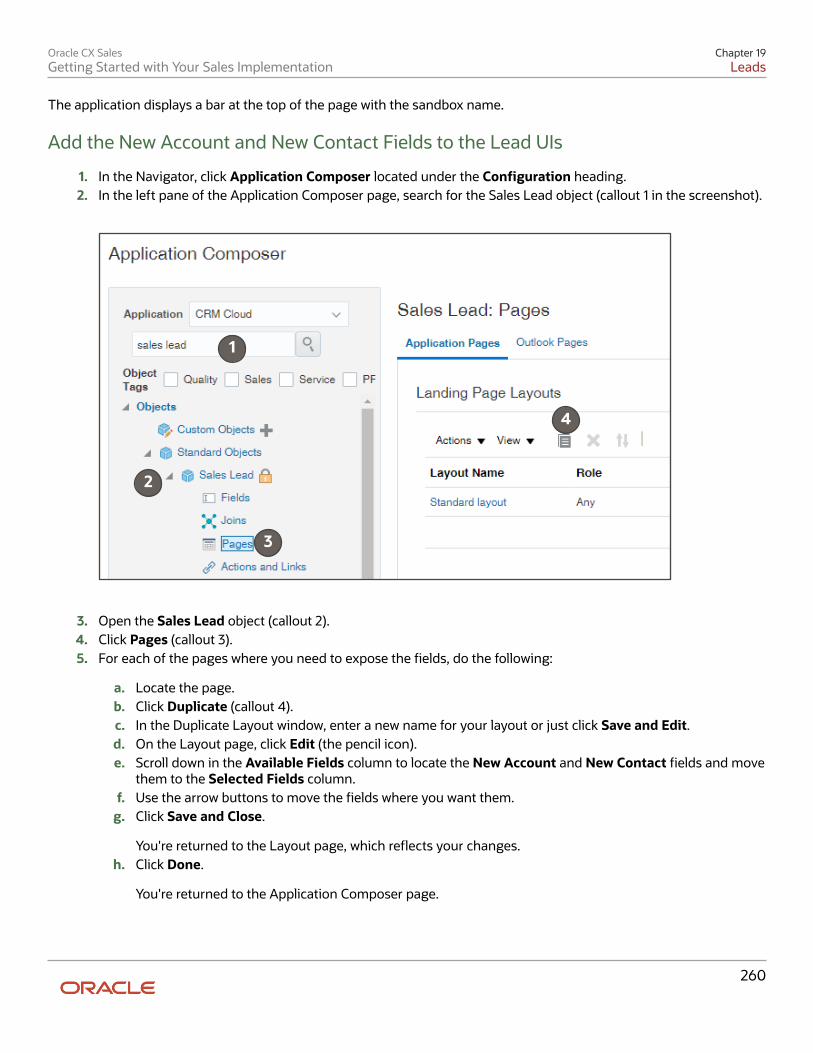
Oracle CX SalesGetting Started with Your Sales Implementation
Chapter 19Leads
260
The application displays a bar at the top of the page with the sandbox name.
Add the New Account and New Contact Fields to the Lead UIs
1. In the Navigator, click Application Composer located under the Configuration heading.2. In the left pane of the Application Composer page, search for the Sales Lead object (callout 1 in the screenshot).
1
2
3
4
3. Open the Sales Lead object (callout 2).4. Click Pages (callout 3).5. For each of the pages where you need to expose the fields, do the following:
a. Locate the page.b. Click Duplicate (callout 4).c. In the Duplicate Layout window, enter a new name for your layout or just click Save and Edit.d. On the Layout page, click Edit (the pencil icon).e. Scroll down in the Available Fields column to locate the New Account and New Contact fields and move
them to the Selected Fields column.f. Use the arrow buttons to move the fields where you want them.
g. Click Save and Close.
You're returned to the Layout page, which reflects your changes.h. Click Done.
You're returned to the Application Composer page.
Oracle CX SalesGetting Started with Your Sales Implementation
Chapter 19Leads
261
Test Your Changes
1. Click Home (the icon located at the top of the page).2. Navigate to the Leads work area by clicking Sales > Leads.3. Check to see if the New Account field displays as a column on the list page.4. Click Create Lead.5. Enter a lead name only.6. Click Save and Continue.7. On the Edit Lead page, enter test data in the New Account and New Contact fields.8. Click Save.9. Click Actions > Convert.
10. On the Convert Lead page, click Submit.
After the lead processing completes, the Edit Lead page displays the converted lead. The contact displays as alink in the Existing Contact field. And the account as a link in the Existing Account field.
11. You can drill down in the account and contact links to see that the account and contact records have beencreated for you. From the Opportunity tab on the lead, you can also drill down into the opportunity createdfrom the lead.
12. If you need to make further changes, you can go back to Application Composer and edit the layouts again.
Publish Your SandboxAfter testing, publish your sandbox:
1. Click on the sandbox name in the sandbox toolbar and select Publish.2. Click OK in the dialog box to navigate to the Sandbox Detail page.3. In the Sandbox Detail page, click Publish again.4. Click Continue to Publish in the warning message to confirm that you want to publish.
Set Up the Assignment Rule for Assigning LeadsYou can use assignment rules to automatically assign your leads to sales resources or to sales territories. In thisexample, you set up a rule that assigns imported leads to sales resources, the inside sales representatives.
Creating an assignment rule involves the following three major steps:
1. Create a rule set.2. Create the rule.3. Publish the rule set.
Create the Rule SetYou must create a rule set before you create your rule. The rule set makes it possible for you to have more than one rulefor your lead assignment.
1. Open the Manage Sales Lead Assignment Rules task from the Setup and Maintenance work area:
◦ Offering: Sales
◦ Functional Area: Leads
◦ Show: All Tasks
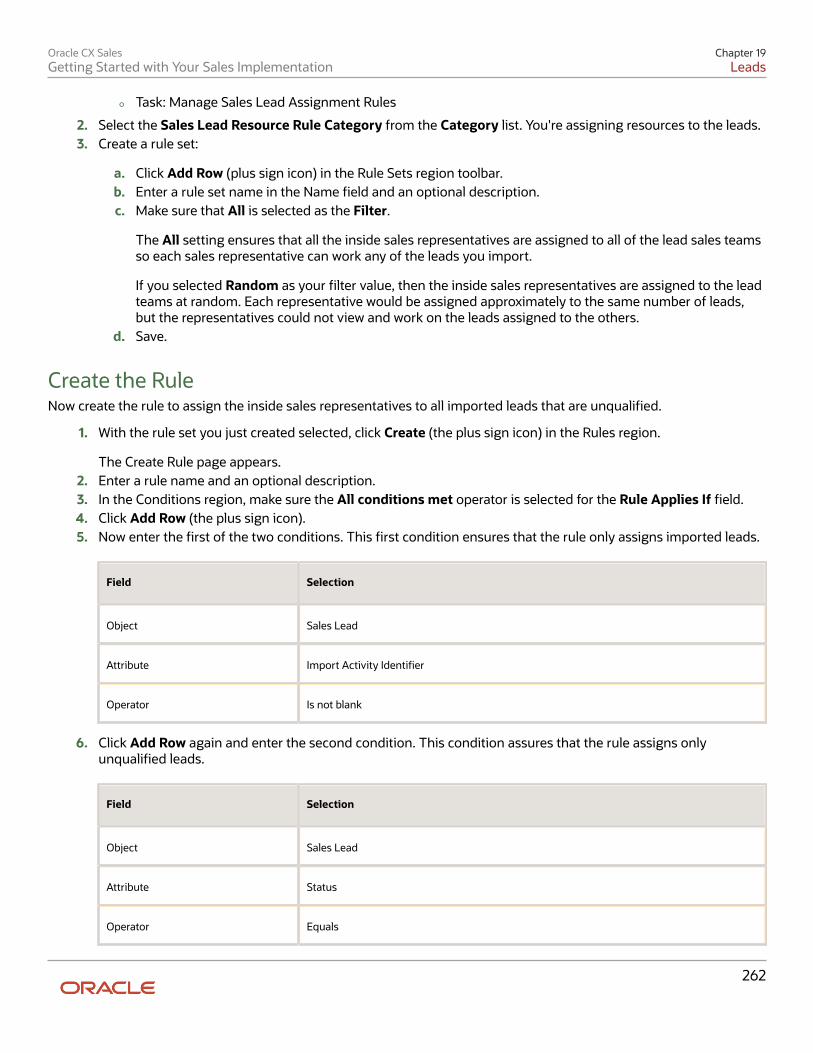
Oracle CX SalesGetting Started with Your Sales Implementation
Chapter 19Leads
262
◦ Task: Manage Sales Lead Assignment Rules
2. Select the Sales Lead Resource Rule Category from the Category list. You're assigning resources to the leads.3. Create a rule set:
a. Click Add Row (plus sign icon) in the Rule Sets region toolbar.b. Enter a rule set name in the Name field and an optional description.c. Make sure that All is selected as the Filter.
The All setting ensures that all the inside sales representatives are assigned to all of the lead sales teamsso each sales representative can work any of the leads you import.
If you selected Random as your filter value, then the inside sales representatives are assigned to the leadteams at random. Each representative would be assigned approximately to the same number of leads,but the representatives could not view and work on the leads assigned to the others.
d. Save.
Create the RuleNow create the rule to assign the inside sales representatives to all imported leads that are unqualified.
1. With the rule set you just created selected, click Create (the plus sign icon) in the Rules region.
The Create Rule page appears.2. Enter a rule name and an optional description.3. In the Conditions region, make sure the All conditions met operator is selected for the Rule Applies If field.4. Click Add Row (the plus sign icon).5. Now enter the first of the two conditions. This first condition ensures that the rule only assigns imported leads.
Field Selection
Object Sales Lead
Attribute Import Activity Identifier
Operator Is not blank
6. Click Add Row again and enter the second condition. This condition assures that the rule assigns onlyunqualified leads.
Field Selection
Object Sales Lead
Attribute Status
Operator Equals
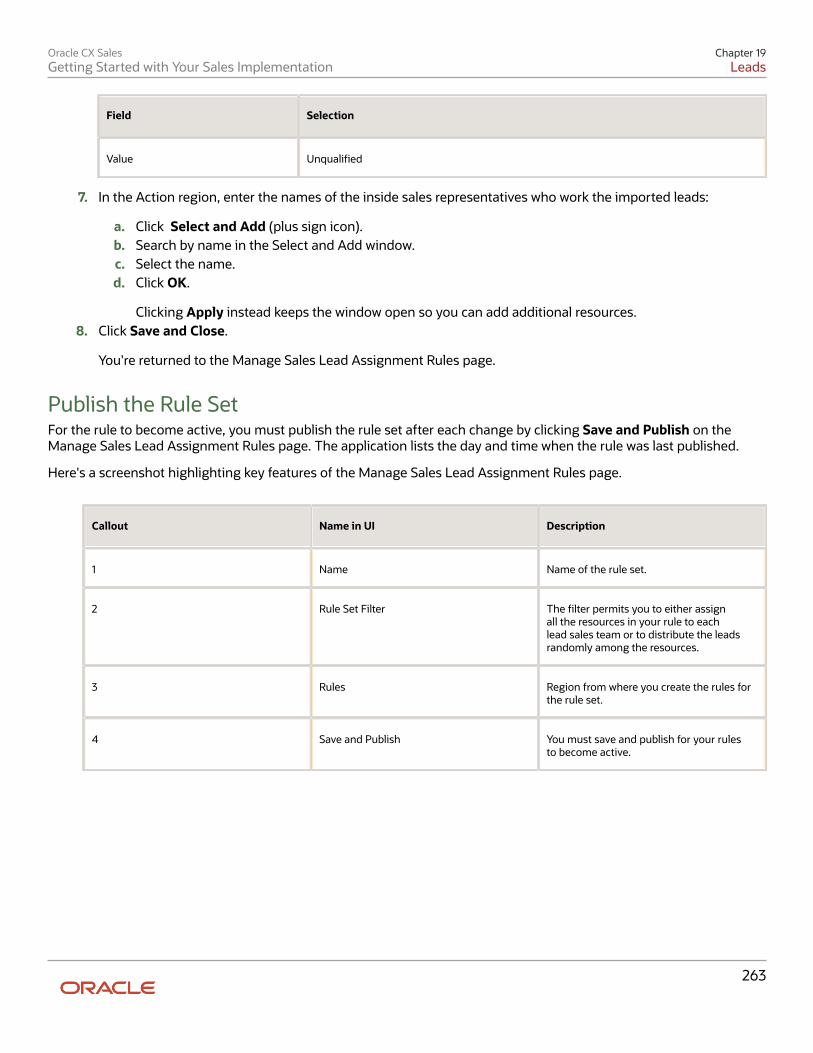
Oracle CX SalesGetting Started with Your Sales Implementation
Chapter 19Leads
263
Field Selection
Value Unqualified
7. In the Action region, enter the names of the inside sales representatives who work the imported leads:
a. Click Select and Add (plus sign icon).b. Search by name in the Select and Add window.c. Select the name.d. Click OK.
Clicking Apply instead keeps the window open so you can add additional resources.8. Click Save and Close.
You're returned to the Manage Sales Lead Assignment Rules page.
Publish the Rule SetFor the rule to become active, you must publish the rule set after each change by clicking Save and Publish on theManage Sales Lead Assignment Rules page. The application lists the day and time when the rule was last published.
Here's a screenshot highlighting key features of the Manage Sales Lead Assignment Rules page.
Callout Name in UI Description
1 Name Name of the rule set.
2 Rule Set Filter The filter permits you to either assignall the resources in your rule to eachlead sales team or to distribute the leadsrandomly among the resources.
3 Rules Region from where you create the rules forthe rule set.
4 Save and Publish You must save and publish for your rulesto become active.
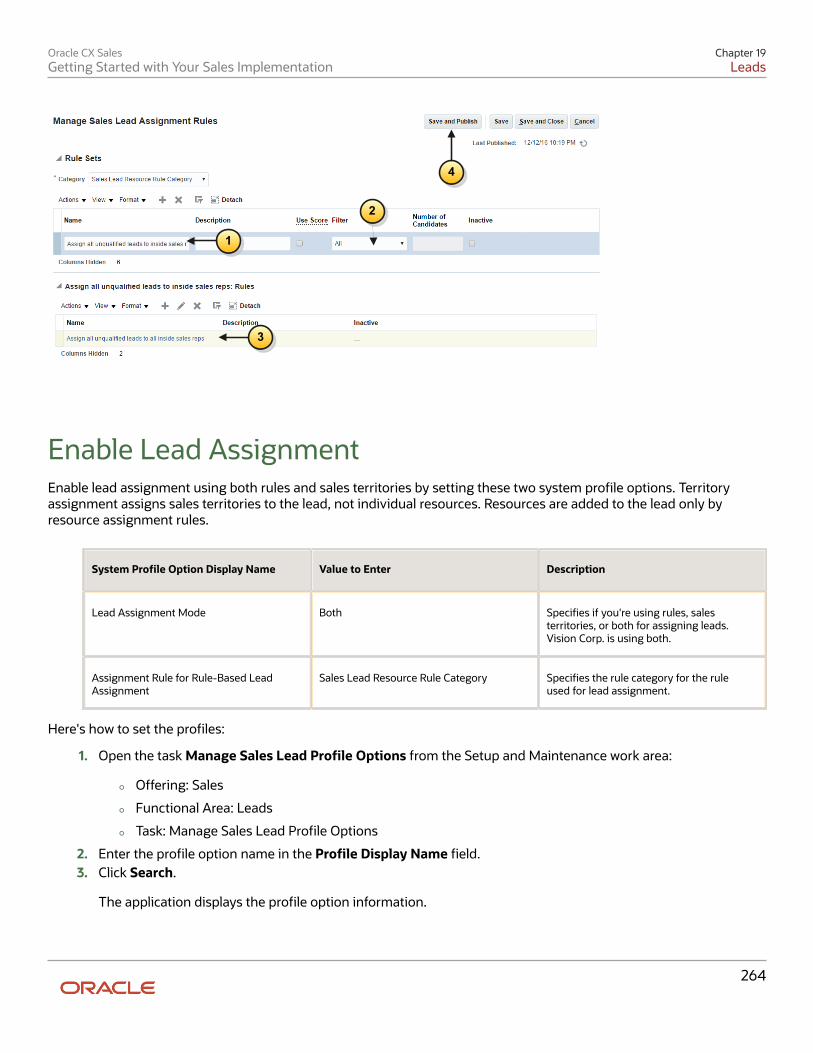
Oracle CX SalesGetting Started with Your Sales Implementation
Chapter 19Leads
264
1
2
3
4
Enable Lead AssignmentEnable lead assignment using both rules and sales territories by setting these two system profile options. Territoryassignment assigns sales territories to the lead, not individual resources. Resources are added to the lead only byresource assignment rules.
System Profile Option Display Name Value to Enter Description
Lead Assignment Mode Both Specifies if you're using rules, salesterritories, or both for assigning leads.Vision Corp. is using both.
Assignment Rule for Rule-Based LeadAssignment
Sales Lead Resource Rule Category Specifies the rule category for the ruleused for lead assignment.
Here's how to set the profiles:
1. Open the task Manage Sales Lead Profile Options from the Setup and Maintenance work area:
◦ Offering: Sales
◦ Functional Area: Leads
◦ Task: Manage Sales Lead Profile Options
2. Enter the profile option name in the Profile Display Name field.3. Click Search.
The application displays the profile option information.
Oracle CX SalesGetting Started with Your Sales Implementation
Chapter 19Leads
265
4. For the Assignment Rule for Rule-Based Lead Assignment profile, click Add (the plus sign icon) in the ProfileValues region and select Site as the Profile Level. For the Lead Assignment Mode system profile option, Site isalready entered for you.
5. In the Profile Values region, select the value from the Profile Value list.6. Click Save or Save and Close.
Change the Values for Lead Rank and Lead ChannelOptionally, you can change the values for lead rank and lead channel by editing their lookup types. Salespeople use leadranks to prioritize leads to work on. The lead channel records the source of the lead.
The lookup type Lead Rank (MKL_LEAD_RANK_SETID) includes these predefined values:
• Cold
• Hot
• Warm
The lookup type Lead Channel (MKL_LEAD_CHANNEL_SETID) includes these predefined values:
• Direct Mail
• Fax
• Model-based prediction
• Phone
• Rules-based prediction
• Sales visit
• Web
• Wireless Message
Here's how to change the existing values and to add new ones:
1. Open the task Manage Set Enabled Lookups from the Setup and Maintenance work area:
◦ Offering: Sales
◦ Functional Area: Leads
◦ Show: All Tasks
◦ Task: Manage Set Enabled Lookups
2. On the Manage Set Enabled Lookups page, search for either of the lookup type names by entering Lead Channelor Lead Rank in the Meaning field.
The lookup type and the available values, called lookup codes, appear below.3. Here's how to change a lookup codes:
◦ For the existing values, you can change the wording displayed to the user by modifying the meaning oryou can end date values you do not need.
◦ You can add new values, by clicking New (the plus sign icon).
4. Click Save and Close when you are done.
Oracle CX SalesGetting Started with Your Sales Implementation
Chapter 19Leads
266
5. If you made changes, you must remember to enter the changes on the Lead Channel and Lead Rank worksheets in the lead import macro.
Import Leads Using the Import MacroHere's how to enter your lead data into the macro and import. You can import up to 5,000 lead records at a time. If youimport multiple batches, you must ensure that each import completes before you start another. You can use the macroonly to import net new leads. You can't use it to import leads for existing customers or prospects.
Note: You can add import additional attributes by appending columns to the import macro, but you can't make anyother changes. You can't edit the Visual Basic for Applications (VBA) code or other functions.
1. Open the Lead Import Macro.2. Make sure macros are enabled in Excel.3. If you're importing additional fields, including custom fields, then do the following:
a. Click the Attributes Mapping worksheet.b. Click Fetch Attributes from Server.c. In an empty row in the worksheet, select the attribute from the Attribute Name column.d. Enter the name you want displayed as the column heading in the Lead worksheet. This name displays
only in the macro.e. Click Update Headers to add the column to the Lead worksheet.
4. If you changed the lead rank or the lead channel lookup types, then enter the new values in the Lead Rank andthe Lead Channel worksheets.
5. In the Template worksheet, enter your lead data. The import requires you to enter three pieces of informationfor each lead:
◦ Lead name
◦ Account name
◦ Contact full name
The macro generates the required lead number after you click Create Import Activity.You must also include contact information for your inside sales representatives to be able to qualify the lead.If you're assigning qualified leads using the state where the business is located, you must include the state inyour import or have the inside sales representatives enter it as they qualify the lead.Here's what to enter in the macro:
Column What to Enter
Lead Number Leave this required column blank. The macro generates the lead number automaticallyusing the date and time. The application uses the lead number to identify the lead record forupdates.
Lead Name The lead name identifies the lead in the lists salespeople see in the Leads work area. In theUI, the application automatically enters a lead name as a combination of the contact nameand the date and time. You may want to follow the same practice in your import. Entry in thisfield is required.
Oracle CX SalesGetting Started with Your Sales Implementation
Chapter 19Leads
267
Column What to Enter
Account Name Organization name. Entry is required.
Contact Full Name You must enter the contact's first and last names separated by a space.
Job Title Job title.
E-mail Contact email address.
Phone Country Code Contact phone country code.
Phone Area Code Contact phone area code.
Phone Number Contact phone number with no spaces or delimiters.
Address 1 Contact address line 1.
If you convert the lead to an opportunity, then the application uses the address entered inthe contact address fields both as the contact address and the account address.
Address 2 Contact address line 2.
City Contact address city.
State For US states, enter the two-letter state code.
Province This column (O) is hidden in the macro.
ZIP Code Postal code.
Country The ISO two-letter code for the country.
Product Group Enter the Product Group Reference Number. You can copy this number from the macro youused to import product groups.
Product Product name you imported earlier using the product import macro. If you're importing aproduct interest for a lead, you can't import a product group at the same time.
Lead Rank You must use one of the standard values provided by Oracle in the macro, unless youchanged them. The standard values are:
◦ COOL
◦ HOT
Oracle CX SalesGetting Started with Your Sales Implementation
Chapter 19Leads
268
Column What to Enter
◦ WARM
Lead Channel You must use one of the standard values provided by Oracle in the macro, unless youchanged them. The standard values are:
◦ DIRECT_MAIL
◦ FAX
◦ PHONE
◦ SALES_VISIT
◦ WEB
◦ WIRELESS_MESSAGE
◦ ZSP_MODEL_PREDICTION
◦ ZSP_RULES_PREDICTION
6. In the lead import macro, click Create Import Activity.7. If you're prompted to correct errors in your entries, do the following:
a. Click OK.b. Click each error link in column D and make the correction on the Template worksheet.
Note: After you correct an error, you must click outside the field for the correction to berecognized.
c. Click Create Import Activity again.8. On the Login page, enter the following:
◦ Host information for your environment.
The host name is the portion of the URL between the https:// and /sales. You must be signed in andnavigate to one of the sales work areas to ensure the host name is correct. The name on the sign-in pageand on setup pages is different.
◦ Your user name
◦ Your password
9. Click Submit.
The application displays one of these messages:
Message Meaning
The file import activitywas submitted successfully.
Your import has started. If the file import activity is submitted successfully, then theconfirmation message displays the job ID.
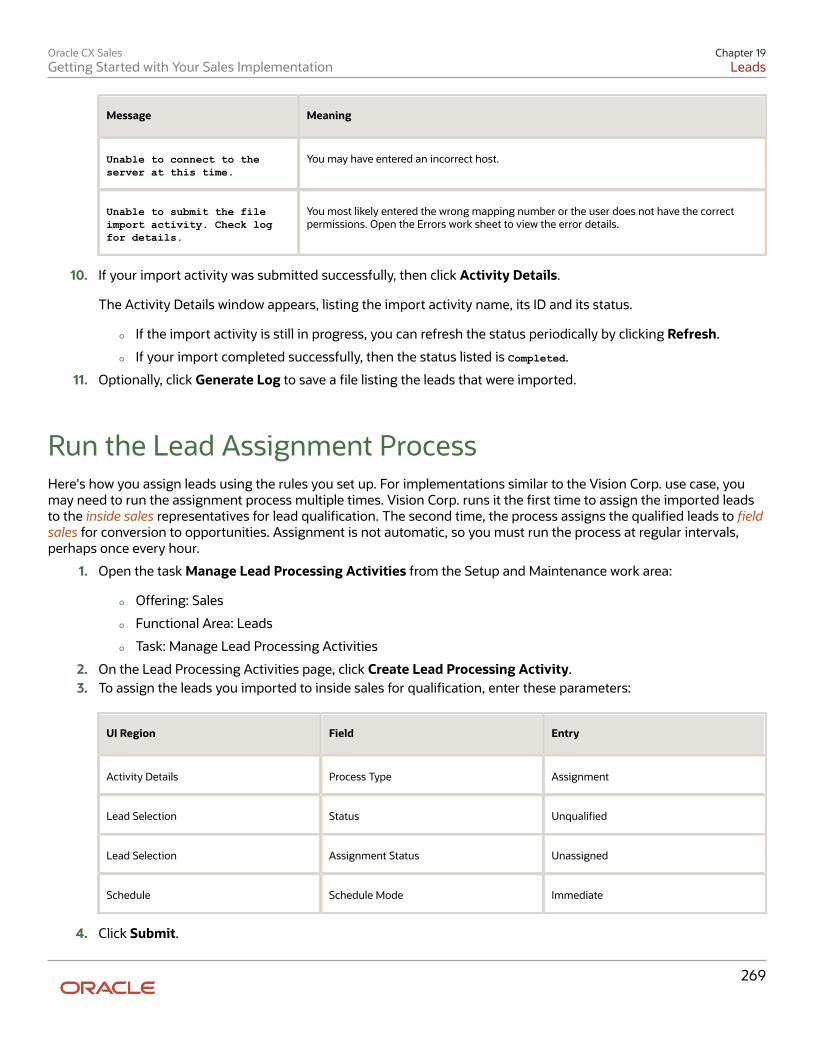
Oracle CX SalesGetting Started with Your Sales Implementation
Chapter 19Leads
269
Message Meaning
Unable to connect to theserver at this time.
You may have entered an incorrect host.
Unable to submit the fileimport activity. Check logfor details.
You most likely entered the wrong mapping number or the user does not have the correctpermissions. Open the Errors work sheet to view the error details.
10. If your import activity was submitted successfully, then click Activity Details.
The Activity Details window appears, listing the import activity name, its ID and its status.
◦ If the import activity is still in progress, you can refresh the status periodically by clicking Refresh.
◦ If your import completed successfully, then the status listed is Completed.
11. Optionally, click Generate Log to save a file listing the leads that were imported.
Run the Lead Assignment ProcessHere's how you assign leads using the rules you set up. For implementations similar to the Vision Corp. use case, youmay need to run the assignment process multiple times. Vision Corp. runs it the first time to assign the imported leadsto the inside sales representatives for lead qualification. The second time, the process assigns the qualified leads to fieldsales for conversion to opportunities. Assignment is not automatic, so you must run the process at regular intervals,perhaps once every hour.
1. Open the task Manage Lead Processing Activities from the Setup and Maintenance work area:
◦ Offering: Sales
◦ Functional Area: Leads
◦ Task: Manage Lead Processing Activities
2. On the Lead Processing Activities page, click Create Lead Processing Activity.3. To assign the leads you imported to inside sales for qualification, enter these parameters:
UI Region Field Entry
Activity Details Process Type Assignment
Lead Selection Status Unqualified
Lead Selection Assignment Status Unassigned
Schedule Schedule Mode Immediate
4. Click Submit.
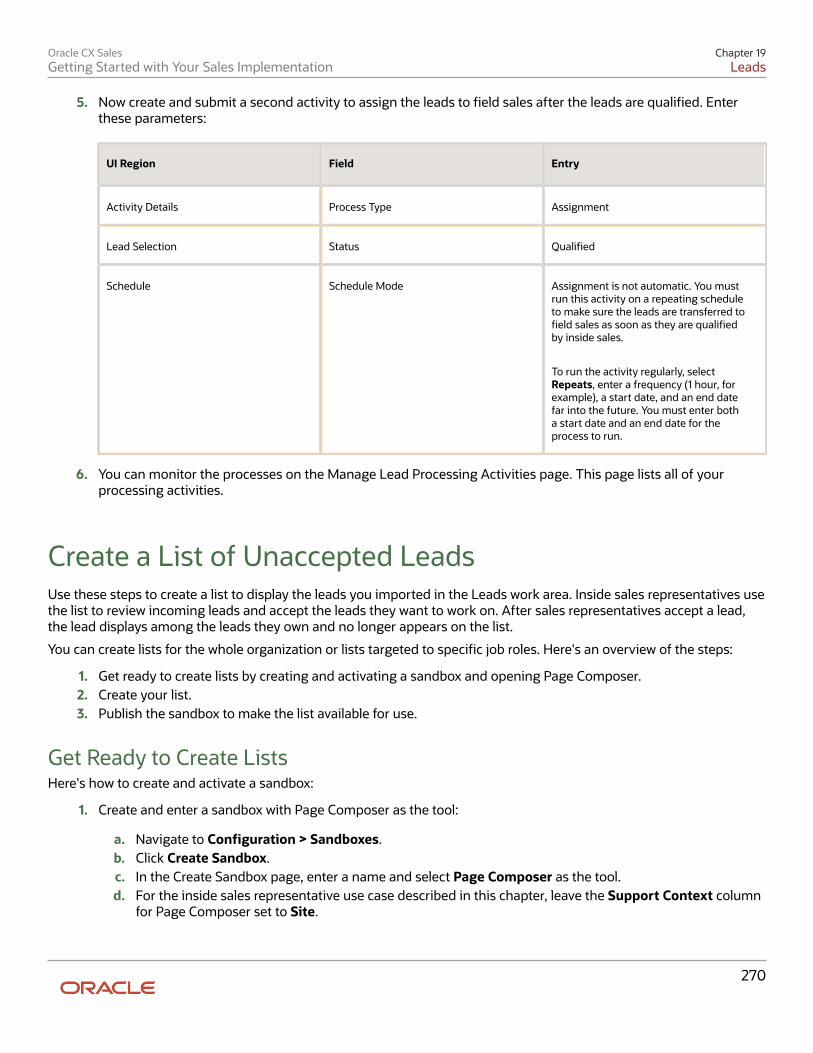
Oracle CX SalesGetting Started with Your Sales Implementation
Chapter 19Leads
270
5. Now create and submit a second activity to assign the leads to field sales after the leads are qualified. Enterthese parameters:
UI Region Field Entry
Activity Details Process Type Assignment
Lead Selection Status Qualified
Schedule Schedule Mode Assignment is not automatic. You mustrun this activity on a repeating scheduleto make sure the leads are transferred tofield sales as soon as they are qualifiedby inside sales.
To run the activity regularly, selectRepeats, enter a frequency (1 hour, forexample), a start date, and an end datefar into the future. You must enter botha start date and an end date for theprocess to run.
6. You can monitor the processes on the Manage Lead Processing Activities page. This page lists all of yourprocessing activities.
Create a List of Unaccepted LeadsUse these steps to create a list to display the leads you imported in the Leads work area. Inside sales representatives usethe list to review incoming leads and accept the leads they want to work on. After sales representatives accept a lead,the lead displays among the leads they own and no longer appears on the list.
You can create lists for the whole organization or lists targeted to specific job roles. Here's an overview of the steps:
1. Get ready to create lists by creating and activating a sandbox and opening Page Composer.2. Create your list.3. Publish the sandbox to make the list available for use.
Get Ready to Create ListsHere's how to create and activate a sandbox:
1. Create and enter a sandbox with Page Composer as the tool:
a. Navigate to Configuration > Sandboxes.b. Click Create Sandbox.c. In the Create Sandbox page, enter a name and select Page Composer as the tool.d. For the inside sales representative use case described in this chapter, leave the Support Context column
for Page Composer set to Site.
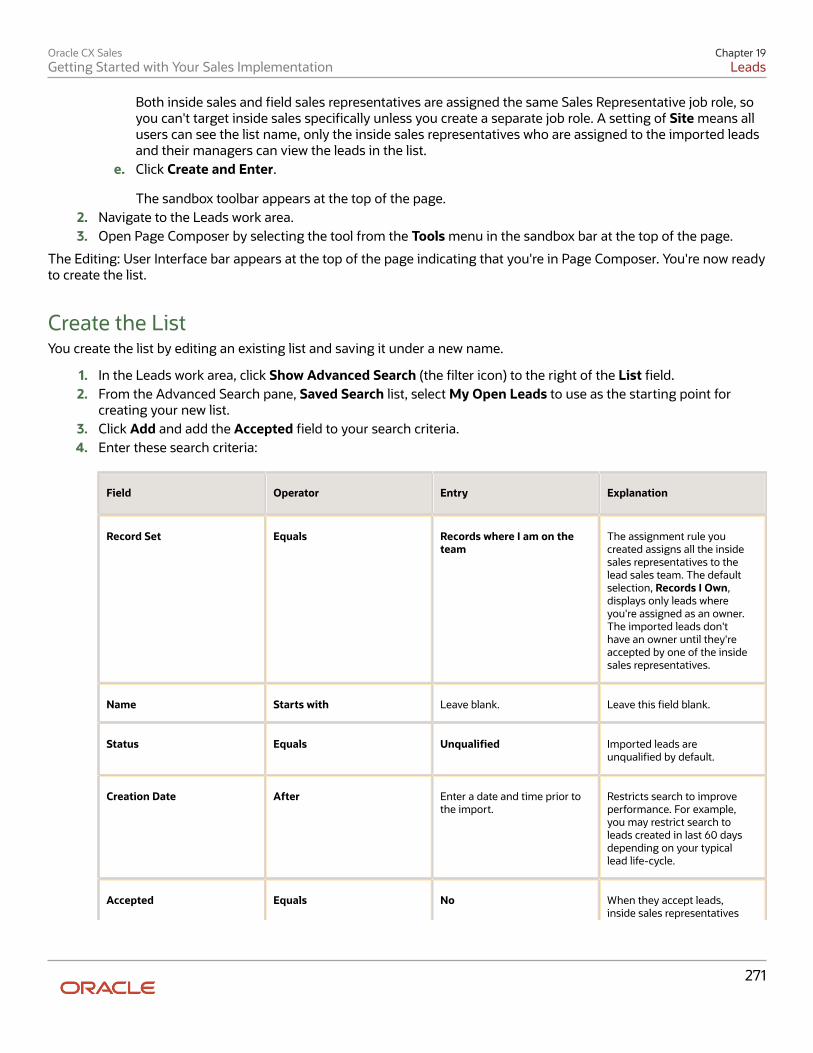
Oracle CX SalesGetting Started with Your Sales Implementation
Chapter 19Leads
271
Both inside sales and field sales representatives are assigned the same Sales Representative job role, soyou can't target inside sales specifically unless you create a separate job role. A setting of Site means allusers can see the list name, only the inside sales representatives who are assigned to the imported leadsand their managers can view the leads in the list.
e. Click Create and Enter.
The sandbox toolbar appears at the top of the page.2. Navigate to the Leads work area.3. Open Page Composer by selecting the tool from the Tools menu in the sandbox bar at the top of the page.
The Editing: User Interface bar appears at the top of the page indicating that you're in Page Composer. You're now readyto create the list.
Create the ListYou create the list by editing an existing list and saving it under a new name.
1. In the Leads work area, click Show Advanced Search (the filter icon) to the right of the List field.2. From the Advanced Search pane, Saved Search list, select My Open Leads to use as the starting point for
creating your new list.3. Click Add and add the Accepted field to your search criteria.4. Enter these search criteria:
Field Operator Entry Explanation
Record Set Equals Records where I am on theteam
The assignment rule youcreated assigns all the insidesales representatives to thelead sales team. The defaultselection, Records I Own,displays only leads whereyou're assigned as an owner.The imported leads don'thave an owner until they'reaccepted by one of the insidesales representatives.
Name Starts with Leave blank. Leave this field blank.
Status Equals Unqualified Imported leads areunqualified by default.
Creation Date After Enter a date and time prior tothe import.
Restricts search to improveperformance. For example,you may restrict search toleads created in last 60 daysdepending on your typicallead life-cycle.
Accepted Equals No When they accept leads,inside sales representatives
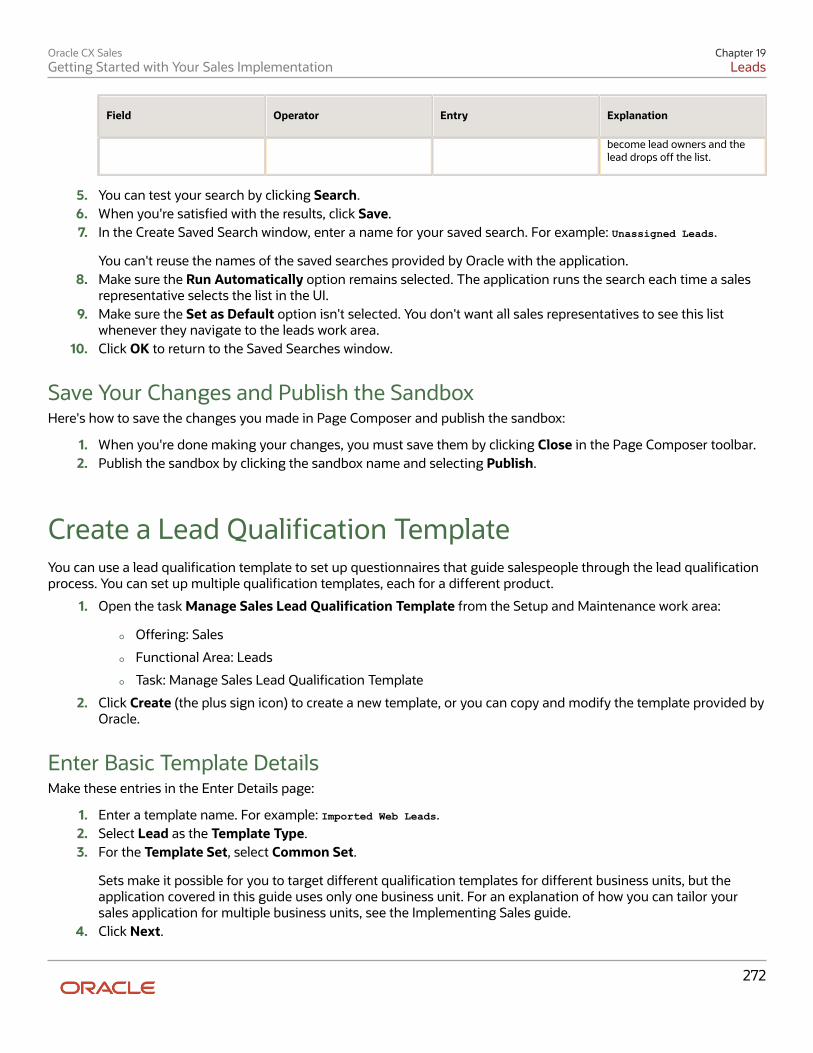
Oracle CX SalesGetting Started with Your Sales Implementation
Chapter 19Leads
272
Field Operator Entry Explanation
become lead owners and thelead drops off the list.
5. You can test your search by clicking Search.6. When you're satisfied with the results, click Save.7. In the Create Saved Search window, enter a name for your saved search. For example: Unassigned Leads.
You can't reuse the names of the saved searches provided by Oracle with the application.8. Make sure the Run Automatically option remains selected. The application runs the search each time a sales
representative selects the list in the UI.9. Make sure the Set as Default option isn't selected. You don't want all sales representatives to see this list
whenever they navigate to the leads work area.10. Click OK to return to the Saved Searches window.
Save Your Changes and Publish the SandboxHere's how to save the changes you made in Page Composer and publish the sandbox:
1. When you're done making your changes, you must save them by clicking Close in the Page Composer toolbar.2. Publish the sandbox by clicking the sandbox name and selecting Publish.
Create a Lead Qualification TemplateYou can use a lead qualification template to set up questionnaires that guide salespeople through the lead qualificationprocess. You can set up multiple qualification templates, each for a different product.
1. Open the task Manage Sales Lead Qualification Template from the Setup and Maintenance work area:
◦ Offering: Sales
◦ Functional Area: Leads
◦ Task: Manage Sales Lead Qualification Template
2. Click Create (the plus sign icon) to create a new template, or you can copy and modify the template provided byOracle.
Enter Basic Template DetailsMake these entries in the Enter Details page:
1. Enter a template name. For example: Imported Web Leads.2. Select Lead as the Template Type.3. For the Template Set, select Common Set.
Sets make it possible for you to target different qualification templates for different business units, but theapplication covered in this guide uses only one business unit. For an explanation of how you can tailor yoursales application for multiple business units, see the Implementing Sales guide.
4. Click Next.
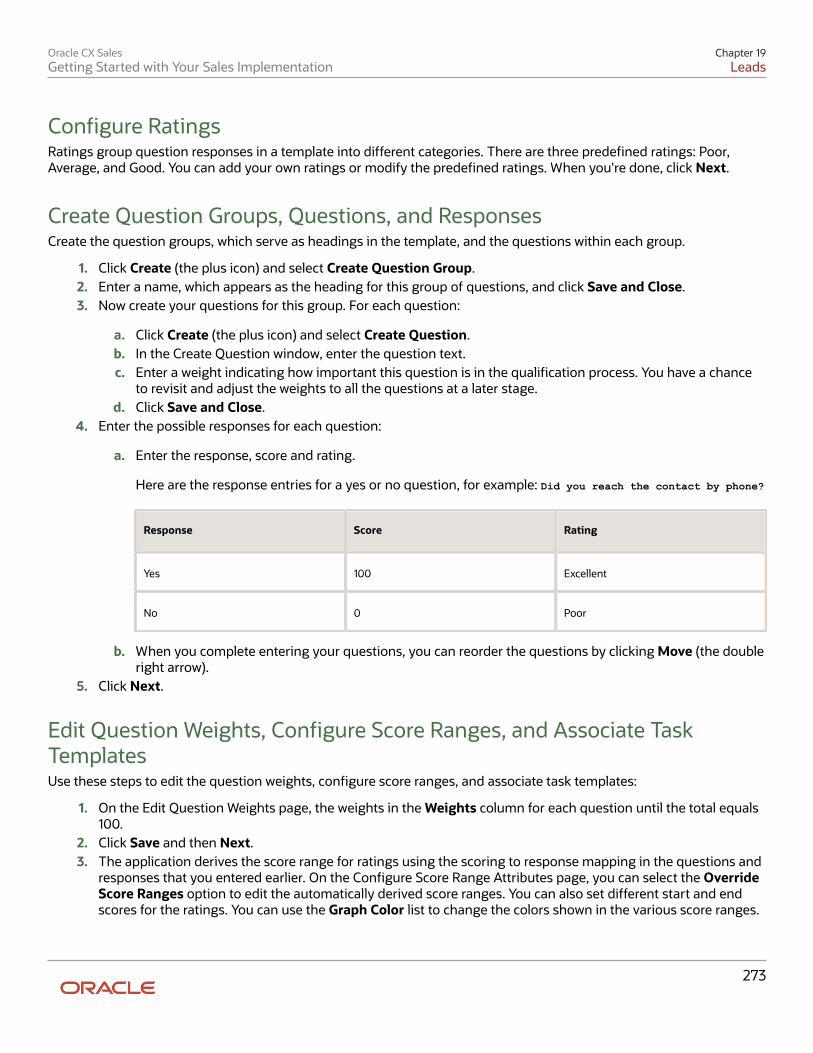
Oracle CX SalesGetting Started with Your Sales Implementation
Chapter 19Leads
273
Configure RatingsRatings group question responses in a template into different categories. There are three predefined ratings: Poor,Average, and Good. You can add your own ratings or modify the predefined ratings. When you're done, click Next.
Create Question Groups, Questions, and ResponsesCreate the question groups, which serve as headings in the template, and the questions within each group.
1. Click Create (the plus icon) and select Create Question Group.2. Enter a name, which appears as the heading for this group of questions, and click Save and Close.3. Now create your questions for this group. For each question:
a. Click Create (the plus icon) and select Create Question.b. In the Create Question window, enter the question text.c. Enter a weight indicating how important this question is in the qualification process. You have a chance
to revisit and adjust the weights to all the questions at a later stage.d. Click Save and Close.
4. Enter the possible responses for each question:
a. Enter the response, score and rating.
Here are the response entries for a yes or no question, for example: Did you reach the contact by phone?
Response Score Rating
Yes 100 Excellent
No 0 Poor
b. When you complete entering your questions, you can reorder the questions by clicking Move (the doubleright arrow).
5. Click Next.
Edit Question Weights, Configure Score Ranges, and Associate TaskTemplatesUse these steps to edit the question weights, configure score ranges, and associate task templates:
1. On the Edit Question Weights page, the weights in the Weights column for each question until the total equals100.
2. Click Save and then Next.3. The application derives the score range for ratings using the scoring to response mapping in the questions and
responses that you entered earlier. On the Configure Score Range Attributes page, you can select the OverrideScore Ranges option to edit the automatically derived score ranges. You can also set different start and endscores for the ratings. You can use the Graph Color list to change the colors shown in the various score ranges.
Oracle CX SalesGetting Started with Your Sales Implementation
Chapter 19Leads
274
Deploy the Qualification TemplateWhen you're ready to deploy the qualification template, do the following:
1. Click Save.2. Click Deploy.3. Click OK to close the confirmation window.
The application displays any errors in setup. For example, if you did not enter question weights which total 100.
Note: You can't edit many aspects of the template after you deploy it. You may have to copy thedeployed template and edit the copy.
Select Default Lead Qualification TemplatesTo turn on lead qualification, you set the system profile option Advanced Lead Qualification Enabled to the leadtemplates you want to use by default. You can specify one template for use for the whole sales organization, you canspecify different templates for different products, and you can assign specific templates to different users. The settingsare not mutually exclusive. You can provide a default template for the whole organization, but target different templateto individual users or product groups, for example
1. Open the task Manage Sales Lead Profile Options from the Setup and Maintenance work area:
◦ Offering: Sales
◦ Functional Area: Leads
◦ Task: Manage Sales Lead Profile Options
2. Enter Advanced Lead Qualification Enabled in the Profile Display Name field.3. Click Search.4. Select the system profile.5. In the Profile Values section, click New (the plus sign).6. If you're using only one template, then select Site from the Profile Level list. The options are:
◦ Site
The same template is used for the entire organization unless you specify additional templates for productand user.
◦ Product
The template is used for a product group. All other product groups are assigned the template you specifyat the site level.
◦ User
The template is used for the user you enter. All other users are assigned templates for the product or thesite.
Select the name of the template from the Profile Value list.7. Repeat the previous steps for additional products and users.8. Click Save and Close.
Oracle CX SalesGetting Started with Your Sales Implementation
Chapter 19Leads
275
Test Your Leads SetupTest your leads setup. Sign in first as an inside sales representative to accept and qualify the lead. Then sign in as a fieldsales representative to convert the lead to an opportunity.
Sign In as an Inside Sales Representative
1. Sign in as one of the inside sales representatives and navigate to the Leads work area.2. Select the list of unaccepted leads you created.
The list should contain all your imported leads.3. Open one of the leads and click Accept.
You should now be listed as the lead owner.4. Click the Sales Team tab to make sure all the appropriate sales representatives are listed.5. Click the Qualification tab.
The tab displays the qualification template you created.6. Answer the questions.
If you must update the qualification template after your testing, you may have to create a copy, edit the copy,and publish it. If you do make a copy, you will also have to reset the Advanced Lead Qualification Enabledprofile as well.
7. Make sure that the information in the lead you're qualifying is sufficient to assign the lead to the field servicerepresentative you're using for testing.
In our use case, qualified leads are assigned to sales territories by state. Make sure that the contact address inthe lead includes one of the states in the US that belong to the territory of the field sales representative you'reusing for testing.
8. Click Qualify to indicate the lead is qualified.
Sign In as a Field Sales Representative
1. Ensure that the assignment process you scheduled previously has successfully completed. If you have not runthe assignment process, then you must run the process again, this time, immediately.
2. Sign in as the field sales representative who owns the territory the qualified lead is assigned to.3. Navigate to the Leads work area.4. Select the Open leads where I am on the team list.5. Edit the lead.6. From the Actions menu, select Convert.
The Convert window appears.7. Optionally, change the opportunity name to something more meaningful.8. Click Submit.9. Navigate to the Opportunity work area. The new opportunity should be listed in the My Open Opportunities list.
10. You can open the opportunity and view the created account and contact from there.
Oracle CX SalesGetting Started with Your Sales Implementation
Chapter 19Leads
276
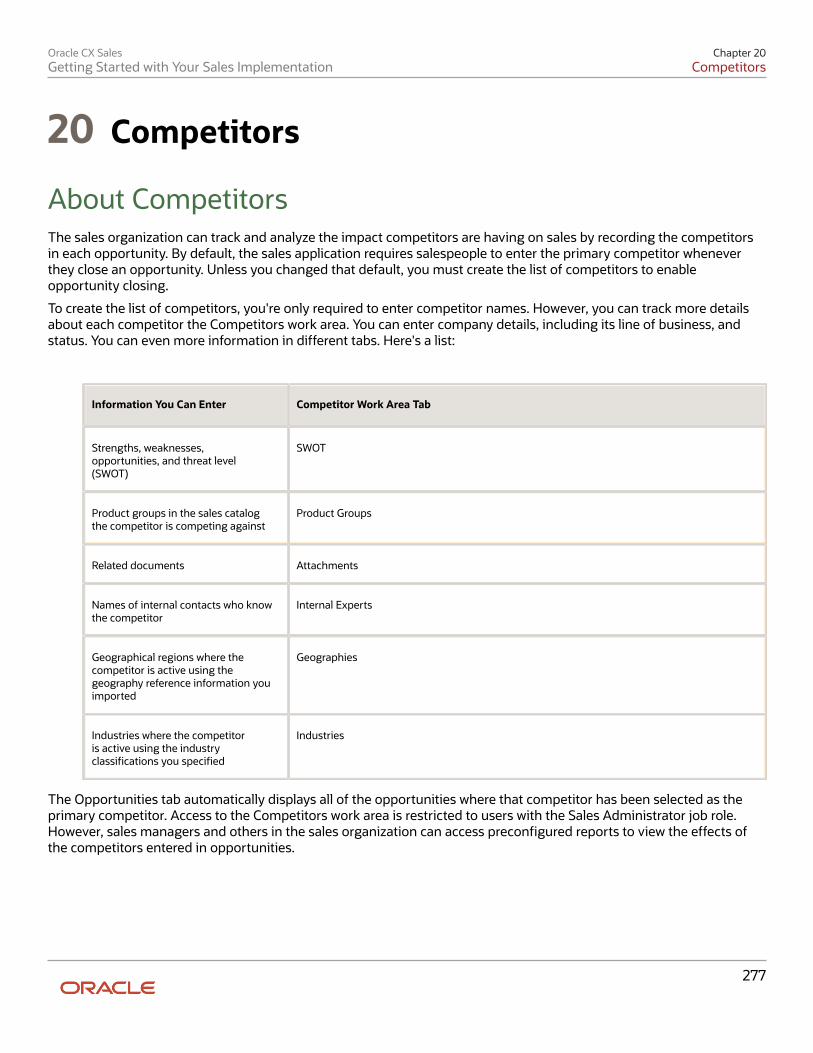
Oracle CX SalesGetting Started with Your Sales Implementation
Chapter 20Competitors
277
20 Competitors
About CompetitorsThe sales organization can track and analyze the impact competitors are having on sales by recording the competitorsin each opportunity. By default, the sales application requires salespeople to enter the primary competitor wheneverthey close an opportunity. Unless you changed that default, you must create the list of competitors to enableopportunity closing.
To create the list of competitors, you're only required to enter competitor names. However, you can track more detailsabout each competitor the Competitors work area. You can enter company details, including its line of business, andstatus. You can even more information in different tabs. Here's a list:
Information You Can Enter Competitor Work Area Tab
Strengths, weaknesses,opportunities, and threat level(SWOT)
SWOT
Product groups in the sales catalogthe competitor is competing against
Product Groups
Related documents Attachments
Names of internal contacts who knowthe competitor
Internal Experts
Geographical regions where thecompetitor is active using thegeography reference information youimported
Geographies
Industries where the competitoris active using the industryclassifications you specified
Industries
The Opportunities tab automatically displays all of the opportunities where that competitor has been selected as theprimary competitor. Access to the Competitors work area is restricted to users with the Sales Administrator job role.However, sales managers and others in the sales organization can access preconfigured reports to view the effects ofthe competitors entered in opportunities.
Oracle CX SalesGetting Started with Your Sales Implementation
Chapter 20Competitors
278
Setup Assistant and CompetitorsYou can create up to 15 competitors using Setup Assistant. For each competitor you can enter:
• Name and suffix
• Line of business
• Threat level
• Organization size
You must go to the Competitors work area to enter the other details.
Related Topics
• Overview of Sales Competitors
• Manage Sales Competitors
Review the List of Competitors and Create AdditionalOnesHere's how to review the list of competitors you created using Setup Assistant, add more information, and create newones. The names of the competitors you create are available for selection in the Edit Opportunity page.
1. Click Navigator > Sales > Competitors.2. To create a new competitor:
a. On the Review Competitors page, click Create.b. In the Create Competitor page, enter the competitor name in the Organization Name field.c. You can enter a suffix, such as Ltd. or Co., in the Name Suffix field.
The suffix is automatically appended to the name in the application.d. Select a threat level. Salespeople can use the threat level to filter their competitor searches.e. Optionally, enter additional information about the competitor.
Any additional information you enter is only visible in the Competitors work area. Only the competitorname is visible while selecting competitors in opportunities.
f. Click Save and Edit.g. The application checks to see if any other organizations are potential duplicates. If there are existing
companies with a similar name, you can choose to edit one of these instead.h. You can enter additional competitor information on the Edit Competitor page.
3. To review or edit an existing competitor, click on the competitor name link.
Related Topics
• Manage Sales Competitors
• Enable Competitors in Opportunities
• View Competitor Information Outside Opportunities
• Associate Competitors with Opportunities
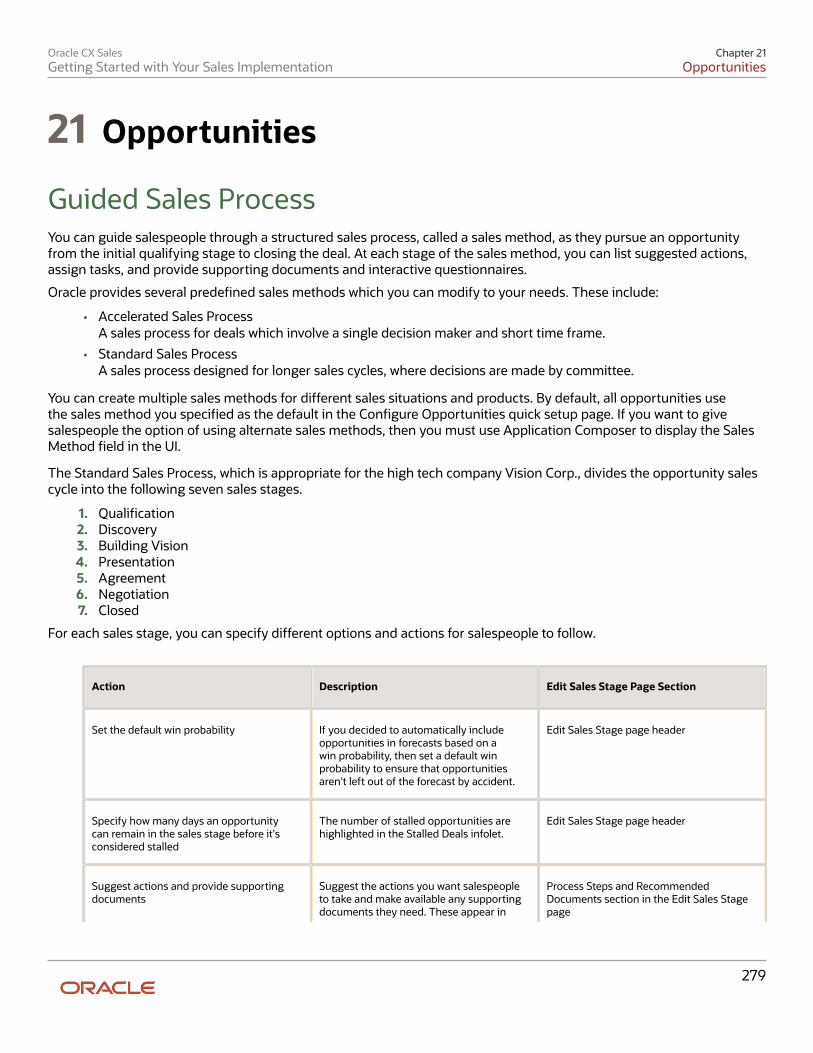
Oracle CX SalesGetting Started with Your Sales Implementation
Chapter 21Opportunities
279
21 Opportunities
Guided Sales ProcessYou can guide salespeople through a structured sales process, called a sales method, as they pursue an opportunityfrom the initial qualifying stage to closing the deal. At each stage of the sales method, you can list suggested actions,assign tasks, and provide supporting documents and interactive questionnaires.
Oracle provides several predefined sales methods which you can modify to your needs. These include:
• Accelerated Sales ProcessA sales process for deals which involve a single decision maker and short time frame.
• Standard Sales ProcessA sales process designed for longer sales cycles, where decisions are made by committee.
You can create multiple sales methods for different sales situations and products. By default, all opportunities usethe sales method you specified as the default in the Configure Opportunities quick setup page. If you want to givesalespeople the option of using alternate sales methods, then you must use Application Composer to display the SalesMethod field in the UI.
The Standard Sales Process, which is appropriate for the high tech company Vision Corp., divides the opportunity salescycle into the following seven sales stages.
1. Qualification2. Discovery3. Building Vision4. Presentation5. Agreement6. Negotiation7. Closed
For each sales stage, you can specify different options and actions for salespeople to follow.
Action Description Edit Sales Stage Page Section
Set the default win probability If you decided to automatically includeopportunities in forecasts based on awin probability, then set a default winprobability to ensure that opportunitiesaren't left out of the forecast by accident.
Edit Sales Stage page header
Specify how many days an opportunitycan remain in the sales stage before it'sconsidered stalled
The number of stalled opportunities arehighlighted in the Stalled Deals infolet.
Edit Sales Stage page header
Suggest actions and provide supportingdocuments
Suggest the actions you want salespeopleto take and make available any supportingdocuments they need. These appear in
Process Steps and RecommendedDocuments section in the Edit Sales Stagepage
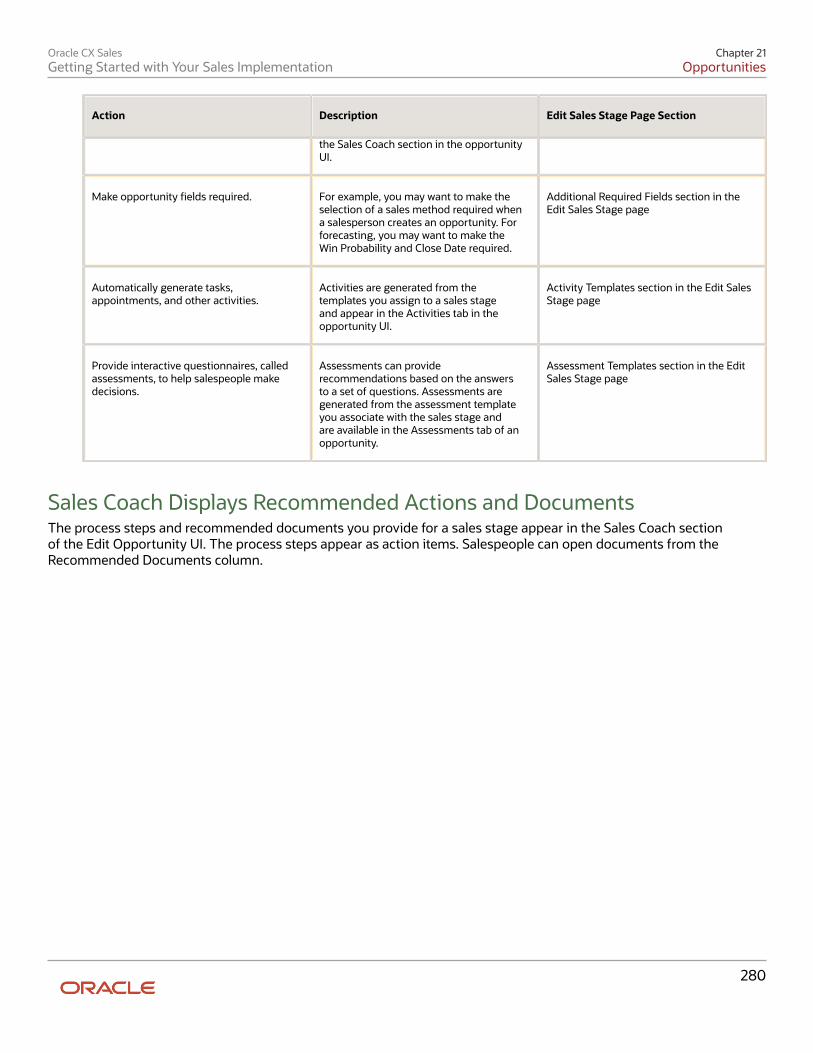
Oracle CX SalesGetting Started with Your Sales Implementation
Chapter 21Opportunities
280
Action Description Edit Sales Stage Page Section
the Sales Coach section in the opportunityUI.
Make opportunity fields required. For example, you may want to make theselection of a sales method required whena salesperson creates an opportunity. Forforecasting, you may want to make theWin Probability and Close Date required.
Additional Required Fields section in theEdit Sales Stage page
Automatically generate tasks,appointments, and other activities.
Activities are generated from thetemplates you assign to a sales stageand appear in the Activities tab in theopportunity UI.
Activity Templates section in the Edit SalesStage page
Provide interactive questionnaires, calledassessments, to help salespeople makedecisions.
Assessments can providerecommendations based on the answersto a set of questions. Assessments aregenerated from the assessment templateyou associate with the sales stage andare available in the Assessments tab of anopportunity.
Assessment Templates section in the EditSales Stage page
Sales Coach Displays Recommended Actions and DocumentsThe process steps and recommended documents you provide for a sales stage appear in the Sales Coach sectionof the Edit Opportunity UI. The process steps appear as action items. Salespeople can open documents from theRecommended Documents column.
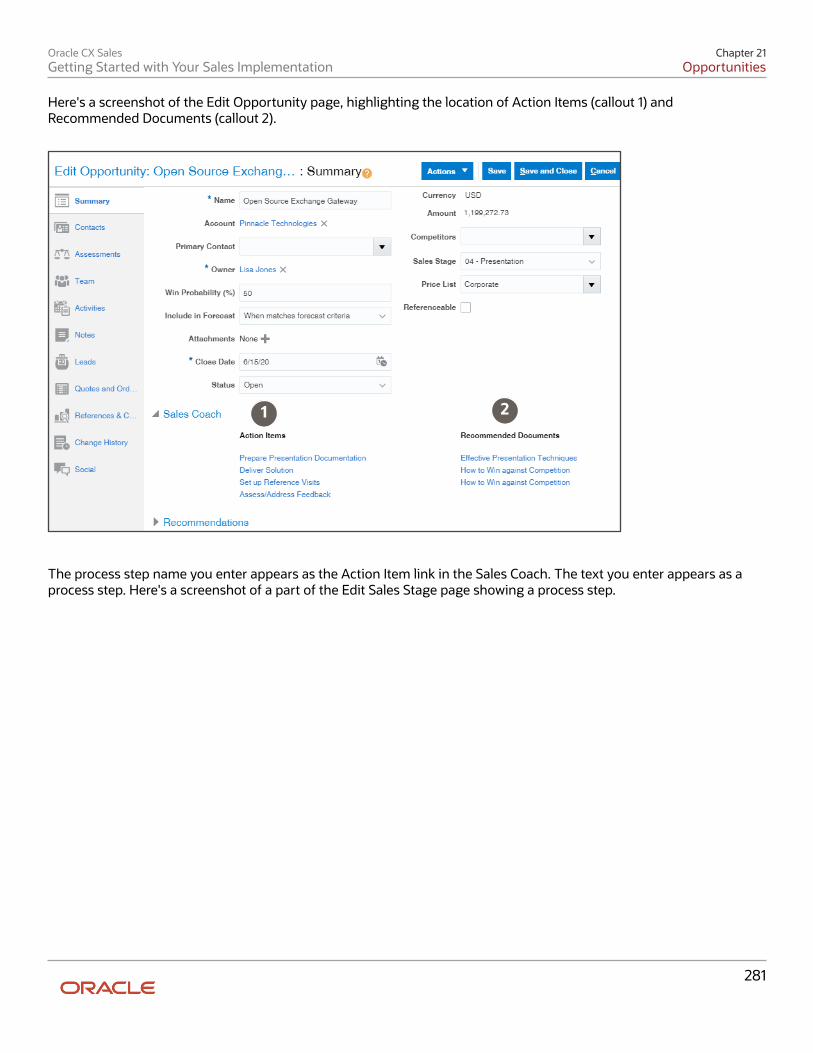
Oracle CX SalesGetting Started with Your Sales Implementation
Chapter 21Opportunities
281
Here's a screenshot of the Edit Opportunity page, highlighting the location of Action Items (callout 1) andRecommended Documents (callout 2).
1 2
The process step name you enter appears as the Action Item link in the Sales Coach. The text you enter appears as aprocess step. Here's a screenshot of a part of the Edit Sales Stage page showing a process step.
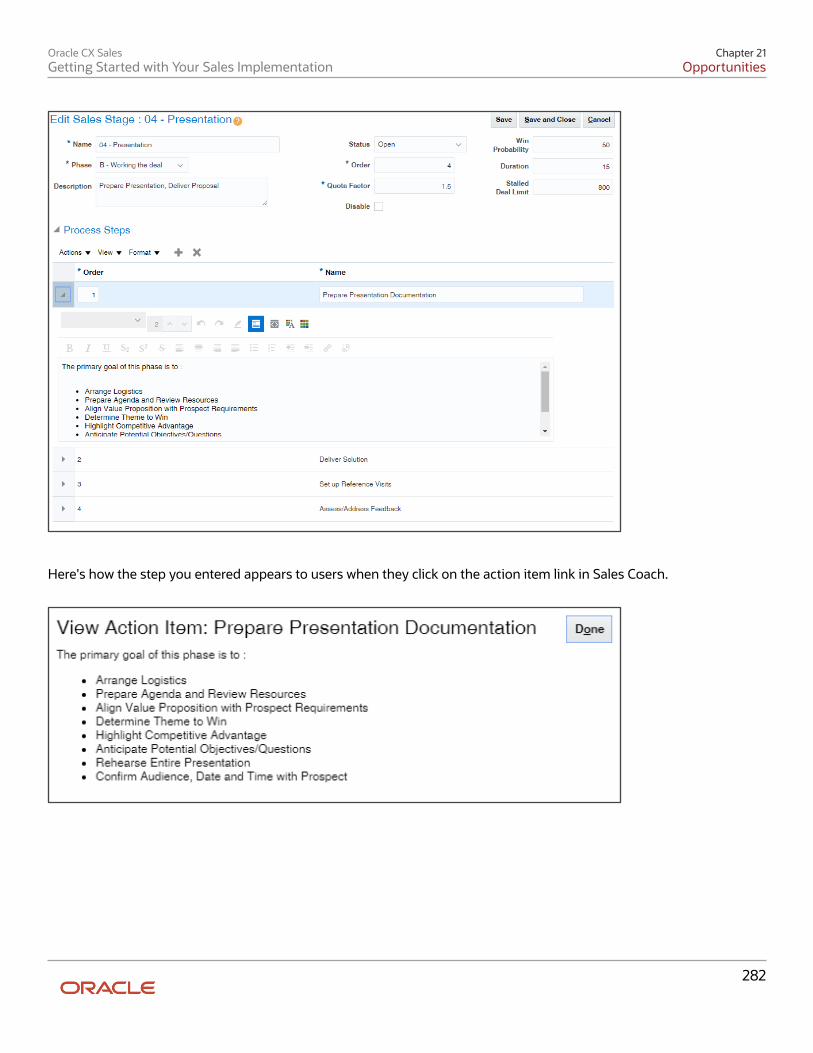
Oracle CX SalesGetting Started with Your Sales Implementation
Chapter 21Opportunities
282
Here's how the step you entered appears to users when they click on the action item link in Sales Coach.
Oracle CX SalesGetting Started with Your Sales Implementation
Chapter 21Opportunities
283
Setup Assistant and OpportunitiesYou use Setup Assistant to configure basic opportunity behavior, but you must still supply the details of the salesprocess you want the sales organization to follow.
What You Can Do in Setup Assistant• Select the default sales method.
• Add, edit, or reorder sales stages.
• Specify if win or loss reasons are required when closing opportunities.
• Specify the default close date for opportunities.
If salespeople don't enter a close date in an opportunity, the close date is set to the creation date plus thenumber you entered. The close date affects the way opportunities are forecast.
What You Must Complete Manually• Create the content for the sales method you selected.
For example, for each sales stage, you can suggest action items, make some entries required, and providedocuments and assessments.
• Edit the list of opportunity statuses.
• Edit the list of win/loss reasons salespeople enter when closing opportunities.
Setup OverviewThis chapter explains how to configure opportunities to guide salespeople through a structured sales process that'sappropriate to your business. Your sales organization can use opportunities to standardize the sales process from thetime a lead gets qualified to the final sale. You can provide salespeople with the best practices at each stage of the salescycle, forecast sales, and track sales outcomes.
Here's a list of setup tasks covered in this chapter.
Step Description Navigation Where to Get More Details
1 You can review and changethe sales method you choseand change the opportunityclose behavior you specifiedin Setup Assistant on theopportunity Quick Setup page.
Setup and Maintenance> Sales > Opportunities >Quick Setup (gears icon)
Setup and Maintenance> Sales > Opportunities >Manage Sales Methods andSales Stages
See the following topics in thischapter:
• What OpportunityBehavior You CanConfigure and Where
• Configure BasicOpportunity Behavior
Oracle CX SalesGetting Started with Your Sales Implementation
Chapter 21Opportunities
284
Step Description Navigation Where to Get More Details
However, you must use theManage Sales Methodsand Sales Stages task tocreate new sales methods orproperly configure the oneyou chose. You can enteraction items for salespeople,make fields required, andprovide recommendeddocuments, such as collateralto show to the customer. Therecommended actions anddocuments appear in theSales Coach section of theopportunity UI.
• Create and Edit SalesMethods and SalesStages
2 Optionally, configureopportunity statuses.
Setup and Maintenance> Sales > Opportunities >Manage Sales Methods andSales Stages
See the Modify OpportunityStatuses topic in this chapter.
3 Optionally, configure thelist of win/loss reasonssalespeople enter when theyclose opportunities.
Setup and Maintenance> Sales > Opportunities> Manage Set EnabledLookups
See the Modify the List ofReasons Opportunities AreWon or Lost topic in thischapter.
What Opportunity Behavior You Can Configure andWhereYou can configure opportunities to support your specific sales process. For basic configuration, you can use eitherSetup Assistant or the Configure Opportunities quick setup page (the two are equivalent). You must use other tasksto make more substantial changes. Here's an overview of default opportunity behavior and some of the ways you canchange it.
Default Opportunity Behavior Changes You Can Make in SetupAssistant or in the ConfigureOpportunities Quick Setup Page
Additional Setup
Opportunities follow the Standard SalesProcess sales method provided by Oracle.
Oracle provides three sales methods:
• Standard Sales Process (the default)• Accelerated Sales Process
You can select any one of these salesmethods as the default and modify itssales stages. Or you can select a salesmethod that you created from scratch.
Use the Manage Sales Methods and SalesStages task to populate the details of eachsales stage, including:
• What fields are required• The actions you want salespeople
to take• The tasks you want assigned• Documents you want to provide as
part of Sales Coach

Oracle CX SalesGetting Started with Your Sales Implementation
Chapter 21Opportunities
285
Default Opportunity Behavior Changes You Can Make in SetupAssistant or in the ConfigureOpportunities Quick Setup Page
Additional Setup
In Setup Assistant or Quick Setup page,you can edit the sales method sales stagenames and add your own stages. To enteror edit the stage details, you must use theManage Sales Methods and Sales Stagestask
• Assessments
Salespeople are required to enter a win orloss reason for an opportunity when theyclose it.
You can make the entry of the win orloss reason optional. Your entry is theequivalent of setting the system profileoption Close Opportunity Win/LossReason Required.
You can modify the list of win and lossreasons. See the Modify the List of Win/Loss reasons topic for details.
Salespeople must also enter at least onecompetitor before closing opportunities.
You can make competitor entry optional.Your setting is the equivalent tosetting the system profile option CloseOpportunity Competitor Required.
If you want salespeople to entercompetitors, you must set them up asdescribed in the Competitors chapter.
When a salesperson creates anopportunity, the application automaticallysets the close date to 20 days after thecreation date unless the salespersonenters a different date. The close date canaffect opportunity forecasts.
You can change the default close date.Your entry is the equivalent to setting theOpportunity Close Date Default systemprofile option.
By default, when the salespersoncloses an opportunity, the close dateis automatically updated to the actualdate. You can retain the previous date,by setting the system profile optionOpportunity Close Date Retain on Closureto Yes.
A salesperson closes an opportunity byselecting one of the closed statuses: Won,Lost, or No Sale.
None You can modify the list of opportunitystatuses using the Manage Sales Statustask. For more details see the ModifyOpportunity Statuses topic.
Configure Basic Opportunity BehaviorHere's how to select and modify a sales method for your opportunities and to change opportunity close requirements. Ifyou're satisfied with the entries you made in Setup Assistant, you can skip this step.
1. Click Quick Setup (gears) icon for the Opportunities functional area in Setup and Maintenance:
◦ Offering: Sales
◦ Functional Area: Opportunities
◦ Quick Setup
2. You can make these modifications to the sales method:
◦ Select a different sales method from the Default Sales Method list.
◦ Edit an existing sales stage name, description, or win probability.
◦ Select a different phase and status for a sales stage.
Oracle CX SalesGetting Started with Your Sales Implementation
Chapter 21Opportunities
286
◦ Enter a new sales stage:
i. Click Add Row (the plus sign icon).ii. Enter the sales stage information.
iii. In the Order column, enter a decimal number to insert the new stage between new stages. Forexample, enter 1.5 to enter a stage between stage 1 and stage 2. To enter a sales stage at thebeginning, enter a value smaller than 1, for example, 0.5 or 0.75.
Note: You can't change the order of the existing sales stages by changing the ordernumber.
3. Modify opportunity close behavior:
◦ Make the entry of the competitor and win or loss reason optional by selecting the No option for each.
◦ Enter a different number of days in the Default Close Date in Days After Opportunity Creation field.
If salespeople don't enter a close date in an opportunity, the close date is set to the creation date plus thenumber you entered. The close date affects the way opportunities are forecast.
Create and Edit Sales Methods and StagesWatch video
Use these steps to edit an existing sales method, including one of those predefined by Oracle, or to create a new salesmethod entirely.
Create or Edit Sales MethodsHere's how to create and edit sales methods.
1. From Setup and Maintenance, open the task Manage Sales Methods and Sales Stages:
◦ Offering: Sales
◦ Functional Area: Opportunities
◦ Task: Manage Sales Methods and Sales Stages
2. On the Manage Sales Methods page, edit a sales method by clicking its name or click Create.3. Leave the default value of Common Set for the Set field. Other values apply for implementations that require
different sales methods for different business units.4. Enter a name for the sales method and an optional description. These entries aren't visible to salespeople by
default, but can be made visible when you configure the UI.5. To provide a default close date for opportunities when they're created, enter a number of days in Close
Window.
Create or edit the sales stages for the sales method as described in the following section.6. Save your changes.
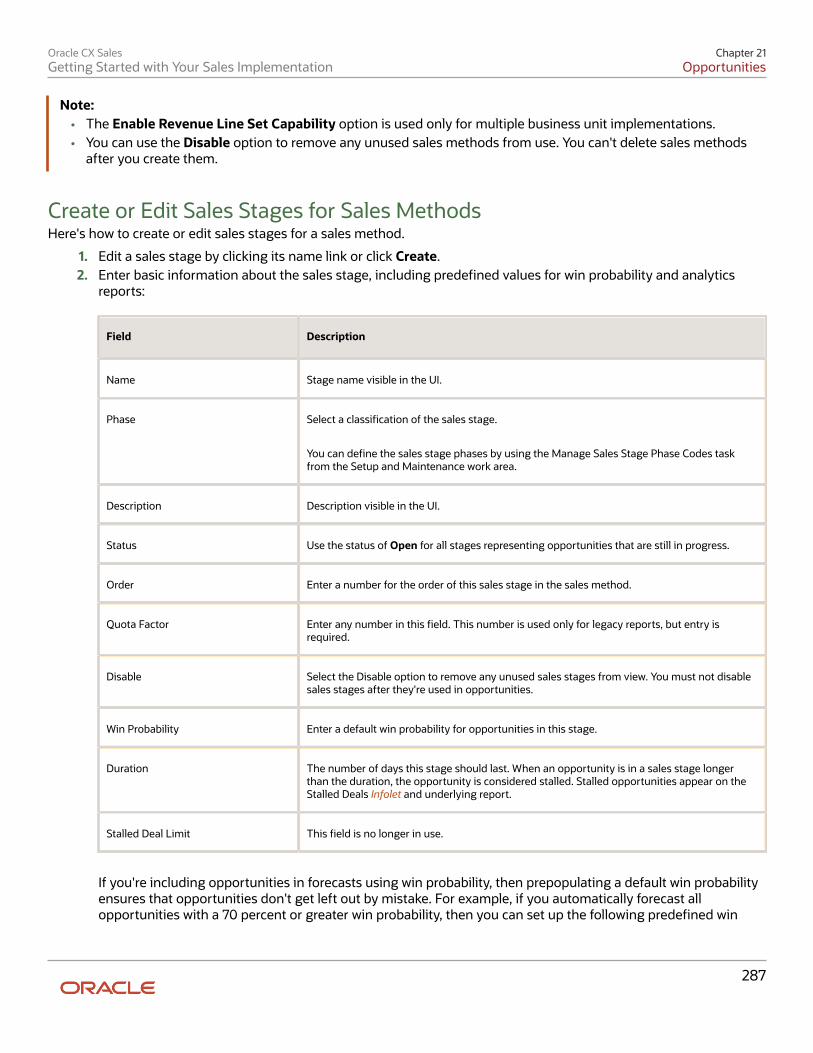
Oracle CX SalesGetting Started with Your Sales Implementation
Chapter 21Opportunities
287
Note:• The Enable Revenue Line Set Capability option is used only for multiple business unit implementations.• You can use the Disable option to remove any unused sales methods from use. You can't delete sales methods
after you create them.
Create or Edit Sales Stages for Sales MethodsHere's how to create or edit sales stages for a sales method.
1. Edit a sales stage by clicking its name link or click Create.2. Enter basic information about the sales stage, including predefined values for win probability and analytics
reports:
Field Description
Name Stage name visible in the UI.
Phase Select a classification of the sales stage.
You can define the sales stage phases by using the Manage Sales Stage Phase Codes taskfrom the Setup and Maintenance work area.
Description Description visible in the UI.
Status Use the status of Open for all stages representing opportunities that are still in progress.
Order Enter a number for the order of this sales stage in the sales method.
Quota Factor Enter any number in this field. This number is used only for legacy reports, but entry isrequired.
Disable Select the Disable option to remove any unused sales stages from view. You must not disablesales stages after they're used in opportunities.
Win Probability Enter a default win probability for opportunities in this stage.
Duration The number of days this stage should last. When an opportunity is in a sales stage longerthan the duration, the opportunity is considered stalled. Stalled opportunities appear on theStalled Deals Infolet and underlying report.
Stalled Deal Limit This field is no longer in use.
If you're including opportunities in forecasts using win probability, then prepopulating a default win probabilityensures that opportunities don't get left out by mistake. For example, if you automatically forecast allopportunities with a 70 percent or greater win probability, then you can set up the following predefined win
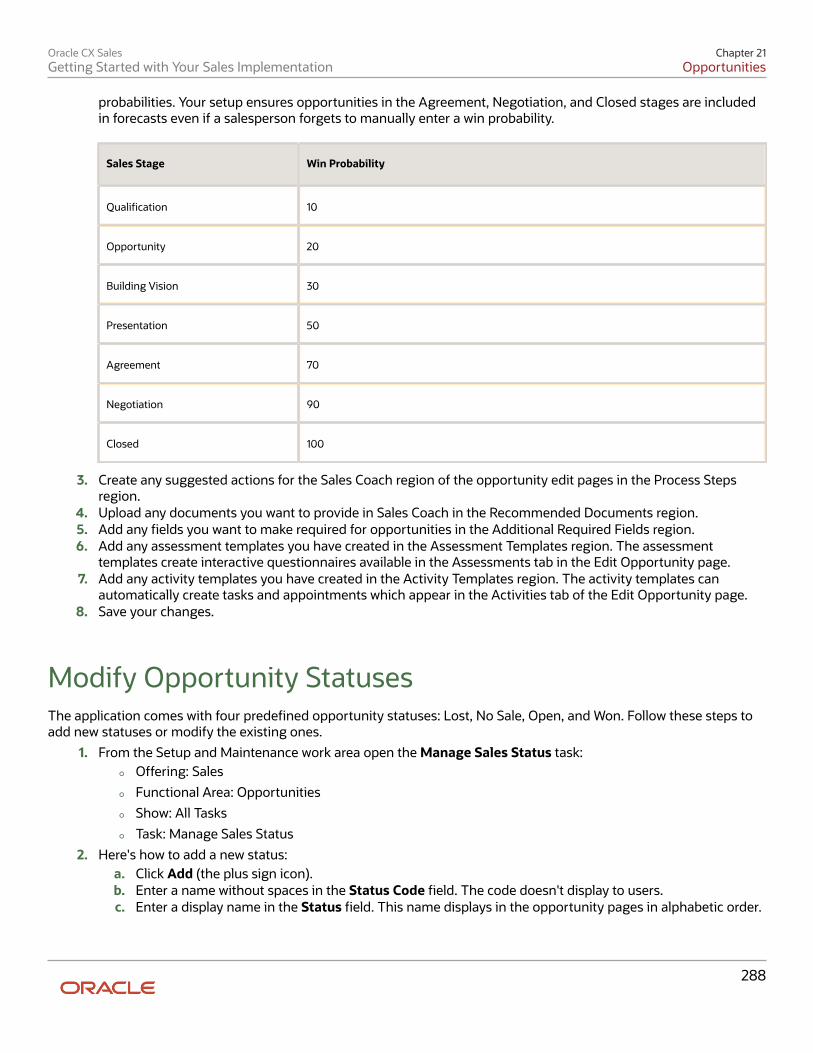
Oracle CX SalesGetting Started with Your Sales Implementation
Chapter 21Opportunities
288
probabilities. Your setup ensures opportunities in the Agreement, Negotiation, and Closed stages are includedin forecasts even if a salesperson forgets to manually enter a win probability.
Sales Stage Win Probability
Qualification 10
Opportunity 20
Building Vision 30
Presentation 50
Agreement 70
Negotiation 90
Closed 100
3. Create any suggested actions for the Sales Coach region of the opportunity edit pages in the Process Stepsregion.
4. Upload any documents you want to provide in Sales Coach in the Recommended Documents region.5. Add any fields you want to make required for opportunities in the Additional Required Fields region.6. Add any assessment templates you have created in the Assessment Templates region. The assessment
templates create interactive questionnaires available in the Assessments tab in the Edit Opportunity page.7. Add any activity templates you have created in the Activity Templates region. The activity templates can
automatically create tasks and appointments which appear in the Activities tab of the Edit Opportunity page.8. Save your changes.
Modify Opportunity StatusesThe application comes with four predefined opportunity statuses: Lost, No Sale, Open, and Won. Follow these steps toadd new statuses or modify the existing ones.
1. From the Setup and Maintenance work area open the Manage Sales Status task:
◦ Offering: Sales
◦ Functional Area: Opportunities
◦ Show: All Tasks
◦ Task: Manage Sales Status
2. Here's how to add a new status:a. Click Add (the plus sign icon).b. Enter a name without spaces in the Status Code field. The code doesn't display to users.c. Enter a display name in the Status field. This name displays in the opportunity pages in alphabetic order.
Oracle CX SalesGetting Started with Your Sales Implementation
Chapter 21Opportunities
289
d. Select the Active option.e. Select from one of the predefined values for Status Category.
3. You can modify an existing status by selecting its row.4. Save your changes.
Modify the List of Reasons Opportunities Are Won orLostWhen they close an opportunity, salespeople enter the reasons why the opportunity was won or lost. The applicationcomes with a predefined list that you can modify to suit your business:
• Customer not ready
• Good lead
• Install base
• Lost to competition
• Lost to internal development
• Lost to no decision
• No bandwidth
• No budget
• Other
• Price
• Product
• Relationship
• Track record
Use these steps to modify the reasons:
1. Open the task Manage Set Enabled Lookups from the Setup and Maintenance work area:
◦ Offering: Sales
◦ Functional Area: Opportunities
◦ Task: Manage Set Enabled Lookups
2. On the Manage Set Enabled Lookups page, Lookup Type field, enter MOO_SETID_WIN_LOSS_REASON.3. Click Search.4. Here's how you can add a new reason in the Lookup Codes section:
a. Click Add (the plus sign icon).b. Enter an internal name in the Lookup Code field. No spaces permitted.c. Select Common Set from the Reference Data Set list.d. Select Enabled.e. Optionally, enter a start and end date.f. Enter the wording salespeople see as they close an opportunity in the Meaning field.
5. You can modify an existing win/loss reason by selecting its row.
Oracle CX SalesGetting Started with Your Sales Implementation
Chapter 21Opportunities
290
6. Save your changes.
Oracle CX SalesGetting Started with Your Sales Implementation
Chapter 22Import Opportunities
291
22 Import Opportunities
Opportunity Import StepsYou use two different Excel macros to import opportunities in two stages:
1. Use the Opportunity Import Macro to import opportunities minus the revenue lines.2. Use the Opportunity Revenue Line Import Macro to import the revenue lines.
You can import up to 5,000 opportunities at a time using the macros.
Note: While you can import additional fields by appending columns to the import macros, you can't make any otherchanges. You can't edit the Visual Basic for Applications (VBA) code or other functions.
Import Opportunity Information Minus the OpportunityRevenueYou can use an Excel macro provided by Oracle to import basic information of up to 5,000 opportunities at a time. Theinformation you import includes the account, the opportunity owner, the primary competitor, and so on. You mustimport the individual revenue lines for the opportunities separately, using the opportunity revenue macro.
Note: All opportunities you import with the macro are imported with the Qualification sales stage and the defaultsales method. To import opportunities at different stages, you must add the fields Sales Method and Sales Stage tothe macro.
1. Open the opportunity import macro file.2. Enable macros, if required.3. If you modified opportunity statuses, click the Status worksheet and enter the status codes and statuses in the
appropriate columns.4. If you modified the win/loss reasons, click the Win_Loss_Reason worksheet and enter the codes and values in
the appropriate columns.5. On the Competitors worksheet, click Populate Competitors from Server.6. Make these entries in the Login dialog:
a. Enter the host name. The host name is in the portion of the URL between https:// and /sales.b. Enter the user name and password.c. Click Submit.
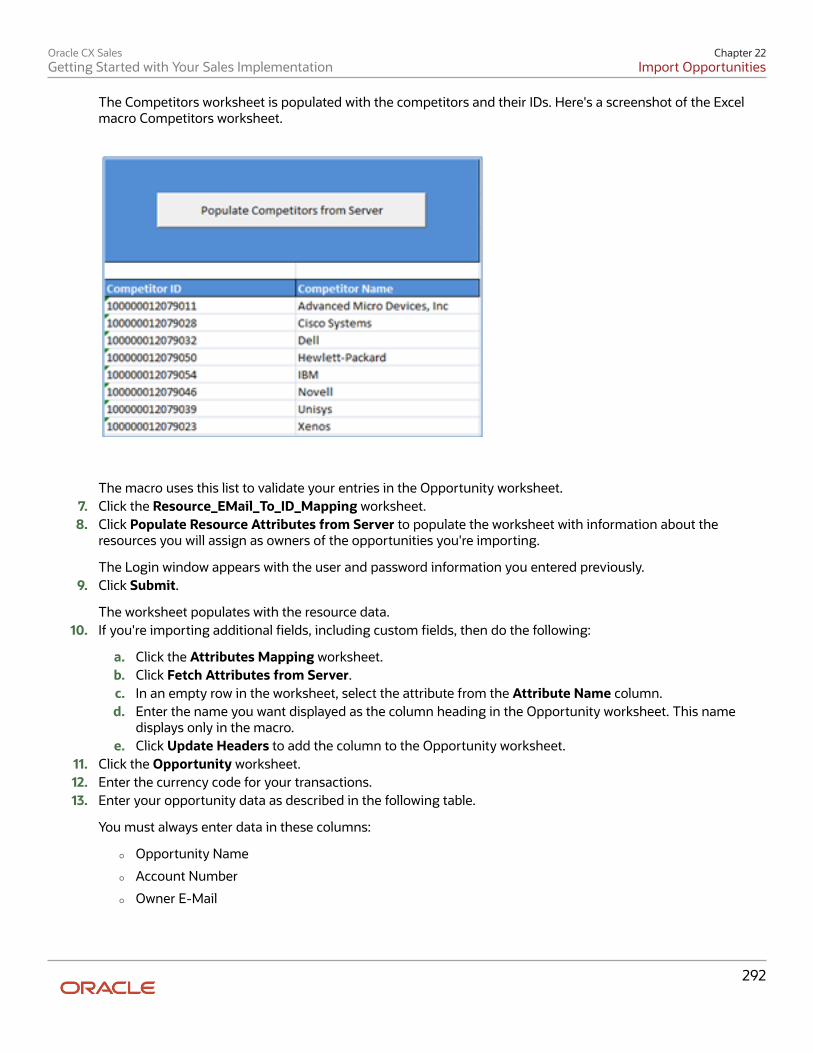
Oracle CX SalesGetting Started with Your Sales Implementation
Chapter 22Import Opportunities
292
The Competitors worksheet is populated with the competitors and their IDs. Here's a screenshot of the Excelmacro Competitors worksheet.
The macro uses this list to validate your entries in the Opportunity worksheet.7. Click the Resource_EMail_To_ID_Mapping worksheet.8. Click Populate Resource Attributes from Server to populate the worksheet with information about the
resources you will assign as owners of the opportunities you're importing.
The Login window appears with the user and password information you entered previously.9. Click Submit.
The worksheet populates with the resource data.10. If you're importing additional fields, including custom fields, then do the following:
a. Click the Attributes Mapping worksheet.b. Click Fetch Attributes from Server.c. In an empty row in the worksheet, select the attribute from the Attribute Name column.d. Enter the name you want displayed as the column heading in the Opportunity worksheet. This name
displays only in the macro.e. Click Update Headers to add the column to the Opportunity worksheet.
11. Click the Opportunity worksheet.12. Enter the currency code for your transactions.13. Enter your opportunity data as described in the following table.
You must always enter data in these columns:
◦ Opportunity Name
◦ Account Number
◦ Owner E-Mail
Oracle CX SalesGetting Started with Your Sales Implementation
Chapter 22Import Opportunities
293
◦ Expected Close Date
◦ Status
◦ Creation Date
◦ Last Update Date
◦ Created By
◦ Last Updated By
You may have to enter data in additional columns, depending on your settings and what type of opportunityyou're importing. Here are the macro columns:
Column What to Enter
Opportunity Number Leave this required column blank. The macro generates the opportunity numberautomatically using the date and time when you click Generate Opportunity Number. Youmust generate the opportunity numbers before entering opportunity revenue lines. Theapplication uses the opportunity number to link the opportunity to the revenue lines and toidentify opportunities during updates.
Opportunity Name Entry is required. The opportunity name identifies the opportunity in lists displayed in theOpportunity work area.
Account Number Enter the account number. You can copy the account number from macro you used toimport accounts.
Owner E-Mail Enter the email of the opportunity owner. The email must be one of the email addresses onthe Resource EMail to ID Mapping worksheet.
Win Probability Optionally, enter a win probability. Depending on your setup, a win probability can determineif an opportunity is included in a forecast. For example, you can decide to include allopportunities with a win probability greater than 70 percent in your forecasts. See theSetting Up Forecasting chapter for details.
Expected Close Date Enter the expected close date in the following format MM/DD/YYYY. The expected closedate determines which forecast includes the opportunity. See the Forecasting chapter fordetails.
Status Using the list of values, select one of the statuses available on the Status worksheet. You canalso enter the statuses manually.
Win/Loss Reason Using the list of values, enter a win or loss reason for a closed opportunity. If you enteran actual close date, then a win/loss reason is required depending on your system profileoption setting.
Primary Competitor Select the primary competitor from the list of values or enter one of the valid companynames manually. For opportunities with a close date, entry in this field is required dependingon the system profile option setting you made.
Oracle CX SalesGetting Started with Your Sales Implementation
Chapter 22Import Opportunities
294
Column What to Enter
Creation Date Enter the opportunity creation date. The required format is YYYY-MM-DD'T'HH:MM:SS.SSSwhich stands for Year-Month-Date'Time'Hour:Min:Sec + UTC. You can enter the date as MM/DD/YYYY and have the macro convert your entry into the required format. For example,your entry 2017/01/2005 converts to 2017-01-05T00:00:00.000+0000.
Last Update Date Enter the date the opportunity was last updated. This date field requires the same format asthe creation date. You can enter MM/DD/YYYY, and have the macro convert your entry tothe required format.
Created By Enter the Party Number of the user who created the opportunity. You can copy the PartyNumber from the Resource EMail to ID Mapping worksheet. See the chapter on ImportingAccounts and Contacts for details.
Last Updated By Enter the Party Number of the user who last updated the opportunity. You can copy theParty Number from the Registry ID column in the file you exported to obtain the Party ID.See the chapter on Importing Accounts and Contacts for details.
14. When you're done with your entries, click Create Import Activity.
The Login dialog appears displaying the host name, user name, and password you entered earlier.15. Click Submit.16. If the application prompts you to correct errors, then do the following:
a. Click OK
The Error worksheet displays your errors.b. Click each error link in column D and make the correction on the Opportunity worksheet.
Note: After you correct an error, you must click outside the field for the correction to berecognized.
c. Click Create Import Activity and Submit again.17. If the macro data is validated without errors then, the macro displays one of the following messages:
Message Meaning
The file import activitywas submitted successfully.
Your import has started. If the file import activity is submitted successfully, then theconfirmation message displays the job ID.
Unable to connect to theserver at this time.
You may have entered an incorrect host.
Unable to submit the fileimport activity. Check logfor details.
Open the Errors work sheet to view the error details.
18. If your import activity was submitted successfully, then click Activity Details.
Oracle CX SalesGetting Started with Your Sales Implementation
Chapter 22Import Opportunities
295
The Activity Details window appears, listing the import activity name, its ID and its status.
◦ If the import activity is still in progress, you can refresh the status periodically by clicking Refresh.
◦ If your import completed successfully, then the status listed is Completed.
19. Optionally, click Generate Log to save a file listing the opportunities that were imported.
Import Opportunity Revenue LinesYou can use the Excel macro provided by Oracle to import basic information of up to 5,000 opportunity lines at a time.
1. Open the Opportunity Revenue Quick Import Macro file.2. Enable macros, if required.3. If you modified opportunity statuses, click the Status worksheet and enter the status codes and statuses in the
appropriate columns.4. If you modified the win/loss reasons, click the Win_Loss_Reason worksheet and enter the codes and values in
the appropriate columns.5. Click the Resource_EMail_To_ID_Mapping worksheet.6. Click Populate Resource Attributes from Server to populate the worksheet with information about the
resources you assign as owners of the opportunity revenue lines you're importing.7. Make these entries in the Login dialog:
a. Enter the host name. The host name is in the portion of the URL between https:// and /sales.b. Enter the user name and password.c. Click Submit.
8. If you're importing additional fields, including custom fields, then do the following:
a. Click the Attributes Mapping worksheet.b. Click Fetch Attributes from Server.c. In an empty row in the worksheet, select the attribute from the Attribute Name column.d. Enter the name you want displayed as the column heading in the Opportunity worksheet. This name
displays only in the macro.e. Click Update Headers to add the column to the Opportunity Revenue worksheet.
9. Click the Opportunity Revenue worksheet and enter the revenue lines.You can enter multiple lines for eachopportunity. Here's what to enter in the columns:
Column What to Enter
Revenue Number Leave this column blank. This unique identifier for the revenue line number is automaticallypopulated by the macro when you initiate the import by clicking Generate Import Activity.
Opportunity Number Enter the opportunity number linked to the revenue line you're entering. You can copy thenumber from the Opportunity Number column in the opportunity import macro.
Product Group Reference Number This column identifies the sales catalog product group the customer is interested inpurchasing. Enter the Product Group Reference Number from the macro you used to importproduct groups. See the Setting Up the Sales Catalog chapter for details.
Oracle CX SalesGetting Started with Your Sales Implementation
Chapter 22Import Opportunities
296
Column What to Enter
Each revenue line can have either a product group or a product. You can't enter both.
Product Number You can enter the Product Number to indicate the specific sales catalog product thecustomer is interested in purchasing. You can copy the product number from the productimport macro you used earlier or you can view the product numbers in the Products workarea.
You can't enter a product if you entered a product group. A revenue line can't have both.
Currency Code Enter an ISO currency code for the opportunity. For example, USD, EUR, or AUD.
Status Select the status of the opportunity revenue line from the list of values or enter one of thestatuses manually. For example, Open, Won, Lost, or No Sale.
Win/Loss Reason Using the list of values, enter a win or loss reason for a closed opportunity. If you enteran actual close date, then a win/loss reason is required depending on your system profileoption setting.
Actual Close Date For closed opportunities, enter the date the opportunity was closed in the following formatMM/DD/YYYY.
If you enter a close date, you must also enter a primary competitor and a win/loss reason,depending on the system profile option settings you made.
Owner E-Mail Enter the email of the opportunity revenue line owner. The email must be one of the emailaddresses on the Resource EMail to ID Mapping worksheet.
Quantity Enter the number of products or product groups that the customer is interested in.
Estimated Price Enter the estimated price per unit for the product group or product.
Amount Leave this column blank. The macro automatically calculates the amount when you import.
10. When you're done with your entries, click Create Import Activity.
The Login dialog appears displaying the host name, user name, and password you entered earlier.11. Click Submit.12. If the application prompts you to correct errors, then do the following:
a. Click OK
The Error worksheet displays your errors.b. Click each error link in column D and make the correction on the Template worksheet.
Oracle CX SalesGetting Started with Your Sales Implementation
Chapter 22Import Opportunities
297
Note: After you correct an error, you must click outside the field for the correction to berecognized.
c. Click Create Import Activity and Submit again.13. If the macro data is validated without errors then, the macro displays one of the following messages:
Message Meaning
The file import activitywas submitted successfully.
Your import has started. If the file import activity is submitted successfully, then theconfirmation message displays the job ID.
Unable to connect to theserver at this time.
You may have entered an incorrect host.
Unable to submit the fileimport activity. Check logfor details.
You most likely entered the wrong mapping number or the user doesn't have the correctpermissions. Open the Errors work sheet to view the error details.
14. If your import activity was submitted successfully, then click Activity Details.
The Activity Details window appears, listing the import activity name, its ID and its status.
◦ If the import activity is still in progress, you can refresh the status periodically by clicking Refresh.
◦ If your import completed successfully, then the status listed is Completed.
15. Optionally, click Generate Log to save a file listing the opportunities that were imported.
Validate the Imported OpportunitiesYou can validate the opportunities you imported using advanced search in the Opportunities work area.
1. Sign in as a salesperson with the Sales Administrator job role. Sales administrators have broad access to salesdata.
2. Navigate to the Opportunities work area.3. Click Advanced Search.
Here's screenshot of the Advanced search panel in the Opportunities work area with key fields highlighted bycallouts.
Callout Number Field
1 Advanced Search
2 Saved Search
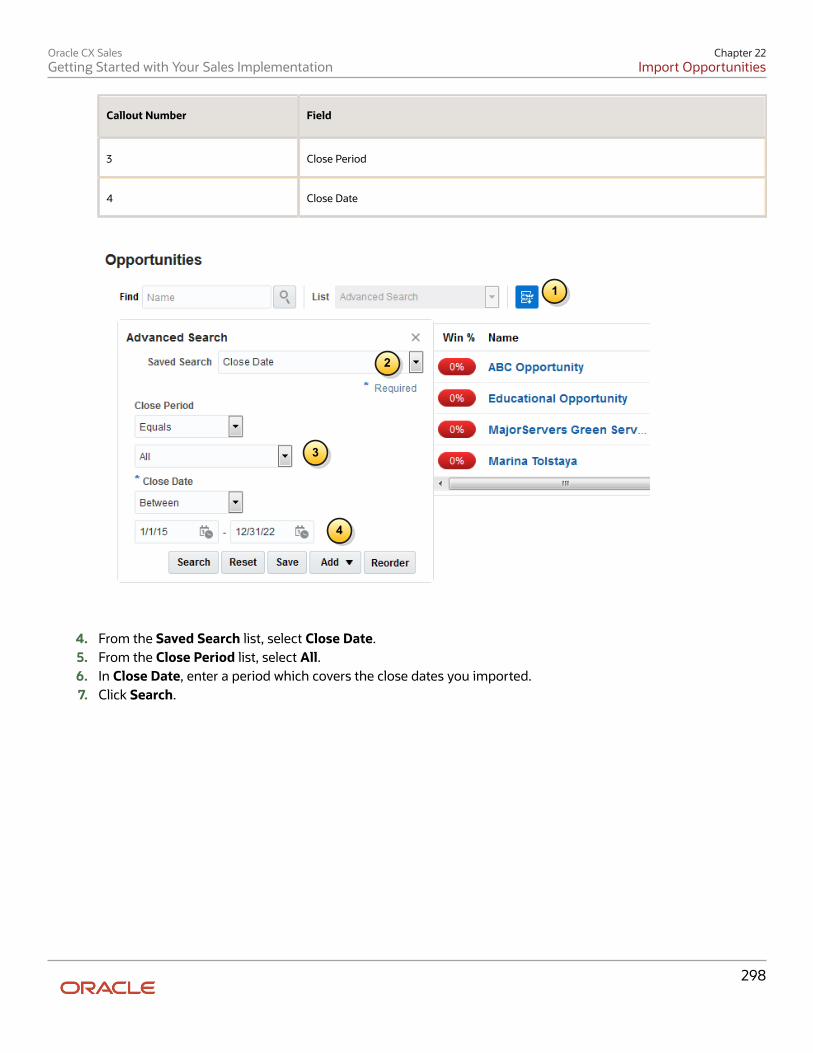
Oracle CX SalesGetting Started with Your Sales Implementation
Chapter 22Import Opportunities
298
Callout Number Field
3 Close Period
4 Close Date
1
2
3
4
4. From the Saved Search list, select Close Date.5. From the Close Period list, select All.6. In Close Date, enter a period which covers the close dates you imported.7. Click Search.
Oracle CX SalesGetting Started with Your Sales Implementation
Chapter 23Sales Quotas
299
23 Sales Quotas
Overview of Sales Quota SetupQuotas are targets salespeople strive to reach. Set up this feature to simplify assigning quotas to salespeople and totrack their progress. This chapter covers the basic setup for quota management using the UI. It doesn't cover quotaimport or advanced quota calculation features.
Here are the setup steps.
Step Description Navigation Where to Get More Details
1 You previously set up salesterritories. Each salespersoneligible to receive a quotamust be assigned to an activeterritory. Quota calculationsrely on territory coverage.If you plan to use quotacalculations, then make sureterritories have dimensionalcoverage defined.
Navigator > Sales >Territories
See the Sales Territories andAssignment chapter.
2 Seasonality appliespercentages to split a quotaover months or quarters tofactor in seasonal fluctuations.Seasonality factor groupscan be associated with quotaplans or specific territoriesto account for variations insales seasonality amongdifferent territories. Insteadof entering quotas for eachperiod of the year, you relyinstead on seasonality to splityour annual quota into periodquotas. This task is optional.
Setup and Maintenance >Sales > Quotas > ManageSales Quota SeasonalityGroups
See Set Up Sales Quotas inthis chapter.
3 The sales revenue goal ispredefined for revenuequotas. You can add othertypes of goals, such asvolume. This is optional.
Navigator > Quotas > Tasks(the side panel) > ManageSales Goals
See Sales Goals in theImplementing Sales guide (linkfollows)
4 Create a sales quota plan foryour fiscal year. One planper fiscal year is required fortracking quotas for the entireterritory hierarchy. The plan
Setup and Maintenance >Sales > Quotas > ManageSales Quota Plans
See Set Up Sales Quotas inthis chapter.
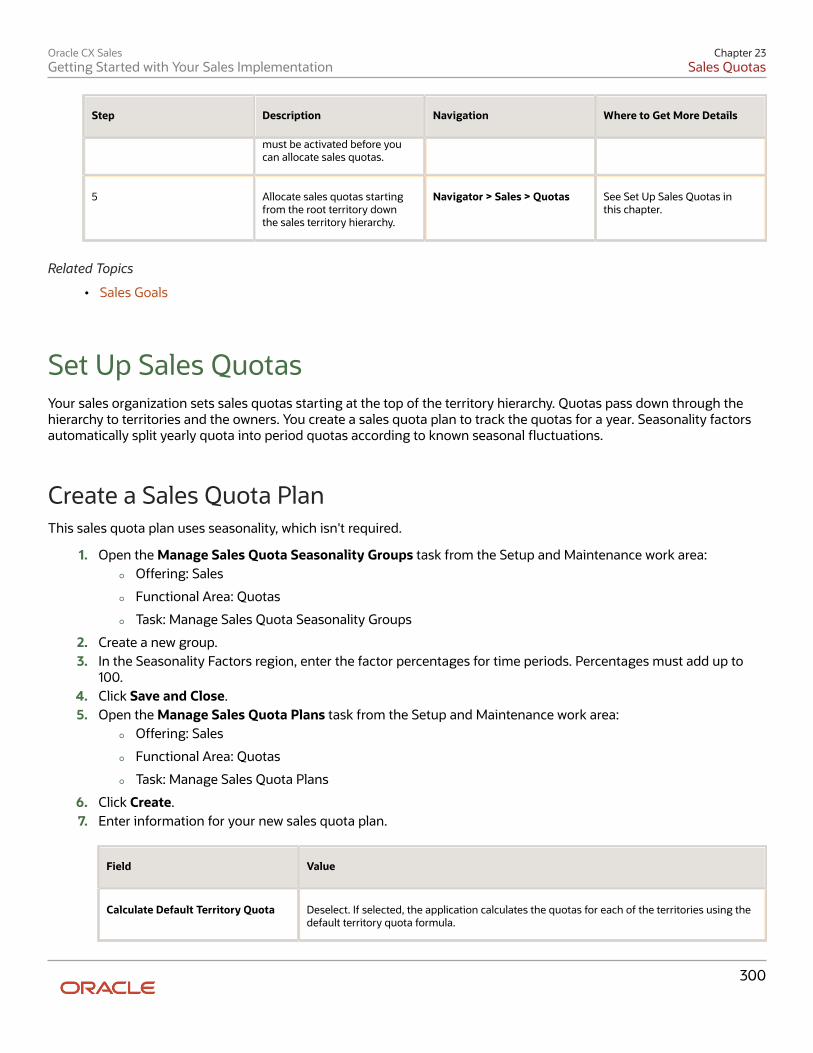
Oracle CX SalesGetting Started with Your Sales Implementation
Chapter 23Sales Quotas
300
Step Description Navigation Where to Get More Details
must be activated before youcan allocate sales quotas.
5 Allocate sales quotas startingfrom the root territory downthe sales territory hierarchy.
Navigator > Sales > Quotas See Set Up Sales Quotas inthis chapter.
Related Topics
• Sales Goals
Set Up Sales QuotasYour sales organization sets sales quotas starting at the top of the territory hierarchy. Quotas pass down through thehierarchy to territories and the owners. You create a sales quota plan to track the quotas for a year. Seasonality factorsautomatically split yearly quota into period quotas according to known seasonal fluctuations.
Create a Sales Quota PlanThis sales quota plan uses seasonality, which isn't required.
1. Open the Manage Sales Quota Seasonality Groups task from the Setup and Maintenance work area:
◦ Offering: Sales
◦ Functional Area: Quotas
◦ Task: Manage Sales Quota Seasonality Groups
2. Create a new group.3. In the Seasonality Factors region, enter the factor percentages for time periods. Percentages must add up to
100.4. Click Save and Close.5. Open the Manage Sales Quota Plans task from the Setup and Maintenance work area:
◦ Offering: Sales
◦ Functional Area: Quotas
◦ Task: Manage Sales Quota Plans
6. Click Create.7. Enter information for your new sales quota plan.
Field Value
Calculate Default Territory Quota Deselect. If selected, the application calculates the quotas for each of the territories using thedefault territory quota formula.
Oracle CX SalesGetting Started with Your Sales Implementation
Chapter 23Sales Quotas
301
Field Value
Track Select. Only one plan can track quotas for the year.
Copy Quotas From Leave Blank. After creating your first sales quota plan, copy a previous plan for a quick wayto create a new plan.
8. Click Save and Close.9. On the Options tab, select the name of your seasonality factor group.
Here's the Options tab.
10. Click Save.11. With your new quota plan selected in the list of plans, click the Activate button.12. Set the activation to right now plus a few minutes in the future.13. Click OK.
The initial status is Pending Activation. Refresh the page to verify that the status changed to Active.14. A sales revenue goal is automatically assigned to every territory owner during the annual quota planning
process. Upon activation, sales managers can sign in to the application and begin allocating revenue quotas totheir teams. Click Synchronize if you suspect the territory hierarchy for quotas isn't current.
Allocate Sales QuotasUse the following steps to allocate sales quotas to territories. Allocate quotas to each territory from the top of theterritory hierarchy down. You can allocate a quota to a territory only after you allocate the quotas for all the territorieshigher in the territory hierarchy.
1. Navigate to Quotas.2. Select your activated quota plan.3. In the Edit Sales Quotas region, verify that the territory quotas and owners' quotas are zero.4. Select the root territory in the hierarchy.5. Enter a territory quota amount and a resource quota amount for the year for the whole organization.6. Click Publish and verify that the status changed from Not Published to Published.
Oracle CX SalesGetting Started with Your Sales Implementation
Chapter 23Sales Quotas
302
7. For each child territory of the root territory, enter a territory quota amount and an owner's quota amount.8. Select the parent territory and click Details for the territory.
The Details table shows the rollup quotas total for the child territories and the variance from the parent quota.9. Click Save.
10. Click the Territory Quota tab and verify that as part of the publish process, seasonality was automaticallyapplied to split the annual quota into period quotas.
11. In the Manage Sales Quotas page, select a child territory of the root territory and click Publish.
Note: If the Publish button is disabled, this could be the result of one of the following:
◦ You did not publish the parent territory.
◦ You don't own the parent territory.
◦ The territory was already published. You can't republish a territory at the bottom of thehierarchy.
12. Verify that the status is Published.The application notifies the territory owner and the analyst that the territory was published.
13. Click Save.The following table lists common publishing errors and their solutions.
Error Steps to Resolve
You can't publish quota forthe territory because theterritory has revenue quotaassigned prior to the territoryquota start date.
a. Select the parent territory.b. Click Details to navigate to the Edit Sales Quotas page.c. Select the territory.d. Select the Territory Quota tab.e. Set the period quota to zero for any period prior to the territory
quota start date.
The total quota of allquarters for the territorydoesn't equal the annualquota.
a. Select the parent territory.b. Click Details to navigate to the Edit Sales Quotas page.c. Select the territory.d. Select the Territory Quota tab.e. Update the period quotas so their sum equals the territory quota.
You can't perform this actionfor the selected record.
This error occurs when you attempt to publish a quota for a territory thatyou own. Only administrators and owners of parent territories can publishquotas for this territory.
Schedule Quota ProcessesSales managers or administrators frequently make changes to active territories directly, using territory proposals, orthrough web services. Schedule synchronization to run frequently to provide the latest structure for allocating quotas.
1. Click Navigator > Tools > Scheduled Processes.2. Click Schedule New Process.
Oracle CX SalesGetting Started with Your Sales Implementation
Chapter 23Sales Quotas
303
3. For the Type field, select Job.4. In the name field list, click Search.5. Search for Synchronize Quotas.6. Select Synchronize Quotas and click OK.7. In the Parameters region of the Process Details page, select the sales quota plan.8. Click Advanced.9. In the Schedule tab, select Using a schedule.
10. Select the Daily frequency.11. Change the start date to when you want to start running the process, and select the time of day when you want
it to run.12. Change the end date to a future date.13. Use the Notification tab to add notifications to specific people when the process completes.14. Click Submit.
Oracle CX SalesGetting Started with Your Sales Implementation
Chapter 23Sales Quotas
304
Oracle CX SalesGetting Started with Your Sales Implementation
Chapter 24Forecasting
305
24 Forecasting
Two Forecasting ScenariosYour sales organization can forecast opportunities by sales territory for each forecasting period and managers canadjust those forecasts as required. There are two broad forecasting scenarios that require different setup:
• Scenario 1: Forecasting by Opportunity Owner
• Scenario 2: Forecasting When You Use Sales Territories to Assign Opportunities
Scenario 1: Forecasting by Opportunity OwnerIndividual salespeople own their opportunities and forecast them. The forecasts are passed up the managementhierarchy for adjustment and approval. Your organization doesn't use geography, product, industry, or other territorydimensions to assign salespeople to opportunities. If your sales process meets these criteria, then setup is as simple asselecting Yes for Enable Sales Forecasting in Setup Assistant. The application sets up everything you need:
• Sets up a sales territory hierarchy that mirrors your sales resource hierarchy, with the individual salespeople asterritory owners.
• Assigns opportunities to the territory of their owners. This means that opportunity revenue is automaticallyincluded in the forecasts of the opportunity owner.
When new accounts or opportunities come in, managers assign ownership to one of their salespeople and theapplication automatically includes those accounts and opportunities in each owner's territory.
• Keeps the sales territories in sync if your resource hierarchy changes.
If you do update the sales hierarchy and want to see the changes reflected in your forecasts right away, thenyou must run the Refresh Territories from Resources process. The process is set to automatically run beforeeach forecasting window freeze.
• Rolls up forecasts up the sales resource hierarchy.
• Enables quarterly forecasts.
• Creates monthly forecast submission windows, so the sales organization can adjust forecasts and pass them upthe management chain. All you have to do is adjust the forecast submission window dates.
• Makes it possible for your sales organization to forecast product totals.
If you enable forecasting by opportunity owner in Setup Assistant, then each resource can only be in one territory (theirown) and you can't use sales territories to assign opportunities by geography, product, industry, or any other dimension.
Scenario 2: Forecasting When You Use Sales Territories to AssignOpportunitiesYou assign opportunities to sales territories by geography, product, industry, and other dimensions. You may havemultiple salespeople from different parts of the sales organization involved in the sale. The opportunity owner is notnecessarily the sole person forecasting the revenue. If your implementation meets any of these criteria, then you mustset up sales territories and enable assignment using the Set Forecasting Options task. You can't use Setup Assistant.
Oracle CX SalesGetting Started with Your Sales Implementation
Chapter 24Forecasting
306
Setup OverviewHere are the steps for setting up forecasting for the two forecasting scenarios. You can open these from the Salesoffering in the Setup and Maintenance work area.
Step Description Navigation Where to Get More Details
1 If your implementation fits thesecond scenario (you use salesterritories for assignment),you enable Forecasting byclicking Submit on the SelectForecasting Options page.
Setup and Maintenance >Sales > Sales Forecasting >Select Forecasting Options
See the topic: EnableForecasting If You Use SalesTerritories for Assignment
2 Enabling Forecasting usingeither method createsquarterly forecasts for the nextyear and monthly forecastsubmission windows for each.
The forecast submissionwindows are createdautomatically, withoutaccounting for the differentnumber of days in eachmonth, weekends, or holidays.For these reasons, you mayneed to adjust the starting andending dates of each windowto conform to your company'sschedule.
Setup and Maintenance >Sales > Sales Forecasting >Select Forecasting Options
See the topic: AdjustForecasting Windows and SetForecasting Options
3 You can change otherforecasting options on thesame page:
• Increase the numberof quarters you canforecast at the sametime.
• Specify criteria forincluding opportunitiesin the forecast.
• Set the number oflevels of the salescatalog hierarchymanagers can adjustforecasts by productrevenue.
• Display a differentchart on the Forecastslanding page.
• Hide the Products tabon the forecast page
Setup and Maintenance >Sales > Sales Forecasting >Select Forecasting Options
See the topic: AdjustForecasting Windows and SetForecasting Options
Oracle CX SalesGetting Started with Your Sales Implementation
Chapter 24Forecasting
307
Step Description Navigation Where to Get More Details
to disable forecastadjustments byproducts.
4 If you didn't hide theProducts tab, permittingsales managers to adjustforecasts by product, thenyou should specify whatkinds of adjustment types themanagers can make.
You don't want salesmanagers entering theirbest case forecasts, if the VPof sales isn't interested, forexample.
Hide the unusedforecasts adjustmenttypes by editing theORA_ZSF_SHOW_METRICSlookup type.
Setup and Maintenance >Sales > Sales Foundation >Manage Standard Lookups
See the topic: Specify theTypes of Forecast AdjustmentsSales Managers Can Use
How Forecasting Works and How You Can Change ItWatch video
Your sales organization can start forecasting as soon as you enable forecasting using any of the available methods:the Sales Setup Assistant, the Quick Setup page, or the Select Forecasting Options task. The application automaticallycreates all you need to get started:
• Quarterly forecasts for each sales territory for one year.
Each quarterly forecast automatically includes all won opportunities and all opportunities with a win probabilitygreater than 70 percent with close dates that fall within the quarter. Lost opportunities are never included inforecasts.
• Monthly forecast submission windows.
During each forecast submission window, salespeople and their management adjust their forecasts and submitthem up the management hierarchy.
How It WorksSometimes forecasting sales isn't much better than gazing into a crystal ball. Forecasting depends on the accuracy ofyour pipeline data, and that's a problem. Sales prospects often lie about what they want to purchase to gain a betterbargaining position. Salespeople get lazy about entering deals or they withhold information because they're scaredothers will steal their hot prospects. Your sales application can't make anyone truthful, but it does provide a structured
Oracle CX SalesGetting Started with Your Sales Implementation
Chapter 24Forecasting
308
process that encourages salespeople to enter what they know, and holds them accountable. Each month, salespeoplesubmit their quarterly forecasts to their managers. The managers review the forecasts, adjust the forecast amounts,if necessary, and submit them up the management chain. Your organization gets a historical record of the monthlyforecasts that lets you evaluate how well you're doing. Here's how the process works as delivered:
1. Salespeople review their pipeline and their forecasts.
The Forecasts work area displays a dashboard with a summary of revenue forecasts by territory and quarter.The forecasts are compiled automatically from all won opportunities with close dates in the quarter, and thosewith 70 percent or greater win probability. Salespeople choose the territory they want to view (callout 1 in thescreenshot). A bar chart shows the amounts for the forecasts, won revenue, and open pipeline (callout 2). Bydefault, a second summary chart displays a bar chart that shows forecasts by time period. If you use quotas,you can instead display a visual indicator showing in percentage of quota attainment with a numeric summary(callout 3). The page also indicates if the forecast is submitted, how it was changed, and how much pipelineremains to be submitted.
1
2
3
2. Salespeople can review the list of opportunities included in the forecast and drill down to edit the opportunities.Their changes are automatically reflected in the forecast by the Refresh Forecast process.
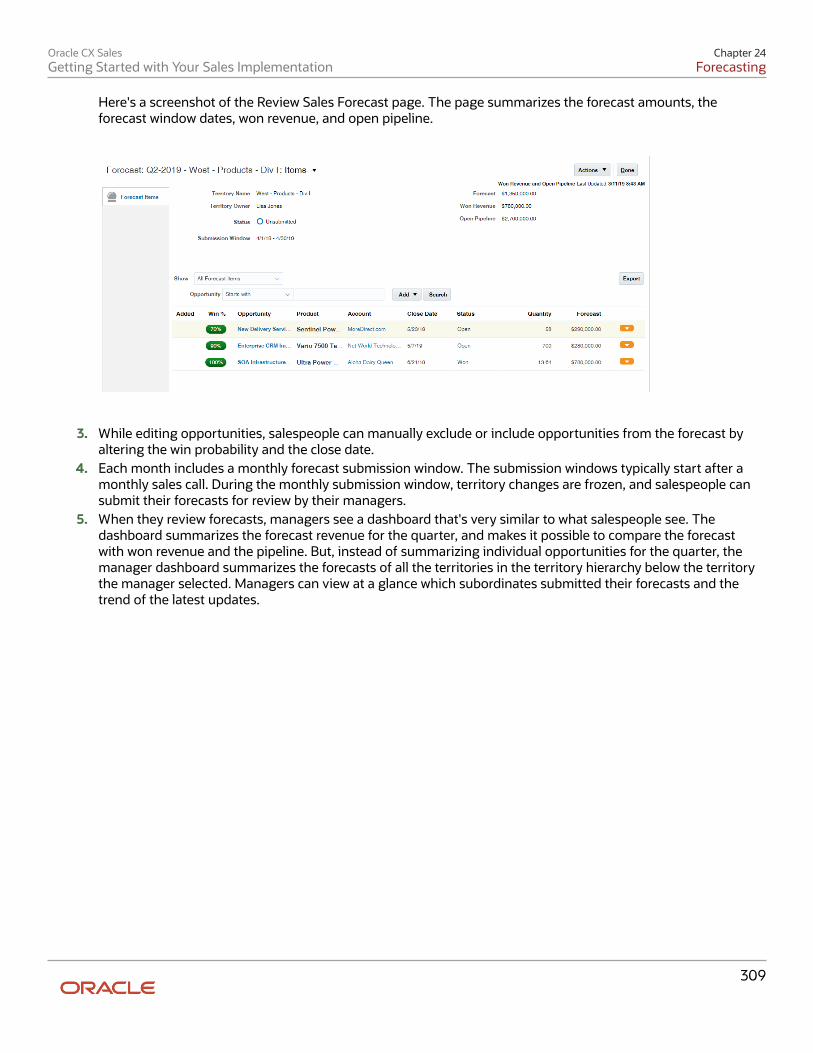
Oracle CX SalesGetting Started with Your Sales Implementation
Chapter 24Forecasting
309
Here's a screenshot of the Review Sales Forecast page. The page summarizes the forecast amounts, theforecast window dates, won revenue, and open pipeline.
3. While editing opportunities, salespeople can manually exclude or include opportunities from the forecast byaltering the win probability and the close date.
4. Each month includes a monthly forecast submission window. The submission windows typically start after amonthly sales call. During the monthly submission window, territory changes are frozen, and salespeople cansubmit their forecasts for review by their managers.
5. When they review forecasts, managers see a dashboard that's very similar to what salespeople see. Thedashboard summarizes the forecast revenue for the quarter, and makes it possible to compare the forecastwith won revenue and the pipeline. But, instead of summarizing individual opportunities for the quarter, themanager dashboard summarizes the forecasts of all the territories in the territory hierarchy below the territorythe manager selected. Managers can view at a glance which subordinates submitted their forecasts and thetrend of the latest updates.
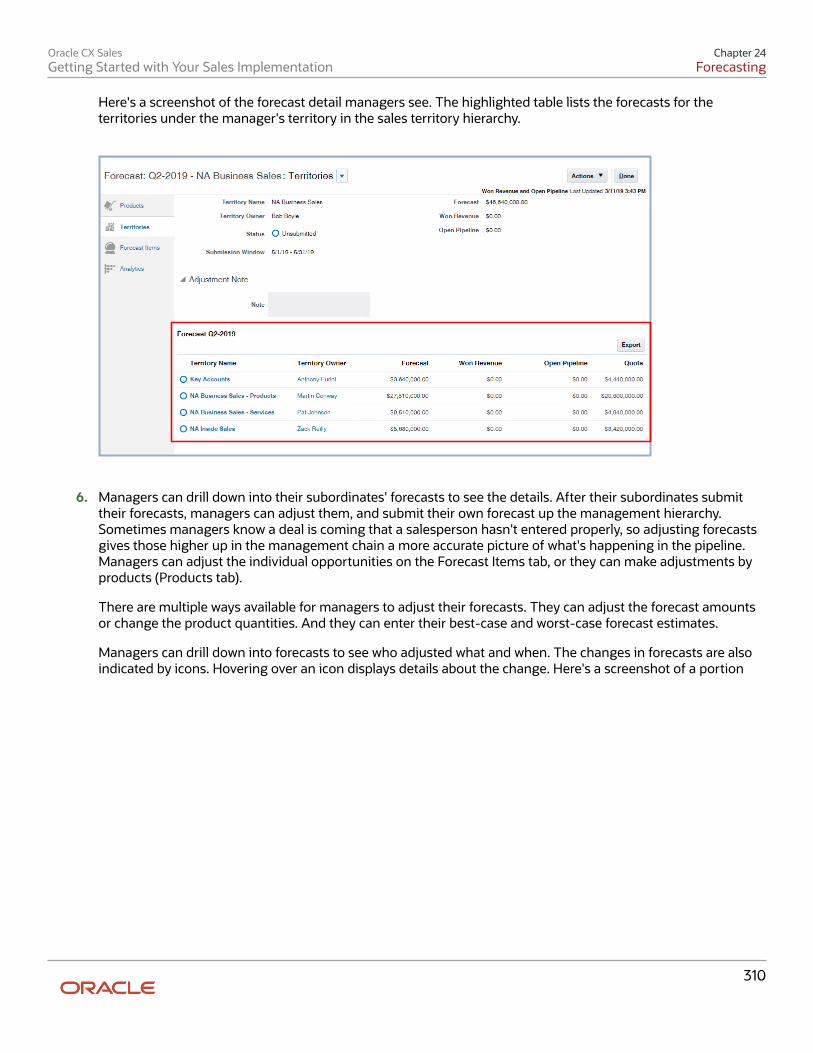
Oracle CX SalesGetting Started with Your Sales Implementation
Chapter 24Forecasting
310
Here's a screenshot of the forecast detail managers see. The highlighted table lists the forecasts for theterritories under the manager's territory in the sales territory hierarchy.
6. Managers can drill down into their subordinates' forecasts to see the details. After their subordinates submittheir forecasts, managers can adjust them, and submit their own forecast up the management hierarchy.Sometimes managers know a deal is coming that a salesperson hasn't entered properly, so adjusting forecastsgives those higher up in the management chain a more accurate picture of what's happening in the pipeline.Managers can adjust the individual opportunities on the Forecast Items tab, or they can make adjustments byproducts (Products tab).
There are multiple ways available for managers to adjust their forecasts. They can adjust the forecast amountsor change the product quantities. And they can enter their best-case and worst-case forecast estimates.
Managers can drill down into forecasts to see who adjusted what and when. The changes in forecasts are alsoindicated by icons. Hovering over an icon displays details about the change. Here's a screenshot of a portion
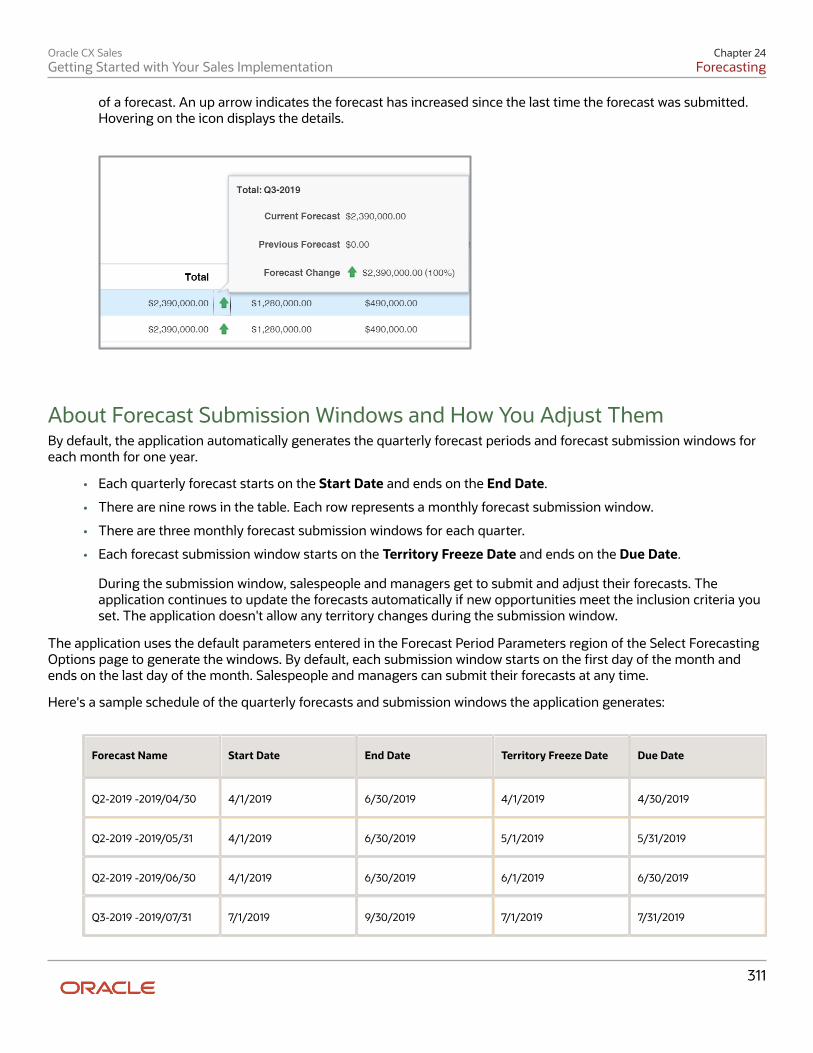
Oracle CX SalesGetting Started with Your Sales Implementation
Chapter 24Forecasting
311
of a forecast. An up arrow indicates the forecast has increased since the last time the forecast was submitted.Hovering on the icon displays the details.
About Forecast Submission Windows and How You Adjust ThemBy default, the application automatically generates the quarterly forecast periods and forecast submission windows foreach month for one year.
• Each quarterly forecast starts on the Start Date and ends on the End Date.
• There are nine rows in the table. Each row represents a monthly forecast submission window.
• There are three monthly forecast submission windows for each quarter.
• Each forecast submission window starts on the Territory Freeze Date and ends on the Due Date.
During the submission window, salespeople and managers get to submit and adjust their forecasts. Theapplication continues to update the forecasts automatically if new opportunities meet the inclusion criteria youset. The application doesn't allow any territory changes during the submission window.
The application uses the default parameters entered in the Forecast Period Parameters region of the Select ForecastingOptions page to generate the windows. By default, each submission window starts on the first day of the month andends on the last day of the month. Salespeople and managers can submit their forecasts at any time.
Here's a sample schedule of the quarterly forecasts and submission windows the application generates:
Forecast Name Start Date End Date Territory Freeze Date Due Date
Q2-2019 -2019/04/30 4/1/2019 6/30/2019 4/1/2019 4/30/2019
Q2-2019 -2019/05/31 4/1/2019 6/30/2019 5/1/2019 5/31/2019
Q2-2019 -2019/06/30 4/1/2019 6/30/2019 6/1/2019 6/30/2019
Q3-2019 -2019/07/31 7/1/2019 9/30/2019 7/1/2019 7/31/2019
Oracle CX SalesGetting Started with Your Sales Implementation
Chapter 24Forecasting
312
Forecast Name Start Date End Date Territory Freeze Date Due Date
Q3-2019 -2019/08/31 7/1/2019 9/30/2019 8/1/2019 8/31/2019
Q3-2019 -2019/09/30 7/1/2019 9/30/2019 9/1/2019 9/30/2019
Q4-2019 -10/31/2019 10/1/2019 12/31/2019 10/1/2019 10/31/2019
Q4-2019 -11/30/2019 10/1/2019 12/31/2019 11/1/2019 11/30/2019
Q4-2019 -12/31/2019 10/1/2019 12/31/2019 12/1/2019 12/31/2019
The application automatically generates new submission windows at the end of each quarter, so there's always a year'sworth of submission windows. Your organization can modify the start and end dates of each submission windowby entering new dates in the Territory Freeze Date and Due Date fields. If you do adjust the dates, then you mustcontinue to adjust these dates as the new quarters get generated.
Here's how forecasting works before each territory freeze date:
• The application compiles the forecast from opportunities that meet the forecast criteria.
• Salespeople and managers can't submit their forecasts or adjust them. All changes are made by editing theopportunities themselves.
• Changes to the territory and sales catalog product hierarchy are automatically synchronized to the forecast.
• Salespeople and managers can change the opportunity lines and the changes are automatically reflected in theforecasts.
Here's what happens after each freeze date:
• Salespeople and managers can edit, adjust, and submit forecasts for review up the management chain.
• Territories are frozen. Any changes to territories and product hierarchy aren't reflected in the forecasts.
• Changes to revenue items are synchronized to forecast items.
• Salespeople can adjust and submit their forecast between the Territory Freeze Date and the Due Date.
After salespeople submit their forecasts, their managers can review and adjust them. Salespeople can change andresubmit their forecasts until managers submit theirs. After the due date is reached, each forecast becomes read-onlyand can't be adjusted any more.
How You Change How Many Quarters You Can Forecast At the Same TimeBy default, you can only forecast one quarter at a time. However, you can forecast two or three quarters at the sametime. Just enter a 2 or a 3 in the Number of Concurrent Forecasts field in the Forecast Period Parameters section of theSelect Forecasting Options page and regenerate the forecast submission windows.
Oracle CX SalesGetting Started with Your Sales Implementation
Chapter 24Forecasting
313
How You Can Change What's Included in ForecastsBy default, the application automatically includes in each forecast all won opportunities and opportunities with a winprobability greater than or equal to 70 percent with close dates that fall within the forecast period. Only sales territoriesthat have the Forecast Participation attribute set to revenue can participate in forecasts.
What You Can Change How
Change the win probability requiredto automatically include anopportunity in the forecast.
On the Select Forecasting Options page, Unadjusted Forecast Criteria section, specify adifferent probability.
You can let salespeople override theautomatic criteria and decide whatopportunities to include in forecasts.
On the Select Forecasting Options page, Unadjusted Forecast Criteria section, select theEnable Forecast Criteria Override option in the Select Forecasting Options page, UnadjustedForecast Criteria section.
Prevent opportunities from gettingleft out of forecasts when salespeopleforget to enter a close date and winprobability.
You can set up your sales method to ensure that opportunities aren't left out because ofincomplete data entries. For example, you can make entries in the Win Probability and CloseDate fields required for the later stages of the sales process and you can have the applicationautomatically prefill the win probabilities themselves when salespeople move an opportunityto a particular sales stage.
You can also set up your sales method so that a particular sales stage defaults a win probabilitythat
Make sure that an opportunity at aparticular sales stage gets included inforecasts.
When setting up your sales method, you can specify a default win probability. By entering adefault of 70 percent for opportunities in the Agreement sales stage, for example, you ensurethat all opportunities in the Agreement stage are included unless sales representatives changethe win probability manually.
You can enable forecasting onindividual line items separately.
By default, the win probability and close date are set for the whole opportunity. To forecastindividual revenue lines, you can expose the Win Probability field for the lines in the EditOpportunity page using Application Composer. See the Implementing Sales guide for detailson this and other advanced features.
Forecast Adjustment OptionsBy default, managers can adjust the submitted forecast revenue by opportunities on the Forecast Items tab and byproducts on the Products tab of the Edit Forecast page. Adjustments on the Products tab are especially handy whensales managers want to forecast products that aren't yet entered as part of an opportunity.
• You can specify the level of granularity for the product adjustments. For example, you can enable adjustmentsjust for broad groups of products, or down to the individual product. By default, the application enablesadjustments two levels down from the sales catalog root. The adjustments that managers make are visible totheir own managers after they submit the forecasts.
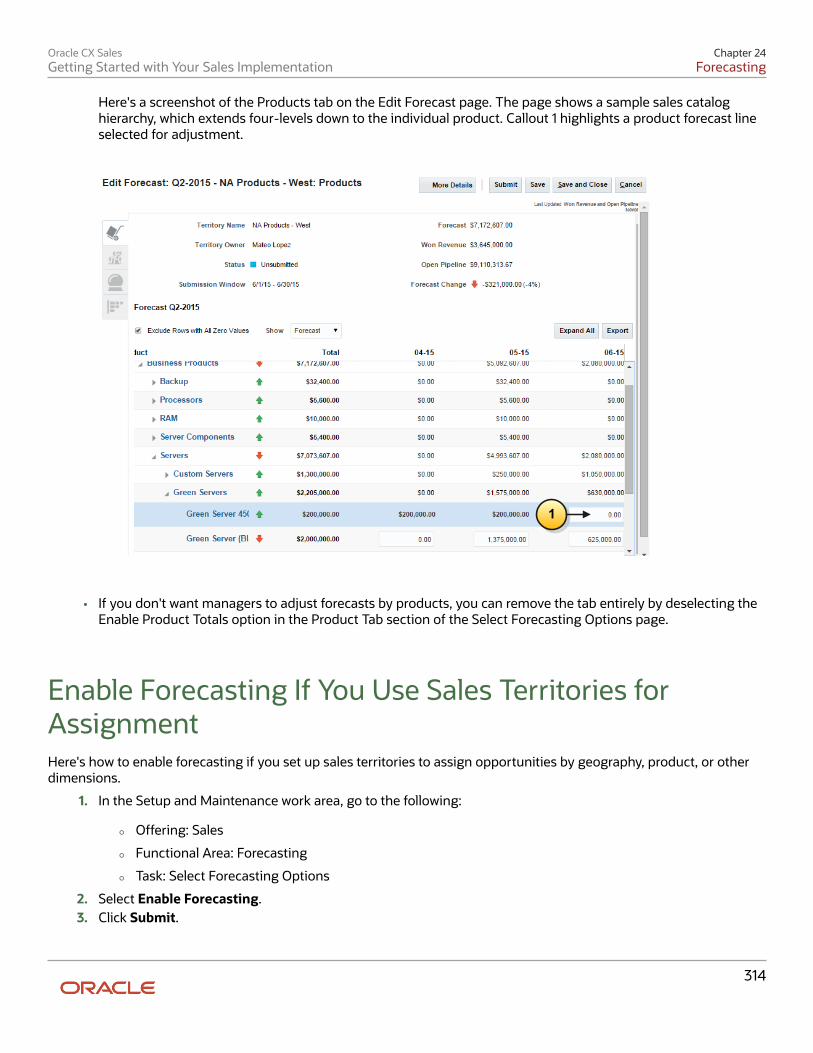
Oracle CX SalesGetting Started with Your Sales Implementation
Chapter 24Forecasting
314
Here's a screenshot of the Products tab on the Edit Forecast page. The page shows a sample sales cataloghierarchy, which extends four-levels down to the individual product. Callout 1 highlights a product forecast lineselected for adjustment.
1
• If you don't want managers to adjust forecasts by products, you can remove the tab entirely by deselecting theEnable Product Totals option in the Product Tab section of the Select Forecasting Options page.
Enable Forecasting If You Use Sales Territories forAssignmentHere's how to enable forecasting if you set up sales territories to assign opportunities by geography, product, or otherdimensions.
1. In the Setup and Maintenance work area, go to the following:
◦ Offering: Sales
◦ Functional Area: Forecasting
◦ Task: Select Forecasting Options
2. Select Enable Forecasting.3. Click Submit.
Oracle CX SalesGetting Started with Your Sales Implementation
Chapter 24Forecasting
315
The application runs a background process to generate your forecast windows and forecasts using theapplication's default option settings. The application generates quarterly forecasts for one year with a forecastsubmission window each month. After the process completes, your sales organization can start reviewing yourforecasts right away. You can also change the forecasting defaults on the Select Forecasting Options page.
Overview of the Sales Forecasting Options PageThe Select Forecasting Options page is the Swiss Army knife in your forecasting setup, so it's worth getting an overviewof the tools at your disposal. Here's an overview of the different page sections and what you can use them for.
Section Name Overview
Forecast Period Parameters The application generates the forecast submission windows using the default parametersentered in this section when you enable forecasting and at the end of every quarter.
The generated submission windows are displayed in the Scheduled Forecasts section whereyou can adjust them to conform with your actual forecasting schedule.
The automatically generated submission windows are approximations only, so you must adjustthe dates manually. You can also enter different parameters to generate entirely different set ofsubmission windows.
Unadjusted Forecast Criteria Here you specify the win probability the application uses to determine which opportunities toinclude in the forecast. You can also permit salespeople to include any opportunity they want.
Product Tab Selecting the Enable Product Totals displays the Products tab on the Edit Forecasts page. Salesmanagers use the tab to adjust forecasts by product group rather than by territories. DeselectEnable Product Totals to enable adjustments by territories only.
Metrics All forecasting metrics are enabled automatically, but you can use this section to change whatchart is displayed in the Forecasts landing page. If you want to enable the display of the chartcomparing forecasts to quotas, select the Quota option and disable the Enable Forecast TrendGraph option in Additional Settings. You can ignore the other options. They aren't used anymore.
Additional Settings Use this section to enable the forecast trend graph as the second chart on the Forecastslanding page, and to make it possible for managers to enter notes about their forecastadjustments.
Scheduled Forecasts The application displays the generated forecast submission windows in this section. You mustmanually adjust the dates of each submission window.
Oracle CX SalesGetting Started with Your Sales Implementation
Chapter 24Forecasting
316
Adjust Forecasting Windows and Set ForecastingOptionsAfter you enable forecasting, you can adjust the monthly forecast submission windows the application generated,change the criteria for including opportunities in forecasts, and set other forecasting options.
1. Open the task Select Forecasting Options from the Setup and Maintenance work area:
◦ Offering: Sales
◦ Functional Area: Sales Forecasting
◦ Task: Select Forecasting Options
Adjust the Forecast Submission WindowsThe application generates the monthly forecast submission windows using the parameters specified in the ScheduledForecasts section.
1. Review and adjust the monthly forecast submission windows the application generated in the ScheduledForecasts section of the page. Each window starts on the Territory Freeze Date and ends on the Due Date.
2. If you want to specify a different set of forecasting periods or want to forecast more than one quarter at a time,you can enter different parameters in the Forecast Period Parameters section. You must then regenerate thescheduled forecasts and submission windows by clicking Submit. Here's an explanation of the fields in thissection:
Field Explanation Provided and Suggested Values
Forecast Period Typically a quarter. Each forecast includesonly those opportunities set to close inthe forecast period.
Quarter
Adjustment Period This read-only field displays the type ofperiod you selected when you set up youraccounting calendar. Typically, this is amonth.
You can't edit this field.
Forecast Frequency Enter the number of submission windowsyou want to generate for each forecastperiod.
Because you are holding a forecastingcall each month and there are threemonths in each quarter, the value is 3.
First Forecast Due Date The date you want the first submissionwindow to end relative to the forecastperiod. The application takes the forecastsnapshot at the end of the day.
The First Forecast Due Date has thedefault value of 31 and the After theforecast period start date option isselected. These settings create the firstforecast submission window, which endson the last day of the first month in eachquarter.
Oracle CX SalesGetting Started with Your Sales Implementation
Chapter 24Forecasting
317
Field Explanation Provided and Suggested Values
The application generates thesubsequent submission windows basedon the number of days you enter hereand in the Territory Freeze Date field.
First Territory Freeze Date The number of days before the end datewhen you want the submission windowto start.
Any sales territory changes after thisfreeze date are ignored and applied onlyto subsequent forecasting windows.
For the forecast submission windows tostart at the beginning of each month, thenumber provided is 31.
Number of Concurrent Forecasts Specified how many quarters you cansubmit forecast for at the same time.
The default value is 1, so by default, youcan forecast only one quarter at a time.
Entering a 2 or a 3, makes it possible foryou to submit and adjust forecasts fortwo or three quarters every month.
Number of Scheduled Periods The number of forecast periods you wantto view.
Managers can only adjust the forecast forthe current period during the submissionwindows you generated, but you can viewthe forecasts for subsequent periods.
The number of forecast periods is setto 4 (four quarters) for the whole year.You can change the number of forecastperiods.
3. If you modified forecast period options, then click Submit.The application runs a process to regenerate the forecasting periods and updates your forecasts. The SelectForecasting Options page is unavailable until the processes completes. When the process completes, thegenerated submission windows appear in the Scheduled Forecasts region.
4. Click Submit when you are done.5. The application automatically generates new submission windows at the end of each quarter. You must
continue to manually adjust these windows as they are generated.
Set Forecasting CriteriaThe application includes in a quarterly forecast any opportunities that close within the quarter and match the forecastcriteria you set in this section.
1. By default, the application includes opportunities with a win probability greater than or equal to 70 percent. Youcan change the probability to include or exclude more opportunities. It's a good idea to specify a probabilitythat matches the default probability of the appropriate sales stage in your sales method.
Note: By default, the win probability is set at the opportunity level. To forecast at the level ofindividual revenue lines, you can expose the win probabilities for the lines in the Edit Opportunitypage using Application Composer.
Oracle CX SalesGetting Started with Your Sales Implementation
Chapter 24Forecasting
318
2. Selecting the Enable Forecast Criteria Override option makes it possible for salespeople or their managers toinclude or exclude an opportunity from a forecast while editing regardless of its win probability. If you select theoption, then salespeople can make a selection from the Include in Forecast list while editing an opportunity.
3. Select the Enable nonrevenue forecasting option if you want to generate separate forecasts for overlayterritories.
Specify the Granularity of Product Adjustments or Disable Adjustment byProduct EntirelyBy default, sales managers see the Products tab on the Forecasts page and can adjust forecasts by product. You canmake these changes:
• Specify number of sales catalog levels sales managers can adjust in the Product Hierarchy Depth field. Bydefault, managers can adjust product groups up to two levels below the catalog root.
• Hide the Products tab and disable adjustments by product entirely, by deselecting the Enable Product Totalsoption.
Change the Chart on the Landing Page and Turn on Adjustment NotesThe Forecasts landing page displays a Forecast Overview chart that compares your forecast with won revenue andopen pipeline. It also displays a second bar chart that shows your forecast by time periods. You can replace the secondchart with a chart comparing the forecast and quotas. You can also enable managers to add notes about their forecastadjustments.
• To display the forecast to quota comparison chart instead of the forecast by time periods bar chart, make theseselections:
◦ In the Metrics section of the Select Forecasting Options page, select the Quota option.
◦ In the Additional settings section, deselect the Enable Forecast Trend Graph option.
• If you want to enable sales managers to add notes when they adjust forecasts, select the Enable AdjustmentNotes option in the Additional Settings section. Sales managers can add adjustment notes for each forecastitem. They can also create and edit a single adjustment note for summary territory adjustments or a note forsummary product adjustments.
Specify the Types of Forecast Adjustments SalesManagers Can UseSales managers can adjust forecasts on the Products tab in a number of ways. They can adjust the revenue totalsfor products or groups of products, or they can adjust the product quantities, for example. A salesperson didn't getaround to entering the potential sale of 20 Green Servers? No problem! The manager can add the servers to the forecastwithout creating an opportunity. Managers can also enter their best case and worst-case forecast scenarios. All of theadjustments and scenarios get passed up the management chain. You should decide which forecast adjustment typesyou want to use in your sales organization and disable the rest. There's no point for managers to enter the best-case orworst-case scenarios if their management doesn't view them.
Oracle CX SalesGetting Started with Your Sales Implementation
Chapter 24Forecasting
319
Available Forecast Adjustment TypesManagers select the adjustment type they want to use from the Show list on the Product tab. Here are the availableadjustment types:
• Forecast
Managers can adjust the revenue for products or product groups for each forecast submission window.And they can even enter revenue for products that aren't associated with any opportunities. These revenueadjustments get reflected in the forecast landing page charts.
• Best Case
Managers can use this forecast to enter their best-case scenario numbers. You can also make it possible forsales managers to view the best case or worst case forecast totals on the Forecasts landing page. You mustexpose the Best Case and Worst Case fields on the landing page layout using Application Composer. SomeOracle customers also write Groovy scripts to automatically enter the sum of submitted and potential sales.
• Worst Case
Managers can use this forecast to indicate their best case scenario numbers. A Groovy script you create couldautomatically enter the submitted opportunity numbers.
• Quantity
Makes it possible to forecast and adjust forecasts by product quantity. This is the only adjustment type notdisplayed in the list by default.
• All Totals
Displays a table summarizing the totals for all the different forecast adjustment types. Here managers canupdate the total revenue forecast for the quarter, rather than updating the individual monthly numbers on theForecast selection.
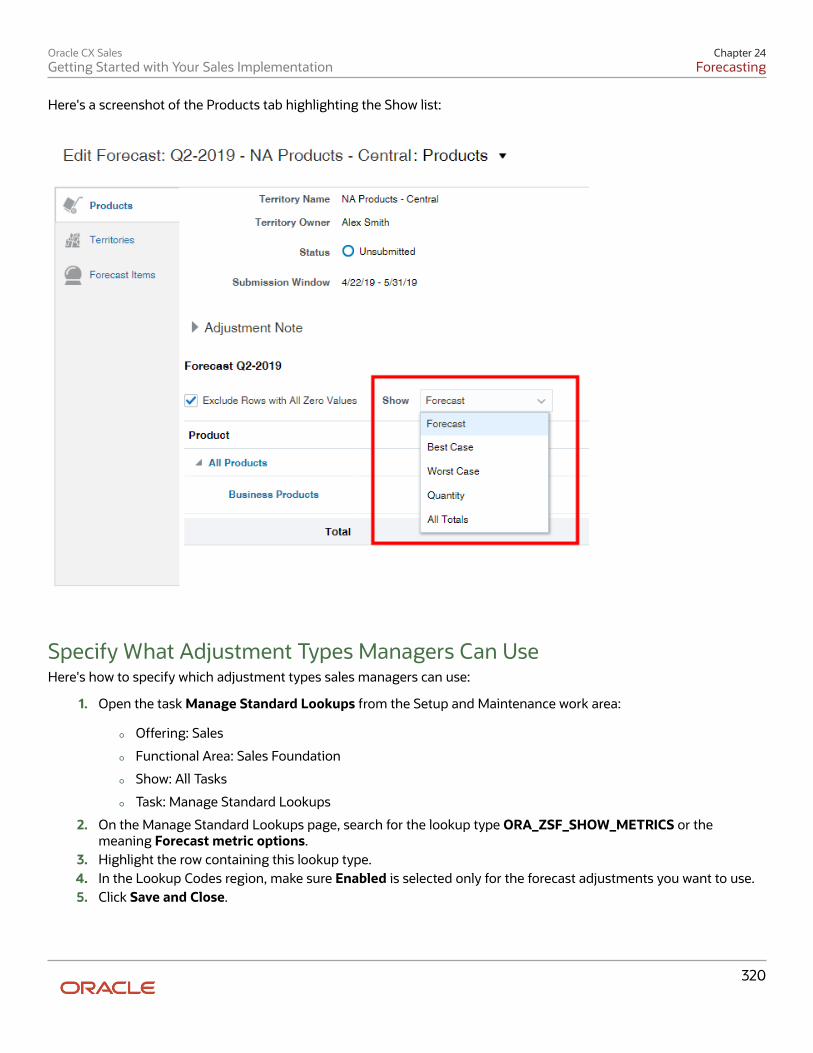
Oracle CX SalesGetting Started with Your Sales Implementation
Chapter 24Forecasting
320
Here's a screenshot of the Products tab highlighting the Show list:
Specify What Adjustment Types Managers Can UseHere's how to specify which adjustment types sales managers can use:
1. Open the task Manage Standard Lookups from the Setup and Maintenance work area:
◦ Offering: Sales
◦ Functional Area: Sales Foundation
◦ Show: All Tasks
◦ Task: Manage Standard Lookups
2. On the Manage Standard Lookups page, search for the lookup type ORA_ZSF_SHOW_METRICS or themeaning Forecast metric options.
3. Highlight the row containing this lookup type.4. In the Lookup Codes region, make sure Enabled is selected only for the forecast adjustments you want to use.5. Click Save and Close.
Oracle CX SalesGetting Started with Your Sales Implementation
Chapter 25Configure the Navigator and Home Page
321
25 Configure the Navigator and Home Page
A Single Page for All Your Sales ActivitiesIn the default home page design provided by Oracle, salespeople can access both the different work areas they needas well as the reports and analytics that highlight key sales information. Here's a brief description of the home pagesections. You can configure the different sections and even hide some, but you can't change their order on the page.
Global Toolbar and Springboard with Navigation Icons
Callout Number Region Description
1 Global region with toolbar. The toolbar includes global search andicons to open the Navigator, Home page,and the Settings and Actions menu,among others. The toolbar, described in aseparate topic, is available on all pages.
2 Tabs that group navigation icons. Which tabs users see depends primarilyon their security privileges. Because setupusers have broad privileges, you see manymore tabs than sales users. For example,sales users never see the Service or HelpDesk tabs, as these aren't part of CX Sales.
Sign in as a Sales Representative or aSales Manager to get an idea of how theapplication is set up by default for eachuser.
Using the Structure tool, you can renamethe tabs, hide them, change heir order,and move their contents.
The tabs correspond to the groupings yousee in the Navigator, but you can chooseto display only a subset of what's availablein the Navigator.
3 Navigation icons within the tab youselected. This region is called thespringboard.
Navigation icons within the tab youselected.
The navigation icons correspond to theselections you see in the Navigator.
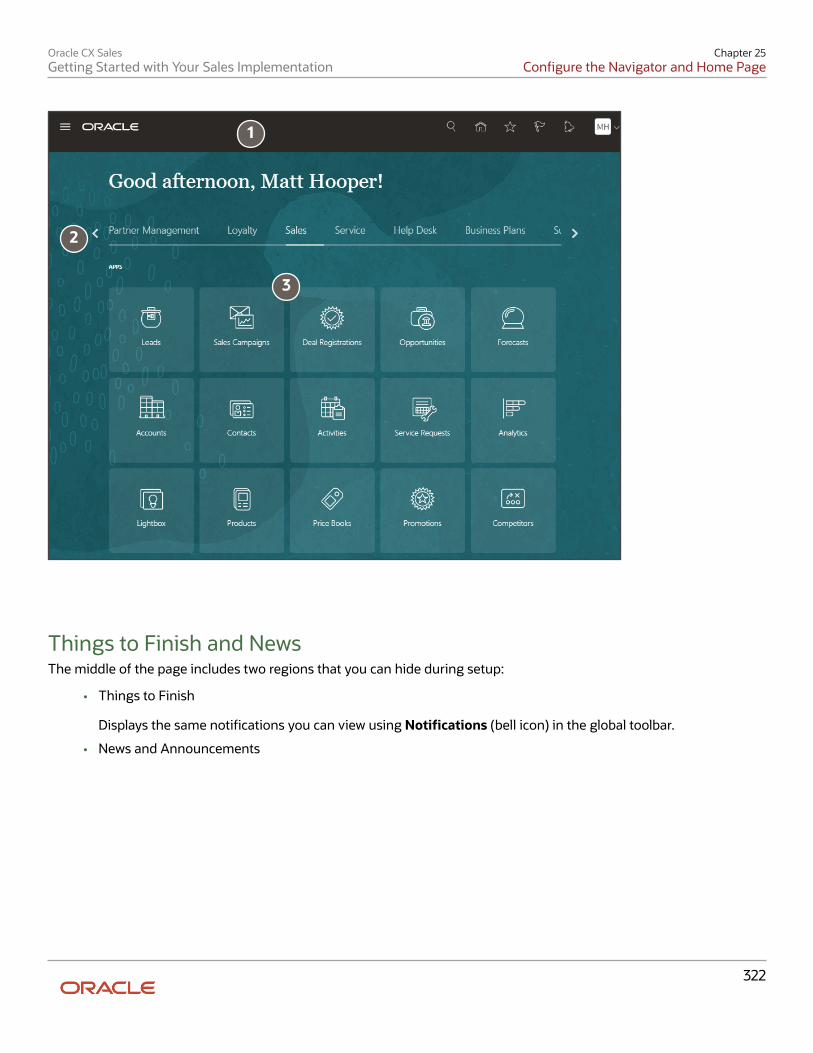
Oracle CX SalesGetting Started with Your Sales Implementation
Chapter 25Configure the Navigator and Home Page
322
1
2
3
Things to Finish and NewsThe middle of the page includes two regions that you can hide during setup:
• Things to Finish
Displays the same notifications you can view using Notifications (bell icon) in the global toolbar.
• News and Announcements
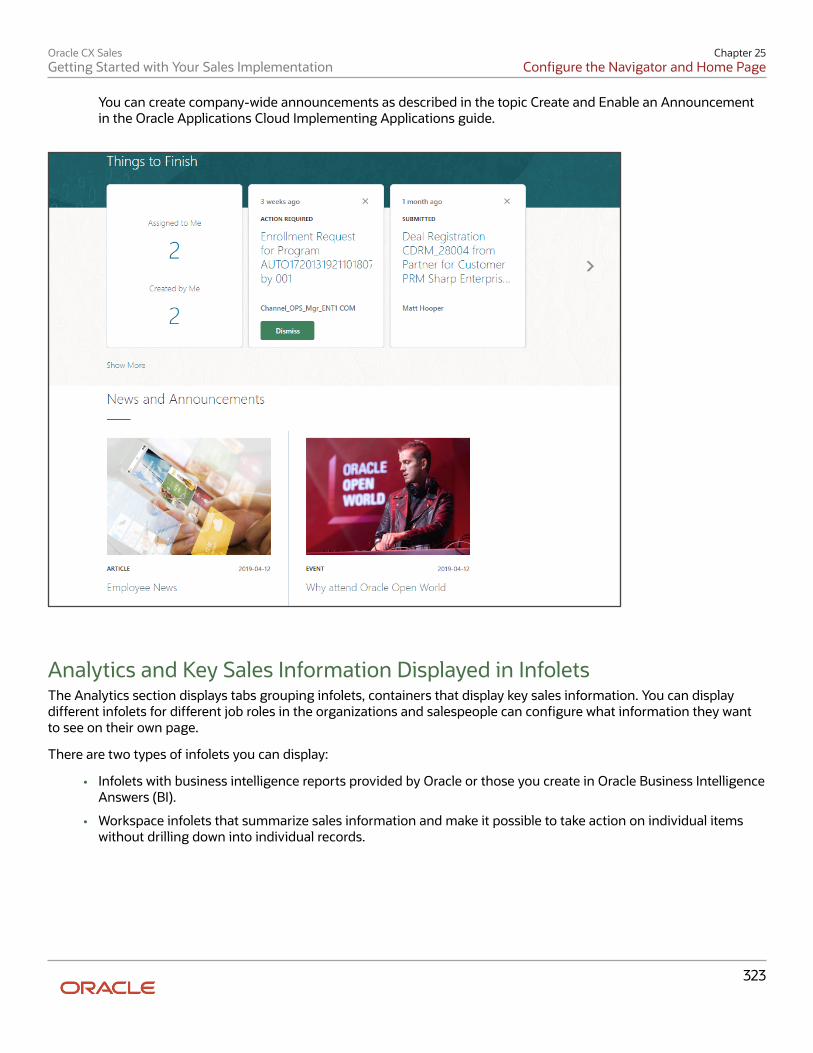
Oracle CX SalesGetting Started with Your Sales Implementation
Chapter 25Configure the Navigator and Home Page
323
You can create company-wide announcements as described in the topic Create and Enable an Announcementin the Oracle Applications Cloud Implementing Applications guide.
Analytics and Key Sales Information Displayed in InfoletsThe Analytics section displays tabs grouping infolets, containers that display key sales information. You can displaydifferent infolets for different job roles in the organizations and salespeople can configure what information they wantto see on their own page.
There are two types of infolets you can display:
• Infolets with business intelligence reports provided by Oracle or those you create in Oracle Business IntelligenceAnswers (BI).
• Workspace infolets that summarize sales information and make it possible to take action on individual itemswithout drilling down into individual records.
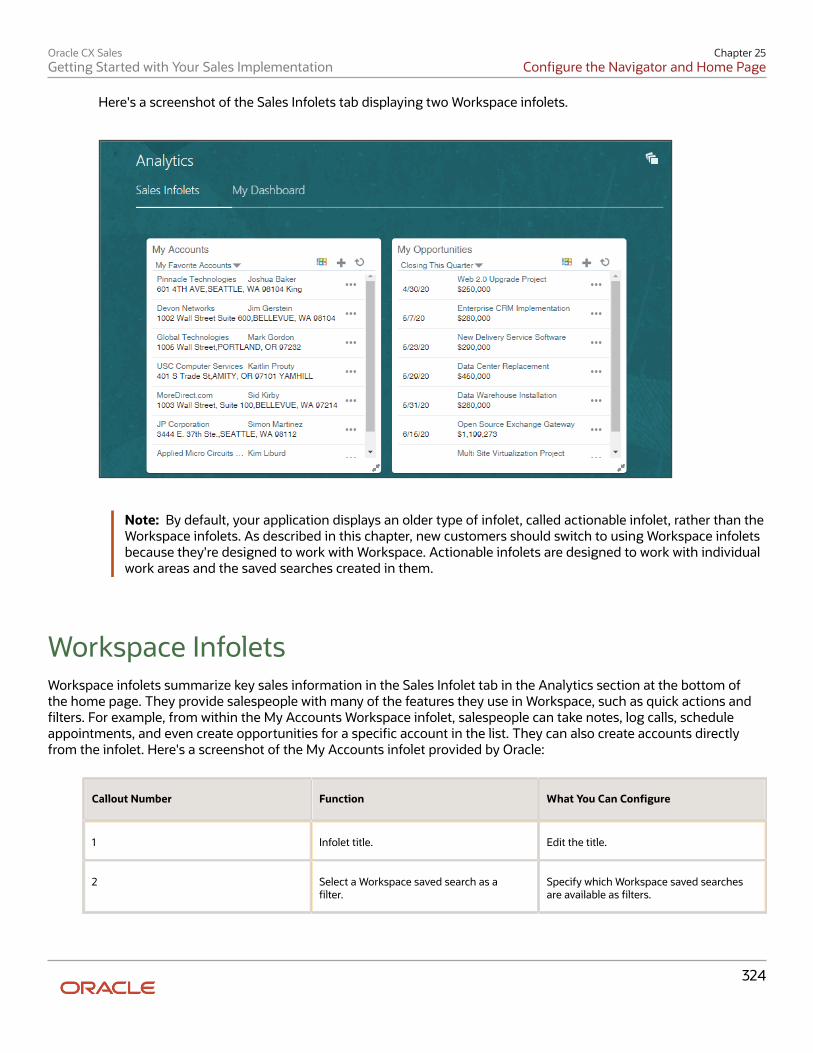
Oracle CX SalesGetting Started with Your Sales Implementation
Chapter 25Configure the Navigator and Home Page
324
Here's a screenshot of the Sales Infolets tab displaying two Workspace infolets.
Note: By default, your application displays an older type of infolet, called actionable infolet, rather than theWorkspace infolets. As described in this chapter, new customers should switch to using Workspace infoletsbecause they're designed to work with Workspace. Actionable infolets are designed to work with individualwork areas and the saved searches created in them.
Workspace InfoletsWorkspace infolets summarize key sales information in the Sales Infolet tab in the Analytics section at the bottom ofthe home page. They provide salespeople with many of the features they use in Workspace, such as quick actions andfilters. For example, from within the My Accounts Workspace infolet, salespeople can take notes, log calls, scheduleappointments, and even create opportunities for a specific account in the list. They can also create accounts directlyfrom the infolet. Here's a screenshot of the My Accounts infolet provided by Oracle:
Callout Number Function What You Can Configure
1 Infolet title. Edit the title.
2 Select a Workspace saved search as afilter.
Specify which Workspace saved searchesare available as filters.
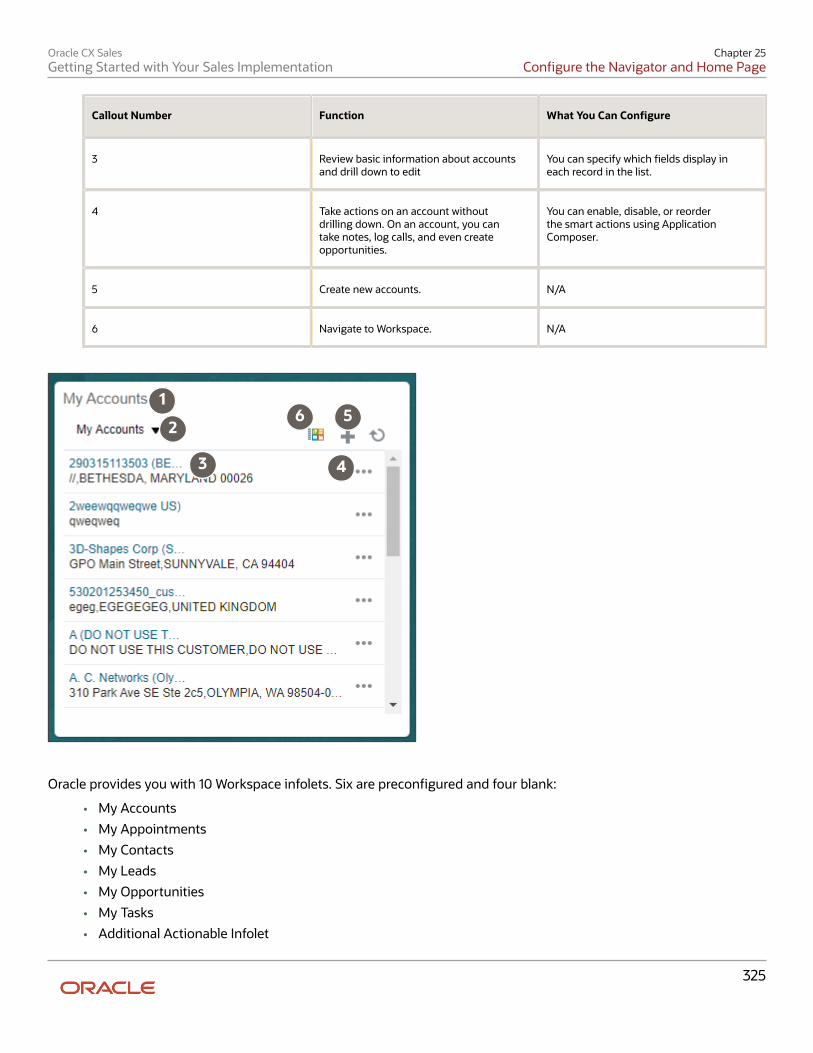
Oracle CX SalesGetting Started with Your Sales Implementation
Chapter 25Configure the Navigator and Home Page
325
Callout Number Function What You Can Configure
3 Review basic information about accountsand drill down to edit
You can specify which fields display ineach record in the list.
4 Take actions on an account withoutdrilling down. On an account, you cantake notes, log calls, and even createopportunities.
You can enable, disable, or reorderthe smart actions using ApplicationComposer.
5 Create new accounts. N/A
6 Navigate to Workspace. N/A
2
4
5
3
16
Oracle provides you with 10 Workspace infolets. Six are preconfigured and four blank:
• My Accounts
• My Appointments
• My Contacts
• My Leads
• My Opportunities
• My Tasks
• Additional Actionable Infolet
Oracle CX SalesGetting Started with Your Sales Implementation
Chapter 25Configure the Navigator and Home Page
326
• Additional Actionable Infolet
• Additional Actionable Infolet
• Additional Actionable Infolet
As a sales administrator or setup user, you can configure the information in each of the infolets, even those thatare preconfigured. You can specify which Workspace saved searches are available as filters, change the infolet title,and decide how you want the infolet information to display. You can configure Workspace infolets to display anycombination of saved searches from Workspace. Suppose, for example, that you created a project custom object totrack projects involving multiple customers. You could configure one of the Workspace infolets as My Projects to trackthe accounts and the tasks involved.
Setup OverviewHere's an overview of the steps to configure your home page and navigation to application features.
Home PageHere's a summary of the steps to configure your home page appearance.
Step Description Navigation Where to Get More Details
1 Create a sandbox with theAppearance tool.
Configuration > Sandboxes See the video and topic:Configure Home PageAppearance
3 Upload your companylogo and save your newconfiguration.
In the sandbox, select Tools >Appearance
Covered in the same videoand topic.
For additional configurationoptions, see the Configurationof Home Page andNavigation chapter of theOracle Applications CloudConfiguring and ExtendingApplications guide.
4 You can remove the Thingsto Finish and the News andAnnouncements sections ofthe home page, by clickingHome Page Display (top iconin the Appearance tool) andsetting Visible to No.
In the Appearance tool, clickHome Page Display
Covered in the same videoand topic.
5 Publish your sandbox. Click Publish in the sandbox. Covered in the same videoand topic.
Oracle CX SalesGetting Started with Your Sales Implementation
Chapter 25Configure the Navigator and Home Page
327
Navigation and Infolet TabsHere's an overview of the steps to configure navigation and specify which infolet tabs appear in the Analytics section.
Step Description Navigation Where to Get More Details
1 Sign in as users with thedifferent job roles you areusing and review the defaultnavigation for each to seewhich items you want to hideor configure.
Not applicable. See the topic: What DifferentSales Job Roles See in theNavigator and Springboard
2 Create a sandbox with theStructure tool.
Configuration > Sandboxes See the video and topic:Configure Navigation
3 Specify which itemssalespeople see on theNavigator and which iconsthey see on the home pagespringboard and in whichorder. You can hide unwanteditems from everyone oryou can add EL Expressionconditions to make themvisible only to a subset ofusers. You can make featuresaccessible from both theNavigator and the home pagespringboard, or from theNavigator only.
In the sandbox, select Tools >Structure
Covered in the same videoand topic.
4 Specify which infolet tabs inthe Analytics section appearand in which order. All ofthe Workspace infolets youneed to display key salesinformation are availablewithin the Sales Infolet tab, soyou can hide the rest unlessyou need them.
In the Structure tool, click theHome Configuration tab.
Covered in the same topic.
5 Publish your sandbox. Click Publish in the sandbox. Covered in the same topic.
Workspace Infolet Configuration
Oracle CX SalesGetting Started with Your Sales Implementation
Chapter 25Configure the Navigator and Home Page
328
Step Description Navigation Where to Get More Details
1 Create and enter a sandboxwith Page Composer as yourtool. If you want to displaydifferent Workspace infoletconfigurations for differentjob roles, you can specify a jobrole.
Configuration > Sandboxes See the topic: Create andEnter a Sandbox with PageComposer As Your Tool
2 Specify which Workspaceinfolets you want to expose onthe page and how you wantthe page to look.
While in Page Composer,select each infolet you wantto display from the InfoletRepository.
See the topic: Specify WhichWorkspace Infolets Displayand In What Order
3 Configure the content of eachWorkspace infolet. You can:
• Change the infolet title• Specify which
Workspace savedsearches salespeoplecan select
• Choose the fields thatdisplay in each recordfor each saved search
While in Page Composer, openeach Workspace infolet and goto Actions > Configure
See the topic: ConfigureWorkspace Infolets
4 Remove any unused infoletsfrom the list of infoletsavailable for display.
While in Page Composer, openeach Workspace infolet and goto Actions > Edit Visibility
Covered in the same topic.
5 Save your work by clickingClose in the Page Composertoolbar, and publish yoursandbox.
Click Close in Page Composerand then Publish in thesandbox.
N/A
6 In Application Composer, youcan enable, disable, or reorderthe actions users can takefor each object. This setup isoptional.
Application Composer >Common Setup > SmartActions
See the topic "Overviewof Smart Actions" in theConfiguring ApplicationsUsing Application Composerguide
Related Topics
• Overview of Configuring Home Page and Navigation
• Overview of Smart Actions
Configure Home Page Appearance
Oracle CX SalesGetting Started with Your Sales Implementation
Chapter 25Configure the Navigator and Home Page
329
Watch video
Oracle provides you with a default home page design that salespeople can use to access all of the navigation iconsand key sales information they need. While you can still use alternate multipage designs that are more configurable,Oracle recommends that for CX Sales, you use the default theme and limit your configuration to uploading your logoand hiding sections of the page you don't need. You can't change the order of the sections on the page.
1. Create and enter a sandbox with the Appearance tool enabled:a. In the Navigator, click Configuration > Sandboxes.b. Click Create Sandbox.c. Enter a sandbox name.d. Select Active for the Appearance tool.e. Click Create and Enter.f. From the sandbox Tools menu, select Appearance to enter the tool.
2. In the Logo field, select File from the list and upload your logo.The logo image must be saved as a .png file with a transparent background with a recommended maximumsize of 200 pixels wide and 50 pixels high.
3. If you're hiding the Things to Finish and News and Announcements sections, there's no point in uploading animage using Cover Image. The image appears in the center of the page under these sections.
4. Remove either or both of the Things to Finish and News and Announcements sections of the page if youaren't using them. Things to Finish displays notifications you can also access from the toolbar. News andAnnouncements can display your company-wide announcements. Here's how to hide them:
a. Click Home Page Display, the top icon on the page.b. Click in the Visible column for each section and select No.
5. View your new home page configuration while inside the sandbox by clicking Home.6. Publish the sandbox:
a. Click the sandbox name and select Publish.b. On the Sandbox Detail page, click Publish.
You can check the progress of the publish process in the Current Status section.
Configure Navigation
The Different Factors That Determine What Users See on theHome PageWhich selections users see in the Navigator, and which icons and infolets they see on the home page depends on anumber of factors:
• Security rolesWhat users see in the UI is primarily determined by their security roles. For example, users you provision withany of the standard sales job roles, get to see all of the sales navigation, including Opportunities, Accounts,Leads, Contacts and so on. But they don't see the Security Console, a feature only available to users with theIT Security Manager job role. Because users are granted the Employee abstract role, they get many human
Oracle CX SalesGetting Started with Your Sales Implementation
Chapter 25Configure the Navigator and Home Page
330
resources features on the Navigator that aren't pertinent to sales unless you're implementing Oracle HCMCloud.
• Configuration in the Structure tool
Use the Structure tool to fine-tune the access granted by the security roles:
◦ Specify if navigation is available in the Navigator and the springboard or hidden from users. You cancreate, edit, and change the order of the different headings (called groups) and even create new groups.
◦ Specify which sales infolet tabs appear and in which order.
You can add conditions (EL Expressions), to display or hide specific items or groups. For example, you canremove an item from view for a specific user or a specific job role. Sales representatives have the securitypermissions to import accounts and contacts and monitor background processes, but you may want to leavethese rather technical tasks for sales administrators. Some selections already include EL Expressions that makeitems visible depending on system profile option settings or only when you enable a particular functional areaof an offering. You can append additional conditions to the existing expressions.
• Default infolet views you create
Using Page Composer, you can specify which infolets appear in an infolet tab by default and in which order.Hiding an infolet doesn't remove the infolet entirely. Users can always add it back to their home page. If youwant to hide infolets from users entirely, you must edit the visibility of each one. See the Enable and ConfigureWorkspace Infolets section for details.
• Personalization
Individual users can create their own personal views of the navigation icons they see on their springboard, butthey can't change what displays on the Navigator. Users can also select the infolets they want to display andchange their display order. Any personalization supersedes the default Infolet views you created.
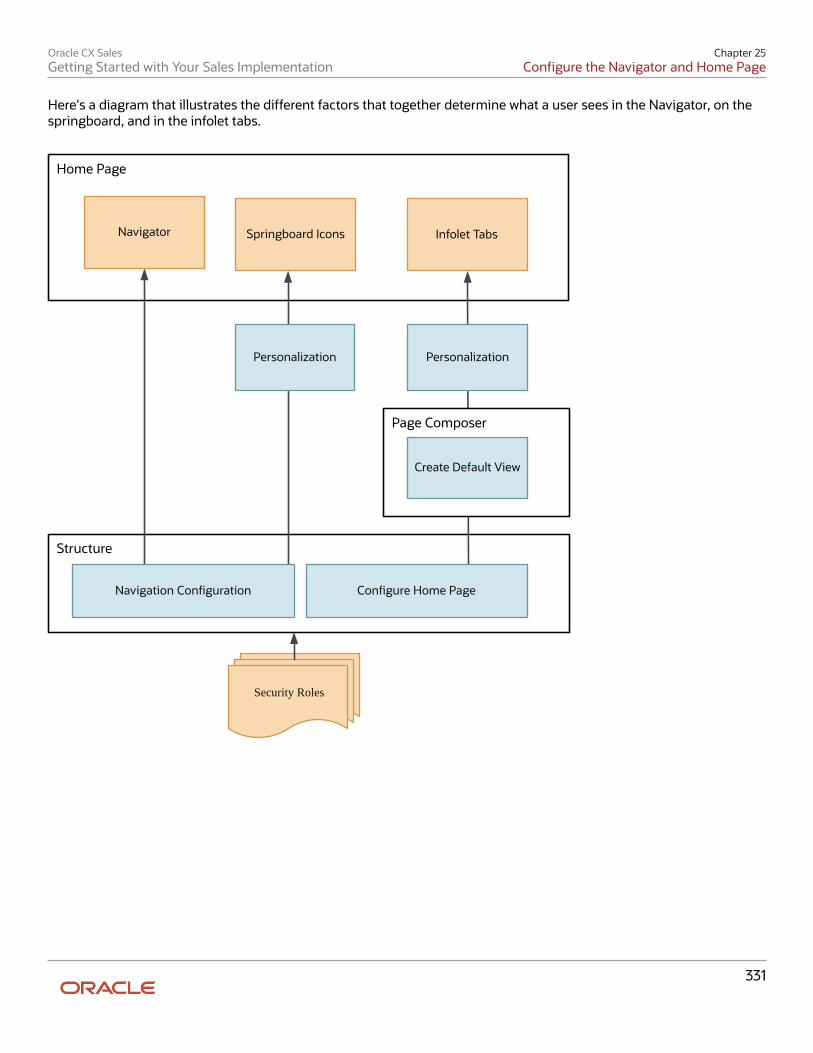
Oracle CX SalesGetting Started with Your Sales Implementation
Chapter 25Configure the Navigator and Home Page
331
Here's a diagram that illustrates the different factors that together determine what a user sees in the Navigator, on thespringboard, and in the infolet tabs.
Home Page
Structure
Navigator Springboard Icons Infolet Tabs
Personalization Personalization
Page Composer
Create Default View
Navigation Conguration Congure Home Page
Security Roles
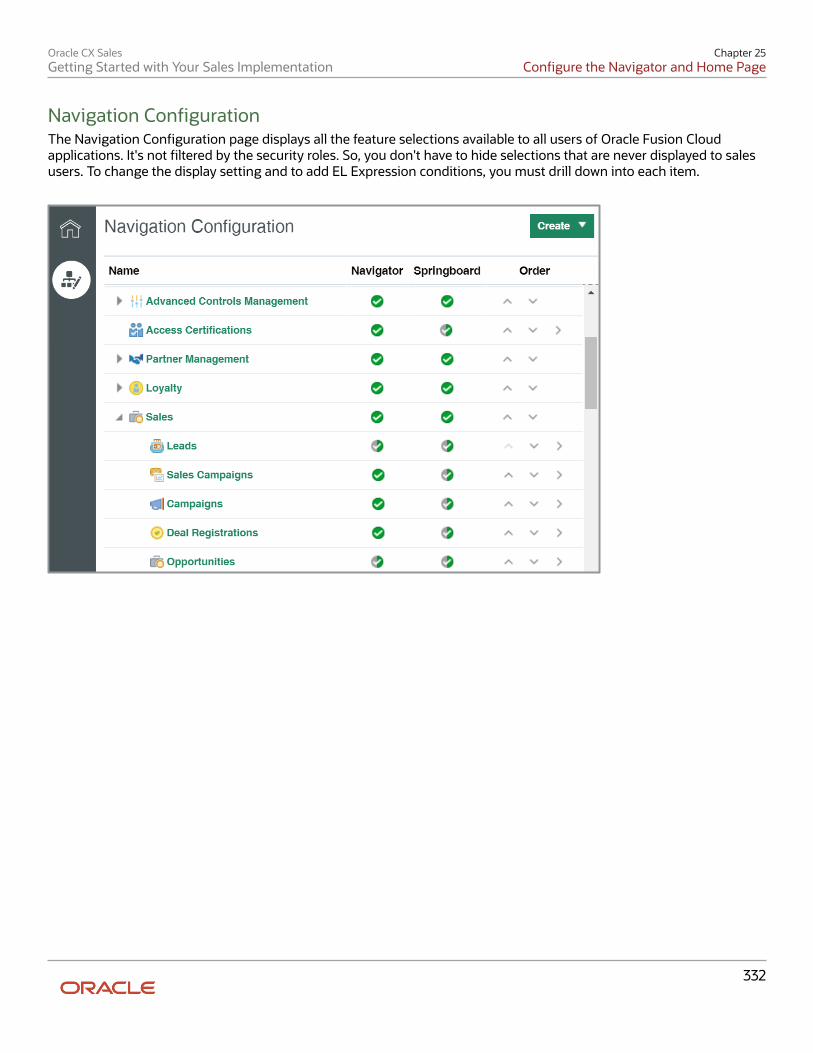
Oracle CX SalesGetting Started with Your Sales Implementation
Chapter 25Configure the Navigator and Home Page
332
Navigation ConfigurationThe Navigation Configuration page displays all the feature selections available to all users of Oracle Fusion Cloudapplications. It's not filtered by the security roles. So, you don't have to hide selections that are never displayed to salesusers. To change the display setting and to add EL Expression conditions, you must drill down into each item.
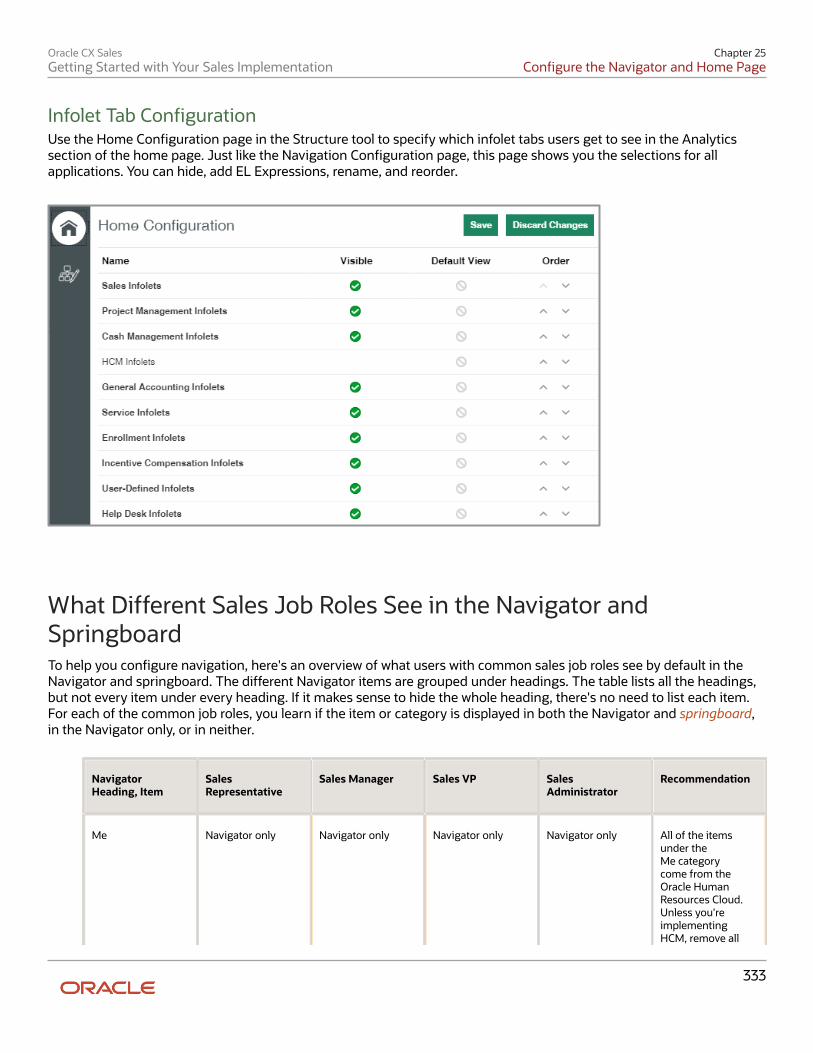
Oracle CX SalesGetting Started with Your Sales Implementation
Chapter 25Configure the Navigator and Home Page
333
Infolet Tab ConfigurationUse the Home Configuration page in the Structure tool to specify which infolet tabs users get to see in the Analyticssection of the home page. Just like the Navigation Configuration page, this page shows you the selections for allapplications. You can hide, add EL Expressions, rename, and reorder.
What Different Sales Job Roles See in the Navigator andSpringboardTo help you configure navigation, here's an overview of what users with common sales job roles see by default in theNavigator and springboard. The different Navigator items are grouped under headings. The table lists all the headings,but not every item under every heading. If it makes sense to hide the whole heading, there's no need to list each item.For each of the common job roles, you learn if the item or category is displayed in both the Navigator and springboard,in the Navigator only, or in neither.
NavigatorHeading, Item
SalesRepresentative
Sales Manager Sales VP SalesAdministrator
Recommendation
Me Navigator only Navigator only Navigator only Navigator only All of the itemsunder theMe categorycome from theOracle HumanResources Cloud.Unless you'reimplementingHCM, remove all
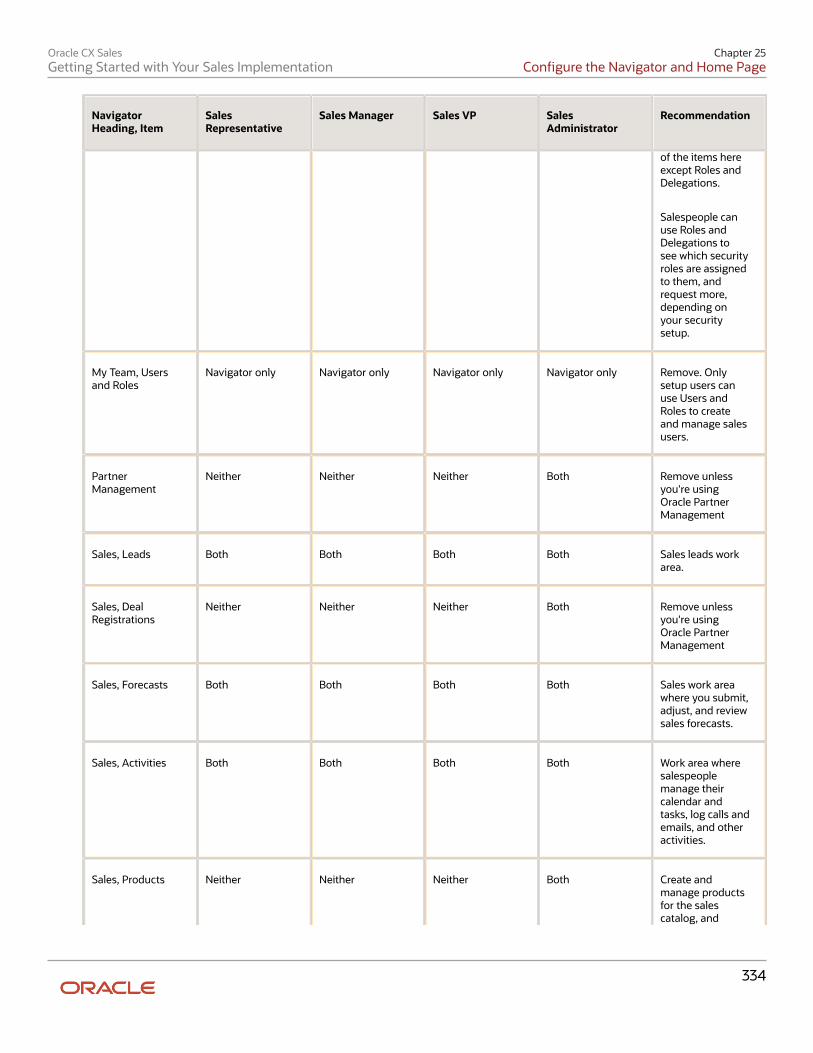
Oracle CX SalesGetting Started with Your Sales Implementation
Chapter 25Configure the Navigator and Home Page
334
NavigatorHeading, Item
SalesRepresentative
Sales Manager Sales VP SalesAdministrator
Recommendation
of the items hereexcept Roles andDelegations.
Salespeople canuse Roles andDelegations tosee which securityroles are assignedto them, andrequest more,depending onyour securitysetup.
My Team, Usersand Roles
Navigator only Navigator only Navigator only Navigator only Remove. Onlysetup users canuse Users andRoles to createand manage salesusers.
PartnerManagement
Neither Neither Neither Both Remove unlessyou're usingOracle PartnerManagement
Sales, Leads Both Both Both Both Sales leads workarea.
Sales, DealRegistrations
Neither Neither Neither Both Remove unlessyou're usingOracle PartnerManagement
Sales, Forecasts Both Both Both Both Sales work areawhere you submit,adjust, and reviewsales forecasts.
Sales, Activities Both Both Both Both Work area wheresalespeoplemanage theircalendar andtasks, log calls andemails, and otheractivities.
Sales, Products Neither Neither Neither Both Create andmanage productsfor the salescatalog, and
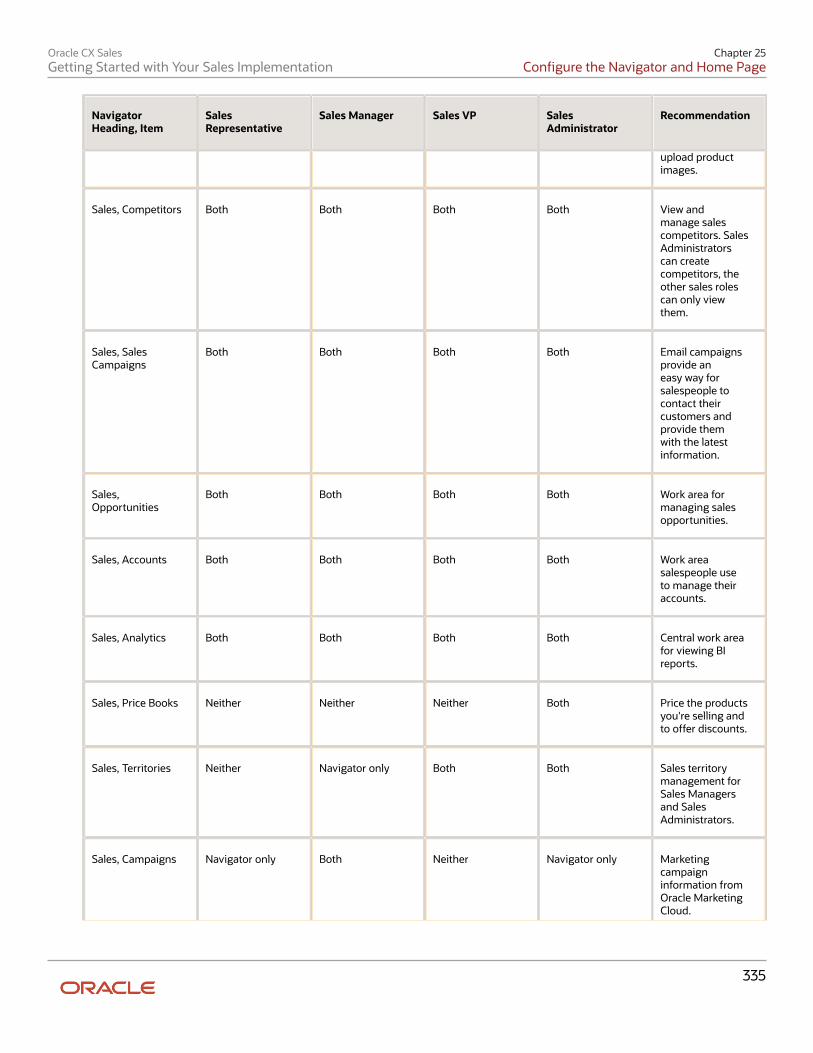
Oracle CX SalesGetting Started with Your Sales Implementation
Chapter 25Configure the Navigator and Home Page
335
NavigatorHeading, Item
SalesRepresentative
Sales Manager Sales VP SalesAdministrator
Recommendation
upload productimages.
Sales, Competitors Both Both Both Both View andmanage salescompetitors. SalesAdministratorscan createcompetitors, theother sales rolescan only viewthem.
Sales, SalesCampaigns
Both Both Both Both Email campaignsprovide aneasy way forsalespeople tocontact theircustomers andprovide themwith the latestinformation.
Sales,Opportunities
Both Both Both Both Work area formanaging salesopportunities.
Sales, Accounts Both Both Both Both Work areasalespeople useto manage theiraccounts.
Sales, Analytics Both Both Both Both Central work areafor viewing BIreports.
Sales, Price Books Neither Neither Neither Both Price the productsyou're selling andto offer discounts.
Sales, Territories Neither Navigator only Both Both Sales territorymanagement forSales Managersand SalesAdministrators.
Sales, Campaigns Navigator only Both Neither Navigator only Marketingcampaigninformation fromOracle MarketingCloud.
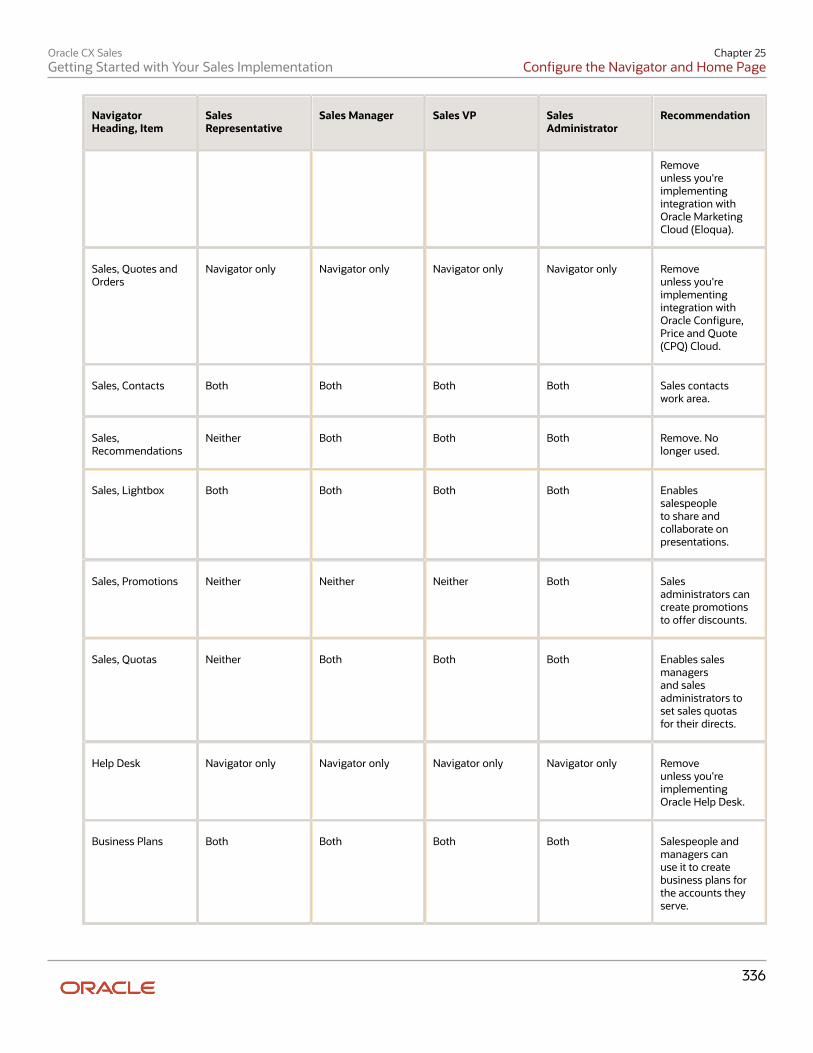
Oracle CX SalesGetting Started with Your Sales Implementation
Chapter 25Configure the Navigator and Home Page
336
NavigatorHeading, Item
SalesRepresentative
Sales Manager Sales VP SalesAdministrator
Recommendation
Removeunless you'reimplementingintegration withOracle MarketingCloud (Eloqua).
Sales, Quotes andOrders
Navigator only Navigator only Navigator only Navigator only Removeunless you'reimplementingintegration withOracle Configure,Price and Quote(CPQ) Cloud.
Sales, Contacts Both Both Both Both Sales contactswork area.
Sales,Recommendations
Neither Both Both Both Remove. Nolonger used.
Sales, Lightbox Both Both Both Both Enablessalespeopleto share andcollaborate onpresentations.
Sales, Promotions Neither Neither Neither Both Salesadministrators cancreate promotionsto offer discounts.
Sales, Quotas Neither Both Both Both Enables salesmanagersand salesadministrators toset sales quotasfor their directs.
Help Desk Navigator only Navigator only Navigator only Navigator only Removeunless you'reimplementingOracle Help Desk.
Business Plans Both Both Both Both Salespeople andmanagers canuse it to createbusiness plans forthe accounts theyserve.

Oracle CX SalesGetting Started with Your Sales Implementation
Chapter 25Configure the Navigator and Home Page
337
NavigatorHeading, Item
SalesRepresentative
Sales Manager Sales VP SalesAdministrator
Recommendation
ContractManagement
Neither Neither Neither Navigator only Remove.Sales users,including SalesAdministratorscannot usecontracts withoutadditional securityroles.
IncentiveCompensation
Navigator only Navigator only Navigator only Navigator only Manage salescompensation.
Procurement Navigator only Navigator only Navigator only Navigator only Removeunless you'reimplementingpurchasing.
My Enterprise,Offerings
Neither Neither Neither Both Salesadministrators andsetup users enablethe offeringsrelated to theapplications theypurchased. Youmust enablethe offering andits features forimplementation.
My Enterprise,New Features
Neither Neither Neither Navigator only Salesadministrators andsetup users
My Enterprise,Subscriptions
Neither Neither Neither Navigator only OracleSubscriptionManagementinformation.
Removeunless you'reimplementingOracleSubscriptionManagement.
Tools, SetPreferences
Both Both Both Both Lets users resettheir password,upload theirpicture. The sameSet Preferences isalso available inthe Settings andActions menu that
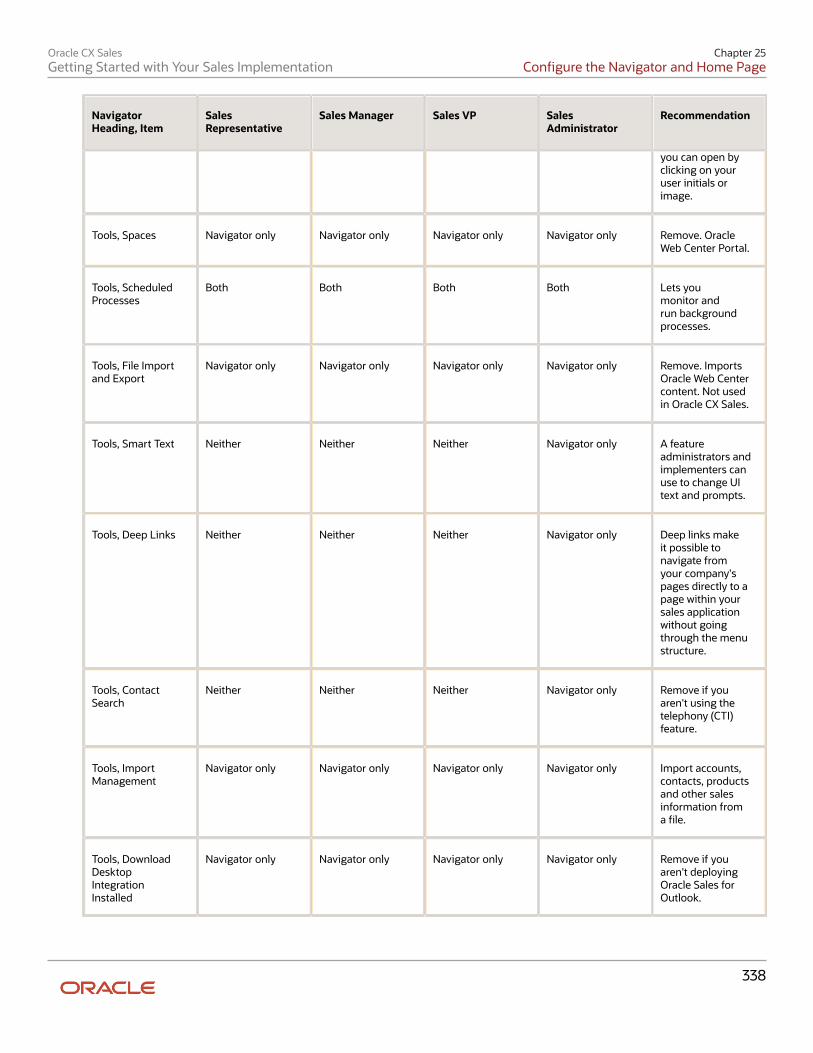
Oracle CX SalesGetting Started with Your Sales Implementation
Chapter 25Configure the Navigator and Home Page
338
NavigatorHeading, Item
SalesRepresentative
Sales Manager Sales VP SalesAdministrator
Recommendation
you can open byclicking on youruser initials orimage.
Tools, Spaces Navigator only Navigator only Navigator only Navigator only Remove. OracleWeb Center Portal.
Tools, ScheduledProcesses
Both Both Both Both Lets youmonitor andrun backgroundprocesses.
Tools, File Importand Export
Navigator only Navigator only Navigator only Navigator only Remove. ImportsOracle Web Centercontent. Not usedin Oracle CX Sales.
Tools, Smart Text Neither Neither Neither Navigator only A featureadministrators andimplementers canuse to change UItext and prompts.
Tools, Deep Links Neither Neither Neither Navigator only Deep links makeit possible tonavigate fromyour company'spages directly to apage within yoursales applicationwithout goingthrough the menustructure.
Tools, ContactSearch
Neither Neither Neither Navigator only Remove if youaren't using thetelephony (CTI)feature.
Tools, ImportManagement
Navigator only Navigator only Navigator only Navigator only Import accounts,contacts, productsand other salesinformation froma file.
Tools, DownloadDesktopIntegrationInstalled
Navigator only Navigator only Navigator only Navigator only Remove if youaren't deployingOracle Sales forOutlook.
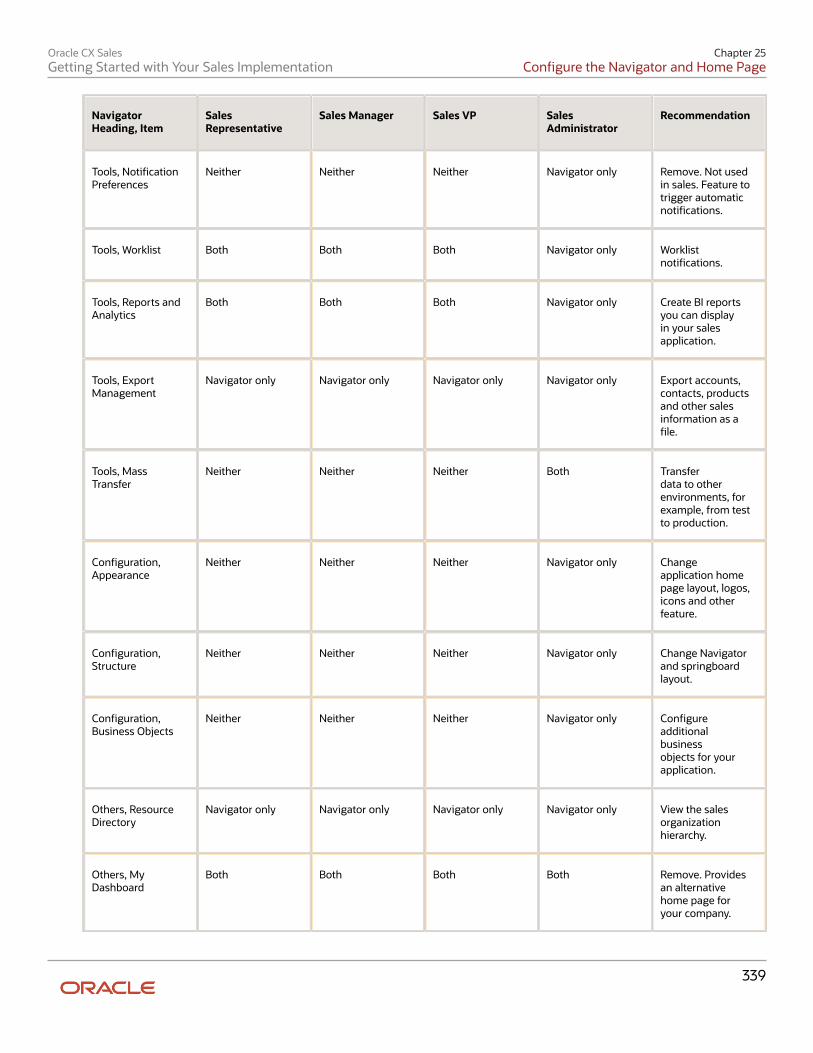
Oracle CX SalesGetting Started with Your Sales Implementation
Chapter 25Configure the Navigator and Home Page
339
NavigatorHeading, Item
SalesRepresentative
Sales Manager Sales VP SalesAdministrator
Recommendation
Tools, NotificationPreferences
Neither Neither Neither Navigator only Remove. Not usedin sales. Feature totrigger automaticnotifications.
Tools, Worklist Both Both Both Navigator only Worklistnotifications.
Tools, Reports andAnalytics
Both Both Both Navigator only Create BI reportsyou can displayin your salesapplication.
Tools, ExportManagement
Navigator only Navigator only Navigator only Navigator only Export accounts,contacts, productsand other salesinformation as afile.
Tools, MassTransfer
Neither Neither Neither Both Transferdata to otherenvironments, forexample, from testto production.
Configuration,Appearance
Neither Neither Neither Navigator only Changeapplication homepage layout, logos,icons and otherfeature.
Configuration,Structure
Neither Neither Neither Navigator only Change Navigatorand springboardlayout.
Configuration,Business Objects
Neither Neither Neither Navigator only Configureadditionalbusinessobjects for yourapplication.
Others, ResourceDirectory
Navigator only Navigator only Navigator only Navigator only View the salesorganizationhierarchy.
Others, MyDashboard
Both Both Both Both Remove. Providesan alternativehome page foryour company.
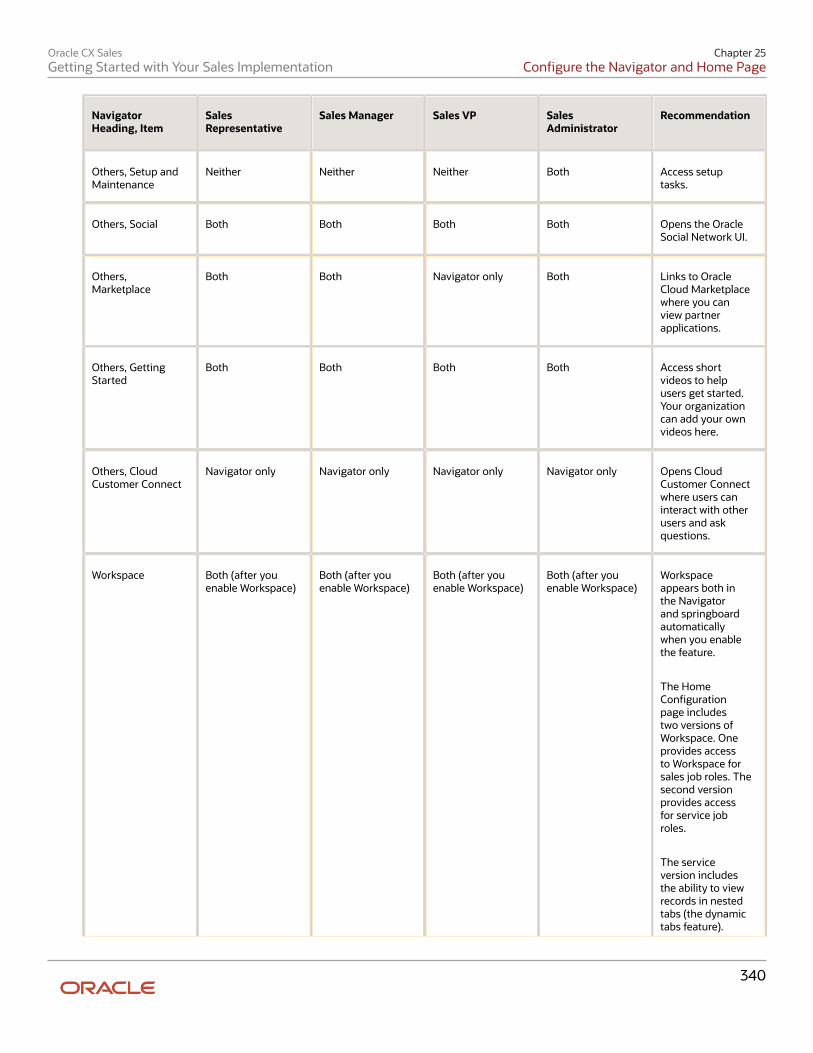
Oracle CX SalesGetting Started with Your Sales Implementation
Chapter 25Configure the Navigator and Home Page
340
NavigatorHeading, Item
SalesRepresentative
Sales Manager Sales VP SalesAdministrator
Recommendation
Others, Setup andMaintenance
Neither Neither Neither Both Access setuptasks.
Others, Social Both Both Both Both Opens the OracleSocial Network UI.
Others,Marketplace
Both Both Navigator only Both Links to OracleCloud Marketplacewhere you canview partnerapplications.
Others, GettingStarted
Both Both Both Both Access shortvideos to helpusers get started.Your organizationcan add your ownvideos here.
Others, CloudCustomer Connect
Navigator only Navigator only Navigator only Navigator only Opens CloudCustomer Connectwhere users caninteract with otherusers and askquestions.
Workspace Both (after youenable Workspace)
Both (after youenable Workspace)
Both (after youenable Workspace)
Both (after youenable Workspace)
Workspaceappears both inthe Navigatorand springboardautomaticallywhen you enablethe feature.
The HomeConfigurationpage includestwo versions ofWorkspace. Oneprovides accessto Workspace forsales job roles. Thesecond versionprovides accessfor service jobroles.
The serviceversion includesthe ability to viewrecords in nestedtabs (the dynamictabs feature).
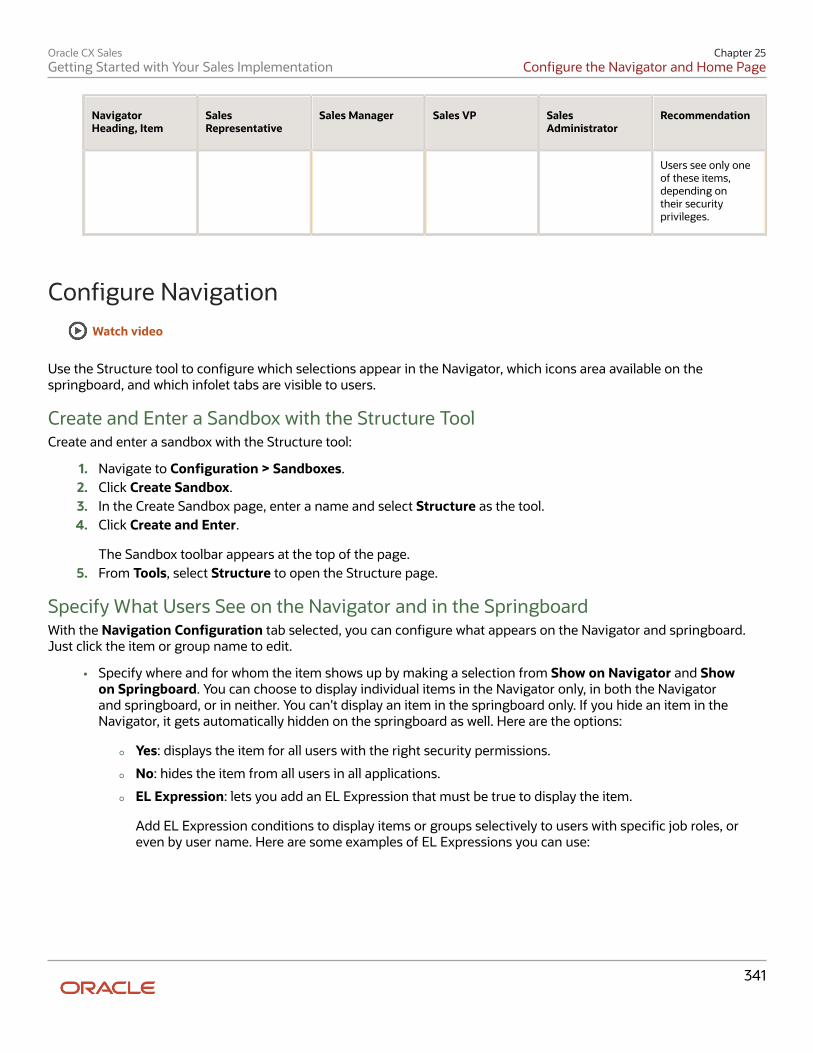
Oracle CX SalesGetting Started with Your Sales Implementation
Chapter 25Configure the Navigator and Home Page
341
NavigatorHeading, Item
SalesRepresentative
Sales Manager Sales VP SalesAdministrator
Recommendation
Users see only oneof these items,depending ontheir securityprivileges.
Configure NavigationWatch video
Use the Structure tool to configure which selections appear in the Navigator, which icons area available on thespringboard, and which infolet tabs are visible to users.
Create and Enter a Sandbox with the Structure ToolCreate and enter a sandbox with the Structure tool:
1. Navigate to Configuration > Sandboxes.2. Click Create Sandbox.3. In the Create Sandbox page, enter a name and select Structure as the tool.4. Click Create and Enter.
The Sandbox toolbar appears at the top of the page.5. From Tools, select Structure to open the Structure page.
Specify What Users See on the Navigator and in the SpringboardWith the Navigation Configuration tab selected, you can configure what appears on the Navigator and springboard.Just click the item or group name to edit.
• Specify where and for whom the item shows up by making a selection from Show on Navigator and Showon Springboard. You can choose to display individual items in the Navigator only, in both the Navigatorand springboard, or in neither. You can't display an item in the springboard only. If you hide an item in theNavigator, it gets automatically hidden on the springboard as well. Here are the options:
◦ Yes: displays the item for all users with the right security permissions.
◦ No: hides the item from all users in all applications.
◦ EL Expression: lets you add an EL Expression that must be true to display the item.
Add EL Expression conditions to display items or groups selectively to users with specific job roles, oreven by user name. Here are some examples of EL Expressions you can use:
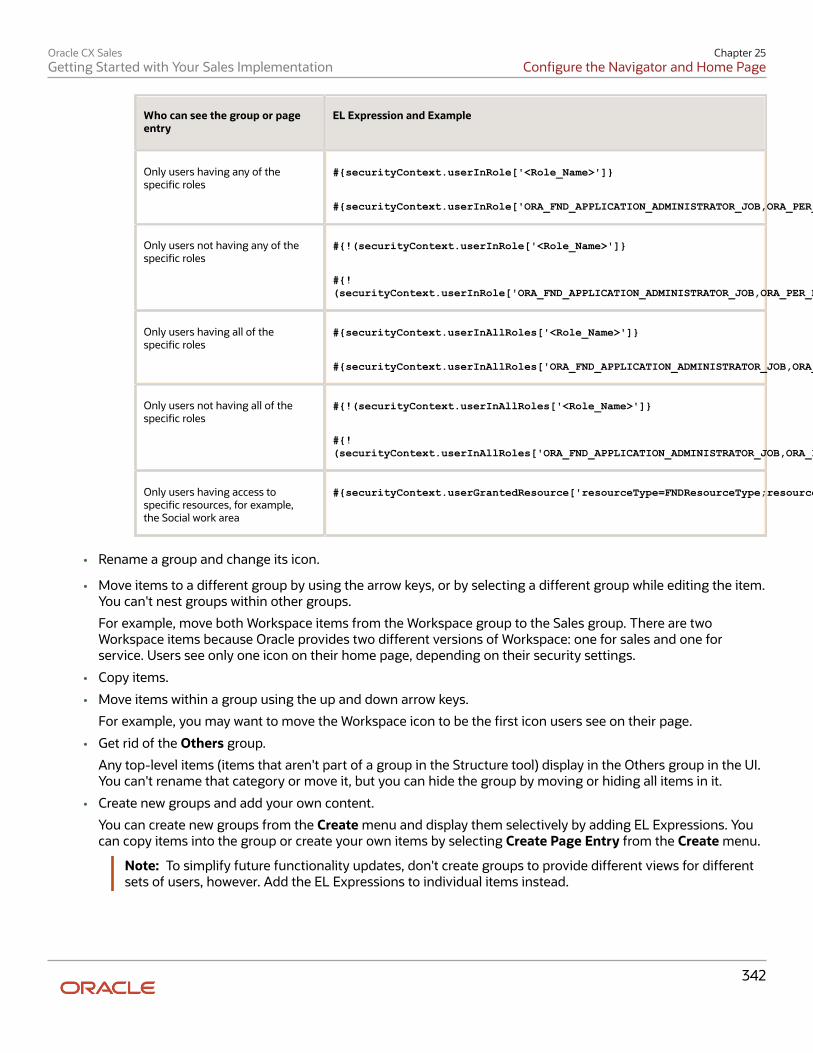
Oracle CX SalesGetting Started with Your Sales Implementation
Chapter 25Configure the Navigator and Home Page
342
Who can see the group or pageentry
EL Expression and Example
Only users having any of thespecific roles
#{securityContext.userInRole['<Role_Name>']}
#{securityContext.userInRole['ORA_FND_APPLICATION_ADMINISTRATOR_JOB,ORA_PER_EMPLOYEE_ABSTRACT']}
Only users not having any of thespecific roles
#{!(securityContext.userInRole['<Role_Name>']}
#{!(securityContext.userInRole['ORA_FND_APPLICATION_ADMINISTRATOR_JOB,ORA_PER_EMPLOYEE_ABSTRACT'])}
Only users having all of thespecific roles
#{securityContext.userInAllRoles['<Role_Name>']}
#{securityContext.userInAllRoles['ORA_FND_APPLICATION_ADMINISTRATOR_JOB,ORA_PER_EMPLOYEE_ABSTRACT']}
Only users not having all of thespecific roles
#{!(securityContext.userInAllRoles['<Role_Name>']}
#{!(securityContext.userInAllRoles['ORA_FND_APPLICATION_ADMINISTRATOR_JOB,ORA_PER_EMPLOYEE_ABSTRACT'])}
Only users having access tospecific resources, for example,the Social work area
#{securityContext.userGrantedResource['resourceType=FNDResourceType;resourceName=FND_Launch_Social_Menu;action=launch']}
• Rename a group and change its icon.
• Move items to a different group by using the arrow keys, or by selecting a different group while editing the item.You can't nest groups within other groups.
For example, move both Workspace items from the Workspace group to the Sales group. There are twoWorkspace items because Oracle provides two different versions of Workspace: one for sales and one forservice. Users see only one icon on their home page, depending on their security settings.
• Copy items.
• Move items within a group using the up and down arrow keys.
For example, you may want to move the Workspace icon to be the first icon users see on their page.
• Get rid of the Others group.
Any top-level items (items that aren't part of a group in the Structure tool) display in the Others group in the UI.You can't rename that category or move it, but you can hide the group by moving or hiding all items in it.
• Create new groups and add your own content.
You can create new groups from the Create menu and display them selectively by adding EL Expressions. Youcan copy items into the group or create your own items by selecting Create Page Entry from the Create menu.
Note: To simplify future functionality updates, don't create groups to provide different views for differentsets of users, however. Add the EL Expressions to individual items instead.
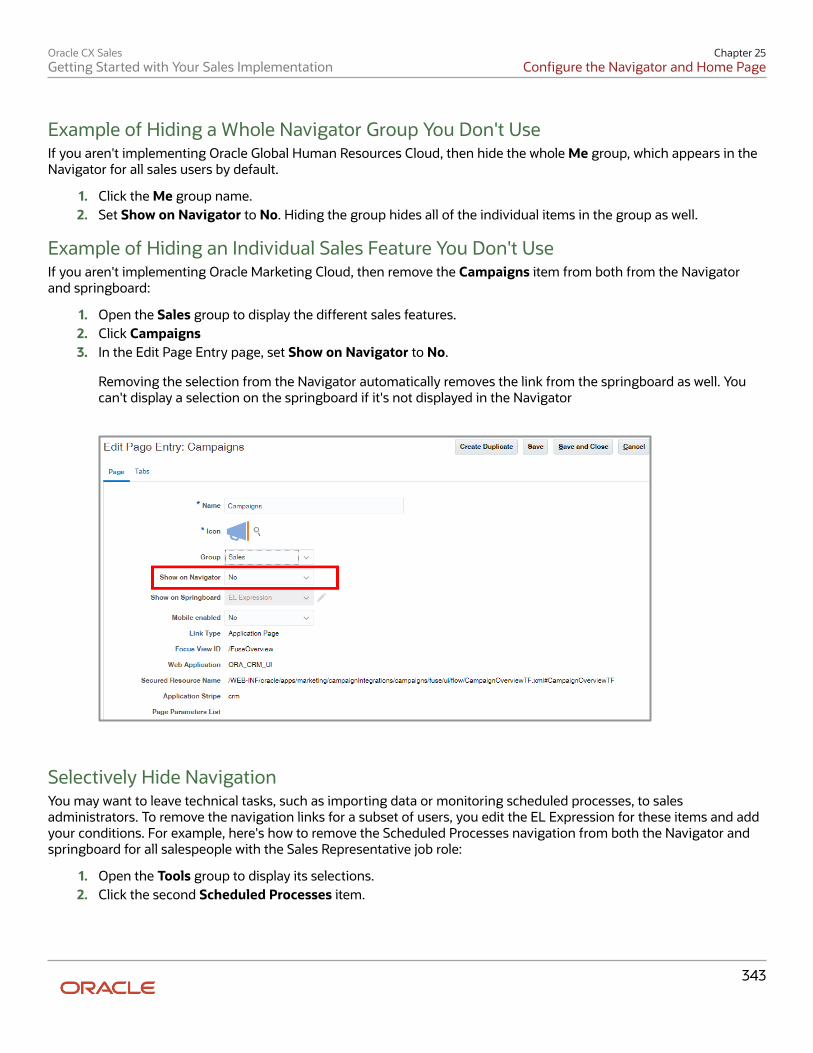
Oracle CX SalesGetting Started with Your Sales Implementation
Chapter 25Configure the Navigator and Home Page
343
Example of Hiding a Whole Navigator Group You Don't UseIf you aren't implementing Oracle Global Human Resources Cloud, then hide the whole Me group, which appears in theNavigator for all sales users by default.
1. Click the Me group name.2. Set Show on Navigator to No. Hiding the group hides all of the individual items in the group as well.
Example of Hiding an Individual Sales Feature You Don't UseIf you aren't implementing Oracle Marketing Cloud, then remove the Campaigns item from both from the Navigatorand springboard:
1. Open the Sales group to display the different sales features.2. Click Campaigns3. In the Edit Page Entry page, set Show on Navigator to No.
Removing the selection from the Navigator automatically removes the link from the springboard as well. Youcan't display a selection on the springboard if it's not displayed in the Navigator
Selectively Hide NavigationYou may want to leave technical tasks, such as importing data or monitoring scheduled processes, to salesadministrators. To remove the navigation links for a subset of users, you edit the EL Expression for these items and addyour conditions. For example, here's how to remove the Scheduled Processes navigation from both the Navigator andspringboard for all salespeople with the Sales Representative job role:
1. Open the Tools group to display its selections.2. Click the second Scheduled Processes item.
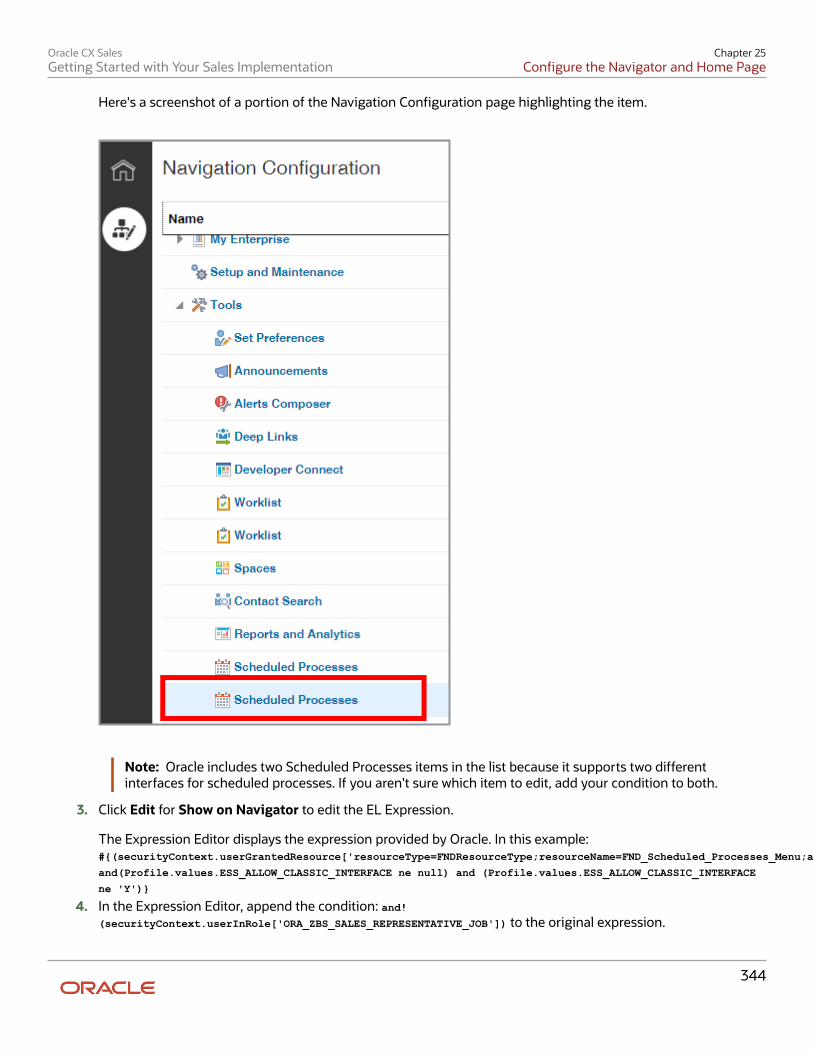
Oracle CX SalesGetting Started with Your Sales Implementation
Chapter 25Configure the Navigator and Home Page
344
Here's a screenshot of a portion of the Navigation Configuration page highlighting the item.
Note: Oracle includes two Scheduled Processes items in the list because it supports two differentinterfaces for scheduled processes. If you aren't sure which item to edit, add your condition to both.
3. Click Edit for Show on Navigator to edit the EL Expression.
The Expression Editor displays the expression provided by Oracle. In this example:#{(securityContext.userGrantedResource['resourceType=FNDResourceType;resourceName=FND_Scheduled_Processes_Menu;action=launch'])
and(Profile.values.ESS_ALLOW_CLASSIC_INTERFACE ne null) and (Profile.values.ESS_ALLOW_CLASSIC_INTERFACE
ne 'Y')}
4. In the Expression Editor, append the condition: and!(securityContext.userInRole['ORA_ZBS_SALES_REPRESENTATIVE_JOB']) to the original expression.
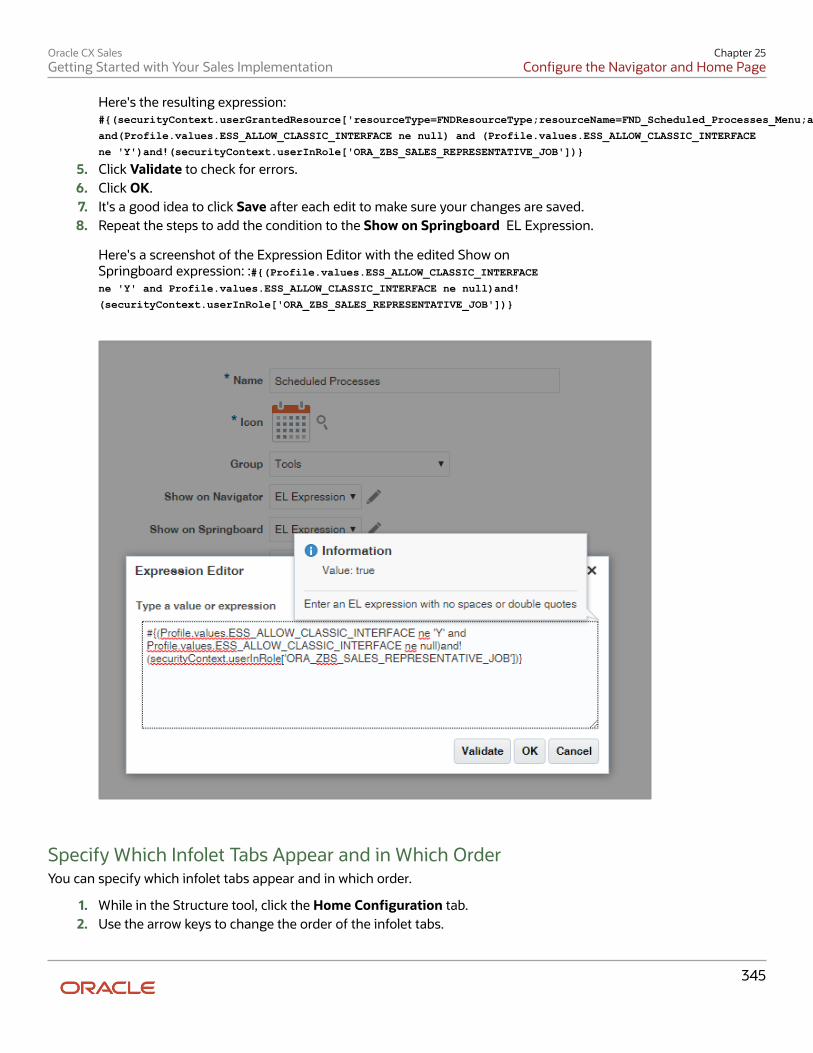
Oracle CX SalesGetting Started with Your Sales Implementation
Chapter 25Configure the Navigator and Home Page
345
Here's the resulting expression:#{(securityContext.userGrantedResource['resourceType=FNDResourceType;resourceName=FND_Scheduled_Processes_Menu;action=launch'])
and(Profile.values.ESS_ALLOW_CLASSIC_INTERFACE ne null) and (Profile.values.ESS_ALLOW_CLASSIC_INTERFACE
ne 'Y')and!(securityContext.userInRole['ORA_ZBS_SALES_REPRESENTATIVE_JOB'])}
5. Click Validate to check for errors.6. Click OK.7. It's a good idea to click Save after each edit to make sure your changes are saved.8. Repeat the steps to add the condition to the Show on Springboard EL Expression.
Here's a screenshot of the Expression Editor with the edited Show onSpringboard expression: :#{(Profile.values.ESS_ALLOW_CLASSIC_INTERFACEne 'Y' and Profile.values.ESS_ALLOW_CLASSIC_INTERFACE ne null)and!
(securityContext.userInRole['ORA_ZBS_SALES_REPRESENTATIVE_JOB'])}
Specify Which Infolet Tabs Appear and in Which OrderYou can specify which infolet tabs appear and in which order.
1. While in the Structure tool, click the Home Configuration tab.2. Use the arrow keys to change the order of the infolet tabs.
Oracle CX SalesGetting Started with Your Sales Implementation
Chapter 25Configure the Navigator and Home Page
346
3. To edit the infolet tab name and to specify how the infolet page gets displayed, click its name:
◦ Yes: displays the infolet tab for all users with the right security permissions.
◦ No: hides the infolet tab from all users in all applications.
◦ EL Expression: lets you add an EL Expression condition that must be true to display the infolet page.
4. To create additional infolet tabs with your own content, you can edit the five sales tabs crated for this purpose:Sales Page 1 through Sales Page 5.
Related Topics• Examples of EL Expressions• Overview of Configuring Home Page and Navigation
Enable and Configure Workspace Infolets
Enable Workspace InfoletsEnable Workspace infolets by setting the profile Enable Workspace Infolets (ZCA_ENABLE_ADAPTIVE_INFOLETS) to Yes.Here's how:
1. In the Setup and Maintenance work area, go to the Manage Administrator Profile Values task:
◦ Offering: Sales
◦ Functional Area: Sales Foundation
◦ Task: Manage Administrator Profile Values
2. On the Manage Administrator Profile Values page, search for the profile option by enteringZCA_ENABLE_ADAPTIVE_INFOLETS in the Profile Option Code field.
3. Click Search.4. In the ZCA_ENABLE_ADAPTIVE_INFOLETS: Profile Values section, set the profile value to Yes.5. Click Save and Close.
Create and Enter a Sandbox with Page Composer as Your ToolYou can create different Workspace infolet configurations for the whole enterprise, or for specific job roles. If you'reconfiguring different configurations of Workspace infolets for different job roles, then you must create separatesandboxes for each job role.
1. Navigate to Configuration > Sandboxes.2. Click Create Sandbox.3. In the Create Sandbox page, enter a name and select Page Composer as the tool.4. If you want to create different infolet configurations for different user roles, select the job role:
a. Click Edit in the Support Context column for Page Composer.b. In the Edit Sandbox Context window, select Job Role and select the job role you want to configure.
Each job role can access different saved searches and can have a different infolet configuration on theirpage.
c. Click OK.
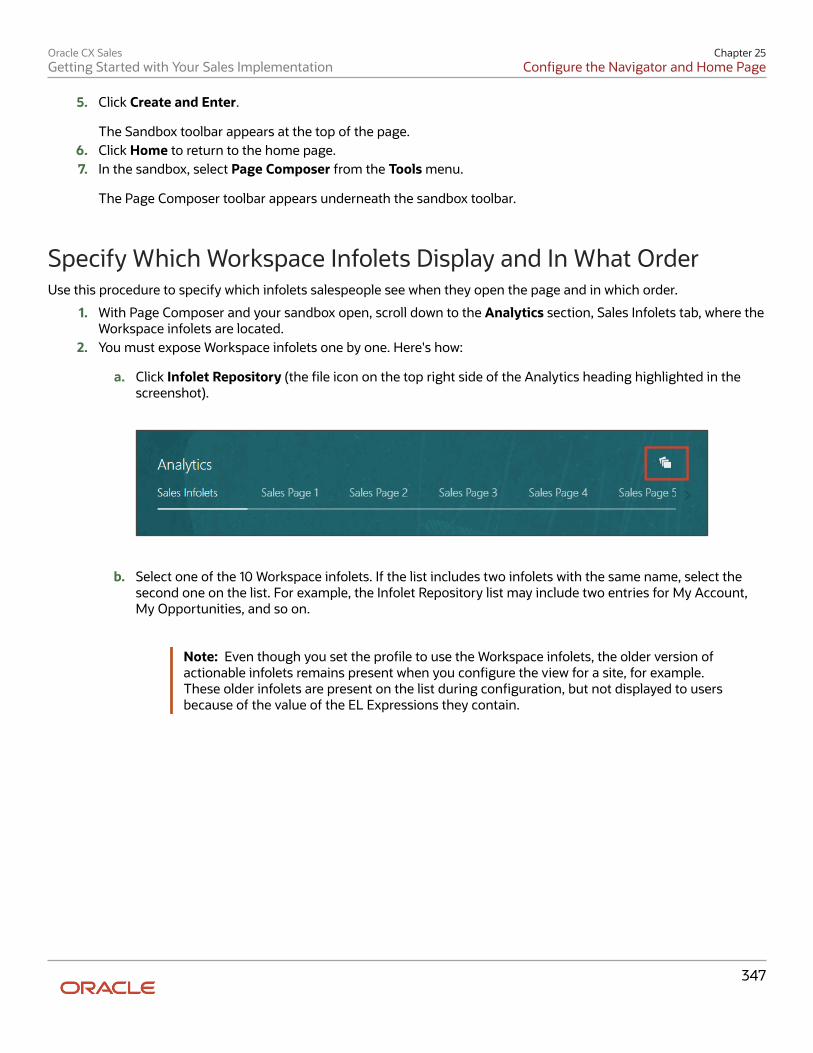
Oracle CX SalesGetting Started with Your Sales Implementation
Chapter 25Configure the Navigator and Home Page
347
5. Click Create and Enter.
The Sandbox toolbar appears at the top of the page.6. Click Home to return to the home page.7. In the sandbox, select Page Composer from the Tools menu.
The Page Composer toolbar appears underneath the sandbox toolbar.
Specify Which Workspace Infolets Display and In What OrderUse this procedure to specify which infolets salespeople see when they open the page and in which order.
1. With Page Composer and your sandbox open, scroll down to the Analytics section, Sales Infolets tab, where theWorkspace infolets are located.
2. You must expose Workspace infolets one by one. Here's how:
a. Click Infolet Repository (the file icon on the top right side of the Analytics heading highlighted in thescreenshot).
b. Select one of the 10 Workspace infolets. If the list includes two infolets with the same name, select thesecond one on the list. For example, the Infolet Repository list may include two entries for My Account,My Opportunities, and so on.
Note: Even though you set the profile to use the Workspace infolets, the older version ofactionable infolets remains present when you configure the view for a site, for example.These older infolets are present on the list during configuration, but not displayed to usersbecause of the value of the EL Expressions they contain.
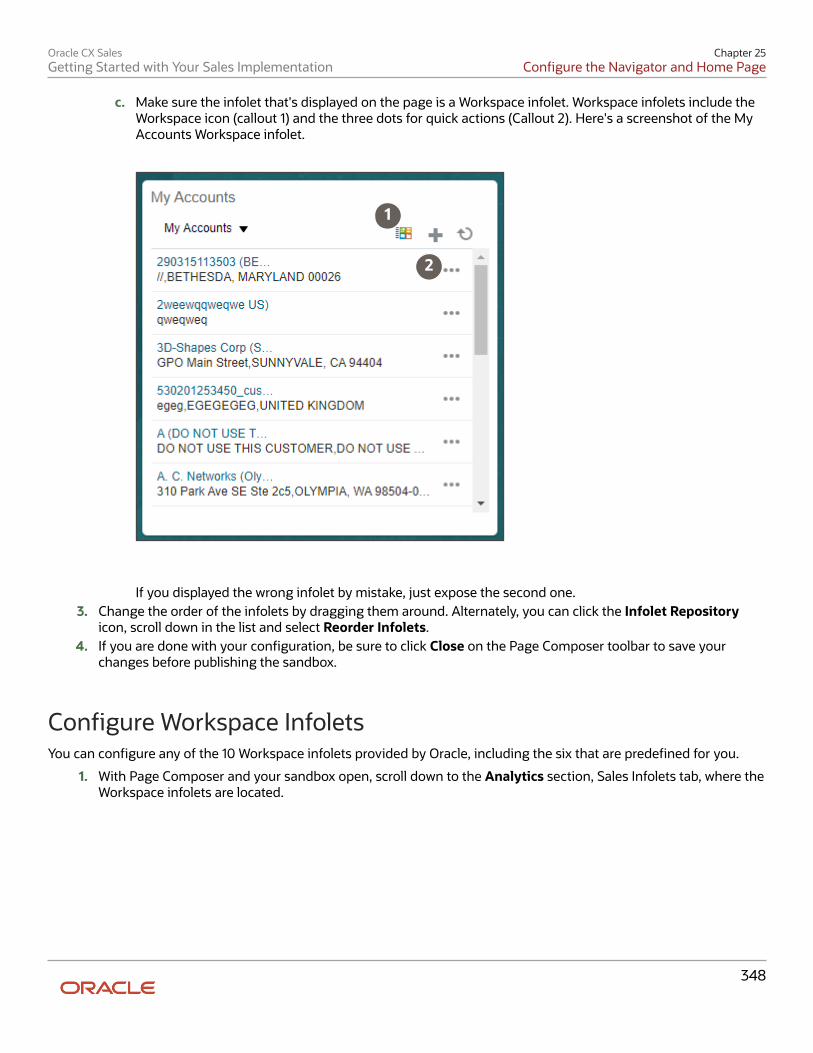
Oracle CX SalesGetting Started with Your Sales Implementation
Chapter 25Configure the Navigator and Home Page
348
c. Make sure the infolet that's displayed on the page is a Workspace infolet. Workspace infolets include theWorkspace icon (callout 1) and the three dots for quick actions (Callout 2). Here's a screenshot of the MyAccounts Workspace infolet.
2
1
If you displayed the wrong infolet by mistake, just expose the second one.3. Change the order of the infolets by dragging them around. Alternately, you can click the Infolet Repository
icon, scroll down in the list and select Reorder Infolets.4. If you are done with your configuration, be sure to click Close on the Page Composer toolbar to save your
changes before publishing the sandbox.
Configure Workspace InfoletsYou can configure any of the 10 Workspace infolets provided by Oracle, including the six that are predefined for you.
1. With Page Composer and your sandbox open, scroll down to the Analytics section, Sales Infolets tab, where theWorkspace infolets are located.
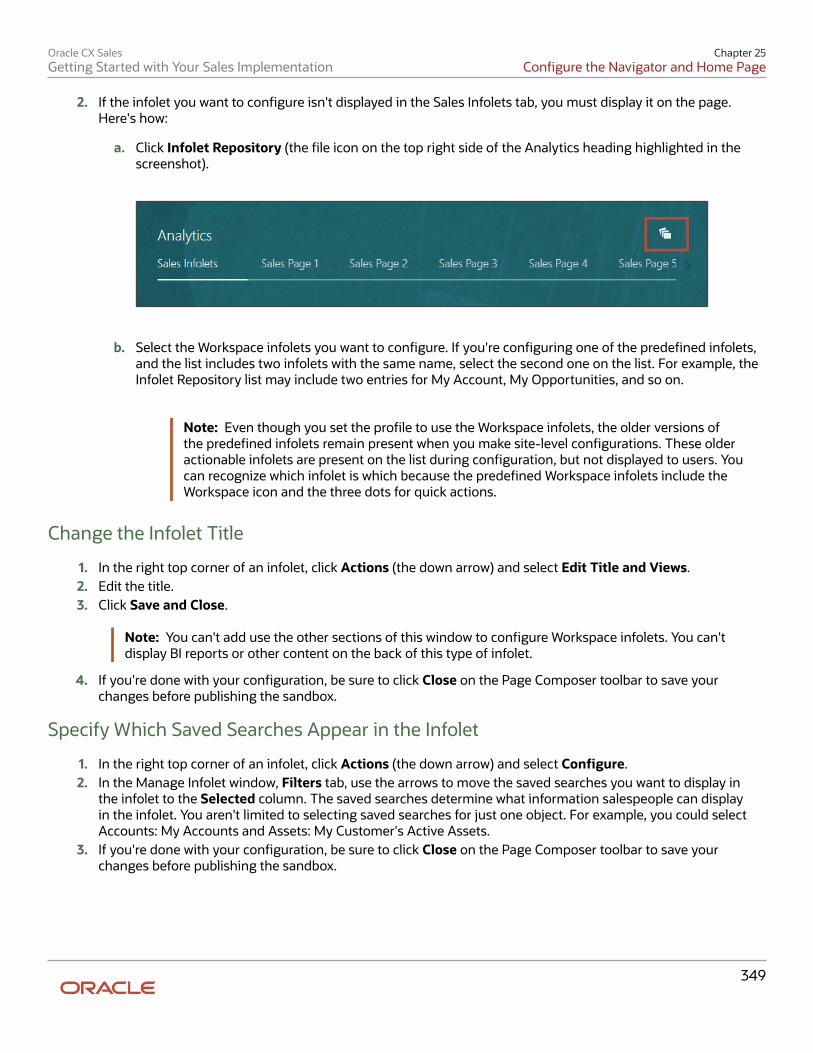
Oracle CX SalesGetting Started with Your Sales Implementation
Chapter 25Configure the Navigator and Home Page
349
2. If the infolet you want to configure isn't displayed in the Sales Infolets tab, you must display it on the page.Here's how:
a. Click Infolet Repository (the file icon on the top right side of the Analytics heading highlighted in thescreenshot).
b. Select the Workspace infolets you want to configure. If you're configuring one of the predefined infolets,and the list includes two infolets with the same name, select the second one on the list. For example, theInfolet Repository list may include two entries for My Account, My Opportunities, and so on.
Note: Even though you set the profile to use the Workspace infolets, the older versions ofthe predefined infolets remain present when you make site-level configurations. These olderactionable infolets are present on the list during configuration, but not displayed to users. Youcan recognize which infolet is which because the predefined Workspace infolets include theWorkspace icon and the three dots for quick actions.
Change the Infolet Title
1. In the right top corner of an infolet, click Actions (the down arrow) and select Edit Title and Views.2. Edit the title.3. Click Save and Close.
Note: You can't add use the other sections of this window to configure Workspace infolets. You can'tdisplay BI reports or other content on the back of this type of infolet.
4. If you're done with your configuration, be sure to click Close on the Page Composer toolbar to save yourchanges before publishing the sandbox.
Specify Which Saved Searches Appear in the Infolet
1. In the right top corner of an infolet, click Actions (the down arrow) and select Configure.2. In the Manage Infolet window, Filters tab, use the arrows to move the saved searches you want to display in
the infolet to the Selected column. The saved searches determine what information salespeople can displayin the infolet. You aren't limited to selecting saved searches for just one object. For example, you could selectAccounts: My Accounts and Assets: My Customer's Active Assets.
3. If you're done with your configuration, be sure to click Close on the Page Composer toolbar to save yourchanges before publishing the sandbox.

Oracle CX SalesGetting Started with Your Sales Implementation
Chapter 25Configure the Navigator and Home Page
350
Specify What Fields Display for Each Saved SearchHere's how to determine which fields display on the infolet for each record. You must configure each saved search youare using separately.
1. In the right top corner of an infolet, click Actions (the down arrow) and select Configure.2. In the Manage Infolet window, select the Layout tab (callout 1 in the screenshot).3. Select the saved search you want to configure (callout 2).4. Add the fields you want to display (callout 3). Be sure to always display the Name field: it provides the link that
salespeople use to drill down into the record.5. You can adjust the relative width of the columns using the slider (callout 4).6. Keep the Show quick actions option selected to display the actions for each record (callout 5).
1
2
3
4
5
7. If you're done with your configurations, be sure to click Close on the Page Composer toolbar to save yourchanges before publishing the sandbox.
Hide Unused Workspace Infolets from UsersRemove unused Workspace infolets from use by changing their visibility. Unless you change their visibility, infolets arelisted in the Infolet Repository list and available for display by salespeople even if you remove them from the page. You
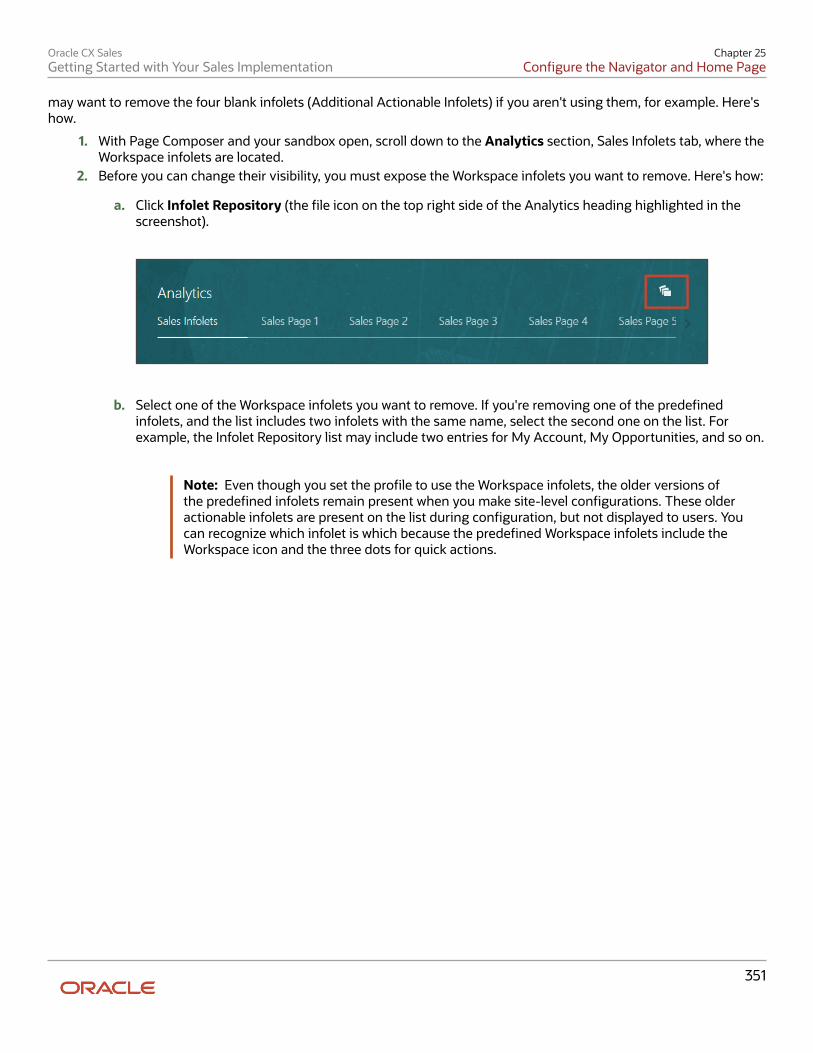
Oracle CX SalesGetting Started with Your Sales Implementation
Chapter 25Configure the Navigator and Home Page
351
may want to remove the four blank infolets (Additional Actionable Infolets) if you aren't using them, for example. Here'show.
1. With Page Composer and your sandbox open, scroll down to the Analytics section, Sales Infolets tab, where theWorkspace infolets are located.
2. Before you can change their visibility, you must expose the Workspace infolets you want to remove. Here's how:
a. Click Infolet Repository (the file icon on the top right side of the Analytics heading highlighted in thescreenshot).
b. Select one of the Workspace infolets you want to remove. If you're removing one of the predefinedinfolets, and the list includes two infolets with the same name, select the second one on the list. Forexample, the Infolet Repository list may include two entries for My Account, My Opportunities, and so on.
Note: Even though you set the profile to use the Workspace infolets, the older versions ofthe predefined infolets remain present when you make site-level configurations. These olderactionable infolets are present on the list during configuration, but not displayed to users. Youcan recognize which infolet is which because the predefined Workspace infolets include theWorkspace icon and the three dots for quick actions.
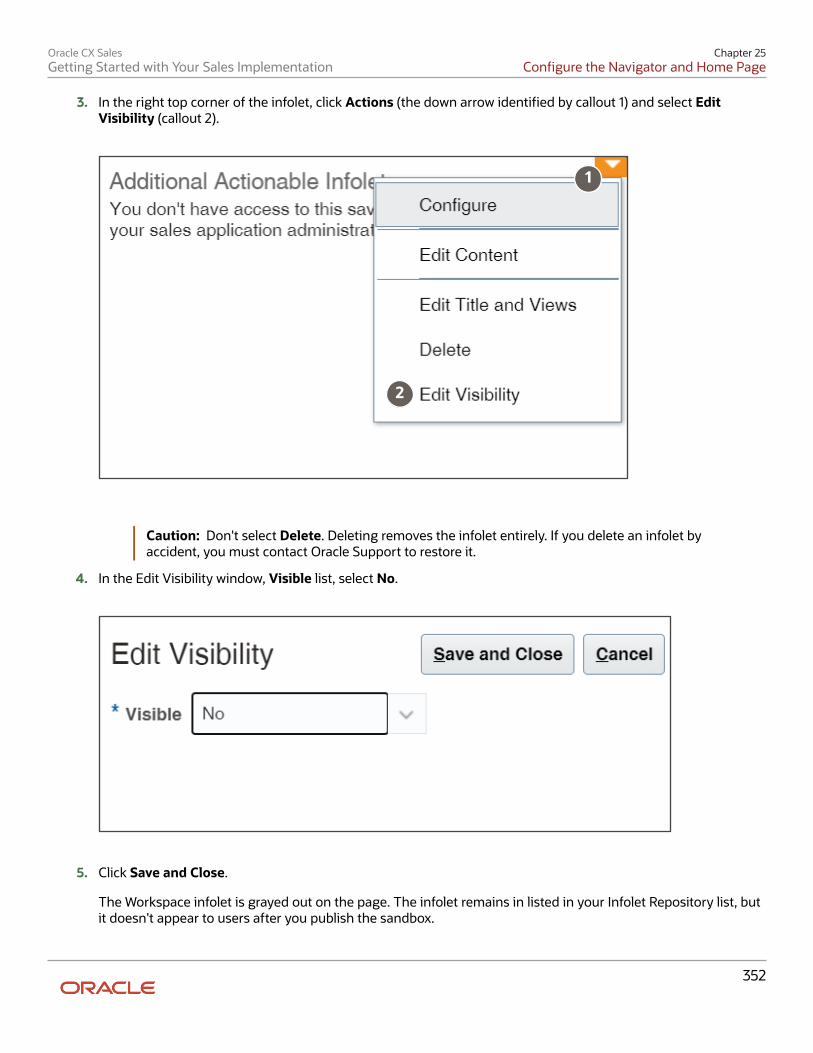
Oracle CX SalesGetting Started with Your Sales Implementation
Chapter 25Configure the Navigator and Home Page
352
3. In the right top corner of the infolet, click Actions (the down arrow identified by callout 1) and select EditVisibility (callout 2).
1
2
Caution: Don't select Delete. Deleting removes the infolet entirely. If you delete an infolet byaccident, you must contact Oracle Support to restore it.
4. In the Edit Visibility window, Visible list, select No.
5. Click Save and Close.
The Workspace infolet is grayed out on the page. The infolet remains in listed in your Infolet Repository list, butit doesn't appear to users after you publish the sandbox.
Oracle CX SalesGetting Started with Your Sales Implementation
Chapter 25Configure the Navigator and Home Page
353
6. If you're done with your configuration, be sure to click Close on the Page Composer toolbar to save yourchanges before publishing the sandbox.
Oracle CX SalesGetting Started with Your Sales Implementation
Chapter 25Configure the Navigator and Home Page
354
Oracle CX SalesGetting Started with Your Sales Implementation
Chapter 26Microsoft 365
355
26 Microsoft 365
Overview of Microsoft 365 for SalesWatch video
Your sales organization can use the integration between CX Sales and Microsoft 365 (recently renamed from Office365) to access sales application data from within Microsoft 365 and apps that use Microsoft Exchange. The integrationincludes an add-in that opens as a side-panel in Outlook. Here's how the sales organization benefits from theintegration:
• Salespeople can capture interactions with customers, including emails and meetings, into CX Sales. This allowsthe sales organization to remain informed on the latest status of customer engagements, communications,ongoing meetings, and meeting outcomes.
• Salespeople can perform their sales-related work without having to leave Outlook, often their most frequently-used application.
• Salespeople can see their sales appointments in CX Sales Mobile and enter meeting outcomes while on theroad.
Setup OverviewThis chapter provides you with the basics on how to set up the integration with Microsoft 365. You learn how to registerand enable the Oracle add-in to Outlook and how to run the processes that synchronize data in CX Sales with MicrosoftExchange. For more detailed information review the Microsoft 365 chapters in the Implementing Sales and Using Salesguides.
Step Description Where to Get More Details
1 Make sure your software meets theprerequisite requirements listed inthe System Requirements for OracleApplications Cloud (oracle.com/system-requirements/).
If you're using the Microsoft Edge browser,ensure that the browser includes thefollowing trusted sites:
• https://*.office.com• The CX Sales cloud domain: for
example: https://*.oraclecloud.com
Open the System Requirements for OracleApplications Cloud page (oracle.com/system-requirements/). The Microsoft365 requirements are listed under the"Oracle Customer Experience Cloud -Oracle Sales Release 13" heading.
2 Complete the integration stepsin Microsoft Azure, CX Sales, and
See the topic: Enable Microsoft 365Integration

Oracle CX SalesGetting Started with Your Sales Implementation
Chapter 26Microsoft 365
356
Step Description Where to Get More Details
in Microsoft 365 and enable datasynchronization.
3 Schedule the three synchronizationprocesses in CX Sales.
See the topic: Synchronize Data BetweenCX Sales and Microsoft 365
4 Sign in to Microsoft 365 and open Outlookto test the integration and add-in.
See the topic: Open the Add-In fromOutlook for the First Time
Related Topics
• System Requirements for Oracle Applications Cloud
• What should I know when implementing the Microsoft 365 add-in
• Home Page
Enable Microsoft 365 IntegrationEnabling the integration between CX Sales and Microsoft 365 accomplishes two things:
• Allows users to access the add-in in the side panel
• Sets up background processes that keeps information between CX Sales and Outlook consistent.
You require two users to complete the setup: a setup user in your sales application and an administrator user forMicrosoft Azure and Microsoft 365 portals. Enabling the integration involves three steps:
1. Register the Oracle add-in in Microsoft Azure.
During the setup, you copy the generated application ID and application key.2. In your sales application (Setup and Maintenance, Manage Microsoft 365 task), you enter the application ID and
application key and generate a manifest file. On the same Manage Microsoft 365 page, you must also enablethe synchronization of data..
3. In the Microsoft 365 portal, you upload the manifest file and deploy the add-in.
User Agreement
This Oracle-Microsoft integration or plug-in may enable you to link to or transmit your content or third-party contentto, or otherwise access, or retrieve content from, Microsoft and its platforms, users, or services. Oracle doesn't controland isn't responsible for Microsoft sites or platforms or services, the performance or availability of the services, or anycontent received or sent. You bear any and all risks associated with access to and use of Microsoft sites, platforms, andservices and are solely responsible for entering into and compliance with separate terms between you and Microsoft.Oracle isn't responsible for the security, protection or confidentiality of such content (including obligations in theHosting and Delivery Policies and Data Processing Agreement and Oracle's Privacy Policy) that's transmitted to suchMicrosoft sites or platforms or services. You're solely responsible for obtaining or having any required consents orother legal basis for your use of this integration or plug-in. Oracle reserves the rights to terminate your connection orintegration if your use of this integration or plug-in violates the terms of your Agreement(s) with Oracle.
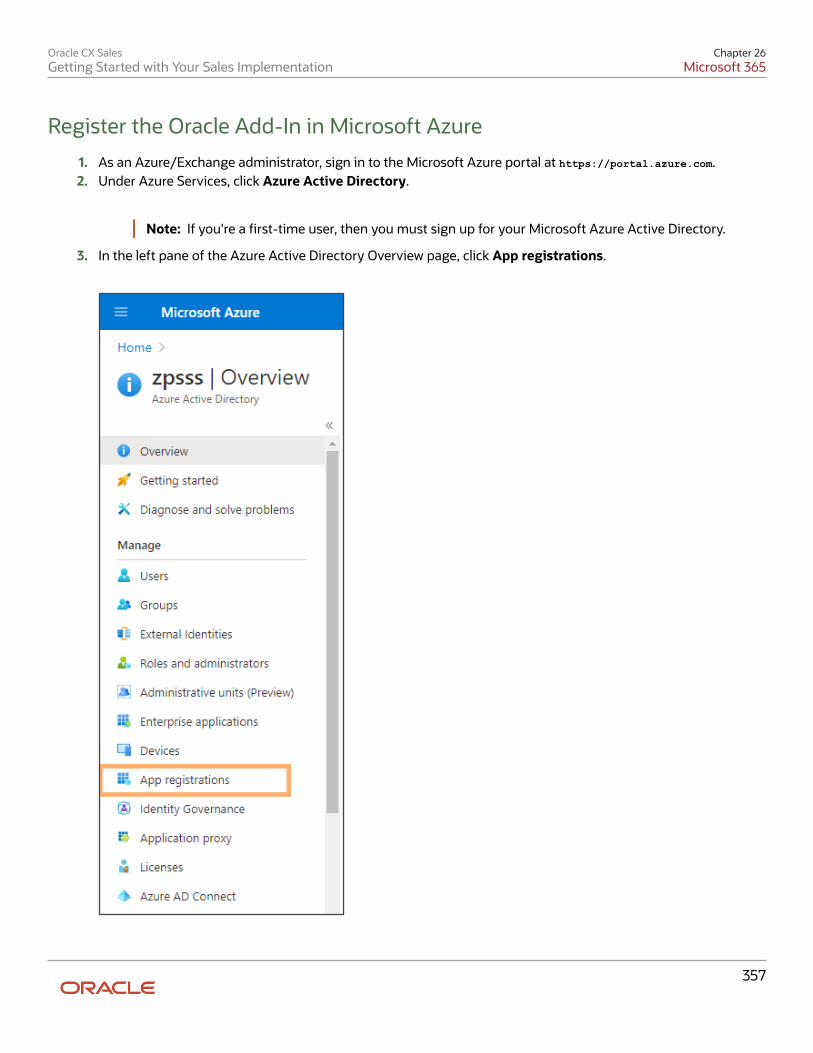
Oracle CX SalesGetting Started with Your Sales Implementation
Chapter 26Microsoft 365
357
Register the Oracle Add-In in Microsoft Azure
1. As an Azure/Exchange administrator, sign in to the Microsoft Azure portal at https://portal.azure.com.2. Under Azure Services, click Azure Active Directory.
Note: If you're a first-time user, then you must sign up for your Microsoft Azure Active Directory.
3. In the left pane of the Azure Active Directory Overview page, click App registrations.
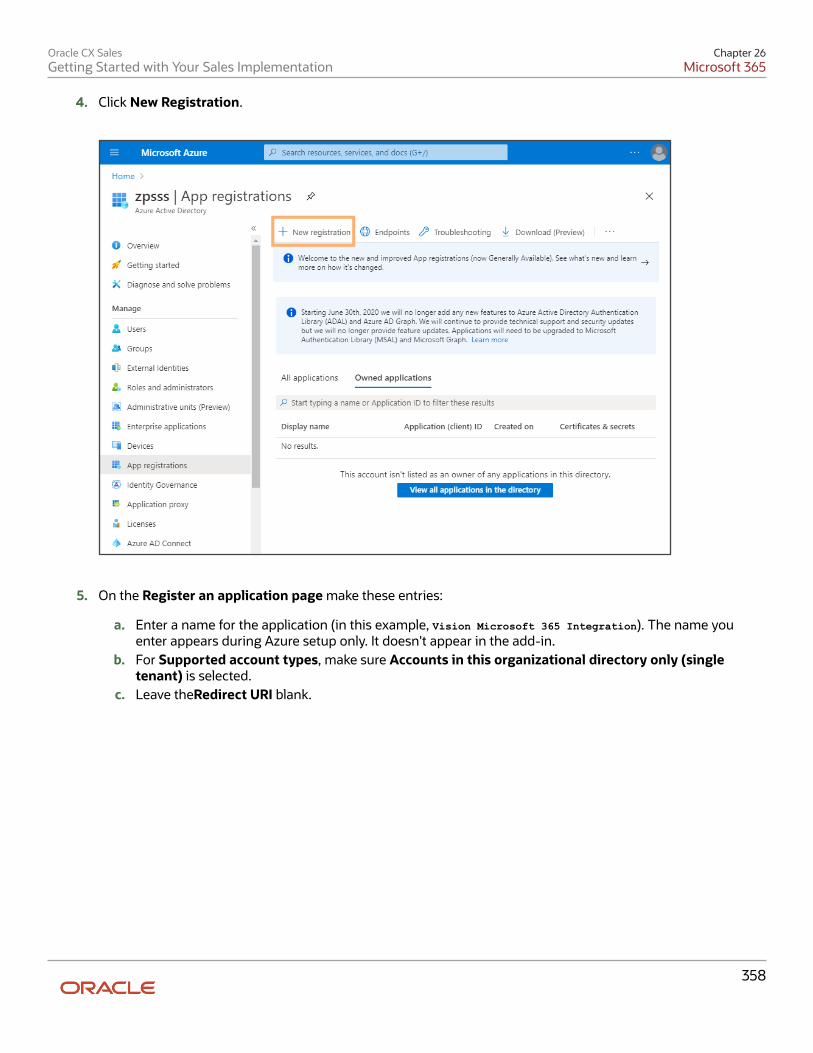
Oracle CX SalesGetting Started with Your Sales Implementation
Chapter 26Microsoft 365
358
4. Click New Registration.
5. On the Register an application page make these entries:
a. Enter a name for the application (in this example, Vision Microsoft 365 Integration). The name youenter appears during Azure setup only. It doesn't appear in the add-in.
b. For Supported account types, make sure Accounts in this organizational directory only (singletenant) is selected.
c. Leave theRedirect URI blank.
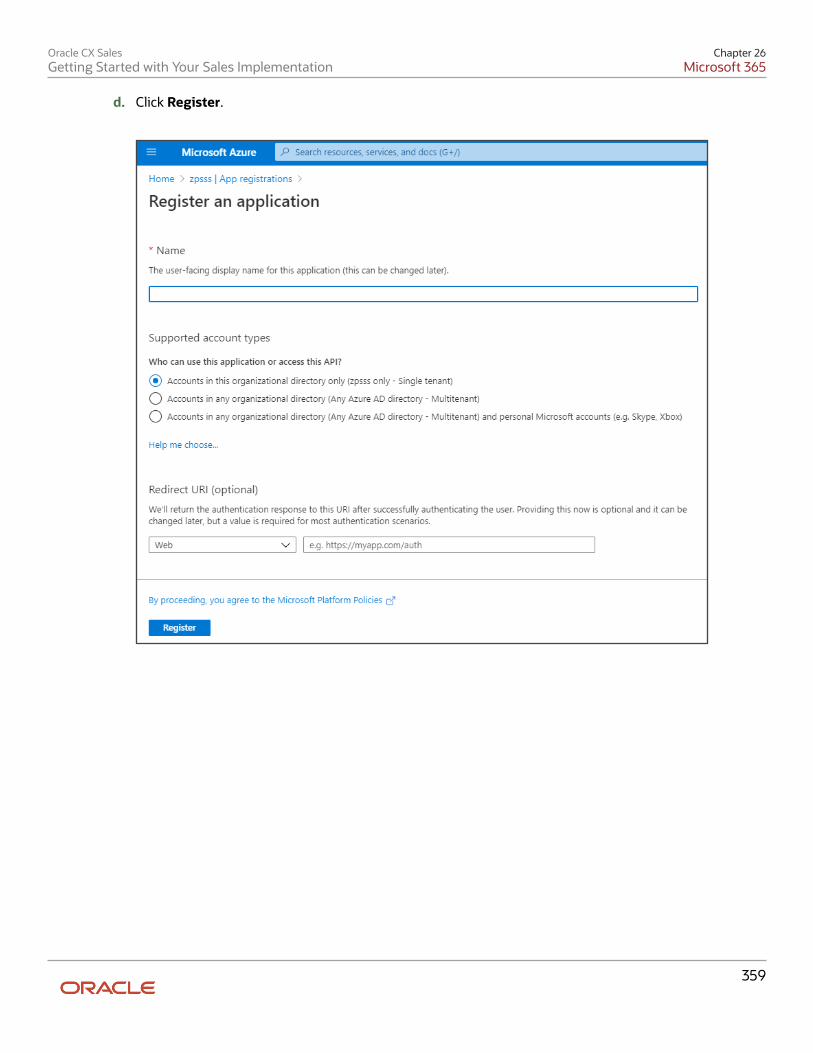
Oracle CX SalesGetting Started with Your Sales Implementation
Chapter 26Microsoft 365
359
d. Click Register.
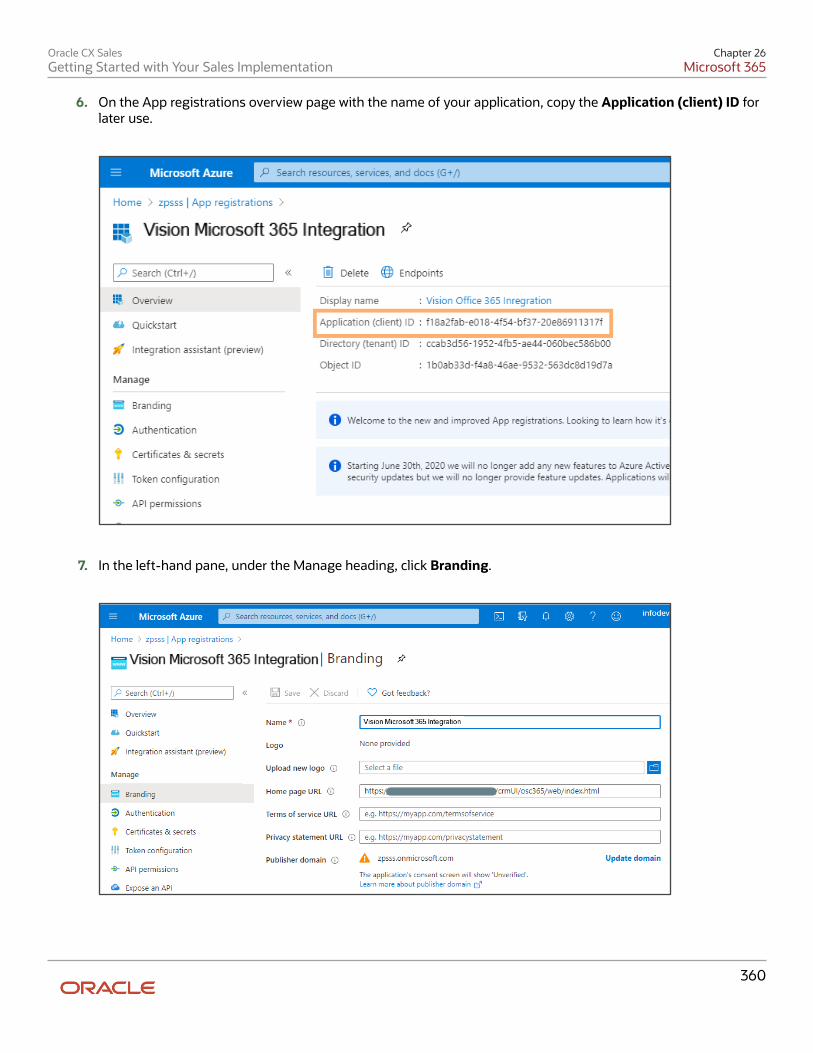
Oracle CX SalesGetting Started with Your Sales Implementation
Chapter 26Microsoft 365
360
6. On the App registrations overview page with the name of your application, copy the Application (client) ID forlater use.
7. In the left-hand pane, under the Manage heading, click Branding.
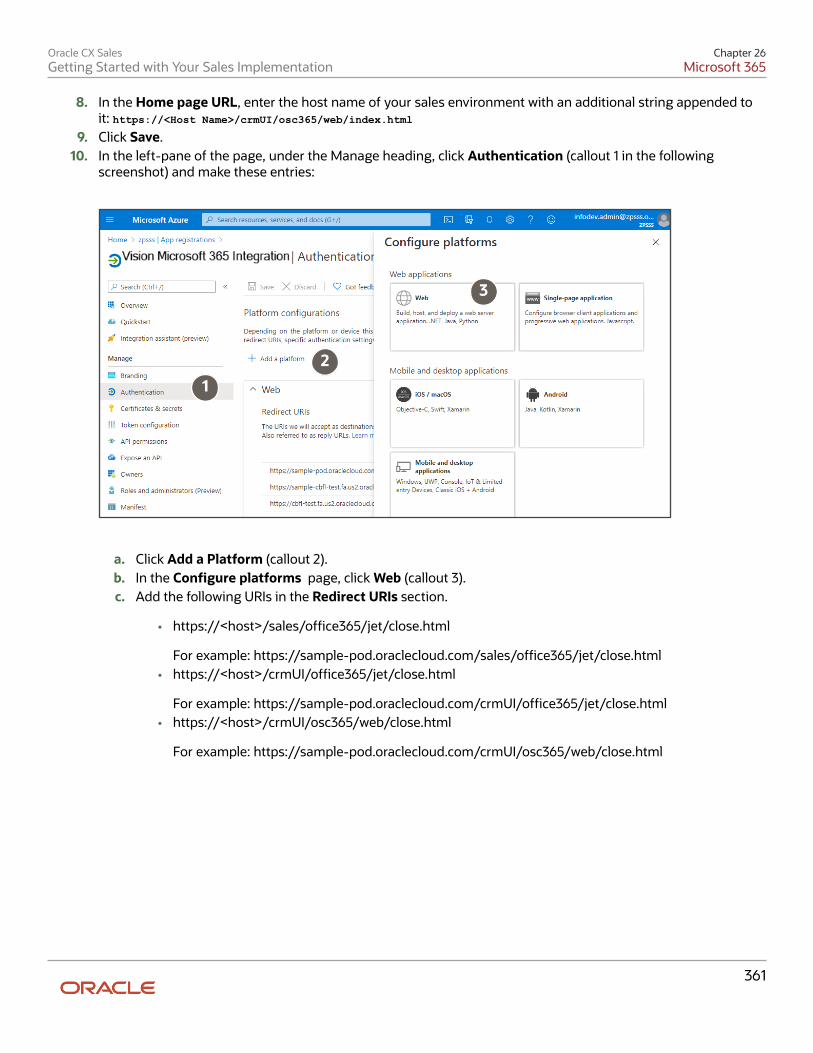
Oracle CX SalesGetting Started with Your Sales Implementation
Chapter 26Microsoft 365
361
8. In the Home page URL, enter the host name of your sales environment with an additional string appended toit: https://<Host Name>/crmUI/osc365/web/index.html
9. Click Save.10. In the left-pane of the page, under the Manage heading, click Authentication (callout 1 in the following
screenshot) and make these entries:
12
3
a. Click Add a Platform (callout 2).b. In the Configure platforms page, click Web (callout 3).c. Add the following URIs in the Redirect URIs section.
• https://<host>/sales/office365/jet/close.html
For example: https://sample-pod.oraclecloud.com/sales/office365/jet/close.html• https://<host>/crmUI/office365/jet/close.html
For example: https://sample-pod.oraclecloud.com/crmUI/office365/jet/close.html• https://<host>/crmUI/osc365/web/close.html
For example: https://sample-pod.oraclecloud.com/crmUI/osc365/web/close.html
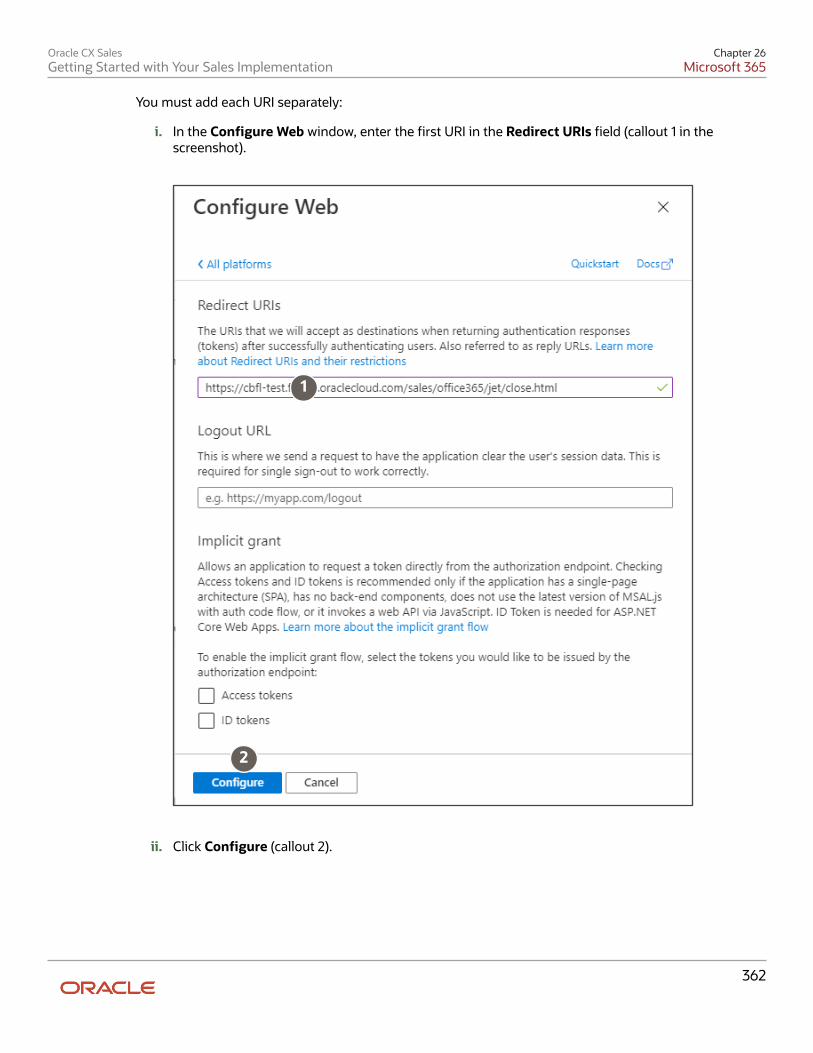
Oracle CX SalesGetting Started with Your Sales Implementation
Chapter 26Microsoft 365
362
You must add each URI separately:
i. In the Configure Web window, enter the first URI in the Redirect URIs field (callout 1 in thescreenshot).
1
2
ii. Click Configure (callout 2).
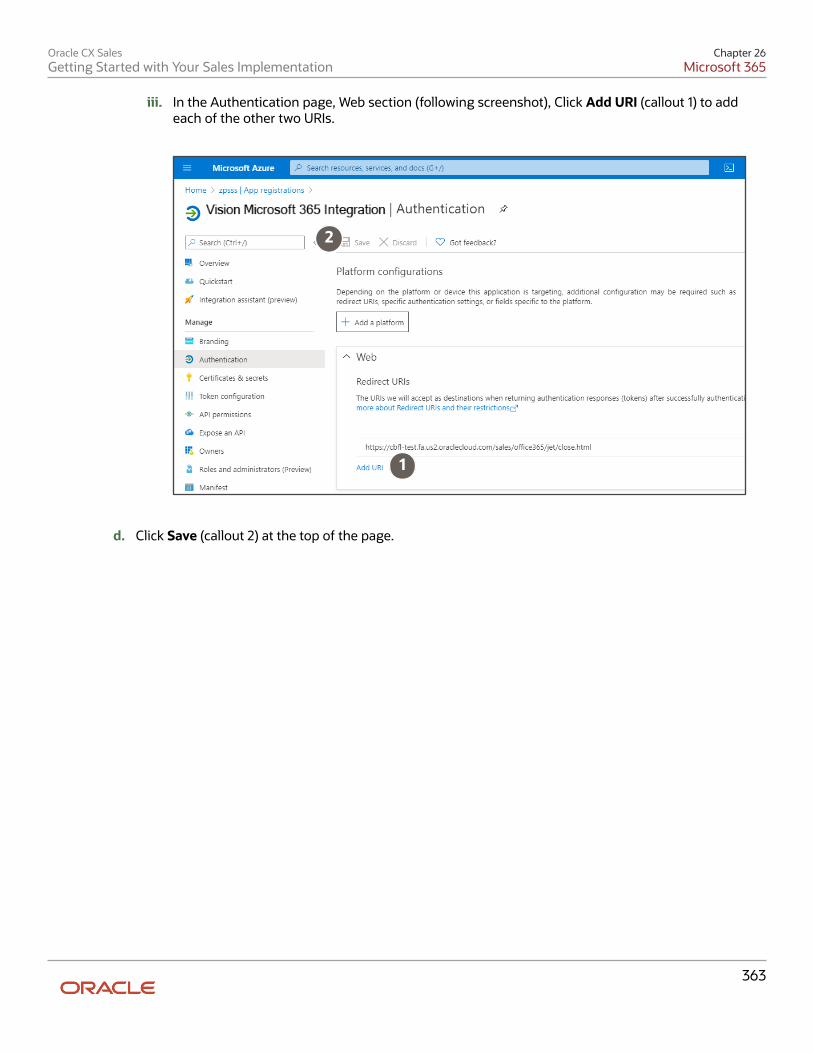
Oracle CX SalesGetting Started with Your Sales Implementation
Chapter 26Microsoft 365
363
iii. In the Authentication page, Web section (following screenshot), Click Add URI (callout 1) to addeach of the other two URIs.
1
2
d. Click Save (callout 2) at the top of the page.
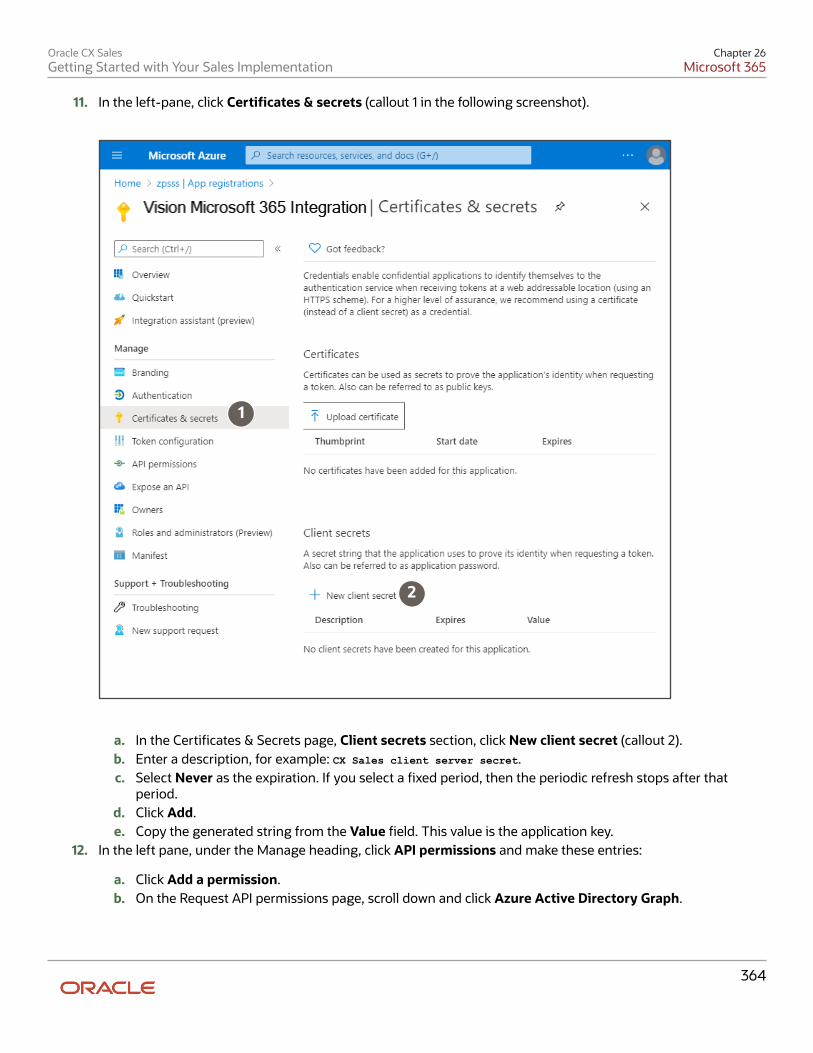
Oracle CX SalesGetting Started with Your Sales Implementation
Chapter 26Microsoft 365
364
11. In the left-pane, click Certificates & secrets (callout 1 in the following screenshot).
1
2
a. In the Certificates & Secrets page, Client secrets section, click New client secret (callout 2).b. Enter a description, for example: CX Sales client server secret.c. Select Never as the expiration. If you select a fixed period, then the periodic refresh stops after that
period.d. Click Add.e. Copy the generated string from the Value field. This value is the application key.
12. In the left pane, under the Manage heading, click API permissions and make these entries:
a. Click Add a permission.b. On the Request API permissions page, scroll down and click Azure Active Directory Graph.
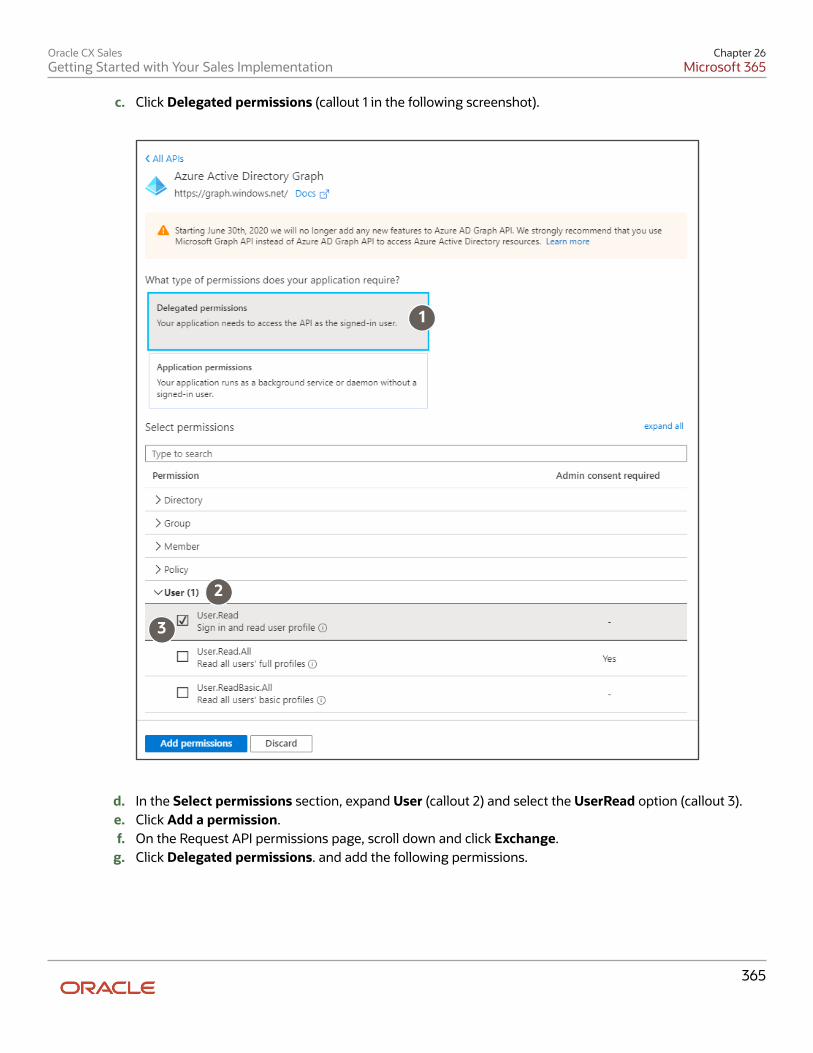
Oracle CX SalesGetting Started with Your Sales Implementation
Chapter 26Microsoft 365
365
c. Click Delegated permissions (callout 1 in the following screenshot).
1
2
3
d. In the Select permissions section, expand User (callout 2) and select the UserRead option (callout 3).e. Click Add a permission.f. On the Request API permissions page, scroll down and click Exchange.
g. Click Delegated permissions. and add the following permissions.
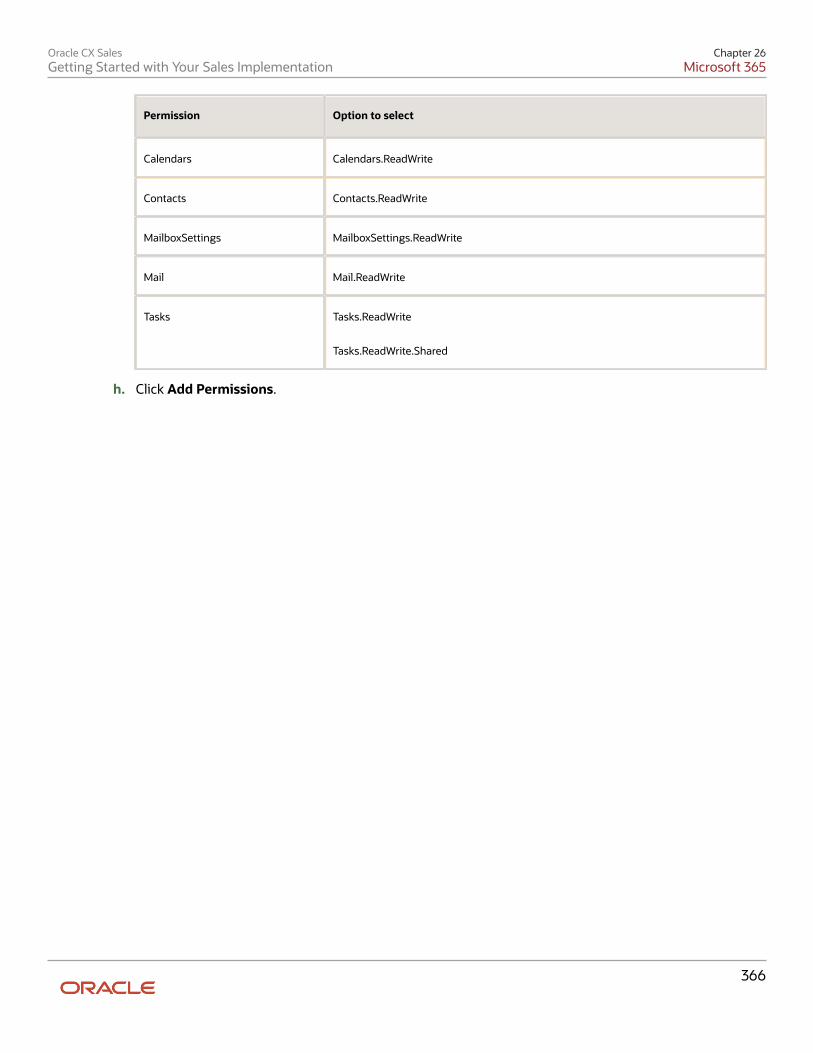
Oracle CX SalesGetting Started with Your Sales Implementation
Chapter 26Microsoft 365
366
Permission Option to select
Calendars Calendars.ReadWrite
Contacts Contacts.ReadWrite
MailboxSettings MailboxSettings.ReadWrite
Mail Mail.ReadWrite
Tasks Tasks.ReadWrite
Tasks.ReadWrite.Shared
h. Click Add Permissions.
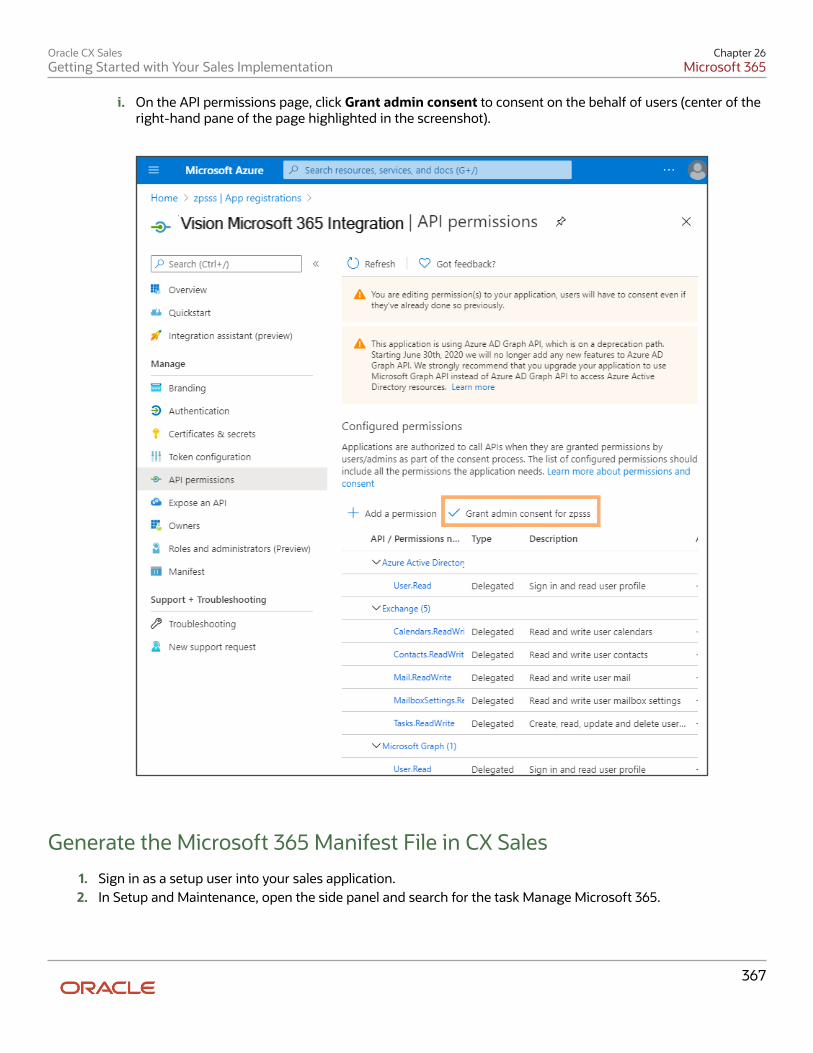
Oracle CX SalesGetting Started with Your Sales Implementation
Chapter 26Microsoft 365
367
i. On the API permissions page, click Grant admin consent to consent on the behalf of users (center of theright-hand pane of the page highlighted in the screenshot).
Generate the Microsoft 365 Manifest File in CX Sales
1. Sign in as a setup user into your sales application.2. In Setup and Maintenance, open the side panel and search for the task Manage Microsoft 365.
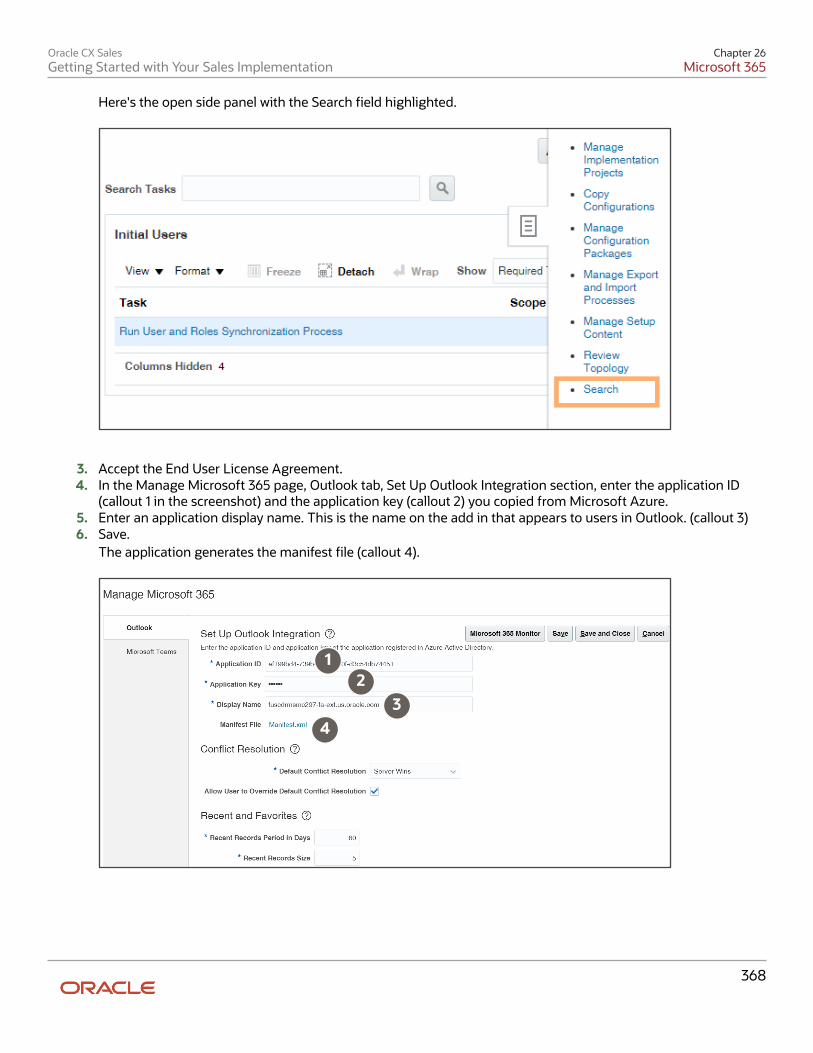
Oracle CX SalesGetting Started with Your Sales Implementation
Chapter 26Microsoft 365
368
Here's the open side panel with the Search field highlighted.
3. Accept the End User License Agreement.4. In the Manage Microsoft 365 page, Outlook tab, Set Up Outlook Integration section, enter the application ID
(callout 1 in the screenshot) and the application key (callout 2) you copied from Microsoft Azure.5. Enter an application display name. This is the name on the add in that appears to users in Outlook. (callout 3)6. Save.
The application generates the manifest file (callout 4).
12
34
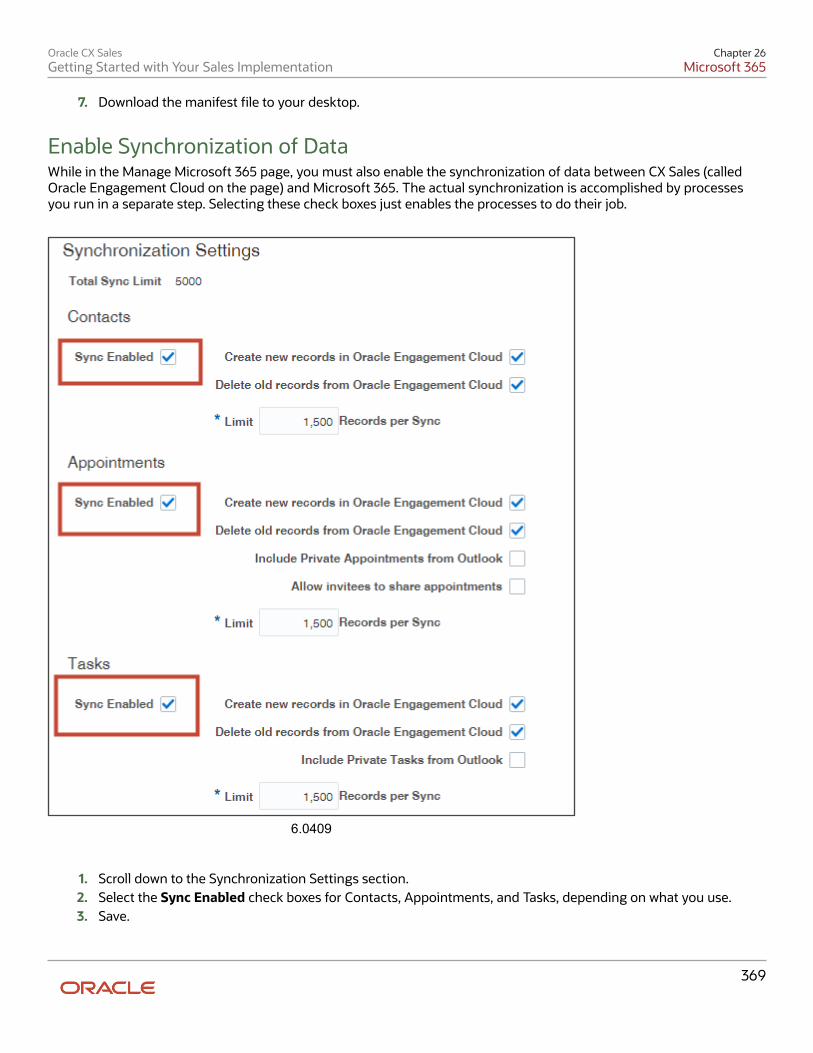
Oracle CX SalesGetting Started with Your Sales Implementation
Chapter 26Microsoft 365
369
7. Download the manifest file to your desktop.
Enable Synchronization of DataWhile in the Manage Microsoft 365 page, you must also enable the synchronization of data between CX Sales (calledOracle Engagement Cloud on the page) and Microsoft 365. The actual synchronization is accomplished by processesyou run in a separate step. Selecting these check boxes just enables the processes to do their job.
6.0409
1. Scroll down to the Synchronization Settings section.2. Select the Sync Enabled check boxes for Contacts, Appointments, and Tasks, depending on what you use.3. Save.
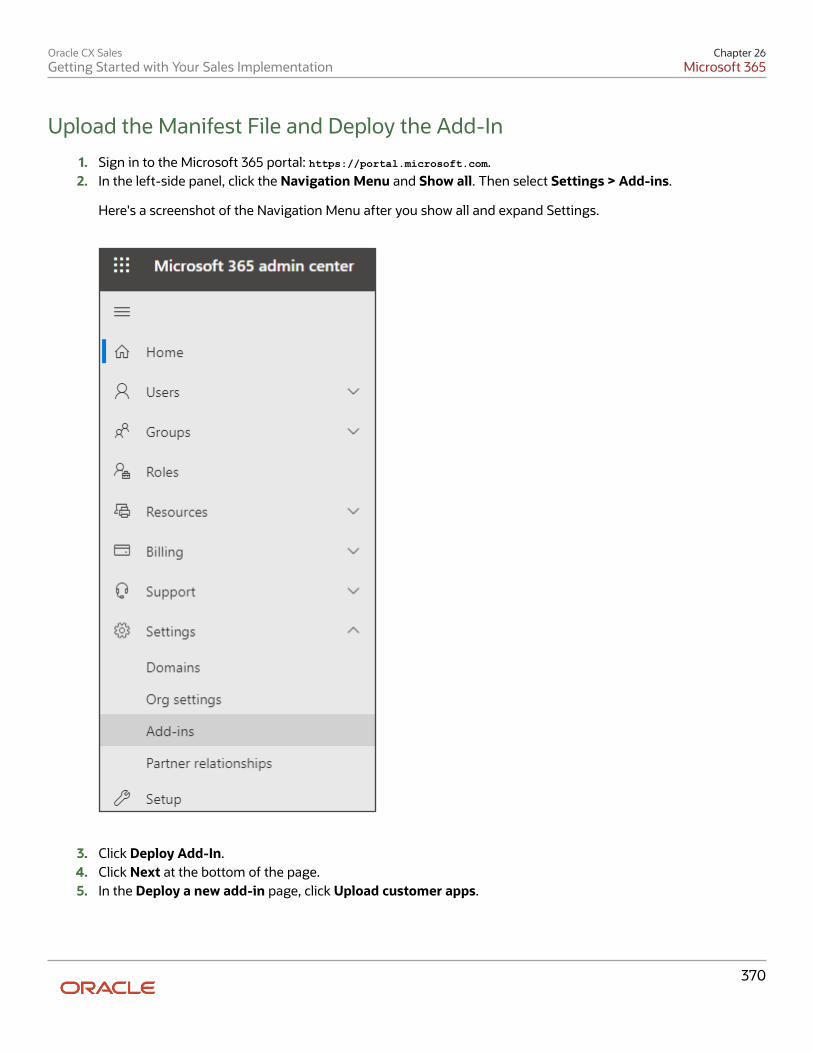
Oracle CX SalesGetting Started with Your Sales Implementation
Chapter 26Microsoft 365
370
Upload the Manifest File and Deploy the Add-In
1. Sign in to the Microsoft 365 portal: https://portal.microsoft.com.2. In the left-side panel, click the Navigation Menu and Show all. Then select Settings > Add-ins.
Here's a screenshot of the Navigation Menu after you show all and expand Settings.
3. Click Deploy Add-In.4. Click Next at the bottom of the page.5. In the Deploy a new add-in page, click Upload customer apps.
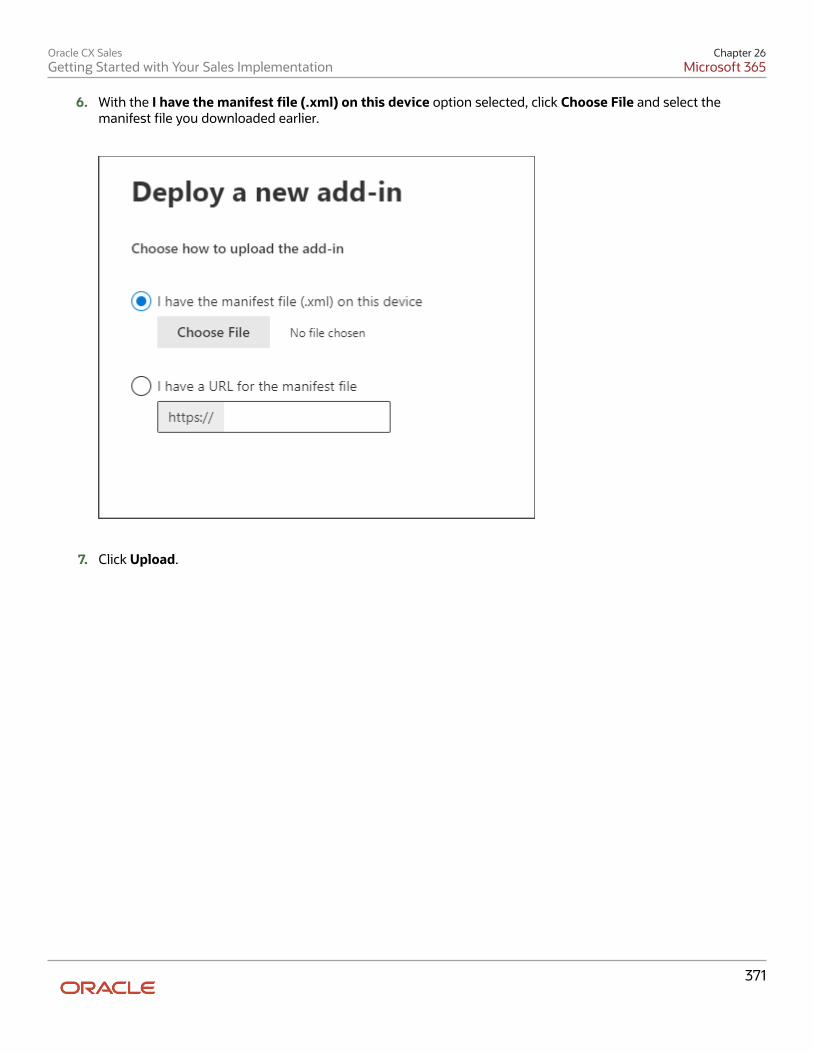
Oracle CX SalesGetting Started with Your Sales Implementation
Chapter 26Microsoft 365
371
6. With the I have the manifest file (.xml) on this device option selected, click Choose File and select themanifest file you downloaded earlier.
7. Click Upload.
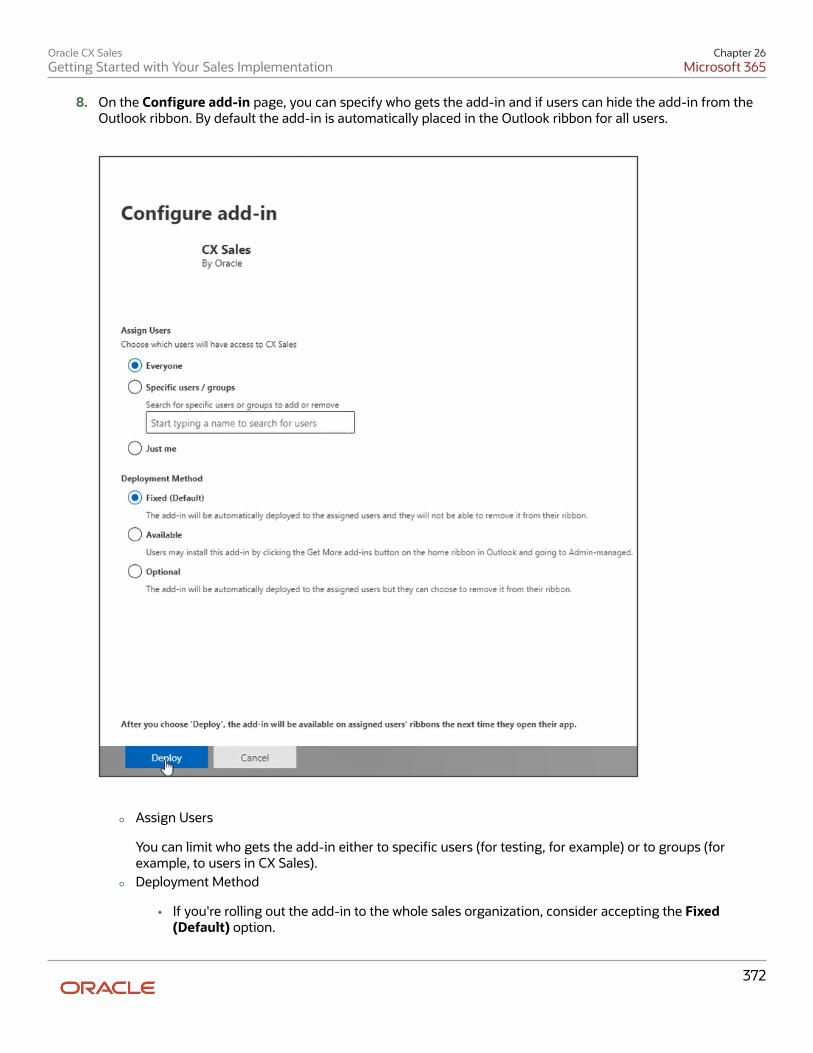
Oracle CX SalesGetting Started with Your Sales Implementation
Chapter 26Microsoft 365
372
8. On the Configure add-in page, you can specify who gets the add-in and if users can hide the add-in from theOutlook ribbon. By default the add-in is automatically placed in the Outlook ribbon for all users.
◦ Assign Users
You can limit who gets the add-in either to specific users (for testing, for example) or to groups (forexample, to users in CX Sales).
◦ Deployment Method
• If you're rolling out the add-in to the whole sales organization, consider accepting the Fixed(Default) option.
Oracle CX SalesGetting Started with Your Sales Implementation
Chapter 26Microsoft 365
373
• If you're testing with a few administrators, then Available may be the better option. Administratorsmay test both the test and production environments at the same time, and might want to hide oneor the other from their ribbon.
• Optional makes sense if you don't want the add-in showing up on any of the users' ribbons unlessthey need to test it.
• The Available and Optional deployment methods make it possible for users to hide the add-infrom their ribbon.
9. At the bottom of the Configure add-in page, click Deploy.
The application confirms the deployment is complete and the add-in appears in the list on the Add-ins page. It cantake 12 hours for the deployed add-in to appear on a user's Outlook ribbon. Users who are added to the group areautomatically assigned the add-in. And, when users are removed, they lose access to the add-in.
Related Topics
• Manage Microsoft 365
Synchronize Data Between CX Sales and Microsoft 365Run three processes to synchronize data in your sales application with Microsoft 365:
Process Description
Microsoft 365 Instant Sync Job Synchronizes the Microsoft 365 activities shared with your sales application.
You can share an appointment or email with Oracle CX Sales. Appointments are synchronizedas appointments and emails synchronized as tasks.
Microsoft 365 Standard Sync Job Synchronizes the contacts and activities between Microsoft 365 and your sales application.
Microsoft 365 Token Refresh Job This mandatory process synchronizes and refreshes your login credentials for the scheduledprocesses to run successfully
Note: For your data to be synchronized, you must make sure that synchronization is enabled in the Manage Microsoft365 task. You should have already completed this setup while enabling the integration.
Best Practices for Sync FrequencyHere's are the recommended frequencies for the sync jobs:
• Microsoft 365 Token Refresh Job: Schedule this to run every 3 Hours. This job keeps the users' tokens active allthe time.
• Microsoft 365 Instant Sync Job: Schedule this for every 1 hour.
• Microsoft 365 Standard Sync Job: Schedule this for every 4 hours.
Oracle CX SalesGetting Started with Your Sales Implementation
Chapter 26Microsoft 365
374
If you're required to change the frequencies of the Standard Sync and Instant Sync jobs, evaluate the customerenvironment before making the changes. Also, consider factors such as number of total users and volume of data beingsynchronized.
A good approach to determine the frequency is to monitor these jobs for some time and evaluate how long the jobs aretaking to complete. Based on the actual 'Run Time' (time taken for a job to complete), you can determine the frequency.For example, if the Standard Sync job instances are consistently completing in an hour, you can change the frequencyfrom 4 hours to 2 hours. Similarly, you can change the Instant Sync jobs frequency to 30 minutes, if they're completingin about 15 minutes.
Related Topics
• Overview of Scheduled Processes
• Submit Scheduled Processes and Process Sets
Open the Add-In from Outlook for the First TimeHere's what to do when you open the Oracle add-in from Outlook for the first time:
1. If you're using your own computer, select the This is a trusted device check box.2. Click Connect.
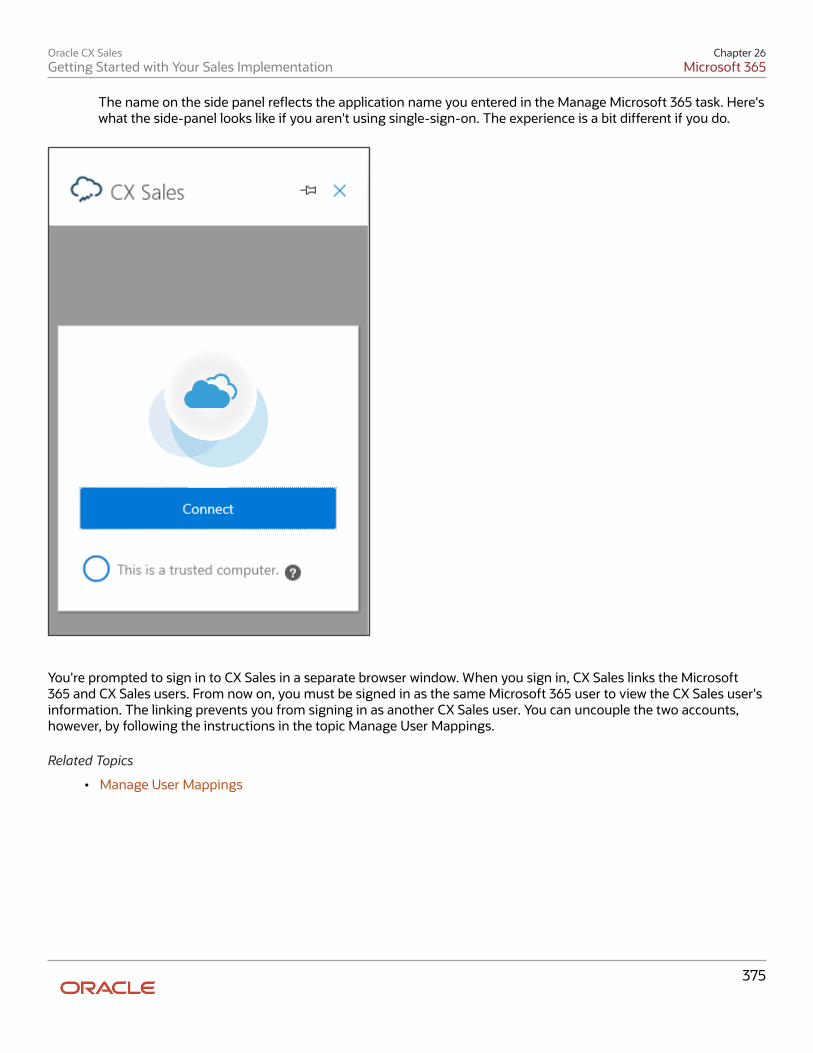
Oracle CX SalesGetting Started with Your Sales Implementation
Chapter 26Microsoft 365
375
The name on the side panel reflects the application name you entered in the Manage Microsoft 365 task. Here'swhat the side-panel looks like if you aren't using single-sign-on. The experience is a bit different if you do.
You're prompted to sign in to CX Sales in a separate browser window. When you sign in, CX Sales links the Microsoft365 and CX Sales users. From now on, you must be signed in as the same Microsoft 365 user to view the CX Sales user'sinformation. The linking prevents you from signing in as another CX Sales user. You can uncouple the two accounts,however, by following the instructions in the topic Manage User Mappings.
Related Topics
• Manage User Mappings

Oracle CX SalesGetting Started with Your Sales Implementation
Chapter 26Microsoft 365
376
Oracle CX SalesGetting Started with Your Sales Implementation
Chapter 27Mobile
377
27 Mobile
Overview of CX Sales MobileThe Oracle CX Sales Mobile app helps your users to manage their day effectively and develop customer relationshipsusing their phone or tablet.
• Manage Sales Activities Using These Features:
◦ Action driven, configurable Home page, containing a sales briefing so that sales representatives can tracktheir pipeline and stay on top of daily activities.
◦ Optimized task based flows for key sales functions: Accounts, contacts, leads, opportunities, activities,assets, service requests, partners, and custom objects.
◦ View, create and edit tasks, appointments and call reports.
◦ Use saved searches that are shared across CX Sales Mobile and Workspace lists, for consistency acrossapplications.
◦ View your recently accessed records in the app when using the global search, or when sharing notes froman external app.
◦ Add contacts and leads to CX Sales Mobile from the mobile device's address book.
◦ Create contacts and leads by using a photo of a business card.
◦ Scan an asset's bar code to search for an asset and automatically enter the asset serial number.
◦ Share notes, photos, videos, documents, or files from the mobile device to CX Sales accounts,opportunities or other records.
◦ Plan your sales activities around your current location by viewing your nearby contacts, accounts,opportunities, and leads plotted on an interactive map. You can also plan future appointments in a city ornear an address with an easy location search.
◦ View your quotes in the app and stay updated on the quote status. View and send quote proposaldocuments to customers, or share them with your team for feedback.
◦ View reports and analytics with modern visualizations optimized for mobile displays, such as bar graphs,funnels, bubble charts, and more. Role-based layouts allow sales administrators to provide uniqueexperiences to sales representatives, managers, and others.
• Manage Partner Relationship Management Activities:
◦ Partner users can effectively manage and improve channel sales on the go.
◦ Channel Managers can track the overall channel sales and also manage partner, partner contacts, andrelated information easily.
◦ Role-based restriction of PRM features enables you to configure the app for your business requirements.
◦• Oracle Sales Assistant Chatbot:
◦ Use Oracle Sales Assistant to help you perform your daily sales-related tasks. Using your phone, youcan type or use your voice to ask questions and sales assistant retrieves the information, or acts on yourrequests.
Oracle CX SalesGetting Started with Your Sales Implementation
Chapter 27Mobile
378
◦ Sales Assistant reduces manual data entry, and makes it easier to view and update sales records usingvoice commands or typing.
Note: If you need help with enabling Oracle Sales Assistant, send us a message on the Sales Assistantforum on Oracle Cloud Customer Connect.
• New Design for Efficiency on the Go:
◦ Modern and intuitive experience, designed to boost productivity with fast and seamless interactions.
◦ At-a-glance record view for quick grasp of summary, key and related information.
◦ Access contextual actions everywhere for fast and easy record updates.
◦ Improved picker experience powered by Adaptive Search.
• Global Search:
◦ Fast and simple search across all objects in one place.
◦ Use multi-keyword search across multiple fields for faster and easier access to desired information.
◦ Search more easily with recent searches and type ahead results displaying results as soon as you type.
◦ Filter results by object types.
• New and Improved Sign In Experience:
◦ Scan QR Code to sign in easily using your Single Sign On, or basic authentication.
◦ Use face or fingerprint recognition to securely sign in to the app.
◦ Quickly see new configurations due to the fast download and instant activation of your configurations.
◦ Enable OAuth authentication token support to let users stay signed in to the app for longer.
• Use a Phone or Tablet:
◦ Use either a phone or tablet to access the app. Using a tablet changes the display to 2x portrait mode.
• Easy Configuration:
◦ Configure the app using the new interface designer.
◦ Create criteria for page layouts for both standard and custom objects.
◦ Import your CX Cloud Mobile configurations into CX Sales Mobile using the new configuration importtool.
◦ Download your configurations to the app quickly and easily, as CX Sales Mobile automatically signs youin to the correct sandbox without having to re-start the app.
◦ Create custom scripts that enforce custom validations and business logic for both top-level parent andchild objects.
• Use Offline:
◦ View and edit Oracle CX Sales data in areas with no network connection.
◦ Sync automatically when a connection is re-established.
Related Topics• Oracle Cloud Customer Connect Sales Assistant forum
Oracle CX SalesGetting Started with Your Sales Implementation
Chapter 27Mobile
379
Which mobile devices are supported?To find out which mobile devices and operating systems are supported by CX Sales Mobile, see the SystemRequirements for Oracle Applications Cloud at: https://www.oracle.com/system-requirements/
Get Started with Your CX Sales Mobile ImplementationThe Oracle CX Sales Mobile application enables your sales representatives to manage their day effectively and developcustomer relationships using their phone or tablet. After download and installation, the app is ready to use. Thefollowing steps will help you roll out CX Sales Mobile successfully across your organization.
PrepareIt's best to try out the app and become familiar with the standard capabilities, but before you do that, check these thingsfirst:
1. Check that Workspace is deployed in the CX Sales application, and that search indexing processes are run andregularly scheduled, prior to using the CX Sales Mobile application. The CX Sales Mobile app utilizes the savedsearches enabled in Workspace and the high-performance search capabilities powered by Adaptive Search.See the Getting Started with Your Sales Implementation guide for more information about Workspace andsetting up Workspace saved searches.
2. Make sure that your device is ready to use with CX Sales Mobile:
◦ Does your mobile device meet the requirements? See the "Which mobile devices are supported?" topic tofind out.
◦ Have you tested your network connection?
◦ Does your mobile device include data service?
◦ Have you set up your email account?
Use your Mobile Device Management Software to Install the AppTo make signing in to the app easier for your users, you can use your mobile device management (MDM) software toinstall the CX Sales Mobile application. Using MDM also enables you to manage the CX Sales Mobile app centrally inyour organization. Her's how you set this up:
1. Add CX Sales Mobile to your organization's Mobile Device Management application catalog.2. In the Mobile Device Management app, navigate to the application configuration details, so that you can specify
configuration values for CX Sales Mobile.3. Create a new configuration record to set the host URL value. Use these values:
◦ Configuration Key: CXM_HOST
◦ Value Type: String
◦ Configuration Value: Your organization's host URL value. Find out the host URL by signing in to your CXSales application, and in your browser's address bar, locate the part of the URL between https:// and thenext slash (/). For example, it might be something like: example-xxxx.exampleleads.com.
Oracle CX SalesGetting Started with Your Sales Implementation
Chapter 27Mobile
380
4. Create another configuration record to specify basic authentication sign in, or Single Sign-On (SSO). Use thesevalues:
◦ Configuration Key: CXM_AUTH_TYPE
◦ Value Type: String
◦ Configuration Value: Don't enter a value if you want to use SSO, enter BASIC if you want to use basicauthentication.
Create a QR Code and Install the AppIf your organization doesn't use MDM, you can create a QR code that automatically populates the sign in settings. QRcodes can be created using any QR code generator and you can find many free ones available on the internet.
You will need to create a URL that automatically populates the sign in settings, so that you can associate it with the QRcode. Here's how to create the URL:
1. Find out the host URL by signing in to your CX Sales application, and in your browser's address bar, locate thepart of the URL between https:// and the next slash (/). For example, it might be something like: example-xxxx.exampleleads.com. Take a note of the host URL, as you will need in the next step.
2. Create the URL that you will add to the QR code. The general format of the URL is cxm://?host=<hostURL>&type=<authentication type>. Enter the host URL you made a note of in the first step to the <host URL>value. Enter the authentication type of either basic or sso (single sign on) to the <authentication type>value. For example, if you want to create a URL for basic authentication, use this format: cxm://?host=<hostvalue>&type=basic. If you want to create a URL for Single Sign On (SSO), use this format: cxm://?host=<hostvalue>&type=sso.
Note: <host URL> and <authentication type> represent the host URL or authentication value, soensure that you don't include the brackets when entering the actual value.
Install the CX Sales Mobile app and sign in:
1. Open the App Store, or Google Play, and search for Oracle CX Sales Mobile application, and then tap Install.2. Open the app and accept the legal terms.3. If you have already created your QR code, then you can use that to sign in. Alternatively, tap I don't have a QR
code on the sign in page, then tap Basic Authentication or Single Sign On, and enter the host URL that youmade a note of above.
4. If you chose the Single Sign On (SSO) option then enter your SSO information, if you chose the BasicAuthentication option then enter your CX Sales application user name and password.
5. Tap Sign In.
Note: If you're using SSO to sign in to the app there's no additional setup required for CX SalesMobile, just ensure that you have SSO set up for the Oracle CX Sales app.
Try it Out!Now you can try out the app and familiarize yourself with the standard capabilities:
1. Sign in to the app and take note of the default objects, fields, and page layouts. While doing that, think aboutthese questions:
◦ What objects are available?
Oracle CX SalesGetting Started with Your Sales Implementation
Chapter 27Mobile
381
◦ What fields and related objects are displayed with each object?
◦ What do the page layouts look like for each object?
2. When you're familiar with the default objects, fields, related objects, and the page layouts, consider if you needto change anything to address your organization's needs.
◦ Does CX Sales Mobile display the objects - standard and custom - that your sales team needs to workwith?
◦ Are the fields that you require displayed for each of those objects? Do you want to add or remove otherfields, including custom fields?
◦ What about the related objects?
◦ Do you want to configure the page layouts?
◦ Do you need page layouts for users located in different geographical regions, or with different roles?
ConfigureCX Sales Mobile can be configured easily and comprehensively, allowing you to tailor the app to suit your organization.There are two ways that you can configure the app: By enabling and disabling profile options, or by using theconfiguration tool in Application Composer.
1. First, it's best to enable or disable profile options for the app. These will allow you, for example, to enable thecall logging feature. See the "Enable or Disable Features Using the Profile Options" topic in the mobile chapterof the Implementing Sales guide for the full list of profile options.
2. Next, you can use the powerful configuration tool in Application Composer. This is the main way that youcan configure the app, enabling you to comprehensively personalize the app to your requirements. Examplesof the configuration capabilities include: Creating new page layouts to include the fields that your businessrequires, setting up criteria for displaying the page, configuring the app with custom scripts, and enablingsales representatives to scan a business card using their mobile device's camera. See the "Configure the PageLayouts" and "Further Configurations" sections of the mobile chapter in the Implementing Sales guide for moreinformation.
Onboard Sales RepresentativesNow you want to think about how you're going to roll out the application to your sales representatives. Here are sometips to help direct you:
• Consider a phased roll out, starting with a pilot project that includes a small group of users.
• Collect feedback from the test users and create training materials to address their specific pain points.
• Capture screenshots on your mobile device for use in your training materials.
• To create videos of the application, download software that lets you record your screen on your PC.
• To present live training, download software that lets you mirror your mobile device on your PC.
• Consider creating a web page on your intranet with information and links relating to the application.
• Inform your users of the QR code, if you have created one. You could publish the QR code on your intranet webpage.
• Make sure that your users have their mobile devices up and running. Remind yourself of the questions theymight have by reviewing the Prepare section of this topic.
Oracle CX SalesGetting Started with Your Sales Implementation
Chapter 27Mobile
382
Set Up the Maps FeatureYou can access the What's Around Me? maps feature directly from on the CX Sales Mobile home page. The area shownon the map defaults to your current location and displays your nearby leads, accounts, contacts, and opportunities.Filters allow you to change the radius distance that's shown on the map, change the unit of length to miles orkilometers, show and hide different objects, and choose record sets such as "Records where I am on the team" or "Allrecords I can see." Your location can be changed through gestures similar to native map applications and location-basedsearch. Records display on the map as pins with icons that allow you to distinguish the record type, and tapping a pindisplays a card showing record details and actionable items. The card's Get Directions button uses the phone's nativemap application to guide you to your destination. Actions such as Contact, Edit, and Convert Lead are available directlyfrom the cards, meaning that you remain in context when you act on the information that's presented in the map.
The map feature is enabled in the app by default, however there are certain scheduled processes that need to be run toset up the feature:
1. Sign in to the Oracle CX Sales application as user with a Sales Administrator role.2. Enable geocoding for a country by following the steps in the "Set Up Geocoding" topic, found in the Enterprise
Structures > Geographies > Set Up Geocoding chapter in the Implementing Applications guide.3. Navigate to Tools > Scheduled Processes work area.4. In the Overview page, click Actions > Schedule New Process.5. Click the Name list button and search for the Populate Location Latitude and Longitude Information
process, and then click OK. This process populates the latitude and longitude information for every sales objectapart from leads.
6. Enter the parameters, such as the start date and end date, and schedule the job to run automatically atspecified intervals.
7. Click Submit.8. Carry out steps 3 to 7 again, this time searching for the Populate Lead Latitude and Longitude Information
process. This process populates the latitude and longitude information for leads.
Related Topics
• Set Up Geocoding
Implementation ConsiderationsHere's some best practices to follow and things to note when you're implementing Oracle CX Sales Mobile.
The Home PageThe home page is the first page that you see when you sign into the application. For sales representatives, the homepage can show their pipeline and tasks, and for sales managers it can show navigation shortcuts to sales objects (suchas opportunity and account pages).
Here are the aspects to note about the home page:
• For the ORA_ZBS_SALES_REPRESENTATIVE_JOB and ORA_ZBS_SALES_ADMINISTRATOR_JOB roles, the salespipeline and tasks have been added to their home page by default.

Oracle CX SalesGetting Started with Your Sales Implementation
Chapter 27Mobile
383
• All other job roles, including sales manager job roles, don't see sales pipelines and tasks by default. Instead,they see their relevant saved searches and shortcuts to view sales objects (such as viewing opportunities andaccounts).
• The pipeline shows the total amount and number of the opportunities owned by the user. The amounts areshown in the corporate currency, however bear in mind that opportunities might have different currencies andso will use an exchange rate conversion to calculate the corporate currency amount.
• If an accounting calendar is setup with quarters (specified in the ZCA_COMMON_CALENDAR profile option),then the pipeline uses the accounting calendar to determine the period for the current and next quarter. Ifthere isn't an accounting calendar defined for Sales use, then the pipeline uses the standard Gregorian calendarquarter definition (January to March, April to June, July to September, October to December). If there's anaccounting calendar available for Sales, but it doesn't conform to quarterly periods, or current or next quarterscan't be resolved, then the pipeline uses the standard Gregorian calendar quarter definition.
• Ensure that for the MOO_OPTY_SRCH_CLS_PERIOD lookup type that the relevant lookup values are enabled, sothat the calendar displays the associated close period data:
◦ If you're using the accounting calendar, ensure that the lookup value CURR_NEXT_QTR_FSCL is enabledand not end dated.
◦ If you're not using the accounting calendar, ensure the lookup value CURR_NEXT_QTR is enabled and notend dated.
Search FeaturesYou can use the global search feature directly from any page to locate any type of record quickly and easily. You can alsouse saved searches for each of the objects that are set up using Workspace, and are shared across the CX Sales Mobileapp and the CX Sales app.
Here are the aspects to note about the global search and adaptive search features:
• The global search feature appears at the bottom of every page and uses adaptive search. Search capabilitiesthat are available in other parts of a page also use adaptive search, but they only search the object type thatyou're viewing. For example, if you're viewing an opportunity list and use the search field at the top of the page,then CX Sales Mobile searches for opportunities only.
• CX Sales Mobile uses adaptive search and adaptive search configuration, so if an object isn't enabled foradaptive search, then it won't appear in CX Sales Mobile search results. For example, if you create four customobjects, enable them all for adaptive search, but only enable one for mobile, then only the one custom object isincluded in the CX Sales mobile search results.
• The search is also limited to the standard sales objects that are available in CX Sales Mobile and custom objects.Therefore, if you try to search for a deal for example, it won't appear in the search results.
• You can't configure the information that's shown in the global search results.
• The global search uses a keyword search for all objects enabled for CX Sales Mobile and for all fields that are inthose objects. If you want to narrow your search results to a specific object, you can use the Show filter to filterthe search results.
Here are the aspects to note about the saved search feature for each of the objects:
• You can enable seeded or custom saved searches for each object in Workspace and make them available forall users generally, or restrict them by role. In addition, sales users can also create their own personal savedsearches. All the saved searches that are available in Workspace for a user are also available in CX Sales Mobilefor that user.
• The last used saved search for an object, and the last used sort option for a saved search, are used by the appuntil you close and restart the app. For example, if you had chosen the "All Opportunities" saved search, rather
Oracle CX SalesGetting Started with Your Sales Implementation
Chapter 27Mobile
384
than the default "My Open Opportunities", when you return to the opportunity list the "All Opportunities" savedsearch is shown, as that was your last used saved search.
• Custom activity saved searches need to be set up with their corresponding activity type criterion, so that theydisplay in the CX Sales Mobile saved search list. For example, custom task saved searches need to be associatedto the Task activity type in Workspace, otherwise the saved search won't be shown in the CX Sales Mobile Tasksaved search list.
FAQsHere are some FAQs about the features outlined in this topic:
• Question: Why can't I see a pipeline or tasks in the home page?
Answer: Only the ORA_ZBS_SALES_REPRESENTATIVE_JOB and ORA_ZBS_SALES_ADMINISTRATOR_JOB rolessee their pipeline and tasks by default.
• Question: Why can't I find what I am searching for?
Answer: If an object isn't enabled for adaptive search, then it won't appear on in CX Sales Mobile search results.
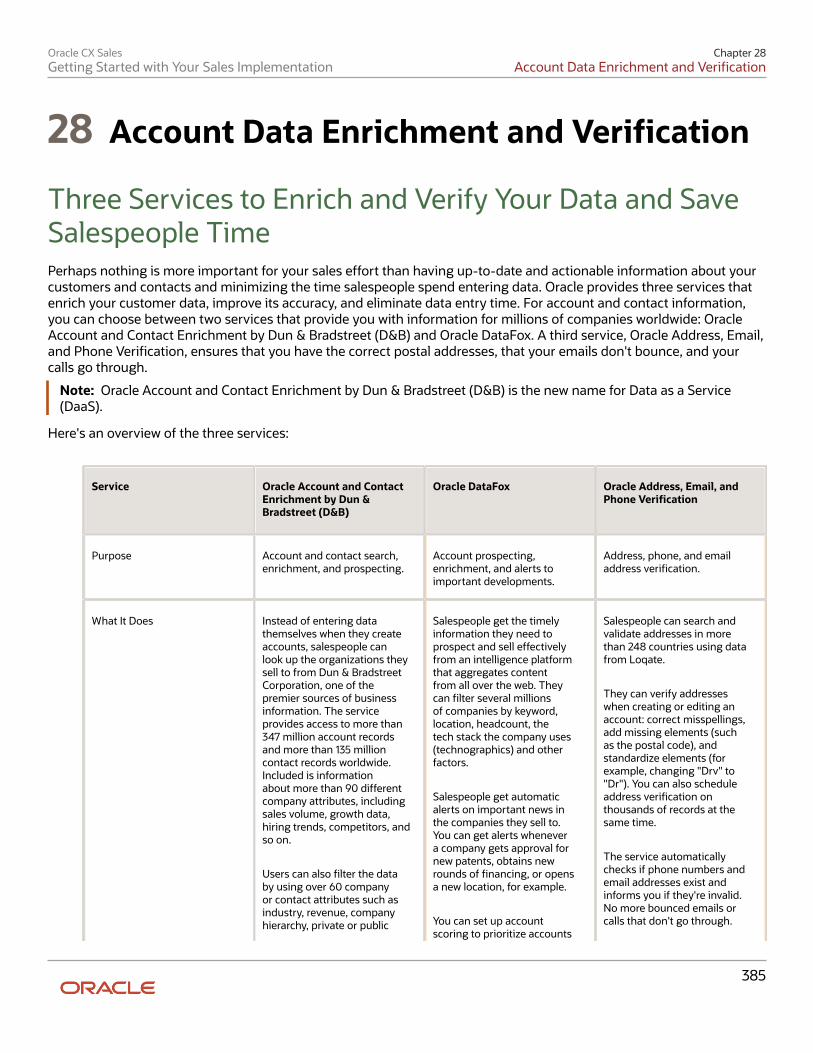
Oracle CX SalesGetting Started with Your Sales Implementation
Chapter 28Account Data Enrichment and Verification
385
28 Account Data Enrichment and Verification
Three Services to Enrich and Verify Your Data and SaveSalespeople TimePerhaps nothing is more important for your sales effort than having up-to-date and actionable information about yourcustomers and contacts and minimizing the time salespeople spend entering data. Oracle provides three services thatenrich your customer data, improve its accuracy, and eliminate data entry time. For account and contact information,you can choose between two services that provide you with information for millions of companies worldwide: OracleAccount and Contact Enrichment by Dun & Bradstreet (D&B) and Oracle DataFox. A third service, Oracle Address, Email,and Phone Verification, ensures that you have the correct postal addresses, that your emails don't bounce, and yourcalls go through.
Note: Oracle Account and Contact Enrichment by Dun & Bradstreet (D&B) is the new name for Data as a Service(DaaS).
Here's an overview of the three services:
Service Oracle Account and ContactEnrichment by Dun &Bradstreet (D&B)
Oracle DataFox Oracle Address, Email, andPhone Verification
Purpose Account and contact search,enrichment, and prospecting.
Account prospecting,enrichment, and alerts toimportant developments.
Address, phone, and emailaddress verification.
What It Does Instead of entering datathemselves when they createaccounts, salespeople canlook up the organizations theysell to from Dun & BradstreetCorporation, one of thepremier sources of businessinformation. The serviceprovides access to more than347 million account recordsand more than 135 millioncontact records worldwide.Included is informationabout more than 90 differentcompany attributes, includingsales volume, growth data,hiring trends, competitors, andso on.
Users can also filter the databy using over 60 companyor contact attributes such asindustry, revenue, companyhierarchy, private or public
Salespeople get the timelyinformation they need toprospect and sell effectivelyfrom an intelligence platformthat aggregates contentfrom all over the web. Theycan filter several millionsof companies by keyword,location, headcount, thetech stack the company uses(technographics) and otherfactors.
Salespeople get automaticalerts on important news inthe companies they sell to.You can get alerts whenevera company gets approval fornew patents, obtains newrounds of financing, or opensa new location, for example.
You can set up accountscoring to prioritize accounts
Salespeople can search andvalidate addresses in morethan 248 countries using datafrom Loqate.
They can verify addresseswhen creating or editing anaccount: correct misspellings,add missing elements (suchas the postal code), andstandardize elements (forexample, changing "Drv" to"Dr"). You can also scheduleaddress verification onthousands of records at thesame time.
The service automaticallychecks if phone numbers andemail addresses exist andinforms you if they're invalid.No more bounced emails orcalls that don't go through.
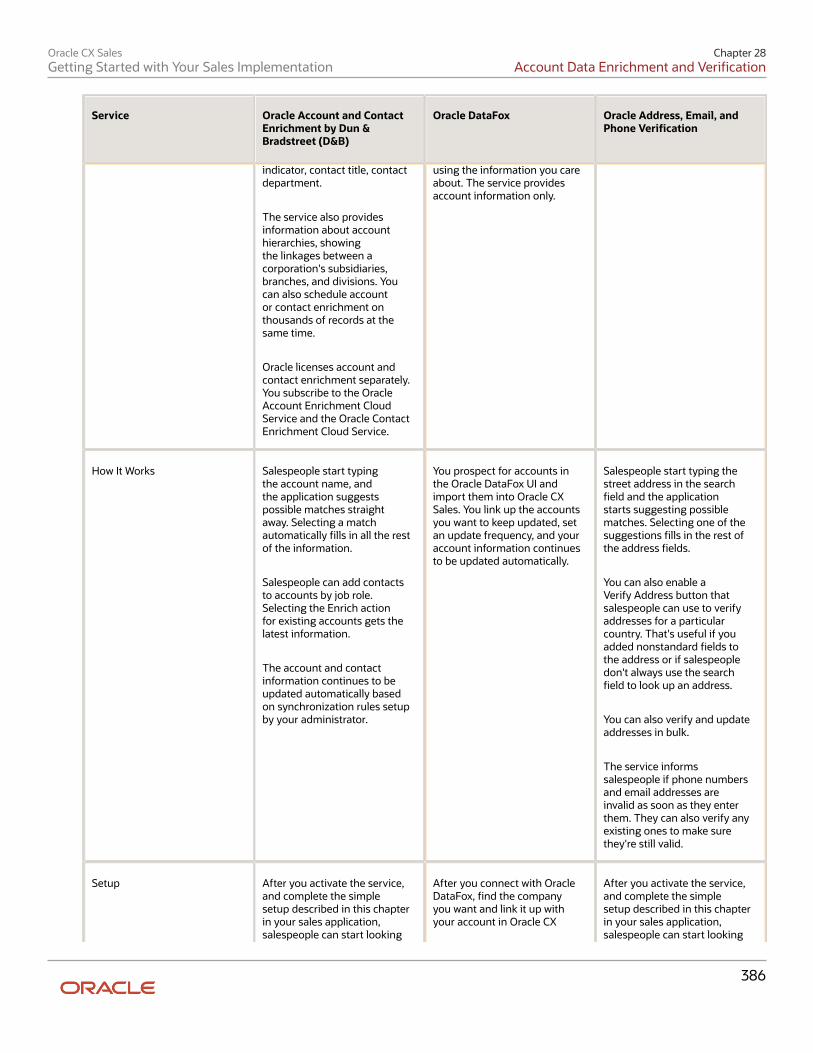
Oracle CX SalesGetting Started with Your Sales Implementation
Chapter 28Account Data Enrichment and Verification
386
Service Oracle Account and ContactEnrichment by Dun &Bradstreet (D&B)
Oracle DataFox Oracle Address, Email, andPhone Verification
indicator, contact title, contactdepartment.
The service also providesinformation about accounthierarchies, showingthe linkages between acorporation's subsidiaries,branches, and divisions. Youcan also schedule accountor contact enrichment onthousands of records at thesame time.
Oracle licenses account andcontact enrichment separately.You subscribe to the OracleAccount Enrichment CloudService and the Oracle ContactEnrichment Cloud Service.
using the information you careabout. The service providesaccount information only.
How It Works Salespeople start typingthe account name, andthe application suggestspossible matches straightaway. Selecting a matchautomatically fills in all the restof the information.
Salespeople can add contactsto accounts by job role.Selecting the Enrich actionfor existing accounts gets thelatest information.
The account and contactinformation continues to beupdated automatically basedon synchronization rules setupby your administrator.
You prospect for accounts inthe Oracle DataFox UI andimport them into Oracle CXSales. You link up the accountsyou want to keep updated, setan update frequency, and youraccount information continuesto be updated automatically.
Salespeople start typing thestreet address in the searchfield and the applicationstarts suggesting possiblematches. Selecting one of thesuggestions fills in the rest ofthe address fields.
You can also enable aVerify Address button thatsalespeople can use to verifyaddresses for a particularcountry. That's useful if youadded nonstandard fields tothe address or if salespeopledon't always use the searchfield to look up an address.
You can also verify and updateaddresses in bulk.
The service informssalespeople if phone numbersand email addresses areinvalid as soon as they enterthem. They can also verify anyexisting ones to make surethey're still valid.
Setup After you activate the service,and complete the simplesetup described in this chapterin your sales application,salespeople can start looking
After you connect with OracleDataFox, find the companyyou want and link it up withyour account in Oracle CX
After you activate the service,and complete the simplesetup described in this chapterin your sales application,salespeople can start looking
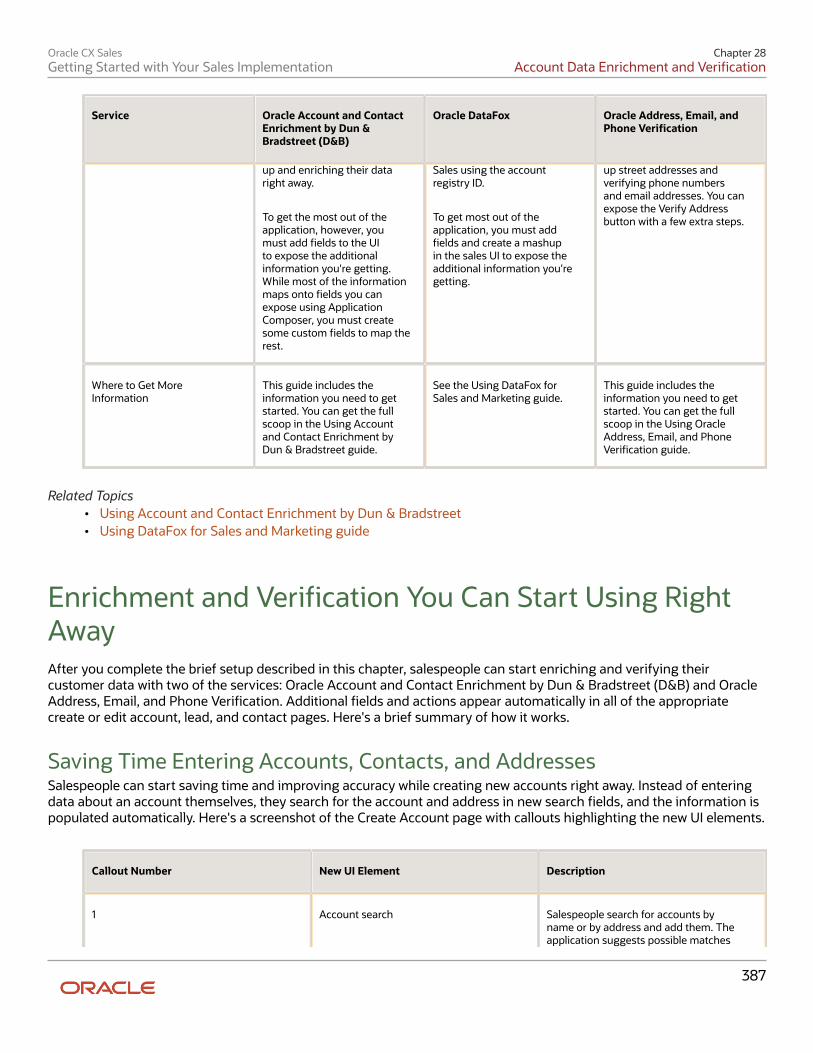
Oracle CX SalesGetting Started with Your Sales Implementation
Chapter 28Account Data Enrichment and Verification
387
Service Oracle Account and ContactEnrichment by Dun &Bradstreet (D&B)
Oracle DataFox Oracle Address, Email, andPhone Verification
up and enriching their dataright away.
To get the most out of theapplication, however, youmust add fields to the UIto expose the additionalinformation you're getting.While most of the informationmaps onto fields you canexpose using ApplicationComposer, you must createsome custom fields to map therest.
Sales using the accountregistry ID.
To get most out of theapplication, you must addfields and create a mashupin the sales UI to expose theadditional information you'regetting.
up street addresses andverifying phone numbersand email addresses. You canexpose the Verify Addressbutton with a few extra steps.
Where to Get MoreInformation
This guide includes theinformation you need to getstarted. You can get the fullscoop in the Using Accountand Contact Enrichment byDun & Bradstreet guide.
See the Using DataFox forSales and Marketing guide.
This guide includes theinformation you need to getstarted. You can get the fullscoop in the Using OracleAddress, Email, and PhoneVerification guide.
Related Topics• Using Account and Contact Enrichment by Dun & Bradstreet• Using DataFox for Sales and Marketing guide
Enrichment and Verification You Can Start Using RightAwayAfter you complete the brief setup described in this chapter, salespeople can start enriching and verifying theircustomer data with two of the services: Oracle Account and Contact Enrichment by Dun & Bradstreet (D&B) and OracleAddress, Email, and Phone Verification. Additional fields and actions appear automatically in all of the appropriatecreate or edit account, lead, and contact pages. Here's a brief summary of how it works.
Saving Time Entering Accounts, Contacts, and AddressesSalespeople can start saving time and improving accuracy while creating new accounts right away. Instead of enteringdata about an account themselves, they search for the account and address in new search fields, and the information ispopulated automatically. Here's a screenshot of the Create Account page with callouts highlighting the new UI elements.
Callout Number New UI Element Description
1 Account search Salespeople search for accounts byname or by address and add them. Theapplication suggests possible matches
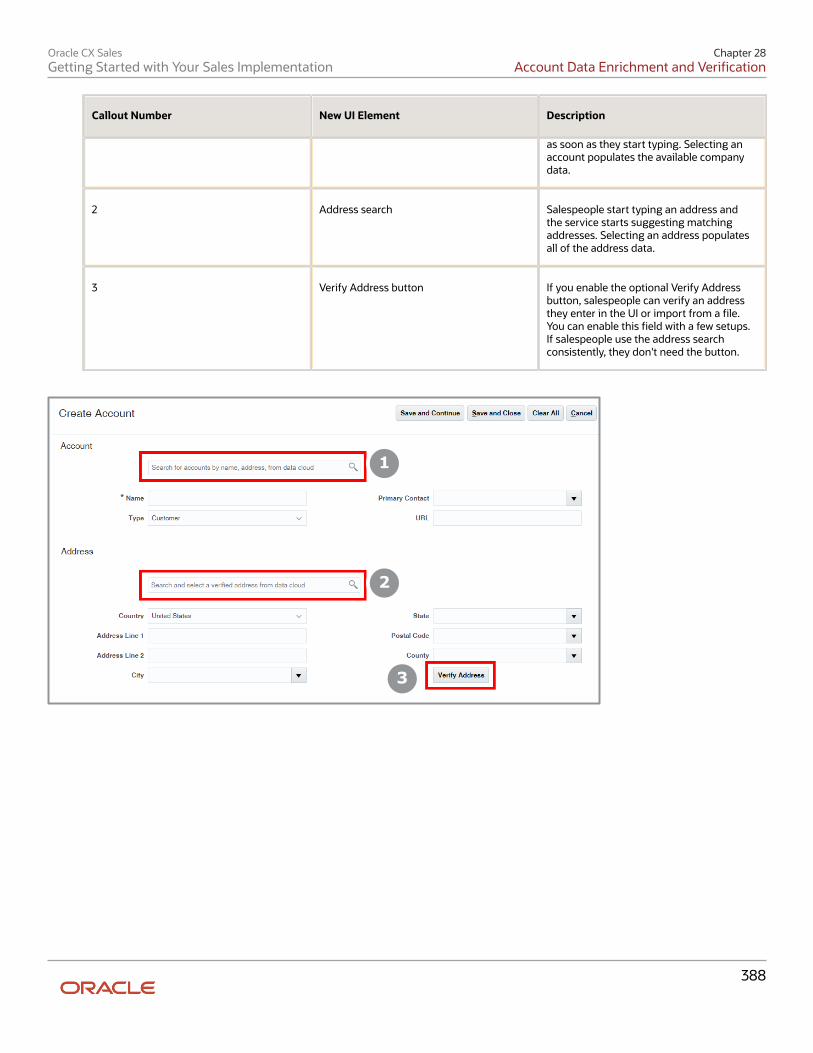
Oracle CX SalesGetting Started with Your Sales Implementation
Chapter 28Account Data Enrichment and Verification
388
Callout Number New UI Element Description
as soon as they start typing. Selecting anaccount populates the available companydata.
2 Address search Salespeople start typing an address andthe service starts suggesting matchingaddresses. Selecting an address populatesall of the address data.
3 Verify Address button If you enable the optional Verify Addressbutton, salespeople can verify an addressthey enter in the UI or import from a file.You can enable this field with a few setups.If salespeople use the address searchconsistently, they don't need the button.
1
2
3
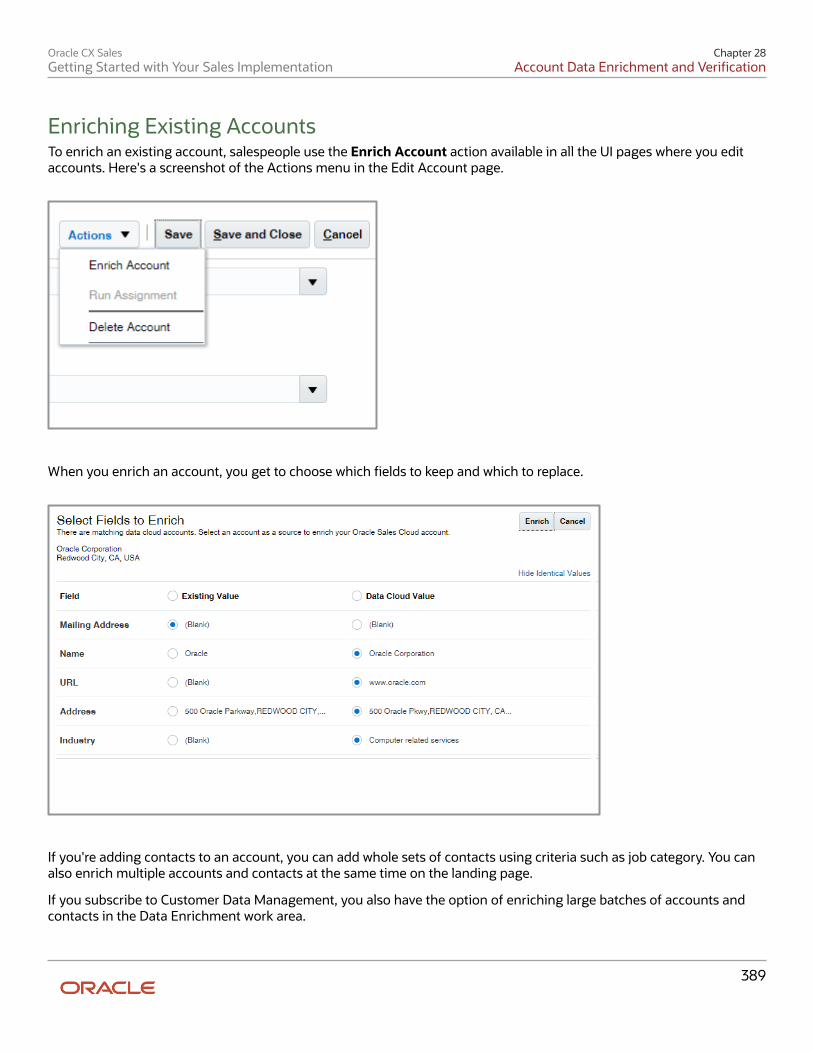
Oracle CX SalesGetting Started with Your Sales Implementation
Chapter 28Account Data Enrichment and Verification
389
Enriching Existing AccountsTo enrich an existing account, salespeople use the Enrich Account action available in all the UI pages where you editaccounts. Here's a screenshot of the Actions menu in the Edit Account page.
When you enrich an account, you get to choose which fields to keep and which to replace.
If you're adding contacts to an account, you can add whole sets of contacts using criteria such as job category. You canalso enrich multiple accounts and contacts at the same time on the landing page.
If you subscribe to Customer Data Management, you also have the option of enriching large batches of accounts andcontacts in the Data Enrichment work area.

Oracle CX SalesGetting Started with Your Sales Implementation
Chapter 28Account Data Enrichment and Verification
390
Email Address and Phone Number VerificationWhen you enter a phone number or an email address, the application automatically checks if they're valid. Theapplication can't check if the phone numbers and emails you enter are valid for the specific person or account, ofcourse, but it does assure that a phone number will actually dial and that an email won't bounce.
If the email or phone number you enter isn't valid, you get informed right away: the application displays the status rightunder the field. If nothing appears, your entry is valid. Here's a screenshot of a phone number to give you an idea ofwhat appears under invalid information:
Callout Number Description
1 Status. For phone numbers, this can be only Invalid. Email addresses can also display thestatus of Partially-Valid: the domain is valid but the name isn't. If the person left the company,or changed their name, you'll see the Partially-Valid status for the email, for example.
2 Date the email address or phone number was verified by the application.
3 Reverify button that you can use to verify again. You never know when area codes or emailaddresses may change. What's valid today may not be in six months.
4 Overwrite button to manually set the status. The application, isn't perfect. If you knowthe number or email is correct, you can set the status to Verified. When you do, you seeOverwritten on instead of Verified on.
1 2 34
The application does display a Valid status, but only much later. By default, the status appears 180 days later. Whenthe information is old, salespeople may want to verify it again by clicking on the Reverify button. You can specify thenumber of days before the Valid status appears or even turn this option off during setup. For details, see the topic:Enable the Verification of Addresses, Emails, and Phone Numbers.
Three Ways to Enrich DataThere are three ways to enrich account and contact data from the Oracle Account and Contact Enrichment by Dun &Bradstreet (D&B) service:
• Real-time enrichment
You can enrich data directly in the Account and Contact pages as described in this chapter.
Oracle CX SalesGetting Started with Your Sales Implementation
Chapter 28Account Data Enrichment and Verification
391
The real-time enrichment uses the REST APIs and the mapping you maintain using the Manage Oracle Data asa Service Attribute Mapping and Preferences task in the Setup and Maintenance work area.
• Manual enrichment
You can do your sales prospecting in the D&B service UI, which provides more ways to filter and search. Youthen export your account or contact records into a file and import the file into your sales application.
The D&B service includes a default export mapping you can edit. You can edit the import mapping in the salesapplication. The Using Account and Contact Enrichment by Dun & Bradstreet guide provides the details aboutthe export and import mappings.
• Batch enrichment
You can also enrich your account and contact data in bulk. Bulk enrichment uses the same REST APIs andmapping you maintain in Manage Oracle Data as a Service Attribute Mapping and Preferences. However, theintegration doesn't support any additional custom fields you add.
Here's a diagram to illustrate the architecture:
• The D&B service includes the mapping you can use to export a file with accounts and contacts. Importing thefile using Import Management into your sales application uses an import mapping.
Oracle CX SalesGetting Started with Your Sales Implementation
Chapter 28Account Data Enrichment and Verification
392
• The real-time enrichment feature and Oracle Customer Data Management (CDM) both use the REST APIs andthe mapping you can update in your sales application. The mapping determines which fields show up in the UI.
AccountAnd
ContactUIs
Enrichment with D&B Sales
CDM
Batch Enrichment
.CSV File
File Import Mapping
Export Mapping
UI
REST API
Import Mapping
Aribute Mapping
Accountand
ContactUIs
Overview of Data Enrichment and Verification SetupThis chapter outlines the process for setting up two Oracle cloud services that enrich and verify your account andcontact data: Oracle Account and Contact Enrichment by Dun & Bradstreet (D&B) and Oracle Address, Email, and PhoneVerification. If, instead, you're setting up Oracle DataFox integration, then read the last topic in this chapter to learn howto hook up DataFox to CX Sales. The rest of the DataFox setup is covered in the Using DataFox for Sales and Marketingguide.
When your organization subscribes to Oracle Account and Contact Enrichment by Dun & Bradstreet (D&B) and OracleAddress, Email, and Phone Verification services, the person or people designated as the service administrators foryour sales application domain or the account administrator, receive a welcome email. You must be one of the serviceadministrators to complete the setup. If you don't receive the email, you can ask the account administrator to create youas a service administrator or resend the email. Here's a list of the setup tasks.
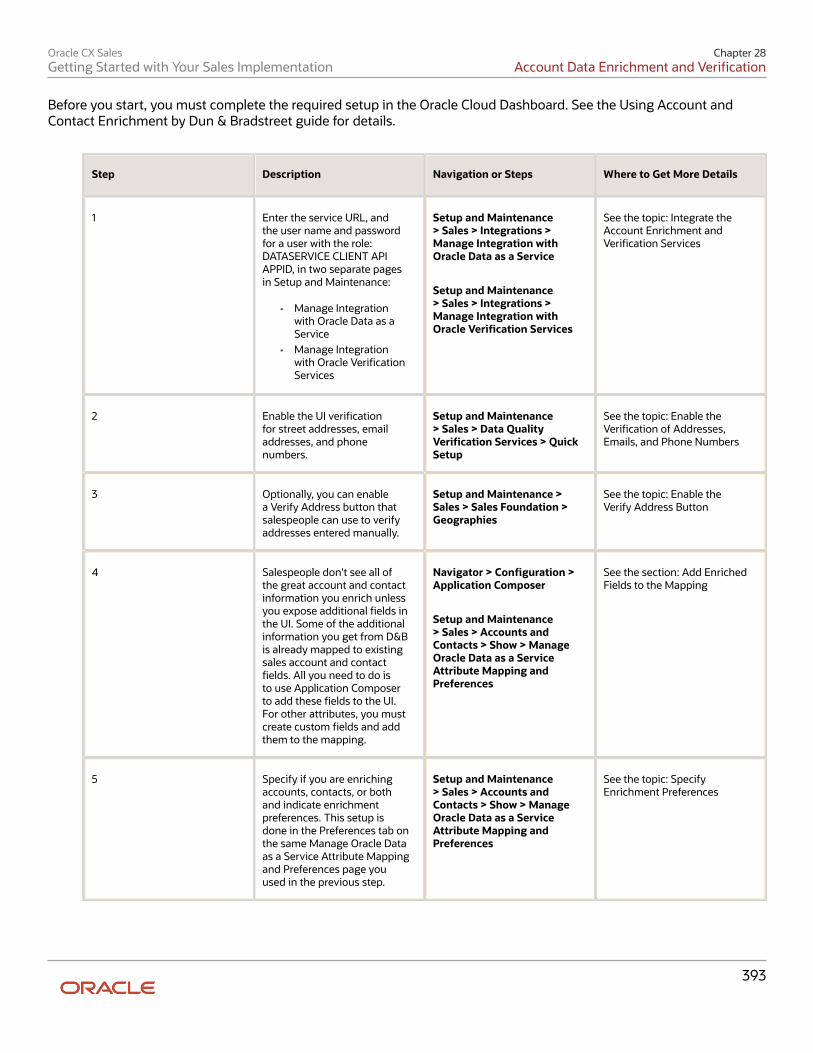
Oracle CX SalesGetting Started with Your Sales Implementation
Chapter 28Account Data Enrichment and Verification
393
Before you start, you must complete the required setup in the Oracle Cloud Dashboard. See the Using Account andContact Enrichment by Dun & Bradstreet guide for details.
Step Description Navigation or Steps Where to Get More Details
1 Enter the service URL, andthe user name and passwordfor a user with the role:DATASERVICE CLIENT APIAPPID, in two separate pagesin Setup and Maintenance:
• Manage Integrationwith Oracle Data as aService
• Manage Integrationwith Oracle VerificationServices
Setup and Maintenance> Sales > Integrations >Manage Integration withOracle Data as a Service
Setup and Maintenance> Sales > Integrations >Manage Integration withOracle Verification Services
See the topic: Integrate theAccount Enrichment andVerification Services
2 Enable the UI verificationfor street addresses, emailaddresses, and phonenumbers.
Setup and Maintenance> Sales > Data QualityVerification Services > QuickSetup
See the topic: Enable theVerification of Addresses,Emails, and Phone Numbers
3 Optionally, you can enablea Verify Address button thatsalespeople can use to verifyaddresses entered manually.
Setup and Maintenance >Sales > Sales Foundation >Geographies
See the topic: Enable theVerify Address Button
4 Salespeople don't see all ofthe great account and contactinformation you enrich unlessyou expose additional fields inthe UI. Some of the additionalinformation you get from D&Bis already mapped to existingsales account and contactfields. All you need to do isto use Application Composerto add these fields to the UI.For other attributes, you mustcreate custom fields and addthem to the mapping.
Navigator > Configuration >Application Composer
Setup and Maintenance> Sales > Accounts andContacts > Show > ManageOracle Data as a ServiceAttribute Mapping andPreferences
See the section: Add EnrichedFields to the Mapping
5 Specify if you are enrichingaccounts, contacts, or bothand indicate enrichmentpreferences. This setup isdone in the Preferences tab onthe same Manage Oracle Dataas a Service Attribute Mappingand Preferences page youused in the previous step.
Setup and Maintenance> Sales > Accounts andContacts > Show > ManageOracle Data as a ServiceAttribute Mapping andPreferences
See the topic: SpecifyEnrichment Preferences
Oracle CX SalesGetting Started with Your Sales Implementation
Chapter 28Account Data Enrichment and Verification
394
Related Topics• Account and Contact Enrichment by D&B: Overview of the Setup Process• Using Account and Contact Enrichment by Dun & Bradstreet• Using DataFox for Sales and Marketing guide
Integrate the Account Enrichment and VerificationServicesHere's how to integrate the Oracle Account and Contact Enrichment by Dun & Bradstreet (D&B) and the Oracle Address,Email, and Phone Verification services in your sales application.
Note: Oracle Account and Contact Enrichment by Dun & Bradstreet (D&B) is the new name for Data as a Service(DaaS).
PrerequisitesBefore you start, you must:
• Set up the DaaS service in the Oracle Cloud Dashboard.
• Copy the URL of the DaaS instance.
• Provision a user with the DATASERVICE CLIENT API APPID role.
• Add each service as a confidential application in Oracle Identity Cloud Service as described in the topic "Add aConfidential Application" in the Administering Oracle Identity Cloud Service guide.
On the Client page of the Add Confidential Application wizard, in the Authorization section, select ResourceOwner, Client Credentials, Authorization Code, and Refresh Token as Allowed Grant Types. Leave RedirectURL blank. If you use Basic Authentication, do not include the question mark special character (?) in thepassword.
You must enter the URL and user name and password to complete the integration in the Setup and Maintenance workarea.
Integrate the D&B Enrichment with Your Sales Application1. In the Setup and Maintenance work area, open the Manage Integration with Oracle Data as a Service task:
◦ Offering: Sales
◦ Functional Area: Integrations
◦ Show: All Tasks
◦ Task: Manage Integration with Oracle Data as a Service
2. In the Manage Integration with Oracle Data as a Service page, select the OAuth Authentication option.3. In the URL field, enter the URL of the DaaS instance. Remove /data/ui from the end of the URL. Here's an
example: https://mydataservice-myidentitydomain.data.us2.oraclecloud.com.
If you didn't save the URL, you can find it in the welcome email and in Oracle Cloud Dashboard.
Oracle CX SalesGetting Started with Your Sales Implementation
Chapter 28Account Data Enrichment and Verification
395
4. In the Client ID and the Client Secret fields, enter the values you obtained when you added the service as aconfidential application in Oracle Identity Cloud Service.
5. Click Save and Close.
Integrate the Address, Email, and Phone Verification with Your SalesApplicationEnter the same information in the Manage Integration with Oracle Address Verification page:
1. In the Setup and Maintenance work area, open the task Manage Integration with Oracle VerificationServices:
◦ Offering: Sales
◦ Functional Area: Integrations
◦ Show: All Tasks
◦ Task: Manage Integration with Oracle Verification Services
2. In the Manage Integration with Oracle Verification Services page, select the OAuth Authentication option.3. In the URL field, enter the URL of the verification service instance. Remove /data/ui from the end of the URL.
Here's an example: https://mydataservice-myidentitydomain.data.us2.oraclecloud.com.
If you didn't save the URL, you can find it in the welcome email and in Oracle Cloud Dashboard.4. In the Client ID and the Client Secret fields, enter the values you obtained when you added the service as a
confidential application in Oracle Identity Cloud Service.5. Click Save and Close.
Related Topics
• Account and Contact Enrichment by D&B Overview of the Setup Process
Enable the Verification of Addresses, Emails, and PhoneNumbersAfter you enter the integration information, you enable the verification services that you want to use. Here's the easiestway, using the Quick Setup page provided for this purpose:
1. In the Setup and Maintenance work area, open the Sales offering.
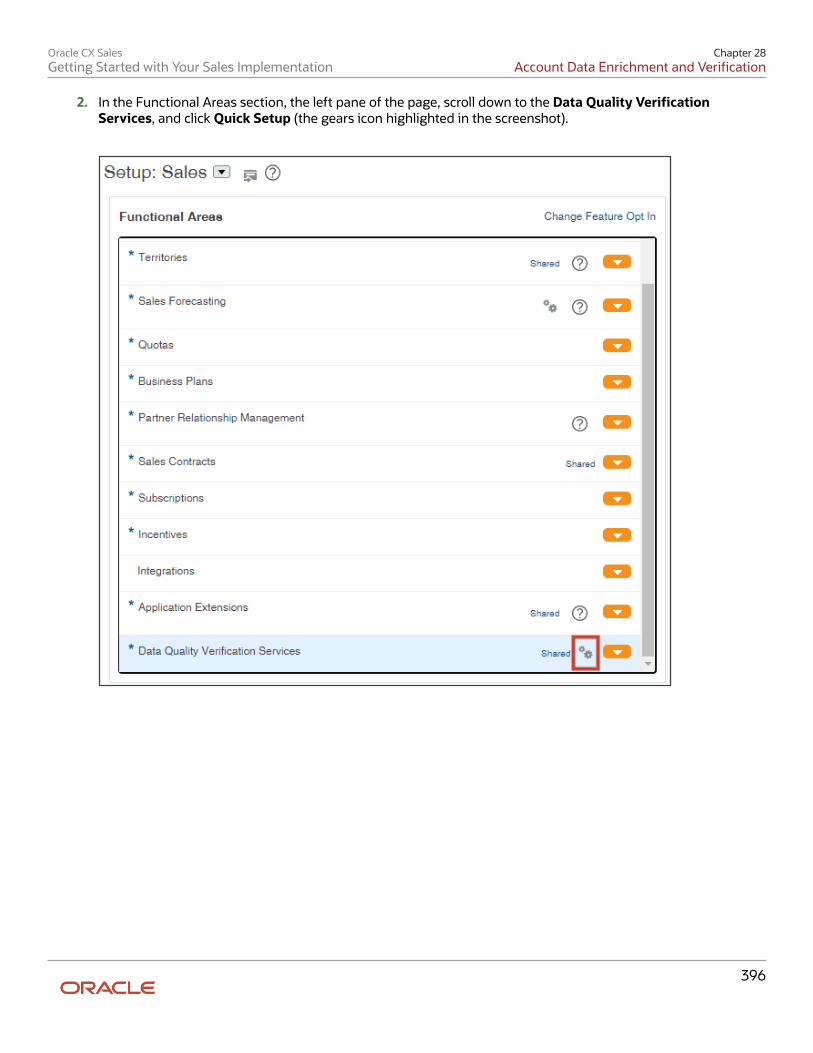
Oracle CX SalesGetting Started with Your Sales Implementation
Chapter 28Account Data Enrichment and Verification
396
2. In the Functional Areas section, the left pane of the page, scroll down to the Data Quality VerificationServices, and click Quick Setup (the gears icon highlighted in the screenshot).
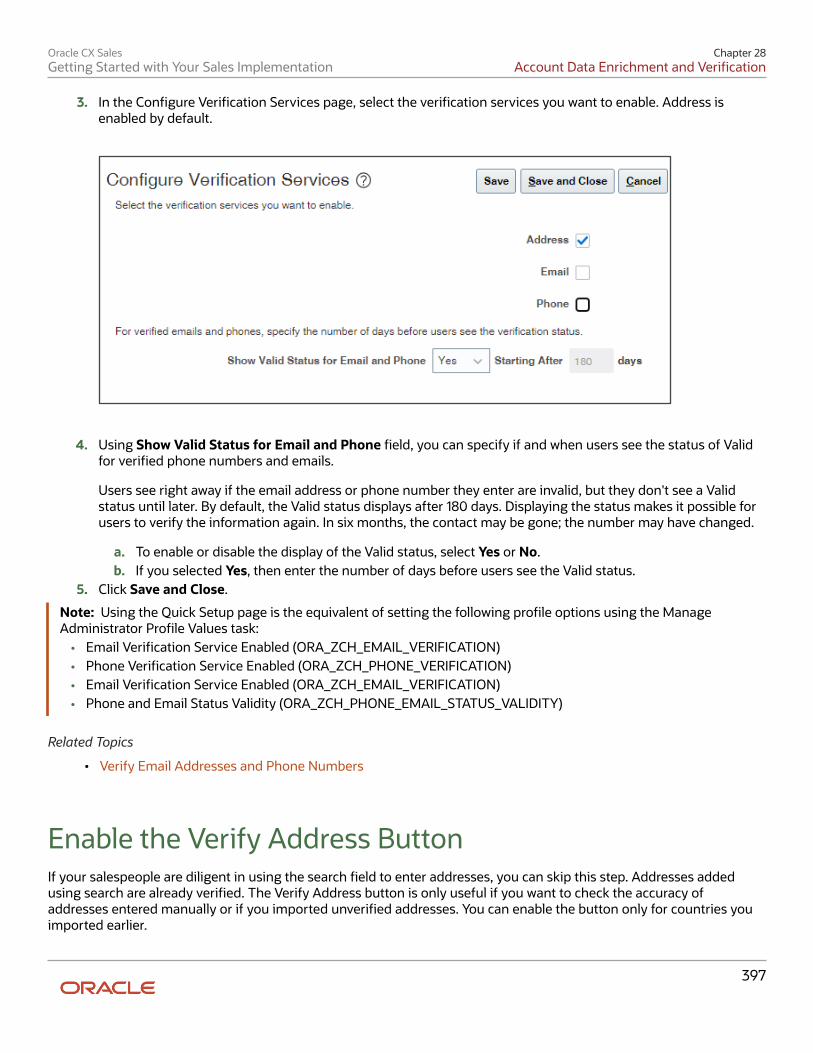
Oracle CX SalesGetting Started with Your Sales Implementation
Chapter 28Account Data Enrichment and Verification
397
3. In the Configure Verification Services page, select the verification services you want to enable. Address isenabled by default.
4. Using Show Valid Status for Email and Phone field, you can specify if and when users see the status of Validfor verified phone numbers and emails.
Users see right away if the email address or phone number they enter are invalid, but they don't see a Validstatus until later. By default, the Valid status displays after 180 days. Displaying the status makes it possible forusers to verify the information again. In six months, the contact may be gone; the number may have changed.
a. To enable or disable the display of the Valid status, select Yes or No.b. If you selected Yes, then enter the number of days before users see the Valid status.
5. Click Save and Close.
Note: Using the Quick Setup page is the equivalent of setting the following profile options using the ManageAdministrator Profile Values task:
• Email Verification Service Enabled (ORA_ZCH_EMAIL_VERIFICATION)• Phone Verification Service Enabled (ORA_ZCH_PHONE_VERIFICATION)• Email Verification Service Enabled (ORA_ZCH_EMAIL_VERIFICATION)• Phone and Email Status Validity (ORA_ZCH_PHONE_EMAIL_STATUS_VALIDITY)
Related Topics
• Verify Email Addresses and Phone Numbers
Enable the Verify Address ButtonIf your salespeople are diligent in using the search field to enter addresses, you can skip this step. Addresses addedusing search are already verified. The Verify Address button is only useful if you want to check the accuracy ofaddresses entered manually or if you imported unverified addresses. You can enable the button only for countries youimported earlier.
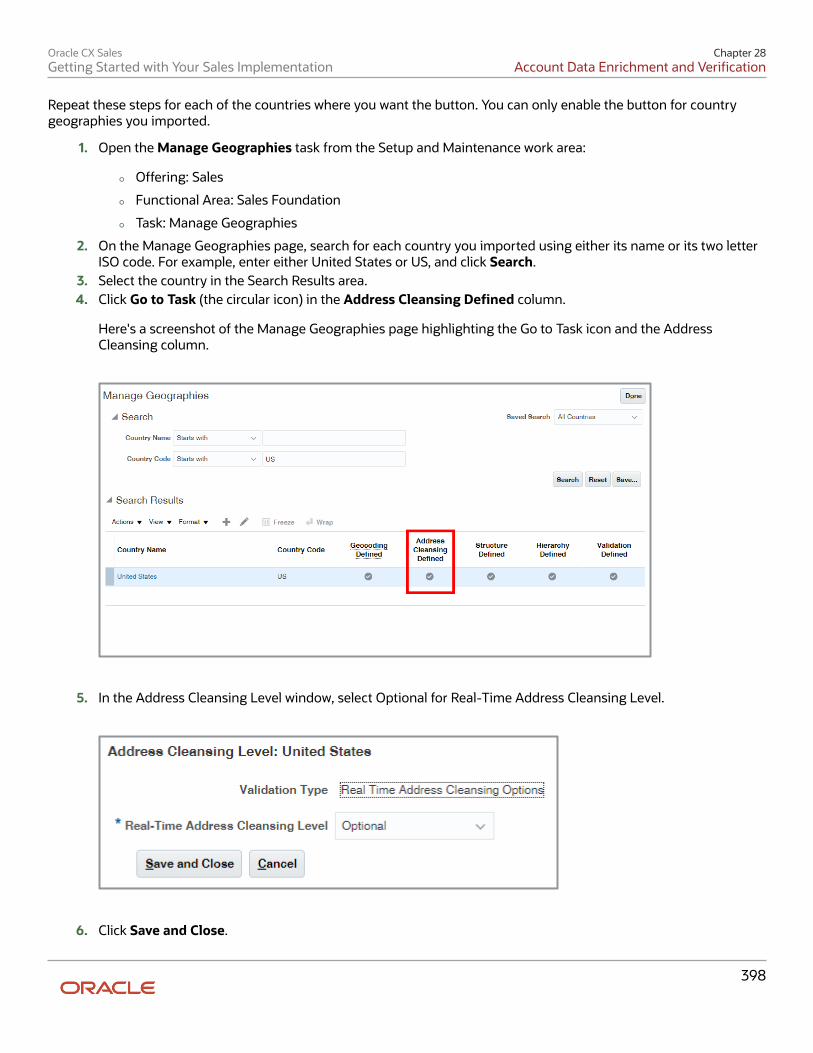
Oracle CX SalesGetting Started with Your Sales Implementation
Chapter 28Account Data Enrichment and Verification
398
Repeat these steps for each of the countries where you want the button. You can only enable the button for countrygeographies you imported.
1. Open the Manage Geographies task from the Setup and Maintenance work area:
◦ Offering: Sales
◦ Functional Area: Sales Foundation
◦ Task: Manage Geographies
2. On the Manage Geographies page, search for each country you imported using either its name or its two letterISO code. For example, enter either United States or US, and click Search.
3. Select the country in the Search Results area.4. Click Go to Task (the circular icon) in the Address Cleansing Defined column.
Here's a screenshot of the Manage Geographies page highlighting the Go to Task icon and the AddressCleansing column.
5. In the Address Cleansing Level window, select Optional for Real-Time Address Cleansing Level.
6. Click Save and Close.
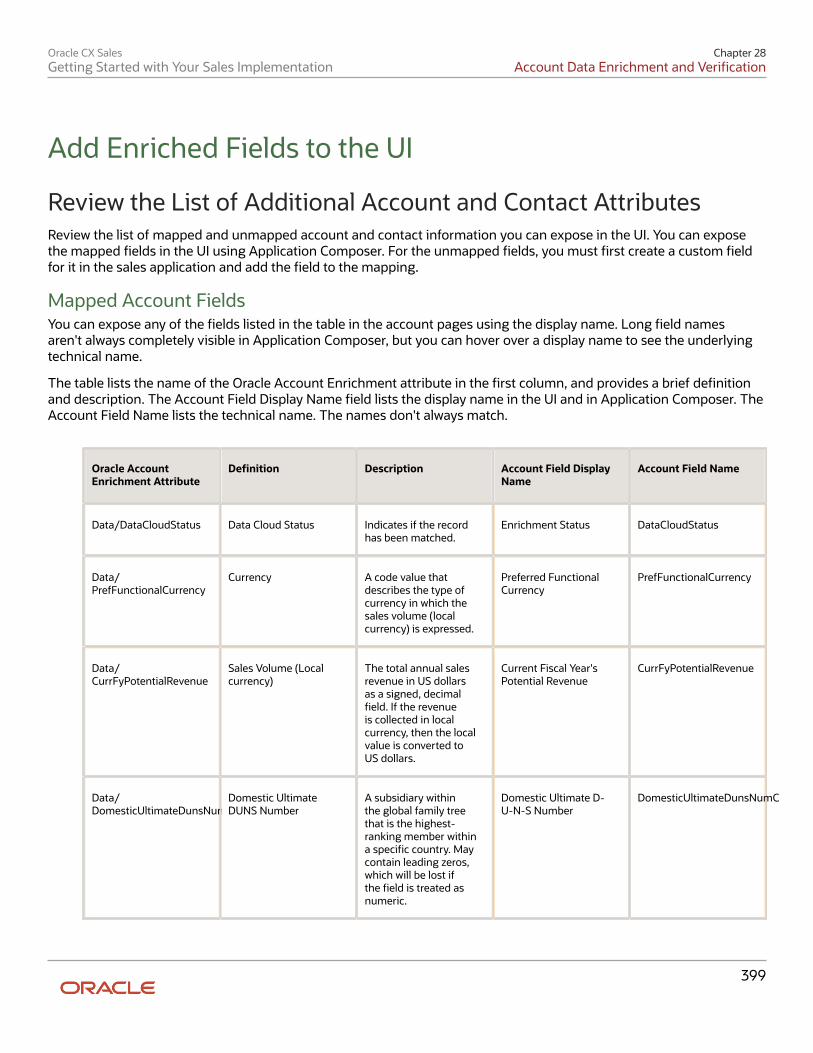
Oracle CX SalesGetting Started with Your Sales Implementation
Chapter 28Account Data Enrichment and Verification
399
Add Enriched Fields to the UI
Review the List of Additional Account and Contact AttributesReview the list of mapped and unmapped account and contact information you can expose in the UI. You can exposethe mapped fields in the UI using Application Composer. For the unmapped fields, you must first create a custom fieldfor it in the sales application and add the field to the mapping.
Mapped Account FieldsYou can expose any of the fields listed in the table in the account pages using the display name. Long field namesaren't always completely visible in Application Composer, but you can hover over a display name to see the underlyingtechnical name.
The table lists the name of the Oracle Account Enrichment attribute in the first column, and provides a brief definitionand description. The Account Field Display Name field lists the display name in the UI and in Application Composer. TheAccount Field Name lists the technical name. The names don't always match.
Oracle AccountEnrichment Attribute
Definition Description Account Field DisplayName
Account Field Name
Data/DataCloudStatus Data Cloud Status Indicates if the recordhas been matched.
Enrichment Status DataCloudStatus
Data/PrefFunctionalCurrency
Currency A code value thatdescribes the type ofcurrency in which thesales volume (localcurrency) is expressed.
Preferred FunctionalCurrency
PrefFunctionalCurrency
Data/CurrFyPotentialRevenue
Sales Volume (Localcurrency)
The total annual salesrevenue in US dollarsas a signed, decimalfield. If the revenueis collected in localcurrency, then the localvalue is converted toUS dollars.
Current Fiscal Year'sPotential Revenue
CurrFyPotentialRevenue
Data/DomesticUltimateDunsNumC
Domestic UltimateDUNS Number
A subsidiary withinthe global family treethat is the highest-ranking member withina specific country. Maycontain leading zeros,which will be lost ifthe field is treated asnumeric.
Domestic Ultimate D-U-N-S Number
DomesticUltimateDunsNumC
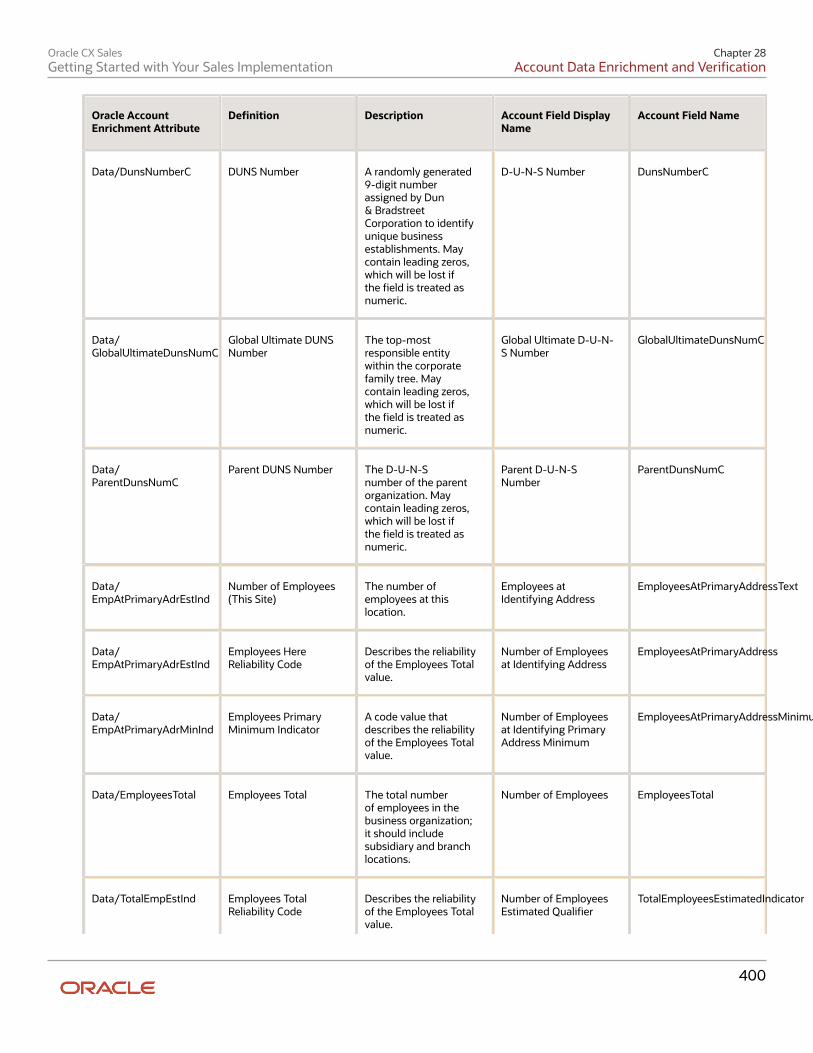
Oracle CX SalesGetting Started with Your Sales Implementation
Chapter 28Account Data Enrichment and Verification
400
Oracle AccountEnrichment Attribute
Definition Description Account Field DisplayName
Account Field Name
Data/DunsNumberC DUNS Number A randomly generated9-digit numberassigned by Dun& BradstreetCorporation to identifyunique businessestablishments. Maycontain leading zeros,which will be lost ifthe field is treated asnumeric.
D-U-N-S Number DunsNumberC
Data/GlobalUltimateDunsNumC
Global Ultimate DUNSNumber
The top-mostresponsible entitywithin the corporatefamily tree. Maycontain leading zeros,which will be lost ifthe field is treated asnumeric.
Global Ultimate D-U-N-S Number
GlobalUltimateDunsNumC
Data/ParentDunsNumC
Parent DUNS Number The D-U-N-Snumber of the parentorganization. Maycontain leading zeros,which will be lost ifthe field is treated asnumeric.
Parent D-U-N-SNumber
ParentDunsNumC
Data/EmpAtPrimaryAdrEstInd
Number of Employees(This Site)
The number ofemployees at thislocation.
Employees atIdentifying Address
EmployeesAtPrimaryAddressText
Data/EmpAtPrimaryAdrEstInd
Employees HereReliability Code
Describes the reliabilityof the Employees Totalvalue.
Number of Employeesat Identifying Address
EmployeesAtPrimaryAddress
Data/EmpAtPrimaryAdrMinInd
Employees PrimaryMinimum Indicator
A code value thatdescribes the reliabilityof the Employees Totalvalue.
Number of Employeesat Identifying PrimaryAddress Minimum
EmployeesAtPrimaryAddressMinimum
Data/EmployeesTotal Employees Total The total numberof employees in thebusiness organization;it should includesubsidiary and branchlocations.
Number of Employees EmployeesTotal
Data/TotalEmpEstInd Employees TotalReliability Code
Describes the reliabilityof the Employees Totalvalue.
Number of EmployeesEstimated Qualifier
TotalEmployeesEstimatedIndicator
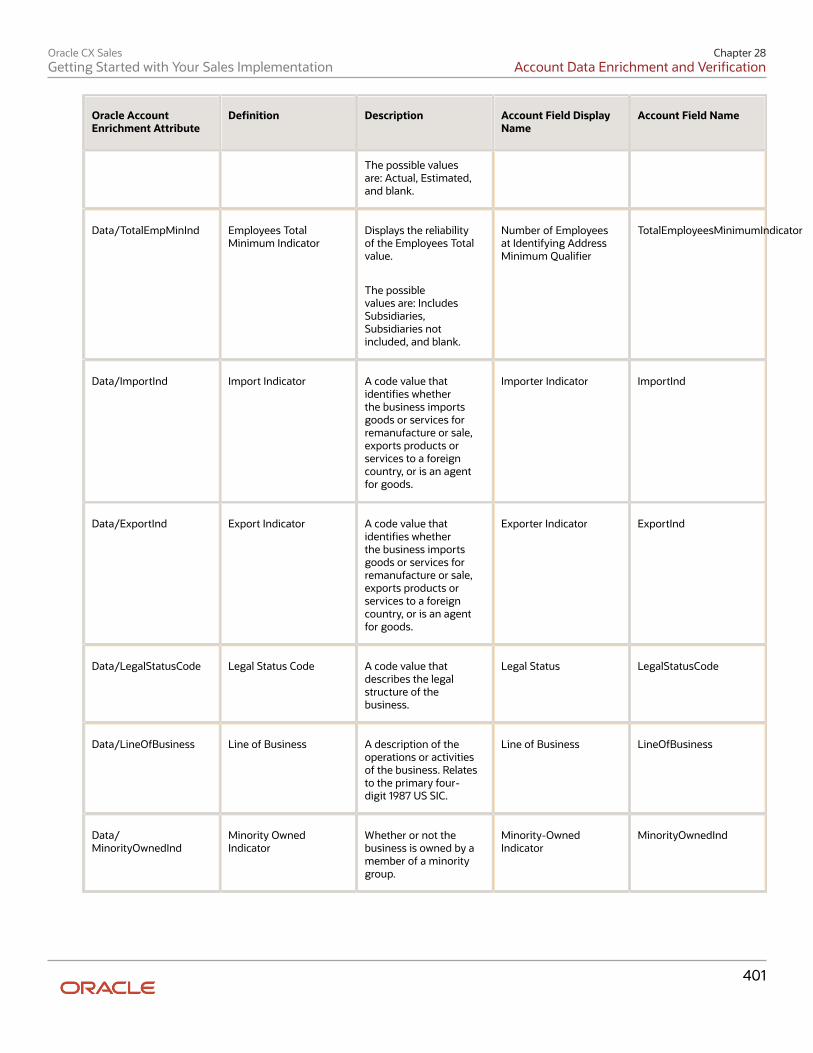
Oracle CX SalesGetting Started with Your Sales Implementation
Chapter 28Account Data Enrichment and Verification
401
Oracle AccountEnrichment Attribute
Definition Description Account Field DisplayName
Account Field Name
The possible valuesare: Actual, Estimated,and blank.
Data/TotalEmpMinInd Employees TotalMinimum Indicator
Displays the reliabilityof the Employees Totalvalue.
The possiblevalues are: IncludesSubsidiaries,Subsidiaries notincluded, and blank.
Number of Employeesat Identifying AddressMinimum Qualifier
TotalEmployeesMinimumIndicator
Data/ImportInd Import Indicator A code value thatidentifies whetherthe business importsgoods or services forremanufacture or sale,exports products orservices to a foreigncountry, or is an agentfor goods.
Importer Indicator ImportInd
Data/ExportInd Export Indicator A code value thatidentifies whetherthe business importsgoods or services forremanufacture or sale,exports products orservices to a foreigncountry, or is an agentfor goods.
Exporter Indicator ExportInd
Data/LegalStatusCode Legal Status Code A code value thatdescribes the legalstructure of thebusiness.
Legal Status LegalStatusCode
Data/LineOfBusiness Line of Business A description of theoperations or activitiesof the business. Relatesto the primary four-digit 1987 US SIC.
Line of Business LineOfBusiness
Data/MinorityOwnedInd
Minority OwnedIndicator
Whether or not thebusiness is owned by amember of a minoritygroup.
Minority-OwnedIndicator
MinorityOwnedInd
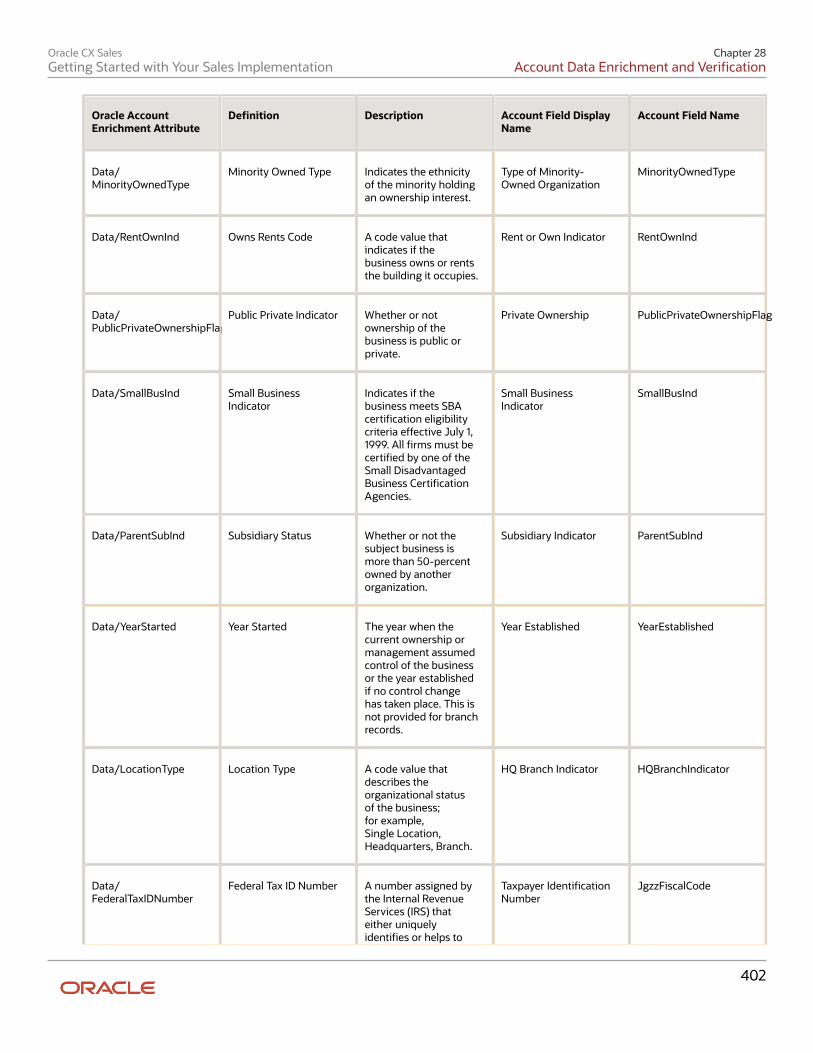
Oracle CX SalesGetting Started with Your Sales Implementation
Chapter 28Account Data Enrichment and Verification
402
Oracle AccountEnrichment Attribute
Definition Description Account Field DisplayName
Account Field Name
Data/MinorityOwnedType
Minority Owned Type Indicates the ethnicityof the minority holdingan ownership interest.
Type of Minority-Owned Organization
MinorityOwnedType
Data/RentOwnInd Owns Rents Code A code value thatindicates if thebusiness owns or rentsthe building it occupies.
Rent or Own Indicator RentOwnInd
Data/PublicPrivateOwnershipFlag
Public Private Indicator Whether or notownership of thebusiness is public orprivate.
Private Ownership PublicPrivateOwnershipFlag
Data/SmallBusInd Small BusinessIndicator
Indicates if thebusiness meets SBAcertification eligibilitycriteria effective July 1,1999. All firms must becertified by one of theSmall DisadvantagedBusiness CertificationAgencies.
Small BusinessIndicator
SmallBusInd
Data/ParentSubInd Subsidiary Status Whether or not thesubject business ismore than 50-percentowned by anotherorganization.
Subsidiary Indicator ParentSubInd
Data/YearStarted Year Started The year when thecurrent ownership ormanagement assumedcontrol of the businessor the year establishedif no control changehas taken place. This isnot provided for branchrecords.
Year Established YearEstablished
Data/LocationType Location Type A code value thatdescribes theorganizational statusof the business;for example,Single Location,Headquarters, Branch.
HQ Branch Indicator HQBranchIndicator
Data/FederalTaxIDNumber
Federal Tax ID Number A number assigned bythe Internal RevenueServices (IRS) thateither uniquelyidentifies or helps to
Taxpayer IdentificationNumber
JgzzFiscalCode
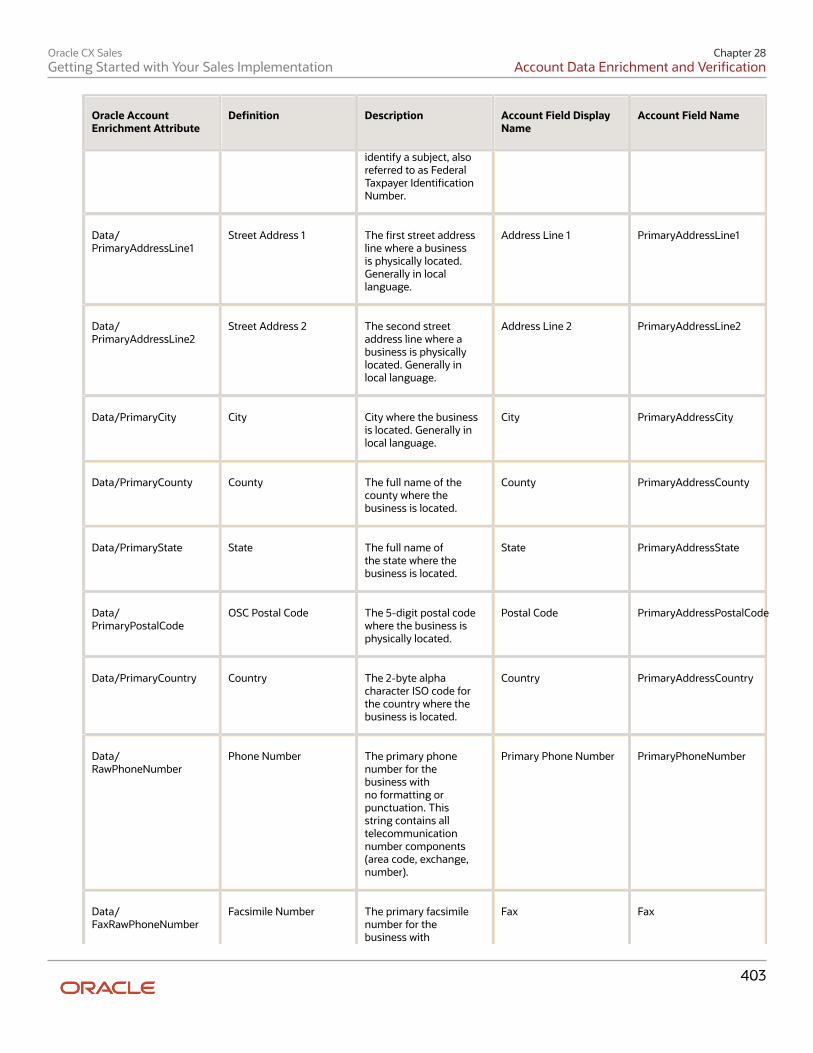
Oracle CX SalesGetting Started with Your Sales Implementation
Chapter 28Account Data Enrichment and Verification
403
Oracle AccountEnrichment Attribute
Definition Description Account Field DisplayName
Account Field Name
identify a subject, alsoreferred to as FederalTaxpayer IdentificationNumber.
Data/PrimaryAddressLine1
Street Address 1 The first street addressline where a businessis physically located.Generally in locallanguage.
Address Line 1 PrimaryAddressLine1
Data/PrimaryAddressLine2
Street Address 2 The second streetaddress line where abusiness is physicallylocated. Generally inlocal language.
Address Line 2 PrimaryAddressLine2
Data/PrimaryCity City City where the businessis located. Generally inlocal language.
City PrimaryAddressCity
Data/PrimaryCounty County The full name of thecounty where thebusiness is located.
County PrimaryAddressCounty
Data/PrimaryState State The full name ofthe state where thebusiness is located.
State PrimaryAddressState
Data/PrimaryPostalCode
OSC Postal Code The 5-digit postal codewhere the business isphysically located.
Postal Code PrimaryAddressPostalCode
Data/PrimaryCountry Country The 2-byte alphacharacter ISO code forthe country where thebusiness is located.
Country PrimaryAddressCountry
Data/RawPhoneNumber
Phone Number The primary phonenumber for thebusiness withno formatting orpunctuation. Thisstring contains alltelecommunicationnumber components(area code, exchange,number).
Primary Phone Number PrimaryPhoneNumber
Data/FaxRawPhoneNumber
Facsimile Number The primary facsimilenumber for thebusiness with
Fax Fax
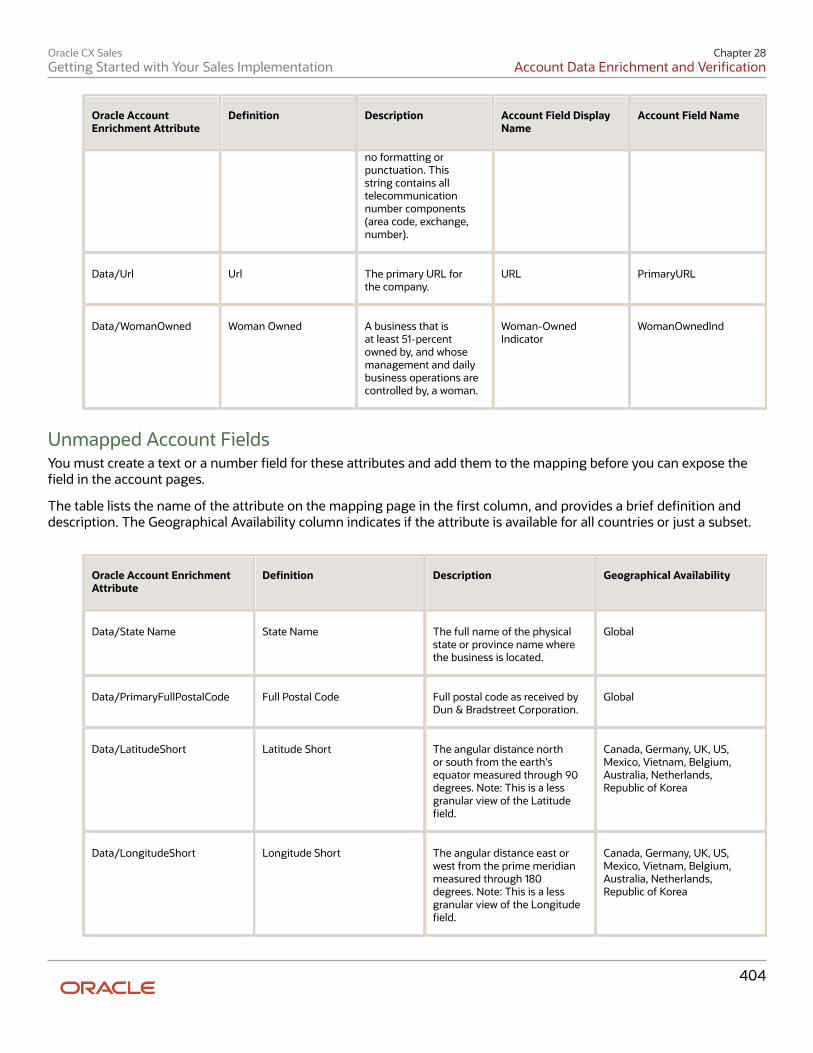
Oracle CX SalesGetting Started with Your Sales Implementation
Chapter 28Account Data Enrichment and Verification
404
Oracle AccountEnrichment Attribute
Definition Description Account Field DisplayName
Account Field Name
no formatting orpunctuation. Thisstring contains alltelecommunicationnumber components(area code, exchange,number).
Data/Url Url The primary URL forthe company.
URL PrimaryURL
Data/WomanOwned Woman Owned A business that isat least 51-percentowned by, and whosemanagement and dailybusiness operations arecontrolled by, a woman.
Woman-OwnedIndicator
WomanOwnedInd
Unmapped Account FieldsYou must create a text or a number field for these attributes and add them to the mapping before you can expose thefield in the account pages.
The table lists the name of the attribute on the mapping page in the first column, and provides a brief definition anddescription. The Geographical Availability column indicates if the attribute is available for all countries or just a subset.
Oracle Account EnrichmentAttribute
Definition Description Geographical Availability
Data/State Name State Name The full name of the physicalstate or province name wherethe business is located.
Global
Data/PrimaryFullPostalCode Full Postal Code Full postal code as received byDun & Bradstreet Corporation.
Global
Data/LatitudeShort Latitude Short The angular distance northor south from the earth'sequator measured through 90degrees. Note: This is a lessgranular view of the Latitudefield.
Canada, Germany, UK, US,Mexico, Vietnam, Belgium,Australia, Netherlands,Republic of Korea
Data/LongitudeShort Longitude Short The angular distance east orwest from the prime meridianmeasured through 180degrees. Note: This is a lessgranular view of the Longitudefield.
Canada, Germany, UK, US,Mexico, Vietnam, Belgium,Australia, Netherlands,Republic of Korea
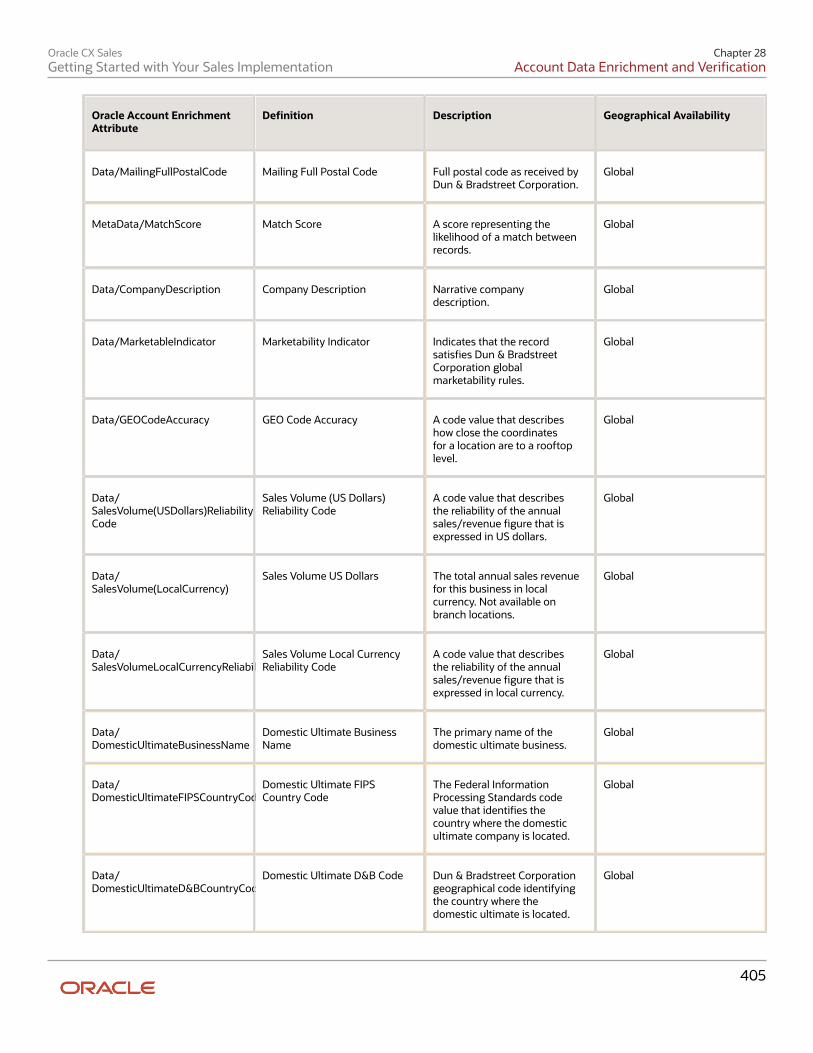
Oracle CX SalesGetting Started with Your Sales Implementation
Chapter 28Account Data Enrichment and Verification
405
Oracle Account EnrichmentAttribute
Definition Description Geographical Availability
Data/MailingFullPostalCode Mailing Full Postal Code Full postal code as received byDun & Bradstreet Corporation.
Global
MetaData/MatchScore Match Score A score representing thelikelihood of a match betweenrecords.
Global
Data/CompanyDescription Company Description Narrative companydescription.
Global
Data/MarketableIndicator Marketability Indicator Indicates that the recordsatisfies Dun & BradstreetCorporation globalmarketability rules.
Global
Data/GEOCodeAccuracy GEO Code Accuracy A code value that describeshow close the coordinatesfor a location are to a rooftoplevel.
Global
Data/SalesVolume(USDollars)ReliabilityCode
Sales Volume (US Dollars)Reliability Code
A code value that describesthe reliability of the annualsales/revenue figure that isexpressed in US dollars.
Global
Data/SalesVolume(LocalCurrency)
Sales Volume US Dollars The total annual sales revenuefor this business in localcurrency. Not available onbranch locations.
Global
Data/SalesVolumeLocalCurrencyReliabilityCode
Sales Volume Local CurrencyReliability Code
A code value that describesthe reliability of the annualsales/revenue figure that isexpressed in local currency.
Global
Data/DomesticUltimateBusinessName
Domestic Ultimate BusinessName
The primary name of thedomestic ultimate business.
Global
Data/DomesticUltimateFIPSCountryCode
Domestic Ultimate FIPSCountry Code
The Federal InformationProcessing Standards codevalue that identifies thecountry where the domesticultimate company is located.
Global
Data/DomesticUltimateD&BCountryCode
Domestic Ultimate D&B Code Dun & Bradstreet Corporationgeographical code identifyingthe country where thedomestic ultimate is located.
Global

Oracle CX SalesGetting Started with Your Sales Implementation
Chapter 28Account Data Enrichment and Verification
406
Oracle Account EnrichmentAttribute
Definition Description Geographical Availability
Data/DomesticUltimateState/ProvinceAbbreviation
Domestic Ultimate StateProvince Abbreviation
The abbreviated name of thestate or province in which thedomestic ultimate is located.
Global
Data/GlobalUltimateBusinessName
Global Ultimate BusinessName
The name of the ultimatecompany.
Global
Data/GlobalUltimateIndicator Global Ultimate Indicator Indicates whether the siterecord is the Global UltimateD-U-N-S within the corporatefamily tree.
Global
Data/GlobalUltimateFIPSCountryCode
Domestic Ultimate FIPSCountry Code
The Federal InformationProcessing Standards codevalue that identifies thecountry where the domesticultimate company is located.
Global
Data/GlobalUltimateD&BCountryCode
Domestic Ultimate D&BCountry Code
Dun & Bradstreet Corporationgeographical code identifyingthe country where thedomestic ultimate is located.
Global
Data/GlobalUltimateState/ProvinceAbbreviation
Global Ultimate State ProvinceAbbreviation
The abbreviated name of thestate or province in which theglobal ultimate is located.
Global
Data/HeadquarterDUNSNumber
Headquarter DUNS Number The D-U-N-S number of theheadquarter organization.May contain lead zeros whichwill be lost if field is treated asnumeric.
Global
Data/Parent/HeadquarterBusinessName
Parent Headquarters BusinessName
The primary name of theparent headquarters company.
Global
Data/HierarchyCode Hierarchy Code A number used with the statusand subsidiary indicatorsto pinpoint the location ofan establishment within acorporate hierarchy. Thehierarchy on the globalultimate is '01'. A branchhierarchy is the same as itsheadquarters'. A subsidiary'shierarchy is one more than itsparent's.
Global
Data/NumberofFamilyMembers
Number of Family Members The number of familymembers including the globalultimate and all subsidiaries
Global
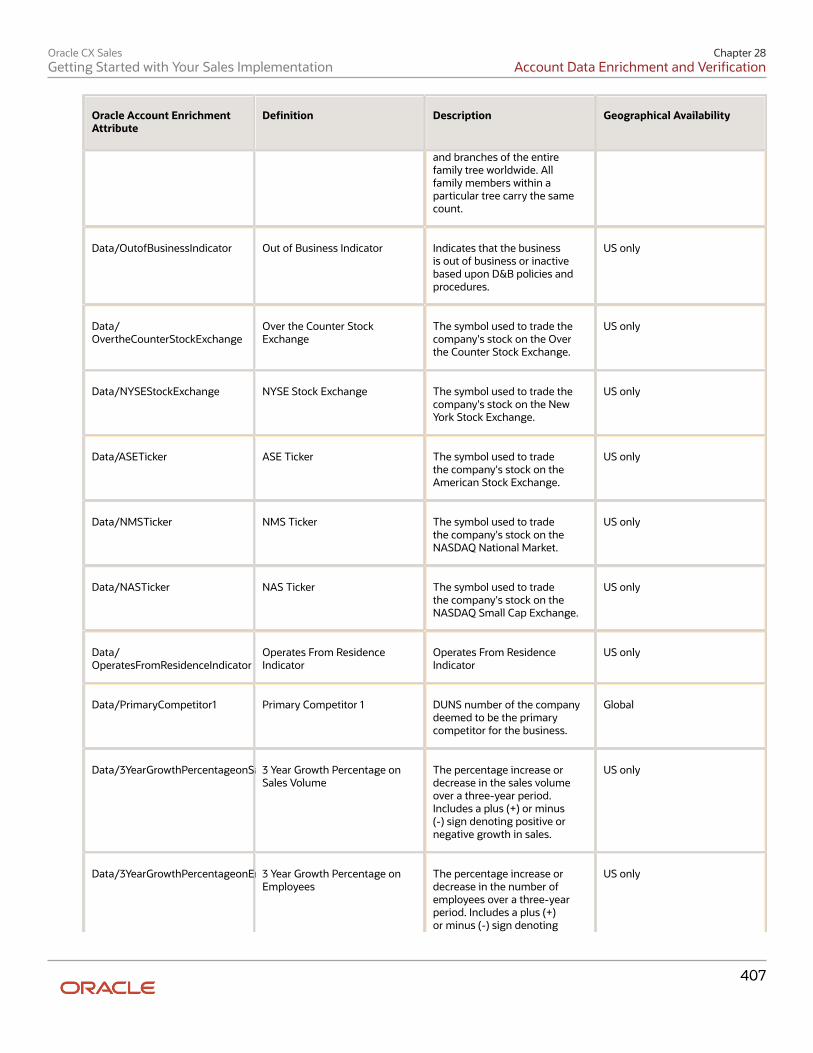
Oracle CX SalesGetting Started with Your Sales Implementation
Chapter 28Account Data Enrichment and Verification
407
Oracle Account EnrichmentAttribute
Definition Description Geographical Availability
and branches of the entirefamily tree worldwide. Allfamily members within aparticular tree carry the samecount.
Data/OutofBusinessIndicator Out of Business Indicator Indicates that the businessis out of business or inactivebased upon D&B policies andprocedures.
US only
Data/OvertheCounterStockExchange
Over the Counter StockExchange
The symbol used to trade thecompany's stock on the Overthe Counter Stock Exchange.
US only
Data/NYSEStockExchange NYSE Stock Exchange The symbol used to trade thecompany's stock on the NewYork Stock Exchange.
US only
Data/ASETicker ASE Ticker The symbol used to tradethe company's stock on theAmerican Stock Exchange.
US only
Data/NMSTicker NMS Ticker The symbol used to tradethe company's stock on theNASDAQ National Market.
US only
Data/NASTicker NAS Ticker The symbol used to tradethe company's stock on theNASDAQ Small Cap Exchange.
US only
Data/OperatesFromResidenceIndicator
Operates From ResidenceIndicator
Operates From ResidenceIndicator
US only
Data/PrimaryCompetitor1 Primary Competitor 1 DUNS number of the companydeemed to be the primarycompetitor for the business.
Global
Data/3YearGrowthPercentageonSalesVolume3 Year Growth Percentage onSales Volume
The percentage increase ordecrease in the sales volumeover a three-year period.Includes a plus (+) or minus(-) sign denoting positive ornegative growth in sales.
US only
Data/3YearGrowthPercentageonEmployees3 Year Growth Percentage onEmployees
The percentage increase ordecrease in the number ofemployees over a three-yearperiod. Includes a plus (+)or minus (-) sign denoting
US only
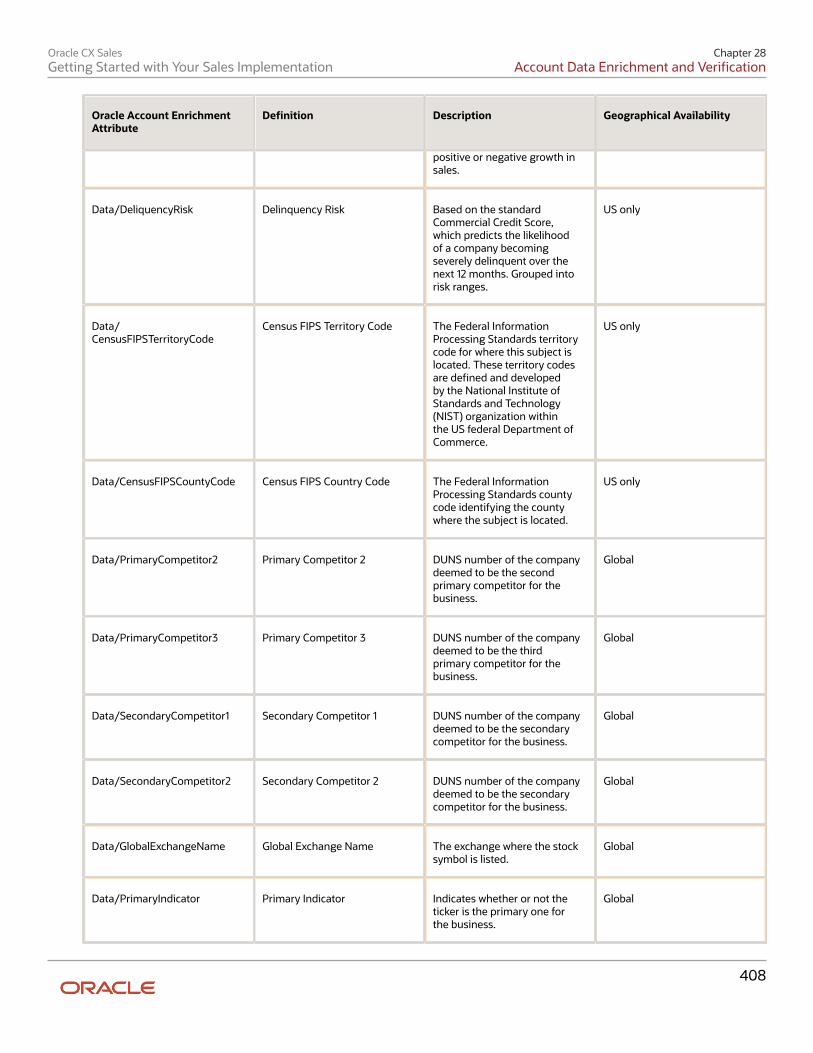
Oracle CX SalesGetting Started with Your Sales Implementation
Chapter 28Account Data Enrichment and Verification
408
Oracle Account EnrichmentAttribute
Definition Description Geographical Availability
positive or negative growth insales.
Data/DeliquencyRisk Delinquency Risk Based on the standardCommercial Credit Score,which predicts the likelihoodof a company becomingseverely delinquent over thenext 12 months. Grouped intorisk ranges.
US only
Data/CensusFIPSTerritoryCode
Census FIPS Territory Code The Federal InformationProcessing Standards territorycode for where this subject islocated. These territory codesare defined and developedby the National Institute ofStandards and Technology(NIST) organization withinthe US federal Department ofCommerce.
US only
Data/CensusFIPSCountyCode Census FIPS Country Code The Federal InformationProcessing Standards countycode identifying the countywhere the subject is located.
US only
Data/PrimaryCompetitor2 Primary Competitor 2 DUNS number of the companydeemed to be the secondprimary competitor for thebusiness.
Global
Data/PrimaryCompetitor3 Primary Competitor 3 DUNS number of the companydeemed to be the thirdprimary competitor for thebusiness.
Global
Data/SecondaryCompetitor1 Secondary Competitor 1 DUNS number of the companydeemed to be the secondarycompetitor for the business.
Global
Data/SecondaryCompetitor2 Secondary Competitor 2 DUNS number of the companydeemed to be the secondarycompetitor for the business.
Global
Data/GlobalExchangeName Global Exchange Name The exchange where the stocksymbol is listed.
Global
Data/PrimaryIndicator Primary Indicator Indicates whether or not theticker is the primary one forthe business.
Global
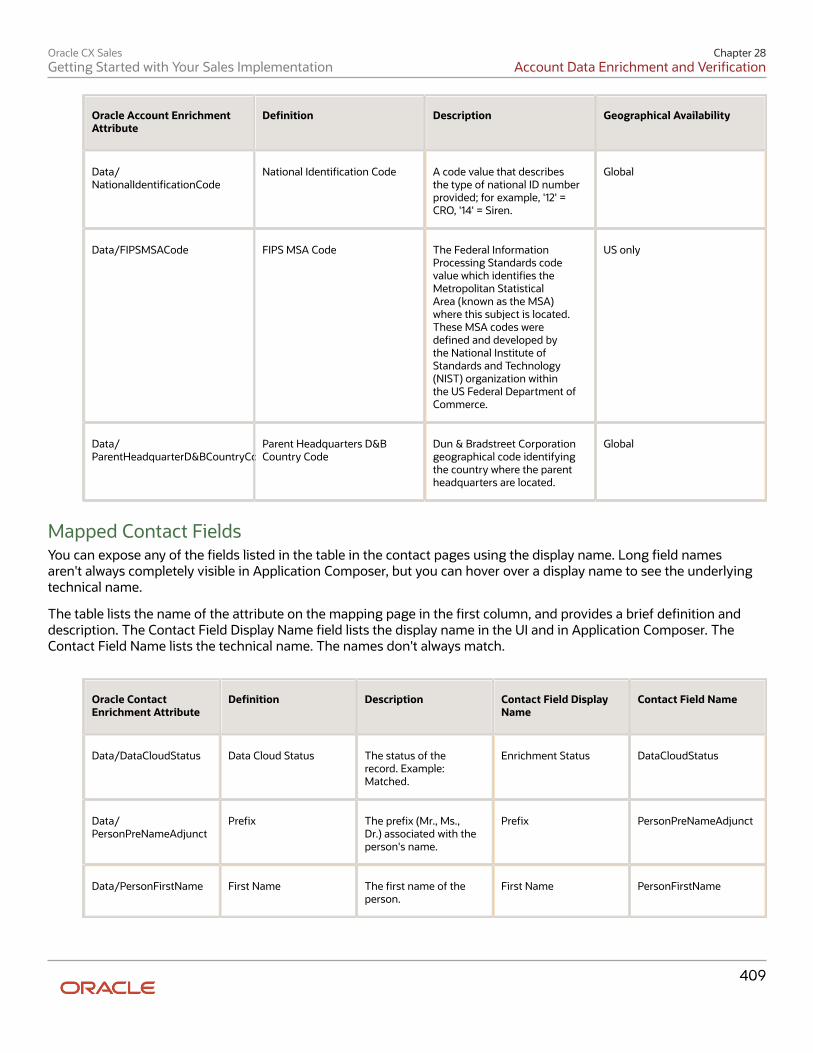
Oracle CX SalesGetting Started with Your Sales Implementation
Chapter 28Account Data Enrichment and Verification
409
Oracle Account EnrichmentAttribute
Definition Description Geographical Availability
Data/NationalIdentificationCode
National Identification Code A code value that describesthe type of national ID numberprovided; for example, '12' =CRO, '14' = Siren.
Global
Data/FIPSMSACode FIPS MSA Code The Federal InformationProcessing Standards codevalue which identifies theMetropolitan StatisticalArea (known as the MSA)where this subject is located.These MSA codes weredefined and developed bythe National Institute ofStandards and Technology(NIST) organization withinthe US Federal Department ofCommerce.
US only
Data/ParentHeadquarterD&BCountryCode
Parent Headquarters D&BCountry Code
Dun & Bradstreet Corporationgeographical code identifyingthe country where the parentheadquarters are located.
Global
Mapped Contact FieldsYou can expose any of the fields listed in the table in the contact pages using the display name. Long field namesaren't always completely visible in Application Composer, but you can hover over a display name to see the underlyingtechnical name.
The table lists the name of the attribute on the mapping page in the first column, and provides a brief definition anddescription. The Contact Field Display Name field lists the display name in the UI and in Application Composer. TheContact Field Name lists the technical name. The names don't always match.
Oracle ContactEnrichment Attribute
Definition Description Contact Field DisplayName
Contact Field Name
Data/DataCloudStatus Data Cloud Status The status of therecord. Example:Matched.
Enrichment Status DataCloudStatus
Data/PersonPreNameAdjunct
Prefix The prefix (Mr., Ms.,Dr.) associated with theperson's name.
Prefix PersonPreNameAdjunct
Data/PersonFirstName First Name The first name of theperson.
First Name PersonFirstName
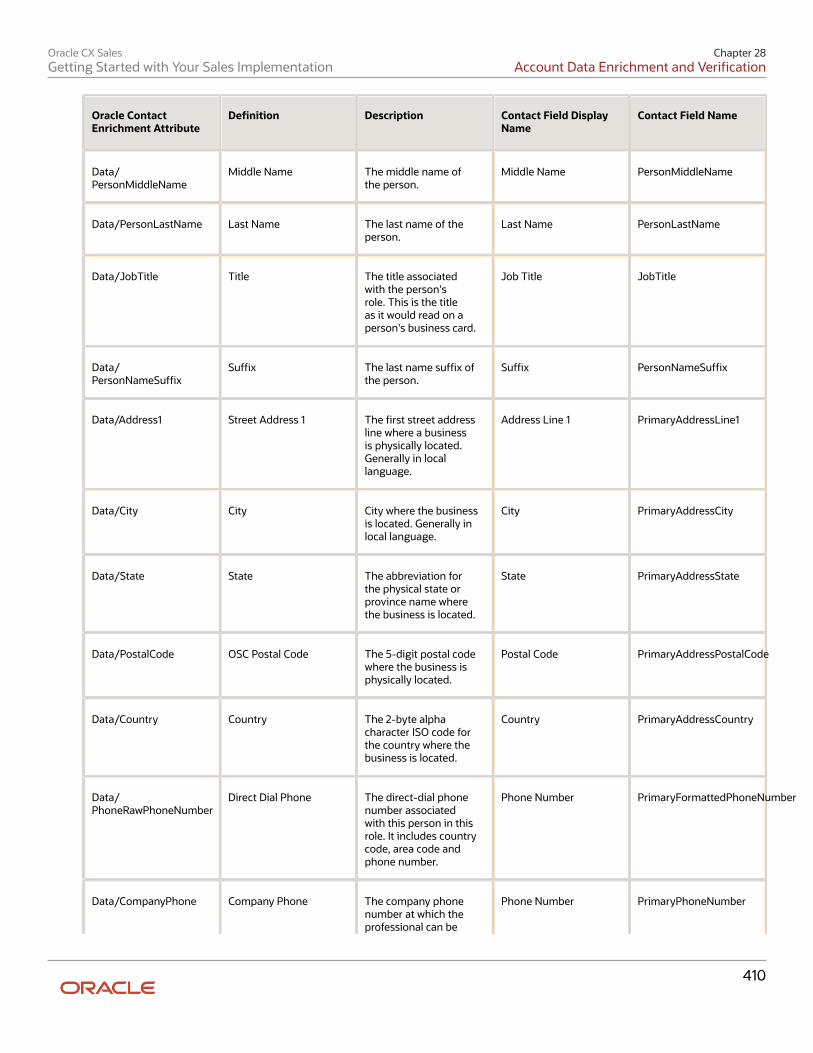
Oracle CX SalesGetting Started with Your Sales Implementation
Chapter 28Account Data Enrichment and Verification
410
Oracle ContactEnrichment Attribute
Definition Description Contact Field DisplayName
Contact Field Name
Data/PersonMiddleName
Middle Name The middle name ofthe person.
Middle Name PersonMiddleName
Data/PersonLastName Last Name The last name of theperson.
Last Name PersonLastName
Data/JobTitle Title The title associatedwith the person'srole. This is the titleas it would read on aperson's business card.
Job Title JobTitle
Data/PersonNameSuffix
Suffix The last name suffix ofthe person.
Suffix PersonNameSuffix
Data/Address1 Street Address 1 The first street addressline where a businessis physically located.Generally in locallanguage.
Address Line 1 PrimaryAddressLine1
Data/City City City where the businessis located. Generally inlocal language.
City PrimaryAddressCity
Data/State State The abbreviation forthe physical state orprovince name wherethe business is located.
State PrimaryAddressState
Data/PostalCode OSC Postal Code The 5-digit postal codewhere the business isphysically located.
Postal Code PrimaryAddressPostalCode
Data/Country Country The 2-byte alphacharacter ISO code forthe country where thebusiness is located.
Country PrimaryAddressCountry
Data/PhoneRawPhoneNumber
Direct Dial Phone The direct-dial phonenumber associatedwith this person in thisrole. It includes countrycode, area code andphone number.
Phone Number PrimaryFormattedPhoneNumber
Data/CompanyPhone Company Phone The company phonenumber at which theprofessional can be
Phone Number PrimaryPhoneNumber
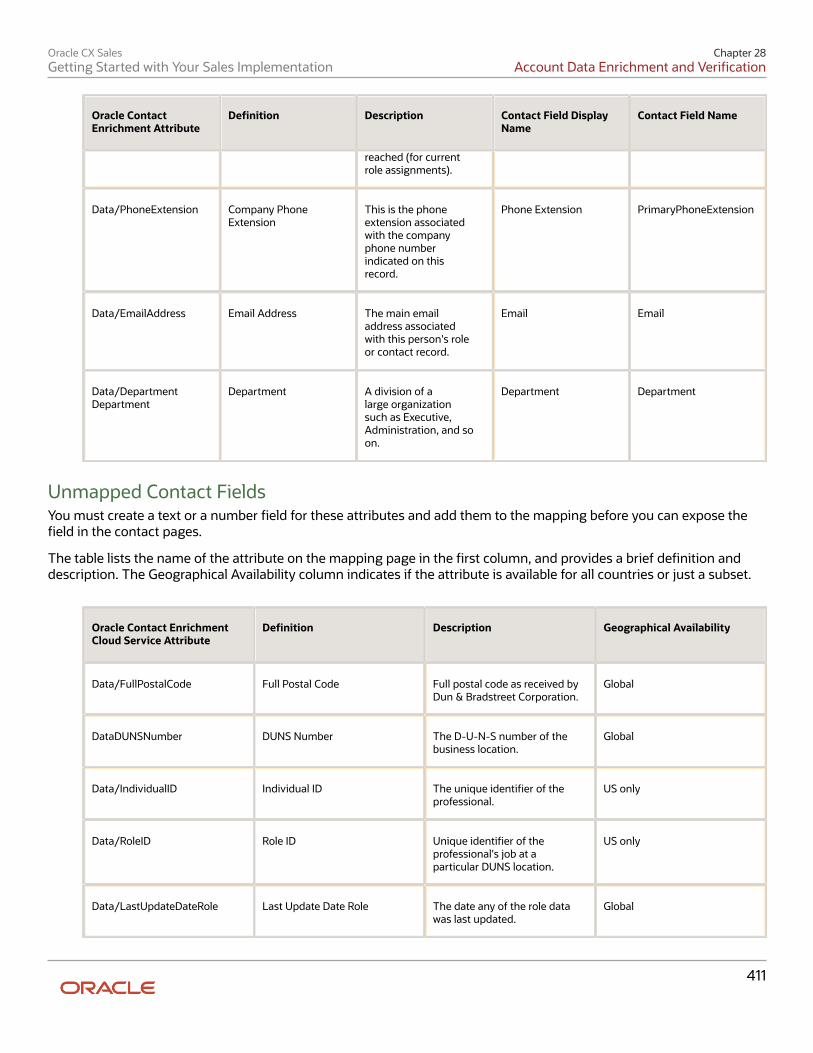
Oracle CX SalesGetting Started with Your Sales Implementation
Chapter 28Account Data Enrichment and Verification
411
Oracle ContactEnrichment Attribute
Definition Description Contact Field DisplayName
Contact Field Name
reached (for currentrole assignments).
Data/PhoneExtension Company PhoneExtension
This is the phoneextension associatedwith the companyphone numberindicated on thisrecord.
Phone Extension PrimaryPhoneExtension
Data/EmailAddress Email Address The main emailaddress associatedwith this person's roleor contact record.
Email Email
Data/DepartmentDepartment
Department A division of alarge organizationsuch as Executive,Administration, and soon.
Department Department
Unmapped Contact FieldsYou must create a text or a number field for these attributes and add them to the mapping before you can expose thefield in the contact pages.
The table lists the name of the attribute on the mapping page in the first column, and provides a brief definition anddescription. The Geographical Availability column indicates if the attribute is available for all countries or just a subset.
Oracle Contact EnrichmentCloud Service Attribute
Definition Description Geographical Availability
Data/FullPostalCode Full Postal Code Full postal code as received byDun & Bradstreet Corporation.
Global
DataDUNSNumber DUNS Number The D-U-N-S number of thebusiness location.
Global
Data/IndividualID Individual ID The unique identifier of theprofessional.
US only
Data/RoleID Role ID Unique identifier of theprofessional's job at aparticular DUNS location.
US only
Data/LastUpdateDateRole Last Update Date Role The date any of the role datawas last updated.
Global
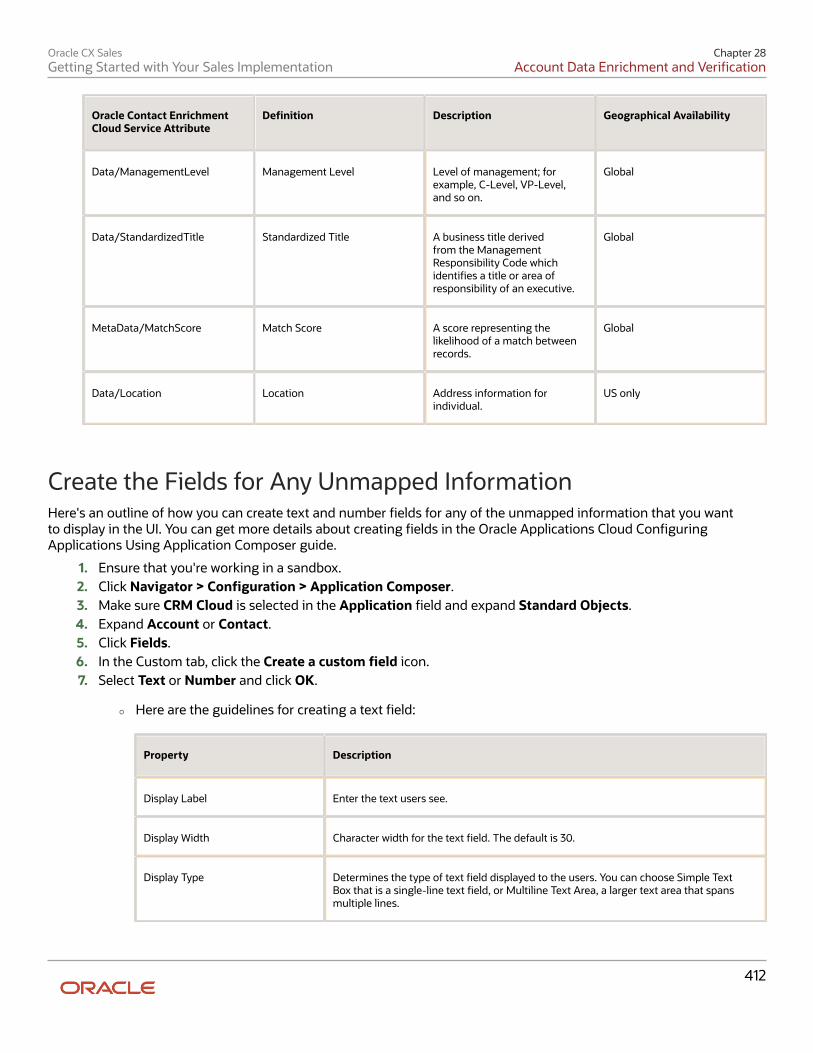
Oracle CX SalesGetting Started with Your Sales Implementation
Chapter 28Account Data Enrichment and Verification
412
Oracle Contact EnrichmentCloud Service Attribute
Definition Description Geographical Availability
Data/ManagementLevel Management Level Level of management; forexample, C-Level, VP-Level,and so on.
Global
Data/StandardizedTitle Standardized Title A business title derivedfrom the ManagementResponsibility Code whichidentifies a title or area ofresponsibility of an executive.
Global
MetaData/MatchScore Match Score A score representing thelikelihood of a match betweenrecords.
Global
Data/Location Location Address information forindividual.
US only
Create the Fields for Any Unmapped InformationHere's an outline of how you can create text and number fields for any of the unmapped information that you wantto display in the UI. You can get more details about creating fields in the Oracle Applications Cloud ConfiguringApplications Using Application Composer guide.
1. Ensure that you're working in a sandbox.2. Click Navigator > Configuration > Application Composer.3. Make sure CRM Cloud is selected in the Application field and expand Standard Objects.4. Expand Account or Contact.5. Click Fields.6. In the Custom tab, click the Create a custom field icon.7. Select Text or Number and click OK.
◦ Here are the guidelines for creating a text field:
Property Description
Display Label Enter the text users see.
Display Width Character width for the text field. The default is 30.
Display Type Determines the type of text field displayed to the users. You can choose Simple TextBox that is a single-line text field, or Multiline Text Area, a larger text area that spansmultiple lines.
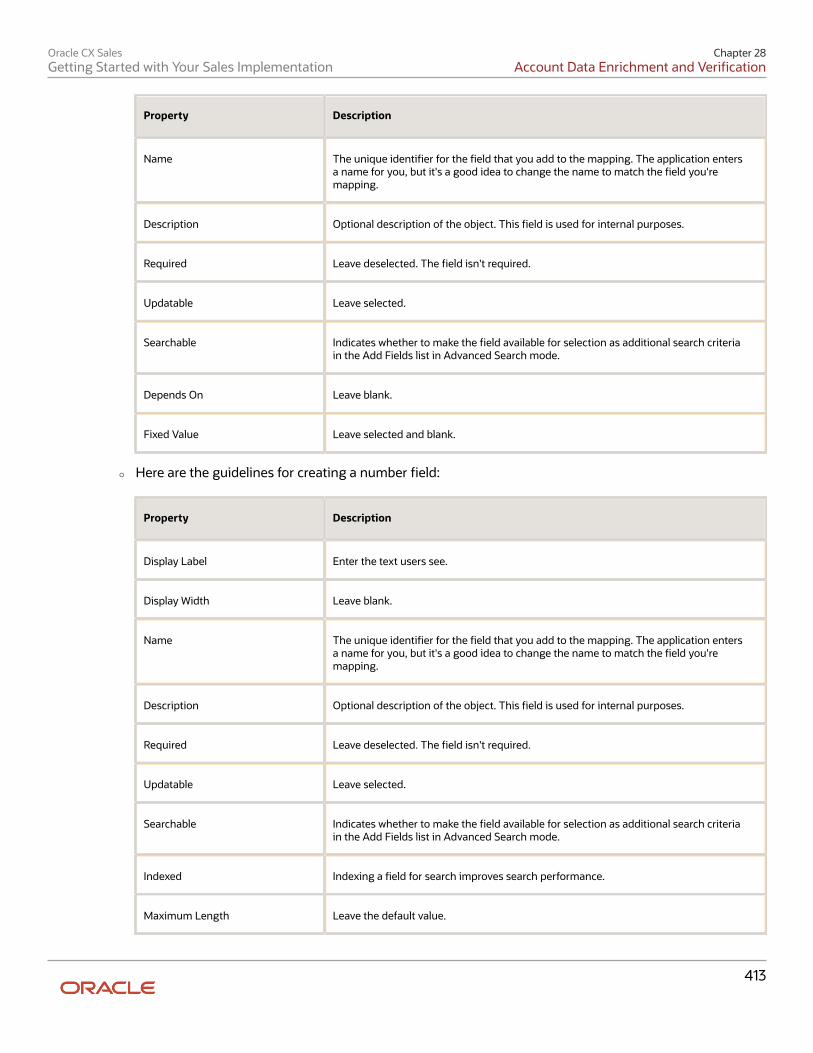
Oracle CX SalesGetting Started with Your Sales Implementation
Chapter 28Account Data Enrichment and Verification
413
Property Description
Name The unique identifier for the field that you add to the mapping. The application entersa name for you, but it's a good idea to change the name to match the field you'remapping.
Description Optional description of the object. This field is used for internal purposes.
Required Leave deselected. The field isn't required.
Updatable Leave selected.
Searchable Indicates whether to make the field available for selection as additional search criteriain the Add Fields list in Advanced Search mode.
Depends On Leave blank.
Fixed Value Leave selected and blank.
◦ Here are the guidelines for creating a number field:
Property Description
Display Label Enter the text users see.
Display Width Leave blank.
Name The unique identifier for the field that you add to the mapping. The application entersa name for you, but it's a good idea to change the name to match the field you'remapping.
Description Optional description of the object. This field is used for internal purposes.
Required Leave deselected. The field isn't required.
Updatable Leave selected.
Searchable Indicates whether to make the field available for selection as additional search criteriain the Add Fields list in Advanced Search mode.
Indexed Indexing a field for search improves search performance.
Maximum Length Leave the default value.
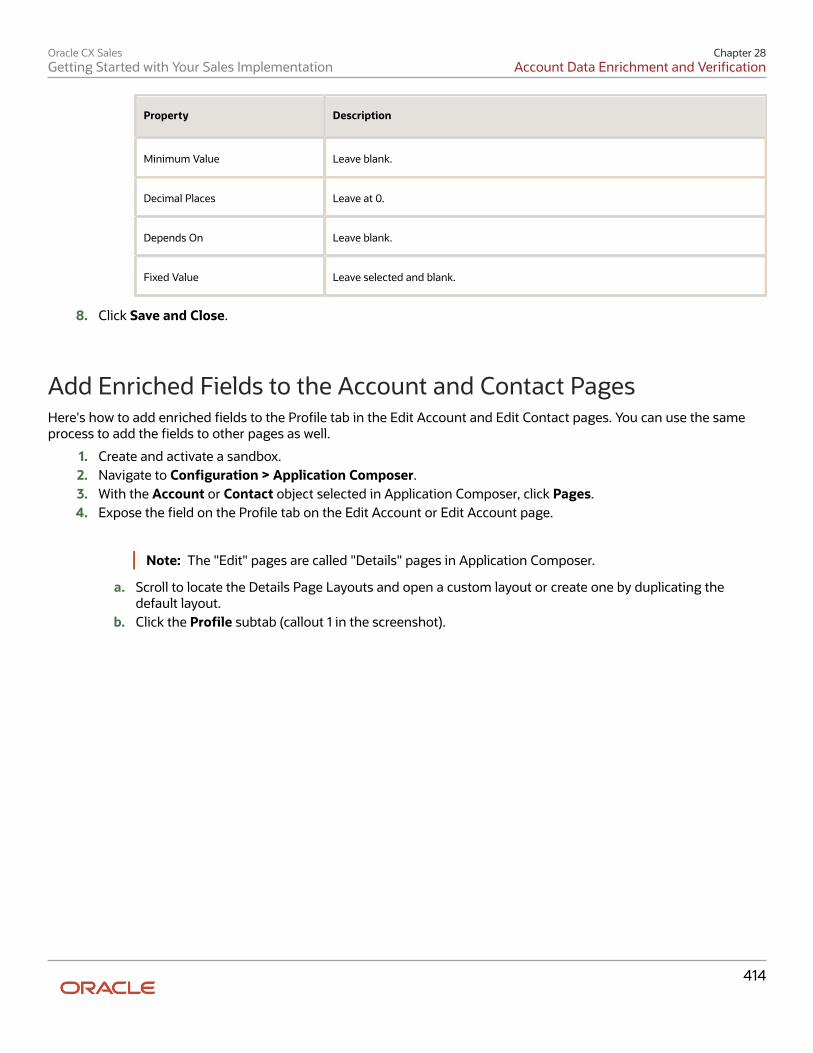
Oracle CX SalesGetting Started with Your Sales Implementation
Chapter 28Account Data Enrichment and Verification
414
Property Description
Minimum Value Leave blank.
Decimal Places Leave at 0.
Depends On Leave blank.
Fixed Value Leave selected and blank.
8. Click Save and Close.
Add Enriched Fields to the Account and Contact PagesHere's how to add enriched fields to the Profile tab in the Edit Account and Edit Contact pages. You can use the sameprocess to add the fields to other pages as well.
1. Create and activate a sandbox.2. Navigate to Configuration > Application Composer.3. With the Account or Contact object selected in Application Composer, click Pages.4. Expose the field on the Profile tab on the Edit Account or Edit Account page.
Note: The "Edit" pages are called "Details" pages in Application Composer.
a. Scroll to locate the Details Page Layouts and open a custom layout or create one by duplicating thedefault layout.
b. Click the Profile subtab (callout 1 in the screenshot).
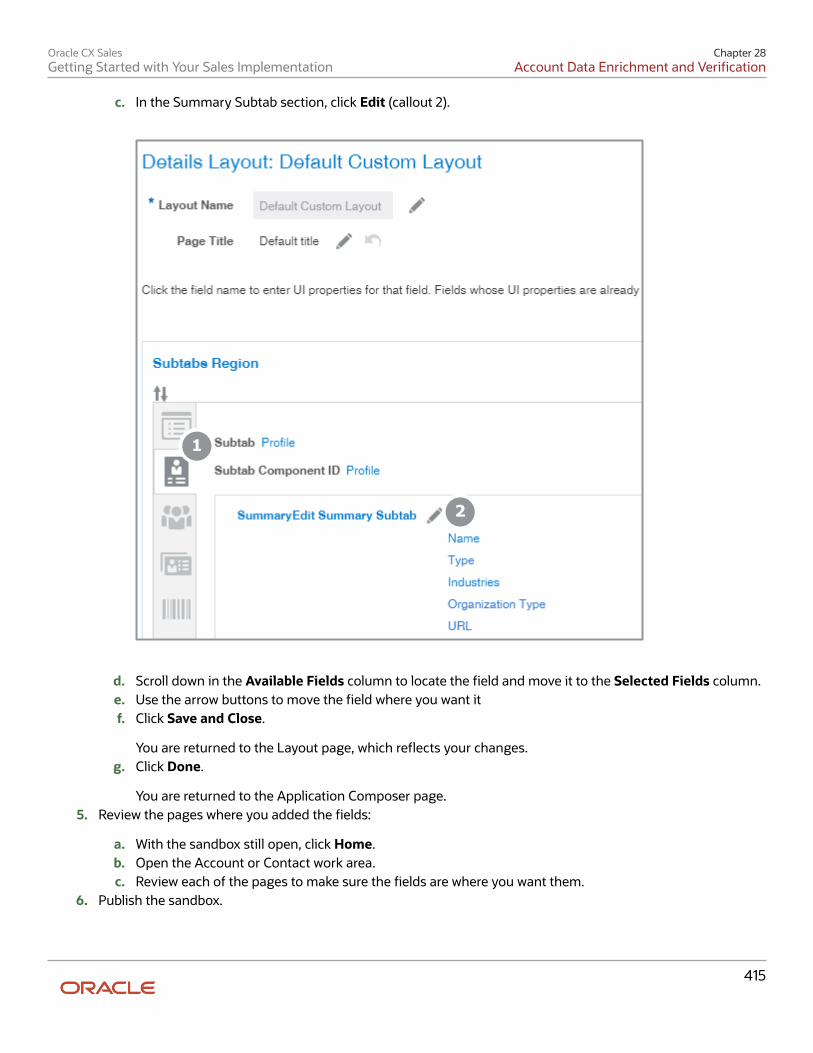
Oracle CX SalesGetting Started with Your Sales Implementation
Chapter 28Account Data Enrichment and Verification
415
c. In the Summary Subtab section, click Edit (callout 2).
1
2
d. Scroll down in the Available Fields column to locate the field and move it to the Selected Fields column.e. Use the arrow buttons to move the field where you want itf. Click Save and Close.
You are returned to the Layout page, which reflects your changes.g. Click Done.
You are returned to the Application Composer page.5. Review the pages where you added the fields:
a. With the sandbox still open, click Home.b. Open the Account or Contact work area.c. Review each of the pages to make sure the fields are where you want them.
6. Publish the sandbox.
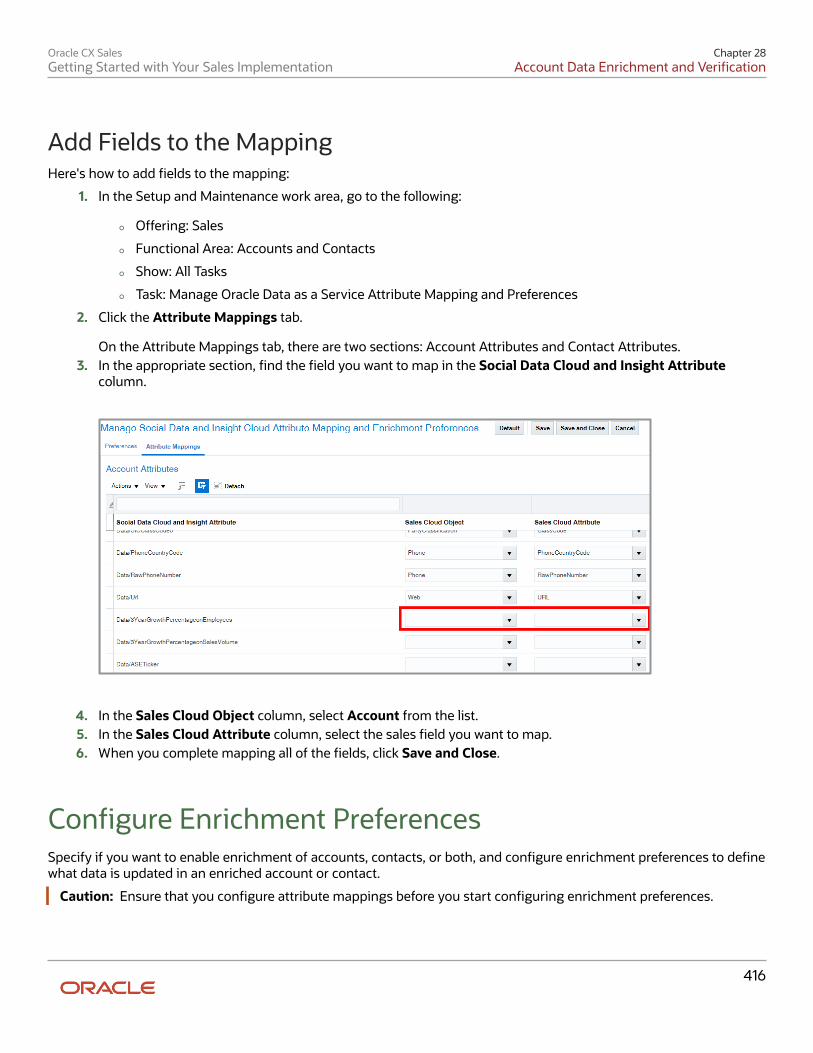
Oracle CX SalesGetting Started with Your Sales Implementation
Chapter 28Account Data Enrichment and Verification
416
Add Fields to the MappingHere's how to add fields to the mapping:
1. In the Setup and Maintenance work area, go to the following:
◦ Offering: Sales
◦ Functional Area: Accounts and Contacts
◦ Show: All Tasks
◦ Task: Manage Oracle Data as a Service Attribute Mapping and Preferences
2. Click the Attribute Mappings tab.
On the Attribute Mappings tab, there are two sections: Account Attributes and Contact Attributes.3. In the appropriate section, find the field you want to map in the Social Data Cloud and Insight Attribute
column.
4. In the Sales Cloud Object column, select Account from the list.5. In the Sales Cloud Attribute column, select the sales field you want to map.6. When you complete mapping all of the fields, click Save and Close.
Configure Enrichment PreferencesSpecify if you want to enable enrichment of accounts, contacts, or both, and configure enrichment preferences to definewhat data is updated in an enriched account or contact.
Caution: Ensure that you configure attribute mappings before you start configuring enrichment preferences.
Oracle CX SalesGetting Started with Your Sales Implementation
Chapter 28Account Data Enrichment and Verification
417
1. In the Setup and Maintenance work area, go to the Manage Oracle Data as a Service Attribute Mapping andPreferences task:
◦ Offering: Sales
◦ Functional Area: Accounts and Contacts
◦ Show: All Tasks
◦ Task: Manage Oracle Data as a Service Attribute Mapping and Preferences
2. Click the Preferences tab.
The Preferences tab page includes two regions, one for accounts and one for contacts. You can use these toenable enrichment for accounts and contacts, and configure the data that should be included in the enrichedaccount.
3. Select Enable Enrichment for Account or Enable Enrichment for Contact to enable enrichment for accountsor contacts, respectively.
4. Next, define the data in your enriched accounts and contacts:
◦ Select Auto fill blank fields in record to update all blank fields with the data from Oracle Account andContact Enrichment by Dun & Bradstreet (D&B).
◦ Select Configure Settings by Field to define what data should be updated for each field in the enrichedaccount or contact.
5. To define the data at the field level, select:
◦ Auto fill blank: To update blank fields with data from the data service.
◦ Update with Data Cloud Value: To update all blank fields with data from the data service.
◦ Display on select fields to enrich page: To display the value in the Select Fields to Enrich page andprompt salespeople to select the field value.
6. Enter a match threshold for accounts and contacts in the Match Threshold field.7. Enter the maximum number of records that should be enriched in the Maximum Number of Accounts for
Real-Time Enrichment and Maximum Number of Contacts for Real-Time Enrichment fields.8. Enter the maximum number of new contacts to create during enrichment in the Maximum Number of New
Contacts field.9. Click Save and Close
If you have a preproduction or staging environment, then test the service association between your sales preproductionenvironment and your Oracle Account and Contact Enrichment by Dun & Bradstreet (D&B) subscription. You must limittesting to 500 records. When you go to production, do the service association between your production environmentsand your Oracle Account and Contact Enrichment by Dun & Bradstreet (D&B) production environment. The serviceassociation steps are the same, but the test and production service URLs are different. The service URLs are listed inyour welcome email and in the Unified Console application.
Enable the Integration with Oracle DataFoxHere's how to enable the integration with Oracle DataFox.
1. In Setup and Maintenance, open the Manage DataFox Data Enrichment Integration task:
◦ Offering: Sales
◦ Functional Area: Integrations
Oracle CX SalesGetting Started with Your Sales Implementation
Chapter 28Account Data Enrichment and Verification
418
◦ Task: Manage DataFox Data Enrichment Integration
2. In the Manage DataFox Data Enrichment Integration page, select the Authenticate Using DataFox Instanceoption.
3. Enter the URL of your DataFox instance and your DataFox user credentials.4. If you want to enable salespeople to manually enrich individual accounts from the Edit Account page at will,
then select the Enable Data Enrichment from DataFox option.
If you leave the option unselected, the account data gets enriched by Oracle DataFox sync jobs when they run.5. Customers with existing DataFox integrations, can also make it possible for salespeople to enter new account
information directly from DataFox into the Create Account page in sales by selecting the Enable Smart Datafor Account from DataFox. Salespeople use the search field on the page to search for the account they want tocreate in DataFox. When they select a matching account, DataFox automatically populates account informationinto sales.
6. Click Save and Close.7. For information on the rest of your DataFox setup, see the Using DataFox guide.
Related Topics
• Using DataFox guide
Oracle CX SalesGetting Started with Your Sales Implementation
Glossary
419
Glossary
abstract role
A description of a person's function in the enterprise that's unrelated to the person's job (position), such as employee,contingent worker, or line manager.
account hierarchy
A set of accounts organized according to their position in a parent-child relationship.
actionable infolet
Actionable infolets summarize key sales information. Salespeople can use saved searches as filters, and they can takedirect action on any record without having to edit it. Actionable infolets use saved searches from individual work areas.If you're using Workspace, you should enable and use Workspace infolets instead.
adaptive search
A high-performance search engine that provides keyword searching and enhanced filtering capabilities for CX Sales,B2B Service, and Partner Relationship Management. Adaptive Search is used by Workspace, Global Search Powered byAdaptive Search, and in REST web services.
autosuggest
Suggestions that automatically appear for a search field, even before you finish typing your search term. You can selectany of the suggestions to run your search.
catchall territory
Sales territory with the value of Any in one or more territory dimensions. Catchall territories can be used for territoryassignment troubleshooting.
dimension
A data category used to define territory boundaries, such as geography. Dimensions contain related dimensionmembers usually organized in hierarchies. For example, a geography dimension often includes members, such ascountries, and cities that belong to countries. Defined dimensions determine how to assign objects, such as customers,leads, and opportunities.
field sales
Sales representatives dedicated to working directly with their customers, often making presentations in person, to closedeals.
Oracle CX SalesGetting Started with Your Sales Implementation
Glossary
420
geocoding
Generation of geographic coordinates for address mapping.
infolet
A small interactive widget on the home page that provides key information and actions for a specific area, for exampleyour personal profile. Each infolet can have multiple views.
inside sales
Sales representatives dedicated to qualifying leads and contacting customers over the phone or e-mail.
job role
Job roles provide access to both application functions and data that users need to perform specific jobs in yourorganization. Examples of job roles provided by Oracle include Sales Administrator, Sales Manager, and SalesRepresentative. Access to sales information also depends on other factors, such as sales team membership and theresource hierarchy.
LDAP
Abbreviation for Lightweight Directory Access Protocol.
lookup code
An option available within a lookup type, such as the lookup code BLUE within the lookup type COLORS.
lookup type
The label for a static list that has lookup codes as its values.
net new lead
Lead that's not linked to existing account and contact records. All of the account and contact information is stored aspart of the lead business object. Account and contact records are created only after the information is verified, whensalespeople convert the leads to opportunities.
offering
Grouping of setup tasks that support specific business functions, such as Sales, Service, and Product Management.
overall catchall territory
Sales territory with the value of Any for all the territory dimensions, which you can use for territory assignmenttroubleshooting. You must include an overall catchall territory in all sales territory hierarchies used for assignment.
resource hierarchy
The organization chart that determines how forecasts roll up and who can see what opportunity data. The resourcehierarchy is separate from the formal reporting hierarchy in the Oracle Global Human Resources Cloud or other humanresources applications.
Oracle CX SalesGetting Started with Your Sales Implementation
Glossary
421
resource organization
An organization whose members are resources. Resource organizations are used to implement sales organizations,partner organizations, and so on.
resource role
The role the user plays in the sales organization. The resource role appears as the person's title in the ResourceDirectory.
role-provisioning rule
Provides users with security permissions. A role-provisioning rule is made up of the rule conditions and the names ofthe job roles and abstract roles that are assigned to the user if the conditions are met.
root product group
The top node of your sales catalog.
Sales Coach
The section in the Edit Opportunity page where you can suggest actions and provide recommended documents. Youcan provide different actions and documents for each sales stage.
sales method
Structured sales process for opportunities from the initial qualifying stage to closing the deal. At each stage of the salesmethod, you can list suggested actions, assign tasks, provide supporting documents, launch interactive questionnaires,and more.
sales resource hierarchy
The sales organization you create when you create or import sales users. The sales resource hierarchy is separate fromthe employee hierarchy in your HR application. Your manager in the resource hierarchy need not be the same person asyour actual manager.
sales stage
A stage in a sales method. Sales stages track the progress of the opportunity from qualification to the closing of thedeal. Each sales stage can suggest different actions to salespeople as part of a structured sales process.
saved search
Saved search criteria (also called lists) that you can select in the different work areas. While all users can create their ownlists, administrators can create useful lists for different roles in the organization.
Oracle CX SalesGetting Started with Your Sales Implementation
Glossary
422
setup user
A user provisioned with the job roles and abstract roles required to perform implementation tasks.
springboard
The grid of icons on the home page that you can use to open pages.
territory
The jurisdiction of responsibility of a salesperson or sales manager over a set of customers. Territories serve as a basisfor forecasting, quota, compensation, and analysis of sales performance.
territory coverage
A territory coverage is a set of boundaries that define what's included or excluded in the territory and what can be sold.For example, sell all products in North America. Customers or partners can be selected to be included or excluded fromthe territory.
territory freeze date
The date after which forecasting stops accepting territory hierarchy changes for the scheduled forecast and forecastingactivities can begin.
territory member
A sales resource who's a territory member gains access to the opportunities and other work objects in that territory, butcan't submit or review sales forecasts. Only territory owners can participate in forecasts.
territory owner
A sales resource who owns a territory gains access to the opportunities and other work objects in that territory and cansubmit and review sales forecasts for that territory.
ultimate parent
The account at the top of the account hierarchy.
Workspace infolet
Workspace infolets summarize key sales information on the Home page. They provide salespeople with many of thefeatures they use in Workspace, such as quick actions and filters. For example, from within the My Accounts Workspaceinfolet, salespeople can take notes, log calls, schedule appointments, and even create opportunities for a specificaccount in the list.