![3T[WXaX^cbPX\TSc^VPX] U^aTXV]\TSXPPccT]cX^]](https://static.fdokumen.com/doc/165x107/633431d762e2e08d49028554/3twxaxcbpxtscvpx-uatxvtsxppcctcx.jpg)
CX-20 Installation manual - Barco
124
ENABLING BRIGHT OUTCOMES Installation manual CX-20
-
Upload
khangminh22 -
Category
Documents
-
view
3 -
download
0
Transcript of CX-20 Installation manual - Barco
ENABLING BRIGHT OUTCOMES
Installation manual
CX-20

Registered office: Barco NVPresident Kennedypark 35, 8500 Kortrijk, Belgiumwww.barco.com/en/supportwww.barco.com
Barco NVBeneluxpark 21, 8500 Kortrijk, Belgiumwww.barco.com/en/supportwww.barco.com
Copyright ©All rights reserved. No part of this document may be copied, reproduced or translated. It shall not otherwise berecorded, transmitted or stored in a retrieval system without the prior written consent of Barco.
TrademarksBrand and product names mentioned in this manual may be trademarks, registered trademarks or copyrightsof their respective holders. All brand and product names mentioned in this manual serve as comments orexamples and are not to be understood as advertising for the products or their manufacturers.
TrademarksUSB Type-CTM and USB-CTM are trademarks of USB Implementers Forum.
HDMI Trademark Notice
The terms HDMI, HDMI High Definition Multimedia Interface, and the HDMI Logo aretrademarks or registered trademarks of HDMI Licensing Administrator, Inc.
Product Security Incident ResponseAs a global technology leader, Barco is committed to deliver secure solutions and services to our customers,while protecting Barco’s intellectual property. When product security concerns are received, the productsecurity incident response process will be triggered immediately. To address specific security concerns or toreport security issues with Barco products, please inform us via contact details mentioned onhttps://www.barco.com/psirt. To protect our customers, Barco does not publically disclose or confirm securityvulnerabilities until Barco has conducted an analysis of the product and issued fixes and/or mitigations.
Patent protectionPlease refer to www.barco.com/about-barco/legal/patents
Guarantee and CompensationBarco provides a guarantee relating to perfect manufacturing as part of the legally stipulated terms ofguarantee. On receipt, the purchaser must immediately inspect all delivered goods for damage incurred duringtransport, as well as for material and manufacturing faults Barco must be informed immediately in writing ofany complaints.The period of guarantee begins on the date of transfer of risks, in the case of special systems and software onthe date of commissioning, at latest 30 days after the transfer of risks. In the event of justified notice ofcomplaint, Barco can repair the fault or provide a replacement at its own discretion within an appropriateperiod. If this measure proves to be impossible or unsuccessful, the purchaser can demand a reduction in thepurchase price or cancellation of the contract. All other claims, in particular those relating to compensation fordirect or indirect damage, and also damage attributed to the operation of software as well as to other servicesprovided by Barco, being a component of the system or independent service, will be deemed invalid providedthe damage is not proven to be attributed to the absence of properties guaranteed in writing or due to theintent or gross negligence or part of Barco.If the purchaser or a third party carries out modifications or repairs on goods delivered by Barco, or if thegoods are handled incorrectly, in particular if the systems are operated incorrectly or if, after the transfer ofrisks, the goods are subject to influences not agreed upon in the contract, all guarantee claims of thepurchaser will be rendered invalid. Not included in the guarantee coverage are system failures which areattributed to programs or special electronic circuitry provided by the purchaser, e.g. interfaces. Normal wearas well as normal maintenance are not subject to the guarantee provided by Barco either.The environmental conditions as well as the servicing and maintenance regulations specified in this manualmust be complied with by the customer.
Barco ClickShare Product Specific End User License Agreement1THIS PRODUCT SPECIFIC USER LICENSE AGREEMENT (EULA) TOGETHER WITH THE BARCOGENERAL EULA ATTACHED HERETO SET OUT THE TERMS OF USE OF THE SOFTWARE.
1. In the event of any differences or inconsistencies between translations of the EULA and the English text of the EULA, the Englishtext will prevail.
PLEASE READ THIS DOCUMENT CAREFULLY BEFORE OPENING OR DOWNLOADING AND USINGTHE SOFTWARE.DO NOTACCEPT THE LICENSE, AND DO NOT INSTALL, DOWNLOAD, ACCESS, OR OTHERWISE COPYOR USE ALL OR ANY PORTION OF THE SOFTWARE UNLESS YOU CAN AGREE WITH ITS TERMS ASSET OUT IN THIS LICENSE AGREEMENT.1. EntitlementBarco ClickShare (the “Software”) offered as a wireless presentation solution that includes the respectivesoftware components as further detailed in the applicable Documentation.The Software can be used upon purchase from, and subject to payment of the relating purchase price to, aBarco authorized distributor or reseller of the ClickShare base unit and button or download of the authorizedClickShare applications (each a “Barco ClickShare Product”).• Term
The Software can be used under the terms of this EULA from the date of first use of the Barco ClickShareProduct, for as long as you operate such Barco ClickShare Product.
• Deployment and UseThe Software shall be used solely in association with a Barco ClickShare Product in accordance with theDocumentation issued by Barco for such Product.
2. SupportThe Software is subject to the warranty conditions outlined in the Barco warranty rider. Maintenance, includingthe provision of upgrades and updates to the Software, and helpdesk support are available at your option onthe terms of Barco’s then current warranty rider.Higher maintenance and support levels can be obtained at the moment of product sale or during the BarcoClickShare Product and/or Software warranty term.Higher maintenance and support levels may be included in the initial transaction if ordered and paid foradditionally. It is strongly suggested to maintain the maintenance and support agreement without interruption.Barco reserves the right not to restart maintenance following an interruption by the customer.3. Terms of UseThe Software can be used as set out in the Barco EULA attached hereto.The provisions of this Product Specific EULA override the Barco generic EULA in case of conflicts orinconsistencies.In case of (inadvertent or other) non-compliance (e.g. where the actual use overshoots the use authorizedhereunder), Barco shall have the option to suspend access to the Software until the non-compliance isremedied, failing of which Barco may terminate the License Agreement as set out herein.4. PrivacyYou are controller for personal data which are being processed via the Software. Therefore, you remain solelyresponsible for complying with all applicable data protection laws and for implementing and maintainingprivacy protection and security measures (especially for components that you provide or control). Barcodisclaims any liability in this regard.Barco created a specific privacy policy for the ClickShare software application for mobile devices, whichdescribes the processing of personal data via this application (http://www.barco.com/en/about-barco/legal/privacy-policy/clickshare-app).5. Other Terms• Open Source components
The Software contains software components released under an Open Source license.A list of the third party components used is available in the Software’s README files, through the “MyBarco” section of the Barco website or through other (online) means. The applicable license terms,copyright notices and, as relevant, source code access conditions apply as set out in the Barco EULAattached hereto.
• Retention of dataBarco right to use and retain Functional Information (section 10.2 of the EULA) shall survive the term ofthis EULA.
Barco ClickShare Product Specific Privacy policyYou are controller for personal data which are being processed via the Software. Therefore, you remain solelyresponsible for complying with all applicable data protection laws and for implementing and maintainingprivacy protection and security measures (especially for components that you provide or control). Barcodisclaims any liability in this regard. Barco created a specific privacy policy for the ClickShare softwareapplication for mobile devices, which describes the processing of personal data via this application (http://www.barco.com/en/about-barco/legal/privacy-policy/clickshare-app).Via the Software, Barco may gather technical information about (i) the functioning and the functionality of theproducts which are connected through the Software, and/or (ii) as provided by you or generated by your use ofthe Software (“Functional Information”). Barco may make use of such Functional Information for purposes ofanalytics, for developing and improving products and services, offering products and services to yourorganization and/or allowing third parties to access such Functional Information; based on the legitimateinterest of Barco of evaluating the market, assessing and improving its products and conducting research anddevelopment. All knowhow, inventions and works derived by Barco from the Functional Information will beexclusively owned by Barco.
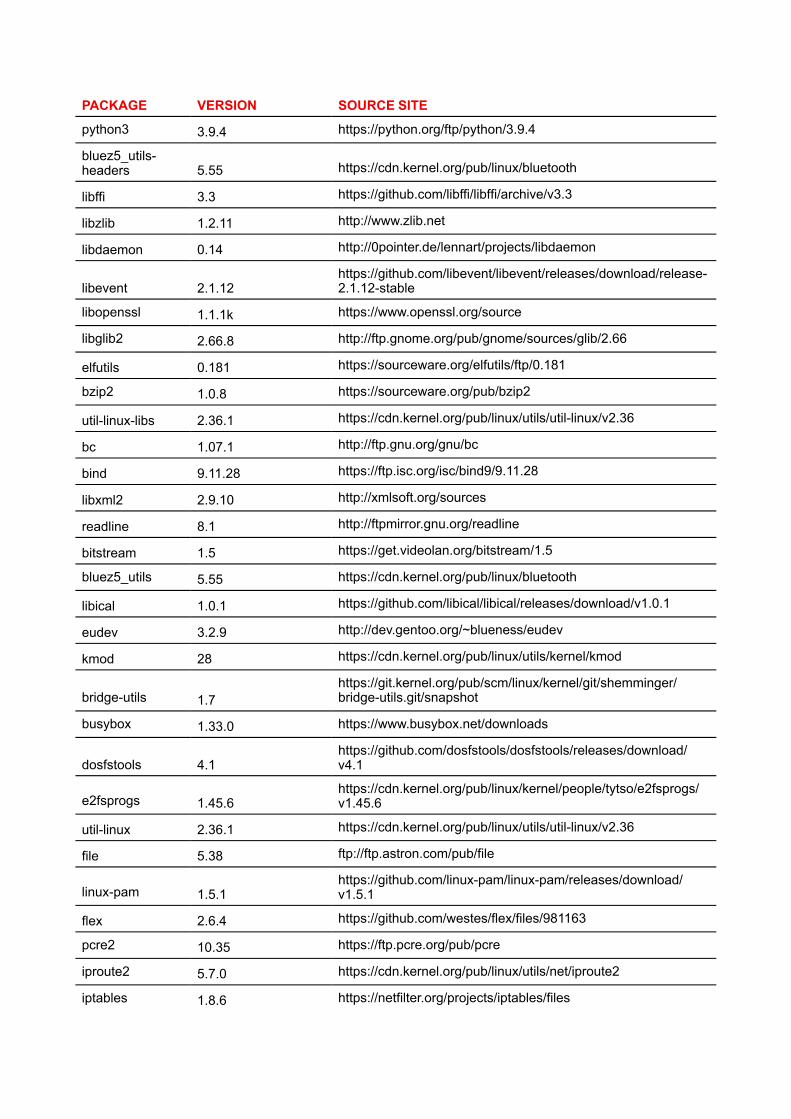
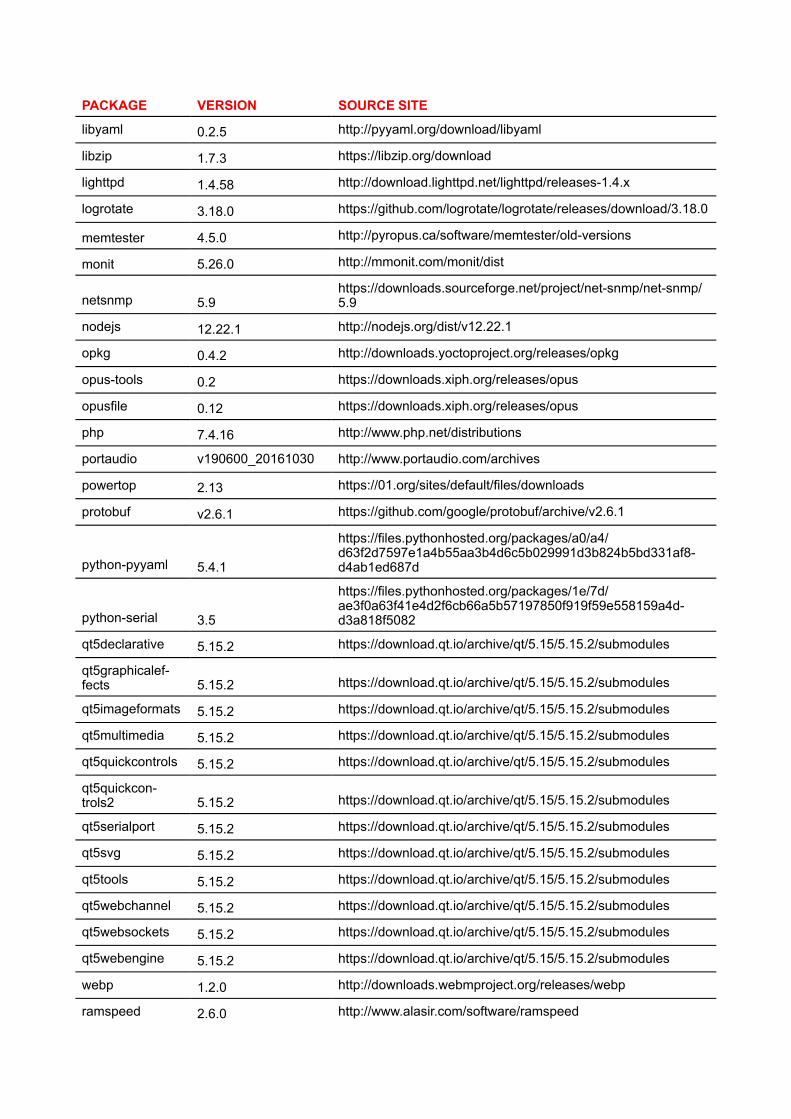
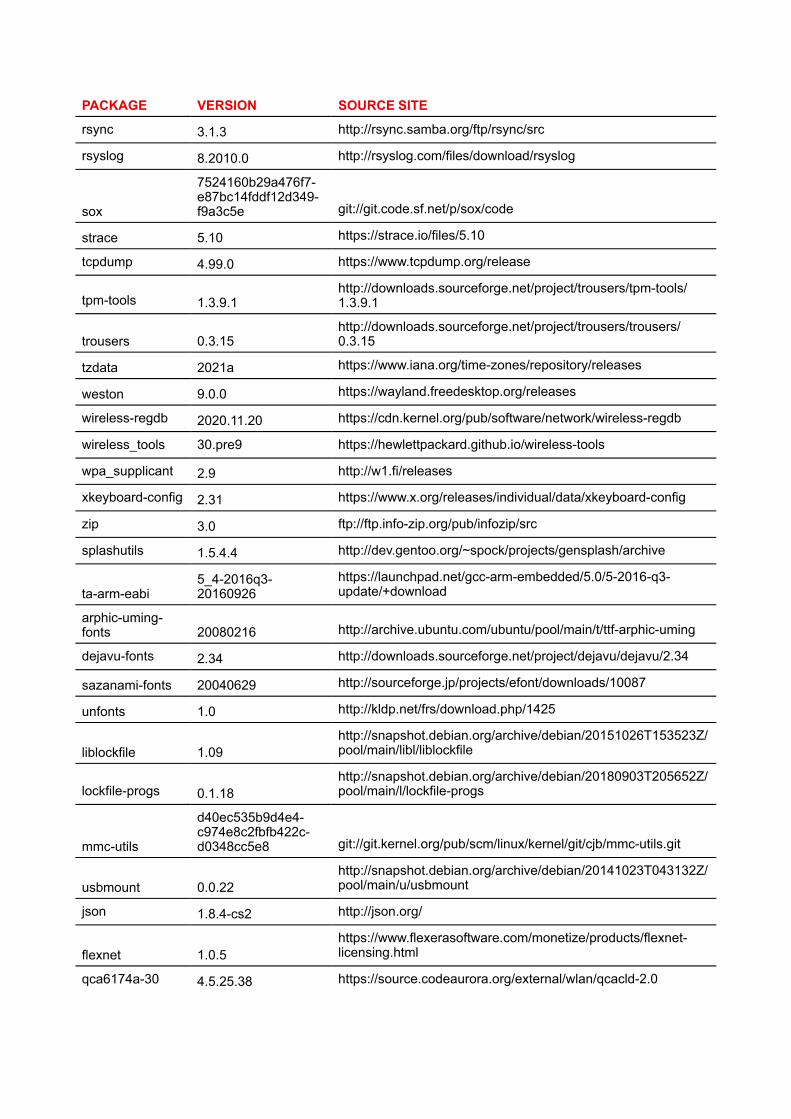
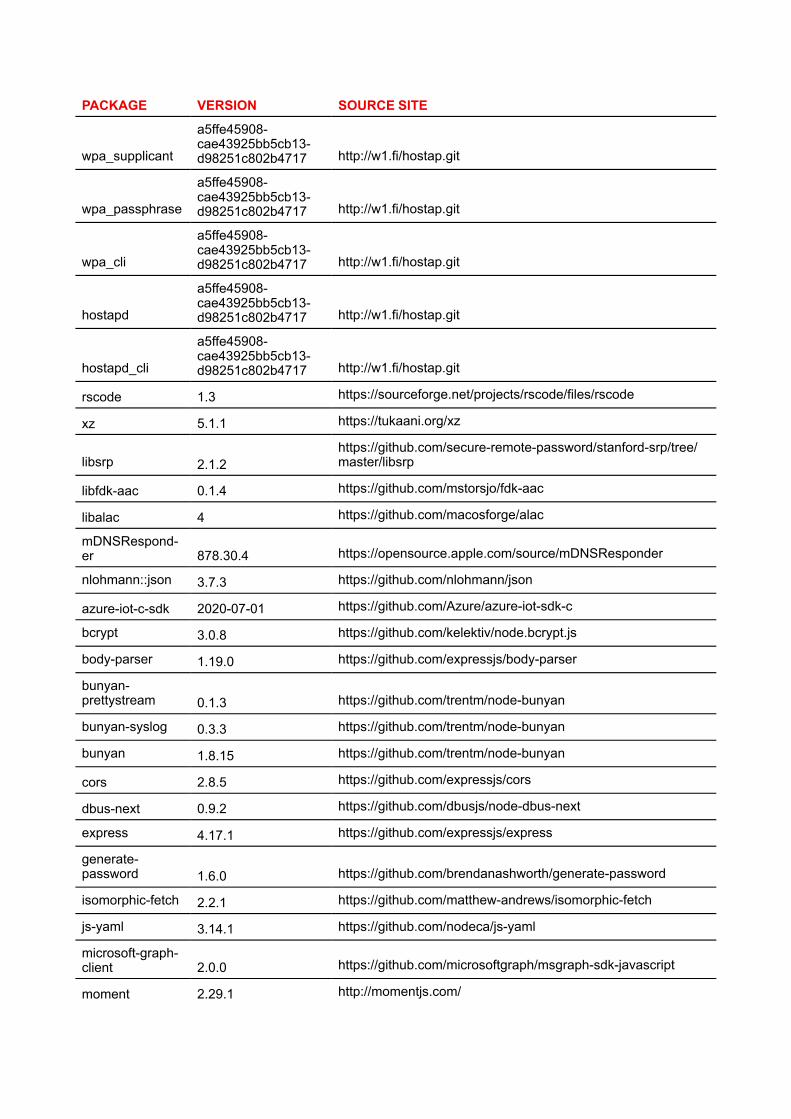
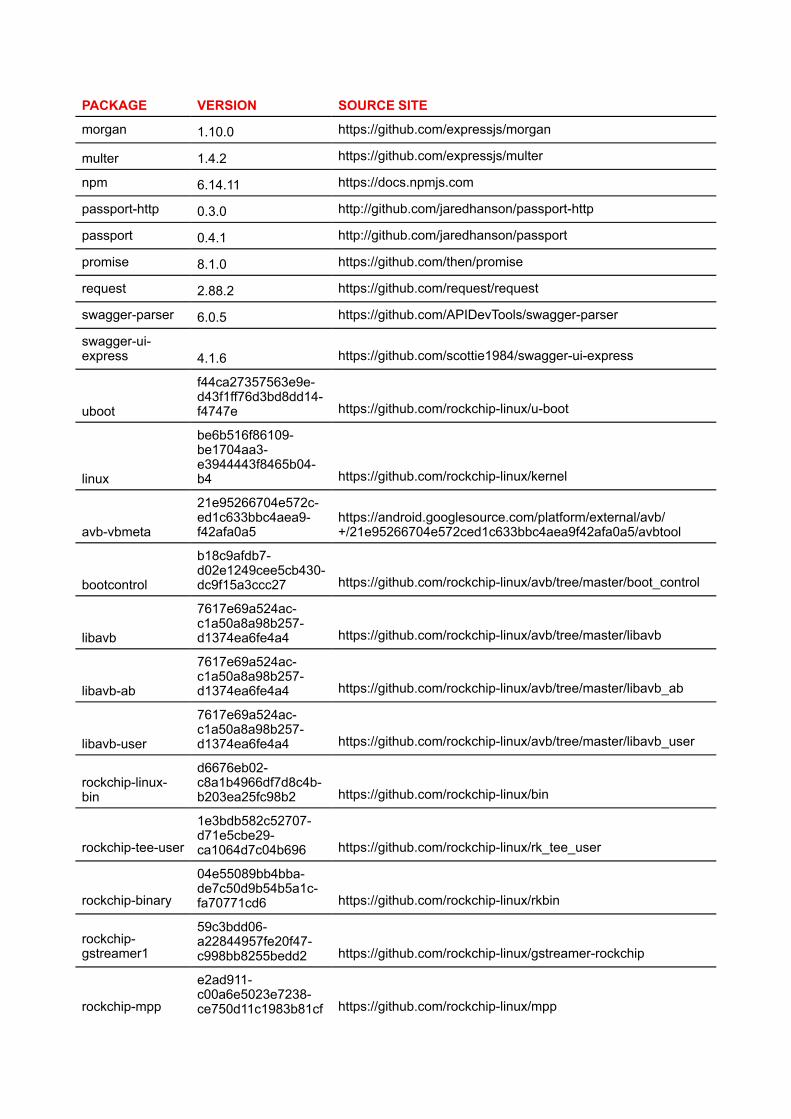
Open Source Software provisionsThis product contains software components released under an Open Source license. A copy of the sourcecode is available on request by contacting your Barco customer support representative.EACH SEPARATE OPEN SOURCE SOFTWARE COMPONENT AND ANY RELATED DOCUMENTATIONARE PROVIDED "AS IS" WITHOUT EXPRESS OR IMPLIED WARRANTY INCLUDING, BUT NOT LIMITEDTO, THE IMPLIED WARRANTIES OF MERCHANTABILITY AND FITNESS FOR A PARTICULAR PURPOSE.IN NO EVENT SHALL THE COPYRIGHT HOLDER OR ANY OTHER CONTRIBUTOR BE LIABLE FORDIRECT, INCIDENTAL, SPECIAL, EXEMPLARY OR CONSEQUENTIAL DAMAGES, EVEN IF ADVISED OFTHE POSSIBILITY OF SUCH DAMAGES, HOWEVER CAUSED AND ON ANY THEORY OF LIABILITY,WHETHER IN CONTRACT, STRICT LIABILITY, OR TORT (INCLUDING NEGLIGENCE OR OTHERWISE)ARISING IN ANY WAY OUT OF THE USE OF THIS OPEN SOURCE SOFTWARE. MORE INFORMATION/DETAILS IS TO BE FOUND IN EACH SPECIFIC OPEN SOURCE LICENSE.Copyright on each Open Source Software component belongs to the respective initial copyright holder, eachadditional contributor and/or their respective assignee (s), as may be identified in the respectivedocumentation, source code, README file, or otherwise. You shall not remove or obscure or otherwise alterthe respective copyrights.You acknowledge living up to the conditions of each separate Open Source Software license.In the development of the Software, the following Open Source Software components have been used:
PACKAGE VERSION SOURCE SITE
alsa-lib 1.2.4 https://www.alsa-project.org/files/pub/lib
alsa-plugins 1.1.1 ftp://ftp.alsa-project.org/pub/plugins
libsamplerate 0.1.9 http://www.mega-nerd.com/SRC
libsndfile 1.0.28 http://www.mega-nerd.com/libsndfile/files
alsa-utils 1.2.4 https://www.alsa-project.org/files/pub/utils
ncurses 6.1 http://ftpmirror.gnu.org/ncurses
avahi 0.8 https://github.com/lathiat/avahi/releases/download/v0.8
dbus 1.12.20 https://dbus.freedesktop.org/releases/dbus
expat 2.2.10 http://downloads.sourceforge.net/project/expat/expat/2.2.10
libselinux 3.1https://github.com/SELinuxProject/selinux/releases/download/20200710
libsepol 3.1https://github.com/SELinuxProject/selinux/releases/download/20200710
pcre 8.44 https://ftp.pcre.org/pub/pcre
PACKAGE VERSION SOURCE SITE
python3 3.9.4 https://python.org/ftp/python/3.9.4
bluez5_utils-headers 5.55 https://cdn.kernel.org/pub/linux/bluetooth
libffi 3.3 https://github.com/libffi/libffi/archive/v3.3
libzlib 1.2.11 http://www.zlib.net
libdaemon 0.14 http://0pointer.de/lennart/projects/libdaemon
libevent 2.1.12https://github.com/libevent/libevent/releases/download/release-2.1.12-stable
libopenssl 1.1.1k https://www.openssl.org/source
libglib2 2.66.8 http://ftp.gnome.org/pub/gnome/sources/glib/2.66
elfutils 0.181 https://sourceware.org/elfutils/ftp/0.181
bzip2 1.0.8 https://sourceware.org/pub/bzip2
util-linux-libs 2.36.1 https://cdn.kernel.org/pub/linux/utils/util-linux/v2.36
bc 1.07.1 http://ftp.gnu.org/gnu/bc
bind 9.11.28 https://ftp.isc.org/isc/bind9/9.11.28
libxml2 2.9.10 http://xmlsoft.org/sources
readline 8.1 http://ftpmirror.gnu.org/readline
bitstream 1.5 https://get.videolan.org/bitstream/1.5
bluez5_utils 5.55 https://cdn.kernel.org/pub/linux/bluetooth
libical 1.0.1 https://github.com/libical/libical/releases/download/v1.0.1
eudev 3.2.9 http://dev.gentoo.org/~blueness/eudev
kmod 28 https://cdn.kernel.org/pub/linux/utils/kernel/kmod
bridge-utils 1.7https://git.kernel.org/pub/scm/linux/kernel/git/shemminger/bridge-utils.git/snapshot
busybox 1.33.0 https://www.busybox.net/downloads
dosfstools 4.1https://github.com/dosfstools/dosfstools/releases/download/v4.1
e2fsprogs 1.45.6https://cdn.kernel.org/pub/linux/kernel/people/tytso/e2fsprogs/v1.45.6
util-linux 2.36.1 https://cdn.kernel.org/pub/linux/utils/util-linux/v2.36
file 5.38 ftp://ftp.astron.com/pub/file
linux-pam 1.5.1https://github.com/linux-pam/linux-pam/releases/download/v1.5.1
flex 2.6.4 https://github.com/westes/flex/files/981163
pcre2 10.35 https://ftp.pcre.org/pub/pcre
iproute2 5.7.0 https://cdn.kernel.org/pub/linux/utils/net/iproute2
iptables 1.8.6 https://netfilter.org/projects/iptables/files
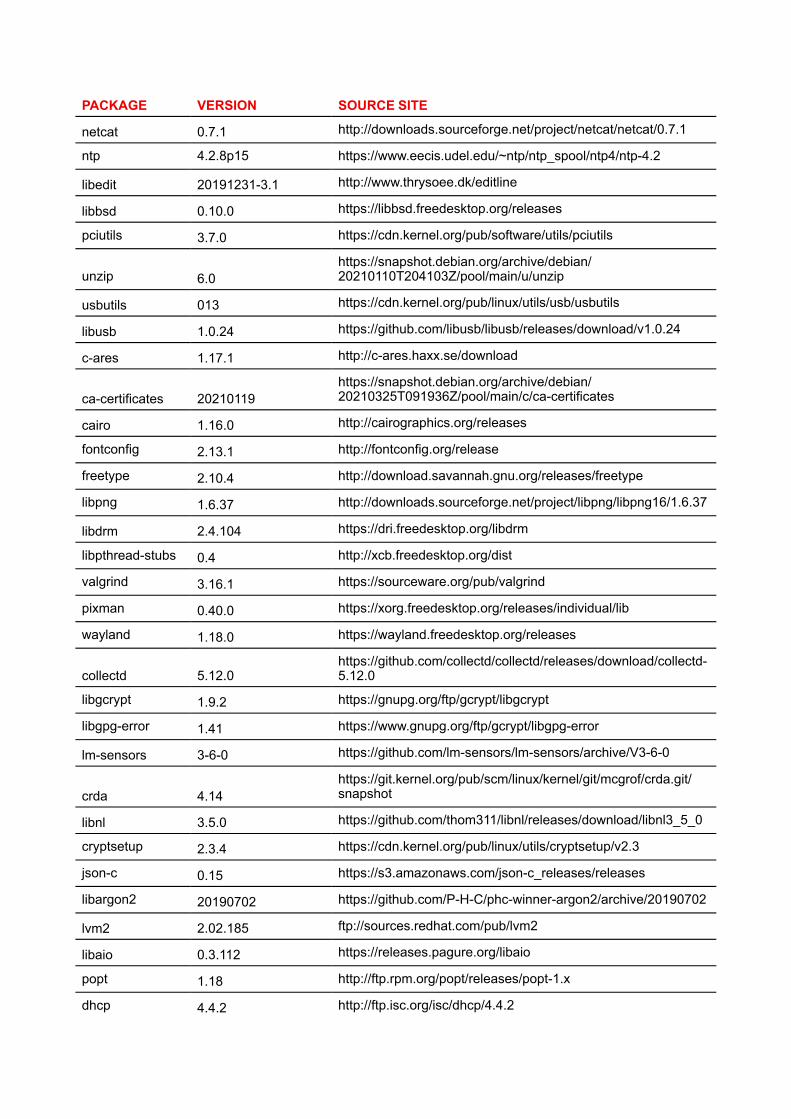
PACKAGE VERSION SOURCE SITE
netcat 0.7.1 http://downloads.sourceforge.net/project/netcat/netcat/0.7.1
ntp 4.2.8p15 https://www.eecis.udel.edu/~ntp/ntp_spool/ntp4/ntp-4.2
libedit 20191231-3.1 http://www.thrysoee.dk/editline
libbsd 0.10.0 https://libbsd.freedesktop.org/releases
pciutils 3.7.0 https://cdn.kernel.org/pub/software/utils/pciutils
unzip 6.0https://snapshot.debian.org/archive/debian/20210110T204103Z/pool/main/u/unzip
usbutils 013 https://cdn.kernel.org/pub/linux/utils/usb/usbutils
libusb 1.0.24 https://github.com/libusb/libusb/releases/download/v1.0.24
c-ares 1.17.1 http://c-ares.haxx.se/download
ca-certificates 20210119https://snapshot.debian.org/archive/debian/20210325T091936Z/pool/main/c/ca-certificates
cairo 1.16.0 http://cairographics.org/releases
fontconfig 2.13.1 http://fontconfig.org/release
freetype 2.10.4 http://download.savannah.gnu.org/releases/freetype
libpng 1.6.37 http://downloads.sourceforge.net/project/libpng/libpng16/1.6.37
libdrm 2.4.104 https://dri.freedesktop.org/libdrm
libpthread-stubs 0.4 http://xcb.freedesktop.org/dist
valgrind 3.16.1 https://sourceware.org/pub/valgrind
pixman 0.40.0 https://xorg.freedesktop.org/releases/individual/lib
wayland 1.18.0 https://wayland.freedesktop.org/releases
collectd 5.12.0https://github.com/collectd/collectd/releases/download/collectd-5.12.0
libgcrypt 1.9.2 https://gnupg.org/ftp/gcrypt/libgcrypt
libgpg-error 1.41 https://www.gnupg.org/ftp/gcrypt/libgpg-error
lm-sensors 3-6-0 https://github.com/lm-sensors/lm-sensors/archive/V3-6-0
crda 4.14https://git.kernel.org/pub/scm/linux/kernel/git/mcgrof/crda.git/snapshot
libnl 3.5.0 https://github.com/thom311/libnl/releases/download/libnl3_5_0
cryptsetup 2.3.4 https://cdn.kernel.org/pub/linux/utils/cryptsetup/v2.3
json-c 0.15 https://s3.amazonaws.com/json-c_releases/releases
libargon2 20190702 https://github.com/P-H-C/phc-winner-argon2/archive/20190702
lvm2 2.02.185 ftp://sources.redhat.com/pub/lvm2
libaio 0.3.112 https://releases.pagure.org/libaio
popt 1.18 http://ftp.rpm.org/popt/releases/popt-1.x
dhcp 4.4.2 http://ftp.isc.org/isc/dhcp/4.4.2
PACKAGE VERSION SOURCE SITE
dnsmasq 2.84 http://thekelleys.org.uk/dnsmasq
dropbear 2020.81 https://matt.ucc.asn.au/dropbear/releases
dvblast 3.4 https://get.videolan.org/dvblast/3.4
libev 4.27 http://dist.schmorp.de/libev/Attic
faad2 2.10.0 https://github.com/knik0/faad2/archive/2_10_0
fbv 1.0b http://s-tech.elsat.net.pl/fbv
giflib 5.2.1 http://downloads.sourceforge.net/project/giflib
jpeg-turbo 2.0.6 https://downloads.sourceforge.net/project/libjpeg-turbo/2.0.6
ffmpeg 4.3.1 http://ffmpeg.org/releases
libv4l 1.20.0 https://linuxtv.org/downloads/v4l-utils
qt5base 5.15.2 https://download.qt.io/archive/qt/5.15/5.15.2/submodules
icu 68-1https://github.com/unicode-org/icu/releases/download/release-68-1
libinput 1.16.4 http://www.freedesktop.org/software/libinput
libevdev 1.11.0 http://www.freedesktop.org/software/libevdev
mtdev 1.1.6 http://bitmath.org/code/mtdev
libva 2.10.0 https://github.com/intel/libva/releases/download/2.10.0
libvorbis 1.3.7 https://downloads.xiph.org/releases/vorbis
libogg 1.3.4 http://downloads.xiph.org/releases/ogg
libvpx 1.9.0 https://github.com/webmproject/libvpx/archive/v1.9.0
opus 1.3.1 https://downloads.xiph.org/releases/opus
speex 1.2.0 https://downloads.xiph.org/releases/speex
speexdsp SpeexDSP-1.2.0 https://gitlab.xiph.org/xiph/speexdsp.git
gdb 10.1 http://ftpmirror.gnu.org/gdb
gnupg2 2.2.25 https://gnupg.org/ftp/gcrypt/gnupg
libassuan 2.5.4 ftp://ftp.gnupg.org/gcrypt/libassuan
libksba 1.5.0 ftp://ftp.gnupg.org/gcrypt/libksba
libnpth 1.6 https://www.gnupg.org/ftp/gcrypt/npth
sqlite 3340100 https://www.sqlite.org/2021
gssdp 1.0.2 http://ftp.gnome.org/pub/gnome/sources/gssdp/1.0
libsoup 2.62.3 http://ftp.gnome.org/pub/gnome/sources/libsoup/2.62
gst1-libav 1.18.4 https://gstreamer.freedesktop.org/src/gst-libav
gst1-plugins-base 1.18.4 https://gstreamer.freedesktop.org/src/gst-plugins-base
gstreamer1 1.18.4 https://gstreamer.freedesktop.org/src/gstreamer
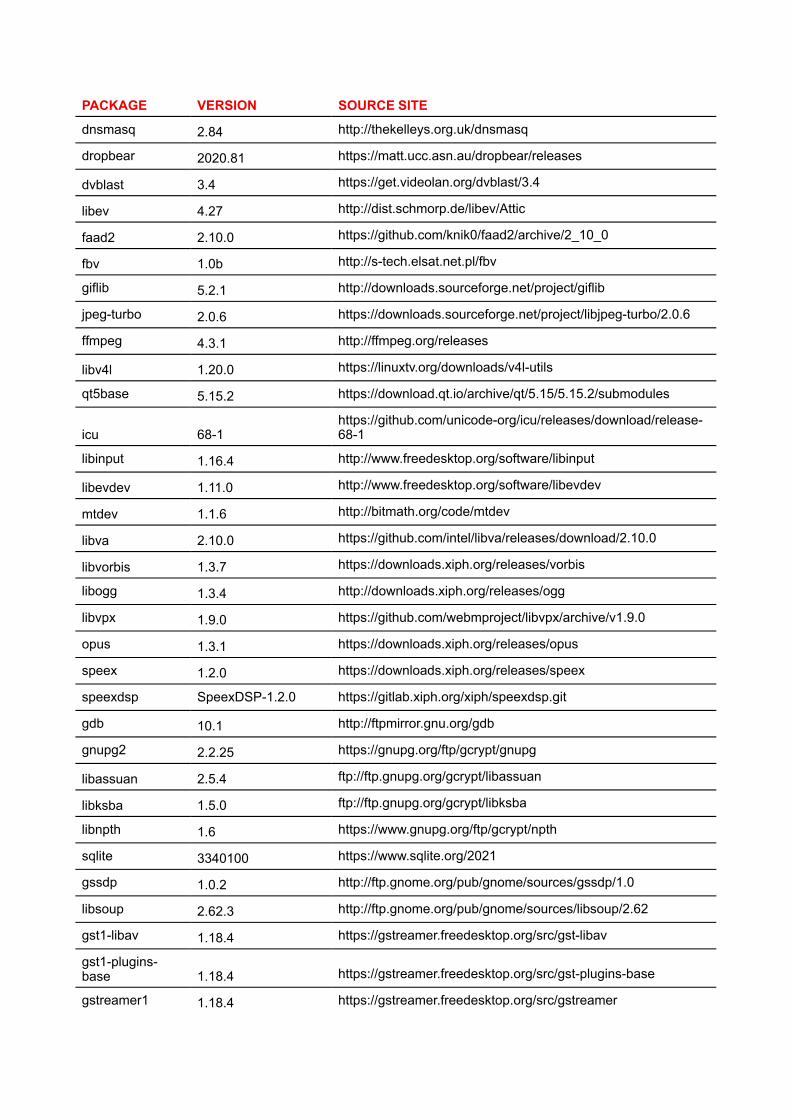
PACKAGE VERSION SOURCE SITE
gst1-plugins-bad 1.18.4 https://gstreamer.freedesktop.org/src/gst-plugins-bad
wayland-protocols 1.20 https://wayland.freedesktop.org/releases
gst1-plugins-good 1.18.4 https://gstreamer.freedesktop.org/src/gst-plugins-good
libgudev 233 http://ftp.gnome.org/pub/GNOME/sources/libgudev/233
gst1-vaapi 1.18.4 https://gstreamer.freedesktop.org/src/gstreamer-vaapi
htop 3.0.5 https://dl.bintray.com/htop/source
hwdata 0.342 https://github.com/vcrhonek/hwdata/archive/v0.342
input-event-daemon 0.1.3 https://github.com/gandro/input-event-daemon/archive/v0.1.3
iperf 2.0.13 http://downloads.sourceforge.net/project/iperf2
iperf3 3.9 https://downloads.es.net/pub/iperf
iw 5.9 https://cdn.kernel.org/pub/software/network/iw
jansson 2.13.1 http://www.digip.org/jansson/releases
jose 10 https://github.com/latchset/jose/releases/download/v10
json-for-modern-cpp 3.9.0 https://github.com/nlohmann/json/archive/v3.9.0
jsoncpp 1.9.4 https://github.com/open-source-parsers/jsoncpp/archive/1.9.4
libarchive 3.5.1 https://www.libarchive.de/downloads
libconfig 1.7.2 https://github.com/hyperrealm/libconfig/archive/v1.7.2
libcurl 7.76.0 https://curl.haxx.se/download
nghttp2 1.41.0 https://github.com/nghttp2/nghttp2/releases/download/v1.41.0
libestr 0.1.11 http://libestr.adiscon.com/files/download
libfastjson 0.99.9 https://github.com/rsyslog/libfastjson/archive/v0.99.9
liblogging 1.0.6 http://download.rsyslog.com/liblogging
libnspr 4.29 https://ftp.mozilla.org/pub/mozilla.org/nspr/releases/v4.29/src
libnss 3.61https://ftp.mozilla.org/pub/mozilla.org/security/nss/releases/NSS_3_61_RTM/src
libopusenc 0.2.1 https://downloads.xiph.org/releases/opus
libpcap 1.10.0 https://www.tcpdump.org/release
libqrencode 4.1.1 http://fukuchi.org/works/qrencode
libsha1 0.3 https://github.com/dottedmag/libsha1/archive/0.3
libtool 2.4.6 http://ftpmirror.gnu.org/libtool
libuv 1.40.0 https://github.com/libuv/libuv/archive/v1.40.0
libxkbcommon 1.0.3 http://xkbcommon.org/download
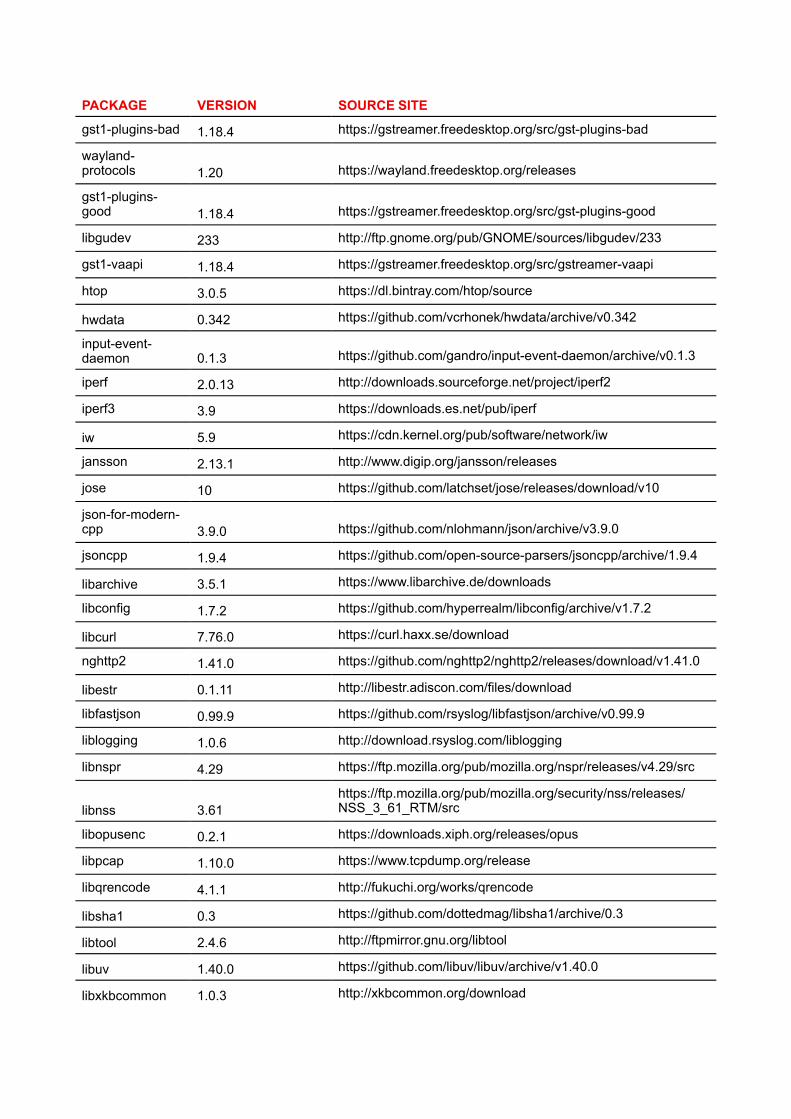
PACKAGE VERSION SOURCE SITE
libyaml 0.2.5 http://pyyaml.org/download/libyaml
libzip 1.7.3 https://libzip.org/download
lighttpd 1.4.58 http://download.lighttpd.net/lighttpd/releases-1.4.x
logrotate 3.18.0 https://github.com/logrotate/logrotate/releases/download/3.18.0
memtester 4.5.0 http://pyropus.ca/software/memtester/old-versions
monit 5.26.0 http://mmonit.com/monit/dist
netsnmp 5.9https://downloads.sourceforge.net/project/net-snmp/net-snmp/5.9
nodejs 12.22.1 http://nodejs.org/dist/v12.22.1
opkg 0.4.2 http://downloads.yoctoproject.org/releases/opkg
opus-tools 0.2 https://downloads.xiph.org/releases/opus
opusfile 0.12 https://downloads.xiph.org/releases/opus
php 7.4.16 http://www.php.net/distributions
portaudio v190600_20161030 http://www.portaudio.com/archives
powertop 2.13 https://01.org/sites/default/files/downloads
protobuf v2.6.1 https://github.com/google/protobuf/archive/v2.6.1
python-pyyaml 5.4.1
https://files.pythonhosted.org/packages/a0/a4/d63f2d7597e1a4b55aa3b4d6c5b029991d3b824b5bd331af8-d4ab1ed687d
python-serial 3.5
https://files.pythonhosted.org/packages/1e/7d/ae3f0a63f41e4d2f6cb66a5b57197850f919f59e558159a4d-d3a818f5082
qt5declarative 5.15.2 https://download.qt.io/archive/qt/5.15/5.15.2/submodules
qt5graphicalef-fects 5.15.2 https://download.qt.io/archive/qt/5.15/5.15.2/submodules
qt5imageformats 5.15.2 https://download.qt.io/archive/qt/5.15/5.15.2/submodules
qt5multimedia 5.15.2 https://download.qt.io/archive/qt/5.15/5.15.2/submodules
qt5quickcontrols 5.15.2 https://download.qt.io/archive/qt/5.15/5.15.2/submodules
qt5quickcon-trols2 5.15.2 https://download.qt.io/archive/qt/5.15/5.15.2/submodules
qt5serialport 5.15.2 https://download.qt.io/archive/qt/5.15/5.15.2/submodules
qt5svg 5.15.2 https://download.qt.io/archive/qt/5.15/5.15.2/submodules
qt5tools 5.15.2 https://download.qt.io/archive/qt/5.15/5.15.2/submodules
qt5webchannel 5.15.2 https://download.qt.io/archive/qt/5.15/5.15.2/submodules
qt5websockets 5.15.2 https://download.qt.io/archive/qt/5.15/5.15.2/submodules
qt5webengine 5.15.2 https://download.qt.io/archive/qt/5.15/5.15.2/submodules
webp 1.2.0 http://downloads.webmproject.org/releases/webp
ramspeed 2.6.0 http://www.alasir.com/software/ramspeed
PACKAGE VERSION SOURCE SITE
rsync 3.1.3 http://rsync.samba.org/ftp/rsync/src
rsyslog 8.2010.0 http://rsyslog.com/files/download/rsyslog
sox
7524160b29a476f7-e87bc14fddf12d349-f9a3c5e git://git.code.sf.net/p/sox/code
strace 5.10 https://strace.io/files/5.10
tcpdump 4.99.0 https://www.tcpdump.org/release
tpm-tools 1.3.9.1http://downloads.sourceforge.net/project/trousers/tpm-tools/1.3.9.1
trousers 0.3.15http://downloads.sourceforge.net/project/trousers/trousers/0.3.15
tzdata 2021a https://www.iana.org/time-zones/repository/releases
weston 9.0.0 https://wayland.freedesktop.org/releases
wireless-regdb 2020.11.20 https://cdn.kernel.org/pub/software/network/wireless-regdb
wireless_tools 30.pre9 https://hewlettpackard.github.io/wireless-tools
wpa_supplicant 2.9 http://w1.fi/releases
xkeyboard-config 2.31 https://www.x.org/releases/individual/data/xkeyboard-config
zip 3.0 ftp://ftp.info-zip.org/pub/infozip/src
splashutils 1.5.4.4 http://dev.gentoo.org/~spock/projects/gensplash/archive
ta-arm-eabi5_4-2016q3-20160926
https://launchpad.net/gcc-arm-embedded/5.0/5-2016-q3-update/+download
arphic-uming-fonts 20080216 http://archive.ubuntu.com/ubuntu/pool/main/t/ttf-arphic-uming
dejavu-fonts 2.34 http://downloads.sourceforge.net/project/dejavu/dejavu/2.34
sazanami-fonts 20040629 http://sourceforge.jp/projects/efont/downloads/10087
unfonts 1.0 http://kldp.net/frs/download.php/1425
liblockfile 1.09http://snapshot.debian.org/archive/debian/20151026T153523Z/pool/main/libl/liblockfile
lockfile-progs 0.1.18http://snapshot.debian.org/archive/debian/20180903T205652Z/pool/main/l/lockfile-progs
mmc-utils
d40ec535b9d4e4-c974e8c2fbfb422c-d0348cc5e8 git://git.kernel.org/pub/scm/linux/kernel/git/cjb/mmc-utils.git
usbmount 0.0.22http://snapshot.debian.org/archive/debian/20141023T043132Z/pool/main/u/usbmount
json 1.8.4-cs2 http://json.org/
flexnet 1.0.5https://www.flexerasoftware.com/monetize/products/flexnet-licensing.html
qca6174a-30 4.5.25.38 https://source.codeaurora.org/external/wlan/qcacld-2.0
PACKAGE VERSION SOURCE SITE
wpa_supplicant
a5ffe45908-cae43925bb5cb13-d98251c802b4717 http://w1.fi/hostap.git
wpa_passphrase
a5ffe45908-cae43925bb5cb13-d98251c802b4717 http://w1.fi/hostap.git
wpa_cli
a5ffe45908-cae43925bb5cb13-d98251c802b4717 http://w1.fi/hostap.git
hostapd
a5ffe45908-cae43925bb5cb13-d98251c802b4717 http://w1.fi/hostap.git
hostapd_cli
a5ffe45908-cae43925bb5cb13-d98251c802b4717 http://w1.fi/hostap.git
rscode 1.3 https://sourceforge.net/projects/rscode/files/rscode
xz 5.1.1 https://tukaani.org/xz
libsrp 2.1.2https://github.com/secure-remote-password/stanford-srp/tree/master/libsrp
libfdk-aac 0.1.4 https://github.com/mstorsjo/fdk-aac
libalac 4 https://github.com/macosforge/alac
mDNSRespond-er 878.30.4 https://opensource.apple.com/source/mDNSResponder
nlohmann::json 3.7.3 https://github.com/nlohmann/json
azure-iot-c-sdk 2020-07-01 https://github.com/Azure/azure-iot-sdk-c
bcrypt 3.0.8 https://github.com/kelektiv/node.bcrypt.js
body-parser 1.19.0 https://github.com/expressjs/body-parser
bunyan-prettystream 0.1.3 https://github.com/trentm/node-bunyan
bunyan-syslog 0.3.3 https://github.com/trentm/node-bunyan
bunyan 1.8.15 https://github.com/trentm/node-bunyan
cors 2.8.5 https://github.com/expressjs/cors
dbus-next 0.9.2 https://github.com/dbusjs/node-dbus-next
express 4.17.1 https://github.com/expressjs/express
generate-password 1.6.0 https://github.com/brendanashworth/generate-password
isomorphic-fetch 2.2.1 https://github.com/matthew-andrews/isomorphic-fetch
js-yaml 3.14.1 https://github.com/nodeca/js-yaml
microsoft-graph-client 2.0.0 https://github.com/microsoftgraph/msgraph-sdk-javascript
moment 2.29.1 http://momentjs.com/
PACKAGE VERSION SOURCE SITE
morgan 1.10.0 https://github.com/expressjs/morgan
multer 1.4.2 https://github.com/expressjs/multer
npm 6.14.11 https://docs.npmjs.com
passport-http 0.3.0 http://github.com/jaredhanson/passport-http
passport 0.4.1 http://github.com/jaredhanson/passport
promise 8.1.0 https://github.com/then/promise
request 2.88.2 https://github.com/request/request
swagger-parser 6.0.5 https://github.com/APIDevTools/swagger-parser
swagger-ui-express 4.1.6 https://github.com/scottie1984/swagger-ui-express
uboot
f44ca27357563e9e-d43f1ff76d3bd8dd14-f4747e https://github.com/rockchip-linux/u-boot
linux
be6b516f86109-be1704aa3-e3944443f8465b04-b4 https://github.com/rockchip-linux/kernel
avb-vbmeta
21e95266704e572c-ed1c633bbc4aea9-f42afa0a5
https://android.googlesource.com/platform/external/avb/+/21e95266704e572ced1c633bbc4aea9f42afa0a5/avbtool
bootcontrol
b18c9afdb7-d02e1249cee5cb430-dc9f15a3ccc27 https://github.com/rockchip-linux/avb/tree/master/boot_control
libavb
7617e69a524ac-c1a50a8a98b257-d1374ea6fe4a4 https://github.com/rockchip-linux/avb/tree/master/libavb
libavb-ab
7617e69a524ac-c1a50a8a98b257-d1374ea6fe4a4 https://github.com/rockchip-linux/avb/tree/master/libavb_ab
libavb-user
7617e69a524ac-c1a50a8a98b257-d1374ea6fe4a4 https://github.com/rockchip-linux/avb/tree/master/libavb_user
rockchip-linux-bin
d6676eb02-c8a1b4966df7d8c4b-b203ea25fc98b2 https://github.com/rockchip-linux/bin
rockchip-tee-user
1e3bdb582c52707-d71e5cbe29-ca1064d7c04b696 https://github.com/rockchip-linux/rk_tee_user
rockchip-binary
04e55089bb4bba-de7c50d9b54b5a1c-fa70771cd6 https://github.com/rockchip-linux/rkbin
rockchip-gstreamer1
59c3bdd06-a22844957fe20f47-c998bb8255bedd2 https://github.com/rockchip-linux/gstreamer-rockchip
rockchip-mpp
e2ad911-c00a6e5023e7238-ce750d11c1983b81cf https://github.com/rockchip-linux/mpp
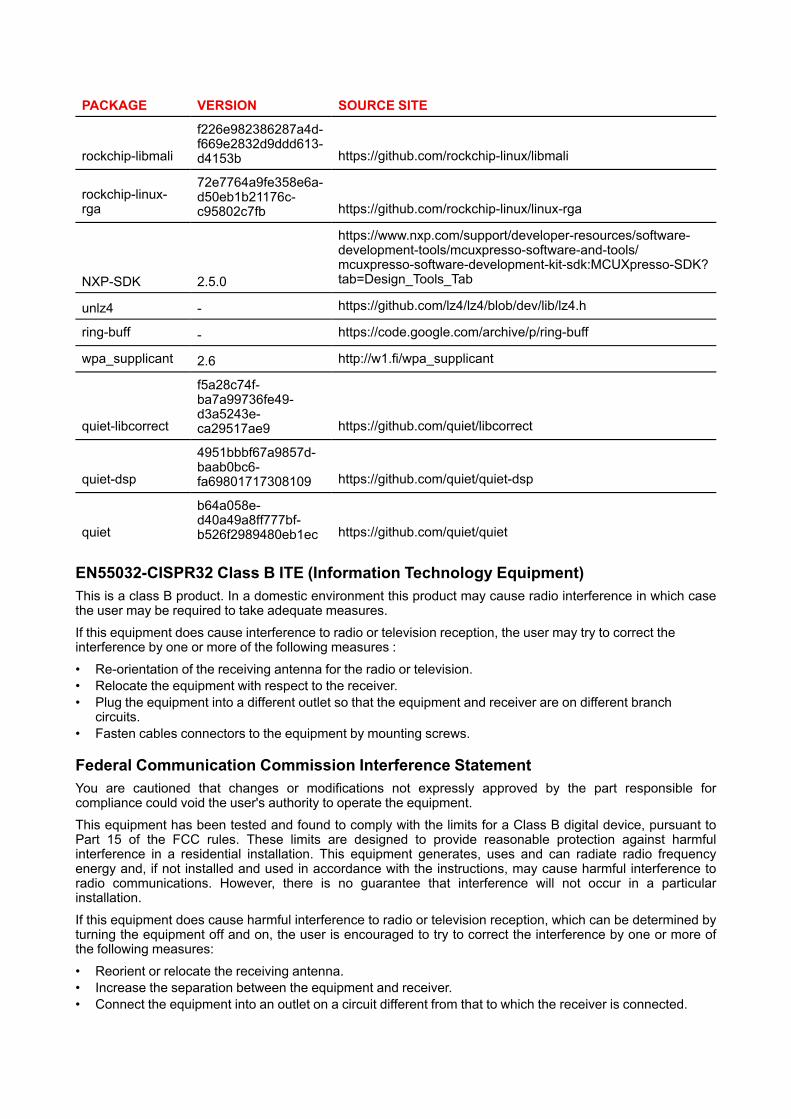
PACKAGE VERSION SOURCE SITE
rockchip-libmali
f226e982386287a4d-f669e2832d9ddd613-d4153b https://github.com/rockchip-linux/libmali
rockchip-linux-rga
72e7764a9fe358e6a-d50eb1b21176c-c95802c7fb https://github.com/rockchip-linux/linux-rga
NXP-SDK 2.5.0
https://www.nxp.com/support/developer-resources/software-development-tools/mcuxpresso-software-and-tools/mcuxpresso-software-development-kit-sdk:MCUXpresso-SDK?tab=Design_Tools_Tab
unlz4 - https://github.com/lz4/lz4/blob/dev/lib/lz4.h
ring-buff - https://code.google.com/archive/p/ring-buff
wpa_supplicant 2.6 http://w1.fi/wpa_supplicant
quiet-libcorrect
f5a28c74f-ba7a99736fe49-d3a5243e-ca29517ae9 https://github.com/quiet/libcorrect
quiet-dsp
4951bbbf67a9857d-baab0bc6-fa69801717308109 https://github.com/quiet/quiet-dsp
quiet
b64a058e-d40a49a8ff777bf-b526f2989480eb1ec https://github.com/quiet/quiet
EN55032-CISPR32 Class B ITE (Information Technology Equipment)This is a class B product. In a domestic environment this product may cause radio interference in which casethe user may be required to take adequate measures.If this equipment does cause interference to radio or television reception, the user may try to correct theinterference by one or more of the following measures :• Re-orientation of the receiving antenna for the radio or television.• Relocate the equipment with respect to the receiver.• Plug the equipment into a different outlet so that the equipment and receiver are on different branch
circuits.• Fasten cables connectors to the equipment by mounting screws.
Federal Communication Commission Interference StatementYou are cautioned that changes or modifications not expressly approved by the part responsible forcompliance could void the user's authority to operate the equipment.This equipment has been tested and found to comply with the limits for a Class B digital device, pursuant toPart 15 of the FCC rules. These limits are designed to provide reasonable protection against harmfulinterference in a residential installation. This equipment generates, uses and can radiate radio frequencyenergy and, if not installed and used in accordance with the instructions, may cause harmful interference toradio communications. However, there is no guarantee that interference will not occur in a particularinstallation.If this equipment does cause harmful interference to radio or television reception, which can be determined byturning the equipment off and on, the user is encouraged to try to correct the interference by one or more ofthe following measures:• Reorient or relocate the receiving antenna.• Increase the separation between the equipment and receiver.• Connect the equipment into an outlet on a circuit different from that to which the receiver is connected.

• Consult the dealer or an experienced radio/TV technician for help.You may also find helpful the following booklet, prepared by the FCC: "How to Identify and Resolve Radio-TVInterference Problems." This booklet is available from the U.S. Government Printing Office, Washington D.C.20402.Changes and Modifications not expressly approved by the manufacturer or registrant of this equipment canvoid your authority to operate this equipment under Federal Communications Commissions rules.In order to maintain compliance with FCC regulations shielded cables must be used with this equipment.Operation with non-approved equipment or unshielded cables is likely to result in interference to radio &television reception.FCC RF Radiation Exposure Statement: This device is capable of operating in 802.11a mode. For 802.11adevices operating in the frequency range of 5.15 - 5.25 GHz, they are restricted for indoor operations toreduce any potential harmful interference for Mobile Satellite Services (MSS) in the US. WIFI Access Pointsthat are capable of allowing your device to operate in 802.11a mode (5 .15 - 5.25 GHz band) are optimized forindoor use only. If your WIFI network is capable of operating in this mode, please restrict your WIFI useindoors to not violate federal regulations to protect Mobile Satellite Services.1. This Transmitter must not be co-located or operating in conjunction with any other antenna or transmitter.2. This equipment complies with RF radiation exposure limits set forth for an uncontrolled environment.
This equipment should be installed and operated with a minimum distance of 20 cm between the radiatorand your body.
Base Unit FCC ID: 2AAED-R9861511Button FCC ID (model R9861600D01C): 2AAED-R9861600D01ClickShare Button 2AAED-R9861600D01 has been tested and meets the FCC RF exposure guidelines.Themaximum SAR value reported is 1.19 W/kg.ClickShare button 2AAED-R9861600D01 should be installed and operated with a minimum distance of 5 mmbetween the radiator and your body.
Canada, Industry Canada (IC) NoticesThis device complies with Industry Canada licence-exempt RSS standard (s). Operation is subject to thefollowing two conditions: (1) this device may not cause interference, and (2) this device must accept anyinterference, including interference that may cause undesired operation of the device.
Radio Frequency (RF) Exposure InformationThe radiated output power of the Barco Wireless Device is below the Industry Canada (IC) radio frequencyexposure limits. The Barco Wireless Device should be used in such a manner such that the potential forhuman contact during normal operation is minimized.Caution: Exposure to Radio Frequency Radiation.1. To comply with the Canadian RF exposure compliance requirements, this device and its antenna must not
be co-located or operating in conjunction with any other antenna or transmitter.2. To comply with RSS 102 RF exposure compliance requirements, a separation distance of at least 20 cm
must be maintained between the antenna of this device and all persons.Base Unit IC: IC: 21559-R9861511Button IC (model R9861600D01C): 21559-R9861600D01
IC Antenna statementUnder Industry Canada regulations, this radio transmitter may only operate using an antenna of a type andmaximum (or lesser) gain approved for the transmitter by Industry Canada. To reduce potential radiointerference to other users, the antenna type and its gain should be so chosen that the equivalent isotropicallyradiated power (e.i.r.p.) is not more than that necessary for successful communication.This radio transmitter 23575-R9861511 has been approved by Industry Canada to operate with the antennatypes listed below with the maximum permissible gain and required antenna impedance for each antenna typeindicated. Antenna types not included in this list, having a gain greater than the maximum gain indicated forthat type, are strictly prohibited for use with this device.
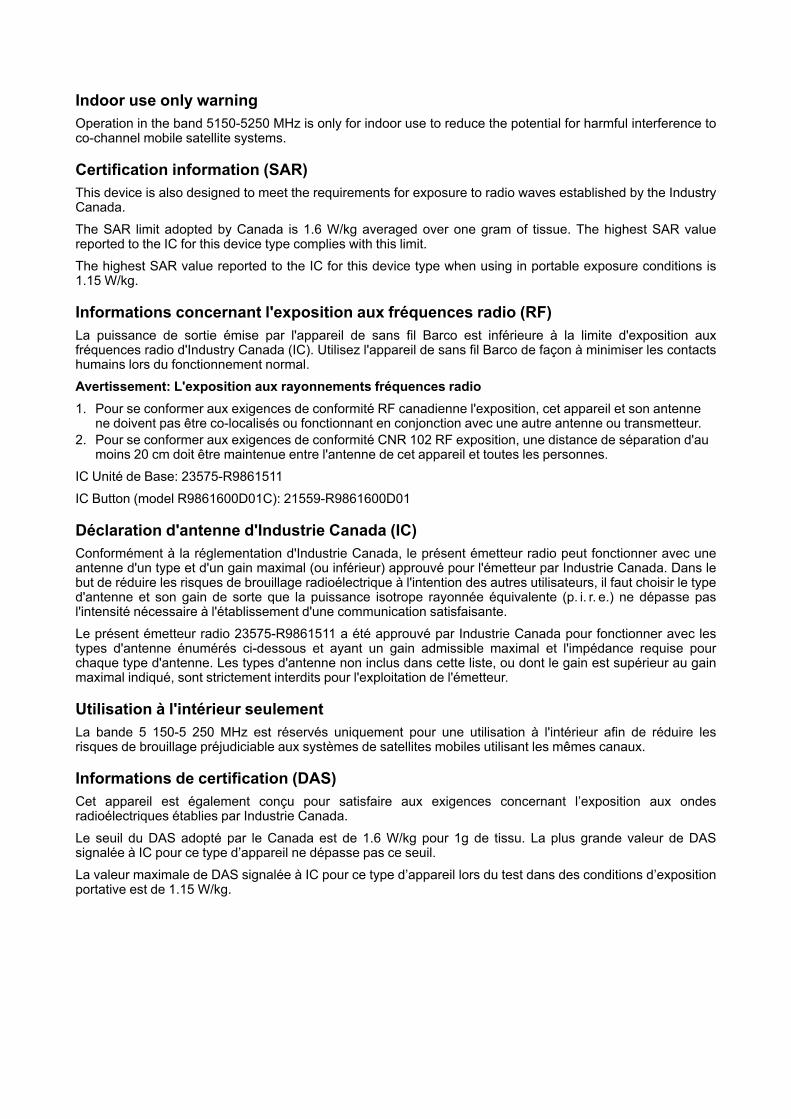
Indoor use only warningOperation in the band 5150-5250 MHz is only for indoor use to reduce the potential for harmful interference toco-channel mobile satellite systems.
Certification information (SAR)This device is also designed to meet the requirements for exposure to radio waves established by the IndustryCanada.The SAR limit adopted by Canada is 1.6 W/kg averaged over one gram of tissue. The highest SAR valuereported to the IC for this device type complies with this limit.The highest SAR value reported to the IC for this device type when using in portable exposure conditions is1.15 W/kg.
Informations concernant l'exposition aux fréquences radio (RF)La puissance de sortie émise par l'appareil de sans fil Barco est inférieure à la limite d'exposition auxfréquences radio d'Industry Canada (IC). Utilisez l'appareil de sans fil Barco de façon à minimiser les contactshumains lors du fonctionnement normal.Avertissement: L'exposition aux rayonnements fréquences radio1. Pour se conformer aux exigences de conformité RF canadienne l'exposition, cet appareil et son antenne
ne doivent pas être co-localisés ou fonctionnant en conjonction avec une autre antenne ou transmetteur.2. Pour se conformer aux exigences de conformité CNR 102 RF exposition, une distance de séparation d'au
moins 20 cm doit être maintenue entre l'antenne de cet appareil et toutes les personnes.IC Unité de Base: 23575-R9861511IC Button (model R9861600D01C): 21559-R9861600D01
Déclaration d'antenne d'Industrie Canada (IC)Conformément à la réglementation d'Industrie Canada, le présent émetteur radio peut fonctionner avec uneantenne d'un type et d'un gain maximal (ou inférieur) approuvé pour l'émetteur par Industrie Canada. Dans lebut de réduire les risques de brouillage radioélectrique à l'intention des autres utilisateurs, il faut choisir le typed'antenne et son gain de sorte que la puissance isotrope rayonnée équivalente (p. i. r. e.) ne dépasse pasl'intensité nécessaire à l'établissement d'une communication satisfaisante.Le présent émetteur radio 23575-R9861511 a été approuvé par Industrie Canada pour fonctionner avec lestypes d'antenne énumérés ci-dessous et ayant un gain admissible maximal et l'impédance requise pourchaque type d'antenne. Les types d'antenne non inclus dans cette liste, ou dont le gain est supérieur au gainmaximal indiqué, sont strictement interdits pour l'exploitation de l'émetteur.
Utilisation à l'intérieur seulementLa bande 5 150-5 250 MHz est réservés uniquement pour une utilisation à l'intérieur afin de réduire lesrisques de brouillage préjudiciable aux systèmes de satellites mobiles utilisant les mêmes canaux.
Informations de certification (DAS)Cet appareil est également conçu pour satisfaire aux exigences concernant l’exposition aux ondesradioélectriques établies par Industrie Canada.Le seuil du DAS adopté par le Canada est de 1.6 W/kg pour 1g de tissu. La plus grande valeur de DASsignalée à IC pour ce type d’appareil ne dépasse pas ce seuil.La valeur maximale de DAS signalée à IC pour ce type d’appareil lors du test dans des conditions d’expositionportative est de 1.15 W/kg.
17R5900102 /05 CX-20
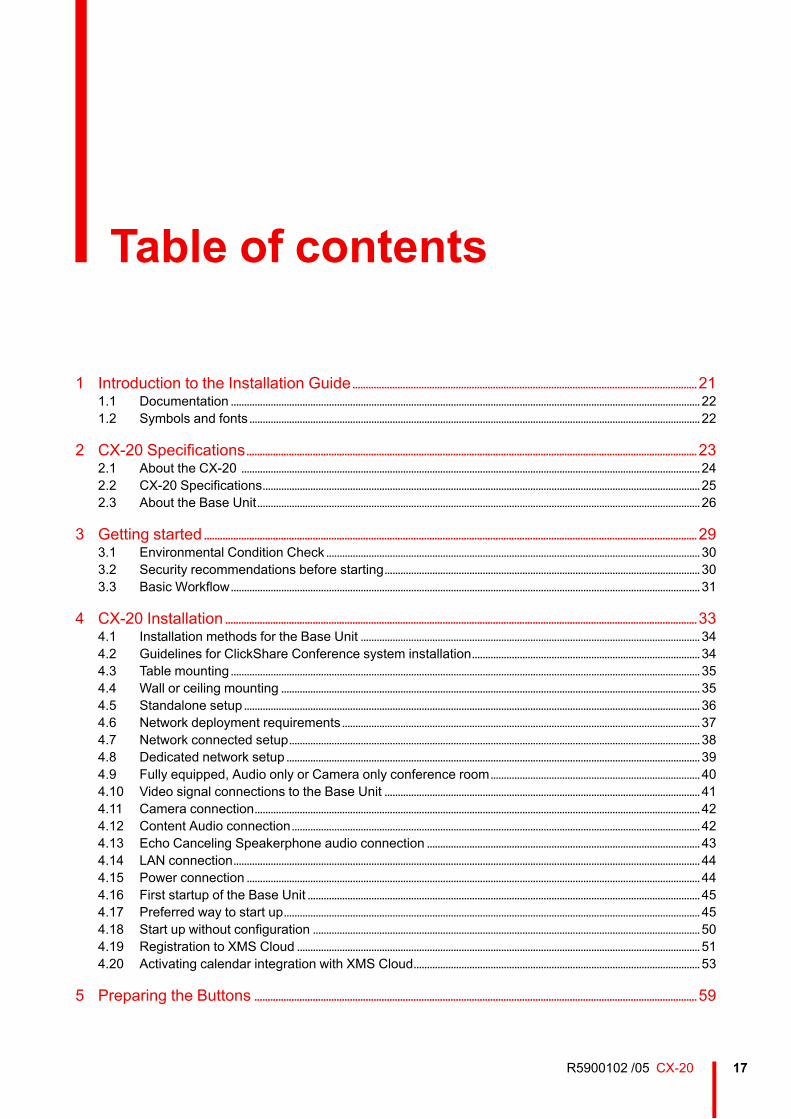
1 Introduction to the Installation Guide..................................................................................................................................211.1 Documentation .................................................................................................................................................................................221.2 Symbols and fonts..........................................................................................................................................................................22
2 CX-20 Specifications..........................................................................................................................................................................232.1 About the CX-20 .............................................................................................................................................................................242.2 CX-20 Specifications.....................................................................................................................................................................252.3 About the Base Unit.......................................................................................................................................................................26
3 Getting started..........................................................................................................................................................................................293.1 Environmental Condition Check.............................................................................................................................................303.2 Security recommendations before starting.......................................................................................................................303.3 Basic Workflow.................................................................................................................................................................................31
4 CX-20 Installation..................................................................................................................................................................................334.1 Installation methods for the Base Unit ................................................................................................................................344.2 Guidelines for ClickShare Conference system installation......................................................................................344.3 Table mounting.................................................................................................................................................................................354.4 Wall or ceiling mounting ..............................................................................................................................................................354.5 Standalone setup............................................................................................................................................................................364.6 Network deployment requirements.......................................................................................................................................374.7 Network connected setup...........................................................................................................................................................384.8 Dedicated network setup............................................................................................................................................................394.9 Fully equipped, Audio only or Camera only conference room...............................................................................404.10 Video signal connections to the Base Unit .......................................................................................................................414.11 Camera connection........................................................................................................................................................................424.12 Content Audio connection..........................................................................................................................................................424.13 Echo Canceling Speakerphone audio connection .......................................................................................................434.14 LAN connection................................................................................................................................................................................444.15 Power connection ...........................................................................................................................................................................444.16 First startup of the Base Unit ....................................................................................................................................................454.17 Preferred way to start up.............................................................................................................................................................454.18 Start up without configuration ..................................................................................................................................................504.19 Registration to XMS Cloud ........................................................................................................................................................514.20 Activating calendar integration with XMS Cloud............................................................................................................53
5 Preparing the Buttons .......................................................................................................................................................................59
Table of contents
R5900102 /05 CX-2018
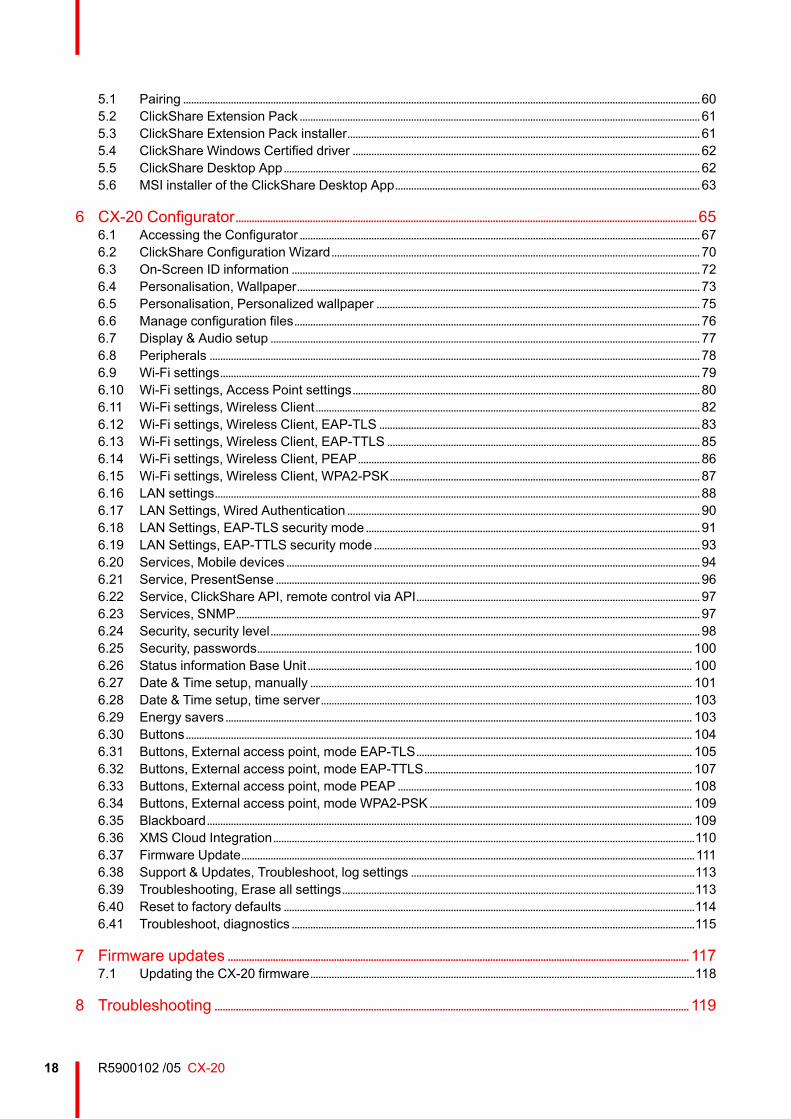
5.1 Pairing ...................................................................................................................................................................................................605.2 ClickShare Extension Pack.......................................................................................................................................................615.3 ClickShare Extension Pack installer.....................................................................................................................................615.4 ClickShare Windows Certified driver ...................................................................................................................................625.5 ClickShare Desktop App.............................................................................................................................................................625.6 MSI installer of the ClickShare Desktop App...................................................................................................................63
6 CX-20 Configurator..............................................................................................................................................................................656.1 Accessing the Configurator .......................................................................................................................................................676.2 ClickShare Configuration Wizard...........................................................................................................................................706.3 On-Screen ID information ..........................................................................................................................................................726.4 Personalisation, Wallpaper........................................................................................................................................................736.5 Personalisation, Personalized wallpaper ..........................................................................................................................756.6 Manage configuration files.........................................................................................................................................................766.7 Display & Audio setup ..................................................................................................................................................................776.8 Peripherals .........................................................................................................................................................................................786.9 Wi-Fi settings.....................................................................................................................................................................................796.10 Wi-Fi settings, Access Point settings...................................................................................................................................806.11 Wi-Fi settings, Wireless Client.................................................................................................................................................826.12 Wi-Fi settings, Wireless Client, EAP-TLS .........................................................................................................................836.13 Wi-Fi settings, Wireless Client, EAP-TTLS ......................................................................................................................856.14 Wi-Fi settings, Wireless Client, PEAP.................................................................................................................................866.15 Wi-Fi settings, Wireless Client, WPA2-PSK.....................................................................................................................876.16 LAN settings.......................................................................................................................................................................................886.17 LAN Settings, Wired Authentication .....................................................................................................................................906.18 LAN Settings, EAP-TLS security mode..............................................................................................................................916.19 LAN Settings, EAP-TTLS security mode...........................................................................................................................936.20 Services, Mobile devices............................................................................................................................................................946.21 Service, PresentSense................................................................................................................................................................966.22 Service, ClickShare API, remote control via API...........................................................................................................976.23 Services, SNMP...............................................................................................................................................................................976.24 Security, security level..................................................................................................................................................................986.25 Security, passwords.................................................................................................................................................................... 1006.26 Status information Base Unit................................................................................................................................................. 1006.27 Date & Time setup, manually ................................................................................................................................................ 1016.28 Date & Time setup, time server............................................................................................................................................ 1036.29 Energy savers................................................................................................................................................................................ 1036.30 Buttons............................................................................................................................................................................................... 1046.31 Buttons, External access point, mode EAP-TLS........................................................................................................ 1056.32 Buttons, External access point, mode EAP-TTLS..................................................................................................... 1076.33 Buttons, External access point, mode PEAP ............................................................................................................... 1086.34 Buttons, External access point, mode WPA2-PSK................................................................................................... 1096.35 Blackboard....................................................................................................................................................................................... 1096.36 XMS Cloud Integration...............................................................................................................................................................1106.37 Firmware Update...........................................................................................................................................................................1116.38 Support & Updates, Troubleshoot, log settings ...........................................................................................................1136.39 Troubleshooting, Erase all settings.....................................................................................................................................1136.40 Reset to factory defaults ...........................................................................................................................................................1146.41 Troubleshoot, diagnostics ........................................................................................................................................................115
7 Firmware updates ..............................................................................................................................................................................1177.1 Updating the CX-20 firmware.................................................................................................................................................118
8 Troubleshooting ...................................................................................................................................................................................119

19R5900102 /05 CX-20
8.1 Troubleshooting list..................................................................................................................................................................... 120

R5900102 /05 CX-2020
21R5900102 /05 CX-20
1.1 Documentation .............................................................................................................................221.2 Symbols and fonts ........................................................................................................................22
Introduction to theInstallation Guide 1
R5900102 /05 CX-2022
1.1 DocumentationAbout the documentationThis installation guide explains how to install your CX-20 in a meeting room, It explains also how to makeeverything operational. It provides detailed information on how to configure your CX-20 .
Available System documentationNext to the installation manual, a user guide and a safety guide are available on Barco’s website,www.barco.com/clickshare.A printed copy of the Safety Guide is included in the CX-20 box at purchase.
Depending on the CX-20 version, some graphics might be different to the ones used in this manual.This however does not have any effect on the functionality.
1.2 Symbols and fontsSymbol overviewThe following icons are used in the manual :
Caution
Warning
Info, term definition. General info about the term
Note: gives extra information about the described subject
Tip: gives extra advice about the described subject
Font overview• Buttons are indicated in bold, e.g. OK.• Menu items are indicated in italic.• Step related notes, tips, warnings or cautions are printed in italic.• Procedure related notes, tips, warnings or cautions are printed in bold between 2 lines preceded by the
corresponding icon.
Introduction to the Installation Guide
23R5900102 /05 CX-20
CX-20Specifications 2
R5900102 /05 CX-2024
2.1 About the CX-20CX-20 setsWith the Conferencing Button, in seconds, you are automatically connected to cameras, mics, soundbars andany other AV peripherals in the room for a better, more immersive meeting experience. Everything becomespart of your laptop.This CX-20 not only helps the presenter get the presentation on-screen in a second, but it also allows theother people in the conference to participate more actively. The result is enhanced meeting efficiency andbetter decision-making.The set is compatible with any laptop, desktop tablet or smartphone OS. It works with most conferencingplatforms and connects instantly with most brands of peripherals (speakers, microphones, webcams,soundbars) when using the Conferencing Button.At the moment 6 different sets are available on the market. Each set is sold in its specific region and it can onlybe used in that specific region because of WiFi regulations.
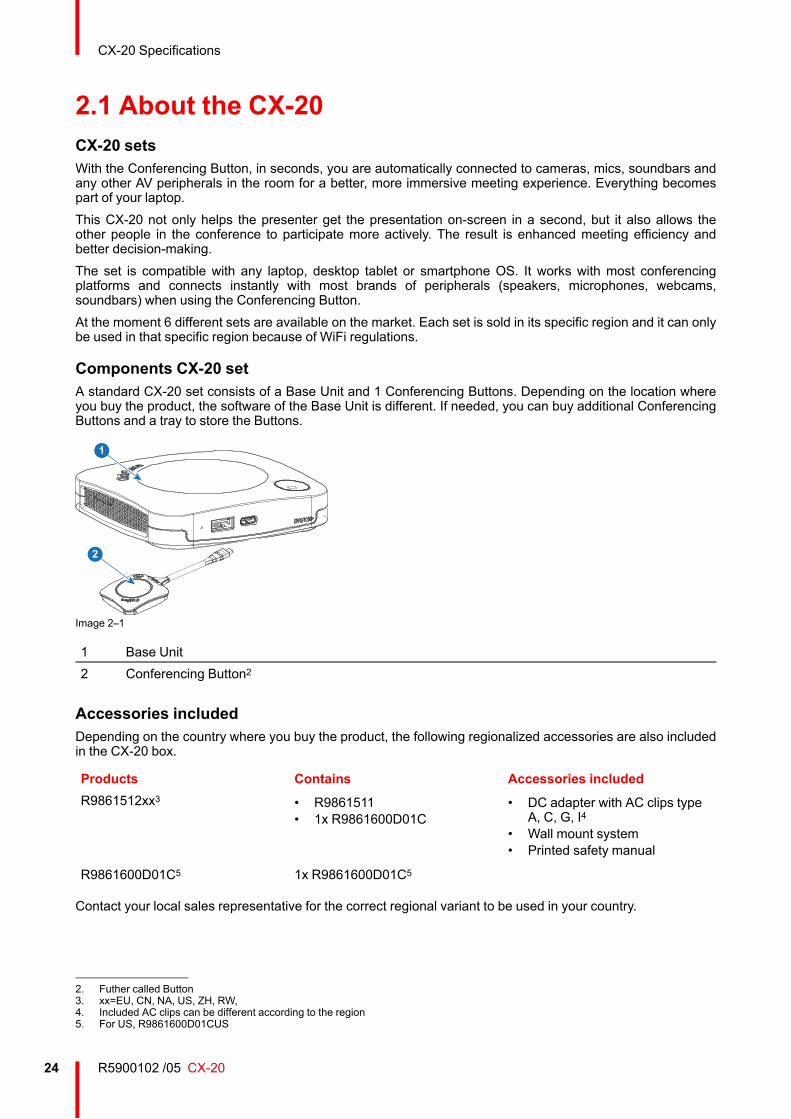
Components CX-20 setA standard CX-20 set consists of a Base Unit and 1 Conferencing Buttons. Depending on the location whereyou buy the product, the software of the Base Unit is different. If needed, you can buy additional ConferencingButtons and a tray to store the Buttons.
1
2
Image 2–1
1 Base Unit2 Conferencing Button2
Accessories includedDepending on the country where you buy the product, the following regionalized accessories are also includedin the CX-20 box.
Products Contains Accessories includedR9861512xx3 • R9861511
• 1x R9861600D01C• DC adapter with AC clips type
A, C, G, I4• Wall mount system• Printed safety manual
R9861600D01C5 1x R9861600D01C5
Contact your local sales representative for the correct regional variant to be used in your country.
CX-20 Specifications
2. Futher called Button3. xx=EU, CN, NA, US, ZH, RW,4. Included AC clips can be different according to the region5. For US, R9861600D01CUS
25R5900102 /05 CX-20
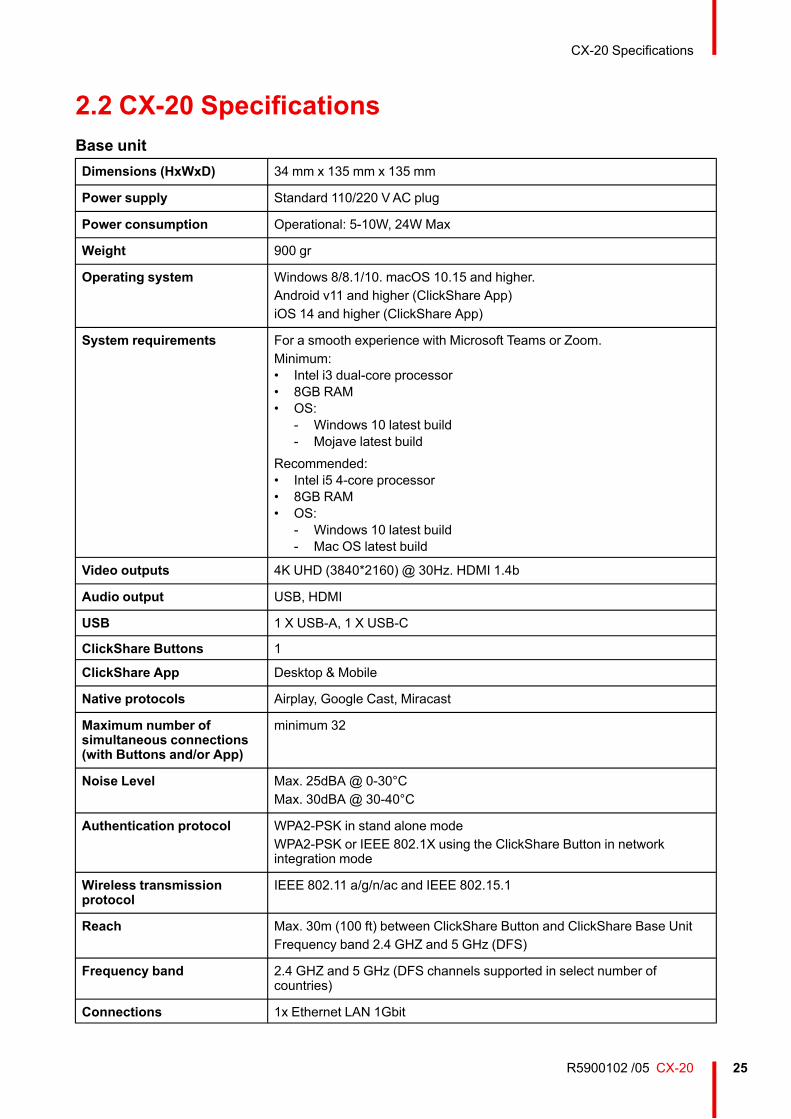
2.2 CX-20 SpecificationsBase unitDimensions (HxWxD) 34 mm x 135 mm x 135 mm
Power supply Standard 110/220 VAC plug
Power consumption Operational: 5-10W, 24W Max
Weight 900 gr
Operating system Windows 8/8.1/10. macOS 10.15 and higher.Android v11 and higher (ClickShare App)iOS 14 and higher (ClickShare App)
System requirements For a smooth experience with Microsoft Teams or Zoom.Minimum:• Intel i3 dual-core processor• 8GB RAM• OS:
- Windows 10 latest build- Mojave latest build
Recommended:• Intel i5 4-core processor• 8GB RAM• OS:
- Windows 10 latest build- Mac OS latest build
Video outputs 4K UHD (3840*2160) @ 30Hz. HDMI 1.4b
Audio output USB, HDMI
USB 1 X USB-A, 1 X USB-C
ClickShare Buttons 1
ClickShare App Desktop & Mobile
Native protocols Airplay, Google Cast, Miracast
Maximum number ofsimultaneous connections(with Buttons and/or App)
minimum 32
Noise Level Max. 25dBA @ 0-30°CMax. 30dBA @ 30-40°C
Authentication protocol WPA2-PSK in stand alone modeWPA2-PSK or IEEE 802.1X using the ClickShare Button in networkintegration mode
Wireless transmissionprotocol
IEEE 802.11 a/g/n/ac and IEEE 802.15.1
Reach Max. 30m (100 ft) between ClickShare Button and ClickShare Base UnitFrequency band 2.4 GHZ and 5 GHz (DFS)
Frequency band 2.4 GHZ and 5 GHz (DFS channels supported in select number ofcountries)
Connections 1x Ethernet LAN 1Gbit
CX-20 Specifications
R5900102 /05 CX-2026
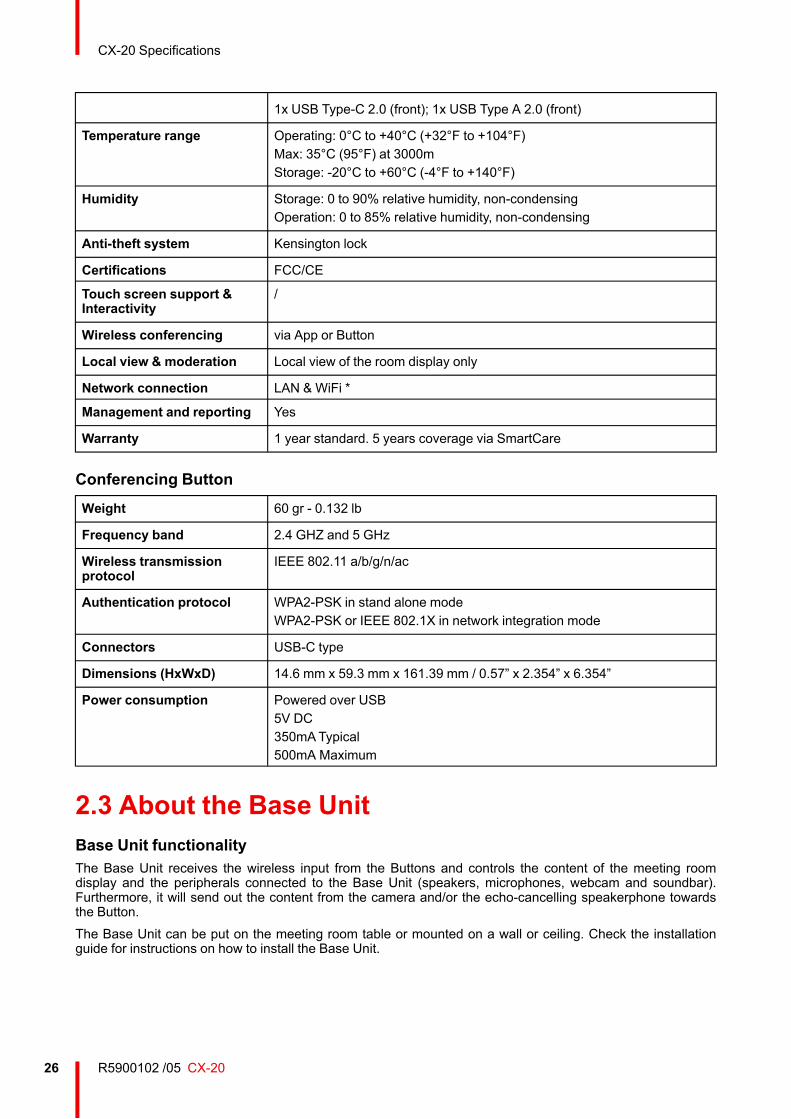
1x USB Type-C 2.0 (front); 1x USB Type A 2.0 (front)
Temperature range Operating: 0°C to +40°C (+32°F to +104°F)Max: 35°C (95°F) at 3000mStorage: -20°C to +60°C (-4°F to +140°F)
Humidity Storage: 0 to 90% relative humidity, non-condensingOperation: 0 to 85% relative humidity, non-condensing
Anti-theft system Kensington lock
Certifications FCC/CE
Touch screen support &Interactivity
/
Wireless conferencing via App or Button
Local view & moderation Local view of the room display only
Network connection LAN & WiFi *
Management and reporting Yes
Warranty 1 year standard. 5 years coverage via SmartCare
Conferencing ButtonWeight 60 gr - 0.132 lb
Frequency band 2.4 GHZ and 5 GHz
Wireless transmissionprotocol
IEEE 802.11 a/b/g/n/ac
Authentication protocol WPA2-PSK in stand alone modeWPA2-PSK or IEEE 802.1X in network integration mode
Connectors USB-C type
Dimensions (HxWxD) 14.6 mm x 59.3 mm x 161.39 mm / 0.57” x 2.354” x 6.354”
Power consumption Powered over USB5V DC350mATypical500mA Maximum
2.3 About the Base UnitBase Unit functionalityThe Base Unit receives the wireless input from the Buttons and controls the content of the meeting roomdisplay and the peripherals connected to the Base Unit (speakers, microphones, webcam and soundbar).Furthermore, it will send out the content from the camera and/or the echo-cancelling speakerphone towardsthe Button.The Base Unit can be put on the meeting room table or mounted on a wall or ceiling. Check the installationguide for instructions on how to install the Base Unit.
CX-20 Specifications
27R5900102 /05 CX-20
12
43
5
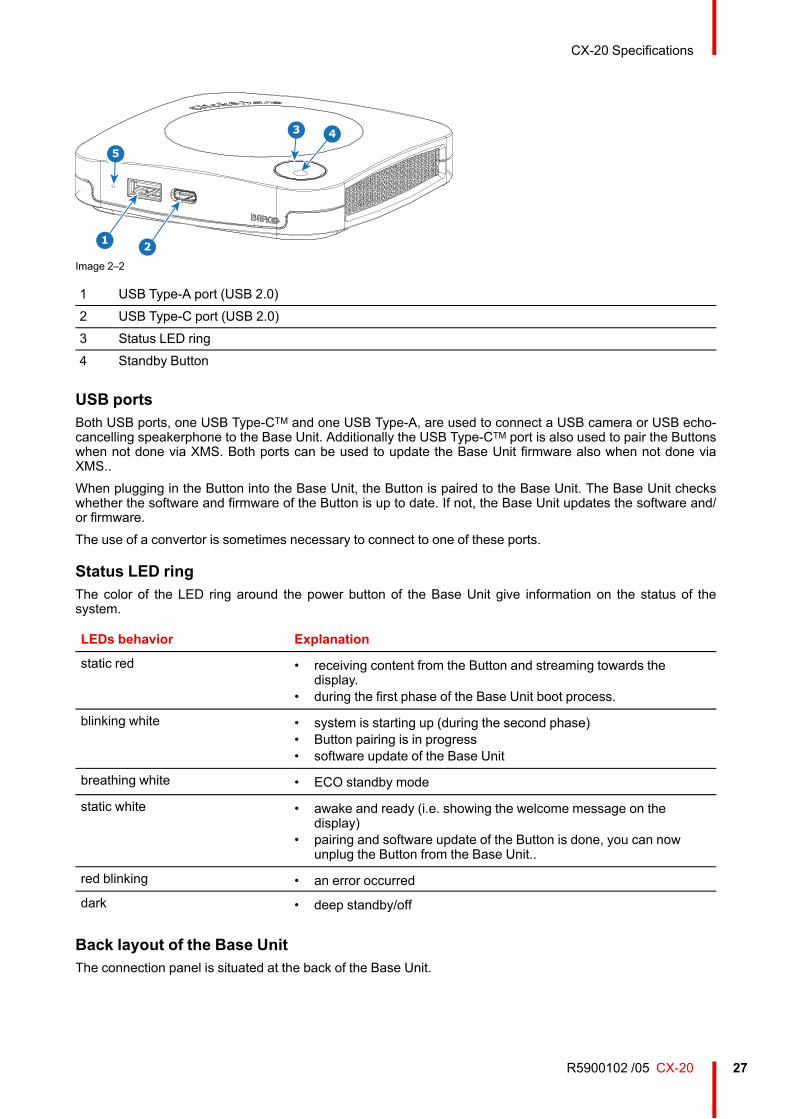
Image 2–2
1 USB Type-A port (USB 2.0)2 USB Type-C port (USB 2.0)3 Status LED ring4 Standby Button
USB portsBoth USB ports, one USB Type-CTM and one USB Type-A, are used to connect a USB camera or USB echo-cancelling speakerphone to the Base Unit. Additionally the USB Type-CTM port is also used to pair the Buttonswhen not done via XMS. Both ports can be used to update the Base Unit firmware also when not done viaXMS..When plugging in the Button into the Base Unit, the Button is paired to the Base Unit. The Base Unit checkswhether the software and firmware of the Button is up to date. If not, the Base Unit updates the software and/or firmware.The use of a convertor is sometimes necessary to connect to one of these ports.
Status LED ringThe color of the LED ring around the power button of the Base Unit give information on the status of thesystem.
LEDs behavior Explanation
static red • receiving content from the Button and streaming towards thedisplay.
• during the first phase of the Base Unit boot process.
blinking white • system is starting up (during the second phase)• Button pairing is in progress• software update of the Base Unit
breathing white • ECO standby mode
static white • awake and ready (i.e. showing the welcome message on thedisplay)
• pairing and software update of the Button is done, you can nowunplug the Button from the Base Unit..
red blinking • an error occurreddark • deep standby/off
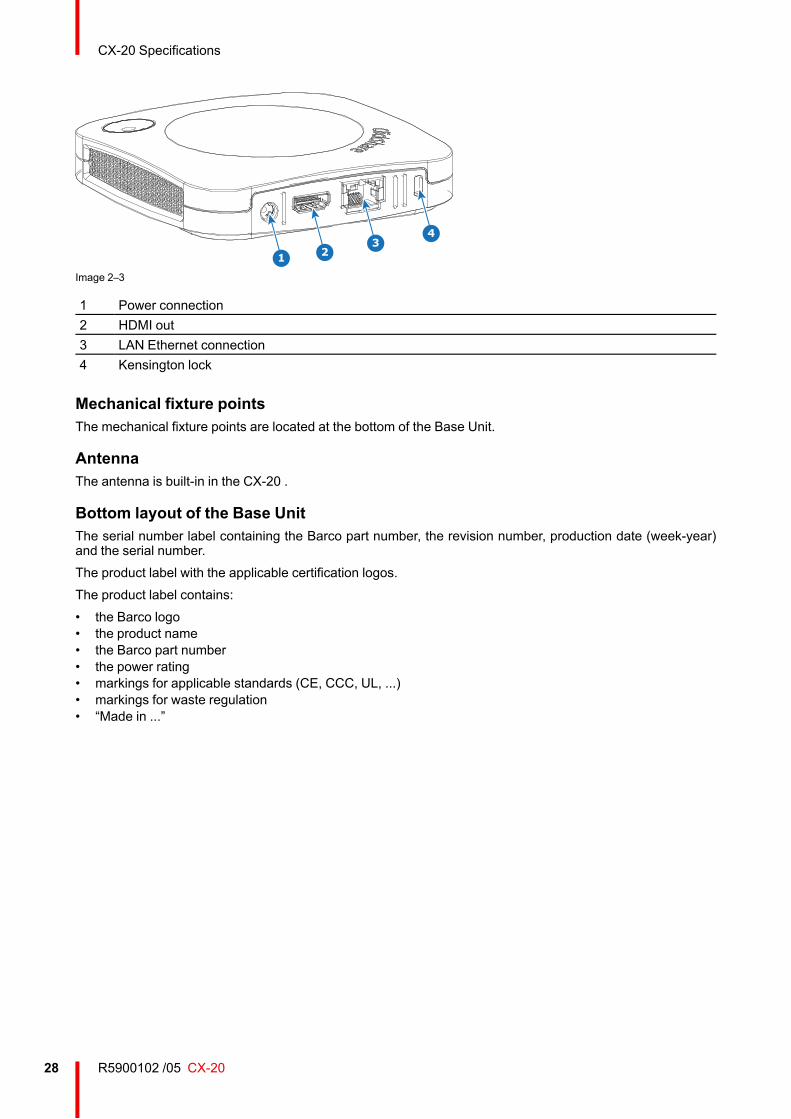
Back layout of the Base UnitThe connection panel is situated at the back of the Base Unit.
CX-20 Specifications
R5900102 /05 CX-2028
1 23
4
Image 2–3
1 Power connection2 HDMI out3 LAN Ethernet connection4 Kensington lock
Mechanical fixture pointsThe mechanical fixture points are located at the bottom of the Base Unit.
AntennaThe antenna is built-in in the CX-20 .
Bottom layout of the Base UnitThe serial number label containing the Barco part number, the revision number, production date (week-year)and the serial number.The product label with the applicable certification logos.The product label contains:• the Barco logo• the product name• the Barco part number• the power rating• markings for applicable standards (CE, CCC, UL, ...)• markings for waste regulation• “Made in ...”
CX-20 Specifications

29R5900102 /05 CX-20
3.1 Environmental Condition Check.....................................................................................................303.2 Security recommendations before starting ......................................................................................303.3 Basic Workflow.............................................................................................................................31
Getting started 3
R5900102 /05 CX-2030
3.1 Environmental Condition CheckEnvironment condition checkFor installations in environments where the device is subject to excessive dust, then it is highly advisable anddesirable to have this dust removed prior to it reaching the device clean air supply. Devices or structures toextract or shield excessive dust well away from the device are a prerequisite; if this is not a feasible solutionthen measures to relocate the device to a clean air environment should be considered.It is the customer's responsibility to ensure at all times that the device is protected from the harmful effects ofhostile airborne particles in the environment of the device. The manufacturer reserves the right to refuse repairif a device has been subject to negligence, abandon or improper use.
Ambient temperature conditionsMax. ambient temperature : +40°C or 104°FMin. ambient temperature: +0°C or 32°FStorage temperature: -10°C to +60°C (14°F to 140°F)
Humidity ConditionsStorage: 0 to 90% relative humidity, non-condensingOperation: 0 to 85% relative humidity, non-condensing
EnvironmentDo not install the device in a site near heat sources such as radiators or air ducts, or in a place subject todirect sunlight, excessive dust or humidity. Be aware that room heat rises to the ceiling; check thattemperature near the installation site is not excessive.
3.2 Security recommendations before startingKeep your Base Units and Buttons up to dateBarco keeps improving their devices, this means extending existing features and adding new ones, but alsoproviding security patches. Therefore, it is strongly recommended to keep the Base Units up to date with thelatest available firmware, and ensure Buttons are updated. Always updating your device to the latest firmware.Therefor, it is strongly recommended to connect your device to internet to get automatic updates.To insure an update of all Buttons, Barco strongly recommends pairing all Buttons with the correspondingBase Unit immediately after the Base Unit has been upgraded.
XMS platformManage Base Units through XMS (Cloud) management Platform to receive updates.XMS is Barco’s secure cloud-based solution for the configuration, remote management and real-time statusmonitoring of your devices, distributed over different locations. Enjoy easy & automated (scheduling of)software updates, Base Unit configuration, creation of templates, remote wallpaper installation, usermanagement and insights to drive Digital Workplace.
Keep Base Units locked awayIn case you expect physical tampering of the hardware by malicious people Barco recommends keeping theBase Units locked away.
Change the default Wi-Fi passwordBarco strongly recommends changing the default Wi-Fi password (only applicable when WPA2-PSK mode isused), this makes it again one step more difficult for malicious people, without physical access to yourdevices, to intercept the traffic between Button and Base Unit.
Getting started
31R5900102 /05 CX-20
Change the default Configurator passwordBarco strongly recommends changing the default Configurator password. Anyone with malicious intentionswho can access the Base Unit locally or via adjacent networks will definitely verify if the Base Unit’sConfigurator can be accessed to extract valuable information like e.g. Wi-Fi credentials.
3.3 Basic WorkflowBefore using CX-201. Unpack the ClickShare components and accessories from the box.
For a detailed overview of the content of the CX-20 box, see “About the CX-20 ”, page 24.2. Install the Base Unit in the meeting room using one of the possible installation methods.
For more information on the installing procedures, see “CX-20 Installation”, page 333. Connect the video signal between the Base Unit and the display, see “Video signal connections to the
Base Unit”, page 41.4. Connect USB camera to Base Unit if any, see “Camera connection”, page 425. Connect the Base Unit to the mains power.
For more information see “Power connection”, page 44,6. Connect a network cable between the Base Unit and the local network (make sure the Base Unit is
connected to the internet to be able to reach the update server ).7. Configure device (can be used without configuration but is not recommanded).8. Register you device online to obtain your SmartCare package.9. Pair your Buttons, see “Preparing the Buttons”, page 59
For more information on using CX-20 , refer to the CX-20 User Guide. This manual can be found onBarco's website www.barco.com/clickshare.
Getting started

R5900102 /05 CX-2032
Getting started
33R5900102 /05 CX-20
4.1 Installation methods for the Base Unit ............................................................................................344.2 Guidelines for ClickShare Conference system installation................................................................344.3 Table mounting.............................................................................................................................354.4 Wall or ceiling mounting ................................................................................................................354.5 Standalone setup .........................................................................................................................364.6 Network deployment requirements.................................................................................................374.7 Network connected setup ..............................................................................................................384.8 Dedicated network setup...............................................................................................................394.9 Fully equipped, Audio only or Camera only conference room ...........................................................404.10 Video signal connections to the Base Unit ......................................................................................414.11 Camera connection.......................................................................................................................424.12 Content Audio connection .............................................................................................................424.13 Echo Canceling Speakerphone audio connection............................................................................434.14 LAN connection............................................................................................................................444.15 Power connection .........................................................................................................................444.16 First startup of the Base Unit..........................................................................................................454.17 Preferred way to start up ...............................................................................................................454.18 Start up without configuration ........................................................................................................504.19 Registration to XMS Cloud ............................................................................................................514.20 Activating calendar integration with XMS Cloud ..............................................................................53
CX-20 Installation 4
R5900102 /05 CX-2034
4.1 Installation methods for the Base UnitFor optimal performance, install the Base Unit close to the display and avoid obstacles between theBase Unit and the Buttons.
Make sure not to install the Base Unit in a metal enclosure.
Physical installationThe Base Unit can be installed in different ways in a meeting room.• Table mount• Wall mount• Ceiling mount
Standalone or network integrationThe Base Unit can be use as standalone unit or integrated in a corporate network.• Out-of-the-box use• Out-of-the-box use with Ethernet link• Integration in enterprise network• Dual network integration• Integration in dedicated enterprise network
Conferencing room setup• Full conferencing room setup• Audio only conferencing room setup• Video only conferencing room setup
4.2 Guidelines for ClickShare Conference systeminstallationOverview• Keep your Base Unit up to date. For an optimal experience and to assure the security of the overall system
free updates are multiple times available.• It is recommended to connect the Base Unit to the network (wired Ethernet connection or wireless
connection) for the best user experience for users, guests, employees and administrators. By doing so,both guests and employees can make use of BYOD services (e.g. AirPlay, Google Cast and Miracast) butalso the ClickShare Apps without disconnecting from the wireless network or losing their internetconnection.
• It is recommended to use a direct connection between the Conferencing Button and the Base Unit for highquality and low latency wireless conferencing.
• Place the Base Unit in an open emplacement and avoid installing a metallic shell.• For an optimal user experience, both ClickShare and BYOD services such as AirPlay, Google Cast or
Miracast, have different implementations for presence and proximity detection. To take full advantage ofthese mechanisms, we strongly advise to install the ClickShare Base Unit inside the meeting room,physically close to the display and not in a closed cabinet.
• Always connect your camera and/or audio device via USB to the Base Unit.• For optimal security, it is strongly advised to change the default passwords.• When connecting the Base Unit onto the corporate network to enable BYOD protocols and the ClickShare
Apps to share, we strongly advise to change the standby mode to “eco standby”. If not, BYOD protocols,the ClickShare apps and possibly the ClickShare Button will not be able to wake the Base Unit fromstandby.
CX-20 Installation
35R5900102 /05 CX-20
For a more detailed guidelines, see “Network Deployment Guide” available on the support pages ofthe product on Barco’s website.
4.3 Table mountingOverviewPut the Base Unit directly on the meeting room table.The total weight of the Base Unit is 530 g.
4.4 Wall or ceiling mountingAbout wall or ceiling mountingA mounting base is used to mount the CX-20 t o the wall or ceiling. This base has key-shaped screw holes toallow you to fasten the base to a wall or ceiling or you can use the self-adhesive layer to mount the base. Onceyou determine the location for your device follow the next procedure to mount the device.
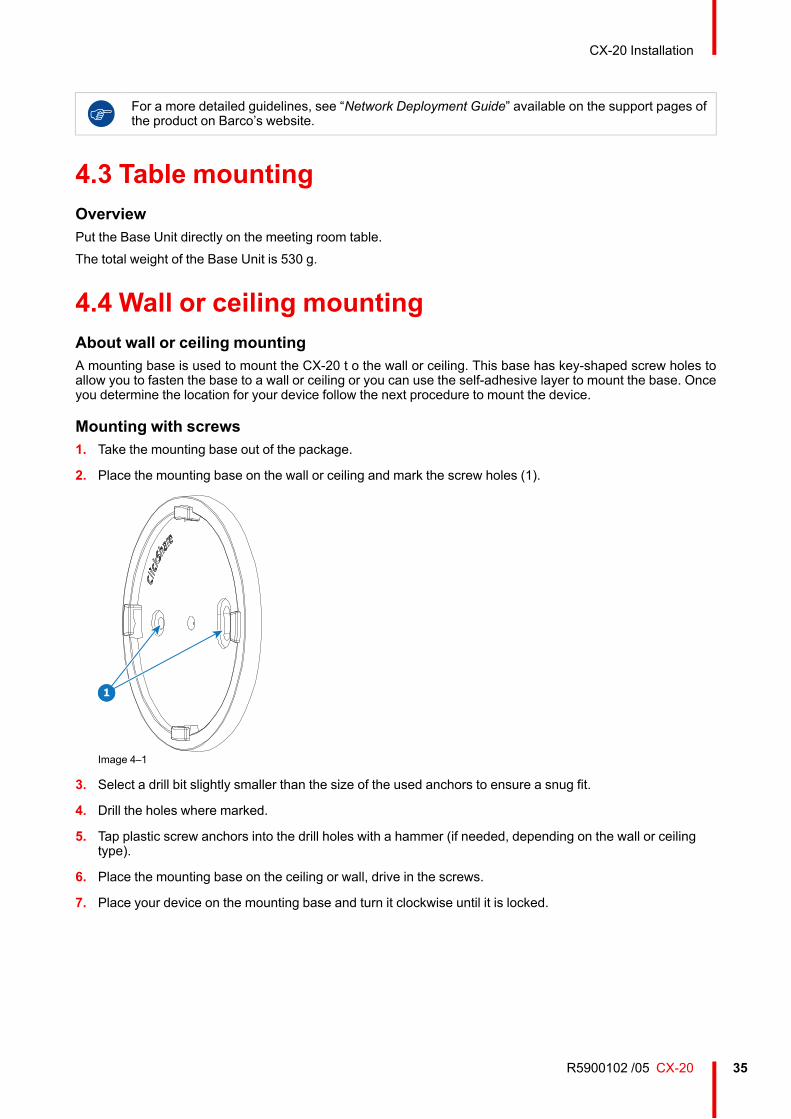
Mounting with screws1. Take the mounting base out of the package.
2. Place the mounting base on the wall or ceiling and mark the screw holes (1).
1
Image 4–1
3. Select a drill bit slightly smaller than the size of the used anchors to ensure a snug fit.
4. Drill the holes where marked.
5. Tap plastic screw anchors into the drill holes with a hammer (if needed, depending on the wall or ceilingtype).
6. Place the mounting base on the ceiling or wall, drive in the screws.
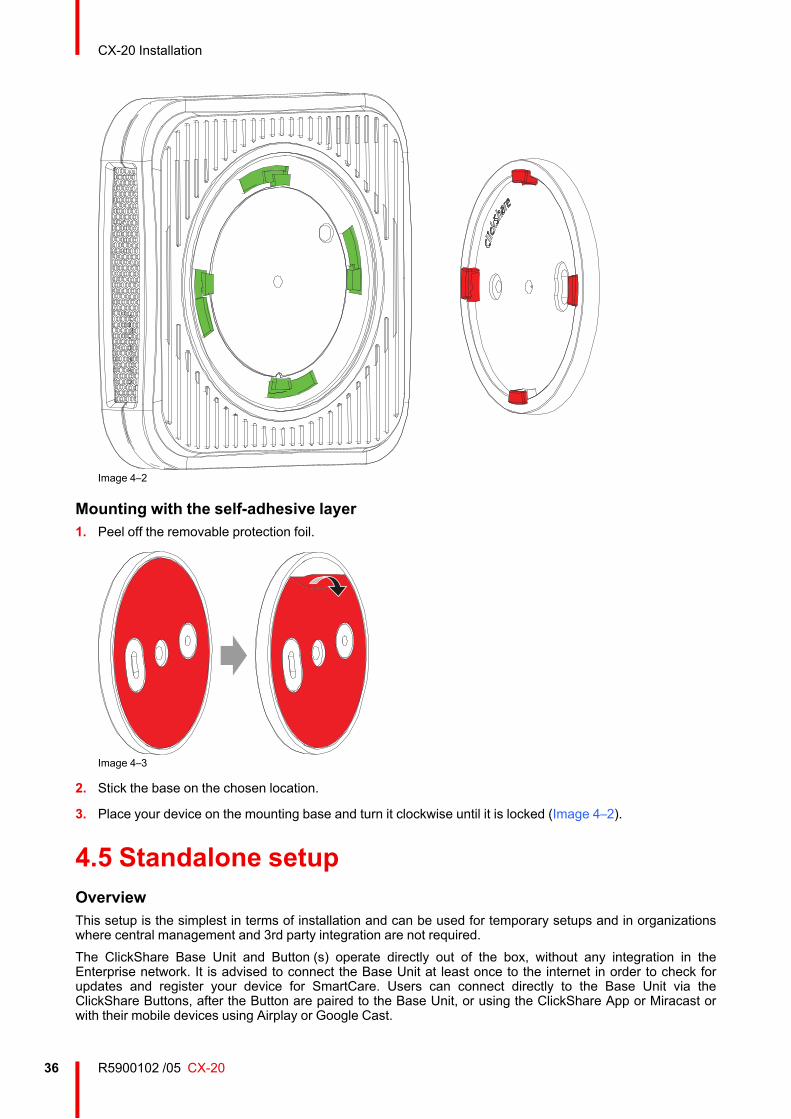
7. Place your device on the mounting base and turn it clockwise until it is locked.
CX-20 Installation
R5900102 /05 CX-2036
Image 4–2
Mounting with the self-adhesive layer1. Peel off the removable protection foil.
Image 4–3
2. Stick the base on the chosen location.
3. Place your device on the mounting base and turn it clockwise until it is locked (Image 4–2).
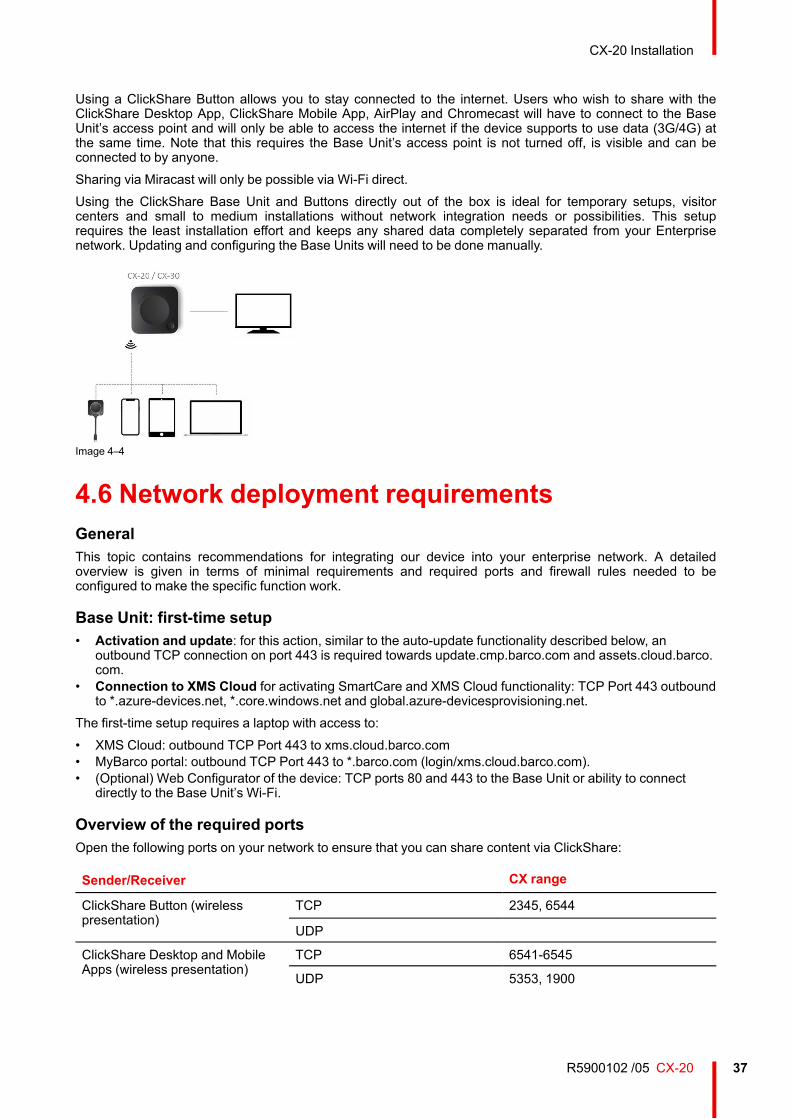
4.5 Standalone setupOverviewThis setup is the simplest in terms of installation and can be used for temporary setups and in organizationswhere central management and 3rd party integration are not required.The ClickShare Base Unit and Button (s) operate directly out of the box, without any integration in theEnterprise network. It is advised to connect the Base Unit at least once to the internet in order to check forupdates and register your device for SmartCare. Users can connect directly to the Base Unit via theClickShare Buttons, after the Button are paired to the Base Unit, or using the ClickShare App or Miracast orwith their mobile devices using Airplay or Google Cast.
CX-20 Installation
37R5900102 /05 CX-20
Using a ClickShare Button allows you to stay connected to the internet. Users who wish to share with theClickShare Desktop App, ClickShare Mobile App, AirPlay and Chromecast will have to connect to the BaseUnit’s access point and will only be able to access the internet if the device supports to use data (3G/4G) atthe same time. Note that this requires the Base Unit’s access point is not turned off, is visible and can beconnected to by anyone.Sharing via Miracast will only be possible via Wi-Fi direct.Using the ClickShare Base Unit and Buttons directly out of the box is ideal for temporary setups, visitorcenters and small to medium installations without network integration needs or possibilities. This setuprequires the least installation effort and keeps any shared data completely separated from your Enterprisenetwork. Updating and configuring the Base Units will need to be done manually.
Image 4–4
4.6 Network deployment requirementsGeneralThis topic contains recommendations for integrating our device into your enterprise network. A detailedoverview is given in terms of minimal requirements and required ports and firewall rules needed to beconfigured to make the specific function work.
Base Unit: first-time setup• Activation and update: for this action, similar to the auto-update functionality described below, an
outbound TCP connection on port 443 is required towards update.cmp.barco.com and assets.cloud.barco.com.
• Connection to XMS Cloud for activating SmartCare and XMS Cloud functionality: TCP Port 443 outboundto *.azure-devices.net, *.core.windows.net and global.azure-devicesprovisioning.net.
The first-time setup requires a laptop with access to:• XMS Cloud: outbound TCP Port 443 to xms.cloud.barco.com• MyBarco portal: outbound TCP Port 443 to *.barco.com (login/xms.cloud.barco.com).• (Optional) Web Configurator of the device: TCP ports 80 and 443 to the Base Unit or ability to connect
directly to the Base Unit’s Wi-Fi.
Overview of the required portsOpen the following ports on your network to ensure that you can share content via ClickShare:
Sender/Receiver CX range
ClickShare Button (wirelesspresentation)
TCP 2345, 6544
UDP
ClickShare Desktop and MobileApps (wireless presentation)
TCP 6541-6545
UDP 5353, 1900
CX-20 Installation
R5900102 /05 CX-2038
Sender/Receiver CX range
Additional ports for WirelessConferencing (Button or DesktopApp)
TCP 1235, 9999
UDP 1234
AirPlay TCP 4100-4200, 7000, 7100, 47000
UDP 4100-4200, 5353
Google Cast TCP 8008, 8009, 9080
UDP 1900, 5353, 32768, 610006
Miracast MS-MICE TCP 7236, 7250
UDP 7236
ClickShare Configurator TCP 80, 443
UDP n/a
XMS Cloud TCP 443
XMS Edge TCP 4003
Auto-update TCP 80, 443
UDP n/a
Button Manager TCP 6546
SNMP UDP 161 and 162
RESTAPI TCP 4003
4.7 Network connected setupOverviewThis is the simplest installation which offers a seamless experience for employees and is the recommendedsetup for temporary setups, visitors' centers, small to medium installations without network integration needs,for internal meeting rooms, for companies with a flat network topology or when the ClickShare Button will bethe main way for people to the system.In this default mode, ClickShare Buttons and Base Units operate directly out of the box (Buttons must bepaired to the Base Unit before they can be used) and users can share to the Base Unit with the ClickShareDesktop App, the ClickShare Mobile App, AirPlay, Google Cast via the network to which the Base Unit isconnected without losing the internet connectivity. Sharing via Miracast depends on the configuration of thedevice.Using a ClickShare Button allows guests to stay connected to the Guest LAN and thus retain internetconnectivity. Guest mobile devices will usually need to connect to the Base Unit directly and will only be ableto access the internet if the device supports to use data (3G/4G) at the same time.
CX-20 Installation
6. Google Cast will pick a random UDP port above 32768 to facilitate video streaming.
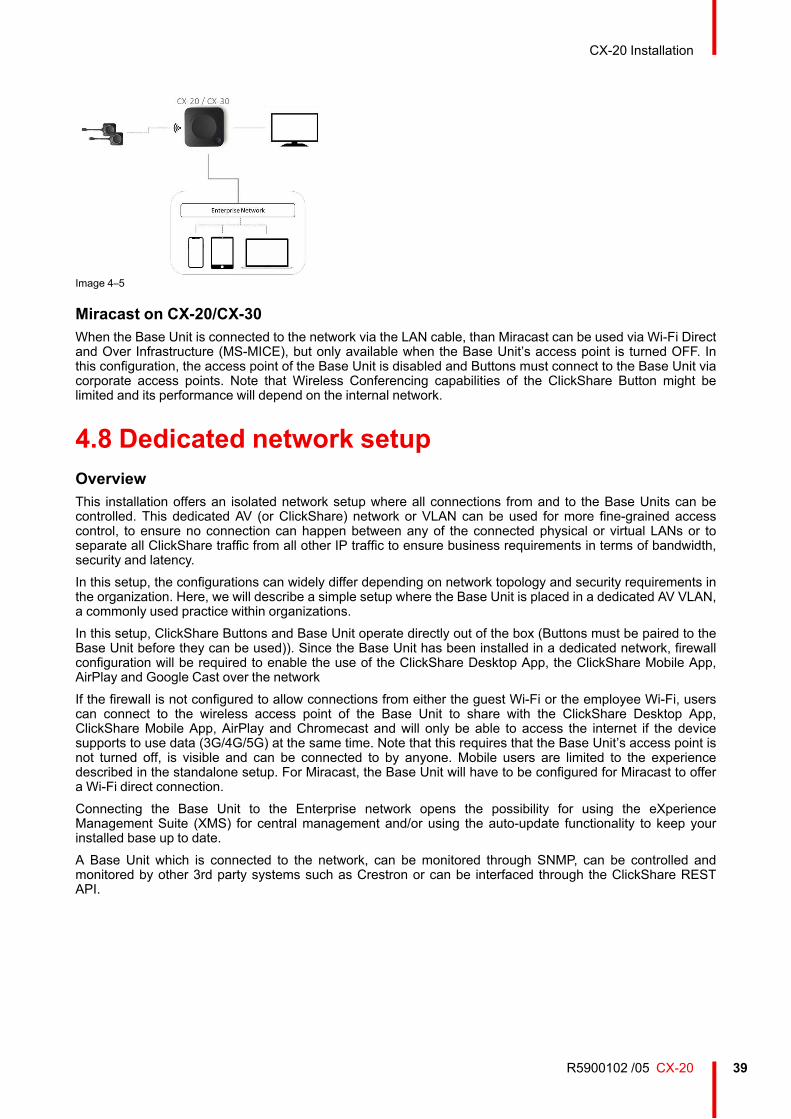
39R5900102 /05 CX-20
Image 4–5
Miracast on CX-20/CX-30When the Base Unit is connected to the network via the LAN cable, than Miracast can be used via Wi-Fi Directand Over Infrastructure (MS-MICE), but only available when the Base Unit’s access point is turned OFF. Inthis configuration, the access point of the Base Unit is disabled and Buttons must connect to the Base Unit viacorporate access points. Note that Wireless Conferencing capabilities of the ClickShare Button might belimited and its performance will depend on the internal network.
4.8 Dedicated network setupOverviewThis installation offers an isolated network setup where all connections from and to the Base Units can becontrolled. This dedicated AV (or ClickShare) network or VLAN can be used for more fine-grained accesscontrol, to ensure no connection can happen between any of the connected physical or virtual LANs or toseparate all ClickShare traffic from all other IP traffic to ensure business requirements in terms of bandwidth,security and latency.In this setup, the configurations can widely differ depending on network topology and security requirements inthe organization. Here, we will describe a simple setup where the Base Unit is placed in a dedicated AV VLAN,a commonly used practice within organizations.In this setup, ClickShare Buttons and Base Unit operate directly out of the box (Buttons must be paired to theBase Unit before they can be used)). Since the Base Unit has been installed in a dedicated network, firewallconfiguration will be required to enable the use of the ClickShare Desktop App, the ClickShare Mobile App,AirPlay and Google Cast over the networkIf the firewall is not configured to allow connections from either the guest Wi-Fi or the employee Wi-Fi, userscan connect to the wireless access point of the Base Unit to share with the ClickShare Desktop App,ClickShare Mobile App, AirPlay and Chromecast and will only be able to access the internet if the devicesupports to use data (3G/4G/5G) at the same time. Note that this requires that the Base Unit’s access point isnot turned off, is visible and can be connected to by anyone. Mobile users are limited to the experiencedescribed in the standalone setup. For Miracast, the Base Unit will have to be configured for Miracast to offera Wi-Fi direct connection.Connecting the Base Unit to the Enterprise network opens the possibility for using the eXperienceManagement Suite (XMS) for central management and/or using the auto-update functionality to keep yourinstalled base up to date.A Base Unit which is connected to the network, can be monitored through SNMP, can be controlled andmonitored by other 3rd party systems such as Crestron or can be interfaced through the ClickShare RESTAPI.
CX-20 Installation
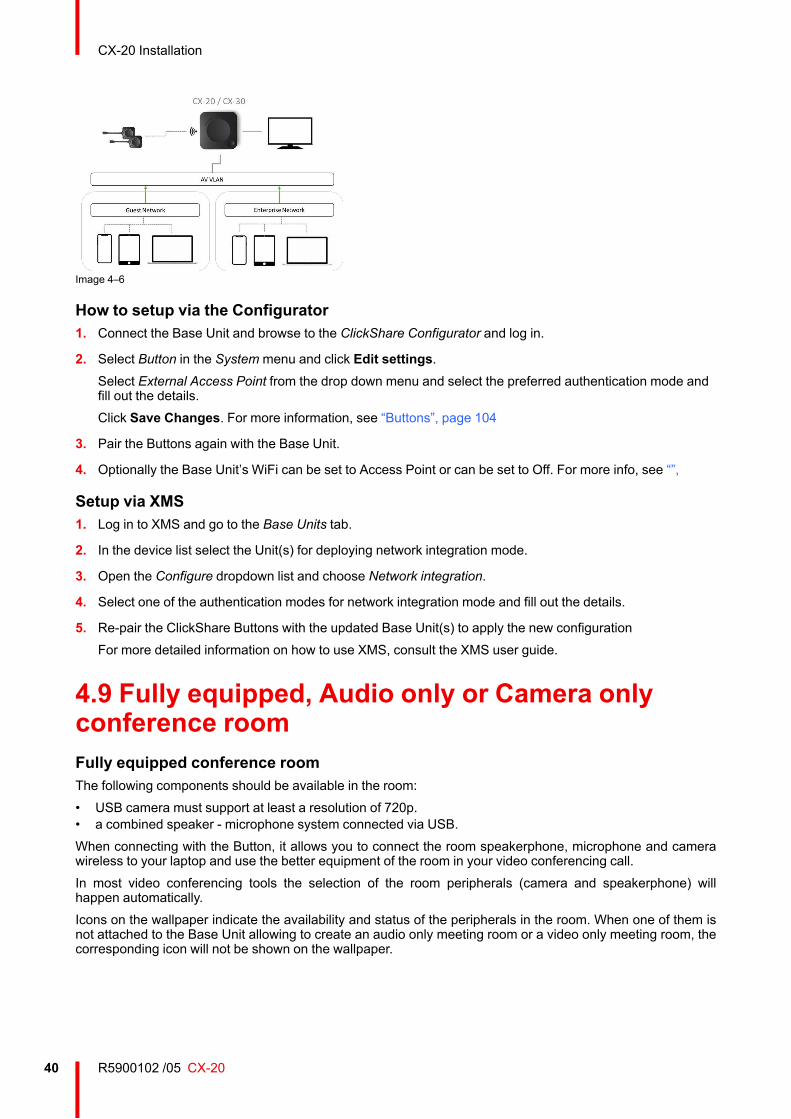
R5900102 /05 CX-2040
Image 4–6
How to setup via the Configurator1. Connect the Base Unit and browse to the ClickShare Configurator and log in.
2. Select Button in the System menu and click Edit settings.Select External Access Point from the drop down menu and select the preferred authentication mode andfill out the details.Click Save Changes. For more information, see “Buttons”, page 104
3. Pair the Buttons again with the Base Unit.
4. Optionally the Base Unit’s WiFi can be set to Access Point or can be set to Off. For more info, see “”,
Setup via XMS1. Log in to XMS and go to the Base Units tab.
2. In the device list select the Unit(s) for deploying network integration mode.
3. Open the Configure dropdown list and choose Network integration.
4. Select one of the authentication modes for network integration mode and fill out the details.
5. Re-pair the ClickShare Buttons with the updated Base Unit(s) to apply the new configurationFor more detailed information on how to use XMS, consult the XMS user guide.
4.9 Fully equipped, Audio only or Camera onlyconference roomFully equipped conference roomThe following components should be available in the room:• USB camera must support at least a resolution of 720p.• a combined speaker - microphone system connected via USB.When connecting with the Button, it allows you to connect the room speakerphone, microphone and camerawireless to your laptop and use the better equipment of the room in your video conferencing call.In most video conferencing tools the selection of the room peripherals (camera and speakerphone) willhappen automatically.Icons on the wallpaper indicate the availability and status of the peripherals in the room. When one of them isnot attached to the Base Unit allowing to create an audio only meeting room or a video only meeting room, thecorresponding icon will not be shown on the wallpaper.
CX-20 Installation
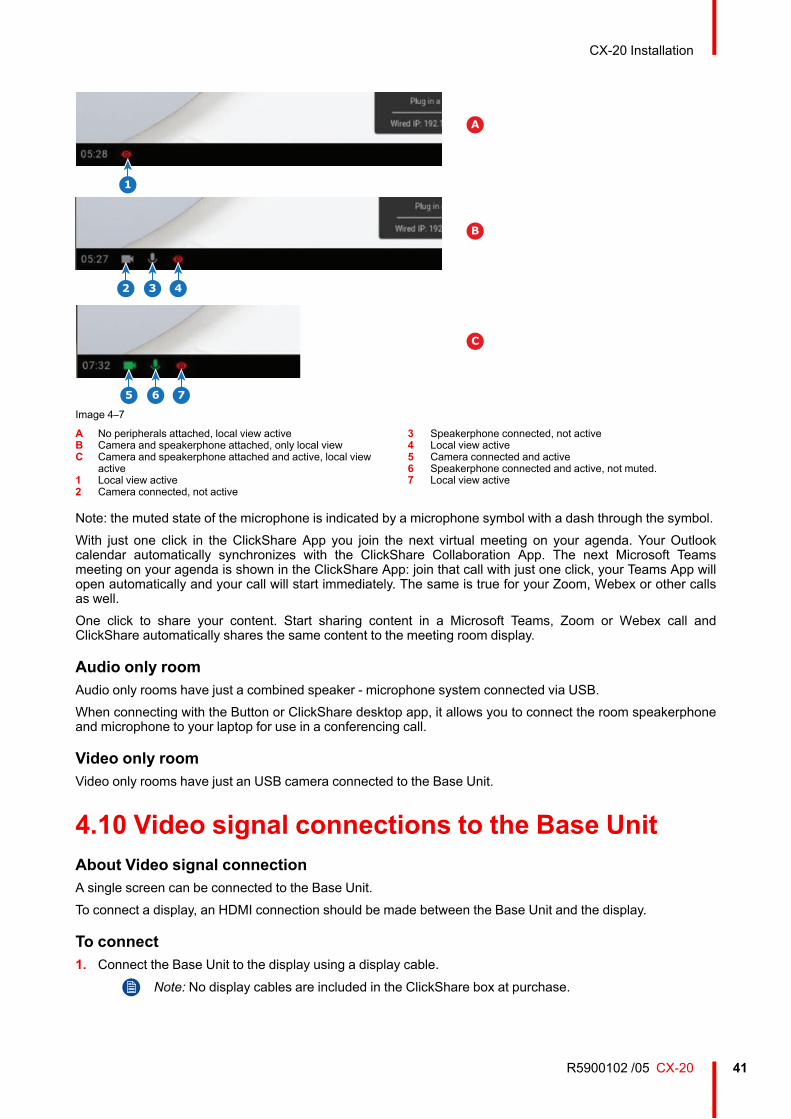
41R5900102 /05 CX-20
1
432
765
A
B
C
Image 4–7
A No peripherals attached, local view activeB Camera and speakerphone attached, only local viewC Camera and speakerphone attached and active, local view
active1 Local view active2 Camera connected, not active
3 Speakerphone connected, not active4 Local view active5 Camera connected and active6 Speakerphone connected and active, not muted.7 Local view active
Note: the muted state of the microphone is indicated by a microphone symbol with a dash through the symbol.With just one click in the ClickShare App you join the next virtual meeting on your agenda. Your Outlookcalendar automatically synchronizes with the ClickShare Collaboration App. The next Microsoft Teamsmeeting on your agenda is shown in the ClickShare App: join that call with just one click, your Teams App willopen automatically and your call will start immediately. The same is true for your Zoom, Webex or other callsas well.One click to share your content. Start sharing content in a Microsoft Teams, Zoom or Webex call andClickShare automatically shares the same content to the meeting room display.
Audio only roomAudio only rooms have just a combined speaker - microphone system connected via USB.When connecting with the Button or ClickShare desktop app, it allows you to connect the room speakerphoneand microphone to your laptop for use in a conferencing call.
Video only roomVideo only rooms have just an USB camera connected to the Base Unit.
4.10 Video signal connections to the Base UnitAbout Video signal connectionA single screen can be connected to the Base Unit.To connect a display, an HDMI connection should be made between the Base Unit and the display.
To connect1. Connect the Base Unit to the display using a display cable.
Note: No display cables are included in the ClickShare box at purchase.
CX-20 Installation
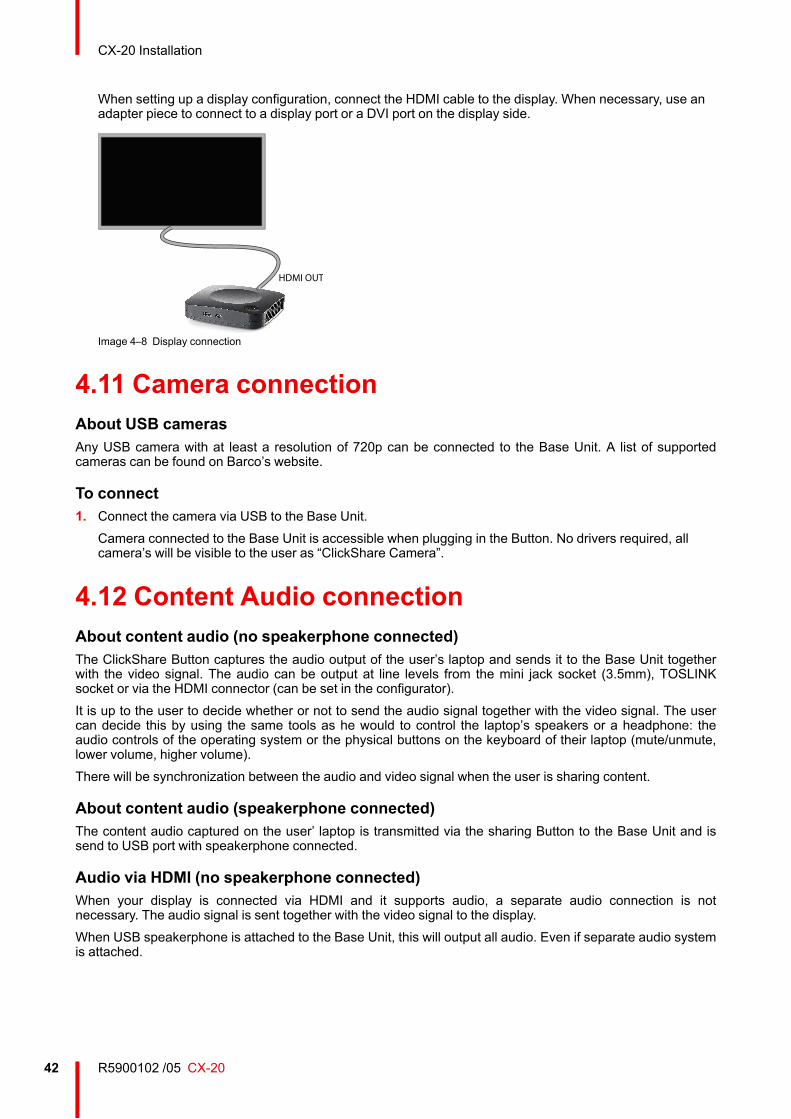
R5900102 /05 CX-2042
When setting up a display configuration, connect the HDMI cable to the display. When necessary, use anadapter piece to connect to a display port or a DVI port on the display side.
HDMI OUT
Image 4–8 Display connection
4.11 Camera connectionAbout USB camerasAny USB camera with at least a resolution of 720p can be connected to the Base Unit. A list of supportedcameras can be found on Barco’s website.
To connect1. Connect the camera via USB to the Base Unit.
Camera connected to the Base Unit is accessible when plugging in the Button. No drivers required, allcamera’s will be visible to the user as “ClickShare Camera”.
4.12 Content Audio connectionAbout content audio (no speakerphone connected)The ClickShare Button captures the audio output of the user’s laptop and sends it to the Base Unit togetherwith the video signal. The audio can be output at line levels from the mini jack socket (3.5mm), TOSLINKsocket or via the HDMI connector (can be set in the configurator).It is up to the user to decide whether or not to send the audio signal together with the video signal. The usercan decide this by using the same tools as he would to control the laptop’s speakers or a headphone: theaudio controls of the operating system or the physical buttons on the keyboard of their laptop (mute/unmute,lower volume, higher volume).There will be synchronization between the audio and video signal when the user is sharing content.
About content audio (speakerphone connected)The content audio captured on the user’ laptop is transmitted via the sharing Button to the Base Unit and issend to USB port with speakerphone connected.
Audio via HDMI (no speakerphone connected)When your display is connected via HDMI and it supports audio, a separate audio connection is notnecessary. The audio signal is sent together with the video signal to the display.When USB speakerphone is attached to the Base Unit, this will output all audio. Even if separate audio systemis attached.
CX-20 Installation
43R5900102 /05 CX-20
Sound is not sent outIn some Windows environments sound is not sent out. This can be solved as follow (depending on yourWindows version):E.g. for Windows 7:1. Right click on the sound icon in the system tray and select Default device. The Sound window opens.2. Select Speakers ClickShare, select Set default and click Apply.E.g. for Windows 101. Click on the sound icon in the system tray and click on the arrow up to open possibilities.2. Select the desired device.
4.13 Echo Canceling Speakerphone audioconnectionAbout echo canceling speakerphone audioThe audio capture by an echo canceling speakerphone connected to the Base Unit is send to the Button andcan be used in remote conference. The content audio transmitted from the Button to the Base Unit is send tothe speakerphone.It is a bidirectional audio transmission between the Button and the speakerphone.
USB speakerphone supportA list of supported speakerphones can be found on Barco’s website.
How to connect an echo-canceling speakerphone1. Connect your speakerphone device via USB to the Base Unit.
When USB speakerphone is attached to the Base Unit, this will output all audio. Even if separate audiosystem is attached for the content audio..
Sound is not sent outIn some Windows environments sound is not sent out. This can be solved as follow:E.g. for Windows 71. Right click on the sound icon in the system tray and select Default communication device. The Sound
window opens.2. Select Echo Cancelling Speakerphone, select Set default and click Apply.E.g. for Windows 101. Click on the sound icon in the system tray and click on the arrow up to open possibilities.2. Select the desired device.
What happens if you select the wrong audio device• When you are sharing screen content and the audio goes through the speakerphone
- Audio will be played out in the room even when not sharing- Audio will be transmitted low-latency, so there will be no lip-sync- Due to aggressive jitter adaptation, the sound (esp. music) might not be 100% fixed tone
• When you use the ClickShare speaker in your UC&C call- Audio will have additional delay- Audio will not be outputted when you are not on screen, potentially giving you a false feeling of “ended
call” or “muted state”• When you do not select the room speakerphone as microphone, but your laptop’s microphone in
combination with a ClickShare Speaker or the room speakerphone:- High probability of echo for remote participants!- Bad microphone pickup in the room
CX-20 Installation
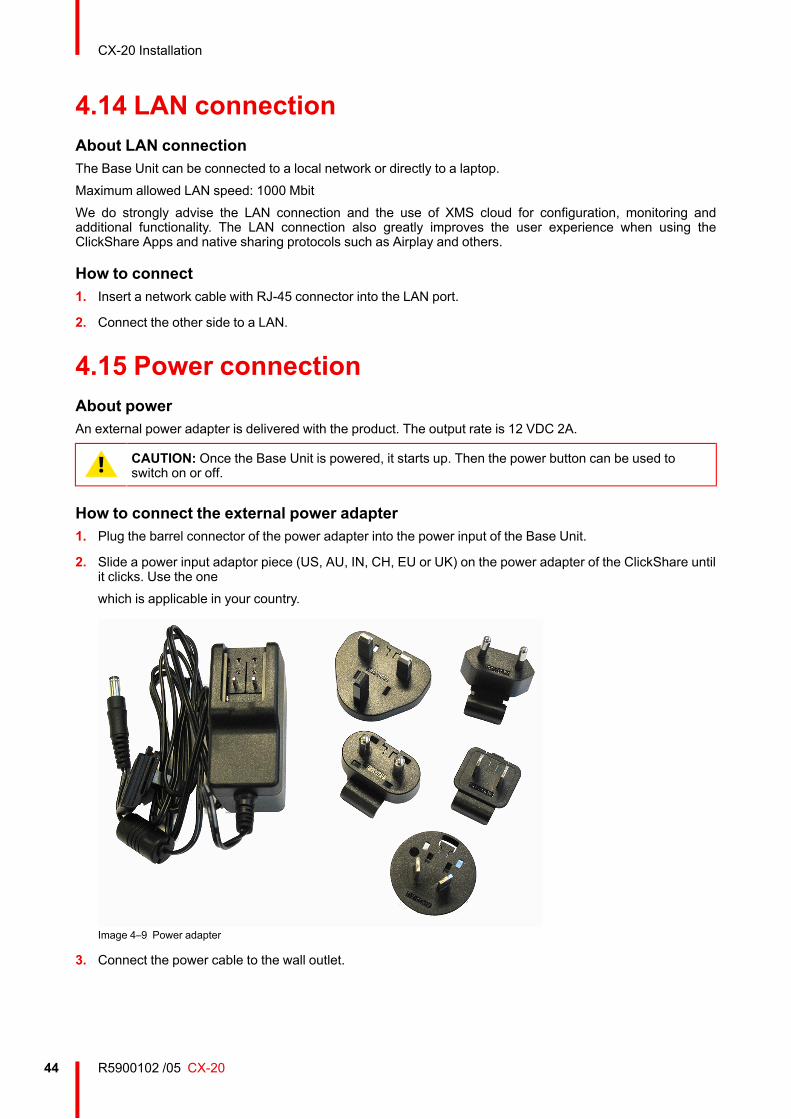
R5900102 /05 CX-2044
4.14 LAN connectionAbout LAN connectionThe Base Unit can be connected to a local network or directly to a laptop.Maximum allowed LAN speed: 1000 MbitWe do strongly advise the LAN connection and the use of XMS cloud for configuration, monitoring andadditional functionality. The LAN connection also greatly improves the user experience when using theClickShare Apps and native sharing protocols such as Airplay and others.
How to connect1. Insert a network cable with RJ-45 connector into the LAN port.
2. Connect the other side to a LAN.
4.15 Power connectionAbout powerAn external power adapter is delivered with the product. The output rate is 12 VDC 2A.
CAUTION: Once the Base Unit is powered, it starts up. Then the power button can be used toswitch on or off.
How to connect the external power adapter1. Plug the barrel connector of the power adapter into the power input of the Base Unit.
2. Slide a power input adaptor piece (US, AU, IN, CH, EU or UK) on the power adapter of the ClickShare untilit clicks. Use the onewhich is applicable in your country.
Image 4–9 Power adapter
3. Connect the power cable to the wall outlet.
CX-20 Installation
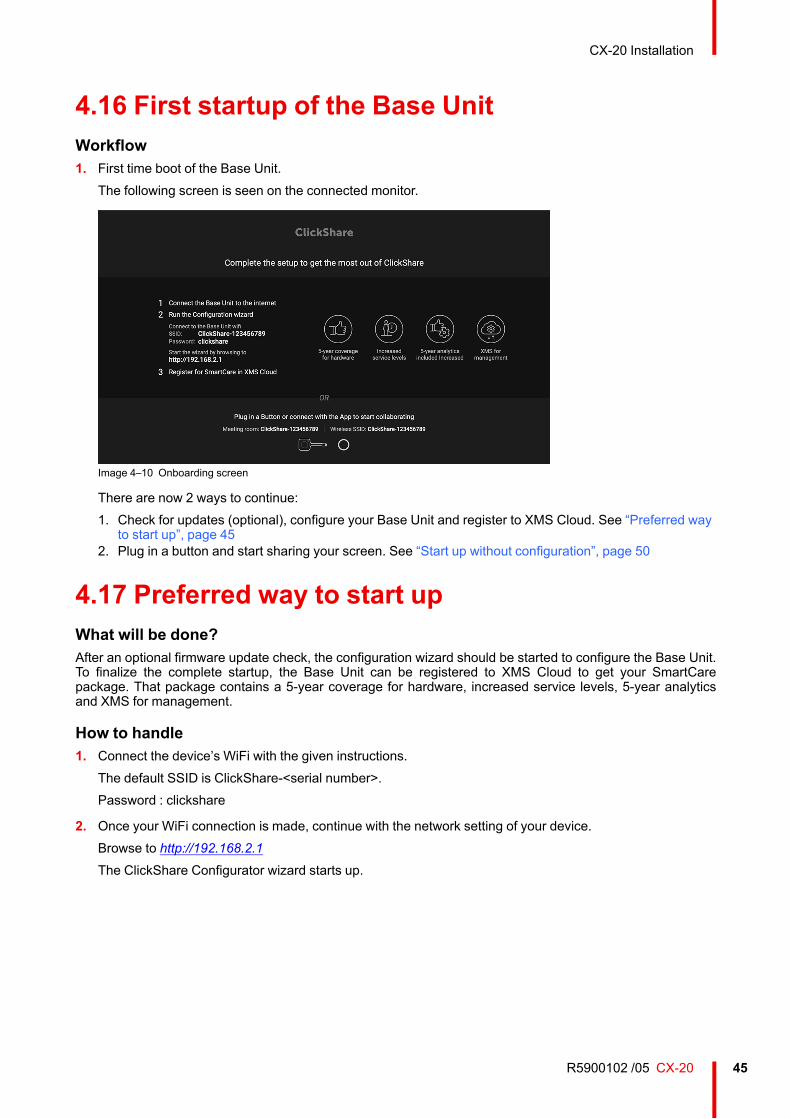
45R5900102 /05 CX-20
4.16 First startup of the Base UnitWorkflow1. First time boot of the Base Unit.
The following screen is seen on the connected monitor.
Image 4–10 Onboarding screen
There are now 2 ways to continue:1. Check for updates (optional), configure your Base Unit and register to XMS Cloud. See “Preferred way
to start up”, page 452. Plug in a button and start sharing your screen. See “Start up without configuration”, page 50
4.17 Preferred way to start upWhat will be done?After an optional firmware update check, the configuration wizard should be started to configure the Base Unit.To finalize the complete startup, the Base Unit can be registered to XMS Cloud to get your SmartCarepackage. That package contains a 5-year coverage for hardware, increased service levels, 5-year analyticsand XMS for management.
How to handle1. Connect the device’s WiFi with the given instructions.
The default SSID is ClickShare-<serial number>.Password : clickshare
2. Once your WiFi connection is made, continue with the network setting of your device.Browse to http://192.168.2.1The ClickShare Configurator wizard starts up.
CX-20 Installation
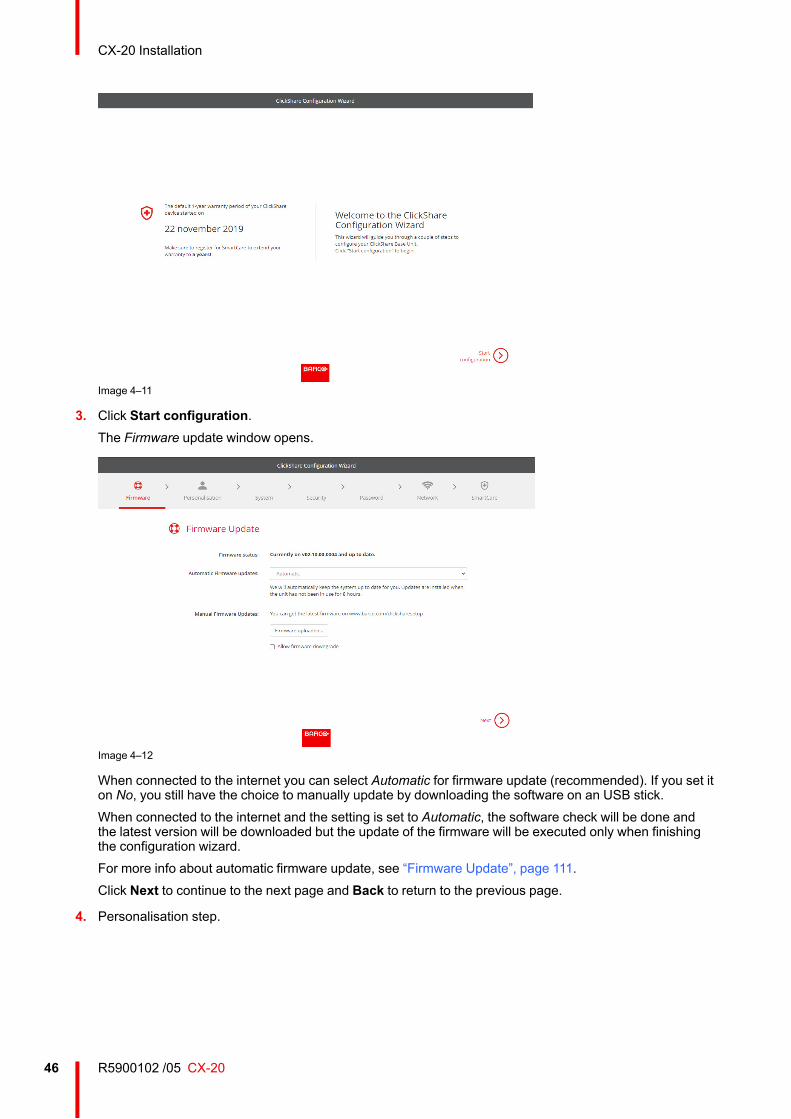
R5900102 /05 CX-2046
Image 4–11
3. Click Start configuration.The Firmware update window opens.
Image 4–12
When connected to the internet you can select Automatic for firmware update (recommended). If you set iton No, you still have the choice to manually update by downloading the software on an USB stick.When connected to the internet and the setting is set to Automatic, the software check will be done andthe latest version will be downloaded but the update of the firmware will be executed only when finishingthe configuration wizard.For more info about automatic firmware update, see “Firmware Update”, page 111.Click Next to continue to the next page and Back to return to the previous page.
4. Personalisation step.
CX-20 Installation
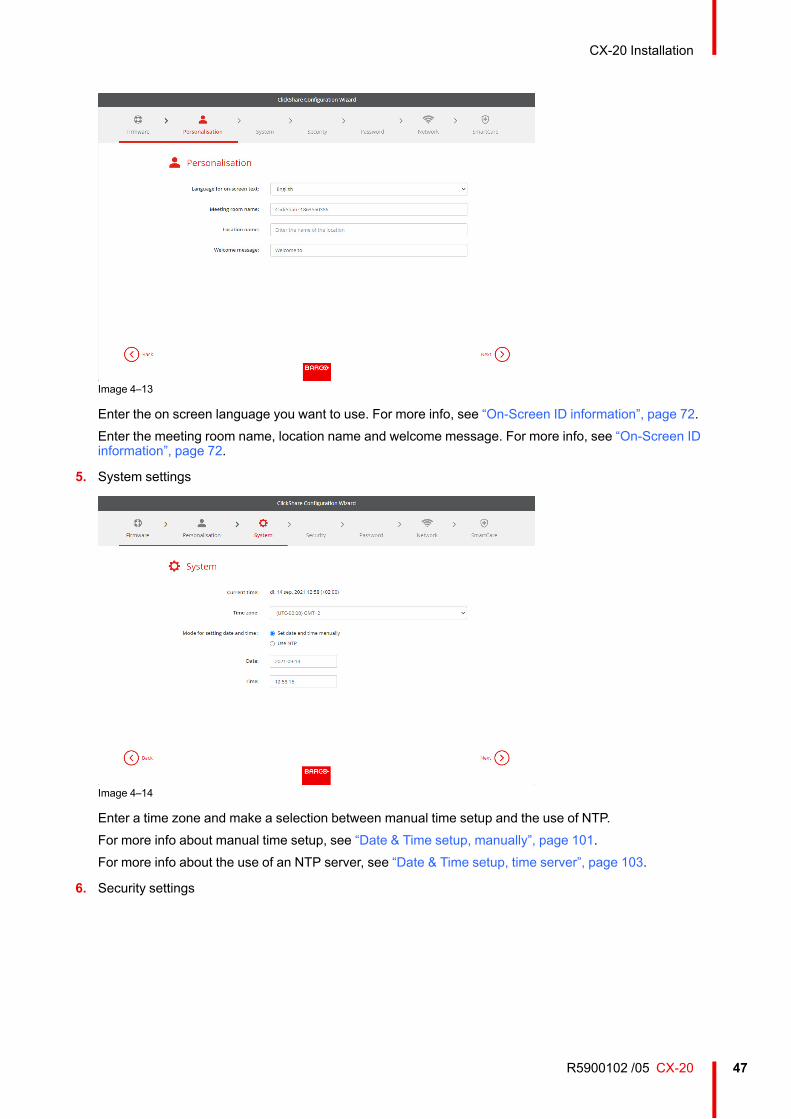
47R5900102 /05 CX-20
Image 4–13
Enter the on screen language you want to use. For more info, see “On-Screen ID information”, page 72.Enter the meeting room name, location name and welcome message. For more info, see “On-Screen IDinformation”, page 72.
5. System settings
Image 4–14
Enter a time zone and make a selection between manual time setup and the use of NTP.For more info about manual time setup, see “Date & Time setup, manually”, page 101.For more info about the use of an NTP server, see “Date & Time setup, time server”, page 103.
6. Security settings
CX-20 Installation
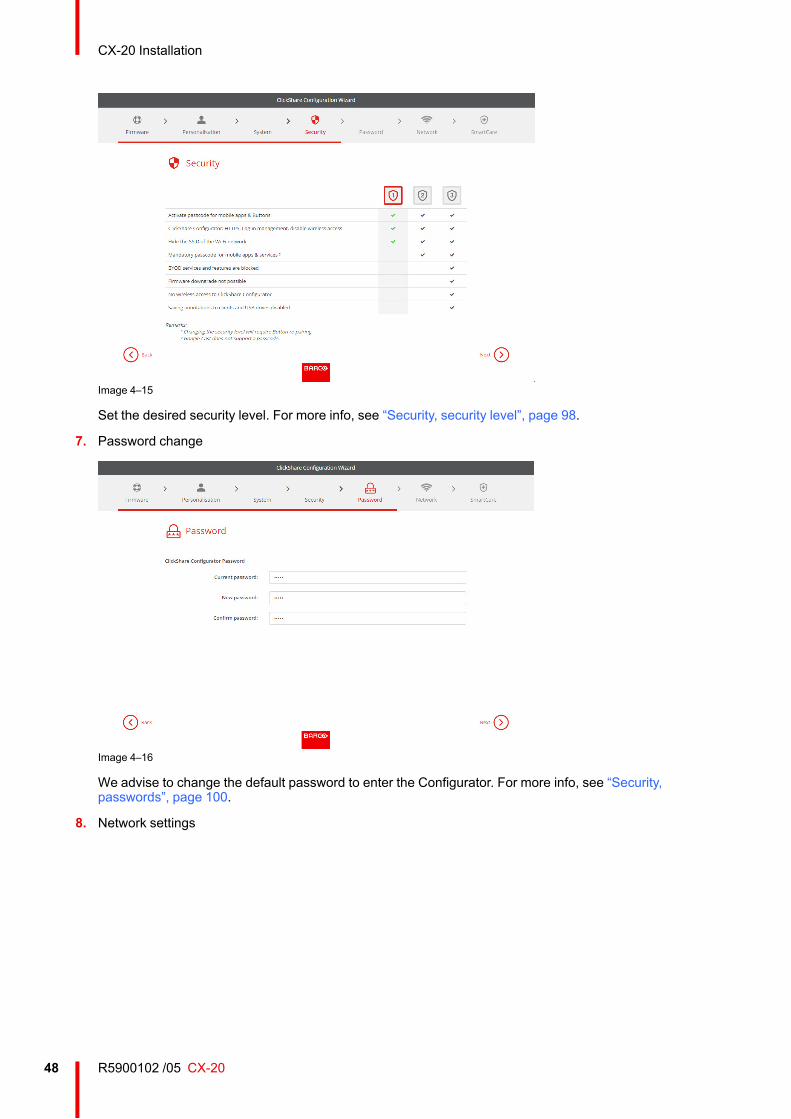
R5900102 /05 CX-2048
Image 4–15
Set the desired security level. For more info, see “Security, security level”, page 98.
7. Password change
Image 4–16
We advise to change the default password to enter the Configurator. For more info, see “Security,passwords”, page 100.
8. Network settings
CX-20 Installation
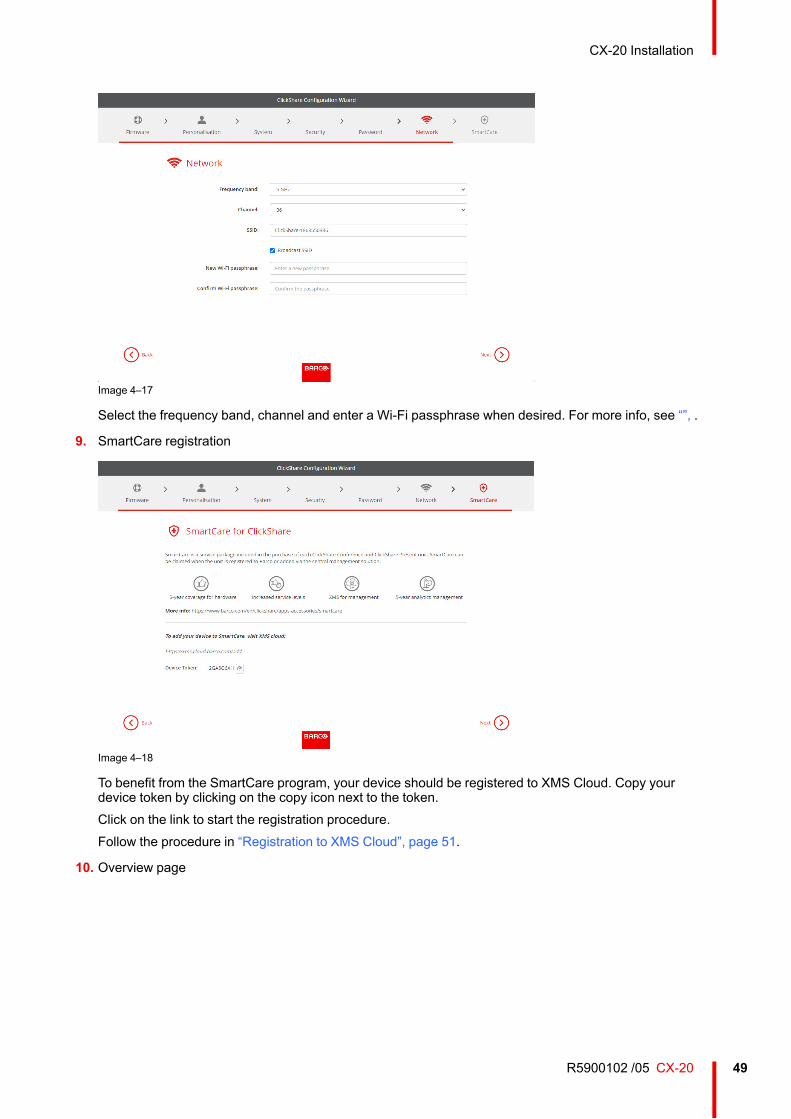
49R5900102 /05 CX-20
Image 4–17
Select the frequency band, channel and enter a Wi-Fi passphrase when desired. For more info, see “”, .
9. SmartCare registration
Image 4–18
To benefit from the SmartCare program, your device should be registered to XMS Cloud. Copy yourdevice token by clicking on the copy icon next to the token.Click on the link to start the registration procedure.Follow the procedure in “Registration to XMS Cloud”, page 51.
10. Overview page
CX-20 Installation
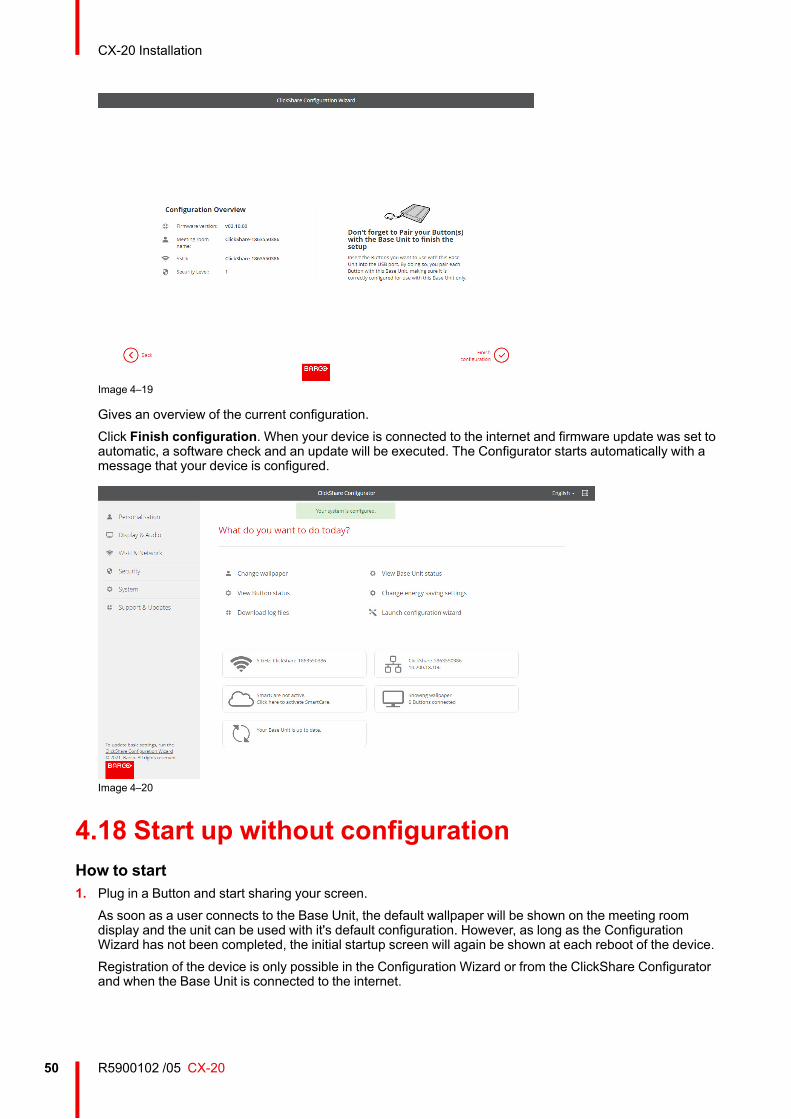
R5900102 /05 CX-2050
Image 4–19
Gives an overview of the current configuration.Click Finish configuration. When your device is connected to the internet and firmware update was set toautomatic, a software check and an update will be executed. The Configurator starts automatically with amessage that your device is configured.
Image 4–20
4.18 Start up without configurationHow to start1. Plug in a Button and start sharing your screen.
As soon as a user connects to the Base Unit, the default wallpaper will be shown on the meeting roomdisplay and the unit can be used with it's default configuration. However, as long as the ConfigurationWizard has not been completed, the initial startup screen will again be shown at each reboot of the device.Registration of the device is only possible in the Configuration Wizard or from the ClickShare Configuratorand when the Base Unit is connected to the internet.
CX-20 Installation
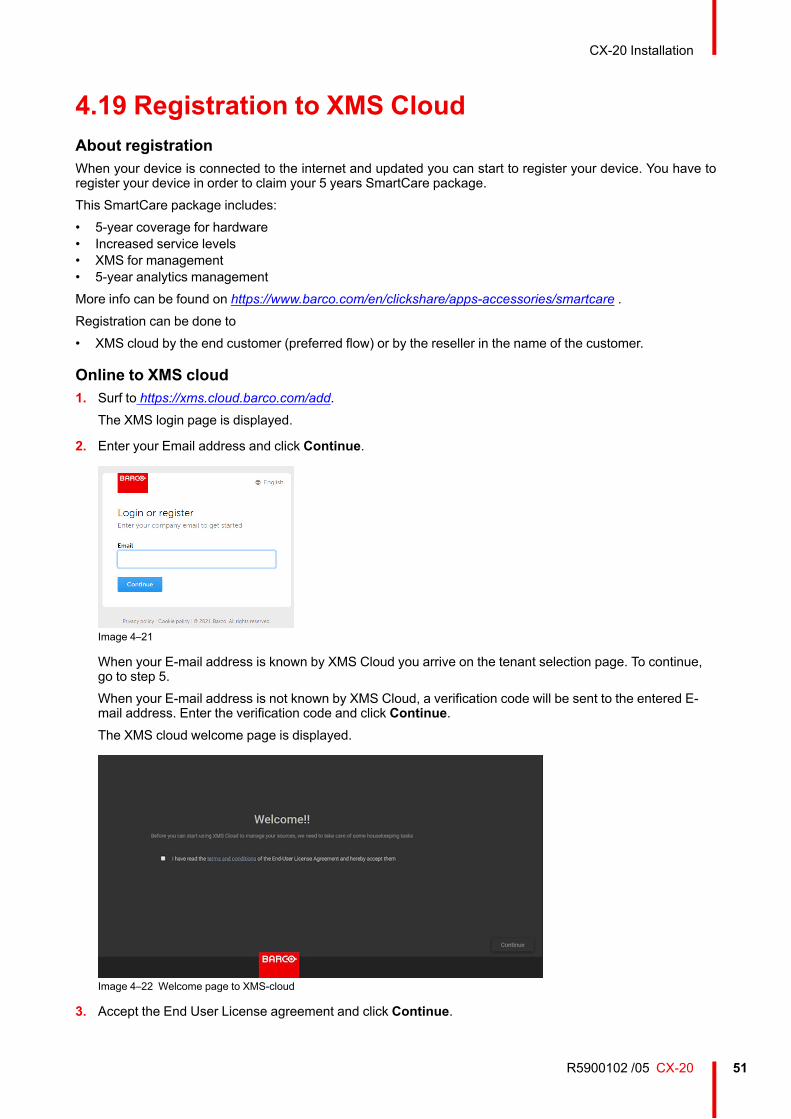
51R5900102 /05 CX-20
4.19 Registration to XMS CloudAbout registrationWhen your device is connected to the internet and updated you can start to register your device. You have toregister your device in order to claim your 5 years SmartCare package.This SmartCare package includes:• 5-year coverage for hardware• Increased service levels• XMS for management• 5-year analytics managementMore info can be found on https://www.barco.com/en/clickshare/apps-accessories/smartcare .Registration can be done to• XMS cloud by the end customer (preferred flow) or by the reseller in the name of the customer.
Online to XMS cloud1. Surf to https://xms.cloud.barco.com/add.
The XMS login page is displayed.
2. Enter your Email address and click Continue.
Image 4–21
When your E-mail address is known by XMS Cloud you arrive on the tenant selection page. To continue,go to step 5.When your E-mail address is not known by XMS Cloud, a verification code will be sent to the entered E-mail address. Enter the verification code and click Continue.The XMS cloud welcome page is displayed.
Image 4–22 Welcome page to XMS-cloud
3. Accept the End User License agreement and click Continue.
CX-20 Installation
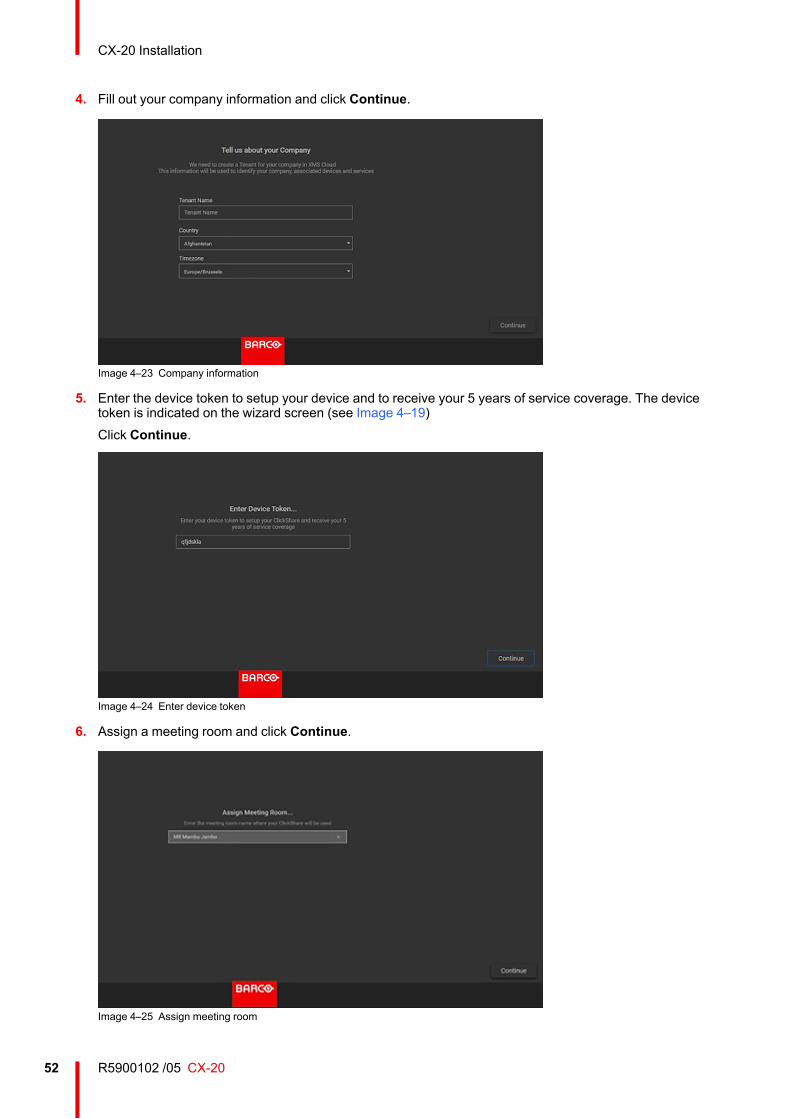
R5900102 /05 CX-2052
4. Fill out your company information and click Continue.
Image 4–23 Company information
5. Enter the device token to setup your device and to receive your 5 years of service coverage. The devicetoken is indicated on the wizard screen (see Image 4–19)Click Continue.
Image 4–24 Enter device token
6. Assign a meeting room and click Continue.
Image 4–25 Assign meeting room
CX-20 Installation
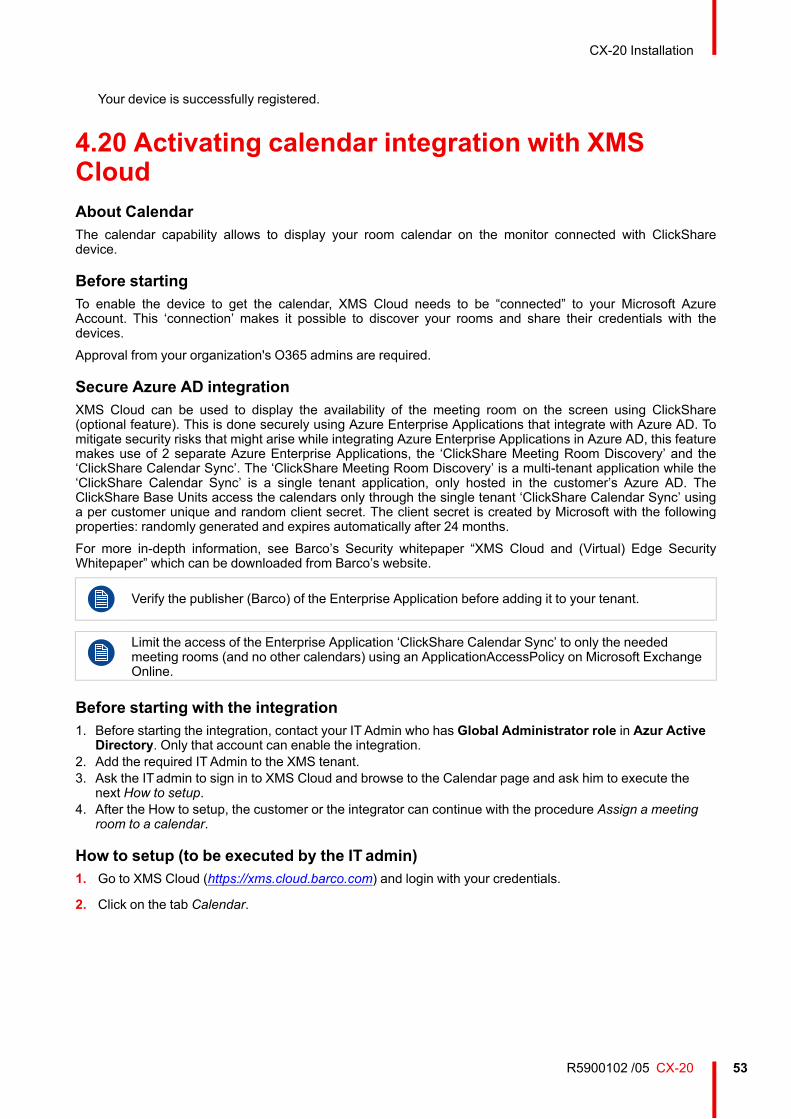
53R5900102 /05 CX-20
Your device is successfully registered.
4.20 Activating calendar integration with XMSCloudAbout CalendarThe calendar capability allows to display your room calendar on the monitor connected with ClickSharedevice.
Before startingTo enable the device to get the calendar, XMS Cloud needs to be “connected” to your Microsoft AzureAccount. This ‘connection’ makes it possible to discover your rooms and share their credentials with thedevices.Approval from your organization's O365 admins are required.
Secure Azure AD integrationXMS Cloud can be used to display the availability of the meeting room on the screen using ClickShare(optional feature). This is done securely using Azure Enterprise Applications that integrate with Azure AD. Tomitigate security risks that might arise while integrating Azure Enterprise Applications in Azure AD, this featuremakes use of 2 separate Azure Enterprise Applications, the ‘ClickShare Meeting Room Discovery’ and the‘ClickShare Calendar Sync’. The ‘ClickShare Meeting Room Discovery’ is a multi-tenant application while the‘ClickShare Calendar Sync’ is a single tenant application, only hosted in the customer’s Azure AD. TheClickShare Base Units access the calendars only through the single tenant ‘ClickShare Calendar Sync’ usinga per customer unique and random client secret. The client secret is created by Microsoft with the followingproperties: randomly generated and expires automatically after 24 months.For more in-depth information, see Barco’s Security whitepaper “XMS Cloud and (Virtual) Edge SecurityWhitepaper” which can be downloaded from Barco’s website.
Verify the publisher (Barco) of the Enterprise Application before adding it to your tenant.
Limit the access of the Enterprise Application ‘ClickShare Calendar Sync’ to only the neededmeeting rooms (and no other calendars) using an ApplicationAccessPolicy on Microsoft ExchangeOnline.
Before starting with the integration1. Before starting the integration, contact your IT Admin who has Global Administrator role in Azur Active
Directory. Only that account can enable the integration.2. Add the required ITAdmin to the XMS tenant.3. Ask the ITadmin to sign in to XMS Cloud and browse to the Calendar page and ask him to execute the
next How to setup.4. After the How to setup, the customer or the integrator can continue with the procedure Assign a meeting
room to a calendar.
How to setup (to be executed by the IT admin)1. Go to XMS Cloud (https://xms.cloud.barco.com) and login with your credentials.
2. Click on the tab Calendar.
CX-20 Installation
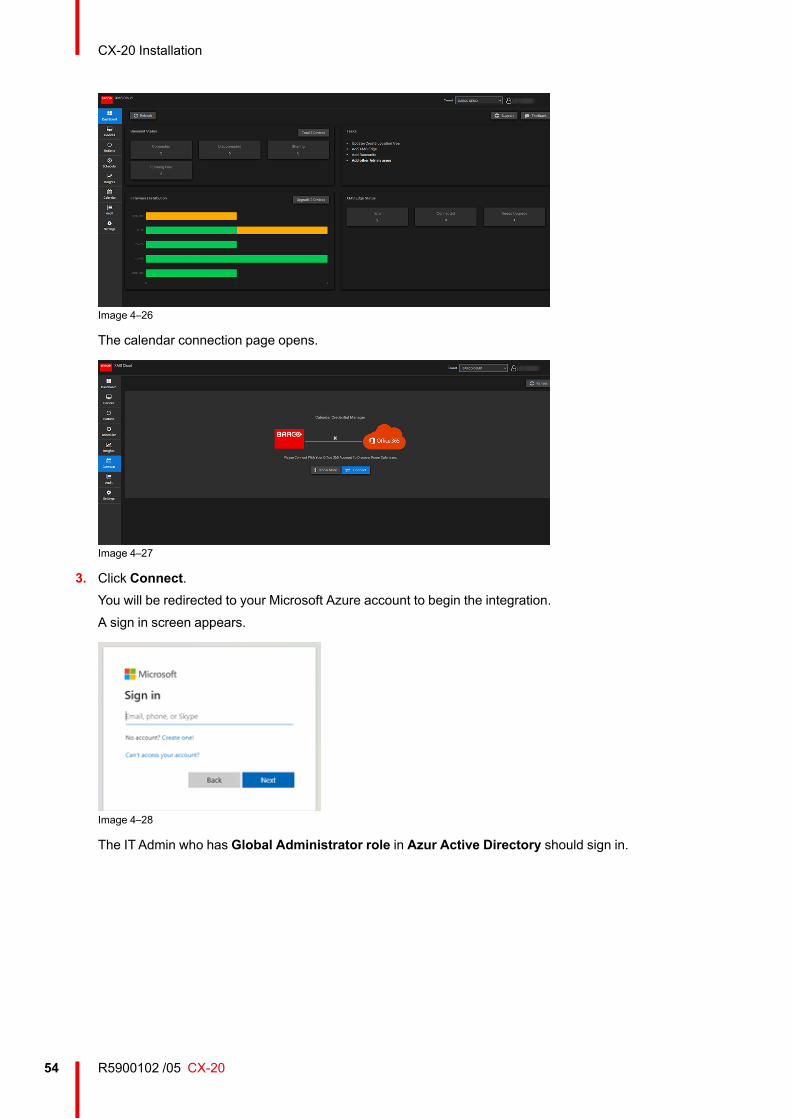
R5900102 /05 CX-2054
Image 4–26
The calendar connection page opens.
Image 4–27
3. Click Connect.You will be redirected to your Microsoft Azure account to begin the integration.A sign in screen appears.
Image 4–28
The IT Admin who has Global Administrator role in Azur Active Directory should sign in.
CX-20 Installation
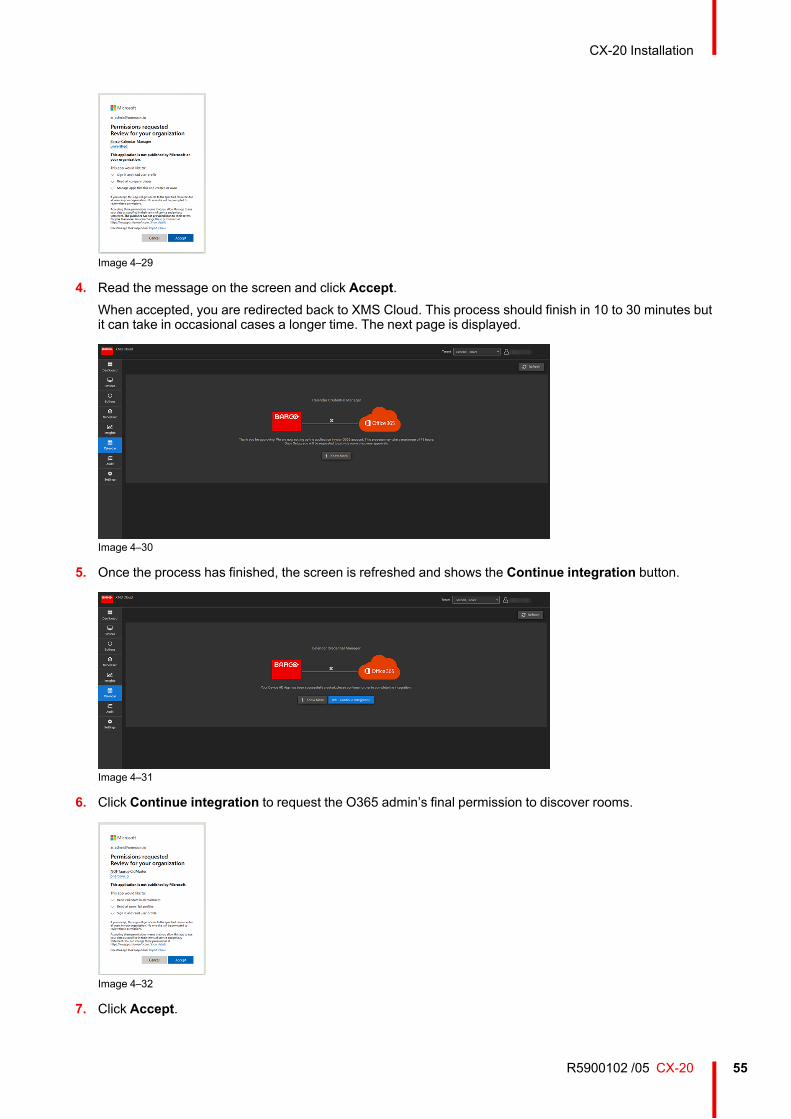
55R5900102 /05 CX-20
Image 4–29
4. Read the message on the screen and click Accept.When accepted, you are redirected back to XMS Cloud. This process should finish in 10 to 30 minutes butit can take in occasional cases a longer time. The next page is displayed.
Image 4–30
5. Once the process has finished, the screen is refreshed and shows the Continue integration button.
Image 4–31
6. Click Continue integration to request the O365 admin’s final permission to discover rooms.
Image 4–32
7. Click Accept.
CX-20 Installation
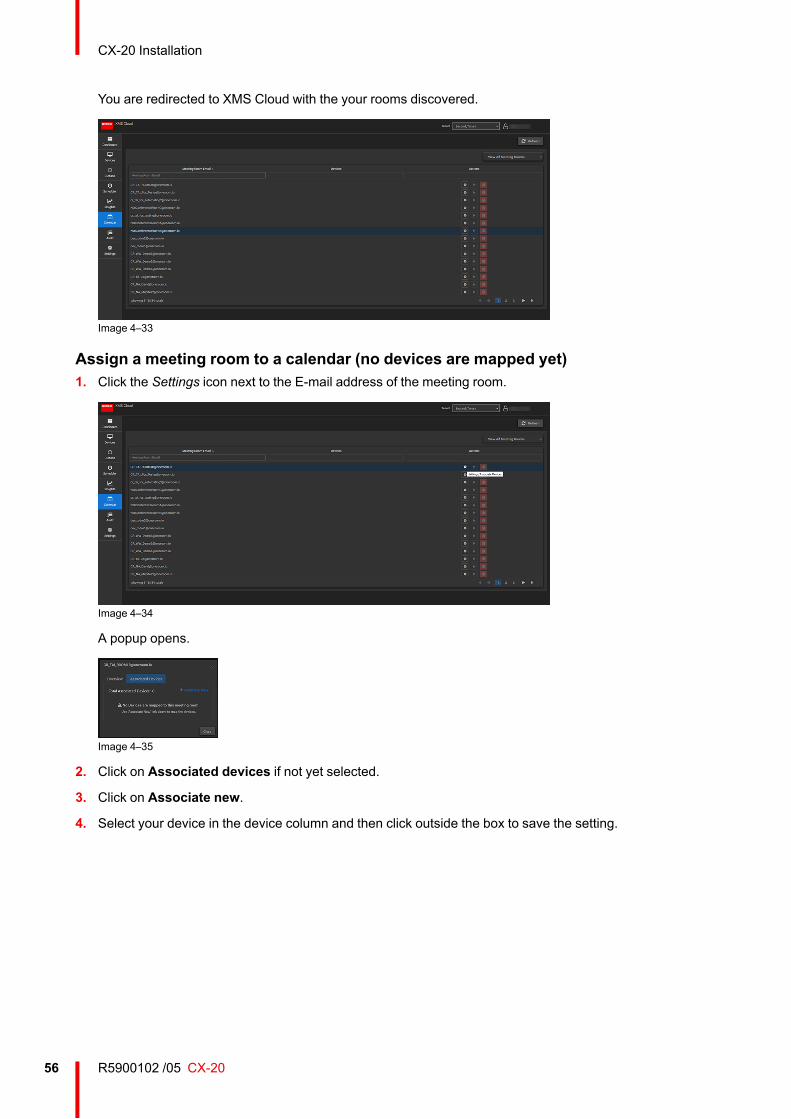
R5900102 /05 CX-2056
You are redirected to XMS Cloud with the your rooms discovered.
Image 4–33
Assign a meeting room to a calendar (no devices are mapped yet)1. Click the Settings icon next to the E-mail address of the meeting room.
Image 4–34
A popup opens.
Image 4–35
2. Click on Associated devices if not yet selected.
3. Click on Associate new.
4. Select your device in the device column and then click outside the box to save the setting.
CX-20 Installation
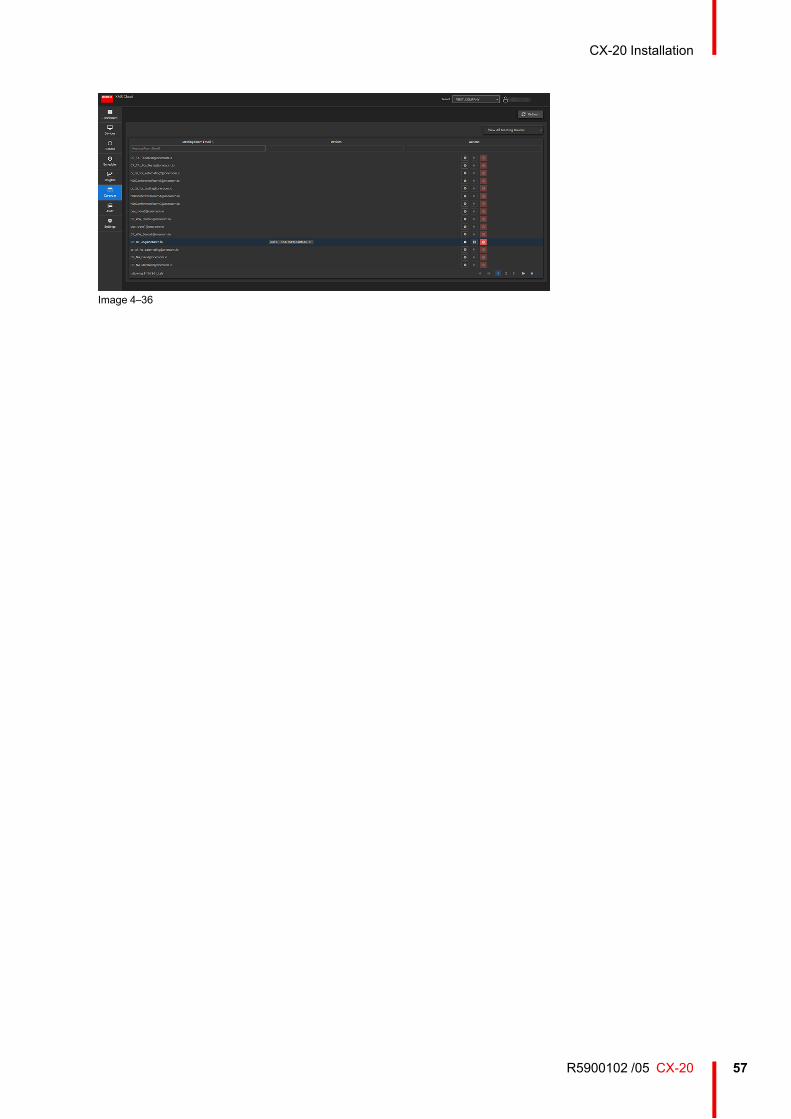
57R5900102 /05 CX-20
Image 4–36
CX-20 Installation
R5900102 /05 CX-2058
CX-20 Installation
59R5900102 /05 CX-20
5.1 Pairing .........................................................................................................................................605.2 ClickShare Extension Pack ...........................................................................................................615.3 ClickShare Extension Pack installer ...............................................................................................615.4 ClickShare Windows Certified driver ..............................................................................................625.5 ClickShare Desktop App ...............................................................................................................625.6 MSI installer of the ClickShare Desktop App ...................................................................................63
Preparing theButtons 5
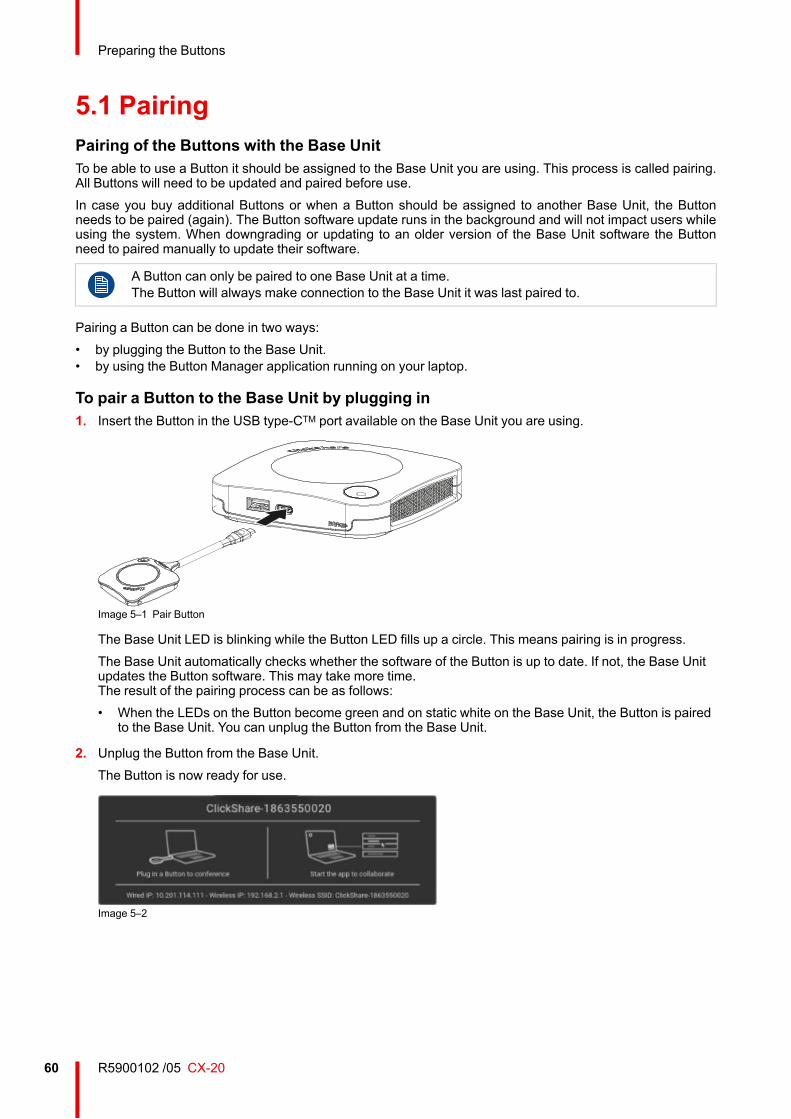
R5900102 /05 CX-2060
5.1 PairingPairing of the Buttons with the Base UnitTo be able to use a Button it should be assigned to the Base Unit you are using. This process is called pairing.All Buttons will need to be updated and paired before use.In case you buy additional Buttons or when a Button should be assigned to another Base Unit, the Buttonneeds to be paired (again). The Button software update runs in the background and will not impact users whileusing the system. When downgrading or updating to an older version of the Base Unit software the Buttonneed to paired manually to update their software.
A Button can only be paired to one Base Unit at a time.The Button will always make connection to the Base Unit it was last paired to.
Pairing a Button can be done in two ways:• by plugging the Button to the Base Unit.• by using the Button Manager application running on your laptop.
To pair a Button to the Base Unit by plugging in1. Insert the Button in the USB type-CTM port available on the Base Unit you are using.
Image 5–1 Pair Button
The Base Unit LED is blinking while the Button LED fills up a circle. This means pairing is in progress.The Base Unit automatically checks whether the software of the Button is up to date. If not, the Base Unitupdates the Button software. This may take more time.The result of the pairing process can be as follows:• When the LEDs on the Button become green and on static white on the Base Unit, the Button is paired
to the Base Unit. You can unplug the Button from the Base Unit.
2. Unplug the Button from the Base Unit.The Button is now ready for use.
Image 5–2
Preparing the Buttons
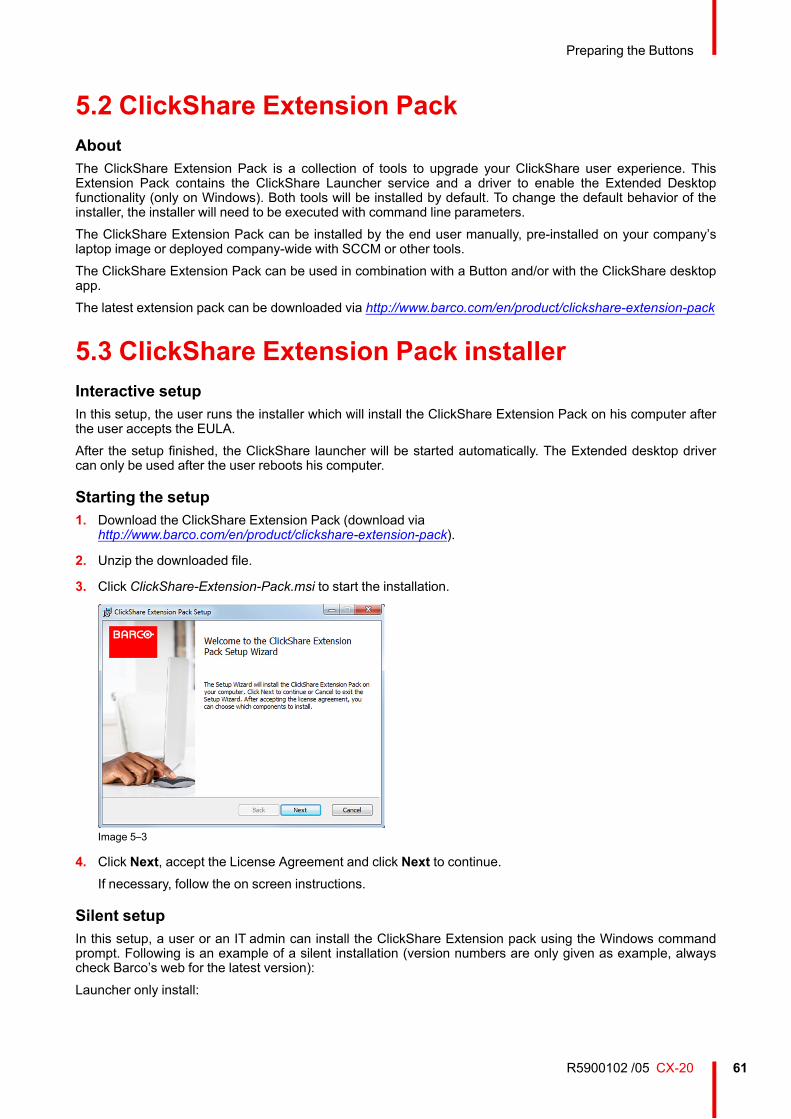
61R5900102 /05 CX-20
5.2 ClickShare Extension PackAboutThe ClickShare Extension Pack is a collection of tools to upgrade your ClickShare user experience. ThisExtension Pack contains the ClickShare Launcher service and a driver to enable the Extended Desktopfunctionality (only on Windows). Both tools will be installed by default. To change the default behavior of theinstaller, the installer will need to be executed with command line parameters.The ClickShare Extension Pack can be installed by the end user manually, pre-installed on your company’slaptop image or deployed company-wide with SCCM or other tools.The ClickShare Extension Pack can be used in combination with a Button and/or with the ClickShare desktopapp.The latest extension pack can be downloaded via http://www.barco.com/en/product/clickshare-extension-pack
5.3 ClickShare Extension Pack installerInteractive setupIn this setup, the user runs the installer which will install the ClickShare Extension Pack on his computer afterthe user accepts the EULA.After the setup finished, the ClickShare launcher will be started automatically. The Extended desktop drivercan only be used after the user reboots his computer.
Starting the setup1. Download the ClickShare Extension Pack (download via
http://www.barco.com/en/product/clickshare-extension-pack).
2. Unzip the downloaded file.
3. Click ClickShare-Extension-Pack.msi to start the installation.
Image 5–3
4. Click Next, accept the License Agreement and click Next to continue.If necessary, follow the on screen instructions.
Silent setupIn this setup, a user or an IT admin can install the ClickShare Extension pack using the Windows commandprompt. Following is an example of a silent installation (version numbers are only given as example, alwayscheck Barco’s web for the latest version):Launcher only install:
Preparing the Buttons
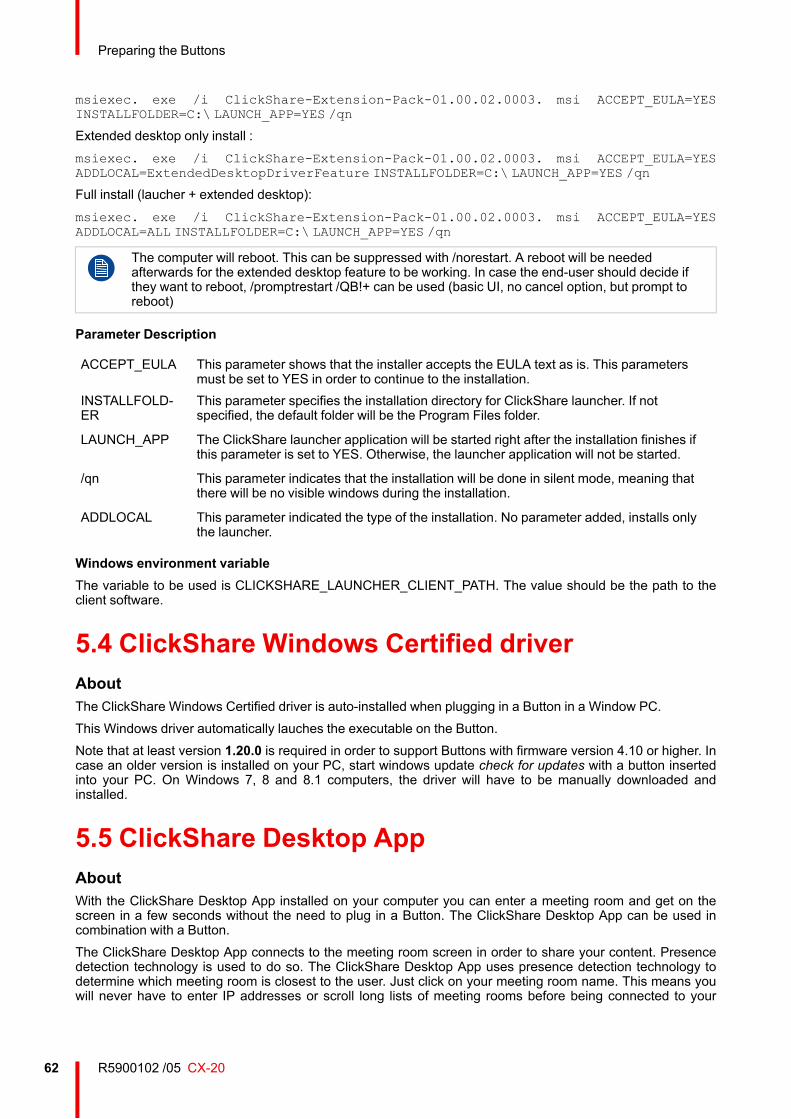
R5900102 /05 CX-2062
msiexec. exe /i ClickShare-Extension-Pack-01.00.02.0003. msi ACCEPT_EULA=YESINSTALLFOLDER=C:\ LAUNCH_APP=YES /qn
Extended desktop only install :msiexec. exe /i ClickShare-Extension-Pack-01.00.02.0003. msi ACCEPT_EULA=YESADDLOCAL=ExtendedDesktopDriverFeature INSTALLFOLDER=C:\ LAUNCH_APP=YES /qn
Full install (laucher + extended desktop):msiexec. exe /i ClickShare-Extension-Pack-01.00.02.0003. msi ACCEPT_EULA=YESADDLOCAL=ALL INSTALLFOLDER=C:\ LAUNCH_APP=YES /qn
The computer will reboot. This can be suppressed with /norestart. A reboot will be neededafterwards for the extended desktop feature to be working. In case the end-user should decide ifthey want to reboot, /promptrestart /QB!+ can be used (basic UI, no cancel option, but prompt toreboot)
Parameter Description
ACCEPT_EULA This parameter shows that the installer accepts the EULA text as is. This parametersmust be set to YES in order to continue to the installation.
INSTALLFOLD-ER
This parameter specifies the installation directory for ClickShare launcher. If notspecified, the default folder will be the Program Files folder.
LAUNCH_APP The ClickShare launcher application will be started right after the installation finishes ifthis parameter is set to YES. Otherwise, the launcher application will not be started.
/qn This parameter indicates that the installation will be done in silent mode, meaning thatthere will be no visible windows during the installation.
ADDLOCAL This parameter indicated the type of the installation. No parameter added, installs onlythe launcher.
Windows environment variableThe variable to be used is CLICKSHARE_LAUNCHER_CLIENT_PATH. The value should be the path to theclient software.
5.4 ClickShare Windows Certified driverAboutThe ClickShare Windows Certified driver is auto-installed when plugging in a Button in a Window PC.This Windows driver automatically lauches the executable on the Button.Note that at least version 1.20.0 is required in order to support Buttons with firmware version 4.10 or higher. Incase an older version is installed on your PC, start windows update check for updates with a button insertedinto your PC. On Windows 7, 8 and 8.1 computers, the driver will have to be manually downloaded andinstalled.
5.5 ClickShare Desktop AppAboutWith the ClickShare Desktop App installed on your computer you can enter a meeting room and get on thescreen in a few seconds without the need to plug in a Button. The ClickShare Desktop App can be used incombination with a Button.The ClickShare Desktop App connects to the meeting room screen in order to share your content. Presencedetection technology is used to do so. The ClickShare Desktop App uses presence detection technology todetermine which meeting room is closest to the user. Just click on your meeting room name. This means youwill never have to enter IP addresses or scroll long lists of meeting rooms before being connected to your
Preparing the Buttons
63R5900102 /05 CX-20
meeting room. Even more easy when using the PresentSense functionality. Just walk in a meeting room andclick Connect.When using Outlook as your main agenda, you get also an immediate overview of your next meetings. Noneed to search for the appointment or invite in Outlook. Just click Join to join your conference call. With App-based Conferencing, you can now also enjoy wireless conferencing without plugging in a Button. As soon asyou are connected to the ClickShare Conference device, the attached room peripherals can be used in yournext conference call. Make sure to install the ClickShare Desktop App through the MSI installer (admin rightsrequired) and to enable the App-based Conferencing feature.
InstallationWhen the ClickShare Desktop App is not pre-deployed in your IT environment, you can download and installthe software without administrator rights from www.clickshare.app . Admin rights are necessary to install theClickShare Desktop App with calendar integration function or App-based Conferencing feature. More info ofthe MSI installer can be found in “MSI installer of the ClickShare Desktop App”, page 63.
5.6 MSI installer of the ClickShare Desktop App
CAUTION: Installation can only be done with administrator rights.
How to install1. Download the MSI installer from www.clickshare.app.
2. Run the MSI installer by double clicking the downloaded file.The installation wizard starts. Follow the instruction on the different windows.
Image 5–4
3. Read the License Agreement and check the 'I accept the terms in the license agreement' checkbox tocontinue.Click Next.
4. Enable the necessary components and click Install.The ClickShare Desktop App and the selected features are now available for all users of your computer.
Preparing the Buttons
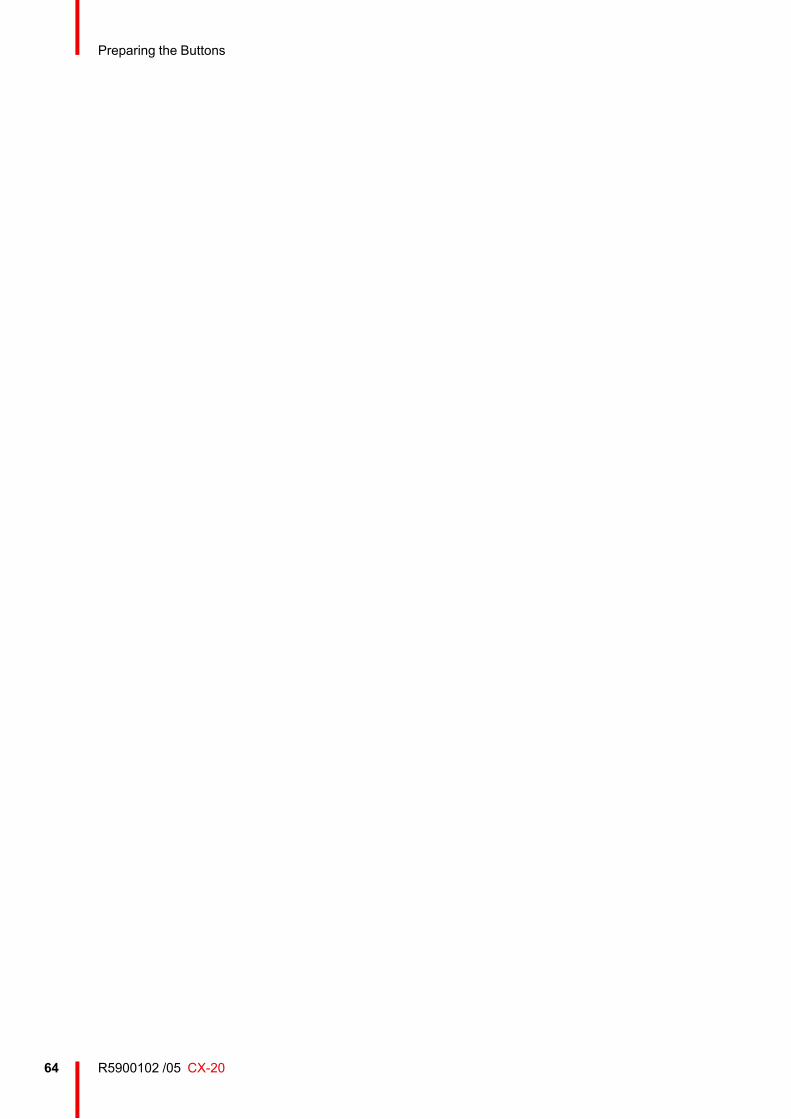
R5900102 /05 CX-2064
Preparing the Buttons

65R5900102 /05 CX-20
6.1 Accessing the Configurator ...........................................................................................................676.2 ClickShare Configuration Wizard ...................................................................................................706.3 On-Screen ID information..............................................................................................................726.4 Personalisation, Wallpaper ............................................................................................................736.5 Personalisation, Personalized wallpaper ........................................................................................756.6 Manage configuration files.............................................................................................................766.7 Display & Audio setup ...................................................................................................................776.8 Peripherals ..................................................................................................................................786.9 Wi-Fi settings ...............................................................................................................................796.10 Wi-Fi settings, Access Point settings ..............................................................................................806.11 Wi-Fi settings, Wireless Client .......................................................................................................826.12 Wi-Fi settings, Wireless Client, EAP-TLS........................................................................................836.13 Wi-Fi settings, Wireless Client, EAP-TTLS......................................................................................856.14 Wi-Fi settings, Wireless Client, PEAP.............................................................................................866.15 Wi-Fi settings, Wireless Client, WPA2-PSK.....................................................................................876.16 LAN settings.................................................................................................................................886.17 LAN Settings, Wired Authentication................................................................................................906.18 LAN Settings, EAP-TLS security mode...........................................................................................916.19 LAN Settings, EAP-TTLS security mode.........................................................................................936.20 Services, Mobile devices...............................................................................................................946.21 Service, PresentSense..................................................................................................................966.22 Service, ClickShare API, remote control via API..............................................................................976.23 Services, SNMP ...........................................................................................................................976.24 Security, security level...................................................................................................................986.25 Security, passwords.................................................................................................................... 1006.26 Status information Base Unit ....................................................................................................... 1006.27 Date & Time setup, manually ....................................................................................................... 1016.28 Date & Time setup, time server .................................................................................................... 1036.29 Energy savers ............................................................................................................................ 1036.30 Buttons ...................................................................................................................................... 1046.31 Buttons, External access point, mode EAP-TLS ............................................................................ 1056.32 Buttons, External access point, mode EAP-TTLS.......................................................................... 1076.33 Buttons, External access point, mode PEAP................................................................................. 1086.34 Buttons, External access point, mode WPA2-PSK......................................................................... 1096.35 Blackboard................................................................................................................................. 1096.36 XMS Cloud Integration ................................................................................................................ 1106.37 Firmware Update........................................................................................................................ 1116.38 Support & Updates, Troubleshoot, log settings.............................................................................. 1136.39 Troubleshooting, Erase all settings............................................................................................... 1136.40 Reset to factory defaults.............................................................................................................. 1146.41 Troubleshoot, diagnostics............................................................................................................ 115
CX-20 Configurator 6
R5900102 /05 CX-2066
About configurationThe configuration of your device can be done in• XMS cloud• the local configuratorThe configurator in XMS cloud will (in time) more elaborated than the local configurator. Therefore it preferredto configure your devices via XMS cloud. For more info see XMS documentation.The next topics are describing the local configurator.
Within some menus the Configurator is indicated asWebUI. E.g. WebUI password, that is thepassword to enter the Configurator.
CX-20 Configurator
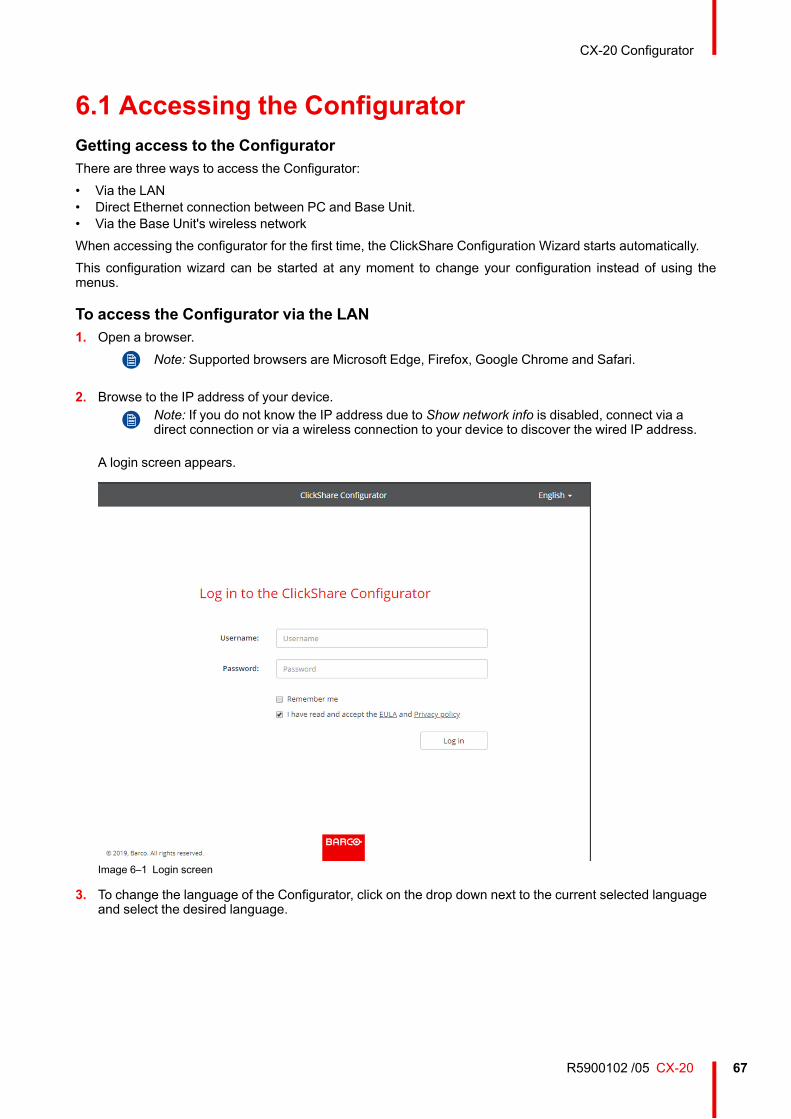
67R5900102 /05 CX-20
6.1 Accessing the ConfiguratorGetting access to the ConfiguratorThere are three ways to access the Configurator:• Via the LAN• Direct Ethernet connection between PC and Base Unit.• Via the Base Unit's wireless networkWhen accessing the configurator for the first time, the ClickShare Configuration Wizard starts automatically.This configuration wizard can be started at any moment to change your configuration instead of using themenus.
To access the Configurator via the LAN1. Open a browser.
Note: Supported browsers are Microsoft Edge, Firefox, Google Chrome and Safari.
2. Browse to the IP address of your device.Note: If you do not know the IP address due to Show network info is disabled, connect via adirect connection or via a wireless connection to your device to discover the wired IP address.
A login screen appears.
Image 6–1 Login screen
3. To change the language of the Configurator, click on the drop down next to the current selected languageand select the desired language.
CX-20 Configurator
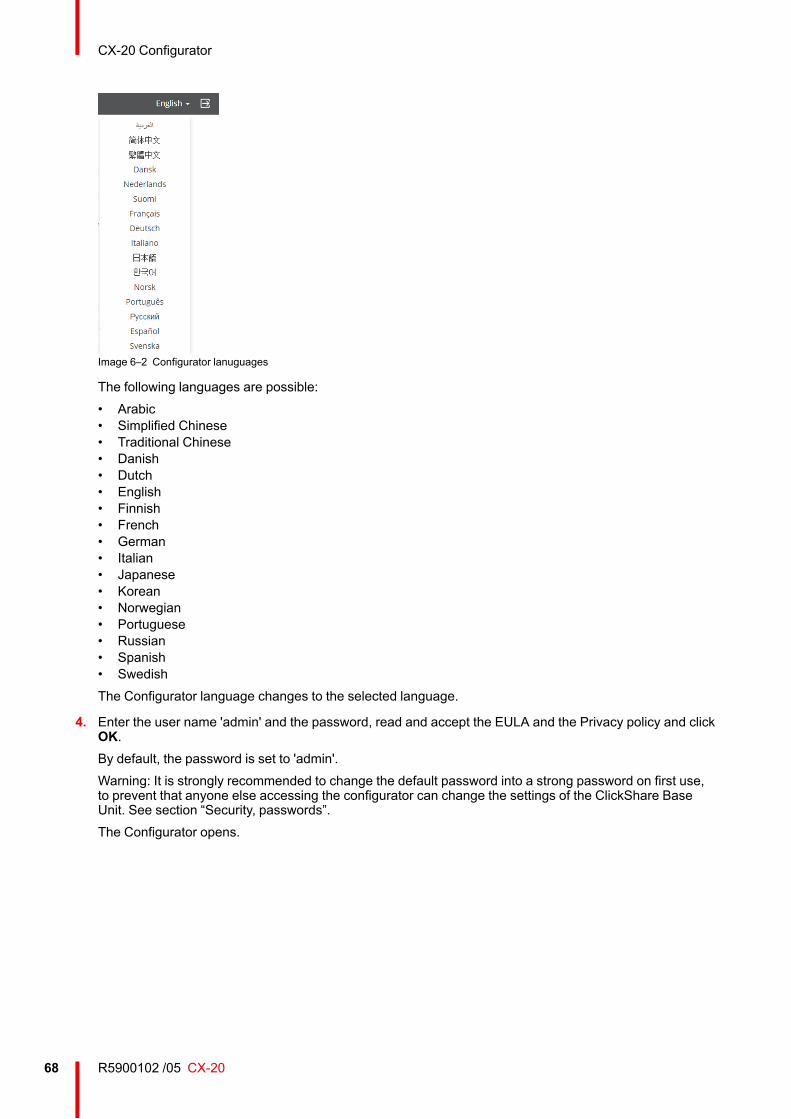
R5900102 /05 CX-2068
Image 6–2 Configurator lanuguages
The following languages are possible:• Arabic• Simplified Chinese• Traditional Chinese• Danish• Dutch• English• Finnish• French• German• Italian• Japanese• Korean• Norwegian• Portuguese• Russian• Spanish• SwedishThe Configurator language changes to the selected language.
4. Enter the user name 'admin' and the password, read and accept the EULA and the Privacy policy and clickOK.By default, the password is set to 'admin'.Warning: It is strongly recommended to change the default password into a strong password on first use,to prevent that anyone else accessing the configurator can change the settings of the ClickShare BaseUnit. See section “Security, passwords”.The Configurator opens.
CX-20 Configurator
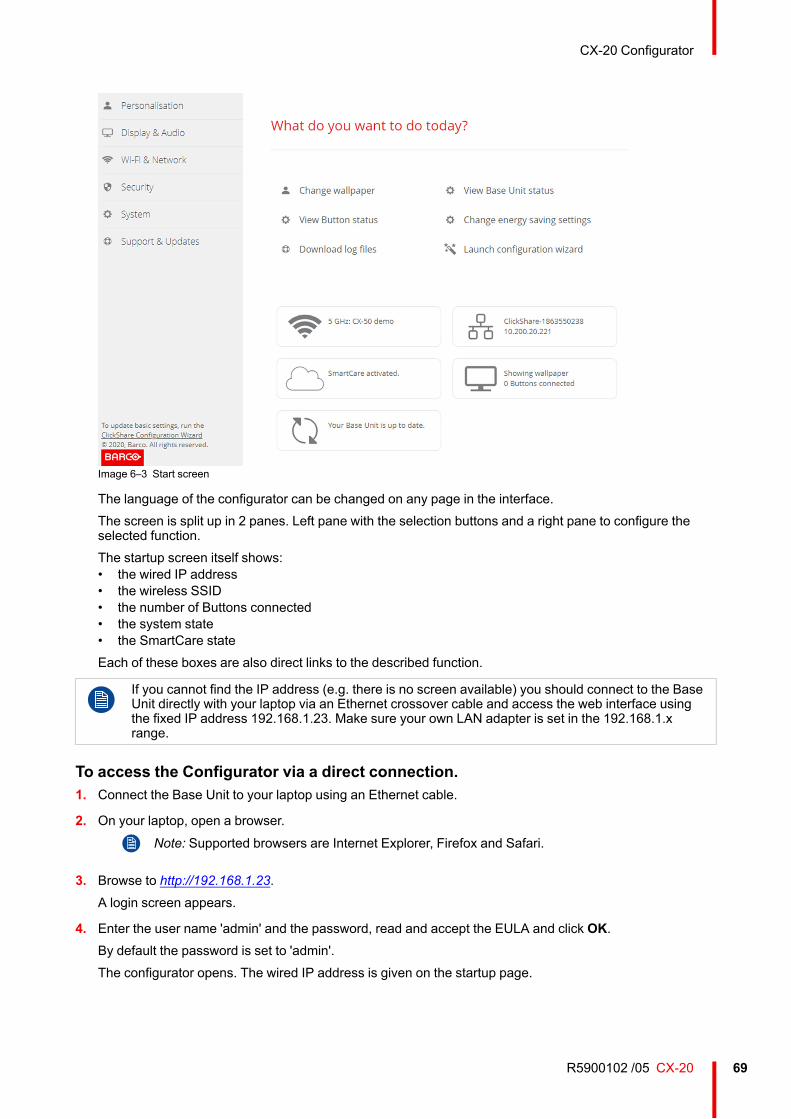
69R5900102 /05 CX-20
Image 6–3 Start screen
The language of the configurator can be changed on any page in the interface.The screen is split up in 2 panes. Left pane with the selection buttons and a right pane to configure theselected function.The startup screen itself shows:• the wired IP address• the wireless SSID• the number of Buttons connected• the system state• the SmartCare stateEach of these boxes are also direct links to the described function.
If you cannot find the IP address (e.g. there is no screen available) you should connect to the BaseUnit directly with your laptop via an Ethernet crossover cable and access the web interface usingthe fixed IP address 192.168.1.23. Make sure your own LAN adapter is set in the 192.168.1.xrange.
To access the Configurator via a direct connection.1. Connect the Base Unit to your laptop using an Ethernet cable.
2. On your laptop, open a browser.Note: Supported browsers are Internet Explorer, Firefox and Safari.
3. Browse to http://192.168.1.23.A login screen appears.
4. Enter the user name 'admin' and the password, read and accept the EULA and click OK.By default the password is set to 'admin'.The configurator opens. The wired IP address is given on the startup page.
CX-20 Configurator
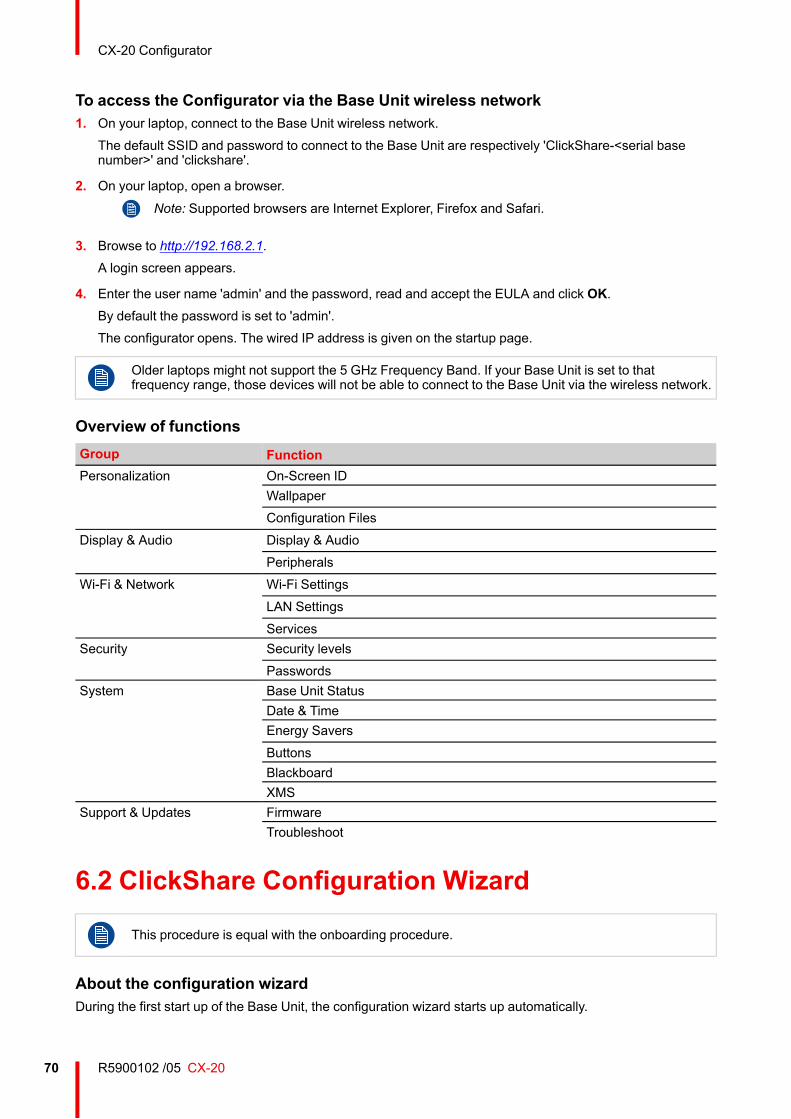
R5900102 /05 CX-2070
To access the Configurator via the Base Unit wireless network1. On your laptop, connect to the Base Unit wireless network.
The default SSID and password to connect to the Base Unit are respectively 'ClickShare-<serial basenumber>' and 'clickshare'.
2. On your laptop, open a browser.Note: Supported browsers are Internet Explorer, Firefox and Safari.
3. Browse to http://192.168.2.1.A login screen appears.
4. Enter the user name 'admin' and the password, read and accept the EULA and click OK.By default the password is set to 'admin'.The configurator opens. The wired IP address is given on the startup page.
Older laptops might not support the 5 GHz Frequency Band. If your Base Unit is set to thatfrequency range, those devices will not be able to connect to the Base Unit via the wireless network.
Overview of functionsGroup FunctionPersonalization On-Screen ID
WallpaperConfiguration Files
Display & Audio Display & AudioPeripherals
Wi-Fi & Network Wi-Fi SettingsLAN SettingsServices
Security Security levelsPasswords
System Base Unit StatusDate & TimeEnergy SaversButtonsBlackboardXMS
Support & Updates FirmwareTroubleshoot
6.2 ClickShare Configuration Wizard
This procedure is equal with the onboarding procedure.
About the configuration wizardDuring the first start up of the Base Unit, the configuration wizard starts up automatically.
CX-20 Configurator
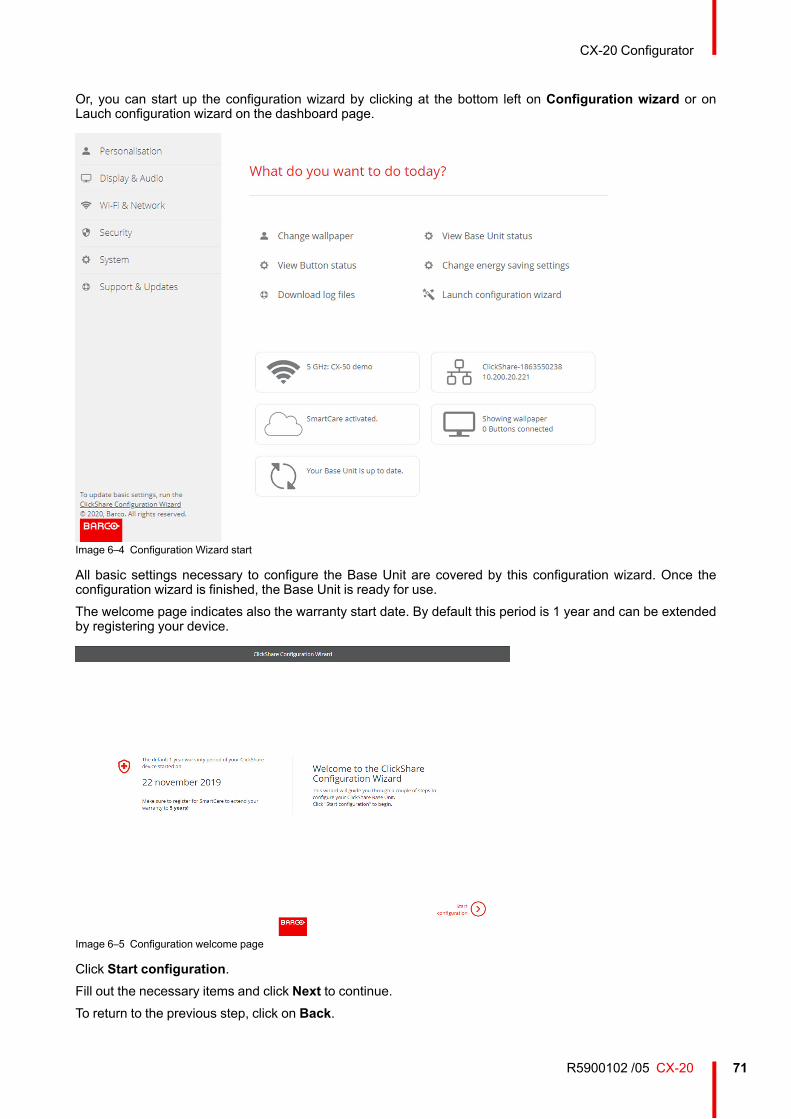
71R5900102 /05 CX-20
Or, you can start up the configuration wizard by clicking at the bottom left on Configuration wizard or onLauch configuration wizard on the dashboard page.
Image 6–4 Configuration Wizard start
All basic settings necessary to configure the Base Unit are covered by this configuration wizard. Once theconfiguration wizard is finished, the Base Unit is ready for use.The welcome page indicates also the warranty start date. By default this period is 1 year and can be extendedby registering your device.
Image 6–5 Configuration welcome page
Click Start configuration.Fill out the necessary items and click Next to continue.To return to the previous step, click on Back.
CX-20 Configurator
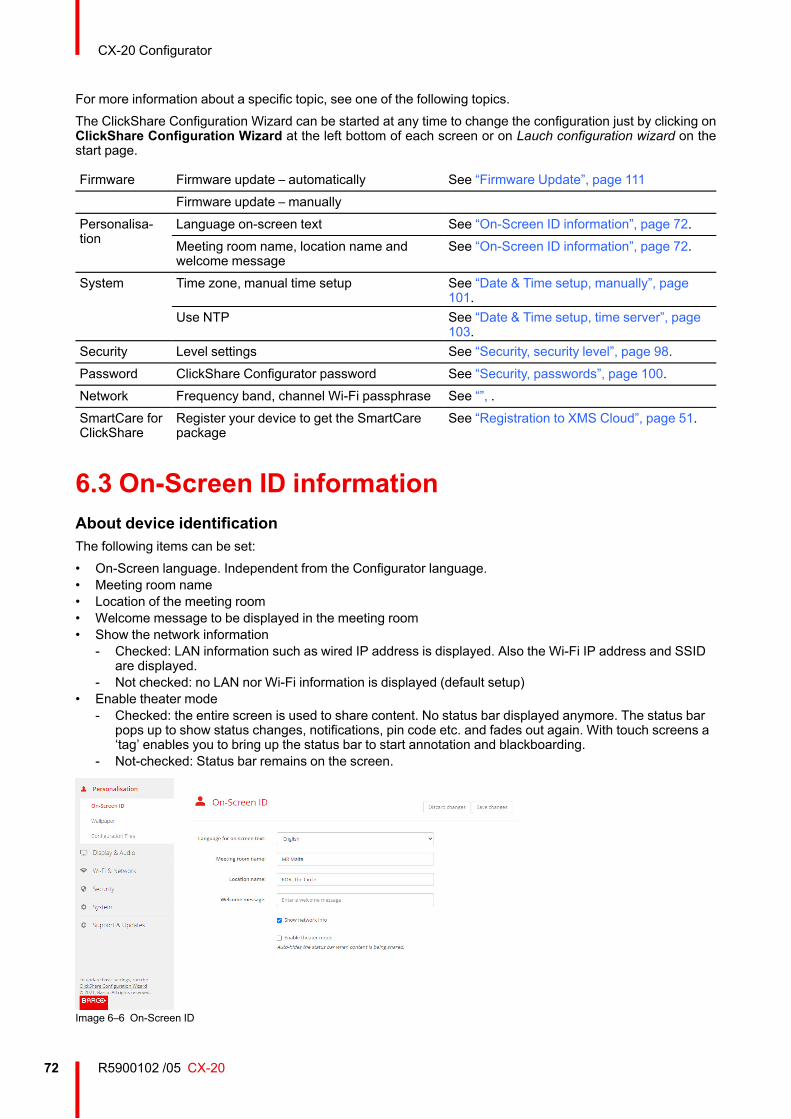
R5900102 /05 CX-2072
For more information about a specific topic, see one of the following topics.The ClickShare Configuration Wizard can be started at any time to change the configuration just by clicking onClickShare Configuration Wizard at the left bottom of each screen or on Lauch configuration wizard on thestart page.
Firmware Firmware update – automatically See “Firmware Update”, page 111Firmware update – manually
Personalisa-tion
Language on-screen text See “On-Screen ID information”, page 72.Meeting room name, location name andwelcome message
See “On-Screen ID information”, page 72.
System Time zone, manual time setup See “Date & Time setup, manually”, page101.
Use NTP See “Date & Time setup, time server”, page103.
Security Level settings See “Security, security level”, page 98.Password ClickShare Configurator password See “Security, passwords”, page 100.Network Frequency band, channel Wi-Fi passphrase See “”, .SmartCare forClickShare
Register your device to get the SmartCarepackage
See “Registration to XMS Cloud”, page 51.
6.3 On-Screen ID informationAbout device identificationThe following items can be set:• On-Screen language. Independent from the Configurator language.• Meeting room name• Location of the meeting room• Welcome message to be displayed in the meeting room• Show the network information
- Checked: LAN information such as wired IP address is displayed. Also the Wi-Fi IP address and SSIDare displayed.
- Not checked: no LAN nor Wi-Fi information is displayed (default setup)• Enable theater mode
- Checked: the entire screen is used to share content. No status bar displayed anymore. The status barpops up to show status changes, notifications, pin code etc. and fades out again. With touch screens a‘tag’ enables you to bring up the status bar to start annotation and blackboarding.
- Not-checked: Status bar remains on the screen.
Image 6–6 On-Screen ID
CX-20 Configurator
73R5900102 /05 CX-20
On Screen language selection1. Log in to the Configurator.
2. Click Personalisation → On-screen ID.
3. Select the language of the on-screen text. Click on the drop down box next to Language for on-screen textand select the desired language.The following languages are possible:• Arabic• Simplified Chinese• Traditional Chinese• Danish• Dutch• English• Finnish• French• German• Italian• Japanese• Korean• Norwegian• Portuguese• Russian• Spanish• Swedish
Meeting room name, location and welcome message1. Log in to the Configurator.
2. Click Personalisation → On-screen ID.
3. Click in the input field next toMeeting room name and enter a name for the meeting room.This text is shown on the user's device when the Button is ready to share ("Ready to share on..."), on thecentral screen connected to the Base Unit and in the list of AirPlay receivers on the user's iOS device.
4. Click in the input field next to Location name and enter the location.
5. Click in the input field next toWelcome message and enter the desired message.
6.4 Personalisation, WallpaperAbout wallpaperWhen CX-20 starts up, a background (wallpaper) is displayed. The display of this background wallpaper canbe disabled.By default two general ClickShare wallpapers are available. The possibility exists to upload personalbackgrounds (wallpapers). The default wallpapers cannot be removed from the system.
Wallpaper selection1. Log in to the Configurator
2. Click Personalisation →Wallpaper.
CX-20 Configurator
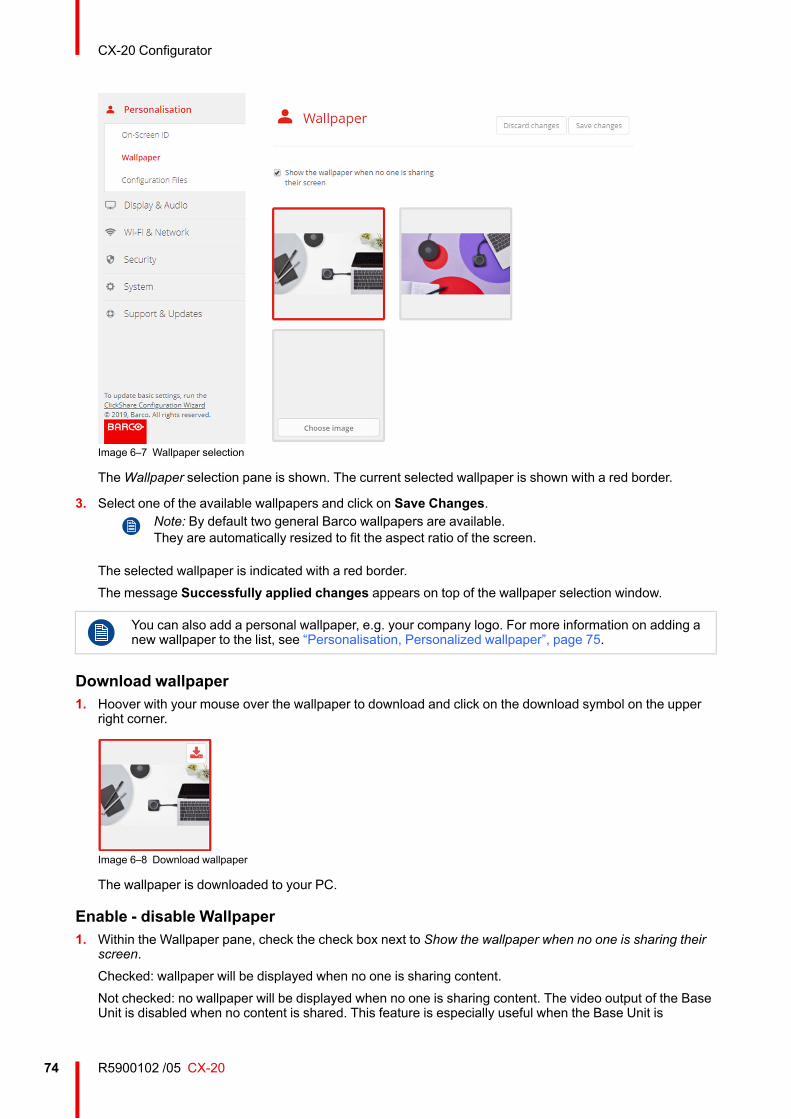
R5900102 /05 CX-2074
Image 6–7 Wallpaper selection
TheWallpaper selection pane is shown. The current selected wallpaper is shown with a red border.
3. Select one of the available wallpapers and click on Save Changes.Note: By default two general Barco wallpapers are available.They are automatically resized to fit the aspect ratio of the screen.
The selected wallpaper is indicated with a red border.The message Successfully applied changes appears on top of the wallpaper selection window.
You can also add a personal wallpaper, e.g. your company logo. For more information on adding anew wallpaper to the list, see “Personalisation, Personalized wallpaper”, page 75.
Download wallpaper1. Hoover with your mouse over the wallpaper to download and click on the download symbol on the upper
right corner.
Image 6–8 Download wallpaper
The wallpaper is downloaded to your PC.
Enable - disable Wallpaper1. Within the Wallpaper pane, check the check box next to Show the wallpaper when no one is sharing their
screen.Checked: wallpaper will be displayed when no one is sharing content.Not checked: no wallpaper will be displayed when no one is sharing content. The video output of the BaseUnit is disabled when no content is shared. This feature is especially useful when the Base Unit is
CX-20 Configurator
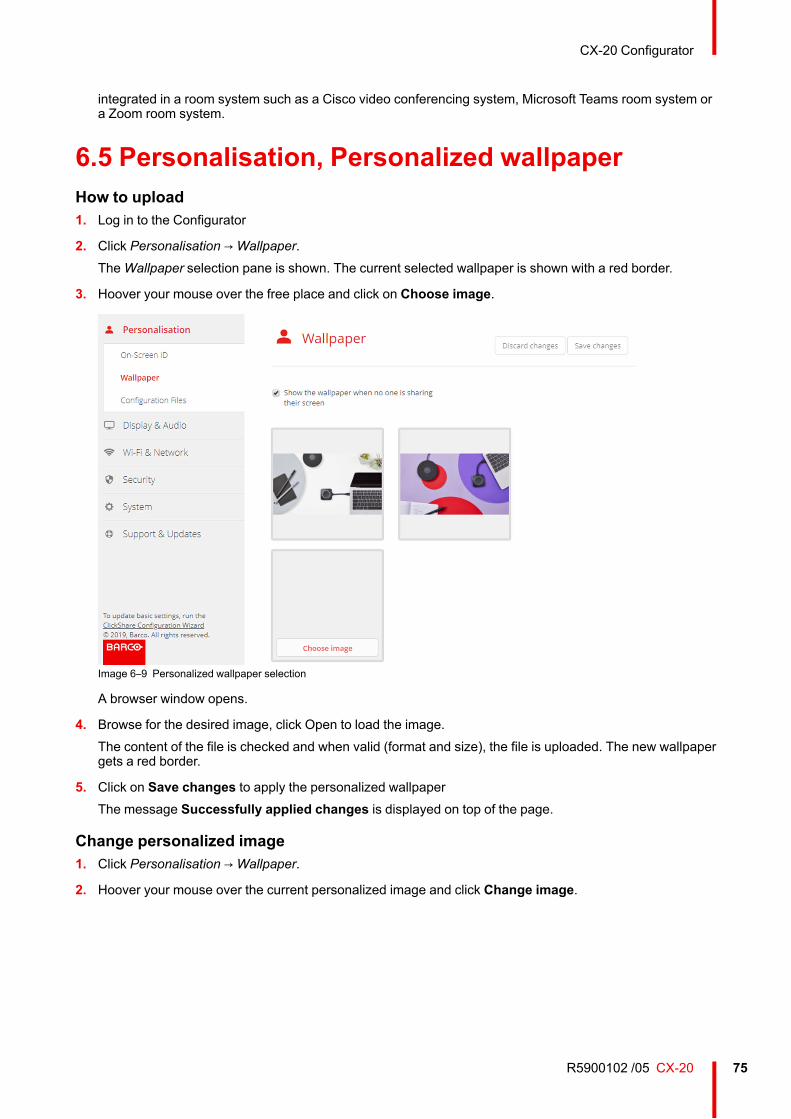
75R5900102 /05 CX-20
integrated in a room system such as a Cisco video conferencing system, Microsoft Teams room system ora Zoom room system.
6.5 Personalisation, Personalized wallpaperHow to upload1. Log in to the Configurator
2. Click Personalisation →Wallpaper.TheWallpaper selection pane is shown. The current selected wallpaper is shown with a red border.
3. Hoover your mouse over the free place and click on Choose image.
Image 6–9 Personalized wallpaper selection
A browser window opens.
4. Browse for the desired image, click Open to load the image.The content of the file is checked and when valid (format and size), the file is uploaded. The new wallpapergets a red border.
5. Click on Save changes to apply the personalized wallpaperThe message Successfully applied changes is displayed on top of the page.
Change personalized image1. Click Personalisation →Wallpaper.
2. Hoover your mouse over the current personalized image and click Change image.
CX-20 Configurator
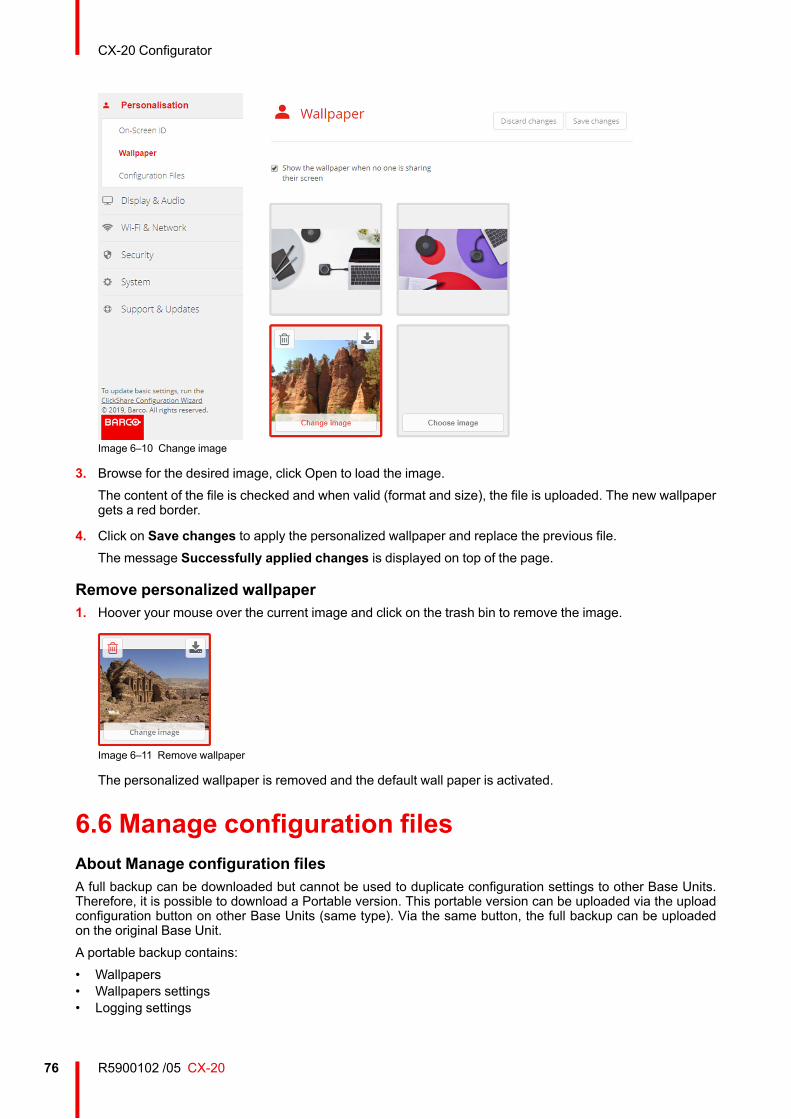
R5900102 /05 CX-2076
Image 6–10 Change image
3. Browse for the desired image, click Open to load the image.The content of the file is checked and when valid (format and size), the file is uploaded. The new wallpapergets a red border.
4. Click on Save changes to apply the personalized wallpaper and replace the previous file.The message Successfully applied changes is displayed on top of the page.
Remove personalized wallpaper1. Hoover your mouse over the current image and click on the trash bin to remove the image.
Image 6–11 Remove wallpaper
The personalized wallpaper is removed and the default wall paper is activated.
6.6 Manage configuration filesAbout Manage configuration filesA full backup can be downloaded but cannot be used to duplicate configuration settings to other Base Units.Therefore, it is possible to download a Portable version. This portable version can be uploaded via the uploadconfiguration button on other Base Units (same type). Via the same button, the full backup can be uploadedon the original Base Unit.A portable backup contains:• Wallpapers• Wallpapers settings• Logging settings
CX-20 Configurator
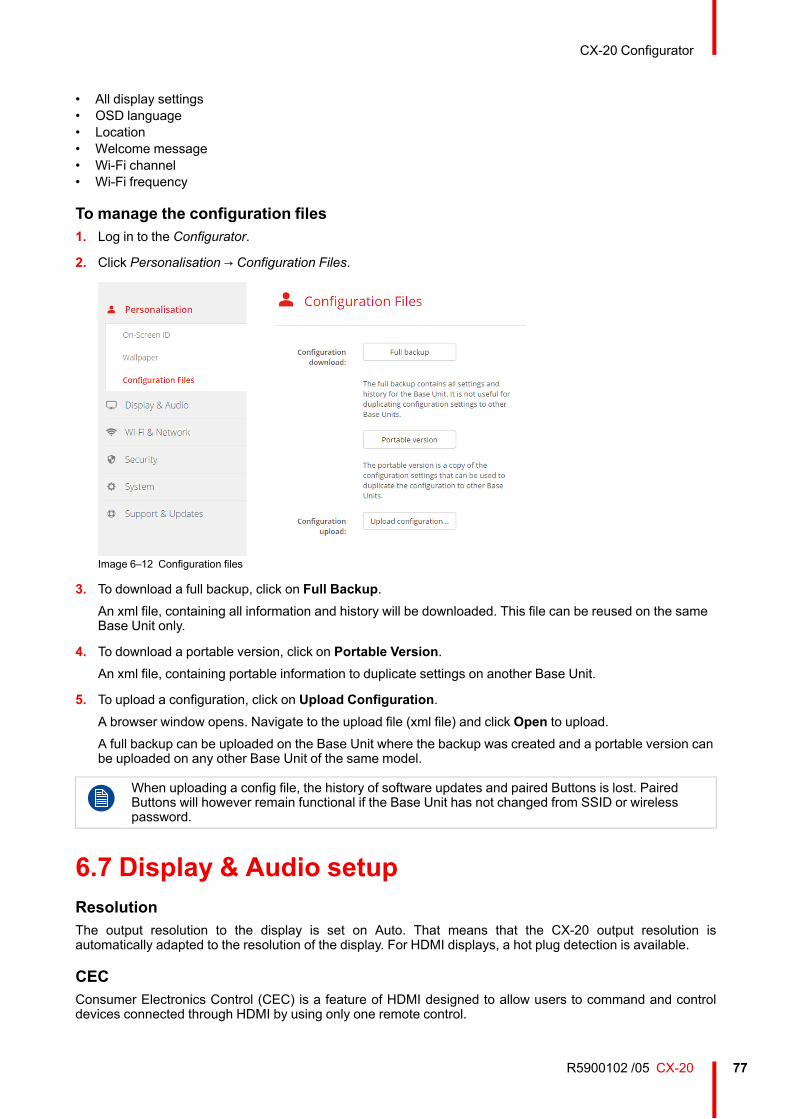
77R5900102 /05 CX-20
• All display settings• OSD language• Location• Welcome message• Wi-Fi channel• Wi-Fi frequency
To manage the configuration files1. Log in to the Configurator.
2. Click Personalisation → Configuration Files.
Image 6–12 Configuration files
3. To download a full backup, click on Full Backup.An xml file, containing all information and history will be downloaded. This file can be reused on the sameBase Unit only.
4. To download a portable version, click on Portable Version.An xml file, containing portable information to duplicate settings on another Base Unit.
5. To upload a configuration, click on Upload Configuration.A browser window opens. Navigate to the upload file (xml file) and click Open to upload.A full backup can be uploaded on the Base Unit where the backup was created and a portable version canbe uploaded on any other Base Unit of the same model.
When uploading a config file, the history of software updates and paired Buttons is lost. PairedButtons will however remain functional if the Base Unit has not changed from SSID or wirelesspassword.
6.7 Display & Audio setupResolutionThe output resolution to the display is set on Auto. That means that the CX-20 output resolution isautomatically adapted to the resolution of the display. For HDMI displays, a hot plug detection is available.
CECConsumer Electronics Control (CEC) is a feature of HDMI designed to allow users to command and controldevices connected through HDMI by using only one remote control.
CX-20 Configurator
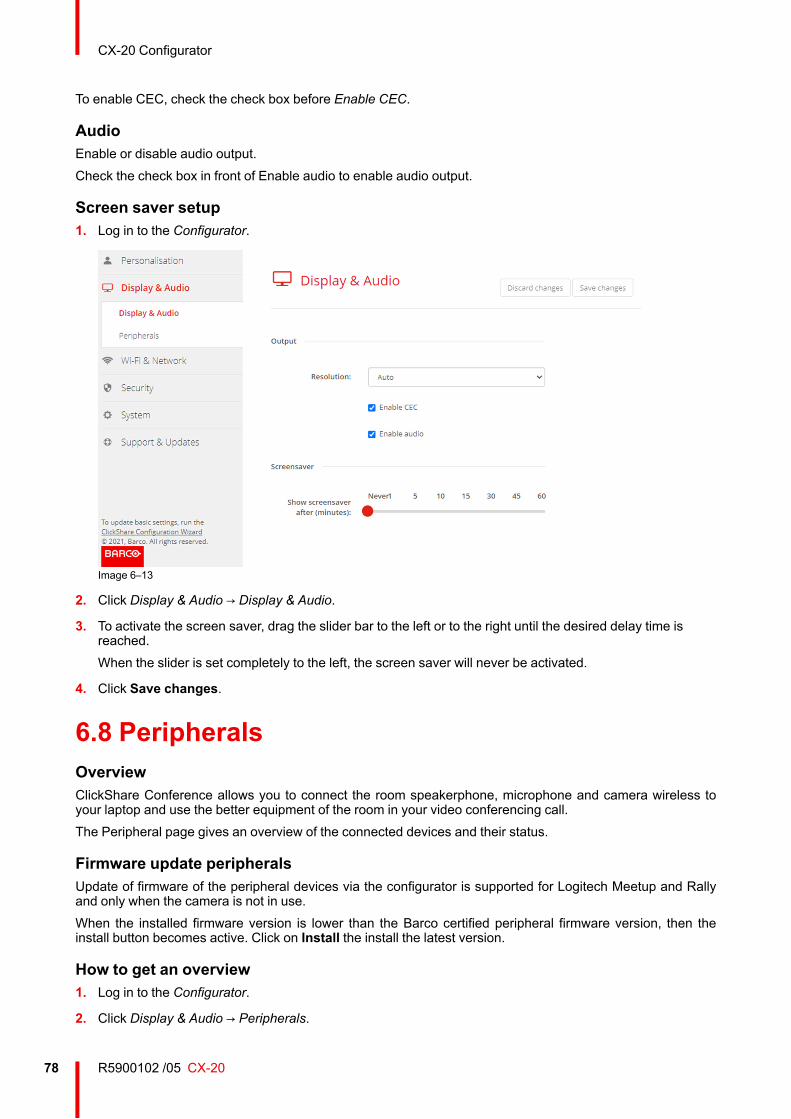
R5900102 /05 CX-2078
To enable CEC, check the check box before Enable CEC.
AudioEnable or disable audio output.Check the check box in front of Enable audio to enable audio output.
Screen saver setup1. Log in to the Configurator.
Image 6–13
2. Click Display & Audio → Display & Audio.
3. To activate the screen saver, drag the slider bar to the left or to the right until the desired delay time isreached.When the slider is set completely to the left, the screen saver will never be activated.
4. Click Save changes.
6.8 PeripheralsOverviewClickShare Conference allows you to connect the room speakerphone, microphone and camera wireless toyour laptop and use the better equipment of the room in your video conferencing call.The Peripheral page gives an overview of the connected devices and their status.
Firmware update peripheralsUpdate of firmware of the peripheral devices via the configurator is supported for Logitech Meetup and Rallyand only when the camera is not in use.When the installed firmware version is lower than the Barco certified peripheral firmware version, then theinstall button becomes active. Click on Install the install the latest version.
How to get an overview1. Log in to the Configurator.
2. Click Display & Audio → Peripherals.
CX-20 Configurator
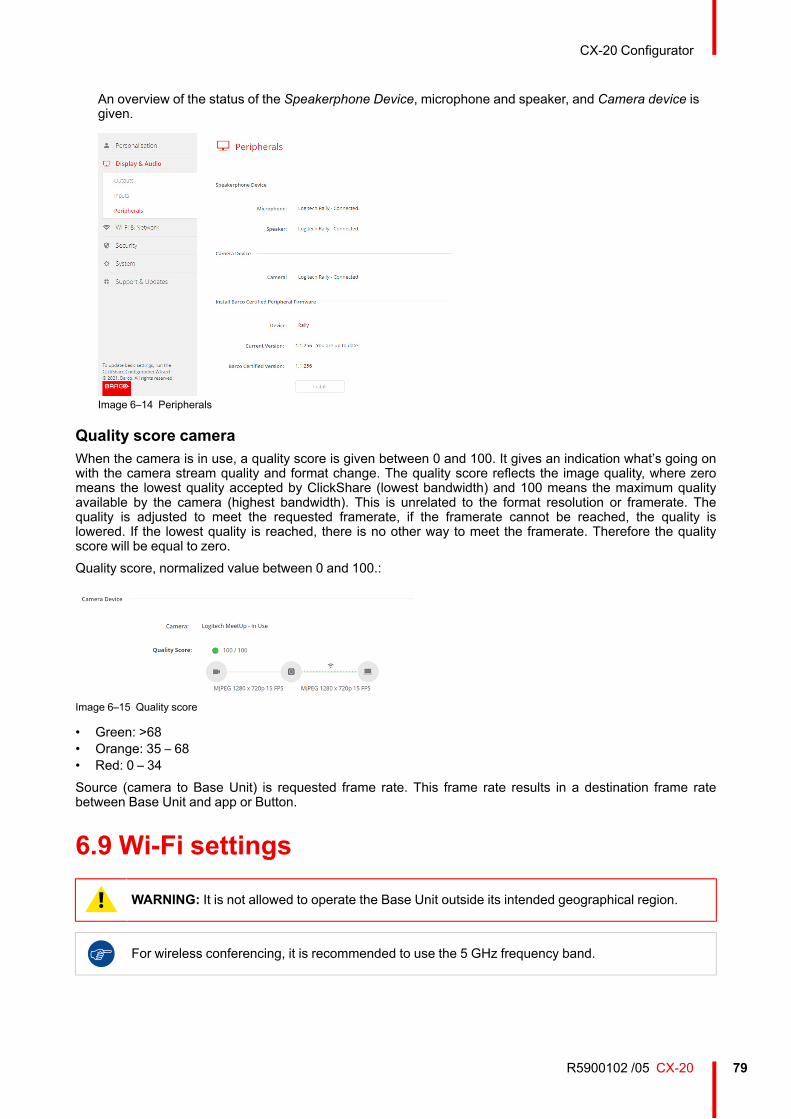
79R5900102 /05 CX-20
An overview of the status of the Speakerphone Device, microphone and speaker, and Camera device isgiven.
Image 6–14 Peripherals
Quality score cameraWhen the camera is in use, a quality score is given between 0 and 100. It gives an indication what’s going onwith the camera stream quality and format change. The quality score reflects the image quality, where zeromeans the lowest quality accepted by ClickShare (lowest bandwidth) and 100 means the maximum qualityavailable by the camera (highest bandwidth). This is unrelated to the format resolution or framerate. Thequality is adjusted to meet the requested framerate, if the framerate cannot be reached, the quality islowered. If the lowest quality is reached, there is no other way to meet the framerate. Therefore the qualityscore will be equal to zero.Quality score, normalized value between 0 and 100.:
Image 6–15 Quality score
• Green: >68• Orange: 35 – 68• Red: 0 – 34Source (camera to Base Unit) is requested frame rate. This frame rate results in a destination frame ratebetween Base Unit and app or Button.
6.9 Wi-Fi settings
WARNING: It is not allowed to operate the Base Unit outside its intended geographical region.
For wireless conferencing, it is recommended to use the 5 GHz frequency band.
CX-20 Configurator
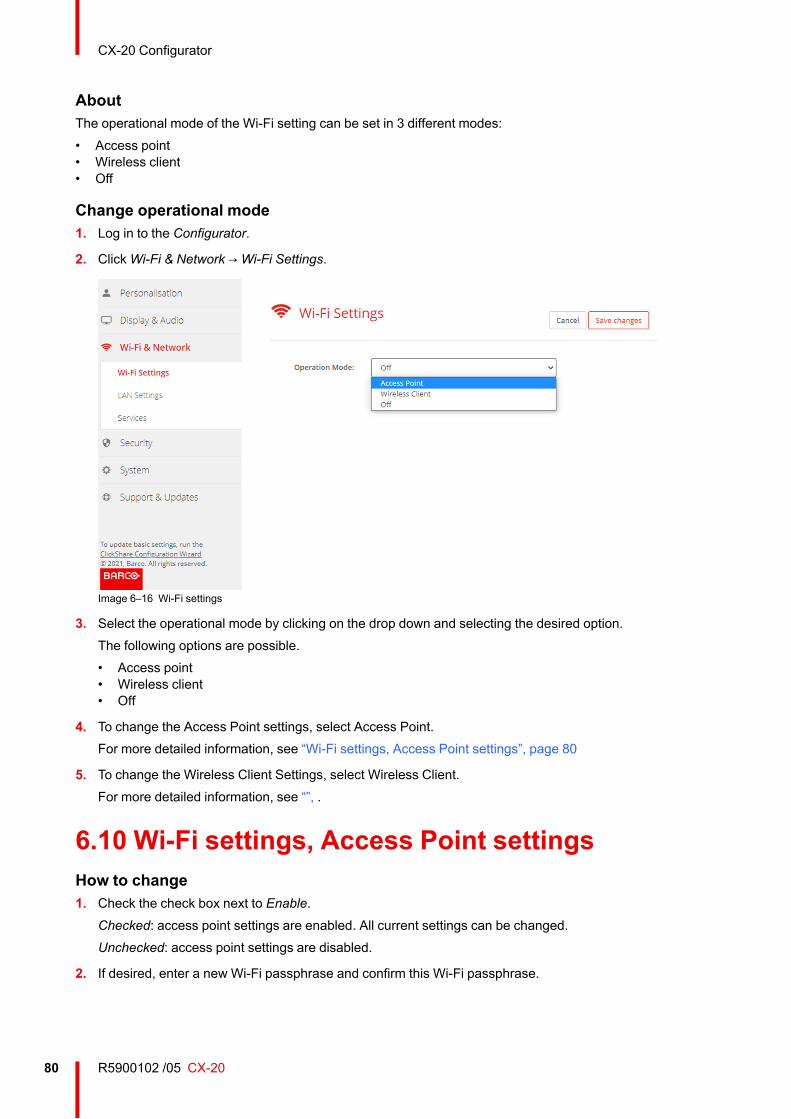
R5900102 /05 CX-2080
AboutThe operational mode of the Wi-Fi setting can be set in 3 different modes:• Access point• Wireless client• Off
Change operational mode1. Log in to the Configurator.
2. ClickWi-Fi & Network →Wi-Fi Settings.
Image 6–16 Wi-Fi settings
3. Select the operational mode by clicking on the drop down and selecting the desired option.The following options are possible.• Access point• Wireless client• Off
4. To change the Access Point settings, select Access Point.For more detailed information, see “Wi-Fi settings, Access Point settings”, page 80
5. To change the Wireless Client Settings, select Wireless Client.For more detailed information, see “”, .
6.10 Wi-Fi settings, Access Point settingsHow to change1. Check the check box next to Enable.
Checked: access point settings are enabled. All current settings can be changed.Unchecked: access point settings are disabled.
2. If desired, enter a new Wi-Fi passphrase and confirm this Wi-Fi passphrase.
CX-20 Configurator
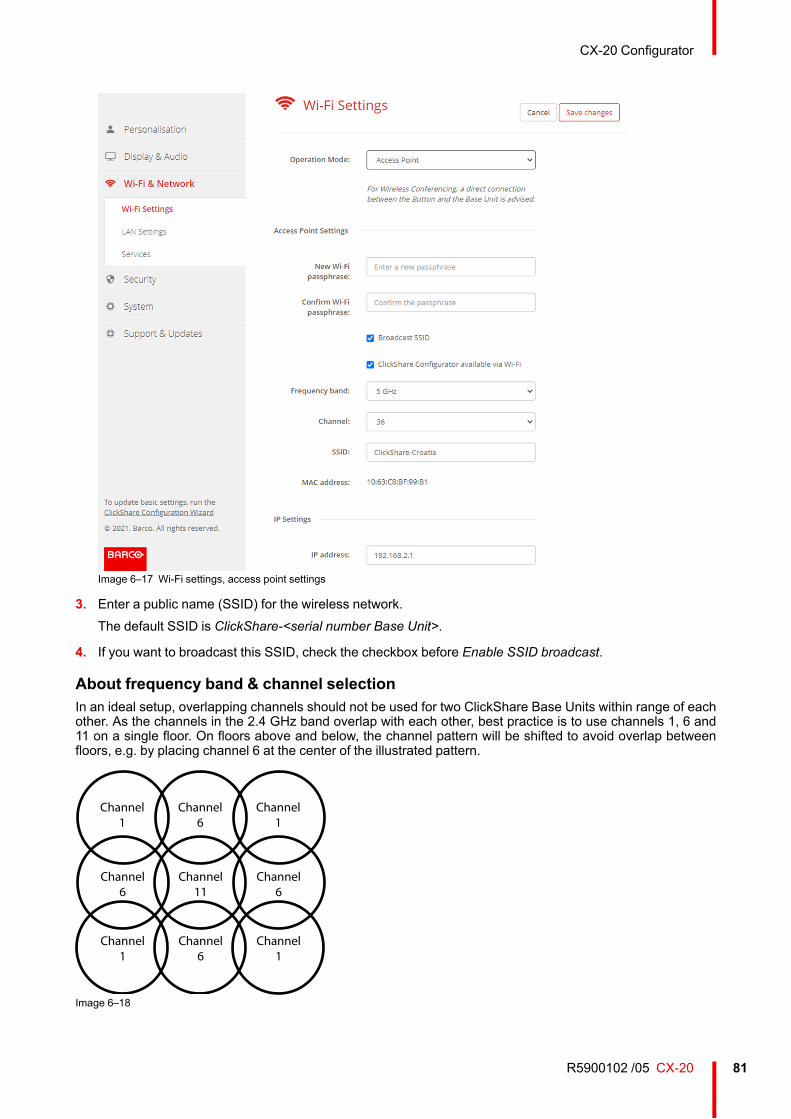
81R5900102 /05 CX-20
Image 6–17 Wi-Fi settings, access point settings
3. Enter a public name (SSID) for the wireless network.The default SSID is ClickShare-<serial number Base Unit>.
4. If you want to broadcast this SSID, check the checkbox before Enable SSID broadcast.
About frequency band & channel selectionIn an ideal setup, overlapping channels should not be used for two ClickShare Base Units within range of eachother. As the channels in the 2.4 GHz band overlap with each other, best practice is to use channels 1, 6 and11 on a single floor. On floors above and below, the channel pattern will be shifted to avoid overlap betweenfloors, e.g. by placing channel 6 at the center of the illustrated pattern.
Channel1
Channel6
Channel1
Channel6
Channel11
Channel6
Channel1
Channel6
Channel1
Image 6–18
CX-20 Configurator
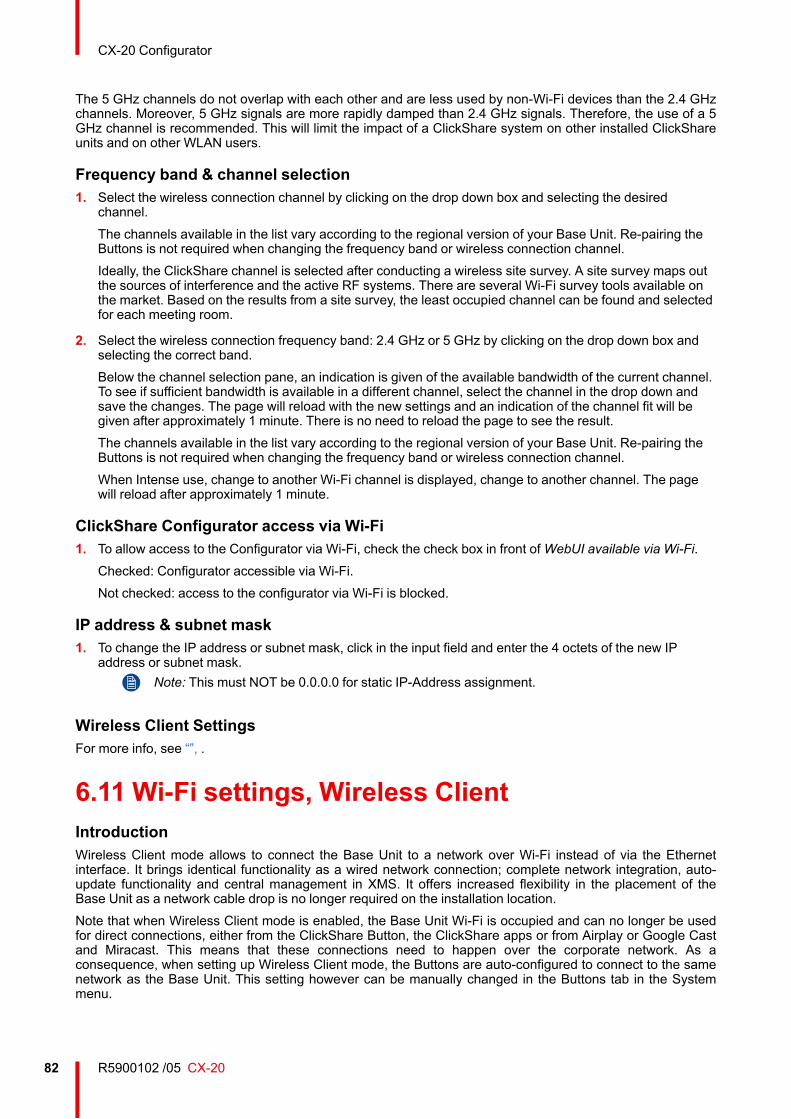
R5900102 /05 CX-2082
The 5 GHz channels do not overlap with each other and are less used by non-Wi-Fi devices than the 2.4 GHzchannels. Moreover, 5 GHz signals are more rapidly damped than 2.4 GHz signals. Therefore, the use of a 5GHz channel is recommended. This will limit the impact of a ClickShare system on other installed ClickShareunits and on other WLAN users.
Frequency band & channel selection1. Select the wireless connection channel by clicking on the drop down box and selecting the desired
channel.The channels available in the list vary according to the regional version of your Base Unit. Re-pairing theButtons is not required when changing the frequency band or wireless connection channel.Ideally, the ClickShare channel is selected after conducting a wireless site survey. A site survey maps outthe sources of interference and the active RF systems. There are several Wi-Fi survey tools available onthe market. Based on the results from a site survey, the least occupied channel can be found and selectedfor each meeting room.
2. Select the wireless connection frequency band: 2.4 GHz or 5 GHz by clicking on the drop down box andselecting the correct band.Below the channel selection pane, an indication is given of the available bandwidth of the current channel.To see if sufficient bandwidth is available in a different channel, select the channel in the drop down andsave the changes. The page will reload with the new settings and an indication of the channel fit will begiven after approximately 1 minute. There is no need to reload the page to see the result.The channels available in the list vary according to the regional version of your Base Unit. Re-pairing theButtons is not required when changing the frequency band or wireless connection channel.When Intense use, change to another Wi-Fi channel is displayed, change to another channel. The pagewill reload after approximately 1 minute.
ClickShare Configurator access via Wi-Fi1. To allow access to the Configurator via Wi-Fi, check the check box in front ofWebUI available via Wi-Fi.
Checked: Configurator accessible via Wi-Fi.Not checked: access to the configurator via Wi-Fi is blocked.
IP address & subnet mask1. To change the IP address or subnet mask, click in the input field and enter the 4 octets of the new IP
address or subnet mask.Note: This must NOT be 0.0.0.0 for static IP-Address assignment.
Wireless Client SettingsFor more info, see “”, .
6.11 Wi-Fi settings, Wireless ClientIntroductionWireless Client mode allows to connect the Base Unit to a network over Wi-Fi instead of via the Ethernetinterface. It brings identical functionality as a wired network connection; complete network integration, auto-update functionality and central management in XMS. It offers increased flexibility in the placement of theBase Unit as a network cable drop is no longer required on the installation location.Note that when Wireless Client mode is enabled, the Base Unit Wi-Fi is occupied and can no longer be usedfor direct connections, either from the ClickShare Button, the ClickShare apps or from Airplay or Google Castand Miracast. This means that these connections need to happen over the corporate network. As aconsequence, when setting up Wireless Client mode, the Buttons are auto-configured to connect to the samenetwork as the Base Unit. This setting however can be manually changed in the Buttons tab in the Systemmenu.
CX-20 Configurator
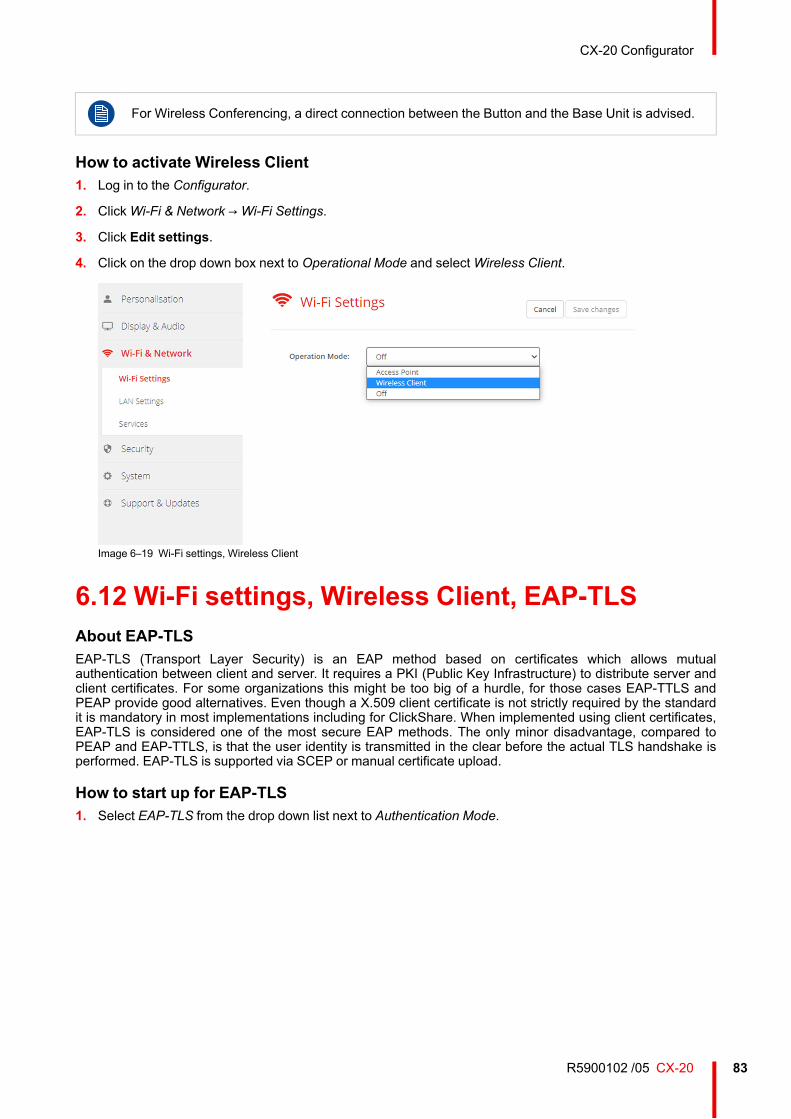
83R5900102 /05 CX-20
For Wireless Conferencing, a direct connection between the Button and the Base Unit is advised.
How to activate Wireless Client1. Log in to the Configurator.
2. ClickWi-Fi & Network →Wi-Fi Settings.
3. Click Edit settings.
4. Click on the drop down box next to Operational Mode and selectWireless Client.
Image 6–19 Wi-Fi settings, Wireless Client
6.12 Wi-Fi settings, Wireless Client, EAP-TLSAbout EAP-TLSEAP-TLS (Transport Layer Security) is an EAP method based on certificates which allows mutualauthentication between client and server. It requires a PKI (Public Key Infrastructure) to distribute server andclient certificates. For some organizations this might be too big of a hurdle, for those cases EAP-TTLS andPEAP provide good alternatives. Even though a X.509 client certificate is not strictly required by the standardit is mandatory in most implementations including for ClickShare. When implemented using client certificates,EAP-TLS is considered one of the most secure EAP methods. The only minor disadvantage, compared toPEAP and EAP-TTLS, is that the user identity is transmitted in the clear before the actual TLS handshake isperformed. EAP-TLS is supported via SCEP or manual certificate upload.
How to start up for EAP-TLS1. Select EAP-TLS from the drop down list next to Authentication Mode.
CX-20 Configurator
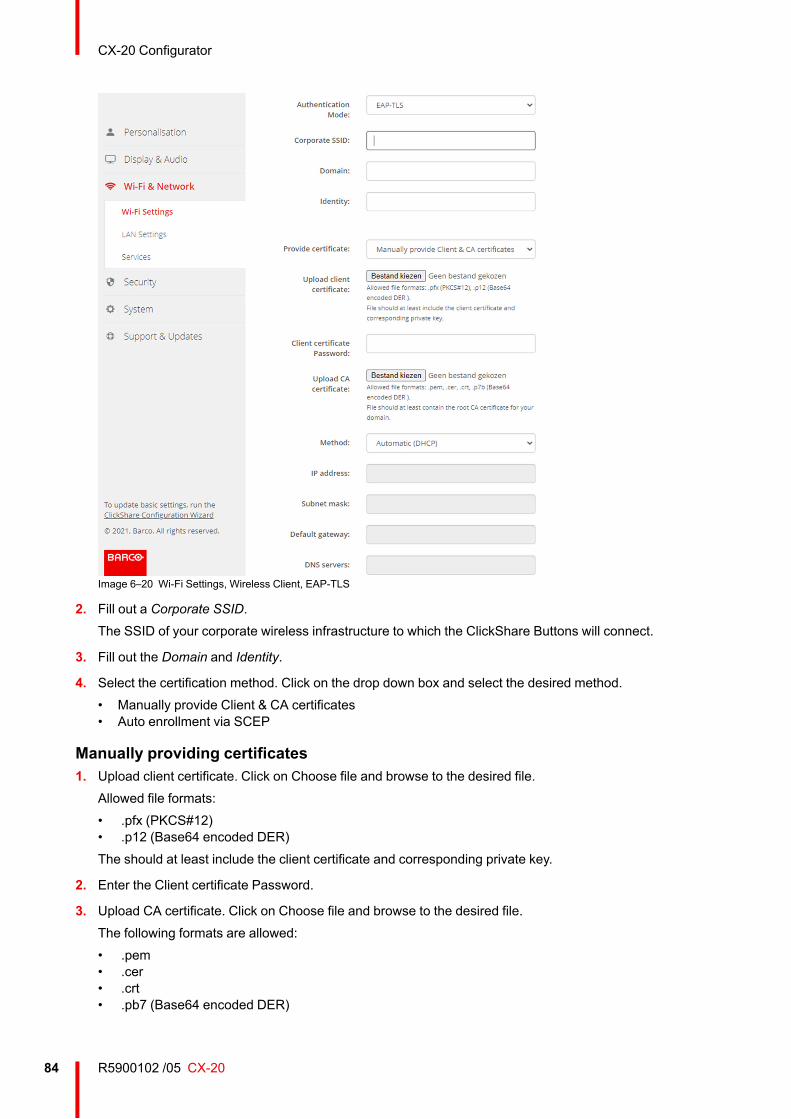
R5900102 /05 CX-2084
Image 6–20 Wi-Fi Settings, Wireless Client, EAP-TLS
2. Fill out a Corporate SSID.The SSID of your corporate wireless infrastructure to which the ClickShare Buttons will connect.
3. Fill out the Domain and Identity.
4. Select the certification method. Click on the drop down box and select the desired method.• Manually provide Client & CA certificates• Auto enrollment via SCEP
Manually providing certificates1. Upload client certificate. Click on Choose file and browse to the desired file.
Allowed file formats:• .pfx (PKCS#12)• .p12 (Base64 encoded DER)The should at least include the client certificate and corresponding private key.
2. Enter the Client certificate Password.
3. Upload CA certificate. Click on Choose file and browse to the desired file.The following formats are allowed:• .pem• .cer• .crt• .pb7 (Base64 encoded DER)
CX-20 Configurator
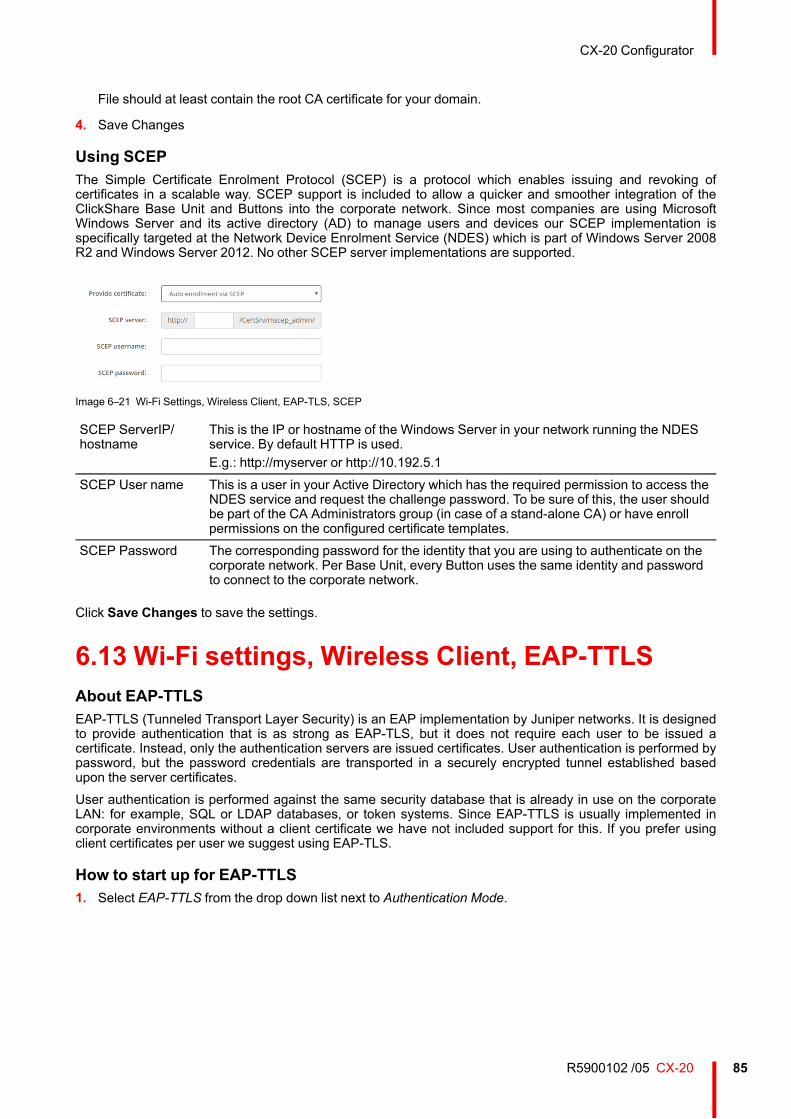
85R5900102 /05 CX-20
File should at least contain the root CA certificate for your domain.
4. Save Changes
Using SCEPThe Simple Certificate Enrolment Protocol (SCEP) is a protocol which enables issuing and revoking ofcertificates in a scalable way. SCEP support is included to allow a quicker and smoother integration of theClickShare Base Unit and Buttons into the corporate network. Since most companies are using MicrosoftWindows Server and its active directory (AD) to manage users and devices our SCEP implementation isspecifically targeted at the Network Device Enrolment Service (NDES) which is part of Windows Server 2008R2 and Windows Server 2012. No other SCEP server implementations are supported.
Image 6–21 Wi-Fi Settings, Wireless Client, EAP-TLS, SCEP
SCEP ServerIP/hostname
This is the IP or hostname of the Windows Server in your network running the NDESservice. By default HTTP is used.E.g.: http://myserver or http://10.192.5.1
SCEP User name This is a user in your Active Directory which has the required permission to access theNDES service and request the challenge password. To be sure of this, the user shouldbe part of the CA Administrators group (in case of a stand-alone CA) or have enrollpermissions on the configured certificate templates.
SCEP Password The corresponding password for the identity that you are using to authenticate on thecorporate network. Per Base Unit, every Button uses the same identity and passwordto connect to the corporate network.
Click Save Changes to save the settings.
6.13 Wi-Fi settings, Wireless Client, EAP-TTLSAbout EAP-TTLSEAP-TTLS (Tunneled Transport Layer Security) is an EAP implementation by Juniper networks. It is designedto provide authentication that is as strong as EAP-TLS, but it does not require each user to be issued acertificate. Instead, only the authentication servers are issued certificates. User authentication is performed bypassword, but the password credentials are transported in a securely encrypted tunnel established basedupon the server certificates.User authentication is performed against the same security database that is already in use on the corporateLAN: for example, SQL or LDAP databases, or token systems. Since EAP-TTLS is usually implemented incorporate environments without a client certificate we have not included support for this. If you prefer usingclient certificates per user we suggest using EAP-TLS.
How to start up for EAP-TTLS1. Select EAP-TTLS from the drop down list next to Authentication Mode.
CX-20 Configurator
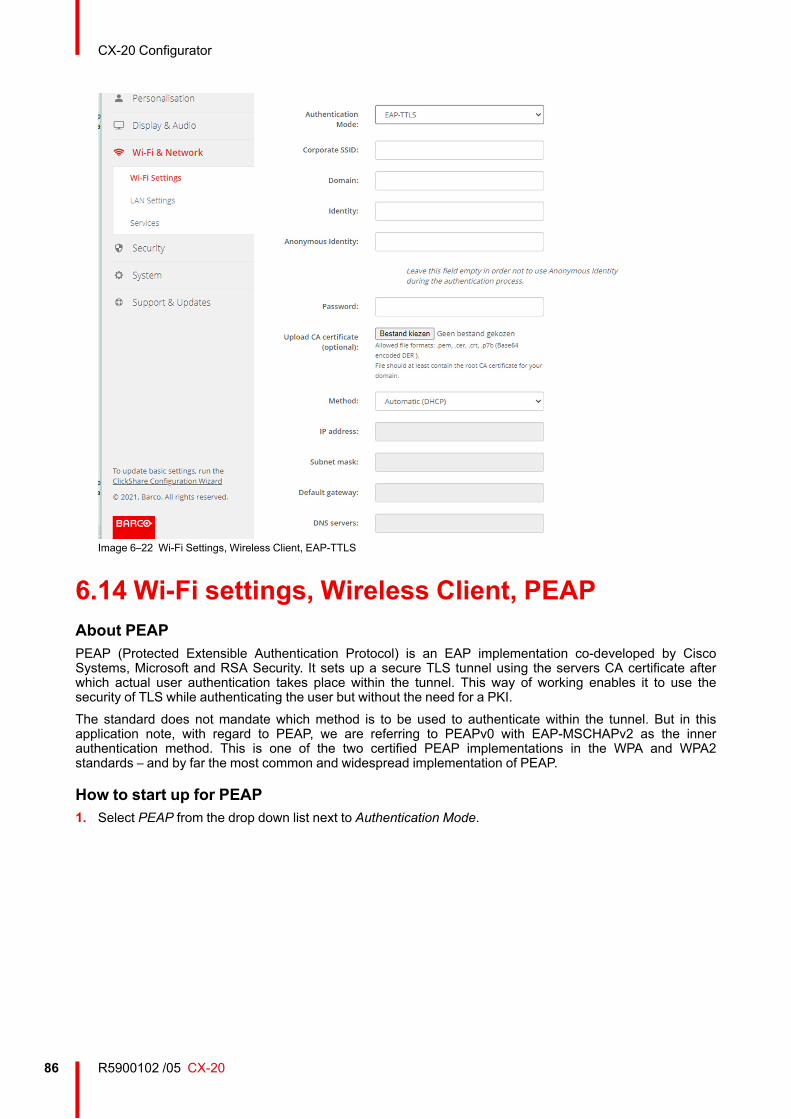
R5900102 /05 CX-2086
Image 6–22 Wi-Fi Settings, Wireless Client, EAP-TTLS
6.14 Wi-Fi settings, Wireless Client, PEAPAbout PEAPPEAP (Protected Extensible Authentication Protocol) is an EAP implementation co-developed by CiscoSystems, Microsoft and RSA Security. It sets up a secure TLS tunnel using the servers CA certificate afterwhich actual user authentication takes place within the tunnel. This way of working enables it to use thesecurity of TLS while authenticating the user but without the need for a PKI.The standard does not mandate which method is to be used to authenticate within the tunnel. But in thisapplication note, with regard to PEAP, we are referring to PEAPv0 with EAP-MSCHAPv2 as the innerauthentication method. This is one of the two certified PEAP implementations in the WPA and WPA2standards – and by far the most common and widespread implementation of PEAP.
How to start up for PEAP1. Select PEAP from the drop down list next to Authentication Mode.
CX-20 Configurator
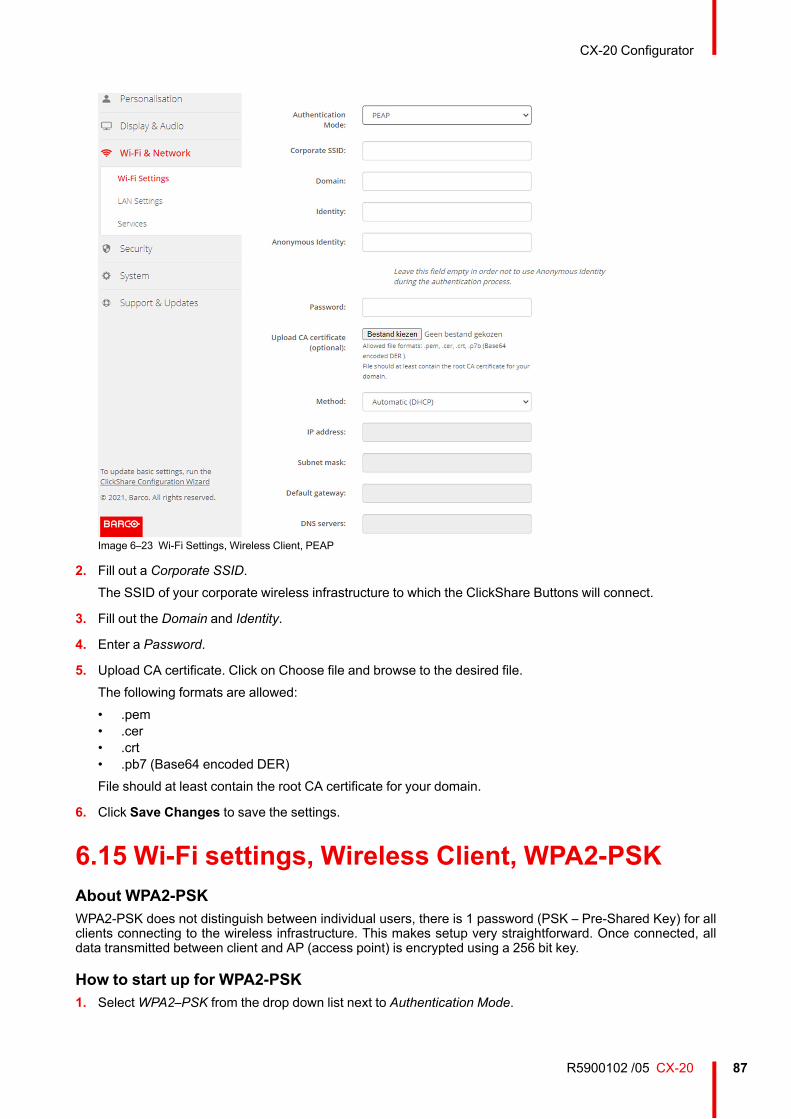
87R5900102 /05 CX-20
Image 6–23 Wi-Fi Settings, Wireless Client, PEAP
2. Fill out a Corporate SSID.The SSID of your corporate wireless infrastructure to which the ClickShare Buttons will connect.
3. Fill out the Domain and Identity.
4. Enter a Password.
5. Upload CA certificate. Click on Choose file and browse to the desired file.The following formats are allowed:• .pem• .cer• .crt• .pb7 (Base64 encoded DER)File should at least contain the root CA certificate for your domain.
6. Click Save Changes to save the settings.
6.15 Wi-Fi settings, Wireless Client, WPA2-PSKAbout WPA2-PSKWPA2-PSK does not distinguish between individual users, there is 1 password (PSK – Pre-Shared Key) for allclients connecting to the wireless infrastructure. This makes setup very straightforward. Once connected, alldata transmitted between client and AP (access point) is encrypted using a 256 bit key.
How to start up for WPA2-PSK1. SelectWPA2–PSK from the drop down list next to Authentication Mode.
CX-20 Configurator
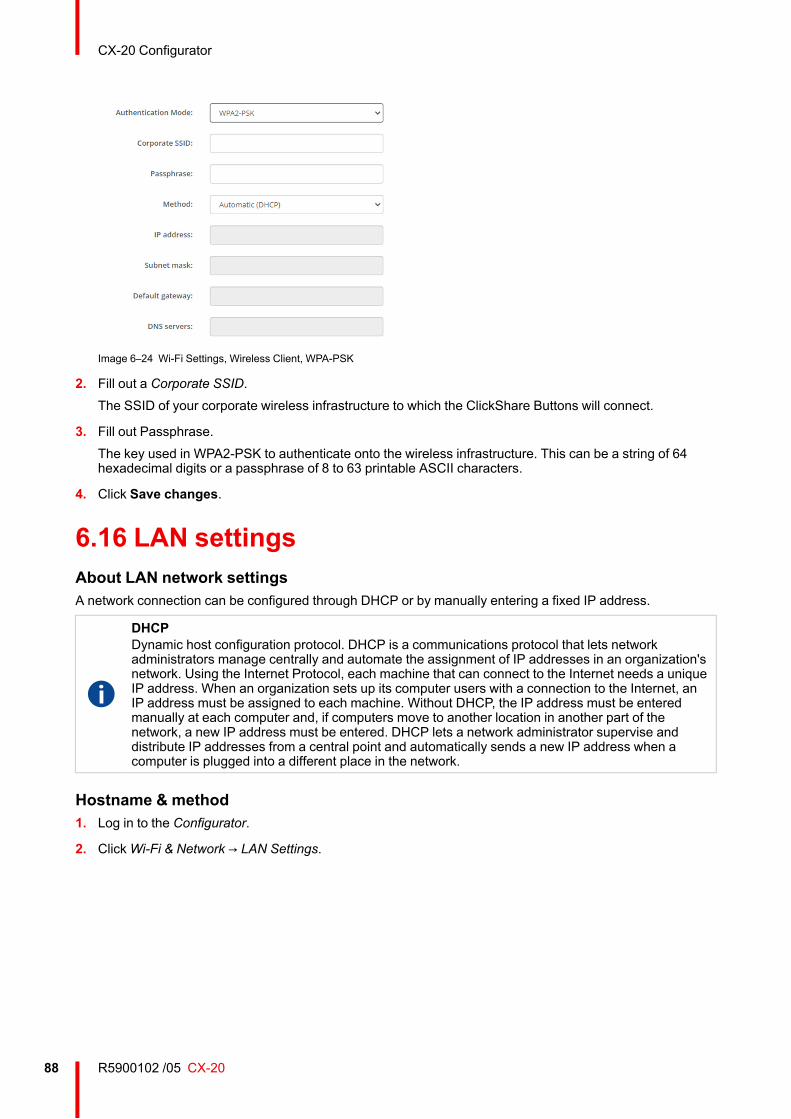
R5900102 /05 CX-2088
Image 6–24 Wi-Fi Settings, Wireless Client, WPA-PSK
2. Fill out a Corporate SSID.The SSID of your corporate wireless infrastructure to which the ClickShare Buttons will connect.
3. Fill out Passphrase.The key used in WPA2-PSK to authenticate onto the wireless infrastructure. This can be a string of 64hexadecimal digits or a passphrase of 8 to 63 printable ASCII characters.
4. Click Save changes.
6.16 LAN settingsAbout LAN network settingsA network connection can be configured through DHCP or by manually entering a fixed IP address.
DHCPDynamic host configuration protocol. DHCP is a communications protocol that lets networkadministrators manage centrally and automate the assignment of IP addresses in an organization'snetwork. Using the Internet Protocol, each machine that can connect to the Internet needs a uniqueIP address. When an organization sets up its computer users with a connection to the Internet, anIP address must be assigned to each machine. Without DHCP, the IP address must be enteredmanually at each computer and, if computers move to another location in another part of thenetwork, a new IP address must be entered. DHCP lets a network administrator supervise anddistribute IP addresses from a central point and automatically sends a new IP address when acomputer is plugged into a different place in the network.
Hostname & method1. Log in to the Configurator.
2. ClickWi-Fi & Network → LAN Settings.
CX-20 Configurator
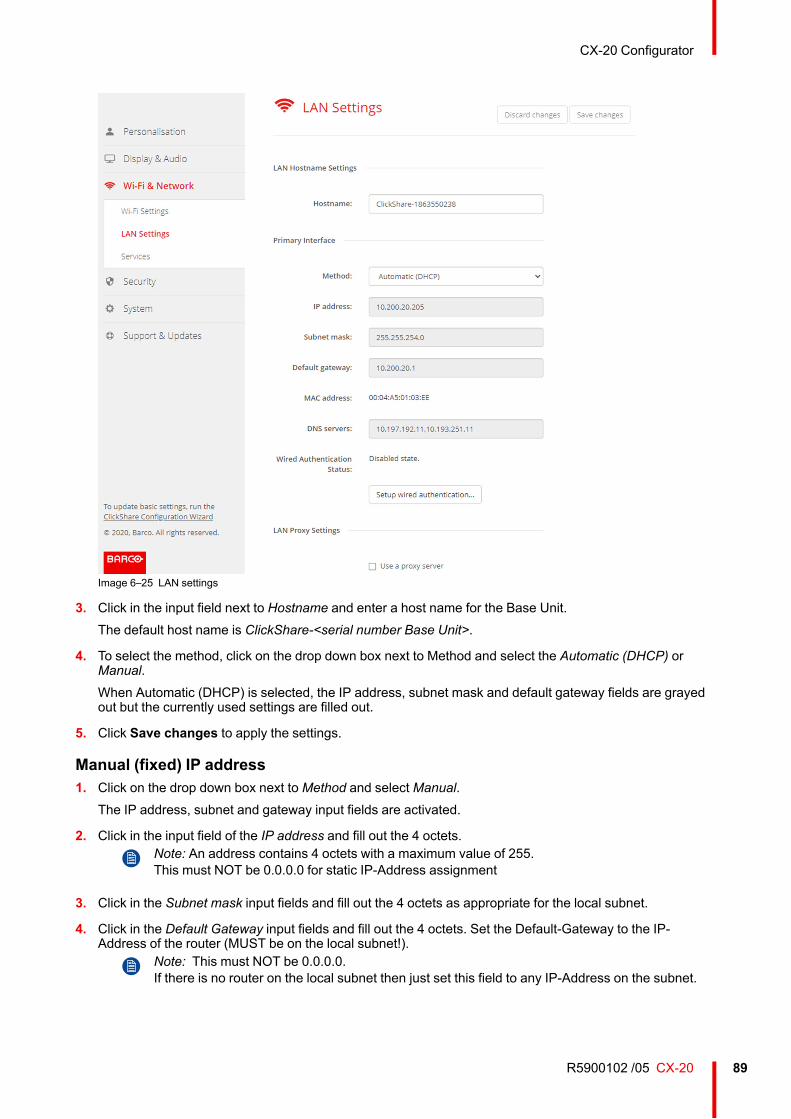
89R5900102 /05 CX-20
Image 6–25 LAN settings
3. Click in the input field next to Hostname and enter a host name for the Base Unit.The default host name is ClickShare-<serial number Base Unit>.
4. To select the method, click on the drop down box next to Method and select the Automatic (DHCP) orManual.When Automatic (DHCP) is selected, the IP address, subnet mask and default gateway fields are grayedout but the currently used settings are filled out.
5. Click Save changes to apply the settings.
Manual (fixed) IP address1. Click on the drop down box next to Method and select Manual.
The IP address, subnet and gateway input fields are activated.
2. Click in the input field of the IP address and fill out the 4 octets.Note: An address contains 4 octets with a maximum value of 255.This must NOT be 0.0.0.0 for static IP-Address assignment
3. Click in the Subnet mask input fields and fill out the 4 octets as appropriate for the local subnet.
4. Click in the Default Gateway input fields and fill out the 4 octets. Set the Default-Gateway to the IP-Address of the router (MUST be on the local subnet!).
Note: This must NOT be 0.0.0.0.If there is no router on the local subnet then just set this field to any IP-Address on the subnet.
CX-20 Configurator
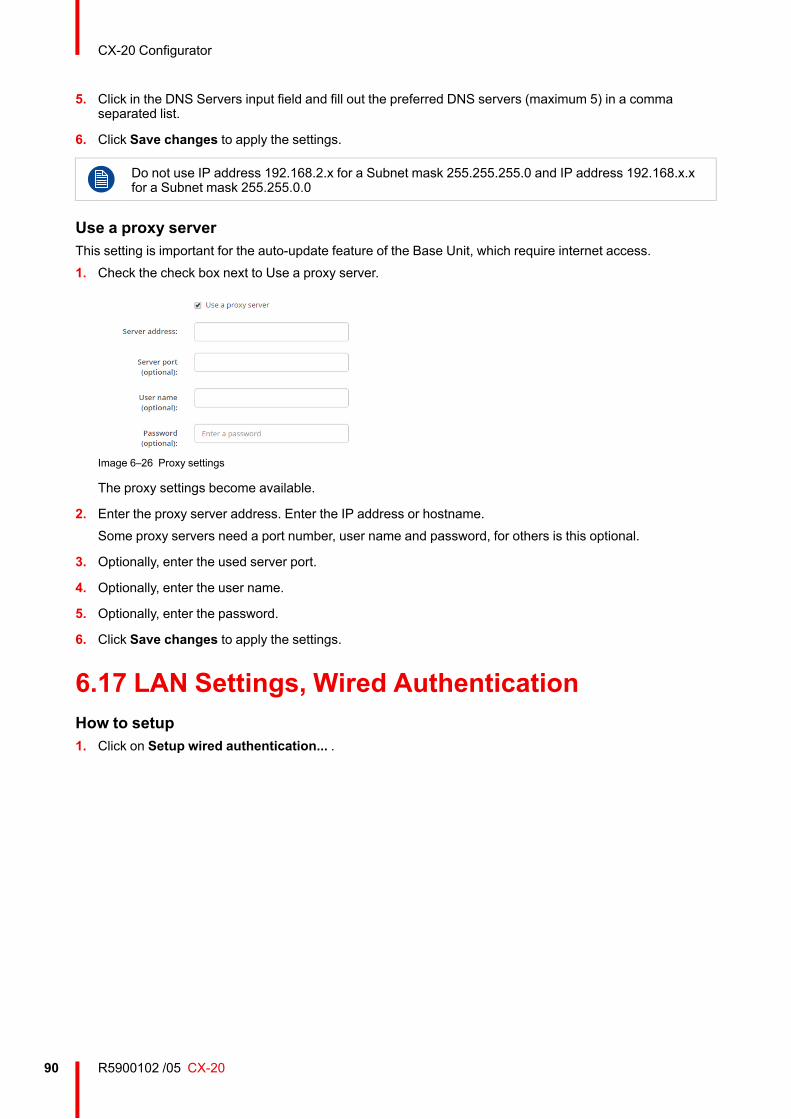
R5900102 /05 CX-2090
5. Click in the DNS Servers input field and fill out the preferred DNS servers (maximum 5) in a commaseparated list.
6. Click Save changes to apply the settings.
Do not use IP address 192.168.2.x for a Subnet mask 255.255.255.0 and IP address 192.168.x.xfor a Subnet mask 255.255.0.0
Use a proxy serverThis setting is important for the auto-update feature of the Base Unit, which require internet access.1. Check the check box next to Use a proxy server.
Image 6–26 Proxy settings
The proxy settings become available.
2. Enter the proxy server address. Enter the IP address or hostname.Some proxy servers need a port number, user name and password, for others is this optional.
3. Optionally, enter the used server port.
4. Optionally, enter the user name.
5. Optionally, enter the password.
6. Click Save changes to apply the settings.
6.17 LAN Settings, Wired AuthenticationHow to setup1. Click on Setup wired authentication... .
CX-20 Configurator
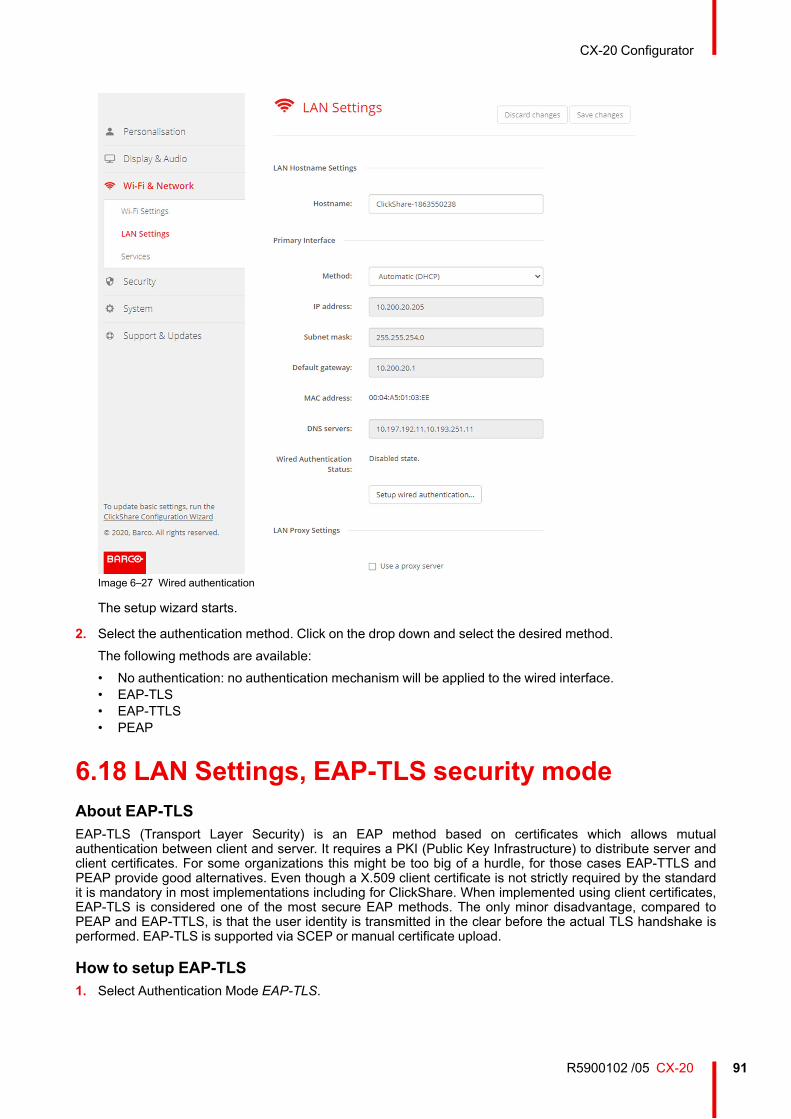
91R5900102 /05 CX-20
Image 6–27 Wired authentication
The setup wizard starts.
2. Select the authentication method. Click on the drop down and select the desired method.The following methods are available:• No authentication: no authentication mechanism will be applied to the wired interface.• EAP-TLS• EAP-TTLS• PEAP
6.18 LAN Settings, EAP-TLS security modeAbout EAP-TLSEAP-TLS (Transport Layer Security) is an EAP method based on certificates which allows mutualauthentication between client and server. It requires a PKI (Public Key Infrastructure) to distribute server andclient certificates. For some organizations this might be too big of a hurdle, for those cases EAP-TTLS andPEAP provide good alternatives. Even though a X.509 client certificate is not strictly required by the standardit is mandatory in most implementations including for ClickShare. When implemented using client certificates,EAP-TLS is considered one of the most secure EAP methods. The only minor disadvantage, compared toPEAP and EAP-TTLS, is that the user identity is transmitted in the clear before the actual TLS handshake isperformed. EAP-TLS is supported via SCEP or manual certificate upload.
How to setup EAP-TLS1. Select Authentication Mode EAP-TLS.
CX-20 Configurator
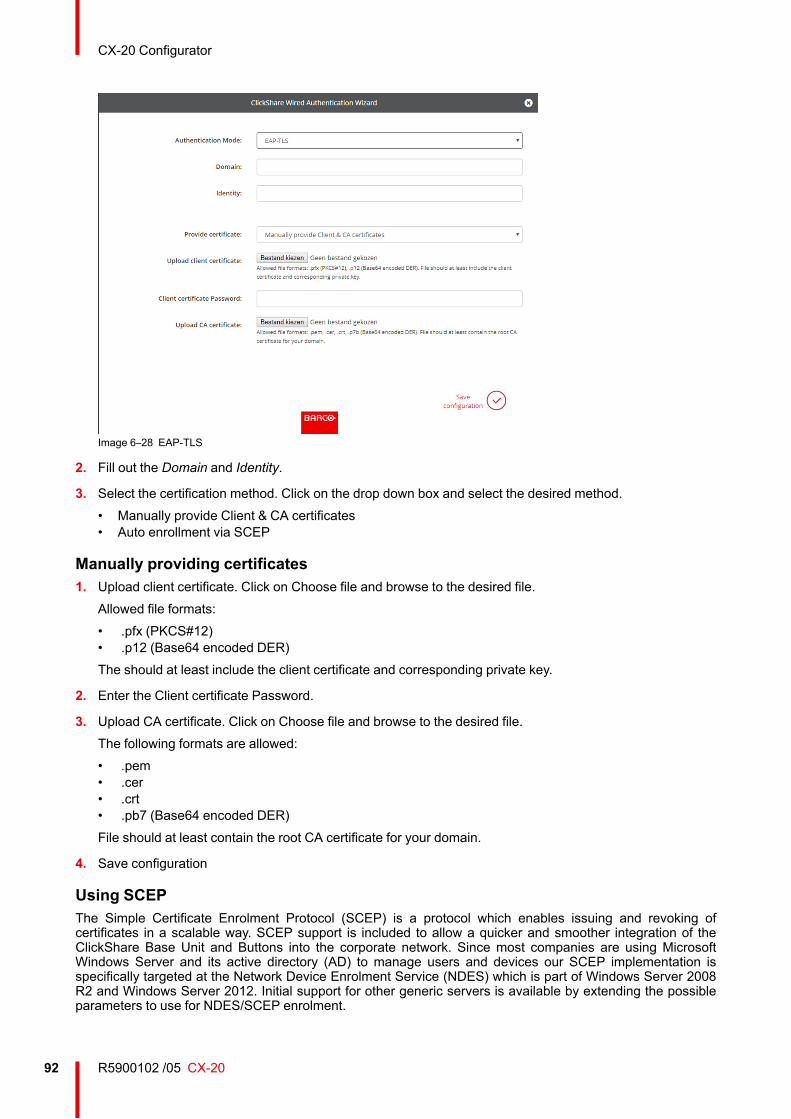
R5900102 /05 CX-2092
Image 6–28 EAP-TLS
2. Fill out the Domain and Identity.
3. Select the certification method. Click on the drop down box and select the desired method.• Manually provide Client & CA certificates• Auto enrollment via SCEP
Manually providing certificates1. Upload client certificate. Click on Choose file and browse to the desired file.
Allowed file formats:• .pfx (PKCS#12)• .p12 (Base64 encoded DER)The should at least include the client certificate and corresponding private key.
2. Enter the Client certificate Password.
3. Upload CA certificate. Click on Choose file and browse to the desired file.The following formats are allowed:• .pem• .cer• .crt• .pb7 (Base64 encoded DER)File should at least contain the root CA certificate for your domain.
4. Save configuration
Using SCEPThe Simple Certificate Enrolment Protocol (SCEP) is a protocol which enables issuing and revoking ofcertificates in a scalable way. SCEP support is included to allow a quicker and smoother integration of theClickShare Base Unit and Buttons into the corporate network. Since most companies are using MicrosoftWindows Server and its active directory (AD) to manage users and devices our SCEP implementation isspecifically targeted at the Network Device Enrolment Service (NDES) which is part of Windows Server 2008R2 and Windows Server 2012. Initial support for other generic servers is available by extending the possibleparameters to use for NDES/SCEP enrolment.
CX-20 Configurator
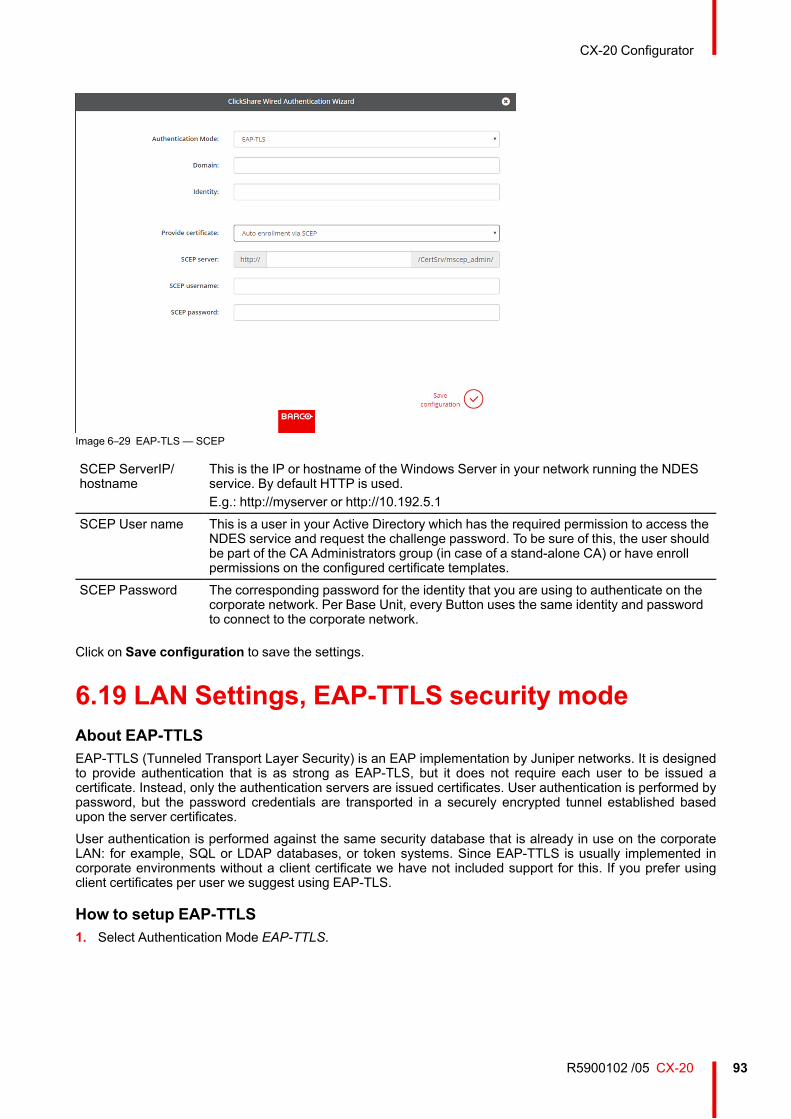
93R5900102 /05 CX-20
Image 6–29 EAP-TLS— SCEP
SCEP ServerIP/hostname
This is the IP or hostname of the Windows Server in your network running the NDESservice. By default HTTP is used.E.g.: http://myserver or http://10.192.5.1
SCEP User name This is a user in your Active Directory which has the required permission to access theNDES service and request the challenge password. To be sure of this, the user shouldbe part of the CA Administrators group (in case of a stand-alone CA) or have enrollpermissions on the configured certificate templates.
SCEP Password The corresponding password for the identity that you are using to authenticate on thecorporate network. Per Base Unit, every Button uses the same identity and passwordto connect to the corporate network.
Click on Save configuration to save the settings.
6.19 LAN Settings, EAP-TTLS security modeAbout EAP-TTLSEAP-TTLS (Tunneled Transport Layer Security) is an EAP implementation by Juniper networks. It is designedto provide authentication that is as strong as EAP-TLS, but it does not require each user to be issued acertificate. Instead, only the authentication servers are issued certificates. User authentication is performed bypassword, but the password credentials are transported in a securely encrypted tunnel established basedupon the server certificates.User authentication is performed against the same security database that is already in use on the corporateLAN: for example, SQL or LDAP databases, or token systems. Since EAP-TTLS is usually implemented incorporate environments without a client certificate we have not included support for this. If you prefer usingclient certificates per user we suggest using EAP-TLS.
How to setup EAP-TTLS1. Select Authentication Mode EAP-TTLS.
CX-20 Configurator
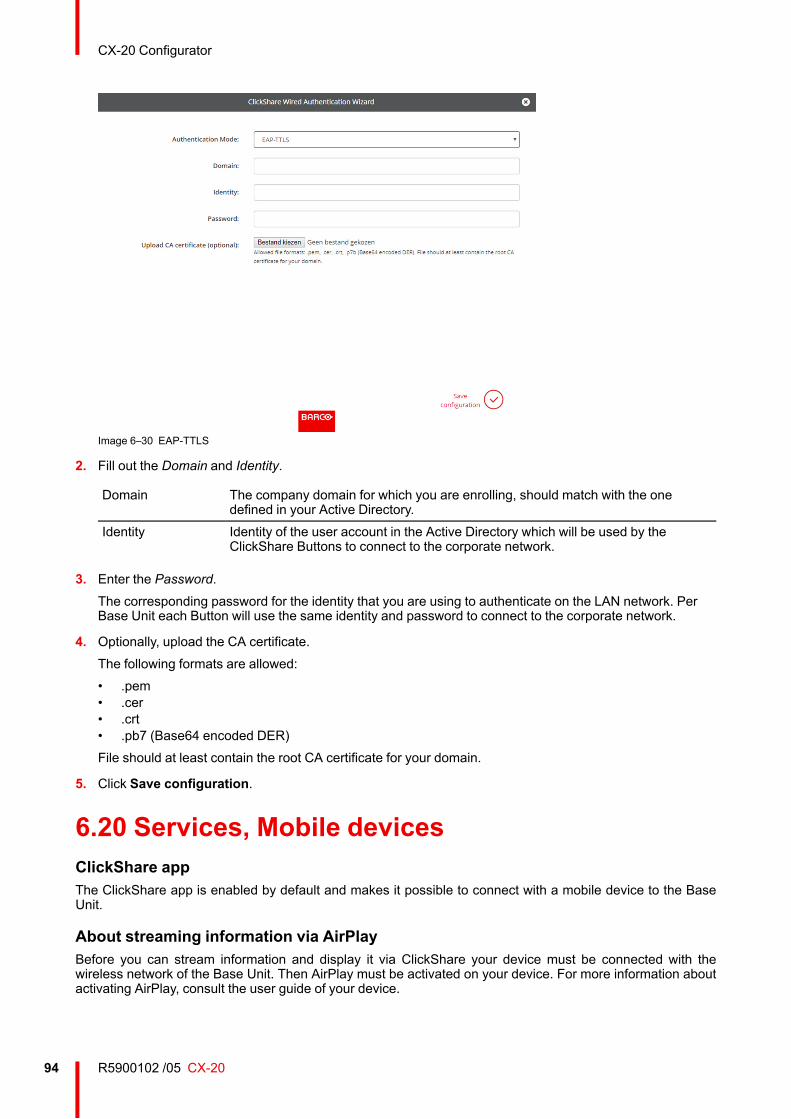
R5900102 /05 CX-2094
Image 6–30 EAP-TTLS
2. Fill out the Domain and Identity.
Domain The company domain for which you are enrolling, should match with the onedefined in your Active Directory.
Identity Identity of the user account in the Active Directory which will be used by theClickShare Buttons to connect to the corporate network.
3. Enter the Password.The corresponding password for the identity that you are using to authenticate on the LAN network. PerBase Unit each Button will use the same identity and password to connect to the corporate network.
4. Optionally, upload the CA certificate.The following formats are allowed:• .pem• .cer• .crt• .pb7 (Base64 encoded DER)File should at least contain the root CA certificate for your domain.
5. Click Save configuration.
6.20 Services, Mobile devicesClickShare appThe ClickShare app is enabled by default and makes it possible to connect with a mobile device to the BaseUnit.
About streaming information via AirPlayBefore you can stream information and display it via ClickShare your device must be connected with thewireless network of the Base Unit. Then AirPlay must be activated on your device. For more information aboutactivating AirPlay, consult the user guide of your device.
CX-20 Configurator
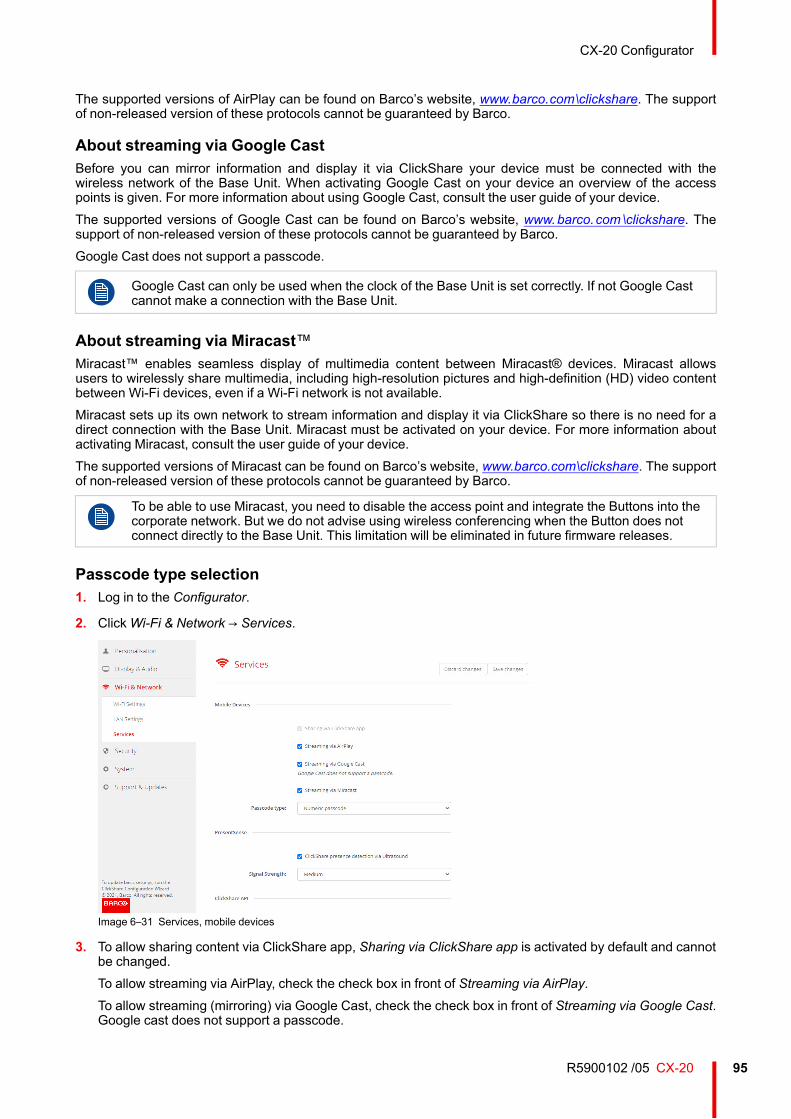
95R5900102 /05 CX-20
The supported versions of AirPlay can be found on Barco’s website, www.barco.com\clickshare. The supportof non-released version of these protocols cannot be guaranteed by Barco.
About streaming via Google CastBefore you can mirror information and display it via ClickShare your device must be connected with thewireless network of the Base Unit. When activating Google Cast on your device an overview of the accesspoints is given. For more information about using Google Cast, consult the user guide of your device.The supported versions of Google Cast can be found on Barco’s website, www.barco.com\clickshare. Thesupport of non-released version of these protocols cannot be guaranteed by Barco.Google Cast does not support a passcode.
Google Cast can only be used when the clock of the Base Unit is set correctly. If not Google Castcannot make a connection with the Base Unit.
About streaming via Miracast™Miracast™ enables seamless display of multimedia content between Miracast® devices. Miracast allowsusers to wirelessly share multimedia, including high-resolution pictures and high-definition (HD) video contentbetween Wi-Fi devices, even if a Wi-Fi network is not available.Miracast sets up its own network to stream information and display it via ClickShare so there is no need for adirect connection with the Base Unit. Miracast must be activated on your device. For more information aboutactivating Miracast, consult the user guide of your device.The supported versions of Miracast can be found on Barco’s website, www.barco.com\clickshare. The supportof non-released version of these protocols cannot be guaranteed by Barco.
To be able to use Miracast, you need to disable the access point and integrate the Buttons into thecorporate network. But we do not advise using wireless conferencing when the Button does notconnect directly to the Base Unit. This limitation will be eliminated in future firmware releases.
Passcode type selection1. Log in to the Configurator.
2. ClickWi-Fi & Network → Services.
Image 6–31 Services, mobile devices
3. To allow sharing content via ClickShare app, Sharing via ClickShare app is activated by default and cannotbe changed.To allow streaming via AirPlay, check the check box in front of Streaming via AirPlay.To allow streaming (mirroring) via Google Cast, check the check box in front of Streaming via Google Cast.Google cast does not support a passcode.
CX-20 Configurator
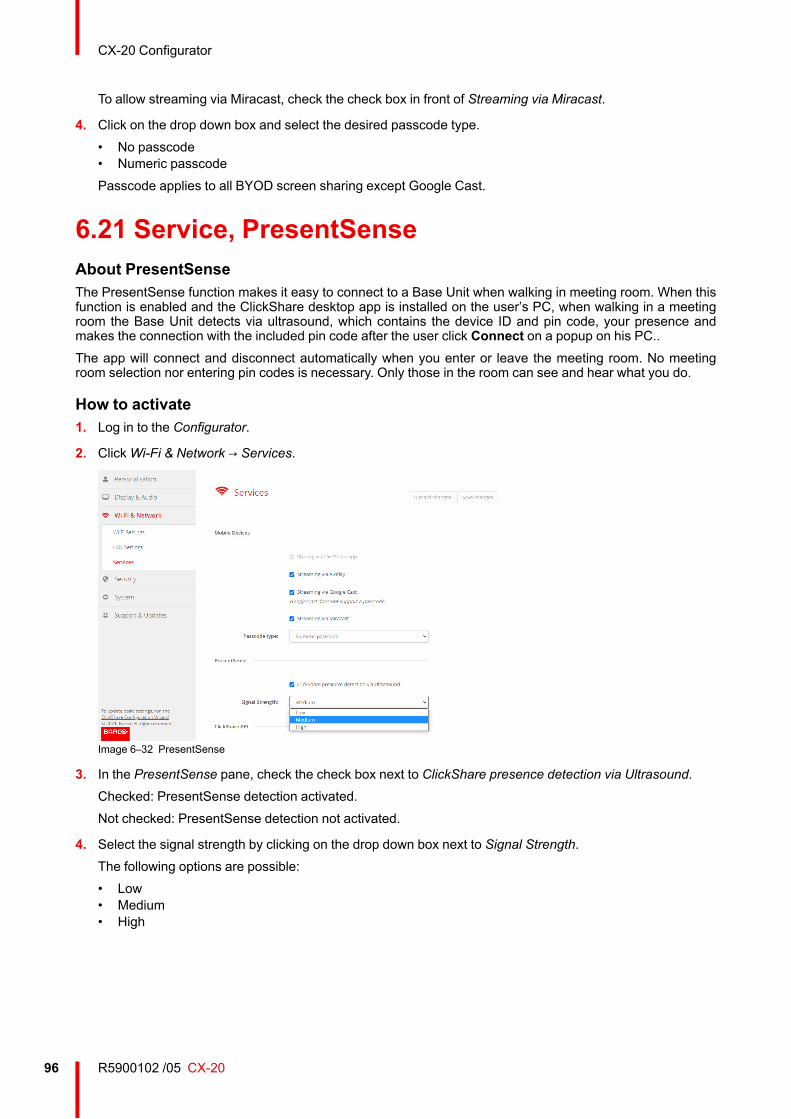
R5900102 /05 CX-2096
To allow streaming via Miracast, check the check box in front of Streaming via Miracast.
4. Click on the drop down box and select the desired passcode type.• No passcode• Numeric passcodePasscode applies to all BYOD screen sharing except Google Cast.
6.21 Service, PresentSenseAbout PresentSenseThe PresentSense function makes it easy to connect to a Base Unit when walking in meeting room. When thisfunction is enabled and the ClickShare desktop app is installed on the user’s PC, when walking in a meetingroom the Base Unit detects via ultrasound, which contains the device ID and pin code, your presence andmakes the connection with the included pin code after the user click Connect on a popup on his PC..The app will connect and disconnect automatically when you enter or leave the meeting room. No meetingroom selection nor entering pin codes is necessary. Only those in the room can see and hear what you do.
How to activate1. Log in to the Configurator.
2. ClickWi-Fi & Network → Services.
Image 6–32 PresentSense
3. In the PresentSense pane, check the check box next to ClickShare presence detection via Ultrasound.Checked: PresentSense detection activated.Not checked: PresentSense detection not activated.
4. Select the signal strength by clicking on the drop down box next to Signal Strength.The following options are possible:• Low• Medium• High
CX-20 Configurator
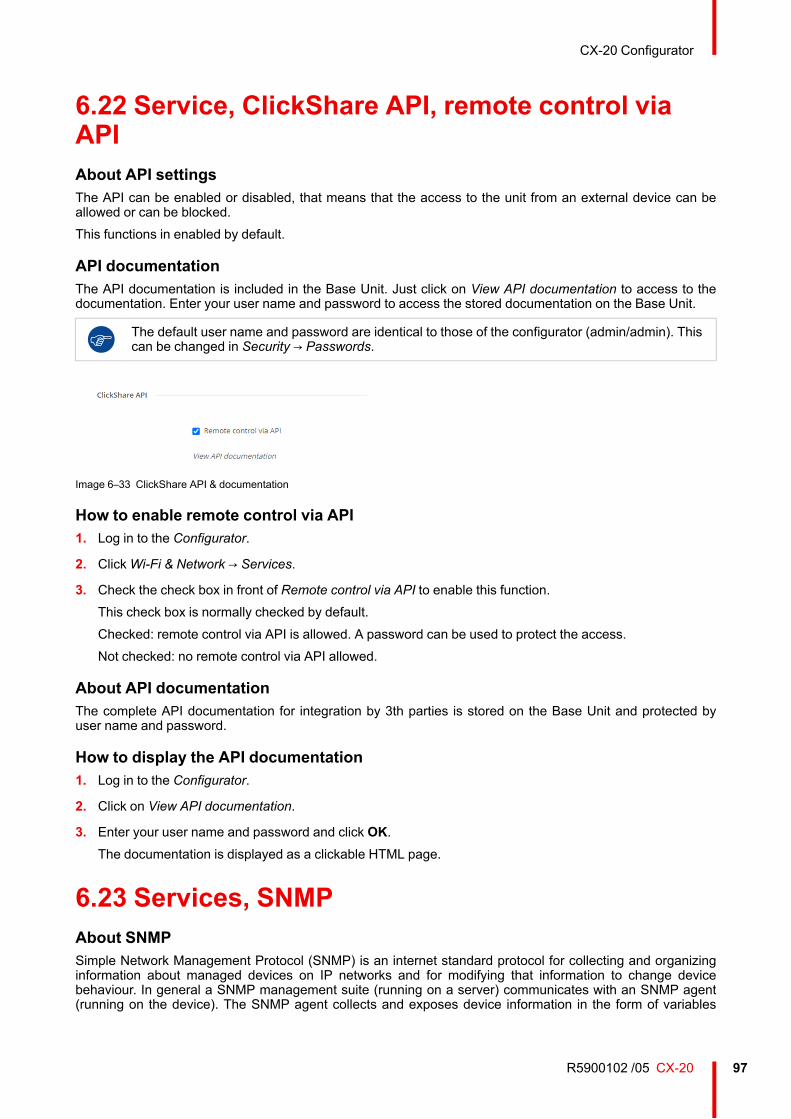
97R5900102 /05 CX-20
6.22 Service, ClickShare API, remote control viaAPIAbout API settingsThe API can be enabled or disabled, that means that the access to the unit from an external device can beallowed or can be blocked.This functions in enabled by default.
API documentationThe API documentation is included in the Base Unit. Just click on View API documentation to access to thedocumentation. Enter your user name and password to access the stored documentation on the Base Unit.
The default user name and password are identical to those of the configurator (admin/admin). Thiscan be changed in Security → Passwords.
Image 6–33 ClickShare API & documentation
How to enable remote control via API1. Log in to the Configurator.
2. ClickWi-Fi & Network → Services.
3. Check the check box in front of Remote control via API to enable this function.This check box is normally checked by default.Checked: remote control via API is allowed. A password can be used to protect the access.Not checked: no remote control via API allowed.
About API documentationThe complete API documentation for integration by 3th parties is stored on the Base Unit and protected byuser name and password.
How to display the API documentation1. Log in to the Configurator.
2. Click on View API documentation.
3. Enter your user name and password and click OK.The documentation is displayed as a clickable HTML page.
6.23 Services, SNMPAbout SNMPSimple Network Management Protocol (SNMP) is an internet standard protocol for collecting and organizinginformation about managed devices on IP networks and for modifying that information to change devicebehaviour. In general a SNMP management suite (running on a server) communicates with an SNMP agent(running on the device). The SNMP agent collects and exposes device information in the form of variables
CX-20 Configurator
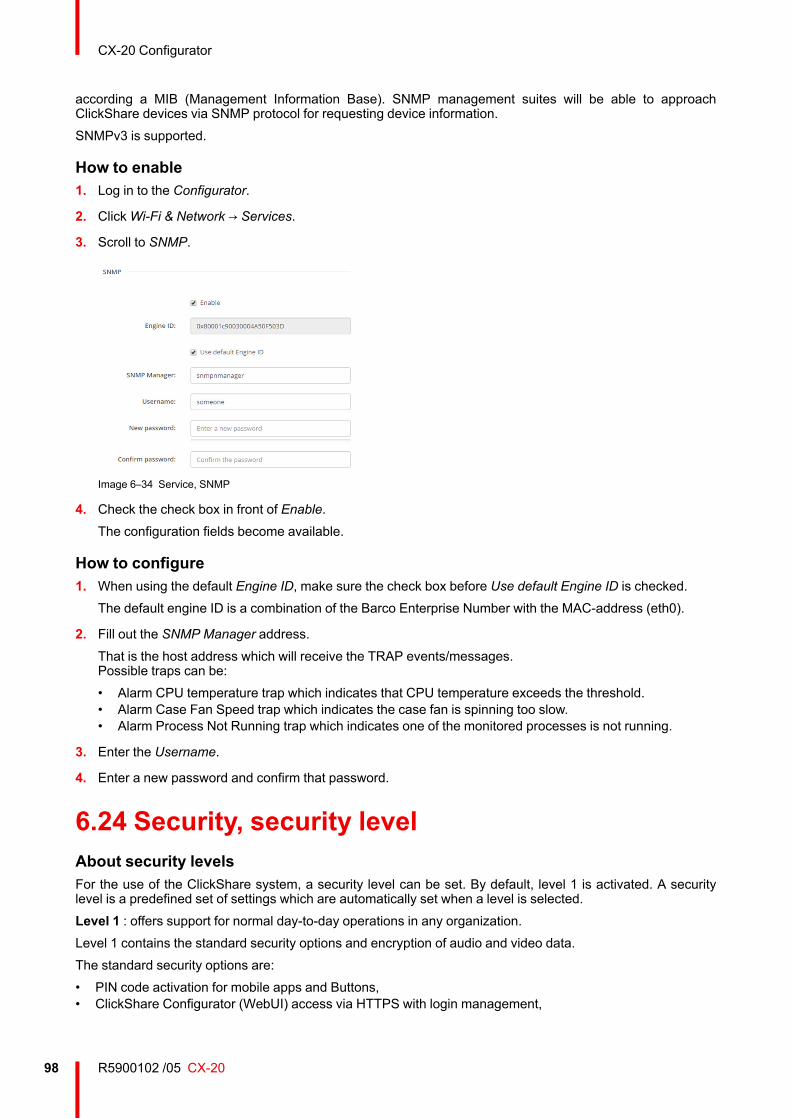
R5900102 /05 CX-2098
according a MIB (Management Information Base). SNMP management suites will be able to approachClickShare devices via SNMP protocol for requesting device information.SNMPv3 is supported.
How to enable1. Log in to the Configurator.
2. ClickWi-Fi & Network → Services.
3. Scroll to SNMP.
Image 6–34 Service, SNMP
4. Check the check box in front of Enable.The configuration fields become available.
How to configure1. When using the default Engine ID, make sure the check box before Use default Engine ID is checked.
The default engine ID is a combination of the Barco Enterprise Number with the MAC-address (eth0).
2. Fill out the SNMP Manager address.That is the host address which will receive the TRAP events/messages.Possible traps can be:• Alarm CPU temperature trap which indicates that CPU temperature exceeds the threshold.• Alarm Case Fan Speed trap which indicates the case fan is spinning too slow.• Alarm Process Not Running trap which indicates one of the monitored processes is not running.
3. Enter the Username.
4. Enter a new password and confirm that password.
6.24 Security, security levelAbout security levelsFor the use of the ClickShare system, a security level can be set. By default, level 1 is activated. A securitylevel is a predefined set of settings which are automatically set when a level is selected.Level 1 : offers support for normal day-to-day operations in any organization.Level 1 contains the standard security options and encryption of audio and video data.The standard security options are:• PIN code activation for mobile apps and Buttons,• ClickShare Configurator (WebUI) access via HTTPS with login management,
CX-20 Configurator
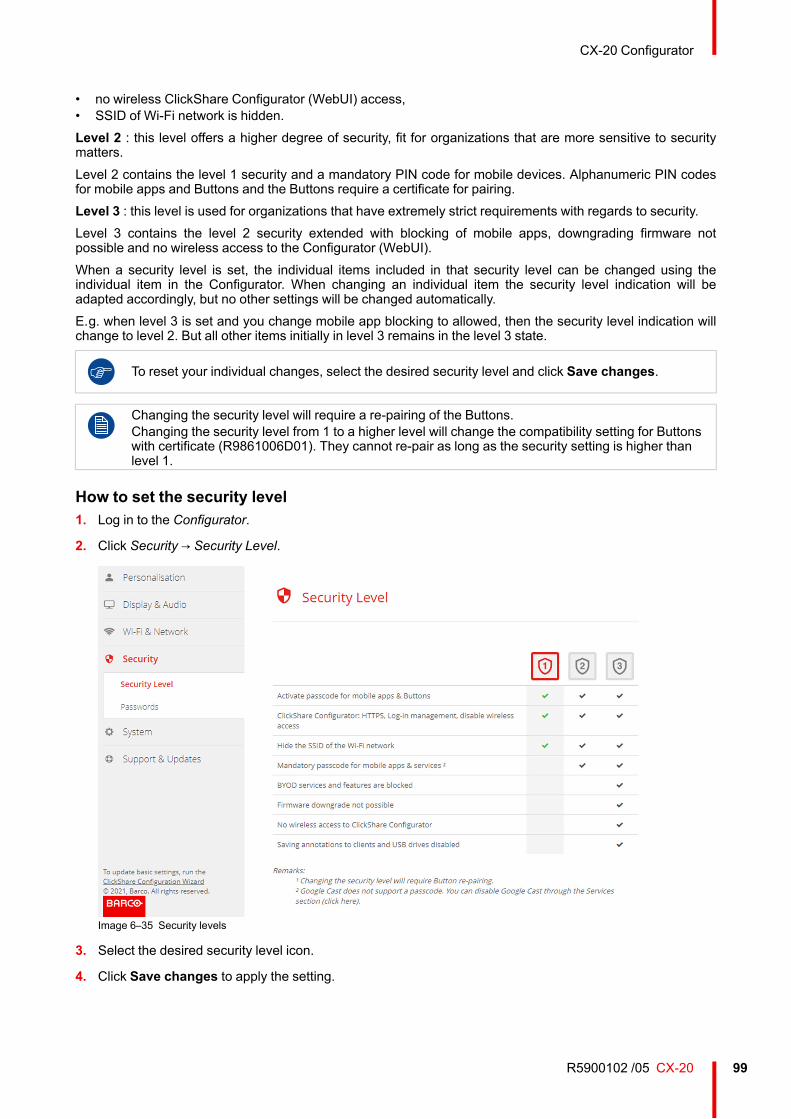
99R5900102 /05 CX-20
• no wireless ClickShare Configurator (WebUI) access,• SSID of Wi-Fi network is hidden.Level 2 : this level offers a higher degree of security, fit for organizations that are more sensitive to securitymatters.Level 2 contains the level 1 security and a mandatory PIN code for mobile devices. Alphanumeric PIN codesfor mobile apps and Buttons and the Buttons require a certificate for pairing.Level 3 : this level is used for organizations that have extremely strict requirements with regards to security.Level 3 contains the level 2 security extended with blocking of mobile apps, downgrading firmware notpossible and no wireless access to the Configurator (WebUI).When a security level is set, the individual items included in that security level can be changed using theindividual item in the Configurator. When changing an individual item the security level indication will beadapted accordingly, but no other settings will be changed automatically.E.g. when level 3 is set and you change mobile app blocking to allowed, then the security level indication willchange to level 2. But all other items initially in level 3 remains in the level 3 state.
To reset your individual changes, select the desired security level and click Save changes.
Changing the security level will require a re-pairing of the Buttons.Changing the security level from 1 to a higher level will change the compatibility setting for Buttonswith certificate (R9861006D01). They cannot re-pair as long as the security setting is higher thanlevel 1.
How to set the security level1. Log in to the Configurator.
2. Click Security → Security Level.
Image 6–35 Security levels
3. Select the desired security level icon.
4. Click Save changes to apply the setting.
CX-20 Configurator
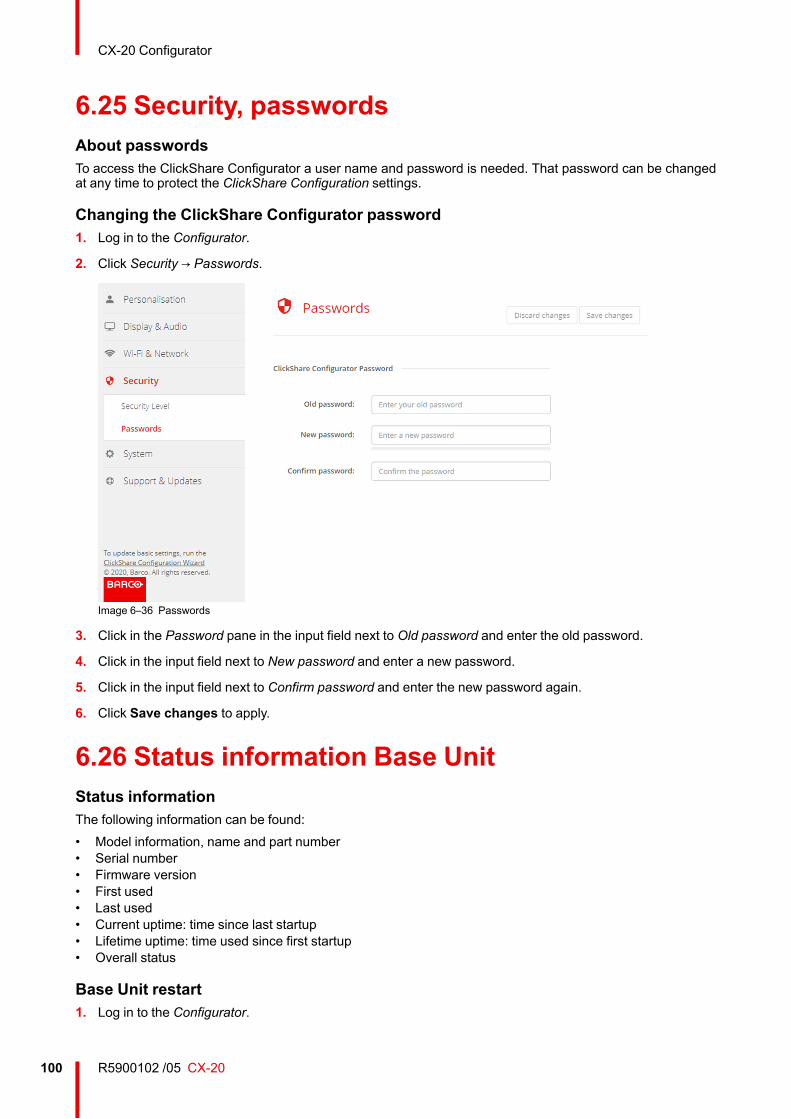
R5900102 /05 CX-20100
6.25 Security, passwordsAbout passwordsTo access the ClickShare Configurator a user name and password is needed. That password can be changedat any time to protect the ClickShare Configuration settings.
Changing the ClickShare Configurator password1. Log in to the Configurator.
2. Click Security → Passwords.
Image 6–36 Passwords
3. Click in the Password pane in the input field next to Old password and enter the old password.
4. Click in the input field next to New password and enter a new password.
5. Click in the input field next to Confirm password and enter the new password again.
6. Click Save changes to apply.
6.26 Status information Base UnitStatus informationThe following information can be found:• Model information, name and part number• Serial number• Firmware version• First used• Last used• Current uptime: time since last startup• Lifetime uptime: time used since first startup• Overall status
Base Unit restart1. Log in to the Configurator.
CX-20 Configurator
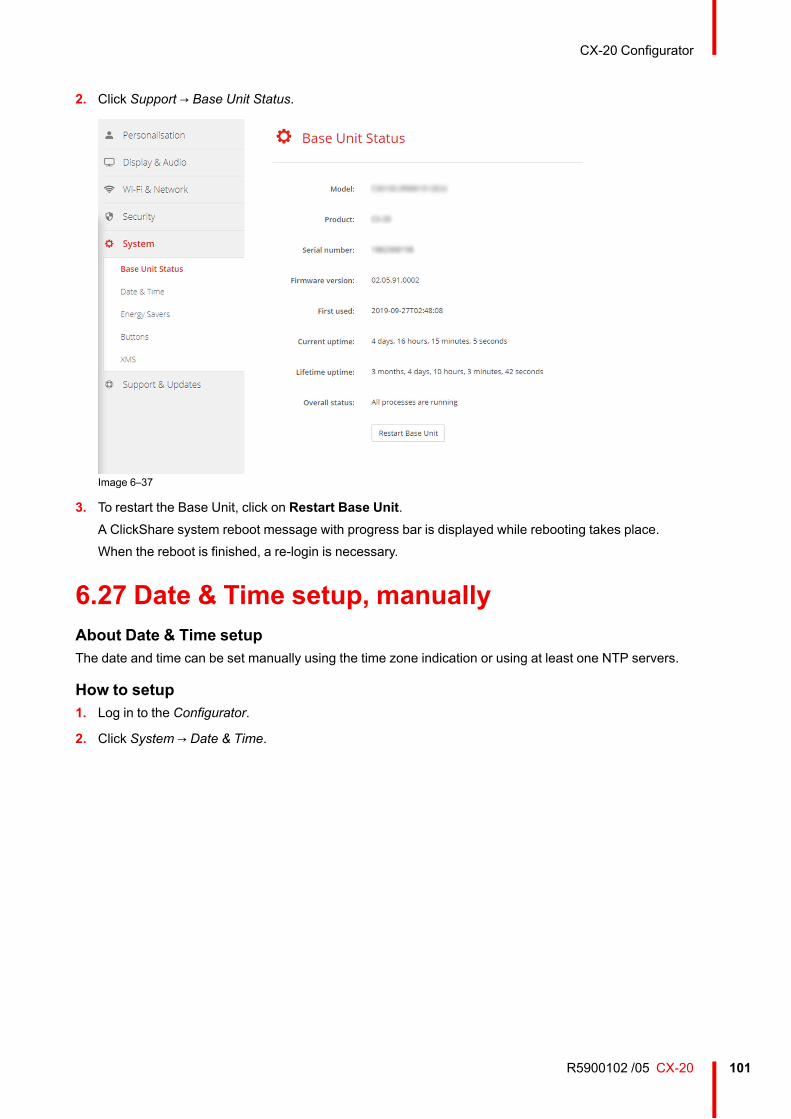
101R5900102 /05 CX-20
2. Click Support → Base Unit Status.
Image 6–37
3. To restart the Base Unit, click on Restart Base Unit.A ClickShare system reboot message with progress bar is displayed while rebooting takes place.When the reboot is finished, a re-login is necessary.
6.27 Date & Time setup, manuallyAbout Date & Time setupThe date and time can be set manually using the time zone indication or using at least one NTP servers.
How to setup1. Log in to the Configurator.
2. Click System → Date & Time.
CX-20 Configurator
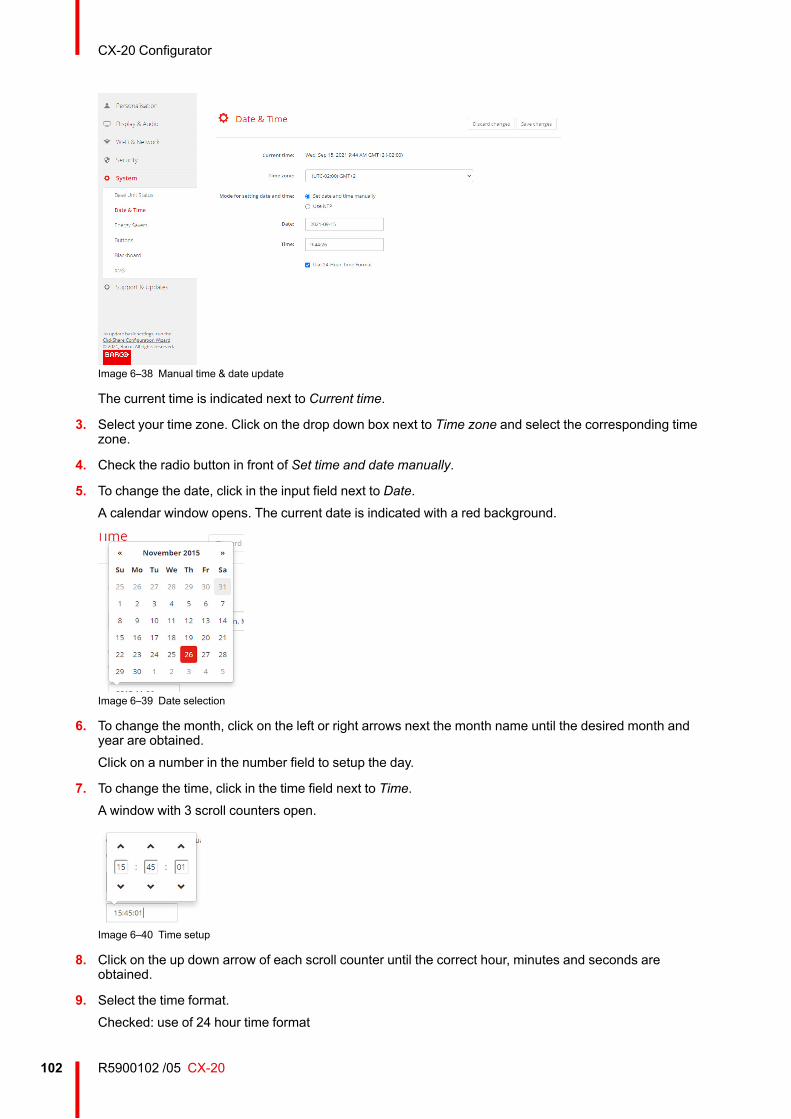
R5900102 /05 CX-20102
Image 6–38 Manual time & date update
The current time is indicated next to Current time.
3. Select your time zone. Click on the drop down box next to Time zone and select the corresponding timezone.
4. Check the radio button in front of Set time and date manually.
5. To change the date, click in the input field next to Date.A calendar window opens. The current date is indicated with a red background.
Image 6–39 Date selection
6. To change the month, click on the left or right arrows next the month name until the desired month andyear are obtained.Click on a number in the number field to setup the day.
7. To change the time, click in the time field next to Time.A window with 3 scroll counters open.
Image 6–40 Time setup
8. Click on the up down arrow of each scroll counter until the correct hour, minutes and seconds areobtained.
9. Select the time format.Checked: use of 24 hour time format
CX-20 Configurator
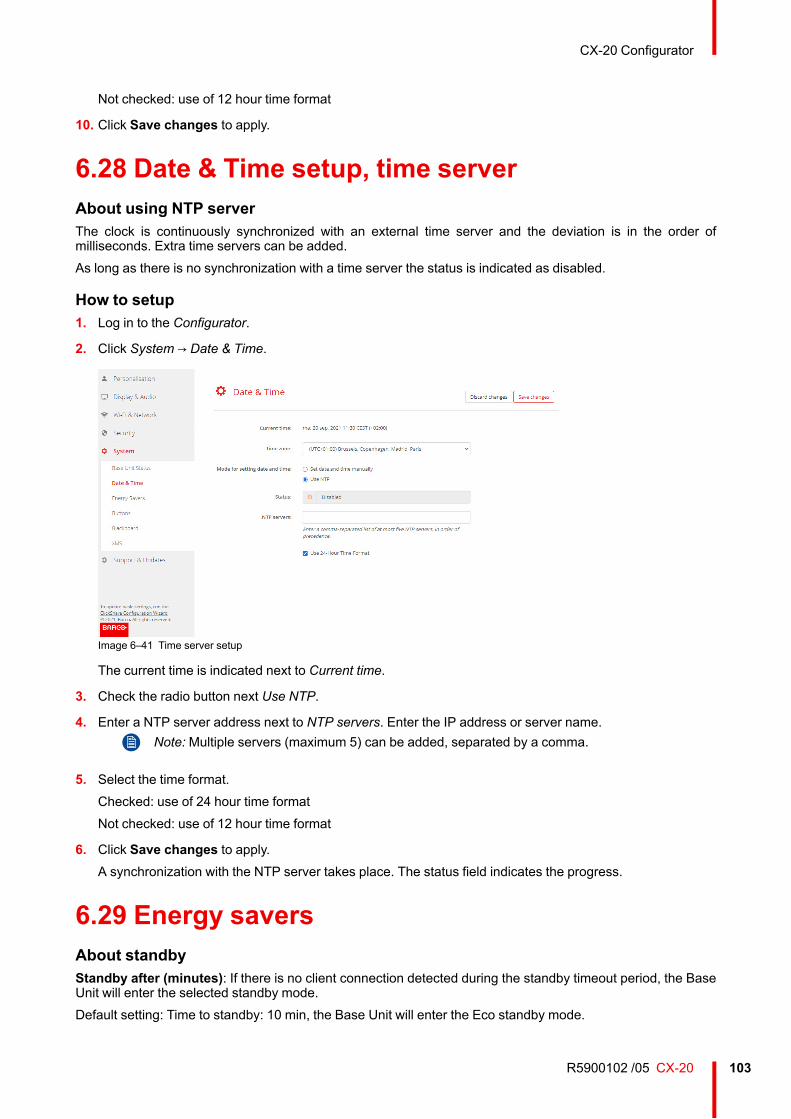
103R5900102 /05 CX-20
Not checked: use of 12 hour time format
10. Click Save changes to apply.
6.28 Date & Time setup, time serverAbout using NTP serverThe clock is continuously synchronized with an external time server and the deviation is in the order ofmilliseconds. Extra time servers can be added.As long as there is no synchronization with a time server the status is indicated as disabled.
How to setup1. Log in to the Configurator.
2. Click System → Date & Time.
Image 6–41 Time server setup
The current time is indicated next to Current time.
3. Check the radio button next Use NTP.
4. Enter a NTP server address next to NTP servers. Enter the IP address or server name.Note: Multiple servers (maximum 5) can be added, separated by a comma.
5. Select the time format.Checked: use of 24 hour time formatNot checked: use of 12 hour time format
6. Click Save changes to apply.A synchronization with the NTP server takes place. The status field indicates the progress.
6.29 Energy saversAbout standbyStandby after (minutes): If there is no client connection detected during the standby timeout period, the BaseUnit will enter the selected standby mode.Default setting: Time to standby: 10 min, the Base Unit will enter the Eco standby mode.
CX-20 Configurator
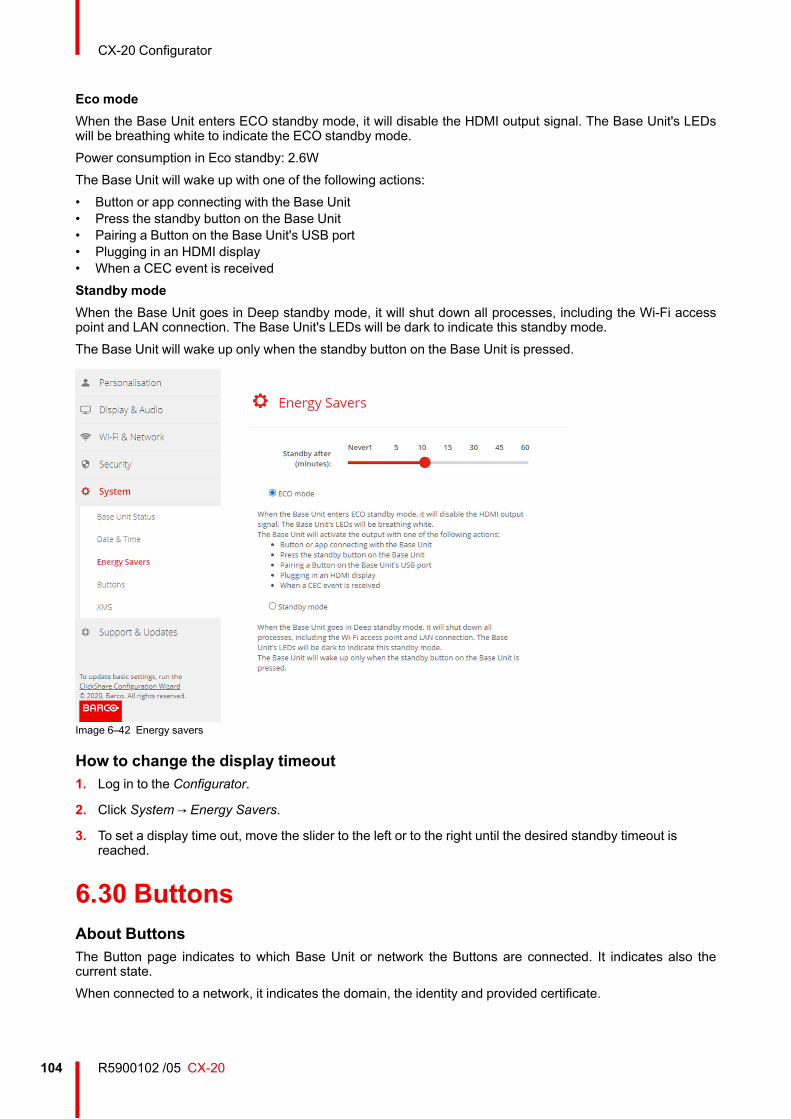
R5900102 /05 CX-20104
Eco modeWhen the Base Unit enters ECO standby mode, it will disable the HDMI output signal. The Base Unit's LEDswill be breathing white to indicate the ECO standby mode.Power consumption in Eco standby: 2.6WThe Base Unit will wake up with one of the following actions:• Button or app connecting with the Base Unit• Press the standby button on the Base Unit• Pairing a Button on the Base Unit's USB port• Plugging in an HDMI display• When a CEC event is receivedStandby modeWhen the Base Unit goes in Deep standby mode, it will shut down all processes, including the Wi-Fi accesspoint and LAN connection. The Base Unit's LEDs will be dark to indicate this standby mode.The Base Unit will wake up only when the standby button on the Base Unit is pressed.
Image 6–42 Energy savers
How to change the display timeout1. Log in to the Configurator.
2. Click System → Energy Savers.
3. To set a display time out, move the slider to the left or to the right until the desired standby timeout isreached.
6.30 ButtonsAbout ButtonsThe Button page indicates to which Base Unit or network the Buttons are connected. It indicates also thecurrent state.When connected to a network, it indicates the domain, the identity and provided certificate.
CX-20 Configurator
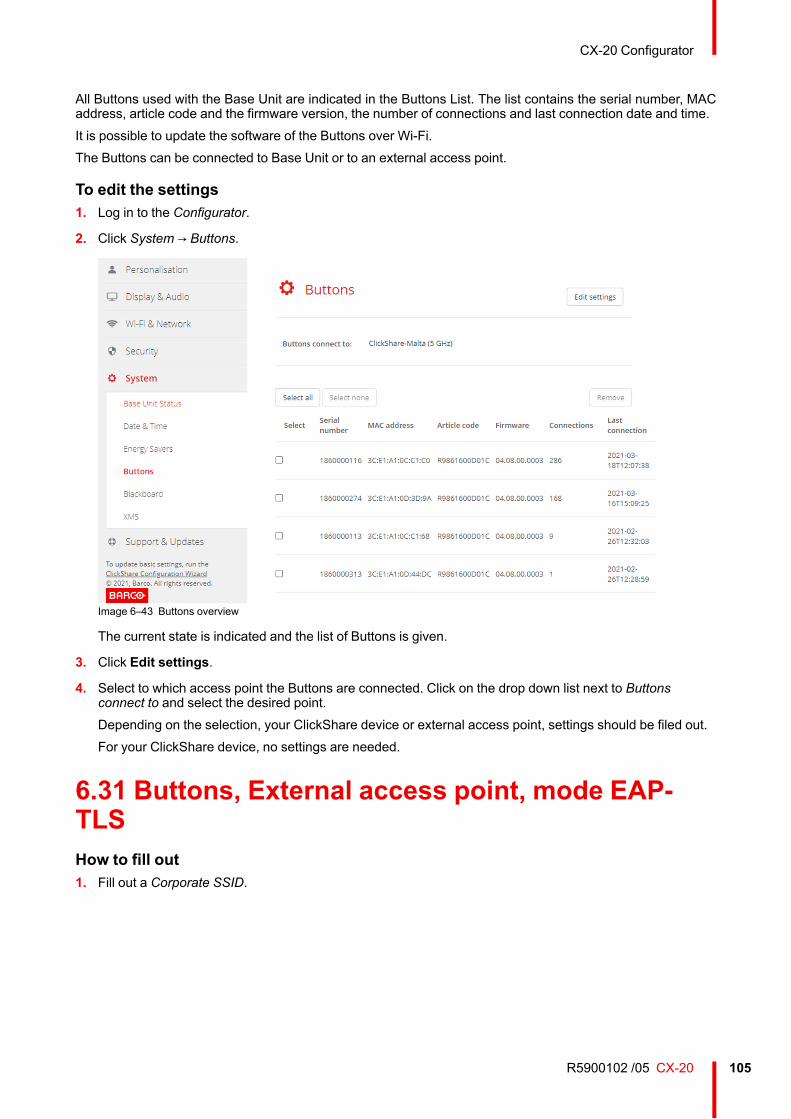
105R5900102 /05 CX-20
All Buttons used with the Base Unit are indicated in the Buttons List. The list contains the serial number, MACaddress, article code and the firmware version, the number of connections and last connection date and time.It is possible to update the software of the Buttons over Wi-Fi.The Buttons can be connected to Base Unit or to an external access point.
To edit the settings1. Log in to the Configurator.
2. Click System → Buttons.
Image 6–43 Buttons overview
The current state is indicated and the list of Buttons is given.
3. Click Edit settings.
4. Select to which access point the Buttons are connected. Click on the drop down list next to Buttonsconnect to and select the desired point.Depending on the selection, your ClickShare device or external access point, settings should be filed out.For your ClickShare device, no settings are needed.
6.31 Buttons, External access point, mode EAP-TLSHow to fill out1. Fill out a Corporate SSID.
CX-20 Configurator
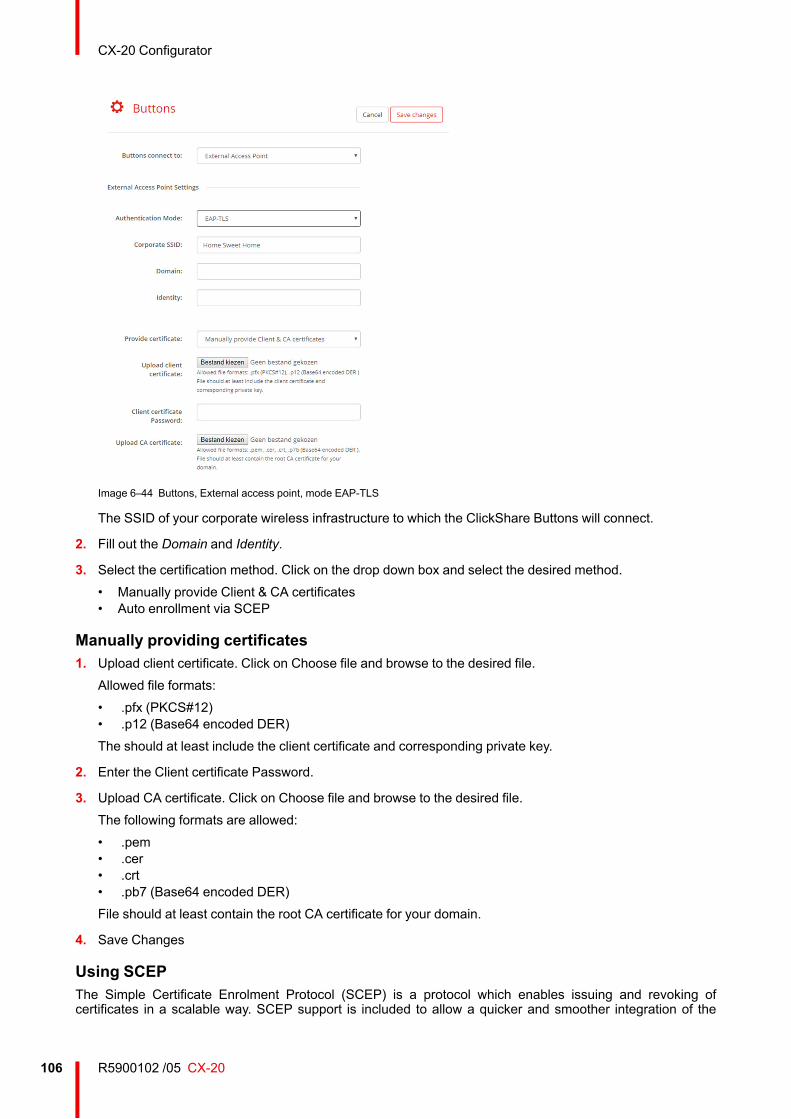
R5900102 /05 CX-20106
Image 6–44 Buttons, External access point, mode EAP-TLS
The SSID of your corporate wireless infrastructure to which the ClickShare Buttons will connect.
2. Fill out the Domain and Identity.
3. Select the certification method. Click on the drop down box and select the desired method.• Manually provide Client & CA certificates• Auto enrollment via SCEP
Manually providing certificates1. Upload client certificate. Click on Choose file and browse to the desired file.
Allowed file formats:• .pfx (PKCS#12)• .p12 (Base64 encoded DER)The should at least include the client certificate and corresponding private key.
2. Enter the Client certificate Password.
3. Upload CA certificate. Click on Choose file and browse to the desired file.The following formats are allowed:• .pem• .cer• .crt• .pb7 (Base64 encoded DER)File should at least contain the root CA certificate for your domain.
4. Save Changes
Using SCEPThe Simple Certificate Enrolment Protocol (SCEP) is a protocol which enables issuing and revoking ofcertificates in a scalable way. SCEP support is included to allow a quicker and smoother integration of the
CX-20 Configurator
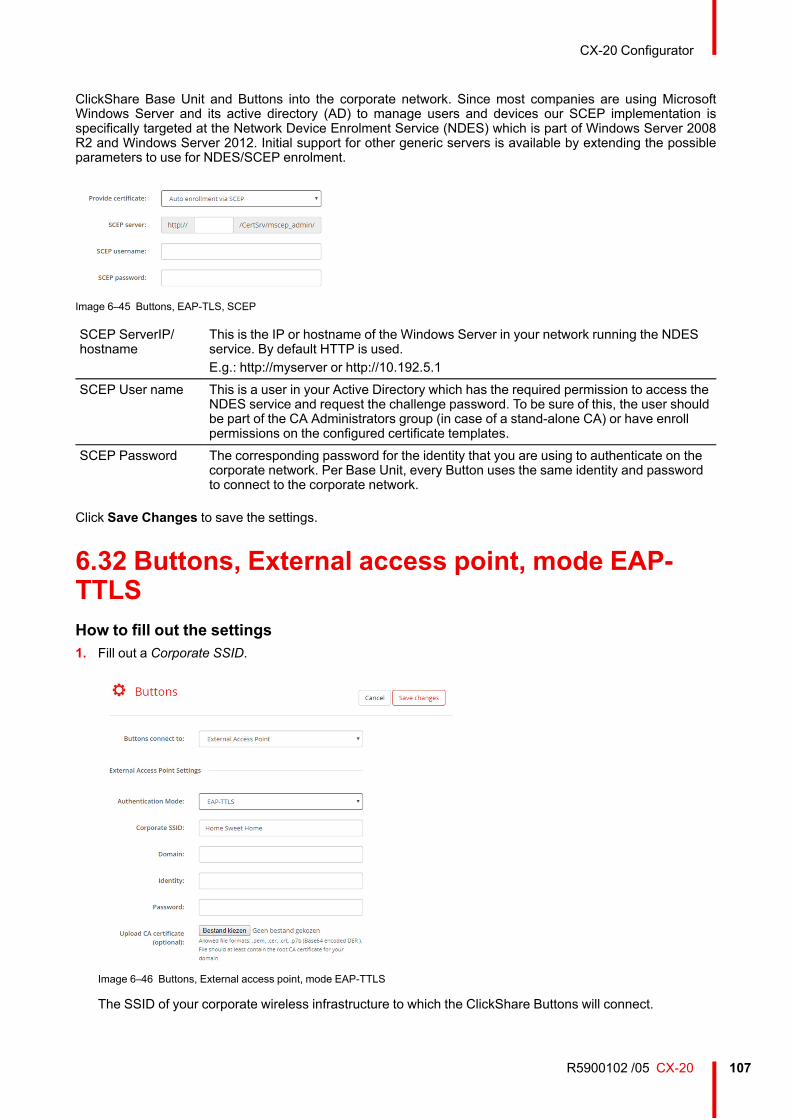
107R5900102 /05 CX-20
ClickShare Base Unit and Buttons into the corporate network. Since most companies are using MicrosoftWindows Server and its active directory (AD) to manage users and devices our SCEP implementation isspecifically targeted at the Network Device Enrolment Service (NDES) which is part of Windows Server 2008R2 and Windows Server 2012. Initial support for other generic servers is available by extending the possibleparameters to use for NDES/SCEP enrolment.
Image 6–45 Buttons, EAP-TLS, SCEP
SCEP ServerIP/hostname
This is the IP or hostname of the Windows Server in your network running the NDESservice. By default HTTP is used.E.g.: http://myserver or http://10.192.5.1
SCEP User name This is a user in your Active Directory which has the required permission to access theNDES service and request the challenge password. To be sure of this, the user shouldbe part of the CA Administrators group (in case of a stand-alone CA) or have enrollpermissions on the configured certificate templates.
SCEP Password The corresponding password for the identity that you are using to authenticate on thecorporate network. Per Base Unit, every Button uses the same identity and passwordto connect to the corporate network.
Click Save Changes to save the settings.
6.32 Buttons, External access point, mode EAP-TTLSHow to fill out the settings1. Fill out a Corporate SSID.
Image 6–46 Buttons, External access point, mode EAP-TTLS
The SSID of your corporate wireless infrastructure to which the ClickShare Buttons will connect.
CX-20 Configurator
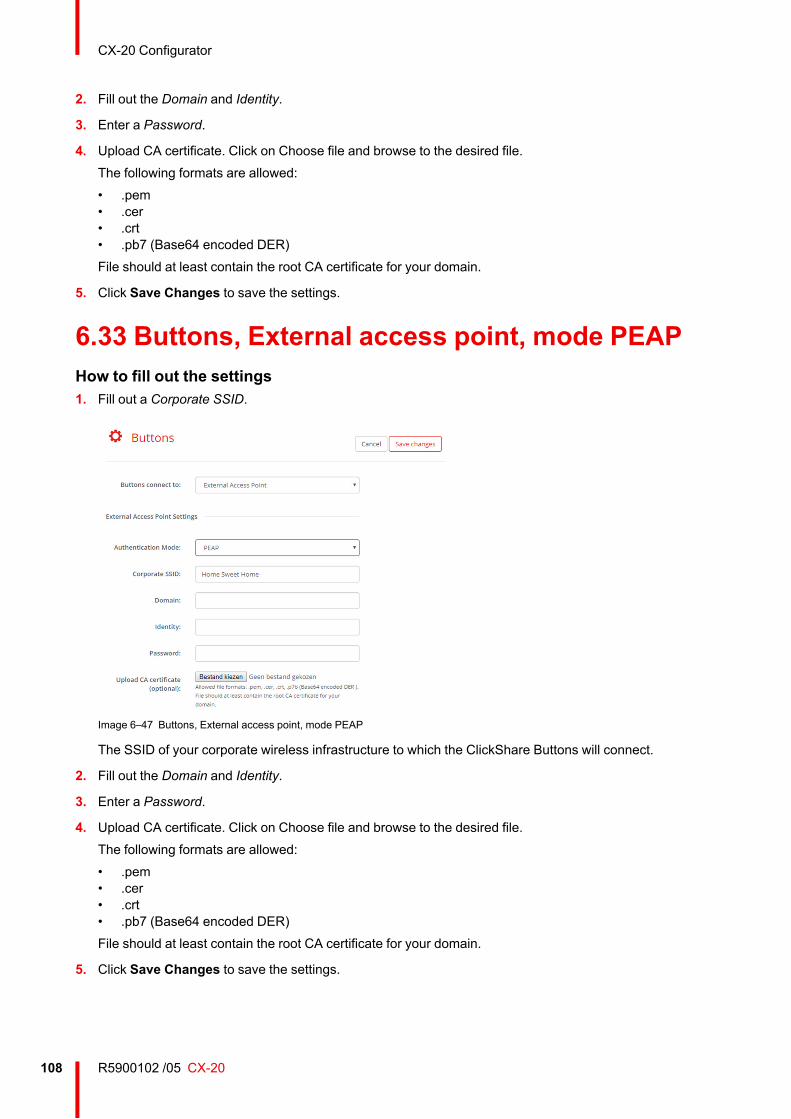
R5900102 /05 CX-20108
2. Fill out the Domain and Identity.
3. Enter a Password.
4. Upload CA certificate. Click on Choose file and browse to the desired file.The following formats are allowed:• .pem• .cer• .crt• .pb7 (Base64 encoded DER)File should at least contain the root CA certificate for your domain.
5. Click Save Changes to save the settings.
6.33 Buttons, External access point, mode PEAPHow to fill out the settings1. Fill out a Corporate SSID.
Image 6–47 Buttons, External access point, mode PEAP
The SSID of your corporate wireless infrastructure to which the ClickShare Buttons will connect.
2. Fill out the Domain and Identity.
3. Enter a Password.
4. Upload CA certificate. Click on Choose file and browse to the desired file.The following formats are allowed:• .pem• .cer• .crt• .pb7 (Base64 encoded DER)File should at least contain the root CA certificate for your domain.
5. Click Save Changes to save the settings.
CX-20 Configurator
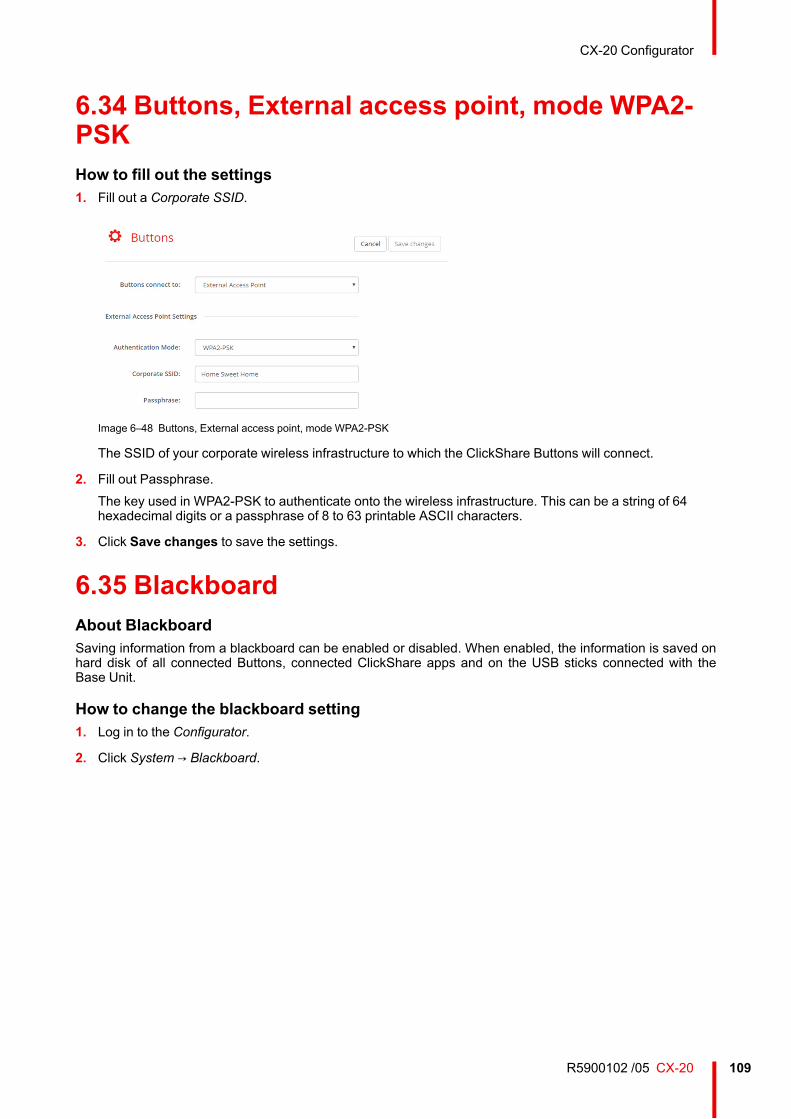
109R5900102 /05 CX-20
6.34 Buttons, External access point, mode WPA2-PSKHow to fill out the settings1. Fill out a Corporate SSID.
Image 6–48 Buttons, External access point, mode WPA2-PSK
The SSID of your corporate wireless infrastructure to which the ClickShare Buttons will connect.
2. Fill out Passphrase.The key used in WPA2-PSK to authenticate onto the wireless infrastructure. This can be a string of 64hexadecimal digits or a passphrase of 8 to 63 printable ASCII characters.
3. Click Save changes to save the settings.
6.35 BlackboardAbout BlackboardSaving information from a blackboard can be enabled or disabled. When enabled, the information is saved onhard disk of all connected Buttons, connected ClickShare apps and on the USB sticks connected with theBase Unit.
How to change the blackboard setting1. Log in to the Configurator.
2. Click System → Blackboard.
CX-20 Configurator
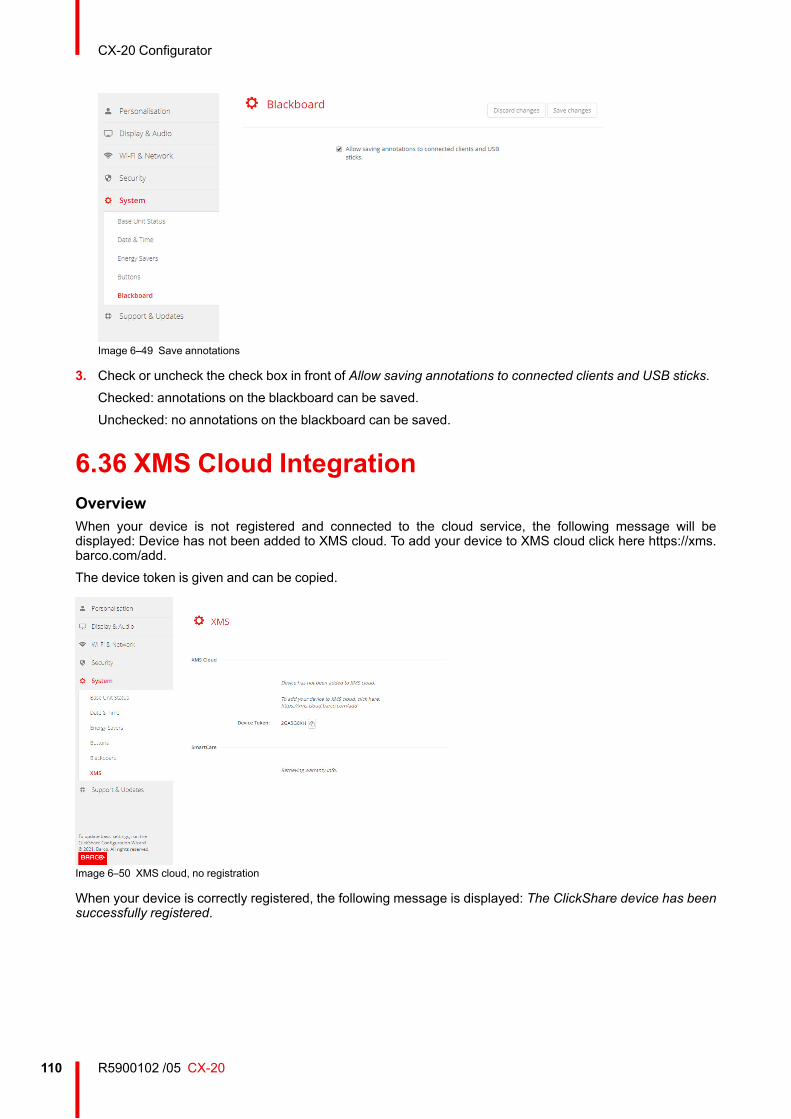
R5900102 /05 CX-20110
Image 6–49 Save annotations
3. Check or uncheck the check box in front of Allow saving annotations to connected clients and USB sticks.Checked: annotations on the blackboard can be saved.Unchecked: no annotations on the blackboard can be saved.
6.36 XMS Cloud IntegrationOverviewWhen your device is not registered and connected to the cloud service, the following message will bedisplayed: Device has not been added to XMS cloud. To add your device to XMS cloud click here https://xms.barco.com/add.The device token is given and can be copied.
Image 6–50 XMS cloud, no registration
When your device is correctly registered, the following message is displayed: The ClickShare device has beensuccessfully registered.
CX-20 Configurator
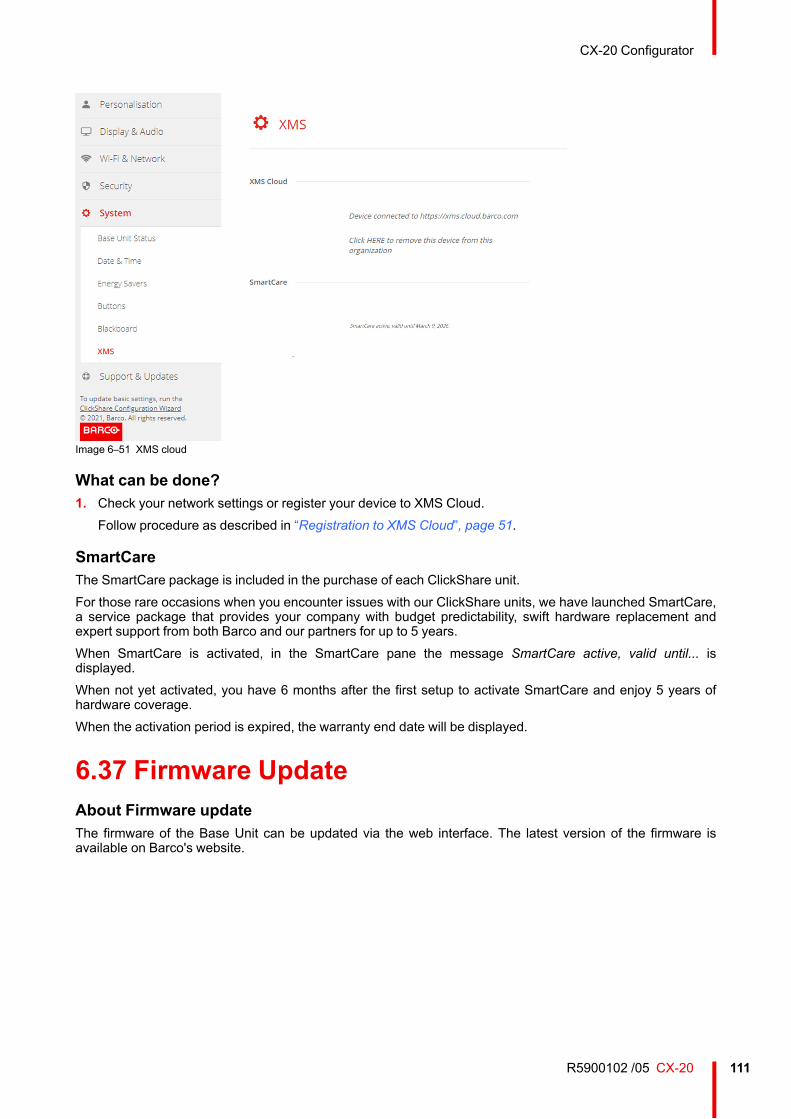
111R5900102 /05 CX-20
Image 6–51 XMS cloud
What can be done?1. Check your network settings or register your device to XMS Cloud.
Follow procedure as described in “Registration to XMS Cloud”, page 51.
SmartCareThe SmartCare package is included in the purchase of each ClickShare unit.For those rare occasions when you encounter issues with our ClickShare units, we have launched SmartCare,a service package that provides your company with budget predictability, swift hardware replacement andexpert support from both Barco and our partners for up to 5 years.When SmartCare is activated, in the SmartCare pane the message SmartCare active, valid until... isdisplayed.When not yet activated, you have 6 months after the first setup to activate SmartCare and enjoy 5 years ofhardware coverage.When the activation period is expired, the warranty end date will be displayed.
6.37 Firmware UpdateAbout Firmware updateThe firmware of the Base Unit can be updated via the web interface. The latest version of the firmware isavailable on Barco's website.
CX-20 Configurator
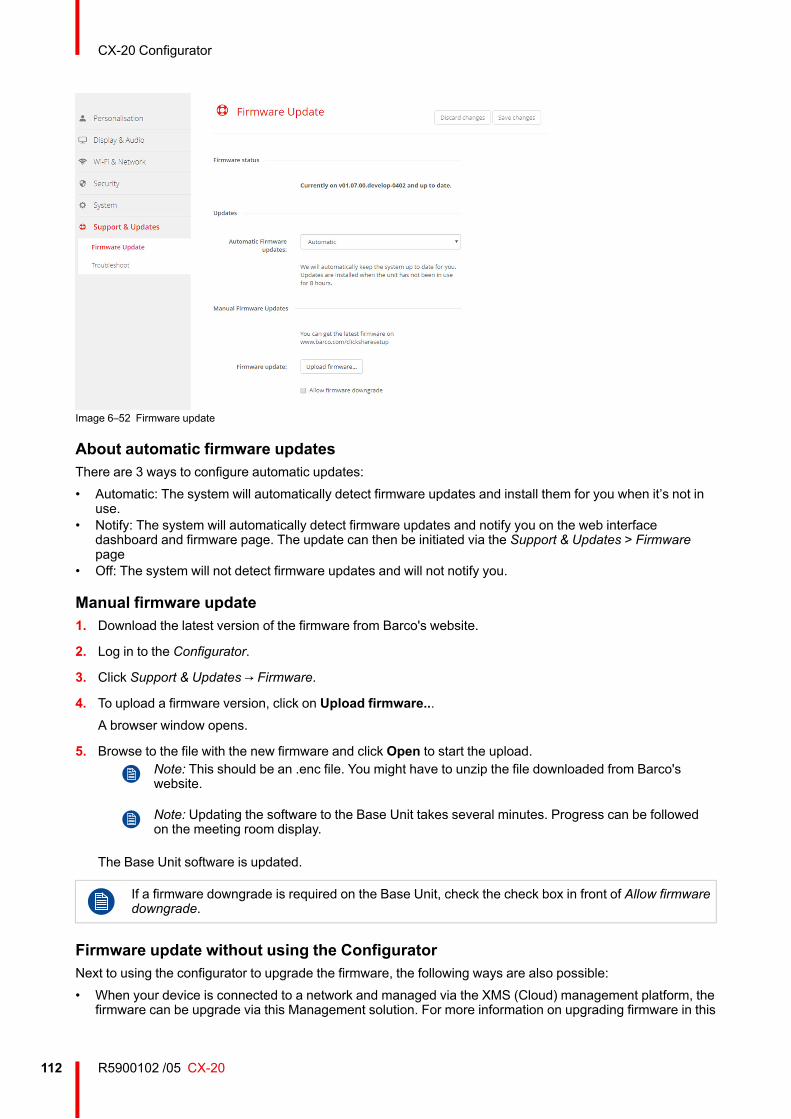
R5900102 /05 CX-20112
Image 6–52 Firmware update
About automatic firmware updatesThere are 3 ways to configure automatic updates:• Automatic: The system will automatically detect firmware updates and install them for you when it’s not in
use.• Notify: The system will automatically detect firmware updates and notify you on the web interface
dashboard and firmware page. The update can then be initiated via the Support & Updates > Firmwarepage
• Off: The system will not detect firmware updates and will not notify you.
Manual firmware update1. Download the latest version of the firmware from Barco's website.
2. Log in to the Configurator.
3. Click Support & Updates → Firmware.
4. To upload a firmware version, click on Upload firmware...A browser window opens.
5. Browse to the file with the new firmware and click Open to start the upload.Note: This should be an .enc file. You might have to unzip the file downloaded from Barco'swebsite.
Note: Updating the software to the Base Unit takes several minutes. Progress can be followedon the meeting room display.
The Base Unit software is updated.
If a firmware downgrade is required on the Base Unit, check the check box in front of Allow firmwaredowngrade.
Firmware update without using the ConfiguratorNext to using the configurator to upgrade the firmware, the following ways are also possible:• When your device is connected to a network and managed via the XMS (Cloud) management platform, the
firmware can be upgrade via this Management solution. For more information on upgrading firmware in this
CX-20 Configurator
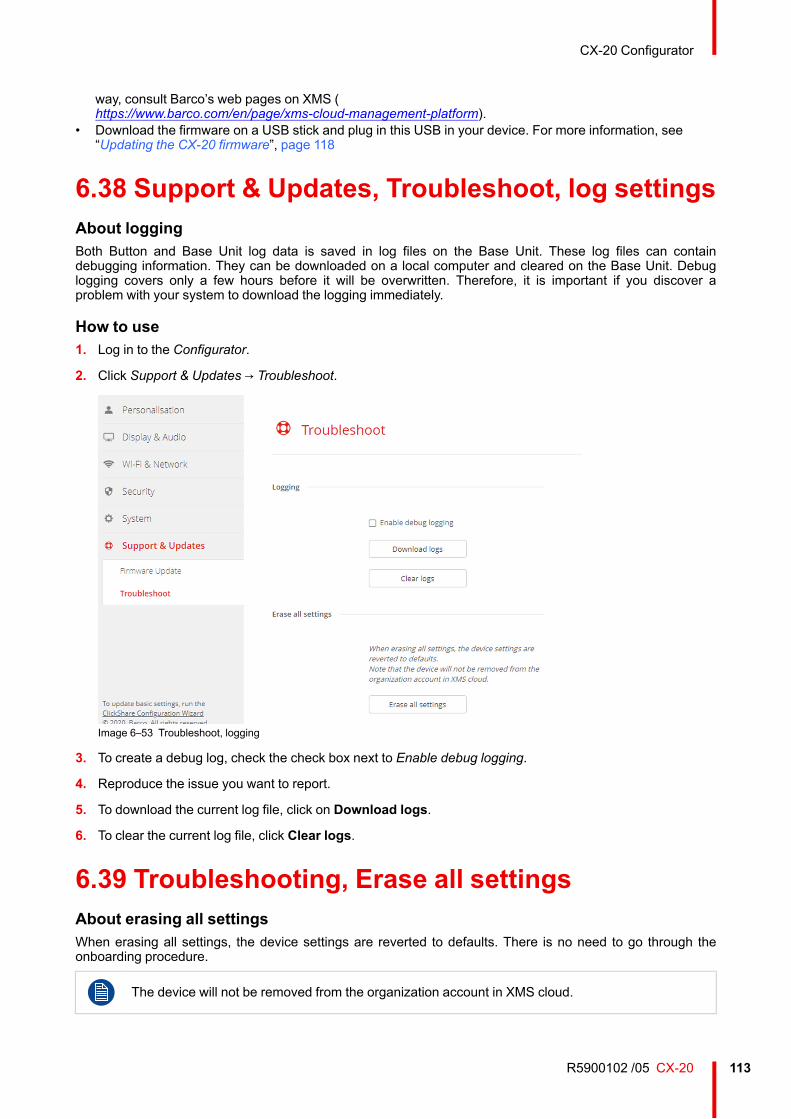
113R5900102 /05 CX-20
way, consult Barco’s web pages on XMS (https://www.barco.com/en/page/xms-cloud-management-platform).
• Download the firmware on a USB stick and plug in this USB in your device. For more information, see“Updating the CX-20 firmware”, page 118
6.38 Support & Updates, Troubleshoot, log settingsAbout loggingBoth Button and Base Unit log data is saved in log files on the Base Unit. These log files can containdebugging information. They can be downloaded on a local computer and cleared on the Base Unit. Debuglogging covers only a few hours before it will be overwritten. Therefore, it is important if you discover aproblem with your system to download the logging immediately.
How to use1. Log in to the Configurator.
2. Click Support & Updates → Troubleshoot.
Image 6–53 Troubleshoot, logging
3. To create a debug log, check the check box next to Enable debug logging.
4. Reproduce the issue you want to report.
5. To download the current log file, click on Download logs.
6. To clear the current log file, click Clear logs.
6.39 Troubleshooting, Erase all settingsAbout erasing all settingsWhen erasing all settings, the device settings are reverted to defaults. There is no need to go through theonboarding procedure.
The device will not be removed from the organization account in XMS cloud.
CX-20 Configurator
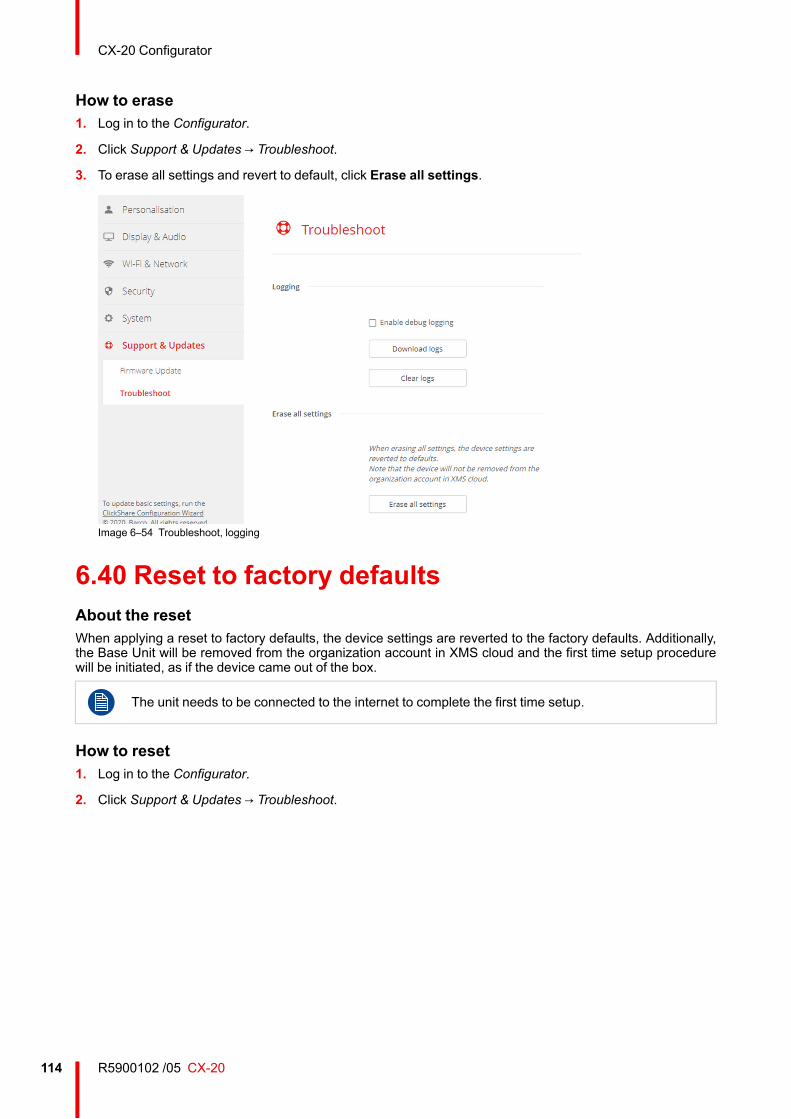
R5900102 /05 CX-20114
How to erase1. Log in to the Configurator.
2. Click Support & Updates → Troubleshoot.
3. To erase all settings and revert to default, click Erase all settings.
Image 6–54 Troubleshoot, logging
6.40 Reset to factory defaultsAbout the resetWhen applying a reset to factory defaults, the device settings are reverted to the factory defaults. Additionally,the Base Unit will be removed from the organization account in XMS cloud and the first time setup procedurewill be initiated, as if the device came out of the box.
The unit needs to be connected to the internet to complete the first time setup.
How to reset1. Log in to the Configurator.
2. Click Support & Updates → Troubleshoot.
CX-20 Configurator
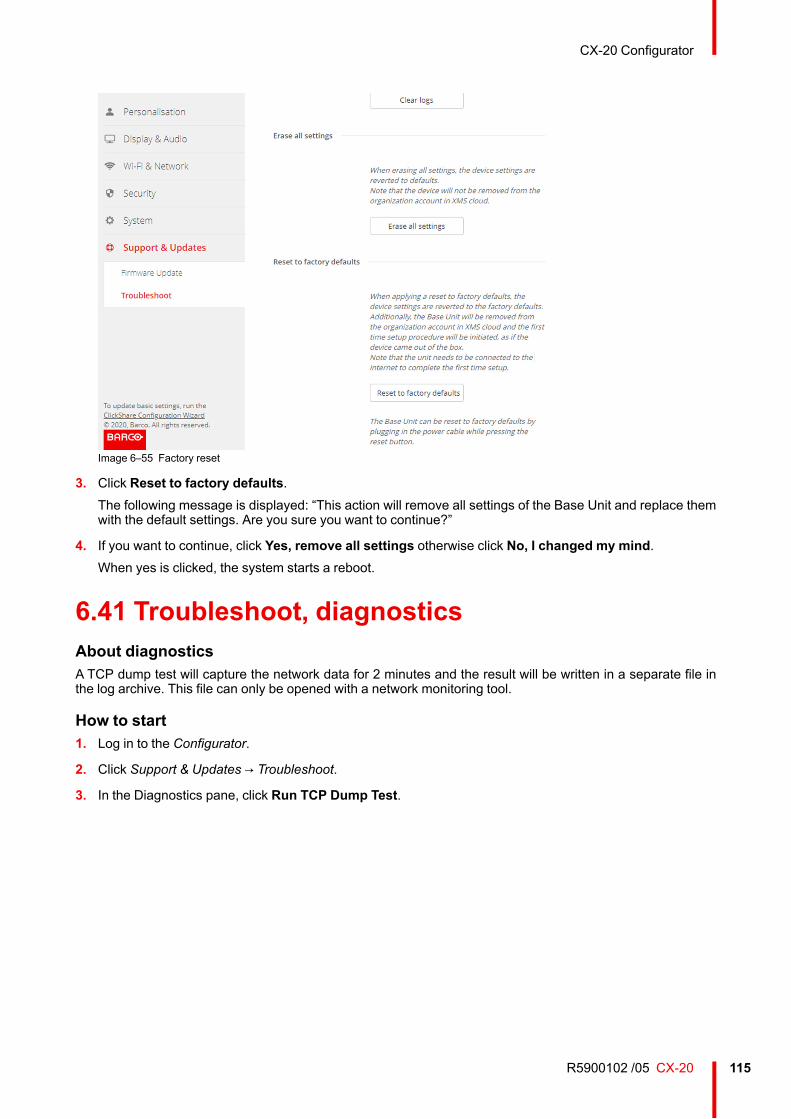
115R5900102 /05 CX-20
Image 6–55 Factory reset
3. Click Reset to factory defaults.The following message is displayed: “This action will remove all settings of the Base Unit and replace themwith the default settings. Are you sure you want to continue?”
4. If you want to continue, click Yes, remove all settings otherwise click No, I changed my mind.When yes is clicked, the system starts a reboot.
6.41 Troubleshoot, diagnosticsAbout diagnosticsA TCP dump test will capture the network data for 2 minutes and the result will be written in a separate file inthe log archive. This file can only be opened with a network monitoring tool.
How to start1. Log in to the Configurator.
2. Click Support & Updates → Troubleshoot.
3. In the Diagnostics pane, click Run TCP Dump Test.
CX-20 Configurator
R5900102 /05 CX-20116
Image 6–56 Troubleshoot, diagnositcs
A separate file is written to the log archive.Only the TCP header info will be collected as part of this test.
CX-20 Configurator
117R5900102 /05 CX-20
Firmware updates 7
R5900102 /05 CX-20118
7.1 Updating the CX-20 firmwareWhen starting up the device for the first time a software update is necessary. This update can onlybe done via the network.
About Firmware updatesThere are different ways to update the Base Unit software:• automatic update when connected with the network or your device is configured in XMS cloud.• via the Configurator, for more information, see “Firmware Update”, page 111.• by copying the software on a USB stick
To update the Base Unit software by copying the software on a USB stick1. Download the latest version of the firmware from Barco's website, www.barco.com/clickshare. Click on
Support and select the update firmware button of your device type.
2. Unzip the zip file.
3. Copy the ENC file to a USB stick.You can have multiple firmwares for multiple device types on the same stick.
4. Insert the USB stick into the USB port at the front of the Base Unit.
5. Follow the instructions on the meeting room screen.
6. When the on-screen message indicates that the process is finished, remove the USB stick.The Base Unit reboots.
Firmware updates
119R5900102 /05 CX-20
Troubleshooting 8
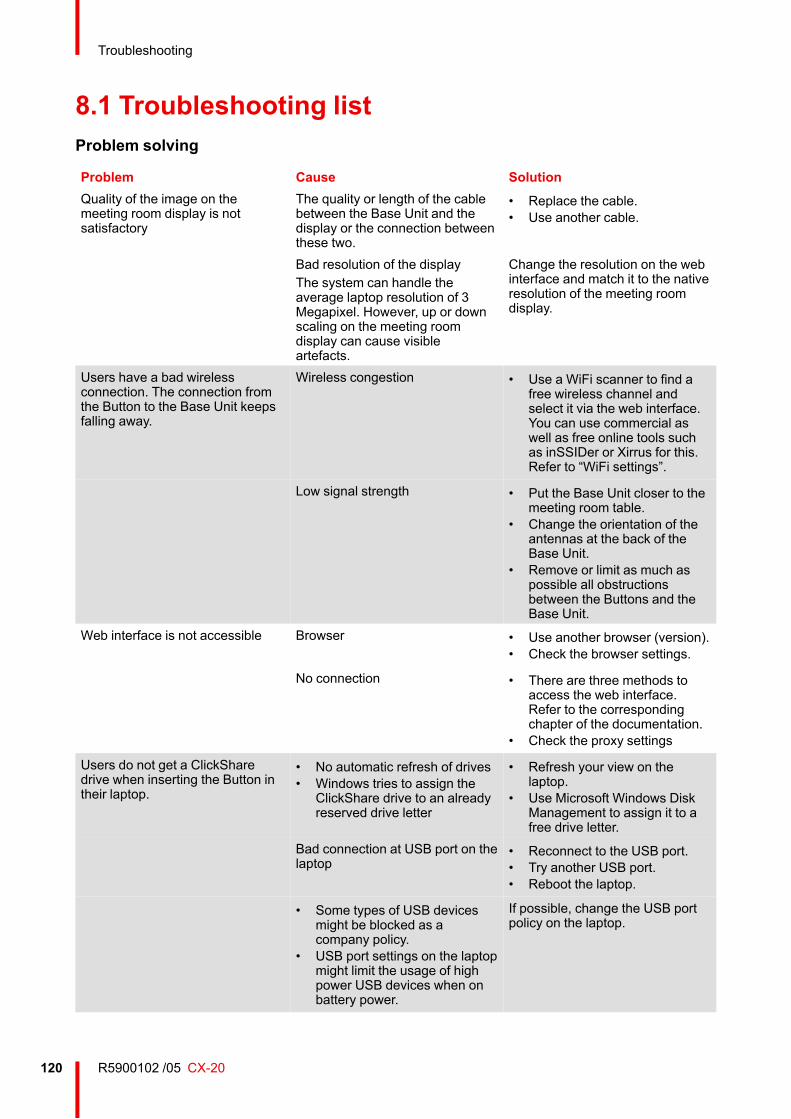
R5900102 /05 CX-20120
8.1 Troubleshooting listProblem solving
Problem Cause SolutionQuality of the image on themeeting room display is notsatisfactory
The quality or length of the cablebetween the Base Unit and thedisplay or the connection betweenthese two.
• Replace the cable.• Use another cable.
Bad resolution of the displayThe system can handle theaverage laptop resolution of 3Megapixel. However, up or downscaling on the meeting roomdisplay can cause visibleartefacts.
Change the resolution on the webinterface and match it to the nativeresolution of the meeting roomdisplay.
Users have a bad wirelessconnection. The connection fromthe Button to the Base Unit keepsfalling away.
Wireless congestion • Use a WiFi scanner to find afree wireless channel andselect it via the web interface.You can use commercial aswell as free online tools suchas inSSIDer or Xirrus for this.Refer to “WiFi settings”.
Low signal strength • Put the Base Unit closer to themeeting room table.
• Change the orientation of theantennas at the back of theBase Unit.
• Remove or limit as much aspossible all obstructionsbetween the Buttons and theBase Unit.
Web interface is not accessible Browser • Use another browser (version).• Check the browser settings.
No connection • There are three methods toaccess the web interface.Refer to the correspondingchapter of the documentation.
• Check the proxy settings
Users do not get a ClickSharedrive when inserting the Button intheir laptop.
• No automatic refresh of drives• Windows tries to assign the
ClickShare drive to an alreadyreserved drive letter
• Refresh your view on thelaptop.
• Use Microsoft Windows DiskManagement to assign it to afree drive letter.
Bad connection at USB port on thelaptop
• Reconnect to the USB port.• Try another USB port.• Reboot the laptop.
• Some types of USB devicesmight be blocked as acompany policy.
• USB port settings on the laptopmight limit the usage of highpower USB devices when onbattery power.
If possible, change the USB portpolicy on the laptop.
Troubleshooting
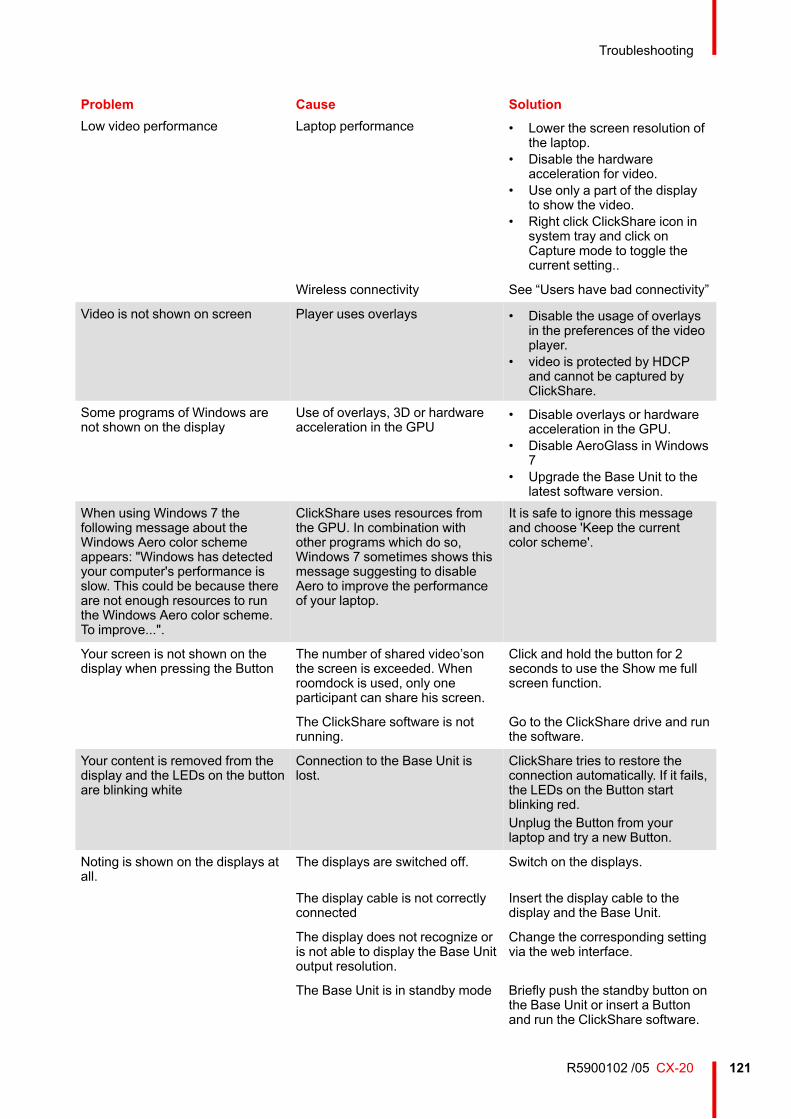
121R5900102 /05 CX-20
Problem Cause SolutionLow video performance Laptop performance • Lower the screen resolution of
the laptop.• Disable the hardware
acceleration for video.• Use only a part of the display
to show the video.• Right click ClickShare icon in
system tray and click onCapture mode to toggle thecurrent setting..
Wireless connectivity See “Users have bad connectivity”
Video is not shown on screen Player uses overlays • Disable the usage of overlaysin the preferences of the videoplayer.
• video is protected by HDCPand cannot be captured byClickShare.
Some programs of Windows arenot shown on the display
Use of overlays, 3D or hardwareacceleration in the GPU
• Disable overlays or hardwareacceleration in the GPU.
• Disable AeroGlass in Windows7
• Upgrade the Base Unit to thelatest software version.
When using Windows 7 thefollowing message about theWindows Aero color schemeappears: "Windows has detectedyour computer's performance isslow. This could be because thereare not enough resources to runthe Windows Aero color scheme.To improve...".
ClickShare uses resources fromthe GPU. In combination withother programs which do so,Windows 7 sometimes shows thismessage suggesting to disableAero to improve the performanceof your laptop.
It is safe to ignore this messageand choose 'Keep the currentcolor scheme'.
Your screen is not shown on thedisplay when pressing the Button
The number of shared video’sonthe screen is exceeded. Whenroomdock is used, only oneparticipant can share his screen.
Click and hold the button for 2seconds to use the Show me fullscreen function.
The ClickShare software is notrunning.
Go to the ClickShare drive and runthe software.
Your content is removed from thedisplay and the LEDs on the buttonare blinking white
Connection to the Base Unit islost.
ClickShare tries to restore theconnection automatically. If it fails,the LEDs on the Button startblinking red.Unplug the Button from yourlaptop and try a new Button.
Noting is shown on the displays atall.
The displays are switched off. Switch on the displays.
The display cable is not correctlyconnected
Insert the display cable to thedisplay and the Base Unit.
The display does not recognize oris not able to display the Base Unitoutput resolution.
Change the corresponding settingvia the web interface.
The Base Unit is in standby mode Briefly push the standby button onthe Base Unit or insert a Buttonand run the ClickShare software.
Troubleshooting
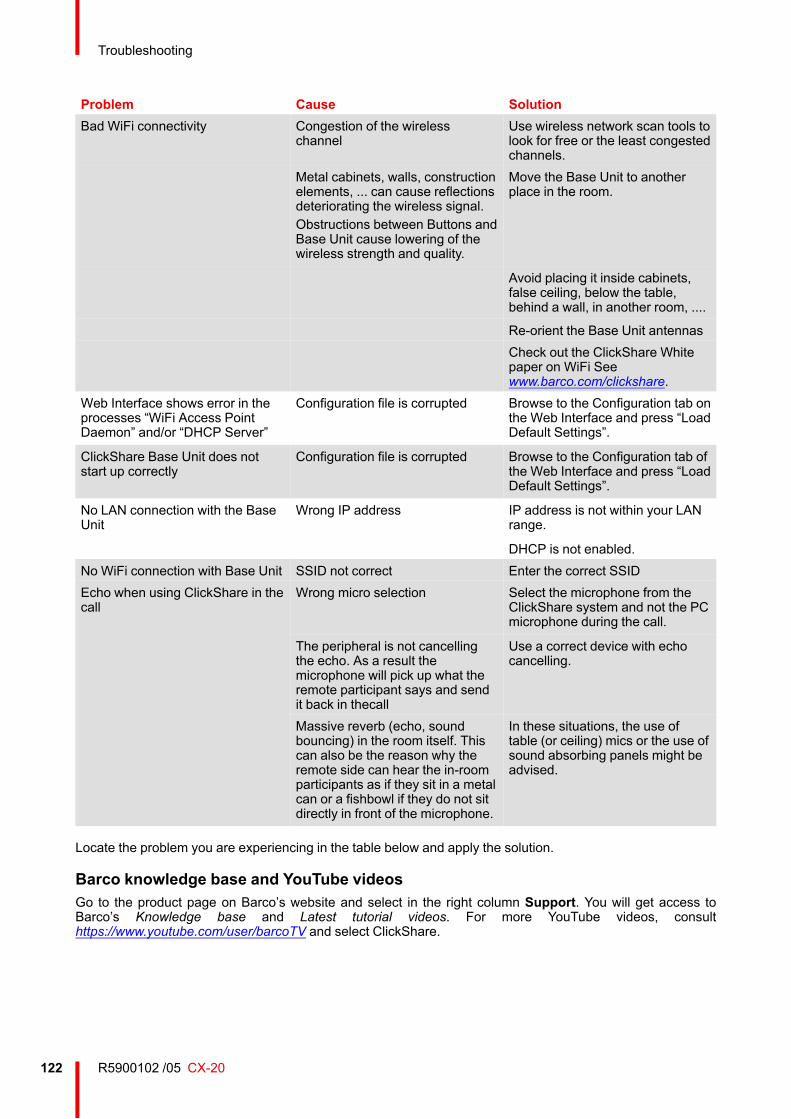
R5900102 /05 CX-20122
Problem Cause SolutionBad WiFi connectivity Congestion of the wireless
channelUse wireless network scan tools tolook for free or the least congestedchannels.
Metal cabinets, walls, constructionelements, ... can cause reflectionsdeteriorating the wireless signal.Obstructions between Buttons andBase Unit cause lowering of thewireless strength and quality.
Move the Base Unit to anotherplace in the room.
Avoid placing it inside cabinets,false ceiling, below the table,behind a wall, in another room, ....
Re-orient the Base Unit antennasCheck out the ClickShare Whitepaper on WiFi Seewww.barco.com/clickshare.
Web Interface shows error in theprocesses “WiFi Access PointDaemon” and/or “DHCP Server”
Configuration file is corrupted Browse to the Configuration tab onthe Web Interface and press “LoadDefault Settings”.
ClickShare Base Unit does notstart up correctly
Configuration file is corrupted Browse to the Configuration tab ofthe Web Interface and press “LoadDefault Settings”.
No LAN connection with the BaseUnit
Wrong IP address IP address is not within your LANrange.
DHCP is not enabled.No WiFi connection with Base Unit SSID not correct Enter the correct SSIDEcho when using ClickShare in thecall
Wrong micro selection Select the microphone from theClickShare system and not the PCmicrophone during the call.
The peripheral is not cancellingthe echo. As a result themicrophone will pick up what theremote participant says and sendit back in thecall
Use a correct device with echocancelling.
Massive reverb (echo, soundbouncing) in the room itself. Thiscan also be the reason why theremote side can hear the in-roomparticipants as if they sit in a metalcan or a fishbowl if they do not sitdirectly in front of the microphone.
In these situations, the use oftable (or ceiling) mics or the use ofsound absorbing panels might beadvised.
Locate the problem you are experiencing in the table below and apply the solution.
Barco knowledge base and YouTube videosGo to the product page on Barco’s website and select in the right column Support. You will get access toBarco’s Knowledge base and Latest tutorial videos. For more YouTube videos, consulthttps://www.youtube.com/user/barcoTV and select ClickShare.
Troubleshooting


www.barco.com
R5900102 /05 | 2021-12-20
Wi Fi