Operating Instructions - Veterinary Technics
246
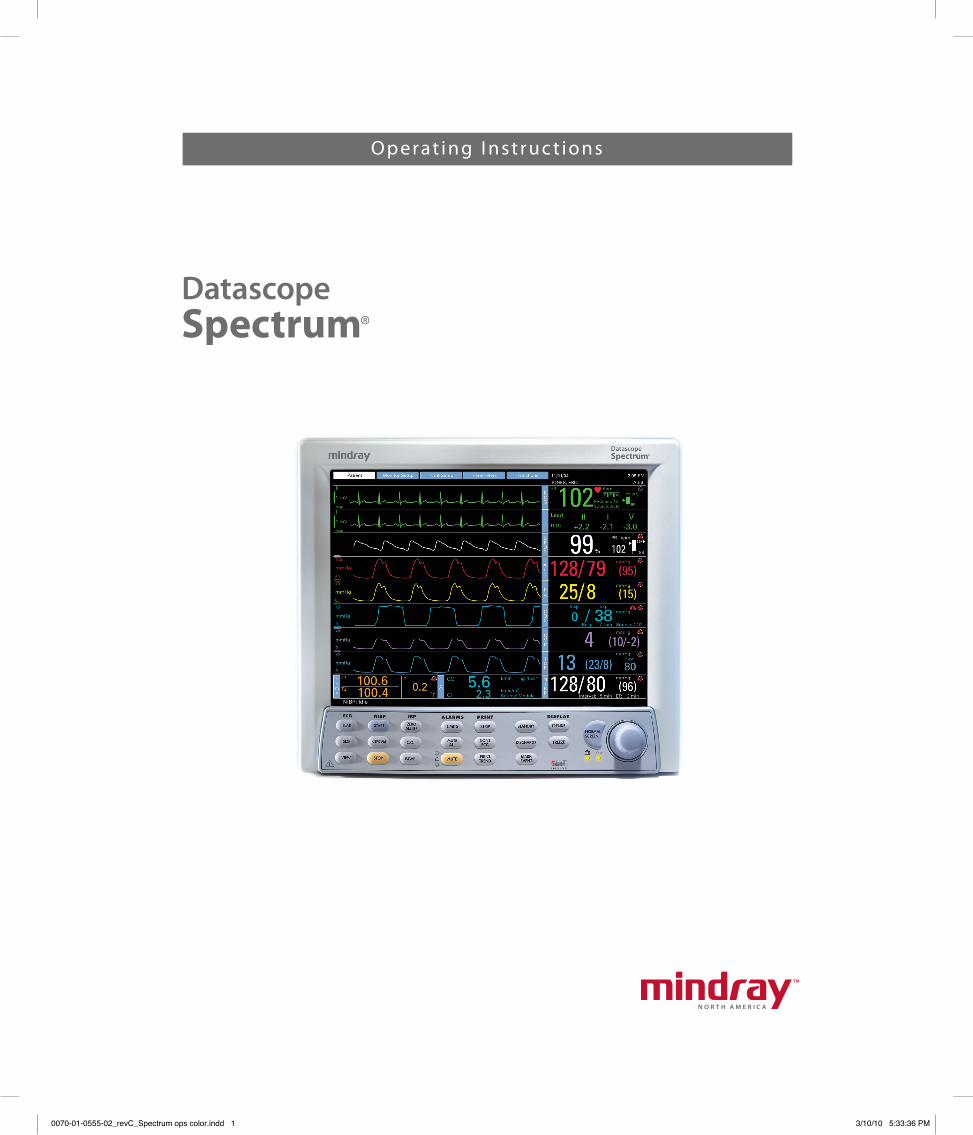
Operating Instructions 0070-01-0555-02_revC_Spectrum ops color.indd 1 3/10/10 5:33:36 PM
-
Upload
khangminh22 -
Category
Documents
-
view
2 -
download
0
Transcript of Operating Instructions - Veterinary Technics
Operat ing I nst ruc t ions
0070-01-0555-02_revC_Spectrum ops color.indd 1 3/10/10 5:33:36 PM

Operat ing I nst ruc t ions

0070-10-0648-02 Spectrum® Operating Instructions
Abbott® is a U.S. registered trademark of Abbott Laboratories.
CapnoLine™ is a trademark of Oridion Medical Ltd.
DRYLINE™ is a trademark of Artema Medical AB
Durasensor® is a U.S. registered trademark of Nellcor Puritan Bennett Inc.
Edwards® is a U.S. registered trademark of Edwards Lifesciences Corporation.
FilterLine® is a U.S. registered trademark of Oridion Medical Ltd.
LNCS® is a U.S. registered trademark of Masimo Corp.
LNOP® is a U.S. registered trademark of Masimo Corp.
Masimo SET® is a U.S. registered trademark of Masimo Corp.
Max-Fast® is a U.S. registered trademark of Nellcor Puritan Bennett Inc.
MediCO2® is a registered trademark of Oridion Medical Ltd.
Microstream® is a U.S. registered trademark of Oridion Medical Ltd.
Navigator™ is a U.S. trademark of Mindray DS USA
Nellcor® is U.S. registered trademark of Nellcor Puritan Bennett Inc.
NIV Line™ is a trademark of Oridion Medical Ltd.
Oxiband® is a U.S. registered trademark of Nellcor Puritan Bennett Inc.
OxiMax® is a US registered trademark of Nellcor Puritan Bennett Inc.
Oxisensor® is a U.S. registered trademark of Nellcor Puritan Bennett Inc.
Oxismart® is a U.S. registered trademark of Nellcor Puritan Bennett Inc.
Panorama™ is a U.S. trademark of Mindray DS USA
PatientNet® is a U.S. registered trademark of GE Medical Systems Information Technologies.
Spectrum® is a U.S. registered trademark of Mindray DS USA
Velcro® is a registered trademark of Velcro Industries B.V.
View 12™ is a U.S. trademark of Mindray DS USA
Vigilance® is a US registered trademark of Edwards Lifesciences Corporation.
Copyright © Mindray DS USA, 2003. All rights reserved. Contents of this publication may not be reproduced in any form without permission of Mindray DS USA.

Spectrum® Operating Instructions 0070-10-0648-02 i
Table of Contents
Foreword....................................................................................................................................................... vWarnings, Precautions and Notes..................................................................................................................... vWarnings ...................................................................................................................................................... viPrecautions ....................................................................................................................................................xNotes ............................................................................................................................................................xivIndication For Use...........................................................................................................................................xivUnpacking .....................................................................................................................................................xvSymbols and Descriptions ................................................................................................................................xvi
General Product Description..............................................................................................1 - 1General Product Description.............................................................................................................................1 - 2Key Features ..................................................................................................................................................1 - 3Keys and Front Panel.......................................................................................................................................1 - 4Display..........................................................................................................................................................1 - 9Rear View......................................................................................................................................................1 - 11Left Side Panel ................................................................................................................................................1 - 12Right Side Panel .............................................................................................................................................1 - 14Gas Module (Optional) ...................................................................................................................................1 - 16
Front Panel .............................................................................................................................................1 - 16Rear Panel ..............................................................................................................................................1 - 17
Comm-Ports ....................................................................................................................................................1 - 18External Parameter Modules (Optional)..............................................................................................................1 - 20
External Parameter Module Top View.........................................................................................................1 - 21External Parameter Module Front View.......................................................................................................1 - 22Left Side View with External Parameter Module ...........................................................................................1 - 23Rear View with External Parameter Module.................................................................................................1 - 25
Operations .......................................................................................................................2 - 1Getting Started ...............................................................................................................................................2 - 1Installation Mode ............................................................................................................................................2 - 3
Installation Menu .....................................................................................................................................2 - 3System Information Menu..........................................................................................................................2 - 6
Main Menus...................................................................................................................................................2 - 8Patient Menu...........................................................................................................................................2 - 8Monitor Setup Menu ................................................................................................................................2 - 10Print Setup Menu .....................................................................................................................................2 - 13Parameters Menu.....................................................................................................................................2 - 14Functions Menu .......................................................................................................................................2 - 15
Remote View ..................................................................................................................................2 - 16Parameter Menus and Monitoring .....................................................................................................................2 - 22
ECG Monitoring......................................................................................................................................2 - 22ECG Menu .............................................................................................................................................2 - 22
Skin Preparation .............................................................................................................................2 - 25Electrode Patch Location ...................................................................................................................2 - 25Lead Placement ...............................................................................................................................2 - 27Arrhythmia Algorithm .......................................................................................................................2 - 34Arrhythmia Alarms ..........................................................................................................................2 - 36Arrhythmia Analysis (Optional) .........................................................................................................2 - 40ST Analysis (Optional) .....................................................................................................................2 - 42Relearning ST or Arrhythmia Analysis ................................................................................................2 - 4412-lead ECG (Optional) ...................................................................................................................2 - 45ECG Troubleshooting .......................................................................................................................2 - 46
Non-Invasive Blood Pressure Measurements (NIBP) ......................................................................................2 - 48Manual NIBP Measurements .............................................................................................................2 - 48

Table of Contents
ii 0070-10-0648-02 Spectrum® Operating Instructions
Automatic Interval NIBP Measurements ..............................................................................................2 - 50NIBP Troubleshooting ......................................................................................................................2 - 53
SpO2 Pulse Oximetry ...............................................................................................................................2 - 55Masimo SET® SpO2 ........................................................................................................................2 - 57Nellcor® SpO2 ...............................................................................................................................2 - 57SpO2 Troubleshooting and SpO2 Menu Performance Considerations ....................................................2 - 58
Temperature Menu...................................................................................................................................2 - 60Temperature Troubleshooting ............................................................................................................2 - 61
Respiration Menu ....................................................................................................................................2 - 61Thoracic Impedance ........................................................................................................................2 - 61Microstream® CO2 Monitoring (Optional) ..........................................................................................2 - 62Microstream® CO2 Menu ................................................................................................................2 - 63Respiration and CO2 Troubleshooting ................................................................................................2 - 64
Gas Monitoring with Gas Module .............................................................................................................2 - 66Gas Module 3 Pre-use Test .......................................................................................................................2 - 68
Gas Monitor Calibration ..................................................................................................................2 - 69Gas Module Troubleshooting ............................................................................................................2 - 72
IBP - Invasive Blood Pressure Menu (Optional) .............................................................................................2 - 75Measuring IBP ................................................................................................................................2 - 76IBP Troubleshooting .........................................................................................................................2 - 77
Pulmonary Artery Wedge Pressure (PAWP).................................................................................................2 - 78Measuring PAWP ............................................................................................................................2 - 78PAWP Troubleshooting ....................................................................................................................2 - 79
Cardiac Output (CO) (Optional)................................................................................................................2 - 80External Parameter Module (EPM) .....................................................................................................2 - 80Edwards Vigilance® Monitor (Vigilance) ............................................................................................2 - 86CO from both Vigilance and EPM .....................................................................................................2 - 89
Calculations ...................................................................................................................................................2 - 90Drug Calculations ....................................................................................................................................2 - 90Hemodynamic Calculations ......................................................................................................................2 - 95
Alarms...........................................................................................................................................................2 - 96Adjusting Alarms .....................................................................................................................................2 - 96Alarm Limits ............................................................................................................................................2 - 97Alarm Troubleshooting .............................................................................................................................2 - 101
Trends ...........................................................................................................................................................2 - 102List Trends...............................................................................................................................................2 - 102Graph Trends..........................................................................................................................................2 - 105OxyCRG Trends ......................................................................................................................................2 - 107Trends Troubleshooting.............................................................................................................................2 - 108
Printing (Optional) ..........................................................................................................................................2 - 109Internal Recorder (Optional)......................................................................................................................2 - 109Printing 12-lead to the Laser Printer ............................................................................................................2 - 116Printer / Recorder Troubleshooting ............................................................................................................2 - 116
Connection to PatientNet® Central Station .........................................................................................................2 - 117Connection to Panorama™ Central Station .........................................................................................................2 - 118Connection to Panorama™ Gateway .................................................................................................................2 - 119Monitor/Display Troubleshooting......................................................................................................................2 - 120
User Maintenance.............................................................................................................3 - 1Introduction....................................................................................................................................................3 - 1Care and Cleaning of Monitor .........................................................................................................................3 - 1Decontamination of Monitor .............................................................................................................................3 - 2Care and Cleaning of SpO2 Sensors.................................................................................................................3 - 2

Spectrum® Operating Instructions 0070-10-0648-02 iii
Table of Contents
Sterilization and Cleaning of Reusable Bladderless Cuffs .....................................................................................3 - 3Battery Replacement and Maintenance ..............................................................................................................3 - 3
Battery Replacement ................................................................................................................................3 - 3Battery Maintenance ................................................................................................................................3 - 3
Recorder Paper Replacement............................................................................................................................3 - 4Care and Storage of Thermal Chart Paper .........................................................................................................3 - 4Care and Cleaning of Gas Module...................................................................................................................3 - 5
Gas Module II and Gas Module SE ...........................................................................................................3 - 5Gas Module 3 ........................................................................................................................................3 - 6
Care and Cleaning of 3 and 5-lead ECG Cables and Leadwires ..........................................................................3 - 7Care and Cleaning of View 12™ ECG Analysis Module......................................................................................3 - 7
Accessories .......................................................................................................................4 - 1Optional Accessories ......................................................................................................................................4 - 1
NIBP Accessories.....................................................................................................................................4 - 1Oximetry Sensors and Accessories.............................................................................................................4 - 2
Pulse Oximetry-Masimo SET® LNOP® SpO2 .......................................................................................4 - 2Pulse Oximetry-Masimo Set® LNCS® SpO2 .........................................................................................4 - 3Pulse Oximetry-Nellcor® OxiMax® SpO2* .........................................................................................4 - 4
Oridion CO2 Accessories .........................................................................................................................4 - 4Gas Module Accessories ..........................................................................................................................4 - 5
Gas Module II and Gas Module SE ...................................................................................................4 - 5Gas Module 3 ................................................................................................................................4 - 5
Reusable Temperature Probes....................................................................................................................4 - 6Disposable Temperature Probes.................................................................................................................4 - 6ECG Accessories .....................................................................................................................................4 - 7
ECG Cables ...................................................................................................................................4 - 7ECG Leadwires ...............................................................................................................................4 - 712 Lead ECG Accessories ................................................................................................................4 - 8Electrodes ......................................................................................................................................4 - 9
IBP Accessories .......................................................................................................................................4 - 9Comm-Port Accessories ............................................................................................................................4 - 9Base Station Accessories ..........................................................................................................................4 - 10Miscellaneous Accessories........................................................................................................................4 - 11Mounting Kits and Accessories ..................................................................................................................4 - 11Upgrade Kits...........................................................................................................................................4 - 12Central Station Accessories.......................................................................................................................4 - 13External Parameter Module Accessories .....................................................................................................4 - 13
Appendix .........................................................................................................................5 - 1Safety Designations.........................................................................................................................................5 - 1
Safety designations per IEC 60601-1 Standard...........................................................................................5 - 1Patient Parameter Specifications .......................................................................................................................5 - 3
ECG ......................................................................................................................................................5 - 3ECG Respiration Performance Requirements................................................................................................5 - 7NIBP Performance and Functional Characteristics ........................................................................................5 - 7IBP Performance Characteristics.................................................................................................................5 - 10Temperature Parameter Performance Characteristics ....................................................................................5 - 12SpO2 Performance Requirements...............................................................................................................5 - 13
Masimo SET SpO2 Performance Requirements ....................................................................................5 - 13Nellcor SpO2 Performance Requirements ...........................................................................................5 - 15
CO2 Performance Characteristics ..............................................................................................................5 - 15MediCO2 Microstream® (Only in monitors with serial numbers below MS05000.) .................................5 - 15MiniMediCO2 Microstream® (Only in monitors with serial number MS05000 and higher.) ......................5 - 17

Table of Contents
iv 0070-10-0648-02 Spectrum® Operating Instructions
Cardiac Output .......................................................................................................................................5 - 19Special Functions ............................................................................................................................................5 - 20
ST Segment Analysis Performance Requirements ..........................................................................................5 - 20Arrhythmia Analysis .................................................................................................................................5 - 21ECG Interpretation...................................................................................................................................5 - 22Calculations............................................................................................................................................5 - 22Hemodynamic Calculations ......................................................................................................................5 - 22
Information Display and Control .......................................................................................................................5 - 25Input/Output Communications..........................................................................................................................5 - 27Communication Protocols.................................................................................................................................5 - 28Power Supply .................................................................................................................................................5 - 30
Battery Power..........................................................................................................................................5 - 30Sealed Lead Acid (P/N0146-00-0043) .............................................................................................5 - 30Lithium-Ion Battery (P/N 0146-00-0069) ............................................................................................5 - 31
Data Storage..................................................................................................................................................5 - 32Printing..........................................................................................................................................................5 - 33Monitor Physical Characteristics .......................................................................................................................5 - 34Comm-Port Physical Characteristics ...................................................................................................................5 - 36External Parameter Module Physical Characteristics ............................................................................................5 - 37Environmental and Safety Characteristics ...........................................................................................................5 - 38
Spectrum ................................................................................................................................................5 - 38Gas Module 3 ........................................................................................................................................5 - 39
Agency Compliance........................................................................................................................................5 - 40Spectrum ................................................................................................................................................5 - 40Gas Module II and Gas Module SE ...........................................................................................................5 - 40Gas Module 3 ........................................................................................................................................5 - 41
Electromagnetic Capability ..............................................................................................................................5 - 41Spectrum ................................................................................................................................................5 - 41Gas Module SE and Gas Module 3 ...........................................................................................................5 - 45
Warranty Statements.......................................................................................................................................5 - 49Phone Numbers and How To Get Assistance......................................................................................................5 - 51Mindray’s Responsibility ..................................................................................................................................5 - 51
Glossary...........................................................................................................................6 - 1Glossary of Terms ...........................................................................................................................................6 - 1
Spectrum® Operating Instructions 0070-10-0648-02 v
Foreword Introduction
ForewordThe Spectrum Operating Instructions are intended to provide information for proper operation.
General knowledge of monitoring and an understanding of the features and functions of the Mindray Spectrum Monitor are prerequisites for its proper use.
NOTE: Do not operate this monitor before reading these instructions.
Information for servicing this instrument is contained in the Spectrum Monitor Service Manual, part number 0070-00-0556-02. For additional information or assistance, please contact an authorized Mindray representative in your area.
CAUTION: U.S. Federal Law restricts this device to sale by or on the order of a physician or other practitioner licensed by state law to use or order the use of this device.
NOTE: Figures in this manual are provided for reference purposes only. Screens will likely differ based on the monitoring device configuration, licenses available, parameters selected and patient configuration of the Spectrum Monitor.
Patents: This device is covered under one or more of the following U.S. Patents 4,621,643, 4,653,498, 4,700,708, 4,770,179, 4,869,254, 4,911,167, 4,928,692, 4,934,372, 5,078,136, 5,368,224, 5,482,036, 5,490,505, 5,632,272, 5,685,299, 5,758,644, 5,769,785, 6,002,952, 6,036,642, 6,067,462, 6,157,850, 6,206,830, 6,247,674, 6,377,845, 4,802,486, 4,960,126, 5,485,847, 5,743,263, 5,865,736, 6,035,223, 6,298,252, 6,463,310, 6,591,123, 6,675,031, 6,708,049, 6,801,797, 6,589,028, 6,896,713, Re.35,122 and foreign equivalents. Possession or purchase of this device does not convey any express or implied license to use the device with replacement parts which would, alone, or in combination with this device, fall within the scope of one or more of the patents relating to this device.
Warnings, Precautions and NotesPlease read and adhere to all warnings, precautions and notes listed here and in the appropriate areas throughout this manual.
A WARNING is provided to alert the user to potential serious outcomes (death, injury, or serious adverse events) to the patient or the user.
A CAUTION is provided to alert the user to use special care necessary for the safe and effective use of the device. They may include actions to be taken to avoid effects on patients or users that may not be potentially life threatening or result in serious injury, but about which the user should be aware. Cautions are also provided to alert the user to adverse effects on this device of use or misuse and the care necessary to avoid such effects.
A NOTE is provided when additional general information is applicable.

Introduction Warnings
vi 0070-10-0648-02 Spectrum® Operating Instructions
WarningsWARNING: Internal Electrical Shock Hazard - This unit does not contain
any user-serviceable parts. Do not remove instrument covers. Refer Servicing to qualified personnel.
WARNING: Trace Gas Hazard - When using the optional Gas Module, a health hazard exists when trace amounts of vaporized anesthetic agents are chronically inspired by operating room personnel. See Appendix A in NFPA 56A on Inhalation Anesthetics. During any procedure where such agents are employed, the Gas Module exhaust output should be connected to a medical gas-scavenging system.
WARNING: Do not use this monitor during MRI (Magnetic Resonance Imaging) scanning. Induced current could potentially cause burns. Accuracy of measurements on this unit and the MRI unit may also be affected.
WARNING: For continued protection against a fire hazard, replace all fuses with the specified type and rating.
WARNING: This unit uses a common isolation path for the ECG leads and the Invasive Pressure Channels. Ensure that conductive parts of the ECG electrodes do not contact other conductive parts including earth ground. Do not connect any non-isolated accessories to the Spectrum or to the ECG or invasive pressure channel inputs when connected to a patient. Insure that the total chassis leakage currents of all connected units does not exceed 300µA. Use an IEC 60601-1 approved isolation / separation transformer if required. Do not simultaneously touch the patient and any piece of electrical equipment if any cover has been removed from the equipment.
WARNING: The AC line cord and interface cables (i.e. non-patient cables) may utilize the same ground. Therefore, removal of the AC line cord does not necessarily isolate the Spectrum, if non-patient interface cables are attached.
WARNING: Observe extreme caution when a defibrillator is used on a patient. Do not touch any part of patient, table, or monitor when a defibrillator is in use.
WARNING: Do not incinerate battery, possible explosion may occur.
WARNING: Do not put MPSO (Multiple Portable Socket Outlets i.e. Multiple outlet extension cords) used with the Spectrum or its accessories on the floor. Connect only Spectrum accessories to the same MPSO as the Spectrum. Do not overload the MPSO.
WARNING: Do not connect other equipment to the same MPSO with the Spectrum, as it may increase system leakage current.
WARNING: Reliably attach Potential Equalization connector to the safety ground when interconnecting Spectrum with other medical or non-medical electrical equipment to minimize the risk of excessive leakage current and/or shock hazard.
WARNING: Do not reuse disposable devices.

Spectrum® Operating Instructions 0070-10-0648-02 vii
Warnings Introduction
WARNING: Compressed gasses are considered Dangerous Goods/Hazardous Materials per I.A.T.A. And D.O.T. regulations. It is a violation of federal and international law to offer any package or over pack of dangerous goods for transportation without the package being appropriately identified, packed, marked, classified, labeled and documented according to D.O.T. and I.A.T.A. regulations. Please refer to the applicable I.A.T.A. Dangerous Goods Regulations and/or the Code of Federal Regulations 49 (Transportation, Parts 171-180) for further information.
WARNING: Route cables neatly. Ensure cables, hoses and wires are kept away from patient’s neck to avoid strangulation. Keep floors and walkways free of cables to reduce risk to hospital personnel, patients and visitors.
WARNING: Do not use a damaged or broken unit or accessory.
WARNING: Inaccurate Cardiac Output measurements may be caused by:
• Incorrect placement or position of the catheter• Excessive variation in pulmonary artery blood
temperature
• Clot formation on the thermistor
• Anatomical abnormalities, (for example, cardiac shunts)
• Excessive patient movement• Repeated intermittent flushes of cold fluid through the
fluid lumens of the catheter
• Use of a manual pump such as the Abbott® Blood Set with Pump and CAIR clamp
• Electrocautery or electrosurgical unit interference• Rapid changes in cardiac output
• Using an incorrect computation constant
WARNING: Ensure that the conductive parts of ECG electrodes do not contact other conductive parts, including earth ground.
WARNING: Pacemaker patients’ rate meters may continue to count the pacemaker rate during occurrences of cardiac arrest or some arrhythmias. Do not rely entirely upon rate meter alarms. Keep pacemaker patients under close surveillance. See the Appendix section of this manual for disclosure of the pacemaker pulse rejection capability of this instrument.
WARNING: Due to physiologic differences in the patient population, the Spectrum may occasionally not alarm or may sound a false alarm for some arrhythmia patterns. The arrhythmia analysis feature is intended to detect ventricular rhythms only. High-risk patients should be kept under close surveillance.
WARNING: The View 12™ ECG Analysis Module is not intended for use during electrosurgery. If the electrosurgical ground connection is not satisfactory, there exists a possibility of patient burns at the ECG electrode sites.
WARNING: Computerized ECG Analysis should be reviewed by qualified medical personnel. It should not be used exclusively for treatment or non-treatment of patients.

Introduction Warnings
viii 0070-10-0648-02 Spectrum® Operating Instructions
WARNING: ST segment measurements may be affected by one or more of the following ECG rhythm morphologies: wide complex QRS such as bundle branch blocks, ventricular pacemaker rhythm, left ventricular hypertrophy or Wolff-Parkinson-White Syndrome. Consult with qualified medical personnel prior to treatment or non-treatment.
WARNING: When monitoring CO2 with a Spectrum, the maximum sampling rate at the nasal cannula is 58 ml/min. This device should not be used on patients whose breathing could be impaired by this vacuum flow rate.
WARNING: When monitoring CO2, connection from the exhaust port of the Spectrum to the hospital’s waste gas scavenging system is recommended to prevent exposure of hospital personnel to the patient’s respiratory sample.
WARNING: When using the Gas Module, the maximum sampling rate at the nasal cannula is 200 ml/min (120 ml/min for Gas Module 3 with a neonatal water trap). This device should not be used on patients whose breathing could be impaired by this vacuum flow rate.
WARNING: Connection of the Gas Module exhaust port to the hospital’s waste gas scavenging system is strongly recommended to prevent exposure of hospital personnel to the patient’s respiratory sample. Vacuum (negative pressure) should not exceed 1 mmHg at the Gas Module Pump Exhaust fitting. Excessive scavenge vacuum may result in damage to the Gas Modules internal pump.
WARNING: Do not clean the monitor while it is on and/or plugged in.
WARNING: Operation of the Spectrum below the minimum amplitude or value of PATIENT physiological signal may cause inaccurate results.
WARNING: Use of ACCESSORIES, transducers and cables other than those specified in the manual may result in increased Electromagnetic Emissions or decreased Electromagnetic Immunity of the Spectrum. It can also cause delayed recovery after the discharge of a cardiac defibrillator.
WARNING: The use of gas sampling accessories in Gas Module 3 other than specified by Mindray may cause significant measurement errors and patient risk.
WARNING: Use of accessories, transducers and cables other than those specified in the manual may result in increased Electromagnetic Emissions or decreased Electromagnetic Immunity of the Gas Module 3.
WARNING: With the exception of stacking on a Gas Module with the appropriate mounting brackets, the Spectrum should not be used adjacent to or stacked with other equipment. If adjacent or stacked use is necessary, the Spectrum should be observed to verify normal operation in the configuration in which it will be used.

Spectrum® Operating Instructions 0070-10-0648-02 ix
Warnings Introduction
WARNING: With the exception of stacking under a Spectrum with the appropriate mounting brackets, the Gas Module 3 should not be used adjacent to or stacked with other equipment. If adjacent or stacked use is necessary, the Gas Module 3 should be observed to verify normal operation in the configuration in which it will be used.
WARNING: The arrhythmia analysis feature is intended to detect ventricular rhythms, however, due to physiologic differences in patient populations, the Spectrum may occasionally sound a false alarm or may not recognize some arrhythmia patterns.
WARNING: Ensure that the ECG lead wires are neatly secured in a manner that will prevent them from encircling the patient’s neck, creating a strangulation hazard.
WARNING: Perform the decontamination process with the unit powered down and power cord removed.
WARNING: If the water trap breaks or becomes damaged during operation, there is a risk that bacteria and/or mucus may contaminate the Gas Module.
WARNING: Do not use Adult/Pediatric type water traps and/or sampling lines with neonates to avoid high sampling flow.
WARNING: The Gas Module must not be used with flammable anesthetic agents.
WARNING: The Gas Module water trap, sampling line and airway adapter should be disposed of in accordance with local regulations for contaminated and biologically hazardous items.
WARNING: Do not clean the Gas Module while it is on and/or plugged in.
WARNING: Connect only DRYLINE™ gas sampling lines to the water trap. Note that there may be other compatible tubes present that must not be used, e.g. IV lines.
WARNING: Do not use DRYLINE™ Neonatal sampling lines (blue Luer lock nuts) with DRYLINE™ Adult/Pediatric water traps as this could result in incorrect measurement data.
WARNING: Do not use DRYLINE™ Adult/Pediatric sampling lines (colorless Luer lock nuts) with DRYLINE™ Neonatal water traps as this could result in incorrect measurement data.
WARNING: The contents of the water trap should be handled as a potential infection hazard.
WARNING: Do not use other cleaning methods for the DRYLINE™ water traps. Do not clean or wash the filter housing of the water trap. Never allow alcohol to enter the filter housing. Never force air through the water trap.

Introduction Precautions
x 0070-10-0648-02 Spectrum® Operating Instructions
PrecautionsCAUTION: Always place the monitor on a rigid, flat surface or on
approved mounts. Do not block ventilation or speaker vents.
CAUTION: Never place fluids on top of this monitor. In case of accidental spillage, wipe clean immediately and have the monitor serviced to ensure no hazard exists.
CAUTION: This unit must only be operated with Mindray approved software.
CAUTION: To avoid possible damage to the Spectrum, use only ECG cables and accessories available from Mindray.
CAUTION: Operation of the Spectrum below the minimum amplitude or value of patient physiological signal may cause inaccurate results.
CAUTION: Use of accessories, transducers and cables other than those specified in the manual may result in increased Electromagnetic Emissions or decreased Electromagnetic Immunity of the Spectrum. It can also cause delayed recovery after the discharge of a cardiac defibrillator.
CAUTION: Dispose of single use items in accordance with hospital policy.
CAUTION: To prevent condensation, allow the Spectrum to warm up and dry if it is moved from a cold area to a warm one.
CAUTION: The Spectrum may not meet its performance specifications if stored or operated outside of specified temperature and humidity ranges.
CAUTION: Prior to use, be sure the rail supporting the bed rail mounting hook can support the weight of the monitor. Consult the bed manufacturer’s specifications if necessary. Mindray cannot be responsible for injury or damage resulting from improper or inadequate support of the monitor.
CAUTION: Use recommended Mindray supplied power cords. If a substitute is necessary use only hospital grade power cords.
CAUTION: Sudden changes in PA blood temperature such as those caused by patient movement or bolus drug administration may cause a CO or CI value to be computed. To avoid falsely triggered curves, you should inject as soon as possible after the INJECT message appears.
CAUTION: Line Isolation Monitor transients may resemble actual cardiac waveforms, thus inhibiting heart rate alarms. Check lead wires for damage and ensure good skin contact prior to and during use. Always use fresh electrodes and follow proper skin preparation techniques.

Spectrum® Operating Instructions 0070-10-0648-02 xi
Precautions Introduction
CAUTION: To assure successful triggering of a Mindray Intra-Aortic balloon pump from the Spectrum monitor, set the “ECG Filter” to “Extended” and set “Pacer Enhancement” to “On”. Both of these settings are located in the ECG setup menu of the Spectrum.
CAUTION: The Analog Output on the Spectrum supports triggering the Intra-Aortic Balloon Pump (IABP) for 3 Lead and 5 Lead ECG cable monitoring only. Invasive Blood Pressure triggering is not supported. ECG analog output is disabled when 12 Lead ECG analysis is enabled.
CAUTION: Removal of the View 12™ ECG Analysis Module without first disabling the 12-lead ECG card may cause a temporary disruption in patient monitoring.
CAUTION: Cuffs must be used with the correct Mindray hoses.
CAUTION: Please consult a physician for interpretation of blood pressure measurements.
CAUTION: A blood pressure measurement can be affected by the position of the patient, and his / her physiological condition as well as other factors, such as patient movement.
CAUTION: Observe caution on all patients (Neonates, Pediatrics, and Adults) when NIBP is set to the Continuous Mode and the 1 minute interval. When the NIBP continuous interval is selected, the Spectrum will continually take back to back blood pressure readings. As a safety precaution, a limit is placed on continuous and 1 minute interval measurements. In continuous mode, after 5 minutes, the NIBP interval will automatically switch to one measurement taken every 5 minutes. In 1 minute mode, after 10 minutes the NIBP interval automatically switches to measurements taken once every 10 minutes. Reports have been made of nerve injury occurring during use of automatically cycled blood pressure cuffs.
CAUTION: Tissue damage or inaccurate measurements may be caused by incorrect sensor application or use, such as wrapping too tightly, applying supplemental tape, failing to inspect the sensor site periodically, or failing to position appropriately. Carefully read the sensor directions for use, the Spectrum Operating Instructions, and all precautionary information before use.
CAUTION: Inaccurate SpO2 measurements may be caused by:
• Incorrect sensor application or use
• Significant levels of dysfunctional hemoglobins, (e.g., carboxyhemoglobin or methemoglobin)
• Intra-vascular dyes such as indocyanine green or methylene blue
• Exposure to excessive illumination such as surgical lamps (especially ones with a xenon light source), bilirubin lamps, fluorescent lights, infrared heating lamps, or excessive ambient light. In such cases, cover the sensor site with opaque material.
• Excessive patient movement

Introduction Precautions
xii 0070-10-0648-02 Spectrum® Operating Instructions
• Venous pulsations
• Electro-surgical interference
• Placement of a sensor on an extremity that has a blood pressure cuff, arterial catheter, or intra-vascular line.
• Nail polish or fungus
CAUTION: In certain situations in which perfusion and signal strength are low, such as in patients with thick or pigmented skin, inaccurately low SpO2 readings will result. Verification of oxygenation should be made, especially in preterm infants and patients with chronic lung disease, before instituting any therapy or intervention.
CAUTION: Many patients suffer from poor peripheral perfusion due to hypothermia, hypovolemia, severe vasoconstriction, reduced cardiac output, etc. These symptoms may cause a loss in vital sign readings.
CAUTION: The SpO2 sensor site should be checked at least every eight (8) hours (every four (4) hours with the Adult re-usable finger sensor). Ensure proper adhesion, skin integrity, and proper alignment. Exercise extreme caution with poorly perfused patients. Skin erosion and pressure necrosis can be caused when sensors are not frequently monitored. Assess the site every two (2) hours with poorly perfused patients and neonates.
CAUTION: When equipped with Masimo SET® SpO2, use only Masimo SET Oxygen Transducers including Masimo SET LNOP® and LNCS™ Patient Dedicated Adhesive, Sensors and Masimo SET PC Series Patient Cables. Use of other oxygen transducers may cause improper oximeter performance.
CAUTION: When equipped with Nellcor® SpO2, use only Nellcor oxygen transducers including Nellcor Oxisensor® and OxiMax® patient dedicated adhesive sensors. Use of other oxygen transducers may cause improper oximeter performance.
CAUTION: Vacuum (negative pressure) should not exceed 1 mmHg at the Spectrum Pump Exhaust fitting. Excessive scavenge vacuum may result in an Occlusion message or damage to the Spectrum’s internal pump. The scavenging system must be on during calibration.
CAUTION: Microstream® CO2 waste and CO2 FilterLine® should be treated as biohazardous waste.
CAUTION: When cleaning sensors, do not use excessive amounts of liquid. Wipe the sensor surface with a soft cloth, dampened with cleaning solution. Do not attempt to sterilize.
CAUTION: The internal sampling system of the Gas Module does not need to be cleaned or sterilized. There is no reverse flow back to the patient. If the internal sampling system is suspected to be clogged or dirty, the module should be serviced by an authorized service person only.

Spectrum® Operating Instructions 0070-10-0648-02 xiii
Precautions Introduction
CAUTION: If the dust filter for the fan cannot be cleaned or is damaged, replace it with part number 0378-00-0040. Use of another type of filter may decrease the cooling effectivity and cause damage to the Gas Module.
CAUTION: To avoid permanent damage, do not expose metal components (pins, sockets, snaps) to disinfectants, soaps or chemicals.
CAUTION: Only connect NIBP Luer fittings to Blood Pressure Cuff or Monitor.
CAUTION: Sudden changes in blood temperature such as those caused by bolus drug administration may cause a CO or CI value to be computed. To avoid falsely triggered curves, inject as soon as possible after the “Inject when Ready” message is displayed.
CAUTION: Some pacemakers may contain a respiratory sensor that may produce artifact on an ECG waveform.
CAUTION: During the decontamination process, do not get the LpH SE Germicidal detergent into any vent openings.
CAUTION: The monitor display provides data and waveform information over its entire area. Do not cover any part of the monitor display with tape or labels.
CAUTION: The 2.4 GHz radio optionally used in this device must be at least 20 cm away from the user and/or patient during normal operating conditions.
CAUTION: Replace sealed lead acid batteries with Mindray P/N 0146-00-0043 ONLY. Replace lithium-ion batteries with Mindray P/N 0146-00-0069 ONLY.
CAUTION: Gas Module 3 must be moisture protected whenever transported. This can be done with a protective plastic bag in which water-absorbing materials (e.g. silica gel) have been included.
CAUTION: Contamination with CO2, N2O or Anesthetic Agent in the air surrounding the Gas Module 3 may cause significant measurement errors.

Introduction Notes
xiv 0070-10-0648-02 Spectrum® Operating Instructions
NotesNOTE: This unit is not designed to be used with a peripheral pulse
sensor. SpO2 is a standard function in this monitor, and may be used to obtain a plethysmograph waveform and heart rate.
NOTE: The comparison testing conducted via the auscultatory method used both Phase 4 and Phase 5 Korotkoff sounds. Reports of study findings for both the auscultatory method as well as the intra-arterial methods are available by contacting Mindray Technical Support (800) 288-2121, ext. 8116 or (201) 995-8237.
NOTE: Potential hazards due to errors in software or hardware have been minimized by actions taken in accordance with IEC 60601-1-4.
Indication For UseThe Spectrum Monitor is intended for intra hospital use under the direct supervision of a licensed healthcare practitioner. The indications for use for the Spectrum Monitor include the monitoring of the following human physiological parameters:
• ECG waveform derived from 3, 5 or 12 lead measurements
• Heart Rate derived from selected sources (ECG, SpO2, IBP, NIBP)
• Pulse Oximetry (SpO2)
• ST Segment Analysis derived from 3, 5 or12 ECG lead measurements
• Arrhythmia Detection derived from 3, 5 or 12 ECG lead measurements
• Interpretation of Resting 12 lead ECG
• Non Invasive Blood Pressure (NIBP)
• Invasive Blood Pressure (IBP) - up to four (4) channels
• Cardiac Output
• Respiration Rate/waveform derived from ECG or CO2
• CO2, inspired and end tidal microstream/waveform
• Temperature - up to two (2) channels
• Hemodynamic Calculations
• IV Drug Calculations
The target populations are adult, pediatric and neonate with the exception of:
• Arrhythmia detection, ST Segment Analysis, Cardiac Output, Hemodynamic Calculations, and Pulmonary Artery Wedge Pressure measurements for which the target populations are adult and pediatric only, and
• Interpretation of Resting 12 Lead ECG and IV Drug Calculations, for which the target population is adult only.
The Spectrum Monitor has the capability of interfacing with Mindray's Intra Aortic Balloon Pumps, Central Stations, and Gas Module products.

Spectrum® Operating Instructions 0070-10-0648-02 xv
Unpacking Introduction
UnpackingRemove the instrument from the shipping carton and examine it for signs of shipping damage. Save all packing materials, invoice and bill of lading. These may be required to process a claim with the carrier. Check all materials against the packing list. Contact the Mindray Service Department at (800) 288-2121 or (201) 995-8237 for prompt assistance in resolving shipping problems.

Introduction Symbols and Descriptions
xvi 0070-10-0648-02 Spectrum® Operating Instructions
Symbols and Descriptions
SYMBOL DESCRIPTION SYMBOL DESCRIPTION
Attention, Consult Accompanying Documents / Refer to Manual
Type B Equipment
Dangerous Voltage Type BF Equipment
Equipotentiality Defibrillator Proof Type BF Equipment
Alternating Current (AC) Defibrillator Proof Type CF Equipment
Direct Current (DC) Alarm Off Icon
On (only for a part of the equipment) Alarm Mute Icon
OFF (only for a part of the equipment) Earth (Ground)
Data Input Protective Earth (Ground)
Data Output Battery Charging
Data Input / Output Full Battery
Gas Port Input Low Battery
Gas Port Output No Battery Present
NIBP Connection IABPAnalog ECG and IBP output for communication to an Intra-Aortic Balloon Pump
Latex-free product DEFIB Analog ECG out and Sync Pulse for connection to a Defibrillator
Crossed out wheelie bin indicates separate treatment from general waste at endof life
Interference may occur in the vicinity of equipment marked with this symbol
For single-patient use only, do not reuse.
Manufacturer’s reference/catalogue number

Spectrum® Operating Instructions 0070-10-0648-02 xvii
Symbols and Descriptions Introduction
For Neonatal use Manufacturer’s batch number
Not for Neonatal use Serial number
Conformité Européenne (CE) Marking of Conformity to European Medical Device Directive. CEXXXX represents the Notified Body number
Software Version

Introduction Symbols and Descriptions
xviii 0070-10-0648-02 Spectrum® Operating Instructions
This page intentionally left blank.

Spectrum® Operating Instructions 0070-10-0648-02 1 - 1
1.0 General Product Description
FIGURE 1-1 The Mindray Spectrum Patient Monitor

General Product Description General Product Description
1 - 2 0070-10-0648-02 Spectrum® Operating Instructions
1.1 General Product DescriptionThe Spectrum is a vital signs monitor intended for intrahospital use on human patients. The Spectrum is a three (3) to eight (8) trace monitor. The unit has many features and functions, yet is easy to use through an integrated keypad, Navigator™ Knob and an intuitive menu system.
The Spectrum has a 12.1 inch color display and comes standard with 3 or 5-lead ECG, Masimo SET® SpO2, Non-invasive Blood Pressure, Respiration, Continuous Temperature and IV Drug Calculations.
The Spectrum may be configured to suit your department by adding software and hardware optional features. Optional software features include ST and Arrhythmia analysis. Optional hardware features include View 12™ ECG Analysis Module (which includes ST, Arrhythmia and 12-lead interpretation), Up to 4 Invasive Blood Pressure Channels, MicroStream® CO2, Anesthetic Gases, Nellcor® Oxismart® and OxiMax® SpO2, a second temperature source, dual trace recorder, and Cardiac Output. A comprehensive calculation package, including hemodynamic calculations, is available if the Spectrum is equipped with an External Parameter Module.
Digital displays are provided for Heart Rate, Non-invasive Blood Pressure (NIBP), Pulse Oximetry (SpO2), Respiration Rate and Temperature (T1). Optional digital areas provided for Invasive Blood Pressure (up to four), Anesthetic Agents, O2 and NO2, ST, and CO2. The optional internal recorder provides hard copies of all digital data and waveforms as well as trend information.
The Spectrum Monitor can be mounted on a rolling stand, a wall mount bracket, gas machine arm, bedrail, Gas Module or operated as a tabletop instrument.
The View 12 ECG Analysis Module for the Spectrum enables 12-lead acquisition, continuous 12-lead ST analysis and arrhythmia analysis with print capability. The View 12 ECG analysis module consists of a PCMCIA card for insertion into the Spectrum and a detachable leadwire set.
The Spectrum has the capability of interfacing with Mindray’s Central Stations, Gas Module, IABP Systems, Edwards Vigilance® Monitor, Remote Displays and Nurse Call Systems.
The Spectrum monitor is powered by an AC connection or internal batteries.

Spectrum® Operating Instructions 0070-10-0648-02 1 - 3
General Product Description Key Features
1.2 Key Features
FEATURES STANDARD OPTIONAL
Display 12.1 inch color liquid crystal display
External Remote Color Display
Automatic Sensor Detection and Waveform Display
8-trace erase bar refresh
ECG 3 or 5-lead (I, II, III, aVR, aVL, aVF, V)
12-lead (I, II, III, aVR, aVL, aVF, V1, V2, V3, V4, V5, V6)
ECG Cascade 3 or 12-lead ST Analysis
ESIS Capability (3 or 5-lead) Arrhythmia Analysis
12-lead ECG Interpretation
Blood Pressure Non-Invasive Blood Pressure Up to 4 channels of Invasive Blood Pressure
Wedge Pressure with reference line
Cardiac Output Mindray External Parameter Module (EPM)
Edwards Vigilance® Monitor
SpO2 Masimo SET® Nellcor® OxiMax®
Temperature One YSI 400/700 channel Second YSI 400/700 channel
Respirations Lead-selectable Impedance Microstream® CO2
Gas Module with Automatic Agent ID
Trend Tabular and Graphic trends with 120 entries
Extended trend display with up to 500 entries
OxyCRG trending, 6 minutes OxyCRG trending, 12 hours
Power Internal isolated power module Sealed lead acid batteriesLithium-ion batteries
Printing Internal recorder
12-lead ECG data to Laser Printer
External Interfaces
Mindray’s Central Stations, Gas Module, IABP Systems, Remote Displays, Nurse Call Systems, Serial Communications
Edwards Vigilance® Monitor
Calculation IV drug calculations Hemodynamic calculations
Other Soft Grip Handle Mounting kits
Navigator™ Knob Patient and monitor data transfer
Dedicated keys
Dual PCMCIA Ports
SvO2 Edwards Vigilance® Monitor

Keys and Front Panel General Product Description
1 - 4 0070-10-0648-02 Spectrum® Operating Instructions
1.3 Keys and Front PanelThe front panel keys are used to access many main functions quickly and easily. The figure below shows the keys and a brief explanation follows.
FIGURE 1-2 Keypad
1. LEAD
Press this key to select the next ECG lead to display in Waveform 1. Each time you press this key, the next available ECG lead displays.
2. SIZE
Press this key to select the next available size of ECG for Waveform 1. Each time you press this key, the next available ECG size displays. When the largest ECG size is displayed, the next key press displays the smallest size.
3. VIEW
Press the VIEW key to see multiple leads of ECG when using the View 12™ ECG Analysis Module or the 5-lead ECG cable. Press this key to toggle between multi-lead view and normal display.
4. START
Press this key to begin an NIBP measurement or to begin or re-start automatic interval measurements.
5. INTERVAL
Press this key to modify the NIBP interval measurement time. The choices are: Off, Continuous, 1 min, 2 min, 2.5 min, 3 min, 5 min, 10 min, 15 min, 20 min, 30 min, 1 hr, 2 hr or 4 hr. The Off selection means that NIBP measurements can only be initiated manually. The Continuous selection means that measurements will be continuous (one right after the other). The continuous measurement interval will only last for 5 minutes and then automatically change to a 5 minute interval. The 1 minute interval will last for 10 minutes and then automatically change to a 5 minute interval.
STARTLEAD
SIZE INTERVAL
LIMITS
MUTE ALL
NORMALSCREEN
FREEZE
TRENDSSTANDBY
MARK EVENT
STRIP
CONT ECG
PRINT TRENDMUTE
ZERO ALL IBP
NIBPECG ALARMS PRINT DISPLAY
STOPVIEW
DISCHARGEC.O.
PAWP
1 2
3
7
6
8
23
10 14
15
16 17
18
2045
25 26
2119
12 229
1113
24

Spectrum® Operating Instructions 0070-10-0648-02 1 - 5
General Product Description Keys and Front Panel
6. STOP
Press this key to stop any NIBP measurement. If the interval mode is activated, pressing this key disables the interval mode measurements. An NIBP Idle message displays until the interval mode is restarted. If a Press STOP to clear. message is displayed, pressing this key will clear a Cuff Overpressure condition.
7. ZERO ALL IBP
Press this key to set the current pressure for all invasive pressure channels to zero. This key does not affect any channels monitoring pressure. During the zeroing process, the message Zeroing is displayed. The message Zero Complete displays when the zeroing process is successful. If the zero process is not successful, the message Unable to Zero is displayed.
8. C.O.
Press this key to open the Cardiac Output Menu or the Vigilance CO Menu. If the Cardiac Output Menu is already open and the “Ready” message is displayed, pressing the C.O. key activates the CO run sequence. Pressing the C.O. key while the Vigilance CO Menu is open will have no effect.
9. PAWP
Press this key to open the Pulmonary Artery Wedge Pressure (PAWP) Menu and measure the PAWP. The key is active if a pressure channel has been labeled PA.
10. LIMITS
Press this key to display the Alarm Limits Menu. The Alarm Limits Menu provides access to view or change alarm values.
11. MUTE ALL
Press this key to suspend audio alarms on all parameters. The alarms remain suspended for a user selected amount of time. This amount of time is set in the Alarms Setup Menu. While the alarms are suspended, an Alarm Mute icon is displayed next to each silenced parameter. Also, the message ALL ALARMS MUTED FOR XX:XX mins displays. XX:XX is the time remaining in minutes and seconds. Press this key again during the suspended alarm time to re-enable the audio alarm. If the suspend time was set to Permanent, the message ALL ALARMS MUTED PERMANENTLY is displayed.
12. MUTE
Press this key to suspend audio alarms on all currently alarming parameters. The alarms remain suspended for a user selected amount of time as set in the Alarms Setup Menu or until the alarm condition is no longer present. Any new alarms that occur while the alarm tone is silenced will disable the silence and sound the alarm tone. While the alarms are suspended, an Alarm Mute icon is displayed next to each silenced parameter.

Keys and Front Panel General Product Description
1 - 6 0070-10-0648-02 Spectrum® Operating Instructions
13. STRIP
Press this key to initiate a printout to the selected device.
• If the print destination is the internal recorder, then pressing this key will produce a 16-second strip of up to two (2) waveforms. Pressing this key during a print job will abort the strip printout.
• If the print destination is a remote Central Station, then pressing this key will initiate a printout at the Central Station.
• If the View 12™ ECG Analysis Module is installed, and the View All ECG screen is active, pressing this key will initiate a 12-lead interpretative report that will be printed at either the internal recorder or a laser printer.
14. CONT ECG
Press this key to initiate a continuous ECG 1 and 2 waveform printout from the internal printer. Press this key again to abort printing.
15. PRINT TREND
Press this key to initiate printing of the desired trend. By default, the monitor’s stored trend information will be printed by the internal printer. Pressing this key during a print job will abort printing.
If the print destination is a remote Central Station, then pressing this key will initiate a trend report at the Central Station.
16. STANDBY
Press this key to place the Spectrum into a STANDBY mode. While in STANDBY mode, monitoring is discontinued and the alarms are in permanent suspension, interval NIBP measurements are placed in idle mode, CO2 pump is shut off, and the display shuts down. When in the STANDBY mode, the message STANDBY. TO BEGIN MONITORING, PRESS STANDBY is displayed. Press the STANDBY key again to exit the STANDBY mode and return to the normal screen.
NOTE: Trend data is not cleared in the STANDBY mode. When the STANDBY mode is released, NIBP INTERVAL is in IDLE MODE and requires reactivation via the START key. The CO2 pump automatically reactivates if the Microstream® sensor is in place.

Spectrum® Operating Instructions 0070-10-0648-02 1 - 7
General Product Description Keys and Front Panel
17. DISCHARGE
Press this key to initiate the process of discharging the patient from the monitor. A menu titled Patient Discharge will be displayed. Depending on the monitor’s configuration, the Normal Screen menu choice will be provided along with one or more of the following selections: Discharge From Monitor, Discharge From Central and Discharge From Both. If any discharge option is selected, a confirmation box will be displayed. (Discharging a patient from the monitor deletes all patient trend and demographic data and places the monitor in STANDBY mode.) An onscreen message will display as follows:
• For Main Module Software Versions H.xx and earlier, the message STANDBY. TO BEGIN MONITORING, PRESS STANDBY is displayed.
• For Main Module Software Versions J.xx and later, the message PATIENT DISCHARGED. MONITOR IN STANDBY MODE - TO BEGIN MONITORING, PRESS STANDBY is displayed.
Upon exiting STANDBY mode, the monitor configuration reverts to currently saved settings. Selecting Normal Screen from the menu aborts the discharge.
18. MARK EVENT
Press this key to cause a time stamp event marker to be noted in the trend memory. If connected to a Panorama Central Station, a time stamp event marker will also be noted in the Central Station’s trend memory.
19. TRENDS
Press this key to display the List Trend screen. Press this key a second time to display the Graph Trend screen. Press this key a third time to return to the normal display. If Neonate or Pediatric is selected as the patient size, a third press will display the OxyCRG Trend screen. When OxyCRG trend is available a fourth press will return the monitor to normal display.
20. FREEZE
Press this key to freeze the waveform display. When waves are frozen, the message Waves Frozen is displayed. Digital data will continue to be updated.
21. NORMAL SCREEN
Press this key at any time to return the screen to the normal monitoring mode. All menus are closed.
22. Navigator™ Knob
Rotate this knob to highlight the various menus on the display. Press the center of the knob to display the highlighted menu. Once a menu is displayed, rotate the knob to highlight the menu items listed. Press the center of the knob to select a highlighted item.
23. Warning LED
LED used to indicate that an alarm has been tripped. The WARNING (or Priority 1) LED is red.

Keys and Front Panel General Product Description
1 - 8 0070-10-0648-02 Spectrum® Operating Instructions
24. Caution LED
LED used to indicate that an alarm has been tripped. The CAUTION (or Priority 2) LED is yellow.
25. Battery Charging LED
A green LED located below the battery icon indicates that the battery charger is active. The charger will not always be active when AC power is present. It is dependent on the battery type (sealed lead acid vs. lithium-ion) and battery charge condition. The LED is not an indication of the condition of the batteries or their charge level. Charged batteries must be installed in the monitor to ensure uninterrupted operation while switching from AC to battery power.
26. AC Power LED
A green LED beside the Battery Charging LED that is used to indicate that the unit is connected to the AC Power within the facility.

Spectrum® Operating Instructions 0070-10-0648-02 1 - 9
General Product Description Display
1.4 DisplayThe display of the Spectrum provides menus, waveforms, parameter information, and messages. The Spectrum includes a display setup function that allows customization of the display. Preferred setup details can be programmed and saved.
FIGURE 1-3 Display
1. Waveform Area
The waveform area is used to display windows which contain parameter waveforms. Up to 8 waveforms may be displayed. The top window is always set to display the ECG waveform and cannot be changed. By default, SpO2 (Pleth) waveform will appear as the second waveform, if connected. Respiration or CO2 will appear as the third waveform. If pressure transducers are plugged into IBP1 and IBP2 the screen will reformat to display additional waveforms and the IBP waveforms will appear as the fourth and fifth waveform. The setup can be changed to display any of the available parameters and waveforms.
2. Main Menus
The Main Menus enable the user to enter patient specific data, customize the monitor, setup printing or transfer patient data. Use the Navigator™ Knob to access these functions.
NIBP: Idle
l/min/m 2
l/minCO
CI
20.0Source: Module
@ 15:21
10.0
ParametersPrint SetupMonitor Setup Funct ionsPat ient
HR
%
mmHg
Source: CO2
ExpInsp
38Resp 17 rpm
mmHg
mmHg
mmHgmmHg
Art
Interval: 15 min ET: 13 min
/
mmHg
PA
Source: Aut o
bpm
PVC/min: 45
P AS 170
55
bpmPR
JONES, ERIC Adult11/01/04 2:05 PM
mmHg
mmHg
0
OFF
94
Lead
mmII I V
+ 2.2 -2.1 -3.0
T1 100.6T2
ΔT
100.4 0.2ºF
mmHg
mmHgCPP
80
Main Menus
Waveform Area
ParameterMenus
Battery Indicator
ParameterAreas
2
1
3
4
Message Area A
6
Message Area B
5
7
RadioIcon
PanoramaIcon
8
9

Display General Product Description
1 - 10 0070-10-0648-02 Spectrum® Operating Instructions
3. Parameter Menus
The Parameter Menus enable the user to review and customize various parameter display and alarm attributes. Use the Navigator Knob to access these menus.
4. Parameter Areas
The parameter area contains the digital data for each available parameter.
5. Battery Indicator
When batteries are installed and the monitor is functioning on battery power, the battery indicator provides a visual reference for the approximate charge level of the batteries. See the following examples.
If the monitor is configured for lithium-ion batteries, when there are no batteries installed, the battery indicator will be displayed with an “X” through it as shown in the example.
When the battery charge is low, but not below the cutoff voltage, the battery indicator will begin to flash and a low pitched double beep will be generated every minute.
NOTE: When the battery indicator begins to flash, less than 15 minutes of operating time remains, depending upon the number of functions that are operational.
NOTE: The internal recorder may not be operational when the battery charge is low.
6. Message Area A
This message area is located above the ECG waveform window. Messages regarding the ECG/heart rate and alarm status are displayed here.
7. Message Area B
This message area is located below the last row of parameter tiles. Messages regarding NIBP, IBP, printer status, SpO2, CO2, and Gas Module are displayed here.
8. Radio Icon
If a Panorama Instrument Radio - 608 is installed and “WMTS Enabled” is set to “Yes” (in the Installation Menu), this icon will be displayed.
9. Panorama Icon
This icon will display in one of two possible formats as follows:
• If the Spectrum 608 radio is sending data but it is not being displayed at a Panorama Central Station, then this icon will display the number “1”.
• If the Spectrum data is being displayed at a Panorama Central Station, then this icon will display the capital letter “V”.
Full Battery Low Battery No Battery Present(Lithium-Ion batteries only)
1 Vor

Spectrum® Operating Instructions 0070-10-0648-02 1 - 11
General Product Description Rear View
1.5 Rear View
FIGURE 1-4 Rear Panel
1. AC Receptacle
Insert an AC power cord into this connector.
2. Equipotential Lug
Provides Equipotential grounding of hospital equipment.
3. Soft Grip Handle
Used for carrying the monitor.
4. Main I/O Connector Port (DM1)
Area dedicated for the use of an optional communication port.
5. Expansion Slot
Used for connecting an optional Panorama Instrument Radio - 608.
6. External Parameter Module Port (EM1)
Port used to connect the External Parameter Module to the Spectrum.
1
2
4
3
6 5

Left Side Panel General Product Description
1 - 12 0070-10-0648-02 Spectrum® Operating Instructions
1.6 Left Side Panel
FIGURE 1-5 Left Side Panel
1. CO2 Exhaust Connector (Optional)
This connector is used to attach an exhaust line which can be used to connect to a gas scavenging system.
2. T1 Connector
This connector mates with either the YSI series 400 or series 700 temperature probes. The monitor automatically detects which probe is connected.
3. IBP 1 Connector (Optional)
This connector is used for Channel 1 Pressure Transducer connection.
CO2 Exhaust CO2 Input
T1 IBP 1 IBP 2
ECGSpO2
CO2 Exhaust
T1 IBP 1 IBP 2
ECG
CO2 Input1
2
3
4
5
6
7
8
9

Spectrum® Operating Instructions 0070-10-0648-02 1 - 13
General Product Description Left Side Panel
4. IBP 2 Connector (Optional)
This connector is used for the Channel 2 Pressure Transducer connection.
5. SpO2 Connector
This connector is used to attach the SpO2 sensor to the monitor, either Masimo SET®, Nellcor® Oxismart® or Nellcor® OxiMax® technology.
6. Battery Compartment
This compartment houses the two optional, user replaceable, rechargeable batteries (sealed lead acid or lithium-ion). These batteries provide power to the unit when it is not connected to an AC receptacle. The batteries can be independently removed and replaced while the unit is operating.
7. NIBP Rectus Connector
This connector is used to attach the NIBP hose to the unit.
8. ECG Connector
This connector is used to attach a 3 or 5-lead ECG cable.
9. CO2 Input Connector (Optional)
This connector is used to attach a Microstream® CO2 FilterLine® to the unit.

Right Side Panel General Product Description
1 - 14 0070-10-0648-02 Spectrum® Operating Instructions
1.7 Right Side Panel
FIGURE 1-6 Right Side Panel
1. PCM1 and PCM2 Card Slots
These sockets are used for extended trend memory, software download to the CPU, patient data transfer, monitor set-up transfers, View 12™ ECG Analysis Module, and Panorama Instrument Radio - 2.4.
2. Power Switch
A momentary switch that turns power ON or OFF but does not prevent charging of the batteries. Press the top of the switch once to turn the unit ON. Press the top of the switch again to turn the unit OFF.
3. DEFIB Connector
Used to connect a defibrillator sync cable.
1
2
3
4
5

Spectrum® Operating Instructions 0070-10-0648-02 1 - 15
General Product Description Right Side Panel
4. IABP Connector
Used for triggering an Intra-Aortic Balloon Pump from the Spectrum when using a 3-lead or 5-lead ECG cable.
5. Recorder (Optional)
A two trace thermal strip chart recorder with integral paper spool.

Gas Module (Optional) General Product Description
1 - 16 0070-10-0648-02 Spectrum® Operating Instructions
1.8 Gas Module (Optional)NOTE: The following models are referenced in this manual: Gas
Module II, Gas Module SE, and Gas Module 3. When information is common to all models, the generic name “Gas Module” is used. Information that is unique to a specific model is identified accordingly.
1.8.1 Front Panel
FIGURE 1-7 Gas Module II and SE
FIGURE 1-8 Gas Module 3
1. Input Port
This port is used to connect the sampling tubing to the Gas Module.
2. Water Trap Assembly (includes Water Trap Reservoir)
• Gas Module II and SE – (P/N 0202-00-0129)
• Gas Module 3 – (Adult/Pediatric P/N 0202-00-0182-10, Neonate P/N 0202-00-0181-10)
The Water Trap Assembly is used to capture moisture drawn in with the patient sample. The Water Trap Reservoir must be emptied and rinsed (with water only) whenever more than half full or whenever changing patients. Refer to section 3.9 for more details.
3. Dust Filter
The Dust Filter (P/N 0378-00-0040) protects the Gas Module from airborne dust. It should be removed and cleaned on a regular basis. Refer to section 3.9 for more details.
4. Dust Filter Cover
The Dust Filter Cover is removed to access the filter.
1
2
34 5
6
1
2
5
6

Spectrum® Operating Instructions 0070-10-0648-02 1 - 17
General Product Description Gas Module (Optional)
5. Power Indicator Lamp
This lamp illuminates when the Power Switch is in the ON position.
6. Power Switch
A switch used to power the unit ON and OFF. It is located on the front of the Gas Module SE and Gas Module 3. It is located on the back of the Gas Module II.
1.8.2 Rear Panel
FIGURE 1-9 Gas Module II and SE
FIGURE 1-10 Gas Module 3
7. AC Power Input
This input is used to attach the special “Y” Shaped Power Cord.
8. Exhaust Port
This panel mount coupling is used for attaching a gas scavenging system (P/N 0997-00-0923 or P/N 0997-00-0984) to the Gas Module.
9. Reference Port
This port is used only to measure room air. This port is not to be connected to anything. Do not block this port.
10. External Interface Port
A communication interface port used to connect the Gas Module to the Spectrum.
11. Equipotential lug
Provides Equipotential grounding of hospital equipment.
11
7 8 910
11
7 810

Comm-Ports General Product Description
1 - 18 0070-10-0648-02 Spectrum® Operating Instructions
1.9 Comm-PortsNOTE: Figures 1-12 to 1-15 depict four distinct sub-models of the
Comm-Port that have different interface capabilities. Only one sub-model at a time can be connected to the Spectrum.
FIGURE 1-11 Comm-Port
1. Comm-Port to Main I/O Connector (DB1)
This is the female connector that will engage the equivalent male connector when connected to the Spectrum.
FIGURE 1-12 CS1/MB1/SP1Comm-Port
2. Ethernet Connector (CS1)
Ethernet connection port used for networking connections or devices requiring ethernet communication such as the Panorama™ Central Station or a Laser Printer.
3. Module Bus Connector (MB1)
Port used for future enhancements.
4. Serial Port Connector (SP1/SP2)
Proprietary serial port used to connect to the PatientNet® Central Station, Gas Module, Edwards Vigilance® Monitor, or other devices.
Main I/O Connector1
2 3 4

Spectrum® Operating Instructions 0070-10-0648-02 1 - 19
General Product Description Comm-Ports
FIGURE 1-13 RD1/NC1/SP1 Comm-Port
5. Remote Display Connector (RD1)
Port used to connect a color remote display to the Spectrum monitor.
6. Nurse Call Connector (NC1)
Port used to connect a nurse call cable to the Spectrum monitor.
FIGURE 1-14 CS1/MB1/RD1 Comm-Port
FIGURE 1-15 SP1/NC1/SP2 Comm-Port
SP1NC1RD1
!
45 6
53
2
SP1 SP2NC1
4 46

External Parameter Modules (Optional) General Product Description
1 - 20 0070-10-0648-02 Spectrum® Operating Instructions
1.10 External Parameter Modules (Optional)The module contains a YSI 400/700 temperature port and may also contain one or both of the following:
• Two Invasive Blood pressure ports
• Cardiac Output port
To connect the External Parameter Module to the Spectrum:
1. Line up the connectors on the front of the Module (security posts, module hooks and EM1 port).
2. Slide the module forward, towards the monitor front until an audible “click” is heard as the module hooks are engaged.
To remove the External Parameter Module from the Spectrum:
1. Press the two release buttons on the top of the module.
2. Slide the module straight back until all connectors are clear.
3. Lift the module straight up for complete disengagement.
WARNING: Do not clean the monitor while it is on and/or plugged in.

Spectrum® Operating Instructions 0070-10-0648-02 1 - 21
General Product Description External Parameter Modules (Optional)
1.10.1 External Parameter Module Top View
FIGURE 1-16 Diagram of Top View
1. Soft Grip Module Handle
This integrated grip handle is used for carrying the Spectrum with the External Parameter Module attached.
2. Release Buttons
There are two release buttons at the top. Press these two release buttons, simultaneously during the removal of the External Parameter Module from the Spectrum.
1
2

External Parameter Modules (Optional) General Product Description
1 - 22 0070-10-0648-02 Spectrum® Operating Instructions
1.10.2 External Parameter Module Front View
FIGURE 1-17 Front View of EPM
1. Module Connector (EB1)
This module bus port connects the External Parameter Module to the EM1 port on the Spectrum.
2. Module Latches
These latches secure the module to the Spectrum.
3. Guide Pins
These pins guide the EB1 connector into the EM1 port on the Spectrum.
31
2

Spectrum® Operating Instructions 0070-10-0648-02 1 - 23
General Product Description External Parameter Modules (Optional)
1.10.3 Left Side View with External Parameter Module
FIGURE 1-18 Left Side View with External Parameter Module
1. T2 Connector
This connector mates with either the YSI series 400 or 700 temperature probes. The monitor automatically detects which probe is connected.
2. IBP3 Connector
This connector is used for the Channel 3 Pressure Transducer connection.
3. ZERO ALL IBP Key
Press this key to zero all invasive blood pressure simultaneously. This key operates the same as the ZERO ALL IBP key on the monitor keypad.
4. IBP4 Connector
This connector is used for the Channel 4 Pressure Transducer connection.
CO2 Exhaust CO2 Input
T1 IBP 1 IBP 2
ECGSpO2
CO2 Exhaust
T1 IBP 1 IBP 2
ECG
CO2 Input
C.O.
T2 IBP 3 IBP 4
2 4
5
61
3

External Parameter Modules (Optional) General Product Description
1 - 24 0070-10-0648-02 Spectrum® Operating Instructions
5. C.O. Key
Press this key to open the Cardiac Output Menu. If the Cardiac Output Menu is already open and the “Ready” message is displayed, pressing the C.O. key activates the CO run sequence.
NOTE: Pressing this key will not open the Vigilance CO Menu.
6. CO Connector
A port used to connect the Cardiac Output cable.

Spectrum® Operating Instructions 0070-10-0648-02 1 - 25
General Product Description External Parameter Modules (Optional)
1.10.4 Rear View with External Parameter Module
FIGURE 1-19 Rear View with External Parameter Module
1. Module Bus Port (MB2)
This is used for connection to future devices.
2. Rear Module Hooks
These two hooks secure the module to the Spectrum.
NC1
!
SP1RD1
2
1

External Parameter Modules (Optional) General Product Description
1 - 26 0070-10-0648-02 Spectrum® Operating Instructions
This page intentionally left blank.

Spectrum® Operating Instructions 0070-10-0648-02 2 - 1
2.0 Operations
2.1 Getting StartedThe Spectrum comes with default factory settings which enable you to begin monitoring without setting any of the waveforms, parameters, alarms, or functions. However, all of these settings can be changed for specific patient or departmental needs.
Certain operating characteristics are based on the selected patient size (e.g. NIBP start pressure). The patient size selection should be matched to the actual patient before monitoring begins.
Setting-up Patients1. Turn the monitor on using the ON/OFF switch. Ensure the previous patient’s data has
been removed from the monitor by discharging previous patient.
2. Connect the patient to the monitor, apply appropriate accessories such as ECG electrodes, NIBP cuff, SpO2 probe, CO2 Fiterline®, etc.
3. Enter patient information into the Spectrum via the Patient Menu, check patient size.
4. If desired, press the START key to initiate a non-invasive blood pressure measurement.

Getting Started Operations
2 - 2 0070-10-0648-02 Spectrum® Operating Instructions
How to Set the Clock / Date and TimeThe date and time are set in the Monitor Setup Menu.
1. Using the Navigator™ Knob, highlight Monitor Setup. Press the Navigator Knob to open the menu.
2. Use the Navigator Knob to select Advanced Setup, then select either Date or Time.
3. Turn the Navigator Knob to select a new setting. Once the desired choice is highlighted, press the Navigator Knob.
4. This setting is saved when Yes is selected via the confirmation prompt.
NOTE: Patient trend data is cleared if the Time and/or Date are changed on the monitor.
If the Spectrum is connected to a Panorama Central Station, the Time and Date settings of the Central Station will be acquired by the Spectrum in one of three ways as follows:
• the Time and/or Date are changed on the Spectrum
• “Clear Trends” is chosen from the List Trend or Graph Trend menus
• the patient is discharged
Transferring Monitor Default SettingsWhen installing several Spectrum monitors with identical display and alarm settings it is not necessary to set each unit separately. A Transfer Card may be used to copy the settings from monitor to monitor.
1. Insert the Transfer Card into the PCM2 slot on the right side of the source monitor.
2. Enter the Installation Menu, (Press and hold the DISCHARGE key during power-up). Select “Copy Monitor defaults to card” from the menu. A status message will report completion of the transfer.
3. Remove the card and insert it into the PCM2 slot of the receiving monitor.
4. Enter Installation Mode on the receiving monitor (Press and hold the DISCHARGE key during power-up), and select “Copy monitor defaults from card”. A status message will report completion of the transfer.
5. Select “Save Current” and power-cycle the receiving monitor to enter normal monitoring mode.

Spectrum® Operating Instructions 0070-10-0648-02 2 - 3
Operations Installation Mode
2.2 Installation Mode
2.2.1 Installation Menu
FIGURE 2-1 Installation Menu
The Installation Mode is accessed by pressing and holding the DISCHARGE key during power on. See the table that follows for descriptions of the Installation Menu choices.
To enter Installation Mode proceed as follows:
1. Power up the Spectrum while holding down the DISCHARGE key.
2. Set each item as necessary. To save all of the chosen settings, choose “Save current” before leaving this menu. To return to normal operating mode, power the unit Off and On again.

Installation Mode Operations
2 - 4 0070-10-0648-02 Spectrum® Operating Instructions
The following table describes the Installation Menu structure:
MENU TITLEON SCREEN MENU CHOICES DEFAULT ACTIONS/COMMENTS
Save current Select to save current settings as defaults.
Select Language Set up at factory Select to change language.
Select Country Set up at factory Select to change country.
Date Format M/D/Y, D/M/Y,Y/M/D
Per country Select to change date format
Time Format 12, 24 hour Per country Select to change time format
NIBP Timeout 15, 30, 45, 60 mins 15 min Select to change NIBP display time out
CO & PAWP Timeout 15, 30, 45 mins, 1, 2, 4 hr
15 min Select to change CO and PAWP timeout.
Enable EPM No, Yes No Select to enable or disable the External Parameter Module.
Temperature units °F, °C °F - USA°C - All others
Select to change temperature units
Weight Units lbs, kg lbs - USAkg - All others
Select to change weight units
Height Units Ft/inches, cm Ft/inches - USAcm - All others
Select to change height units
CO2 Units mmHg, %, kPa mmHg Select to change CO2 units
Copy monitor defaults to card.
Select to copy the monitor defaults and settings to a data transfer card.
Copy monitor defaults from card.
Select to copy the monitor defaults and settings from a data transfer card inserted into PCM2.
SetUp Serial Port 1 None, Visa with admit,1 DIAP, Accutorr,2 Gas Module, PatientNet,1,2 Vigilance3
None Select to set up a serial output protocol port. An item enabled in SetUp Serial Port 1 will be removed from the selections in SetUp Serial Port 2.
SetUp Serial Port 2 None, Visa with admit,1 DIAP, Accutorr,2 Gas Module, PatientNet,1,2 Vigilance3
None Select to set up a serial output protocol port. An item enabled in SetUp Serial Port 2 will be removed from the selections in SetUp Serial Port 1.
1 “Visa with admit” and “PatientNet” will not be available as menu choices if “WMTS Enabled” is set to “Yes” or if “Enable Network” is set to “Wired” in the System Information menu.
2 “Accutorr” will not be available as a menu choice if “WMTS Enabled” is set to “Yes”3 “Vigilance” will only be available as a menu choice if it has been installed.4 Country, language and system information are not affected by restoring defaults.

Spectrum® Operating Instructions 0070-10-0648-02 2 - 5
Operations Installation Mode
WMTS Enabled No, Yes No Set to “YES” to enable the use of the Panorama Instrument Radio - 608.
Re-boot in demo mode No, Yes No Set to “YES” to start the monitor in demonstration mode on next power-up. Normal monitoring will resume after cycling power in demonstration mode.
Restore factory defaults4
Select to restore factory defaults
System Information Select to setup owner’s screen.
Options Select to add/view options.
MENU TITLEON SCREEN MENU CHOICES DEFAULT ACTIONS/COMMENTS
1 “Visa with admit” and “PatientNet” will not be available as menu choices if “WMTS Enabled” is set to “Yes” or if “Enable Network” is set to “Wired” in the System Information menu.
2 “Accutorr” will not be available as a menu choice if “WMTS Enabled” is set to “Yes”3 “Vigilance” will only be available as a menu choice if it has been installed.4 Country, language and system information are not affected by restoring defaults.
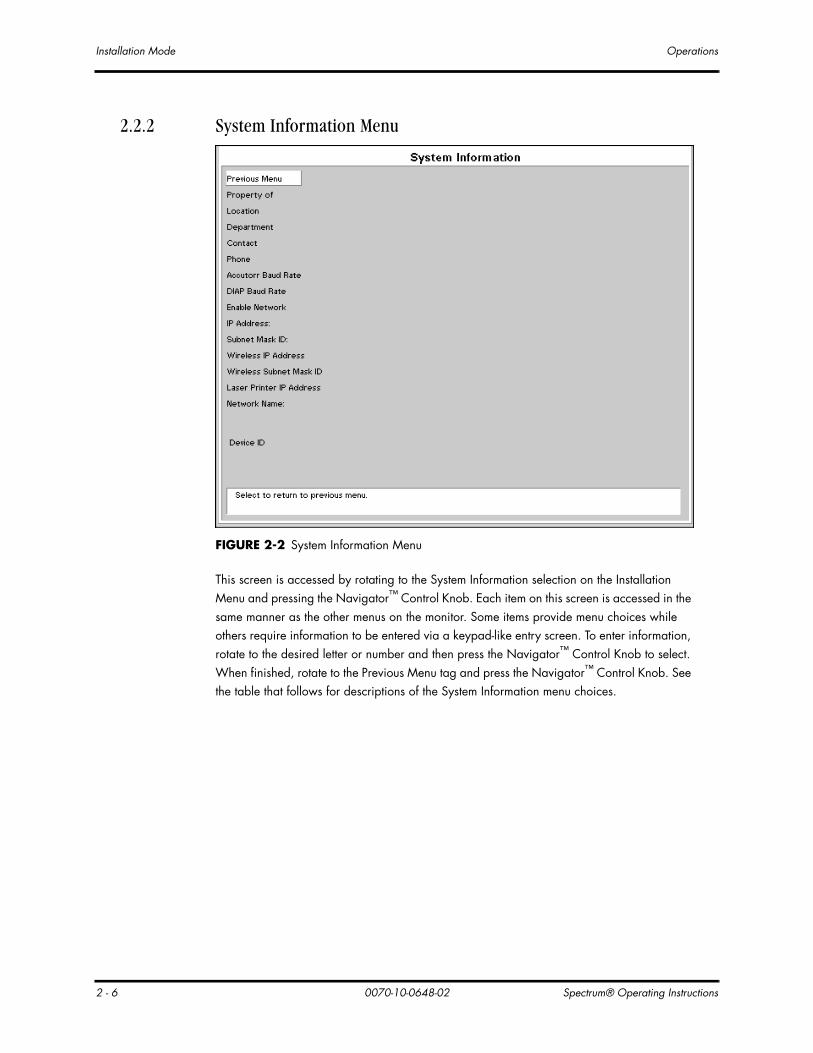
Installation Mode Operations
2 - 6 0070-10-0648-02 Spectrum® Operating Instructions
2.2.2 System Information Menu
FIGURE 2-2 System Information Menu
This screen is accessed by rotating to the System Information selection on the Installation Menu and pressing the Navigator™ Control Knob. Each item on this screen is accessed in the same manner as the other menus on the monitor. Some items provide menu choices while others require information to be entered via a keypad-like entry screen. To enter information, rotate to the desired letter or number and then press the Navigator™ Control Knob to select. When finished, rotate to the Previous Menu tag and press the Navigator™ Control Knob. See the table that follows for descriptions of the System Information menu choices.

Spectrum® Operating Instructions 0070-10-0648-02 2 - 7
Operations Installation Mode
MENU TITLE ON SCREEN
MENU CHOICES DEFAULT TEXT STRINGS
Previous Menu Select to return to Previous Menu
Property Of Select to set up Property name
Location Select to set up Location
Department Select to set up Department
Contact Select to set up Contact
Phone Select to set up Phone
Accutorr Baud Rate 1200, 9600 9600 Select to change the Accutorrprotocol baud rate
DIAP Baud Rate 9600, 19200 9600 Select to change the DIAPprotocol baud rate
Enable Network1 No, Wired No Select to enable Panorama communications
IP Address:2 Select to set up IP Address
Subnet Mask ID:2 Select to set up Subnet Mask ID
Wireless IP Address2 Select to set up Wireless IP Address
Wireless SubnetMask ID2
Select to set up Wireless SubnetMask ID
Laser Printer IP Address Select to set up laser printer IP Address
Network Name:2 Select to set up Network name
Device ID3
1 If a serial port is set to “Visa with admit” or “PatientNet”, or if “WMTS Enabled” is set to “Yes” in the Installation Menu, “Enable Network” will not be available as a menu choice.
2 Refer to the Panorama Service Manual for information on network settings.3 Device ID is an information field that displays a unique, factory defined, device ID number.
It is not user selectable.

Main Menus Operations
2 - 8 0070-10-0648-02 Spectrum® Operating Instructions
2.3 Main MenusThe Main Menus of the Spectrum are always displayed at the top of the screen and are accessed using the Navigator™ Knob.
The Main Menu headings are Patient, Monitor Setup, Print Setup, Parameters and Functions.
2.3.1 Patient Menu
FIGURE 2-3 Patient Menu
The Patient Menu stores patient demographic data, identification data and bed number.
The Patient Menu contains the following patient information: Patient’s Size (Adult, Pediatric or Neonate), Gender, Date of Birth, First Name, Last Name, Identification Number, Bed Number, measurements of Height and Weight and IV Drug Calculations.
NOTE: Changes that are made in the Patient Menu do not become effective until the menu is closed.
NOTE: Verify monitoring settings when the patient size is changed.

Spectrum® Operating Instructions 0070-10-0648-02 2 - 9
Operations Main Menus
Entering a Patient’s First / Last Name, ID Number and Bed NumberTo enter the patient’s First Name, Last Name, ID Number and Bed Number complete the following steps:
1. Open the Patient Menu and scroll down through the menu using the Navigator Knob.
2. Select the patient data you wish to enter or change.
3. Press the Navigator Knob and a keypad will appear on the screen.
4. To enter Patient information highlight the appropriate characters.
5. When finished entering the data select Done and press the Navigator™ Knob to close the keypad.
6. The patient information will appear in the upper right hand corner of the display. This data will also appear on printouts.
NOTE: Although the “Bed #” field can accept a maximum of 15 characters, if a Spectrum 608 radio is communicating with a Panorama Central Station, only the first 5 characters will be displayed in the “Bed” field at the Central Station. Also, since Remote View requires selecting a “Bed #”, a unique number for each bed should be used. The following standard format for this demographic is recommended:
NOTE: If the monitor is communicating with the EMR (Electronic Medical Records) system through a Panorama Gateway, any changes to patient demographics made at the monitor will not be sent to the EMR system. For further explanation, refer to section 2.11, “Connection to Panorama™ Gateway”.
Entering a Patient’s Date of BirthTo enter the patient’s Date of Birth complete the following steps:
1. Open the Patient Menu and scroll down through the menu using the Navigator Knob.
2. Select Date of Birth from the menu. Press the Navigator Knob and a pop-up window will emerge with day, month and year choices for Date of Birth.
3. To enter the patient’s Date of Birth, turn the Navigator Knob and scroll until you reach the desired dates.
4. When finished with the Date of Birth, press the Navigator Knob to return to the Patient Menu.
• Start the string with a room # that has a fixed number of digits. For example, if the maximum number of digits that is used in numbering the rooms is 4, then for room 102, a leading zero would be added to get the 4th digit - 0102.
• Follow the room # with a letter to identify the particular bed within the room. For example, a room with 2 beds would have bed A and bed B.
• An example of a complete “Bed #”: Bed B in room 513 (in a facility where the maximum number of digits that is used in numbering the rooms is 4) would be identified as 0513B.
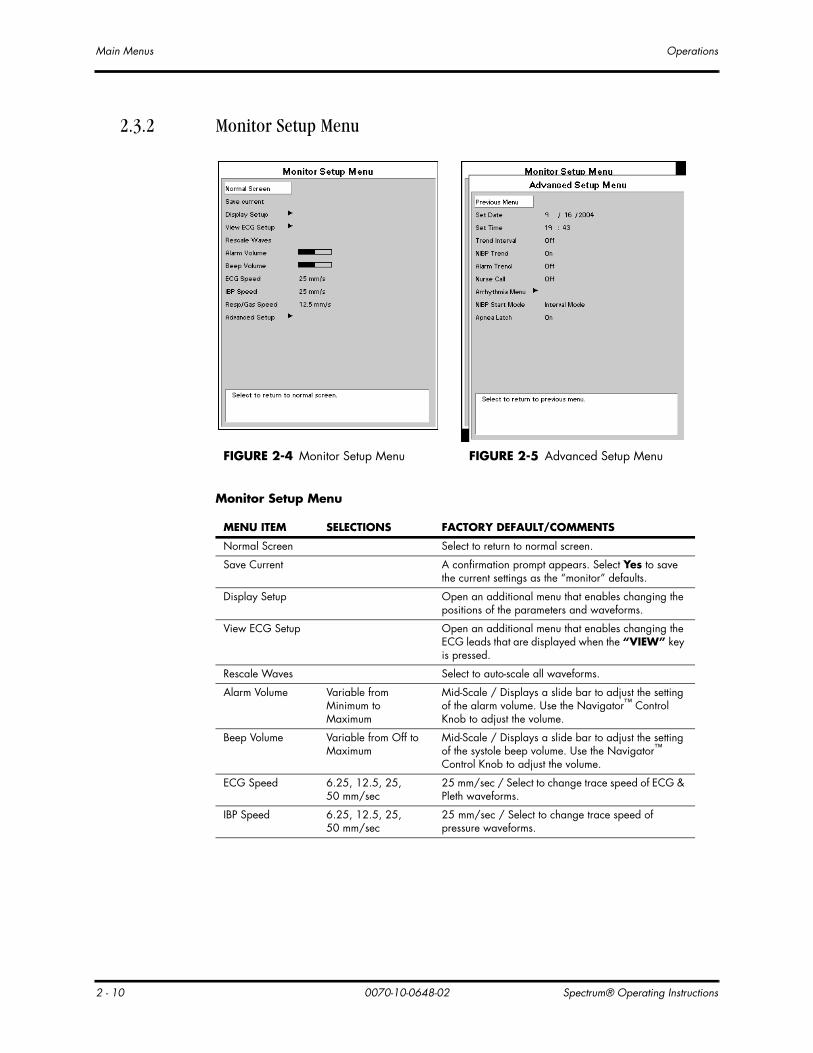
Main Menus Operations
2 - 10 0070-10-0648-02 Spectrum® Operating Instructions
2.3.2 Monitor Setup Menu
FIGURE 2-4 Monitor Setup Menu FIGURE 2-5 Advanced Setup Menu
Monitor Setup Menu
MENU ITEM SELECTIONS FACTORY DEFAULT/COMMENTS
Normal Screen Select to return to normal screen.
Save Current A confirmation prompt appears. Select Yes to save the current settings as the “monitor” defaults.
Display Setup Open an additional menu that enables changing the positions of the parameters and waveforms.
View ECG Setup Open an additional menu that enables changing the ECG leads that are displayed when the “VIEW” key is pressed.
Rescale Waves Select to auto-scale all waveforms.
Alarm Volume Variable from Minimum to Maximum
Mid-Scale / Displays a slide bar to adjust the setting of the alarm volume. Use the Navigator™ Control Knob to adjust the volume.
Beep Volume Variable from Off to Maximum
Mid-Scale / Displays a slide bar to adjust the setting of the systole beep volume. Use the Navigator™ Control Knob to adjust the volume.
ECG Speed 6.25, 12.5, 25, 50 mm/sec
25 mm/sec / Select to change trace speed of ECG & Pleth waveforms.
IBP Speed 6.25, 12.5, 25, 50 mm/sec
25 mm/sec / Select to change trace speed of pressure waveforms.

Spectrum® Operating Instructions 0070-10-0648-02 2 - 11
Operations Main Menus
Resp/Gas Speed 3.125, 6.25, 12.5, 25 mm/sec
12.5 mm/sec / Select to change trace speed.
Advanced Setup Select to set these menu items:Set DateSet TimeTrend IntervalNIBP TrendAlarm TrendNurse CallArrhythmia MenuNIBP Start ModeApnea Latch
Advanced Setup Menu
MENU ITEM SELECTIONS FACTORY DEFAULT/COMMENTS
Previous Menu Select to return to previous menu.
Set Date Select to change date. Changing the date will clear the trend information. A confirmation message will display.
Set Time Select to change time. Changing the date will clear the trend information. A confirmation message will display.
Trend Interval Off, 1, 2.5, 5,10, 15, 20, 30 min, 1 hr, 2 hr
Off / Select to change time of trend data collection.
NIBP Trend On, Off On / Select to save numeric data to trend on NIBP measurements.
Alarm Trend On, Off Off / Select to save numeric data to trend on Alarms.
Nurse Call Off, 1 second, Continuous
Off / Select to choose the Nurse Call activation time.
Arrhythmia Menu This selection will open the Arrhythmia Menu.
NIBP Start Mode Interval Mode, Timer Mode
Interval Mode / Select the Interval mode to synchronize NIBP start with the integral clock. Select Timer Mode to synchronize NIBP start with the interval selected in relation to the real time clock.
Apnea Latch On, Off On / Select to turn apnea alarm latching on or off.
Arrhythmia Menu (Optional)
MENU ITEM SELECTIONS FACTORY DEFAULT/COMMENTS
Previous Menu Select to return to previous menu.
Arrhythmia All On, All Off, Non-lethals Off
Factory default is All On. Use Navigator Control knob to turn arrhythmia analysis on or off.
Irregular HR** On, Off Factory default is On. Use Navigator Control knob to turn Irregular HR on or off.
** Only available with 3-lead or 5-lead.
Monitor Setup Menu (Continued)
MENU ITEM SELECTIONS FACTORY DEFAULT/COMMENTS

Main Menus Operations
2 - 12 0070-10-0648-02 Spectrum® Operating Instructions
V-Tach 3 to 15 beats Factory default is 3 beats. Use Navigator Control knob to select how many ventricular beats in a row will constitute V-Tach.
V-Tach Rate 100 to 180 bpm Factory default is 120 bpm. Use Navigator Control knob to select the heart rate threshold which must be reached to constitute V-Tach.
Asystole Delay 3 to 10 seconds (3/5 lead)3 to 8 seconds (12 lead)
Factory default is 4 seconds for 3/5 Lead and 3 seconds for 12 Lead. Use Navigator Control knob to select the number of seconds with an absence of an R wave that will constitute asystole.
Relearn Use Navigator Control knob to select to relearn Arrhythmia and ST.
ECG Noise Delay** 3 to 30 seconds Factory default is 5 seconds. Use Navigator Control knob to select the number of seconds to delay the ECG Noise Alarm.
Arrhythmia Menu (Optional) (Continued)
MENU ITEM SELECTIONS FACTORY DEFAULT/COMMENTS
** Only available with 3-lead or 5-lead.

Spectrum® Operating Instructions 0070-10-0648-02 2 - 13
Operations Main Menus
2.3.3 Print Setup Menu
FIGURE 2-6 Print Setup Menu
Printing of Waveform DataThe Print Setup Menu allows the user to set up waveforms for printing and gives the user the ability to change the print destination.
Waveforms may be printed at the time of an alarm by selecting Yes in response to Print on Alarm. Waveforms may also be printed at regular intervals by selecting Print Every. Available selections are 1, 5, 10, 15, 20, 30, 60 and 120 min.
To choose which waveform will print to the internal printer select Waveform 1 or 2 and then select any of the waveforms: ECG 1 - 6, IBP 1 - 4, Pleth, Resp, CO2, O2, and Agent.
NOTE: If a 3-lead cable is installed, the ECG 2 through ECG 6 references will not be displayed.
The following printer options may be available: Local, Remote and Laser. A default printer or combination of printers can be set.
Local printing will initiate a printout delivered via the internal printer.
Remote printing will send a printout to the printer associated with the Central Station.
Laser printing sends 12-lead data to the laser printer.

Main Menus Operations
2 - 14 0070-10-0648-02 Spectrum® Operating Instructions
2.3.4 Parameters Menu
FIGURE 2-7 Parameters Menu
The Parameters Menu selections vary according to the optional features installed on the the monitor. The possible selections are: ECG, ST, NIBP, IBP1, IBP2, IBP3, IBP4, SpO2, CO2, Resp, Gases, Temperature, and CO.

Spectrum® Operating Instructions 0070-10-0648-02 2 - 15
Operations Main Menus
2.3.5 Functions Menu
FIGURE 2-8 Functions Menu
The Functions Menu provides the following choices: Normal Screen, Remote View, Drug Calculator, Hemo Calcs Menu, Disable 12 Lead ECG, Copy patient data to card and Copy patient data from card.
The Normal Screen selection returns the view to the normal screen.
The Remote View selection opens the Remote View Menu shown in FIGURE 2-10. This menu enables the user to view the numeric and waveform data of another patient who is being monitored at a remote location. A more detailed description of this function is provided in the next subsection.
The Drug Calculator selection opens the (IV) Drug Calculation Menu. This menu calculates both the infusion rate and the concentration rate of IV medications.
The Hemo Calcs Menu selection opens the Hemodynamic Calculations Menu. This menu calculates the patient’s hemodynamic status.
The Disable 12 Lead ECG selection toggles between Enable and Disable with regard to the View 12™ ECG Analysis Module. This selection activates or deactivates access to the 12-lead software. This menu selection is only available when the View 12™ ECG Analysis Module is installed.
There are two options for data transfer. Copy patient data to card and Copy patient data from card options allow for the transfer of patient specific data from monitor to monitor.

Main Menus Operations
2 - 16 0070-10-0648-02 Spectrum® Operating Instructions
2.3.5.1 Remote ViewThe Remote View feature allows the simultaneous display of data from two patients on a single monitor. The monitor at the user’s current location is defined as the host monitor. While maintaining visibility of the primary patient at the host monitor, the Remote View Menu enables the user to view the numeric data and two selectable waveforms of another patient who is being monitored at a remote location. The monitor at the remote location is defined as the remote monitor. Visual and audio alarms occurring at the remote monitor are also received through the Remote View Menu at the host monitor.
FIGURE 2-9 Remote View Menu on Main Display
Hardwired Spectrum monitors can function as host monitors with the ability to view other hardwired Spectrum monitors and 2.4 GHz wireless Spectrum monitors.
NOTE: 2.4 GHz wireless Spectrum monitors cannot function as host monitors.
All Remote View controls are contained within the Remote View Menu. Opening other menus from the monitor’s keypad or by pressing the NORMAL SCREEN key will close the Remote View Menu.

Spectrum® Operating Instructions 0070-10-0648-02 2 - 17
Operations Main Menus
Remote View Menu DisplayThe Remote View Menu displays data as follows:
• The waveforms that are displayed are user-selectable through the Remote View Setup Menu, as described in the table on page 2-19. Corresponding numeric tiles are displayed to the right of the waveforms. The numeric data for a maximum of fifteen (15) parameters that are not related to the waveforms is displayed in the “Numeric Data Area” located directly below the waveforms. The following is a hierarchical listing of the parameters as they will display if they are not assigned to numeric tiles.
NOTE: Respiration alarm text messages are also displayed in the “Numeric Data Area” as follows:
• The colors of the waveforms and all numeric data correspond to the settings of the host monitor (not the remote monitor).
• When numeric data for a particular parameter is unavailable, dashes (– –) are displayed.
• If a high or low alarm limit has not been set, an Alarm Off icon is displayed.
• Remote View alarms follow the alarm settings at the remote monitor, displaying in a priority-appropriate, reverse video color.
• If the remote monitor is placed into Standby mode, the message “Viewed Monitor is Currently in Standby” is displayed in the message area.
• HR and PVC/min
• SpO2 and PR
• IBP1, IBP2, IBP3, IBP4
• CPP
• PAWP
• NIBP
• Resp
• CO2
• SvO2
• ST1
• ST2
• ST3
• O2
• N2O
• Agent
• T1, T2, TBlood, ΔT
• CO
• CI
• If Apnea is detected, the message “APNEA” is displayed.
• If CVA is detected, the message “CVA” is displayed.
• If high impedance is detected from the ECG electrodes, the message “CHK LEAD” is displayed.

Main Menus Operations
2 - 18 0070-10-0648-02 Spectrum® Operating Instructions
FIGURE 2-10 Remote View Menu
The Remote View Menu also provides the following menu choices: Normal Screen, Setup, Remote Mute, Remote Mute All, and Remote Print.
1. Normal Screen — this selection removes the Remote View Menu from the display.
2. Setup — this selection opens the Remote View Setup Menu shown in FIGURE 2-11. This menu enables the user to configure the display and functionality of the Remote View Menu.
NOTE: With the exception of the “New Bed” menu choice, the current settings in the Remote View Setup Menu are saved when “Save Current” is selected from the Host Monitor. There is one set of saved settings for each patient size.
NOTE: The saved settings in the Remote View Setup Menu are transferable with the monitor defaults via a PCMCIA card.
FIGURE 2-11 Remote View Setup Menu
Message AreaNumeric Data Area
Wave 1 (Selectable)
Wave 2 (Selectable)

Spectrum® Operating Instructions 0070-10-0648-02 2 - 19
Operations Main Menus
The following table provides a listing of the Remote View Setup Menu items:
3. Remote Mute — this selection silences the audio portion of a remote alarm for the duration that is selected from the Remote Mute For list in the Remote View Setup Menu. The factory default is 2 minutes. While the audio alarm is silenced:
• the visual alarm indicators remain displayed
• the message ALARMS MUTED FOR XX:XX mins is displayed in the message area of the Remote View Menu. The XX:XX in the message is a digital timer for the mute time remaining
• if a new remote alarm occurs during this time, the current alarm will remain silenced while its digital timer continues to count down, and the new alarm tone will sound
• an Alarm Mute icon (resembling a crossed speaker) is displayed in the numeric tile of each muted parameter, and in the “Numeric Data Area” if one or more parameters in that area are muted
If Remote Mute is selected again, the digital timer is reset.
NOTE: The Remote Mute selection silences only the alarms indicated in the Remote View Menu. It does not silence the primary patient's alarms or alarm sounds at the remote location.
Remote View Setup Menu
MENU ITEM SELECTIONS FACTORY DEFAULT/COMMENTS
Previous Menu Select to return to previous menu.
New Bed All available beds on a single network.
This menu item provides a list of monitor devices that are available in the Mindray approved hardwired network and have Bed numbers assigned. The chosen Bed # displays at the top of the Remote View Menu.
Wave 1 All waveforms available on the remote monitor.
Only waveforms available on the remote monitor will be listed as selections for this menu item. The menu selections for Wave 1 will not include the waveform that is currently selected as Wave 2.
Wave 2 All waveforms available on the remote monitor.
Only waveforms available on the remote monitor will be listed as selections for this menu item. The menu selections for Wave 2 will not include the waveform that is currently selected as Wave 1.
Remote Mute For 1 min, 2 min, 5 min*, 10 min*
Select to choose duration of Remote Mute.
Remote MuteAll For
Permanent*, 1 min, 2 min, 5 min*, 10 min*
Select to choose duration of Remote Mute All.
* These selections will not be available if the country chosen in the Installation Menu is France.

Main Menus Operations
2 - 20 0070-10-0648-02 Spectrum® Operating Instructions
4. Remote Mute All — this selection silences the audio alarm tones of all remote alarms for the duration that is selected from the Remote Mute All For list in the Remote View Setup Menu. The factory default is 2 minutes. While the audio alarms are silenced:
• the visual alarm indicators remain displayed
• the message ALL ALARMS MUTED FOR XX:XX mins is displayed in the message area of the Remote View Menu. The XX:XX in the message is a digital timer for the mute time remaining
NOTE: If “Permanent” is selected from the Remote Mute All For list, “ALL ALARMS MUTED PERMANENTLY” is displayed in the message area of the Remote View Menu. If a new bed is chosen while all remote alarms are permanently muted, the permanent mute condition will continue for the new bed.
• an Alarm Mute icon (resembling a crossed speaker) is displayed in the numeric tiles and in the “Numeric Data Area”
If Remote Mute All is selected again, the audio alarm tones are re-enabled.
NOTE: The Remote Mute All selection silences only the alarms indicated in the Remote View Menu. It does not silence the primary patient's alarms or alarm sounds at the remote location.
5. Remote Print — this selection sends a print request to the remote monitor. The printout will be as configured in the Print Setup menu of the remote monitor.
NOTE: When a Remote Print is requested, there is no indication that the printout was completed as requested. The user should verify the successful print at the printer.
Remote View Message AreaThe Message Area shown in FIGURE 2-10 displays status and alarm messages as follows:
• If more than one message is being received, they are alternately displayed.
• All arrhythmia alarms, priority one and priority two alarms generate the appropriate audio alerts at the host monitor and the associated alarm text messages are displayed in the Remote View Message Area. Refer to section 2.4.2.5, “Arrhythmia Alarms” for the specific arrhythmia alarm text messages that can be displayed.

Spectrum® Operating Instructions 0070-10-0648-02 2 - 21
Operations Main Menus
NOTE: The Lethal Arrhythmia alarms (V-Tach, V-Fib, and Asystole) are latched alarms. Even after the alarming condition is resolved at the remote monitor, a latched alarm will continue at the host monitor until it is acknowledged by selecting “Remote Mute” or “Remote Mute All” from the “Remote View Menu”. If the alarm is acknowledged while the lethal condition still exists, the audio portion of the alarm will be muted for the duration that is selected from the “Remote Mute For” list or the “Remote Mute All For” list of the “Remote View Setup Menu”, but the alarm message will remain in the Remote View Message Area. If a new lethal condition occurs while the initial lethal alarm is muted, the new lethal alarm will not break through and will be muted for the remainder of the mute duration. If the lethal condition is resolved while the alarm is muted, the alarm will be terminated.
• Only alarm text messages for parameters that are not currently displayed in a Wave 1 or Wave 2 numeric tile or in the “Numeric Data Area” are displayed in the Remote View Message Area.
• If Apnea is detected, the message “Respiratory Apnea alarm.” is displayed.
• If CVA is detected, the message “CVA” is displayed.
• Status Messages that are supported by the Remote View are:
NOTE: Status Messages are not displayed if high priority alarms are alternately displaying.
• Leads Off
• SpO2: Sensor Fault
• SpO2: Check Sensor
• SpO2: Failure
• SpO2: Interference
• SpO2: Low Perfusion
• SpO2: Motion
• SpO2: No Pulse
• SpO2: No Sensor
• SpO2: Pulse Search
• SpO2: Sensor Off

Parameter Menus and Monitoring Operations
2 - 22 0070-10-0648-02 Spectrum® Operating Instructions
2.4 Parameter Menus and MonitoringEach parameter’s menu can be accessed from the Parameters menu or by selecting its menu target on the normal operating screen.
2.4.1 ECG MonitoringECG is a continuous waveform of a patient's cardiac electrical activity. The ECG waveform will display in the first waveform area of the Spectrum.
The quality of an ECG signal is directly affected by electrode site skin preparation, electrode patch quality and ECG lead placement. If artifact is present on the ECG waveform, then the arrhythmia processing, alarm processing, and quality of the monitoring function may be affected. The presence of artifact can prevent the monitor from establishing an accurate ECG reference waveform, increasing the difficulty experienced in assessing the ECG rhythm.
Optimizing the ECG signal is imperative for accurate monitoring. Use high quality electrodes, designed to acquire the ECG with excellent base line stability, recovery from defibrillation and minimum artifact from patient movement.
With the Spectrum, ECG can be obtained by using a 3 Lead, 5 Lead or 12 Lead ECG cable in conjunction with a lead set and skin electrodes. For best performance and safety, inspect the ECG cables and electrodes daily.
2.4.2 ECG Menu
The ECG Menu provides the following choices: Normal Screen, ECG 1 — ECG 6, Arrhythmia Menu, Relearn, ST Menu, ECG Sizes Menu, ECG Setup and Resp Menu.
FIGURE 2-12 ECG Menu FIGURE 2-13 ECG Setup Menu

Spectrum® Operating Instructions 0070-10-0648-02 2 - 23
Operations Parameter Menus and Monitoring
• The Normal Screen selection returns the view to the normal screen.
• The ECG 1 — ECG 6 selections define the ECG labels for printing and trends.
• The Arrhythmia Menu selection opens the Arrhythmia Menu.
• The Relearn selection is only available if the ST or Arrhythmia options are installed and is used to manually initiate the learning process for ST measurements or Arrhythmia analysis.
• The ST Menu selection opens the ST Menu.
• The ECG Sizes Menu selection opens the ECG Sizes Menu.
• The ECG Setup selection opens the ECG Setup Menu that is detailed in the following table.
• The Resp Menu selection opens the Resp Menu.
ECG Setup Menu
MENU ITEM SELECTIONS FACTORY DEFAULT/COMMENTS
Previous Menu Returns to the previous menu.
Filter Monitor, Extended, ST
Select to change the filter mode for ECG. Extended or ST must be used for ST analysis. The filter setting affects both the display output and the printer output.
Monitor = 0.5 - 40 HzExtended, 3 or 5-lead = 0.05 - 100 Hz Extended, 12-lead = 0.05 - 150 HzST = 0.05 - 40 Hz
HR Source Auto, ECG, <IBP1 Label>, <IBP2 Label>, <IBP3 Label>, <IBP4 Label>, SpO2
Dependent on current settings, the IBP Label selections may remain as numbered or may be substituted with one of the following: Art, PA, CVP, ICP, RA, UA, LV, LA, IABP.
Pacer Reject On, Off When set to On, pacers are eliminated from the display.
Pacer Enhancement
On, Off When set to On, all detected pacemaker spikes are displayed.
Notch Filter Off, 50 Hz, 60 Hz This menu item is used to filter out AC line noise from the ECG waveform. The Off selection is not saved with the Save Current function and will be reset when the monitor is power cycled.
ESU Filter Auto, Disable This menu item is used to filter out high frequency electrosurgical noise from the ECG waveform. The Disable selection is not saved with the Save Current function and will be reset when the monitor is power cycled. This function is not supported in 12 lead mode.
ECG Cable Auto Detect, 3 lead, 5 lead
This menu item is used to manually set the mode of operation for the chosen ECG cable type.
NOTE: When using Mindray cables, the Auto Detect selection will automatically detect the cable type and switch the mode of operation accordingly.
Grid On, Off Select to turn the ECG grid On or Off.
Color List of 16 colors Select to change the display color for all ECG waves and for the HR and ST parameters.

Parameter Menus and Monitoring Operations
2 - 24 0070-10-0648-02 Spectrum® Operating Instructions
WARNING: Ensure that the conductive parts of ECG electrodes do not contact other conductive parts, including earth ground.
CAUTION: To avoid possible damage to the Spectrum, use only ECG cables and accessories available from Mindray.
CAUTION: Line Isolation Monitor transients may resemble actual cardiac waveforms, thus inhibiting heart rate alarms. Check lead wires for damage and ensure good skin contact prior to and during use. Always use fresh electrodes and follow proper skin preparation techniques.
NOTE: This device is not intended for direct cardiac application.
CAUTION: To assure successful triggering of a Mindray Intra-Aortic balloon pump from the Spectrum monitor, set the “ECG Filter” to “Extended” and set “Pacer Enhancement” to “On”. Both of these settings are located in the ECG setup menu of the Spectrum.
CAUTION: The Analog Output on the Spectrum supports triggering the Intra-Aortic Balloon Pump (IABP) for 3 Lead and 5 Lead ECG cable monitoring only. Invasive Blood Pressure triggering is not supported. ECG analog output is disabled when 12 Lead ECG analysis is enabled.
ECG Lead Fault MessagesA “Lead Fault” message will be displayed if an ECG lead becomes disconnected from the patient.
A “Check Lead Connection” message will be displayed if 3-lead or 5-lead ECG has an intermittent or poor connection.
NOTE: If a 3 or 5-lead ECG cable and the View 12™ ECG Analysis Module are both in use, then Lead Fault messages refer to the 12-lead cable only.
NOTE: When monitoring 12-lead ECG, a Lead Fault message will not be displayed if Right Leg Lead (RL or R) becomes disconnected from the patient.
Symbols in Heart Rate TileThe following symbols can appear in the HR Parameter tile.
Arrhythmia This indicates arrhythmia option is installed and active.
ST Analysis This indicates ST Analysis option is installed and active.
Pacemaker This indicates pacemaker rejection is On.

Spectrum® Operating Instructions 0070-10-0648-02 2 - 25
Operations Parameter Menus and Monitoring
2.4.2.1 Skin PreparationProper skin preparation is essential in obtaining an accurate ECG reading. Electrode sites should be clean and dry and should provide a smooth flat surface. Incidental electrical activity and inaccurate readings may arise from incorrect skin preparation.
The following procedure is recommended for secure electrode patch application:
1. Shave the chest hair from the electrode sites in a circular area with a diameter of2 – 4 inches.
2. Use a dry gauze pad to remove excess skin oils, skin cells and residue from the electrode sites. Never rub the skin until it is raw or bleeding.
NOTE: Prepare the electrode site with alcohol only if the skin is extremely greasy. If alcohol is used as a drying agent, always allow the skin to dry before placing the electrode patch on the skin.
2.4.2.2 Electrode Patch Location
NOTE: Store electrode patches at room temperature and open just prior to use.
NOTE: Avoid more than one type of electrode on a patient because of variations in electrical resistance.
NOTE: Avoid placing electrode patches directly over bone prominences or over any high activity movement areas such as shoulders or arms because muscle motion produces electrical activity. If an electrode patch is placed over a large muscle such as the pectorals, the monitor may detect this additional muscle activity and could lead to false arrhythmia calls.
1. To prevent evaporation of the contact gel medium, peel the backing off of the electrode patch only when it is ready for use. Visually inspect the contact gel medium for moistness. If the gel medium is not moist, do not use the electrode patch. Dry electrode patches are not conductive.
NOTE: If using the snap type electrode wires, attach the electrode patch to the lead wire before placing patch on the patient.
2. Attach the electrode patch to the skin at the prepared site. Smooth the electrode patch down in a circular motion to ensure proper skin contact. If using soft gel electrodes, never push down directly over the contact gel medium as this may displace the gel and cause monitoring artifact. If using hard gel electrodes, it is recommended that during application, the center of the electrode should be slightly pressed onto the skin to ensure direct contact. Consult the electrode patch manufacturer’s instructions for specific use.
3. Secure the lead wires to the patient according to hospital practice. For additional information see section 2.4.2.3, “Lead Placement”.
WARNING: Ensure that the ECG lead wires are neatly secured in a manner that will prevent them from encircling the patient’s neck, creating a strangulation hazard.

Parameter Menus and Monitoring Operations
2 - 26 0070-10-0648-02 Spectrum® Operating Instructions
NOTE: It is recommended that electrode patches be changed at least every 24 – 36 hours to maintain proper contact with the skin. Some patients may require electrodes to be changed more often. Electrode patches are disposable and should be applied only once. Try to avoid reusing the exact same electrode site during reapplication. If an electrode becomes wet with fluid, change the electrode patch.

Spectrum® Operating Instructions 0070-10-0648-02 2 - 27
Operations Parameter Menus and Monitoring
2.4.2.3 Lead PlacementThe computerized arrhythmia algorithm works best when the patient’s R wave is significantly larger than the P wave or the T wave. If the R wave is not significantly larger than other lower voltage waves on the ECG tracing, the computer may have some difficulty in identifying the appropriate waves. On some patients, electrode patch placement and/or the viewed ECG lead may need to be adjusted in order to obtain a significant R wave.
This section outlines lead placement according to the guidelines of the American Heart Association (AHA) and the International Electro-Technical Commission (IEC).
Standard 3-wire Lead SetsA 3-wire lead set can monitor one of three ECG vectors (I, II, or III). The recommended 3-wire lead placement is as follows.
FIGURE 2-14 3-wire Lead Placement (AHA)
FIGURE 2-15 3-wire Lead Placement(IEC)
• Place the RA (white) electrode under the patient’s right clavicle, at the mid-clavicular line within the rib cage frame.
• Place the LA (black) electrode under the patient’s left clavicle, at the mid-clavicular line within the rib cage frame.
• Place the LL (red) electrode on the patient’s lower left abdomen within the rib cage frame.
• Place the R (red) electrode under the patient’s right clavicle, at the mid-clavicular line within the rib cage frame.
• Place the L (yellow) electrode under the patient’s left clavicle, at the mid-clavicular line within the rib cage frame.
• Place the F (green) electrode on the patient’s lower left abdomen within the rib cage frame.
RA LA
LL
BlackWhite
Red
R L
F
Red
Green
Yellow
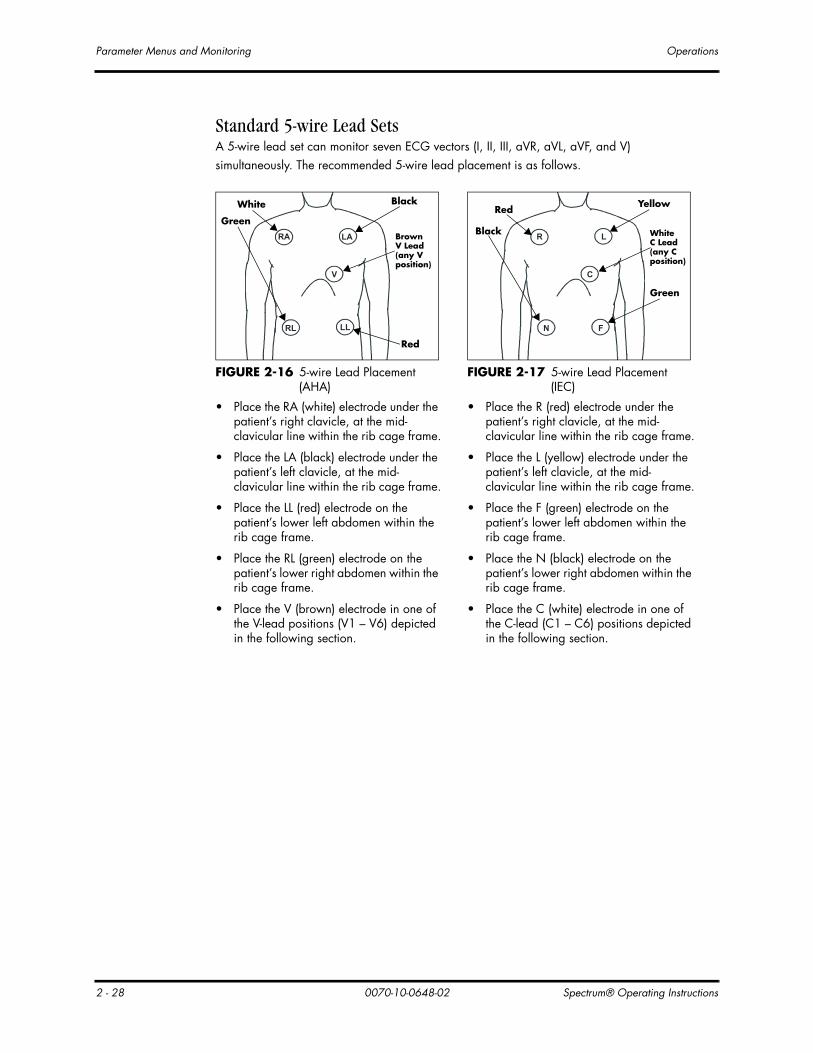
Parameter Menus and Monitoring Operations
2 - 28 0070-10-0648-02 Spectrum® Operating Instructions
Standard 5-wire Lead SetsA 5-wire lead set can monitor seven ECG vectors (I, II, III, aVR, aVL, aVF, and V) simultaneously. The recommended 5-wire lead placement is as follows.
FIGURE 2-16 5-wire Lead Placement (AHA)
FIGURE 2-17 5-wire Lead Placement(IEC)
• Place the RA (white) electrode under the patient’s right clavicle, at the mid-clavicular line within the rib cage frame.
• Place the LA (black) electrode under the patient’s left clavicle, at the mid-clavicular line within the rib cage frame.
• Place the LL (red) electrode on the patient’s lower left abdomen within the rib cage frame.
• Place the RL (green) electrode on the patient’s lower right abdomen within the rib cage frame.
• Place the V (brown) electrode in one of the V-lead positions (V1 – V6) depicted in the following section.
• Place the R (red) electrode under the patient’s right clavicle, at the mid-clavicular line within the rib cage frame.
• Place the L (yellow) electrode under the patient’s left clavicle, at the mid-clavicular line within the rib cage frame.
• Place the F (green) electrode on the patient’s lower left abdomen within the rib cage frame.
• Place the N (black) electrode on the patient’s lower right abdomen within the rib cage frame.
• Place the C (white) electrode in one of the C-lead (C1 – C6) positions depicted in the following section.
RA
RL
LA
LL
V
White
Green
Black
BrownV Lead(any V position)
Red
R
N
L
F
C
Red
Black
Yellow
WhiteC Lead(any C position)
Green

Spectrum® Operating Instructions 0070-10-0648-02 2 - 29
Operations Parameter Menus and Monitoring
View 12™ CardA View 12™ card utilizes a 10-wire ECG lead set that can monitor 12 ECG vectors (I, II, III, aVR, aVL, aVF, V1, V2, V3, V4, V5, and V6) simultaneously. The recommended lead placement for a View 12™ card is as follows.
FIGURE 2-18 View 12™ CardLead Placement (AHA)
FIGURE 2-19 View 12™ CardLead Placement (IEC)
• Place RA (white) electrode under the right clavicle, mid-clavicular line within the rib cage frame.
• Place LA (black) electrode under the left clavicle, mid-clavicular line within the rib cage frame.
• Place LL (red) electrode on the lower left abdomen within the rib cage frame.
• Place RL (green) electrode on lower right abdomen within the rib cage frame.
• Place V1 (brown) chest lead in the fourth intercostal space, right sternal border.
• Place V2 (brown) chest lead in the fourth intercostal space, left sternal border.
• Place V3 (brown) chest lead midway between V2 and V4 on a straight line.
• Place V4 (brown) chest lead in the fifth intercostal space, mid-clavicular line.
• Place V5 (brown) chest lead in the fifth intercostal space, anterior axillary line.
• Place V6 (brown) chest lead in the fifth intercostal space, mid-axillary line.
• Place R (red) electrode under the right clavicle, mid-clavicular line within the rib cage frame.
• Place L (yellow) electrode under the left clavicle, mid-clavicular line within the rib cage frame.
• Place F (green) electrode on the lower left abdomen within the rib cage frame.
• Place N (black) electrode on lower right abdomen within the rib cage frame.
• Place C1 (white) chest lead in the fourth intercostal space, right sternal border.
• Place C2 (white) chest lead in the fourth intercostal space, left sternal border.
• Place C3 (white) chest lead midway between C2 and C4 on a straight line.
• Place C4 (white) chest lead in the fifth intercostal space, mid-clavicular line.
• Place C5 (white) chest lead in the fifth intercostal space, anterior axillary line.
• Place C6 (white) chest lead in the fifth intercostal space, mid-axillary line.
RA
V1
RL
LA
V6
V5
V4
LL
V2 V3
R L
C1
N
C6
C5C4
F
C2 C3

Parameter Menus and Monitoring Operations
2 - 30 0070-10-0648-02 Spectrum® Operating Instructions
Lead II MonitoringThe recommended lead placement for Lead II monitoring is as follows.
FIGURE 2-20 Lead II Monitoring (AHA) FIGURE 2-21 Lead II Monitoring (IEC)
• Place the RA (white) electrode under the patient’s right clavicle, at the mid-clavicular line within the rib cage frame.
• Place the LA (black) electrode under the patient’s left clavicle, at the mid-clavicular line within the rib cage frame.
• Place the LL (red) electrode on the patient’s lower left abdomen within the rib cage frame.
Select ECG Lead II on the monitor. Lead II is the direct electrical line between the RA (white) electrode and the LL (red) electrode.
• Place the R (red) electrode under the patient’s right clavicle, at the mid-clavicular line within the rib cage frame.
• Place the L (yellow) electrode under the patient’s left clavicle, at the mid-clavicular line within the rib cage frame.
• Place the F (green) electrode on the patient’s lower left abdomen within the rib cage frame.
Select ECG Lead II on the monitor. Lead II is the direct electrical line between the R (red) electrode and the F (green) electrode.
RA LA
LL
BlackWhite
Red
R L
F
Red
Green
Yellow

Spectrum® Operating Instructions 0070-10-0648-02 2 - 31
Operations Parameter Menus and Monitoring
Modified Chest Lead (MCL) MonitoringThe recommended lead placement for MCL monitoring is as follows.
FIGURE 2-22 MCL Monitoring with a3-wire Lead Set (AHA)
FIGURE 2-23 MCL Monitoring with a3-wire Lead Set (IEC)
• Place the RA (white) electrode under the patient’s left clavicle, at the mid-clavicular line within the rib cage frame.
• Place the LA (black) electrode on the right sternal border, at the fourth intercostal space within the rib cage frame.
• Place the LL (red) electrode on the patient’s lower left abdomen within the rib cage frame.
Select ECG Lead I for MCL1 monitoring. Lead I is the direct electrical line between the RA (white) electrode and the LA (black) electrode.
Select ECG Lead II for MCL6 monitoring. Lead II is the direct electrical line between the RA (white) electrode and the LL (red) electrode.
• Place the R (red) electrode under the patient’s left clavicle, at the mid-clavicular line within the rib cage frame.
• Place the L (yellow) electrode on the right sternal border, at the fourth intercostal space within the rib cage frame.
• Place the F (green) electrode on the patient’s lower left abdomen within the rib cage frame.
Select ECG Lead I for MCL1 monitoring. Lead I is the direct electrical line between the R (red) electrode and the L (yellow) electrode.
Select ECG Lead II for MCL6 monitoring. Lead II is the direct electrical line between the L (red) electrode and the F (green) electrode.
RA
LALL
Red
WhiteBlack
R
LF
Red
Green
Yellow

Parameter Menus and Monitoring Operations
2 - 32 0070-10-0648-02 Spectrum® Operating Instructions
Neonatal Electrode PlacementUsing a 3-wire lead set, ECG lead placement on a neonate is usually directed towards obtaining the best possible respiration data through the ECG thoracic impedance technique. Thoracic impedance is usually measured between the Right Arm and Left Arm electrode patches. These patches should be placed on the chest directly across from each other to optimize the measuring of the neonate’s chest movement. The recommended lead placement for neonate monitoring is as follows.
FIGURE 2-24 Neonatal 3-wire Lead Placement (AHA)
FIGURE 2-25 Neonatal 3-wire Lead Placement (IEC)
• Place the RA (white) electrode under the patient’s right clavicle, at the mid-clavicular line within the rib cage frame.
• Place the LA (black) electrode under the patient’s left clavicle, at the mid-clavicular line within the rib cage frame.
• Place the LL (red) electrode on the patient’s lower left abdomen within the rib cage frame.
• Place the R (red) electrode under the patient’s right clavicle, at the mid-clavicular line within the rib cage frame.
• Place the L (yellow) electrode under the patient’s left clavicle, at the mid-clavicular line within the rib cage frame.
• Place the F (green) electrode on the patient’s lower left abdomen within the rib cage frame.
RA LA
LL
Red
Black
White
R L
F
RedYellow
Green

Spectrum® Operating Instructions 0070-10-0648-02 2 - 33
Operations Parameter Menus and Monitoring
Monitoring a Pacemaker PatientThe recommended lead placement for monitoring a pacemaker patient is as follows.
A pacemaker patient usually requires a different electrode patch placement configuration than a non-pacemaker patient.
Do not place an ECG electrode directly over the pacemaker generator. Place the electrode patches 3 – 5 inches away from the pacemaker generator area. For example, if the pacemaker generator is located in the right subclavian area, relocate the Right Arm electrode closer in towards the center of the chest.
WARNING: Pacemaker patients’ rate meters may continue to count the pacemaker rate during occurrences of cardiac arrest or some arrhythmias. Do not rely entirely upon rate meter alarms. Keep pacemaker patients under close surveillance. See the Appendix section of this manual for disclosure of the pacemaker pulse rejection capability of this instrument.
CAUTION: Some pacemakers may contain a respiratory sensor that may produce artifact on an ECG waveform.
FIGURE 2-26 3-wire Lead Placement for a Pacemaker Patient (AHA)
FIGURE 2-27 3-wire Lead Placement for a Pacemaker Patient (IEC)
FIGURE 2-28 5-wire Lead Placement for a Pacemaker Patient (AHA)
FIGURE 2-29 5-wire Lead Placement for a Pacemaker Patient (IEC)
Pacer
Black
White
Red
Pacer
Yellow
Red
Green
White Pacer
BrownV
Green Red
Black
Pacer
WhiteV
Green
Red
Black
Yellow

Parameter Menus and Monitoring Operations
2 - 34 0070-10-0648-02 Spectrum® Operating Instructions
Using a Transcutaneous Electrical Nerve Stimulator (TENS)Since a TENS unit transmits electrical impulses, avoid placing ECG electrode patches near the TENS electrodes. ECG electrode patches may need to be repositioned and the ECG lead viewed may need to be adjusted until the optimum ECG tracing is obtained.
2.4.2.4 Arrhythmia AlgorithmThe Spectrum uses an arrhythmia algorithm to monitor ECG waveform data. The algorithm creates ECG waveform templates based on a patient’s normal ECG data and uses them to analyze newly received data. The algorithm verifies that data is free from noise and artifact, and that it does not deviate from the patient’s normal ECG rhythms.
A normal ECG waveform typically includes consistent spacing between R waves, a sharp and well defined QRS complex, and an ECG baseline that is free of noise and artifact.
FIGURE 2-30 Sample Waveform
Noise and ArtifactThe presence of noise or artifact in an ECG waveform makes the accurate detection and classification of heart beats difficult. To best optimize performance, all leads should be free of noise.
Some of the causes of ECG noise include poor skin preparation, improperly attached electrodes, dried electrode gel, defective lead wires, and patient movement. The algorithm uses several techniques to differentiate a patient’s QRS complexes from noise sources.
If noise levels are too high for a particular lead, a message is posted, and the data is dropped from analysis until the signal quality is re-established.
If noise levels are too high, the following will occur until the signal quality is re-established:
• Beat detection is suspended
• All rhythm calls are suspended
ST P
oin
t
J Poin
tST deviation
(Depression or Elevation)
ISO
Poin
t
40 to 80 msec
ST Segment
P
R
Q
S
T

Spectrum® Operating Instructions 0070-10-0648-02 2 - 35
Operations Parameter Menus and Monitoring
• An ECG Noise message is displayed when ECG noise is detected in one or more ECG leads. If ECG noise continues beyond the configured noise delay, an alarm is triggered, and ECG rhythm analysis is stopped.
Heart Rate MeterHeart Rate is computed using the 16 most recent R-R intervals for heart rates above 48 beats per minute. If the heart rate calculated using the last 4 beats is less than 48 beats per minute, then this rate is used. All detected beats are used to compute the heart rate. A separate ventricular rate is used in the algorithm to determine rhythms like ventricular tachycardia and ventricular run.
Filtering Pacer SignalsIn order to prevent pacer pulses from being mistaken for QRS complexes, they are removed from the ECG data that is sent to the arrhythmia algorithm for analysis. Pacer pulses are shown on the Spectrum as exaggerated vertical lines.
ECG AmplitudeThe QRS detection threshold algorithm setting is fixed between 0.15 and 0.45 mV to avoid detecting noise spikes or P-waves as valid beats. Changing the display gain on the monitor does not affect the signal that is used by the algorithm for beat detection. For optimal performance, the leads selected for monitoring should have an amplitude of 0.5 to 1 mV or more.
LearningThe process of learning is used to establish a normal beat template for a patient. The learn period is dependent on the heart rate and the dominant pattern. Learning should not be initiated during a primarily ventricular rhythm because an ectopic beat may be established as normal.
A learn should be initiated when beats are not being properly detected, or when they are being erroneously classified. However, if a signal is not strong enough, or lead data is extremely noisy, better signal quality must be established before a learn can be effective.
Beat Detection and TypingThe following table describes the leads that are used to measure beat detection and beat typing.
The search for the next beat begins after a refractory period to avoid detecting T- waves as valid QRS complexes. For all patient sizes, the minimum QRS amplitude that can be detected is between 0.15 and 0.45 mV depending on the width of the QRS complexes.
DESCRIPTION 3-WIRE LEAD SET 5-WIRE LEAD SET VIEW 12™ CARD
Leads used forBeat Detection
Determined by viewed lead II and V V1 and V5
Leads used forBeat Typing
Determined by viewed lead II, V, and I V1, V5, and II
Leads used forV-Fib Detection
Determined by viewed lead II and V V1 and V5

Parameter Menus and Monitoring Operations
2 - 36 0070-10-0648-02 Spectrum® Operating Instructions
Beat typing aligns and compares each new heart beat to reference templates that were previously stored in the system. A beat typing algorithm classifies the beats.
• If an incoming beat matches a template that has already been classified, it is given the same label as the template. The template parameters are updated with the features from this new beat.
The real time ECG analysis library incorporates ventricular ectopic beat detection as a part of arrhythmia analysis.
• Beats are measured for compensatory pause, QRS width, QRS positive and negative areas, and R wave positive and negative amplitudes. This process uses multiple leads when available.
• A scoring algorithm is then applied to those measurements to determine whether or not a beat is ectopic.
2.4.2.5 Arrhythmia AlarmsArrhythmia alarms are activated based on the patterns in the patient ECG waveform rhythms. Beat detection for a 5-lead wire set is determined by using a combination of leads II and V. When using a 3-lead wire set, beat detection is determined by using the lead being viewed.
The following lethal and non-lethal arrhythmia alarms may be detected by the arrhythmia algorithm.
NOTE: Arrhythmia alarms are not available for the Neonate patient size.
2.4.2.5.1 Lethal Arrhythmia AlarmsA lethal arrhythmia is an arrhythmia that can be life threatening to a patient if left untreated. Ventricular Tachycardia (V-Tach), Ventricular Fibrillation (V-Fib), and Asystole alarms are classified as lethal arrhythmia alarms. These alarms automatically default to Alarm Priority 1.
NOTE: Lethal arrhythmia alarms are latched alarms. Even after the alarming condition is resolved, a latched alarm will continue until it is acknowledged by pressing the MUTE or MUTE ALL key on the front panel keypad. If the alarm is acknowledged while the lethal condition still exists, the audio portion of the alarm will be muted for the duration that is selected from the “Mute For” list in the “Alarm Setup” menu, but the alarm message will remain in message area A. If a new lethal condition occurs while the initial lethal alarm is muted, the new lethal alarm will not break through and will be muted for the remainder of the mute duration. If the lethal condition is resolved while the alarm is muted, the alarm will be terminated.

Spectrum® Operating Instructions 0070-10-0648-02 2 - 37
Operations Parameter Menus and Monitoring
Asystole AlarmAn Asystole alarm is activated when no QRS complexes are detected for the configured time period in the absence of Ventricular Fibrillation.
For 3-Lead and 5-Lead ECG – The time period range for an Asystole alarm is user selectable from 3 to 10 seconds.
For 12-Lead ECG – The time period range for an Asystole alarm is user selectable from 3 to 8 seconds.
The Asystole alarm is a Priority 1 alarm event that produces:
• Alarm Priority 1 visual and audio alarm indicators.
• An Asystole text message above the ECG1 waveform area.
Ventricular-Fibrillation (V-FIB) AlarmA V-FIB alarm is activated when a fibrillated waveform (P, QRS or T waves can no longer be identified) is detected. V-FIB is defined as “irregular, disorganized electrical activity of the heart”. The V-FIB detection algorithm runs in parallel to the beat detection algorithm and continuously examines the incoming data.
The V-FIB alarm is a Priority 1 alarm event that produces:
• Alarm Priority 1 visual and audio alarm indicators.
• A V-FIB text message above the ECG1 waveform area.
Ventricular Tachycardia (V-TACH) AlarmA V-TACH alarm is activated as follows:
• The range of the V-TACH rate is between 100 to 180 beats per minute.
AND
• The V-TACH lethal arrhythmia alarm is activated when the configured number of consecutive PVCs is reached. The range for the V-TACH threshold is 3 – 15 beats per minute.
A V-TACH alarm is a Priority 1 alarm event that produces:
• Alarm Priority 1 visual and audio alarm indicators.
• A V-TACH text message above the ECG1 waveform area.
2.4.2.5.2 Non-Lethal Arrhythmia AlarmsA Non-Lethal Arrhythmia is an arrhythmia that is most likely not life threatening to a patient. Bigeminy, Bradycardia, Couplet, Irregular Heart Rate, Pause, PVC/min, Run, Trigeminy, and Ventricular Rhythm (V-Rhythm) alarms are classified as non-lethal arrhythmia alarms. With the exception of PVC/min, all other Non-Lethal Arrhythmias are Alarm Priority 2. The Alarm Priority for PVC/min is user selectable between 1 and 2.

Parameter Menus and Monitoring Operations
2 - 38 0070-10-0648-02 Spectrum® Operating Instructions
NOTE: Non-lethal arrhythmia alarms are not latched alarms and can be acknowledged at any time. To acknowledge a non-lethal arrhythmia alarm, press the MUTE key on the keypad.
Bigeminy AlarmThe Bigeminy alarm is activated when three or more cycles of one PVC coupled to one normal beat are detected.
The Bigeminy alarm is a Priority 2 alarm event that produces:
• Alarm Priority 2 visual and audio alarm indicators.
• A BIGEMINY text message above the ECG1 waveform area.
Bradycardia (Brady) AlarmThe Brady alarm is activated when the heart rate falls to a value 10% lower than the user selected value for low heart rate alarm.
NOTE: The Bradycardia alarm is not available when using a View 12™ card.
The Brady alarm is an alarm event that produces:
• Alarm Priority 1 visual and audio alarm indicators.
• A Brady text message above the ECG1 waveform area.
Couplet AlarmThe Couplet alarm is activated when two consecutive PVCs are detected between normal beats.
The Couplet alarm is a Priority 2 alarm event that produces:
• Alarm Priority 2 visual and audio alarm indicators.
• A COUPLET text message above the ECG1 waveform area.
Irregular Heart Rate AlarmThe Irregular Heart Rate alarm is activated when the measured variations in the R-R interval over a period of time exceeds a preset limit established by the arrhythmia algorithm.
NOTE: The Irregular Heart Rate alarm is not available when using a View 12™ card.
The Irregular Heart Rate alarm is a Priority 2 alarm event that produces:
• Alarm Priority 2 visual and audio alarm indicators.
• An IRREGULAR HR text message above the ECG1 waveform area.
Pause AlarmThe Pause alarm is activated when no beat is detected during an interval that is greater than 1.8 R-R and the next beat is not a PVC.

Spectrum® Operating Instructions 0070-10-0648-02 2 - 39
Operations Parameter Menus and Monitoring
NOTE: The Pause alarm is only available when using a View 12™ card.
The Pause alarm is a Priority 2 alarm event that produces:
• Alarm Priority 2 visual and audio alarm indicators.
• A PAUSE text message above the ECG1 waveform area.
PVC/minute AlarmThe High PVC alarm is activated when the number of PVCs detected per minute exceeds the configured threshold. The PVC limit can be set to Off, or 1 to 30 PVCs per minute.
The High PVC alarm has priority settings of 1 or 2, and behaves as follows:
• If the High PVC alarm priority is set to 1, Alarm Priority 1 visual and audio alarm indicators are produced.
• If the High PVC alarm priority is set to 2, Alarm Priority 2 visual and audio alarm indicators are produced.
• A High PVC text message is produced above the ECG1 waveform area.
NOTE: PVC/min will not be displayed during periods of Ventricular Rhythms, V-TACH, V-FIB and Asystole.
Run AlarmThe Run alarm is activated when the number of consecutive PVCs occur at a rate that equals or exceeds the user defined V-Tach Rate. The number of consecutive PVCs that constitute a Run is one beat less than the minimum used to identify V-Tach.
The Run alarm is a Priority 2 alarm event that produces:
• Alarm Priority 2 visual and audio alarm indicators.
• A RUN text message above the ECG1 waveform area.
Trigeminy AlarmThe Trigeminy alarm is activated when three or more cycles of one PVC coupled to two normal beats are detected. This rhythm could also cause an Irregular HR alarm.
The Trigeminy alarm is a Priority 2 alarm event that produces:
• Alarm Priority 2 visual and audio alarm indicators.
• A TRIGEMINY text message above the ECG1 waveform area.
Ventricular Rhythm (V-Rhythm) AlarmThe V-Rhythm alarm is activated when more than 2 consecutive PVCs occur at a rate that is less than the user defined V-Tach Rate.
The V-Rhythm alarm is a Priority 2 alarm event that produces:
• Alarm Priority 2 visual and audio alarm indicators.
• A VENTRICULAR RHYTHM text message above the ECG1 waveform area.

Parameter Menus and Monitoring Operations
2 - 40 0070-10-0648-02 Spectrum® Operating Instructions
2.4.2.6 Arrhythmia Analysis (Optional)
WARNING: The arrhythmia analysis feature is intended to detect ventricular rhythms, however, due to physiologic differences in patient populations, the Spectrum may occasionally sound a false alarm or may not recognize some arrhythmia patterns.
The Spectrum is capable of identifying ventricular arrhythmia patterns in Adult and Pediatric size patients. Arrhythmia analysis may be enabled or disabled via the Arrhythmia Menu. By default, arrhythmia analysis is enabled.
Arrhythmia alarm calls are classified as Priority 1 or Priority 2.
Asystole, Ventricular Tachycardia, and Ventricular Fibrillation are classified as Priority 1 and the priority level cannot be changed by the user. In addition, these alarms will sound continuously until the user presses the MUTE or MUTE ALL key, regardless of whether the patient’s condition has improved.
The other arrhythmia alarms (listed below) are classified as Priority 2 by default. The characteristics and priority level of the “PVC/min” alarm can be changed at the user’s discretion via the Alarm Limits Setup menu.
The following alarm calls can be made when Arrhythmia Analysis is set to “All On” (default setting):
• Asystole, Ventricular Tachycardia, Ventricular Fibrillation, Ventricular Rhythm, Run, PVC/Min, Couplet, Bigeminy, and Trigeminy.
For 3-lead or 5-lead ECG, the following additional calls can be made:
• Irregular HR and Bradycardia
FIGURE 2-31 Arrhythmia Menu(3/5 lead)
FIGURE 2-32 Arrhythmia Menu(12 lead)

Spectrum® Operating Instructions 0070-10-0648-02 2 - 41
Operations Parameter Menus and Monitoring
For 12-lead ECG, the following additional call will be made:
• Pause
The following alarm calls will be made when Arrhythmia analysis is set to “Non-lethals Off”:
• Asystole, Ventricular Tachycardia, and Ventricular Fibrillation.
When Arrhythmia analysis is set to “All Off,” no arrhythmia alarm calls will be made.
The Spectrum initiates the Learning process for Arrhythmia measurements after one of the following:
• Unit Power-Up
• Return to normal monitoring from Standby mode
• Enabling Arrhythmia analysis
• The lead has been changed in ECG 1 waveform (3 lead only)
• Patient Size is changed
• Whenever the “Relearn” function is selected from the ST, ECG or Arrhythmia Menus.
It is recommended that a Relearn be initiated after one or more of the following:
• The ECG electrodes have been repositioned
• Sufficient time has passed since the last Relearn
• Any significant changes to the patient QRS complex
• Any significant changes to the patient ECG rhythm
• A clinician has observed clinically questionable arrhythmia calls
A Relearn must be initiated if “Learning” occurred during a “Leads Off” condition.

Parameter Menus and Monitoring Operations
2 - 42 0070-10-0648-02 Spectrum® Operating Instructions
2.4.2.7 ST Analysis (Optional)ST Analysis is available for Adult and Pediatric patients only.
FIGURE 2-33 ST Monitoring
The depression or elevation of the ST segment is measured as the vertical distance between the isoelectric (ISO) point which provides the baseline, and the ST point (See figure above). ST measurements are available on a maximum of three user selected ECG leads at a point situated 80 ms (heart rate 120 bpm or less) or 60 ms (heart rate more than 120 bpm) from the algorithmically determined end point of the QRS (J Point). In addition, the user can also select from three (3) different settings for the ST measurement point (80, 60, or 40 ms) from the J-point and independent of heart rate. These measurements are valid only on normal beats. Abnormal beats, like ventricular beats, are excluded from the analysis of the ST segment. Ventricular paced beats are also rejected from the analysis of the ST segment, because pacemaker tails distort the shape of the ST segment.
ST segment changes are continuously measured by the monitor, but update of the displayed ST data is different depending on the ECG cable in use. When using a 3 or 5-lead ECG cable, the displayed ST data is updated approximately every 10 seconds.
NOTE: The ST algorithm has been tested for accuracy of the ST segment data. The significance of the ST segment changes must be determined by a clinician.
ST Minitrends or Average ST data may be displayed in any of the available waveform areas.
ST Minitrends are graphical displays of ST deviations. The data can be displayed at intervals of 15, 30 or 60 minutes, selectable via the ST Setup Menu. The ST scale is also adjustable with selections of ±2.5 mm, ±5 mm or ±10 mm.
ST P
oin
t
J Poin
t
ISO
Poin
t
40 to 80 msec
P
R
Q
S
T
ST deviation(Depression or Elevation)

Spectrum® Operating Instructions 0070-10-0648-02 2 - 43
Operations Parameter Menus and Monitoring
Average ST is an on-screen display of both the learned ST complex and the current ST complex superimposed to show changes in ECG morphology over time. The learned ST complex will appear in white, with the current ST complex appearing in the ECG waveform color. (If the ECG waveform is white, then the learned complex will appear in green).
With a 3-lead cable, ST Minitrends and Average ST will display the ST data from ECG1. With a 5-lead cable, ST Minitrends and Average ST will display the ST data from ECG1, ECG2, and ECG3. With a 12-lead ECG cable, ST Minitrends and Average ST will display the ST data from the 3 ECG leads with the greatest deviation.
2.4.2.7.1 ST Analysis SetupST analysis begins when the feature is turned on from the ST Menu. By default, ST data will appear in the Heart Rate Tile, when using a 3-lead or 5-lead cable.
When using a 3-lead cable, ST Analysis is performed on the lead chosen as ECG1. With a 5-lead cable, ST Analysis is performed on the leads chosen as ECG 1, ECG 2 and ECG 3 on the ECG Menu.
To display ST data, set a waveform to display any ECG wave (i.e., ECG2, ECG3, etc.), or set any waveform to display Average ST or Minitrends, then set Combine ST/HR to OFF.
FIGURE 2-34 ST Menu
When View 12™ ECG Analysis Module is installed, continuous 12-lead ST monitoring will be enabled when ST Analysis is set to On. 12-lead ST analysis may be viewed in 2 modes: Delta and Absolute. Delta ST is the ST segment change between the learned ST segment and the present ST segment. Absolute ST is the ST segment change between the 0 baseline point of the ST and the present ST segment.
To display 12-lead ST data in a tile, set any waveform to display any ECG wave, ST Minitrends or Averaged ST.

Parameter Menus and Monitoring Operations
2 - 44 0070-10-0648-02 Spectrum® Operating Instructions
Adjusting the ISO and J/ST Point1. Open the ST Menu by using the Navigator™ Knob to select the ST parameter heading.
ST Menu can also be accessed through the ECG Menu.
2. Insure the ST Analysis selection in the ST Menu is On. The Spectrum will learn the patient's QRS complexes (one for a 3-lead cable, 3 for a 5-lead or 12-lead cable). These learned complexes will appear in the ST Menu with the monitor-selected ISO and J/ST points displayed.
3. Scroll to the ISO selection to adjust the isoelectric point on the learned QRS complex. The isoelectric point is the area of the QRS complex following the P-wave and before the start of the Q-wave.
4. Adjust the ISO point by pressing the Navigator™ Knob and turning to adjust the white ISO reference line. Press the Navigator Knob when the ISO point is satisfactory.
5. Scroll to the J/ST point heading. Adjust the J/ST point by pressing the Navigator Knob and turning to adjust the orange and green J/ST reference lines. Press the Navigator Knob when the J/ST points are satisfactory.
6. To adjust the ST-pt, scroll to the ST-pt heading and press the Navigator Knob to display a list of ST measurement point settings. Select the appropriate setting, then press the Navigator Knob when the ST-pt choice is satisfactory.
2.4.2.8 Relearning ST or Arrhythmia AnalysisThe Spectrum initiates the learning process for ST measurements or Arrhythmia analysis after one of the following:
• Unit Power-Up
• Return to normal monitoring from Standby mode
• Enabling ST or Arrhythmia analysis
• The lead has been changed in ECG 1 waveform (3 lead only)
• Patient Size is changed
• Whenever the Relearn function is selected from the ST, ECG or Arrhythmia Menus
A Relearn is recommended after one or more of the following:
• ECG electrodes have been repositioned
• Eight hours have passed since the last Relearn
• After significant changes to the patient QRS complex
• The observed ST measurement mode has been changed (Delta or Absolute - 12-lead only)
• A clinician has observed clinically questionable arrhythmia calls
A Relearn must be initiated if “Learning” occurred during a “Leads Off” condition.
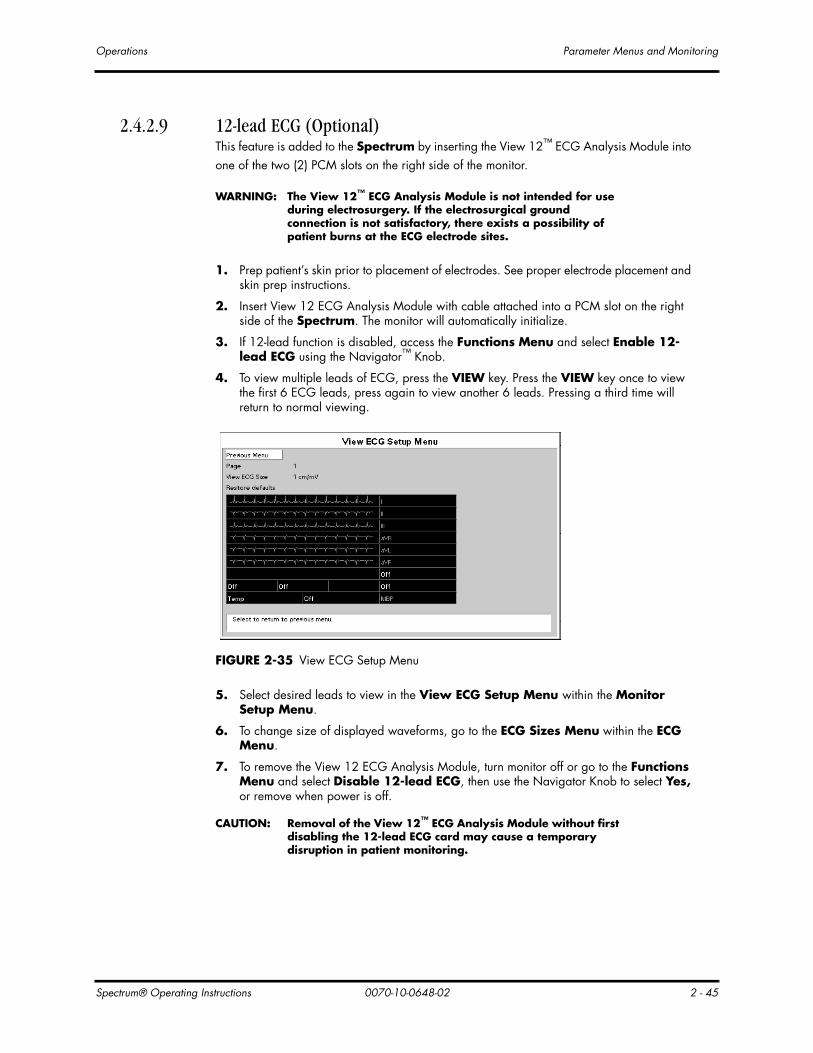
Spectrum® Operating Instructions 0070-10-0648-02 2 - 45
Operations Parameter Menus and Monitoring
2.4.2.9 12-lead ECG (Optional)This feature is added to the Spectrum by inserting the View 12™ ECG Analysis Module into one of the two (2) PCM slots on the right side of the monitor.
WARNING: The View 12™ ECG Analysis Module is not intended for use during electrosurgery. If the electrosurgical ground connection is not satisfactory, there exists a possibility of patient burns at the ECG electrode sites.
1. Prep patient’s skin prior to placement of electrodes. See proper electrode placement and skin prep instructions.
2. Insert View 12 ECG Analysis Module with cable attached into a PCM slot on the right side of the Spectrum. The monitor will automatically initialize.
3. If 12-lead function is disabled, access the Functions Menu and select Enable 12-lead ECG using the Navigator™ Knob.
4. To view multiple leads of ECG, press the VIEW key. Press the VIEW key once to view the first 6 ECG leads, press again to view another 6 leads. Pressing a third time will return to normal viewing.
FIGURE 2-35 View ECG Setup Menu
5. Select desired leads to view in the View ECG Setup Menu within the Monitor Setup Menu.
6. To change size of displayed waveforms, go to the ECG Sizes Menu within the ECG Menu.
7. To remove the View 12 ECG Analysis Module, turn monitor off or go to the Functions Menu and select Disable 12-lead ECG, then use the Navigator Knob to select Yes, or remove when power is off.
CAUTION: Removal of the View 12™ ECG Analysis Module without first disabling the 12-lead ECG card may cause a temporary disruption in patient monitoring.

Parameter Menus and Monitoring Operations
2 - 46 0070-10-0648-02 Spectrum® Operating Instructions
2.4.2.9.1 12-lead InterpretationWith a View 12™ ECG Analysis Module installed and enabled, the Spectrum is capable of providing 12-lead interpretive printouts to either the internal thermal printer or an attached laser printer.
To print this analysis, press the VIEW key (to view multiple ECG leads), then press the STRIP key. If all conditions for analysis have been met, the recorder will include the results on the printout. The analysis will consist of an interpretive statement, a condition statement, and a rhythm statement as specified in the Physician’s Guide to Computerized ECG Analysis.
The conditions for printing the ECG analysis are:
1. The Spectrum patient size must be set to Adult.
2. The patient’s Gender and Date of Birth must be entered via the Patient Menu.
3. The patient must be at least 18 years old. (The monitor calculates the patient age from the date of birth entered).
WARNING: Computerized ECG Analysis should be reviewed by qualified medical personnel. It should not be used exclusively for treatment or non-treatment of patients.
WARNING: ST segment measurements may be affected by one or more of the following ECG rhythm morphologies: wide complex QRS such as bundle branch blocks, ventricular pacemaker rhythm, left ventricular hypertrophy or Wolff-Parkinson-White Syndrome. Consult with qualified medical personnel prior to treatment or non-treatment.
2.4.2.10 ECG Troubleshooting
MESSAGE/PROBLEM REASON SOLUTION
Noisy ECG traces Loose or dry electrodes. Apply fresh, moist electrodes.
Defective electrode wires. Replace wires as necessary.
Patient cable or leads are routed too close to other electrical devices.
Eliminate 60Hz interference.
Excessive Electro-surgical Interference
Wrong ECG cable used. Use ESIS ECG cable with internal filter block.NOTE: Respiration monitoring via the ECG electrodes will not be available when using the cable.
Muscle Noise Inadequate skin preparation prior to application of electrode, tremors, tense subject, and/or poor electrode placement.
Repeat skin preparation and electrode location procedures.Apply fresh, moist electrodes. Avoid areas of the torso that are very muscular.

Spectrum® Operating Instructions 0070-10-0648-02 2 - 47
Operations Parameter Menus and Monitoring
Intermittent Signal Connections not tight and/or properly secured.
Ensure proper connection. (Electrode to lead, lead to cable, cable to monitor).
Electrodes dry or loose. Re-prep skin and apply fresh, moist electrodes.
Cable or lead wires damaged. Check with continuity tester.
Excessive alarms: heart rate, lead fault
Electrodes dry Re-prep skin and apply fresh, moist electrodes.
Alarm limits set too close to patient's normal heart rate.
Readjust
R-wave wrong size Must have a higher amplitude than the other ECG waves, like the P and T waves.
Excessive patient movement or muscle tremor.
Reposition electrodes and secure with tape, if necessary.
Low Amplitude ECG Signal Gain set too low. Readjust as required -(Set via the SIZE key).
Electrodes dry / old Apply fresh, moist electrodes
Skin improperly prepared Abrade skin
This could be the patient’s normal QRS complex.
Verify with a 12-lead electro-cardiogram.
Electrode could be positioned over a bone or muscle mass.
Move ECG patches closer towards each other.
No ECG Waveform Gain set too low. Readjust as required -(Set via the SIZE key).
Lead wires and patient cable not fully or properly inserted.
Check for proper insertion.
Cable or lead wires damaged. Check with lead continuity tester.
Base Line Wander Patient moving excessively. Secure lead wires and cable to patient.
Patient's respiration Reposition electrodes
Electrodes dry or loose Re-prep skin and apply fresh, moist electrodes.
Static build up around patient. Check with local biomedical personnel.
ECG Filter set to “ST” or “Extended” mode.
Set ECG Filter to “Monitor” mode.
“Artifact” Message The 12-lead ECG is detecting muscle artifact, or electrical interference from auxiliary devices.
Check leads, follow skin preparation procedure.
Check for electrical interferences, replace wires as necessary.
MESSAGE/PROBLEM REASON SOLUTION

Parameter Menus and Monitoring Operations
2 - 48 0070-10-0648-02 Spectrum® Operating Instructions
2.4.3 Non-Invasive Blood Pressure Measurements (NIBP)In the Spectrum, Non-Invasive Blood Pressure monitoring utilizes the oscillometric method of measurement. The NIBP measurement includes Systolic (Sys), Diastolic (Dia) and Mean Blood Pressure.
FIGURE 2-36 NIBP Menu
2.4.3.1 Manual NIBP Measurements1. Select a blood pressure cuff that is appropriate for the size of the patient. Measure limb
for the best results.
NOTE: A cuff that is too narrow for the limb will result in erroneously high readings. The correct size of the pressure cuff for a given patient has, among other considerations, a direct bearing on the accuracy of the obtained NIBP measurements. Base selection of the cuff size on the limb circumference of the patient. The design dimensions of the cuffs and their intended uses are based on recommendations of the American Heart Association.
NOTE: Cuffs become brittle as they age and sometimes develop permanent folds that can leave temporary marks on the limb. Any cuffs that exhibit this effect should be replaced.
NOTE: Ensure that the pressure tubes are not compressed or restricted.
NOTE: The pressure on the limb may not fall to zero between measurements if the cuff is wrapped too tightly. Therefore, ensure that the cuff is properly applied.

Spectrum® Operating Instructions 0070-10-0648-02 2 - 49
Operations Parameter Menus and Monitoring
NOTE: The skin is sometimes fragile (i.e., on pediatrics, geriatrics, etc.). In these cases, a longer interval between measurements should be considered to decrease the number of cuff inflations over a period of time. In extreme cases, a thin layer of soft roll or cotton padding may be applied to the limb in order to cushion the skin when the cuff is inflated. This measure may affect NIBP performance and should be used with caution.
2. Attach cuff hose to NIBP Connector.
3. Apply the cuff to the patient. To reduce errors, the cuff should be adjusted for a snug fit. Little or no air should be present within the cuff. Be sure the cuff lies directly against the patient’s skin. No clothing should come between the patient and the cuff.
NOTE: The NIBP cuff should not be placed on a limb that is being utilized for any other medical procedure. For example, an IV catheter or an SpO2 sensor.
4. If not already selected, select the Patient Size through the Patient Menu. Choices are Adult, Pediatric or Neonate.
5. If necessary, change the initial cuff inflation pressure through the NIBP Menu.
Initial cuff inflation pressures depend on the patient size setting. The values for cuff inflation are identified in the following table:
6. Press START to begin an NIBP measurement.
CAUTION: Cuffs must be used with the correct Mindray hoses.
CAUTION: Please consult a physician for interpretation of blood pressure measurements.
CAUTION: A blood pressure measurement can be affected by the position of the patient, and his / her physiological condition as well as other factors, such as patient movement.
NOTE: Inflate the cuff only after proper application to the patient’s limb. Cuff damage can result if the cuff is left unwrapped and then inflated.
7. The cuff begins to inflate to the selected cuff pressure. After reaching the selected value the cuff begins to slowly deflate and the Spectrum collects oscillometric pulsations.
8. If the initial cuff inflation is found to be inadequate, the unit retries with a higher inflation pressure (+50 mmHg in adult or pediatric mode; +40 mmHg in neonate mode).
9. The patient should remain still to avoid the introduction of unnecessary motion artifact. After the cuff pressure drops below the diastolic pressure, the results of the measurement are displayed.
PATIENT SIZE SETTING
INITIAL CUFF INFLATION VALUES
DEFAULT SETTING
MAXIMUM INFLATION VALUES
Adult 100 - 280 mmHg 180 mmHg 300 mmHg
Pediatric 60 - 180 mmHg 140 mmHg 195 mmHg
Neonate 40 - 120 mmHg 100 mmHg 150 mmHg

Parameter Menus and Monitoring Operations
2 - 50 0070-10-0648-02 Spectrum® Operating Instructions
If NIBP is the only parameter being measured with the Spectrum, a heart rate can be derived from NIBP. The HR Source Menu selection must be in the Auto Mode (i.e., not selected for ECG, IBP or SpO2) with no heart rate alarm limits set. If another heart rate source is available, the NIBP heart rate will be replaced by the heart rate from the available source.
If NIBP is a selected trend source, then NIBP data will be recorded in the trend with the time stamp of the reading. If NIBP is not a selected trend source, then NIBP data will be recorded in the trend with the next entry into the trend caused by another trigger (i.e., ALARM, INTERVAL, or MARK EVENT key press). The time stamp will be that of the trigger causing the trend entry. The NIBP measurement and NIBP heart rate will be automatically removed from the display after a predetermined time interval. The NIBP timeout interval is 15 minutes by default and can be set to a different value through the Installation Menu.
2.4.3.2 Automatic Interval NIBP MeasurementsThere are two modes available for automatic NIBP measurements. They are the Interval Mode and the Timer Mode. The Interval Mode allows you to set the interval between measurements. For example, if the interval is set to 10 minutes and the START key is pressed at 10:12, the measurements will be taken at 10:12, 10:22, 10:32, etc. The Timer Mode allows you to set an interval that is synchronized with the real time clock. For example, if the timer is set to 30 and the START key is pressed at 10:12, the measurements will be taken at 10:12, 10:30, 11:00, 11:30, etc.
1. Select the Interval Mode or the Timer Mode in the Monitor Setup Menu.
2. Press INTERVAL until the desired time displays. The choices are: OFF, Continuous, 1, 2.5, 3, 5, 10, 15, 20, 30, 60, and 120 minutes and 4 hours.
3. Press START to begin taking interval measurements.
NOTE: If the monitor is in the interval mode when it is turned ON, no measurement will be taken until the START key is pressed.
Automatic Adjustment in the Interval ModeIn the Interval Mode, the unit adjusts the inflation pressure according to the previous reading of the systolic pressure. After the first measurement in the timer mode, the inflation pressure is the previous systolic +50 mmHg in the Adult Mode or Pediatric Mode and +40 mmHg in the Neonate Mode.
Suspension of NIBP Measurements1. Press STOP to suspend an automatically timed measurement sequence or to end a
measurement cycle already in progress (deflate cuff).
2. Press START to take an immediate measurement and resume a suspended timed measurement sequence.
NOTE: You can press STOP at any time to postpone a scheduled measurement or to terminate a measurement cycle already in progress.

Spectrum® Operating Instructions 0070-10-0648-02 2 - 51
Operations Parameter Menus and Monitoring
CAUTION: Observe caution on all patients (Neonates, Pediatrics, and Adults) when NIBP is set to the Continuous Mode and the 1 minute interval. When the NIBP continuous interval is selected, the Spectrum will continually take back to back blood pressure readings. As a safety precaution, a limit is placed on continuous and 1 minute interval measurements. In continuous mode, after 5 minutes, the NIBP interval will automatically switch to one measurement taken every 5 minutes. In 1 minute mode, after 10 minutes the NIBP interval automatically switches to measurements taken once every 10 minutes. Reports have been made of nerve injury occurring during use of automatically cycled blood pressure cuffs.
NIBP Pressure Limit Fail SafeIf the cuff is over-pressurized, the cuff will automatically vent to atmosphere and the NIBP message window will alternately read Cuff Over Pressure and Unable to Measure.
Cuff Inflation TimeIf the cuff pressure does not attain 20 mmHg within 40 seconds of the start of inflation or if the target pressure is not reached within another 60 seconds, then the cuff is vented and the Retry or Unable to Measure message will display in the NIBP message window.
START and STOP FunctionsThe START and STOP functions have the following effects on the timed measurement sequence (Interval or Timer Mode).
INTERVAL is set and you press START:
An unscheduled measurement is made. Taking this unscheduled measurement does not affect the timing of the interval cycle, therefore, the scheduled measurements will be taken as if there were no interruptions. Only one measurement is taken for each measurement cycle - therefore, if the unscheduled measurement coincides with the scheduled measurement, it counts as the scheduled measurement.
INTERVAL is set and you press STOP during the measurement:
1. The cuff deflates and interval measurements are suspended.
2. INTERVAL is set and you change the interval.
3. The measurement cycle is reset with the new interval. A measurement will be taken after you press the START key.
NIBP Auto Time Out FunctionsThe NIBP data will time out on the display under the following conditions:
• When the elapsed time exceeds the pre-set time out in the installation mode
• If a measurement is unsuccessful, the display values are replaced with “XX” and a tone sounds

Parameter Menus and Monitoring Operations
2 - 52 0070-10-0648-02 Spectrum® Operating Instructions
Indirect BP Measurements and Associated ErrorsPlace the patient in a supine position to obtain true physiological pressure. If the cuff is not at the patient’s heart level, the pressure values obtained will not reflect the true physiological pressure. Instead, the readings will be decreased by 1.86 mmHg for every inch the cuff is placed above the heart level and increased by 1.86 mmHg for every inch the cuff is placed below the heart level. This effect is due to hydrostatic pressure.
Blood weight influences blood pressure readings. The value of the weight of blood depends on where the measurement is taken with respect to the heart. When the patient is supine, on a flat surface, the arm is near enough to the heart level that no adjustment of the NIBP readings is necessary.
Recommendations for Automatic Blood Pressure MeasurementsThe following practices are recommended when making automatically cycled blood pressure measurements:
• Position and support the limb in such a way as to minimize stretching of and weight exertion on affected nerves
• Avoid cuff placement that applies pressure on the ulnar nerve. Cuff tubing should not exit the cuff over the course of the ulnar nerve at the elbow
• Select a measurement interval that provides adequate venous drainage during cuff deflation
• Periodically inspect the limb bearing the cuff in order to detect venostasis
• If necessary move cuff to another limb to relieve single-limb stress
Cuff SizeUsing a narrow cuff gives erroneously high pressure readings. If a standard cuff is applied to an obese patient or a patient with large biceps, the extra tissue and fat will dissipate the applied pressure requiring an additional pressure increase to collapse the artery. On the other hand, over-wrapping a slender arm gives erroneously low pressure readings because too much force per unit area is exerted. This requires less pressure to collapse the artery.
Other FactorsAn accurate determination of blood pressure by the Spectrum can be difficult if cardiac rhythm is irregular. Irregular cardiac rhythm changes the stroke volume from beat to beat. This changing stroke volume may increase the time it takes the Spectrum to take a measurement. The Spectrum makes up to four successive attempts to obtain a measurement. If a measurement cannot be taken after four tries, the numeric displays are zeroed.
User Verification of Spectrum Blood Pressure MeasurementsRegular service to blood pressure equipment will help insure accurate measurements. Consult your Service Manual for appropriate information. If you question the accuracy of the Spectrum check the blood pressure in the Spectrum with a manometer.

Spectrum® Operating Instructions 0070-10-0648-02 2 - 53
Operations Parameter Menus and Monitoring
Auscultatory verification can be made at the same time the Spectrum is taking a measurement. Apply a bell stethoscope over the brachial artery. Do not allow the stethoscope to touch either the patient’s clothing or the pressure cuff.
Newborn NIBP TechniqueNewborn patients present unique obstacles to NIBP measurement. Their vital signs can change from moment to moment, and their tiny physiological signals are very prone to noise interference. The following suggestions will help you to obtain the best possible NIBP measurement:
1. Try to measure infants when they are calm. A kicking/crying baby may disturb or jiggle the cuff, causing noise within the system and resulting in unstable blood pressure readings. If necessary, hold the cuffed limb steady, without impeding circulation. Do not hold onto the cuff and do not pat the cuffed limb to comfort the child.
2. Try the calf. Irritable newborns will react to the cuff pressure but may tolerate the calf better than the arm. Place the cuff just above the ankle.
3. Use the correct size cuff. Mindray offers Newborn and Infant size cuffs. When applying, verify the cuff’s Index line falls between the Range lines.
4. Try disposable cuffs. Disposable cuffs are more pliant than reusable ones. They generally fit smaller infants better.
5. Place the cuff lightly. If the cuff is too snug, it won’t work properly. On infants, you should be able to easily move the cuff over the limb.
NOTE: NIBP cannot be taken under all conditions. Even manual methods, employing a sphygmomanometer and stethoscope, will not work on unstable or active patients.
2.4.3.3 NIBP Troubleshooting
MESSAGE/PROBLEM REASON SOLUTION
NIBP: Idle Displayed while system is idle. Note: This is not displayed while in the interval mode.
Press START to take a single measurement. Select an interval and start timed measurements.
NIBP: Deflate Displayed when a measurement that is in process is stopped by pressing the STOP key.
Press START to take an immediate measurement and resume timed measurements.
NIBP: Interval Displayed during the interval between two timed measurements.
Press STOP to suspend timed measurements.Change timer to OFF to stop timer.
NIBP: Failure The system has detected an unrecoverable failure of the NIBP system.
Power cycle unit. If message reappears, contact Mindray Customer Support.
NIBP: Measuring Displayed during a measurement. Cuff pressure is also displayed.
Press STOP to suspend a measurement and deflate the cuff.
NIBP: Retry Pump Higher A measurement has been attempted but no reading was possible. This results from inadequate cuff inflation.
Retry will be attempted. Check that appropriate patient size is set.Preset initial inflation pressure.
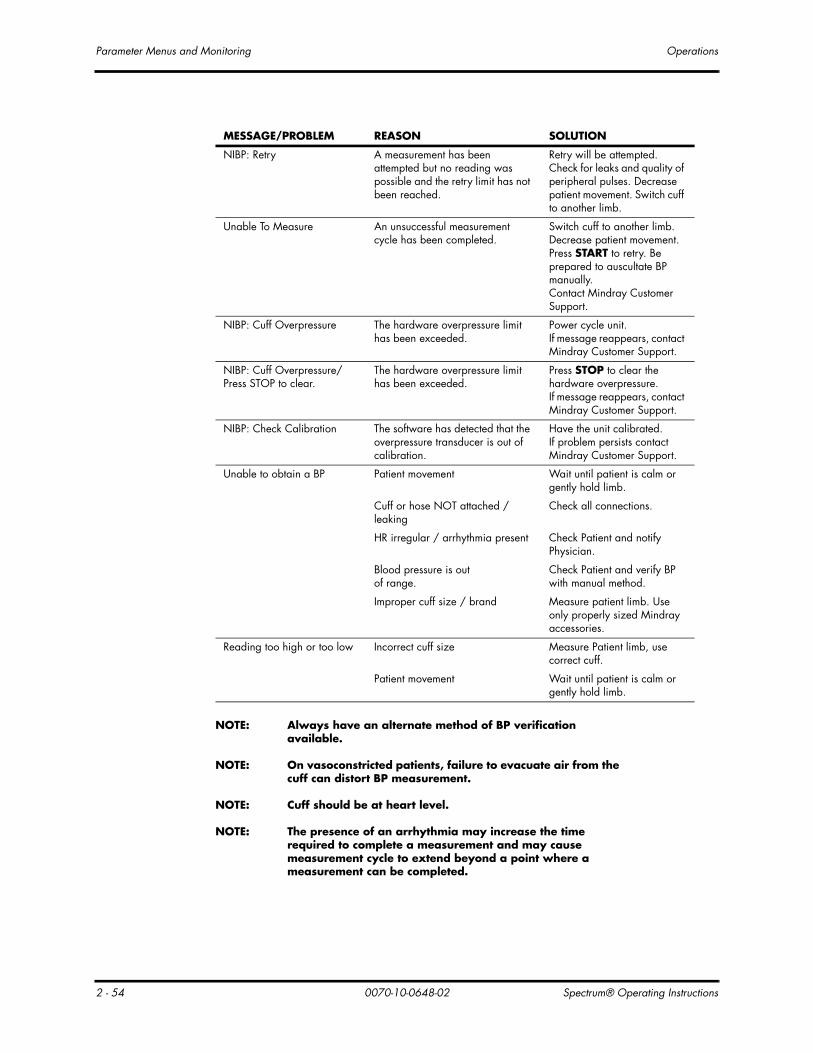
Parameter Menus and Monitoring Operations
2 - 54 0070-10-0648-02 Spectrum® Operating Instructions
NOTE: Always have an alternate method of BP verification available.
NOTE: On vasoconstricted patients, failure to evacuate air from the cuff can distort BP measurement.
NOTE: Cuff should be at heart level.
NOTE: The presence of an arrhythmia may increase the time required to complete a measurement and may cause measurement cycle to extend beyond a point where a measurement can be completed.
NIBP: Retry A measurement has been attempted but no reading was possible and the retry limit has not been reached.
Retry will be attempted. Check for leaks and quality of peripheral pulses. Decrease patient movement. Switch cuff to another limb.
Unable To Measure An unsuccessful measurement cycle has been completed.
Switch cuff to another limb. Decrease patient movement.Press START to retry. Be prepared to auscultate BP manually.Contact Mindray Customer Support.
NIBP: Cuff Overpressure The hardware overpressure limit has been exceeded.
Power cycle unit.If message reappears, contact Mindray Customer Support.
NIBP: Cuff Overpressure/Press STOP to clear.
The hardware overpressure limit has been exceeded.
Press STOP to clear the hardware overpressure.If message reappears, contact Mindray Customer Support.
NIBP: Check Calibration The software has detected that the overpressure transducer is out of calibration.
Have the unit calibrated.If problem persists contact Mindray Customer Support.
Unable to obtain a BP Patient movement Wait until patient is calm or gently hold limb.
Cuff or hose NOT attached / leaking
Check all connections.
HR irregular / arrhythmia present Check Patient and notify Physician.
Blood pressure is out of range.
Check Patient and verify BP with manual method.
Improper cuff size / brand Measure patient limb. Use only properly sized Mindray accessories.
Reading too high or too low Incorrect cuff size Measure Patient limb, use correct cuff.
Patient movement Wait until patient is calm or gently hold limb.
MESSAGE/PROBLEM REASON SOLUTION

Spectrum® Operating Instructions 0070-10-0648-02 2 - 55
Operations Parameter Menus and Monitoring
2.4.4 SpO2 Pulse OximetryPulse oximetry is a continuous and non-invasive measurement of the amount of oxygen attached to the hemoglobin in red blood cells. SpO2 is an estimation of arterial oxygen saturation, SpO2 may be used interchangeably with SaO2. The Spectrum comes standard with Masimo SET® SpO2. Nellcor® Oxismart® or OxiMax® SpO2 is an option.
SpO2 Measurements1. Select the appropriate sensor for the patient.
2. Attach the SpO2 patient cable to the sensor and plug the other end of the patient cable into the SpO2 connector located on the left side panel of the monitor.
NOTE: Do not place the sensor on an extremity with an IV catheter or blood pressure cuff in place.
NOTE: Ensure proper routing of patient cable to avoid entanglement and/or strangulation.
3. The pleth waveform and digital SpO2 value will be displayed by default in the second waveform and parameter area.
4. Enter the Display Setup Menu to describe Pleth waveform and data in an alternate location.
5. Set Sensor Off Audio in the SpO2 Menu to the desired setting. When set to Off the Spectrum will not give an audio beep. When set to On, the Spectrum will sound a series of 5 triple beeps.
CalibrationThe oximetry sub-system incorporates automatic calibration mechanisms. No other calibration is required.
FIGURE 2-37 SpO2 Menu-Masimo SET® equipped unit
FIGURE 2-38 SpO2 Menu-Nellcor® equipped unit

Parameter Menus and Monitoring Operations
2 - 56 0070-10-0648-02 Spectrum® Operating Instructions
Auto ScalingThe pleth waveform is automatically scaled and is not proportional to the patient’s pulse volume. There is no adjustment that can be made to the pleth waveform.
CAUTION: Tissue damage or inaccurate measurements may be caused by incorrect sensor application or use, such as wrapping too tightly, applying supplemental tape, failing to inspect the sensor site periodically, or failing to position appropriately. Carefully read the sensor directions for use, the Spectrum Operating Instructions, and all precautionary information before use.
CAUTION: Inaccurate SpO2 measurements may be caused by:
• Incorrect sensor application or use
• Significant levels of dysfunctional hemoglobins, (e.g., carboxyhemoglobin or methemoglobin)
• Intra-vascular dyes such as indocyanine green or methylene blue
• Exposure to excessive illumination such as surgical lamps (especially ones with a xenon light source), bilirubin lamps, fluorescent lights, infrared heating lamps, or excessive ambient light. In such cases, cover the sensor site with opaque material.
• Excessive patient movement
• Venous pulsations
• Electro-surgical interference
• Placement of a sensor on an extremity that has a blood pressure cuff, arterial catheter, or intra-vascular line.
• Nail polish or fungus
CAUTION: In certain situations in which perfusion and signal strength are low, such as in patients with thick or pigmented skin, inaccurately low SpO2 readings will result. Verification of oxygenation should be made, especially in preterm infants and patients with chronic lung disease, before instituting any therapy or intervention.
CAUTION: Many patients suffer from poor peripheral perfusion due to hypothermia, hypovolemia, severe vasoconstriction, reduced cardiac output, etc. These symptoms may cause a loss in vital sign readings.
CAUTION: The SpO2 sensor site should be checked at least every eight (8) hours (every four (4) hours with the Adult re-usable finger sensor). Ensure proper adhesion, skin integrity, and proper alignment. Exercise extreme caution with poorly perfused patients. Skin erosion and pressure necrosis can be caused when sensors are not frequently monitored. Assess the site every two (2) hours with poorly perfused patients and neonates.
CAUTION: When cleaning sensors, do not use excessive amounts of liquid. Wipe the sensor surface with a soft cloth, dampened with cleaning solution. Do not attempt to sterilize.

Spectrum® Operating Instructions 0070-10-0648-02 2 - 57
Operations Parameter Menus and Monitoring
2.4.4.1 Masimo SET® SpO2 Spectrum monitors equipped with Masimo SET SpO2 allow the user to adjust Sensitivity and Post Averaging Time. The user should choose the sensitivity mode depending upon signal quality and patient motion. In most cases, the normal setting is appropriate. If patient motion is limited, high sensitivity can be used.
It is also possible to change the averaging time of the Saturation and Pulse Rate measurements. The Post Average Time can be changed to 6, 8, 10, 12, 14 or 16 seconds.
CAUTION: When equipped with Masimo SET® SpO2, use only Masimo SET Oxygen Transducers including Masimo SET LNOP® and LNCS™ Patient Dedicated Adhesive, Sensors and Masimo SET PC Series Patient Cables. Use of other oxygen transducers may cause improper oximeter performance.
Masimo SET SensorsMasimo SET provides a family of sensors suitable for a wide variety of clinical settings and patients. Specific sensors have been developed for neonates, infants, children, and adults. All sensors are indicated for continuous non-invasive monitoring of arterial oxygen saturation (SpO2) and pulse rate, all sensors are non-sterile and usable during patient movement.
The Adult Reusable Finger Sensors can also be used for spot check applications if needed. All sensors are intended for single-patient use only unless indicated as “reusable.”
2.4.4.2 Nellcor® SpO2
CAUTION: When equipped with Nellcor® SpO2, use only Nellcor oxygen transducers including Nellcor Oxisensor® and OxiMax® patient dedicated adhesive sensors. Use of other oxygen transducers may cause improper oximeter performance.
Nellcor SensorsNellcor provides a family of sensors suitable for a wide variety of clinical settings and patients. Specific sensors have been developed for neonates, infants, children, and adults. Oxisensor® and OxiMax® oxygen transducers are sterile adhesive sensors with optical components mounted on adhesive tape. Oxiband® oxygen transducers and the Duraform® oxygen transducer system are reusable sensors that are applied with disposable adhesive. The Durasensor DS-100A Adult Digit Oxygen Transducer is a reusable sensor with its optical components mounted in a plastic casing. The Nellcor RS-10 and Max-Fast® oxygen transducers are adhesive sensors for application on the forehead or temples.
To order all Nellcor accessories and sensors call 1-888-744-1414.
Selecting a Nellcor SensorSensors are designed for specific sites on patients with designated weight ranges. To select the appropriate sensor, consider the patient’s weight, level of activity, adequacy of perfusion, which sensor sites are available, whether sterility is required, and the anticipated duration of monitoring.

Parameter Menus and Monitoring Operations
2 - 58 0070-10-0648-02 Spectrum® Operating Instructions
NOTE: Only Nellcor oxygen transducers should be used with the Spectrum monitors with Nellcor Oxismart® or OxiMax® pulse oximetry.
2.4.4.3 SpO2 Troubleshooting and SpO2 Menu Performance ConsiderationsTo ensure optimal performance, use an appropriate sensor, apply it as directed and observe all warnings and cautions.
If excessive ambient light is present, cover the sensor site with opaque material. Failure to do so may result in inaccurate measurements. Light sources that can affect performance include surgical lights, especially those with a xenon light source, bilirubin lamps, fluorescent lights, infrared heating lamps, and direct sunlight.
In the event that you are unable to get a reading, or the reading you get is inaccurate, consider the following:
• If your patient is poorly perfused, try applying the sensor to another site - such as a different finger or toe
• Check that the sensor is properly aligned
• In electrosurgery, make sure sensor is not too close to ESU devices or cables
• Check to make sure the site area is clean/non-greasy. Clean site and sensor if needed.
MESSAGE/PROBLEM REASON SOLUTION
SpO2: No Sensor Sensor is not plugged in to the Spectrum.
Plug the sensor into the monitor.
SpO2: Sensor Off (Masimo SET® Only)
Sensor may not be connected to the patient.
Check patient connection.
SpO2: Interference Noise detected on the pulse signal prevents pulse discrimination.
Decrease patient motion, check sensor.
SpO2: Pulse Search Hardware settings are being adjusted in order to discriminate a pulse waveform.
Change to site where pulse is stronger if patient is vasoconstricted. Change or readjust sensor if loose.
SpO2: No Pulse (Nellcor Only)
No detectable pulse is measured Check to patient connection and patient status.
SpO2: Failure The system has detected an unrecoverable failure of the SpO2 system.
Power cycle unit. If message reappears, contact Mindray Customer Support.
SpO2: Low Perfusion (Masimo SET Only)
Patient perfusion is low. Check to patient connection and patient status.
SpO2: Too Much Light (Masimo SET Only)
There is too much ambient room light for the sensor to function properly
Minimize the room light around the patient. Check sensor.
SpO2: Unrecognized Sensor (Masimo SET Only)
The sensor is not recognized by the Monitor.
Replace the sensor with a Mindray recommended sensor.
SpO2: Communication Error
The monitor and the SpO2 modules are not communicating properly.
Power cycle unit. If problem persists, contact Mindray Customer Support.
SpO2: Board Fault Masimo SET board failed to operate properly.
See Proper Service Menu: Suggestion.
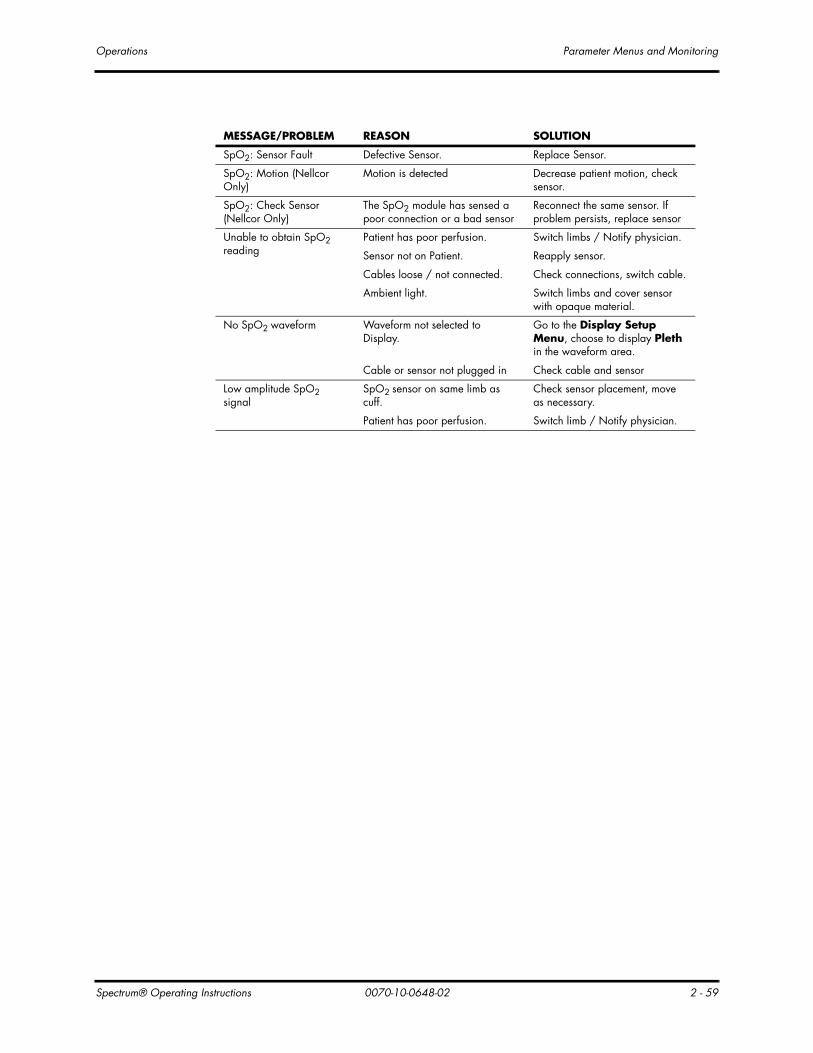
Spectrum® Operating Instructions 0070-10-0648-02 2 - 59
Operations Parameter Menus and Monitoring
SpO2: Sensor Fault Defective Sensor. Replace Sensor.
SpO2: Motion (Nellcor Only)
Motion is detected Decrease patient motion, check sensor.
SpO2: Check Sensor (Nellcor Only)
The SpO2 module has sensed a poor connection or a bad sensor
Reconnect the same sensor. If problem persists, replace sensor
Unable to obtain SpO2 reading
Patient has poor perfusion. Switch limbs / Notify physician.
Sensor not on Patient. Reapply sensor.
Cables loose / not connected. Check connections, switch cable.
Ambient light. Switch limbs and cover sensor with opaque material.
No SpO2 waveform Waveform not selected to Display.
Go to the Display Setup Menu, choose to display Pleth in the waveform area.
Cable or sensor not plugged in Check cable and sensor
Low amplitude SpO2 signal
SpO2 sensor on same limb as cuff.
Check sensor placement, move as necessary.
Patient has poor perfusion. Switch limb / Notify physician.
MESSAGE/PROBLEM REASON SOLUTION

Parameter Menus and Monitoring Operations
2 - 60 0070-10-0648-02 Spectrum® Operating Instructions
2.4.5 Temperature MenuThe temperature measurement function of the Spectrum is designed to take a continuous temperature reading from YSI 400 or YSI 700 or compatible probes. To display the Temperature Menu, turn the Navigator™ Knob to the Parameters Menu. Press the Navigator Knob and rotate down to highlight Temperature. Press the Navigator Knob again and the Temperature Menu will appear.
FIGURE 2-39 Temperature Menu
To display temperature in a parameter tile, go to Display Setup Menu and select a tile in which to display temperature.
Measuring TemperatureThe Spectrum Monitor has three (3) potential temperature measurement sources: the TI connector on the monitor, the T2 connector on a Mindray External Parameter Module (EPM) and a PA catheter (T Blood) from an EPM or an Edwards Vigilance® Monitor. Data for up to two (2) of these sources may be simultaneously displayed.
T1 and T Blood data have display priority over T2 data. If all three (3) temperature sources are being used, T2 data will not appear on the display, although T2 alarms will still function and T2 data will appear on printouts and continue to accumulate in the Trend data.
Whenever two (2) temperatures are being displayed, the difference between them (ΔT) may also be displayed.
To display ΔT in the Temperature Parameter Area:
1. Ensure that two temperature sources are connected.
2. Go to the Temperature Menu and select Display Delta, then select Yes.

Spectrum® Operating Instructions 0070-10-0648-02 2 - 61
Operations Parameter Menus and Monitoring
2.4.5.1 Temperature Troubleshooting
2.4.6 Respiration MenuRespirations, or the amount of breaths per minute, are measured by 2 methods in the Spectrum. The first method is thoracic impedance through the ECG signal. The second is by CO2 exchange via Microstream® CO2 or via the Gas Module.
FIGURE 2-40 Respiration Menu
2.4.6.1 Thoracic ImpedanceThe Spectrum Monitor presents a small electrical signal across the RA and LA (or R & L) ECG limb leads. This signal changes as the patient’s chest wall rises and falls during the breath cycle. The advantage of the thoracic impedance method is that respiration is obtained non-invasively. It is important to use cables with internal resistors for thoracic impedance.
ESIS choke block cables have electrical filters that may be used in electro-cautery environments where ECG interference can be substantial. These filters remove the electro-cautery noise, but also block the signal used by the Spectrum Monitor to measure respiration.
MESSAGE/PROBLEM REASON SOLUTION
Temperature Probes not Working
Poor contact from probes to body Check the body surface contact at the probe tip
Reposition or apply thermoconductive gel
Temperature not displayed Improper display setup Check display setup in Monitor Setup Menu and change as desired
Cable not plugged in Check the cable

Parameter Menus and Monitoring Operations
2 - 62 0070-10-0648-02 Spectrum® Operating Instructions
The filling and emptying of the heart chambers can interfere with the thoracic impedance signal, so called cardiovascular artifact (CVA), such that the respiratory signal matches the heart rate. The Spectrum warns the operator when the respiration value equals the heart rate by displaying “CVA”.
If the patient’s airway is obstructed and the patient attempts to breath, then the chest wall can move and create a respiratory signal even though no gas flow is occurring in the patient.
CAUTION: Some pacemakers may contain a respiratory sensor that may produce artifact on an ECG waveform.
2.4.6.2 Microstream® CO2 Monitoring (Optional)Microstream CO2 modules provide Expired CO2, Inspired CO2 and Respiration Rate monitoring utilizing a small lumen FilterLine® Microstream capnography that is acquired via a nasal cannula (non-intubated) or through an adapter set for use in a breathing circuit (intubated). Microstream can be used on adult, pediatric and neonatal patients.
To begin monitoring Microstream CO2:
1. Connect one end of an exhaust line to the exhaust port on the Spectrum and the other end to the hospital gas scavenging system.
2. Select CO2 or AUTO as the Resp. Source in the Resp Menu.
CAUTION: Vacuum (negative pressure) should not exceed 1 mmHg at the Spectrum Pump Exhaust fitting. Excessive scavenge vacuum may result in an Occlusion message or damage to the Spectrum’s internal pump. The scavenging system must be on during calibration.
3. Open CO2 input door and connect the proper FilterLine® to the Monitor. Connect the opposite end to the patient.
WARNING: When monitoring CO2 with a Spectrum, the maximum sampling rate at the nasal cannula is 58 ml/min. This device should not be used on patients whose breathing could be impaired by this vacuum flow rate.
WARNING: When monitoring CO2, connection from the exhaust port of the Spectrum to the hospital’s waste gas scavenging system is recommended to prevent exposure of hospital personnel to the patient’s respiratory sample.
NOTE: Ensure all tubing connections are secure. Ensure that the nasal cannula is away from all sources of CO2 (including the patient’s and your own exhaled breath and ventilator exhaust valves) during the warm up period.

Spectrum® Operating Instructions 0070-10-0648-02 2 - 63
Operations Parameter Menus and Monitoring
2.4.6.3 Microstream® CO2 MenuAccuracy verification of the Microstream CO2 is recommended at one (1) year intervals, or whenever the readings appear to be in error. The date of the last successful calibration appears on the CO2 Calibration Menu.
FIGURE 2-41 CO2 Menu
NOTE: For maximum accuracy during calibration, a 20 minute warm-up time is recommended.
1. Connect the tubing that comes with the calibration gas to the gas canister and to the FilterLine. Use calibration gas, part number 0075-00-0033-01 and a Microstream FilterLine®. Attach the gas / tubing assembly to the CO2 input port on the Spectrum.
2. Select the CO2 Parameter Tile by rotating Navigator™ Knob and pressing the Navigator Knob after the CO2 Menu is highlighted. The same menu can be accessed by using the Parameters Tile and selecting CO2.
3. Select the Calibrate and press the button on the gas canister to begin releasing the gas mixture.
NOTE: Auto zero occurs at the start of the CO2 monitoring session and periodically throughout the monitoring session. Auto zero will last approximately 15 seconds.
4. Select Start from the Calibration Menu. Once the Start option has been selected, no CO2 waveform data will be displayed.
5. The message Calibrating, continue to apply 5% CO2 will appear in the Calibration Menu.
NOTE: If no gas is being delivered, or the mixture does not contain 5% CO2, the message “Calibration error. Caused by no gas or wrong gas concentration” will appear. Obtain a new gas canister and return step 1.

Parameter Menus and Monitoring Operations
2 - 64 0070-10-0648-02 Spectrum® Operating Instructions
6. When the proper gas mixture is applied, the message Calibrating, continue to apply 5% CO2 will appear in the Calibration Menu window. When the calibration is complete, the message will change to Calculating, calibration gas can be removed. Release the button and remove the connector from the canister.
7. After a moment, the message will change to Calibration Completed Successfully. The date and time of the successful calibration will appear in the Calibration Menu.
-
8. Rotate the Navigator™ Knob to Previous Menu and press to select.
9. Rotate the Navigator Knob to Normal Screen and press to return to the monitor’s normal display screen.
10. When the Spectrum has detected valid breaths, numbers will display for the CO2, Inspired CO2 and Respiratory Rate.
11. The CO2 respiration waveform and data will automatically replace the ECG Respiration waveform and data on the display. If respiration wave or data is not displayed, use the Display Setup Menu to select RESP or CO2 to be displayed as desired.
12. If desired, the CO2 waveform scale can be changed through the CO2 Menu.
CAUTION: Microstream® CO2 waste and CO2 FilterLine® should be treated as biohazardous waste.
2.4.6.4 Respiration and CO2 Troubleshooting
MESSAGE/PROBLEM REASON SOLUTION
Resp. Waveform Too Large Scales set inappropriately. Change lead selection.
Change Respiration scale.
Resp. Waveform Too Small Patient breathing is shallow or patient is turned on side.
Change lead selection.
Scale set inappropriately. Change respiration scale.
False Apnea Alarm Apnea delay may be improperly set.
Choose an.other apnea delay
Patient may be having frequent episodes of CVA.
Reposition electrodes to better detect respirations.
Scale size may be too low. Change Respiration scale
No Resp. Waveform or Rate Displayed
Respiration turned Off. Turn respiration On (Off will be displayed in Resp. window).
Patient connected using ESIS choke cable.
Check that proper patient cable is used. Use Mindray non ESIS patient cable.
Cable not connected. Check cable.
CO2: FilterLine® Disconnected The FilterLine is not connected to the monitor.
Connect the FilterLine.
CO2: Warming Up The CO2 sensor has not reached its operating temperature.
Wait for the message to go away.
(The monitor was just turned on).
It takes typically 30 seconds for the sensor to warm up.
CO2: Auto-zero In Progress The CO2 sensor is. performing an auto-zero
Wait for the auto-zero to complete.

Spectrum® Operating Instructions 0070-10-0648-02 2 - 65
Operations Parameter Menus and Monitoring
CO2: Auto-zero Requested An Auto-zero was automatically requested by the system.
Wait for the auto-zero to complete.
CO2: Failure CO2 system failure. Contact Mindray Technical Support.
CO2: Occlusion Sampling pump line is blocked while the CO2 sidestream pump is on.
Check sampling line and filter for blockage, clear sampling line if possible.
Replace sampling line if necessary.
Disconnect and reconnect the FilterLine from the Spectrum in order to clear this message.
CO2: Purge The system has detected a blocked FilterLine® and has attempted to unblock it by temporarily increasing the flow rate.
Check FilterLine and replace if necessary.
CO2: Check Flow Rate The system has detected a high or low flow rate.
Check FilterLine and replace if necessary.
“CHK Lead” Message Increased impedance caused by one of the following:
Chest hair under electrodes. Prep chest.
Dried electrode gel. Change electrodes.
Electrode off. Replace electrode.
Lead off. Replace lead.
Cracked lead wires. Replace lead wires.
Poor skin prep. Clean and abrade skin before applying electrodes.
“CVA” Message Can be caused by shallow breathing or an apnea event.
Check the patient.
Patient HR and respiratory rate identical.
Adjust scales or leads if necessary.
Check the patient.
MESSAGE/PROBLEM REASON SOLUTION

Parameter Menus and Monitoring Operations
2 - 66 0070-10-0648-02 Spectrum® Operating Instructions
2.4.7 Gas Monitoring with Gas ModuleThe Gas Module option allows for the measurement of anesthetic gases, O2, N2O and CO2 levels. Measurement can be acquired via a nasal cannula (non-intubated) for oxygen and CO2 only or through a sampling line connected to a breathing circuit (intubated).
FIGURE 2-42 Gas Menu
NOTE: The Spectrum will interface to the Gas Module via the Serial Port Connector on the Comm-Port mounted onto the Spectrum.
WARNING: When using the Gas Module, the maximum sampling rate at the nasal cannula is 200 ml/min (120 ml/min for Gas Module 3 with a neonatal water trap). This device should not be used on patients whose breathing could be impaired by this vacuum flow rate.
NOTE: The Gas Module 3 is equipped with automatic barometric pressure compensation.
NOTE: The Gas Module 3 uses a fixed correction of 11 hPa to compensate for the influence of water vapor in the gas sample, when converting the gas readings to ATPD. An increase in the ambient H20 partial pressure to 30 hPa(i.e. 28 °C, 80% RH or 33 °C, and 60% RH) will cause a general error for all gases of only -2% REL.

Spectrum® Operating Instructions 0070-10-0648-02 2 - 67
Operations Parameter Menus and Monitoring
Monitoring Anesthetic Gases, O2, N2O and/or CO2
NOTE: To prevent moisture from entering the pneumatic system, ensure that the Gas Module is always installed and operated in the horizontal orientation shown in all graphical depictions.
1. Turn on the Gas Module and Spectrum, and configure the Spectrum serial port to be used with the Gas Module. Hold the DISCHARGE key in while powering unit on. Set alarms as desired.
NOTE: Sample line must be connected to Gas Module when turned on to avoid Air Leak message (Gas Module II and SE).
FIGURE 2-43 Gas Module II and SE Airway Adapter
FIGURE 2-44 Gas Module 3 Airway Adapter
7 Foot Nasal Cannula, CO2/O2P/N 0683-00-0452-10
7 Foot Nasal Cannula, CO2P/N 0683-00-0424-10
Adapter, Straight Tee ETP/N 0683-00-0242-22
10 Foot Sample Line, PatientP/N 0683-00-0451-10
Adapter, Mask Elbow ETP/N 0683-00-0242-12
Gas Scavenging Adapter Assy.P/N 0997-00-0923orP/N 0997-00-0984
or
7 Foot Nasal Cannula, CO2/O2P/N 0683-00-0452-10
7 Foot Nasal Cannula, CO2P/N 0683-00-0424-10
Adapter, Straight Tee ETP/N 0683-00-0242-22
Adapter, Mask Elbow ETP/N 0683-00-0242-12
or
2.5 Meter Sample Line, PatientAdult/Pediatric P/N 0683-00-0525-25Neonate P/N 0683-00-0524-25
Gas Scavenging Adapter Assy.P/N 0997-00-0923orP/N 0997-00-0984

Parameter Menus and Monitoring Operations
2 - 68 0070-10-0648-02 Spectrum® Operating Instructions
NOTE: DRYLINE™ Sample Lines are for use with Gas Module 3 only.
2. For non-intubated patients, apply the nasal cannula to the patient. For intubated patients connect the sample line to the breathing circuit. Refer to instruction provided in the sample line packets.
3. Connect the other end of the nasal cannula or sample line to the Gas Module at the input port. Do not connect anything to the reference port on the rear of the Gas Module II or SE. This port is used to monitor the room air only. Ensure all tubing connections are tight.
WARNING: Connection of the Gas Module exhaust port to the hospital’s waste gas scavenging system is strongly recommended to prevent exposure of hospital personnel to the patient’s respiratory sample. Vacuum (negative pressure) should not exceed 1 mmHg at the Gas Module Pump Exhaust fitting. Excessive scavenge vacuum may result in damage to the Gas Modules internal pump.
CAUTION: Contamination with CO2, N2O or Anesthetic Agent in the air surrounding the Gas Module 3 may cause significant measurement errors.
4. Check for a clean water trap.
5. Select CO2 or AUTO as the Resp Source in the Resp Menu.
6. Observe the capnogram on the monitor’s display. On Spectrum powerup, O2, Agent and N2O numbers will display. CO2 numbers will be displayed when a valid breath is detected.
NOTE: The Gas Module II and SE must be warmed up a minimum of two minutes for accurate CO2, O2 and N2O readings and five minutes for agent readings.
NOTE: The Gas Module 3 must be warmed up a minimum of 45 seconds for ISO accurate CO2, O2, N2O, and agent readings.
7. If not already set, use the Display Setup Menu to select the gas waveforms to be displayed.
8. If desired, the gas waveform speed can be changed via the Monitor Setup Menu and the scale can be changed in the Gas Menu.
2.4.8 Gas Module 3 Pre-use TestPrior to each use, perform the following test with the Gas Module 3 to verify that the gas analyzer and sample system are functioning properly:
1. Verify that the appropriate water trap is properly installed and that the appropriate sampling line is connected.
• DRYLINE™ Adult/Pediatric water trap used with DRYLINE™ Adult/Pediatric sampling line (colorless Luer lock nut)
• DRYLINE™ Neonatal water trap used with DRYLINE™ Neonatal sampling line (blue Luer lock nut)

Spectrum® Operating Instructions 0070-10-0648-02 2 - 69
Operations Parameter Menus and Monitoring
2. Verify that the water trap container is less than half full.
3. Occlude the sampling line and verify that the occlusion alarm functions properly.
4. Breathe into the sampling line and verify that a CO2 waveform is correctly displayed on the monitor.
5. Sample room air for 30 seconds and verify that the monitor oxygen output is 20.95%(± sensor inaccuracy).
2.4.8.1 Gas Monitor CalibrationAccuracy verification of the Gas Module II and SE is recommended at six (6) month intervals or whenever gas readings appear to be in error. Accuracy verification of the Gas Module 3 is recommended at one (1) year intervals or whenever gas readings appear to be in error. The date of the last successful mixture calibration appears at the bottom of the gas Calibration Menu. During the calibration session gas readings and all other gas functions are not available. Span calibration is a set of prompted commands that enables the operator to align the gas display(s) to specific gas concentration(s) in the Calibration Gas canister. Span calibration can be initiated by the operator any time the gas module’s readings are suspected to be inaccurate.
Always verify accuracy using a full canister of Mindray approved precision calibration gas, after calibration is performed. Never use calibration gas that has expired, or has a canister that is indicating low pressure. The pressure indicator on the Mindray gas regulator must operate in the green zone during the entire calibration session.
NOTE: The Gas Module II and SE must be fully warmed up before performing a gas calibration. For maximum accuracy, a warm-up time of 30 minutes is recommended.
NOTE: The Gas Module 3 must be fully warmed up before performing a gas calibration. For maximum accuracy, a warm-up time of 10 minutes is recommended.
1. Select Calibrate from the Gas Menu. The Calibration Menu opens.
2. Select Gas Selection from the Calibration Menu and choose the calibration gas type. Choices are: Mixture, 5% CO2, 55% O2, 33% N2O and 2% Des.
3. Select Start to begin calibration.
4. At the start of the calibration, the Gas Module will zero the gas channels. After successful zeroing, the Gas Module will request the calibration gas.

Parameter Menus and Monitoring Operations
2 - 70 0070-10-0648-02 Spectrum® Operating Instructions
FIGURE 2-45 Calibration Menu
NOTE: If the Gas Module cannot zero, a zeroing error will be displayed and the previous calibration data will be restored. Repeat the calibration procedure from step 1. If problems persist, contact Mindray Customer Support.
5. The message Feed Calibration Gas will appear. At this point, attach the calibration gas canister to the regulator and turn it on. Increasing gas values will appear in the window as the Gas Module samples the calibration gas.
FIGURE 2-46 Gas Calibration Menu FIGURE 2-47 Gas Calibration Menu

Spectrum® Operating Instructions 0070-10-0648-02 2 - 71
Operations Parameter Menus and Monitoring
6. When sampling is complete, the Feed Calibration Gas message will disappear and Adjusting will appear next to each value. An Accept menu item will also appear. If the values are acceptable, select Accept. To cancel calibration and re-install the previous calibration values, select Abort.
FIGURE 2-48 Gas Calibration Menu
NOTE: To avoid premature emptying of the gas canister, always remove the regulator at the end of the procedure.
NOTE: For Gas Module II and SE, if any channel cannot be calibrated due to a sampling error, the “Sampling Error” message will appear. Selecting the “Accept” button will calibrate only those channels that do not have a sampling error. If any channel fails calibration, the gas value will be “XXX”. These channels will appear as “XXX” in the normal run mode as well. Repeat procedure from step 1. If problems persist, contact Mindray Customer Support.
NOTE: For Gas Module 3, if any input data is corrupt or if there are other errors, a “Calibration Error” message will appear after the “Accept” button is selected. The Gas Module 3 will not accept span calibration with errors in any channel.

Parameter Menus and Monitoring Operations
2 - 72 0070-10-0648-02 Spectrum® Operating Instructions
2.4.8.2 Gas Module Troubleshooting
MESSAGE/PROBLEM REASON SOLUTION
GM: Warming Up Appears when the system has been turned on, and the sensors have not reached their stable operating temperature.
Wait for the message to go away. It takes up to five minutes for the device to warm up.
GM: Agent Warming Up
Does not apply to Gas Module 3.
This message appears after the GM: Warming Up message disappears. It indicates that the Agent ID Bench is warming up and readings will not be available.
Wait for the message to go away. It takes up to five minutes from power-up for the Agent ID Bench to warm up.
GM: Exhaust Blocked Appears when the system detects a blockage at the exhaust gas outlet, as indicated by an increase in internal pressure.
Remove waste gas scavenging assembly, check if message disappears. Check exhaust line for blockage and clear if possible. If message persists contact Mindray Customer Support.
GM: Mixed Agents Appears when more than one anesthetic agent is detected by the system.
Message will disappear when a single agent is detected again.
GM: Air Leak Appears when the system detects a pneumatic leak.
Turn Gas Module and Spectrum Off.
Also may appear when the Gas Module has been turned on without a sample line attached.
Install/check sample lines, filters, water trap and electrical connections.
Gas Module has been on for a long period of time without the Spectrum Monitor being on.
Turn off Gas Module.Turn on Gas Module and Spectrum Monitor.
GM: Replace Trap Indicates residue build-up on the water trap membrane that is decreasing air flow.
Replace water trap reservoir.
GM: Occlusion Appears when the system detects an obstruction in the sampling line or the water trap bottle is full.
Empty and rinse water trap. Change water trap if necessary. Check sampling line and filter for blockage, clear sampling line if possible. Replace sampling line and/or filter if necessary. Check exhaust line for blockage and clear if possible. If problem persists, contact Mindray Customer Support.
GM: Zero In Progress Appears when the system is zeroing all of it’s channels. This appears whether initiated by the user or is automatic.
This is normal operation. Wait for message to clear.
GM: CO2 Zero Error Appears when the system has been unable to successfully zero the CO2 sensor.
Manually start zeroing the system again. If problem persists, contact Mindray Customer Support.

Spectrum® Operating Instructions 0070-10-0648-02 2 - 73
Operations Parameter Menus and Monitoring
GM: O2 Zero Error Appears when the system has been unable to successfully zero the O2 sensor.
Manually start zeroing the system again. If problem persists, contact Mindray Customer Support.
GM: N2O Zero Error Appears when the system has been unable to successfully zero the N2O sensor.
Manually start zeroing the system again. If problem persists, contact Mindray Customer Support.
GM: Agent Zero Error Appears when the system has been unable to successfully zero the anesthetic agent sensor.
Manually start zeroing the system again. If problem persists, contact Mindray Customer Support.
GM: Pump Off Appears when the system has turned off the pump due to a pneumatic error.
Restart the pump from the Gas Menu. If problem persists, contact Mindray Customer Support.
GM: Agent Mismatch - HAL
Appears when the system detects Halothane as the primary agent and the manually selected agent is not Halothane.
Match the Agent administered with the Agent selected, or select Agent Auto ID.
GM: Agent Mismatch - ISO
Appears when the system detects Isoflurane as the primary agent and the manually selected agent is not Isoflurane.
Match the Agent administered with the Agent selected, or select Agent Auto ID.
GM: Agent Mismatch - ENF
Appears when the system detects Enflurane as the primary agent and the manually selected agent is not Enflurane.
Match the Agent administered with the Agent selected, or select Agent Auto ID
GM: Agent Mismatch - SEV
Appears when the system detects Sevoflurane as the primary agent and the manually selected agent is not Sevoflurane.
Match the Agent administered with the Agent selected, or select Agent Auto ID
GM: Agent Mismatch - DES
Appears when the system detects Desflurane as the primary agent and the manually selected agent is not Desflurane.
Match the Agent administered with the Agent selected, or select Agent Auto ID
GM: Unknown Agent Appears when the system detects a gas that does not match the spectroscopic signatures of the five known anesthetic agents
Use recognized agent
GM: Cannot Zero... RETRYING
Appears when the Spectrum requests Zeroing (either on the automatic cycle or by a user request) and the Gas Module is unable to initialize the cycle
Allow system to retry without intervention. If problem persist, contact Mindray Customer Support.
GM: CO2 Uncalibrated Appears after an unsuccessful calibration attempt of the CO2 sensor. The numeric data for CO2 will appear as - - -, and the CO2 waveform will be a flatline
Ensure proper gas mixture is attached tightly and regulator is on. Repeat calibration procedure. If problem persists, contact Mindray Customer Support.
MESSAGE/PROBLEM REASON SOLUTION

Parameter Menus and Monitoring Operations
2 - 74 0070-10-0648-02 Spectrum® Operating Instructions
GM: O2 Uncalibrated Appears after an unsuccessful calibration attempt of the O2 sensor. The numeric data for O2 will appear as - - -, and the O2 waveform will be a flatline
Ensure proper gas mixture is attached tightly and regulator is on. Repeat calibration procedure. If problem persists, contact Mindray Customer Support.
GM: N2O Uncalibrated Appears after an unsuccessful calibration attempt of the N2O sensor. The numeric data for N2O will appear as - - -, and the N2O waveform will be a flatline
Ensure proper gas mixture is attached tightly and regulator is on. Repeat calibration procedure. If problem persists, contact Mindray Customer Support.
GM: Agents Uncalibrated Appears after an unsuccessful calibration attempt of the agent sensor. The numeric data for all agents will appear as - - -, and the agent waveform will be a flatline
Ensure proper gas mixture is attached tightly and regulator is on. Repeat calibration procedure. If problem persists, contact Mindray Customer Support.
GM: Failed Appears when the Gas Module detects an unrecoverable error in its own operation
Contact Mindray Customer Support.
GM: Disconnected Appears when the Spectrum cannot detect signals being sent by the Gas Module
Ensure Gas Module is turned on and interface cable is properly connected. If problem persists, contact Mindray Customer Support.
Sampling Error Appears when a sampling error occurs on one or more Gas Module channels during calibration
Repeat calibration procedure. If problem persists, contact Mindray Customer Support.
Not Ready For Calibration
Appears when the Gas Module is unable to initialize calibration
Repeat calibration procedure. If problem persists, contact Mindray Customer Support.
Calibration Error, Sampling Error
Appears when a sampling error occurs in all four Gas Module channels during calibration
Repeat calibration procedure. If problem persists, contact Mindray Customer Support.
Calibration Error, Zeroing Error
Appears when the Gas Module cannot perform a Zeroing during calibration
Repeat calibration procedure. If problem persists, contact Mindray Customer Support.
MESSAGE/PROBLEM REASON SOLUTION

Spectrum® Operating Instructions 0070-10-0648-02 2 - 75
Operations Parameter Menus and Monitoring
2.4.9 IBP - Invasive Blood Pressure Menu (Optional)Invasive Blood Pressure (IBP) is a direct measurement of the patient's arterial or venous blood pressure. IBP utilizes a catheter that is inserted directly into a vein, artery or other pressure access areas, and is connected to a transducer for interpretation of Systolic (Sys), Diastolic (Dia), and Mean blood pressures.
Invasive Blood Pressure measurement is an option for the Spectrum.
FIGURE 2-49 IBP Menu
IBP1, IBP2, IBP3, IBP4 waveforms may be labeled according to the site of insertion. The labels are identified in the following table:
LABEL DEFINITION
Art Arterial Blood Pressure
UA Umbilical Artery Pressure
LV Left Ventricular Pressure
PA Pulmonary Artery Pressure
CVP Central Venous Pressure
ICP Intracranial Pressure
LA Left Atrial Pressure
RA Right Atrial Pressure

Parameter Menus and Monitoring Operations
2 - 76 0070-10-0648-02 Spectrum® Operating Instructions
2.4.9.1 Measuring IBP1. Plug the pressure transducer cable into the IBP port(s) on the left side panel, or into the
IBP port(s) on the External Parameter Module.
2. The IBP1 and IBP2 waveforms will appear by default as the fourth and fifth waveform on the display with its associated data to the right of the waveform. The waveform may be moved to another location or turned off by accessing the Display Setup Menu. The IBP3 and IBP4 waveforms and/or data will not appear unless the External Parameter Module has been enabled and a location has been designated in the Display Setup Menu.
NOTE: The arterial pressure catheter should not be used on a limb that is being utilized for any other medical procedure. For example, an IV Catheter, NIBP Cuff or an SpO2 sensor.
3. Connect catheter line with flushing device to a pressure transducer.
4. Zero pressure transducer as follows:
a. Open transducer vent to atmosphere.
b. Press ZERO ALL IBP or individually zero pressure lines by opening individual IBP menus.
After the automatic zero process is complete, the pressure display should indicate zeros.
NOTE: If the transducer offset should exceed 120 mmHg, it will not be possible to automatically zero the transducer. Pressure values will be xxx and an “Unable to Zero” message will be displayed.
5. Close the pressure transducer vent from atmosphere.
6. Select the desired pressure scale in the IBP Menu.
7. Zero and flush pressure line at regular intervals per standard hospital procedure.
NOTE: Pressure transducers are protected against the effects of defibrillation, electrocautery and cerebral perfusion.
Cerebral Perfusion Pressure (CPP)The monitor will calculate and display CPP under the following conditions:
1. The Hemodynamic Calculation option has been installed in the monitor.
2. One IBP channel has been labeled Art
3. One IBP channel has been labeled ICP
4. Display CPP, located on the ICP parameter menu, has been set to Yes.
NOTE: CPP data will be displayed in the same parameter tile as the ICP data.

Spectrum® Operating Instructions 0070-10-0648-02 2 - 77
Operations Parameter Menus and Monitoring
2.4.9.2 IBP Troubleshooting
MESSAGE/PROBLEM REASON SOLUTION
Damped Invasive Waveform
Air bubbles in tubing. Eliminate air from tubing.
Kinked catheter. Change position of catheter, check patient.
Catheter against wall of blood vessel.
Check for leaks at connector, flush catheter.
Blood in tubing Pump pressure bag up to 300 mmHg.
Catheter partially occluded with clot.
Consult physician.
IBP not Displayed / No IBP Waveform
Improper Setup. Check display setup in monitor setup.
Cable not plugged in Check cable.
Transducer not connected. Check transducer connection.
Stopcock turned improperly. Check transducer.
Transducer not zeroed. Check and zero the transducer.
Abnormally High or Low readings
Transducer too HIGH or to LOW. Check patient adjust transducer rezero.
Unable to Zero Stopcock not open to atmosphere.
Check transducer.
Cable/Transducer not plugged in.
Check cable.

Parameter Menus and Monitoring Operations
2 - 78 0070-10-0648-02 Spectrum® Operating Instructions
2.4.10 Pulmonary Artery Wedge Pressure (PAWP)Pulmonary Artery Wedge Pressure (PAWP) is a pressure measurement derived from a PA catheter when the PA distal balloon is inflated and the catheter advances and occludes a distal pulmonary artery. PAWP pressure is a reflection of the pressure in the left ventricle at end-diastole.
PAWP measurement is available if the Hemodynamic Calculation option has been installed on the monitor and one of the available invasive pressure channels has been labeled PA.
The Wedge Menu may be opened from the PA Menu or by pressing the PAWP key on the monitor keypad.
FIGURE 2-50 Wedge Menu
2.4.10.1 Measuring PAWP
NOTE: To ensure accurate wedge pressure readings, rezero the PA pressure channel and check the PA catheter for integrity, kinks and/or leaks prior to measurement.
1. Open the PAWP Menu by pressing the PAWP key or by selecting Wedge Menu from the PA Menu.
NOTE: Follow manufacturer’s suggested procedures and hospital policy for PAWP balloon inflation.
2. Inflate balloon, watch PA waveform for wedge waveform.
3. Once a satisfactory wedge waveform is detected, press Measure to freeze the waveforms within the PAWP Menu.
4. Use the Navigator™ Knob to adjust the reference line to the estimated Wedge measurement.
5. Press the Navigator knob to return to PAWP Menu choices.
6. Press Accept to enter the PAWP measurement onto the Hemodynamic Calculations Menu and post the measurement in the PA parameter tile, or select Measure to further adjust the reference line.
The Reset Waves menu selection will restart the waves scrolling from the left side of the display. All waves will be restarted.

Spectrum® Operating Instructions 0070-10-0648-02 2 - 79
Operations Parameter Menus and Monitoring
The Print Wedge menu selection will begin a continuous printout of the top two waveforms on the Wedge Menu. By default these waveforms are ECG1 and PA. To stop the Wedge printout, select Print Wedge again.
The Wedge Setup menu selection opens the Wedge Setup Menu. This menu allows you to make the following changes to the waveforms displayed on the Wedge Menu:
1. Change the parameters displayed in the upper and lower waveform windows
2. Change the scale of the PA waveform
3. Change the speed of the waveforms displayed
The monitor also allows you to use the PA Diastolic (PAD) reading as PAWP.
NOTE: Please check hospital policy concerning the use of PAD as a Wedge
To use the Pulmonary Artery Diastolic reading as PAWP, select Accept PAD as Wedge from the PA Menu. A confirmation prompt will appear. This menu selection will not be available if the PA Diastolic value is invalid or the pressure channel in use has not been zeroed.
2.4.10.2 PAWP Troubleshooting
MESSAGE/PROBLEM REASON SOLUTION
Unable to Wedge Improper catheter position Check PA catheter, notify physician
Catheter against wall or blood vessel
Flush catheter, notify physician
PA catheter in Spontaneous Wedge
Catheter in too far Notify physician immediately
“Overwedging” or dampened PAWP
Balloon overinflated Deflate balloon, reinflate slowly, notify physician

Parameter Menus and Monitoring Operations
2 - 80 0070-10-0648-02 Spectrum® Operating Instructions
2.4.11 Cardiac Output (CO) (Optional)Cardiac Output (CO) is the amount of blood ejected from the left ventricle each minute, expressed in liters per minute (l/min). Cardiac Index (CI) is the Cardiac Output divided by the patient's body surface area. The following two optional interfaces can be used to measure CO:
• the Mindray External Parameter Module (EPM)(P/N 0998-00-0501-01X and 0998-00-0501-03X)
• the Edwards Vigilance® Monitor (Vigilance)
CO can be monitored when Patient Size is set to either Adult or Pediatric and:
1. When the Hemodynamics Option is installed and the EPM is enabled inthe Installation Menu
and/or
2. When the Vigilance Option is installed and a serial port is set to Vigilancein the Installation Menu
Cardiac Output cannot be monitored when Patient Size is set to Neonate.
2.4.11.1 External Parameter Module (EPM)Intermittent (bolus) CO can be monitored through a Mindray EPM. If a tile has been set to display CO from the Display Setup Menu, when measuring intermittent CO with the EPM, the CO tile will be displayed as shown in the example of FIGURE 2-51. The “@ 3:06 PM” label shown in the example is a “time stamp” that indicates the time at which the displayed measurement occurred. A “Source” label indicates the source of the CO. The units of measure for each parameter are: CO - l/min, CI - l/min/m2
NOTE: If the “CO & PAWP Timeout” setting in the InstallationMenu is exceeded, the CO and CI numeric data in the COtile will be replaced by dashes and the “time stamp” will be removed.
FIGURE 2-51 Example CO tile with Intermittent Cardiac Output from the EPM
Optimizing EPM CO Measurements1. From the PA catheter package insert, verify the correct computation constant for the
catheter type, injectate volume, and injectate temperature. If the computation constant is different than the monitor’s factory default of 0.500, it must be changed.
2. Verify proper PA catheter positioning.
3. Purge system of air.
4. Use correct injectate port.
CO
CI
l/min
l/min/m2
@ 3:06 PMSource: Module
5.42.7

Spectrum® Operating Instructions 0070-10-0648-02 2 - 81
Operations Parameter Menus and Monitoring
5. Inject correct volume in smooth motion.
6. Edit erroneous values from average.
2.4.11.1.1 EPM CO Setup1. Ensure that the Spectrum is powered OFF.
2. Connect the EPM to the Spectrum as follows:
a. Align the EB1 Module Connector on the EPM with the EM1 External Parameter Module Port on the rear of the Spectrum.
b. Slide the EPM and the Spectrum together, using the Guide Pins on the EPM to guide the EB1 connector into the EM1 port. The Module Latches on the EPM will secure it to the Spectrum.
3. Power ON the Spectrum while holding down the DISCHARGE key to enter into its Installation Mode.
4. From the Spectrum Installation Menu, set “Enable EPM” to “Yes” and then select “Save Current”.
5. Restart the Spectrum to enter normal monitoring mode.
6. From the Patient menu of the main screen, set Patient Size to either Adult or Pediatric.
7. Open the Cardiac Output Menu (shown in FIGURE 2-52) in one of the following three ways:
• by choosing CO from the Parameters Menu
• by pressing the C.O. key on the front panel keypad
• by pressing the C.O. key on the EPM keypad
8. Open the CO Setup Menu by choosing CO Setup Menu from the Cardiac Output Menu.
FIGURE 2-52 Cardiac Output Menu

Parameter Menus and Monitoring Operations
2 - 82 0070-10-0648-02 Spectrum® Operating Instructions
2.4.11.1.2 CO Setup Menu
FIGURE 2-53 CO Setup Menu
Auto StartWith the EPM, there are two modes of operation: Auto Start and Manual. To choose the desired mode of operation, open the CO Setup Menu (shown in FIGURE 2-53) and set Auto Start to either On or Off.
In Auto Start Mode (when Auto Start is set to On), the monitor automatically displays the prompt Inject when Ready upon achieving a baseline blood temperature. When injection is completed, the Spectrum computes the CO and is ready to start another bolus injection.
In Manual Mode (when Auto Start is set to Off), the monitor will display the message Ready when a baseline blood temperature is achieved. Manual mode of operation is similar to Auto Start except that you must press Start CO Run or the C.O. key on the Monitor or Module prior to each injection.
NOTE: Refer to the catheter package insert provided with each PA catheter for the appropriate computation constant, specific instructions on catheter placement and use, warnings, cautions, and specifications.
WARNING: Do not use a damaged or broken unit or accessory.
Computation ConstantComputation Constant is used to change the monitor’s factory default of 0.500 with the appropriate computation constant from the PA catheter package insert.
CO TimeCO Time is used to adjust the time period for the current CO Run window shown in the top of the Cardiac Output Menu. Choices are 30 sec and 60 sec.
CO ScaleCO Scale is used to adjust the temperature scale for the current CO Run window shown in the top of the Cardiac Output Menu. Choices are 0.5 ºC, 1 ºC, 2 ºC and 4 ºC.

Spectrum® Operating Instructions 0070-10-0648-02 2 - 83
Operations Parameter Menus and Monitoring
CO SourceAs noted in the introduction to the Cardiac Output section, CO can also be measured through an Edwards Vigilance® Monitor. If both the EPM and the Vigilance are connected and the Installation Menu is properly configured, CO Source enables the user to choose either device as the source for CO. A detailed description of this configuration is provided in the CO from both Vigilance and EPM section.
2.4.11.1.3 Measuring Cardiac Output with the EPM
WARNING: Inaccurate Cardiac Output measurements may be caused by:
• Incorrect placement or position of the catheter
• Excessive variation in pulmonary artery blood temperature
• Clot formation on the thermistor
• Anatomical abnormalities, (for example, cardiac shunts)
• Excessive patient movement
• Repeated intermittent flushes of cold fluid through the fluid lumens of the catheter
• Use of a manual pump such as the Abbott® Blood Set with Pump and CAIR clamp
• Electrocautery or electrosurgical unit interference
• Rapid changes in cardiac output
• Using an incorrect computation constant
Auto Start On (Auto Mode)1. Connect the proper Cardiac Output cable and PA catheter. Open the CO Setup Menu
and set Auto Start to On. From the PA catheter package insert, verify the correct computation constant for the catheter type, injectate volume, and injectate temperature. Set the Computation Constant as necessary if it is different than the monitor’s factory default of 0.500. Return to the Cardiac Output Menu.
2. When a stable baseline blood temperature is obtained, the Inject when Ready message will be displayed. Proceed with a bolus injection.
CAUTION: Sudden changes in blood temperature such as those caused by bolus drug administration may cause a CO or CI value to be computed. To avoid falsely triggered curves, inject as soon as possible after the “Inject when Ready” message is displayed.
3. Once a bolus is injected, the CO curve appears, the Measuring message is displayed, and the resultant CO measurement is displayed.
NOTE: If a measurement is compromised, as indicated by an Irregular Curve or Injectate Temp Error alert message, the curve will be displayed in Red and an X mark will be displayed in the box.

Parameter Menus and Monitoring Operations
2 - 84 0070-10-0648-02 Spectrum® Operating Instructions
4. Note the injectate temperature and verify that the correct computation constant was set.
5. Subsequent cardiac output runs can be performed as desired when the Inject when Ready message reappears.
6. When sufficient CO runs are completed, use Edit CO Runs to choose the runs to be computed in the CO Average. Runs that have green waveform data and a check mark ( ) in the box will be included in the average. Runs that have red waveform data and an X mark (X) in the box will be excluded from the average.
7. Select the Accept Average key to accept and store the CO Average.
8. To display Cardiac Index (CI), the patient weight and height must be entered via the CO Setup Menu or the Patient Menu.
Auto Start Off (Manual Mode)1. Connect the proper Cardiac Output cable and PA catheter. Open the CO Setup Menu
and set Auto Start to Off. From the PA catheter package insert, verify the correct computation constant for the catheter type, injectate volume, and injectate temperature. Set the Computation Constant as necessary if it is different than the monitor’s factory default of 0.500. Return to the Cardiac Output Menu.
2. When a stable baseline blood temperature is obtained, the Ready message will be displayed. Select Start CO Run or the C.O. key on the Monitor or Module and the Inject Now message will be displayed. Proceed with a bolus injection.
NOTE: You have a maximum of 30 seconds in which to inject following Start CO Run. If no injection is detected within this time interval, the display returns to Ready until you choose to resume the measurement sequence.
3. Once a bolus is injected, the CO curve appears, Measuring message is displayed, and the resultant CO measurement is displayed.
NOTE: If a measurement is compromised, as indicated by an Irregular Curve or Injectate Temp Error alert message, the curve will be displayed in Red and an X mark will be displayed in the box.
4. Note the injectate temperature and verify that the correct computation constant was set.
5. Subsequent CO runs can be performed as desired when the Ready message reappears.
6. When sufficient CO runs are completed, use Edit CO Runs to choose the runs to be computed in the CO Average. Runs that have green waveform data and a check mark ( ) in the box will be included in the average. Runs that have red waveform data and an X mark (X) in the box will be excluded from the average.
7. Select the Accept Average key to accept and store the CO Average.
8. To display Cardiac Index (CI), the patient weight and height must be entered via the CO Setup Menu or the Patient Menu.
Spectrum® Operating Instructions 0070-10-0648-02 2 - 85
Operations Parameter Menus and Monitoring
2.4.11.1.4 EPM Cardiac Output Troubleshooting
MESSAGE/PROBLEM REASON SOLUTION
CO value higher / lower than expected
Computation constant incorrect for PA catheter type, injectate temperature, and injectate volume.
Check computation constant and enter correct data.
Catheter may be kinked or not in proper position.
Notify physician.
No measurement/Unable to measure
Unstable temperature. Check injectate temperature.
No temperature or temperature out of range.
Flush PA catheter.
Time elapsed for measurement. Discard bolus fluid.
Check patient.
Wait for Ready or Inject when Ready message to appear. Rebolus when ready.
CO Signal Under Range
Appears if the CO curve is not sufficient for a CO calculation or if a curve is not detected within thirty (30) seconds
Rebolus if necessary
CO Out of Range Appears if the CO is out of the measurable range(0.2 l/min to 20.0 l/min). Computation constant incorrect for PA catheter type, injectate temperature, and injectate volume.
Check computation constant and enter correct data. Rebolus when ready.
Irregular curve Improper injection procedure. Check hospital policy, inject in a smooth and fluid bolus.
Catheter may be kinked or not in proper position.
Notify physician.
Patient movement during injection. Have patient lay still during bolus procedure.
Measurement displayed if CO curve has multiple peaks, failure to return to baseline or irregularities in curve.
Rebolus when ready
Delayed Injection Appears if the time between the start of the CO measurement and the onset of the temperature change is more than fifteen (15) seconds
Rebolus when ready.
Ensure that the CO bolus is initiated within 15 seconds
Check the temperature of the injectate
Injectate Temp Error Appears when the temperature of the injectate is too warm (>27ºC) or the difference between the injectate and the blood temperature is <8ºC.
Check injectate fluid, insure fluid is not under warm lights, near a warming blanket or another warm source.
Noisy Baseline Cardiac Output waveform baseline is unstable
Rebolus when ready.
Measuring Appears once an injection is detected during the process of a CO run.
Injectate Temp. Outof Range
Appears when the temperature of the injectate is too warm (>27ºC) or the difference between the injectate and the blood temperature is <8ºC.
Check injectate fluid, insure fluid is not under warm lights, near a warming blanket or over-chilled in the ice bath.

Parameter Menus and Monitoring Operations
2 - 86 0070-10-0648-02 Spectrum® Operating Instructions
2.4.11.2 Edwards Vigilance® Monitor (Vigilance)For questions regarding the use and maintenance of the Edwards Vigilance® Monitor, refer to its operator’s manual or contact Edwards Lifesciences Corporation for assistance. Within the USA: (800)-424-3278, Outside the USA: (949)-250-2500.
The standard Edwards Vigilance Monitor measures both intermittent and continuous cardiac output (CO), as well as T Blood. It can also be optionally configured to measure continuous mixed venous oxygen saturation (SvO2). Intermittent CO uses the bolus thermodilution method, while continuous CO uses a pulmonary artery catheter to introduce small pulses of energy into the blood and then record the blood temperature. SvO2 is measured by a spectrophotometric technique that uses light emitting diodes to transmit light in the red and infrared spectra through an optical fiber in a pulmonary artery catheter to the blood.
The Vigilance can be interfaced with the Spectrum. This enables Vigilance CO, T Blood and SvO2 data to be displayed and trended at the Spectrum, as well as providing alarm control for these parameters. The Spectrum uses T Blood data from Vigilance to derive ΔT which can also be displayed and trended, as well as providing alarm control.
At the Spectrum, the CO value is divided by the patient’s BSA (Body Surface Area) to calculate and display a corresponding cardiac index (CI). The BSA is determined from the patient’s height and weight as entered in the Spectrum.
When measuring continuous cardiac output, the CO tile on the main screen of the Spectrum will be displayed as shown in the example of FIGURE 2-54. The “@Cont” label in the example CO tile indicates that the displayed measurements are continuous. If the Vigilance is used for intermittent CO measurements, an “@XX:XX” label will be displayed. This label is a “time stamp” where XX:XX = the time at which the displayed measurements occurred. A “Source” label indicates the source of the cardiac output. The units of measure for each attribute are: CO - l/min, CI - l/min/m2, SvO2 - %
NOTE: If the Edwards Vigilance Monitor is powered off or disconnected from the Spectrum, the CO tile willbe removed from the display.
Inject When Ready Appears if Auto Start is enabled, stable temperatures are detected
Bolus when ready
Ready Appears if Auto Start is not enabled, and stable temperatures are detected
Press START when ready
Inject Now Appears once START has been pressed, before bolus is initiated
Bolus when ready
Please Wait Appears after fluid bolus is initiated and Cardiac Output is being calculated
Wait until message disappears
MESSAGE/PROBLEM REASON SOLUTION

Spectrum® Operating Instructions 0070-10-0648-02 2 - 87
Operations Parameter Menus and Monitoring
FIGURE 2-54 Example CO tile with Continuous Cardiac Output from Vigilance
The setup and patient connections for the Vigilance must be completed as instructed in the Edwards Vigilance Monitor Operator’s Manual.
To display Vigilance cardiac output measurements at the Spectrum, the two devices must be physically configured as follows:
• the Spectrum must be equipped with an optional Comm-Port that contains serial port interface SP1 and/or SP2
• the two devices must be interfaced using the Vigilance/PC Interface cable (serial port to serial port) (P/N 0012-00-1275-01) as described in step 1 of the following section.
2.4.11.2.1 Vigilance CO Setup1. Both ends of the Vigilance/PC Interface cable are identical. Before it is connected,
ensure that the Vigilance and the Spectrum are powered OFF. Connect one end of the cable to the Spectrum at a serial port (SP1 or SP2) that is located on the optional Comm-Port. Connect the other end of the cable to the Vigilance at the COM 1 port.
2. Power ON the Vigilance and then power ON the Spectrum while holding down the DISCHARGE key to enter into its Installation Mode.
3. Set a serial port to “Vigilance” and then select “Save Current”.
4. Restart the Spectrum to enter normal monitoring mode.
5. From the Patient menu of the main screen, set Patient Size to either Adult or Pediatric.
6. Open the Vigilance CO Menu by choosing CO from the Parameters Menu or by pressing the C.O. key on the front panel keypad.
NOTE: The C.O. key on the EPM keypad does not function when the Spectrum is configured to monitor Vigilance cardiac output measurements.
CO CI
l/min l/min/m2@ Cont
Source:
5.4 2.7
Vigilance
SvO2
85%

Parameter Menus and Monitoring Operations
2 - 88 0070-10-0648-02 Spectrum® Operating Instructions
2.4.11.2.2 Vigilance CO MenuThe Vigilance CO Menu enables the user to:
• set the patient height and weight to be used in calculating cardiac index (CI)
NOTE: Other menus also use patient height and weight data. When this data is changed in any menu, it is automatically updated in the other menus.
• choose the source for cardiac output
• access the Hemodynamics Calculations Menu (a description of the Spectrum Hemodynamics Calculation method is provided in section 2.5.2)
• choose the color of the data that will display in the CO tile
FIGURE 2-55 Vigilance CO Menu
CO SourceAs noted in the introduction to the Cardiac Output section, CO can also be measured through an EPM. If both the EPM and the Vigilance are connected and the Installation Menu is properly configured, CO Source enables the user to choose between either device as the source for CO. A detailed description of this configuration is provided in the CO from both Vigilance and EPM section.
2.4.11.2.3 Vigilance Cardiac Output Troubleshooting
MESSAGE/PROBLEM REASON SOLUTION
CO: Check Vigilance. This message is displayed when an alert or alarm status has been sent from the Vigilance to the Spectrum.
Refer to the Edwards Vigilance® Monitor Operator’s Manual or contact Edwards Lifesciences Corporation for assistance.
Within the USA: (800)-424-3278Outside the USA: (949)-250-2500

Spectrum® Operating Instructions 0070-10-0648-02 2 - 89
Operations Parameter Menus and Monitoring
2.4.11.3 CO from both Vigilance and EPMIf switching between Vigilance CO and EPM CO is desired, proceed as follows:
1. Setup the EPM as described in steps 1 and 2 of the EPM CO Setup section.
2. Setup the Vigilance as described in step 1 of the Vigilance CO Setup section.
3. Power ON the Vigilance and then power ON the Spectrum while holding down the DISCHARGE key to enter into its Installation Mode.
4. Set “Enable EPM” to “Yes”, set a serial port to “Vigilance” and then select “Save Current”.
5. Restart the Spectrum to enter normal monitoring mode.
6. From the Patient menu of the main screen, set Patient Size to either Adult or Pediatric.
7. Open the Cardiac Output Menu (shown in FIGURE 2-52) in one of the following three ways:
• by choosing CO from the Parameters Menu
• by pressing the C.O. key on the front panel keypad
• by pressing the C.O. key on the EPM keypad
8. Open the CO Setup Menu by choosing CO Setup Menu from the Cardiac Output Menu.
EPM CO
Refer to the CO Setup Menu section.
Vigilance CO
a. Choose “CO Source” from the CO Setup Menu, select “Vigilance” and then close the CO Setup Menu.
b. Open the Vigilance CO Menu by choosing CO from the Parameters Menu or by pressing the C.O. key on the front panel keypad.
NOTE: The C.O. key on the EPM keypad does not function when the Spectrum is configured to monitor Vigilance cardiac output measurements.
c. Refer to the Vigilance CO Menu section 2.4.11.2.2.

Calculations Operations
2 - 90 0070-10-0648-02 Spectrum® Operating Instructions
2.5 CalculationsThe Spectrum supports two types of calculation packages: Drug / IV Medications and Hemodynamics. Calculations are accessible through the Functions Menu.
2.5.1 Drug CalculationsThe Spectrum has the ability to calculate and display IV drug infusion rate and concentration based upon patient weight and/or drug dosage.
Drug calculations may also be accessed through the Patient Menu. Drug calculations are only available if the Patient Size is set to Adult.
Drug Calculation FormulasFor Drug Concentration, the Spectrum uses the following formula:
For weight-based Drug Infusion Rate, the Spectrum uses the following formula:
For non-weight-based Drug Infusion Rate, the Spectrum uses the following formula:
Drug Amount)(Solution Volume)(
-------------------------------------------------------------------------- Concentration=
(Dose Ordered) x (Weight in kg) x (Solution Volume)(Drug Amount)
--------------------------------------------------------------------------------------------------------------------------------------------------------------------------------------------------------------------------- Infusion Rate ml/hr( )=
Dose Ordered) x (Solution Volume) (Drug Amount)(
--------------------------------------------------------------------------------------------------------------------------------------------------------- Infusion Rate ml/hr( )=

Spectrum® Operating Instructions 0070-10-0648-02 2 - 91
Operations Calculations
Drug CalculatorWhen “Drug Calculator” is chosen from the Patient Menu or the Functions Menu, the Drug Calculator is displayed. An example Drug Calculator that is set for a weight-based drug is shown in FIGURE 2-56.
FIGURE 2-56 Drug Calculator set for a weight-based drug
The following table describes the menu structure of the Drug Calculator:
Drug Calculator Menu Structure
MENU TITLEON SCREEN MENU CHOICES DEFAULT
ACTIONS/COMMENTS
Normal Screen Select to return to normal screen.
Drug Name See the “GENERIC NAME” and “BRAND NAME” columns of the table in the Adult Medication Choices subsection. The Drug A – D choices are for drugs that are not listed in the table.
Unspecified Select to choose medication.
Weight 1 to 1100 lbs or1 to 500 kg
Unspecified Select to enter or change patient weight.
* When any one of the menu items marked with an asterisk (*) is changed, the others areautomatically updated.

Calculations Operations
2 - 92 0070-10-0648-02 Spectrum® Operating Instructions
Drug Units mcg, mg, g, units, mU mcg for Drug A, B, C or D. For drugs listed in the table in the Adult Medication Choices subsection, see the “DEFAULT UNITS” column.
This menu item is only selectable if Drug A, B, C or D is chosen. Otherwise, the default unit for the specified drug is used. If Drug Units are changed for Drug A, B, C or D, Drug Amount, Solution Volume, Dose/min, Dose/hr, Dose/kg/min and Dose/kg/hr will be reset to blank fields and Infusion Rate and Concentration will be invalidated.
Select to enter or change drug units.
Drug Amount Based on current Drug Units setting.
Select to enter amount of drug in IV bag.
Solution Volume 10 to 1000 ml Select to enter volume of solution in IV bag.
Dose/min* 0.01 to 10000.00 If the chosen drug is Vasopressin, the Default is 0.200
For all other drugs, the Default is 1.00
Select to enter dosage of drug to be infused per minute.
Dose/hr* 0.01 to 10000.00 If the chosen drug is Vasopressin, the Default is 12.00
For all other drugs, the Default is 60.00
Select to enter dosage of drug to be infused per hour.
Dose/kg/min* If the chosen drug is Milrinone, 0.005 to 2.000
For all other drugs, 0.01 to 10000.00
If the chosen drug is Milrinone, the Default is 0.375
For all other drugs, the Default is 1.00
Select to enter dosage of drug to be infused per minute based upon patient weight. Please verify patient weight.
Dose/kg/hr* If the chosen drug is Milrinone, 0.300 to 120.000
For all other drugs, 0.01 to 10000.00
If the chosen drug is Milrinone, the Default is 22.500
For all other drugs, the Default is 60.00
Select to enter dosage of drug to be infused per hour based upon patient weight. Please verify patient weight.
Infusion Rate This menu item is automatically calculated as previously described in this section using the values entered for other menu items.
Drug Calculator Menu Structure (Continued)
MENU TITLEON SCREEN MENU CHOICES DEFAULT
ACTIONS/COMMENTS
* When any one of the menu items marked with an asterisk (*) is changed, the others areautomatically updated.

Spectrum® Operating Instructions 0070-10-0648-02 2 - 93
Operations Calculations
Concentration This menu item is automatically calculated as previously described in this section using the values entered for other menu items.
Print Units Dose/min, Dose/hr, Dose/kg/min, Dose/kg/hr
Dose/kg/min (when the chosen drug is weight-based)
Dose/min (when the chosen drug is non-weight-based)
This menu item is automatically populated with the appropriate default when: 1) a Drug Name is chosen, 2) the patient Weight is specified (for a weight-based drug), and3) Dose/min, Dose/hr, Dose/kg/min or Dose/kg/hr is specified.
If the dose is entered as Dose/min, then the menu choices will be Dose/min or Dose/hr.
If the dose is entered as Dose/kg/min, then the menu choices will be Dose/kg/min or Dose/kg/hr.
If the dose is entered as Dose/hr, then Dose/hr will be the only menu choice for the Print Units.
If the dose is entered as Dose/kg/hr, then Dose/kg/hr will be the only menu choice for the Print Units.
If the chosen drug is Milrinone, then Dose/kg/min will be the only menu choice for the Print Units.
Print Table Select to print Drug Calculation data.
Drug Calculator Menu Structure (Continued)
MENU TITLEON SCREEN MENU CHOICES DEFAULT
ACTIONS/COMMENTS
* When any one of the menu items marked with an asterisk (*) is changed, the others areautomatically updated.

Calculations Operations
2 - 94 0070-10-0648-02 Spectrum® Operating Instructions
The following table details adult medication choices:
Adult Medication Choices
GENERIC NAME BRAND NAME
IS THE PATIENT’S WEIGHT USED IN THE CALCULATION?
DEFAULTUNITS
DEFAULT SOLUTION VOLUME
DEFAULT DRUG AMOUNT
Aminophylline1 Theophylline Y mg 500 ml 500 mg
Diltiazem1 Cardizem N mg 125 ml 125 mg
Dobutamine1 Dobutrex Y mcg 250 ml 500 mg
Dopamine1 Inotropin Y mcg 250 ml 400 mg
Epinephrine HCL1
Adrenalin N mcg 250 ml 1mg
Esmolol HCL1,2 Brevibloc Y mcg 500 ml 5000 mg
Fentanyl Citrate1 Sublimaze Y mcg 100 ml 5 mg
Heparin Sodium1 Heparin N units 250 ml 12,500 units
Inamrinone Lactate1
Inocor Y mcg 250 ml 500 mg
Insulin, Regular1 Humulin N units 100 ml 100 units
Isoproterenol HCL1
Isuprel HCL N mcg 500 ml 2 mg
Labetalol HCL1,2 Normodyne N mg 200 ml 200 mg
Lidocaine HCL1,2 Xylocaine HCL N mg 500 ml 2000 mg
Lorazepam Ativan N mg 500 ml 40 mg
Midazolam HCL1,2
Versed Y mg 125 ml 125 mg
Milrinone Lactate1,2
Primacor Y mcg 200 ml 20 mg
Nicardipine HCL1
Cardene N mg 250 ml 25 mg
Nitroglycerin1 Tridil N mcg 250 ml 50 mg
Nitroprusside Sodium1
Nipride Y mcg 250 ml 50 mg
Norepinephrine1 Levophed N mcg 250 ml 4 mg
Phenylephrine1 Neosynephrine N mcg 250 ml 10 mg
Procainamide HCL1
Pronestyl N mg 500 ml 2000 mg
Propofol1 Diprivan Y mcg 50 ml 500 mg
Vasopressin2 Pitressin N units 250 ml 250 units
1 Gahart B and Nazareno A. 2002 Intravenous Medications. St. Louis: Mosby, 2001.2 Algozzine G, Algozzine R, and Lilly D. Critical Care Intravenous Infusion Drug Handbook.
St. Louis: Mosby, 2002.

Spectrum® Operating Instructions 0070-10-0648-02 2 - 95
Operations Calculations
2.5.2 Hemodynamic CalculationsHemodynamic calculations are a set of values that are used to determine the hemodynamic status of the patient. The values that are necessary for these calculations are Patient Height, Patient Weight, Cardiac Output, Heart Rate, Mean Arterial Pressure, Mean PA, Wedge and Central Venous Pressure.
All manually entered values (such as PAWP) are denoted with an asterisk (*). The following values are calculated and trended: CI, SV, SVI, SVR, SVRI, PVR, PVRI, LCW, LCWI, RCW, RCWI, LVSW, LVSWI, RVSW, and RVSWI.
NOTE: Calculated patient parameters contain more decimal places of accuracy than are displayed on the screen (e.g., a CO of 2.4 may be a CO of 2.4492). Consequently, attempts to verify the accuracy of the monitor’s display using the following equations may produce results that are slightly different from the data computed by the monitor.
Hemodynamic Calculations
ABBREVIATION / UNITS DESCRIPTION FORMULA
CI (l/min/m2) Cardiac Index CO / BSA
BSA (m2)* Body Surface Area Ht0.725(cm) x Wt0.425(kg) x 0.007184
SV (ml) Stroke Volume (CO / HR) x 1000
SVI (ml/m2) Stroke Volume Index SV / BSA
SVR (dyne-sec/cm5) Systemic Vascular Resistance
((ART mean-CVP) / CO) x 79.96
SVRI (dyne-sec/cm5/m2) Systemic Vascular Resistance Index
SVR x BSA
PVR (dyne-sec/cm5) Pulmonary Vascular Resistance
((PA mean-PAWP) / CO) x 79.96
PVRI (dyne-sec/cm5/m2) Pulmonary Vascular Resistance Index
PVR x BSA
LCW (kg-m) Left Cardiac Work 0.0136 x ART mean x CO
LCWI (kg-m/m2) Left CardiacWork Index
LCW / BSA
RCW (kg-m) Right Cardiac Work 0.0136 x PA mean x CO
RCWI (kg-m/m2) Right Cardiac Work Index RCW / BSA
LVSW (gm-m) Left Ventricular Stroke Work
SV x (ART mean-PAWP) x 0.0136
LVSWI (gm-m/m2) Left Ventricular Stroke Work Index
LVSW / BSA
RVSW (gm-m) Right Ventricular Stroke Work
SV x (PA mean - CVP) x 0.0136
RVSWI (gm-m/m2) Right Ventricular Stroke Work Index
RVSW / BSA
* Dubois’ equation

Alarms Operations
2 - 96 0070-10-0648-02 Spectrum® Operating Instructions
2.6 AlarmsThe Spectrum monitor provides a broad range of alarm settings. For detailed information see “Alarm Limits”. Settings for alarm delay times are also available.
FIGURE 2-57 Alarm Limits Menu
2.6.1 Adjusting Alarms
Setting Parameter Alarm Limits1. To access the Alarms Limits Menu press the ALARMS LIMITS key. The main
Alarm Limits Menu displays.
2. Use the Navigator™ Knob to set alarm limits as desired for currently monitored parameters.
3. To save alarm limit settings as the default, select Save Current from the Monitor Setup Menu.
NOTE: Alarm Limits are not saved when the monitor is turned off, unless you select Save Current from the Monitor Setup Menu.
4. To set alarm limits for any parameter not currently monitored or to adjust the priority level of any alarm select Alarm Setup from the Alarm Limits Menu. The Alarm Setup menu also provides options for setting alarm delay times and alarm muting features.
FIGURE 2-58 Alarm Setup Menu

Spectrum® Operating Instructions 0070-10-0648-02 2 - 97
Operations Alarms
2.6.2 Alarm LimitsA separate table of alarm limit settings is maintained for each patient size. When the patient size is changed, the appropriate selections are automatically used. See table below for alarm ranges. Default settings appear in bold text.
HIGH LOW
PARAMETERS ADULT PED NEONATE ADULT PED NEONATE
Heart Rate (bpm)Except France
Off, 60-250
Off, 100-300
Off, 100-350
Off, 30-120
Off, 30-150
Off, 30-200
Heart Rate (bpm)France
120, 60-250
150, 100-300
175, 100-350
30, 30-120
50, 30-150
70, 30-200
PVC/min Off, 1-30
Run Off, 4-8
ST Single Lead (mm)
Off, +0.5 to +10.0 (Elevation) Off, -0.5 to -10.0 (Depression)
ST Dual Lead (mm)
Off, +0.5 to +10.0 (Elevation) Off, -0.5 to -10.0 (Depression)
NIBP Sys (mmHg) Off, 70-240
Off, 40-180
Off, 40-180
Off, 50-150
Off, 15-130
Off, 15-130
NIBP Mean (mmHg)
Off, 60-200
Off, 50-180
Off, 40-160
Off, 40-140
Off, 10-100
Off, 10-70
NIBP Dia (mmHg) Off, 40-130
Off, 50-100
Off, 50-100
Off, 30-120
Off, 10-50
Off, 10-50
IBP Sys (mmHg) Off, 5-300
Off, 5-240
Off, 5-180
Off, 0-150
Off, 0-130
Off, 0-130
IBP Mean (mmHg) Off, 5-150
Off, 5-100
Off, 5-100
Off, 2-100
Off, 2-50
Off, 2-50
IBP Dia (mmHg) Off, 0-140
Off, 0-100
Off, 0-70
Off, 0-120
Off, 0-100
Off, 0-50
SpO2 (%) Off, 80-100
Off, 80-100
Off, 80-100
50-9985
50-9985
50-9985
Temp (ºF) Off, 95-110 Off, 80-100
Temp (ºC) Off, 35-43 Off, 26-38
T blood (ºF) Off, 95-110 Off, 80-100
T blood (ºC) Off, 35-43 Off, 26-38
Delta Temp (ºF) Off, 2-10 Off, 2-10
Delta Temp (ºC) Off, 1-5 Off, 1-5
Resp Rate (rpm) Off, 10-100
Off, 15-150
Off, 30-200
Off, 5-30
Off, 5-40
Off, 5-50
ET CO2 (mmHg) Off, 20-8060
Off, 5-50
ET CO2 (%) Off, 2.0-10.08.0
Off, 1.0-6.0
ET CO2 (kPa) Off, 2.0-10.08.0
Off, 1.0-6.0
Insp CO2 (mmHg) Off, 5-3010
Insp CO2 (%) Off, 1.0 - 4.0
Insp CO2 (kPa) Off, 1.0 - 4.0
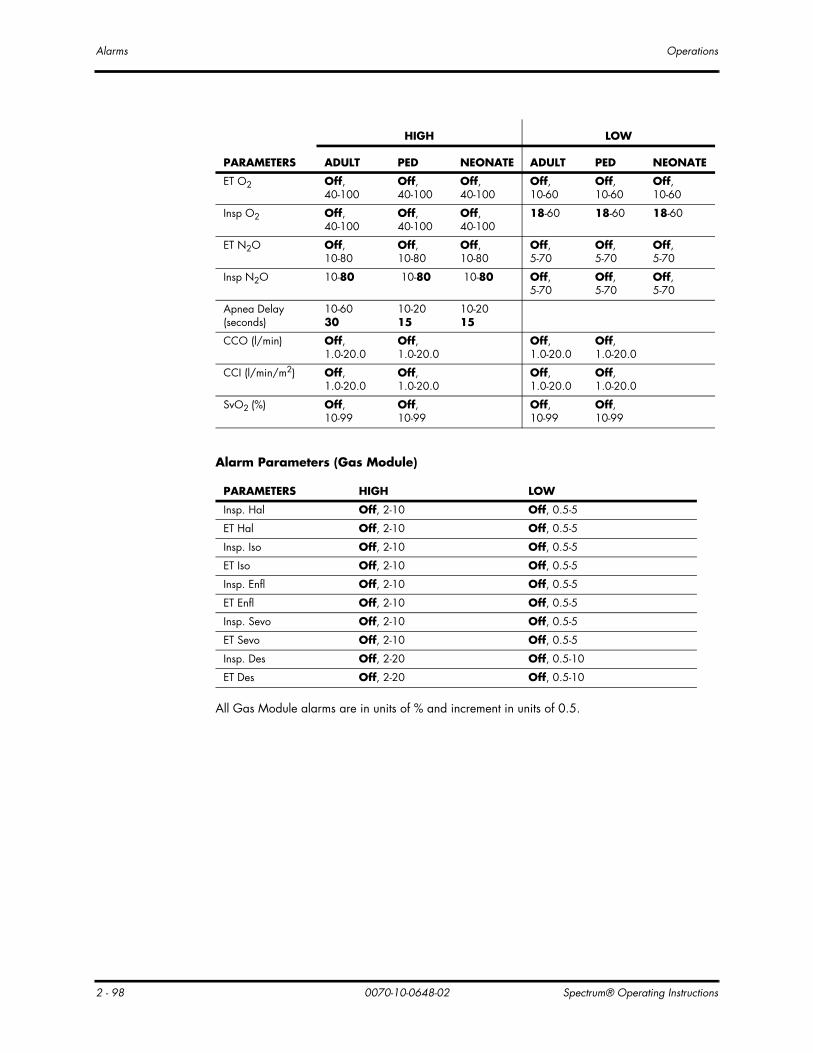
Alarms Operations
2 - 98 0070-10-0648-02 Spectrum® Operating Instructions
All Gas Module alarms are in units of % and increment in units of 0.5.
ET O2 Off, 40-100
Off, 40-100
Off, 40-100
Off, 10-60
Off, 10-60
Off, 10-60
Insp O2 Off, 40-100
Off, 40-100
Off, 40-100
18-60 18-60 18-60
ET N2O Off, 10-80
Off, 10-80
Off, 10-80
Off, 5-70
Off, 5-70
Off, 5-70
Insp N2O 10-80 10-80 10-80 Off, 5-70
Off, 5-70
Off, 5-70
Apnea Delay (seconds)
10-6030
10-2015
10-2015
CCO (l/min) Off, 1.0-20.0
Off, 1.0-20.0
Off, 1.0-20.0
Off, 1.0-20.0
CCI (l/min/m2) Off, 1.0-20.0
Off, 1.0-20.0
Off, 1.0-20.0
Off, 1.0-20.0
SvO2 (%) Off,10-99
Off,10-99
Off,10-99
Off,10-99
Alarm Parameters (Gas Module)
PARAMETERS HIGH LOW
Insp. Hal Off, 2-10 Off, 0.5-5
ET Hal Off, 2-10 Off, 0.5-5
Insp. Iso Off, 2-10 Off, 0.5-5
ET Iso Off, 2-10 Off, 0.5-5
Insp. Enfl Off, 2-10 Off, 0.5-5
ET Enfl Off, 2-10 Off, 0.5-5
Insp. Sevo Off, 2-10 Off, 0.5-5
ET Sevo Off, 2-10 Off, 0.5-5
Insp. Des Off, 2-20 Off, 0.5-10
ET Des Off, 2-20 Off, 0.5-10
HIGH LOW
PARAMETERS ADULT PED NEONATE ADULT PED NEONATE

Spectrum® Operating Instructions 0070-10-0648-02 2 - 99
Operations Alarms
Alarm ViolationsSpectrum alarm violations are classified by severity:
For priority 1 or “Warning” alarms,
• The red alarm LED flashes
• The data in violation of the alarm flashes over a red background
• The priority 1 audio alarm sounds. The priority 1 audio alarm is a pattern of 10 tones repeated every 10 seconds
For priority 2 or “Caution” alarms,
• The amber alarm LED flashes
• The data in violation of the alarm flashes over an amber background
• The priority 2 audio alarm sounds. The priority 2 audio alarm is a pattern of 3 tones repeated every 30 seconds
For both priority 1 and priority 2 alarms,
• If there is no displayed digital data associated with the alarm, a message will be posted in Message Area A that identifies the alarm
If the “Print on Alarm” feature has been enabled and an alarm violation occurs,
• The internal recorder will print a 2-wave 16 second strip. The upper wave will be ECG1 and the lower wave will be that of the parameter associated with the alarm violation
• Any other printing in process at the time of the alarm will be aborted
• Data in violation of an alarm will be printed within brackets
• A bar will be printed along the top margin of the waveform area to mark the time the alarm was triggered.
A. Parameter Alarms
Individual alarm levels are adjustable for most of the parameters Spectrum is capable of monitoring. In addition, these alarms may be set by the user to either priority level 1 or 2 as desired.
NOTE: The Heart Rate Alarm can be triggered only by the source identified in the Heart Rate data tile. In some circumstances, the pulse rate displayed in the SPO2 data tile may differ from the heart rate displayed in the heart rate data tile. When the Spectrum detects SPO2 pulse rate is in violation of the set heart rate limits, the pulse rate data will flash over a red background, but the audio alarm will not sound.
B. Heart Rate Fault Alarm
The Heart Rate Fault Alarm occurs if the selected heart rate source is no longer able to detect a heart rate. This alarm is only active if a low heart rate limit is set. The Spectrum may display a message to help identify the cause of the alarm (e.g., “Lead Off”, “Sensor Off”). The Heart Rate Fault Alarm is a priority 1 alarm.

Alarms Operations
2 - 100 0070-10-0648-02 Spectrum® Operating Instructions
C. Apnea Alarm
The Apnea Alarm is active when respiration is being monitored. The Apnea Alarm will be triggered if respiration is not detected for a time period longer than set in the Alarm Setup menu. The Apnea Alarm can be set as a “Latched” or “Non-latched” alarm via the Advanced Setup menu.
When “Apnea Latch” is set to “Off”, the Apnea Alarm will silence and cancel itself if patient breathing is again detected.
When “Apnea Latch” is set to “On” (default), the Apnea Alarm will not be silenced unless the operator acknowledges the alarm by pressing the MUTE or MUTE ALL keys. The visual Apnea Alarm indications will not be cancelled unless patient breathing resumes.
The Apnea Alarm is a priority 1 alarm.
D. Arrhythmia Alarms
Arrhythmia Alarms, with the exception of the PVC Rate Alarm, are identified in message Area A.
“Lethal” Arrhythmia Alarms (“Asystole”, “V-Fib”, and “V-Tach”) are priority 1 alarms and in addition are latched. Even after the alarming condition is resolved, a latched alarm will continue until it is acknowledged by pressing the MUTE or MUTE ALL key on the front panel keypad. If the alarm is acknowledged while the lethal condition still exists, the audio portion of the alarm will be muted for the duration that is selected from the “Mute For” list in the “Alarm Setup” menu, but the alarm message will remain in message area A. If a new lethal condition occurs while the initial lethal alarm is muted, the new lethal alarm will not break through and will be muted for the remainder of the mute duration. If the lethal condition is resolved while the alarm is muted, the alarm will be terminated.
“Non-Lethal” Arrhythmia Alarms are priority 2 alarms. These alarms will silence and cancel automatically if the patient's condition is corrected. The PVC Rate Alarm, although considered “non-lethal”, may be set to either priority 1 or 2.
E. ST Alarms
ST alarms can be set for either single lead alarm or dual lead alarm. The ST single lead alarm will be initiated if one ST lead has exceeded the set alarm parameters. The ST dual lead alarm will be initiated if two ST leads have exceeded the set alarm parameters.
F. Indications of Disabled or Silenced Alarms
ALARMS OFF ICON
If both high and low alarms are not set for a parameter, an alarm off icon, resembling a crossed bell, will be displayed next to the numerical data for that parameter.
VOLUME - The audio level of the alarm can be adjusted through the Monitor Setup Menu.

Spectrum® Operating Instructions 0070-10-0648-02 2 - 101
Operations Alarms
ALARM MUTE
One or more alarms can be muted for a programmable length of time. The following is a description of how to enable the different mute modes.
MUTE - This key silences alarms on parameters for a programmed length of time (default is 2 minutes), or until the alarm condition is no longer present, whichever is shorter. Any new alarms that occur during the silenced period will disable the silence and the alarm will sound the tone. An Alarm Mute Icon, resembling a crossed speaker, is displayed next to each muted parameter. A message and digital timer counts down in the upper message area. Pressing MUTE again does not re-enable audio alarms.
MUTE ALL- This key suspends alarms on all parameters for a programmed period of time (default is 2 minutes). An Alarm Mute Icon, resembling a crossed speaker, is displayed next to each parameter. A message and timer appear in the upper message area showing the time remaining. Pressing MUTE ALL at any time re-enables audio alarm tones. If MUTE ALL is set to Permanent the message All alarms muted permanently is displayed.
The time period for MUTE and MUTE ALL is adjustable via the Alarms Setup Menu.
2.6.3 Alarm Troubleshooting
MESSAGE/PROBLEM REASON SOLUTION
High or Low or No Alarm Sound
Alarm limits not set Go to Alarm Setup and adjust alarms
Alarm Mute All, On time has not expired
Press MUTE ALL to reactivate alarms
No Arrhythmia Alarm Sound
Arrhythmia option not installed Call Sales Rep to purchase option
Arrhythmia Alarms off Go to Monitor Setup / Advanced Setup to activate alarm
Monitor is in learning mode Wait until learning is concluded and monitor patient closely
Alarms continue to Sound despite pressing MUTE
More than one alarm is active Press MUTE or MUTE ALL key to silence
Check Patient
No Alarm printout with Alarm violation
Print on Alarm is set to Off Go to Print Menu and set Print on Alarm to On

Trends Operations
2 - 102 0070-10-0648-02 Spectrum® Operating Instructions
2.7 TrendsThree types of trend displays are available with the Spectrum. All trends are accessed via the trends key and can be printed via the internal recorder.
2.7.1 List TrendsThe List Trend display allows the user to view a tabular list of stored patient vital signs and anesthetic gas data. Press the TRENDS key to access this display. A maximum of 120 time-stamped entries may be stored. If the Extended Trend option is installed, a maximum of 500 time-stamped entries may be stored. When the maximum number of entries has been reached, the oldest entry will be deleted from the trend record in order to allow storage of a new entry.
FIGURE 2-59 List Trends
The left side of the List Trend display contains menu items for scrolling and access to other displays. Trend data is listed from newest to oldest. Use the vertical scroll feature to view older data. Use the horizontal scroll feature to view all the columns of data.
NOTE: When scrolling horizontally, the first column of data remains displayed and does not scroll.
Scroll bars along the right and bottom sides of the trend display indicate the position of viewed data in relation to the rest of the database. Upon reopening of the List Trend display, the top of the trend screen will display the most recently viewed data.
The leftmost column of the List Trend display contains markers which indicate that the entry was triggered by an alarm violation or by pressing the MARK EVENT key. These markers are red for priority 1 alarms, yellow for priority 2 alarms, and green if initiated by pressing the MARK EVENT key.

Spectrum® Operating Instructions 0070-10-0648-02 2 - 103
Operations Trends
Trend data in violation of an alarm is also highlighted according to the priority of the alarm. On color displays the data is red for priority 1 alarms and yellow for priority 2 alarms.
If data for a parameter is not available at the time of the trend entry, the data field will be dashed. If an NIBP reading could not be obtained or an invasive pressure channel was not zeroed at the time of the trend entry, the data field will contain “xxx”.
Modification of Parameters DisplayedThe parameters displayed always include the currently active parameters and any others used since the time the patient was admitted to the monitoring system. The default order of parameters displayed from left to right is: HR, NIBP, SpO2, Resp, CO2, IBP1, IBP2, IBP3, IBP4, T1, T2, TBlood, ΔT, O2, Agent, N2O, PVC, CO, CI and SvO2. When CO and CI data is obtained in continuous mode, the label “@Cont” will display next to the data entry in the CO and CI columns. When CO and CI data is obtained in intermittent mode, an “@XX:XX” label will display next to the data entry in the CO and CI columns. This label is a “time stamp” where XX:XX = the time at which the trended data was recorded. To change the order of the parameters displayed, select the Setup Menu from the List Trend Menu. Once in the Setup Menu, change the Format selection from Auto to Manual. Select parameters to be displayed in each of the first 6 columns.
Modification of Trend Entry ConditionsTrend entry conditions may be modified via the Advanced Setup Menu. The Advanced Setup Menu is accessed from the Monitor Setup Menu. Any combination of trend input triggers may be used.
Filtering of List Trend Data DisplayedPressing the MARK EVENT key will cause a Trend Entry.
Data corresponding to MARK EVENT key presses will be included in the displayed data. If the Trend Entry Triggers for Alarms and/or NIBP have been set to On, this data will also always be included.
TREND ENTRY TRIGGER DEFAULT COMMENT
Interval Off Trend entries will occur at the selected time interval
Alarm Off Trend entries will occur when an alarm violation occurs
NIBP On Trend entries will occur whenever an NIBP measurement is made

Trends Operations
2 - 104 0070-10-0648-02 Spectrum® Operating Instructions
Trend entries triggered by the Interval setting above may be filtered out from the displayed List Trend data. To change the amount of interval entries displayed, select Setup from the List Trend Menu. From the Setup Menu, select Display Interval and set as desired. The choices available for the Display Interval depend on the setting of the Trend Entry Interval setting above. (If the Trend Entry Interval is set to Off, there will be no choices available for Display Interval.)
NOTE: If the Display Interval remains set to Off while the Trend Entry Interval has been set to something other than Off, the trend may appear to clear itself or to have disappeared. This is because the trend has reached the maximum number of entries. New interval data (although not displayed) is causing older trend entries to be deleted from the database.
Transferring List Trend Data Between Different Spectrum MonitorsList and Graph Trend data, along with patient name and demographics may be transferred between Spectrum monitors with a Mindray Transfer Card.
1. Insert the Transfer Card into the PCM2 slot on the right side of the source monitor.
2. Access the Functions Menu of the source monitor, and select Copy patient data to card from the menu. A status message will report completion of the transfer.
3. Remove the card and insert it into the PCM2 slot of the receiving monitor.
4. Access the Functions Menu of the receiving monitor, and select Copy patient data from card. A status message will report completion of the transfer.
NOTE: If the source monitor is equipped with the Extended Trend option and the receiving monitor is not, only the latest 120 trend entries will be transferred from the card.
NOTE: If the latest trend data stored on the card has a time stamp newer than the time displayed on the receiving monitor, data transfer will be prohibited. (This is possible when the time and date settings on the monitors have not been correctly set.)
Clearing Trend DataTo manually clear all trend data, including Graph and OxyCRG trends, choose Clear Trends from the menu. A confirmation prompt will appear. Once cleared, the data cannot be restored.
• All trend data is automatically cleared when the patient is discharged from the monitor.
• All trend data is also cleared if the monitor’s displayed time or date is changed.
Removing the List Trend DisplayThe List Trend display does not automatically time-out and must be manually removed to return to the normal waveform display. To remove the List Trend display, choose Normal Screen from the menu, or press the NORMAL SCREEN key.

Spectrum® Operating Instructions 0070-10-0648-02 2 - 105
Operations Trends
2.7.2 Graph TrendsThe Graph Trend display allows the user to view a graphic summary of stored patient vital signs and anesthetic gas data. To access this display from the normal monitoring screen, press the TRENDS key twice. To access this display from the List Trends display, press the TRENDS key once. This display may also be accessed from other trend displays via menu selection.
FIGURE 2-60 Graph Trends
The left side of the Graph Trend display contains menu items for scrolling, setup and access to other displays. The Graph Trend data window contains up to 4 parameter displays. Use the vertical Scroll feature to view other parameters.
NOTE: When scrolling vertically, the topmost parameter remains displayed and does not scroll.
Time stamps are included at the top of the window, with the most recent data appearing at the right end. Use the horizontal Scroll feature to move the cursor though time. Scroll bars along the right and bottom sides of the Graph Trend display indicate the position of viewed data in relation to the rest of the database. The Event feature may be used to scroll quickly between events (caused by Alarm entries and MARK EVENT keypresses).
The Rescale Waves feature automatically rescales the viewed parameters’ graphs so all data is displayed. The Zoom feature may be used to adjust the amount of time shown in the trend window.
The top line of the Graph Trend display contains markers which indicate if the entry was triggered by an alarm violation or by pressing the MARK EVENT key. These markers are red for priority 1 alarms, yellow for priority 2 alarms, and green if initiated by pressing the MARK EVENT key.

Trends Operations
2 - 106 0070-10-0648-02 Spectrum® Operating Instructions
As the cursor is scrolled horizontally, the digital data corresponding to the points in the graph is shown at the right side of the window. Trend data in violation of an alarm is highlighted according to the priority of the alarm.
On color displays:
• Priority 1 alarm data is shown in inverse video with red background.
• Priority 2 alarm data is shown in inverse video with yellow background.
If data for a parameter is not available at the time of the trend entry, the data field will be dashed. If an NIBP reading could not be obtained or an invasive pressure channel was not zeroed at the time of the trend entry, the data field will contain “xxx”.
Modification of Parameters DisplayedThe parameters displayed always include the currently active parameters and any others used since the time the patient was admitted to the monitoring system. The default order of parameters displayed from top to bottom is: HR, NIBP, SpO2, Resp, CO2, IBP1, IBP2, IBP3, IBP4, ST1, ST2, ST3, ST4, ST5, ST6, ST7, ST8, ST9, ST10, ST11, ST12, T1, T2, TBlood, ΔT, O2, Agent, N2O, PVC/min, CO, CI, and SvO2. To change the order of the parameters displayed, select the Setup Menu from the Graph Trend Menu. Once in the Setup Menu, change the Format selection from Auto to Manual. Select parameters to be displayed in each of the top 5 rows.
Modification of Trend Entry ConditionsThe Graph Trend data is the same as that stored for List Trends, arranged graphically. (If data is not available for time period, it appears as a gap in the Graph Trend.) Refer to the previous section (List Trend) for modification of trend entry conditions.
Transferring Graph Trend Data Between DifferentSpectrum MonitorsGraph Trend data is transferred together with List Trend and patient name and demographics. Refer to the List Trend section for details.
Clearing Trend DataTo manually clear all trend data, including List and OxyCRG trends, choose Clear Trends from the menu. A confirmation prompt will appear. Once cleared, the data cannot be restored.
• All trend data is automatically cleared when the patient is discharged from the monitor.
• All trend data is also cleared if the monitor’s displayed time or date is changed.
Removing the Graph Trend DisplayThe Graph Trend display does not automatically time-out and must be manually removed to return to the normal waveform display. To remove the Graph Trend display, choose Normal Screen from the menu, or press the NORMAL SCREEN key.

Spectrum® Operating Instructions 0070-10-0648-02 2 - 107
Operations Trends
2.7.3 OxyCRG TrendsThe OxyCRG (Oxygen Cardiorespirogram) display allows the user to view a continuously updated graphic summary of 5 specific patient vital signs. This display is available for Neonate and Pediatric patient sizes only. To access this display from the normal monitoring screen, press the TRENDS key 3 times. To access this display from the List Trends display, press the TRENDS key twice. To access this display from the Graph Trends display, press the TRENDS key once. This display may also be accessed from the other trend displays via menu selection. A maximum of 6 minutes of data may be stored. If the Extended Trend option is installed, a maximum of 12 hours of data may be stored. When the maximum storage time has been reached, the oldest data will be deleted from the database in order to allow storage of new data.
FIGURE 2-61 OxyCRG Display Menu
The general operation and format of the OxyCRG Menu items and display is the same as for Graph Trend display described previously.
Parameters DisplayedThe parameters displayed are Heart Rate (from ECG source only), SpO2, condensed thoracic impedance respiration wave (with digital rate data), IBP1, and Temperature.
Transferring OxyCRG Data Between Different Spectrum MonitorsOxyCRG data may not be transferred between monitors.
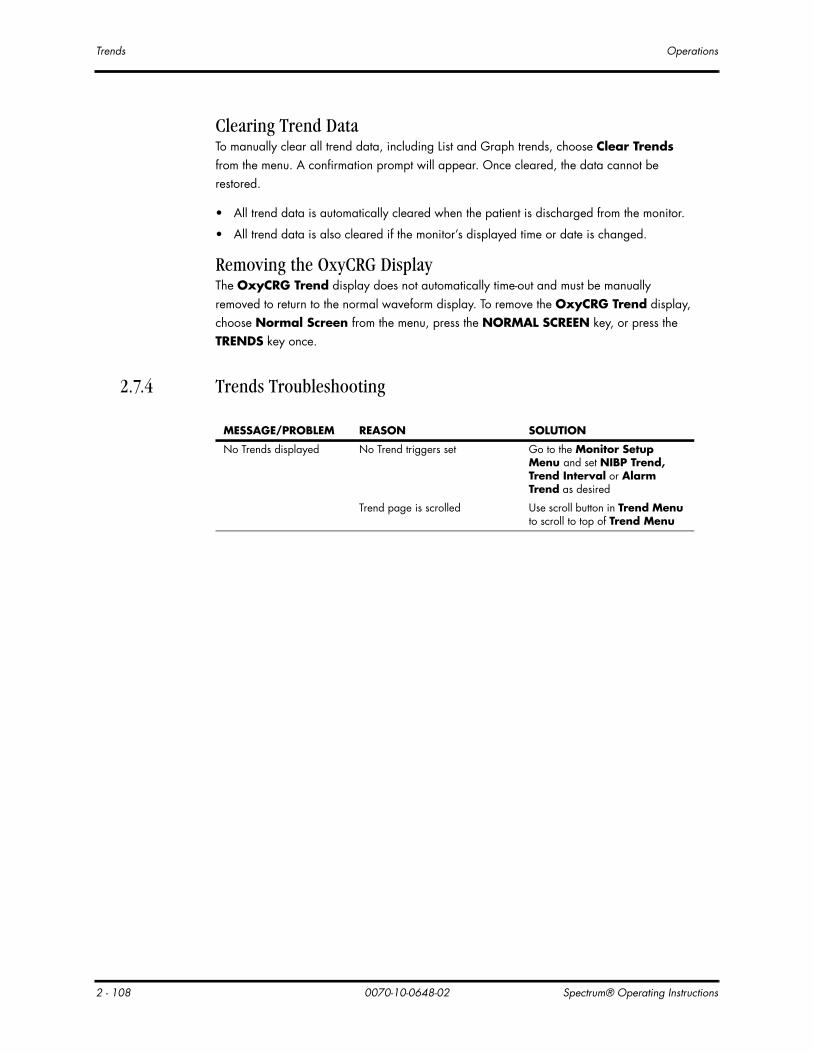
Trends Operations
2 - 108 0070-10-0648-02 Spectrum® Operating Instructions
Clearing Trend DataTo manually clear all trend data, including List and Graph trends, choose Clear Trends from the menu. A confirmation prompt will appear. Once cleared, the data cannot be restored.
• All trend data is automatically cleared when the patient is discharged from the monitor.
• All trend data is also cleared if the monitor’s displayed time or date is changed.
Removing the OxyCRG DisplayThe OxyCRG Trend display does not automatically time-out and must be manually removed to return to the normal waveform display. To remove the OxyCRG Trend display, choose Normal Screen from the menu, press the NORMAL SCREEN key, or press the TRENDS key once.
2.7.4 Trends Troubleshooting
MESSAGE/PROBLEM REASON SOLUTION
No Trends displayed No Trend triggers set Go to the Monitor Setup Menu and set NIBP Trend, Trend Interval or Alarm Trend as desired
Trend page is scrolled Use scroll button in Trend Menu to scroll to top of Trend Menu

Spectrum® Operating Instructions 0070-10-0648-02 2 - 109
Operations Printing (Optional)
2.8 Printing (Optional)Spectrum data and waveforms may be printed to the following destinations: internal recorder, remote central station or to a laser printer (12-lead data only).
FIGURE 2-62 Print Setup Menu
2.8.1 Internal Recorder (Optional)The Spectrum recorder can provide a printed record of all patient parameters. It is a two-trace thermal strip chart recorder with an integral paper spool. The recorder uses plain white thermal paper, 5 cm wide.
NOTE: All grid patterns and data are printed by the recorder.
Operation of the Recorder1. Select the waveforms to print to the recorder via the Print Setup Menu using the
Navigator™ Knob. To change the waveforms that appear, select Waveform 1 or Waveform 2 and choose from the available parameters.
2. To print to the recorder, select Local from the Print Setup Menu.
3. Press the STRIP key to initiate printing.
4. Press the STRIP key again to abort the printout. Select printouts will also require the use of alternate menus or keys.
During an ECG waveform printout, tic marks appear every one second, for reference.
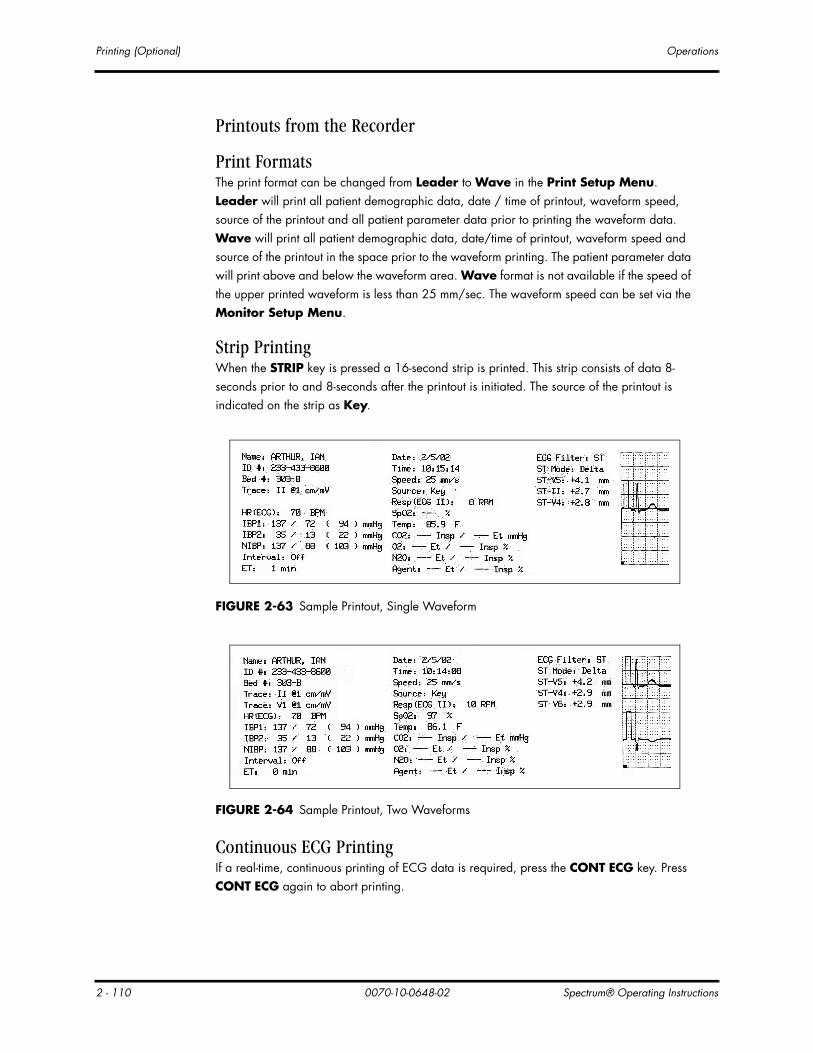
Printing (Optional) Operations
2 - 110 0070-10-0648-02 Spectrum® Operating Instructions
Printouts from the Recorder
Print FormatsThe print format can be changed from Leader to Wave in the Print Setup Menu. Leader will print all patient demographic data, date / time of printout, waveform speed, source of the printout and all patient parameter data prior to printing the waveform data. Wave will print all patient demographic data, date/time of printout, waveform speed and source of the printout in the space prior to the waveform printing. The patient parameter data will print above and below the waveform area. Wave format is not available if the speed of the upper printed waveform is less than 25 mm/sec. The waveform speed can be set via the Monitor Setup Menu.
Strip PrintingWhen the STRIP key is pressed a 16-second strip is printed. This strip consists of data 8-seconds prior to and 8-seconds after the printout is initiated. The source of the printout is indicated on the strip as Key.
FIGURE 2-63 Sample Printout, Single Waveform
FIGURE 2-64 Sample Printout, Two Waveforms
Continuous ECG PrintingIf a real-time, continuous printing of ECG data is required, press the CONT ECG key. Press CONT ECG again to abort printing.

Spectrum® Operating Instructions 0070-10-0648-02 2 - 111
Operations Printing (Optional)
Printing Frozen WaveformsWhen waveforms are frozen (by pressing the FREEZE key), the recorder will print an 8-second strip of Waveform 1 and Waveform 2 data. The source of the printout is indicated on the strip as Frozen.
Print on AlarmIf a waveform is initiated by an alarm violation, then the internal recorder will initiate a 16-second waveform strip. To activate this feature, go to the Print Setup Menu, highlight the Print on Alarm selection and select Yes. During an alarm printout, the data for the parameter which violated the alarm will be printed in brackets and the portion of the waveform triggering the alarm will have a bar printed above. If the recorder is printing a strip (or trend data) and an alarm is violated, then the currently printing waveform will be aborted and the alarm waveform will be printed. The source of the printout is indicated on the strip as Alarm.
Interval PrintingTo print waveform strips at regular intervals, go to the Print Setup Menu, highlight Print Every and select a time interval to print. The selections are Off, 1, 5, 10, 15, 20, 30 minutes, 1 hour and 2 hours. The source of the printout is indicated on the strip as Periodic.
Trend PrintingTo print any trend data to the recorder, press the PRINT TREND key while the trend is displayed. To abort trend printing, press the PRINT TREND key during the print. The trends available for printing are: List Trend, Graph Trend and OxyCRG Trend.
List Trend prints digital data information while Graph Trend and OxyCRG print graphic representations of the data in the respective menus.
FIGURE 2-65 Sample Printout, List Trend Format
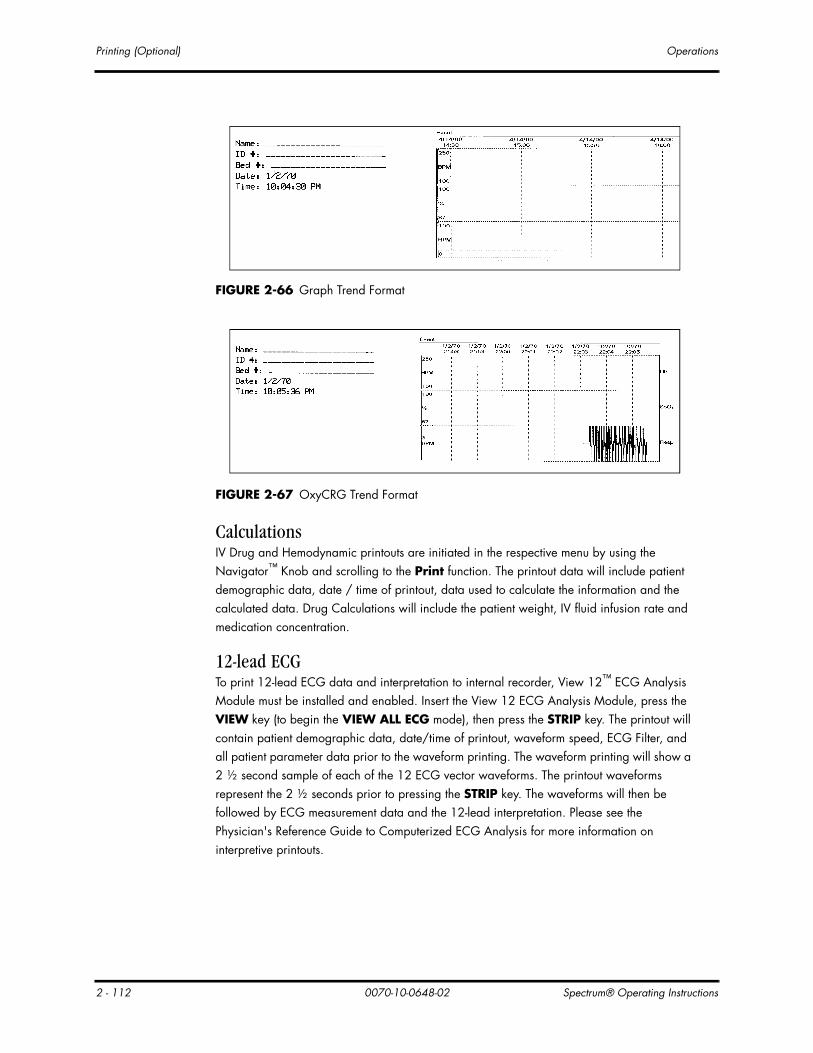
Printing (Optional) Operations
2 - 112 0070-10-0648-02 Spectrum® Operating Instructions
FIGURE 2-66 Graph Trend Format
FIGURE 2-67 OxyCRG Trend Format
CalculationsIV Drug and Hemodynamic printouts are initiated in the respective menu by using the Navigator™ Knob and scrolling to the Print function. The printout data will include patient demographic data, date / time of printout, data used to calculate the information and the calculated data. Drug Calculations will include the patient weight, IV fluid infusion rate and medication concentration.
12-lead ECGTo print 12-lead ECG data and interpretation to internal recorder, View 12™ ECG Analysis Module must be installed and enabled. Insert the View 12 ECG Analysis Module, press the VIEW key (to begin the VIEW ALL ECG mode), then press the STRIP key. The printout will contain patient demographic data, date/time of printout, waveform speed, ECG Filter, and all patient parameter data prior to the waveform printing. The waveform printing will show a 2 ½ second sample of each of the 12 ECG vector waveforms. The printout waveforms represent the 2 ½ seconds prior to pressing the STRIP key. The waveforms will then be followed by ECG measurement data and the 12-lead interpretation. Please see the Physician's Reference Guide to Computerized ECG Analysis for more information on interpretive printouts.
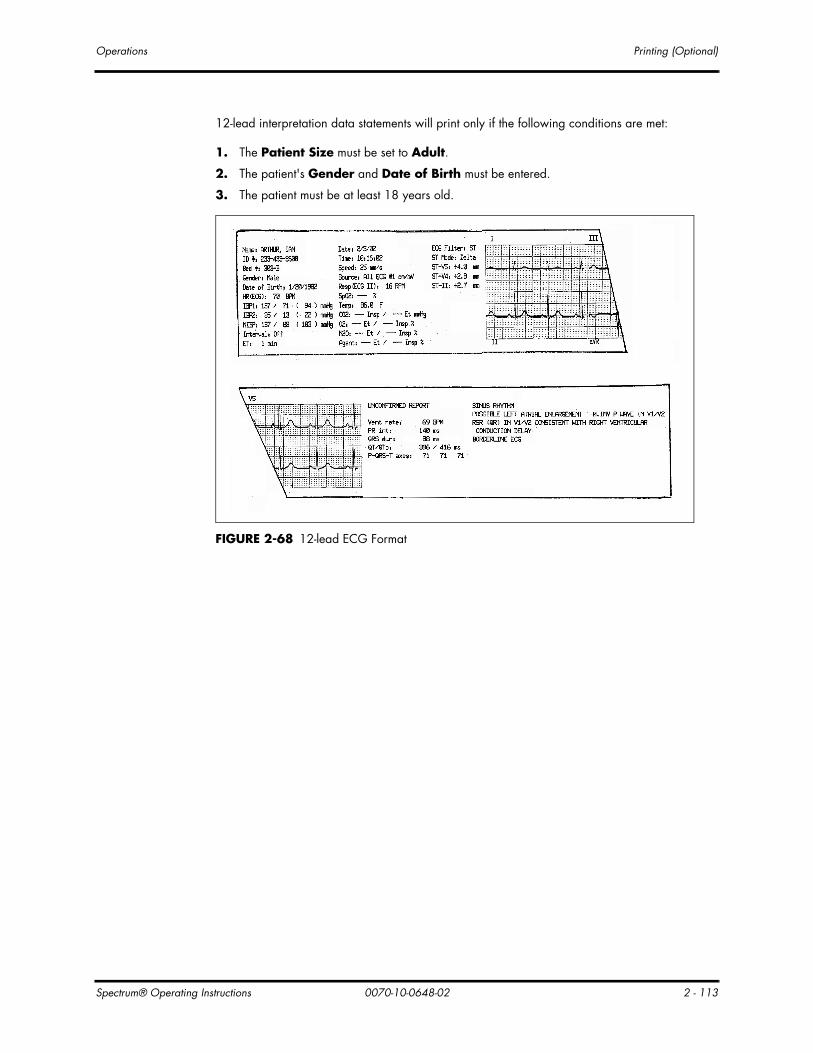
Spectrum® Operating Instructions 0070-10-0648-02 2 - 113
Operations Printing (Optional)
12-lead interpretation data statements will print only if the following conditions are met:
1. The Patient Size must be set to Adult.
2. The patient's Gender and Date of Birth must be entered.
3. The patient must be at least 18 years old.
FIGURE 2-68 12-lead ECG Format

Printing (Optional) Operations
2 - 114 0070-10-0648-02 Spectrum® Operating Instructions
Average ST ComplexTo print the Average ST Complex, use the Navigator™ Knob to select Average ST Complex from the Print Setup Menu. This function is only available when the View 12™ ECG Analysis Module is enabled and ST Analysis is occurring. The internal recorder will print the patient's demographic data, date/time of printout, waveform speed and source of the printout in the space prior to the waveform printing. The recorder will print the average ST complex (waveform) for each of the 12 ECG vectors, followed by the digital information associated with each waveform.
FIGURE 2-69 Average ST Complex Format
Cardiac OutputPrinting Cardiac Output waveforms and data is initiated from the Cardiac Output Menu by selecting Print Runs. Only valid Cardiac Output runs will be printed. The printout data will include patient demographic data, date of printout and patient parameter data prior to printing the waveform data. Following the digital information, up to five (5) Cardiac Output runs with time, Cardiac Output data and Cardiac Index data will be printed, followed by the Average Cardiac Output / Cardiac Index and catheter-specific data.
NOTE: Cardiac Output report printing from the recorder is only available if the CO Source is the EPM.

Spectrum® Operating Instructions 0070-10-0648-02 2 - 115
Operations Printing (Optional)
PAWPTo print PAWP (Pulmonary Artery Wedge Pressure) waveforms access the PAWP Menu and select Print Wedge. This printout is continuous and will only be aborted by pressing the PRINT WEDGE key again or by running out of recorder paper. The printout data will include patient demographic data, time/date of printout, and waveform speed just prior to printing the waveform data. Following the digital information, 2 waveforms will print continuously. These waveforms are the top two (2) waveforms appearing in the Wedge Menu. The printed strip will be annotated with the waveform names and scales every 18 seconds.
Laser Printing 12-leadPrinting 12-lead data to a laser printer is similar to the printing of the data to the recorder. The data will print Landscape orientation to the laser printer to pre-grid laser printer paper. The printout will include, in addition to the data on a recorder strip, a 10-second rhythm strip of Lead II.
NOTE: Printing 12-lead to a laser printer is not available when “WMTS Enabled” is set to “Yes” in the Installation Menu.
FIGURE 2-70 12-lead Laser Format
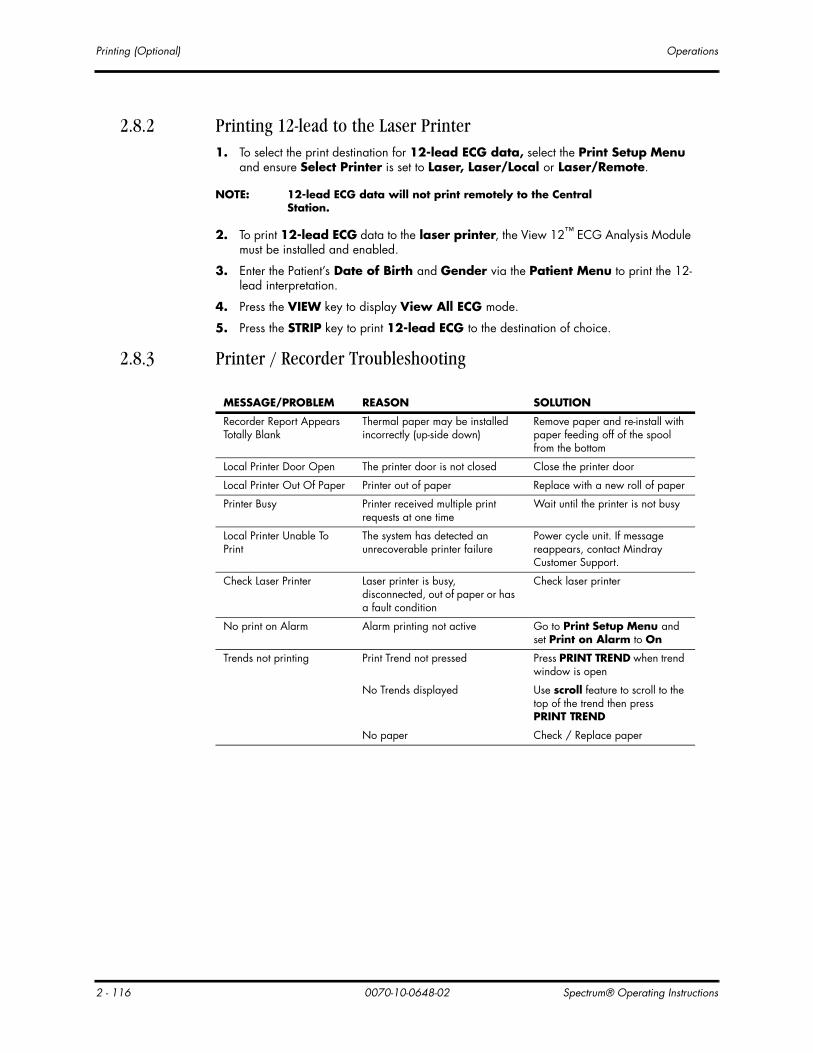
Printing (Optional) Operations
2 - 116 0070-10-0648-02 Spectrum® Operating Instructions
2.8.2 Printing 12-lead to the Laser Printer1. To select the print destination for 12-lead ECG data, select the Print Setup Menu
and ensure Select Printer is set to Laser, Laser/Local or Laser/Remote.
NOTE: 12-lead ECG data will not print remotely to the Central Station.
2. To print 12-lead ECG data to the laser printer, the View 12™ ECG Analysis Module must be installed and enabled.
3. Enter the Patient’s Date of Birth and Gender via the Patient Menu to print the 12-lead interpretation.
4. Press the VIEW key to display View All ECG mode.
5. Press the STRIP key to print 12-lead ECG to the destination of choice.
2.8.3 Printer / Recorder Troubleshooting
MESSAGE/PROBLEM REASON SOLUTION
Recorder Report Appears Totally Blank
Thermal paper may be installed incorrectly (up-side down)
Remove paper and re-install with paper feeding off of the spool from the bottom
Local Printer Door Open The printer door is not closed Close the printer door
Local Printer Out Of Paper Printer out of paper Replace with a new roll of paper
Printer Busy Printer received multiple print requests at one time
Wait until the printer is not busy
Local Printer Unable To Print
The system has detected an unrecoverable printer failure
Power cycle unit. If message reappears, contact Mindray Customer Support.
Check Laser Printer Laser printer is busy, disconnected, out of paper or has a fault condition
Check laser printer
No print on Alarm Alarm printing not active Go to Print Setup Menu and set Print on Alarm to On
Trends not printing Print Trend not pressed Press PRINT TREND when trend window is open
No Trends displayed Use scroll feature to scroll to the top of the trend then press PRINT TREND
No paper Check / Replace paper

Spectrum® Operating Instructions 0070-10-0648-02 2 - 117
Operations Connection to PatientNet® Central Station
2.9 Connection to PatientNet® Central StationThe Spectrum can be connected to the PatientNet Central Stations via direct hardwire or telemetry connection using the Comm-Port. Access the Installation Menu and set a Serial Port to PatientNet to enable PatientNet.
The interface allows the Spectrum waveforms and data to be displayed at the PatientNet Central Station. The interface also enables the Spectrum to Admit to, Discharge from, and print at the PatientNet Central Station.
NOTE: Pressing the VIEW key does not affect the waveforms being transmitted to the Central Station.
NOTE: See the PatientNet Operating Instructions for more details on PatientNet Operation.
NOTE: See Administrative Guide for the PatientNet Central Station, for more detail.

Connection to Panorama™ Central Station Operations
2 - 118 0070-10-0648-02 Spectrum® Operating Instructions
2.10 Connection to Panorama™ Central StationThe Spectrum will communicate with the Panorama Central Station via direct hardwire to an appropriate Comm-Port or via a wireless network. The “Enable Network” option in the System Information menu must be set to “Wired” when using a hardwire Spectrum. “Enable Network” must be set to “Wireless” for communication between the Spectrum and the Panorama via the 2.4 GHz wireless Symbol radio card. “WMTS Enabled” must be set to “Yes” to allow for communication between the Spectrum and the Panorama via the Panorama Instrument Radio - 608.
Refer to the Panorama Operating Instructions Manual for a list of supported parameters.
The Spectrum is capable of transmitting a discharge command to a Panorama Central Station. It is also capable of bi-directional transmission of patient demographics and patient alarm settings with a Panorama Central Station.
When the Panorama Central is selected for operation, the Patient Discharge menu selections will vary as follows:
• For Main Module Software Versions H.xx and earlier, “Discharge From Central” and “Discharge From Both” will be displayed.
• For Main Module Software Versions J.xx and later, “Discharge From Both” will be displayed.
When “Discharge From Central” or “Discharge From Both” are selected from the Patient Discharge menu, the Panorama will discharge the patient.
If Trend is cleared or the patient is discharged at the Spectrum, the Spectrum time and date will be synchronized with the Panorama Central Station time and date.
NOTE: If the Edwards Vigilance® Monitor is the source for CO, CCO, CI, CCI, SvO2, T Blood and ΔT measurements, this data will not be available at the Panorama Central Station.
NOTE: If a Spectrum 608 radio is communicating with a Panorama Central Station, Gas Module data and alarms, V2 - V6 waveform data and ST templates are not displayed at the Central Station.

Spectrum® Operating Instructions 0070-10-0648-02 2 - 119
Operations Connection to Panorama™ Gateway
2.11 Connection to Panorama™ GatewayThe Spectrum can communicate with an EMR system through a Panorama Gateway via a hardwired network connection to a Comm-Port with a CS1 port or via wireless connection through a Panorama Central Monitoring System. The “Enable Network” option in the Spectrum System Information menu must be set to “Wired” when using a hardwire Spectrum. “Enable Network” must be set to “Wireless” to allow for wireless communication through a Panorama Central Station via the 2.4 GHz wireless Symbol radio card. “WMTS Enabled” must be set to “Yes” to allow for wireless communication through a Panorama Central Station via the Panorama Instrument Radio - 608.
For the Spectrum to be recognized by the EMR system, certain demographics content, referred to as the “Patient Key”, must be entered from its Patient Menu. Each facility has its own unique “Patient Key” that must be entered before making a connection to the EMR. The “Patient Key” consists of the required ID # and, optionally, one or more of the following Patient Menu demographics fields:
Once the “Patient Key” has been entered, communication with the EMR system must be verified. Since the Panorama Gateway can be purchased with ADT messaging only, Results messaging only or ADT messaging with Results messaging, this verification differs as follows:
ADT messagingFor a Panorama Gateway that has ADT messaging, verify that communication with the EMR system has been established as follows:
• After entering the “Patient Key” in the Patient Menu, select Normal Screen to close the menu.
• If demographics information corresponding to the following fields was not part of the “Patient Key” but is entered into the EMR system, these fields in the Patient Menu should auto-populate upon re-opening the menu:
• In addition, the First Name and Last Name should populate in the upper right of the display.
• If the fields do not auto-populate, verify that the “Patient Key” has been correctly entered and that the patient demographics have been entered in the EMR system. If the fields still do not auto-populate, contact the EMR administrator.
Results messagingFor facilities with a Panorama Gateway that has Results messaging, verify that communication with the EMR system has been established by checking the charting system to ensure that vital signs data has been uploaded. If the charting system is not displaying the information, contact the EMR administrator.
• First name • Last name • Bed #
• First name • Last name • Bed #
• Date of Birth • Gender

Monitor/Display Troubleshooting Operations
2 - 120 0070-10-0648-02 Spectrum® Operating Instructions
2.12 Monitor/Display Troubleshooting
MESSAGE/PROBLEM REASON SOLUTION
No trace for a desired parameter
Improper attachment of transducer or cable to monitor
Check transducer / cable connection.
Faulty transducer or cable. Try a new transducer or cable.
Trace Not Moving FREEZE key may have been pressed.
Press the FREEZE key to unfreeze the trace.
Display Appears to be Off Mains power switch may not be on.
Check mains power switch on side panel.
Unit may not be plugged into an AC outlet.
Check power cord (Is it plugged in?)
If used as a portable, battery pack may be drained.
If battery pack is drained, plug into an AC outlet to recharge the battery. A period of 5 hours is required for a full charge of lithium-ion batteries. A period of 16 hours is required for a full charge of sealed lead acid batteries.
12-lead card removed without disabling 12-lead.
Always disable 12-lead card prior to removal.
Power unit back on.Contact Mindray Customer Support.
Disabled Alarm Tone MUTE key pressed. Check for alarm mute symbol and message.
Beep volume low. Increase beep volume.
Cooling Fan Failure The unit running on AC power and the cooling fan is not operational.
Contact Mindray Customer Support.
Patient Information did not appear on display
No data entered. Enter proper patient data.
Done was not selected from keypad after entering data.
Go to the proper keypad enter data, select Done when finished.
Incorrect Date or Time Data not entered or entered incorrectly.
Follow instructions from “How to Set the Clock / Date and Time”.

Spectrum® Operating Instructions 0070-10-0648-02 3 - 1
3.0 User Maintenance
3.1 IntroductionThis section of the manual outlines routine user maintenance guidelines.
The Spectrum Monitor is designed for stable operation over long periods of time. Under normal circumstances the monitor should not require technical maintenance beyond that described in this section. However, routine maintenance, calibration and safety checks are recommended at least once a year or more often as required by local statutory or hospital administration practice.
3.2 Care and Cleaning of MonitorThe monitor enclosure may be cleaned with a mild soap and water solution or ammoniated window cleaner. Apply cleaning solution to the cloth, not directly onto the monitor. DO NOT apply large amounts of liquid. DO NOT use abrasive cleaning agents or organic solvents.
WARNING: Do not clean the monitor while it is on and/or plugged in.
To prevent scratches on the screen carefully brush dust and dirt particles with a soft sponge moistened with cleaning solution or a fine, soft-hair brush. DO NOT use abrasive cleaning materials. Remove fingerprints and stains with a liquid lens cleaner and a soft cloth. DO NOT wipe a dry screen or use alcohol or solvents containing chlorinated hydrocarbon.

Decontamination of Monitor User Maintenance
3 - 2 0070-10-0648-02 Spectrum® Operating Instructions
3.3 Decontamination of MonitorWARNING: Perform the decontamination process with the unit powered
down and power cord removed.
Decontamination of a unit that has come in contact with a biological material can be performed using LpH SE Germicidal detergent. Apply a small amount of detergent to a disposable wipe (paper based) and wipe down the outside of the unit. Discard the wipe appropriately. After waiting 10 minutes, use a clean dry wipe to dry the unit.
CAUTION: During the decontamination process, do not get the LpH SE Germicidal detergent into any vent openings.
3.4 Care and Cleaning of SpO2 Sensors NOTE: Refer to the individual instruction sheets that are packaged
with each sensor.
• Check sensors and cables daily for signs of damage. Replace as required.
• Sensors should be cleaned before and after each new patient.
• Wipe the patient contact area using a soft cloth with mild soap and water solution or isopropyl alcohol. Hydrogen peroxide can be used to remove dried blood.
• Allow the sensor to completely dry before using.
CAUTION: When cleaning sensors, do not use excessive amounts of liquid. Wipe the sensor surface with a soft cloth, dampened with cleaning solution. Do not attempt to sterilize.
Cleaning and Re-use of a Nellcor® SensorSensors may be reattached to the same patient if the emitter and detector windows are clear and the adhesive still adheres to the skin. The adhesive can be partially rejuvenated by wiping with an alcohol wipe and allowing the sensor to thoroughly air dry prior to replacement on the patient.
Do not immerse any Oxisensor®, OxiMax®, Durasensor®, Oxiband®, or Duraform® oxygen transducers, the Nellcor® RS-10 or Max-Fast® oxygen transducers, or any Nellcor® adhesive in water or cleaning solution. Clean Durasensor®, Oxiband®, and Duraform® oxygen transducers, and the Nellcor® RS-10 or Max-Fast® oxygen transducers by wiping with a disinfectant such as a solution containing 70% alcohol. Do not sterilize by irradiation, steam, or ethylene oxide. Use a new Oxiband® adhesive wrap or FORM-A adhesive bandage for each patient. Do not re-sterilize Oxisensor® or OxiMax® oxygen transducers.

Spectrum® Operating Instructions 0070-10-0648-02 3 - 3
User Maintenance Sterilization and Cleaning of Reusable Bladderless Cuffs
3.5 Sterilization and Cleaning of Reusable Bladderless CuffsClean cuffs with warm water and a mild detergent. Do not use a detergent containing hand conditioners, softeners, or fragrances.
NIBP cuffs can be sterilized with gamma sterilization without effecting the repeated performance of the cuff. Steam sterilization is not recommended. Use of a washing liquid containing bleach is not recommended because chlorine will chemically break down the urethane on the inside of the cuff.
Antimicrobial DefinitionMindray bladderless cuffs are treated with an antimicrobial coating. Antimicrobial technology effectively controls a broad spectrum of bacteria, fungi, algae and yeasts on a wide variety of treated substrates.
3.6 Battery Replacement and Maintenance
3.6.1 Battery Replacement1. Open battery compartment door, on left side of unit, by pressing the finger grip area
and sliding the door to the left.
2. Press the release button, located on the right side of the installed battery. This will eject the battery. Slide out and remove battery.
3. Slide in replacement battery until it clicks into place.
4. Close battery compartment door by sliding the door to the right until it firmly clicks into place.
CAUTION: Replace sealed lead acid batteries with Mindray P/N 0146-00-0043 ONLY. Replace lithium-ion batteries with Mindray P/N 0146-00-0069 ONLY.
3.6.2 Battery MaintenanceThe batteries may be subject to local regulations regarding disposal. At the end of the battery life, dispose of the batteries in accordance with any local regulations.
NOTE: Spectrum batteries may only be charged within a Spectrum monitor. Do not attempt to use commercial rechargers.
Sealed Lead AcidDue to the self-discharge characteristics of sealed lead acid batteries, it is imperative that they are charged after 3 months of storage (or unit not in use). If not, permanent loss of capacity may occur as a result of sulfation. Charge retention at 20oC is 6 months to 83%.
Lithium-IonStorage of the lithium-ion batteries depends on temperature, time period and the degree of cell charging state. After 6 months of storage at 23oC, fully charged lithium-ion batteries have a retention capacity of 93%.

Recorder Paper Replacement User Maintenance
3 - 4 0070-10-0648-02 Spectrum® Operating Instructions
3.7 Recorder Paper ReplacementThe instructions below describe the replacement of recorder paper. Use only recommended recorder paper, Mindray part number 0683-00-0422-XX. This ensures that the print quality is acceptable and reduces print head wear.
1. Open recorder door by pressing the paper eject button.
2. Remove empty paper spool.
3. Insert new paper roll between the two rounded tabs of the paper holder with the sensitive (shiny) side of the paper facing the print head at the top of the recorder (paper feeding off of the spool from the bottom).
4. Unroll approximately 4 inches of paper.
5. Align the paper across the top of the roller.
6. Holding the paper in place, close recorder door.
7. To ensure that the paper is aligned properly and has not been pinched in the door, pull the loose edge out a couple of inches. If the paper jams, open the door and return to step 5.
3.8 Care and Storage of Thermal Chart PaperThermal Chart Paper is chemically treated and the permanency of a recording is affected by storage and handling conditions. These conditions are:
• Ultraviolet Light
We recommend storing the recordings in a filing cabinet within a few days of printing. Long term exposure to natural or artificial U.V. sources is detrimental.
• Storage Temperature and Humidity
Keep the recordings in a cool and dry area for a longer lasting image. Extreme temperature and humidity (above 80° F/26° C and 80% Humidity) should be avoided.
• Solvent Reactions
Do not store the recordings in plastic bags, acetate sheet protectors, and similar items made from petroleum products. These products emit a small amount of vapor which will, over a period of time, deteriorate the image on the chart paper.
• Adhesive Tape
Never place adhesive tape over recordings. The reaction between the adhesive compound and the chemical/thermal paper can destroy the image within hours.
• Archives
We recommend that if long term archives are required, make a photocopy of the recordings as back-up. Under normal office filing conditions the recordings should retain acceptable image quality for about 5 years.

Spectrum® Operating Instructions 0070-10-0648-02 3 - 5
User Maintenance Care and Cleaning of Gas Module
3.9 Care and Cleaning of Gas Module
3.9.1 Gas Module II and Gas Module SE
WARNING: Do not clean the Gas Module while it is on and/or plugged in.
1. The Gas Module enclosure may be cleaned with a mild soap and water solution or ammoniated window cleaner. Apply cleaning solution to the cloth, not directly onto the Gas Module. DO NOT apply large amounts of liquid. DO NOT use abrasive cleaning agents or organic solvents.
CAUTION: The internal sampling system of the Gas Module does not need to be cleaned or sterilized. There is no reverse flow back to the patient. If the internal sampling system is suspected to be clogged or dirty, the module should be serviced by an authorized service person only.
2. The fan dust filter should be checked and cleaned on a regular basis, at least once every two months.
• Locate fan on front panel.
• Remove the filter by pulling the dust filter cover.
• Remove the dust from the filter.
• Let the filter soak in a mild detergent solution.
• Rinse the filter and let dry completely before re-installing.
CAUTION: If the dust filter for the fan cannot be cleaned or is damaged, replace it with part number 0378-00-0040. Use of another type of filter may decrease the cooling effectivity and cause damage to the Gas Module.
3. The Water Trap Reservoir must be checked and emptied whenever changing patients or if it is more than half full.
• To remove the water trap, push the water trap latch to the right. The water trap is spring loaded and will pop out. An Air Leak message will be displayed. The monitor will suspend sampling.
• Detach the reservoir from the water trap assembly by pulling it down carefully.
• Empty the reservoir and rinse with water only.
• Re-attach the reservoir to the assembly tightly.
• Re-install the whole unit into the Gas Module making sure the latch is set. Check that the Air Leak message disappears and monitoring resumes.
NOTE: Do not disinfect or open the water trap. If an occlusion message appears, it may be necessary to replace the water trap assembly (P/N 0202-00-0129).
NOTE: The Water Trap Assembly must be replaced every two months.

Care and Cleaning of Gas Module User Maintenance
3 - 6 0070-10-0648-02 Spectrum® Operating Instructions
3.9.2 Gas Module 3
WARNING: Do not clean the Gas Module while it is on and/or plugged in.
1. The Gas Module enclosure may be cleaned with a mild soap and water solution or ammoniated window cleaner. Apply cleaning solution to the cloth, not directly onto the Gas Module. DO NOT apply large amounts of liquid. DO NOT use abrasive cleaning agents or organic solvents.
CAUTION: The internal sampling system of the Gas Module does not need to be cleaned or sterilized. There is no reverse flow back to the patient. If the internal sampling system is suspected to be clogged or dirty, the module should be serviced by an authorized service person only.
2. The DRYLINE™ Water Trap Assembly consists of a filter housing and reservoir that must be checked and emptied whenever changing patients or if it is more than half full.
WARNING: The contents of the water trap should be handled as a potential infection hazard.
NOTE: Replace the complete DRYLINE™ Water Trap Assembly every month or more often if indicated on the monitor.
• To remove the DRYLINE™ Water Trap Assembly from its receptacle, press the lugs on its sides and pull out. An Air Leak message will be displayed. The monitor will suspend sampling.
• Detach the reservoir from the filter housing by twisting and separating these two parts.
• Empty the reservoir and rinse with water only.
• Tightly re-attach the reservoir to the filter housing.
• Re-install the DRYLINE™ Water Trap Assembly into the Gas Module, ensuring that it snaps into place. Check that the Air Leak message disappears and monitoring resumes.
NOTE: Only the reservoir of the DRYLINE™ Water Trap Assembly may be cleaned and/or disinfected.
NOTE: If an “Occlusion” message appears, it may be necessary to replace the DRYLINE™ Water Trap Assembly (Adult/Pediatric P/N 0202-00-0182-10; Neonate P/N 0202-00-0181-10).

Spectrum® Operating Instructions 0070-10-0648-02 3 - 7
User Maintenance Care and Cleaning of 3 and 5-lead ECG Cables and Leadwires
3.10 Care and Cleaning of 3 and 5-lead ECG Cables and LeadwiresRecommended cleaning method of ECG cables and leadwires is a cloth wipe using ordinary alcohol-free hand soap or USP green soap tincture. When disinfection is required, a cloth wipe using disinfectants such as isopropyl alcohol, chlorine bleach in water (1:10 mixture) or 2% Glutaraldehyde solution (i.e., Cidex) is recommended. After cleaning, the ECG cables and leadwires should be wiped with water using a clean damp cloth then dried with a clean dry cloth.
CAUTION: To avoid permanent damage, do not expose metal components (pins, sockets, snaps) to disinfectants, soaps or chemicals.
NOTE: ECG cables and leadwires must never be immersed, soaked in any fluids, and they should not be cleaned with harsh chemicals such as acetone or non-diluted bleach.
NOTE: Do not autoclave, radiation or steam sterilize ECG cables or leadwires.
NOTE: Extended exposure to Ethylene Oxide gas may shorten life of the ECG cables and leadwires, leading to poor signal quality.
3.11 Care and Cleaning of View 12™ ECG Analysis ModuleClean cables and leadwires using a cloth wipe and warm water. Use a dry, clean cloth to dry leadwires and cables before placing them on a patient. Do not use alcohol to clean the View 12 ECG Analysis Module. Alcohol or other harsh chemicals will cause the cables and leadwires to become brittle or harden, causing damage.
NOTE: The View 12 ECG Analysis Module must never be immersed or soaked in any fluids.

Care and Cleaning of View 12™ ECG Analysis Module User Maintenance
3 - 8 0070-10-0648-02 Spectrum® Operating Instructions
This page intentionally left blank.

Spectrum® Operating Instructions 0070-10-0648-02 4 - 1
4.0 Accessories
4.1 Optional Accessories
4.1.1 NIBP Accessories
Hoses/Adapters
DESCRIPTION PART NUMBERS
NIBP Hose, 60” (1.5 m), Female Rectus to Female Rectus 0683-04-0003
NIBP Hose, 138” (3.5 m), Female Rectus to Female Rectus 0683-04-0004
NIBP Hose, Neonate 60” (1.5 m), Female Luer to Female Rectus(for use with disposable neonate cuffs)
0683-04-0005
Color Coded Reusable Cuffs (with Quick-Connect fittings)
DESCRIPTION PART NUMBER
Variety Kit I, 6 cuffs [(1) Small Child, (1) Child, (1) Small Adult, (1) Adult, (1) Large Adult, (1) Adult Thigh]
0020-00-0082-31
Variety Kit II, 6 cuffs [(1) Small Adult, (2) Adult, (2) Large Adult,(1) Adult Thigh]
0020-00-0082-33
Variety Kit III, 6 cuffs [(1) Small Child, (2) Child, (3) Small Adult] 0020-00-0082-32
Adult Thigh, Brown (45 - 56.5 cm circumference) 0998-00-0003-56
Large Adult Long, Burgundy (35.5 - 46 cm arm circumference) 0998-00-0003-58
Large Adult, Burgundy (35.5 - 46 cm arm circumference) 0998-00-0003-55
Adult Long, Navy Blue (27.5 - 36.5 cm arm circumference) 0998-00-0003-57
Adult, Navy Blue (27.5 - 36.5 cm arm circumference) 0998-00-0003-54
Small Adult, Light Blue (20.5 - 28.5 cm arm circumference) 0998-00-0003-53
Child, Green (13.8 - 21.5 cm arm circumference) 0998-00-0003-52
Small Child, Orange (9 - 14.8 cm arm circumference) 0998-00-0003-51

Optional Accessories Accessories
4 - 2 0070-10-0648-02 Spectrum® Operating Instructions
4.1.2 Oximetry Sensors and Accessories
4.1.2.1 Pulse Oximetry-Masimo SET® LNOP® SpO2
Disposable Cuffs (with Quick-Connect fittings)
DESCRIPTION PART NUMBER
Adult Thigh, White/Brown (5/box) (45 - 56.5 cm circumference) 0683-07-0036-01
Large Adult Long, White/Burgundy (10/box) (35.5 - 46 cmarm circumference)
0683-07-0038-01
Large Adult, White/Burgundy (10/box) (35.5 - 46 cm arm circumference) 0683-07-0035-01
Adult Long, White/Navy Blue (10/box) (27.5 - 36.5 cmarm circumference)
0683-07-0037-01
Adult, White/Navy Blue (10/box) (27.5 - 36.5 cm arm circumference) 0683-07-0034-01
Small Adult, White/Light Blue (10/box) (20.5 - 28.5 cmarm circumference)
0683-07-0033-01
Child, White/Green (10/box) (13.8 - 21.5 cm arm circumference) 0683-07-0032-01
Small Child, White/Orange (10/box) (9 - 14.8 cm arm circumference) 0683-07-0031-01
Disposable Neonatal NIBP Cuffs - Quick Connect*
DESCRIPTION PART NUMBERS
Neonatal Size 1: limb circumference 3 – 6 cm, Box of 10 0683-13-0001-01
Neonatal Size 2: limb circumference 5 – 8 cm, Box of 10 0683-13-0002-01
Neonatal Size 3: limb circumference 7 – 10 cm, Box of 10 0683-13-0003-01
Neonatal Size 4: limb circumference 9 – 13 cm, Box of 10 0683-13-0004-01
Neonatal Size 5: limb circumference 12 – 17 cm, Box of 10 0683-13-0005-01
* Disposable neonatal cuffs require NIBP hose part number 0683-04-0003 (1.5 m).
DESCRIPTION PART NUMBER
LNOP® DCI Adult/Pediatric starter kit (one reusable adult sensor, 2 adult and 1 pediatric single patient adhesive sensors and one 12’ cable)
0020-00-0130
LNOP® DCI-Adult reusable finger sensor (with added “flaps” for ambient light shielding and 3’ cable)
0600-00-0047
LNOP® DC-12 Adult direct connect reusable finger sensor with attached 12' cable
0600-00-0120
LNOP® DCIP-Pediatric/slender digit reusable finger sensor 0600-00-0063
LNOP® TCI Tip Clip Ear Sensor 0600-00-0110
Ear Clip 0600-00-0086
Ear Hanger (pkg of 5) 0600-00-0087
LNOP® YI-Multisite reusable sensor 0600-00-0078
Multisite wrap (box of 100) 0600-00-0081
Multisite wrap, foam (pkg of 12) 0600-00-0083
LNOP® DCSC-Adult spot check reusable sensor 0600-00-0077
PC08-SpO2 cable (2.44 m./8’) 0012-00-1099-01
PC12-SpO2 cable (3.66 m./12’) 0012-00-1099-02
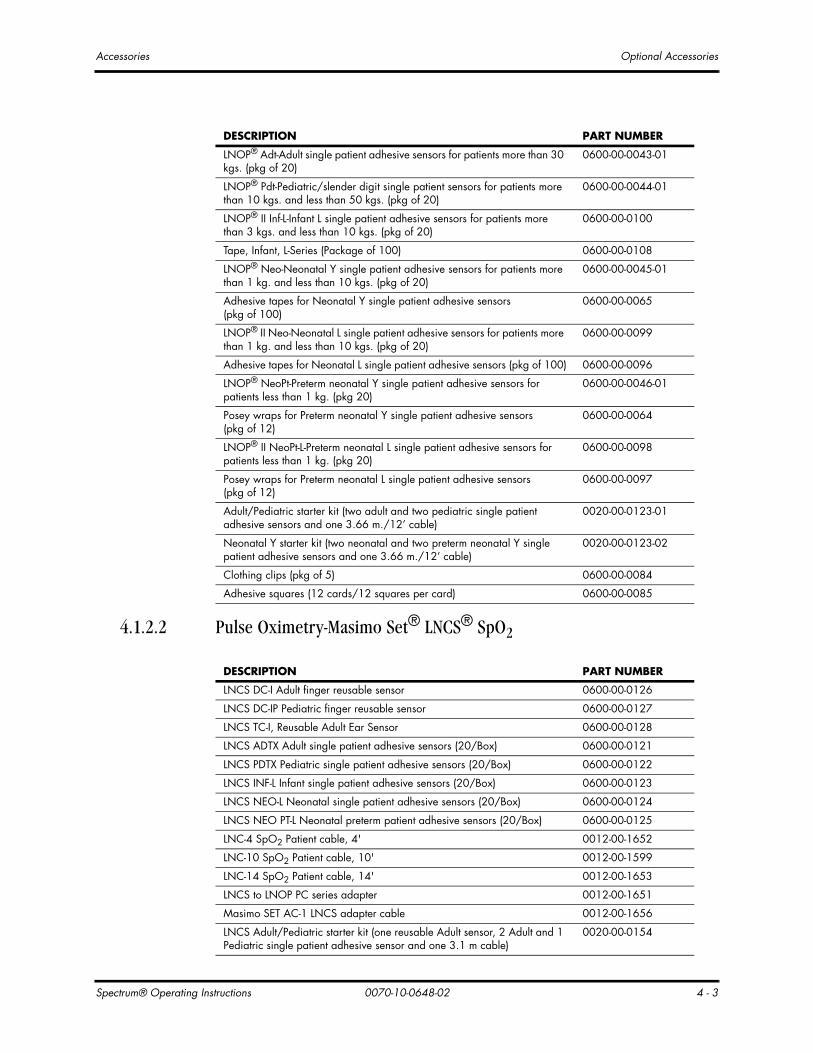
Spectrum® Operating Instructions 0070-10-0648-02 4 - 3
Accessories Optional Accessories
4.1.2.2 Pulse Oximetry-Masimo Set® LNCS® SpO2
LNOP® Adt-Adult single patient adhesive sensors for patients more than 30 kgs. (pkg of 20)
0600-00-0043-01
LNOP® Pdt-Pediatric/slender digit single patient sensors for patients more than 10 kgs. and less than 50 kgs. (pkg of 20)
0600-00-0044-01
LNOP® II Inf-L-Infant L single patient adhesive sensors for patients more than 3 kgs. and less than 10 kgs. (pkg of 20)
0600-00-0100
Tape, Infant, L-Series (Package of 100) 0600-00-0108
LNOP® Neo-Neonatal Y single patient adhesive sensors for patients more than 1 kg. and less than 10 kgs. (pkg of 20)
0600-00-0045-01
Adhesive tapes for Neonatal Y single patient adhesive sensors(pkg of 100)
0600-00-0065
LNOP® II Neo-Neonatal L single patient adhesive sensors for patients more than 1 kg. and less than 10 kgs. (pkg of 20)
0600-00-0099
Adhesive tapes for Neonatal L single patient adhesive sensors (pkg of 100) 0600-00-0096
LNOP® NeoPt-Preterm neonatal Y single patient adhesive sensors for patients less than 1 kg. (pkg 20)
0600-00-0046-01
Posey wraps for Preterm neonatal Y single patient adhesive sensors(pkg of 12)
0600-00-0064
LNOP® II NeoPt-L-Preterm neonatal L single patient adhesive sensors for patients less than 1 kg. (pkg 20)
0600-00-0098
Posey wraps for Preterm neonatal L single patient adhesive sensors(pkg of 12)
0600-00-0097
Adult/Pediatric starter kit (two adult and two pediatric single patient adhesive sensors and one 3.66 m./12’ cable)
0020-00-0123-01
Neonatal Y starter kit (two neonatal and two preterm neonatal Y single patient adhesive sensors and one 3.66 m./12’ cable)
0020-00-0123-02
Clothing clips (pkg of 5) 0600-00-0084
Adhesive squares (12 cards/12 squares per card) 0600-00-0085
DESCRIPTION PART NUMBER
DESCRIPTION PART NUMBER
LNCS DC-I Adult finger reusable sensor 0600-00-0126
LNCS DC-IP Pediatric finger reusable sensor 0600-00-0127
LNCS TC-I, Reusable Adult Ear Sensor 0600-00-0128
LNCS ADTX Adult single patient adhesive sensors (20/Box) 0600-00-0121
LNCS PDTX Pediatric single patient adhesive sensors (20/Box) 0600-00-0122
LNCS INF-L Infant single patient adhesive sensors (20/Box) 0600-00-0123
LNCS NEO-L Neonatal single patient adhesive sensors (20/Box) 0600-00-0124
LNCS NEO PT-L Neonatal preterm patient adhesive sensors (20/Box) 0600-00-0125
LNC-4 SpO2 Patient cable, 4' 0012-00-1652
LNC-10 SpO2 Patient cable, 10' 0012-00-1599
LNC-14 SpO2 Patient cable, 14' 0012-00-1653
LNCS to LNOP PC series adapter 0012-00-1651
Masimo SET AC-1 LNCS adapter cable 0012-00-1656
LNCS Adult/Pediatric starter kit (one reusable Adult sensor, 2 Adult and 1 Pediatric single patient adhesive sensor and one 3.1 m cable)
0020-00-0154

Optional Accessories Accessories
4 - 4 0070-10-0648-02 Spectrum® Operating Instructions
4.1.2.3 Pulse Oximetry-Nellcor® OxiMax® SpO2*
4.1.3 Oridion CO2 Accessories
LNCS Neonatal disposable starter kit (2 Neonate and 2 Neonate PreTerm single patient adhesive sensors and one 3.1 m cable)
0020-00-0155
LNCS Adult/Pediatric disposable starter kit (2 Adult and 2 Pediatric single patient adhesive sensors and one 3.1 m cable)
0020-00-0156
DESCRIPTION PART NUMBER
DESCRIPTION PART NUMBER
Reusable sensor 0600-00-0051
SpO2 cable, DOC-10, OxiMax 0012-00-1464
Disposable OxiMax Sensor Kit (2 adult/2 neonatal) 0600-00-0103
* Oximetry-Nellcor® OxiMax® SpO2 Replacement sensors are available from Nellcor-Puritan Bennett. Phone: 1 800 NELLCOR or WWW.NELLCOR.COM
DESCRIPTION PART NUMBERS
Filterline Set (short term), Adult/Pediatric (box of 25) 0683-00-0470-25
Filterline Set, High Humidity, Infant/Neonatal (box of 25) 0683-00-0490-25
Filterline Set, High Humidity, Adult/Pediatric (box of 25) 0683-00-0469-25
Smart CapnoLine™ Oral Nasal Cannula Pediatric (box of 25) 0683-00-0495-25
Smart CapnoLine™ O2/CO2 Oral Nasal Cannula Adult (box of 25) 0683-00-0496-25
Smart CapnoLine™ O2/CO2 Oral Nasal Cannula Pediatric (box of 25) 0683-00-0498-25
Smart CapnoLine Plus™ O2/CO2 Oral Nasal Cannula with O2 tubing, Adult/Intermediate (box of 25)
0683-00-0516-25
Smart CapnoLine Plus™ O2/CO2 Oral Nasal Cannula with O2 connector, Adult/Intermediate (box of 25)
0683-00-0517-25
NIV Line™ Adult (box of 25) 0683-00-0506-25
NIV Line™ Pediatric (box of 25) 0683-00-0507-25
CapnoLine™ H Adult (box of 25) 0683-00-0508-25
CapnoLine™ H Pediatric (box of 25) 0683-00-0509-25
CapnoLine™ H Infant/Neonatal (box of 25) 0683-00-0510-25
CapnoLine™ H O2 Adult (box of 25) 0683-00-0511-25
CapnoLine™ H O2 Pediatric (box of 25) 0683-00-0512-25
Calibration Gas 0075-00-0033-01
CO2 Exhaust Connector, Male 0008-00-0332-01
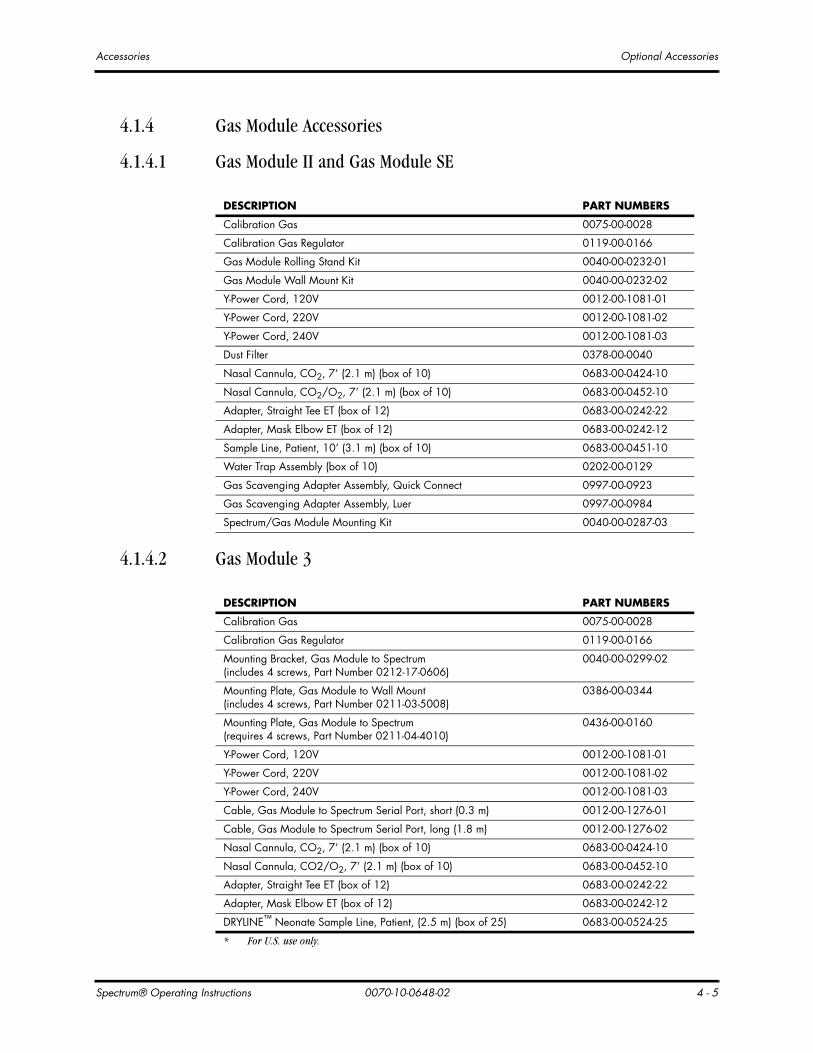
Spectrum® Operating Instructions 0070-10-0648-02 4 - 5
Accessories Optional Accessories
4.1.4 Gas Module Accessories
4.1.4.1 Gas Module II and Gas Module SE
4.1.4.2 Gas Module 3
DESCRIPTION PART NUMBERS
Calibration Gas 0075-00-0028
Calibration Gas Regulator 0119-00-0166
Gas Module Rolling Stand Kit 0040-00-0232-01
Gas Module Wall Mount Kit 0040-00-0232-02
Y-Power Cord, 120V 0012-00-1081-01
Y-Power Cord, 220V 0012-00-1081-02
Y-Power Cord, 240V 0012-00-1081-03
Dust Filter 0378-00-0040
Nasal Cannula, CO2, 7’ (2.1 m) (box of 10) 0683-00-0424-10
Nasal Cannula, CO2/O2, 7’ (2.1 m) (box of 10) 0683-00-0452-10
Adapter, Straight Tee ET (box of 12) 0683-00-0242-22
Adapter, Mask Elbow ET (box of 12) 0683-00-0242-12
Sample Line, Patient, 10’ (3.1 m) (box of 10) 0683-00-0451-10
Water Trap Assembly (box of 10) 0202-00-0129
Gas Scavenging Adapter Assembly, Quick Connect 0997-00-0923
Gas Scavenging Adapter Assembly, Luer 0997-00-0984
Spectrum/Gas Module Mounting Kit 0040-00-0287-03
DESCRIPTION PART NUMBERS
Calibration Gas 0075-00-0028
Calibration Gas Regulator 0119-00-0166
Mounting Bracket, Gas Module to Spectrum(includes 4 screws, Part Number 0212-17-0606)
0040-00-0299-02
Mounting Plate, Gas Module to Wall Mount(includes 4 screws, Part Number 0211-03-5008)
0386-00-0344
Mounting Plate, Gas Module to Spectrum(requires 4 screws, Part Number 0211-04-4010)
0436-00-0160
Y-Power Cord, 120V 0012-00-1081-01
Y-Power Cord, 220V 0012-00-1081-02
Y-Power Cord, 240V 0012-00-1081-03
Cable, Gas Module to Spectrum Serial Port, short (0.3 m) 0012-00-1276-01
Cable, Gas Module to Spectrum Serial Port, long (1.8 m) 0012-00-1276-02
Nasal Cannula, CO2, 7’ (2.1 m) (box of 10) 0683-00-0424-10
Nasal Cannula, CO2/O2, 7’ (2.1 m) (box of 10) 0683-00-0452-10
Adapter, Straight Tee ET (box of 12) 0683-00-0242-22
Adapter, Mask Elbow ET (box of 12) 0683-00-0242-12
DRYLINE™ Neonate Sample Line, Patient, (2.5 m) (box of 25) 0683-00-0524-25
* For U.S. use only.
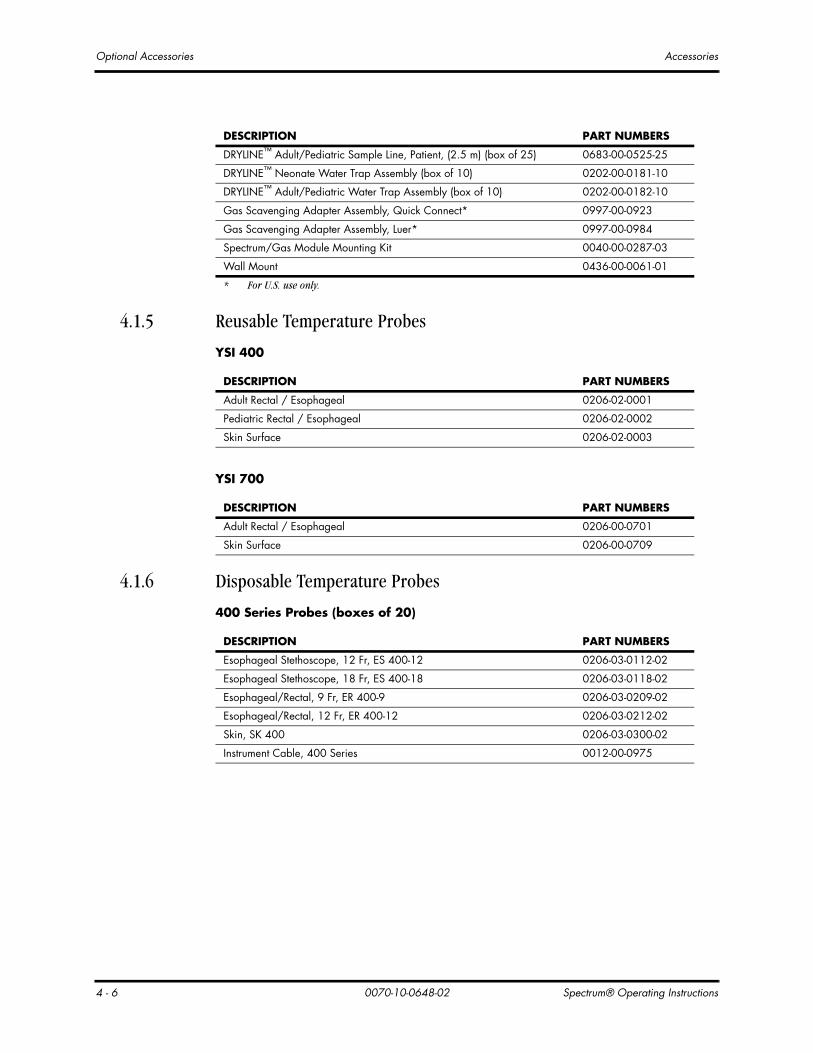
Optional Accessories Accessories
4 - 6 0070-10-0648-02 Spectrum® Operating Instructions
4.1.5 Reusable Temperature Probes
4.1.6 Disposable Temperature Probes
DRYLINE™ Adult/Pediatric Sample Line, Patient, (2.5 m) (box of 25) 0683-00-0525-25
DRYLINE™ Neonate Water Trap Assembly (box of 10) 0202-00-0181-10
DRYLINE™ Adult/Pediatric Water Trap Assembly (box of 10) 0202-00-0182-10
Gas Scavenging Adapter Assembly, Quick Connect* 0997-00-0923
Gas Scavenging Adapter Assembly, Luer* 0997-00-0984
Spectrum/Gas Module Mounting Kit 0040-00-0287-03
Wall Mount 0436-00-0061-01
DESCRIPTION PART NUMBERS
* For U.S. use only.
YSI 400
DESCRIPTION PART NUMBERS
Adult Rectal / Esophageal 0206-02-0001
Pediatric Rectal / Esophageal 0206-02-0002
Skin Surface 0206-02-0003
YSI 700
DESCRIPTION PART NUMBERS
Adult Rectal / Esophageal 0206-00-0701
Skin Surface 0206-00-0709
400 Series Probes (boxes of 20)
DESCRIPTION PART NUMBERS
Esophageal Stethoscope, 12 Fr, ES 400-12 0206-03-0112-02
Esophageal Stethoscope, 18 Fr, ES 400-18 0206-03-0118-02
Esophageal/Rectal, 9 Fr, ER 400-9 0206-03-0209-02
Esophageal/Rectal, 12 Fr, ER 400-12 0206-03-0212-02
Skin, SK 400 0206-03-0300-02
Instrument Cable, 400 Series 0012-00-0975
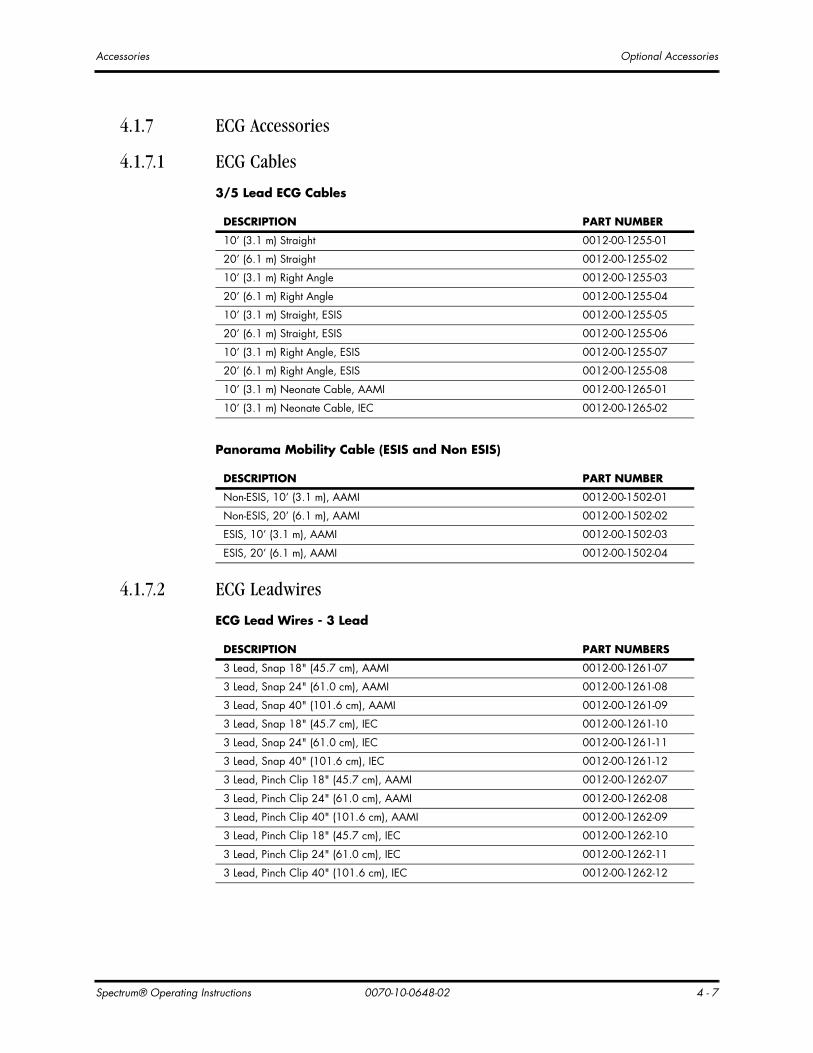
Spectrum® Operating Instructions 0070-10-0648-02 4 - 7
Accessories Optional Accessories
4.1.7 ECG Accessories
4.1.7.1 ECG Cables
4.1.7.2 ECG Leadwires
3/5 Lead ECG Cables
DESCRIPTION PART NUMBER
10’ (3.1 m) Straight 0012-00-1255-01
20’ (6.1 m) Straight 0012-00-1255-02
10’ (3.1 m) Right Angle 0012-00-1255-03
20’ (6.1 m) Right Angle 0012-00-1255-04
10’ (3.1 m) Straight, ESIS 0012-00-1255-05
20’ (6.1 m) Straight, ESIS 0012-00-1255-06
10’ (3.1 m) Right Angle, ESIS 0012-00-1255-07
20’ (6.1 m) Right Angle, ESIS 0012-00-1255-08
10’ (3.1 m) Neonate Cable, AAMI 0012-00-1265-01
10’ (3.1 m) Neonate Cable, IEC 0012-00-1265-02
Panorama Mobility Cable (ESIS and Non ESIS)
DESCRIPTION PART NUMBER
Non-ESIS, 10’ (3.1 m), AAMI 0012-00-1502-01
Non-ESIS, 20’ (6.1 m), AAMI 0012-00-1502-02
ESIS, 10’ (3.1 m), AAMI 0012-00-1502-03
ESIS, 20’ (6.1 m), AAMI 0012-00-1502-04
ECG Lead Wires - 3 Lead
DESCRIPTION PART NUMBERS
3 Lead, Snap 18" (45.7 cm), AAMI 0012-00-1261-07
3 Lead, Snap 24" (61.0 cm), AAMI 0012-00-1261-08
3 Lead, Snap 40" (101.6 cm), AAMI 0012-00-1261-09
3 Lead, Snap 18" (45.7 cm), IEC 0012-00-1261-10
3 Lead, Snap 24" (61.0 cm), IEC 0012-00-1261-11
3 Lead, Snap 40" (101.6 cm), IEC 0012-00-1261-12
3 Lead, Pinch Clip 18" (45.7 cm), AAMI 0012-00-1262-07
3 Lead, Pinch Clip 24" (61.0 cm), AAMI 0012-00-1262-08
3 Lead, Pinch Clip 40" (101.6 cm), AAMI 0012-00-1262-09
3 Lead, Pinch Clip 18" (45.7 cm), IEC 0012-00-1262-10
3 Lead, Pinch Clip 24" (61.0 cm), IEC 0012-00-1262-11
3 Lead, Pinch Clip 40" (101.6 cm), IEC 0012-00-1262-12

Optional Accessories Accessories
4 - 8 0070-10-0648-02 Spectrum® Operating Instructions
4.1.7.3 12 Lead ECG Accessories
ECG Lead Wires - 5 Lead
DESCRIPTION PART NUMBERS
5 Lead, Snap 18" (45.7 cm), AAMI 0012-00-1261-01
5 Lead, Snap 24" (61.0 cm), AAMI 0012-00-1261-02
5 Lead, Snap 40" (101.6 cm), AAMI 0012-00-1261-03
5 Lead, Snap 18" (45.7 cm), IEC 0012-00-1261-04
5 Lead, Snap 24" (61.0 cm), IEC 0012-00-1261-05
5 Lead, Snap 40" (101.6 cm), IEC 0012-00-1261-06
Snap, Extended Leg, 3/40" (3/101.6 cm), 2/60" (2/152.4 cm), AAMI 0012-00-1261-13
Snap, Extended Leg, 3/40" (3/101.6 cm), 2/60" (2/152.4 cm), IEC 0012-00-1261-14
5 Lead, Pinch Clip 18" (45.7 cm), AAMI 0012-00-1262-01
5 Lead, Pinch Clip 24" (61.0 cm), AAMI 0012-00-1262-02
5 Lead, Pinch Clip 40" (101.6 cm), AAMI 0012-00-1262-03
5 Lead, Pinch Clip 18" (45.7 cm), IEC 0012-00-1262-04
5 Lead, Pinch Clip 24" (61.0 cm), IEC 0012-00-1262-05
5 Lead, Pinch Clip 40" (101.6 cm), IEC 0012-00-1262-06
Pinch, Extended Leg, 3/40" (3/101.6 cm), 2/60" (2/152.4 cm), AAMI 0012-00-1262-13
Pinch, Extended Leg, 3/40" (3/101.6 cm), 2/60" (2/152.4 cm), IEC 0012-00-1262-14
ECG Leadwires - 12 Lead
DESCRIPTION PART NUMBERS
12 Lead, AAMI 0012-00-1411-02
12 Lead, IEC 0012-00-1411-03
12 Long Lead, AAMI, 63” (160 cm) 0012-00-1588
12 Long Lead, IEC, 63” (160 cm) 0012-00-1587
Panorama Mobility Lead Wires
DESCRIPTION PART NUMBERS
5 Lead, Snap 24" (61.0 cm), AAMI 0012-00-1503-02
3 Lead, Snap 24" (61.0 cm), AAMI 0012-00-1503-05
DESCRIPTION PART NUMBERS
View 12 Domestic Kit VIEW12DOMP2SP
View 12 International Kit VIEW12INTP2SP
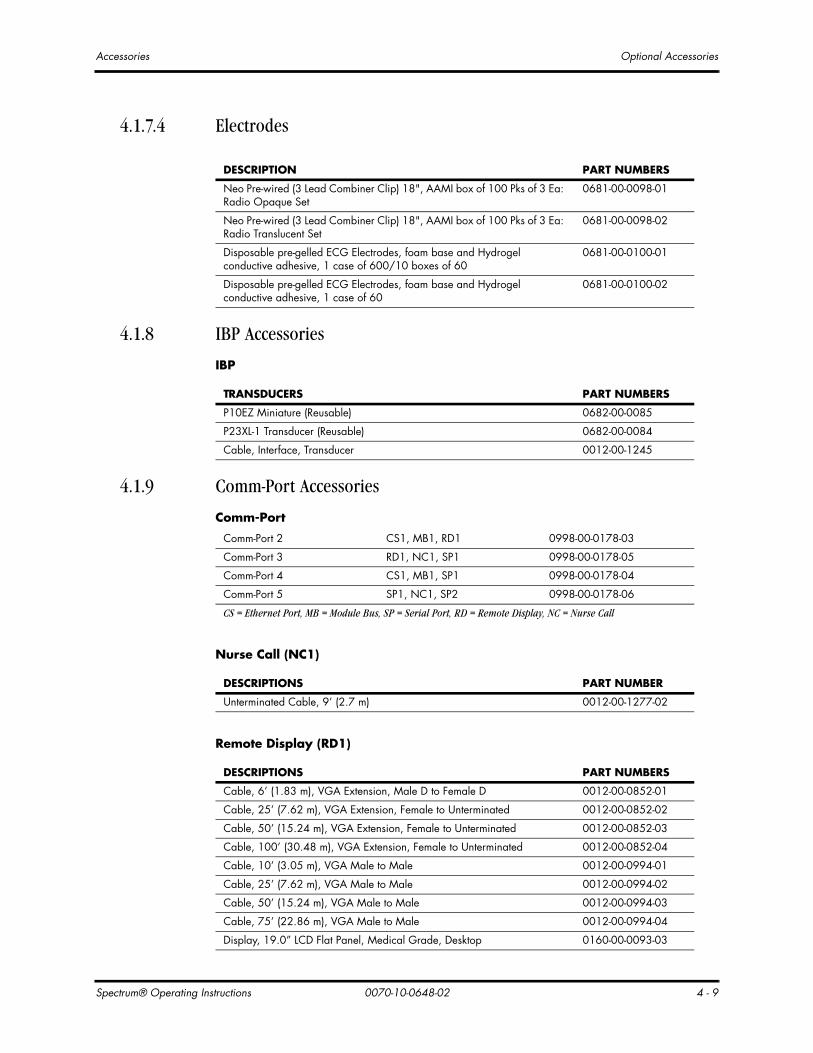
Spectrum® Operating Instructions 0070-10-0648-02 4 - 9
Accessories Optional Accessories
4.1.7.4 Electrodes
4.1.8 IBP Accessories
4.1.9 Comm-Port Accessories
DESCRIPTION PART NUMBERS
Neo Pre-wired (3 Lead Combiner Clip) 18", AAMI box of 100 Pks of 3 Ea: Radio Opaque Set
0681-00-0098-01
Neo Pre-wired (3 Lead Combiner Clip) 18", AAMI box of 100 Pks of 3 Ea: Radio Translucent Set
0681-00-0098-02
Disposable pre-gelled ECG Electrodes, foam base and Hydrogel conductive adhesive, 1 case of 600/10 boxes of 60
0681-00-0100-01
Disposable pre-gelled ECG Electrodes, foam base and Hydrogel conductive adhesive, 1 case of 60
0681-00-0100-02
IBP
TRANSDUCERS PART NUMBERS
P10EZ Miniature (Reusable) 0682-00-0085
P23XL-1 Transducer (Reusable) 0682-00-0084
Cable, Interface, Transducer 0012-00-1245
Comm-Port
Comm-Port 2 CS1, MB1, RD1 0998-00-0178-03
Comm-Port 3 RD1, NC1, SP1 0998-00-0178-05
Comm-Port 4 CS1, MB1, SP1 0998-00-0178-04
Comm-Port 5 SP1, NC1, SP2 0998-00-0178-06
CS = Ethernet Port, MB = Module Bus, SP = Serial Port, RD = Remote Display, NC = Nurse Call
Nurse Call (NC1)
DESCRIPTIONS PART NUMBER
Unterminated Cable, 9’ (2.7 m) 0012-00-1277-02
Remote Display (RD1)
DESCRIPTIONS PART NUMBERS
Cable, 6’ (1.83 m), VGA Extension, Male D to Female D 0012-00-0852-01
Cable, 25’ (7.62 m), VGA Extension, Female to Unterminated 0012-00-0852-02
Cable, 50’ (15.24 m), VGA Extension, Female to Unterminated 0012-00-0852-03
Cable, 100’ (30.48 m), VGA Extension, Female to Unterminated 0012-00-0852-04
Cable, 10’ (3.05 m), VGA Male to Male 0012-00-0994-01
Cable, 25’ (7.62 m), VGA Male to Male 0012-00-0994-02
Cable, 50’ (15.24 m), VGA Male to Male 0012-00-0994-03
Cable, 75’ (22.86 m), VGA Male to Male 0012-00-0994-04
Display, 19.0” LCD Flat Panel, Medical Grade, Desktop 0160-00-0093-03

Optional Accessories Accessories
4 - 10 0070-10-0648-02 Spectrum® Operating Instructions
4.1.10 Base Station Accessories
Display, 19.0” LCD Flat Panel, Medical Grade, Wall mount 0160-00-0093-04
Wall mount, adjustable, VHM, Flat Panel 0436-00-0210
Wall mount, flush, Flat Panel 0040-00-0368
Serial Port (SP1)
DESCRIPTIONS PART NUMBERS
Cable, Serial Port to Gas Module, 12” (30.48 cm) 0012-00-1276-01
Cable, Serial Port to Gas Module, 72” (182.88 cm) 0012-00-1276-02
Cable, Interface, Vigilance/PC, Serial Port to Serial Port 0012-00-1275-01
Cable, Serial Port to VISA, 10’ (3.05 m) 0012-00-1299-01
Ethernet (CS1)
DESCRIPTIONS PART NUMBERS
CAT 5 Ethernet Cable, Patch, STP, 6’ (1.83 m) 0012-00-1274-01
CAT 5 Ethernet Cable, Patch, STP, 25’ (7.62 m) 0012-00-1274-02
CAT 5 Ethernet Cable, Patch, STP, 50’ (15.24 m) 0012-00-1274-03
CAT 5 Ethernet Cable, Patch, STP, 1’ (0.30 m) 0012-00-1274-04
CAT 5 Ethernet Cable, Patch, STP, 2’ (0.61 m) 0012-00-1274-05
CAT 5 Ethernet Cable, Patch, STP, 3’ (0.91 m) 0012-00-1274-06
CAT 5 Ethernet Cable, Patch, STP, 10’ (3.05 m) 0012-00-1274-07
Laser Printer, Laserjet 4200N 0992-00-0091-04
Paper, Laser Printer, View 12 0683-00-0503
ECS, HUB, 12 Port 0992-00-0085-01
CAT 5 Ethernet Cable, Crossover, STP, 3’ (0.91 m) 0012-00-1392-05
CAT 5 Ethernet Cable, Crossover, STP, 6’ (1.83 m) 0012-00-1392-06
CAT 5 Ethernet Cable, Crossover, STP, 10’ (3.05 m) 0012-00-1392-07
CAT 5 Ethernet Cable, Crossover, STP, 20’ (6.10 m) 0012-00-1392-08
Remote Display (RD1)
DESCRIPTIONS PART NUMBERS
DESCRIPTION PART NUMBERS
Base Station kit with 110V line cord BASESTATION110
Base Station kit with 220V line cord BASESTATION220
Base Station kit with 240V line cord BASESTATION240
Base Station 110V line cord 0012-25-0001
Base Station 220V line cord 0012-25-0002
Base Station 240V line cord 0012-25-0003
Base Station power supply 0014-00-0070
Base Station mounting kit 0386-00-0259
Base Station Operator's manual multilanguage 0073-00-1292

Spectrum® Operating Instructions 0070-10-0648-02 4 - 11
Accessories Optional Accessories
4.1.11 Miscellaneous Accessories
4.1.12 Mounting Kits and Accessories
DESCRIPTIONS PART NUMBERS
Recorder Chart Paper (10 Rolls) 0683-00-0422-02
Battery, Lithium-Ion 0146-00-0069
Battery, Sealed Lead Acid 0146-00-0043
AC Power Cord, 120V 0012-25-0001
AC Power Cord, 220V 0012-25-0002
AC Power Cord, 240V 0012-25-0003
Cable Assy, DPD Defibrillator, 8” (20.32 cm) 0012-00-1301-01
Cable Assy, DPD Defibrillator, 10’ (3.05 m) 0012-00-1301-02
Cable Assy, Analog Output (ECG only), 15’ (4.57 m) CABLEANALOGOUT
Cable, ECG/IBP to IABP interface, for Software Version L.04 and above, 6-pin (4.6 m)
0012-00-1650-01
Transfer Card 0996-00-0094-01
Extended Trend Card 0996-00-0052-01
Abbreviated Operator’s Manual 0070-00-0574-02
12 Lead ECG Physician’s Reference Guide, English Version 0070-00-0524-01
12 Lead ECG Physician’s Reference Guide, Multi-Language Version 0070-00-0524-50
DESCRIPTIONS PART NUMBERS
Rolling Stand with mounting bracket TRANSLBRKT
Rolling Stand with quick release plate TRANSQRMTG
Wall Mount Kit 0040-00-0287-02
VHM Wall Mount 0040-00-0287-04
Bedrail Mount Kit 0040-00-0293
Quick Release Mounting Plate Kit 0040-00-0299-01
Stationary Mounting Bracket Kit 0040-00-0299-02
Gas Module Mounting Kit 0040-00-0287-03
12 Lead ECG Mounting Kit 0040-00-0352

Optional Accessories Accessories
4 - 12 0070-10-0648-02 Spectrum® Operating Instructions
4.1.13 Upgrade Kits
DESCRIPTION PART NUMBERS
CO2 Upgrade Kit with Masimo SpO2 0040-00-0353-01
CO2 Upgrade Kit with Nellcor® Oxismart® SpO2 0040-00-0353-02
CO2 Upgrade Kit with Nellcor® OxiMax® SpO2, Nell-3 0040-00-0353-03
CO2 MiniMedi Upgrade - For use in units with serial number prefix MS only, with Masimo SpO2 (includes installation at Mindray Repair Center)
0040-00-0353-04
CO2 MiniMedi Upgrade - For use in units with serial number prefix MS-XXXX-A6 and below only, with Nellcor OxiSmart SpO2 (includes installation at Mindray Repair Center)
0040-00-0353-05
CO2 MiniMedi Upgrade - For use in units with serial number prefix MS-XXXX-B6 and above only, with Nellcor OxiMax SpO2 (includes installation at Mindray Repair Center)
0040-00-0353-06
IBP Upgrade Kit (Add IBP1 and IBP2) 0040-00-0268-02
ST Software Option Enable Kit - 1 License 0040-00-0300-01
ST Software Option Enable Kit - 5 Licenses 0040-00-0300-02
ST Software Option Enable Kit - 10 Licenses 0040-00-0300-03
Arrhythmia Software Option Enable Kit - 1 License 0040-00-0300-11
Arrhythmia Software Option Enable Kit - 5 Licenses 0040-00-0300-12
Arrhythmia Software Option Enable Kit - 10 Licenses 0040-00-0300-13
ST & Arrhythmia Software Option Enable Kit - 1 License 0040-00-0300-21
ST & Arrhythmia Software Option Enable Kit - 5 Licenses 0040-00-0300-22
ST & Arrhythmia Software Option Enable Kit - 10 Licenses 0040-00-0300-23
Vigilance Software Option Enable Kit - 1 License 0040-00-0300-31
Vigilance Software Option Enable Kit - 5 Licenses 0040-00-0300-32
Vigilance Software Option Enable Kit - 10 Licenses 0040-00-0300-33
Vigilance & ST Software Option Enable Kit - 1 License 0040-00-0300-41
Vigilance & ST Software Option Enable Kit - 5 Licenses 0040-00-0300-42
Vigilance & ST Software Option Enable Kit - 10 Licenses 0040-00-0300-43
Vigilance & Arrhythmia Software Option Enable Kit - 1 License 0040-00-0300-51
Vigilance & Arrhythmia Software Option Enable Kit - 5 Licenses 0040-00-0300-52
Vigilance & Arrhythmia Software Option Enable Kit - 10 Licenses 0040-00-0300-53
Vigilance, ST & Arrhythmia Software Option Enable Kit - 1 License 0040-00-0300-61
Vigilance, ST & Arrhythmia Software Option Enable Kit - 5 Licenses 0040-00-0300-62
Vigilance, ST & Arrhythmia Software Option Enable Kit - 10 Licenses 0040-00-0300-63

Spectrum® Operating Instructions 0070-10-0648-02 4 - 13
Accessories Optional Accessories
4.1.14 Central Station Accessories
4.1.15 External Parameter Module Accessories
DESCRIPTION PART NUMBERS
Kit, Telemetry, 2.4 GHz 0040-00-0327-XX
Kit, Instrument Radio, Panorama, 608 MHz 0040-00-0361-01
DESCRIPTION PART NUMBERS
External Parameter Module with Temperature 0998-00-0501-04X*
External Parameter Module with Temperature and Cardiac Output 0998-00-0501-03X*
External Parameter Module with Temperature and IBP 0998-00-0501-02X*
External Parameter Module with Temperature, Cardiac Output and IBP 0998-00-0501-01X*
Cable, Cardiac Output Y, two Temperature connections 0012-00-1447-01
Cable, Cardiac Output Edwards LifeSciences in-line injectate adapter 0012-00-1520
Cable, Cardiac Output Edwards LifeSciences Bath probe adapter 0012-00-1519
Cable, Cardiac Output Becton Dickinson in-line injectate adapter 0012-00-1532
Cable, Cardiac Output Abbott Labs in-line injectate adapter 0012-00-1533
* NOTE: Please replace “X” with one of the following letters to designate language required: A-English;P-Spanish; T-Italian; D-Dutch; F-French; G-German; N-Danish

Optional Accessories Accessories
4 - 14 0070-10-0648-02 Spectrum® Operating Instructions
This page intentionally left blank.

Spectrum® Operating Instructions 0070-10-0648-02 5 - 1
5.0 Appendix
5.1 Safety Designations
5.1.1 Safety designations per IEC 60601-1 Standard
Type of protection against electric shock:
Class 1 with internal electric power source. Where the integrity of the external protective earth (ground) in the installation or its conductors is in doubt, the equipment will be operated from its internal electric power source (batteries).
Degree of protection against electric shock:
ECG, IBP and Cardiac Output - Type CF defibrillation protectedNIBP - Type BF defibrillation protectedSpO2, CO2 and Temperature - Type BF
Supply Connection: 100 - 240 Volt50 or 60 Hz1.2 - 0.7 Amps12 VDC Sealed Lead Acid Internal Batteryor11.1 VDC Lithium-Ion Internal Battery
Mode of Operation: Continuous
Protection Against Hazards of Explosion: Not protected (Ordinary)
Protection Against Ingress of Liquids: Not protected (Ordinary)

Safety Designations Appendix
5 - 2 0070-10-0648-02 Spectrum® Operating Instructions
Degree of electrical connection between equipment and patient:
Equipment designed for direct electrical and non-electrical connection to the patient
Degree of Mobility: Transportable
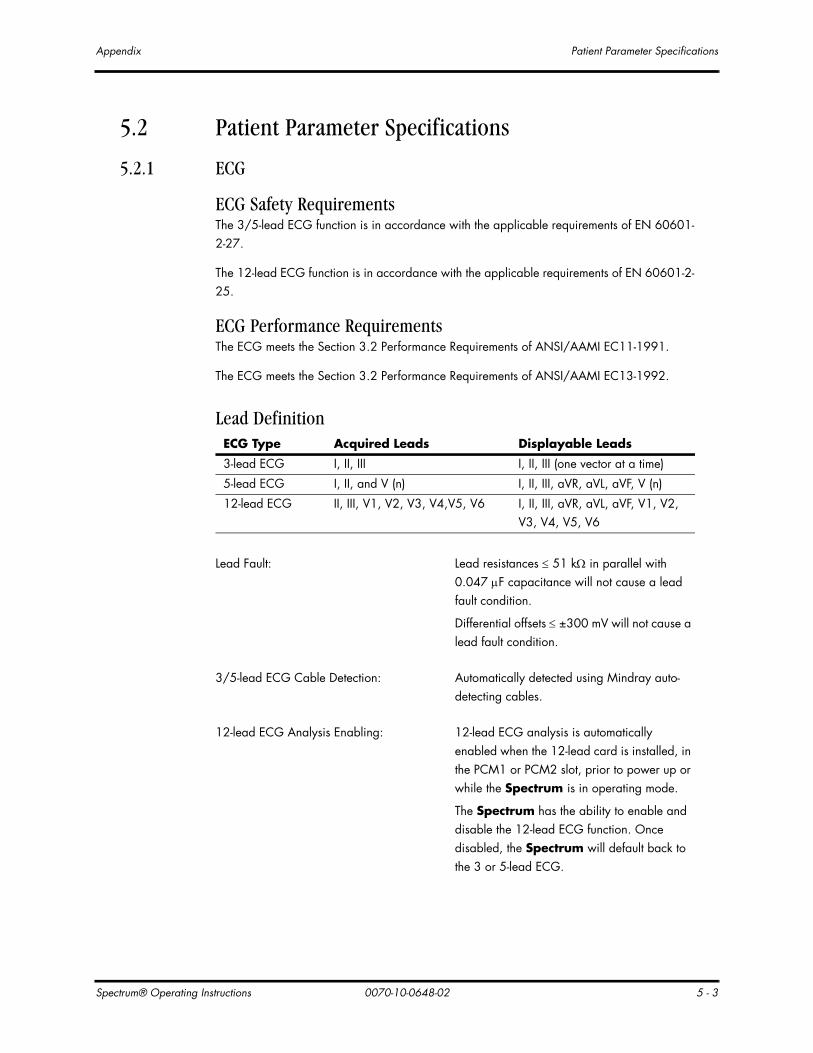
Spectrum® Operating Instructions 0070-10-0648-02 5 - 3
Appendix Patient Parameter Specifications
5.2 Patient Parameter Specifications
5.2.1 ECG
ECG Safety RequirementsThe 3/5-lead ECG function is in accordance with the applicable requirements of EN 60601-2-27.
The 12-lead ECG function is in accordance with the applicable requirements of EN 60601-2-25.
ECG Performance RequirementsThe ECG meets the Section 3.2 Performance Requirements of ANSI/AAMI EC11-1991.
The ECG meets the Section 3.2 Performance Requirements of ANSI/AAMI EC13-1992.
Lead DefinitionECG Type Acquired Leads Displayable Leads
3-lead ECG I, II, III I, II, III (one vector at a time)
5-lead ECG I, II, and V (n) I, II, III, aVR, aVL, aVF, V (n)
12-lead ECG II, III, V1, V2, V3, V4,V5, V6 I, II, III, aVR, aVL, aVF, V1, V2, V3, V4, V5, V6
Lead Fault: Lead resistances ≤ 51 kΩ in parallel with 0.047 μF capacitance will not cause a lead fault condition.
Differential offsets ≤ ±300 mV will not cause a lead fault condition.
3/5-lead ECG Cable Detection: Automatically detected using Mindray auto-detecting cables.
12-lead ECG Analysis Enabling: 12-lead ECG analysis is automatically enabled when the 12-lead card is installed, in the PCM1 or PCM2 slot, prior to power up or while the Spectrum is in operating mode.
The Spectrum has the ability to enable and disable the 12-lead ECG function. Once disabled, the Spectrum will default back to the 3 or 5-lead ECG.

Patient Parameter Specifications Appendix
5 - 4 0070-10-0648-02 Spectrum® Operating Instructions
Electrical Surgical Unit (ESU) Use
Frequency Response
ECG TypeBandwidth (-3db)
Monitor Mode Extended Mode ST Mode
3/5-lead ECG 0.5 to 40 Hz 0.05 to 100 Hz 0.05 to 40 Hz
12-lead ECG 0.5 to 40 Hz 0.05 to 150 Hz 0.05 to 40 Hz
3/5-lead ECG analog output HP compatible cable
0.55 to 35 Hz 0.05 to 90 Hz 0.05 to 35 Hz
Protection: 3 and 5-lead ECG meets IEC. 60601-2-25, clause 36.202.7 for functionality following ESU energy exposure.
The system is capable of withstanding ESU stress with no permanent damage and regain normal function within 10 seconds after removal of the disturbance. The 12-lead ECG function does not provide ESU protection or suppression.
Withstand: 3 and 5-lead ECG can withstand ESU stress from a High Frequency Surgical Unit operating at 300 Watts in cut mode and 100 Watts on coagulate mode. The 12-lead ECG function does not provide ESU protection or suppression
Noise Suppression: 3 and 5-lead ECG peak noise is less than ± 2 mV from ECG baseline when used with AAMI compatible cables. Noise level is unspecified when the monitor is used with HP compatible cables. The 12-lead ECG function does not provide ESU protection or suppression.
Noise Detection: An ESU noise declaration will be asserted if signals detected as pacers are detected at a rate greater than 50 Hz. No noise declaration will be asserted if pacer-like signals are detected at a rate less than 10 Hz. The 12-lead ECG function does not provide ESU protection or suppression.
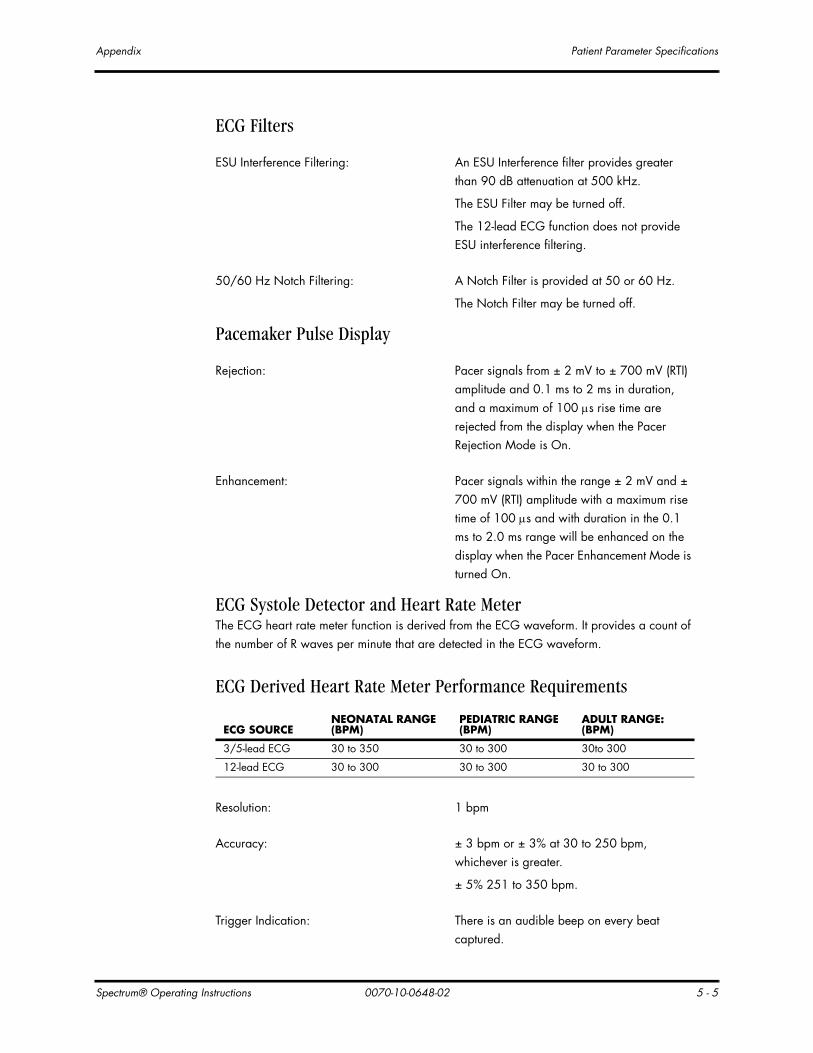
Spectrum® Operating Instructions 0070-10-0648-02 5 - 5
Appendix Patient Parameter Specifications
ECG Filters
Pacemaker Pulse Display
ECG Systole Detector and Heart Rate Meter The ECG heart rate meter function is derived from the ECG waveform. It provides a count of the number of R waves per minute that are detected in the ECG waveform.
ESU Interference Filtering: An ESU Interference filter provides greater than 90 dB attenuation at 500 kHz.
The ESU Filter may be turned off.
The 12-lead ECG function does not provide ESU interference filtering.
50/60 Hz Notch Filtering: A Notch Filter is provided at 50 or 60 Hz.
The Notch Filter may be turned off.
Rejection: Pacer signals from ± 2 mV to ± 700 mV (RTI) amplitude and 0.1 ms to 2 ms in duration, and a maximum of 100 μs rise time are rejected from the display when the Pacer Rejection Mode is On.
Enhancement: Pacer signals within the range ± 2 mV and ± 700 mV (RTI) amplitude with a maximum rise time of 100 μs and with duration in the 0.1 ms to 2.0 ms range will be enhanced on the display when the Pacer Enhancement Mode is turned On.
ECG Derived Heart Rate Meter Performance Requirements
ECG SOURCENEONATAL RANGE (BPM)
PEDIATRIC RANGE (BPM)
ADULT RANGE: (BPM)
3/5-lead ECG 30 to 350 30 to 300 30to 300
12-lead ECG 30 to 300 30 to 300 30 to 300
Resolution: 1 bpm
Accuracy: ± 3 bpm or ± 3% at 30 to 250 bpm, whichever is greater.
± 5% 251 to 350 bpm.
Trigger Indication: There is an audible beep on every beat captured.

Patient Parameter Specifications Appendix
5 - 6 0070-10-0648-02 Spectrum® Operating Instructions
Tall T-Wave Rejection: When tested in accordance with ANSI/AAMI EC13-1992 Section 4.1.2.1c, the heart rate meter rejects all T-waves with amplitudes less than 120% of a 1mV, 100 ms QRS, and a T wave duration of 180ms and a Q-T interval of 350 ms.
Step Change Response Time: When tested in accordance with ANSI/AAMI EC13-1992 Section 4.1.2.1f, the response time of the heart rate meter to changes in heart rate is:
Less then 10 sec for step increase from 80 to 120 bpm.
Less then 11 sec for step decrease from 80 to 40 bpm.
Pacemaker Pulse Rejection: When tested in accordance with ANSI/AAMI EC13-1992 Section 4.1.4, the heart rate meter rejects tall pulses of amplitude ± 2.0 mV to ± 700 mV and duration 0.1 ms to 2 ms with no tail.
When tested in accordance with ANSI/AAMI EC13-1992 Section 4.1.4, the 3/5 Lead ECG derived heart rate meter will reject all pacer pulses ± 2.0 mV to ± 700 mV and duration 0.1 ms to 2 ms with 4 ms time constant tail of less than 2.0 mV.
NOTE: 12-lead does not reject Pacemaker pulses with tails.
Heart Rate Averaging: 3/5/12 Lead ECG:
The average heart rate is calculated as follows:
Mean R to R interval in the last 16 R to R intervals (HR > 48 bpm).
Mean R to R interval in the last 4 R to R intervals (HR ≤ 48 bpm).

Spectrum® Operating Instructions 0070-10-0648-02 5 - 7
Appendix Patient Parameter Specifications
5.2.2 ECG Respiration Performance Requirements
5.2.3 NIBP Performance and Functional CharacteristicsThe NIBP function is capable of providing systolic, diastolic, and mean blood pressure measurements in Neonate, Pediatric, and Adult modes non-invasively, using a blood pressure cuff.
The NIBP function is in accordance with the requirements of EN 60601-2-30, EN 1060-1, EN 1060-3, and SP 10.
Sensing Leads: Lead II or I
Default Sensing Lead: Lead II
Source: When 12-lead ECG is enabled, the Spectrum is capable of acquiring respiration while using a 3-lead or 5-lead ECG cable.
Range: 4 to 199 breaths per minute.
Accuracy: ± 2% or ± 2 breaths per minute, whichever is greater from 4 to 150. ± 4%, from 151 to 199.
Excitation: < 550 μA RMS max.
Bandwidth: 0.1 Hz to 3 Hz (-3 dB) for adults.0.2 Hz to 3 Hz (-3 dB) for pediatric and neonatal patients.
Baseline Impedance Range: 200 Ω to 2000 Ω at patient with 1 k resistor in the ECG cable.
High Impedance Indication: Greater than 2.2 kΩ at patient.
Linear Signal Range: 8 Ω p-p minimum.
Noise: Less than 0.05 Ω at 500 Ω patient impedance, using a standard ECG cable.
User Selectable Scales: Function of respiration scale. Waveform needs to be greater than 0.1 Ω in order for breathes to be accurately detected.
Cardiovascular Artifact Rejection: Detected by algorithm.
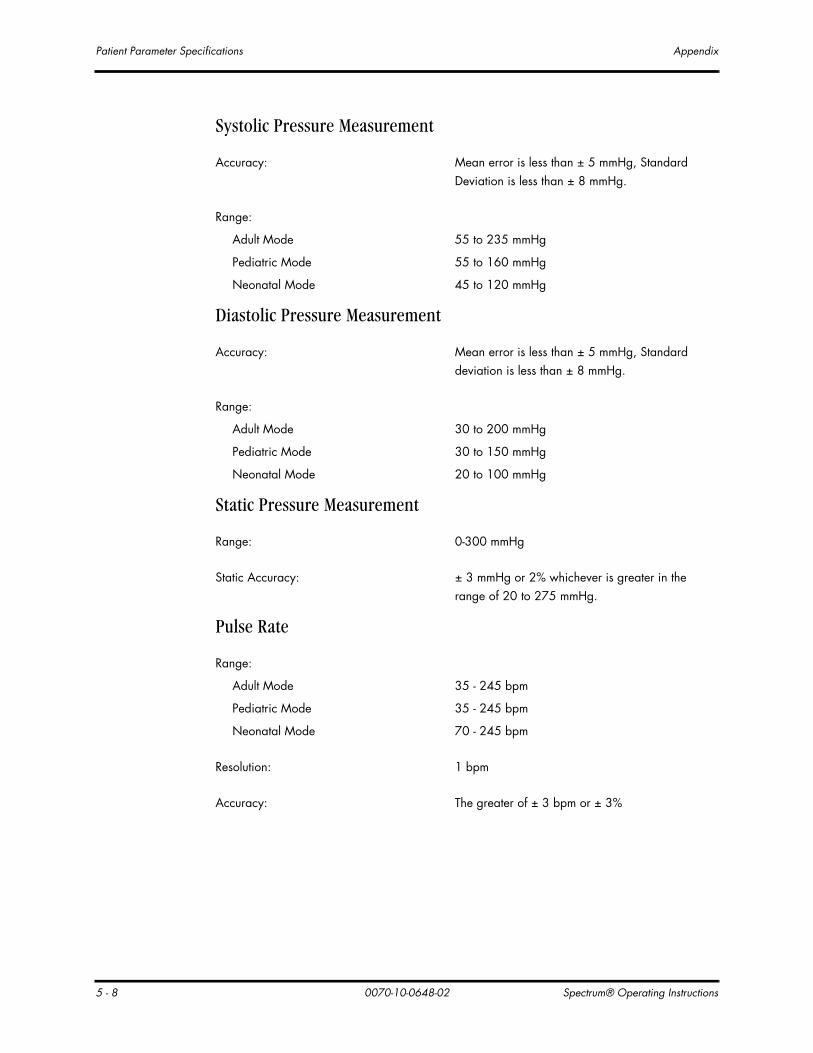
Patient Parameter Specifications Appendix
5 - 8 0070-10-0648-02 Spectrum® Operating Instructions
Systolic Pressure Measurement
Diastolic Pressure Measurement
Static Pressure Measurement
Pulse Rate
Accuracy: Mean error is less than ± 5 mmHg, Standard Deviation is less than ± 8 mmHg.
Range:
Adult Mode 55 to 235 mmHg
Pediatric Mode 55 to 160 mmHg
Neonatal Mode 45 to 120 mmHg
Accuracy: Mean error is less than ± 5 mmHg, Standard deviation is less than ± 8 mmHg.
Range:
Adult Mode 30 to 200 mmHg
Pediatric Mode 30 to 150 mmHg
Neonatal Mode 20 to 100 mmHg
Range: 0-300 mmHg
Static Accuracy: ± 3 mmHg or 2% whichever is greater in the range of 20 to 275 mmHg.
Range:
Adult Mode 35 - 245 bpm
Pediatric Mode 35 - 245 bpm
Neonatal Mode 70 - 245 bpm
Resolution: 1 bpm
Accuracy: The greater of ± 3 bpm or ± 3%

Spectrum® Operating Instructions 0070-10-0648-02 5 - 9
Appendix Patient Parameter Specifications
Maximum Cuff Pressure
Cuff InflationThe inflation source is capable of supplying sufficient air to bring a volume of 500 cc's to a pressure of 300 mmHg in no more than 35 seconds (Reference ANSI/AAMI SP10A-1996, EN60601-2-30:1995 does not have a requirement for this).
If the cuff is not inflated to the desired pressure within 60 seconds then the cuff is vented and a retry cycle is initiated, up to 3 times.
Maximum LeakageThe maximum allowed pressure drop with the bleed valves closed is 10 mmHg in 10 seconds as measured with a 500 cc volume at differential pressures of 250 mmHg, 150 mmHg and 50 mmHg (Reference ANSI/AAMI SP10-1992, EN1060-3, 1997).
Vent RateA volume of 500 cc, when vented, is reduced from a pressure of 260 mmHg to a pressure of 15 mmHg in a maximum of 10 seconds. For Neonate, from a pressure of 150 mmHg to a pressure of 5 mmHg in less then 5 seconds (Reference: EN1060-3, 1997).
Initial ConditionsThe NIBP will power-up and go into a warm up state.
An NIBP Zero is performed automatically before the NIBP can be initiated.
An NIBP measurement will not initiate until the unit has been powered on for 20 sec. in order to allow time for the Zero. Afterwards it goes into an idle state.
The software controlled maximum cuff pressure:
Adult Mode 300 mmHg
Pediatric Mode 195 mmHg
Neonatal Mode 150 mmHg
The hardware controlled maximum cuff pressure:
Adult Mode 330 mmHg
Pediatric Mode 220 mmHg
Neonatal Mode 165 mmHg

Patient Parameter Specifications Appendix
5 - 10 0070-10-0648-02 Spectrum® Operating Instructions
NIBP Start Pressure Settings and RangesThe Start Pressure is adjustable throughout the following ranges and is set to the following defaults:
NIBP Measurement CycleThere are two different modes of measurement operation: manual and interval modes. The manual mode requires the operator to initiate the measurement cycle. The interval mode follows a configured plan of automatically initiated measurement cycles.
The Maximum Measurement Cycle Duration is 180 sec for Adult and Pediatric patients (Reference: EN60601-2-30, 1995).
The Maximum Measurement Cycle Duration is 90 sec for Neonatal patients (Reference: EN60601-2-30, 1995).
During a measurement, if the initial cuff inflation pressure is found to be inadequate, the unit will retry with a higher inflation pressure (+ 50 ± 10 mmHg in Adult mode and Pediatric mode, + 40 ± 10 mmHg in Neonatal mode).
In interval mode only, the unit will adjust the inflation pressure according to the previous systolic pressure. After the first successful measurement is made, the subsequent inflation pressure becomes + 50 ± 10 mmHg in the Adult mode and Pediatric Mode and + 40 ±10 mmHg in Neonatal mode.
5.2.4 IBP Performance CharacteristicsThe Spectrum is capable of providing invasive blood pressure (IBP) measurements from a maximum of 4 IBP channels that can be used simultaneously.
Each IBP channel provides three pressure readings: systolic, diastolic, and mean pressures.
IBP Safety RequirementsThe IBP function meets the safety requirements of EN 60601-2-34.
IBP Performance Requirements
PATIENT SIZEUSER SELECTABLE START PRESSURE RANGE INCREMENT SIZE
DEFAULT SETTING
Adult Mode 100-280 mmHg 5 mmHg 180 mmHg
Pediatric Mode 60-180 mmHg 5 mmHg 140 mmHg
Neonatal Mode 40-120 mmHg 5 mmHg 100 mmHg
Accuracy: ± 2mm Hg or 2% which ever is greater (excluding transducer error)

Spectrum® Operating Instructions 0070-10-0648-02 5 - 11
Appendix Patient Parameter Specifications
IBP Transducer Performance
IBP Heart Rate Meter
Excitation: 5 Volts DC, ± 2%Minimum load resistance is 300 ohms per transducer.
Transfer Function: Compatible with 5 μV/mmHg/Volt nominal excitation transducers.
Zero Offset Range: The transducer zero offset range is ± 120 mmHg.
Zero Accuracy: The zero accuracy is ± 1 mm Hg.
Linear Input Range: Is -30 to +300 mmHg, after zeroing.
Noise: < 0.5 mmHg RTI, DC to 15 Hz, 300 Ω source impedance.
Drift: < 0.15 mmHg per degree Celsius.
Frequency Response: DC to 16 Hz ± 1 Hz, -3 dB
Range:
Neonatal Range (bpm) 30 to 350
Pediatric Range (bpm) 30 to 300
Adult Range (bpm) 30 to 300
Resolution: 1 bpm
Accuracy: ± 3 bpm or ± 3% at 30 to 250 bpm
± 5 bpm or ± 5% from 251 to 350 bpm
Trigger Threshold: 18 mm ± 9 mmHg
Step Change Response Time: When tested using methods similar to ANSI/AAMI EC13-1992 Section 4.1.2.1f, the response time of the heart rate meter to changes in heart rate is:
Less then 10 sec for step increase from 80 to 120 bpm.
Less then 11 sec for step decrease from 80 to 40 bpm.

Patient Parameter Specifications Appendix
5 - 12 0070-10-0648-02 Spectrum® Operating Instructions
5.2.5 Temperature Parameter Performance CharacteristicsThe Spectrum is capable of providing temperature measurements from a maximum of 2 temperature channels, used simultaneously, as measured from YSI 400 or YSI 700 probes.
Temperature Performance Requirements
Scale: Celsius or Fahrenheit
Range:
T1-T2: 15° C to 45° C
59° F to 113° F
Delta T: 0° C to 9.9° C
0° F to 9.9° F
Resolution: 0.1° C
0.1° F
Accuracy: ± 0.1° C (15° C - 45° C), exclusive of probe errors
± 0.2° F (59° F - 113° F), exclusive of probe errors
Accuracy inclusive of 400 Series probes: ± 0.1° C (25° C - 42° C)
± 0.2° C (otherwise)
± 0.2° F (77° F - 108° F)
± 0.4° F (otherwise)
Accuracy inclusive of 700 Series probes: ± 0.2° C (15° C - 45° C)
± 0.4° F (59° F - 113° F)
Probe Excitation: 400 Series: < 200 μA, tip to sleeve.
Probe Excitation: 700 Series: < 200 μA, tip to sleeve and <30 μA maximum, ring to sleeve.

Spectrum® Operating Instructions 0070-10-0648-02 5 - 13
Appendix Patient Parameter Specifications
5.2.6 SpO2 Performance RequirementsThe Spectrum is capable of providing SpO2 measurements via an OEM Masimo SET® MS-3, OEM Nellcor MP-304 or OEM Nellcor NELL-3 pulse oximeter.
The SpO2 function is in accordance with the requirements of EN 865: 1997.
The SpO2 function is calibrated to display functional saturation.
Update Rate: Every 2 seconds
5.2.6.1 Masimo SET SpO2 Performance Requirements
Sensor Compatibility: LNOP® and LNCS™ Series
SpO2 Accuracy No motion conditions:
During motion conditions:
SpO2 Response Time:The response time is 18 seconds to 95% of final step change of % SpO2 value from 60 to 95% at 75 bpm. Post averaging time is set at 8 seconds.
PATIENT SIZE
SATURATION RANGE
70% TO 100% 0-69%
Adult Mode ± 2 digits unspecified
Pediatric Mode ± 2 digits unspecified
Neonatal Mode ± 3 digits unspecified
PATIENT SIZE
SATURATION RANGE
70% TO 100% 0-69%
Adult Mode ± 3 digits unspecified
Pediatric Mode ± 3 digits unspecified
Neonatal Mode ± 3 digits unspecified
Low Perfusion Performance
LOW PERFUSION CONDITIONS
PULSE AMPLITUDE
% TRANSMISSION
SATURATION ACCURACY
PULSE RATEACCURACY
> 0.02% > 5% ± 2 digits ± 3 digits

Patient Parameter Specifications Appendix
5 - 14 0070-10-0648-02 Spectrum® Operating Instructions
Update RateEvery 2 seconds
Masimo SET® Reference notesThe Masimo SET MS-3 pulse oximeter with LNOP®•Adt sensors has been validated for no motion accuracy in human blood studies on healthy adult volunteers in induced hypoxia studies in the range of 70% to 100% SpO2 against a laboratory co-oximeter and ECG monitor. This variation equals plus or minus one standard deviation. Plus or minus one standard deviation encompasses 68% of the population.
The Masimo SET MS-3 pulse oximeter with LNOP®•Adt sensors has been validated for motion accuracy in human blood studies on healthy adult volunteers in induced hypoxia studies while performing rubbing and tapping motions at 2 to 4 Hz. At an amplitude of 1 to 2 cm and non-repetitive motion between 1 to 5 Hz. At an amplitude of 2 to 3 cm in induced hypoxia studies in the range of 70% to 100% SpO2 against a laboratory co-oximeter and ECG monitor. This variation equals plus or minus one standard deviation. Plus or minus one standard deviation encompasses 68% of the population.
The Masimo SET MS-3 pulse oximeter with LNOP®•Neo and Neo•Pt sensors has been validated for neonatal motion accuracy in human blood studies on neonates while moving the neonate's foot at 2 to 4 Hz at an amplitude of 1 to 2 cm against a laboratory co-oximeter and ECG monitor. This variation equals plus or minus one standard deviation. Plus or minus one standard deviation encompasses 68% of the population.
The Masimo SET MS-3 pulse oximeter has been validated for low perfusion accuracy in bench top testing against a Biotek Index 2 simulator and Masimo's simulator with signal strengths of greater then 0.02% and a % transmission of greater than 5% for saturation's ranging from 70 to 100%. This variation equals plus or minus one standard deviation. Plus or minus on standard deviation encompasses 68% of the population.
The LNOP ear sensors have an SPO2 accuracy of 70% to 100% ±3.5% for adults during no motion conditions, however, since the monitor cannot display ½ digits, the accuracy rounded to ±4 digits. The SPO2 accuracy during motion conditions is not specified for the LNOP ear or LNCS™ TF-I sensors.
Pulse Rate Range and Accuracy
ACCURACY
PATIENT SIZEPULSE RATE RANGE
NO MOTION CONDITIONS
DURING MOTION CONDITIONS
Adult / Pediatric / Neonate 30 to 235 bpm ± 3 digits ± 5 digits

Spectrum® Operating Instructions 0070-10-0648-02 5 - 15
Appendix Patient Parameter Specifications
5.2.6.2 Nellcor SpO2 Performance Requirements
Sensor CompatibilityNellcor types: D-25L, N-25, I-20, D-20, OxiCliq A, OxiCliq N, OxiCliq P, OxiCliq I, Oxiband A/N, Oxiband P/I, OXI 1-2-3 A/N, OXI 1-2-3 P/I, DS-100A, DY-S, Max-Fast
Saturation Accuracy
Pulse Rate Range and Accuracy
Update RateEvery 2 seconds
5.2.7 CO2 Performance CharacteristicsThe Spectrum is capable of providing CO2 measurements from either an Oridion MediCO2 capnography module, or an Oridion MiniMediCO2 capnography module.
The CO2 performance is in accordance with the requirements of EN 864 (MediCO2) or ISO 21647:2004 (MiniMediCO2).
5.2.7.1 MediCO2 Microstream® (Only in monitors with serial numbers below MS05000.)
Accuracy specification of the measured CO2 partial pressure is according to the following table
Sensor Accuracy
D-25L, D-20, I-20, N-25 70% to 100% ± 2 digits Below 70% unspecified
OxiCliq A, OxiCliq N, OxiCliq P, OxiCliq I, Oxiband A/N, Oxiband P/I, OXI 1-2-3 A/N, OXI 1-2-3 P/I, DS-100A, DY-S, Max-Fast
70% to 100% ± 3 digits Below 70% unspecified
Range Accuracy
20 to 249 bpm ± 3 bpm
Range: 0 - 99 mmHg
OPERATING TIME
CO2 CONCENTRATION* ACCURACY**
0 - 20 min. 0 - 38 mmHg ± 4 mmHg
39 - 99 mmHg ± 12%
20 min. and up 0 - 38 mmHg ± 2 mmHg

Patient Parameter Specifications Appendix
5 - 16 0070-10-0648-02 Spectrum® Operating Instructions
The accuracy specification is maintained to within ± 4% for the following gas mixtures (all values are in Vol. %)
Above 80% O2, 1 mmHg has to be added to the upper tolerance of the accuracy specs.
Respiration Rate Accuracy
39 - 99 mmHg ± 5% to 39 - 40 mmHg + 0.08% for every 1 mmHg above 40 mmHg
* At 760 mmHg** Accuracy applies for respiration rates of up to 80 RPM. For breath rates above 80 RPM, accuracy complies
with EN 864/ISO 9918 (4 mmHg or ± 12% of reading whichever is greater) for EtCO2 values exceeding 19 mmHg. To achieve the specified accuracy for respiration rates above 60 respirations/minute, an endotra-cheal tube adapter with low dead-space must be used in neonatal mode.
CO2 N2 O2 N2O H2OANESTHETIC AGENTS
0 to 13 0 to 97.5 0 to 100 0 to 100 Dry to saturated
According to EN864
Sampling Rate: Nominally 50 ml/minute, ± 7.5 ml/min
Respiration Rate Range: 0 - 150 RPM
Respiration Rate 0 to 40 RPM 41 to 70 RPM 71 to 100 RPM 100 to 150 RPM
Accuracy ± 1 RPM ± 2 RPM ± 3% ± 5%
Auto Zero: The Auto Zero process is performed only during measurement mode. The MediCO2 PlusMediCO Plus 2001A updates the ambient pressure that is measured during the Auto Zero process. The Auto Zero is triggered:
1. During the first hour after entering measurement mode, periodically for durations of typically 15 seconds at a rate which limits the total time consumed by Auto Zeros to less then 2% of the time in which active measurements are taken. Following the first hour after entering measurement mode, periodically from or durations of typically 15 seconds at a rate of at most once per hour.
2. If a change of 8 degree C from the last Auto Zero is detected.
3. If a pressure change of 20 mmHg relative to the last Auto Zero (less than the purge threshold) for period of 30 seconds. is detected.
Pump Calibration: No routine calibration is required
OPERATING TIME
CO2 CONCENTRATION* ACCURACY**

Spectrum® Operating Instructions 0070-10-0648-02 5 - 17
Appendix Patient Parameter Specifications
5.2.7.2 MiniMediCO2 Microstream® (Only in monitors with serial number MS05000 and higher.)
Accuracy specification of the measured CO2 partial pressure is according to the following table (This testing is done according to ISO 21647 clauses 51.101.1 and 51.101.2.).
Accuracy in the presence of interfering gases:
The accuracy specification is maintained to within 4% of the values indicated in the table above in the presence of interfering gases according to ISO 21647 clauses 51.101.3 and 101.1.
Respiration Rate Accuracy:
Rise/Fall Time: < 190 ms to display 10 to 90% step change with a 5% CO2/balance air test gas at 10 liters per minute flow through an airway adapter.
< 190 ms to display 90 to 10% step change with a 5% CO2/balance air test gas at a 10 liters per minute flow through an airway adapter.
Range: 0 - 99 mmHg
CO2 PARTIAL PRESSURE * ACCURACY**
0 - 38 mmHg ± 2 mmHg
39 - 99 mmHg ± (5% of reading + 0.08% for every 1 mmHg above 38 mmHg)
* At sea level.** Accuracy applies for respiration rates of up to 80 RPM. For respiration rates above 80 RPM, accuracy is
4 mmHg or ± 12% of the reading, whichever is greater, for EtCO2 values exceeding 18 mmHg. This is tested according to and is compliant with EN 864 and ISO 21647. To achieve the specified accuracies for respiration rates above 60 respirations/minute, the Microstream FilterLine H Set for Infant/Neonatal(p/n 006324) must be used. Above 55 degrees C module temperature, ± 1 mmHg or ± 2.5% (whichever is greater) has to be added to the tolerance of the accuracy specs.
Flow Rate: 50 ml/min -7.5 + 15 ml/min, flow measured by volume.
Respiration Rate Range: 0 - 150 RPM
Respiration Rate 0 to 70 RPM 71 to 120 RPM 121 to 150 RPM
Accuracy ± 1 RPM ± 2 RPM ± 3 RPM

Patient Parameter Specifications Appendix
5 - 18 0070-10-0648-02 Spectrum® Operating Instructions
Self Maintenance (SFM) Interval:
Self-Maintenance (SFM) is performed only during measurement mode. The module performs one or more of the following:
• Ambient pressure measurement
• Auto zero (AZ)
• Flow test
SFM is triggered under the following conditions:
• During the first hour after entering measurement mode, periodically for durations of typically 10 seconds at a rate which limits the total time consumed by SFMs to less than 2% of the time in which active measurements are taken. Following the first hour after entering measurement mode, periodically for durations of typically 10 seconds at a rate of at most once per hour.
• If a change of 8 °C from the last AZ is detected.
• If a pressure change of 20 mmHg relative to the last ambient pressure measurement (less than the purge threshold) for a period of 30 seconds is detected. The module will be able to detect a real change in the ambient pressure and a pressure change due to partial blockage of the FilterLine.
The module prevents the triggering of an SFM in the following situations:
• In case of purging until the end of this state.
• During a breath absence period which follows a valid breath.
• While waiting a minimum of 20 seconds for host SFM enable command. (After the 20-second opportunity given to the host to schedule the SFM passes, the module schedules the SFM according to a priority determined by current conditions).
System Response Time: The system response time (with a standard-length FilterLine) which includes the delay time and rise time (10% to 90%) in response to a step change in the CO2 concentration is 2.9 seconds typical.
Rise Time (Adult and Neonatal):
190 msec maximum
Delay Time: 2.7 seconds typical
Pump Calibration Interval: No routine calibration is required. The module should initially be calibrated after 1200 operating hours, then once a year or after 4,000 operating hours, whichever comes first.

Spectrum® Operating Instructions 0070-10-0648-02 5 - 19
Appendix Patient Parameter Specifications
5.2.8 Cardiac OutputThe Spectrum is capable of providing thermal dilution Cardiac Output in Adult and Pediatric modes only.
Performance Requirements:
Cardiac output range: 0.2 - 20.0 liters/minute
Cardiac output resolution: 0.1 liters/minute
Cardiac Output Repeatability: ± 2% or 0.2 liters/minute from the mean value, whichever is greater, as measured using electronically generated flow curves.
Accuracy: ± 5% or 0.2 liters/minute, whichever is greater, as measured using electronically generated flow curves.
Blood Temperature Measurement:
Range: 17.5 - 43° C (63.5° F - 109.4° F)
Accuracy: Exclusive of probe errors:
± 0.2° C (± 0.4° F)
Resolution: 0.1° C (0.1° F)
Injected Temperature Measurement:
Range: 0.1 - 30.0° C (30.2° F - 86° F)
Accuracy: Exclusive of probe errors:
± 0.2° C (± 0.4° F)
Resolution: 0.1° C (0.1° F)
Modes of Operation: Auto Start, Manual Start
Injectate volume: 3, 5, 10 cc

Special Functions Appendix
5 - 20 0070-10-0648-02 Spectrum® Operating Instructions
5.3 Special Functions
5.3.1 ST Segment Analysis Performance Requirements
Enabling: Enabled in Adult and Pediatric modes only
Absolute ST Deviation Range: 3/5-lead ECG:
-9.9 mm to 9.9 mm (-990 μV to 990 μV RTI)
12-lead ECG:
-10.0 mm to + 10.0 mm (-1000 μV to 1000 μV RTI)
Delta ST Deviation Range: 12-lead ECG Only:
-20.0 mm to 20.0 mm (-2000 μV to 2000 μV RTI)
Resolution: 0.1 mm (10 μV)
Default ST Measurement Point: 80 ms after J point for heart rates ≤ 120 bpm
60 ms after the J point for heart rates > 120 bpm
User Selectable ST Measurement Points: 40, 60 and 80 ms after J point (heart rate independent) or 60/80 (heart rate dependent)
Default ISO Point: Located between the P and Q waves.
User adjustable ISO Point: 3/5 Lead ECG:
User adjustable from “R peak” - 10 ms to “R peak” - 200 ms in 8 ms increments.
12 Lead ECG:
User adjustable from “R peak” - 10 ms to “R peak” - 200 ms in 8 ms increments.
Default J Point: The end of the QRS complex.

Spectrum® Operating Instructions 0070-10-0648-02 5 - 21
Appendix Special Functions
5.3.2 Arrhythmia AnalysisArrhythmia analysis can be enabled in Adult and Pediatric modes. Arrhythmia analysis will identify ventricular arrhythmia only. Non-lethal or all arrhythmia alarms are capable of being disabled. The Spectrum will have the ability to make the following arrhythmia calls as applicable per ECG source:
3/5-lead ECG includes the following Arrhythmia Calls: Asystole, Irregular Heart Rate, Couplet, PVCs per minute, Run, Bigeminy, Trigeminy, Ventricular Tachycardia, Ventricular Fibrillation, Ventricular Rhythm and Bradycardia.
12-lead ECG includes the following Arrhythmia Calls: Asystole, Pause, Couplet, Ventricular Rhythm, PVCs per minute, Run, Bigeminy, Trigeminy, Ventricular Tachycardia and Ventricular Fibrillation.
When the ECG source is 3/5-Lead, PVCs per minute are invalidated and the PVC counter reset to 0 during periods of Ventricular Rhythm, Ventricular Tachycardia, Ventricular Fibrillation or Asystole.
When the ECG source is 12-Lead, PVCs per minute are invalidated and the PVC counter is reset to 0 during periods of Ventricular Rhythm, Ventricular Tachycardia, and Ventricular Fibrillation. During periods of Asystole, the PVC counter is reset to 0.
User Selectable J Point: 3/5 Lead ECG:
User adjustable from “R peak” + 10 ms to “R peak” + 200 ms in 8 ms increments.
12 lead ECG:
User adjustable from “R peak” + 10 ms to “R peak” + 200 ms in 8 ms increments.
Excluded Beats: Ectopic beats and ventricular paced beats are excluded from ST measurement.
Invalid ST 3 and 5-lead modes: ST data is invalidated when the paced rhythm, Ventricular Rhythm or Ventricular Tachycardia persists for more than 45 seconds and/or during detected episodes of Asystole and Ventricular Fibrillation.
12-lead mode: ST data is invalidated when the paced rhythm or Ventricular Rhythm persists for more than 30 seconds, and/or during detected episodes of Asystole, Ventricular Fibrillation and Ventricular Tachycardia.

Special Functions Appendix
5 - 22 0070-10-0648-02 Spectrum® Operating Instructions
5.3.3 ECG Interpretation The Spectrum, equipped with 12-lead ECG and in adult mode only, is capable of providing interpretive, rhythm, and condition statements in accordance with 0070-00-0524-XX.
Interpretive statements are disabled in adult modes for ages less than 18 years old.
5.3.4 CalculationsThe Spectrum has the ability to calculate and display intravenous (IV) drug infusion rate and concentration based upon patient weight and drug dosage.
Drug Infusion Rate
Drug Concentration
ReferencesSource: Chulay M, Guzzetta C, Dossey B. AACN Pocket Handbook of Critical Care Nursing. Stamford: Appleton & Lange, 1997.
Source: Vallerand A, and Deglin J. Davis's Guide to IV Medications, 3rd Edition. Philadelphia: F.A. Davis Company, 1996.
5.3.5 Hemodynamic CalculationsThe Spectrum will have the ability to calculate and display the following Hemodynamic parameters.
Units: ml/hr
Range: 0 to 9999 ml/hr
Resolution: 0.01 ml/hr
Units: mcg/ml, mg/ml, g/ml, units/ml, or mU/ml
Range: 0.1 - 100
Resolution: 0.1
Cardiac Index (CI)Range: 0.1 - 20.0 l/min/m2
Resolution: 0.1 l/min/m2
Stroke Volume (SV)Range: 1 - 1000 ml
Resolution: 1 ml

Spectrum® Operating Instructions 0070-10-0648-02 5 - 23
Appendix Special Functions
Stroke Volume Index (SVI)Range: 0.1 - 500.0 ml/m2
Resolution: 0.1 ml/m2
Systemic Vascular Resistance (SVR)Range: 50 - 9999 dyne-sec/cm5
Resolution: 1 dyne-sec/cm5
Systemic Vascular Resistance Index (SVRI)Range: 50 - 5000 dyne-sec /cm5/m2
Resolution: 1 dyne-sec /cm5/m2
Pulmonary Vascular Resistance (PVR)Range: 1 - 1000 dyne-sec/cm5
Resolution: 1 dyne-sec/cm5
Pulmonary Vascular Resistance Index (PVRI)Range: 1 - 2000 dyne-sec/cm5/m2
Resolution: 1 dyne-sec/cm5/m2
Left Cardiac Work (LCW)Range: 0.1 - 100.0 kg-m
Resolution: 0.1 kg-m
Left Cardiac Work Index (LCWI)Range: 0.1 - 50.0 kg-m/m2
Resolution: 0.1 kg-m/m2
Right Cardiac Work (RCW)Range: 0.1 - 100.0 kg-m
Resolution: 0.1 kg-m
Right Cardiac Work Index (RCWI)Range: 0.1 - 50.0 kg-m/m2
Resolution: 0.1 kg-m/m2

Special Functions Appendix
5 - 24 0070-10-0648-02 Spectrum® Operating Instructions
Reference SourcesSource: Kinney M, Dunbar S, Brooks-Brunn J, Molter N, and Vitello-Cicciu J. AACN's Clinical Reference for Critical Care Nursing. St. Louis: Mosby, 1996.
Source: DuBois D, Dubois EF. A formula to estimate the approximate surface height and weight be known. Arch Intern Medicing. 1916; 17:863-71.
Source: Baxter Healthcare Corporation. Model COM-2 Cardiac Output Computer Operations Manual Software Version 2.2. Santa Ana: 1989.
Left Ventricular Stroke Work (LVSW)Range: 1 - 500 gm-m
Resolution: 1 gm-m
Left Ventricular Stroke Work Index (LVSWI)Range: 1 - 500 gm-m/m2
Resolution: 1 gm-m/m2
Right Ventricular Stroke Work (RVSW)Range: 1 - 50 gm-m
Resolution: 1 gm-m
Right Ventricular Stroke Work Index (RVSWI)Range: 1 - 50 gm-m/m2
Resolution: 1 gm-m/m2
Cerebral Perfusion Pressure (CPP)Range: -30 - 300 mmHg
Resolution: 1 mmHg

Spectrum® Operating Instructions 0070-10-0648-02 5 - 25
Appendix Information Display and Control
5.4 Information Display and Control
Front Panel Display, Indicators, and ControlsThe front of the monitor will provide a keypad, display, rotary/push knob, and four LEDs.
Front Panel Display
Anti-Glare/ Anti-Reflection FilterThe display is fitted with an anti-glare/anti-reflection filter.
Rotary KnobThe rotary knob is 16 position per revolution optical encoder with an integral push button switch.
LED Indicators
Alarm IndicatorsVisual alarm indicators are in accordance with EN475: 1995.
A red LED will flash at 1.4 - 2.8 Hz (84 times/minute) at 50% duty cycle during a warning alarm (high priority).
A yellow LED will flash at a rate of 0.4 - 0.8 Hz at a 50% duty cycle during a caution alarm (medium priority).
If a warning and caution alarm are in force simultaneously, only the red LED is activated.
Power IndicatorsA green AC Mains LED is illuminated whenever the unit is connected to AC Power.
A green Battery Charging LED is illuminated constantly when the batteries are charging.
Audio IndicatorsAn audio speaker is provided in order to annunciate alarms, key depresses, message tones, and systole beep tones.
Audio alarms are in accordance with EN475: 1995.
DISPLAY TYPE SIZE MINIMUM RESOLUTION
Color active matrix TFT liquid crystal 12.1-inch diagonal 800 x 600 pixels

Information Display and Control Appendix
5 - 26 0070-10-0648-02 Spectrum® Operating Instructions
Real Time Clock
The Real Time Clock has a dedicated independent power source that allows it to keep time whether or not the Spectrum has power provided.
The Display Resolution for the Real Time Clock is:
1 minute
The Accuracy of the Real Time Clock is: ± 1 minute/month (30 days) @ 21± 3ºC

Spectrum® Operating Instructions 0070-10-0648-02 5 - 27
Appendix Input/Output Communications
5.5 Input/Output Communications
ECG Analog Output SpecificationECG analog output is disabled when 12-lead ECG analysis is enabled.
The Spectrum supports slaving of an IABP for the ECG analog output only.
Arterial Blood Pressure Analog Output Specification(Only in monitors with serial number prefix “MS” and software versions L.X and higher.)
The Spectrum supports slaving of an IABP from Arterial Blood Pressure analog output.
Sync Pulse for Cardioversion
Width:
Bandwidth (-3 dB referenced to 10 Hz): Same as ECG Filter Setting
Maximum Propagation Delay (Delay of QRS complex):
25 ms
Sensitivity (referenced to 10 Hz): 1 V/mV of input, ± 10%
Pacer Enhancement: Pacer is summed at the output when pacer enhancement mode is turned ON.
Pacer amplitude signal is a minimum of 2.5 V
Pacer width is 10 ms, with a 5% tolerance.
Pacer rise and fall times is 100 μs, maximum.
Bandwidth (-3 dB referenced to 10 Hz): DC to 15 Hz minimum
Maximum Propagation Delay: 25 ms
Sensitivity: 1 V/100 mmHg, +10%
Source: The Sync Pulse is derived from the active ECG source.
Propagation Delay: 35 ms maximum, between QRS peak and the rising edge of the Sync Pulse Amplitude: 2 Vp minimum into a 5 kΩ load
3/5-LEAD ECG 12-LEAD ECG
2-7 ms 9-11 ms

Communication Protocols Appendix
5 - 28 0070-10-0648-02 Spectrum® Operating Instructions
5.6 Communication Protocols
DIAP Communication ProtocolThe Spectrum supports the Mindray Improved ASCII Protocol (0070-00-0307) with the following exceptions:
1. The NIBP elapsed time is set to “---” when the elapsed time is greater than 999 minutes.
2. Though not specified in the protocol, the alarm limit values are at the same resolution as the parameter value. Example, temperature is 10X; therefore, the alarm limit values are also 10X.
Gas ModuleThe Spectrum supports the Gas Module Communication Protocol (0084-00-0025).
ELAN Communication ProtocolThe Spectrum supports the ELAN Communication Protocol for communication to the Panorama Central Station (0084-00-0007).
Accutorr Communication ProtocolThe Spectrum supports the Accutorr Communication Protocol (0070-00-0304) with the following exceptions:
1. Baud Rate: 9600 or 1200
2. The following “Show patient data” command fields are not supported:
• “f” Status Byte 0
• “g” Status Byte 1
• “h” Status Byte 2
3. The following bits of Status Byte 1 are not supported:
• Bit 1, SpO2 Uncalibrated
• Bit 2, SpO2 Alarm Overlapped
• Bit 3, SpO2 RAM Test Failure
• Bit 4, SpO2 ROM Test Failure
• Bit 5, SpO2 OFFSET Mismatch
• Bit 6, SpO2 FILTER Mismatch
• Bit 7, SpO2 System Test in Progress
4. The following bits of Status Byte 2 are not supported:
• Bit 1, NIBP indicating Motion Artifact
• Bit 2 through 7 not used
Vigilance InterfaceThe Spectrum supports the Vigilance IFMout communications protocol in accordance with Edwards Lifesciences specification ELS 1291.

Spectrum® Operating Instructions 0070-10-0648-02 5 - 29
Appendix Communication Protocols
Module Bus Communication ProtocolThe Spectrum supports the Enterprise Module Serial Protocol Specification(0060-00-0991).
Alarm Delay Time to Remote EquipmentThe alarm delay time from the Spectrum to remote equipment is ≤ 2.7 seconds, measured at the Spectrum signal output connector.

Power Supply Appendix
5 - 30 0070-10-0648-02 Spectrum® Operating Instructions
5.7 Power Supply
Power SourceThe Spectrum will auto-select its power source from those available. The monitor will use the following priority in choosing the power source:
1. AC Mains Power
2. Internal battery power
The monitor will operate from AC Mains power with or without the internal batteries installed.
AC Mains Power Source
5.7.1 Battery Power
5.7.1.1 Sealed Lead Acid (P/N0146-00-0043)
Input Voltage: 100 - 240 VAC (± 10%)
Line Frequency: 50 or 60 Hz (± 3 Hz)
Current: 1.2 - 0.7 Amps
Battery Type: Sealed Lead Acid
Number of Batteries: 2 (the unit is capable of operation with one battery for the sole purpose of changing batteries while in the normal operating mode.)
Minimum Battery Run Time: 1 hour and 20 minutes from two fully charged new batteries at 25º C for the following conditions: ECG, SpO2, and NIBP running at the 15 minute interval.
Battery Recharge Time: 16 hours maximum.
Charging Method: Parallel and independent.
Time to Shutdown from Low Battery: >10 minutes but < 20 minutes after indication, with 2 new, fully charged batteries.

Spectrum® Operating Instructions 0070-10-0648-02 5 - 31
Appendix Power Supply
5.7.1.2 Lithium-Ion Battery (P/N 0146-00-0069)
Battery Type: Lithium-ion
Number of Batteries: 2 (the unit is capable of operation with one battery for the sole purpose of changing batteries while in the normal operating mode.)
Minimum Battery Run Time: 4 hours and 30 minutes from two fully charged new batteries at 25°C for the following conditions: ECG, SpO2, and NIBP running at the 15 minute interval.
Battery Recharge Time: 5 hours maximum.
Charging Method: Parallel and independent.
Time to Shutdown from Low Battery: >10 minutes but < 20 minutes after indication, with 2 new, fully charged batteries with no CO2 and printer.

Data Storage Appendix
5 - 32 0070-10-0648-02 Spectrum® Operating Instructions
5.8 Data Storage
Monitor Configuration Data Storage and Transfer
StorageThe monitor has the ability to store, in non-volatile memory, the user selectable configuration. There is one (1) configuration available for each patient size and the following information is saved:
• Alarm Values
• Display Configurations
• NIBP Interval
• Parameter Settings, scaling
• Trace Speed
• Printer Settings
• Trend Configurations
TransferTransfer of monitor configuration data to and from the Spectrum using a PCMCIA card inserted into PCM2 is provided while in installation mode.
The Transfer PCMCIA card has the ability to be write protected
Patient Data Storage and Transfer
StorageThe current patient information and demographics is stored in non-volatile memory.
The monitor is capable of storing, in non-volatile memory, a maximum of 120 trend values for each active parameter and 6 minutes of OxyCRG data.
Extended TrendWith the addition of a PCMCIA memory card inserted into PCM1, the monitor is capable of storing 500 list trend records for each active parameter and 12 hours of OxyCRG data.
The extended trend card is expected to be present at power-up and never removed.
All trend data not on the extended trend card when installed is lost and not accessible.
TransferTransfer of list trend data and demographics data to and from the Spectrum using a PCMCIA card inserted into PCM2, is provided while in monitoring mode. Only trended data for those parameters that are common between the monitors will be transferred.
The Transfer PCMCIA card has the ability to be write protected.

Spectrum® Operating Instructions 0070-10-0648-02 5 - 33
Appendix Printing
5.9 Printing
Integrated Thermal PrinterThe integrated printer is a maximum 2- trace thermal strip chart printer with integral paper spool.
The printer uses plain white thermal paper 5 cm wide.
The printer supports 5 paper speeds: 3.125, 6.25, 12.5, 25, and 50 mm/sec., each within + 5%.
The printer sensitivity is ± 5% on a single trace, and 50% if scale for dual trace, + 5%.
External Laser Printer The Spectrum has the ability to print 12-lead data to an external Hewlett-Packard 4100N laser printer via a wired Ethernet connection.
The laser printer will print on 8.5" x 11" pre-grided paper.

Monitor Physical Characteristics Appendix
5 - 34 0070-10-0648-02 Spectrum® Operating Instructions
5.10 Monitor Physical Characteristics
MountingThe monitor has the capability to be carried as a portable unit, placed on a tabletop, or mounted to a wall mount, rolling stand, bed rail or Gas Module or SE. The monitor is capable of having a PatientNet instrument transmitter, and an External Parameter Module mounted to it.
Maximum Size
Maximum Weight 11.95 lbs. without optional accessories
15.52 lbs. with 2 Sealed Lead Acid batteries, without optional accessories
13.52 lbs. with 2 Lithium-Ion batteries, without optional accessories
PCMCIA Card Slot
PCMCIA Card Slot Functions
A tool is needed to eject the card from PCM1.
Blank PCMCIA cards will fill the unused slots.
Cooling Fan Control The cooling fan is ON when the unit is powered from an external source (AC).
The cooling fan is OFF when the unit is powered from the internal batteries.
Without ExternalParameter Module
With External ParameterModule mounted
11.9" wide 11.9" wide
10.5" high 10.7" high
7.4" deep (including knob) 7.5" deep (including knob)
PCM1 PCM2
Extended Trend Patient Data Transfer
12-lead ECG Monitor Configuration Transfer
Software Download
12-lead ECG

Spectrum® Operating Instructions 0070-10-0648-02 5 - 35
Appendix Monitor Physical Characteristics
Normal Operating NoiseThe Sound Pressure Level (SPL) produced by the unit during normal operating conditions is 60 dBA at 1 meter when measured in accordance with ISO 3744. Maximum SPL is measured with no alarms sounding, but all internal mechanical devices (i.e., pumps, fans) running.

Comm-Port Physical Characteristics Appendix
5 - 36 0070-10-0648-02 Spectrum® Operating Instructions
5.11 Comm-Port Physical Characteristics
Maximum Weight0.5 lbs.
The CS1/MB1/RD1 Comm-Port supports the following connectionsEthernet Communication labeled CS1
Module Bus labeled MB1
Remote Display labeled RD1 (Future Use)
The CS1/MB1/SP1 Comm-Port supports the following connectionsEthernet Communication labeled CS1
Module Bus labeled MB1
Serial Communication Channel, labeled SP1
The RD1/NC1/SP1 Comm-Port supports the following connectionsRemote Display labeled RD1 (Future Use)
Nurse Call labeled NC1
Serial Communication Channel, labeled SP1
The SP1/NC1/SP2 Comm-Port supports the following connectionsNurse Call labeled NC1
2 Serial Communication Channels, labeled SP1 and SP2

Spectrum® Operating Instructions 0070-10-0648-02 5 - 37
Appendix External Parameter Module Physical Characteristics
5.12 External Parameter Module Physical Characteristics
MountingThe External Parameter Module mounts atop the monitor.
A means of quick disconnect is provided. It does not require a tool, yet requires more than one action in order to prevent accidental disconnect.
Connecting/disconnecting the external module from the Monitor will not disturb monitor operation.
Maximum Size11.0" wide x 2.3" high x 5.0" deep.
Maximum Weight1.75 lbs.
PowerThe module receives power from the monitor.

Environmental and Safety Characteristics Appendix
5 - 38 0070-10-0648-02 Spectrum® Operating Instructions
5.13 Environmental and Safety Characteristics
5.13.1 Spectrum
Transport and Storage Temperature: -20º C to 60º C
Transport and Storage Humidity: 10% to 95%, non-condensing
Transport and Storage Altitude: (-1250 to 9,889 feet ASL)
1060 hPa to700 hPa
(795 mmHg to 525 mmHg)
Operating Temperature: 5º C to 40º C
Operating Humidity: 15% to 95% non-condensing
Operating Altitude: (-1250 to 9,889 feet ASL)
1060 hPa to 700 hPa
(795 mmHg to 525 mmHg)
Shipping: ISTA shipping procedure 1A
Shock: 15 g, 11 ms, half sine shock pulse tested per IEC 60068-2-27.
Vibration: Sinusoidal Vibration per IEC 60068-2-6
1 g or 0.07 mm, 57 - 62 Hz crossover frequency
10 to 500 Hz 10 sweep cycles in each axis
Random Vibration per IEC 60068-2-34
0.02 g2/Hz20 - 500 Hz
low degree of reproducibility 9 minutes per axis
Drop: ECRI PB-296 892, section AIII 3.3 for Class III devices.
Impact: ECRI PB-296 892, section AIIII 3.2 for Class 3 devices.
Spillage and Ingress of Fluids: Non Protected Equipment (IPX0) as specified in IEC 529.

Spectrum® Operating Instructions 0070-10-0648-02 5 - 39
Appendix Environmental and Safety Characteristics
5.13.2 Gas Module 3
CAUTION: Gas Module 3 must be moisture protected whenever transported. This can be done with a protective plastic bag in which water-absorbing materials (e.g. silica gel) have been included.
Transport and Storage Temperature: -40 °C to +70 °C
Transport and Storage Humidity: 5 to 100%, condensing1
Operating Temperature: 10 °C to 40 °C
Operating Humidity: 10 to 95% RH, non-condensing(in Airway: 0-100% RH, condensing)
Operating Altitude: Sea Level to 8,000 feet
Shipping: ISTA shipping procedure 2A
Shock: IEC 60068-2-27peak acceleration: 150 m/s2 (15.3 g);duration: 11 ms;pulse shape: half-sine;number of shocks: 3 shocks per direction per axis (18 total).
Vibration: IEC 60068-2-64
Drop: IEC 60068-2-32
Spillage and Ingress of Fluids: Non-protected Equipment (IPX0) as specified in IEC 60529.
1 After storage in a condensing atmosphere, the unit shall, before use, be kept for more than 24 hr. in anenvironment equivalent to the operating atmosphere.

Agency Compliance Appendix
5 - 40 0070-10-0648-02 Spectrum® Operating Instructions
5.14 Agency Compliance
5.14.1 SpectrumThe Spectrum was designed to comply with the following industry standards:
• EN 60601-1
• UL 60601-1
• CSA Standard C22.2 No. 601.1M90
• EN 60601-1-1/IEC 60601-1-1
• EN 60601-1-4/IEC 60601-1-4
• EN 60601-2-27/IEC 60601-2-27
• EN 60601-2-30/IEC 60601-2-30
• EN 60601-2-34/IEC 60601-2-34
• EN 60601-2-25/IEC 60601-2-25
• EN 60601-2-26/IEC 60601-2-26
• EN 60601-2-49/IEC 60601-2-49
The View 12™ ECG Analysis Module complies with AAMI EC 11 for Diagnostic Electrocardiographic Devices.
The Spectrum has been certified by CSA.
The Spectrum has been tested for functionality following ESU (Electrosurgery Unit Interference) energy exposure as described in the draft Amendment A1 to IEC 60601-2-25.
5.14.2 Gas Module II and Gas Module SEThe Gas Module II and Gas Module SE were designed to comply with the following industry standards:
• EN 60601-1/IEC 60601-1
• UL 60601-1
• CSA Standard C22.2 No. 601.1M90
The Gas Module II and Gas Module SE have been certified by CSA

Spectrum® Operating Instructions 0070-10-0648-02 5 - 41
Appendix Electromagnetic Capability
5.14.3 Gas Module 3The Gas Module 3 was designed to comply with the following industry standards:
• EN 60601-1/IEC 60601-1
• UL 60601-1
• CSA Standard C22.2 No. 601.1M90
• EN 60601-1-1/IEC 60601-1-1
• EN 60601-1-4/IEC 60601-1-4
• ISO 21647
The Gas Module 3 has been certified by CSA.
5.15 Electromagnetic Capability
5.15.1 SpectrumThe Spectrum meets the requirements of IEC 60601-1-2/EN 60601-1-2.
NOTE: The Spectrum needs special precautions regarding EMC and needs to be installed and put into service according to the EMC information provided below.
NOTE: Portable and mobile RF communications equipment can affect the Spectrum. See tables 5-1 through 5-4 that follow.
TABLE 5-1
GUIDANCE AND MINDRAY DS USA DECLARATION - ELECTROMAGNETIC EMISSIONS
The Spectrum is intended for use in the electromagnetic environment specified below. The customer or the user of the Spectrum should assure that it is used in such an environment.
EMISSIONS TEST COMPLIANCE ELECTROMAGNETIC ENVIRONMENT - GUIDANCE
RF emissions CISPR 11
Group 1 The Spectrum uses RF energy only for its internal function. Therefore, its RF emissions are very low and are not likely to cause any interference in nearby electronic equipment.
RF emissions CISPR 11
Class A The Spectrum is suitable for use in all establishments other than domestic establishments and those directly connected to the public low-voltage power supply network that supplies buildings used for domestic purposes
Harmonic emissions IEC 61000-3-2
Class A
Voltage fluctuations/Flicker emissions IEC 61000-3-3
Complies
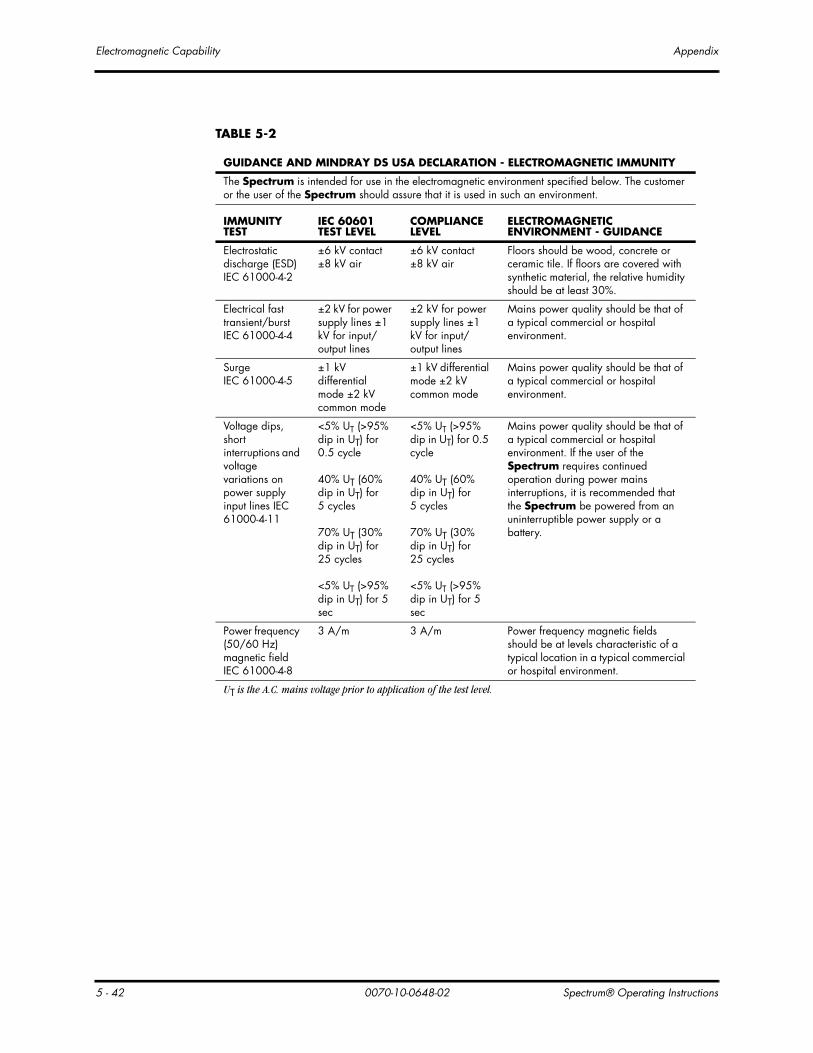
Electromagnetic Capability Appendix
5 - 42 0070-10-0648-02 Spectrum® Operating Instructions
TABLE 5-2
GUIDANCE AND MINDRAY DS USA DECLARATION - ELECTROMAGNETIC IMMUNITY
The Spectrum is intended for use in the electromagnetic environment specified below. The customer or the user of the Spectrum should assure that it is used in such an environment.
IMMUNITY TEST
IEC 60601 TEST LEVEL
COMPLIANCE LEVEL
ELECTROMAGNETIC ENVIRONMENT - GUIDANCE
Electrostatic discharge (ESD) IEC 61000-4-2
±6 kV contact ±8 kV air
±6 kV contact ±8 kV air
Floors should be wood, concrete or ceramic tile. If floors are covered with synthetic material, the relative humidity should be at least 30%.
Electrical fast transient/burst IEC 61000-4-4
±2 kV for power supply lines ±1 kV for input/output lines
±2 kV for power supply lines ±1 kV for input/output lines
Mains power quality should be that of a typical commercial or hospital environment.
SurgeIEC 61000-4-5
±1 kV differential mode ±2 kV common mode
±1 kV differential mode ±2 kV common mode
Mains power quality should be that of a typical commercial or hospital environment.
Voltage dips, short interruptions and voltage variations on power supply input lines IEC 61000-4-11
<5% UT (>95% dip in UT) for 0.5 cycle
40% UT (60% dip in UT) for 5 cycles
70% UT (30% dip in UT) for 25 cycles
<5% UT (>95% dip in UT) for 5 sec
<5% UT (>95% dip in UT) for 0.5 cycle
40% UT (60% dip in UT) for 5 cycles
70% UT (30% dip in UT) for 25 cycles
<5% UT (>95% dip in UT) for 5 sec
Mains power quality should be that of a typical commercial or hospital environment. If the user of the Spectrum requires continued operation during power mains interruptions, it is recommended that the Spectrum be powered from an uninterruptible power supply or a battery.
Power frequency (50/60 Hz) magnetic field IEC 61000-4-8
3 A/m 3 A/m Power frequency magnetic fields should be at levels characteristic of a typical location in a typical commercial or hospital environment.
UT is the A.C. mains voltage prior to application of the test level.

Spectrum® Operating Instructions 0070-10-0648-02 5 - 43
Appendix Electromagnetic Capability
TABLE 5-3
GUIDANCE AND MINDRAY DS USA DECLARATION - ELECTROMAGNETIC IMMUNITY
The Spectrum is intended for use in the electromagnetic environment specified below. The customer or the user of the Spectrum should assure that it is used in such an environment.
IMMUNITY TEST
IEC 60601 TEST LEVEL
COMPLIANCE LEVEL
ELECTROMAGNETIC ENVIRONMENT - GUIDANCE
Portable and mobile RF communications equipment should be used no closer to any part of the Spectrum, including cables, than the recommended separation distance calculated from the equation applicable to the frequency of the transmitter.
Recommended separation distance
Conducted RF IEC 61000-4-6
3 Vrms150 kHz to 80 MHz
3 Vrms d = 1.2 x
Radiated RF IEC 61000-4-3
3 V/m80 MHz to 2.5 GHz
3 V/m d = 1.2 x 80 MHz to 800 MHz
d = 2.3 x 800 MHz to 2.5 GHz
where P is the maximum output power rating of the transmitter in watts (W) according to the transmitter manufacturer and d is the recommended separation distance in meters (m).
Field strengths from fixed RF transmitters, as determined by an electromagnetic site survey,a should be less than the compliance level in each frequency range.b
Interference may occur in the vicinity of equipment marked with the following symbol:
NOTE: At 80 MHz and 800 MHz, the higher frequency range applies.
NOTE: These guidelines may not apply in all situations. Electromagnetic propagation is affected by absorption and reflection from structures, objects and people.
a Field strengths from fixed transmitters, such as base stations for radio (cellular/cordless) telephones and land mobile radios, amateur radio, AM and FM radio broadcast and TV broadcast cannot be predicted theo-retically with accuracy. To assess the electromagnetic environment due to fixed RF transmitters, an electro-magnetic site survey should be considered. If the measured field strength in the location in which the Spectrum is used exceeds the applicable RF compliance level above, the Spectrum should be observed to ver-ify normal operation. If abnormal performance is observed, additional measures may be necessary, such as reorienting or relocating the Spectrum.
b Over the frequency range 150 kHz to 80 MHz, field strengths should be less than 3 V/m.
P
P
P

Electromagnetic Capability Appendix
5 - 44 0070-10-0648-02 Spectrum® Operating Instructions
TABLE 5-4
RECOMMENDED SEPARATION DISTANCES BETWEEN PORTABLE AND MOBILE RF COMMUNICATIONS EQUIPMENT AND THE SPECTRUM
The Spectrum is intended for use in an electromagnetic environment in which radiated RF disturbances are controlled. The customer or the user of the Spectrum can help prevent electromagnetic interference by maintaining a minimum distance between portable and mobile RF communications equipment (transmitters) and the Spectrum as recommended below, according to the maximum output power of the communications equipment.
RATED MAXIMUM OUTPUT POWER (P)OF TRANSMITTERIN WATTS (W)
SEPARATION DISTANCE (d) IN METERS (m) ACCORDING TO FREQUENCY OF TRANSMITTER
150 kHz to 80 MHz
d = 1.2 x
80 MHz to 800 MHz
d = 1.2 x
800 MHz to 2.5 GHz
d = 2.3 x
0.01 0.12 0.12 0.23
0.1 0.38 0.38 0.73
1 1.2 1.2 2.3
10 3.8 3.8 7.3
100 12 12 23
For transmitters rated at a maximum output power not listed above, the recommended separation distance d in meters (m) can be determined using the equation applicable to the frequency of the transmitter, where P is the maximum output power rating of the transmitter in watts (W) according to the transmitter manufacturer.
NOTE: At 80 MHz and 800 MHz, the separation distance for the higher frequency range applies.
NOTE: These guidelines may not apply in all situations. Electromagnetic propagation is affected by absorption and reflection from structures, objects and people.
P P P
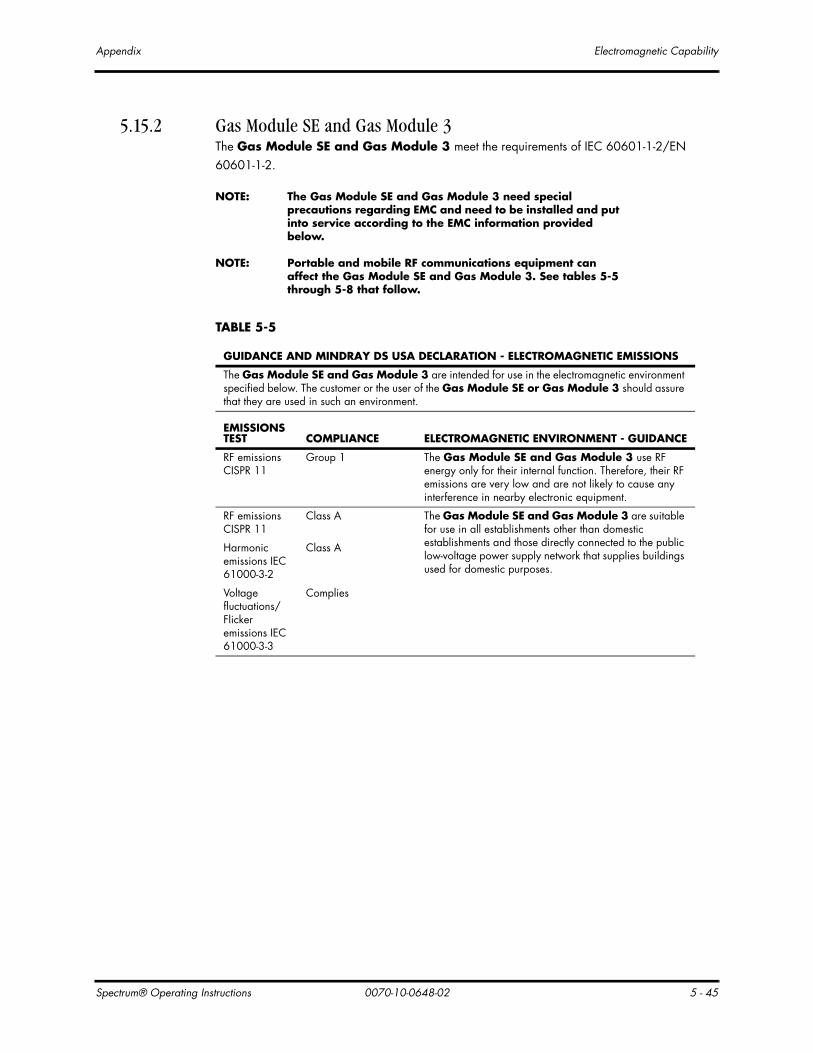
Spectrum® Operating Instructions 0070-10-0648-02 5 - 45
Appendix Electromagnetic Capability
5.15.2 Gas Module SE and Gas Module 3The Gas Module SE and Gas Module 3 meet the requirements of IEC 60601-1-2/EN 60601-1-2.
NOTE: The Gas Module SE and Gas Module 3 need special precautions regarding EMC and need to be installed and put into service according to the EMC information provided below.
NOTE: Portable and mobile RF communications equipment can affect the Gas Module SE and Gas Module 3. See tables 5-5 through 5-8 that follow.
TABLE 5-5
GUIDANCE AND MINDRAY DS USA DECLARATION - ELECTROMAGNETIC EMISSIONS
The Gas Module SE and Gas Module 3 are intended for use in the electromagnetic environment specified below. The customer or the user of the Gas Module SE or Gas Module 3 should assure that they are used in such an environment.
EMISSIONS TEST COMPLIANCE ELECTROMAGNETIC ENVIRONMENT - GUIDANCE
RF emissions CISPR 11
Group 1 The Gas Module SE and Gas Module 3 use RF energy only for their internal function. Therefore, their RF emissions are very low and are not likely to cause any interference in nearby electronic equipment.
RF emissions CISPR 11
Class A The Gas Module SE and Gas Module 3 are suitable for use in all establishments other than domestic establishments and those directly connected to the public low-voltage power supply network that supplies buildings used for domestic purposes.
Harmonic emissions IEC 61000-3-2
Class A
Voltage fluctuations/Flicker emissions IEC 61000-3-3
Complies

Electromagnetic Capability Appendix
5 - 46 0070-10-0648-02 Spectrum® Operating Instructions
TABLE 5-6
GUIDANCE AND MINDRAY DS USA DECLARATION - ELECTROMAGNETIC IMMUNITY
The Gas Module SE and Gas Module 3 are intended for use in the electromagnetic environment specified below. The customer or the user of the Gas Module SE or Gas Module 3 should assure that they are used in such an environment.
IMMUNITY TEST
IEC 60601 TEST LEVEL
COMPLIANCE LEVEL
ELECTROMAGNETIC ENVIRONMENT - GUIDANCE
Electrostatic discharge (ESD) IEC 61000-4-2
±6 kV contact ±8 kV air
±6 kV contact ±8 kV air
Floors should be wood, concrete or ceramic tile. If floors are covered with synthetic material, the relative humidity should be at least 30%.
Electrical fast transient/burst IEC 61000-4-4
±2 kV for power supply lines±1 kV for input/output lines
±2 kV for power supply lines±1 kV for input/output lines
Mains power quality should be that of a typical commercial or hospital environment.
Surge IEC 61000-4-5
±1 kV differential mode±2 kV common mode
±1 kV differential mode±2 kV common mode
Mains power quality should be that of a typical commercial or hospital environment.
Voltage dips, short interruptions and voltage variations on power supply input lines IEC 61000-4-11
<5% UT (>95% dip in UT) for0.5 cycle
40% UT (60% dip in UT) for 5 cycles
70% UT (30% dip in UT) for 25 cycles
<5% UT (>95% dip in UT) for5 sec
<5% UT (>95% dip in UT) for0.5 cycle
40% UT (60% dip in UT) for 5 cycles
70% UT (30% dip in UT) for 25 cycles
<5% UT (>95% dip in UT) for5 sec
Mains power quality should be that of a typical commercial or hospital environment. If the user of the Gas Module SE or Gas Module 3 requires continued operation during power mains interruptions, it is recommended that the Gas Module SE or Gas Module 3 be powered from an uninterruptible power supply or a battery.
Power frequency (50/60 Hz) magnetic field IEC 61000-4-8
3 A/m 3 A/m Power frequency magnetic fields should be at levels characteristic of a typical location in a typical commercial or hospital environment.
UT is the A.C. mains voltage prior to application of the test level.

Spectrum® Operating Instructions 0070-10-0648-02 5 - 47
Appendix Electromagnetic Capability
TABLE 5-7
GUIDANCE AND MINDRAY DS USA DECLARATION - ELECTROMAGNETIC IMMUNITY
The Gas Module SE and Gas Module 3 are intended for use in the electromagnetic environment specified below. The customer or the user of the Gas Module SE or Gas Module 3 should assure that they are used in such an environment.
IMMUNITY TEST
IEC 60601 TEST LEVEL
COMPLIANCE LEVEL
ELECTROMAGNETIC ENVIRONMENT - GUIDANCE
Portable and mobile RF communications equipment should be used no closer to any part of the Gas Module SE or Gas Module 3, including cables, than the recommended separation distance calculated from the equation applicable to the frequency of the transmitter.
Recommended separation distance
Conducted RF IEC 61000-4-6
3 Vrms150 kHz to 80 MHz
3 Vrms d = 1.2 x
Radiated RF IEC 61000-4-3
3 V/m80 MHz to 2.5 GHz
3 V/m d = 1.2 x 80 MHz to 800 MHz
d = 2.3 x 800 MHz to 2.5 GHzwhere P is the maximum output power rating of the transmitter in watts (W) according to the transmitter manufacturer and d is the recommended separation distance in meters (m).
Field strengths from fixed RF transmitters, as determined by an electromagnetic site survey,a should be less than the compliance level in each frequency range.b
Interference may occur in the vicinity of equipment marked with the following symbol:
NOTE: At 80 MHz and 800 MHz, the higher frequency range applies.
NOTE: These guidelines may not apply in all situations. Electromagnetic propagation is affected by absorption and reflection from structures, objects and people.
a Field strengths from fixed transmitters, such as base stations for radio (cellular/cordless) telephones and land mobile radios, amateur radio, AM and FM radio broadcast and TV broadcast cannot be predicted the-oretically with accuracy. To assess the electromagnetic environment due to fixed RF transmitters, an elec-tromagnetic site survey should be considered. If the measured field strength in the location in which the Gas Module SE or Gas Module 3 are used exceeds the applicable RF compliance level above, the Gas Mod-ule SE or Gas Module 3 should be observed to verify normal operation. If abnormal performance is observed, additional measures may be necessary, such as reorienting or relocating the Gas Module SE or Gas Module 3.
b Over the frequency range 150 kHz to 80 MHz, field strengths should be less than 3 V/m.
P
P
P

Electromagnetic Capability Appendix
5 - 48 0070-10-0648-02 Spectrum® Operating Instructions
TABLE 5-8
RECOMMENDED SEPARATION DISTANCES BETWEEN PORTABLE AND MOBILE RF COMMUNICATIONS EQUIPMENT AND THE GAS MODULE SE OR GAS MODULE 3
The Gas Module SE and Gas Module 3 are intended for use in an electromagnetic environment in which radiated RF disturbances are controlled. The customer or the user of the Gas Module SE or Gas Module 3 can help prevent electromagnetic interference by maintaining a minimum distance between portable and mobile RF communications equipment (transmitters) and the Gas Module SE or Gas Module 3 as recommended below, according to the maximum output power of the communications equipment.
RATED MAXIMUM OUTPUT POWER (P) OF TRANSMITTER IN WATTS (W)
SEPARATION DISTANCE (d) IN METERS (m) ACCORDING TO FREQUENCY OF TRANSMITTER
150 kHz to 80 MHz
d = 1.2 x
80 MHz to 800 MHz
d = 1.2 x
800 MHz to 2.5 GHz
d = 2.3 x
0.01 0.12 0.12 0.23
0.1 0.38 0.38 0.73
1 1.2 1.2 2.3
10 3.8 3.8 7.3
100 12 12 23
For transmitters rated at a maximum output power not listed above, the recommended separation distance d in meters (m) can be determined using the equation applicable to the frequency of the transmitter, where P is the maximum output power rating of the transmitter in watts (W) according to the transmitter manufacturer.
NOTE: At 80 MHz and 800 MHz, the separation distance for the higher frequency range applies.
NOTE: These guidelines may not apply in all situations. Electromagnetic propagation is affected by absorption and reflection from structures, objects and people.
P P P

Spectrum® Operating Instructions 0070-10-0648-02 5 - 49
Appendix Warranty Statements
5.16 Warranty StatementsMindray DS USA warrants that components within the monitor unit will be free from defects in workmanship and materials for the number of years shown on the Mindray invoice. Under this extended warranty, Mindray DS USA will repair or replace any defective component at no charge for labor and/or materials. This extended warranty does not cover consumable items such as, but not limited to batteries, displays, external cables and sensors.
Recommended preventative maintenance, as prescribed in the Service Manual, is the responsibility of the user, and is not covered by this warranty.
Except as otherwise provided herein, the terms, conditions and limitations of Mindray DS USA’s standard warranty will remain in effect.
USA, Canada, Mexico, and Puerto RicoMindray DS USA warrants that its products will be free from defects in workmanship and materials for a period of one (1) year from the date of purchase except that disposable or one-time use products are warranted to be free from defects in workmanship and materials up to a date one year from the date of purchase or the date of first use, whichever is sooner. This warranty does not cover consumable items such as, but not limited to, batteries, external cables, sensors, cuffs, hoses, or mounts.
Mindray DS USA will not be liable for any incidental, special, or consequential loss, damage, or expense directly or indirectly arising from the use of its products, liability under this warranty and the buyer’s exclusive remedy under this warranty is limited to servicing or replacing at Mindray DS USA’s option at the factory or at an authorized Mindray Distributor, any product which shall under normal use and service appear to the Company to have been defective in material or workmanship.
No agent, employee, or representative of Mindary DS USA has any authority to bind Mindray DS USA to any affirmation, representation, or warranty concerning its products, and any affirmation, representation or warranty made by any agent, employee, or representative shall not be enforceable by buyer.
This warranty is expressly in lieu of any other express or implied warranties, including any implied warranty or merchantability or fitness, and of any other obligation on the part of the seller.
Damage to any product or parts through misuse, neglect, accident, or by affixing any non-standard accessory attachments or by any customer modification voids this warranty. Mindray DS USA makes no warranty whatever in regard to trade accessories, such being subject to the warranty of their respective manufacturers.
A condition of this warranty is that this equipment or any accessories which are claimed to be defective be returned when authorized by Mindray, freight prepaid to Mindray DS USA, Mahwah, New Jersey 07430. Mindray DS USA shall not have any responsibility in the event of loss or damage in transit.

Warranty Statements Appendix
5 - 50 0070-10-0648-02 Spectrum® Operating Instructions
Calibration may be performed without the need to disassemble the instrument. It is the responsibility of the purchaser to perform calibration as necessary, in accordance with the instructions provided in this manual.
International (excluding North America)Mindray DS USA warrants that its products will be free from defects in workmanship and materials for a period of two (2) years from the date of purchase except that disposable or one-time use products are warranted to be free from defects in workmanship and materials up to a date one year from the date of purchase or the date of first use, whichever is sooner. This warranty does not cover consumable items such as, but not limited to, batteries, external cables, sensors, cuffs, hoses, or mounts.
Mindray DS USA shall not be liable for any incidental, special, or consequential loss, damage, or expense directly or indirectly arising from the use of its products, liability under this warranty and the buyer’s exclusive remedy under this warranty is limited to servicing or replacing at Mindray DS USA’s option at the factory or at an authorized Mindray Distributor, any product which shall under normal use and service appear to the Company to have been defective in material or workmanship.
No agent, employee, or representative of Mindray DS USA has any authority to bind Mindray DS USAto any affirmation, representation, or warranty concerning its products, and any affirmation, representation or warranty made by any agent, employee, or representative shall not be enforceable by buyer.
This warranty is expressly in lieu of any other express or implied warranties, including any implied warranty or merchantability or fitness, and of any other obligation on the part of the seller.
Damage to any product or parts through misuse, neglect, accident, or by affixing any non-standard accessory attachments or by any customer modification voids this warranty. Mindray DS USA makes no warranty whatever in regard to trade accessories, such being subject to the warranty of their respective manufacturers.
A condition of this warranty is that this equipment or any accessories which are claimed to be defective be returned when authorized by Mindray, freight prepaid to Mindray DS USA, Mahwah, New Jersey 07430. Mindray DS USA shall not have any responsibility in the event of loss or damage in transit.
Calibration may be performed without the need to disassemble the instrument. It is the responsibility of the purchaser to perform calibration as necessary, in accordance with the instructions provided in this manual.

Spectrum® Operating Instructions 0070-10-0648-02 5 - 51
Appendix Phone Numbers and How To Get Assistance
5.17 Phone Numbers and How To Get AssistanceMindray DS USA maintains a network of service representatives and factory-trained distributors. Prior to requesting service, perform a complete operational check of the instrument to verify proper control settings. If operational problems continue to exist, contact the Mindray Service Department at (800) 288-2121 or (201) 995-8116 for assistance in determining the nearest field service location.
Please include the instrument model number, the serial number, and a description of the problem with all requests for service.
Any questions regarding the warranty should be directed to the nearest Mindray location. A list of international offices, along with their phone numbers, is provided at the end of this manual.
NOTE: Upon request, Mindray will provide circuit diagrams, component part lists, descriptions, calibration instructions, or other information which will assist the user’s appropriately qualified technical personnel to repair those parts of the Mindray equipment which are designated by Mindray as repairable.
5.18 Mindray’s ResponsibilityMindray is responsible for the effects on safety, reliability and performance of the equipment only if:
a. assembly operations, extensions, readjustments, modifications or repairs are carried out by persons authorized by Mindray; and
b. the electrical installation of the relevant room complies with the appropriate requirements; and
c. the equipment is used in accordance with the instructions for use

Mindray’s Responsibility Appendix
5 - 52 0070-10-0648-02 Spectrum® Operating Instructions
This page intentionally left blank.

Spectrum® Operating Instructions 0070-10-0648-02 6 - 1
6.0 Glossary
6.1 Glossary of Terms
AaDO2 Alveolar-Arterial Oxygen Difference
ALVENT Alveolar Ventilation
Art Arterial - label for invasive blood pressure
AvDO2 Arteriovenous Oxygen Difference
BSA Body Surface Area
CaO2 Arterial Oxygen Content
CcO2 Pulmonary Capillary Blood Oxygen Content
CI Cardiac Index
CO Cardiac Output
CO2 Carbon Dioxide
Comp Dynamic Compliance
CPP Cerebral perfusion pressure - this is the calculated difference between cranial pressure and mean arterial pressure
CVA Cardiovascular Artifact - this is any artifact in the respiratory waveform due to heartbeats, also message will occur if heart rate and respiration rate are the same
CvO2 Venous oxygen content
CVP Central Venous Pressure - label for invasive blood pressure
ECG Electrocardiogram
EMR Electronic Medical Records system. This may include a Hospital Information System (HIS) and/or a Clinical Information System (CIS).
EPM External Parameter Module
etCO2 End - tidal CO2 - A patient’s carbon dioxide level measured at end-expiration

Glossary of Terms Glossary
6 - 2 0070-10-0648-02 Spectrum® Operating Instructions
FiO2 Fraction of inspired oxygen
Hgb Hemoglobin
IABP Intra-aortic balloon pump
ICP Intracranial pressure - label for invasive blood pressure
IBP Invasive Blood pressure
ISO Isoelectric point - reference point on ECG waveform for ST analysis
LA Left atrium - label for invasive blood pressure
LCW Left Cardiac Work - feature of hemodynamic calculations
LCWI Left Cardiac Work Index - feature of hemodynamic calculations
LV Left ventricle - label for invasive blood pressure
LVSW Left Ventricular Stroke Work - feature of hemodynamic calculations
LVSWI Left Ventricular Stroke Work Index - feature of hemodynamic calculations
MAP Mean arterial pressure
MinVol Minute Volume
NIBP Non-invasive Blood Pressure
O2AV Oxygen Availability
O2AVI Oxygen Availability Index
O2ER Oxygen Extraction Ratio
OxyCRG Oxygen - cardiorespirogram - this trend feature is for pediatric and neonatal patients. It graphs selected parameters for comparisons and evaluation.
PA Pulmonary artery - label for invasive blood pressure
PAD Pulmonary artery - diastolic
PAO2 Partial pressure of alveolar oxygen
PaO2 Partial pressure of arterial oxygen
PaCO2 Partial pressure of arterial carbon dioxide
PAWP Pulmonary Artery Wedge Pressure
PB Atmospheric pressure
PECO2 Partial pressure of end-tidal CO2
PEEP Positive End-Expiratory Pressure
PIP Peak Inspiratory Pressure
PVC Premature Ventricular Contractions
PvO2 Partial pressure of venous oxygen
PVR Pulmonary Vascular Resistance - feature of hemodynamic calculations
PVRI Pulmonary Vascular Resistance Index - feature of hemodynamic calculations
Qs/Qt Arteriovenous Shunt percent
RA Right Atrium - label for invasive blood pressure
RCW Right Cardiac Work - feature of hemodynamic calculations
RCWI Right Cardiac Work Index - feature of hemodynamic calculations
RVSW Right Ventricular Stroke Work - feature of hemodynamic calculations
RVSWI Right Ventricular Stroke Work Index - feature of hemodynamic calculations

Spectrum® Operating Instructions 0070-10-0648-02 6 - 3
Glossary Glossary of Terms
SpO2 Oxygen Saturation
SV Stroke volume - feature of hemodynamic calculations
SVI Stroke Volume Index - feature of hemodynamic calculations
SvO2 Mixed venous oxygen saturation
SVR Systemic Vascular Resistance - feature of hemodynamic calculations
SVRI Systemic Vascular - feature of hemodynamic calculations
TV Tidal Volume
UA Umbilical Artery - label for invasive blood pressure
Vd Dead Space
VO2 Oxygen Consumption
VO2I Oxygen Consumption Index
Wedge Pulmonary Artery Wedge Pressure. This term is used interchangeably with PAWP

0070-10-0648-02 Rev L October 14, 2010

0002-08-8918
Mindray DS USA, Inc. • 800 MacArthur Boulevard • Mahwah, NJ 07430 • USA • Dom. Customer Service: 1.800.288.2121 • Intl. Customer Service: +1.201.995.8000 • Dom. Fax: 1.800.926.4275 • Intl. Fax: +1.201.995.8680 • www.mindray.com
Mindray Medical Netherlands B.V.• P.O. Box 26 • 3870 CA Hoevelaken • The Netherlands • Tel: +31 33 25 44 911 • Fax: +31 33 25 37 621
Mindray (UK) Limited • 3 Percy Road • St. John’s Park • Huntingdon • Cambridgeshire PE29 6SZ • United Kingdom • Tel: 01480 416840 • Fax: 01480 436588
Mindray Medical France SARL • Europarc Créteil •123, Chemin des Bassins • 94035 Créteil Cedex • France • Tel: (0)1.45.13.91.50 • Fax: (0)1.45.13.91.51
Mindray Medical German GmbH • Zwischen den Bächen 4 • 64625 Bensheim • Germany • Tel: +49.6251.17524-0 • Fax: +49.6251.17524-20
Mindray Medical International Ltd. • 2813 Office Tower, Convention Plaza • No 1 Harbour Road • Wanchai • Hong Kong • Tel: +852 2793 5596 • Fax: +852 2344 8824