
Maintenance Manual - Formula Air
12
ERGO Extraction arms ERGO-M/Z ERGO-K/Z ERGO-L/Z ERGO-D/Z Maintenance Manual
-
Upload
khangminh22 -
Category
Documents
-
view
8 -
download
0
Transcript of Maintenance Manual - Formula Air

ERGO Extraction arms ERGO-M/Z
ERGO-K/Z
ERGO-L/Z
ERGO-D/Z
Maintenance Manual

1
Contents 1. How it works ........................................................................................................................................ 2
2. Technical Datasheets ........................................................................................................................... 2
3. Structure and Function ........................................................................................................................ 6
4. Assembly .............................................................................................................................................. 6
5. Installing the extraction arms .............................................................................................................. 7
6. Start‐up ................................................................................................................................................ 8
7. Use ....................................................................................................................................................... 8
8. Troubleshooting guide ......................................................................................................................... 9
9. Maintenance and Repair ...................................................................................................................... 9
10. Safety ................................................................................................................................................... 9
11. Storage and Transport ....................................................................................................................... 10
12. Reservations of Producer ................................................................................................................... 10
13. Terms of Warranty ............................................................................................................................. 10
14. Spare parts ......................................................................................................................................... 10
2
1. How it works
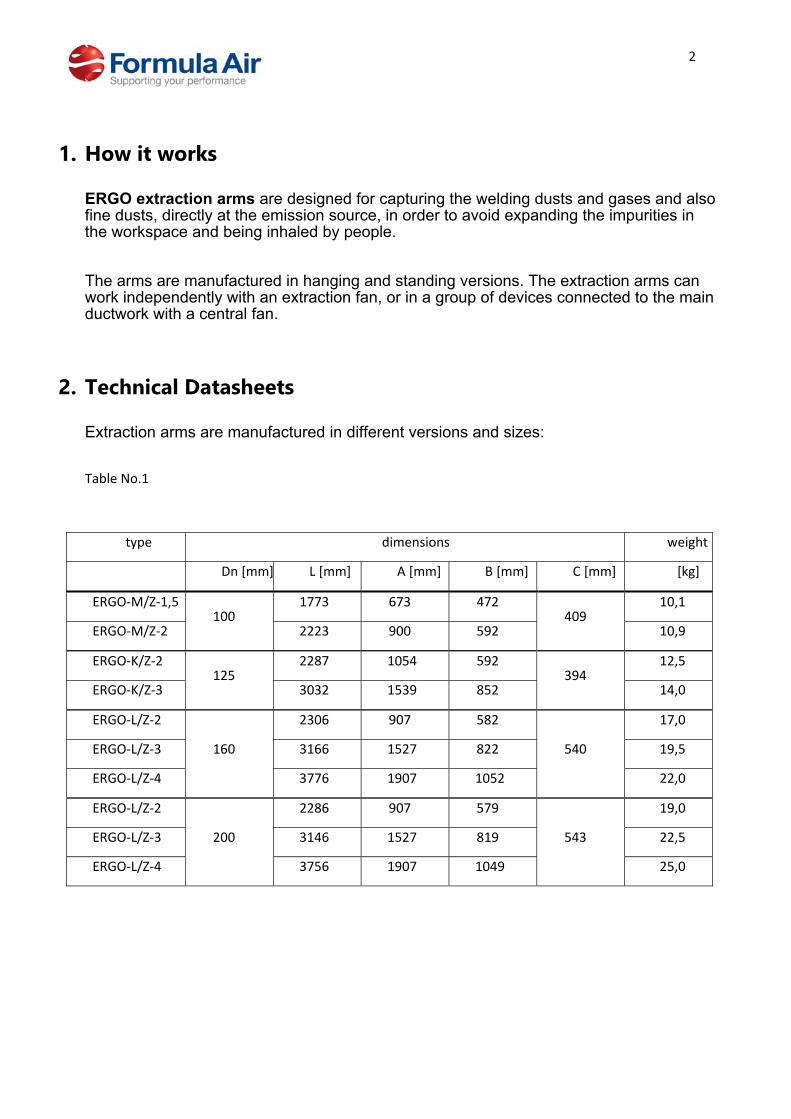
ERGO extraction arms are designed for capturing the welding dusts and gases and also fine dusts, directly at the emission source, in order to avoid expanding the impurities in the workspace and being inhaled by people.
The arms are manufactured in hanging and standing versions. The extraction arms can work independently with an extraction fan, or in a group of devices connected to the main ductwork with a central fan.
2. Technical Datasheets
Extraction arms are manufactured in different versions and sizes:
Table No.1
type dimensions weight
Dn [mm] L [mm] A [mm] B [mm] C [mm] [kg]
ERGO‐M/Z‐1,5 100
1773 673 472 409
10,1
ERGO‐M/Z‐2 2223 900 592 10,9
ERGO‐K/Z‐2 125
2287 1054 592 394
12,5
ERGO‐K/Z‐3 3032 1539 852 14,0
ERGO‐L/Z‐2 2306 907 582 17,0
ERGO‐L/Z‐3 160 3166 1527 822 540 19,5
ERGO‐L/Z‐4 3776 1907 1052 22,0
ERGO‐L/Z‐2 2286 907 579 19,0
ERGO‐L/Z‐3 200 3146 1527 819 543 22,5
ERGO‐L/Z‐4 3756 1907 1049 25,0

3
ERGO extraction arms in versions ERGO‐LL/Z and ERGO‐DL/Z are equipped with hoods with halogen spot‐
lights. A connection diagram is enclosed with the User’s Manual TR‐ERGO (230V; 50Hz).
Dwg No.1 ERGO Extraction arms – dimension-conceptual drawings

4
Dwg No.2 Ranges of the extraction arms
ERGO-M/Z-[1,5;2] ERGO-K/Z-[2;3]
ERGO-L/Z-[2;3;4] ERGO-D/Z-[2;3;4]
Table No.2 Ranges of the extraction arms
type D [mm] E [mm] F [mm] L [mm]
ERGO-M/Z-1,5 1241 1596 590 1773
ERGO-M/Z-2 1556 2001 759 2223
ERGO-K/Z-2 1600 2058 761 2287
ERGO-K/Z-3 2122 2728 1009 3032
ERGO-L/Z-2 1664 2025 718 2306 ERGO-L/Z-3 2224 2745 984 3106
ERGO-L/Z-4 2694 3348 1207 3776
ERGO-D/Z-2 1650 2007 709 2286
ERGO-D/Z-3 2252 2781 997 3146
ERGO-D/Z-4 2679 3330 1200 3756
5

6
3. Structure and Function
ERGO extraction arms are assembled with different elements presented in the Dwg No.1: ● swivel ● two pipe segments (“I” and “II”) connected together with frictional joints ● gas springs – to equilibrate the segment weights● shut-off damper ● suction hood with wire mesh avoiding the burning rests and chippings from
getting in. The swivel guarantees a full rotation of the device around its vertical axis and therefore ensures an easy positioning in the requested point at the work station. The swivel and the pipe segments integrated together with hose sections (flexible connectors) along with the attached hood form a ventilation duct to extract the dust laden air. This configuration can be changed within the work range of the given type of the extraction arm. Additionally, the intake air volume can be adjusted by means of the shut-off damper (installed in the pipe segment “I”). Adequately adjusted frictional joints in co-function with the gas springs ensure a comfortable manoeuvring of the extraction arm. The suction hood can be equipped with a halogen spotlight to light up the workspace. In order to install the extraction arm on a wall or column use a wall bracket. It can also be suspended at the end of the RO-type extension arm.
4. Assembly
ERGO extraction arms are delivered partly assembled in cardboard Boxes. Before the extraction arm is installed in the workplace – it is important to completely assemble it according to the enclosed instruction. The diameter and placement of the mounting holes in the bracket and in the arm swivel are the same.
for ERGO-M/Z (Dn Ø100 mm) – 6 bolts M6x40 – 8,8 for ERGO-K/Z (Dn Ø125 mm) – 6 bolts M6x40 – 8,8 for ERGO-L/Z (Dn Ø160 mm) – 6 bolts M6x40 – 8,8 for ERGO-D/Z (Dn Ø200 mm) – 8 bolts M8x40 – 8,8

7
5. Installing the extraction arms – types ERGO-M/Z, ERGO-K/Z, ERGO-L/Z, ERGO-D/Z (hanging version)
1. Take out the ERGO extraction arm from the package and put it stably on an even surface.
2. Pull the arm segments apart until you obtain a 45º angle.
3. Bolt the swivel support to the plate of the lower joint (see detail “B”)
4. Fold in the loose fabric edge, at the end of the flexible hose – then sleeve the hose onto the swivel ferrule and secure it with a hose clamp.
5. Fasten the end of the gas spring with a screw to the plate of the lower joint —(see detail “A”).
6. Connect the upper segment II with the lower segment I using a flexible hose (following point 4).
7. Screw up the outer joint to the hood (see detail “C”).
8. Using a flexible hose, connect the lower segment I with the hood (followingpoint 4).
9. The ERGO extraction arm is ready to be mounted on a wall bracket or onto a filtering unit.

8
6. Start-up How to start the device: ● Prior to work, start the extraction fan and make sure the ventilation discharge
ductwork is functioning. ● Set the hood in the desired position: not more than 30 cm from the welding arc,
and not less than 20 cm – as the welding chippings could affect the hood and additionally the hood suction could interrupt the protection gas shield (CO2, argon). It is important that the hood is effectively capturing the fume and does not cause any obstacle to the user.
● Adjust the intake air volume with the damper lever to eliminate the dust / fume most efficiently.
● The position of the hood and the damper lever can be changed many times during the work, so the user can adjust them best to the current needs.
● After the work is completed – the extraction arm can be left in the open position (operational state), or if it causes an obstacle – set the arm in the folded position
● Stop the extraction fan, if the device works in a ventilation system – close the appropriate shut-off damper.
7. Use
The construction guarantees a safe and reliable functioning without continuous servicing or special handling. The adjustment of the ERGO extraction arm consists mainly in the

9
adjustment of the frictional joints. The frictional brakes are placed in each joint of the extraction arm and their function is to ensure balance and self-supporting properties for an easy manoeuvring during the operation. The adjustment of the frictional brakes is carried out by increasing or reducing the tension of the nuts upon the frictional elements. The brake adjustment in the following joints ought to be set in such a way that it guarantees the stability and self-supporting ability of the extraction arm (which is important to keep the stable arm position), but it may not cause any excessive resistance while the user is changing the arm position. Having completed the adjustment, tighten-up the counter-nut. The placement of the adjustment nuts is illustrated in the “ERGO Extraction Arms – Dimensional-conceptual Drawings” (Dwg. No1).
8. Trouble Shooting Guide
problem possible reason corrective action 1. The extraction arm keeps Improperly adjusted frictional brake. falling. Increase the tension on frictional disks by tightening the
adjustment nuts.2. The extraction arm is The rotation axis of the arm is not positioned vertically. always settling in the sam Carry out the positioning of the mounting flange of the position. ERGO extraction arm to set the rotation axis vertically. 3. Drop in the air suction ra Improper impeller rotation sense of the extraction fan. along with increased Change the phase connection sequence noise level. (only 3-phase motor).
9. Maintenance and Repair
The maintenance is to be executed periodically : ● In order to obtain appropriate suction efficiency of the suction hood, clean its
surface and the inlet wire-mesh grill from the deposited dusts and impurities.● In case the extraction arm is no longer self-supporting – undertake the
adjustment of its frictional brakes (see point 5).● Lubricate the swivel every 3 months using solid grease (lubrication nipple
is located in the swivel flange).● After 1 operational year submit the device to a technical revision and repair
or replace the faulty elements.● Clean the internal surfaces of the extraction ducts from the deposited impurities
10. Safety
The ERGO extraction arms will not bring any risk under the condition they are firmly and correctly mounted to the wall or another structural element of the building.
Unsure installing could result in an uncontrolled detachment of the device and cause serious risk to personnel / people in the vicinity.
10
Once the work finished, you may leave the extraction arm in the open position. If it should constitute an obstacle to personnel, or become a hazard, set in into the close position.
Prior to installing check the load carrying capacity of the building structure.
11. Storage and Transport
ERGO extraction arms have to be stored and transported in partly disassembled state in special packages. The devices ought to be stored in a dry and well ventilated area. During the transport / reloading protect the device from scratches, indents and pay attention that the markings and labels do not get detached.
12. Reservations of Producer
A. It is unacceptable to install on the structure of the unit any additional elements that don’t belong to its normal construction or accessory set.
B. It is inadmissible to install the ERGO extraction arm directly to the ventilation installation, as it is usually not constructed to carry such charges during the operational use of the device.
C. Protect the flexible elements as well as the pipes of the suction duct from mechanical damage.
D. Prior to installing check the load capacity of the wall or other building structure where the device shall be mounted.
13. Terms of Warranty
The period of warranty for the purchased device is indicated in the “Card of Warranty”. The warranty does not comprise:
● ●
Producer accepts no liability for any consequences following from the operationause that is in contradiction to the purpose of application.
Defects and damages arising during the incorrect use and in application that is inconsistent with the present manual,
● Mechanical and electrical damages being caused during improper storage and transport or incorrect maintenance,
● Structural modifications, or changes / adaptations introduced by the user on one’s own, are not permitted.
● Inefficiency following from the normal operational exhaustion. Infringement of the section 3 “Reservations of producer” of the User’s Manual and especially
modifications undertaken by the user on one’s own shall cause the loss of warranty validity.

11
14. Spare parts
For spare parts please contact Formula Air Group.
Formula Air The Netherlands Bosscheweg 36 SX 5741 Beek en Donk The Netherlands Tel: +31 (0) 45 492 15 45 Fax: +31 (0) 492 45 15 99
[email protected] view Google Map
Formula Air Belgium Rue des Dizeaux 4 1360 Perwez Belgium Tel: +32 (0) 81 23 45 71 Fax: +32 (0) 81 23 45 79
[email protected] view Google Map
Formula Air Baltic Televizorių G.20 LT-78137 Šiauliai Lithuania Tel: +370 41 54 04 82 Fax: +370 41 54 05 50
[email protected] view Google Map
Formula Air France Zac de la Carrière Doree BP 105, 59310 Orchies France Tel: +33 (0) 320 61 20 40 Fax: +33 (0) 320 61 20 45
[email protected] view Google Map
Formula Air Est Agence France
2, rue Armand Bloch 25200 Montbeliard France Tel. +33 (0) 91 381 70 71 Fax +33 (0) 381 31 08 76
[email protected] view Google Map
Formula Air France Agence Ouest
19a rue Deshoulières 44000 Nantes France Tel. +33 (0) 89 251 90 75 Fax +33 (0) 251 89 94 06
[email protected] view Google Map
Formula Air France Agence Sud Chemin de Peyrecave 09600 Regat France Tel: +33 561 66 79 70 Fax: +33 567 07 01 09 [email protected] view Google Map
Air Formula Russia
Нижний Новгород Россия Tel: +7 (499) 609 23 54 Fax: +7 (831) 277 85 38
[email protected] View Google Map
Formula Air Vietnam # 33, Lot 2, Den Lu 1 Hoang Mai District, Hanoi, Vietnam Tel: +84 (4) 38 62 68 01 Fax: +84 (4) 38 62 96 63
[email protected] www.vinaduct.com View Google Map
NOTE : All drawings and references contained within this manual are non-contractual and are subject
to change without prior notice at the discretion of the Formula Air group and its partners.