looking for a new sewing project? - BERNINA 700
168
BERNINA 700
-
Upload
khangminh22 -
Category
Documents
-
view
1 -
download
0
Transcript of looking for a new sewing project? - BERNINA 700

BERNINA 700

LOOKING FOR A NEW SEWING PROJECT?You can find what you want in “inspiration”, our sewing magazine. Thanks to great sewing patterns and detailed sewing instructions, every project succeeds right away.
* Not available in all countries.
Inspiration magazine
is available in German, English,
French and Dutch

Welcome
3
Dear BERNINA Customer,Congratulations! You have decided on BERNINA and therefore on a product which will delight you for years.For more than 100 years our family company has attached greatest importance to satisfied customers. As forme, it is a matter of personal concern to offer you Swiss development and precision at the height ofperfection, future-orientated embroidery technology and a comprehensive customer service.
The BERNINA 7-series consists of various ultramodern machines, whose development not only focused thehighest demands on technique and the ease of use but also considered the design of the product. After allwe sell our products to creative people like you, who do not only appreciate high quality but also form anddesign.
Enjoy the creative embroidering on your new BERNINA 700 and keep informed about the various accessoriesat www.bernina.com. On our homepage you will also find a lot of inspiring embroidery ideas andembroidery motifs, to be downloaded for free.
Our highly trained BERNINA dealers will provide you with more information on service and maintenanceoffers.
I wish you lots of pleasure and many creative hours with your new BERNINA.
H.P. Ueltschi
Owner
BERNINA International AG
CH-8266 Steckborn
Edition notice
4
Edition notice
Graphics
www.sculpt.ch
Text, Setting and LayoutBERNINA International AG
PhotosPatrice Heilmann, Winterthur
Order number0371485.10A.04
2018-11 EN
Copyright2018 BERNINA International AG
All rights reserved: For technical reasons and for the purpose of product improvements, changesconcerning the features of the machine can be made at any time and without advance notice. The suppliedaccessory can vary depending on the country of delivery.

Table of Contents
5
Table of Contents
IMPORTANT SAFETY INSTRUCTIONS.............................................................................................. 10
Important information .................................................................................................................... 12
1 My BERNINA..................................................................................................................................... 13
1.1 Introduction .......................................................................................................................... 13
1.2 BERNINA Quality control ....................................................................................................... 13
1.3 Welcome to the world of BERNINA ....................................................................................... 13
1.4 Explanation of symbols.......................................................................................................... 14
1.5 Overview Machine ................................................................................................................ 15Overview front controls ..................................................................................................... 15Overview front ................................................................................................................. 16Overview sideways ............................................................................................................ 17Overview back................................................................................................................... 18Overview Embroidery module ............................................................................................ 19
1.6 Supplied accessories.............................................................................................................. 19Overview accessories machine ........................................................................................... 19Use of the power cable (only USA/Canada)........................................................................ 21Accessory box.................................................................................................................... 21Overview accessory Embroidery module............................................................................. 22
1.7 Overview User Interface ........................................................................................................ 23Overview Functions and Views........................................................................................... 23Overview System settings .................................................................................................. 23Overview Selection menu .................................................................................................. 24Overview Icons .................................................................................................................. 24
1.8 Needle, Thread, Fabric........................................................................................................... 25Overview Needles .............................................................................................................. 25Example for needle description .......................................................................................... 26Needle/thread combination ............................................................................................... 26Upper thread..................................................................................................................... 27Bobbin thread ................................................................................................................... 27
1.9 Important Embroidery information ........................................................................................ 28Choosing the embroidery motif ......................................................................................... 28Selecting the embroidery file format .................................................................................. 28Embroidery test ................................................................................................................. 28The size of the embroidery motif ....................................................................................... 28Embroidering motifs by third-party providers ..................................................................... 28Underlay stitches ............................................................................................................... 28Satin or Leaf stich .............................................................................................................. 29Step stitch ......................................................................................................................... 29Connecting stitches ........................................................................................................... 29
2 Embroidery preparation.................................................................................................................. 30
2.1 Accessory box ....................................................................................................................... 30Accessory box free standing .............................................................................................. 30Storing accessory............................................................................................................... 30

Table of Contents
6
2.2 Connection and Switching on ............................................................................................... 31Connecting the foot control (Optional accessory)............................................................... 31Connecting the machine ................................................................................................... 31Fixing the touchscreen pen ................................................................................................ 32Switching the machine on ................................................................................................. 32Switching on the sewing light............................................................................................ 32
2.3 Foot control (Optional accessory)........................................................................................... 32Regulating the speed via the foot control .......................................................................... 32Raising/Lowering the needle .............................................................................................. 33
2.4 Spool pin .............................................................................................................................. 33Swiveling spool pin............................................................................................................ 33Horizontal spool pin .......................................................................................................... 35Attaching the multiple-spool holder................................................................................... 35
2.5 Free arm ............................................................................................................................... 35
2.6 Embroidery foot .................................................................................................................... 35Adjusting the presser foot position via the button «Presser foot up/down» ....................... 35Attaching the embroidery foot .......................................................................................... 35Selecting the embroidery foot in the User Interface............................................................ 36
2.7 Needle and stitch plate.......................................................................................................... 37Inserting the embroidery needle ........................................................................................ 37Selecting the needle in the User Interface .......................................................................... 37Selecting needle type and needle size ................................................................................ 38Attaching the stitch plate .................................................................................................. 38Selecting the stitch plate in the User Interface.................................................................... 39
2.8 Threading ............................................................................................................................. 39Threading the upper thread............................................................................................... 39Winding the bobbin thread ............................................................................................... 42Threading the bobbin thread ............................................................................................. 44Thread-up command ......................................................................................................... 46Indicating fill level of bobbin thread................................................................................... 46
2.9 Attaching the Module ........................................................................................................... 46
2.10 Selecting the embroidery motif ............................................................................................. 47
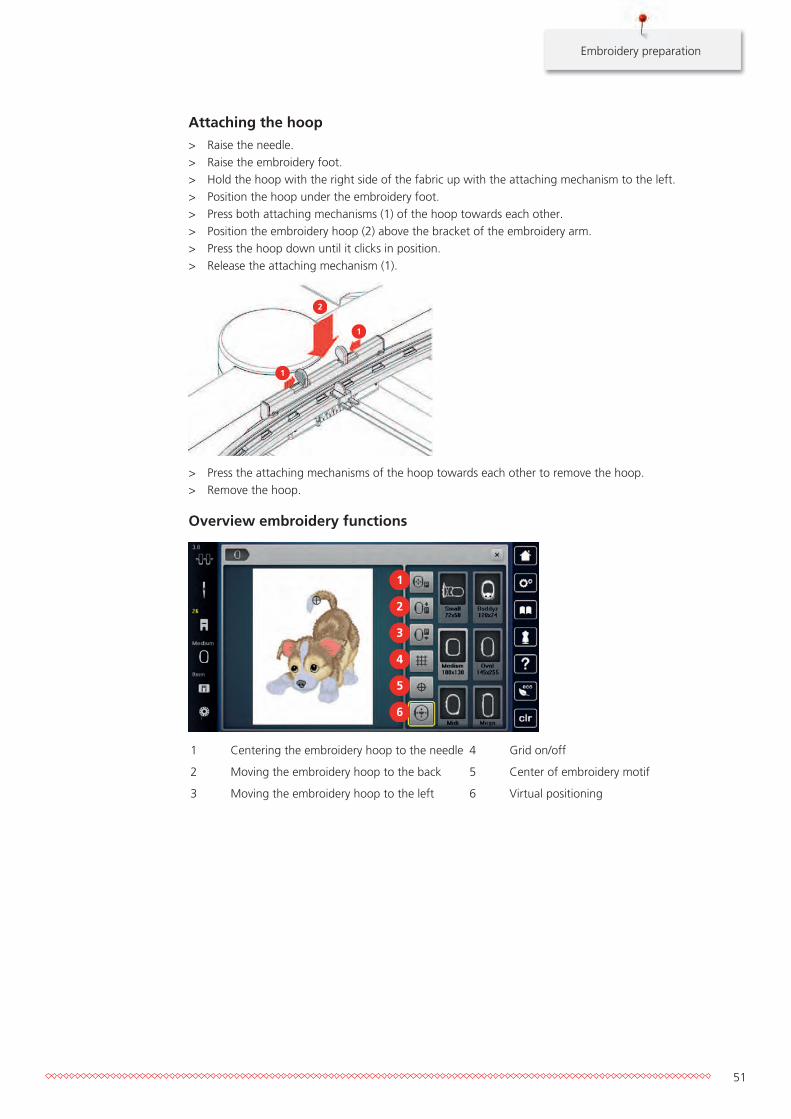
2.11 Embroidery hoop .................................................................................................................. 48Overview embroidery hoop selection ................................................................................. 48Selecting the embroidery hoop .......................................................................................... 48Tear-away stabilizers.......................................................................................................... 48Cut-away stabilizers........................................................................................................... 48Using adhesive spray ......................................................................................................... 49Using spray starch ............................................................................................................. 49Using iron-on interfacing ................................................................................................... 49Using paper-backed adhesive stabilizer .............................................................................. 49Using water-soluble stabilizer ............................................................................................ 49Preparing the embroidery hoop ......................................................................................... 50Attaching the hoop ........................................................................................................... 51Overview embroidery functions ......................................................................................... 51Centering the embroidery hoop to the needle ................................................................... 52Moving the hoop to the back ............................................................................................ 52Moving the embroidery arm to the left .............................................................................. 52Grid on/off ........................................................................................................................ 52Locating the center of the embroidery motif ...................................................................... 53Virtual positioning of the embroidery hoop........................................................................ 53
Table of Contents
7
3 Setup Program ................................................................................................................................. 54
3.1 Embroidery settings............................................................................................................... 54Adjusting the upper thread tension ................................................................................... 54Adjusting the maximum embroidering speed..................................................................... 54Centering or opening embroidery motifs in the original position........................................ 54Calibrating the embroidery hoop ....................................................................................... 55Entering the fabric thickness.............................................................................................. 55Activating/Deactivating the function thread away .............................................................. 56Programming the securing stitches .................................................................................... 56Adjusting the thread cut.................................................................................................... 57Changing the measuring unit ............................................................................................ 57
3.2 Selecting personal settings .................................................................................................... 58
3.3 Monitoring functions ............................................................................................................ 59Activating the upper thread indicator ................................................................................ 59Activating the bobbin thread indicator............................................................................... 59
3.4 Activating the audio signals................................................................................................... 59
3.5 Machine settings................................................................................................................... 60Selecting a language ......................................................................................................... 60Adjusting the brightness of the display .............................................................................. 60Adjusting the sewing light ................................................................................................. 60Calibrating the display ....................................................................................................... 61Back to basic setting.......................................................................................................... 61Deleting user data ............................................................................................................. 61Deleting motifs on the BERNINA USB Stick......................................................................... 62Updating the machine Firmware........................................................................................ 62Recovering saved data ....................................................................................................... 63Cleaning the thread catcher .............................................................................................. 63Lubricating the machine .................................................................................................... 64Packing the embroidery module ........................................................................................ 64Checking the firmware version .......................................................................................... 65Reviewing the total number of stitches .............................................................................. 65Registering details of the dealer......................................................................................... 66Saving Service data............................................................................................................ 66
4 System settings................................................................................................................................ 67
4.1 Calling up the tutorial ........................................................................................................... 67
4.2 Calling up the Embroidery Consultant ................................................................................... 67
4.3 Calling up the Help ............................................................................................................... 67
4.4 Using eco mode .................................................................................................................... 67
4.5 Cancelling any alterations with «clr» ..................................................................................... 67
5 Creative embroidering .................................................................................................................... 68
5.1 Overview embroidering ......................................................................................................... 68
5.2 Selecting and changing the embroidery motif ....................................................................... 68
5.3 Checking the embroidery time and the embroidery motif size ............................................... 68
5.4 Regulating the speed ............................................................................................................ 68

Table of Contents
8
5.5 Editing the embroidery motif................................................................................................. 69Overview Editing embroidery motif .................................................................................... 69Scaling up the embroidery motif view................................................................................ 69Downsizing the embroidery motif view.............................................................................. 69Moving the embroidery motif view .................................................................................... 70Moving the embroidery motif in enlarged view.................................................................. 70Moving the embroidery motif ............................................................................................ 70Rotating motif ................................................................................................................... 71Altering the embroidery motif size proportionally .............................................................. 71Altering the embroidery motif size disproportionally .......................................................... 71Mirroring embroidery motifs .............................................................................................. 72Bending the text................................................................................................................ 72Changing the stitch type ................................................................................................... 73Altering the stitch density .................................................................................................. 73Checking the embroidery motif size and position............................................................... 73Endless embroidery............................................................................................................ 75Duplicating the embroidery motif ...................................................................................... 77Deleting an embroidery motif ............................................................................................ 77Changing the sequence within an embroidery motif combination...................................... 77Undoing entries................................................................................................................. 78Grouping embroidery motifs.............................................................................................. 78
5.6 Pinpoint placement ............................................................................................................... 79Positioning of grid points................................................................................................... 79Free point positioning........................................................................................................ 80
5.7 Combining embroidery motifs............................................................................................... 81Combining embroidery motifs ........................................................................................... 81Deleting a single embroidery motif .................................................................................... 82Duplicating the embroidery motif ...................................................................................... 82Duplicating a combination................................................................................................. 82
5.8 Creating lettering.................................................................................................................. 83Overview embroidery alphabets......................................................................................... 83Creating words/sentences.................................................................................................. 84Editing words/sentences .................................................................................................... 85
5.9 Changing the colors of the embroidery motif ........................................................................ 86Overview changing the color ............................................................................................. 86Changing the colors .......................................................................................................... 86Altering the colors via the color wheel ............................................................................... 87Changing the thread brand ............................................................................................... 88
5.10 Embroidering the embroidery motif....................................................................................... 88Overview Embroidery menu............................................................................................... 88Adding basting stitches ..................................................................................................... 88Moving the hoop............................................................................................................... 89Embroidery sequence control when thread breaks ............................................................. 89Cutting connecting stitches ............................................................................................... 89Reducing color changes..................................................................................................... 90Multi-colored embroidery motif on/off............................................................................... 90Endless Embroidery............................................................................................................ 90Color indication................................................................................................................. 91
5.11 Free arm embroidering.......................................................................................................... 91
Table of Contents
9
5.12 Administering embroidery motifs .......................................................................................... 92Administering embroidery motifs ....................................................................................... 92Saving embroidery motifs in the personal memory............................................................. 93Saving the embroidery motif on the BERNINA USB stick..................................................... 93Overwriting the embroidery motif in the personal memory ................................................ 93Overwriting the embroidery motif on the BERNINA USB stick............................................. 93Loading an embroidery motif from the personal memory................................................... 94Loading an embroidery motif from the BERNINA USB stick ................................................ 94Deleting an embroidery motif from the personal memory .................................................. 94Deleting an embroidery motif from the BERNINA USB stick................................................ 94
6 Embroidery....................................................................................................................................... 95
6.1 Embroidering via the button «Start/Stop» ............................................................................. 95
6.2 Increasing the embroidery speed ........................................................................................... 95
6.3 Adjusting the upper thread tension ....................................................................................... 96
6.4 Embroidering via the foot control (Optional accessory) .......................................................... 96
7 Attachment ...................................................................................................................................... 97
7.1 Maintencance and cleaning................................................................................................... 97Cleaning the display .......................................................................................................... 97Removing thread remnants under the stitch plate.............................................................. 97Cleaning the hook............................................................................................................. 97Lubricating the hook ......................................................................................................... 98
7.2 Troubleshooting.................................................................................................................... 100
7.3 Error messages...................................................................................................................... 103
7.4 Storage and disposal ............................................................................................................. 107Storing the machine .......................................................................................................... 107Dispose of the machine ..................................................................................................... 107
7.5 Technical data....................................................................................................................... 107
8 Overview stitch patterns ................................................................................................................ 108
8.1 Overview Embroidery motifs.................................................................................................. 108Editing embroidery motifs.................................................................................................. 108Projects ............................................................................................................................. 108Quilt motifs ....................................................................................................................... 109Borders and Lace ............................................................................................................... 115Children ............................................................................................................................ 120Flowers.............................................................................................................................. 125Seasons ............................................................................................................................. 130Embellishment................................................................................................................... 134Sport ................................................................................................................................. 139Asia................................................................................................................................... 142Charming Monograms ...................................................................................................... 145Animals ............................................................................................................................. 152DesignWorks design .......................................................................................................... 154Monograms in pink ........................................................................................................... 156Monograms in blue ........................................................................................................... 161
Index................................................................................................................................................. 166

Important safety instructions
10
IMPORTANT SAFETY INSTRUCTIONSPlease be aware of the following basic safety instructions when using yourmachine. Before using this machine, read instruction manual carefully.
DANGER!To reduce the risk of electrical shock:
• Never leave the machine unattended as long as it is plugged in.
• Always unplug the machine from the electrical outlet immediately afterusing.
Protection against LED radiation:
• Do not view the LED light directly with optical instruments (e.g. magnifier).The LED light corresponds with protection class 1M.
• When the LED light is damaged or defective, contact your BERNINA specialistdealer.
WARNINGTo reduce the risk of burns, fire, electric shock or injury to persons:
• To operate the machine always use the supplied power cable. USA andCanada only: Do not connect power plug NEMA 1-15 to circuits exceeding150 volt-to-ground.
• Use this machine only for purposes as described in this manual.
• Only use the machine in dry rooms.
• Do not use the machine in a damp condition or in a damp environment.
• Do not use this machine as a toy. Close attention is necessary when thismachine is used by or near children.
• The machine can be used by children older than 8 or by people with reducedphysical, sensory or mental capabilities or if there is a lack of experience andknowledge how to operate the machine as long as they are supervised orhave been given instruction concerning the responsible use of the applianceand are aware of the involved risks.
• Children are not allowed to play with this machine.
• Cleaning and maintencance work must not be carried out by children unlessthey are supervised.
• Never operate this machine if it has a damaged cord or plug, if it is notworking properly, if it has been dropped or damaged, or dropped intowater. Contact the nearest authorized BERNINA dealer to arrange furtherdetails.
Important safety instructions
11
• Only use accessory recommended by the manufacturer.
• Don't use this machine when the ventilation openings are blocked. Keep theventilation openings and the foot control free from the accumulation of lint,dust and loose cloth.
• Never insert any objects into any openings of the machine.
• Do not place any objects on the foot control.
• Always use the machine with a foot control of this type LV-1.
• Do not operate the machine where aerosol products (sprays) or oxygen arebeing used.
• Keep fingers away from all moving parts. Special care is required around theneedle.
• Neither pull nor push the fabric while sewing. This can cause needlebreakage.
• When making any adjustments in the needle area – such as such asthreading the needle, changing the needle, threading the hook or changingthe presser foot – turn power switch to «0».
• Do not use bent needles.
• Always use the original BERNINA stitch plate.The wrong stitch plate cancause needle breakage.
• To disconnect, turn power switch to «0» and then remove the plug from theoutlet. Do not unplug by pulling the cord, instead grasp the plug to pull itfrom the outlet.
• Always disconnect the power plug from the electrical outlet when the coversare removed or opened, when the machine is lubricated or during any othermaintenance adjustments mentioned in the instruction manual.
• This machine is provided with double insulation (except USA, Canada andJapan). Use only identical replacement parts. See instructions for Servicing ofdouble-insulated products.
• The sound pressure level is lower than 70 dB(A) under normal conditions.

Important information
12
Important information
Availability of the instruction manualThe instruction manual is supplied with the machine.
• Keep the instruction manual safe at a suitable place near the machine to have it at hand in case that youneed to look up something.
• If you pass the machine to a third party, always include the instruction manual.
Appropriate useYour BERNINA machine is conceived and designed for private household use. It answers the purpose toembroider fabrics and other materials as it is decribed in this instruction manual. Any other use is notconsidered proper. BERNINA assumes no liability concerning consequences resulting from an inappropriateusage.
Servicing of double-insulated productsIn a double-insulated product two systems of insulation are provided instead of groanding. No groandingmeans is provided on a doubleinsulated product, nor should a means for groanding be added to theproduct. Servicing a double-insulated product requires extreme care and knowledge of the system andshould be done only by qualified service personnel. Replacement parts for a double-insulated product mustbe identical to the original parts in the product. A double-insulated product is marked with the words:«Double insulation» or «double-insulated».
The symbol may also be marked on the product.
Environmental ProtectionBERNINA is committed to the protection of the environment. We strive to minimize the environmental impactof our products by continuously improving product design and our technology of manufacturing.
The machine is labeled with the symbol of the crossed-out wastebin. This means that the machine must notbe disposed of with the household waste when the machine is no longer needed. Improper disposal canresult in dangerous substances getting into the groundwater and thus into our food chain, damaging ourhealth.
The machine must be returned free of charge to a nearby collection point for waste electrical and electronicequipment or to a collection point for the reuse of the machine. Information on the collection points can beobtained from your local administration. When purchasing a new machine, the dealer is obliged to take backthe old machine free of charge and dispose of it properly.
If the machine contains personal data, you are responsible for deleting the data yourself before returning themachine.

My BERNINA
13
1 My BERNINA
1.1 IntroductionYour BERNINA 700 enables you to be endlessly creative due to the various applications. Delicate silk or satinfabrics as well as heavy-weight linen, fleece and denim can be embroidered successfully with this machine.Numerous embroidery motifs are at your disposal.
Additional to this instruction manual, following help programs are provided which will give you useful adviceand support at any time how to operate you BERNINA 700.
The Tutorial gives information and explanations concerning various aspects of embroidering.
The Embroidery Consultant informs you about decision support for embroidery projects. After entering thedesired embroidery project and the fabric, suggestions for the suitable needle and the suitable embroideryfoot are displayed.
The Help Program contains information about individual embroidery motifs, functions and applications inthe User Interface.
Further information
In addition to this instruction manual of your BERNINA 700 further information products are enclosed.
The latest version of your instruction manual as well as additional information in connection with the
machine and accessories can be found on our website http://www.bernina.com
1.2 BERNINA Quality controlAll BERNINA machines are assembled with utmost care and are subjected to an extensive functionality test.The integrated stitch counter therefore indicates that the machine has already sewn stitches, which wereperformed exclusively for test purposes and quality control. The subsequent thorough cleaning does notexclude the possibility that thread remnants may still be found in the machine.
1.3 Welcome to the world of BERNINA«Made to create», is BERNINA's slogan. Not only our machines do support you to implement your ideas. Ontop of that, our below mentioned opportunities also offer various inspirations and instructions for yourfuture projects as well as the option to exchange ideas with other sewing and embroidering enthusiasts. Wewish you lots of pleasrue doing that.
BERNINA YouTube Channel
On YouTube we offer a wide range of how-to videos and support concerning the most important functionsof our machines. Detailed explanations are also provided as for the various presser feet, so that your projectswill succeed completely.
http://www.youtube.com/BerninaInternational
Provided in the languages English and German.
inspiration – the sewing magazine
Are you looking for ideas, sewing patterns and instructions for great projects? In that case the BERNINAmagazine «inspiration» is exactly what you need. «inspiration» offers extraordinary sewing and embroideryideas four times a year. From seasonal fashion trends to trendy accessories and practical tips to decorate yourhome in an original way.
http://www.bernina.com/inspiration

My BERNINA
14
The magazine is available in the languages English, German, Dutch and French. Not available in all countries.
BERNINA Blog
Fancy instructions, free sewing patterns and embroidery motifs as well as many new ideas: all this you canfind in the weekly blog by BERNINA. Our experts give valuable tips and explain step by step how you canachieve the desired result. In the community you can upload your own projects and exchange experiencesand ideas with other sewing and embroidering enthusiasts.
http://www.bernina.com/blog
Provided in the languages English, German and Dutch.
BERNINA Social Media
Follow us on the social networking to learn more about events, thrilling projects as well as tips and tricks allabout sewing and embroidering. We will keep you informed and we are looking forward to presenting youthe one or the other highlight from the world of BERNINA.
http://www.bernina.com/social-media
1.4 Explanation of symbols
DANGER Labels a danger with a high risk which can lead to death or severe injury unless it is avoided.
WARNING Labels a danger with a medium risk which can lead to death or severe injury unless it is avoided.
CAUTION Designates a hazard with low risk that can cause minor or moderate injury if not avoided.
NOTICE Designates a hazard that can cause property damage if not avoided.
Tips by BERNINA Embroidery experts can be found next to this sign.
By means of illustration, sample pictures are used in this instruction manual. The machines and accessoriesshown in the pictures do not necessarily correspond to the actual items delivered with your machine.

My BERNINA
15
1.5 Overview Machine
Overview front controls
5 6
7 8
9
10
1112
12
34
1 Sewing light on/off 7 Checking the motif size
2 Thread cutter 8 Bobbin thread up
3 Presser foot up/down 9 Upper Multifunction knob
4 Start/Stop 10 Lower Multifunction knob
5 Center the needle to the embroidery hoop 11 Pinpoint placement
6 Moving the hoop to the back 12 Motif center

My BERNINA
16
Overview front
2
1
3
4
5
6
7
8
9
10
1 Connection for the embroidery module 6 Slide speed control
2 Bobbin cover 7 Thread take-up lever cover
3 Embroidery foot 8 Thread take-up lever
4 Needle threader 9 Fixing screw
5 Sewing light 10 Connection for the slide-on table

My BERNINA
17
Overview sideways
1
2
5
6
7
8
9
10
11
4
3
1 Connection for the foot control 7 Power switch
2 PC-connection 8 Connection for the power cable
3 Spool pin 9 Magnet holder for the touchscreen pen
4 Winding unit with thread cutter 10 Air vents
5 Swiveling spool pin 11 USB port
6 Handwheel

My BERNINA
18
Overview back
1
2
3
4
5
7
8
9
6
1 Connection for slide-on table 6 Thread guide
2 Air vents 7 Fixing screw
3 Thread guide 8 Thread cutter
4 Carrying handle 9 Stitch plate
5 Thread pretension

My BERNINA
19
Overview Embroidery module
1
3
4
3
2
1 Embroidery arm 3 Guide rails for the machine
2 Bracket for attaching the embroidery hoop 4 Connection to the machine
1.6 Supplied accessories
Overview accessories machine
All rights reserved: For technical reasons and for the purpose of product improvements, changesconcerning the features of the machine can be made at any time and without advance notice. The suppliedaccessory can vary depending on the country of delivery.
Please visit www.bernina.com for more accessory information.
Illustration Name Purpose
Soft Cover with pocket To protect the machine fromdust and contamination.
Accessory box To store the supplied accessoriesas well as the optionalaccessories.

My BERNINA
20
Illustration Name Purpose
Multiple-spool holder For quick access to the threadspools and thread changes, e.g.for multicolored embroiderymotifs.
For a longer way to the needleand therefore to the option tountangle difficult threads beforeembroidering.
Spool disc To support the regularunwinding of the thread fromthe spool.
3 different sizes for threadspools in different sizes.
Bobbin
4 pieces, 1 of them in themachine
To wind the bobbin thread.
Foam pad
2 pieces
To prevent the thread fromslipping under the spool holder,tangling and breaking.
Touchscreen pen For precise operation of thetouch display.
Seam ripper To undo seams and to cutbuttonholes open.
Screwdriver Torx, gray To change the needle.
Screwdriver red (slot) To loosen and tighten slottedscrews.
Angular Torx wrench Torx To open the headframe.
Brush to clean the feed dog and thehook race area.
Oil pen To fill up the oil depots.
Power cable To connect the machine with thepower supply system.

My BERNINA
21
Use of the power cable (only USA/Canada)
The machine has a polarized plug (one blade wider than the other). To reduce the risk of electrical shock, thisplug is intended to fit in a polarized outlet only one way. If the plug does not fit fully in the outlet, reversethe plug. If it still does not fit, contact a qualified electrician to install the proper outlet. Do not modify theplug in any way!
Accessory box
All rights reserved: The machines's features and parts are subject to unannounced changes at any time fortechnical reasons and for the purpose of product improvement. The supplied accessory can vary dependingon the country of delivery.
The illustrated accessory (kind and quantity) serves as an example and doesn't have to correspond with thesupplied accessory.
1
2
3
5
4
7
6
6
1 Big drawer 5 Embroidery foot
2 Small drawer 6 Holder for embroidery feet, 9.0 mm
3 Selection of needles 7 Holder for embroidery feet, 5.5 mm
4 Spool pin

My BERNINA
22
Overview accessory Embroidery module
All rights reserved: For technical reasons and for the purpose of product improvements, changesconcerning the features of the machine can be made at any time and without advance notice. The suppliedaccessory can vary depending on the country of delivery.
Please visit www.bernina.com for more accessory information.
Illustration Name Purpose
Embroidery foot # 26 For embroidering, darning andfree-motion quilting.
Large oval embroidery hoop To embroider large embroiderymotifs or motif combinations upto 145 x 255 mm (5.70 x10.04 in).
Including the template forprecise fabric positioning.
Medium embroidery hoop To embroider medium-sizedembroidery motifs up to100 x 130 mm (3.94 × 5.12 in).
Including the template forprecise fabric positioning.
Small embroidery hoop To embroider small embroiderymotifs up to 72 × 50 mm (2.83 ×1.97 in).
For free arm embroidering withclosed sewing projects such assleeves, trouser legs or socks.
Including the template forprecise fabric positioning.
USB Connecting cable To transfer data from thecomputer to the machine or viceversa.
Embroidery needle assortment For embroidering.
Template holder To place and remove thetemplate in or out of theembroidery hoop.

My BERNINA
23
Illustration Name Purpose
Net for upper thread spool To support an even unwindingof the thread with slipperyembroidery threads.
1.7 Overview User Interface
Overview Functions and Views
1
2
3
4
5
6
1 Upper thread tension 4 Embroidery hoop display/Embroidery hoopselection
2 Needle selection 5 Stitch plate selection
3 Presser foot display/Presser foot selection 6 Fill level of bobbin thread
Overview System settings
1
2
3
4
5
6
7
1 Home 5 Help
2 Setup Program 6 eco mode
3 Tutorial 7 Back to basic setting
4 Embroidery consultant

My BERNINA
24
Overview Selection menu
1
2
3
4
1 Selection embroidery motifs 3 Color information
2 Editing embroidery motifs 4 Embroidery
Overview Icons
Icon Name Purpose
i-Dialog Touching the icon «i»-Dialog provides variousfunctions to edit motifs.
Close The display is closed and the previously madeadjustments are saved.
Icons «-/+» By touching the icons «-» and «+» the settingvalues are changed.
Yellow frame around theicon
A yellow-framed icon indicates that a settingor a value in this function has been changed.By touching the yellow-framed icon, thedefault setting can be restored.
Confirm Confirms the previously adjusted alterations.The display is closed.
Cancel The process is canceled. The display is closedand the previously made adjustments are notsaved.
Slide By moving the slide the setting values arechanged.
Switch Activates or deactivates functions.

My BERNINA
25
Icon Name Purpose
Process navigation With the process navigation scrolling back inthe display is possible.
Swipe function By swiping the display using the touchscreenpen or the finger upwards or downwards,further functions can be displayed.
1.8 Needle, Thread, FabricIn the course of time a needle wears out. Therefore it should be replaced regularly. Only a perfect pointresults in a good stitching result. In general it can be said: the thinner the thread, the finer the needle. Theillustrated needles are either standard or optional accessory, depending on the machine.
• Needle sizes 70, 75: for thin fabrics.• Needle sizes 80, 90: for medium fabrics.• Needle sizes 100, 110 and 120: for heavy fabrics.
Overview Needles
Illustration Needle name Needle description Purpose
Jersey/Embroideryneedle
130/705 H SUK 60-100
Mid-sized ball point For knitware, knittedgood.
For embroidering.
Embroidery needle
130/705 H-E 75, 90
Small ball point,especially wide needleeye and wide threadgroove
For embroidery on allnatural and syntheticfabrics.
Fine-material needle
130/705 H SES 70, 90
Small ball point For fine knitware andknitted materials.
For embroidery on fine,delicate fabrics.
Metafil needle
130/705 H METAFIL 80
Long needle eye (2 mm)in all needle sizes
For sewing orembroidering withmetallic threads.
Felt needle
PUNCH
Needle with barbedhook
For felt work.

My BERNINA
26
Example for needle description
The 130/705 system, which is the most common for household machines, is explained by the followingpicture of a Jersey/Stretch needle.
2
1
5
3
4
130/705 H-S/70
130 = Shank length (1)
705 = Flat shank (2)
H = Needle scarf (3)
S = Needle point (here medium ball point) (4)
70 = Needle size 0.7 mm (5)
Needle/thread combination
The needle/thread combination is correct, when the thread fits perfectly into the longgroove and goes easily through the needle eye. The thread can be optimally secured.
The thread can break and skipped stitches can occur when there is too much clearance inthe long groove and the needle eye.
The thread can break and get stuck when the thread scrapes against the edge of the longgroove not fit well into the needle eye optimally.
My BERNINA
27
Upper thread
A good quality thread (brand manufacturer) is essential for embroidery so that the embroidery is not affectednegatively because of poor thread or thread breakage.
Embroidery is particularly effective if you use 40wt glossy rayon or polyester embroidery threads as upperthreads. They are available in a wide range of colors for beautiful embroidery.
• Glossy polyester with a brilliant sheen is a hard wearing, colorfast thread and has a high tensile strengthwhich is suitable for all types of embroidery.
• Rayon is a soft viscose fiber with a brilliant sheen and suitable for fine, delicate embroidery, or items thatwill not receive excessive wear and tear.
• Metallic thread is a light to medium-weight thread suitable for special effects in embroidery.• When working with metallic threads, the automatic bobbin thread cutter should be deactivated. The
other thread cutters shouldn't be used either because the knives are likely to wear off very quickly.• When using metallic threads, the speed and the upper thread tension should be reduced.
Bobbin thread
In most cases black or white bobbin thread is used for embroidering. When both sides should have the samelook, it is recommended to use the same color for bobbin and upper thread.
• Bobbin Fill is an especially soft and light polyster thread which is suited well to be used as bobbin thread.This special bobbin thread ensures a steady thread tension and an optimal intertwining of the upper andbobbin thread.
• Darning and embroidery threads are fine mercerized cotton threads which are suitable for embroidery oncotton.

My BERNINA
28
1.9 Important Embroidery information
Choosing the embroidery motif
Simple motifs with a low stitch count are suitable for embroidery on fine material. Densely embroideredmotifs, e. g. embroidered motifs with multiple color and embroidery direction changes, are suitable formedium and heavy-weight material.
Selecting the embroidery file format
In order that embroidery motifs can be read by the BERNINA embroidery machine, they have to be createdby the BERNINA Embroidery software and exported as .EXP file. Besides the actual embroidery file, a .BMPfile and an .INF file are generated additionally. The .BMP file allows a preview of the embroidery motif andthe .INF file provides the information on the thread colors. Please note: If the .INF file is missing, theembroidery motif cannot be displayed in the real color but only in standard colors. In this case, the colors canbe entered manually in the color overview of the motif on the machine.
Additionally, following embroidery formats can be read by the machine: .PES, .PEC, .XXX, .PCS, .JEFand .DST. BERNINA International AG doesn't warrant that embroidery motifs which have not been created orconverted by the BERNINA Embroidery software can be correctly read and embroidered.
Simple motifs with a low stitch count are suitable for embroidery on fine material. Densely embroideredmotifs, e. g. embroidered motifs with multiple color and embroidery direction changes, are suitable formedium and heavy-weight material.
Embroidery test
For the embroidery test, always use the original material reinforced with the same stabilizer as will be usedlater. For the embroidery test it is recommended to use the same colors, threads and needles which areplanned to be used for the embroidery project.
The size of the embroidery motif
Embroidery motifs can be enlarged or downsized on the embroidery machine or on the PC using theBERNINA Embroidery software (optional accessory). Enlargements or reductions up to 20% achieve the bestresults.
Embroidering motifs by third-party providers
BERNINA recommends uploading embroidery motifs of any file format via the free program ««ART-Link»» tothe machine or a USB stick. Using «ART-Link» ensures that the embroidery motif can be read and
embroidered correctly. «ART-Link» can be downloaded for free at www.bernina.com.
Underlay stitches
Underlay stitches are the foundation of a motif and are used to stabilize the base material and hold it inshape. They also prevent the covering stitches of the motif from sinking into the knit or the nap of thematerial.

My BERNINA
29
Satin or Leaf stich
The needle moves left to right and vice versa. The result is a very dense, covering zig zag stitching to fill theshape. Satin stitching fills are ideal for narrow and small shapes. Satin stitching is, however, not suitable forlarger areas, since wide stitches are too loose and do not cover the fabric properly. In addition there is therisk that with too long stitches the threads could catch on something which would damage the embroidery.
Step stitch
Many short, equally long stitches are embroidered in offset rows closely next to each other which results in adensesly filled area.
Connecting stitches
Long stitches which are used to get from one part of the motif to the next. Before and after the connectingstitch securing stitches are sewn. Connecting stitches are trimmed.

Embroidery preparation
30
2 Embroidery preparation
2.1 Accessory box
Accessory box free standing> On the back of the box, pull both extensions out until they click into place.
Storing accessory
NOTICE Incorrect sorting of the bobbin
The silvery sensor surface can get scratched.> Make sure that the silvery sensor surfaces are on the right side when sorting the bobbins into the
accessory box.
> Insert the holders (1) for bobbins, feet and needles.> Store the small parts, e.g. thread discs etc., in the drawers (2) and (3).> Store the provided needle package in the special compartment (4).> Insert the bobbins into the compartment (5) of the accessory box so that the silvery sensor surfaces are
on the right side.> To remove a bobbin, press the compartment holder down.> Store the embroidery feet (5.5 mm or 9.0 mm) in the holders (6).
2
3
4
65
1 1
1
1
1

Embroidery preparation
31
2.2 Connection and Switching on
Connecting the foot control (Optional accessory)> Unwind the cable of the foot control to the desired length.
> Insert the cable of the foot control into the foot control connection.
Connecting the machine> Insert the power cable into the power cord connection.
> Insert the power cable into the power cord connection.

Embroidery preparation
32
Fixing the touchscreen pen> Store the touchscreen pen at the magnet holder.
Switching the machine on> Switch on the machine at the main switch to «I».
Switching on the sewing light
Prerequisite:
• The sewing light has to be activated in the Setup Program.
> Push the button «Sewing light» to switch the sewing light off.> Push the button «Sewing light» again to switch the sewing light on.
– The sewing light can also be switched on and off in the Setup Program. (see page 60)
2.3 Foot control (Optional accessory)
Regulating the speed via the foot control
Via the foot control the speed can be adjusted steplessly.
> Press the foot control down carefully to start the machine.> To embroider faster, press the foot control harder.> Release the foot control to stop the machine.
Embroidery preparation
33
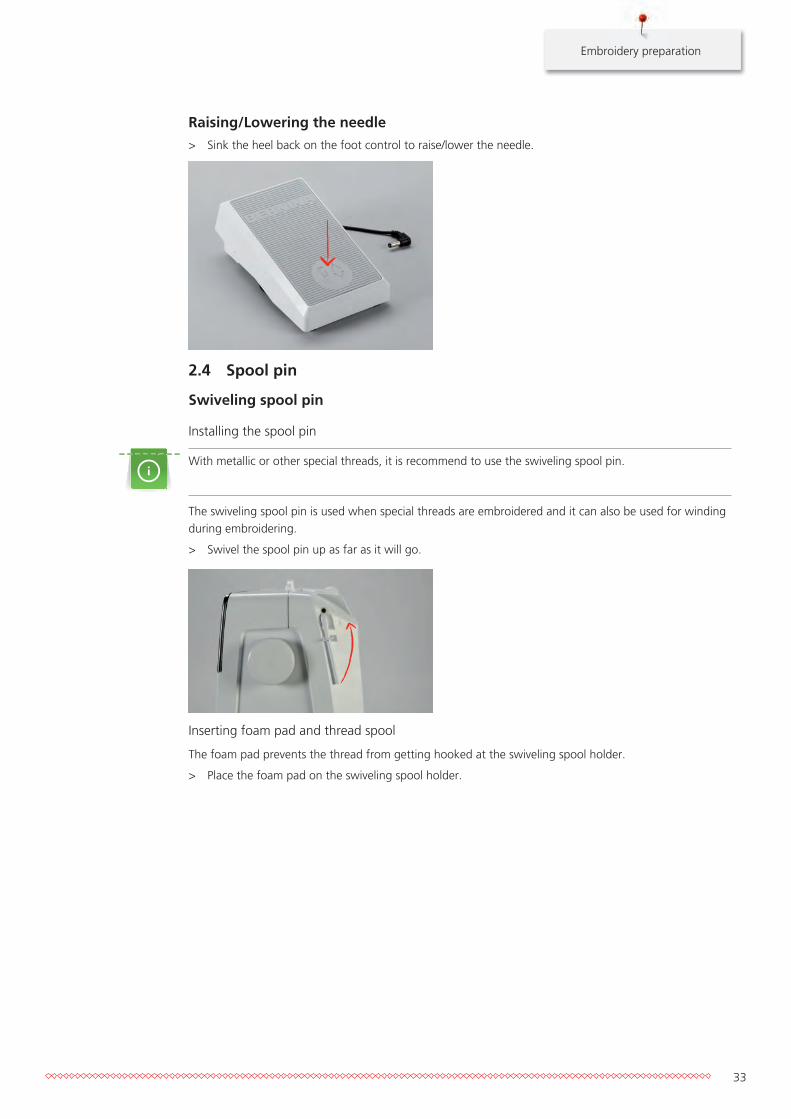
Raising/Lowering the needle> Sink the heel back on the foot control to raise/lower the needle.
2.4 Spool pin
Swiveling spool pin
Installing the spool pin
With metallic or other special threads, it is recommend to use the swiveling spool pin.
The swiveling spool pin is used when special threads are embroidered and it can also be used for windingduring embroidering.
> Swivel the spool pin up as far as it will go.
Inserting foam pad and thread spool
The foam pad prevents the thread from getting hooked at the swiveling spool holder.
> Place the foam pad on the swiveling spool holder.
Embroidery preparation
34
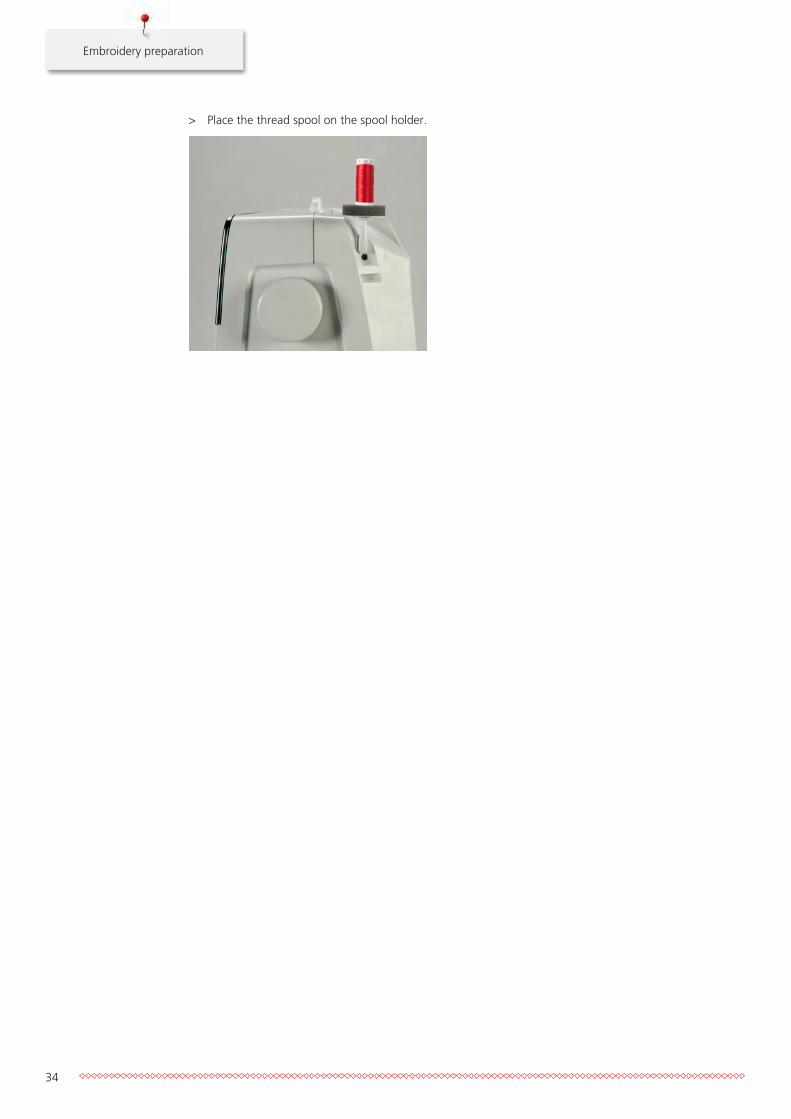
> Place the thread spool on the spool holder.

Embroidery preparation
35
Horizontal spool pin
Placing the foam pad, the thread spool and the spool disc
The spool disc provides an even unwinding of the thread from the thread spool. The spool disc is only usedwith the horizontal spool pin.
> Place the foam pad on the spool pin.> Place the thread spool on the spool pin.> Position the appropriate spool disc on the spool pin so that there is no space between the spool disc and
the thread spool.
Using a spool net
The spool net provides an even unwinding of the thread from the thread spool and prevents the thread fromknotting and breaking. The spool net is only used with the horizontal spool holder.
> Pull the spool net over the thread spool.
Attaching the multiple-spool holder
Additional information how to assemble the multi-spool pin can be found in the separate instruction manualof the multi-spool pin.
2.5 Free armThe BERNINA 700 provides a solidly designed free arm which offers a lot of space for large project on theright of the needle.
2.6 Embroidery foot
Adjusting the presser foot position via the button «Presser foot up/down» > Push the button «Presser foot up/down» to raise the presser foot.> Push the button «Presser foot up/down» again to lower the presser foot.
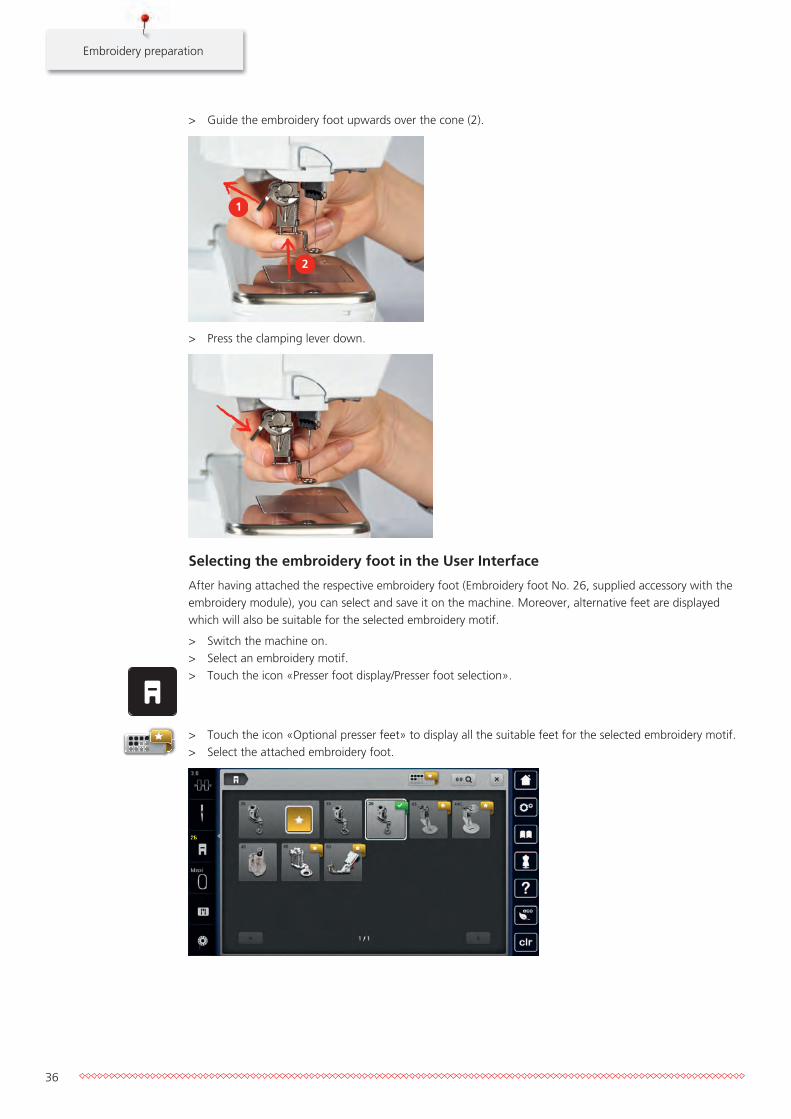
Attaching the embroidery foot> Raise the needle.> Switch the machine off and disconnect it from the power supply system.> Push the clamping lever up (1).
Embroidery preparation
36
> Guide the embroidery foot upwards over the cone (2).
1
2
> Press the clamping lever down.
Selecting the embroidery foot in the User Interface
After having attached the respective embroidery foot (Embroidery foot No. 26, supplied accessory with theembroidery module), you can select and save it on the machine. Moreover, alternative feet are displayedwhich will also be suitable for the selected embroidery motif.
> Switch the machine on.> Select an embroidery motif.> Touch the icon «Presser foot display/Presser foot selection».
> Touch the icon «Optional presser feet» to display all the suitable feet for the selected embroidery motif.> Select the attached embroidery foot.

Embroidery preparation
37
2.7 Needle and stitch plate
Inserting the embroidery needle
Embroidery needles of the type 130/705 H-SUK provide a larger eye and are slightly rounded. This avoidsthread abrasion when using Rayon- and cotton embroidery thread. Depending on the embroidery threaduse a size No. 70-SUK to No. 90-SUK needle.
> Raise the needle.> Switch the machine off and disconnect it from the power supply system.> Remove the attached foot.> Loosen the fixing screw of the needle using the screwdriver gray Torx.
> Pull the needle down.> Hold the new needle with the flat side to the back.> Insert the needle as far as it will go.> Tighten the fixing screw of the needle using the screwdriver gray Torx.
Selecting the needle in the User Interface
After having changed the needle, it can be checked whether it can be used in combination with the selectedstitch plate.
> Touch the icon «Needle selection».> Select the inserted needle.
– If the selected needle is suitable in combination with the stitch plate, embroidering can be started.
– If the selected needle is not suitable in combination with the stitch plate, starting the machine isautomatically blocked.

Embroidery preparation
38
Selecting needle type and needle size
Convenient memory function: To prevent a loss of information, the needle type and the needle size can besaved additionally on the machine. The saved needle type and the saved needle size can be checked at anytime.
> Touch the icon «Needle selection».
> Touch the icon «Needle type/Needle size».> Select the needle type (1) of the inserted needle.> Select the needle size (2) of the inserted needle.
1
2
Attaching the stitch plate
The stitch plate has a small hole in the needle insertion area. The thread is pulled in and knotted optimallywhich results in an optimized stitching result.
Prerequisite:
• The machine is switched off and disconnected from the power supply system.• The foot and the needle are removed.
> Press the stitch plate down at the mark back right until it flips up.
> Remove the stitch plate.> Place the openings of the stitch plate (PunchWork, Optional accessory) above the corresponding guide
pins and press down until it clicks into place.

Embroidery preparation
39
Selecting the stitch plate in the User Interface
After having replaced the stitch plate, it can be checked whether it can be used together with the selectedneedle.
> Touch the icon «Stitch plate selection».> Select the attached stitch plate (PunchWork, optional accessory).
– If the selected needle is suitable in combination with the stitch plate, embroidering can be started
– If the selected needle is not suitable in combination with the stitch plate, starting the machine isautomatically prevented
2.8 Threading
Threading the upper thread
Prerequisite:
• The needle and the presser foot are raised.• The machine is switched off and disconnected from the power supply system.
> Place the foam pad on the spool holder.> Place the thread spool on the spool holder so that the thread unwinds clockwise.> Add the appropriate spool disc.> Guide the thread in direction of the arrow through the rear thread guide (1) and hold the thread with the
hands so that it is taut and can be inserted into the thread tension.> Guide the thread in direction of the arrow through the thread tension (2).
1
2
> Guide the thread downwards (3) around the thread take-up lever cover (4).> Guide the thread upwards and insert into the thread take-up lever (5).

Embroidery preparation
40
> Guide the thread downwards again (6).
3
5
64
> Guide the thread through the guides (7/8) above the presser foot.
7
8
> Switch the machine on.

Embroidery preparation
41
> Press the semi-automatic threader lever (9) slightly down, keep pressed and pull the thread to the leftbeneath the gray threader hook (10).
9
10
> Guide the thread around the gray threader hook from the left to the right (12).> Press the threader lever down as far as it will go (11) and then pull the thread from the left to the right
(12) through the threader slot (13) until it hooks into the small wire hook.
12
11
13
> Release the lever and the thread simultaneously to thread.

Embroidery preparation
42
> Pull the thread loop (14) to the back.
14
> Pull the thread beneath the presser foot from back to front over the thread cutter (15) and cut.
15
Winding the bobbin thread
The bobbin thread can be wound while embroidering if the swiveling spool holder is used for winding.
Prerequisite:
• The foam pad, the thread spool and the appropriate thread disc are positioned.
> Attach the empty bobbin on the winding unit (1) so that the silvery sensor surface is down.
1
> Guide the thread to the left into the rear thread guide (2).> Guide the thread around the thread pretension clockwise (3).

Embroidery preparation
43
> Wind the thread clockwise 2 to 3 times around the empty bobbin (4).
2
3
4
> Pull the excess thread over the thread cutter at the engaging lever (5) and cut.
5
> Push the engaging lever (6) towards the bobbin.
6
– The machine winds and the display to wind the bobbin appears.
> Move the slide on the display using the touchscreen pen/finger to adjust the winding speed.> To stop the winding process, the engaging lever must the pressed to the right.> Push the engaging lever towards the bobbin again to continue the winding process.
– As soon as the bobbin is full, the machine stops the winding process automatically.
> Remove the bobbin and cut the thread using the thread cutter at the engaging lever.

Embroidery preparation
44
Threading the bobbin thread
Prerequisite:
• The needle is raised.• The machine is switched off and the bobbin cover is opened.
> Press the bobbin case release at the bobbin case (1).
1
> Remove the boobin case.> Remove the bobbin from the bobbin case.> Insert the new bobbin so that the silvery sensor surface is facing the back of the bobbin case.

Embroidery preparation
45
> Pull the thread into the slot (2) from the left.
2
> Pull the thread to the right under the spring (3), then lead the thread under the two thread guides (4)and pull upwards.
3
4
> When inserting into the machine, hold the bobbin case so the thread guide (5) points upwards.
5
> Insert the bobbin case.> Press onto the center of the bobbin case until it engages.

Embroidery preparation
46
> Pull the thread through the thread cutter (6) and cut.
6
> Close the bobbin cover.
Thread-up command
The machine must be ready for embroidery to bring up the bobbin thread.The bobbin thread can be broughtup in one step for a manual knotting. If no securing stitches are wanted, it is recommended to deactivate thesecuring stitches in the Setup.
> Hold the upper thread.> Press the button «Needle up/down».
– The bobbin thread is brought up automatically.
Indicating fill level of bobbin thread
As soon as the fill level of the bobbin thread is low, an animation, which indicates that the bobbin thread isrunning out, appears in the icon «Bobbin thread fill level».
> Touch the icon «Bobbin thread fill level» to thread the bobbin thread according to the animation.
2.9 Attaching the Module
NOTICE Transporting the embroidery module
Damage to the embroidery module connection and machine.> Remove the embroidery module before transporting the machine.
Prerequisite:
• The slide-on table (optional accessory) must not be attached.
> Make sure that the module and the machine are placed on a stable, even surface.> Make sure that there is enough space around to allow the unimpeded movement of the embroidery arm.> Lift the embroidery module on the left.

Embroidery preparation
47
> Carefully push the module from left to right into the embroidery module connection (1) of the machine.
1
1
> To remove, lift the embroidery module on the left and carefully pull to the left.
2.10 Selecting the embroidery motifAll embroidery motifs can either be embroidered as-is or changed using the various functions offered by themachine. All embroidery motifs can be found in the attachment. In addition to that, embroidery motifs fromthe personal memory or from the BERNINA USB stick (optional accessory) can be loaded.
Prerequisite:
• The Embroidery foot No. 26 is attached.
> Select an alphabet, embroidery motif or a personal embroidery motif from a file.

Embroidery preparation
48
2.11 Embroidery hoop
Overview embroidery hoop selection
1
1 Hoop selection
Selecting the embroidery hoop
The best embroidery result is achieved when the smallest possible embroidery hoop for the embroidery motifis selected.
The embroidery motif has a pre-set size which is displayed.
Prerequisite:
• The embroidery motif is selected.
> Touch the icon «Hoop selection».– The machine selects the optimal embroidery hoop according to the size of the embroidery motif
automatically. If the pre-set embroidery hoop would not be available, another desired embroideryhoop can be selected. When an embroidery hoop is attached which does not correspond with theselected one, the attached hoop is considered active and the embroidery motif area is displayedaccordingly.
> Select the desired embroidery hoop.
Tear-away stabilizers
Using a stabilizer ensures more stability of the embroidery project. A tear-away stabilizer suits all woven andnon-stretch materials. 1 – 2 layers can be used. Stabilizers are available in different weights. With largerembroidered areas the stabilizer will remain under the embroidery thread. The stabilizer is applied to thewrong side of the fabric with temporary adhesive spray. Carefully tear away excess stabilizer afterembroidering.
Cut-away stabilizers
Using a stabilizer ensure more stability of the embroidery project. A cut-away stabilizer suits all elasticmaterials. 1 – 2 layers can be used. Stabilizers are available in different weights. With larger areas to beembroidered the stabilizer will remain under the embroidery thread. The stabilizer is applied to the wrongside of the fabric with temporary adhesive spray. Carefully cut away excess stabilizer after embroidering.

Embroidery preparation
49
Using adhesive spray
The application of spray adhesive is recommended for stretch and smooth materials and knitware. It preventsthe fabric from losing shape and slipping. Appliqués can be exactly positioned with spray adhesive. The sprayadhesive shouldn't be used near the machine to avoid contamination.
> Use the adhesive spray carefully at a distance 25 – 30 cm (9 – 12 inch) when spraying the stabilizer.> Adhere the sprayed stabilizer to the wrong side of the fabric carefully, smoothing material so there are
no puckers.> Position smaller parts such as pocket flaps or collars on the stabilizer.> To avoid the possibility of getting hoop marks when working with napped materials or fleece, don't hoop
the parts but spray the stabilizer and hoop it.> Adhere the fabric to be embroidered.> Remove any adhesive residue before starting the machine.
Using spray starch
Spray starch is ideal for additional stiffening fine, loosely woven materials. Always use an additional stabilizeron the wrong side of the material.
> Spray the area to be embroidered.> Let it dry or press gently with a warm iron if necessary.
Using iron-on interfacing
Iron-on interfacings are available in a variety of weights. It is recommended to use an iron-on interfacingwhich is easily removable from the basic fabric. An Iron-on interfacing suits all materials that are easilydistorted like stretch fabric such as tricot and jersey.
> Iron-on interfacings are ironed to the wrong side of the material using a warm iron.
Using paper-backed adhesive stabilizer
Paper-backed adhesive stabilizers are intended to be used for fabrics such as jersey and silk as well as forembroidery projects which are not suited to be hooped in the embroidery hoop.
> Place the stabilizer in the hoop, so that the paper side is up.> Use a a pair of scissors to score the paper and remove paper in the hoop area.> Position the fabric to be embroidered on the stabilizer and press it on place.> Remove any adhesive residue before starting the machine.
Using water-soluble stabilizer
For lace embroidery it is recommended to hoop 1 – 3 layers of water-soluble stabilizer in the embroideryhoop. As the embroidery motif is not embroidered on the fabric, only the thread embroidered motif isleft. The embroidery motifs should be combined with short stitches otherwise the individual motifs mayfall out.
The stabilizer dissolves in water. Water-soluble stabilizers are an ideal protection for looped pile fabricspreventing the loops from being damaged! It prevents threads from sinking into the material and keeps thefabric pile from poking though the embroidery. Water-soluble stabilizers are ideal for fine, sheer fabricswhere other stabilizers may show through the embroidery stitches as well as for lace embroidery.
> Place the stabilizer on top of the material.> Place all the layers together into the embroidery hoop.> Use adhesive spray to adhere stabilizer if necessary.> For material with a pile, reinforce with additional, suitable stabilizer on the wrong side. In addition to that
a water-soluble stabilizer can be placed on top of the material and fixed with basting stitches.> After dissolving, lay the motif down flat and let dry.

Embroidery preparation
50
Preparing the embroidery hoop
The embroidery hoop consists of an outer and an inner hoop. There is a corresponding template for everyhoop. The area to be embroidered is marked in 1 cm (0.39 inch) squares. The center and corner points aremarked with holes. The required marks can be transferred to the material.
> Mark the center of an embroidery motif on the fabric, using a water-soluble pen.
> Loosen the screw on the outer hoop.> Remove the inner hoop.> Make sure that the arrows marks of both hoops match.> Attach the template holder.> Place the template in the inner hoop, so the BERNINA logo is at the front edge at the arrow mark until it
clicks into place.
> Place the material under the inner hoop.> Line up the marked center point on the center of the template.> Place the material and the inner hoop on the outer hoop so that the arrows of both hoops match.
> Fit the hoops into each other; ensure that the material does not move.> Hoop the fabric to be embroidered tightly.> Tighten the screw.> Remove the template from the hoop by using the template holder.> To avoid scratches on the free arm, press the inner hoop into the outer hoop so that the inner hoop
including the fabric protrudes downwards by up to 1 mm.
Embroidery preparation
51
Attaching the hoop> Raise the needle.> Raise the embroidery foot.> Hold the hoop with the right side of the fabric up with the attaching mechanism to the left.> Position the hoop under the embroidery foot.> Press both attaching mechanisms (1) of the hoop towards each other.> Position the embroidery hoop (2) above the bracket of the embroidery arm.> Press the hoop down until it clicks in position.> Release the attaching mechanism (1).
1
1
2
> Press the attaching mechanisms of the hoop towards each other to remove the hoop.> Remove the hoop.
Overview embroidery functions
1
2
3
4
5
6
1 Centering the embroidery hoop to the needle 4 Grid on/off
2 Moving the embroidery hoop to the back 5 Center of embroidery motif
3 Moving the embroidery hoop to the left 6 Virtual positioning

Embroidery preparation
52
Centering the embroidery hoop to the needle
Relocating the embroidery hoop facilitates threading when the needle is close to the embroidery hoop.
> Touch the icon «Embroidery hoop display/Embroidery hoop selection».
P
> Touch the icon «Center the embroidery hoop to the needle» or
P
> Push the button «Center the embroidery hoop to the needle».> Thread the upper thread (see page 39).
> Press the button «Start/Stop» to move the embroidery hoop back to the last position.
Moving the hoop to the back
To facilitate changing the bobbin, it is recommended to move the hoop to the back before threading. Thismakes it easier to open the bobbin cover.
> Touch the icon «Embroidery hoop display/Embroidery hoop selection».
P
> Touch the icon «Move the hoop to the back» or
P
> Push the button «Move the hoop to the back».> Thread the bobbin thread (see page 44).
> Push the button «Start/Stop» to move the embroidery hoop back to the last position. Pull the upperthread if necessary.
Moving the embroidery arm to the left> Touch the icon «Embroidery hoop display/Embroidery hoop selection».> Remove the hoop.
P> Touch the icon «Move the embroidery arm to the left».
– An animation «Remove the embroidery hoop» appears.
> Touch the icon «Confirm» to bring the embroidery hoop to the left into the parking position.
Grid on/off
When the center of the hoop and the grid are displayed, the embroidery motif can be positioned moreexactly.
> Touch the icon «Embroidery hoop display/Embroidery hoop selection».
> Touch the icon «Grid on/off» to display the center of the hoop on the display.> Touch the icon «Grid on/off» again to display the grid.> Touch the icon «Grid on/off» again so that the center of the hoop and the grid disappear.

Embroidery preparation
53
Locating the center of the embroidery motif
The embroidery hoop is positioned so that the needle is exactly above the center of the embroidery motif orthe motif begin.
> Touch the icon «Embroidery hoop display/Embroidery hoop selection».
> Touch the icon «Center of embroidery motif» or
> push the button «Center of embroidery motif» to position the embroidery hoop so that the needle isexactly above the center of the embroidery motif.
> Touch the icon «Center of embroidery motif» again or> push the button «Center of embroidery motif» again to position the embroidery hoop so that the needle
is exactly above the pattern begin.
Virtual positioning of the embroidery hoop
The embroidery hoop is automatically moved to the new position as soon as the embroidery motif isrepositioned. Therefore, the icon «Virtual positioning» is activated automatically and outlined in yellow whenan embroidery hoop is attached.
Prerequisite:
• The hoop is attached.
> Touch the icon «Embroidery hoop display/Embroidery hoop selection».
> Touch the icon «Virtual positioning» to deactivate the automatic movement of the hoop when havingrepositioned the embroidery motif.– The icon «Virtual positioning» is not outlined in yellow.
> Touch the icon «Virtual positioning» again to activate the automatic movement of the hoop when havingrepositioned the embroidery motif.

Setup Program
54
3 Setup Program
3.1 Embroidery settings
Adjusting the upper thread tension
Alterations of the upper thread tension in the Setup Program affect all embroidery motifs.
> Touch the icon «Setup Program».
> Touch the icon «Embroidery settings».
> Touch the icon «Alter the upper thread tension».> Move the slide using the touchscreen pen/finger or touch the icons «+» or «-» to alter the upper thread
tension.
Adjusting the maximum embroidering speed
By using this function, the maximum speed can be reduced.
> Touch the icon «Setup Program».
> Touch the icon «Embroidery settings».
RPM
> Touch the icon «Alter the maximum speed».> Move the slide using the touchscreen pen/finger or touch the icons «+» or «-» to alter the maximum
speed.
Centering or opening embroidery motifs in the original position
When the embroidery motif is openend on the machine, it is always centered to the embroidery hoop. If youwant the embroidery motif to be opened in its original position (defined by the BERNINA embroiderysoftware), the function «Center the embroidery motif» must be activated.
> Touch the icon «Setup Program».
> Touch the icon «Embroidery settings».
> Touch the icon «Center the embroidery motif».
> Press the switch in the right section.– A previously moved embroidery motif which has been saved in the new position is opened in the
saved position after selecting.
> Press the switch in the right section again.– The embroidery motif is centered to the embroidery hoop.

Setup Program
55
Calibrating the embroidery hoop
The calibration of the embroidery hoop is the coordination of the needle to the center of the embroideryhoop.
Prerequisite:
• The embroidery module is connected and the embroidery hoop with the appropriate embroiderytemplate is attached.
> Touch the icon «Setup Program».
> Touch the icon «Embroidery settings».
> Touch the icon «Calibrate the embroidery hoop».> Select the desired embroidery hoop and follow the instructions in the display.> Touch the icon «Delete» (1) to delete the present calibration.> Center the needle via the arrow icons on the display.
1
Entering the fabric thickness
If the fabric thickness is more than 4 mm as for e.g. toweling, it is recommended to select 7.5 mm or10 mm. The thicker the fabric, the slower the embroidery speed of the machine. When the machine isswitched off, the alterations are reset to the default setting 4 mm.
> Touch the icon «Setup Program».
> Touch the icon «Embroidery settings».
> Touch the icon «Select the fabric thickness».> Select fabric thickness.
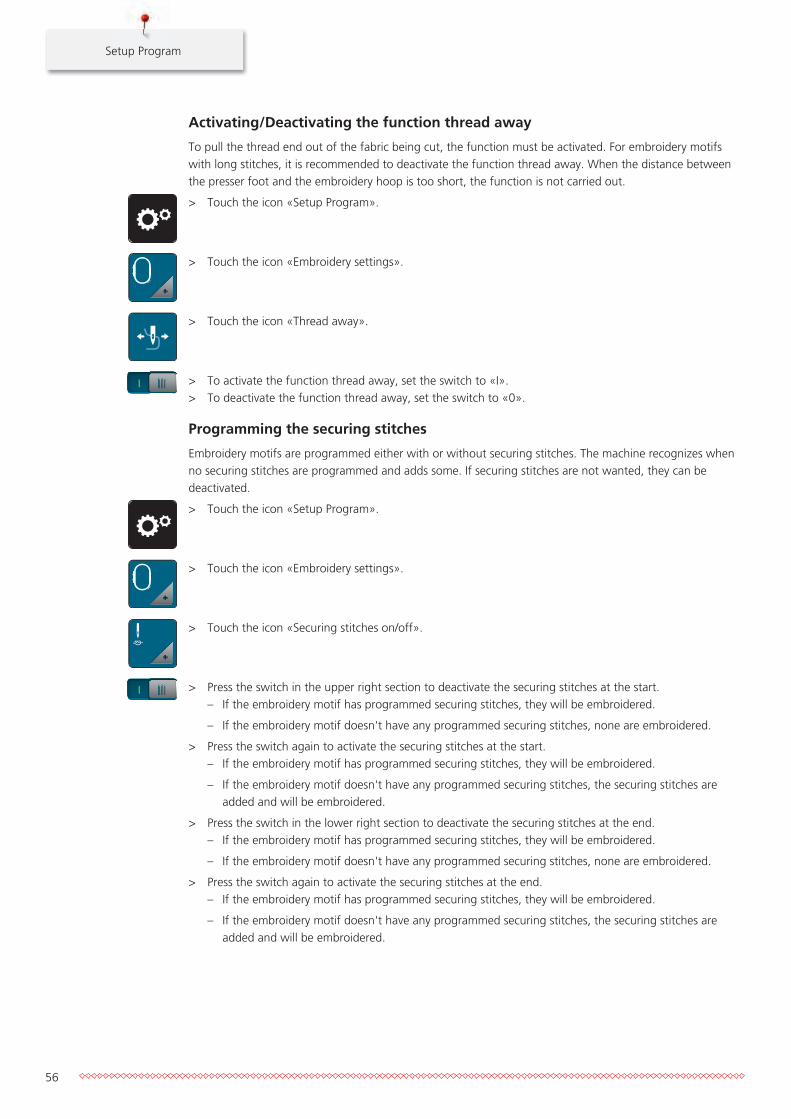
Setup Program
56
Activating/Deactivating the function thread away
To pull the thread end out of the fabric being cut, the function must be activated. For embroidery motifswith long stitches, it is recommended to deactivate the function thread away. When the distance betweenthe presser foot and the embroidery hoop is too short, the function is not carried out.
> Touch the icon «Setup Program».
> Touch the icon «Embroidery settings».
> Touch the icon «Thread away».
> To activate the function thread away, set the switch to «I».> To deactivate the function thread away, set the switch to «0».
Programming the securing stitches
Embroidery motifs are programmed either with or without securing stitches. The machine recognizes whenno securing stitches are programmed and adds some. If securing stitches are not wanted, they can bedeactivated.
> Touch the icon «Setup Program».
> Touch the icon «Embroidery settings».
> Touch the icon «Securing stitches on/off».
> Press the switch in the upper right section to deactivate the securing stitches at the start.– If the embroidery motif has programmed securing stitches, they will be embroidered.
– If the embroidery motif doesn't have any programmed securing stitches, none are embroidered.
> Press the switch again to activate the securing stitches at the start.– If the embroidery motif has programmed securing stitches, they will be embroidered.
– If the embroidery motif doesn't have any programmed securing stitches, the securing stitches areadded and will be embroidered.
> Press the switch in the lower right section to deactivate the securing stitches at the end.– If the embroidery motif has programmed securing stitches, they will be embroidered.
– If the embroidery motif doesn't have any programmed securing stitches, none are embroidered.
> Press the switch again to activate the securing stitches at the end.– If the embroidery motif has programmed securing stitches, they will be embroidered.
– If the embroidery motif doesn't have any programmed securing stitches, the securing stitches areadded and will be embroidered.

Setup Program
57
Adjusting the thread cut> Touch the icon «Setup Program».
> Touch the icon «Embroidery settings».
> Touch the icon «Thread cut settings».
1
2
3
> Touch the switch in the upper portion of the display (1) to deactivate the automatic thread cut before thethread is changed.
> Touch the switch in the upper portion of the display (1) again to activate the automatic thread cut beforethe thread is changed.
> Touch the switch in the middle section of the display (2) so that the machine will stop after about 7stitches and the remaining thread can be cut manually.
> Touch the switch in the middle section of the display (2) again and the machine won't stop for a manualthread cut.
> Touch the icons «-» or «+» (3) to adjust the length from where the connecting stitches are cut.> Touch the yellow-framed icon to reset any alterations to default setting.
Changing the measuring unit
The measuring unit in the embroidery mode can be changed from mm to inch. The standard setting is inmm.
> Touch the icon «Setup Program».
> Touch the icon «Embroidery settings».
> Touch the icon «Change measuring unit».> Touch the icon «Inch» (2) to change the measuring unit in the embroidery mode to inch.
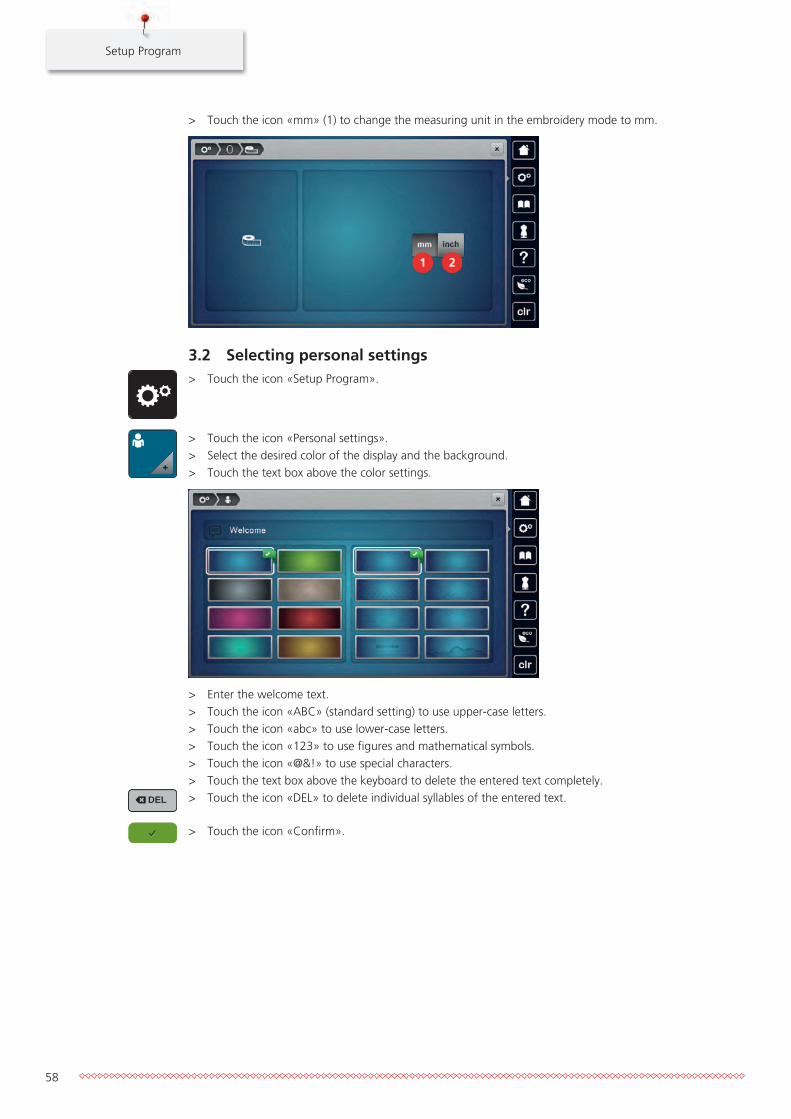
Setup Program
58
> Touch the icon «mm» (1) to change the measuring unit in the embroidery mode to mm.
1 2
3.2 Selecting personal settings> Touch the icon «Setup Program».
> Touch the icon «Personal settings».> Select the desired color of the display and the background.> Touch the text box above the color settings.
> Enter the welcome text.> Touch the icon «ABC» (standard setting) to use upper-case letters.> Touch the icon «abc» to use lower-case letters.> Touch the icon «123» to use figures and mathematical symbols.> Touch the icon «@&!» to use special characters.> Touch the text box above the keyboard to delete the entered text completely.
DELDEL > Touch the icon «DEL» to delete individual syllables of the entered text.
> Touch the icon «Confirm».
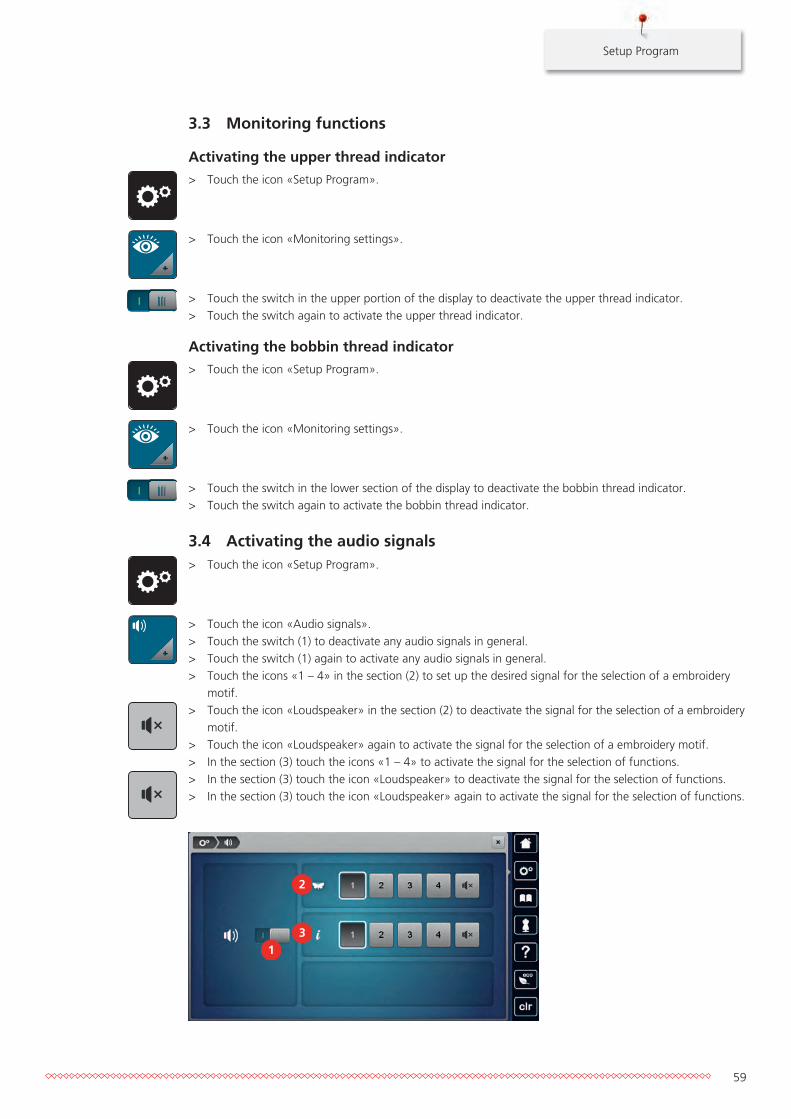
Setup Program
59
3.3 Monitoring functions
Activating the upper thread indicator> Touch the icon «Setup Program».
> Touch the icon «Monitoring settings».
> Touch the switch in the upper portion of the display to deactivate the upper thread indicator.> Touch the switch again to activate the upper thread indicator.
Activating the bobbin thread indicator> Touch the icon «Setup Program».
> Touch the icon «Monitoring settings».
> Touch the switch in the lower section of the display to deactivate the bobbin thread indicator.> Touch the switch again to activate the bobbin thread indicator.
3.4 Activating the audio signals> Touch the icon «Setup Program».
> Touch the icon «Audio signals».> Touch the switch (1) to deactivate any audio signals in general.> Touch the switch (1) again to activate any audio signals in general.> Touch the icons «1 – 4» in the section (2) to set up the desired signal for the selection of a embroidery
motif.> Touch the icon «Loudspeaker» in the section (2) to deactivate the signal for the selection of a embroidery
motif.> Touch the icon «Loudspeaker» again to activate the signal for the selection of a embroidery motif.> In the section (3) touch the icons «1 – 4» to activate the signal for the selection of functions.> In the section (3) touch the icon «Loudspeaker» to deactivate the signal for the selection of functions.> In the section (3) touch the icon «Loudspeaker» again to activate the signal for the selection of functions.
1
2
3

Setup Program
60
3.5 Machine settings
Selecting a language
The User Interface can be programmed in different languages according to the customer's wish becauseBERNINA provides a wide range of international languages for the customers. Via firmware updatesadditional languages for the User Interface can be provided.
> Touch the icon «Setup Program».
> Touch the icon «Machine settings».
> Touch the icon «Language selection».> Select a language.
Adjusting the brightness of the display
The brightness of the display can be adjusted corresponding to the personal preferences.
> Touch the icon «Setup Program».
> Touch the icon «Machine settings».
> Touch the icon «Adjust the brightness».> Move the slide in the upper portion of the display using the touchscreen pen/finger or touch the icons
«+» or «-» to alter the brightness of the display.
Adjusting the sewing light
The brightness of the sewing light can be adjusted corresponding to the personal preferences.
> Touch the icon «Setup Program».
> Touch the icon «Machine settings».
> Touch the icon «Adjust the brightness».> Move the slide in the upper portion of the display using the touchscreen pen/finger or touch the icons
«+» or «-» to alter the brightness of the sewing light.
> Touch the switch to switch the sewing light off.> Touch the switch again to switch the sewing light on.

Setup Program
61
Calibrating the display
Please find further information on this topic in the chapter attachment below troubleshooting at the end ofthe instruction manual.
> Touch the icon «Setup Program».
> Touch the icon «Machine settings».
> Touch the icon «Calibrate the display».> Touch the crosses in sequence using the touchscreen pen.
Back to basic setting
ATTENTION: Using this function will delete all individually made settings.
> Touch the icon «Setup Program».
> Touch the icon «Machine settings».
> Touch the icon «Default settings».
> Touch the icon «Default setting embroidery».
> Touch the icon «Confirm» and restart the machine to restore all default settings.
Deleting user data
Motifs which are not needed anymore can be deleted so that there will be more capacity for new motifs.
> Touch the icon «Setup Program».
> Touch the icon «Machine settings».

Setup Program
62
> Touch the icon «Basic settings».
> Touch the icon «Delete personal embroidery motifs».
> Touch the icon «Confirm» to delete all embroidery motifs from the personal memory.
Deleting motifs on the BERNINA USB Stick
When motifs which won't be needed anymore are saved on the BERNINA USB Stick (Optional accessory), thestick can be connected to the machine and the data can be deleted.
> Insert the BERNINA USB Stick (Optional accessory) into the den USB port of the machine.> Touch the icon «Setup Program».
> Touch the icon «Machine settings».
> Touch the icon «Basic settings».
> Touch the icon «Delete data from USB Stick».
> Touch the icon «Confirm» to delete all data on the BERNINA USB Stick (Optional accessory).
Updating the machine Firmware
The latest firmware of the machine and a detailed step-by-step instruction for updating processes can be
downloaded at www.bernina.com. In general, personal data and settings are automatically transferredduring a firmware update. For reasons of safety, it is also recommended to save data and settings on aBERNINA USB stick (optional accessory) before the firmware update is started. If personal data and settingsshould get lost during a firmware update, they can be transferred to the machine again afterwards.
NOTICE The BERNINA USB stick (optional accessory) has been removed too early
Firmware has not been updated and the machine cannot be used.> Remove the BERNINA USB stick (optional accessory) only after the update has been completed
successfully.
> Insert the BERNINA USB stick (optional accessory), FAT32 formatted, providing the latest software intothe port.
> Touch the icon «Setup Program».
> Touch the icon «Machine settings».
Setup Program
63
> Touch the icon «Maintenance/Update».
UPDATE
> Touch the icon «Update the machine».
> Touch the icon «Save data on USB stick».– The icon is checkmarked in green.
UpdateUpdate > Touch the icon «Update» to start the update of the firmware.
Recovering saved data
If personal data and settings after a software update are not available anymore, they can be transferred tothe machine again afterwards.
NOTICE The BERNINA USB stick (optional accessory) has been removed too early
Saved data cannot be transferred and the machine cannot be used.> Remove the BERNINA USB stick (optional accessory) only after the saved data has been transferred
successfully.
> Insert the BERNINA USB stick (optional accessory) providing the saved data and settings into the USB portof the machine.
> Touch the icon «Setup Program».
> Touch the icon «Machine settings».
> Touch the icon «Maintenance/Update».
UPDATE
> Touch the icon «Update the machine».
> Touch the icon «Transfer saved data to machine».– The icon is checkmarked in green.
Cleaning the thread catcher
In chapter «Maintenance and cleaning» there are additional illustrated step-by-step instructions.
> Touch the icon «Setup Program».
> Touch the icon «Machine settings».

Setup Program
64
> Touch the icon «Maintenance/Update».
> Touch the icon «Clean the thread catcher».> Clean the thread catcher according to the instructions on the display.
Lubricating the machine
The Setup Program provides animations how the machine has to be oiled. In chapter «Maintenance andcleaning» there are additional illustrated step-by-step instructions. Always use BERNINA oil to lubricate.
CAUTION Electronically driven components
Risk of injury near the needle and the hook.> Switch the machine off and disconnect it from the power supply system.
NOTICE Lubricating the hook
Too much oil can pollute the fabric and the thread.> Always sew a test sample first.
> Touch the icon «Setup Program».
> Touch the icon «Machine settings».
> Touch the icon «Maintenance/Update».
> Touch the icon «Lubricate the machine».> Lubricate the machine according to the instructions on the display.
Packing the embroidery module
To pack the embroidery module into the original packaging without moving the embroidery arm manually,the embroidery arm needs to be brought to its packing position.
Prerequisite:
• The embroidery module is connected with the machine.
> Touch the icon «Setup Program».
> Touch the icon «Machine settings».

Setup Program
65
> Touch the icon «Maintenance/Update».
> Touch the icon «Pack position for the embroidery module».> Follow the instructions on the display.
Checking the firmware version
Both the firmware and the hardware version of the machine and the attached embroidery module aredisplayed.
> Touch the icon «Setup Program».
> Touch the icon «Machine settings».
> Touch the icon «Information».
> Touch the icon «Firmware and hardware information».
Reviewing the total number of stitches
The total number of stitches of the machine as well as the number of stitches since the last service carriedout by the specialized BERNINA dealer are displayed.
> Touch the icon «Setup Program».
> Touch the icon «Machine settings».
> Touch the icon «Information».
> Touch the icon «Firmware und Hardware Informationen».

Setup Program
66
Registering details of the dealer
The contact details of your specialized BERNINA dealer can be registered.
> Touch the icon «Setup Program».
> Touch the icon «Machine settings».
> Touch the icon «Information».
> Touch the icon «Dealer details» to enter the information of the specialized dealer.
> Touch the icon «Name of the shop» to enter the name of the specialized BERNINA dealer.
> Touch the icon «Address» to enter the address of the specialized BERNINA dealer.
> Touch the icon «Phone» to enter the telephone number of the specialized BERNINA dealer.
> Touch the icon «Internet» to enter the Internet homepage or the email address of the specializedBERNINA dealer.
Saving Service data
Service data concerning the status quo of the machine can be saved on a BERNINA USB stick (Optionalaccessory) and then given to the BERNINA dealer this way.
> Insert a BERNINA USB stick (Optional accessory) which provides enough free memory space into the USBport.
> Touch the icon «Setup Program».
> Touch the icon «Machine settings».
> Touch the icon «Information».
> Touch the icon «Service data».> Touch the icon «LOG».
– The icon «LOG» is outlined in white.
> Only when the icon is not outlined in white anymore, remove the BERNINA USB Stick (Optionalaccessory).

System settings
67
4 System settings
4.1 Calling up the tutorialThe tutorial provides information and explanations on different sections concerning embroidering.
> Touch the icon «Tutorial».> Select the desired topic to get information.
4.2 Calling up the Embroidery ConsultantThe Embroidery Consultant provides information about decision support concerning embroidery projects.After entering the desired embroidery project and the fabric, suggestions for the suitable needle and thesuitable embroidery foot are displayed.
> Touch the icon «Embroidery Consultant».> Select the embroidery project.> Select the fabric which is to be embroidered.> Touch the icon «Confirm».
– If the embroidery motif has already been selected, a warning appears that it will be overwritten.
4.3 Calling up the Help> Touch the window in the display where help is needed.> Touch the icon «Help» to start the help mode.> Touch the icon in the display where help is needed.
– Assistance concerning the selected icon is displayed.
4.4 Using eco modeDuring a longer interruption of work the machine can be set into a power save mode. The power save modealso serves as a child safety feature. Nothing can be selected in the display and the machine cannot bestarted.
> Touch the icon «eco».– The display goes to sleep. The power consumption is reduced and the sewing light is off.
> Touch the icon «eco» again.– The machine is ready for use.
4.5 Cancelling any alterations with «clr»Any alterations to motifs can be reset to default setting. Exceptions are saved motifs which have been filed inthe personal memory and monitoring functions.
> Touch the icon «clr».

Creative embroidering
68
5 Creative embroidering
5.1 Overview embroidering
1
3
52
4
1 Embroidery time/Embroidery motif size in mmor inch
4 «i»-Dialog
2 Scaling up, downsizing and moving theembroidery motif view
5 Embroidery motif layers
3 Area to be embroidered
5.2 Selecting and changing the embroidery motif> Touch the icon «Selection».
> Touch the icon «Upload embroidery motif».> Select a new embroidery motif.
5.3 Checking the embroidery time and the embroidery motif sizeIn the selection menu «Editing» the estimated embroidery time in minutes as well as the width and height ofthe embroidery motif is indicated at lower left (1).
1
5.4 Regulating the speedThe sewing speed can be adjusted infinitely variable with the slide.
> Move the slide to the left to reduce the sewing speed.> Move the slide to the right to increase the sewing speed.

Creative embroidering
69
5.5 Editing the embroidery motif
Overview Editing embroidery motif
1 2
4
5 6
7
9
8
3
10
11 12
13 14
15 16
1 Moving the view 10 Mirror image up/down
2 Moving the motif 11 Duplicating
3 Zoom out 12 Endless Embroidery
4 Zoom in 13 Deleting
5 Moving the motif 14 Check embroidery motif size
6 Rotating the motif 15 Bending the text
7 Altering the size 16 Grouping embroidery motifs
8 Pinpoint placement 17 Changing the sequence within an embroiderymotif combination (appears by scrolling)
9 Mirror image left/right 18 Altering the stitch type/stitch density (appearsby scrolling)
Scaling up the embroidery motif view
The view of the embroidery motif can be scaled up. In addition to that, the view can be adjusted with orwithout changing the embroidery position.
> Select an embroidery motif.> Touch the icon «Zoom in» to edit the view of the embroidery motif.
> Touch the icon «Zoom in» 1 to 4 times to enlarge the view of the embroidery motif gradually.
> Touch the icon «Zoom out» 1 to 4 times to get back to the Edit Mode.
Downsizing the embroidery motif view
The view of the embroidery motif can be downsized. In addition to that, the view can be adjusted with orwithout changing the embroidery position.
> Select an embroidery motif.> Touch the icon «Zoom in» to edit the view of the embroidery motif.
> Touch the icon «Zoom out» 1 to 4 times to downsize the view of the embroidery motif gradually.

Creative embroidering
70
Moving the embroidery motif view
The view of the embroidery motif can be moved. In addition to that, the view can be adjusted with orwithout changing the embroidery position.
> Select an embroidery motif.> To activate the icon «Move the view», touch the icon «Zoom in».
> Touch the icon «Move the view».– The icon turns dark gray.
> Alter the view of the embroidery motif.– The embroidery position is not altered.
> Touch the icon «Zoom out» to get back to the Edit Mode.
Moving the embroidery motif in enlarged view
The view of the embroidery motif can be moved. In addition to that, the view can be adjusted with orwithout changing the embroidery position.
> Select an embroidery motif.> To activate the icon «Move the view», touch the icon «Zoom in».
> Touch the icon «Move the stitch pattern».> Move the view of the embroidery motif using the touchscreen pen/finger.
– The embroidery position is altered.
> Touch the icon «Zoom out» to get back to the Edit Mode.
Moving the embroidery motif> Select an embroidery motif.> Touch the icon «i»-Dialog.
> Touch the icon «Move the stitch pattern».> Turn the «Upper Multifunction knob» to move the embroidery motif horizontally in 1/10-mm steps.> Turn the «Lower Multifunction knob» to move the embroidery motif vertically in 1/10-mm steps or> touch the embroidery motif, keep it pressed and move it as you like.
– The relocation is indicated in the yellow-framed icons.
> Touch the icon «Center of the embroidery motif».– The embroidery motif is repositioned in the center of the embroidery hoop.

Creative embroidering
71
Rotating motif> Select an embroidery motif.> Touch the icon «i»-Dialog.
> Touch the icon «Rotate the motif».> Turn the «Upper Multifunctional knob» or the «Lower Multifunctional knob» to the right to rotate the
embroidery motif clockwise.> Turn the «Upper Multifunctional knob» or the «Lower Multifunctional knob» to the left to rotate the
embroidery motif counter-clockwise.> Touch the icon «Rotate the motif +90°» to rotate the embroidery motif in 90°-steps.
Altering the embroidery motif size proportionally
Enlargements or reductions of the motif size up to maximum 20% achieve the best results.
If the motif size is to be altered by more than 20%, the motif should be adapted in a separateembroidery software and then reloaded onto the machine.
> Select an embroidery motif.> Touch the icon «i»-Dialog.
> Touch the icon «Alter the embroidery size».
> Touch the icon «Retain the proportions» so that the icon is outlined in white.
> Turn the «Upper/Lower Multifunction knob» to the right to scale up the embroidery motif proportionally.> Turn the «Upper/Lower Multifunction knob» to the left to downsize the embroidery motif proportionally.
Altering the embroidery motif size disproportionally
Enlargements or reductions of the motif size up to maximum 20% achieve the best results.
If the motif size is to be altered by more than 20%, the motif should be adapted in a separateembroidery software and then reloaded onto the machine.
> Select an embroidery motif.

Creative embroidering
72
> Touch the icon «i»-Dialog.
> Touch the icon «Alter the embroidery size».
> To alter the embroidery motif disproportionally, touch the icon «Retain the proportions» so that the iconis not framed in white.
> Turn the «Upper Multifunctional knob» to move the embroidery motif horizontally.> Turn the «Lower Multifunctional knob» to alter the embroidery motif vertically.
Mirroring embroidery motifs
Embroidery motifs can be mirror-imaged both vertically and horizontally.
> Select an embroidery motif.> Touch the icon «i»-Dialog.
> Touch the icon «Mirror image left/right» to mirror the embroidery motif vertically.
> Touch the icon «Mirror image up/down» to mirror the embroidery motif horizontally.
Bending the text
Texts can be arranged and designed arc-shaped.
> Create an alphabet embroidery motif.> Touch the icon «i»-Dialog.
> Touch the icon «Bend text».> Turn the «Upper Multifunctional knob» to alter the distance between the characters in millimeter-steps.> Turn the «Lower Multifunctional knob» to the left or to the right to bend the lettering upwards or
downwards.

Creative embroidering
73
Changing the stitch type
If the satin stitches are too long, they can be changed to step stitches.
> Select an embroidery motif.> Touch the icon «i»-Dialog.
> Touch the icon «Change the stitch type».
1
2
> Touch the switch in the upper section of the display (1) to change the satin stitch to the step stitch.> Adjust the desired stitch length (2) with the icons «-» or «+».
Altering the stitch density
If the satin stitches are embroidered too densely, the stitch density can be adjusted.
> Select an embroidery motif.> Touch the icon «i»-Dialog.
> Touch the icon «Change the stitch type».> Adjust the desired stitch density (1) with the icons «-» or «+».
1
Checking the embroidery motif size and position
It can be checked whether or not the embroidery motif matches the designated position/location on thefabric. Points which are beyond the embroidery hoop are not traveled to.
> Select the embroidery motif.> Touch the icon «i»-Dialog.

Creative embroidering
74
check
> Touch the icon «Check the embroidery motif size» or
> push the button «Check the embroidery motif size».– The embroidery hoop travels all the way until the needle is at the position as it is indicated in the
display.
> Touch the icon «Corner top left» to select the top left corner of the embroidery motif.– The embroidery hoop travels all the way until the needle is at the position as it is indicated in the
display.
> Touch the icon «Corner top right» to select the top right corner of the embroidery motif.– The embroidery hoop travels all the way until the needle is at the position as it is indicated in the
display.
> Touch the icon «Corner bottom left» to select the bottom left corner of the embroidery motif.– The embroidery hoop travels all the way until the needle is at the position as it is indicated in the
display.
> Touch the icon «Corner bottom right» to select the bottom right corner of the embroidery motif.– The embroidery hoop travels all the way until the needle is at the position as it is indicated in the
display. If the embroidery motif hasn't been positioned correctly yet, the position can be altered viathe «Upper/Lower Multifunctional knobs» and the complete embroidery positions can be checkedagain.
> Touch the icon «Center of the embroidery motif» or
> push the button «Center of the embroidery motif» to bring the needle to the center of the embroiderymotif.
> Turn the «Upper Multifunctional knob» to move the embroidery motif horizontally.> Turn the «Lower Multifunctional knob» to move the embroidery motif vertically.

Creative embroidering
75
Endless embroidery
When embroidering a border, it is advantageous to use the «Mega-Hoop» (optional accessory) or the «Maxi-Hoop» (optional accessory). The embroidery project requires less rehooping. We recommend markingreference lines on the fabric, and using the template when hooping and rehooping. Here, the reference linesmust run parallel to the lines on the template. In the following example, the supplied «Oval-Hoop» is used.
> Select an embroidery motif.> Touch the icon «i»-Dialog.
> Touch the icon «Endless Embroidery».– The embroidery motif will be duplicated as many times as possible to fill the hoop.
– The reference points, which are necessary when rehooping the fabric, are added.
> Add further reference points, if necessary, using the arrow icons (1).> Turn the «Upper Multifunctional knob» or> touch the icons «-/+» (2) to enter the number of embroidery motifs.> Turn the «Lower Multifunctional knob» or> touch the icons «-/+» (3) to determine the distance between the embroidery motifs.> Touch the icon «Fit to hoop» (4) to adjust the size of the motifs automatically so they all fit in the hoop.
> Touch the icon «Confirm».
1
2
3
4
> Touch the icon «i»-Dialog.
> Touch the icon «Embroidering».
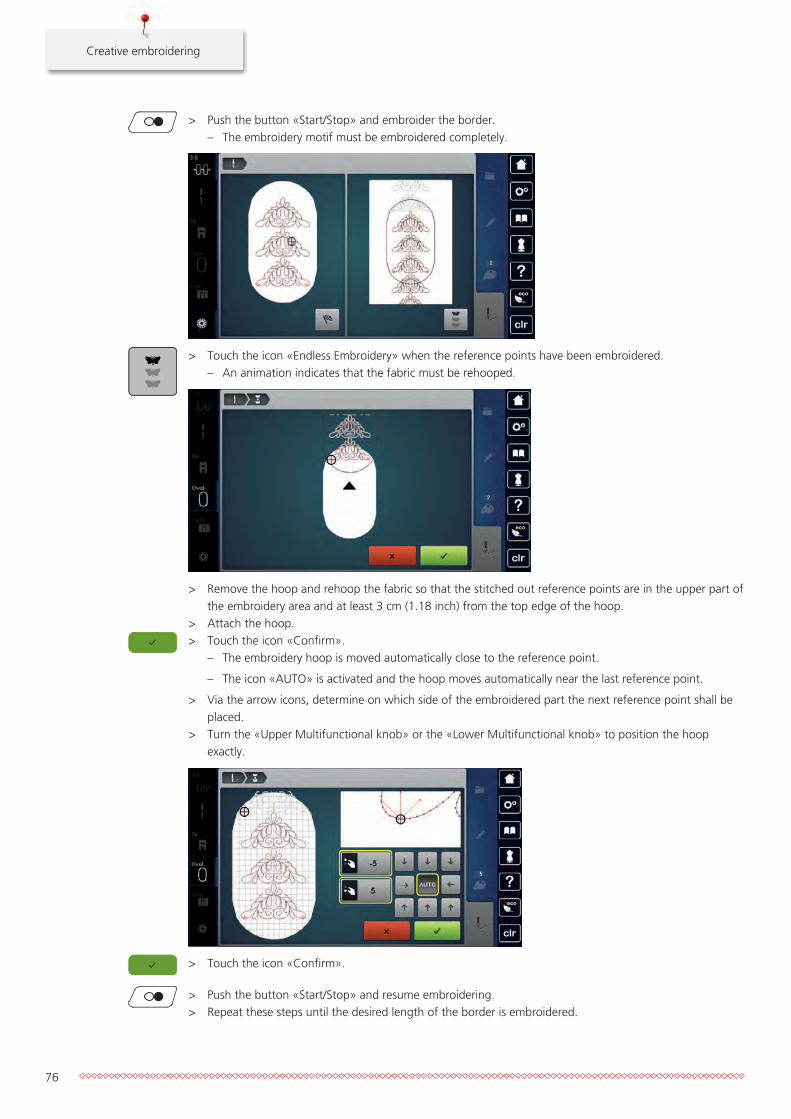
Creative embroidering
76
> Push the button «Start/Stop» and embroider the border.– The embroidery motif must be embroidered completely.
> Touch the icon «Endless Embroidery» when the reference points have been embroidered.– An animation indicates that the fabric must be rehooped.
> Remove the hoop and rehoop the fabric so that the stitched out reference points are in the upper part ofthe embroidery area and at least 3 cm (1.18 inch) from the top edge of the hoop.
> Attach the hoop.> Touch the icon «Confirm».
– The embroidery hoop is moved automatically close to the reference point.
– The icon «AUTO» is activated and the hoop moves automatically near the last reference point.
> Via the arrow icons, determine on which side of the embroidered part the next reference point shall beplaced.
> Turn the «Upper Multifunctional knob» or the «Lower Multifunctional knob» to position the hoopexactly.
> Touch the icon «Confirm».
> Push the button «Start/Stop» and resume embroidering.> Repeat these steps until the desired length of the border is embroidered.

Creative embroidering
77
Duplicating the embroidery motif> Select an embroidery motif.> Touch the icon «i»-Dialog.
> Touch the icon «Duplicate».– The embroidery motif (1) is duplicated (2).
1
2
Deleting an embroidery motif
The active embroidery motif is deleted.
> Select an embroidery motif.> Touch the icon «i»-Dialog.
> Touch the icon «Delete».
Changing the sequence within an embroidery motif combination
The sequence of the embroidery motifs within the embroidery motif combination can be changed.
Prerequisite:
• The embroidery motif combination has been created or the motif has been ungrouped.
> Select the desired embroidery motif which is to be repositioned.> Touch the icon «i»-Dialog.
2
1
3
> Touch the icon «New Allocation».
> Touch the icon «Scroll up» to position the selected embroidery motif further up within the sequence.
> Touch the icon «Scroll down» to position the selected embroidery motif further down within thesequence.

Creative embroidering
78
Undoing entries
All entries can be undone and redone again step by step.
Prerequisite:
• An embroidery motif has been selected and alterations have been done.
> Touch the icon «Undo» to cancel the last entry.> Touch the icon «Undo» several times to cancel the last entries step by step.
> Touch the icon «Redo» to restore the last entry.> Touch the icon «Redo» several times to restore the last entries step by step.
Grouping embroidery motifs
Embroidery motifs can be added to a combination or removed. The grouped embroidery motifs can beedited like one single embroidery motif.
The sequence of the embroidery motifs in the combination can be changed (see page 77).
As soon as an embroidery motif has been ungrouped, in other words, it has been decomposed in differentelements/colors, the colors won't be recomposed. With alphabets, the jumpstitch length needs to beadjusted to 1 in the Setup so that ungrouping will work with all the letters.
> Create an embroidery motif combination.> Select an embroidery motif (1) within the embroidery motif combination.
1
> Touch the icon «i»-Dialog.
> Touch the icon «Group».
> Touch the icon «Group».– The embroidery motif above the selected embroidery motif is added to the embroidery motif
combination.
> Select an embroidery motif combination.> Touch the icon «Ungroup».
– The combination is ungrouped.
or
> Create an embroidery motif combination.

Creative embroidering
79
> Select all embroidery motifs (2).
2
> Touch the icon «i»-Dialog.
> Touch the icon «Group».– All embroidery motifs are added to the embroidery motif combination.
> Select an embroidery motif combination.
> Touch the icon «Ungroup».– The combination is ungrouped.
5.6 Pinpoint placement
Positioning of grid points
This function allows the exact positioning of the embroidery motif on the fabric in an easy way. Thepositioning points can be placed in the grid.
Prerequisite:
• Any two points of the embroidery motif are marked with chalk or a water-soluble pen on the fabric. Theplace or the location where the embroidery motif is to be positioned is clearly visible.
> Select an embroidery motif.> Touch the icon «i»-Dialog.
> Touch the icon «Pinpoint placement».
> Touch the icon «Grid».– The embroidery motif is given a grid with nine different location/positioning points.
> Select the desired positioning point to which the embroidery motif is to be adjusted.– The point changes its color.
> Turn the «Upper Multifunctional knob» or the «Lower Multifunctional knob» to the left or to the right toposition the needle above the respective mark on the fabric.
SETSETSETSETSETSETSETSET
> Touch the icon «SET» to confirm the altered position.– The point changes its color and is defined.
> Select the second positioning point of the embroidery motif.

Creative embroidering
80
> Turn the «Upper Multifunctional knob» or the «Lower Multifunctional knob» to the left or to the right toposition the needle above the respective mark on the fabric.
> Touch the icon «SET» to confirm the altered position.– The point changes its color and is defined. The embroidery motif is adjusted accordingly.
> Touch the icon «Reset Pinpoint placement» to reset the alterations to default setting.
Free point positioning
This function allows the exact positioning of the embroidery motif on the fabric in an easy way. The pointscan be defined as you like within the embroidery motif.
Prerequisite:
• Any two points of the embroidery motif are marked with chalk or a water-soluble pen on the fabric. Theplace or the location where the embroidery motif is to be positioned is clearly visible.
> Select an embroidery motif.> Touch the icon «i»-Dialog.
> Touch the icon «Pinpoint placement».
> Touch the icon «Place points as desired».> Define a desired point within the embroidery motif.
– The positioning point is displayed.
> Turn the «Upper Multifunctional knob» or the «Lower Multifunctional knob» to the left or to the right toposition the needle above the respective mark on the fabric.
SETSETSETSETSETSETSETSET
> Touch the icon «SET» to confirm the altered position.– The point changes its color and is defined.
> Select the second positioning point of the embroidery motif.

Creative embroidering
81
> Turn the «Upper Multifunctional knob» or the «Lower Multifunctional knob» to the left or to the right toposition the needle above the respective mark on the fabric.
> Touch the icon «SET» again to confirm the altered position.– The point changes its color and is defined. The embroidery motif is adjusted accordingly.
> Touch the icon «Reset Pinpoint placement» to reset the alterations to default setting.
5.7 Combining embroidery motifs
Combining embroidery motifs
In the Combi-Mode several embroidery motifs can be combined.
> Select an embroidery motif.> Touch the icon «Add an embroidery motif» (1).> Select another embroidery motif.
1

Creative embroidering
82
Deleting a single embroidery motif
Prerequisite:
• A combination of embroidery motifs has been created.
> In the section of the embroidery motif level (1) touch the desired embroidery motif with the finger, keepit pressed and move it outwards.– A new window opens.
1
> Touch the icon «Confirm» to delete the selected embroidery motif.
Duplicating the embroidery motif> Select an embroidery motif.> Touch the icon «i»-Dialog.
> Touch the icon «Duplicate».– The embroidery motif (1) is duplicated (2).
1
2
Duplicating a combination
When a combination is duplicated, the individual embroidery motifs cannot be selected anymore.
> Select an embroidery motif.> Touch the icon «Add motif».> Select another embroidery motif.> Select the combination (1).
> Touch the icon «i»-Dialog.

Creative embroidering
83
> Touch the icon «Duplicate».– The combination is duplicated (2).
1
2
5.8 Creating lettering
Overview embroidery alphabets
Embroiderymotif
Name
Drifter
Childs Play
Victoria
Condensed Sans
Flare Serif
Deco block
Curly
Rounded Sans
Anniversary
Bamboo
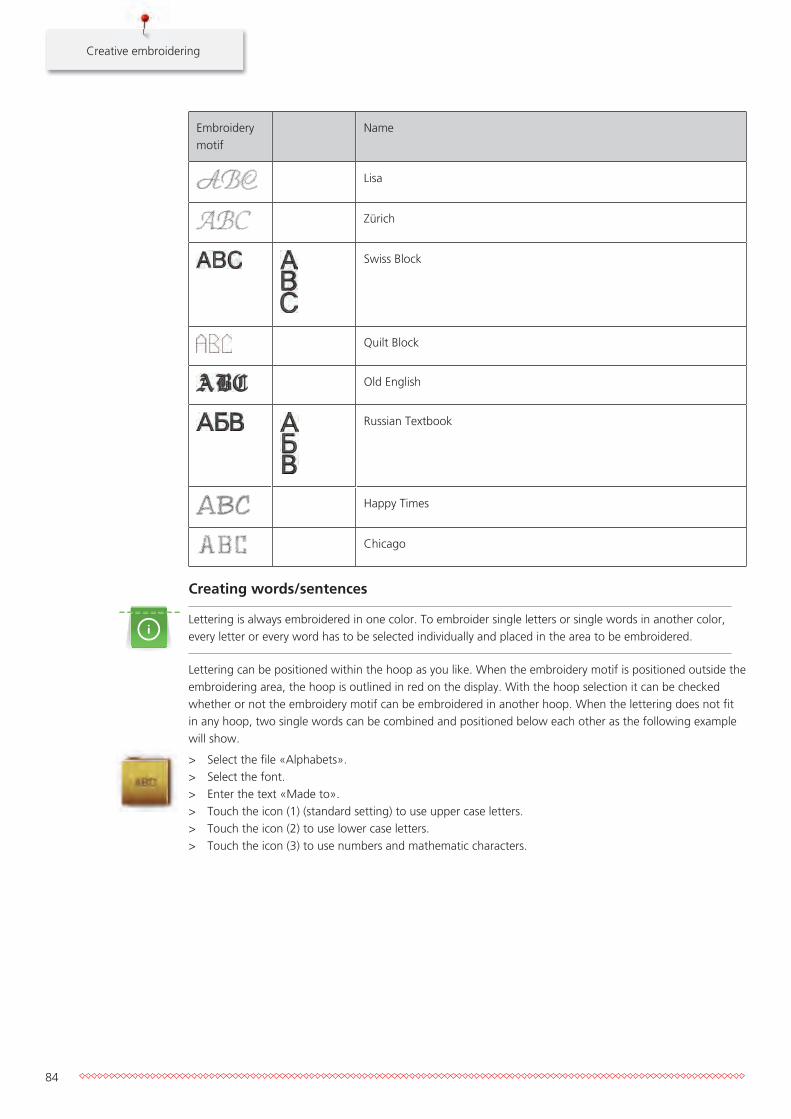
Creative embroidering
84
Embroiderymotif
Name
Lisa
Zürich
Swiss Block
Quilt Block
Old English
Russian Textbook
Happy Times
Chicago
Creating words/sentences
Lettering is always embroidered in one color. To embroider single letters or single words in another color,every letter or every word has to be selected individually and placed in the area to be embroidered.
Lettering can be positioned within the hoop as you like. When the embroidery motif is positioned outside theembroidering area, the hoop is outlined in red on the display. With the hoop selection it can be checkedwhether or not the embroidery motif can be embroidered in another hoop. When the lettering does not fitin any hoop, two single words can be combined and positioned below each other as the following examplewill show.
> Select the file «Alphabets».> Select the font.> Enter the text «Made to».> Touch the icon (1) (standard setting) to use upper case letters.> Touch the icon (2) to use lower case letters.> Touch the icon (3) to use numbers and mathematic characters.

Creative embroidering
85
> Touch the icon (4) to use special characters.
1 2 3 4
> Toucht the text box above the keyboard to delete the entered text completely.
DELDEL > Touch the icon «DEL» to delete single letters of the entered text.
> Touch the icon «Confirm» to accept the text.
> Touch the icon «Embroidery hoop display/Embroidery hoop selection».> Select the hoop.> Touch the icon «Embroidery hoop display/Embroidery hoop selection» again to go back to the Edit
Mode.
Editing words/sentences> Touch the icon «i»-Dialog.
> Touch the icon «Rotate the motif».
> Touch the icon «+90» to rotate the text by 90°.> Touch the icon «i» (1).
> Touch the icon «Move the stitch pattern».> Turn the «Upper Multifunctional knob» to move the embroidery motif horizontally.> Turn the «Lower Multifunctional knob» to move the embroidery motif vertically.
1
> Touch the icon «Add motif».> Enter and also rotate the text «create».

Creative embroidering
86
> Touch the icon «Embroidery hoop display/Embroidery hoop selection».
> Touch the icon «Grid on/off» to position the text lines more exactly.
5.9 Changing the colors of the embroidery motif
Overview changing the color
1
2
3
4
5
1 Colors of embroidery motifs 4 Altering color/brand
2 Preview for selected color 5 Color information
3 Allocating thread brand
Changing the colors
Lettering is always embroidered in one color. To embroider single letters or single words in another color,every letter or every word has to be selected individually and placed in the area to be embroidered.
> Select an embroidery motif.> Touch the icon «Color information».
> Touch the icon «Alter color/brand» next to the color which is to be changed.
> Touch the icon «Scroll right» in the lower portion of the display to display other colors.

Creative embroidering
87
0-90-9 > Touch the icon «Color selection by number» to select the color by entering the color number.> Select the desired color.> The color selection must be confirmed by touching the color bar on the right side.
Altering the colors via the color wheel> Touch the icon «Color information».> Touch the icon «Color wheel» (1).
1
> Turn the round knob (2) with the the touchscreen pen/finger clockwise or counter-clockwise or turn the«Upper Multifunction knob» to alter the colors of the embroidery motif.
2
> Move the slide (3) with the the touchscreen pen/finger to alter the brightness of the colors.
3
> Touch the icon «Edit».– The embroidery motif appears in the new colors.

Creative embroidering
88
Changing the thread brand> Select the embroidery motif.> Touch the icon «Color information».
> Touch the icon «Alter color/brand».
> To show more thread brands, touch the icons «Scroll left» and «Scroll rights» in the upper part of thescreen.
> Touch the icon «Allocate thread brand».– Any thread colors of the selected embroidery motif will be matched with the selected thread brand.
5.10 Embroidering the embroidery motif
Overview Embroidery menu
1
2
3
4
5
7
6
8
1 Basting 5 Reducing color changes
2 Moving the hoop 6 Multi-colored embroidery motif on/off
3 Embroidery sequence control when thethread breaks
7 Endless Embroidery
4 Cutting connecting stitches 8 Color indication
Adding basting stitches
The basting stitches can be embroidered along the embroidery motif. Therefore the connection between thefabric and the stabilizer can be improved.
> Select an embroidery motif.> Touch the icon «Embroidering».
> Touch the icon «Basting» to embroider basting stitches along the embroidery motif.> Touch the icon «Basting» again to embroider basting stitches along the embroidery hoop.> Touch the icon «Basting» again to deactivate the basting stitches.

Creative embroidering
89
Moving the hoop
If the embroidery motif is so big that repeated rehooping is necessary, the embroidered motif can be movedagain.
> Select an embroidery motif.> Touch the icon «Embroidering».
> Touch the icon «Move the hoop».> Turn the «Upper Multifunctional knob» to move the hoop horizontally.> Turn the «Lower Multifunctional knob» to move the hoop vertically.
> Touch the icon «Embroidering» in the process navigation to accept the settings.
Embroidery sequence control when thread breaks
When the thread breaks, the needle can be repositioned in the embroidery motif by means of theembroidery sequence control.
> Select an embroidery motif.> Touch the icon «Embroidering».
> Touch the icon «Embroidery sequence control when thread breaks».– In the left portion of the display a compact view of the embroidery motif is displayed. On the right
side the enlarged embroidery motif is displayed.
> Select the desired position in the compact view using the touchscreen pen/finger.> Turn the «Upper Multifunctional knob» to move the hoop stitch by stitch.> Turn the «Lower Multifunctional knob» to move the hoop in large steps.
– The number in the yellow-framed icon indicates the number of stitches within the embroiderysequence.
0-90-9
> Touch the icon «0-9» to select the desired stitch by entry.
Cutting connecting stitches
The function is activated by default and the connecting stitches are cut automatically. When the function isdeactivated, the connecting stitches between the embroidery motifs must be cut manually.
> Select an embroidery motif.> Touch the icon «Embroidering».
> Touch the yellow-framed icon «Cut the connecting stitches» to deactivate the function.> Touch the yellow-framed icon «Cut the connecting stitches» again to activate the function.

Creative embroidering
90
Reducing color changes
When the embroidery motifs overlap, the color changes cannot be reduced.
> Select an embroidery motif.> Touch the icon «Embroidering».
> Touch the icon «Reduce thread change».– Identical colors of the embroidery motif are collected to one color.
Multi-colored embroidery motif on/off
Multi-colored embroidery motifs can also be embroidered in one color.
> Select an embroidery motif.> Touch the icon «Embroidering».
> Touch the icon «Multi-colored embroidery motif on/off».– The embroidery motif is embroidered in one color.
Endless Embroidery
Allows to resume embroidering borders which have already been started even if the machine has beenswitched off and on again.
Prerequisite:
• An embroidery motif for borders must be saved in the Personal Memory. The reference points must bedefined in the embroidery motif.
> Select border embroidery motif from the Personal Memory.> Touch the icon «Embroidering».
> The icon «Endless embroidery» becomes visible in the right bar by scrolling upwards.> Touch the icon «Endless Embroidery».
> Remove the hoop and rehoop the fabric so that the stitched out reference points are in the upper part ofthe embroidery area and at least 3 cm (1.18 inch) from the top edge of the hoop.
> Attach the hoop.

Creative embroidering
91
> Touch the icon «Confirm».– The hoop is moved automatically near the last stitch.
– The icon «AUTO» is activated and the hoop moves automatically near the last reference point.
> Via the arrow icons, determine on which side of the embroidered part the next reference point shall beplaced.
> Turn the «Upper Multifunctional knob» or the «Lower Multifunctional knob» to position the hoopexactly.
> Touch the icon «Confirm».
> Push the button «Start/Stop» and resume embroidering.> Repeat these steps until the desired length of the border is embroidered.
Color indication
Every color of the embroidery motif can be selected individually. The hoop moves to the first stitch of thecurrent color. The currently active color can be embroidered individually or in another sequence.
> Select an embroidery motif.> Touch the icon «Embroidering».
> Touch the icon «Scroll down» to select the next color of the embroidery motif.
> Touch the icon «Scroll up» to select the previous color of the embroidery motif.
5.11 Free arm embroideringFree arm embroidering is defined as embroidering tubular fabrics or garments which are positioned aroundthe free arm of the embroidery machine while being embroidered. Often used with sleeves, pant legs orother narrow-tailored garments.
A tubular piece of fabric can be pulled over the free arm of the machine easily when the free arm ispositioned to the left in parking position before the hoop is attached or removed. Push the button «Start/Stop» to move the embroidery hoop back to the embroidery position again.
Make sure to use a full bobbin as the embroidery hoop needs to be removed for changing the bobbin.
Borders can be closed to a ring easily and exactly along the edge of the tube. Before embroidering thelast embroidery motif, after rehooping the fabric, activate the function «Pinpoint placement» in the editmode. Using the subfunction «Free point positioning» align the still missing embroidery motif precisely.

Creative embroidering
92
The movability of the embroidery arm can be limited or impeded with very narrow tubes. Therefore pleasemake sure that the embroidery hoop can move forwards and backwards sufficiently. An impediment of theembroidery arm caused by a tube which is too tight can result in embroidery motif offset or in damaging thefabric.
Check the movability of the free arm
Please note: With tiny fabric tubes, deactivate the thread-away in the Setup Program if necessary.
> Open the embroidery motif on the machine and edit as desired.> Mark the embroidery motif position and the size on the fabric in a suitable way.> Select the embroidery hoop as small as possible.> Hoop or stick the fabric along with the appropriate stabilizer in the embroidery hoop, depending on the
stabilizer.> Pull the fabric tube carefully over the free arm of the machine and attach the embroidery hoop at the
clutch of the embroidery module.> If necessary, reposition the embroidery motif.> Previously check whether the embroidery hoop can be moved forwards and backwards according to the
embroidery motif size.
check
> Touch the icon «Check embroidery motif size».> After the successful check of the embroidery motif size, start the embroidery process.
Detailed instructions about embroidery, the use of suitable materials or selecting the required embroiderysettings of the machine can be found in the «Tutorial» under embroidery techniques --> Embroidering.
5.12 Administering embroidery motifs
Administering embroidery motifs
2
1
4
3
1 Loading the embroidery motif 3 Saving the embroidery motif
2 Adding an embroidery motif 4 Deleting
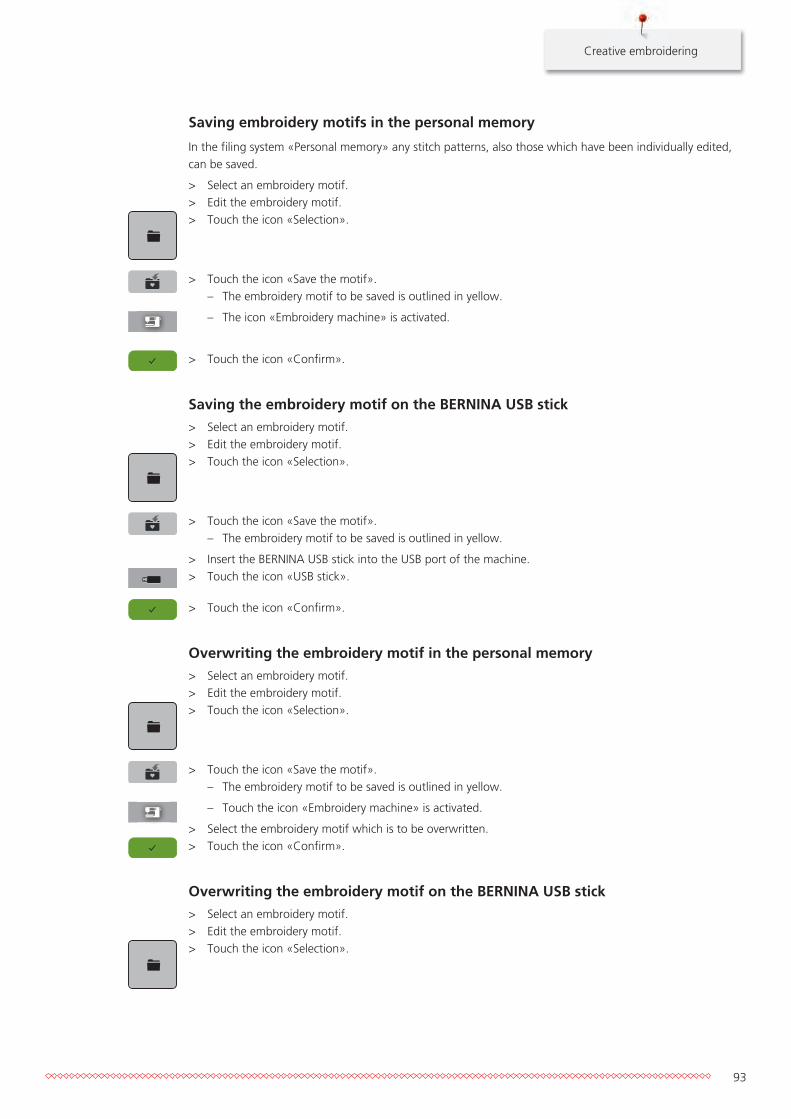
Creative embroidering
93
Saving embroidery motifs in the personal memory
In the filing system «Personal memory» any stitch patterns, also those which have been individually edited,can be saved.
> Select an embroidery motif.> Edit the embroidery motif.> Touch the icon «Selection».
> Touch the icon «Save the motif».– The embroidery motif to be saved is outlined in yellow.
– The icon «Embroidery machine» is activated.
> Touch the icon «Confirm».
Saving the embroidery motif on the BERNINA USB stick> Select an embroidery motif.> Edit the embroidery motif.> Touch the icon «Selection».
> Touch the icon «Save the motif».– The embroidery motif to be saved is outlined in yellow.
> Insert the BERNINA USB stick into the USB port of the machine.> Touch the icon «USB stick».
> Touch the icon «Confirm».
Overwriting the embroidery motif in the personal memory> Select an embroidery motif.> Edit the embroidery motif.> Touch the icon «Selection».
> Touch the icon «Save the motif».– The embroidery motif to be saved is outlined in yellow.
– Touch the icon «Embroidery machine» is activated.
> Select the embroidery motif which is to be overwritten.> Touch the icon «Confirm».
Overwriting the embroidery motif on the BERNINA USB stick> Select an embroidery motif.> Edit the embroidery motif.> Touch the icon «Selection».

Creative embroidering
94
> Touch the icon «Save the motif».– The embroidery motif to be saved is outlined in yellow.
> Insert the BERNINA USB stick into the USB port of the machine.> Touch the icon «USB stick».> Select the embroidery motif which is to be overwritten.> Touch the icon «Confirm».
Loading an embroidery motif from the personal memory> Touch the icon «Selection».
> Touch the icon «Upload embroidery motif».
> Select the file «Personal embroidery motifs».> Select an embroidery motif.
Loading an embroidery motif from the BERNINA USB stick> Touch the icon «Selection».> Insert the BERNINA USB stick into the USB port of the machine.
> Touch the icon «USB stick».> Select a personal embroidery motif.
Deleting an embroidery motif from the personal memory
The embroidery motifs which are saved in the personal memory can be deleted individually.
> Touch the icon «i»-Dialog.
> Touch the icon «Delete».
– Touch the icon «Embroidery machine» is activated.
> Select the embroidery motif which is to be deleted.> Touch the icon «Confirm».
Deleting an embroidery motif from the BERNINA USB stick> Touch the icon «Selection».
> Touch the icon «Delete».> Insert the BERNINA USB stick into the USB port of the machine.> Touch the icon «USB stick».> Select the embroidery motif which is to be deleted.> Touch the icon «Confirm».
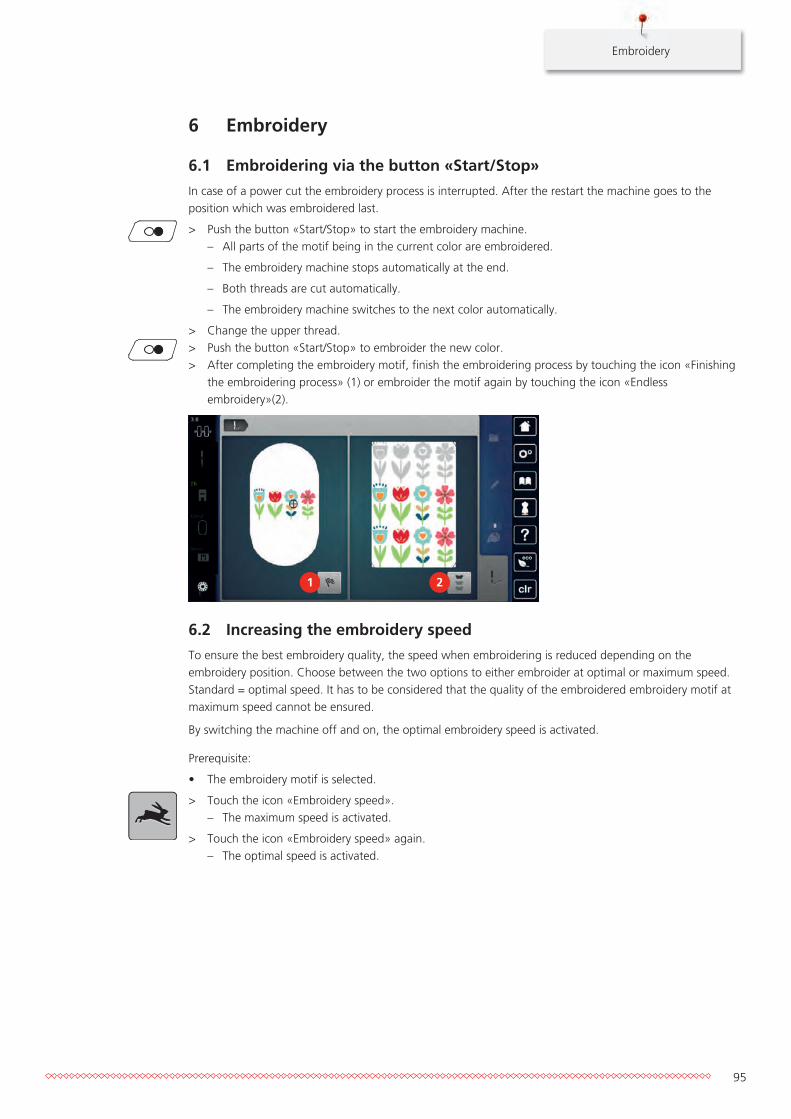
Embroidery
95
6 Embroidery
6.1 Embroidering via the button «Start/Stop»In case of a power cut the embroidery process is interrupted. After the restart the machine goes to theposition which was embroidered last.
> Push the button «Start/Stop» to start the embroidery machine.– All parts of the motif being in the current color are embroidered.
– The embroidery machine stops automatically at the end.
– Both threads are cut automatically.
– The embroidery machine switches to the next color automatically.
> Change the upper thread.> Push the button «Start/Stop» to embroider the new color.> After completing the embroidery motif, finish the embroidering process by touching the icon «Finishing
the embroidering process» (1) or embroider the motif again by touching the icon «Endlessembroidery»(2).
1 2
6.2 Increasing the embroidery speedTo ensure the best embroidery quality, the speed when embroidering is reduced depending on theembroidery position. Choose between the two options to either embroider at optimal or maximum speed.Standard = optimal speed. It has to be considered that the quality of the embroidered embroidery motif atmaximum speed cannot be ensured.
By switching the machine off and on, the optimal embroidery speed is activated.
Prerequisite:
• The embroidery motif is selected.
> Touch the icon «Embroidery speed».– The maximum speed is activated.
> Touch the icon «Embroidery speed» again.– The optimal speed is activated.

Embroidery
96
6.3 Adjusting the upper thread tensionThe default setting of the upper thread tension is determined automatically after an embroidery motif isselected.
The upper thread tension is set optimally at the BERNINA factory and the machine has been tested.Metrosene-/Seralon thread size 100/2 (Company Mettler, Switzerland) is used for upper and bobbin thread.
When using other types of embroidery threads, the optimal tension may vary. Therefore it may be necessaryto adjust the upper thread tension according to the embroidering project as well as the desired theembroidery motif individually.
The higher the upper thread tension, the tighter the upper thread which means that the bobbin thread ispulled up to the top of the fabric. When the upper thread tension is low, the upper thread is less tightenedwhich means that the bobbin thread is pulled up less.
Alteration of the upper thread tension affect all embroidery motifs. Permanent alterations of the upperthread tension can be made in the Setup Program (see page 54).
> Touch the icon «Upper thread tension».> Move the slide with the touchscreen pen or the finger to increase or reduce the upper thread tension.
> Touch the yellow-framed icon on the right side to reset the alteration to default setting.> If the upper thread tension had been changed in the Setup Program, touch the yellow-framed icon on
the left to reset the alterations to default setting in the Setup Program.
6.4 Embroidering via the foot control (Optional accessory)Embroidering via the foot control is recommended when only a short sequence has to be embroidered.While embroidering, the foot control must be pressed down all the time.
> Press the foot control to start embroidering.

Attachment
97
7 Attachment
7.1 Maintencance and cleaning
Cleaning the display> Clean the display in the switched off status with a soft slightly damp mircrofiber cloth.
Removing thread remnants under the stitch plate
CAUTION Electronically driven components
Risk of injury near the needle and the hook.> Switch the machine off and disconnect it from the power supply system.
Remove the thread remnants under the stitch plate regularly.
> Remove the presser foot and the needle.> Remove the stitch plate.
> Remove the thread remnants under the stitch plate.
Cleaning the hook
CAUTION Electronically driven components
Risk of injury near the needle and the hook.> Switch the machine off and disconnect it from the power supply system.
> Open the bobbin cover.> Remove the boobin case.> Push the fastening bracket to the left.
> Flap down the fastening bracket along with the black hook race cover.

Attachment
98
> Remove the hook.
> Clean the hook race area with the brush; never use a sharp instrument.> Hold the hook at the pin in the center with two fingers.> Lead the hook, lower edge ahead, angular top-down behind the hook race cover.> Position the hook with the two lugs meeting the openings in the hook, the colored mark on the hook
driver should be visible through the hole in the hook.> Insert the hook.
– The hook is magnetic and therefore fastened to the correct position.
> Close the hook race cover and the fastening bracket until the release bracket engages.> As a check, turn the handwheel.> Insert the bobbin case.
Lubricating the hook
CAUTION Electronically driven components
Risk of injury near the needle and the hook.> Switch the machine off and disconnect it from the power supply system.
NOTICE Lubricating the hook
Too much oil can pollute the fabric and the thread.> Always sew a test sample first.
> Remove the boobin case.> Push the fastening bracket to the left.
> Flap down the fastening bracket along with the black hook race cover.

Attachment
99
> Remove the hook.
> Give one drop of BERNINA oil down in the hook race.
> Give one drop of oil in each of the two oil depots so that the felts are damp and make sure that the red-marked surface of the hook sleeve remains free of oil.
> Hold the hook at the pin in the center with two fingers.> Lead the hook, lower edge ahead, angular top-down behind the hook race cover.> Position the hook with the two lugs meeting the openings in the hook, the colored mark on the hook
driver should be visible through the hole in the hook.> Insert the hook.
– The hook is magnetic and therefore fastened to the correct position.
> Close the hook race cover and the fastening bracket until the release bracket engages.> As a check, turn the handwheel.> Insert the bobbin case.

Attachment
100
7.2 Troubleshooting
Failure Cause Repair
Uneven stitch formation Upper thread too tight or tooloose.
> Adjust upper thread tension.
Needle blunt or bent. > Replace the needle, make sure that a new BERNINAquality needle is used.
Poor quality needle. > Use a new BERNINA quality needle.
Poor quality thread. > Use quality thread.
Incorrect needle/threadcombination.
> Match the needle with the thread size.
Incorrectly threaded. > Rethread.
Uneven stitch formation Incorrect bobbin case is used. > Use the supplied bobbin case marked with the triangle.
Skipped stitches Incorrect needle. > Use the needle system 130/705H.
Needle blunt or bent. > Replace the needle.
Poor quality needle. > Use a new BERNINA quality needle.
The needle is incorrectly inserted. > Insert the needle with the flat side to the back as far upas it will go into the needle holder and tighten thescrew.
Incorrect needle point. > Match the needle point to the texture of the material.
Faulty stitching Thread remnants between thethread tension discs.
> Fold a piece of thin material and slide the folded edge(not the raw edges) between the thread tension discs.
Incorrectly threaded. > Rethread.
Thread remnants below thebobbin case spring.
> Remove the thread remnants under the spring.

Attachment
101
Failure Cause Repair
Upper thread breaks Incorrect needle/threadcombination.
> Match the needle with the thread size.
Upper thread is too tight. > Reduce the upper thread tension.
Incorrectly threaded. > Rethread.
Poor quality thread. > Use quality thread.
The stitch plate or the hook tip isdamaged.
> Contact the nearest specialized BERNINA dealer to havethe damages repaired.
> Replace the stitch plate.
The thread is caught in the areaof the thread take-up lever.
1
> Remove the screw (1) on the headframe with theangular Torx wrench.
> Pull the headframe at the bottom slighty forward.> Flip the headframe upwards a bit and remove it.> Remove the thread remnants.> Attach the headframe and tighten the screw.
Lower thread breaks The bobbin case is damaged. > Replace the bobbin case.
The stitch hole in the stitch plateis damaged.
> Contact the nearest specialized BERNINA dealer to havethe damages repaired.
> Replace the stitch plate.
Needle blunt or bent. > Replace the needle.
Needle breaks The needle is incorrectly inserted. > Insert the needle with the flat side to the back as far upas it will go into the needle holder and tighten thescrew.
Knotted thread. > Use quality thread.
Display is inactive Incorrect calibrating data. > Switch the machine off.> Switch the machine on and simultaneously press the
buttons «SET» and «Center of the embroidery motif»and keep pressed.
> Calibrate the display again.
The eco-function is active. > Touch the icon «eco».
The needle and the stitchplate do not match
The selected needle and stitchplate cannot be used incombination.
> Replace the needle.> Replace the stitch plate.
Speed too low Unfavorable room temperature. > Place the machine in a warm room one hour before use.
Settings in the Setup Program. > Adjust the sewing speed in the Setup Program.> Adjust the slide.

Attachment
102
Failure Cause Repair
The machine doesn't start Unfavorable room temperature. > Place the machine in a warm room one hour before use.> Connect the machine and switch it on.
The machine is damaged. > Contact the specialized BERNINA dealer.
The light of the button«Start-/Stop» doesn't light up
Light is defect. > Contact the specialized BERNINA dealer.
Neither the sewing light northe light on the free armlights up
The sewing light is deactivated. > Push the button «Sewing light on/off».
Settings in the Setup Program. > Activate it in the Setup Program.
The sewing light is defect. > Contact the specialized BERNINA dealer.
Upper thread indicatordoesn't react
Settings in the Setup Program. > Activate it in the Setup Program.
The upper thread indicator isdefect.
> Contact the specialized BERNINA dealer.
Bobbin thread indicatordoesn't react
Settings in the Setup Program. > Activate it in the Setup Program.
The bobbin thread indicator isdefect.
> Contact the specialized BERNINA dealer.
Error during software update USB stick is not recognized. > Use a BERNINA USB stick.
The update process is blockedand the hourglass on the displayis inactive.
> Remove the USB stick.> Switch the machine off.> Switch the machine on.> Follow the instruction on the display.
Date of the software updatecannot be found.
> Unzip the update data.> Save data of the software update directly on the data
medium and not in a file on the USB stick.

Attachment
103
7.3 Error messages
Message on the display Cause Repair
The selected needle and stitchplate cannot be used incombination.
> Replace the needle.> Replace the stitch plate.
The needle is not at its top end. > Adjust the needle position via the handwheel.
The upper thread is used up. > Rethread.
The upper thread has broken. > Rethread.
The bobbin thread is used up. > Rethread.
The bobbin thread has broken. > Clean the hook.> Rethread.
The main motor isn't running. > Turn the handwheel clockwise until the needle is at itstop position.
> Remove the stitch plate.> Remove the thread remnants.> Clean the hook.> Remove the hook and make sure that there are no
pieces of broken needle points on the magnetic back ofthe hook.
The fabric under the presser footis too thick.
> Reduce the fabric thickness.

Attachment
104
Message on the display Cause Repair
The contact between themachine and the embroiderymodule is interrupted due tovibrations.
> Make sure that the module and the machine arestanding on a stable, even surface.
> Connect the embroidery module to the machine.
The needle position doesn'tcorrespond with the center of thehoop.
> Calibrate the hoop.
The embroidery module is notattached.
> Connect the embroidery module to the machine.> Contact the specialized BERNINA dealer to have the
machine checked.
The hoop is not attached. > Attach the hoop.
The hoop is attached. > Remove the hoop.
The movement of the hoopfollows.
> Touch the icon «Confirm».

Attachment
105
Message on the display Cause Repair
The embroidery motif is partlyoutside the hoop.
> Reposition the embroidery motif and start embroideringit again.
The embroidery motif is toolarge.
> Reduce the size of the embroidery motif.> Attach a larger hoop.
Too less free capacity on theBERNINA USB stick (optionalaccessory).
Not enough free capacity on theBERNINA USB stick (optionalaccessory).
> Make sure that the BERNINA USB stick (optionalaccessory) is used.
> Delete data from the BERNINA USB stick (optionalaccessory).
No personal data on theBERNINA USB stick (optionalaccessory).
No personal data for recoveryavailable on the BERNINA USBstick (optional accessory).
> Make sure that the data and settings have been savedon the BERNINA USB stick (optional accessory).
The recovery of personal data hasfailed.
The software update has beensuccessful but the personal datacouldn't be recovered.
> Make sure that the data and settings have been savedon the BERNINA USB stick (optional accessory).
> Transfer saved data to the machine.
No BERNINA USB stick is inserted.Make sure that during thecomplete automatic updatealways the same BERNINA USBstick remains inserted.
The BERNINA USB stick (optionalaccessory) is not inserted.
> Use a BERNINA USB stick (optional accessory) providingenough free capacity.
The update of the software hasfailed.
The latest software versioncannot be found on the USBstick.
> Make sure that the compressed zip file has beenunzipped for the software update.
> Check whether the data for the software update aresaved directly on the data medium and not in a file onthe USB stick.
> Update the software.

Attachment
106
Message on the display Cause Repair
The machine needs cleaning/lubricating.
> Clean the machine.> Lubricate the machine.
Important information on lubricating:
> Too much oil can pollute the fabric and the thread.> After lubricating, always embroider on a test piece.
The automatic thread cutter (atthe thread catcher) needscleaning.
The automatic thread cutterneeds cleaning. The messageappears every time when themachine is started as soon as1000 cutting cycles have beencarried out.
> Touch the icon «Confirm».– The machine calls up the function «Clean the thread
catcher».
> Clean the thread catcher according to the instructionson the display.– The counter for the cutting cycles is reset.
It is time for the regularmaintenance. Please contact yourspecialzed BERNINA dealer tomake an appointment.
The machine needs maintenance.The message appears after theprogrammed service interval hasexpired.
Important information: Havingyour machine cleaned andserviced properly at theappropriate times ensures itsproper functioning and a longservice life. Ignoring the termscan affect the operating life andrestrict the guaranteeing. Thecost allocation for maintencancework is regulated nationally.Consult your spezialised dealer oryour servicing shop for moredetails.
> Contact the specialized BERNINA dealer.> Delete the message temporarily by touching the icon
«ESC».
Having cleared the message three times, the message willappear as recently as the next service interval has beencompleted.

Attachment
107
7.4 Storage and disposal
Storing the machine
It is recommended to store the machine in the original packaging. If the machine is stored in a cold room,place it in a warm room one hour before use.
> Switch the machine off and disconnect it from the power supply system.> Don't store the machine outdoor.> Protect the machine against climatic influences.
Dispose of the machine> Clean the machine.> Sort the components by their materials and dispose of them according to the local laws and regulations.
7.5 Technical data
Term Value Unit
Maximum fabric thickness 12,5
(0,49)
mm
(in)
Sewing light 30 LED
Maximum speed 1000 Stitches per minute
Measurements without the spool pin (W × H × D) 522 × 358 × 214
(20,55 × 14,09 × 8,43)
mm
(in)
Weight 13,5
(29,76)
kg
(lb)
Energy consumption 140 W
Input voltage 100 – 240 V
Protection class (Electrical engineering) II

Overview stitch patterns
108
8 Overview stitch patterns
8.1 Overview Embroidery motifs
Editing embroidery motifs
Let your inspiration run free. A vast selection of embroidery motifs is at your disposal.
If you see one the following pictograms below a number of the embroidery motif, you can find additionalinformation at
www.bernina.com/7series.
Detached point Punchwork Design (motif)
Hole embroidery Cord embroidery
Fringe embroidery Projects in the hoop
Appliqué Puffy fonts
CutWork Design (motif) Quilting
PaintWork Design (motif) Trapunto
CrystalWork Design (motif)
Projects
Please find the detailed embroidery instructions at www.bernina.com/700designs
No.
Width x Heightin mm
Embroidery motif
Colors
No.
Width x Heightin mm
Embroidery motif
Colors
BE700701
208.7 X 201.6
12604-02
45.0 x 152.8

Overview stitch patterns
109
No.
Width x Heightin mm
Embroidery motif
Colors
No.
Width x Heightin mm
Embroidery motif
Colors
21519-03
108.4 x 161.2
19999-032
90.4 x 143.0
Quilt motifs
No.
Width x Heightin mm
Embroidery motif
Colors
No.
Width x Heightin mm
Embroidery motif
Colors
BD289
95.0 x 94.7
BD285
202.0 x 201.0

Overview stitch patterns
110
No.
Width x Heightin mm
Embroidery motif
Colors
No.
Width x Heightin mm
Embroidery motif
Colors
BD288
202.0 x 201.0
BD292
94.8 x 95.1
BD299
94.5 x 95.0
BD308
95.0 x 94.4
BD413
97.1 x 97.2
BD837
123.6 x 123.6
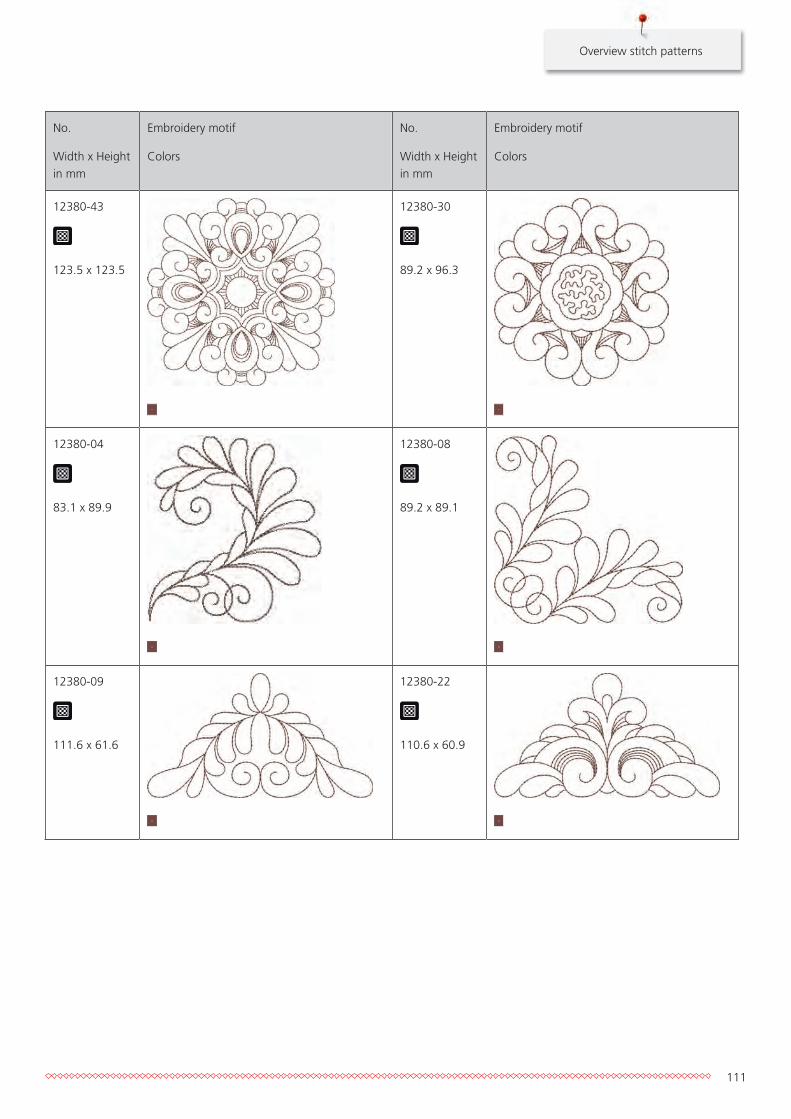
Overview stitch patterns
111
No.
Width x Heightin mm
Embroidery motif
Colors
No.
Width x Heightin mm
Embroidery motif
Colors
12380-43
123.5 x 123.5
12380-30
89.2 x 96.3
12380-04
83.1 x 89.9
12380-08
89.2 x 89.1
12380-09
111.6 x 61.6
12380-22
110.6 x 60.9

Overview stitch patterns
112
No.
Width x Heightin mm
Embroidery motif
Colors
No.
Width x Heightin mm
Embroidery motif
Colors
12380-10
152.0 x 356.7
BD796
47.2 x 174.5
BD800
127.3 x 122.4
BD801
122.2 x 124.2
BD804
122.9 x 123.6
BD394
97.0 x 96.8

Overview stitch patterns
113
No.
Width x Heightin mm
Embroidery motif
Colors
No.
Width x Heightin mm
Embroidery motif
Colors
BD412
89.4 x 53.2
BD513
63.5 x 63.4
BD514
63.5 x 62.9
BD553
113.8 x 121.1
BD567
107.9 x 108.2
BD554
109.9 x 109.9

Overview stitch patterns
114
No.
Width x Heightin mm
Embroidery motif
Colors
No.
Width x Heightin mm
Embroidery motif
Colors
BD659
66.6 x 219.1
BD665
160.3 x 117.8
HE959
120.6 x 120.6

Overview stitch patterns
115
Borders and Lace
No.
Width x Heightin mm
Embroidery motif
Colors
No.
Width x Heightin mm
Embroidery motif
Colors
82011-30
107.2 x 130.3
82011-28
133.6 x 99.4
NB952
108.2 x 119.4
OC00303
100.6 x 110.6
12410-08
80.5 x 168.3
12410-07
115.5 x 158.8

Overview stitch patterns
116
No.
Width x Heightin mm
Embroidery motif
Colors
No.
Width x Heightin mm
Embroidery motif
Colors
12410-15
29.1 x 133.5
12454-05
117.0 x 108.3
12454--06
116.6 x 47.6
12454-07
48.5 x 57.4
FA981
35.1 x 142.3
BE790701
113.6 x 230.1

Overview stitch patterns
117
No.
Width x Heightin mm
Embroidery motif
Colors
No.
Width x Heightin mm
Embroidery motif
Colors
BE790704
72.5 x 217.2
BE790703
70.7 x 185.0
BE790702
73.0 x 190.5
21013-29
40.2 x 152.0
21013-30
75.8 x 75.9
12398-29
26.4 x 152.9

Overview stitch patterns
118
No.
Width x Heightin mm
Embroidery motif
Colors
No.
Width x Heightin mm
Embroidery motif
Colors
12398-30
76.8 x 76.9
OC33411
24.2 x 177.1
CM471
59.1 x 190.8
FB403
52.2 x 208.5
FQ785
92.6 x 342.0
FQ969
51.6 x 161.9

Overview stitch patterns
119
No.
Width x Heightin mm
Embroidery motif
Colors
No.
Width x Heightin mm
Embroidery motif
Colors
FQ736
7.9 x 253.1
BD582
48.6 x 171.1
NA912
115.1 x 15.8
NA914
120.3 x 18.8
NB478
121.7 x 85.5
FQ945
93.8 x 95.1

Overview stitch patterns
120
No.
Width x Heightin mm
Embroidery motif
Colors
No.
Width x Heightin mm
Embroidery motif
Colors
FB422
52.3 x 33.8
FB423
132.9 x 53.6
Children
No.
Width x Heightin mm
Embroidery motif
Colors
No.
Width x Heightin mm
Embroidery motif
Colors
BE790305
118.3 x 145.5
12535-03
160.6 x 120.3
BE790302
68.3 x 66.3
BE790303
69.5 x 70.1

Overview stitch patterns
121
No.
Width x Heightin mm
Embroidery motif
Colors
No.
Width x Heightin mm
Embroidery motif
Colors
BE790304
127.2 x 65.8
BE790307
141.5 x 126.9
BE790308
191.3 x 219.6
12421-03
45.8 x 48.3
NB193
113.3 x 96.2
CM384
77.4 x 80.7

Overview stitch patterns
122
No.
Width x Heightin mm
Embroidery motif
Colors
No.
Width x Heightin mm
Embroidery motif
Colors
CM226
63.3 x 63.1
CM193
106.7 x 127.4
CM220
71.5 x 71.8
WP325
77.9 x 94.0
CM428
78.2 x 106.4
CM404
47.2 x 165.4

Overview stitch patterns
123
No.
Width x Heightin mm
Embroidery motif
Colors
No.
Width x Heightin mm
Embroidery motif
Colors
CM368
70.2 x 140.1
CM147
55.0 x 99.6
CM022
89.1 x 97.1
CM442
46.5 x 47.0
CM362
120.6 x 113.0
WP201
76.2 x 92.0

Overview stitch patterns
124
No.
Width x Heightin mm
Embroidery motif
Colors
No.
Width x Heightin mm
Embroidery motif
Colors
CM286
97.9 x 82.4
CK970
84.8 x 81.6
RC765
100.5 x 99.0

Overview stitch patterns
125
Flowers
No.
Width x Heightin mm
Embroidery motif
Colors
No.
Width x Heightin mm
Embroidery motif
Colors
80001-23
85.0 x 101.6
82006-02
128.6 x 205.1
BE790404
202.0 x 225.8
12392-1
112.6 x 157.4
12392-13
112.6 x 203.4
12457-13
113.1 x 130.3

Overview stitch patterns
126
No.
Width x Heightin mm
Embroidery motif
Colors
No.
Width x Heightin mm
Embroidery motif
Colors
12457-06
106.3 x 172.3
BE790401
205.7 x 242.0
BE790405
125.9 x 185.4
FS142
69.3 x 143.8
82004-34
198.8 x 281.3
BE790409
188.4 x 215.3

Overview stitch patterns
127
No.
Width x Heightin mm
Embroidery motif
Colors
No.
Width x Heightin mm
Embroidery motif
Colors
BE790402
146.5 x 280.0
FQ061
75.2 x 92.8
FQ801
46.0 x 112.5
FQ273
88.6 x 193.4
FQ055
84.6 x 100.5
FQ982
150.1 x 218.5

Overview stitch patterns
128
No.
Width x Heightin mm
Embroidery motif
Colors
No.
Width x Heightin mm
Embroidery motif
Colors
FB268
123.7 x 87.3
FQ934
119.1 x 192.4
CM418
45.7 x 87.4
FQ972
111.6 x 73.2
FQ548
93.8 x 159.3
NB513
103.7 x 111.7

Overview stitch patterns
129
No.
Width x Heightin mm
Embroidery motif
Colors
No.
Width x Heightin mm
Embroidery motif
Colors
FQ274
63.0 x 77.7
NB668
114.3 x 165.1
FQ331
84.6 x 63.5
FQ738
51.6 x 101.4
FQ434
100.0 x 162.2
FB419
64.3 x 56.5
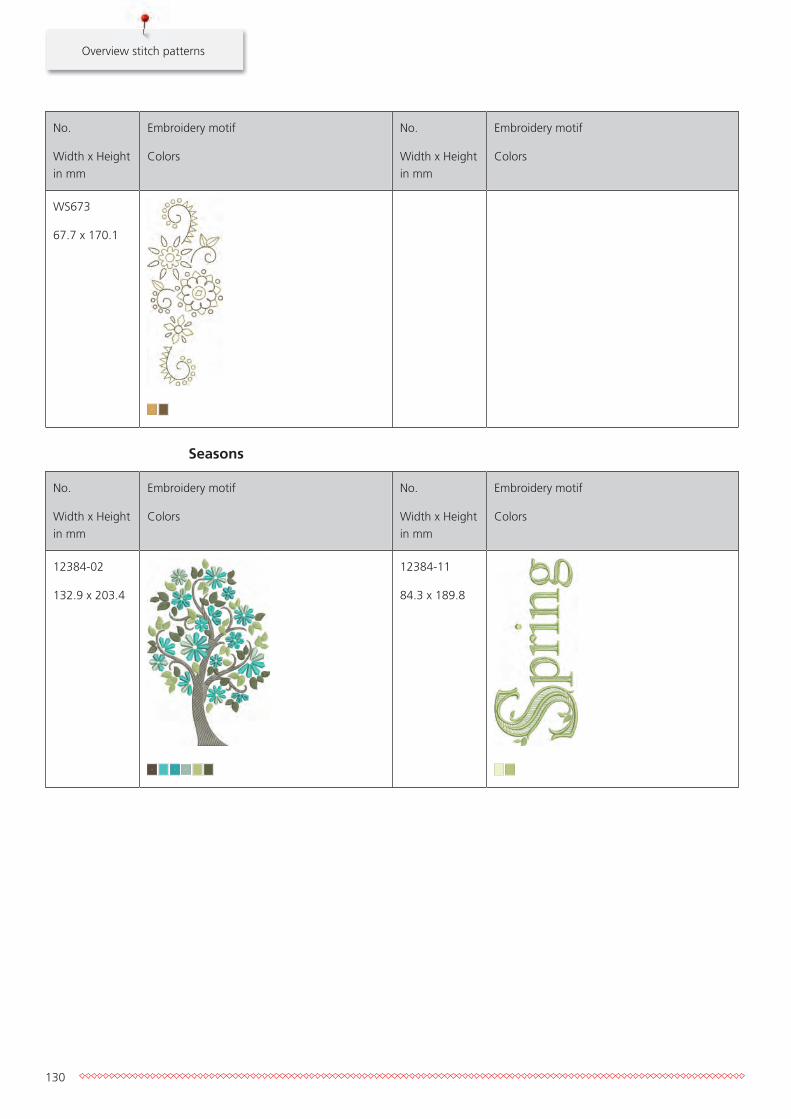
Overview stitch patterns
130
No.
Width x Heightin mm
Embroidery motif
Colors
No.
Width x Heightin mm
Embroidery motif
Colors
WS673
67.7 x 170.1
Seasons
No.
Width x Heightin mm
Embroidery motif
Colors
No.
Width x Heightin mm
Embroidery motif
Colors
12384-02
132.9 x 203.4
12384-11
84.3 x 189.8

Overview stitch patterns
131
No.
Width x Heightin mm
Embroidery motif
Colors
No.
Width x Heightin mm
Embroidery motif
Colors
12443-03
120.5 x 161.4
12443-11
73.4 x 193.1
12427-01
133.8 x 167.6
12427-11
81.6 x 126.2
12400-03
123.4 x 161.3
12400-11
74.1 x 211.9

Overview stitch patterns
132
No.
Width x Heightin mm
Embroidery motif
Colors
No.
Width x Heightin mm
Embroidery motif
Colors
HG319
88.6 x 151.5
HG301
123.9 x 122.4
BD603
80.7 x 78.3
HE919
89.1 x 69.2
HG053
122.1 x 121.8
NB317
87.4 x 86.9
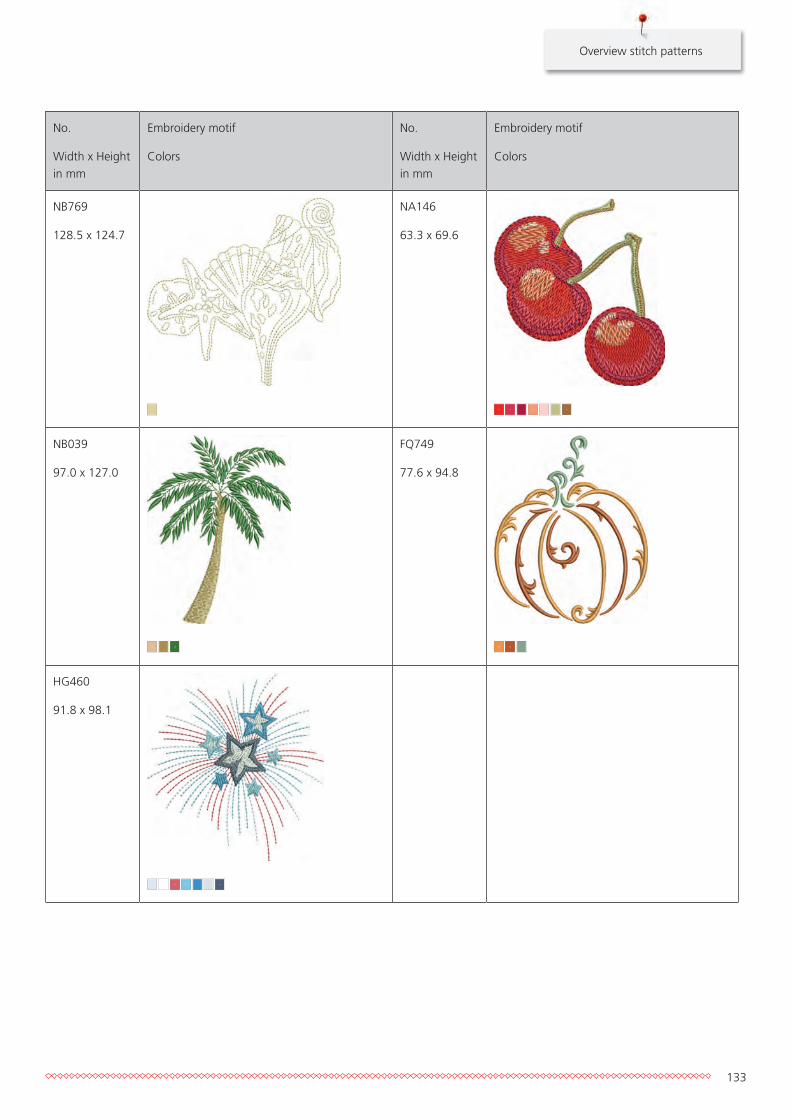
Overview stitch patterns
133
No.
Width x Heightin mm
Embroidery motif
Colors
No.
Width x Heightin mm
Embroidery motif
Colors
NB769
128.5 x 124.7
NA146
63.3 x 69.6
NB039
97.0 x 127.0
FQ749
77.6 x 94.8
HG460
91.8 x 98.1
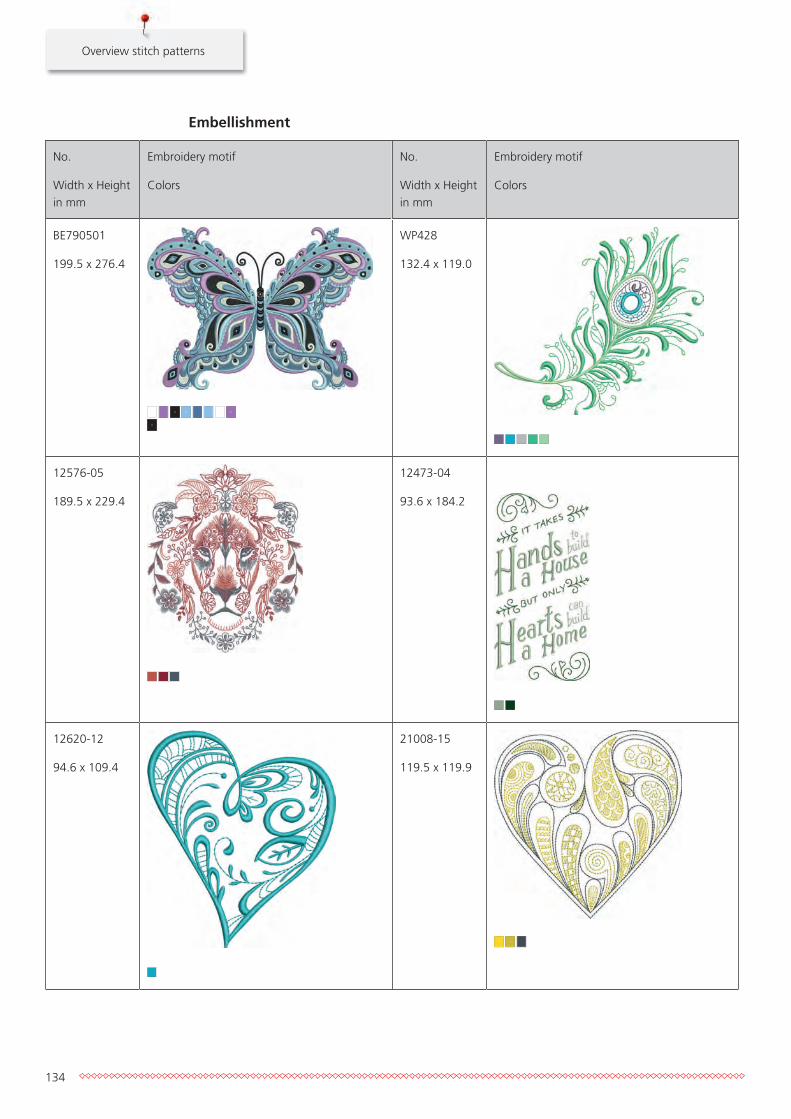
Overview stitch patterns
134
Embellishment
No.
Width x Heightin mm
Embroidery motif
Colors
No.
Width x Heightin mm
Embroidery motif
Colors
BE790501
199.5 x 276.4
WP428
132.4 x 119.0
12576-05
189.5 x 229.4
12473-04
93.6 x 184.2
12620-12
94.6 x 109.4
21008-15
119.5 x 119.9

Overview stitch patterns
135
No.
Width x Heightin mm
Embroidery motif
Colors
No.
Width x Heightin mm
Embroidery motif
Colors
82006-30
99.9 x 174.6
BE790503
130.0 x 130.9
BE790504
121.3 x 121.3
FB126
86.9 x 102.2
82005-01
175.6 x 109.1
21003-26
123.0 x 124.1

Overview stitch patterns
136
No.
Width x Heightin mm
Embroidery motif
Colors
No.
Width x Heightin mm
Embroidery motif
Colors
82006-36
121.8 x 123.0
BE790403
140.0 x 130.4
NB018
90.3 x 97.1
NB728
97.5 x 112.6
NB403
78.1 x 78.3
HG079
116.0 x 116.1

Overview stitch patterns
137
No.
Width x Heightin mm
Embroidery motif
Colors
No.
Width x Heightin mm
Embroidery motif
Colors
FB457
107.7 x 83.6
FQ881
129.2 x 129.3
FB336
122.0 x 122.0
FB377
121.0 x 92.5
FQ870
122.1 x 105.1
FB385
131.1 x 127.8

Overview stitch patterns
138
No.
Width x Heightin mm
Embroidery motif
Colors
No.
Width x Heightin mm
Embroidery motif
Colors
FQ072
79.7 x 101.6
NB101
99.2 x 99.3
NB373
121.4 x 176.8
WS649
125.4 x 248.3
NB708
137.8 x 127.7
FB433
120.9 x 120.9

Overview stitch patterns
139
Sport
No.
Width x Heightin mm
Embroidery motif
Colors
No.
Width x Heightin mm
Embroidery motif
Colors
BE790601
80.2 x 80.2
BE790602
80.3 x 75.6
12611-08
80.0 x 119.7
12611-18
130.2 x 157.6
BE790603
80.5 x 74.8
BE790604
79.8 x 80.3

Overview stitch patterns
140
No.
Width x Heightin mm
Embroidery motif
Colors
No.
Width x Heightin mm
Embroidery motif
Colors
BE790605
79.5 x 79.5
BE790606
100.2 x 86.0
BE790607
79.8 x 74.4
BE790608
80.3 x 80.1
SP980
63.2 x 63.5
NB036
35.7 x 69.9

Overview stitch patterns
141
No.
Width x Heightin mm
Embroidery motif
Colors
No.
Width x Heightin mm
Embroidery motif
Colors
RC244
88.4 x 53.4
RC675
101.6 x 79.9
SP266
75.8 x 54.2
SP989
101.6 x 82.5
SR067
87.5 x 96.9
LT870
97.5 x 57.0

Overview stitch patterns
142
No.
Width x Heightin mm
Embroidery motif
Colors
No.
Width x Heightin mm
Embroidery motif
Colors
SR589
66.5 x 95.2
FB158
39.5 x 53.3
Asia
No.
Width x Heightin mm
Embroidery motif
Colors
No.
Width x Heightin mm
Embroidery motif
Colors
NB124
172.4 x 132.0
BE790801
137.8 x 137.7

Overview stitch patterns
143
No.
Width x Heightin mm
Embroidery motif
Colors
No.
Width x Heightin mm
Embroidery motif
Colors
BE790802
36.2 x 116.9
BE790803
22.4 x 215.9
FQ212
61.6 x 61.9
FB492
86.8 x 293.2
FQ194
120.2 x 118.5
FQ217
84.8 x 59.2

Overview stitch patterns
144
No.
Width x Heightin mm
Embroidery motif
Colors
No.
Width x Heightin mm
Embroidery motif
Colors
FA427
111.8 x 66.1
FB276
124.8 x 112.1
FB283
102.4 x 109.4
FB490
67.7 x 67.7
FB491
31.7 x 165.6
NB491
79.2 x 168.4

Overview stitch patterns
145
No.
Width x Heightin mm
Embroidery motif
Colors
No.
Width x Heightin mm
Embroidery motif
Colors
FB484
66.8 x 59.2
WP423
90.4 x 157.9
Charming Monograms
No.
Width x Heightin mm
Embroidery motif
Colors
No.
Width x Heightin mm
Embroidery motif
Colors
12587-01
58.7 x 89.7
12587-02
52.0 x 89.9

Overview stitch patterns
146
No.
Width x Heightin mm
Embroidery motif
Colors
No.
Width x Heightin mm
Embroidery motif
Colors
12587-03
45.4 x 89.9
12587-04
56.8 x 90.6
12587-05
50.4 x 90.2
12587-06
57.0 x 89.7
12587-07
39.1 x 90.4
12587-08
61.9 x 90.3

Overview stitch patterns
147
No.
Width x Heightin mm
Embroidery motif
Colors
No.
Width x Heightin mm
Embroidery motif
Colors
12587-09
49.4 x 89.2
12587-10
56.9 x 89.5
12587-11
61.7 x 90.7
12587-12
63.2 x 90.1
12587-13
64.4 x 92.1
12587-14
63.1 x 90.4

Overview stitch patterns
148
No.
Width x Heightin mm
Embroidery motif
Colors
No.
Width x Heightin mm
Embroidery motif
Colors
12587-15
44.5 x 90.1
12587-16
63.2 x 89.6
12587-17
54.2 x 89.2
12587-18
64.1 x 90.3
12587-19
56.1 x 90.4
12587-20
56.9 x 89.9

Overview stitch patterns
149
No.
Width x Heightin mm
Embroidery motif
Colors
No.
Width x Heightin mm
Embroidery motif
Colors
12587-21
62.0 x 91.1
12587-22
64.4 x 91.3
12587-23
64.6 x 90.2
12587-24
62.4 x 90.7
12587-25
51.7 x 91.5
12587-26
67.8 x 89.6

Overview stitch patterns
150
No.
Width x Heightin mm
Embroidery motif
Colors
No.
Width x Heightin mm
Embroidery motif
Colors
12587-53
67.4 x 22.9
12587-54
50.1 x 106.8
12587-55
70.5 x 144.7
12587-56
49.0 x 100
12587-57
57.5 x 20.3
12587-58
52.9 x 116.3

Overview stitch patterns
151
No.
Width x Heightin mm
Embroidery motif
Colors
No.
Width x Heightin mm
Embroidery motif
Colors
12587-59
33.0 x 94.7
12587-60
126.1 x 126.0
12587-61
35.7 x 28.8
12587-62
35.6 x 33.8

Overview stitch patterns
152
Animals
No.
Width x Heightin mm
Embroidery motif
Colors
No.
Width x Heightin mm
Embroidery motif
Colors
CM140
88.1 x 97.7
CM142
56.5 x 66.7
FB258
83.2 x 184.0
FQ106
109.3 x 108.9
FQ617
118.0 x 198.3
FQ624
64.5 x 144.2

Overview stitch patterns
153
No.
Width x Heightin mm
Embroidery motif
Colors
No.
Width x Heightin mm
Embroidery motif
Colors
MT022
123.2 x 125.4
MT028
103.3 x 93.4
WM785
84.6 x 103.4
WP217
93.3 x 78.1
WP244
136.8 x 172.4
WS610
127.3 x 111.1

Overview stitch patterns
154
DesignWorks design
No.
Width x Heightin mm
Embroidery motif
Colors
No.
Width x Heightin mm
Embroidery motif
Colors
DW11
70 × 71
BE790901
181 × 252
BE790903
181 × 292
BE790905
104 × 227
BE790906
192 × 195
BE790909
167 × 322

Overview stitch patterns
155
No.
Width x Heightin mm
Embroidery motif
Colors
No.
Width x Heightin mm
Embroidery motif
Colors
DW07
114 × 152
DW05
105 × 94
DW10
184 × 184
DW08
100 × 206
BE700121
196 × 197
BE700122
119 × 37

Overview stitch patterns
156
No.
Width x Heightin mm
Embroidery motif
Colors
No.
Width x Heightin mm
Embroidery motif
Colors
BE700123
112 × 205
BE700124
141 × 134
Monograms in pink
No.
Width x Heightin mm
Embroidery motif
Colors
No.
Width x Heightin mm
Embroidery motif
Colors
BE790101
75.0 x 89.4
BE790102
73.0 x 89.4
BE790103
64.7 x 92.8
BE790104
90.4 x 97.5

Overview stitch patterns
157
No.
Width x Heightin mm
Embroidery motif
Colors
No.
Width x Heightin mm
Embroidery motif
Colors
BE790105
60.9 x 89.6
BE790106
63.5 x 89.9
BE790107
79.6 x 89.9
BE790108
70.5 x 90.0
BE790109
32.2 x 100.6
BE790110
73.5 x 89.4

Overview stitch patterns
158
No.
Width x Heightin mm
Embroidery motif
Colors
No.
Width x Heightin mm
Embroidery motif
Colors
BE790111
65.0 x 89.4
BE790112
70.1 x 89.7
BE790113
88.8 x 90.1
BE790114
76.4 x 90.6
BE790115
74.4 x 89.3
BE790116
71.1 x 102.9

Overview stitch patterns
159
No.
Width x Heightin mm
Embroidery motif
Colors
No.
Width x Heightin mm
Embroidery motif
Colors
BE790117
82.1 x 100.8
BE790118
73.6 x 103.8
BE790119
60.6 x 89.5
BE790120
71.8 x 99.6
BE790121
77.4 x 89.7
BE790122
86.9 x 89.3

Overview stitch patterns
160
No.
Width x Heightin mm
Embroidery motif
Colors
No.
Width x Heightin mm
Embroidery motif
Colors
BE790123
104.6 x 89.4
BE790124
90.6 x 92.2
BE790125
84.1 x 89.4
BE790126
56.5 x 88.9

Overview stitch patterns
161
Monograms in blue
No.
Width x Heightin mm
Embroidery motif
Colors
No.
Width x Heightin mm
Embroidery motif
Colors
BE790201
84.9 x 95.3
BE790202
79.7 x 95.1
BE790203
78.7 x 95.3
BE790204
104.4 x 96.5
BE790205
83.7 x 95.2
BE790206
77.7 x 96.0

Overview stitch patterns
162
No.
Width x Heightin mm
Embroidery motif
Colors
No.
Width x Heightin mm
Embroidery motif
Colors
BE790207
92.8 x 95.3
BE790208
87.7 x 95.3
BE790209
51.3 x 111.0
BE790210
88.7 x 95.6
BE790211
75.5 x 95.3
BE790212
83.3 x 95.3

Overview stitch patterns
163
No.
Width x Heightin mm
Embroidery motif
Colors
No.
Width x Heightin mm
Embroidery motif
Colors
BE790213
99.7 x 101.3
BE790214
89.9 x 94.8
BE790215
87.9 x 95.3
BE790216
71.6 x 94.9
BE790217
86.3 x 102.2
BE790218
82.6 x 95.1
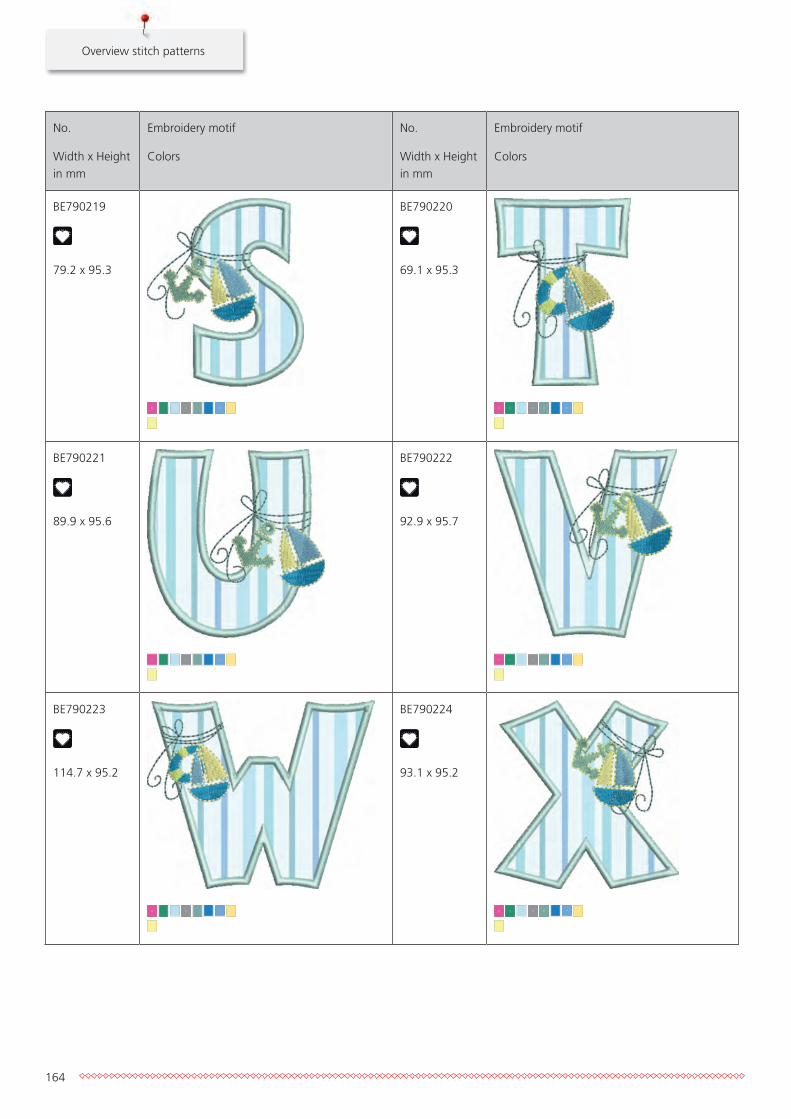
Overview stitch patterns
164
No.
Width x Heightin mm
Embroidery motif
Colors
No.
Width x Heightin mm
Embroidery motif
Colors
BE790219
79.2 x 95.3
BE790220
69.1 x 95.3
BE790221
89.9 x 95.6
BE790222
92.9 x 95.7
BE790223
114.7 x 95.2
BE790224
93.1 x 95.2

Overview stitch patterns
165
No.
Width x Heightin mm
Embroidery motif
Colors
No.
Width x Heightin mm
Embroidery motif
Colors
BE790225
89.1 x 95.3
BE790226
59.3 x 95.9

Index
166
Index
AActivating the audio signals 59
Activating the bobbin thread indicator 59
Activating the upper thread indicator 59
Adjusting the brightness of the display 60
Adjusting the sewing light 60
Altering the embroidery motif size disproportionally 71
Altering the embroidery motif size proportionally 71
Altering the stitch density 73
Attaching the hoop 51
Attaching the stitch plate 38
BBack to default settings 61
CCalibrating the display 61
Calibrating the hoop 55
Calling up Help 67
Calling up the Embroidery Consultant 67
Calling up the tutorial 67
Checking the firmware version 65
Child safety feature 67
Cleaning the hook 97
Cleaning the thread catcher 63
Combi Mode 81
Combining embroidery motifs 81
Connecting the embroidery module 46
Connecting the foot control 31
DDispose of the machine 107
EEmbroidery file format 28
Embroidery test 28
Environmental Protection 12
Error messages 103
FFree point positioning 80
IInserting the embroidery needle 37
Introduction 13
KKey to signs 14
LLubricating the hook 98
Lubricating the machine 64
MMaintencance and cleaning 97
NNeedle, Thread, Fabric 25
Needles, Threads 26
OOverview Embroidery module 22
Overview Embroidery motifs 108
PPlacing the spool disc 35
Positioning of grid points 79
Power save mode 67
RRaising/Lowering the needle 33
Registering details of the dealer 66
Regulating the speed 68
Removing thread remnants under the stitch plate 97
SSafety instructions 10
Saving Service data 66
Selecting a language 60
Selecting an embroidery motif 47
Selecting personal settings 58
Storing the machine 107

Index
167
TTechnical data 107
Threading the bobbin thread 44
Threading the upper thread 39
Troubleshooting 100
UUpdating the machine Firmware 62
Using a spool net 35
Using eco mode 67
VVirtual positioning of the embroidery hoop 53