Presser Feet and Accessories - BERNINA
65
1 ©2020 BERNINA of America. Permission granted to copy and distribute in original form only. Content may not be altered or used in any other form or under any other branding. 05152020 ACCESSORIES WORKBOOK BERNINA PRESSER FEET Presser Feet and Accessories MASTERY BOOK SERIES MY BERNINA
-
Upload
khangminh22 -
Category
Documents
-
view
1 -
download
0
Transcript of Presser Feet and Accessories - BERNINA

My BERNINA B E R N I N A A C C E S S O R I E S W O R K B O O K
1
©2020 BERNINA of America. Permission granted to copy and distribute in original form only. Content may not be altered or used in any other form or under any other branding.
05152020
ACCESSORIES WORKBOOKBERNINA PRESSER FEET
Presser Feet and Accessories
M A S T E R Y B O O K
S E R I E S
MYBERNINA

My BERNINA B E R N I N A A C C E S S O R I E S W O R K B O O K
TABLE OF CONTENTSINTRODUCTION ....................................... 4
FEET INFORMATION ................................ 5
SEAMS ...................................................... 6
PATCHWORK SEAM ................................ 7
STANDARD SEAM .................................... 8
KNIT SEAM ............................................... 9
FAGOTED SEAM .................................... 10
HEMSTITCHED SEAM ............................. 11
EDGE JOINING SEAM ............................. 12
FLAT FELLED SEAM ................................ 13
CLOSURES .............................................. 14
MANUAL BUTTONHOLES ...................... 15
DUPLICATE BUTTONHOLES ................... 16
ATTACHING BUTTONS ........................... 17
CENTER ZIPPER ...................................... 18
INVISIBLE ZIPPER .................................... 19
SEWING HOOK-AND-LOOP TAPE ......... 20
HEMS & EDGE FINISHES ........................ 21
BLIND HEM ............................................ 22
BIAS BINDING ........................................ 23
FRENCH BINDING ................................... 24
CORDED EDGE ....................................... 25
NARROW HEM ....................................... 26
TRIMMED EDGE ..................................... 27
SPECIALTY FABRICS ............................... 28
SEWING JEANS & DENIM ...................... 29
SEWING LEATHER, VINYL & PLASTIC .... 30
APPLIQUÉ & DECORATIVE STITCHES .... 31
BLANKET STITCH APPLIQUÉ .................. 32
INVISIBLE APPLIQUÉ .............................. 33
DECORATIVE STITCHING ....................... 34
QUILTING ............................................... 35
MACHINE QUILTING .............................. 36
ECHO QUILTING - FOOT #55 ................. 37
ECHO QUILTING - FOOT #44C ............... 38
FREE-MOTION QUILTING ....................... 39
FREE-MOTION STITCHING ..................... 40
RULERWORK QUILTING ......................... 41
STIPPLE QUILTING .................................. 42
PIPING .................................................... 43
STANDARD PIPING ................................. 44
MINI PIPING ........................................... 45

My BERNINA B E R N I N A A C C E S S O R I E S W O R K B O O K
3
TABLE OF CONTENTS
DOUBLE PIPING ..................................... 46
JUMBO PIPING ....................................... 47
PLEATS, TUCKS, & RUFFLES ................... 48
GATHERING ............................................ 49
CORDED PINTUCKS ................................ 50
PINTUCKS & DECORATIVE STITCHING .. 51
PLEATING & RUFFLING .......................... 52
NARROW TUCKS .................................... 53
COUCHING ............................................. 54
BASIC COUCHING .................................. 55
ATTACHING STRANDS OF BEADS ......... 56
FLAT COUCHING .................................... 57
FREE-MOTION COUCHING .................... 58
SURFACE DESIGN ................................... 59
HEMSTITCHING ...................................... 60
EYELET EMBROIDERY ............................ 61
LACE INSERTION .................................... 62
NEEDLE FELTING .................................... 63
SASHIKO ................................................. 64
SEWING CIRCLES .........................................65

My BERNINA B E R N I N A A C C E S S O R I E S W O R K B O O K
4
INTRODUCTIONBERNINA has almost 100 presser feet and accesso-ries. Why so many? • Improves sewing skills—Presser feet designed
to do certain tasks help you to sew better, improving skills, often with a simple change of the presser foot!
• Faster sewing, quicker results—Many presser feet and accessories were designed for factory use, where time and production are of major importance; gives you more time to sew!
• More professional-looking projects—The right tools for the right job result in projects that are crafted with a look that does NOT say, “homemade.”
• Offers more creative options—Sometimes the only way to accomplish a task is with a specialty presser foot; add new tricks to your sewing machine!
This workbook is designed to be used as a step-by-step guide to familiarize you with many of the BERNINA presser feet and accessories. Once you have completed the stitching exercises, attach the sewn samples to the information pages (or add an extra mounting page as a facing page) and insert the pages into plastic page protectors to store in a 3-ring binder. They can then be used as a reference tool as you use your machine and explore its creative possibilities. BERNINA strives to provide its customers with quality sewing machines, and informative publications and classes. Along with providing My BERNINA Classes, your local BERNINA dealer stocks The Big Book of Feet, a complete guide to BERNINA presser feet and accessories. Plus, BERNINA’s website and blog offers product information, free projects and a variety of articles that appeal to all types of stitchers, no mat-ter which machines are their favorites.
www.bernina.comweallsew.com
Click here for video:Introduction

My BERNINA B E R N I N A A C C E S S O R I E S W O R K B O O K
5
FEET INFORMATION
Numbered FeetMany of the BERNINA presser feet come in more than one version. Reverse Pattern Foot #1 is shown here in the most common versions of BERNINA presser feet:• Number only - Made for BERNINA sewing
machines that have a maximum stitch width of 5.5 mm. These feet will often work with the 9 mm models also, but are limited to a 5.5 mm width.
• Number + C - Works with BERNINA models that have a maximum 9 mm stitch width. The sensor on the foot works with the electronics of the machine to sew 9 mm stitches.
• Number + D - These feet work with the Dual Feed of some BERNINA models that are equipped with the Dual Feed function. Once the foot is attached to the machine, there is a connector on the back of the machine that engages the Dual Feed function.
The Big Book of FeetThis 250-page publication has all you need to know about BERNINA presser feet & accesso-ries in one volume! Filled with inspirational pho-tos, giving you lots of ideas for using techniques sewn on BERNINA sewing machines.
The spiral binding lays flat when open, making it easy to keep the book right next to your sewing machine so you can reference it as you sew.
Handy charts are included for each presser foot and accessory that show settings such as stitch width, length and needle position for each technique.
Find out the original purpose for each presser feet, how they are designed and what additional techniques can be sewn using them.
The presser feet and accessories are organized numerically to make them easy to find. They are also listed by name in the index along with sew-ing techniques for easy-to-find information.
Reverse Pattern Foot #1/1C/1D

My BERNINA B E R N I N A A C C E S S O R I E S W O R K B O O K
6
SEAMSPATCHWORK SEAM
STANDARD SEAM
KNIT SEAM
FAGOTED SEAM
HEMSTITCHED SEAM
EDGE JOINING SEAM
FLAT FELLED SEAM

My BERNINA B E R N I N A A C C E S S O R I E S W O R K B O O K
7
PATCHWORK SEAM Typical patchwork seams have quarter inch seam allowances, and must be consistent to precisely form the patchwork pattern. BERNINA has three patchwork feet - #37, #57, and #97. All of these come in two ver-sions, regular and Dual Feed for a total of six feet. All of the BERNINA Patchwork Feet are straight stitch, center needle position feet.
Supplies & Settings• Nine 2½” squares of firmly woven fabric (5 dark & 4 light) • Cotton or polyester thread• Patchwork Feet #37/37D, #57/57D or #97/97D• 80/12 Universal needle• Center needle position • Stitch: Straight Stitch - Note: For the most precise stitching, also
use a Straight Stitch Plate
Patchwork Piecing1. Place one dark and one light square right sides together; stitch
with a ¼” seam allowance using one of the following feet: • Patchwork Foot #37/37D—Align the edge of the foot with
the raw edges of the fabric and sew. • Patchwork Foot with Guide #57/57D—Align the edge of
the guide with the raw edges of the fabric and sew. • 9 mm Patchwork Foot with Guide #97/97D—Align the outer
edge of the right toe with the raw edges of the fabric and sew. The separate guide can also be used for accuracy.
2. Press seams to one side toward the dark fabric; seam a second dark square on the opposite of the light to complete the row 1.
3. Stitch row 2 with two lights and a dark between them; stitch row 3 the same as row 1.
4. Join the three rows to complete a block, 6 1/2” square. Intersecting seams should go in “opposing” directions, nesting against each other.
Patchwork Foot #37/37D
Patchwork Foot #57/57D
9 mm Patchwork Foot with Gu ide #97/97D
Row 1
Row 3
Row 2
Click here for video:Patchwork Feet

My BERNINA B E R N I N A A C C E S S O R I E S W O R K B O O K
8
STANDARD SEAMAn all-purpose presser foot is used for most general sewing tech-niques such as seaming, hemming, and topstitching. BERNINA has three feet suited for all-purpose sewing: Zigzag Foot #0, Reverse Pattern Foot #1/1C/1D, and Clear Foot #34/34C/34D.
Supplies & Settings• Two pieces firmly woven fabric, 4” x 6” each• Cotton or polyester thread• All-purpose presser foot of your choice• 80/12 Universal needle• Center needle position • Stitch: Straight Stitch
Standard Seams1. Select an all-purpose presser foot:
• Zigzag Foot #0 is made for BERNINA models with a maximum stitch width of 5.5 mm and is designed for straight stitches and other forward motion stitches such as zigzag and running stitches.
• Reverse Pattern Foot #1/1C/1D is made for stitches that go backward and forward to form patterns. Each BERNINA machine comes with a version of this all-purpose foot.
• Clear Foot #34 is the same as Foot #1 except the sole is clear for extra visibility of the stitching area. The markings on the foot let you precisely align rows of stitches.
2. Place two pieces of fabric right sides together and align the edge of the fabric with the appropriate marking on the stitch plate to get even, consistent seam allowances.
3. Press the seam open.
Zigzag Foot #0
Reverse Pattern Foot #1/1C/1D
Clear Foot #34/34C/34D
Click here for video:All Purpose Feet

My BERNINA B E R N I N A A C C E S S O R I E S W O R K B O O K
9
KNIT SEAMKnit fabrics are easy to care for and comfortable to wear. Sewing knit fabric is not difficult but does require a little know-how. Using Overlock Foot #2/2A with Vari Overlock Stitch #3 sews the seam while overcasting the edges of the fabric.
Supplies & Settings• Two pieces of knit fabric, 4” x 6” each• Cotton or polyester thread• Overlock Foot #2/2A• 80/12 Ballpoint needle• Center needle position• Stitch: Vari Overlock Stitch #3
AlphabetsFolder
My DesignsFolder
Overlock Foot #2/2A
Knit Seam1. Attach the appropriate foot to the machine: Foot #2 is for 5.5 mm machines and 2A for 9
mm models. The sole of Foot #2A is wider to fit the feed teeth of the large machines but the needle opening is 5.5 mm.
2. Select Vari Overlock Stitch #3, which stretches with the fabric as the garment is worn. The seam looks like a traditional seam on the outside of the garment but is a narrow seam with overcast edges on the inside.
3. Position the fabric under the foot. This foot has one toe on the left and a pin on the right edge that should be placed on the edge of the fabric. It holds the fabric edge flat for stitching.
4. Stitch the seam. The result is a scant ¼” seam allowance that you press to one side after stitching.
Click here for video:Overlock Feet & Knit Seams

My BERNINA B E R N I N A A C C E S S O R I E S W O R K B O O K
10
FAGOTED SEAMThis decorative seam technique is a 3-part process that joins two pieces of fabric with threadwork anchored by decorative stitches.
Supplies & Settings• Two pieces firmly woven fabric, 4” x 6” each• Tear-away stabilizer• Cotton, polyester, or rayon embroidery thread• Tailor Tack Foot #7 and Open Embroidery Foot #20/20C• 80/12 Universal needle• Center needle position• Stitches: Zigzag; Triple Straight; Decorative as desired
Part 1: Fagoting1. Thread the machine with the same thread in the bobbin and
the needle. Attach Tailor Tack Foot #7 to the machine. 2. Select Zigzag Stitch with a width of 5.5 mm and a satin stitch
length (0.4-0.6 mm). Note: The longer the stitch length, the more sparse the threadwork will be.
3. Engage the Needle Stop Down function.4. Optional: Loosen the upper tension 1-2 numbers to add slack in
the thread, forming a higher “tunnel” of thread. 5. Place fabrics right sides together; sew 5/8” from one 6” edge,
sewing slowly (adjust motor to ½ speed, if available). 6. Once the “tunnel” of thread has been formed, carefully hold
the end of thread tunnel and slide it off the back of the foot.7. Gently pull the two layers firmly apart to show “air” between
them; press seam open.
Part 2: BundlingChange to Open Embroidery Foot #20/20C.To “bundle” the fagoting stitches, select the Triple Straight Stitch, center the foot over the fagoting stitches, and sew through the middle of the thread, holding the fabrics apart as much as possible.
Part 3: AnchoringStabilize the stitching area with tear-away stabilizer if necessary. From the right side, anchor the threadwork to the fabric on each side with decorative stitches, sewing through the seam allowance. Note: Adjust stitch width and length as desired; engage Mirror Image (if available) as needed; alter needle position as desired. Trim any excess seam allowance if necessary.
Tailor Tack Foot #7Open Embroidery Foot #20/20C
Anchor Stitches shown: Honeycomb Stitch next to fagoting with Triple
Straight Stitch along the outer edges
Click here for video:Tailor Tack Foot & Fagoted Seams

My BERNINA B E R N I N A A C C E S S O R I E S W O R K B O O K
11
HEMSTITCHED SEAM
Hemstitched seams have a delicate lacy look created by using threadwork to join the fabric pieces. The Spanish Hemstitch Attachment #47 is used for this technique and works with Open Embroidery Foot #20, which comes in three versions, 5.5 mm, 9 mm and a Dual Feed version.
Supplies & Settings• 3 grosgrain ribbons, 5/8” x 8” each• Narrow cord such as perle cotton, 10” long• Polyester or rayon embroidery thread• Spanish Hemstitch Attachment #47• Open Embroidery Foot #20/20C/20D • 80/12 Universal needle• Center needle position • Stitch: Various decorative stitches
Hemstitching1. Attach Foot #20/20C/20D to the machine.2. Select the desired spacer (5.5 mm or 9 mm); attach it to
the plate of the Spanish Hemstitching Attachment, and then secure the plate to the machine according to the package directions.
3. Position one piece of ribbon on each side of the spacer. 4. Select one of the decorative stitches below and adjust
the width if needed to the maximum setting (the width should be the same as the spacer - 5.5 mm or 9 mm).
5. Stitch the length of the ribbons to join them. The stitch should sew on the edges of both ribbons as it goes back and forth between them.
6. Position a third ribbon next to one of the outer edges of the joined ribbons. Select another decorative stitch and place a narrow decorative cord in the spacer.
7. Stitch the length of the ribbons to join them.
Open Embroidery Foot #20/20C
Spanish Hemstitch Attachment #47
Start with these stitches but try others to
find more that are suitable. Note: Select open
decorative stitches that move in a forward direction
Click here for video:Spanish Hemstitch Attachment and Hemstitching

My BERNINA B E R N I N A A C C E S S O R I E S W O R K B O O K
12
EDGE JOINING SEAMWhen using Foot #10 for Edge Joining, the result is a flat, dec-orative seam. The fabrics are placed on each side of the guide and the stitch is divided perfectly between the 2 fabrics that are being joined. Edge-joining fabrics offers a way to add fabric in a planned and pretty way such as when lengthening a little girl’s dress. This same technique can also be sewn with ribbons or laces and for any project where a flat seam is desired.
Supplies & Settings• Two pieces firmly woven fabric, 4” x 6” each• Cotton, polyester, or rayon embroidery thread• Edgestitch Foot #10/10C Note: Foot #10D (Dual Feed) is
designed for moving 2 layers of fabric and may not feed a single layer as precisely as Foot #10 or #10C so it is not recommended for this technique.
• 80/12 Universal needle• Center needle position• Stitch: Decorative stitch of choice
Edge Joining1. Attach Edgestitch Foot #10/10C to the machine. 2. The fabric edges must be finished by hemming, facing,
or folding. Fold one 6” edge of each piece of fabric to the wrong side.
3. Place one folded edge on each side of the center guide of Foot #10/10C.
4. Select a side-to-side decorative stitch and sew the seam.
Edgestitch Foot #10/10C
Stitch #417 on fabricStitch #641 on ribbon
Click here for video:Edge Joining Seam

My BERNINA B E R N I N A A C C E S S O R I E S W O R K B O O K
13
FLAT FELLED SEAMCommonly seen on tailored shirts and denim jeans, flat felled seams are entirely finished inside and out with no exposed raw edges. BERNINA has two presser that make it easy to stitch flat felled seams, Lap Seam Feet #70 and #71.
Supplies & Settings• Two pieces firmly woven fabric, 4” x 6” each• Cotton, polyester, or rayon embroidery thread• Lap Seam Foot #70 or #71 • 80/12 Universal needle• Center needle position for Foot #70; Half Left for #71• Stitch: Straight Stitch
Flat Felled Seams1. Attach Foot #70 for a 1/8” flat felled seam or Foot #71
for a 1/4” flat felled seam.2. Pin the wrong sides of the fabric together, with the
bottom layer extending approximately 1/4” (for Foot #70) or 1/2” (for Foot #71) beyond the top layer.
3. Fold the lower piece over the top piece and slide it under the presser foot, aligning fold with the inner right toe.
4. Sew four stitches, then lower the needle into the fabric. Lift the presser foot and guide the fabric into the slot, over the left toe of the foot. Stitch the remainder of the seam, allowing seam allowance to “stand up” as it enters the slot. Press the seam flat toward the raw edge.
5. Slide the seam under the presser foot so the first stitching is visible in the slot. Sew four stitches, then lower the needle into the fabric. Load the fabric into the slot, over the crook of the left toe, and sew the remaining line of stitching (along the folded edge).
Lap Seam Foot #70Lap Seam Foot #71
Step 4 Step 5
Click here for video:Flat Felled Seam

My BERNINA B E R N I N A A C C E S S O R I E S W O R K B O O K
14
CLOSURESMANUAL BUTTONHOLES
DUPLICATE BUTTONHOLES
ATTACHING BUTTONS
CENTER ZIPPER
INVISIBLE ZIPPER
SEWING HOOK-AND-LOOP TAPE

My BERNINA B E R N I N A A C C E S S O R I E S W O R K B O O K
15
MANUAL BUTTONHOLESDesigned for making manual buttonholes, Foot #3/3C is used for making single buttonholes, long buttonholes such as for a pocket opening and buttonholes in tight spaces such as on a col-lar stand. This foot has two channels in the sole to let the two beads of the buttonhole move smoothly under the foot.
You can make any size buttonhole with Foot #3 because the foot does not restrict the length. Besides making buttonholes, Buttonhole Foot #3 is used for gathering over cord, fine edge finish, and other techniques.
Supplies & Settings• One piece firmly woven, suit-weight fabric, 6” x 6” • About 12” of a narrow cord such as topstitching thread,
perle cotton, or embroidery floss.• Cotton or polyester thread• Buttonhole Foot #3/3C • 80/12 Universal needle• Center needle position• Stitch: Buttonhole #51
Corded ButtonholesCorded buttonholes are good to use on knits to stabilize the buttonhole, keeping it from stretching. They also make strong reinforced buttonholes for jackets and coats.
1. Fold the fabric in half and place stabilizer or interfacing between the layers if needed for stability.
2. Mark the buttonhole placement as desired on your fabric.3. Attach Buttonhole Foot #3/3C to the machine.4. Place the marked fabric under the foot, aligning it with
the buttonhole marking.5. Fold the cord in half and place the folded end over the
middle toe of the foot with the length of the cord placed under the foot and out the back. The cords should be aligned with the two grooves on the sole of the foot.
6. Stitch the buttonhole, manually selecting the steps needed to complete the buttonhole. Check your owner’s manual for the specific steps for your machine.
7. Remove the fabric from under the foot. Pull the two single ends of the cord until the looped end disappears into the bartack. Trim the single cord ends very close to the opposite bartack, or pull the cords to the wrong side and tie for knit fabrics.
Buttonhole Foot #3/3C
Click here for video:Manual Buttonholes

My BERNINA B E R N I N A A C C E S S O R I E S W O R K B O O K
16
DUPLICATE BUTTONHOLESButtonholes are usually the final step in making a garment and with Buttonhole Feet #3A and #3B, they will be a beautiful finishing touch! These presser feet are designed for making duplicate buttonholes. Foot #3A does this automatically and 3B helps you do it manually and is a good choice for models that do not have the automatic buttonhole feature. The red indicators on the side of each foot are for setting the desired size when stitching a test buttonhole.
Supplies & Settings• One piece firmly woven, suit-weight fabric, 6” x 6” • Cotton or polyester thread• Buttonhole Foot #3A or #3B• 80/12 Universal needle• Center needle position• Stitch: Buttonhole #51
Duplicate Buttonholes1. Attach Buttonhole Foot #3A to the machine. 2. The first buttonhole should be a test to set the size
of the buttonhole. Mark the starting position of the buttonhole on the fabric.
3. Place the fabric under the foot, aligning the starting mark with the needle. Set the red indicator for the length you want, and start stitching.
4. When the red marks on the foot align, push the reverse button. The machine will complete the buttonhole, secure the stitching and stop automatically.
5. Mark the starting point of the buttonholes on your project.
6. Place the fabric under the foot, aligning the starting mark with the needle.
7. Push the Start/Stop button and let the machine stitch. It will complete the buttonhole, secure the stitches and stop automatically.
Buttonhole Foot #3B is used for the manual process of making duplicate buttonholes. It has the same red indicator as Foot #3A, but you will manually stop sewing when the two red marks line up and then manually select each step of the buttonhole to complete it.
Automatic Buttonhole Foot #3AManual Buttonhole Foot #3B
Click here for video:Duplicate Buttonholes

My BERNINA B E R N I N A A C C E S S O R I E S W O R K B O O K
17
ATTACHING BUTTONSSewing buttons on by machine is faster and more secure than hand stitching. This technique is made for sewing flat, 2- and 4-hole buttons.
Supplies & Settings• One piece firmly woven, suit-weight fabric, 6” x 6” • Cotton, polyester, or rayon embroidery thread• 2 buttons, one with 2 holes and one with four holes• Button Sew-On Foot #18• 80/12 Universal needle• Defualt needle position • Stitch: Button Sew-On Program #60• Feed Dog lowered (Feed Dog is automatically lowered
when this stitch is selected on the B 880 PLUS.)
Attaching Buttons1. Attach Button Sew-On Foot #18 to the machine.2. Select the Button Sew-on Program in the buttonhole
menu. 3. Place a 2-hole button on the fabric as desired. Position
the button under the foot with the holes between the two toes.
4. Before you start stitching, use the hand wheel to make sure the width of the stitch is the same as the width of the button. If needed, adjust the stitch width.
5. Now you are ready to sew, and this is a good place to use the Start/Stop button instead of the foot control. The machine will tie off the stitches and stop automatically when the program is finished.
A 4-hole button is sewn the same way but you want to stitch the front holes first and then raise the needle, lift the foot and slide the button toward you and position the back holes under the foot.
The stitch forms over the center “toe” of the foot to create a thread shank for your button. This is especially important for heavy coats and jackets. Raising the middle toe adds more slack in the thread, which creates more room for thick fabrics to lie flat when the garment is buttoned. To adjust the middle toe, loosen the side screw and move the toe up or down as desired; re-tighten the screw.
Button Sew-On Foot #18
Click here for video:Attaching Buttons

My BERNINA B E R N I N A A C C E S S O R I E S W O R K B O O K
18
CENTER ZIPPERZipper Foot #4 is a simple zipper foot that has one toe and uses the far right or far left needle positions. This same foot also comes as #4D, which is a dual feed foot made for the 9 mm machines and #14D that has an added adjustable guide that helps you evenly topstitch the zipper laps.
Supplies & Settings• Two pieces firmly woven fabric, 4” x 10” each• Cotton or polyester thread• 9” zipper• Zipper Foot #4/4D or #14D• 80/12 Universal needle• Center needle position for seaming and far right or far left
as needed for stitching the zipper• Stitch: Straight Stitch
Center Zipper1. Place right sides together and stitch a seam 5/8” from the
raw edges along the 10” side. Baste with long stitches (4-5 mm) for 6”, and then set the length to 2.5 mm for the remainder of the length.
2. Press the seam open.3. Place the right side of the zipper against the seam
allowances with the coils on the seam, allowing the excess zipper length to extend above the top of the seam. Pin the zipper or use double-stick sewing tape to hold it in place. Using a zipper 2”-4” longer than the opening makes it easy to sew because you don’t have to stitch around the zipper pull.
4. Without backstitching, and leaving 6”-8” of thread tails, begin at the seam line at the bottom of the zipper and stitch out 3/8” perpendicular to the seam line. Pivot and continue, topstitching parallel to the seam through all layers.
5. Repeat for the other side of the zipper. Pull the thread ends to the wrong side and knot to secure. Remove the basting stitches.
When using Zipper Foot #14D, set the adjustable guide the desired size of the lap. Place the guide on the seam line and keep it there as you stitch, making it easy to sew an even lap on each side of the zipper.
Zipper Foot 4/4DZipper Foot with Guide #14D
Click here for video:Center Zipper

My BERNINA B E R N I N A A C C E S S O R I E S W O R K B O O K
19
INVISIBLE ZIPPERInvisible zippers are stitched so they cannot be seen from the outside of the garment or project. Sewing an invisible zipper requires a special presser foot, as the coils of the zipper must be stitched exactly on the seam line for the finished closure to appear as a simple seam from the outside. Foot #35 has two grooves on the sole that ride over the coils of the zipper as the zipper is sewn. The grooves are set at an angle, designed to hold the coils upright so the stitching will be next to them on the seam lines.
Supplies & Settings• Two pieces firmly woven fabric, 4” x 12” each and one 9”-
10” Invisible Zipper• Cotton or polyester thread• Invisible Zipper Foot #35 and Zipper Foot #4• 80/12 Universal needle• Center needle position • Stitch: Straight Stitch
Note: Do not sew the seam first as with conventional zippers. Invisible zipper tapes are sewn to fabric sections first, then the seam is sewn.
Invisible Zipper1. Unzip the zipper. It is not necessary to press coils as with
other invisible zipper applications. Invisible Zipper Foot #35 has specially designed grooves that guide the zipper coils out of the way as the tape is stitched in place.
2. With right sides together, baste or pin the right zipper tape to the right garment piece, so the coil is on the seam line.
3. Using the center needle position, place the coil in the right groove of Foot #35. Sew until foot is stopped by the zipper pull. The needle should sew close to, but not into, the zipper coil.
4. With right sides together, baste or pin the left zipper tape to the left garment piece so that the coil is again on the seam line. Check to be sure the zipper is not twisted. Place the coil in the left groove of the foot and complete as directed for the right side of the zipper.
5. Close zipper. Using Zipper Foot #4, place fabric right sides together and stitch, starting about ½” above the bottom of the zipper.
Invisible Zipper Foot #35
Click here for video:Invisible Zipper

My BERNINA B E R N I N A A C C E S S O R I E S W O R K B O O K
20
SEWING HOOK-AND-LOOP TAPEWhen stitching hook-and-loop tape, also known as Velcro, it is sometimes difficult to stitch along the edge using an all-purpose foot. The foot has to straddle the flat fabric and the thick Velcro, so it is hard to stitch a straight line and the stitch formation is distorted. Using Piping Foot #38 solves that problem.
Supplies & Settings• One piece firmly woven fabric and one piece tear-away
stabilizer, both 4” x 6”• Cotton or polyester thread• Piping Foot #38• 80/12 Universal needle• Center needle position • Stitch: Straight Stitch
Sewing Hook-and-Loop Tape1. Attach Piping Foot #38 to the machine.2. Place the stabilizer behind the fabric.3. Place one side of the tape as desired on the fabric,
then position the fabric under the foot. The thin part of the foot will sit on the tape and the thick part sits on the fabric. This positions the needle to stitch along the edge of the tape as the foot “hugs” the tape.
4. Sew around the edges of the tape, pivoting at the corners and backstitching to secure.
Piping Foot #38
Click here for video:Hook-and-Loop-Tape

My BERNINA B E R N I N A A C C E S S O R I E S W O R K B O O K
21
HEMS & EDGE FINISHESBLIND HEM
BIAS BINDING
FRENCH BINDING
CORDED EDGE
NARROW HEM
TRIMMED EDGE

My BERNINA B E R N I N A A C C E S S O R I E S W O R K B O O K
22
BLIND HEMThis traditional folded hem is stitched using Blindstitch Foot #5. This hem is good for a variety of projects including dresses, skirts and draperies. Blindstitch Foot #5 has a 5.5 mm needle opening but can be used with all BERNINA sewing machines.
Supplies & Settings• One piece firmly woven fabric, 6” x 10” • Cotton or polyester thread in a color that matches or
blends with the fabric• Blind Hem Foot #5• 80/12 Universal needle• Far Right needle position (this is the default setting for
the Blindstitch)• Stitch: Blindstitch
Blind Hem1. Finish the lower edge of the fabric with an overlock or
zigzag stitch. 2. Attach Blindstitch Foot #5 to the machine.3. Select the Blindstitch, which is Stitch #9 on most
BERNINA models.4. Fold the hem allowance to the wrong side. Use a
basting or a long straight stitch to baste the hem in place about ¼” from the finished edge.
5. Fold the project back against the basting so the finished edge is exposed. The needle will stitch on this edge and every few stitches, it will take a small stitch into the fold of the garment.
6. Place the fold next to the guide of the foot. As you sew, put your left hand on the project, keeping the fold in constant contact with the guide.
7. Because the guide extends down the middle of the foot, the needle must form the stitch over it as the hem is sewn. This makes a loose stitch, which in this case is a good thing. The extra slack in the thread lets the fabric lie flat without puckering once the hem is stitched.
Blind Hem Foot #5
Click here for video:Blind Hem

My BERNINA B E R N I N A A C C E S S O R I E S W O R K B O O K
23
BIAS BINDINGBound edges are common on quilts but can also be found on other projects including garments, purses, and pillows.
Supplies & Settings• One piece double-sided, pre-quilted fabric, 5” x 10”
and one bias strip 18” in length x the width indicated in the binder instructions
• Cotton or polyester thread• Binder Foot #95/95C• 80/12 Universal needle• Needle position indicated below• Stitch: Straight Stitch
Bias Binding1. Select the desired size Binder Attachment #88
and attach it to the machine according to binder directions.
2. For best results, stiffen the binding fabric with Best Press Starch Alternative.
3. Attach Bias Binder Foot #95/95C to the machine.4. Feed the bias strip into the slot of the binder. Swing
binder toward you if needed for easier insertion of the strip. Tip: Cut the end of the strip at a slant and use a stiletto or wooden skewer to encourage the fabric to feed into the binder.
5. Raise the presser foot and pull the fabric through the binder so that the fabric extends completely under the foot.
6. Lower the presser foot and sew a few stitches. Adjust the needle position until the needle stitches on the binding edge as desired.
7. Position the fabric to be bound into the fabric channel between the folds of the bias and continue stitching, binding one 10” edge of the fabric. Make sure that the bias strip can flow freely into the binder.
8. Check to ensure that the fabric is completely encased in the fold and that the stitching catches the fabric and the binding. Adjust needle position if necessary. Note: Finished binding should be filled with project fabric edge.
Bias Binder #88for flat bias strips of fabric
Binder Foot #95/95C
Bias Binder #87for pre-folded bias tape
Click here for video:Bias Binding

My BERNINA B E R N I N A A C C E S S O R I E S W O R K B O O K
24
FRENCH BINDINGLap Seam Foot #71 is designed for making 8 mm flat felled seam and is also useful for sewing French binding. Foot #71 holds the binding in place as it goes under the needle for the final stitching.
Supplies & Settings• One piece double-sided, pre-quilted fabric, 10” x 10” • 55”-60” of 2” wide fabric strips, pieced to make 1 strip• Cotton or polyester thread• Lap Seam Foot #71• 80/12 Universal needle• Needle position as indicated below• Stitch: Straight Stitch
French Binding1. Fold the bias strip in half lengthwise and press.2. Using a walking or dual feed foot, stitch the folded strip
to the back of the project, using a 1/4” seam allowance. Stop 1/4” from the next edge. Backstitch or pivot 45° and sew to the point of the corner.
3. Fold the binding straight up off the quilt. The binding should have a 45° fold in it.
4. Fold the binding straight down, aligning the raw edges. Starting at the top, continue stitching the binding, mitering each corner in the same way and stopping about 4” from the beginning, leaving about 4” of unattached binding.
5. Join the two loose ends of binding, trimming to fit. Complete the stitching of the binding in place.
6. Wrap binding to front of the quilt; pin or clip in place.7. Attach Lap Seam Foot #71 to the machine and select the
Straight Stitch. Move the needle position so the stitching is placed close to the folded edge of the binding. Sew a few stitches, then stop with the needle down. Lift the presser foot and slide the edge of the binding over the small inner edge of the presser foot. Lower the foot and continue stitching to secure the binding.
8. When you get to a corner, stitch as far as you can, and then stop with the needle in the fabric. Lift the foot, remove the binding from the foot and lower the foot on top of the binding. Stitch to the corner, pivot, and start the next side. After a few stitches, place the binding back into the foot and continue stitching.
Lap Seam Foot #71
Click here for video:French Binding

My BERNINA B E R N I N A A C C E S S O R I E S W O R K B O O K
25
CORDED EDGEAdding decorative cord to edges is easy to do and uses a sim-ple zigzag stitch. This technique is used to finish edges of jour-nal covers, art quilts, bags and other craft projects. It works best on an edge that is hemmed, faced or folded.
Supplies & Settings• One piece medium weight fabric, 8” x 8” each• 10” of smooth decorative cord such as rattail• Monofilament (“invisible”) or polyester thread in a color
that blends or contrasts with the fabric and cord; same thread in needle & bobbin
• Bulky Overlock Foot #12/12C• 80/12 Universal needle• Default needle position• Stitch: Zigzag Stitch
Corded Edge1. Fold the fabric in half; the cord will be applied to the
folded edge.2. Attach the Bulky Overlock Foot #12/12C to the machine.3. Place the cord next to the folded edge of the fabric.4. Position the fabric/cord under the foot so that the cord
is in the tunnel that is on the bottom of the sole.5. Select the Zigzag Stitch; adjust stitch width so that the
stitch is just wide enough to go over the cord with the left swing going into the fold of the fabric and the right one going over the cord and into the air.
Tip: For a more inconspicuous attachment the cord can be secured to the edge using a Blindstitch.
Bulky Overlock Foot #12/12C
Click here for video:Corded Edge

My BERNINA B E R N I N A A C C E S S O R I E S W O R K B O O K
26
NARROW HEMStitch beautiful narrow hems using one of the five BERNINA hemmer feet. The foot folds the fabric and holds it in place for stitching.
Supplies & Settings• One piece light to medium weight fabric, 4” x 10”• Cotton or polyester thread.• Hemmer Foot of choice• 80/12 Universal needle• Center needle position• Stitch: As directed below
Narrow Hem1. Select one of the hemmer feet and attach it to the
machine.2. Select a straight or zigzag stitch as desired. Note:
Feet #62 and #64 require a straight stitch. The remaining feet may be used with either straight, zigzag, or other decorative stitch.
3. Each hemmer foot has a coil that folds the fabric twice before it goes under the needle for stitching. To get started, double-fold about 2-3” of the edge to the wrong side, making the folded piece about the size of the channel on the sole.
4. Place the folded edge under the foot with the wrong side of the fabric up. Take 4-5 stitches and stop with the needle in the fabric.
5. Raise the foot and using tweezers, place the fabric edge into the coil of the foot.
6. Lower the foot and as you start sewing, hold the fabric edge slightly to the left to prevent it from coming out of the coil. Hem the entire edge.
Tips:• Start with clean, rotary-cut edges. • Spray starch and press the fabric edges.
Hemmer Feet #61, #62, #63
Hemmer Feet #64, #66
2 mm Straight Stitch Hemmer Foot #62Click here for video:Narrow Hems

My BERNINA B E R N I N A A C C E S S O R I E S W O R K B O O K
27
TRIMMED EDGEWhen attaching heavy trim, Piping Foot #38 is a perfect choice. This foot is made for straight stitching using the center needle position only. Place the thin part of the sole on top of the trim and the thick part of the foot will hug the edge of the header. This positions the needle to stitch along the edge of the trim, securing it to the fabric.
Supplies & Settings• One piece of drapery/upholstery weight fabric, 4” x 6”• 7” of heavy decorative trim or fringe• Cotton or polyester thread• Piping Foot #38• 90/14 Universal needle• Center needle position• Stitch: Straight Stitch
Attaching Heavy Trim1. Attach Piping Foot #38 to the machine. Note: This foot
is designed to work with a center needle position only. Using other positions may cause the needle to strike the foot, break the needle, and possibly damage the machine.
2. Position the header of the trim on the fabric, about ½” up from the edge. The raw edge can be finished before attaching the trim using a serger or an overcast stitch on the sewing machine.
3. Position the fabric/trim under the needle with the “thick” part of the sole on the fabric and the “thin” part of the sole on the header of the trim. The presser foot evens out the surface, letting the foot ride smoothly rather than wobble along an uneven surface.
4. Sew along the header to attach the trim to the fabric.
Piping Foot #38
Click here for video:Trimmed Edge

My BERNINA B E R N I N A A C C E S S O R I E S W O R K B O O K
28
SPECIALTY FABRICSJEANS & DENIM
LEATHER, VINYL &
PLASTIC

My BERNINA B E R N I N A A C C E S S O R I E S W O R K B O O K
29
SEWING JEANS & DENIMJeans Foot #8/8D is the best choice for stitching through multi-ple layers of heavy fabrics. You can tell by the name that it is a perfect choice for stitching denim, but it also works for stitch-ing other sturdy materials such as canvas and upholstery fabrics when sewing items like seat cushions, slipcovers, pillows, out-door tarps and furniture covers.
Foot #8 is the foot to use when you need a reinforced seam. This seam is stitched in the same way as a standard seam except instead of a regular straight stitch, use a triple straight stitch. It results in a strong straight seam that can be pressed to the side or open.
Supplies & Settings• Two pieces of denim, 5” x 4” each• Cotton or polyester thread• Jeans Foot #8/8D• Size 110/16 or 110/18 Jeans or Denim needle• Straight Stitch needle plate focuses the needle for the
most penetrating power• Center needle position• Stitch: Triple Straight Stitch
Reinforced Seam, Topstitching, & Hemming1. Insert a Jeans needle into the machine.2. Attach Jeans Foot #8/8D to the machine.3. Select the Triple Straight Stitch. 4. With right sides together, sew a 5/8” seam along one 5”
side. Press seam to one side.5. Topstitch the seam from the right side using the edge
of the foot along the seam as a guide, and stitching through the seam allowances.
6. Turn up the lower edge twice, about ½” each time.7. Stitch the hem in place from the right side. Hint: Sew
toward the “gradual rise” of thick seams rather than toward the thickest part of the seam. Use the Height Compensation Tool (included with your machine) to keep the presser foot level; this helps keep the foot in contact with the fabric, and the fabric in contact with the feed dog.
Jeans Foot #8/8D
Click here for video:Jeans/Denim Seams & Hems

My BERNINA B E R N I N A A C C E S S O R I E S W O R K B O O K
30
SEWING LEATHER, VINYL & PLASTICNon-stick feet have coated soles and are made to move over “sticky” fabrics such as leather, plastic, vinyl, microfibers, etc. These feet all correspond to familiar uncoated counter-parts that are commonly used for sewing fabrics.• Zigzag Foot #52/52C/52D• Straight Stitch Foot #53• Zipper Foot with Guide #54• Open Embroidery Foot #56
Supplies & Settings• Two pieces of soft leather or vinyl, 3” x 4” each• Cotton or polyester thread• Non-Stick Foot Open Embroidery Foot #56• 80/12 Universal needle for vinyl or soft leather• Needle position as indicated below• Stitch: Straight Stitch
Lapped SeamHere’s a great flat seam for leather and vinyl that is sewn with Non-stick Embroidery Foot #56. It is a sturdy, flat seam stitched with Non-stick Embroidery Foot #56 that adds a nice tailored look to your project.
1. Overlap the two pieces with the seamlines stacked on top of each other. Use clips or tape to hold them together.
2. Place the pieces under the foot with the edge of the top piece aligned with the inside right toe of the foot. Adjust your needle position so that the stitches fall along the edge of the top piece and then stitch.
3. Sew a second line of stitching in the same way except, move the needle to the far-left position. This results in two beautiful parallel lines of stitching.
Non-Stick Zigzag Foot #52/52C/52D
Non-Stick Zipper Foot #53Non-Stick Zipper Foot with Guide #54 Non-Stick Open Embroidery Foot #56
Click here for video:Leather, Suede and Vinyl

My BERNINA B E R N I N A A C C E S S O R I E S W O R K B O O K
31
APPLIQUÉ & DECORATIVE STITCHESBLANKET STITCH APPLIQUÉ
INVISIBLE APPLIQUÉ
DECORATIVE STITCHES

My BERNINA B E R N I N A A C C E S S O R I E S W O R K B O O K
32
BLANKET STITCH APPLIQUÉBlanket stitch appliqué is traditional and trendy at the same time. Using Open Embroidery Foot #20 for appliqué makes it fast and easy to sew. The center part of the foot has been cut away, letting you see the needle as it stitches, making this foot perfect for blanket stitching.
Supplies & Settings• One piece quilting cotton for background, contrasting
appliqué fabric, tear-away stabilizer, and paper-backed fusible web, all 8” x 8”
• Cotton, polyester, or rayon embroidery thread• Open Embroidery Foot #20/20C/20D• 80/12 Universal needle• Far Right needle position• Stitch: Blanket Stitch
Blanket Stitch Appliqué1. Following the manufacturer’s instructions, fuse paper-
backed web to wrong side of the appliqué fabric. Cut out the desired shape and fuse it to the base fabric. Place 1-2 layers of tear-away stabilizer behind the base fabric if needed to prevent tunneling and puckering.
2. Attach Open Embroidery Foot #20/20C/20D to the machine.
3. Select the Blanket stitch; adjust stitch width and length as desired. Mirror Image Vertical (Left/Right) if necessary (and available) so the horizontal stitches of the pattern fall on the appliqué shape.
4. Move the needle to the far right; align the raw edge of the appliqué with the inside of the toe of the foot.
5. Stitch along all sides of the appliqué shape, with the straight portion of the stitch falling on the base fabric and the horizontal swing stitching on the shape.
6. At corners, stop with the needle down in the fabric, pivot 45° and complete the stitch, stopping with the needle on the background fabric; continue stitching. Pivot another 45° and align the next side of the appliqué shape with the inside of the right toe of the presser foot.
7. Pivot around curves, keeping the straight portion of the stitch against the edge of the appliqué. Note: Reduce motor speed to make maneuvering curves easier.
Open Embroidery Foot #20/20C/20D
Stop with needle in the fabric, lift foot and rotate slightly or pivot as needed.
Click here for video:Blanket Stitch and Invisible Applique

My BERNINA B E R N I N A A C C E S S O R I E S W O R K B O O K
33
INVISIBLE APPLIQUÉBlind or Invisible appliqué is similar to blanket stitch appliqué but uses a blindstitch, normally used for hemming. Some BERNINA models have this Hand-Look Appliqué stitch in the Quilt menu. The settings of the Blindstitch can also be adjusted for the same effect.
Supplies & Settings• One piece quilting cotton for background, contrasting
appliqué fabric, tear-away stabilizer, and paper-backed fusible web, all 8” x 8”
• Monofilament thread or a thread color that matches the appliqué makes the stitching inconspicuous with a look similar to hand-stitched appliqué.
• Open Embroidery Foot #20/20C/20D• 80/12 Universal needle• Far Right needle position• Stitch: Hand-Look Appliqué Stitch #1331 or Blindstitch #9
Invisible Appliqué1. Following the manufacturer’s instructions, fuse paper-
backed web to wrong side of fabric for appliqué shapes. Cut out the desired shape and fuse it to the base fabric. Place 1-2 layers of tear-away stabilizer behind the base fabric if needed to prevent tunneling and puckering.
2. Attach Open Embroidery Foot #20/20C/20D.3. Select the Hand-Look Appliqué Stitch #1331 or
Blindstitch #9 with a length of.75 mm and a 1 mm width.4. Move the needle to the far right; align the raw edge
of the appliqué with the inside of the right toe of the presser foot.
5. Stitch along all sides of the appliqué shape. The stitch is sewn on the background fabric and every few stitches it will barely take a bite into the appliqué shape.
6. At corners, stop with the needle down in the fabric, pivot and align the next side of the appliqué shape with the inside of the right toe of the presser foot.
7. Pivot around curves as needed to make them smooth. Note: Reduce motor speed to make maneuvering curves easier.
Open Embroidery Foot #20/20C/20D
Click here for video:Blanket Stitch and Invisible Applique

My BERNINA B E R N I N A A C C E S S O R I E S W O R K B O O K
34
DECORATIVE STITCHINGBERNINA sewing machines have hundreds of decorative stitches that look great on all types of projects. Using the cor-rect presser foot to stitch these is important. For satin and heavy decorative stitching, look for a foot with a wedge-shape indentation on the sole. It is there to allow the thread build-up to feed easily and smoothly under the foot.
Clear Embroidery Foot #39 has a clear sole, making it easy to see the fabric and stitching under the foot. It has two versions: #39 for 5.5 mm models and #39C for 9 mm machines. The red markings on the foot help to perfectly align rows of stitching.
Supplies & Settings• One piece quilting cotton, 1-2 layers of tear-away
stabilizer, all 6” x 6” • Cotton, polyester, or rayon embroidery thread• Clear Embroidery Foot #39/39C• 80/12 Universal needle• Center needle position• Decorative Stitches as desired
Decorative Stitching1. Place 1-2 layers of tear-away stabilizer behind the fabric
if needed to prevent tunneling and puckering.2. Attach Clear Embroidery Foot #39/39C to the machine.3. Select the decorative stitch of your choice and sew a line
of it across the fabric.4. Continue selecting stitches and stitching rows using the
edge of the presser foot for spacing.
Clear Embroidery Foot #39/39C
Click here for video:Decorative Stitching

My BERNINA B E R N I N A A C C E S S O R I E S W O R K B O O K
35
QUILTINGMACHINE QUILTING
ECHO QUILTING - FOOT #55
ECHO QUILTING - FOOT #44C
FREE-MOTION QUILTING
FREE-MOTION STITCHING
RULERWORK

My BERNINA B E R N I N A A C C E S S O R I E S W O R K B O O K
36
MACHINE QUILTINGWalking Foot #50 is designed to feed fabrics that don’t usually move easily under the presser foot such as velvet and vinyl; and layered fabrics, such as quilts. It is also useful for ensuring that stripes and plaids don’t shift as they are being stitched. The BERNINA Walking Foot comes in one version that has a needle opening of 5.5 mm and a wide sole that works with both 9 mm and 5.5 mm models.
Walking Foot #50 comes with three interchangeable soles:• The Standard Sole offers the most support for
matching plaids and stripes. It also works well for fabrics that tend to stick or slip.
• The Open Sole is open between the toes, giving full visibility of the needle, making it easy to follow a quilt design.
• The Center Guide Sole has a metal guide in the that facilitates edgestitching and stitching in the ditch.
Walking Foot #50 has two seam guides (right and left); they attach to the back of the foot and are held in place by a removable collar. These guides make it easy to sew paral-lel rows up to 4” apart with minimal marking.
Supplies & Settings• Two pieces quilting cotton, one piece of batting, all
10” x 10” to make a quilt sandwich• Cotton or polyester thread• Walking Foot #50 with Guides• 80/12 Universal needle• Center needle position• Stitch: Straight Stitch
Grid Quilting1. Attach Walking Foot #50 to the machine by placing
the foot under the attachment cone while bringing the U-shaped arm over the needle bar. Attach a guide to the back of the foot and set it about 1” from the needle.
2. Mark a vertical line 1” from one edge of the fabric.3. Stitch along the drawn line.4. Place the guide on the stitched line and sew a
second one parallel to the first.5. Continue stitching parallel lines across the fabric. 6. Repeat process with horizontal lines, forming a grid.
Walking Foot #50
Note: Create a diagonal grid by stitching lines angled at 45 degrees in opposite directions.
Click here for video:Machine Quilting

My BERNINA B E R N I N A A C C E S S O R I E S W O R K B O O K
37
ECHO QUILTING - FOOT #55Leather Roller Foot #55, originally designed to roll across leather, is an unusual looking foot that is easy to maneuver when echo stitching.
When using Foot #55, the fabric is only controlled where the wheel holds it down on the feed teeth, so it acts as a pivot point and makes it easy to move the fabric back and forth, even in circles to follow a shape. The needle should be close to the wheel in the far-left position for the best stitch formation.
Supplies & Settings• One piece quilting cotton, one piece of batting, both
8” x 8”• Cotton or polyester thread• Leather Roller Foot #55• 80/12 Universal needle• Far Left needle position• Stitch: Straight Stitch
Echo Quilting1. Attach Leather Roller Foot #55 to the machine. 2. Move the needle to the far left position.3. Draw or fuse a shape near one edge of the fabric.4. Use the wheel as a guide to keep the lines of
stitching evenly spaced on your project. Follow the shape you are echoing by keeping the back of the wheel on the previous line of stitching. Maneuver around the shape by moving the fabric as you sew. Sew several lines of stitching, echoing the drawn line or shape.
Leather Roller Foot #55
Click here for video:Echo Quilting - Foot #55
My BERNINA B E R N I N A A C C E S S O R I E S W O R K B O O K
38
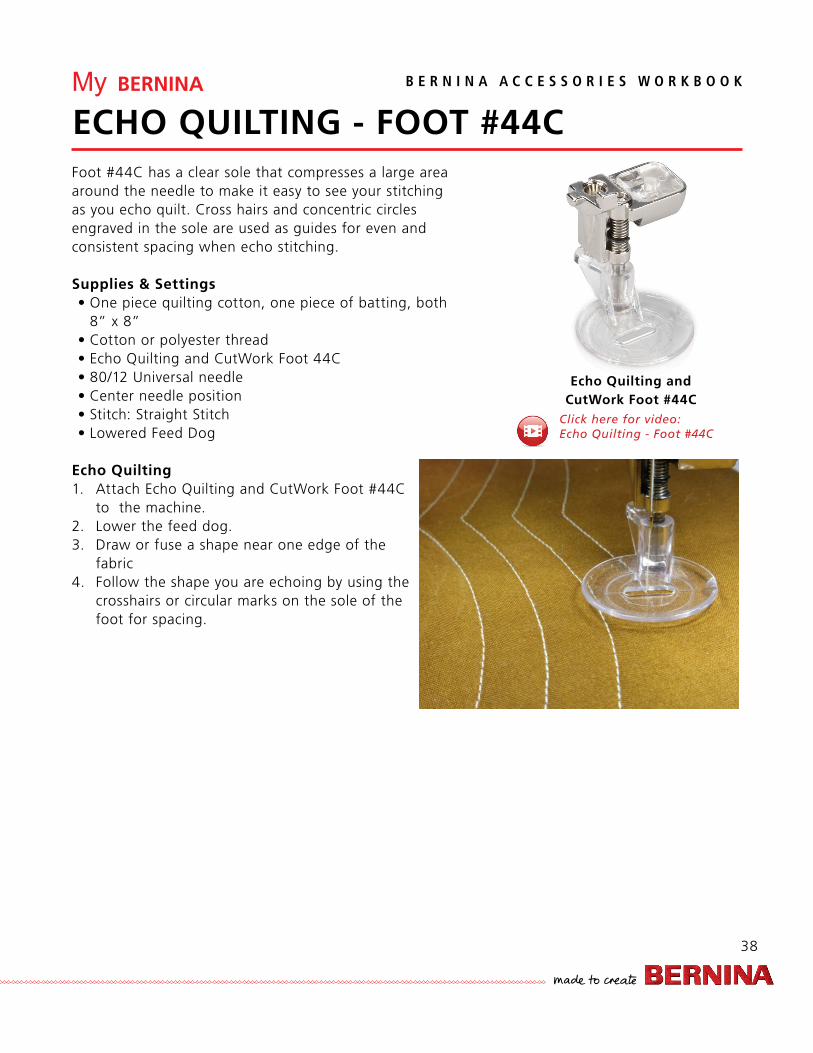
ECHO QUILTING - FOOT #44CFoot #44C has a clear sole that compresses a large area around the needle to make it easy to see your stitching as you echo quilt. Cross hairs and concentric circles engraved in the sole are used as guides for even and consistent spacing when echo stitching.
Supplies & Settings• One piece quilting cotton, one piece of batting, both
8” x 8”• Cotton or polyester thread• Echo Quilting and CutWork Foot 44C• 80/12 Universal needle• Center needle position• Stitch: Straight Stitch• Lowered Feed Dog
Echo Quilting1. Attach Echo Quilting and CutWork Foot #44C
to the machine. 2. Lower the feed dog.3. Draw or fuse a shape near one edge of the
fabric4. Follow the shape you are echoing by using the
crosshairs or circular marks on the sole of the foot for spacing.
Echo Quilting and CutWork Foot #44C
Click here for video:Echo Quilting - Foot #44C

My BERNINA B E R N I N A A C C E S S O R I E S W O R K B O O K
39
FREE-MOTION QUILTINGQuilting Foot #29 is designed to work with both thick and thin quilt battings. The clear sole lets you see exactly where you are placing your stitches. This foot has two versions. Both have 9 mm needle openings but 29C has a sensor for presser foot recognition.
Supplies & Settings• Two pieces quilting cotton, one piece of batting,
all 10” x 10” to make a quilt sandwich• Cotton or polyester thread• Freehand Quilting #29/29C• 80/12 Universal needle• Center needle position• Stitch: Straight Stitch• Lowered Feed Dog
Free-Motion Quilting1. Attach Freehand Quilting Foot #29/29C and lower
the feed dog. 2. Create a “quilt sandwich” by placing batting
between the fabric squares, wrong sides to the batting. Use a temporary adhesive spray to “baste” the layers together.
3. Select the Straight Stitch.4. Position one hand on each side of the square and
practice the shapes shown below on the diagram. Move the fabric in a forward/back motion and a side-to-side motion. Move hands from side to side, then top to bottom, keeping the lines perpendicular to each other. Move hands in smooth curves from left to right.
5. Create stippling shapes – think of interconnecting puzzle pieces with evenly sized “bumps.” Avoid “painting yourself into a corner” and/or stitching across a previously stitched line.
Freehand Quilting Foot #29/29C
Click here for video:Free-motion Quilting

My BERNINA B E R N I N A A C C E S S O R I E S W O R K B O O K
40
FREE-MOTION STITCHINGThe BERNINA Stitch Regulator #42, known as the BSR, is a free-motion presser foot. It helps beginners quickly master free-motion stitching and let’s more experienced stitchers tackle increasingly challenging techniques.
Supplies & Settings• One piece quilting cotton, one piece of batting, both
10” x 10”; flower motif cut from printed fabric or a flower shape cut from solid fabric backed with fusible web and fused to 10’ X 10’ square.
• Cotton or polyester thread• BERNINA Stitch Regulator #42• 80/12 Universal needle• Center needle position• Stitch: BSR Straight Stitch• Lowered Feed Dog
Free-motion StitchingWhen free-motion stitching, it is important to coordinate the movement of the fabric with the speed of the machine to get even, consistent stitches. If you move the fabric too slowly, you get tiny stitches, too fast gives you long basting stitches. When using the BSR, you set your desired stitch length and the BSR regulates the stitch as you move the fabrics.
1. Attach the BSR and connect the cable into your machine; the BSR screen appears and you can select the straight or zigzag stitch.
2. On the screen, select Mode 1 or 2 as desired. When Mode 1 is selected, the needle immediately starts to move up and down, with or without fabric under it. This is the ideal mode for quilting points and/or corners, as the needle continues to stitch when paused at a point or corner. When working in BSR Mode 2, the motor is engaged only when the fabric is moved under the foot, providing time to stop and think about the path that the needle is taking.
3. Thread-paint the fused flower, adding details as desired. If you move too quickly, the machine will beep so you can slow down. As with any free-motion stitching, it takes a little practice to master but with the BSR, it takes a lot less!
BERNINA Stitch Regulator #42
Click here for video:Free-motion Stitching

My BERNINA B E R N I N A A C C E S S O R I E S W O R K B O O K
41
RULERWORK QUILTINGOriginally a longarm technique, rulerwork quilting is a beautiful style of free-motion quilting made up of precisely shaped and spaced patterns designed to fit the space you are quilting.
When you look at Adjustable Ruler Foot #72, you can see that it is different than other presser feet. The sole is 1/4” high and is designed to work with rulerwork rulers that are also 1/4” high. The thick outside edge of the foot is called the “fence” and it keeps the ruler from sliding under or over the foot as you guide the fabric under the needle.
Supplies & Settings• Two pieces quilting cotton & One piece batting, all
10” x 10” to make a quilt sandwich• Cotton or polyester thread• Adjustable Ruler Foot #72• 80/12 Universal needle• Center needle position• Stitch: Straight Stitch• Lowered Feed Dog
Rulerwork Quilting1. Attach Adjustable Ruler Foot #72 to the machine.2. Lower the feed dog.3. Place the fabric under the foot and lower the foot. 4. Pull the bobbin thread to the top of the work and
take a few short stitches to secure the stitching. 5. Slide the edge of the ruler up to the foot and hold
the ruler with your fingertips placed a comfortable distance apart in the area to be stitched.
6. Place enough pressure on the ruler to gently guide the foot along the edge without the ruler moving. Attaching grip dots or strips to the bottom of the rulers will keep the ruler steady.
7. Sew along the edge of the ruler. When near the end, stop the machine, lift the presser foot and slide the ruler in position to continue the line. When changing directions, simply reposition the ruler and stitch in the direction needed to follow the ruler – no need to rotate the quilt!
Adjustable Ruler Foot #72
As with any free-motion technique, rulerwork takes practice. Not only must you control the movement of the fabric and the speed of the machine, but the ruler must be managed as well. But practice makes perfect and before long, you will be creating beautiful, perfectly-spaced lines of quilting.
Click here for video:Rulerwork

My BERNINA B E R N I N A A C C E S S O R I E S W O R K B O O K
42
STIPPLE QUILTINGCreate beautiful textured quilting stitches with Adjustable Stippling Foot #73. This height-adjustable, free-motion presser foot is perfect for techniques such as meandering, stippling and micro stippling.
Supplies & Settings• Two pieces quilting cotton & one piece batting, all
10” x 10” to make a quilt sandwich• Cotton or polyester thread• Adjustable Stippling Foot #73• 80/12 Universal needle• Center needle position• Stitch: Straight Stitch• Lowered Feed Dog
Stipple Quilting1. Attach Adjustable Stipple Foot #73 to the machine.2. Lower the feed dog.3. Place the fabric under the foot and lower the foot. 4. Pull the bobbin thread to the top of the work and
take a few short stitches to secure the stitching. 5. Start to sew by moving the fabric side to side and
front to back, filling in the selected area with a continuous line of wavy, sinuous stitching. Stippling is a series of rounded shapes (similar to puzzle pieces) sewn in a continuous line. They interlock with each other without touching or crossing over any lines of stitching. Widely-spaced stippling is called meandering and closely-spaced is micro-stippling.
Adjustable Stippling Foot #73
The sole of the Foot #73 is offset from the shaft, giving an unobstruct-ed view of the stitching area. There are engraved markings to help you precisely place your stitches.

My BERNINA B E R N I N A A C C E S S O R I E S W O R K B O O K
43
PIPINGSTANDARD PIPING
MINI PIPING
DOUBLE PIPING
JUMBO PIPING

My BERNINA B E R N I N A A C C E S S O R I E S W O R K B O O K
44
STANDARD PIPINGOne of the oldest fabric embellishment techniques, piping is used to define seams and edges of home decorating items, garments, purses, and other projects.
Supplies & Settings• Two pieces firmly woven fabric, 3” x 6” each and one
bias strip, 1 3/4”” x 8” and 8” of 1/4” filler cord• Cotton or polyester thread• Bulky Overlock Foot #12/12C• 90/14 Universal needle• Needle position as indicated below• Stitch: Straight Stitch
Piping1. Fold the wrong side of the bias strip around the
filler cord and position it under the presser foot with the folded edge to the left and the cord under the groove on the sole of the foot.
2. Select the straight stitch and adjust the needle so it stitches next to the cord (align the needle with the engraved line on the top of the sole).
3. Stitch the length of the cord. Once the cord is covered, it is ready to be inserted into a seam or along an edge.
4. Matching the raw edges, place the piping along the long edge of one fabric piece. Using the same machine settings, sew along the side of the cord on top of the previous stitching.
5. Matching the raw edges, place the second piece right sides together with the first piece. The piping will be sandwiched between the fabrics.
6. Position the fabric/piping under the presser foot as before. Adjust the needle one position closer to the cord. This ensures that the previous stitching will not be seen in the finished project.
Bulky Overlock Foot #12/12C
Click here for video:Piping

My BERNINA B E R N I N A A C C E S S O R I E S W O R K B O O K
45
MINI PIPINGMini piping is a tailored trim that looks great on kids’ clothing, purses, and anywhere you want a subtle embellishment. Even though Clear Appliqué Foot #23 was designed for narrow satin stitch appliqué, it is perfect for making mini piping.
Supplies & Settings• Two pieces firmly woven fabric, 3” x 6” each and one bias
strip, 1 3/4” x 8” and 8” of 1/4” filler cord• Cotton or polyester thread• Clear Appliqué Foot #23• 80/14 Universal needle• Needle position as indicated below• Stitch: Straight Stitch
Mini Piping1. Fold the wrong side of the bias strip around the filler cord
and position it under the presser foot with the cord riding in the 2 mm groove in the center of the sole of the foot.
2. Select the Straight Stitch; adjust the needle position to sew next to, but not into the cord. Sew alongside the cord. Once the piping is covered, it is ready to be inserted into a seam.
3. Matching the raw edges, place the piping along the long edge of one fabric piece. Using the same machine settings as above, sew along the side of the cord on top of the previous stitching.
4. Matching the raw edges, place the second fabric piece right sides together with piping and first piece.
5. Position the fabric/piping under the presser foot; adjust the needle one position closer to the cord so the previous stitching will not be seen on the finished project.
Clear Appliqué Foot #23Click here for video:Mini Piping

My BERNINA B E R N I N A A C C E S S O R I E S W O R K B O O K
46
DOUBLE PIPINGDouble Cord Feet #59C and #60C are both 9 mm presser feet designed to stitch piping, double piping, and double couching. The sole of each foot has two large grooves to accommodate cords. Foot #59C works with cords that are 4-6 mm in diameter and #60C takes cords up to 7-8 mm. One of the most unique techniques to make with these feet is double piping that is used as a trim for upholstery projects.
Supplies & Settings• One bias strip of fabric, 3” x 15” and two 16” of 1/4”
filler cord• Cotton or polyester thread• Double Cord Foot #59C or #60C• 80/12 Universal needle• Center needle position • Stitch: Straight Stitch
Double Piping1. Wrap the 3” wide bias strip around two ¼” cords
placed side by side. 2. Position the wrapped cord under the foot with one
cord in each groove. 3. Set the machine for straight stitching with the
needle in the center position and then stitch down the center. This holds one cord snugly in the fabric, but the other cord is still loose.
4. Wrap the fabric to the back around the loose cord as snugly as possible. Place the cords under the foot again and stitch down the center again, over the previous stitching.
5. The last step is to trim the excess fabric from the back, leaving about an 1/8” beyond the stitching. The finished trim is usually glued along the edges of upholstered furniture to cover staples and fabric raw edges.
Double Cord Foot #59CDouble Cord Foot #60C
Click here for video:Double Piping

My BERNINA B E R N I N A A C C E S S O R I E S W O R K B O O K
47
JUMBO PIPINGTry jumbo piping with Foot #55 to give a unique designer look to your decorating projects. It ’s a fun look for trimming floor pillows and is a great finish for the edge of a circular tablecloth. Leather Roller Foot #55, originally designed to roll across leather, allows you to position the needle close to the jumbo piping. When using Foot #55, the fabric is only controlled where the wheel holds it down on the feed dog, so the needle should be close to the wheel in the far-left position for the best stitch formation.
Supplies & Settings• Two pieces firmly woven fabric, 4” x 8” each and
one bias strip, 3” x 10” • 10” of 1” filler cord• Cotton or polyester thread• Leather Roller Foot #55• 90/14 Universal needle• Needle position as indicated below• Stitch: Straight Stitch
Jumbo Piping1. Attach Leather Roller Foot #55 to the
machine.
2. Adjust the needle to the far-left position.
3. Wrap the piping with the bias strip of fabric
with raw edges even.
4. Position the wheel on the seam allowance
of the piping with the needle in the left
position, close to the cord, and stitch.
5. To insert the trim into a seam, stitch the
piping to the long side of a piece of fabric
with the raw edges even.
6. Place a second piece of fabric piece right
side down over the piping and stitch the
fabrics together, catching the piping seam
allowance in the process.
Leather Roller Foot #55
Click here for video:Jumbo Piping

My BERNINA B E R N I N A A C C E S S O R I E S W O R K B O O K
48
PLEATS, TUCKS, & RUFFLESGATHERING
PINTUCKS
PINTUCKS & STITCHES
PLEATING & RUFFLING
NARROW TUCKS

My BERNINA B E R N I N A A C C E S S O R I E S W O R K B O O K
49
GATHERINGGathering Foot #16 comes in two versions, one for 5.5 mm machines and one for 9 mm machines. They are both called #16 and both have a 5.5 mm needle opening. One is wider than the other and it is designed to fit the wider feed teeth of the larger machines.
Supplies & Settings• Three pieces medium weight cotton, one 3” x 6” and
two 4” x 12”• Cotton or polyester thread• Gathering Foot #16• 80/12 Universal needle• Center needle position• Stitch: Straight Stitch
GatheringAttach the gathering foot to the machine, select the Straight Stitch and adjust the stitch length to 5 mm.
Swatch #11. Place one 12” length of fabric right side up under
the foot. 2. Stitch the length of the fabric; it will gather as it
goes under the needle.
Swatch #21. Place the remaining 12” length of fabric right side
up under the presser foot. Stitch 2”-3” and stop.2. Insert the 6” length of fabric right side down into
the slot of the foot with the raw edge against the right side of the slot.
3. Continue stitching, carefully guiding both pieces of fabric. Guide the fabric being gathered with the left hand and the flat piece of fabric with the right hand. Note that the fabric being gathered moves under the foot much faster than the flat, top layer.
Tip: Reduce the motor speed to help keep the fabric under control.
Gathering Foot #16
Note: There are three things that affect the amount of gathers:
Fabric Weight—The lighter weight the fabric, the more it gathers.
Tension—Increased upper tension increases the amount of gathering.
Stitch Length—The longer the stitch length, the tighter the gathers. Use the basting stitch or the Long Stitch function to increase gathers in heavier weight fabrics such as woolens and corduroys.
Click here for video:Gathering

My BERNINA B E R N I N A A C C E S S O R I E S W O R K B O O K
50
CORDED PINTUCKSPintucks can be used as embellishment in a variety of ways on projects such as blouses, christening gowns, pillows, book covers and more. BERNINA has four basic pintuck feet. The grooves on the soles of these feet correspond to the size pintuck each foot makes. Foot #33 has 9 grooves and is for lightweight fabric. Foot #32 has 7 grooves and #31 has five. These feet are for medium weight fabric. Foot #30 has 3 grooves and is great for making pintucks on sturdy fabric such as lightweight denim and heavy linen.
Supplies & Settings • One piece quilting cotton, one piece of batting, both
10” x 10” • Narrow cord such as perle cotton, crochet cotton,
embroidery floss, etc.• Two spools of cotton or polyester thread for the
needle and one spool of cotton, polyester or thread for the bobbin
• Pintuck Foot #31• Pintuck Cording Attachment• 3.0/90 Twin needle• Center needle position• Stitch: Straight Stitch
Corded Pintucks1. Insert the Twin Needle into the machine and thread
with 2 spools of thread. Note: Thread the machine holding both threads as one except at the tension disc where you will place one thread on each side of the disc. See your owner’s manual for specific threading instructions for your model. Note: 8 Series machines must be threaded manually.
2. Select Straight Stitch; adjust stitch length to 1.75 mm-2 mm.
3. Attach Pintuck Foot #31 to the machine.4. Attach the Pintuck Cording Attachment to the bed
of the machine; thread the cord through the guide,5. Start sewing in one corner and meander across
fabric. Sew 5-6 more rows, evenly spaced across the fabric. Position the previously sewn pintuck in any groove of the foot for even spacing.
Pintuck Feet #30, 31, 32, and 33
6. Sew 4-6 random corners, similar to the photo. To turn corners, use the following steps:
• Sew to corner; stop with needles barely in fabric.
• Turn 45°, take 1 stitch, barely lower needles into the fabric, turn another 45° and continue stitching.
Click here for video:Pintucks

My BERNINA B E R N I N A A C C E S S O R I E S W O R K B O O K
51
PINTUCKS & DECORATIVE STITCHINGPintuck and Decorative Stitch Foot #46C does two sewing techniques. First, you make pintucks with it using a twin needle. For the second technique, you add decorative stitches between the pintucks. The pintuck grooves on the bottom of the clear sole are widely spaced, leaving room for 9 mm decorative stitches.
Supplies & Settings• One piece, medium weight cotton fabric, 6” x 6” and
1 yard narrow cording (gimp, perle cotton) and 1-2 pieces of tear-away stabilizer, 6” x 6” each
• Two spools of cotton or polyester thread for the needle and one spool of cotton, polyester or thread for the bobbin
• Pintucks & Decorative Stitches Foot #46C• 3.0/90 Twin needle• Center needle position• Stitch: Straight Stitch
Pintucks & Decorative Stitching1. Insert Twin Needle into the machine and thread
with 2 spools of thread. Thread the machine holding both threads as one except at the tension disc where you will place one thread on each side of the disc. See your owner’s manual for specific threading instructions for your model. Note: 8 Series machines must be threaded manually
2. Select Straight Stitch; adjust stitch length to 2 mm. Attach the Pintuck Foot #46C.
3. Attach the Pintuck Cord Guide to the bed of the machine and thread the cord through the guide.
4. Mark the first pintuck & stitch along marked line. 5. Move the fabric and position the first pintuck in one
of the grooves to get the desired spacing. Stitch a second pintuck.
6. Continue repositioning the foot and aligning the pintucks in the grooves until the desired number of pintucks are sewn.
7. Place 1-2 layers of stabilizer behind the fabric. Position the foot over the pintucks; the pintucks fit into the grooves, letting the fabric ride smoothly as you add decorative stitches. Select a decorative stitch; sew the stitch between the pintucks.
Pintuck & Decorative Stitch Foot #46C
Decorative stitches can be sewn with a single needle
or a twin needle as desired.
Click here for video:Pintucks & Decorative Stitching

My BERNINA B E R N I N A A C C E S S O R I E S W O R K B O O K
52
PLEATING & RUFFLINGRuffler #86 is an unusual device that looks a bit intimidating. But it’s easier to use than it looks. What it actually does is pleat fabric as it moves though the attachment. The frequency and the depth of the pleats can be adjusted to get the look you want. The ruffler attaches to the machine in the same way as other feet with one addition. It has a U-shaped arm that has to be slipped over the needle bar as you attach the foot. That is how the ruffler counts the stitches as it goes up and down to know when to pleat.
Supplies & Settings• One piece quilting cotton, 4” x 21” • Cotton or polyester thread• Ruffler Attachment #86• 80/12 Universal needle• Center needle position• Stitch: Straight Stitch
Ruffling and Pleating1. Place the fabric between the blades at the bottom
of the ruffler and move it up under the needle. Once you have it positioned, the blades hold it and you cannot pull it back out. You remove it from the side or back of the ruffler.
2. Set the Adjusting Lever to 1 and stitch for about 6”. Stop and change the lever to 6 and stitch for about another 6”. Stop and change the lever to 12 and stitch the remainder of the fabric. Use your fingertips to guide the fabric it so it doesn’t come out of the ruffler as it is being pushed and pulled to form a pleat.
Tips: If you want the pleats to look more like gathering, use a setting of 1 and set the screw for a shallow pleat. If you want more of a pleated look, use a setting of 6 or 12 and then press the pleats in place after stitching.
The “0” setting on the lever (see picture at right) results in no pleat, allowing for a straight stitch without removing the ruffler, This is convenient when needing to alernate pleats and straight stitching.
Ruffler Attachment #86
Change the frequency of pleats with the adjusting lever on the front of the ruffler: 1 = a pleat with every stitch, 6 = every 6 stitches and 12 = every 12th stitch. The screw below the lever changes the depth of the pleats – turn it clockwise for deeper and counter clockwise for more shallow pleats.
Click here for video:Pleating & Ruffling

My BERNINA B E R N I N A A C C E S S O R I E S W O R K B O O K
53
NARROW TUCKSStitching perfect narrow tucks is easy using Edgestitch Foot #10/10C/10D and an adjusted needle position.
Supplies & Settings• Two pieces medium weight cotton, 6” x 6” each • Cotton or polyester thread• Edgestitch Foot #10/10C/10D• 80/12 Universal needle• Needle position as indicated below• Stitch: Straight Stitch
Narrow TucksSwatch #1: Vertical Tucks1. Fold the fabric in half; crease to mark the center.2. Make 2 more creases on each side of the center,
spacing the lines about 1” apart. 3. Fold fabric along one line. Place fold to the left of
the center blade of Foot #10/10C/10D, with the fold against the blade.
4. Move needle position to the far left; sew the length of the fabric to form a tuck.
5. Repeat for the remaining lines, adjusting the needle position to form various widths of tucks as desired.
6. Press tucks to one side.
Swatch #2: Grid Tucks1. Create a swatch of vertical tucks, following the
directions above.2. Fold the fabric in half; crease to mark the horizontal
center of the swatch. 3. Make 2 more creases on each side of the center,
spacing the lines about 1” apart.4. Fold fabric along one line. Place fold to the left of
the center blade of Foot #10/10C/10D, with the fold against the blade.
5. Move needle position to the far left; sew the length of the fabric to form a tuck.
6. Repeat for the remaining lines, adjusting the needle position to form various widths of tucks as desired.
7. Press tucks to one side.
Note: When stitching over the vertical tucks, make sure they are all facing the same direction.
Edgestitch Foot #10/10C/10D
Click here for video:Narrow Tucks

My BERNINA B E R N I N A A C C E S S O R I E S W O R K B O O K
54
COUCHINGBASIC COUCHING
FLAT COUCHING
FREE-MOTION COUCHING

My BERNINA B E R N I N A A C C E S S O R I E S W O R K B O O K
55
BASIC COUCHINGCouching is a technique borrowed from hand embroidery. It is a way to add color and texture to projects by stitching cords, yarns, and fibers to the surface of the fabric.
Supplies & Settings • One piece quilting cotton or other firm fabric and
one piece of tear-away stabilizer, both 10” x 10” • Cotton or polyester thread• Braiding Foot #21• 80/12 Universal needle• Default needle position• Stitch: Zigzag Stitch
Basic Couching1. Place the tear-away stabilizer on the wrong side of
the fabric.2. Attach Braiding Foot #21 to the machine. Note:
Bulky Overlock Foot #12C also works for this technique.
3. Select the zigzag stitch and set the width to match the cord width. Determine the stitch length by the coverage desired on the cord.
4. Thread selected fibers through hole on top of sole. 5. If using several strands, lightly twist them together
as they go through the opening. Stitch over the fibers, sewing a gently curved line.
Couching Tips• Match the color of the stitching to the background
fabric and the contrasting cord will look as if it is woven into the fabric.
• Match the color of the stitching to the cord; it will give the cord a more pronounced look, subtly adding to its thickness.
• Match the color of the stitching and cord to the background fabric creating subtle texture without calling attention to the cord.
• Use invisible thread and a blindstitch to make the cord appear to be floating on the surface of the fabric, especially if the cord is a contrasting color to the fabric.
Braiding Foot #21
Click here for video:Basic CouchingCouching Beads

My BERNINA B E R N I N A A C C E S S O R I E S W O R K B O O K
56
ATTACHING STRANDS OF BEADSAttaching strands of beads to fabric is a form of couching but it uses beads instead of cord or yarn. Strands of beads can be couched using Bulky Overlock Foot #12/12C because the groove on the sole allows the beads to move easily under the foot.
Supplies & Settings• One piece quilting cotton, one piece of stabilizer,
both 10” x 10” • 10”-12” of molded or strung beads that will fit into
the groove on the sole of the foot• Cotton or polyester thread• Bulky Overlock Foot #12/12C• 80/12 Universal needle• Default needle position• Stitch: Universal Stitch
Attaching Strands of Beads1. Attach Bulky Overlock Foot #12/12C to the machine.2. Thread the machine with monofilament thread in
needle and bobbin.3. Place the stabilizer on the wrong side of the fabric.4. Attach Bulky Overlock Foot #12/12C to the machine.
The strand of beads should be able to move freely through the “tunnel” under the foot.
5. Select the Universal Stitch with a length equal to the length of the bead (the cross threads will slip between the beads and be inconspicuous). The width should be wide enough to go from one side of the bead to the other.
6. Stitch the beads in place, sewing in straight lines or gentle curves.
Bulky Overlock Foot #12/12C

My BERNINA B E R N I N A A C C E S S O R I E S W O R K B O O K
57
FLAT COUCHINGCouched cords can have a variety of looks, depending on the foot used to hold the cords. Cording Feet #22 and #25 hold multiple narrow cords side by side as they go under the needle. The result is the look of a flat, narrow braid.
Supplies & Settings• One piece firmly woven fabric and tear-away
stabilizer, both 6” x 6” • Assorted narrow cords, perle cotton, and/or
embroidery floss• Polyester or rayon embroidery thread• Cording Feet #22 or #25• 80/12 Universal needle• Center needle position• Stitch: Various decorative stitches
Flat Couching1. Place the stabilizer on the wrong side of the fabric.2. Attach Cording Feet #22 or #25 to the machine.3. Thread the machine with embroidery thread in the
needle. The same thread or coordinating bobbin thread can be used in the bobbin.
4. Place narrow cords and yarns in the grooves of the foot on top of the sole, closing the black “gate” over them to hold them side-by-side as they are stitched.
5. Select decorative stitches as desired and sew over the cords in straight lines.
Cording Feet #22 and #25
Cording Foot TipBefore loading the cords into the foot, tie one end into a knot to manage them easier.
Experiment with decorative stitches to change the look of your couching.
Click here for video:Flat Couching

My BERNINA B E R N I N A A C C E S S O R I E S W O R K B O O K
58
FREE-MOTION COUCHINGFree-motion couching is a way to stitch cord onto fabric following any pattern or design you want.
Supplies & Settings• One piece firmly woven fabric and tear-away
stabilizer, both 8” x 8” • 1-2 yards of 2 mm decorative cord• Cotton or polyester thread in a color that blends
with the yarn/cord• Free-Motion Couching Foot #43• 80/12 Sharp/Microtex or Universal needle• Center needle position• Stitch: Straight Stitch
Free-motion Couching 1. Place the stabilizer on the wrong side of the fabric.2. Use the Threading Loop included with the foot
to pull cord through the guide next to the thread cutter, through the guide in the left side of the foot, and finally through the needle hole.
3. Optional: Using a marker, draw a fluid design on the
fabric, starting and stopping at the fabric edges.4. Lower the feed dog. Holding the thread and cord
behind the foot as you start, move the fabric as for other free-motion sewing techniques (see pages 39-40), coordinating the stitching speed with the movement of the fabric so that the stitches are approximately 1.5 mm to 2 mm in length and create smooth, curved lines.
5. Follow your drawn pattern or make one up as you go along, covering the fabric with couched cord.
Free-Motion Couching Foot #43
Note: Before using Free-Motion Couching Foot #43 for the first time, attach the extra guide to the side of the machine following the instructions included with the accessory. This guide may be left in place when using other presser feet and accessories, as it will not interfere with other types of sewing.
Click here for video:Free-motion Couching

My BERNINA B E R N I N A A C C E S S O R I E S W O R K B O O K
59
HEMSTITCHING
EMBROIDERED EYELETS
LACE INSERTION
NEEDLE FELTING
SASHIKO
SEWING CIRCLES
SURFACE DESIGN

My BERNINA B E R N I N A A C C E S S O R I E S W O R K B O O K
60
Hemstitching is a beautiful embellishment using a wing needle to make decorative holes in the fabric. The needle is called this because it has flat “wings” on each side. This technique uses decorative stitch patterns that stitch in the same holes several times.
Supplies & Settings• One piece natural fiber fabric such as linen, 6” x 6”.
For easier handling, press the fabric using a light starch or sizing.
• Cotton embroidery thread, 60-weight in a color that matches the fabric.
• Clear Foot #34/34C/34D• Wing Needle, size 100, 110, or 120• Default needle position• Stitch: Various decorative stitches
Hemstitching1. Insert a Wing needle into
the machine. Go to the Needle Security display (if available on your model) and select the wing needle.
2. Select open decorative stitches that go in and out of the same holes several times. Something as simple as a triple straight stitch creates a delicate line of hemstitching. Try the stitches shown below and to the right, but experiment with others.
3. Stitch several rows of hemstitching using the edge of the foot for spacing.
HEMSTITCHING
Clear Foot #34/34C/34D
Click here for video:Hemstitching with Wing Needle

My BERNINA B E R N I N A A C C E S S O R I E S W O R K B O O K
61
EYELET EMBROIDERYMake beautiful embroidered eyelets with the easiest free-motion technique you’ll ever sew. Most of the tools included in the Eyelet Set are used to make holes in the fabric. Once a hole is made, fit it over the post of the eyelet set and stitch around the edges of the opening, covering the raw edges with satin stitching.
Supplies & Settings• One piece linen fabric, 10” x 10”• Hand embroidery hoop or spring hoop• Cotton, polyester or rayon embroidery thread• Eyelet Embroidery Set #82 with Eyelet Foot #92• 80/12 Universal needle• Half right needle position• Stitch: Zigzag Stitch
Embroidered Eyelets1. Lower the feed dog of the machine. Attach Foot #92
and the plate to the bed of the machine according to the instructions included with the Eyelet Set.
2. Stabilize the fabric by hooping firmly in a hand embroidery hoop or a spring hoop. Stabilizer can be used instead of hooping.
3. Using an awl or punch, make a hole in the fabric. Note: Use an awl or cutter slightly smaller than the post; the fabric should fit tightly and will open more as you sew.
4. Place the punched hole over the grey eyelet post. Select the zigzag stitch with a width of 2 mm.
5. Begin stitching, rotating the hoop as you stitch. This step stabilizes the edge of the hole in the fabric.
6. Adjust the zigzag stitch to 4-6mm. Stitch again, rotating the hoop as you sew. Move the hoop at a speed that places the stitches close together (satin stitches). Repeat to get the desired look.
7. For a more decorative look, try these options: a. Use stitch #13 for Step #6. b. Stitch an eyelet as described above. Remove the grey post from the plate and reinsert it with the prong away from the needle opening. Select a decorative stitch and create an outer eyelet detail.
Eyelet Set #82 with Eyelet Foot #92
Stitch #13 and Stitch #417
Click here for video:Eyelet Embroidery

My BERNINA B E R N I N A A C C E S S O R I E S W O R K B O O K
62
LACE INSERTIONUsing lace to join two pieces of fabric is easier than it looks. The lace is first stitched to a single piece of fabric. The fabric behind the lace is trimmed away, making it look as if one piece of fabric is attached to each edge of the lace.
Supplies & Settings• One piece lightweight cotton, 4” x 9” and 9”
insertion lace, 1/2”-3/4” wide• 60 weight cotton embroidery thread• Edgestitch Foot #10/10C• 70/10 Universal needle• Needle position as indicated below• Stitch: Straight Stitch and Zigzag Stitch
Lace InsertionFirst Run1. Position lace on top of fabric where the insertion is
desired. Lace and fabric are both right sides up. Pin or spray baste lace to fabric if desired.
2. Attach Edgestitch Foot #10/10C. Select straight stitch; adjust length to 1.5-2 mm.
3. Position blade next to the right side of lace and adjust needle position to barely catch the header of the lace. Stitch.
4. Sew the left side in the same manner adjusting the needle position as needed to barely catch the header.
5. From the back, carefully cut through the fabric only, between the two rows of stitching, leaving the lace intact. Press the cut fabric away from the lace on each side.
Second Run1. Select Zigzag Stitch; SW = 1-1.5 mm and SL = 0.75-1 mm.2. Move needle to half left position.3. Lay fabric right side up under the presser foot.4. Place right edge of exposed lace to the left of the
guide, and zigzag over the edge of the lace/fabric fold and the previously sewn straight stitch.
5. Sew left edge in the same manner, adjusting needle position as needed to stitch over edge of lace/fabric.
6. Trim excess fabric from wrong side, close to the zigzag stitching.
Edgestitch Foot #10/10C
Click here for video:Lace Insertion

My BERNINA B E R N I N A A C C E S S O R I E S W O R K B O O K
63
NEEDLE FELTINGNeedle Punch, also called felting, is a fun way to embellish wall hangings, book covers, bags, and other craft projects. BERNINA has two versions of this attachment. One is for CB hook machines, and the other is for the 8 Series and BERNINA Hook machines.
Supplies & Settings • Felt or wool, 8” x 8” and yarn and/or wool roving• No thread• Needle Punch Set #45• Punch needles (included with set)• Center needle position• Stitch: Straight• Lower Feed Dog
Needle Felting1. Attach the Needle Punch Set specific to your
machine following the directions included with it.2. Remove the bobbin case, bobbin, and hook from the
machine if required for your model.3. Turn off the Upper and Lower Thread Sensors in
the Setup Program, or use Presser Foot Recognition (available on some models) and key in the correct foot. Lower the feed dog.
4. Place the fibers to be punched (wool roving, yarns, or decorative fibers) over the background fabric. If using wool roving, you may wish to pinch off small bits and pieces. Let your imagination be your guide…swirl yarns to resemble flowers, pinch roving to look like leaves, or simply lay the fibers on top of the fabric as desired to create an all-over design.
5. Quickly punch over the placed fibers to “baste” them in place.
6. Then, go over the same area several times until the fibers are punched completely through to the back of the background fabric.
7. To further enmesh the fibers into the fabric, punch once from the back, and then finish with a final punch to the front.
Needle Punch Set #45
Needle Punch Set for CB Hook Machines
Tip: Felting creates more lint than general sewing. Clean and oil your machine after felting.
Click here for video:Needle Felting

My BERNINA B E R N I N A A C C E S S O R I E S W O R K B O O K
64
SASHIKOSashiko is a Japanese hand embroidery and quilting method. Sashiko designs are traditionally stitched in white thread on dark indigo fabric and are often based on a grid pattern. Use Cordonnet Foot #11 topstitching thread. The 2 mm groove on the sole of the foot cradles the heavy thread as you stitch, allowing it to move freely under the presser foot.
Supplies & Settings • One piece denim, & tear-away stabilizer, both 8” x 8” • Topstitching thread or Cordonnet thread by Mettler• Cotton or polyester thread in the bobbin (see below)• Cordonnet Foot #11• 90/14 or 100/16 Topstitch Needle• Center needle position• Stitch: Straight Stitch
Sashiko1. Thread the needle with Cordonnet or topstitching
thread, and the bobbin with regular cotton or polyester construction thread. Note: If the color of the bobbin thread matches the fabric and the needle thread is contrasting, it will give the appearance of a hand-sewn running stitch.
2. Select Straight Stitch; adjust the stitch length to 3-4 mm as desired.
3. Using chalk or fabric marker, draw a 1” grid on the fabric. Use the grid to draw a design, using one of the diagrams as a guide.
4. Place the tear-away stabilizer on the wrong side of the fabric.
5. Stitch along the drawn lines. Try to stitch as continuously as possible to avoid an excessive number of thread ends. When all stitching is finished, pull the ends to the back and tie off.
Sashiko Tips:• If using the thread cutter, disengage the Securing
Stitch to avoid thread jams when using heavy threads.• Tension adjustments are usually not needed; however,
it is occasionally necessary to slightly tighten the needle tension to get a perfect stitch.
Cordonnet Foot #11
Click here for video:Sashiko

My BERNINA B E R N I N A A C C E S S O R I E S W O R K B O O K
65
SEWING CIRCLESDrawing or stitching a circle is almost impossible to do but Circular Embroidery Attachment #83 makes it easy to sew a perfect circle.
Supplies & Settings• One piece quilting cotton, one piece of stabilizer or
batting, both 10” x 10” • Cotton or polyester thread• Circular Embroidery Attachment #83 and Open
Embroidery Foot #20/20C/20D• 80/12 Universal needle• Center needle position• Stitch: Straight Stitch and decorative stitches
Sewing Circles1. Attach Circular Embroidery Attachment #83 to the
bed of machine.2. Attach Open Embroidery Foot #20/20C/20D to
machine.3. Fold the fabric in quarters to mark the center. Add
1-2 layers of tear-away stabilizer. Note: If fabric is not stabilized well enough, the fabric will not move smoothly in a circle.
4. Push fabric onto tack at center of the fabric square; put stopper over tack (careful: it’s VERY sharp).
5. Slide the black tab to change the size of the circle.6. Select Straight Stitch; sew a circle.7. Remove the fabric from the tack and reposition it to
stitch another circle. Change circle sizes, placement, and stitches as desired.
Circular Embroidery Attachment #83
Tips• Fabric needs to be firm – stabilize well.• Use the same presser foot you would use if sewing your chosen stitch or technique in a straight line.• When sewing a decorative pattern, use an odd-numbered notch (count them as you move the slide)
and the patterns will usually (not always) match.• As you come full circle, press Pattern End so you will stop near the end but with a gap (about 1
pattern away). You can then judge how much space you need to fill. Use the Balance feature or Pattern Extend on your machine to adjust the last pattern to fill the space or carefully push or pull the fabric to match the patterns.
• When stitching letters, mount the attachment on both sides of needle so the letters will be readable on both the upper and the lower curves.
Click here for video:Sewing Circles