Creative Serging with the L 8 Overlocker | BERNINA
13
©2022 BERNINA of America Creative Serging with the L 8 Overlocker FABRIC & NOTION SUPPLIES: • 1/3 yard 54” wide denim • Five coordinating fat quarters with a solid look • 1 yard of coordinating cotton print fabric • 8” of 1 1/4” wide ribbon • 1 package pre-made covered piping • 1 1/4 yards narrow lace trim • 1 yard 1” polypropylene webbing for handles • 1/2 yard fusible fleece • 4 cones serger thread in a neutral color • 1 cone serger thread to match denim • Assorted decorative threads • ELX 90/14 overlocker needles • 90/14 Topstitch needle (ONLY for the Flatlock Ribbon Block) • Basic sewing and serger supplies MACHINE & PRESSER FOOT SUPPLIES: • BERNINA L 890 • Blindstitch Foot #C19 • Gathering Foot #C18 • Piping Foot #C16 L (5 mm) • Clear Foot #C27 • Coverstitch Compensation Foot #C12 • Accessories Holder • Double Fold Binder Attachment #C21 1/4” seam allowance except where indicated. Read through the directions before starting. WOF is width of fabric. Always test stitches when working with decorative threads. It’s time to explore the creative options of the overlocker with this sampler tote bag. Each block on the front will have a different technique using accessory feet and decorative threads. The reverse side is a log cabin quilt block. Let’s have some creative fun! Directions are for the BERNINA L 890. Finished tote size: approximately 12 1/2” x 11 1/2”
-
Upload
khangminh22 -
Category
Documents
-
view
1 -
download
0
Transcript of Creative Serging with the L 8 Overlocker | BERNINA

©2022 BERNINA of America
Creative Serging with the L 8 Overlocker
FABRIC & NOTION SUPPLIES:
• 1/3 yard 54” wide denim
• Five coordinating fat quarters with a solid look
• 1 yard of coordinating cotton print fabric
• 8” of 1 1/4” wide ribbon
• 1 package pre-made covered piping
• 1 1/4 yards narrow lace trim
• 1 yard 1” polypropylene webbing for handles
• 1/2 yard fusible fleece
• 4 cones serger thread in a neutral color
• 1 cone serger thread to match denim
• Assorted decorative threads
• ELX 90/14 overlocker needles
• 90/14 Topstitch needle (ONLY for the Flatlock Ribbon Block)
• Basic sewing and serger supplies
MACHINE & PRESSER FOOT SUPPLIES:
• BERNINA L 890
• Blindstitch Foot #C19
• Gathering Foot #C18
• Piping Foot #C16 L (5 mm)
• Clear Foot #C27
• Coverstitch Compensation Foot #C12
• Accessories Holder
• Double Fold Binder Attachment #C21
1/4” seam allowance except where indicated.
Read through the directions before starting. WOF is width of fabric.
Always test stitches when working with decorative threads.
It’s time to explore the creative options of the overlocker with this sampler tote bag. Each block on the front will have a different technique using accessory feet and decorative threads. The reverse side is a log cabin quilt block. Let’s have some creative fun!
Directions are for the BERNINA L 890.
Finished tote size: approximately 12 1/2” x 11 1/2”

Creative Serging with the L 8 Overlocker
©2022 BERNINA of America
FLATLOCK RIBBON BLOCK
Machine Set Up
• Stitch: 3-thread Flatlock Wide (LN) #5
• Foot: Blindstitch Foot #C19
• Position guide even with left needle pin
• Needle: Topstitch 90/14 (ONLY for this block)
• Decorative thread in needle
• Serger thread in loopers
• Disengage knife
Directions
1. Cut (2) 2 1/2” x 8” strips from green fat quarter.
2. Press 1/4” to wrong side along one long edge of each strip.
3. Place ribbon and folded edge of one of the strips right sides together.
4. Guide along blade of foot and sew.
5. Open the flatlock. The edge of the ribbon will be next to the pressed edge.
6. Add remaining strip of fabric to other side of ribbon in the same manner.
7. Press and trim to 4 1/2” x 6 1/2”.
Tips
• The needle thread creates the ladder stitch.
• Alter the width of the fabric strips depending upon the width of the ribbon.

Creative Serging with the L 8 Overlocker
©2022 BERNINA of America
ROLLED HEM PINTUCK BLOCK
Machine Set Up
• Stitch: 2-thread Rolled Hem (RN) #13
• Foot: Blindstitch Foot #C19
• Position guide on intersection of upper and lower knife blades
• Texturized thread in looper
• Serger thread in needle
• Disengage knife
Directions
1. Cut 6” square from plum fat quarter.
2. Press square in half wrong sides together.
3. Add creases on either side of center 1“ away.
4. Start with left fold and stitch a rolled hem guiding fold along blade of foot.
5. Sew center and right creases in same manner.
6. Press and trim to 4 1/2” square.
Tip
• For uniformity, stitch all rolled hem pintucks in the same direction.

Creative Serging with the L 8 Overlocker
©2022 BERNINA of America
PUFFING AND PIPING BLOCK
Machine Set Up
• Stitch: 4-thread Overlock #1
• Feet: Gathering Foot #C18 and Piping Foot #C16 L (5 mm)
• Serger thread in needles and loopers
• Engage knife
Directions
1. Cut a 2 1/2” x 21” strip from cotton print.
2. Cut (2) 3” x 8” strips from coral fat quarter.
3. Cut (2) 8” pieces of covered piping.
4. Attach Gathering Foot #C18.
5. Using Creative Consultant, select Medium Weight Woven Fabric and Gathering (H) to set machine for gathering.
6. Place 2 1/2” strip right side up under foot, guiding along the edge of the foot to trim just a little. Serge and gather allowing fabric to feed freely.
7. Repeat on other side of strip.
8. Lightly press and trim to 8” long.
9. Return machine to default settings for a 4-thread overlock.
10. Attach Piping Foot #C16 L (5mm).
11. Place one piping piece on the right side of gathered strip aligning long raw edges. Sew to gathered strip allowing piping to feed in the groove of foot. Repeat on other side.
12. Place one coral strip right sides together on top of gathered and piped strip, aligning long raw edges.
13. Insert under foot placing piping in the groove of the foot and sew.

Creative Serging with the L 8 Overlocker
©2022 BERNINA of America
14. Repeat on other side.
15. Press seam allowances to outside.
16. Trim to 4 1/2” x 6 1/2”.
Tips
• Increase both needle tensions for tighter gathers.
• Gathers can be adjusted after sewing by releasing the needle threads at each end.
• Test gathering on fabric scraps to achieve the desired result.

Creative Serging with the L 8 Overlocker
©2022 BERNINA of America
DOUBLE THREAD FLATLOCK AND CHAINSTITCH BLOCK
Machine Set Up #1
• Stitch: 2-thread Flatlock Wide (LN) #11
• Foot: Blindstitch Foot #C19
• Position guide centered between needles
• Two decorative threads in lower looper
• Use a thread cradle to thread looper
• Serger thread in needle that matches fabric
• Disengage knife
• Increase cutting width to 8
Directions
1. Cut 8” square from blue fat quarter.
2. Mark a line down the center on the right side. Add lines on either side of center 1 1/2‘‘ away.
3. Fold fabric wrong sides together on one of the lines and stitch guiding along blade of foot. Open flatlock.
4. Repeat on remaining lines. Looper threads will be on the right side of the fabric.
Machine Set Up #2
• Stitch: 2-thread Chainstitch RC #16
• Foot: Clear Foot #C27
• Two decorative threads in chain looper
• Use a thread cradle to thread looper
• Serger thread in needle
Directions
1. Mark lines on wrong side centered between flatlock stitches. Add a line 1/2’’ away from both outside flatlock stitches.
2. Stitch chainstitches on the marked lines on the wrong side of the fabric.
3. Press and trim to 6 1/2” square.
4. Apply seam sealant to stitch ends.

Creative Serging with the L 8 Overlocker
©2022 BERNINA of America
Tips
• Use Decorative Thread Guide #L25 and/or Decorative Thread Spool Pin #L26 as needed.
• Stitch a triple stitch or decorative stitch on the sewing machine instead of the chainstitch.

Creative Serging with the L 8 Overlocker
©2022 BERNINA of America
SAMPLER ASSEMBLY
Machine Set Up
• Stitch: 4-thread Overlock #1
• Feet: Clear Foot #C27 and Piping Foot #C16 L (5 mm)
• Serger thread in needles and loopers
• Engage knife
• Seam guide even with cutting blade mark on foot
Directions
1. Lay blocks out as shown.
2. Sew together in rows and then sew rows together. Knife is skimming the fabric.
3. Press.
4. Attach piping foot and sew piping to the four edges of panel, starting with top and bottom edges. For fun, use a different color piping than in the puffing block.

Creative Serging with the L 8 Overlocker
©2022 BERNINA of America
LOG CABIN BLOCK
Machine Set Up
• Stitch: 4-thread Overlock #1
• Foot: Clear Foot #C27
• Serger thread in needles and loopers
• Engage knife
• Seam guide even with cutting blade mark on foot
Directions
1. Cut (2) 3“ x WOF strips from the cotton print. Cut a 3” square from from one strip for block center.
2. Cut (2) 1 1/2” x 21” strips from each of the five fat quarters.
3. Sew one strip along one edge of square, just skimming the knife.
4. Press open and trim edges even.
5. Rotate the square and add another strip of a different color.t
6. Continue sewing around adding different colors. Stop when block is about 8“ square.
7. Use 3” cotton print for last round.
8. Square block to 10 1/2” square.
Tip
• Be consistent in the amount of trimming and try to keep it to a minimum.
• Or sew different width strips for a unique look.
Creative Serging with the L 8 Overlocker
©2022 BERNINA of America
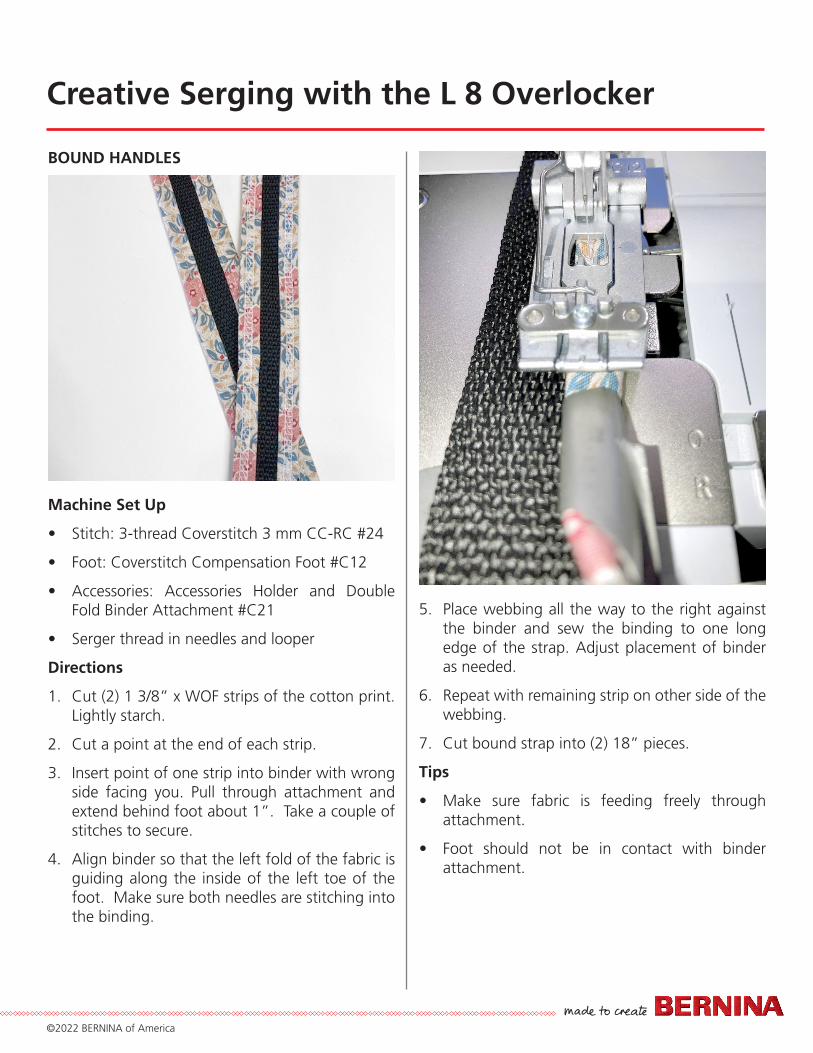
BOUND HANDLES
Machine Set Up
• Stitch: 3-thread Coverstitch 3 mm CC-RC #24
• Foot: Coverstitch Compensation Foot #C12
• Accessories: Accessories Holder and Double Fold Binder Attachment #C21
• Serger thread in needles and looper
Directions
1. Cut (2) 1 3/8” x WOF strips of the cotton print. Lightly starch.
2. Cut a point at the end of each strip.
3. Insert point of one strip into binder with wrong side facing you. Pull through attachment and extend behind foot about 1”. Take a couple of stitches to secure.
4. Align binder so that the left fold of the fabric is guiding along the inside of the left toe of the foot. Make sure both needles are stitching into the binding.
5. Place webbing all the way to the right against the binder and sew the binding to one long edge of the strap. Adjust placement of binder as needed.
6. Repeat with remaining strip on other side of the webbing.
7. Cut bound strap into (2) 18” pieces.
Tips
• Make sure fabric is feeding freely through attachment.
• Foot should not be in contact with binder attachment.

Creative Serging with the L 8 Overlocker
©2022 BERNINA of America
OUTER BAG ASSEMBLY
Denim
• Cut: (1) 2 1/2” X WOF strip
• Subcut: (2) 2 1/2” x 10 1/2” rectangles for upper borders
• (2) 3 1/2” x WOF strips
• Subcut: (2) 3 1/2” x 10 1/2” rectangles for lower borders
• (4) 3 1/2” x 15 1/2” rectangles for side borders
Machine Set Up
• Stitch: 4-thread Overlock #1
• Feet: Clear Foot #C27 and Piping Foot #C16 L (5mm)
• Serger thread in needles and loopers
• Use thread to match denim in left needle
• Engage knife
• Seam guide attached as before
Directions
1. Sew a 2 1/2” x 10 1/2” strip to the top of the log cabin block.
2. Sew a 3 1/2” x 10 1/2” strip to the bottom of the log cabin block.
3. Sew a 3 1/2” x 15 1/2” strip to each side of the log cabin block.
4. Press seams to outside.
5. Attach the piping foot and repeat with the sampler block.
6. Square both pieces to 15 1/2” wide and 15” tall. These are the outer bag pieces.
7. Cut two pieces of fusible fleece to the same size as the outer bag pieces and fuse to the wrong side of each piece.

Creative Serging with the L 8 Overlocker
©2022 BERNINA of America
TRIM DETAILS AND QUILTING
(Stitching is done only through front pieces and fleece.)
Machine Set Up
• Stitch: 2-thread Chainstitch RC #16
• Foot: Clear Foot #C27
• Serger thread in needle to match trim
Directions
1. For the log cabin piece, thread lace trim through groove on front of foot.
2. Stitch trim down along seam between block and denim.
3. Miter lace at the corners and turn with needle down.
4. When back to start overlap slightly and trim excess.
5. Tack down corners with a hand needle if desired.
6. Quilt in the ditch between the piping and denim on the sampler piece. Use thread matching the piping.
FINAL ASSEMBLY
Cotton Print (lining):
• Cut: (1) 15“ x WOF strip
• Subcut: (2) 15” x 15 1/2” pieces
Machine Set Up
• Stitch: 4-thread Overlock #1
• Foot: Clear Foot #C27
• Serger thread in needles and loopers
• Use thread to match denim in left needle
• Use seam guide as before
Directions
1. To box the corners, cut 1 1/2” squares from the bottom corners of both outer bag pieces and both lining pieces. Remember that the bottom edges are 15 1/2” wide.

Creative Serging with the L 8 Overlocker
©2022 BERNINA of America
2. Sew outer bag pieces right sides together along side and bottom seams.
3. Repeat with lining pieces. Leave a 5” opening along the bottom of the lining for turning.
4. Flatten the corners by matching the side and bottom seams on each side of bag and lining and stitch closed.
5. Turn outer bag right side out and place handles along seams between denim and blocks. Align raw edge of handles with top of bag and pin outside of stitching area.
6. Place outer bag into lining right sides together matching the side seams.
7. Stitch around the top edge of the bag.
8. Remove pins from handles and turn bag right side out.
9. Close the opening in the lining with a chainstitch.
10. Press top of bag.
11. Topstitch with a chainstitch around the top of the bag. Reduce presser foot pressure as needed.
Now you have completed your Overlocker Foot Sampler Tote! I hope you enjoyed the creative journey and are looking forward to more adventures with feet and thread!