looking for a new sewing project? - BERNINA 480
133
BERNINA 480
-
Upload
khangminh22 -
Category
Documents
-
view
0 -
download
0
Transcript of looking for a new sewing project? - BERNINA 480
BERNINA 480
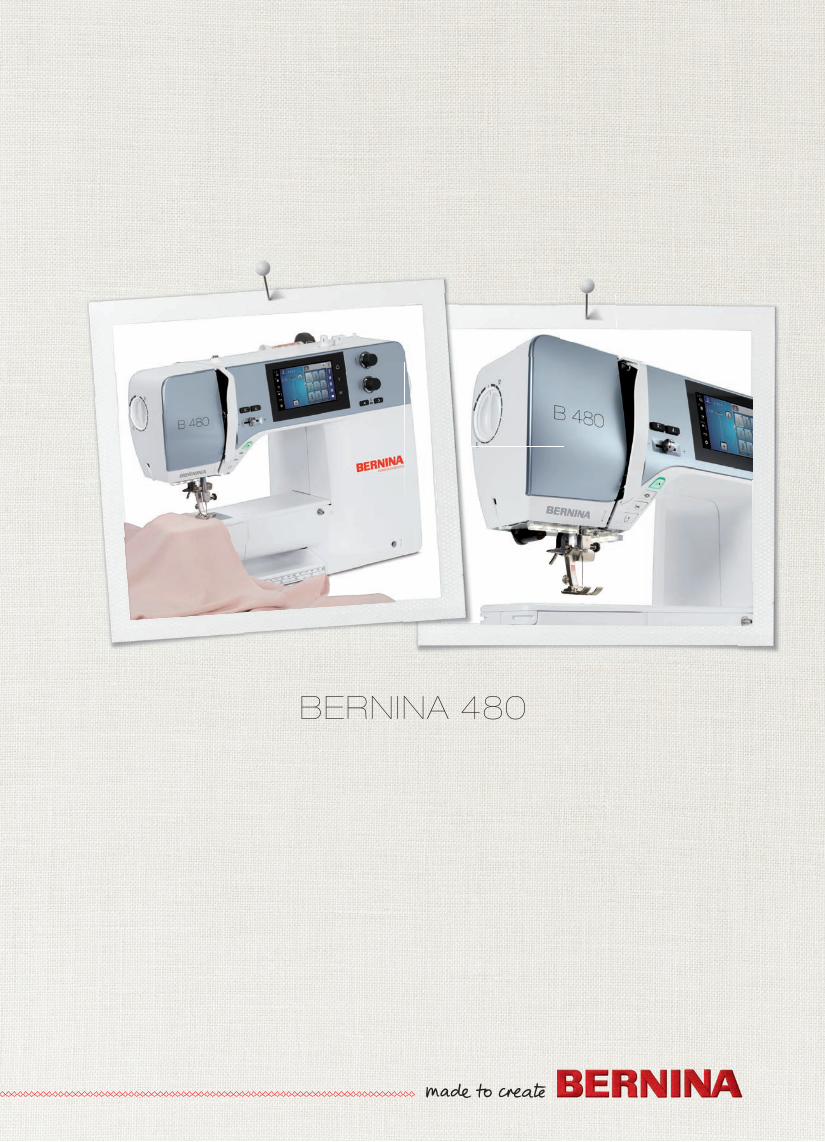
LOOKING FOR A NEW SEWING PROJECT?You can find what you want in “inspiration”, our sewing magazine. Thanks to great sewing patterns and detailed sewing instructions, every project succeeds right away.
* Not available in all countries.
Inspiration magazine
is available in German, English,
French and Dutch

Welcome
3
Dear BERNINA customerCongratulations! You have decided on BERNINA and therefore on a product which will delight you for years.For more than 100 years our family company has attached greatest importance to satisfied customers. As forme, it is a matter of personal concern to offer you Swiss development and precision at the height ofperfection, future-orientated sewing technology and a comprehensive customer service.
The BERNINA 4-series consists of several ultramodern machines, whose development not only focused thehighest demands on technique and the ease of use but also considered the design of the product. After allwe sell our products to creative people like you, who do not only appreciate high quality but also form anddesign.
Enjoy the creative sewing on your new BERNINA 480 and keep informed about the various accessories atwww.bernina.com. On our homepage you will also find a lot of inspiring sewing instructions, to bedownloaded for free.
Our highly trained BERNINA dealers will provide you with more information on service and maintenanceoffers.
I wish you lots of pleasure and many creative hours with your new BERNINA.
H.P. Ueltschi
Owner
BERNINA International AG
CH-8266 Steckborn
Edition notice
4
Edition notice
Graphics
www.sculpt.ch
Text, Setting and Layout
BERNINA International AG
Photos
Patrice Heilmann, Winterthur
Part number
2018/02 en 1031775.0.04
1st Edition
Copyright
2018 BERNINA International AG
All rights reserved: For technical reasons and for the purpose of product improvements, changesconcerning the features of the machine can be made at any time and without advance notice. The suppliedaccessory can vary depending on the country of delivery.
Contents
5
Contents
IMPORTANT SAFETY INSTRUCTIONS.............................................................................................. 11
1 My BERNINA..................................................................................................................................... 15
1.1 Introduction .......................................................................................................................... 15
1.2 Welcome to the world of BERNINA ....................................................................................... 15
1.3 Key to signs .......................................................................................................................... 16
1.4 Overview Machine ................................................................................................................ 17Overview front controls ..................................................................................................... 17Overview front .................................................................................................................. 18Overview sideways ............................................................................................................ 19Overview back................................................................................................................... 20
1.5 Supplied accessories.............................................................................................................. 21Overview accessories machine ........................................................................................... 21Use of the power cable (only USA/Canada)........................................................................ 22Overview presser feet ........................................................................................................ 23Accessory box.................................................................................................................... 24
1.6 Overview User Interface ........................................................................................................ 25Overview functions/visual information ............................................................................... 25Overview System settings .................................................................................................. 25Overview selection menu sewing ....................................................................................... 25Overview Icons .................................................................................................................. 26
1.7 Needle, Thread, Fabric........................................................................................................... 26Overview needles .............................................................................................................. 27Example for needle description .......................................................................................... 28Thread selection ................................................................................................................ 29Needle/thread combination ............................................................................................... 29
2 Sewing preparation......................................................................................................................... 30
2.1 Accessory box ....................................................................................................................... 30Removing and attaching the accessory box........................................................................ 30Storing accessories ............................................................................................................ 30
2.2 Connection and Switching on ............................................................................................... 31Connecting the foot control .............................................................................................. 31Connecting the machine ................................................................................................... 31Attaching the knee lifter of the Free Hand System ............................................................. 32Attaching the touchscreen pen (optional accessory) ........................................................... 32Switching the machine on ................................................................................................. 32
2.3 Foot control ......................................................................................................................... 32Regulating the speed via the foot control .......................................................................... 32Raising/Lowering the needle .............................................................................................. 33
2.4 Spool pin .............................................................................................................................. 33Retractable spool pin ......................................................................................................... 33Horizontal spool pin .......................................................................................................... 34
2.5 Free arm ............................................................................................................................... 34
2.6 Feed dog............................................................................................................................... 35Adjusting the feed dog...................................................................................................... 35Instruction for adjusting the feed dog................................................................................ 36
Contents
6
2.7 Slide-on table........................................................................................................................ 36Using the slide-on table ..................................................................................................... 36
2.8 Presser foot........................................................................................................................... 36Adjusting the presser foot position via the knee lifter of the Free Hand System .................. 36Changing the presser foot ................................................................................................. 37Having the presser foot displayed in the User Interface ...................................................... 37Adjusting the presser foot pressure.................................................................................... 37
2.9 Needle and stitch plate.......................................................................................................... 38Changing the needle ......................................................................................................... 38Selecting the needle in the User Interface .......................................................................... 39Selecting the needle type and the needle size .................................................................... 39Adjusting the needle position up/down ............................................................................. 39Adjusting the needle position left/right .............................................................................. 39Needle stop up/down (permanent) .................................................................................... 40Changing the stitch plate .................................................................................................. 40Selecting the stitch plate in the User Interface.................................................................... 41
2.10 Threading ............................................................................................................................. 41Threading the upper thread............................................................................................... 41Threading the double needle ............................................................................................. 44Threading the triple needle................................................................................................ 44Winding the bobbin thread ............................................................................................... 45Threading the bobbin thread ............................................................................................. 46Instruction how to thread the bobbin thread ..................................................................... 48
3 Setup Program ................................................................................................................................. 49
3.1 Sewing settings..................................................................................................................... 49Adjusting the upper thread tension ................................................................................... 49Adjusting the maximum sewing speed............................................................................... 49Programming securing stitches .......................................................................................... 49Programming the button «Thread cutter» ......................................................................... 50Programming the button «Securing»................................................................................. 50Programming the button «Quick reverse» ......................................................................... 51Programming the foot control ........................................................................................... 51
3.2 Selecting personal settings .................................................................................................... 52
3.3 Activating the audio signals................................................................................................... 53
3.4 Machine settings................................................................................................................... 54Selecting a language ......................................................................................................... 54Adjusting the brightness of the display .............................................................................. 54Checking the firmware version .......................................................................................... 54Reviewing the total number of stitches .............................................................................. 55Registering details of the dealer......................................................................................... 55Saving Service data............................................................................................................ 56Back to default setting....................................................................................................... 56Deleting user data ............................................................................................................. 57Calibrating the Buttonhole foot No. 3A ............................................................................. 57Updating the machine Firmware........................................................................................ 58Recovering saved data ....................................................................................................... 59Cleaning the thread catcher .............................................................................................. 59Lubricating the machine .................................................................................................... 60
Contents
7
4 System settings................................................................................................................................ 61
4.1 Calling up the Tutorial........................................................................................................... 61
4.2 Calling up the Creative Consultant........................................................................................ 61
4.3 Using eco mode .................................................................................................................... 61
4.4 Calling up the Help ............................................................................................................... 61
4.5 Cancelling any alterations with «clr» ..................................................................................... 62
5 Creative sewing ............................................................................................................................... 63
5.1 Overview selection menu sewing........................................................................................... 63Selecting a stitch pattern ................................................................................................... 63
5.2 Regulating the speed ............................................................................................................ 63
5.3 Adjusting the upper thread tension ....................................................................................... 63
5.4 Editing stitch patterns ........................................................................................................... 64Changing the stitch width ................................................................................................. 64Changing the stitch length ................................................................................................ 64Correcting the balance ...................................................................................................... 65Programming pattern repeat ............................................................................................. 65Mirror image of stitch patterns ......................................................................................... 65Quick reverse..................................................................................................................... 66Permanent Quick reverse ................................................................................................... 66
5.5 Combining stitch patterns ..................................................................................................... 66Overview Combi mode ...................................................................................................... 66Creating Stitch pattern combinations................................................................................. 67Saving a stitch pattern combination................................................................................... 67Loading a stitch pattern combination................................................................................. 67Overwriting a stitch pattern combination........................................................................... 67Deleting a stitch pattern combination ................................................................................ 67Editing a single stitch pattern............................................................................................. 68Deleting a single stitch pattern .......................................................................................... 68Adding a single stitch pattern ............................................................................................ 69Mirroring a stitch pattern combination .............................................................................. 69Securing a stitch pattern combination................................................................................ 69Programming pattern repeat ............................................................................................. 70
5.6 Administering stitch patterns................................................................................................. 70Saving settings of stitch patterns ...................................................................................... 70Saving stitch patterns in personal memory ......................................................................... 70Overwriting stitch patterns from the personal memory ...................................................... 71Loading stitch patterns from the personal memory ............................................................ 71Deleting stitch patterns from the personal memory............................................................ 71Saving stitch patterns on the BERNINA USB stick................................................................ 71Uploading a stitch pattern from the BERNINA USB stick ..................................................... 72Deleting stitch patterns from the BERNINA USB stick ......................................................... 72
5.7 Securing................................................................................................................................ 73Securing a seam with the button «Securing»..................................................................... 73
5.8 Height Compensation of uneven layers ................................................................................. 73
5.9 Sewing Corners..................................................................................................................... 74
Contents
8
6 Practical stitches .............................................................................................................................. 75
6.1 Overview Practical stitches..................................................................................................... 75
6.2 Sewing straight stitch............................................................................................................ 77
6.3 Securing with the automatic Securing Program ..................................................................... 78
6.4 Sewing in the zipper ............................................................................................................. 78
6.5 Sewing both sides of the zipper from bottom to top ............................................................. 79
6.6 Sewing triple straight stitch ................................................................................................... 80
6.7 Sewing Triple zig zag ............................................................................................................ 81
6.8 Manual darning .................................................................................................................... 81
6.9 Automatic darning ................................................................................................................ 83
6.10 Reinforced darning, automatic .............................................................................................. 84
6.11 Finishing edges ..................................................................................................................... 85
6.12 Sewing Double overlock........................................................................................................ 85
6.13 Narrow edgestitching............................................................................................................ 86
6.14 Wide edgestitching ............................................................................................................... 86
6.15 Edgestitching using the seam guide (optional accessory) ....................................................... 87
6.16 Sewing hem edges................................................................................................................ 87
6.17 Sewing blind hems................................................................................................................ 88
6.18 Sewing visible hems .............................................................................................................. 89
6.19 Sewing flat joining seams...................................................................................................... 89
6.20 Sewing basting stitches ......................................................................................................... 90
7 Decorative stitches .......................................................................................................................... 91
7.1 Overview Decorative Stitches................................................................................................. 91
7.2 Bobbin-Play........................................................................................................................... 92
7.3 Sewing cross stitches............................................................................................................. 93
7.4 Pintucks ................................................................................................................................ 93Pintucks............................................................................................................................. 93Overview pintucks ............................................................................................................. 94Inserting the cord .............................................................................................................. 94Sewing Pintucks ................................................................................................................ 95
8 Alphabets ......................................................................................................................................... 96
8.1 Overview Alphabet................................................................................................................ 96
8.2 Creating lettering.................................................................................................................. 96
9 Buttonholes...................................................................................................................................... 98
9.1 Overview Buttonholes ........................................................................................................... 98
9.2 Making use of the height compensation tool ........................................................................ 99
9.3 Using the compensation plate ............................................................................................... 99
9.4 Marking buttonholes............................................................................................................. 100
Contents
9
9.5 Cord ..................................................................................................................................... 101Using cord with the Buttonhole foot with slide No. 3A ...................................................... 101Using cord with the Buttonhole foot No. 3C (optional accessory) ....................................... 102
9.6 Sewing a test sample ............................................................................................................ 103
9.7 Determining the buttonhole slit width................................................................................... 103
9.8 Determining the buttonhole length with the Buttonhole foot with slide No. 3A .................... 104
9.9 Determining the buttonhole length with Buttonhole foot No. 3C (optional accessory) ........... 104
9.10 Sewing a buttonhole automatically with the Buttonhole foot with slide No. 3A..................... 105
9.11 Sewing the manual 7-step buttonhole with the Buttonhole foot No. 3C (optional accessory). 106
9.12 Sewing the manual 5-step buttonhole with the Buttonhole foot No. 3C (optional accessory). 107
9.13 Cutting the buttonhole open with the seam ripper................................................................ 108
9.14 Cutting open buttonholes with the buttonhole cutter (optional accessory) ............................ 108
9.15 Sewing on buttons................................................................................................................ 108
9.16 Sewing eyelets ...................................................................................................................... 109
10 Quilting ............................................................................................................................................ 110
10.1 Overview Quilt Stitches ......................................................................................................... 110
10.2 Quilting, Securing Program ................................................................................................... 111
10.3 Sewing handlook quilt stitches .............................................................................................. 111
10.4 Guiding the quilt work freely................................................................................................. 112
11 BERNINA Stitch Regulator (BSR) (optional accessory) .................................................................. 113
11.1 BSR mode 1 .......................................................................................................................... 113
11.2 BSR mode 2 .......................................................................................................................... 113
11.3 BSR function with Straight stitch No. 1.................................................................................. 113
11.4 BSR function with Zig zag No. 2 ............................................................................................ 113
11.5 Sewing preparations for quilting ........................................................................................... 113Attach the BSR presser foot ............................................................................................... 113Changing the presser foot sole .......................................................................................... 114
11.6 Using the BSR mode.............................................................................................................. 114
11.7 Securing................................................................................................................................ 115Securing in BSR1 mode with the button «Start/Stop» ........................................................ 115Securing in BSR2 mode...................................................................................................... 115
12 Attachment ...................................................................................................................................... 117
12.1 Maintenance and cleaning .................................................................................................... 117Cleaning the display .......................................................................................................... 117Cleaning the feed dog....................................................................................................... 117Cleaning the hook............................................................................................................. 117Lubricating the hook ......................................................................................................... 118
12.2 Troubleshooting.................................................................................................................... 120
12.3 Error messages...................................................................................................................... 123
12.4 Storage and disposal ............................................................................................................. 125Storing the machine .......................................................................................................... 125Dispose of the machine ..................................................................................................... 125

Contents
10
12.5 Technical data....................................................................................................................... 126
13 Overview stitch patterns ................................................................................................................ 127
13.1 Overview Stitch patterns ....................................................................................................... 127Practical stitches ................................................................................................................ 127Buttonholes....................................................................................................................... 127Decorative stitches............................................................................................................. 127
Index................................................................................................................................................. 131

Important safety instructions
11
IMPORTANT SAFETY INSTRUCTIONSPlease be aware of the following basic safety instructions when usingyour machine. Before using this machine, read instruction manualcarefully.
DANGER!To reduce the risk of electrical shock:
• Never leave the machine unattended as long as it is plugged in.
• Always unplug the machine from the electrical outlet immediatelyafter using and before cleaning.
Protection against LED radiation:
• Do not view the LED light directly with optical instruments (e.g.magnifier). The LED light corresponds with protection class 1M.
Protection against injuries:
• Attention moving parts. To avoid injuries, switch off the machinebefore manipulations are carried out. Always close the coverwhen operating the machine.
Important safety instructions
12
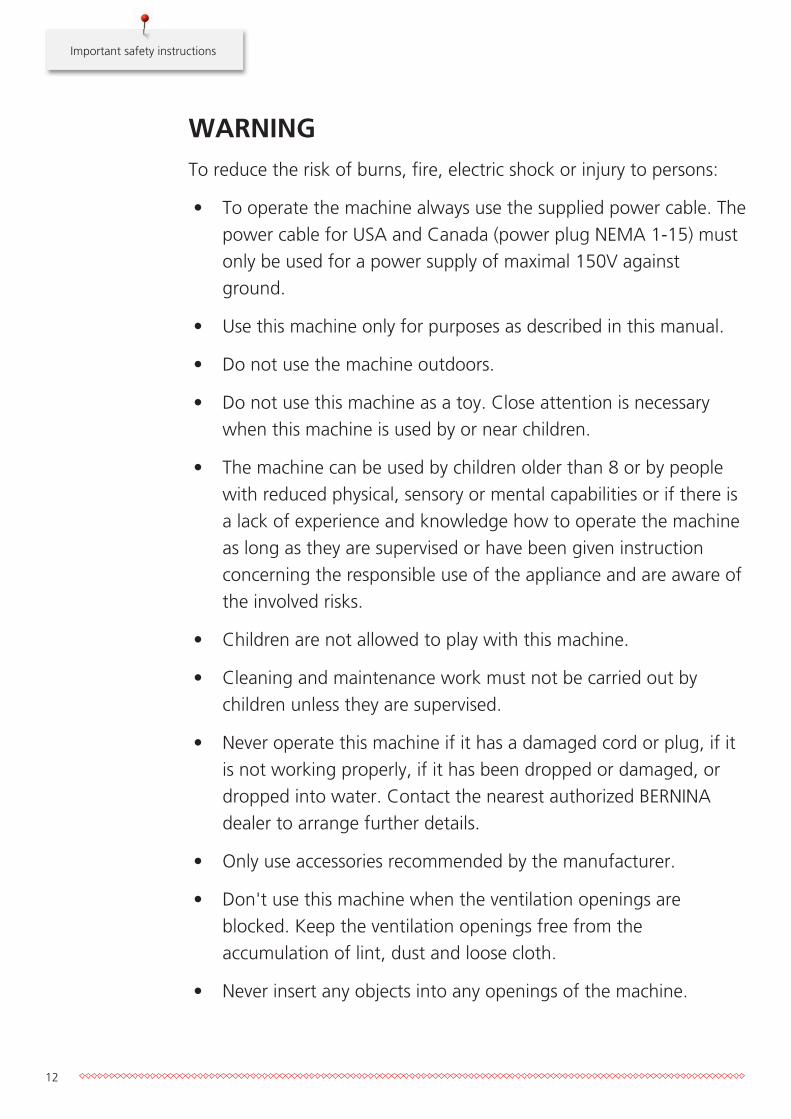
WARNINGTo reduce the risk of burns, fire, electric shock or injury to persons:
• To operate the machine always use the supplied power cable. Thepower cable for USA and Canada (power plug NEMA 1-15) mustonly be used for a power supply of maximal 150V againstground.
• Use this machine only for purposes as described in this manual.
• Do not use the machine outdoors.
• Do not use this machine as a toy. Close attention is necessarywhen this machine is used by or near children.
• The machine can be used by children older than 8 or by peoplewith reduced physical, sensory or mental capabilities or if there isa lack of experience and knowledge how to operate the machineas long as they are supervised or have been given instructionconcerning the responsible use of the appliance and are aware ofthe involved risks.
• Children are not allowed to play with this machine.
• Cleaning and maintenance work must not be carried out bychildren unless they are supervised.
• Never operate this machine if it has a damaged cord or plug, if itis not working properly, if it has been dropped or damaged, ordropped into water. Contact the nearest authorized BERNINAdealer to arrange further details.
• Only use accessories recommended by the manufacturer.
• Don't use this machine when the ventilation openings areblocked. Keep the ventilation openings free from theaccumulation of lint, dust and loose cloth.
• Never insert any objects into any openings of the machine.
Important safety instructions
13
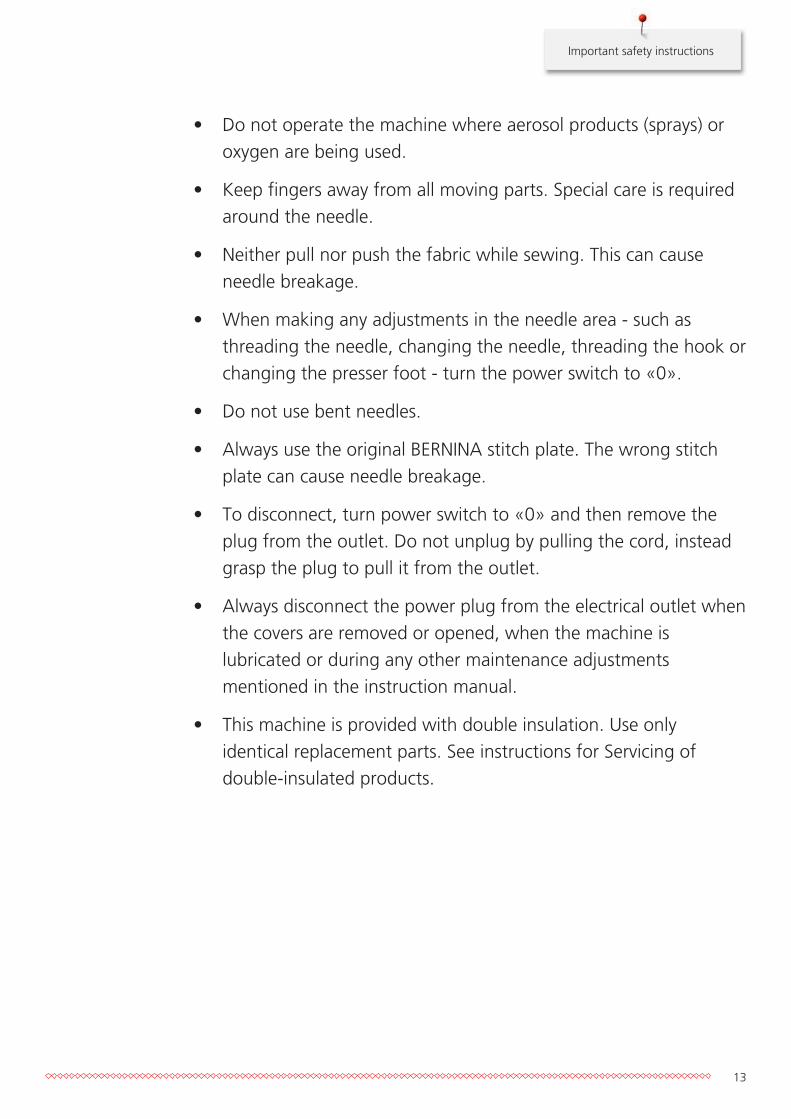
• Do not operate the machine where aerosol products (sprays) oroxygen are being used.
• Keep fingers away from all moving parts. Special care is requiredaround the needle.
• Neither pull nor push the fabric while sewing. This can causeneedle breakage.
• When making any adjustments in the needle area - such asthreading the needle, changing the needle, threading the hook orchanging the presser foot - turn the power switch to «0».
• Do not use bent needles.
• Always use the original BERNINA stitch plate. The wrong stitchplate can cause needle breakage.
• To disconnect, turn power switch to «0» and then remove theplug from the outlet. Do not unplug by pulling the cord, insteadgrasp the plug to pull it from the outlet.
• Always disconnect the power plug from the electrical outlet whenthe covers are removed or opened, when the machine islubricated or during any other maintenance adjustmentsmentioned in the instruction manual.
• This machine is provided with double insulation. Use onlyidentical replacement parts. See instructions for Servicing ofdouble-insulated products.
Important safety instructions
14
Servicing double-insulated productsIn a double-insulated product two systems of insulation are providedinstead of grounding. No grounding device is provided on adoubleinsulated product, nor should any grounding device be addedto the product. Servicing a double-insulated product requires extremecare and knowledge of the system and should be done only byqualified service personnel. Replacement parts for a double-insulatedproduct must be identical to the original parts in the product. Adouble-insulated product is marked with the words: «Doubleinsulation» or «double-insulated».
The symbol may also be marked on the product.
KEEP THE INSTRUCTION MANUAL SAVE
Appropriate useYour BERNINA machine is conceived and designed for privatehousehold use. It answers the purpose to quilt fabrics as it is decribedin this instruction manual. Any other use is not consideredappropriate. BERNINA assumes no liability concerning consequncesresulting from an inappropriate usage.
My BERNINA
15
1 My BERNINA
1.1 Introduction
With your BERNINA 480 you can sew delicate silk or satin fabrics as well as heavy-weight linen, fleece anddenim without any problems. Numerous practical, decorative stitches and buttonholes are at your disposal.
Additional to this instruction manual, subsequently listed help programs are provided which will give youuseful advice and support at any time how to operate your BERNINA 480.
The Tutorial provides information and explanations on different sections concerning sewing and the variousstitches.
The Creative Consultant informs you about decision support for sewing projects. After entering the kind offabric and the desired sewing project, suggestions concerning the suitable needle or the appropriate presserfoot are displayed.
The Help Program contains information about individual stitch patterns, functions and applications in thedisplay.
Further information
In addition to this instruction manual of your BERNINA 480 further information products are enclosed.
The latest version of your instruction manual as well as additional information in connection with the
machine and accessories can be found on our website http://www.bernina.com
1.2 Welcome to the world of BERNINA
Made to create, this is the slogan of BERNINA. Not only our machines do support you to implement yourideas. On top of that, our below mentioned opportunities also offer various inspirations and instructions foryour future projects as well as the option to exchange ideas with other sewing and embroidering enthusiasts.We wish you lots of pleasrue doing that.
BERNINA YouTube Channel
On YouTube we offer a wide range of how-to videos and support concerning the most important functionsof our machines. Detailed explanations are also provided as for the various presser feet, so that your projectswill succeed completely.
http://www.youtube.com/BerninaInternational
Provided in the languages English and German.
inspiration – the sewing magazine
Are you looking for ideas, sewing patterns and instructions for great projects? In that case the BERNINAmagazine «inspiration» is exactly what you need. «inspiration» offers extraordinary sewing and embroideryideas four times a year. From seasonal fashion trends to trendy accessories and practical tips to decorate yourhome in an original way.
http://www.bernina.com/inspiration
The magazine is available in the languages English, German, Dutch and French. Not available in all countries.
My BERNINA
16
BERNINA Blog
Fancy instructions, free sewing patterns and embroidery motifs as well as many new ideas: all this you canfind in the weekly blog by BERNINA. Our experts give valuable tips and explain step by step how you canachieve the desired result. In the community you can upload your own projects and exchange experiencesand ideas with other sewing and embroidering enthusiasts.
http://www.bernina.com/blog
Provided in the languages English, German and Dutch.
BERNINA Social Media
Follow us on the social networking to learn more about events, thrilling projects as well as tips and tricks allabout sewing. We will keep you informed and we are looking forward to presenting you the one or theother highlight from the world of BERNINA.
http://www.bernina.com/social-media
1.3 Key to signs
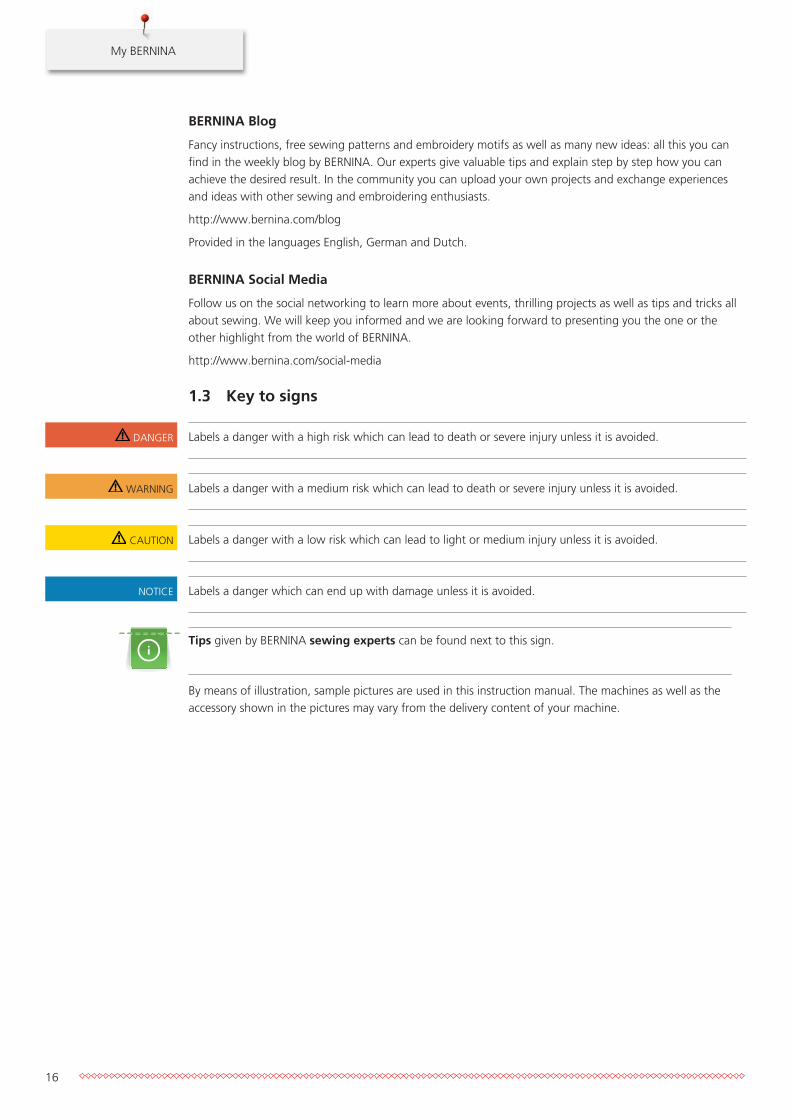
DANGER Labels a danger with a high risk which can lead to death or severe injury unless it is avoided.
WARNING Labels a danger with a medium risk which can lead to death or severe injury unless it is avoided.
CAUTION Labels a danger with a low risk which can lead to light or medium injury unless it is avoided.
NOTICE Labels a danger which can end up with damage unless it is avoided.
Tips given by BERNINA sewing experts can be found next to this sign.
By means of illustration, sample pictures are used in this instruction manual. The machines as well as theaccessory shown in the pictures may vary from the delivery content of your machine.
My BERNINA
17
1.4 Overview Machine
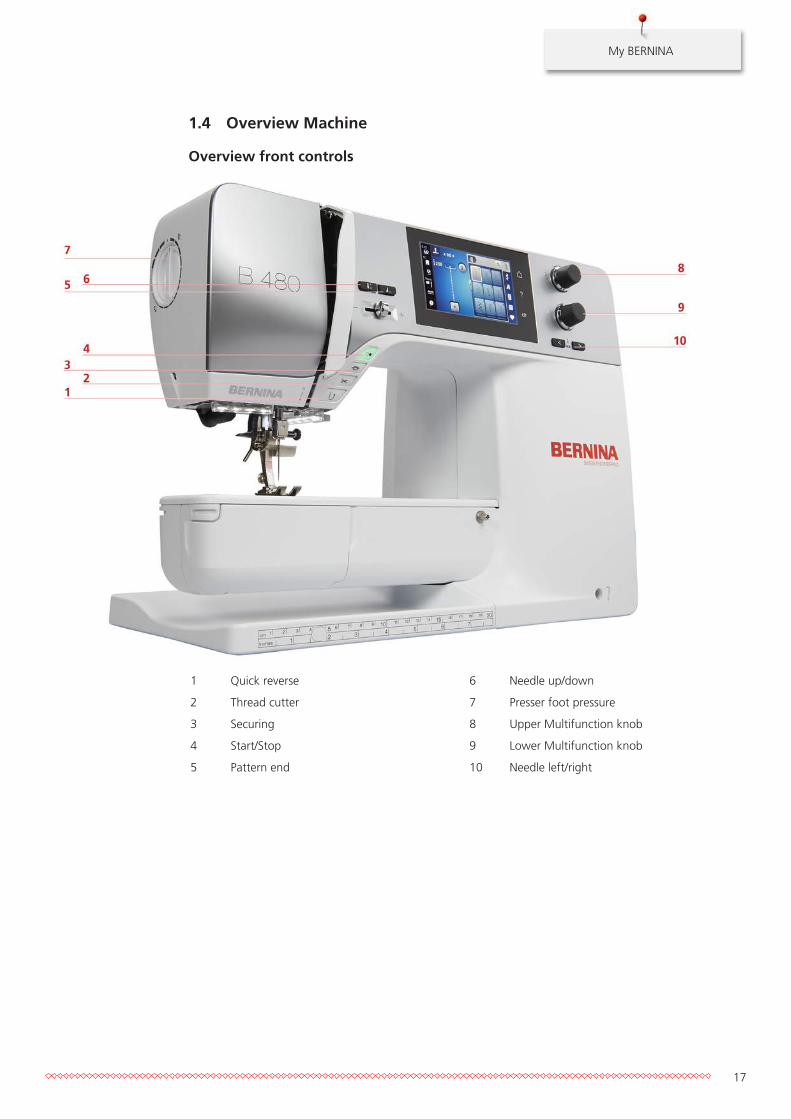
Overview front controls
1 Quick reverse 6 Needle up/down
2 Thread cutter 7 Presser foot pressure
3 Securing 8 Upper Multifunction knob
4 Start/Stop 9 Lower Multifunction knob
5 Pattern end 10 Needle left/right
My BERNINA
18
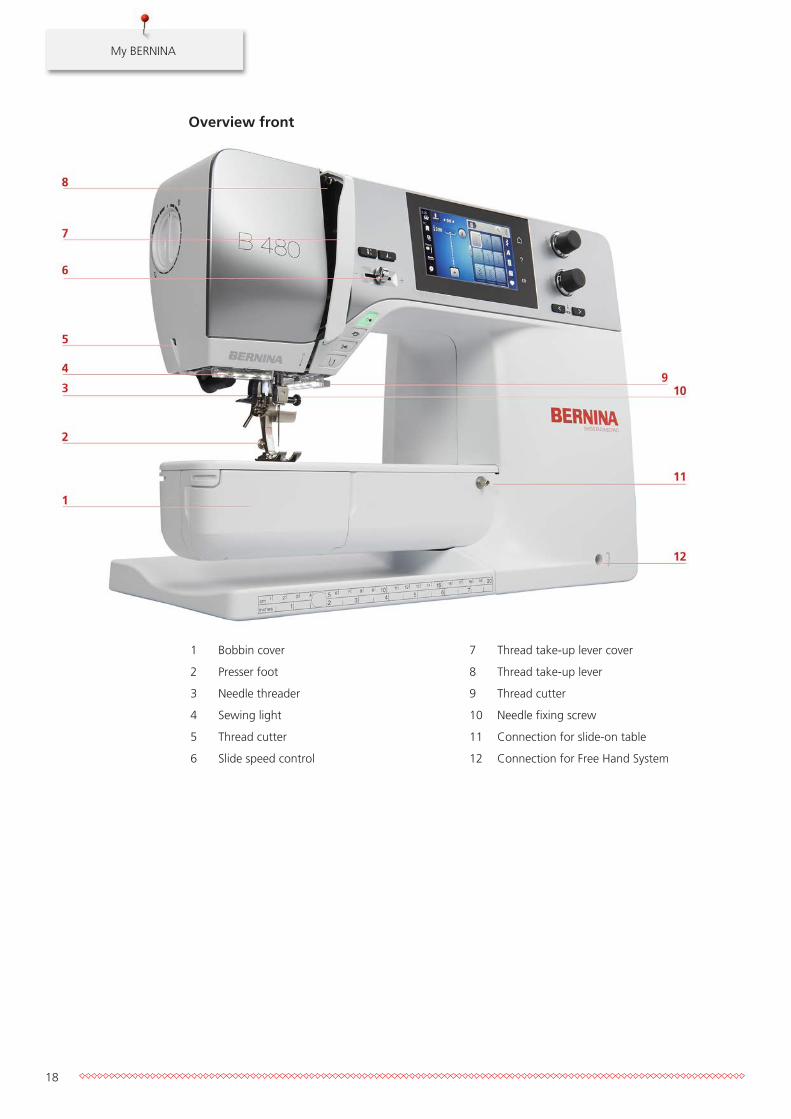
Overview front
1 Bobbin cover 7 Thread take-up lever cover
2 Presser foot 8 Thread take-up lever
3 Needle threader 9 Thread cutter
4 Sewing light 10 Needle fixing screw
5 Thread cutter 11 Connection for slide-on table
6 Slide speed control 12 Connection for Free Hand System
My BERNINA
19
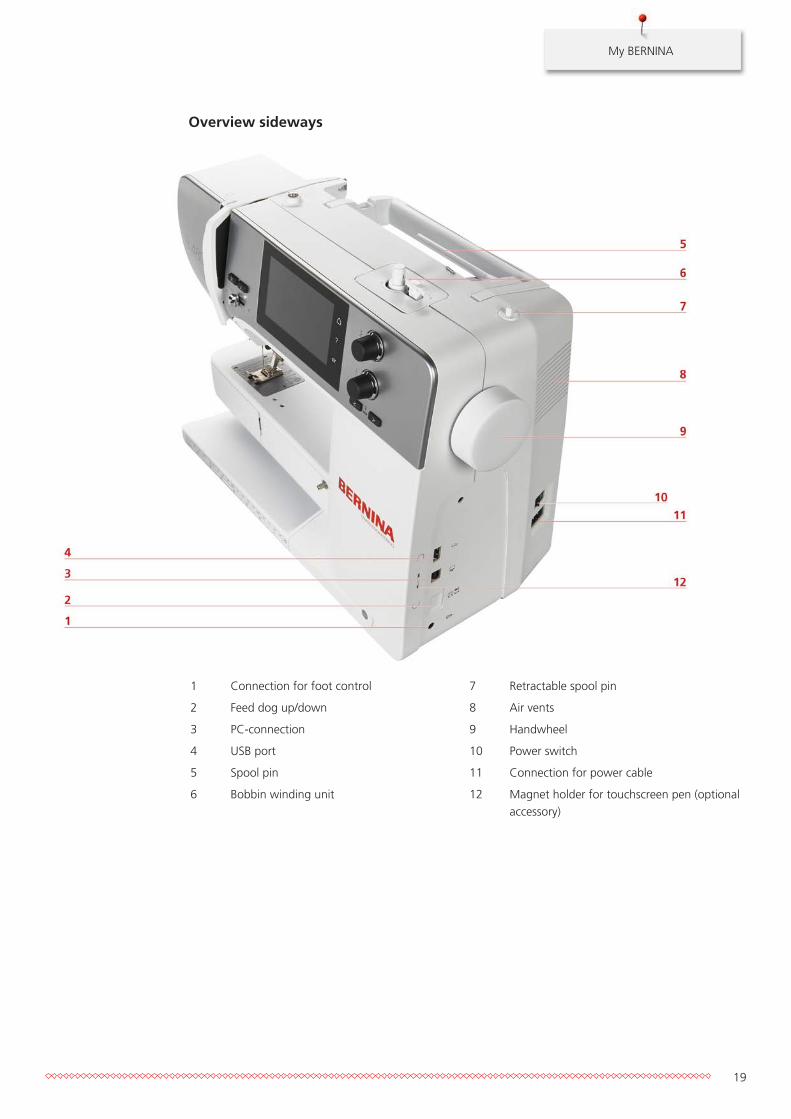
Overview sideways
1 Connection for foot control 7 Retractable spool pin
2 Feed dog up/down 8 Air vents
3 PC-connection 9 Handwheel
4 USB port 10 Power switch
5 Spool pin 11 Connection for power cable
6 Bobbin winding unit 12 Magnet holder for touchscreen pen (optionalaccessory)
My BERNINA
20
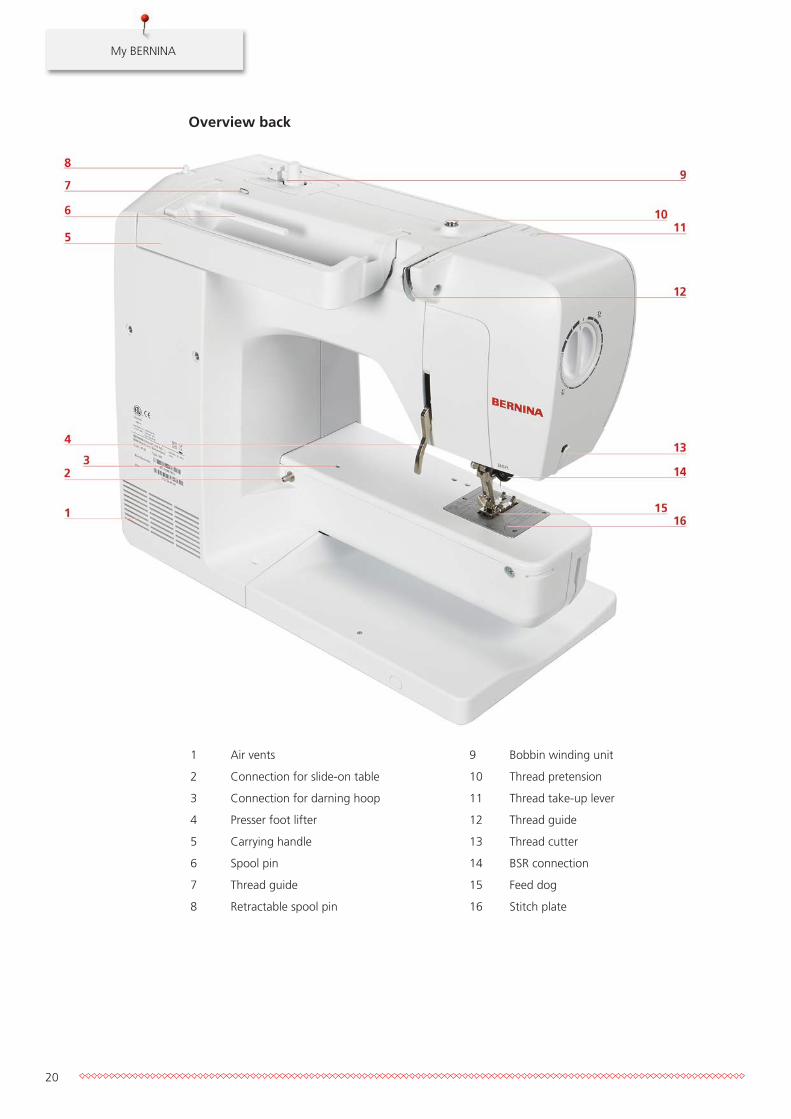
Overview back
1 Air vents 9 Bobbin winding unit
2 Connection for slide-on table 10 Thread pretension
3 Connection for darning hoop 11 Thread take-up lever
4 Presser foot lifter 12 Thread guide
5 Carrying handle 13 Thread cutter
6 Spool pin 14 BSR connection
7 Thread guide 15 Feed dog
8 Retractable spool pin 16 Stitch plate
My BERNINA
21
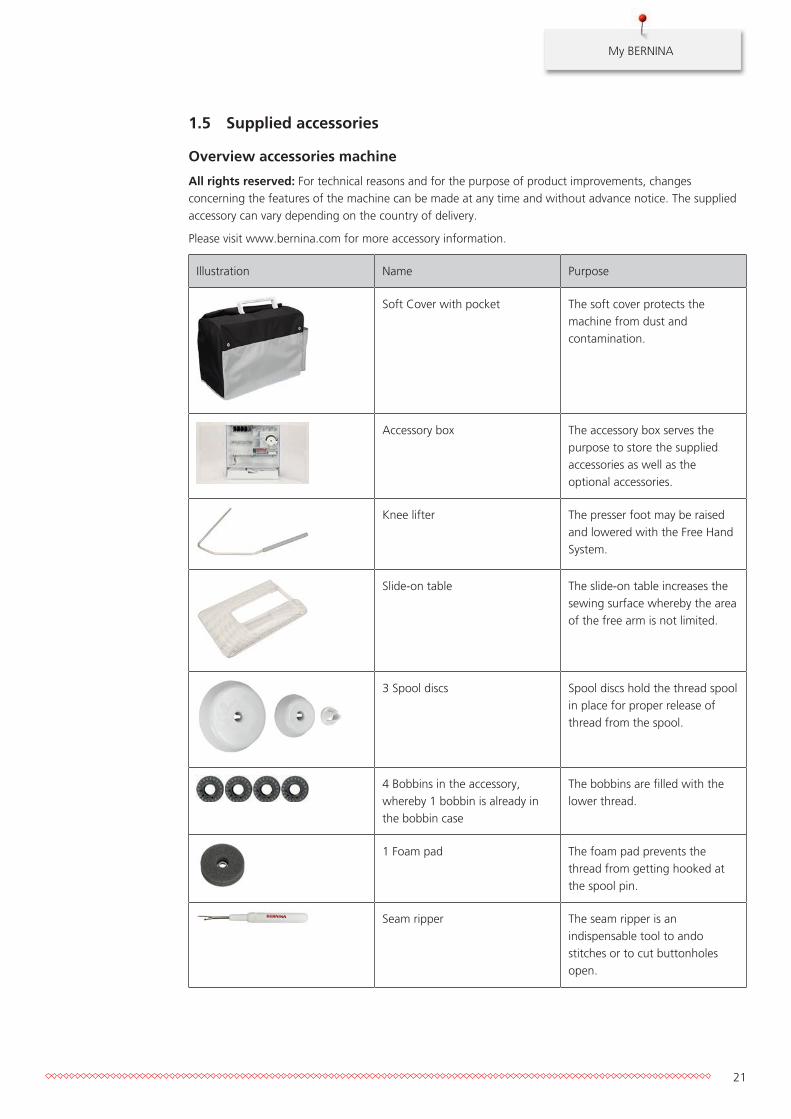
1.5 Supplied accessories
Overview accessories machine
All rights reserved: For technical reasons and for the purpose of product improvements, changesconcerning the features of the machine can be made at any time and without advance notice. The suppliedaccessory can vary depending on the country of delivery.
Please visit www.bernina.com for more accessory information.
Illustration Name Purpose
Soft Cover with pocket The soft cover protects themachine from dust andcontamination.
Accessory box The accessory box serves thepurpose to store the suppliedaccessories as well as theoptional accessories.
Knee lifter The presser foot may be raisedand lowered with the Free HandSystem.
Slide-on table The slide-on table increases thesewing surface whereby the areaof the free arm is not limited.
3 Spool discs Spool discs hold the thread spoolin place for proper release ofthread from the spool.
4 Bobbins in the accessory,whereby 1 bobbin is already inthe bobbin case
The bobbins are filled with thelower thread.
1 Foam pad The foam pad prevents thethread from getting hooked atthe spool pin.
Seam ripper The seam ripper is anindispensable tool to andostitches or to cut buttonholesopen.
My BERNINA
22
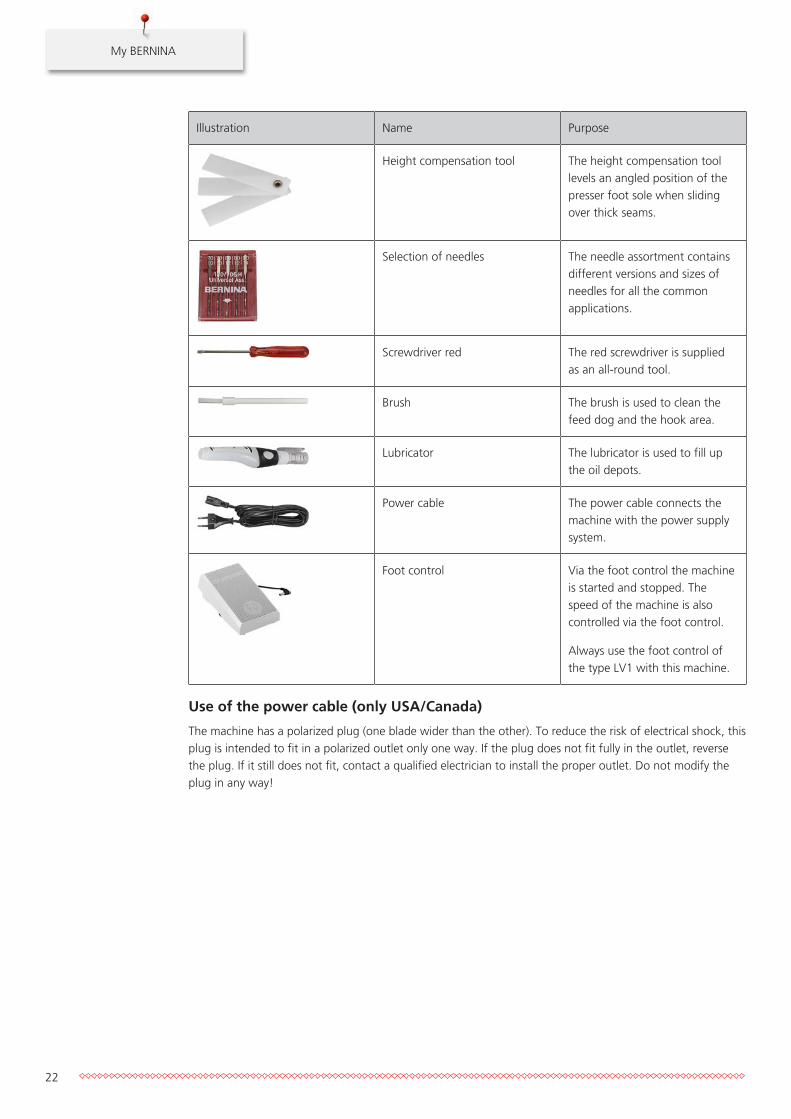
Illustration Name Purpose
Height compensation tool The height compensation toollevels an angled position of thepresser foot sole when slidingover thick seams.
Selection of needles The needle assortment containsdifferent versions and sizes ofneedles for all the commonapplications.
Screwdriver red The red screwdriver is suppliedas an all-round tool.
Brush The brush is used to clean thefeed dog and the hook area.
Lubricator The lubricator is used to fill upthe oil depots.
Power cable The power cable connects themachine with the power supplysystem.
Foot control Via the foot control the machineis started and stopped. Thespeed of the machine is alsocontrolled via the foot control.
Always use the foot control ofthe type LV1 with this machine.
Use of the power cable (only USA/Canada)
The machine has a polarized plug (one blade wider than the other). To reduce the risk of electrical shock, thisplug is intended to fit in a polarized outlet only one way. If the plug does not fit fully in the outlet, reversethe plug. If it still does not fit, contact a qualified electrician to install the proper outlet. Do not modify theplug in any way!
My BERNINA
23
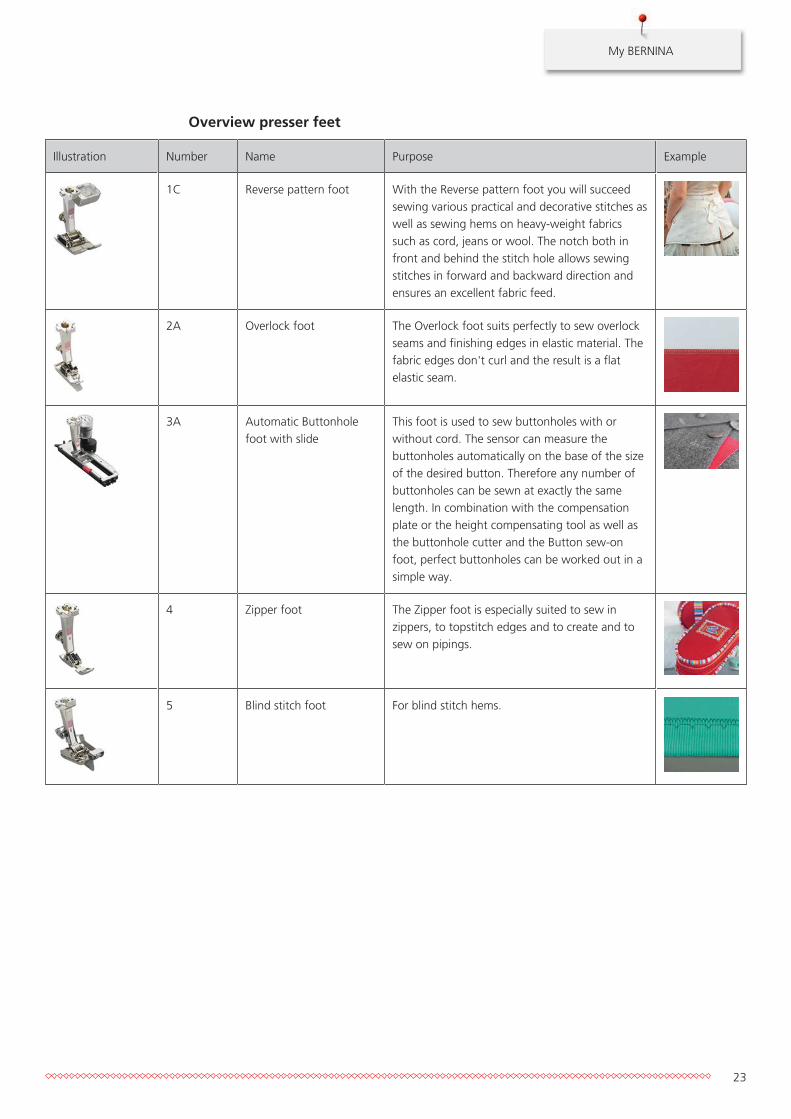
Overview presser feet
Illustration Number Name Purpose Example
1C Reverse pattern foot With the Reverse pattern foot you will succeedsewing various practical and decorative stitches aswell as sewing hems on heavy-weight fabricssuch as cord, jeans or wool. The notch both infront and behind the stitch hole allows sewingstitches in forward and backward direction andensures an excellent fabric feed.
2A Overlock foot The Overlock foot suits perfectly to sew overlockseams and finishing edges in elastic material. Thefabric edges don't curl and the result is a flatelastic seam.
3A Automatic Buttonholefoot with slide
This foot is used to sew buttonholes with orwithout cord. The sensor can measure thebuttonholes automatically on the base of the sizeof the desired button. Therefore any number ofbuttonholes can be sewn at exactly the samelength. In combination with the compensationplate or the height compensating tool as well asthe buttonhole cutter and the Button sew-onfoot, perfect buttonholes can be worked out in asimple way.
4 Zipper foot The Zipper foot is especially suited to sew inzippers, to topstitch edges and to create and tosew on pipings.
5 Blind stitch foot For blind stitch hems.
My BERNINA
24
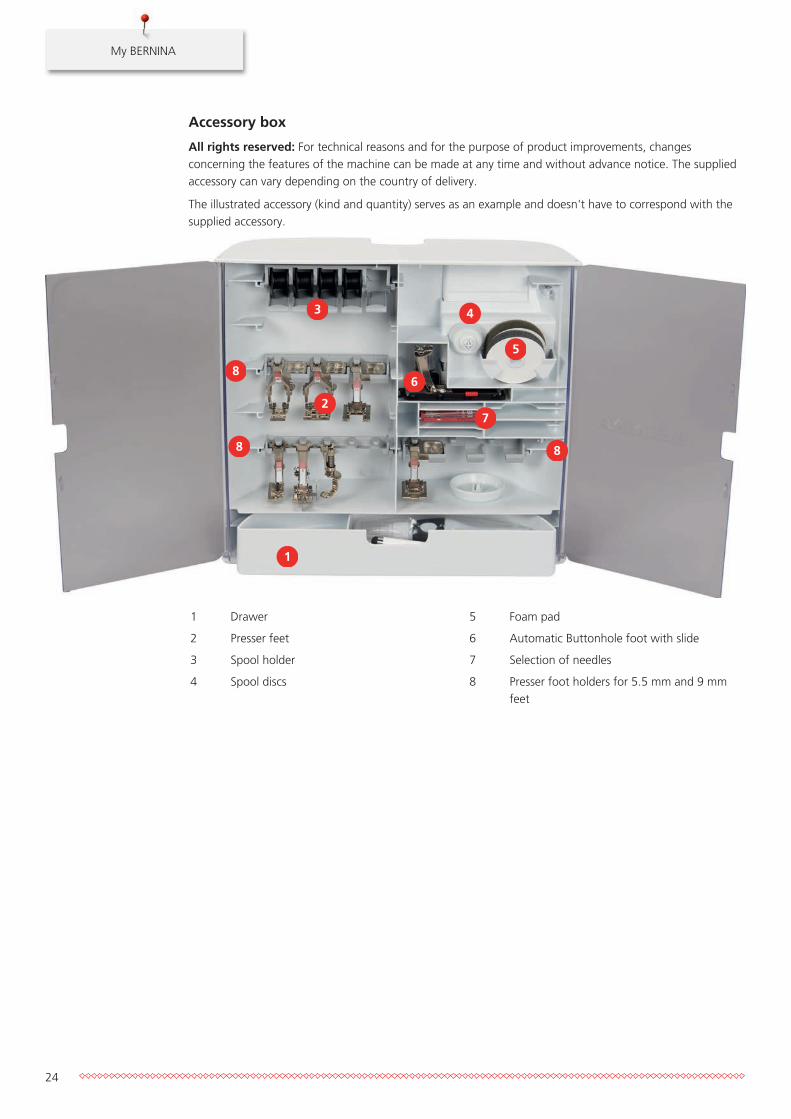
Accessory box
All rights reserved: For technical reasons and for the purpose of product improvements, changesconcerning the features of the machine can be made at any time and without advance notice. The suppliedaccessory can vary depending on the country of delivery.
The illustrated accessory (kind and quantity) serves as an example and doesn't have to correspond with thesupplied accessory.
1
3 4
5
6
8
7
8
2
8
1 Drawer 5 Foam pad
2 Presser feet 6 Automatic Buttonhole foot with slide
3 Spool holder 7 Selection of needles
4 Spool discs 8 Presser foot holders for 5.5 mm and 9 mmfeet
My BERNINA
25
1.6 Overview User Interface
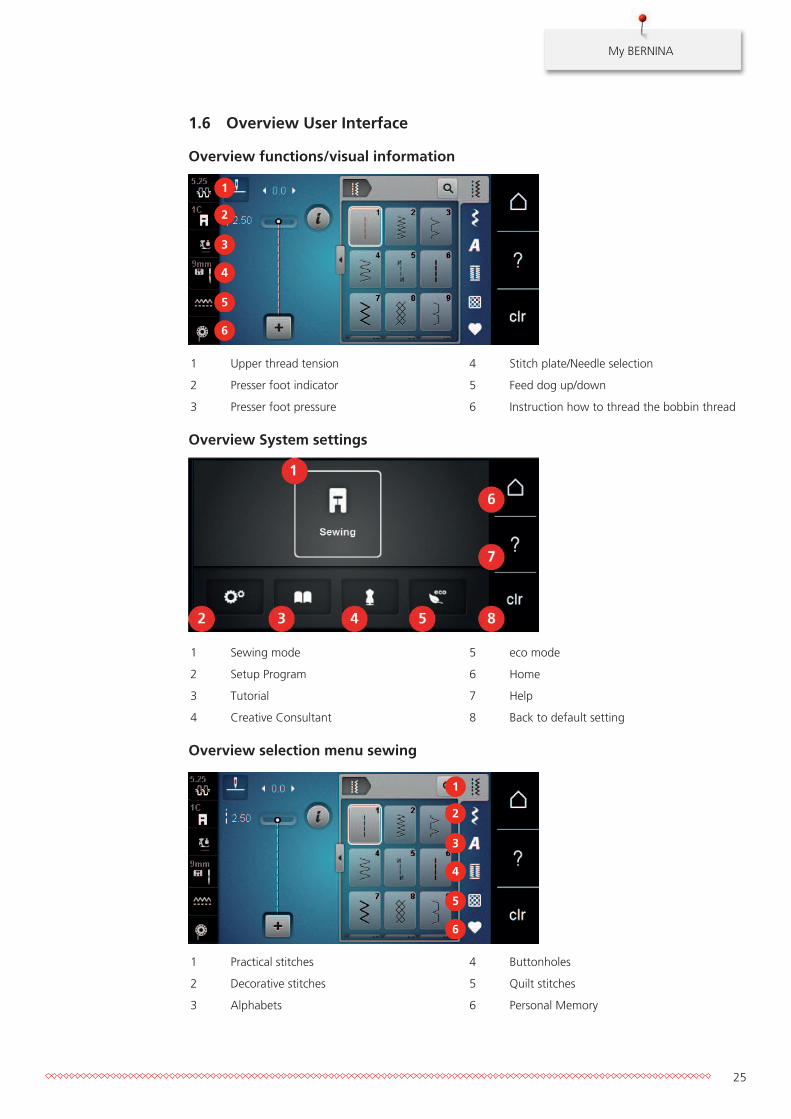
Overview functions/visual information
1
2
3
4
5
6
1 Upper thread tension 4 Stitch plate/Needle selection
2 Presser foot indicator 5 Feed dog up/down
3 Presser foot pressure 6 Instruction how to thread the bobbin thread
Overview System settings
1 Sewing mode 5 eco mode
2 Setup Program 6 Home
3 Tutorial 7 Help
4 Creative Consultant 8 Back to default setting
Overview selection menu sewing
1
2
3
4
5
6
1 Practical stitches 4 Buttonholes
2 Decorative stitches 5 Quilt stitches
3 Alphabets 6 Personal Memory

My BERNINA
26
Overview Icons
Icon Name Purpose
i-Dialog Touching the icon «i»-Dialog provides variousfunctions to edit motifs.
Close The display is closed and the previously madeadjustments are saved.
Icons «-/+» By touching the icons «-» and «+» the settingvalues are changed.
Yellow frame around theicon
A yellow-framed icon indicates that a settingor a value in this function has been changed.By touching the yellow-framed icon, thedefault setting can be restored.
Confirm Confirms the previously adjusted alterations.The display is closed.
Cancel The process is canceled. The display is closedand the previously made adjustments are notsaved.
Slide By moving the slide the setting values arechanged.
Switch Activates or deactivates functions.
Process navigation With the process navigation scrolling back inthe display is possible.
Swipe function By swiping the display using the touchscreenpen or the finger upwards or downwards,further functions can be displayed.
1.7 Needle, Thread, Fabric
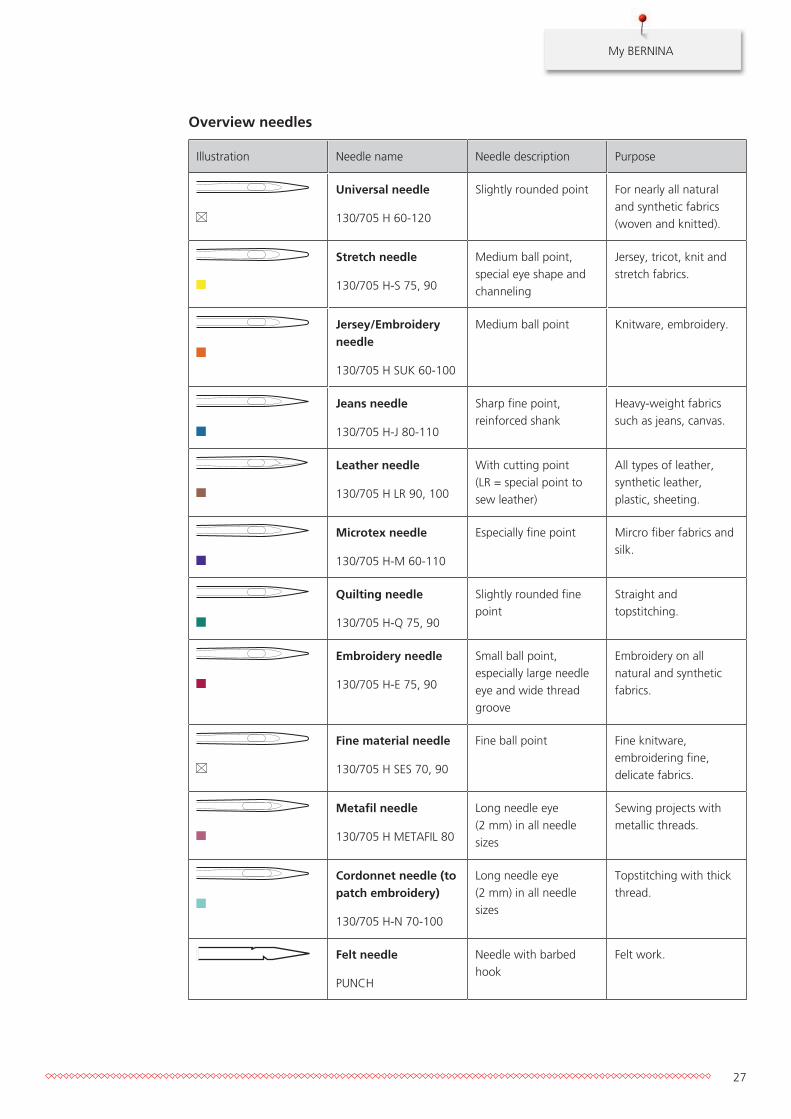
In the course of time a needle wears out. Therefore it should be replaced regularly. Only a perfect pointresults in a good stitching result. In general it can be said: the thinner the thread, the finer the needle. Theillustrated needles are either standard or optional accessory, depending on the machine.
• Needle sizes 70, 75: for thin fabrics.• Needle sizes 80, 90: for medium fabrics.• Needle sizes 100, 110 and 120: for heavy fabrics.
My BERNINA
27
Overview needles
Illustration Needle name Needle description Purpose
Universal needle
130/705 H 60-120
Slightly rounded point For nearly all naturaland synthetic fabrics(woven and knitted).
Stretch needle
130/705 H-S 75, 90
Medium ball point,special eye shape andchanneling
Jersey, tricot, knit andstretch fabrics.
Jersey/Embroideryneedle
130/705 H SUK 60-100
Medium ball point Knitware, embroidery.
Jeans needle
130/705 H-J 80-110
Sharp fine point,reinforced shank
Heavy-weight fabricssuch as jeans, canvas.
Leather needle
130/705 H LR 90, 100
With cutting point(LR = special point tosew leather)
All types of leather,synthetic leather,plastic, sheeting.
Microtex needle
130/705 H-M 60-110
Especially fine point Mircro fiber fabrics andsilk.
Quilting needle
130/705 H-Q 75, 90
Slightly rounded finepoint
Straight andtopstitching.
Embroidery needle
130/705 H-E 75, 90
Small ball point,especially large needleeye and wide threadgroove
Embroidery on allnatural and syntheticfabrics.
Fine material needle
130/705 H SES 70, 90
Fine ball point Fine knitware,embroidering fine,delicate fabrics.
Metafil needle
130/705 H METAFIL 80
Long needle eye (2 mm) in all needlesizes
Sewing projects withmetallic threads.
Cordonnet needle (topatch embroidery)
130/705 H-N 70-100
Long needle eye (2 mm) in all needlesizes
Topstitching with thickthread.
Felt needle
PUNCH
Needle with barbedhook
Felt work.
My BERNINA
28
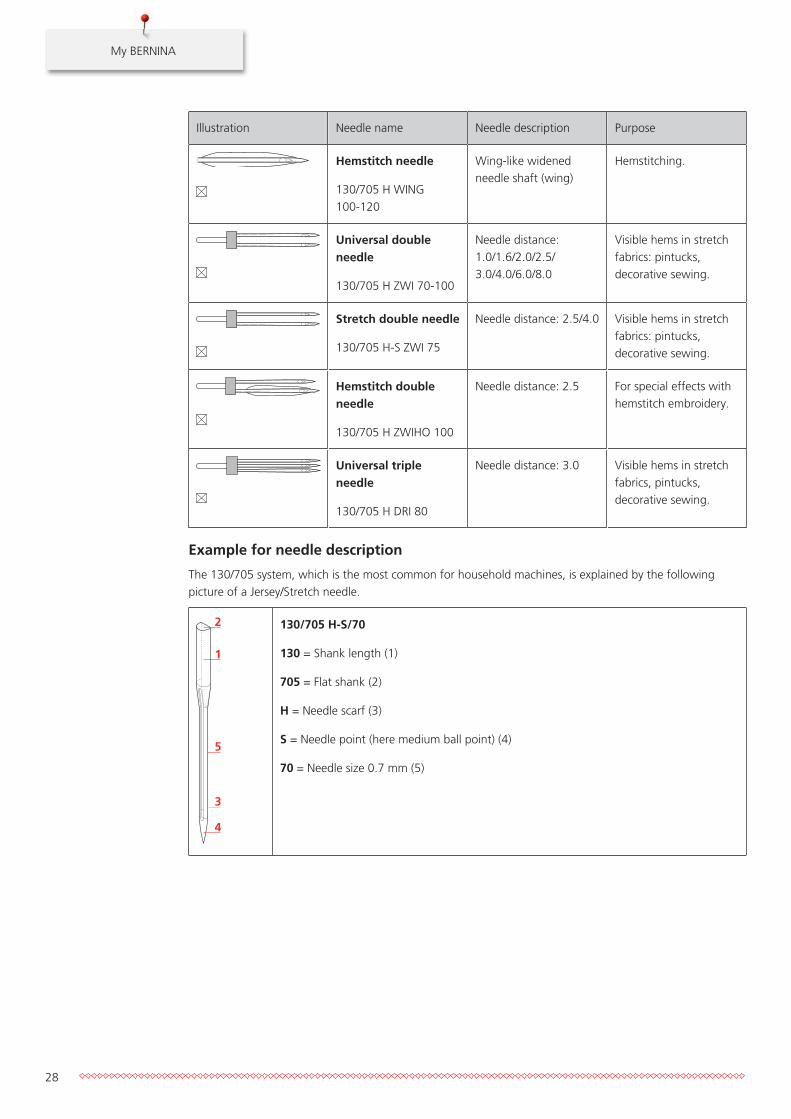
Illustration Needle name Needle description Purpose
Hemstitch needle
130/705 H WING 100-120
Wing-like widenedneedle shaft (wing)
Hemstitching.
Universal doubleneedle
130/705 H ZWI 70-100
Needle distance: 1.0/1.6/2.0/2.5/3.0/4.0/6.0/8.0
Visible hems in stretchfabrics: pintucks,decorative sewing.
Stretch double needle
130/705 H-S ZWI 75
Needle distance: 2.5/4.0 Visible hems in stretchfabrics: pintucks,decorative sewing.
Hemstitch doubleneedle
130/705 H ZWIHO 100
Needle distance: 2.5 For special effects withhemstitch embroidery.
Universal tripleneedle
130/705 H DRI 80
Needle distance: 3.0 Visible hems in stretchfabrics, pintucks,decorative sewing.
Example for needle description
The 130/705 system, which is the most common for household machines, is explained by the followingpicture of a Jersey/Stretch needle.
2
1
5
3
4
130/705 H-S/70
130 = Shank length (1)
705 = Flat shank (2)
H = Needle scarf (3)
S = Needle point (here medium ball point) (4)
70 = Needle size 0.7 mm (5)
My BERNINA
29
Thread selection
For a perfect sewing result, thread and fabric quality play an important role.
We recommend purchasing quality threads to achieve good sewing results.
• Cotton threads have the advantage of being a natural fiber and therefore are especially suitable forsewing cotton fabrics.
• Mercerized cotton threads have a slight sheen that is not lost with washing.• Polyester threads have a high tensile strength and is particularly colorfast.• Polyester threads are more flexible and are recommended where a strong and elastic seam is required.• Rayon threads are made of natural fibers and have a brilliant sheen.• Rayon threads are suitable for decorative stitches and achieve a more beautiful effect.
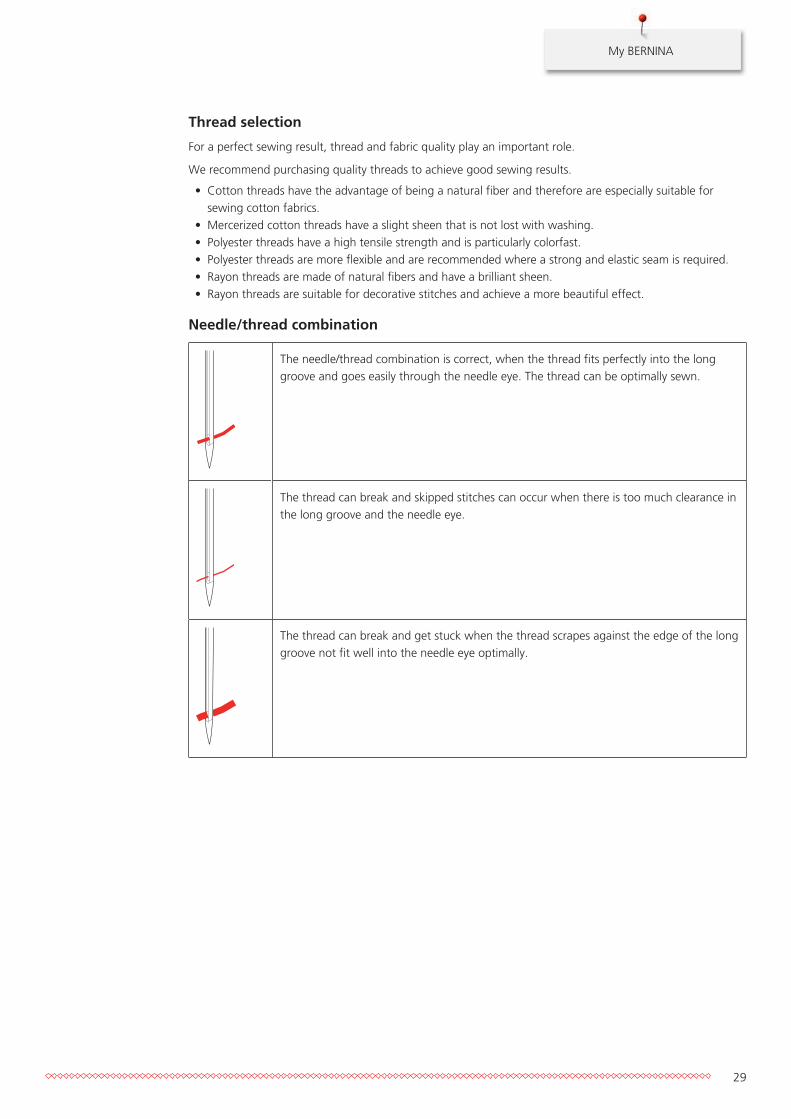
Needle/thread combination
The needle/thread combination is correct, when the thread fits perfectly into the longgroove and goes easily through the needle eye. The thread can be optimally sewn.
The thread can break and skipped stitches can occur when there is too much clearance inthe long groove and the needle eye.
The thread can break and get stuck when the thread scrapes against the edge of the longgroove not fit well into the needle eye optimally.
Sewing preparation
30
2 Sewing preparation
2.1 Accessory box
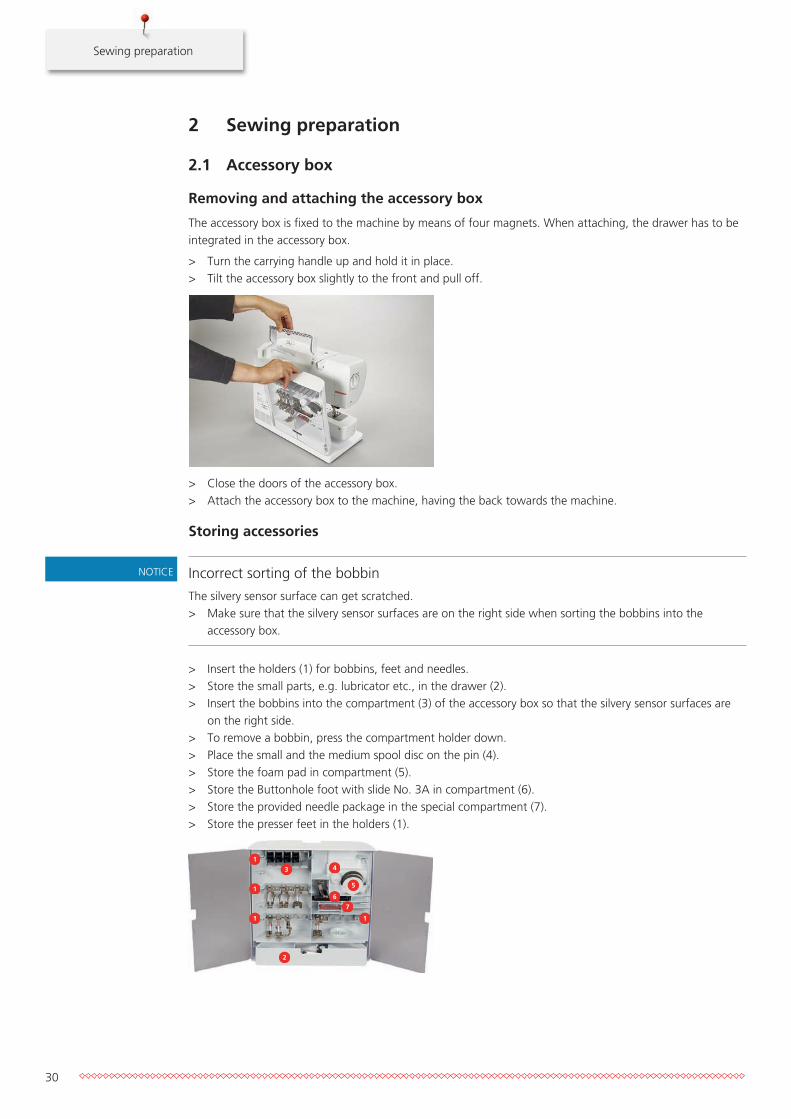
Removing and attaching the accessory box
The accessory box is fixed to the machine by means of four magnets. When attaching, the drawer has to beintegrated in the accessory box.
> Turn the carrying handle up and hold it in place.> Tilt the accessory box slightly to the front and pull off.
> Close the doors of the accessory box.> Attach the accessory box to the machine, having the back towards the machine.
Storing accessories
NOTICE Incorrect sorting of the bobbin
The silvery sensor surface can get scratched.> Make sure that the silvery sensor surfaces are on the right side when sorting the bobbins into the
accessory box.
> Insert the holders (1) for bobbins, feet and needles.> Store the small parts, e.g. lubricator etc., in the drawer (2).> Insert the bobbins into the compartment (3) of the accessory box so that the silvery sensor surfaces are
on the right side.> To remove a bobbin, press the compartment holder down.> Place the small and the medium spool disc on the pin (4).> Store the foam pad in compartment (5).> Store the Buttonhole foot with slide No. 3A in compartment (6).> Store the provided needle package in the special compartment (7).> Store the presser feet in the holders (1).
2
3 4
5
6
7
1
1 1
1
Sewing preparation
31
2.2 Connection and Switching on
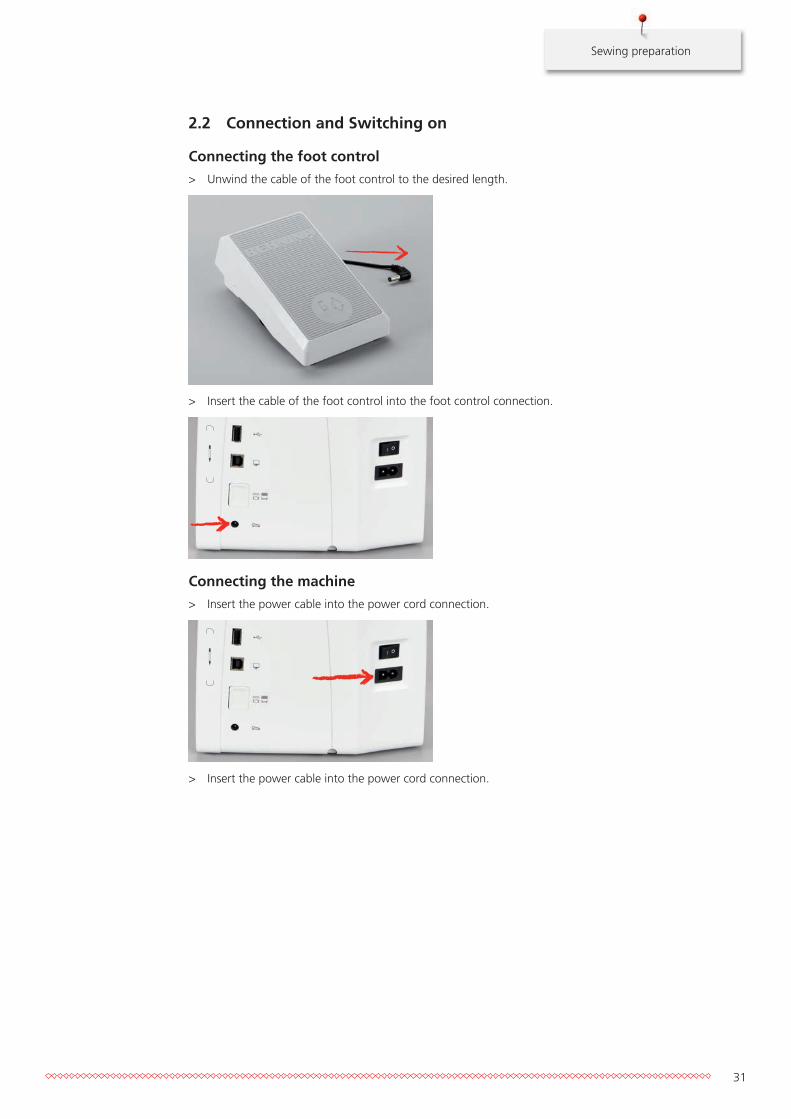
Connecting the foot control
> Unwind the cable of the foot control to the desired length.
> Insert the cable of the foot control into the foot control connection.
Connecting the machine
> Insert the power cable into the power cord connection.
> Insert the power cable into the power cord connection.

Sewing preparation
32
Attaching the knee lifter of the Free Hand System
The lateral position of the knee lifter can be adjusted by your local BERNINA Dealer if required.
> Insert the knee lifter into the opening at the front side of the machine.> Adjust the sitting height so that the knee lifter can be operated with the knee.
Attaching the touchscreen pen (optional accessory)
> Store the touchscreen pen at the magnet holder.
Switching the machine on
> Switch on the machine at the main switch to «I».
2.3 Foot control
Regulating the speed via the foot control
Via the foot control the speed is infinitely variable.
> Press the foot control down carefully to start the machine.> To sew faster, press the foot control harder.
Sewing preparation
33
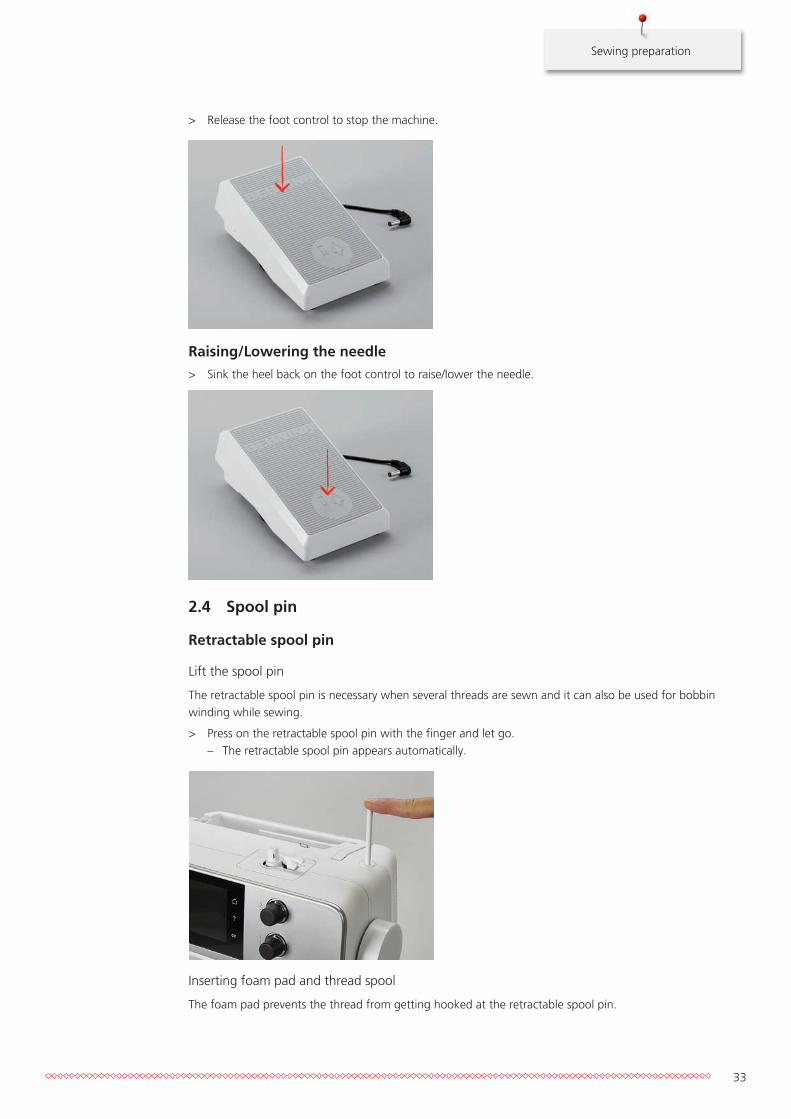
> Release the foot control to stop the machine.
Raising/Lowering the needle
> Sink the heel back on the foot control to raise/lower the needle.
2.4 Spool pin
Retractable spool pin
Lift the spool pin
The retractable spool pin is necessary when several threads are sewn and it can also be used for bobbinwinding while sewing.
> Press on the retractable spool pin with the finger and let go.– The retractable spool pin appears automatically.
Inserting foam pad and thread spool
The foam pad prevents the thread from getting hooked at the retractable spool pin.
Sewing preparation
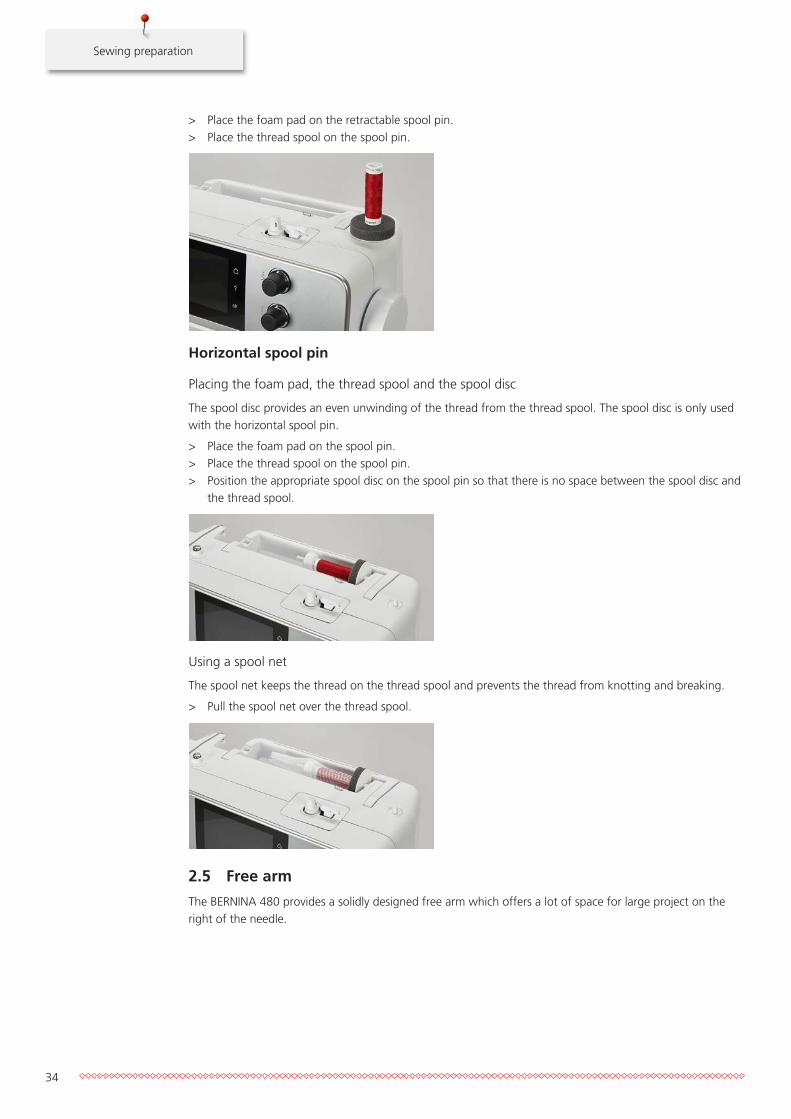
34
> Place the foam pad on the retractable spool pin.> Place the thread spool on the spool pin.
Horizontal spool pin
Placing the foam pad, the thread spool and the spool disc
The spool disc provides an even unwinding of the thread from the thread spool. The spool disc is only usedwith the horizontal spool pin.
> Place the foam pad on the spool pin.> Place the thread spool on the spool pin.> Position the appropriate spool disc on the spool pin so that there is no space between the spool disc and
the thread spool.
Using a spool net
The spool net keeps the thread on the thread spool and prevents the thread from knotting and breaking.
> Pull the spool net over the thread spool.
2.5 Free arm
The BERNINA 480 provides a solidly designed free arm which offers a lot of space for large project on theright of the needle.
Sewing preparation
35
2.6 Feed dog
Adjusting the feed dog
NOTICE Inappropriate handling of the fabric
Damage of the needle and the stitch plate.> Let the sewing project be fed evenly.
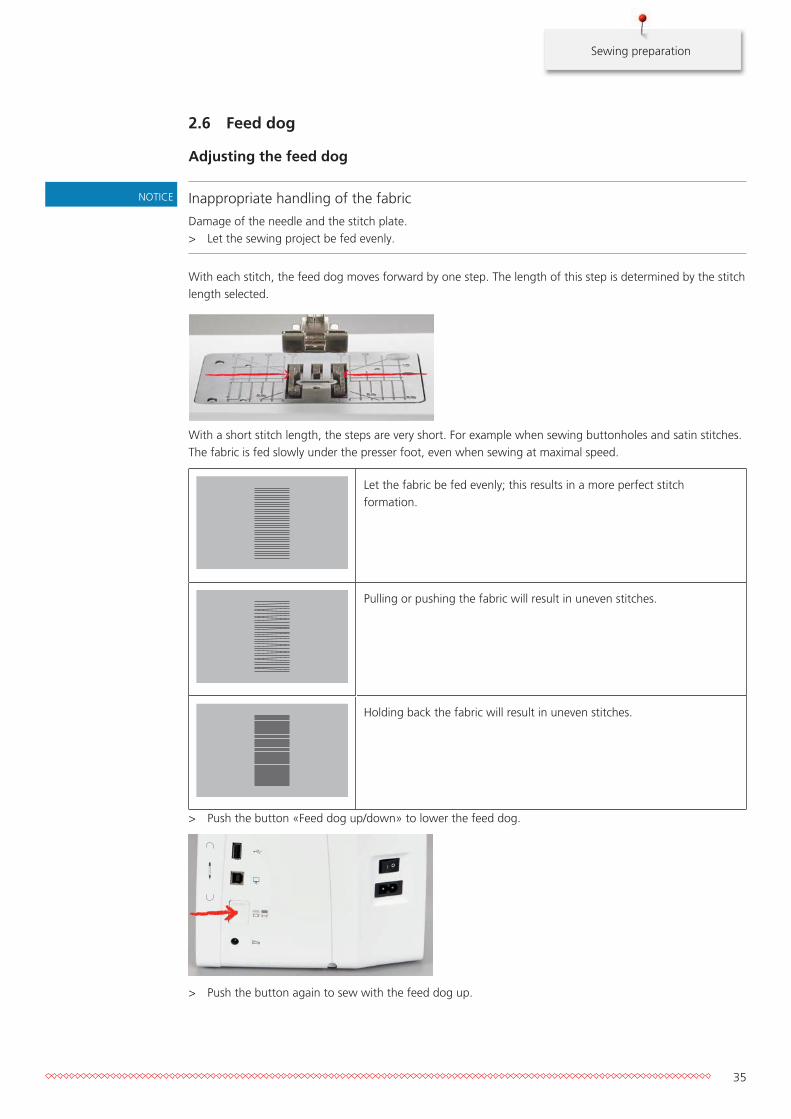
With each stitch, the feed dog moves forward by one step. The length of this step is determined by the stitchlength selected.
With a short stitch length, the steps are very short. For example when sewing buttonholes and satin stitches.The fabric is fed slowly under the presser foot, even when sewing at maximal speed.
Let the fabric be fed evenly; this results in a more perfect stitchformation.
Pulling or pushing the fabric will result in uneven stitches.
Holding back the fabric will result in uneven stitches.
> Push the button «Feed dog up/down» to lower the feed dog.
> Push the button again to sew with the feed dog up.
Sewing preparation
36
Instruction for adjusting the feed dog
> Touch the icon «Feed dog up/down».> Raise or lower the feed dog according to the animation.
2.7 Slide-on table
Using the slide-on table
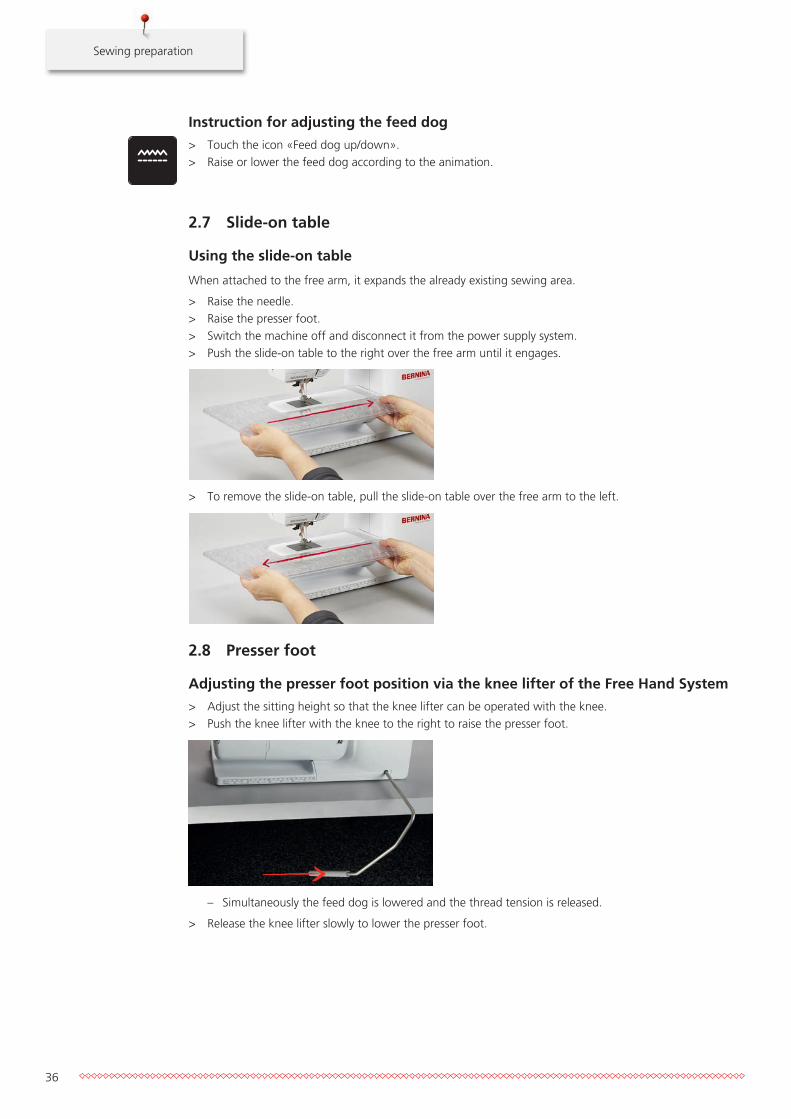
When attached to the free arm, it expands the already existing sewing area.
> Raise the needle.> Raise the presser foot.> Switch the machine off and disconnect it from the power supply system.> Push the slide-on table to the right over the free arm until it engages.
> To remove the slide-on table, pull the slide-on table over the free arm to the left.
2.8 Presser foot
Adjusting the presser foot position via the knee lifter of the Free Hand System
> Adjust the sitting height so that the knee lifter can be operated with the knee.> Push the knee lifter with the knee to the right to raise the presser foot.
– Simultaneously the feed dog is lowered and the thread tension is released.
> Release the knee lifter slowly to lower the presser foot.

Sewing preparation
37
Changing the presser foot
> Raise the needle.> Raise the presser foot.> Switch the machine off and disconnect it from the power supply system.> Push the clamping lever up (1).> Remove the presser foot (2).
> Guide the new presser foot upwards over the cone.> Press the clamping lever down.
Having the presser foot displayed in the User Interface
The recommended presser foot for the selected stitch is displayed. In addition to that, optional presser feetcan be displayed.
> Switch the machine on.> Select a stitch pattern.
– In the icon «Presser foot display» the recommended presser foot is indicated with a number.
> Touch the icon «Presser foot display».> With the touchscreen pen/finger scroll up within the range of presser feet to have optional presser feet
displayed.> If a presser foot is touched, the description and the application for this presser foot is displayed.
Sewing preparation
38
Adjusting the presser foot pressure
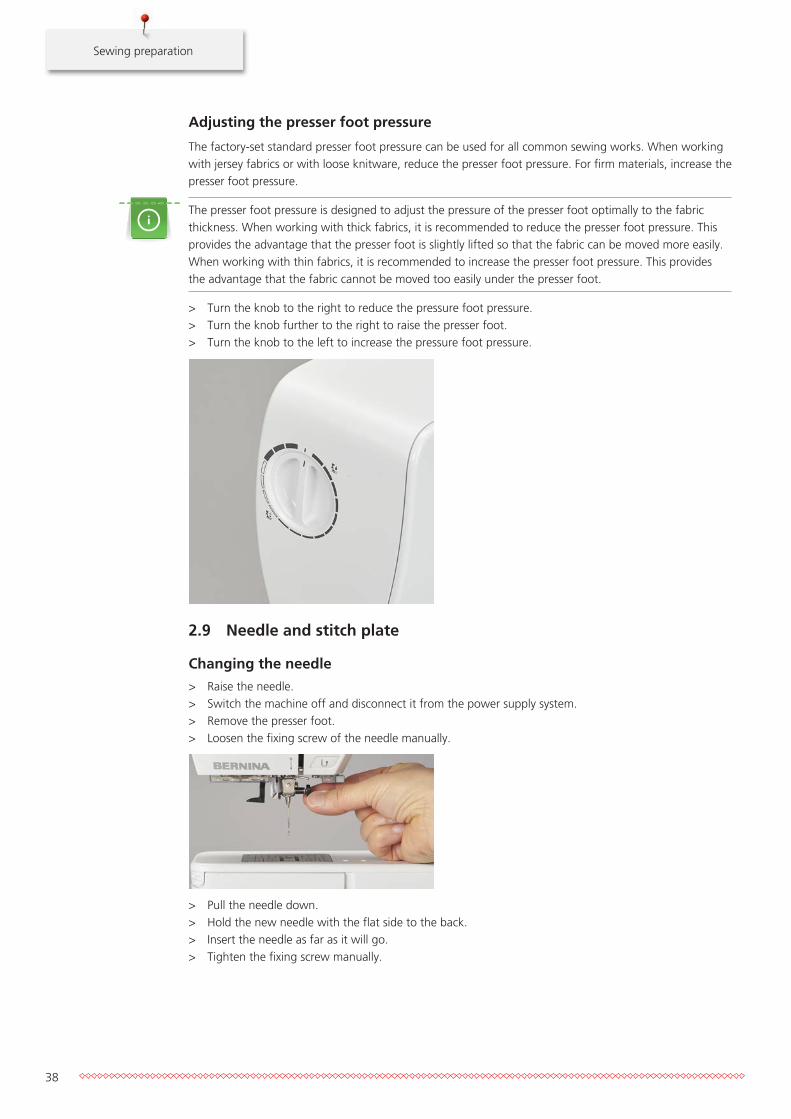
The factory-set standard presser foot pressure can be used for all common sewing works. When workingwith jersey fabrics or with loose knitware, reduce the presser foot pressure. For firm materials, increase thepresser foot pressure.
The presser foot pressure is designed to adjust the pressure of the presser foot optimally to the fabricthickness. When working with thick fabrics, it is recommended to reduce the presser foot pressure. Thisprovides the advantage that the presser foot is slightly lifted so that the fabric can be moved more easily.When working with thin fabrics, it is recommended to increase the presser foot pressure. This providesthe advantage that the fabric cannot be moved too easily under the presser foot.
> Turn the knob to the right to reduce the pressure foot pressure.> Turn the knob further to the right to raise the presser foot.> Turn the knob to the left to increase the pressure foot pressure.
2.9 Needle and stitch plate
Changing the needle
> Raise the needle.> Switch the machine off and disconnect it from the power supply system.> Remove the presser foot.> Loosen the fixing screw of the needle manually.
> Pull the needle down.> Hold the new needle with the flat side to the back.> Insert the needle as far as it will go.> Tighten the fixing screw manually.
Sewing preparation
39
Selecting the needle in the User Interface
After having changed the needle, it can be checked whether or not it can be used in combination with theselected stitch plate.
> Touch the icon «Stitch plate/Needle selection».
> Select the inserted needle.
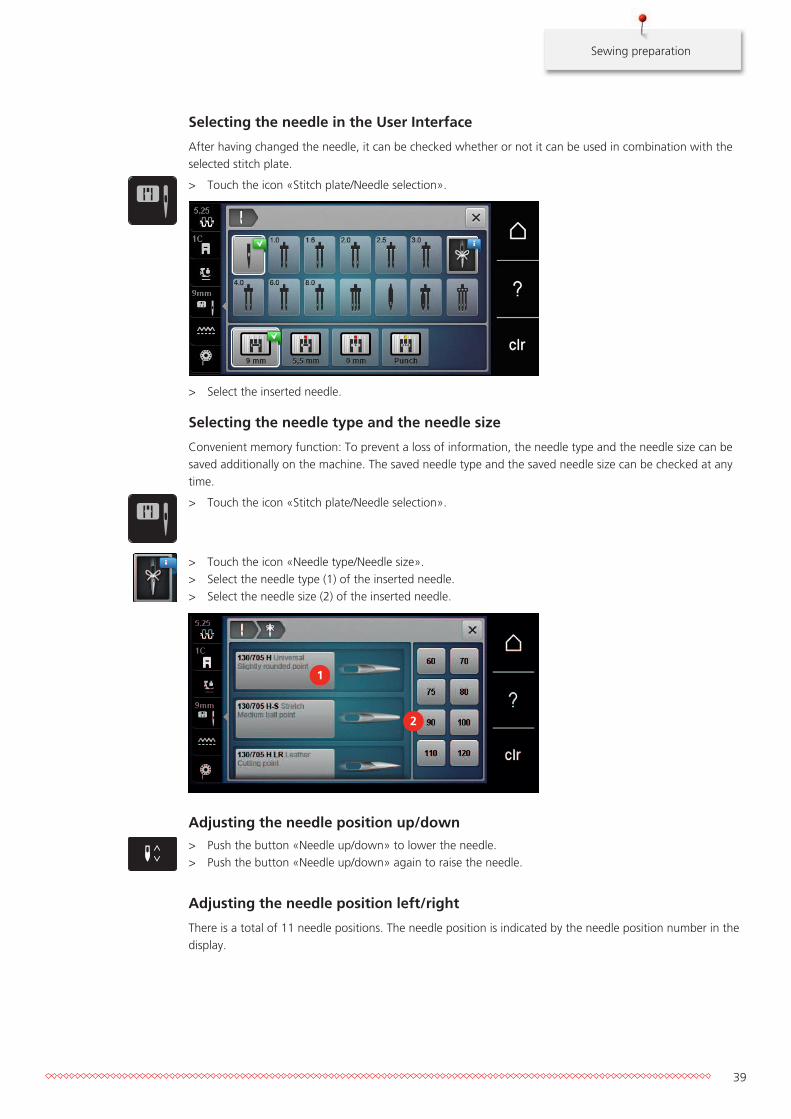
Selecting the needle type and the needle size
Convenient memory function: To prevent a loss of information, the needle type and the needle size can besaved additionally on the machine. The saved needle type and the saved needle size can be checked at anytime.
> Touch the icon «Stitch plate/Needle selection».
> Touch the icon «Needle type/Needle size».> Select the needle type (1) of the inserted needle.> Select the needle size (2) of the inserted needle.
1
2
Adjusting the needle position up/down
> Push the button «Needle up/down» to lower the needle.> Push the button «Needle up/down» again to raise the needle.
Adjusting the needle position left/right
There is a total of 11 needle positions. The needle position is indicated by the needle position number in thedisplay.
Sewing preparation
40
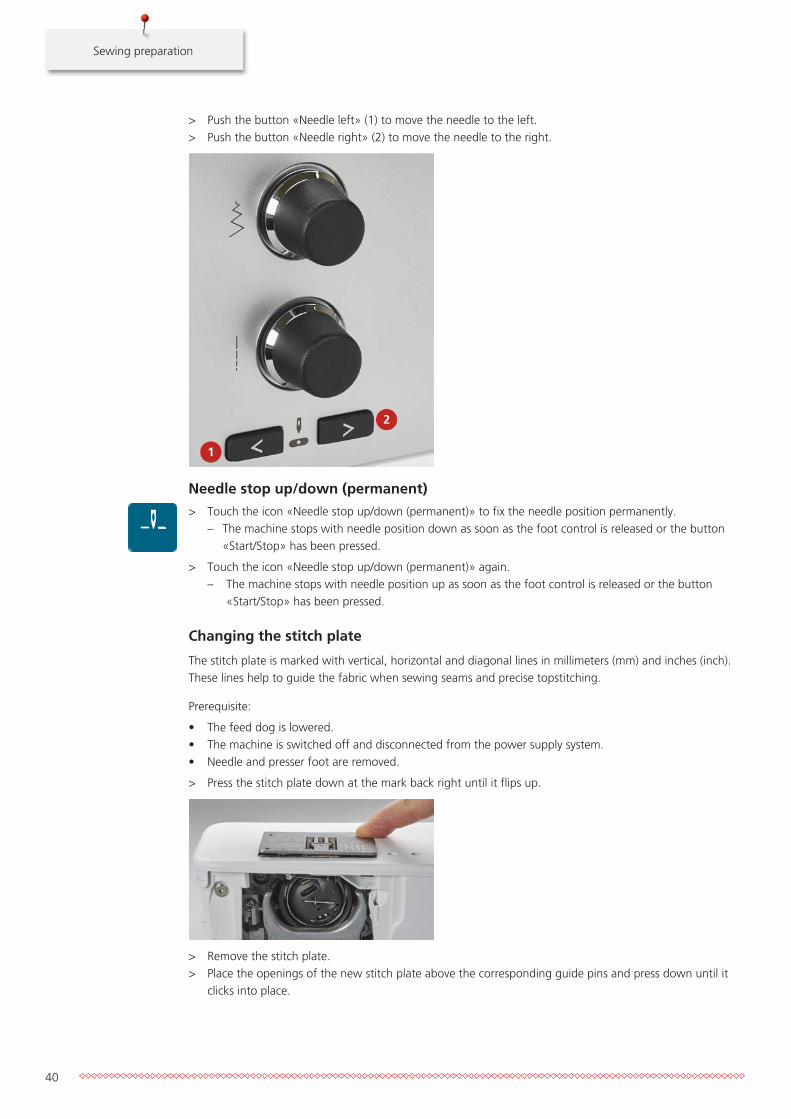
> Push the button «Needle left» (1) to move the needle to the left.> Push the button «Needle right» (2) to move the needle to the right.
Needle stop up/down (permanent)
> Touch the icon «Needle stop up/down (permanent)» to fix the needle position permanently.– The machine stops with needle position down as soon as the foot control is released or the button
«Start/Stop» has been pressed.
> Touch the icon «Needle stop up/down (permanent)» again.– The machine stops with needle position up as soon as the foot control is released or the button
«Start/Stop» has been pressed.
Changing the stitch plate
The stitch plate is marked with vertical, horizontal and diagonal lines in millimeters (mm) and inches (inch).These lines help to guide the fabric when sewing seams and precise topstitching.
Prerequisite:
• The feed dog is lowered.• The machine is switched off and disconnected from the power supply system.• Needle and presser foot are removed.
> Press the stitch plate down at the mark back right until it flips up.
> Remove the stitch plate.> Place the openings of the new stitch plate above the corresponding guide pins and press down until it
clicks into place.
Sewing preparation
41
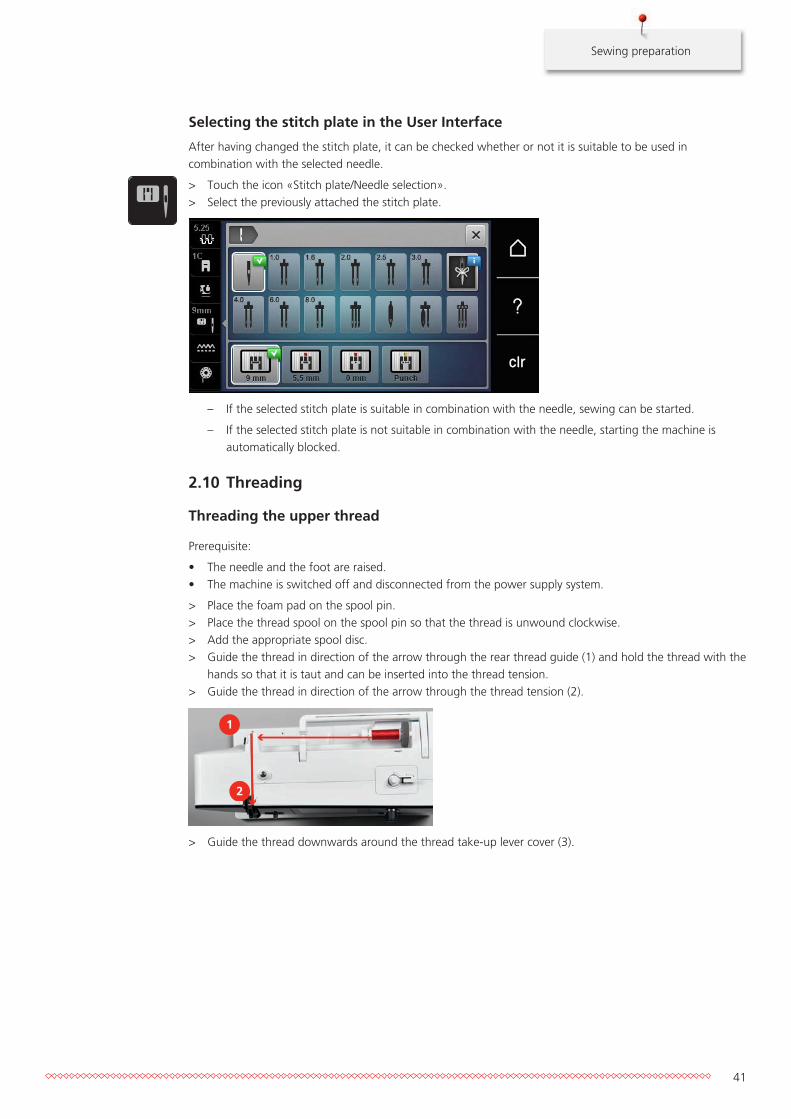
Selecting the stitch plate in the User Interface
After having changed the stitch plate, it can be checked whether or not it is suitable to be used incombination with the selected needle.
> Touch the icon «Stitch plate/Needle selection».> Select the previously attached the stitch plate.
– If the selected stitch plate is suitable in combination with the needle, sewing can be started.
– If the selected stitch plate is not suitable in combination with the needle, starting the machine isautomatically blocked.
2.10 Threading
Threading the upper thread
Prerequisite:
• The needle and the foot are raised.• The machine is switched off and disconnected from the power supply system.
> Place the foam pad on the spool pin.> Place the thread spool on the spool pin so that the thread is unwound clockwise.> Add the appropriate spool disc.> Guide the thread in direction of the arrow through the rear thread guide (1) and hold the thread with the
hands so that it is taut and can be inserted into the thread tension.> Guide the thread in direction of the arrow through the thread tension (2).
1
2
> Guide the thread downwards around the thread take-up lever cover (3).
Sewing preparation
42
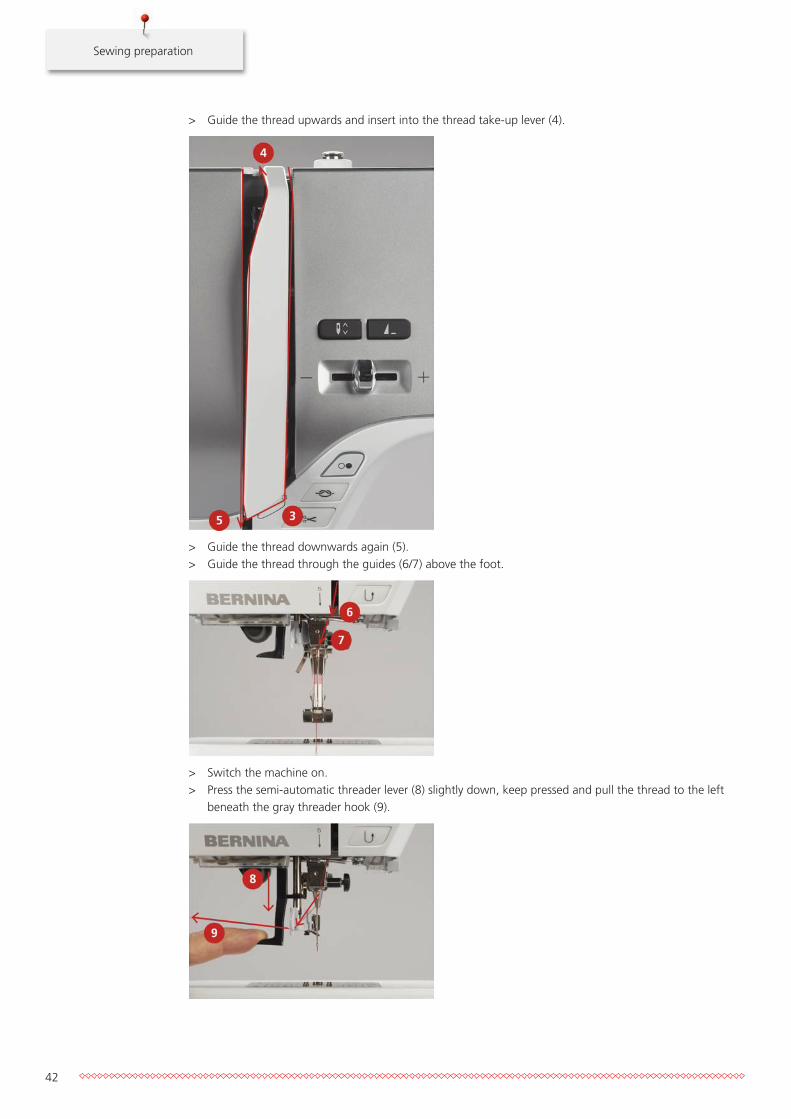
> Guide the thread upwards and insert into the thread take-up lever (4).
> Guide the thread downwards again (5).> Guide the thread through the guides (6/7) above the foot.
> Switch the machine on.> Press the semi-automatic threader lever (8) slightly down, keep pressed and pull the thread to the left
beneath the gray threader hook (9).
Sewing preparation
43
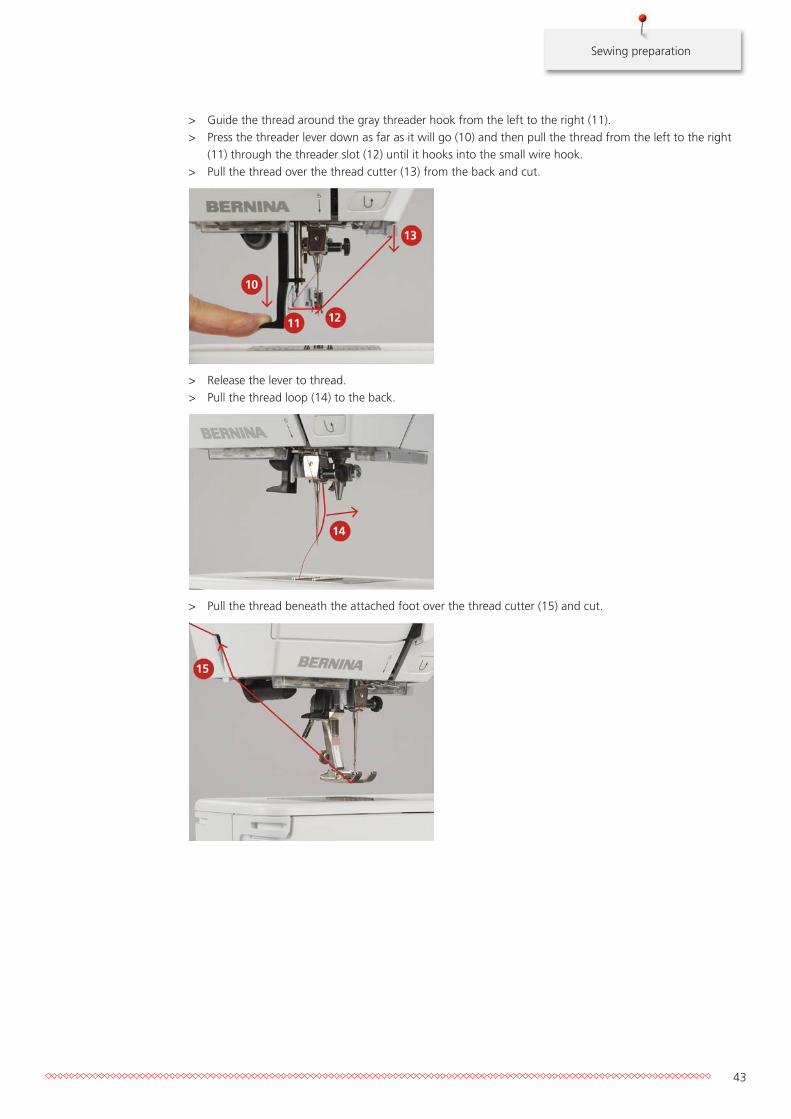
> Guide the thread around the gray threader hook from the left to the right (11).> Press the threader lever down as far as it will go (10) and then pull the thread from the left to the right
(11) through the threader slot (12) until it hooks into the small wire hook.> Pull the thread over the thread cutter (13) from the back and cut.
> Release the lever to thread.> Pull the thread loop (14) to the back.
> Pull the thread beneath the attached foot over the thread cutter (15) and cut.
Sewing preparation
44
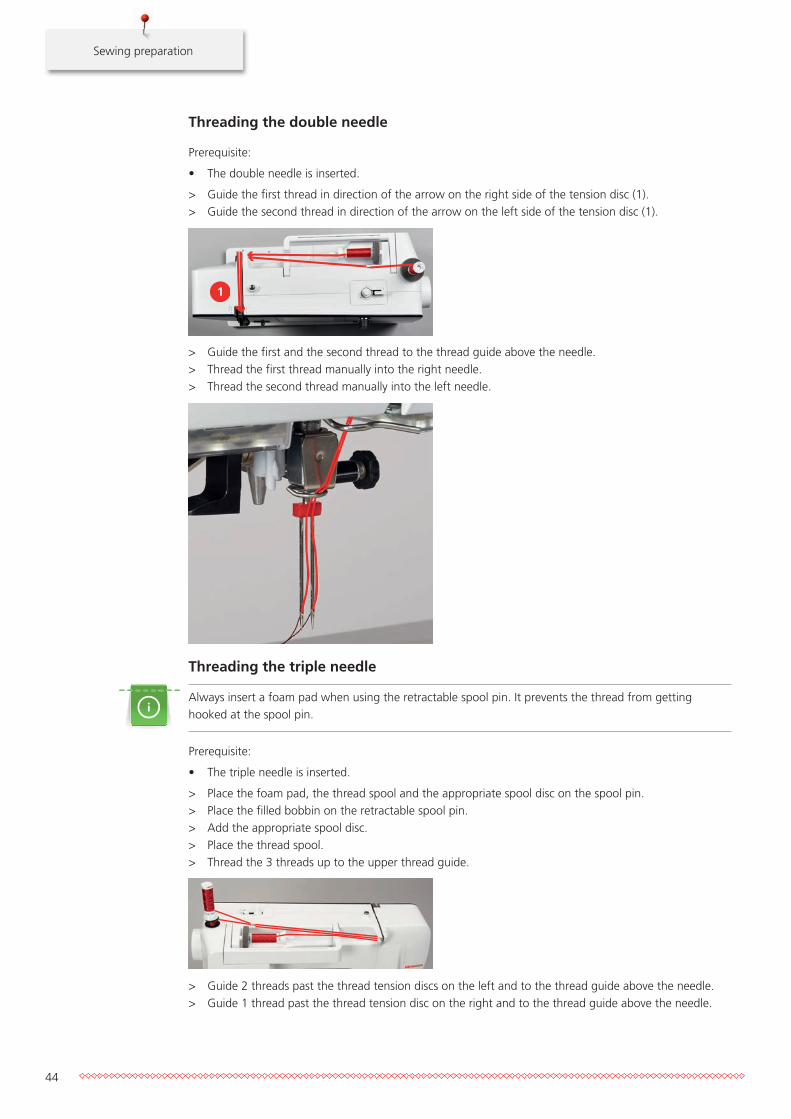
Threading the double needle
Prerequisite:
• The double needle is inserted.
> Guide the first thread in direction of the arrow on the right side of the tension disc (1).> Guide the second thread in direction of the arrow on the left side of the tension disc (1).
1
> Guide the first and the second thread to the thread guide above the needle.> Thread the first thread manually into the right needle.> Thread the second thread manually into the left needle.
Threading the triple needle
Always insert a foam pad when using the retractable spool pin. It prevents the thread from gettinghooked at the spool pin.
Prerequisite:
• The triple needle is inserted.
> Place the foam pad, the thread spool and the appropriate spool disc on the spool pin.> Place the filled bobbin on the retractable spool pin.> Add the appropriate spool disc.> Place the thread spool.> Thread the 3 threads up to the upper thread guide.
> Guide 2 threads past the thread tension discs on the left and to the thread guide above the needle.> Guide 1 thread past the thread tension disc on the right and to the thread guide above the needle.
Sewing preparation
45
> Thread the first thread into the left needle manually.> Thread the second thread into the center needle manually.> Thread the third thread into the right needle manually.
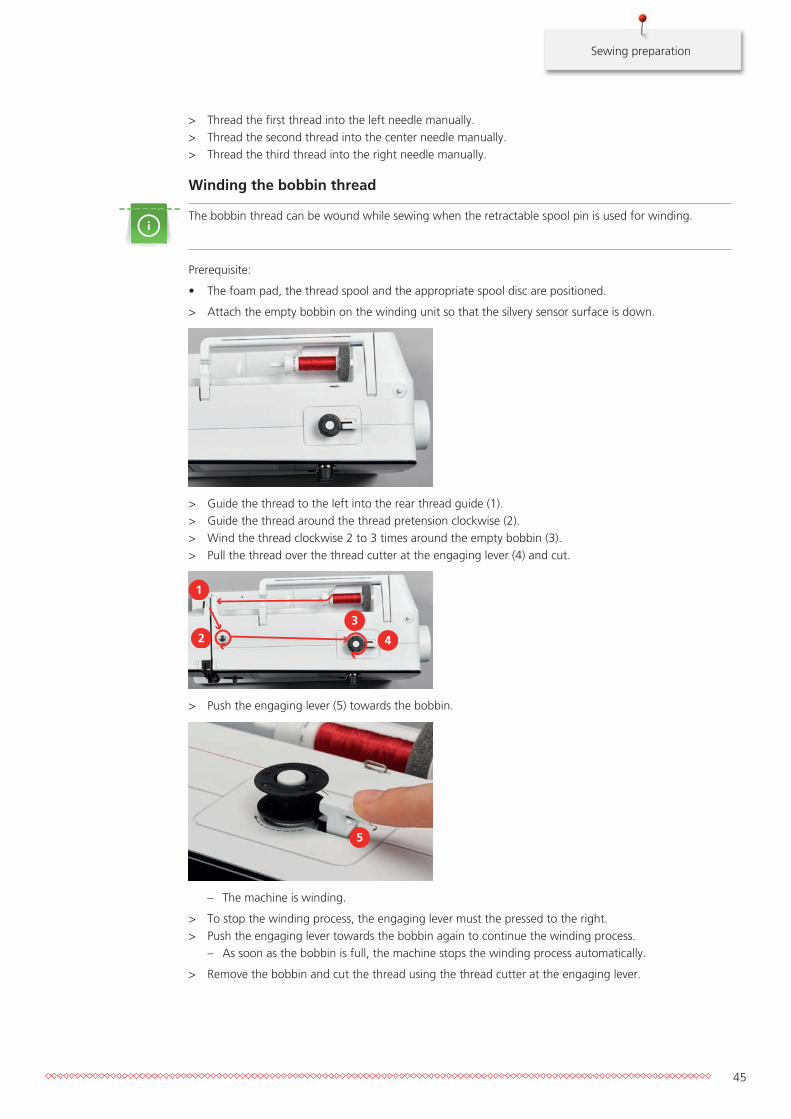
Winding the bobbin thread
The bobbin thread can be wound while sewing when the retractable spool pin is used for winding.
Prerequisite:
• The foam pad, the thread spool and the appropriate spool disc are positioned.
> Attach the empty bobbin on the winding unit so that the silvery sensor surface is down.
> Guide the thread to the left into the rear thread guide (1).> Guide the thread around the thread pretension clockwise (2).> Wind the thread clockwise 2 to 3 times around the empty bobbin (3).> Pull the thread over the thread cutter at the engaging lever (4) and cut.
1
3
42
> Push the engaging lever (5) towards the bobbin.
5
– The machine is winding.
> To stop the winding process, the engaging lever must the pressed to the right.> Push the engaging lever towards the bobbin again to continue the winding process.
– As soon as the bobbin is full, the machine stops the winding process automatically.
> Remove the bobbin and cut the thread using the thread cutter at the engaging lever.
Sewing preparation
46
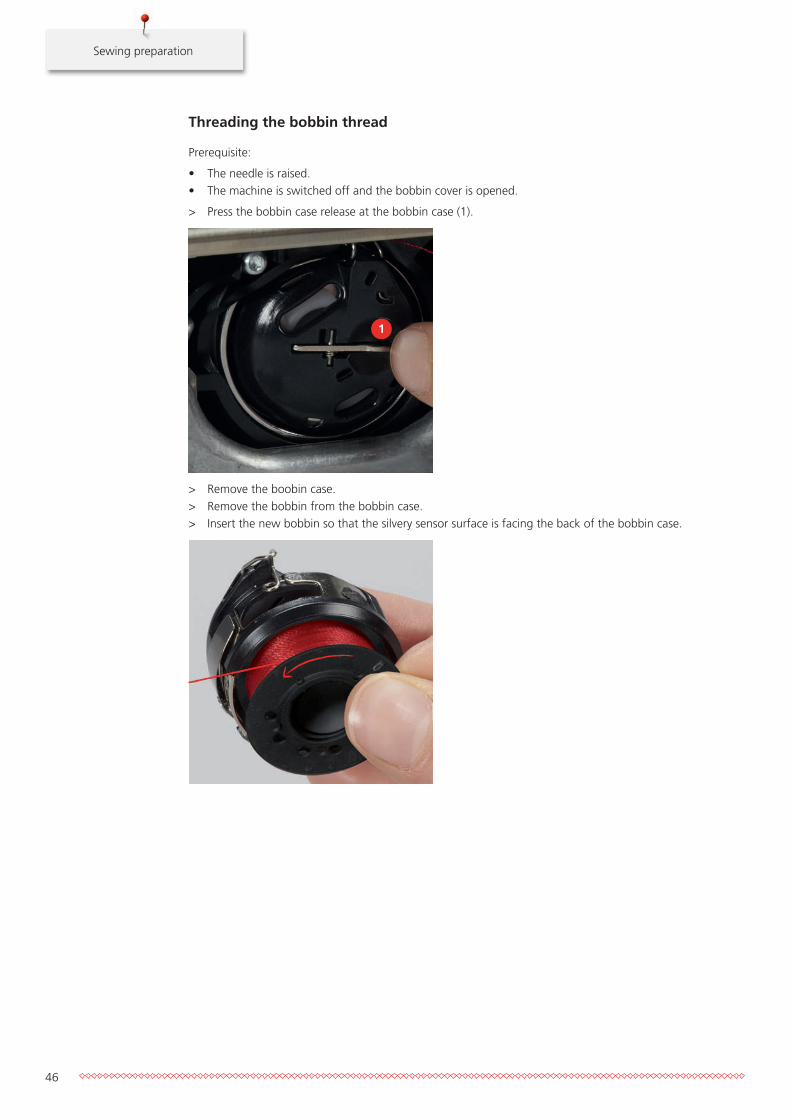
Threading the bobbin thread
Prerequisite:
• The needle is raised.• The machine is switched off and the bobbin cover is opened.
> Press the bobbin case release at the bobbin case (1).
1
> Remove the boobin case.> Remove the bobbin from the bobbin case.> Insert the new bobbin so that the silvery sensor surface is facing the back of the bobbin case.
Sewing preparation
47
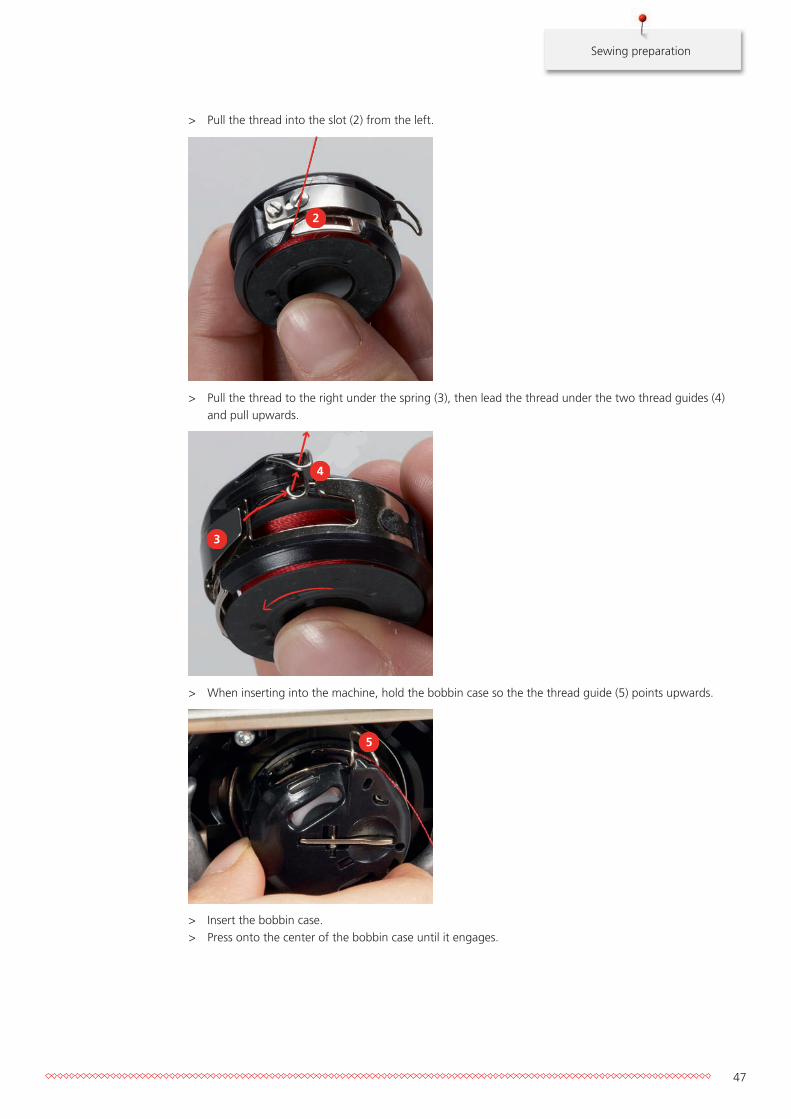
> Pull the thread into the slot (2) from the left.
2
> Pull the thread to the right under the spring (3), then lead the thread under the two thread guides (4)and pull upwards.
3
4
> When inserting into the machine, hold the bobbin case so the the thread guide (5) points upwards.
5
> Insert the bobbin case.> Press onto the center of the bobbin case until it engages.
Sewing preparation
48
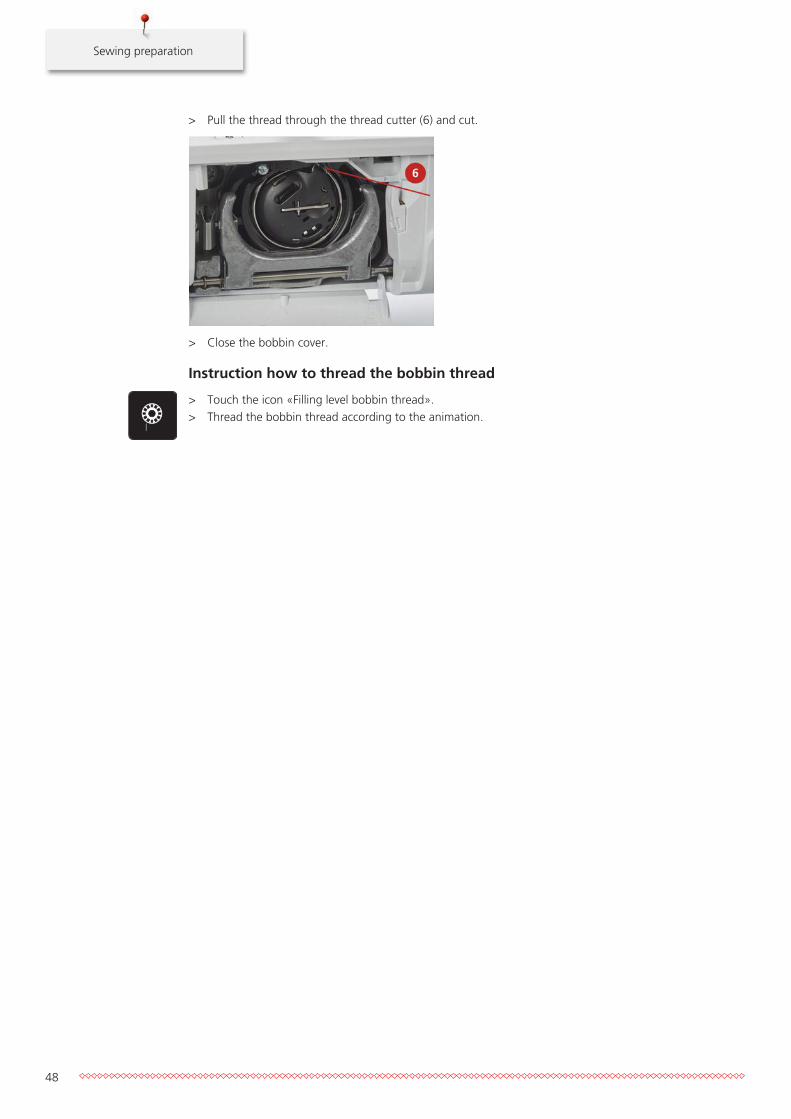
> Pull the thread through the thread cutter (6) and cut.
> Close the bobbin cover.
Instruction how to thread the bobbin thread
> Touch the icon «Filling level bobbin thread».> Thread the bobbin thread according to the animation.
Setup Program
49
3 Setup Program
3.1 Sewing settings
Adjusting the upper thread tension
Adjustments to the upper thread tension in the Setup Program affect all stitch patterns. Individual alterationsof the upper thread tension can also be made for currently selected stitches. The setting in the Setup remainsactive after switching off.
> Touch the icon «Home».
> Touch the icon «Setup Program».
> Touch the icon «Sewing settings».
> Touch the icon «Alter the upper thread tension».> Move the slide using the touchscreen pen/finger or touch the icons «+» or «-» to alter the upper thread
tension.
Adjusting the maximum sewing speed
By using this function, the maximum speed can be reduced.
> Touch the icon «Home».
> Touch the icon «Setup Program».
> Touch the icon «Sewing settings».
RPM
> Touch the icon «Alter the maximum speed».> Move the slide using the touchscreen pen/finger or touch the icons «+» or «-» to alter the maximum
speed.
Programming securing stitches
If the function is activated, 4 securing stitches are sewn automatically at the pattern start after the threadcut.
> Touch the icon «Home».
> Touch the icon «Setup Program».
Setup Program
50
> Touch the icon «Sewing settings».
> Touch the switch using the touchscreen pen/finger to deactivate the securing stitches.> Touch the switch again to activate the securing stitches.
Programming the button «Thread cutter»
The automatic securing can be programed before the thread cut takes place.
> Touch the icon «Home».
> Touch the icon «Setup Program».
> Touch the icon «Sewing settings».
> Touch the icon «Program buttons and icons».
> Touch the icon «Program the button thread cutter».
> Touch the icon «Securing» to sew 4 securing stitches in place.
> Touch the icon «Alter the number of securing stitches» to program the number of securing stitches inclose succession.
> Touch the icons «-» or «+» to program the number of securing stitches.
> Touch the icon «Securing stitches in place» to program 4 securing stitches in place.
> Touch the icon «Securing» deactivate the automatic securing.> Touch the icon «Securing» again to activate the automatic securing.
Programming the button «Securing»
Number and type of securing stitches can be programmed.
> Touch the icon «Setup Program».
> Touch the icon «Sewing settings».

Setup Program
51
> Touch the icon «Program buttons and icons».
> Touch the icon «Program the securing button».
> Touch the icon «Alter the number of securing stitches» to program subsequent securing stitches.> Touch the icons «-» or «+» to program the number of securing stitches.> Touch the yellow-framed icon to reset the alterations to default setting.
> Touch the icon «Securing stitches in place» to program 4 securing stitches in place.
Programming the button «Quick reverse»
Either «Quick reverse permanent» or «Backstepping» can be chosen.
> Touch the icon «Home».
> Touch the icon «Setup Program».
> Touch the icon «Sewing settings».
> Touch the icon «Program buttons and icons».
> Touch the icon «Program Quick reverse».
> Touch the icon «Backstepping» to activate backstepping.
> Touch the icon «Quick reverse» to activate the permanent reverse sewing.
Programming the foot control
When the icon «Needle up/down» is activated, the needle is raised or lowered via a back kick on the footcontrol. Alternatively, the presser foot can be positioned, the thread can be cut and the automatic securingcan be programmed.
> Touch the icon «Home».
Setup Program
52
> Touch the icon «Setup Program».
> Touch the icon «Sewing settings».
> Touch the icon «Program the foot control».
– The icon «Needle up/down» is activated by default.
– The back kick on the foot control raises or lowers the needle.
> Touch the icon «Program the back kick» to program the back kick.
> Touch the icon «Securing» to sew 4 securing stitches in place.
> Touch the icon «Alter the number of securing stitches» to program subsequent securing stitches.> Touch the icons «-» or «+» to program the number of securing stitches.> Touch the yellow-framed icon to reset the alteration to default setting.
> Touch the icon «Securing stitches in place» to program 4 securing stitches in place.
> Touch the icon «Securing» to deactivate the automatic securing via the back kick.> Touch the icon «Securing» again to activate the automatic securing via the back kick.
> Touch the icon «Cut the thread» to deactivate the automatic thread cut.> Touch the icon «Cut the thread» again to activate the automatic thread cut via the back kick.
3.2 Selecting personal settings> Touch the icon «Home».
> Touch the icon «Setup Program».
> Touch the icon «Personal settings».> Select the desired color of the display and the background.
Setup Program
53
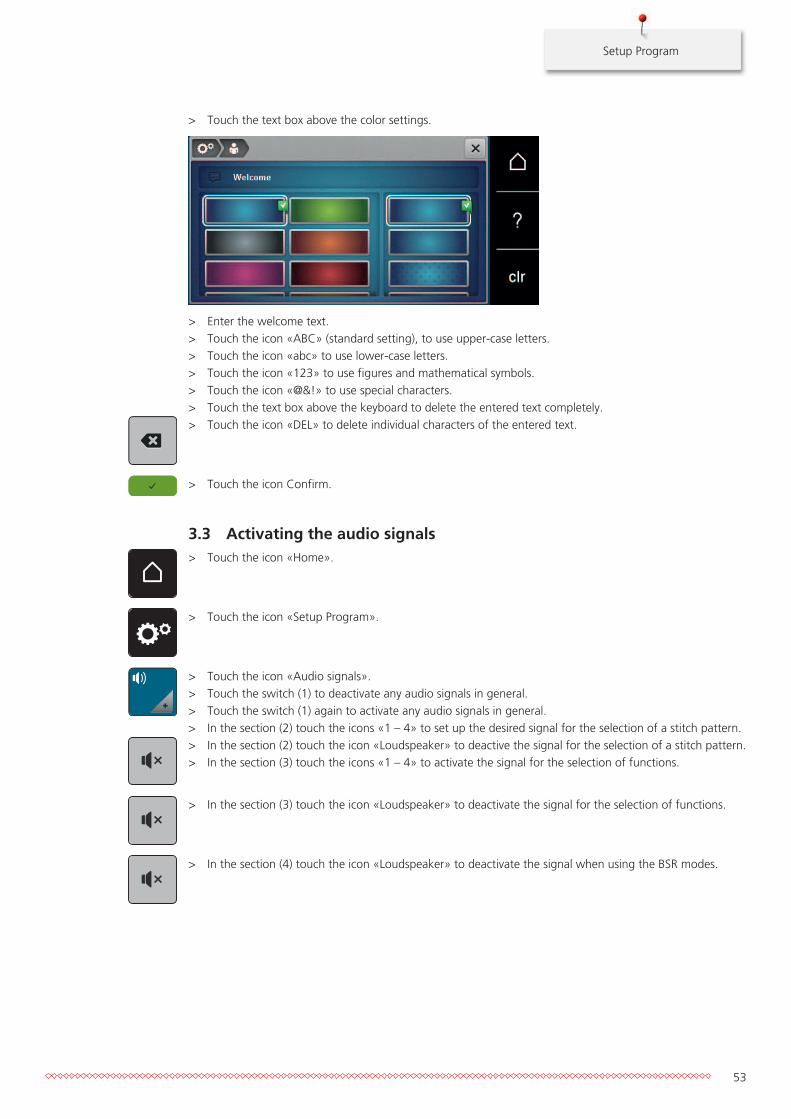
> Touch the text box above the color settings.
> Enter the welcome text.> Touch the icon «ABC» (standard setting), to use upper-case letters.> Touch the icon «abc» to use lower-case letters.> Touch the icon «123» to use figures and mathematical symbols.> Touch the icon «@&!» to use special characters.> Touch the text box above the keyboard to delete the entered text completely.> Touch the icon «DEL» to delete individual characters of the entered text.
> Touch the icon Confirm.
3.3 Activating the audio signals> Touch the icon «Home».
> Touch the icon «Setup Program».
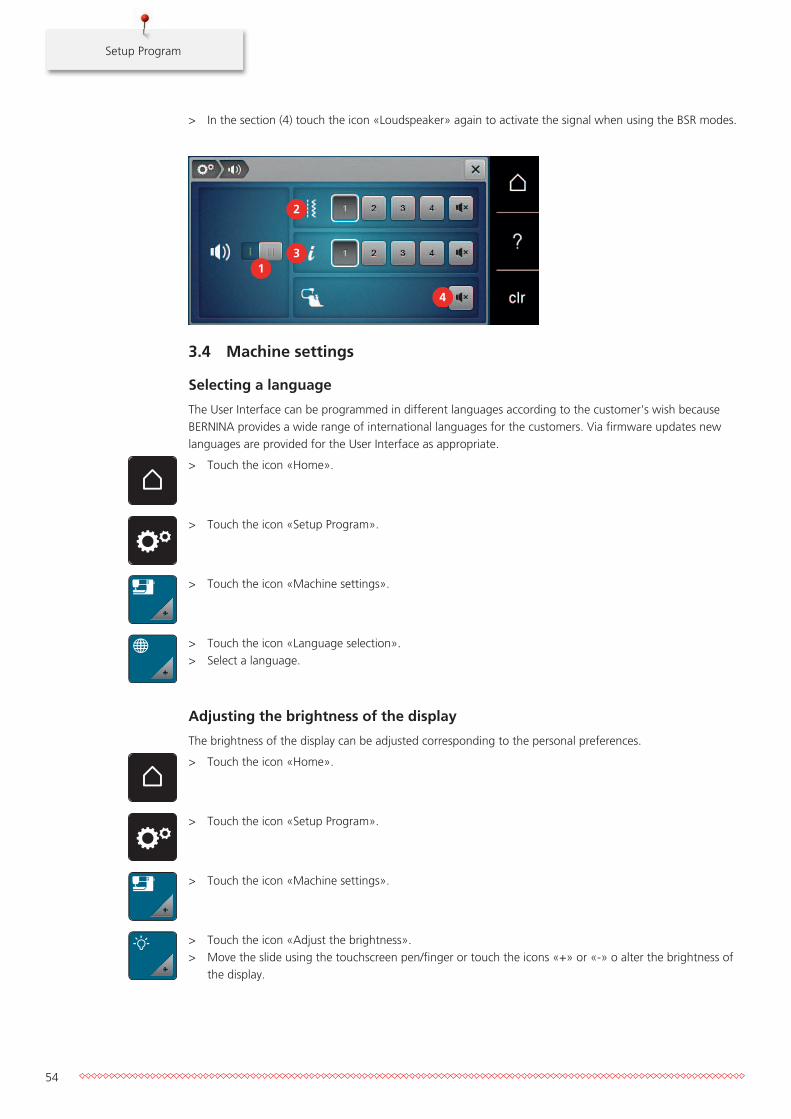
> Touch the icon «Audio signals».> Touch the switch (1) to deactivate any audio signals in general.> Touch the switch (1) again to activate any audio signals in general.> In the section (2) touch the icons «1 – 4» to set up the desired signal for the selection of a stitch pattern.> In the section (2) touch the icon «Loudspeaker» to deactive the signal for the selection of a stitch pattern.> In the section (3) touch the icons «1 – 4» to activate the signal for the selection of functions.
> In the section (3) touch the icon «Loudspeaker» to deactivate the signal for the selection of functions.
> In the section (4) touch the icon «Loudspeaker» to deactivate the signal when using the BSR modes.
Setup Program
54
> In the section (4) touch the icon «Loudspeaker» again to activate the signal when using the BSR modes.
1
2
3
4
3.4 Machine settings
Selecting a language
The User Interface can be programmed in different languages according to the customer's wish becauseBERNINA provides a wide range of international languages for the customers. Via firmware updates newlanguages are provided for the User Interface as appropriate.
> Touch the icon «Home».
> Touch the icon «Setup Program».
> Touch the icon «Machine settings».
> Touch the icon «Language selection».> Select a language.
Adjusting the brightness of the display
The brightness of the display can be adjusted corresponding to the personal preferences.
> Touch the icon «Home».
> Touch the icon «Setup Program».
> Touch the icon «Machine settings».
> Touch the icon «Adjust the brightness».> Move the slide using the touchscreen pen/finger or touch the icons «+» or «-» o alter the brightness of
the display.
Setup Program
55
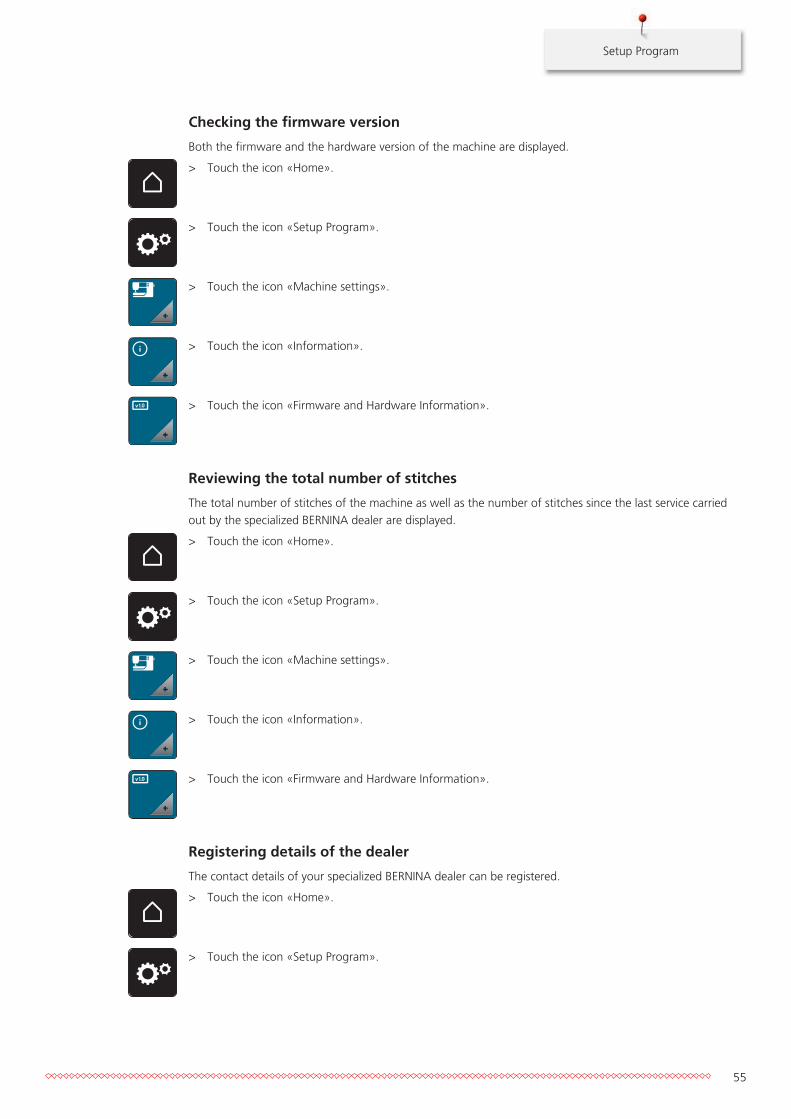
Checking the firmware version
Both the firmware and the hardware version of the machine are displayed.
> Touch the icon «Home».
> Touch the icon «Setup Program».
> Touch the icon «Machine settings».
> Touch the icon «Information».
> Touch the icon «Firmware and Hardware Information».
Reviewing the total number of stitches
The total number of stitches of the machine as well as the number of stitches since the last service carriedout by the specialized BERNINA dealer are displayed.
> Touch the icon «Home».
> Touch the icon «Setup Program».
> Touch the icon «Machine settings».
> Touch the icon «Information».
> Touch the icon «Firmware and Hardware Information».
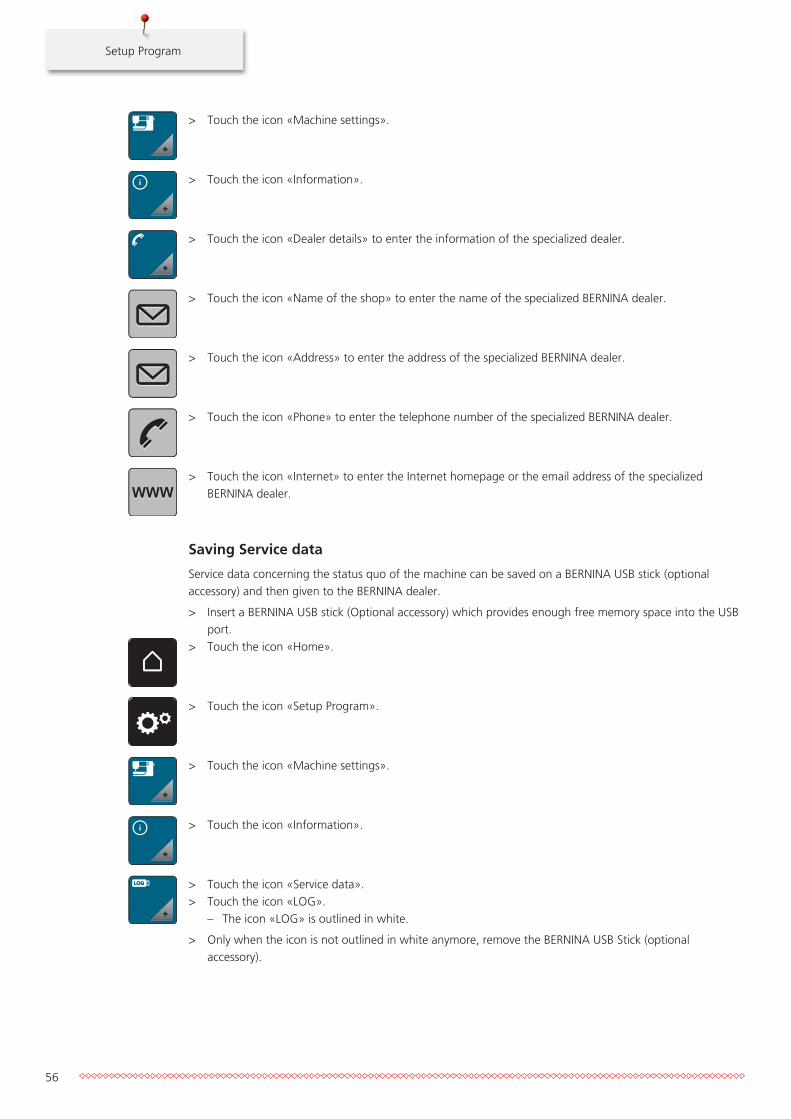
Registering details of the dealer
The contact details of your specialized BERNINA dealer can be registered.
> Touch the icon «Home».
> Touch the icon «Setup Program».
Setup Program
56
> Touch the icon «Machine settings».
> Touch the icon «Information».
> Touch the icon «Dealer details» to enter the information of the specialized dealer.
> Touch the icon «Name of the shop» to enter the name of the specialized BERNINA dealer.
> Touch the icon «Address» to enter the address of the specialized BERNINA dealer.
> Touch the icon «Phone» to enter the telephone number of the specialized BERNINA dealer.
> Touch the icon «Internet» to enter the Internet homepage or the email address of the specializedBERNINA dealer.
Saving Service data
Service data concerning the status quo of the machine can be saved on a BERNINA USB stick (optionalaccessory) and then given to the BERNINA dealer.
> Insert a BERNINA USB stick (Optional accessory) which provides enough free memory space into the USBport.
> Touch the icon «Home».
> Touch the icon «Setup Program».
> Touch the icon «Machine settings».
> Touch the icon «Information».
> Touch the icon «Service data».> Touch the icon «LOG».
– The icon «LOG» is outlined in white.
> Only when the icon is not outlined in white anymore, remove the BERNINA USB Stick (optionalaccessory).
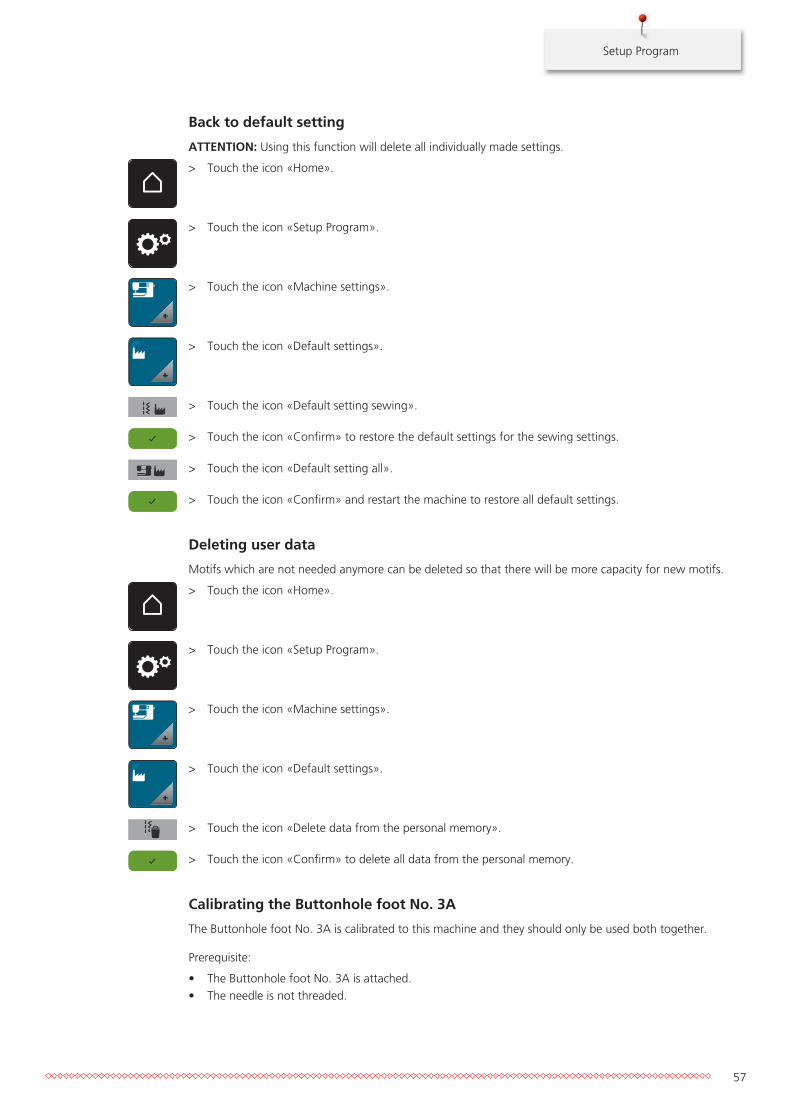
Setup Program
57
Back to default setting
ATTENTION: Using this function will delete all individually made settings.
> Touch the icon «Home».
> Touch the icon «Setup Program».
> Touch the icon «Machine settings».
> Touch the icon «Default settings».
> Touch the icon «Default setting sewing».
> Touch the icon «Confirm» to restore the default settings for the sewing settings.
> Touch the icon «Default setting all».
> Touch the icon «Confirm» and restart the machine to restore all default settings.
Deleting user data
Motifs which are not needed anymore can be deleted so that there will be more capacity for new motifs.
> Touch the icon «Home».
> Touch the icon «Setup Program».
> Touch the icon «Machine settings».
> Touch the icon «Default settings».
> Touch the icon «Delete data from the personal memory».
> Touch the icon «Confirm» to delete all data from the personal memory.
Calibrating the Buttonhole foot No. 3A
The Buttonhole foot No. 3A is calibrated to this machine and they should only be used both together.
Prerequisite:
• The Buttonhole foot No. 3A is attached.• The needle is not threaded.
Setup Program
58
> Touch the icon «Home».
> Touch the icon «Setup Program».
> Touch the icon «Machine settings».
> Touch the icon «Maintenance/Update».
> Touch the icon «Calibrate the Buttonhole foot with slide No. 3A».> Lower the Buttonhole foot with slide No. 3A.
> Touch the button «Start/Stop» to start the calibration.
> After the calibration is finished, touch the icon «Close».
Updating the machine Firmware
NOTICE The BERNINA USB stick (optional accessory) has been removed too early
Firmware has not been updated and the machine cannot be used.> Remove the BERNINA USB stick (optional accessory) only after the update has been completed
successfully.
The latest firmware of the machine and a detailed step-by-step instruction for updating processes can be
downloaded at www.bernina.com. In general, personal data and settings are automatically transferredduring a firmware update. For reasons of safety, it is also recommended to save data and settings on aBERNINA USB stick (optional accessory) before the firmware update is started. If personal data and settingsshould get lost during a firmware update, they can be transferred to the machine again afterwards.
> Insert the BERNINA USB Stick (optional accessory), FAT32 formatted, providing the latest software intothe port.
> Touch the icon «Home».
> Touch the icon «Setup Program».
> Touch the icon «Machine settings».
> Touch the icon «Maintenance/Update».
Setup Program
59
UPDATE
> Touch the icon «Update the machine».
> Touch the icon «Save data on USB Stick».– The icon is checkmarked in green.
UpdateUpdate > Touch the icon «Update» to start the update of the firmware.
Recovering saved data
NOTICE The BERNINA USB stick (optional accessory) has been removed too early
Saved data cannot be transferred and the machine cannot be used.> Remove the BERNINA USB stick (optional accessory) only after the saved data has been transferred
successfully.
If personal data and settings after a software update are not available anymore, they can be transfered tothe machine again afterwards.
> Insert the BERNINA USB stick (Optional accessory) providing the saved data and settings into the USB portof the machine.
> Touch the icon «Home».
> Touch the icon «Setup Program».
> Touch the icon «Machine settings».
> Touch the icon «Maintenance/Update».
UPDATE
> Touch the icon «Update the machine».
> Touch the icon «Transfer saved data to machine».– The icon is checkmarked in green.
Cleaning the thread catcher
In chapter «Maintenance and cleaning» there are additional illustrated step-by-step instructions.
> Touch the icon «Home».
> Touch the icon «Setup Program».
Setup Program
60
> Touch the icon «Machine settings».
> Touch the icon «Maintenance/Update».
> Touch the icon «Clean the thread catcher».> Clean the thread catcher according to the instructions on the display.
Lubricating the machine
CAUTION Electronically driven components
Risk of injury near the needle and the hook.> Switch the machine off and disconnect it from the power supply system.
NOTICE Lubricating the hook
Too much oil can pollute the fabric and the thread.> Always sew a test sample first.
The Setup Program provides animations how the machine has to be oiled. In chapter «Maintenance andcleaning» there are more illustrated step by step instructions. Always use BERNINA oil to lubricate.
> Touch the icon «Home».
> Touch the icon «Setup Program».
> Touch the icon «Machine settings».
> Touch the icon «Maintenance/Update».
> Touch the icon «Lubricate the machine».> Lubricate the machine according to the instructions on the display.
System settings
61
4 System settings
4.1 Calling up the Tutorial
The Tutorial provides information and explanations on different sections concerning sewing and the variousstitches.
> Touch the icon «Home».
> Touch the icon «Tutorial».> Select the desired topic to get information.
4.2 Calling up the Creative Consultant
The Creative Consultant provides information about decision support concerning sewing projects. Afterentering the fabric and the desired sewing project, suggestions for suitable needles, presser feet etc. aredisplayed.
Prerequisite:
• Sewing mode is active.
> Touch the icon «Home».
> Touch the icon «Creative Consultant».> Select the fabric to be sewn.> Select the sewing project.
4.3 Using eco mode
During a longer interruption of work the machine can be set into a power save mode.
> Touch the icon «Home».
> Touch the icon «eco mode».– The display goes to sleep. The power consumption is reduced and the sewing light is off.
> Touch «eco».– The machine is ready for use.
4.4 Calling up the Help> Touch the window in the display where help is needed.> Touch the icon «Help» to start the help mode.> Touch the icon in the display where help is needed.
– Assistance concerning the selected icon is displayed.

System settings
62
4.5 Cancelling any alterations with «clr»
Any alterations to motifs can be reset to default setting. Exceptions are saved motifs which have been filed inthe personal memory and monitoring functions.
> Touch the icon «clr».
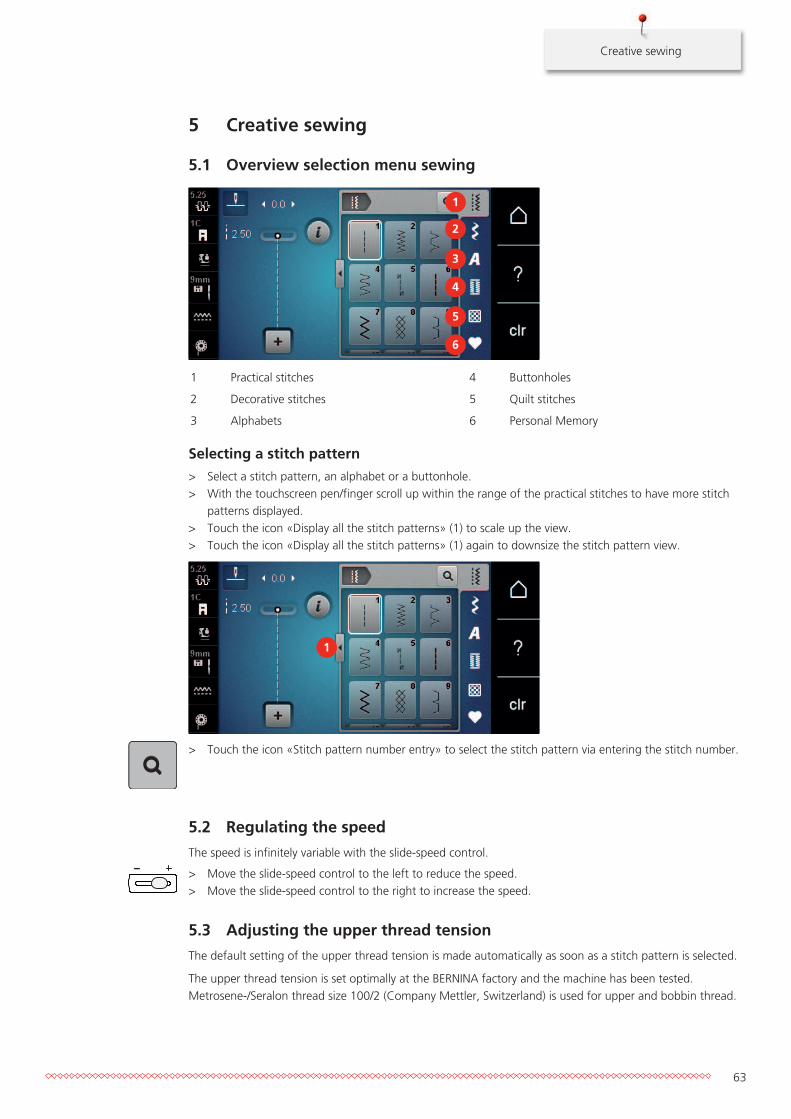
Creative sewing
63
5 Creative sewing
5.1 Overview selection menu sewing
1
2
3
4
5
6
1 Practical stitches 4 Buttonholes
2 Decorative stitches 5 Quilt stitches
3 Alphabets 6 Personal Memory
Selecting a stitch pattern
> Select a stitch pattern, an alphabet or a buttonhole.> With the touchscreen pen/finger scroll up within the range of the practical stitches to have more stitch
patterns displayed.> Touch the icon «Display all the stitch patterns» (1) to scale up the view.> Touch the icon «Display all the stitch patterns» (1) again to downsize the stitch pattern view.
1
> Touch the icon «Stitch pattern number entry» to select the stitch pattern via entering the stitch number.
5.2 Regulating the speed
The speed is infinitely variable with the slide-speed control.
> Move the slide-speed control to the left to reduce the speed.> Move the slide-speed control to the right to increase the speed.
5.3 Adjusting the upper thread tension
The default setting of the upper thread tension is made automatically as soon as a stitch pattern is selected.
The upper thread tension is set optimally at the BERNINA factory and the machine has been tested.Metrosene-/Seralon thread size 100/2 (Company Mettler, Switzerland) is used for upper and bobbin thread.
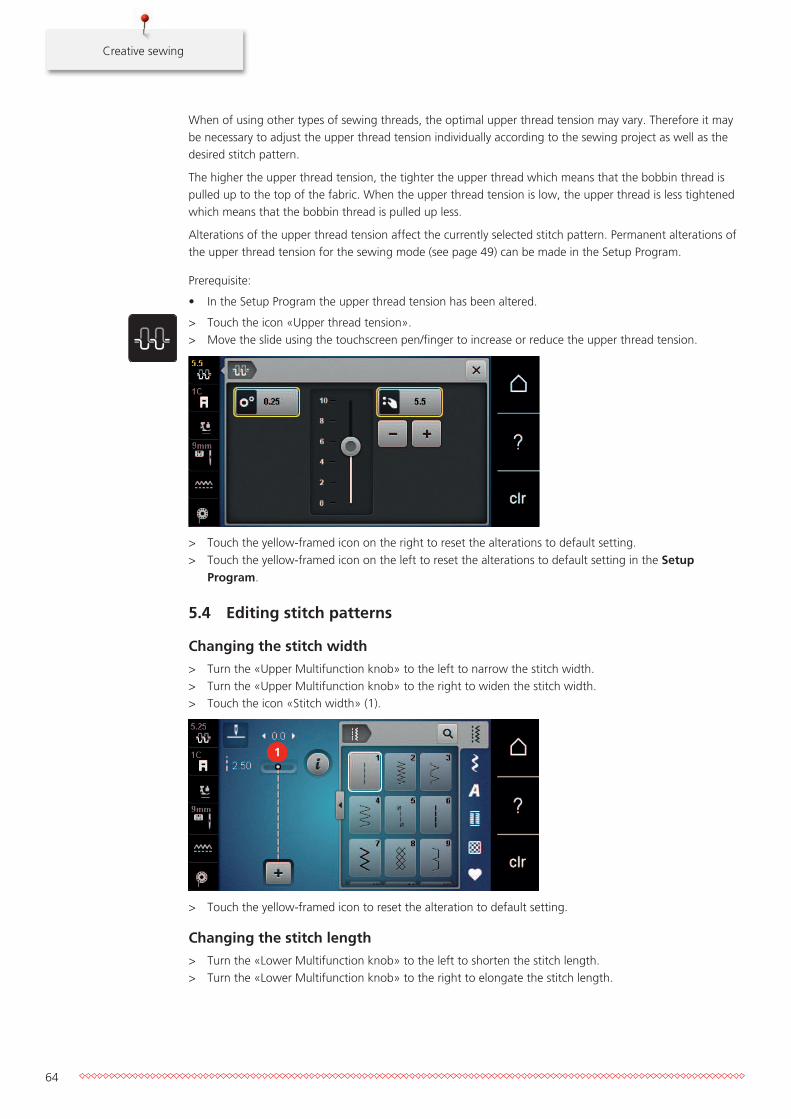
Creative sewing
64
When of using other types of sewing threads, the optimal upper thread tension may vary. Therefore it maybe necessary to adjust the upper thread tension individually according to the sewing project as well as thedesired stitch pattern.
The higher the upper thread tension, the tighter the upper thread which means that the bobbin thread ispulled up to the top of the fabric. When the upper thread tension is low, the upper thread is less tightenedwhich means that the bobbin thread is pulled up less.
Alterations of the upper thread tension affect the currently selected stitch pattern. Permanent alterations ofthe upper thread tension for the sewing mode (see page 49) can be made in the Setup Program.
Prerequisite:
• In the Setup Program the upper thread tension has been altered.
> Touch the icon «Upper thread tension».> Move the slide using the touchscreen pen/finger to increase or reduce the upper thread tension.
> Touch the yellow-framed icon on the right to reset the alterations to default setting.> Touch the yellow-framed icon on the left to reset the alterations to default setting in the Setup
Program.
5.4 Editing stitch patterns
Changing the stitch width
> Turn the «Upper Multifunction knob» to the left to narrow the stitch width.> Turn the «Upper Multifunction knob» to the right to widen the stitch width.> Touch the icon «Stitch width» (1).
1
> Touch the yellow-framed icon to reset the alteration to default setting.
Changing the stitch length
> Turn the «Lower Multifunction knob» to the left to shorten the stitch length.> Turn the «Lower Multifunction knob» to the right to elongate the stitch length.
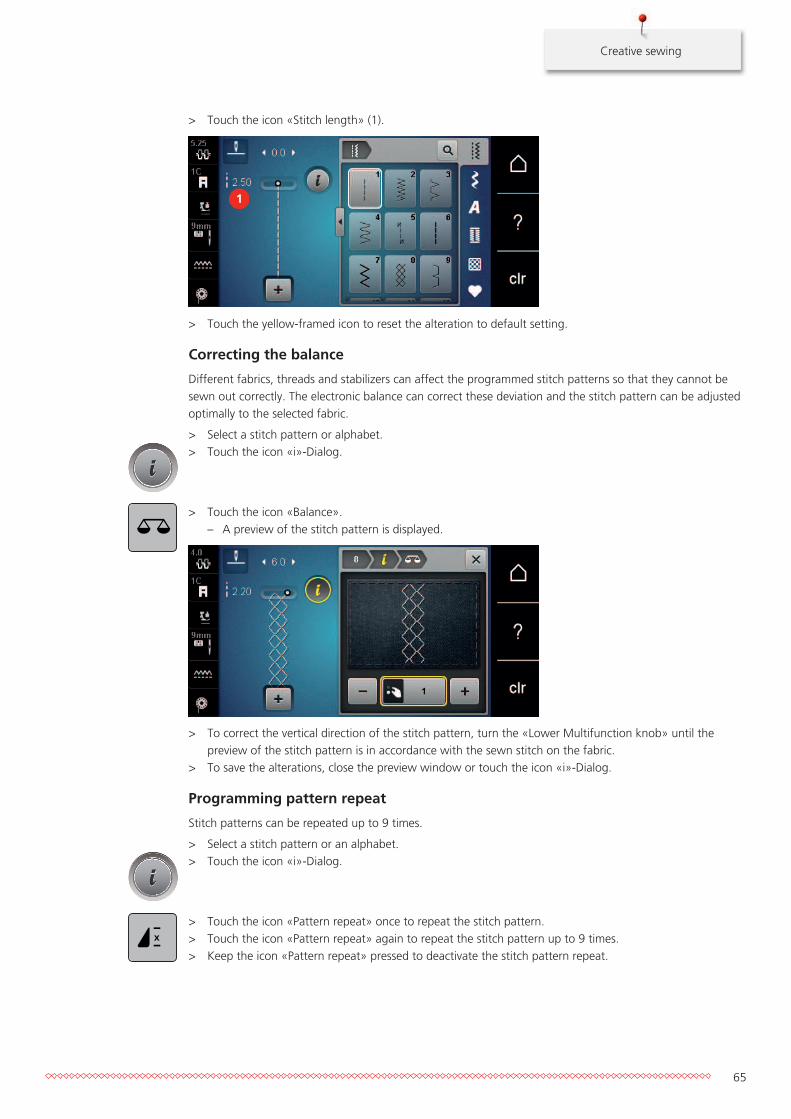
Creative sewing
65
> Touch the icon «Stitch length» (1).
1
> Touch the yellow-framed icon to reset the alteration to default setting.
Correcting the balance
Different fabrics, threads and stabilizers can affect the programmed stitch patterns so that they cannot besewn out correctly. The electronic balance can correct these deviation and the stitch pattern can be adjustedoptimally to the selected fabric.
> Select a stitch pattern or alphabet.> Touch the icon «i»-Dialog.
> Touch the icon «Balance».– A preview of the stitch pattern is displayed.
> To correct the vertical direction of the stitch pattern, turn the «Lower Multifunction knob» until thepreview of the stitch pattern is in accordance with the sewn stitch on the fabric.
> To save the alterations, close the preview window or touch the icon «i»-Dialog.
Programming pattern repeat
Stitch patterns can be repeated up to 9 times.
> Select a stitch pattern or an alphabet.> Touch the icon «i»-Dialog.
x
> Touch the icon «Pattern repeat» once to repeat the stitch pattern.> Touch the icon «Pattern repeat» again to repeat the stitch pattern up to 9 times.> Keep the icon «Pattern repeat» pressed to deactivate the stitch pattern repeat.
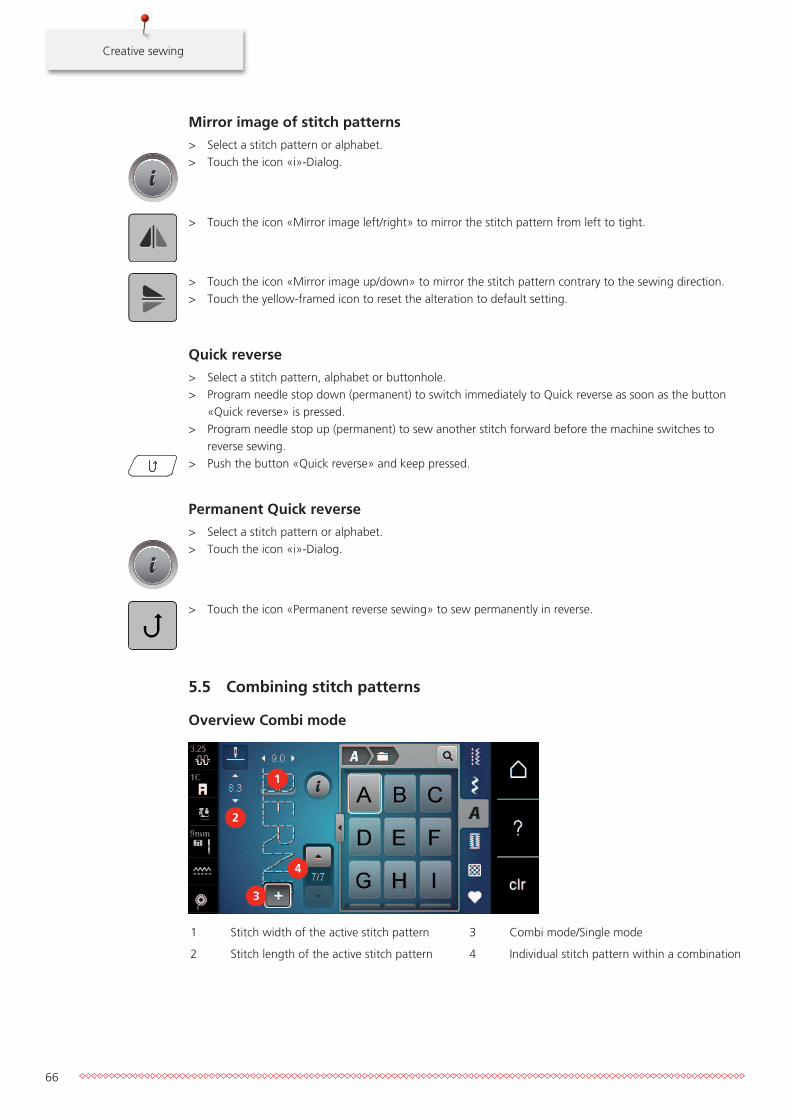
Creative sewing
66
Mirror image of stitch patterns
> Select a stitch pattern or alphabet.> Touch the icon «i»-Dialog.
> Touch the icon «Mirror image left/right» to mirror the stitch pattern from left to tight.
> Touch the icon «Mirror image up/down» to mirror the stitch pattern contrary to the sewing direction.> Touch the yellow-framed icon to reset the alteration to default setting.
Quick reverse
> Select a stitch pattern, alphabet or buttonhole.> Program needle stop down (permanent) to switch immediately to Quick reverse as soon as the button
«Quick reverse» is pressed.> Program needle stop up (permanent) to sew another stitch forward before the machine switches to
reverse sewing.> Push the button «Quick reverse» and keep pressed.
Permanent Quick reverse
> Select a stitch pattern or alphabet.> Touch the icon «i»-Dialog.
> Touch the icon «Permanent reverse sewing» to sew permanently in reverse.
5.5 Combining stitch patterns
Overview Combi mode
1
2
3
4
1 Stitch width of the active stitch pattern 3 Combi mode/Single mode
2 Stitch length of the active stitch pattern 4 Individual stitch pattern within a combination
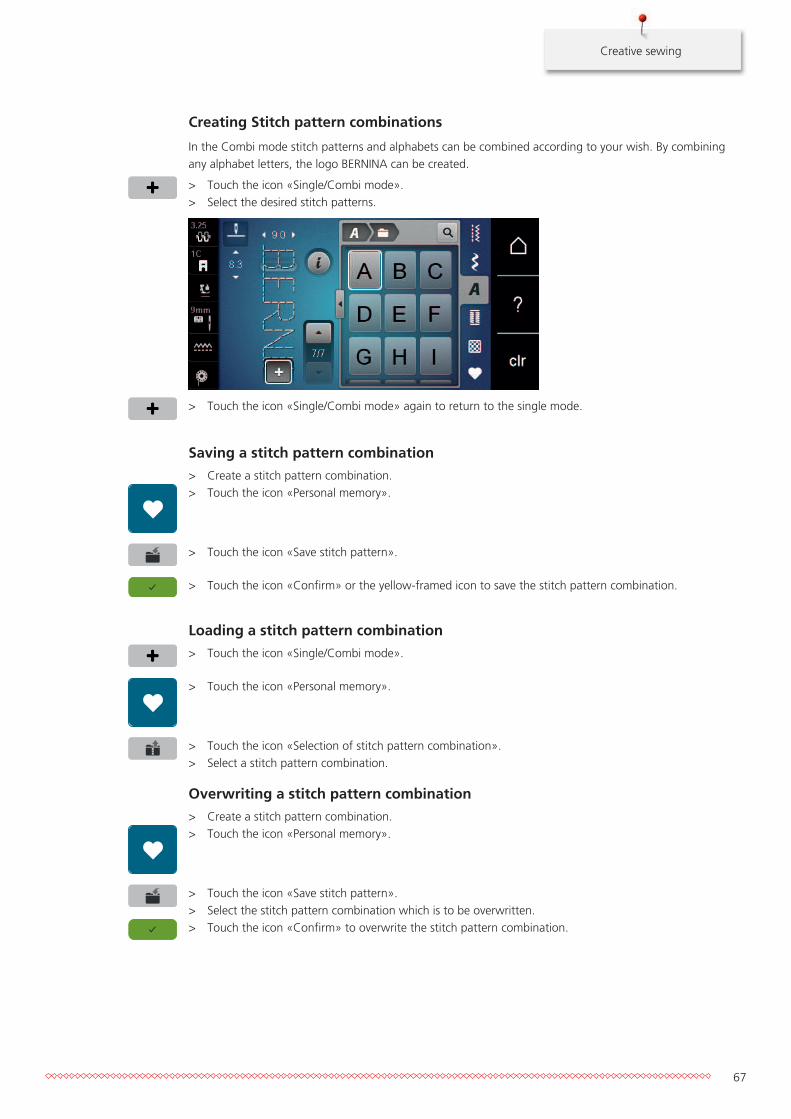
Creative sewing
67
Creating Stitch pattern combinations
In the Combi mode stitch patterns and alphabets can be combined according to your wish. By combiningany alphabet letters, the logo BERNINA can be created.
> Touch the icon «Single/Combi mode».> Select the desired stitch patterns.
> Touch the icon «Single/Combi mode» again to return to the single mode.
Saving a stitch pattern combination
> Create a stitch pattern combination.> Touch the icon «Personal memory».
> Touch the icon «Save stitch pattern».
> Touch the icon «Confirm» or the yellow-framed icon to save the stitch pattern combination.
Loading a stitch pattern combination
> Touch the icon «Single/Combi mode».
> Touch the icon «Personal memory».
> Touch the icon «Selection of stitch pattern combination».> Select a stitch pattern combination.
Overwriting a stitch pattern combination
> Create a stitch pattern combination.> Touch the icon «Personal memory».
> Touch the icon «Save stitch pattern».> Select the stitch pattern combination which is to be overwritten.> Touch the icon «Confirm» to overwrite the stitch pattern combination.
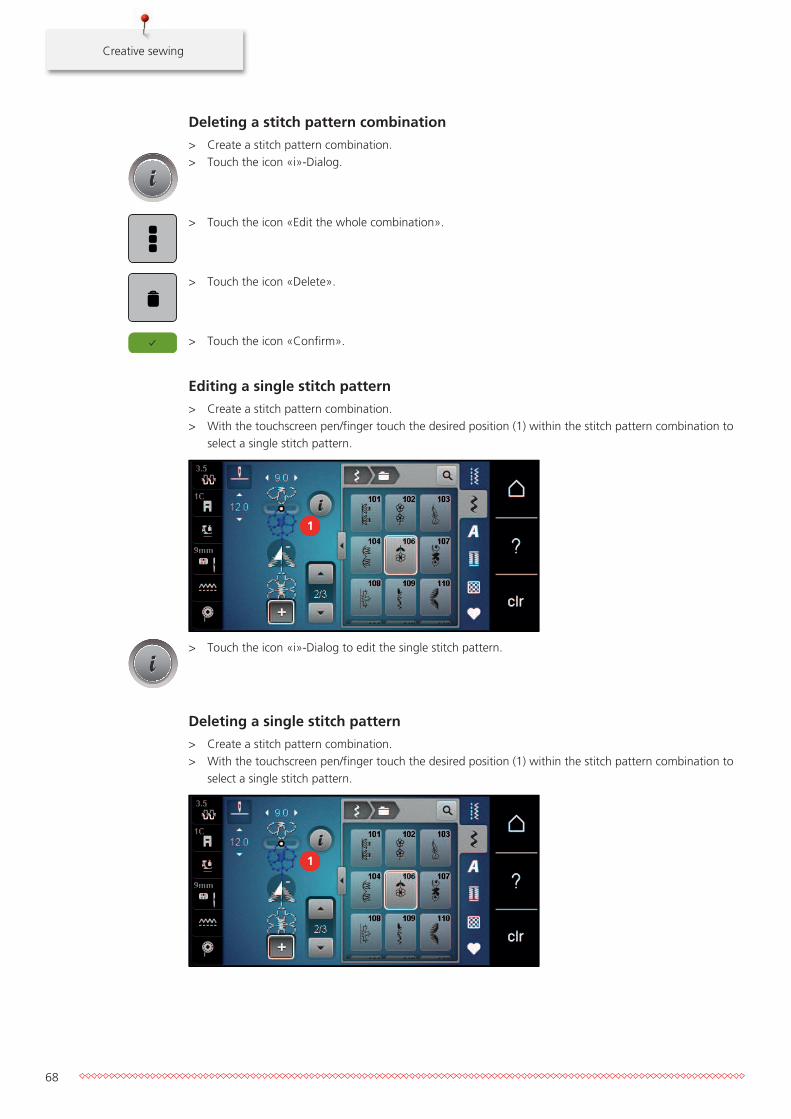
Creative sewing
68
Deleting a stitch pattern combination
> Create a stitch pattern combination.> Touch the icon «i»-Dialog.
> Touch the icon «Edit the whole combination».
> Touch the icon «Delete».
> Touch the icon «Confirm».
Editing a single stitch pattern
> Create a stitch pattern combination.> With the touchscreen pen/finger touch the desired position (1) within the stitch pattern combination to
select a single stitch pattern.
1
> Touch the icon «i»-Dialog to edit the single stitch pattern.
Deleting a single stitch pattern
> Create a stitch pattern combination.> With the touchscreen pen/finger touch the desired position (1) within the stitch pattern combination to
select a single stitch pattern.
1
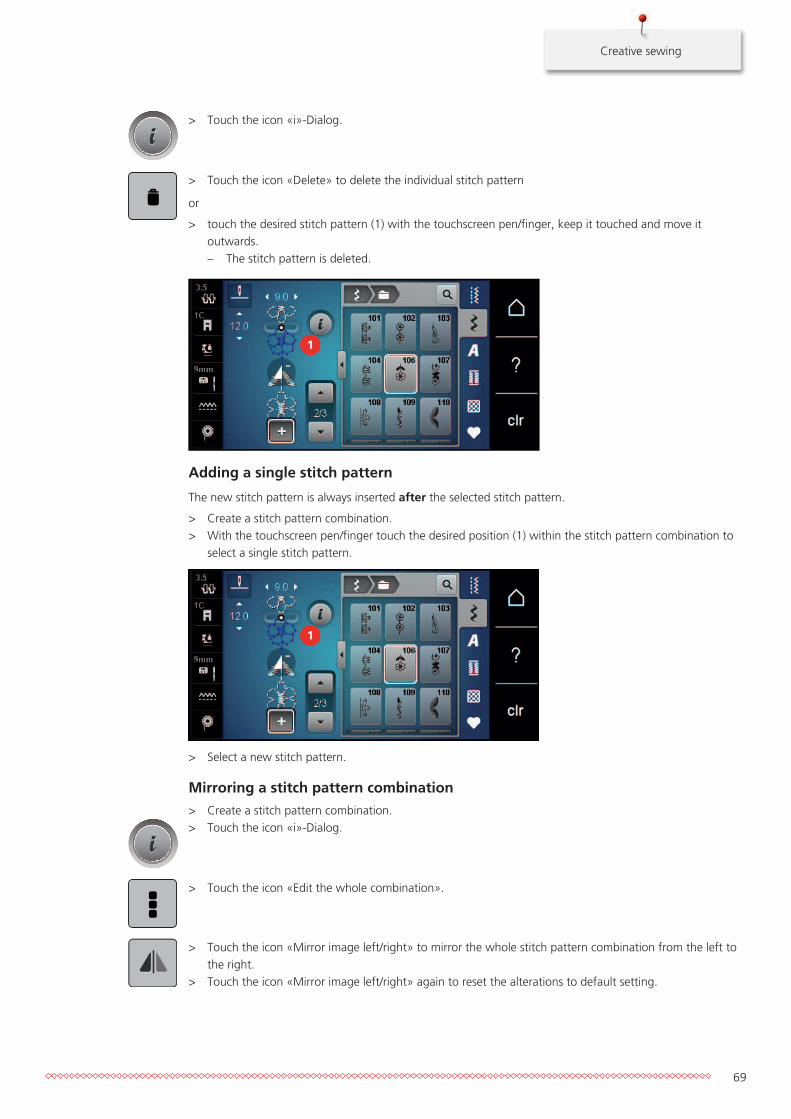
Creative sewing
69
> Touch the icon «i»-Dialog.
> Touch the icon «Delete» to delete the individual stitch pattern
or
> touch the desired stitch pattern (1) with the touchscreen pen/finger, keep it touched and move itoutwards.– The stitch pattern is deleted.
1
Adding a single stitch pattern
The new stitch pattern is always inserted after the selected stitch pattern.
> Create a stitch pattern combination.> With the touchscreen pen/finger touch the desired position (1) within the stitch pattern combination to
select a single stitch pattern.
1
> Select a new stitch pattern.
Mirroring a stitch pattern combination
> Create a stitch pattern combination.> Touch the icon «i»-Dialog.
> Touch the icon «Edit the whole combination».
> Touch the icon «Mirror image left/right» to mirror the whole stitch pattern combination from the left tothe right.
> Touch the icon «Mirror image left/right» again to reset the alterations to default setting.
Creative sewing
70
Securing a stitch pattern combination
> Create a stitch pattern combination.> With the touchscreen pen/finger select the desired position within the stitch pattern combination where
the stitch pattern combination is to be secured.> Touch the icon «i»-Dialog.
> Touch the icon «Edit combination at cursor position».
> Touch the icon «Securing».– Every single pattern of the stitch pattern combination can be secured at the start or at the end.
Programming pattern repeat
> Create a stitch pattern combination.> Touch the icon «i»-Dialog.
> Touch the icon «Edit the whole combination».
x
> Touch the icon «Pattern repeat» once to repeat the stitch pattern combination.> Touch the icon «Pattern repeat» again to repeat the stitch pattern combination up to 9 times.> Keep the icon «Pattern repeat» pressed to deactivate the pattern repeat.
5.6 Administering stitch patterns
Saving settings of stitch patterns
> Select a stitch pattern, alphabet or buttonhole.> Touch the icon «i»-Dialog.> Edit the stitch, alphabet or buttonhole.
> Touch the icon «Saving stitch pattern settings» to save the alterations permanently.
> Touch the icon «Back to default setting» to cancel the alterations.
Saving stitch patterns in personal memory
In the filing system «Personal memory» any stitch patterns, also those which have been individually edited,can be saved.
> Select a stitch pattern, alphabet or buttonhole.> Edit the stitch pattern.

Creative sewing
71
> Touch the icon «Personal memory».
> Touch the icon «Save stitch pattern».> Select the file where the pattern is to be saved.> Touch the icon «Confirm».
Overwriting stitch patterns from the personal memory
Prerequisite:
• The stitch pattern is saved in the personal memory.
> Select a stitch pattern, alphabet or buttonhole.> Edit the stitch pattern.> Touch the icon «Personal memory».
> Touch the icon «Save stitch pattern».> Select the file where the stitch pattern to be overwritten has been saved.> Select the stitch pattern which should be overwritten.> Touch the icon «Confirm».
Loading stitch patterns from the personal memory
Prerequisite:
• The stitch pattern is saved in the personal memory.
> Touch the icon «Personal memory».
> Touch the icon «Stitch pattern selection».> Select the file where the stitch pattern has been saved.> Select a stitch pattern.
Deleting stitch patterns from the personal memory
Prerequisite:
• The stitch pattern is saved in the personal memory.
> Touch the icon «Personal memory».
> Touch the icon «Delete».> Select the file where the stitch pattern has been saved.> Select a stitch pattern.> Touch the icon «Confirm» to delete the stitch pattern.
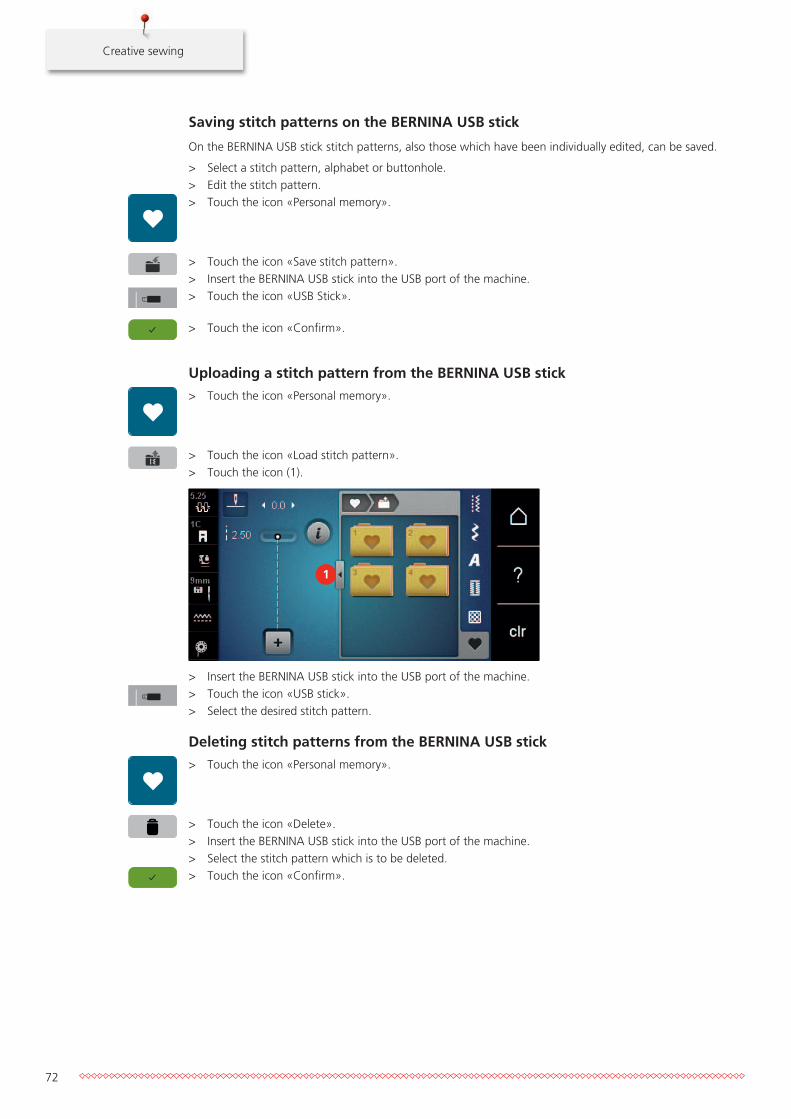
Creative sewing
72
Saving stitch patterns on the BERNINA USB stick
On the BERNINA USB stick stitch patterns, also those which have been individually edited, can be saved.
> Select a stitch pattern, alphabet or buttonhole.> Edit the stitch pattern.> Touch the icon «Personal memory».
> Touch the icon «Save stitch pattern».> Insert the BERNINA USB stick into the USB port of the machine.> Touch the icon «USB Stick».
> Touch the icon «Confirm».
Uploading a stitch pattern from the BERNINA USB stick
> Touch the icon «Personal memory».
> Touch the icon «Load stitch pattern».> Touch the icon (1).
1
> Insert the BERNINA USB stick into the USB port of the machine.> Touch the icon «USB stick».> Select the desired stitch pattern.
Deleting stitch patterns from the BERNINA USB stick
> Touch the icon «Personal memory».
> Touch the icon «Delete».> Insert the BERNINA USB stick into the USB port of the machine.> Select the stitch pattern which is to be deleted.> Touch the icon «Confirm».
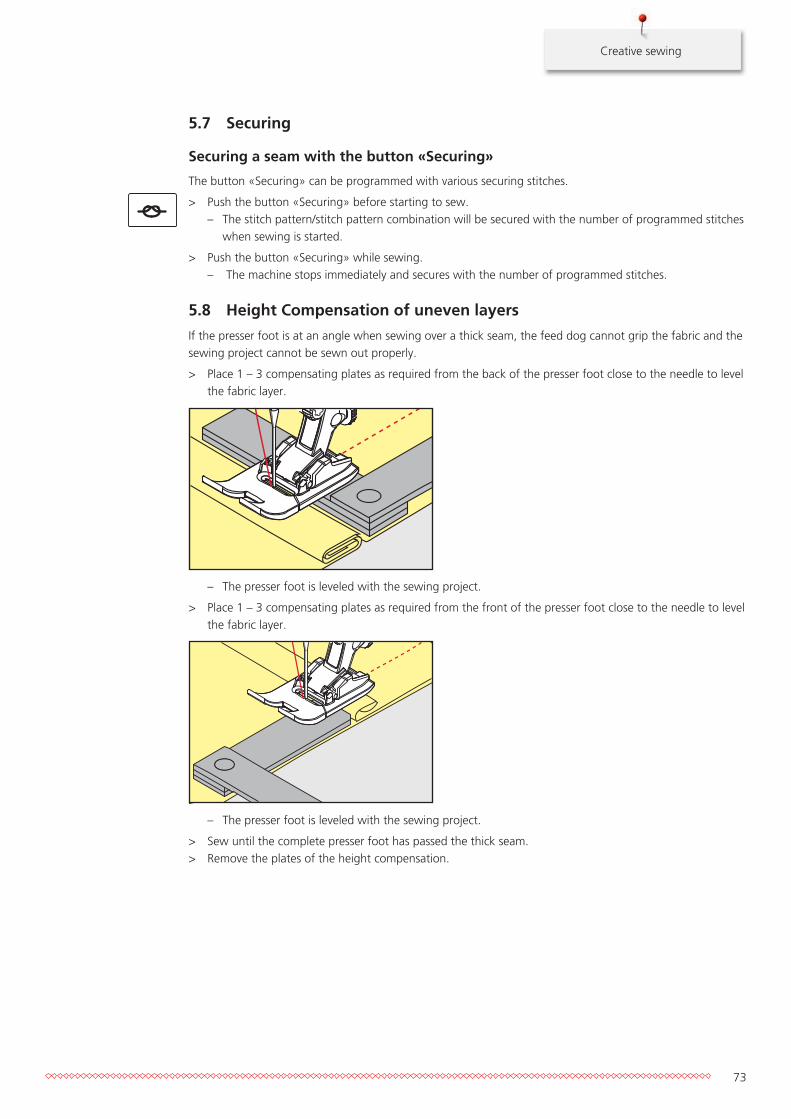
Creative sewing
73
5.7 Securing
Securing a seam with the button «Securing»
The button «Securing» can be programmed with various securing stitches.
> Push the button «Securing» before starting to sew.– The stitch pattern/stitch pattern combination will be secured with the number of programmed stitches
when sewing is started.
> Push the button «Securing» while sewing.– The machine stops immediately and secures with the number of programmed stitches.
5.8 Height Compensation of uneven layers
If the presser foot is at an angle when sewing over a thick seam, the feed dog cannot grip the fabric and thesewing project cannot be sewn out properly.
> Place 1 – 3 compensating plates as required from the back of the presser foot close to the needle to levelthe fabric layer.
– The presser foot is leveled with the sewing project.
> Place 1 – 3 compensating plates as required from the front of the presser foot close to the needle to levelthe fabric layer.
– The presser foot is leveled with the sewing project.
> Sew until the complete presser foot has passed the thick seam.> Remove the plates of the height compensation.
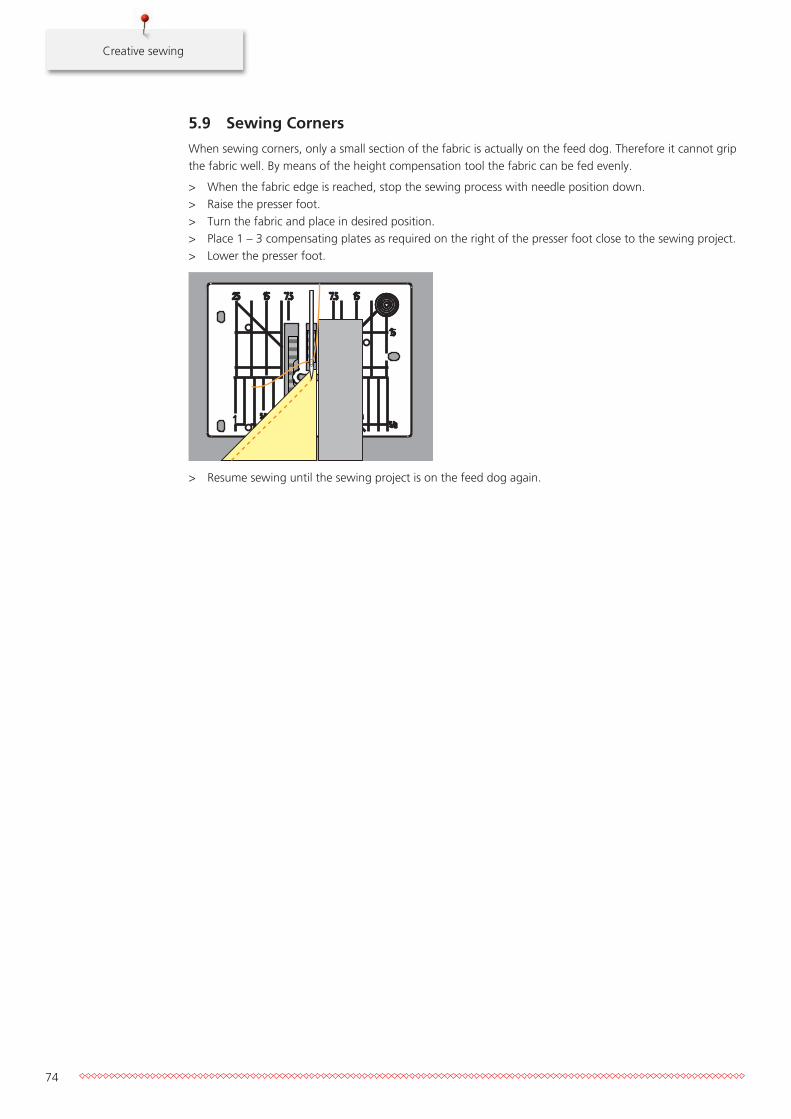
Creative sewing
74
5.9 Sewing Corners
When sewing corners, only a small section of the fabric is actually on the feed dog. Therefore it cannot gripthe fabric well. By means of the height compensation tool the fabric can be fed evenly.
> When the fabric edge is reached, stop the sewing process with needle position down.> Raise the presser foot.> Turn the fabric and place in desired position.> Place 1 – 3 compensating plates as required on the right of the presser foot close to the sewing project.> Lower the presser foot.
> Resume sewing until the sewing project is on the feed dog again.
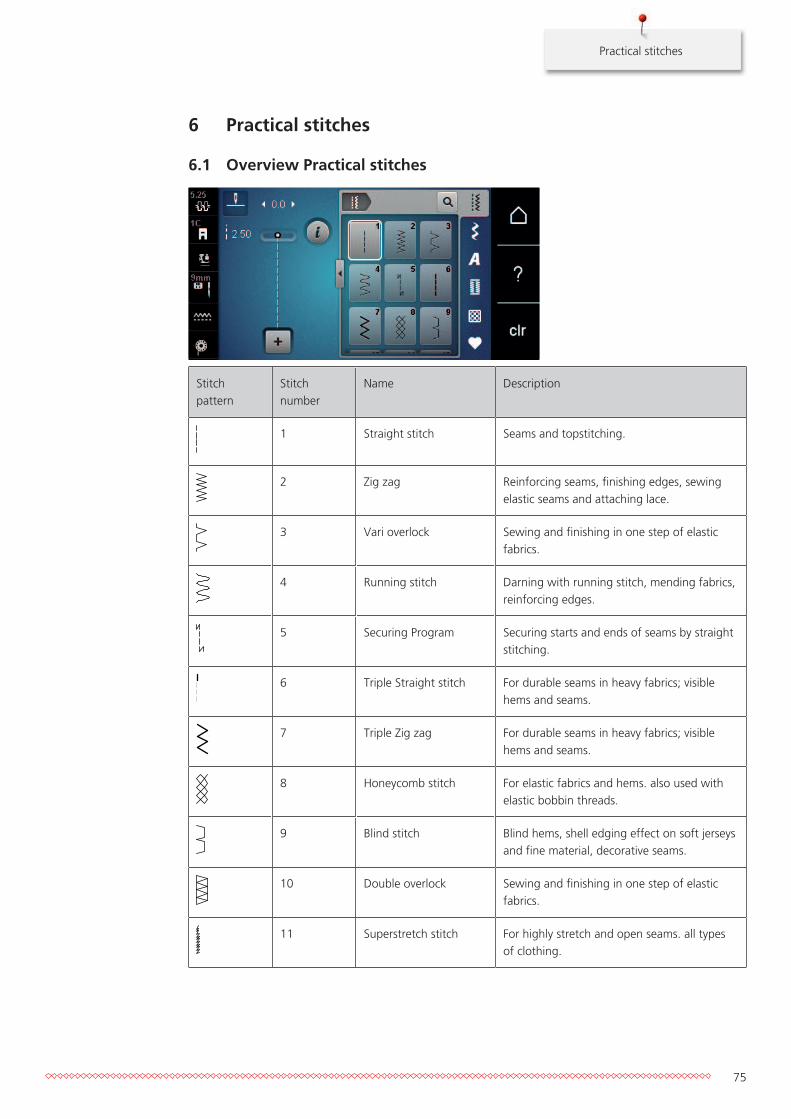
Practical stitches
75
6 Practical stitches
6.1 Overview Practical stitches
Stitchpattern
Stitchnumber
Name Description
1 Straight stitch Seams and topstitching.
2 Zig zag Reinforcing seams, finishing edges, sewingelastic seams and attaching lace.
3 Vari overlock Sewing and finishing in one step of elasticfabrics.
4 Running stitch Darning with running stitch, mending fabrics,reinforcing edges.
5 Securing Program Securing starts and ends of seams by straightstitching.
6 Triple Straight stitch For durable seams in heavy fabrics; visiblehems and seams.
7 Triple Zig zag For durable seams in heavy fabrics; visiblehems and seams.
8 Honeycomb stitch For elastic fabrics and hems. also used withelastic bobbin threads.
9 Blind stitch Blind hems, shell edging effect on soft jerseysand fine material, decorative seams.
10 Double overlock Sewing and finishing in one step of elasticfabrics.
11 Superstretch stitch For highly stretch and open seams. all typesof clothing.
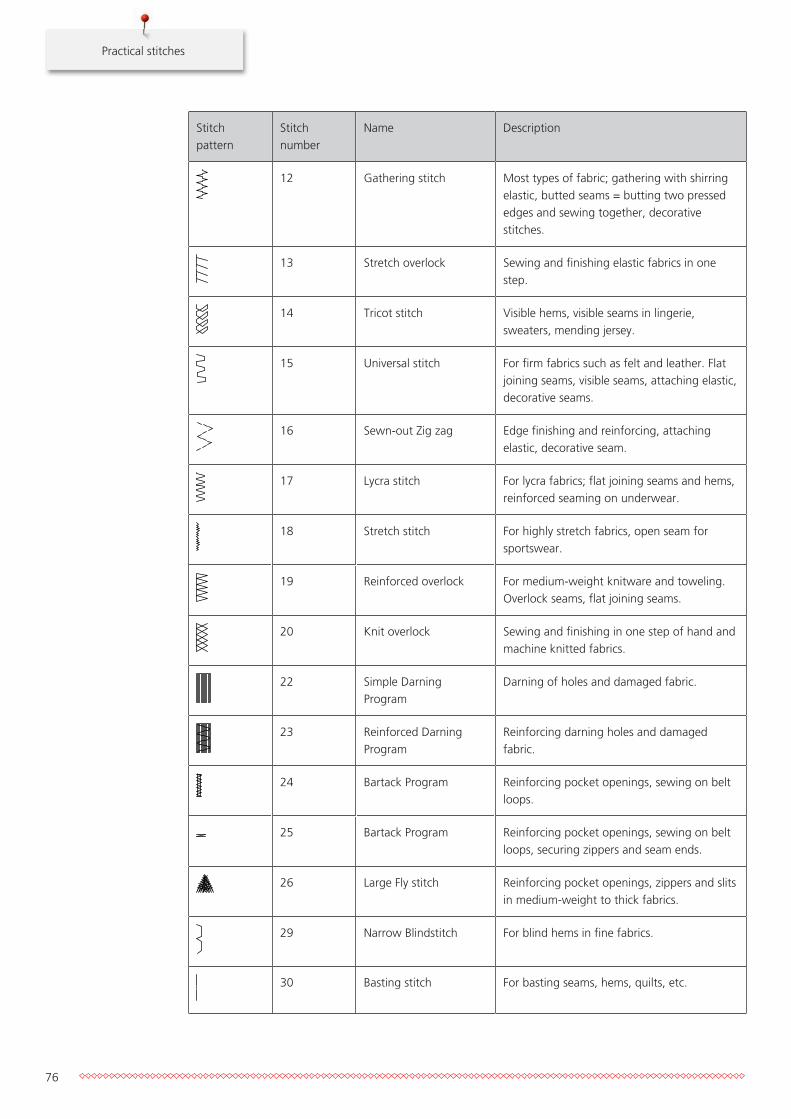
Practical stitches
76
Stitchpattern
Stitchnumber
Name Description
12 Gathering stitch Most types of fabric; gathering with shirringelastic, butted seams = butting two pressededges and sewing together, decorativestitches.
13 Stretch overlock Sewing and finishing elastic fabrics in onestep.
14 Tricot stitch Visible hems, visible seams in lingerie,sweaters, mending jersey.
15 Universal stitch For firm fabrics such as felt and leather. Flatjoining seams, visible seams, attaching elastic,decorative seams.
16 Sewn-out Zig zag Edge finishing and reinforcing, attachingelastic, decorative seam.
17 Lycra stitch For lycra fabrics; flat joining seams and hems,reinforced seaming on underwear.
18 Stretch stitch For highly stretch fabrics, open seam forsportswear.
19 Reinforced overlock For medium-weight knitware and toweling.Overlock seams, flat joining seams.
20 Knit overlock Sewing and finishing in one step of hand andmachine knitted fabrics.
22 Simple DarningProgram
Darning of holes and damaged fabric.
23 Reinforced DarningProgram
Reinforcing darning holes and damagedfabric.
24 Bartack Program Reinforcing pocket openings, sewing on beltloops.
25 Bartack Program Reinforcing pocket openings, sewing on beltloops, securing zippers and seam ends.
26 Large Fly stitch Reinforcing pocket openings, zippers and slitsin medium-weight to thick fabrics.
29 Narrow Blindstitch For blind hems in fine fabrics.
30 Basting stitch For basting seams, hems, quilts, etc.
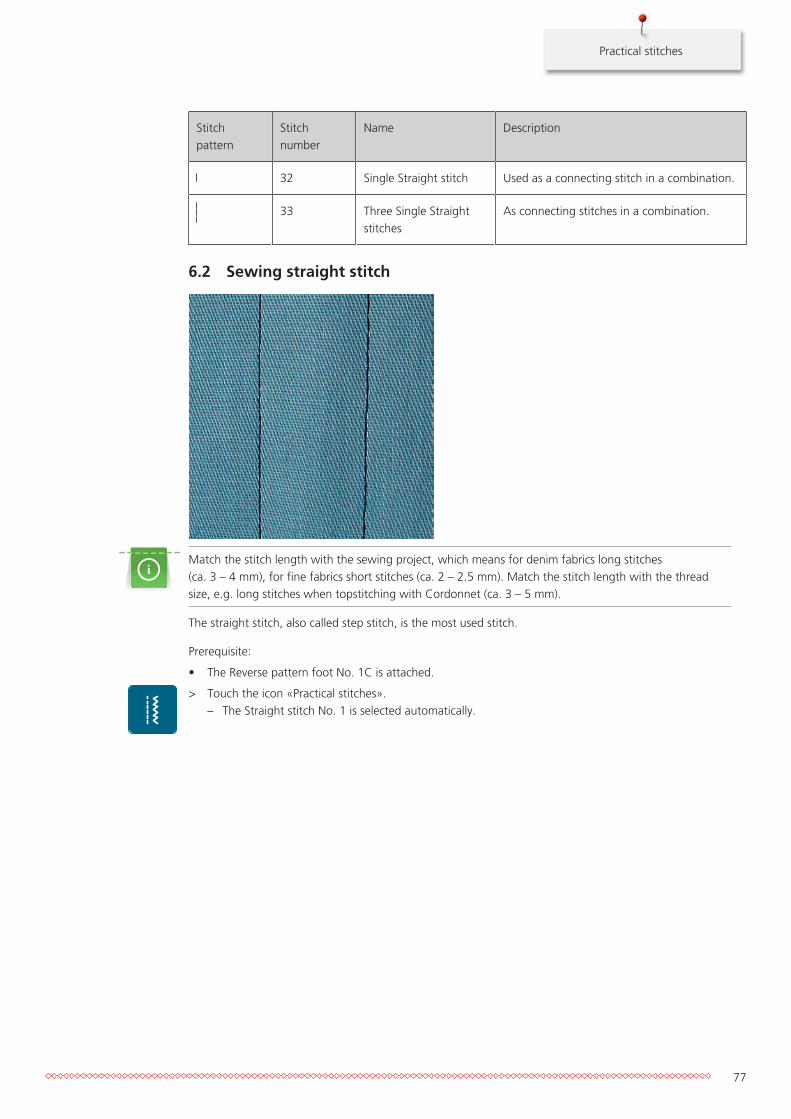
Practical stitches
77
Stitchpattern
Stitchnumber
Name Description
32 Single Straight stitch Used as a connecting stitch in a combination.
33 Three Single Straightstitches
As connecting stitches in a combination.
6.2 Sewing straight stitch
Match the stitch length with the sewing project, which means for denim fabrics long stitches (ca. 3 – 4 mm), for fine fabrics short stitches (ca. 2 – 2.5 mm). Match the stitch length with the threadsize, e.g. long stitches when topstitching with Cordonnet (ca. 3 – 5 mm).
The straight stitch, also called step stitch, is the most used stitch.
Prerequisite:
• The Reverse pattern foot No. 1C is attached.
> Touch the icon «Practical stitches».– The Straight stitch No. 1 is selected automatically.

Practical stitches
78
6.3 Securing with the automatic Securing Program
Due to a determined number of 5 stitches sewn forward and 5 stitches sewn backward, the securing isregular.
Prerequisite:
• The Reverse pattern foot No. 1C is attached.
> Touch the icon «Practical stitches».> Select the Securing Program No. 5.> Press the foot control.
– The machine secures automatically.
> Sew the seam in the desired length.> Push the button «Quick reverse».
– The machine secures automatically and stops at the end of the securing program.
6.4 Sewing in the zipper
As the fabric feed can be difficult when starting to sew, it is recommended to hold the threads firmly orto pull the fabric slightly to the back for a few stitches or to sew 1 – 2 cm reverse first.
> Attach the Reverse pattern foot No. 1C.
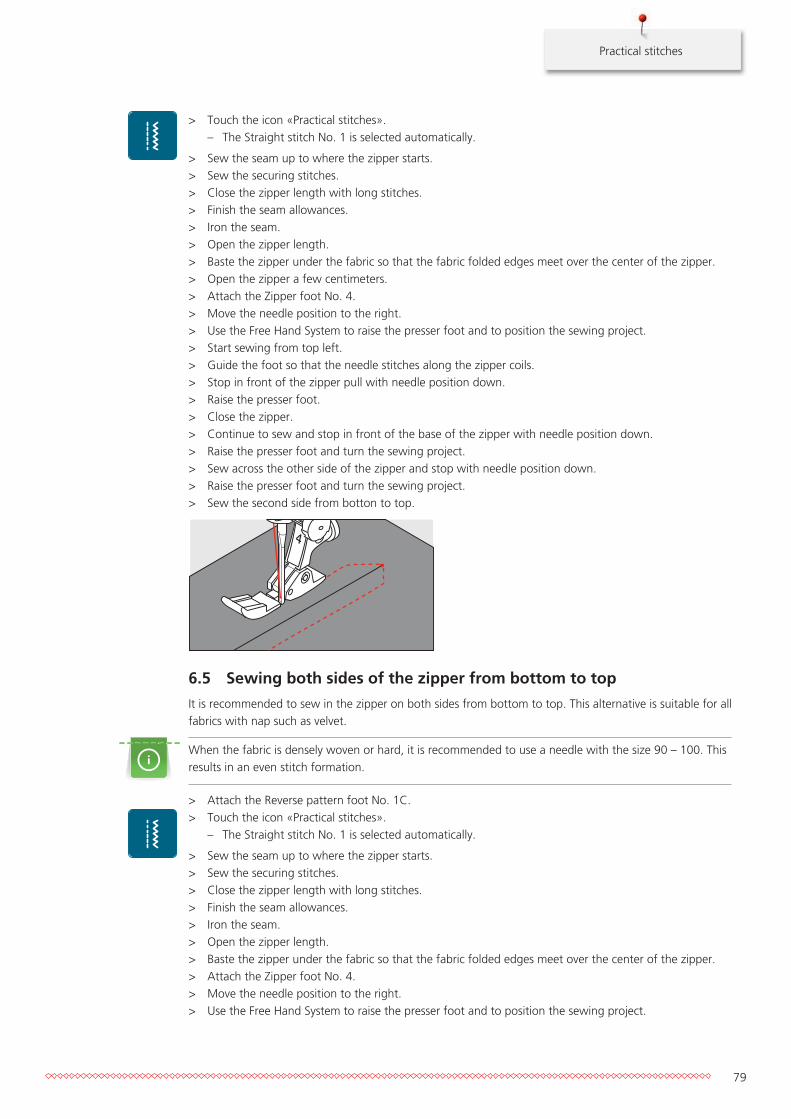
Practical stitches
79
> Touch the icon «Practical stitches».– The Straight stitch No. 1 is selected automatically.
> Sew the seam up to where the zipper starts.> Sew the securing stitches.> Close the zipper length with long stitches.> Finish the seam allowances.> Iron the seam.> Open the zipper length.> Baste the zipper under the fabric so that the fabric folded edges meet over the center of the zipper.> Open the zipper a few centimeters.> Attach the Zipper foot No. 4.> Move the needle position to the right.> Use the Free Hand System to raise the presser foot and to position the sewing project.> Start sewing from top left.> Guide the foot so that the needle stitches along the zipper coils.> Stop in front of the zipper pull with needle position down.> Raise the presser foot.> Close the zipper.> Continue to sew and stop in front of the base of the zipper with needle position down.> Raise the presser foot and turn the sewing project.> Sew across the other side of the zipper and stop with needle position down.> Raise the presser foot and turn the sewing project.> Sew the second side from botton to top.
6.5 Sewing both sides of the zipper from bottom to top
It is recommended to sew in the zipper on both sides from bottom to top. This alternative is suitable for allfabrics with nap such as velvet.
When the fabric is densely woven or hard, it is recommended to use a needle with the size 90 – 100. Thisresults in an even stitch formation.
> Attach the Reverse pattern foot No. 1C.> Touch the icon «Practical stitches».
– The Straight stitch No. 1 is selected automatically.
> Sew the seam up to where the zipper starts.> Sew the securing stitches.> Close the zipper length with long stitches.> Finish the seam allowances.> Iron the seam.> Open the zipper length.> Baste the zipper under the fabric so that the fabric folded edges meet over the center of the zipper.> Attach the Zipper foot No. 4.> Move the needle position to the right.> Use the Free Hand System to raise the presser foot and to position the sewing project.
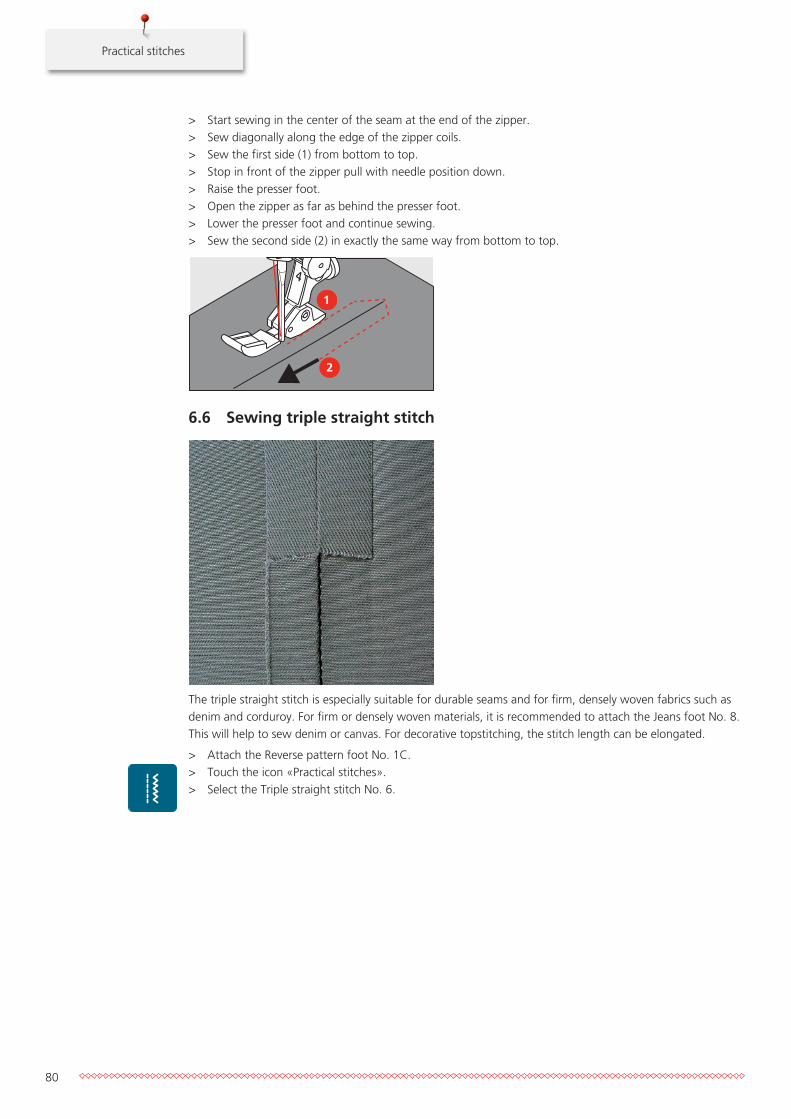
Practical stitches
80
> Start sewing in the center of the seam at the end of the zipper.> Sew diagonally along the edge of the zipper coils.> Sew the first side (1) from bottom to top.> Stop in front of the zipper pull with needle position down.> Raise the presser foot.> Open the zipper as far as behind the presser foot.> Lower the presser foot and continue sewing.> Sew the second side (2) in exactly the same way from bottom to top.
2
1
6.6 Sewing triple straight stitch
The triple straight stitch is especially suitable for durable seams and for firm, densely woven fabrics such asdenim and corduroy. For firm or densely woven materials, it is recommended to attach the Jeans foot No. 8.This will help to sew denim or canvas. For decorative topstitching, the stitch length can be elongated.
> Attach the Reverse pattern foot No. 1C.> Touch the icon «Practical stitches».> Select the Triple straight stitch No. 6.
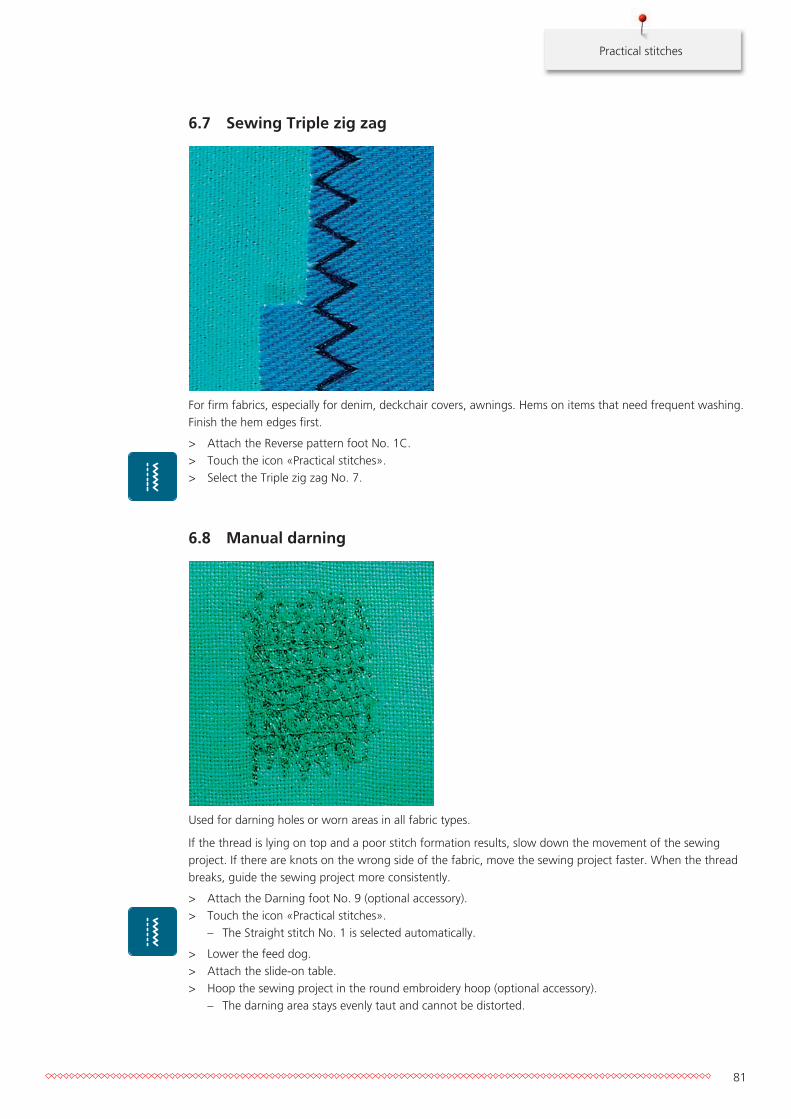
Practical stitches
81
6.7 Sewing Triple zig zag
For firm fabrics, especially for denim, deckchair covers, awnings. Hems on items that need frequent washing.Finish the hem edges first.
> Attach the Reverse pattern foot No. 1C.> Touch the icon «Practical stitches».> Select the Triple zig zag No. 7.
6.8 Manual darning
Used for darning holes or worn areas in all fabric types.
If the thread is lying on top and a poor stitch formation results, slow down the movement of the sewingproject. If there are knots on the wrong side of the fabric, move the sewing project faster. When the threadbreaks, guide the sewing project more consistently.
> Attach the Darning foot No. 9 (optional accessory).> Touch the icon «Practical stitches».
– The Straight stitch No. 1 is selected automatically.
> Lower the feed dog.> Attach the slide-on table.> Hoop the sewing project in the round embroidery hoop (optional accessory).
– The darning area stays evenly taut and cannot be distorted.
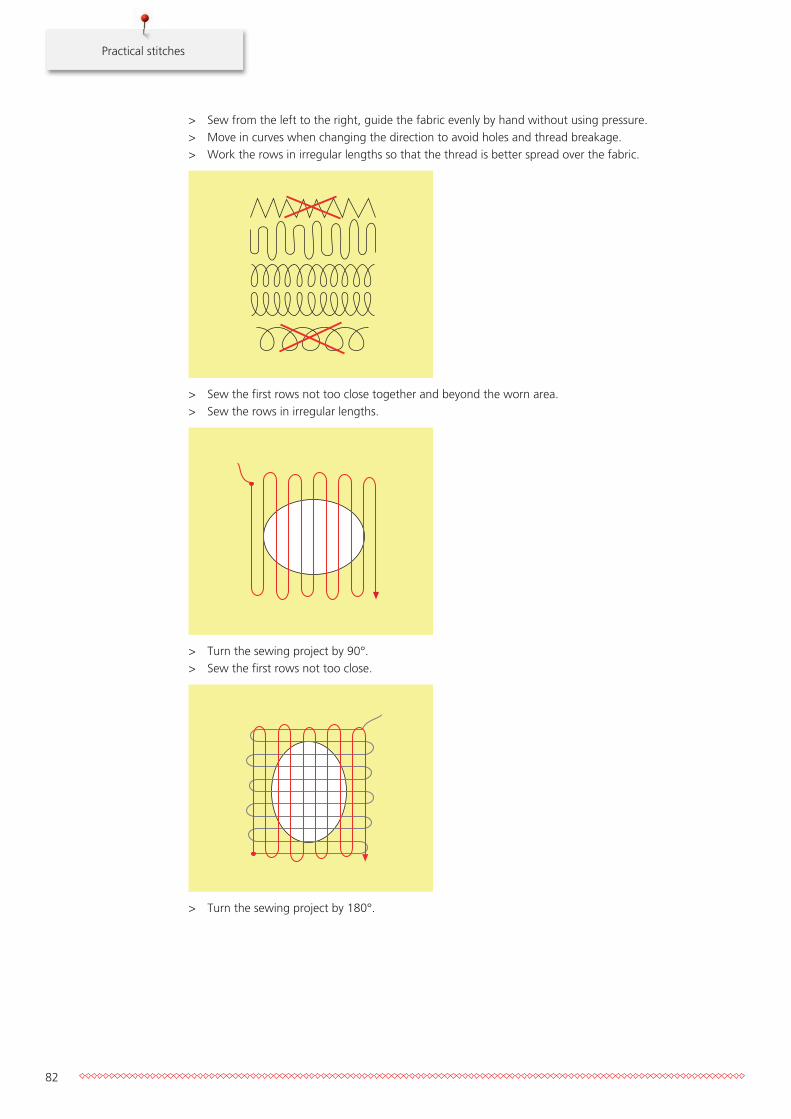
Practical stitches
82
> Sew from the left to the right, guide the fabric evenly by hand without using pressure.> Move in curves when changing the direction to avoid holes and thread breakage.> Work the rows in irregular lengths so that the thread is better spread over the fabric.
> Sew the first rows not too close together and beyond the worn area.> Sew the rows in irregular lengths.
> Turn the sewing project by 90°.> Sew the first rows not too close.
> Turn the sewing project by 180°.
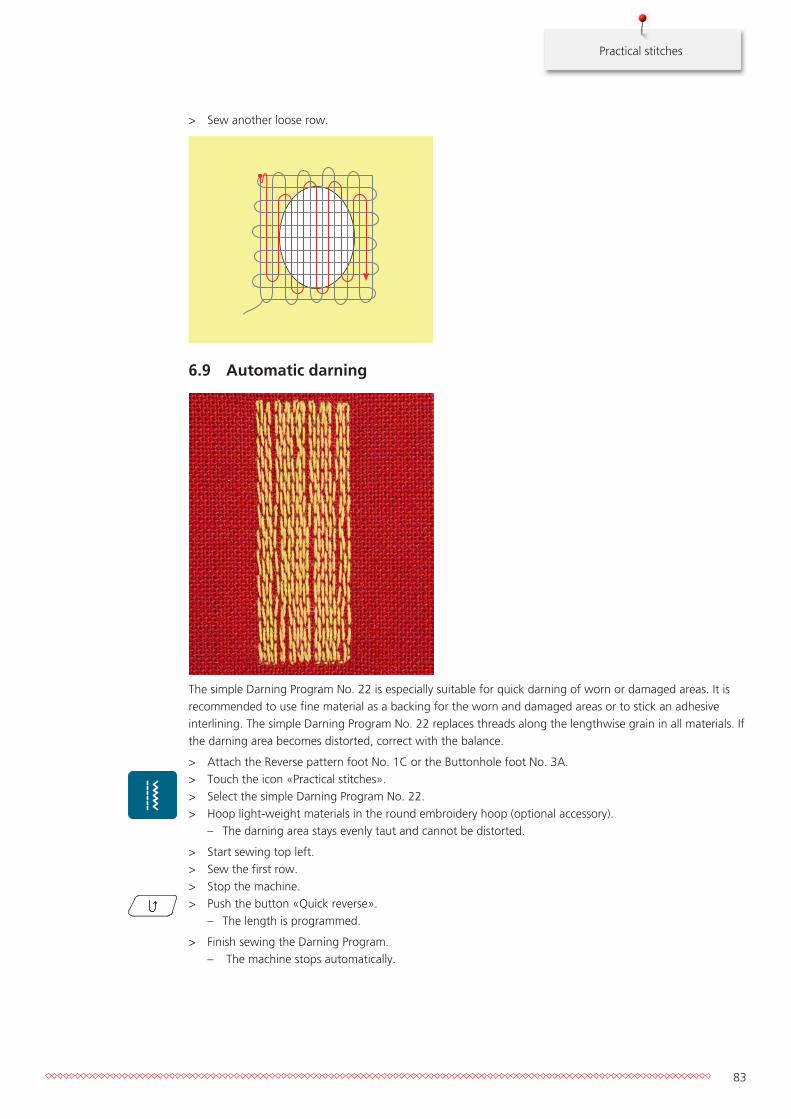
Practical stitches
83
> Sew another loose row.
6.9 Automatic darning
The simple Darning Program No. 22 is especially suitable for quick darning of worn or damaged areas. It isrecommended to use fine material as a backing for the worn and damaged areas or to stick an adhesiveinterlining. The simple Darning Program No. 22 replaces threads along the lengthwise grain in all materials. Ifthe darning area becomes distorted, correct with the balance.
> Attach the Reverse pattern foot No. 1C or the Buttonhole foot No. 3A.> Touch the icon «Practical stitches».> Select the simple Darning Program No. 22.> Hoop light-weight materials in the round embroidery hoop (optional accessory).
– The darning area stays evenly taut and cannot be distorted.
> Start sewing top left.> Sew the first row.> Stop the machine.> Push the button «Quick reverse».
– The length is programmed.
> Finish sewing the Darning Program.– The machine stops automatically.
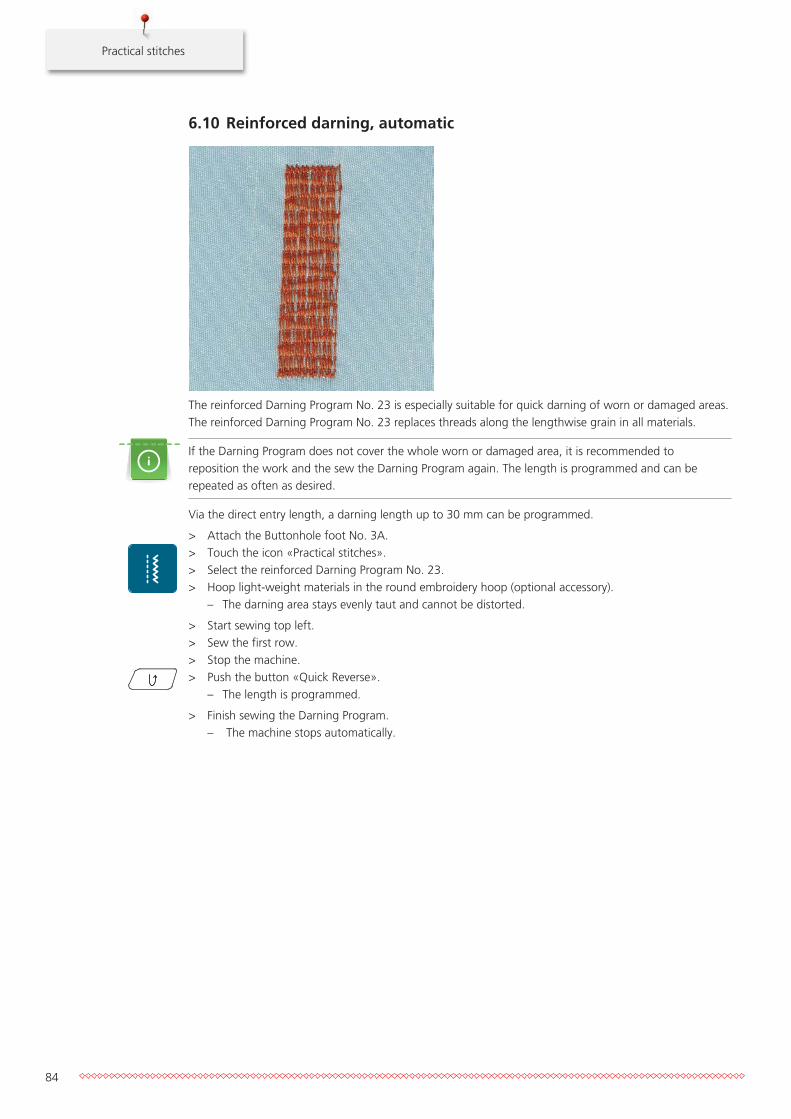
Practical stitches
84
6.10 Reinforced darning, automatic
The reinforced Darning Program No. 23 is especially suitable for quick darning of worn or damaged areas.The reinforced Darning Program No. 23 replaces threads along the lengthwise grain in all materials.
If the Darning Program does not cover the whole worn or damaged area, it is recommended toreposition the work and the sew the Darning Program again. The length is programmed and can berepeated as often as desired.
Via the direct entry length, a darning length up to 30 mm can be programmed.
> Attach the Buttonhole foot No. 3A.> Touch the icon «Practical stitches».> Select the reinforced Darning Program No. 23.> Hoop light-weight materials in the round embroidery hoop (optional accessory).
– The darning area stays evenly taut and cannot be distorted.
> Start sewing top left.> Sew the first row.> Stop the machine.> Push the button «Quick Reverse».
– The length is programmed.
> Finish sewing the Darning Program.– The machine stops automatically.
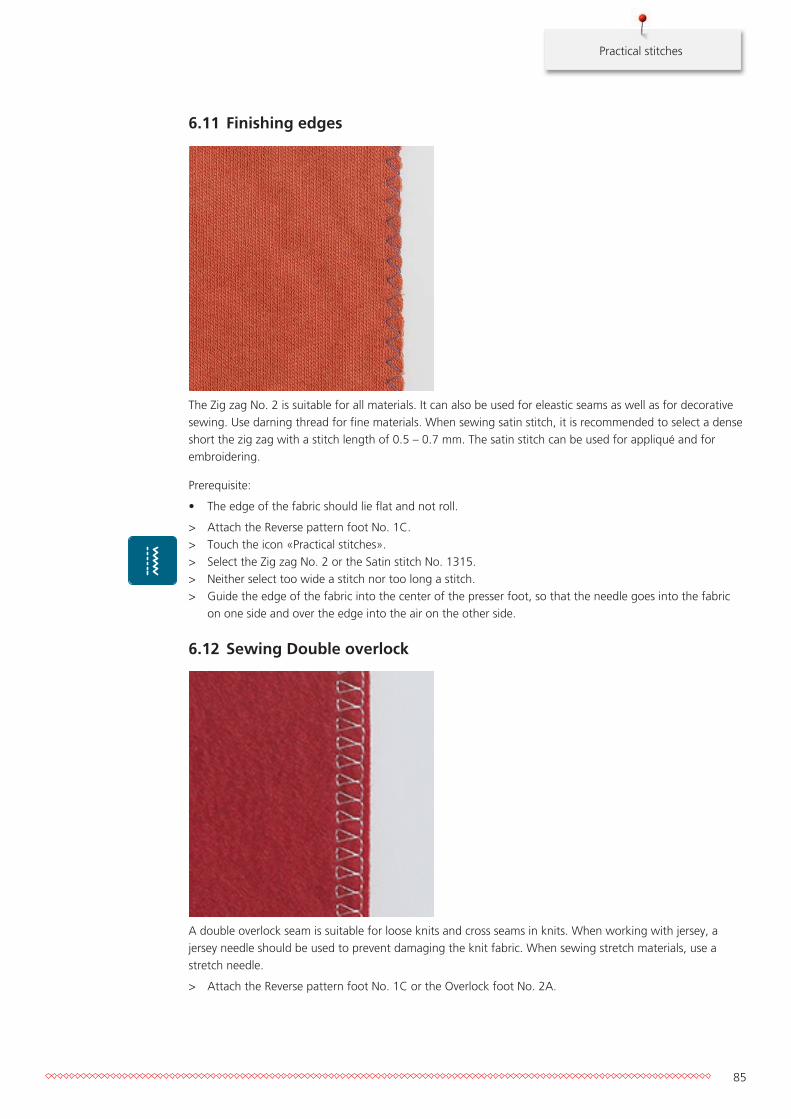
Practical stitches
85
6.11 Finishing edges
The Zig zag No. 2 is suitable for all materials. It can also be used for eleastic seams as well as for decorativesewing. Use darning thread for fine materials. When sewing satin stitch, it is recommended to select a denseshort the zig zag with a stitch length of 0.5 – 0.7 mm. The satin stitch can be used for appliqué and forembroidering.
Prerequisite:
• The edge of the fabric should lie flat and not roll.
> Attach the Reverse pattern foot No. 1C.> Touch the icon «Practical stitches».> Select the Zig zag No. 2 or the Satin stitch No. 1315.> Neither select too wide a stitch nor too long a stitch.> Guide the edge of the fabric into the center of the presser foot, so that the needle goes into the fabric
on one side and over the edge into the air on the other side.
6.12 Sewing Double overlock
A double overlock seam is suitable for loose knits and cross seams in knits. When working with jersey, ajersey needle should be used to prevent damaging the knit fabric. When sewing stretch materials, use astretch needle.
> Attach the Reverse pattern foot No. 1C or the Overlock foot No. 2A.
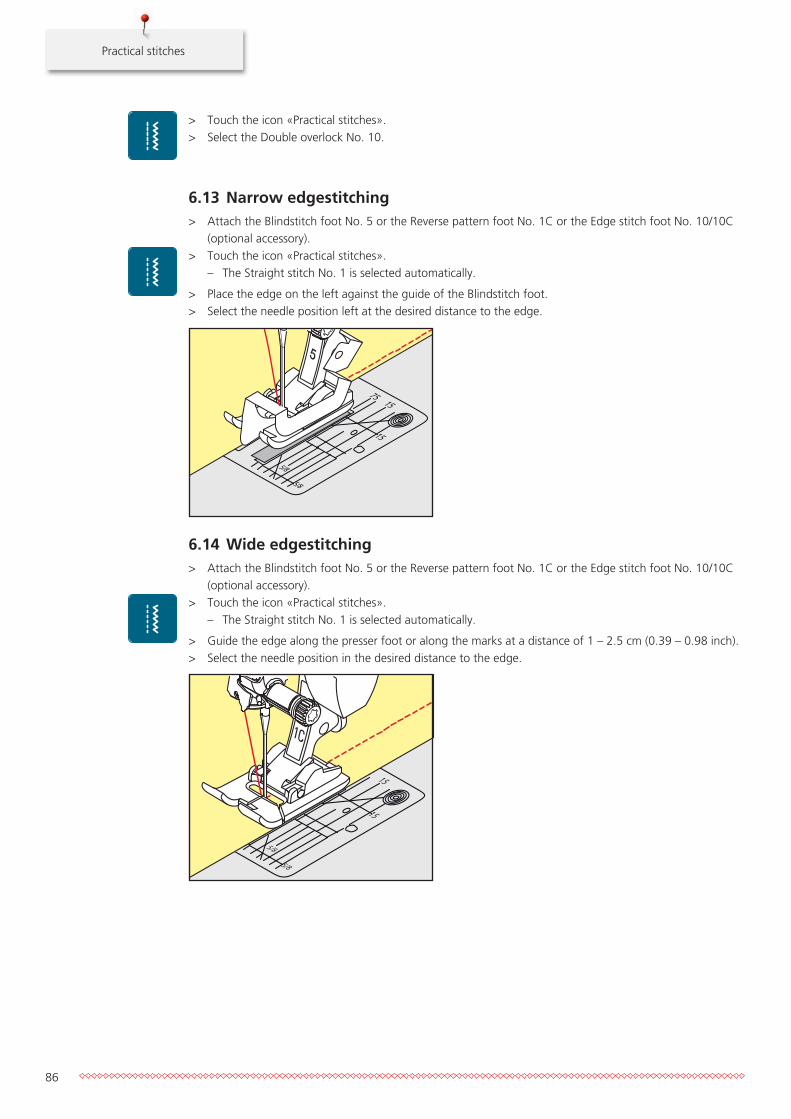
Practical stitches
86
> Touch the icon «Practical stitches».> Select the Double overlock No. 10.
6.13 Narrow edgestitching> Attach the Blindstitch foot No. 5 or the Reverse pattern foot No. 1C or the Edge stitch foot No. 10/10C
(optional accessory).> Touch the icon «Practical stitches».
– The Straight stitch No. 1 is selected automatically.
> Place the edge on the left against the guide of the Blindstitch foot.> Select the needle position left at the desired distance to the edge.
5/8
5/8
5/8
1
2515
15
15
75
75
6.14 Wide edgestitching> Attach the Blindstitch foot No. 5 or the Reverse pattern foot No. 1C or the Edge stitch foot No. 10/10C
(optional accessory).> Touch the icon «Practical stitches».
– The Straight stitch No. 1 is selected automatically.
> Guide the edge along the presser foot or along the marks at a distance of 1 – 2.5 cm (0.39 – 0.98 inch).> Select the needle position in the desired distance to the edge.
5/8
5/8
5/8
2515
15
15
75
75
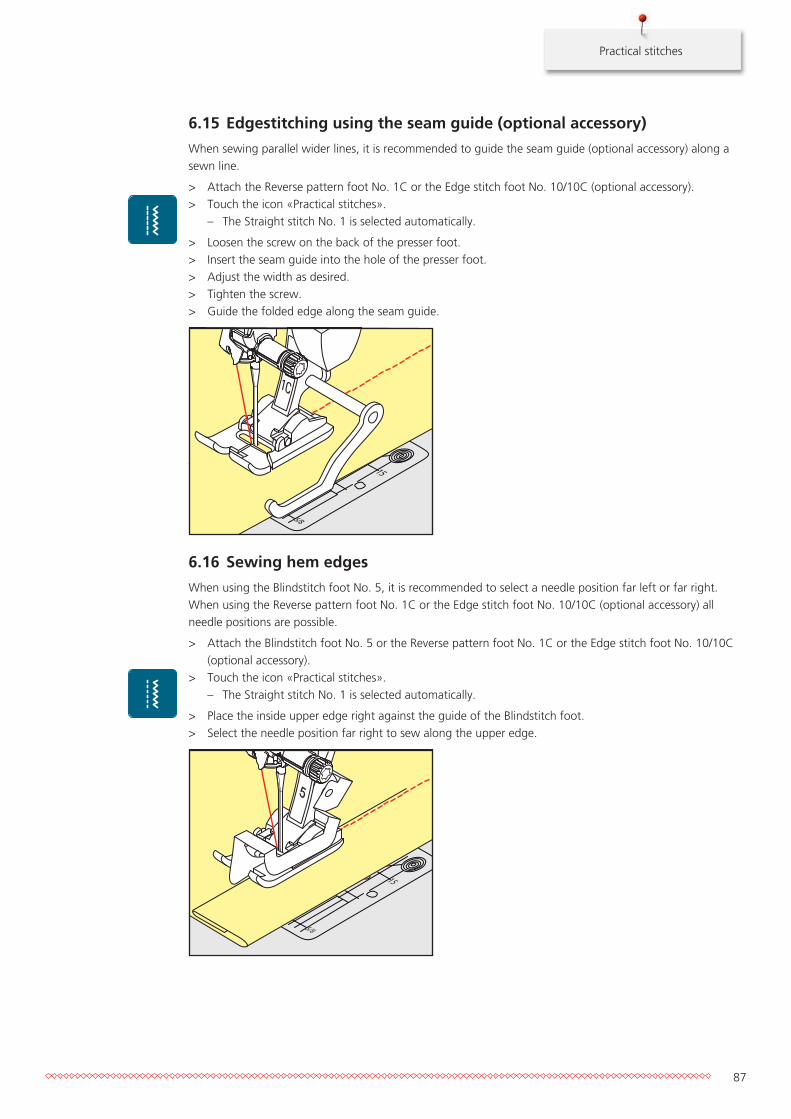
Practical stitches
87
6.15 Edgestitching using the seam guide (optional accessory)
When sewing parallel wider lines, it is recommended to guide the seam guide (optional accessory) along asewn line.
> Attach the Reverse pattern foot No. 1C or the Edge stitch foot No. 10/10C (optional accessory).> Touch the icon «Practical stitches».
– The Straight stitch No. 1 is selected automatically.
> Loosen the screw on the back of the presser foot.> Insert the seam guide into the hole of the presser foot.> Adjust the width as desired.> Tighten the screw.> Guide the folded edge along the seam guide.
5/8
5/8
5/8
1
2515
15
15
75
75
6.16 Sewing hem edges
When using the Blindstitch foot No. 5, it is recommended to select a needle position far left or far right.When using the Reverse pattern foot No. 1C or the Edge stitch foot No. 10/10C (optional accessory) allneedle positions are possible.
> Attach the Blindstitch foot No. 5 or the Reverse pattern foot No. 1C or the Edge stitch foot No. 10/10C(optional accessory).
> Touch the icon «Practical stitches».– The Straight stitch No. 1 is selected automatically.
> Place the inside upper edge right against the guide of the Blindstitch foot.> Select the needle position far right to sew along the upper edge.
5/8
5/8
5/8
1
2515
15
15
75
75
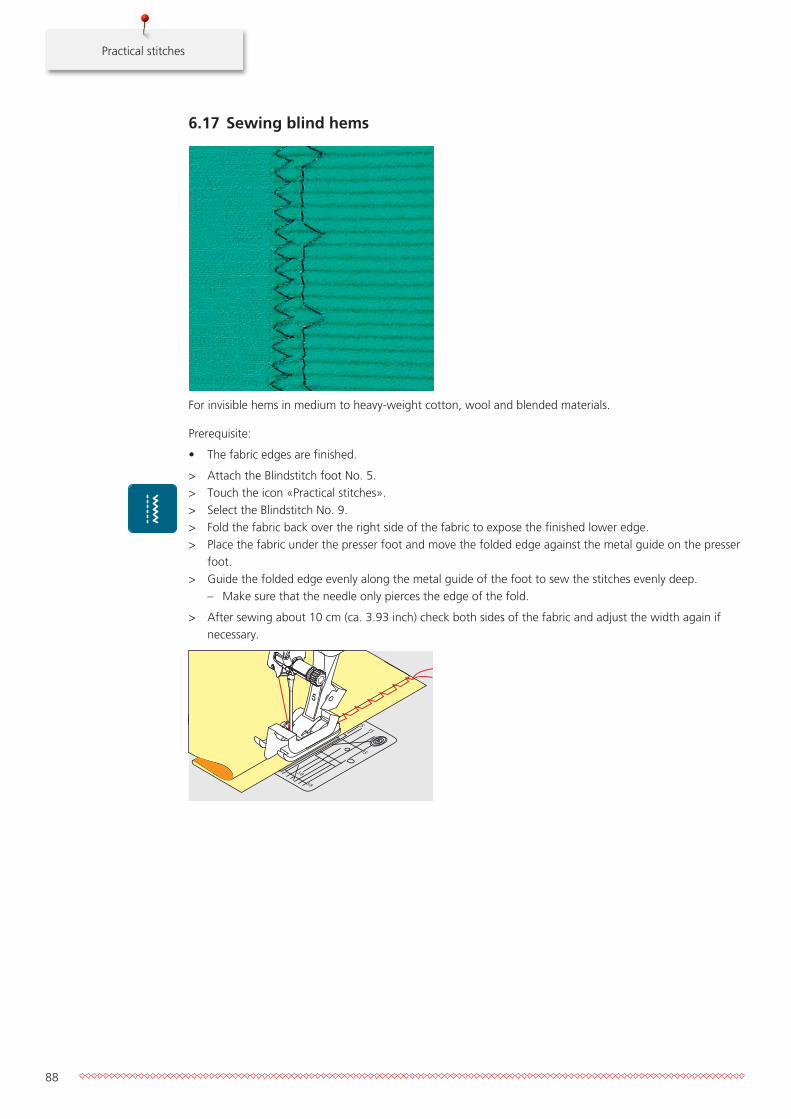
Practical stitches
88
6.17 Sewing blind hems
For invisible hems in medium to heavy-weight cotton, wool and blended materials.
Prerequisite:
• The fabric edges are finished.
> Attach the Blindstitch foot No. 5.> Touch the icon «Practical stitches».> Select the Blindstitch No. 9.> Fold the fabric back over the right side of the fabric to expose the finished lower edge.> Place the fabric under the presser foot and move the folded edge against the metal guide on the presser
foot.> Guide the folded edge evenly along the metal guide of the foot to sew the stitches evenly deep.
– Make sure that the needle only pierces the edge of the fold.
> After sewing about 10 cm (ca. 3.93 inch) check both sides of the fabric and adjust the width again ifnecessary.
5/8
5/8
5/8
1
2515
15
15
75
75

Practical stitches
89
6.18 Sewing visible hems
The visible hem is especially suitable for elastic hems in jersey made of cotton, wool, synthetic and mixedfibers.
> Attach the Reverse pattern foot No. 1C.> Touch the icon «Practical stitches».> Select the Tricot stitch No. 14.> Iron and baste the hem if necessary.> Reduce the presser foot pressure if necessary.> Sew the hem at the preferred depth on the right side of the fabric.> Trim the excess fabric from the wrong side of the fabric.
6.19 Sewing flat joining seams
The flat joining seam is especially suitable for or thick materials such as terry cloth, felt and leather.
> Attach the Reverse pattern foot No. 1C.> Touch the icon «Practical stitches».> Select the Stretch overlock No. 13.> Overlap the fabric edges.> Sew along the fabric edge.> The needle stitches over the edge of the top layer on the right side into the bottom layer to get a very flat
durable seam.
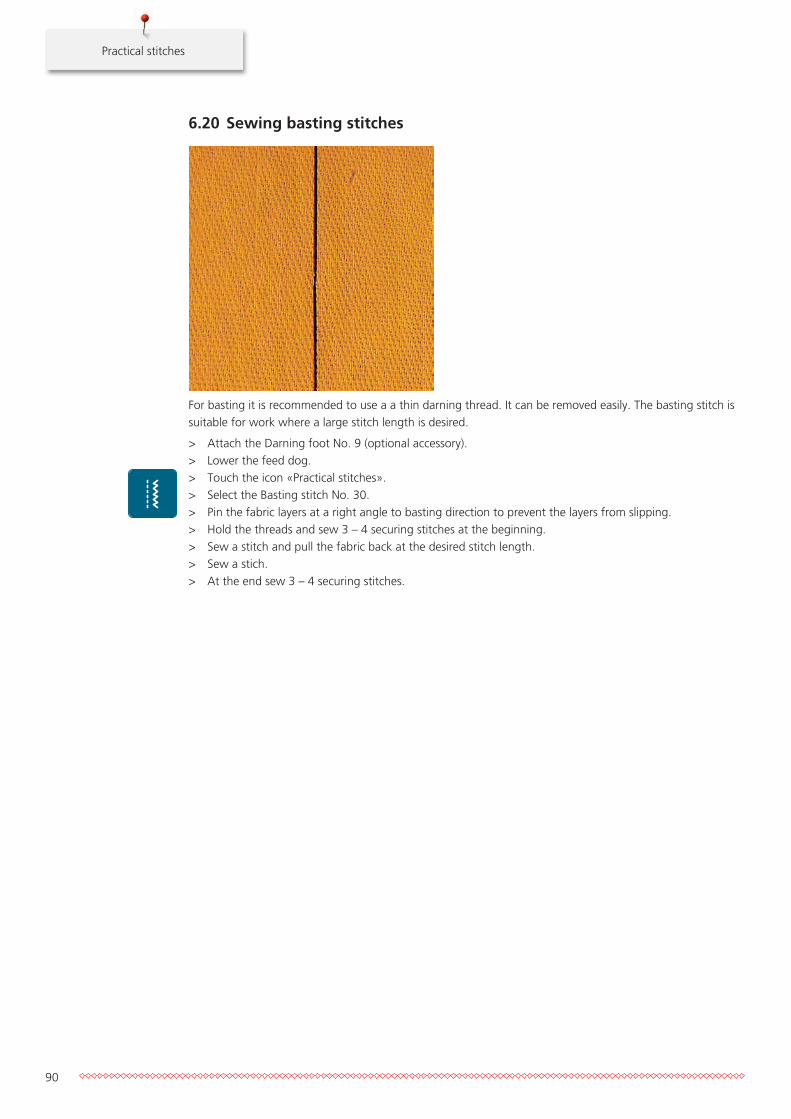
Practical stitches
90
6.20 Sewing basting stitches
For basting it is recommended to use a a thin darning thread. It can be removed easily. The basting stitch issuitable for work where a large stitch length is desired.
> Attach the Darning foot No. 9 (optional accessory).> Lower the feed dog.> Touch the icon «Practical stitches».> Select the Basting stitch No. 30.> Pin the fabric layers at a right angle to basting direction to prevent the layers from slipping.> Hold the threads and sew 3 – 4 securing stitches at the beginning.> Sew a stitch and pull the fabric back at the desired stitch length.> Sew a stich.> At the end sew 3 – 4 securing stitches.
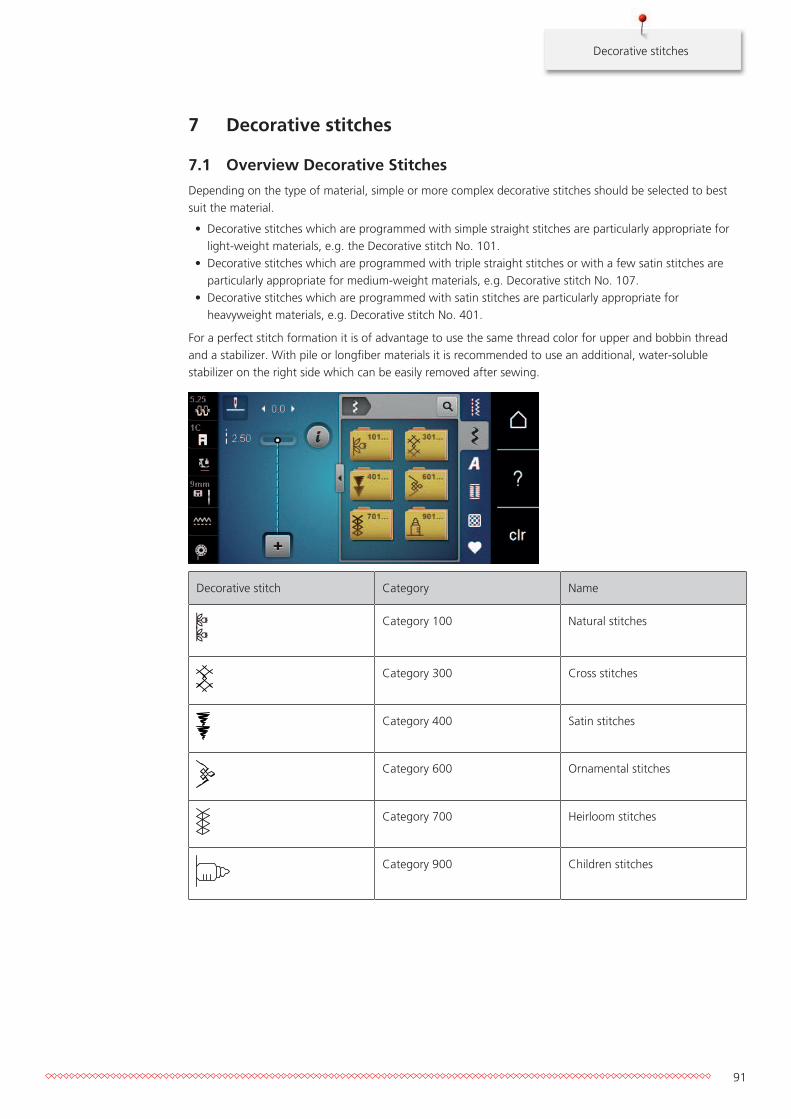
Decorative stitches
91
7 Decorative stitches
7.1 Overview Decorative Stitches
Depending on the type of material, simple or more complex decorative stitches should be selected to bestsuit the material.
• Decorative stitches which are programmed with simple straight stitches are particularly appropriate forlight-weight materials, e.g. the Decorative stitch No. 101.
• Decorative stitches which are programmed with triple straight stitches or with a few satin stitches areparticularly appropriate for medium-weight materials, e.g. Decorative stitch No. 107.
• Decorative stitches which are programmed with satin stitches are particularly appropriate forheavyweight materials, e.g. Decorative stitch No. 401.
For a perfect stitch formation it is of advantage to use the same thread color for upper and bobbin threadand a stabilizer. With pile or longfiber materials it is recommended to use an additional, water-solublestabilizer on the right side which can be easily removed after sewing.
Decorative stitch Category Name
Category 100 Natural stitches
Category 300 Cross stitches
Category 400 Satin stitches
Category 600 Ornamental stitches
Category 700 Heirloom stitches
Category 900 Children stitches
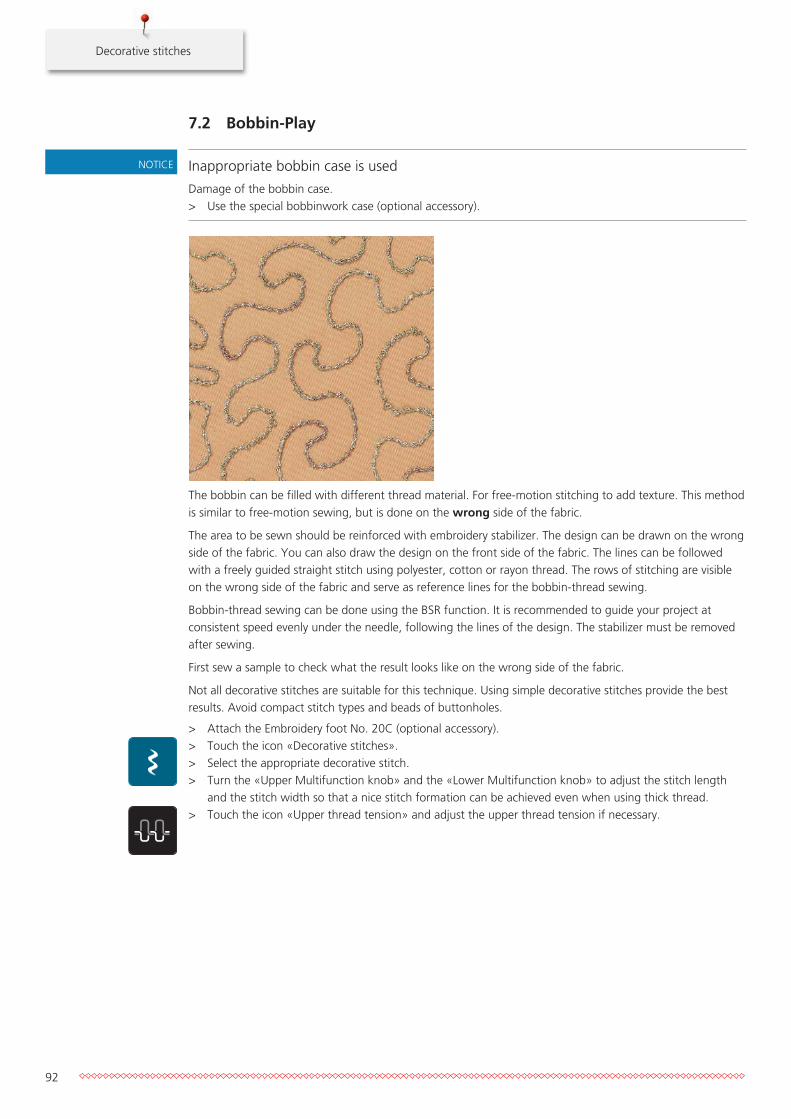
Decorative stitches
92
7.2 Bobbin-Play
NOTICE Inappropriate bobbin case is used
Damage of the bobbin case.> Use the special bobbinwork case (optional accessory).
The bobbin can be filled with different thread material. For free-motion stitching to add texture. This methodis similar to free-motion sewing, but is done on the wrong side of the fabric.
The area to be sewn should be reinforced with embroidery stabilizer. The design can be drawn on the wrongside of the fabric. You can also draw the design on the front side of the fabric. The lines can be followedwith a freely guided straight stitch using polyester, cotton or rayon thread. The rows of stitching are visibleon the wrong side of the fabric and serve as reference lines for the bobbin-thread sewing.
Bobbin-thread sewing can be done using the BSR function. It is recommended to guide your project atconsistent speed evenly under the needle, following the lines of the design. The stabilizer must be removedafter sewing.
First sew a sample to check what the result looks like on the wrong side of the fabric.
Not all decorative stitches are suitable for this technique. Using simple decorative stitches provide the bestresults. Avoid compact stitch types and beads of buttonholes.
> Attach the Embroidery foot No. 20C (optional accessory).> Touch the icon «Decorative stitches».> Select the appropriate decorative stitch.> Turn the «Upper Multifunction knob» and the «Lower Multifunction knob» to adjust the stitch length
and the stitch width so that a nice stitch formation can be achieved even when using thick thread.> Touch the icon «Upper thread tension» and adjust the upper thread tension if necessary.
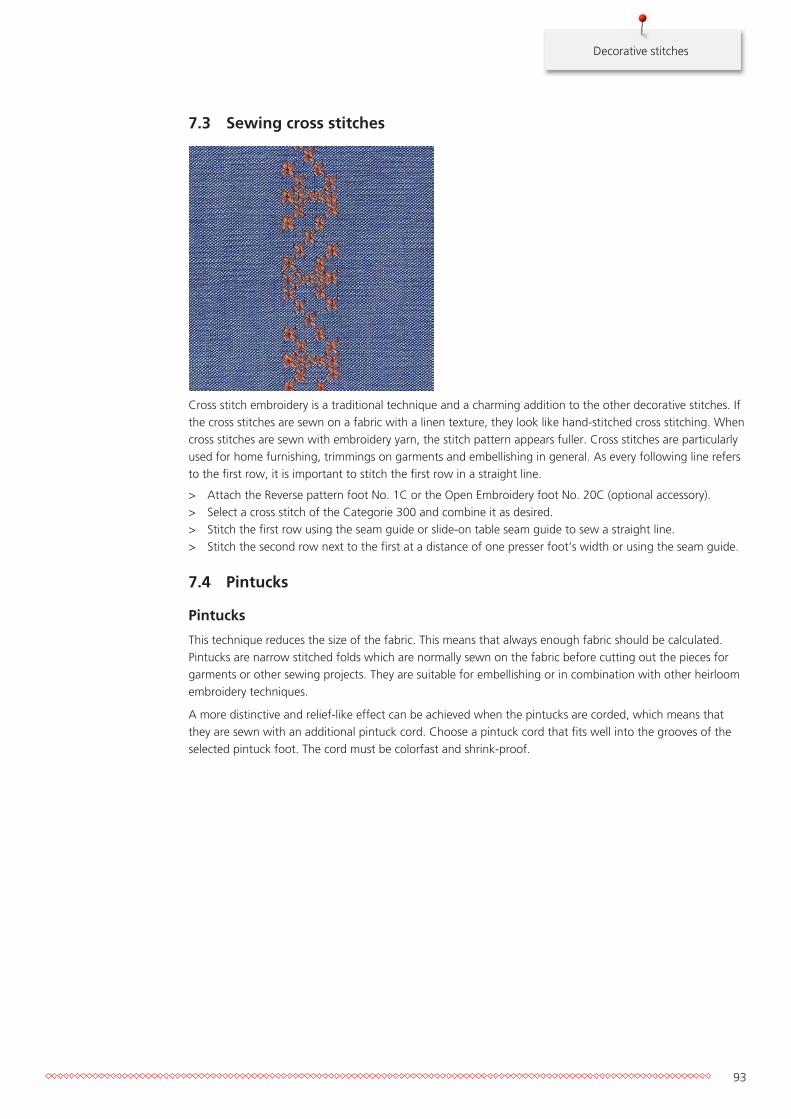
Decorative stitches
93
7.3 Sewing cross stitches
Cross stitch embroidery is a traditional technique and a charming addition to the other decorative stitches. Ifthe cross stitches are sewn on a fabric with a linen texture, they look like hand-stitched cross stitching. Whencross stitches are sewn with embroidery yarn, the stitch pattern appears fuller. Cross stitches are particularlyused for home furnishing, trimmings on garments and embellishing in general. As every following line refersto the first row, it is important to stitch the first row in a straight line.
> Attach the Reverse pattern foot No. 1C or the Open Embroidery foot No. 20C (optional accessory).> Select a cross stitch of the Categorie 300 and combine it as desired.> Stitch the first row using the seam guide or slide-on table seam guide to sew a straight line.> Stitch the second row next to the first at a distance of one presser foot‘s width or using the seam guide.
7.4 Pintucks
Pintucks
This technique reduces the size of the fabric. This means that always enough fabric should be calculated.Pintucks are narrow stitched folds which are normally sewn on the fabric before cutting out the pieces forgarments or other sewing projects. They are suitable for embellishing or in combination with other heirloomembroidery techniques.
A more distinctive and relief-like effect can be achieved when the pintucks are corded, which means thatthey are sewn with an additional pintuck cord. Choose a pintuck cord that fits well into the grooves of theselected pintuck foot. The cord must be colorfast and shrink-proof.
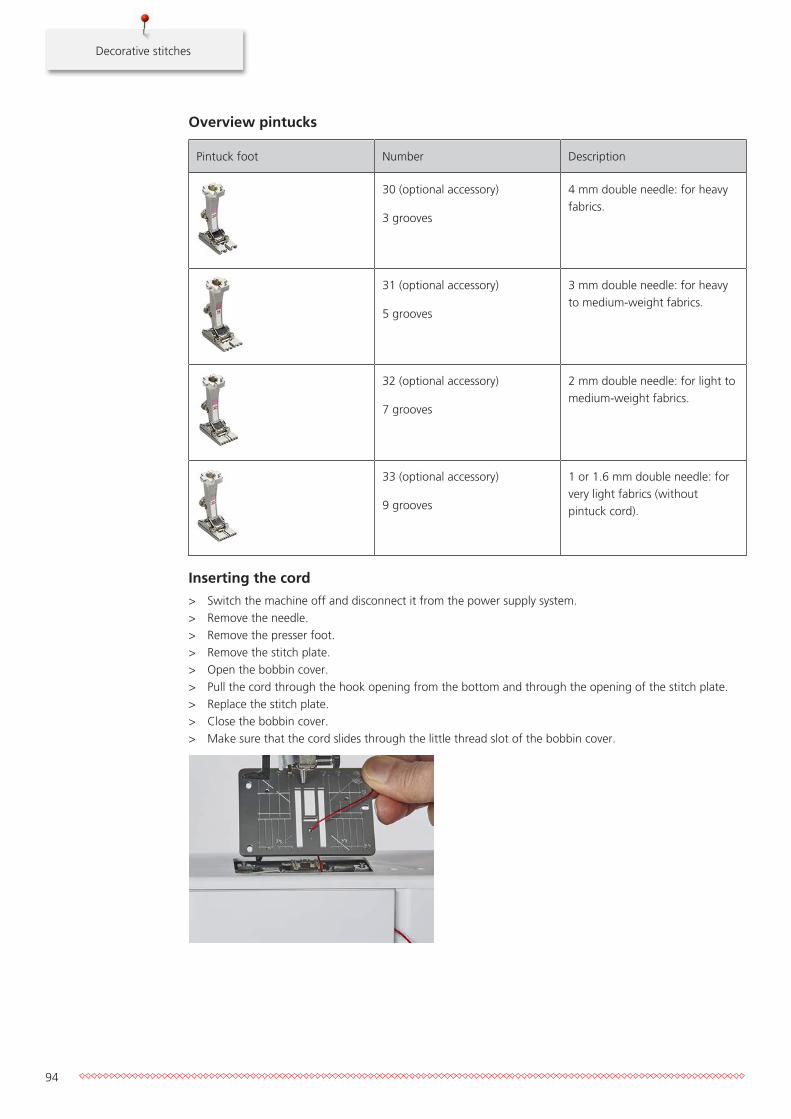
Decorative stitches
94
Overview pintucks
Pintuck foot Number Description
30 (optional accessory)
3 grooves
4 mm double needle: for heavyfabrics.
31 (optional accessory)
5 grooves
3 mm double needle: for heavyto medium-weight fabrics.
32 (optional accessory)
7 grooves
2 mm double needle: for light tomedium-weight fabrics.
33 (optional accessory)
9 grooves
1 or 1.6 mm double needle: forvery light fabrics (withoutpintuck cord).
Inserting the cord
> Switch the machine off and disconnect it from the power supply system.> Remove the needle.> Remove the presser foot.> Remove the stitch plate.> Open the bobbin cover.> Pull the cord through the hook opening from the bottom and through the opening of the stitch plate.> Replace the stitch plate.> Close the bobbin cover.> Make sure that the cord slides through the little thread slot of the bobbin cover.
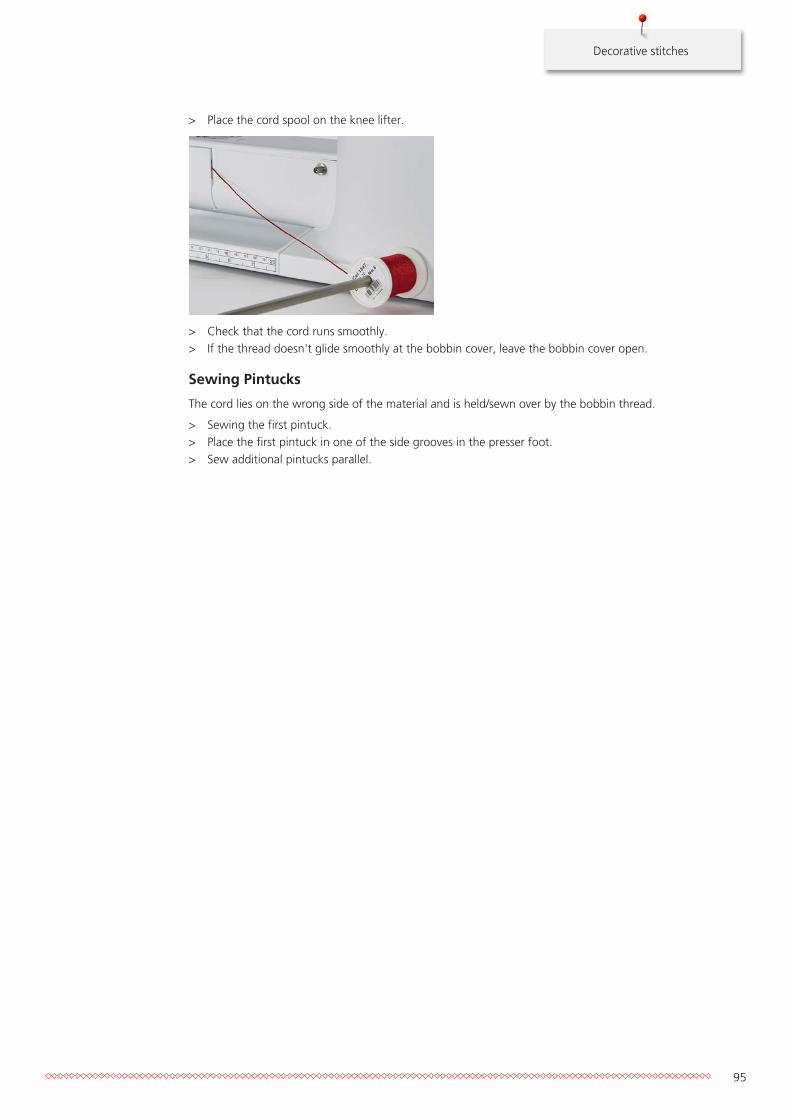
Decorative stitches
95
> Place the cord spool on the knee lifter.
> Check that the cord runs smoothly.> If the thread doesn't glide smoothly at the bobbin cover, leave the bobbin cover open.
Sewing Pintucks
The cord lies on the wrong side of the material and is held/sewn over by the bobbin thread.
> Sewing the first pintuck.> Place the first pintuck in one of the side grooves in the presser foot.> Sew additional pintucks parallel.
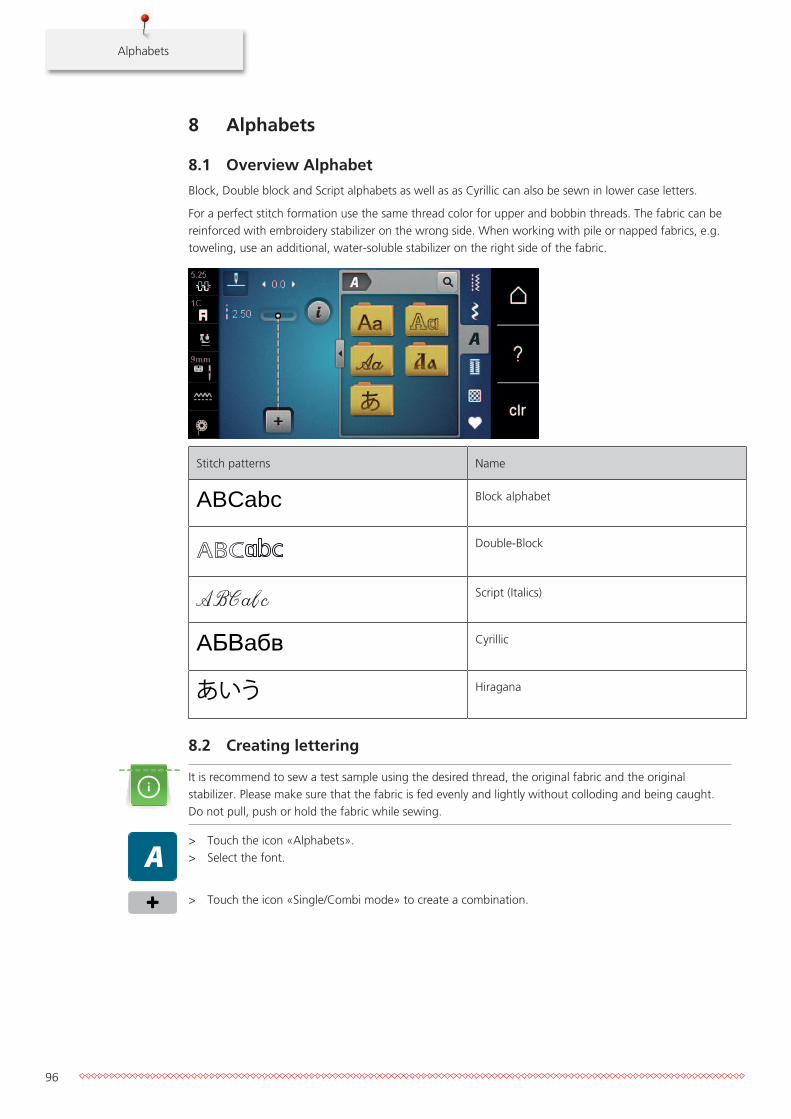
Alphabets
96
8 Alphabets
8.1 Overview Alphabet
Block, Double block and Script alphabets as well as as Cyrillic can also be sewn in lower case letters.
For a perfect stitch formation use the same thread color for upper and bobbin threads. The fabric can bereinforced with embroidery stabilizer on the wrong side. When working with pile or napped fabrics, e.g.toweling, use an additional, water-soluble stabilizer on the right side of the fabric.
Stitch patterns Name
ABCabc Block alphabet
Double-Block
Script (Italics)
AБВaбв Cyrillic
あいう Hiragana
8.2 Creating lettering
It is recommend to sew a test sample using the desired thread, the original fabric and the originalstabilizer. Please make sure that the fabric is fed evenly and lightly without colloding and being caught.Do not pull, push or hold the fabric while sewing.
> Touch the icon «Alphabets».> Select the font.
> Touch the icon «Single/Combi mode» to create a combination.

Alphabets
97
> Touch the icon «Display alphabets» (1) to open an extended enter mode.
1
> Select the letters.> Touch the icon (2) (standard setting) to use upper case letters.> Touch the icon (3) to use lower case letters.> Touch the icon (4) to use figures.> Touch the icon (5) to use special characters and mathematical symbols.
2 3 4 5
> Touch the icon «DEL» to delete single letters of the entered text.> Touch the icon «Display alphabets» again to close the extended enter mode.

Buttonholes
98
9 Buttonholes
9.1 Overview Buttonholes
To create the correct buttonhole for every button, every purpose and for every garment, your BERNINA 480is equipped with a considerable collection of buttonholes. The corresponding button can be sewn onautomatically. Eyelets can also be sewn.
Buttonhole Buttonholenumber
Name Description
51 Standard buttonhole For light to medium-weight fabrics;blouses, dresses, bedlinens.
52 Standard buttonholenarrow
For light to medium-weight fabrics;blouses, dresses, children's and babyclothes, crafts.
53 Stretch buttonhole For any highly elastic jersey made fromcotton, wool, silk and synthetic fibers.
54 Round buttonhole withnormal bartack
For medium to heavy-weight fabrics;dresses, jackets, coats, rainwear.
55 Round Buttonhole withhorizontal bartack
For medium to heavy-weight fabrics:dresses, jackets, coats, rainwear.
56 Keyhole buttonhole For heavy-weight, non-stretch fabrics;jackets, coats, leisure wear.
57 Keyhole buttonholewith pointed bartack
For firm, non-stretch fabrics: jackets,coats, leisure wear.
59 Straight stitchbuttonhole
Program for staystitching buttonholes,for pocket openings, reinforcingbuttonholes, especially for buttonholesin leather and imitation leather.
63 Heirloom For light to medium-weight wovenfabrics; blouses, dresses, leisure wear,bedlinen.
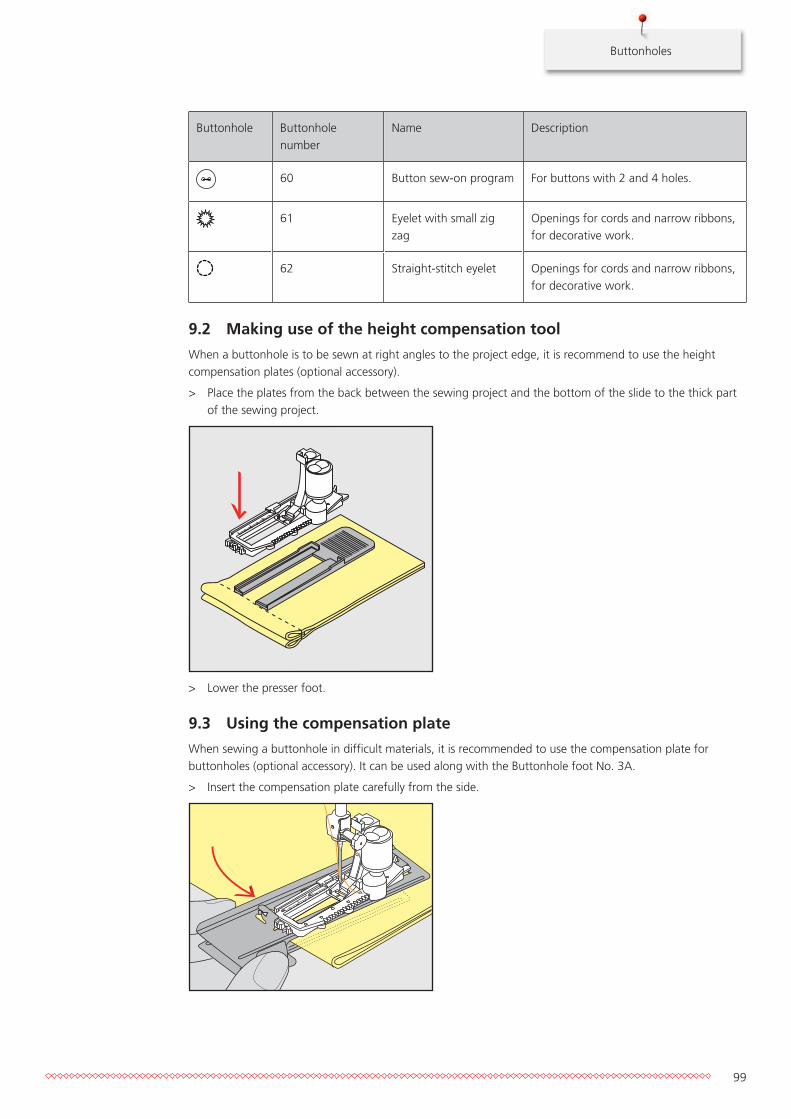
Buttonholes
99
Buttonhole Buttonholenumber
Name Description
60 Button sew-on program For buttons with 2 and 4 holes.
61 Eyelet with small zigzag
Openings for cords and narrow ribbons,for decorative work.
62 Straight-stitch eyelet Openings for cords and narrow ribbons,for decorative work.
9.2 Making use of the height compensation tool
When a buttonhole is to be sewn at right angles to the project edge, it is recommend to use the heightcompensation plates (optional accessory).
> Place the plates from the back between the sewing project and the bottom of the slide to the thick partof the sewing project.
> Lower the presser foot.
9.3 Using the compensation plate
When sewing a buttonhole in difficult materials, it is recommended to use the compensation plate forbuttonholes (optional accessory). It can be used along with the Buttonhole foot No. 3A.
> Insert the compensation plate carefully from the side.
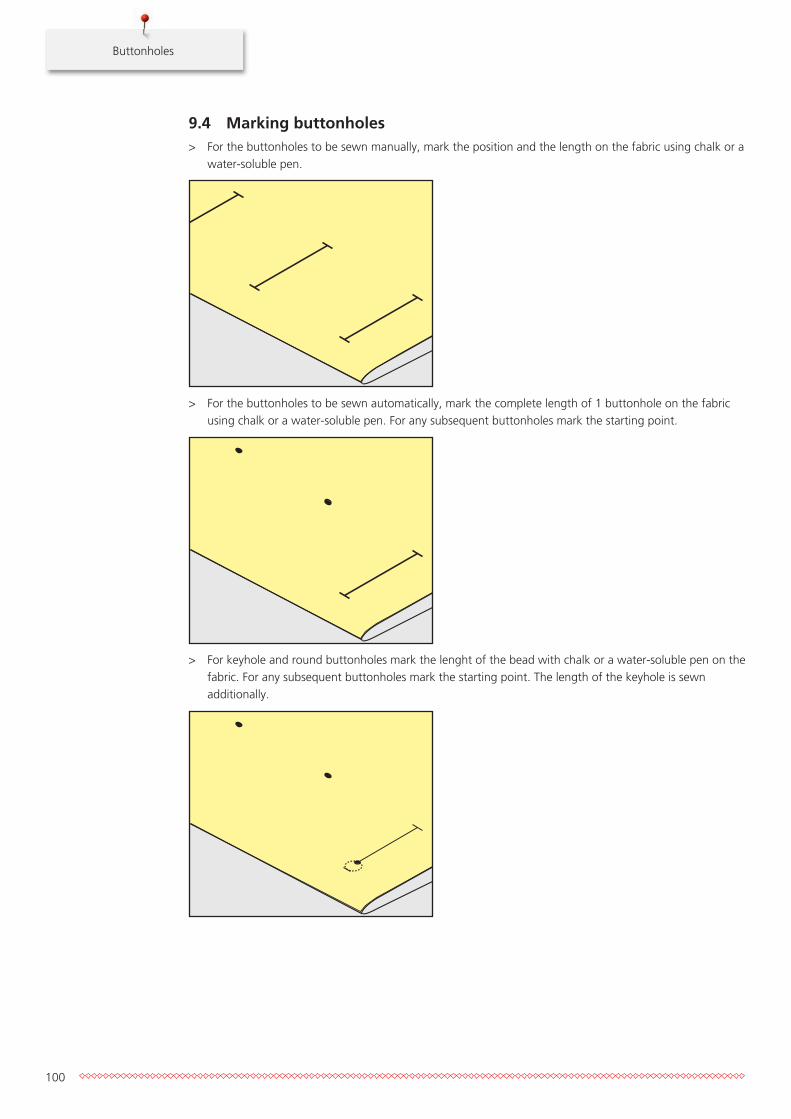
Buttonholes
100
9.4 Marking buttonholes> For the buttonholes to be sewn manually, mark the position and the length on the fabric using chalk or a
water-soluble pen.
> For the buttonholes to be sewn automatically, mark the complete length of 1 buttonhole on the fabricusing chalk or a water-soluble pen. For any subsequent buttonholes mark the starting point.
> For keyhole and round buttonholes mark the lenght of the bead with chalk or a water-soluble pen on thefabric. For any subsequent buttonholes mark the starting point. The length of the keyhole is sewnadditionally.

Buttonholes
101
9.5 Cord
Using cord with the Buttonhole foot with slide No. 3A
The cord reinforces and enhences the buttonhole and is particularly suitable for the Buttonhole No. 51.Optimal cord is Perle cotton No. 8, strong hand-sewing thread and fine crochet yarn. It is recommended notto hold the cord when sewing.
Prerequisite:
• The Buttonhole foot with slide No. 3A is attached and raised.
> Insert the needle at the beginning of the buttonhole.> Guide the cord on the right side under the buttonhole foot.> Hook the cord over the pin at the back of the buttonhole foot.
> Pull the cord on the left side under the buttonhole foot to the front.
> Pull the cord ends into the slits.> Lower the buttonhole foot.> Sew the buttonhole in the usual manner.> Pull the cord through the buttonhole until the loop disappears in the bartack.
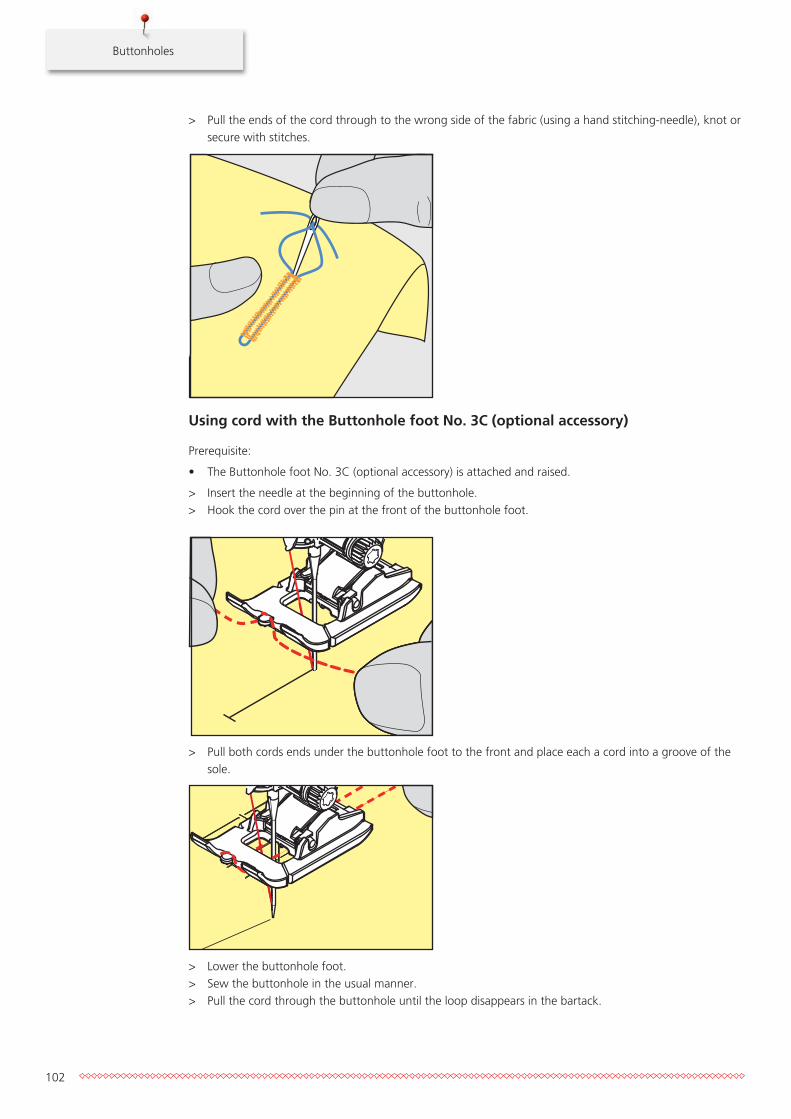
Buttonholes
102
> Pull the ends of the cord through to the wrong side of the fabric (using a hand stitching-needle), knot orsecure with stitches.
Using cord with the Buttonhole foot No. 3C (optional accessory)
Prerequisite:
• The Buttonhole foot No. 3C (optional accessory) is attached and raised.
> Insert the needle at the beginning of the buttonhole.> Hook the cord over the pin at the front of the buttonhole foot.
> Pull both cords ends under the buttonhole foot to the front and place each a cord into a groove of thesole.
> Lower the buttonhole foot.> Sew the buttonhole in the usual manner.> Pull the cord through the buttonhole until the loop disappears in the bartack.
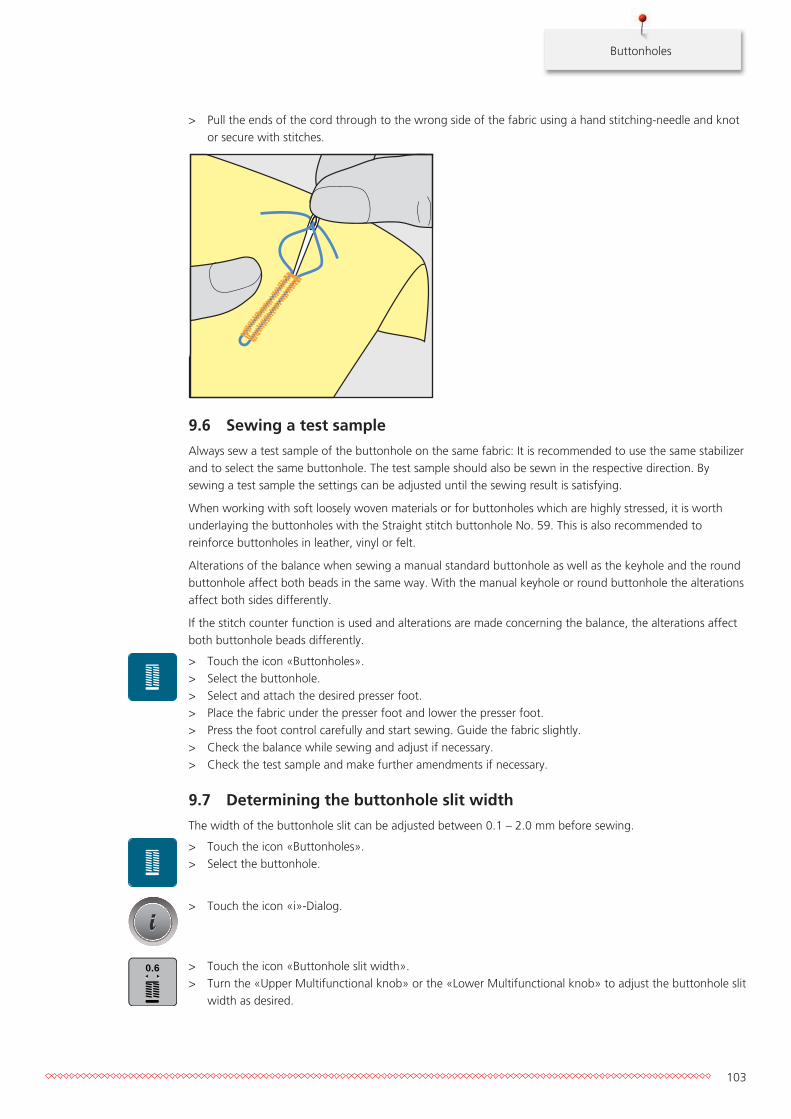
Buttonholes
103
> Pull the ends of the cord through to the wrong side of the fabric using a hand stitching-needle and knotor secure with stitches.
9.6 Sewing a test sample
Always sew a test sample of the buttonhole on the same fabric: It is recommended to use the same stabilizerand to select the same buttonhole. The test sample should also be sewn in the respective direction. Bysewing a test sample the settings can be adjusted until the sewing result is satisfying.
When working with soft loosely woven materials or for buttonholes which are highly stressed, it is worthunderlaying the buttonholes with the Straight stitch buttonhole No. 59. This is also recommended toreinforce buttonholes in leather, vinyl or felt.
Alterations of the balance when sewing a manual standard buttonhole as well as the keyhole and the roundbuttonhole affect both beads in the same way. With the manual keyhole or round buttonhole the alterationsaffect both sides differently.
If the stitch counter function is used and alterations are made concerning the balance, the alterations affectboth buttonhole beads differently.
> Touch the icon «Buttonholes».> Select the buttonhole.> Select and attach the desired presser foot.> Place the fabric under the presser foot and lower the presser foot.> Press the foot control carefully and start sewing. Guide the fabric slightly.> Check the balance while sewing and adjust if necessary.> Check the test sample and make further amendments if necessary.
9.7 Determining the buttonhole slit width
The width of the buttonhole slit can be adjusted between 0.1 – 2.0 mm before sewing.
> Touch the icon «Buttonholes».> Select the buttonhole.
> Touch the icon «i»-Dialog.
0.6 > Touch the icon «Buttonhole slit width».> Turn the «Upper Multifunctional knob» or the «Lower Multifunctional knob» to adjust the buttonhole slit
width as desired.
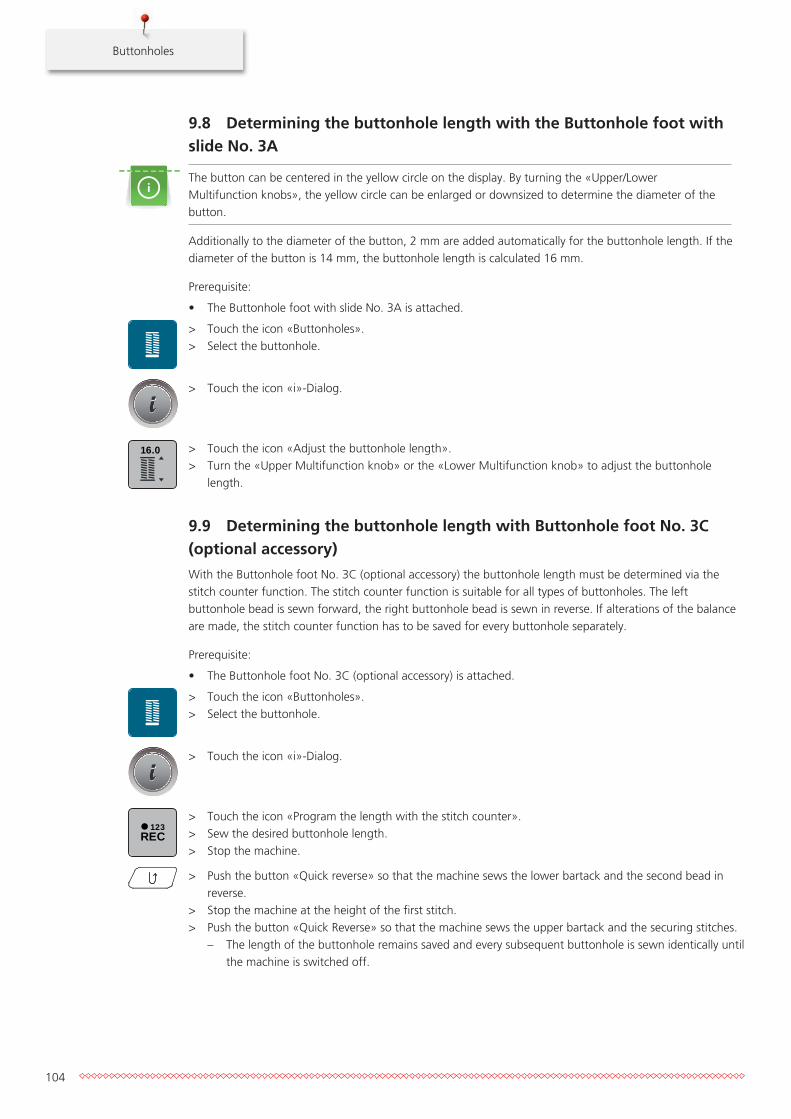
Buttonholes
104
9.8 Determining the buttonhole length with the Buttonhole foot withslide No. 3A
The button can be centered in the yellow circle on the display. By turning the «Upper/LowerMultifunction knobs», the yellow circle can be enlarged or downsized to determine the diameter of thebutton.
Additionally to the diameter of the button, 2 mm are added automatically for the buttonhole length. If thediameter of the button is 14 mm, the buttonhole length is calculated 16 mm.
Prerequisite:
• The Buttonhole foot with slide No. 3A is attached.
> Touch the icon «Buttonholes».> Select the buttonhole.
> Touch the icon «i»-Dialog.
16.0 > Touch the icon «Adjust the buttonhole length».> Turn the «Upper Multifunction knob» or the «Lower Multifunction knob» to adjust the buttonhole
length.
9.9 Determining the buttonhole length with Buttonhole foot No. 3C(optional accessory)
With the Buttonhole foot No. 3C (optional accessory) the buttonhole length must be determined via thestitch counter function. The stitch counter function is suitable for all types of buttonholes. The leftbuttonhole bead is sewn forward, the right buttonhole bead is sewn in reverse. If alterations of the balanceare made, the stitch counter function has to be saved for every buttonhole separately.
Prerequisite:
• The Buttonhole foot No. 3C (optional accessory) is attached.
> Touch the icon «Buttonholes».> Select the buttonhole.
> Touch the icon «i»-Dialog.
REC 123
> Touch the icon «Program the length with the stitch counter».> Sew the desired buttonhole length.> Stop the machine.
> Push the button «Quick reverse» so that the machine sews the lower bartack and the second bead inreverse.
> Stop the machine at the height of the first stitch.> Push the button «Quick Reverse» so that the machine sews the upper bartack and the securing stitches.
– The length of the buttonhole remains saved and every subsequent buttonhole is sewn identically untilthe machine is switched off.

Buttonholes
105
9.10 Sewing a buttonhole automatically with the Buttonhole foot withslide No. 3A
NOTICE! It depends on the markets, whether or not the Buttonhole foot with slide No. 3A isincluded in the delivery contens. When the Buttonhole foot with slide No. 3A is not included in thestandard accessory, it can be purchased as optional accessory at the specialized BERNINA retailers.
When the Buttonhole foot with slide No. 3A is used, the length of the buttonhole is measured automaticallyby the lens on the presser foot. The buttonhole will be exactly duplicated and the machine switches to thenext step automatically when the maximum length is reached. The Buttonhole foot with slide No. 3A issuitable for buttonholes at a length of 4 – 31 mm, depending on the buttonhole type. The slide of theButtonhole foot must lie perfectly flat on the fabric so that the length can be measured accurately.Programmed buttonholes are the same length and of the same nice look.
Prerequisite:
• The Buttonhole foot with slide No. 3A is attached.
> Touch the icon «Buttonholes».> Select buttonhole No. 51 – 57, No. 59 or 63.> Sew the desired buttonhole length.
> Push the button «Quick Reverse» to program the length.
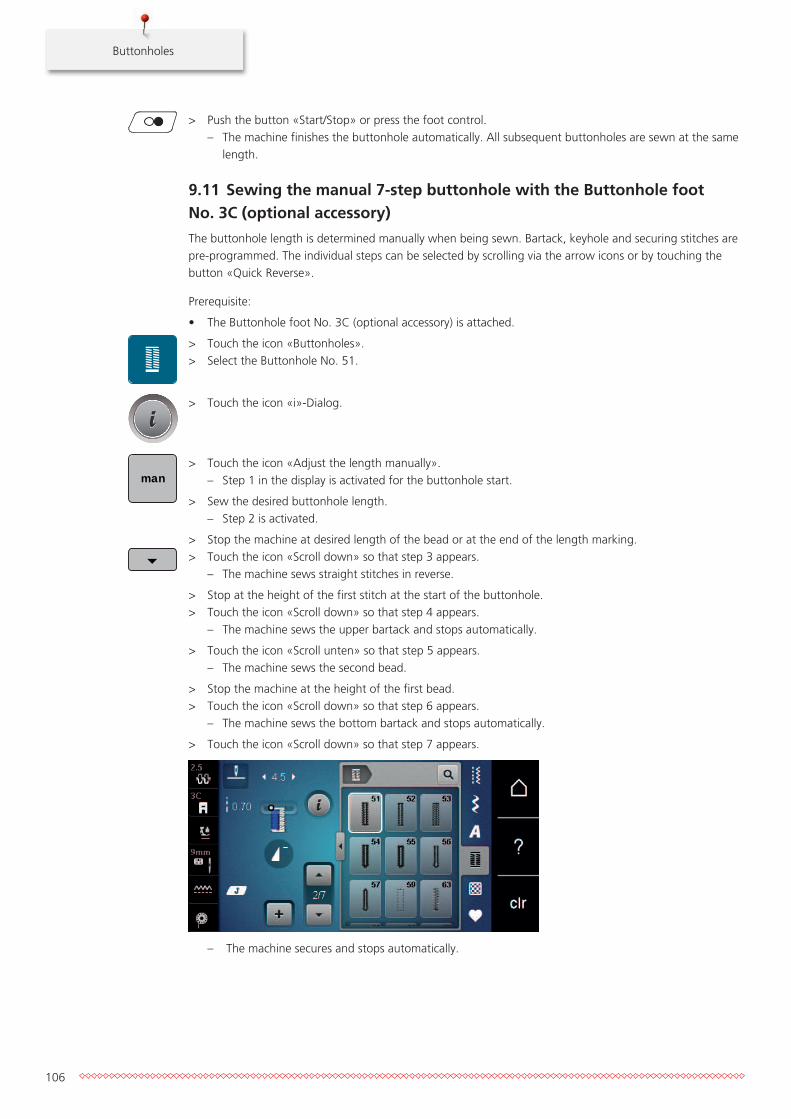
Buttonholes
106
> Push the button «Start/Stop» or press the foot control.– The machine finishes the buttonhole automatically. All subsequent buttonholes are sewn at the same
length.
9.11 Sewing the manual 7-step buttonhole with the Buttonhole foot No. 3C (optional accessory)
The buttonhole length is determined manually when being sewn. Bartack, keyhole and securing stitches arepre-programmed. The individual steps can be selected by scrolling via the arrow icons or by touching thebutton «Quick Reverse».
Prerequisite:
• The Buttonhole foot No. 3C (optional accessory) is attached.
> Touch the icon «Buttonholes».> Select the Buttonhole No. 51.
> Touch the icon «i»-Dialog.
man
> Touch the icon «Adjust the length manually».– Step 1 in the display is activated for the buttonhole start.
> Sew the desired buttonhole length.– Step 2 is activated.
> Stop the machine at desired length of the bead or at the end of the length marking.> Touch the icon «Scroll down» so that step 3 appears.
– The machine sews straight stitches in reverse.
> Stop at the height of the first stitch at the start of the buttonhole.> Touch the icon «Scroll down» so that step 4 appears.
– The machine sews the upper bartack and stops automatically.
> Touch the icon «Scroll unten» so that step 5 appears.– The machine sews the second bead.
> Stop the machine at the height of the first bead.> Touch the icon «Scroll down» so that step 6 appears.
– The machine sews the bottom bartack and stops automatically.
> Touch the icon «Scroll down» so that step 7 appears.
– The machine secures and stops automatically.
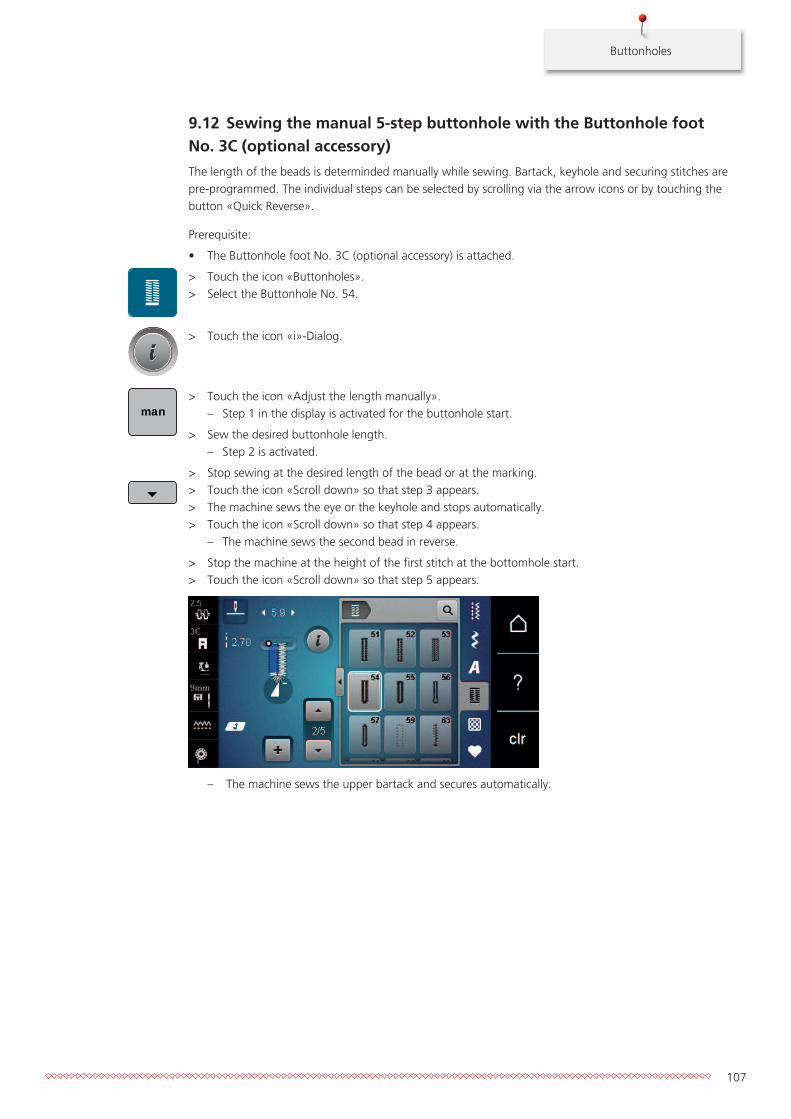
Buttonholes
107
9.12 Sewing the manual 5-step buttonhole with the Buttonhole foot No. 3C (optional accessory)
The length of the beads is determinded manually while sewing. Bartack, keyhole and securing stitches arepre-programmed. The individual steps can be selected by scrolling via the arrow icons or by touching thebutton «Quick Reverse».
Prerequisite:
• The Buttonhole foot No. 3C (optional accessory) is attached.
> Touch the icon «Buttonholes».> Select the Buttonhole No. 54.
> Touch the icon «i»-Dialog.
man
> Touch the icon «Adjust the length manually».– Step 1 in the display is activated for the buttonhole start.
> Sew the desired buttonhole length.– Step 2 is activated.
> Stop sewing at the desired length of the bead or at the marking.> Touch the icon «Scroll down» so that step 3 appears.> The machine sews the eye or the keyhole and stops automatically.> Touch the icon «Scroll down» so that step 4 appears.
– The machine sews the second bead in reverse.
> Stop the machine at the height of the first stitch at the bottomhole start.> Touch the icon «Scroll down» so that step 5 appears.
– The machine sews the upper bartack and secures automatically.
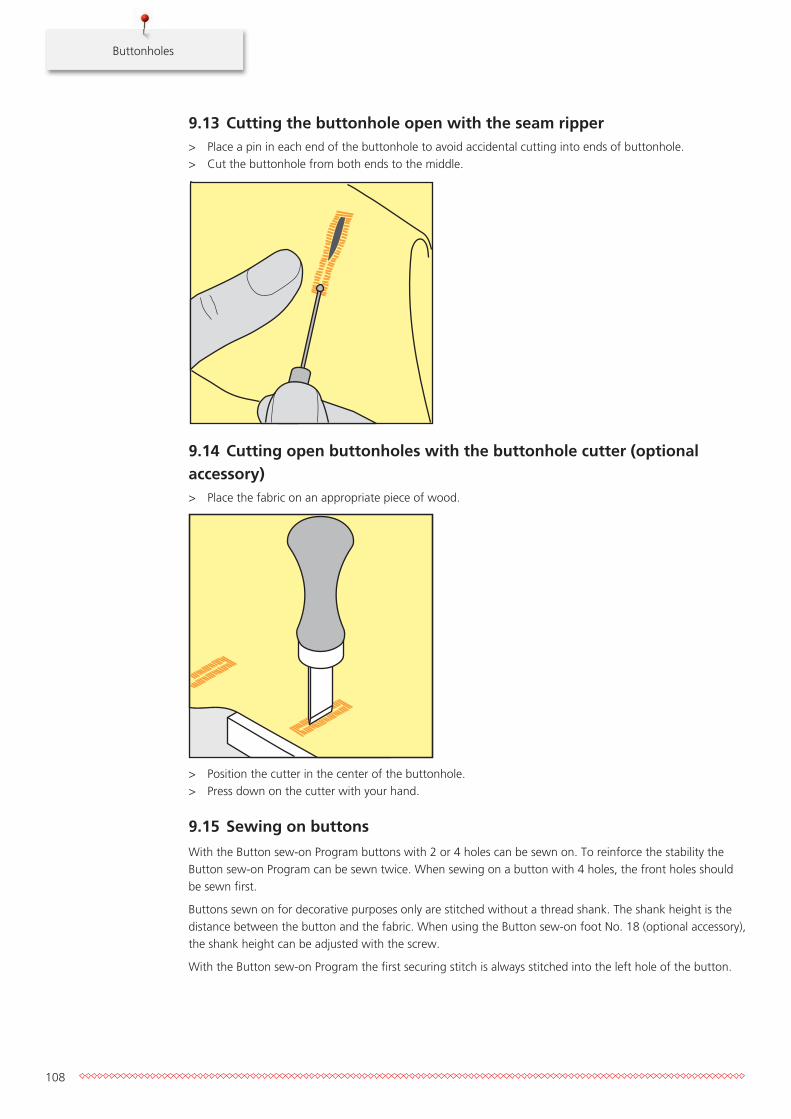
Buttonholes
108
9.13 Cutting the buttonhole open with the seam ripper> Place a pin in each end of the buttonhole to avoid accidental cutting into ends of buttonhole.> Cut the buttonhole from both ends to the middle.
9.14 Cutting open buttonholes with the buttonhole cutter (optionalaccessory)> Place the fabric on an appropriate piece of wood.
> Position the cutter in the center of the buttonhole.> Press down on the cutter with your hand.
9.15 Sewing on buttons
With the Button sew-on Program buttons with 2 or 4 holes can be sewn on. To reinforce the stability theButton sew-on Program can be sewn twice. When sewing on a button with 4 holes, the front holes shouldbe sewn first.
Buttons sewn on for decorative purposes only are stitched without a thread shank. The shank height is thedistance between the button and the fabric. When using the Button sew-on foot No. 18 (optional accessory),the shank height can be adjusted with the screw.
With the Button sew-on Program the first securing stitch is always stitched into the left hole of the button.
Buttonholes
109
Prerequisite:
• The Darning foot No. 9 (optional accessory) or the Button sew-on foot No. 18 (optional accessory) isattached.
> Touch the icon «Buttonholes».> Lower the feed dog.> Select the Button sew-on Program No. 60.> Place the button on the sewing project.> Turn the handwheel to adjust the distance between the holes.> Hold the threads when starting to sew and, if necessary, alter the stitch width.
– The machine sews the Button sew-on Program and stops automatically.
> Pull on both bobbin threads until the ends of the upper threads are visible on the wrong side.> Knot the ends manually.
9.16 Sewing eyelets
For increased stability sew the eyelet twice.
Prerequisite:
• The Reverse pattern foot No. 1C or the Open embroidery foot No. 20C (optional accessory) is attached.
> Touch the icon «Buttonholes».> Select the Eyelet Program No. 61 or No. 62.> Turn the «Upper Multifuntion knob» or the «Lower Multifunction knob» to alter the size of the eyelet.> Sew the Eyelet Program.
– The machine stops automatically at the end of the Eyelet Program.
> Use an awl, punch pliers or a hole punch to open the eyelet.

Quilting
110
10 Quilting
10.1 Overview Quilt Stitches
Stitchpatterns
Stitchnumber
Name Description
1301 Quilting, SecuringProgram
To secure at the sewing start and sewing endwith short stitches forward.
1302 Quilting straight stitch Straight stitch at 3 mm stitch length.
1303 Piecing stitch/Straightstitch
Straight stitch at 2 mm stitch length.
1304 Handlook quilt stitch1304 – 1308
Imitation of handlook quilt stitch withmonofilament.
1309 Blanket stitch 1309 – 1310, 1313 – 1314
For appliqué and sewing on ribbons.
1311 Dekorative Quilt stitches1311, 1317 – 1324
Imitation of handlook quilt stitch withmonofilament.
1315 Satin stitch For appliqué.
1316 Blindstitch narrow To sew blind stitches.
1331 Stippling stitch Imitation of stipple quilting.
1332 Feather stitch For "Crazy Patchwork" and embellishing.
1333 Feather stitch variations For "Crazy Patchwork" and embellishing.
1334 Feather stitch variations For "Crazy Patchwork" and embellishing.
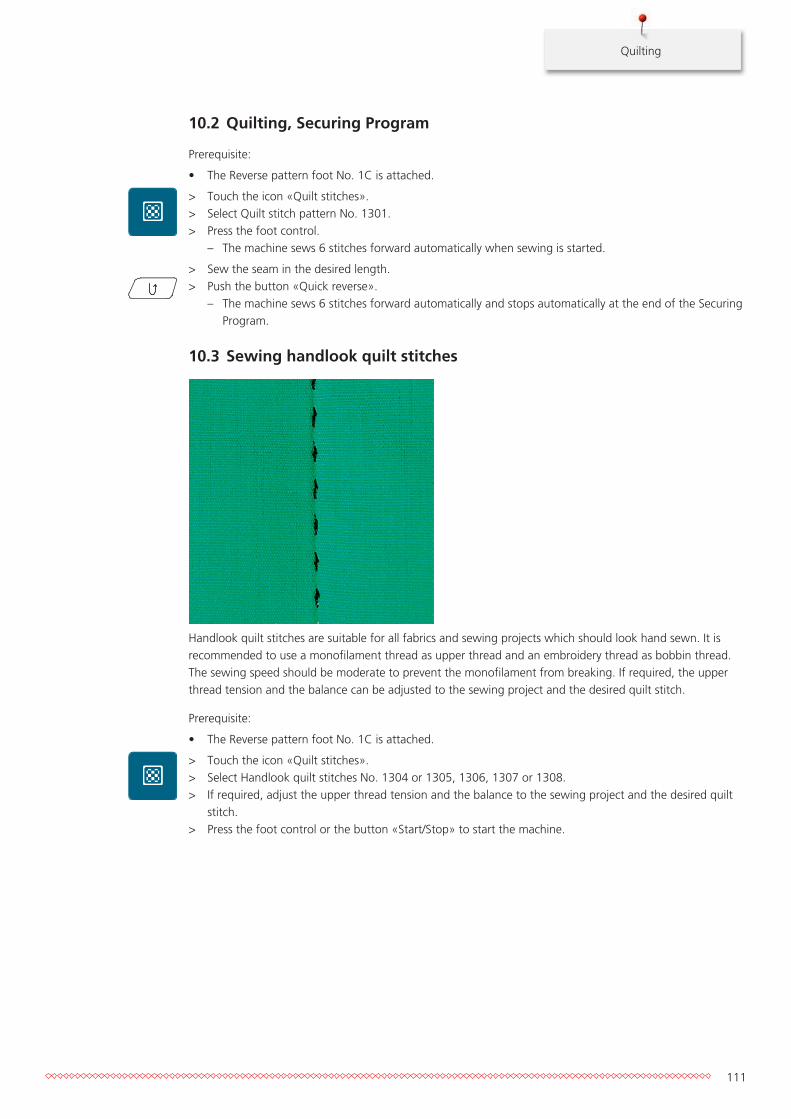
Quilting
111
10.2 Quilting, Securing Program
Prerequisite:
• The Reverse pattern foot No. 1C is attached.
> Touch the icon «Quilt stitches».> Select Quilt stitch pattern No. 1301.> Press the foot control.
– The machine sews 6 stitches forward automatically when sewing is started.
> Sew the seam in the desired length.> Push the button «Quick reverse».
– The machine sews 6 stitches forward automatically and stops automatically at the end of the SecuringProgram.
10.3 Sewing handlook quilt stitches
Handlook quilt stitches are suitable for all fabrics and sewing projects which should look hand sewn. It isrecommended to use a monofilament thread as upper thread and an embroidery thread as bobbin thread.The sewing speed should be moderate to prevent the monofilament from breaking. If required, the upperthread tension and the balance can be adjusted to the sewing project and the desired quilt stitch.
Prerequisite:
• The Reverse pattern foot No. 1C is attached.
> Touch the icon «Quilt stitches».> Select Handlook quilt stitches No. 1304 or 1305, 1306, 1307 or 1308.> If required, adjust the upper thread tension and the balance to the sewing project and the desired quilt
stitch.> Press the foot control or the button «Start/Stop» to start the machine.
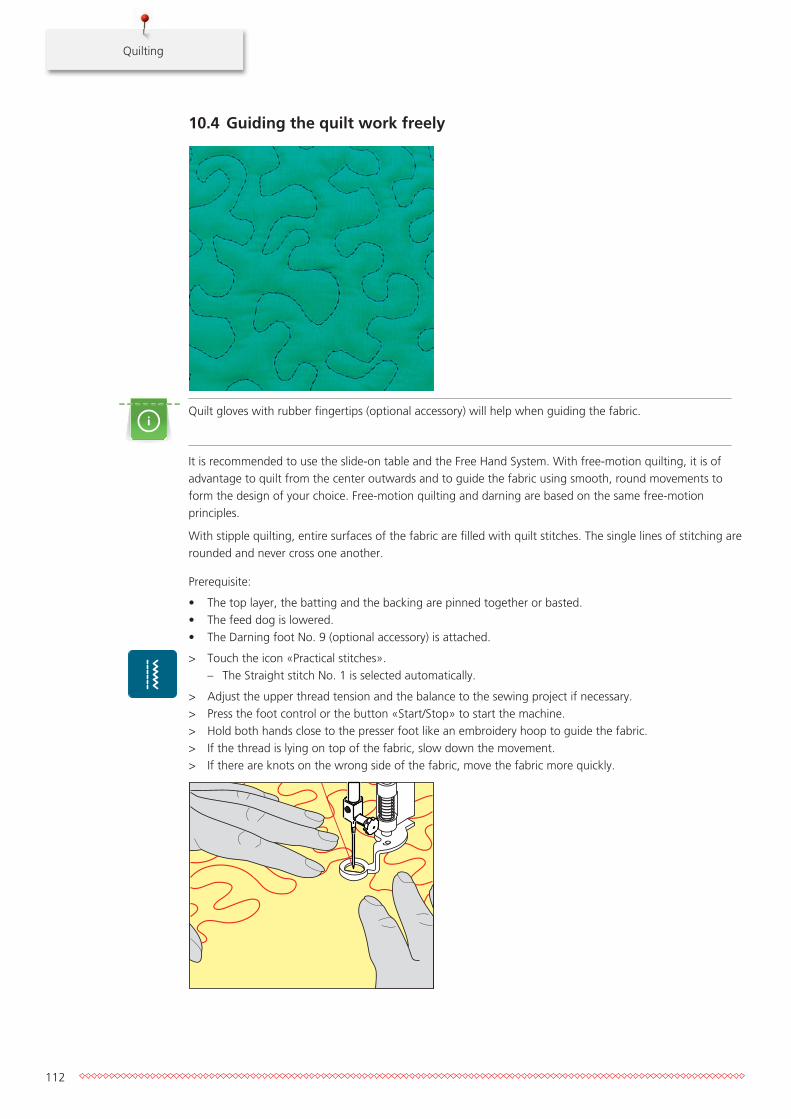
Quilting
112
10.4 Guiding the quilt work freely
Quilt gloves with rubber fingertips (optional accessory) will help when guiding the fabric.
It is recommended to use the slide-on table and the Free Hand System. With free-motion quilting, it is ofadvantage to quilt from the center outwards and to guide the fabric using smooth, round movements toform the design of your choice. Free-motion quilting and darning are based on the same free-motionprinciples.
With stipple quilting, entire surfaces of the fabric are filled with quilt stitches. The single lines of stitching arerounded and never cross one another.
Prerequisite:
• The top layer, the batting and the backing are pinned together or basted.• The feed dog is lowered.• The Darning foot No. 9 (optional accessory) is attached.
> Touch the icon «Practical stitches».– The Straight stitch No. 1 is selected automatically.
> Adjust the upper thread tension and the balance to the sewing project if necessary.> Press the foot control or the button «Start/Stop» to start the machine.> Hold both hands close to the presser foot like an embroidery hoop to guide the fabric.> If the thread is lying on top of the fabric, slow down the movement.> If there are knots on the wrong side of the fabric, move the fabric more quickly.
BERNINA Stitch Regulator (BSR)(optional accessory)
113
11 BERNINA Stitch Regulator (BSR) (optional accessory)The BERNINA Stitch regulator equalizes the stitch length which results of the free movement of the fabricwhile free-motion sewing - a sewing technique which grows more and more popular. When free-motionsewing with the BSR presser foot, every stitch is equally long and the stitch formation is perfectly regular.
As soon as the BSR presser foot is attached and the feed dog is lowered, the selection menu of the desiredmode appears in the display of the machine. The BSR presser foot can be used with sewing straight stitch aswell as zig zag.
The BSR presser foot reacts on the movement of the fabric and therefore controls the speed of the machineup to the highest possible speed. It can be said: the faster the movement of the material, the higher thespeed of the machine.
If the fabric is moved too quickly, an acoustic signal sounds. The beeper can be activated or deactivated inthe BSR display. The sound of the beeper can also be activated or deactivated in the Setup Program.
11.1 BSR mode 1
The BSR function can be controlled via the foot control or with the button «Start/Stop». Start the BSR mode.At the BSR presser foot a red light is on. By moving the fabric the machine accelerates. If the fabric isn'tmoved, securing in place is possible without pressing an additional button. When working via the footcontrol or when using the button «Start/Stop», the BSR mode doesn't stop automatically.
11.2 BSR mode 2
The BSR function can be controlled via the foot control or the button «Start/Stop». The machine starts onlywhen the foot control or the button «Start/Stop» is pressed and the fabric is moved simultaneously. Withoutmoving the fabric, the BSR2 modus stops after about 7 seconds. The red light goes off (only when workingwith the button «Start/Stop»). When working via the foot control, the red light doesn't go off.
11.3 BSR function with Straight stitch No. 1
This function allows free-motion quilting with straight stitch and a pre-programmed stitch length up to4 mm. The programmed stitch length is maintained within a certain speed, independent of the fabricmovement.
11.4 BSR function with Zig zag No. 2
The zig zag can be used e.g. for thread painting. The set stitch length will not be maintained when sewingthe zig zag stitch, but the BSR function simplifies the application.
11.5 Sewing preparations for quilting
Attach the BSR presser foot
NOTICE The lens of the BSR presser foot is dirty
The machine doesn't recognize the BSR presser foot.> Clean the lens with a soft, slightly damp cloth.
> Change the presser foot.
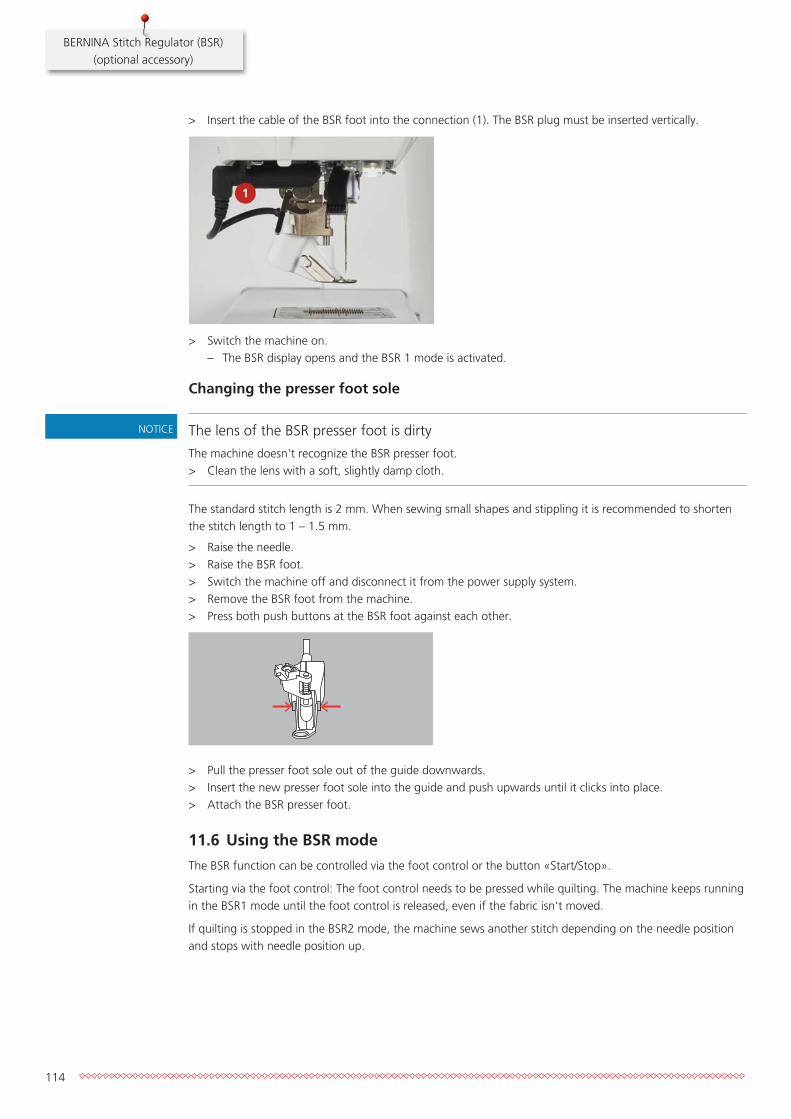
BERNINA Stitch Regulator (BSR)(optional accessory)
114
> Insert the cable of the BSR foot into the connection (1). The BSR plug must be inserted vertically.
> Switch the machine on.– The BSR display opens and the BSR 1 mode is activated.
Changing the presser foot sole
NOTICE The lens of the BSR presser foot is dirty
The machine doesn't recognize the BSR presser foot.> Clean the lens with a soft, slightly damp cloth.
The standard stitch length is 2 mm. When sewing small shapes and stippling it is recommended to shortenthe stitch length to 1 – 1.5 mm.
> Raise the needle.> Raise the BSR foot.> Switch the machine off and disconnect it from the power supply system.> Remove the BSR foot from the machine.> Press both push buttons at the BSR foot against each other.
> Pull the presser foot sole out of the guide downwards.> Insert the new presser foot sole into the guide and push upwards until it clicks into place.> Attach the BSR presser foot.
11.6 Using the BSR mode
The BSR function can be controlled via the foot control or the button «Start/Stop».
Starting via the foot control: The foot control needs to be pressed while quilting. The machine keeps runningin the BSR1 mode until the foot control is released, even if the fabric isn't moved.
If quilting is stopped in the BSR2 mode, the machine sews another stitch depending on the needle positionand stops with needle position up.
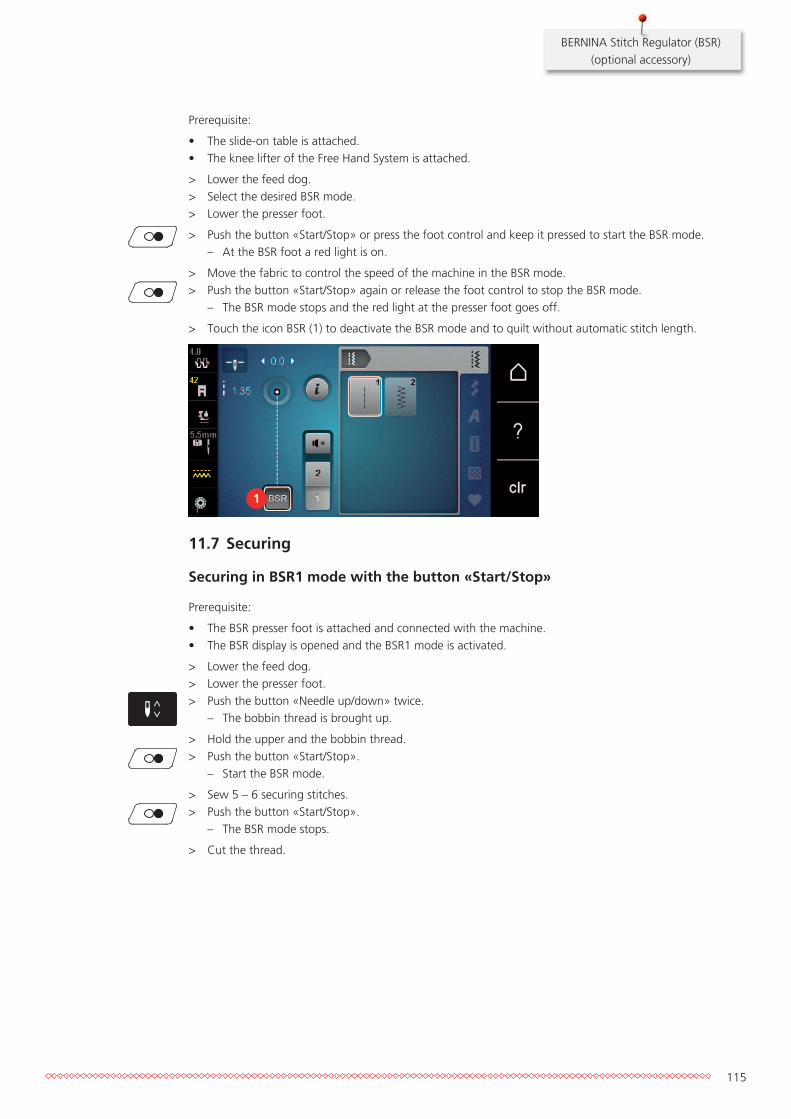
BERNINA Stitch Regulator (BSR)(optional accessory)
115
Prerequisite:
• The slide-on table is attached.• The knee lifter of the Free Hand System is attached.
> Lower the feed dog.> Select the desired BSR mode.> Lower the presser foot.
> Push the button «Start/Stop» or press the foot control and keep it pressed to start the BSR mode.– At the BSR foot a red light is on.
> Move the fabric to control the speed of the machine in the BSR mode.> Push the button «Start/Stop» again or release the foot control to stop the BSR mode.
– The BSR mode stops and the red light at the presser foot goes off.
> Touch the icon BSR (1) to deactivate the BSR mode and to quilt without automatic stitch length.
1
11.7 Securing
Securing in BSR1 mode with the button «Start/Stop»
Prerequisite:
• The BSR presser foot is attached and connected with the machine.• The BSR display is opened and the BSR1 mode is activated.
> Lower the feed dog.> Lower the presser foot.> Push the button «Needle up/down» twice.
– The bobbin thread is brought up.
> Hold the upper and the bobbin thread.> Push the button «Start/Stop».
– Start the BSR mode.
> Sew 5 – 6 securing stitches.> Push the button «Start/Stop».
– The BSR mode stops.
> Cut the thread.

BERNINA Stitch Regulator (BSR)(optional accessory)
116
Securing in BSR2 mode
Prerequisite:
• The BSR presser foot is attached and connected with the machine.• The BSR display is open and the BSR2 mode is activated.
> Lower the presser foot.> Push the button «Securing».> Press the foot control or the button «Start/Stop».
By moving the fabric some short securing stitches are sewn, then the programmed stitch length is activatedand the securing function is deactivated automatically.
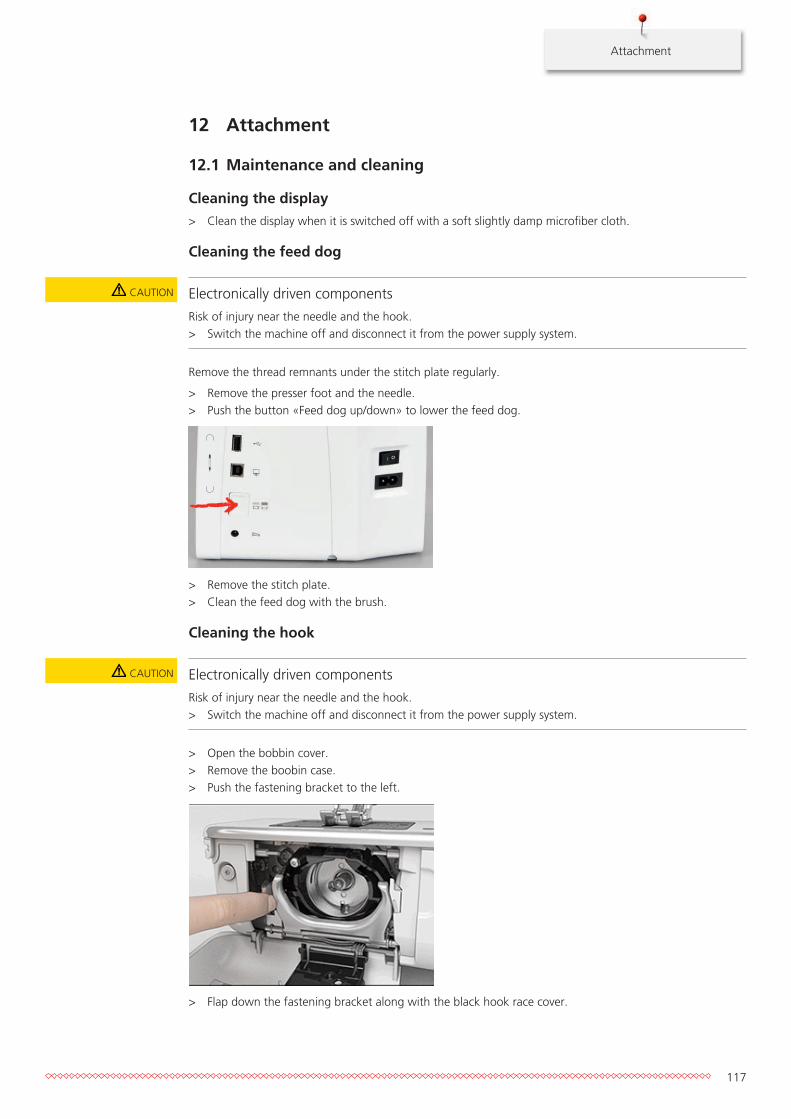
Attachment
117
12 Attachment
12.1 Maintenance and cleaning
Cleaning the display
> Clean the display when it is switched off with a soft slightly damp microfiber cloth.
Cleaning the feed dog
CAUTION Electronically driven components
Risk of injury near the needle and the hook.> Switch the machine off and disconnect it from the power supply system.
Remove the thread remnants under the stitch plate regularly.
> Remove the presser foot and the needle.> Push the button «Feed dog up/down» to lower the feed dog.
> Remove the stitch plate.> Clean the feed dog with the brush.
Cleaning the hook
CAUTION Electronically driven components
Risk of injury near the needle and the hook.> Switch the machine off and disconnect it from the power supply system.
> Open the bobbin cover.> Remove the boobin case.> Push the fastening bracket to the left.
> Flap down the fastening bracket along with the black hook race cover.
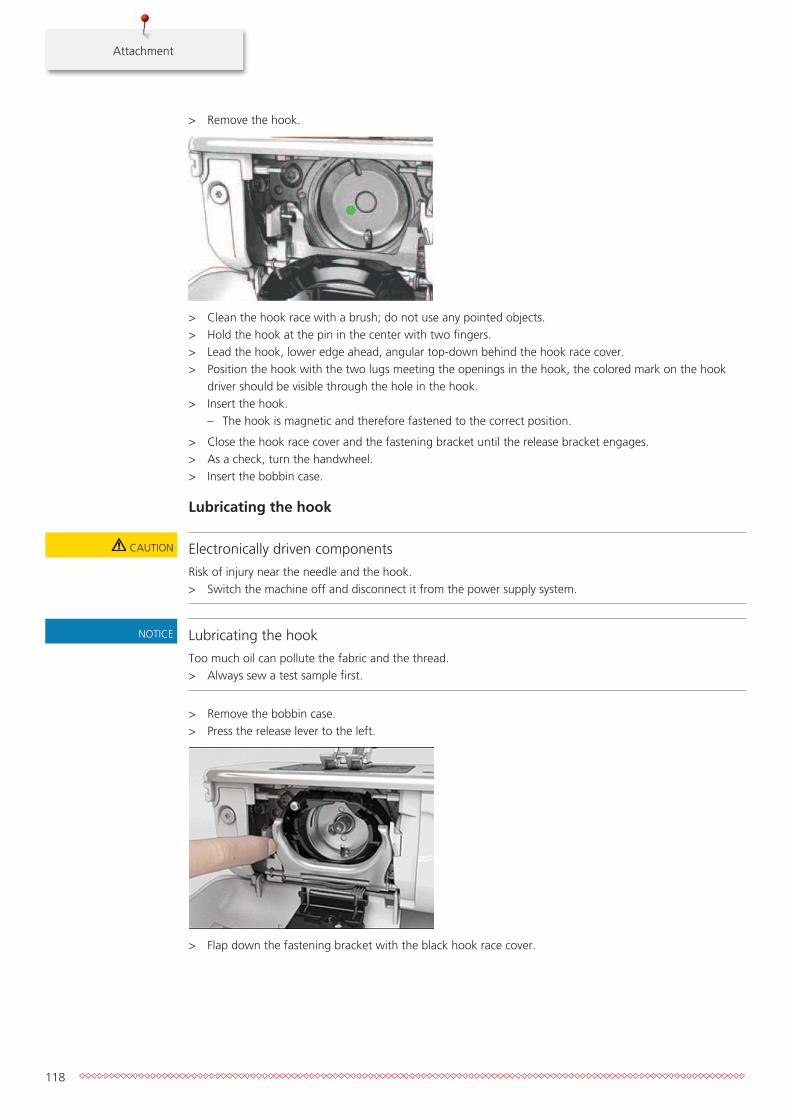
Attachment
118
> Remove the hook.
> Clean the hook race with a brush; do not use any pointed objects.> Hold the hook at the pin in the center with two fingers.> Lead the hook, lower edge ahead, angular top-down behind the hook race cover.> Position the hook with the two lugs meeting the openings in the hook, the colored mark on the hook
driver should be visible through the hole in the hook.> Insert the hook.
– The hook is magnetic and therefore fastened to the correct position.
> Close the hook race cover and the fastening bracket until the release bracket engages.> As a check, turn the handwheel.> Insert the bobbin case.
Lubricating the hook
CAUTION Electronically driven components
Risk of injury near the needle and the hook.> Switch the machine off and disconnect it from the power supply system.
NOTICE Lubricating the hook
Too much oil can pollute the fabric and the thread.> Always sew a test sample first.
> Remove the bobbin case.> Press the release lever to the left.
> Flap down the fastening bracket with the black hook race cover.
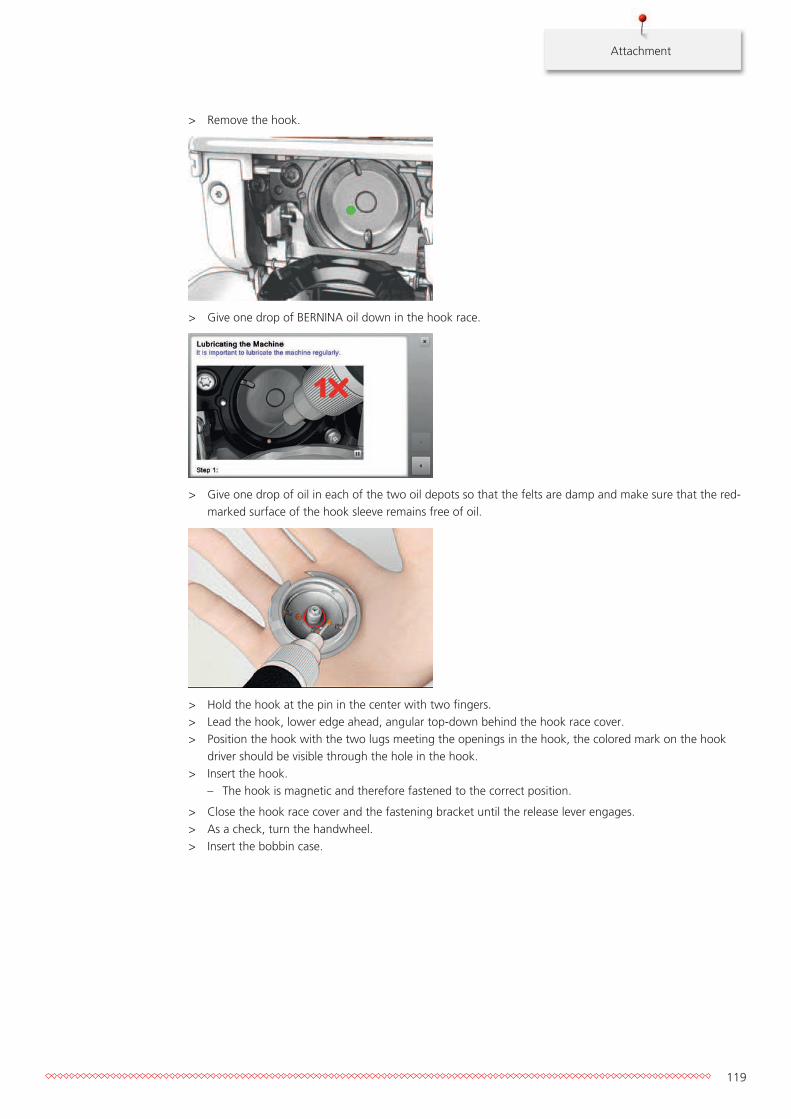
Attachment
119
> Remove the hook.
> Give one drop of BERNINA oil down in the hook race.
> Give one drop of oil in each of the two oil depots so that the felts are damp and make sure that the red-marked surface of the hook sleeve remains free of oil.
> Hold the hook at the pin in the center with two fingers.> Lead the hook, lower edge ahead, angular top-down behind the hook race cover.> Position the hook with the two lugs meeting the openings in the hook, the colored mark on the hook
driver should be visible through the hole in the hook.> Insert the hook.
– The hook is magnetic and therefore fastened to the correct position.
> Close the hook race cover and the fastening bracket until the release lever engages.> As a check, turn the handwheel.> Insert the bobbin case.
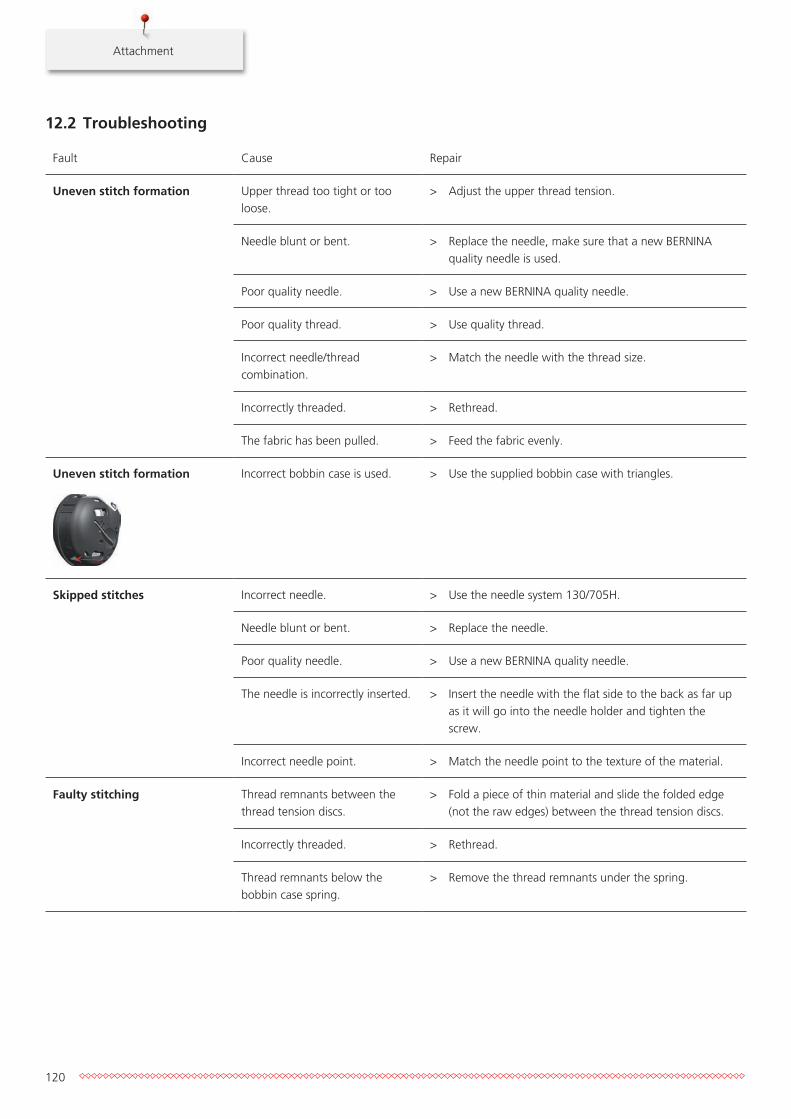
Attachment
120
12.2 Troubleshooting
Fault Cause Repair
Uneven stitch formation Upper thread too tight or tooloose.
> Adjust the upper thread tension.
Needle blunt or bent. > Replace the needle, make sure that a new BERNINAquality needle is used.
Poor quality needle. > Use a new BERNINA quality needle.
Poor quality thread. > Use quality thread.
Incorrect needle/threadcombination.
> Match the needle with the thread size.
Incorrectly threaded. > Rethread.
The fabric has been pulled. > Feed the fabric evenly.
Uneven stitch formation Incorrect bobbin case is used. > Use the supplied bobbin case with triangles.
Skipped stitches Incorrect needle. > Use the needle system 130/705H.
Needle blunt or bent. > Replace the needle.
Poor quality needle. > Use a new BERNINA quality needle.
The needle is incorrectly inserted. > Insert the needle with the flat side to the back as far upas it will go into the needle holder and tighten thescrew.
Incorrect needle point. > Match the needle point to the texture of the material.
Faulty stitching Thread remnants between thethread tension discs.
> Fold a piece of thin material and slide the folded edge(not the raw edges) between the thread tension discs.
Incorrectly threaded. > Rethread.
Thread remnants below thebobbin case spring.
> Remove the thread remnants under the spring.
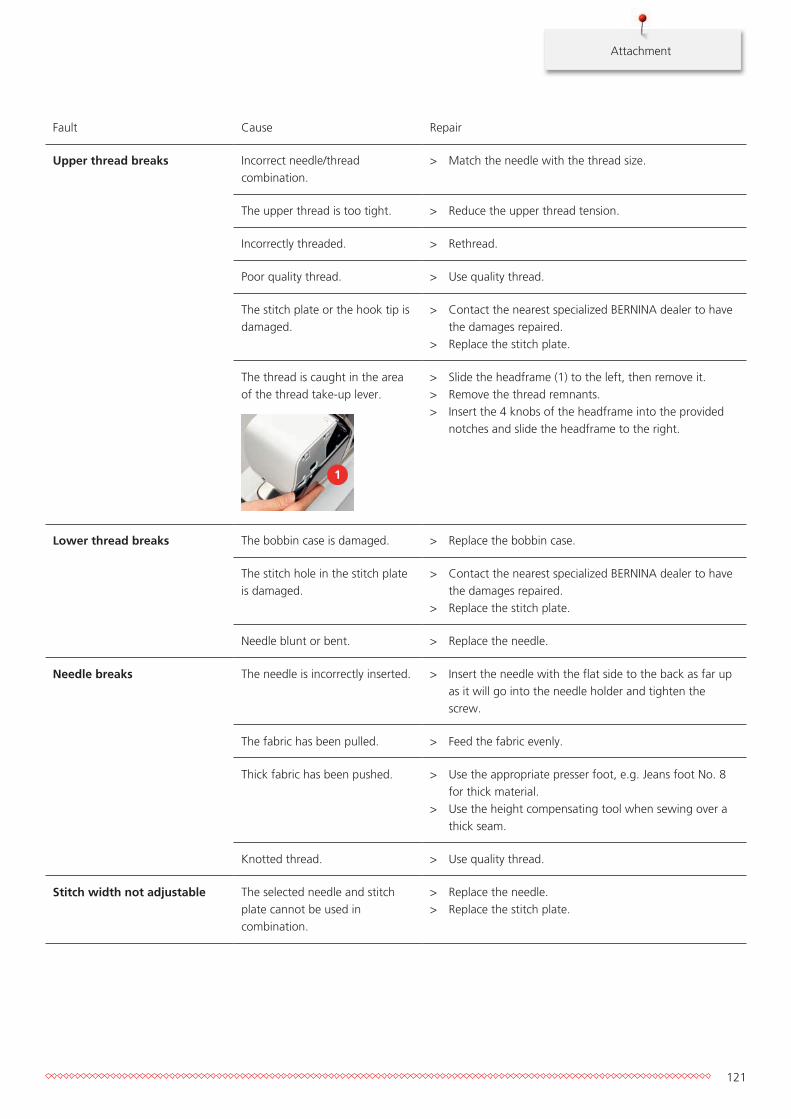
Attachment
121
Fault Cause Repair
Upper thread breaks Incorrect needle/threadcombination.
> Match the needle with the thread size.
The upper thread is too tight. > Reduce the upper thread tension.
Incorrectly threaded. > Rethread.
Poor quality thread. > Use quality thread.
The stitch plate or the hook tip isdamaged.
> Contact the nearest specialized BERNINA dealer to havethe damages repaired.
> Replace the stitch plate.
The thread is caught in the areaof the thread take-up lever.
1
> Slide the headframe (1) to the left, then remove it.> Remove the thread remnants.> Insert the 4 knobs of the headframe into the provided
notches and slide the headframe to the right.
Lower thread breaks The bobbin case is damaged. > Replace the bobbin case.
The stitch hole in the stitch plateis damaged.
> Contact the nearest specialized BERNINA dealer to havethe damages repaired.
> Replace the stitch plate.
Needle blunt or bent. > Replace the needle.
Needle breaks The needle is incorrectly inserted. > Insert the needle with the flat side to the back as far upas it will go into the needle holder and tighten thescrew.
The fabric has been pulled. > Feed the fabric evenly.
Thick fabric has been pushed. > Use the appropriate presser foot, e.g. Jeans foot No. 8for thick material.
> Use the height compensating tool when sewing over athick seam.
Knotted thread. > Use quality thread.
Stitch width not adjustable The selected needle and stitchplate cannot be used incombination.
> Replace the needle.> Replace the stitch plate.

Attachment
122
Fault Cause Repair
Speed too low Unfavorable room temperature. > Place the machine in a warm room one hour before use.
Settings in the Setup Program. > Adjust the sewing speed in the Setup Program.> Adjust the slide.
The machine doesn't start Unfavorable room temperature. > Place the machine in a warm room one hour before use.> Connect the machine and switch it on.
The machine is damaged. > Contact the specialized BERNINA dealer.
Error during software update USB stick is not recognized. > Use a BERNINA USB stick.
The update process is blockedand the hourglass on the displayis inactive.
> Remove the USB stick.> Switch the machine off.> Switch the machine on.> Follow the instruction on the display.
Date of the software updatecannot be found.
> Unzip the update data.> Save data of the software update directly on the data
medium and not in a file on the USB stick.
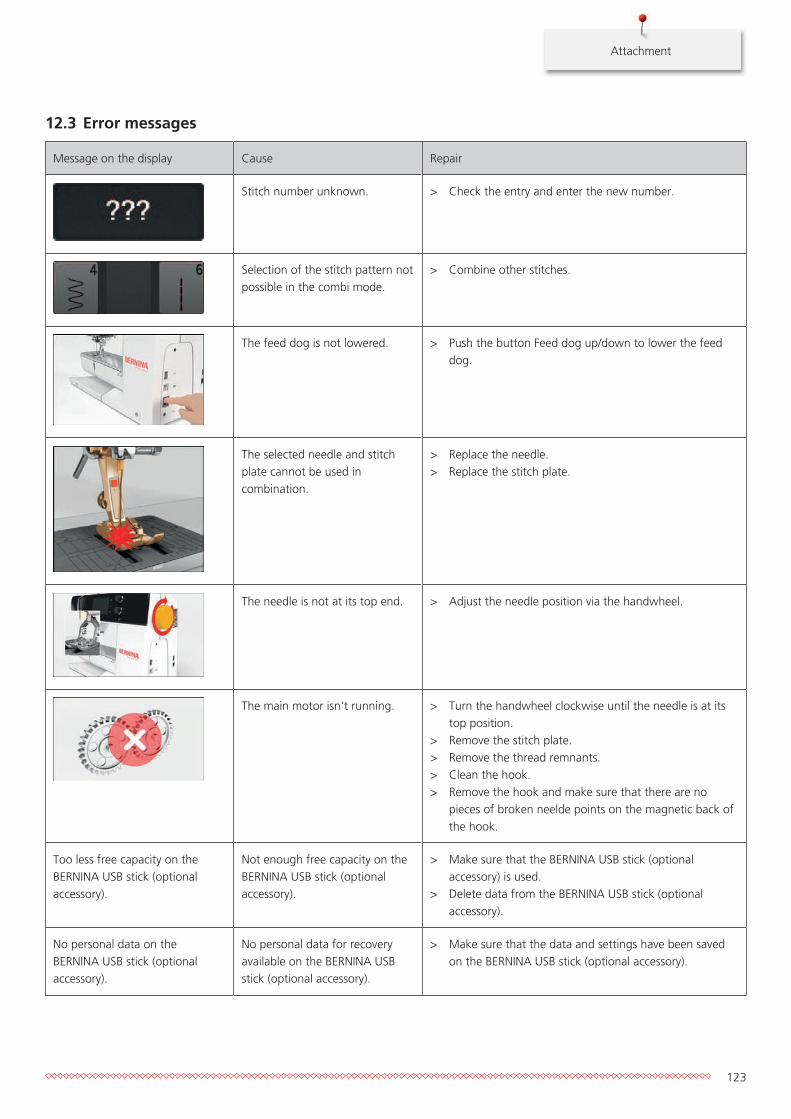
Attachment
123
12.3 Error messages
Message on the display Cause Repair
Stitch number unknown. > Check the entry and enter the new number.
Selection of the stitch pattern notpossible in the combi mode.
> Combine other stitches.
The feed dog is not lowered. > Push the button Feed dog up/down to lower the feeddog.
The selected needle and stitchplate cannot be used incombination.
> Replace the needle.> Replace the stitch plate.
The needle is not at its top end. > Adjust the needle position via the handwheel.
The main motor isn't running. > Turn the handwheel clockwise until the needle is at itstop position.
> Remove the stitch plate.> Remove the thread remnants.> Clean the hook.> Remove the hook and make sure that there are no
pieces of broken neelde points on the magnetic back ofthe hook.
Too less free capacity on theBERNINA USB stick (optionalaccessory).
Not enough free capacity on theBERNINA USB stick (optionalaccessory).
> Make sure that the BERNINA USB stick (optionalaccessory) is used.
> Delete data from the BERNINA USB stick (optionalaccessory).
No personal data on theBERNINA USB stick (optionalaccessory).
No personal data for recoveryavailable on the BERNINA USBstick (optional accessory).
> Make sure that the data and settings have been savedon the BERNINA USB stick (optional accessory).
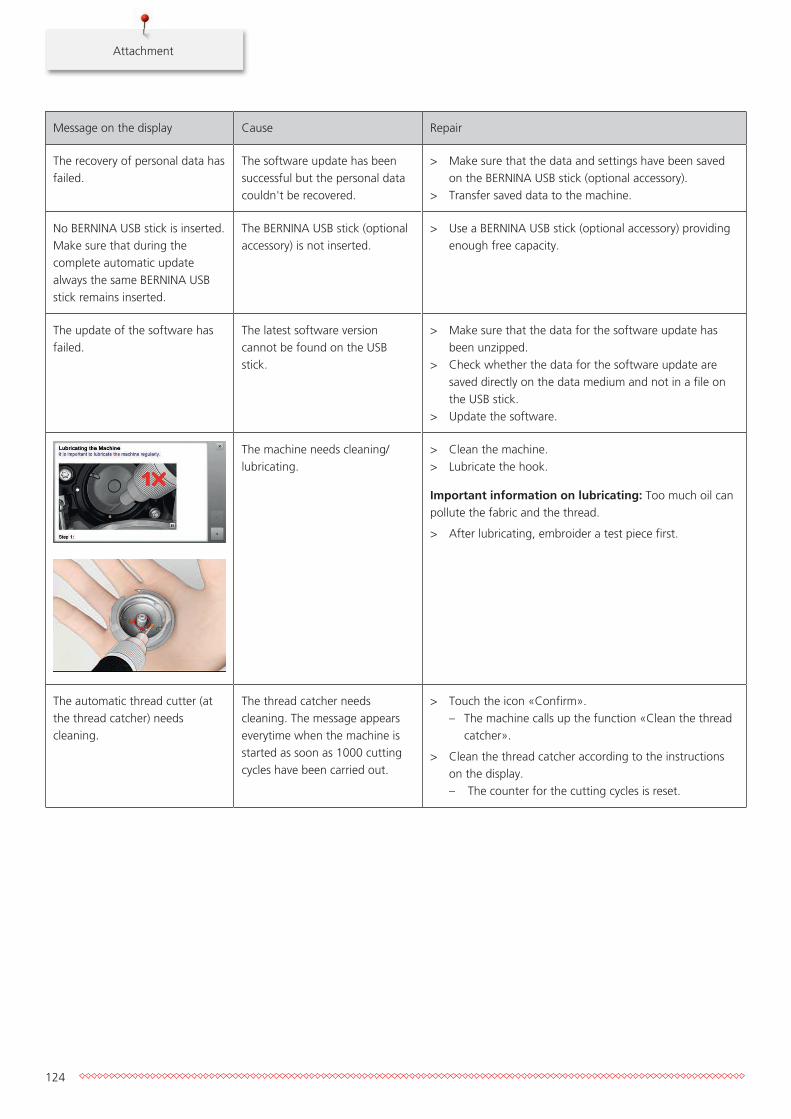
Attachment
124
Message on the display Cause Repair
The recovery of personal data hasfailed.
The software update has beensuccessful but the personal datacouldn't be recovered.
> Make sure that the data and settings have been savedon the BERNINA USB stick (optional accessory).
> Transfer saved data to the machine.
No BERNINA USB stick is inserted.Make sure that during thecomplete automatic updatealways the same BERNINA USBstick remains inserted.
The BERNINA USB stick (optionalaccessory) is not inserted.
> Use a BERNINA USB stick (optional accessory) providingenough free capacity.
The update of the software hasfailed.
The latest software versioncannot be found on the USBstick.
> Make sure that the data for the software update hasbeen unzipped.
> Check whether the data for the software update aresaved directly on the data medium and not in a file onthe USB stick.
> Update the software.
The machine needs cleaning/lubricating.
> Clean the machine.> Lubricate the hook.
Important information on lubricating: Too much oil canpollute the fabric and the thread.
> After lubricating, embroider a test piece first.
The automatic thread cutter (atthe thread catcher) needscleaning.
The thread catcher needscleaning. The message appearseverytime when the machine isstarted as soon as 1000 cuttingcycles have been carried out.
> Touch the icon «Confirm».– The machine calls up the function «Clean the thread
catcher».
> Clean the thread catcher according to the instructionson the display.– The counter for the cutting cycles is reset.
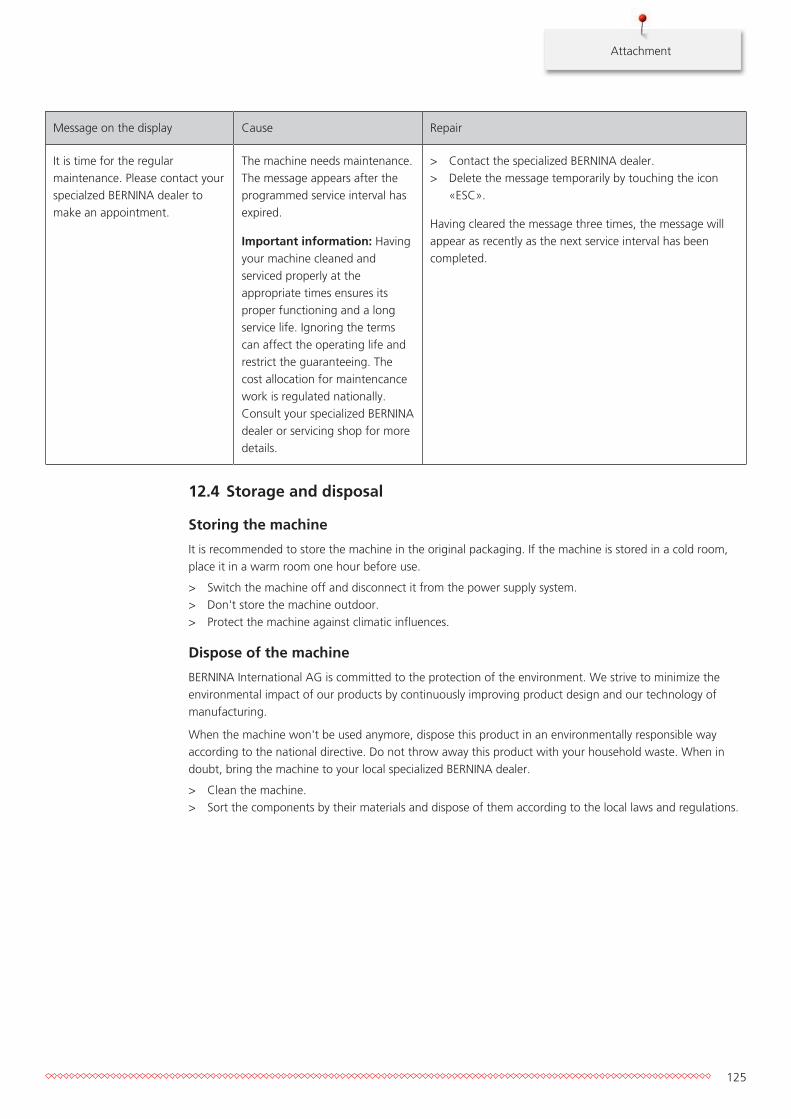
Attachment
125
Message on the display Cause Repair
It is time for the regularmaintenance. Please contact yourspecialzed BERNINA dealer tomake an appointment.
The machine needs maintenance.The message appears after theprogrammed service interval hasexpired.
Important information: Havingyour machine cleaned andserviced properly at theappropriate times ensures itsproper functioning and a longservice life. Ignoring the termscan affect the operating life andrestrict the guaranteeing. Thecost allocation for maintencancework is regulated nationally.Consult your specialized BERNINAdealer or servicing shop for moredetails.
> Contact the specialized BERNINA dealer.> Delete the message temporarily by touching the icon
«ESC».
Having cleared the message three times, the message willappear as recently as the next service interval has beencompleted.
12.4 Storage and disposal
Storing the machine
It is recommended to store the machine in the original packaging. If the machine is stored in a cold room,place it in a warm room one hour before use.
> Switch the machine off and disconnect it from the power supply system.> Don't store the machine outdoor.> Protect the machine against climatic influences.
Dispose of the machine
BERNINA International AG is committed to the protection of the environment. We strive to minimize theenvironmental impact of our products by continuously improving product design and our technology ofmanufacturing.
When the machine won't be used anymore, dispose this product in an environmentally responsible wayaccording to the national directive. Do not throw away this product with your household waste. When indoubt, bring the machine to your local specialized BERNINA dealer.
> Clean the machine.> Sort the components by their materials and dispose of them according to the local laws and regulations.
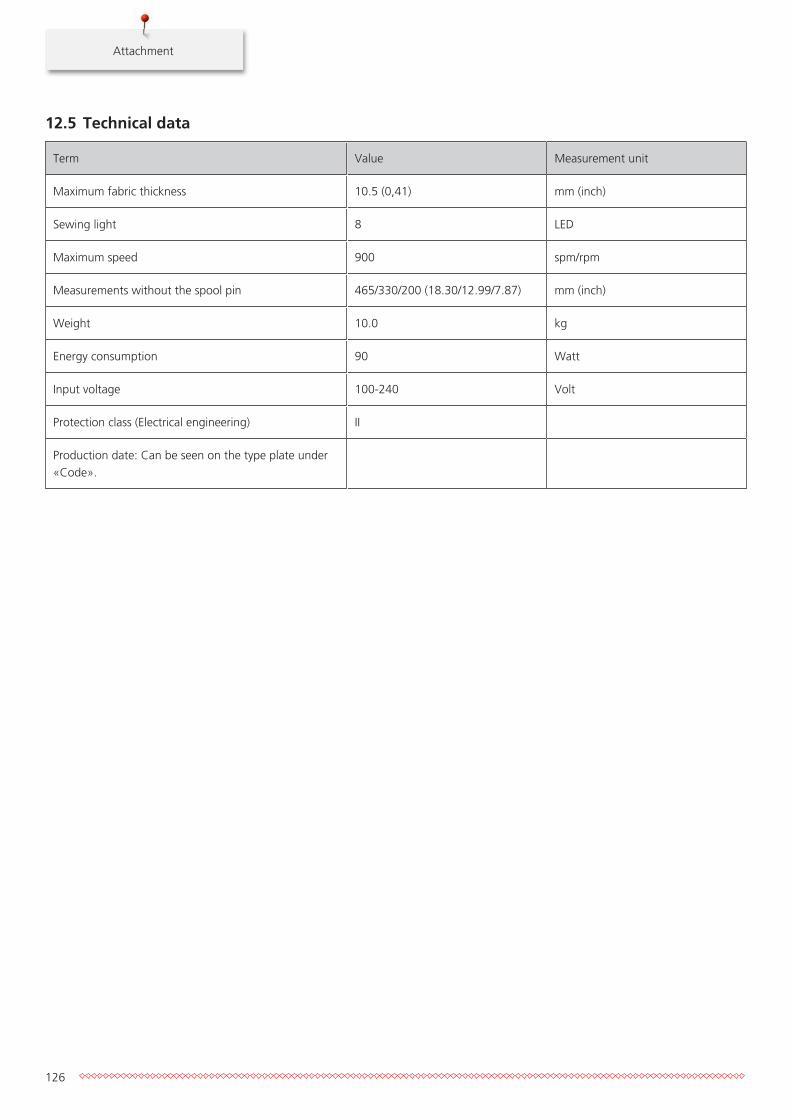
Attachment
126
12.5 Technical data
Term Value Measurement unit
Maximum fabric thickness 10.5 (0,41) mm (inch)
Sewing light 8 LED
Maximum speed 900 spm/rpm
Measurements without the spool pin 465/330/200 (18.30/12.99/7.87) mm (inch)
Weight 10.0 kg
Energy consumption 90 Watt
Input voltage 100-240 Volt
Protection class (Electrical engineering) II
Production date: Can be seen on the type plate under«Code».
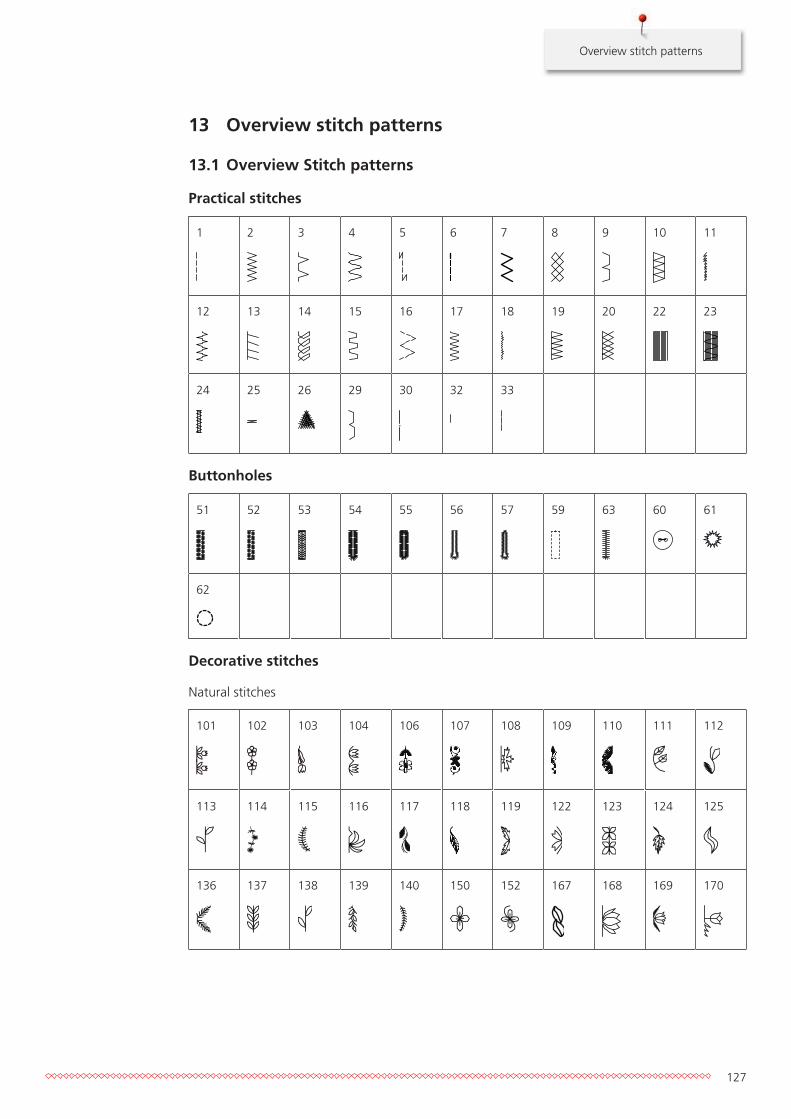
Overview stitch patterns
127
13 Overview stitch patterns
13.1 Overview Stitch patterns
Practical stitches
1 2 3 4 5 6 7 8 9 10 11
12 13 14 15 16 17 18 19 20 22 23
24 25 26 29 30 32 33
Buttonholes
51 52 53 54 55 56 57 59 63 60 61
62
Decorative stitches
Natural stitches
101 102 103 104 106 107 108 109 110 111 112
113 114 115 116 117 118 119 122 123 124 125
136 137 138 139 140 150 152 167 168 169 170
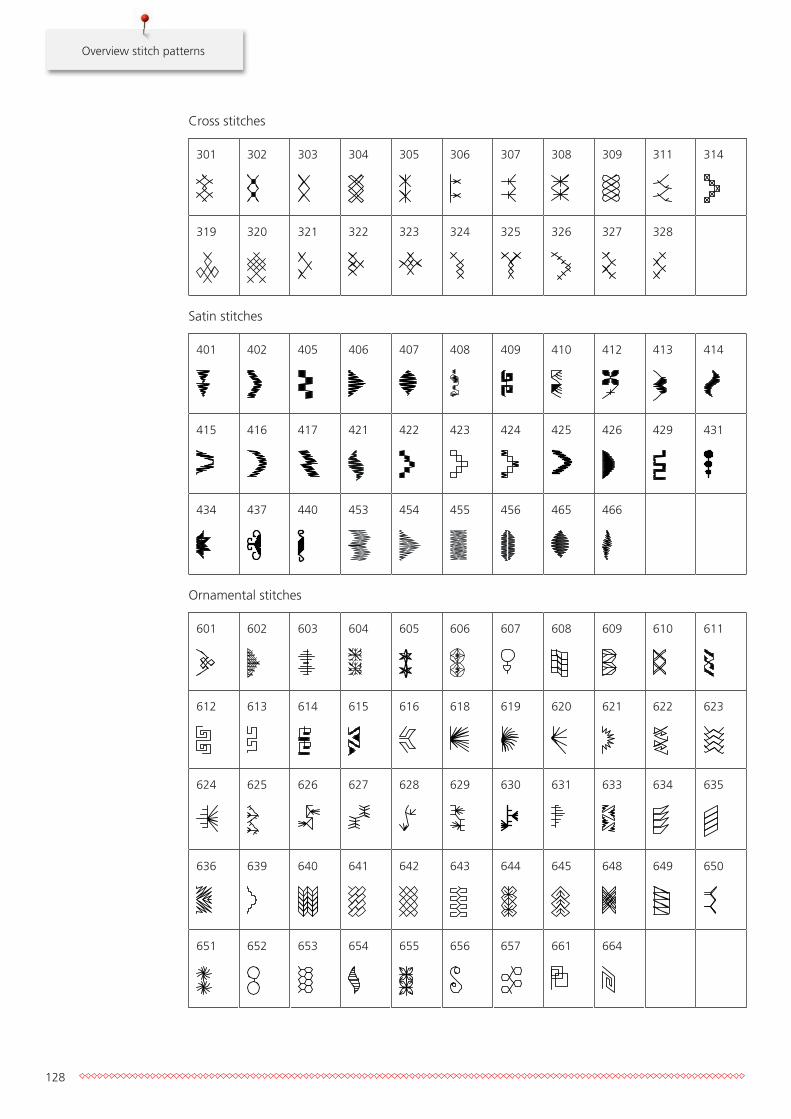
Overview stitch patterns
128
Cross stitches
301 302 303 304 305 306 307 308 309 311 314
319 320 321 322 323 324 325 326 327 328
Satin stitches
401 402 405 406 407 408 409 410 412 413 414
415 416 417 421 422 423 424 425 426 429 431
434 437 440 453 454 455 456 465 466
Ornamental stitches
601 602 603 604 605 606 607 608 609 610 611
612 613 614 615 616 618 619 620 621 622 623
624 625 626 627 628 629 630 631 633 634 635
636 639 640 641 642 643 644 645 648 649 650
651 652 653 654 655 656 657 661 664
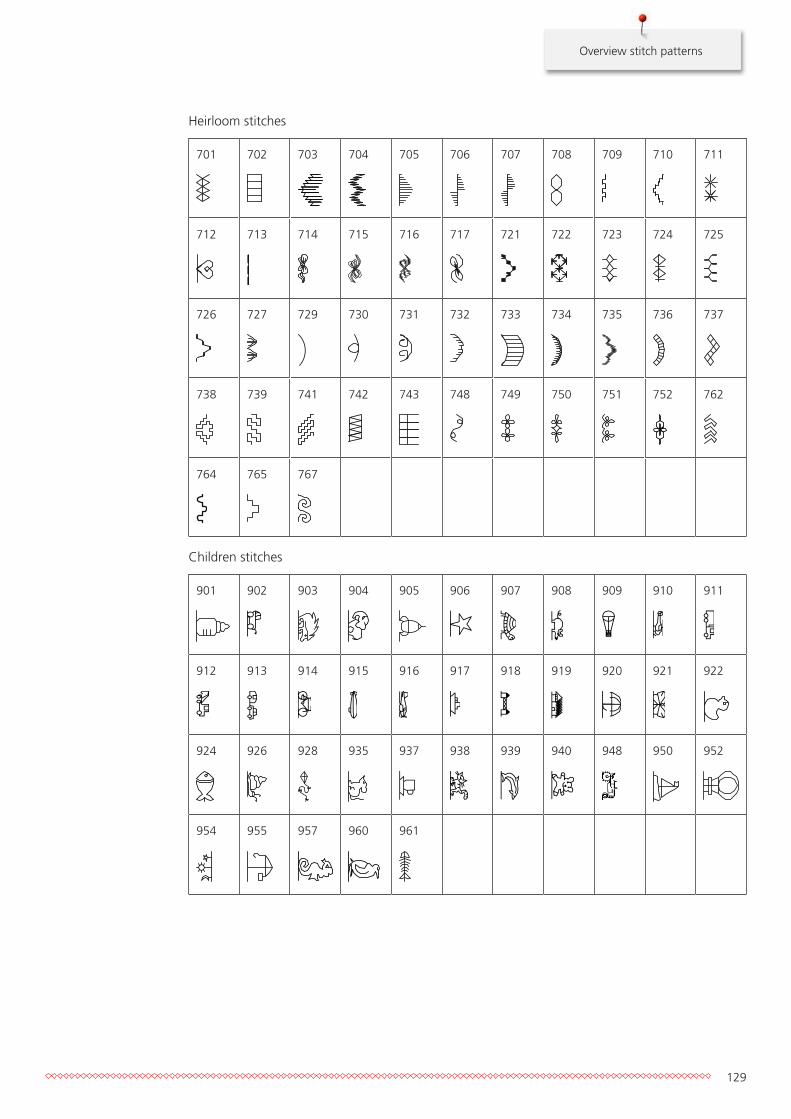
Overview stitch patterns
129
Heirloom stitches
701 702 703 704 705 706 707 708 709 710 711
712 713 714 715 716 717 721 722 723 724 725
726 727 729 730 731 732 733 734 735 736 737
738 739 741 742 743 748 749 750 751 752 762
764 765 767
Children stitches
901 902 903 904 905 906 907 908 909 910 911
912 913 914 915 916 917 918 919 920 921 922
924 926 928 935 937 938 939 940 948 950 952
954 955 957 960 961
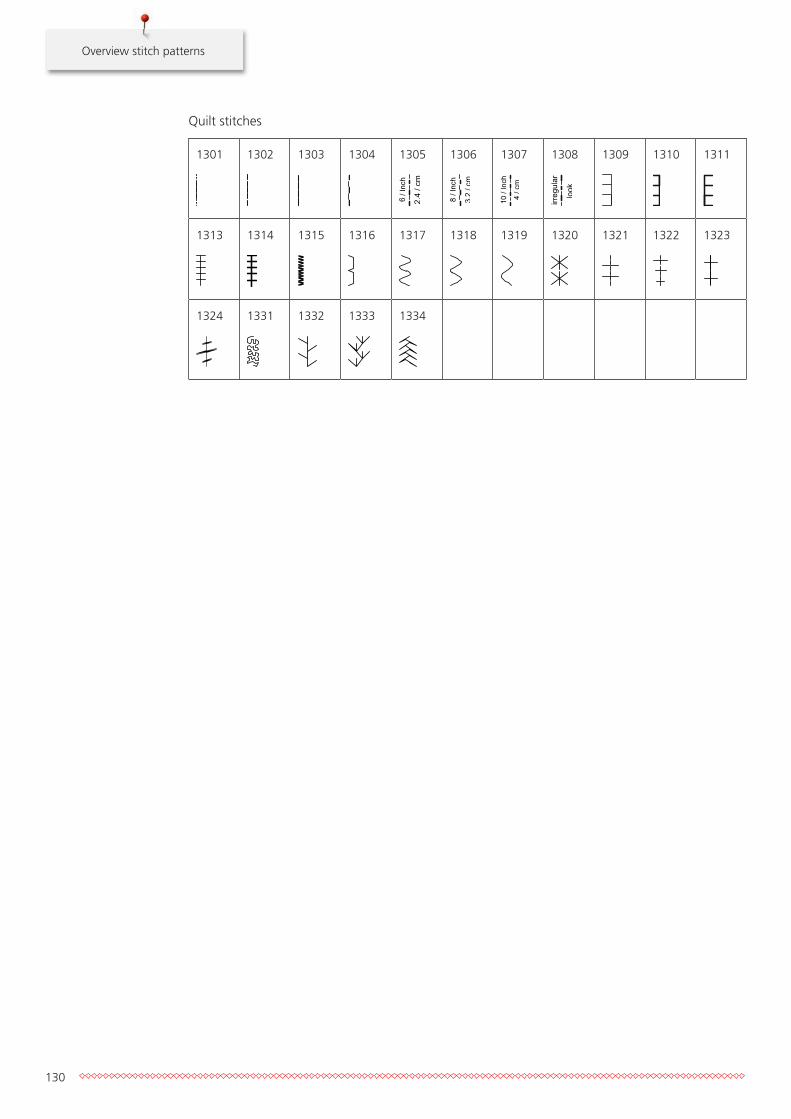
Overview stitch patterns
130
Quilt stitches
1301 1302 1303 1304 1305 1306 1307 1308 1309 1310 1311
1313 1314 1315 1316 1317 1318 1319 1320 1321 1322 1323
1324 1331 1332 1333 1334

Index
131
AActivating the audio signals 53
Adjusting the brightness of the display 54
Adjusting the maximum sewing speed 49
Adjusting the presser position via the knee lifter of the FreeHand System 36
Adjusting the upper thread tension 49
Alphabets 96
Attaching the BSR foot 113, 114
Attaching the knee lifter 32
BBack to default setting 57
Buttonholes 98
CCalibrating the Buttonhole foot with slide No. 3A 57
Calling up the Creative Consultant 61
Calling up the Help 61
Calling up the Tutorial 61
Changing the needle 38
Changing the presser foot 37
Changing the stitch plate 40
Checking the firmware version 55
Cleaning the feed dog 117
Cleaning the hook 117
Cleaning the thread catcher 59
Combi mode 66
Connecting the foot control 31
Cord 101
DDecorative Stitches 91
Dispose of the machine 125
EError messages 125
IIntroduction 15
KKey to signs 16
LLubricating the hook 118
MMaintenance and Cleaning 117
NNeedle stop up/down (permanent) 40
Needle, Thread, Fabric 26
Needle/thread combination 29
OOverview stitch patterns 127
PPintucks 93
Placing the spool disc 34
Practical stitches 75
Programming securing stitches 49
QQuilting 110
RRaising/Lowering the needle 33
Registering details of the dealer 55
Regulating the speed 63
SSafety instructions 11
Saving Service data 56
Selecting a language 54
Selecting a stitch pattern 63
Selecting personal settings 52
Sewing a test sample 103
Storing the machine 125
Supplied accessories 21

Index
132
TTechnical data 126
Threading the bobbin thread 46
Threading the double needle 44
Threading the triple needle 44
Threading the upper thread 41
Troubleshooting 122
UUpdating the machine Firmware 58
Using a spool net 34
Using eco mode 61
WWelcome to the world of BERNINA 15