Solaris-Instruction-Manual.pdf - Schillers Sewing Circle
416
-
Upload
khangminh22 -
Category
Documents
-
view
0 -
download
0
Transcript of Solaris-Instruction-Manual.pdf - Schillers Sewing Circle


INTRODUCTION
1
Thank you for purchasing this machine.Before using this machine or attempting any maintenance, carefully read the “IMPORTANT SAFETY INSTRUCTIONS” on this page, and then study the Instruction and Reference Guide for the correct operation of the various functions. In addition, after you have finished reading this product safety manual, store it where it can quickly be accessed for future reference. Failure to follow these instructions may result in an increased risk of personal injury or damage to property, including through fire, electrical shock, burns or suffocation.
Please read these safety instructions before attempting to use the machine.
DANGER - To reduce the risk of electric shock
1Always unplug the machine from the electrical outlet immediately after using, when cleaning, when making any
user servicing adjustments mentioned in this manual, or if you are leaving the machine unattended.
WARNING - To reduce the risk of burns, fire, electric shock, or injury to
persons.
2Always unplug the machine from the electrical outlet when removing covers, or when making any adjustments
mentioned in the instruction manual.
• To unplug the machine, switch the machine to the symbol “O” position to turn it off, then grasp the plug and pull it out of the electrical outlet. Do not pull on the cord.
• Plug the machine directly into the electrical outlet. Do not use an extension cord.• Always unplug your machine if the power is cut.
3 Electrical Hazards:
• This machine should be connected to an AC power source within the range indicated on the rating label. Do not connect it to a DC power source or inverter. If you are not sure what kind of power source you have, contact a qualified electrician.
• This machine is approved for use in the country of purchase only.
4Never operate this machine if it has a damaged cord or plug, if it is not working properly, if it has been dropped
or damaged, or water is spilled on the unit. Return the machine to the nearest authorized Baby Lock retailer for examination, repair, electrical or mechanical adjustment.
• While the machine is stored or in use if you notice anything unusual, such as an odor, heat, discoloration or deformation, stop using the machine immediately and unplug the power cord.
• When transporting the sewing machine, be sure to carry it by its handle. Lifting the sewing machine by any other part may damage the machine or result in the machine falling, which could cause injuries.
• When lifting the sewing machine, be careful not to make any sudden or careless movements, otherwise you may injure your back or knees.
INTRODUCTION
IMPORTANT SAFETY INSTRUCTIONS
IMPORTANT SAFETY INSTRUCTIONS
2
5Always keep your work area clear:
• Never operate the machine with any air openings blocked. Keep ventilation openings of the sewing machine and foot control free from the build up of lint, dust, and loose cloth.
• Do not store objects on the foot controller. • Do not use extension cords. Plug the machine directly into the electrical outlet.• Never drop or insert any object into any opening.• Do not operate where aerosol (spray) products are being used or where oxygen is being administered. • Do not use the machine near a heat source, such as a stove or iron; otherwise, the machine, power cord or
garment being sewn may ignite, resulting in fire or an electric shock.• Do not place this sewing machine on an unstable surface, such as an unsteady or slanted table, otherwise the
sewing machine may fall, resulting in injuries.
6 Special care is required when sewing:
• Always pay close attention to the needle. Do not use bent or damaged needles.• Keep fingers away from all moving parts. Special care is required around the machine needle.• Switch the sewing machine to the symbol “O” position to turn it off when making any adjustments in the needle
area.• Do not use a damaged or incorrect needle plate, as it could cause the needle to break.• Do not push or pull the fabric when sewing, and follow careful instruction when free motion stitching so that
you do not deflect the needle and cause it to break.
7 This machine is not a toy:
• Your close attention is necessary when the machine is used by or near children.• The plastic bag that this sewing machine was supplied in should be kept out of the reach of children or disposed
of. Never allow children to play with the bag due to the danger of suffocation.• Do not use outdoors.
8 For a longer service life:
• When storing this machine, avoid direct sunlight and high humidity locations. Do not use or store the machine near a space heater, iron, halogen lamp, or other hot objects.
• Use only neutral soaps or detergents to clean the case. Benzene, thinner, and scouring powders can damage the case and machine, and should never be used.
• Always consult the Instruction and Reference Guide when replacing or installing any assemblies, the presser feet, needle, or other parts to assure correct installation.
9 For repair or adjustment:
• If the light unit is damaged, it must be replaced by an authorized Baby Lock retailer.• In the event a malfunction occurs or adjustment is required, first follow the troubleshooting table in the back of
the Instruction and Reference Guide to inspect and adjust the machine yourself. If the problem persists, please consult your local authorized Baby Lock retailer.

IMPORTANT SAFETY INSTRUCTIONS
3
Use this machine only for its intended use as described in the manual.
Use accessories recommended by the manufacturer as contained in this manual.
Use only the mouse designed specifically for this machine.
The contents of this manual and specifications of this product are subject to change without notice.
For additional product information and updates, visit our website at www.babylock.com
SAVE THESE INSTRUCTIONSThis machine is intended for household use.
FOR USERS IN COUNTRIES EXCEPT EUROPEAN COUNTRIESThis appliance is not intended for use by persons (including children) with reduced physical, sensory or mental capabilities, or lack of experience and knowledge, unless they have been given supervision or instruction concerning use of the appliance by a person responsible for their safety. Children should be supervised to ensure that they do not play with the appliance.
FOR USERS IN EUROPEAN COUNTRIESThis appliance can be used by children aged from 8 years and above and persons with reduced physical, sensory or mental capabilities or lack of experience and knowledge if they have been given supervision or instruction concerning use of the appliance in a safe way and understand the hazards involved. Children shall not play with the appliance. Cleaning and user maintenance shall not be made by children without supervision.
FOR USERS IN THE UK, EIRE, MALTA AND CYPRUS ONLY
IMPORTANT• In the event of replacing the plug fuse, use a fuse approved by ASTA to BS 1362, i.e. carrying the mark,
rating as marked on plug.• Always replace the fuse cover. Never use plugs with the fuse cover omitted.• If the available electrical outlet is not suitable for the plug supplied with this equipment, you should contact your
authorized Baby Lock retailer to obtain the correct lead.

IMPORTANT SAFETY INSTRUCTIONS
4
Federal Communications Commission (FCC) Declaration of Conformity (For U.S.A. Only)
This device complies with Part 15 of the FCC Rules. Operation is subject to the following two conditions: (1) this device may not cause harmful interference, and (2) this device must accept any interference received, including interference that may cause undesired operation.
This equipment has been tested and found to comply with the limits for a Class B digital device, pursuant to Part 15 of the FCC Rules. These limits are designed to provide reasonable protection against harmful interference in a residential installation. This equipment generates, uses, and can radiate radio frequency energy and, if not installed and used in accordance with the instructions, may cause harmful interference to radio communications. However, there is no guarantee that interference will not occur in a particular installation. If this equipment does cause harmful interference to radio or television reception, which can be determined by turning the equipment off and on, the user is encouraged to try to correct the interference by one or more of the following measures:
• Reorient or relocate the receiving antenna.• Increase the separation between the equipment and receiver.• Connect the equipment into an outlet on a circuit different from that to which the receiver is connected.• Consult the authorized Baby Lock retailer or an experienced radio/TV technician for help.• This transmitter must not be co-located or operated in conjunction with any other antenna or transmitter.
ImportantChanges or modifications not expressly approved by Tacony Corporation could void the user's authority to operate the equipment.
This equipment complies with FCC/IC radiation exposure limits set forth for an uncontrolled environment and meets the FCC radio frequency (RF) Exposure Guidelines and RSS-102 of the IC radio frequency (RF) Exposure rules. This equipment has very low levels of RF energy that it deemed to comply without maximum permissive exposure evaluation (MPE).
Responsible Party: Tacony Corporation1760 Gilsinn Lane, Fenton, Missouri 63026 USA
declares that the product
Product Name:Model Number:
Baby Lock Sewing MachineBLSA

IMPORTANT SAFETY INSTRUCTIONS
5
For users in CanadaThis equipment complies with FCC/IC radiation exposure limits set forth for an uncontrolled environment and meets the FCC radio frequency (RF) Exposure Guidelines and RSS-102 of the IC radio frequency (RF) Exposure rules. This equipment has very low levels of RF energy that it deemed to comply without maximum permissive exposure evaluation (MPE).
For users in MexicoThe operation of this equipment is subject to the following two conditions:(1) it is possible that this equipment or device may not cause harmful interference, and(2) this equipment or device must accept any interference, including interference that may cause undesired operation.
La operación de este equipo está sujeta a las siguientes dos condiciones:(1) es posible que este equipo o dispositivo no cause interferencia perjudicial y(2) este equipo o dispositivo debe aceptar cualquier interferencia, incluyendo la que pueda causar su operación no deseada.

Trademarks
6
Trademarks
IMPORTANT:READ BEFORE DOWNLOADING, COPYING, INSTALLING OR USING.By downloading, copying, installing or using the software you agree to this license. If you do not agree to this license, do not download, install, copy or use the software.
Intel License Agreement For Open Source Computer Vision LibraryCopyright © 2000, Intel Corporation, all rights reserved. Third party copyrights are property of their respective owners.
Redistribution and use in source and binary forms, with or without modification, are permitted provided that the following conditions are met:• Redistribution’s of source code must retain the above copyright notice, this list of conditions and the following
disclaimer.• Redistribution’s in binary form must reproduce the above copyright notice, this list of conditions and the
following disclaimer in the documentation and/or other materials provided with the distribution.• The name of Intel Corporation may not be used to endorse or promote products derived from this software
without specific prior written permission.This software is provided by the copyright holders and contributors “as is” and any express or implied warranties, including, but not limited to, the implied warranties of merchantability and fitness for a particular purpose are disclaimed. In no event shall Intel or contributors be liable for any direct, indirect, incidental, special, exemplary, or consequential damages (including, but not limited to, procurement of substitute goods or services; loss of use, data, or profits; or business interruption) however caused and on any theory of liability, whether in contract, strict liability, or tort (including negligence or otherwise) arising in any way out of the use of this software, even if advised of the possibility of such damage.
All information provided related to future Intel products and plans is preliminary and subject to change at any time, without notice.
FlashFX® is a registered trademark of Datalight, Inc.FlashFX® Copyright 1998-2007 Datalight, Inc.U.S.Patent Office 5,860,082/6,260,156FlashFX® Pro™ is a trademark of Datalight, Inc.Datalight® is a registered trademark of Datalight, Inc.Copyright 1989-2007 Datalight, Inc., All Rights Reserved
Secure Digital (SD) Card is a registered trademark or a trademark of SD-3C, LLC.CompactFlash is a registered trademark or a trademark of Sandisk Corporation.Memory Stick is a registered trademark or a trademark of Sony Corporation.SmartMedia is a registered trademark or a trademark of Toshiba Corporation.MultiMediaCard (MMC) is a registered trademark or a trademark of Infineon Technologies AG.xD-Picture Card is a registered trademark or a trademark of Fuji Photo Film Co. Ltd.IBM is a registered trademark or a trademark of International Business Machines Corporation.Microsoft, Windows and Windows Vista are registered trademarks or trademarks of Microsoft Corporation.“Adobe” and “Adobe Reader” are either registered trademarks or trademarks of Adobe Systems Incorporated in the United States and/or other countries.This software is based in part on the work of the Independent JPEG Group.
Each company whose software title is mentioned in this manual has a Software License Agreement specific to its proprietary programs.
All other brands and product names mentioned in this manual are registered trademarks of their respective companies. However, the explanations for markings such as ® and ™ are not clearly described within the text.

7
The Instruction and Reference Guides for this machine consist of the Instruction and Reference Guide (Sewing) and the Instruction and Reference Guide (Embroidery). Refer to the appropriate Instruction and Reference Guide according to your needs. For basic information about, for example, the included accessories or the settings screen, refer to chapter 1 of the Instruction and Reference Guide (Sewing).In the screens appearing in the step-by-step instructions, the parts referred to in the operations are marked
with . Compare the screen in the directions with the actual screen, and carry out the operation.If, while using the machine, you experience something you do not understand, or there is a function you would like to know more about, refer to the index at the back of the Instruction and Reference Guide in conjunction with the table of contents to find the section of the manual you should refer to.
HOW TO USE THIS MANUAL

CONTENTS
8
CONTENTSINTRODUCTION................................................. 1IMPORTANT SAFETY INSTRUCTIONS ................ 1Trademarks........................................................... 6HOW TO USE THIS MANUAL ............................. 7
Chapter 1 Getting Ready 11NAMES OF MACHINE PARTS AND THEIR FUNCTIONS....................................................... 12
Machine............................................................................... 12Needle and Presser Foot Section .......................................... 14Embroidery Unit ................................................................... 15Operation Buttons ................................................................ 15Using the Flat Bed Attachment ............................................. 16Using the Accessory Case..................................................... 16Included Accessories ............................................................ 17Options ................................................................................ 20Using the Multi-purpose Screwdriver ................................... 23Using the Spool Stand .......................................................... 23Assembling the Spool Stand ................................................. 24
TURNING THE MACHINE ON/OFF................... 25Setting Your Machine for the First Time................................ 26
LCD SCREEN ...................................................... 27Using the Machine Setting Mode Key................................... 28Sewing Settings .................................................................... 28General Settings ................................................................... 29Embroidery Settings.............................................................. 31Wireless LAN settings........................................................... 32Setting Functions .................................................................. 32Using the Machine Help Key................................................ 38Using the Operation Guide Function.................................... 39Using the Sewing Guide Function ........................................ 40Playing a Tutorial Video ....................................................... 41Playing MPEG-4 (MP4) Videos ............................................. 42Using the Stitch Pattern Explanation Function ...................... 43Viewing the Instruction and Reference Guide (PDF File) on the Machine............................................................................... 44
WIRELESS NETWORK CONNECTION FUNCTIONS... 45Specifying Wireless Network Connection Settings ................ 45Using the Wizard to Set Up the Wireless Network Connection ... 46
CONNECTING THE ACCESSORY TO THE MACHINE........................................................... 48
Using USB Media/SD card (Sold Separately)......................... 48Using a USB Mouse (Sold Separately)................................... 48
Chapter 2 Sewing Basics 51LOWER THREADING......................................... 52
Winding the Bobbin ............................................................. 52Setting the Bobbin ................................................................ 58Pulling Up the Bobbin Thread .............................................. 59
UPPER THREADING........................................... 61Upper Threading .................................................................. 61Using the Twin Needle Mode............................................... 64Using the Spool Stand .......................................................... 66Using Threads that Unwind Quickly .................................... 68
CHANGING THE NEEDLE.................................. 69Fabric/Thread/Needle Combinations .................................... 71
CHANGING THE PRESSER FOOT ...................... 72Removing the Presser Foot ................................................... 72Attaching the Presser Foot .................................................... 72Attaching the Presser Foot with the Included Adapter ........... 73Using the Dual Feed Foot..................................................... 74
SEWING ............................................................. 77Sewing a Stitch..................................................................... 77Sewing Reinforcement Stitches............................................. 79Automatic Reinforcement Stitching ...................................... 79
Automatic Presser Foot Lowering Function and Thread Cutting Function .............................................................................. 81Sewing Curves ..................................................................... 81Changing Sewing Direction ................................................. 81Sewing Heavyweight Fabrics ............................................... 82Sewing Hook-and-Loop Fastener Tape................................. 83Sewing Lightweight Fabrics.................................................. 84Sewing Stretch Fabrics ......................................................... 84
STITCH SETTINGS ............................................. 85Setting the Stitch Width ....................................................... 85Setting the Stitch Length....................................................... 86Setting the “L/R Shift”........................................................... 86Setting the Thread Tension................................................... 87
USEFUL FUNCTIONS ........................................ 88Automatic Thread Cutting.................................................... 88Pivoting ............................................................................... 89Using the Knee Lifter ........................................................... 90Automatic Fabric Sensor System (Automatic Presser Foot Pressure) .............................................................................. 91Needle Position - Stitch Placement ...................................... 92Checking the Needle Location in the Screen........................ 92
USING THE PROJECTOR................................... 94Convenient Sewing Features by Using the Projector ............ 94About the Dual Purpose Stylus............................................. 94Installing a Battery in the Dual Purpose Stylus ..................... 94Operating the Projector with the Dual Purpose Stylus.......... 95Using the Dual Purpose Stylus Holder ................................. 95
PROJECTOR FUNCTIONS (UTILITY STITCHES AND CHARACTER/DECORATIVE STITCHES).... 96
Projection Area of Projector ................................................. 96Projecting the Stitch Pattern with the Projector .................... 96Selecting a Stitch Pattern with the Dual Purpose Stylus ........ 97Editing a Stitch Pattern Selected with the Dual Purpose Stylus ... 97Projecting the Guidelines with the Projector ........................ 98
Chapter 3 Utility Stitches 101SELECTING UTILITY STITCHES ....................... 102
Selecting a Stitch ............................................................... 105Saving Your Stitch Settings................................................. 107
SEWING THE STITCHES .................................. 108Straight Stitches ................................................................. 108Dart Seam.......................................................................... 112Gathering .......................................................................... 113Flat Fell Seam .................................................................... 113Pintuck .............................................................................. 114Zigzag Stitches................................................................... 116Elastic Zigzag Stitches........................................................ 117Overcasting ....................................................................... 118Quilting ............................................................................. 121Blind Hem Stitches ............................................................ 131Appliqué............................................................................ 133Shelltuck Stitches............................................................... 134Scallop Stitches.................................................................. 135Crazy Quilting ................................................................... 135Smocking Stitches.............................................................. 136Fagoting............................................................................. 137Tape or Elastic Attaching ................................................... 137Heirloom ........................................................................... 138Basting............................................................................... 140One-step Buttonholes ........................................................ 141Four-step Buttonholes ........................................................ 145Bar Tacks........................................................................... 148Button Sewing ................................................................... 149Eyelet................................................................................. 150Multi-directional Sewing (Straight Stitch and Zigzag Stitch) ... 151Zipper Insertion ................................................................. 152

CONTENTS
9
1
2
3
4
5
Chapter 4 Character/Decorative Stitches 157SELECTING STITCH PATTERNS ....................... 158
Selecting Decorative Stitch Patterns ................................... 160Selecting Character Stitch Patterns ..................................... 160
SEWING STITCH PATTERNS............................ 163Sewing Attractive Finishes.................................................. 163Basic Sewing...................................................................... 163Making Adjustments .......................................................... 164
EDITING STITCH PATTERNS ........................... 166Changing the Size .............................................................. 169Changing the Length (for 7mm Satin Stitch Patterns Only)... 169Creating a Vertical Mirror Image ........................................ 169Creating a Horizontal Mirror Image ................................... 169Sewing a Stitch Pattern Continuously ................................. 169Changing Thread Density (for Large Satin Only)................. 170Returning to the Beginning of the Stitch Pattern ................. 170Checking the Image ........................................................... 171
COMBINING STITCH PATTERNS .................... 172Before Combining .............................................................. 172Combining Various Stitch Patterns ..................................... 172Combining Large and Small Stitch Patterns ........................ 173Combining Horizontal Mirror Image Stitch Patterns ........... 174Combining Stitch Patterns of Different Length .................... 175Making Step Stitch Patterns ................................................ 175
USING THE MEMORY FUNCTION.................. 178Stitch Data Precautions ...................................................... 178Saving Stitch Patterns in the Machine’s Memory ................ 179Saving Stitch Patterns to USB Media .................................. 179Retrieving Stitch Patterns from the Machine’s Memory....... 180Recalling from USB Media ................................................. 181Managing Saved File .......................................................... 182
Chapter 5 Appendix 183CARE AND MAINTENANCE............................. 184
Restrictions on oiling ......................................................... 184Precautions on storing the machine ................................... 184Cleaning the LCD Screen ................................................... 184Cleaning the Machine Casing ............................................ 184Cleaning the Race .............................................................. 184Cleaning the Bobbin Case .................................................. 186Cleaning the Cutter in the Bobbin Case Area ..................... 186About the Maintenance Message ....................................... 187
TROUBLESHOOTING...................................... 188Frequent Troubleshooting Topics ....................................... 188Upper Thread is Too Tight ................................................. 188Tangled Thread on Wrong Side of Fabric ........................... 189Incorrect Thread Tension ................................................... 191Fabric is Caught in the Machine and Cannot be Removed ... 192List of Symptoms ................................................................ 195
ERROR MESSAGES ........................................... 200SPECIFICATIONS ............................................. 203UPGRADING YOUR MACHINE’S SOFTWARE ... 204
Upgrade Procedure Using USB Media ............................... 204STITCH SETTING CHART................................. 206INDEX .............................................................. 215

CONTENTS
10

Chapter 1Getting Ready

NAMES OF MACHINE PARTS AND THEIR FUNCTIONS
12
The names of the various parts of the machine and their functions are described below. Before using the machine, carefully read these descriptions to learn the names of the machine parts.
Machine
■ Front View
a Top coverOpen the top cover when threading the machine or winding the bobbin.
b Pretension diskPass the thread around the pretension disk when winding the bobbin thread. (page 52)
c Thread guide for bobbin windingPass the thread through this thread guide when winding the bobbin thread. (page 52)
d Spool pinPlace a spool of thread on the spool pin. (page 61)
e Spool capUse the spool cap to hold the spool of thread in place. (page 61)
f Supplemental spool pinUse this spool pin to wind the bobbin thread, or to sew with the twin needle. (page 52, 64)
g Bobbin winderUse the bobbin winder when winding the bobbin. (page 52)
h Bobbin winding sliderAdjust the amount of thread wound onto the bobbin. (page 54)
i LCD (liquid crystal display)Settings for the selected stitch and error messages appear in the LCD. (page 27)
j Speakerk Knee lifter
Use the knee lifter to raise and lower the presser foot. (page 90)l Knee lifter slot
Insert the knee lifter into the slot. (page 90)m Operation buttons (7 buttons) and sewing speed
controllerUse these buttons and the slide to operate the machine. (page 15)
n Needle plate leverSlide the lever toward you to remove the needle plate. (page 184)
o Flat bed attachment with accessory compartmentStore presser feet and bobbins in the accessory compartment of the flat bed attachment. When sewing cylindrical pieces, remove the flat bed attachment. (page 16)
p Thread cutterPass the threads through the thread cutter to cut them. (page 63)
q Thread guide platePass the thread around the thread guide plate when threading upper thread. (page 61)
* Camera and projector (built-in)
■ Right-side/Rear View
a Connector for the presser footConnect the dual feed foot or embroidery foot with LED pointer (sold separately). (page 74)
b HandleCarry the machine by its handle when transporting the machine.
c Presser foot leverRaise and lower the presser foot lever to raise and lower the presser foot. (page 72)
d Air ventThe air vent allows the air surrounding the motor to circulate. Do not cover the air vent while the machine is being used.
e Main power switchUse the main power switch to turn the machine ON and OFF. (page 25)
f Foot controllerUse the foot controller to operate the machine.
g Power cord receptacleInsert the power cord into the machine receptacle. (page 25)
h Dual purpose stylus holder connectorConnect the included dual purpose stylus holder. (page 95)
i Foot controller jackInsert the foot controller plug into its jack on the machine. (page 78)
NAMES OF MACHINE PARTS AND THEIR FUNCTIONS
CAUTION• Do not place any object weighing 1 kg or more
on the top cover, otherwise the cover may be damaged.
a b c d e fg
h
o
p
i
j
l
mn k
q
*
CAUTION• Do not touch the camera or projector.
Otherwise, it will not display properly.
a
b
c
defg
h
i
j
k
l

NAMES OF MACHINE PARTS AND THEIR FUNCTIONSG
etting Ready
13
1
j USB portIn order to send stitch patterns and embroidery patterns from/to USB media, plug the USB media directly into the USB port.
k SD card slotInsert an SD card into the SD card slot in order to import/export stitch patterns and embroidery patterns.
l HandwheelRotate the handwheel toward you (counterclockwise) to raise and lower the needle. The wheel should be turned toward the front of the machine.
NAMES OF MACHINE PARTS AND THEIR FUNCTIONS
14
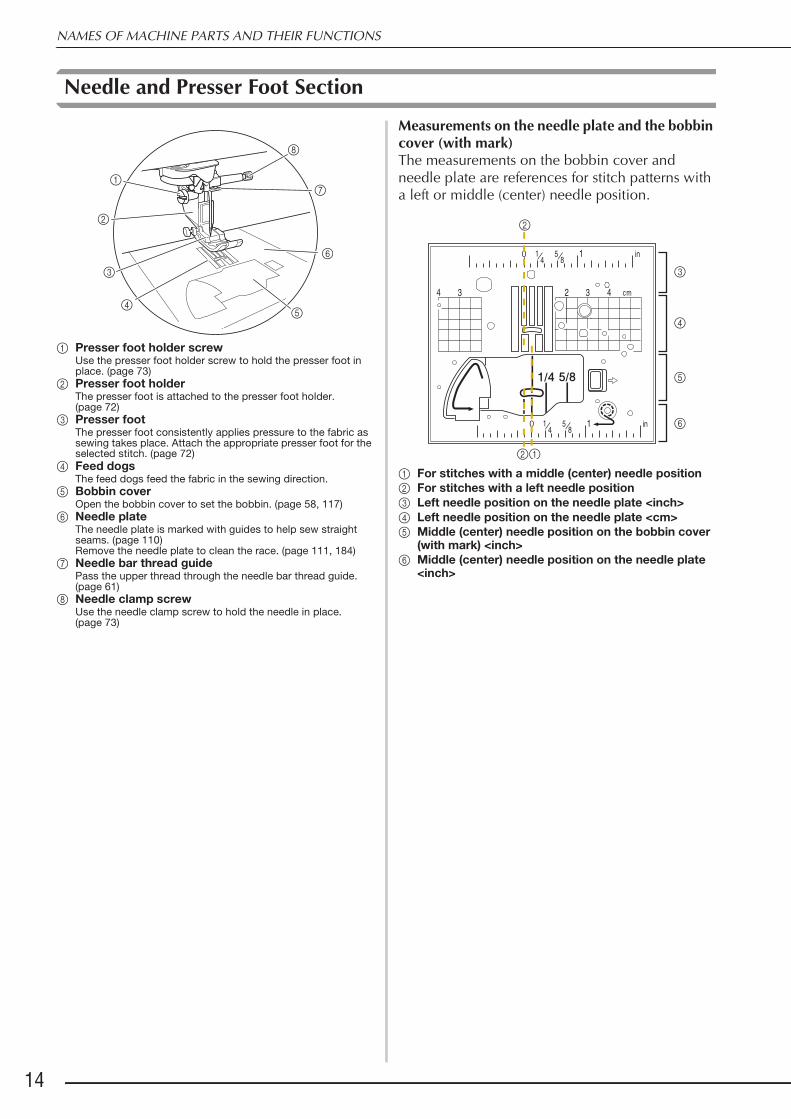
Needle and Presser Foot Section
a Presser foot holder screwUse the presser foot holder screw to hold the presser foot in place. (page 73)
b Presser foot holderThe presser foot is attached to the presser foot holder. (page 72)
c Presser footThe presser foot consistently applies pressure to the fabric as sewing takes place. Attach the appropriate presser foot for the selected stitch. (page 72)
d Feed dogsThe feed dogs feed the fabric in the sewing direction.
e Bobbin coverOpen the bobbin cover to set the bobbin. (page 58, 117)
f Needle plateThe needle plate is marked with guides to help sew straight seams. (page 110) Remove the needle plate to clean the race. (page 111, 184)
g Needle bar thread guidePass the upper thread through the needle bar thread guide. (page 61)
h Needle clamp screwUse the needle clamp screw to hold the needle in place. (page 73)
Measurements on the needle plate and the bobbin cover (with mark)The measurements on the bobbin cover and needle plate are references for stitch patterns with a left or middle (center) needle position.
a For stitches with a middle (center) needle positionb For stitches with a left needle positionc Left needle position on the needle plate <inch>d Left needle position on the needle plate <cm>e Middle (center) needle position on the bobbin cover
(with mark) <inch>f Middle (center) needle position on the needle plate
<inch>
a
b
c
d
g
h
e
f
ab
c
d
e
f
b

NAMES OF MACHINE PARTS AND THEIR FUNCTIONSG
etting Ready
15
1Embroidery Unit
a CarriageThe carriage moves the embroidery frame automatically when embroidering.
b Release lever (located under the embroidery unit)Press the release lever to remove the embroidery unit.
c Embroidery frame holderInsert the embroidery frame into the embroidery frame holder to hold the frame in place.
d Frame-securing leverPress the frame-securing lever down to secure the embroidery frame.
e Embroidery unit connectionInsert the embroidery unit connection into the connection port when attaching the embroidery unit.
Operation Buttons
a “Start/Stop” button Press this button and the machine will sew a few stitches at a slow speed and then begin sewing at the speed set by the sewing speed controller. Press the button again to stop the machine. Hold the button in to sew at the machine’s slowest speed. The button changes color according to the machine’s operation mode.
b “Reverse Stitch” button For straight, zigzag, and elastic zigzag stitch patterns that take reverse stitches, the machine will sew reverse stitches at low speed only while holding down the “Reverse Stitch” button. The stitches are sewn in the opposite position.For other stitches, use this button to sew reinforcement stitches at the beginning and end of sewing. Press and hold this button, and the machine sews 3 stitches in the same spot and stops automatically. (page 79)
c “Reinforcement Stitch” button Use this button to sew a single stitch repeatedly and tie-off.For character/decorative stitches, press this button to end with a full stitch instead of at a mid-point. The LED light beside this button lights up while the machine is sewing a full motif, and automatically turns off when the sewing is stopped. (page 79)
d “Needle Position” button Use this button when changing sewing direction or for detailed sewing in small areas. Press this button to raise or lower the needle position. With this button, you can lower and raise the needle to sew a single stitch.
e “Thread Cutter” button Press this button after sewing to automatically trim the excess thread.
f “Presser Foot Lifter” button Press this button to lower the presser foot and apply pressure to the fabric. Press this button again to raise the presser foot.
g Sewing Speed controller Use this controller to adjust the sewing speed. Move the slide to the left to sew at slower speeds. Move the slide to the right to sew at higher speeds.
h “Automatic Threading” button Use this button to automatically thread the needle.
CAUTION• Before inserting or removing the embroidery
unit, turn the main power to off.• After the embroidery frame is set in the frame
holder, be sure the frame-securing lever is correctly lowered.
ab
c d e
Green: The machine is ready to sew or is sewing.
Red: The machine cannot sew.
CAUTION• Do not press the thread cutter button after the
threads have been cut. The needle may break and threads may become tangled, or damage to the machine may occur.
abc d e f g h

NAMES OF MACHINE PARTS AND THEIR FUNCTIONS
16
Using the Flat Bed Attachment
Pull the top of the flat bed attachment to open the accessory compartment.
Using the Accessory Case
■ Opening the Accessory CaseSlide the latches on the front of the accessory case outward to open it.
a Latches
■ Using the Accessory TraysThree presser foot storage trays are stored in the included accessory case. For your convenience, a presser foot storage tray can be stored in the accessory compartment of the flat bed attachment.
a Presser foot storage space of the flat bed attachment
b Presser foot storage trays
a
a
b
NAMES OF MACHINE PARTS AND THEIR FUNCTIONSG
etting Ready
17
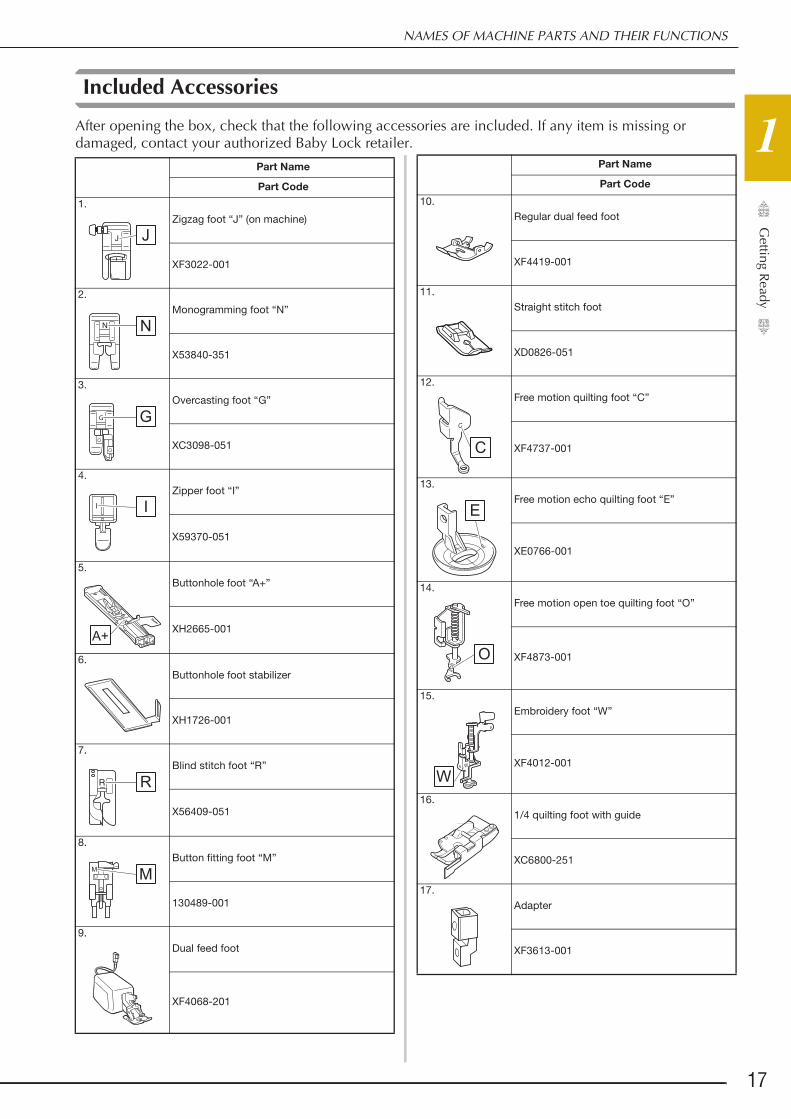
1Included Accessories
After opening the box, check that the following accessories are included. If any item is missing or damaged, contact your authorized Baby Lock retailer.
Part Name
Part Code
1.Zigzag foot “J” (on machine)
XF3022-001
2.Monogramming foot “N”
X53840-351
3.Overcasting foot “G”
XC3098-051
4.Zipper foot “I”
X59370-051
5.Buttonhole foot “A+”
XH2665-001
6.Buttonhole foot stabilizer
XH1726-001
7.Blind stitch foot “R”
X56409-051
8.Button fitting foot “M”
130489-001
9.Dual feed foot
XF4068-201
J
N
G
I
A+
R
M
10.Regular dual feed foot
XF4419-001
11.Straight stitch foot
XD0826-051
12.Free motion quilting foot “C”
XF4737-001
13.Free motion echo quilting foot “E”
XE0766-001
14.Free motion open toe quilting foot “O”
XF4873-001
15.Embroidery foot “W”
XF4012-001
16.1/4 quilting foot with guide
XC6800-251
17.Adapter
XF3613-001
Part Name
Part Code
C
E
E
OO
W

NAMES OF MACHINE PARTS AND THEIR FUNCTIONS
18
18.Screw (small)
XA4813-051
19. Needle set 75/11 2 needles90/14 2 needles90/14 2 needles: Ball point needle (gold colored)
XE4962-001
20.Twin needle2.0/11 needle
XE4963-001
21. Ball point needle set75/11 2 needles:Ball point needle for embroideryHAX130EBBR
XD0705-151
22.Bobbin × 10 (One is on machine.)
X52800-150
23.Seam ripper
XF4967-001
24.Scissors
XF2052-001
25.Cleaning brush
X59476-051
26.Eyelet punch
XZ5051-001
27.Screwdriver (small)
X55468-051
Part Name
Part Code
28.Screwdriver (large)
XC4237-021
29.Multi-purpose screwdriver
BLMPD
30.Spool cap (small)
130013-154
31.Spool cap (medium) × 2 (One is on machine.)
X55260-153
32.Spool cap (large)
130012-054
33.Thread spool insert (mini king spool insert)
XA5752-121
34.Spool stand
XH1607-001Refer to “Using the Spool Stand” on page 23.
35.Spool felt (on machine)
X57045-051
36.Spool net × 2
XA5523-050
37.Embroidery needle plate cover
XE4708-001
Part Name
Part Code

NAMES OF MACHINE PARTS AND THEIR FUNCTIONSG
etting Ready
19
138.
Knee lifter
XE4713-001
39.Alternate bobbin case (no color on the screw)
XC8167-651
40.Standard bobbin case (green marking on the screw) (on machine)
XE5342-101
41.Straight stitch needle plate
XH2513-001
42.Cord guide bobbin cover (with single hole)
XE0085-101
43.Bobbin cover (with mark) (on machine)
XH3126-001
44.Bobbin cover
XF9666-001
45.Embroidery frame H 100 mm × W 100 mm (H 4 inches × W 4 inches)
EF74
46.Embroidery frame H 180 mm × W 130 mm (H 7 inches × W 5 inches)
EF75
47.Embroidery frame H 240 mm x W 240 mm (H 9-1/2 inches × W 9-1/2 inches)
XG5558-001
Part Name
Part Code
48.Embroidery frame H 408 mm × W 272 mm (H 16 inches × W 10-5/8 inches)
XH1466-001
49.Scanning frame
XF9321-001
50.Magnet × 6
XF9325-001
51.Embroidery bobbin thread
BBT-W
52.Embroidery positioning sticker sheets × 2
XE4912-501
53.White calibration stickers (solid)
XE7916-001
54.Stabilizer material
X81176-001
55.Chalk pencil
XE8568-001
56.Dual purpose stylus
XH2515-001
57.Dual purpose stylus holder
XH1805-001
Part Name
Part Code

NAMES OF MACHINE PARTS AND THEIR FUNCTIONS
20
Following documents can be downloaded.
• Instruction and Reference Guide (Sewing)
• Instruction and Reference Guide (Embroidery)
• Embroidery Design Guidewww.babylock.com/
Options
The following are available as optional accessories to be purchased separately from your authorized Baby Lock retailer.
58.Accessory case
XH2514-001
59.Foot controller
XC8816-051
60.Bobbin center pin and instruction sheet
XF5048-001
61.Power cord
XC6052-151
Memo• (For U.S.A. only)
Foot controller: Model T This foot controller can be used on the machine with product code 882-W31. The product code is mentioned on the machine rating plate.
• Always use accessories recommended for this machine.
• The screw for the presser foot holder is available through your authorized Baby Lock retailer (Part code XA4813-051).
Part Name
Part Code
Part Name
Part Code
1.Embroidery frame set H 20 mm × W 60 mm (H 1 inch × W 2-1/2 inches)
EF73: FrameEF77: Embroidery sheet
2.Embroidery frame set H 150 mm × W 150 mm (H 6 inches × W 6 inches)
BLMA-150
3.Embroidery frame set H 200 mm × W 200 mm (H 8 inches × W 8 inches)
EF91: FrameEF93: Embroidery sheet
4.Embroidery frame set H 300 mm × W 200 mm (H 12 inches × W 8 inches)
EF92: FrameEF94: Embroidery sheet
5.Embroidery frame set H 260 mm × W 160 mm (H 10-1/4 inches × W 6-1/4 inches)
EF81: FrameEF84: Embroidery sheet
6.Embroidery frame set H 360 mm × W 240 mm (H 14 inches × W 9-1/2 inches)
EF95: FrameEF96: Embroidery sheet
7.Border embroidery frame H 300 mm × W 100 mm (H 12 inches × W 4 inches)
BLMA-CBH
8.Border embroidery frame set H 180 mm × W 100 mm (H 7 inches × W 4 inches)
BLSO-BF

NAMES OF MACHINE PARTS AND THEIR FUNCTIONSG
etting Ready
21
19.
Embroidery bobbin thread (white)
BBT-W
Embroidery bobbin thread (black)
BBT-B
10.10 spool stand
BLMA-TS
11.Wide table
BLSA-ET
12.Seam guide
BLG-SG
13.Walking foot
BLG-WF
14.Side cutter foot
BLG-SCF
15.Quilting guide
BLG-QG
16.Embroidery foot “W+” with LED pointer
BTY-EF
Part Name
Part Code
W+
17.Free-motion quilting foot
BLG-FM
18.Couching foot
BLTY-CCF
19.Multi-Function Foot controller
BLMA-MFC
20.Circular attachment
BL-CSA
21.Edge joining foot
ESG-EJF
22.Vertical spool pin
XC8619-052
23.Embroidery positioning sticker sheets × 8
BLSO-EPS
24.Free motion guide grip
XG1921-001
25.USB mouse
XE4904-101
Part Name
Part Code

NAMES OF MACHINE PARTS AND THEIR FUNCTIONS
22
26.Vertical stitch alignment foot “V”
BLSO-VF
27.Open toe sole for dual feed foot
BLTY-OTDF
28.Stitch in the Ditch Sole for Digital Dual Foot
BLDY-SDDF
29.1/4" Sole with Guide for Digital Dual Foot
BLDY-QFDF
30.Embroidery frame sheet H 100 mm × W 100 mm (H 4 inches × W 4 inches)
EF78
31.Embroidery frame sheet H 180 mm × W 130 mm (H 7 inches × W 5 inches)
EF79
32.Embroidery frame sheet H 240 mm x W 240 mm (H 9-1/2 inches × W 9-1/2 inches)
XG5566-001
33.Embroidery frame sheet H 408 mm × W 272 mm (H 16 inches × W 10-5/8 inches)
XH1825-001
34.Bobbin Work Kit
BL-BWA
Memo• All specifications are correct at the time of
printing. Please be aware that some specifications may change without notice.
Part Name
Part Code
V
Note• Visit your nearest authorized Baby Lock
retailer for a complete listing of optional accessories for your machine.

NAMES OF MACHINE PARTS AND THEIR FUNCTIONSG
etting Ready
23
1Using the Multi-purpose Screwdriver
Since the screwdriver can be changed to three different positions, it can be extremely useful for the various machine preparations. With this machine, position “1” and position “3” are used.
■ Position “1”
You can install/remove the presser foot holder, needle clamp screw.
■ Position “3”
The multi-purpose screwdriver can be positioned over the screw on the embroidery frame to tighten the screw after hooping the fabric or when removing the fabric.
Using the Spool Stand
The included spool stand is useful when using thread spools with a large diameter (cross-wound thread). The spool stand can hold two spools of thread.
* No.2 to No.6 are included in a plastic bag.
■ Warning label
This product contains magnets.a Be careful not to pinch your fingers or any objects
between the spool stand and the upper cover of the machine.
b Be sure to keep the magnets away from precision electronics, computer disks, credit cards with a magnetic stripe, etc.
c Do not use the spool stand if you have a pacemaker. Note
• When rotating the multi-purpose screwdriver, do not forcefully rotate it in the direction that it does not rotate; otherwise, it may break.
1 2 3
4 5 6
No. Part Name Part Code1 Spool stand XH1607-0012 Spool cap (XL) × 2 XE0779-0013 Spool holder × 2 XA0679-0504 Spool cap base × 2 XE0780-0015 Spool felt × 2 XC7134-0516 Ring × 4 026030-136
CAUTION• Do not lift the handle of the machine while the
spool stand is installed.• Do not push or pull the telescopic thread
guide or spool pins with extreme force, otherwise damage may result.
• Do not place any object other than spools of thread on the spool support.
• Do not try to wind thread on the bobbin while sewing using the spool stand.

NAMES OF MACHINE PARTS AND THEIR FUNCTIONS
24
Assembling the Spool Stand
aHold in the tabs on the spool stand and remove the lid.
a Tabs
bRaise the telescopic thread guide shaft and the two spool pins.
a Spool pinsb Telescopic thread guide shaft
cFully extend the telescopic thread guide shaft until the two internal stoppers snap into place.
dTurn the thread guide counterclockwise.
eOpen the upper cover of the machine, and then place the spool stand on the upper cover with the notches in the spool stand aligned with the tabs on the upper cover.
a
a
b
a
Note• Make sure that the spool stand is firmly
secured. Otherwise, the spool stand may fall during sewing.
• Do not place any object weighing 1 kg or more on the top cover. The weight of the spool stand with its lid removed is about 280 g.
Memo• For details on winding the bobbin using the
spool stand, refer to page 56.• For details on upper threading using the
spool stand, refer to page 66.

TURNING THE MACHINE ON/OFFG
etting Ready
25
1TURNING THE MACHINE ON/OFF
WARNING• Use only regular household electricity for the power source. Using other power sources may result in fire,
electric shock, or damage to the machine.• Make sure that the plugs on the power cord are firmly inserted into the electrical outlet and the power
cord receptacle on the machine. Otherwise, a fire or electric shock may result.• Do not insert the plug on the power cord into an electrical outlet that is in poor condition.• Turn the main power to OFF and remove the plug in the following circumstances:
When you are away from the machineAfter using the machineWhen the power fails during useWhen the machine does not operate correctly due to a bad connection or a disconnectionDuring electrical storms
CAUTION• Use only the power cord included with this machine.• Do not use extension cords or multi-plug adapters with many other appliances plugged in to them. Fire or
electric shock may result.• Do not touch the plug with wet hands. Electric shock may result.• When unplugging the machine, always turn the main power to OFF first. Always grasp the plug to remove
it from the outlet. Pulling on the cord may damage the cord, or lead to fire or electric shock.• Do not allow the power cord to be cut, damaged, modified, forcefully bent, pulled, twisted, or bundled.
Do not place heavy objects on the cord. Do not subject the cord to heat. These things may damage the cord, or cause fire or electric shock. If the cord or plug is damaged, take the machine to your authorized Baby Lock retailer for repairs before continuing use.
• Unplug the power cord if the machine is not to be used for a long period of time. Otherwise, a fire may result.
• When leaving the machine unattended, either the main switch of the machine should be turned to OFF or the plug must be removed from the socket-outlet.
• When servicing the machine or when removing covers, the machine must be unplugged.• For U.S.A only
This appliance has a polarized plug (one blade wider than the other). To reduce the risk of electrical shock, this plug is intended to fit in a polarized outlet only one way.If the plug does not fit fully in the outlet, reverse the plug. If it still does not fit, contact a qualified electrician to install the proper outlet. Do not modify the plug in any way.
TURNING THE MACHINE ON/OFF
26
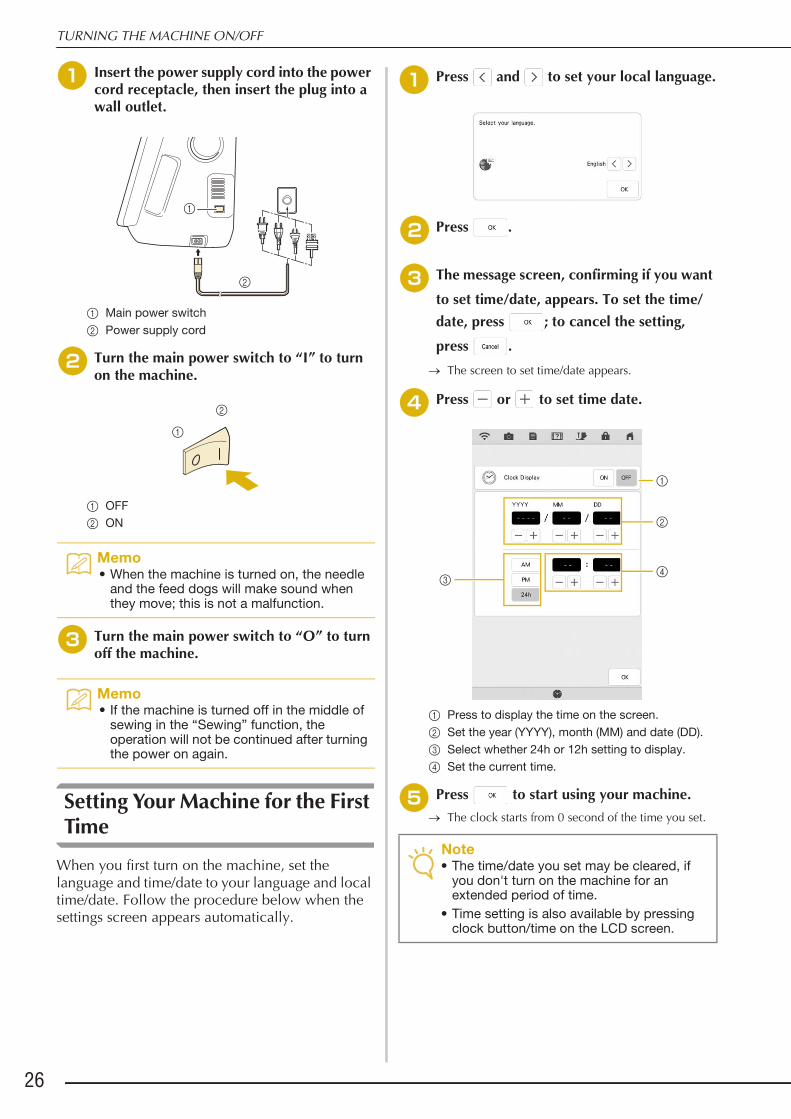
aInsert the power supply cord into the power cord receptacle, then insert the plug into a wall outlet.
a Main power switchb Power supply cord
bTurn the main power switch to “I” to turn on the machine.
a OFFb ON
cTurn the main power switch to “O” to turn off the machine.
Setting Your Machine for the First Time
When you first turn on the machine, set the language and time/date to your language and local time/date. Follow the procedure below when the settings screen appears automatically.
aPress and to set your local language.
bPress .
cThe message screen, confirming if you want
to set time/date, appears. To set the time/date, press ; to cancel the setting,
press .o The screen to set time/date appears.
dPress or to set time date.
a Press to display the time on the screen.b Set the year (YYYY), month (MM) and date (DD).c Select whether 24h or 12h setting to display.d Set the current time.
ePress to start using your machine.
o The clock starts from 0 second of the time you set.
Memo• When the machine is turned on, the needle
and the feed dogs will make sound when they move; this is not a malfunction.
Memo• If the machine is turned off in the middle of
sewing in the “Sewing” function, the operation will not be continued after turning the power on again.
a
b
Note• The time/date you set may be cleared, if
you don't turn on the machine for an extended period of time.
• Time setting is also available by pressing clock button/time on the LCD screen.
b
a
cd

LCD SCREENG
etting Ready
27
1When the machine is turned on, the opening movie is played. Touch anywhere on the screen for the home page screen to be displayed. Touch the LCD screen or a key with your finger or the included dual purpose stylus to select a machine function.
■ Home Page Screen
LCD SCREEN
Note• When the straight stitch needle plate is on
the machine, the needle will automatically move to the middle position.
Memo• Only touch the screen with your finger or the
included dual purpose stylus. Do not use a sharp pencil, screwdriver, or other hard or sharp object. It is not necessary to press hard on the screen. Pressing too hard or using a sharp object may damage the screen.
No. Display Key Name Explanation Page
a Sewing key Press this key to sew utility stitches or character/decorative stitch patterns.
102, 158
b Embroidery key
Attach the embroidery unit and press this key to embroider patterns.
–
c IQ Designer key
Press this key to start creating your custom design embroidery patterns.
–
b
c
a
k
d e f g h i j
d Wireless LAN key
Check the machine’s signal strength. Press this key to specify the wireless settings.
45
e Camera view key
Press this key to check the needle location as it is shown on the screen through the built-in camera.
92
f Machine setting screen key
Press this key to change the needle stop position, adjust the stitch patterns and embroidery patterns or screen, and change other machine settings.
28
g Machine help key
Press this key to see explanations on how to use the machine. You can see the tutorial videos and also the MP4 movie files that you have.
38
h Presser foot/Needle exchange key
Press this key before changing the needle, the presser foot, etc. This key locks all key and button functions to prevent operation of the machine.
58, 72
i Screen lock key
Press this key to lock the screen. When the screen is locked, can still sew, but cannot change any of the screen functions. Press this key again to unlock the settings.
158
j Home page screen key
Press this key anytime it is displayed to return to the home page screen and select a different category - “Sewing”, “Embroidery” or “IQ Designer”.
–
k Time/Date key
Press this key to set the clock to your local time.
26
No. Display Key Name Explanation Page

LCD SCREEN
28
Using the Machine Setting Mode Key
Press to change the default machine settings (needle stop position, embroidery speed, opening display, etc.). To display the different settings screens, press for “Sewing settings”, for “General settings”, for “Embroidery settings” or for “Wireless LAN settings”.
Sewing Settings
■ Page 1
a Select whether to use the sewing speed controller to determine the zigzag width (page 125).
b Make adjustments to character or decorative stitch patterns (page 164).
c Adjust the presser foot height. Select the height of the presser foot when the presser foot is raised.
d Adjust the presser foot pressure. The higher the number, the greater the pressure will be. Set the pressure at “3” for normal sewing.
e When set to “ON”, the thickness of the fabric is automatically detected by an internal sensor while sewing. This enables the fabric to be fed smoothly (pages 83 and 91).
■ Page 2
f Select whether “1-01 Straight stitch (Left)” or “1-03 Straight stitch (Middle)” is the utility stitch that is automatically selected when the machine is turned on.
g Change the height of the presser foot when sewing is stopped when the pivot setting is selected (page 89). Adjust the presser foot to one of the four heights.
h Change the height of the presser foot when the machine is set to free motion sewing mode (page 126).
i Adjust the amount of fabric feeding of the dual feed foot (page 76).
j Pressing the “Start/Stop” button or depressing the foot controller automatically lowers the presser foot (if it is raised) before starting sewing.
k Pressing the “Thread Cutter” button automatically lowers the presser foot before cutting the thread. The presser foot will be raised after the thread is cut.
Memo• Press or to display a different settings screen.
a
b
c
d
e
f
g
h
i
j
k

LCD SCREENG
etting Ready
29
1■ Page 3
l Select whether utility stitches ( ) or quilting
stitches ( ) are displayed first in the stitch selection screen.
m When set to “ON”, reinforcement stitches are sewn at the beginning and/or end of sewing for a reinforcement stitch pattern, even when the “Reverse Stitch” button is pressed (page 79).
n You can activate this setting after connecting the multi-function foot controller (optional). (These settings are not operable unless the multi-function foot controller is attached to the machine.) (page 33)
General Settings
■ Page 4
a Change the display language.b Change the brightness of the needle area and
work area lights.c If the screen is not very clear in certain
environments, you can adjust the brightness of the screen.
d Turn both the upper and bobbin thread sensor “ON” or “OFF”. If it is turned “OFF”, the machine can be used without thread.
e Change the speaker volume. Increase the number for louder volume, decrease for softer volume.
f Select the operation of the “Needle Position - Stitch Placement” button from the following two sequences. (page 92)
n
l
m
a
d
f
b
c
e

LCD SCREEN
30
■ Page 5
g Select whether to display the opening screen video when the machine is turned on.
h Select to save the machine power by setting the “Eco Mode” or the “Shutoff Support Mode” (page 34).
i Select the length of time until the screen saver appears.
j Change the image of the screen saver (page 35).k Change the shape of the pointer when a USB
mouse is used. The setting remains selected even after the machine is turned off.
■ Page 6
l Select the brightness of the projector.m Select whether to show background color when
using projector function.n Select whether to display outline of the pattern.o Select the color of the pointer.p The camera needle drop point can be specified.
(page 36)
■ Page 7
q Display the total number of stitches sewn on this machine, which is a reminder to take your machine in for regular servicing. (Contact your authorized Baby Lock retailer for details.)
r The “No.” is the internal machine number for the machine.
s Display the program version.
i
h
j
k
g
p
o
n
l
m
s
q
r

LCD SCREENG
etting Ready
31
1Embroidery Settings
For details on embroidering settings, refer to the Instruction and Reference Guide (Embroidery).
■ Page 8
a Select from among 12 embroidery frame displays.b Change the center point marker or grid lines.c Adjust the maximum embroidery speed setting.d Adjust the upper thread tension for embroidering.e Select the height of the embroidery foot during
embroidering.f Adjust the needle position for embroidering.
■ Page 9
g Change the display units (mm/inch).h Change the thread color display on the
“Embroidery” screen; thread number, color name.i Select the thread brand used to display a pattern
when it is opened.j Change the color of the background for the
embroidery display area.k Change the color of the background for the
thumbnail area.l Press to specify the size of pattern thumbnails.m Adjust the distance between the pattern and the
basting stitching.
■ Page 10
n Select the quality for displaying the fabric in the screen.
o Erase the scanned image.p Set to “ON” when positioning the pattern on the
thick fabric using the built-in camera.q Adjust the position and brightness of the
embroidery foot “W+” with LED pointer (sold separately). (These settings are not available unless embroidery foot “W+” with LED pointer is installed on the machine.)
a
d
e
f
b
c
j
k
g
h
l
i
m
p
q
o
n
LCD SCREEN
32
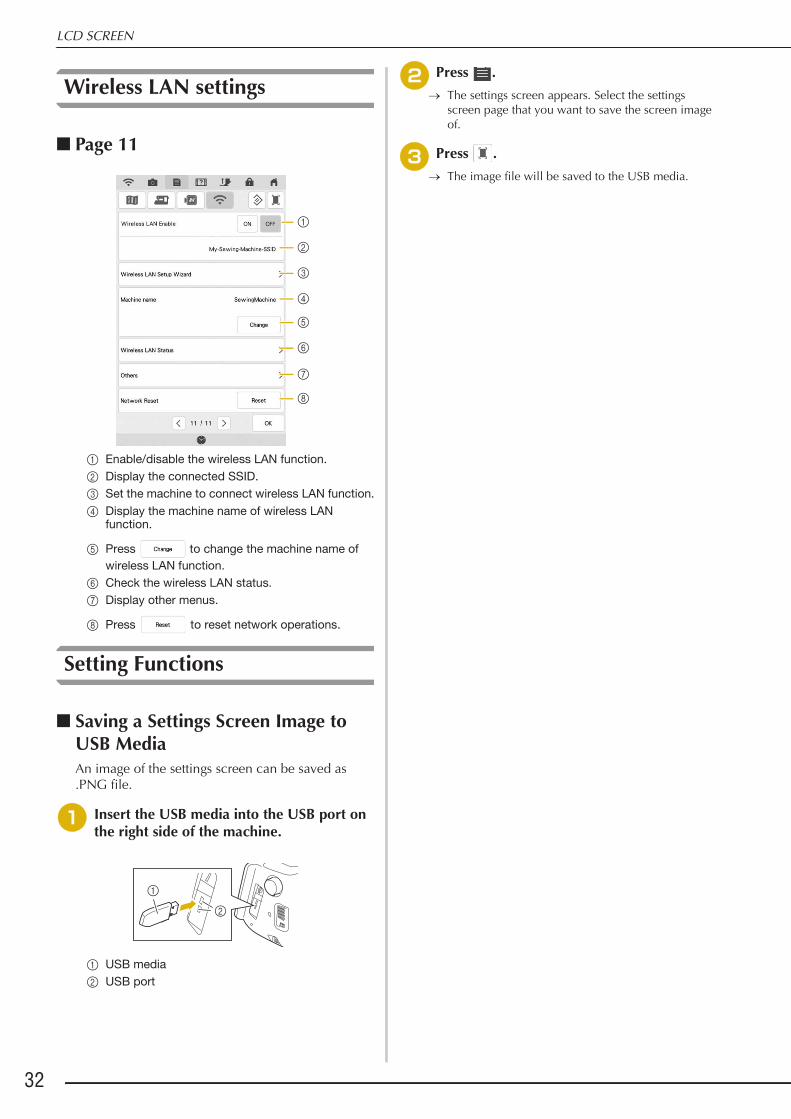
Wireless LAN settings
■ Page 11
a Enable/disable the wireless LAN function.b Display the connected SSID.c Set the machine to connect wireless LAN function.d Display the machine name of wireless LAN
function.
e Press to change the machine name of wireless LAN function.
f Check the wireless LAN status.g Display other menus.
h Press to reset network operations.
Setting Functions
■ Saving a Settings Screen Image to USB MediaAn image of the settings screen can be saved as .PNG file.
aInsert the USB media into the USB port on the right side of the machine.
a USB mediab USB port
bPress .
o The settings screen appears. Select the settings screen page that you want to save the screen image of.
cPress .
o The image file will be saved to the USB media.
c
d
b
a
e
f
g
h
a
b

LCD SCREENG
etting Ready
33
1■ Specifying the Multi-Function Foot
Controller (Sold Separately)With the multi-function foot controller, various machine operations in addition to starting/stopping sewing, such as thread cutting and reverse stitching, can be specified to be performed.Functions that can be specified
* If you set the “Reverse Stitch” function on the heel switch, machine operates the same as pressing the “Reverse Button” on the machine.
* Reinforcement stitching may be applied depending on the selected stitch pattern. For the details, refer to “Automatic Reinforcement Stitching” on page 79.
Specifying the functionsThe functions performed by the multi-function foot controller can be specified in the settings screen.
aPress .
bDisplay page 3 of the settings screen.
cSelect the functions to be performed by the multi-function foot controller.
dPress .
Controller Functions that can be specified
a Main foot controller Start/Stop
b Heel switch Select any of the following:• Thread Cutting• Needle Position – Up/Down• Single Stitch• Reverse Stitch (Reinforcement
Stitch) *• Presser Foot Up/Down• No Setting
c Side pedal
Memo• If you set “Reverse Stitch” on the side
pedal, you can create a darning stitch effect using zigzag stitches. With both feet, keep pressing the main foot controller, and repeat pressing and releasing the side pedal to sew forward and reverse in turn. Machine will reverse at the speed you press the main foot controller.
Note• Before specifying the functions, connect the
multi-function foot controller to the machine. The settings screen is activated the first time that the machine detects the multi-function foot controller.
• After the multi-function foot controller is connected to the machine and the functions are specified, the “Start/Stop” button cannot be used. All buttons other than the “Start/Stop” button can continue to be used.

LCD SCREEN
34
■ Selecting the “Eco Mode” or “Shutoff Support Mode”You can save the machine power by setting the eco mode or the shutoff support mode.If you leave the machine without using for a specified period of time, the machine enters in one of these modes.
“Eco Mode”;Machine will enter a sleep mode. Touch the screen or press the “Start/Stop” button to continue sewing.
“Shutoff Support Mode”;Machine will enter the lower power mode after set period of time. Turn machine off and then back on to restart sewing.
Press the “Start/Stop” button or touch the screen display to recover from these modes.
aPress .
o The settings screen appears.
bPress .
o The General settings screen appears.
cDisplay page 5 of the General settings screen.
dPress circled area to select the time until entering the mode.
Condition Eco Mode Shutoff Support Mode
Available time OFF, 10 - 120 (minute)
OFF, 1 - 12 (hour)
“Start/Stop” button Green flashing Green slow flashingSuspended function Machine light,
Screen displayAll functions
After recovering The machine starts from the previous operation.
You need to turn off the machine.
Note• If you turn off the machine while the
machine is in the “Eco Mode” or the “Shutoff Support Mode”, wait for about 5 seconds before turning on the machine again.

LCD SCREENG
etting Ready
35
1■ Changing the Screen Saver Image
Instead of the default image, you can select your own personal images for the screen saver of your machine.Before changing the screen saver image, prepare the image on your computer or USB media.
Compatible image files
aPress .
o The settings screen appears.
b Press .
o The General settings screen appears.
cDisplay page 5 of the General settings screen.
dPress .
ePress .
fConnect the USB media that contains your personal image to the USB port of the machine.
* Refer to page 48 about USB connectivity.
gPress to select the first image.
* The images will appear in a list in this screen. Select
the desired to specify the image.
* Press to delete the selected image.
Format .bmp, .jpg, .png
File size Max. 2 MB for each image
File dimension 800 × 1280 pixels or less, (If the width is more than 800 pixels, the image imported will be reduced to a width of 800 pixels.)
Number allowed 5 or less

LCD SCREEN
36
hSelect the device that is connected.
o A list of your personal images appear on the screen.
* Press to view the previous page.
iPress a file name to select image and then press .
o The selected image is stored on your machine.
* Press to view the previous page.
jRepeat the procedure from step g to select the remaining images.
kPress to return to the original screen.
■ Needle Calibration Using the Built-in Camera
Setting the camera needle position is essential when you use camera or projector function. It is not necessary to perform this operation each time, but we recommend performing it when the needle is changed. Use the white stickers (solid) included with the machine.
aPress .
o The settings screen appears.
bPress .
o The General settings screen appears.
cDisplay page 6 of the General settings screen.
dPress .
o Camera needle position setting screen appears.
eFollow the on-screen instructions to complete the procedure.1. Press the needle position button to raise the
needle.

LCD SCREENG
etting Ready
37
1
2. After removing the needle and the presser foot, affix white sticker on needle dropping point area.
a White sticker
3. Insert the needle (standard size 75/11 or 90/14).
4. Press to initiate the calibration process. For safety please make sure area around needle is clear prior to pressing
.o Setting the needle drop point begins.
fThe operation is finished when “OK”
appears. If “NG” appears, affix a new white sticker, and then press . If multiple attempts to set the position are not successful, contact your nearest authorized Baby Lock retailer.
* Press to memorize the calibration data.
* Press to back to original screen without memorizing the calibration data.
gRemove the sticker.
Note• Use a new sticker. The camera needle
position cannot be set correctly if there is a hole in sticker or if it is dirty. If you have no new stickers, contact your nearest authorized Baby Lock retailer.

LCD SCREEN
38
Using the Machine Help Key
Press to open the machine help screen. Six functions are available from the screen shown below.
a Press this key to continue viewing the Instruction and Reference Guide (PDF file) or watching the video that was stopped.
b Press this key to view the Instruction and Reference Guide (PDF file).c Press this key to see explanation for upper threading, winding the bobbin, changing the presser foot, preparing to
embroider a pattern, and how to use the machine (page 39).d Press this key to select utility stitches when you are not sure which stitch to use or how to sew the stitch (page 40).e Press this key to see an explanation of the selected stitch (page 43).f Press this key to watch tutorial videos or MPEG-4 (MP4) files from USB media (page 41).
a
b
c
d
e
f

LCD SCREENG
etting Ready
39
1Using the Operation Guide Function
Press to open the screen shown below. Six categories are displayed at the top of the screen. Press a key to see more information about that category.
displays information about the main parts of the machine and their functions. This is the first screen displayed
when you press .
displays information about the operation buttons.
displays information about threading the machine, changing presser feet, etc. Some of the functions are described in the movies. Watch these movies for a better understanding of the functions.
displays information about attaching the embroidery unit, preparing fabric for embroidering, etc.Some of the functions are described in the movies. Watch these movies for a better understanding of the functions.
displays troubleshooting information.
displays information about cleaning the machine, etc.Some of the functions are described in the movies. Watch these movies for a better understanding of the functions.

LCD SCREEN
40
Example: Displaying information about upper threading
aPress .
bPress .
cPress .
o The lower half of the screen will change.
dPress (upper threading).
o The screen shows instructions for threading the machine.
eRead the instructions.
* Press to view the next page.
* Press to view the previous page.
fPress to return to the original screen.
Using the Sewing Guide Function
The sewing guide function can be used to select stitch patterns from the Utility Stitch screen.Use this function when you are not sure which stitch to use for your application, or to get advice about sewing particular stitches. For example, if you want to sew overcasting, but you do not know which stitch to use or how to sew the stitch, you can use this screen to get advice. We recommend that beginners use this method to select stitches.
aEnter Utility Stitch category from the home page.
bPress .
cPress .
o The advice screen is displayed.

LCD SCREENG
etting Ready
41
1d
Press the key of the category whose sewing instructions you wish to view.
* Press to return to the original screen.
eRead the explanations and select the appropriate stitch.
o The screen displays directions for sewing the selected stitch. Follow the directions to sew the stitch.
Playing a Tutorial Video
This machine provides tutorial videos on how to use the machine. Together with the help guides, which offer descriptions through text and illustrations, the tutorial videos assist with machine operation.
aPress .
bPress .
cPress the title of the desired tutorial video.
o The selected tutorial video begins playing.
dPlay the tutorial video.
a Number of seconds elapsed/Total number of seconds
Operation keys
eAfter you are finished playing the video,
press .
Play
Pause
Skip back 10 seconds
Skip forward 10 seconds
Return to beginning
Repeat
Delete video (when playing from the machine’s memory)
Save to machine (when playing from USB media)
Memo• A frequently viewed tutorial video can be
saved to (favorites) of the machine, from where it can be played.
a

LCD SCREEN
42
Playing MPEG-4 (MP4) Videos
Your MP4 videos can be played from USB media. In addition, the MP4 video can be saved to the machine so that a tutorial video on creating a project, for example, can be viewed at any time.
Videos that can be played
aPress .
bPress .
cSelect the device where the video is saved.
: Play a tutorial video: Play a video saved on the machine (favorites): Play a video from USB media plugged into the
USB port: Play a video from USB media plugged into the
USB port for mouse* To return to the previous screen, press .
dSelect the video that you want to play.
* To return to the previous screen, press .
ePlay the video.
* Use the operation keys as described in “Playing a Tutorial Video” on page 41.
fAfter you are finished playing the video, press .
MP4 file format: Video - H.264/MPEG-4 AVC, Audio – AAC
Size: 450 (H) × 800 (W)
Memo• MP4 file size will be changed to fit the
screen. If you view the large MP4 file, the file will be reduced to fit the screen. If you view the smaller MP4 file, the file will be expanded to fit the screen.
• Some type of MP4 file cannot viewed with the machine.
Note• Long video file names may be shortened
when they are displayed.
Note• Up to about 1 GB of MP4 videos can be
saved on the machine. When the maximum capacity has been reached, delete unnecessary videos.

LCD SCREENG
etting Ready
43
1Using the Stitch Pattern Explanation Function
If you want to know more about the uses of a stitch pattern, select the stitch pattern and press and then to see an explanation of the stitch selection. Descriptions are displayed for each stitch pattern in the Utility Stitch screen.
Example: Displaying information about
aPress .
bPress .
cPress .
o The screen shows information.
dPress to return to the original screen.
Note• With the stitch pattern explanation function,
descriptions can be displayed for the stitch patterns available on the Utility Stitch and Character/Decorative Stitch screens.
Memo• The settings remain displayed to allow you
to fine tune the stitch.

LCD SCREEN
44
Viewing the Instruction and Reference Guide (PDF File) on the Machine
The Instruction and Reference Guide (PDF file) for this machine can be viewed on the machine.
aPress .
bPress .
cSelect the document to be viewed.
dRead the Instruction and Reference Guide.Operation keys
Memo• The Instruction and Reference Guide can be
viewed in the currently selected display language. For details on selecting the display language, refer to “Page 4” on page 29.
a Press to select from 100%, 200% and 400%.
b 1. Press to display a keyboard.2. Enter the text to be searched for.3. To search from the current page to
the beginning of the document,
press . To search from the current page to the end of the
document, press .
c Press to return to the screen before the Instruction and Reference Guide (PDF file) was opened.
d Press to display the first page.
e Press to display the previous page.
f Shows the current page/total number of pages. Press the current page number, and then enter a page number to display the desired page.
g Press to display the next page.
h Press to display the last page.
i Press to close the screen and exit the machine help screen.
Memo• To zoom in or out on a page, pinch two
fingers together or spread them apart. You can also move a page after zooming in by dragging it.
a
c d e f g h i
b

WIRELESS NETWORK CONNECTION FUNCTIONSG
etting Ready
45
1This machine supports a wireless network connection. Using this function, an embroidery pattern or decorative stitch pattern edited in embroidery editing software (Palette 11) with wireless transfer functions can be transferred to the machine from a computer. In addition, embroidery patterns can be transferred from the machine to the embroidery editing software (Palette 11). The machine and computer must be connected to the same network. For detailed procedures, refer to the manual for the application.
Specifying Wireless Network Connection Settings
The machine can be connected to your wireless network.
aPress .
bSet “Wireless LAN Enable” to “ON”.
o The machine will begin to emit the wireless network signal.
■ Requirements for a Wireless Network ConnectionThe wireless network connection complies with IEEE 802.11 n/g/b standards and uses the 2.4 GHz frequency.
WIRELESS NETWORK CONNECTION FUNCTIONS
Memo• A wireless network cannot be set up with
WPA/WPA2 Enterprise.

WIRELESS NETWORK CONNECTION FUNCTIONS
46
Using the Wizard to Set Up the Wireless Network Connection
There are multiple ways to set up the wireless network connection. We recommend the method that uses the wizard on this machine.
aIn order to connect your machine to a wireless network, the security information (SSID and network key) for your home network will be required. The network key may also be called a password, security key or encryption key. First, find your security information and note it.
bPress beside “Wireless LAN Setup Wizard”.
o A list of available SSIDs appears.
cSelect beside the SSID that was noted.
o The screen for entering the network key (password) appears.
SSID Network Key(Password)
Memo• The wireless network connection cannot be
set up if you do not have the security information.
• How to find the security informationa Check the manual provided with your home
network.b The default SSID may be the manufacturer's
name or the model name.c If you cannot find the security information,
contact the manufacturer of the router, your network administrator or your Internet provider.
Memo• If the desired network SSID does not
appear in the list, press .
• If the desired network SSID is not displayed, specify it as described below.
a Select in the list of SSIDs, and then
press .
b Enter the desired network SSID, and then
press .
c Select the authentication method and encryption mode.
• If the machine had already been connected to the home network, press , and then select the saved SSID.

WIRELESS NETWORK CONNECTION FUNCTIONSG
etting Ready
47
1d
Enter the network key (password) that was noted, and then press .
a Text input areab Character keysc Caps keyd Space keye Letters/numbers/symbols keyf Backspace key (Deletes the character at the
cursor's position.)g Cursor keys (Move the cursor to the left or right.)
eWhen the following message appears, press
.
o When a connection is established, the following message appears.
fPress to exit the setup.
o The number beside “Machine Name” is the name that will be used when registering the machine with embroidery editing software (Palette 11) in order to transfer files.
■ Using the “Others” MenuThe “Others” menu contains the following items.
a TCP/IP settings can be manually entered.b Shows the MAC address.c Use when proxy settings are required.
c
b
a
e
d
fg
Memo• While connected, the signal strength is
indicated by the icon in the upper-left corner of the display.
• Once a wireless network connection has been set up, a wireless network connection will be established each time the machine is turned on. However, “Wireless LAN Enable” in the network settings screen must remain set to “ON”.
a
b
c

CONNECTING THE ACCESSORY TO THE MACHINE
48
Using USB Media/SD card (Sold Separately)
When sending or reading stitch patterns using the USB media, connect the device to the USB port. When using SD card, insert the SD card into the SD card slot.
a SD card slotb USB port
Using a USB Mouse (Sold Separately)
The USB mouse, connected to the machine, can be used to perform a variety of operations in the screens.Connect a USB mouse to the USB port.
a USB portb USB mouse
CONNECTING THE ACCESSORY TO THE MACHINE
Memo• USB media is widely used, however some
USB media may not be usable with this machine. Please visit our website for more details.
• Depending on the type of USB media being used, either directly plug the USB device into the machine’s USB port or plug the USB media Reader/Writer into the machine’s USB port.
• Do not insert anything other than USB media into the USB media port. Otherwise, the machine may be damaged.
• Do not insert anything other than SD card into the SD card slot. Otherwise, the machine may be damaged.
a
b
Memo• If a mouse other than the optional USB
mouse is used, it may not perform as described in this Instruction and Reference Guide.
Note• A USB mouse can be connected or
disconnected at any time.• Only the left mouse button can be used to
perform operations. No other buttons can be used.
• The mouse pointer does not appear in the camera view window, the screen saver or opening screen.
a
b

CONNECTING THE ACCESSORY TO THE MACHINEG
etting Ready
49
1■ Clicking a Key
When the mouse is connected, the pointer appears on the screen. Move the mouse to position the pointer over the desired key, and then click the left mouse button.
a Pointer
■ Changing PagesIf page numbers and a vertical scroll bar for additional pages are displayed, click the left mouse button with the pointer on / or / to display the previous or next page.
Memo• Double-clicking has no effect.
a

CONNECTING THE ACCESSORY TO THE MACHINE
50

Chapter 2Sewing Basics

LOWER THREADING
52
Winding the Bobbin
■ Using the Supplemental Spool PinWith this machine, you can wind the bobbin during sewing. While the main spool pin is being used for sewing, you can wind a bobbin by using the supplemental spool pin.
a Supplemental spool pin
aTurn the main power to ON and open the top cover.
bAlign the groove in the bobbin with the spring on the bobbin winder shaft, and set the bobbin on the shaft.
a Groove in the bobbinb Spring on the shaft
cSet the supplemental spool pin in the “up” position.
a Supplemental spool pin
dPlace the spool of thread on the supplemental spool pin, so that thread unrolls from the front. Push the spool cap onto the spool pin as far as possible to secure the thread spool.
a Spool capb Spool pinc Thread spool
LOWER THREADING
CAUTION• The included bobbin was designed specifically
for this machine. If bobbins from other models are used, the machine will not operate correctly. Use only the included bobbin or bobbins of the same type (part code: X52800-150). X52800-150 is Class 15 type bobbin.
a
a
b
CAUTION• If the thread spool and/or spool cap are set
incorrectly, the thread may tangle on the spool pin and cause the needle to break.
• Use the spool cap (large, medium, small or mini king) that is closest in size to the thread spool. If a spool cap smaller than the thread spool is used, the thread may become caught in the slit on the end of the spool and cause the needle to break.

LOWER THREADINGSew
ing Basics
53
2
eWith your right hand, hold the thread near the thread spool. With your left hand, hold the end of the thread, and use both hands to pass the thread through the thread guide.
a Thread guide
fPass the thread around the pretension disk making sure that the thread is under the pretension disk.
a Pretension disko Make sure that the thread passes under the
pretension disk.
b Pretension diskc Pull it in as far as possible.o Check to make sure thread is securely set between
pretension disks.
gWind the thread clockwise around the bobbin 5-6 times.
Memo• When sewing with fine, cross-wound
thread, use the small spool cap, and leave a small space between the cap and the thread spool.
a Spool cap (small)b Thread spool (cross-wound thread)c Space
• If a spool of thread whose core is 12 mm (1/2 inch) in diameter and 75 mm (3 inches) high is inserted onto the spool pin, use the mini spool cap.
a Spool cap (mini king spool insert)b 12 mm (1/2 inch)c 75 mm (3 inches)
a

LOWER THREADING
54
hPass the end of the thread through the guide slit in the bobbin winder seat, and pull the thread to the right to cut the thread with the cutter.
a Guide slit (with built-in cutter)b Bobbin winder seat
iSet the bobbin winding switch to the left, until it clicks into place.
a Bobbin winding switch
o The bobbin winding window appears.
jPress .
o Bobbin winding starts. The bobbin stops rotating when bobbin winding is completed. The bobbin winding switch will automatically return to its original position. CAUTION
• Be sure to follow the process described. If the thread is not cut with the cutter, and the bobbin is wound, when the thread runs low it may tangle around the bobbin and cause the needle to break.
Memo• Sliding the bobbin winding switch to the left
switches the machine into bobbin winding mode.
• Use the bobbin winding slider to adjust the amount of thread wound onto the bobbin to one of five levels.
a Bobbin winding sliderb Morec Less
ab
c
Note• When winding transparent nylon thread on
the bobbin, stop bobbin winding when the bobbin is 1/2 to 2/3 full. If the bobbin was fully wound with transparent nylon thread, it may not be wound neatly.
Note• changes to while the bobbin is
winding.• Stay near the machine while winding the
bobbin to make sure the bobbin thread is being wound correctly. If the bobbin thread is wound incorrectly, press immediately to stop the bobbin winding.
• The sound of winding the bobbin with stiff thread, such as nylon thread for quilting, may be different from the one produced when winding normal thread; however, this is not a sign of a malfunction.

LOWER THREADINGSew
ing Basics
55
2
kCut the thread with cutter and remove the bobbin.
a Cutter
■ Using the Spool PinYou can use the main spool pin to wind the bobbin before sewing. You cannot use this spool pin to wind the bobbin while sewing.
aTurn the main power to ON and open the top cover.
bAlign the groove in the bobbin with the spring on the bobbin winder shaft, and set the bobbin on the shaft.
a Groove in the bobbinb Spring on the shaft
cPivot the spool pin so that it angles upward. Set the thread spool on the spool pin so that the thread unwinds from the front of the spool.
a Spool pinb Spool capc Thread spoold Spool felt
Memo• You can change the winding speed by
pressing (to decrease) or (to increase) in the bobbin winding window.
• Press to minimize the bobbin winding window. Then, you can perform other operations, such as selecting a stitch or adjusting the thread tension, while the bobbin is being wound.
• Press (in top right of the LCD screen) to display the bobbin winding window again.
Memo• When removing the bobbin, do not pull on
the bobbin winder seat. Doing so could loosen or remove the bobbin winder seat, and could result in damage to the machine.
CAUTION• Setting the bobbin improperly may cause the
thread tension to loosen, breaking the needle and possibly resulting in injury.
a
b

LOWER THREADING
56
dPush the spool cap onto the spool pin as far as possible, then return the spool pin to its original position.
eWhile holding the thread with both hands, pull the thread up from under the thread guide plate.
a Thread guide plate
fPass the thread through the thread guide.
a Thread guide
gPass the thread around the pretension disk making sure that the thread is under the pretension disk.
a Thread guideb Pretension disk
hFollow steps g through k on page 53 through 55.
■ Using the Spool StandTo wind thread on the bobbin while the spool stand is installed, pass the thread from the spool through the thread guide on the telescopic thread guide, and then wind the bobbin according to steps e through
k of “Using the Supplemental Spool Pin”on page 53 to page 55.
■ Untangling Thread from Beneath the Bobbin Winder SeatIf the bobbin winding starts when the thread is not passed through the pretension disk correctly, the thread may become tangled beneath the bobbin winder seat.Wind off the thread according to the following procedure.
a Threadb Bobbin winder seat
a
a
ab
Memo• Refer to page 24 to assemble the spool
stand.• Refer to page 66 to thread the machine
using the spool stand.
CAUTION• When winding thread on the bobbin, do not
cross the bobbin winding thread with the upper thread in the thread guides.
CAUTION• Do not remove the bobbin winder seat even if
the thread becomes tangled under the bobbin winder seat. It may result in injuries.

LOWER THREADINGSew
ing Basics
57
2
aIf the thread becomes tangled under the
bobbin winder seat, press once to stop the bobbin winding.
bCut the thread with scissors near the pretension disk.
a Pretension disk
cPush the bobbin winder switch to the right, and then raise the bobbin at least 100 mm (4 inches) from the shaft.
dCut the thread near the bobbin and hold the thread end of the spool with your left hand. Unwind the thread clockwise near the bobbin winder seat with your right hand as shown below.
eWind the bobbin again.
a
Note• Make sure that the thread passes through
the pretension disk correctly (page 53).

LOWER THREADING
58
Setting the Bobbin
aPress to lock all keys and buttons and raise the presser foot.
* If the message “OK to automatically lower the presser foot?” appears on the LCD screen, press
to continue.
bSlide the bobbin cover latch to the right.
a Bobbin coverb Latcho The bobbin cover opens.
cRemove the bobbin cover.
dHold the bobbin with your right hand and hold the end of the thread with your left hand.
eSet the bobbin in the bobbin case so that the thread unwinds to the left.
fHold the bobbin lightly with your right hand, and then guide the thread with your left hand.
gPass the thread through the guide, and then pull the thread out toward the front.
a Cuttero The cutter cuts the thread.
CAUTION• Use a bobbin thread that has been correctly
wound. Otherwise, the needle may break or the thread tension will be incorrect.
• The included bobbin was designed specifically for this machine. If bobbins from other models are used, the machine will not operate correctly. Use only the included bobbin or bobbins of the same type (part code: X52800-150). X52800-150 is Class 15 type bobbin.
• Before inserting or changing the bobbin, be
sure to press in the LCD to lock all keys and buttons, otherwise injuries may occur if the “Start/Stop” button or any other button is pressed and the machine starts sewing.
a b

LOWER THREADINGSew
ing Basics
59
2
hInsert the tab in the lower-left corner of the bobbin cover (1), and then lightly press down on the right side to close the cover (2).
iPress to unlock all keys and buttons.
Pulling Up the Bobbin Thread
There may be some sewing applications where you want to pull up the bobbin thread; for example, when making gathers, darts, or doing free motion quilting or embroidery.
aFollow steps a to d in “Setting the Bobbin” on page 58 for installing the bobbin into the bobbin case.
bGuide the bobbin thread through the groove, following the arrow in the illustration.
* Do not cut the thread with the cutter.* Do not replace the bobbin cover.
cWhile holding the upper thread, press the “Needle Position” button to lower the needle.
a “Needle Position” button
dPress the “Needle Position” button to raise the needle.
eGently pull the upper thread. A loop of the bobbin thread will come out of the hole in the needle plate.
Note• If the thread is not correctly inserted
through the tension spring of the bobbin case, it may cause incorrect thread tension. (page 87)
a Tension spring
CAUTION• Be sure to hold down the bobbin with your
finger and unwind the bobbin thread correctly. Otherwise, the thread may break or the thread tension will be incorrect.
a
Memo• You can pull up the bobbin thread after
threading the upper thread (“UPPER THREADING” on page 61).
a

LOWER THREADING
60
fPull up the bobbin thread, pass it under the presser foot and pull it about 100 mm (approx. 3-4 inches) toward the back of the machine, making it even with the upper thread.
a Upper threadb Bobbin thread
gReplace the bobbin cover.
a
b

UPPER THREADINGSew
ing Basics
61
2
Upper Threading
aTurn the main power to ON.
bPress the “Presser Foot Lifter” button to raise the presser foot.
o The upper thread shutter opens so the machine can be threaded.
a Upper thread shutter
cPress the “Needle Position” button to raise the needle.
dPivot the spool pin so that it angles upward. Set the thread spool on the spool pin so that the thread unwinds from the front of the spool.
a Spool pinb Spool capc Thread spoold Spool felt
UPPER THREADING
CAUTION• Be sure to thread the machine properly.
Improper threading can cause the thread to tangle and break the needle, leading to injury.
• When using the walking foot, the side cutter or accessories not included with this machine, attach the accessory to the machine after threading the machine.
Memo• The automatic threading function can be
used with home sewing machine needle sizes 75/11 through 100/16.
• When threads such as transparent nylon monofilament or speciality threads are used it is not recommended to use the needle threader.
• The automatic threading function cannot be used with the wing needle or the twin needle.
Memo• This machine is equipped with an upper
thread shutter, allowing you to check that the upper threading is performed correctly.
Note• If you try to thread the needle automatically
without raising the needle, the thread may not thread correctly.
a

UPPER THREADING
62
ePush the spool cap onto the spool pin as far as possible, then return the spool pin to its original position.
fWhile holding the thread with both hands, pull the thread up from under the thread guide plate.
a Thread guide plate
gWhile holding the thread in your right hand, pass the thread through the thread guide in the direction indicated.
hGuide the thread down, up, then down through the groove, as shown in the illustration.
CAUTION• If the thread spool and/or spool cap are set
incorrectly, the thread may tangle on the spool pin and cause the needle to break.
• Use the spool cap (large or medium) or the thread spool insert (mini king spool insert) that is closest in size to the thread spool. If a spool cap smaller than the thread spool is used, the thread may become caught in the slit on the end of the spool and cause the needle to break.
Memo• When sewing with fine, cross-wound
thread, use the small spool cap, and leave a small space between the cap and the thread spool.
a Spool cap (small)b Thread spool (cross-wound thread)c Space
• If a spool of thread whose core is 12 mm (1/2 inch) in diameter and 75 mm (3 inches) high is inserted onto the spool pin, use the thread spool insert (mini king spool insert).
a Thread spool insert (mini king spool insert)b 12 mm (1/2 inch)c 75 mm (3 inches)
Memo• Look in the upper groove area to check if
the thread catches on the thread take-up lever visible inside the upper groove area.
a Look in the upper groove area
a

UPPER THREADINGSew
ing Basics
63
2
iPass the thread through the needle bar thread guide (marked “6”) by holding the thread with both hands and guiding it as shown in the illustration.
a Needle bar thread guide
jPress the “Presser Foot Lifter” button to lower presser foot.
kPass the thread through the thread guide disks (marked “7”). Make sure that the thread passes through the groove in the thread guide.
a Groove in thread guide
lPull the thread up through the thread cutter to cut the thread, as shown in the illustration.
a Thread cutter
mPress the “Automatic Threading” button to have the machine automatically thread the needle.
o The thread passes through the eye of the needle.
nCarefully pull the end of the thread that was passed through the eye of the needle.
* If a loop was formed in the thread passed through the eye of the needle, carefully pull on the loop of thread through to the back of the needle.
a
a
a
Note• When using thread that quickly winds off
the spool, such as metallic thread, it may be difficult to thread the needle if the thread is cut.Therefore, instead of using the thread cutter, pull out about 80 mm (approx. 3 inches) of thread after passing it through the thread guide disks (marked “7”).
a 80 mm (approx. 3 inches) or more
Memo• When the “Automatic Threading” button is
pressed, the presser foot will be automatically lowered. After threading is finished, the presser foot moves back to the position before the “Automatic Threading” button was pressed.
Note• Pulling the loop of thread gently will avoid
needle breakage.
a

UPPER THREADING
64
oPull out about 100-150 mm (approx. 4-6 inches) of the thread, and then pass it under the presser foot toward the rear of the machine.
o Raise the presser foot lever if the presser foot is lowered.
a About 100-150 mm (approx. 4-6 inches)
Using the Twin Needle Mode
The twin needle can only be used for stitch patterns that show after being selected. Before you select a stitch pattern, make sure the stitch can be sewn in the twin needle mode (refer to the “STITCH SETTING CHART” on page 206).
aPress to lock all keys and buttons and
then install the twin needle (“CHANGING THE NEEDLE” on page 69).
* If the message “OK to automatically lower the presser foot?” appears on the LCD screen, press
to continue.
Memo• If the needle could not be threaded or the
thread was not passed through the needle bar thread guides, perform the procedure again starting from step c.Then, pass the thread through the eye of the needle after step i.
Note• Some needles cannot be threaded with the
needle threader. In this case, instead of using the needle threader after passing the thread through the needle bar thread guide (marked “6”), manually pass the thread through the eye of the needle from the front.
CAUTION• Twin needle (part code XE4963-001) is
recommended for this machine. Contact your authorized Baby Lock retailer for replacement needles (size 2.0/11 is recommended).
• Be sure to set the twin needle mode when using the twin needle. Using the twin needle while the machine is in single needle mode could cause the needle to break, resulting in damage.
• Do not sew with bent needles. The needle could break and cause injury.
• When using the twin needle, it is recommended to use presser foot “J”.
• When the twin needle is used, bunched stitches may occur depending on the types of fabric and thread that are used.Use monogramming foot “N” for decorative stitches.
• Before changing the needle or threading the
machine, be sure to press on the LCD Screen to lock all keys and buttons, otherwise injuries may occur if the “Start/Stop” button or any other button is pressed and the machine starts sewing.

UPPER THREADINGSew
ing Basics
65
2
bThread the machine for the first needle according to the procedure for threading a single needle (“Upper Threading” on page 61).
cPass the thread through the needle bar thread guides on the needle bar, then thread the needle on the left side manually.
a Needle bar thread guide
dPull up the supplemental spool pin and set it in the up position.
a Supplemental spool pin
ePlace the additional spool of thread on the supplemental spool pin, so that the thread unwinds from the front. Push the spool cap onto the spool pin as far as possible to secure the thread spool.
a Spool capb Spool pinc Thread spool
fHold the thread from the spool with both hands, and place the thread in the thread guide.
* Do not place the thread in the pretension disks.
a Thread guide
gWhile holding the thread from the spool, pull the thread through the lower notch in the thread guide plate, then through the upper notch. Hold the end of the thread with your left hand, and then guide the thread through the groove, following the arrows in the illustration.
Note• The “Automatic Threading” button cannot
be used. Manually thread the twin needle from front to back. Using the “Automatic Threading” button may result in damage to the machine.
a

UPPER THREADING
66
hContinue threading however do not pass the thread in the needle bar thread guide “6” on the needle bar. Thread the needle on the right side.
a Needle bar thread guide
iPress to unlock all keys and buttons.
jSelect a stitch pattern. (Example: )
* Refer to “Sewing a Stitch” on page 77 for selecting the stitch.
* Refer to the “STITCH SETTING CHART” on page 206 for the proper stitch to use with presser foot “J”.
o The selected stitch is displayed.
kPress , and then press to select the twin needle mode.
o Twin needle mode is set.
lStart sewing.Sample of Twin Needle Sewing
Using the Spool Stand
The included spool stand is useful when using thread on spools with a large diameter (cross-wound thread). This spool stand can hold two spools of thread.
■ Using the Spool Stand• Be sure to use a spool cap that is slightly larger
than the spool.If the spool cap that is used is smaller or much larger than the spool, the thread may catch and sewing performance may suffer.
Note• If the key is light gray after selecting the
stitch, the selected stitch cannot be sewn in the twin needle mode.
CAUTION• Be sure to set the twin needle mode when
using the twin needle. Using the twin needle while the machine is in single needle mode could cause the needle to break, resulting in damage.
a
Memo• To change direction when sewing with the
twin needle, raise the needle from the fabric, raise the presser foot lever, and then turn the fabric.
Memo• Refer to page 24 to assemble the spool
stand.• Refer to page 56 to wind the bobbin when
using the spool stand.

UPPER THREADINGSew
ing Basics
67
2
• When using thread on a thin spool, place the included spool felt on the spool pin, place the thread spool on the spool pin so that the center of the spool is aligned with the hole at the center of the spool felt, and then insert the spool cap onto the spool pin.
a Spool felt
• When using thread on a cone spool, use the spool holder. When using cone shaped thread spool with other than cotton thread, it is not necessary to use spool caps.
a Spool holder
• Depending on the size of spool or the amount of thread remaining, choose the appropriate sized spool cap (large or medium). Spool cap (small) cannot be used with the spool cap base.
a Spool capb Spool cap base
aAttach the spool stand to the machine.
bPlace the spool of thread on the spool pin so that the thread feeds off the spool clockwise. Firmly insert the spool cap onto the spool pin.
a
b
Note• When using 2 spools of thread, make sure
that both spools are feeding in the same direction.
• Make sure that the spools do not touch each other, otherwise the thread will not feed off smoothly, the needle may break, or the thread may break or become tangled. In addition, make sure that the spools do not touch the telescopic thread guide at the center.
• Make sure that the thread is not caught under the spool.

UPPER THREADING
68
cPull the thread off the spool. Pass the thread from the back to the front through the thread guides at the top.When using thread that quickly feeds off the spool, such as metallic thread, use the enclosed ring to prevent the thread from becoming entangled.Threading sequence; Pull the thread from the spool, place the thread through the ring from the bottom up (1), into the thread guide (2) and through the ring from the top down (3). When using the ring, do not use the spool cap base.
dPass the thread through the machine’s thread guide from the right to the left.
a Thread guide
eThread the machine according to the steps f to o of “Upper Threading” on page 61.
Using Threads that Unwind Quickly
■ Using the Spool NetIf using transparent nylon monofilament thread, metallic thread, or other strong thread, place the included spool net over the spool before using it. When using specialty threads, threading must be done manually.If the spool net is too long, fold it once to match it to the spool size before placing it over the spool.
Note• Guide the thread so that it does not become
entangled with the other thread.• After feeding the thread as instructed, wind
any excess thread back onto the spool, otherwise the excess thread will become tangled.
2
13
a
a Spool netb Thread spoolc Spool pind Spool cap
Memo• When threading the spool with the spool net
on, make sure that 50-60 mm (approx. 2 - 2-1/2 inches) of thread are pulled out.
• It may be necessary to adjust the thread tension when using the spool net.

CHANGING THE NEEDLESew
ing Basics
69
2
aPress the “Needle Position” button to raise the needle.
bPress to lock all keys and buttons.
* If the message “OK to automatically lower the presser foot?” appears on the LCD screen, press
to continue.
cUse the screwdriver to turn the needle clamp screw toward the front of the machine and loosen the screw. Remove the needle.
CHANGING THE NEEDLE
CAUTION• Always press on the screen to lock all keys and buttons before changing the needle. If is not
pressed and the “Start/Stop” button or another operation button is pressed accidentally, the machine will start and injury may result.
• Use only home sewing machine needles made for home use. Other needles may bend or break and may cause injury.
• Never sew with a bent needle. A bent needle will easily break and may cause injury.
Memo• To check the needle correctly, place the flat
side of the needle on a flat surface. Check the needle from the top and the sides. Throw away any bent needles.
a Parallel spaceb Level surface (bobbin cover, glass, etc.)
Note• Before replacing the needle, cover the hole
in the needle plate with fabric or paper to prevent the needle from falling into the machine.
Note• Do not apply pressure to the needle clamp
screw. Doing so may damage the needle or machine.

CHANGING THE NEEDLE
70
dWith the flat side of the needle facing the back, insert the new needle all the way to the top of the needle stopper (viewing window) in the needle clamp. Use a screwdriver to securely tighten the needle clamp screw.
a Needle stopperb Hole for setting the needlec Flat side of needle
ePress to unlock all keys and buttons.
CAUTION• Be sure to push in the needle until it touches
the stopper, and securely tighten the needle clamp screw with a screwdriver. If the needle is not completely inserted or the needle clamp screw is loose, the needle may break or the machine may be damaged.
Memo• The automatic threading function can be
used with home sewing machine needle sizes 75/11 through 100/16.
• When threads such as transparent nylon monofilament or speciality threads are used it is not recommended to use the needle threader.
a
b
c

CHANGING THE NEEDLESew
ing Basics
71
2
Fabric/Thread/Needle Combinations
• Needles that can be used with this machine: Home sewing machine needles (size 65/9 - 100/16)* The larger the number, the larger the needle. As the numbers decrease, the needles get finer.
• Thread that can be used with this machine: 30 - 90 weight* Never use thread of 20 weight or lower. It may cause machine to malfunction.* The smaller the number, the heavier the thread. As the numbers increase, the thread gets finer.
• The machine needle and thread that should be used depends on the type and thickness of the fabric. Refer to the following table when choosing the thread and needle appropriate for the fabric that you wish to sew.- The combinations shown in the table provide a general guideline. Be sure to sew trial stitches on the actual number of
layers and type of fabric to be used in your project.- The machine needles are consumables. For safety and best results, we recommend replacing the needle regularly. For
details on when to replace the needle, refer to “CHANGING THE NEEDLE” on page 69.• In principle, use a fine needle and thread with lightweight fabrics, and a larger needle and heavier thread with
heavyweight fabrics.• Select a stitch appropriate for the fabric, and then adjust the stitch length. When sewing lightweight fabrics,
make the stitch length finer (shorter). When sewing heavyweight fabrics, make the stitch length coarser (longer). (page 86)When sewing stretch fabrics, refer to “Sewing Stretch Fabrics” on page 84.
■ Transparent nylon threadUse a home sewing machine topstitching needle, regardless of the fabric or thread.
■ Embroidery needlesUse a 75/11 home sewing machine needle for embroidery.
Fabric Type/ApplicationThread
Size of needle Stitch length mm (inch)Type Weight
Lightweight fabrics
Lawn, georgette, challis, organdy, crepe, chiffon, voile, gauze, tulle, lining, etc.
Polyester thread 60 - 90
65/9 - 75/11Fine stitches
1.8-2.5(1/16-3/32)Cotton thread,
Silk thread 50 - 80
Medium weight fabrics
Broadcloth, taffeta, gabardine, flannel, seersucker, double gauze, linen, terry cloth, waffle weave, sheeting, poplin, cotton twill, satin, quilting cotton, etc.
Polyester thread 60 - 90
75/11 - 90/14Regular stitches
2.0-3.0(1/16-1/8)Cotton thread,
Silk thread 50 - 60
Heavyweight fabrics
Denim (12 ounces or more), canvas, etc.
Polyester thread,
Cotton thread30 100/16
Coarse stitches2.5-4.0
(3/32-3/16)Denim (12 ounces or more), canvas, tweed, corduroy, velour, melton wool, vinyl-coated fabric, etc.
Polyester thread 60
90/14 - 100/16Cotton thread,
Silk thread 30 - 50
Stretch fabrics (knit fabrics, etc.)
Jersey, tricot, T-shirt fabric, fleece, interlock, etc.
Polyester thread, Cotton thread,
Silk thread50 Ball point needle
75/11 - 90/14Setting appropriate for
the fabric thickness
For top-stitching Polyester thread, Cotton thread
30 90/14 - 100/16 Setting appropriate for the fabric thickness50 - 60 75/11 - 90/14
CAUTION• The appropriate fabric, thread and needle combinations are shown in the preceding table. If the
combination of the fabric, thread and needle is not correct, particularly when sewing heavy fabrics (such as denim) with thin needles (such as 65/9 to 75/11), the needle may bend or break. In addition, the stitching may be uneven or puckered or there may be skipped stitches.

CHANGING THE PRESSER FOOT
72
Removing the Presser Foot
aPress the “Needle Position” button to raise the needle.
bPress to lock all keys and buttons.
* If the message “OK to automatically lower the presser foot?” appears on the LCD screen, press
to continue.
cRaise the presser foot lever.
dPress the black button on the presser foot holder and remove the presser foot.
a Black buttonb Presser foot holder
Attaching the Presser Foot
aPlace the new presser foot under the holder, aligning the foot pin with the notch in the holder. Lower the presser foot lever so that the presser foot pin snaps into the notch in the holder.
a Notchb Pin
bPress to unlock all keys and buttons.
cRaise the presser foot lever.
CHANGING THE PRESSER FOOT
CAUTION• Always press on the screen to lock all keys and buttons before changing the presser foot. If is
not pressed and the “Start/Stop” button or another button is pressed, the machine will start and may cause injury.
• Always use the correct presser foot for the selected stitch pattern. If the wrong presser foot is used, the needle may strike the presser foot and bend or break, and may cause injury.
• Only use presser feet made for this machine. Using other presser feet may lead to accident or injury.
b
a
CAUTION• Make sure that the presser foot is installed in
the correct direction, otherwise the needle may strike the presser foot, breaking the needle and causing injuries.

CHANGING THE PRESSER FOOTSew
ing Basics
73
2
Attaching the Presser Foot with the Included Adapter
You can attach the presser feet using the included adapter and small screw.For example, the walking foot, the free motion echo quilting foot “E”, the free motion quilting foot “C” and so on.Following procedure shows how to attach the walking foot as an example.
■ Attaching the Walking FootThe walking foot holds the fabric between the presser foot and the feed dogs to feed the fabric. This enables you to have better fabric control when sewing difficult fabrics (such as quilted fabrics or velvet) or fabrics that slip easily (such as vinyl, leather, or synthetic leather).
aFollow the steps in “Removing the Presser Foot” on page 72.
bLoosen the screw of the presser foot holder to remove the presser foot holder.
a Multi- purpose screwdriverb Presser foot holder screwc Presser foot holder
cRemove the screw of the presser foot completely from the presser foot shaft.
dSet the adapter on the presser foot bar, aligning the flat side of the adapter opening with the flat side of the presser bar. Push it up as far as possible, and then tighten the screw securely with the screwdriver.
eTurn a supplied small screw 2 or 3 times with your hand.
Note• Thread the needle manually when using the
walking foot, or only attach the walking foot after threading the needle using the “Automatic Threading” button.
• When sewing with the walking foot, sew at medium to low speeds.
Memo• The walking foot can only be used with
straight or zigzag stitch patterns. Reverse stitches cannot be sewn with the walking foot. Only select straight or zigzag stitch patterns with reinforcement stitches. (page 79.)

CHANGING THE PRESSER FOOT
74
fSet the operation lever of the walking foot so that the needle clamp screw is set in the fork. Position the shank of the walking foot on the presser foot bar.
a Operation leverb Needle clamp screwc Forkd Walking foot shanke Presser foot bar
gLower the presser foot lever. Insert the screw, and tighten the screw securely with the screwdriver.
Using the Dual Feed Foot
Dual feed foot enables you to have best fabric control when sewing difficult fabrics that slip easily, such as quilted fabrics or fabrics that tend to stick to the bottom of a presser foot, such as vinyl, leather or synthetic leather.
■ Attaching the Dual Feed Foot
aFollow the steps in “Removing the Presser Foot” on page 72.
bLoosen the screw of the presser foot holder to remove the presser foot holder.
a Multi- purpose screwdriverb Presser foot holder screwc Presser foot holder
cPosition the dual feed foot to the presser foot bar by aligning the notch of the dual feed foot to the large screw.Side view
CAUTION• Use the included screwdriver to tighten the
screw securely. If the screw is loose, the needle may strike the presser foot and cause injury.
• Be sure to rotate the handwheel toward you (counterclockwise) to check that the needle does not strike the presser foot. If the needle strikes the presser foot, injury may result.
Note• When sewing with the dual feed foot, sew at
medium to low speeds.
Memo• When selecting stitches to be used with the
dual feed foot, only the stitches that can be used will be activated on the display.
• When sewing fabric that easily sticks together, a more attractive finish can be achieved by basting the beginning of sewing.

CHANGING THE PRESSER FOOTSew
ing Basics
75
2
dHold the dual feed foot in place with your right hand, then using the included screwdriver securely tighten the large screw.
ePlug the connector of the dual feed foot into the jack on the back of your machine.
fPress to unlock all keys and buttons.
o All keys and operation buttons are unlocked, and the previous screen is displayed.
■ Attaching/Detaching toeAttach the toe by aligning the pins with the notches and snap it into place.
a Pinsb Notches
If you push down on the front and back part of the dual feed foot, the toe of the dual feed foot will snap off.
CAUTION• Use the included screwdriver to firmly tighten
the screw. If the screw is loose, the needle may strike the presser foot and possibly cause injury.

CHANGING THE PRESSER FOOT
76
■ Using the Dual Feed Position LeverWhen the feed position lever is up, the black roller belt on the dual feed is not engaged.
When the feed position lever is down, the black roller belt on the dual feed is engaged.
■ Adjusting the Amount of Fabric Feeding of the Dual Feed FootThe dual feed mechanism pulls the top fabric according to the set stitch length. With troublesome fabrics, fine tune the set length, by changing the dual feed feed adjustment in the settings screen.
aPress .
o The settings screen appears.
bPress .
o The Sewing settings screen appears.
cDisplay page 2 of the Sewing settings screen.
dTouch the number to select the feeding of the top fabric.
* Select “00” for sewing in most cases.* If the feed amount for the top fabric is too little,
causing the fabric to be longer than the bottom fabric, touch a higher number to increase the feed amount for the top fabric.
* If the feed amount for the top fabric is too much, causing the fabric to be shorter than the bottom fabric, touch a lower number to decrease the feed amount for the top fabric.
ePress to return to the original screen.Note
• Do not operate the lever while sewing.
Note• As a default, some keys mentioned in the
following procedures appear in light gray and are not available. To enable the keys for specifying the settings, attach the dual feed foot to the machine. The keys are enabled after the dual feed foot is detected.

SEWINGSew
ing Basics
77
2
Sewing a Stitch
aTurn the main power to ON and press
to display the utility stitches, and push the “Needle Position” button to raise the needle.
bSelect the category, and then press the key of the stitch you want to sew.
a Categoryb Key of the stitcho The symbol of the correct presser foot will be
displayed in the upper left corner of the LCD screen.
cInstall the presser foot (“CHANGING THE PRESSER FOOT” on page 72).
dSet the fabric under the presser foot. Hold the fabric and thread in your left hand, and push the “Needle Position” button to set the needle in the sewing start position.
eLower the presser foot.
* You do not have to pull up the bobbin thread.
SEWING
CAUTION• To avoid injury, pay special attention to the needle while the machine is in operation. Keep your hands
away from moving parts while the machine is in operation.• Do not stretch or pull the fabric during sewing. Doing so may lead to injury. • Do not use bent or broken needles. Doing so may lead to injury.• Do not attempt to sew over basting pins or other objects during sewing. Otherwise, the needle may break
and cause injury.• If stitches become bunched, lengthen the stitch length setting before continuing sewing. Otherwise, the
needle may break and cause injury.
b
a
CAUTION• Always use the correct presser foot. If the
wrong presser foot is used, the needle may strike the presser foot and bend or break, possibly resulting in injury. Refer to “STITCH SETTING CHART” on page 206 for presser foot recommendations.
Memo• The black button on the left side of presser
foot “J” should be pressed only if the fabric does not feed or when sewing thick seams (page 83). Normally, you can sew without pressing the black button.

SEWING
78
fAdjust the sewing speed with the speed control slide.
* You can use this slide to adjust sewing speed during sewing.
a Slowb Fast
gPress the “Start/Stop” button to start sewing.
* Guide the fabric lightly by hand.
hPress the “Start/Stop” button again to stop sewing.
iPress the “Thread Cutter” button to trim the upper and lower threads.
o The needle will return to the up position automatically.
jWhen the needle has stopped moving, raise the presser foot and remove the fabric.
■ Using the Foot ControllerYou can also use the foot controller to start and stop sewing.
Memo• When the foot controller is being used, you
cannot start sewing by pressing the “Start/Stop” button.
a b
CAUTION• Do not press the “Thread Cutter” button after
the threads have been cut. Doing so could tangle the thread or break the needle and damage the machine.
• Do not press the “Thread Cutter” button when there is no fabric set in the machine or during machine operation. The thread may tangle, possibly resulting in damage.
Note• When cutting thread thicker than #30, nylon
monofilament thread, or other decorative threads, use the thread cutter on the side of the machine.
Memo• This machine is equipped with a bobbin
thread sensor that warns you when the bobbin thread is almost empty. When the bobbin thread is nearly empty, the machine automatically stops. However, if the “Start/Stop” button is pressed, a few stitches can be sewn. When the warning displays, re-thread the machine immediately.
CAUTION• Do not allow fabric pieces and dust to collect
in the foot controller. Doing so could cause a fire or an electric shock.
Memo• When the foot controller is being used, you
cannot start sewing by pressing the “Start/Stop” button.
• The foot controller cannot be used when embroidering.
• The foot controller can be used for sewing utility and decorative stitches when the embroidery unit is attached.

SEWINGSew
ing Basics
79
2
aInsert the foot controller plug into its jack on the machine.
a Foot controllerb Foot controller jack
bSlowly depress the foot controller to start sewing.Pressing down on the foot controller increases the sewing speed; releasing the pressure on the foot controller decreases the sewing speed.
cRelease the foot controller to stop the machine.
Sewing Reinforcement Stitches
Reverse/reinforcement stitches are generally necessary at the beginning and end of sewing. You can use the “Reverse Stitch” button to sew reverse/reinforcement stitches. When you keep pressing “Reinforcement Stitch” button, the machine will sew reinforcement stitch at that point 3 to 5 stitches, and then stop. (page 15)
a “Reverse Stitch” buttonb “Reinforcement Stitch” button
If the automatic reinforcement stitch is selected on the screen, reverse stitches (or reinforcement stitches) will be sewn automatically at the beginning of sewing when the “Start/Stop” button is pressed. Press “Reverse Stitch” button or “Reinforcement Stitch” button to sew reverse stitches (or reinforcement stitches) automatically at the end of sewing (Refer to the next procedure “Automatic Reinforcement Stitching”.).
a Reverse stitchb Reinforcement stitch
The operation performed when the button is pressed differs depending on the selected stitch pattern. (Refer to “STITCH SETTING CHART” on page 206.)
Automatic Reinforcement Stitching
After selecting a stitch motif, turn on the automatic reinforcement stitching function before sewing, and the machine will automatically sew reinforcement stitches (or reverse stitches, depending on the stitch motif) at the beginning and end of sewing.
Memo• The speed that is set using the sewing
speed controller is the foot controller’s maximum sewing speed.
ab
Memo• When you press the “Reinforcement Stitch”
button while sewing character/decorative stitch pattern, you can end sewing with a full stitch instead of at a mid-point.
• The green light on the right of the “Reinforcement Stitch” button lights up while the machine is sewing a full motif, and it automatically turns off when the sewing is stopped.

SEWING
80
aSelect a stitch pattern.
bPress to set the automatic reinforcement stitching function.
o The key will display as .
cSet the fabric in the start position and begin sewing.
a Reverse stitches (or reinforcement stitches)o The machine will automatically sew reverse stitches
(or reinforcement stitches) and then continue sewing.
If you press the Start/Stop button to pause sewing, press it again to continue. The machine will not sew reverse/reinforcement stitches again.
dPress “Reverse Stitch” button or “Reinforcement Stitch” button.
a Reverse stitches (or reinforcement stitches)o The machine will sew reverse stitches (or
reinforcement stitches) and stop.
The operation performed when the button is pressed differs depending on the selected stitch pattern. Refer to the following table for details on the operation that is performed when the button is pressed.
Memo• Some stitches, such as buttonholes and bar
tacks, require reinforcement stitches at the beginning of sewing. If you select one of these stitches, the machine will automatically turn on this function (the key appears as when the stitch is selected).
Memo• To turn off the automatic reinforcement
stitching function, press again, so it
appears as .
“Reverse Stitch”
button
“Reinforcement
Stitch” button
+
Machine starts sewing the stitches and only sews reverse stitches while holding the “Reverse Stitch” button.
Machine starts sewing the stitches and sews 3 – 5 reinforcement stitches while holding the “Reinforcement Stitch” button.
+
Machine starts sewing the stitches and only sews reverse stitches while holding the “Reverse Stitch” button.*
Machine starts sewing the stitches and sews 3 – 5 reinforcement stitches while holding the “Reinforcement Stitch” button.
+
Machine sews reverse stitches at the beginning and end of sewing.
Machine sews reverse stitches at the beginning and reinforcement stitches at the end of sewing.
+
Machine sews reinforcement stitches at the beginning and reverse stitches at the end of sewing.*
Machine sews reinforcement stitches at the beginning and end of sewing.

SEWINGSew
ing Basics
81
2
* If “Reinforcement Priority” of the settings screen is set to “ON” (page 29), reinforcement stitches are sewn instead of reverse stitches.
Automatic Presser Foot Lowering Function and Thread Cutting Function
By setting the machine to automatically raise and lower the presser foot, sewing operations can be performed more smoothly.
Sewing Curves
Sew slowly while keeping the seam parallel with the fabric edge as you guide the fabric around the curve.
Changing Sewing Direction
Stop the machine. Leave the needle in the fabric, and press the “Presser Foot Lifter” button to raise the presser foot. Using the needle as a pivot, turn the fabric so that you can sew in the new direction. Press the “Presser Foot Lifter” button to lower the presser foot and start sewing.
The pivot setting is useful when changing the sewing direction. When the machine is stopped at the corner of the fabric, the machine stops with the needle in the fabric and the presser foot is automatically raised so the fabric can easily be rotated (“Pivoting” on page 89).
+ Machine starts sewing and then sews reinforcement stitches while holding the “Reverse Stitch” button.
Machine starts sewing at the beginning, then completes the stitch pattern and sews reinforcement stitches at the end of sewing.
+ Machine sews reinforcement stitches at the beginning and sews reinforcement stitches when the “Reverse Stitch” button is pressed.
Machine sews reinforcement stitches at the beginning, then completes the stitch pattern and sews reinforcement stitches at the end of sewing.
No. Key Name Explanation
a Auto Down When “Auto Down” in the machine settings screen is set to “ON”, pressing the “Start/Stop” button or depressing the foot controller automatically lowers the presser foot (if it is raised) before starting to sew.
“Reverse Stitch”
button
“Reinforcement
Stitch” button
a
b
b Press to Trim When “Press to Trim” in the machine settings screen is set to “ON”, pressing the “Thread Cutter” button automatically lowers the presser foot (if it is raised) before cutting the thread. The presser foot will be raised after the thread is cut.
No. Key Name Explanation

SEWING
82
■ Sewing a Seam Allowance of 0.5 cm or LessBaste the corner before sewing, and then, after changing the sewing direction at the corner, pull the basting thread toward the back while sewing.
a 5 mm (approx. 3/16 inch)
Sewing Heavyweight Fabrics
The machine can sew fabrics up to 6 mm (approx. 1/4 inch) thick. If the thickness of a seam causes sewing to occur at an angle, help guide the fabric by hand and sew on the downward slope.
CAUTION• Do not forcefully push fabrics more than 6 mm
(approx. 1/4 inch) thick through the machine. This may cause the needle to break and cause injury.
• Thicker fabrics require a larger needle. (page 71)

SEWINGSew
ing Basics
83
2
■ If the Fabric does not Fit under the Presser FootIf the presser foot is in the up position, and you are sewing heavyweight or multiple layers of fabric which do not fit easily under the presser foot, use the presser foot lever to raise the presser foot to its highest position. The fabric will now fit under the presser foot.
■ If the Fabric does not FeedIf the fabric does not feed when starting to sew or when sewing thick seams, press the black button on the left side of presser foot “J”.
aRaise the presser foot.
bWhile keeping the black button on the left side of presser foot “J” pressed in, press the “Presser Foot Lifter” button to lower the presser foot.
cRelease the black button.
o The presser foot remains level, enabling the fabric to be fed.
Sewing Hook-and-Loop Fastener Tape
Memo• You cannot use the presser foot lever after
the presser foot has been raised using the “Presser Foot Lifter” button.
Memo• Once the trouble spot has been passed, the
foot will return to its normal position.• When “Automatic Fabric Sensor System”
(Automatic Presser Foot Pressure) in the machine settings screen is set to “ON”, the thickness of the fabric is automatically detected by the internal sensor so the fabric can be fed smoothly for best sewing results. (page 91.)
CAUTION• Do not use adhesive backed hook-and-loop
fastener tape designed for sewing. When glue adheres to the needle or the bobbin hook race, it may cause malfunction.
• If the hook-and-loop fastener tape is sewn with a fine needle (65/9-75/11), the needle may bend or break.
Note• Before starting to sew, baste the fabric and
hook-and-loop fastener tape together.

SEWING
84
Make sure that the needle passes through the hook-and-loop fastener tape by rotating the handwheel and lower the needle into the hook-and-loop fastener tape before sewing. Sew the edge of the hook-and-loop fastener tape at a slow speed.If the needle does not pass through the hook-and-loop fastener tape, replace the needle size with the needle for thick fabrics (page 71).
a Edge of the hook-and-loop fastener tape
Sewing Lightweight Fabrics
Place thin paper or tear away embroidery stabilizer under thin fabrics to make sewing easier. Gently tear off the paper or the stabilizer after sewing.
a Thin paper
Sewing Stretch Fabrics
First, baste together the pieces of fabric, and then sew without stretching the fabric.In addition, a better result can be achieved by using thread for knits or a stretch stitch.
a Basting stitching
Memo• For best results when sewing stretch
fabrics, decrease the pressure of the presser foot (“Using the Machine Setting Mode Key” on page 28).

STITCH SETTINGSSew
ing Basics
85
2
When you select a stitch, your machine automatically selects the appropriate stitch width, stitch length, and upper thread tension. However, if needed, you can change any of the individual settings.
Setting the Stitch Width
Follow the steps below when you want to change the zigzag stitch pattern width.
Example:Press to narrow the zigzag stitch pattern width.
o The value in the display gets smaller.
Press to widen the zigzag stitch pattern width.
o The value in the display gets bigger.
STITCH SETTINGS
Note• Settings for some stitches cannot be changed (refer to “STITCH SETTING CHART” on page 206).• If you turn off the machine or select another stitch without saving stitch setting changes (“Saving Your
Stitch Settings” on page 107), the stitch settings will return to their default settings.
Memo• For an alternate method of changing the
stitch width using the speed controller, refer to page 125.
Memo• Press to save the stitch settings.
• Press to check changes made to the stitch.
• Press to return the stitch width to the original setting.
Note• After adjusting the stitch width, slowly
rotate the handwheel toward you (counterclockwise) and check that the needle does not touch the presser foot. If the needle hits the presser foot, the needle may bend or break.

STITCH SETTINGS
86
Setting the Stitch Length
Follow the steps below when you want to change the stitch pattern length.
Example:Press to shorten the stitch length.
o The value in the display gets smaller.
Press to lengthen the stitch length.
o The value in the display gets bigger.
Setting the “L/R Shift”
Follow the steps below when you want to change the placement of the zigzag stitch pattern by moving it left and right.
Example:Press to shift the stitch pattern to the left.
o The value in the display appears with a minus sign.
Press to shift the stitch pattern to the right side of the left needle position.
o The value in the display appears with a plus sign.
Memo• Press to save the stitch settings.
• Press to check changes made to the stitch.
• Press to return the stitch length to the original setting.
CAUTION• If the stitches get bunched together, lengthen
the stitch length and continue sewing. Do not continue sewing without lengthening the stitch length. Otherwise, the needle may break and cause injury.
Memo• Press to save the stitch settings.
• Press to check changes made to the stitch.
• Press to return to the original setting.
Note• After adjusting the “L/R Shift”, slowly rotate
the handwheel toward you (counterclockwise) and check that the needle does not touch the presser foot. If the needle hits the presser foot, the needle may bend or break.

STITCH SETTINGSSew
ing Basics
87
2
Setting the Thread Tension
You may need to change the thread tension, depending on the fabric and thread being used. Follow the steps below to make any necessary changes.
■ Proper Thread Tension The upper thread and the bobbin thread should cross near the center of the fabric. Only the upper thread should be visible from the right side of the fabric, and only the bobbin thread should be visible from the wrong side of the fabric.
a Wrong sideb Surface c Upper threadd Bobbin thread
■ Upper Thread is Too TightIf the bobbin thread is visible from the right side of the fabric, the upper thread is too tight.
a Bobbin threadb Upper threadc Surface d Locks appear on surface of fabric
Press , to loosen the upper thread.
■ Upper Thread is Too LooseIf the upper thread is visible from the wrong side of the fabric, the upper thread is too loose.
a Upper threadb Bobbin threadc Wrong sided Locks appear on wrong side of fabric
Press , to tighten the upper thread.
Note• If the bobbin thread was incorrectly
threaded, the upper thread may be too tight. In this case, refer to “Setting the Bobbin” on page 58 and rethread the bobbin thread.
Memo• When you finish sewing, remove the bobbin
cover and then make sure that the thread is shown as below. If the thread is not shown as below, the thread is not inserted through the tension-adjusting spring of the bobbin case correctly. Reinsert the thread correctly. For details, refer to page 58.
Note• If the upper thread was incorrectly
threaded, the upper thread may be too loose. In this case, refer to “Upper Threading” on page 61 and rethread the upper thread.
Memo• Press to return the thread tension
to the original setting.

USEFUL FUNCTIONS
88
Automatic Thread Cutting
After selecting a stitch pattern, turn on the automatic thread cutting function before sewing, and the machine will automatically sew reinforcement stitches (or reverse stitches, depending on the stitch pattern) at the beginning and end of sewing, and trim the threads at the end of sewing. This function is useful when sewing buttonholes and bar tacks.
aSelect a stitch pattern.
bPress to set the automatic thread cutting function.
o You get , and the machine is set for automatic thread cutting function and automatic reverse/reinforcement stitching.
cSet the fabric in the start position and start sewing.
a Reverse stitches (or reinforcement stitches) o The machine will automatically sew reverse stitches
(or reinforcement stitches) and then continue sewing.
dOnce you have reached the end of the stitching, press “Reverse Stitch” button or “Reinforcement Stitch” button once.If stitching, such as buttonholes and bar tacking, that includes reinforcement stitching has been selected, this operation is unnecessary.
a The point where the “Start/Stop” button was pressed.
b The point where the “Reverse Stitch” button or the “Reinforcement Stitch” button was pressed.
c The thread is cut here.
USEFUL FUNCTIONS
Memo• To turn off the automatic thread cutting
function, press again, so it appears as
.• This function is set automatically when
doing embroidery.
Memo• If you press the “Start/Stop” button to
pause sewing, press the same button again to continue. The beginning reverse/reinforcement stitches will not be sewn again.
Memo• The automatic thread cutting function will
not be performed if the “Start/Stop” button is pressed while sewing. Press the “Reverse Stitch” button or the “Reinforcement Stitch” button at the end of the stitching.
32
1

USEFUL FUNCTIONSSew
ing Basics
89
2
Pivoting
If the pivot function is selected, the machine stops with the needle lowered (in the fabric) and the presser foot is automatically raised to an appropriate height when the “Start/Stop” button is pressed. When the “Start/Stop” button is pressed again, the presser foot is automatically lowered and sewing continues. This function is useful for stopping the machine to rotate the fabric.
aSelect a stitch.
bPress to select the pivot setting.
o The key appears as .
cPlace the fabric under the presser foot with the needle at the starting point of the stitching, and then press the “Start/Stop” button. The machine will begin sewing.
CAUTION• When the pivot setting is selected, the
machine starts when the “Start/Stop” button is pressed or the foot controller is pressed down even if the presser foot has been raised. Be sure to keep your hands and other items away from the needle, otherwise injuries may occur.
Memo• When the pivot setting is selected, the
height of the presser foot when sewing is stopped can be changed according to the type of fabric being sewn. Press to display “Pivoting Height” of the settings screen. Touch the number to select the height. To raise the presser foot further, increase the setting. (Normally, 3.2 mm is set.)
Note• The pivot function can only be used with
stitches where presser foot “J”, “N” or “X” (Couching foot) is indicated in the upper-left corner of the screen. If any other stitch is selected, appears as light gray and is not available.
• If the pivot function is selected, “Presser Foot Height” in the settings screen are not available and the setting cannot be changed.
Note• To use the pivot function, the needle
position should be set to . When the
needle position is set to , the presser foot is raised automatically.

USEFUL FUNCTIONS
90
dPress the “Start/Stop” button to stop the machine at the point where the sewing direction changes.
o The machine stops with the needle in the fabric, and the presser foot is raised.
eRotate the fabric, and then press the “Start/Stop” button.
o The presser foot is automatically lowered, and sewing continues.
Using the Knee Lifter
Using the knee lifter, you can raise and lower the presser foot with your knee, leaving both hands free to handle the fabric.
aChange the operating position of the knee lifter handle before inserting into the machine.Slide up the knee lifter handle slightly and rotate it while releasing pressure so handle will click into position.
* The knee lifter can be adjusted to three different angles.
a Knee lifter handleo Rotate knee lifter handle till it clicks into the
selected position that is most comfortable for you.
Memo• If you press the “Start/Stop” button to
pause sewing, press it again to continue, reverse stitches (or reinforcement stitches) will not be sewn.
Memo• If “Automatic Presser Foot Lift” in the
machine settings screen is set to “ON”, the needle and the presser foot are raised when the machine is stopped.

USEFUL FUNCTIONSSew
ing Basics
91
2
bAlign the tabs on the knee lifter with the notches in the knee lifter slot on the front of the machine. Insert the knee lifter bar as far as possible.
cUse your knee to move the knee lifter bar to the right in order to raise the presser foot. Release the knee lifter to lower the presser foot.
Automatic Fabric Sensor System (Automatic Presser Foot Pressure)
The thickness of the fabric is automatically detected and the presser foot pressure is automatically adjusted with an internal sensor while sewing, to insure that your fabric is fed smoothly. The fabric sensor system works continuously while sewing. This function is useful for sewing over thick seams (page 82), or quilting (page 123).
aPress .
o The settings screen appears.
bSet “Automatic Fabric Sensor System” to “ON”.
cPress to return to the original screen.
CAUTION• Only change position of the knee lifter handle
when knee lifter is not on the machine, otherwise the knee lifter may damage the mounting slot on front of the machine.
Note• If the knee lifter bar is not pushed into the
mounting slot as far as possible, it may come out during use.
CAUTION• Be sure to keep your knee away from the knee
lifter during sewing. If the knee lifter is pushed during machine operation, the needle may break or the thread tension may loosen.
Memo• When the presser foot is in the up position,
move the knee lifter to the far right and then release to return the presser foot to the down position.

USEFUL FUNCTIONS
92
Needle Position - Stitch Placement
When the “Needle Position - Stitch Placement” is “ON”, the needle will be partially lowered for precise stitch placement and then press the “Needle Position” button to lower the needle completely. Each press of the “Needle Position” button changes the needle to the next position. When the “Needle Position - Stitch Placement” is “OFF”, each press of the “Needle Position” button simply raises and then lowers the needle.
“Needle Position - Stitch Placement” is “ON”
* When the needle is nearly lowered by pressing the “Needle Position” button, the feed dogs are lowered. At this time, the fabric can be shifted to finely adjust the needle drop position.
“Needle Position - Stitch Placement” is “OFF”
aPress .
bSet “Needle Position - Stitch Placement” to “ON” or “OFF”.
cPress to return to the original screen.
Checking the Needle Location in the Screen
You can check the stitch image with actual fabric image on the screen.
aSelect a stitch.
bPress .
o An image of the selected stitch and the actual fabric image are displayed.
* Press to change the thread color displayed on the screen. You can select from four different colors.
cPress on the fabric image or on the screen.
o The camera view window appears.
o Press again to turn off the camera view.

USEFUL FUNCTIONSSew
ing Basics
93
2
■ Using the Camera View Window
o The camera view window appears.a CAMERA IMAGEb GRID VIEWc NEEDLE DROP POSITION
d
e ZOOM
CAMERA IMAGEPress this key to save a camera image to the USB media.Insert the USB media to the machine to save a camera image (Refer to “Saving a Settings Screen Image to USB Media” on page 32). The files for camera images are saved as “.PNG”. A maximum of 100 camera images can be saved in one USB media.
GRID VIEWPress this key to display a grid.
Press to close the screen.
NEEDLE DROP POSITION
Press to show the needle drop position in the
screen as “ ”.
Lower the presser foot before pressing . Once the needle drop position appears on the screen, you can raise the presser foot and change the needle drop position by moving the fabric.
a Needle drop position
ZOOM
Press to enlarge the image in the screen.
Press again to return the image to its original display size.
bc
d
e
a
Note• The camera view window disappears when
you start sewing.• When sewing thick fabrics, the needle drop
position indicated in the screen may differ from the actual position.
a

USING THE PROJECTOR
94
Convenient Sewing Features by Using the Projector
Operations that can use the projector
• Setting the guideline as a reference for your sewing position.
• Selecting a stitch pattern
• Editing the selected stitch pattern
• Displaying the needle drop point (when embroidering)
• Displaying the edited embroidery pattern (when embroidering)
About the Dual Purpose Stylus
The included dual purpose stylus has two points. Use the soft point to operate the LCD screen and the hard point to operate the projector.
Installing a Battery in the Dual Purpose Stylus
A battery for the dual purpose stylus is not included with your machine. Use a new AAA alkaline battery (LR03).
aSlide the lid with your finger to remove it.
bInstall a new AAA alkaline battery (LR03) in the dual purpose stylus with the negative end (-) pointing up.
USING THE PROJECTOR
CAUTION• Do not stare directly at the projector light.
Otherwise, blindness may result.
WARNING• Do not disassemble or modify the dual
purpose stylus.• Do not use metallic objects, such as tweezers
or a metallic pen, when changing the battery.• Do not throw the battery into fire or expose to
heat.• Remove battery immediately and stop using
the machine if you notice abnormal odor, heat, discoloration, deformation or anything unusual while using or storing it.
CAUTION• Remove the battery if you do not intend to use
the dual purpose stylus for an extended period of time.
• Do not set the positive and negative ends of the battery in the wrong direction.
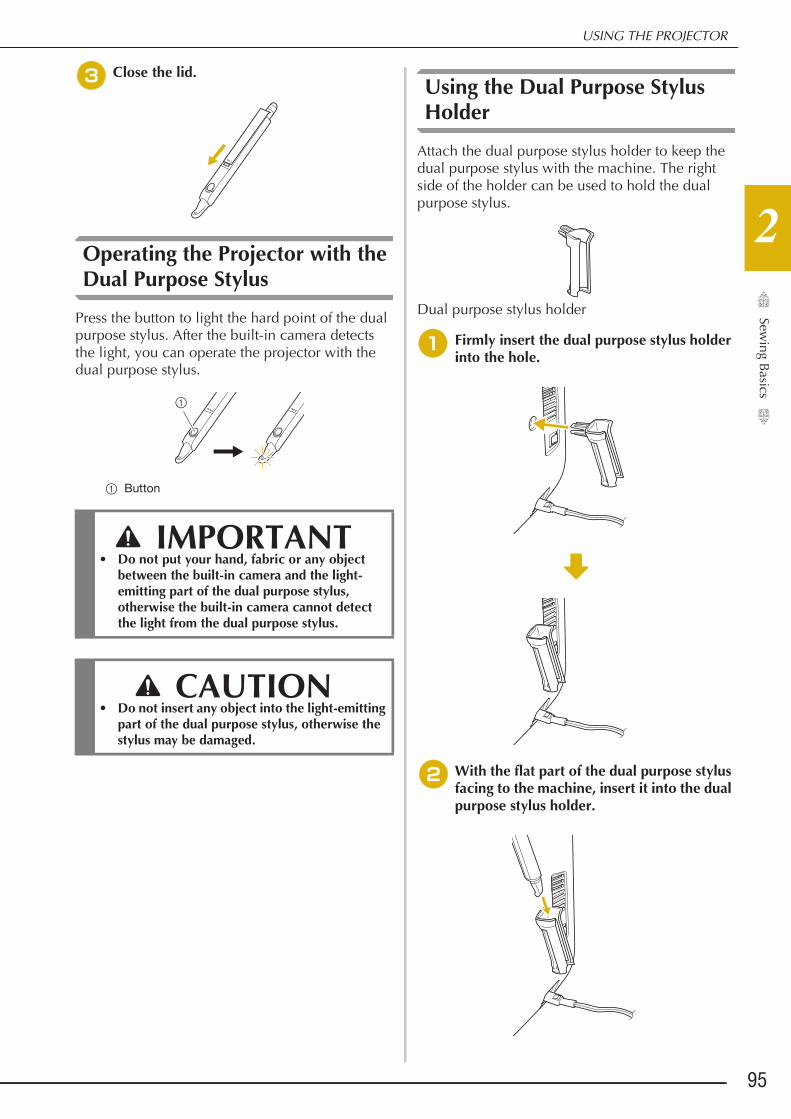
USING THE PROJECTORSew
ing Basics
95
2
cClose the lid.
Operating the Projector with the Dual Purpose Stylus
Press the button to light the hard point of the dual purpose stylus. After the built-in camera detects the light, you can operate the projector with the dual purpose stylus.
a Button
Using the Dual Purpose Stylus Holder
Attach the dual purpose stylus holder to keep the dual purpose stylus with the machine. The right side of the holder can be used to hold the dual purpose stylus.
Dual purpose stylus holder
aFirmly insert the dual purpose stylus holder into the hole.
bWith the flat part of the dual purpose stylus facing to the machine, insert it into the dual purpose stylus holder.
IMPORTANT• Do not put your hand, fabric or any object
between the built-in camera and the light-emitting part of the dual purpose stylus, otherwise the built-in camera cannot detect the light from the dual purpose stylus.
CAUTION• Do not insert any object into the light-emitting
part of the dual purpose stylus, otherwise the stylus may be damaged.
a

PROJECTOR FUNCTIONS (UTILITY STITCHES AND CHARACTER/DECORATIVE STITCHES)
96
Projection Area of Projector
When the machine is sewing utility stitches or character/decorative stitches, the projection area of the projector is as shown below.
a Needle drop pointb Projection areac 7.6 cm (3 inches)d 12.7 cm (5 inches)
Projecting the Stitch Pattern with the Projector
Using the projector, the selected stitch pattern can be projected onto the fabric.
aSelect a stitch pattern.
bPress .
o The selected stitch pattern and the adjustment keys are projected onto the fabric.
PROJECTOR FUNCTIONS (UTILITY STITCHES AND CHARACTER/DECORATIVE STITCHES)
Note• A stitch pattern cannot be selected from the
LCD while a stitch pattern is being projected by the projector. In order to select
a stitch pattern from the LCD, press in the screen.
a
b
c
d

PROJECTOR FUNCTIONS (UTILITY STITCHES AND CHARACTER/DECORATIVE STITCHES)Sew
ing Basics
97
2
Selecting a Stitch Pattern with the Dual Purpose Stylus
aWhen the stitch pattern is projected onto the fabric, press with the dual purpose stylus.
o A stitch pattern can be selected.
bPress with the dual purpose stylus until the desired stitch pattern is displayed, and then press .
Editing a Stitch Pattern Selected with the Dual Purpose Stylus
The stitch width, stitch length and “L/R Shift” can be changed for the stitch pattern projected by the projector.
aUse the dual purpose stylus to adjust the stitch width, stitch length and sewing position.
a Stitch width settingb Stitch length settingc “L/R Shift” settingd Press to select a different stitch pattern.o The specified settings are applied to the projected
stitch pattern.
Memo• When the stitch selection screen appears
again in the LCD, the settings change to those specified with the dual purpose stylus.
• With twin needle sewing, the stitch width is specified based on the left needle.
d
a b c

PROJECTOR FUNCTIONS (UTILITY STITCHES AND CHARACTER/DECORATIVE STITCHES)
98
Projecting the Guidelines with the Projector
With the guideline function, sewing can easily be done by following the lines and marks projected onto the fabric.
aPress .
o The guideline settings screen appears.
bSpecify the guideline settings.Main guideline
a If the guidelines will not be used, select “OFF”.b Select the guideline whose settings are to be
specified.c Select the length of the main guideline.d Select the color of the main guideline.e Specify the position of the main guideline.f Press to finish specifying the guideline settings.
Sub guideline
a Select the color of the sub guideline.b Specify the position of the sub guideline.
c Press to finish specifying the guideline settings.
Sub guideline
a Select the color of the sub guideline.b Specify the grid size of the sub guideline.
a
b
c
d
e
f
Memo• When or is selected, the position of
the sub guideline is based on the position of the main guideline. When the position of the sub guideline is changed, change the position of the main guideline.
a
b
c
a
b

PROJECTOR FUNCTIONS (UTILITY STITCHES AND CHARACTER/DECORATIVE STITCHES)Sew
ing Basics
99
2
Sub guideline
a Select the color of the sub guideline.b Specify the angle of the sub guideline.c Specify the seam allowance of the sub guideline.
a
b
c

PROJECTOR FUNCTIONS (UTILITY STITCHES AND CHARACTER/DECORATIVE STITCHES)
100

Chapter 3Utility Stitches

SELECTING UTILITY STITCHES
102
■ Utility Stitch LCD ScreenPress a key with your finger to select the stitch pattern, to select a machine function, or to select an operation indicated on the key.
* All key functions of the LCD are explained in the “Key Functions” table on the following page.
SELECTING UTILITY STITCHES
No. Display Key Name Explanation Page
a Stitch pattern display size
Shows the approximate size of the stitch pattern selected.
: Nearly the same size as the sewn stitch pattern* The actual size of the sewn stitch pattern may differ depending on the
type of fabric and thread that is used.
105
b Presser foot display Shows the presser foot code. Attach the presser foot indicated in this display before sewing.
72
c Selected stitch display
Shows the name and code number of the selected stitch. 105
d Stitch preview Shows a preview of the selected stitch. When shown at 100%, the stitch
appears in the screen at nearly its actual size. Press to display the stitch preview and the camera view together to check how the stitch will be sewn on the actual fabric.
92, 105
e Stitch selection screen
Press the key for the stitch pattern you want to sew. Use
to change to different stitch
groups.
105
f Scroll bar Slide the scroll bar to move the pages of stitch selection screen. 104
a
b
d
c
e
f

SELECTING UTILITY STITCHESU
tility Stitches
103
3
■ Key Functions
Note• Editing function keys are found after pressing .
No. Display Key Name Explanation Page
a Image key Press this key to display an enlarged image of the selected stitch pattern. 106
b Projector key Press this key to use projector functions. 96
c Guideline marker key Press this key to display or set the guideline marker for the sewing line. The guideline marker makes quilt piecing or aligning stitching on the fabric edge easier.
98
d Utility stitch key Press this key to select a straight stitch, zigzag stitch, buttonhole, blind hem stitch, or other stitches commonly used in garment construction.
105
e Character/Decorative stitch key
Press this key to select character or decorative stitch patterns. 158
f Edit key Press this key to display editing function keys on the screen. 166
g Free motion mode key
Press this key to enter free motion sewing mode.The presser foot is raised to an appropriate height and the feed dog is lowered for free motion quilting.
126
h Back to beginning key When sewing is stopped, press this key to return to the beginning of the stitch. 106
i Single/Repeat sewing key
Press this key to choose single stitches or continuous stitches. 106
j Mirror image key Press this key to create a mirror image of the selected stitch pattern. If the key display is light gray, a mirror image of the selected stitch pattern cannot be sewn.
105
k Needle mode selection key (single/double)
Press this key to select twin needle sewing mode. The sewing mode changes between single needle mode and twin needle mode each time you press the key. If the key display is light gray, the selected stitch pattern cannot be sewn in the twin needle mode.
64
l Slit length key Press this key to manually set the buttonhole length when a buttonhole stitch is selected.
144
m Retrieve key Press this key to retrieve a saved stitch pattern. 107
n Manual memory key Change the stitch pattern settings (zigzag width and stitch length, thread tension, automatic thread cutting or automatic reinforcement stitching, etc.), then save them by pressing this key. Five sets of settings can be saved for a single stitch pattern.
107
o Reset key Press this key to return the selected stitch pattern saved settings to the default settings.
85-87
v
c
g
l
mno
p
s
d e
f
i
h
k
j
qr
tu
a
w
b

SELECTING UTILITY STITCHES
104
■ Stitch Selection ScreensThere are seven categories of Utility Stitches.
p Thread tension key Shows the automatic thread tension setting of the currently selected stitch
pattern. You can use and to change the thread tension settings.
87
q “L/R Shift” keyPress to shift the stitch pattern to the right or press to shift the stitch pattern to the left. This feature is not available for all stitch patterns. Only those applicable will be shifted. The machine default setting is highlighted.
86
r Stitch width and stitch length key
Shows the zigzag width and stitch length settings of the currently selected
stitch pattern. You can use and to adjust the zigzag width and
stitch length settings.
85, 86
s Automatic reinforcement stitch key
Press this key to use the automatic reinforcement stitching (reverse stitching) setting. If you select this setting before sewing, the machine will automatically sew reinforcement stitches at the beginning and end of sewing (depending on the stitch pattern, the machine may sew reverse stitches).
79
t Automatic thread cutting key
Press this key to set the automatic thread cutting function. Set the automatic thread cutting function before sewing to have the machine automatically sew reinforcement stitches at the beginning and end of sewing (depending on the stitch pattern, the machine may sew reverse stitches) and trim the threads after sewing.
88
u Needle position setting key
Press this key to select the needle stop position to be up or down. You can also check the needle mode setting (single or twin).
Single needle/down position
Single needle/up position
Twin needle/down position
Twin needle/up position
64, 89
v Pivot key / Auto Up key
Press this key to select the pivot function. When the pivot function is selected, stopping the machine lowers the needle and slightly raises the presser foot automatically. In addition, when sewing is restarted, the presser foot is automatically lowered.
89
w Thread color change key
Press this key to change the thread color displayed on the screen. 106
Straight/Overcasting Decorative Stitches Heirloom Stitches Buttonholes/Bar tacks
Multi-directional Sewing Quilting Stitches Other stitches
No. Display Key Name Explanation Page

SELECTING UTILITY STITCHESU
tility Stitches
105
3
Selecting a Stitch
aTurn the main power to ON and press
to display the utility stitches.
o Either “1-01 Straight stitch (Left)” or “1-03 Straight stitch (Middle)” is selected, depending on the setting selected in the settings screen.
bUse to
select the category you want.
cPress the key of the stitch you want to sew.
■ Using the Mirror Image Key Depending on the type of utility stitch you select, you may be able to sew a horizontal mirror image of the stitch.
If is lit when you select a stitch, it will be possible to make a mirror image of the stitch.
Press to create a horizontal mirror image of the selected stitch.
The key will display as .
Memo• Swipe the key of a category or stitch pattern
sideways to display hidden categories.
Memo• For details on each stitch, refer to “STITCH
SETTING CHART” on page 206.
Note• If is light gray after you select a stitch,
you cannot create a horizontal mirror image of the selected stitch due to the type of stitch or type of presser foot recommended (this is true of buttonholes, multi-directional sewing, and others).

SELECTING UTILITY STITCHES
106
■ Returning to the Beginning of the StitchEven if you stopped stitching while sewing, you can return to the beginning of the stitch pattern. This function is useful after trial sewing or when the stitching is sewn incorrectly.
Press before start sewing, to return to the beginning of the stitch.
a Stop stitchingb Re-start stitching
■ Sewing Continuous/Single Stitch SewingPress to select continuous sewing or single stitch sewing.
■ Using the Image KeyYou can display an image of the selected stitch. You can check and change the colors of the image of the screen.
aPress .
o An image of the selected stitch is displayed.
bPress to change the thread color of the
stitch on the screen.
* Press to display an enlarged image of the stitch.
a Stitch screen
cPress to go back to the original
screen.
Memo• The color changes every time you press
.
a

SELECTING UTILITY STITCHESU
tility Stitches
107
3
Saving Your Stitch Settings
The settings for the zigzag stitch width, stitch length, thread tension, automatic thread cutting, automatic reinforcement stitching, etc., are preset in the machine for each stitch. However, if you have specific settings that you wish to reuse later for a stitch, you can change the settings so that they can be saved for that stitch. Five sets of settings can be saved for a single stitch.
■ Saving Settings
aSelect a stitch. (Example: )
bSpecify your preferred settings.
cPress .
o The settings are saved and the original screen automatically appears.
■ Retrieving Saved Settings
aSelect a stitch.
bPress .
cPress the numbered key of the settings to be retrieved.
* Press to return to the original screen without retrieving settings.
a Numbered keys
dPress .
o The selected settings are retrieved, and the original screen automatically appears.
Memo• If you try to save settings when there are
already 5 sets of settings saved for a stitch, the message “The pockets are full. Delete a pattern” will appear. Close the message and delete a setting referring to page 107.
Memo• When a stitch is selected, the last settings
retrieved are displayed. The last settings retrieved are retained even if the machine was turned off or a different stitch was selected.
Memo• To save new settings when there are
already 5 sets of settings saved for a stitch, press . Press the numbered key of
the setting to be deleted. Press ,
press and then . The new setting will be saved in place of the recently deleted setting.
• You can delete all the saved settings by pressing .
a
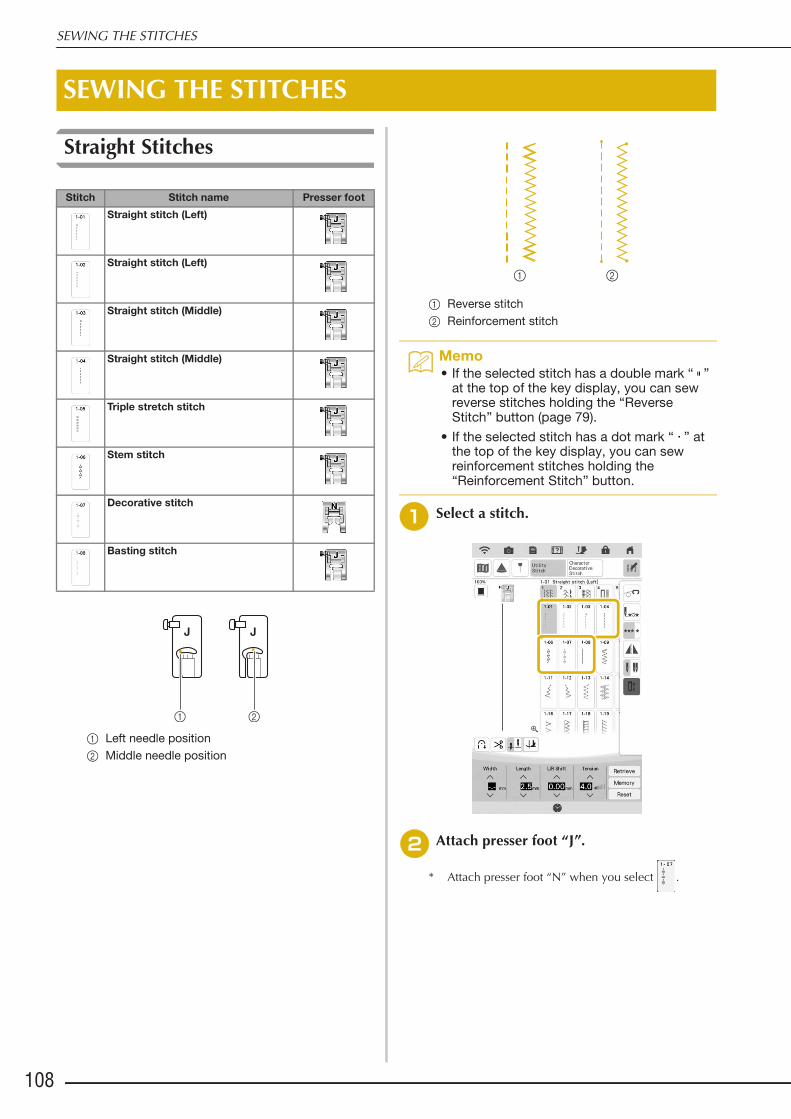
SEWING THE STITCHES
108
Straight Stitches
a Left needle positionb Middle needle position
a Reverse stitch b Reinforcement stitch
aSelect a stitch.
bAttach presser foot “J”.
* Attach presser foot “N” when you select .
SEWING THE STITCHES
Stitch Stitch name Presser foot
Straight stitch (Left)
Straight stitch (Left)
Straight stitch (Middle)
Straight stitch (Middle)
Triple stretch stitch
Stem stitch
Decorative stitch
Basting stitch
Memo• If the selected stitch has a double mark “ ”
at the top of the key display, you can sew reverse stitches holding the “Reverse Stitch” button (page 79).
• If the selected stitch has a dot mark “ ” at the top of the key display, you can sew reinforcement stitches holding the “Reinforcement Stitch” button.

SEWING THE STITCHESU
tility Stitches
109
3
cHold the thread tail and fabric with your left hand, and push the “Needle Position” button with your right hand to insert the needle into the fabric.
a Sewing start position
dLower the presser foot, and hold the “Reverse Stitch” button or the “Reinforcement Stitch” button to sew 3-4 stitches.
o The machine sews reverse stitches or reinforcement stitches.
ePress the “Start/Stop” button to sew forward.
a Reverse stitches or reinforcement stitcheso The machine will begin sewing slowly.
fWhen sewing is completed, hold the “Reverse Stitch” button or the “Reinforcement Stitch” button to sew 3-4 reverse stitches or reinforcement stitches at the end of the seam.
gAfter sewing, press the “Thread Cutter” button to trim the threads.
CAUTION• Be sure the needle does not strike a basting
pin, or any other objects, during sewing. The thread could tangle or the needle could break, causing injury.
Memo• When the automatic thread cutting and
automatic reinforcement stitch keys on the screen are selected, reverse stitches or reinforcement stitches will be sewn automatically at the beginning of sewing when the “Start/Stop” button is pressed. Press the “Reverse Stitch” button or the “Reinforcement Stitch” button to sew reverse stitches or reinforcement stitches and trim the thread automatically at the end of sewing.
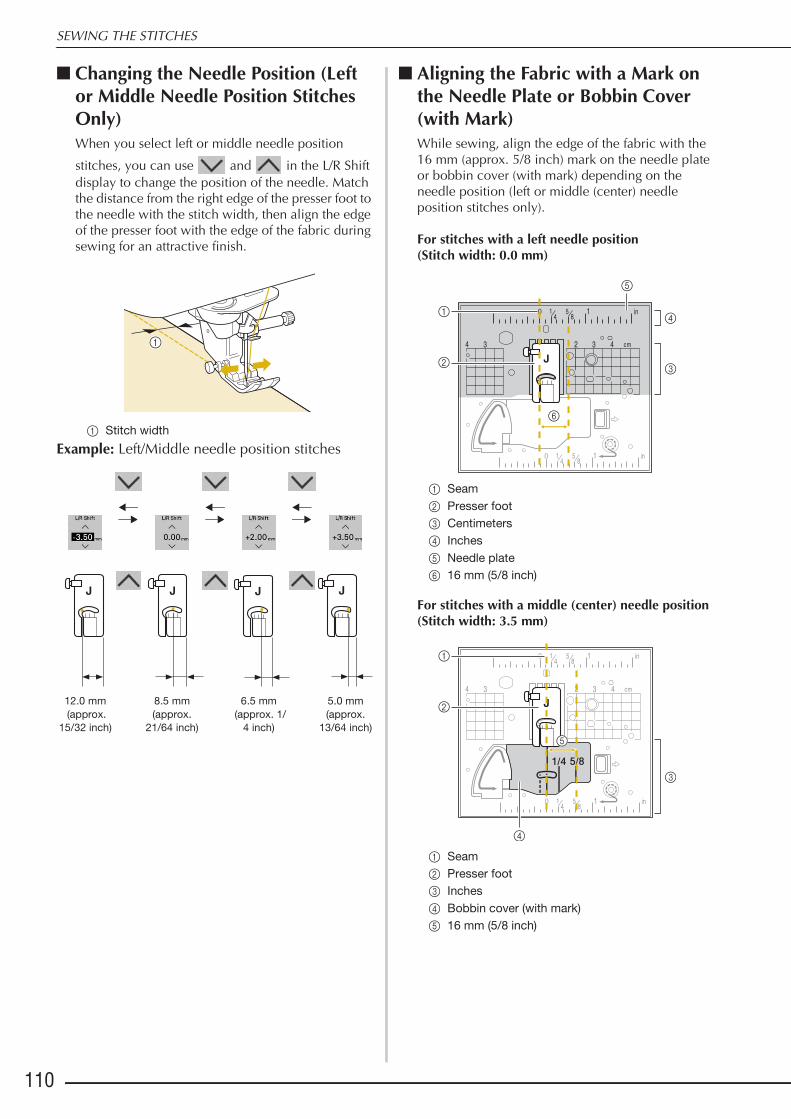
SEWING THE STITCHES
110
■ Changing the Needle Position (Left or Middle Needle Position Stitches Only) When you select left or middle needle position
stitches, you can use and in the L/R Shift display to change the position of the needle. Match the distance from the right edge of the presser foot to the needle with the stitch width, then align the edge of the presser foot with the edge of the fabric during sewing for an attractive finish.
a Stitch width Example: Left/Middle needle position stitches
■ Aligning the Fabric with a Mark on the Needle Plate or Bobbin Cover (with Mark)While sewing, align the edge of the fabric with the 16 mm (approx. 5/8 inch) mark on the needle plate or bobbin cover (with mark) depending on the needle position (left or middle (center) needle position stitches only).
For stitches with a left needle position(Stitch width: 0.0 mm)
a Seamb Presser footc Centimetersd Inchese Needle platef 16 mm (5/8 inch)
For stitches with a middle (center) needle position(Stitch width: 3.5 mm)
a Seamb Presser footc Inchesd Bobbin cover (with mark)e 16 mm (5/8 inch)
12.0 mm (approx.
15/32 inch)
8.5 mm(approx.
21/64 inch)
6.5 mm (approx. 1/
4 inch)
5.0 mm(approx.
13/64 inch)
a
bc
d
e
f
a
b
c
e
d

SEWING THE STITCHESU
tility Stitches
111
3
■ Using the Straight Stitch Needle Plate and the Straight Stitch FootThe straight stitch needle plate and the straight stitch foot can only be used for straight stitches (middle needle position stitches). Use the straight stitch needle plate and the straight stitch foot when sewing thin fabrics or when sewing small pieces which tend to sink into the hole of the regular needle plate during sewing. The straight stitch foot is perfect to reduce puckering on lightweight fabrics. The small opening on the foot provides support for the fabric as the needle travels through the fabric.
aPress the “Needle Position” button to raise the needle and turn the main power to OFF or press to lock all keys and buttons.
bRemove the needle and the presser foot holder (refer to page 69, 73).
cRemove the flat bed attachment or the embroidery unit if either are attached.
dSlide the needle plate lever toward you.
a Slide toward you.o The needle plate opens.
eSlide out the regular needle plate with your
right hand to remove it.
fInsert the tabs on the straight stitch needle plate into the notches in the machine.
a Tabsb Notchesc Round hole
gPress down on the right side of the straight stitch needle plate to secure it.
hSelect any of the straight stitches.
a 2.25 mm (1/8 inch)b 4.25 mm (3/16 inch)c 6.25 mm (1/4 inch)d 8.5 mm (5/16 inch)
CAUTION• Always use the straight stitch foot in
combination with the straight stitch needle plate.
a
Note• Selecting other stitches will cause an error
message to be displayed.• After installing straight stitch needle plate,
you must turn the machine OFF, then back to ON to reset the straight stitch settings.
a
c
b

SEWING THE STITCHES
112
iInsert needle and attach the straight stitch foot.
a Notchb Pin
jPress to unlock all keys and buttons, and then start sewing.
* After sewing, make sure to remove the straight stitch needle plate and the straight stitch foot, and reinstall the regular needle plate and the presser foot “J”.
Dart Seam
aSelect and attach presser foot “J”.
bSew a reverse stitch at the beginning of the dart and then sew from the wide end to the other end without stretching the fabric.
a Basting
cCut the thread at the end leaving 50 mm (approx. 1-15/16 inches), and then tie both ends together.
* Do not sew a reverse stitch at the end.
dInsert the ends of the thread into the dart with a hand sewing needle.
eIron the dart to one side so that it is flat.
Memo• When using the straight stitch needle plate,
many straight stitches become middle needle position stitches. If a straight stitch is selected that is not applicable for use when the straight stitch needle plate is attached, an error message will be displayed to prevent the use of this stitch. You cannot change the needle position using the L/R Shift.
CAUTION• Slowly rotate the handwheel toward you
(counterclockwise) before sewing and make sure that the needle is not contacting the straight stitch foot and straight stitch needle plate.
Memo• To prevent puckering on fine fabrics, use a
fine needle, size 75/11, and a short stitch length. For heavier fabrics, use a heavier needle, size 90/14, and longer stitches.

SEWING THE STITCHESU
tility Stitches
113
3
Gathering
Use on waists of skirts, sleeves of shirts, etc.
aSelect a straight stitch and attach presser foot “J”.
bSet the stitch length to 4.0 mm (approx. 5/32 inch) and the thread tension to approximately 2.0 (weaker tension).
cPull the bobbin and upper threads out by 50 mm (approx. 1-15/16 inches) (page 59).
a Upper threadb Bobbin threadc About 50 mm (approx. 1-15/16 inches)
dSew two rows of straight stitches parallel to the seam line, then trim excess thread leaving 50 mm (approx. 1-15/16 inches).
a Seam lineb 10 to 15 mm (approx. 3/8 inch to 9/16 inch)c About 50 mm (approx. 1-15/16 inches)
ePull the bobbin threads to obtain the desired amount of gather, then tie the threads.
fSmooth the gathers by ironing them.
gSew on the seam line and remove the basting stitch.
Flat Fell Seam
Use for reinforcing seams and finishing edges neatly.
aSelect and attach presser foot “J”.
bSew the finish line, then cut half of the seam allowance from the side on which the flat fell seam will lie.
* When the automatic thread cutting and automatic reinforcement stitching are preset, reverse stitches will be sewn automatically at the beginning of sewing. Press the “Reinforcement Stitch” button to sew a reinforcement stitch and trim the thread automatically at the end of sewing.

SEWING THE STITCHES
114
a About 12 mm (approx. 1/2 inch)b Wrong side
cSpread the fabric out along the finish line.
a Finish lineb Wrong side
dLay both seam allowances on the side of the shorter seam (cut seam) and iron them.
a Wrong side
eFold the longer seam allowance around the shorter one, and sew the edge of the fold.
a Wrong side
Finished flat fell seam
a Surface
Pintuck
aMark along the folds on the wrong side of the fabric.
a Wrong side
bTurn the fabric and iron the folded parts only.
a Surface
cSelect and attach presser foot “I”.

SEWING THE STITCHESU
tility Stitches
115
3
dSew a straight stitch along the fold.
* When the automatic thread cutting and automatic reinforcement stitching are preset, reverse stitches will be sewn automatically at the beginning of sewing. Press the “Reinforcement Stitch” button to sew a reinforcement stitch and trim the thread automatically at the end of sewing.
a Width for pintuckb Wrong sidec Surface
eIron the folds in the same direction.

SEWING THE STITCHES
116
Zigzag Stitches
Zigzag stitches are useful for overcasting, appliqué, patchwork, and many other applications. Select a stitch, and attach presser foot “J”. If the stitch which you select has a double mark “ ” at the top of the key display, you can sew reverse stitches by holding the “Reverse Stitch” button. (page 79)If the stitch which you select has a dot mark “ ” at the top of the key display, you can sew reinforcement stitches by holding the “Reinforcement Stitch” button (page 79).
aSelect a stitch.
bAttach presser foot “J”.
■ Overcasting (Using a Zigzag Stitch) Sew the overcasting along the edge of the fabric while positioning the right-hand side needle drop point just outside the edge of the fabric.
a Needle drop position
■ Appliqué (Using a Zigzag Stitch) Attach the appliqué material using a temporary spray adhesive or basting, and then sew it.
* Sew a zigzag stitch while positioning the right-hand side needle drop point just outside the edge of the fabric.
■ Patchwork (for Crazy Quilt) Turn back the desired width of fabric and position it over the lower fabric, then sew so that the stitch bridges both pieces of fabric.
■ Sewing Curves (Using a Zigzag Stitch) Shorten the stitch length setting to obtain a fine stitch. Sew slowly, keeping the seams parallel with the fabric edge as you guide the fabric around the curve.
Stitch Stitch name Presser foot
Zigzag stitch
Zigzag stitch
Zigzag stitch (Right)
Zigzag stitch (Left)

SEWING THE STITCHESU
tility Stitches
117
3
■ Cord Guide Bobbin Cover (Using a Zigzag Stitch)
aRemove the bobbin cover from the machine (page 58).
bThread the gimp thread through the hole in the cord guide bobbin cover from bottom to top. Position the thread in the notch at the back of the cord guide bobbin cover.
a Notchb Gimp thread
cSnap the cord guide bobbin cover into place, making sure that the gimp thread can be fed freely.
* Make sure there are no restrictions when feeding the thread.
dSet the zigzag width from 2.0-2.5 mm (approx. 1/16 - 3/32 inch).
eAttach presser foot “N”.
fPosition the fabric right side up on top of the cord and place the cord to the rear of the machine under the presser foot.
a Fabric (right side)b Gimp thread
gLower the presser foot and start sewing to make a decorative finish.
Elastic Zigzag Stitches
Use elastic zigzag stitches for tape attaching, overcasting, darning, or a wide variety of other uses.
aSelect a stitch.
bAttach presser foot “J”.
■ Tape Attaching While stretching the tape flat, sew it to the fabric.
a Tape
a
b
Stitch Stitch name Presser foot
2 steps elastic zigzag
2 steps elastic zigzag
3 steps elastic zigzag

SEWING THE STITCHES
118
■ OvercastingUse this stitch to sew overcasting on the edge of stretch fabrics. Sew the overcasting along the edge of the fabric while positioning the right-hand side needle drop point just outside the edge of the fabric.
Overcasting
Use for the edge of seams in skirts or trousers, and the edge of all cuttings. Use presser foot “G”, presser foot “J”, or the side cutter attachment depending on the kind of overcasting stitch you select.
■ Overcasting Using Presser Foot “G”
aSelect a stitch and attach presser foot “G”.
bLower the presser foot so that the presser foot guide is set flush against the edge of the fabric.
cSew along the presser foot guide.
a Guide
dPress the “Start/Stop” button to stop sewing when you are finished, and raise the presser foot and needle to remove the fabric by pulling it back.
Stitch Stitch name Presser foot
Overcasting stitch
Overcasting stitch
Overcasting stitch
CAUTION• After the stitch width is adjusted, rotate the
handwheel toward you (counterclockwise). Check that the needle does not touch the presser foot. If the needle hits the presser foot, the needle may break and cause injury.
a The needle should not touch the center bar• If the presser foot is raised to its highest level,
the needle may strike the presser foot.
CAUTION• Pull the fabric to the back of the machine after
finished sewing. By pulling the fabric to the front or side, the center bar of the presser foot “G” may break.
a Center bar

SEWING THE STITCHESU
tility Stitches
119
3
■ Overcasting Using Presser Foot “J”
aSelect a stitch and attach presser foot “J”.
bSew with the needle dropping slightly off the edge of the fabric.
a Needle drop position
■ Overcasting Using the Side Cutter (Sold Separately)By using the side cutter, you can do overcasting while cutting the fabric.
aSelect a stitch.
bFollow the steps on page 72 to remove the presser foot.
cThread the needle (page 61).
Stitch Stitch name Presser foot
Overcasting stitch
Overcasting stitch
Overcasting stitch
Overcasting stitch
Single diamond overcast
Single diamond overcast
Note• Fine adjustment of the stitching on the
fabric can be done with “L/R Shift”. Before sewing your project, be sure to sew trial stitches using the same conditions as in the actual project.
Memo• For best results when sewing stretch
fabrics, decrease the pressure of the presser foot.
a
CAUTION• Recommended stitches are noted “S” in the
lower right corner, therefore sure to only select one of these stitches listed below. Using another stitch may cause the needle to hit the presser foot and break, possibly causing injury.
Note• Thread the needle manually when using the
side cutter, or only attach the side cutter after threading the needle using the “Automatic Threading” button.
Stitch Stitch name Presser foot
With side cutter
With side cutter
With side cutter
With side cutter
With side cutter

SEWING THE STITCHES
120
dPosition the fork on the side cutter’s operating lever onto the needle clamp screw.
a Needle clamp screwb Operating lever
ePosition the side cutter so that the side cutter pin is aligned with the notch in the presser foot holder, and then lower the presser foot.
a Notch in presser foot holderb Pino The side cutter is attached.
fRaise the presser foot and pull out a long section of the upper thread. Pass it below the presser foot and pull it out in the fabric feed direction.
a Presser foot b Upper thread
gMake a cut of approximately 20 mm (approx. 3/4 inch) in the fabric.
a 20 mm (approx. 3/4 inch)
hPosition the fabric so that the right side of the cut is on top of the guide plate and the left side of the cut is underneath the presser foot.
a Guide plate (lower knife)b Presser footc Upper thread
iLower the presser foot and start.
o A seam allowance is cut while the stitching is sewn.
Memo• Make sure that the fork of the operating
lever is set onto the needle screw firmly.
Memo• If the fabric is not positioned correctly, the
fabric will not be cut.

SEWING THE STITCHESU
tility Stitches
121
3
■ Sewing Straight Stitches While Using the Side Cutter (Sold Separately)The seam margin should be approximately 5 mm (approx. 3/16 inch).
a Seam margin
Quilting
You can make beautiful quilts quickly and easily with this machine. When making a quilt, you will find it convenient to use the knee lifter and foot controller to free your hands for other tasks (“Using the Foot Controller” on page 78 and /or “Using the Knee Lifter” on page 90). The 30 quilting stitches Q-01 through Q-30 and the utility stitches with “P” or “Q” indicated on their key are useful for quilting.The “P” or “Q” at the bottom of the key display indicates that these stitches are intended for (“Q”) quilting and (“P”) piecing.
• When using the side cutter, sew between low and mid-speed and do not touch the knives or operation lever of the side cutter while sewing to avoid equipment damage or injury.
a Guide plate (lower knife)b Upper knifec Operation lever
Note• If the width has been adjusted, rotate the
handwheel toward you (counterclockwise). Check that the needle does not touch the side cutter. If the needle touches the side cutter, it might cause the needle to break.
Memo• The fabric will not be cut if the whole fabric
is simply spread out underneath the presser foot guide plate. Set the fabric as explained in step h from the previous section, and then start sewing.
• One layer of 13 oz. denim can be cut.• Clean the side cutter after use to avoid
having dust and scraps of thread build up in the cutter area.
• Add a small amount of oil as required to the cutting edge of the cutter.
Stitch Stitch name
Presser foot
Piecing stitch (Middle)
Piecing stitch (Right)
Piecing stitch (Left)
Hand-look quilting (Middle)
Basting stitch

SEWING THE STITCHES
122
Stem stitch
Quilting appliqué zigzag stitch
Zigzag stitch (Right)
Zigzag stitch (Left)
2 steps elastic zigzag
3 steps elastic zigzag
Quilting appliqué stitch
Shell tuck edge
Blanket stitch
Quilting stippling
Overcasting stitch
Tape attaching
Serpentine stitch
Feather stitch
Fagoting cross stitch
Couching stitch
Patchwork double overlock stitch
Smocking stitch
Rick-rack stitch
Stitch Stitch name
Presser foot
Decorative stitch
Decorative stitch
Hemstitching
Hemstitching
Single diamond overcast
Overcasting stitch
Piecing stitch (Right)
Piecing stitch (Middle)
Piecing stitch (Left)
Hand-look quilting
Quilting appliqué zigzag stitch
Quilting appliqué stitch
Quilting stippling
Memo• When a stitch pattern in the quilting stitches
category (only quilting stitches marked with “Q”) is selected, a finer stitch width can be set than that available with stitch patterns in other categories.
Stitch Stitch name
Presser foot

SEWING THE STITCHESU
tility Stitches
123
3
■ PiecingSewing two pieces of fabric together is called piecing. When cutting pieces for quilt blocks, make sure the seam allowance is 6.5 mm (approx. 1/4 inch).
aSelect or and attach presser foot “J”.
bAlign the edge of the fabric with the edge of the presser foot, and start sewing.
* To sew a 6.5 mm (approx. 1/4 inch) seam allowance
along the right edge of the presser foot with
selected, the width should be set to 5.50 mm (approx. 7/32 inch).
a 6.5 mm (approx. 1/4 inch) * To sew a 6.5 mm (approx. 1/4 inch) seam allowance
along the left edge of the presser foot with
selected, the width should be set to 1.50 mm (approx. 1/32 inch).
a 6.5 mm (approx. 1/4 inch)
* To change the needle position, use or in the L/R Shift display.
■ QuiltingSewing the quilt top, batting, and backing together is called quilting. You can sew the quilt with the dual feed foot to keep the quilt top, batting, and backing from sliding. The dual feed foot has a motorized belt that moves together with the feed dogs in the needle plate during sewing.For straight line quilting, use the dual feed foot and the straight stitch needle plate. Always select a straight stitch (middle needle position) when using the straight stitch needle plate.
aSelect , or .
bAttach the dual feed foot (page 74).
cPlace one hand on each side of the presser foot to hold the fabric secure while sewing.
Memo• Using a straight stitch (middle needle
position) makes it easier to sew smoothly (page 108).
• In the case Q-01(center, at L/R Shift 3.5 mm) is selected, if the guideline marker is set at 10.0 mm (3.5 mm plus 6.5 mm, close to 1/4 inch), you can sew piecing by referring to the guideline marker.
Memo• Sew at slow to medium speed. • Always check to be sure that your quilting
surface is securely basted before beginning to sew. Specialized machine quilt needles and threads are also available for machine quilting.

SEWING THE STITCHES
124
■ Appliqué
aTrace the pattern onto the appliqué fabric and then cut around it, leaving a 3 to 5 mm (approx. 1/8 to 3/16 inch) seam allowance.
a Seam allowance: 3 to 5 mm (approx. 1/8 to 3/16 inch)
bPlace a piece of stabilizer cut to the finished size of the appliqué design onto the fabric, and then fold over the seam margin using an iron. Clip curves when necessary.
cTurn the appliqué over, and attach the stabilizer with basting pins or a basting stitch.
dSelect and attach presser foot “J”.
eUse the quilting appliqué stitch to attach the appliqué. Sew around the edge while dropping the needle as close to the edge as possible.
a Appliquéb Needle drop position
You can use the appliqué technique to attach appliqué designs like the three pictured below.
CAUTION• Be careful that the needle does not strike a
basting pin during sewing. Striking a pin can cause the needle to break, resulting in injury.
a Dresden plate b Stained glass c Sunbonnet sue
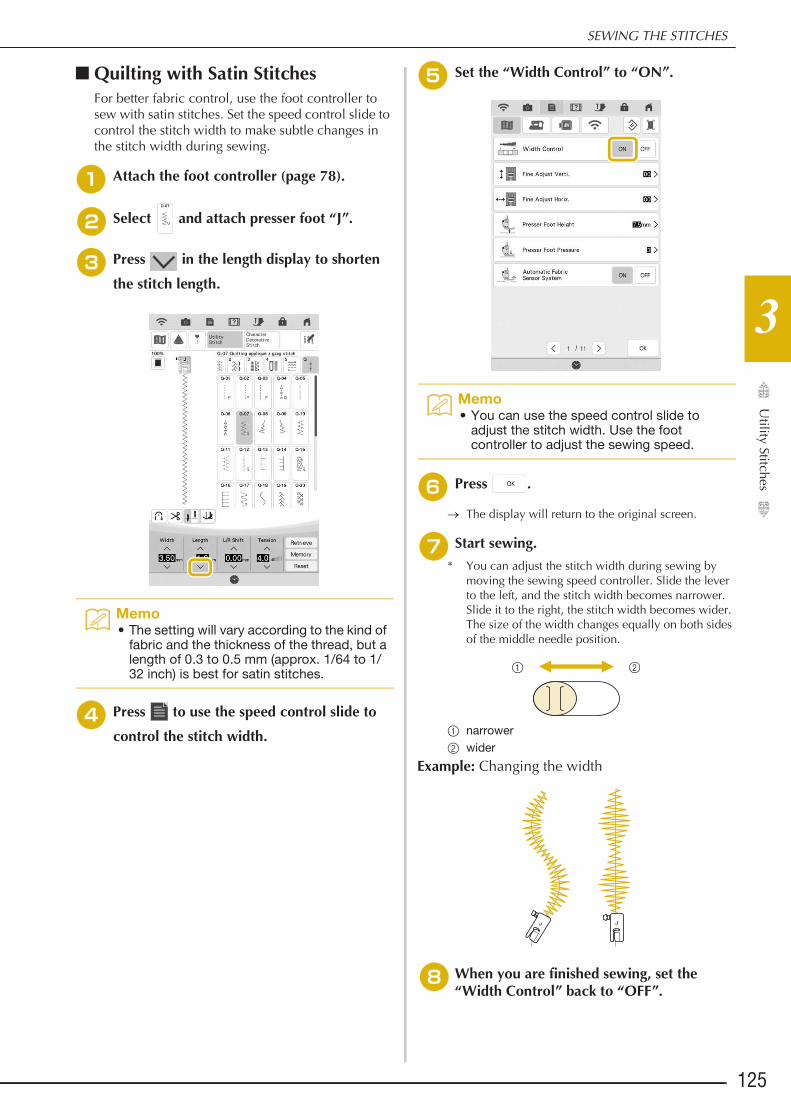
SEWING THE STITCHESU
tility Stitches
125
3
■ Quilting with Satin Stitches For better fabric control, use the foot controller to sew with satin stitches. Set the speed control slide to control the stitch width to make subtle changes in the stitch width during sewing.
aAttach the foot controller (page 78).
bSelect and attach presser foot “J”.
cPress in the length display to shorten
the stitch length.
dPress to use the speed control slide to
control the stitch width.
eSet the “Width Control” to “ON”.
fPress .
o The display will return to the original screen.
gStart sewing.
* You can adjust the stitch width during sewing by moving the sewing speed controller. Slide the lever to the left, and the stitch width becomes narrower. Slide it to the right, the stitch width becomes wider. The size of the width changes equally on both sides of the middle needle position.
a narrower b wider
Example: Changing the width
hWhen you are finished sewing, set the “Width Control” back to “OFF”.
Memo• The setting will vary according to the kind of
fabric and the thickness of the thread, but a length of 0.3 to 0.5 mm (approx. 1/64 to 1/32 inch) is best for satin stitches.
Memo• You can use the speed control slide to
adjust the stitch width. Use the foot controller to adjust the sewing speed.
a b

SEWING THE STITCHES
126
■ Free Motion QuiltingWith free motion quilting, the feed dogs can be
lowered by pressing , so that the fabric can be moved freely in any direction.For free motion quilting, use free motion quilting foot “C” or free motion open toe quilting foot “O” depending on the stitch that is selected, and set the machine to free motion sewing mode. In this mode, the presser foot is raised to the necessary height for free motion sewing.We recommend attaching the foot controller and sewing at a consistent speed. You can adjust the sewing speed with the speed control slide on the machine.
Using Free motion Quilting Foot “C”Use the free motion quilting foot “C” with straight stitch needle plate for free motion sewing.
Free motion quilting foot “C”
aAttach the straight stitch needle plate (page 111).
a Round hole
bSelect or .
CAUTION• With free motion quilting, control the feeding
speed of the fabric to match the sewing speed. If the fabric is moved faster than the sewing speed, the needle may break or other damage may result.
• When using free motion quilting foot “C”, be sure to use the straight stitch needle plate and sew with the needle in middle (center) needle position. If the needle is moved to any position other than the middle (center) needle position, the needle may break, which may result in injuries.
C
Memo• When starting to sew, the internal sensor
detects the thickness of the fabric, and the quilting foot is raised to the height specified in the machine settings screen. Press to display “Free Motion Foot Height” of the settings screen. Touch the number to select the height that the quilting foot is raised above the fabric. Increase the setting, for example, when sewing very stretchy fabric, so that it is easier to sew.
• In order to sew with a balanced tension, it may be necessary to adjust the upper thread tension. Test with a sample piece of fabric that is similar to your chosen fabric.
Memo• Notice this needle plate has a round hole for
the needle.
a

SEWING THE STITCHESU
tility Stitches
127
3
cPress to set the machine to free motion
sewing mode.
o The key appears as , the quilting foot is raised to the necessary height, and then the feed dogs are lowered for free motion sewing.
a Free motion quilting foot “C”o When stitch Q-01 or 1-31 is selected, free motion
quilting foot “C” is indicated in the upper-left corner of the screen.
dRemove the presser foot holder (page 73).
eAttach free motion quilting foot “C” at the front with the presser foot holder screw aligned with the notch in the quilting foot.
a Presser foot holder screwb Notch
fHold the quilting foot in place with your right hand, and tighten the presser foot holder screw using the multi-purpose screwdriver with your left hand.
a Presser foot holder screw
gUse both hands to stretch the fabric taut, and then move the fabric at a consistent pace in order to sew uniform stitches roughly 2.0-2.5 mm (approx. 1/16 - 3/32 inch) in length.
a Stitch
a
Note• Make sure that the quilting foot is attached
properly and not slanted.
CAUTION• Be sure to securely tighten the screws with the
included multi-purpose screwdriver. Otherwise, the needle may touch the quilting foot, causing it to bend or break.
b
a

SEWING THE STITCHES
128
hPress to cancel the free motion sewing
mode.o Rotate the handwheel toward you
(counterclockwise) to raise the feed dogs.
iAfter sewing, make sure to remove the straight stitch needle plate and presser foot “C”, and reinstall the regular needle plate.
Using free motion Open Toe Quilting Foot “O”The free motion open toe quilting foot “O” is used for free motion quilting with zigzag or decorative stitches or for free motion quilting of straight lines on fabric with an uneven thickness. Various stitches can be sewn using free motion open toe quilting foot “O”. For details on the stitches that can be used, refer to “STITCH SETTING CHART” on page 206.
Free motion open toe quilting foot “O”
aPress to set the machine to free motion
sewing mode.
o The key appears as , the quilting foot is raised to
the necessary height, and then the feed dogs are lowered for free motion sewing.
bSelect a stitch.
cRemove the presser foot holder (page 73).
dAttach free motion open toe quilting foot “O” by positioning the pin of the quilting foot above the needle clamp screw and aligning the lower-left of the quilting foot and the presser bar.
a Pinb Needle clamp screwc Presser bar
eHold the quilting foot in place with your right hand, and tighten the presser foot holder screw using the multi-purpose screwdriver with your left hand.
* Use the multi-purpose screw driver setting the position to “1”. (page 23)
a Presser foot holder screw
Note• Free motion open toe quilting foot “O” can
also be used with the straight stitch needle plate. We recommend using free motion open toe quilting foot “O” with free motion sewing of fabrics of uneven thicknesses.
• When using the straight stitch needle plate, all straight stitches become middle needle position stitches. You cannot change the needle position using the L/R Shift.
Memo• Normally, the feed dogs are raised for
regular sewing.• Do not be discouraged with your initial
results. The technique requires practice.
Memo• In order to sew with a balanced tension, it
may be necessary to adjust the upper thread tension (page 87). Test with a sample piece of quilting fabric.
OO
Memo• When stitch Q-01 or 1-31 is selected, free
motion quilting foot “C” is indicated in the upper-left corner of the screen. When the other stitches are selected, free motion open toe quilting foot “O” is indicated in the screen.
Note• Make sure that the quilting foot is not
slanted.
CAUTION• Be sure to securely tighten the screws with the
included multi-purpose screwdriver. Otherwise, the needle may touch the quilting foot, causing it to bend or break.

SEWING THE STITCHESU
tility Stitches
129
3
fUse both hands to stretch the fabric taut, and then move the fabric at a consistent pace in order to sew uniform stitches roughly 2.0-2.5 mm (approx. 1/16 - 3/32 inch) in length.
a Stitch
gPress to cancel the free motion sewing mode.
o Rotate the handwheel toward you (counterclockwise) to raise the feed dogs.
■ Echo Quilting Using the Free Motion Echo Quilting Foot “E”Sewing quilting lines at equal distances around a motif is called echo quilting. The quilting lines, which appear as ripples echoing away from the motif, are the distinguishing characteristic of this quilting style. Use the free motion echo quilting foot “E” for echo quilting. Using the measurement on the presser foot as a guide, sew around the motif at a fixed interval. We recommend attaching the foot controller and sewing at a consistent speed.
Free motion echo quilting foot “E” measurement
a 6.4 mm (approx. 1/4 inch)b 9.5 mm (approx. 3/8 inch)
aSelect .
bPress to set the machine to free motion sewing mode.
o The key appears as , the quilting foot is raised to
the necessary height, then the feed dogs are lowered for free motion sewing.
cFollow the steps on page 72 to remove the presser foot.
dRemove the presser foot holder (page 73) and the screw.
Memo• Do not be discouraged with your initial
results. The technique requires practice.
E
E
CAUTION• With free motion quilting, control the feeding
speed of the fabric to match the sewing speed. If the fabric is moved faster than the sewing speed, the needle may break or other damage may result.
Memo• When starting to sew, the internal sensor
detects the thickness of the fabric, and the quilting foot is raised to the height specified in the machine settings screen. Press to display “Free Motion Foot Height” of the settings screen (page 28). Touch the number to select the height that the quilting foot is raised above the fabric. Increase the setting, for example, when sewing very soft fabric, so that it is easier to sew.
• In order to sew with a balanced tension, it may be necessary to adjust the upper thread tension (page 87). Test with a sample piece of quilting fabric.

SEWING THE STITCHES
130
ePosition the free motion echo quilting foot “E” on the left side of the presser bar with the holes in the quilting foot and presser bar aligned.
fTighten the screw with the included screwdriver (large).
gUsing the measurement on the quilting foot as a guide, sew around the motif.
a 6.4 mm (approx. 1/4 inch)Finished project
hPress to cancel the free motion sewing
mode.o Rotate the handwheel toward you
(counterclockwise) to raise the feed dogs.
CAUTION• Be sure to securely tighten the screws with the
included screwdriver (large). Otherwise, the needle may touch the quilting foot, causing it to bend or break.
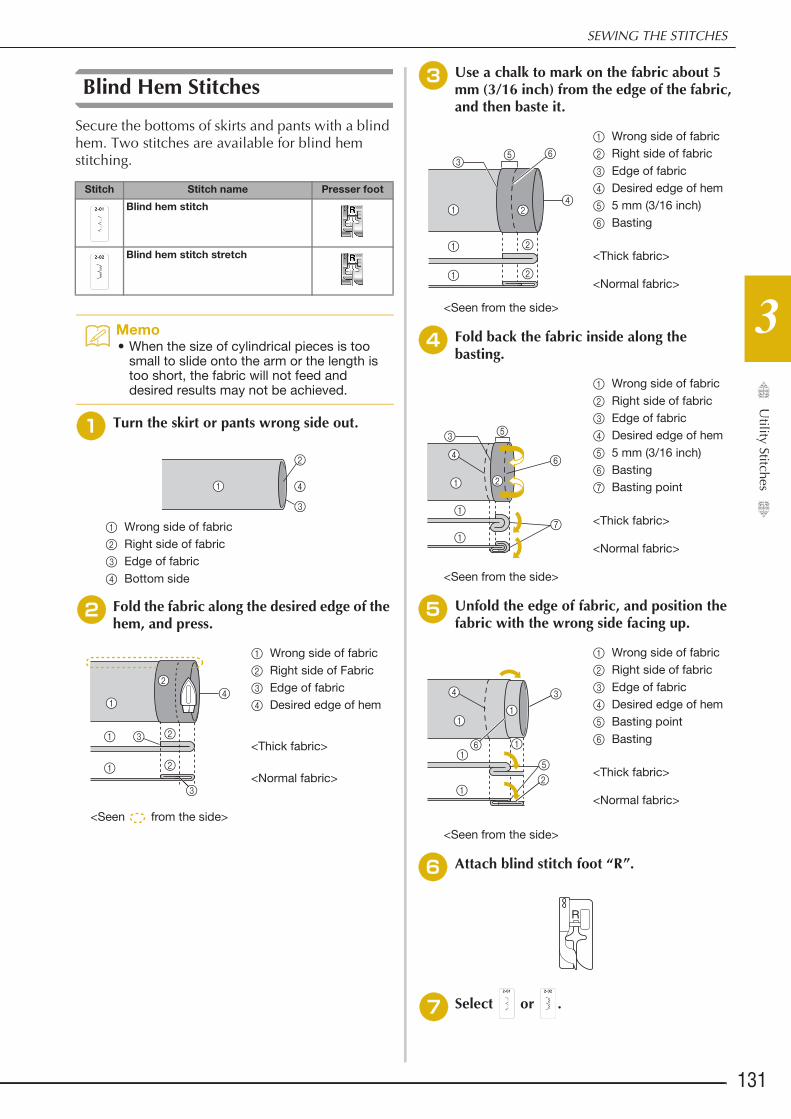
SEWING THE STITCHESU
tility Stitches
131
3
Blind Hem Stitches
Secure the bottoms of skirts and pants with a blind hem. Two stitches are available for blind hem stitching.
aTurn the skirt or pants wrong side out.
a Wrong side of fabricb Right side of fabricc Edge of fabricd Bottom side
bFold the fabric along the desired edge of the hem, and press.
cUse a chalk to mark on the fabric about 5 mm (3/16 inch) from the edge of the fabric, and then baste it.
dFold back the fabric inside along the basting.
eUnfold the edge of fabric, and position the fabric with the wrong side facing up.
fAttach blind stitch foot “R”.
gSelect or .
Stitch Stitch name Presser foot
Blind hem stitch
Blind hem stitch stretch
Memo• When the size of cylindrical pieces is too
small to slide onto the arm or the length is too short, the fabric will not feed and desired results may not be achieved.
a Wrong side of fabricb Right side of Fabricc Edge of fabricd Desired edge of hem
<Thick fabric>
<Normal fabric>
<Seen from the side>
2
1
3
1
2
1 2
1
3
3
4
2
a Wrong side of fabricb Right side of fabricc Edge of fabricd Desired edge of heme 5 mm (3/16 inch)f Basting
<Thick fabric>
<Normal fabric>
<Seen from the side>
a Wrong side of fabricb Right side of fabricc Edge of fabricd Desired edge of heme 5 mm (3/16 inch)f Bastingg Basting point
<Thick fabric>
<Normal fabric>
<Seen from the side>
a Wrong side of fabricb Right side of fabricc Edge of fabricd Desired edge of heme Basting pointf Basting
<Thick fabric>
<Normal fabric>
<Seen from the side>
1 2
1 2
35 6
4
1 2
1
3
6
5
1
1
2
7
4
5
11
11
12
6
34

SEWING THE STITCHES
132
hRemove the flat bed attachment to use the free-arm.
iSlide the item that you wish to sew onto the free arm, make sure that the fabric feeds correctly, and then start sewing.
a Free arm
jPosition the fabric with the edge of the folded hem against the guide of the presser foot, and then lower the presser foot lever.
a Wrong side of fabricb Fold of hemc Guide
kAdjust the stitch width until the needle slightly catches the fold of the hem.
a Needle drop pointWhen you change the needle drop point, raise the needle, and then change the stitch width.
<Stitch Width>
a Thick fabricb Normal fabric
■ If the Needle Catches Too Much of the Hem FoldThe needle is too far to the left.
Press to decrease the stitch width so that the needle slightly catches the fold of the hem.
<Thick fabric>
<Normal fabric>
a Wrong side of fabricb Right side of fabric
■ If the Needle does not Catch the Hem FoldThe needle is too far to the right.Press to increase the stitch width so that the needle slightly catches the fold of the hem.
Memo• Blind hem stitches cannot be sewn if the left
needle drop point does not catch the fold. If the needle catches too much of the fold, the fabric cannot be unfolded and the seam appearing on the right side of the fabric will be very large, leaving an unattractive finish. If you experience either of these cases, follow the instructions below to solve the problem.
1 2

SEWING THE STITCHESU
tility Stitches
133
3
<Thick fabric>
<Normal fabric>
a Wrong side of fabricb Right side of fabric
lSew with the fold of the hem against the
presser foot guide.
mRemove the basting stitching and reverse the fabric.
a Wrong side of fabricb Right side of fabric
Appliqué
aUse a temporary spray adhesive, fabric glue or a basting stitch to attach the appliqué to the fabric.
* This will keep the fabric from moving during sewing.
a Appliqué b Fabric glue
bSelect or .
* Adjust the stitch length and width to correspond to the appliqué shape, size, and quality of material (page 85).
cAttach presser foot “J”. Check that the needle drops slightly off the edge of the appliqué, then start sewing.
a Appliqué material
a Needle drop position
1 2
Memo• For details on each stitch, refer to “STITCH
SETTING CHART” on page 206.

SEWING THE STITCHES
134
■ Appliqué Sharp Curves Stop the machine with the needle in the fabric outside the appliqué. Raise the presser foot and turn the fabric a little bit at a time while sewing for an attractive finish to the seam.
■ Appliqué CornersStop the machine with the needle in the right position of the outside (or inside) corner of the appliqué. Raise the presser foot and pivot the fabric to align the fabric edge. Lower the presser foot and continue stitching.
a Outside cornerb Inside corner
Shelltuck Stitches
Shelltuck stitches give an attractive appearance of shells along the curve of a collar. This stitch pattern can be used for edging the neckline or sleeves of dresses and blouses.
aSelect .
bIncrease the upper thread tension for an attractive scallop finish to the shelltuck stitches (page 87).
cTo make rows of shell tuck stitches, fold the fabric in half along the bias.
dAttach presser foot “J”. Set the needle drop point slightly off the edge of the fabric, and start sewing.
Memo• Placing a lightweight tear away stabilizer
beneath the stitching area will improve the stitch placement along the edge of the appliqué fabric.
Memo• For details on each stitch, refer to “STITCH
SETTING CHART” on page 206.
Memo• If the upper thread tension is too weak, the
shelltuck stitches will not scallop.
Memo• Use a thin fabric.

SEWING THE STITCHESU
tility Stitches
135
3
a Needle drop position
eUnfold the fabric, and iron the tucks to one side.
Scallop Stitches
This wave-shaped satin stitch is called the scallop stitch. Use this stitch to decorate the edges of blouse collars and handkerchiefs or use it as a hem accent.
aSelect .
bAttach presser foot “N”. Sew scallop stitches along the edge of the fabric.
* Do not sew directly on the edge of the fabric.
cTrim along the seam, making sure not to cut the stitches.
Crazy Quilting
For a decorative look called “Crazy Quilting”, the following stitches can be sewn on top of a pressed seam allowance.
aSelect a straight stitch and attach presser foot “J”.
bWith the right sides facing each other, sew two pieces of fabric together, and then press open the seam allowance.
a Straight stitch b Seam margins c 6.5 mm (approx. 1/4 inch) d Wrong side
Memo• To make shell tucks at the edge of a collar
or neckline, follow the stitch pattern’s instructions and then use this stitch to make a decorative finish on the collar or neckline.
Memo• A temporary spray adhesive may be
necessary for lightweight fabrics. Test sew the fabric before sewing a project.
Memo• For details on each stitch, refer to “STITCH
SETTING CHART” on page 206.
Memo• Use a seam sealant to secure the edges of
the scallop stitches.

SEWING THE STITCHES
136
cSelect a stitch for top stitching.
dPlace the fabric right side up in the machine, and center the presser foot over the seam when sewing.
a Right side of fabric
Smocking Stitches
Use smocking stitches for decorative sewing on clothes, etc.
aSelect a straight stitch and attach presser foot “J”.
bSet the stitch length to 4.0 mm (approx. 5/32 inch) and loosen the upper thread tension to approximately 2.0 (“Setting the Stitch Length” on page 86 and “Setting the Thread Tension” on page 87).
cPull the bobbin and upper threads out by 50 mm (approx. 2 inches).
dSew the seams, leaving approximately 10 mm (approx. 3/8 inch) between the seams, then trim excess thread, leaving 50 mm (approx. 2 inches).
a Approximately 10 mm (approx. 3/8 inch)
ePull the bobbin threads to obtain the desired amount of gather, and then smooth the gathers by ironing them.
fSelect or .
gSew the spaces between the straight seams.
hPull out the straight stitch threads.
Memo• For details on each stitch, refer to “STITCH
SETTING CHART” on page 206.

SEWING THE STITCHESU
tility Stitches
137
3
Fagoting
When there is a space between two fabrics with thread sewn over the space to join the fabrics together, it is called fagoting. Use this stitch when sewing blouses or children’s clothes.
aBaste two pieces of fabric onto thin paper, leaving a space of 4 mm (approx. 3/16 inch) between the fabrics.
* If you draw a line down the middle of the thin paper or water soluble stabilizer, sewing is easier.
a 4.0 mm (approx. 3/16 inch) b Paper c Basting stitches
bSelect or .
cAttach presser foot “J”. Align the center of
the presser foot with the middle of the space between the fabrics and begin sewing.
a Basting stitches
dWhen sewing is finished, gently tear the paper away.
Tape or Elastic Attaching
aSelect a straight stitch and attach presser foot “J”.
bSet the stitch length to 4.0 mm (approx. 3/16 inch), and loosen the upper thread tension to 2.0 (“Setting the Stitch Length” on page 86 and “Setting the Thread Tension” on page 87).
cSew two rows of straight stitches on the right side of the fabric, then pull the bobbin thread to create the necessary gather.
dPlace the tape over the gather, and hold it in place with basting pins.
a Tape
Memo• For details on each stitch, refer to “STITCH
SETTING CHART” on page 206.
Memo• Use a thick thread.
Memo• Be sure that neither automatic
reinforcement nor automatic thread
cutting is selected.
Memo• Before sewing the straight stitch, rotate the
handwheel toward you (counterclockwise) and pull up the bobbin thread. Holding the top and bobbin thread, pull a length of thread out from the rear of the machine. (Be sure that the presser foot is raised.)

SEWING THE STITCHES
138
eSelect or .
fSew over the tape (or elastic).
gPull out the straight stitch threads.
Heirloom
■ Hemstitching (1) (Daisy Stitch) Use for sewing tablecloths, decorative hems, and decorative stitching on shirt fronts.
aInsert a type 130/705H, size 100/16 Wing needle.
* This specialty sewing needle is not furnished with your machine. Must be purchased separately.
bSelect a stitch and attach presser foot “N”.
* Select any stitch between 3-01 and 3-25.
cStart sewing.
Example: Illustration of finished product
Memo• For details on each stitch, refer to “STITCH
SETTING CHART” on page 206.
CAUTION• Be sure the needle does not strike a basting
pin, or any other objects, during sewing. The thread could tangle or the needle could break, causing injury.
Memo• Use a light to medium weight homespun
fabric with a little stiffness.
CAUTION• The “Automatic Threading” button cannot be
used. Thread the wing needle by hand, from front to back. Using the “Automatic Threading” button may result in damage to the machine.
• A more attractive finish can be obtained if you use a “130/705H Wing” needle when sewing these stitch patterns. If using a wing needle and the stitch width has been set manually, check that the needle will not touch the presser foot by carefully rotating the handwheel toward you (counterclockwise) before starting to sew.
Memo• For details on each stitch, refer to “STITCH
SETTING CHART” on page 206.

SEWING THE STITCHESU
tility Stitches
139
3
■ Hemstitching (2) (Drawn Work (1))
aPull out several threads from one area on a piece of fabric to open the area.
* Pull out 5 or 6 threads to leave a 3 mm (approx. 1/8 inch) area open.
bSelect .
cAttach presser foot “N”. With the right side of the fabric facing up, sew one edge of the open area.
dPress to create a mirror image of the
stitch.
eMatch beginning needle drop points on the opposite edge of the open area to keep the stitching symmetrical.
■ Hemstitching (3) (Drawn Work (2))
aPull out several threads from both sides of the 4 mm (approx. 3/16 inch) area which are not yet open.
* Pull out four threads, leave five threads, and then pull out four threads. The width of five threads is approximately 4 mm (approx. 3/16 inch) or less.
a Approx. 4 mm (approx. 3/16 inch) or less b Four threads (pull out) c Five threads (leave)
bSelect .
cSew the decorative stitch in the center of the five threads created above.
Memo• Loosely woven fabrics work best for this.
Memo• For details on each stitch, refer to “STITCH
SETTING CHART” on page 206.
Memo• For details on each stitch, refer to “STITCH
SETTING CHART” on page 206.

SEWING THE STITCHES
140
Basting
aSelect and attach presser foot “J”.
bKeep pressing the “Reverse Stitch” button or the “Reinforcement Stitch” button to sew 4 stitches of reinforcement stitches, then press “Start/Stop” button to continue sewing.
cSew while keeping the fabric straight.
dEnd the basting with reinforcement stitches.
■ Free-Motion BastingWhen the feed dogs are lowered, basting can be sewn while freely moving the fabric.
aPress .
o The presser foot is raised to the height necessary for free-motion sewing, and the feed dogs are lowered.
bKeep pressing the “Reverse Stitch” button or the “Reinforcement Stitch” button to sew 4 stitches of reinforcement stitches, then press “Start/Stop” button to continue sewing.
cPress the “Start/Stop” button to start sewing.Sew while moving the fabric when the needle is raised.
dEnd the basting with reinforcement stitches.
Memo• A wing needle can be used for Hemstitching
(3).
Memo• When you use the basting stitch for
gathering, do not use a reinforcement stitch at the beginning; you should lift the presser foot, rotate the handwheel toward you (counterclockwise), pull up the bobbin thread and pull a length of top and bobbin thread out from the rear of the machine.
• Stitching will be sewn with a length of 5 mm (approx. 3/16 inch).
a 5 mm (approx. 3/16 inch)
Memo• If the side pedal of the multi-function foot
controller (sold separately) is set to “Single Stitch”, basting can be sewn by using the side pedal to sew each single stitch. For details on specifying settings for the multi-function foot controller, refer to “Specifying the Multi-Function Foot Controller (Sold Separately)” on page 33.
• The green light on the right of the “Reinforcement Stitch” button lights up while reinforcement or reverse stitching.
• The sewing speed is limited up to 100 spm.

SEWING THE STITCHESU
tility Stitches
141
3
One-step Buttonholes
With one-step buttonholes, you can make buttonholes appropriate to the size of your button.
One-step buttonholes are sewn from the front of the presser foot to the back, as shown below.
a Reinforcement stitching
aSelect a buttonhole stitch, and attach buttonhole foot “A+”.
CAUTION• When attaching and removing buttonhole foot
“A+”, do not apply excessive force to the presser foot, otherwise it may be damaged. In addition, be careful not to hit the needle when attaching and removing buttonhole foot “A+”, otherwise the needle may break.
Note• Before attaching the presser foot, check
that there is enough thread in the bobbin.• When the presser foot is attached, the
compartment of the flat bed attachment cannot be opened. Be sure to first remove any necessary accessories.
• Sew trial stitches on fabric that is the same as that used in your project, referring to “Fabric/Thread/Needle Combinations” on page 71.
• The built-in camera detects the position of buttonhole foot “A+”. Do not touch the camera. (Refer to “NAMES OF MACHINE PARTS AND THEIR FUNCTIONS” on page 12.)
• Do not peel the “A+” sticker off buttonhole foot “A+” or cover the sticker with the upper thread, etc., otherwise the camera cannot detect the presser foot or buttonholes cannot be sewn.
Stitch Stitch name Presser foot
Narrow rounded buttonhole
Wide round ended buttonhole
Tapered round ended buttonhole
Round ended buttonhole
Round ended buttonhole
Round double ended buttonhole
Narrow squared buttonhole
Wide squared buttonhole
Squared buttonhole
Stretch buttonhole
Heirloom buttonhole
Bound buttonhole
Keyhole buttonhole
Tapered keyhole buttonhole
Keyhole buttonhole
Stitch Stitch name Presser foot

SEWING THE STITCHES
142
bMark the position and length of the buttonhole on the fabric.
a Marks on fabricb Buttonhole sewing
cPull out the button holder plate on the presser foot, and insert the button that will be put through the buttonhole. Then tighten the button holder plate around the button.
a Button holder plate
dAlign the presser foot with the mark on the fabric, and lower the presser foot.
a Mark on the fabric b Marks on the presser foot
eGently hold the end of the upper thread, and then start sewing.
* Feed the fabric carefully by hand while the buttonhole is sewn.
o Once sewing is completed, the machine automatically sews reinforcement stitches, and then stops.
Memo• The maximum buttonhole length is about 47
mm (approx. 1-3/4 inches) (diameter + thickness of the button).
Memo• The size of the buttonhole is determined by
the size of the button in the button holder plate.
a
b
a
b
a
Note• Pass the thread underneath the presser
foot. • Slide the outside frame of the buttonhole
foot backward as far as possible as shown in the illustration, making sure that there is no gap behind the part of the foot marked “A+”. If the buttonhole foot is not slid back as far as possible, the buttonhole will not be sewn at the correct size.
Memo• If automatic thread cutting is turned on
before you start sewing, both threads are automatically cut after the reinforcement stitches are sewn. If the fabric does not feed (for example, because it is too thick), increase the stitch length setting.

SEWING THE STITCHESU
tility Stitches
143
3
fInsert a pin along the inside of one of the bar tacks, and then insert the seam ripper into the center of the buttonhole and cut towards the pin.
a Basting pinb Seam ripper
■ Sewing Stretch Fabrics
When sewing on stretch fabric with or , sew
the buttonhole stitches over a gimp thread.
aHook the gimp thread onto the back of presser foot “A+”. Insert the ends into the grooves at the front of the presser foot, and then temporarily tie them there.
a Upper thread
bLower the presser foot and start sewing.
CAUTION• When using the seam ripper to open the
buttonhole, do not put your hand or finger in the path of the ripper. The ripper may slip and cause injury. Do not use the seam ripper in any other way than how it is intended.
Memo• For keyhole buttonholes, use the eyelet
punch to make a hole in the rounded end of the buttonhole. Then insert a pin along the inside of one of the bar tacks, insert a seam ripper into the hole made with the eyelet punch, and cut towards the pin.
a Eyelet punch b Basting pin
Note• Attach stabilizer material to the back of
stretch fabrics to prevent them from stretching.
Memo• Set the width of the satin stitches to the
width of the gimp thread, and set the buttonhole width to be 2-3 times the width of the gimp thread.
a

SEWING THE STITCHES
144
cOnce sewing is completed, gently pull the gimp thread to remove any slack, and trim off any excess.
■ Odd Shaped Buttons/Buttons that do Not Fit into the Button Holder Plate Use the markings on the presser foot scale to set the size of the buttonhole. One mark on the presser foot scale equals 5 mm (approx. 3/16 inch). Add the button diameter and thickness together, and then set the plate at the calculated value.
a Presser foot scale b Button holder plate c Completed measurement of diameter + thickness d 5 mm (approx. 3/16 inch)
■ Sewing Thick FabricsPlace a piece of folded fabric or cardboard beside the fabric being sewn to level the buttonhole foot and allow for easier and even feeding.
a Presser foot b Thick paperc Fabric
Memo• After using the seam ripper to cut open the
threads over the buttonhole, trim off the threads.
a
dc
b
Memo• Example) For a button with a diameter of 15
mm (about 9/16 inch) and thickness of 10 mm (about 3/8 inch), align the scale with 25 mm (about 1 inch), or specify 25 mm in the screen.
a 10 mm (approx. 3/8 inch) b 15 mm (approx. 9/16 inch)
Memo• If automatic thread cutting is turned on
before you start sewing, both threads are automatically cut after the reinforcement stitches are sewn. If the fabric does not feed (for example, because it is too thick), increase the stitch length setting.
a
bc

SEWING THE STITCHESU
tility Stitches
145
3
■ Sewing Thick Seams or Fabric That Cannot Be Correctly FedAttach the buttonhole stabilizer, and then feed the fabric between the stabilizer and the presser foot.
Four-step Buttonholes
You can sew 4-step buttonholes using the following 4 stitches together. You can sew any desired length for the buttonhole when using 4-step buttonholes. 4-step buttonholes are a good option when attaching oversize buttons.
Four-step buttonholes are sewn as shown below.
aMark the position and length of the buttonhole on the fabric.
a Starting pointb End pointc Buttonhole sewing
bAttach monogramming foot “N”, and select
stitch to sew the left side of the
buttonhole.
cPress the “Start/Stop” button to start sewing.
dSew the desired length for the buttonhole and press the “Start/Stop” button again.
eSelect stitch to sew the bar tack and
press the “Start/Stop” button.o The machine will automatically stop after sewing
the bar tack.
fSelect stitch to sew the right side of the
buttonhole, and press the “Start/Stop” button to begin sewing.
Note• When changing the stitch settings, make
sure that all stitch settings are changed to match.
Stitch Stitch name Presser foot
4 steps buttonhole 1
4 steps buttonhole 2
4 steps buttonhole 3
4 steps buttonhole 4
b
c
a

SEWING THE STITCHES
146
gSew the right side of the buttonhole and press the “Start/Stop” button again.
* Sew the right side of the buttonhole the same length as the left.
hSelect stitch to sew the bar tack and
then press the “Start/Stop” button.o The machine will automatically sew off the bar tack
tie and stop when the bar tack is complete.
iRaise the presser foot and remove the fabric.
jRefer to page 143 to open the buttonhole.

SEWING THE STITCHESU
tility Stitches
147
3
■ Darning Use darning stitches for mending and other applications.
Darning is performed by sewing from the front of the presser foot to the back as shown below.
a Reinforcement stitches
aSelect a stitch, and attach buttonhole foot “A+”.
bSet the scale to the desired length of the darning.
a Presser foot scale b Completed length measurement c Width 7 mm (approx. 1/4 inch) d 5 mm (approx. 3/16 inch)
cCheck that the needle drops at the desired position and lower the presser foot, making sure the upper thread passes underneath the buttonhole foot.
dGently hold the end of the upper thread, and then press the “Start/Stop” button to start the machine.
o Once sewing is completed, the machine automatically sews reinforcement stitches, and then stops.
Stitch Stitch name Presser foot
Darning
Darning
Memo• The maximum length for darning is 50 mm
(approx. 1-31/32 inches).
a
d
c
b
Note• Pass the thread underneath the presser
foot.• Set the presser foot so that there is no gap
behind the section marked with an “A+” (the shaded area in the illustration below). If there is a gap, the size of the darning will not be correct.
Memo• If automatic thread cutting is turned on
before you start sewing, both threads are automatically cut after the reinforcement stitches are sewn. If the fabric does not feed (for example, because it is too thick), increase the stitch length setting.

SEWING THE STITCHES
148
Bar Tacks
Use bar tacks to reinforce areas that will be subject to strain, such as pocket corners.
aSelect .
bAttach buttonhole foot “A+” and set the scale to the length of the bar tack you wish to sew.
a Presser foot scale b Completed length measurement c 5 mm (approx. 3/16 inch)
cSet the fabric so that the pocket moves toward you during sewing.
dCheck the first needle drop point and lower the presser foot.
a 2 mm (approx. 1/16 inch)
eGently hold the end of the upper thread and begin sewing.
o When sewing is completed, the machine will sew reinforcement stitches and stop automatically.
Stitch Stitch name Presser foot
Bar tack
Memo• Bar tacks can be between 10 mm (approx.
25/64 inch) and 50 mm (approx. 1-31/32 inches).
a
cb
Note• Pass the thread underneath the presser
foot. • Slide the outside frame of the buttonhole
foot backward as far as possible as shown in the illustration, making sure that there is no gap behind the part of the foot marked “A+”. If the buttonhole foot is not slid back as far as possible, the bar tack will not be sewn to the correct size.

SEWING THE STITCHESU
tility Stitches
149
3
Button Sewing
Buttons with 2 or 4 holes can be attached, using the machine.
aSelect .
o The feed dogs are lowered automatically.
bRaise the presser foot.
cAttach button sewing foot “M”, slide the button along the metal plate and into the presser foot, and lower the presser foot.
a Buttonb Metal plate
dRotate the handwheel toward you (counterclockwise) to check that the needle goes into each hole correctly.
* If the needle does not reach the holes on the left side, adjust the stitch width.
* To attach the button more securely, repeat the process.
eGently hold the end of the upper thread and start sewing.
o The machine stops automatically when sewing is finished.
fFrom the wrong side of the fabric, pull the end of the bobbin thread to pull the upper thread through to the wrong side of the fabric. Tie the two thread ends together and cut the threads.
gAfter the button is attached, select another stitch and rotate the handwheel toward you (counterclockwise) to raise the feed dogs.
Stitch Stitch name Presser foot
Button sewing
Note• Do not use the automatic thread cutting
function when sewing buttons. Otherwise, you will lose the thread ends.
CAUTION• Make sure the needle does not strike the
button during sewing. The needle may break and cause injury.

SEWING THE STITCHES
150
■ Attaching 4 Hole ButtonsSew the two holes closest to you. Then raise the presser foot and move the fabric so that the needle goes into the next two holes, and sew them in the same way.
■ Attaching a Shank to the Button
aPull the shank lever toward you before sewing.
a Shank lever
bPull the two ends of the upper thread between the button and the fabric, wind them around the shank, and then tie them firmly together.
cTie the ends of the bobbin thread from the beginning and end of sewing together on the wrong side of the fabric.
dCut off any excess thread.
Eyelet
Use this stitch for making belt holes and other similar applications.
aSelect or .
bUse in either the stitch width
display or the stitch length display to choose the size of the eyelet.
a Large 7 mm (approx. 9/32 inch)b Medium 6 mm (approx. 15/64 inch)c Small 5 mm (approx. 13/64 inch)
cAttach monogramming foot “N”, then rotate the handwheel toward you (counterclockwise) to check the needle drop position.
a Needle drop position Note• When sewing is completed, be sure to
select the other stitch and rotate the handwheel toward you (counterclockwise) to raise the feed dogs.
Stitch Stitch name Presser foot
Eyelet
Star eyelet
Note• Only one size is available for .

SEWING THE STITCHESU
tility Stitches
151
3
dLower the presser foot and start sewing.
o When sewing is finished, the machine sews reinforcement stitches and stops automatically.
eUse the eyelet punch to make a hole in the center of the stitching.
Multi-directional Sewing (Straight Stitch and Zigzag Stitch)
Use these stitch patterns to attach patches or emblems to pant legs, shirt sleeves, etc.
aRemove the flat bed attachment to use the free-arm.
bSelect and attach monogramming foot
“N”.
cSet the needle in the fabric at the sewing start point, and sew seam “1” as shown.
a Start Point
dSelect and sew seam “2” as shown.
* The fabric will move sideways, guide the fabric by hand to keep sewing straight.
eSelect and sew seam “3” as shown.
o The fabric feeds forward while stitching backward.
Note• If the stitch pattern comes out poorly, make
adjustments to “SEWING STITCH PATTERNS” on page 163.
Memo• Insert the tubular piece of fabric onto the
free-arm, and then sew in the order shown in the illustration.
Memo• For details on each stitch, refer to “STITCH
SETTING CHART” on page 206.

SEWING THE STITCHES
152
fSelect and sew seam “4” as shown.
o The seam will be connected to the starting point of seam 1.
Zipper Insertion
■ Centered Zipper Use for bags and other such applications.
aSelect .
bAttach presser foot “J” and sew straight stitches up to the zipper opening. Change to a basting stitch (page 140) and sew to the top of the fabric.
a Basting stitches b Reverse stitches c End of zipper opening d Wrong side
cPress the seam allowance open and attach the zipper with a basting stitch in the middle of each side of the zipper tape.
a Basting stitches b Zipper c Wrong side
dRemove presser foot “J”. Align the right side of the pin in zipper foot “I” with the presser foot holder, and attach the zipper foot.
a Right b Left c Needle drop position
Memo• For details on each stitch, refer to “STITCH
SETTING CHART” on page 206.
Note• Make sure you sew using the middle needle
position.
CAUTION• When using zipper foot “I”, make sure the
straight stitch, middle needle position is selected. Rotate the handwheel toward you (counterclockwise) to make sure the needle does not strike the presser foot. If another stitch is selected, the needle will strike the presser foot, causing the needle to break and possibly causing injury.

SEWING THE STITCHESU
tility Stitches
153
3
eTopstitch 7 to 10 mm (approx. 1/4 to 3/8 inch) from the seamed edge of the fabric, then remove the basting.
■ Inserting a Side Zipper Use for side zippers in skirts or dresses.
aSelect .
bAttach presser foot “J” and sew straight stitches up to the zipper opening. Change to a basting stitch and sew to the top of the fabric.
a Reverse stitches b Wrong side of fabric c Basting stitches d End of zipper opening
cPress the seam allowance open and align the folded hem along the teeth of the zipper, while maintaining 3 mm (approx. 1/8 inch) of sewing space.
a Zipper pull tab b Wrong side of fabric c Zipper teeth d End of zipper opening e 3 mm (approx. 1/8 inch)
dRemove presser foot “J”.
CAUTION• Make sure the needle does not strike the
zipper during sewing. If the needle strikes the zipper, the needle may break, leading to injury.
Note• Make sure you sew using the middle needle
position.

SEWING THE STITCHES
154
eAlign the right side of the pin in zipper foot “I” with the presser foot holder, and attach the presser foot.
a Right b Left c Needle drop position
fSet the presser foot in the 3 mm (approx. 1/8 inch) margin.
gStarting from the end of the zipper opening, sew to a point about 50 mm (approx. 2 inches) from the edge of the fabric, then stop the machine.
hPull down the zipper slider, then continue sewing to the edge of the fabric.
a 50 mm (approx. 2 inches) b 3 mm (approx. 1/8 inch)
iClose the zipper, turn the fabric over, and sew a basting stitch.
a Front of the skirt (wrong side of fabric) b Basting stitches c Front of the skirt (right side of fabric) d Back of the skirt (right side of fabric)
jRemove the presser foot, and reattach it so that the left side of the pin is attached to the presser foot holder.
* When sewing the left side of the zipper, the needle should drop on the right side of the presser foot. When sewing the right side of the zipper, the needle should drop on the left side of the presser foot.
a Right b Left c Needle drop position
kSet the fabric so that the left edge of the presser foot touches the edge of the zipper teeth.
lSew reverse stitches at the top of the zipper, then continue sewing.
mStop sewing about 50 mm (approx. 2 inches) from the edge of the fabric, leave the needle in the fabric, and remove the basting stitches.
CAUTION• When using zipper foot “I”, make sure the
straight stitch, middle needle position is selected. Rotate the handwheel toward you (counterclockwise) to make sure the needle does not strike the presser foot. If another stitch is selected, the needle will strike the presser foot, causing the needle to break and possibly causing injury.
CAUTION• Make sure the needle does not strike the
zipper during sewing. If the needle strikes the zipper, the needle may break, leading to injury.

SEWING THE STITCHESU
tility Stitches
155
3
nOpen the zipper and sew the rest of the seam.
a Basting stitches b 7 to 10 mm (approx. 1/4 inch to 3/8 inch) c Reverse stitches d 50 mm (approx. 2 inches)

SEWING THE STITCHES
156

Chapter 4Character/Decorative Stitches

SELECTING STITCH PATTERNS
158
Press , then to display the screen below.
.
SELECTING STITCH PATTERNS
a Wide and Variousb Wide Botanicalc Wide Motifs and Messagesd Narrow and Variouse Narrow Botanicalf Candlewickingg Large Satinh Satini Cross Stitchesj Combinable Utilityk Alphabet characters (gothic font)l Alphabet characters (handwriting font)m Alphabet characters (outline)n Cyrillic fonto Pocket
Note• If the screen is locked ( ), unlock the screen by pressing . While the screen is locked, no other
key can be operated.
a b c d e f g h i j k l m n o

SELECTING STITCH PATTERNSC
haracter/Decorative Stitches
159
4
■ Stitch Selection Screens There are 14 categories of Character/Decorative stitch patterns.
Wide and Various Wide Botanical Wide Motifs and Messages Narrow and Various
Narrow Botanical Candlewicking Large Satin Satin
Cross Stitches Combinable UtilityAlphabet characters
(gothic font)Alphabet characters
(handwriting font)
Alphabet characters (outline) Cyrillic font

SELECTING STITCH PATTERNS
160
Selecting Decorative Stitch Patterns
aSelect the category of the stitch pattern you want to sew.
bPress the key of the stitch pattern you want to sew.
o The selected stitch pattern is displayed.
Selecting Character Stitch Patterns
Entering characters from the groups shown below, for example “Blue Sky”.
aPress , , or to select a font.
bPress to change the selection screens.
cPress and then enter “B”.
dPress and then enter “lue”.

SELECTING STITCH PATTERNSC
haracter/Decorative Stitches
161
4
ePress to enter a space.
fPress again and enter “S”.
gPress and then enter “ky”.
a Jump stitch* Remove the jump stitches after sewing.* To continue entering characters in a different font,
select the other font, and then repeat the procedure from step a.
■ Deleting Characters
aPress , and then press to delete the last character.
bSelect the correct character.
■ Adding Characters
aPress so that screen displays .
bPress or to move the cursor in front
of the character where you want to add characters.
cSelect the character you want to add.
■ Adjusting the Character SpacingThe space between the characters can be adjusted.
aPress , and then press .
o The character spacing window appears.
a
SELECTING STITCH PATTERNS
162
bPress to adjust character spacing.
* Press to increase the character spacing and press
to decrease the character spacing.
Memo• The default setting is “0”. No number less
than “0” can be set.• Changing character spacing by this
method, pertains to all characters. Spacing changes are valid not only while entering characters but also before and after the entering of characters.

SEWING STITCH PATTERNSC
haracter/Decorative Stitches
163
4
Sewing Attractive Finishes
To achieve attractive results when sewing character/decorative stitches, check the table below for the proper fabric/needle/thread combinations.
Basic Sewing
aSelect a stitch pattern.
bAttach monogramming foot “N”.
cPlace the fabric under the presser foot, pull the upper thread out to the side, and then lower the presser foot.
dPress the “Start/Stop” button to start sewing.
SEWING STITCH PATTERNS
Note• Other factors, such as fabric thickness, stabilizer material, etc., also have an effect on the stitch, so
you should always sew a few trial stitches before beginning your project. • When sewing satin stitch patterns, there may be shrinking or bunching of stitches, so be sure to
attach a stabilizer material. • Guide the fabric with your hand to keep the fabric feeding straight and even during sewing.
Fabric When sewing on stretch fabrics, lightweight fabrics, or fabrics with coarse weaves, attach stabilizer on the wrong side of the fabric. If you do not wish to do so, place the fabric on a thin paper such as tracing paper.
a Fabricb Stabilizerc Thin paper
Thread #50 - #60Needle With lightweight, regular, or stretch fabrics: the Ball point needle (golden colored)
With heavyweight fabrics: home sewing machine needle 90/14Presser foot Monogramming foot “N”.
Using another presser foot may give inferior results.
CAUTION• When sewing 7 mm satin stitch patterns and
the stitches are bunched, lengthen the stitch length. If you continue sewing when the stitches are bunched, the needle may bend or break (“Setting the Stitch Length” on page 86).
Memo• If the fabric is pulled or pushed during
sewing, the stitch pattern may not turn out correctly. Also, depending on the stitch pattern, there may be movement to the left and right as well as front and back. Guide the fabric with your hand to keep the fabric feeding straight and even during sewing.

SEWING STITCH PATTERNS
164
ePress the “Start/Stop” button to stop sewing.
fKeep pressing the “Reverse Stitch” button or the “Reinforcement Stitch” button to sew 4 stitches of reinforcement stitches.
Making Adjustments
Your stitch pattern may sometimes turn out poorly, depending on the type or thickness of fabric, the stabilizer material used, sewing speed, etc. If your sewing does not turn out well, sew trial stitches using the same conditions as the real sewing, and adjust the stitch pattern as explained below. If the stitch pattern does not turn out well even after
making adjustments based on the stitch
pattern, make adjustments for each stitch pattern individually.
aPress and select .
bAttach monogramming foot “N” and sew the stitch pattern.
cCompare the finished stitch pattern to the illustration of the correct stitch pattern below.
Memo• When sewing character stitches, the
machine automatically sews reinforcement stitches at the beginning and end of each character.
• After sewing is finished, use a seam ripper to trim any excess thread (jump stitches).

SEWING STITCH PATTERNSC
haracter/Decorative Stitches
165
4
dPress , and then adjust the stitch pattern
with the “Fine Adjust Verti.” or “Fine Adjust Horiz.” displays.
* If the stitch pattern is bunched: Touch to increase the number in the “Fine Adjust Verti.” display.
o The displayed value increases each time the button is pressed and the stitch pattern will lengthen.
* If the stitch pattern has gaps: Touch to decrease the number in the “Fine Adjust Verti.” display.
o The displayed value decreases each time the button is pressed and the stitch pattern will shorten.
* If the stitch pattern is skewed to the left: Touch to increase the number in the “Fine Adjust Horiz.” display.
o The displayed value increases each time the button is pressed and the stitch pattern will slide to the right.
* If the stitch pattern is skewed to the right: Touch to decrease the number in the “Fine Adjust Horiz.” display.
o The displayed value decreases each time the button is pressed and the stitch pattern will slide to the left.
eSew the stitch pattern again.
* If the stitch pattern still comes out poorly, make adjustments again. Adjust until the stitch pattern comes out correctly.
fPress to return to the original screen.
Memo• You can sew with the setting screen on the
display.

EDITING STITCH PATTERNS
166
■ Key FunctionsYou can create just the finish you want using the editing functions. Make stitch patterns larger or smaller, make mirror images, etc.
EDITING STITCH PATTERNS
Note• Some editing functions cannot be used with certain stitch patterns. Only the functions for the
displayed keys are available when a stitch pattern is selected.
a
bc
xwv
r
s
u
t
opq n
h
m
g
j
i
l
k
f
e
d
z
y
Q
R
S
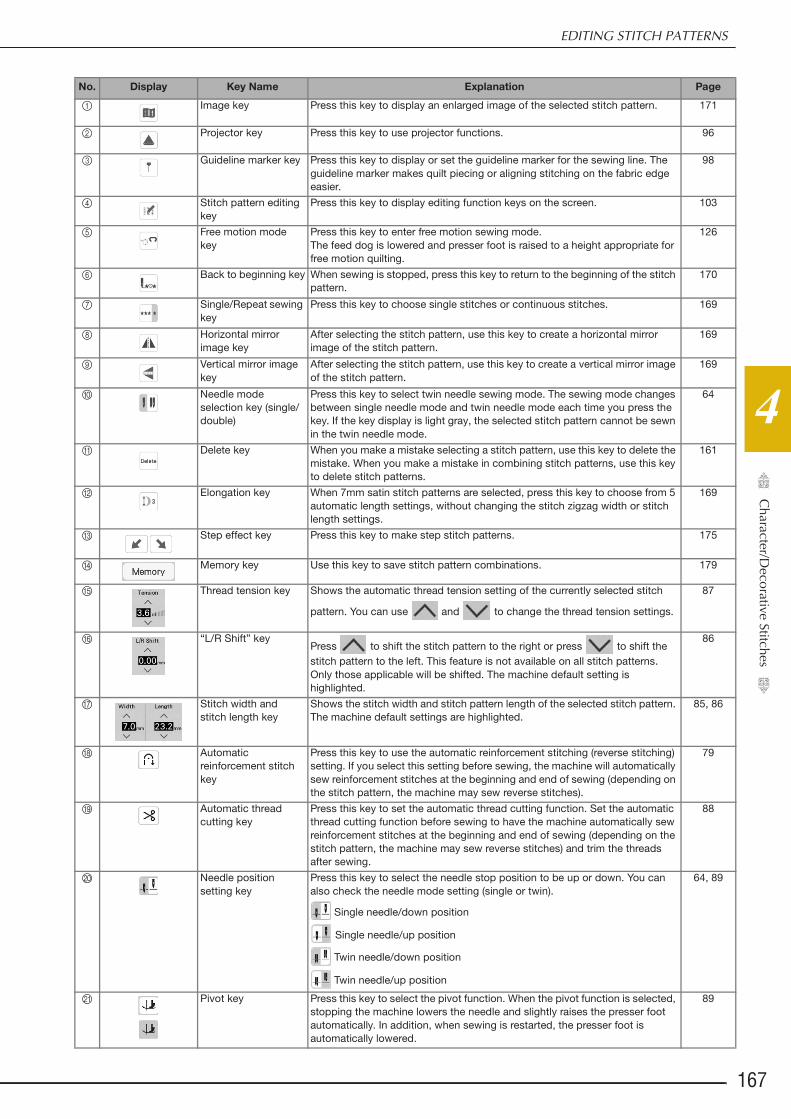
EDITING STITCH PATTERNSC
haracter/Decorative Stitches
167
4
No. Display Key Name Explanation Page
a Image key Press this key to display an enlarged image of the selected stitch pattern. 171
b Projector key Press this key to use projector functions. 96
c Guideline marker key Press this key to display or set the guideline marker for the sewing line. The guideline marker makes quilt piecing or aligning stitching on the fabric edge easier.
98
d Stitch pattern editing key
Press this key to display editing function keys on the screen. 103
e Free motion mode key
Press this key to enter free motion sewing mode.The feed dog is lowered and presser foot is raised to a height appropriate for free motion quilting.
126
f Back to beginning key When sewing is stopped, press this key to return to the beginning of the stitch pattern.
170
g Single/Repeat sewing key
Press this key to choose single stitches or continuous stitches. 169
h Horizontal mirror image key
After selecting the stitch pattern, use this key to create a horizontal mirror image of the stitch pattern.
169
i Vertical mirror image key
After selecting the stitch pattern, use this key to create a vertical mirror image of the stitch pattern.
169
j Needle mode selection key (single/double)
Press this key to select twin needle sewing mode. The sewing mode changes between single needle mode and twin needle mode each time you press the key. If the key display is light gray, the selected stitch pattern cannot be sewn in the twin needle mode.
64
k Delete key When you make a mistake selecting a stitch pattern, use this key to delete the mistake. When you make a mistake in combining stitch patterns, use this key to delete stitch patterns.
161
l Elongation key When 7mm satin stitch patterns are selected, press this key to choose from 5 automatic length settings, without changing the stitch zigzag width or stitch length settings.
169
m Step effect key Press this key to make step stitch patterns. 175
n Memory key Use this key to save stitch pattern combinations. 179
o Thread tension key Shows the automatic thread tension setting of the currently selected stitch
pattern. You can use and to change the thread tension settings.
87
p “L/R Shift” keyPress to shift the stitch pattern to the right or press to shift the stitch pattern to the left. This feature is not available on all stitch patterns. Only those applicable will be shifted. The machine default setting is highlighted.
86
q Stitch width and stitch length key
Shows the stitch width and stitch pattern length of the selected stitch pattern. The machine default settings are highlighted.
85, 86
r Automatic reinforcement stitch key
Press this key to use the automatic reinforcement stitching (reverse stitching) setting. If you select this setting before sewing, the machine will automatically sew reinforcement stitches at the beginning and end of sewing (depending on the stitch pattern, the machine may sew reverse stitches).
79
s Automatic thread cutting key
Press this key to set the automatic thread cutting function. Set the automatic thread cutting function before sewing to have the machine automatically sew reinforcement stitches at the beginning and end of sewing (depending on the stitch pattern, the machine may sew reverse stitches) and trim the threads after sewing.
88
t Needle position setting key
Press this key to select the needle stop position to be up or down. You can also check the needle mode setting (single or twin).
Single needle/down position
Single needle/up position
Twin needle/down position
Twin needle/up position
64, 89
u Pivot key Press this key to select the pivot function. When the pivot function is selected, stopping the machine lowers the needle and slightly raises the presser foot automatically. In addition, when sewing is restarted, the presser foot is automatically lowered.
89

EDITING STITCH PATTERNS
168
v Add stitch pattern key Press this key to add a new stitch pattern. 161
w Thread color change key
Press this key to change the thread color displayed on the screen. 171
x Stitch pattern display size
Show the approximate size of the stitch pattern selected.
: Nearly the same size as the sewn stitch pattern
: 1/2 the size of the sewn stitch pattern
: 1/4 the size of the sewn stitch pattern* The actual size of the sewn stitch pattern may differ depending on the
type of fabric and thread that is used.
105
y Thread density key After selecting the stitch pattern, use this key to change the thread density of the stitch pattern.
170
z Maintain aspect ratio key
Press this key to maintain the aspect ratio when enlarging or reducing the stitch pattern.
169
Q Stitch pattern selection key
Press this key to enter or edit the stitch pattern immediately after the selected stitch pattern.
161
R Select all on/off key Press this key to switch between selecting only the last stitch pattern entered or all combined stitch patterns.
169
S Character spacing key
Press this key to change the spacing of character stitch patterns. 161
No. Display Key Name Explanation Page

EDITING STITCH PATTERNSC
haracter/Decorative Stitches
169
4
Changing the Size
Select a stitch pattern, then press or to change the size of the stitch pattern.
Stitch Pattern Size * The size differs depending on the fabric and threads.
Changing the Length (for 7mm Satin Stitch Patterns Only)
When 7mm satin stitch patterns are selected, press , and then press to choose from 5 automatic
length settings, without changing the stitch zigzag width or stitch length settings.
Creating a Vertical Mirror Image
To create a vertical mirror image, select a stitch pattern, press , and then press .
Creating a Horizontal Mirror Image
To create a horizontal mirror image, select a stitch pattern, press , and then press .
Sewing a Stitch Pattern Continuously
Press , and then press to select continuous sewing or single stitch sewing.
Memo• When the select all on/off key appears as
, the size of all stitch patterns can be changed.
• When the maintain aspect ratio key appears
as , the stitch pattern size can be changed while maintaining the aspect ratio.
Memo• To finish a complete motif while sewing the
stitch pattern continuously, you can press the key while sewing. The machine will automatically stop when the motif is finished.

EDITING STITCH PATTERNS
170
Changing Thread Density (for Large Satin Only)
After selecting a satin stitch pattern, press , and then press to select your preferred thread density.
Returning to the Beginning of the Stitch Pattern
When sewing character/decorative stitches, you can return to the beginning of the stitch pattern after trial sewing or when the stitching is sewn incorrectly.
aPress the “Start/Stop” button to stop the machine, press , and then press .
o Sewing returns to the beginning of the selected stitch pattern (“W”) from the point where sewing was stopped.
bPress the “Start/Stop” button to continue sewing.
CAUTION• If the stitches bunch when thread density is
changed to , return the thread density to
. If you continue sewing when the stitches are bunched, the needle may bend or break.
Memo• When the select all on/off key appears as
, the thread density of all stitch patterns can be changed.
Memo• If this key is pressed while sewing is
stopped, stitch patterns can be added at the end of a combined stitch pattern. (In this example, “!” is added.) Press or to add the stitch pattern at the desired location.

EDITING STITCH PATTERNSC
haracter/Decorative Stitches
171
4
Checking the Image
You can display an approximate size image of the selected stitch pattern. You can also check and change the colors of the image on the screen.
aPress .
o An image of the selected stitch pattern is displayed.
bPress to change the thread color in the
image to red, blue, black or yellow.
o The color changes every time you press the button.
cPress to display the enlarged image.
dScroll with your finger to view any part of the image that extends out of the viewable display area.
ePress to return to the original screen.

COMBINING STITCH PATTERNS
172
You can combine many varieties of stitch patterns, such as character stitches, cross stitches or satin stitches. You can also combine stitch patterns of different sizes, mirror image stitch patterns, and others.
Before Combining
Single stitch sewing is automatically selected for sewing combined stitch patterns. If you want to sew the stitch pattern continuously, press after finishing the stitch pattern combination.
Combining Various Stitch Patterns
Example:
aPress .
bSelect .
cPress .
COMBINING STITCH PATTERNS

COMBINING STITCH PATTERNSC
haracter/Decorative Stitches
173
4
dPress .
eSelect .
fPress to sew the stitch pattern
continuously.
Combining Large and Small Stitch Patterns
Example:
aPress .
o The large size stitch will be selected.
bPress so that it displays .
cPress again, and then press to
change the size.
o The size of the stitch pattern changes.
Memo• Stitch patterns are deleted individually
starting with the last stitch pattern entered by pressing .
Memo• To change the size of the stitch pattern
while maintaining the aspect ratio, press the maintain aspect ratio key ( ).

COMBINING STITCH PATTERNS
174
dPress , and then press to sew
continuously.
o The entered stitch pattern is repeated.
Combining Horizontal Mirror Image Stitch Patterns
Example:
aPress .
bPress .
cPress again, press , and then press
.
o The stitch pattern is flipped along a vertical axis.
dPress .
o The entered stitch pattern is repeated.
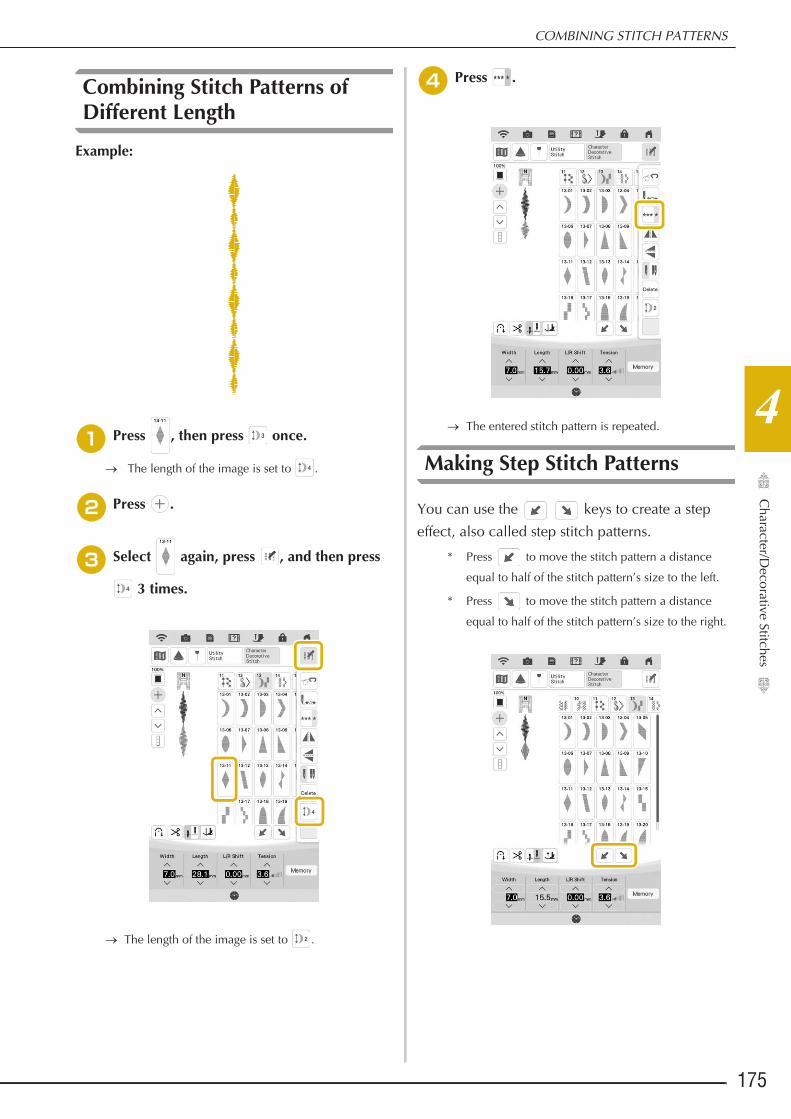
COMBINING STITCH PATTERNSC
haracter/Decorative Stitches
175
4
Combining Stitch Patterns of Different Length
Example:
aPress , then press once.
o The length of the image is set to .
bPress .
cSelect again, press , and then press
3 times.
o The length of the image is set to .
dPress .
o The entered stitch pattern is repeated.
Making Step Stitch Patterns
You can use the keys to create a step effect, also called step stitch patterns.
* Press to move the stitch pattern a distance
equal to half of the stitch pattern’s size to the left.
* Press to move the stitch pattern a distance
equal to half of the stitch pattern’s size to the right.

COMBINING STITCH PATTERNS
176
Example:
aPress .
bPress .
o The next stitch pattern will move to the right.
cPress again.
dPress .
o The next stitch pattern will move to the left.
ePress , and then press .
o The entered stitch pattern is repeated.
■ More Examples
Press o o o o .

COMBINING STITCH PATTERNSC
haracter/Decorative Stitches
177
4
Press o o o o o o
o o .
Press o o o .
Press o o o o o o
o o .

USING THE MEMORY FUNCTION
178
Stitch Data Precautions
Observe the following precautions when using stitch data other than that created and saved in this machine.
■ Types of Stitch Data that can be Used
• In the Character/Decorative Stitch memory, “.pmv”, “.pmx”, “.pmu” and “.pmp” stitch data files can be used with this machine. When the machine is used to save a file with any extension, it is saved as a “.pmp” data file.
• Using data other than that created using this machine or the machine which create “.pmu” data file, may cause the machine to malfunction.
■ Types of USB Devices/Media that can be Used
Stitch data can be saved to or recalled from USB external media. Use external media that meets the following specifications.• USB Flash drive (USB Flash memory)
Stitch data can be recalled only from;
• USB CD-ROM, CD-R, CD-RW drives
You can also use the following types of USB media with the USB Memory Card Reader/USB card writer module.• Secure Digital (SD) Card• CompactFlash• Memory Stick• Smart Media• Multi Media Card (MMC)• xD-Picture Card
• To create file folders, use a computer.
■ Precautions on Using the Computer to Create and Save Data• If the name of the stitch data file/folder cannot be identified, for example, because the name contains special
characters, the file/folder is not displayed. If this occurs, change the name of the file/folder. We recommend using the 26 letters of the alphabet (uppercase and lowercase), the numbers 0 through 9, “-”, and “_”.
• Stitch data in a folder created in USB media can be retrieved.
USING THE MEMORY FUNCTION
Note• Some USB media may not be usable with this machine. Please visit our website for more details.• The access lamp will begin blinking after inserting USB devices/media, and it will take about 5 to 6
seconds to recognize the devices/media. (Time will differ depending on the USB device/media).

USING THE MEMORY FUNCTIONC
haracter/Decorative Stitches
179
4
Saving Stitch Patterns in the Machine’s Memory
You can save often used stitch patterns in the machine’s memory. A total of about 1 MB of stitch patterns can be saved in the machine’s memory.
aPress .
bPress .
* Press to return to the original screen without saving.
o The “Saving…” screen is displayed. When the stitch pattern is saved, the display returns to the original screen automatically.
■ If the Memory is FullIf the following screen appears while you are trying to save a stitch pattern, the memory is too full to hold the currently selected stitch pattern. To save the stitch pattern in the machine’s memory, you have to delete a previously saved stitch pattern.
Press , and then refer to “Retrieving Stitch Patterns from the Machine’s Memory” on page 180.
Saving Stitch Patterns to USB Media
When sending stitch patterns from the machine to USB media, plug the USB media into the machine’s USB port.
aPress .
Note• Do not turn the main power to OFF while the
“Saving…” screen is displayed. You will lose the stitch pattern you are saving.
Memo• It takes a few seconds to save a stitch
pattern. • Refer to page 180 for information on
retrieving a saved stitch pattern.
Memo• USB media is commercially available, but
some USB media may not be usable with this machine. Please visit our website for more details.
• Depending on the type of USB media being used, either directly plug the USB device into the machine’s USB port or plug the USB media Reader/Writer into the machine’s USB port.
• The USB media can be inserted or removed at any time.

USING THE MEMORY FUNCTION
180
bInsert the USB media into the USB port on the machine.
a USB port
cPress .
* Press when connecting the USB media to the USB port for mouse.
* Press to return to the original screen without saving.
o The “Saving…” screen is displayed. When the stitch pattern is saved, the display returns to the original screen automatically.
Retrieving Stitch Patterns from the Machine’s Memory
aPress .
o The pocket selection screen appears.
bChoose a stitch pattern to retrieve.
* If the entire saved stitch pattern is not displayed, press the thumbnail.
a Saved stitch patternso The selected stitch pattern is retrieved and the
sewing screen will be displayed.
Note• Do not insert or remove USB media while
“Saving…” screen is displayed. You will lose some or all of the stitch pattern you are saving.
a
a

USING THE MEMORY FUNCTIONC
haracter/Decorative Stitches
181
4
Recalling from USB Media
You can recall a specific stitch pattern from either direct USB media or a folder in the USB media. If the stitch pattern is in a folder, check each folder to find the stitch pattern.
aInsert the USB media into the USB port on the machine. (page 179)
a USB port
bPress .
* Press when connecting the USB media to the USB port for mouse.
o Stitch patterns and a folder in a top folder are displayed.
cPress when there is a subfolder to
sort two or more stitch patterns to USB media, the stitch pattern in the subfolder is displayed.
* Press to return to the original screen without recalling.
a Folder nameb Stitch patterns in a folder show only the first stitch
pattern of any combined stitch patterns.c Patho The path shows the current folder at the top of the
list.Stitch patterns and a subfolder within a folder are displayed.
* Press to return to the previous folder.* Use the computer to create folders. Folders cannot
be created with the machine.
a
a
c
b

USING THE MEMORY FUNCTION
182
dPress the key of the stitch pattern you want to recall.
o The selected stitch pattern is recalled and the sewing screen will be displayed.
Managing Saved File
You can delete the saved file, or save to machine’s memory from USB media.
aIn the retrieving screen from USB, press
, and touch the stitch pattern you want to manage.
bChoose the command.
Press to select all displayed stitch patterns.
Press to deselect all selected stitch patterns.
Press to delete the selected stitch patterns.
Press to save the selected stitch patterns in the machine’s memory.

Chapter 5Appendix

CARE AND MAINTENANCE
184
Restrictions on oiling
In order to prevent damaging this machine, it must not be oiled by the user. This machine was manufactured with the necessary amount of oil applied to ensure correct operation, making periodic oiling unnecessary.If problems occur, such as difficulty turning the handwheel or an unusual noise, immediately stop using the machine, and contact your authorized Baby Lock retailer.
Precautions on storing the machine
Do not store the machine in any of the locations described below, otherwise damage to the machine may result, for example, rust caused by condensation.
* Exposed to extremely high temperatures* Exposed to extremely low temperatures* Exposed to extreme temperature changes* Exposed to high humidity or steam* Near a flame, heater or air conditioner* Outdoors or exposed to direct sunlight* Exposed to extremely dusty or oily environments
Cleaning the LCD Screen
If the screen is dirty, gently wipe it with a soft, dry cloth. Do not use organic solvents or detergents.
Cleaning the Machine Casing
If the surface of the machine is dirty, lightly soak a cloth in a neutral detergent, squeeze it out firmly, and then wipe the surface. Then wipe again with a dry cloth.
Cleaning the Race
aPress the “Needle Position” button to raise the needle.
bTurn the main power to OFF.
cRemove the needle and the presser foot holder (page 69, 72).
dRemove the flat bed attachment or the embroidery unit if either is attached.
eSlide the needle plate lever toward you.
a Slide toward you.o The needle plate opens.
fSlide out the needle plate with your right hand to remove it.
CARE AND MAINTENANCE
CAUTION• Be sure to unplug the machine before cleaning it. Otherwise, electric shock or injury may result.
Note• In order to extend the life of this machine,
periodically turn it on and use it. Storing this machine for an extended period of time without using it may reduce its efficiency.
Note• Do not wipe the LCD screen with a damp
cloth.
Memo• Occasionally, condensation may form on
the LCD screen or it may become fogged up; however, this is not a malfunction. After a while, the cloudiness will disappear.
a

CARE AND MAINTENANCE
185
Appendix
5
gGrasp the bobbin case, and then gently lift out.
a Bobbin case
hUse the cleaning brush or a vacuum cleaner to remove any lint and dust from the race and bobbin thread sensor and the surrounding area.
a Cleaning brushb Racec Bobbin thread sensor
iInsert the bobbin case so that the S mark on the bobbin case aligns with the ● mark on the machine.
* Align the S and ● marks.
a S mark on the bobbin caseb ● mark on the machinec Bobbin case* Make sure that the indicated points are aligned
before installing the bobbin case.
jInsert the tabs on the needle plate into the notches in the machine.
a Tabsb Notches
kPress down on the right side of the needle plate to secure it.
Note• Do not apply oil to the bobbin case.• If lint or dust collects on the bobbin thread
sensor, the sensor may not operate correctly.
a
a
bc
a
b
ba
CAUTION• Never use a bobbin case that is scratched;
otherwise, the upper thread may become tangled, the needle may break, or sewing performance may suffer. For a new bobbin case (part code: XE5342-101 (green marking on the screw), XC8167-551 (no color on the screw)), contact your nearest authorized Baby Lock retailer.
• Make sure that you fit the bobbin case properly, otherwise the needle may break.
c
ab

CARE AND MAINTENANCE
186
Cleaning the Bobbin Case
Thread wax and dust easily collect around the notch in the tension spring on the bobbin case, resulting in an incorrect thread tension. Therefore, the bobbin case should be cleaned as necessary should tension problems arise.When cleaning the bobbin case, use card stock or another type of paper of similar thickness and sturdiness in order to prevent pieces of paper tearing off and getting lodged in the bobbin case.
aFollow steps a to g in “Cleaning the Race” to remove the bobbin case.
bUsing a piece of paper of adequate thickness and sturdiness, slide the paper between the tension plate base and the tension spring and also slide the paper behind the notch of the spring to remove any dirt or dust.
a Tension plate baseb Notchc Paper (e.g. business card type)d Tension spring
cUse the cleaning brush to remove any lint and dust from inside the bobbin case.
dReplace the bobbin case and needle plate.
Cleaning the Cutter in the Bobbin Case Area
The cutter below the needle plate should be cleaned. If dust or lint accumulate on the cutter, it will be difficult to cut the thread when the “Thread Cutter” button is pressed or the automatic thread cutting function is used. Clean the cutter when the thread is not easily cut.
aFollow steps a through g in “Cleaning the Race” to remove the needle plate.
bUse the cleaning brush or a vacuum cleaner to remove any lint and dust from the cutter in the bobbin case area.
a Cutter
cAttach the needle plate.
Memo• Do not bend the tension spring. In addition,
do not use anything other than recommended paper to clean the bobbin case.
CAUTION• Do not touch the cutter, otherwise injuries
may result.
a

CARE AND MAINTENANCE
187
Appendix
5
About the Maintenance Message
Once this message appears, it is recommended to take your machine to an authorized Baby Lock retailer for a regular maintenance check. Although this message will disappear and the machine will continue to function once you press , the message will display several more times until the appropriate maintenance is performed.
Please take the time to arrange for the maintenance your machine requires once this message appears. Such steps will help to ensure you receive continued, uninterrupted hours of machine operation for the future.

TROUBLESHOOTING
188
If the machine stops operating correctly, check the following possible problems before requesting service.You can solve most problems by yourself. Visit us at “ www.babylock.com ”.If the problem persists, contact your authorized Baby Lock retailer.
Frequent Troubleshooting Topics
Detailed causes and remedies for common troubleshooting topics are described below. Be sure to refer to this before contacting your authorized Baby Lock retailer.
Upper Thread is Too Tight
■ Symptom* The upper thread appears as a single continuous
line.* The lower thread is visible from the upper side of the
fabric. (Refer to the illustration below.)* The upper thread has tightened up, and comes out
when pulled.* The upper thread has tightened up, and wrinkles
appear in the fabric.* The upper thread tension is tight, and the results do
not change even after the thread tension is adjusted.
a Lower side of fabricb Lower thread visible from upper side of fabricc Upper threadd Upper side of fabrice Lower thread
■ CauseIncorrect lower threadingIf the lower thread is incorrectly threaded, instead of the appropriate tension being applied to the lower thread, it is pulled through the fabric when the upper thread is pulled up. For this reason, the thread is visible from the upper side of the fabric.
■ RemedyCorrectly install the lower thread.
aTurn off the machine.
bRemove the bobbin from the bobbin case.
cPlace the bobbin in the bobbin case so that the thread unwinds in the correct direction.
* Hold the bobbin with your right hand with the thread unwinding to the left, and hold the end of the thread with your left hand. Then, with your right hand, place the bobbin in the bobbin case.
If the bobbin is inserted with the thread unwinding in the wrong direction, sewing will be done with an incorrect thread tension.
TROUBLESHOOTING
■ Upper Thread is Too Tight page 188
■ Tangled Thread on Wrong Side of Fabric page 189
■ Incorrect Thread Tension page 191
■ Fabric is Caught in the Machine and Cannot be Removed page 192

TROUBLESHOOTING
189
Appendix
5
dWhile holding the bobbin in place with your finger, pass the thread through the slit in the needle plate.
* Hold down the bobbin with your right hand, and then pull the end of the thread around the tab with your left hand.
a Tabb Hold down the bobbin with your right hand.
Pull the thread to pass it through the slit in the needle plate, then cut it with the cutter.
c Slitd Cutter
Sewing with the correct thread tension is possible after the bobbin has been correctly installed in the bobbin case.
Tangled Thread on Wrong Side of Fabric
■ Symptom* The thread becomes tangled on the lower side of the
fabric.
* After starting sewing, a rattling noise is made and sewing cannot continue.
* Looking under the fabric, there is tangled thread in the bobbin case.
■ CauseIncorrect upper threadingIf the upper thread is incorrectly threaded, the upper thread passed through the fabric cannot be firmly pulled up and the upper thread becomes tangled in the bobbin case, causing a rattling noise.
■ RemedyRemove the tangled thread, and then correct the upper threading.
aRemove the tangled thread. If it cannot be removed, cut the thread with scissors.
* Refer to “Cleaning the Race” in “CARE AND MAINTENANCE” on page 184.
bRemove the upper thread from the machine.
cRefer to the following steps to correct the upper threading.
* If the bobbin was removed from the bobbin case, refer to “Setting the Bobbin” on page 58 and “Remedy” in the section “Upper Thread is Too Tight” on page 188 to correctly install the bobbin.
c
d

TROUBLESHOOTING
190
dRaise the presser foot using the presser foot lever.
* If the presser foot is not raised, the machine cannot be threaded correctly.
eRaise the needle by turning the handwheel toward you (counterclockwise) so that the mark on the wheel points up, or press “Needle Position” button once or twice to raise the needle.
or
a Mark
fWhile holding the thread with both hands, pull the thread up from under the thread guide plate.
a Thread guide plate
gWhile holding the thread in your right hand, pass the thread through the thread guide in the direction indicated.
hGuide the thread down, up, then down through the groove, as shown in the illustration.
iPass the thread through the needle bar thread guide (marked “6”) by holding the thread with both hands and guiding it as shown in the illustration.
a Needle bar thread guide
jThread the needle according to steps j and o in “UPPER THREADING” on page 61.
a
Memo• Look in the upper groove area to check if
the thread catches on the thread take-up lever visible inside the upper groove area.
a Look in the upper groove area
a

TROUBLESHOOTING
191
Appendix
5
Incorrect Thread Tension
■ Symptoms• Symptom 1: The lower thread is visible from the upper side of the fabric.• Symptom 2: The upper thread appears as a straight line on the upper side of the fabric.• Symptom 3: The upper thread is visible from the lower side of the fabric.• Symptom 4: The lower thread appears as a straight line on the lower side of the fabric.• Symptom 5: The stitching on the lower side of the fabric is loose or has slack.
■ Cause/remedy� Cause 1
The machine is not correctly threaded.<With symptoms 1 and 2 described above>The lower threading is incorrect.Adjust the upper thread tension and then refer to “Upper Thread is Too Tight” on page 87.
<With symptoms 3 through 5 described above>The upper threading is incorrect.Adjust the upper thread tension and then refer to “Tangled Thread on Wrong Side of Fabric” on page 189 to correct the upper threading.
� Cause 2A needle and thread appropriate for the fabric are not being used.The machine needle that should be used depends on the type of fabric sewn and the thread thickness.If a needle and thread appropriate for the fabric are not being used, the thread tension will not be adjusted correctly, causing wrinkles in the fabric or skipped stitches.
* Refer to “Fabric/Thread/Needle Combinations” on page 71 to check that a needle and thread appropriate for the fabric are being used.
� Cause 3An appropriate upper tension is not selected.Adjust the upper thread tension to select an appropriate thread tension.The appropriate thread tension differs according to the type of fabric and thread being used.
* Adjust the thread tension while test sewing on a piece of scrap fabric that is the same as that used in your project.
* When the lower thread is visible on the upper side of the fabric. Set the upper thread tension to a lower number. (Loosen the thread tension.)
* When the upper thread is visible on the lower side of the fabric. Set the upper thread tension to a higher number. (Tighten the thread tension.)
� Symptom 1 � Symptom 3a Lower side of fabricb Lower thread visible on
upper side of fabricc Upper threadd Upper side of fabrice Lower threadf Upper thread visible from
lower side of fabric
Note• If the upper threading and lower threading are incorrect, the thread tension cannot be adjusted
correctly, even by adjusting the upper thread tension. Check the upper threading and lower threading first, and then adjust the thread tension.

TROUBLESHOOTING
192
Fabric is Caught in the Machine and Cannot be Removed
If the fabric is caught in the machine and cannot be removed, the thread may have become tangled under the needle plate. Follow the procedure described below to remove the fabric from the machine. If the operation could not be completed according to the procedure, instead of attempting to complete it forcefully, contact your authorized Baby Lock retailer.
■ Removing the fabric from the machine
aImmediately stop the machine.
bTurn off the machine.
cRemove the needle.If the needle is lowered into the fabric, turn the handwheel away from you (clockwise) to raise the needle out of the fabric, and then remove the needle.
* Refer to “CHANGING THE NEEDLE” on page 69.
dRemove the presser foot and presser foot holder.
* Refer to “CHANGING THE PRESSER FOOT” on page 72.
eLift up the fabric and cut the threads below it.If the fabric can be removed, remove it. Continue with the following steps to clean the race.
fSlide the needle plate lever toward you.
a Slide toward you.o The needle plate opens.
gSlide out the needle plate with your right hand to remove it.
hGrasp the bobbin case, and then gently lift out.If threads remain in the bobbin case, remove them.
a Bobbin case
iUse the cleaning brush or a vacuum cleaner to remove any dust or loose threads from the race and its surrounding area.
a Cleaning brushb Race
jInsert the bobbin case so that the S mark on the bobbin case aligns with the ● mark on the machine.
a
a
a
b
a
b
ba

TROUBLESHOOTING
193
Appendix
5
* Align the S and ● marks.
a S markb ● markc Bobbin case* Make sure that the indicated points are aligned
before installing the bobbin case.
kInsert the tabs on the needle plate into the notches in the machine.
a Tabsb Notches
lPress down on the right side of the needle plate to secure it.
mCheck the condition of the needle, and then install it.If the needle is in a poor condition, for example, if it is bent, be sure to install a new needle.
* Refer to “CHANGING THE NEEDLE” on page 69.
■ Checking machine operationsIf the needle plate has been removed, check machine operations to confirm that installation has been completed correctly.
aTurn on the machine.
bSelect .
cSlowly turn the handwheel toward you (counterclockwise), and look from all sides to check that the needle falls at the center of the hole in the needle plate.If the needle contacts the needle plate, remove the needle plate, and then install it again.
a Hole in the needle plateb Handwheel
CAUTION• Never use a bobbin case that is scratched;
otherwise, the upper thread may become tangled, the needle may break, or sewing performance may suffer. For a new bobbin case (part code: XE5342-101 (green marking on the screw), XC8167-551 (no color on the screw)), contact your nearest authorized Baby Lock retailer.
• Make sure that you fit the bobbin case properly, otherwise the needle may break.
c
ab
CAUTION• Never use bent needles. Bent needles can
easily break, possibly resulting in injuries.
Note• After completing this procedure, continue
with the following procedure in “Checking machine operations” to check that the machine is operating correctly.
Memo• Since the needle may have been damaged
when the fabric was caught in the machine, we recommend replacing it with a new one.
Note• Do not yet install the presser foot and
thread.

TROUBLESHOOTING
194
dSelect zigzag stitch . At this time,
increase the stitch length and width to their maximum settings.
eSlowly turn the handwheel toward you (counterclockwise) and check that the needle bar and feed dogs operate correctly.If the needle or feed dogs contact the needle plate, the machine may be malfunctioning; therefore, contact your authorized Baby Lock retailer.
fTurn off the machine, and then install the bobbin and presser foot.
* Refer to “Setting the Bobbin” on page 58 and “CHANGING THE PRESSER FOOT” on page 72.
gCorrectly thread the machine.
* For details on the machine, refer to “UPPER THREADING” on page 61.
hPerform trial sewing with normal fabric.
Note• The thread may have become tangled as a
result of incorrect upper threading. Make sure that the machine is correctly threaded.
Note• Remember when sewing thin fabrics, select
a center stitch that is shorter in length and use the straight stitch needle plate for straight sewing stitches. A lightweight paper stabilizer can also be placed on the underside of the fabric.

TROUBLESHOOTING
195
Appendix
5
List of Symptoms
If you have a minor problem with your machine, check the following solutions. If the solutions suggested do not correct the problem, contact your authorized Baby Lock retailer. Press o o
for advice about minor sewing problems during sewing. Press at any time to return to the original screen.
■ Getting ready
Problem Cause Solution Page
Cannot thread the needle.
Needle is not in the correct position. Press the “Needle Position” button to raise the needle.
15
Needle is installed incorrectly. Reinstall the needle correctly. 69
Needle is turned, bent or the point is dull. Replace the needle. 69
Upper threading is incorrect. Check the steps for threading the machine and rethread the machine.
61
The needle threader hook is bent and does not pass through the eye of the needle.
Contact your authorized Baby Lock retailer. —
The needle threader lever cannot be moved or returned to its original position.
Contact your authorized Baby Lock retailer. —
A size 65/9 needle is being used. The needle is incompatible with the needle threader. Manually pass the thread through the eye of the needle.
64
Cannot lower the presser foot with the presser foot lever.
Presser foot was raised using the “Presser Foot Lifter” button.
Press the “Presser Foot Lifter” button to lower the presser foot.
15
Bobbin thread does not wind neatly on the bobbin.
The thread is not passed through the bobbin winding thread guide correctly.
Correctly pass the thread through the bobbin winding thread guide.
65
Bobbin spins slowly.Press in the bobbin winding window to increase the bobbin winding speed.
55
The thread that was pulled out was not wound onto the bobbin correctly.
Wind the thread that was pulled off around the bobbin 5 or 6 times clockwise.
53
The empty bobbin was not set on the pin properly.
Set the empty bobbin on the pin and slowly turn the bobbin until you hear it click in place.
52
While winding the bobbin, the bobbin thread was wound below the bobbin winder seat.
You have not wound the bobbin thread properly when you are initially winding thread on the bobbin as well as being sure that the bobbin thread is set in the guides.
After removing the thread wound below the bobbin winder seat, wind the bobbin correctly.Follow the drawn images on the top of the machine for guidance when threading the machine for bobbin winding.
52
The bobbin thread cannot be pulled up.
Needle is turned, bent or the point is dull. Replace the needle. 69
Bobbin is set incorrectly. Reset the bobbin thread correctly. 58
Machine does not operate
All keys and buttons have been locked by
.Press to unlock all keys and buttons.
66, 72
Nothing appears in the LCD.
Main power switch is not turned on. Turn the main power to ON. 25
The plug of the power cord is not inserted into an electrical outlet.
Insert the plug of the power cord into an electrical outlet.
26
The LCD screen does not look very clear.
The brightness of the screen is not adjusted. Adjust the “Screen Display Brightness” in the settings screen.
29
Nothing happens, even if the LCD display is pressed
The screen has been locked. Press either of the following keys to unlock the
screen.
—
The LCD screen is fogged up.
Condensation has formed on the LCD screen. After a while, the cloudiness will disappear. —
The dual purpose stylus cannot be operated.
The dual purpose stylus is dirty. Clean the light-emitting part of the dual purpose stylus.
—
The battery is dead. Replace the battery with a new one. 94

TROUBLESHOOTING
196
■ While sewing
Problem Cause Solution Page
Machine does not operate.
“Start/Stop” button was not pressed. Press the “Start/Stop” button. 15
There is no stitch pattern selected. Select a stitch pattern. 105, 158
Presser foot is not lowered. Lower the presser foot. 15
“Start/Stop” button was pressed with the foot controller attached.
Remove the foot controller, or use the foot controller to operate the machine.
78
The “Start/Stop” button was pressed while the machine is set for the sewing speed controller to control the zigzag stitch width.
Use the foot controller instead of the “Start/Stop” button to operate the machine, or set the “Width Control” to “OFF” in the settings screen.
28, 78
Needle breaks. Needle is installed incorrectly. Reinstall the needle correctly. 69
Needle clamp screw is not tightened. Tighten the needle clamp screw. 70
Needle is turned or bent. Replace the needle. 69
Using improper needle or thread for the selected fabric.
Check the “Fabric/Thread/Needle Combinations” chart.
71
Wrong presser foot was used. Use the recommended presser foot. 206
Upper thread tension is too tight. Adjust the thread tension. 87
Fabric is pulled during sewing. Do not pull the fabric during sewing. —
Spool cap is set incorrectly. Check the method for attaching the spool cap, then reattach the spool cap.
61
There are scratches around the opening in the needle plate.
Replace the needle plate, or consult your authorized Baby Lock retailer.
184
There are scratches around the opening in the presser foot.
Replace the presser foot, or consult your authorized Baby Lock retailer.
72
There are scratches on the bobbin case. Replace the bobbin case, or consult your authorized Baby Lock retailer.
184
Needle is defective. Replace the needle. 69
A bobbin designed specifically for this machine is not used.
Incorrect bobbins will not work properly. Only use a bobbin designed specifically for this machine.
58
Upper threading is incorrect. Check the steps for threading the machine and rethread the machine.
61
Bobbin is set incorrectly. Reset the bobbin thread correctly. 58
Presser foot is attached incorrectly. Attach the presser foot correctly. 72
Screw of the presser foot holder is loose. Securely tighten the screw of the presser foot. 73
Fabric is too thick. Use fabric that the needle can pierce when the handwheel is turned.
82
Fabric is fed forcefully when sewing thick fabric or thick seams.
Allow the fabric to be fed without being forcefully pushed.
71, 82
Stitch length is too short. Adjust the stitch length. 86
Bobbin thread is incorrectly wound. Use a correctly wound bobbin. 52

TROUBLESHOOTING
197
Appendix
5
Upper thread breaks. Machine is not threaded correctly (used the wrong spool cap, spool cap is loose, the thread did not catch the needle bar threader, etc.)
Rethread the machine correctly. 61
Knotted or tangled thread is being used. Remove any knots or tangles. —
The selected needle is not appropriate for the thread being used.
Select a needle that is appropriate for the type of thread being used.
71
Upper thread tension is too tight. Adjust the thread tension. 87
Thread is twisted. Use scissors, etc., to cut the twisted thread and remove it from the race, etc.
—
Needle is turned, bent or the point is dull. Replace the needle. 69
Needle is installed incorrectly. Reinstall the needle correctly. 69
There are scratches around the opening of the needle plate.
Replace the needle plate, or consult your authorized Baby Lock retailer.
184
There are scratches around the opening in the presser foot.
Replace the presser foot, or consult your authorized Baby Lock retailer.
72
There are scratches on the bobbin case. Replace the bobbin case, or consult your authorized Baby Lock retailer.
184
Using improper needle or thread for the selected fabric.
Check the “Fabric/Thread/Needle Combinations” chart.
71
While sewing, the thread became knotted or tangled.
Rethread upper and lower thread. 58, 61
A bobbin designed specifically for this machine is not used.
Incorrect bobbins will not work properly. Only use a bobbin designed specifically for this machine.
58
The thread is tangled on the wrong side of the fabric.
Upper threading is incorrect. Check the steps for threading the machine and rethread the machine. Be sure that the presser foot is in the raised position when threading the machine so that the upper thread sets properly in the upper tension.
61
Using improper needle or thread for the selected fabric.
Check the “Fabric/Thread/Needle Combinations” chart.
71
The upper thread is too tight.
The bobbin thread is incorrectly installed. Correctly install the bobbin thread. 58
Bobbin thread breaks.
Bobbin is set incorrectly. Reset the bobbin thread correctly. 58
Bobbin thread is incorrectly wound. Use a correctly wound bobbin. 52
There are scratches on the bobbin or it doesn’t rotate properly.
Replace the bobbin. 58
Thread is twisted. Use scissors, etc. to cut the twisted thread and remove it from the race, etc.
—
A bobbin designed specifically for this machine is not used.
Incorrect bobbins will not work properly. Only use a bobbin designed specifically for this machine.
58
Fabric puckers. There is a mistake in the upper or bobbin threading.
Check the steps for threading the machine and rethread it correctly.
58, 61
Spool cap is set incorrectly. Check the method for attaching the spool cap, then reattach the spool cap.
61
Using improper needle or thread for the selected fabric.
Check the “Fabric/Thread/Needle Combinations” chart.
71
Needle is turned, bent or the point is dull. Replace the needle. 69
Stitches are too long when sewing thin fabrics. Shorten the stitch length. 86
Thread tension is set incorrectly. Adjust the thread tension. 87
Wrong presser foot. Use the correct presser foot. 206
The stitch is not sewn correctly.
The presser foot that is used is not appropriate for the type of stitch that you wish to sew.
Attach the presser foot that is appropriate for the type of stitch that you wish to sew.
206
The thread tension is incorrect. Adjust the tension of the upper thread. 87
The thread is tangled, for example, in the bobbin case.
Remove the tangle thread. If the thread is tangled in the bobbin case, clean the race.
184
Skipped stitches Machine is threaded incorrectly. Check the steps for threading the machine and rethread it correctly.
61
Using improper needle or thread for the selected fabric.
Check the “Fabric/Thread/Needle Combinations” chart.
71
Problem Cause Solution Page

TROUBLESHOOTING
198
Skipped stitches Needle is turned, bent or the point is dull. Replace the needle. 69
Needle is installed incorrectly. Reinstall the needle correctly. 69
Needle is defective. Replace the needle. 69
Dust or lint has collected under the needle plate.
Remove the dust or lint with the brush. 184
Thin or stretch fabrics are being sewn. Sew with one sheet of thin paper under the fabric.
84
No stitching Needle is turned, bent or the point is dull. Replace the needle. 69
Bobbin is set incorrectly. Reset the bobbin thread correctly. 58
Upper threading is incorrect. Check the steps for threading the machine and rethread the machine.
61
High-pitched sound while sewing
Dust or lint is caught in the feed dogs. Remove the dust or lint. 184
Pieces of thread are caught in the race. Clean the race. 184
Upper threading is incorrect. Check the steps for threading the machine and rethread the machine.
61
A bobbin designed specifically for this machine is not used.
Incorrect bobbins will not work properly. Only use a bobbin designed specifically for this machine.
58
There are needle holes or friction scratches in the bobbin case.
Replace the bobbin case, or consult your authorized Baby Lock retailer.
184
Fabric does not feed through the machine.
Feed dogs are set in the down position.Press , and then turn the handwheel to raise the feed dogs.
126
Stitches are too close together. Lengthen the stitch length setting. 86
Wrong presser foot was used. Use the correct presser foot. 206
Needle is turned, bent or the point is dull. Replace the needle. 69
Thread is entangled. Cut the entangled thread and remove it from the race.
—
Zigzag foot “J” is slanted on a thick seam at the beginning of stitching.
Use the presser foot locking pin (black button on the left side) on zigzag foot “J” to keep the presser foot level while sewing.
83
The fabric feeds in the opposite direction.
The feed mechanism is damaged. Contact your authorized Baby Lock retailer. —
The needle contacts the needle plate.
The needle clamp screw is loose. Firmly tighten the needle clamp screw. If the needle is bent or blunt, replace it with a new one.
70
Needle is turned, bent or the point is dull. Replace the needle. 69
Fabric being sewn with the machine cannot be removed.
Thread is tangled below the needle plate. Lift up the fabric and cut the threads below it, and clean the race.
189
A broken needle has fallen into the machine.
— Turn off the machine, and then remove the needle plate. If the needle that fell into the machine can be seen, use tweezers to remove it. After removing the needle, return the needle plate to its original position.Before turning on the machine, slowly turn the handwheel toward you to check that it turns smoothly. If the handwheel does not turn smoothly or the needle that fell into the machine cannot be removed, consult your authorized Baby Lock retailer.
—
The handwheel feels sluggish when it is turned.
Thread is tangled in the bobbin case. Remove the tangled thread from the bobbin case. Re-install the bobbin case so it is correctly positioned.
189
The built-in camera cannot detect the buttonhole foot.
The buttonhole foot is dirty. Clean the area of the buttonhole foot to be detected.
141
Mark “A+” or 3 dots on the presser foot is shaded.
Keep these area clean. 141
Problem Cause Solution Page

TROUBLESHOOTING
199
Appendix
5
■ After sewing
Problem Cause Solution Page
Thread tension is incorrect.
Upper threading is incorrect. Check the steps for threading the machine and rethread the machine.
61
Bobbin is set incorrectly. Reset the bobbin. (If needle plate was removed, reinstall needle plate and tighten screws prior to installing bobbin case.)
58
Using improper needle or thread for the selected fabric.
Check the “Fabric/Thread/Needle Combinations” chart.
71
Presser foot holder is not attached correctly. Reattach the presser foot holder correctly. —
Thread tension is set incorrectly. Adjust the thread tension. 87
Bobbin thread is incorrectly wound. Use a correctly wound bobbin. 52
Needle is turned, bent or the point is dull. Replace the needle. 69
A bobbin designed specifically for this machine is not used.
Incorrect bobbins will not work properly. Only use a bobbin designed specifically for this machine.
58
Character or decorative stitch patterns are misaligned.
Stitch pattern adjustment settings were set incorrectly.
Revise the stitch pattern adjustment settings. 164
Stitch pattern does not turn out.
Wrong presser foot was used. Attach the correct presser foot. 206
Did not use a stabilizer material on thin fabrics or stretch fabrics.
Attach a stabilizer material. 163
Thread tension is set incorrectly. Adjust the thread tension. 87
Fabric was pulled, pushed or fed at an angle while it was being sewn.
Sew while guiding the fabric with your hands so that the fabric is fed in a straight line.
77
The thread is tangled, for example, in the bobbin case.
Remove the tangle thread. If the thread is tangled in the bobbin case, clean the race.
184
CAUTION• This machine is equipped with a thread detection device. If the “Start/Stop” button is pushed before the
upper threading is done, the machine will not operate properly. • If the power is disconnected during sewing:
Turn the main power to OFF and unplug the machine. If you restart the machine, follow the Instruction and Reference Guide for operating the machine correctly.
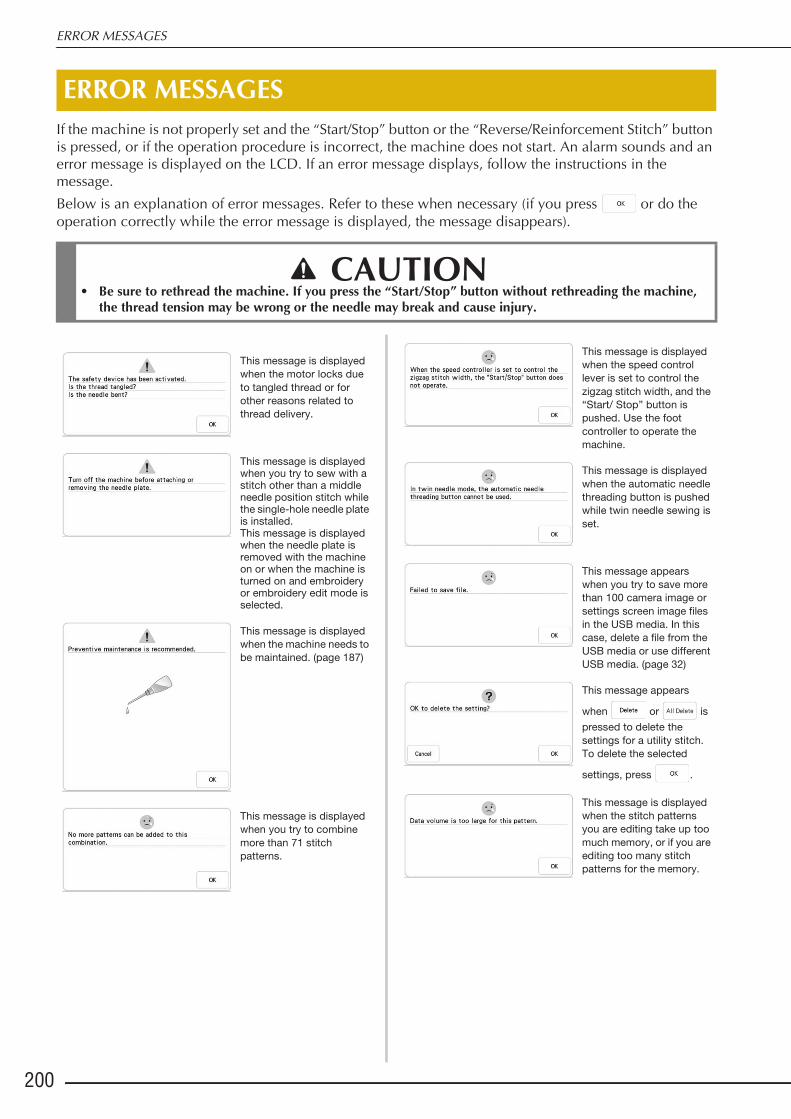
ERROR MESSAGES
200
If the machine is not properly set and the “Start/Stop” button or the “Reverse/Reinforcement Stitch” button is pressed, or if the operation procedure is incorrect, the machine does not start. An alarm sounds and an error message is displayed on the LCD. If an error message displays, follow the instructions in the message. Below is an explanation of error messages. Refer to these when necessary (if you press or do the operation correctly while the error message is displayed, the message disappears).
ERROR MESSAGES
CAUTION• Be sure to rethread the machine. If you press the “Start/Stop” button without rethreading the machine,
the thread tension may be wrong or the needle may break and cause injury.
This message is displayed when the motor locks due to tangled thread or for other reasons related to thread delivery.
This message is displayed when you try to sew with a stitch other than a middle needle position stitch while the single-hole needle plate is installed. This message is displayed when the needle plate is removed with the machine on or when the machine is turned on and embroidery or embroidery edit mode is selected.
This message is displayed when the machine needs to be maintained. (page 187)
This message is displayed when you try to combine more than 71 stitch patterns.
This message is displayed when the speed control lever is set to control the zigzag stitch width, and the “Start/ Stop” button is pushed. Use the foot controller to operate the machine.
This message is displayed when the automatic needle threading button is pushed while twin needle sewing is set.
This message appears when you try to save more than 100 camera image or settings screen image files in the USB media. In this case, delete a file from the USB media or use different USB media. (page 32)
This message appears
when or is pressed to delete the settings for a utility stitch. To delete the selected
settings, press .
This message is displayed when the stitch patterns you are editing take up too much memory, or if you are editing too many stitch patterns for the memory.

ERROR MESSAGES
201
Appendix
5
This message is displayed when a key on the LCD display is touched while the needle is in the down position.
This message is displayed when there are too many characters and the curved character configuration is impossible.
This message is displayed when the upper thread is broken or not threaded correctly, and the “Start/Stop” button or the “Reverse/ Reinforcement Stitch” button is pressed.
This message is displayed when the “Presser Foot Lifter” button is pushed while the presser foot lever is raised/the needle is lowered.
This message is displayed when the “Start/Stop” button is pushed to sew utility stitches or character/decorative stitches while the foot controller is connected.
This message is displayed when there is no stitch pattern selected and the “Start/Stop” button or the “Reverse/Reinforcement Stitch” button is pressed.
This message is displayed when the bobbin thread is running out.
This message is displayed when the memory is full and the stitch pattern or embroidery pattern cannot be saved.
This message is displayed when, after selecting a
stitch pattern, ,
, or is pressed and the stitch pattern is about to be deleted.
This message is displayed when the bobbin is being wound, and the motor locks because the thread is tangled, etc.
This message is displayed when there is a possibility that the data for the selected stitch pattern is corrupted.
This message is displayed when you try to use incompatible media.
This message is displayed when you attempt to select a stitch pattern after the USB media in which the stitch pattern is saved has been changed.
This message is displayed when an error occurs with the USB media.
This message is displayed when the memory is full and a stitch pattern must be deleted.

ERROR MESSAGES
202
■ Alarm Sounds If the operation was performed incorrectly, an alarm sounds to indicate that an error occurred. If the operation was performed correctly, the machine beeps to confirm the operation.
This message is displayed when a button, such as the “Start/Stop” button, is pushed while the presser foot is raised.
This message is displayed when it seems that the upper thread has not been threaded correctly.
This message is displayed when the file size exceeds the data capacity of the machine. Confirm the file size and format. (page 35.)
This message appears if the file format is incompatible with this machine. Check the list of compatible file formats. (page 35.)
This message is displayed when the image is deleted.
This message is displayed when you press
in the screen other than the utility stitch, or press
in the screen other than the utility stitch or character/decorative stitch.
This message appears when you try to start sewing utility stitches or character/decorative stitches with the embroidery foot with the LED pointer attached to the machine.Remove the embroidery foot with the LED pointer before entering the sewing mode.
This message appears when the dual feed foot cannot be used with the current stitch. Select other stitch.
This message appears when start sewing buttonhole stitches without attaching buttonhole foot “A+”.
Memo• To cancel the operation beep or to change
the volume, press , display page 4 of the General settings screen, and then change the setting for “Machine Speaker Volume”. Refer to page 29 for more details.

SPECIFICATIONS
203
Appendix
5* Please be aware that some specifications may change without notice.
SPECIFICATIONS
Item Specification
Machine (Box 1 of 2)
Dimensions of machine Approx. 690 mm (W) × 349 mm (H) × 322 mm (D) (approx. 27-11/64 inches (W) × 13-47/64 inches (H) × 12-43/64 inches (D))
Dimensions of box Approx. 805 mm (W) × 510 mm (H) × 405 mm (D) (approx. 31-11/16 inches (W) × 20-5/64 inches (H) × 15-15/16 inches (D))
Weight of machine Approx. 19.6 kg (approx. 43.2 lb)
Weight of box (for shipping) Approx. 23.0 kg (approx. 50.7 lb)
Sewing speed 70 to 1050 stitches per minute
Needles Home sewing machine needles (HA × 130)
Embroidery Unit (Box 2 of 2)
Dimensions of embroidery unit Approx. 637 mm (W) × 150 mm (H) × 576 mm (D) (approx. 25-5/64 inches (W) × 5-29/32 inches (H) × 22-43/64 inches (D))
Dimensions of machine with embroidery unit attached
Approx. 973 mm (W) × 349 mm (H) × 576 mm (D) (approx. 38-5/16 inches (W) × 13-47/64 inches (H) × 22-43/64 inches (D))
Dimensions of box Approx. 800 mm (W) × 695 mm (H) × 205 mm (D) (approx. 31-1/2 inches (W) × 27-23/64 inches (H) × 8-5/64 inches (D))
Weight of embroidery unit Approx. 5.6 kg (approx. 12.3 lb)
Weight of box (for shipping) Approx. 9.2 kg (approx. 20.3 lb)
Total Shipping Weight (Combination of all 2 boxes complete) Approx. 43.4 kg (approx. 95.7 lb)
Data storage USB media/SD card (SD and SDHC)

UPGRADING YOUR MACHINE’S SOFTWARE
204
You can use USB media to upgrade software for your machine.When an upgrade program is available on “ www.babylock.com ”, please download the files following the instructions on the website and steps below.
Upgrade Procedure Using USB Media
aWhile pressing the “Automatic Threading” button, turn the main power to ON.
o The following screen will appear on the LCD.
bPress or .
cInsert the USB media into the USB port corresponding to the button pressed in step b. USB port on the machine. The media device should only contain the upgrade file.
a USB mediab USB port
dPress .
o The upgrade file is loaded.
eRemove the USB media, and turn the machine off and on again.
UPGRADING YOUR MACHINE’S SOFTWARE
Note• When using USB media to upgrade the software, check that no data other than the upgrade file is
saved on the USB media being used before starting to upgrade.• Compatible operating systems:
Windows 7, Windows 8.1, Windows 10
Note• The access lamp will begin blinking after
inserting USB media, and it will take about 5 to 6 seconds to recognize the media. (Time will differ depending on the USB media).
a
b
Note• If an error occurs, a red text error message
will appear. When the installation is performed successfully, following message will appear.

UPGRADING YOUR MACHINE’S SOFTWARE
205
Appendix
5

STITCH SETTING CHART
206
The following chart shows information for each utility stitch concerning applications, stitch lengths, stitch widths, and whether or not the twin needle mode can be used.
STITCH SETTING CHART
Note• Quilting foot “C” is used when the straight stitch needle plate is attached to the machine. Refer to
“Using Free motion Quilting Foot “C”” on page 126.
Stitch Stitch namePresser foot
Applications
Stitch width [mm (inch)]
Stitch length [mm (inch)] Twin
needleAuto. Manual Auto. Manual
Straight stitch (Left)
General sewing, gather, pintuck, etc. Reverse stitch is sewn while pressing “Reverse/Reinforcement Stitch” button.
0.0(0)
0.0 - 7.0(0 - 9/32)
2.5(3/32)
0.2 - 5.0(1/64 - 13/
64)
OK( J )
Straight stitch (Left)
General sewing, gather, pintuck, etc. Reinforcement stitch is sewn while pressing “Reverse/Reinforcement Stitch” button.
0.0(0)
0.0 - 7.0(0 - 9/32)
2.5(3/32)
0.2 - 5.0(1/64 - 13/
64)
OK( J )
Straight stitch (Middle)
General sewing, gather, pintuck, etc. Reverse stitch is sewn while pressing “Reverse/Reinforcement Stitch” button.
3.5(9/64)
0.0 - 7.0(0 - 9/32)
2.5(3/32)
0.2 - 5.0(1/64 - 13/
64)
OK( J )
Straight stitch (Middle)
General sewing, gather, pintuck, etc. Reinforcement stitch is sewn while pressing “Reverse/Reinforcement Stitch” button.
3.5(9/64)
0.0 - 7.0(0 - 9/32)
2.5(3/32)
0.2 - 5.0(1/64 - 13/
64)
OK( J )
Triple stretch stitch
General sewing for reinforcement and decorative topstitching
0.0(0)
0.0 - 7.0(0 - 9/32)
2.5(3/32)
0.4 - 5.0(1/64 - 13/
64)
OK( J )
Stem stitch Reinforced stitching, sewing and decorative applications 1.0
(3/64)0.0 - 7.0(0 - 9/32)
2.5(3/32)
0.4 - 5.0(1/64 - 13/
64)
OK( J )
Decorative stitch
Decorative stitching, top stitching 0.0
(0)0.0 - 7.0(0 - 9/32)
2.5(3/32)
0.4 - 5.0(1/64 - 13/
64)
OK( J )
Basting stitch Basting0.0(0)
0.0 - 7.0(0 - 9/32)
20(25/32)
5.0(13/64) NO
Zigzag stitch For overcasting, mending. Reverse stitch is sewn while pressing “Reverse/Reinforcement Stitch” button.
3.5(9/64)
0.0 - 7.0(0 - 9/32)
1.4(1/16)
0.0 - 5.0(0 - 13/64)
OK( J )
Zigzag stitch For overcasting, mending. Reinforcement stitch is sewn while pressing “Reverse/Reinforcement Stitch” button.
3.5(9/64)
0.0 - 7.0(0 - 9/32)
1.4(1/16)
0.0 - 5.0(0 - 13/64)
OK( J )
Zigzag stitch (Right)
Start from right needle position, zigzag sew at left. 3.5
(9/64)
2.5 - 5.0(3/32 - 13/
64)
1.4(1/16)
0.3 - 5.0(1/64 - 13/
64)
OK( J )
Zigzag stitch (Left)
Start from left needle position, zigzag sew at right. 3.5
(9/64)
2.5 - 5.0(3/32 - 13/
64)
1.4(1/16)
0.3 - 5.0(1/64 - 13/
64)
OK( J )
2 steps elastic zigzag
Overcasting (medium weight and stretch fabrics), tape and elastic
5.0(13/64)
0.0 - 7.0(0 - 9/32)
1.0(3/64)
0.2 - 5.0(1/64 - 13/
64)
OK( J )

STITCH SETTING CHART
207
Appendix
5
2 steps elastic zigzag
Overcasting (medium weight and stretch fabrics), tape and elastic
5.0(13/64)
0.0 - 7.0(0 - 9/32)
1.0(3/64)
0.2 - 5.0(1/64 - 13/
64)
OK( J )
3 steps elastic zigzag
Overcasting (medium, heavyweight and stretch fabrics), tape and elastic
5.0(13/64)
0.0 - 7.0(0 - 9/32)
1.0(3/64)
0.2 - 5.0(1/64 - 13/
64)
OK( J )
Overcasting stitch
Reinforcing of light and medium weight fabrics 3.5
(9/64)
2.5 - 5.0(3/32 - 13/
64)
2.0(5/64)
0.4 - 5.0(1/64 - 13/
64)NO
Overcasting stitch
Reinforcing of heavyweight fabric 5.0
(13/64)
2.5 - 5.0(3/32 - 13/
64)
2.5(3/32)
0.4 - 5.0(1/64 - 13/
64)NO
Overcasting stitch
Reinforcing of medium, heavyweight and easily friable fabrics or decorative stitching.
5.0(13/64)
3.5 - 5.0(9/64 - 13/
64)
2.5(3/32)
0.4 - 5.0(1/64 - 13/
64)NO
Overcasting stitch
Reinforced seaming of stretch fabric 5.0
(13/64)0.0 - 7.0(0 - 9/32)
2.5(3/32)
0.4 - 5.0(1/64 - 13/
64)
OK( J )
Overcasting stitch
Reinforcing of medium stretch fabric and heavyweight fabric, decorative stitching
5.0(13/64)
0.0 - 7.0(0 - 9/32)
2.5(3/32)
0.4 - 5.0(1/64 - 13/
64)
OK( J )
Overcasting stitch
Reinforcement of stretch fabric or decorative stitching 4.0
(5/32)0.0 - 7.0(0 - 9/32)
4.0(5/32)
0.4 - 5.0(1/64 - 13/
64)
OK( J )
Overcasting stitch
Stretch knit seam5.0
(13/64)0.0 - 7.0(0 - 9/32)
4.0(5/32)
0.4 - 5.0(1/64 - 13/
64)NO
Single diamond overcast
Reinforcement and seaming stretch fabric 6.0
(15/64)0.0 - 7.0(0 - 9/32)
3.0(1/8)
0.4 - 5.0(1/64 - 13/
64)
OK( J )
Single diamond overcast
Reinforcement of stretch fabric 6.0
(15/64)0.0 - 7.0(0 - 9/32)
1.8(1/16)
0.4 - 5.0(1/64 - 13/
64)
OK( J )
With side cutter Straight stitch while cutting fabrics 0.0
(0)0.0 - 2.5(0 - 3/32)
2.5(3/32)
0.2 - 5.0(1/64 - 13/
64)NO
With side cutter Zigzag stitch while cutting fabrics 3.5
(9/64)
3.5 - 5.0(9/64 - 13/
64)
1.4(1/16)
0.0 - 5.0(0 - 13/64) NO
With side cutter Overcasting stitch while cutting fabrics 3.5
(9/64)
3.5 - 5.0(9/64 - 13/
64)
2.0(5/64)
0.4 - 5.0(1/64 - 13/
64)NO
With side cutter Overcasting stitch while cutting fabrics 5.0
(13/64)
3.5 - 5.0(9/64 - 13/
64)
2.5(3/32)
0.4 - 5.0(1/64 - 13/
64)NO
With side cutter Overcasting stitch while cutting fabrics 5.0
(13/64)
3.5 - 5.0(9/64 - 13/
64)
2.5(3/32)
0.4 - 5.0(1/64 - 13/
64)NO
Piecing stitch (Right)
Piecework/patchwork 6.5 mm (approx. 1/4 inch) right seam allowance
5.5(7/32)
0.0 - 7.0(0 - 9/32)
2.0(5/64)
0.2 - 5.0(1/64 - 13/
64)NO
Piecing stitch (Middle)
Piecework/patchwork— — 2.0
(5/64)
0.2 - 5.0(1/64 - 13/
64)NO
Stitch Stitch namePresser foot
Applications
Stitch width [mm (inch)]
Stitch length [mm (inch)] Twin
needleAuto. Manual Auto. Manual

STITCH SETTING CHART
208
Piecing stitch (Left)
Piecework/patchwork 6.5 mm (approx. 1/4 inch) left seam allowance
1.5(1/16)
0.0 - 7.0(0 - 9/32)
2.0(5/64)
0.2 - 5.0(1/64 - 13/
64)NO
Hand-look quilting
Quilting stitch made to look like hand quilting stitch 0.0
(0)0.0 - 7.0(0 - 9/32)
2.5(3/32)
0.4 - 5.0(1/64 - 13/
64)NO
Quilting appliqué zigzag stitch
Zigzag stitch for quilting and sewing on appliqué quilt pieces
3.5(9/64)
0.0 - 7.0(0 - 9/32)
1.4(1/16)
0.0 - 5.0(0 - 13/64) NO
Quilting appliqué stitch
Quilting stitch for invisible appliqué or attaching binding 1.5
(1/16)0.0 - 7.0(0 - 9/32)
1.8(1/16)
0.4 - 5.0(1/64 - 13/
64)NO
Quilting stippling
Background quilting7.0
(9/32)0.0 - 7.0(0 - 9/32)
1.6(1/16)
0.4 - 5.0(1/64 - 13/
64)NO
Blind hem stitch Hemming woven fabrics0.0(0)
+3.0 - -3.0(+1/8 - -1/8)
2.0(5/64)
0.4 - 5.0(1/64 - 13/
64)NO
Blind hem stitch stretch
Hemming stretch fabric0.0(0)
+3.0 - -3.0(+1/8 - -1/8)
2.0(5/64)
0.4 - 5.0(1/64 - 13/
64)NO
Blanket stitch Appliqués, decorative blanket stitch 3.5
(9/64)0.0 - 7.0(0 - 9/32)
2.5(3/32)
0.4 - 5.0(1/64 - 13/
64)
OK( J )
Blanket stitch Appliqués, decorative blanket stitch 2.5
(3/32)0.0 - 7.0(0 - 9/32)
2.5(3/32)
0.4 - 5.0(1/64 - 13/
64)
OK( J )
Shell tuck edge Shell tuck edge finish on fabrics 4.0
(5/32)0.0 - 7.0(0 - 9/32)
2.5(3/32)
0.2 - 5.0(1/64 - 13/
64)
OK( J )
Satin scallop stitch
Decorating collar of blouse, edge of handkerchief 5.0
(13/64)0.0 - 7.0(0 - 9/32)
0.5(1/64)
0.1 - 5.0(0 - 13/64)
OK( J )
Scallop stitch Decorating collar of blouse, edge of handkerchief 7.0
(9/32)0.0 - 7.0(0 - 9/32)
1.4(1/16)
0.4 - 5.0(1/64 - 13/
64)NO
Patchwork join stitch
Patchwork stitches, decorative stitching 4.0
(5/32)0.0 - 7.0(0 - 9/32)
1.2(1/16)
0.2 - 5.0(1/64 - 13/
64)
OK( J )
Patchwork double overlock stitch
Patchwork stitches, decorative stitching 5.0
(13/64)0.0 - 7.0(0 - 9/32)
2.5(3/32)
0.4 - 5.0(1/64 - 13/
64)
OK( J )
Couching stitch Decorative stitching, attaching cord and couching 5.0
(13/64)0.0 - 7.0(0 - 9/32)
1.2(1/16)
0.2 - 5.0(1/64 - 13/
64)
OK( J )
Smocking stitch Smocking, decorative stitching 5.0
(13/64)0.0 - 7.0(0 - 9/32)
1.6(1/16)
0.4 - 5.0(1/64 - 13/
64)
OK( J )
Feather stitch Fagoting, decorative stitching5.0
(13/64)0.0 - 7.0(0 - 9/32)
2.5(3/32)
0.4 - 5.0(1/64 - 13/
64)
OK( J )
Fagoting cross stitch
Fagoting, bridging and decorative stitching 5.0
(13/64)0.0 - 7.0(0 - 9/32)
2.5(3/32)
0.4 - 5.0(1/64 - 13/
64)
OK( J )
Tape attaching Attaching tape to seam in stretch fabric 4.0
(5/32)0.0 - 7.0(0 - 9/32)
1.0(3/64)
0.2 - 5.0(1/64 - 13/
64)
OK( J )
Stitch Stitch namePresser foot
Applications
Stitch width [mm (inch)]
Stitch length [mm (inch)] Twin
needleAuto. Manual Auto. Manual

STITCH SETTING CHART
209
Appendix
5
Ladder stitch Decorative stitching4.0
(5/32)0.0 - 7.0(0 - 9/32)
3.0(1/8)
0.4 - 5.0(1/64 - 13/
64)NO
Rick-rack stitch Decorative top stitching4.0
(5/32)0.0 - 7.0(0 - 9/32)
2.5(3/32)
0.4 - 5.0(1/64 - 13/
64)
OK( J )
Decorative stitch
Decorative stitching1.0
(3/64)0.0 - 7.0(0 - 9/32)
2.5(3/32)
0.4 - 5.0(1/64 - 13/
64)
OK( J )
Decorative stitch
Decorative stitching5.5
(7/32)0.0 - 7.0(0 - 9/32)
1.6(1/16)
0.4 - 5.0(1/64 - 13/
64)
OK( J )
Serpentine stitch
Decorative stitching and attaching elastic 5.0
(13/64)0.0 - 7.0(0 - 9/32)
1.0(3/64)
0.2 - 5.0(1/64 - 13/
64)
OK( J )
Decorative stitch
Decorative stitching and appliqué 6.0
(15/64)0.0 - 7.0(0 - 9/32)
1.0(3/64)
0.2 - 5.0(1/64 - 13/
64)
OK( J )
Decorative stippling stitch
Decorative stitching7.0
(9/32)0.0 - 7.0(0 - 9/32)
1.6(1/16)
0.4 - 5.0(1/64 - 13/
64)NO
Hemstitching Decorative hems, triple straight at left 1.0
(3/64)0.0 - 7.0(0 - 9/32)
2.5(3/32)
0.4 - 5.0(1/64 - 13/
64)
OK( J )
Hemstitching Decorative hems, triple straight at center 3.5
(9/64)0.0 - 7.0(0 - 9/32)
2.5(3/32)
0.4 - 5.0(1/64 - 13/
64)
OK( J )
Hemstitching zigzag
Decorative hems, top stitching6.0
(15/64)0.0 - 7.0(0 - 9/32)
3.0(1/8)
0.4 - 5.0(1/64 - 13/
64)
OK( J )
Hemstitching Decorative hems, lace attaching pin stitch 3.5
(9/64)0.0 - 7.0(0 - 9/32)
2.5(3/32)
0.4 - 5.0(1/64 - 13/
64)NO
Hemstitching Decorative hems3.0
(1/8)0.0 - 7.0(0 - 9/32)
3.5(9/64)
0.4 - 5.0(1/64 - 13/
64)NO
Hemstitching Decorative hems daisy stitch6.0
(15/64)0.0 - 7.0(0 - 9/32)
3.0(1/8)
0.4 - 5.0(1/64 - 13/
64)NO
Hemstitching Heirloom, decorative hems5.0
(13/64)0.0 - 7.0(0 - 9/32)
3.5(9/64)
0.4 - 5.0(1/64 - 13/
64)NO
Hemstitching Heirloom, decorative hems5.0
(13/64)0.0 - 7.0(0 - 9/32)
3.5(9/64)
0.4 - 5.0(1/64 - 13/
64)NO
Hemstitching Heirloom, decorative hems5.0
(13/64)0.0 - 7.0(0 - 9/32)
3.5(9/64)
0.4 - 5.0(1/64 - 13/
64)
OK( J )
Hemstitching Heirloom, decorative hems5.0
(13/64)0.0 - 7.0(0 - 9/32)
4.0(5/32)
0.4 - 5.0(1/64 - 13/
64)
OK( J )
Hemstitching Heirloom, decorative hems4.0
(5/32)0.0 - 7.0(0 - 9/32)
2.5(3/32)
0.4 - 5.0(1/64 - 13/
64)
OK( J )
Stitch Stitch namePresser foot
Applications
Stitch width [mm (inch)]
Stitch length [mm (inch)] Twin
needleAuto. Manual Auto. Manual
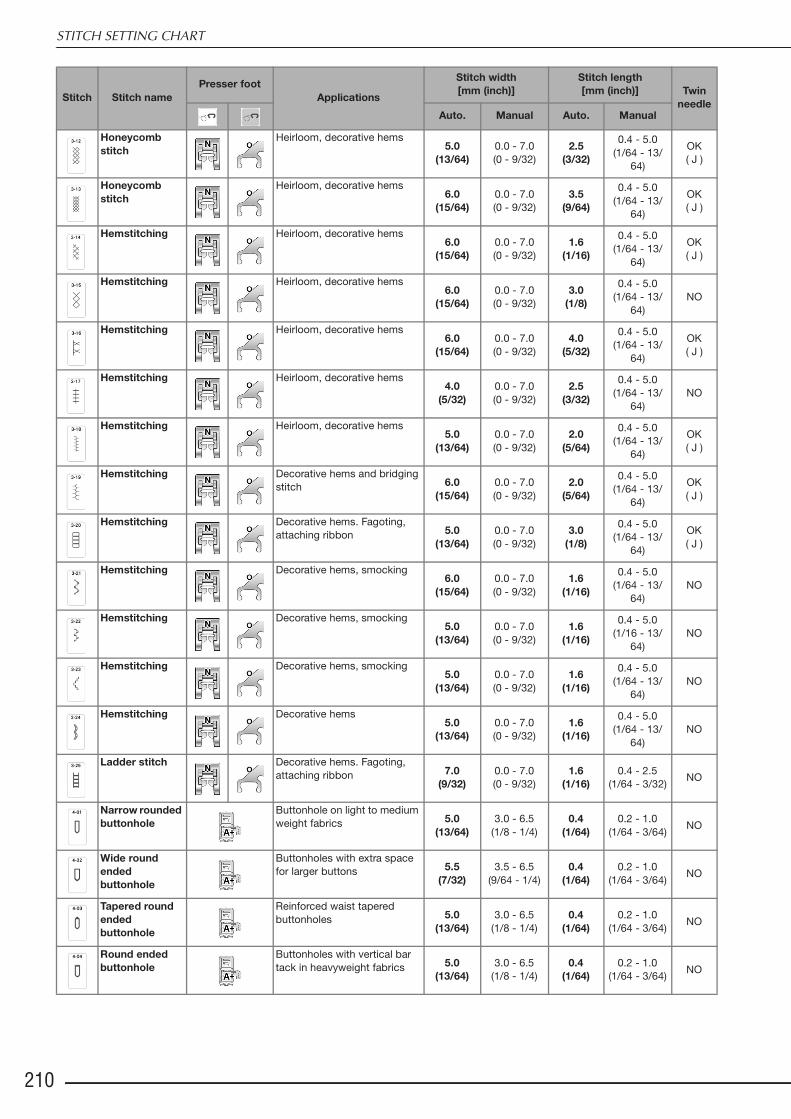
STITCH SETTING CHART
210
Honeycomb stitch
Heirloom, decorative hems5.0
(13/64)0.0 - 7.0(0 - 9/32)
2.5(3/32)
0.4 - 5.0(1/64 - 13/
64)
OK( J )
Honeycomb stitch
Heirloom, decorative hems6.0
(15/64)0.0 - 7.0(0 - 9/32)
3.5(9/64)
0.4 - 5.0(1/64 - 13/
64)
OK( J )
Hemstitching Heirloom, decorative hems6.0
(15/64)0.0 - 7.0(0 - 9/32)
1.6(1/16)
0.4 - 5.0(1/64 - 13/
64)
OK( J )
Hemstitching Heirloom, decorative hems6.0
(15/64)0.0 - 7.0(0 - 9/32)
3.0(1/8)
0.4 - 5.0(1/64 - 13/
64)NO
Hemstitching Heirloom, decorative hems6.0
(15/64)0.0 - 7.0(0 - 9/32)
4.0(5/32)
0.4 - 5.0(1/64 - 13/
64)
OK( J )
Hemstitching Heirloom, decorative hems4.0
(5/32)0.0 - 7.0(0 - 9/32)
2.5(3/32)
0.4 - 5.0(1/64 - 13/
64)NO
Hemstitching Heirloom, decorative hems5.0
(13/64)0.0 - 7.0(0 - 9/32)
2.0(5/64)
0.4 - 5.0(1/64 - 13/
64)
OK( J )
Hemstitching Decorative hems and bridging stitch 6.0
(15/64)0.0 - 7.0(0 - 9/32)
2.0(5/64)
0.4 - 5.0(1/64 - 13/
64)
OK( J )
Hemstitching Decorative hems. Fagoting, attaching ribbon 5.0
(13/64)0.0 - 7.0(0 - 9/32)
3.0(1/8)
0.4 - 5.0(1/64 - 13/
64)
OK( J )
Hemstitching Decorative hems, smocking6.0
(15/64)0.0 - 7.0(0 - 9/32)
1.6(1/16)
0.4 - 5.0(1/64 - 13/
64)NO
Hemstitching Decorative hems, smocking5.0
(13/64)0.0 - 7.0(0 - 9/32)
1.6(1/16)
0.4 - 5.0(1/16 - 13/
64)NO
Hemstitching Decorative hems, smocking5.0
(13/64)0.0 - 7.0(0 - 9/32)
1.6(1/16)
0.4 - 5.0(1/64 - 13/
64)NO
Hemstitching Decorative hems5.0
(13/64)0.0 - 7.0(0 - 9/32)
1.6(1/16)
0.4 - 5.0(1/64 - 13/
64)NO
Ladder stitch Decorative hems. Fagoting, attaching ribbon 7.0
(9/32)0.0 - 7.0(0 - 9/32)
1.6(1/16)
0.4 - 2.5(1/64 - 3/32) NO
Narrow rounded buttonhole
Buttonhole on light to medium weight fabrics 5.0
(13/64)3.0 - 6.5
(1/8 - 1/4)0.4
(1/64)0.2 - 1.0
(1/64 - 3/64) NO
Wide round ended buttonhole
Buttonholes with extra space for larger buttons 5.5
(7/32)3.5 - 6.5
(9/64 - 1/4)0.4
(1/64)0.2 - 1.0
(1/64 - 3/64) NO
Tapered round ended buttonhole
Reinforced waist tapered buttonholes 5.0
(13/64)3.0 - 6.5
(1/8 - 1/4)0.4
(1/64)0.2 - 1.0
(1/64 - 3/64) NO
Round ended buttonhole
Buttonholes with vertical bar tack in heavyweight fabrics 5.0
(13/64)3.0 - 6.5
(1/8 - 1/4)0.4
(1/64)0.2 - 1.0
(1/64 - 3/64) NO
Stitch Stitch namePresser foot
Applications
Stitch width [mm (inch)]
Stitch length [mm (inch)] Twin
needleAuto. Manual Auto. Manual

STITCH SETTING CHART
211
Appendix
5
Round ended buttonhole
Buttonholes with bar tack5.0
(13/64)3.0 - 6.5
(1/8 - 1/4)0.4
(1/64)0.2 - 1.0
(1/64 - 3/64) NO
Round double ended buttonhole
Buttonholes for fine, medium to heavyweight fabrics 5.0
(13/64)3.0 - 6.5
(1/8 - 1/4)0.4
(1/64)0.2 - 1.0
(1/64 - 3/64) NO
Narrow squared buttonhole
Buttonholes for light to medium weight fabrics 5.0
(13/64)3.0 - 6.5
(1/8 - 1/4)0.4
(1/64)0.2 - 1.0
(1/64 - 3/64) NO
Wide squared buttonhole
Buttonholes with extra space for larger decorative buttons 5.5
(7/32)3.5 - 6.5
(9/64 - 1/4)0.4
(1/64)0.2 - 1.0
(1/64 - 3/64) NO
Squared buttonhole
Heavy-duty buttonholes with vertical bar tacks 5.0
(13/64)3.0 - 6.5
(1/8 - 1/4)0.4
(1/64)0.2 - 1.0
(1/64 - 3/64) NO
Stretch buttonhole
Buttonholes for stretch or woven fabrics 6.0
(15/64)3.0 - 6.5
(1/8 - 1/4)1.0
(3/64)0.5 - 2.0
(1/64 - 5/64) NO
Heirloom buttonhole
Buttonholes for heirloom and stretch fabrics 6.0
(15/64)3.0 - 6.5
(1/8 - 1/4)1.5
(1/16)1.0 - 3.0
(3/64 - 1/8) NO
Bound buttonhole
The first step in making bound buttonholes 5.0
(13/64)0.0 - 6.5(0 - 1/4)
2.0(5/64)
0.2 - 4.0(1/64 - 5/32) NO
Keyhole buttonhole
Buttonholes in heavyweight or thick fabrics for larger flat buttons
7.0(9/32)
3.0 - 7.0(1/8 - 9/32)
0.5(1/64)
0.3 - 1.0(1/64 - 3/64) NO
Tapered keyhole buttonhole
Buttonholes in medium to heavy weight fabrics for larger flat buttons
7.0(9/32)
3.0 - 7.0(1/8 - 9/32)
0.5(1/64)
0.3 - 1.0(1/64 - 3/64) NO
Keyhole buttonhole
Buttonholes with vertical bar tack for reinforcement in heavyweight or thick fabrics
7.0(9/32)
3.0 - 7.0(1/8 - 9/32)
0.5(1/64)
0.3 - 1.0(1/64 - 3/64) NO
4 steps buttonhole 1
Left side of 4 step buttonhole5.0
(13/64)1.5 - 7.0
(1/16 - 9/32)0.4
(1/64)0.2 - 1.0
(1/64 - 3/64) NO
4 steps buttonhole 2
Bar tack of 4 step buttonhole5.0
(13/64)1.5 - 7.0
(1/16 - 9/32)0.4
(1/64)0.2 - 1.0
(1/64 - 3/64) NO
4 steps buttonhole 3
Right side of 4 step buttonhole5.0
(13/64)1.5 - 7.0
(1/16 - 9/32)0.4
(1/64)0.2 - 1.0
(1/64 - 3/64) NO
4 steps buttonhole 4
Bar tack of 4 step buttonhole5.0
(13/64)1.5 - 7.0
(1/16 - 9/32)0.4
(1/64)0.2 - 1.0
(1/64 - 3/64) NO
Darning Darning of medium weight fabric 7.0
(9/32)2.5 - 7.0
(3/32 - 9/32)2.0
(5/64)0.4 - 2.5
(1/64 - 3/32) NO
Darning Darning of heavyweight fabric7.0
(9/32)2.5 - 7.0
(3/32 - 9/32)2.0
(5/64)0.4 - 2.5
(1/64 - 3/32) NO
Bar tack Reinforcement at opening of pocket, etc. 2.0
(5/64)1.0 - 3.0
(3/64 - 1/8)0.4
(1/64)0.3 - 1.0
(1/64 - 3/64) NO
Stitch Stitch namePresser foot
Applications
Stitch width [mm (inch)]
Stitch length [mm (inch)] Twin
needleAuto. Manual Auto. Manual

STITCH SETTING CHART
212
Button sewing Attaching buttons3.5
(9/64)
2.5 - 4.5(3/32 - 11/
64)— — NO
Eyelet For making eyelets, holes on belts, etc. 7.0
(9/32)
7.0 6.0 5.0(9/32 15/64
13/64)
7.0(9/32)
7.0 6.0 5.0(9/32 15/64
13/64)NO
Star eyelet For making star-shaped eyelets on holes. — — — — NO
Diagonally left up (Straight)
For attaching appliqué on tubular pieces of fabric and mitering corners
— — — — NO
Reverse (Straight)
For attaching appliqué on tubular pieces of fabric and mitering corners
— — — — NO
Diagonally right up (Straight)
For attaching appliqué on tubular pieces of fabric and mitering corners
— — — — NO
Sideways to left (Straight)
For attaching appliqué on tubular pieces of fabric — — — — NO
Sideways to right (Straight)
For attaching appliqué on tubular pieces of fabric — — — — NO
Diagonally left down (Straight)
For attaching appliqué on tubular pieces of fabric and mitering corners
— — — — NO
Forward (Straight)
For attaching appliqué on tubular pieces of fabric and mitering corners
— — — — NO
Diagonally right down (Straight)
For attaching appliqué on tubular pieces of fabric and mitering corners
— — — — NO
Sideways to left (Zigzag)
For attaching appliqué on tubular pieces of fabric — — — — NO
Sideways to right (Zigzag)
For attaching appliqué on tubular pieces of fabric — — — — NO
Forward (Zigzag)
For attaching appliqué on tubular pieces of fabric and mitering corners
— — — — NO
Reverse (Zigzag)
For attaching appliqué on tubular pieces of fabric and mitering corners
— — — — NO
Piecing stitch (Middle)
Piecework/patchwork— — 2.0
(5/64)
0.2 - 5.0(1/64 - 13/
64)NO
Piecing stitch (Right)
Piecework/patchwork6.5 mm (approx. 1/4 inch) right seam allowance
5.50(7/32)
0.00 - 7.00(0 - 9/32)
2.0(5/64)
0.2 - 5.0(1/64 - 13/
64)NO
Piecing stitch (Left)
Piecework/patchwork6.5 mm (approx. 1/4 inch) left seam allowance
1.50(1/16)
0.00 - 7.00(0 - 9/32)
2.0(5/64)
0.2 - 5.0(1/64 - 13/
64)NO
Stitch Stitch namePresser foot
Applications
Stitch width [mm (inch)]
Stitch length [mm (inch)] Twin
needleAuto. Manual Auto. Manual

STITCH SETTING CHART
213
Appendix
5
Hand-look quilting
Quilting stitch made to look like hand quilting stitch 3.50
(9/64)0.00 - 7.00(0 - 9/32)
2.5(3/32)
0.4 - 5.0(1/64 - 13/
64)NO
Basting stitch Basting3.50
(9/64)0.00 - 7.00(0 - 9/32)
20(25/32)
5 - 30(13/64 - 1-3/
16)NO
Stem stitch Reinforced stitching, sewing and decorative applications 1.00
(3/64)0.00 - 7.00(0 - 9/32)
2.5(3/32)
0.4 - 5.0(1/64 - 13/
64)NO
Quilting appliqué zigzag stitch
Zigzag stitch for quilting and sewing on appliqué quilt pieces
3.50(9/64)
0.00 - 7.00(0 - 9/32)
1.6(1/16)
0.0 - 5.0(0 - 13/64) NO
Zigzag stitch (Right)
Start from right needle position, zigzag sew at left 3.50
(9/64)
2.50 - 5.00(3/32 - 13/
64)
1.6(1/16)
0.3 - 5.0(1/64 - 13/
64)NO
Zigzag stitch (Left)
Start from left needle position, zigzag sew at right 3.50
(9/64)
2.50 - 5.00(3/32 - 13/
64)
1.6(1/16)
0.3 - 5.0(1/64 - 13/
64)NO
2 steps elastic zigzag
Overcasting (medium weight and stretch fabrics), tape and elastic
5.00(13/64)
0.00 - 7.00(0 - 9/32)
1.0(3/64)
0.2 - 5.0(1/64 - 13/
64)NO
3 steps elastic zigzag
Overcasting (medium, heavyweight and stretch fabrics), tape and elastic
5.00(13/64)
0.00 - 7.00(0 - 9/32)
1.0(3/64)
0.2 - 5.0(1/64 - 13/
64)NO
Quilting appliqué stitch
Quilting stitch for invisible appliqué or attaching binding 2.00
(5/64)0.00 - 7.00(0 - 9/32)
2.0(5/64)
0.4 - 5.0(1/64 - 13/
64)NO
Shell tuck edge Shell tuck edge finish on fabrics 4.00
(5/32)0.00 - 7.00(0 - 9/32)
2.5(3/32)
0.2 - 5.0(1/64 - 13/
64)NO
Blanket stitch Appliqués, decorative blanket stitch 3.50
(9/64)0.00 - 7.00(0 - 9/32)
2.5(3/32)
0.4 - 5.0(1/64 - 13/
64)NO
Quilting stippling
Background quilting7.00
(9/32)0.00 - 7.00(0 - 9/32)
1.6(1/16)
0.4 - 5.0(1/64 - 13/
64)NO
Overcasting stitch
Stretch knit seam5.00
(13/64)0.00 - 7.00(0 - 9/32)
4.0(5/32)
0.4 - 5.0(1/64 - 13/
64)NO
Tape attaching Attaching tape to seam in stretch fabric 5.50
(7/32)0.00 - 7.00(0 - 9/32)
1.4(1/16)
0.2 - 5.0(1/64 - 13/
64)NO
Serpentine stitch
Decorative stitching and attaching elastic 5.00
(13/64)0.00 - 7.00(0 - 9/32)
2.0(5/64)
0.2 - 5.0(1/64 - 13/
64)NO
Feather stitch Fagoting, decorative stitching5.00
(13/64)0.00 - 7.00(0 - 9/32)
2.5(3/32)
0.4 - 5.0(1/64 - 13/
64)NO
Fagoting cross stitch
Fagoting, bridging and decorative stitching 5.00
(13/64)0.00 - 7.00(0 - 9/32)
2.5(3/32)
0.4 - 5.0(1/64 - 13/
64)NO
Couching stitch Decorative stitching, attaching cord and couching 5.00
(13/64)0.00 - 7.00(0 - 9/32)
1.2(1/16)
0.2 - 5.0(1/64 - 13/
64)NO
Stitch Stitch namePresser foot
Applications
Stitch width [mm (inch)]
Stitch length [mm (inch)] Twin
needleAuto. Manual Auto. Manual

STITCH SETTING CHART
214
Patchwork double overlock stitch
Patchwork stitches, decorative stitching 5.00
(13/64)0.00 - 7.00(0 - 9/32)
2.5(3/32)
0.4 - 5.0(1/64 - 13/
64)NO
Smocking stitch Smocking, decorative stitching 5.00
(13/64)0.00 - 7.00(0 - 9/32)
1.6(1/16)
0.4 - 5.0(1/64 - 13/
64)NO
Rick-rack stitch Decorative top stitching4.00
(5/32)0.00 - 7.00(0 - 9/32)
2.5(3/32)
0.4 - 5.0(1/64 - 13/
64)NO
Decorative stitch
Decorative stitching and appliqué 6.00
(15/64)0.00 - 7.00(0 - 9/32)
1.0(3/64)
0.2 - 5.0(1/64 - 13/
64)NO
Decorative stitch
Decorative stitching5.50
(7/32)0.00 - 7.00(0 - 9/32)
1.6(1/16)
0.4 - 5.0(1/64 - 13/
64)NO
Hemstitching Heirloom, decorative hems5.00
(13/64)0.00 - 7.00(0 - 9/32)
2.0(5/64)
0.4 - 5.0(1/64 - 13/
64)NO
Hemstitching Decorative hems and bridging stitch 6.00
(15/64)0.00 - 7.00(0 - 9/32)
2.0(5/64)
0.4 - 5.0(1/64 - 13/
64)NO
Single diamond overcast
Reinforcement and seaming stretch fabric 6.00
(15/64)0.00 - 7.00(0 - 9/32)
3.0(1/8)
0.4 - 5.0(1/64 - 13/
64)NO
Overcasting stitch
Reinforcement of stretch fabric or decorative stitching 4.00
(5/32)0.00 - 7.00(0 - 9/32)
4.0(5/32)
0.4 - 5.0(1/64 - 13/
64)NO
Free motion couching stitch
Free motion couching stitch3.50
(9/64)2.75 - 3.75(3/32 - 1/8) – – NO
Basting stitch Free motion basting stitch3.50
(9/64)0.00 - 7.00(0 - 9/32) – – NO
Stitch Stitch namePresser foot
Applications
Stitch width [mm (inch)]
Stitch length [mm (inch)] Twin
needleAuto. Manual Auto. Manual

INDEX
215
Appendix
5
INDEXA
Accessoriesincluded accessories ................................................................ 17options .................................................................................... 20
Accessory case ............................................................................ 16Accessory compartment .............................................................. 16Air vent ....................................................................................... 12Alarm sounds ............................................................................ 202Alphabet characters
character/decorative stitches .................................................. 160Appliqué ................................................................................... 133
quilting .................................................................................. 124using a zigzag stitch ............................................................... 116
Automatic fabric sensor system .................................................... 91Automatic reinforcement stitching ............................................... 79Automatic thread cutting key ....................................................... 88Automatic Threading button ................................................ 15, 61
B
Back to beginning key ............................................................... 170Ball point needle ......................................................................... 71Ball point needle 75/107 ............................................................. 71Bar tacks .................................................................................... 148Basting ...................................................................................... 140Blind hem stitches ..................................................................... 131Bobbin
pulling up the bobbin thread ................................................... 59setting ...................................................................................... 58winding ................................................................................... 52
Bobbin casecleaning ................................................................................. 184
Bobbin cover ....................................................................... 14, 58Bobbin winder ............................................................................. 12Bobbin winding switch ................................................................ 54Built-in camera .................................................................... 93, 95Button sewing ............................................................................ 149
4 hole buttons ........................................................................ 150shank ..................................................................................... 150
Buttonholesfour-step ................................................................................ 145odd-shaped/buttons that do not fit the button holder plate ..... 144one-step ................................................................................. 141
C
Character/Decorative Stitchesadjustments ........................................................................... 164combining ............................................................................. 172editing ................................................................................... 166key functions ......................................................................... 166retrieving ..................................................................... 180, 181saving .................................................................................... 179selecting ................................................................................ 158sewing ................................................................................... 163stitch selection screens .......................................................... 159
CleaningLCD screen ............................................................................ 184machine casing ...................................................................... 184race ....................................................................................... 184
Clock ........................................................................................... 26Combining stitch patterns
character/decorative stitches .................................................. 172Cord guide bobbin cover ........................................................... 117Crazy quilt ................................................................................. 116
D
Darning ..................................................................................... 147
Dart seam .................................................................................. 112Dual feed foot .................................................................... 74, 123Dual purpose stylus ..................................................................... 94Dual purpose stylus holder .......................................................... 95
E
Echo quilting .............................................................................. 129Eco mode ..................................................................................... 34Editing
character/decorative stitches .................................................. 166Elastic zigzag stitches ................................................................. 117Elongation key ........................................................................... 169Embroidery unit ........................................................................... 15
carriage .................................................................................... 15Error messages ........................................................................... 200Eyelet ......................................................................................... 150
F
Fabricsfabric/thread/needle combinations ........................................... 71sewing heavyweight fabrics ...................................................... 82sewing lightweight fabrics ........................................................ 84sewing stretch fabrics ..................................................... 84, 143
Fagoting ..................................................................................... 137Feed dogs .......................................................................... 14, 126Flat bed attachment ..................................................................... 12Flat fell Seam ............................................................................. 113Foot controller ..................................................................... 12, 78Free motion quilting
free motion echo quilting foot “E” .......................................... 129free motion open toe quilting foot “O” ................................... 128free motion quilting foot “C” .................................................. 126
Free motion sewing mode .......................................................... 126
G
Gathering ................................................................................... 113
H
Handle ......................................................................................... 12Handwheel .................................................................................. 13Heirloom ................................................................................... 138Hemstitching
daisy stitch ............................................................................. 138drawn work ............................................................................ 139
Home page screen ....................................................................... 27
I
Image key ........................................................................ 106, 171Innov-eye Technology (for U.S.A. only) ....................................... 93
K
Key functionscharacter/decorative stitches .................................................. 166utility stitches ......................................................................... 103
Knee lifter ............................................................................ 12, 90
L
L/R Shift ....................................................................................... 86LCD screen .......................................................................... 12, 27
cleaning ................................................................................. 184light ......................................................................................... 29
Lower threadingpulling up the bobbin thread .................................................... 59

INDEX
216
setting the bobbin .................................................................... 58winding the bobbin .................................................................. 52
M
Machine help key ........................................................................ 38Machine operation mode key .................................................... 195Main power switch .............................................................. 12, 25Mirror image key ............................................................. 105, 169MPEG-4 (MP4) videos .................................................................. 42Multi-directional sewing ............................................................ 151Multi-function foot controller ....................................................... 33Multi-purpose screwdriver ........................................................... 23Muvit (for U.S.A. only) ................................................................. 74
N
Needlechanging the needle ................................................................. 69changing the needle position ................................................. 110checking the needle location ................................................... 92fabric/thread/needle combinations ........................................... 71twin needle .............................................................................. 64
Needle bar thread guides ..................................................... 14, 65Needle calibration ....................................................................... 36Needle clamp screw .................................................................... 14Needle mode selection key .......................................................... 64Needle plate ................................................................................ 14Needle position ................................................................. 92, 110Needle Position button ................................................................ 15
O
Operation buttons ................................................................ 12, 15Overcasting ..................................................................... 116, 118
P
Patchwork .................................................................................. 116Piecing ....................................................................................... 123Pintuck ...................................................................................... 114Pivoting ....................................................................................... 89Power cord .................................................................................. 26Power cord receptacle ................................................................. 12Presser foot
attaching .................................................................................. 72pressure ................................................................................... 91removing .................................................................................. 72types ...................................................................................... 206
Presser foot holder ............................................................... 14, 72Presser foot holder screw ............................................................. 14Presser foot lever .................................................................. 12, 83Presser Foot Lifter button .............................................................. 15Presser foot/Needle exchange key ................................ 64, 69, 72Pretension disk ............................................................. 12, 53, 56Projector .............................................................................. 94, 96
Q
Quilting ..................................................................................... 121free motion ............................................................................ 126with satin stitches ................................................................... 125
R
Race .......................................................................................... 184Reinforcement stitch .................................................................... 79Reinforcement Stitch button ......................................................... 79Retrieving
character/decorative stitch patterns ........................................ 180machine’s memory ................................................................. 180stitch settings .......................................................................... 107USB media ............................................................................. 181utility stitches ......................................................................... 107
Reverse Stitch button ................................................................... 79
Reverse/Reinforcement Stitch button .................................... 15, 79Reverse/Reinforcement stitches ................................................... 79
S
Satin stitches .................................................................... 125, 170Saving
character/decorative stitches .................................................. 179machine’s memory ................................................................ 179stitch settings ......................................................................... 107USB media ............................................................................ 179utility stitches ........................................................................ 107
Scallop stitches .......................................................................... 135Screen saver ................................................................................ 35SD card
usable .................................................................................... 178Settings
automatic thread cutting .......................................................... 88embroidery settings ................................................................. 31general settings ........................................................................ 29machine setting mode key ....................................................... 28sewing settings ........................................................................ 28stitch length ............................................................................. 86stitch width .............................................................................. 85thread tension .......................................................................... 87
Sewing speed controller (speed control slide) ............... 12, 15, 77Sewing type selection key ........................................................... 40Shelltuck stitches ....................................................................... 134Shutoff support mode .................................................................. 34Side cutter ................................................................................. 119Single/Repeat sewing key .......................................................... 169Size selection key ...................................................................... 169Smocking stitches ...................................................................... 136Speaker ....................................................................................... 29Specifications ............................................................................ 203Spool cap .................................................................................... 12Spool net ..................................................................................... 68Spool pin ..................................................................................... 12Spool stand .......................................................................... 56, 66Start/Stop button .......................................................................... 15Step stitch patterns .................................................................... 175Stitch setting chart ..................................................................... 206StitchVision Technology (for U.S.A. only) .................................... 94Straight stitch foot ...................................................................... 111Straight stitch needle plate ......................................................... 111Straight stitches ......................................................................... 108Supplemental spool pin ................................................ 12, 52, 65
T
Tape attaching ........................................................................... 117Tape or elastic attaching ............................................................ 137Thread
fabric/thread/needle combinations ........................................... 71thread tension .......................................................................... 87
Thread cutter ........................................................................ 12, 78Thread Cutter button ................................................................... 15Thread density key .................................................................... 170Thread guide ........................................................ 12, 53, 56, 65Thread guide plate ....................................................... 12, 56, 61Top cover .................................................................................... 12Top stitching ............................................................................. 135Transparent nylon thread ............................................................. 71Troubleshooting ........................................................................ 188Tutorial video .............................................................................. 41Twin needle ................................................................................ 64
U
Up Close Viewer (for U.S.A. only) ............................................... 93Upgrading ................................................................................. 204Upper threading
twin needle mode .................................................................... 64using the “Automatic Threading” button .................................. 61using the spool net .................................................................. 68
INDEX
217
Appendix
5
USB mediarecalling ................................................................................ 181saving .................................................................................... 179usable .................................................................................... 178
USB mouse .................................................................................. 48USB port connector
for media ....................................................................... 13, 179Utility stitches
key functions ......................................................................... 103retrieving ............................................................................... 107saving .................................................................................... 107selecting ................................................................................ 102sewing type selection key ........................................................ 40stitch pattern explanation key .................................................. 43stitch selection screens .......................................................... 104stitch setting chart .................................................................. 206
W
Walking foot ................................................................................ 73
Z
Zigzag stitches ........................................................................... 116Zipper insertion
centered ................................................................................ 152side ........................................................................................ 153


1
The Instruction and Reference Guides for this machine consist of the Instruction and Reference Guide (Sewing) and the Instruction and Reference Guide (Embroidery). Refer to the appropriate Instruction and Reference Guide according to your needs. For basic information about, for example, the included accessories or the settings screen, refer to chapter 1 of the Instruction and Reference Guide (Sewing).In the screens appearing in the step-by-step instructions, the parts referred to in the operations are marked
with . Compare the screen in the directions with the actual screen, and carry out the operation.If, while using the machine, you experience something you do not understand, or there is a function you would like to know more about, refer to the index at the back of the Instruction and Reference Guide in conjunction with the table of contents to find the section of the manual you should refer to.
HOW TO USE THIS MANUAL

CONTENTS
2
CONTENTSHOW TO USE THIS MANUAL ............................. 1
Chapter 1 Embroidery Step by Step 5BEFORE EMBROIDERING .................................... 6
Using the Machine Setting Mode Key.................................... 7Embroidery settings ................................................................ 7
CHANGING THE PRESSER FOOT ........................ 9Removing the Presser Foot ..................................................... 9Attaching Embroidery Foot “W” ........................................... 10
CHANGING THE NEEDLE.................................. 11ATTACHING THE EMBROIDERY UNIT ............. 13
About the Embroidery Unit................................................... 13Removing the Embroidery Unit ............................................ 14
LOWER THREADING......................................... 15Winding the Bobbin ............................................................. 15Setting the Bobbin ................................................................ 20
UPPER THREADING........................................... 22Upper Threading .................................................................. 22Using the Spool Stand .......................................................... 25Using Threads that Unwind Quickly .................................... 27
PREPARING THE FABRIC................................... 28Attaching Iron-on Stabilizers (Backing) to the Fabric............. 28Hooping the Fabric in the Embroidery Frame ....................... 29Embroidering Small Fabrics or Fabric Edges ......................... 33
ATTACHING THE EMBROIDERY FRAME........... 34EMBROIDERY SCREENS..................................... 36KEY FUNCTIONS ............................................... 38
Editing Patterns..................................................................... 38Editing Letters ....................................................................... 40Embroidery Screen ............................................................... 41
SELECTING PATTERNS....................................... 43Selecting Embroidery Patterns/Decorative Alphabet Patterns/Utility Embroidery Patterns................................................... 43Selecting Frame Patterns....................................................... 45
CONFIRMING THE PATTERN POSITION.......... 46Checking the Embroidery Pattern with the Projector ............. 46Checking the Needle Drop Point With the Projector ............ 47Aligning the Embroidering Position Using the Built-In Camera ... 47Using the Embroidery Position Sticker to Align the Embroidering Position ................................................................................ 49Checking the Pattern Position............................................... 52
EMBROIDERING A PATTERN ............................ 53Embroidering Attractive Finishes .......................................... 53Embroidering Patterns .......................................................... 54
ADJUSTMENTS DURING THE EMBROIDERY PROCESS.............................................................. 56
If the Bobbin Runs Out of Thread ......................................... 56If the Thread Breaks During Embroidering ............................ 57Restarting from the Beginning............................................... 58Resuming Embroidery After Turning Off the Power .............. 58
Chapter 2 Basic Editing 61BASIC EDITING.................................................. 62
Previewing the Pattern.......................................................... 62Moving the Pattern ............................................................... 63Rotating the Pattern .............................................................. 63Changing the Size of the Pattern........................................... 64Changing the Density ........................................................... 66Creating a Horizontal Mirror Image...................................... 67Designing Repeated Patterns ................................................ 67Embroidering the Pattern Repeatedly.................................... 70Duplicating a Pattern............................................................ 73Deleting the Pattern.............................................................. 73Displaying Patterns in the Screen Magnified......................... 73
EDITING LETTERS .............................................. 75Selecting Alphabet Character Patterns .................................. 75
Character Alignment............................................................ 76Changing Font Type............................................................. 76Changing Letter Size ............................................................ 77Changing the Configuration of Alphabet Character Patterns... 78Changing Alphabet Character Spacing................................. 79Re-editing Character Patterns............................................... 80
EDITING COLORS............................................. 81Changing the Thread Color.................................................. 81Find New Color Schemes With the Color Visualizer Function ... 81Thread Color Sorting............................................................ 84
COMBINING PATTERNS ................................... 85Editing Combined Patterns................................................... 85Selecting Multiple Patterns at the Same Time....................... 87Grouping Multiple Selected Patterns.................................... 88Aligning the Embroidery Patterns ......................................... 89Embroidering Combined Patterns......................................... 90
Chapter 3 Advanced Editing 91VARIOUS EMBROIDERING FUNCTIONS ......... 92
Uninterrupted Embroidering (Using a Single Color : Monochrome)...................................................................... 92Display the Fabric While Aligning the Embroidering Position ... 92Basting Embroidery.............................................................. 96
MAKING EMBROIDERY ADJUSTMENTS........... 97Adjusting Thread Tension .................................................... 97Adjusting the Alternate Bobbin Case (with No Color on the Adjusting Screw).................................................................. 99Using the Automatic Thread Cutting Function (End Color Trim)... 100Using the Thread Trimming Function (Jump Stitch Trim).... 101Adjusting the Embroidery Speed ........................................ 102Changing the Thread Color Display ................................... 102Changing the Embroidery Frame Display ........................... 103Aligning the Pattern and the Needle .................................. 103Embroidering Linked Characters ........................................ 104
USING THE MEMORY FUNCTION ................. 107Embroidery Data Precautions............................................. 107Saving Embroidery Patterns in the Machine’s Memory....... 109Retrieving Patterns from the Machine’s Memory ................ 110Saving Embroidery Patterns to USB Media/SD Card ........... 111Recalling from USB Media/SD card ................................... 112Saving/Deleting Multiple Patterns ...................................... 114Transferring Embroidery Patterns ....................................... 114Receiving Embroidery Patterns on the Machine ................. 115
EMBROIDERY APPLICATIONS ........................ 116Creating an Appliqué Piece ............................................... 116Using Appliqués ................................................................ 121Using a Frame Pattern to Make an Appliqué (1) ................. 124Using a Frame Pattern to Make an Appliqué (2) ................. 125Creating Stippling or Echo Patterns Automatically.............. 126Embroidering Quilting Border Patterns............................... 127Embroidering Split Embroidery Patterns ............................. 129
USING THE CAMERA TO CONNECT PATTERNS ... 131Connecting Three Patterns ................................................. 131Changing the Position of a Sticker...................................... 137Connecting Large-Size Split Embroidery Patterns ............... 139Resume Feature ................................................................. 140
Chapter 4 IQ Designer 141ABOUT IQ DESIGNER..................................... 142PATTERN DRAWING SCREEN......................... 143
Before Creating Designs..................................................... 145Drawing Lines ................................................................... 145Drawing Regions ............................................................... 147Using the Stamp Key.......................................................... 148Using the Erase Key ........................................................... 149Using the Select Key .......................................................... 150
STITCH SETTINGS SCREEN ............................. 151

CONTENTS
3
1
2
3
4
5
Specifying Individual Stitch Settings ................................... 151Specifying Global Stitch Settings ........................................ 153
IQ DESIGNER WITH SCAN.............................. 154Using the Scanning Frame ................................................. 154Scanning to Trace Background Image ................................ 155
LINE SCAN....................................................... 159Using the Scanning Frame to Create a Pattern with Line Scan... 159
ILLUSTRATION SCAN...................................... 162Using the Scanning Frame to Create a Pattern with Illustration Scan................................................................................... 162
STIPPLING ....................................................... 165Basic Stippling with IQ Designer........................................ 165Scanning Drawing to Create Stippling Pattern .................... 167Scanning Fabric and Stippling ............................................ 171Decorative Stitching Around a Pattern in Embroidery (a Quilting Function) ........................................................................... 175
Chapter 5 Appendix 179TROUBLESHOOTING...................................... 180
List of Symptoms ................................................................ 180ERROR MESSAGES ........................................... 186INDEX .............................................................. 191

CONTENTS
4

Chapter 1Embroidery Step by Step

BEFORE EMBROIDERING
6
Follow the steps below to prepare the machine for embroidery.
BEFORE EMBROIDERING
Step 3
Step 1, 2Step 7
Step 5
Step 4
Step 6, 8
Step 9
Step # Aim Action Page
1 Presser foot attachment Attach embroidery foot “W”. 9
2 Checking the needle Use needle 75/11 for embroidery. * —
3 Embroidery unit attachment Attach the embroidery unit. 13
4 Bobbin thread setup For the bobbin thread, wind embroidery bobbin thread and set it in place. 15
5 Fabric preparation Attach a stabilizer material to the fabric, and hoop it in the embroidery frame. 28
6 Pattern selection Turn the main power to ON, and select an embroidery pattern. 36
7 Embroidery frame attachment Attach the embroidery frame to the embroidery unit. 34
8 Checking the layout Check and adjust the size and position of the embroidery. 46
9 Embroidery thread setup Set up embroidery thread according to the pattern. 22
* It is recommended that a 90/14 needle should be used when embroidering on heavy weight fabrics or stabilizing products (for example; denim, puffy foam, etc.). Ball point needle (golden colored) 90/14 is not recommended for embroidery.

BEFORE EMBROIDERING
7
Embroidery Step by Step
1Using the Machine Setting Mode Key
Press to change the default machine settings (needle stop position, embroidery speed, opening display, etc.). To display the different settings screens, press for “Sewing settings”, for “General settings”, for “Embroidery settings” or for “Wireless LAN settings”. For details on settings for sewing utility stitches, on common settings and on wireless settings, refer to the Instruction and Reference Guide (Sewing).
Embroidery settings
■ Page 8
a Select from among 12 embroidery frame displays (page 103).
b Change the center point marker or grid lines (page 103).
c Adjust the maximum embroidery speed setting (page 102).
d Adjust the upper thread tension for embroidering (page 98).
e Select the height of the embroidery foot during embroidering.
f Adjust the needle position for embroidering.
■ Page 9
g Change the display units (mm/inch).h Change the thread color display on the
“Embroidery” screen; thread number, color name (page 102).
i Select the thread brand used to display a pattern when it is opened (page 102).
j Change the color of the background for the embroidery display area.
k Change the color of the background for the thumbnail area.
l Press to specify the size of pattern thumbnails.m Adjust the distance between the pattern and the
basting stitching (page 96).
Memo• Press or to display a different settings screen.
a
d
e
f
b
c
k
l
g
h
j
m
i

BEFORE EMBROIDERING
8
■ Page 10
n Select the quality for displaying the fabric in the screen (page 94).
o Erase the scanned image (page 94).p Set to “ON” when positioning the pattern on the
thick fabric using the built-in camera (page 95).q Adjust the position and brightness of the
embroidery foot “W+” with LED pointer (sold separately). (These settings are not available unless embroidery foot “W+” with LED pointer is installed on the machine.)
n
o
p
q

CHANGING THE PRESSER FOOT
9
Embroidery Step by Step
1
Removing the Presser Foot
aPress the “Needle Position” button to raise the needle.
bPress to lock all keys and buttons.
* If the message “OK to automatically lower the presser foot?” appears on the LCD screen, press
to continue.
cRaise the presser foot lever.
dPress the black button on the presser foot holder and remove the presser foot.
a Black buttonb Presser foot holder
eLoosen the screw of the presser foot holder to remove the presser foot holder.
a Multi-purpose screwdriverb Presser foot holder screwc Presser foot holder
fRemove the screw of the presser foot completely from the presser foot shaft.
CHANGING THE PRESSER FOOT
CAUTION• Always press on the screen to lock all keys and buttons before changing the presser foot. If is
not pressed and the “Start/Stop” button or another button is pressed, the machine will start and may cause injury.
• Only use presser feet made for this machine. Using other presser feet may lead to accident or injury.
b
a

CHANGING THE PRESSER FOOT
10
Attaching Embroidery Foot “W”
aRemove the presser foot and presser foot holder. For details, refer to “Removing the Presser Foot” on page 9.
bPosition the embroidery foot “W” on the presser foot bar by aligning the notch of the presser foot to the large screw.Side view
cHold the embroidery foot in place with your right hand, and then use the included multi-purpose screwdriver to securely tighten the presser foot holder screw.
a Presser foot holder screw
dPress to unlock all keys and buttons.
o All keys and operation buttons are unlocked, and the previous screen is displayed.
CAUTION• When attaching an embroidery foot, always
press on the screen. You may accidentally press the “Start/Stop” button and possibly cause injury.
• Be sure to use embroidery foot “W” when doing embroidery. Using another embroidery foot may cause the needle to strike the embroidery foot, causing the needle to bend or break and possibly cause injury.
CAUTION• Use the included multi-purpose screwdriver to
firmly tighten the screw of the presser foot holder. If the screw is loose, the needle may strike the embroidery foot and possibly cause injury.
a

CHANGING THE NEEDLE
11
Embroidery Step by Step
1
aPress the “Needle Position” button to raise the needle.
bPress to lock all keys and buttons.
* If the message “OK to automatically lower the presser foot?” appears on the LCD screen, press
to continue.
cUse the screwdriver to turn the needle clamp screw toward the front of the machine and loosen the screw. Remove the needle.
CHANGING THE NEEDLE
CAUTION• Always press on the screen to lock all keys and buttons before changing the needle. If is not
pressed and the “Start/Stop” button or another operation button is pressed accidentally, the machine will start and injury may result.
• Use only home sewing machine needles made for home use. Other needles may bend or break and may cause injury.
• Never embroider with a bent needle. A bent needle will easily break and may cause injury.
Memo• To check the needle correctly, place the flat
side of the needle on a flat surface. Check the needle from the top and the sides. Throw away any bent needles.
a Parallel spaceb Level surface (bobbin cover, glass, etc.)
Note• Before replacing the needle, cover the hole
in the needle plate with fabric or paper to prevent the needle from falling into the machine.
Note• Do not apply pressure to the needle clamp
screw. Doing so may damage the needle or machine.

CHANGING THE NEEDLE
12
dWith the flat side of the needle facing the back, insert the new needle all the way to the top of the needle stopper (viewing window) in the needle clamp. Use a screwdriver to securely tighten the needle clamp screw.
a Needle stopperb Hole for setting the needlec Flat side of needle
ePress to unlock all keys and buttons.
CAUTION• Be sure to push in the needle until it touches
the stopper, and securely tighten the needle clamp screw with a screwdriver. If the needle is not completely inserted or the needle clamp screw is loose, the needle may break or the machine may be damaged.
a
b
c
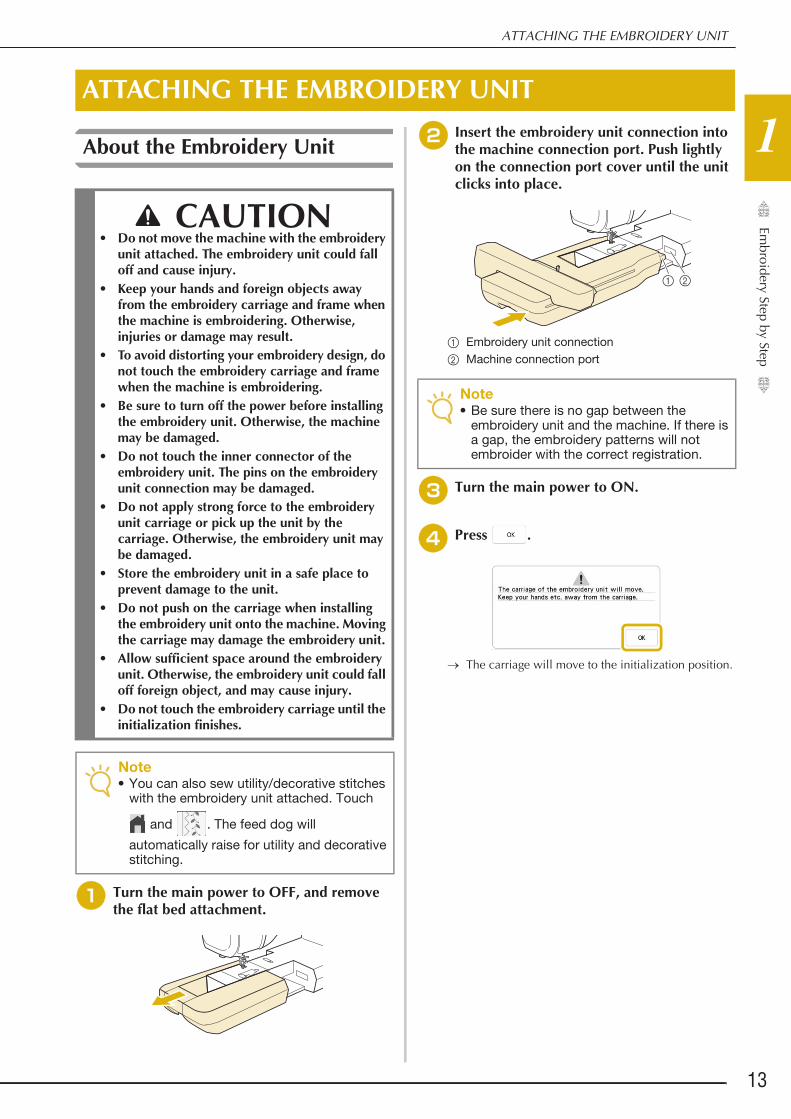
ATTACHING THE EMBROIDERY UNIT
13
Embroidery Step by Step
1About the Embroidery Unit
aTurn the main power to OFF, and remove the flat bed attachment.
bInsert the embroidery unit connection into the machine connection port. Push lightly on the connection port cover until the unit clicks into place.
a Embroidery unit connection b Machine connection port
cTurn the main power to ON.
dPress .
o The carriage will move to the initialization position.
ATTACHING THE EMBROIDERY UNIT
CAUTION• Do not move the machine with the embroidery
unit attached. The embroidery unit could fall off and cause injury.
• Keep your hands and foreign objects away from the embroidery carriage and frame when the machine is embroidering. Otherwise, injuries or damage may result.
• To avoid distorting your embroidery design, do not touch the embroidery carriage and frame when the machine is embroidering.
• Be sure to turn off the power before installing the embroidery unit. Otherwise, the machine may be damaged.
• Do not touch the inner connector of the embroidery unit. The pins on the embroidery unit connection may be damaged.
• Do not apply strong force to the embroidery unit carriage or pick up the unit by the carriage. Otherwise, the embroidery unit may be damaged.
• Store the embroidery unit in a safe place to prevent damage to the unit.
• Do not push on the carriage when installing the embroidery unit onto the machine. Moving the carriage may damage the embroidery unit.
• Allow sufficient space around the embroidery unit. Otherwise, the embroidery unit could fall off foreign object, and may cause injury.
• Do not touch the embroidery carriage until the initialization finishes.
Note• You can also sew utility/decorative stitches
with the embroidery unit attached. Touch
and . The feed dog will automatically raise for utility and decorative stitching.
Note• Be sure there is no gap between the
embroidery unit and the machine. If there is a gap, the embroidery patterns will not embroider with the correct registration.
a b

ATTACHING THE EMBROIDERY UNIT
14
Removing the Embroidery Unit
aPress , then press .
o The carriage will move to the removal position.
bTurn the main power to OFF.
cPress the release button, and pull the embroidery unit away from the machine.
a Release button
CAUTION• Always remove the embroidery frame before
pressing . Otherwise, the frame may strike the embroidery foot, and possibly cause injury.
CAUTION• Do not carry the embroidery unit by holding
the release button compartment.
a
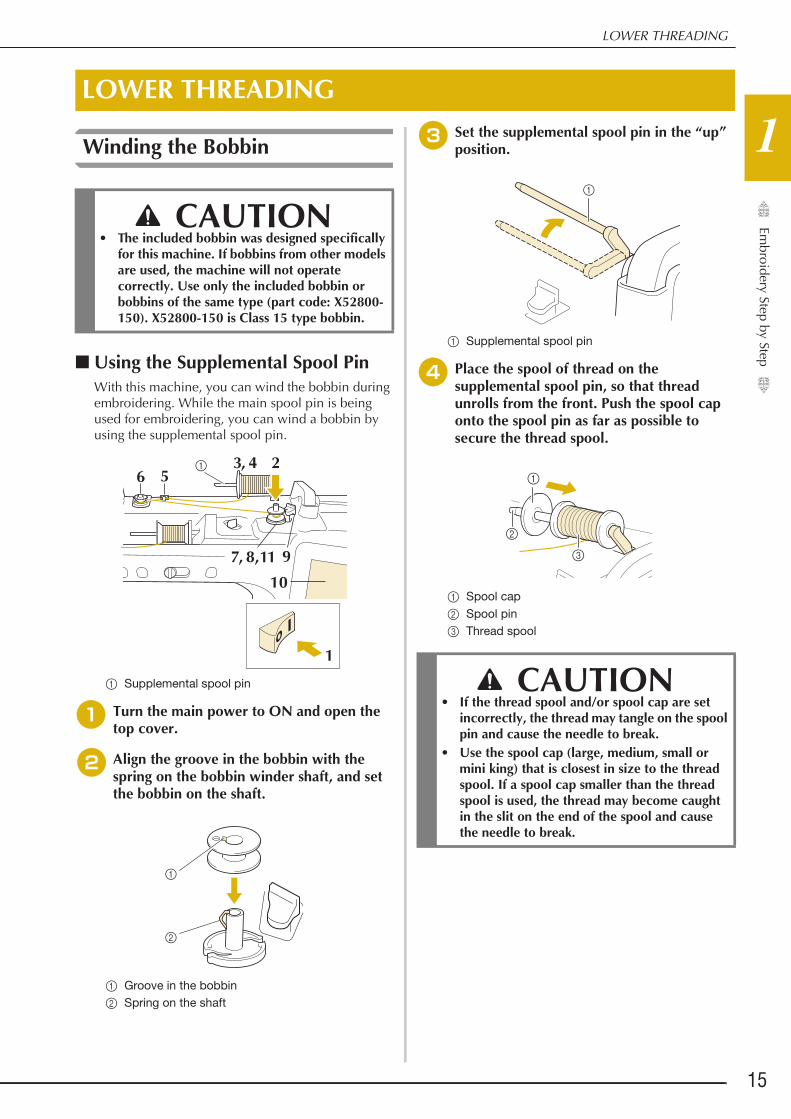
LOWER THREADING
15
Embroidery Step by Step
1Winding the Bobbin
■ Using the Supplemental Spool PinWith this machine, you can wind the bobbin during embroidering. While the main spool pin is being used for embroidering, you can wind a bobbin by using the supplemental spool pin.
a Supplemental spool pin
aTurn the main power to ON and open the top cover.
bAlign the groove in the bobbin with the spring on the bobbin winder shaft, and set the bobbin on the shaft.
a Groove in the bobbinb Spring on the shaft
cSet the supplemental spool pin in the “up” position.
a Supplemental spool pin
dPlace the spool of thread on the supplemental spool pin, so that thread unrolls from the front. Push the spool cap onto the spool pin as far as possible to secure the thread spool.
a Spool capb Spool pinc Thread spool
LOWER THREADING
CAUTION• The included bobbin was designed specifically
for this machine. If bobbins from other models are used, the machine will not operate correctly. Use only the included bobbin or bobbins of the same type (part code: X52800-150). X52800-150 is Class 15 type bobbin.
a
a
b
CAUTION• If the thread spool and/or spool cap are set
incorrectly, the thread may tangle on the spool pin and cause the needle to break.
• Use the spool cap (large, medium, small or mini king) that is closest in size to the thread spool. If a spool cap smaller than the thread spool is used, the thread may become caught in the slit on the end of the spool and cause the needle to break.

LOWER THREADING
16
eWith your right hand, hold the thread near the thread spool. With your left hand, hold the end of the thread, and use both hands to pass the thread through the thread guide.
a Thread guide
fPass the thread around the pretension disk making sure that the thread is under the pretension disk.
a Pretension disko Make sure that the thread passes under the
pretension disk.
b Pretension diskc Pull it in as far as possible.o Check to make sure thread is securely set between
pretension disks.
gWind the thread clockwise around the bobbin 5-6 times.
Memo• When embroidering with fine, cross-wound
thread, use the small spool cap, and leave a small space between the cap and the thread spool.
a Spool cap (small)b Thread spool (cross-wound thread)c Space
• If a spool of thread whose core is 12 mm (1/2 inch) in diameter and 75 mm (3 inches) high is inserted onto the spool pin, use the mini spool cap.
a Spool cap (mini king spool insert)b 12 mm (1/2 inch)c 75 mm (3 inches)
a

LOWER THREADING
17
Embroidery Step by Step
1h
Pass the end of the thread through the guide slit in the bobbin winder seat, and pull the thread to the right to cut the thread with the cutter.
a Guide slit (with built-in cutter)b Bobbin winder seat
iSet the bobbin winding switch to the left, until it clicks into place.
a Bobbin winding switch
o The bobbin winding window appears.
jPress .
o Bobbin winding starts. The bobbin stops rotating when bobbin winding is completed. The bobbin winding switch will automatically return to its original position.
CAUTION• Be sure to follow the process described. If the
thread is not cut with the cutter, and the bobbin is wound, when the thread runs low it may tangle around the bobbin and cause the needle to break.
Memo• Sliding the bobbin winding switch to the left
switches the machine into bobbin winding mode.
• Use the bobbin winding slider to adjust the amount of thread wound onto the bobbin to one of five levels.
a Bobbin winding sliderb Morec Less
ab
c
Note• When winding transparent nylon thread on
the bobbin, stop bobbin winding when the bobbin is 1/2 to 2/3 full. If the bobbin was fully wound with transparent nylon thread, it may not be wound neatly.
Note• changes to while the bobbin is
winding.• Stay near the machine while winding the
bobbin to make sure the bobbin thread is being wound correctly. If the bobbin thread is wound incorrectly, press immediately to stop the bobbin winding.
Memo• You can change the winding speed by
pressing (to decrease) or (to increase) in the bobbin winding window.
• Press to minimize the bobbin winding window. Then, you can perform other operations, such as selecting a stitch or adjusting the thread tension, while the bobbin is being wound.
• Press (in top right of the LCD screen) to display the bobbin winding window again.

LOWER THREADING
18
kCut the thread with cutter and remove the bobbin.
a Cutter
■ Using the Spool PinYou can use the main spool pin to wind the bobbin before embroidering. You cannot use this spool pin to wind the bobbin while embroidering.
aTurn the main power to ON and open the top cover.
bAlign the groove in the bobbin with the spring on the bobbin winder shaft, and set the bobbin on the shaft.
a Groove in the bobbinb Spring on the shaft
cPivot the spool pin so that it angles upward. Set the thread spool on the spool pin so that the thread unwinds from the front of the spool.
a Spool pinb Spool capc Thread spoold Spool felt
dPush the spool cap onto the spool pin as far as possible, then return the spool pin to its original position.
eWhile holding the thread with both hands, pull the thread up from under the thread guide plate.
a Thread guide plate
Memo• When removing the bobbin, do not pull on
the bobbin winder seat. Doing so could loosen or remove the bobbin winder seat, and could result in damage to the machine.
CAUTION• Setting the bobbin improperly may cause the
thread tension to loosen, breaking the needle and possibly resulting in injury.
a
b
a

LOWER THREADING
19
Embroidery Step by Step
1f
Pass the thread through the thread guide.
a Thread guide
gPass the thread around the pretension disk making sure that the thread is under the pretension disk.
a Thread guideb Pretension disk
hFollow steps g through k on page 16 through 18.
■ Using the Spool StandTo wind thread on the bobbin while the spool stand is installed, pass the thread from the spool through the thread guide on the telescopic thread guide, and then wind the bobbin according to steps e through k of “Using the Supplemental Spool Pin”on page 16 to page 18.
■ Untangling Thread from Beneath the Bobbin Winder SeatIf the bobbin winding starts when the thread is not passed through the pretension disk correctly, the thread may become tangled beneath the bobbin winder seat.Wind off the thread according to the following procedure.
a Threadb Bobbin winder seat
aIf the thread becomes tangled under the
bobbin winder seat, press once to stop the bobbin winding.
bCut the thread with scissors near the pretension disk.
a Pretension disk
a
ab
Memo• Refer to the Instruction and Reference
Guide (Sewing) to assemble the spool stand.
• Refer to page 25 to thread the machine using the spool stand.
CAUTION• When winding thread on the bobbin, do not
cross the bobbin winding thread with the upper thread in the thread guides.
CAUTION• Do not remove the bobbin winder seat even if
the thread becomes tangled under the bobbin winder seat. It may result in injuries.
a

LOWER THREADING
20
cPush the bobbin winder switch to the right, and then raise the bobbin at least 100 mm (4 inches) from the shaft.
dCut the thread near the bobbin and hold the thread end of the spool with your left hand. Unwind the thread clockwise near the bobbin winder seat with your right hand as shown below.
eWind the bobbin again.
Setting the Bobbin
aPress to lock all keys and buttons and raise the embroidery foot.
* If the message “OK to automatically lower the presser foot?” appears on the LCD screen, press
to continue.
bSlide the bobbin cover latch to the right.
a Bobbin coverb Latcho The bobbin cover opens.
Note• Make sure that the thread passes through
the pretension disk correctly (page 16).
CAUTION• Use a bobbin thread that has been correctly
wound. Otherwise, the needle may break or the thread tension will be incorrect.
• The included bobbin was designed specifically for this machine. If bobbins from other models are used, the machine will not operate correctly. Use only the included bobbin or bobbins of the same type (part code: X52800-150). X52800-150 is Class 15 type bobbin.
• Before inserting or changing the bobbin, be
sure to press in the LCD to lock all keys and buttons, otherwise injuries may occur if the “Start/Stop” button or any other button is pressed and the machine starts embroidering.
a b

LOWER THREADING
21
Embroidery Step by Step
1c
Remove the bobbin cover.
dHold the bobbin with your right hand and hold the end of the thread with your left hand.
eSet the bobbin in the bobbin case so that the thread unwinds to the left.
fHold the bobbin lightly with your right hand, and then guide the thread with your left hand.
gPass the thread through the guide, and then pull the thread out toward the front.
a Cuttero The cutter cuts the thread.
hInsert the tab in the lower-left corner of the bobbin cover (1), and then lightly press down on the right side to close the cover (2).
iPress to unlock all keys and buttons.
Note• If the thread is not correctly inserted
through the tension spring of the bobbin case, it may cause incorrect thread tension. (page 97)
a Tension spring
CAUTION• Be sure to hold down the bobbin with your
finger and unwind the bobbin thread correctly. Otherwise, the thread may break or the thread tension will be incorrect.
a

UPPER THREADING
22
Upper Threading
aTurn the main power to ON.
bPress the “Presser Foot Lifter” button to raise the embroidery foot.
o The upper thread shutter opens so the machine can be threaded.
a Upper thread shutter
cPress the “Needle Position” button to raise the needle.
dPivot the spool pin so that it angles upward. Set the thread spool on the spool pin so that the thread unwinds from the front of the spool.
a Spool pinb Spool capc Thread spoold Spool felt
UPPER THREADING
CAUTION• Be sure to thread the machine properly.
Improper threading can cause the thread to tangle and break the needle, leading to injury.
Memo• The automatic threading function can be
used with home sewing machine needle sizes 75/11 through 100/16.
• When threads such as transparent nylon monofilament or speciality threads are used it is not recommended to use the needle threader.
Memo• This machine is equipped with an upper
thread shutter, allowing you to check that the upper threading is performed correctly.
Note• If you try to thread the needle automatically
without raising the needle, the thread may not thread correctly.
a

UPPER THREADING
23
Embroidery Step by Step
1e
Push the spool cap onto the spool pin as far as possible, then return the spool pin to its original position.
fWhile holding the thread with both hands, pull the thread up from under the thread guide plate.
a Thread guide plate
gWhile holding the thread in your right hand, pass the thread through the thread guide in the direction indicated.
hGuide the thread down, up, then down through the groove, as shown in the illustration.
CAUTION• If the thread spool and/or spool cap are set
incorrectly, the thread may tangle on the spool pin and cause the needle to break.
• Use the spool cap (large or medium) or the thread spool insert (mini king spool insert) that is closest in size to the thread spool. If a spool cap smaller than the thread spool is used, the thread may become caught in the slit on the end of the spool and cause the needle to break.
Memo• When embroidering with fine, cross-wound
thread, use the small spool cap, and leave a small space between the cap and the thread spool.
a Spool cap (small)b Thread spool (cross-wound thread)c Space
• If a spool of thread whose core is 12 mm (1/2 inch) in diameter and 75 mm (3 inches) high is inserted onto the spool pin, use the thread spool insert (mini king spool insert).
a Thread spool insert (mini king spool insert)b 12 mm (1/2 inch)c 75 mm (3 inches)
Memo• Look in the upper groove area to check if
the thread catches on the thread take-up lever visible inside the upper groove area.
a Look in the upper groove area
a

UPPER THREADING
24
iPass the thread through the needle bar thread guide (marked “6”) by holding the thread with both hands and guiding it as shown in the illustration.
a Needle bar thread guide
jPress the “Presser Foot Lifter” button to lower embroidery foot.
kPass the thread through the thread guide disks (marked “7”). Make sure that the thread passes through the groove in the thread guide.
a Groove in thread guide
lPull the thread up through the thread cutter to cut the thread, as shown in the illustration.
a Thread cutter
mPress the “Automatic Threading” button to have the machine automatically thread the needle.
o The thread passes through the eye of the needle.
nCarefully pull the end of the thread that was passed through the eye of the needle.
* If a loop was formed in the thread passed through the eye of the needle, carefully pull on the loop of thread through to the back of the needle.
a
a
a
Note• When using thread that quickly winds off
the spool, such as metallic thread, it may be difficult to thread the needle if the thread is cut.Therefore, instead of using the thread cutter, pull out about 80 mm (approx. 3 inches) of thread after passing it through the thread guide disks (marked “7”).
a 80 mm (approx. 3 inches) or more
Memo• When the “Automatic Threading” button is
pressed, the embroidery foot will be automatically lowered. After threading is finished, the embroidery foot moves back to the position before the “Automatic Threading” button was pressed.
Note• Pulling the loop of thread gently will avoid
needle breakage.
a

UPPER THREADING
25
Embroidery Step by Step
1o
Pull out about 100-150 mm (approx. 4-6 inches) of the thread, and then pass it under the embroidery foot toward the rear of the machine.
o Raise the presser foot lever if the embroidery foot is lowered.
a About 100-150 mm (approx. 4-6 inches)
Using the Spool Stand
The included spool stand is useful when using thread on spools with a large diameter (cross-wound thread). This spool stand can hold two spools of thread.
■ Using the Spool Stand• Be sure to use a spool cap that is slightly larger
than the spool.If the spool cap that is used is smaller or much
larger than the spool, the thread may catch and embroidering performance may suffer.
• When using thread on a thin spool, place the included spool felt on the spool pin, place the thread spool on the spool pin so that the center of the spool is aligned with the hole at the center of the spool felt, and then insert the spool cap onto the spool pin.
a Spool felt
• When using thread on a cone spool, use the spool holder. When using cone shaped thread spool with other than cotton thread, it is not necessary to use spool caps.
a Spool holder
• Depending on the size of spool or the amount of thread remaining, choose the appropriate sized spool cap (large or medium). Spool cap (small) cannot be used with the spool cap base.
a Spool capb Spool cap base
Memo• If the needle could not be threaded or the
thread was not passed through the needle bar thread guides, perform the procedure again starting from step c.Then, pass the thread through the eye of the needle after step i.
Note• Some needles cannot be threaded with the
needle threader. In this case, instead of using the needle threader after passing the thread through the needle bar thread guide (marked “6”), manually pass the thread through the eye of the needle from the front.
Memo• Refer to the Instruction and Reference
Guide (Sewing) to assemble the spool stand.
• Refer to page 19 to wind the bobbin when using the spool stand.
a
a
b

UPPER THREADING
26
aAttach the spool stand to the machine.
bPlace the spool of thread on the spool pin so that the thread feeds off the spool clockwise. Firmly insert the spool cap onto the spool pin.
cPull the thread off the spool. Pass the thread from the back to the front through the thread guides at the top.When using thread that quickly feeds off the spool, such as metallic thread, use the enclosed ring to prevent the thread from becoming entangled.Threading sequence; Pull the thread from the spool, place the thread through the ring from the bottom up (1), into the thread guide (2) and through the ring from the top down (3). When using the ring, do not use the spool cap base.
dPass the thread through the machine’s thread guide from the right to the left.
a Thread guide
eThread the machine according to the steps f to o of “Upper Threading” on page 22.
Note• When using 2 spools of thread, make sure
that both spools are feeding in the same direction.
• Make sure that the spools do not touch each other, otherwise the thread will not feed off smoothly, the needle may break, or the thread may break or become tangled. In addition, make sure that the spools do not touch the telescopic thread guide at the center.
• Make sure that the thread is not caught under the spool.
Note• Guide the thread so that it does not become
entangled with the other thread.• After feeding the thread as instructed, wind
any excess thread back onto the spool, otherwise the excess thread will become tangled.
2
13
a

UPPER THREADING
27
Embroidery Step by Step
1Using Threads that Unwind Quickly
■ Using the Spool NetIf using transparent nylon monofilament thread, metallic thread, or other strong thread, place the included spool net over the spool before using it. When using specialty threads, threading must be done manually.If the spool net is too long, fold it once to match it to the spool size before placing it over the spool.
a Spool netb Thread spoolc Spool pind Spool cap
Memo• When threading the spool with the spool net
on, make sure that 50-60 mm (approx. 2 - 2-1/2 inches) of thread are pulled out.
• It may be necessary to adjust the thread tension when using the spool net.

PREPARING THE FABRIC
28
Attaching Iron-on Stabilizers (Backing) to the Fabric
aUse a piece of stabilizer which is larger than the embroidery frame being used.
a Size of the embroidery frame b Iron-on stabilizer (backing)
bIron the iron-on stabilizer material to the wrong side of the fabric.
a Fusible side of stabilizer b Fabric (wrong side)
PREPARING THE FABRIC
CAUTION• Use fabrics with a thickness of less than 3 mm (approx. 1/8 inch). Using fabrics thicker than 3 mm
(approx. 1/8 inch) may cause the needle to break.
Note• When embroidering fabric layers filled with thick batting, for example, a better result can be achieved
by adjusting the embroidery foot height in the embroidery settings screen. Press , and select page 8. Touch the number beside “Embroidery Foot Height” in the embroidery settings screen. Adjust the embroidery foot height for thick or puffy fabrics.
• To increase the space between the embroidery foot and the needle plate, set the “Embroidery Foot Height” to a larger number.
• In the case of thick terry cloth towels we recommend that you place a piece of water soluble stabilizer on the top surface of the towel. This will help to reduce the nap of the toweling and result in more attractive embroidery.
CAUTION• Always use a stabilizer material for embroidery
when embroidering stretch fabrics, lightweight fabrics, fabrics with a coarse weave, or fabrics which cause pattern shrinkage. Otherwise, the needle may break and cause injury. Not using a stabilizer material may result in a poor finish to your project.
Memo• When embroidering on thin fabrics such as
organdy or lawn, or on napped fabrics such as towel or corduroy, use water soluble stabilizer (sold separately) for best results. The water soluble stabilizer material will dissolve completely in water, giving the project a more attractive finish.

PREPARING THE FABRIC
29
Embroidery Step by Step
1Hooping the Fabric in the Embroidery Frame
■ Types of Embroidery Frames
Other optional embroidery frames can be used. When choosing frames that do not appear on the screen, be sure to check the design size of the embroidery field of the optional frame. Check with your authorized Baby Lock retailer for frame compatibility.Select a frame that matches the pattern size. Included frame options are displayed on the LCD.
a Highlighted: Can be usedb Shaded: Cannot be used
Embroidery field408 mm × 272 mm
(approx. 16 inches × 10-5/8 inches)
Embroidery field240 mm × 240 mm
(approx. 9-1/2 inches × 9-1/2 inches)
Embroidery field180 mm × 130 mm
(approx. 7 inches u 5 inches)
Embroidery field100 mm × 100 mm
(approx. 4 inches u 4 inches)
a b

PREPARING THE FABRIC
30
■ Inserting the Fabric
aLift-up and loosen the frame adjustment screw and remove the inner frame.
a Frame adjustment screwb Inner frame
bLay the fabric right side up on top of the outer frame.
cRe-insert the inner frame making sure to align the inner frame’s with the outer frame’s .
a Inner frame’s
b Outer frame’s
dSlightly tighten the frame adjustment screw, and then remove the slack in the fabric by pulling on the edges and corners.
eGently stretch the fabric taut to keep the fabric from loosening after stretching.
* After stretching the fabric, make sure the fabric is taut.
* Make sure the inside and outside frames are even before you start embroidering.
a Outer frame b Inner frame c Fabric
fTighten the frame adjustment screw.
Note• If the fabric is not securely held in the
embroidery frame, the embroidery design will embroider out poorly. Insert the fabric on a level surface, and gently stretch the fabric taut in the frame. Follow the steps below to insert the fabric correctly.
a
b
a b
c
a
b
c

PREPARING THE FABRIC
31
Embroidery Step by Step
1g
Return the frame adjustment screw to its initial position.
■ Inserting Fabric into Embroidery Frame (408mm × 272 mm (approx. 16 inches × 10-5/8 inches))
aLower the lever.
bLoosen the frame adjustment screw by hand, and then remove the inner frame.
cRefer to steps c through f of “Inserting the Fabric” on page 30 to hoop the fabric.
dTighten the frame adjustment screw by hand.
eReturn the lever to its original position.
■ Using the Embroidery Sheet (sold separately)When you want to embroider the pattern in a particular place, use the embroidery sheet with the frame.
aWith a chalk pencil, mark the area of the fabric you want to embroider.
a Embroidery patternb Mark
Memo• You can use the included multi-purpose
screw driver setting the position to “3”, when you loosen or tighten the frame adjustment screw.
CAUTION• Do not overtighten the screw.

PREPARING THE FABRIC
32
bPlace the embroidery sheet on the inner frame. Align the guide lines on the embroidery sheet with the mark you made on the fabric.
a Inner frameb Guide line
cGently stretch the fabric so there are no folds or wrinkles, and press the inner frame into the outer frame.
a Inner frameb Outer frame
dRemove the embroidery sheet.
■ Embroidery Needle Plate CoverUnder some conditions, based on the type of fabric, stabilizer, or thread being used, there may be some looping in the upper thread. In this case, attach the included embroidery needle plate cover to the needle plate. Attach the cover by inserting the two projections on the underside of the cover into the notches on the needle plate as shown below.
a Groove b Projection c Notch
To remove the embroidery needle plate cover, place your fingernail in the groove and lift the plate out.
CAUTION• Push the embroidery needle plate cover as far
as possible to attach it. If the embroidery needle plate cover is not securely attached, it may cause the needle to break.
Note• Do not use the embroidery needle plate
cover for any applications other than embroidery.

PREPARING THE FABRIC
33
Embroidery Step by Step
1Embroidering Small Fabrics or Fabric Edges
Use an embroidery stabilizer to provide extra support. We recommend using a stabilizer for embroidery. After embroidering, remove the stabilizer carefully. Attach the stabilizer as shown in the following examples.
■ Embroidering Small FabricsUse a temporary spray adhesive to adhere the small piece of fabric to the larger piece in the frame. If you do not wish to use a temporary spray adhesive, attach the stabilizer with a basting stitch.
a Fabric b Stabilizer
■ Embroidering Edges or CornersUse temporary spray adhesive to attach the fabric to the stabilizer, and then hoop the fabric.If you do not wish to use a temporary spray adhesive, attach the stabilizer with a basting stitch.
a Fabric b Stabilizer
■ Embroidering Ribbons or TapeSecure with double-sided tape or a temporary spray adhesive.
a Ribbon or tapeb Stabilizer

ATTACHING THE EMBROIDERY FRAME
34
aPress the “Presser Foot Lifter” button to raise the embroidery foot.
bAlign the embroidery frame guide with the right edge of the embroidery frame holder.
a Embroidery frame holder b Embroidery frame guide
cSlide the embroidery frame into the holder, making sure to align the embroidery frame’s
with the holder’s .
a Arrow mark
dLower the frame-securing lever to be level with the frame to secure the embroidery frame in the embroidery frame holder.
a Frame-securing lever
■ Removing the Embroidery Frame
aRaise the frame-securing lever.
ATTACHING THE EMBROIDERY FRAME
Note• Wind and insert the bobbin before attaching the embroidery frame.
CAUTION• If the frame-securing lever is not lowered, the
following message appears. You cannot start embroidering until you lower the frame-securing lever.

ATTACHING THE EMBROIDERY FRAME
35
Embroidery Step by Step
1b
Pull the embroidery frame toward you.

EMBROIDERY SCREENS
36
■ Copyright Information The patterns stored in the machine and patterns sold separately are intended for private use only. Any public or commercial use of copyrighted patterns is an infringement of copyright law and is strictly prohibited. There are many character and decorative embroidery patterns stored in the machine’s memory. You can also use patterns sold separately.
EMBROIDERY SCREENS
a Baby Lock “Exclusives”b Embroidery patternsc Character patternsd Decorative alphabet patternse Frame patternsf Utility embroidery patternsg Quilt sashes (page 127)h Patterns saved in your favoritesi IQ Designer(page 142)j Press this key to position the embroidery unit for
storaged
f
gh
a
j
i
e
c
b

EMBROIDERY SCREENS
37
Embroidery Step by Step
1■ Pattern Selection Screens
There are 7 categories of patterns in this machine.
Baby Lock “Exclusives”
Embroidery patterns
Alphabet characters
Decorative alphabet patterns
Frame patterns
Utility embroidery patterns
Quilting border patterns

KEY FUNCTIONS
38
Editing Patterns
a Shows the size of the entire combined pattern.b Shows the color sequence and stitching times of each step of the pattern currently selected.
Using these keys, you can edit the pattern as you like. Press to display the editing window.
KEY FUNCTIONS
Memo• If a key display is grayed out, you cannot use that function with the selected pattern.
a
b
y
ef
gh
ij
kl
mn
op
qr
x t s
b
a
w v u
d
c
z
Q

KEY FUNCTIONS
39
Embroidery Step by Step
1No. Display Key Name Explanation Page
a Magnify key Press this key to select the magnification ratio. 73
b Hand key Press this key to move the canvas when it is magnified. —
c Fabric scan key Press this key to scan the fabric to align the embroidery position. 92
d Image key Press this key for a preview of the embroidered image. 62
e Size key Press this key to change the size of the pattern. Patterns can be enlarged or reduced.
64
f Move key Press this key to display the pattern moving window. 63
g Group key Press this key to select multiple patterns in the screen at the same time. 88
h Rotate key Press this key to rotate the pattern. 63
i Horizontal mirror image key
Press this key to make a horizontal mirror image of the selected pattern. 67
j Duplicate key Press this key to duplicate a pattern. 73
k Density key Press this key to change the density of frame patterns or character patterns. 66
l Border function key Press this key to create and edit repeated patterns. 67
m Appliqué piece key Press this key to create an appliqué piece by sewing an outline around the selected pattern.
116
n Thread palette key Press this key to change the colors of the displayed pattern. 81
o Letter edit key Press this key to edit character patterns. 40
p Alignment key Press this key to arrange multiple patterns on a line. 89
q Stippling key Press this key to create stippling around a pattern. 126
r Outline key Press this key to extract the outline of a pattern. The extracted pattern can be used with IQ Designer.
175
s Embroidery key Press this key to call up the embroidering screen. —
t Memory key Press this key to save a pattern in the machine’s memory, USB media or an SD card. The pattern can also be transferred to a computer via a wireless network connection.
109, 111
u Pattern select key When a combined pattern is selected, use this key to select a part of the pattern to edit.
—
v Redo key Press this key to redo the last operation that was undone. —
w Undo key Press this key to undo the last operation. —
x Delete key Press this key to delete the selected pattern (the pattern outlined by the red box).
73
y Add key Press this key to add another pattern to the editing pattern. —
z Select key Press this key to change a selected pattern when multiple patterns are in the screen.
87
Q Grouping key / Multiple selection key
Press this key to make multiple patterns are on the screen to be selected at the same time or to be grouped.
87, 88

KEY FUNCTIONS
40
Editing Letters
edb ca
h
f g
No. Display Key Name Explanation Page
a Cancel key Press this key to exit the editing character pattern screen. —
b Size key Press this key to change the size of the character pattern. 77
c Array key Press this key to change the configuration of a character pattern. 78
d Character spacing key
Press this key to change the spacing of character patterns. 79
e Alignment key Press this key to align the characters at the right, left or center. 76
f Font type key Press this key to change the font type. 76
g Set key Press this key to apply the text editing. —
h Character selection keys
Press these keys to move the cursor and select a character. —

KEY FUNCTIONS
41
Embroidery Step by Step
1Embroidery Screen
a Shows the embroidery foot code. Attach embroidery foot “W” for all embroidery projects. When the embroidery foot symbol is displayed on the screen, you are able to embroider.
b Shows the embroidery frames that can be used for the selected pattern. Be sure to use the proper frame (page 29). c Shows a preview of the selected pattern.d Shows the boundary for embroidering with the selected frame in the settings screen. (page 103)e Shows the size of the selected pattern.f Shows how many stitches are in the selected pattern and how many stitches have been embroidered so far.g Shows the number of colors in the selected pattern, and the number of the color currently being embroidered. h Shows the time necessary to embroider the pattern, and the time already spent embroidering the pattern (not
including time for changing and automatically trimming the thread).i Shows the part of the embroidery that will be embroidered with the first thread color.j Shows the order for thread color changes and the embroidering time for each thread color.* The displayed time is the approximate time that will be required. The actual embroidering time may be longer than the
displayed time, depending on the embroidery frame that is used. In addition, the amount of time required to change thread colors is not included.
Note• There is an explanation of additional key functions on the next page.
b
j
a
c
d
e f g
i
h
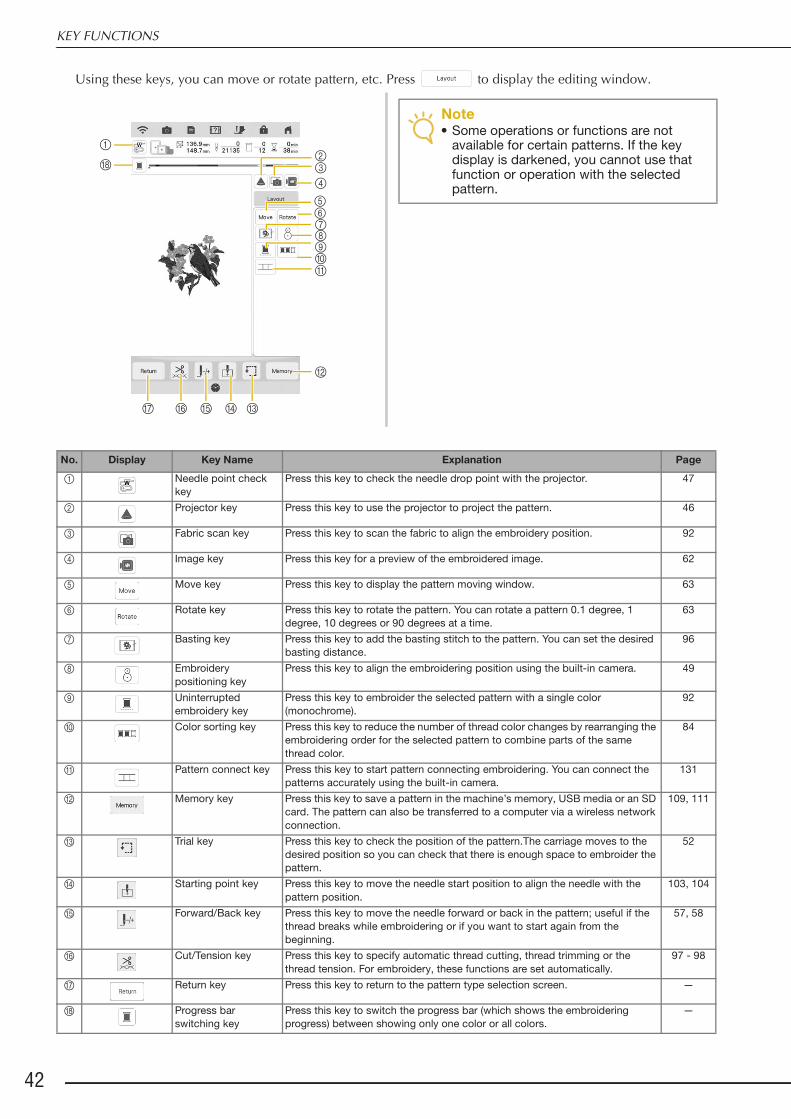
KEY FUNCTIONS
42
Using these keys, you can move or rotate pattern, etc. Press to display the editing window.
e
b
f
l
r
mnp o
d
c
ghijk
a
q
Note• Some operations or functions are not
available for certain patterns. If the key display is darkened, you cannot use that function or operation with the selected pattern.
No. Display Key Name Explanation Page
a Needle point check key
Press this key to check the needle drop point with the projector. 47
b Projector key Press this key to use the projector to project the pattern. 46
c Fabric scan key Press this key to scan the fabric to align the embroidery position. 92
d Image key Press this key for a preview of the embroidered image. 62
e Move key Press this key to display the pattern moving window. 63
f Rotate key Press this key to rotate the pattern. You can rotate a pattern 0.1 degree, 1 degree, 10 degrees or 90 degrees at a time.
63
g Basting key Press this key to add the basting stitch to the pattern. You can set the desired basting distance.
96
h Embroidery positioning key
Press this key to align the embroidering position using the built-in camera. 49
i Uninterrupted embroidery key
Press this key to embroider the selected pattern with a single color (monochrome).
92
j Color sorting key Press this key to reduce the number of thread color changes by rearranging the embroidering order for the selected pattern to combine parts of the same thread color.
84
k Pattern connect key Press this key to start pattern connecting embroidering. You can connect the patterns accurately using the built-in camera.
131
l Memory key Press this key to save a pattern in the machine’s memory, USB media or an SD card. The pattern can also be transferred to a computer via a wireless network connection.
109, 111
m Trial key Press this key to check the position of the pattern.The carriage moves to the desired position so you can check that there is enough space to embroider the pattern.
52
n Starting point key Press this key to move the needle start position to align the needle with the pattern position.
103, 104
o Forward/Back key Press this key to move the needle forward or back in the pattern; useful if the thread breaks while embroidering or if you want to start again from the beginning.
57, 58
p Cut/Tension key Press this key to specify automatic thread cutting, thread trimming or the thread tension. For embroidery, these functions are set automatically.
97 - 98
q Return key Press this key to return to the pattern type selection screen. —
r Progress bar switching key
Press this key to switch the progress bar (which shows the embroidering progress) between showing only one color or all colors.
—

SELECTING PATTERNS
43
Embroidery Step by Step
1Selecting Embroidery Patterns/Decorative Alphabet Patterns/Utility Embroidery Patterns
aPress the category tab you want to embroider.
a Pattern category tabs
bSelect the sub-category, and then select the pattern that you want to embroider.
a Sub-categoryb Embroidery pattern
cPress .
o The pattern selected is outlined in red on the “Edit” display.
SELECTING PATTERNS
a
a
b
Memo
• If you press , you can see detailed information about the pattern.

SELECTING PATTERNS
44
dPress to edit the selected pattern.
* Refer to “Editing Patterns” on page 38 about the “Edit” display.
ePress .
o The embroidering screen is displayed.
fTo reposition the pattern in the
embroidering screen before embroidering, press .
* Refer to “Embroidery Screen” on page 41.
* To return to the previous screen to select another
pattern, press .
gPress the “Start/Stop” button to begin embroidering.
* Refer to “Embroidering Patterns” on page 54.

SELECTING PATTERNS
45
Embroidery Step by Step
1Selecting Frame Patterns
aPress .
bPress the key of the frame shape you want to embroider in the top part of the screen.
a Frame shapesb Frame patternso Various frame patterns are displayed at the bottom
part of the screen.
cPress the key of the frame pattern you want to embroider.
* If you make a mistake selecting the pattern, press the key of the pattern you want to embroider.
o The selected pattern is displayed on the screen.
dFollow the steps from d to g of “Selecting Embroidery Patterns/Decorative Alphabet Patterns/Utility Embroidery Patterns” on page 43.
a
b

CONFIRMING THE PATTERN POSITION
46
The pattern is normally positioned in the center of the embroidery frame. If the pattern needs to be repositioned for better placement on the garment, you can check the layout before starting embroidery.
Checking the Embroidery Pattern with the Projector
Using the projector, the selected embroidery pattern can be projected onto the fabric.
aPress in the embroidering screen.
a Display areao The part of the pattern within the display area will
be projected onto the fabric.
bCheck the embroidery pattern.While the display area remains in place, the pattern can be moved.
a Press to change the angle.b Press to return the pattern to its original angle.c Press to move the pattern.
CONFIRMING THE PATTERN POSITION
a
Memo• To change the position of the display area,
drag the display area with your finger. At the same time, the embroidery frame is moved.
a
b
c

CONFIRMING THE PATTERN POSITION
47
Embroidery Step by Step
1Checking the Needle Drop Point With the Projector
With the projector pointer, you can check the needle drop point before embroidering.
aPress in the embroidery screen.
o The pointer of the projector indicates the needle drop point.
* The pointer of the projector turns off automatically by lowering the embroidery foot or returning to the previous page.
Aligning the Embroidering Position Using the Built-In Camera
The camera built into this machine can be used to easily align the embroidering position. This is
useful for patterns which need to be embroidered in a particular position as shown below.
aUse a chalk pencil to draw a cross at the desired embroidering location.
a Chalk pencil mark
bHoop the fabric.
cSelect the pattern on your machine and
press .
dPress in the embroidering screen.
Memo• When the pointer of the projector is turned
on, the embroidery foot height is automatically adjusted according to the fabric thickness.
• If embroidery foot “W+” with LED pointer (sold separately) is installed, the LED pointer is turned on.
Note• With fabric that has a very uneven surface
such as thick fabric or quilting, the fabric thickness may not be correctly measured. In this case, the pointer indication should be used only as a reference.

CONFIRMING THE PATTERN POSITION
48
ePress to set the starting point to the center of the pattern.
fPress .
gPress the “Presser Foot Lifter” button to lower the embroidery foot.
hPress .
iPress the positioning keys to move the embroidery frame until the cross-shaped chalk mark drawn on the fabric is displayed in the camera view window.
a Positioning keys
jPress to display the grid lines.
a Grid linesb Chalk mark on the fabric
kAdjust the orientation of the pattern by pressing the orientation keys until the grid lines are parallel with the chalk mark drawn on the fabric. (Refer to “Rotating the Pattern” on page 63.)
a Center point of the pattern
a
Memo
• Press to enlarge the camera view. By enlarging the camera view, you can make a close adjustment for the center point of the pattern moving the embroidery frame little by little.
a
b
a

CONFIRMING THE PATTERN POSITION
49
Embroidery Step by Step
1l
Press the positioning keys to move the embroidery frame until the center point of the pattern in the camera view window is aligned with the chalk mark drawn on the fabric.
mPress to return to the previous screen.
nPress the “Start/Stop” button to begin embroidering.
* Refer to “Embroidering Patterns” on page 54.
Using the Embroidery Position Sticker to Align the Embroidering Position
The embroidering position can easily be aligned using the machine’s built-in camera and the included embroidery positioning sticker.
aPress to display the editing
window, and then press .
bFollowing message appears. Press .
o The embroidering position will return to the original position, even if you changed before.
Note• Depending on the type of fabric that is
used, a part of the embroidery positioning sticker may remain attached when it is peeled off. Before using the embroidery positioning sticker, check that it can be cleanly removed from a scrap piece of the fabric to be used.
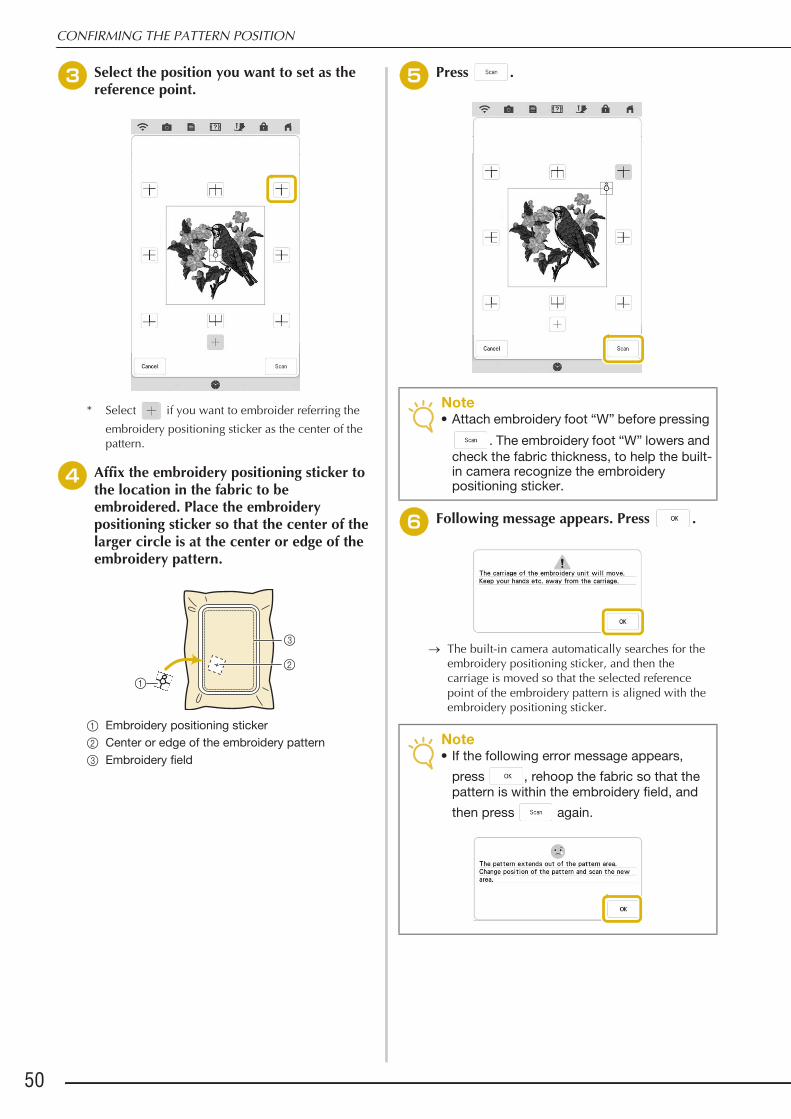
CONFIRMING THE PATTERN POSITION
50
cSelect the position you want to set as the reference point.
* Select if you want to embroider referring the embroidery positioning sticker as the center of the pattern.
dAffix the embroidery positioning sticker to the location in the fabric to be embroidered. Place the embroidery positioning sticker so that the center of the larger circle is at the center or edge of the embroidery pattern.
a Embroidery positioning stickerb Center or edge of the embroidery patternc Embroidery field
ePress .
fFollowing message appears. Press .
o The built-in camera automatically searches for the embroidery positioning sticker, and then the carriage is moved so that the selected reference point of the embroidery pattern is aligned with the embroidery positioning sticker.
Note• Attach embroidery foot “W” before pressing
. The embroidery foot “W” lowers and check the fabric thickness, to help the built-in camera recognize the embroidery positioning sticker.
Note• If the following error message appears,
press , rehoop the fabric so that the pattern is within the embroidery field, and then press again.

CONFIRMING THE PATTERN POSITION
51
Embroidery Step by Step
1g
A reminder message appears. Remove the
embroidery positioning sticker from the fabric, and press .
* To remove the embroidery positioning sticker more
easily, press so that the carriage moves slightly forward and away from under the needle. After the embroidery positioning sticker is removed, press
.
hPress the “Start/Stop” button to begin embroidering.
* Refer to “Embroidering Patterns” on page 54.
Note• After the included embroidery positioning
stickers are used up, optional stickers are available. For details, refer to the Instruction and Reference Guide (Sewing).
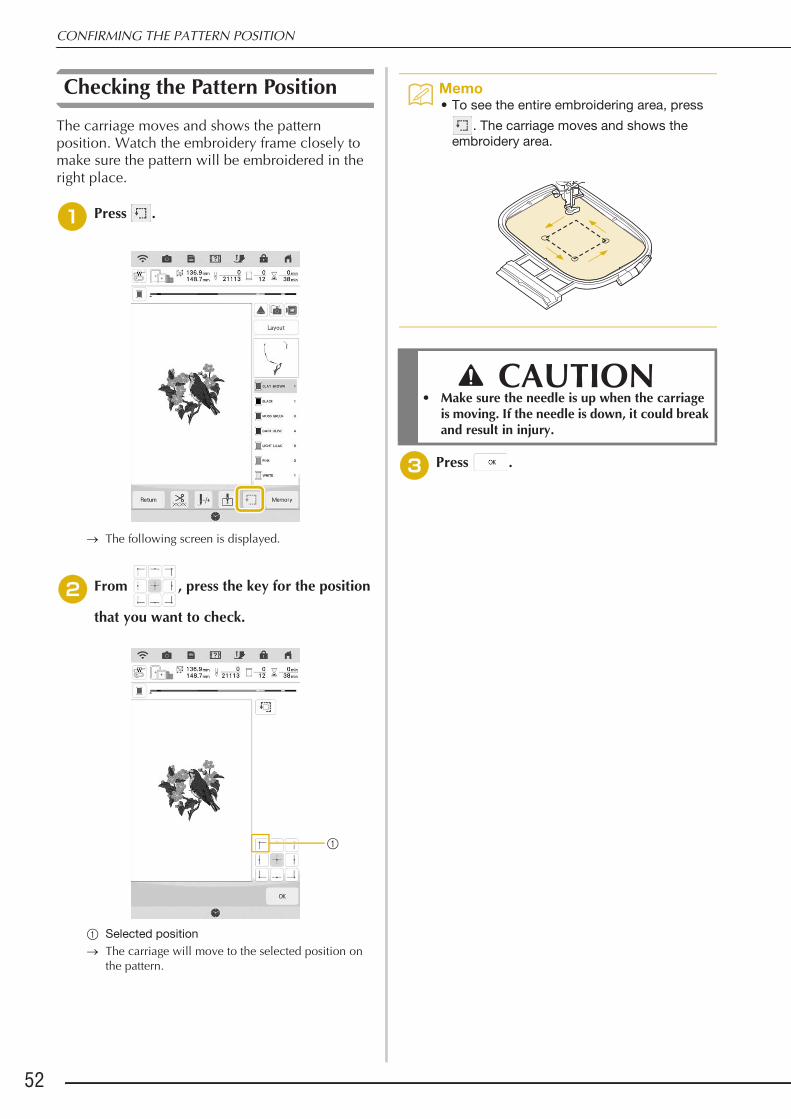
CONFIRMING THE PATTERN POSITION
52
Checking the Pattern Position
The carriage moves and shows the pattern position. Watch the embroidery frame closely to make sure the pattern will be embroidered in the right place.
aPress .
o The following screen is displayed.
bFrom , press the key for the position
that you want to check.
a Selected positiono The carriage will move to the selected position on
the pattern.
cPress .
a
Memo• To see the entire embroidering area, press
. The carriage moves and shows the embroidery area.
CAUTION• Make sure the needle is up when the carriage
is moving. If the needle is down, it could break and result in injury.

EMBROIDERING A PATTERN
53
Embroidery Step by Step
1Embroidering Attractive Finishes
Many factors are involved in achieving a beautiful embroidery result. Using the appropriate stabilizer (page 28) and hooping the fabric in the frame (page 29) are two important factors mentioned earlier. Another important point is the appropriateness of the needle and thread being used. See the explanation of threads below. Included with this machine are two bobbin cases. Follow the explanation below.
Bobbin case (recommended for sewing and for embroidering with included 60 weight bobbin thread)
a Standard bobbin case (green marking on the screw)
Standard bobbin case originally installed in the machine has a green marking on the screw. We recommend using the included embroidery bobbin thread with this bobbin case. Do not adjust the tension screw on this bobbin case with the green marked screw.
Bobbin case (for prewound or other embroidery bobbin threads)
a Bobbin case (no color on the screw)
The bobbin case with no color on the screw is set with tighter tension for embroidery with different weights of bobbin threads and a variety of embroidery techniques. This bobbin case is identified with a dark colored mark on the inside of the bobbin cavity. The tension screw on this case can be adjusted if necessary.
EMBROIDERING A PATTERN
Thread Upper thread Use embroidery thread intended for use with this machine. Other embroidery threads may not yield optimum results.
Bobbin thread Use embroidery bobbin thread intended for use with this machine.
Memo• If you use threads other than those listed
above, the embroidery pattern may not embroider out correctly.
CAUTION• When embroidering on large garments
(especially jackets or other heavy fabrics), do not let the fabric hang over the table. Otherwise, the embroidery unit cannot move freely and the embroidery frame may strike the needle, causing the needle to bend or break and possibly cause injury.Place the fabric so that it does not hang off the table or hold the fabric to keep it from dragging.
Note• Before embroidering, check that there is
enough thread in the bobbin. If you start to embroider your project without enough thread in the bobbin, you will need to rewind the bobbin in the middle of the embroidery pattern.
• Do not leave objects in the range of motion of the embroidery frame. The frame may strike the object and cause a poor finish to the embroidery pattern.
• When embroidering on large garments (especially jackets or other heavy fabrics), do not let the fabric hang over the table. Otherwise, the embroidery unit cannot move freely, and the pattern may not turn out as planned.

EMBROIDERING A PATTERN
54
Embroidering Patterns
Example:
a Embroidery color orderb Cursor
aUsing the automatic needle threader, thread the machine for the first color.
bLower the embroidery foot, then press the “Start/Stop” button to start embroidering.
o When the first color is completely embroidered, the machine will automatically trim the threads and stop. The embroidery foot will then automatically be raised.On the embroidery color order display, the next color will move to the top.
cRemove the thread for the first color from the machine. Thread the machine with the next color.
Memo• The [+] cursor moves over the pattern,
showing which part of the pattern is being embroidered.
b
a
Memo• If you want to get more attractive finishes,
try the procedures below;- After 5-6 stitches, press the “Start/Stop”
button again to stop the machine. - Trim the excess thread at the end of the
seam. If the end of the seam is under the embroidery foot, raise the embroidery foot, then trim the excess thread.
• If there is thread left over from the beginning of embroidering, it may be embroidered over as you continue embroidering the pattern, making it very difficult to deal with the thread after the pattern is finished. Trim the threads at the beginning of each thread change.

EMBROIDERING A PATTERN
55
Embroidery Step by Step
1d
Repeat the same steps for embroidering the remaining colors.
a Current stitch numbers/Total stitch numbersb Current time/Total timec The part of pattern embroider nextd Embroidered colors/Total colorso When the last color is embroidered, “Finished
embroidering” will appear on the display. Press
, and the display will return to the original screen.
Memo• The Thread Trimming Function is originally
set to trim excess thread jumps (threads linking parts of the pattern, etc.). Depending on the type of thread and fabric that are used, an end of upper thread may remain on the surface of the fabric at the beginning of the stitching. After embroidering is finished, cut off this excess thread.If the setting has been turned off, trim the excess thread jumps using scissors after the pattern is finished.Refer to page 101 for information on the thread trimming function.
c
d
ab
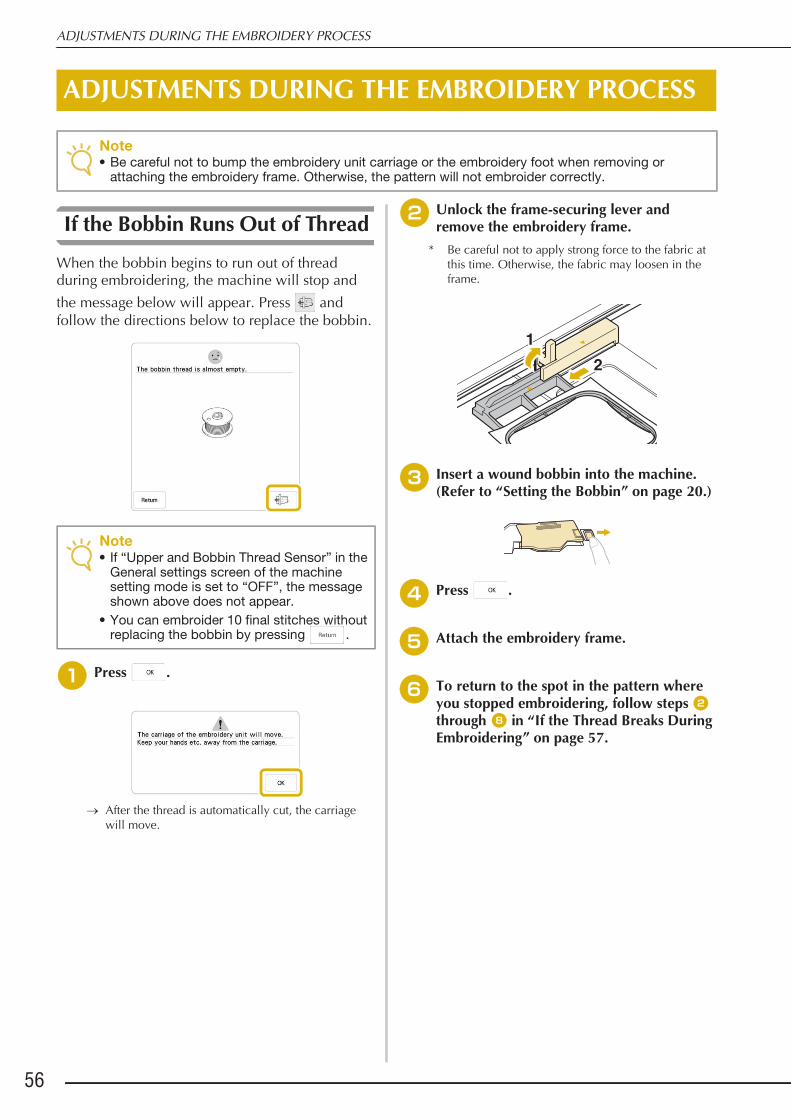
ADJUSTMENTS DURING THE EMBROIDERY PROCESS
56
If the Bobbin Runs Out of Thread
When the bobbin begins to run out of thread during embroidering, the machine will stop and the message below will appear. Press and follow the directions below to replace the bobbin.
aPress .
o After the thread is automatically cut, the carriage will move.
bUnlock the frame-securing lever and remove the embroidery frame.
* Be careful not to apply strong force to the fabric at this time. Otherwise, the fabric may loosen in the frame.
cInsert a wound bobbin into the machine. (Refer to “Setting the Bobbin” on page 20.)
dPress .
eAttach the embroidery frame.
fTo return to the spot in the pattern where you stopped embroidering, follow steps b through h in “If the Thread Breaks During Embroidering” on page 57.
ADJUSTMENTS DURING THE EMBROIDERY PROCESS
Note• Be careful not to bump the embroidery unit carriage or the embroidery foot when removing or
attaching the embroidery frame. Otherwise, the pattern will not embroider correctly.
Note• If “Upper and Bobbin Thread Sensor” in the
General settings screen of the machine setting mode is set to “OFF”, the message shown above does not appear.
• You can embroider 10 final stitches without replacing the bobbin by pressing .

ADJUSTMENTS DURING THE EMBROIDERY PROCESS
57
Embroidery Step by Step
1If the Thread Breaks During Embroidering
aIf the upper thread is broken, redo the
upper threading. If the bobbin thread is broken, press and follow the directions in steps a through e in “If the Bobbin Runs Out of Thread” on page 56.
bPress .
cPress the “Presser Foot Lifter” button to lower the embroidery foot.
dPress .
o The camera view window appears.
ePress or to move the needle back
the correct number of stitches before the spot where the thread broke.
* If you cannot move back to the spot where the
thread broke, press or to select the color and move to the beginning position of that color,
then use or to move ahead to slightly before where the thread broke.
* Press to enlarge the image in the screen.
* Press to remove “ “ from the screen.
fPress to close the camera view window.
gPress to return to the original screen.
hPress the “Start/Stop” button to continue embroidering.

ADJUSTMENTS DURING THE EMBROIDERY PROCESS
58
Restarting from the Beginning
aPress .
bPress .
o The carriage moves, returning the needle to the pattern’s beginning position.
cPress the “Presser Foot Lifter” button to lower the embroidery foot and start embroidering.
Resuming Embroidery After Turning Off the Power
The current color and stitch number are saved when embroidery is stopped. The next time the machine is turned on, you have the option to continue or delete the pattern.
a Current stitch number when embroidery was stopped
aTurn the main power to ON.
bFollow the instructions shown on the screen and remove the embroidery frame.
o The following message will appear.
Memo• Even if the power goes out in the middle of
embroidery, the machine returns to the point where embroidery was stopped when the machine is turned on again.
Note• Do not remove the embroidery unit or the
memory will no longer remember your design.
a

ADJUSTMENTS DURING THE EMBROIDERY PROCESS
59
Embroidery Step by Step
1c
Attach the embroidery frame and press
.
o The previous embroidering screen displayed before the machine was turned off appears.
dContinue embroidering.
a Stitch number when embroidery is resumed
Memo• If you want to start a new embroidery
pattern, press so the pattern selection screen appears.
a

ADJUSTMENTS DURING THE EMBROIDERY PROCESS
60

Chapter 2Basic Editing

BASIC EDITING
62
Previewing the Pattern
aPress .
o An image of the pattern as it will be embroidered appears.
bPress to select the frame used in the preview.
* Frames displayed in dark gray cannot be selected.
* Press to enlarge the image of the pattern.* The pattern can be embroidered as it appears in the
following display.
cPress to check the embroidering order.
o The stitch simulator screen appears.
a Select the simulation speed. Press , or to change the speed. The speed can even be changed while the simulation is running.
b Operation keys
: Press to start the simulation at the set
speed. When pressing , icon changes to .
: Press this key while the simulation is running
to pause it. When pressing , icon changes to
.
• Press to return to the embroidery frame holder/embroidery frame selection screen.
dPress .
BASIC EDITING
a b

BASIC EDITING
63
Basic Editing
2
Moving the Pattern
aPress , and then press to display the pattern move window.
bSelect the desired pattern by pressing
, if there are several patterns on the screen.
cUse to move the pattern in the
direction shown by the arrow. Press to center the pattern.
a Distance from the centerb Pattern select key
If a USB mouse is connected, move the mouse to position the pointer on the desired pattern, and then select and drag the pattern. The pattern can also be dragged by selecting it directly in the screen with your finger or the dual purpose stylus.
dPress .
Rotating the Pattern
aPress , and then press .
bSelect the key indicating the desired
direction and angle for rotating the pattern. (Example: rotates 90 degrees clockwise.)
a
b
0°

BASIC EDITING
64
* Press to return the pattern to its original position.
a Degree of rotation
cPress .
Changing the Size of the Pattern
aPress , and then press .
bSelect the direction in which to change the size.Example:
Memo• If the USB mouse is connected, you can
rotate the pattern by rotating the mouse wheel. Rotate the mouse wheel away from you to rotate the pattern 10 degrees to the left. Rotate the mouse wheel toward you to rotate the pattern 10 degrees to the right.
• You can move patterns using on
the window.• You can also rotate patterns by dragging
at the top of the pattern.
a
Memo• Press to return the pattern to its
original size.

BASIC EDITING
65
Basic Editing
2
a Size of the pattern
cPress .
■ Changing the Size by DraggingYou can also change the pattern size by dragging the red point on the pattern image.
■ Changing the Size and the Density of the PatternYou can change the pattern size while maintaining the desired thread density. The machine recalculates the stitch density automatically. With this function, the pattern will be enlarged or reduced at a larger ratio than with normal pattern resizing.
aPress in the size window.
* : When you want to increase or decrease the density of the design. When the pattern size is changed, the thread density for the pattern increases or decreases, but the number of stitches is maintained.
Memo• In order to maintain embroidering quality,
there is a limit to how much the embroidery pattern can be enlarged or reduced.
• Some patterns or characters can be enlarged to a greater degree if they are rotated 90 degrees.
• If the USB mouse is connected, you can change the size of the pattern by rotating the mouse wheel. Rotate the mouse wheel away from you to shrink the pattern. Rotate the mouse wheel toward you to enlarge the pattern.
• You can move patterns using on
the window.
a
Note• You can change the pattern size with one
finger. Using two or more fingers does not work.
Note• Be sure to do trial embroidery using same
fabric and threads as project in order to check the embroidering results.
• This function cannot be used with character patterns, frame patterns or border patterns. However, a border pattern can be edited after this function has been used.
• Patterns with a large number of stitches cannot be resized while maintaining a thread density.
Memo• Depending on the pattern, the size of the
pattern increases up to 200 % or reduces to 60 %.

BASIC EDITING
66
* : When changing the size, the pattern keeps the original density. The number of stitch is recalculated.
bSelect the direction in which to change the size.
* Press to make the pattern less dense.
* Press to make the pattern more dense.
cPress .
Changing the Density
The thread density can be changed.A setting between 80% and 120% in 5% increments can be specified.This setting is available for some alphabet character patterns, frame patterns and so on. Other patterns are available after enabling patterns to change the density. For details, refer to “Changing the Size and the Density of the Pattern” on page 65.
aPress , and then press .
bChange the density.
* Press to make the pattern less dense.
* Press to make the pattern more dense.
Note• If the pattern is enlarged and there is space
between stitches, a better effect can be achieved by increasing the thread density.
• If the pattern is reduced and the stitching is too thick, a better effect can be achieved by reducing the thread density.

BASIC EDITING
67
Basic Editing
2a Normal b Fine (stitches closer together)c Coarse (stitches farther apart)o The pattern density changes each time you press a
button.
cPress .
Creating a Horizontal Mirror Image
Press , and then press to create a horizontal mirror image of the selected pattern.
Designing Repeated Patterns
■ Embroidering Repeated PatternsUsing the border function, you can create repeated patterns. You can also adjust the spacing of the patterns.
aPress , and then press .
bSelect the direction in which the pattern
will be repeated. Use to repeat the
pattern above and to repeat the
pattern below.
* To delete above pattern, press .
* To delete below pattern, press .

BASIC EDITING
68
Vertical direction
a Repeating and deleting keysb Spacing keysc Key to cancel pattern repeating
Horizontal direction
a Repeating and deleting keysb Spacing keysc Key to cancel pattern repeatingo The pattern direction indicator will change
depending on the direction selected.
cAdjust the spacing of the repeated pattern.
* To widen spacing, press .
* To tighten spacing, press .
dComplete repeated patterns by repeating steps b through c.
ePress .
b
a
c
b
a
c
Memo• When there are two or more patterns, all
patterns will be grouped together as one pattern in the red frame.
• When changing the direction in which the pattern will be repeated, all of the patterns in the red frame will automatically be grouped as one repeating unit. Refer to the following section on how to repeat one element of a repeated pattern.

BASIC EDITING
69
Basic Editing
2
■ Repeating One Element of a Repeated PatternBy using the Cut function, you can select one element of a repeated pattern and repeat only that single element. This function allows you to design complex repeated patterns.
aPress .
bChoose the direction in which the repeated pattern will be cut.
* Press to cut vertically.
* Press to cut horizontally.
o The pattern direction indicator will change depending on the direction selected.
cUse and to select the cut line.
o The cut line will move.
dPress .
o The repeated pattern will be divided into separate elements.
ePress .
fUse and to select the element to repeat.
gRepeat the selected element.
hPress .

BASIC EDITING
70
■ Assigning Thread MarksBy embroidering thread marks, you can easily align patterns when embroidering a series. When embroidering is finished on a pattern, a thread mark in the shape of an arrow will be sewn using the final thread. When embroidering a series of patterns, use the point of this arrow for positioning the following designs to be embroidered.
aPress , and then press .
bPress .
cPress to select the thread mark to be
sewn.
dPress .
Embroidering the Pattern Repeatedly
After creating the repeated pattern, rehoop the embroidery frame and keep embroidering for the next pattern.
Note• Once you have cut a repeated pattern into
separate elements, you cannot return to the original repeated pattern.
• Each element can be edited separately in the edit screen. Refer to “Selecting combined embroidery patterns” on page 87.
• Press to change the embroidering order in order to minimize the number of the thread color changes.
Memo• When there are two or more elements, use
and or and to select a pattern that you want to assign a thread mark(s) to.
Memo• The optional border frame allows you to
easily rehoop the fabric without removing the embroidery frame from the machine.

BASIC EDITING
71
Basic Editing
2
aSelect the boarder pattern with the thread mark at the center of the end of the pattern.
* Refer to “Assigning Thread Marks” on page 70.
bPress , then .
cPress the “Start/Stop” button to begin embroidering.
o When embroidering is finished, the thread mark is sewn with the last thread color.
dRemove the embroidery frame.
eRehoop the fabric in the embroidery frame.
fAttach the embroidery frame to the machine, and then touch .
Note• Adjust the position of the fabric so that the
embroidering area for the next pattern is within the embroidering area of the embroidery sheet.
a Pattern embroidered firstb Position of pattern to be embroidered nextc Embroidering area of embroidery sheet

BASIC EDITING
72
gTouch to set the starting point to the
center of the pattern.
hTouch .
iPress the “Presser Foot Lifter” button to lower the embroidery foot.
jPress .
kPress .
lPress the positioning keys to move the embroidery frame until the thread mark on the fabric is aligned on the starting point in the camera view window.
a Grid linesb Thread mark on the fabricc Positioning keys
mIf the pattern position cannot be aligned using the positioning keys, rehoop the fabric, and then try again to align the position with the positioning keys.
nPress to return to the previous screen.
oRemove the thread mark.
Memo• Press to enlarge the camera view. By
enlarging the camera view, you can make a close adjustment for the needle drop point moving the embroidery frame little by little.
Note• When embroidering the repeated pattern,
you cannot rotate the pattern in the camera view window. If the pattern is rotated in the camera view window, you cannot embroider the pattern properly aligned even if the thread mark and the starting point are aligned in the camera view window.
a
c
b

BASIC EDITING
73
Basic Editing
2
pPress the “Start/Stop” button to begin embroidering.
Duplicating a Pattern
aPress , and then press .
o The duplicate is positioned.
a Duplicated pattern
Deleting the Pattern
Press to delete the pattern from the screen.
Displaying Patterns in the Screen Magnified
aPress to magnify the image.
* The image is magnified by 125%, 150% and 200%
as you press .
Note• If multiple patterns are displayed in the
screen, only the pattern selected using
and is duplicated.• Move and edit each duplicated pattern
individually.
a

BASIC EDITING
74
bCheck the displayed pattern.
Memo• When magnifying, pressing enables you
to move displayed area. At this time, the embroidery pattern in the location in the embroidery field does not move.

EDITING LETTERS
75
Basic Editing
2
Selecting Alphabet Character Patterns
Example: Entering “The Sky is Blue”.
aPress .
bPress the key of the font you want to embroider.
cPress the tab to select a character type.
dPress and then enter “T”.
* If you want to change the size of a character, select
the character and then press to change the size. The size changes each time you press the key, from large to medium to small.
* If you make a mistake, press to erase the mistake.
ePress and enter “he”.
fPress to enter a space.
EDITING LETTERS
Memo• If you continue adding characters after
changing the size, the new characters will be entered in the new size.

EDITING LETTERS
76
gPress again and enter “S”.
hPress and then enter “ky_is”.
iPress to make a new line.
jEnter “Blue” according to step d and e.
kPress .
o The embroidering screen is displayed.
lFollow the steps from d to g of “Selecting Embroidery Patterns/Decorative Alphabet Patterns/Utility Embroidery Patterns” on page 43.
Character Alignment
Each press of switches between right alignment, left alignment and center alignment, in that order.
Changing Font Type
aBefore changing the font type, press
, and then press .
Right alignment Left alignment
Center alignment
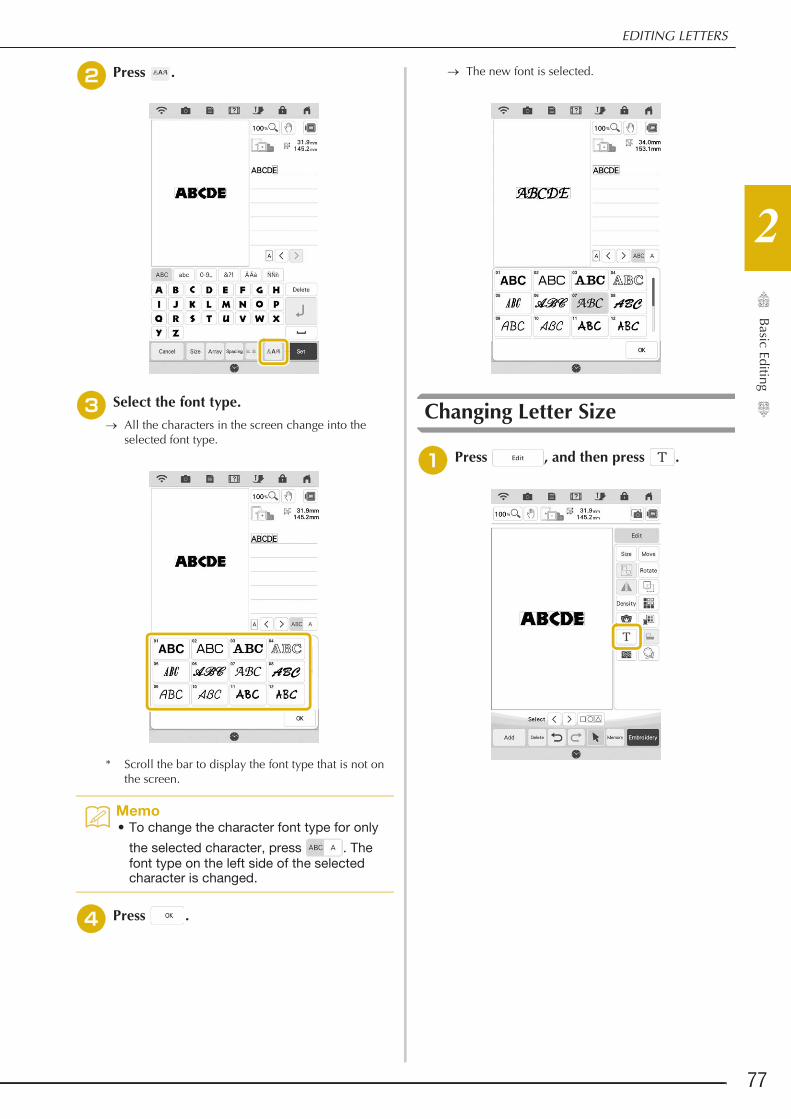
EDITING LETTERS
77
Basic Editing
2
bPress .
cSelect the font type.
o All the characters in the screen change into the selected font type.
* Scroll the bar to display the font type that is not on the screen.
dPress .
o The new font is selected.
Changing Letter Size
aPress , and then press .
Memo• To change the character font type for only
the selected character, press . The font type on the left side of the selected character is changed.

EDITING LETTERS
78
bPress .
cChange the size of letters.
a Change the size to the specific direction.b Change the size from L, M or S size.c Move the text.
dPress .
Changing the Configuration of Alphabet Character Patterns
aPress , and then press .
Memo• To change the character letter size for only
the selected character, press . The letter size on the left side of the selected character is changed.
ca
b

EDITING LETTERS
79
Basic Editing
2
bPress .
cSelect the layout. (Example: )
When selecting an arc, use and to
change the degree of the arc.
* Press to make the arc flatter.
* Press to make the arc rounder.
dPress .
Changing Alphabet Character Spacing
aPress , and then press .
bPress .
Memo
• When selecting , these keys ( and
) change to look like ( and ). So you can increase or decrease the incline.
• You can move patterns using on
the screen.

EDITING LETTERS
80
cSelect the spacing.
* Press to increase the character spacing.
* Press to decrease the character spacing.
* Press to return the pattern to its original
appearance.
* Press to move the text up.
* Press to move the text down.
dPress .
Re-editing Character Patterns
Even after text has been entered, the characters can be re-edited.
aPress , and then press .
o The character pattern can be re-edited.
Memo• To change the character spacing for only
the selected character, press . The spacing on the left side of the selected character is changed.
• You can move patterns using on
the screen.
Note• It is not recommended to edit data and
transfer to other or older version machines. Some features do not apply in other machines, so problems may occur.
• Character spacing can be reduced only when characters are arranged normally on a straight line.
Memo• The spacing between characters can be
reduced to 50% of the narrowest character in the group.
Note• A line feed cannot be added when re-
editing character patterns.

EDITING COLORS
81
Basic Editing
2
Changing the Thread Color
You can change the thread color by moving the color to be changed to the top of the embroidering order and selecting a new color from the thread colors in the machine.
aPress , and then press .
o The thread color palette screen displays.
bPress the color of the part to be changed.
* Scroll color palette area to display the thread color that is not on the screen.
o The selected thread color image is displayed.
a Selected thread color imageb 64 Embroidery thread color palette
cSelect a new color from the color palette,
and then press .
* To return to the original color, press . If multiple colors have been changed, this command will return all colors to their original colors.
a Color paletteo The selected color appears at the top of the
embroidering order.o The display shows the changed colors.
dPress .
Find New Color Schemes With the Color Visualizer Function
With the color visualizer function, the machine suggests new color schemes for the embroidery pattern that you have selected. After you select the
EDITING COLORS
b
a
Memo
• Press to find a thread color by entering its number. If you enter the wrong number, press , and then enter the correct number. After entering the number,
press .
a

EDITING COLORS
82
desired effect from the four available (“Random”, “Vivid”, “Gradient” and “Soft”), sample color schemes for the selected effect are displayed.
aPress , and then press .
o The thread color palette screen appears.
bPress .
o The color visualizer screen appears.
cSelect the thread brand for colors and the number of colors you want to create the pattern with.
a Thread brand for colorsb Number of colors to be used.
dSelect the desired effect.
a Effects for schemes
o If you select “Random” or “Gradient”, the color specifying screen will appear.
* If you select “Vivid” or “Soft”, proceed to step f.
ePress and specify the thread color to
use in the desired effect.* If you don’t need to specify the thread color, just set
to .
Note• This function may not be available
depending on the pattern you select (ex. a bordered embroidery pattern, licensed pattern).
b
a
a

EDITING COLORS
83
Basic Editing
2
“Manual” setting for “Random”You can select up to 6 colors to be used in the “Random” effect.The effect will be created using the selected colors.
a Select colors from the pallet.b Selected colors are listed.
“Manual” setting for “Gradient”You can select one color to be used in the “Gradient” effect.The effect will be created with a color you select.
a Select a color from the pallet.b Selected color is displayed.
fPress .
gPress the desired color scheme from samples.
* Press to display the new schemes.
a Press to review the previous schemes.
hPress and then, select the displayed color scheme.
* Press to return to the previous screen.* You can continue selecting color schemes from the
selected page prior to pressing .
a
b
a
b
Note• Maximum 10 pages of schemes can be
reviewed. After 10 pages of schemes, the oldest page is deleted every time you press
.
a

EDITING COLORS
84
* Press or to display the other color schemes.
o The thread color palette screen will appear.
Thread Color Sorting
This function allows you to embroider while replacing the thread spool a minimal number of times.Before starting to embroider, press in the embroidery screen to rearrange the embroidery order and sort it by thread colors.
aPress in the embroidery screen.
bPress .
* Press again to check the sorted thread colors.
The embroidery color order is rearranged and sorted by thread colors.Press , then to cancel color sorting and embroider with the original embroidery color order.
Note• This function does not work on overlapping
designs.

COMBINING PATTERNS
85
Basic Editing
2
Editing Combined Patterns
Example: Combining alphabet characters with an embroidery pattern and editing
aPress to select an embroidery
pattern.
bSelect , press and then press
.
cPress .
COMBINING PATTERNS
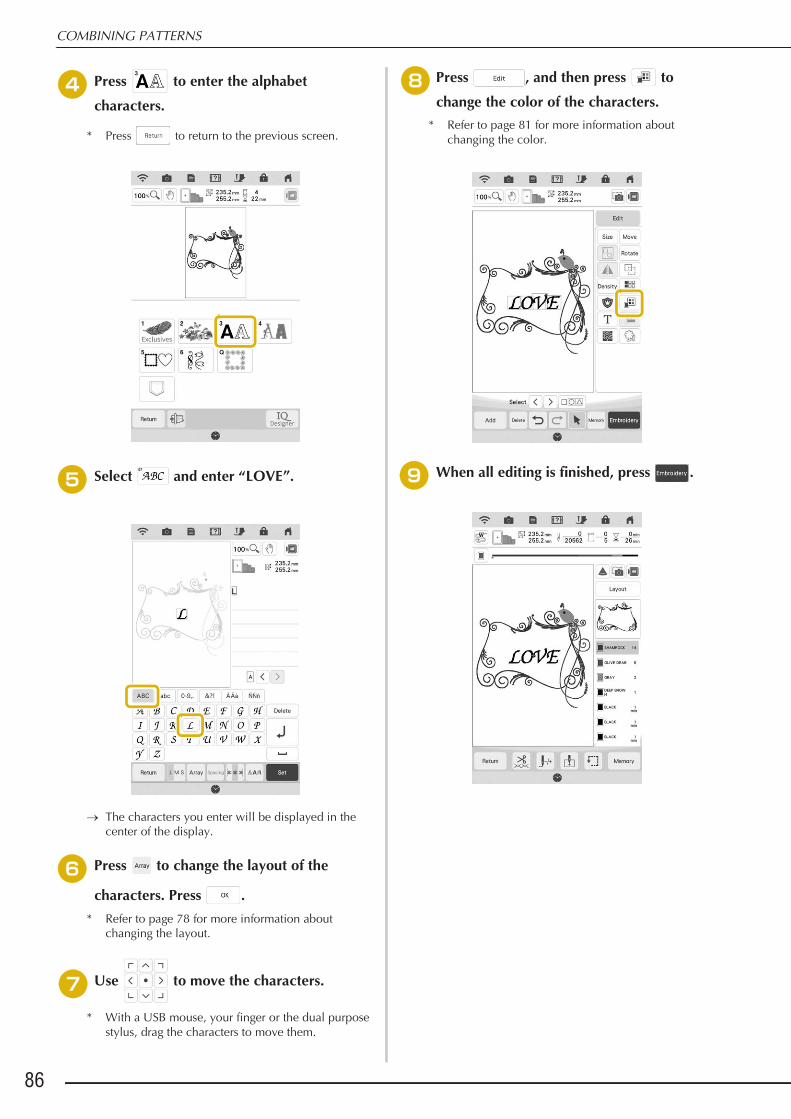
COMBINING PATTERNS
86
dPress to enter the alphabet
characters.
* Press to return to the previous screen.
eSelect and enter “LOVE”.
o The characters you enter will be displayed in the center of the display.
fPress to change the layout of the
characters. Press .* Refer to page 78 for more information about
changing the layout.
gUse to move the characters.
* With a USB mouse, your finger or the dual purpose stylus, drag the characters to move them.
hPress , and then press to
change the color of the characters.* Refer to page 81 for more information about
changing the color.
iWhen all editing is finished, press .

COMBINING PATTERNS
87
Basic Editing
2
■ Selecting combined embroidery patternsIf multiple patterns have been combined, use to select the pattern to be edited. If a USB mouse is connected, the pattern can be selected by clicking it. Move the mouse to position the pointer over the desired pattern, and then click the left mouse button. In addition, patterns can be selected by directly touching the screen with your finger or dual purpose stylus.
Selecting Multiple Patterns at the Same Time
Multiple patterns can easily be edited, for example, when moving patterns that are combined, if they are all selected together.
aPress .
o The Multiple Selection screen appears.
bTouch each pattern to select multiple patterns.
Memo• Use to select patterns that are
overlapping and cannot be selected by clicking them or by touching the screen.

COMBINING PATTERNS
88
cPress to return to the embroidery edit screen.
* Each selected pattern is surrounded with a red box.
Grouping Multiple Selected Patterns
If the multiple patterns selected in “Selecting Multiple Patterns at the Same Time” on page 87 are grouped, they can be edited as a single pattern.
aPress to select multiple patterns.
o The selected patterns are grouped.
* Press to ungroup the patterns. If there are multiple grouped patterns, the selected pattern group is ungrouped.
Memo• Multiple patterns can also be selected by
dragging your finger in the screen.• Multiple patterns can be selected or
deselected from the Multiple Selection screen. Press or to check the patterns to be selected, and then press
.
The selected patterns are surrounded with a red box.
• Press to select all patterns in the pattern display area.
• Press to deselect all selected patterns.• The patterns can also be selected by
touching them directly in the screen.• While the Multiple Selection screen is
displayed, patterns can be moved with
.• The following functions cannot be used
while multiple patterns are selected.- Resizing- Rotating- Appliqué- Border- Thread color changing
Memo• When patterns are grouped, the following
functions are applied to all patterns in the pattern group.- Moving- Rotating- Appliqué- Border- Extracting pattern outlines- Simple stippling or echo quilting- Thread color changing

COMBINING PATTERNS
89
Basic Editing
2
Aligning the Embroidery Patterns
aPress , select each pattern that you
want to align, and then press .
bPress , , and then press the key
for the desired alignment.
Example:
No. Display Explanation
a Top
b Middle
c Bottom
d Left
e Center
f Right
a
b
c
d e f

COMBINING PATTERNS
90
Embroidering Combined Patterns
Combined patterns will be embroidered in the order they were entered. In this example, the embroidery order will be as follows:
o
aEmbroider by following the color
order on the right side of the display.
o After are embroidered, the [+] cursor will
move to the “LOVE” part of the pattern.
bEmbroider .
o When “LOVE” is embroidered, the display returns to the embroidering screen.
Note• Follow the directions in “Embroidering
Patterns” on page 54.

Chapter 3Advanced Editing
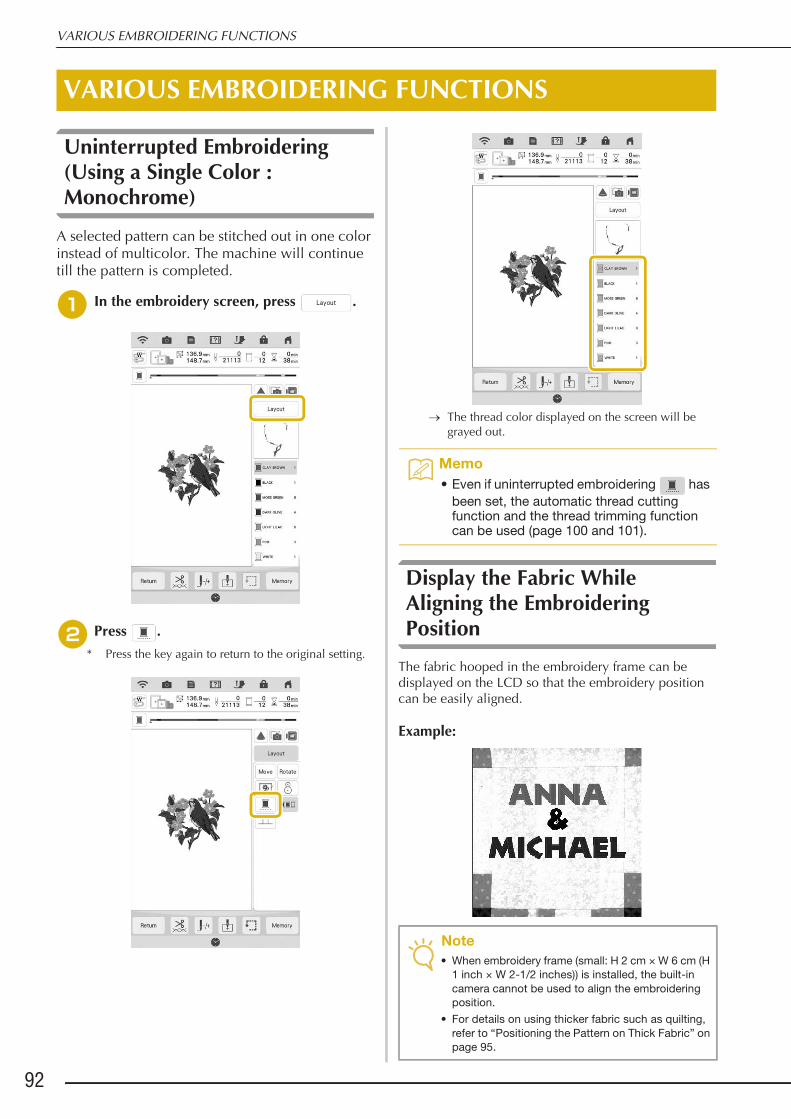
VARIOUS EMBROIDERING FUNCTIONS
92
Uninterrupted Embroidering (Using a Single Color : Monochrome)
A selected pattern can be stitched out in one color instead of multicolor. The machine will continue till the pattern is completed.
aIn the embroidery screen, press .
bPress .
* Press the key again to return to the original setting.
o The thread color displayed on the screen will be grayed out.
Display the Fabric While Aligning the Embroidering Position
The fabric hooped in the embroidery frame can be displayed on the LCD so that the embroidery position can be easily aligned.
Example:
VARIOUS EMBROIDERING FUNCTIONS
Memo• Even if uninterrupted embroidering has
been set, the automatic thread cutting function and the thread trimming function can be used (page 100 and 101).
Note• When embroidery frame (small: H 2 cm × W 6 cm (H
1 inch × W 2-1/2 inches)) is installed, the built-in camera cannot be used to align the embroidering position.
• For details on using thicker fabric such as quilting, refer to “Positioning the Pattern on Thick Fabric” on page 95.

VARIOUS EMBROIDERING FUNCTIONS
93
Advanced Editing
3
aHoop the fabric in the embroidery frame, and then attach the frame to the machine.
bSelect the pattern and, if necessary, edit the
pattern and press .
cPress .
dPress .
eWhen the following message appears, press
.
o The carriage moves so the fabric can be scanned.
fWhen the fabric appears as a background for
the pattern, press to display the
editing window.
* The pattern can be moved to the desired position by dragging on the screen using your finger, the dual purpose stylus or connected mouse without displaying the editing window. If you need some fine adjustment, move the pattern from the editing window.
Note• When using light to medium weight fabrics, check
the settings screen to make sure “Fabric Thickness Sensor” is set to “OFF”.
Memo• If you do not wish the upper thread to be scanned
together with the fabric, scan the fabric without the needle threaded with the upper thread.

VARIOUS EMBROIDERING FUNCTIONS
94
gPress to display the pattern moving
window.
hUse to align the pattern to the desired
embroidery position.
iPress .
jPress the “Start/Stop” button to start embroidering.
* Refer to “Embroidering Patterns” on page 54.
o When embroidery is finished, the fabric displayed in the background disappears.
■ Specify Fabric Display from the Settings ScreenWhether the fabric disappears or remains displayed can be specified from the settings screen.
a Set to “Fine” to scan clearer than setting to “Standard”.
b Press to remove the background image completely.
■ Saving Scanned Image to USB Media
aInsert the USB media into the USB port on the machine.
a USB mediab USB port
bPress and select the USB port to save image.
cPress .
o The image file will be saved to the USB media.
dRemove the USB media, and then check the saved image using a computer.
o The files for scanned images are saved with the name “BG**.PNG” in a folder labeled “bPocket”.
Memo
• If necessary, press to display a preview in order to check the pattern position.
Note• The fabric background will remain if the embroidery
is not finished. In this case, erase the background image from the settings screen.
a
b
a
b

VARIOUS EMBROIDERING FUNCTIONS
95
Advanced Editing
3
* “**” in the name “BG**.PNG” will automatically be replaced with a number between 00 and 99.
■ Positioning the Pattern on Thick FabricWhen positioning the pattern on thick fabric such as quilting, the fabric may not be detected correctly. In order for the fabric to be correctly detected, its thickness must first be measured.
aHoop the fabric in the embroidery frame, and then attach the frame to the machine.
bSelect the pattern and, if necessary, edit the
pattern and press .
cDisplay page 10 of the settings screen, and then set “Fabric Thickness Sensor” to “ON”.
dPress .
ePress .
fPress .
gAffix the embroidery positioning sticker to
the fabric within the area indicated by the red frame displayed with the projector, and then press .
hWhen the following message appears,
remove the embroidery positioning sticker, and then press .
o The carriage is moved, and the embroidery positioning sticker affixed to the fabric is detected.
iContinue with step f on page 93 to align the pattern with the desired embroidery position.
Memo• This feature is functional only when the fabric is
scanned. It will not affect embroidering if it is turned on with normal embroidery.
CAUTION• Use fabrics with a thickness of less than 3 mm
(approx. 1/8 inch). Using fabrics thicker than 3 mm (approx. 1/8 inch) may cause the needle to break.

VARIOUS EMBROIDERING FUNCTIONS
96
Basting Embroidery
Before embroidering, basting stitches can be sewn along the outline of the pattern. This is useful for embroidering fabric that cannot have stabilizer material affixed with an iron or adhesive. By stitching stabilizer material to the fabric, shrinkage of the stitching or misaligned pattern can be minimized.
aPress , and then press to select the basting setting.
o Basting is added to the beginning of the embroidering order.
bPress .
cTouch the number to specify the distance from the pattern to the basting stitching.
dPress to return to the previous screen.
ePress the “Start/Stop” button to begin embroidering.
fWhen embroidering is finished, remove the basting stitching.
Note• It is recommended to finish combining and
editing the pattern before selecting the basting setting. If the pattern is edited after selecting the basting setting, the basting and pattern may become misaligned, and the basting under the pattern may be difficult to remove after embroidering is complete.
Memo• To cancel the setting, press .
Memo• The higher the setting, the farther the
basting is from the pattern.• The setting remains selected even if the
machine is turned off.

MAKING EMBROIDERY ADJUSTMENTS
97
Advanced Editing
3
Adjusting Thread Tension
When embroidering, the thread tension should be set so that the upper thread can slightly be seen on the wrong side of the fabric.
■ Correct Thread TensionThe pattern can be seen from the wrong side of the fabric. If the thread tension is not set correctly, the pattern will not finish well. The fabric may pucker or the thread may break.
a Right sideb Wrong side
Follow the operations described below to adjust thread tension according to the situation.
■ Upper Thread is Too TightThe tension of the upper thread is too tight, resulting in the bobbin thread being visible from the right side of the fabric.
a Right sideb Wrong side
aPress .
MAKING EMBROIDERY ADJUSTMENTS
Note• If the thread tension setting is made
extremely loose, the machine may stop during embroidering. This is not the sign of a malfunction. Increase the thread tension slightly, and begin embroidering again.
Memo• If you turn the main power to OFF or select
a different pattern, the thread tension will reset to the automatic setting.
• When you retrieve a saved pattern, the thread tension setting will be the same as when the pattern was saved.
Note• If the bobbin thread was incorrectly
threaded, the upper thread may be too tight. In this case, refer to “Setting the Bobbin” on page 20 and rethread the bobbin thread.

MAKING EMBROIDERY ADJUSTMENTS
98
bPress to loosen the upper thread
tension. (The tension number will decrease.)
cPress .
■ Upper Thread is Too LooseThe tension of the upper thread is too loose, resulting in a loose upper thread, loose thread locks, or loops appearing on the right side of the fabric.
a Right sideb Wrong side
aPress .
bPress to tighten the upper thread
tension. (The tension number will increase.)
cPress .
■ Adjusting Overall Upper Thread TensionWhen embroidering, if the overall tension of the upper thread is too tight or too loose, adjust it from the setting screen.
aPress , and then press .
Note• If the upper thread was incorrectly
threaded, the upper thread may be too loose. In this case, refer to “Upper Threading” on page 22 and rethread the upper thread.
Note• The tension of the upper thread can be
adjusted for embroidering on page 8 of the embroidery settings screen. The selected setting will be applied to all patterns.When embroidering, if the overall tension of the upper thread is too tight or too loose, adjust it from the setting screen. Increase the number to tighten the upper thread and decrease the number to loosen the upper tension. If an individual embroidery pattern needs additional fine tuning, refer to “Adjusting Thread Tension” on page 97.

MAKING EMBROIDERY ADJUSTMENTS
99
Advanced Editing
3
bIn the “Embroidery Tension”, touch the number to adjust the upper thread tension.
* Increase to tighten the upper thread tension.* Decrease to loosen the upper thread tension.
cPress .
Adjusting the Alternate Bobbin Case (with No Color on the Adjusting Screw)
When using the embroidery bobbin thread provided, please be sure to choose the green marked bobbin case when performing utility stitch sewing and embroidery functions. When in the embroidery function mode, the alternate bobbin case (with no color on the screw) should be selected when substitute embroidery bobbin threads (other than what is accompanied with your machine) are being used. The alternate bobbin case (with no color on the screw) can be easily adjusted when bobbin tension changes are required to accommodate different bobbin threads. Refer to the Instruction and Reference Guide (Sewing).
To adjust the bobbin tension for embroidery function, using the alternate bobbin case (with no color on the screw), turn the slotted screw (-) with a (small) screwdriver.
a Do not turn a phillips screw (+).b Adjust with a screwdriver (small).
■ Correct TensionUpper thread slightly appears on the wrong side of fabric.
a Right sideb Wrong side

MAKING EMBROIDERY ADJUSTMENTS
100
■ Bobbin Thread is Too LooseBobbin thread appears slightly on the right side of fabric.
a Right sideb Wrong side
If this occurs, turn the slotted screw (-) clockwise, being careful not to over-tighten the screw, approximately 30-45 degrees to increase bobbin tension.
■ Bobbin Thread is Too TightUpper thread on the right side of fabric seems to be lifting/looping and bobbin thread is not seen on the wrong side of fabric.
a Right sideb Wrong side
If this occurs, turn the slotted screw (-) counterclockwise, being careful not to over-loosen the screw, approximately 30-45 degrees to decrease bobbin tension.
Using the Automatic Thread Cutting Function (End Color Trim)
The automatic thread cutting function will cut the thread at the end of embroidering each color. This function is initially turned ON. To turn this function OFF, press key and then . This function can be turned on or off during embroidering.
* This setting returns to its default when the machine is turned off.
aPress .
bPress to turn off the automatic thread cutting function.
o The key will display as .* When one color thread is embroidered, the machine
will stop without cutting the thread.
CAUTION• When adjusting the alternate bobbin case, be
sure to remove the bobbin from the alternate bobbin case.
• DO NOT adjust the position of the phillips (+) screw on the alternate bobbin case as this may result in damage to the bobbin case, rendering it unusable.
• If the slotted screw (-) is difficult to turn, do not use force. Turning the screw too much or providing force in either (rotational) direction may cause damage to the bobbin case. Should damage occur, the bobbin case may not maintain proper tension.

MAKING EMBROIDERY ADJUSTMENTS
101
Advanced Editing
3
Using the Thread Trimming Function (Jump Stitch Trim)
The thread trimming function will automatically trim any excess thread jumps within the color. This function is initially turned ON. To turn this function OFF, press key and then
. This function can be turned on or off during embroidering.
* Your customized setting remains after turning the machine off and on.
a Jump stitch
aPress .
bPress to turn off the thread trimming
function.
o The key will display as .* The machine will not trim the thread before moving
to the next stitching.
■ Selecting the Trim Function to Adjust Jump Stitch LengthWhen the thread trimming function is turned on, you can select the length of the jump stitch. Stitch below the value will not be trimmed. This function can be turned ON or OFF during embroidering.Select a setting from 5 mm to 50 mm in 5 mm increments.
* Your customized setting remains after turning the machine off and on.
Press or to select the length of jump stitch.
For example: Press to select 25 mm (1 inch) and the machine will not trim a jump stitch of 25 mm or less before moving to the next stitching.
Note• When this function is turned on, use the
included ball point needle 75/11 for embroidering patterns with short jump stitches such as alphabet characters. Using other needles may cause the thread to break.
Note• If design has many trims it is recommended
to select a higher jump stitch trim setting in order to reduce the amount of excess tails on backside of fabric.
• The higher number of the jump stitch length selected, the fewer number of times the machine will trim. In this case, more jump stitches remain on the surface of the fabric.

MAKING EMBROIDERY ADJUSTMENTS
102
Adjusting the Embroidery Speed
aPress , and then press .
bIn the “Max Embroidery Speed”, touch the number to change the maximum embroidery speed.
* You can choose from 8 different speed levels.
cPress .
Changing the Thread Color Display
You can display the name of the thread colors or embroidery thread number.
aPress , and then press .
bIn the “Thread color”, touch the status to display the name of the thread colors or the embroidery thread number.
cTouch the embroidery thread name to select from 13 embroidery thread brands pictured below.
* Depending on the country or area, cotton-like polyester thread is sold.
dPress .
Memo• SPM is the number of stitches embroidered
in one minute. • Decrease the embroidery speed when
embroidering on thin, thick, or heavy fabrics.
• The embroidery speed can be changed while embroidery is being done.
• The setting specified before the main power is set to OFF remains selected the next time that the machine is turned ON.
• Decrease the embroidery speed to 600 spm when using a speciality thread like a metallic thread.
Memo• Colors on the screen may vary slightly from
actual spool colors.• “Original”, imported data remains the brand
thread created with the software, is set as a default.
Embroidery: Polyester thread
Country: Cotton thread*
Madeira Poly: Polyester thread
Madeira Rayon
Sulky
Robison-Anton: Polyester thread
Robison-Anton: Rayon thread
Isacord
GueterMann
Simplicity Pro
Polyfast
Iris
Floriani

MAKING EMBROIDERY ADJUSTMENTS
103
Advanced Editing
3
Changing the Embroidery Frame Display
aPress and .
bIn the “Embroidery Frame Display”, touch
to change the embroidery frame display mode.
* There are 12 choices.
cPress .
Aligning the Pattern and the Needle
Example: Aligning the lower left side of a pattern and the needle
aMark the embroidery start position on the fabric, as shown.
bPress .
cPress .
a This key is used for aligning linked characters (page 104).
b Start positiono The needle position moves to the bottom left corner
of the pattern (the embroidery frame moves so that the needle is positioned correctly).
b
a

MAKING EMBROIDERY ADJUSTMENTS
104
dPress , and then press .
eUse to align the needle and the
mark on the fabric, and begin embroidering the pattern.
Embroidering Linked Characters
Follow the procedure described below to embroider linked characters in a single row when the entire pattern extends beyond the embroidery frame.Example: Linking “FG” to the characters “ABCDE”
aSelect the character patterns for “ABCDE”.
bPress .
cPress .
o The needle is positioned in the lower-left corner of the pattern. The carriage moves so that the needle is positioned correctly.
dPress .
Memo• You can use camera positioning function.
For details, refer to “Aligning the Embroidering Position Using the Built-In Camera” on page 47.
Note• For details on selecting character patterns,
refer to “Selecting Alphabet Character Patterns” on page 75. Note
• To cancel the starting point setting and return the starting point to the center of the pattern, press .
• Use to select a different starting
point for embroidering.

MAKING EMBROIDERY ADJUSTMENTS
105
Advanced Editing
3
ePress .
fPress to turn off the thread cutting
function and then press .
gPress the “Start/Stop” button.
hAfter the characters are embroidered, cut the threads to a generous length, remove the embroidery frame, and then attach the embroidery frame again so that the remaining characters (“FG”) can be embroidered.
a End of the embroidering
iAs in step a, select the character patterns for “FG”.
jPress .
kPress .
o The needle is positioned in the lower-left corner of the pattern. The carriage moves so that the needle is positioned correctly.
lPress .

MAKING EMBROIDERY ADJUSTMENTS
106
mUse to align the needle with the end
of embroidering for the previous pattern.
nPress the “Start/Stop” button to begin embroidering the remaining character patterns.
Memo• You can use camera positioning function.
For details, refer to “Aligning the Embroidering Position Using the Built-In Camera” on page 47.

USING THE MEMORY FUNCTION
107
Advanced Editing
3
Embroidery Data Precautions
Observe the following precautions when using embroidery data other than that created and saved in this machine.
■ Types of Embroidery Data that can be Used• Only .pes,.pha,.phb,.phc, .dst and .phx embroidery data files can be used with this machine. Using data
other than that saved using our data design systems or machines may cause this machine to malfunction. When the machine is used to save a file with any extension, it is saved as a .phx data file.
■ Types of USB Devices/Media that can be UsedEmbroidery data can be saved to or recalled from USB media. Use media that meets the following specifications.• USB Flash drive (USB Flash memory)Embroidery data can be recalled only.• USB CD-ROM, CD-R, CD-RW drivesYou can also use the following types of USB media with the USB Memory Card Reader/USB card writer module.• Secure Digital (SD) Card• CompactFlash• Memory Stick• Smart Media• Multi Media Card (MMC)• xD-Picture Card
USING THE MEMORY FUNCTION
CAUTION• When using embroidery data other than our original patterns, the thread or needle may break when
embroidering with a stitch density that is too fine or when embroidering three or more overlapping stitches. In that case, use one of our original data design systems to edit the embroidery data.
Note• The processing speed may vary by port selection and quantity of data stored.• Some USB media may not be usable with this machine. Please visit our website for more details.• The access lamp will begin blinking after inserting USB devices/media, and it will take about 5 to 6
seconds to recognize the devices/media. (Time will differ depending on the USB device/media).
Memo• To create file folders, use a computer.• Letters and numerals can be used in the file names. In addition, if the file name contains no more than
eight characters, the entire file name will appear on the screen.If the file name is more than eight characters long, only the first six characters followed by “~” and a number appear as the file name.

USING THE MEMORY FUNCTION
108
■ Precautions on Using the Computer to Create and Save Data• If the name of the embroidery data file/folder cannot be identified, for example, because the name contains
special characters, the file/folder is not displayed. If this occurs, change the name of the file/folder. We recommend using the 26 letters of the alphabet (uppercase and lowercase), the numbers 0 through 9,”-”, and “_”.
• If embroidery data larger than 408 mm (H) × 272 mm (W) (approx.16 inches (H) × 10-5/8 inches (W)) is selected, a message is shown asking if you wish to rotate the pattern 90 degrees.Even after being rotated 90 degrees, embroidery data larger than 408 mm (H) × 272 mm (W) (approx.16 inches (H) × 10-5/8 inches (W)) cannot be used. (All designs must be within the 408 mm (H) × 272 mm (W) (approx.16 inches (H) × 10-5/8 inches (W)) design field size.)
• .pes files saved with the number of stitches or the number of colors exceeding the specified limits cannot be displayed. The combined design cannot exceed a maximum number of 750,000 stitches or a maximum number of 127 color changes (Above numbers are approximate, depending on the overall size of the design). Use one of our design software programs to edit the embroidery pattern so that it meets these specifications.
• Embroidery data stored in a folder created in USB media can be retrieved.• Even if the embroidery unit is not attached, the machine will recognize embroidery data.
■ Tajima (.dst) Embroidery Data• .dst data is displayed in the pattern list screen by file name (the actual image cannot be displayed). Only the
first eight characters of the file name can be displayed.• Since Tajima (.dst) data does not contain specific thread color information, it is displayed with our default
thread color sequence. Check the preview and change the thread colors as desired.

USING THE MEMORY FUNCTION
109
Advanced Editing
3
Saving Embroidery Patterns in the Machine’s Memory
You can save embroidery patterns that you have customized and will use often; for example, your name, patterns that have been rotated or had the size changed, patterns that have had the embroidering position changed, etc. A total of about 10 MB of patterns can be saved in the machine's memory.
aPress when the pattern you want to
save is in the embroidering screen.
bPress .
* Press to return to the original screen without saving.
o The “Saving…” screen is displayed. When the pattern is saved, the display returns to the original screen automatically.
■ If the Memory is FullIf the screen below displays, either the maximum number of patterns have been saved or the pattern you want to save takes a lot of memory, and the machine cannot save it. Refer to “Retrieving Patterns from the Machine’s Memory” on page 110.
Note• Do not turn the main power to OFF while the
“Saving…” screen is displayed. You will lose the pattern you are saving.
Memo• It takes a few seconds to save a pattern to
the machine’s memory. • Refer to page 110 for information on
retrieving a saved pattern.
USING THE MEMORY FUNCTION
110
Retrieving Patterns from the Machine’s Memory
aPress .
o The machine displays the patterns currently in the memory.
bPress the key of the pattern you want to retrieve.
cPress .
* Press to delete the embroidery pattern.
o The embroidering screen is displayed.

USING THE MEMORY FUNCTION
111
Advanced Editing
3
Saving Embroidery Patterns to USB Media/SD Card
When sending embroidery patterns from the machine to USB media/SD card, plug the USB media/SD card into the machine’s USB port/SD card slot.
aPress when the pattern you want to
save is in the embroidering screen.
bInsert the USB media/SD card into the USB port/SD card slot on the machine.
a SD card slotb USB port
cPress the key for the corresponding media.
* Press to return to the original screen without saving.
o The “Saving…” screen is displayed. When the pattern is saved, the display returns to the original screen automatically.
Memo• USB media is commercially available, but
some USB media may not be usable with this machine. Please visit our website for more details.
• Depending on the type of USB media being used, either directly plug the USB device into the machine’s USB port or plug the USB media Reader/Writer into the machine’s USB port.
• The USB media/SD card can be inserted or removed at any time.
Note• Do not insert anything other than USB
media into the USB media port. Otherwise, damage to the machine may result.
• Do not insert anything other than SD card into the SD card slot. Otherwise, damage to the machine may result.
Note• Do not insert or remove USB media/SD
card while “Saving…” screen is displayed. You will lose some or all of the pattern you are saving.
a
b

USING THE MEMORY FUNCTION
112
Recalling from USB Media/SD card
You can recall a specific embroidery pattern from either direct USB media/SD card or a folder in the USB media/SD card. If the pattern is in a folder, check each folder to find the embroidery pattern.
aInsert the USB media/SD card into the USB port/SD card slot on the machine.
a SD card slotb USB port
bPress .
cPress the key for the corresponding media.
o Embroidery patterns and a folder in a top folder are displayed.
Note• The processing speed may vary by quantity
of data.
a
b

USING THE MEMORY FUNCTION
113
Advanced Editing
3
dPress when there is a subfolder to sort
two or more embroidery patterns to USB media/SD card, the embroidery pattern in the subfolder is displayed.
a Folder nameb Embroidery patterns in USB media/SD cardc Path* The path to show the current folder at the top of the
list.Embroidery patterns and subfolders within a folder are displayed.
d Press to return to the previous folder.* Use the computer to create folders. Folders cannot
be created with the machine.
ePress the key of the pattern you want to retrieve.
o The pattern is selected.
* Press to return to the original screen.
a b
d c

USING THE MEMORY FUNCTION
114
Saving/Deleting Multiple Patterns
It may be useful to save all or multiple data from USB media/SD card, for example, to the machine. The data can only be saved to the machine’s memory (bPocket).
aPress , and then either select the
thumbnails of the patterns or press .
o The thumbnails of selected patterns appear in blue. To deselect the pattern, either press the thumbnail
again or press .
Transferring Embroidery Patterns
For detailed procedures, refer to Palette manual (Version 11 or higher).
aIn the pattern type selection screen on the machine, press .
o A list of embroidery patterns saved in the machine appears.
bSelect the pattern to be transferred to the application, and then press .
o The pattern is saved in a folder to be transferred via the wireless network.
Memo• When selecting USB media or SD card,
is displayed. When is selected, all the selected files are saved to the machine's memory.
Memo• Embroidery patterns cannot be transferred
if the computer and machine are connected to different home network. Be sure to connect to the same home network.

USING THE MEMORY FUNCTION
115
Advanced Editing
3
Receiving Embroidery Patterns on the Machine
For detailed procedures, refer to Palette manual (Version 11 or higher).
aIn the pattern type selection screen on the machine, press , and then press .
bSelect from the list the pattern to be recalled
Memo• Embroidery patterns cannot be transferred
if the computer and machine are connected to different home network. Be sure to connect to the same home network.

EMBROIDERY APPLICATIONS
116
Creating an Appliqué Piece
Appliqué pieces can be created from the built-in patterns and imported patterns. This is convenient for fabrics that cannot be embroidered or when you wish to attach an appliqué to a garment.
■ Creating an Appliqué PieceThe following pattern will be used to create an appliqué piece.
aSelect the pattern, and edit it if necessary.
EMBROIDERY APPLICATIONS
Note• Felt or denim fabrics are recommended to
make the appliqué piece. Depending on the pattern and fabric used, lighter weight fabrics may cause the stitching to appear smaller.
• For best results, be sure to use stabilizer material for embroidering.
• Select a frame that matches the pattern size. Frame options are displayed on the LCD screen.
• When making appliqué pieces, do not use the border embroidery frame. Depending on the pattern density and fabric used, shrinkage of the stitching may occur.
Note• Finish combining and editing the pattern
before selecting the appliqué setting. If the pattern is edited after selecting the appliqué setting, the appliqué stitching and pattern may become misaligned.
• Since an outline is added, the pattern for an appliqué piece (when the appliqué setting is selected) will be larger than the original pattern. First, adjust the size and position of the pattern as shown below.
a Embroidering areab Approx. 10 mm (3/8 inch)c Pattern size
a
b
c

EMBROIDERY APPLICATIONS
117
Advanced Editing
3
bPress , and then press to
position the satin stitching around design.
cSpecify the distance between the pattern and the appliqué outline.
o The steps for creating the appliqué piece are added to the embroidering order.
dPress .
eFuse or stick a piece of stabilizer to the back of the felt or denim fabric to be used as the appliqué piece.Memo
• At this time, the pattern and appliqué piece are grouped.
Memo• Three steps are added to the embroidering
order: appliqué cutting line, position of pattern placement on the garment, and appliqué stitching.
a Cutting line for appliquéb Position of pattern placement on garmentc Appliqué stitching
Note• An appliqué piece cannot be created if the
pattern is too large or too complicated or a combined pattern is separated. Even if the selected pattern fits within the embroidering area, the entire appliqué pattern may exceed the embroidering area when the outline is added. If an error message appears, select a different pattern or edit it.
Note• For best results, be sure to use stabilizer
material for embroidering.
abc

EMBROIDERY APPLICATIONS
118
fHoop the appliqué fabric in the embroidery frame, attach the embroidery frame to the machine, and then start embroidering.
gAfter the pattern is embroidered, thread the machine with the thread for the cutting line, and then sew the cutting line (APPLIQUE MATERIAL).
a Cutting line for appliqué
hRemove the appliqué material from the embroidery frame, and then carefully cut along the stitching. After cutting, carefully remove all of the cutting line thread.
iUse two layers of adhesive water soluble stabilizer material with their sticky sides together, and then hoop them in the embroidery frame.
jThread the machine with the thread for the outline from step l, and then sew the placement line for the appliqué position (APPLIQUE POSITION).
a Pattern placement line
kLightly apply glue or spray adhesive, and paste the appliqué piece so that it aligns with the placement line.
Memo• We recommend using thread for the cutting
line that is closest to the color of the fabric.
Note• Depending on the pattern density and fabric
used, there may be shrinking of the pattern or the appliqué may be misaligned with the placement line. We recommend cutting slightly outside of the cutting line.
• When using patterns that are vertically and horizontally symmetrical, use a chalk pencil to indicate the pattern orientation before cutting it out.
• Carefully cut out the pattern on the outline you just sewed. Do not cut inside the cutting line, otherwise the appliqué fabric will not be caught by the appliqué stitch.
a
Note• If water soluble stabilizer is used, it is not
necessary to remove the stabilizer material after sewing the appliqué outline. To reduce shrinkage of the pattern, we recommend using water soluble stabilizer.
• Put together two layers of water soluble stabilizer, otherwise the stabilizer material may tear during embroidering.
Note• Before pasting the appliqué piece down,
make sure the appliqué piece is positioned correctly within the placement line.
a

EMBROIDERY APPLICATIONS
119
Advanced Editing
3
lWith the machine threaded using the thread for the outline from step j, sew the outline (APPLIQUE).
a Outline of appliqué piece
mAfter sewing is finished, remove the stabilizer material from the embroidery frame.
nUse scissors to cut the excess water soluble stabilizer from outside the appliqué outline.
oSoak the appliqué piece in water to dissolve the water soluble stabilizer.
pDry the appliqué piece, and then iron it if necessary.
■ Using a Frame Pattern for the OutlineUsing a frame pattern, the desired shape can be added as the outline of the appliqué. To select the desired frame, refer to “Selecting Frame Patterns” on page 45.
aSelect the pattern and edit, if necessary.
bSelect the desired frame shape and pattern, and add it to the appliqué pattern.
Memo• The outline is sewn using satin stitching.• Some glue may get onto the embroidery
foot, needle, and needle plate at this time. Finish embroidering the appliqué pattern, and then clean off the glue.
Note• Do not apply a strong force when ironing,
otherwise the stitching may be damaged.

EMBROIDERY APPLICATIONS
120
cPress to edit the frame pattern to
fit the size of the appliqué pattern.
dPress to select the appliqué piece
setting.
ePress to ungroup the patterns.
fUse to select the frame pattern, and
then press and .
o The frame pattern is deleted.
gPress .
hContinue with step e of “Creating an Appliqué Piece” on page 117 to complete the appliqué piece.

EMBROIDERY APPLICATIONS
121
Advanced Editing
3
Using Appliqués
This machine can embroider patterns that contain an appliqué. Follow the procedure described below to embroider patterns with
(appliqué piece), (appliqué position) and
(appliqué) in the embroidery color order display.
Required materials
• Fabric for the appliqué piece
• Fabric for the appliqué base
• Stabilizer material
• Craft glue
• Embroidery thread
■ 1. Creating the Appliqué Piece
aSelect the appliqué pattern, and then continue to the embroidering screen.
bAttach stabilizer material to the wrong side of the appliqué fabric.Hoop the fabric in the embroidery frame, and then attach the embroidery frame to the embroidery unit.
a Appliqué (cotton, felt, etc.)b Stabilizer
cThread the machine with the embroidery thread, lower the presser foot lever, and then press the “Start/Stop” button to sew the cutting line of the appliqué piece.
o The outline of the appliqué piece is sewn, and then the machine stops.
a Cutting line for appliqué pieceb Fabric for appliqué piece
1. Create the appliqué piece.È
2. Sew the appliqué position on the base fabric.
È
3. Affix the appliqué piece to the base fabric.
È
4. Embroider the remainder of the pattern.
Note• If (appliqué piece),
(appliqué position) and (appliqué) appear in the embroidery color order display, the names and numbers of the thread colors to be used will not appear. Select the thread colors according to those in the appliqué pattern.

EMBROIDERY APPLICATIONS
122
dRemove the fabric for the appliqué piece from the embroidery frame, and then carefully cut along the sewn cutting line.
■ 2. Sewing the Appliqué Position on the Base Fabric
aAttach stabilizer material to the wrong side of the fabric for the appliqué base.Hoop the fabric in the embroidery frame, and then attach the embroidery frame to the embroidery unit.
bThread the machine with the embroidery thread, lower the presser foot lever, and then press the “Start/Stop” button to sew the appliqué position.
o The position of the appliqué is sewn, and then the machine stops.
a Appliqué positionb Base fabric
cRemove the embroidery frame from the embroidery unit.
■ 3. Affixing the Appliqué Piece to the Base Fabric
aLightly apply craft glue to the back of the appliqué piece, and then attach it to the base fabric within the outline of the position sewn in step b of “2. Sewing the Appliqué Position on the Base Fabric”.
Note• If the appliqué piece is cut out along the
inside of the cutting line, it may not be correctly attached to the fabric. Therefore, carefully cut out the appliqué piece along the cutting line.
• After cutting out the appliqué piece, carefully remove the thread.
Note• Do not remove the base fabric from the
embroidery frame until all sewing is finished.
Note• If the appliqué piece is not securely
attached to the base fabric, the appliqué piece may lift off the base fabric during embroidering, causing misalignment.
• If the appliqué piece cannot be attached to the base fabric with craft glue, securely baste it in place with basting stitches.
• If thin fabric is used for the appliqué piece, reinforce and secure it in place with an iron-on adhesive sheet. An iron can be used to attach the appliqué piece to the appliqué location.
• Do not remove the fabric from the embroidery frame when attaching the appliqué piece to the base fabric.

EMBROIDERY APPLICATIONS
123
Advanced Editing
3
bAfter the appliqué piece is attached, attach the embroidery frame to the machine.Thread the machine with the embroidery thread, lower the presser foot lever, and then press the “Start/Stop” button to embroider the appliqué.
o The appliqué piece is embroidered to the base fabric, and then the machine stops.
■ 4. Embroidering the Remainder of the Pattern
aChange the embroidery thread according to the embroidery color order display, and then finish embroidering the remainder of the pattern.
Memo• Depending on the pattern that is selected,
(appliqué piece),
(appliqué position) and (appliqué) for all three steps may not appear. If
(appliqué) appears as a color, embroider using thread of that color.
Memo• Since glue may become attached to the
embroidery foot, needle or needle plate, clean off any glue off after finishing embroidering the appliqué pattern.
• For best results, trim all excess threads each time the thread color is changed.

EMBROIDERY APPLICATIONS
124
Using a Frame Pattern to Make an Appliqué (1)
You can use framed patterns of the same size and shape to create an appliqué. Embroider one pattern with a straight stitch and one pattern with a satin stitch.
aSelect a straight stitch frame pattern. Embroider the pattern onto the appliqué material, then cut neatly around the outside of the shape.
bEmbroider the same pattern from step a onto the base fabric.
cApply a thin layer of fabric glue or a temporary spray adhesive to the rear of the appliqué created in step a. Attach the appliqué to the base fabric matching the shapes.
dSelect the satin stitch frame pattern of the same shape as the appliqué. Embroider over the appliqué and base fabric from step c to create the appliqué.
Note• If you change the size or position of the
patterns when selecting them, make a note of the size and location.
a Appliqué material

EMBROIDERY APPLICATIONS
125
Advanced Editing
3
Using a Frame Pattern to Make an Appliqué (2)
This is a second method to make appliqué using embroidery patterns. You do not have to change the fabric in the embroidery frame using this method. Embroider one pattern with a straight stitch and one pattern with a satin stitch.
aSelect a straight stitch frame pattern, and embroider the pattern onto the base fabric.
bPlace the appliqué fabric over the pattern embroidered in step a.
* Be sure that the appliqué fabric completely covers the seam.
cEmbroider the same pattern on the appliqué fabric.
dRemove the embroidery frame from the embroidery unit, and cut around the outside of the stitches.
eSelect the satin stitch frame pattern of the same shape as the appliqué.
Note• Do not remove the fabric from the
embroidery frame to cut it. Also, do not pull strongly on the fabric. Otherwise, the fabric may loosen in the frame.
Note• Do not change the size or position of the
pattern.• If you change the size or position of the
patterns when selecting them, make a note of the size and location.
a Appliqué material

EMBROIDERY APPLICATIONS
126
fReattach the embroidery frame to the embroidery unit, and embroider the satin stitch pattern to create an appliqué.
Creating Stippling or Echo Patterns Automatically
Stippling or echo quilting patterns can be created around the machine’s built-in patterns or original embroidery data without using IQ Designer.
aSelect the pattern that stippling will be
added around.
bPress in the embroidery edit screen.
o Stippling is automatically applied around the selected pattern.To select multiple patterns, refer to “Selecting Multiple Patterns at the Same Time” on page 87.
* Press in the stippling settings screen to create an echo quilting pattern.
cAfter specifying the stitch settings for the
stippling, press .
a If an embroidery frame size is selected, the stippling is added within the area of the selected frame size. If the pattern is larger than the selected frame size, the area indicating the frame size will appear in gray.
b Specify the distance from the outline of the pattern to the stippling.
c Specify the spacing for the stippling.
Memo• If this simple stippling operation is used
with batting sandwiched between two layers of fabric, the embroidery pattern and stippling may become misaligned. For quilting, refer to “Decorative Stitching Around a Pattern in Embroidery (a Quilting Function)” on page 175.
a
b
c

EMBROIDERY APPLICATIONS
127
Advanced Editing
3
Embroidering Quilting Border Patterns
Quilting border patterns larger than the embroidery frame can be split in order to be embroidered.It is recommended to measure the size of quilting border you want to embroider in the beginning.
aPress .
bSelect the quilt border pattern, and then
press .
cEnter values to each of the width and height
of the sash and quilting border, and then press . After entering all three values, press .
a Widthb Heightc Quilting border
* To clear the value, press .
o The pattern appears with the specified settings applied.
dCheck the split pattern, and then press
.
a You can change the thread color.o The data for the split embroidery pattern is saved on
the machine.
Note• The data for the split embroidery pattern
cannot be saved on external media such as USB media.
c
b
a
a

EMBROIDERY APPLICATIONS
128
eTo embroider the pattern, press .
fSelect the embroidering method, and then press .
a To embroider using the built-in camera for aligning the embroidering position, press the key showing the entire pattern.
b To embroider by visually aligning the pattern sections, press the pattern section to be embroidered.
* This manual shows method a. For method b, refer to “Embroidering Split Embroidery Patterns” on page 129.
gPress .
hAttach the embroidery frame along with the first section being embroidered, and scan the frame. For scanning the background, refer to “Display the Fabric While Aligning the Embroidering Position” on page 92.
iMove and rotate the pattern to align with the background.
• For moving the pattern, refer to “Moving the Pattern” on page 63.
• For rotating the pattern, refer to “Rotating the Pattern” on page 63.
jEmbroider the first section.
kAfter embroidering the first section, following message appears. Press .
o Move to embroider the second section.
lPress .
ba

EMBROIDERY APPLICATIONS
129
Advanced Editing
3
mPress .
nEmbroider the rest of the section following the step m on page 133 through step s on page 136 of “Connecting Three Patterns”.
Embroidering Split Embroidery Patterns
Split embroidery patterns created with Palette Ver.7 or later can be embroidered. With split embroidery patterns, embroidery designs larger than the embroidery hoop are divided into multiple sections, which combine to create a single pattern after each section is embroidered.
For details on creating split embroidery patterns and for more detailed embroidering instructions, refer to the operation manual included with Palette Ver.7 or later.
The following procedure describes how to read the split embroidery pattern shown below from USB media/SD card and embroider it.
aConnect to the machine the media containing the created split embroidery pattern, and then select the split embroidery pattern to be embroidered.
* For details on recalling patterns, refer to “Recalling from USB Media/SD card” on page 112.
o A screen appears so that a section of the split embroidery pattern can be selected.
EMBROIDERY APPLICATIONS
130
bSelect section to be embroidered.
* Select the sections in alphabetical order.* A maximum of 12 sections can be displayed in one
page. If there are 13 or more sections in the pattern, scroll the bar.
cIf necessary, press and edit the
pattern. Press to display the
embroidery screen.
dPress the “Start/Stop” button to embroider the pattern section.
eWhen embroidering is finished, the
following screen appears. Press .
o A screen appears so that a section of the split embroidery pattern can be selected.
fRepeat steps b through e to embroider the remaining sections of the pattern.
Note• To embroider large-size split embroidery
patterns by using the camera to connect the pattern sections, press the whole pattern icon. Refer to “Connecting Large-Size Split Embroidery Patterns” on page 139.
Memo• The pattern can be rotated 90° to either the
left or right when is pressed.

USING THE CAMERA TO CONNECT PATTERNS
131
Advanced Editing
3
Instead of using thread marks, the camera can be used to connect patterns in the Embroidery Edit screen.Select the appropriate frame depending on the size of the embroidery. At this time, the margin for the pattern is about 3 cm (1-3/16 inches). The small embroidery frame (2 cm × 6 cm (1 inch × 2-1/2 inches)) cannot be used with the camera function.
Connecting Three Patterns
Example:
a Pattern Ab Pattern Bc Pattern C
aSelect the first pattern A, and then press
.
bThread the machine with the upper thread
and the bobbin thread.
cHoop fabric in the 18 cm × 13 cm (7-1/8 inches × 5-1/8 inches) embroidery frame, and then attach the frame to the machine.
dPress to display the embroidering screen.
ePress .
fPress .
o appears in the screen, and then changes
to .
gLower the embroidery foot, and then embroider the first pattern.
USING THE CAMERA TO CONNECT PATTERNS
Memo• can be pressed while embroidering.• A pattern cannot be saved in the machine’s
memory while patterns are being connected.

USING THE CAMERA TO CONNECT PATTERNS
132
hAfter embroidering of the first pattern is finished, the following message appears. Press .
iWhen the following message appears, press
.
jSelect the second pattern B, and then press
.
kPress , and then select how the patterns will be connected.
o The pattern connection setting screen appears.
lSelect the position of the second pattern by pressing on the screen. Press after specifying the position.
* You can adjust the position of the second pattern using the keys described below.
Memo• You can edit the second pattern in this
screen.

USING THE CAMERA TO CONNECT PATTERNS
133
Advanced Editing
3a Connecting pointb First pattern Ac Second pattern Bd Press to move the second pattern.
o Message appears on screen and carriage will move after pressing .
mPrepare two embroidery positioning stickers. Follow the on-screen instructions to affix the two stickers to the fabric so that the positioning marks can be detected by the camera.
nAffix the first embroidery positioning sticker onto the fabric within the red lines that now appear on the screen of the machine by using both hands to press down on each corner of the sticker. Affix the sticker with the large circle to the top as shown on machine. Then, press .
o The camera detects the first embroidery positioning sticker.
Press to rotate the second pattern in a clockwise arc referring the first pattern as a center.
Press to rotate the second pattern in a counterclockwise arc referring the first pattern as a center.
Rotate the second pattern 90 degrees in a clockwise arc.
Note• The second pattern will be automatically
connected to the first pattern without adjustment. Change the position of the
second pattern manually using .
• The position of the second pattern can be moved using your finger or the included dual purpose stylus.
• Use , or if you want to align the pattern to the corner of the center of the first pattern, when changing the pattern’s connecting position.
a
b
c
d
Note• Use the embroidery positioning stickers
included with this product or purchase replacement stickers (BLSO-EPS) from your authorized Baby Lock retailer. If any other sticker is used, the camera may not recognize it.
• The 182 mm × 257 mm (7 inches × 10 inches) embroidery positioning sticker sheet with strong adhesive is most appropriate for connecting patterns (BLSO-EPS). If any other positioning sticker is used, it may peel off. If the sticker peels off, the patterns cannot be connected.
USING THE CAMERA TO CONNECT PATTERNS
134
oUse both hands to affix the second embroidery positioning mark within the red lines that now appear on the machine by pressing down on each corner of the positioning mark onto the material and then touch .
o The camera detects the second embroidery positioning sticker.
pAfter the two embroidery positioning stickers have been detected, the following message appears.
a Embroidering area
Note• Do not peel off the first embroidery
positioning sticker to use it for the second embroidery positioning mark.
• Use new embroidery positioning stickers. If a sticker is reused, it may easily peel off. If the sticker peels off during this procedure, the patterns cannot be connected.
• Use your fingers to apply pressure to the corners of the embroidery positioning sticker to firmly affix it to the fabric. If the sticker is not firmly attached, the camera may incorrectly detect the sticker.
• If any of the following messages appear, reattach the embroidery positioning sticker in the correct position. Make sure that the sticker is affixed with the large circle at the top.
Note• The positioning markers are shown with a
tilted appearance to make sure that as long as the markers were placed with the red outlined square, they will be read properly and correct connection can be assured.
a

USING THE CAMERA TO CONNECT PATTERNS
135
Advanced Editing
3
While making sure that the two embroidery positioning stickers do not peel off, remove the embroidery frame from the machine, and then rehoop the fabric. Be sure to hoop the fabric so the next pattern and both the embroidery positioning stickers are within the embroidery area. Reattach the frame and press .
a Pattern to be embroidered nextb Centers of large circles for stickerso The camera detects the two embroidery positioning
stickers.
a
b
Note• If either of the following messages appear,
rehoop the fabric so that the next pattern and both the embroidery positioning stickers are within the embroidery area as indicated in the screen. Press to detect the embroidery positioning stickers.
• If the machine detects that the next pattern and the centers of the large circles of the two embroidery positioning stickers do not fit within the embroidering area, the operation will be paused. Follow the on-screen instructions to reposition the embroidery positioning stickers. Refer to “Changing the Position of a Sticker” on page 137 to reposition the stickers.
• If the sticker peels off during this procedure, the patterns cannot be connected. If this occurs, restart the procedure from the beginning.
• To quit positioning, press .

USING THE CAMERA TO CONNECT PATTERNS
136
qAfter the embroidery positioning stickers
have been detected, press , and then
remove the stickers.
rLower the embroidery foot, and then embroider the second pattern.
o When embroidering is finished, the following message appears.To connect a third pattern, press .
sWhen the following message appears, press
.
tSelect the third pattern C, and press .
uPress , and then select how the patterns will be connected.
o The pattern connection setting screen appears.
vSpecify the position of the third pattern
referring to the screen display.
In this example, press 2 times, and then press
. Press after specifying the position.
a Connecting pointb Second pattern Bc Third pattern C
Memo• You can edit the third pattern in this screen.
a
b
c
USING THE CAMERA TO CONNECT PATTERNS
137
Advanced Editing
3o Message appears on screen and carriage will move
after pressing .
wLower the embroidery foot, and then embroider the third pattern.
o When embroidering is finished, the following message appears. When finished connecting
patterns, press .
o After embroidering is finished, is no longer located at the top left of LCD screen.
The three patterns have been connected.
Changing the Position of a Sticker
If the selected pattern or embroidery positioning stickers for connecting the next pattern do not easily fit in the embroidering area, follow the on-screen instructions that appear after step o on page 134 in order to move the embroidery positioning stickers.For an example, the on-screen instruction appears when you use the embroidery frame with a size of 10 cm × 10 cm (4 inches × 4 inches) to connect patterns as shown below.
a Pattern Ab Pattern B
aRefer to steps a through o of “Connecting Three Patterns” using the embroidery frame with a size of 10 cm × 10 cm (4 inches × 4 inches) to embroider the first pattern and to connect the second pattern.
bFollowing message appears in step p if the next pattern or affixed embroidery positioning stickers are close to being out of the embroidering area. Follow the instructions and then press .
a Embroidering area
a

USING THE CAMERA TO CONNECT PATTERNS
138
a Pattern to be embroidered next
cAfter the sticker position is detected, press
, and then remove the stickers.
dAffix the two embroidery positioning stickers again according to the on-screen instructions so that the next pattern or positioning marks can fit in the embroidery area.
o Press so that the camera detects the first embroidery positioning sticker.
eAffix the second sticker and then press
.
o The camera detects the second embroidery positioning sticker.
Note• If the following message appears, rehoop
the fabric as indicated in the screen, and then press .
a
Note• The positioning markers are shown with a
tilted appearance to make sure that as long as the markers were placed with the red outlined square, they will be read properly and correct connection can be assured.

USING THE CAMERA TO CONNECT PATTERNS
139
Advanced Editing
3
fAfter the two embroidery positioning stickers have been detected, the following message appears. While making sure that the embroidery positioning stickers do not peel off, rehoop the fabric according to the example displayed on the on-screen instruction.
a Embroidering area
a Pattern to be embroidered next
gContinue the operation from step q on
page 136 after pressing .
Connecting Large-Size Split Embroidery Patterns
Large-size split embroidery patterns can be embroidered if embroidery positioning stickers are used.
aRecall the large-size split embroidery pattern.
bPress .
o Use the camera to connect large-size split embroidery patterns.
cEmbroider the first pattern.
dRefer to steps m to q of “Connecting Three Patterns” on page 131 to embroider the remaining patterns.
a
a

USING THE CAMERA TO CONNECT PATTERNS
140
Resume Feature
If the machine is turned off while the pattern connecting function is being used, the machine will return to the operation indicated below when it is turned on again. The machine operation will differ depending on when it is turned off.
Example: When connecting two patterns
Select the first pattern. Press the pattern connection key .Begin embroidering the first pattern.
È
Finish embroidering the first pattern. (A)
If the machine is turned off during any operation in this box, the machine will return to (A) when it is turned on again.
ÈSelect the second pattern.
È
Press .È
Specify the reference point for connecting the pattern.È
Start detecting embroidery positioning stickers (2 locations).È
Finish detecting embroidery positioning stickers. (B)
If the machine is turned off during any operation in this box, the machine will return to (B) when it is turned on again.
ÈRehoop the fabric.
È
Finish detecting embroidery positioning stickers (2 locations).
ÈBegin embroidering the second pattern.
ÈFinish embroidering the second pattern.

Chapter 4IQ Designer

ABOUT IQ DESIGNER
142
With IQ Designer, you can use the functions listed below:
• Hand-drawn functions - creating embroidery patterns by drawing on the LCD screen
• Scanning functions - creating embroidery patterns by not only scanning object with built-in camera, but also imported data from USB media or SD card.
You can also combine patterns that you have created with the machine’s built-in patterns.
Start IQ Designer by pressing in the home page screen or pressing in the embroidery pattern selection screen.
ABOUT IQ DESIGNER
CAUTION• Only touch the screen with your finger or the dual purpose stylus included with the machine. Do not use
a mechanical pencil, screwdriver or any other hard or sharp object. In addition, do not press the screen with extreme pressure. Otherwise the screen may be damaged.
• All or part of the screen may sometimes become darker or lighter due to changes in the surrounding temperature or other changes in the environment. This is not a sign of a malfunction. If the screen is difficult to read, adjust its brightness.

PATTERN DRAWING SCREEN
143
IQ D
esigner
4
* Pattern drawing area
PATTERN DRAWING SCREEN
Memo• The actual dimension of the pattern area is the size of the embroidery frame, which is 40.8 cm × 27.2
cm (approx. 16 inches × 10-5/8 inches). The pattern you drew may be bigger than you expected. Please resize the pattern after converting the design to the embroidery pattern.
• When the pattern is enlarged so that only a part of it appears in the pattern drawing area, the entire pattern is displayed in the pattern preview area. The red frame in the pattern preview area indicates the part of the pattern displayed in the pattern drawing area. Move the red frame in the pattern preview area with the dual purpose stylus or your finger to display the corresponding area in the pattern drawing area.
a
u
h
c d
o
f
g
ji
lk
t s r q
m
* e
n
p
b

PATTERN DRAWING SCREEN
144
■ Key functions
No. Display Key Name Explanation Page
a Magnify key Press this key to magnify the pattern. 147
b Hand key Press this key to move the canvas when it is magnified. —
c Scan key Press this key to select background image scanning, line scanning or illustration scanning.
155, 159, 162
d Recall key Press this key to recall image data created with IQ Designer from the machine’s memory, USB media, SD card or the computer.
—
e Line tool key Draw lines and set the color. You can select the line type, stitch type and color as you need.
Press to pick up the color, line type and stitch type from a line in
the pattern within the pattern drawing area. The picked up color is shown as the currently selected line color beside the button and as the selected color in the Line Property screen.
145
f Brush tool key Paint with brush and set the color. You can select the brush type, fill type and color as you need. Painted lines and areas will be converted to the pattern embroidered with fill stitch.
Press to pick up the color, brush type and fill type from a region in the pattern within the pattern drawing area. The picked up color is shown as the currently selected region color beside the button and as the selected color in the Region Property screen.
147
g Erase key Press this key to erase lines and shapes that have been drawn. You can select the size/shape of the eraser.
149
h Stamp key Press this key to select the stamp shape for pattern drawing. 148
i Size key Press this key to change the size of the selected section. 149, 166
j Rotate key Press this key to rotate the selected section. 149
k Mirror image key Press this key to create a mirror image of the selected pattern. 150
l Duplicate key Press this key to duplicate the selected section. The temporarily positioned section can immediately be rotated, enlarged, reduced or moved.
150
m Cut key Press this key to cut out the selected section. 150
n Paste key Press this key to paste in the selected section duplicated with the duplicate key or a selected section using the cut key.
150
o Next key Press this key to continue to the stitch settings screen. —
p Memory key Press this key to store the pattern being created. —
q Select key Press this key to select a section for moving by finger or pen, copying, deleting, changing size and rotating lines and shapes that have been drawn.
150
r Redo key Press this key to redo the last operation that was undone. —
s Undo key Press this key to undo the last operation that was performed and return to the previous state. Each press of this key will undo one operation.
—
t All Clear key Press this key to clear all the lines and shapes and start from the beginning. The background image is also cleared.
—
u Cancel key Press this key to exit from IQ Designer. All lines and shaped are erased when you press this key.
—

PATTERN DRAWING SCREEN
145
IQ D
esigner
4
Before Creating Designs
The pattern preview displays the design smaller than the actual size. You can view the actual pattern size by setting the “Embroidery Frame Display”.With “Embroidery Frame Display” in the settings screen, the embroidery frame and grid can be specified separately. For details on the types of embroidery frames and grids available, refer to “Changing the Embroidery Frame Display” on page 103.
aPress .
bSelect the grid line of the “Embroidery Frame Display”.
a Embroidery frame typesb Grid types* Select the grid size 10 mm (3/8 inch) or 25 mm (1
inch).
Drawing Lines
aPress and draw lines.
a
b
Memo• When is pressed, all regions will be
displayed in the background to clarify the drawing lines on the screen.

PATTERN DRAWING SCREEN
146
■ Setting the line types, stitch types and colorsYou can set or change the line types, stitch types and colors anytime. You can also specify the line types, stitch types and colors before drawing lines.
aPress to set the line types, stitch types and colors.
o The settings screen appears.
a Line typesb Stitch typesc Line color selection: touch the color palette to
activate the drawing pen color.
Line types
Stitch types
bPress to return to the pattern drawing
screen.o You can check the selected stitch type and color.
a Color barb Stitch type
Freehand line with the end open.
Freehand line closing the end automatically.
Straight line with one stroke
Straight line changing directions to the point you select. If the end point is created near the start point, a closed object will be created.
a
c
b
Zigzag stitch
Running stitch
Triple stitch
Candlewicking stitch
Chain stitch
E stitch
V stitch
Select motif stitchesDisplays motif stitch selection screen, where
can be pressed to select a pattern.
Line without stitch for creating a region. Created region will be defined by the gray line.
a
b

PATTERN DRAWING SCREEN
147
IQ D
esigner
4
cPress then press on the line to change
its color.o The connected line will be changed to the selected
color.
Drawing Regions
aPress and draw with brush.
■ Setting the brush types and fill colors
aPress to set the brush types and fill colors.
a Brush typesb Fill stitch typesc Fill color selection: touch the color palette to
activate the paint brush color.
Brush shapes
To select the brush size, press or .
Fill stitch types
Select when you don’t want fill stitch.
Memo• Press to magnify the image when
you cannot press on the line correctly. For details on magnify the image, refer to “Displaying Patterns in the Screen Magnified” on page 73.
• Press , and then select a color within the pattern drawing area to apply the same color to other lines or parts of the pattern.
a Use to select the line color.
b Press for changing the line color, and then select the pattern to be changed.
a
b
Square brush
Round brush
Fill stitch pattern
Stippling pattern
Select decorative fill patternsDisplays a fill pattern selection screen, where
can be pressed to select a pattern.
c
a
b

PATTERN DRAWING SCREEN
148
bPress to return to the pattern drawing
screen.o You can check the selected stitch type and color.
a Color bar* If a stippling pattern or decorative fill pattern has
been specified, the settings are displayed.b Stitch type
cPress and press on the brush line to change color and fill stitch types. You can also set the fill color, stitch type and fill pattern of a closed area made of the lines and brush lines.
Using the Stamp Key
aPress .
bSelect a stamp type and stamp shape.
a Stamp shapesb Stamp typesc Saved outlinesd Frame embroidering areas
Memo• Press to magnify the image when
you cannot press on the fill correctly.
• Press , and then select a pattern color in the pattern drawing area to apply that fill color to other patterns.
a Use to select the fill color.
b Press for changing the fill color, and then select the pattern to be changed.
b
a
a
b
c
b
da

PATTERN DRAWING SCREEN
149
IQ D
esigner
4
Stamp shapes
Stamp types (Only for Basic shapes)
* Select the outline ( ), fill stitch ( ), or outline
and fill stitch ( ) of a basic shape.
Saved outlines
Frame embroidering areas
* Press to return to the pattern drawing screen.
cPress to set the selected stamp.
o The pattern drawing screen is displayed.* You can change size of, rotate or move the shape
right after you create it by pressing or .
Using the Erase Key
aPress .
bSelect the shape of the eraser.
* To select the eraser size, press or .
cDrag along the area or line that you want to
erase while the key appears as .
Basic shapes
Closed shapes
Open shapes
Outline
Fill stitch
Outline and fill stitch
Embroidery pattern outlines can be registered as stamp shapes. When registering stamp shapes, select from the last six embroidery patterns used. If more than six shapes are registered, the oldest one is automatically erased. For details on registering a stamp shape, refer to “Decorative Stitching Around a Pattern in Embroidery (a Quilting Function)” on page 175.
Select an embroidering area in order to arrange the pattern to fit an embroidery frame.

PATTERN DRAWING SCREEN
150
Using the Select Key
You can select the part of the design to move and/or edit. Some keys are available only after you select the part.
aPress .
bSelect the method for selecting an area.
cSelect the area you want to edit, and then press .
* To select an area you want to edit, hold the dual purpose stylus at a point on the screen and drag the dual purpose stylus to create the red box around your selected area to be edited.
dEdit the design with available keys. (Refer to “Key functions” on page 144 for the details of each key function.)
ePress , and then specify the stitch setting.

STITCH SETTINGS SCREEN
151
IQ D
esigner
4
Before creating the embroidery pattern, specify the stitch settings. Lines of the design are sewn with various stitches and areas are sewn with fill stitches or stippling stitches. Stitching of the areas was already selected in “Drawing Regions” on page 147, so specify values of detailed settings.After specifying the settings, press to create the embroidery pattern.
Specifying Individual Stitch Settings
Select a pattern in the stitch settings screen to specify its line and region stitch settings. If multiple patterns are selected, the settings are applied to those patterns.
■ Line settings
a Shows the stitch type and color for the selected line.
b Shows the stitch settings for the selected line.Line sew stitch settings
Select the type of stitching you want applied to your line art, from zigzag stitch ( ), running stitch
( ), triple stitch ( ), candlewicking stitch
or chain stitch .
Zigzag stitch
Running stitch /Triple stitch * Both includes an under sewing.
Candlewicking Stitch
Chain stitch
E stitch
V stitch
Motif stitch
STITCH SETTINGS SCREEN
Zigzag width Specifies the width of the zigzag stitches used to sew the lines of the design.
Density Specifies the density of the zigzag stitches used to sew the lines of the design.
a
b
Run pitch Specifies the length of the straight stitch of the design.
Size Increases/reduces the size of the pattern.
Spacing Specifies the spacing of the candlewicking stitch.
Size Increases/reduces the size of the pattern.
Thickness Sets repeated sewing at the same part.
Stitch width
Increases/reduces the size of the pattern.
Spacing Specifies the spacing of the E stitch.
Thickness Sets repeated sewing at the same part.
Arrange Specifies the orientation of the pattern.
Flip Specifies the decorative line shows up inside or outside.
Stitch width
Increases/reduces the size of the pattern.
Spacing Specifies the spacing of the V stitch.
Thickness Sets repeated sewing at the same part.
Arrange Specifies the orientation of the pattern.
Flip Specifies the decorative line shows up inside or outside.
Pattern selection
Select the pattern.
Size Increases/reduces the size of the pattern.
Spacing Specifies the spacing of the motif stitch.
Flip Specifies the decorative line shows up inside or outside.

STITCH SETTINGS SCREEN
152
■ Region settings
a Shows the stitch type and color for the selected region.
b Shows the stitch settings for the selected region.
Fill stitch settings
Stippling stitch settings
Decorative fill
aUse to select the line or region to be changed.
o Each press of moves the highlighting of the selected pattern in order.
bSelect the setting to be changed, and then change the setting in the screen that appears. (In this example, the sewing direction will be changed.)
o The setting screen appears.
cPress , and then use to change the direction.
dPress to apply the setting.
* Change other settings in the same way.
Direction Specifies the sewing direction. Select “Manual” to change to the desired direction of fill stitch.
Density Specifies the stitch density of fill stitch.
Pull
compensation
Specifies to correct the shrinkage of the pattern by slightly shortening or lengthening the stitching. Change the setting after you embroider the pattern and can check the shrinkage.
Under sewing
Select if you need or do not need the under sewing for the stabilized fabric.
Run pitch Specifies the length of a stitch of the stippling stitch.
Spacing Specifies the spacing between the stitches when embroidering the stippling stitch.
Distance Specifies the offset from the pattern outline.
Single/
Triple stitchSpecifies the stitch type.
Size Increases/reduces the size of the pattern.
Direction Specifies the rotation angle of the pattern.
Outline Select whether “ON” or “OFF” the outline is also converted to embroidery data. If “ON” is selected, the number of thread jumps can be reduced.
Random shift Randomly varies the line.
Position offset Specifies the reference point for the pattern.
a
b

STITCH SETTINGS SCREEN
153
IQ D
esigner
4
Specifying Global Stitch Settings
The same stitch settings can be changed at the same time for multiple patterns of the same type.
aUse to select the stitch whose settings are to be changed, and then press
.
a Press to check various information such as the thread colors.
o The same stitch type areas will be selected at the same time.
bFollow steps b through d in “Specifying Individual Stitch Settings” on page 151 to change the settings.
cPress to display the pattern editing screen.
a Press to check an enlarged view of the pattern.
b Press to save the embroidery data.
a
ba

IQ DESIGNER WITH SCAN
154
Using the Scanning Frame
aPrepare the desired drawing/illustration.
bPlace the paper to be scanned in the scanning frame, and then secure the paper in place with the magnets.
* Place the magnets at six locations around the paper to secure it, making sure that the line drawing is not covered.
IQ DESIGNER WITH SCAN
CAUTION• To avoid having the embroidery foot strike the
frame during the scanning process and possibly causing injury, check the following: the thickness of the fabric or paper, creases or folds in the fabric or paper that may be rolled up too close to the frame.
Memo• Only one sheet of paper can be placed in
the scanning frame per scan.
Note• When placing the paper in the scanning
frame, make sure that the white balance area is not hidden; otherwise, the drawing cannot be scanned correctly. At the same time, be sure to place the scan image within the scan area. The image out of the scan area will not be scanned.
a White balance areab Scan area
• Make sure that the white balance area or the scan area is not dirty or scratched; otherwise, the image cannot be scanned correctly.
• Be sure to use the magnets which are included with the scanning frame. If any other magnets are used, they may become attached to the machine during scanning, or other problems, such as a misaligned scan image, may occur.
• Be sure to place the magnets so that they secure the paper firmly. If the paper is placed unevenly, the image cannot be scanned correctly.
• If the scanning frame is dirty, wipe it with a cloth dampened with a diluted neutral detergent solution.
Memo• If you want to scan an image from a small
piece of paper that can't be held with the magnets, copy that image onto a larger piece of paper, to then be placed on the scanning frame.
a
b

IQ DESIGNER WITH SCAN
155
IQ D
esigner
4
cAttach the embroidery unit to the machine, and then turn on the machine.
* Refer to “ATTACHING THE EMBROIDERY UNIT” on page 13.
dPress the “Presser Foot Lifter” button to raise the embroidery foot, and then press the “Needle Position” button to raise the needle.
* The embroidery foot is not raised high enough when raised with the presser foot lever.
eAfter attaching the scanning frame to the embroidery unit, swing the frame-securing lever toward you to secure the frame.
* Refer to “ATTACHING THE EMBROIDERY FRAME” on page 34.
■ Scanning with an Embroidery FrameDrawings and illustrations can also be scanned using an embroidery frame. Hoop the embroidery frame with fabric larger than the frame. Place the
paper to be scanned on the fabric, and then secure it, with tape.
a Fabricb Tape
Scanning to Trace Background Image
If you have a favorite picture or drawing, it can easily be traced on the scanned background image and you can create your own pattern.
aPress .
bPress .
o The image display screen appears.
Note• Unthread the machine to avoid having the
thread slipping out of the needle or getting caught on the embroidery frame.
CAUTION• Make sure that embroidery foot and needle are
fully raised. If scanning is started with the embroidery foot and needle lowered, the scanning frame may hit the machine, causing damage.
Note• Be sure not to attach any embroidery foot
other than the embroidery foot “W”, otherwise the embroidery foot will be scanned.

IQ DESIGNER WITH SCAN
156
cUsing the magnets, affix a picture to the scanning frame and attach the frame to the machine. Refer to “Using the Scanning Frame” on page 154.
dPress .
o When the following message appears, press .
o Scanning begins.* To stop scanning and return to the screen in
step d, press .
eWhen scanning is finished, scanned image is displayed transparently in the pattern drawing area.
fUsing the included dual purpose stylus,
press , and then draw lines to trace the image.
* For details on drawing lines, refer to “Drawing Lines” on page 145.
a Transparency adjustment
* Press or to adjust the transparency of the background.
Each press of lightens the background, making
the line pattern darker. Each press of darkens the background, making the line pattern lighter.
gAfter editing the pattern, press to specify the settings for pattern.
Note• When scanning starts, some of the machine
lights will turn off in certain circumstances, in order to increase the scan quality. The machine lights will return to their original brightness when scanning ends.
a

IQ DESIGNER WITH SCAN
157
IQ D
esigner
4
hPress to display the pattern editing screen.
■ Importing the Background imagePrepare the data file of your favorite picture so that you can create an embroidery pattern. Save data as a .jpg file type in your computer, on a USB media stick or SD card.
aPress .
bPress .
o The image display screen appears.
cSelect the device you saved the data to.
dSelect the data, and then press .
Note• You can import an image of 2 MB or smaller
from USB media or SD card.

IQ DESIGNER WITH SCAN
158
eThe selected image is displayed transparently in the pattern drawing area.
* After the scanned image is converted to stitching, it appears as a background in the pattern drawing screen. Use gauge a to adjust the transparency of
the background. Each press of lightens the background, making the line pattern darker. Each
press of darkens the background, making the line pattern lighter.
a

LINE SCAN
159
IQ D
esigner
4
Custom patterns can be created from drawings. You can create patterns by scanning your drawings using the included scanning frame or importing an image from USB media or SD card.
Recommended line drawings for Line Scan
• Line drawings must be drawn clearly using lines with approximately 1 mm thickness.
• Line drawings should be drawn in a strong contrast.
• If the lines are too short or gathered too densely, they will not be scanned correctly.
Using the Scanning Frame to Create a Pattern with Line Scan
aPress .
bPress .
o The image display screen appears.
cPress .
* To import an image from USB media or SD card, press , or . For details, see
“Importing the Background image” on page 157.
LINE SCAN
Note• For details on creating patterns using color
illustrations, refer to “ILLUSTRATION SCAN” on page 162.
• If you cannot scan the drawings as expected, you can edit the design in IQ Designer. Refer to “PATTERN DRAWING SCREEN” on page 143.
• Line drawings are scanned without recognizing the thickness of lines. If you want to change the thickness of lines, specify in the settings screen. Refer to “STITCH SETTINGS SCREEN” on page 151.
• Line drawings are scanned as black lines. If you want to change the colors, specify in IQ Designer. Refer to “Drawing Regions” on page 147.

LINE SCAN
160
* If you scan the image, make sure that the scanning frame is attached to the machine. Refer to “Using the Scanning Frame” on page 154.
o When the following message appears, press .
o Scanning begins.* To stop scanning and return to the screen in
step c, press .
dWhen scanning is finished, specify the “Gray-Scale Detection level” on the screen if necessary.The “Gray-Scale Detection level” can change the black and white threshold for the image.
* If you do not know how the settings should be changed, first continue the operation without specifying settings and check the results.
* To stop scanning and return to the screen in
step c, press . The scanned image will be deleted when you return to the previous screen.
eMove to frame the image for the pattern.
fPress .
o The screen for confirming the converted image appears.
gIn the screen for confirming the converted image, you can adjust the “Gray-Scale Detection level” again, if necessary.
a The settings for the lines to be sewn appear.
Note• The scanned background image can be
converted to line scan data. At this time, it is unnecessary to scan the line drawing again.
• When scanning starts, some of the machine lights will turn off in certain circumstances, in order to increase the scan quality. The machine lights will return to their original brightness when scanning ends.
• You can import an image of 2 MB or smaller from USB media or SD card.
a

LINE SCAN
161
IQ D
esigner
4
* If you do not know how the settings should be changed, first continue the operation without specifying settings and check the results.
* To enlarge the image, press .* To display the image before being converted, press
. Compare the images before and after being converted, and then change the settings if necessary.
* To return to the previous screen, press .
o After changes to the settings for “Detection level” is
applied, changes to . Press to check that the image is as desired.
hPress .
o The pattern drawing screen is displayed.
iIf necessary, edit the scanned image.
* After the scanned image is converted to stitching, it appears as a background in the pattern drawing screen. Use gauge a to adjust the transparency of
the background. Each press of lightens the background, making the line pattern darker. Each
press of darkens the background, making the line pattern lighter.
Note• During scanning, the small dots that appear
and unnecessary lines can be erased.
a

ILLUSTRATION SCAN
162
Custom patterns can be created from color illustrations. You can create patterns by scanning an illustration using the included scanning frame or importing an image from USB media or SD card.
Recommended illustrations for Illustration Scan
• Patterns that are clearly drawn, with no gradation, fading or blurriness.
• Patterns that are at least a 5 mm square
• Patterns that are extremely simple images
Using the Scanning Frame to Create a Pattern with Illustration Scan
aPress .
bPress .
o The image display screen appears.
cPress .
* To import an image from USB media or SD card, press , or .
o When the following message appears, press .
o Scanning begins.* To stop scanning and return to the screen in
step c, press .
ILLUSTRATION SCAN
Note• The scanned background image can be
converted to illustration scan data. At this time, it is unnecessary to scan the illustration again.
• When scanning starts, some of the machine lights will turn off in order to increase the scan quality. The machine lights will return to their original brightness when scanning ends.

ILLUSTRATION SCAN
163
IQ D
esigner
4
dWhen scanning is finished, specify the necessary settings in the scan image confirmation screen.Change the settings to adjust the image so it can easily be converted to the desired pattern.
* To stop scanning and return to the screen in step c, press .
eMove to frame the image for the
pattern.
fPress .
o The screen for confirming the converted image appears.
gIn the screen for confirming the converted image, adjust the image as necessary as in step d.
* To enlarge the image, press .* To display the image before being converted, press
. Compare the images before and after being converted, and then change the settings if necessary.
* To return to the previous screen, press .
o After changes to the settings described above have
been applied, changes to . Press
to check that the image is as desired.
hPress .
o The pattern drawing screen is displayed.
a Max. Number of Colors
The number of colors in an image will be reduced less than the number specified here, and then the outline will be extracted.
b Remove Background Select whether or not the background color will be included as one of the colors.
c Line Select whether or not the outline will be detected as a line. A thick outline can also be detected as a region.When detected as a line, the line thickness and color can be specified.
Memo
• Press to detect the outline.Line thickness can be specified from 1.0 mm (1/16 inch) to 5.0 mm (3/16 inch).
• Press to select the outline color. Select by touching the color, or moving
icon using in the color
selection screen.
c
b
a

ILLUSTRATION SCAN
164
iIf necessary, edit the scanned image.
* After the scanned image is converted to stitching, it appears as a background in the pattern drawing screen. Use gauge a to adjust the transparency of
the background. Each press of lightens the background, making the illustration pattern darker.
Each press of darkens the background, making the illustration pattern lighter.
a

STIPPLING
165
IQ D
esigner
4
Basic Stippling with IQ Designer
Create a stippling design with the basic procedure.Example:
aPress .
* You can also start the function by pressing in “Embroidery” mode.
bPress .
cSelect the square shape, and then press
.
dPress .
STIPPLING

STIPPLING
166
eSelect the heart shape, and then press
.
fPress .
gPress until the heart shape fits in the square shape, and then press .
hPress , and then press .
iPress , and then select the stitch color.
Press after setting the color.

STIPPLING
167
IQ D
esigner
4
jSelect the area you want to set stippling effect.
a Select this area.
kPress .
lAdjust the stippling settings to create the desired effect, and then press .
* For details, refer to “Specifying Individual Stitch Settings” on page 151.
mFollow the procedure described on “Editing Patterns” on page 38 to edit the pattern as desired.
Scanning Drawing to Create Stippling Pattern
Create a custom pattern with stippling design.Example:
aPlace a drawing of your design on the scanning frame.
bPress .
* You can also start the function by pressing in “Embroidery” mode.
a

STIPPLING
168
cPress .
dPress .
o The image display screen appears.
ePosition the scanning frame on the
machine, and then press .
o When the following message appears, press .
o Scanning begins.* To stop scanning and return to the screen in
step e, press .
fWhen scanning is finished, move to
frame the image for the pattern, and then
press .
Note• When scanning starts, some of the machine
lights will turn off in certain circumstances, in order to increase the scan quality. The machine lights will return to their original brightness when scanning ends.
• You can import an image of 2 MB or smaller from USB media or SD card.

STIPPLING
169
IQ D
esigner
4
gThe screen for confirming the converted
image appears, adjust the image if
necessary and then press .
o The pattern drawing screen is displayed.
hTo set the outline of the pattern, press ,
and then .
iPress and then .
This will set the outline without a stitch.
jSelect the outline of the pattern.
a Outline of the pattern
a

STIPPLING
170
kPress to select the color of the stitch
around the stippling effect.
lPress and select the stitch color, and
then press .
mSelect the stitch line around the stippling effect.
a Stitch line
nTo set the stitch color and fill stitch type, press , and then .
a

STIPPLING
171
IQ D
esigner
4
oPress , and then select the stitch color.
Press after setting the color.
pSelect the area you want to set stippling effect.
qFollow the procedure from step k of “Basic Stippling with IQ Designer” on page 165.
Scanning Fabric and Stippling
Use the fabric pattern to coordinate with the stippling pattern.
aSet the fabric to the embroidery frame.
bPress .
* You can also start the function by pressing in “Embroidery” mode.
cPress .
dPress .
o The image display screen appears.

STIPPLING
172
ePosition the embroidery frame on the
machine, and then press .
o When the following message appears, press .
o Scanning begins.* To stop scanning and return to the screen in
step e, press .
fPress .
gSelect the circle shape, and then press
.Memo• Although the instructions in the LCD screen
refer to the scanning frame, this example uses an embroidery frame for scanning.
Note• When scanning starts, some of the machine
lights will turn off in certain circumstances, in order to increase the scan quality. The machine lights will return to their original brightness when scanning ends.
• You can import an image of 2 MB or smaller from USB media or SD card.

STIPPLING
173
IQ D
esigner
4
hPress to increase or decrease the size of the circle.
iPress until the size of circle fits the
pattern on the fabric, and then press .
* Use to align the position of the circle to
the pattern on the fabric.
jTo set the stitch color and fill stitch type, press , and then .
kPress , and then select the stitch color.
Press after setting the color.

STIPPLING
174
lSelect the area you want to set stippling effect.
mTo set the outline of the pattern, press , and then .
nPress and then . This will set the
outline without a stitch.
oSelect the outline of the pattern.
a Outline of the pattern
pFollow the procedure from step k of “Basic Stippling with IQ Designer” on page 165.
o Start embroidering on the fabric that you scanned at first.
a

STIPPLING
175
IQ D
esigner
4
Decorative Stitching Around a Pattern in Embroidery (a Quilting Function)
A quilt can be created with stippling around an embroidery pattern.
aHoop the embroidery frame with batting sandwiched between two layers of fabric, and then attach the frame to the machine.
bPress and select the pattern that
decorative stitching will be added around,
and then press in the embroidery edit
screen.
o The outline of the pattern is displayed.
cPress .
o A message appears, and the pattern outline is registered as a stamp shape in IQ Designer. Press
.
dPress to continue to the embroidery screen, and then embroider the pattern.
ePress in the home page screen to start
IQ Designer.
Memo• For best results, reduce the sewing speed.

STIPPLING
176
fPress to scan the embroidered fabric. Refer to “Importing the Background image” on page 157 for details.
gPress , press to recall the stamp shape registered in step c, and then arrange it over the scanned pattern.
hUse a stamp or rectangular frame to determine the area to be stitched.
iUse the brush tool keys to select the pattern and color of the decorative stitching.
Note• If the area is to be drawn by hand, be sure
to draw a completely closed shape. If the area is not closed, it cannot be correctly filled with the decorating.

STIPPLING
177
IQ D
esigner
4
jFill the area to be stitched outside of the stamp shape outline.
kSet the line type for the frame and pattern
to , and then press .
* Stitch settings can be adjusted in the stitch settings screen. For details, refer to “STITCH SETTINGS SCREEN” on page 151.
lSpecify the stitch spacing and length in the
stitch settings screen, and then press .
mEmbroider the stippling around the embroidery pattern.

STIPPLING
178

Chapter 5Appendix

TROUBLESHOOTING
180
If the machine stops operating correctly, check the following possible problems before requesting service.You can solve most problems by yourself. Visit us at “ www.babylock.com ”.If the problem persists, contact your authorized Baby Lock retailer.
List of Symptoms
If you have a minor problem with your machine, check the following solutions. If the solutions suggested do not correct the problem, contact your authorized Baby Lock retailer. Press o o
for advice about minor embroidering problems during embroidering. Press at any time to return to the original screen.
■ Getting ready
TROUBLESHOOTING
Problem Cause Solution Page
Cannot thread the needle.
Needle is not in the correct position. Press the “Needle Position” button to raise the needle.
—
Needle is installed incorrectly. Reinstall the needle correctly. 11
Needle is turned, bent or the point is dull. Replace the needle. 11
Upper threading is incorrect. Check the steps for threading the machine and rethread the machine.
22
The needle threader hook is bent and does not pass through the eye of the needle.
Contact your authorized Baby Lock retailer. —
The needle threader lever cannot be moved or returned to its original position.
Contact your authorized Baby Lock retailer. —
A size 65/9 needle is being used. The needle is incompatible with the needle threader. Manually pass the thread through the eye of the needle.
25
Cannot lower the embroidery foot with the presser foot lever.
Embroidery foot was raised using the “Presser Foot Lifter” button.
Press the “Presser Foot Lifter” button to lower the embroidery foot.
—
Bobbin thread does not wind neatly on the bobbin.
The thread is not passed through the bobbin winding thread guide correctly.
Correctly pass the thread through the bobbin winding thread guide.
16
Bobbin spins slowly.Press in the bobbin winding window to increase the bobbin winding speed.
17
The thread that was pulled out was not wound onto the bobbin correctly.
Wind the thread that was pulled off around the bobbin 5 or 6 times clockwise.
16
The empty bobbin was not set on the pin properly.
Set the empty bobbin on the pin and slowly turn the bobbin until you hear it click in place.
15
While winding the bobbin, the bobbin thread was wound below the bobbin winder seat.
You have not wound the bobbin thread properly when you are initially winding thread on the bobbin as well as being sure that the bobbin thread is set in the guides.
After removing the thread wound below the bobbin winder seat, wind the bobbin correctly.Follow the drawn images on the top of the machine for guidance when threading the machine for bobbin winding.
15
The bobbin thread cannot be pulled up.
Needle is turned, bent or the point is dull. Replace the needle. 11
Bobbin is set incorrectly. Reset the bobbin thread correctly. 20
Machine does not operate
All keys and buttons have been locked by
.Press to unlock all keys and buttons.
9, 11
Nothing appears in the LCD.
Main power switch is not turned on. Turn the main power to ON. —
The plug of the power cord is not inserted into an electrical outlet.
Insert the plug of the power cord into an electrical outlet.
—
The LCD screen does not look very clear.
The brightness of the screen is not adjusted. Adjust the “Screen Display Brightness” in the settings screen.
—
Nothing happens, even if the LCD display is pressed
The screen has been locked. Press either of the following keys to unlock the
screen.
—

TROUBLESHOOTING
181
Appendix
5
■ While embroidering
The LCD screen is fogged up.
Condensation has formed on the LCD screen. After a while, the cloudiness will disappear. —
Embroidery unit does not operate.
Embroidery unit is not attached correctly. Reattach the embroidery unit correctly. 13
Embroidery frame was attached before the unit was initialized.
Remove the embroidery unit, and then perform the initialization process correctly.
13
Pointer of the projector does not indicate the position correctly
With thick elastic fabric, the position will be misaligned only at raised parts in the fabric.
Manually adjust the position according to the thickness of the fabric.
47
With fabric having a very uneven surface, the position is not correctly aligned.
The pointer indication should be used only as a reference.
—
Problem Cause Solution Page
Machine does not operate.
“Start/Stop” button was not pressed. Press the “Start/Stop” button. —
There is no pattern selected. Select a pattern. 36
Embroidery foot is not lowered. Lower the embroidery foot. —
Needle breaks. Needle is installed incorrectly. Reinstall the needle correctly. 11
Needle clamp screw is not tightened. Tighten the needle clamp screw. 12
Needle is turned or bent. Replace the needle. 11
Using improper needle or thread for the selected fabric.
Refer to the “Fabric/Thread/Needle Combinations” chart in the Instruction and Reference Guide (Sewing).
—
Wrong embroidery foot was used. Use the recommended embroidery foot. 10
Upper thread tension is too tight. Adjust the thread tension. 97
Fabric is pulled during embroidering. Do not pull the fabric during embroidering. —
Spool cap is set incorrectly. Check the method for attaching the spool cap, then reattach the spool cap.
22
There are scratches around the opening in the needle plate.
Replace the needle plate, or consult your authorized Baby Lock retailer.
—
There are scratches around the opening in the embroidery foot.
Replace the embroidery foot, or consult your authorized Baby Lock retailer.
9
There are scratches on the bobbin case. Replace the bobbin case, or consult your authorized Baby Lock retailer.
—
Needle is defective. Replace the needle. 11
A bobbin designed specifically for this machine is not used.
Incorrect bobbins will not work properly. Only use a bobbin designed specifically for this machine.
20
Upper threading is incorrect. Check the steps for threading the machine and rethread the machine.
22
Bobbin is set incorrectly. Reset the bobbin thread correctly. 20
Embroidery foot is attached incorrectly. Attach the embroidery foot correctly. 9
Screw of the presser foot holder is loose. Securely tighten the screw of the presser foot. 10
Fabric is too thick. Use fabric that the needle can pierce when the handwheel is turned.
—
Stabilizer is not attached to fabric being embroidered.
Attach stabilizer. 28
Bobbin thread is incorrectly wound. Use a correctly wound bobbin. 15
Problem Cause Solution Page

TROUBLESHOOTING
182
Upper thread breaks. Machine is not threaded correctly (used the wrong spool cap, spool cap is loose, the thread did not catch the needle bar threader, etc.)
Rethread the machine correctly. 22
Knotted or tangled thread is being used. Remove any knots or tangles. —
The selected needle is not appropriate for the thread being used.
Refer to the “Fabric/Thread/Needle Combinations” chart in the Instruction and Reference Guide (Sewing).
—
Upper thread tension is too tight. Adjust the thread tension. 97
Thread is twisted. Use scissors, etc., to cut the twisted thread and remove it from the race, etc.
—
Needle is turned, bent or the point is dull. Replace the needle. 11
Needle is installed incorrectly. Reinstall the needle correctly. 11
There are scratches around the opening of the needle plate.
Replace the needle plate, or consult your authorized Baby Lock retailer.
—
There are scratches around the opening in the embroidery foot.
Replace the embroidery foot, or consult your authorized Baby Lock retailer.
9
There are scratches on the bobbin case. Replace the bobbin case, or consult your authorized Baby Lock retailer.
—
Using improper needle or thread for the selected fabric.
Refer to the “Fabric/Thread/Needle Combinations” chart in the Instruction and Reference Guide (Sewing).
—
While embroidering, the thread became knotted or tangled.
Rethread upper and lower thread. 20, 22
A bobbin designed specifically for this machine is not used.
Incorrect bobbins will not work properly. Only use a bobbin designed specifically for this machine.
20
The thread is tangled on the wrong side of the fabric.
Upper threading is incorrect. Check the steps for threading the machine and rethread the machine. Be sure that the embroidery foot is in the raised position when threading the machine so that the upper thread sets properly in the upper tension.
22
Using improper needle or thread for the selected fabric.
Refer to the “Fabric/Thread/Needle Combinations” chart in the Instruction and Reference Guide (Sewing).
—
The upper thread is too tight.
The bobbin thread is incorrectly installed. Correctly install the bobbin thread. 20
Bobbin thread breaks.
Bobbin is set incorrectly. Reset the bobbin thread correctly. 20
Bobbin thread is incorrectly wound. Use a correctly wound bobbin. 15
There are scratches on the bobbin or it doesn’t rotate properly.
Replace the bobbin. 20
Thread is twisted. Use scissors, etc. to cut the twisted thread and remove it from the race, etc.
—
A bobbin designed specifically for this machine is not used.
Incorrect bobbins will not work properly. Only use a bobbin designed specifically for this machine.
20
Fabric puckers. There is a mistake in the upper or bobbin threading.
Check the steps for threading the machine and rethread it correctly.
20, 22
Spool cap is set incorrectly. Check the method for attaching the spool cap, then reattach the spool cap.
22
Using improper needle or thread for the selected fabric.
Refer to the “Fabric/Thread/Needle Combinations” chart in the Instruction and Reference Guide (Sewing).
—
Needle is turned, bent or the point is dull. Replace the needle. 11
Thread tension is set incorrectly. Adjust the thread tension. 97
Problem Cause Solution Page

TROUBLESHOOTING
183
Appendix
5
Skipped stitches Machine is threaded incorrectly. Check the steps for threading the machine and rethread it correctly.
22
Using improper needle or thread for the selected fabric.
Refer to the “Fabric/Thread/Needle Combinations” chart in the Instruction and Reference Guide (Sewing).
—
Needle is turned, bent or the point is dull. Replace the needle. 11
Needle is installed incorrectly. Reinstall the needle correctly. 11
Needle is defective. Replace the needle. 11
Dust or lint has collected under the needle plate.
Remove the dust or lint with the brush. —
High-pitched sound while embroidering
Pieces of thread are caught in the race. Clean the race. —
Upper threading is incorrect. Check the steps for threading the machine and rethread the machine.
22
A bobbin designed specifically for this machine is not used.
Incorrect bobbins will not work properly. Only use a bobbin designed specifically for this machine.
20
There are needle holes or friction scratches in the bobbin case.
Replace the bobbin case, or consult your authorized Baby Lock retailer.
—
Fabric does not feed through the machine.
Needle is turned, bent or the point is dull. Replace the needle. 11
Thread is entangled. Cut the entangled thread and remove it from the race.
—
The fabric feeds in the opposite direction.
The feed mechanism is damaged. Contact your authorized Baby Lock retailer. —
The needle contacts the needle plate.
The needle clamp screw is loose. Firmly tighten the needle clamp screw. If the needle is bent or blunt, replace it with a new one.
11
Needle is turned, bent or the point is dull. Replace the needle. 11
Fabric being embroidered with the machine cannot be removed.
Thread is tangled below the needle plate. Lift up the fabric and cut the threads below it, and clean the race.
—
A broken needle has fallen into the machine.
— Turn off the machine, and then remove the needle plate. If the needle that fell into the machine can be seen, use tweezers to remove it. After removing the needle, return the needle plate to its original position.Before turning on the machine, slowly turn the handwheel toward you to check that it turns smoothly. If the handwheel does not turn smoothly or the needle that fell into the machine cannot be removed, consult your authorized Baby Lock retailer.
—
The handwheel feels sluggish when it is turned.
Thread is tangled in the bobbin case. Remove the tangled thread from the bobbin case. Re-install the bobbin case so it is correctly positioned.
—
Problem Cause Solution Page

TROUBLESHOOTING
184
■ After embroidering
Problem Cause Solution Page
Thread tension is incorrect.
Upper threading is incorrect. Check the steps for threading the machine and rethread the machine.
22
Bobbin is set incorrectly. Reset the bobbin. (If needle plate was removed, reinstall needle plate.)
20
Using improper needle or thread for the selected fabric.
Refer to the “Fabric/Thread/Needle Combinations” chart in the Instruction and Reference Guide (Sewing).
—
Thread tension is set incorrectly. Adjust the thread tension. 97
Bobbin thread is incorrectly wound. Use a correctly wound bobbin. 15
Needle is turned, bent or the point is dull. Replace the needle. 11
A bobbin designed specifically for this machine is not used.
Incorrect bobbins will not work properly. Only use a bobbin designed specifically for this machine.
20
Embroidery pattern does not embroider out correctly.
Thread is twisted. Use scissors, etc., to cut the twisted thread and remove it from the bobbin case, etc.
—
Thread tension is set incorrectly. Adjust the thread tension. 97
Fabric was not inserted into the frame correctly (fabric was loose, etc.).
If the fabric is not stretched tight in the frame, the pattern may turn out poorly or there may be shrinkage of the pattern. Set the fabric into the frame correctly.
30
Stabilizing material was not attached. Always use stabilizing material, especially with stretch fabrics, lightweight fabrics, fabrics with a coarse weave, or fabrics that often cause pattern shrinkage. See your authorized Baby Lock retailer for the proper stabilizer.
28
There was an object placed near the machine, and the carriage or embroidery frame hit the object during embroidering.
If the frame bumps something during embroidering, the pattern will turn out poorly. Do not place anything in the area where the frame may bump it during embroidering.
53
Fabric outside the frame edges interferes with the free arm, so the embroidery unit cannot move.
Reinsert the fabric in the embroidery frame so that the excess fabric is away from the free arm, and rotate the pattern 180 degrees.
30
Fabric is too heavy, so the embroidery unit cannot move freely.
Place a large thick book or similar object under the arm head to lightly lift the heavy side and keep it level.
—
Fabric is hanging off the table. If the fabric is hanging off the table during embroidery, the embroidery unit will not move freely. Place the fabric so that it does not hang off the table or hold the fabric to keep it from dragging.
53
Fabric is snagged or caught on something. Stop the machine and place the fabric so that it does not get caught or snagged.
—
Embroidery frame was removed during embroidering (for example, to reset the bobbin). The embroidery foot was bumped or moved while removing or attaching the embroidery frame, or the embroidery unit was moved.
If the embroidery foot is bumped or the embroidery unit is moved during embroidering, the pattern will not turn out. Be careful when removing or reattaching the embroidery frame during embroidering.
56
Stabilizer is incorrectly attached, for example, it is smaller than the embroidery frame.
Attach the stabilizer correctly. 28
Loops appear on the surface of the fabric when embroidering
The thread tension is incorrectly set. Adjust the thread tension. 97
The tension of the upper thread is incorrectly set for the combination of the fabric, thread and pattern being used.
Use the embroidery needle plate cover. 32
The combination of the bobbin case and bobbin thread is incorrect.
Change the bobbin case or bobbin thread so that the correct combination is used.
53

TROUBLESHOOTING
185
Appendix
5
CAUTION• This machine is equipped with a thread detection device. If the “Start/Stop” button is pushed before the
upper threading is done, the machine will not operate properly.• If the power is disconnected during embroidering:
Turn the main power to OFF and unplug the machine. If you restart the machine, follow the Instruction and Reference Guide for operating the machine correctly.

ERROR MESSAGES
186
If the machine is not properly set and the “Start/Stop” button or the “Reverse/Reinforcement Stitch” button is pressed, or if the operation procedure is incorrect, the machine does not start. An alarm sounds and an error message is displayed on the LCD. If an error message displays, follow the instructions in the message. Below is an explanation of error messages. Refer to these when necessary (if you press or do the operation correctly while the error message is displayed, the message disappears).
ERROR MESSAGES
CAUTION• Be sure to rethread the machine. If you press the “Start/Stop” button without rethreading the machine,
the thread tension may be wrong or the needle may break and cause injury.
This message is displayed when the motor locks due to tangled thread or for other reasons related to thread delivery.
This message is displayed when the embroidery unit is initializing.
This message is displayed when the needle plate is removed with the machine on or when the machine is turned on and embroidery or embroidery edit mode is selected.
This message is displayed when the machine needs to be maintained.
This message appears when you try to save more than 100 camera image or settings screen image files in the USB media. In this case, delete a file from the USB media or use different USB media.
This message is displayed when the “Reverse/Reinforcement Stitch” button is pushed while the embroidery unit is attached.
This message is displayed when the foot controller is pressed while the embroidery unit is attached and machine is set up for embroidering.
This message is displayed when the patterns you are editing take up too much memory, or if you are editing too many patterns for the memory.
This message is displayed when a key on the LCD display is touched while the needle is in the down position.

ERROR MESSAGES
187
Appendix
5
This message is displayed when the machine is in embroidery mode, and the character pattern combination is too large to fit in the embroidery frame.
This message is displayed when the machine is in embroidery mode and the combined character pattern is too large for the embroidery frame. You can rotate the pattern 90 degrees and continue combining characters.
This message is displayed when the machine is in embroidery mode and the embroidery unit tries to initialize while the embroidery frame is attached.
This message is displayed when the machine is ready to embroider a pattern, and the “Start/Stop” button is pushed while the embroidery frame is not attached.
This message is displayed when the machine is in embroidery edit mode, and you try to use an editing function when the pattern is not completely within the red outline.
This message is displayed when you try to save a copyright protected pattern to USB media or computer. According to copyright laws, patterns that are illegal to reproduce or edit cannot be saved to USB media or computer. If this message displays, save the pattern in the machine’s memory.
This message is displayed when the machine is in embroidery mode and the small frame is attached, and the selected pattern does not fit in the small frame. This message appears when embroidery frame (small) is attached while aligning the embroidery position using the built-in camera.
This message is displayed
when is pressed when changing thread colors.
This message appears if the machine is turned off while embroidering, then turned on again. Press
to return the machine to the condition (pattern position and number of stitches) when it was turned off. Follow the procedure described in “If the Thread Breaks During Embroidering” on page 57 to align the needle position and embroider the remainder of the pattern.
This message is displayed when the “Start/Stop” button is pushed and the machine is in embroidery mode, but the embroidery unit is not attached.
This message is displayed when replacing the embroidering bobbin thread.
This message is displayed when rotating a saved combined pattern in the Embroidery screen.
This message is displayed when the embroidery frame is attached.
This message is displayed when the machine failed to recognize the embroidery positioning mark.- Confirm that the
embroidery positioning mark is in the selected area. If problem persists, refer to page 51 to reposition mark.

ERROR MESSAGES
188
This message is displayed when the machine has recognized the embroidery position mark. Remove the embroidery positioning
sticker and press to continue. To remove the embroidery positioning sticker more easily, press
. (page 51)
This message appears when the built-in camera is being used to align the embroidery position, but the embroidery positioning sticker is too near an edge or the pattern extends from the embroidery frame. Change the positioning of the embroidery position sticker, and then try aligning the position again. Refer to page 46.
This message is displayed when the upper thread is broken or not threaded correctly, and the “Start/Stop” button or the “Reverse/ Reinforcement Stitch” button is pressed.
This message is displayed when the “Presser Foot Lifter” button is pushed while the presser foot lever is raised/the needle is lowered.
This message is displayed when the “Start/ Stop” button is pushed while the machine is in embroidery edit mode and a pattern is being edited.
This message is displayed when there is no stitch or embroidery pattern selected and the “Start/Stop” button or the “Reverse/Reinforcement Stitch” button is pressed.
This message is displayed when the bobbin thread is running out.
This message is displayed when the memory is full and the stitch or pattern cannot be saved.
This message is displayed when, after selecting a
pattern or is pressed and the pattern is about to be deleted.
This message is displayed when the bobbin is being wound, and the motor locks because the thread is tangled, etc.
This message is displayed when there is a possibility that the data for the selected pattern is corrupted.
This message is displayed when the embroidery unit is attached and the power is turned on with the needle in the down position.
This message is displayed when you try to use incompatible media.
This message is displayed when you attempt to select a pattern after the USB media in which the pattern is saved has been changed.

ERROR MESSAGES
189
Appendix
5
■ Alarm Sounds If the operation was performed incorrectly, an alarm sounds to indicate that an error occurred. If the operation was performed correctly, the machine beeps to confirm the operation.
This message is displayed when an error occurs with the USB media.
This message is displayed when a button, such as the “Start/Stop” button, is pushed while the presser foot is raised.
This message is displayed when it seems that the upper thread has not been threaded correctly.
This message is displayed when the file size exceeds the data capacity of the machine. Confirm the file size and format.
This message appears if the file format is incompatible with this machine. Check the list of compatible file formats.
This message is displayed when the image is deleted.
This message is displayed when you press
in the screen other than the utility stitch, or press
in the screen other than the utility stitch or character/decorative stitch.
This message appears when you try to start embroidering with the dual feed foot attached to the machine. Remove the dual feed foot before entering the embroidery mode.
Memo• To cancel the operation beep or to change
the volume, press , display page 4 of the settings screen, and then change the setting for “Machine Speaker Volume”. For details, refer to the Instruction and Reference Guide (Sewing).

ERROR MESSAGES
190

INDEX
191
Appendix
5
INDEXA
Alarm sounds ............................................................................ 189Aligning the position .................................................... 47, 49, 92Alphabet characters
embroidery .............................................................................. 75Appliqué
using an embroidery frame pattern ........................................ 124Array key ..................................................................................... 79Arrow keys .................................................................................. 63Automatic Threading button ........................................................ 22
B
Ball point needle 75/11 ............................................................. 101Bobbin
runs out of thread .................................................................... 56setting ...................................................................................... 20winding ................................................................................... 15
Bobbin cover ............................................................................... 20Bobbin winding switch ................................................................ 17Border key ........................................................................... 67, 70Built-in camera ............................................................................ 49
C
Character spacing key ................................................................. 79Color visualizer function ............................................................. 81Combining Patterns
embroidery edit ....................................................................... 85Connecting patterns ................................................................... 131Cut/Tension key ........................................................................... 97
D
Density key ................................................................................. 66
E
Editingembroidery edit ....................................................................... 38
Embroideryadjusting the speed ................................................................ 102automatic thread cutting function (END COLOR TRIM) ......... 100edges or corners ...................................................................... 33restarting from the beginning ................................................... 58resuming embroidery after turning off the power ..................... 58ribbons or tape ........................................................................ 33selecting patterns ..................................................................... 36small fabrics ............................................................................ 33thread color display ............................................................... 102thread trimming function (JUMP STITCH TRIM) ..................... 101
Embroidery appliqué ................................................................. 121Embroidery edit
changing the thread color ........................................................ 81combined patterns ........................................................... 85, 90repeated patterns ..................................................................... 67
Embroidery foot “W” ................................................................... 10Embroidery foot code .................................................................. 41Embroidery frame display .......................................................... 103Embroidery frames
attaching .................................................................................. 34inserting fabric ......................................................................... 30removing ................................................................................. 34types ........................................................................................ 29using the embroidery sheet ...................................................... 31
Embroidery needle plate cover .................................................... 32Embroidery patterns
aligning the position ................................................................ 92checking the position ............................................................... 52
combining ................................................................................ 85duplicating ............................................................................... 73editing ...................................................................................... 38embroidering ........................................................................... 53linked characters .................................................................... 104pattern selection screens .......................................................... 37retrieving ...................................................................... 110, 112saving .......................................................................... 109, 111selecting ................................................................................... 36using a frame pattern to make an appliqué ................... 124, 125
Embroidery positioning sticker ..................................................... 49Embroidery sheet ......................................................................... 31Embroidery unit ........................................................................... 13Error messages ........................................................................... 186
F
Flat bed attachment ..................................................................... 13Forward/Back key ................................................................ 57, 58
I
Image key .................................................................................... 62Innov-eye Technology (for U.S.A. only) ....................................... 49IQ Designer ............................................................................... 142
K
Key functions ............................................................................... 38
L
Lower threadingsetting the bobbin .................................................................... 20winding the bobbin .................................................................. 15
M
Machine operation mode key .................................................... 180Mirror image key ......................................................................... 67
N
Needlechanging the needle ................................................................. 11
P
Presser foot/Needle exchange key .......................................... 9, 11Pretension disk ..................................................................... 16, 19Projector .............................................................................. 46, 47
R
Repeated patterns ........................................................................ 67Retrieving
embroidery patterns ............................................................... 110machine’s memory ................................................................. 110USB media/SD card ............................................................... 112
Rotate key .................................................................................... 63
S
Savingembroidery patterns ............................................................... 109machine’s memory ................................................................. 109USB media/SD card ............................................................... 111
Scan ........................................................................................... 154Scanimation (for U.S.A. only) ..................................................... 154SD card

INDEX
192
recalling ................................................................................. 112saving .................................................................................... 111usable .................................................................................... 107
Settingsautomatic thread cutting ........................................................ 100embroidery settings .................................................................... 7machine setting mode key .......................................................... 7sewing settings ........................................................................... 7thread tension .......................................................................... 97thread trimming ..................................................................... 101
Size key ....................................................................................... 64Snowman (for U.S.A. only) ........................................................... 49Spool net ..................................................................................... 27Spool stand .......................................................................... 19, 25Stabilizer ...................................................................................... 28Starting point key ....................................................................... 103StitchVision Technology (for U.S.A. only) ............................ 46, 47Supplemental spool pin ............................................................... 15
T
Threadthread tension .......................................................................... 97
Thread color display .................................................................. 102Thread guide ........................................................................ 16, 19Thread guide plate ............................................................... 18, 22Thread marks ............................................................................... 70Thread palette key ....................................................................... 81Trial key ....................................................................................... 52Troubleshooting ......................................................................... 180
U
Uninterrupted embroidering ........................................................ 92Up Close Viewer (for U.S.A. only) ................................................ 49Upper threading
using the “Automatic Threading” button .................................. 22using the spool net ................................................................... 27
USB mediarecalling ................................................................................. 112saving .................................................................................... 111usable .................................................................................... 107
USB port connectorfor media ............................................................................... 111


English 882-W31
Version 0

English 882-W31
Version 0