iSecurity Audit - Raz-Lee
402
iSecurity Audit Monitor and Report Critical System Changes Software Version: 14.12
-
Upload
khangminh22 -
Category
Documents
-
view
4 -
download
0
Transcript of iSecurity Audit - Raz-Lee

iSecurity Audit
Monitor and Report CriticalSystem ChangesSoftware Version: 14.12

About this Manual
This user guide is intended for system administrators and securityadministrators responsible for the implementation and management ofsecurity on IBM i systems. However, any user with basic knowledge of IBM ioperations will be able to make full use of this product after reading thisbook.
Raz-Lee takes customer satisfaction seriously. Our products are designed forease of use by personnel at all skill levels, especially those with minimal IBM iexperience. The documentation package includes a variety of materials toget you familiar with this software quickly and effectively.
This user guide, together with the iSecurity Installation Guide, is the onlyprinted documentation necessary for understanding this product. It isavailable in HTML form as well as in user-friendly PDF format, which may bedisplayed or printed using Adobe Acrobat Reader version 6.0 or higher. Ifyou do not have Acrobat Reader, you can download it from the Adobewebsite: http://www.adobe.com/. You can also read and print pages fromthe manual using any modern web browser.
This manual contains concise explanations of the various product features aswell as step-by-step instructions for using and configuring the product.
Raz-Lee’s iSecurity is an integrated, state-of-the-art security solution for allSystem i servers, providing cutting-edge tools for managing all aspects ofnetwork access, data, and audit security. Its individual components worktogether transparently, providing comprehensive “out-of-the- box” security.To learn more about the iSecurity Suite, visit our website athttp://www.razlee.com/.
Intended AudienceThe Audit User Guide document was developed for users, systemadministrators and security administrators responsible for theimplementation and management of security on IBM® AS/400 systems.However, any user with a basic knowledge of System i operations is able tomake full use of this document following study of this User Guide.
-
2 Audit | User Guide

NOTE: Deviations from IBM® standards are employed in certaincircumstances in order to enhance clarity or when standard IBM®terminology conflicts with generally accepted industry conventions.
This document may also serve for new versions' upgrade approval bymanagement.
Native IBM i (OS/400) User InterfaceAudit is designed to be a user-friendly product for auditors, managers,security personnel and system administrators. The user interface followsstandard IBM i CUA conventions. All product features are available via themenus, so you are never required to memorize arcane commands.
Many features are also accessible via the command line, for the convenienceof experienced users.
Conventions Used in the DocumentMenu options, field names, and function key names are written in CourierNew Bold.
Links (internal or external) are emphasized with underline and blue color asfollows: "About this Manual" on the previous page.
Commands and system messages of IBM i® (OS/400®), are written in BoldItalic.
Key combinations are in Bold and separated by a dash, for example: Enter,Shift-Tab.
Emphasis is written in Bold.
A sequence of operations entered via the keyboard is marked as
STRAUD> 81 > 32
meaning: Syslog definitions activated by typing STRAUDand selecting option:81 then option: 32.
MenusProduct menus allow easy access to all features with a minimum ofkeystrokes. Menu option numbering and terminology is consistentthroughout this product and with other Raz-Lee products. To select a menuoption, simply type the option number and press Enter. The command line is
Audit|User Guide 3
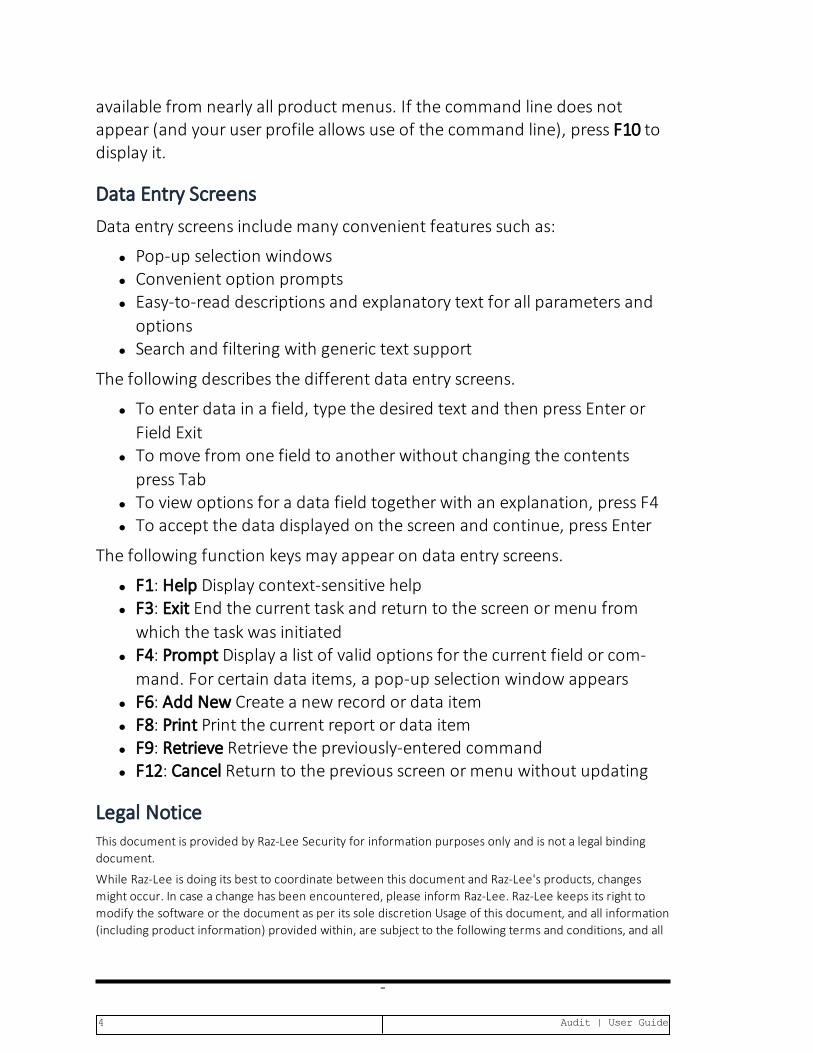
available from nearly all product menus. If the command line does notappear (and your user profile allows use of the command line), press F10 todisplay it.
Data Entry ScreensData entry screens include many convenient features such as:
l Pop-up selection windowsl Convenient option promptsl Easy-to-read descriptions and explanatory text for all parameters andoptions
l Search and filtering with generic text support
The following describes the different data entry screens.
l To enter data in a field, type the desired text and then press Enter orField Exit
l To move from one field to another without changing the contentspress Tab
l To view options for a data field together with an explanation, press F4l To accept the data displayed on the screen and continue, press Enter
The following function keys may appear on data entry screens.
l F1: Help Display context-sensitive helpl F3: Exit End the current task and return to the screen or menu fromwhich the task was initiated
l F4: Prompt Display a list of valid options for the current field or com-mand. For certain data items, a pop-up selection window appears
l F6: Add New Create a new record or data iteml F8: Print Print the current report or data iteml F9: Retrieve Retrieve the previously-entered commandl F12: Cancel Return to the previous screen or menu without updating
Legal NoticeThis document is provided by Raz-Lee Security for information purposes only and is not a legal bindingdocument.
While Raz-Lee is doing its best to coordinate between this document and Raz-Lee's products, changesmight occur. In case a change has been encountered, please inform Raz-Lee. Raz-Lee keeps its right tomodify the software or the document as per its sole discretion Usage of this document, and all information(including product information) provided within, are subject to the following terms and conditions, and all
-
4 Audit | User Guide

applicable laws. If you do not agree with these terms, please do not access or use the remainder of thisdocument.
This document contains highly confidential information, which is proprietary to Raz-Lee Security Ltd.and/or its affiliates (hereafter, "Raz-Lee"). No part of this document's contents may be used, copied,disclosed or conveyed to any third party in any manner whatsoever without prior written permission fromRaz-Lee. The information included in this document is intended for your knowledge and for negotiationpurposes only. Raz-Lee makes no implicit representations or warranties with respect to such information.The information included in this document is subject to change without notice. Any decision to rely on theinformation contained herein shall be at your sole responsibility, and Raz-Lee will not accept any liabilityfor your decision to use any information or for any damages resulting therefrom. Certain laws do not allowlimitations on implied warranties or the exclusion or limitation of certain damages. If these laws apply toyou, some or all of the above disclaimers, exclusions, or limitations may not apply to you.
All registered or unregistered trademarks, product names, logos and other service marks mentionedwithin this document are the property of Raz-Lee or their respective owners. Nothing contained hereinshall be construed as conferring by implication, estoppels, or otherwise any license or right, either expressor implied, under any patent or trademark of Raz-Lee or any third party. No use of any trademark may bemade without the prior written authorization of Raz-Lee. This document and all of its contents areprotected intellectual property of Raz-Lee. Any copying, reprinting, reuse, reproduction, adaptation,distribution or translation without the prior written permission of Raz-Lee is prohibited.
Please check your End User License Agreement (EULA) for terms and Conditions.
2020 © Copyright Raz-Lee Security Inc. All rights reserved.
Audit|User Guide 5
ContactsRaz-Lee Security Inc. www.razlee.comMarketing: [email protected] 1-888-RAZLEE-4 (1-888-7295334)Support: [email protected] 1-888-RAZLEE-2 (1-888-7295332)
-
6 Audit | User Guide

Contents
About this Manual 2Intended Audience 2Native IBM i (OS/400) User Interface 3Conventions Used in the Document 3Menus 3Data Entry Screens 4Legal Notice 4Contacts 6
Contents 7Preface 16Audit Overview 18
IBM i (OS/400) Audit Settings Made Easy 19Real-Time Detection 20Integration with Action 21Rules 22Actions 23History Log 24Creating and Running Queries and Reports 26IBM and Raz-Lee Entry Types 30Other Related Modules 31
Getting Started 32Starting Audit for the First Time 33System Configuration 34
Step 1: Setting General Definitions 35Step 2: Setting Log and Journal Retention Parameters 37Step 3: Setting Action General Definitions 39Step 4: Language Support 43Step 5: Activating Real Time Detection 44
Detailed Change User Profile Audit Type 46Working with Operators’ Authorities 47Initial IBM i (OS/400) Audit Settings 51
Audit|User Guide 7

Working with Current Setting 52Working with User Activity Auditing 53
Working with Object Auditing 55IBM i (OS/400) Audit Settings 56
Working with the Current Settings 57Current Setting Strategies 59
Predefined Audit Settings 61Creating and Modifying Predefined Audit Settings 62Activating a Predefined Setting 63Example: Three Shift Production Scenario 64
Using the Audit Scheduler 65Setting up the Audit Scheduler 66Copying a Daily Audit Schedule 68Example: Three-Shift Production Environment 69
User Activity Auditing 70Creating and Modifying User Activity Audit Rules 71User Activity Audit Strategies 74Examples of User Activity Auditing 76
Object Access Auditing 78Creating and Modifying Object Access Audit Rules 79Object Audit Strategies 82Defaults for Object Creation 84
Working with IFS logs 86Settings 87
To work with Definitions: 88To change the logging settings on a file: 89
Original Input Formats 92Activate /Deactivate IFS Log Detection 93
Real-Time Auditing 95Real-Time Detection 95Integration with Action 97
-
8 Audit | User Guide

Rules and Actions 98Creating and Modifying Rules 100
Comparison Test Operators 106And/Or Boolean Operators 112
Firewall/Screen 114Working with Status and Active Job Rules 118
Working with Message Queues 123Create Message Queue Audit Rules 124Define a Message Queue Rule 128Activate Message Queue Detection 131Deactivate Message Queue Detection 133Build Rules for Displayed Messages 134Display Message History Log 135
Working with Time Groups 137Time Groups 138Copy Time Groups 140
Working with Actions 141Defining Alert Messages 142Predefined Messages 144
Selecting a Predefined Message 145Creating or Modifying a Predefined Message 146
Defining Command Scripts 148Replacement Variables 150Conditional Branching 151
Testing and Debugging Rules 152Creating and Running Queries and Reports 153
Working with Individual Reports 157Running Reports 158
Baseline Setup 159System Values 160Network Attributes 161
Network Reporting 162
Audit|User Guide 9

Network Description 163Current Job Central Administration Messages 164All Jobs Central Administration Messages 165Creating and Running Queries 166Adding and Modifying Queries 169Selecting Output Fields for Queries and Reports 174Selecting Sort Fields for Queries and Reports 176
Setting Filter Conditions 178Setting the Order of Rules 179Test Comparison Operators 180Combining Tests with the And/Or Field 182
Scheduling Queries 183Modifying Query Summary Definitions 185Creating Query Classifications and Explanations 187Running Queries 189Scheduling Reports 192Adding or Modifying Report Groups 194Adding Reports to Report Groups 199Defining Time Groups 201
Further Operations from the Define Time Groups Screen 204Defining Groups of Items 205
More Operations from theWork with Classes of Groupsscreen 208
Running Report Groups On Demand 209iSecurity Multi System Support 210
Remote Execution 210Local Execution 210
Displaying the History Log 211The “Backward Glance” Feature 211
User Management 214Working with Users 215
Overview 215
-
10 Audit | User Guide

Using theWork with Users Wizard 215Screen 1: Work with User Status - Basic 217Screen 2: Work with User Status - Signon 220Screen 3: Work with User Status - Password 221
Disabling Inactive Users 223Work with Auto-Disable 224Disable Exceptions 225
Deleting/Reviving Users 226Deleting Unused Disabled Users 227
Auto-Delete Reports Available 229Deleting Exceptions 230Reviving Deleted Users 231
Authorizing Sign-on Times 232Working with Sign-on Schedule 233Display Sign-on Schedule 236
User Absence Security 237Working with Absence Schedule 238Display Absence Schedule 242
User and Password Reporting 243Analyzing Default Passwords 243Printing User Profile Information 245
Replication 246Activation 247Network Definitions 248System Values 250
Set System Values as a Baseline 250Set Baseline Values to be System Values 251Replicate System Values to Another System 252Test RDB Connection 254
User/Password 255Replication Rules 255
Audit|User Guide 11

Replicate Users 259Program Exceptions for Replication 268Revive Deleted Users 270
Replication Log 271Configuration and Maintenance 275
System Configuration 276Audit Configuration 277
General Definitions 277Log QSH, PASE activity 279Auto start activities in ZAUDIT 281Log and Journal Retention 283
Action Definitions 285General Definitions 285SMS Definitions 287Email Definitions 289
Security Event Manager 291QSYSOPR and other message queues 291QAUDJRN Type/Sub Severity Setting 292
SIEM Support 294Syslog Parameters 295Triple Syslog Definitions (#1-#3) 297Syslog Simulation Software 304JSON Definitions 305SNMP Definitions 306
Maintenance Menu 307Transfer Log Copy 308
Export Product Log 308Import Product Log 310
Export / Import Definitions 313Export Definitions 314Import Definitions 317Display Definitions 318
Transfer Definitions 319Export Definitions 319
-
12 Audit | User Guide
Import Definitions 321Audit Maintenance 323
Start a New Journal Receiver 323Change Journal Receiver Library 324Work with Journal Attributes 325Automatic Translation 327Use English File Descriptions 328Delete Statistic Data 329
Journal Product Definitions 330To start recording physical file changes: 330To stop recording physical file changes: 330Display Journal 331
Other Maintenance Options 332Copy Queries from Backup 332Uninstall 333
Central Administration 334To access the iSecurity Central Administration – Audit menu 335
BASE Support 336Definitions 337
Network Definitions 337Network Authentication 339
Email 340Email Address Book 340Email Definitions 342
Operators and Authority Codes 344Work with Operators 344Work with Operators for Authority on Demand and Pass-word Reset 344Work with Authorization 346Display Authorization Status 348
Working with Collected Data 349Purging all AUDIT data 351Purging all AUDIT data 352Check Locks 353
Audit|User Guide 13

*PRINT1-*PRINT9 and *PDF Setup 354*PDF Setup 356*PDF Setup 358Global Installation Defaults 360
Network Support 364Work with network definitions 364Network Authentication 367Send PTF 368Run CL Scripts 371
Displaying Communication Logs 373Appendix A: Raz-Lee Information Sources 374
Summary of Raz-Lee Entry Types 374Report Generator Capabilities 375
Output 375Select (Filter) 375Sort 376Summary Sub Reports 376Explanation 376Print of Filter 376Print of Header 376
Information Types 377Appendix B: configuring CEF format for Apache and WebSphere loginrecords 388
Disclaimer 388Appendix objective 388
Configuring CEF output for Apache web server 389HTTP protocol: 390HTTPS: 391
Configuring CEF output for IBMWebsphere web server 392To configure WebSphere Application Server NetworkDeployment: 393To configure theWebSphere Application Server LibertyProfile: 394HTTP, HTTPS protocols: 395
-
14 Audit | User Guide

Appendix C: Analyzing QAUDJRN on Other Systems 396Preparing the Systems for Remote Auditing 397Activation of Remote Auditing 399
Audit|User Guide 15

Preface
In today’s increasingly complex business environment, security auditing is akey component of an organizational IT security program. Simply creating asecurity policy and purchasing security software tools is not enough.Management should ensure that security policies and procedures areproperly implemented and enforced. In addition, managers must be able toevaluate and test the effectiveness of these policies on a continuing basis.
External auditing firms, as well as internal audit departments, routinelyperform extensive reviews of data systems. Such audit programs typicallyinvolve:
l Transaction testing, including accuracy review
l Verification that transactions are initiated and approved only byauthorized personnel
l Ensuring prompt detection and correction of errors with appropriatetraceability
l Ensuring adequacy of the audit trail
l Implementing and testing the adequacy of IT security policy
Powerful and flexible auditing tools are required to meet theserequirements.
Traditionally, IBM i systems have offered the strongest security features inthe industry. These features, however, are effective only for stand-alone,terminal based computing environments that have all but passed from thescene. The contemporary environment is highly interconnected, based onmultiple computing platforms, and incorporates a high degree of datasharing.
Auditors, managers and even many system administrators are less likely tobe familiar with the complex, arcane nature of the IBM i (OS/400) operatingsystem and its tools. They need intuitive and user-friendly tools that providesolutions quickly and efficiently.
Over the past several years, IBM has begun to take IBM i security auditingseriously. The current version of the IBM i operating IBM includes over
-
16 Audit | User Guide
seventy different audit types and a large number of sub-classifications. Eachindividual audit type covers a particular event or transaction, and specificinformation relating to that event is stored in an audit database (QAUDJRN,also called the security audit journal by IBM). As well as objects, user profilesand security, many of these new audit types relate to connectivity,communication protocols, and distributed database issues.
This security audit journal is difficult and inefficient to use withoutassistance. Audit allows you to use this information efficiently.
Audit|User Guide 17
Audit Overview
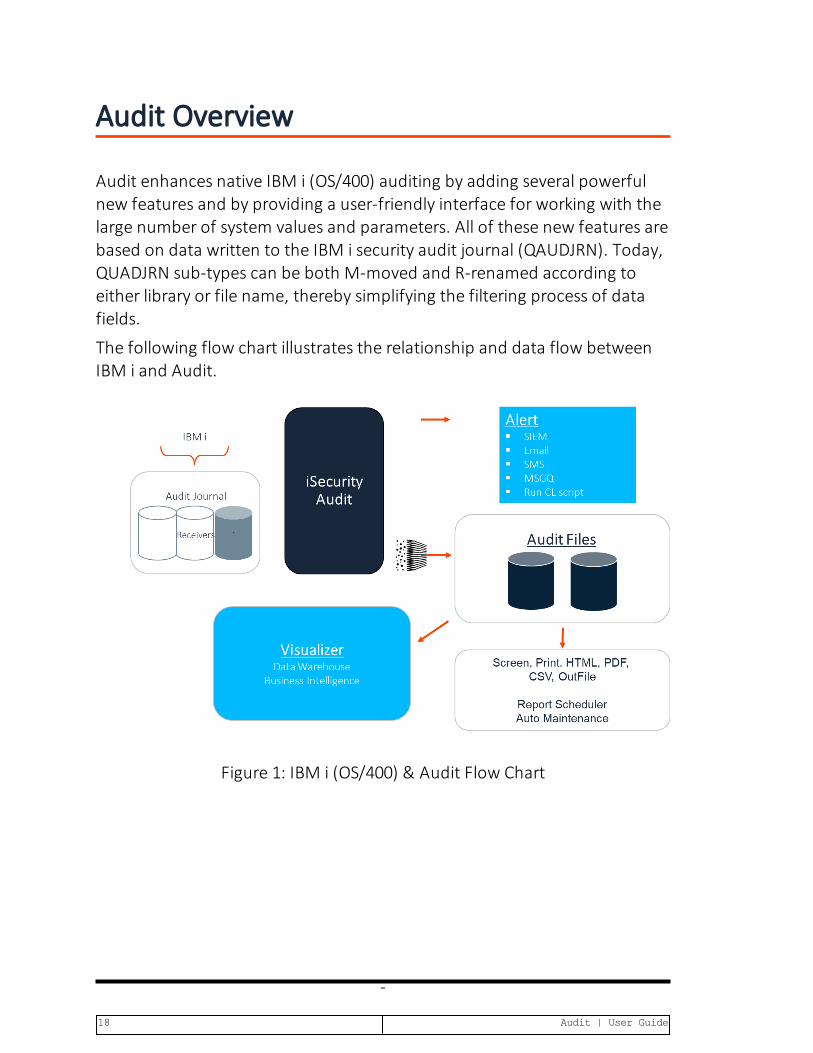
Audit enhances native IBM i (OS/400) auditing by adding several powerfulnew features and by providing a user-friendly interface for working with thelarge number of system values and parameters. All of these new features arebased on data written to the IBM i security audit journal (QAUDJRN). Today,QUADJRN sub-types can be both M-moved and R-renamed according toeither library or file name, thereby simplifying the filtering process of datafields.
The following flow chart illustrates the relationship and data flow betweenIBM i and Audit.
Figure 1: IBM i (OS/400) & Audit Flow Chart
-
18 Audit | User Guide

IBM i (OS/400) Audit Settings Made EasyYou should use Audit to define the IBM i (OS/400) system values, user profileparameters and object parameters that make up the audit settings. All ofthese parameters are available from the IBM i Audit Features menu in Audit.You should never again have to use the IBM i commands to maintain auditsettings.
IBM i records user activities and object access attempts to the security auditjournal according to the audit settings currently in force. This is referred to asthe Current Setting. You can create and save groups of settings for futureuse.
If the IBM i audit is not working and is activated after activating real-timeAudit, the result will include:
l IBM i (OS/400) audit according to the selected audit level
l Real-time Audit
l Actions based on the real time Audit
l The disk-space consumed by both the IBM i (OS/400) system journaland by the real-time Audit logs
Some of the entries (for example, object auditing: ZR=read object) influenceperformance and disk space. Use the Visualizer to recognize what are thelargest entry types in the organization and how to minimize the performanceimpact. To learn how to define the Audit settings according to yourorganization’s needs, see "IBM i (OS/400) Audit Settings" on page 56.
Audit|User Guide 19
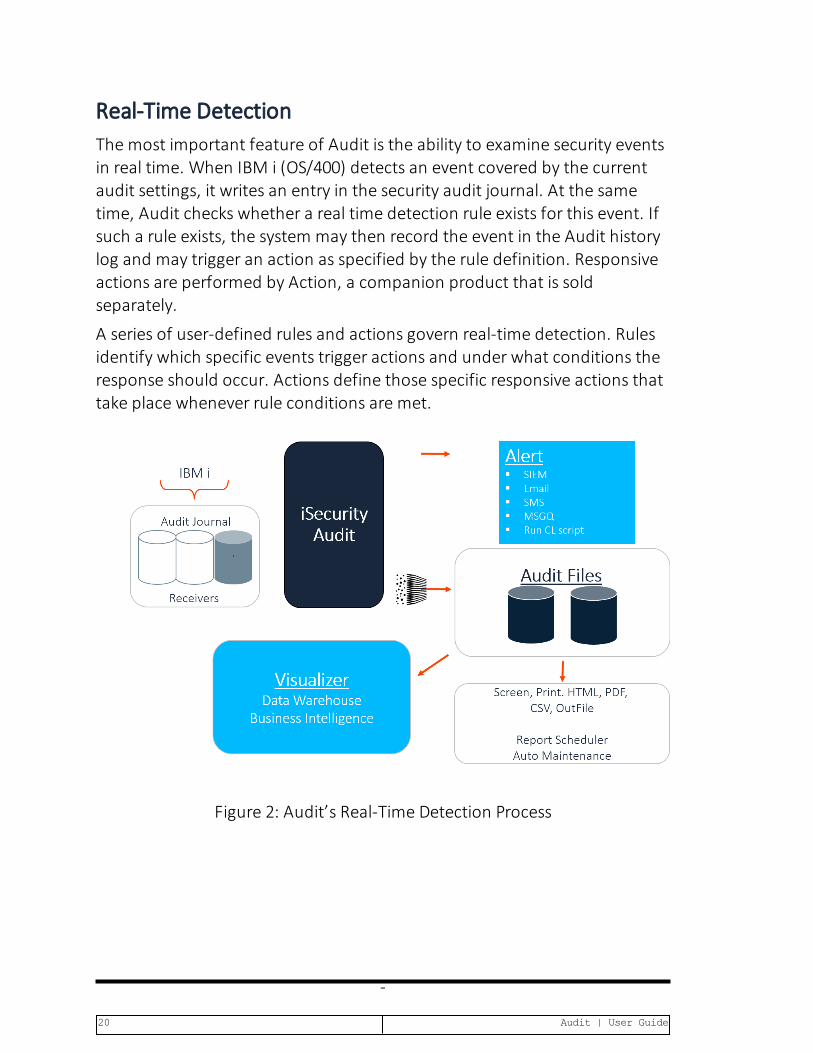
Real-Time DetectionThe most important feature of Audit is the ability to examine security eventsin real time. When IBM i (OS/400) detects an event covered by the currentaudit settings, it writes an entry in the security audit journal. At the sametime, Audit checks whether a real time detection rule exists for this event. Ifsuch a rule exists, the system may then record the event in the Audit historylog and may trigger an action as specified by the rule definition. Responsiveactions are performed by Action, a companion product that is soldseparately.
A series of user-defined rules and actions govern real-time detection. Rulesidentify which specific events trigger actions and under what conditions theresponse should occur. Actions define those specific responsive actions thattake place whenever rule conditions are met.
Figure 2: Audit’s Real-Time Detection Process
-
20 Audit | User Guide

Integration with ActionAs you can see from the above chart, one of the main advantages of real-time detection lies in its integration with the Action product. Actionphysically sends the alert messages and executes command scripts triggeredby Audit.
Audit|User Guide 21
RulesRules determine which conditions trigger an action and/or are recorded inthe history log. For example, you can create a rule that triggers a messagewhenever a specific user modifies any *FILE object, located in theACCOUNTING folder, on or after 05-January-2019.
Conditions are based on a variety of criteria such as, “equal to/not equal to”,“greater/less than”, “included/not included in list”, “like” and “starts with”.In addition, multiple conditions may be combined using Boolean “and/or”conditions.
Audit incorporates a Rule Wizard to assist users in defining complexconditions.
-
22 Audit | User Guide

ActionsAn action may be an alert message sent to designated personnel or apredefined command script that runs automatically. You can configureAudit to send alert messages as email, IBM i (OS/400) system messages,network messages, SMSmessages to cellular telephones, or beeper (pager)messages.
Audit|User Guide 23
History LogAudit maintains a separate history log in addition to the security auditjournal. The primary purpose of the log is to facilitate the powerful queryand reporting features without the need to extract data from the securityaudit journal.
Auditrecords event data in the history log, only when instructed to do so byreal-time detection rules. Therefore, the log typically contains only a subsetof the events recorded in the security audit journal. You should create rulesonly for those events that you wish to track using the query and reportingfeatures.
There is an option that allows you to copy all events to the log, unless a rulespecifically excludes it. However, we do not recommend this featurebecause of performance degradation and disk space requirements.
l Neither QSECOFR nor any other user can update or delete recordsfrom the file that contains the log. This is true even when using theSQL, DFU, CHGFC or other commands.
l Users authorized as Administrators for the Work with Oper-ators option in the BASE Support menu (STRAUD> 89 > 11) canset the number of days that data is kept online.
l Users authorized as Administrators for the Work with Operatorsoption in the BASE Support menu (STRAUD> 89 > 11) can use theWork with Collected Data option in the BASE Support menu(STRAUD > 89 > 51) to remove data of full days.
l To know what user QSECOFR has done in the product log files (forexample, RMVM or CLRPFM), use the Add Journal option in theMaintenance Menu (STRAUD > 82 > 71). Every operation withthe definition file is recorded. To control the logs, use the STRJRNPFcommand for files SMZ4DTA/AUXX, SMZ4DTA/AUCC, andSMZTMPA/GSCALP.
NOTE: This will extend the data space requirements.
-
24 Audit | User Guide

l SECOFR as well as any other authorized user can use the RealTime Auditing option (STRAUD > 11) to change the loggingoption per any audit type or the combination of field values in audittype.
Audit|User Guide 25
Creating and Running Queries and Reports
Audit includes powerful tools for creating and viewing queries, reports, andlogs. Many of these tools are also available within other iSecurity products,giving a consistent experience in using them.
You can use several powerful and user-friendly tools to create output thatcontains only the data that you need to see, in a format that is useful to you.
The reporting features are:
l Display of log – showing the collected information of logs in either amessage format which looks similar to a job log, or in a tabular view
l Query generator – a comprehensive report generator which hastremendous filtering capabilities and can create reports for one ormore systems without copying the report definition
l Compliance Evaluator – score cards type reports to verify compliancewith predefined targets
l Report Scheduler - enabling automatic run of groups of reports andlogs
l Visualizer – BI (Business Intelligence) for activity logs. It uses a datawarehouse with compressed information, making it possible to keepinformation for long periods. This is available in the GUI interface only.
Possible outputs for reports include display on the Green or GUI screen,HTML, PDF, CSV (Excel), and OUTFILE (Output file). When using the GUI, theresults of a query can also be directed to the Visualizer to enabling using BImethods to deal with the results.
Once a report is defined on a system, it can be run on information on thecurrent system, any other system, or any group of systems. There is no needto copy the definition to any other system.
Result files are named and stored in a proper order to ensure that they allrun.
The output can be sent by email, either one report at a time, or as a group ofreports together. Optional zip and password are available.
If the information that is sent contains one or more empty reports, this isdenoted in the subject of the email. Customers can set the product to eithereliminate or send empty reports. (Some auditors prefer to keep all reports,
-
26 Audit | User Guide

even if they are empty, to ensure that the definition of the report did notchange.)
The product collects information about each query that is run. Thisinformation includes the full command used to run the report, the time thatit ran, how long it took to run it, and the name of the output that itproduced.
An effective security policy relies on queries and reports to providetraceability for system activity. Audit queries and reports containinformation from an extremely wide range of sources, (as shown in"Appendix A: Raz-Lee Information Sources" on page 374) including:
l Activity data collected from sources such as QHST, QAUDJRN (thesystem audit journal), QIPFILTER, QIPNAT, QACGJRN, QQOS, QSNMP,QDSNX, QVPN, and QZMF
l Activity data collected by iSecurity/Firewall from security related exitpoints
l Activity of the Antivirus and Anti-Ransomware modules of iSecurityl Information from the system about Users, Groups, Native and IFSObjects, System values, PTFs, Authorization lists, and other categories
l Information that shows current activity status such as Active Jobs,NETSTAT, Disk, and System Status
l Summarized activity information which is kept in the internal DataWarehouse that is the base of the GUI Visualizer.
l Database changes, filtered, collected and reported by iSecurity/AP-Journal
l Activity about elevated authority, collected and reported by Authority-On-Demand
l Activities with objects in product libraries, collected and reported byChange-Tracker
l Activities of users on emulated screens collected and reported byCapture
l Activity of Password-Reset, MFA, and other products, also collectedand reported.
To work with these features, select 41. Queries and Reports fromthe Audit Main Menu. The Queries screen appears:
Audit|User Guide 27

AUQRYMN Queries iSecurity⁄Audit System: S520 Select one of the following:
Query Wizard Report Scheduler 1. Work with Queries 51. Work with Report Scheduler 52. Run a Report Group
Run a Query Baseline Setup 11. Display 61. System Values 12. Print 62. Network Attributes 13. Submit as Batch Job 63. Counts in Compliance Query
Log Network reporting SYSTEM() 21. Display Log 71. Network description 75. Current Job CntAdm Messages 76. All Jobs CntAdm Messages
Selection or command ===>
F3=Exit F4=Prompt F9=Retrieve F12=Cancel F13=Information Assistant F16=AS⁄400 main menu
To workwith queries:
To create and modify queries,
select 1. Work with Queries. TheWork with Queriesscreen appears, as shown in "Creating and Running Queries"on page 166.
To run existing queries,
select the following items. For each the Run Audit Query(RUNAUQRY) screen appears, as shown in "Running Queries"on page 189, with the relevant ways of running the queryselected:
l 11. Displayl 12. Printl 13. Submit as Batch Job
To workwith logs:
To display Audit log entries,
select 21. Display Log. The Display Firewall Log(DSPFWLOG) screen appears, as shown in Displaying FirewallLogs.
-
28 Audit | User Guide

To workwith reports
To schedule reports to run,
select 51. Work with Report Scheduler. TheWorkwith Report Scheduler screen appears, as shown in"Scheduling Reports" on page 192.
To run groups of reports,
select 52. Run a Report Group. The Run Report Group(RUNRPTGRP) screen appears, as shown in "Running ReportGroups On Demand" on page 209.
To view other network and system information,
To ping and test DDM connections for network systems,
select 71. Network Description. The standard DisplayNetwork Systems screen appears.
To view Central Administration messages for current jobs,
select 75. Current Job CntAdm Messages. TheDisplay Messages screen appears, showing the job log for thecurrent job.
To view Central Administration messages for all jobs,
select 76. All Jobs CntAdm Messages. The DisplayMessages screen appears, showing the job log for all jobs.
To exit the screen, press the F3 or F12 key.
Audit|User Guide 29
IBM and Raz-Lee Entry TypesThe OS/400 System Journal (QAUDJRN) logs all system activities involvingJobs, Objects, User Profiles, Authorities and much more. The activities areclassified as “entry types”, many of which have associated subtypes in orderto differentiate between different occurrences of the entry type; as anexample, entry type JS, which records actions relating to jobs, has eightsubtypes, two of which differentiate between batch and interactive jobs.
IBM entry types are associated with “audit types” which are simply IBM-defined auditing categories. A comprehensive table listing all Audit Types,their corresponding Entry Types and all Subtypes, including a description foreach category, can be found in STRAUD > 1 > 9.
To set which IBM Entry types are logged in QAUDJRN:
l Use STRAUD > 1 > 1.
To set which IBM Entry types are logged in iSecurity Audit log:
l Use STRAUD > 11.
See "Working with Current Setting" on page 52 and "Setting up the AuditScheduler" on page 66, and see "Working with Status and Active Job Rules"on page 118.
For more information regarding QAUDJRN and the IBM-supplied EntryTypes, see https://www.ibm.com/support/knowledgecenter/ssw_ibm_i_73/rzarl/rzarlf04.htm .
-
30 Audit | User Guide

Other RelatedModulesAudit is a comprehensive product that controls the configuration andmanagement of newer iSecurity products designed to meet specific auditingand tracking needs. Access these products and supplementary Auditmodules directly from Audit by selecting STRAUD > 69. OtherRelated Modules in the Main menu. This opens the following RelatedModules screen.
In addition, the following options have their own chapters within thismanual:
l Working with Native Object Security
l "Replication" on page 246
Audit|User Guide 31

Getting Started
This chapter guides you through the steps necessary to begin using Audit forthe first time and the basic procedures for configuring the product for day-to-day use.
-
32 Audit | User Guide

Starting Audit for the First TimeTo use this product, the user must have *AUDIT special authority. Anadditional product password may also be required to access certainfunctions. The default product password is QSECOFR. We recommend thatyou change this password as soon as possible.
To start Audit:
l In the command line, type STRAUD. The Main menu appears.
AUAUDMN Audit iSecurity/AuditSystem: S520 Settings Analysis 1. OS/400 Audit Features 41. Queries and Reports 2. Activation 42. Display Log
Real-Time Filtering and Alerts Related Modules/Options 11. Audit (QAUDJRN, QIPFILTER...) 61. Work With Actions 12. Firewall/Screen 62. User Management 13. Status & Active Job (SysCtl) 68. Compliance 14. Message Queue & QHST (SysCtl) 69. Other Related Modules 15. IFS Logs
Definitions General 31. Time Groups 81. System Configuration 35. General Groups 82. Maintenance Menu 89. Base Support
Selection or command ===>
F3=Exit F4=Prompt F9=Retrieve F12=Cancel F13=Information Assistant F16=AS/400 main menu
Audit|User Guide 33

System ConfigurationAudit is ready-to-run right out of the box. Before using the product for thefirst time, you should review the system configuration parameters thatcontrol important features.
Security products such as Audit do not have a “typical” or “optimal”configuration. Each installation or application has different operationalcriteria and security needs. The auditing requirements for a largemanufacturing environment differ from those for a bank, a softwaredeveloper or a service organization.
To start configuring your system:
1. Select STRAUD > 81. System Configuration from the Mainmenu.
2. Perform the steps on the following pages. After finishing, press Enteragain to save your changes and leave this menu.
WARNING: If you press F3, you will lose any changes thatyou have made.
The following is an overview of the System Configuration process:
NOTE: After you modify any of the parameters accessiblefrom this menu, the message
Modify data, or press Enter
appears when the menu returns.
-
34 Audit | User Guide

Step 1: Setting General DefinitionsFive important parameters are located on the Audit General Definitions screen.
1. Select 1. General Definitions from the System Configurationmenu(STRAUD > 81 > 1), shown in "Starting Audit for the First Time" onpage 33. The Audit General Definitions screen appears.
Audit General Definitions 23⁄07⁄1911:46:47
Type options, press Enter.
Enable Audit Scheduling . . . . . . Y Y=Yes, N=No Audit can automatically replace the OS⁄400 audit setting with pre-defined settings according to the time and day of the week. Y enables this feature.
"Field changed" symbol (print). . . # This symbol is printed before each user profile attribute that has been changed.
Use *N to represent empty fields . Y Y=Yes, N=No Empty fields can be displayed as *N when the log is displayed. If you select N=No, the system will use less disk space.
Start log display . . . . . . . . . N N=New, O=Old Start query display . . . . . . . . N N=New, O=Old
F3=Exit F12=Cancel
Audit|User Guide 35

Parameter orOption
Description
EnableAuditScheduling
Allows you to change the IBM i (OS/400) setting automaticallyaccording to the day of the week and the time of day.Y=YesN=No
"Fieldchanged"symbol(print)
Audit can compare "before" and "after" images of records. Youcan define a symbol to appear by each changed field on printedreports. Choose any character you want. The default character is#.
Use *N torepresentemptyfields
When displaying a log, empty fields can be displayed as *N. Ifyou do not represent empty fields, you will save disk space.Y=YesN=No
Start logdisplay
Sort order for displaying a log.N=Newest item appears first.O=Oldest item appears first.
Start queryDisplay
Sort order for displaying query results.N=Newest item appears first.O=Oldest item appears first.
-
36 Audit | User Guide

Step 2: Setting Log and Journal Retention ParametersTo preserve disk storage capacity and improve query response time, retaintransactions for no more than the minimum period necessary to maintain aneffective audit program.
Define how long to retain the Audit logs and journals for, and definewhether to run a backup program that will run automatically before the logsand journals are deleted at the end of the retention period.
NOTE: The IBM i (OS/400) journal receiver may contain data not recorded inthe Audit history log. Therefore, it is highly recommended that youretain and backup the journal in addition to the history log.
1. Select 9. Log Retention from the Audit Main Menu(STRAUD > 81 > 9), shown in "Starting Audit for the First Time" onpage 33. The Log & Journal Retention screen appears. The recommended ini-tial settings are displayed below.
Log & Journal Retention 23⁄07⁄1911:39:11
Log retention period (days) . . . . . . . 7 Days, 9999=*NOMAXBackup program for logs . . . . . . . . . *NONE Name, *STD, *NONEBackup program library . . . . . . . . .A specified backup program may run before deleting old logs. It will backup all data deleted after the retention period expires. The *STD backup program source is in SMZ4⁄AUSOURCE AULOGBKP.
Keep deleted users for revival (days) . . 10 Days, 999=*NOMAX
The following parameters apply to the audit journal receivers. This is the primary data source for Audit. You should always backup the journal receiver because it may contain data not logged in Audit. QAUDJRN receivers retention period (days) 5 Days, 9999=*NOMAX Backup program for journal . . . . . . . *NONE Name, *STD, *NONEBackup program library . . . . . . . . .A specified backup program may run before deleting old journal receivers. It will backup data deleted after the retention period expires. The *STD program is SMZ4⁄AUSOURCE AUJRNBKP.
F3=Exit F12=Cancel
2. Enter the required fields as defined below and press Enter.
Audit|User Guide 37

Parameter Description
Logretentionperiod(days)
Transactions are retained for the specified number of days. Atthe end of this period, transactions are purged from the log.Enter 9999 to retain all data indefinitely.
Backupprogramfor logs
Enter the name of the backup program to use to back up logs.Type *STD to use the Audit standard backup program or *NONEfor no backup. You must ensure the appropriate backup media isloaded before the automatic backup program runs.
Backupprogramlibrary
Enter the name of the library where the Backup program isstored.
Keepdeletedusers forrevival(days)
Enter the number of days for which deleted users are stored onthe system. Enter 999 to keep all users indefinitely.
QAUDJRNreceiversretentionperiod(days)
Transactions are retained for the specified number of days. Atthe end of this period, transactions are purged from the journal.Enter 9999 to retain all data indefinitely.
Backupprogramfor journal
Enter the name of the backup program to use to back upjournals. Type *STD to use the Audit standard backup programor *NONE for no backup. You must ensure the appropriatebackup media is loaded before the automatic backup programruns.
Backupprogramlibrary
Enter the name of the library where the Backup program isstored.
-
38 Audit | User Guide

Step 3: Setting Action General DefinitionsThis option enables you to take full advantage of the integration betweenIBM®Audit and Action.
1. Select 11. General Definitions from the Audit Main Menu(STRAUD > 81 > 11), shown in "Starting Audit for the First Time" onpage 33. The Action General Definitions screen appears.
Action General Definitions 23⁄07⁄1914:17:48
Work in *FYI* (Simulation) mode . . . . .N Y=Yes, N=No*FYI* is an acronym for "For Your Information". In this mode,security rules are fully operational, but no action is taken.
Log CL script commands . . . . . . . . .3 1=No, 2=Fails, 3=All
Status & Active jobs detection Interval between checks . . . . . . . . 1200 Seconds Prevent action for same rule (default). 20 Seconds Actions are not repeated for the same rule until the specified period of time has elapsed. This prevents unnecessary repetition of actions.
For events processed a long time after they occurred Send message only if within . . . . . . 60 Minutes Run scripts only if within . . . . . . 60 Minutes Do not perform actions for events if the time passed since they have occured passed the specified limits.
F3=Exit F12=Previous
The following table provides an explanation for some of the options:
Audit|User Guide 39

Option Description
Enable FYI Simulation Mode FYI is an acronym for"For YourInformation". In thismode, security rulesare fully operational,but no action isactually taken. Thisenables you to reviewyour History Log foranalysis, and therebylater create validsecurity rules.Y= Enable FYIN = Do not enable FYI
Log CL Script Commands This option enablesyou to save a log of CLcommands that run ina particular action inthe job log of the real-time processor.1= Do not save to thelog2 = Save only failedcommands3 = Save all commands
Status & Active jobs detection Actions are notrepeated for the samerule until the specifiedperiod has elapsed.This preventsunnecessary repetitionof actions.
-
40 Audit | User Guide

Option Description
Interval betweenchecks= the timebetween Action checks(in seconds)Prevent action forsame rule for = thisoption avoidsrepetition of the samerule (in seconds)
For events processed a long time after they occurred Do not performactions for events ifthe time passed sincethey have occurredhas passed thespecified limits (inminutes).
2. Select 5. Auto start activities in ZAUDIT from the SystemConfigurationmenu (STRAUD > 81 > 5). The Auto start activ-ities in ZAUDIT subsystem screen appears.
3. Type Y for system activities that you want to start automatically after youactivate the ZAUDIT subsystem in Action.
Audit|User Guide 41

Auto Start Activities in ZAUDIT Subsystem 22⁄07⁄1917:30:46
Type options, press Enter.
Real-Time Auditing (All systems) . . . Y Y=Yes, N=NoStatus & Active jobs . . . . . . . . . Y Y=Yes, N=NoFirewall & Screen (Action) . . . . . . Y Y=Yes, A=Always, N=NoSelecting A will perform Action even if Firewall is in *FYI. (1) Message Queues (2) . . . . . . . . . . Y Y=Yes, N=NoReplication of User, Pwd, SysVal . . . N Y=Yes, N=No
(1) Action must be running in real mode (not in *FYI) (2) Only message queues marked as Active definition A=Auto start, are started.
F3=Exit F12=Previous
-
42 Audit | User Guide

Step 4: Language Support
Use this option to replace characters when creating HTML files.
In some languages, the keyboard settings are different. When creating anHTML file via one of the commands, such as DSPAULOG or DSPFWLOG, themachine writes to a text file that the HTML translator understands.
For example, a keyword for HTML might have to be between squarebrackets, as in [keyword], but in input to be processed, the key word mightlook like !keyword^ , with the word between an exclamation mark (!) and acaret (^). Setting the replacement fields as follows:
Replacement of special characters. !^
(original value)[]@#$....1....+....2....+....3....+....4
converts the string into [keyword] , which will the HTML translator willunderstand. Each character in the upper field is converted to the characterdirectly beneath it in the lower field.
To configure Action Language Definitions, select STRAUD > 81 > 91.Lanuage Support. The Action Language Definitions screenappears.
Action Language Definitions 1⁄08⁄1915:39:01 Type options, press Enter.
Right to left language system . . Y Y=Yes, N=No DBCS system . . . . . . . . . . . N Y=Yes, N=No
Override HTML, CSV etc. Attributes Target CCSID (Windows ASCII) . . 0 Place cursor and press: HTML Character set . . . . . . . - F4 for selection - F5 for auto set Special consideration for DBCS⁄non-Latin languages CCSID to use as origin of data . 37
Replacement of special characters (originalvalue) []@#${}..1....+....2....+....3....+....4
F3=Exit F4=Prompt F5=Autoset F12=Cancel
Audit|User Guide 43

Step 5: Activating Real Time DetectionYou must activate real-time detection on your system to enable triggeringactions and posting events in the Audit history log. It is recommended thatyou allow IBM i (OS/400) to activate real-time detection automatically at IPL.You can de-activate real-time detection at any time.
To manage real-time detection after installation, select 2. Activation inthe Audit main menu (STRAUD > 2). The Activationmenu appears.
AUSETMN Activation iSecurity/AuditSystem: S520
Activation Manual Activation (Local/Remote) 1. Activate ZAUDIT subsystem 31. Start Real-Time Auditing 2. De-activate ZAUDIT subsystem 32. End Real-Time Auditing 5. Work with Active Jobs 33. Set/Add Start of Auditing STRAUD, 81, 5 to set activities 35. Work with Active JournalsFor QHST/MsgQ see STRAUD, 14
Auto-Activation at IPL Analyzing QAUDJRN on another system 11. Activate ZAUDIT subsystem at IPL 41. Setup 12. Do Not Activate ZAUDIT sbs at IPL
Selection or command ===>
F3=Exit F4=Prompt F9=Retrieve F12=Cancel F13=Information Assistant F16=AS/400 main menu
To activate real-time auditing manually:
1. Select 31. Start Real-Time Auditing.
2. In the Start Real-Time Auditing (STRRTAUD)screen that appears, enter therequired starting date and time (and if relevant, enter the required end-ing date and time), then press Enter.
To end real-time auditing,
1. Select 32. End Real-Time Auditing.
2. Specify which system to stop auditing.
To set a specific time and date to begin auditing:
-
44 Audit | User Guide

1. Select 35. Set Start of Auditing Time.
2. In the Set Start of Auditing Time (SETRTAUD) screen thatappears, enter the required starting date and time, then press Enter.
To enable automatic activation at IPL, select 11. Activate ZAUDITsubsystem at IPL.
To manually activate or add additional message queue detection:
1. Select 14. Message Queue (SysCtl) in the Audit main menu
2. Select 21. Activate in the Message Queue menu.
Audit|User Guide 45
Detailed Change User Profile Audit TypeAudit presents a new unique solution in auditing User Profile changes. Thissolution allows you to receive detailed information on any changes made onthe IBM i user profiles:
l Exact user attributes that were changed
l Their former value
l Their current value
To reach this detailed information, Audit uses a special artificial audit type,C@ - Change User Profile. This audit type, unique to iSecurity, writes tothe Audit log file when user profiles change and contains user profile datafrom before and after the change.
This audit type can be used both for real-time detection and for queries andreports. The queries from this audit-type show the “before and after” valuesonly of the fields changed.
-
46 Audit | User Guide

Working with Operators’ AuthoritiesOperators' authority management for all iSecurity modules is nowmaintained in a single place.
There are three default groups:
l *AUD#SECAD- All users with both *AUDIT and *SECADM specialauthorities. By default, this group has full access (Read and Write) to alliSecurity components.
l *AUDIT - All users with *AUDIT special authority. By default, thisgroup has only Read authority to Audit.
l *SECADM- All users with *SECADM special authority- By default, thisgroup has only Read authority to Firewall.
iSecurity related objects are secured automatically by product authorizationlists (named security1P). This strengthens the internal security of theproduct. It is essential that you use Work with Operators to define allusers who have *SECADM, *AUDIT or *AUD#SECAD privileges, but do nothave all object authority. The Work with Operators screen has Usr(user management) and Adm for all activities related to starting, stoppingsubsystems, jobs, import/export and so on. iSecurity automatically adds allusers listed in Work with Operators to the appropriate productauthorization list.
Users may add more operators, delete them, and give them authorities andpasswords according to their own judgment. Users can even make the newoperators’ definitions apply to all their systems; therefore, upon import, theywill work on every system.
Use Password = *BLANK for the default entries. Use DSPPGM GSIPWDRto verify. The default for other users can be controlled as well.
If your organization wants the default to be *BLANK, then the followingcommand must be used:CRTDTAARA SMZTMPC/DFTPWD *char 10
This command creates a data area called DFTPWD in library SMZTMPC. Thedata area is 10 bytes long and is blank.
NOTE: When installing iSecurity for the first time, certain user(s) might nothave access according to the new authority method. Therefore, thefirst step you need to take after installing is to edit those authorities.
Audit|User Guide 47

To modify operators’ authorities:
1. Select 11. Work with Operators in the Base Supportmenu(STRAUD > 89 > 11). TheWork with Operators screen appears.
Work with Operators
Type options, press Enter. 1=Select 3=Copy 4=Delete Auth.level: 1=*USE, 3=*QRY(FW,AU,CT,SU), 5=*DFN(CT,EN,SU), 9=*FULL User System FWSCPWCDAVAUACCPJRSUVSRPCOCTPRUMENAD
*AUD#SECADS520 9 9 9 9 9 9 9 9 9 9 9 9 9 9 9 9 9 9*AUDIT S520 9 9 9 9 9 9 *SECADM S520 9 9 9 9 9 9 ALEX3 S520 9 9 9 9 9 9 9 9 9 9 9 9 9 9 9 9 9 9AV S520 9 9 9 9 9 9 9 9 9 9 9 AVRAHAM S520 9 9 9 9 9 9 9 9 9 9 9 9 9 9 9 9 9 9DB S520 9 9 9 9 9 9 9 9 9 9 9 9 9 3 9 9 9 9EVGPRVD S520 9 9 9 9 9 9 9 9 9 9 9 9 9 9 9 9 9GS S520 9 9 9 9 9 9 9 9 9 5 9 9 9 9 9 9 9 9JAVA S520 3 5
More...FW=Firewall SC=Screen PW=Password CM=Command AU=Audit AC=ActionAV=Antivirus CA=Capture JR=Journal VS=Visualizer UM=User Mgt. AD=AdminRP=ReplicationCO=Compliance CT=Chg TrackerPR=Pwd ResetEN=Encryption SU=SafeUpd
F3=Exit F6=Add new F8=Print F11=*SECADM⁄*AUDIT authority F12=Cancel
2. Type 1 next to the user to modify his authorities (or press F6 to add anew user). The Modify Operator screen appears.
-
48 Audit | User Guide
Modify Operator
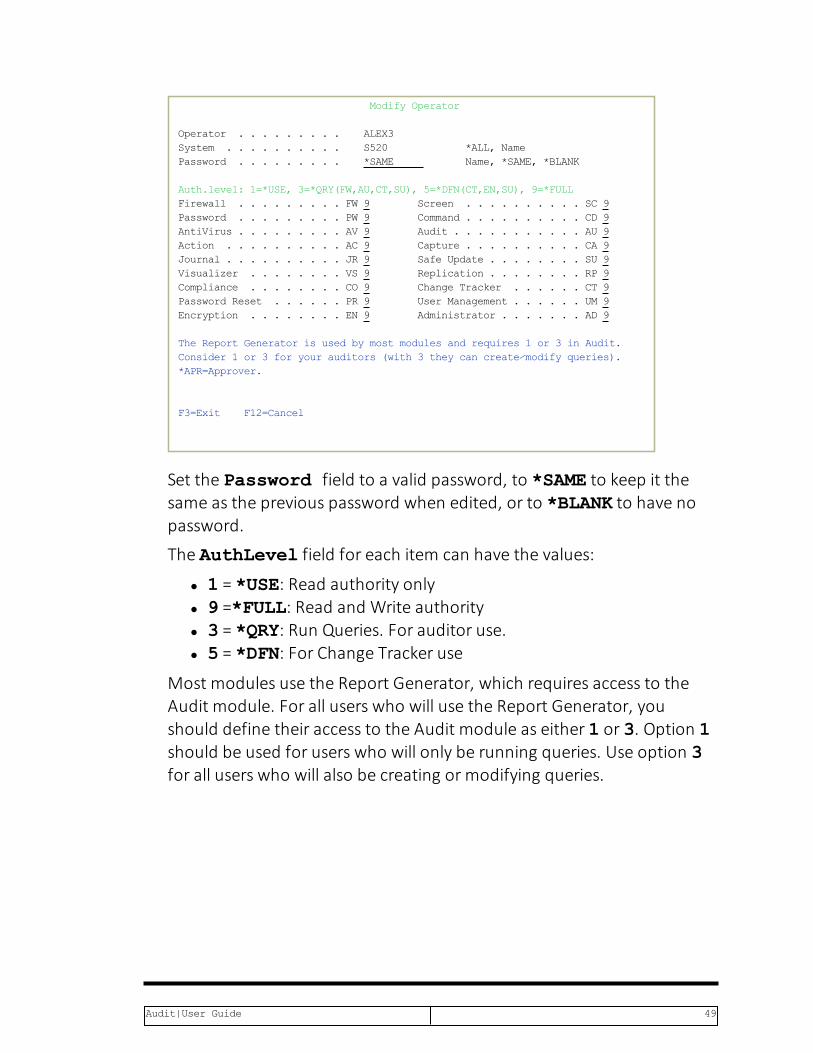
Operator . . . . . . . . . ALEX3 System . . . . . . . . . . S520 *ALL, Name Password . . . . . . . . . *SAME Name, *SAME, *BLANK
Auth.level: 1=*USE, 3=*QRY(FW,AU,CT,SU), 5=*DFN(CT,EN,SU), 9=*FULLFirewall . . . . . . . . .FW9 Screen . . . . . . . . . .SC9Password . . . . . . . . .PW9 Command . . . . . . . . . .CD9AntiVirus . . . . . . . . .AV9 Audit . . . . . . . . . . .AU9Action . . . . . . . . . .AC9 Capture . . . . . . . . . .CA9Journal . . . . . . . . . .JR9 Safe Update . . . . . . . .SU9Visualizer . . . . . . . .VS9 Replication . . . . . . . .RP9Compliance . . . . . . . .CO9 Change Tracker . . . . . .CT9Password Reset . . . . . .PR9 User Management . . . . . .UM9Encryption . . . . . . . .EN9 Administrator . . . . . . .AD9
The Report Generator is used by most modules and requires 1 or 3 in Audit. Consider 1 or 3 for your auditors (with 3 they can create⁄modify queries). *APR=Approver.
F3=Exit F12=Cancel
Set the Password field to a valid password, to *SAME to keep it thesame as the previous password when edited, or to *BLANK to have nopassword.
The AuthLevel field for each item can have the values:
l 1 = *USE: Read authority onlyl 9 =*FULL: Read and Write authorityl 3 = *QRY: Run Queries. For auditor use.l 5 = *DFN: For Change Tracker use
Most modules use the Report Generator, which requires access to theAudit module. For all users who will use the Report Generator, youshould define their access to the Audit module as either 1 or 3. Option 1should be used for users who will only be running queries. Use option 3for all users who will also be creating or modifying queries.
Audit|User Guide 49

3. Set authorities and press Enter. A message appears stating that the userbeing added or modified was added to the Authority list that secures theproduct's objects; the user carries Authority *CHANGE and will be gran-ted Object operational authority. The Authority list is created in the install-ation or release upgrade process. The SECURITY_P user profile isgranted Authority *ALLwhile the *PUBLIC is granted Authority*EXCLUDE. All objects in the libraries of the product (except some restric-ted special cases) are secured via the Authority list.
-
50 Audit | User Guide

Initial IBM i (OS/400) Audit SettingsEffective security auditing demands a balance between preserving historicaldata and system performance. The process of capturing events andrecording them in both the IBM-provided security audit journal and theAudit history log can consume system resources and large amounts of diskspace. Performance degradation can result when you capture and recordtoo many events.
Which specific events you choose to track is a function of your organization’soverall security objectives and potential exposures. When working with Auditfor the first time, we recommend certain all-purpose settings that will allowyou to examine security exposures and to develop historical data that will beuseful when creating real-time detection rules.
In the following section, several generic setting scenarios help get youstarted with security data collection, while minimizing performance burdenand disk space. Modify these settings as soon as possible, in accordance withyour organizational and system requirements. In any case, you shouldcarefully monitor system performance and disk space.
After analyzing audit data generated by this initial process, you will be ableto narrow your audit scope and use real-time detection rules to build a moreefficient audit program.
However, for your initial settings, we recommend that you follow theseprocedures as described. For the step-by-step tutorials, together withdetailed explanations for the parameter settings see "IBM i (OS/400) AuditSettings" on page 56.
To begin working with IBM i audit settings:
1. Select 1. OS/400 Audit Features in the Audit main menu(STRAUD > 1). The OS/400 Audit Featuresmenu appears.
2. Perform the following procedures:
l "Working with Current Setting" on the next page
l "Working with User Activity Auditing" on page 53
l "Working with Object Auditing" on page 55
Audit|User Guide 51
Working with Current SettingThe current audit setting determines which events you track for all users on aglobal basis and whether object auditing is active for all users.
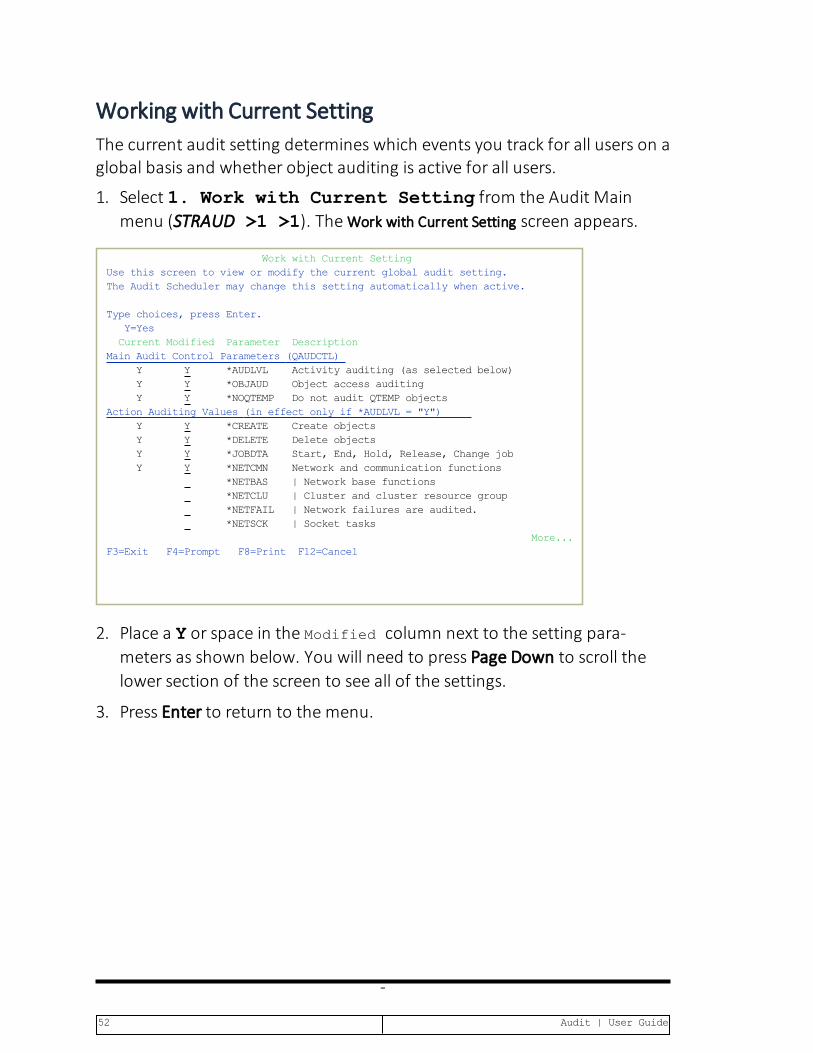
1. Select 1. Work with Current Setting from the Audit Mainmenu (STRAUD >1 >1). TheWork with Current Setting screen appears.
Work with Current SettingUse this screen to view or modify the current global audit setting. The Audit Scheduler may change this setting automatically when active.
Type choices, press Enter. Y=Yes CurrentModified Parameter DescriptionMain Audit Control Parameters (QAUDCTL) Y Y *AUDLVL Activity auditing (as selected below) Y Y *OBJAUD Object access auditing Y Y *NOQTEMP Do not audit QTEMP objects Action Auditing Values (in effect only if *AUDLVL = "Y") Y Y *CREATE Create objects Y Y *DELETE Delete objects Y Y *JOBDTA Start, End, Hold, Release, Change job Y Y *NETCMN Network and communication functions *NETBAS | Network base functions *NETCLU | Cluster and cluster resource group *NETFAIL | Network failures are audited. *NETSCK | Socket tasks More...F3=Exit F4=Prompt F8=Print F12=Cancel
2. Place a Y or space in the Modified column next to the setting para-meters as shown below. You will need to press Page Down to scroll thelower section of the screen to see all of the settings.
3. Press Enter to return to the menu.
-
52 Audit | User Guide

Working with User Activity AuditingThe following settings apply to the security officer (QSECOFR)and any otherusers with similar authority.
1. Select 31. User Activity Auditing from the OS/400 AuditFeaturesmenu (STRAUD > 1 > 31). The Set User Auditing screenappears.
Set User Auditing
Select User or Group Profile, press Enter:
User profile . . . . . . . Name -or-Group profile . . . . . . . NameEnables setting of all User Profiles in the group profile.
Retrieve auditing of User . NameSets the default of the Audit values as per those of the specified User.
F3=Exit F4=Prompt
2. In Group Profile, enter the user profile QSECOFR.
3. Set the parameters as shown below:
Audit|User Guide 53
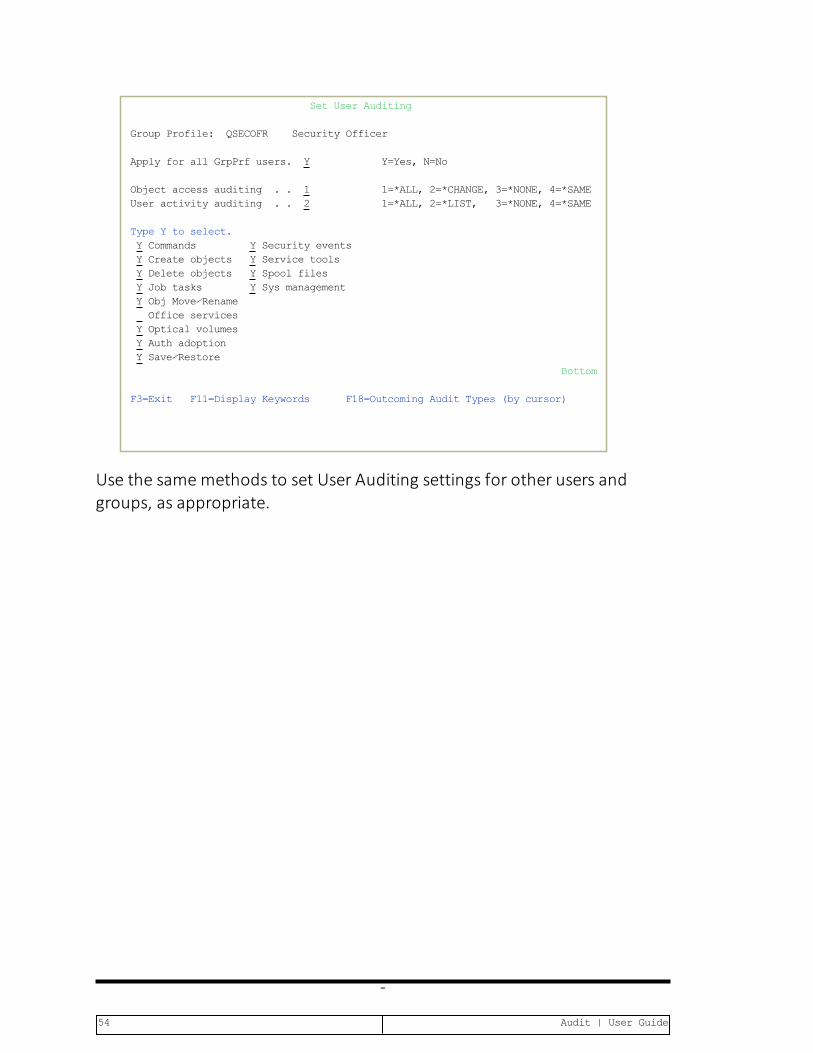
Set User Auditing
Group Profile: QSECOFR Security Officer
Apply for all GrpPrf users. Y Y=Yes, N=No
Object access auditing . . 1 1=*ALL, 2=*CHANGE, 3=*NONE, 4=*SAMEUser activity auditing . . 2 1=*ALL, 2=*LIST, 3=*NONE, 4=*SAME
Type Y to select. Y Commands Y Security events
Y Create objects Y Service tools Y Delete objects Y Spool files Y Job tasks Y Sys management Y Obj Move⁄Rename Office services Y Optical volumes Y Auth adoption Y Save⁄Restore Bottom
F3=Exit F11=Display Keywords F18=Outcoming Audit Types (by cursor)
Use the samemethods to set User Auditing settings for other users andgroups, as appropriate.
-
54 Audit | User Guide

Working with Object AuditingYou should identify those objects that are critical to your organization andthen create settings to capture all attempts to access these objects. Thereare separate wizards for auditing native IBM i objects or IFS (any non-nativeIBM i objects). The procedures are similar for both object types.
At first, you should capture all changes to critical objects. When you haveanalyzed the data, you can define settings and real-time detection rules tocapture a much smaller sample to provide an effective audit trail.
1. For native objects, select 41. Native Object Auditing from theOS/400 Audit Featuresmenu (STRAUD > 1 > 41). For IFS objects, select42. IFS Object Auditing.
2. Select a library and object combination from the list, or press F6 to createa new entry.
3. Enter parameters on the appropriate Add Object Auditingscreen as dis-played (example is for native IBM i (OS/400) objects).
Add Object Auditing
Type choices, press Enter.
Object . . . . . . . . . . Name, generic*, *ALL Library . . . . . . . . . Name, *LIBL, *ALL, *ALLUSR
Object type . . . . . . . . *ALL, *ALRTBL, *AUTHLR...
Object auditing option . . 1=*NONE 2=*USRPRF 3=*CHANGE 4=*ALL
Apply immediately . . . . . B Y=Yes, B=in Batch, N=No This might be a long running procedure. Batch run is recommended.
F3=Exit F4=Prompt F12=Cancel
4. Repeat this process for other critical objects.
Audit|User Guide 55

IBM i (OS/400) Audit Settings
This Chapter discusses the concepts and procedures for working with theIBM i (OS/400) auditing features using Audit. The topics in this chapter coverthe most commonly used audit features and parameters.
-
56 Audit | User Guide

Working with the Current SettingsThe term Current Setting refers to those parameters governing events thatare currently in effect and will be recorded in the IBM i security audit journalfor all users on a global basis. Two separate audit modes comprise thecurrent setting, user activity auditing and object access auditing
You can enable or disable either of these modes and specify which types ofuser activities are audited for all users. You use the User Audit Settings andObject Audit Settings to record specific user activities and object accessevents for audit in addition to those specified in the current setting.
Audit includes several features that make working with the IBM i (OS/400)current setting more efficient:
l Current Setting Screen – This screen allows you to quickly review thecurrent setting parameters and make changes on the fly. You nolonger have to worry about all those system values and other para-meters.
l Predefined Settings – You can create and store groups of current set-ting parameters for future use. This allows you to change the settingsquickly with only a few keystrokes.
l Audit Scheduler – This feature allows you to change the current set-ting automatically according to the time of day and the day of theweek.
All of these features involved in Current Settings are accessible in the OS/400Audit Featuresmenu.
To open the OS/400 Audit Features menu and begin working:
1. Select 1. OS/400 Audit Features in the Main menu(STRAUD > 1). The OS/400 Audit Features screen appears.
2. Select 1. Work with Current Settings. The Work withCurrent Setting screen appears.
Use the Page Up and Page Down keys to scroll the user activity auditing val-ues.
Audit|User Guide 57

Work with Current SettingUse this screen to view or modify the current global audit setting. The Audit Scheduler may change this setting automatically when active.
Type choices, press Enter. Y=Yes CurrentModified Parameter DescriptionMain Audit Control Parameters (QAUDCTL) Y Y *AUDLVL Activity auditing (as selected below) Y Y *OBJAUD Object access auditing Y Y *NOQTEMP Do not audit QTEMP objects Action Auditing Values (in effect only if *AUDLVL = "Y") Y Y *CREATE Create objects Y Y *DELETE Delete objects Y Y *JOBDTA Start, End, Hold, Release, Change job Y Y *NETCMN Network and communication functions *NETBAS | Network base functions *NETCLU | Cluster and cluster resource group *NETFAIL | Network failures are audited. *NETSCK | Socket tasks More...F3=Exit F4=Prompt F8=Print F12=Cancel
Parameter orOption
Description
*AUDLVL Toggles user activity auditing (enabled/disabled).Y = user activity auditing enabled (recommended)Blank = User activity auditing is disabled
*OBJAUD Toggles object access auditing (enabled/disabled).Y = object access auditing enabled (recommended)Blank = object access auditing is disabled
*NOQTEMP Toggles auditing of objects in the QTEMP library(enabled/disabled).Y = Do not audit objects in the QTEMP library(recommended)Blank = Enable auditing of objects in the QTEMP library
ActionAuditingValues
Toggles user auditing of various types of objects in theQTEMP library (enabled/disabled)Y = Enable auditingBlank = Disable auditing
-
58 Audit | User Guide

Current Setting StrategiesIn general, you should try to minimize the number of records posted to thesecurity audit journal to preserve disk space and lessen the impact on systemperformance. Since the current setting applies globally to all users, it is bestto avoid capturing routine user activity that will create many entries. Thecurrent setting is best employed to capture exceptional occurrences, such asserious errors, program failures, changes to security definitions and changesto important system parameters.
You can also use the current setting to track routine activity for very limitedperiods to analyze user activities, assess security risks, and evaluate systemperformance.
Current Setting Suggestions
l Always enable the Do not audit QTEMP objects option. Manyobjects are located in this library and they are rarely important.
l Enable user activity auditing, but only include extraordinary activity inthe current setting such as:
l Authority failures (*AUTFAIL)
l Program failures (*PGMFAIL)
l Security definitions (*SECURITY)
l System service operations (*SERVICE)
l Use the User Activity and Object Access features to audit routine activ-ities for specific users and objects.
Example: Typical Production System
The following example illustrates the procedure for defining the global auditsetting for a typical production environment.
1. Select 1. OS/400 Audit Features in the Main menu(STRAUD > 1). The OS/400 Audit Featuresmenu appears.
2. Select 1. Work with Current Settings. The Work with Cur-rent Setting screen appears.
3. Type Y to the left of the following options:
l *AUDLVL User activity auditing
Audit|User Guide 59

l *OBJAUD Object access auditingl *NOQTEMP Do not audit QTEMP objectsl *AUTFAIL Authority failures
l *NETCMN Violations detected by the APPN filter
l Security definitions (*SECURITY)l System service operations (*SERVICE)
4. Press Enter to return to the Main menu.
-
60 Audit | User Guide
Predefined Audit SettingsThis feature allows you to create and save predefined audit settings forfuture use. You can then substitute the predefined setting for current settingat any time. The audit scheduler automatically substitutes a predefinedsetting for the current setting at a specific time.
Audit|User Guide 61

Creating andModifying Predefined Audit Settings1. Select 1. OS/400 Audit Features in the Main menu
(STRAUD > 1). The OS/400 Audit Featuresmenu appears.
2. Select 2. Work with Pre-Defined Settings. TheWork with Pre-Defined Settings screen appears.
Work With Pre-defined Settings Type choices, press Enter. 1=Select 4=Delete OptSetting Description
ALON_QA checking audinting of all NO except Create objectsSHIFT1 SHIFT1 SHIFT2 SHIFT2 SHIFT3 SHIFT3
BottomF3=Exit F6=Add new F8=Print F12=Cancel
3. Select an existing setting to modify, or press F6 to create a new setting.
4. Modify or create new settings as described in "Working with the CurrentSettings" on page 57.
5. Press Enter to return to the Work with Predefined Settingsscreen.
6. Work with another setting, or press Enter to return to the OS/400 AuditFeaturesmenu.
-
62 Audit | User Guide
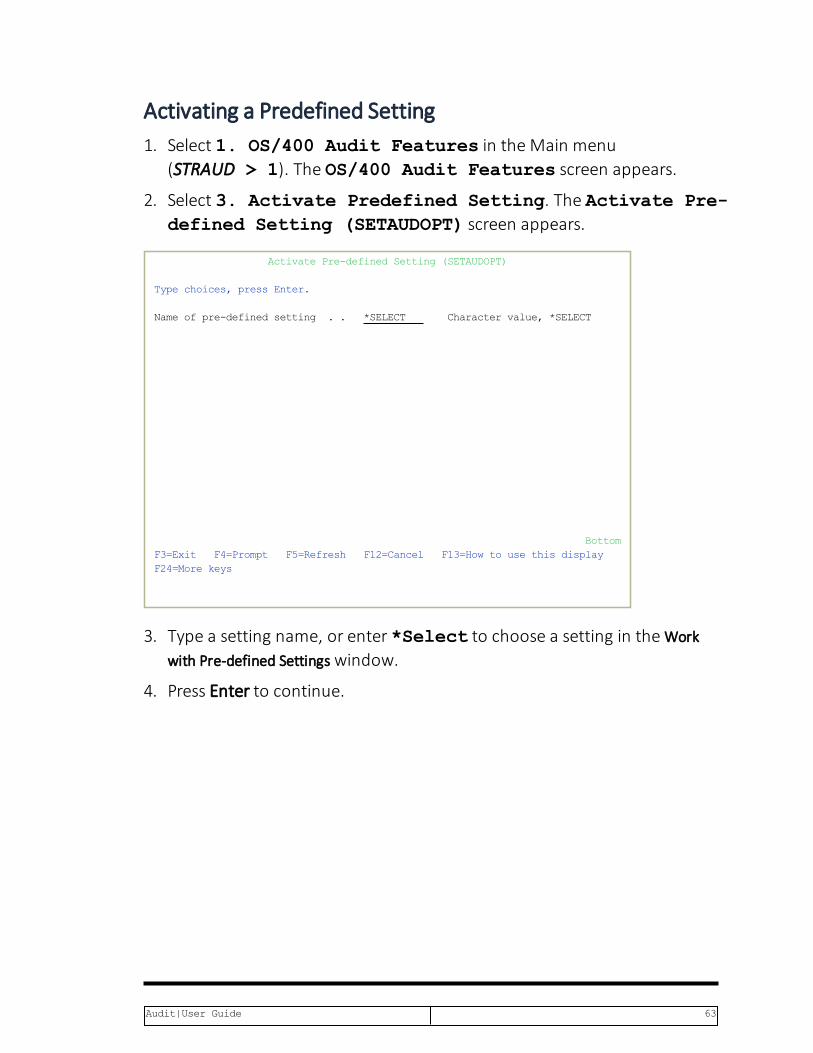
Activating a Predefined Setting1. Select 1. OS/400 Audit Features in the Main menu
(STRAUD > 1). The OS/400 Audit Features screen appears.
2. Select 3. Activate Predefined Setting. The Activate Pre-defined Setting (SETAUDOPT) screen appears.
Activate Pre-defined Setting (SETAUDOPT) Type choices, press Enter.
Name of pre-defined setting . . *SELECT Character value, *SELECT
BottomF3=Exit F4=Prompt F5=Refresh F12=Cancel F13=How to use this display F24=More keys
3. Type a setting name, or enter *Select to choose a setting in theWorkwith Pre-defined Settingswindow.
4. Press Enter to continue.
Audit|User Guide 63

Example: Three Shift Production ScenarioThe following example describes the creation of four predefined settings fora hypothetical production scenario. The settings shown here are fordemonstration purposes only, and do not represent typical orrecommended settings. Your settings should represent the operationalcharacteristics and security exposure for your organization.
1. Select 1. OS/400 Audit Features in the Main menu(STRAUD > 1). The OS/400 Audit Features screen appears.
2. Select 2. TheWork With Pre-defined Settings screen appears.
3. Press F6 to create a new setting.
4. For each of the four settings:
a. Type the value SHIFT1 in the first Set field.
b. Type a description in the field to the right.
c. Type the setting parameters as shown in the SHIFT1 column in thetable below and press Enter twice.
5. Press F12 to return to the OS/400 Audit Featuresmenu.
6. Select 3.
7. Press Enter to accept the *SELECT parameter.
8. Select one of the newly defined settings. Press Enter to continue.
9. Select 1 in the OS/400 Audit Featuresmenu. Note that the current settingparameters have changed accordingly.
-
64 Audit | User Guide
Using the Audit SchedulerThe Audit Scheduler feature automatically replaces the current audit settingwith a predefined setting at specific days and times. Some usefulapplications of this feature may include:
l More intensive system activity auditing at night or on weekends whenusers are more likely to attempt unauthorized activity
l Tracking of scheduled backups, program installations or system main-tenance
l Performing “system snapshot” audit samples of routine activity forshort periods of time during peak hours for analysis purposes
Audit|User Guide 65

Setting up the Audit SchedulerYou set up the Audit Scheduler by specifying predefined settings to replacethe current setting at specific times for each day of the week. For moreinformation about creating predefined settings, see "Predefined AuditSettings" on page 61, on page "Predefined Audit Settings" on page 61.
1. Select 1. OS/400 Audit Features in the Main menu(STRAUD > 1). The OS/400 Audit Featuresmenu appears.
2. Select 11. Work with Audit Scheduler. TheWork with AuditSchedulerscreen appears.
Work with Audit Scheduler
Type choices, press Enter.
Activate Audit Scheduler . . Y (Y⁄N)
Change pre-defined settings at: Time . . . . :15 :49 9:00 14:55 19:50 :00
Pre-defined settings to be activated at the above times: Monday . . . Tuesday . . Wednesday . Thursday . . Friday . . . Saturday . . Sunday . . .
F3=Exit F4=Prompt F8=Print F12=Cancel F13=Copy daily schedule
3. Make sure that the Activate Audit Scheduler field is set to Y.
4. You can specify up to six times each day at which settings can auto-matically change. Type the times for settings to change in the Time fieldsusing 24-hour notation (HH:MM)
-
66 Audit | User Guide

5. For each day of the week, to change to a different scheduler setting atany of the times that you entered in the Time field, enter the name of thepredefined setting in the column under that Time setting in the row forthat day. Press F4 in any setting field to choose from a list of available pre-defined settings. To copy the schedule from one day to another day ordays, press the F13=Copy daily schedule key. For more details, see "Copy-ing a Daily Audit Schedule" on the next page.
6. When you are finished, press Enter to return to the OS/400 Audit Featuresmenu. The current setting changes to the appropriate scheduled setting.
Audit|User Guide 67

Copying a Daily Audit ScheduleWhen working with the Audit Scheduler, you can save time by copying agiven day’s schedule to another day or days.1. Select 1. OS/400 Audit Features in the Main menu
(STRAUD > 1). The OS/400 Audit Featuresmenu appears.
2. Select 11. Work with Audit Scheduler. The Work withAudit Scheduler screen appears.
3. In the Work with Audit Scheduler screen, after entering pre-defined settings to at least one day of the week, press F13. The DuplicateDay Schedulingscreen appears.
Duplicate Day Scheduling
Copy from source day: . . 1=Monday 2=Tuesday 3=Wednesday 4=Thursday 5=Friday 6=Saturday 7=Sunday To Target day: Monday . . . . . . . . . Y=Yes Tuesday . . . . . . . . Wednesday. . . . . . . . Thursday . . . . . . . . Friday . . . . . . . . . Saturday . . . . . . . . Sunday . . . . . . . . .
F3=Exit F12=Cancel
4. Enter the number corresponding to the day of the week to copy in theCopy from source day field.
5. Enter Y for all days in the To Target day list that will receive the copiedschedule.
6. Press Enter. The schedule is copied.
-
68 Audit | User Guide

Example: Three-Shift Production EnvironmentThe following example portrays a scenario for a hypothetical three-shiftproduction environment, in which the majority of clerical, data entry andreporting functions take place during the first (daytime) shift.
This example uses the settings that you created in the Activating aPredefined Setting example shown in "Example: Three Shift ProductionScenario" on page 64
1. Select STRAUD > 1. OS/400 Audit Features in the Main menu(STRAUD > 1). The OS/400 Audit Featuresmenu appears.
2. Select 11. Work with Audit Scheduler. TheWork with AuditScheduler screen appears.
3. Type the values 0600, 1600, and 2300 in the first three Time fields.
4. Move the cursor to the first Setting field on the Monday line and press F4.TheWork with Predefined Settings screen appears.
5. Type 1 to the left of the SHIFT1 line and press Enter.
6. On theWork with Audit Scheduler screen, move the cursor to the second andthird Setting fields on the Monday line, then use F4 to select SHIFT2 andSHIFT3.
7. Press F13. The Duplicate Day Scheduling screen appears.
8. In the Copy from source day field, type 1.
9. In the To Target day field, type Y in the field to the right of Tuesdaythrough Friday.
10. Press Enter to confirm and return to the OS/400 Audit Featuresmenu.
Audit will now automatically change the settings each day at the indicatedtimes. If you check the current settings after the indicated times, you canverify that this has occurred.
Audit|User Guide 69
User Activity AuditingUser activity auditing covers specific user activities that are written to thesecurity audit journal in addition to those activities specified in the currentsetting. User activity rules contain the parameters regarding specific activitiesto be audited for a given user as well as for object access attempts by thatuser.
-
70 Audit | User Guide
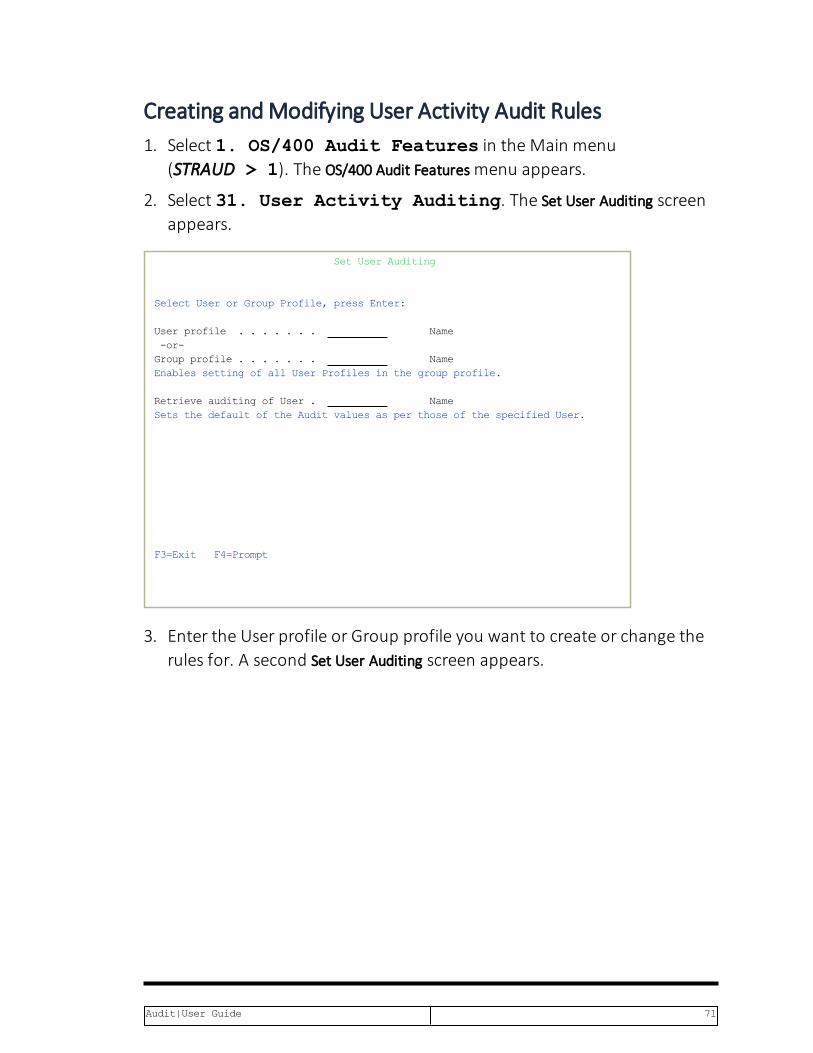
Creating andModifying User Activity Audit Rules1. Select 1. OS/400 Audit Features in the Main menu
(STRAUD > 1). The OS/400 Audit Featuresmenu appears.
2. Select 31. User Activity Auditing. The Set User Auditing screenappears.
Set User Auditing
Select User or Group Profile, press Enter:
User profile . . . . . . . Name -or-Group profile . . . . . . . NameEnables setting of all User Profiles in the group profile.
Retrieve auditing of User . NameSets the default of the Audit values as per those of the specified User.
F3=Exit F4=Prompt
3. Enter the User profile or Group profile you want to create or change therules for. A second Set User Auditing screen appears.
Audit|User Guide 71

Set User Auditing
User Profile .:ALEX Alex - Supporteam strong user
Object access auditing . . 2 1=*ALL, 2=*CHANGE, 3=*NONE, 4=*SAMEUser activity auditing . . 1 1=*ALL, 2=*LIST, 3=*NONE, 4=*SAME
Type Y to select. Y Commands Y Security events
Y Create objects Y Service tools Y Delete objects Y Spool files Y Job tasks Y Sys management Y Obj Move⁄Rename Y Office services Y Optical volumes Y Auth adoption Y Save⁄Restore Bottom
F3=Exit F11=Display Keywords F18=Outcoming Audit Types (by cursor)
4. Create or modify the rules as desired.
-
72 Audit | User Guide

Parameter orOption
Description
User Existing valid user profileObject AccessAuditing
Determines the auditing action when object auditing isdefined according to user profile.1 (*ALL)= Audit all object access attempts (read, change,delete)2 (*CHANGE)= Audit only access attempts for changeobject3 (*NONE)= No object access auditing for this user4 (*SAME) = Retain existing setting
User ActivityAuditing
Determines the user activity auditing action for this user.1 (*ALL)= Audit all activity for this user2 (*LIST)= Only audit activities specified in the ActivityList3 (*NONE)= No auditing for this user4 (*SAME) = Retain existing setting
Activity List Type Y next to the activities to audit for this user.l Commandsl Create objectsl Delete objectsl Job tasks (Start, end, hold, release, change jobs)l Obj Move/Renamel Office services (Sys distribution directory, Office mail)l Optical volumesl Auth adoptionl Save/Restore (Save and restore operations)l Security eventsl Service toolsl Spool files (Operations on spooled files)l Sys activities
Audit|User Guide 73

User Activity Audit StrategiesThe following best practices will help you balance the need to capturesufficient historical data without generating an excessive amount of rawdata.
l Create a unique user profile for each individual user; do not use gen-eric departmental user profiles. Define rules for all active users.
l Avoid defining rules using the *ALL parameter for object access anduser activity auditing. This will only generate a large volume of irrel-evant journal entries. These options should be used only to trace sus-picious activity or troubleshooting system problems.
l Avoid continuous auditing of routine activities for high volume users,such as data entry clerks and programmers. The following activitieswill likely generate an enormous quantity of journal entries for thistype of user.
l Commands (*CMD)
l Create objects (*CREATE)
l Delete objects (*DELETE)
l Spool files (*SPLFDTA)
As an alternative, you can choose to audit these activities for short timeperiods on a random basis.
l Audit the Commands (*CMD) activity sparingly. Programs typically gen-erate numerous other programs, commands and batch jobs. Each ofthese is a separate activity, generating its own audit journal entries.Consequently, a single job can create hundreds of journal entries,most of which are irrelevant for effective security auditing.
l Do not audit IBM i internal user profiles (such as QSYS, QUSER, QTCP)regularly. They generate a large volume of journal entries that are oflittle value for security auditing. Never allow users to sign-on usingthese profiles.
-
74 Audit | User Guide

l Use object access auditing instead of the Create Objects and DeleteObjects user audit activities. This greatly reduces the volume of journalentries by allowing you to audit only specific user accesses to specificobjects.
l Use the *CHANGE object access audit parameter instead of *ALL. Yourarely need to audit who reads or uses an object.
Audit|User Guide 75

Examples of User Activity AuditingThis section presents examples of user activity auditing settings for severaluser types. Please note that the settings shown here are for demonstrationpurposes only, and do not represent “typical” or “recommended” settings.Your settings should represent the operational characteristics and securityexposure for your organization.
These examples also illustrate the Subset and Copy features provided by theuser interface.
Use the following command to create temporary user profiles: CRTUSRPRFUSRPRF (XXXXX) LMTCPB (*YES), where ‘XXXXX’ represents the user profilenames appearing in the table below (XDATA and so on).
You will use these temporary user profiles for other tutorial examples as well.You should only delete these profiles when you have completed all theexamples in this manual.
1. Follow these steps for users named XDATA, XPROG, XSY, and XSECO:
a. Select 31. User Activity Auditing in the OS/400Audit Featuresmenu (STRAUD > 1 > 31).
b. Press F6 to create a new user audit rule.
c. Type the value XDATA in the User field.
d. Type the values as shown in the table in the Object access auditing,User activity auditing and activity list fields.
e. Then press Enter to continue.
2. To demonstrate the Subset feature, press F7. The Subset Selectionscreen appears.
3. Type the value X* in the User Profile field and press Enter. Note that onlyuser profiles beginning with the letter X appear. (See the table followingthis procedure.)
4. Next, you need to copy a user profile and modify it. This feature savestime when defining rules for many similar profiles. Type 3 next to theXSECO profile to copy it and then press Enter.
5. Type XSUSP in the To User field and press Enter.
6. Type 1 next to the XSUSP profile to modify it.
-
76 Audit | User Guide

7. Enter the parameters as shown in the last column of the table and pressEnter.
We suggest you sign-on with these user profiles and perform some routineactivities to create entries in the security audit journal.
Activity Data EntryXDATA
ProgrammerXPROG
SystemOperator XSYS
Security OfficerXSECO
Suspicious UserXSUSP
Object accessauditing
2 2 2 2 2
User activityauditing
2 2 2 2 2
Commands Y Y YCreate objects YDelete objects YJob tasks Y Y Y YObjectmanagement
Y Y Y Y
Office services Y YOpticalvolumesAuthorityadoption
Y Y Y
Save / restore Y Y Y YSecurity events Y Y Y Y YService tools Y Y YSpool files YSystemmanagement
Y Y Y Y
Audit|User Guide 77

Object Access AuditingIBM i (OS/400) allows you to audit all attempts to access certain criticalobjects, such as database files, source code files or key libraries. You canchoose to audit the contents of entire libraries or only specific object typeswithin those libraries, such as data files, job queues or program source files.Auditing can cover all access attempts, changes only or as specified in theuser profile.
For example, you can choose to audit all attempts to modify programsources by users whose user class is not *PGMR.
-
78 Audit | User Guide

Creating andModifying Object Access Audit RulesSeparate menu options exist for Native IBM i (OS/400) objects and objectsnative to other computer platforms (known as Integrated File System (IFS)Objects).
NOTE: The procedures for working with both object typesare virtually identical.
To work with Native Object Audit rules:
1. Select 1. OS/400 Audit Features in the Main menu(STRAUD > 1). The OS/400 Audit Featuresmenu appears.
2. Select 41. Native Object Auditing. TheWork with Object Auditingscreen appears.
Work with Object Auditing
Type options, press Enter. 1=Select 3=Copy 4=Delete 5=Display Objects 8=Apply
Opt Library Object Type Option Previous Change ALEX DEMOPF *FILE *NONE 31⁄07⁄19 16:32
ALEX DEMOPFF *FILE *ALL 30⁄04⁄19 15:25 ALEX DEMOPF1 *FILE *NONE 30⁄04⁄19 15:24 ALEX DEMOPF2 *FILE *NONE 30⁄04⁄19 15:25 ANLIB A* *ALL *NONE 17⁄07⁄19 10:41 ANLIB AUFF* *ALL *USRPRF 15⁄04⁄18 15:00 ANLIB AUFFX* *ALL *NONE 15⁄04⁄18 15:00 ANLIB AUS* *FILE *USRPRF 17⁄07⁄19 13:06 DLT A* *ALL *ALL 15⁄04⁄18 15:01 DLT TES* *DTAARA *NONE 2⁄12⁄18 15:21 QSYS ANLIB *LIB *NONE 17⁄01⁄18 10:16 YOEL DEMOPF *FILE *CHANGE 17⁄07⁄19 12:11 More...List is of activities done by this option. It does not represent current statusF3=Exit F6=Add new F7=Subset F8=Print F12=Cancel
3. Enter 1 in the Opt column for the object that you want to change. TheApply Object Auditing screen appears.
Audit|User Guide 79

Apply Object Auditing
Type choices, press Enter.
Object . . . . . . . . . . DEMOPF Name, generic*, *ALL Library . . . . . . . . . ALEX Name, *LIBL, *ALL, *ALLUSR
Object type . . . . . . . . *FILE *ALL, *ALRTBL, *AUTHLR...
Object auditing option . . 1 1=*NONE 2=*USRPRF 3=*CHANGE 4=*ALL
This might be a long running procedure. Batch run is recommended.
F3=Exit F12=Cancel
3. Enter the Object or Library to change audit options for.
4. If desired, enter the Object Type.
5. Select the Object auditing option.
6. Press Enter.
Parameter or Option Description
Object AuditingOptions
Define access auditing for this option1 (*NONE) = No auditing for this object2 (*USRPRF) = Audit according to user profiledefinition3 (*CHANGE)= Audit all changes to this object4 (*ALL) = Audit all activity for this object
To work with IFS Object Audit rules:
1. Select STRAUD >1. OS/400 Audit Featuresin the Main menu (STRAUD >1).The OS/400 Audit Featuresmenu appears.
2. Select 42. IFS Object Auditing. TheWork with IFS Object Auditing screenappears.
-
80 Audit | User Guide
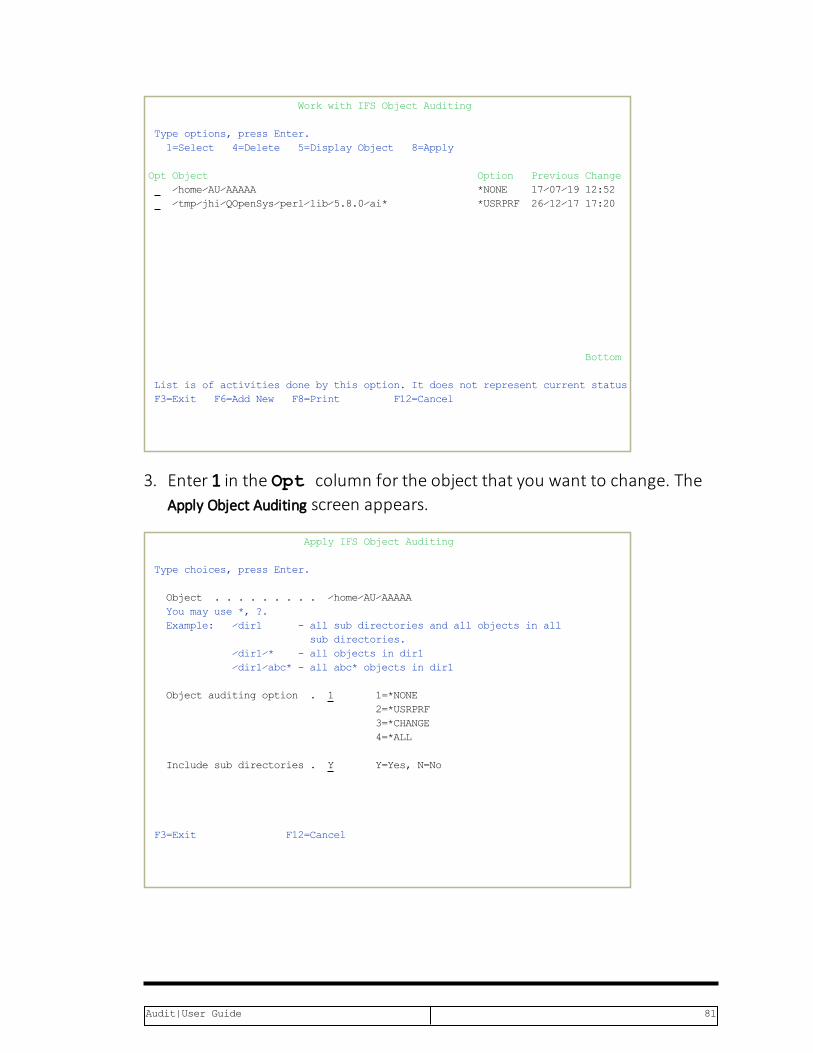
Work with IFS Object Auditing
Type options, press Enter. 1=Select 4=Delete 5=Display Object 8=Apply OptObject Option Previous Change
⁄home⁄AU⁄AAAAA *NONE 17⁄07⁄1912:52⁄tmp⁄jhi⁄QOpenSys⁄perl⁄lib⁄5.8.0⁄ai* *USRPRF 26⁄12⁄1717:20
Bottom
List is of activities done by this option. It does not represent current statusF3=Exit F6=Add New F8=Print F12=Cancel
3. Enter 1 in the Opt column for the object that you want to change. TheApply Object Auditing screen appears.
Apply IFS Object Auditing
Type choices, press Enter.
Object . . . . . . . . . ⁄home⁄AU⁄AAAAA You may use *, ?. Example: ⁄dir1 - all sub directories and all objects in all sub directories. ⁄dir1⁄* - all objects in dir1 ⁄dir1⁄abc* - all abc* objects in dir1 Object auditing option . 1 1=*NONE 2=*USRPRF 3=*CHANGE 4=*ALL
Include sub directories . Y Y=Yes, N=No
F3=Exit F12=Cancel
Audit|User Guide 81

Object Audit StrategiesThe following best practices will help you balance the need to capturesufficient historical data without generating an excessive amount of rawdata.
l Avoid using the *ALL parameter in object audit rules. It is generallyunnecessary to audit passive object accesses, such as read attempts,on a routine basis. You can choose to do periodic, short-term auditsof certain objects to get an idea of who is using them, but certainlynot on an everyday basis.
l Utilize the *USRPRF option to restrict auditing of commonly usedobjects to users who do not need to access such objects routinely. Forexample, programmers routinely modify program source files. Youmight not wish to audit every update attempt by these users, but youwould certainly want to know if your technical writer is messingaround with program sources. This same axiom holds true for datafiles frequently updated by data entry clerks.
l Make effective use of the Object Type parameter in your rules, forexample:
l If your objective is to audit changes to program files in a librarythat contains both program and data files, use the *PGM objecttype to avoid cluttering your audit journal with updates of datafiles.
l Likewise, use the *FILE object type to restrict your auditing tophysical files.
l Use *AUTL and *USRPRF to see who has been changing user pro-files and object authorizations.
l To discover who deleted your reports, use the *OUTQ objecttype.
l Use the *CMD object type together with the *USRPRF auditingoption to audit the use of specific commands by certain users.This creates far fewer journal entries then the user activity *CMDaudit option.
-
82 Audit | User Guide

l Use IFS object auditing. Databases shared with other platforms, suchas ODBC databases, are IFS objects that should be audited on a reg-ular basis.
Audit|User Guide 83

Defaults for Object Creation1. Select 1. OS/400 Audit Features in the Main menu
(STRAUD> 1). The OS/400 Audit Featuresmenu appears.
2. Select 45. The Work with New Object Auditing(WRKNEWAUD) screen appears.
Work with New Objects Auditing (WRKNEWAUD) Type choices, press Enter.
Library . . . . . . . . . . . . Name, generic*, *ALL
BottomF3=Exit F4=Prompt F5=Refresh F12=Cancel F13=How to use this display F24=More keys
Parameter Description
Library Name = Display a specific user profileGeneric* = Display all users beginning with text preceding the **ALL = Display all users
3. Press Enter. TheWork with New Object Audit Defaults screen appears.
-
84 Audit | User Guide

Work with New Objects Auditing (WRKNEWAUD) Type choices, press Enter.
Library . . . . . . . . . . . . Name, generic*, *ALL
BottomF3=Exit F4=Prompt F5=Refresh F12=Cancel F13=How to use this display F24=More keys
Audit|User Guide 85

Working with IFS logsWhen an organization is using a Security Information and EventManagement (SIEM) system, Raz-Lee Security provides the administratorwith an easy and effective tool for sending messages and events to thosesystems. With special capabilities and advanced features, Raz-Lee allowsconfiguring up to three unique SIEM systems to be handled using the IFSlogs mechanism.
NOTE: For more information about SIEM integration and configuration, see"SIEM Support" on page 294.
To access the IFS Logs:
l Select 15. IFS Logs from the Audit main menu screen(STRAUD > 15).
AUIFSMN IFS Logs iSecurity⁄SysCtl System: S520 Select one of the following:
Settings 1. Work with Definitions
5. Work with Activities
Activate IFS Log Detect21. Activate22. Deactivate
Note: Apache, WebSphere and other well-known servers can be set to produce logs in CEF format.
Selection or command ===>
F3=Exit F4=Prompt F9=Retrieve F12=Cancel F13=Information Assistant F16=AS⁄400 main menu
The IFS Logsmenu allows the administrator to set and configure various typesof message sources to be forwarded to SIEM systems such as Apache webserver, IBM's WebSphere Application Server (WAS), and various databasetools.
-
86 Audit | User Guide

SettingsThe settings section lets you configure IFS logging, including defining whichfiles are logged.
Audit|User Guide 87

To work with Definitions:l Item STRAUD > 15 > 1. Work with Definitions. from theSettings section allows the administrator to add, remove, display andmodify the desired application messages to communicate with theSIEM:
Work with IFS log Definitions
Type options, press Enter. 1=Select 4=Delete 5=Display Auto -SIEM- Subset . .OptSubject Start 1 2 3
AABB Y Y YFOR TEST FROM JAVA. APACHEVV Y Apache Web Server S520 ARDGATE Y Y YArdGate log TEST50 Y test dir longer than 50
BottomF3=Exit F5=Refresh F6=Add New F12=Cancel
-
88 Audit | User Guide

To change the logging settings on a file:1. Type 1 next to the item to change, then press Enter.
Add IFS Log Auditing
Subject . . . . . . . . . .Description . . . . . . . .Inform SIEM 1 2 3 . . . . . Y=YesAuto-start . . . . . . . . Y Y=Yes
Dir . . . . . . . . . . . . File prefix . . . . . . . .Original input format . . . *CEF, *LEEF, *FREESeverity . . . . . . . . . 0 0-7Add date . . . . . . . . . Y Y=YesAdd system . . . . . . . . Y Y=YesAdd subject . . . . . . . . Y=Yes
Maximum message length is 5000. F3=Exit F12=Cancel
2. Change the settings as appropriate.
3. Press F3. The changes are saved.
To delete the logging settings for a file:
l Type 4 next to the file whose settings are to be deleted, then pressEnter.
To display the settings for a file:
l Type 5 next to the file, then press Enter.
To log settings for a new file:
1. Press F6. The Add IFS Log Auditing page is displayed.
2. Enter the settings as appropriate.
3. Press F3. The file's changes will now be logged.
Audit|User Guide 89

Parameter DescriptionSubject Indicates the specific server type.
Keep this part blank, as the software will fill that partautomatically.
Description Enter the name of the server.Inform SIEM1 2 3
Set which SIEM servers to inform. More information, about thedifferent three types can be found underSTRAUD > 81 > 30.
Auto-Start Choose Y next to the Auto-Start section in order for the serverto send messages automatically to the desired SIEM system.Note: Choosing Y will start automatically the IFS Logtransmission when Audit is activated.
Dir Enter the specific path where the server message log is located.For example: /tmp/
File Prefix Indicate the specific file name containing the messages to besent to the SIEM system under the desired directory.Normally, the SIEM messaging system works with a specific file.WHen the file fills up, the system renames the file andcontinues to write the new logs and messages under the samefile. Indicating the correct file name will ensure that themessaging activity and sending works flawlessly.
OriginalinputFormat
The Original input format indicates which log the Raz-Lee IFSgets from the Apache webserver or the IBM websphere. Youcan choose CEF, LEEF or FREE.
Severity Use the severity mechanism to determine the importance levelof a message.The possible values are:Blank = Do not send0 = Emergency (Default)1 = Alert2 = Critical3 = Error4 =Warning5 = Notice6 = Info
-
90 Audit | User Guide
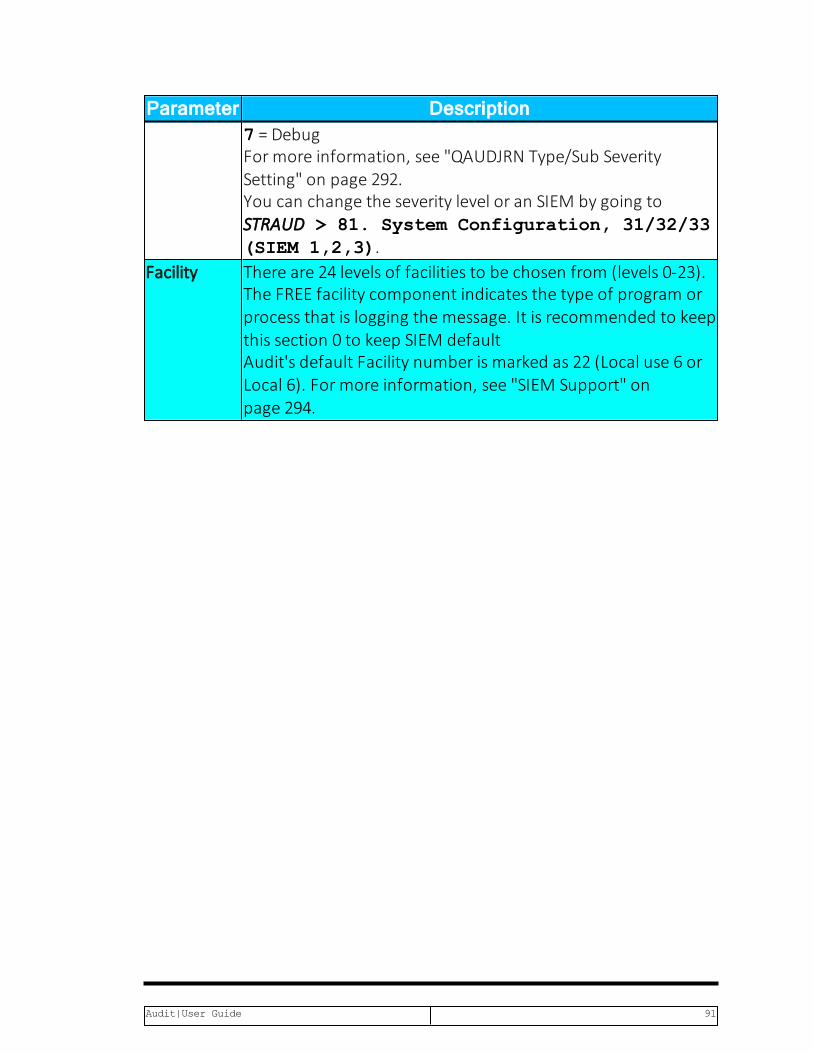
Parameter Description7 = DebugFor more information, see "QAUDJRN Type/Sub SeveritySetting" on page 292.You can change the severity level or an SIEM by going toSTRAUD > 81. System Configuration, 31/32/33(SIEM 1,2,3).
Facility There are 24 levels of facilities to be chosen from (levels 0-23).The FREE facility component indicates the type of program orprocess that is logging the message. It is recommended to keepthis section 0 to keep SIEM defaultAudit's default Facility number is marked as 22 (Local use 6 orLocal 6). For more information, see "SIEM Support" onpage 294.
Audit|User Guide 91

Original Input FormatsThe following Original Input Formats are supported:
l CEF – Common Event Format, an open standard that passes mes-sages over to the communications module that handles the trans-mission of the messages to the waiting log collection server usingeither UDP, TCP or TLS protocol.
l LEEF – Log Event Extended Format, another open standard for logmanagement and interoperability of security related information fromdifferent devices, network components and applications. The LEEFformat is a customized event format for IBM security Qradar that con-tains readable and easily processed events.
l FREE - In the FREE format, information and message settings (Sever-ity and Facility) are sent as is (i.e. as configured at the Add/Change IFSLog Auditing menu, shown in "Working with IFS logs" on page 86). IfFREE format is chosen, the administrator has to manually indicateSeverity and Facility sections, and the subject name would beattached to the log that is sent.
-
92 Audit | User Guide
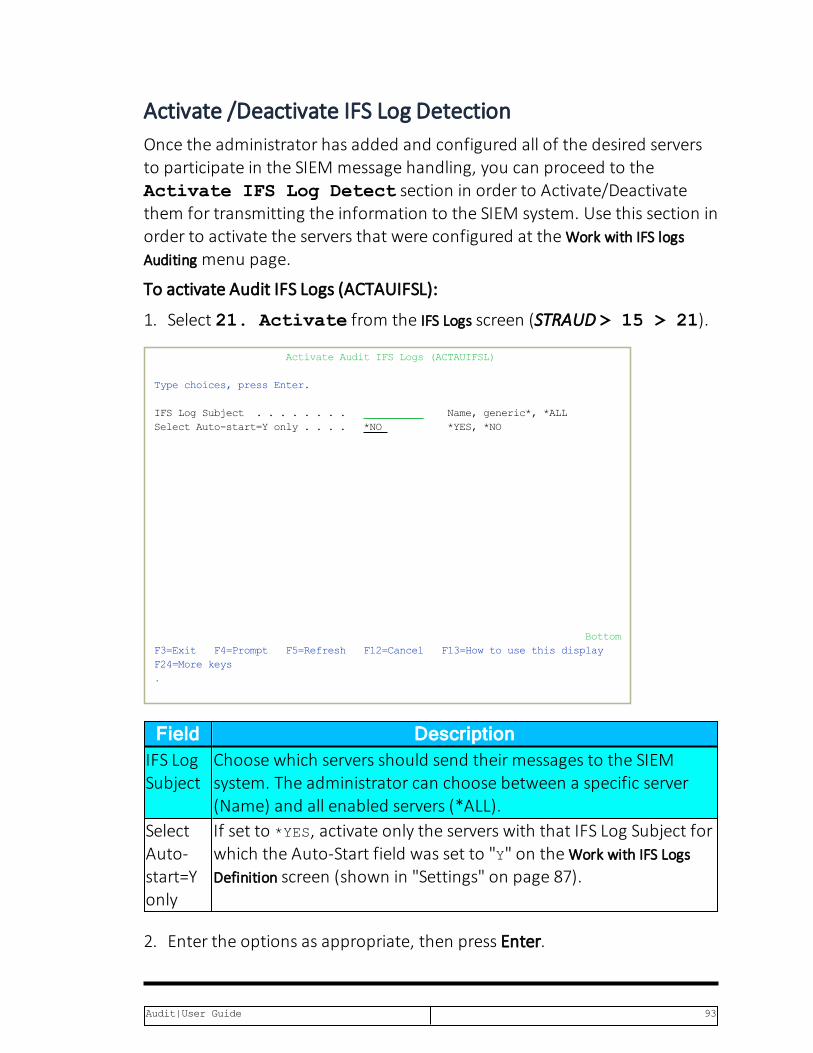
Activate /Deactivate IFS Log DetectionOnce the administrator has added and configured all of the desired serversto participate in the SIEM message handling, you can proceed to theActivate IFS Log Detect section in order to Activate/Deactivatethem for transmitting the information to the SIEM system. Use this section inorder to activate the servers that were configured at theWork with IFS logsAuditing menu page.
To activate Audit IFS Logs (ACTAUIFSL):
1. Select 21. Activate from the IFS Logs screen (STRAUD > 15 > 21).
Activate Audit IFS Logs (ACTAUIFSL) Type choices, press Enter.
IFS Log Subject . . . . . . . . Name, generic*, *ALL Select Auto-start=Y only . . . . *NO *YES, *NO
BottomF3=Exit F4=Prompt F5=Refresh F12=Cancel F13=How to use this display F24=More keys .
Field DescriptionIFS LogSubject
Choose which servers should send their messages to the SIEMsystem. The administrator can choose between a specific server(Name) and all enabled servers (*ALL).
SelectAuto-start=Yonly
If set to *YES, activate only the servers with that IFS Log Subject forwhich the Auto-Start field was set to "Y" on theWork with IFS LogsDefinition screen (shown in "Settings" on page 87).
2. Enter the options as appropriate, then press Enter.
Audit|User Guide 93

NOTE: Only the enabled subject at the Control IFS Logsmenu will be activated.
To deactivate Audit IFS Logs (DCTAUIFSL):
1. Select 22. Deactivate from the IFS Logs screen(STRAUD > 15 > 22).
Deactivate Audit IFS Logs (DCTAUIFSL) Type choices, press Enter.
IFS Log Subject . . . . . . . . Name, generic*, *ALL
BottomF3=Exit F4=Prompt F5=Refresh F12=Cancel F13=How to use this display F24=More keys
2. Enter the log subject to deactivate or*ALL to deactivate all of them, thenpress Enter.
-
94 Audit | User Guide

Real-Time Auditing
This chapter presents a detailed discussion of the real-time auditingfeatures. The discussion begins with a conceptual introduction andcontinues with the most commonly used features and parameters. Practicalexamples are presented together with detailed procedures.
Real-Time DetectionThe principal feature of Audit is its ability to examine and respond to securityrelated events in real time. When the IBM i (OS/400) current audit settingsdetect an event, an entry is recorded in the security audit journal. At thesame time, Audit looks for a real time detection rule for this event.
If such a rule exists, Auditrecords the event in a history log and optionallytriggers an alert message or command script as specified by the ruledefinition. Action (sold as a separate product) performs these responsiveactions.
The powerful query and reporting features of Audituse the contents of thehistory log. You must define real time detection rules to capture and recordevents in the history log, even if no responsive action is necessary. In fact,you will likely create most of your real time detection rules solely for thepurpose of recording events in the history log for subsequent audit andanalysis.
It is important to note that an event must first be detected by the currentIBM i (OS/400) audit settings in order for real-time detection to capture andrecord it in the history log and/or trigger an action.
Audit|User Guide 95
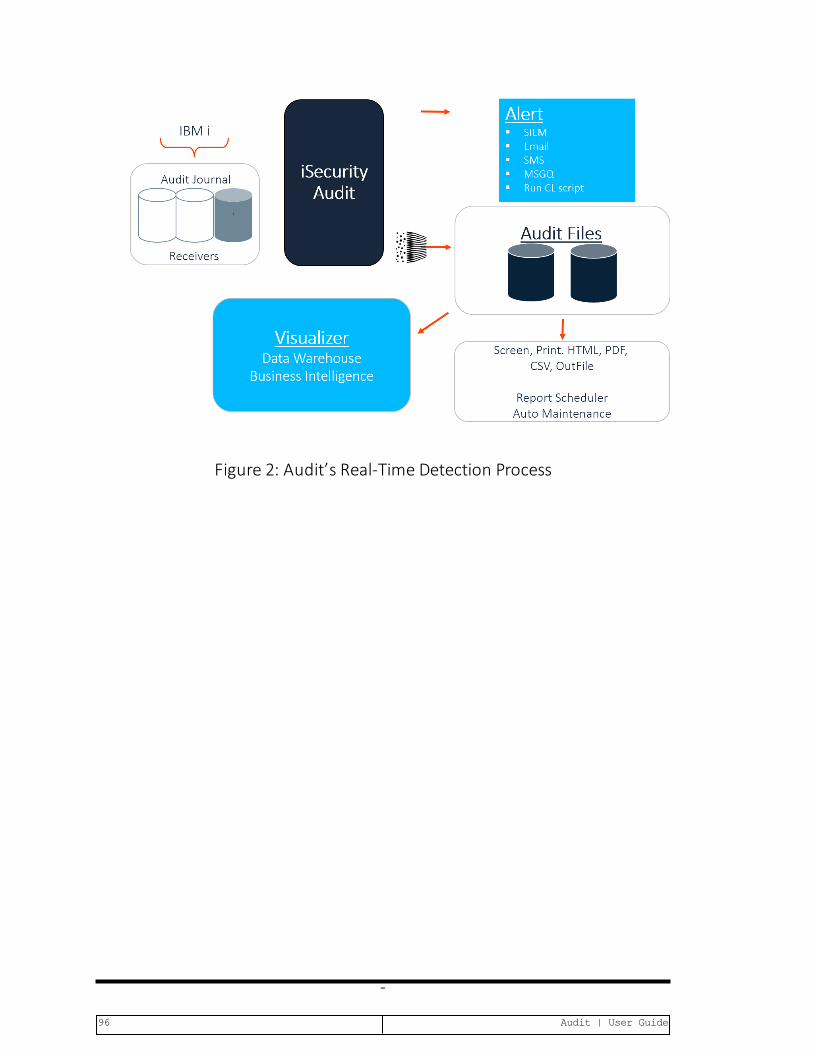
Figure 2: Audit’s Real-Time Detection Process
-
96 Audit | User Guide

Integration with ActionAs you can see from the above chart, one of the main advantages of real-time detection lies in its integration with the Action product. Actionphysically sends the alert messages and executes command scripts triggeredby Audit.
Audit|User Guide 97

Rules and ActionsA series of user-defined rules and actions controls real-time detection. Rulesidentify which specific events trigger actions and under what conditions theresponse should occur. Actions define specific responsive actions that takeplace whenever rule conditions are met.
Real-time detection rules are based on IBM i (OS/400) audit journal types.You can create several different rules for a single audit type. User-definedsequence numbers determine the order of rule processing within a giventype.
The procedure for defining a real-time detection rule may seem a bitcomplex at first, but in fact, it is both easy and intuitive. There are somebasic steps for creating rules.
1. Ensure that the IBM i (OS/400) audit settings are properly defined to cap-ture events covered by the rule.
2. Create a new real-time detection rule or select an existing rule for modi-fication.
3. Optionally:a. Set basic rule parameters using the Selection Rule screen.b. Define filter conditions limiting application of the rule to specific
conditions.c. Define alert message actions as necessary.d. Define command script actions as necessary.
4. Test and debug your rule.
Audit provides you with a suite of powerful but easy-to-use tools to help youcreate rules that precisely define the circumstances governing the recordingof an event in the history log and/or performing a responsive action. Conciseexplanations for data elements and options as well as pop-up selectionwindows are only a key press away.
l You can copy existing rules, making minor changes to save definitioneffort.
l You can use existing action definitions with any number of rules.l You can apply precise filter criteria to any or all fields in the history logrecords using powerful criteria selection operators. A single, user-friendly screen supports this process.
-
98 Audit | User Guide

l The unique Time Group feature allows you to apply rules only during(or outside of) predefined periods.
Audit|User Guide 99

Creating andModifying RulesTo create or modify real time detection rules:
1. Select 11. QAUDJRN Real-Time Processsing in the Main menu(STRAUD> 11). TheWork with Real-Time Audit Rules screen appears.
Work with Real-Time Audit Rules Rules & Actions for QAUDJRN Real-Time audit rules trigger alerts, responsive actions and event logging. Subset by entry . . by description . .Type option, press Enter. by classification. C=Compliance,.. 1=Select 3=Copy 4=Delete 5=Info 8=Msg 9=Explanation & Classification
OptEntrySeqLogActCont.Description AD 999.9N N N Default for: Auditing changes AD
AF 999.9N N Default for: Authority failure AF AP 999.9N N Default for: Obtaining adopted authority AP AU 999.9N N Default for: Attribute change AU AX 999.9N N N Default for: Row and Column Access Control (RCAC) C@ 1.0 Y N N scc@ test x Stephen Laseplan 999.9Y N Default for: User profile changed (After & Previou CA 1.0 N N N Authority changes 2.0 N N N Authority changes 999.9N N N Default for: Authority changes CA CD 1.0 Y N N Command string audit More...F3=Exit F6=Add New F8=Print F11=No⁄Default F12=Cancel F22=Renumber
Modify data, or press Enter to confirm.
-
100 Audit | User Guide
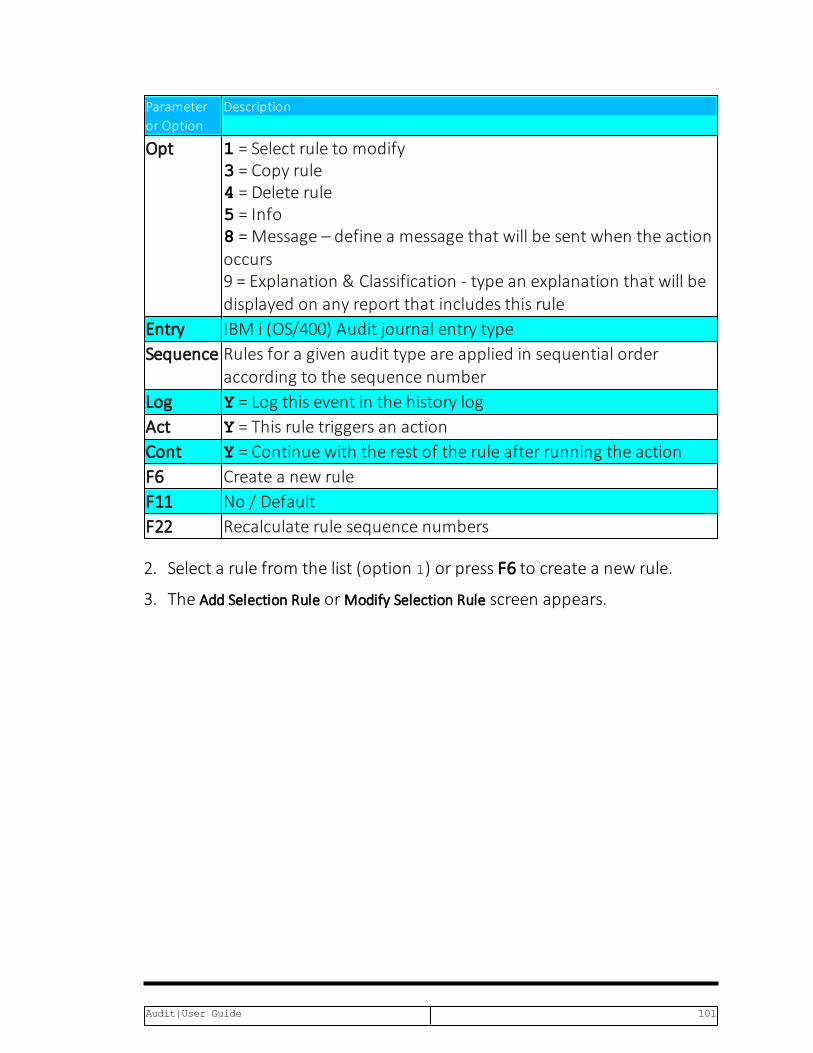
Parameteror Option
Description
Opt 1 = Select rule to modify3 = Copy rule4 = Delete rule5 = Info8 =Message – define a message that will be sent when the actionoccurs9 = Explanation & Classification - type an explanation that will bedisplayed on any report that includes this rule
Entry IBM i (OS/400) Audit journal entry typeSequence Rules for a given audit type are applied in sequential order
according to the sequence numberLog Y = Log this event in the history logAct Y = This rule triggers an actionCont Y = Continue with the rest of the rule after running the actionF6 Create a new ruleF11 No / DefaultF22 Recalculate rule sequence numbers
2. Select a rule from the list (option 1) or press F6 to create a new rule.
3. The Add Selection Rule orModify Selection Rule screen appears.
Audit|User Guide 101

Modify Selection Rule Rules & Actions for QAUDJRN
Entry type . . . . . . . C@User profile changed (After & Previous images) Sequence . . . . . . . 1.0
Description . . . . . . scc@ test x Stephen Laseplan Sub-type list . . . . . *ALL *ALL, List N Name Check if in Time group .
Log . . . . . . . . . . Y Y=Yes, N=No
Perform action . . . . . N VICT202448 Name, *NONE, *ADD If event rate exceeds. 1 ⁄ 1 Events⁄Seconds, 1⁄1=Always Run action once per . 0 Seconds, 0=AlwaysIf true, re-check after. 0 Seconds, 0=DefaultIf false, re-check after 0 SecondsContinue to rule seq . . N .0 Y=Yes, N=No. 0=Following rule
F3=Exit F4=Prompt F8=Print F12=Cancel
-
102 Audit | User Guide
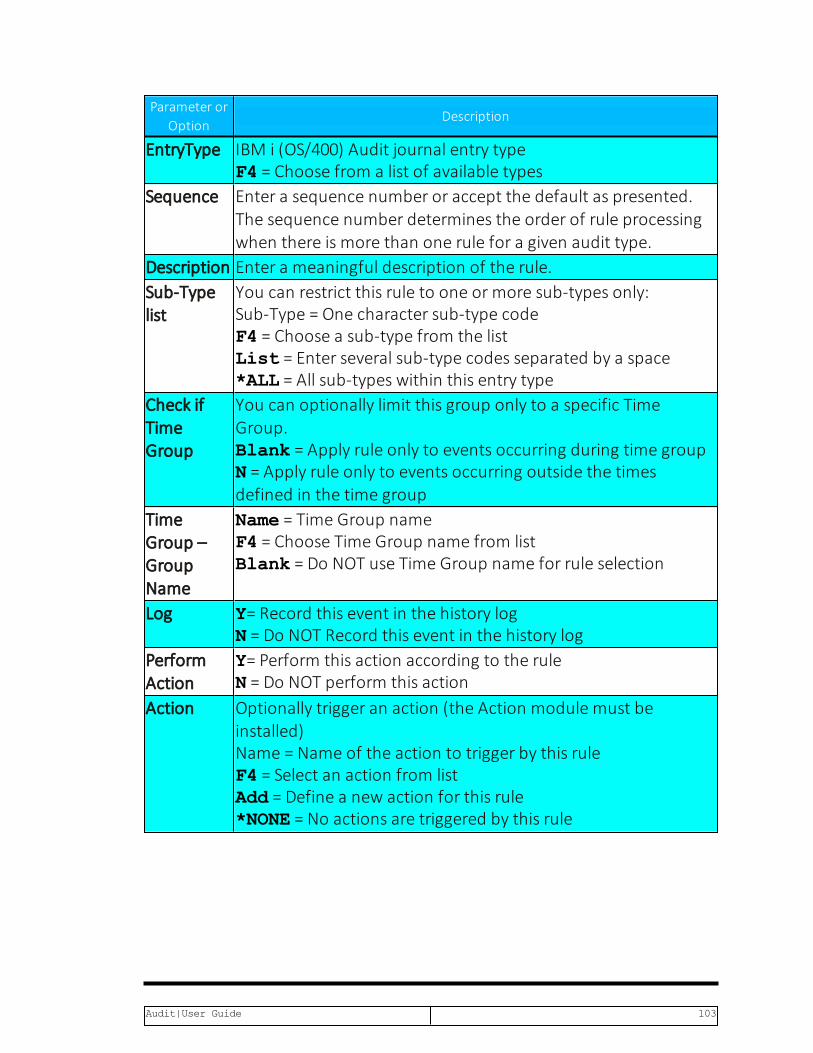
Parameter orOption
Description
EntryType IBM i (OS/400) Audit journal entry typeF4 = Choose from a list of available types
Sequence Enter a sequence number or accept the default as presented.The sequence number determines the order of rule processingwhen there is more than one rule for a given audit type.
Description Enter a meaningful description of the rule.Sub-Typelist
You can restrict this rule to one or more sub-types only:Sub-Type = One character sub-type codeF4 = Choose a sub-type from the listList = Enter several sub-type codes separated by a space*ALL = All sub-types within this entry type
Check ifTimeGroup
You can optionally limit this group only to a specific TimeGroup.Blank = Apply rule only to events occurring during time groupN = Apply rule only to events occurring outside the timesdefined in the time group
TimeGroup –GroupName
Name = Time Group nameF4 = Choose Time Group name from listBlank = Do NOT use Time Group name for rule selection
Log Y= Record this event in the history logN = Do NOT Record this event in the history log
PerformAction
Y= Perform this action according to the ruleN = Do NOT perform this action
Action Optionally trigger an action (the Action module must beinstalled)Name = Name of the action to trigger by this ruleF4 = Select an action from listAdd = Define a new action for this rule*NONE = No actions are triggered by this rule
Audit|User Guide 103

Parameter orOption
Description
If eventrateexceeds
Only perform the action if the event occurs more than a givennumber of times in a given time period. For example, 5 times inevery 10 seconds. If you want to run the action always, enter1/1.
Run actiononce per
The number of seconds between each performance of theaction.
Continueto rule seq
Y= After performing the actions, continue to the rule sequence.
4. Enter parameters and data as described in the table, then Press Enter.The Filter Conditions screen appears.
Filter criteria allow you to limit the application of real-time detection rules tocertain specific conditions.
Filter conditions are optional. If you do not define any filter conditions, therule will incorporate all events for the specified audit type or types.
Filter Conditions Entry . . . . . . . . ZC Object accessed (change) Sequence . . . . . . . 1.0React to unpermitted changes in prod files Subset by text . .Type conditions, press Enter. Specify OR to start each new group. Test: EQ, NE, LE, GE, LT, GT, N⁄LIST, N⁄LIKE, N⁄ITEM, N⁄START, N⁄PGM And For N⁄LIKE: % is "any string"; Case is ignoredOr Field Test Value (If Test=ITEM use F4) UC Program library Library name Date & Time yyyy-mm-dd-hh.mm Name of job User of job LIST QSECOFR JOHN Number of job Name of program Program library Current user profile System name IP address family More...Pinkfields are from the generic header.Greenfields apply to this type only.F3=Exit F4=Prompt F6=Insert F8=UC⁄LC F12=Cancel
-
104 Audit | User Guide

Parameteror Option
Description
And/Or A or Blank = AndO = Or
Field Data field in the journal record:Pink fields are part of the generic header common to all journaltypesGreen fields represent data specific to this journal type
Test Comparison test type – see the table on the following page fordetails.
Value Comparison value text; this field is case sensitive.F4 Displays explanatory information/options applicable to the data
field on the line where the cursor is locatedF6 Select another comparison test from a pop-up window and insert
it at the current cursor positionF8 Change Caps Lock from lower to upper case. An indicator appears
on the screen.
5. If desired, add filter conditions, then press Enter. The previous screen isdisplayed.
Audit|User Guide 105

Comparison Test OperatorsYou can use these test operators when creating filters.
-
106 Audit | User Guide
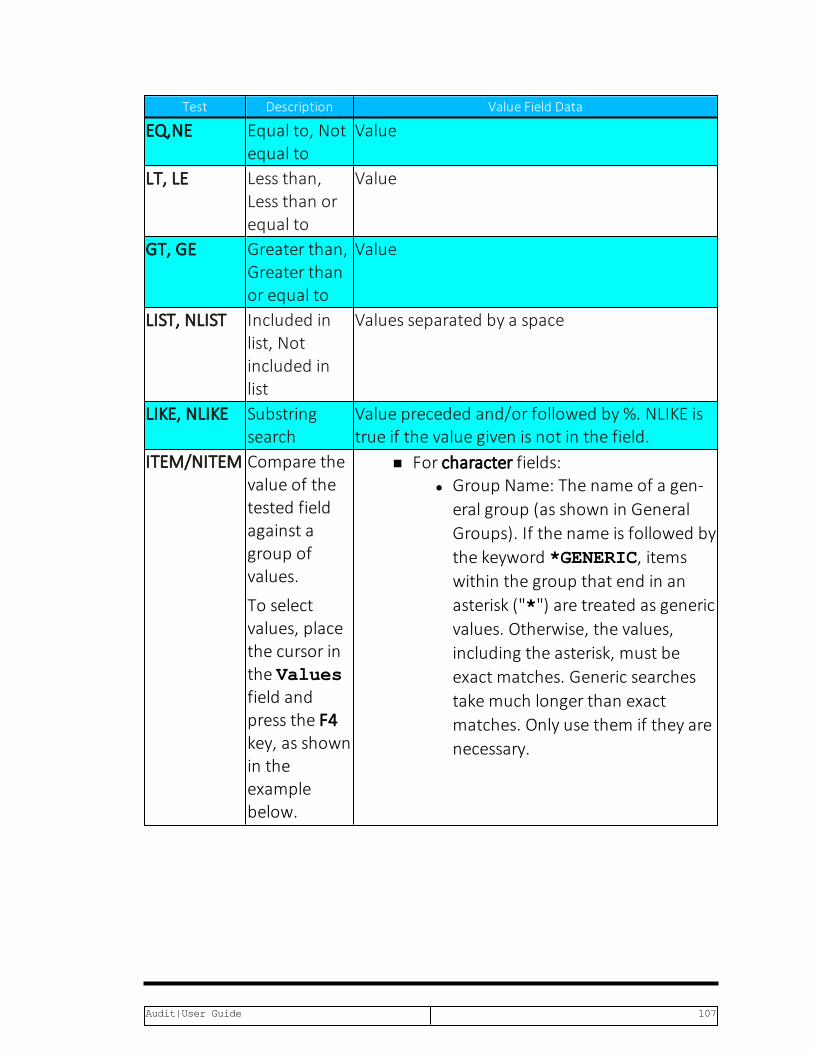
Test Description Value Field Data
EQ,NE Equal to, Notequal to
Value
LT, LE Less than,Less than orequal to
Value
GT, GE Greater than,Greater thanor equal to
Value
LIST, NLIST Included inlist, Notincluded inlist
Values separated by a space
LIKE, NLIKE Substringsearch
Value preceded and/or followed by %. NLIKE istrue if the value given is not in the field.
ITEM/NITEM Compare thevalue of thetested fieldagainst agroup ofvalues.
To selectvalues, placethe cursor inthe Valuesfield andpress the F4key, as shownin theexamplebelow.
n For character fields:l Group Name: The name of a gen-eral group (as shown in GeneralGroups). If the name is followed bythe keyword *GENERIC, itemswithin the group that end in anasterisk ("*") are treated as genericvalues. Otherwise, the values,including the asterisk, must beexact matches. Generic searchestake much longer than exactmatches. Only use them if they arenecessary.
Audit|User Guide 107

Test Description Value Field Data
n For user profile fields:l *GRPPRF: Check if the User isincluded in a Group or Sup-plemental profile.
l *LMTCPB: Checks the User LimitCapabilities.
l *SPCAUT: Check if the User has aSpecial Authority.
l *USRGRP: Checks if the User isincluded in an iSecurity/Firewallgroup (as documented in the Fire-wall manual).
n For timestamp fields:l Check if the time is within aTimegroup (as shown in UsingTime Groups).
START Starts with Starting characters of a stringPGM, NPGM Calls a
specific userprogram toconduct acomparisonwhich replieswith True orFalseIf you useNPGM, thena returnedvalue of Falsemeans thatthe conditionis True.
The user program name (library/program)
For example, in this Filter Conditions screen, the Test for the field UserProfile is set to ITEM.
-
108 Audit | User Guide

Filter Conditions Entry . . . . . . . . $A User profile information Sequence . . . . . . . 1.0 Subset by text . .Type conditions, press Enter. Specify OR to start each new group. Test: EQ, NE, LE, GE, LT, GT, N/LIST, N/LIKE, N/ITEM, N/START, N/PGM And For N/LIKE: % is "any string"; Case is ignoredOr Field Test Value (If Test=ITEM use F4) UC *ALLOBJ (User+Groups) X=Yes EQ X
User Profile ITEM Previous sign-on date: YYMMDD Days passed since last sign-on Sign-on attempts not valid Status Password of *NONE: *YES or *NO Password change date: YYMMDD Password expiration interval Days password is in use Block password change More...Pinkfields are from the generic header.Greenfields apply to this type only.F3=Exit F4=Prompt F6=Insert F8=UC/LC F12=Cancel
To select values for the test, place the cursor in the Value field for that lineand press the F4 key.
The Select Subjectwindow appears:
Filter Conditions ................................................................................: Select Subject :: :: Type options, press Enter. Position to . . . :: 1=Select Subset . . . . . :: ** When run for another system, groups on that system are considered. ** :: OptSubject Description :: *GRPPRF User is included in Group/Supplemental profile :: *LMTCPB User Limit Capabilities :: *SPCAUT User has a Special Authority :: *TIMEGRP Time group :: *USRGRP User is included in iSecurity/Firewall Group :: AUD List for Audit Reporting :: AUDJ Secondary list for audits :: COMMANDS Initial commands to run as a group :: COMMANDS2 Secondary commands group :: More...:: F3=Exit F6=Work with group type F12=Cancel :: ::..............................................................................:F3=Exit F4=Prompt F6=Insert F8=UC/LC F12=Cancel
Audit|User Guide 109

Each Subject on this screen contains one or more groups that can beselected. To select a Subject, enter 1 in the Opt field next to thatSubject field.
The Select Groups of screen for that Subject appears:
Filter Conditions ................................................................................: Select Subject ................................................................................: Select Groups ofLIBRARIES :: Class:Groups of libraries :: :: Type options, press Enter. Position to . :: 1=Select Subset . . . :: 2=Select withgeneric*support :: Opt Group Description :: KEYSLIB List of libraries holding encryption keys :: PGMPROD :: 2 PRODLIB List of Production Libraries :: SYSTLIB List of System Libraries :: :: :: :: Bottom:: :: F3=Exit F6=Work with groups F12=Cancel :: ::..............................................................................:
For example, this screen shows the groups within the subject LIBRARIES.
You can select the groups in two ways.
To select a group with generic* support, enter 2 in the Opt field for thatgroup. With generic* support, for each item in the group that ends with anasterisk ("*"), the test will attempt to match the item with any values thatbegin with the characters in the item name preceding the asterisk. This cansignificantly increase the amount of time that the test will take. Only specifythis when necessary.
To select a group without generic* support, enter 1 in the Opt field for thegroup. The test will match the items in the group literally.
When you press Enter, the Filter Conditions screen returns:
-
110 Audit | User Guide

Filter Conditions Entry . . . . . . . . $A User profile information Sequence . . . . . . . 1.0 Subset by text . .Type conditions, press Enter. Specify OR to start each new group. Test: EQ, NE, LE, GE, LT, GT, N/LIST, N/LIKE, N/ITEM, N/START, N/PGM And For N/LIKE: % is "any string"; Case is ignoredOr Field Test Value (If Test=ITEM use F4) UC *ALLOBJ (User+Groups) X=Yes EQ X
User Profile ITEM LIBRARIES/PRODLIB *GENERIC Previous sign-on date: YYMMDD Days passed since last sign-on Sign-on attempts not valid Status Password of *NONE: *YES or *NO Password change date: YYMMDD Password expiration interval Days password is in use Block password change More...Pinkfields are from the generic header.Greenfields apply to this type only.F3=Exit F4=Prompt F6=Insert F8=UC/LC F12=Cancel
In this case, the Value field for User Profile showsLIBRARIES/PRODLIB *GENERIC, indicating that you had selected thegroup PRODLIB within the subject LIBRARIES, with *GENERICsupport enabled.
Audit|User Guide 111

And/Or Boolean OperatorsYou can combine multiple filter conditions in one rule using BooleanAND/OR operators. This allows you to create complex rules that produceprecise results.
When using OR operators in your filter conditions, the order in which eachcondition appears in the list of conditions is critical. The OR operator allowsyou to group several conditions together because it includes all the ANDconditions that follow it until the next OR operator or until the end of thelist.
The AND condition groups the OR condition which was defined before it.
The following example illustrates this principle. This rule will apply to allevents meeting either the conditions listed in the first two lines or theconditions listed in the second two lines. The second group includes the ‘Or’condition and all of the ‘And’ conditions that follow it.
Filter Conditions Entry . . . . . . . . ZC Object accessed (change) Sequence . . . . . . . 1.0React to unpermitted changes in prod files Subset by text . .Type conditions, press Enter. Specify OR to start each new group. Test: EQ, NE, LE, GE, LT, GT, N⁄LIST, N⁄LIKE, N⁄ITEM, N⁄START, N⁄PGM And For N⁄LIKE: % is "any string"; Case is ignoredOr Field Test Value (If Test=ITEM use F4) UC Program library NITEM LIBRARIES⁄PGMPROD
A Library name ITEM LIBRARIES⁄PRODLIB Date & Time yyyy-mm-dd-hh.mm Name of job User of job Number of job Name of program Program library Current user profile System name IP address family More...Pinkfields are from the generic header.Greenfields apply to this type only.F3=Exit F4=Prompt F6=Insert F8=UC⁄LC F12=Cancel
This rule applies only to commands that changed the accessed object only ifthe User Profile was either QSECOFR or JON and on System S520 OR if theUser Profile was either QSYSOPR or SAM and on System S720.
-
112 Audit | User Guide

If you intend that your rule will trigger an action, the action definitionscreens appear automatically. If this is not the case, the rule definitionprocess is complete and the Real-Time Audit Rules screen re-appears.
Message to send Rule:*REAL-TIME ZC 1.0Object accessed (change) Type message to send. Use F7-F9 to select replacement fields. *AUTO is the standard message (*AUTO1⁄*AUTO2 are message first⁄second levels). Message text: Job: &ZCNBR⁄&ZCUSER⁄&ZCJOB Action: &ACTION &SEQID
F7=Replacement fields F8=Add JOB F9=Add ACTION F12=CancelModify data, or press Enter to confirm.
Use F7 to insert fields to the message, F8 to add the job information, F9 toadd Action information.
Audit|User Guide 113

Firewall/ScreenUse this feature to add and modify rules to work with active jobs(WRKACTJOB) and work with system status.
To work with system status:
1. Select 12. Firewall/Screen from the Main menu (STRAUD > 12).The Work with Firewall/Screen Rules screen appears.
Work with Firewall⁄Screen Rules Firewall and Screen (after decision)
Subset by entry . . by description . .Type option, press Enter. by classification. C=Compliance,.. 1=Select 3=Copy 4=Delete 8=Msg 9=Explanation & Classification
OptEntrySeq ActCont.Description 01 1.0 Y N N *FILTFR Original File Transfer Function
999.9Y N Default for: *FILTFR Original File Transfer Functi 02 999.9Y N Default for: *FTPLOG FTP Server Logon 02 03 1.0 Y N N *FTPSRV FTP Server-Incoming Rqst Validation 999.9Y N Default for: *FTPSRV FTP Server-Incoming Rqst Vali 04 999.9Y N Default for: *SQL Database Server - SQL access 04 05 999.9Y N Default for: *RMTSRV Remote Command⁄Program Call 0 06 999.9Y N Default for: *FILSRV File Server 06 07 999.9Y N Default for: *DDM DDM request access 07 08 999.9Y N Default for: *TELNET Telnet Device Initialization 09 999.9Y N Default for: *TFTP TFTP Server Request Validation More...F3=Exit F6=Add New F8=Print F11=No⁄Default F12=Cancel F22=Renumber
2. Select 1 to modify an existing rule or F6 to create a new rule. The AddSelection Rule screen appears.
-
114 Audit | User Guide

Add Selection Rule Firewall and Screen (after decision)
Entry type . . . . . . . Sequence . . . . . . . .0
Description . . . . . .Sub-type list . . . . . *ALL *ALL, List N Name Check if in Time group .
Perform action . . . . . Y *ADD Name, *NONE, *ADD If event rate exceeds. 0 ⁄ 0 Events⁄Seconds, 1⁄1=Always Run action once per . 0 Seconds, 0=AlwaysIf true, re-check after. 0 Seconds, 0=DefaultIf false, re-check after 0 SecondsContinue to rule seq . . .0 Y=Yes, N=No. 0=Following rule
F3=Exit F4=Prompt F12=Cancel
Audit|User Guide 115
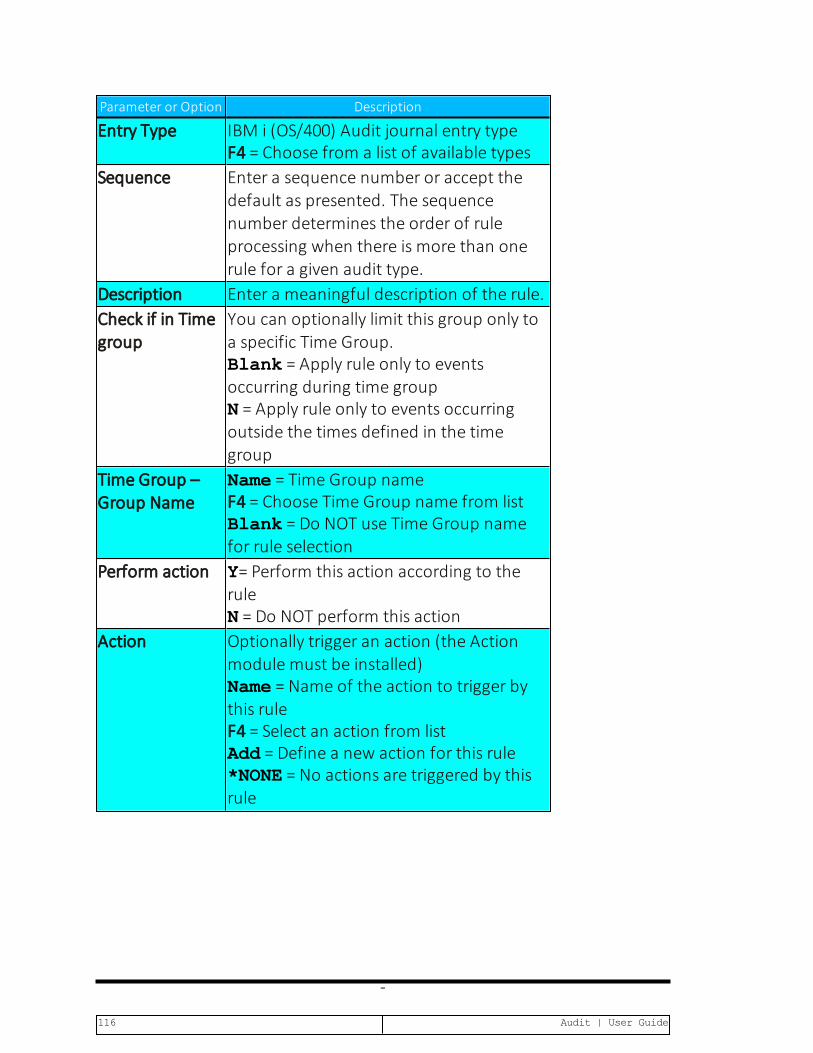
Parameter or Option Description
Entry Type IBM i (OS/400) Audit journal entry typeF4 = Choose from a list of available types
Sequence Enter a sequence number or accept thedefault as presented. The sequencenumber determines the order of ruleprocessing when there is more than onerule for a given audit type.
Description Enter a meaningful description of the rule.Check if in Timegroup
You can optionally limit this group only toa specific Time Group.Blank = Apply rule only to eventsoccurring during time groupN = Apply rule only to events occurringoutside the times defined in the timegroup
Time Group –Group Name
Name = Time Group nameF4 = Choose Time Group name from listBlank = Do NOT use Time Group namefor rule selection
Perform action Y= Perform this action according to theruleN = Do NOT perform this action
Action Optionally trigger an action (the Actionmodule must be installed)Name = Name of the action to trigger bythis ruleF4 = Select an action from listAdd = Define a new action for this rule*NONE = No actions are triggered by thisrule
-
116 Audit | User Guide
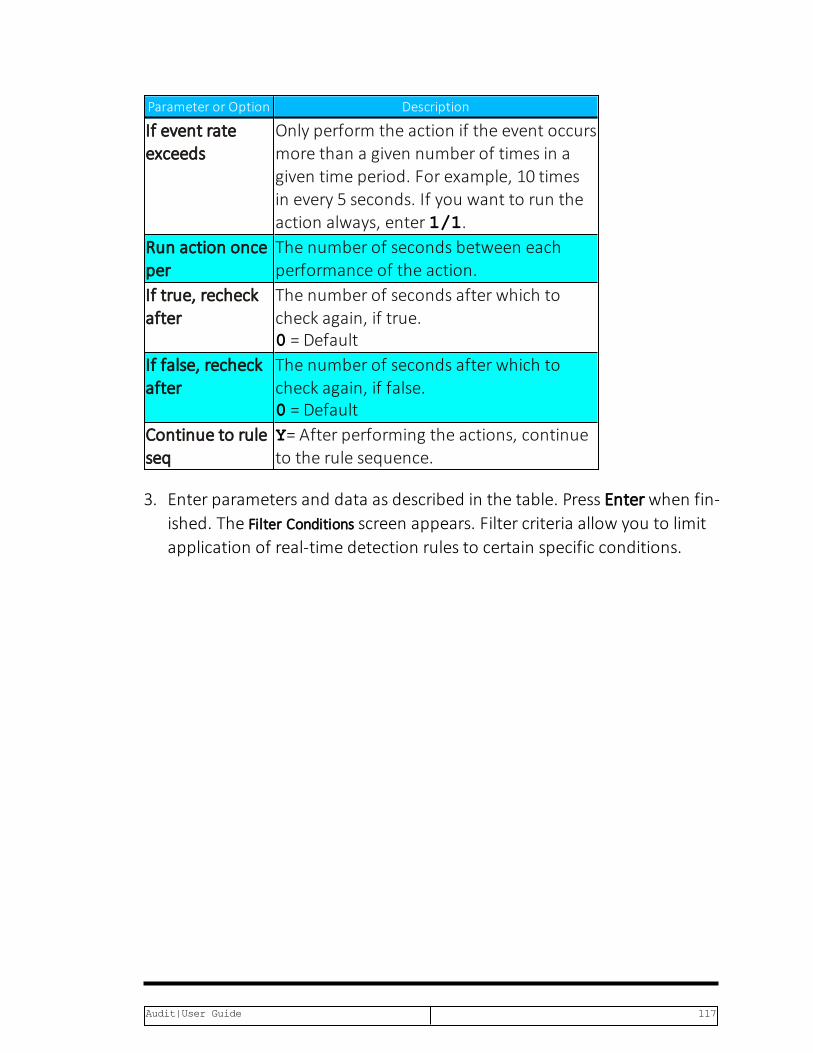
Parameter or Option Description
If event rateexceeds
Only perform the action if the event occursmore than a given number of times in agiven time period. For example, 10 timesin every 5 seconds. If you want to run theaction always, enter 1/1.
Run action onceper
The number of seconds between eachperformance of the action.
If true, recheckafter
The number of seconds after which tocheck again, if true.0 = Default
If false, recheckafter
The number of seconds after which tocheck again, if false.0 = Default
Continue to ruleseq
Y= After performing the actions, continueto the rule sequence.
3. Enter parameters and data as described in the table. Press Enter when fin-ished. The Filter Conditions screen appears. Filter criteria allow you to limitapplication of real-time detection rules to certain specific conditions.
Audit|User Guide 117
Working with Status and Active Job RulesIBM and Raz-Lee Entry Types include (see Appendix A: Raz-Lee Entry Types):
l IBM Entry Types – STRAUD > 11 (see "Setting up the Audit Scheduler"on page 66).
l Raz-Lee Entry Types @J, @K, @P, @S - STRAUD > 13 (see "Workingwith Status and Active Job Rules" above).
l Raz-Lee Entry Types @0…@9 - STRAUD > 14 (see "Working with Mes-sage Queues" on page 123).
l Other Raz-Lee Entry Types (see Appendix A: Raz-Lee Entry Types).
The following can be achieved using the Entry Type screens:
l Define rules triggered by specific field contents for each entry type.Resulting actions can generate messages, run command language (CL)commands and more.
l Generate reports using the iSecurity report generator and schedulerwhich controls, via field filters, which of the collected QAUDJRNentries are to be outputted to e-mail, message queue (MSGQ), Syslog,etc. The report generator can be accessed at STRAUD> 41 > 1.
To Work with Status & Active Job Rules:
1. Select 13. Status & Active Job (SysCtl) in the Main menu(STRAUD> 13). The Work with Status & Active Job Rulesscreen appears. The table below describes the four standard entries thatare included with the product.
-
118 Audit | User Guide

Work with Status & Active Job Rules Rules for WRKACTJOB⁄WRKSYSSTS
Subset by entry . . by description . .Type option, press Enter. by classification. C=Compliance,.. 1=Select 3=Copy 4=Delete 8=Msg 9=Explanation & Classification
OptEntrySeq ActCont.Description @J 999.9N N Default for: Active job information @J
@K 999.9N N Default for: Job not active @K @P 999.9N N Default for: Pool not active @P @S 999.9N N Default for: System status and pool information @S
BottomF3=Exit F6=Add New F8=Print F11=No⁄Default F12=Cancel F22=Renumber
Modify data, or press Enter to confirm.
Entry Rule Description
@J Logs Active job information, while comparing every line in theWRKACTJOB to the rule that uses it.
@K Logs Inactive Jobs, while performing a check to verify whether the job isactive.
@P Logs Inactive Pools, while performing a check to verify whether aparticular pool is active.
@S Logs System status & pool information, while checking filter conditionsto verify if response criteria are met, and activating that response.
2. Select 1=Select to modify an existing rule or F6 to create a new rule.The Add Selection Rule screen appears.
Audit|User Guide 119

Add Selection Rule Firewall and Screen (after decision)
Entry type . . . . . . . Sequence . . . . . . . .0
Description . . . . . .Sub-type list . . . . . *ALL *ALL, List N Name Check if in Time group .
Perform action . . . . . Y *ADD Name, *NONE, *ADD If event rate exceeds. 0 ⁄ 0 Events⁄Seconds, 1⁄1=Always Run action once per . 0 Seconds, 0=AlwaysIf true, re-check after. 0 Seconds, 0=DefaultIf false, re-check after 0 SecondsContinue to rule seq . . .0 Y=Yes, N=No. 0=Following rule
F3=Exit F4=Prompt F12=Cancel
-
120 Audit | User Guide
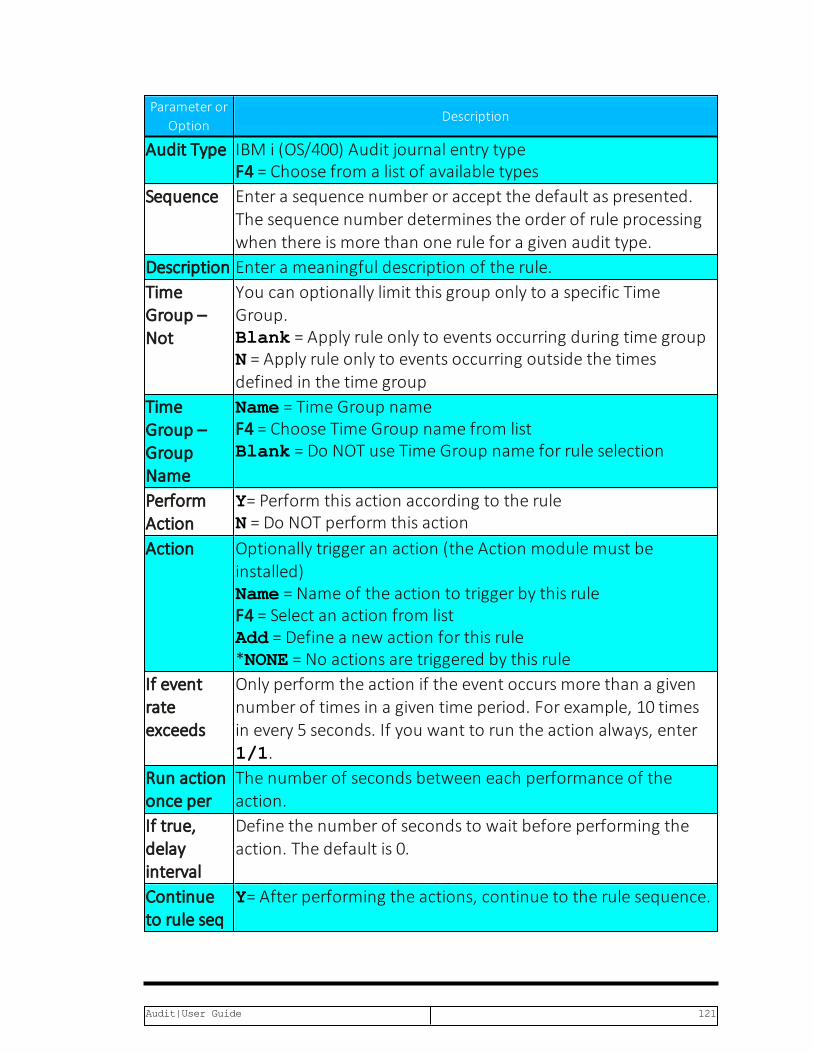
Parameter orOption
Description
Audit Type IBM i (OS/400) Audit journal entry typeF4 = Choose from a list of available types
Sequence Enter a sequence number or accept the default as presented.The sequence number determines the order of rule processingwhen there is more than one rule for a given audit type.
Description Enter a meaningful description of the rule.TimeGroup –Not
You can optionally limit this group only to a specific TimeGroup.Blank = Apply rule only to events occurring during time groupN = Apply rule only to events occurring outside the timesdefined in the time group
TimeGroup –GroupName
Name = Time Group nameF4 = Choose Time Group name from listBlank = Do NOT use Time Group name for rule selection
PerformAction
Y= Perform this action according to the ruleN = Do NOT perform this action
Action Optionally trigger an action (the Action module must beinstalled)Name = Name of the action to trigger by this ruleF4 = Select an action from listAdd = Define a new action for this rule*NONE = No actions are triggered by this rule
If eventrateexceeds
Only perform the action if the event occurs more than a givennumber of times in a given time period. For example, 10 timesin every 5 seconds. If you want to run the action always, enter1/1.
Run actiononce per
The number of seconds between each performance of theaction.
If true,delayinterval
Define the number of seconds to wait before performing theaction. The default is 0.
Continueto rule seq
Y= After performing the actions, continue to the rule sequence.
Audit|User Guide 121
3. Enter parameters and data as described in the table. Press Enter when fin-ished. The Filter Conditions screen appears. Filter criteria allow you tolimit application of real-time detection rules to certain specific con-ditions.
See "Working with Current Setting" on page 52 and "Setting up the AuditScheduler" on page 66.
-
122 Audit | User Guide

Working with Message QueuesThere are two fixed IBM message queue types, known as Group ID:
l @9QHST – IBM provided History queue
l @1QSYSOPR – IBM provided System Operator queue
In Audit, you can create your own message queues and operate themaccording to your needs. This unique solution allows real-time auditing onmessage queues, by:
l Modifying rules according to all the message queue parameters
l Responding to the message by alerting the user (by email and/or textmessage (SMS)) and by reacting to it directly (send auto response).
To work with message queues:
l Select 14. Message Queue (SysCtl) in the Main menu(STRAUD > 14). The Message Queuemenu appears.
AUMSGM Message Queue iSecurity⁄SysCtl System: S520 Select one of the following:
Settings Build Rules for displayed Msgs 1. Control Message Queues⁄QHST 51. Build rules from Displayed Msgs 55. Display History Log (Audit version)Real-Time Detection Rules11. Message Queue rules
Activate MSGQ detection21. Activate22. Deactivate
Set Start35. Set Start of QHST Time
Selection or command ===>
F3=Exit F4=Prompt F9=Retrieve F12=Cancel F13=Information Assistant F16=AS⁄400 main menu
Audit|User Guide 123
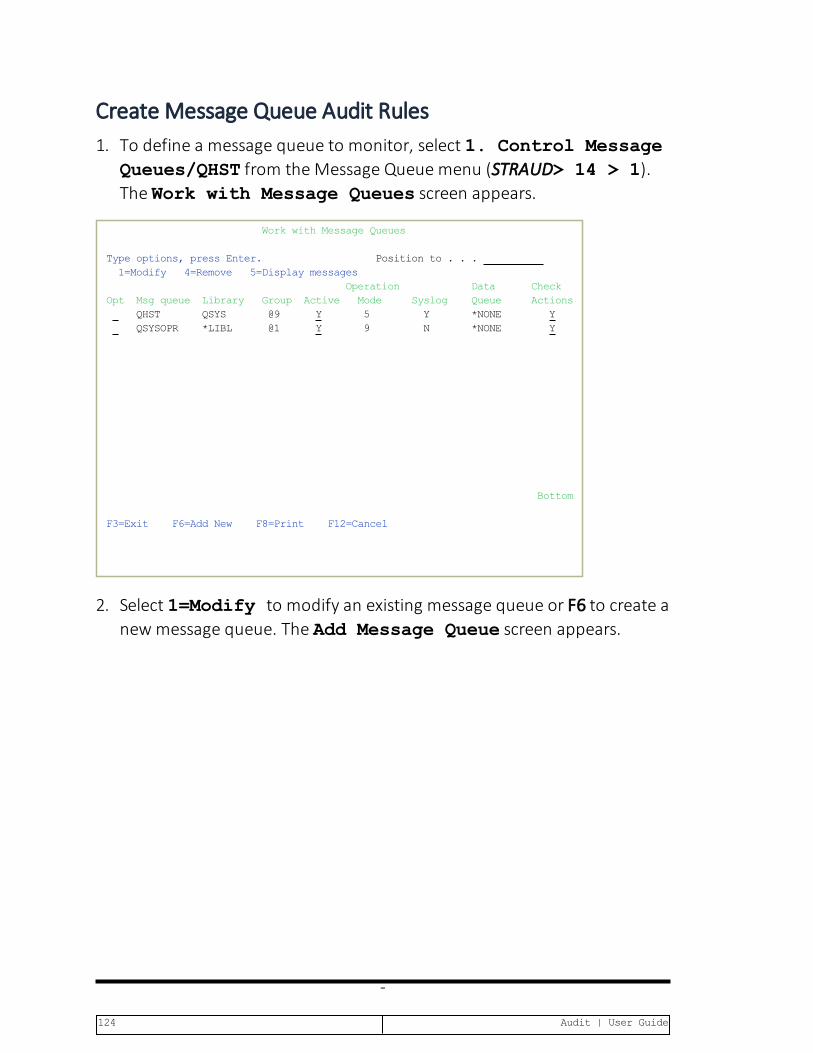
Create Message Queue Audit Rules1. To define a message queue to monitor, select 1. Control Message
Queues/QHST from the Message Queue menu (STRAUD> 14 > 1).The Work with Message Queues screen appears.
Work with Message Queues
Type options, press Enter. Position to . . . 1=Modify 4=Remove 5=Display messages Operation Data CheckOpt Msg queue Library Group Active Mode Syslog Queue Actions
QHST QSYS @9 Y 5 Y *NONE Y QSYSOPR *LIBL @1 Y 9 N *NONE Y
Bottom
F3=Exit F6=Add New F8=Print F12=Cancel
2. Select 1=Modify to modify an existing message queue or F6 to create anew message queue. The Add Message Queue screen appears.
-
124 Audit | User Guide

Add Message Queue
Message queue . . . . . . . . Name, QHST Library . . . . . . . . . . *LIBL Name, *LIBL Active definition . . . . . . Y A=Auto start, N=No, Y=Yes, requires manual activationOperation mode . . . . . . . . 1=Periodic, 5=QHST, 9=Immediate For 1, Number of seconds . . 300 For 9, Break program . . . . *STD Name, *STDSMZ4⁄AUSOURCE AUMSGBRK Library . . . . . . . . . Name, *LIBL
Send to SIEM . . . . . . . . . N Y=Yes, N=NoSend to user Data Queue . . . *NONE Name, *NONE Library . . . . . . Name, *LIBL
Check rules & perform Actions. Y Y=Yes, N=No *NO For Check rules, Group Id . @1 @1, @2, ..., @9=QHSTDuplicates may appear if Action sends to SIEM⁄Data Queue, selected above.
QHST requires Operation mode 5, Group @9.
F3=Exit F4=Prompt F12=Cancel
Audit|User Guide 125
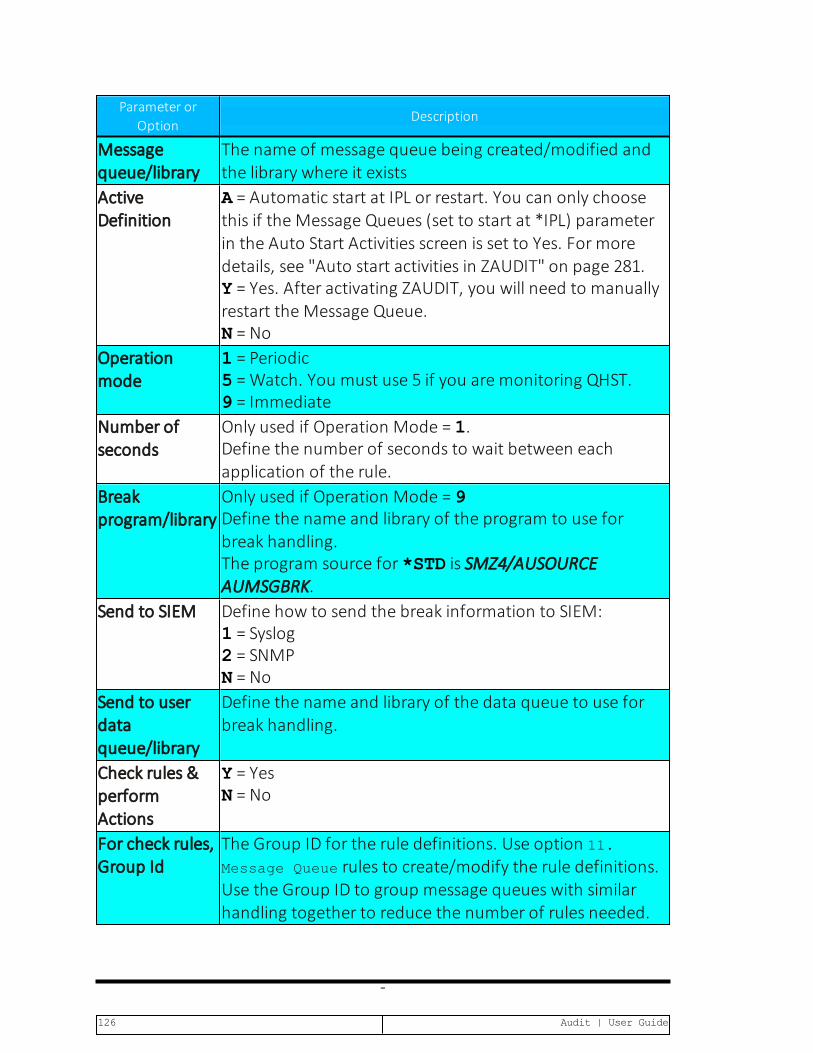
Parameter orOption
Description
Messagequeue/library
The name of message queue being created/modified andthe library where it exists
ActiveDefinition
A = Automatic start at IPL or restart. You can only choosethis if the Message Queues (set to start at *IPL) parameterin the Auto Start Activities screen is set to Yes. For moredetails, see "Auto start activities in ZAUDIT" on page 281.Y = Yes. After activating ZAUDIT, you will need to manuallyrestart the Message Queue.N = No
Operationmode
1 = Periodic5 =Watch. You must use 5 if you are monitoring QHST.9 = Immediate
Number ofseconds
Only used if Operation Mode = 1.Define the number of seconds to wait between eachapplication of the rule.
Breakprogram/library
Only used if Operation Mode = 9Define the name and library of the program to use forbreak handling.The program source for *STD is SMZ4/AUSOURCEAUMSGBRK.
Send to SIEM Define how to send the break information to SIEM:1 = Syslog2 = SNMPN = No
Send to userdataqueue/library
Define the name and library of the data queue to use forbreak handling.
Check rules &performActions
Y = YesN = No
For check rules,Group Id
The Group ID for the rule definitions. Use option 11.
Message Queue rules to create/modify the rule definitions.Use the Group ID to group message queues with similarhandling together to reduce the number of rules needed.
-
126 Audit | User Guide

3. Enter parameters and data as described in the table, then press Enter.The Filter Conditions screen appears. Filter criteria allow you to limit applic-ation of real-time detection rules to certain specific conditions.
Audit|User Guide 127

Define a Message Queue RuleThe message queue rule defines what gets filtered when written to the log.
1. Select 11. Message Queue rules from theMessage Queuesmenus(STRAUD > 14 > 11). The Work with Message Queues screenappears.
Work with Message Queues Rules & Actions for Message Queue
Subset by entry . . by description . .Type option, press Enter. by classification. C=Compliance,.. 1=Select 3=Copy 4=Delete 8=Msg 9=Explanation & Classification
OptEntrySeq ActCont.Description @0 999.9N N N Default for: Message queue (Group Id 0) @0
@1 1.0 Y Y N Message queue (Group Id 1) 999.9N N N Default for: Message queue (Group Id 1) @1 @2 999.9N N Default for: Message queue (Group Id 2) @2 @3 999.9N N Default for: Message queue (Group Id 3) @3 @4 999.9N N Default for: Message queue (Group Id 4) @4 @5 999.9N N Default for: Message queue (Group Id 5) @5 @6 999.9N N Default for: Message queue (Group Id 6) @6 @7 999.9N N Default for: Message queue (Group Id 7) @7 @8 999.9N N Default for: Message queue (Group Id 8) @8 @9 1.0 Y Y N Test More...F3=Exit F6=Add New F8=Print F11=No⁄Default F12=Cancel F22=Renumber
Modify data, or press Enter to confirm.
2. Select 1=Select to modify an existing rule or F6 to create a new rule.TheModify Selection Rule screen appears.
-
128 Audit | User Guide
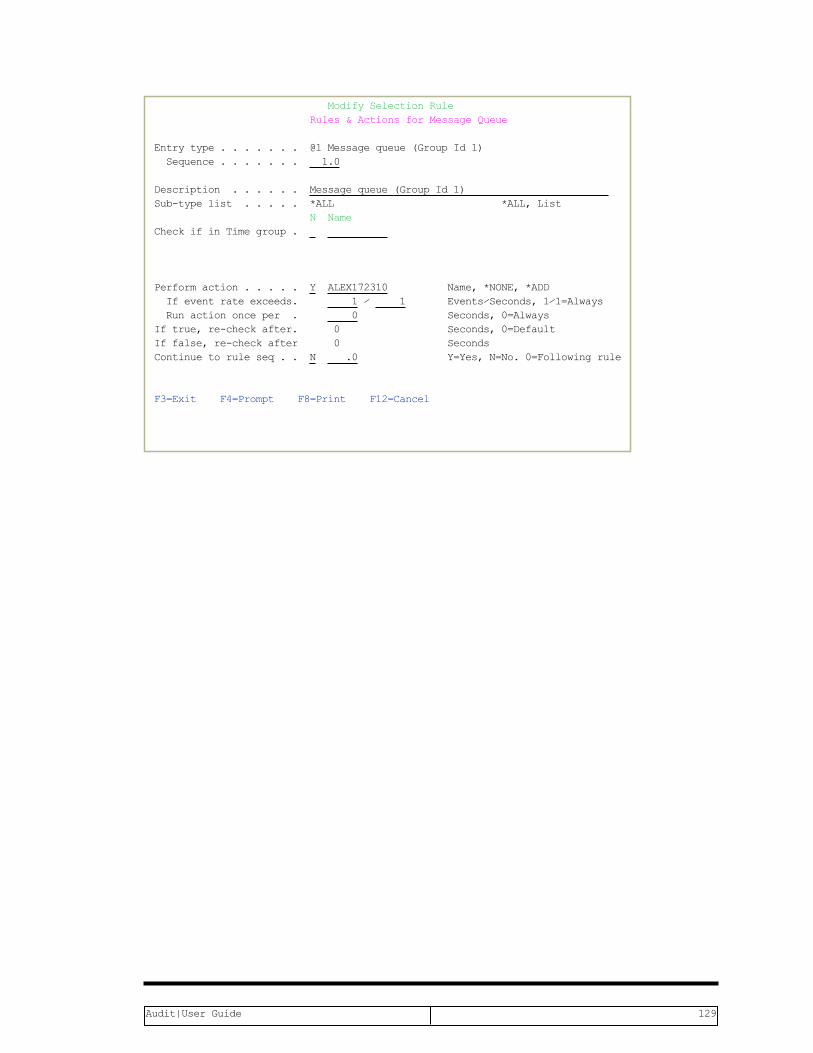
Modify Selection Rule Rules & Actions for Message Queue
Entry type . . . . . . . @1Message queue (Group Id 1) Sequence . . . . . . . 1.0
Description . . . . . . Message queue (Group Id 1) Sub-type list . . . . . *ALL *ALL, List N Name Check if in Time group .
Perform action . . . . . Y ALEX172310 Name, *NONE, *ADD If event rate exceeds. 1 ⁄ 1 Events⁄Seconds, 1⁄1=Always Run action once per . 0 Seconds, 0=AlwaysIf true, re-check after. 0 Seconds, 0=DefaultIf false, re-check after 0 SecondsContinue to rule seq . . N .0 Y=Yes, N=No. 0=Following rule
F3=Exit F4=Prompt F8=Print F12=Cancel
Audit|User Guide 129

Option Description
Entry Type Audit types are the entries @1-@9. All choices have the sameparameters. These are the rule identifiers you use when settingrules.F4 = Choose from a list of available types
Sequence Enter a sequence number or accept the default as presented.The sequence number determines the order of rule processingwhen there is more than one rule for a given audit type.
Description Enter a meaningful description of the rule.TimeGroup
Find time group
PerformAction
Y = Perform this action according to ruleN = Do not perform this action
Action Optionally trigger this actionName = name of action to trigger by this rule*NONE = No actions are triggered by this rule*ADD = Define a new action for this ruleF4 = Select an action from the list
If eventrateexceeds
Only perform the action if the event occurs more than a givennumber of times in a given time period. For example, 10 timesin every 5 seconds. If you want to run the action always, enter1/1.
Run actiononce per
The number of seconds between each performance of theaction.
If true,delayinterval
Define the number of seconds to wait before performing theaction. The default is 0.
Continueto rule seq
Y= After performing the actions, continue to the rule sequence.
3. Enter parameters and data as described in the table. Press Enter when fin-ished. The Filter Conditions screen appears. Filter criteria allow you to limitapplication of real-time detection rules to certain specific conditions.
-
130 Audit | User Guide
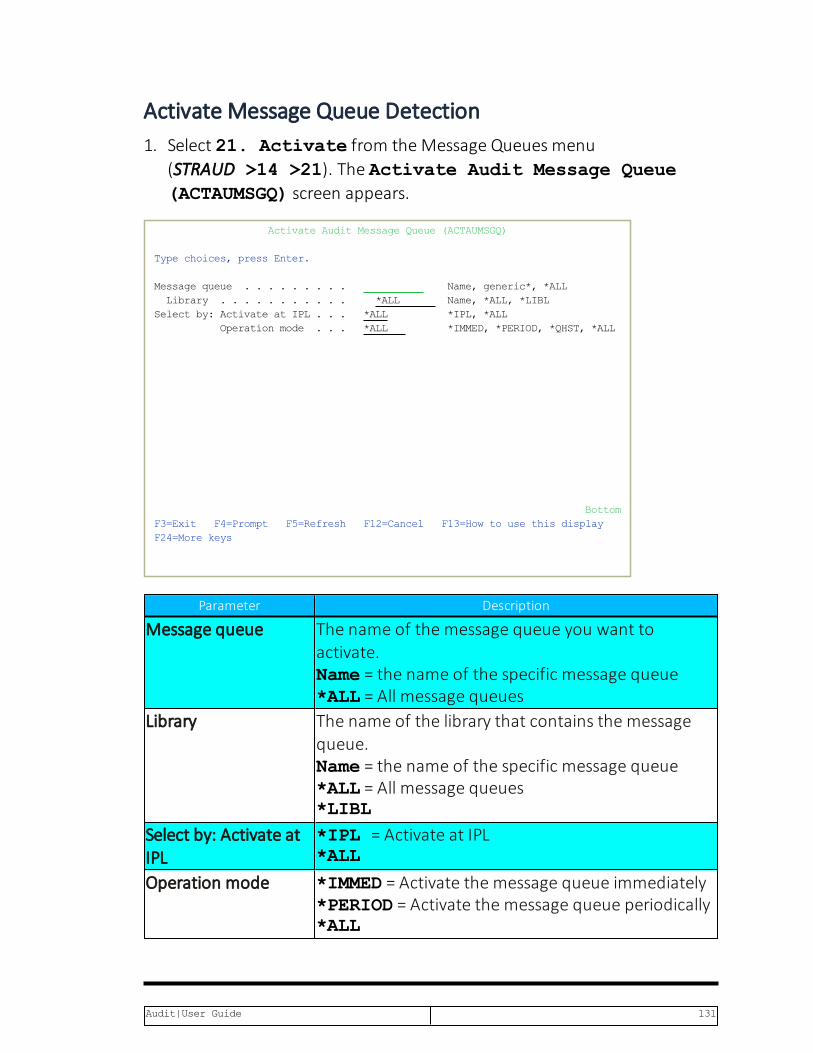
Activate Message Queue Detection1. Select 21. Activate from the Message Queues menu
(STRAUD >14 >21). The Activate Audit Message Queue(ACTAUMSGQ) screen appears.
Activate Audit Message Queue (ACTAUMSGQ) Type choices, press Enter.
Message queue . . . . . . . . . Name, generic*, *ALL Library . . . . . . . . . . . *ALL Name, *ALL, *LIBL Select by: Activate at IPL . . . *ALL *IPL, *ALL Operation mode . . . *ALL *IMMED, *PERIOD, *QHST, *ALL
BottomF3=Exit F4=Prompt F5=Refresh F12=Cancel F13=How to use this display F24=More keys
Parameter Description
Message queue The name of the message queue you want toactivate.Name = the name of the specific message queue*ALL = All message queues
Library The name of the library that contains the messagequeue.Name = the name of the specific message queue*ALL = All message queues*LIBL
Select by: Activate atIPL
*IPL = Activate at IPL*ALL
Operation mode *IMMED = Activate the message queue immediately*PERIOD = Activate the message queue periodically*ALL
Audit|User Guide 131

2. Enter parameters as described in the table and press Enter. The MessageQueue is activated according to the input parameters.
-
132 Audit | User Guide

Deactivate Message Queue Detection1. Select 22. Deactivate from the Message Queues menu
(STRAUD > 14 > 22). The Deactivate Audit Message Queue(DCTAUMSGQ) screen appears.
Deactivate Audit Message Queue (DCTAUMSGQ) Type choices, press Enter.
Message queue . . . . . . . . . Name, generic*, *ALL Library . . . . . . . . . . . *ALL Name, *ALL, *LIBL Handling type . . . . . . . . . *ALL *IMMED, *QHST, *PERIOD, *ALL
BottomF3=Exit F4=Prompt F5=Refresh F12=Cancel F13=How to use this display F24=More keys
Parameter Description
Message queue The name of the message queue you want to deactivate.Name = the name of the specific message queue*ALL = All message queues
Library The name of the library that contains the message queue.Name = the name of the specific message queue*ALL = All message queues*LIBL
Handling type *IMMED = Deactivate the message queue immediately*PERIOD = Deactivate the message queue periodically*ALL
2. Enter parameters as described in the table and press Enter. The MessageQueue is deactivated according to the input parameters.
Audit|User Guide 133
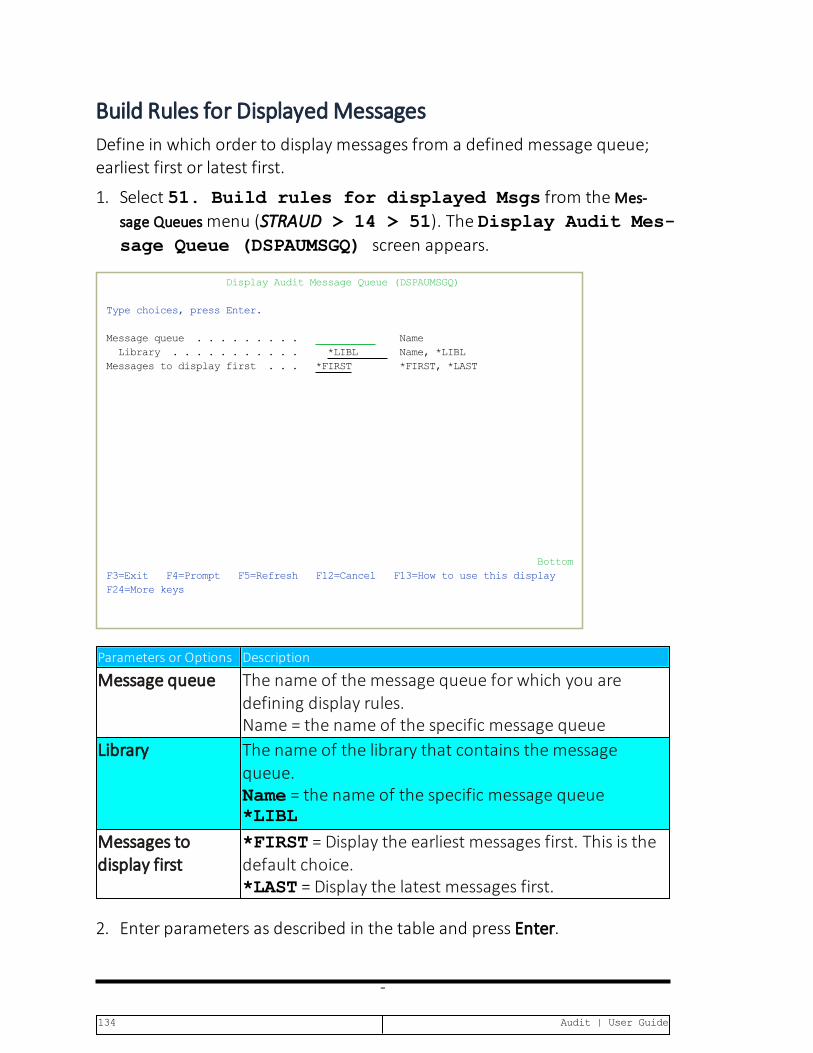
Build Rules for DisplayedMessagesDefine in which order to display messages from a defined message queue;earliest first or latest first.
1. Select 51. Build rules for displayed Msgs from theMes-sage Queuesmenu (STRAUD > 14 > 51). The Display Audit Mes-sage Queue (DSPAUMSGQ) screen appears.
Display Audit Message Queue (DSPAUMSGQ) Type choices, press Enter.
Message queue . . . . . . . . . Name Library . . . . . . . . . . . *LIBL Name, *LIBL Messages to display first . . . *FIRST *FIRST, *LAST
BottomF3=Exit F4=Prompt F5=Refresh F12=Cancel F13=How to use this display F24=More keys
Parameters or Options Description
Message queue The name of the message queue for which you aredefining display rules.Name = the name of the specific message queue
Library The name of the library that contains the messagequeue.Name = the name of the specific message queue*LIBL
Messages todisplay first
*FIRST = Display the earliest messages first. This is thedefault choice.*LAST = Display the latest messages first.
2. Enter parameters as described in the table and press Enter.
-
134 Audit | User Guide

Display Message History Log1. Select 55. Display History Log (Audit version)from the
Message Queues menu (STRAUD > 14 > 55). The Display Log (Audit)(DSPSYSLOG) screen appears.
Display Log (Audit) (DSPSYSLOG) Type choices, press Enter.
Display last minutes . . . . . . *BYTIME Number, *BYTIME Starting date and time: Starting date . . . . . . . . *CURRENT Date, *CURRENT, *YESTERDAY... Starting time . . . . . . . . 000000 Time Ending date and time: Ending date . . . . . . . . . *CURRENT Date, *CURRENT, *YESTERDAY... Ending time . . . . . . . . . 235959 Time Output . . . . . . . . . . . . . * *, *PRINT, *PRINT1-*PRINT9
BottomF3=Exit F4=Prompt F5=Refresh F10=Additional parameters F12=Cancel F13=How to use this display F24=More keys
Audit|User Guide 135

Parameter Description
Display lastminutes
Selects only those events occurring within the previousnumber of minutes as specified by the userNumber = Enter the desired number of minutes*BYTIME = According to start and end times specified below
Starting dateand timeEnding dateand time
Selects only those events occurring within the range specifiedby the start and end date/time combinationDate and time = Enter the appropriate date or time*CURRENT = Current day*YESTERDAY = Previous day*WEEKSTR/*PRVWEEKS = Current week/Previous week*MONTHSTR/ *PRVMONTHS = Current month/Previousmonth*YEARSTR/ *PRVYEARS = Current year/ Previous year*SUN -*SAT = Day of week
Output Where to send the output. The default is to the screen.**PRINT*PRINT1 - 9
Print format *SHORT (default)*FULL
2. Enter parameters as described in the table and press Enter. The logappears or printed according to the input parameters.
-
136 Audit | User Guide

Working with Time Groups
Audit|User Guide 137

Time GroupsTime groups are user-defined sets of time and day of the week parametersthat you can use as filter criteria when working with real time auditing rules,as well as for queries, reports and the history log. Time group filters can beeither:
l Inclusive – Including activities that occur only during the time groupperiods
l Exclusive – Excluding all activities that occur during the time groupperiods.
To define a time group:
1. Select 31. Time Groups in the Audit Main menu (STRAUD > 31).The Define Time Groups screen appears.
Define Time Groups
Type options, press Enter. 1=Select 4=Delete
OptTime Group DescriptionALON Special group
FRANCEWH SITE GROUP WORKHOURS Regular work hours WORKHOURS1 Regular work hours + 1 WORKHOURS2 Regular work hours + 2 WORKHOURS3 Regular work hours + 3
BottomF3=Exit F6=Add new F8=Print F12=Cancel
2. Type 1 to select an existing time group to modify or press F6 to create anew time group.
-
138 Audit | User Guide

Change Time Group
Time Group . . .ALON Description . .Special group
Type choices, press Enter
Start End Start EndMonday 8:00 12:00 0:00 0:00Tuesday 8:00 12:00 0:00 0:00Wednesday 8:00 12:00 0:00 0:00Thursday 8:00 12:00 0:00 0:00Friday 0:00 0:00 0:00 0:00Saturday 0:00 0:00 0:00 0:00Sunday 8:00 12:00 0:00 0:00
Note: AnEndtime earlier than theStarttime refers to the following day. Example: Monday 20:00-08:00 means from Monday 20:00 until Tuesday 08:00
F3=Exit F8=Print F12=Cancel F13=Repeat time F14=Clear time
Parameter orOption
Description
TimeGroup
Enter a meaningful name for the Time Group. This field ismandatory.
Description Type a meaningful description of the time groupStart andEnd
For each relevant day of the week, enter Start and End Times inthe format HH:MM, using the 24-hour clock. Midnight is 00:00.NOTE: An End time earlier than the Start time refers to thefollowing day. For example, Monday 20:00-08:00 means fromMonday 20:00 until Tuesday 08:00.
F13 Copy starting and ending times from cursor line to allsubsequent days
F14 Erase the starting and ending times from the cursor line andbelow
3. Enter parameters as described in the table and press Enter.
Audit|User Guide 139

Copy Time GroupsYou can use this feature either to create a new time group that is very similarto an existing one, or to copy the settings of one time group to another timegroup. You should be careful using this command to copy to an existing timegroup, as the contents of the copied time group overwrite the contents ofthe receiving time group.
1. Select 32. Copy Time Groups in the Main menu (STRAUD > 32).The Copy Audit/Firewall Time Group screen appears.
Copy Audit⁄Firewall Time Group (CPYAUTG) Type choices, press Enter.
From time group . . . . . . . . Name To time group . . . . . . . . . Name
BottomF3=Exit F4=Prompt F5=Refresh F12=Cancel F13=How to use this display F24=More keys
2. Enter the From time group and the To time group and pressEnter.
For more information, see Using Time Groups.
-
140 Audit | User Guide
Working with ActionsThis section discusses the steps necessary to define the actions that aretriggered by a rule. Actions may consist of alert messages sent to one ormore users or command scripts that perform one or more specific activities.
If your rule includes actions (the Action parameter on theModify Selection Rulescreen is not set to *NONE), action definition screens appear automatically.You can also define or modify actions separately from the rule definitionprocess.
To work with actions separately from rules,
1. Select 61. Work With Actions in the Main menu(STRAUD > 61).
2. Select an action to modify from the list or press F6 to create a new action.The definition screens for alert messages and command scripts appear insequence.
Audit|User Guide 141

Defining Alert MessagesYour rule can send alert messages to designated personnel via one or moreof the following methods:
l Email over the Internet
l Local workstation message queue using the SNDMSG MSG (MSGTEXT)TOMSGQ (MSGQNAME) command
l Local user message queue using the SNDMSG MSG (MSGTEXT)TOUSER (USERNAME) command
l Remote user on another IBM i system over the SNADS network usingthe SNDNETMSG command
l SMS service to a cellular telephone
l Syslog and SNMP
The message definition consists of predefined message text and one or morerecipient addresses. You can opt to have the system send a default messageor you can select a predefined message.
Modify Alert Message
Type choices, press Enter.
Action Name . . . . VICT202448 Description. . . . . Created by Action
Define alert message recipients 1=E-mail 2=Message Queue 3=User 4=Remote User 5=LAN user 6=SMS 7=Special8=SIEM 9=SNMP T=Twitter
Message ID . . . . . *AUTO *AUTO, Message ID
Type Recipient address, *USER, *DEV, *JOB, *SYSTEM; SIEM 1⁄2⁄3 1 [email protected] 3 ALEX3 8 1 More...
F3=Exit F4=Prompt F12=Cancel
The following table lists the parameters and options for the Modify AlertMessage screen.
-
142 Audit | User Guide

Parameter orOption
Description
ActionNameDescription Type a meaningful description of the actionMessage ID Predefined message text to be sent
*AUTO = Use the default message textMsg ID = name of a predefined alert messageF4 = Select a predefined message from the list or create a newmessage
Type Recipient typen 1 = E-mailn 2 = Any specific message queue (SNDMSG TOMSGQ)n 3 = User message queue (SNDMSG TOUSR)n 4 = Remote system user (SNDNETMSG)n 5 = Users or workstations on a LAN (SNDNWSGMSG)n 6 = SMSmessage to a cellular telephonen 7 =Message to beeper or pagern 8 = Syslogn 9 = SNMP
RecipientAddress
Recipient address formatted according to the recipient type:n 1 – E-mail Email address in standard email format (recip-
ient@address)n 2 –Message Queue Fully qualified name of the message
queue or *SYSOPRn 3 – User profile or IBM i group profilen 4 – Network user profile and SNA address separated by
a space (for example, USER SYSTEM)n 5 – LAN User Valid network user name or *DOMAIN for
all users on your domainn 6 – SMS Phone number including country code and area
code as necessaryn 7 – Special Phone number and access codes for the
pager service
Audit|User Guide 143
PredefinedMessagesYou have the option of using a predefined message instead of the product’sdefault message text. Predefined messages are stored in a special messagefile and have a unique message ID.
-
144 Audit | User Guide

Selecting a Predefined Message1. Move the cursor to the Message ID field in the Alert Message
screen, then press F4. The Select Message screen appears.
2. Type 1 next to the desired message ID, then press Enter.
3. Press Enter a second time to confirm and continue.
4. Select Message
Message file: AUALMSGF Library: SMZ4DTA
Type options, press Enter. Position to . . . 1=Select 2=Change 4=Delete
Opt Message ID Severity Message Text VV00001 5 The user was changed, please check.
VV00002 1 Alert User was *DISABLED VV00003 0 Alert User was *ENABLED
BottomF3=Exit F6=Add F12=Cancel
Audit|User Guide 145

Creating or Modifying a Predefined Message4. Move the cursor to the Message ID field in the Alert Message
screen and press F4. The Select Message screen appears.
5. Type 2 next to a predefined message to modify it, or press F6 to create anew message. If you are modifying a message, you might have to select ita second time in the Work with Message Description screen.
6. The Message Description screen appears. This is the standard para-meter screen for the IBM i (OS/400)ADDMSGD or CHGMSGD commands.
Change Message Description (CHGMSGD) Type choices, press Enter.
Message identifier . . . . . . .>VV00001 Name Message file . . . . . . . . . .>AUALMSGF Name Library . . . . . . . . . . .> SMZ4DTA Name, *LIBL, *CURLIB First-level message text . . . .>'The user was changed, please check.'
Second-level message text . . . *SAME
...Severity code . . . . . . . . .>05 0-99, *SAME More...F3=Exit F4=Prompt F5=Refresh F10=Additional parameters F12=Cancel F13=How to use this display F24=More keys
7. Type the parameters as listed in the following table. The table shows onlythe parameters relevant to this product; you should not modify any otherparameters.
-
146 Audit | User Guide
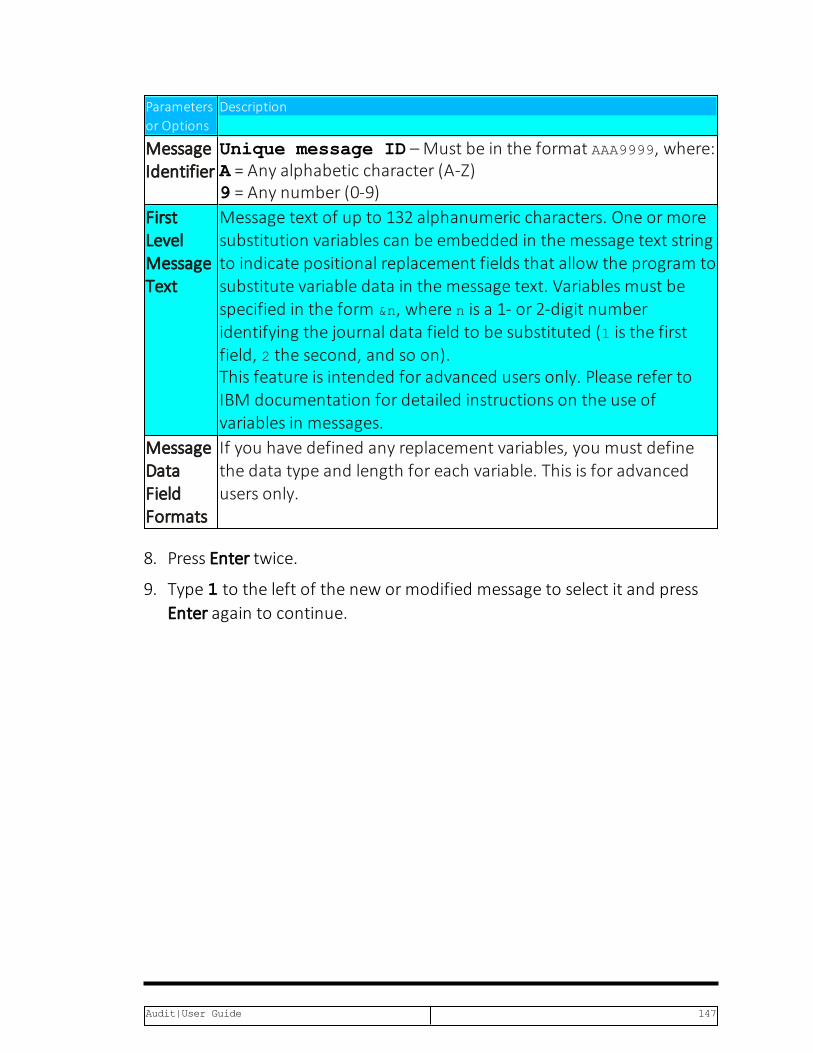
Parametersor Options
Description
MessageIdentifier
Unique message ID –Must be in the format AAA9999, where:A = Any alphabetic character (A-Z)9 = Any number (0-9)
FirstLevelMessageText
Message text of up to 132 alphanumeric characters. One or moresubstitution variables can be embedded in the message text stringto indicate positional replacement fields that allow the program tosubstitute variable data in the message text. Variables must bespecified in the form &n, where n is a 1- or 2-digit numberidentifying the journal data field to be substituted (1 is the firstfield, 2 the second, and so on).This feature is intended for advanced users only. Please refer toIBM documentation for detailed instructions on the use ofvariables in messages.
MessageDataFieldFormats
If you have defined any replacement variables, you must definethe data type and length for each variable. This is for advancedusers only.
8. Press Enter twice.
9. Type 1 to the left of the new or modified message to select it and pressEnter again to continue.
Audit|User Guide 147

Defining Command ScriptsWhen you have finished defining alert messages, the Action Script screenappears automatically. Use this screen to define one or more commandscripts to run whenever the rule conditions are met.
Commands execute sequentially according to a user-defined order.Commands may include replacement variables that extract data from thehistory log record and insert it as command parameters. Action alsosupports conditional branching in the event that an error occurs duringscript execution.
Edit Action Script
Action . .VICT202448 Created by Action
Type choices, press Enter. Note: Add quotes where needed. e.g. CALL PGM PARM('&PARM01' '&PARM02'). OrderLabel Command, GOTO label (unconditional) 1.00 RUNAUQRY QRY(SCC@) PRVMIN(5) OUTPUT(*HTML) MAILTO(VV) - On error, go to label . . LVL001 2.00 LVL001 CHGUSRPRF USRPRF(&CPUSPF) STATUS(*DISABLED) - On error, go to label . . LVL002 3.00 LVL002 MONMSG CPF0000 - On error, go to label . . 4.00 - On error, go to label . . More...F3=Exit F4=Prompt F7=Replacement variables F8=Replacement job F12=CancelF14=SYSLOG F15=SNMP F16=Twitter
The following table summarizes the options and parameters contained inthe Action Script screen.
-
148 Audit | User Guide

Parametersor Options
Description
Order The order to execute the commandsLabel Optional alphanumeric label for the current line; used for the On
Error, Go To feature.Command Command text including all parametersOn Error,Go toLabel
Conditional branch to the line indicated by the label in the eventa script error results from the command on the current line
F4 Open a prompt window for command parameters and optionsF7 Select a variable from pop-up window and insert it at the current
cursor position. Variables insert contents of journal entry data-fields as command parameters.
Audit|User Guide 149

Replacement VariablesReplacement variables allow you to extract data from the history log recordand insert it into command scripts as parameters. For example, in acommand script intended to terminate a suspicious job, you can retrieve andextract Job Name, Job User and Job Number information from the journalentry and insert it into the appropriate parameter fields for the ENDJOBcommand. The command with replacement values would appear as follows:
ENDJOB JOB(&ZRJOB/&ZRUSER/&ZRNBR) OPTION(*IMMED)
NOTE: Replacement variables are always preceded by the ‘&’ character. Ifyou select the data field from a list using F7, this character is insertedautomatically.
To insert a replacement parameter:
1. Move the cursor to the appropriate location in your command script inthe Action Script window.
2. Press F7 to display the Select Field pop-up window.
3. Select the desired field from which you would like to extract data, andpress Enter.
Edit Action Script ....................................................................Action : Select Field : : Entry .:C@User profile changed (After & Previous images) : : Type options, press Enter. :Type ch: 1=Select Subset by text . : Note:: :OrderL: OptDescription Attributes: 1.00 : Message text 1000 : - : Record data 6000 : : Date & Time yyyy-mm-dd-hh.mm A 19 : 2.00 : Date yyyy-mm-dd A 10 : - : Hour of day yyyy-mm-dd.hh A 13 : : Time HH.MM.SS A 8 : 3.00 : Name of job A 10 : - : User of job A 10 : : More...: 4.00 : Marked fields are part of the generic header. : - : F3=Exit F12=Cancel : : : :..................................................................:.F3=Exit F4=Prompt F7=Replacement variables F8=Replacement job F12=CancelF14=SYSLOG F15=SNMP F16=Twitter
-
150 Audit | User Guide
Conditional BranchingAction command scripts support conditional branching in the event of ascript error. The Label field identifies a command line for branchingpurposes. The On Error Go To Label field instructs the script to branch to theline indicated by the label in the event that an error is generated by thecommand.
To end script processing in the event of a script error:
1. Insert a label on a blank line following the last command.
2. Enter that label in the On Error Go To Label field on each activecommand line.
Audit|User Guide 151

Testing and Debugging RulesReal-time detection rules are, in fact, small programs. They require testing,debugging and maintenance to ensure they work properly. The followingsuggestions will help you with this process.
l Make sure that all the actions and events that you want to include inyour rule are captured by the IBM i (OS/400) audit settings (current set-ting, user activity auditing, and object auditing). If you create a real-time detection rule for an event that is not captured by the IBM i(OS/400) audit settings, it will not function.
l Enable logging for all real-time rules. The history log provides you witha complete audit trail for your rules. This information is invaluablewhen testing and debugging complex rules.
l Test the filter conditions in your rules before adding actions (alert mes-sages and command scripts). Use the Query and/or DisplayAudit Log features to examine the history log entries. Verify thatthe log contains all the events that you wish to capture and only thoseevents that you wish to capture.
l Create and test your actions before including them in a rule. Use theRun Action feature (STRAUD> 61 > 5) to perform the test.
Temporarily disable any other rules that include the same events orotherwise conflict with the rule that you are testing. Set the Log parameterto ‘N’ and the Action parameter to ‘*NONE’ to accomplish this.
NOTE: Do not forget to re-activate your rules after youfinish testing.
-
152 Audit | User Guide

Creating and Running Queries and Reports
Audit includes powerful tools for creating and viewing queries, reports, andlogs. Many of these tools are also available within other iSecurity products,giving a consistent experience in using them.
You can use several powerful and user-friendly tools to create output thatcontains only the data that you need to see, in a format that is useful to you.
The reporting features are:
l Display of log – showing the collected information of logs in either amessage format which looks similar to a job log, or in a tabular view
l Query generator – a comprehensive report generator which hastremendous filtering capabilities and can create reports for one ormore systems without copying the report definition
l Compliance Evaluator – score cards type reports to verify compliancewith predefined targets
l Report Scheduler - enabling automatic run of groups of reports andlogs
l Visualizer – BI (Business Intelligence) for activity logs. It uses a datawarehouse with compressed information, making it possible to keepinformation for long periods. This is available in the GUI interface only.
Possible outputs for reports include display on the Green or GUI screen,HTML, PDF, CSV (Excel), and OUTFILE (Output file). When using the GUI, theresults of a query can also be directed to the Visualizer to enabling using BImethods to deal with the results.
Once a report is defined on a system, it can be run on information on thecurrent system, any other system, or any group of systems. There is no needto copy the definition to any other system.
Result files are named and stored in a proper order to ensure that they allrun.
The output can be sent by email, either one report at a time, or as a group ofreports together. Optional zip and password are available.
If the information that is sent contains one or more empty reports, this isdenoted in the subject of the email. Customers can set the product to eithereliminate or send empty reports. (Some auditors prefer to keep all reports,
Audit|User Guide 153

even if they are empty, to ensure that the definition of the report did notchange.)
The product collects information about each query that is run. Thisinformation includes the full command used to run the report, the time thatit ran, how long it took to run it, and the name of the output that itproduced.
An effective security policy relies on queries and reports to providetraceability for system activity. Audit queries and reports containinformation from an extremely wide range of sources, (as shown in"Appendix A: Raz-Lee Information Sources" on page 374) including:
l Activity data collected from sources such as QHST, QAUDJRN (thesystem audit journal), QIPFILTER, QIPNAT, QACGJRN, QQOS, QSNMP,QDSNX, QVPN, and QZMF
l Activity data collected by iSecurity/Firewall from security related exitpoints
l Activity of the Antivirus and Anti-Ransomware modules of iSecurityl Information from the system about Users, Groups, Native and IFSObjects, System values, PTFs, Authorization lists, and other categories
l Information that shows current activity status such as Active Jobs,NETSTAT, Disk, and System Status
l Summarized activity information which is kept in the internal DataWarehouse that is the base of the GUI Visualizer.
l Database changes, filtered, collected and reported by iSecurity/AP-Journal
l Activity about elevated authority, collected and reported by Authority-On-Demand
l Activities with objects in product libraries, collected and reported byChange-Tracker
l Activities of users on emulated screens collected and reported byCapture
l Activity of Password-Reset, MFA, and other products, also collectedand reported.
To work with these features, select 41. Queries and Reports fromthe Audit Main Menu. The Queries screen appears:
-
154 Audit | User Guide

AUQRYMN Queries iSecurity⁄Audit System: S520 Select one of the following:
Query Wizard Report Scheduler 1. Work with Queries 51. Work with Report Scheduler 52. Run a Report Group
Run a Query Baseline Setup 11. Display 61. System Values 12. Print 62. Network Attributes 13. Submit as Batch Job 63. Counts in Compliance Query
Log Network reporting SYSTEM() 21. Display Log 71. Network description 75. Current Job CntAdm Messages 76. All Jobs CntAdm Messages
Selection or command ===>
F3=Exit F4=Prompt F9=Retrieve F12=Cancel F13=Information Assistant F16=AS⁄400 main menu
To workwith queries:
To create and modify queries,
select 1. Work with Queries. TheWork with Queriesscreen appears, as shown in "Creating and Running Queries"on page 166.
To run existing queries,
select the following items. For each the Run Audit Query(RUNAUQRY) screen appears, as shown in "Running Queries"on page 189, with the relevant ways of running the queryselected:
l 11. Displayl 12. Printl 13. Submit as Batch Job
To workwith logs:
To display Audit log entries,
select 21. Display Log. The Display Firewall Log(DSPFWLOG) screen appears, as shown in Displaying FirewallLogs.
Audit|User Guide 155
To workwith reports
To schedule reports to run,
select 51. Work with Report Scheduler. TheWorkwith Report Scheduler screen appears, as shown in"Scheduling Reports" on page 192.
To run groups of reports,
select 52. Run a Report Group. The Run Report Group(RUNRPTGRP) screen appears, as shown in "Running ReportGroups On Demand" on page 209.
To view other network and system information,
To ping and test DDM connections for network systems,
select 71. Network Description. The standard DisplayNetwork Systems screen appears.
To view Central Administration messages for current jobs,
select 75. Current Job CntAdm Messages. TheDisplay Messages screen appears, showing the job log for thecurrent job.
To view Central Administration messages for all jobs,
select 76. All Jobs CntAdm Messages. The DisplayMessages screen appears, showing the job log for all jobs.
To exit the screen, press the F3 or F12 key.
-
156 Audit | User Guide

Working with Individual ReportsThe next step in the definition process is to define the individual reports thatare contained in the report group.
1. To add a new report to a group, type 2 next to the group name, or type 2next an individual report to modify it. The Report Definitionscreen appears. For information, see "Working with Report Groups" onpage 1.
2. Define run time parameters for this report. The actual parameters avail-able are specific to the report type.
l For details regarding query parameters, see "Running Queries" onpage 1.
l For details regarding display log parameters, see "Viewing the logs" onpage 1.
3. Press Enter to finish the definition and return to the Work withReport Scheduler screen.
NOTE: For all parameters that exist at both the group andindividual report level (for example, theemail address to receive the report), if noentry is made in the individual report, thegroup parameter is used. All parametersdefined in the individual report overridethe group parameter.
Audit|User Guide 157

Running ReportsThe Report Scheduler submits all scheduled reports as batch jobsautomatically on the day and time as specified in the definition. You can alsorun a report manually at any time.
To run a report manually:
1. Select 52. Run a Report Group. from the Queriesmenu(STRAUD > 41 > 52). The Run Report Group screen appears.
Parameters Description
Report Group Enter the report group nameJob Description Your batch job subsystem – normally QBATCHLibrary Name = Library name
*Product = SMZ4 or the default product library*LIBL = Current library list*CURLIB = Current Library
-
158 Audit | User Guide

Baseline SetupThere are queries that compare the current situation with a predefinedbaseline. You can set the Baseline to either the current "System Values" onthe next page or the "Network Attributes" on page 161.
Audit|User Guide 159

System ValuesTo define the Baseline as being the system values:
1. Select 61. System Values. from the Queries screen(STRAUD > 41 > 61). The Set Audit Compliance Base-Line screen appears.
Set Audit Compliance Base-Line (SETAUCBL) Type choices, press Enter.
Set current as "Base line" . . .>*SYSVAL *SYSVAL, *NETATR, *COUNTS Compliance query . . . . . . . . *SELECT Name, *SELECT Run number . . . . . . . . . . . *LAST Number, *LAST, *SELECT Additional Parameters Called from . . . . . . . . . . QRY REPL, QRY
BottomF3=Exit F4=Prompt F5=Refresh F12=Cancel F13=How to use this display F24=More keys
Parameters Description
SYSVAL Sets the current system value settings as the baseline.NETATR Sets the current values of network attributes as the baseline.
2. Press Enter. The Compliance Baseline is set.
-
160 Audit | User Guide

Network AttributesTo define the Baseline as being the network attributes:
1. Select 62. Network Attributes. from the Queries screen(STRAUD> 41 > 62). The Set Audit Compliance Base-Line screen appears.
Set Audit Compliance Base-Line (SETAUCBL) Type choices, press Enter.
Set current as "Base line" . . .>*NETATR *SYSVAL, *NETATR, *COUNTS Compliance query . . . . . . . . *SELECT Name, *SELECT Run number . . . . . . . . . . . *LAST Number, *LAST, *SELECT Additional Parameters Called from . . . . . . . . . . QRY REPL, QRY
BottomF3=Exit F4=Prompt F5=Refresh F12=Cancel F13=How to use this display F24=More keys Function key not allowed.
Parameters Description
SYSVAL Sets the current system value settings as the baseline.NETATR Sets the current values of network attributes as the baseline.
2. Press Enter. The Compliance Baseline is set.
Audit|User Guide 161
Network ReportingYou can check the communication between your system and remotesystems. You can also see the job messages for both the current job and forall jobs on the remote system.
-
162 Audit | User Guide

Network DescriptionTo check the communication between your system and remote systems:
1. Select 71. Network description from the Queriesscreen(STRAUD> 41 > 71). The Display Network Systems screen appears.
System type:AS400 Display Network Systems System:S520 Position to . . .Type options, press Enter. 8=Test DDM 9=Ping
Opt System Group RAZLEE1 *RL RAZLEE1 machine
RAZLEE2 *G1 RAZLEE2 machine RAZLEE3 *G1 RAZLEE3 machine S520 *NONE S520 computer
BottomF3=Exit F12=Cancel
2. To test DDM communications with the remote system, type 8 in the Optfield for the selected system and press Enter.
To ping the remote system, type 9 in the Opt field for the selectedsystem and press Enter.
Audit checks communications and displays a result message.
Audit|User Guide 163

Current Job Central AdministrationMessagesTo display messages for the current job, select 75. Current JobCntAdm Messages from the Queriesmenu (STRAUD> 41 > 75).
If there are any relevant message, the IBM supplied Display Messages screenappears and displays them.
If there are no relevant messages, the text "Message queue AUCOMLOGin QTEMP not found." appears at the bottom of the screen.
-
164 Audit | User Guide

All Jobs Central AdministrationMessagesTo display messages for all jobs:
l Select 76. All Job CntAdm Messages from the Queriesmenu(STRAUD > 41 > 76). The IBM supplied Display Messages screenappears.
Audit|User Guide 165
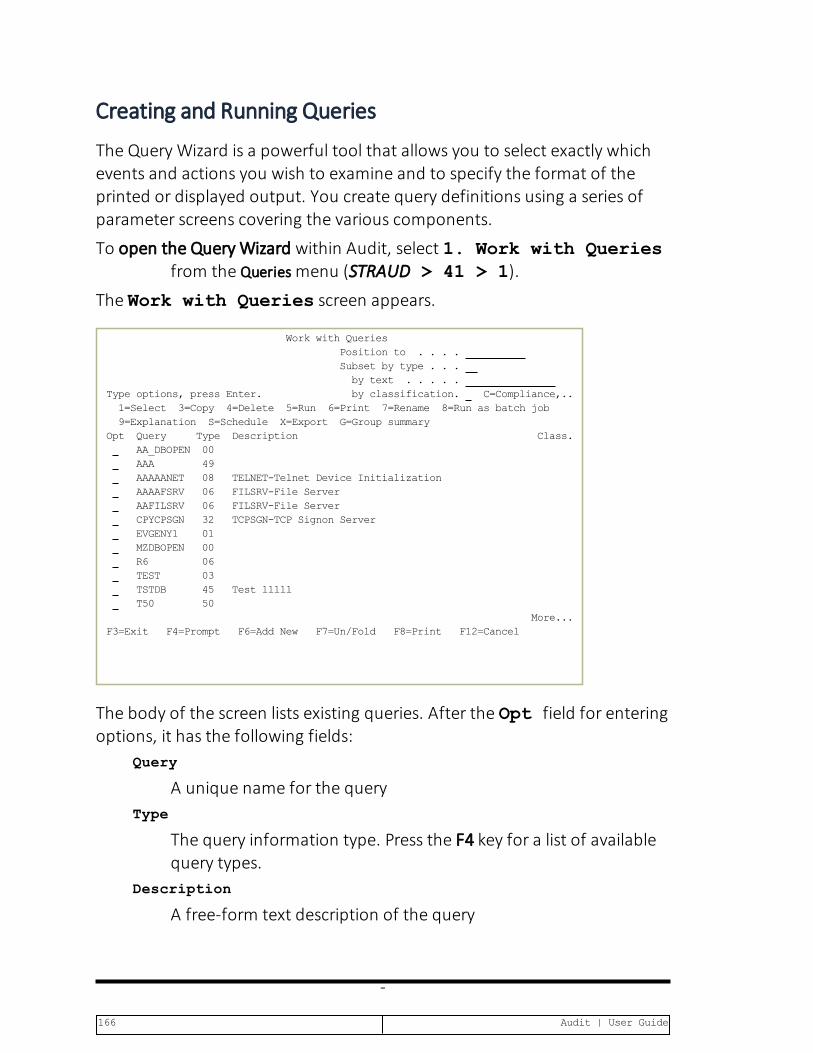
Creating and Running Queries
The Query Wizard is a powerful tool that allows you to select exactly whichevents and actions you wish to examine and to specify the format of theprinted or displayed output. You create query definitions using a series ofparameter screens covering the various components.
To open the Query Wizard within Audit, select 1. Work with Queriesfrom the Queriesmenu (STRAUD > 41 > 1).
The Work with Queries screen appears.
Work with Queries Position to . . . . Subset by type . . . by text . . . . .Type options, press Enter. by classification. C=Compliance,.. 1=Select 3=Copy 4=Delete 5=Run 6=Print 7=Rename 8=Run as batch job 9=Explanation S=Schedule X=Export G=Group summaryOpt Query Type Description Class.
AA_DBOPEN 00 AAA 49 AAAAANET 08 TELNET-Telnet Device Initialization AAAAFSRV 06 FILSRV-File Server AAFILSRV 06 FILSRV-File Server CPYCPSGN 32 TCPSGN-TCP Signon Server EVGENY1 01 MZDBOPEN 00 R6 06 TEST 03 TSTDB 45 Test lllll T50 50 More...F3=Exit F4=Prompt F6=Add New F7=Un/Fold F8=Print F12=Cancel
The body of the screen lists existing queries. After the Opt field for enteringoptions, it has the following fields:
Query
A unique name for the queryType
The query information type. Press the F4 key for a list of availablequery types.
Description
A free-form text description of the query
-
166 Audit | User Guide

Class.
Letters or digits for classifications of queries. Predefined valuesinclude
l C: Compliance (SOX/ISO17799/PCI, etc)l U: Userl O: Objectl S:System Valuesl N: Network
You can freely define meanings for the digits 0 through 9.
To add a new query, press the F6 key. The Add Query screen appears, asshown in "Adding and Modifying Queries" on page 169.
To view or modify further information on a query, type 1 in the Opt fieldfor the query and press Enter. TheModify Query screen appears, asshown in "Adding and Modifying Queries" on page 169.
To view or modify the classification and explanation of a query, type 9 in theOpt field for the query and press Enter. The Query Explanation andClassification screen appears. Enter classification characters (asshown for the Class field above) in the Classification listfield. Enter a free-form explanation of the query in the Queryexplanation field, which is printed on output reports thatinclude headers.
To view or modify summaries included in the query output, type G (forGroup Summary) in the Opt field for the query and press Enter.TheModify Query Summary Definitions screen appears, as shown in"Modifying Query Summary Definitions" on page 185.
To copy information from one query to another, type 3 in the Opt field forthe query and press Enter. The Copy Query window opens. Theread-only From field shows the name and description of theoriginal query. Enter the name and a free-form description for thenew query in the To fields.
To rename a query, type 7 in the Opt field for the query and press Enter.The Rename Query window opens. The read-only From field showsthe name and description of the original query. Enter the newname and description for the query in the To fields.
Audit|User Guide 167
To delete a query, type 4 in the Opt field for the query and press Enter.The Delete Query window opens. Press Enter to confirm thedeletion or the F12 key to cancel it.
To run a query interactively, type 5 in the Opt field for the query and pressEnter. The Run Firewall Query (RUNFWQRY)Run Audit Query (RUNAUQRY)screen appears (as shown in "Running Queries" on page 189) withthe query name in its Query field and the Output field set to *,which immediately sends the output to the screen.
To run a query interactively and print the output, type 5 in the Opt fieldfor the query and press Enter. The Run Firewall Query (RUNFWQRY)RunAudit Query (RUNAUQRY) screen appears (as shown in "RunningQueries" on page 189) with the query name in its Query field andthe Output field set to *PRINT, which immediately sends theoutput to the screen.
To run a query as a batch job, type 8 in the Opt field for the query andpress Enter. The Run Firewall Query (RUNFWQRY)Run Audit Query(RUNAUQRY) screen appears (as shown in "Running Queries" onpage 189) with the query name in its Query field and the Outputfield set to *BATCH, which immediately sends the output to thescreen.
To schedule a query to run regularly as part of a report group, type S in theOpt field for the query and press Enter. The Schedule Query screenappears, as shown in "Scheduling Queries" on page 183.
To export a query definition, type X in the Opt field for the query andpress Enter. A confirmation line stating that the definition hasbeen exported appears at the bottom of the screen. After youhave finished working with this screen and press F3 to exit, theExport iSecurity Query Definitions screen appears. You can specifywhether to export the definition to a particular system, a group ofsystems, or to all. If you set the field to *NONE, it is exported to asave file with a name indicated on the last line of that screen.
-
168 Audit | User Guide

Adding andModifying Queries
To add a new query, press the F6 key from theWork with Queries screen(STRAUD> 41 > 1) as shown in "Creating and Running Queries"on page 166.
To modify an existing query, enter 1 in the Opt field for the query on theWork with Queries screen.
The Add Query orModify Query screen appears. (The only differences betweenthem are the screen title and that some fields for theModify Query screen areread-only, as noted in their descriptions.)
Add Query Last change date 0/00/00 by userType choices, press Enter.
Query name . . . . .Description . . . . .
Type . . . . . . . .
NotNameTime group . . . . . N=Not in time group
Output format . . . . 2 1=Tabular and wrap, 2=One line, 9=LogIf Output=1, Wrap on. 0 Field number, 0=*AUTO
Add Header / Total . 1 1=Both, 2=Header, 3=Total, 4=Total only, 9=NoneAdd Filter / Desc. . 1 1=Filter and description, 2=Filter, 3=Description, 9=None Action . . . . . . . *NONE Name, *NONE, *ADD, F4=Prompt Password . . . . . .
F3=Exit F4=Prompt F12=Cancel
Audit|User Guide 169

Add Query Last change date 0/00/00 by userType choices, press Enter.
Query name . . . . .Description . . . . .
Type(00=All) . . . . 00 Generic entry type (00-99 for reporting only) NotNameTime group . . . . . N=Not in time group
Output format . . . . 2 1=Tabular and wrap, 2=One line, 9=LogIf Output=1, Wrap on. 0 Field number, 0=*AUTO
Add Header / Total . 1 1=Both, 2=Header, 3=Total, 4=Total only, 9=NoneAdd Filter / Desc. . 1 1=Filter and description, 2=Filter, 3=Description, 9=None
Password . . . . . .
F3=Exit F4=Prompt F12=Cancel
The screen contains the following fields:Query name
A unique name for the query. Do not begin the name with theletter "Z", which is reserved for queries included with iSecurityproducts. (ForModify Query, this field is read-only.)
Description
A free-form description of the query.Type (00-All)
A code indicating the type of the query. For a list of possiblevalues, press the F4 key. (ForModify Query, this field is read-only.)
The type $9 is a special value, with which you can use the outputfrom any command as input for the query. If you set this field to$9, the Spool File Query Selection screen appears after this screen, inwhich you can specify the command.
Time group
Restrict information to times within a named time group or, if thefirst one-character field is set to N, to times outside of it. For a listof valid time groups, press the F4 key.
-
170 Audit | User Guide
Output format
The format in which each line of output appears. Possible valuesare:
l 1: Display in tabular format. If the data is longer than an out-put line, wrap on the field of the data indicated on the nextfield of this screen.
l 2: Display in tabular format on a single line.l 9: Display in log format.
If Output=1, Wrap on
If the Output format field is set to 1, the number of the datafield on which to start a new line. If this field is set to 0, wrapoutput to the next line at the start of any data field that wouldcause the output to exceed its maximum line length.
Add Header / Total
Whether the output should include field headers or a summary oftotals. Possible values include:
l 1: Include both the headers and summary.l 2: Include only the header.l 3: Include the summary.l 4: Omit the body of the report and include the summary.l 9: Include neither headers nor summary.
Add Filter / Desc.
Whether the output should include a listing of the query's filterconditions or a text description of them. Possible values include:
l 1: Include both filter and description.l 2: Include only the headerl 3: Descriptionl 4: Include neither filter nor description.
Password
Add a password to this query to protect it from being changed.This is a hidden field, without an underline marking its location. Itbegins on the same line as its label, in the same column as theentry areas for the other fields.
After entering values for the fields, press Enter.
Audit|User Guide 171
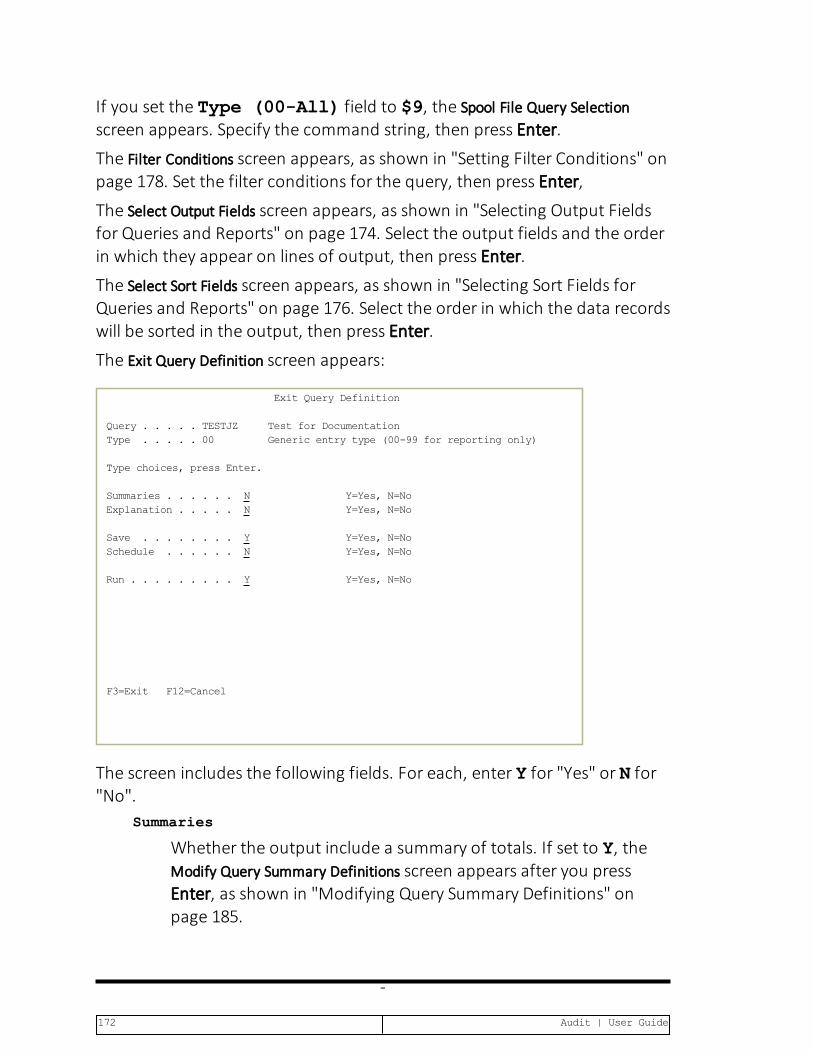
If you set the Type (00-All) field to $9, the Spool File Query Selectionscreen appears. Specify the command string, then press Enter.
The Filter Conditions screen appears, as shown in "Setting Filter Conditions" onpage 178. Set the filter conditions for the query, then press Enter,
The Select Output Fields screen appears, as shown in "Selecting Output Fieldsfor Queries and Reports" on page 174. Select the output fields and the orderin which they appear on lines of output, then press Enter.
The Select Sort Fields screen appears, as shown in "Selecting Sort Fields forQueries and Reports" on page 176. Select the order in which the data recordswill be sorted in the output, then press Enter.
The Exit Query Definition screen appears:
Exit Query Definition
Query . . . . .TESTJZ Test for Documentation Type . . . . .00 Generic entry type (00-99 for reporting only)
Type choices, press Enter.
Summaries . . . . . . N Y=Yes, N=NoExplanation . . . . . N Y=Yes, N=No
Save . . . . . . . . Y Y=Yes, N=NoSchedule . . . . . . N Y=Yes, N=No
Run . . . . . . . . . Y Y=Yes, N=No
F3=Exit F12=Cancel
The screen includes the following fields. For each, enter Y for "Yes" or N for"No".
Summaries
Whether the output include a summary of totals. If set to Y, theModify Query Summary Definitions screen appears after you pressEnter, as shown in "Modifying Query Summary Definitions" onpage 185.
-
172 Audit | User Guide

Explanation
Whether the output should include text description in its header.If set to Y, the Query Explanation and Classification screen appearsafter you press Enter, as shown in "Creating Query Classificationsand Explanations" on page 187.
Save
Whether to save the query definition.Schedule
Whether to add the query to a group to run on a schedule. If set toY, the Schedule Query screen appears after you press Enter, asshown in "Scheduling Queries" on page 183.
Run
Whether to run the query immediately. If set to Y, the Run AuditQuery (RUNAUQRY)Run Firewall Query (RUNFWQRY) screen appearsafter you press Enter, as shown in .
To save your selections and exit the screen, press Enter. The additionalscreens related to your selections appear.
To exit the screen without saving your selections, press the F12 key.
Audit|User Guide 173

Selecting Output Fields for Queries and Reports
The Select Output Fields screen specifies the fields to appear in a query and theorder in which they appear in each record.
The screen appears in the process of adding or modifying queries, as shownin "Adding and Modifying Queries" on page 169.
SelectOutputFields
Query . . . . .TESTJZ Test for Documentation Entry . . . . .00 Generic entry type (00-99 for reporting only) Find (F16).
Output Seq. Description Attribute Length 1.0 Date & Time yyyy-mm-dd-hh.mm 19A 19 2.0 Name of job 10A 10 3.0 User of job 10A 10 Number of job 6A 6 Current user profile 10A 10 System name 8A 8 Object 10A 10 Object library 10A 10 Object type 7A 7 User 18A 18 *FYI mode (simulation) 1A 1 More...Pink fields are generic (all types) Green fields apply to this type only F3=Exit F5=Display values F12=Cancel F16=Find F21=Select all F23=Invert
The read-only Query field shows the name and description of the query.
The read-only Entry field shows the code and description of the entrytype that the query processes.
The body of the screen contains one line for each field defined for the entrytype specified for the query (shown in green) as well as one for each ofseveral generic fields that do not depend on the entry type (shown in pink).
Each contains the following fields:Seq.
A number determining the order in which the fields appear. Forexample, fields with the Seq values 1.0, 1.1, 2.0, 4.0would appear in that order, regardless of the order in which theyappear in the displayed list.
-
174 Audit | User Guide

Description
A read-only text description of the field, as defined for that entrytype or generic field.
Attribute
A pair of read-only fields showing the length and type of the field,as defined for that entry type or generic field.
Output Length
The number of characters allocated for the field contents in theoutput.
To find a field in the list, enter a string from the field name in the Find fieldand press the F16 (Shift+F4) key. The cursor moves from thecurrent field to the next field with a name that includes that string.If there are no more field names containing the string in the rest ofthe list, it searches from the beginning.
To select all fields, press the F21 (Shift+F9) key.
To invert the selection, selecting all fields that are not currently selected anddeselecting those that are, press the F23 (Shift+F11) key.
Audit|User Guide 175

Selecting Sort Fields for Queries and Reports
The Select Sort Fields screen specifies the fields by which data is sorted in aquery.
The screen appears in the process of adding or modifying queries, as shownin "Adding and Modifying Queries" on page 169.
SelectSortFields
Query . . . . .TESTJZ Test for Documentation Entry . . . . .00 Generic entry type (00-99 for reporting only) Order A=Ascending D=Descending A Find (F16).Break after change of . . . . 0 Number of sort fields, 0=No breakRecords to include . . . . . . 1 1=All records, 2=One record per key Seq. Description 1.0 Date & Time yyyy-mm-dd-hh.mm 2.0 Name of job 3.0 User of job Number of job Current user profile System name Object Object library Object type User *FYI mode (simulation) More...Pink fields are generic (all types) Green fields apply to this type only F3=Exit F5=Display values F12=Cancel F16=Find F21=Select all F23=Invert
The read-only Query field shows the name and description of the query.
The read-only Entry field shows the code and description of the entrytype that the query processes.
The following fields control the presentation of the records:Order A=Ascending D=Descending
The order in which the sorted records appear in the output.Break after change of
The number of changes in sort fields that trigger a break in theoutput. If set to 0, there are no breaks.
Records to include
Whether to include only records on which values of sorted fieldschange. Possible values are:
-
176 Audit | User Guide

l 1: Include all recordsl 2: Include only the records on which values change.
The body of the screen contains one line for each field defined for the entrytype specified for the query (shown in green) as well as one for each ofseveral generic fields that do not depend on the entry type (shown in pink).
Each contains the following fields:Seq.
A number determining the priority with which the records aresorted. For example, fields with the Seq values 1.0, 1.1,2.0, 4.0would have sort priorities in that order, regardless ofthe order in which they appear in the displayed list.
Description
A read-only text description of the field, as defined for that entrytype or generic field.
To find a field in the list, enter a string from the field name in the Find fieldand press the F16 (Shift+F4) key. The cursor moves from thecurrent field to the next field with a name that includes that string.If there are no more field names containing the string in the rest ofthe list, it searches from the beginning.
To select all fields, press the F21 (Shift+F9) key.
To invert the selection, selecting all fields that are not currently selected anddeselecting those that are, press the F23 (Shift+F11) key.
Audit|User Guide 177
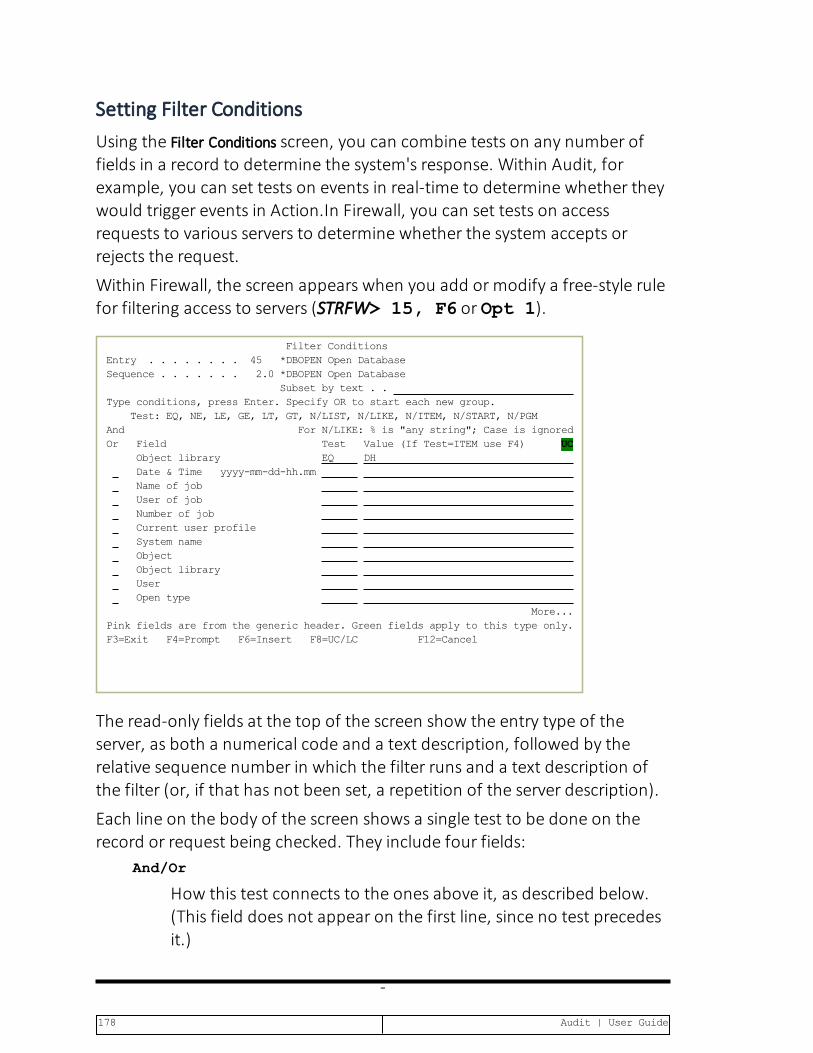
Setting Filter ConditionsUsing the Filter Conditions screen, you can combine tests on any number offields in a record to determine the system's response. Within Audit, forexample, you can set tests on events in real-time to determine whether theywould trigger events in Action.In Firewall, you can set tests on accessrequests to various servers to determine whether the system accepts orrejects the request.
Within Firewall, the screen appears when you add or modify a free-style rulefor filtering access to servers (STRFW> 15, F6 or Opt 1).
Filter Conditions Entry . . . . . . . . 45 *DBOPEN Open Database Sequence . . . . . . . 2.0*DBOPEN Open Database Subset by text . .Type conditions, press Enter. Specify OR to start each new group. Test: EQ, NE, LE, GE, LT, GT, N/LIST, N/LIKE, N/ITEM, N/START, N/PGM And For N/LIKE: % is "any string"; Case is ignoredOr Field Test Value (If Test=ITEM use F4) UC Object library EQ DH
Date & Time yyyy-mm-dd-hh.mm Name of job User of job Number of job Current user profile System name Object Object library User Open type More...Pinkfields are from the generic header.Greenfields apply to this type only.F3=Exit F4=Prompt F6=Insert F8=UC/LC F12=Cancel
The read-only fields at the top of the screen show the entry type of theserver, as both a numerical code and a text description, followed by therelative sequence number in which the filter runs and a text description ofthe filter (or, if that has not been set, a repetition of the server description).
Each line on the body of the screen shows a single test to be done on therecord or request being checked. They include four fields:
And/Or
How this test connects to the ones above it, as described below.(This field does not appear on the first line, since no test precedesit.)
-
178 Audit | User Guide

Field
The name of the field within the record or request being checked.The items in this field are read-only. If they appear in green, theyare the names of fields defined for files on that server or entrytype. If they appear in pink, they are generic fields referring to theevent or request being tested.
Test
How the Field is compared to the Value, using comparators shownbelow.
Value
The value against which the Field is tested.
This field is case sensitive, unless the Test field is set to LIKE orNLIKE. The two characters shown in a black-on-green field at theright end of the line of field labels about the first line of the bodyof the screen shows the Caps-Lock state. If the field shows "UC",typed characters are entered as uppercase. If it shows "LC", typedcharacters are entered as lowercase. To toggle between them,press the F8 key.
Setting the Order of Rules
Tests are run in the order that they appear in the list, from the top down.Tests that you have defined appear at the top of the list. Lines without testsappear below them and are ignored by the filter.
To insert a test above a line showing a defined test, place the cursor on theline containing that test and press the F6 key. The Select MultipleFieldswindow appears, showing the list of generic fields and fieldsknown to the server. To select the field to test, type 1 in its Optfield and press Enter. A line for a test based on the field appearson the Filter Conditions screen above the line on which you hadplaced the cursor.
Audit|User Guide 179

To insert a test after the last defined test, place the cursor on a line belowthat test and press the F6 key. The Select Multiple Fieldswindowappears, showing the list of generic fields and fields known to theserver. To select the field to test, type 1 in its Opt field and pressEnter. The window closes and a line for a test based on the fieldappears on the Filter Conditions screen below the last of the definedtests.
To delete a test, clear the Test and Value fields from the line showing thetest. The line is removed when the screen refreshes.
To move a test, insert an identical test in the new position then clear theoriginal test.
Test Comparison Operators
The Test field can be set to the following values:
l EQ: Equal to. The field contents are identical to those of the Valuefield.
l NE: Not equal to. The field contents are not identical to those of theValue field.
l LT: Less than. The field contents are less than those of the Valuefield.
l LE: Less than or equal to. The field contents are less than or equal tothose of the Value field.
l GT: Greater than. The field contents are greater than those of theValue field.
l GE: Greater than or equal to. The field contents are greater than orequal to those of the Value field.
l LIST: Included in list. The field contents are included in a space-sep-arated list in the Value field. For example, "BLUE" is included in thelist "RED BLUE GREEN". (LIST is not effective if you might be checkingvalues that contain spaces, such as "NEW YORK" or "VAN HALEN". Tocheck those, either create a group to be used with ITEM or combine aset of EQ tests.)
-
180 Audit | User Guide

l NLIST: Not included in list. The field contents are not included in aspace-separated list in the Value field. For example, "YELLOW" is notincluded in the list "RED BLUE GREEN". (Like LIST, NLIST is not effect-ive if you might be checking values that contain spaces.)
l LIKE: Matches a substring search. The field contents match the stringin the Value field. The "%" character can be used as a wild card in theValue field. For example, if the field contents consists of the string"PURPLE", it would be LIKE the Value field string "%URP%".
l NLIKE: Does not match a substring search. The field contents do notmatch the string in the Value field. The "%" character can be used asa wild card in the Value field. For example, if the field contents con-sists of the string "ORANGE", it would be NLIKE the Value fieldstring "%URP%".
l ITEM: True if the value of the Field field is a member of a groupnamed in the Value field. After entering ITEM in the Test field,place the cursor in the Value field and press the F4 key. The Select Sub-jectwindow appears, containing a list of groups known to the system.To select a group from this list, type 1 in the Opt field for that groupand press the Enter key. To work with the groups, including editing orremoving them, press the F6 key.
l NITEM: True if the value of the Field field is not a member of agroup named in the Value field. You can select a group from a list asshown for the ITEM operator.
l START: True if the value of the Field field begins with the char-acters in the Value field.
l NSTART: True if the value of the Field field does not begin with thecharacters in the Value field.
l PGM:True if a specific user program, run against the Field contents,returns a value of True. Indicate the program in the Value field as"LIBRARY/PROGRAM".
l NPGM: True if a specific user program, run against the Field con-tents, returns a value of False. Indicate the program in the Valuefield as "LIBRARY/PROGRAM".
Audit|User Guide 181
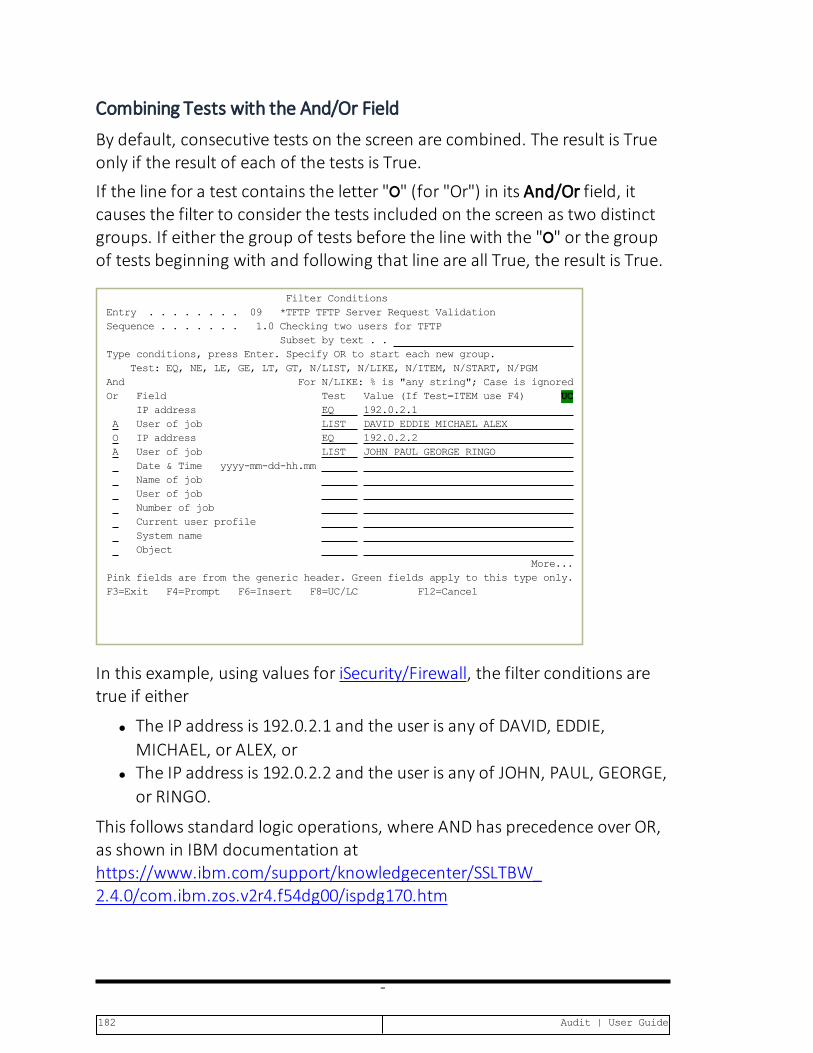
Combining Tests with the And/Or Field
By default, consecutive tests on the screen are combined. The result is Trueonly if the result of each of the tests is True.
If the line for a test contains the letter "O" (for "Or") in its And/Or field, itcauses the filter to consider the tests included on the screen as two distinctgroups. If either the group of tests before the line with the "O" or the groupof tests beginning with and following that line are all True, the result is True.
Filter Conditions Entry . . . . . . . . 09 *TFTP TFTP Server Request Validation Sequence . . . . . . . 1.0Checking two users for TFTP Subset by text . .Type conditions, press Enter. Specify OR to start each new group. Test: EQ, NE, LE, GE, LT, GT, N/LIST, N/LIKE, N/ITEM, N/START, N/PGM And For N/LIKE: % is "any string"; Case is ignoredOr Field Test Value (If Test=ITEM use F4) UC IP address EQ 192.0.2.1
A User of job LIST DAVID EDDIE MICHAEL ALEX O IP address EQ 192.0.2.2 A User of job LIST JOHN PAUL GEORGE RINGO Date & Time yyyy-mm-dd-hh.mm Name of job User of job Number of job Current user profile System name Object More...Pinkfields are from the generic header.Greenfields apply to this type only.F3=Exit F4=Prompt F6=Insert F8=UC/LC F12=Cancel
In this example, using values for iSecurity/Firewall, the filter conditions aretrue if either
l The IP address is 192.0.2.1 and the user is any of DAVID, EDDIE,MICHAEL, or ALEX, or
l The IP address is 192.0.2.2 and the user is any of JOHN, PAUL, GEORGE,or RINGO.
This follows standard logic operations, where AND has precedence over OR,as shown in IBM documentation athttps://www.ibm.com/support/knowledgecenter/SSLTBW_2.4.0/com.ibm.zos.v2r4.f54dg00/ispdg170.htm
-
182 Audit | User Guide
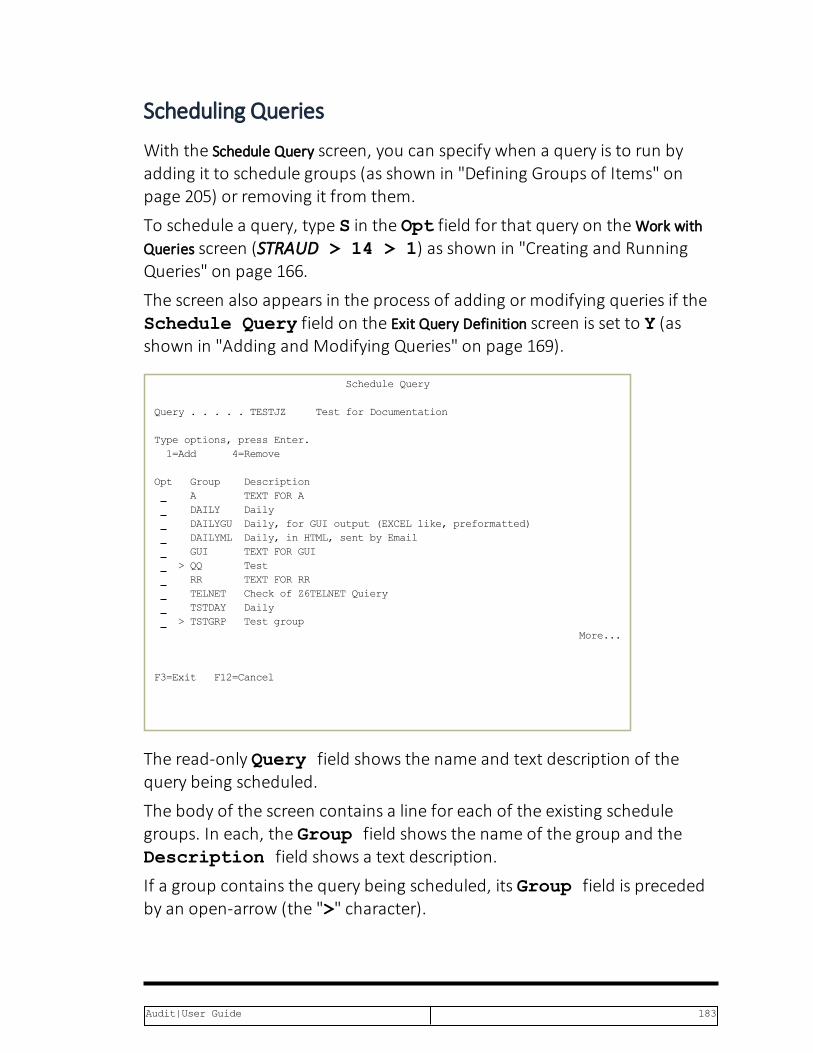
Scheduling Queries
With the Schedule Query screen, you can specify when a query is to run byadding it to schedule groups (as shown in "Defining Groups of Items" onpage 205) or removing it from them.
To schedule a query, type S in the Opt field for that query on theWork withQueries screen (STRAUD > 14 > 1) as shown in "Creating and RunningQueries" on page 166.
The screen also appears in the process of adding or modifying queries if theSchedule Query field on the Exit Query Definition screen is set to Y (asshown in "Adding and Modifying Queries" on page 169).
Schedule Query
Query . . . . .TESTJZ Test for Documentation
Type options, press Enter. 1=Add 4=Remove
Opt Group Description A TEXT FOR A
DAILY Daily DAILYGU Daily, for GUI output (EXCEL like, preformatted) DAILYML Daily, in HTML, sent by Email GUI TEXT FOR GUI >QQ Test RR TEXT FOR RR TELNET Check of Z6TELNET Quiery TSTDAY Daily >TSTGRP Test group More...
F3=Exit F12=Cancel
The read-only Query field shows the name and text description of thequery being scheduled.
The body of the screen contains a line for each of the existing schedulegroups. In each, the Group field shows the name of the group and theDescription field shows a text description.
If a group contains the query being scheduled, its Group field is precededby an open-arrow (the ">" character).
Audit|User Guide 183

To add the query to a schedule group, type 1 in the Opt field for thatgroup and press Enter.
To remove the query from a schedule group, type 4 in the Opt field forthat group and press Enter.
-
184 Audit | User Guide

Modifying Query Summary Definitions
With theModify Query Summary Definition screen, you can group together datarecords to create and modify summaries that appear in query output.
To create summary groups for a query, type G in the Opt field for that queryon theWork with Queries screen (STRAUD > 41 > 1) as shown in"Creating and Running Queries" on page 166.
The screen also appears in the process of adding or modifying queries if theSummaries field on the Exit Query Definition screen is set to Y (as shown in"Adding and Modifying Queries" on page 169).
Modify Query Summary Definitions User Defined
Query .TESTJZ Test for Documentation
Summary Report 1
Title . . . . . . . . . Count of Objects Allowed/Rejected by Library Group by . . . . . . . . 00OBJ Object 00LIB Object library 00RTCD Allow (1=Yes) Sum field or *COUNT . . *COUNT Report if sum is . . . . >=Greater than, <=Less then Than . . . . . . . . . 0 Number Specified in units of. K=Kilo, M=Mega, G=GigaSort by the sum . . . . A=Asc, D=DscCode to add description. 22 F4 to select based on the Group By fields
More...F3=Exit F4=Prompt F12=Cancel
The screen includes fields for creating up to three summaries. These appearon successive pages, which you can reach by pressing the Page Down key.
The fields for each are:Query
A read-only field showing the name and text description of thequery.
Title
A free-form text title for the summary.
Audit|User Guide 185
Group by
How to group items in the output.
A group of three subfields set the fields by which items in thereport are grouped. You can set this via the Code to adddescription field or by pressing the F4 key in each field toselect the fields from a list.
Sum field or *COUNT
The field from the record for which the sum of values since the lastsummary is shown, or *COUNT to show the number of records.
Report if the sum is
Whether the summary appears if the sum is greater than the valuein the Than field or when it is less. Possible values are:
l > : Greater thanl < : Less than
Than
The value to which the sum is compared.Specified in units of
Units to which the values are rounded and displayed:
l K: Kilol M: Megal G: Giga
Sort by the sum
Possible values are:
l A: Ascendingl D: Descending
Code to add description
A code specifying groups of items to place in the three subfields ofthe Group by field. Press the F4 key to see a list of the field sets.
-
186 Audit | User Guide

Creating Query Classifications and Explanations
With the Query Classification and Explanation screen, you can create and modifyclassifications for your query as well as text explanations of the query thatcan be printed in the header of the output.
To create classifications and an explanation for a query, enter 9 in the Optfield for that query on theWork with Queries screen(STRAUD > 14 > 1) as shown in "Creating and RunningQueries" on page 166.
The screen also appears in the process of adding or modifying queries if theExplanation field on the Exit Query Definition screen is set to Y (as shownin "Adding and Modifying Queries" on page 169).
Query Explanation and Classification Query: TESTJZ Test for Documentation Type choices, press Enter. Classification list . . . C=Compliance (SOX/ISO17799/PCI...),(e.g. CU=Compliance+User) U=User, O=Object, S=System values, N=Network, 1-9=User defined Query explanation:(Printed if Header is requested)
F12=Cancel
The body of the screen includes the following fields:Classification list
Letters or digits for classifications of queries. These codes appearin the line for the query on theWork with Queries screen(STRAUD > 14 > 1) as shown in "Creating and RunningQueries" on page 166.
Predefined values include
Audit|User Guide 187

l C: Compliance (SOX/ISO17799/PCI, etc)l U: Userl O: Objectl S:System Valuesl N: Network
You can freely define meanings for the digits 0 through 9.Query explanation
A free-form text explanation of the query. The text is printed in theheader of the output if the Add Header / Total field is set to1 or 2 on the Add Query orModify Query screen as shown in "Addingand Modifying Queries" on page 169.
-
188 Audit | User Guide

Running Queries
You can run queries from several points within Audit.
To run queries for display, for print, or as batch jobs, select 11. Display,12. Print, or 13. Submit as Batch Job respectivelyfrom the Queriesmenu (STRAUD41)
You can also run queries by entering 5 in the Opt field for the query in theWork with Queries screen (STRAUD > 41 > 1) as shown in"Creating and Running Queries" on page 166.
The Run Audit Query (RUNAUQRY) screen appears:
Run Audit Query (RUNAUQRY) Type choices, press Enter.
Query . . . . . . . . . . . . .>Z$J_CMD Name, *SELECT Display last minutes . . . . . . *BYTIME Number, *BYTIME Starting date and time: Starting date . . . . . . . . *CURRENT Date, *CURRENT, *YESTERDAY... Starting time . . . . . . . . 000000 Time Ending date and time: Ending date . . . . . . . . . *CURRENT Date, *CURRENT, *YESTERDAY... Ending time . . . . . . . . . 235959 Time User profile . . . . . . . . . . *ALL Name, generic*, *ALL Run action on each row . . . . . *NO Name, *YES, *NO Run action after end of run . . *NO Name, *NO System to run for . . . . . . . *CURRENT Name, *CURRENT, *group, *ALL..Number of records to process . . *NOMAX Number, *NOMAX Output . . . . . . . . . . . . .>* *, *PRINT, *PDF, *HTML..
BottomF3=Exit F4=Prompt F5=Refresh F10=Additional parameters F12=Cancel F13=How to use this display F24=More keys
The screen includes the following fields. Depending on how and from wherewithin Audityou are running the query, some fields may already be filled inwith read-only values.
Query
The name of the query to run. If you have not yet created thequery, you can do so from the Add Query screen, as shown in"Adding and Modifying Queries" on page 169.
To choose the query after this screen, set this field to the value*SELECT.
Audit|User Guide 189
Display last minutes
To view activity in the immediate past, enter a numbercorresponding to the number of minutes that you would like tocheck. For example, to check activity in the past 120minutes,enter 120 in this field. This value would override starting andending date and time fields.
Starting data and time
Starting date
The day or date on which the included data begins.
Allowed values include:
l *CURRENT: The current datel *YESTERDAY: Yesterday's datel *WEEKSTR: The first day of the current week. Bydefault, this is Sunday.
l *PRVWEEKS: The first day of the previous weekl *MONTHSTR: The first day of the current monthl *PRVMONTHS: The first day of the previous monthl *YEARSTR: The first day of the current yearl *PRVYEARS: The first day of the previous yearl *MON: Mondayl *TUE: Tuesdayl *WED: Wednesdayl *THU: Thursdayl *FRI: Fridayl *SAT: Saturdayl *SUN: Sunday
Starting time
The time on the Starting date at which the included databegins, in HHMMSS format.
Ending date
The day or date on which the included data ends.
Allowed values are the same as for Starting date.
-
190 Audit | User Guide
Ending time
The time on the Starting date at which the included dataends, in HHMMSS format.
User* or '%GROUP'
The name of a user, or the generic* name or %GROUP name of agroup of users, whose data the query examines.
Run action after end of run
If the Query Type of the query is $8, the name of an action for theAction product to run after the query. For no action, enter *NO.
System to run for
Queries can run on information for this system or for others.Possible values include:
l *CURRENT: The current system.l *ALL: All systems.l Name: The name of a different system.l *group: A named group of systems.
Number of records to process
The maximum number of records to process. To include allrecords, enter *NOMAX.
Output
The destinations for output. Possible values include:
l *: The default output. If running interactively, this is the cur-rent screen.
l *PDF: Print report to PDF outfile.l *HTML: Print report to HTML outfile.l *CSV: Print report to CSV outfile.l *OUTFILE: Print report as text to an outfile.l *PRINT: Print to default printer.l *PRINT[1-9]: Print to another destination, as defined viathe Printer Files Setup screen (STRAUD > 89 > 58).
If you choose a destination that goes to an outfile, additionalfields appear for further information.
Audit|User Guide 191
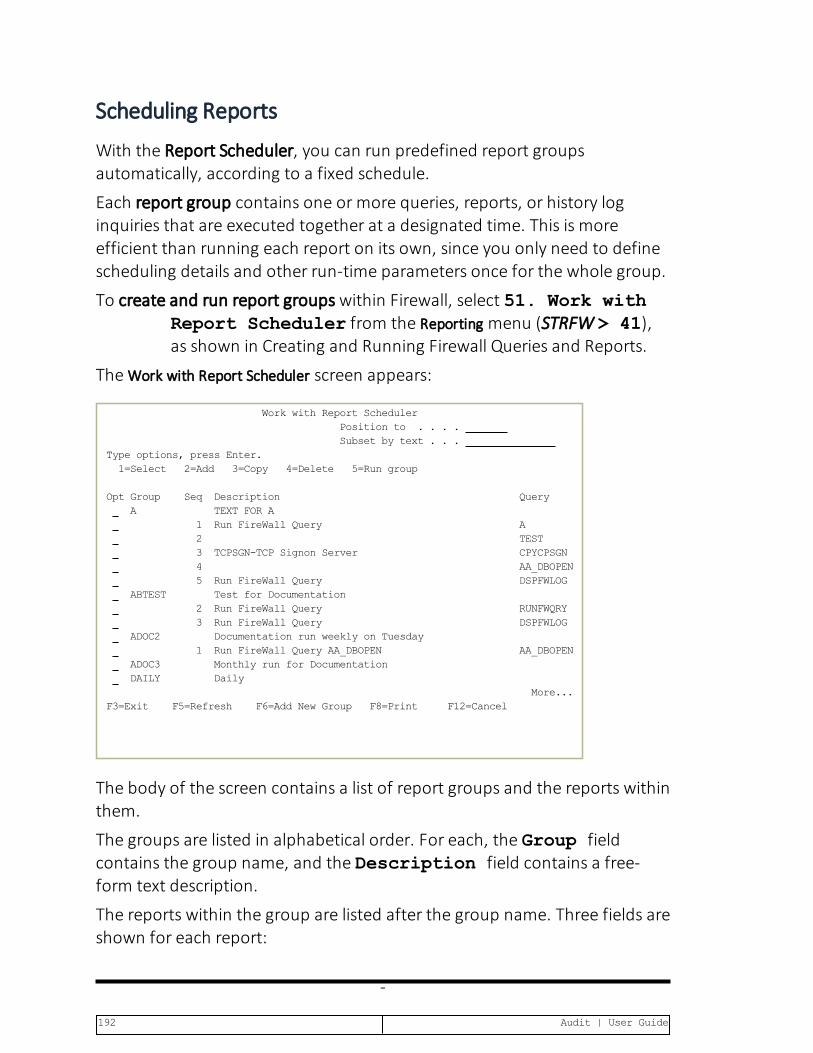
Scheduling Reports
With the Report Scheduler, you can run predefined report groupsautomatically, according to a fixed schedule.
Each report group contains one or more queries, reports, or history loginquiries that are executed together at a designated time. This is moreefficient than running each report on its own, since you only need to definescheduling details and other run-time parameters once for the whole group.
To create and run report groups within Firewall, select 51. Work withReport Scheduler from the Reporting menu (STRFW > 41),as shown in Creating and Running Firewall Queries and Reports.
TheWork with Report Scheduler screen appears:
Work with Report Scheduler Position to . . . . Subset by text . . .Type options, press Enter. 1=Select 2=Add 3=Copy 4=Delete 5=Run group
OptGroup Seq Description Query A TEXT FOR A 1 Run FireWall Query A 2 TEST 3 TCPSGN-TCP Signon Server CPYCPSGN 4 AA_DBOPEN 5 Run FireWall Query DSPFWLOG ABTEST Test for Documentation 2 Run FireWall Query RUNFWQRY 3 Run FireWall Query DSPFWLOG ADOC2 Documentation run weekly on Tuesday 1 Run FireWall Query AA_DBOPEN AA_DBOPEN ADOC3 Monthly run for Documentation DAILY Daily
More...F3=Exit F5=Refresh F6=Add New Group F8=Print F12=Cancel
The body of the screen contains a list of report groups and the reports withinthem.
The groups are listed in alphabetical order. For each, the Group fieldcontains the group name, and the Description field contains a free-form text description.
The reports within the group are listed after the group name. Three fields areshown for each report:
-
192 Audit | User Guide

Seq
The order in which the reports run within the group. Thiscorresponds to the order in which they were added.
Description
A free-form text description of the report.Query
The query that the report runs, as defined in "Adding andModifying Queries" on page 169.
To add a new report group, press the F6 key. The Add Report Group screenappears, as shown in "Adding or Modifying Report Groups" on thenext page.
To add a report to a report group, type 2 in the Opt field for either the groupor another report within it and press Enter. The Add Report Definitionscreen appears, as shown in "Adding Reports to Report Groups"on page 199.
To modify a report group, type 1 in the Opt field for the group or a reportwithin it and press Enter. TheModify Report Groups screen appears,as shown in "Adding or Modifying Report Groups" on the nextpage.
To copy a report group, type 3 in the Opt field for the group or a reportwithin it and press Enter. The Copy Report Groups screen appears.The read-only From Report group field shows the name anddescription of the original group. Enter the name of the new groupin the To Report group field.
To delete a report group, type 4 in the Opt field for the report group andpress Enter. The Delete Report Groupwindow opens. Press Enter toconfirm the deletion or the F12 key to cancel it.
To delete a report from a group, type 4 in the Opt field for the report andpress Enter. The Delete Report Groupwindow opens. Press Enter toconfirm the deletion or the F12 key to cancel it.
To run a report group on demand, type 5 in the Opt field for the reportgroup and press Enter. The Run Report Group (RUNRPTGRP) screenappears, as shown in "Running Report Groups On Demand" onpage 209.
Audit|User Guide 193

Adding or Modifying Report Groups
To add a report group to the Report Scheduler, press the F6 key in theWorkwith Report Scheduler screen (STRAUD> 41 > 51) as shown in"Scheduling Reports" on page 192.
To modify an existing report group, enter 1 in the Opt field for the reportgroup or a report in it in theWork with Report Scheduler screen.
The Add Report Group orModify Report Group screen appears. They differ only intheir title and an additional read-only field on theModify Report Group screen:
Add Report Group
Report groups are intended to run pre-defined sets of reports automatically on a periodic basis. If ZIP(*YES) is specified, all PDF, HTML, CSV will be sent together. Other individual reports parameters, if defined, override group parameters. The use of descriptive date values *YESTERDAY, *WEEKSTR... is recommended.
Type choices, press Enter. Report Group name . . . Name e.g. DAILY, WEEKLY, MONTHLY etc. Description . . . . . .
Press Enter to continue to the Define Parameters screen.
F3=Exit F12=Cancel
The screen includes the following fields:Report Group name
The name of the group. It may have up to seven alphanumericcharacters, beginning with a letter.
Description
A free-form text description of the report group.Group parameters
On theModify Report Group screen, a read-only field showing theparameters that have already been entered for the group.
After entering this information, press Enter twice to confirm it.
-
194 Audit | User Guide

The Define FW Report Group Details (DFNFWGRPD)Define AU Report Group Details(DFNAUGRPD) screen appears:
Define FW Report Group Details (DFNFWGRPD) Type choices, press Enter.
Starting date and time: Starting date . . . . . . . . *CURRENT Date, *CURRENT, *YESTERDAY... Starting time . . . . . . . . 000000 Time Ending date and time: Ending date . . . . . . . . . *CURRENT Date, *CURRENT, *YESTERDAY... Ending time . . . . . . . . . 235959 Time System to run for . . . . . . . *CURRENT Name, *CURRENT, *group, *ALL..Output . . . . . . . . . . . . . *PDF *, *PRINT, *PDF, *HTML..
BottomF3=Exit F4=Prompt F5=Refresh F10=Additional parameters F12=Cancel F13=How to use this display F24=More keys
Define AU Report Group Details (DFNAUGRPD) Type choices, press Enter.
Starting date and time: Starting date . . . . . . . . *CURRENT Date, *CURRENT, *YESTERDAY... Starting time . . . . . . . . 000000 Time Ending date and time: Ending date . . . . . . . . . *CURRENT Date, *CURRENT, *YESTERDAY... Ending time . . . . . . . . . 235959 Time User profile . . . . . . . . . . *ALL Name, generic*, *ALL System to run for . . . . . . . *CURRENT Name, *CURRENT, *group, *ALL..Output . . . . . . . . . . . . . *PDF *, *PRINT, *PDF, *HTML..
BottomF3=Exit F4=Prompt F5=Refresh F10=Additional parameters F12=Cancel F13=How to use this display F24=More keys
The screen contains the following fields:
Audit|User Guide 195
Starting data and time
Starting date
The day or date on which the included data begins.
Allowed values include:
l *CURRENT: The current datel *YESTERDAY: Yesterday's datel *WEEKSTR: The first day of the current week. Bydefault, this is Sunday.
l *PRVWEEKS: The first day of the previous weekl *MONTHSTR: The first day of the current monthl *PRVMONTHS: The first day of the previous monthl *YEARSTR: The first day of the current yearl *PRVYEARS: The first day of the previous yearl *MON: Mondayl *TUE: Tuesdayl *WED: Wednesdayl *THU: Thursdayl *FRI: Fridayl *SAT: Saturdayl *SUN: Sunday
Starting time
The time on the Starting date at which the included databegins, in HHMMSS format.
Ending date
The day or date on which the included data ends.
Allowed values are the same as for Starting date.Ending time
The time on the Starting date at which the included dataends, in HHMMSS format.
User profile
The user or set of users about whom the report group is run. Thiscan be a name, a generic* name, or *ALL.
-
196 Audit | User Guide

System to run for
Queries can run on information for this system or for others.Possible values include:
l *CURRENT: The current system.l *ALL: All systems.l Name: The name of a different system.l *group: A named group of systems.
Output
The destinations for output. Possible values include:
l *: The default output. If running interactively, this is the cur-rent screen.
l *PDF: Print report to PDF outfile.l *HTML: Print report to HTML outfile.l *CSV: Print report to CSV outfile.l *OUTFILE: Print report as text to an outfile.l *PRINT: Print to default printer.l *PRINT[1-9]: Print to another destination, as defined viathe Printer Files Setup screen (STRAUD > 89 > 58).
If you choose a destination that goes to an outfile, additionalfields appear for further information.
After entering this information, press Enter.
The Add Job Schedule Entry (ADDJOBSCDE) screen appears, as shown in IBMdocumentation at https://www.ibm.com/support/knowledgecenter/ssw_ibm_i_72/cl/addjobscde.htm:
Audit|User Guide 197

Add Job Schedule Entry (ADDJOBSCDE) Type choices, press Enter.
Job name . . . . . . . . . . . .>GS@ADOC2 Name, *JOBD Frequency . . . . . . . . . . .>*WEEKLY *ONCE, *WEEKLY, *MONTHLY Schedule date . . . . . . . . .>*NONE Date, *CURRENT, *MONTHSTR... Schedule day . . . . . . . . . .>*ALL *NONE, *ALL, *MON, *TUE... + for more values Schedule time . . . . . . . . .>230000 Time, *CURRENT Additional Parameters Job description . . . . . . . .>*USRPRF Name, *USRPRF Library . . . . . . . . . . . Name, *LIBL, *CURLIB
BottomF3=Exit F4=Prompt F5=Refresh F10=Additional parameters F12=Cancel F13=How to use this display F24=More keys
After entering values, press Enter to return to theWork with Report Schedulerscreen.
-
198 Audit | User Guide
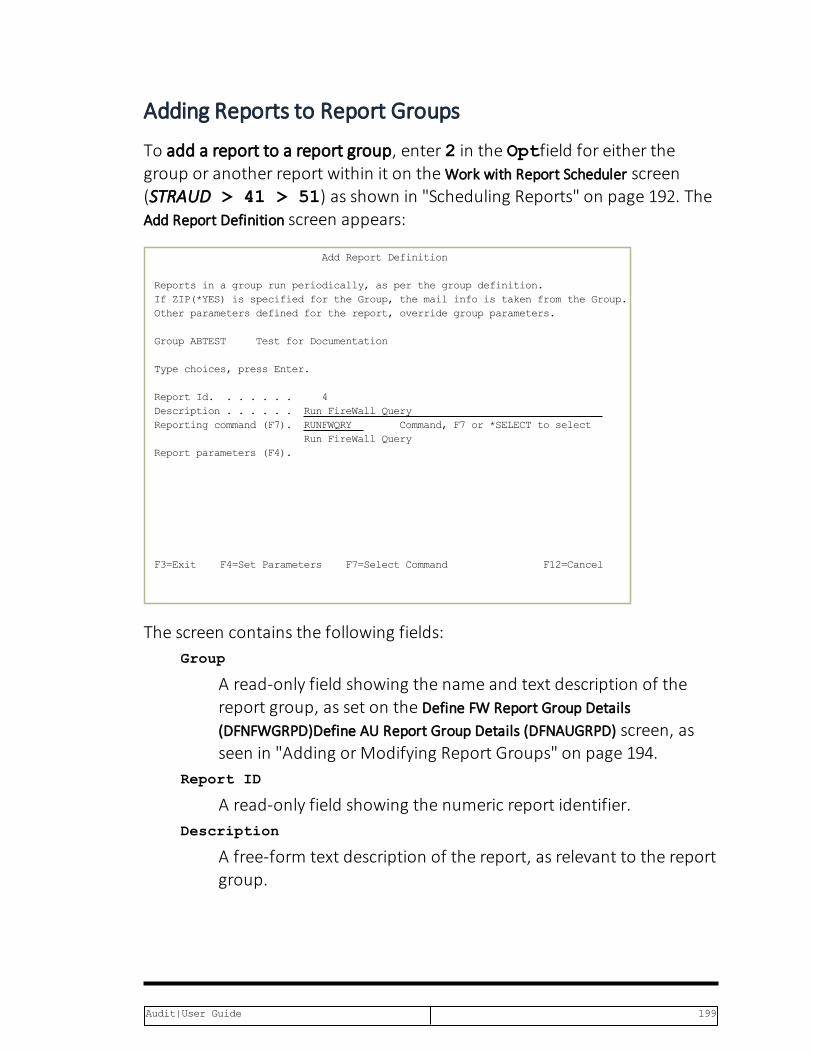
Adding Reports to Report Groups
To add a report to a report group, enter 2 in the Optfield for either thegroup or another report within it on theWork with Report Scheduler screen(STRAUD > 41 > 51) as shown in "Scheduling Reports" on page 192. TheAdd Report Definition screen appears:
Add Report Definition
Reports in a group run periodically, as per the group definition. If ZIP(*YES) is specified for the Group, the mail info is taken from the Group.Other parameters defined for the report, override group parameters.
GroupABTEST Test for Documentation
Type choices, press Enter.
Report Id. . . . . . . 4Description . . . . . . Run FireWall Query Reporting command (F7). RUNFWQRY Command, F7 or *SELECT to select Run FireWall Query Report parameters (F4).
F3=Exit F4=Set Parameters F7=Select Command F12=Cancel
The screen contains the following fields:Group
A read-only field showing the name and text description of thereport group, as set on the Define FW Report Group Details(DFNFWGRPD)Define AU Report Group Details (DFNAUGRPD) screen, asseen in "Adding or Modifying Report Groups" on page 194.
Report ID
A read-only field showing the numeric report identifier.Description
A free-form text description of the report, as relevant to the reportgroup.
Audit|User Guide 199
Reporting command
The command that runs the report. By default, this isRUNFWQRYRUNAUQRY. To select other commands, press the F7key.
Report parameters
A read-only field showing the parameters for the Reportingcommand. To set or change these, press the F4 key. The RunFirewall Query (RUNFWQRY) screen appears, as shown in "RunningQueries" on page 189.
-
200 Audit | User Guide

Defining Time Groups
Many of the Audit rules and reporting features take advantage of the uniqueTime Group feature. With time groups, users can apply predefined sets oftime-based filters to different queries without having to define complexcriteria for each query. Time groups also work with the Report Scheduler andthe Display Activity Log features.
For example, you may be using different queries and reports to audit theactivities of one group employees during normal working hours and adifferent group of employees during nights and weekends. This can beaccomplished with just one time group using the following guidelines:
1. Create a time group that defines normal working hours for each day ofthe week.
2. Use an inclusive time group filter (for activities occurring during thetime group periods) for each query or report that covers activity duringnormal working hours.
3. Use an exclusive time group filter (activities not occurring during thetime group periods) for each query or report covering activity outsideof normal working hours.
One common use of time groups is as filter criteria in security rules, queriesand reports. For example, time groups can be used to restrict the applicationof a rule to specific times and days of the week.
Time group filters can be either:
l Inclusive - Including all activities occurring during the time group peri-ods
l Exclusive - Including all activities not occurring during the time groupperiods
Generally, an exclusive time group filter is indicated by placing an N (NOT) inthe field immediately preceding the time group name field on the ruledefinition or query definition screen.
For example, you can use an exclusive time group filter to apply a rule to anytime occurring outside of days and hours specified in the time group.
Audit|User Guide 201

To create and modify time groups, select 31. Time Groups from theReportingscreen, as shown in Creating and Running Firewall Queriesand Reports.
The Define Time Groups screen appears:
Define Time Groups
Type options, press Enter. 1=Select 3=Copy 4=Delete
OptTime Group DescriptionALEXANDRA TEXT FOR ALEXANDRA
ALON Special group ALONPP Special group ALON88 Special group CONF1 TEXT FOR CONF1 FRANCEWH SITE GROUP NEW TEXT FOR NEW VB123 Special group WORKHOURS Regular work hours WORKHOURS1 Regular work hours + 1 WORKHOURS2 Regular work hours + 2 WORKHOURS3 Regular work hours + 3
BottomF3=Exit F6=Add new F8=Print list F12=Cancel
Each line in the body of the screen refers to a single time group. After thestandard Opt field, it shows a unique name for the Time Group and afree-form text Description.
To create a new time group, press the F6 key. The Add Time Group screenappears:
-
202 Audit | User Guide
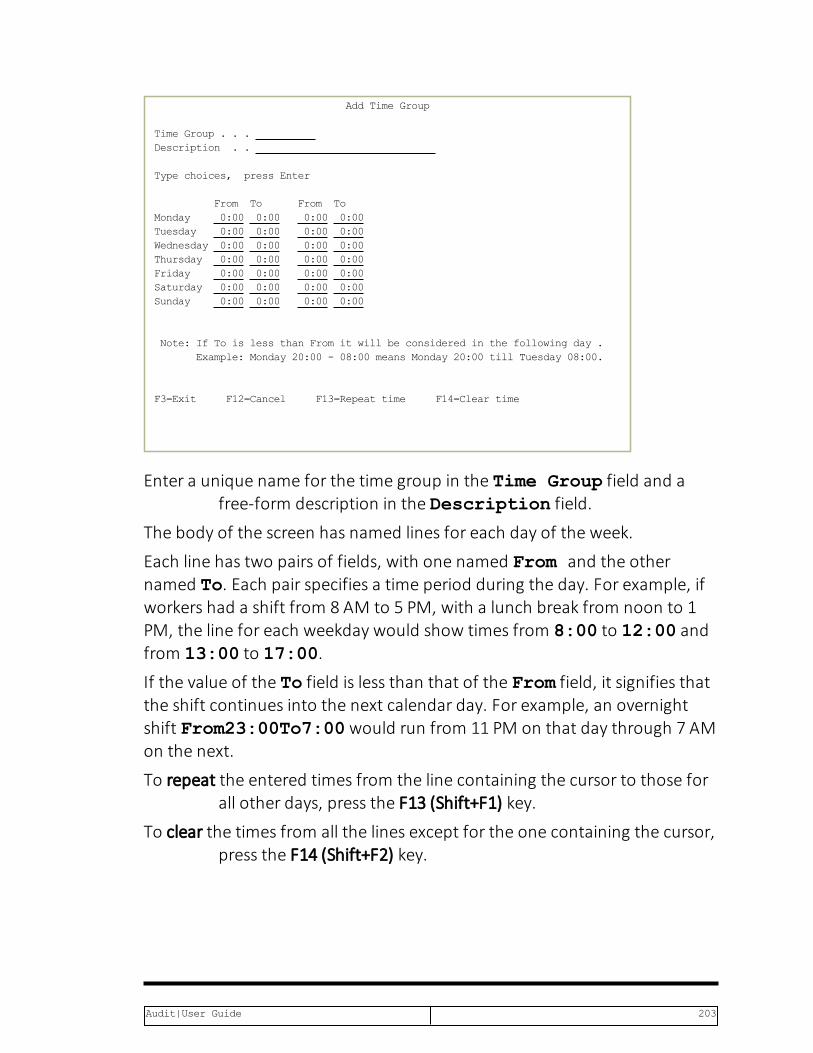
Add Time Group
Time Group . . .Description . .
Type choices, press Enter
From To From ToMonday 0:00 0:00 0:00 0:00Tuesday 0:00 0:00 0:00 0:00Wednesday 0:00 0:00 0:00 0:00Thursday 0:00 0:00 0:00 0:00Friday 0:00 0:00 0:00 0:00Saturday 0:00 0:00 0:00 0:00Sunday 0:00 0:00 0:00 0:00
Note: IfTois less thanFromit will be consideredin the following day. Example: Monday 20:00 - 08:00 means Monday 20:00 till Tuesday 08:00.
F3=Exit F12=Cancel F13=Repeat time F14=Clear time
Enter a unique name for the time group in the Time Group field and afree-form description in the Description field.
The body of the screen has named lines for each day of the week.
Each line has two pairs of fields, with one named From and the othernamed To. Each pair specifies a time period during the day. For example, ifworkers had a shift from 8 AM to 5 PM, with a lunch break from noon to 1PM, the line for each weekday would show times from 8:00 to 12:00 andfrom 13:00 to 17:00.
If the value of the To field is less than that of the From field, it signifies thatthe shift continues into the next calendar day. For example, an overnightshift From23:00To7:00would run from 11 PM on that day through 7 AMon the next.
To repeat the entered times from the line containing the cursor to those forall other days, press the F13 (Shift+F1) key.
To clear the times from all the lines except for the one containing the cursor,press the F14 (Shift+F2) key.
Audit|User Guide 203

Further Operations from the Define Time Groups ScreenTo modify the times for an existing time group, enter 1 in the Opt field for
that group. The Change Time Group screen appears, with the sameset of fields as the Add Time Group screen.
To copy the settings from one time group to another, enter 3 in the Optfield for that group. The Copy / Replace Time-Group screen appears.The Time Group for the existing group appears in read-onlyFrom: fields. Enter the name of the new group in the To:Time Group field. If the group already exists, its settings areoverwritten.
To delete a time group, enter 4 in the Opt field for that group. The DeleteTime Group screen appears. Press Enter to confirm the deletion orthe F12 key to cancel it.
-
204 Audit | User Guide

Defining Groups of Items
You can define groups of reports that you can schedule to run together. Youcan also define classes of groups, so that you can schedule all the groups ofreports in the class to run together.
You can also use classes of other types of groups within queries to limit theitems on which the query would run. For example, you could create a classOVERNIGHT of all Time Groups that work overnight shifts. You could thendefine a query that only select those users by including a filter with thecomparison ITEM OVERNIGHT (as shown in "Setting Filter Conditions"on page 178).
You could also create a class HQIP of all IP address groups at anorganization's headquarters, then create a query that would exclude themby creating a filter with the comparison NITEM HQIP.
To create and modify report groups, select 51. Work with ReportScheduler from the Reporting menu (STRAUD> 41). TheWorkwith Report Scheduler screen appears, as shown in "SchedulingReports" on page 192.
To add reports to a group, enter 2 in the Opt field for either the group oranother report within it in theWork with Report Scheduler screen(STRAUD> 41 > 51). The Add Report Definition screen appears, asshown in "Adding Reports to Report Groups" on page 199.
To create and modify classes and add groups to them, select 35. GroupItems for Selection from the Reporting menu(STRAUD> 41).
TheWork with Classes of Groupswindow appears.
Audit|User Guide 205

GSRPTMNU Reporting Firewall................................................................................: Work with Classes of Groups :: :: Type options, press Enter. Position to . . . :: 1=Work with 2=Edit 4=Remove Subset . . . . . :: :: OptClass Description Item Length :: *GRPPRF User is included in Group/Supplemental profile 10 :: *LMTCPB User Limit Capabilities 10 :: *SPCAUT User has a Special Authority 10 :: *TIMEGRP Time group 10 :: *USRGRP User is included in iSecurity/Firewall Group 10 :: AUD List for Audit Reporting 10 :: AUDJ Secondary list for audits 10 :: COMMANDS Initial commands to run as a group 20 :: COMMANDS2 Secondary commands group 20 :: More...:: *CLASSes are automatically defined by the system. Press F6 for instructions:: F3=Exit F6=Add New (plus instructions) F8=Print F12=Cancel :: ::..............................................................................:F13=Information Assistant F16=AS/400 main menu
Each line on the body of the screen refers to a single class. For each class, itshows the these fields:
Class
A unique name for the class.Description
A free-form text description of the class.Item Length
The maximum length of item names in the class, from 0 through20.
The predefined classes at the start of the list, with names that begin with anasterisk (*), cannot be altered. The lines for the other classes begin with thestandard Opt field.
To add a new class, press the F6 key. The Add Classwindow appears:
-
206 Audit | User Guide

GSRPTMNU Reporting Firewall................................................................................: Add Class :: :: Type choices, press Enter. :: :: Class . . . . . . . . e.g. USERS, IP, COMMANDS, FILES... :: :: Text . . . . . . . . :: :: Maximum item length . 1 - 20 :: :: Group-Classes (such as USERS, IPS, FILES) consist of individual Groups. :: For example, Group-Class USERs could consist of groups HR, ERP, etc. These :: groups are useful when you want to limit a report or a rule to only the :: USERS listed in USERS/HR who accessed files listed in FILES/SENSITIVE. :: To use, enter ITEM or NITEM ("item of" or "not item of") in the TEST :: column of the report's Filter Conditions; then press F4 in VALUE column. :: F3=Exit F12=Cancel :: ::..............................................................................:..............................................................................:F13=Information Assistant F16=AS/400 main menu
The window has the same fields as theWork with Classes of Groupswindow. Fillin the values for the new class, then press Enter.
TheWork with Groups of window appears. To add groups, press the F6 key.
The Add Groupwindow appears. Enter the name of the first group and a free-form text description, then press Enter.
TheWork with Group Itemswindow appears. For each item in the group, enterthe item name and a free-form text description. After entering items, pressEnter.TheWork with Groups of window reappears.
To modify the list of items within the group, enter 1 in the Opt field for thegroup.
To edit the description of a group, enter 2 in the Opt field for the group.
To remove an item from the group, enter 4 in the Opt field for the group.
Audit|User Guide 207
More Operations from the Work with Classes of Groups screenTo modify the list of groups within the class, enter 1 in the Opt field for the
class.
To edit the description or item length of a class, enter 2 in the Opt field forthe class.
To remove a group from the class, enter 4 in the Opt field for the class.
-
208 Audit | User Guide

Running Report Groups On Demand
To run report groups on demand, select 52. Run a Report Groupfrom the Queries Reporting menu (STRAUD> 41), as shown in Creating andRunning Firewall Queries and Reports.
To run a report group on demand from within the Report Scheduler (asshown in "Scheduling Reports" on page 192), type 5 in the Opt field for thereport group and press Enter.
Run Report Group (RUNRPTGRP) Type choices, press Enter.
Product . . . . . . . . . . . .>FIREWALL FIREWALL, SCREEN, PASSWORD... Report group . . . . . . . . . .>ABTEST Name Job description . . . . . . . .>QBATCH Name, *NONE Library . . . . . . . . . . .> *PRODUCT Name, *PRODUCT, *LIBL...
BottomF3=Exit F4=Prompt F5=Refresh F12=Cancel F13=How to use this display F24=More keys
If you have selected the screen from within the Reporting menu, enter thename of the report group (as set within the Report Scheduler) in theReport group field.
If you have selected the screen from within the Report Scheduler, the nameof the product that you are running and the name of the report groupappear as read-only values in the Product and Report group fields.
The Job description field contains the name of the program to run. Torun the report group interactively, enter *NONE.
The Library field contains the name of the library containing theprogram. This can be a library name or *PRODUCT, *LIBL, or *CURLIB.
Audit|User Guide 209
iSecurity Multi System SupportAs more and more sites worldwide implement multiple IBM i systems, it hasbecome imperative that audit and compliance reports be able to reportsimultaneously on all local and remote systems simply and efficiently, andthat the output be presented so that each IBM system is clearly indicated.
Raz-Lee Security has implemented support for multiple systems whichprovides maximum flexibility and capabilities for all IBM i shops.
iSecurity's implementation of multiple system support can be performed inone of the following two manners:
Remote ExecutionIn Remote Execution mode, Audit reports, whether user or schedulerinitiated, indicate the remote (yet connected) systems on which the report isto execute. Upon submission, the report is executed in sequence on each ofthe remote systems with the data for each execution collected at theinitiating system.
When all remote executions have completed, the report is executed at theinitiating system. At this point, if the appropriate option has been selected,all output files are merged into one output file. Again, depending on theexecution option specified, the composite report can be printed on the localsystem or on any of the remote systems, and can also b sent as an HTML,PDF, or CSV email attachment to one or more email addresses.
Local ExecutionIn Local Execution mode, the appropriate remote files (such as SMZ4DTAfor Audit) must first be copied, using whatever facilities are available, to thelocal system. Accessing the appropriate product menu, the user then selectswhich remote file should be used as the basis for all subsequent queriessubmitted on the local system. This selection will remain in effect untilchanged, and all queries executed on the local system will continue toreference the copied remote data files.
-
210 Audit | User Guide

Displaying the History LogYou can use the Display Log feature to display the contents of thehistory log quickly and easily in a standard format using basic filter criteria.You can even use previously defined queries as filter criteria for the logdisplay. This feature is best suited for investigating immediate problems suchas program failures, errors or suspicious activity.
Audit includes many ready-to-use log display sets. Just enter a fewparameters on a simple data screen and the specified data appears inseconds. You can also choose to print a hard copy of the history log results.
The “Backward Glance” FeatureThis unique feature lets you look at the last several minutes of activitywithout the need to define specific time or date parameters. Just enter howlong a period (in minutes) you wish to look at, press Enter, and transactionsoccurring that period of time quickly appear. Backward Glance really comesin handy when assisting users with those nasty error messages that pop upor verifying that a batch job has successfully completed.
If one Audit Type is selected, the output can be directed into a FieldOriented File.
To direct output to a Field Oriented File, enter
DSPAULOG AUDTYP(*BYENTTYP) OUTPUT(*OUTFILE) ENTTYP(xx)OUTFILFMT(*BYTYPE) OUTFILE(QTEMP/OUTNAME)
where AUDTYP(*BYENTTYP) and OUTFILFMT(*BYTYPE) areconstants,
and xxmust be replaced by a valid Audit Type
The history log displays make full use of the convenient time group feature.This timesaving feature further enhances your ability to get to your criticaldata rapidly.
To view the logs:
1. Select 42. Display Log in the Main menu (STRAUD > 42). The LogMenu appears.
Audit|User Guide 211

AULOGMN Log Menu iSecurity⁄Audit System: S520 Select one of the following:
Display Log Display Action Log 1. All 61. All 2. By Entry Type
Display Log by Subject 11. Authorization Failure 20. Program Failures 12. Commands 21. Printing Functions 13. Create Object 22. Restore Operations 14. Delete Object 23. Security Tasks 15. Job Tasks 24. Service Tasks 16. Object Management Tasks 25. Spool File Operations 17. Optical Device Operations 26. System Management Tasks 18. Network Communications 27. Office Services 19. Authority Adoption 28. Change Object Selection or command ===>
F3=Exit F4=Prompt F9=Retrieve F12=Cancel F13=Information Assistant F16=AS⁄400 main menu
2. Choose one of the many predefined log display options.
l All – Display all entries in the history log. This option is useful whenexamining all activities over a period of time, perhaps in conjunctionwith the Backward Glance feature.
l By Entry Type – Display history log entries for one or moreaudit types
l By Subject – Display history log entries according to one of thepredefined subjects listed on the menu.
3. Enter run-time filter and other parameters by selecting 1. All or 2.By Entry Type. The Display Audit Log Entries screen appears. Forscreen parameters and explanations, see Running Queries.
-
212 Audit | User Guide
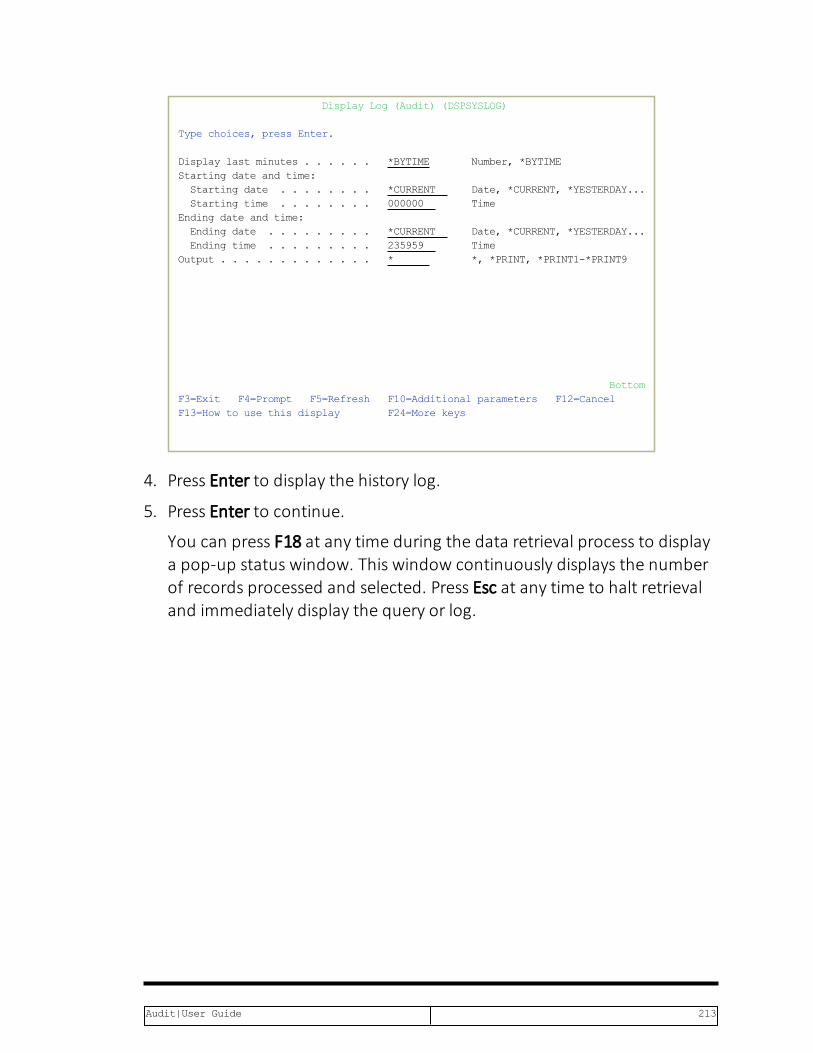
Display Log (Audit) (DSPSYSLOG) Type choices, press Enter.
Display last minutes . . . . . . *BYTIME Number, *BYTIME Starting date and time: Starting date . . . . . . . . *CURRENT Date, *CURRENT, *YESTERDAY... Starting time . . . . . . . . 000000 Time Ending date and time: Ending date . . . . . . . . . *CURRENT Date, *CURRENT, *YESTERDAY... Ending time . . . . . . . . . 235959 Time Output . . . . . . . . . . . . . * *, *PRINT, *PRINT1-*PRINT9
BottomF3=Exit F4=Prompt F5=Refresh F10=Additional parameters F12=Cancel F13=How to use this display F24=More keys
4. Press Enter to display the history log.
5. Press Enter to continue.
You can press F18 at any time during the data retrieval process to displaya pop-up status window. This window continuously displays the numberof records processed and selected. Press Esc at any time to halt retrievaland immediately display the query or log.
Audit|User Guide 213

User Management
This chapter presents several powerful security tools that control the abilityof users to sign on to the system. These tools enhance active system securityby allowing you to perform the following tasks:
l View and modify security parameters in user profiles using a con-venient wizard interface
l Automatically disable inactive users
l Restrict user sign-on to specific hours and days
l Prevent user sign-on during planned absences or following ter-mination
l Analyze default passwords for effectiveness
These options are accessed directly from Audit by selecting 62. UserManagement in the Main menu (STRAUD > 62). The User Managementmenu appears.
-
214 Audit | User Guide

Working with Users
OverviewTheWork with UsersWizard allows you to view and modify several security-related parameters in the user profile by using a user-friendly wizardinterface. You can view and work with many different users at once andcompare settings between different users.
The security officer can use this tool to review all users at a glance andimmediately disable suspicious users. One-key access is provided to many ofthe other user sign-on tools.
Using the Work with Users Wizard1. Select 1. Work with Users (WRKACUSR)from the User Man-
agementmenu (STRAUD > 62 > 1). The Action Work with Users(WRKACUSR) screen appears.
Action Work with Users (WRKACUSR) Type choices, press Enter.
User . . . . . . . . . . . . . . *ALL Name, generic*, *ALL Select-User enabled . . . . . . *ALL *YES, *NO, *ALL User has password . . . . *ALL *YES, *NO, *ALL Days since last signon . *ALL Number, *ALL Invalid signon attempts *ALL Number, *ALL Allow- Planning of enablement . *YES *YES, *NO New Password to *SECADM *NO *YES, *NO
BottomF3=Exit F4=Prompt F5=Refresh F10=Additional parameters F12=Cancel F13=How to use this display F24=More keys
2. Set parameters according to the following options.
Audit|User Guide 215
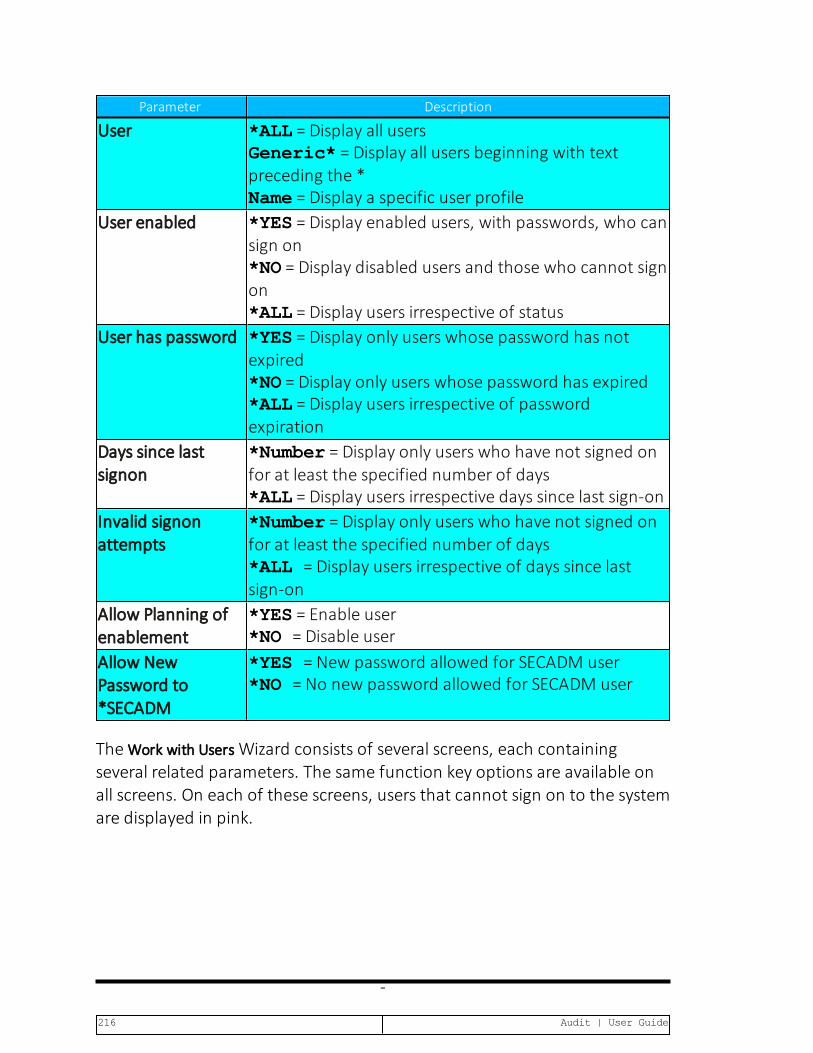
Parameter Description
User *ALL = Display all usersGeneric* = Display all users beginning with textpreceding the *Name = Display a specific user profile
User enabled *YES = Display enabled users, with passwords, who cansign on*NO = Display disabled users and those who cannot signon*ALL = Display users irrespective of status
User has password *YES = Display only users whose password has notexpired*NO = Display only users whose password has expired*ALL = Display users irrespective of passwordexpiration
Days since lastsignon
*Number = Display only users who have not signed onfor at least the specified number of days*ALL = Display users irrespective days since last sign-on
Invalid signonattempts
*Number = Display only users who have not signed onfor at least the specified number of days*ALL = Display users irrespective of days since lastsign-on
Allow Planning ofenablement
*YES = Enable user*NO = Disable user
Allow NewPassword to*SECADM
*YES = New password allowed for SECADM user*NO = No new password allowed for SECADM user
TheWork with UsersWizard consists of several screens, each containingseveral related parameters. The same function key options are available onall screens. On each of these screens, users that cannot sign on to the systemare displayed in pink.
-
216 Audit | User Guide
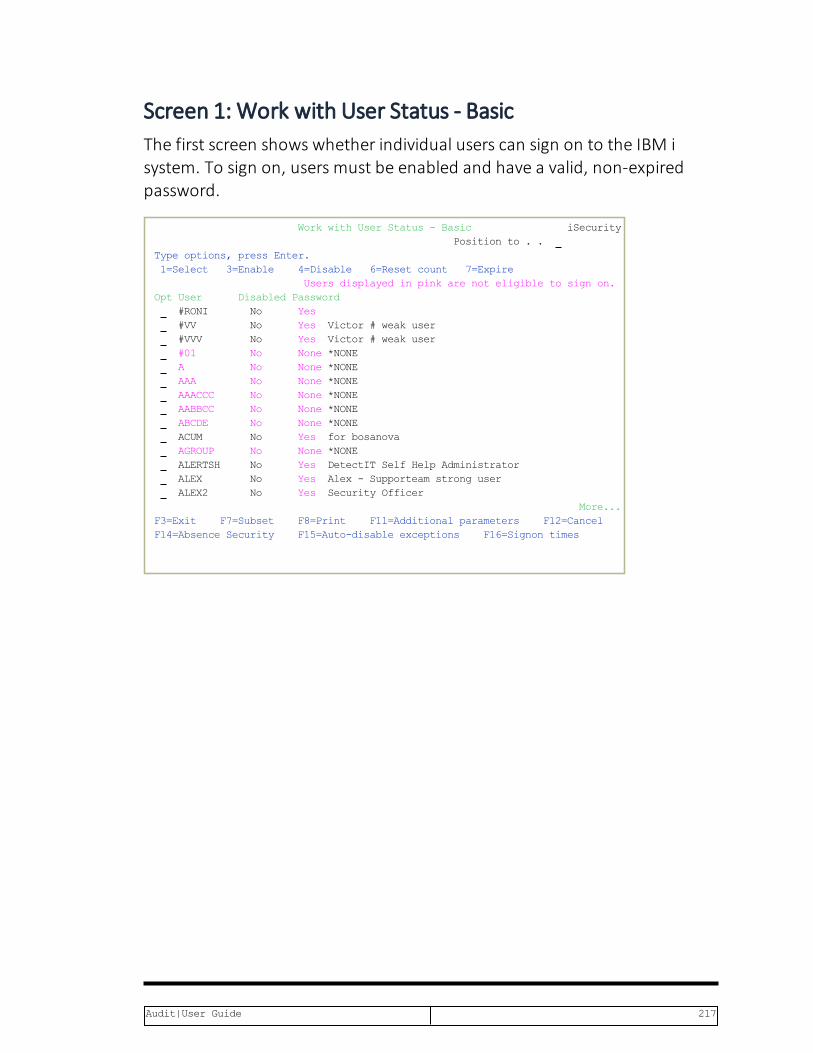
Screen 1: Work with User Status - BasicThe first screen shows whether individual users can sign on to the IBM isystem. To sign on, users must be enabled and have a valid, non-expiredpassword.
Work with User Status - Basic iSecurity Position to . .Type options, press Enter. 1=Select 3=Enable 4=Disable 6=Reset count 7=Expire Users displayed in pink are not eligible to sign on.OptUser DisabledPassword
#RONI No Yes #VV No Yes Victor # weak user #VVV No Yes Victor # weak user #01 No None*NONE A No None*NONE AAA No None*NONE AAACCC No None*NONE AABBCC No None*NONE ABCDE No None*NONE ACUM No Yes for bosanova AGROUP No None*NONE ALERTSH No Yes DetectIT Self Help Administrator ALEX No Yes Alex - Supporteam strong user ALEX2 No Yes Security Officer
More...F3=Exit F7=Subset F8=Print F11=Additional parameters F12=CancelF14=Absence Security F15=Auto-disable exceptions F16=Signon times
Audit|User Guide 217

Parameter Description
Opt 1 = Display all parameters for the selected user profile (see below)3 = Enable user profile4 = Disable user profile6 = Reset invalid sign-on attempt counter – prevents automaticdisabling of this user due to excessive sign-on errors7 = Set password to ‘expired’ – this user must change password atnext sign-on
Enabled Blank = User profile is enabledNo = User profile is disabled
Password Blank = User profile has a valid password and can sign onNone = No password is associated with this user profile and hecannot sign on
F7 Display a subset of user profiles filtered according to statusparameters (available on all screens)
F11 Display the next of the three parameter screens for the currentlydisplayed user profiles
F14 Temporarily disable users during planned absences (for example,vacation, sick, leave of absence), or permanently delete usersleaving the organization
F15 Specify users that should never be disabled automatically, even ifthey have not signed on for a long period of time (inactive user)
F16 Restrict user sign-on to predefined working hours
To display all parameters for a single user, type 1 in the Opt field for therequired user. TheWork with User Status – Details screen appears. Use thefunction keys to modify parameters as described in the table.
-
218 Audit | User Guide

Work with User Status - Details iSecurity
User . . . . . . . . . . : #RONI Disabled . . . . . . . . : No Password . . . . . . . . : Yes
Previous signon . . . . : 0⁄00⁄00 Days passed . . . . . . : Planned action . . . . . : None 0⁄00⁄00
Invalid attempts . . . . : Expiration interval . . : Expiration date . . . . : Days in use . . . . . . : 190Days left . . . . . . . :
F3=Exit F7=Enable F8=Disable F9=Reset password count F10=Expire passwordF12=Cancel
Work with User Status - Details
Parameter Description
F7 Enable user profileF8 Disable user profileF9 Reset invalid sign-on attempt counter – prevents automatic
disabling of this user due to excessive sign-on errorsF10 Set password to ‘expired’ – user must change password at next
sign-on
Audit|User Guide 219
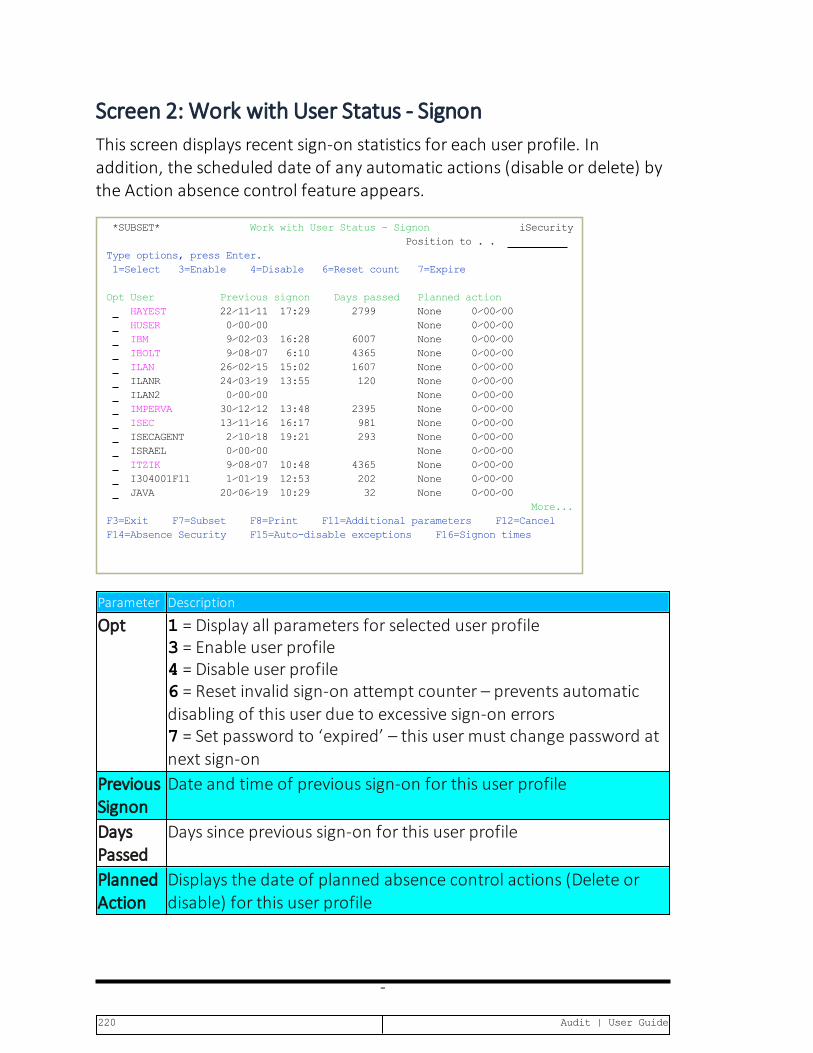
Screen 2: Work with User Status - SignonThis screen displays recent sign-on statistics for each user profile. Inaddition, the scheduled date of any automatic actions (disable or delete) bythe Action absence control feature appears.
*SUBSET* Work with User Status - Signon iSecurity Position to . .Type options, press Enter. 1=Select 3=Enable 4=Disable 6=Reset count 7=Expire
OptUser Previous signon Days passed Planned actionHAYEST 22⁄11⁄11 17:29 2799 None 0⁄00⁄00
HUSER 0⁄00⁄00 None 0⁄00⁄00 IBM 9⁄02⁄03 16:28 6007 None 0⁄00⁄00 IBOLT 9⁄08⁄07 6:10 4365 None 0⁄00⁄00 ILAN 26⁄02⁄15 15:02 1607 None 0⁄00⁄00 ILANR 24⁄03⁄19 13:55 120 None 0⁄00⁄00 ILAN2 0⁄00⁄00 None 0⁄00⁄00 IMPERVA 30⁄12⁄12 13:48 2395 None 0⁄00⁄00 ISEC 13⁄11⁄16 16:17 981 None 0⁄00⁄00 ISECAGENT 2⁄10⁄18 19:21 293 None 0⁄00⁄00 ISRAEL 0⁄00⁄00 None 0⁄00⁄00 ITZIK 9⁄08⁄07 10:48 4365 None 0⁄00⁄00 I304001F11 1⁄01⁄19 12:53 202 None 0⁄00⁄00 JAVA 20⁄06⁄19 10:29 32 None 0⁄00⁄00 More...F3=Exit F7=Subset F8=Print F11=Additional parameters F12=CancelF14=Absence Security F15=Auto-disable exceptions F16=Signon times
Parameter Description
Opt 1 = Display all parameters for selected user profile3 = Enable user profile4 = Disable user profile6 = Reset invalid sign-on attempt counter – prevents automatic disabling of this user due to excessive sign-on errors7 = Set password to ‘expired’ – this user must change password atnext sign-on
PreviousSignon
Date and time of previous sign-on for this user profile
DaysPassed
Days since previous sign-on for this user profile
PlannedAction
Displays the date of planned absence control actions (Delete ordisable) for this user profile
-
220 Audit | User Guide

Screen 3: Work with User Status - PasswordThis screen displays the number of invalid sign-on attempts and theexpiration status of user passwords. This information makes it possible forthe security officer to verify that users change their passwords in accordancewith the security policy.
*SUBSET* Work with User Status - Password iSecurity Position to . .Type options, press Enter. 1=Select 3=Enable 4=Disable 6=Reset count 7=Expire Invalid Expiration Expiration Days DaysOptUser Attempts Interval Date In use Left
EVG2912B 1127 EVG2912X 1127 EXODUS EYAL *NOMAX 1070 FERNANDO 2756 FILESCOPE FORGOT *NOMAX 1723 FORGOTAUA *NOMAX 1145 FORGOTDEU *NOMAX 1728 FORGOTENG *NOMAX 1728 FORGOTHEB *NOMAX 1728 FORGOTS *NOMAX 46 FORGOTV *NOMAX 307 FORGOTYYY *NOMAX 764 More...F3=Exit F7=Subset F8=Print F11=Additional parameters F12=CancelF14=Absence Security F15=Auto-disable exceptions F16=Signon times
Audit|User Guide 221

Work with User Status - Password
Parameter Description
Opt 1 = Display all parameters for selected user profile3 = Enable user profile4 = Disable user profile6 = Reset invalid sign-on attempt counter – prevents automaticdisabling of this user due to excessive sign-on errors7 = Set password to ‘expired’ – this user must change passwordat next sign-on
InvalidAttempts
Blank = User profile is enabledNo = User profile is disabled
ExpirationInterval
Number of days between required password changes
ExpirationDate
Next password expiration date
Days inUse
Number of days the current password has been in use
Days Left Number of days before the current password expires
-
222 Audit | User Guide

Disabling Inactive UsersProfiles that have been inactive for a long time need to be disabled.
Audit User Management provides this functionality. It is composed of twoelements:
l Work with Auto-Disable - by which you can activate the function andprovide the number of days to consider
l Disable Exceptions – By which you can provide a list of user which willnot be checked and will not be set to disable by this function
Auditprovides two methods of handling this subject.
l The standard method wraps IBM OS400 functionality and provides.The OS400 activity is based on the commands ANZPRFACT,CHGACTPRFL, and DSPACTPRFL.
l An extended method is also provided. This extends the ability to spe-cify user profiles that will always be considered active, and will beexcluded from this process by generic* names.
To switch between the two methods:
1. Select Work with Auto-Disable and switch off the current usedmethod.
2. Use STRAUD > 89 > 59. Global Installation Defaultsand change the “Standard auto disable . . Y” field toY=Yes –for the IBM OS400method; E=Extended – for the extended method.
3. Copy the Disable Exceptions list to the new method with therequired changes.
4. Select again Work with Auto-Disable and switch on the activ-ated method.
You can schedule report ZCP_INADIS to see a log of auto-disable activity.
Audit|User Guide 223

Work with Auto-DisableTo define when to disable inactive users:
1. Select 11. Work with Auto-Disable from the User Managementscreen (STRAUD > 62 > 11). The Auto-Disable Inactive Users screenappears.
Extended Auto-Disable Inactive Users With generic* support
Type choices, press Enter.
Auto-Disable inactive users . . *YES *YES, *NO
Days of inactivity . . . . . . . 366 1-366, 0-*NOMAX
Users who have not signed on for the specified period will be disabled automatically by this feature.
Q* profiles, which are required for system activity, are never disabled. Press F11 to prevent specific users from being disabled automatically.
F3=Exit F11=Exceptions F12=Cancel
Parameters Description
Auto-Disableinactiveusers
*NO = Inactive users are not automatically disabled.*YES = Inactive Users are automatically disabled after theyhave been inactive for the number of days in the Days ofinactivity parameter.
Days ofinactivity
Enter a number between 1 -366.
2. Enter your parameters and press Enter.
-
224 Audit | User Guide

Disable ExceptionsTo define the exceptions for inactive user disabling:
1. Select 12. Exceptions from the User Management screen(STRAUD> 62 > 12). The Auto-Disable Exceptions screen appears.
Auto-Disable Exceptions
Specify user names or generic* that should NEVER be disabled automatically. Position: Type options, press Enter. 4=DeleteOptUser Description
AB* AVRAHAM Avrohom Notik IXY* QANZAGENT QAUTPROF IBM-supplied User Profile QCLUMGT IBM-supplied User Profile QCLUSTER IBM-supplied User Profile QCOLSRV IBM-supplied User Profile QDBSHR Internal Data Base User Profile QDBSHRDO Internal Data Base User Profile QDFTOWN Default Owner for System Objects QDIRSRV OS⁄400 Directory Services Server User Profile More...Users defined in the Auto-Disable exception list, are considered excluded.F3=Exit F6=Add new F12=Cancel
2. Press F6. The Add Users to Exception List screen appears.
3. Enter the profiles not to disable and press Enter.
Audit|User Guide 225
Deleting/Reviving UsersYou can set a time period after which disabled, inactive users areautomatically deleted. If a user is deleted by mistake, you can revive theuser. The Auto-Delete runs as part of the daily standard maintenance jobAU#MAINT.
For both successful and unsuccessful delete attempts, a message is sent toQSYSOPR. If the attempt was unsuccessful, the reason is included in themessage. In addition, a report is sent to *PRINT9. See "*PRINT1-*PRINT9 and*PDF Setup" on page 354 for details of how to define *PRINT9. You can alsorun report ZDO_INADLT to see a log of auto-delete activity.
To work with this option, your operating system must be at version 6.1 orlater.
NOTE: For a user profile to be deleted:
l It must be *DISABLEDl Their Last Used Date must be old enoughl Their Creation Date must be old enoughl They cannot be a Group Profilel They may not appear in Disable Exceptionsl They may not appear in Delete Exceptions (includes generic* names)
-
226 Audit | User Guide

Deleting Unused Disabled UsersUsers who have been in the *DISABLED state for a long period of time maybe deleted according to their Last used date, Create date, and Sign-on date.User Profiles which are Group Profiles will never be deleted.
Exceptions may be added to generic* names list and excluded from deleteeven if *DISABLED.
NOTE: Users in the disable exceptions list cannot be deleted.
NOTE: During Auto-Deletion, somemessages are sent to QSYSOPR.
To define when to delete disabled, inactive users:
1. Select 21. Delete Unused Disabled Users from the User Man-agement screen (STRAUD > 62 > 21). TheWork with Auto-Delete of UserProfiles screen appears.
Work with Auto-Delete of User Profiles
Users who were inactive for the period specified below, and are *DISABLED,can be set to be automatically deleted. Q* user profiles, are never deleted.
Type choices, press Enter.
Delete Inactive *DISABLED users . . *YES *YES, *NO
Numbers of days of inactivity . . . 999 1-999, 0=*NOMAXNote that this number has no relevance to the date the user was disabled.
Delete pending distributions . . . *YES *YES, *NOPending distributions must be deletd before a DLTUSRPRF runs.
Parameters of DLTUSRPRF (Press F4).
F3=Exit F4=Prompt F12=Cancel
Audit|User Guide 227

Parameters Description
DeleteInactive*DISABLEDusers
*NO = Inactive disabled users are not automatically deleted.*YES = Inactive disabled users are automatically deleted afterthey have been inactive for the number of days in the Numberof days of inactivity parameter.
Number ofdays ofinactivity
Enter a number between 1 -999.This parameter and the Days of inactivity parameter inthe Auto-Disable Inactive Users screen start counting from thesame date. So, for example, if you want to disable a user after60 days and then delete the user after a further 30 days, set thisparameter to 90.
ParametersofDLTUSRPRF(Press F4)
Press F4 to open the DLTUSRPRF screen and set the parametersfor when the inactive, disabled users are deleted.
2. Enter your parameters and press Enter.
-
228 Audit | User Guide

Auto-Delete Reports AvailableSome reports accompany the Auto-Delete function:
l ZDO_INADLT DO Users that were DELETED due to inactivity. This is astandard report
l Z$@_INADLT $@ Log of Auto-Delete activity. This includes info bothon users that could be deleted and those who for some reason couldnot be deleted. This is a textual report that includes 2 types of mes-sages:
l Auto-Delete: User XXXX could not be deleted: MsgId +MsgText of the reason.
l Auto-Delete: User XXXX inactive since YYYY-MM-DD deleted.
During Auto-Deletion, these messages are also sent to QSYSOPR.
Audit|User Guide 229

Deleting ExceptionsTo delete exceptions:
1. Select 22. Delete Exceptions from the User Managementmenu(STRAUD > 62 > 22). The Auto-Delete Exceptions screen appears.
Auto-Delete Exceptions
Specify user names or generic* that should NEVER be deleted automatically. Position: Type options, press Enter. 4=DeleteOptUser* Description *EXC_DISAB All the users in Auto-Disable Exception list
BottomUsers in pink are excluded by OS⁄400, and cannot be deleted from this list.F3=Exit F6=Add new F12=Cancel
2. Enter 4 next to the User to be deleted, then press Enter. The Auto-DeleteExceptions are deleted.
-
230 Audit | User Guide

Reviving Deleted UsersTo restore a deleted user:
1. Select 26. Revive Deleted Users from the User Managementmenu (STRAUD > 62 > 26). The Revive Deleted Users screen appears.
Revive Deleted Users
Type options, press Enter. Position to . . . 1=Select Subset . . . . .
OptUser Description Delete date ALEX5 Alex - Supporteam strong user 2019-07-21
AODTMP001 Temp. user of job 559777⁄LOWUSR⁄QPADEV000W 2019-07-21 DB2 DB-Gate 2019-07-23
BottomF3=Exit F5=Refresh
2. Enter 1 next to the User to be restored. The Create User Profilescreenappears.
3. Press Enter. The user is restored.
Audit|User Guide 231

Authorizing Sign-on TimesEven valid user profiles have the potential for abuse. A common hacker trickis to obtain a user’s password and use it to sign on after the user has leftwork to access programs and data with that user’s authorities. With thismethod, a dishonest employee can bypass object level security and remaininvisible to a subsequent audit.
An effective defense against this scenario would be to restrict user sign-on toauthorized working hours. Audit includes a user-friendly tool for definingauthorized sign-on periods for users, by time and day of the week.
-
232 Audit | User Guide

Working with Sign-on ScheduleTo define the permitted sign-on times for users:
1. Select 31. Work with Schedule from the User Managementmenu(STRAUD > 62 > 31). TheWork with Signon Schedule screen appears.
Sorted by Group Work with Signon Schedule
Type options, press Enter. 1=Select 4=Delete Position to Group .
Group Opt User Profile Enable Disable Days
#RONI 08:00 19:00 *ALL #VV 08:00 19:00 *ALL #VVV 08:00 19:00 *ALL ALEX 08:00 19:00 *ALL ALEX2 08:00 19:00 *ALL AMIR 08:00 19:00 *ALL AZ 08:00 19:00 *ALL AVRAHAM JR 08:00 19:00 *ALL
Bottom
F3=Exit F6=Add new F8=Print F11=Sort by User⁄Group F12=Cancel
2. Press F6=Add new. The Create Signon Schedule screen appears.
Audit|User Guide 233

Create Signon Schedule
Type choices, press Enter.
Enable . . . . . . . . . . . . . 8:00 Time, 99:99=*NONE Disable . . . . . . . . . . . . 19:00 Time, 99:99=*NONE
This rule is in effect: Every day . . . . . . . . . . Y -or- MonTueWedThuFriSatSun Only on specified days . . . . Y=Yes
Apply schedule to ONE of the following: All users in group profile . . . Name User profile(s) . . . . . . . . Name, Generic*, *ALL Selecting the last option and pressing F4, enables you to apply the signon schedule to more than one user at a time.
F3=Exit F4=Prompt F12=Cancel
Parameters Description
Enable/Disable Enter the time range when the user can sign on. The daystarts at 00:00 and finishes at 23:59. If the enable time isbefore the disable time (for example enable at 22:00 anddisable at 05:00), then the disable time is for the followingday.
Rule is in effectevery day
Y = the sign on rule is valid for all days of the week.
Rule is in effectonly onspecified days
Enter Y for each specific day for which the sign-on rule isvalid.
All users ingroup profile
If you enter a Group Profile, all users that belong to theGroup Profile will have this sign-on schedule.If you enter a Group Profile, do not enter a User Profilename.
User profile(s) Enter a user profile.Name = The sign-on schedule is only for this specific profileGeneric* = The sign-on schedule is for this group ofprofiles*ALL = The sign-on schedule is for all users
-
234 Audit | User Guide
3. Enter your parameters and press Enter. The updated schedule appears intheWork with Signon Schedule screen.
Audit|User Guide 235

Display Sign-on ScheduleTo display the signon schedule:
1. Select 32. Display Schedule from the User Managementmenu(STRAUD > 62 > 32). The Display Activation Schedule (DSPACTSCD) screenappears.
Display Activation Schedule (DSPACTSCD) Type choices, press Enter.
Output . . . . . . . . . . . . . * *, *PRINT
BottomF3=Exit F4=Prompt F5=Refresh F12=Cancel F13=How to use this display F24=More keys
2. Select either* to display the report or *PRINT to send the report to aprinter and press Enter. The report is produced.
-
236 Audit | User Guide

User Absence SecurityAnother common security risk occurs when an authorized user is away ontemporary leave (such as vacation, sick leave, maternity leave, or businesstrips) or leaves the organization. You can make certain that nobody can signon with specific user profiles during such scheduled absences by disabling ordeleting user profiles automatically on a specific date.
Audit|User Guide 237
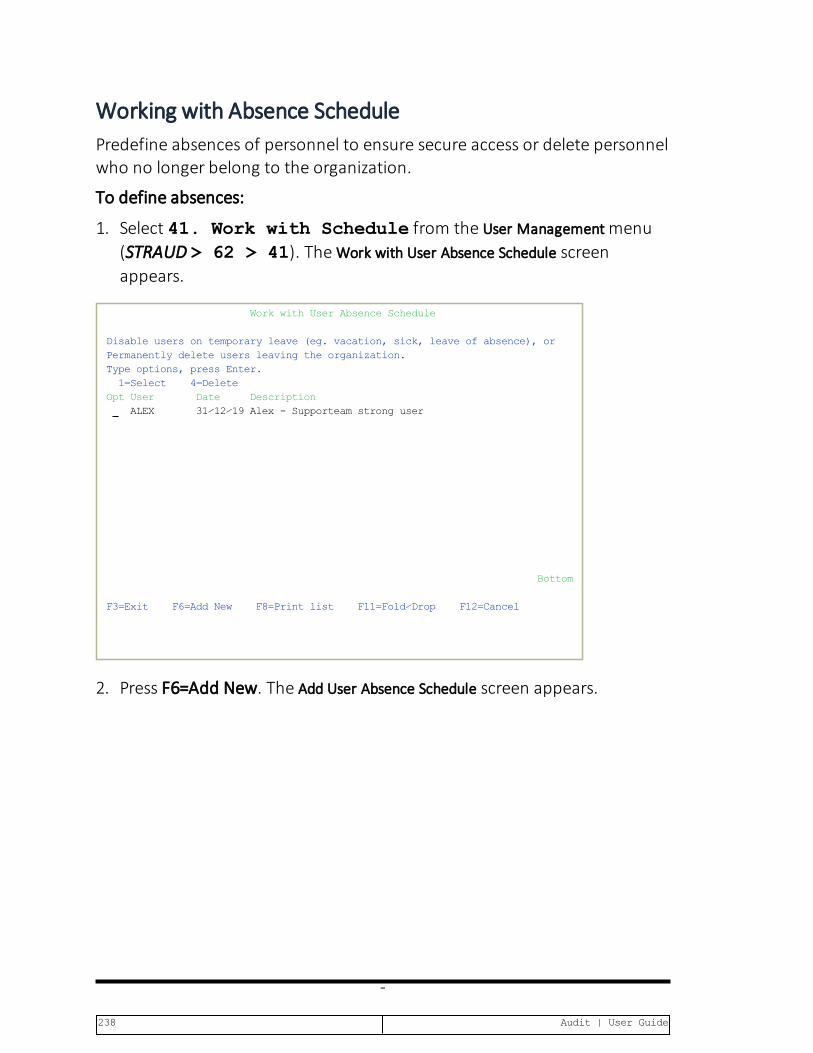
Working with Absence SchedulePredefine absences of personnel to ensure secure access or delete personnelwho no longer belong to the organization.
To define absences:
1. Select 41. Work with Schedule from the User Managementmenu(STRAUD > 62 > 41). TheWork with User Absence Schedule screenappears.
Work with User Absence Schedule
Disable users on temporary leave (eg. vacation, sick, leave of absence), or Permanently delete users leaving the organization. Type options, press Enter. 1=Select 4=DeleteOptUser Date Description
ALEX 31⁄12⁄19Alex - Supporteam strong user
Bottom
F3=Exit F6=Add New F8=Print list F11=Fold⁄Drop F12=Cancel
2. Press F6=Add New. The Add User Absence Schedule screen appears.
-
238 Audit | User Guide

Add User Absence Schedule
Type choices, press Enter.
User . . . . . . . . . . . . Date . . . . . . . . . . . . 0⁄00⁄00 Action . . . . . . . . . . . 1=Disable 2=Delete For scheduled *DELETE: Owned object option . . . . . *NODLT, *DLT, *CHGOWN New owner (if *CHGOWN). . . .
Primary group change option . *NOCHG, *CHGPGP New primary group . . . . . . New primary group authority . *OLDPGP, *PRIVATE, *CHANGE *USE, *EXCLUDE
F3=Exit F12=Cancel
Audit|User Guide 239

Parameters Description
User The user who will be absentDate The date from which the user will be absentAction 1=Disable The user will be disabled from the date entered.
2=Delete The user will be deleted from the date entered.If you disable a profile, you must manually re-enable the profileusing the CHGUSRPRF command.
Forscheduled*DELETE
The parameters below are only relevant if you set Action to 2(Delete).
OwnerObjectOption
*NODLT = The owned objects for the user profile are notchanged, and the user profile is not deleted if the user owns anyobjects.*DLT = The owned objects for the user profile are deleted. Theuser profile is deleted if the deletion of all owned objects issuccessful.*CHGOWN = The owned objects for the user profile haveownership transferred to the specified user profile. The userprofile is deleted if the transfer of all owned objects is successful.
NewOwner
When *CHGOWN is specified, a user profile namemust bespecified for the new user profile.Specify the name of the user profile.
Primarygroupchangeoption
*NOCHG = The objects the user profile is the primary group fordo not change, and the user profile is not deleted if the user istheprimary group for any objects.*CHGPGP = The objects the user profile is the primary group forare transferred to the specified user profile. The user profile isdeleted if the transfer of all objects is successful.
Newprimarygroup
When *CHGPGP is specified, a user profile name or *NONE mustbe specified.The name of the user profile. The user profile specified musthave a group ID number (gid).
-
240 Audit | User Guide

Parameters Description
Newprimarygroupauthority
*OLDPGP = The new primary group has the same authority tothe object as the old primary group.*PRIVATE = If the new primary group has a private authority tothe object, it will become the primary group for that object andthe primary group authority will be what the private authoritywas. If the new primary group does not have a private authorityto the object, it becomes the primary group but does not haveany authority to the object.*ALL = The new primary group has *ALL authority to the object.*CHANGE = The new primary group has *CHANGE authority tothe object.*USE = The new primary group has *USE authority to the object.*EXCLUDE = The new primary group has *EXCLUDE authority tothe object.
3. Enter your parameters and press Enter. The updated schedule appears intheWork with Signon Schedule screen.
NOTE: Refer to IBM documentation for a completediscussion regarding the concepts ofobject ownership and primary groups.
Audit|User Guide 241

Display Absence ScheduleTo display the absence schedule:
1. Select 42. Display Schedule in the User Managementmenu(STRAUD > 62 > 42). The Display Expiration Schedule screen appears.
Display Expiration Schedule (DSPEXPSCD) Type choices, press Enter.
Output . . . . . . . . . . . . . * *, *PRINT
BottomF3=Exit F4=Prompt F5=Refresh F12=Cancel F13=How to use this display F24=More keys
2. Select either * to display the report or *PRINT to send the report to aprinter and press Enter. The report is produced.
-
242 Audit | User Guide
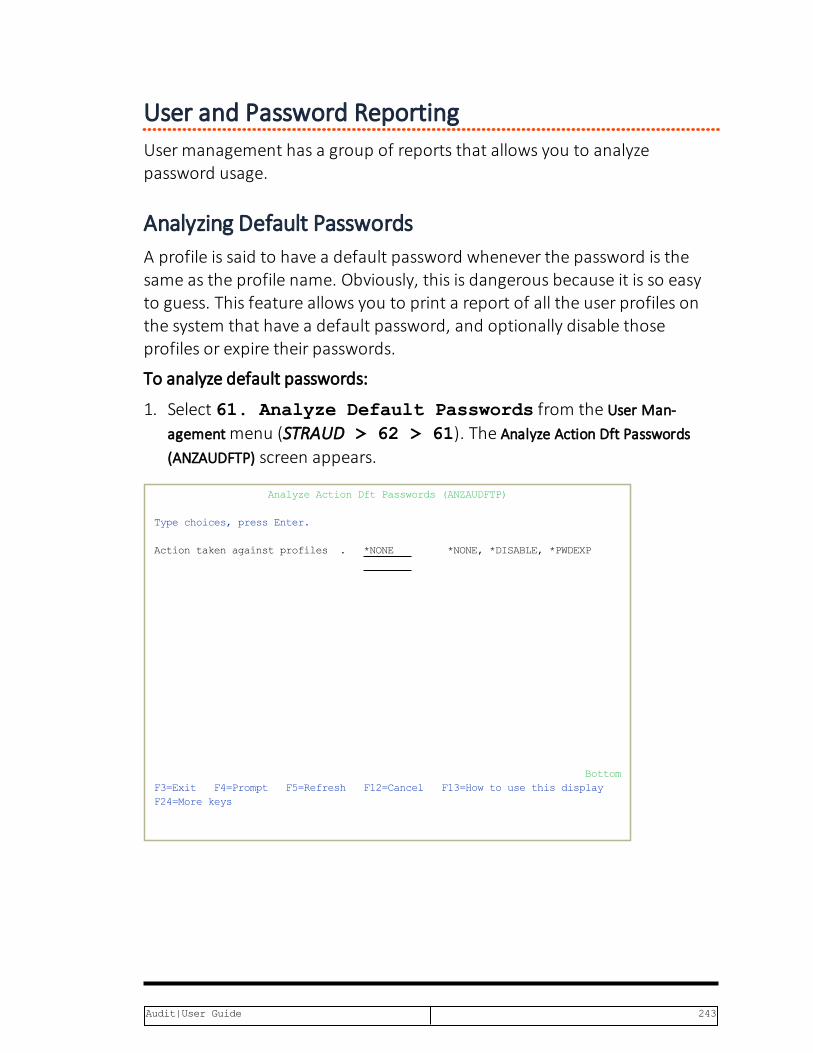
User and Password ReportingUser management has a group of reports that allows you to analyzepassword usage.
Analyzing Default PasswordsA profile is said to have a default password whenever the password is thesame as the profile name. Obviously, this is dangerous because it is so easyto guess. This feature allows you to print a report of all the user profiles onthe system that have a default password, and optionally disable thoseprofiles or expire their passwords.
To analyze default passwords:
1. Select 61. Analyze Default Passwords from the User Man-agementmenu (STRAUD > 62 > 61). The Analyze Action Dft Passwords(ANZAUDFTP) screen appears.
Analyze Action Dft Passwords (ANZAUDFTP) Type choices, press Enter.
Action taken against profiles . *NONE *NONE, *DISABLE, *PWDEXP
BottomF3=Exit F4=Prompt F5=Refresh F12=Cancel F13=How to use this display F24=More keys
Audit|User Guide 243

2. Selectl *DISABLE to disable accounts with default passwords,
l *PWDEXP to expire default passwords, or
l *NONE to list the accounts with default passwords but take noaction.
3. Press Enter. The report is produced. If the selected option was *NONE, aline at the bottom of the screen reports the number of accounts foundwith default passwords and the number of those that are enabled.
-
244 Audit | User Guide
Printing User Profile Information
The following options from the User ManagementMenu (STRAUD > 62):
62. Print Password Info
63. Print Special Authorities
64. Print Programs and Queues
use the OS/400 Print User Profile (PRTUSRPRF) command. They are placedhere for convenience and to enable authorized users of iSecurity to use themeven if their authority is insufficient for the IBM command. In addition, theprint is enhanced to support output to *PRINT1 through *PRINT9, inaddition to the standard *PRINT.
Audit|User Guide 245
Replication
The recent trend of consolidating servers has led to the increasingprevalence of multi-system and multi-LPAR shops. Companies have found itmandatory that system administrators and users alike synchronize userprofile definitions, user passwords and system values between the differentsystems, allowing for exceptions as needed in Production, Test orDevelopment systems. Such synchronization should be accomplished withminimum overhead to both the actual systems and the personnel mandatedwith managing user profile information.
Because of the growing demand for data synchronization, Raz-Lee createdUser and System Value Replication, allowing the user to replicate securitysettings such as user profile definitions, user passwords and system valuesacross multiple servers or LPARs, allowing for the exceptions needed inProduction, Test or Development systems.
Replication includes the following features:
l Flexible user-defined replication rules defining user profiles, pass-words and parameters to be replicated
l Definition of destination systems for replication
l Bulk updates of user profiles
l Setting of System Values to optimal value or site-defined baseline val-ues
l Replication of all, group or individual system values
l Collection and display of network-wide replication results
l Revival of deleted users, with an option to modify parameters
l Can be initiated from any IBM in the environment and does notrequire special commands
-
246 Audit | User Guide

Activation1. Select 71. Enable User/Password Replication from the Rep-
licationmenu (STRAUD > 69 > 25 > 71). The Call Program screenappears.
Call Program (CALL) Type choices, press Enter.
Program . . . . . . . . . . . .>AURPUEP Name Library . . . . . . . . . . .> SMZ4 Name, *LIBL, *CURLIB Parameters . . . . . . . . . . .>*ADD
+ for more values
BottomF3=Exit F4=Prompt F5=Refresh F12=Cancel F13=How to use this display F24=More keys
2. Press Enter. This option adds an exit program to the system registrationfacility.
Audit|User Guide 247

Network DefinitionsTo work with Replication, you must define destination systems.
1. Select 71. Work with Network Definitions from the Base Sup-portmenu (STRAUD > 89). TheWork with Network Systems screen appears.
System type:AS400 Work with Network Systems System:S520 Position to . . .Type options, press Enter. 1=Select 4=Remove 7=Export dfn. 8=Check DDM 9=Verify communication
Opt System Group RAZLEE1 *RL RAZLEE1 machine
RAZLEE2 *G1 RAZLEE2 machine RAZLEE3 *G1 RAZLEE3 machine
BottomF3=Exit F6=Add New F7=Export dfn cmd F12=Cancel
2. Press F6 to add a new system to the list or type 1 to modify an existing
-
248 Audit | User Guide

system. TheModify Network System screen appears.
System type:AS400 Modify Network System System:S520
System . . . . . . . . . . RAZLEE1 Description . . . . . . . . RAZLEE1 machine Group where included . . . *RL *Name
Communication DetailsIP or remote name . . . . . 251.236.56.124 Type . . . . . . . . . . . *IP *SNA, *IPEntry of *LOCAL on System . C205307W Use WRKRDBDIRE to verifyAuto filled for this system. Required for Multi-LPAR of AOD, P-R, Replication.
Copy of QAUDJRN on a different systemWhere is QAUDJRN analyzed . *SYSTEM Name, *SYSTEMExtension Id on remote . . D
Note: After adding a system, run again "Network Authentication".
F3=Exit F12=Cancel
Parameters Description
System The name of the system you are defining.Description Enter a meaningful description.Groupwhereincluded
You can create groups of system. The group namemustbegin with an asterisk (*).
DefaultextensionType *SNA or *IPIP orremotename
If type = *SNA, enter the name of the remote system. IfType = *IP, enter the IP address of the remote system.
3. Type the appropriate parameters and press Enter.
NOTE: When you define both source and target systems, you must defineeach system on both the systems. Both systems must have the sameversion of Base Support installed.
Audit|User Guide 249

System ValuesYou can replicate the System Values from this system to another system, youcan set the current system values and network attributes as a baseline, andyou can set a baseline to be the current system values.
Set System Values as a Baseline1. Select 39. Set Current SysVal as Baseline in the Replication
menu (STRAUD > 69 > 26 > 39). The Set Audit Compliance Base-Linescreen appears.
Set Audit Compliance Base-Line (SETAUCBL) Type choices, press Enter.
Set current as "Base line" . . .>*SYSVAL *SYSVAL, *NETATR, *COUNTS
BottomF3=Exit F4=Prompt F5=Refresh F12=Cancel F13=How to use this display F24=More keys
2. Type either *SYSVAL or *NETATR and press Enter.
-
250 Audit | User Guide
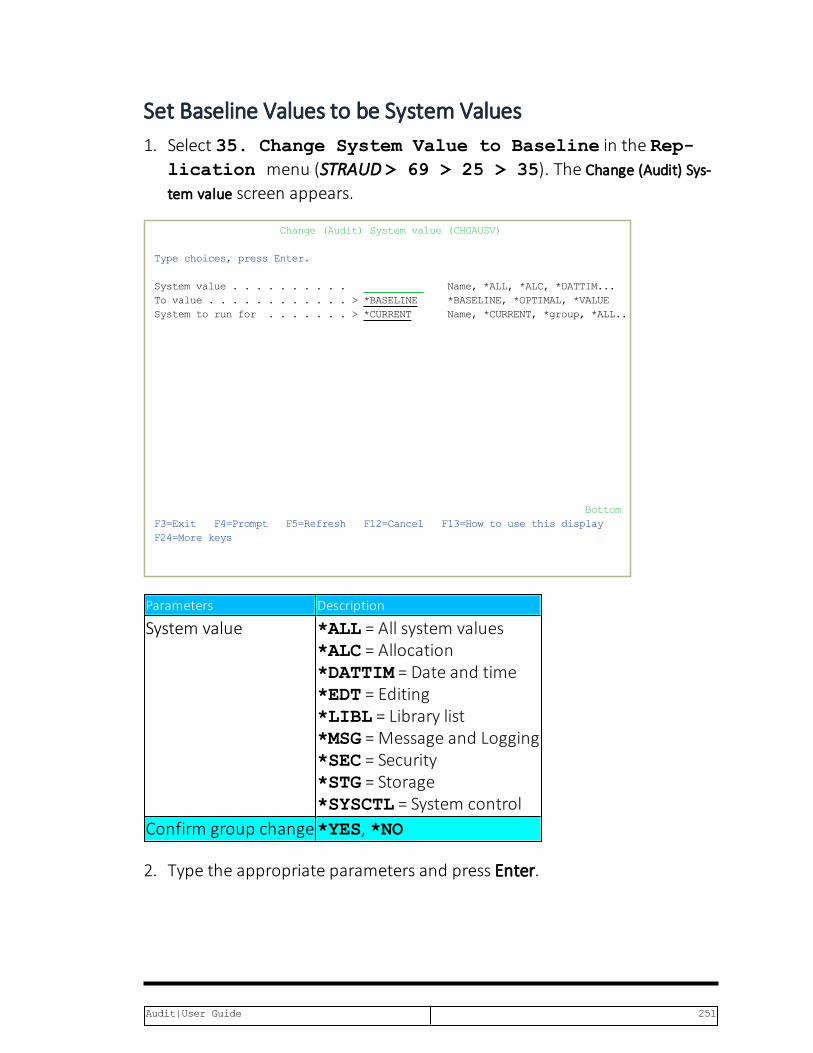
Set Baseline Values to be System Values1. Select 35. Change System Value to Baseline in the Rep-
lication menu (STRAUD > 69 > 25 > 35). The Change (Audit) Sys-tem value screen appears.
Change (Audit) System value (CHGAUSV) Type choices, press Enter.
System value . . . . . . . . . . Name, *ALL, *ALC, *DATTIM... To value . . . . . . . . . . . .>*BASELINE *BASELINE, *OPTIMAL, *VALUE System to run for . . . . . . .>*CURRENT Name, *CURRENT, *group, *ALL..
BottomF3=Exit F4=Prompt F5=Refresh F12=Cancel F13=How to use this display F24=More keys
Parameters Description
System value *ALL = All system values*ALC = Allocation*DATTIM = Date and time*EDT = Editing*LIBL = Library list*MSG =Message and Logging*SEC = Security*STG = Storage*SYSCTL = System control
Confirm group change*YES, *NO
2. Type the appropriate parameters and press Enter.
Audit|User Guide 251

Replicate System Values to Another System1. Select 31. System Value Replication in the Replicationmenu
(STRAUD > 69 > 25 > 31). The Change (Audit) System value screenappears.
Change (Audit) System value (CHGAUSV) Type choices, press Enter.
System value . . . . . . . . . . Name, *ALL, *ALC, *DATTIM... To value . . . . . . . . . . . . *OPTIMAL *BASELINE, *OPTIMAL, *VALUE System to run for . . . . . . . *CURRENT Name, *CURRENT, *group, *ALL..
BottomF3=Exit F4=Prompt F5=Refresh F12=Cancel F13=How to use this display F24=More keys
-
252 Audit | User Guide

Parameters Description
System value *ALL = All system values*ALC = Allocation*DATTIM = Date and time*EDT = Editing*LIBL = Library list*MSG =Message and Logging*SEC = Security*STG = Storage*SYSCTL = System control
To value *BASELINE = the current system as defined in option 39.Set System Values Baseline.*OPTIMAL = defined in the Compliance Evaluator*VALUE
System to runfor
Replicate system values to a specific system name, thecurrent system or a group of systems
Confirm groupchange
*YES,*NO
2. Type the appropriate parameters and press Enter.
Audit|User Guide 253
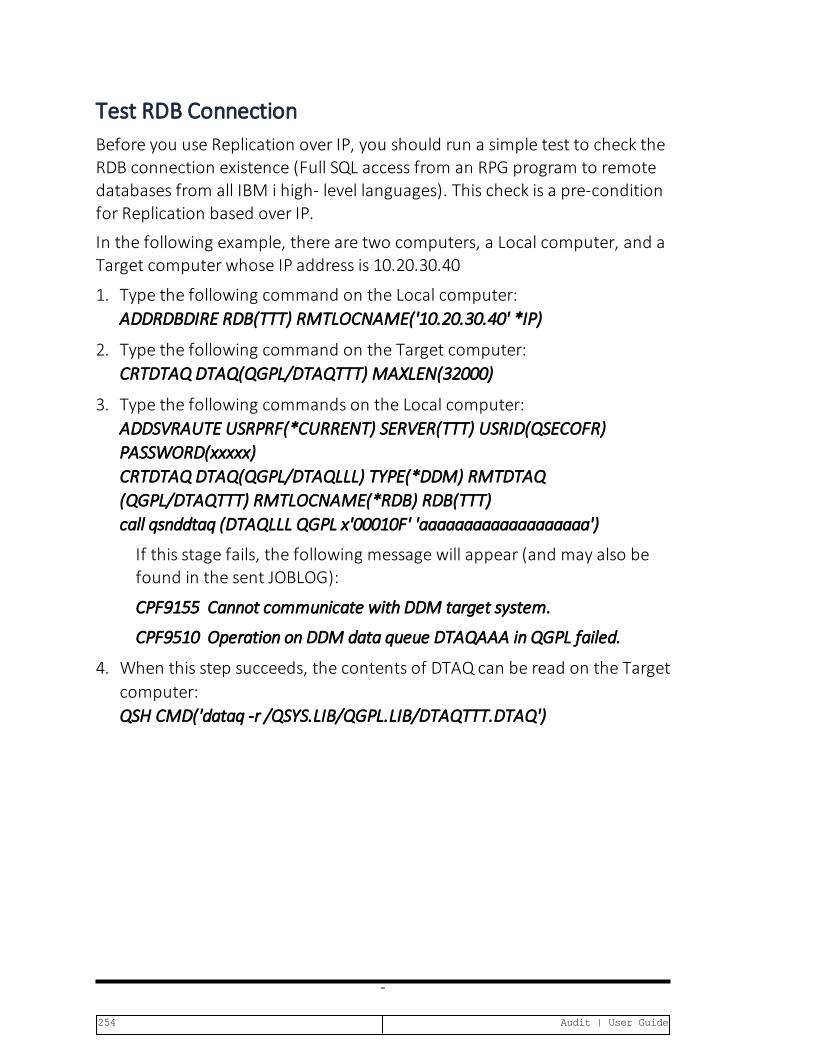
Test RDB ConnectionBefore you use Replication over IP, you should run a simple test to check theRDB connection existence (Full SQL access from an RPG program to remotedatabases from all IBM i high- level languages). This check is a pre-conditionfor Replication based over IP.
In the following example, there are two computers, a Local computer, and aTarget computer whose IP address is 10.20.30.40
1. Type the following command on the Local computer:ADDRDBDIRE RDB(TTT) RMTLOCNAME('10.20.30.40' *IP)
2. Type the following command on the Target computer:CRTDTAQ DTAQ(QGPL/DTAQTTT) MAXLEN(32000)
3. Type the following commands on the Local computer:ADDSVRAUTE USRPRF(*CURRENT) SERVER(TTT) USRID(QSECOFR)PASSWORD(xxxxx)CRTDTAQ DTAQ(QGPL/DTAQLLL) TYPE(*DDM) RMTDTAQ(QGPL/DTAQTTT) RMTLOCNAME(*RDB) RDB(TTT)call qsnddtaq (DTAQLLL QGPL x'00010F' 'aaaaaaaaaaaaaaaaaaa')
If this stage fails, the following message will appear (and may also befound in the sent JOBLOG):
CPF9155 Cannot communicate with DDM target system.
CPF9510 Operation on DDM data queue DTAQAAA in QGPL failed.
4. When this step succeeds, the contents of DTAQ can be read on the Targetcomputer:QSH CMD('dataq -r /QSYS.LIB/QGPL.LIB/DTAQTTT.DTAQ')
-
254 Audit | User Guide

User/PasswordReplication duplicates user profiles and their parameters in their latest andmost updated version. Replication does not copy the actual password but anencrypted version of the password.
Replication RulesBefore you can replicate anything, you must define the rules of what toreplicate.
1. Select 51. Work with Replication Rules in the Replicationmenu (STRAUD > 69 > 25 > 51). TheWork with Replication Rulesscreen appears.
Work with Replication Rules Type options, press Enter. Position to . . . 1=Select 4=Remove 5=Display Subset . . . . . --Systems-- --Replicate-- Opt User* From To CRT CHG DLT
*ALL *ALL *ALL Y Y Y AB* RAZLEE2 *ALL Y Y Y
BottomIf CRT, CHG and DLT are blanks, no replication occurs.
F3=Exit F6=Add New F8=Print F12=Cancel
2. Press F6 to add a new rule or type 1 to modify an existing rule. TheModifyReplication Rules 1/2 screen appears.
Audit|User Guide 255

Screen 1⁄2 Modify Replication Rules
Type choices, press Enter.
User . . . . . . . . . . . AB* Name, generic*, *ALLSystem combination From system . . . . . . . RAZLEE2 System, *ALL Replicate to system . . . *ALL System, *group, *ALLReplicate (set all to blanks for "no replication")Create user . . . . . . . Y Y=Yes, A=Yes⁄Change if exists Change user . . . . . . Y Y=Yes, A=Yes⁄Create if missing Delete user . . . . . . . Y Y=YesIf Change, replicate also (See more on next screen) User disabled . . . . . Y Y=Yes User enabled . . . . . . Y Y=Yes Password changes . . . . Y Y=Yes
At run time, the best fit (most specific) rule for user names, regardless of systems, is selected. Rules with this user notation are then processed. Entries which FROM SYSTEM correspond or is *ALL, are scanned and a single replication request is sent for each TO SYSTEM.
F3=Exit F4=Prompt F12=Cancel
-
256 Audit | User Guide

Parameters Description
User Enter the name of the User Profile to replicate.Name = Enter the name of a specific profile to replicateGeneric* = Use a generic name to copy a group of profiles*ALL = Replicate all profiles
Systemcombination
From system = Type the source system name or select *ALLsystemsReplicate to system= Type the target system name, a group ofsystems or select *ALL systems
Operationsto Replicate
Define how to replicate common operations. Set to blanks forno replication.Create user:Y = Yes – On the target computer, create all users that meetthe rule definition and exist on the source computer, and donot exist on the target computer.A= Yes / Change if the User profile already existsOn the target computer, create all users that meet the ruledefinition and exist on the source computer, and do not existon the target computer. Users that meet the rule definition onthe source computer and already exist on the target computerare changed on the target computer to be identical to the useron the source computer.Change user:Y = Yes – All users that meet the rule definition on the sourcecomputer and also exist on the target computer are changedon the target computer to be identical to the user on thesource computer.A= Yes / Create if the User profile does not existAll users that meet the rule definition and also exist on thetarget computer are changed to be identical to the user on thesource computer. Users that only exist on the sourcecomputer are created on the target computer.Delete user:Y = Yes – All users that meet the rule definition are deletedfrom the source computer. If they also exist on the targetcomputer, they are deleted also from the target computer.
Audit|User Guide 257

Parameters Description
Commonattributes toreplicate
Select what common attributes to replicate. Set to blanks forno replication.User disabled: Y = YesUser enabled: Y = YesPassword changes: Y = Yes
3. Type the appropriate parameters and press Enter. TheModify ReplicationRules 2/2 screen appears.
Screen 2⁄2 Modify Replication Rules
Type choices, press Enter. Description . . Parameters or Parameters with partial value to omite.g. INLPGM or INLPGM(A⁄B
F3=Exit F12=Cancel
4. Type a description and enter exception parameters that are not to be rep-licated and press Enter.
-
258 Audit | User Guide

Replicate UsersUse this feature to replicate one or more user profiles to another system.
1. Select 71. Work with network definitions in the BASE Supportmenu (STRAUD > 89 > 71). The Work with Network Systemsscreen appears.
System type:AS400 Work with Network Systems System:S520 Position to . . .Type options, press Enter. 1=Select 4=Remove 7=Export dfn. 8=Check DDM 9=Verify communication
Opt System Group RAZLEE1 *RL RAZLEE1 machine
RAZLEE2 *G1 RAZLEE2 machine RAZLEE3 *G1 RAZLEE3 machine
BottomF3=Exit F6=Add New F7=Export dfn cmd F12=Cancel
2. Press F6 to define a new network system to work with and press Enter toconfirm.
Audit|User Guide 259

System type:AS400 Add Network System System:S520
System . . . . . . . . . .Description . . . . . . . .Group where included . . . *NONE *Name
Communication DetailsIP or remote name . . . . . Type . . . . . . . . . . . *IP *SNA, *IPEntry of *LOCAL on System . Use WRKRDBDIRE to verifyAuto filled for this system. Required for Multi-LPAR of AOD, P-R, Replication.
Copy of QAUDJRN on a different systemWhere is QAUDJRN analyzed . *SYSTEM Name, *SYSTEMExtension Id on remote . .
Note: After adding a system, run again "Network Authentication".
F3=Exit F12=CancelModify data, or press Enter to confirm.
3. Select 72. Network Authentication in the BASE Support screen(STRAUD > 89 > 72). The Network Authentication screen appears.
Network Authentication
Type choices, press Enter.
User for remote work . . . SECURITY2P Name Password . . . . . . . . . Confirm password . . . . .
In order to perform activity on remote systems, the user SECURITY2P must be defined on all systems and LPARS with the same password. Product options which require this are: - referencing a log or a query with the parameter SYSTEM() - replication user profiles, passwords, system values - populating definitions, log collection, etc. Values entered in this screen are NOT preserved in any iSecurity file. They are only used to set the user profile password and to set server authentication entries. Ensure that SysVal QRETSVRSEC is set to 1.
F3=Exit F12=Cancel
4. Enter the .SECURITY2P user password twice and press Enter.
-
260 Audit | User Guide
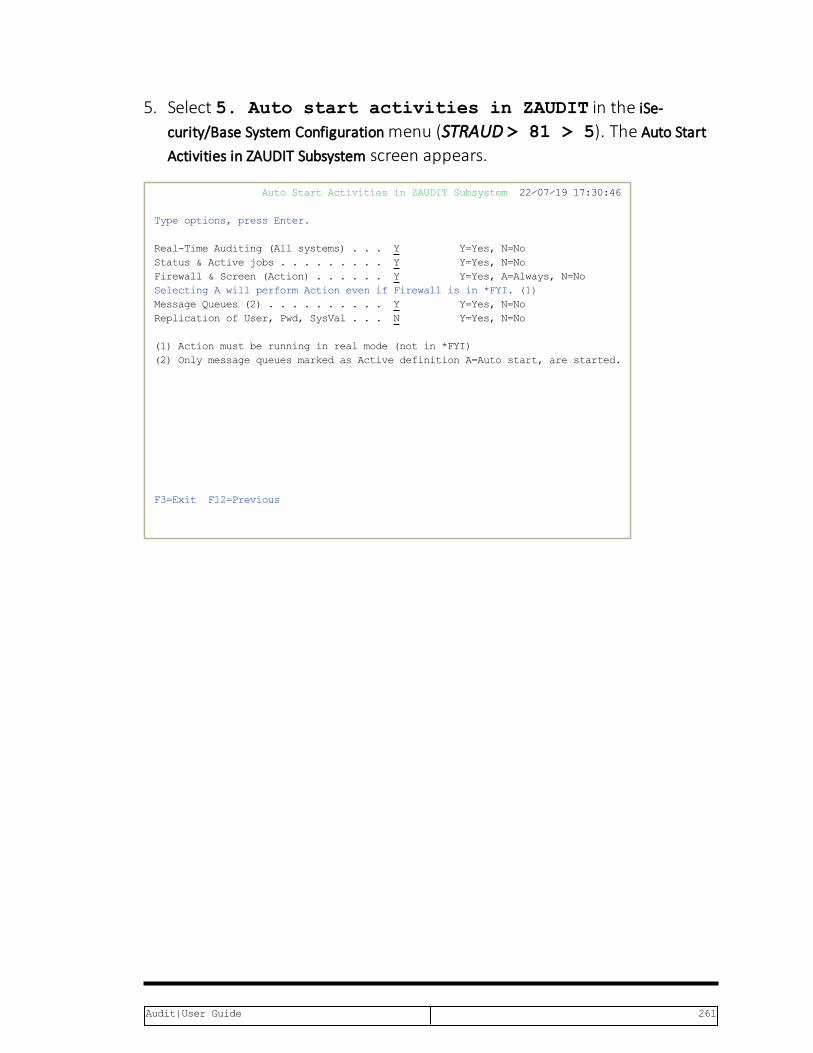
5. Select 5. Auto start activities in ZAUDIT in the iSe-curity/Base System Configurationmenu (STRAUD > 81 > 5). The Auto StartActivities in ZAUDIT Subsystem screen appears.
Auto Start Activities in ZAUDIT Subsystem 22⁄07⁄1917:30:46
Type options, press Enter.
Real-Time Auditing (All systems) . . . Y Y=Yes, N=NoStatus & Active jobs . . . . . . . . . Y Y=Yes, N=NoFirewall & Screen (Action) . . . . . . Y Y=Yes, A=Always, N=NoSelecting A will perform Action even if Firewall is in *FYI. (1) Message Queues (2) . . . . . . . . . . Y Y=Yes, N=NoReplication of User, Pwd, SysVal . . . N Y=Yes, N=No
(1) Action must be running in real mode (not in *FYI) (2) Only message queues marked as Active definition A=Auto start, are started.
F3=Exit F12=Previous
Audit|User Guide 261

Parameter Description
Real-TimeAuditing(Allsystems)
Y = YesN = NoIf you set the Change Tracker parameters Enable Change Trackerand Enable Real Time Tracking to Y, then even if this parameteris set to N, activating the ZAUDIT subsystem activates the Auditjob. You access the Change Tracker parameters in the ActivationMode option in the System Configuration menu in ChangeTracker (STRCT > 81 > 1).
Status &Active jobs
Y = YesN = No
Firewall &Screen(Action)
Y = YesA = AlwaysN = NoSelecting A=Always will perform Action activities even if Firewallis running in *FYI. Action must be running in real mode (not inFYI).
MessageQueues(set to startat *IPL)
Y = YesN = NoIf this parameter is set to Y, then when adding newMessageQueues, you can set them to start automatically at *IPL time.For more details, see "Create Message Queue Audit Rules" onpage 124.
Replicationof User,Pwd,SysVal
Y = YesN = No
6. Enter the required parameters and press Enter.
7. In the Source system only, run 71. Enable User/Password Rep-lication in the Replicationmenu (STRAUD > 69 > 25 > 71). TheCall Program (CALL) screen appears.
-
262 Audit | User Guide

Call Program (CALL) Type choices, press Enter.
Program . . . . . . . . . . . .>AURPUEP Name Library . . . . . . . . . . .> SMZ4 Name, *LIBL, *CURLIB Parameters . . . . . . . . . . .>*ADD
+ for more values
BottomF3=Exit F4=Prompt F5=Refresh F12=Cancel F13=How to use this display F24=More keys
8. Display active jobs in the Target Machine.
9. Select 51. Work with Replication Rules from the Replicationmenu (STRAUD > 69 > 25 > 51).
Work with Replication Rules Type options, press Enter. Position to . . . 1=Select 4=Remove 5=Display Subset . . . . . --Systems-- --Replicate-- Opt User* From To CRT CHG DLT
*ALL *ALL *ALL Y Y Y AB* RAZLEE2 *ALL Y Y Y
BottomIf CRT, CHG and DLT are blanks, no replication occurs.
F3=Exit F6=Add New F8=Print F12=Cancel
Audit|User Guide 263

10. Press F6 to add a new rule or type 1 to modify an existing rule. TheModifyReplication Rules 1/2 screen appears.
Screen 1⁄2 Modify Replication Rules
Type choices, press Enter.
User . . . . . . . . . . . *ALL Name, generic*, *ALLSystem combination From system . . . . . . . *ALL System, *ALL Replicate to system . . . *ALL System, *group, *ALLReplicate (set all to blanks for "no replication")Create user . . . . . . . Y Y=Yes, A=Yes⁄Change if exists Change user . . . . . . Y Y=Yes, A=Yes⁄Create if missing Delete user . . . . . . . Y Y=YesIf Change, replicate also (See more on next screen) User disabled . . . . . Y Y=Yes User enabled . . . . . . Y Y=Yes Password changes . . . . Y Y=Yes
At run time, the best fit (most specific) rule for user names, regardless of systems, is selected. Rules with this user notation are then processed. Entries which FROM SYSTEM correspond or is *ALL, are scanned and a single replication request is sent for each TO SYSTEM.
F3=Exit F4=Prompt F12=Cancel
-
264 Audit | User Guide

Parameters Description
User Enter the name of the User Profile to replicate.Name = Enter the name of a specific profile to replicateGeneric* = Use a generic name to copy a group of profiles*ALL = Replicate all profiles
Systemcombination
From system = Type the source system name or select *ALLsystemsReplicate to system= Type the target system name, a group ofsystems or select *ALL systems
Operationsto Replicate
Define how to replicate common operations. Set to blanks forno replication.Create user:Y = Yes – On the target computer, create all users that meetthe rule definition and exist on the source computer, and donot exist on the target computer.A= Yes / Change if the User profile already existsOn the target computer, create all users that meet the ruledefinition and exist on the source computer, and do not existon the target computer. Users that meet the rule definition onthe source computer and already exist on the target computerare changed on the target computer to be identical to the useron the source computer.Change user:Y = Yes – All users that meet the rule definition on the sourcecomputer and also exist on the target computer are changedon the target computer to be identical to the user on thesource computer.A= Yes / Create if the User profile does not existAll users that meet the rule definition and also exist on thetarget computer are changed to be identical to the user on thesource computer. Users that only exist on the sourcecomputer are created on the target computer.Delete user:Y = Yes – All users that meet the rule definition are deletedfrom the source computer. If they also exist on the targetcomputer, they are deleted also from the target computer.
Audit|User Guide 265

Parameters Description
Commonattributes toreplicate
Select what common attributes to replicate. Set to blanks forno replication.User disabled: Y = YesUser enabled: Y = YesPassword changes: Y = Yes
11. Type the appropriate parameters and press Enter. TheModify ReplicationRules 2/2 screen appears.
Screen 2⁄2 Modify Replication Rules
Type choices, press Enter. Description . . Parameters or Parameters with partial value to omite.g. INLPGM or INLPGM(A⁄B
F3=Exit F12=Cancel
12. Type a description and enter exception parameters that are not to be rep-licated and press Enter.
13. Select STRAUD > 69 > 26 > 52. Replicate Users in the Rep-licationmenu (STRAUD > 69 > 25 > 52). The Replicate (Audit) User Profilescreen appears.
-
266 Audit | User Guide
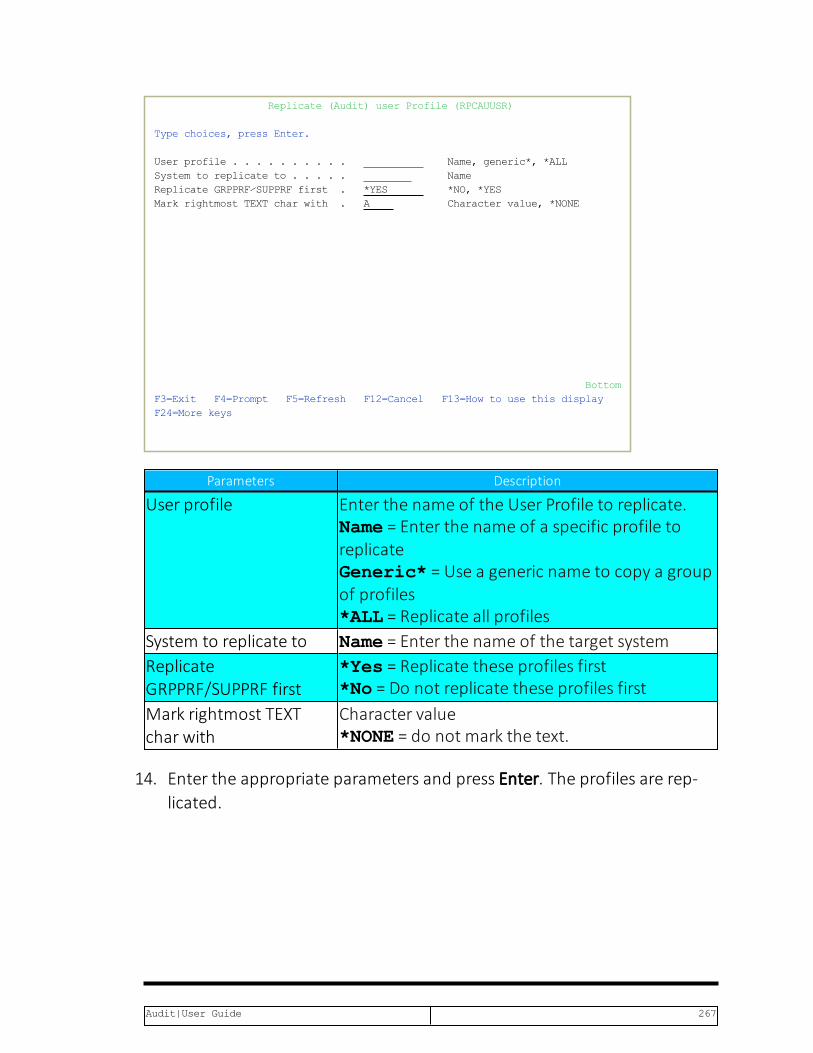
Replicate (Audit) user Profile (RPCAUUSR) Type choices, press Enter.
User profile . . . . . . . . . . Name, generic*, *ALL System to replicate to . . . . . Name Replicate GRPPRF⁄SUPPRF first . *YES *NO, *YES Mark rightmost TEXT char with . A Character value, *NONE
BottomF3=Exit F4=Prompt F5=Refresh F12=Cancel F13=How to use this display F24=More keys
Parameters Description
User profile Enter the name of the User Profile to replicate.Name = Enter the name of a specific profile toreplicateGeneric* = Use a generic name to copy a groupof profiles*ALL = Replicate all profiles
System to replicate to Name = Enter the name of the target systemReplicateGRPPRF/SUPPRF first
*Yes = Replicate these profiles first*No = Do not replicate these profiles first
Mark rightmost TEXTchar with
Character value*NONE = do not mark the text.
14. Enter the appropriate parameters and press Enter. The profiles are rep-licated.
Audit|User Guide 267

Program Exceptions for ReplicationYou can specify that operations, such as create, delete or change userprofile, generated by programs in the Replication Exception list, are notreplicated.1. Select 55. Program Exceptions for Replication in the Rep-
licationmenu (STRAUD > 69 > 25 > 55). The User Replication – Workwith Program Exceptions screen appears.
User Replication - Work with Program Exceptions
Operations such as create, delete or change user profile, generated byprograms in exception list, will not be replicated. Type options, press Enter. 4=Delete Position to . . . . .OptProgram
PGM1 PGM2
BottomF3=Exit F6=Add new F12=Cancel
2. Press F6 to add a new program to the list. The Add Program Exception screenappears.
-
268 Audit | User Guide

Add Program Exception
Type choices, press Enter.
Program PGM1 PGM2
F3=Exit F12=Cancel
3. Enter the required programs and press Enter.
Audit|User Guide 269

Revive Deleted UsersDeleted users can be restored to the system and then be available again forreplication.
1. Select 57. Revive deleted users in the Replicationmenu(STRAUD > 69> 25 > 57). The Revive Deleted Users screen appears.
Revive Deleted Users
Type options, press Enter. Position to . . . 1=Select Subset . . . . .
OptUser Description Delete date ALEX5 Alex - Supporteam strong user 2019-07-21
AODTMP001 Temp. user of job 559777⁄LOWUSR⁄QPADEV000W 2019-07-21 DB2 DB-Gate 2019-07-23
BottomF3=Exit F5=Refresh
2. Type 1 to select a user profile to recreate.
-
270 Audit | User Guide

Replication LogAccess the log to display a list of replications that were requested andcompleted. Filter according to time, replicated item type or item name.
1. Select 1. Display Replication Log in the Replication menu(STRAUD > 69 > 25 > 1). The Display Replication Log screen appears.
Display Replication Log (DSPRPLOG) Type choices, press Enter.
Display last minutes . . . . . . *BYTIME Number, *BYTIME Starting date and time: Starting date . . . . . . . . *CURRENT Date, *CURRENT, *YESTERDAY... Starting time . . . . . . . . 000000 Time Ending date and time: Ending date . . . . . . . . . *CURRENT Date, *CURRENT, *YESTERDAY... Ending time . . . . . . . . . 235959 Time Item type . . . . . . . . . . . *ALL *ALL, *SYSVAL, *USER Item name . . . . . . . . . . . *ALL Name, generic*, *ALL
BottomF3=Exit F4=Prompt F5=Refresh F12=Cancel F13=How to use this display F24=More keys
Audit|User Guide 271

Parameter Description
Display lastminutes
Selects only those events occurring within the previousnumber of minutes as specified by the userNumber = Enter the desired number of minutes*BYTIME = According to start and end times specified below
Starting dateand timeEnding dateand time
Selects only those events occurring within the range specifiedby the start and end date/time combinationDate and time = Enter the appropriate date or time*CURRENT = Current day*YESTERDAY = Previous day*WEEKSTR/*PRVWEEKS = Current week/Previous week*MONTHSTR/ *PRVMONTHS = Current month/Previousmonth*YEARSTR/ *PRVYEARS = Current year/ Previous year*SUN -*SAT = Day of week
Item Type You can filter the log by Item Type.*ALL*SYSVAL*USER
Item Name Enter the name of the Item to display.Name = Enter the name of a specific item to displayGeneric* = Use a generic name to display a group of items*ALL = Display all items
2. Enter the required parameters and press Enter. The Display Replication Logscreen appears.
-
272 Audit | User Guide

Display Replication Log
Type options, press Enter. 1=Select Subset . . . . .
OptDate-time Type Item Target Sent Done Errors Wait2019-07-23-11.33.53*USER VV2 RAZLEE2 1 0 0 1
Bottom Total: 1requests. 1 0 0 1 F3=Exit F5=Refresh F17=Top F18=Bottom
Parameter Description
Date-timeDate and time of the replication requestType Type of object to replicate (*USER or *SYSVAL)Item The item that was replicatedTarget The target system of the replicated objectsStatus Sent = How many items were sent for replication
Done = How many items replication requests are doneErrors = How many replication errorsWait = How many items are waiting to be replicated
3. Type 1 to select a transaction to view the individual items. The Display Rep-lication Details screen appears.
Audit|User Guide 273

Display Replication Details 2019-07-23-11.33.53Item . . . . .*USER VV2 Request ID. 8
Use F6 to toggle additional detailed information.
From systemTo To systemResultS520 RAZLEE2 RAZLEE2 No answer
Bottom
F3=Exit F6=Display⁄Undisplay Request Information
4. You can press F6 to unfold and view the full information of the rep-lication request.
Display Replication Details 2019-07-23-11.33.53Item . . . . .*USER VV2 Request ID. 8
Use F6 to toggle additional detailed information.
From systemTo To systemResultS520 RAZLEE2 RAZLEE2 No answer Request:CRTUSRPRF USRPRF(VV2) PWDEXP(*NO) STATUS(*DISABLED) USRCLS(*PGMR) ASTLVL(*SYSVAL) CURLIB(*CRTDFT) INLPGM(*N⁄*NONE) INLMNU(*LIBL⁄MAIN) LMTCPB(*NO) TEXT('Victor weak user test CP.A') SPCAUT(*NONE) SPCENV(*SYSVAL) DSPSGNINF(*SY...
Bottom
F3=Exit F6=Display⁄Undisplay Request Information
-
274 Audit | User Guide
Configuration and Maintenance
The purpose of this Chapter is to provide information on configuration andmaintenance settings and properties.
Audit|User Guide 275
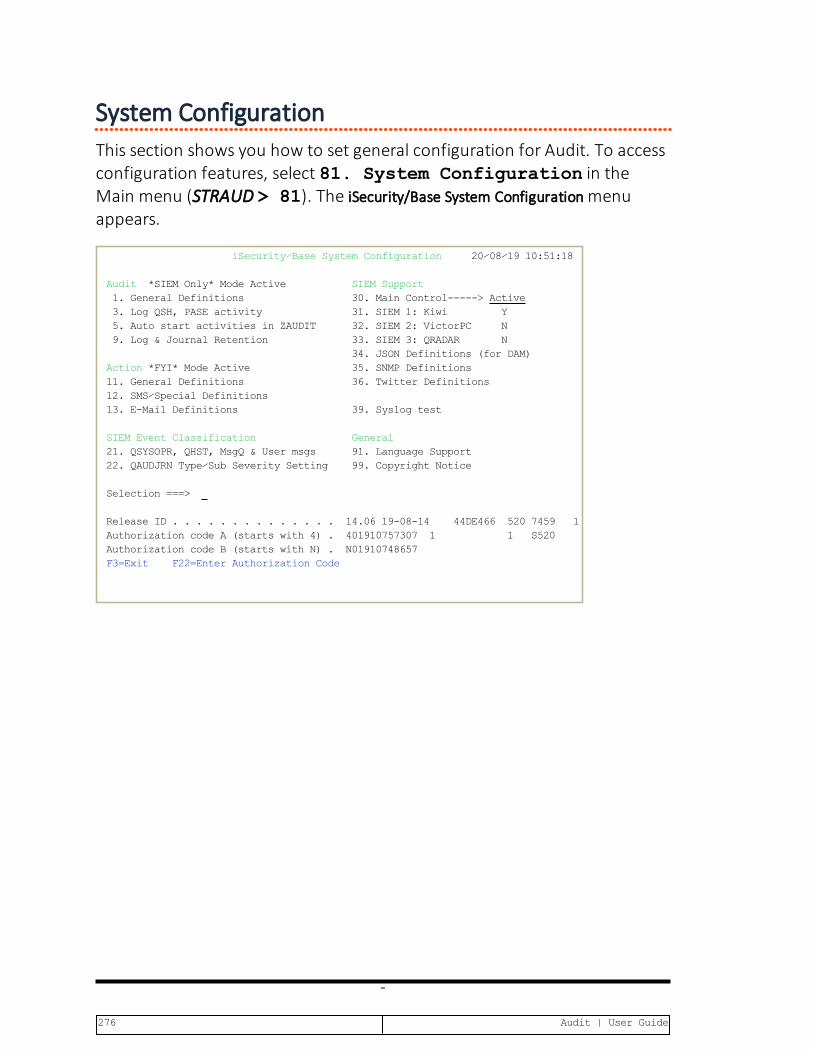
System ConfigurationThis section shows you how to set general configuration for Audit. To accessconfiguration features, select 81. System Configuration in theMain menu (STRAUD > 81). The iSecurity/Base System Configurationmenuappears.
iSecurity⁄Base System Configuration 20⁄08⁄1910:51:18
Audit *SIEM Only* Mode Active SIEM Support 1. General Definitions 30. Main Control----->Active 3. Log QSH, PASE activity 31. SIEM 1:Kiwi Y 5. Auto start activities in ZAUDIT 32. SIEM 2:VictorPC N 9. Log & Journal Retention 33. SIEM 3:QRADAR N 34. JSON Definitions (for DAM) Action*FYI* Mode Active 35. SNMP Definitions 11. General Definitions 36. Twitter Definitions 12. SMS⁄Special Definitions 13. E-Mail Definitions 39. Syslog test
SIEM Event Classification General21. QSYSOPR, QHST, MsgQ & User msgs 91. Language Support22. QAUDJRN Type⁄Sub Severity Setting 99. Copyright Notice
Selection ===>
Release ID . . . . . . . . . . . . . . 14.06 19-08-14 44DE466 5207459 1Authorization code A (starts with 4) . 401910757307 1 1 S520 Authorization code B (starts with N) . N01910748657 F3=Exit F22=Enter Authorization Code
-
276 Audit | User Guide

Audit Configuration
General Definitions1. Select 1. General Definitions in the iSecurity/Base System Con-
figurationmenu (STRAUD > 81 > 1). The Audit General Definitions screenappears.
Audit General Definitions 23⁄07⁄1911:35:52
Type options, press Enter.
Enable Audit Scheduling . . . . . . Y Y=Yes, N=No Audit can automatically replace the OS⁄400 audit setting with pre-defined settings according to the time and day of the week. Y enables this feature.
"Field changed" symbol (print). . . # This symbol is printed before each user profile attribute that has been changed.
Use *N to represent empty fields . Y Y=Yes, N=No Empty fields can be displayed as *N when the log is displayed. If you select N=No, the system will use less disk space.
Start log display . . . . . . . . . N N=New, O=Old Start query display . . . . . . . . N N=New, O=Old
F3=Exit F12=Cancel
Parameter Description
Enable AuditScheduling
Y = YesN = NoAudit can automatically replace the global audit setting withpre-defined settings according to the time and day of theweek. Enter Y to enable this feature.
“Fieldchanged”symbol(print)
Audit can compare "before" and "after" images of records.When you print the Audit log, this symbol entered will appearbefore each changed field.
Use *N torepresentempty fields
Y = YesN = NoEmpty fields can be displayed as *N when the log appears. Ifyou select N, the system will use less disk space.
Audit|User Guide 277

2. Enter the required parameters and press Enter.
-
278 Audit | User Guide

Log QSH, PASE activityTo be able to log QSH and PASE activity, the iSecurity Capture module mustbe installed and active. You must capture all screens that can enter QSH orPASE commands.
1. Select 3. Log QSH, PASE activity in the iSecurity/Base System Con-figurationmenu (STRAUD > 81 > 3). The Log QSHELL (QSH, PASE) Com-mands screen appears.
Log QSHELL (QSH, PASE) Commands 23⁄07⁄1911:38:19
Type options, press Enter.
Log QSHELL (QSH, PASE) activity . . Y Y=Yes, N=NoAudit can log QSH (STRQSH) and PASE (CALL QP2TERM) activities. Both are Unix like shell interpreters. Some limitations exist. See manual.
Minutes between collections . . . . 3 99=*NOMAXLog collection is partially based on periodic activity.
Notes: Audit type CD sub type 8 represents QSH commands. Audit type CD sub type 9 represents PASE commands. Interactive QSHELL activity is added to QAUDJRN, audit code U type RR.
Prerequisites: The module iSecurity⁄Capture must be installed and active. All screens which may enter QSH or PASE commands must be captured.
F3=Exit F12=Cancel
Parameter Description
Log QSHELL (QSH,PASE) activity
Y = YesN = NoAudit can log QSH (STRQSH) and PASE (CALL QP2TERM)activities. Both are Unix-like shell interpreters.
Minutes betweencollections
01 – 99. 99 = *NOMAXLog collection is partially based on periodic activity.
2. Enter the required parameters and press Enter.
NOTE: Audit type CD sub type 8 represents QSH commands.Audit type CD sub type 9 represents PASE commands.
Audit|User Guide 279

Interactive QSHELL activity is added to QAUDJRN, audit code U typeRR.
-
280 Audit | User Guide

Auto start activities in ZAUDITDefine the activities that will start automatically when the ZAUDIT subsystemstarts.
1. Select 5. Auto start activities inZAUDIT in the iSe-curity/Base System Configurationmenu (STRAUD > 81 > 5). The Auto StartActivities in ZAUDIT Subsystem screen appears.
Auto Start Activities in ZAUDIT Subsystem 22⁄07⁄1917:30:46
Type options, press Enter.
Real-Time Auditing (All systems) . . . Y Y=Yes, N=NoStatus & Active jobs . . . . . . . . . Y Y=Yes, N=NoFirewall & Screen (Action) . . . . . . Y Y=Yes, A=Always, N=NoSelecting A will perform Action even if Firewall is in *FYI. (1) Message Queues (2) . . . . . . . . . . Y Y=Yes, N=NoReplication of User, Pwd, SysVal . . . N Y=Yes, N=No
(1) Action must be running in real mode (not in *FYI) (2) Only message queues marked as Active definition A=Auto start, are started.
F3=Exit F12=Previous
Audit|User Guide 281

Parameter Description
Real-TimeAuditing(Allsystems)
Y = YesN = NoIf you set the Change Tracker parameters Enable ChangeTracker and Enable Real Time Tracking to Y, theneven if this parameter is set to N, activating the ZAUDITsubsystem activates the Audit job. You access the ChangeTracker parameters in the Activation Mode option in the SystemConfigurationmenu in Change Tracker (STRCT > 81 > 1).
Status &Active jobs
Y = YesN = No
Firewall &Screen(Action)
Y = YesA = AlwaysN = NoSelecting A=Always will perform Action activities even if Firewallis running in *FYI. Action must be running in real mode (not inFYI).
MessageQueues(set to startat *IPL)
Y = YesN = NoIf this parameter is set to Y, then when adding newMessageQueues, you can set them to start automatically at *IPL time.For more details, see "Create Message Queue Audit Rules" onpage 124.
Replicationof User,Pwd,SysVal
Y = YesN = No
2. Enter the required parameters and press Enter.
-
282 Audit | User Guide
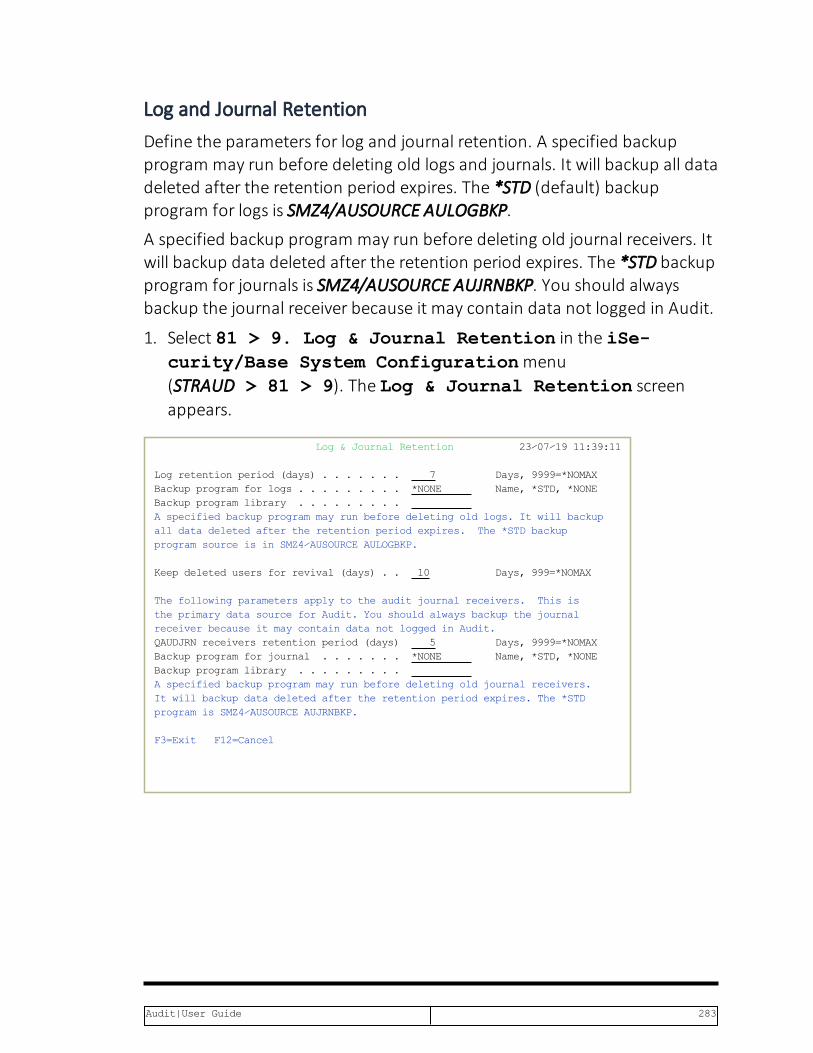
Log and Journal RetentionDefine the parameters for log and journal retention. A specified backupprogram may run before deleting old logs and journals. It will backup all datadeleted after the retention period expires. The *STD (default) backupprogram for logs is SMZ4/AUSOURCE AULOGBKP.
A specified backup program may run before deleting old journal receivers. Itwill backup data deleted after the retention period expires. The *STD backupprogram for journals is SMZ4/AUSOURCE AUJRNBKP. You should alwaysbackup the journal receiver because it may contain data not logged in Audit.
1. Select 81 > 9. Log & Journal Retention in the iSe-curity/Base System Configurationmenu(STRAUD > 81 > 9). The Log & Journal Retention screenappears.
Log & Journal Retention 23⁄07⁄1911:39:11
Log retention period (days) . . . . . . . 7 Days, 9999=*NOMAXBackup program for logs . . . . . . . . . *NONE Name, *STD, *NONEBackup program library . . . . . . . . .A specified backup program may run before deleting old logs. It will backup all data deleted after the retention period expires. The *STD backup program source is in SMZ4⁄AUSOURCE AULOGBKP.
Keep deleted users for revival (days) . . 10 Days, 999=*NOMAX
The following parameters apply to the audit journal receivers. This is the primary data source for Audit. You should always backup the journal receiver because it may contain data not logged in Audit. QAUDJRN receivers retention period (days) 5 Days, 9999=*NOMAX Backup program for journal . . . . . . . *NONE Name, *STD, *NONEBackup program library . . . . . . . . .A specified backup program may run before deleting old journal receivers. It will backup data deleted after the retention period expires. The *STD program is SMZ4⁄AUSOURCE AUJRNBKP.
F3=Exit F12=Cancel
Audit|User Guide 283

Parameter Description
LogRetentionPeriod
Transactions are retained for the specified number of days. At theend of this period, transactions are purged from the log. Enter9999 to retain all data indefinitely.
BackupProgramfor Logs
Enter the name of the backup program to use to back up logs.Type *STD to use the Auditstandard backup program or *NONEfor no backup. You must ensure the appropriate backup media isloaded before the automatic backup program runs.
Library Enter the name of the library where the Backup program isstored.
Keepusers forrevival for(days)
Enter the number of days for which deleted users are kept on thesystem. Enter 999 to keep all users indefinitely.
JournalRetentionPeriod
Transactions are retained for the specified number of days. At theend of this period, transactions are purged from the journal.Enter 9999 to retain all data indefinitely.
BackupProgramforjournal
Enter the name of the backup program to use to back upjournals. Type *STD to use the Audit standard backup programor *NONE for no backup. You must ensure the appropriatebackup media is loaded before the automatic backup programruns.
Library Enter the name of the library where the Backup program isstored.
2. Enter the required parameters and press Enter.
-
284 Audit | User Guide
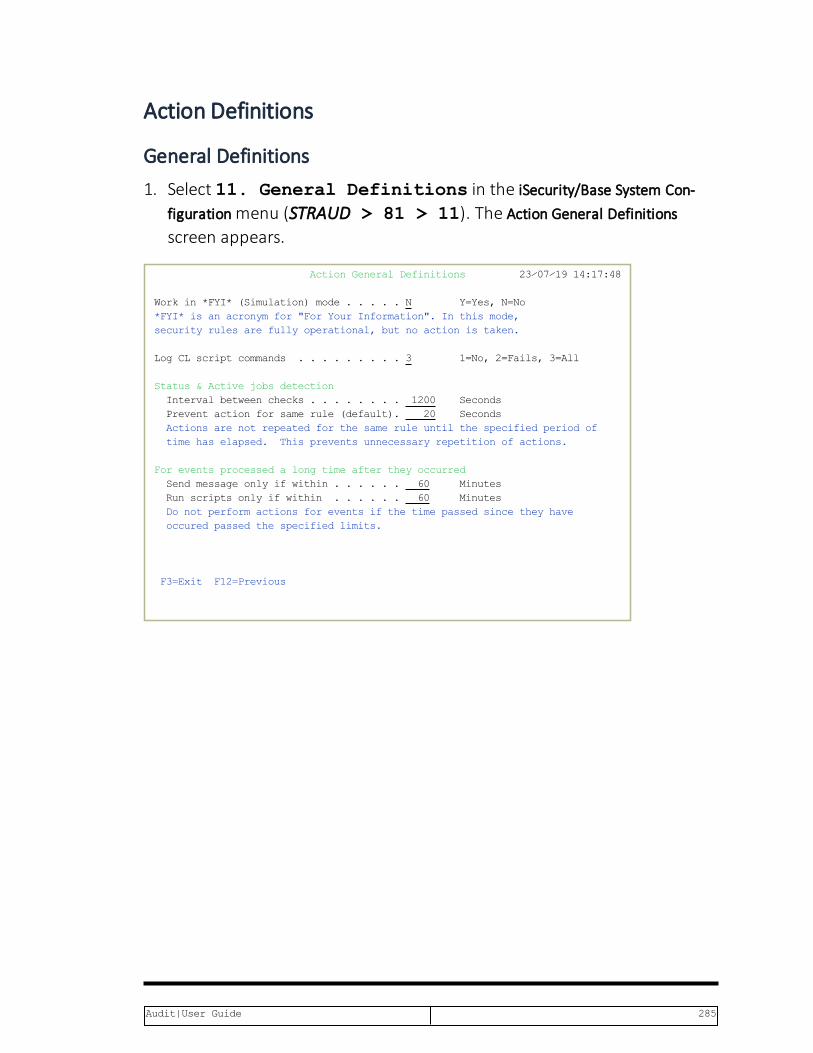
Action Definitions
General Definitions1. Select 11. General Definitions in the iSecurity/Base System Con-
figurationmenu (STRAUD > 81 > 11). The Action General Definitionsscreen appears.
Action General Definitions 23⁄07⁄1914:17:48
Work in *FYI* (Simulation) mode . . . . .N Y=Yes, N=No*FYI* is an acronym for "For Your Information". In this mode,security rules are fully operational, but no action is taken.
Log CL script commands . . . . . . . . .3 1=No, 2=Fails, 3=All
Status & Active jobs detection Interval between checks . . . . . . . . 1200 Seconds Prevent action for same rule (default). 20 Seconds Actions are not repeated for the same rule until the specified period of time has elapsed. This prevents unnecessary repetition of actions.
For events processed a long time after they occurred Send message only if within . . . . . . 60 Minutes Run scripts only if within . . . . . . 60 Minutes Do not perform actions for events if the time passed since they have occured passed the specified limits.
F3=Exit F12=Previous
Audit|User Guide 285
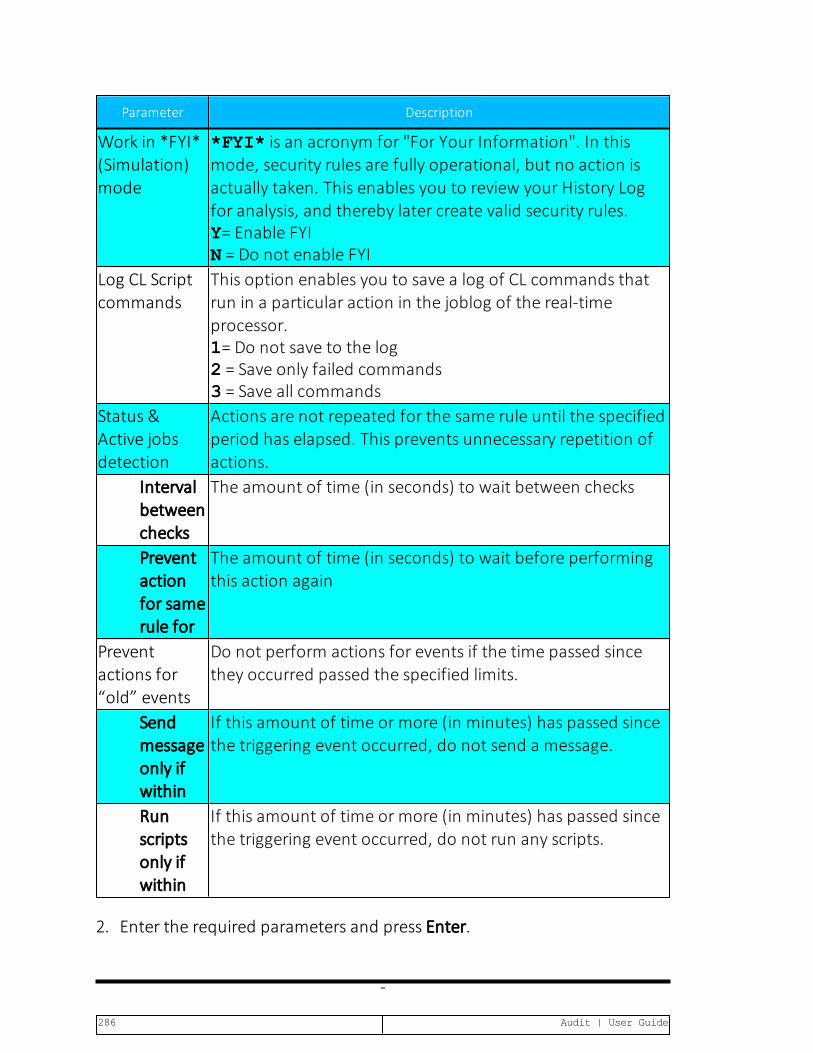
Parameter Description
Work in *FYI*(Simulation)mode
*FYI* is an acronym for "For Your Information". In thismode, security rules are fully operational, but no action isactually taken. This enables you to review your History Logfor analysis, and thereby later create valid security rules.Y= Enable FYIN = Do not enable FYI
Log CL Scriptcommands
This option enables you to save a log of CL commands thatrun in a particular action in the joblog of the real-timeprocessor.1= Do not save to the log2 = Save only failed commands3 = Save all commands
Status &Active jobsdetection
Actions are not repeated for the same rule until the specifiedperiod has elapsed. This prevents unnecessary repetition ofactions.
Intervalbetweenchecks
The amount of time (in seconds) to wait between checks
Preventactionfor samerule for
The amount of time (in seconds) to wait before performingthis action again
Preventactions for“old” events
Do not perform actions for events if the time passed sincethey occurred passed the specified limits.
Sendmessageonly ifwithin
If this amount of time or more (in minutes) has passed sincethe triggering event occurred, do not send a message.
Runscriptsonly ifwithin
If this amount of time or more (in minutes) has passed sincethe triggering event occurred, do not run any scripts.
2. Enter the required parameters and press Enter.
-
286 Audit | User Guide

SMS DefinitionsIf you have an agreement with your company’s mobile phone provider to beable to send text messages from software, the action triggered by an eventcan be a text message to the person who must be informed. You define herethe parameters for the text sender, all of which you should have receivedfrom your mobile phone provider.
Before you add/change these definitions, you should contact Raz-Leesupport staff.
1. Select 81 > 12. SMS Definitions in the iSecurity/Base System Configurationmenu. The Action SMS Definitions screen appears.
Action SMS⁄Special Definitions 23⁄07⁄1911:40:31
When SMS or Special (usually used for Beeper) options are selected, Action calls a standard program. See below another option. In the USA and some other countries, it is possible to use a free SMS or Beeper service. It is done by sending the message via email. The email addresis made of the phone number and a cellular provider specific extension. [email protected] will send SMS to a Verizon number.
To use, enter the full email address, instead of the phone number. Action will send an email to the Destination with the Message text.
You may override this method. To do so, create a program AUALR6R for SMS, or AUALR7R for Special in library SMZ4DTA. When called, these programs receives the parameters: - Destination (A 64) - Message (A 1000)
Example programs are in SMZ4⁄AUSOURCE AUALR6R and AUALR7R.
F3=Exit F12=Cancel
Parameter Description
Sender The telephone number from which the text messages will besent.
User Your User name with your mobile phone provider.Password Your password with your mobile phone provider.SupplierId
An ID that identifies your mobile phone provider.
Audit|User Guide 287

2. Enter the required parameters and press Enter.
-
288 Audit | User Guide

Email DefinitionsIf you have an agreement with your company’s mobile phone provider to beable to send text messages from software, the action triggered by an eventcan be a text message to the person who must be informed.
1. Select 13. E-Mail Definitions from the iSecurity/Base System Con-figurationmenu (STRAUD > 81 > 13). The E-mail Definitionsscreen appears.
E-mail Definitions 23⁄07⁄1911:41:22 Type options, press Enter. E-mail Method . . . . . . . 3 1=Advanced, 2=Native, 3=Secured, 9=None Advanced or Secured mode is recommended for simplicity and performance. Advanced⁄Secured E-mail Support Mail (SMTP) server name . . smtp.land.com
Mail server, *LOCALHOST Port . . . . . . . . . . . 25 SSL Secured N Y=Yes, N=NoUse the Mail Server as defined for outgoing mail in MS Outlook. Reply to mail address . . . [email protected] If Secured, E-mail user . . [email protected] Password . ************************ Native E-mail E-mail User ID and Address. User Profile. Users must be defined as E-mail users prior to using this screen. The required parameters may be found by using the WRKDIRE command. This option does not support attached files. F3=Exit F10=Verify E-mail configuration F12=Cancel
Audit|User Guide 289

Parameter Description
E-mail Method 1=Advanced2=Native3=Secured9=NoneAdvanced or Secured mode is recommended forsimplicity and performance.Note: If using 2=native, Users must be defined as E-mailusers prior to using this screen. The required parametersmay be found by using theWRKDIRE command. Thisoption does not support attached files.
Advanced/SecuredE-mail Support:Mail (SMTP) servername
The name of the STMP server or *LOCALHOST
Reply to mailaddress
The e-mail address to receive tests.
If secured, E-mailuser and Password
If you chose 1 = Advanced or 3=Secured for the E-mailmethod, enter the email user that will be used to sendthe emails and the password of that user
Native E-mail:E-mail User ID andAddress
If you chose 2=Native for the E-mail method, enter theuser ID and address that will be used to send the emails.
User Profile If you chose 2=Native for the E-mail method, enter theuser profile that will be used to send the emails.
2. Enter the required parameters and press Enter.
-
290 Audit | User Guide
Security Event Manager
QSYSOPR and other message queuesYou can monitor QSYSOPR and other message queues:
1. Select the Message Queue (SysCtl).
2. Select the Message Queues to control.
3. Add all the Message Queues, joining each of them to group @1, withinput every 10 seconds.
4. Select Message Queue rules.
5. Add a rule for group @1 specifying the preferred method of sending theinformation. You might wish to specify filters.
6. Select Activate at IPL (or add SMZ4/ACTAUMSGQ to the startup pro-gram).
You can also choose other methods of monitoring message queues:
l Create and monitor message queue QSYSMSG. See IBM doc-umentation for more information.
l Create a group with message IDs you wish to monitor, and specify inthe filter the test ITEM to compare against the items in the group.
To monitor message queues, you must install Action. To use Syslog, SNMP,and so on, you must install Central Admin.
Audit|User Guide 291
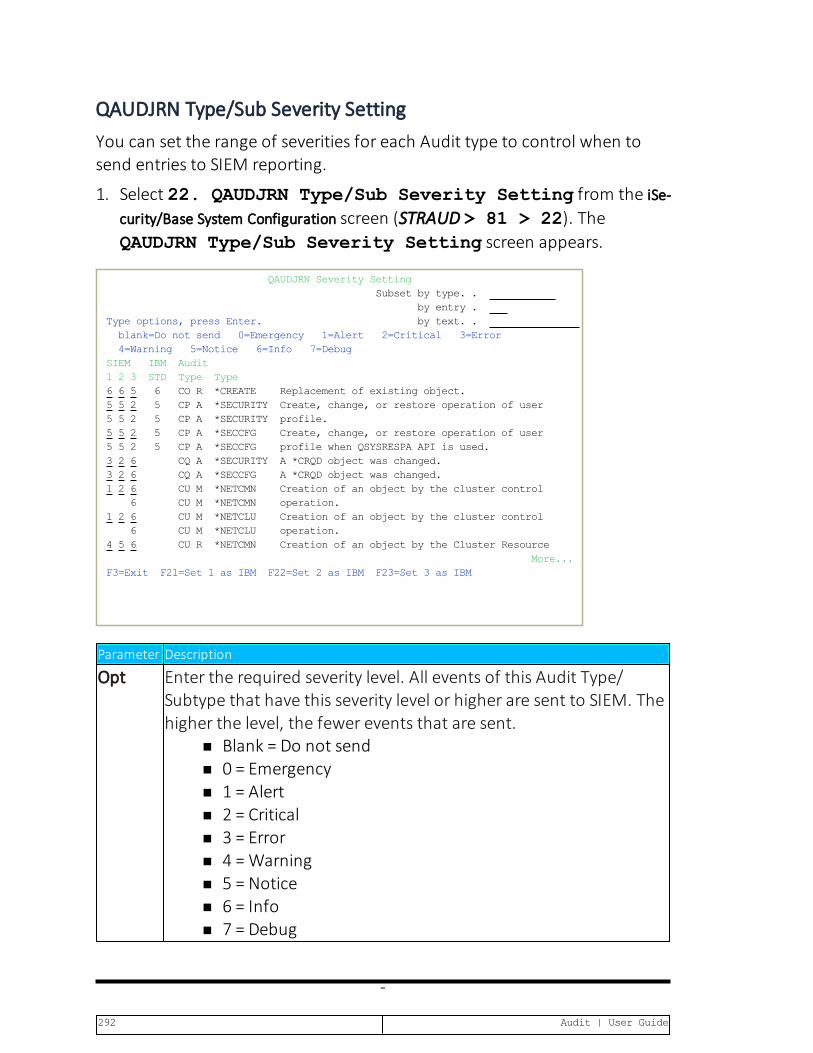
QAUDJRN Type/Sub Severity SettingYou can set the range of severities for each Audit type to control when tosend entries to SIEM reporting.
1. Select 22. QAUDJRN Type/Sub Severity Setting from the iSe-curity/Base System Configuration screen (STRAUD > 81 > 22). TheQAUDJRN Type/Sub Severity Setting screen appears.
QAUDJRN Severity Setting Subset by type.. by entry .Type options, press Enter. by text. . blank=Do not send 0=Emergency 1=Alert 2=Critical 3=Error 4=Warning 5=Notice 6=Info 7=DebugSIEM IBM Audit123 STD Type Type6 6 5 6 COR *CREATE Replacement of existing object. 5 5 2 5 CPA *SECURITY Create, change, or restore operation of user 552 5 CPA *SECURITY profile. 5 5 2 5 CPA *SECCFG Create, change, or restore operation of user 552 5 CPA *SECCFG profile when QSYSRESPA API is used. 3 2 6 CQA *SECURITY A *CRQD object was changed. 3 2 6 CQA *SECCFG A *CRQD object was changed. 1 2 6 CUM *NETCMN Creation of an object by the cluster control 6 CUM *NETCMN operation. 1 2 6 CUM *NETCLU Creation of an object by the cluster control 6 CUM *NETCLU operation. 4 5 6 CUR *NETCMN Creation of an object by the Cluster Resource More...F3=Exit F21=Set 1 as IBM F22=Set 2 as IBM F23=Set 3 as IBM
Parameter Description
Opt Enter the required severity level. All events of this Audit Type/Subtype that have this severity level or higher are sent to SIEM. Thehigher the level, the fewer events that are sent.
n Blank = Do not sendn 0 = Emergencyn 1 = Alertn 2 = Criticaln 3 = Errorn 4 =Warningn 5 = Noticen 6 = Infon 7 = Debug
-
292 Audit | User Guide
2. Enter the required parameters and press Enter.
Audit|User Guide 293

SIEM SupportNumerous iSecurity products integrate with SEM/SIEM systems by sendingsecurity alerts instantaneously to these systems. Message alerts containdetailed event information about application data changes, deletes or readsof objects and files, emergency changes in user authorities, IFS virusesdetected, malicious network access to the Series i, and more.
-
294 Audit | User Guide

Syslog ParametersThe syslog standards, LEEF and CEF send data in Field mode enabling pairsof data to be displayed, i.e. Field name and Field value. QHST, QSYSOPR andothers in the message queue are supported in LEED and CEF field mode.UDP, TCP and TLS (encrypted) protocols are supported and once the settingsare turned on, the SIEM can intercept the message and make it legible forthe Syslog Admin. Standard message support for edited messages andreplacement values exist, enabling sending information in any free format aswell as LEEF and CEF.
To send syslog messages for SIEM:
1. Select 30. Main Control from the iSecurity/Base System Configurationscreen (STRAUD > 81 > 30). The Main Control for SIEM &DAM screen appears.
Main Control for SIEM & DAM 23⁄07⁄1911:48:50
Run rules before sending . . . N Y=Yes, N=No
Send SYSLOG Messages to SIEMSIEM 1:kiwi . . . . . . N Y=Yes, N=No, A=Action onlySIEM 2:VictorPC . . . . . . Y Y=Yes, N=No, A=Action onlySIEM 3:QRADAR . . . . . . N Y=Yes, N=No, A=Action onlyUse Action-Only to send syslog messages from Action, without QAUDJRN info. To increase performance, add SIEM Processors by ADDAJE JOB(AU..n) n=SIEM ID.Send JSON messages (for DAM). . N Y=Yes, N=No
As only operation . . . . . . . N Y=Yes, N=No If Y, information isnot collected, and no other functionality is performed.
Skip info if SIEM is inactive . Y Y=Yes, N=NoY is recommended, unless it is the only operation.
Note: Re-activate subsystem after changes.F3=Exit F12=Cancel
Audit|User Guide 295

Parameter Description
Run rules beforesending
Y = YesN = No
Send SYSLOGmessages to SIEM
Y = YesN = NoA = Action only; Use Action-Only to send syslogmessages from Action, without QAUDJRN info.
Send JSONmessages (forDAM)
Y = Yes; Y is recommended, unless it is the onlyoperation.N = No
As only operation Y = Yes; If Y, information is not collected, and no otherfunctionality is performed.N = No
Skip info if SIEM isinactive
Y = Yes; Y is recommended, unless it is the onlyoperation.N = No
2. Enter the required parameters and press Enter.
-
296 Audit | User Guide
Triple Syslog Definitions (#1-#3)Events from IBM i and different Audit entry types are sent to a remoteSYSLOG server according to a range of severities such as Emergency, Alert,Critical, Error, and Warning. When Send SYSLOG messages (forSIEM) is set to Yes in theMain Control for SIEM & DAM definitions, theproduct will automatically send all events according to the Severity range toauto send for the message structure selected, as described in the tablebelow.
The option to use more than one SIEM is implemented on a separate job perSIEM. This is enabled by an intermediate buffer which assists SIEM inovercoming communication problems or SIEM downtime, while sending amessage to QSYSOPR when the buffer is full or processes are delayed. Forthis purpose Triple Syslog definitions are required, which are described inthis section.
To configure SIEM message structure:
1. Select the SIEM system from the iSecurity/Base System Configurationmenu(STRAUD> 81).
l For SIEM 1, Select 31. SIEM 1 (STRAUD> 81 > 31).
l For SIEM 2, Select 32. SIEM 2 (STRAUD> 81 > 32).
l For SIEM 3, Select 33. SIEM 3 (STRAUD> 81 > 33).
2. The selected SIEM Definitions screen appears.
Audit|User Guide 297
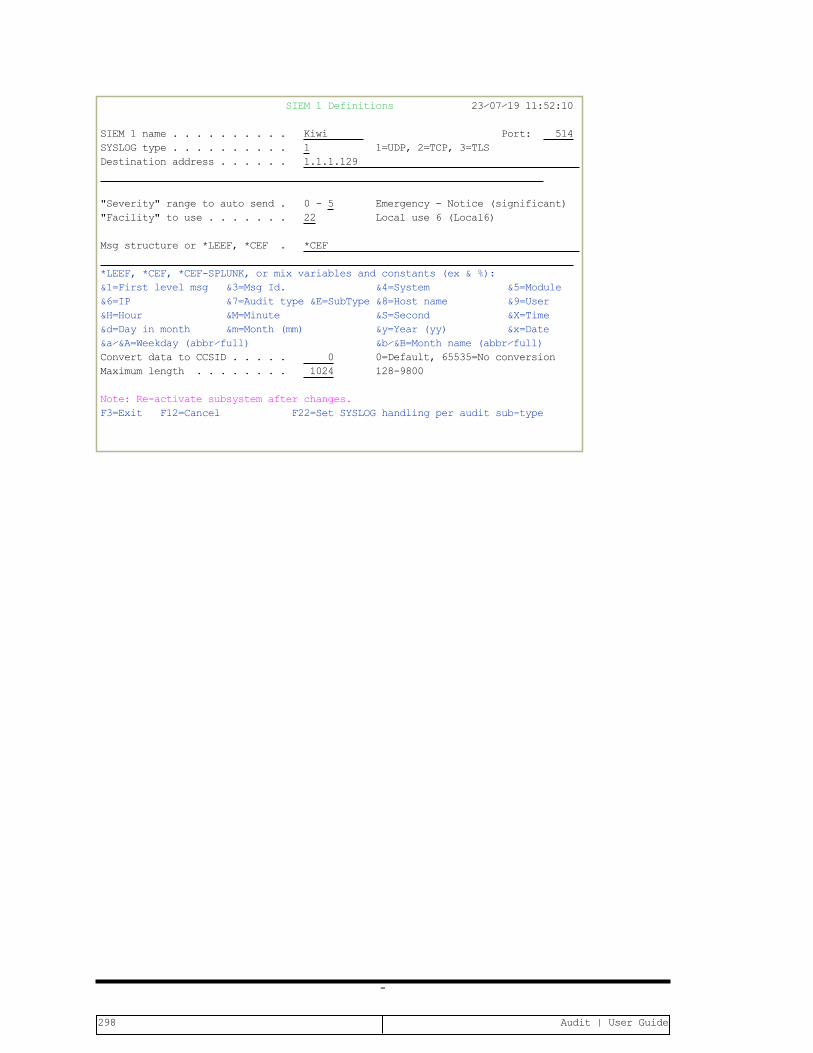
SIEM 1 Definitions 23⁄07⁄1911:52:10 SIEM 1 name . . . . . . . . . . Kiwi Port: 514SYSLOG type . . . . . . . . . . 1 1=UDP, 2=TCP, 3=TLS Destination address . . . . . . 1.1.1.129
"Severity" range to auto send . 0 - 5 Emergency - Notice (significant)"Facility" to use . . . . . . . 22 Local use 6 (Local6) Msg structure or *LEEF, *CEF . *CEF
*LEEF, *CEF, *CEF-SPLUNK, or mix variables and constants (ex & %): &1=First level msg &3=Msg Id. &4=System &5=Module &6=IP &7=Audit type &E=SubType &8=Host name &9=User &H=Hour &M=Minute &S=Second &X=Time &d=Day in month &m=Month (mm) &y=Year (yy) &x=Date &a⁄&A=Weekday (abbr⁄full) &b⁄&B=Month name (abbr⁄full) Convert data to CCSID . . . . . 0 0=Default, 65535=No conversion Maximum length . . . . . . . . 1024 128-9800 Note: Re-activate subsystem after changes. F3=Exit F12=Cancel F22=Set SYSLOG handling per audit sub-type
-
298 Audit | User Guide

Parameter Description
SIEM # name The name of the SyslogPort The port the Syslog is listening to according to the SYSLOG
typeSYSLOG type 1=UDP
2=TCP3=TLS (SYSLOG over TLS uses port number 6514)
Destinationaddress
Enter the destination IP address (without quotes)
Severity rangeto auto send
Enter the severity range at which the SYSLOG message will besent:0-7 Emergency – DEBUGWhere:0. EMERGENCY - EMERGENCY
1. EMERGENCY - ALERT
2. EMERGENCY - CRITICAL
3. EMERGENCY - ERROR
4. EMERGENCY - WARNING
5. EMERGENCY - NOTICE (SIGNIFICANT)
6. EMERGENCY - INFORMATIONAL
7. EMERGENCY - DEBUGFacility to use Enter the facility from which the SYSLOG message will be sent
Where:1. USER-LEVEL MESSAGES
2. MAIL SYSTEM
3. SYSTEM DAEMONS
4. SECURITY/AUTHORIZATION MESSAGES
5. SYSLOGD INTERNAL
6. LINE PRINTER SUBSYSTEM
7. NETWORK NEWS SUBSYSTEM
Audit|User Guide 299

Parameter Description
8. UUCP SUBSYSTEM
9. CLOCK DAEMON
10. SECURITY/AUTHORIZATION MESSAGES
11. FTP DAEMON
12. NTP SUBSYSTEM
13. LOG AUDIT
14. LOG ALERT
15. CLOCK DAEMON
16. LOCAL USE 0 (LOCAL0)
17. LOCAL USE 1 (LOCAL1)
18. LOCAL USE 2 (LOCAL2)
19. LOCAL USE 3 (LOCAL3)
20. LOCAL USE 4 (LOCAL4)
21. LOCAL USE 5 (LOCAL5)
22. LOCAL USE 6 (LOCAL6)
23. LOCAL USE 7 (LOCAL7)MessageStructure
Two built-in message structures are available which senddata in Field Mode by pairs of Field name and Field value:*LEEF = Log Event Extended Format*CEF = Common Event Format-Or-Use mixed variables and constants (ex & %).A full description of the available variables is in the tablebelow.(For more information on LEEF/CEF, see "Original InputFormats" on page 92).
Convert datato CCSID
0 = Default65535 = No conversion
Maximumlength
128 - 9800
-
300 Audit | User Guide

Variable Description
&a Abbreviated name of the day of the week (Sun, Mon, and so on).&A Full name of the day of the week (Sunday, Monday, and so on).&b Abbreviated month name (Jan, Feb, and so on).&B Full month name (January, February, and so on).&c Date/Time in the format of the locale.&C Century number [00-99], the year divided by 100 and truncated to an
integer.&d Day of the month [01-31].&D Date Format, same as &m/&d/&y.&e Same as &d, except single digit is preceded by a space [1-31].&g 2 digit year portion of ISO week date [00,99].&G 4 digit year portion of ISO week date. Can be negative.&h Same as &b.&H Hour in 24-hour format [00-23].&I Hour in 12-hour format [01-12].&j Day of the year [001-366].&L Three digit milliseconds part of event time&m Month [01-12].&M Minute [00-59].&n Newline character.&O UTC offset. Output is a string with format +HH:MM or –HH:MM,
where + indicates east of GMT, - indicates west of GMT, HH indicatesthe number of hours from GMT, and MM indicates the number ofminutes from GMT.
&p AM or PM string.&r Time in AM/PM format of the locale. If not available in the locale
time format, defaults to the POSIX time AM/PM format: &I:&M:&S&p.
&R 24-hour time format without seconds, same as &H:&M.&S Second [00-61]. The range for seconds allows for a leap second and a
double leap second.&t Tab character.
Audit|User Guide 301
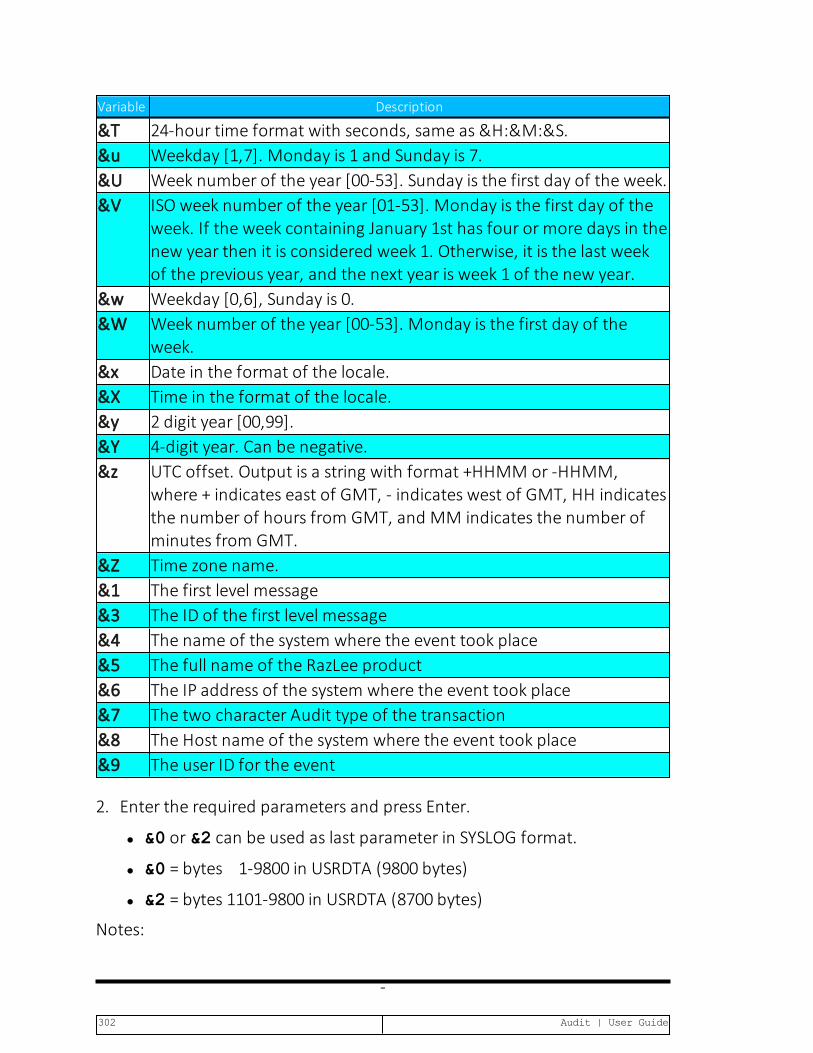
Variable Description
&T 24-hour time format with seconds, same as &H:&M:&S.&u Weekday [1,7]. Monday is 1 and Sunday is 7.&U Week number of the year [00-53]. Sunday is the first day of the week.&V ISO week number of the year [01-53]. Monday is the first day of the
week. If the week containing January 1st has four or more days in thenew year then it is considered week 1. Otherwise, it is the last weekof the previous year, and the next year is week 1 of the new year.
&w Weekday [0,6], Sunday is 0.&W Week number of the year [00-53]. Monday is the first day of the
week.&x Date in the format of the locale.&X Time in the format of the locale.&y 2 digit year [00,99].&Y 4-digit year. Can be negative.&z UTC offset. Output is a string with format +HHMM or -HHMM,
where + indicates east of GMT, - indicates west of GMT, HH indicatesthe number of hours from GMT, and MM indicates the number ofminutes from GMT.
&Z Time zone name.&1 The first level message&3 The ID of the first level message&4 The name of the system where the event took place&5 The full name of the RazLee product&6 The IP address of the system where the event took place&7 The two character Audit type of the transaction&8 The Host name of the system where the event took place&9 The user ID for the event
2. Enter the required parameters and press Enter.
l &0 or &2 can be used as last parameter in SYSLOG format.
l &0 = bytes 1-9800 in USRDTA (9800 bytes)
l &2 = bytes 1101-9800 in USRDTA (8700 bytes)
Notes:
-
302 Audit | User Guide

l These fields are not converted to ASCII.
l SYSLOG manager must set maximum message length from default(1024) to expected size (10000).
l SYSLOG manager must take care of non-printable characters option.
Audit|User Guide 303

Syslog Simulation SoftwareTo see how the Syslog definitions work without actually setting up thesoftware on an IP address and to receive the Syslog messages:
1. Download Kiwi Syslog Server from http://www.kiwisyslog.com
2. Enter the PC IP address in the field on the Syslog definition screen. Thecommand entry of Get Authority on Demand (GETAOD) writes a Syslogmessage and can be seen immediately in the Kiwi Syslog Server.
Figure 4: Kiwi Syslog Server
-
304 Audit | User Guide
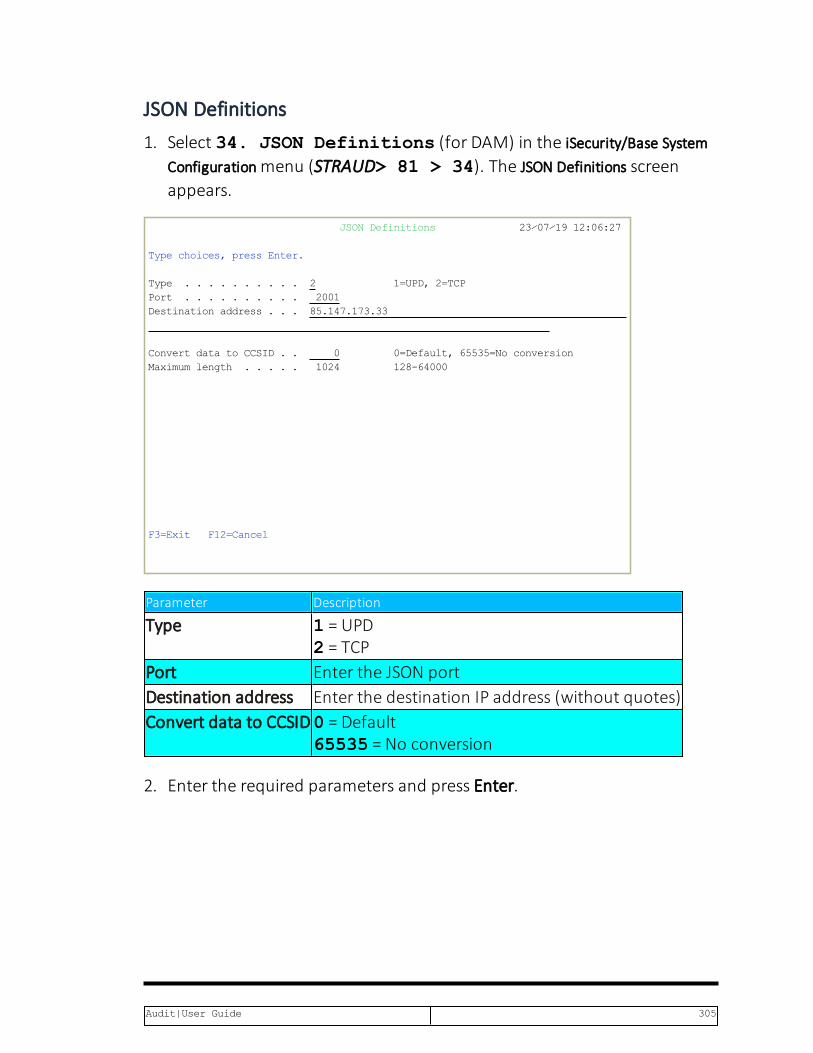
JSON Definitions1. Select 34. JSON Definitions (for DAM) in the iSecurity/Base System
Configurationmenu (STRAUD> 81 > 34). The JSON Definitions screenappears.
JSON Definitions 23⁄07⁄1912:06:27 Type choices, press Enter. Type . . . . . . . . . . 2 1=UPD, 2=TCP Port . . . . . . . . . . 2001 Destination address . . . 85.147.173.33
Convert data to CCSID . . 0 0=Default, 65535=No conversion Maximum length . . . . . 1024 128-64000
F3=Exit F12=Cancel
Parameter Description
Type 1 = UPD2 = TCP
Port Enter the JSON portDestination address Enter the destination IP address (without quotes)Convert data to CCSID0 = Default
65535 = No conversion
2. Enter the required parameters and press Enter.
Audit|User Guide 305
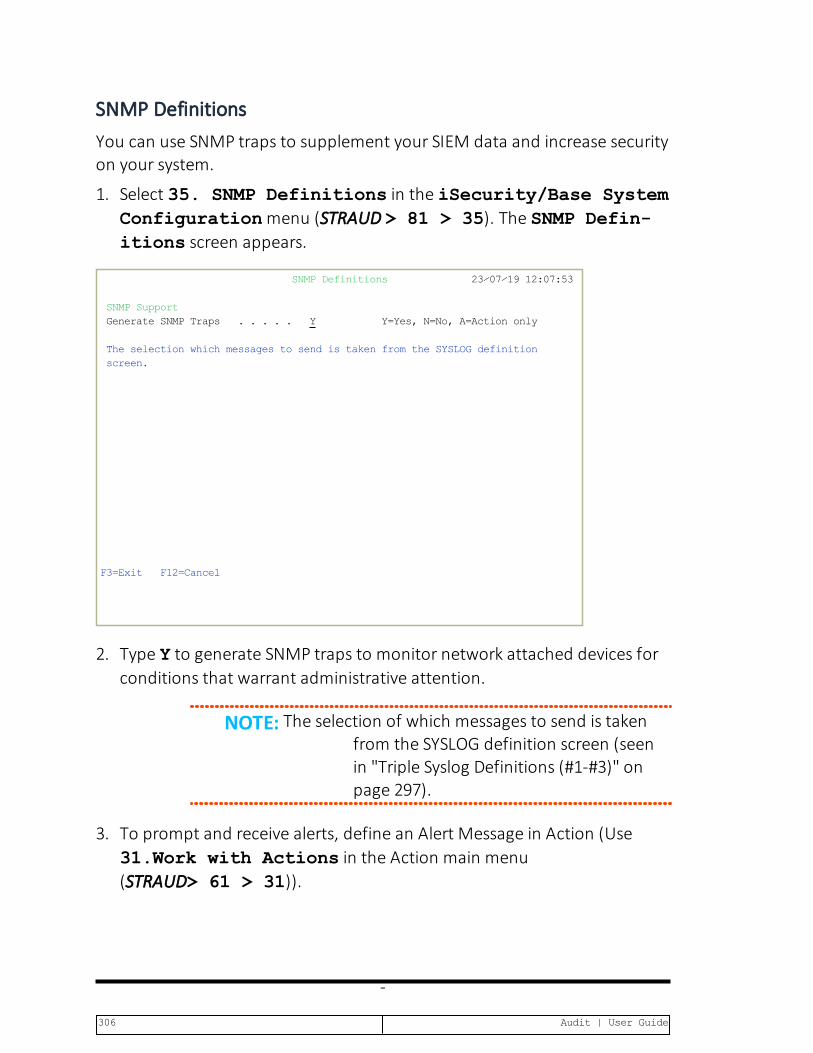
SNMP DefinitionsYou can use SNMP traps to supplement your SIEM data and increase securityon your system.
1. Select 35. SNMP Definitions in the iSecurity/Base SystemConfigurationmenu (STRAUD > 81 > 35). The SNMP Defin-itions screen appears.
SNMP Definitions 23⁄07⁄1912:07:53
SNMP SupportGenerate SNMP Traps . . . . . Y Y=Yes, N=No, A=Action only
The selection which messages to send is taken from the SYSLOG definition screen.
F3=Exit F12=Cancel
2. Type Y to generate SNMP traps to monitor network attached devices forconditions that warrant administrative attention.
NOTE: The selection of which messages to send is takenfrom the SYSLOG definition screen (seenin "Triple Syslog Definitions (#1-#3)" onpage 297).
3. To prompt and receive alerts, define an Alert Message in Action (Use31.Work with Actions in the Action main menu(STRAUD> 61 > 31)).
-
306 Audit | User Guide

Maintenance MenuThe Maintenance Menu enables you to set and display global definitions forSecurity Part 2.To access the Maintenance Menu, select 82.Maintenance Menu in the Audit main menu (STRAUD > 82).
AUMINTM Maintenance Menu iSecurity⁄Base System: S520 iSecurity⁄Base Global Trace Definition Modifications 1. Export Definitions 71. Add Journal 2. Import Definitions 72. Remove Journal 5. Display Definitions 79. Display Journal
Audit 21. Start a New QAUDJRN Receiver 22. Change QAUDJRN Receiver Library23. Work with QAUDJRN Attributes 24. Use Local Field Description 25. Use English Field Description Other 29. Delete Statistic Data 98. Uninstall iSecurity⁄Base
Selection or command ===>
F3=Exit F4=Prompt F9=Retrieve F12=Cancel F13=Information Assistant F16=AS⁄400 main menu
Audit|User Guide 307

Transfer Log Copy
Export Product LogYou can export a product log to another library. You can filter by date theportion of the log to send.
1. Select 33. Export Log in theMaintenancemenu(STRAUD > 82 > 33). The Export iSecurity/BASE Log (EXPS2LOG) screenappears.
Export iSecurity⁄BASE Log (EXPS2LOG) Type choices, press Enter.
To library . . . . . . . . . . . Name Starting date . . . . . . . . . *YESTERDAY Date, *CURRENT, *YESTERDAY... Ending date . . . . . . . . . . *YESTERDAY Date, *CURRENT, *YESTERDAY...
BottomF3=Exit F4=Prompt F5=Refresh F12=Cancel F13=How to use this display F24=More keys
-
308 Audit | User Guide

Parameter Description
To library Type the name of the library to receive the log.Startingdate
Type the starting date of the range to extract from, or choose oneof the following:*CURRENT*YESTERDAY*WEEKSTR*PRVWEEKS*MONTHSTR*PRVMONTHS*YEARSTR*PRVYEARS*MON*TUE*WED*THU*FRI*SAT*SUN
Endingdate
Type the ending date of the range to extract from, or choose oneof the following:*CURRENT*YESTERDAY*WEEKSTR*PRVWEEKS*MONTHSTR*PRVMONTHS*YEARSTR*PRVYEARS*MON*TUE*WED*THU*FRI*SAT*SUN
2. Select the correct options and press Enter.
Audit|User Guide 309

Import Product LogYou can import a product log from another library. You can filter by date theportion of the log to receive.
1. Select 34. Import Product Log, Collect from Rmt in theMaintenancemenu (STRAUD > 82 > 34). The Import iSecurity/BASE Log(IMMPS2LOG) screen appears.
Import iSecurity⁄BASE Log (IMPS2LOG) Type choices, press Enter.
From input type . . . . . . . .>*NET *LIB, *SAVF, *NET System to import from . . . . . Name, *group, *ALL To data library extension . . . *SYSTEM for *NET & *group use *SYSTEM Starting date . . . . . . . . . *YESTERDAY Date, *CURRENT, *YESTERDAY... Ending date . . . . . . . . . . *YESTERDAY Date, *CURRENT, *YESTERDAY...
BottomF3=Exit F4=Prompt F5=Refresh F12=Cancel F13=How to use this display F24=More keys
-
310 Audit | User Guide
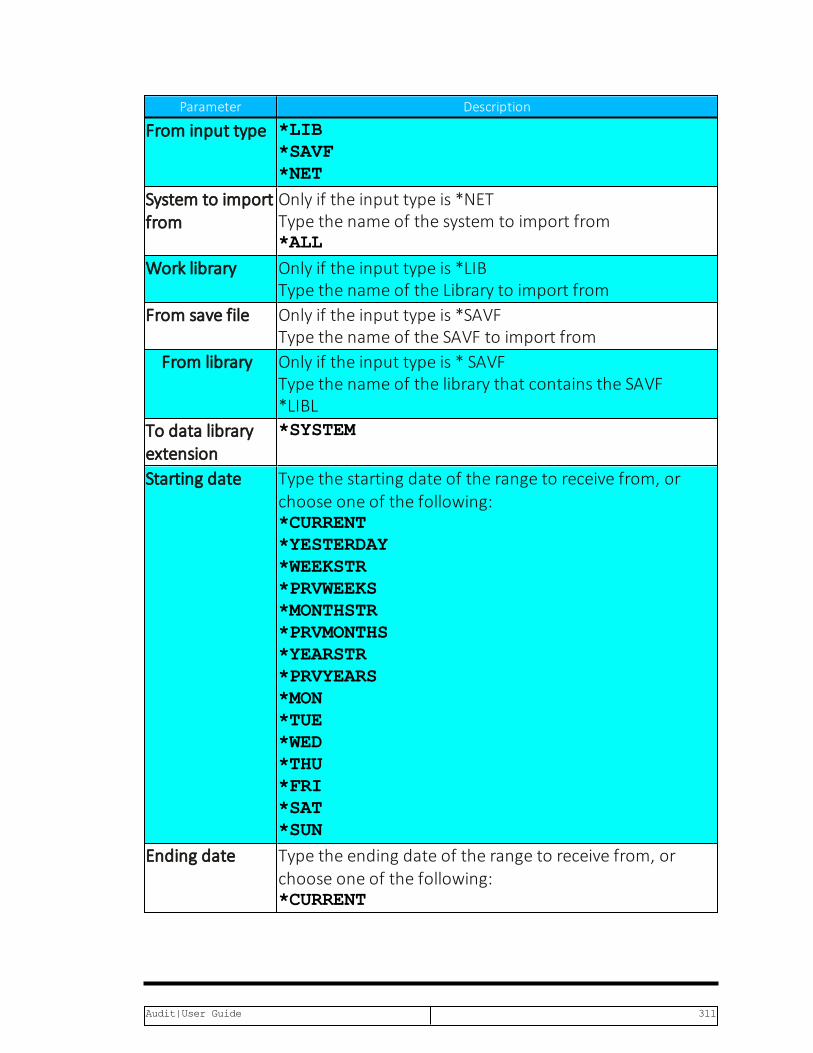
Parameter Description
From input type *LIB*SAVF*NET
System to importfrom
Only if the input type is *NETType the name of the system to import from*ALL
Work library Only if the input type is *LIBType the name of the Library to import from
From save file Only if the input type is *SAVFType the name of the SAVF to import from
From library Only if the input type is * SAVFType the name of the library that contains the SAVF*LIBL
To data libraryextension
*SYSTEM
Starting date Type the starting date of the range to receive from, orchoose one of the following:*CURRENT*YESTERDAY*WEEKSTR*PRVWEEKS*MONTHSTR*PRVMONTHS*YEARSTR*PRVYEARS*MON*TUE*WED*THU*FRI*SAT*SUN
Ending date Type the ending date of the range to receive from, orchoose one of the following:*CURRENT
Audit|User Guide 311

Parameter Description
*YESTERDAY*WEEKSTR*PRVWEEKS*MONTHSTR*PRVMONTHS*YEARSTR*PRVYEARS*MON*TUE*WED*THU*FRI*SAT*SUN
2. Select the correct options and press Enter.
-
312 Audit | User Guide

Export / Import DefinitionsThis option is useful in transferring configuration settings/definitions fromone computer to another, or between LPARs.
Among the settings and definitions that Auditcan export and import are thefollowing:
l IP addresses
l System names (SNA)
l Users
l Groups
l Application
l Location
l Native and IFS
l Logon controls for FTP-TELNET-Passthrough
l Prechecks DDM-DRDA
l Time groups
Audit|User Guide 313

Export DefinitionsCreate an SAVF file containing the definitions and setting you want toexport.
1. Select 1. Export Definitions in theMaintenanceMenu(STRAUD> 82 > 1). The Export iSecurity/BASE Defns. screen appears.
Export iSecurity⁄BASE Defns. (EXPS2DFN) Type choices, press Enter.
Collection type . . . . . . . . *NEW, *ADD, *OLD Work library and SAVF in QGPL . *AUTO Name, *AUTO (S2 + System) Operation type . . . . . . . . . *REPLACE *REPLACE, *BYMODULE, *SAME System Configuration (opt. 81) *NO *REPLACE, *CLEAR, *NO Job Schedule Entries . . . . . . *NO *ALL, *RPT, *NO
BottomF3=Exit F4=Prompt F5=Refresh F12=Cancel F13=How to use this display F24=More keys
-
314 Audit | User Guide

Description
Collectiontype
*ADD – Add subjects to an existing library*NEW – Clear and restart*OLD – Use this option only with the guidance of support;this option is kept for computability purposes only.
Work libraryand SAVF inQGPL
Destination of export library.Name= name of target library*AUTO (S2 + System) default security setting
Operationtype
Definitions pertaining to these two applications*REPLACE = replace a previously imported/exported rule*BYMODULE= import/export rules by module*SAME = no change
SystemConfiguration(opt. 81)
Systems to update=When exporting Firewall definitions, theuser can choose to export and import immediately bypreparing the definitions in a SAVF and send it to a remotesystem or several remote systems, and automatically importthem into it.Update type*REPLACE = replace the definition file and copy the new*CLEAR = replace the definition file and copy the new*NO = no update to files can be exported as is
2. Enter the required parameters and press Enter.
Audit|User Guide 315

Export iSecurity⁄BASE Defns. (EXPS2DFN) Type choices, press Enter.
Collection type . . . . . . . . *NEW, *ADD, *OLD Work library and SAVF in QGPL . *AUTO Name, *AUTO (S2 + System) Operation type . . . . . . . . . *REPLACE *REPLACE, *BYMODULE, *SAME System Configuration (opt. 81) *NO *REPLACE, *CLEAR, *NO Job Schedule Entries . . . . . . *NO *ALL, *RPT, *NO Update remote systems: Systems to update . . . . . . *NONE Name, *group, *ALL, *NONE Update type . . . . . . . . . *UPD *UPD, *REPLACE
BottomF3=Exit F4=Prompt F5=Refresh F12=Cancel F13=How to use this display F24=More keys
Description
Update remote systems
Systems to update Name = Name of the system*group = Name of the group*ALL = All systems*NONE = No systems
Update type *UPD = Update using UPD*REPLACE = Replace current
-
316 Audit | User Guide

Import DefinitionsYou can import the SAVF file containing the exported definitions andsettings to another computer or LPAR.
To import the SAVF definitions file:
1. Select 2. Import Definitions in theMaintenancemenu(STRAUD> 82 > 2). The Import iSecurity/BASE Defns. screen appears.
Import iSecurity/BASE Defns. (IMPS2DFN) Type choices, press Enter.
Input type . . . . . . . . . . . *SAVF *LIB, *SAVF
BottomF3=Exit F4=Prompt F5=Refresh F12=Cancel F13=How to use this display F24=More keys
Description
Input type*LIB = Input from a library*SAVF= Input from a saved file
2. Enter the required parameters and press Enter.
Audit|User Guide 317
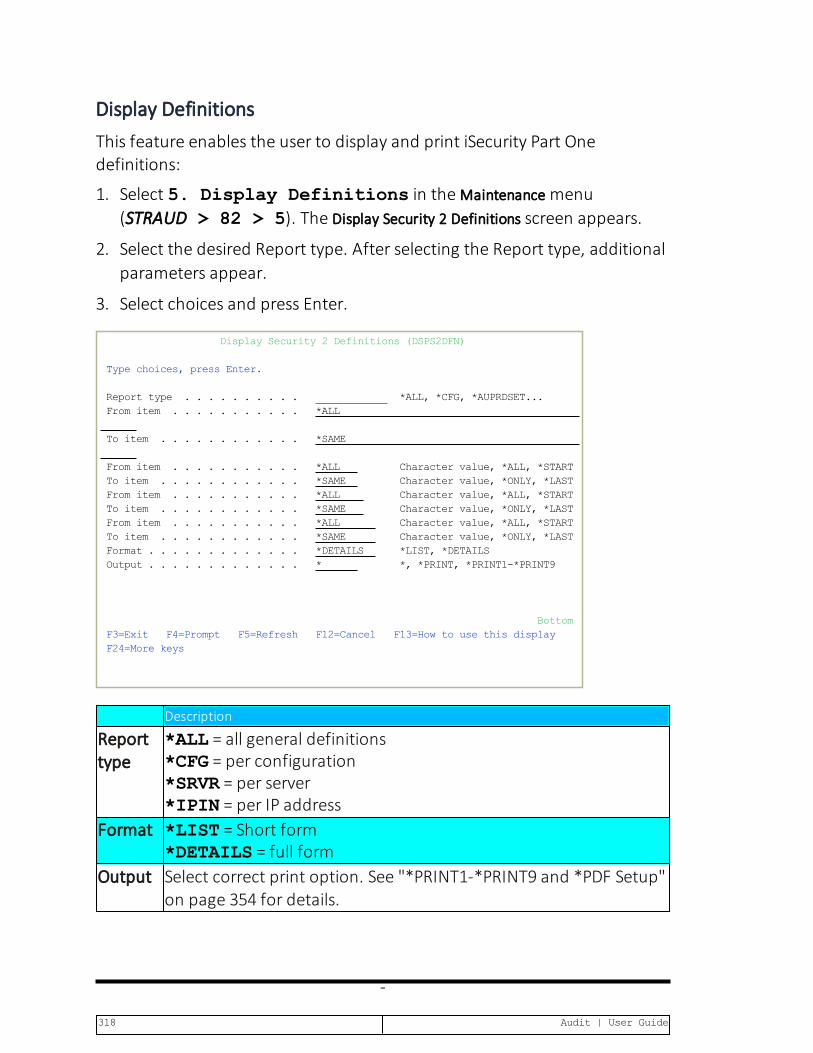
Display DefinitionsThis feature enables the user to display and print iSecurity Part Onedefinitions:
1. Select 5. Display Definitions in theMaintenancemenu(STRAUD > 82 > 5). The Display Security 2 Definitions screen appears.
2. Select the desired Report type. After selecting the Report type, additionalparameters appear.
3. Select choices and press Enter.
Display Security 2 Definitions (DSPS2DFN) Type choices, press Enter.
Report type . . . . . . . . . . *ALL, *CFG, *AUPRDSET... From item . . . . . . . . . . . *ALL
To item . . . . . . . . . . . . *SAME
From item . . . . . . . . . . . *ALL Character value, *ALL, *START To item . . . . . . . . . . . . *SAME Character value, *ONLY, *LAST From item . . . . . . . . . . . *ALL Character value, *ALL, *START To item . . . . . . . . . . . . *SAME Character value, *ONLY, *LAST From item . . . . . . . . . . . *ALL Character value, *ALL, *START To item . . . . . . . . . . . . *SAME Character value, *ONLY, *LAST Format . . . . . . . . . . . . . *DETAILS *LIST, *DETAILS Output . . . . . . . . . . . . . * *, *PRINT, *PRINT1-*PRINT9
BottomF3=Exit F4=Prompt F5=Refresh F12=Cancel F13=How to use this display F24=More keys
Description
Reporttype
*ALL = all general definitions*CFG = per configuration*SRVR = per server*IPIN = per IP address
Format *LIST = Short form*DETAILS = full form
Output Select correct print option. See "*PRINT1-*PRINT9 and *PDF Setup"on page 354 for details.
-
318 Audit | User Guide

Transfer Definitions
Export DefinitionsYou can export your Audit definitions to another computer.
To export Audit definitions to another computer:
1. Select 1. Export Definitions in theMaintenancemenu(STRAUD > 82 > 31). The Export iSecurity/BASE Defns. (EXPS2DFN) screenappears.
Export iSecurity⁄BASE Defns. (EXPS2DFN) Type choices, press Enter.
Collection type . . . . . . . . *NEW, *ADD, *OLD Work library and SAVF in QGPL . *AUTO Name, *AUTO (S2 + System) Operation type . . . . . . . . . *REPLACE *REPLACE, *BYMODULE, *SAME System Configuration (opt. 81) *NO *REPLACE, *CLEAR, *NO Job Schedule Entries . . . . . . *NO *ALL, *RPT, *NO Update remote systems: Systems to update . . . . . . *NONE Name, *group, *ALL, *NONE Update type . . . . . . . . . *UPD *UPD, *REPLACE
BottomF3=Exit F4=Prompt F5=Refresh F12=Cancel F13=How to use this display F24=More keys
2. Type *NEW, *ADD, or *OLD as the Collection type and press Enter. Theappropriate continuation screen appears.
Audit|User Guide 319

Field
Collection type *NEW - the information exported is completely new*ADD - the information exported will be added toprevious information*OLD - the information exported will be old
Work library and SAVFin QGPL
Name - provide name of library*AUTO - library will be automatically retrieved
Operation type *REPLACE - replace data originally in the database*BYMODULE - replaces per module according tospecifications*SAME - stays the same as previous
System Configuration(opt. 81)
*REPLACE - replace data*CLEAR - clear data*NO - no operation required
3. Select the correct options and press Enter.
-
320 Audit | User Guide
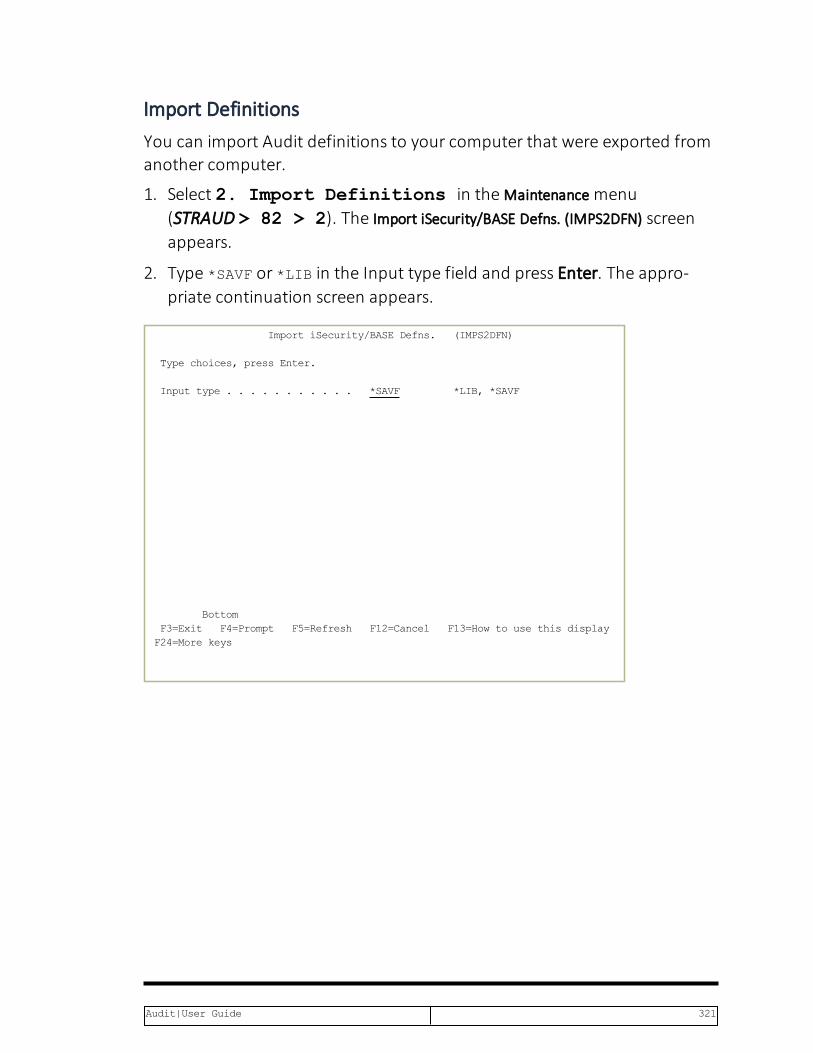
Import DefinitionsYou can import Audit definitions to your computer that were exported fromanother computer.
1. Select 2. Import Definitions in theMaintenancemenu(STRAUD > 82 > 2). The Import iSecurity/BASE Defns. (IMPS2DFN) screenappears.
2. Type *SAVF or *LIB in the Input type field and press Enter. The appro-priate continuation screen appears.
Import iSecurity/BASE Defns. (IMPS2DFN) Type choices, press Enter.
Input type . . . . . . . . . . . *SAVF *LIB, *SAVF
BottomF3=Exit F4=Prompt F5=Refresh F12=Cancel F13=How to use this display F24=More keys
Audit|User Guide 321

Parameter Description
Input type *SAVF*LIB
Save file If Input type = *SAVF, name of the SAVF to which theexported definitions were saved
Library If Input type = *SAVF, name of the library that contains theSAVFIf Input type = *LIB, name of the library to which theexported definitions were saved
Audit options *UPD*REPLACE*BYSUBJECT*SAME
Action optionsComplianceoptionsReplicationoptionsGeneral optionsGeneral GroupsoptionsKeep backup inlibrary
Keep the exported definitions in this library.
3. Select the correct options and press Enter.
-
322 Audit | User Guide

Audit Maintenance
Start a New Journal ReceiverAuditperiodically maintains its Journal Receivers according to yourconfiguration (with no intervention). This, and the following features, givesyou the option of manually handling all Journal Receiver maintenance.
1. Select 21. Start a New Journal Receiver in theMaintenancemenu (STRAUD > 82 > 21). The Change Audit Journal Attr.(CHGAUJRNA)screen appears.
2. Select *YES or *NO and press Enter.
Audit|User Guide 323

Change Journal Receiver Library1. Select 22. Change Journal Receiver Library in theMain-
tenanceMenu (STRAUD> 82 > 22). The Change Audit Journal Attr.(CHGAUJRNA) appears.
Change Audit Journal Attr. (CHGAUJRNA) Type choices, press Enter.
Journal receiver prefix . . . . *GEN Name, *SAME, *GEN Library . . . . . . . . . . . . *SAME Name, *SAME
BottomF3=Exit F4=Prompt F5=Refresh F12=Cancel F13=How to use this display F24=More keys
Parameters orOptions
Description
Journal ReceiverPrefix
Name = The name of the Journal Receiver*Same = The current journal receiver*Gen = Generates a new journal receiver and puts it in thenew library
Library Name = The name of the library where you want to transferthe Journal receiver*Same = The library where the current Journal Receiver isfound
2. Select the correct options and press Enter.
-
324 Audit | User Guide

Work with Journal AttributesThis option displays the journal and its attached journal receiverinformation.
1. Select 23. Work with Journal Attributes in theMaintenanceMenu (STRAUD > 82 > 33). TheWork with Journal Attributes screenappears.
Work with Journal Attributes Journal . . . . . . : QAUDJRN Library . . . . . . : QSYS
Attached receiver . : AUDITR0027 Library . . . . . . : QGPL
Text . . . . . . . . :
ASP . . . . . . . . : 1 Receiver size options: *MAXOPT1 Message queue . . . : QSYSOPR Fixed length data . : *JOB Library . . . . . : *LIBL *USR Manage receivers . . : *SYSTEM *PGM Delete receivers . . : *NO *PGMLIB Journal cache . . . : *NO *SYSSEQ Manage delay . . . . : 10 *RMTADR Delete delay . . . . : 10 *THD Journal type . . . . : *LOCAL *LUW Journal state . . . : *ACTIVE *XID Minimize entry data : *NONE BottomF3=Exit F5=Refresh F12=Cancel F17=Display attached receiver attributesF19=Display journaled objects F24=More keys
Audit|User Guide 325

Options Description
F13 Displayjournaledfiles
The Display Journaled Files Attributes screen appears.
F14 Displayjournaledaccess paths
The Display Journaled Access Paths screen appears.
F15Workwithreceiverdirectory
TheWork with Receiver Directory screen appears. You candisplay a selected receiver (option 8) or delete a selectedreceiver (option 4)
F16Workwith remotejournalinformation
TheWork with Remote Journal Information screen appears.
F17 Displayattachedreceiverattributes
The Display Journal Receiver Attributes screen appears. Fromthis screen you can go to secondary screens to displayassociated receivers (F6) or to work with journal attributes(F10)
F19 Displayjournaledobjects
The Display Journaled Objects screen appears. Choose the typeof object to display:n 1 = Files: Displays the physical database files being journ-
aled.n 2 = Access Paths: Displays the access paths being journaled
n 3 = Data Areas: Displays the data areas being journaledn 4 = Data Queues: Displays the data queues being journaled
n 5 = Integrated File System objects: Displays the integratedfile system objects being journaled. This includes *STMF,*DIR and *SYMLNK objects that are in the Root ('/'),QOpensys, and User-defined file systems.
n 6 = Commitment Definitions: Displays the commitmentdefinitions being journaled
2. Select options you want to work with.
-
326 Audit | User Guide
Automatic TranslationIBM has translated the audit types into several languages; this feature usesthe IBM template to translate automatically the audit type fields into yourlanguage.
l Select 24. Auto-Translate Field Descriptions in theMaintenanceMenu(STRAUD > 82 > 24). The translation is generated automatically.
Audit|User Guide 327
Use English File Descriptionsl Select 25. Use English File Descriptions in theMain-
tenanceMenu (STRAUD > 82 > 25).
-
328 Audit | User Guide

Delete Statistic DataYou can delete the statistical data used in the GUI version of the product.
1. Select 29. Delete Statistic Data in theMaintenanceMenu(STRAUD > 82 > 29). The Delete Audit Statistic Data screen appears.
Delete Audit Statistic Data (DLTAUSTT) Type choices, press Enter.
Ending date . . . . . . . . . . Date Starting date . . . . . . . . . *START Date, *START
BottomF3=Exit F4=Prompt F5=Refresh F12=Cancel F13=How to use this display F24=More keys
Audit|User Guide 329

Journal Product DefinitionsYou can record the system physical files changes in the data library.
To start recording physical file changes:1. Select 71. Add Journal from theMaintenanceMenu (STRAUD
> 82 > 71). The Create Journal – Confirmation screen appears.
2. Press Enter to confirm.
NOTE: You must re-run this option after every release upgrade.
To stop recording physical file changes:1. Select 72. Remove Journal from theMaintenancemenu
(STRAUD > 82 > 72). The End Journal - Confirmation screen appears.
2. Press Enter to confirm.
-
330 Audit | User Guide
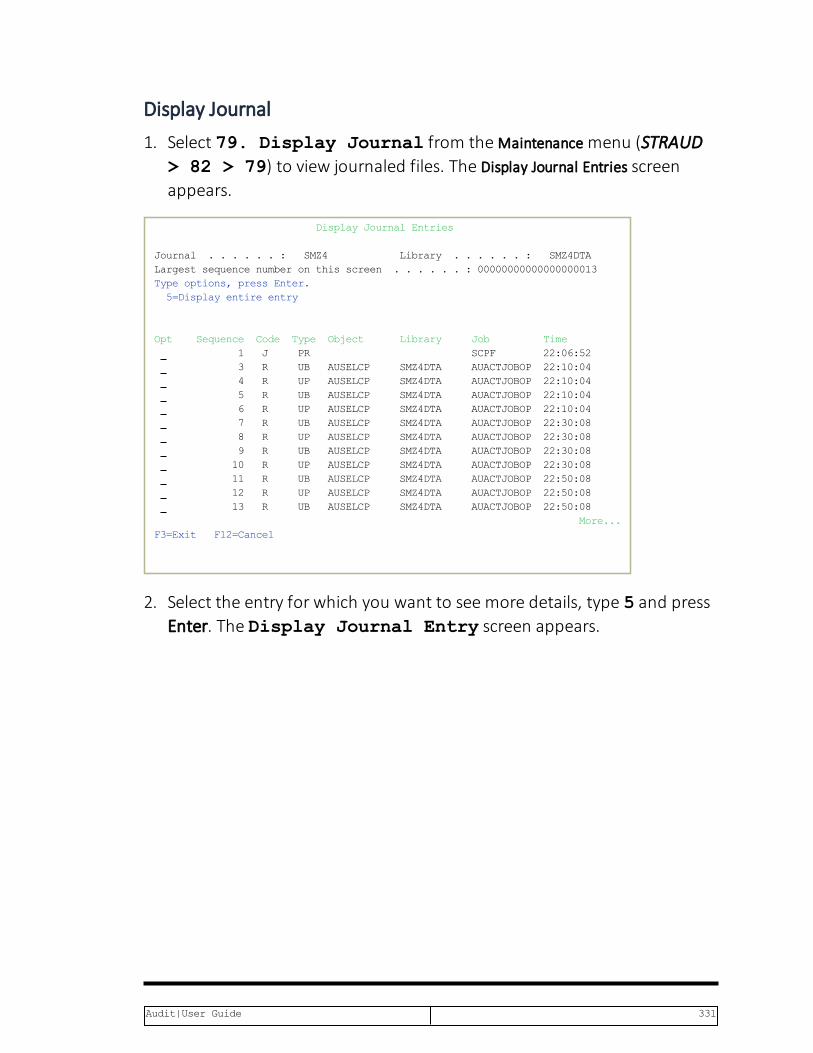
Display Journal1. Select 79. Display Journal from theMaintenancemenu (STRAUD
> 82 > 79) to view journaled files. The Display Journal Entries screenappears.
Display Journal Entries Journal . . . . . . : SMZ4 Library . . . . . . : SMZ4DTA Largest sequence number on this screen . . . . . . :00000000000000000013Type options, press Enter. 5=Display entire entry
Opt Sequence Code Type Object Library Job Time
1 J PR SCPF 22:06:52 3 R UB AUSELCP SMZ4DTA AUACTJOBOP 22:10:04 4 R UP AUSELCP SMZ4DTA AUACTJOBOP 22:10:04 5 R UB AUSELCP SMZ4DTA AUACTJOBOP 22:10:04 6 R UP AUSELCP SMZ4DTA AUACTJOBOP 22:10:04 7 R UB AUSELCP SMZ4DTA AUACTJOBOP 22:30:08 8 R UP AUSELCP SMZ4DTA AUACTJOBOP 22:30:08 9 R UB AUSELCP SMZ4DTA AUACTJOBOP 22:30:08 10 R UP AUSELCP SMZ4DTA AUACTJOBOP 22:30:08 11 R UB AUSELCP SMZ4DTA AUACTJOBOP 22:50:08 12 R UP AUSELCP SMZ4DTA AUACTJOBOP 22:50:08 13 R UB AUSELCP SMZ4DTA AUACTJOBOP 22:50:08 More...F3=Exit F12=Cancel
2. Select the entry for which you want to see more details, type 5 and pressEnter. The Display Journal Entry screen appears.
Audit|User Guide 331
Other Maintenance Options
Copy Queries from BackupThe option to copy queries to and from the SMZ4DTA file exists. By selectingthe file to backup the user can save queries or recover queries in the event ofdata loss.
NOTE: This activity requires backups of files AUSELQP and AUSELCP to be onboth the From and To libraries.
To move or recover selected reports from SMZ4DTA library:
1. Select 93. Copy Queries from Backup in theMaintenancemenu (STRAUD > 82 > 93).
2. In the From Library field, type the name of the ‘Backup’ file.
3. In the To Library field, type the name of the file to backup(SMZ4DTA is default).
4. Press Enter. The list of reports in the From library appears.
-
332 Audit | User Guide

UninstallTo uninstall Security Part 2:
1. Select 98. Uninstall Security Part 2 in theMaintenanceMenu (STRAUD > 82 > 98).
2. Follow the directions on the Uninstall SECURITY2P screen.
Audit|User Guide 333

Central AdministrationThe iSecurity Central Administration – Audit menu enables you to work withvarious administration settings for Security Part 2.
-
334 Audit | User Guide

To access the iSecurity Central Administration – Audit menu
l Select 83. Central Administration in the Auditmain menu(STRAUD > 83).
AUCNTMN iSecurity Central Administration - Audit iSecurity⁄CntAdm System: S520 Select one of the following:
Definitions Network Support 1. Work with network definitions 51. Run CL Scripts 2. Network Authentication 52. Send PTF Use SYSTEM() in the reporting menu Log CopyTransfer Log Copy 11. Run Reports on a Copy of Rmt Log21. Export Log 22. Import Log, Collect from Rmt
Transfer Definitions Communication Log31. Export Definitions, Update Rmt Sys 71. Current Job CntAdm Messages32. Import Definitions 72. All Jobs CntAdm Messages
Selection or command ===>
F3=Exit F4=Prompt F9=Retrieve F12=Cancel F13=Information Assistant F16=AS⁄400 main menu
Audit|User Guide 335

BASE SupportUsing the BASE Supportmenu, you can view and modify settings that arecommon to all modules of iSecurity. This menu, with all its options, is in alliSecurity major modules.
To access the BASE Support menu, select 89. BASE Support in theproduct's main menu (STRAUD> 89).
AUBASE BASE Support iSecurity⁄Base System: S520 Email General 1. Address Book 51. Work with Collected Data 2. Definitions (Base) 52. Check Locks 9. Target Restrictions 55. Raz-Lee Support Menu 58. *PRINT1-*PRINT9, *PDF SetupOperators 59. Global Installation Defaults11. Work with Operators 12. Work with AOD, P-R Operators Network Support 71. Work with Network DefinitionsAuthority Codes 72. Network Authentication 21. Add Authorization Codes 22. Display Authorization Status 74. Send PTF 23. Add Daily Check of Auth Codes 75. Run CL Scripts 24. Remove Daily Check of Auth Codes 76. Current Job CntAdm Log 25. Display CPU⁄Lpar Information 77. All Jobs CntAdm Log
Selection or command ===>
F3=Exit F4=Prompt F9=Retrieve F12=Cancel F13=Information Assistant F16=AS⁄400 main menu
-
336 Audit | User Guide

Definitions
Network DefinitionsThe RDB name passes on the connection request and must match a validentry on the target machine to get current information from existing reportsor queries. Adjust the system parameters only to collect information from allthe groups in the system to output files that can be sent via email.
NOTE: Update of this parameter is recommended in all cases, and is requiredbased on the PTF level of the system
1. Select 71. Work with network definitions in the BASE Sup-portmenu (STRAUD > 89 > 71). TheWork with Network Systemsscreen appears.
System type:AS400 Work with Network Systems System:S520 Position to . . .Type options, press Enter. 1=Select 4=Remove 7=Export dfn. 8=Check DDM 9=Verify communication
Opt System Group RAZLEE1 *RL RAZLEE1 machine
RAZLEE2 *G1 RAZLEE2 machine RAZLEE3 *G1 RAZLEE3 machine
BottomF3=Exit F6=Add New F7=Export dfn cmd F12=Cancel
Audit|User Guide 337

2. Press F6 to define a new network system to use.
System type:AS400 Add Network System System:S520
System . . . . . . . . . .Description . . . . . . . .Group where included . . . *NONE *Name
Communication DetailsIP or remote name . . . . . Type . . . . . . . . . . . *IP *SNA, *IPEntry of *LOCAL on System . Use WRKRDBDIRE to verifyAuto filled for this system. Required for Multi-LPAR of AOD, P-R, Replication.
Copy of QAUDJRN on a different systemWhere is QAUDJRN analyzed . *SYSTEM Name, *SYSTEMExtension Id on remote . .
Note: After adding a system, run again "Network Authentication".
F3=Exit F12=CancelModify data, or press Enter to confirm.
3. Press Enter to confirm the settings.
-
338 Audit | User Guide
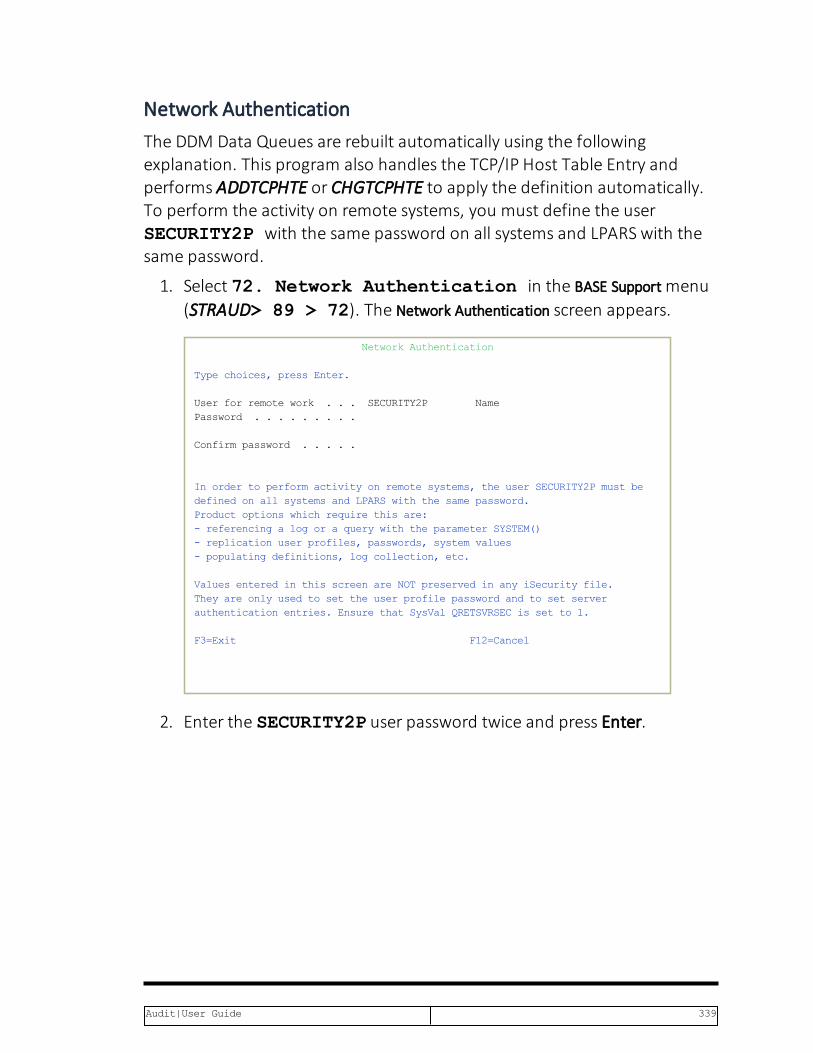
Network AuthenticationThe DDM Data Queues are rebuilt automatically using the followingexplanation. This program also handles the TCP/IP Host Table Entry andperforms ADDTCPHTE or CHGTCPHTE to apply the definition automatically.To perform the activity on remote systems, you must define the userSECURITY2P with the same password on all systems and LPARS with thesame password.
1. Select 72. Network Authentication in the BASE Supportmenu(STRAUD> 89 > 72). The Network Authentication screen appears.
Network Authentication
Type choices, press Enter.
User for remote work . . . SECURITY2P Name Password . . . . . . . . . Confirm password . . . . .
In order to perform activity on remote systems, the user SECURITY2P must be defined on all systems and LPARS with the same password. Product options which require this are: - referencing a log or a query with the parameter SYSTEM() - replication user profiles, passwords, system values - populating definitions, log collection, etc. Values entered in this screen are NOT preserved in any iSecurity file. They are only used to set the user profile password and to set server authentication entries. Ensure that SysVal QRETSVRSEC is set to 1.
F3=Exit F12=Cancel
2. Enter the SECURITY2P user password twice and press Enter.
Audit|User Guide 339

Email Address BookYou can define the email address to be used for each user profile. You canalso use this option to define an email group, with multiple addresses.
1. Select 1. Address Book in the BASE Supportmenu(STRAUD> 89 > 1). TheWork with Email Address Book screen appears.
Work with Email Address Book
Type options, press Enter. 1=Modify 3=Copy 4=Remove Position to . Subset . . .Opt Name Entries Pwd.
AAA@BBB 1 test chkisa *NO ABRAHAM 1 Abraham Notik *NO ALEX 2 ALEX *NO JHJHJH 1 Yuri's Email *NO NOREPLY 1 Do Not Reply *NO SUPPORT 1 Support mail box *NO TZION 1 Tzion's email *NO VV 1 Victor *NO YOEL 1 Yoel's email *NO YURIW 1 Yuri work email *NO ZAILER 1 Shmuel's email *NO
BottomF3=Exit F6=Add new F12=Cancel
2. Press F6 to add a new address entry (or type 1 next to a name to modifyit). The Add Email Name screen appears.
-
340 Audit | User Guide

Add Email NameType choices, press Enter.
Name . . . . . . . . . . Description . . . . . . . ZIP password exists . . . N Use F8 to work with password
Email address(s)(blank, comma, new-line separated)
More...F3=Exit F4=Prompt F8=ZIP password F12=Cancel
The screen contains the following fields:Name
The name to identify the email addresses. Use this name whenrequesting reports that you send by email.
Description
A meaningful descriptionZIP Password exists
You can specify a password to attach to any zip file sent to theaddresses in this group. Without the password, the recipientswill not be able to open the zip file. To add a password, pressF8.
Email addresses
The email addresses of the group. Separate the addresses by acomma, or start each email address on a new line.
3. Enter the required parameters and press Enter.
Audit|User Guide 341
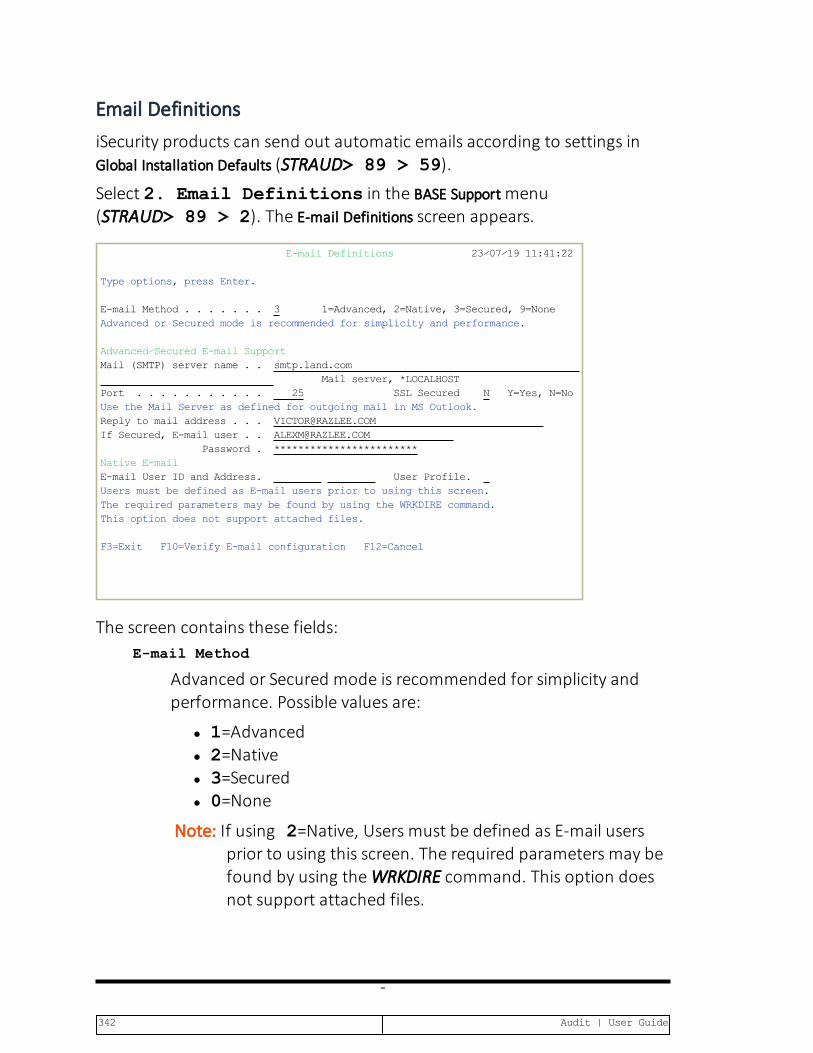
Email DefinitionsiSecurity products can send out automatic emails according to settings inGlobal Installation Defaults (STRAUD> 89 > 59).
Select 2. Email Definitions in the BASE Supportmenu(STRAUD> 89 > 2). The E-mail Definitions screen appears.
E-mail Definitions 23⁄07⁄1911:41:22 Type options, press Enter. E-mail Method . . . . . . . 3 1=Advanced, 2=Native, 3=Secured, 9=None Advanced or Secured mode is recommended for simplicity and performance. Advanced⁄Secured E-mail Support Mail (SMTP) server name . . smtp.land.com
Mail server, *LOCALHOST Port . . . . . . . . . . . 25 SSL Secured N Y=Yes, N=NoUse the Mail Server as defined for outgoing mail in MS Outlook. Reply to mail address . . . [email protected] If Secured, E-mail user . . [email protected] Password . ************************ Native E-mail E-mail User ID and Address. User Profile. Users must be defined as E-mail users prior to using this screen. The required parameters may be found by using the WRKDIRE command. This option does not support attached files. F3=Exit F10=Verify E-mail configuration F12=Cancel
The screen contains these fields:E-mail Method
Advanced or Secured mode is recommended for simplicity andperformance. Possible values are:
l 1=Advancedl 2=Nativel 3=Securedl 0=None
Note: If using 2=Native, Users must be defined as E-mail usersprior to using this screen. The required parameters may befound by using theWRKDIRE command. This option doesnot support attached files.
-
342 Audit | User Guide

Mail (SMTP) server name
The name of the SMTP server or *LOCALHOSTReply to mail address
The e-mail address to receive replies.If secured, E-mail user and Password
If you chose 1=Advanced or 3=Secured for the E-mail method,enter the email user that will be used to send the emails and thepassword of that user
E-mail User ID and Address
If you chose 2=Native for the E-mail method, enter the user ID andaddress that will be used to send the emails.
User Profile
If you chose 2=Native for the E-mail method, enter the userprofile that will be used to send the emails.
To confirm the change to email definitions and send a confirmation email tothe Reply-to mail address, press the F10 key. A dialog opens inwhich you can confirm these settings. Check that you havereceived the confirmation email. If it is not received, there is aproblem with your email definitions.
Audit|User Guide 343

Operators and Authority Codes
Work with OperatorsFor a detailed explanation of this feature, see "Working with Operators’Authorities" on page 47.
Work with Operators for Authority on Demand and Password ResetiSecurity related objects are secured automatically by product authorizationlists (named security1P). This strengthens the internal security of theproduct. It is essential that you useWork with Operators to define all users whohave *SECADM, *AUDIT or *AUD#SECAD privileges, but do not have allobject authority. TheWork with Operators screen has Usr (usermanagement) and Adm for all activities related to tasks such as starting,stopping subsystems, jobs, and import/export. iSecurity automatically addsall users listed in Work with Operators to the appropriate productauthorization list.
1. Select 12. Work with AOD, P-R Operators in the BASE Supportmenu (STRAUD> 89 > 12). TheWork with Operators screen appears.
Work with Operators
Type options, press Enter. 1=Select 4=Delete Authority level: 1=*USE 9=*FULLOptUser System AODPR USP Adm
*AUD#SECAD S520 9 9 9 9 ALEX S520 9 9 5 9 AV S520 9 9 AVI S520 9 9 9 9 JAVA2 S520 9 9 9 9 NISSIMM S520 1 1 1 1 NIV S520 9 9 9 9 OD S520 9 9 9 9 OS *ALL TEST S520 9 9 9 9 TZION S520 9 9 9 9 VICTOR S520 9 9 9 9 More...AOD=Authority on Demand PR=Password Reset USP=User Provisioning Adm=AdministratorF3=Exit F6=Add new F8=Print F11=*SECADM⁄*AUDIT authority F12=Cancel
-
344 Audit | User Guide

2. Type 1 next to the user to modify his authorities (or press F6 to add anew user). TheModify Operator screen appears.
Modify Operator
Type choices, press Enter.
Operator . . . . . . . . . VICTOR System . . . . . . . . . . S520 *ALL, Name Password . . . . . . . . . *SAME Name, *SAME, *BLANK
Authorities by subject:Authority on Demand . . . . 9 1=*USE, 4=Limited *EMERGENCY 5=*EMERGENCY, 8=Limited *FULL 9=*FULLPassword Reset . . . . . . 9 1=*USE, 9=*FULL User Provisioning . . . . . 9 1=*USE, 5=*ENTRY, 9=*FULLProduct Administrator . . . 9 1=*USE, 9=*FULL
Note: Emergency operator can enable or modify emergency rules. This allows solving of critical problems without the intervention of the security administrator. The term Limited denotes that the user cannot change PIN codes.
F3=Exit F12=Cancel
Audit|User Guide 345
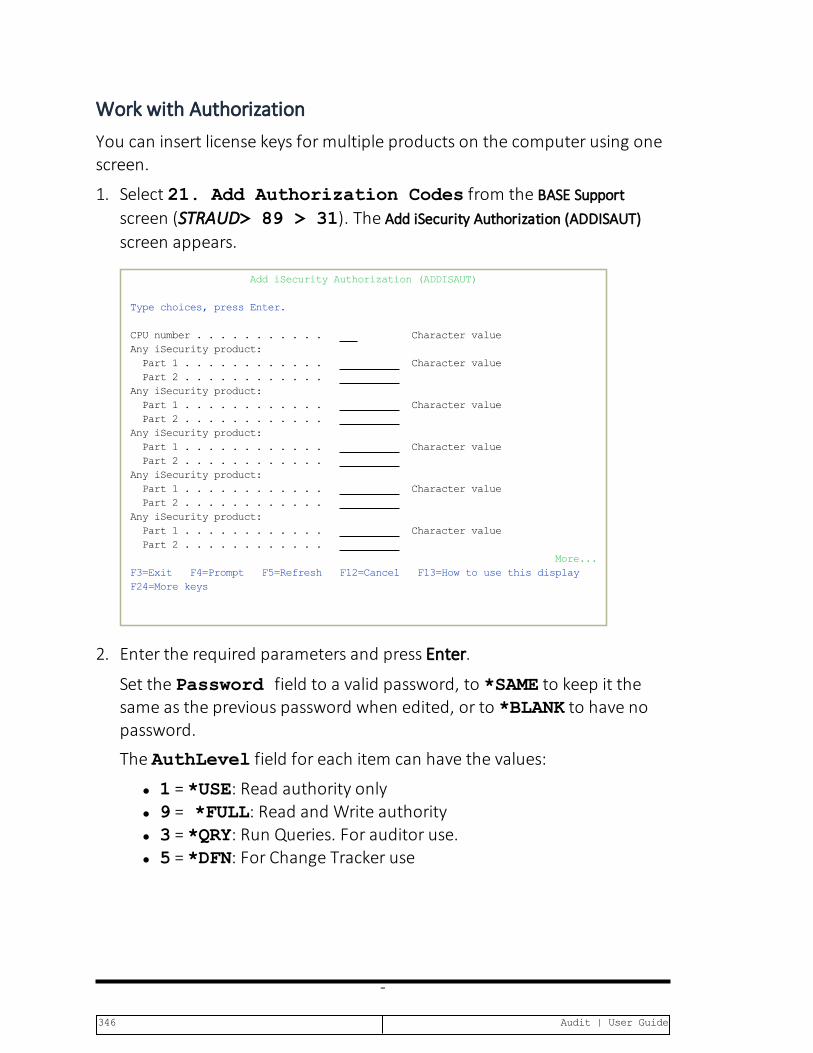
Work with AuthorizationYou can insert license keys for multiple products on the computer using onescreen.
1. Select 21. Add Authorization Codes from the BASE Supportscreen (STRAUD> 89 > 31). The Add iSecurity Authorization (ADDISAUT)screen appears.
Add iSecurity Authorization (ADDISAUT) Type choices, press Enter.
CPU number . . . . . . . . . . . Character value Any iSecurity product: Part 1 . . . . . . . . . . . . Character value Part 2 . . . . . . . . . . . . Any iSecurity product: Part 1 . . . . . . . . . . . . Character value Part 2 . . . . . . . . . . . . Any iSecurity product: Part 1 . . . . . . . . . . . . Character value Part 2 . . . . . . . . . . . . Any iSecurity product: Part 1 . . . . . . . . . . . . Character value Part 2 . . . . . . . . . . . . Any iSecurity product: Part 1 . . . . . . . . . . . . Character value Part 2 . . . . . . . . . . . . More...F3=Exit F4=Prompt F5=Refresh F12=Cancel F13=How to use this display F24=More keys
2. Enter the required parameters and press Enter.
Set the Password field to a valid password, to *SAME to keep it thesame as the previous password when edited, or to *BLANK to have nopassword.
The AuthLevel field for each item can have the values:
l 1 = *USE: Read authority onlyl 9 = *FULL: Read and Write authorityl 3 = *QRY: Run Queries. For auditor use.l 5 = *DFN: For Change Tracker use
-
346 Audit | User Guide

3. Set authorities and press Enter. A message appears to inform that theuser being added or modified was added to the Authority list that securesthe product's objects; the user carries Authority *CHANGE and will begranted Object operational authority. The Authority list is created in theinstallation/release upgrade process. The SECURITY_P user profile isgranted Authority *ALLwhilst the *PUBLIC is granted Authority*EXCLUDE. All objects in the libraries of the product (except some restric-ted special cases) are secured via the Authority list.
Audit|User Guide 347

Display Authorization StatusYou can display the current authorization status of all installed iSecurityproducts on the local system.
1. Select 22. Display Authorization Status from the BASE Sup-portmenu (STRAUD > 89 > 22). The Status of iSecurity Authorizationscreen appears.
44DE466 5207459 Status of iSecurity Authorization LPAR Id1S520 Type choices, press Enter. Subset by . . . . . 1=Select Warning days before expiration .14
OptLib. Status Release ID ProductSMZ4-ADemo 19-08 14.04 19-06-27 *BASE, Audit, Action, SIEM, MSys, CmpEvl
Auth code:4999999999991 Valid until2019-08-31 SMZ4-BDemo 19-08 14.04 19-06-27 Compliance (User,Native,IFS), Replicate Auth code:4999999999991 Valid until2019-08-31 SMZ8 Demo 19-08 18.06 19-07-14 Firewall, Screen, Command, Password Auth code:8999999999991 Valid until2019-08-31 SMZJ Demo 19-08 09.05 19-07-16 AP-Journal, Update-Control Auth code:J99999999999 Valid until2019-08-31 SMZO Demo 19-08 05.09 19-05-21 Authority on Demand,Pwd-Reset Auth code:O99999999999 Valid until2019-08-31 SMZC Demo 19-08 05.00 18-10-08 Capture, w⁄BI Auth code:C99999999999123 Valid until2019-08-31 SMZT Demo 19-08 01.35 19-07-10 Change Tracker Auth code:T99999999999*ALL Valid until2019-08-31 SMZV Demo 19-08 06.98 18-03-20 Antivirus, Anti-Ransomware, ICAP Auth code:V999999999991 Valid until2019-08-31 More...F3=Exit F10=Authority Code
2. Select a specific line and type 1 in the Opt field to see the authoritydetails of one specific product.NOTE: Codes that will expire in less than 14 days appear in pink.
Permanent codes have deliberately been hidden in thisscreenshot.
-
348 Audit | User Guide

Working with Collected DataAdministrators can view summaries of Audit, Firewall, and Action journalcontents by day, showing the number of entries for each day together withthe amount of disk space occupied. Administrators can optionally deleteindividual days to conserve disk space.
1. Select 51. Work with Collected Data from the BASE Supportscreen (STRAUD> 89 > 51). TheWork with Collected Data screenappears.
Work with Collected Data S520
Type options, press Enter.
Module . . . . . . . . . 1=Firewall 2=Audit 3=Action 4=Capture 5=Journal 6=Change Tracker 7=Authority On Demand
F3=Exit
2. Enter 2 (Audit) and press Enter. TheWork with Collected Data – Audit
Audit|User Guide 349

screen appears.
Work with Collected Data - Audit S520
Type options, press Enter. Total Size (MB): 502.8 4=Delete
OptCollected Date Records Size (MB) Save Date Save Time16⁄07⁄19 19,907 90.2 22⁄07⁄19 23:51:37
17⁄07⁄19 28,430 111.2 22⁄07⁄19 23:51:37 18⁄07⁄19 10,619 45.1 22⁄07⁄19 23:51:37 19⁄07⁄19 7,412 27.6 22⁄07⁄19 23:51:37 20⁄07⁄19 11,225 54.1 22⁄07⁄19 23:51:37 21⁄07⁄19 14,066 69.3 22⁄07⁄19 23:51:37 22⁄07⁄19 15,479 78.2 22⁄07⁄19 23:51:37 23⁄07⁄19 5,950 27.1
BottomF3=Exit F5=Refresh F12=Cancel
3. Select 4 to delete data from specific date(s) and press Enter.
-
350 Audit | User Guide

Purging all AUDIT dataYou can purse all AUDIT data.
WARNING: Before you run these commands, back up the Audit data tooffline storage.
To purge all Audit data, run these commands:
l RMVM SMZ4DTA/AUXX *ALLl CLRPFM SMZ4DTA/AUSTTSP
Audit|User Guide 351

Purging all AUDIT dataYou can purse all AUDIT data.
WARNING: Before you run these commands, back up the Audit data tooffline storage
To purge all Audit data, run these commands:
l RMVM SMZ4DTA/AUXX *ALLl CLRPFM SMZ4DTA/AUSTTSP
-
352 Audit | User Guide

Check LocksYou need to run this option before you upgrade your system to check if anyof the files for the products being upgraded are being used. If they are, youmust ensure that they are not in use before you run the upgrade.
1. Select 52. Check Locks from the BASE Support menu(STRAUD> 89 > 52). The Check Locks screen appears.
GSLCKMNU Check Locks iSecurity System: S520 Select one of the following:
Check Locks 1. Data Base Files
-. Display Files End this session. From a new session, enter: CHKSECLCK TYPE(*DSPF)
-. All File Types End this session. From a new session, enter: CHKSECLCK TYPE(*ALL)
Selection or command ===>
F3=Exit F4=Prompt F9=Retrieve F12=Cancel F13=Information Assistant F16=AS⁄400 main menu
2. Select one of the commands that appear on the screen.
Audit|User Guide 353
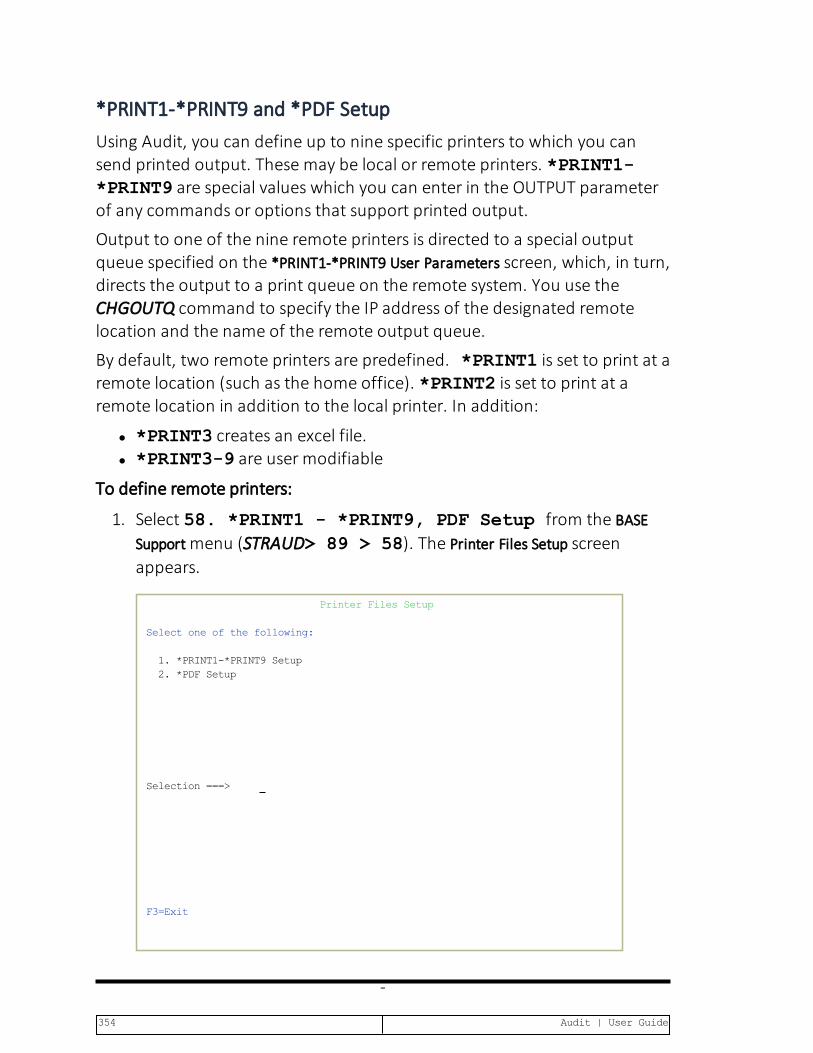
*PRINT1-*PRINT9 and *PDF SetupUsing Audit, you can define up to nine specific printers to which you cansend printed output. These may be local or remote printers. *PRINT1-*PRINT9 are special values which you can enter in the OUTPUT parameterof any commands or options that support printed output.
Output to one of the nine remote printers is directed to a special outputqueue specified on the *PRINT1-*PRINT9 User Parameters screen, which, in turn,directs the output to a print queue on the remote system. You use theCHGOUTQ command to specify the IP address of the designated remotelocation and the name of the remote output queue.
By default, two remote printers are predefined. *PRINT1 is set to print at aremote location (such as the home office). *PRINT2 is set to print at aremote location in addition to the local printer. In addition:
l *PRINT3 creates an excel file.l *PRINT3-9 are user modifiable
To define remote printers:
1. Select 58. *PRINT1 - *PRINT9, PDF Setup from the BASESupportmenu (STRAUD> 89 > 58). The Printer Files Setup screenappears.
Printer Files Setup
Select one of the following:
1. *PRINT1-*PRINT9 Setup 2. *PDF Setup
Selection ===>
F3=Exit
-
354 Audit | User Guide

2. Enter 1 and press Enter. The *PRINT1 - *PRINT9 Setup screen appears.
*PRINT1-*PRINT9 Setup
Type options, press Enter. Using OUTPUT(*PRINTn) where n=1-9, provides extra control over prints. Use this screen to specify parameters for this feature. This functionality canbe modified. For details see the original source SMZ8⁄GRSOURCE GSSPCPRT.
Press F14 for setup instructions OutQ OutQ Save*PRINT Name Library Hold Description 1 CONTROL SMZ4DTA OUTQ to print on the remote 2 CONTROL SMZ4DTA Local+OUTQ that print on the remote 3 4 5 6 7 8 9 Bottom
F3=Exit F8=Print F12=Cancel F14=Setup instructions
3. Enter the name of the local output queue and library as shown in theabove example. You can optionally enter a description. Possible valuesare:
l OUTQ(): Name of the local output queuel RMTPRTQ(): Name of the remote print queuel INTNETADR(): IP address of the remote system
If the desired output queue has not yet been defined, use theCRTOUTQ command to create it. The command parameters remain thesame.
For example, for *PRINT1 in the above screen, the followingcommand would send output to the output queue 'MYOUTQ' on aremote system with the IP address '1.1.1.100' as follows:
l CHGOUTQ OUTQ(CONTROL/SMZTMPA) RMTSYS(*INTNETADR)+ RMTPRTQ(MYOUTQ) AUTOSTRWTR(1) CNNTYPE(*IP)TRANSFORM(*NO)+ INTNETADR(1.1.1.100)
Audit|User Guide 355

*PDF SetupThe operating system, from release 6.1, directly produces *PDF prints. In theabsence of such support a standard *PDF is printed by other means.
To define PDF printers:
1. Select 58. *PRINT1 - *PRINT9, PDF Setup from the BASE Sup-portmenu (STRAUD> 89 > 58). The Printer Files Setup screen appears..
Printer Files Setup
Select one of the following:
1. *PRINT1-*PRINT9 Setup 2. *PDF Setup
Selection ===>
F3=Exit
-
356 Audit | User Guide

2. Enter 2 and press Enter. The *PDF Setup screen appears.
*PDF Setup
The operating system, from release 6.1, directly produces *PDF prints. In the absence of such support a standard *PDF is printed by other means.
When the operating system *PDF capability exists, it is used, and the Query Generator uses the printer file SMZ4⁄AUQRYPDF to print the *PDF.
This file is shipped with the following parameters:
CHGPRTF FILE(SMZ4⁄AUQRYPDF) LPI(8) CPI(15) PAGRTT(*COR)
You may wish to change the attributes of this printer file to suit your needs.
Such changes must be re-applied after each iSecurity⁄Base (SMZ4) upgrade.
Press Enter to continue...
3. Follow the instructions on the screen.
NOTE: You must repeat this task after every upgrade of the Base System.
Audit|User Guide 357

*PDF SetupThe operating system, from release 6.1, directly produces *PDF prints. In theabsence of such support a standard *PDF is printed by other means.
To define PDF printers:
1. Select 58. *PRINT1 - *PRINT9, PDF Setup from the BASE Sup-portmenu (STRAUD> 89 > 58). The Printer Files Setup screen appears..
Printer Files Setup
Select one of the following:
1. *PRINT1-*PRINT9 Setup 2. *PDF Setup
Selection ===>
F3=Exit
-
358 Audit | User Guide
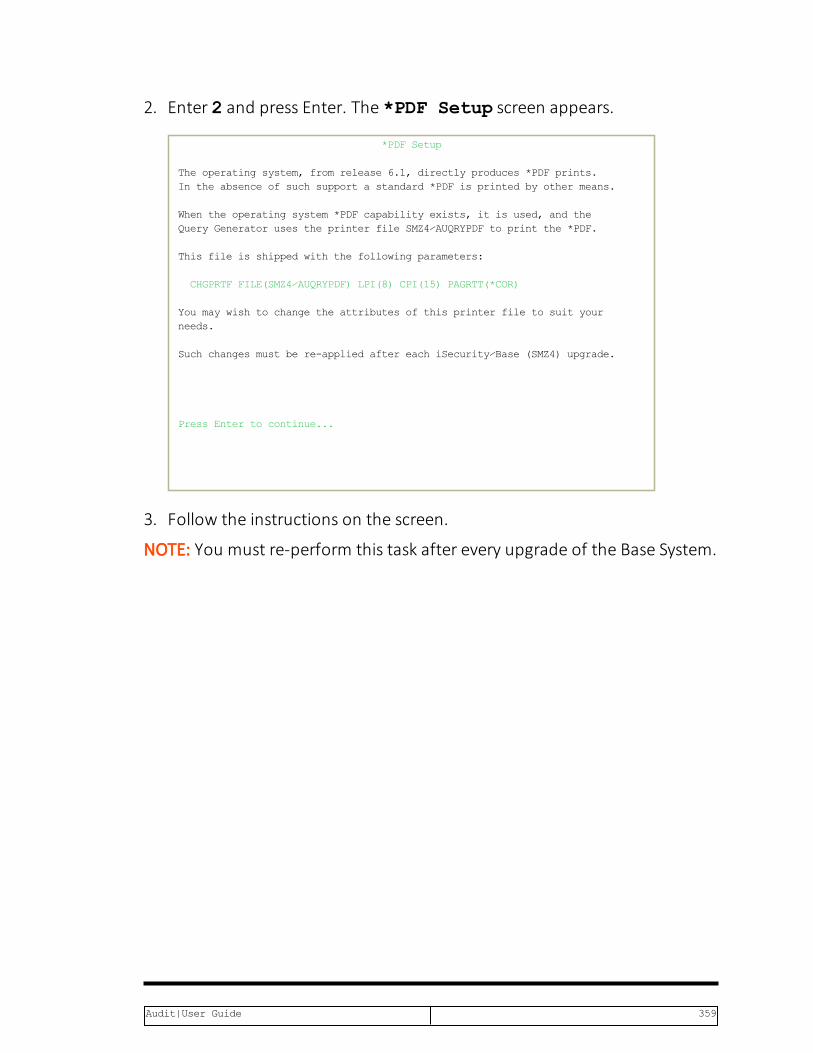
2. Enter 2 and press Enter. The *PDF Setup screen appears.
*PDF Setup
The operating system, from release 6.1, directly produces *PDF prints. In the absence of such support a standard *PDF is printed by other means.
When the operating system *PDF capability exists, it is used, and the Query Generator uses the printer file SMZ4⁄AUQRYPDF to print the *PDF.
This file is shipped with the following parameters:
CHGPRTF FILE(SMZ4⁄AUQRYPDF) LPI(8) CPI(15) PAGRTT(*COR)
You may wish to change the attributes of this printer file to suit your needs.
Such changes must be re-applied after each iSecurity⁄Base (SMZ4) upgrade.
Press Enter to continue...
3. Follow the instructions on the screen.
NOTE: You must re-perform this task after every upgrade of the Base System.
Audit|User Guide 359

Global Installation DefaultsGlobal installation configuration now includes access to the Raz-Lee SupportMenu. Customers should not use it without guidance. It includes:
l Adding a system to enter field help and possible values for all fields inQuery Generator and Logs in all products
l Setting of Default Report Summaries
You can set the parameters that iSecurity uses to control the Installation andupgrade processes. The option includes a Product-Admin Email and SYSTEMwas added to the query mail subject line.
NOTE: Consult Raz-Lee support staff at [email protected] beforechanging any of the values on this form.
Select 59. Global Installation Defaults from the BASE Supportmenu (STRAUD > 89 > 59). The Global Installation Defaults screen appears.
Global Site Defaults - Part 1InstallationGeneral purpose cmd library . . . MYLIBRARY ASP for data libraries . . . . . 01Wait for STROBJCVN to end . . . . Y Y=YesAuto jrn def files on install . . N Y=YesSBS to start iSec after IPL . . . QSYSWRK *LIBL Allow group access to IFS . . . . Y Y=YesRefresh Z* report definitions . . N Y=Yes, A=Add new Upgrades attempt to run a user pgm data-lib⁄xxUPGRADE for site modifications.Run Time AttributesProduct-Admin Email . . . . . . . [email protected] Special Customer Id. . . . . . . PNUse AP-Journal to trace def chgs. N Free. Recommended.Days before to warn Code-Expires. 14Email type . . . . . . . . . . . J A=Auto, J=Java
Names and TitlesAppend date to report gen files . Y Y=Yes, S=Subject, B=Both Add SYSTEM to query mail subject. Y Y=Yes. D=For AOD, B=Body Excel extension . . . . . . . . . .xml .xls, .xml More...F3=Exit
-
360 Audit | User Guide

Global Site Defaults - Part 2Syslog (SIEM) Support Leave blank for default. Syslog source Port⁄IP 1 . Port⁄IP 2 . Port⁄IP 3 .
TLS Application ID SIEM 1 SIEM 2 SIEM 3
Std CEF Ext. fld. names . Y Y=YesInclude QAUDJRN Seq. Num. N Y=Yes*AUTO Level of message . 1 1=1st-*AUTO1, 2=2nd-*AUTO2
Product behaviourGUI must run in SSL . . . N Y=YesUse IBM std auto disable. E Y=Yes (IBM), E=Extended (iSec, generic*) On change, Set ANZPRFACT accordingly.Mask UsrPrf with dft pwd. ?%%%%%%%%% ?=Display, %=Display, random if blankShare Item⁄Time Groups . Y Y=Yes (AP-Journal shares Audit)
BottomF3=Exit F12=Cancel
Enter values in the following fields
Installation
General purpose cmd library
An alternative library to QGPL from which all STR*, RUN*, and*INIT commands will be run.
ASP for data libraries
Products which are installed for the first time will be installedto this ASP. This refers to the product library and data library(for example, SMZ4, SMZ4DTA)
In some products such as APJournal, other libraries arecreated. For example, in the AP-Journal a library is createdper application. When created you are prompted with theCRTLIB (Create Library) so that you can set the ASP number.
Change the current ASP of the library. All future upgrades willuse this ASP.
All products will try to preserve the current ASP at upgradetime. Due to its sensitivity, you should check it.
Audit|User Guide 361
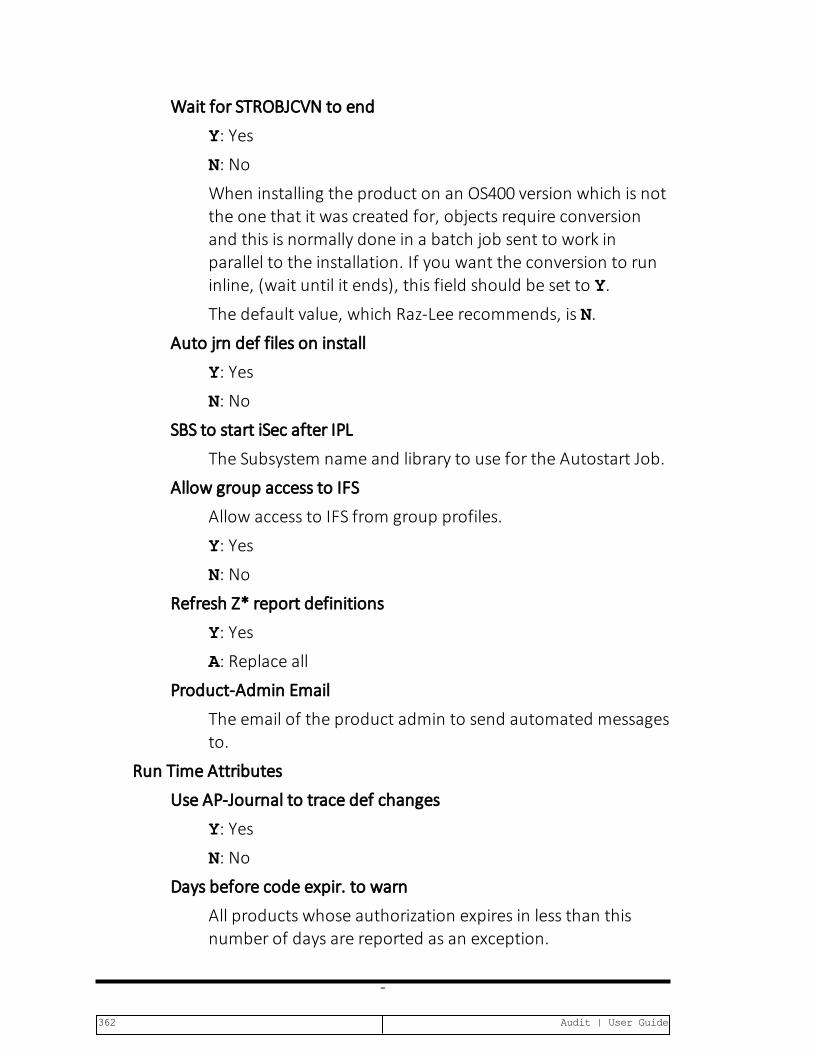
Wait for STROBJCVN to end
Y: Yes
N: No
When installing the product on an OS400 version which is notthe one that it was created for, objects require conversionand this is normally done in a batch job sent to work inparallel to the installation. If you want the conversion to runinline, (wait until it ends), this field should be set to Y.
The default value, which Raz-Lee recommends, is N.
Auto jrn def files on install
Y: Yes
N: No
SBS to start iSec after IPL
The Subsystem name and library to use for the Autostart Job.
Allow group access to IFS
Allow access to IFS from group profiles.
Y: Yes
N: No
Refresh Z* report definitions
Y: Yes
A: Replace all
Product-Admin Email
The email of the product admin to send automated messagesto.
Run Time Attributes
Use AP-Journal to trace def changes
Y: Yes
N: No
Days before code expir. to warn
All products whose authorization expires in less than thisnumber of days are reported as an exception.
-
362 Audit | User Guide
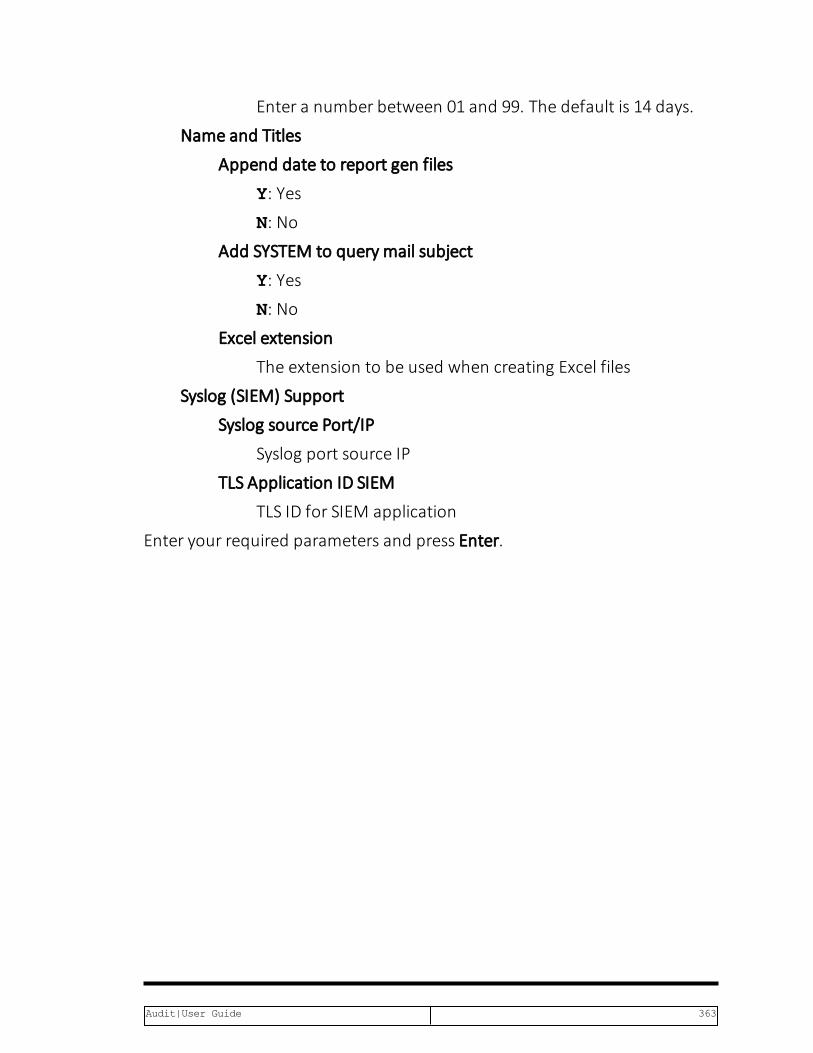
Enter a number between 01 and 99. The default is 14 days.
Name and Titles
Append date to report gen files
Y: Yes
N: No
Add SYSTEM to query mail subject
Y: Yes
N: No
Excel extension
The extension to be used when creating Excel files
Syslog (SIEM) Support
Syslog source Port/IP
Syslog port source IP
TLS Application ID SIEM
TLS ID for SIEM application
Enter your required parameters and press Enter.
Audit|User Guide 363

Network Support
Work with network definitionsTo get current information from existing report or query, adjust systemparameters, or to collect information from all the groups in the system intooutput files that can be sent via email, use theWork with Network Systemsscreen
1. Select 71. Work with network definitions from the BASESupportmenu (STRAUD> 89 > 71). TheWork with Network Systemsscreen appears.
System type:AS400 Work with Network Systems System:S520 Position to . . .Type options, press Enter. 1=Select 4=Remove 7=Export dfn. 8=Check DDM 9=Verify communication
Opt System Group RAZLEE1 *RL RAZLEE1 machine
RAZLEE2 *G1 RAZLEE2 machine RAZLEE3 *G1 RAZLEE3 machine
BottomF3=Exit F6=Add New F7=Export dfn cmd F12=Cancel
2. Press F6 to define a new network system to work with and press Enterto confirm.
-
364 Audit | User Guide

System type:AS400 Add Network System System:S520
System . . . . . . . . . .Description . . . . . . . .Group where included . . . *NONE *Name
Communication DetailsIP or remote name . . . . . Type . . . . . . . . . . . *IP *SNA, *IPEntry of *LOCAL on System . Use WRKRDBDIRE to verifyAuto filled for this system. Required for Multi-LPAR of AOD, P-R, Replication.
Copy of QAUDJRN on a different systemWhere is QAUDJRN analyzed . *SYSTEM Name, *SYSTEMExtension Id on remote . .
Note: After adding a system, run again "Network Authentication".
F3=Exit F12=CancelModify data, or press Enter to confirm.
System
The name of the system
Description
A meaningful description of the system
Group where included
Enter the name of the group to which the IBM is assigned
Where is QAUDJRN analyzed
Give the name of the System where QAUDJRN is analyzed. Enter*IBM if it is analyzed locally.
Default extension Id
Enter the extension ID for local copy details
Type
The type of communication this system uses, Valid values are*SNA and *IP.
IP or Remote Name
Enter the IP address or SNA Name, depending on the Type ofcommunication you defined.
Audit|User Guide 365
Enter your required definitions and press Enter to confirm.
-
366 Audit | User Guide

Network AuthenticationTo perform activity on remote systems, you must define the userSECURITY2P with the same password on all systems and LPARS with thesame password.
1. Select 72. Network Authentication from the BASE Supportmenu (STRAUD> 89 > 72). The Network Authentication screenappears.
Network Authentication
Type choices, press Enter.
User for remote work . . . SECURITY2P Name Password . . . . . . . . . Confirm password . . . . .
In order to perform activity on remote systems, the user SECURITY2P must be defined on all systems and LPARS with the same password. Product options which require this are: - referencing a log or a query with the parameter SYSTEM() - replication user profiles, passwords, system values - populating definitions, log collection, etc. Values entered in this screen are NOT preserved in any iSecurity file. They are only used to set the user profile password and to set server authentication entries. Ensure that SysVal QRETSVRSEC is set to 1.
F3=Exit F12=Cancel
2. Enter the .SECURITY2P user password twice and press Enter.
Audit|User Guide 367

Send PTFThis option allows you to run a set of commands that will send objects as aPTF. This option is restricted to iSecurity products only. If you need to sendPTFs for other products, please contact RazLee Support.
Before you can use this option, you must
l define the entire network, as described in "Network Definitions" onpage 248, and
l define user SECURITY2P on all nodes, using the same password, asdescribed in "Network Authentication" on the previous page.
Select 74. Send PTF from the BASE SupportMenu (STRAUD> 89 > 74).The iSecurity Send PTF (RLSNDPTF) screen appears.
iSecurity Send PTF (RLSNDPTF) Type choices, press Enter.
System to run for . . . . . . . Name, *CURRENT, *group, *ALL..Objects . . . . . . . . . . . . Name, generic*, *ALL, *NONE + for more values Library . . . . . . . . . . . . Name, ISECSETUP Object types . . . . . . . . . . *ALL *ALL, *ALRTBL, *BNDDIR... + for more values Save file . . . . . . . . . . . *LIB Name, *LIB In library . . . . . . . . . . QGPL Name Send SAVF to remote library . . *AUTO Name, *AUTO (RL+job number) On remote, backup LIB to SAVF . *NONE Name, *NONE, *LIB In library . . . . . . . . . . Name Restore the objects . . . . . . *NONE Name, generic*, *NONE, *ALL Into library . . . . . . . . . Name, *LIB, *SAVF, ISECSETUP Call the installation pgm . . . *NONE Name, *NONE Library . . . . . . . . . . . Name, *LIBL, *RSTLIB More...F3=Exit F4=Prompt F5=Refresh F10=Additional parameters F12=Cancel F13=How to use this display F24=More keys
System to run for
l Name = The specific name of the system>l *CURRENT = The current systeml *group = All systems in the group>l *ALL = All systems on the network
-
368 Audit | User Guide

Objects
l Name = A specific objectl generic* = A group of objects with the same prefixl *ALL= All the objectsl *NONE = No objects need to be extracted, the SAVF hasalready been prepared
Library
The name of the library that contains the objects
Object types
The object types to be sent
Save file / Library
The name and library of the SAVF to contain the objects.
If you enter *LIB for the file name, the name of the librarycontaining the objects will be used.
If you enter *AUTO as a name for the library, a library will becreated with the name of RL<jobnumber>
Remote library for SAVF
The name of the remote library to receive the SAVF to contain theobjects. If you enter *AUTO as a name for the library, a library willbe created with the name of RL<jobnumber>
Restore objects
The objects to be restored
l Name = A specific objectl generic* = A group of objects with the same prefixl *ALL= Restore all objectsl *NONE= Do not restore any objects
Restore to library
The name of the library to receive the restored objects
l Name = A specific libraryl *LIB = the name of the original library containing theobjects will be used.
l *SAVF= the same name as the SAVF
Audit|User Guide 369

Program to run / Library
The name and library of a program to run after the objects havebeen restored.
Parameters
The parameters for the program that runs after the restore.
Select the correct options and press Enter.
-
370 Audit | User Guide

Run CL ScriptsWIth the iSecurity Remote Command screen, you can run a set ofcommands either from a file or by entering specific commands asparameters. Each command must be preceded by a label:
l LCL:Run the following command on the local systeml RMT:Run the following command on the remote systeml SNDF:Send the save file (format: library/file) to RLxxxxxxxx/file(xxxxxxxx is the local system name)
Before you can use this option, you must
l define the entire network, as described in "Definitions" on page 337,and
l define user SECURITY2P on all nodes, using the same password, asdescribed in "Network Authentication" on page 339.
Select 75. Run CL Scripts from the BASE Supportmenu(STRAUD > 89 > 75). The iSecurity Remote Command (RLRMTCMD) screenappears.
iSecurity Remote Command (RLRMTCMD) Type choices, press Enter.
System to run for . . . . . . . Name, *CURRENT, *group, *ALL..Starting system . . . . . . . . *START Name, *START Ending system . . . . . . . . . *END Name, *END Run on *CURRENT if in *group . . *NO *NO, *YES Source file for commands . . . . *CMDS Name, *CMDS Library . . . . . . . . . . . Name, *LIBL Source member . . . . . . . . . Name Cmds-LCL:cmd RMT:cmd SNDF:savf
+ for more values
BottomF3=Exit F4=Prompt F5=Refresh F12=Cancel F13=How to use this display F24=More keys
Audit|User Guide 371

System to run for
l Name: The specific name of the system>l *CURRENT: The current systeml *group: All systems in the group>l *ALL: All systems on the network
Starting system
Use to define the start of a subset within *group or *ALL
This is useful if you want to rerun a command that previouslyfailed
Ending system
Use to define the end of a subset within *group or *ALL
This is useful if you want to rerun a command that previouslyfailed
Allow run on local system
*YES: The remote command can run on the local system
*NO: The remote command cannot run on the local system
Source file for commands
Name: The file where the commands to run are stored.
*CMDS: Use the commands entered below
Library
Name: The library that contains the commands source file
*LIBL: The library list
Source member
Name: The member that contains the commands
Cmds –LCL:cmd RMT:cmd SNDF:savf
The commands that can be run (if the Source file for commandsparameter is *CMDS).
LCL:cmd : A command that will be run on the local computer
RMT:cmd : A command that will be run on a remote computer
SNDF:savf: A save file
Select the correct options and press Enter.
-
372 Audit | User Guide
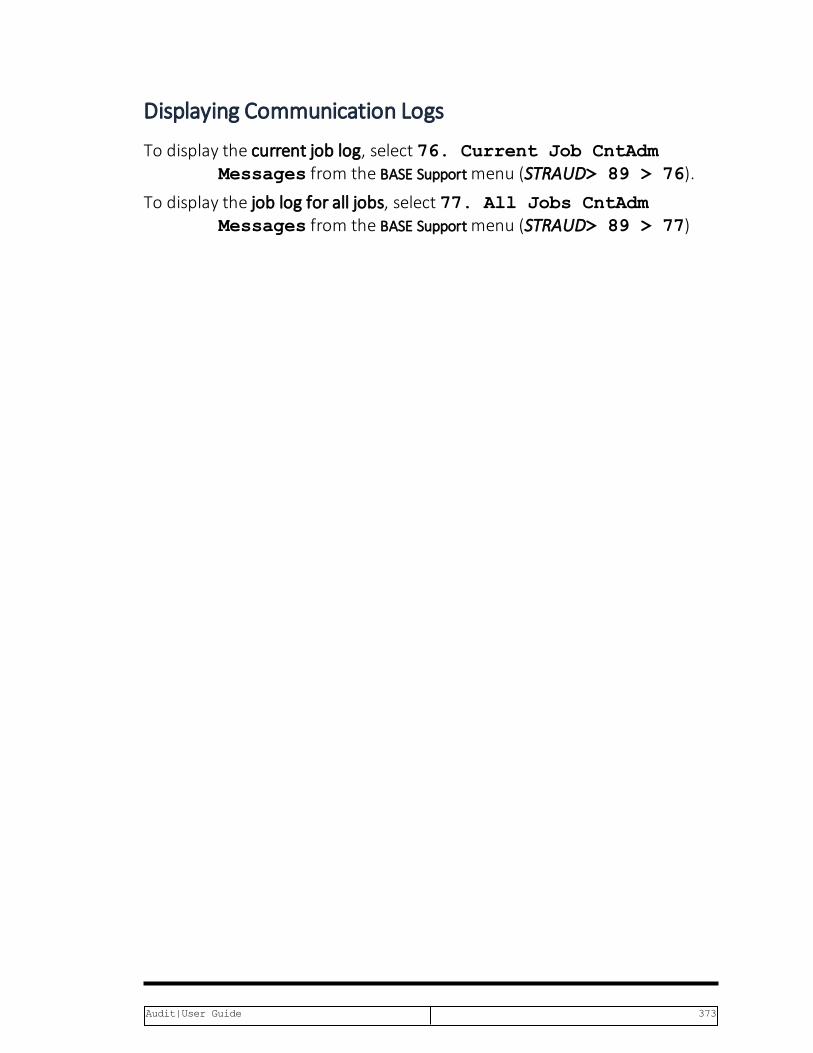
Displaying Communication Logs
To display the current job log, select 76. Current Job CntAdmMessages from the BASE Supportmenu (STRAUD> 89 > 76).
To display the job log for all jobs, select 77. All Jobs CntAdmMessages from the BASE Supportmenu (STRAUD> 89 > 77)
Audit|User Guide 373

Appendix A: Raz-Lee Information Sources
The Report Generator and its associated Report Scheduler service alliSecurity products. They are implemented with its full capacity in both Greenand GUI environments.
This appendix contains the list of types of information that are included foreach products.
Each of these types is an information source. Their names are two characterslong.
All products come with example reports. The example report names that aresent with the product start with Z_xx…., where xx is the informationsource.
Some types refer to static information such as attributes of User profiles,Object descriptions or values of System values. Usually such start with $ or #.
Other represent Audit Types that appear in QAUDJRN. Such are usuallyalphabetical.
Firewall servers are denoted by 2 digits.
Summary of Raz-Lee Entry TypesiSecurity uses several unique additional information types:
$9 Enables any command or call to a program that produces one or morespool files to become a part of the report generator capabilities. $9 caninclude the Display xx Definition (DSPxxDFN) Command, enabling incor-poration of all definition information.
00 All information types for Firewall and ScreenA# All types of QAUDJRNA$ All types of QAUDJRN containing Library & Object$@ History Log (QHST)$8 Query log report. Information of any run of a report and its output
l $@- History Log
l A$- All types of QAUDJRN containing Library and Object
-
374 Audit | User Guide

l A#- All types of QAUDJRN
l C@- User Profile Changed (After and Previous Images)
Report Generator Capabilities
OutputScreen, GUI, *PRINT, *PRINT1-9 (special user settings for print), PDF, HTML,CSV, OUTFILE (output file by fields)
Select (Filter)The following TEST operations are supported:
l EQ, NE, LE, GE, LT, GT
l LIST, NLIST (Not LIST), LIKE, NLIKE (Not LIKE), START, NSTART(Not START),
l ITEM, NITEM (Not ITEM), where a value is checked to see if it is in agroup. Supported groups include:
l *GRPPRF User is included in Group/Supplemental profile
l *LMTCPB User Limit Capabilities
l *SPCAUT User has a specified or any Special Authority
l *TIMEGRP Time group – a weekly time table (e.g. after hoursand weekends)
l *USRGRP User is included in iSecurity/Firewall Group
l General groupMultiple groups ordered in classes such asUsers, IPs, Libraries, and Objects. To simplify the setting of a rule,enter ITEM or NITEM as the TEST and press F4
l PGM, NPGM (Not Program), a provided or user written program thatreturn True or False. For example, whether the command in CD audittype was entered during elevated authority by Authority On Demand
To simplify the setting of rules, enter PGM, NPGM, ITEM, or NITEM as thetest and press F4.
General groups can include generic names. *GENERIC should follow thenamed group.
Audit|User Guide 375

You can combine test with And or Or. And is the default. You can include thesame field multiple times.
SortThe following characteristics are available:
l Multiple Fieldsl Ascending or Descending orderl Break after change of a number of sort fields. A title is createdcontaining the specified sort fields. All lines exclude these fields.
l Report can include either all records or one record per key
Summary Sub ReportsWhile running the main report, data can be grouped in addition sub-reports.For example, when running on objects in a group of libraries, you can createcounts of objects by owner or counts of objects by type, or sum objects sizesper library).Up to 3 Summary Sub Reports can be processed simultaneously.Data is Counted or a value of a field is Summarized.Each such report classifies the data based on 1 to 3 fields.Condition to print lines in a Summary Sub Reports.The total number of records is always printed.
ExplanationEach report may carry a free format text that explains its contents. Thisreduces the effort of explaining the intention of the report and saves as itsdocumentation.
Print of FilterThe filter used for the report can be printed.
Print of HeaderA place for signing the report after inspecting it can be printed.
-
376 Audit | User Guide

Information Types
Audit|User Guide 377

Informationcode ID
Where used(products)
$@ History Log Audit$A User profile information Audit,UserProfile$B Objects that are owned by a user Audit$C Objects that a user is their primary
groupAudit
$D Objects for which a user has specificauthority
Audit
$E Job schedule entries Audit$F Command attributes Audit$G Group profile and their users Audit,UserProfile$H File members Audit$I Object description Audit$J Object authority Audit$K Job descriptions with user profile &
*PUBLIC=*USEAudit
$L Libraries description Audit$M User profile activation schedule Audit,UserProfile$N User profile expiration schedule Audit,UserProfile$O Program/Service-Program information Audit$P Users with default password (Repair by
ANZDFTPWD)Audit,UserProfile
$Q Programs that adopt authorities Audit$R IFS Objects Audit$S System values Audit$T Network attributes Audit$U Authorization Lists Audit$V Native objects secured by
authorization listAudit
$W DLO objects secured by authorizationlist
Audit
$X Library information [run RTVDSKINFfirst]
Audit
-
378 Audit | User Guide

$Y Modules of Program/Service-Program Audit$0 Audit Statistics processing Audit$1 Firewall Statistics processing Audit$3 Compliance report Audit$8 Query log report Audit$9 Interface to any spool file query All products#A System limits trending Audit,KPI#C PTF Groups Installed vs. Available Audit,ChgTracker,KPI#G Group PTF Info Audit,ChgTracker,KPI#H PTF Info Audit,ChgTracker,KPI#K Netstat information Audit,KPI#L NETSTAT interface information Audit,KPI#M NETSTAT routing information Audit,KPI#N NetStat job info Audit,KPI#Q AU TCP/IP information Audit#R Current server information Audit,KPI#S List of Servers-Share info Audit#U System status Audit,KPI#V System memory pool information Audit,KPI#W AU Active jobs Audit#X Disk status Audit,KPI#Y Output queue information (summary) Audit,KPI#Z License Information Audit@J Active job information Audit@K Job NOT active Audit@P Pool NOT active Audit@Q Active JobQ/OutQ information Audit@S System status and pool information Audit@0 Message queue (Group Id 0) Audit@1 Message queue (Group Id 1) Audit@2 Message queue (Group Id 2) Audit@3 Message queue (Group Id 3) Audit
Audit|User Guide 379
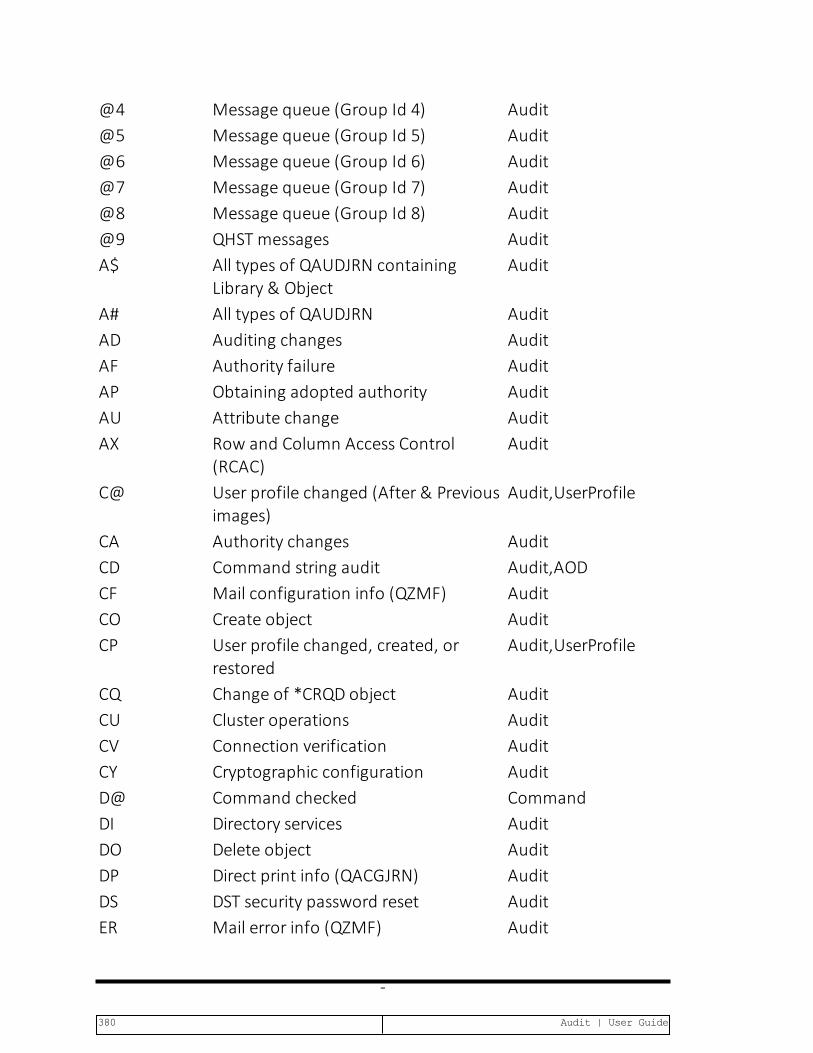
@4 Message queue (Group Id 4) Audit@5 Message queue (Group Id 5) Audit@6 Message queue (Group Id 6) Audit@7 Message queue (Group Id 7) Audit@8 Message queue (Group Id 8) Audit@9 QHST messages AuditA$ All types of QAUDJRN containing
Library & ObjectAudit
A# All types of QAUDJRN AuditAD Auditing changes AuditAF Authority failure AuditAP Obtaining adopted authority AuditAU Attribute change AuditAX Row and Column Access Control
(RCAC)Audit
C@ User profile changed (After & Previousimages)
Audit,UserProfile
CA Authority changes AuditCD Command string audit Audit,AODCF Mail configuration info (QZMF) AuditCO Create object AuditCP User profile changed, created, or
restoredAudit,UserProfile
CQ Change of *CRQD object AuditCU Cluster operations AuditCV Connection verification AuditCY Cryptographic configuration AuditD@ Command checked CommandDI Directory services AuditDO Delete object AuditDP Direct print info (QACGJRN) AuditDS DST security password reset AuditER Mail error info (QZMF) Audit
-
380 Audit | User Guide

EV System environment variables AuditGR Generic record AuditGS Socket description was given to
another jobAudit
IM Intrusion monitor AuditIP Interprocess communication AuditIR IP rules actions AuditIS Internet security management AuditJB Job resource info (QACGJRN) AuditJD Change to user parameter of a job
descriptionAudit
JS Actions that affect jobs AuditKF Key ring file AuditLD Link, unlink, or look up directory entry AuditLG Mail logging table info (QZMF) AuditML Office services mail actions AuditMP QoS policies Modification (QQOS) AuditNA Network attribute changed AuditND APPN directory search filter violation AuditNE APPN end point filter violation AuditOM Object move or rename AuditOR Object restore AuditOW Object ownership changed AuditO1 Optical access: Single file or directory AuditO2 Optical access: Dual file or directory AuditO3 Optical access: Volume AuditP@ Password Reset P-RPA Program changed to adopt authority AuditPF PTF Operations AuditPG Change of an object's primary group AuditPO Printed output AuditPS Profile swap AuditPU PTF Object Change Audit
Audit|User Guide 381
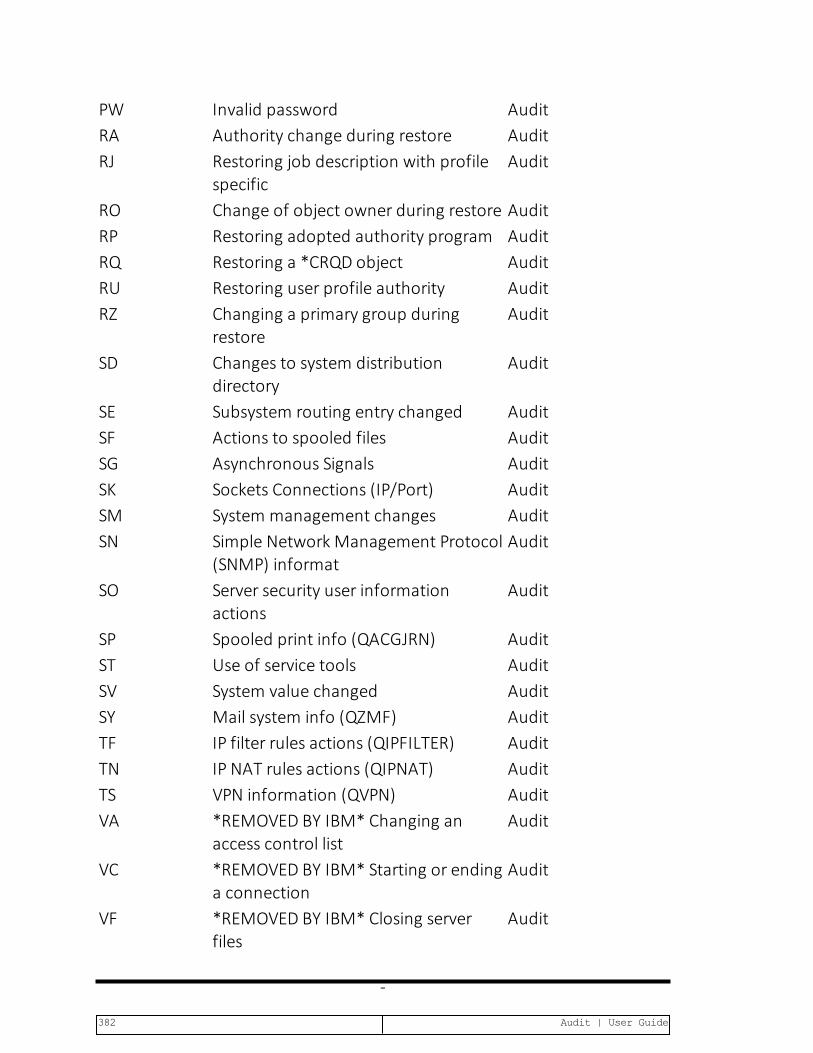
PW Invalid password AuditRA Authority change during restore AuditRJ Restoring job description with profile
specificAudit
RO Change of object owner during restore AuditRP Restoring adopted authority program AuditRQ Restoring a *CRQD object AuditRU Restoring user profile authority AuditRZ Changing a primary group during
restoreAudit
SD Changes to system distributiondirectory
Audit
SE Subsystem routing entry changed AuditSF Actions to spooled files AuditSG Asynchronous Signals AuditSK Sockets Connections (IP/Port) AuditSM System management changes AuditSN Simple Network Management Protocol
(SNMP) informatAudit
SO Server security user informationactions
Audit
SP Spooled print info (QACGJRN) AuditST Use of service tools AuditSV System value changed AuditSY Mail system info (QZMF) AuditTF IP filter rules actions (QIPFILTER) AuditTN IP NAT rules actions (QIPNAT) AuditTS VPN information (QVPN) AuditVA *REMOVED BY IBM* Changing an
access control listAudit
VC *REMOVED BY IBM* Starting or endinga connection
Audit
VF *REMOVED BY IBM* Closing serverfiles
Audit
-
382 Audit | User Guide

VL *REMOVED BY IBM* Account limitexceeded
Audit
VN *REMOVED BY IBM* Logging on andoff the network
Audit
VO Validation list actions AuditVP Network password error AuditVR *REMOVED BY IBM* Network resource
accessAudit
VS *REMOVED BY IBM* Starting/ending aserver session
Audit
VU *REMOVED BY IBM* Changing anetwork profile
Audit
VV *REMOVED BY IBM* Changing servicestatus
Audit
XD Directory server extension AuditXE DSNX error entry (QDSNX) AuditXL DSNX logging entry (QDSNX) AuditX0 Network Authentication AuditX1 Identity token AuditX2 Query Manager profile values. AuditYC DLO object accessed (change) AuditYR DLO object accessed (read) AuditZC Object accessed (change) AuditZM SOM method access (no longer used
by IBM)Audit
ZR Object accessed (read) Audit00 Generic entry type (00-99 for reporting
only)Firewall
01 *FILTFR Original File Transfer Function Firewall02 *FTPLOG FTP Server Logon Firewall03 *FTPSRV FTP Server-Incoming Rqst
ValidationFirewall
04 *SQL Database Server - SQL access Firewall05 *RMTSRV Remote Command/Program Firewall
Audit|User Guide 383

Call06 *FILSRV File Server Firewall07 *DDM DDM request access Firewall08 *TELNET Telnet Device Initialization Firewall09 *TFTP TFTP Server Request Validation Firewall1K *FW-DFN Native Object Security Firewall (dfn)1L *FW-DFN IFS object security Firewall (dfn)1M *FW-DFN Command Exceptions Firewall (dfn)1N *FW-DFN Users & Groups Firewall (dfn)1Y iSecurity groups members Audit10 *REXLOG REXEC Server Logon Firewall11 *REXEC REXEC Server Request
ValidationFirewall
12 *RMTSQL Original Remote SQL Server Firewall13 *NDB Database Server - data base
accessFirewall
14 *WSG WSG Server Sign-On Validation Firewall15 *ORDTAQ Original Data Queue Server Firewall16 *DTAQ Data Queue Server Firewall17 *MSGSRV Original Message Server Firewall18 *SQLENT Database Server - entry Firewall19 *OBJINF Database Server - object
informationFirewall
20 *VPRT Original Virtual Print Server Firewall21 *NPRENT Network Print Server - entry Firewall22 *NPRSPL Network Print Server - spool
fileFirewall
23 *CHGUP Change User Profile Firewall24 *CRTUP Create User Profile Firewall25 *DLTUPA Delete User Profile - after
deleteFirewall
26 *DLTUPB Delete User Profile Firewall27 *RSTUP Restore User Profile Firewall
-
384 Audit | User Guide

28 *ORLICM Original License Mgmt Server Firewall29 *CSLICM Central Server - license mgmt Firewall30 *CSCNVM Central Server - conversion
mapFirewall
31 *CSCLNM Central Server - client mgmt Firewall32 *TCPSGN TCP Signon Server Firewall33 *PWRDWN Prepower Down System Firewall34 *RMTSGN Remote sign-on
(Passthrough)Firewall
35 *PWDVLD Password Dictionary Check /Validation
Firewall
36 *DRDA DRDA Distributed Relational DBaccess
Firewall
37 *FTPCLN FTP Client-Outgoing RqstValidation
Firewall
38 *TELOFF Telnet Device Termination Firewall39 *DHCPAB DHCP Address Binding
NotifyFirewall
40 *DHCPAR DHCP Address ReleaseNotify
Firewall
41 *DHCPRP DHCP Request PacketValidation
Firewall
42 *SIGNON Sign-On completed Firewall43 *PWDCHK Password Dictionary Check /
CheckFirewall
44 *SSHD SSH Daemon Firewall45 *DBOPEN Open Database Firewall46 *PWDVL2 Password Dictionary Check
/Validation fmt2Firewall
47 *SKTACP Socket Accept Firewall48 *SKTCNT Socket Connect Firewall49 *SKTLSN Socket Listen Firewall5A Tracking Data (Native/IFS/PTF/Source) ChgTracker
Audit|User Guide 385

5B ILE Modules Inventory ChgTracker5D Definition of IFS Directories ChgTracker5F PTF Status ChgTracker5G PTF Advanced status (Rel 7.2) ChgTracker5I Definition of Activity to Disregard ChgTracker5J Definition of Environments ChgTracker5L Definition of Libraries to Trace ChgTracker5M Definition of Projects ChgTracker5N Definition of Tasks ChgTracker5R Definition of IFS Directories to
DisregardChgTracker
5W Tracking Data (Native Objects) ChgTracker5X Tracking Data (Source Members) ChgTracker5Y Tracking Data (IFS Objects) ChgTracker5Z Tracking Data (PTF Objects) ChgTracker50 *DBSTT Database statistics Firewall6A Object Journaling Plan AP-Journal6B Object check Journaling Plan AP-Journal6C Confirmation tickets AP-Journal6I AOD History AOD6V Virus, Worm, Trojan, Ransomware
detectedAntivirus
6X Person - Attributes P-R6Y Users of a Person P-R6Z Log of who changed questions P-R7E User Compliance Check Action7F User Compliance Plan Action7I Native Object Compliance Check Action7J Native Object Compliance Plan Action7M IFS Object Compliance Check Action7N IFS Object Compliance Plan Action97 *SCRLCK Screen locked due to timeout Firewall98 *SCRRLS Screen released Firewall
-
386 Audit | User Guide

99 *SCREND Screen jobs ended astimeout passed
Firewall
Audit|User Guide 387

Appendix B: configuring CEF format forApache and WebSphere login records
DisclaimerThis guide refers to products and services that are not under Raz-Leeproduct's umbrella. Use the information in this Appendix under your ownrisk and discretion. Raz-Lee is not responsible for any damages whatsoeverthat may happen using this procedure.
Appendix objectiveThis Appendix demonstrates how to successfully configure Apache or IBMWebsphere webservers to send login records (or messages) in the format ofCommon Event Format (CEF).
-
388 Audit | User Guide

Configuring CEF output for Apache web serverTo configure CEF output for Apache web server:
1. Find the relevant Apache configuration file which contains the logs set-tings.
2. Open it using an editor.
3. Select the desired log you wish to configure CEF output. There are threetypes of directives:
l Errorlog.
l CustomLog.
l GlobalLog.
4. Once the desired directive is found, look for the directive LogFormat.
5. Right after the "LogFormat" directive, enter a space and type a quotationmark (") before and after the desired value parameters mentioned belowsection 8.
6. Right after the closing quotes, add the desired nickname. Normally itwould be "cef".
7. The content of the configuration varies, depending whoever the protocolis HTTP or HTTPS.
It is up to the user's discretion to decide which kind of parameters (markedas %X ) they would like to use.
NOTE: In Apache the division of fields is through the pipe "|" symbol.
Below is an example of such parameters:
Audit|User Guide 389
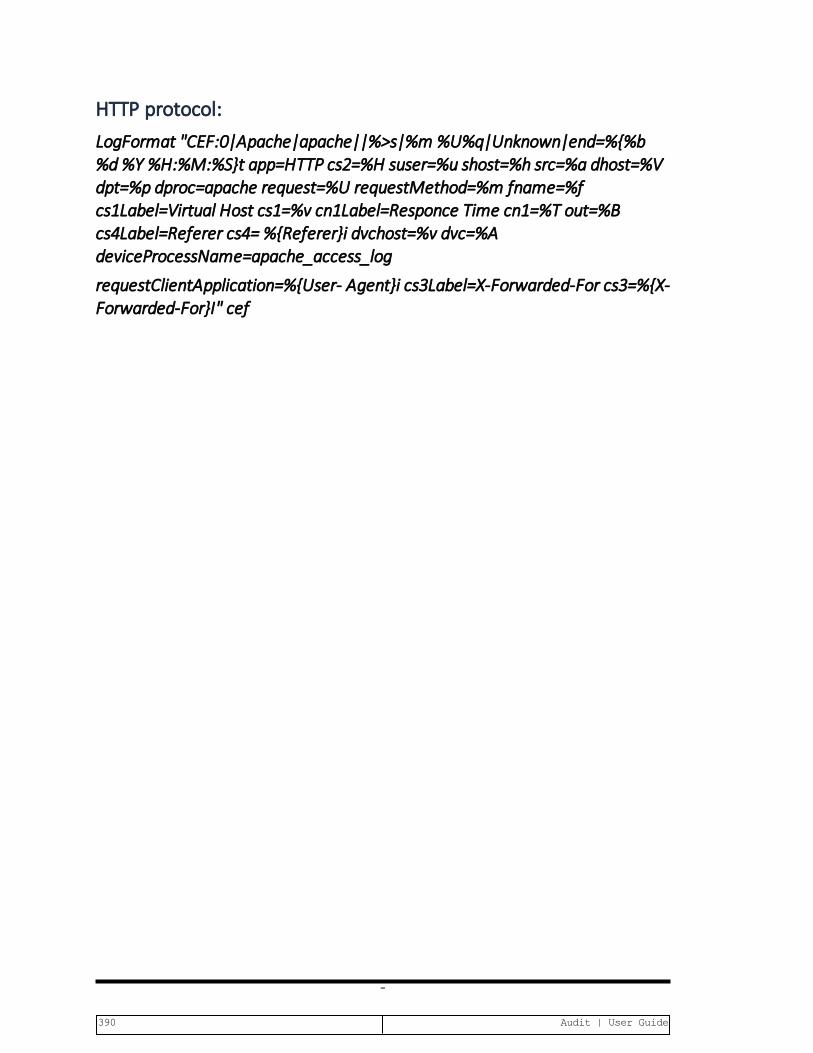
HTTP protocol:LogFormat "CEF:0|Apache|apache||%>s|%m %U%q|Unknown|end=%{%b%d%Y %H:%M:%S}t app=HTTP cs2=%H suser=%u shost=%h src=%a dhost=%Vdpt=%p dproc=apache request=%U requestMethod=%m fname=%fcs1Label=Virtual Host cs1=%v cn1Label=Responce Time cn1=%T out=%Bcs4Label=Referer cs4= %{Referer}i dvchost=%v dvc=%AdeviceProcessName=apache_access_log
requestClientApplication=%{User- Agent}i cs3Label=X-Forwarded-For cs3=%{X-Forwarded-For}I" cef
-
390 Audit | User Guide

HTTPS:LogFormat "CEF:0|Apache|apache||%>s|%m %U%q|%>s|end=%{%b %d%Y%H:%M:%S}t app=%H proto=TCP cs2=%H suser=%u shost=%h src=%adhost=%V dpt=%p dproc=apache request=https://%{HOST}i:%p%U%qrequestMethod=%m fname=%f cs1Label=Virtual Host cs1=%vcn1Label=Response Time cn1=%T in=%I out=%B cs4Label=Referer cs4=%{Referer}i cs5Label=SSL Protocol cs5=%{SSL_PROTOCOL}x cs6Label=SSLCIPHER cs6=%{SSL_CIPHER}x dvchost=%v dvc=%AdeviceProcessName=apache_access_log
requestClientApplication=%{User-Agent}i cs3Label=X-Forwarded-For cs3=%{X-Forwarded-For}I" cef
For example:
l %a = Client IP address of the request (see the mod_remote ipmodule)
l %A = Local IP-addressl %m = The request method
NOTE: A legend of %X parameters can be found athttp://httpd.apache.org/docs/current/mod/mod_log_config.html
Audit|User Guide 391

Configuring CEF output for IBM Websphere webserverUse the IS_install_path/wlp/usr/servers/iis/server.xml
configuration file to configure logging messages for WebSphere® ApplicationServer Liberty Core. The log files are produced in the IS_install_path/wlp/usr/servers/iis/logs folder.
The user must configure the logging messages in two sections: Networkdeployment and Application Server Liberty Profile:
-
392 Audit | User Guide
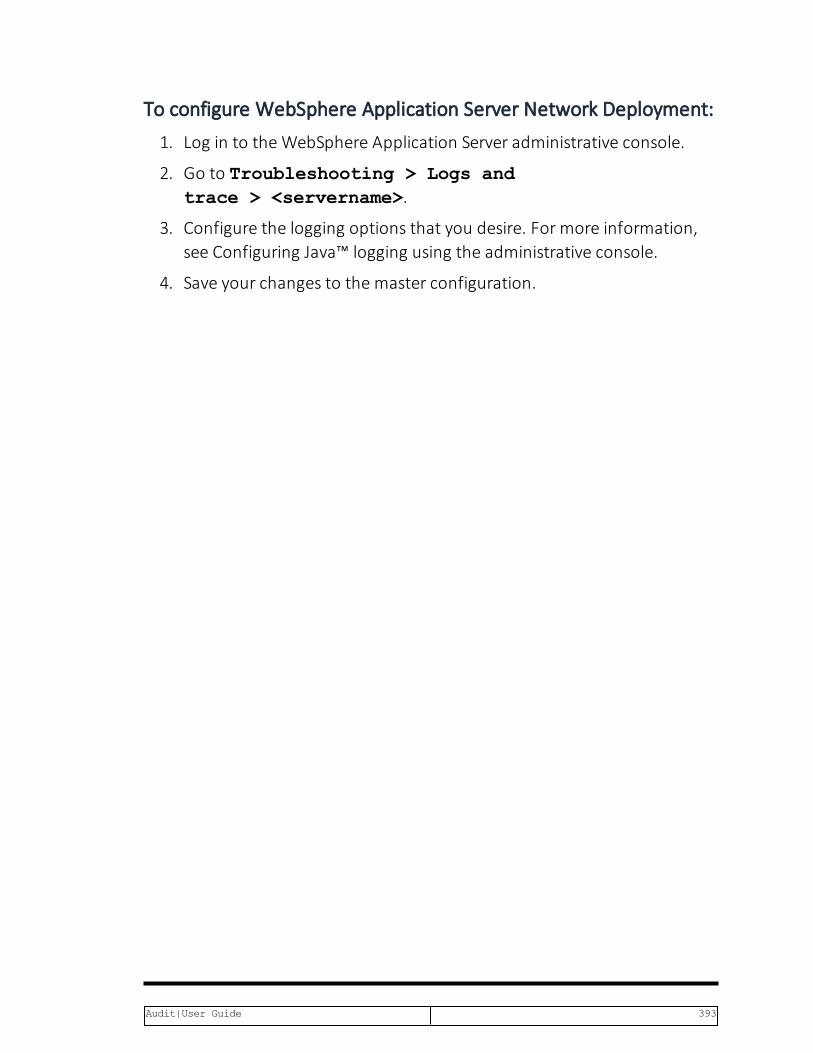
To configure WebSphere Application Server Network Deployment:1. Log in to theWebSphere Application Server administrative console.
2. Go to Troubleshooting > Logs andtrace > <servername>.
3. Configure the logging options that you desire. For more information,see Configuring Java™ logging using the administrative console.
4. Save your changes to the master configuration.
Audit|User Guide 393
To configure the WebSphere Application Server Liberty Profile:1. Open the IS_install_path/wlp/usr/servers/iis/server.xml con-
figuration file.
2. Configure logging related information. Use the comments in the serv-er.xml file to add or change what types of messages are logged.
3. Save your changes.
The configuration is the same for HTTP or HTTPS.
It is up to the user's discretion to decide which kind of parameters (markedas %X) they would like to use.
Below is an example of such values:
-
394 Audit | User Guide
HTTP, HTTPS protocols:CEF:0|WebSphere|websphere||%>s|%m %U%q|%>s|end=%{%b %d %Y %H:%M:%S}tapp=%H proto=TCP cs2=%H shost=%h src=%a dhost=%v dpt=%p dproc=websphererequest=https://%{HOST}i:%p%U%q requestMethod=%m cs1Label=Virtual Host cs1=%vcn1Label=Response Time cn1=%T in=%I out=%B cs4Label=Referer cs4=%{Referer}idvchost=%v dvc=%A deviceProcessName=websphere_access_logrequestClientApplication=%{User-Agent}i cs3Label=X-Forwarded-For cs3=%{X-Forwarded-For}i
NOTE:A legend of %X parameters can be found at the following link:https://www.ibm.com/support/knowledgecenter/en/
SSAW578.5.5/com.ibm.websphere.nd.doc/ae/cwve_xdcustomlog.html
Restart WebSphere Application Server for the configuration changes to takeeffect.
Audit|User Guide 395

Appendix C: Analyzing QAUDJRN on OtherSystems
-
396 Audit | User Guide

Preparing the Systems for Remote AuditingAuditallows you to audit other systems in your network. Before you can dothis, you must prepare both the system where you want to run the audit(your local system) and the system that you want to audit (the remotesystem).
On the remote system:
1. Use theWRKRDBDIRE command to get the RDB-name of the *LOCALentry.
2. Make a note of the RDB name. You will need it when configuring the localsystem.
3. In the Auditmain menu, select 89. Base Support (STRAUD > 89).The BASE Supportmenu appears.
4. Select 71. Work with network definitions. TheWork with Net-work Systems screen appears.
5. Type 1 for each system and define it to the network in theModify NetworkSystem screen.
6. Set Where is QAUDJRN analyzed to the proper system name ofthe local system.
7. Enter a unique ID in Default Extension Id.
On the local system:
1. Use theWRKRDBDIRE command to verify that you defined the remote sys-tem. If not, enter the following command: ADDRDBDIRE RDB(<RDB_NAME>) RMTLOCNAME(‘<IP_ADDRESS>’ *IP)
l <RDB_NAME> - Enter the RDB name you noted above.l <IP_ADDRESS> - Enter the IP Address of the remote system.
2. Enter the following command:ADDRMTJRN RDB(<RDB_NAME>) SRCJRN(QSYS/QAUDJRN) +
TGTJRN(SMZ4DTA???/QAUDJRN) /* ???="Default ExtensionId." */
3. Enter the following command:SBMJOB AUCATCHUP CMD(CALL SMZ4/AURMQAUD *ACTIVE)
Audit|User Guide 397

4. Add the SBMJOB command from the previous step to the IBM i startupprogram.
5. In the Audit main menu, select 89. Base Support (STRAUD > 89).The BASE Supportmenu appears.
6. Select 71. Work with network definitions. TheWork with Net-work Systems screen appears.
7. Type 1 for each system and define it to the network in theModify NetworkSystem screen.
To see a brief version of these instructions online:
1. Select 1. Setup Instructions in the Analyzing QUADRJN onanother systemmenu (STRAUD > 2 > 41 > 1).
-
398 Audit | User Guide
Activation of Remote AuditingFor the Remote System (The System being Analyzed):
When you have finished preparing both systems, you can activate thecollection of data either on the remote system or on the local system.
To start data collection directly on the remote system:
1. Select 2. in the main Auditmenu. The Activation menu appears.
2. Select 41. Setup Analyzing QAUDRN. The AnalyzingQAUDRJN on another system menu appears.
3. Select 51. Activate in the Analyzing QAUDRJN onanother system . The system sends a command to the remote sys-tem to activate audit real-time detection.
To stop data collection directly on the remote system:
1. Select 2. Activation in the main Auditmenu. The Activationmenu appears.
2. Select 41. Setup. The Analyzing QAUDRJN on anothersystemmenu appears.
3. Select 52. Deactivate. The local system sends a command to theremote system to stop audit real-time detection.
To work with journal attributes:
1. Select 2. Activation in the main Auditmenu. The Activationmenu appears.
2. Select 41. Setup. The Analyzing QAUDRJN on anothersystemmenu appears.
3. Select 55. Work with journal status. The Work withJournal Attributes screen appears.
Audit|User Guide 399

Work with Journal Attributes Journal . . . . . . : QAUDJRN Library . . . . . . : QSYS
Attached receiver . : AUDITR0027 Library . . . . . . : QGPL
Text . . . . . . . . :
ASP . . . . . . . . : 1 Receiver size options: *MAXOPT1 Message queue . . . : QSYSOPR Fixed length data . : *JOB Library . . . . . : *LIBL *USR Manage receivers . . : *SYSTEM *PGM Delete receivers . . : *NO *PGMLIB Journal cache . . . : *NO *SYSSEQ Manage delay . . . . : 10 *RMTADR Delete delay . . . . : 10 *THD Journal type . . . . : *LOCAL *LUW Journal state . . . : *ACTIVE *XID Minimize entry data : *NONE BottomF3=Exit F5=Refresh F12=Cancel F17=Display attached receiver attributesF19=Display journaled objects F24=More keys
For the Local System (The System Where the Analysis is Done)
To start data collection directly on the remote system:
1. Select 2. Activation in the main Auditmenu. The Activationmenu appears.
2. Select 41. Setup. The Analyzing QAUDRJN on anothersystemmenu appears.
3. Select 61. Activate. The Submit Audit Remote Commandscreen appears.
-
400 Audit | User Guide
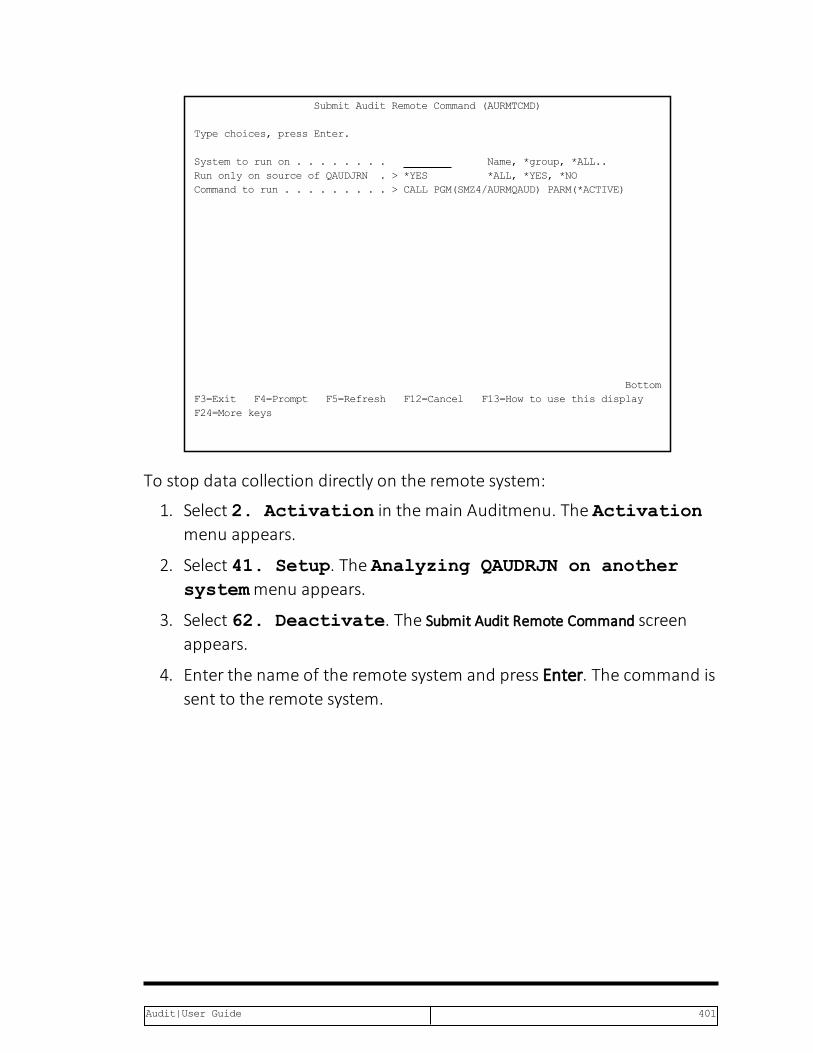
Submit Audit Remote Command (AURMTCMD) Type choices, press Enter.
System to run on . . . . . . . . Name, *group, *ALL.. Run only on source of QAUDJRN .>*YES *ALL, *YES, *NO Command to run . . . . . . . . .>CALL PGM(SMZ4/AURMQAUD) PARM(*ACTIVE)
BottomF3=Exit F4=Prompt F5=Refresh F12=Cancel F13=How to use this display F24=More keys
To stop data collection directly on the remote system:
1. Select 2. Activation in the main Auditmenu. The Activationmenu appears.
2. Select 41. Setup. The Analyzing QAUDRJN on anothersystemmenu appears.
3. Select 62. Deactivate. The Submit Audit Remote Command screenappears.
4. Enter the name of the remote system and press Enter. The command issent to the remote system.
Audit|User Guide 401