INSIDE XEROX VENTURA --PUBLISHER - bitsavers.org
710
, -- DESKTOP POWER SERIES \ INSIDE XEROX VENTURA -- PUBLISHER Second Edition A Guide to Professional Desktop Publishing James Cavuoto and Jesse Berst Supports Version 2
-
Upload
khangminh22 -
Category
Documents
-
view
0 -
download
0
Transcript of INSIDE XEROX VENTURA --PUBLISHER - bitsavers.org

, --DESKTOP POWER SERIES
\
INSIDE XEROX VENTURA --PUBLISHER
Second Edition
A Guide to Professional Desktop Publishing
James Cavuoto and Jesse Berst
Supports Version 2

INSIDE XEROX VENTURA
PUBLISHER A Guide to Professional Desktop Publishing
By James Cavuoto and Jesse Berst
Micro Publishing, Torrance, California and
New Riders Publishing, Thousand Oaks, California

Inside Xerox Ventura Publisher A Guide to Professional Desktop Publishing by James Cavuoto and Jesse Berst
Published by:
Micro Publishing 21150 Hawthorne Blvd'J Suite 104 'lbrranceJ CA 90503
and New Riders Publishing P.O. Box 4846-V Thousand OaksJ CA 91360
All rights reserved. No part of this book may be reproduced or transmitted in any form or by any means, electronic or mechanical, including photocopying, recording, or by any information storage and retrieval system without written permission from Micro Publishing and New Riders Publishing, except for the inclusion of brief quotations in a review.
Copyright © 1987, 1989 by Micro Publishing
First Edition, 1987 Second Edition, 1989
Printed in the United States of America
Library of Congress Cataloging-in-Publications Data
Cavuto, James. Inside Xerox Ventura Publisher.
Includes index. 1. Desktop publishing. 2. Ventura publisher (Computer
program) I. Berst, Jesse. II. Title. Z386.D47C38 1989 686.2'2 88-34739 ISBN 0934035-59-8 (New Riders Pub.)
This book is designed to provide information about the Xerox Ventura Publisher program. Every effort has been made to make this book complete and as accurate as possible. But no warranty of suitability, purpose, or fitness is implied. The information is provided on an "as-is" basis. The authors, Micro Publishing, and New Riders Publishing shall have neither liability nor responsibility to any person or entity with respect to any loss or damages in connection with or arising from the information contained in this book.
Many of the designations used by manufacturers and sellers to distinguish their products are claimed as trademarks. Where these designations appear in the book and the authors were aware of a trademark claim, the designations have been printed with initial capital letters-for example, LaserWriter Plus or WordStar.
Ventura Publisher is a trademark of Ventura Software, Inc. Xerox and Interpress are registered trademarks of Xerox Corp. IBM is a registered trademark of International Business Machines Corp. PostScript and lllustrator are trademarks of Adobe Systems, Inc. WordStar is a registered trademark of MicroPro International Corp. LaserWriter and Macintosh are trademarks of Apple Computer, Inc. MS-DOS and Word are trademarks of Microsoft Corp.

Acknowledgments
We would like to thank the numerous individuals and organizations that have helped make this book - and the previous edition - what it is. This includes a very long list of supportive people at Xerox Corp. including Art Coles, Randi Doecker, Carol Clement, Barry Sulpor, Terry Dillman, Doug Heineman, Carolyn Grossman, Beatrice Morgan, Lori Bertley, Harold Morgan, and others. The public relations team at Hill and Knowlton has also been very helpful.
We are indebted to John Meyer, president of Ventura Software, who has provided a continuing level of support in the form of advice, suggestions, and guidance. And a special thank you to Byron Canfield, Chad Canty, and Steve Murtha for their Ventura insights, suggestions, tips, tricks, and techniques, many of which appear in this book.
Several people provided editorial help, including Steve Beale and Keith Thompson, who contributed portions of the book, and Peg Morell and Marcela Murman, who performed copy editing and proofreading. Carolyn Porter and Todd Meisler at New Riders Publishing managed the production process. Our thanks and congratulations also extend to Harbert Rice, founder of New Riders, now part of Que Corp. Jesse would like to express his appreciation to Lori White, Martha Lubow, and Jon DeKeles for their support and encouragement.
Many companies loaned us hardware or software used in the writing and production of this book. These include MicroPro International Corp., SymSoft Inc., Digital Research Inc., ZSoft, Inc., Wyse Technology, and, of course, Xerox Corp.
Finally, we would like again to to express thanks and admiration to the programmers at Ventura Software, Inc. who wrote Ventura Publisher: Don Heiskell, Lee Lorenzen, and John Grant.
iii

Production Note:
iv
This book was produced using a I6-MHz 386 computer from Mach Computer Systems with 2 MB of RAM and a 40-MB hard disk. We used the SinglePage display from Cornerstone Technology Inc. and the Apple LaserWriter Plus for output. All of the pages of this book, with the exception of the cover and the images so noted in Chapter Seven, were produced at 300 dpi on the LaserWriter Plus.
Portions of the book were produced using an IBM AT computer with Wyse 7190 display and 2-MB JLaser board, and an AST Premium 286 computer with 2 MB of memory.

Table of Contents
Preface 1
Chapter One
Introduction to Desktop Publishing 3 Desktop publishing defined 4 How to benefit from desktop publishi ng 6 The shortcomings of desktop publishing 9 Ventura Publisher VS. other programs 10
Chapter Two
Introduction to Ventura Publisher 15 Before you begin 15 Fifteen minutes to Ventura Publisher 17 Understanding Ventura Publisher 29 The Ventura Formula 51
Chapter Three
Creating Text 53 General rules for creating text 57 Specific word processors 64 Creating text with other programs 71 Creating text within Ventura 75 Editing in Ventura 78 Preformatting text files 89
v

Chapter Four
Chapter Five
Chapter Six
Creating Pictures The Ventura approach to pictures 112 Creating line-art 124 Creating images 140 Creating images with scanners 143 Screen capture utilities 150 Clip Art 152 Ventura's Graphic mode 154
111
Working with Style Sheets 181
Style sheet basics 181 Understanding style sheets and chapter files 188 Loading and saving a style sheet 191 Applying a style sheet 196 Changing or building a style sheet 202 Working with the menus 214 Managing style sheets 248
Building the Chapter
Building page-style chapters 254 Working with text 269 Working with pictures 276 Completing the chapter 322
251
Chapter Seven
vi
Producing Output
Printing options 330 Getting ready to print 345 Printing a single chapter 353 Printing to a disk file 362 Printing multiple chapters 367 Fonts 378
329

Chapter Eight
Chapter Nine
Chapter Ten
Binding pages 394 Guidelines for offset printing 395
Advanced Functions File management techniques 399 Indexing 413 Creating a table of contents 433 Inserting Footnotes 437 Numbering functions 443 Tab settings 459 Typographic functions 464 Hyphenation options 479
Advanced Tips & Techniques Creating a systems environment 485 Performance techniques 508
SpecmlDocumentForma~
Special formats and effects 519 Building frame-style chapters 565 Building free-form chapters 577 Notes on document types 579
Chapter Eleven
The Professional Extension Overview of Professional Extension 586 Installing the Professional Extension 587 EMS support 588 Table Edit mode 589 Creating and editing equations 611 Creating and using cross references 615 Vertical justification 626 Edco hyphenation dictionary 636
399
485
519
585
vii

Appendix A
Glossary 641
AppendixB
Manufacturers and Products 659 ClipArt 659 Fonts and Font Software 659 Graphics Software 661 Monitors 663 Printers 665 Printer Controllers 666 Printer Control Software 667 Publications 667 Scanners 668 Style Sheets 669 Training & Seminars 670 Typesetting Interfaces 670 User Groups 671 Ventura Utilities 671 Word Processing Programs 672
AppendixC
Ventura Character Sets 675
Index 679
viii

Preface
When we finished the first version of this book in early 1987, we expected that Xerox Ventura Publisher would become the leading desktop publishing program. But no amount of optimism could have prepared us for the success Ventura - and our book - have achieved. In part because ours was the first book available, and in part because we had been involved early on in the development of the program, Inside Xerox Ventura Publisher received an outpouring of support from reviewers, users, and Xerox Corp. itself.
But our job had just begun. In the months that followed, we refined our Ventura skills on a number of complex publishing tasks that stretched the software to the limits. We learned about new techniques, new add-on products, and new performance options that expand the power and flexibility of Ventura Publisher.
Then in 1988, Xerox announced version 2 of Ventura Publisher and the Professional Extension, which further cemented the product's premier position in the market. This was no mere product upgrade, but an entirely new realm of publishing capabilities.
Taking our cue from the Ventura development team, we decided that no mere book update would suffice. What you hold is a completely new and expanded version of our book filled with explanations and demonstrations of the amazing power of Xerox Ventura Publisher.
We hope you find this edition as enlightening as we found the process of producing it. Please send us your questions, comments, and suggestions using the reply cards in the back of the book.
Jesse Berst James Cavuoto November, 1988


Chapter One
Introduction to Desktop Publishing
Welcome to the revolution. A movement is underway that is revolutionizing the way businesspeople produce
printed pages. This book win show you how to profit from that trend using a remarkable software program called Xerox Ventura Publisher.
To gain perspective, let's harken back to an earlier revolution and an event that dramatically illustrates the power of the printed word. In January 1 776, Thomas Paine published Common Sense, a vivid call for the formation of a republic. His 50-page pamphlet led directly to the Declaration of Independence a few months later.
Common Sense was an immediate bestseller (120,000 copies in three months - equivalent to 10 million today). Paine's problems lay not with the writing and selling, but with the printing and production, which delayed him and cost more than expected.
Sound familiar?
Two hundred years after Paine's manifesto, the printing process was more sophisticated, but it certainly wasn't any simpler. Two hundred years later, printing and production were still bottlenecks that delayed our important documents.
Until desktop publishing came along.
Which brings us back to our modern-day revolution. Desktop publishing has transformed the process of producing pages. If Thomas Paine were alive today, we think he would have been one of the first to use it. That cantankerous rebel could not

4 Chapter One: Introduction to Desktop Publishing
COMMON SENSE: ADDRESSF.!) to TN'-
INHAIHTANTS or
A MER leA. 0.. ,lie r.w ... i"SittltMno,
SUB J E C T S. J or 1M U,iJ'fII .... ~ ,f CO\>ttAtMnt I,. J't'I"'"
tl'1I'u",IC"e Rt4-\ltl,."" ... .t".,,,,, c ... ttJ,,,\I(I"" 'If. 01 ,",o ... c'-, r.'Ill H~iU"l futctfli ...
Uf. 7'lI~~"h Oft ~ ,!'fit,.. $ ..... r ",,....It." "'f.,fj.
IV. Of t\t. pr'ff1Ulf A~lily of Amttlt .. wit\(~"'. tl'tftcdlaltCQl.ls. R.~(tt.; ....
·\\",i"." ~ya .. £NCf.JSHMAN.
",.".,,,,.11. M' ... Ur...of'''t!'' hu\u •• 0. ,"'de .... \:1'1'1 ct..<Ct ard r'OlnPllt.nln" o'~""
" .. e",.'Doi.
PHILADrLPHIA. ,,; .. «1
II ... Soil ~1 R. BELL, i. T/ •• 4 St...,~ '11(j,
I., ii. i. p .. ! {i c... Ii.!
r L1'W6IHmon ~~~se
THOMAS PAINE
_'1: ... I.."I."";' .. fi .. l_
Figure 1·1. Thomas Paine's Common Sense as it appeared originally (left) and how it might have appeared if Ventura Publisher had been available (right).
have resisted the freedom it provides and the control it allows. Paine could have saved time. He could have gained the control to experiment until he got things right (Figure 1-1). And he could have saved money - something the penniless writer certainly would have appreciated.
It's too late for Thomas Paine. But those of us who are around today can cash in on desktop publishing, thanks to Xerox Ventura Publisher, a product that gives an inexpensive personal computer the power of a print shop.
Desktop publishing defined We're anxious to show you how Ventura Publisher can payoff. First you need to understand where this exceptional product fits into the scheme of things.
Let's begin by defining the term desktop publishing. Quite simply, it's the use of a personal computer for most or all of the stages of publishing. Both desktop and traditional publishing have the same basic steps: creation (of text and pictures), assembly (into pages), and printing. But the traditional method is a tedious, detail-oriented process involving expensive equipment and highly-trained personnel (Table 1-1).

Desktop publishing defined 5
Table 1·1. Traditional publishing versus desktop publishing.
Stage Traditional Publishing Desktop Publishing
Writing Authors create text on typewriter. Authors create text in word processor.
Editors make red pencil marks to typed Editors make changes to text file in word Editing copy. Typists retype pages if changes are processor.
extensive. Several iterations may occur.
Typesetting machine operator rekeys the Editor applies generic labels to elements of manuscript into the typesetter, following the text file such as headline. Text elements editor's instructions about size and selection automatically take on proper type specifica-
Typesetting of type faces. The text is typeset into long tions. galleys, which are the proper column width, but not the right length. Galleys are proofread and corrections reset.
Illustration An artist creates charts, graphs, or drawings An artist creates charts, graphs, or drawings using pens and other tools. using graphics software programs.
Designer creates blank layouts on paste-up Designer creates a style sheet for publica-Page Design boards, using blue pencil to mark location of tion. This task need only be performed once.
text columns.
Paste-up artist cuts galleys lengthwise into Designer flows text file into document using strips one column wide, then applies ad- existing style sheet. Designer creates hesive to back of galley. Artist begins frames to hold artwork and then loads the process of applying galleys to columns on graphic files into the frames. The graphics
Paste-up paste-up boards. Artist leaves "windows" on are scaled automatically. Designer outputs boards to accommodate drawings and pages on laser printer or high-resolution im-photographs after computing how much agesetter. space must be left and what scale factors should be used.
Camera operator shoots a negative image Camera operator shoots one negative of of each page. Blank spaces appear on each page, with all elements in place.
Negatives negatives where artwork is to appear. Camera operator then shoots negatives of the artwork, using the scale factors specified by the paste-up artist.
Stripping Prepress specialist assembles negatives of Prepress specialist need only position ele-artwork into position on pages. ments not included during page layout.
Combined negatives are grouped into a "sig- Same. nature" of 4, 8, or 16 pages and a large
Printing plate is made. The publication is printed onto large sheets which are then trimmed, cut, folded, collated, and bound to make a finished product.

6 Chapter One: Introduction to Desktop Publishing
Desktop publishing had its beginnings in the 1970s, when Xerox Corporation introduced the Star workstation. This computer was the first to offer a high-resolution display that could integrate text and pictures on screen. It also incorporated a revolutionary device called a mouse, which let users move around the screen by sliding a hand-held controller. This user interface was subsequently borrowed by other manufacturers. It's evident in products such as the Apple Macintosh, Microsoft Windows, Digital Research Inc.'s GEM environment, and the Documenter system from Xerox itself.
The second major component of desktop publishing was the laser printer, first put to use by Xerox in the 1970s. Just as the Star workstation offered the ability to merge text and graphics on screen, laser printers offered the capability to merge text and graphics on the printed page.
Prices have fallen in the years since Xerox's pioneering efforts. As a result, many of the capabilities present in the early Starllaser printer system are now available for less than $8,000.
How to benefit from desktop publishing Desktop publishing offers a host of benefits to the savvy businessperson. We've listed a few examples below.
Saving money Desktop publishing saves on equipment and labor. Even lowend typesetters cost $25,000 to $50,000. Many cost more than $100,000. And labor costs continue to climb for the skilled personnel required to manually layout, illustrate, code, paste up, and print. It takes significantly fewer man-hours to produce a page on a personal computer than it would using traditional methods. Desktop publishing also cuts paper costs when compared to typewritten pages. Typesetting fits up to 30 percent more on a page. Merging graphics with text also saves space (a picture's worth a thousand words, remember?).
When you add it all up, desktop publishing can cut costs almost in half. Now consider that American corporations

How to benefit from desktop publishing 7
spend an estimated $200 billion to produce 2.5 trillion pages each year. Quite simply, desktop publishing is an easy computer application to cost-justify. Table 1-2 gives an example of how much money one company was able to save producing its 24-page in-house monthly newsletter. (As the EPA likes to say, your actual cost savings may vary.)
Table 1·2. Typical cost savings from desktop publishing.
Task
Writing
Editing
Keyboarding
Proofreading
Typesetting
Revisions
Illustrations
Halftones
Paste up
Corrections
Total
Saving time
Before DTP After DTP Savings per Issue Savings per Year
$126 $110 $16 $192
$75 $18 $57 $684
$34 0 $34 $408
$31 $6 $25 $300
$35 0 $35 $420
$15 0 $15 $180
$150 0 $150 $1800
$15 $15 0 0
$19 0 $19 $228
$14 0 $14 $168
$514 $149 $365 $4380
Many desktop publishing installations can pay for themselves in less than a year through reduced labor costs alone. But there's another side to saving time that's difficult to quantify.
In many cases, getting a document out sooner provides a competitive advantage. A newsletter publisher, for instance, can wait right up to deadline before assembling the final pages. News is fresher and more timely. Result: satisfied customers and more subscriptions. Likewise, contractors might gain an edge by b.eing the first to submit a professional-looking bid; scientists by getting a monograph out ahead of time; managers by getting a report to top brass before their rivals; consultants by beating the competition to the punch with a top-notch proposal.

8 Chapter One: Introduction to Desktop Publishing
More control Now, for the first time, you govern when your 'Work gets done and how it will look. That translates to freedom. Freedom from high-priced type shops that charge a lot for simple jobs. Freedom from artists and layout people who don't understand what you want. Freedom from outside companies who have no motivation to get it done right and on time. It also translates to fewer mistakes. Traditional publishing can involve as many as 10 different people - one for each of the stages we discussed in Table 1-1.
With a personal computer, a laser printer, and Xerox Ventura Publisher, one person can take the place of all these experts. Okay - one ambitious, hard-working person. But you get the point: The fewer people in the middle, the fewer the errors.
More power to persuade There's a big difference between a typewritten document and one that's been professionally produced (see Figure 1-2). This difference means you'll have more power to persuade. Power to grab the reader's attention and keep it. Power to influence through words, graphics, and design. Power to create documents that look important, professional, expensive.
!hi! Cal:JlI~rat:. :rrai.n:L~ ckpart...nt ba. :LdentiClacl an
ob}.cti"a t.o II.'IId •• iqn and. ~t'anu.t IIv.r; 5000 palJ •• at'
textual and. op:aphia illl'o_ .. t.:Lcm ."ich can..t.itut •• U.
CIlllp.rQ"·.t.r:ainiaqdcz~t.tion.l~t •. IDadd.it.irmto
ftld.~~ thie .uI:Iatanthl ..aW'd: at' intllnlati_. t.M
Clllrr.m.l,.ayail-.blain." .. riat.:rat'_dia, 1aII.t.l~Dn~
Clapi .. P'-I:'II. !hi! ckll:;~.tigft i. aa.what gut of 4 .. t •
• ina& t.he cal1aet.icm at' _tari .. l_ dat. •• itack t.aD y.aC8.
AIIcal2linq t:DtlMCOqKIAt.a Diralrt.H' Dt'!rainin9. tbIo" ,bna
dtld~ •• peait':l.ot'acaatlarlClpntD ••• 61rthet.z:ainillq
dcll:n ... nt.at.iDn,. ~. Botldc .ill belllllU .. ...mer Dt" ~ __
DIt"....., '1
PROPOSAL TO ACME INSURANCE CORPORATION
Figure 1·2 The typewritten document on the left lacks the power and impact of the Ventura document on the right.
The shortcomings of desktop publishing 9
People judge you by what you produce. The old way of doing things discouraged experimentation. With desktop publishing you see the final result immediately, right on the screen. You preview multiple options in seconds. You have the time to try things out until everything looks right. If you put words on paper - reports, proposals, memos, viewgraphs, presentations, whatever - desktop publishing can help you create a better image.
A competitive edge
Versatility
Millions use desktop publishing already. They have an advantage over those who don't. Their proposals look better. Their reports appear more polished. Their brochures and advertisements have a sophisticated veneer. Put simply, they have a jump on the competition.
Many users originally get into desktop publishing because they have one or two document types they want to produce. Once they acquire the equipment and the skills, however, they soon expand their horizons. They learn that Ventura Publisher can create virtually any type of document, from simple one-page flyers to complex engineering documents.
The shortcomings of desktop publishing We wouldn't be doing our job if we didn't warn you that current desktop technology has several limitations. It doesn't provide as many typestyles as a phototypesetter. It doesn't do a good job with halftones (photos), which usually need to be stripped in the old-fashioned way. And it usually relies on laser printing, which is not adequate for certain jobs. (Though you can always send the final result to a phototypesetter.)
Not all problems arise from the technology. Some of them come from human limitations. Desktop publishing software has a learning curve. Then there's the "temptation curve." You'll probably be less productive for a brief period because you'll be tempted to fiddle with every document until it is '~ust right"

10 Chapter One: Introduction to Desktop Publishing
(we know about this problem first-hand). And finally, be aware that buying desktop equipment won't turn you into a graphic designer. Beginners will be wise to study and imitate professionally prepared pages. Otherwise, they may find that desktop publishing does nothing more than make them a lot faster at producing very ugly documents.
Ventura Publisher vs. other programs Given that desktop publishing provides the benefits outlined above, why choose Xerox Ventura Publisher? Several features distinguish this product from the rest of the pack:
• A true ''What You See Is What You Get" display.
• Compatibility with the inexpensive IBM PCIXT (other brands require more costly AT-style or Macintosh computers).
• Compatibility with leading software. Ventura works seamlessly with your favorite word processing and graphics programs. It even uses the same files, avoiding space-wasting duplication.
• Long document capabilities. Format and print hundreds of pages in one pass. Xerox Ventura Publisher is ideally suited for books, catalogs, reports, technical manuals, and other long documents.
• Style sheets that store reusable formats in an electronic file.
Style sheets are important enough to deserve additional comment. A style sheet is a separate file containing format rules. A different style sheet creates a different look. It's a simple idea, but one that's extremely powerful.
If you know how - and we'll show you - you can reformat a document in seconds by loading a new style sheet. You can even build a library of styles, then tryout dozens of design alternatives with a few clicks of the mouse (see Figure 1-3).
But perhaps the single greatest selling point of Xerox Ventura Publisher is its amazing combination of simplicity and power.

Ventura Publisher vs. other programs 11
Document Gallery News Document Gallery News A-.. .......................... u.... ... ....., .... ,. ...... ""' ....... Thl. " /he Rrot He.dllne
... ., .......... CBP ............... _",,~ ......
::~":.=..~_sr.l==-'";t~~ ... ...... ,... .... ri1!1ri. ... a....I.'_ ....... .... ... "" .... AItInIIIl.,." ..... , ........ ,... ........ . ....... ~IId ................ W.V ............. . ............. _ ....... nus.._a. ...... .... ... ,.......w..r.K .. _ .... ..- ...... _,."' .. ,~ .... ........ r.-..r ....... w. __
n. ...................... IIB'WI.1'XI' ..... ....
~...'!-:..-::::c·~~~_ ... ..... "'IIU ... n. ... Jt.I .... ~t6-. ....... ..., .. =~~-c:~ ... --..,...., ...... , ........ ,...tI._s. ... ...w.. ...... ..a .... INNk., ..... w. _~.""'I.~.r....& ..... --"t ......... 1& .,...NtIdw. ... ...,,....w.~ .... .......,,..s_ ---The He'" He.dllne
...
~ ....... _.w ..... ..w.III* .. ~ ....... ::.. ...... ~_Ia_~ .... ,.., .. WIa.
J(1II.a"' .. ItJ'It ... ladU ............. ~ __ ....... 1Is.1lIt" .. ~lII. .................. .m'""'.
:llljllljllllllll~lllj~2f~ljlljll[llllllj~lllllljljlll
Figure 1·3. You can instantly change the look of a Ventura Publisher document simply by loading a new style sheet.
Make no mistake - Ventura is a feature-packed program that takes many hours to master completely. Yet almost anyone can learn to format simple documents in a few minutes. (We'll prove it to you in Chapter 1\vo.)
Despite this ease of use, Ventura can create almost any kind of document. Today, many corporations produce pages in a dozen different ways depending on time, complexity, and cost, from hand-lettering to typewriters to press-on lettering all the way to phototypesetting. Ventura Publisher is so flexible and costefficient that most corporations can abandon this mish-mash of approaches. This one program can accomplish virtually all publishing tasks:
• Advertisements • Books
• Brochures • Catalogs
• Directories • Documentation
• Financial Reports • Forms
• Instruction Manuals • Labels
• Memos • Newsletters
• Overhead Transparencies • Parts Lists
• Press Releases • Proposals
• Reports • Technical Manuals

12 Chapter One: Introduction to Desktop Publishing
For those experienced with Ventura 1.1 Some of you may already be familiar with Ventura 1.1. In that case, you are probably anxious to learn what's new in version 2. We refer to these changes throughout the book, but the bulk of the new material is in Chapters Six, Seven, Eight, Nine, Ten, and Eleven. Table 1-3 summarizes the new features. If you are in a hurry, use this table together with the index to zero in on key subject areas.
Table 1·3. Summary of new features in version 2.
On-line help Over 250 help screens available within dialog boxes.
Menu changes Page menu now called Chapter menu. Various other op-tions grouped more logically.
User interface Chapters can be saved without specifying a file name.
features Easier file saving Text can be typed on blank page without specifying a file name.
Choice of ~enus User can choose between pull-down (requires mouse button) or drop down (as in ver 1.1) menus.
Pop-ups in dialog boxes Dialog boxes simplified using pop-up menus for options rather than multiple boxes.
Automatic quote conversion True quotation marks and em dashes automatically in-serted during text file loading.
Rotated text Text can be rotated by 90, 180, or 270 degrees.
Typographic Fractional point sizes Half point size now permitted for fonts.
features Text can be aligned with top, bottom, or center of a Vertical alignment frame.
Kerning now supported for LaserJet-compatible Kerning printers. Kerning can be applied interactively from the
keyboard.
New symbols Square and hollow bullets, as well as fractions added.

Ventura Publisher vs. other programs 13
Load TIFF files TIFF files from gray-scale scanners now supported.
Gray scale display Gray-scale photographic images can be displayed on VGA monitors.
Color separations Color elements can be printed in separate pass. Graphics features
Squares, circles, and rounded squares can be drawn Constrain elements more easily using a constrain tool.
Display PostScript files Encapsulated PostScript files with embedded metafiles can be displayed and printed on non-PostScript printers.
Easier graphics selection Graphic elements can be selected regardless of which frame they belong to.
Print style sheets Print style sheets command annotates style sheets.
Layout features Numbering across chapters In multi-chapter publications, chapter, page, figure, and table numbers now computed automatically.
Page number placement Page numbers can be placed anywhere on page.
For those new to publishing Some of you may be new to print production as well as to Ventura. Throughout this book, we occasionally use words from the graphic arts, or refer to traditional methods. If you are unfamiliar with any of these phrases, turn to the glossary at the back of this book. In addition to definitions, our glossary includes labeled pictures, so you can see typical pages and the terms to describe them.
For those who don't own a system If you haven't purchased all of your computer hardware yet, or if you are considering replacing part of your system, you are naturally very curious which equipment works best with Ventura. Appendix B, "Manufacturers and Products," gives brief descriptions of products you may want to use with Ventura, along with listings of vendors.
We could continue for many more pages on Ventura's advantages. Instead, we'd prefer to start showing you how to put it to work. The first step is to gain an overall understanding of Ventura Publisher and the way it approaches page makeup. That's precisely what we'll do in the next chapter.

14

Chapter Two
Introduction to Ventura Publisher
Chapter One explained the concept of desktop publishing. Now we're going to give you an overall understanding of
Xerox Ventura Publisher. Don't worry about details yet. Later chapters provide in-depth particulars, but first you need to get the big picture. Here are some of the things you'll learn in this chapter:
• how to get a simple application up and running
• how to understand the user interface
• how to apply the Ventura Formula to every document you create
We'll begin with a brief test drive. You might be overwhelmed if we plunged right into explanations of Ventura's commands. So we're going to start with a quick, hands-on tryout. Mter you've experienced the what of Ventura, the second half of this chapter explains the how and why.
Before you begin Ventura Publisher runs on a wide range of MS-DOS computer systems. A hard disk drive is essential. You can get by with as little as two to three available megabytes (MB), but we recommend 20 or more MB if you intend to do long documents.
For the moment, it doesn't matter which hardware configuration you own, or what additional software you may plan to use with Ventura. We will conduct the test-drive using sample

16 Chapter Two: Introduction to Ventura Publisher
files that were copied to your hard disk when you installed Ventura. We have assumed that you have already installed Ventura. If not, do so now. Refer to the Reference Guide that came with Ventura for complete instructions. Ventura supports incremental installation. If you later want to change something (to add a different printer, for instance) answer ''No'' when VPPREP asks if this is the first time you have installed it. Then you can add only the files you need without stepping through the entire installation.
A word to newcomers Our guided tour assumes that you understand the basic terminology of page design (margins, columns, etc). If you're new to that topic, refer to the Glossary at the back of the book. It defines the most important computer, graphic arts, and Ventura words.
A word to the worried Our test drive shows sample screens, so you can see what's supposed to happen as you follow our instructions. Don't worry if your screen varies slightly from the ones you see on the page. Different monitors and graphics boards create different displays. You should be able to follow along despite these minor discrepancies.
A word to the professionally extended If you are using Ventura's optional Professional Extension, some of your dialog boxes and menus have extra choices. For now, ignore those additional options. The Professional Extension has the same core features as version 2, so the concepts you learn in this chapter still apply. The added functions of the Professional Extension are covered in Chapter Eleven, "The Professional Extension."
A word to the adventuresome Although you can easily accomplish the test-drive in 15 minutes, feel free to take longer. Explore on your own. Experi-

Fifteen minutes to Ventura Publisher 17
ment. When you're ready, come back to the second half of the chapter for an explanation of what you've seen.
Fifteen minutes to Ventura Publisher The purpose of this brief tutorial is to experience the features and concepts explained later in the chapter. Don't worry if you don't grasp all the details yet. And don't be disturbed if you make a mistake and the tutorial doesn't go as planned. Simply try to get a feel for Ventura and the way it operates.
Starting the program To load Ventura, go to the root directory of your hard disk. For most users, this is accomplished by getting to the C: prompt, then typing CD\. Now type VP (for Ventura Publisher versions 1 or 2) or VPPROF (for the Professional Extension). The built-in batch program takes over, automatically loading the files you need. When the program has finished loading, you have a blank Workspace with no text and no pictures. The active style sheet (shown in the title bar) will be the same one that was active when you quit Ventura the last time. Don't worry about the style sheet yet; we will change it as part of the test drive.
Start by looking around and getting comfortable with the Ventura environment. Use the nearby picture (Figure 2-1) to identify the following five key elements:
• the menus
• the scroll bars
• the Workspace
• the Title Bar
• the Side-Bar (which contains the Function Selector, the Assignment List, the Addition button, the Current Selection Box, and the Page Number Box)
You'll do four things to turn the blank Workspace into a real document:

18
Function Selector
Addition Button
Assignment List
Current Selection Box
Page Number
Chapter Two: Introduction to Ventura Publisher
: ';"
Figure 2-1. The key elements of the Ventura screen.
• Load a text file
• Load a picture
• Load a new style sheet (a new format)
• Apply the new style sheet to the text
An important safety precaution The first action you should take is to save the document under a new name. We made this the first step of the test drive, because we recommend it as the first step for every document. It is far too easy to destroy an old document by copying a new variation on top. To prevent such calamities, always rename documents immediately. Here are the steps you should take:
• Touch the mouse cursor to the File menu at the top left of the screen. The menu drops down.
• Move the cursor down the list until Save As is highlighted (Figure 2-2).
• Click the mouse button once.
The process you just completed is called selecting a menu option. As soon as you click the mouse, Ventura completes the function you asked for. In this case, it brings up a dialog box called an Item Selector to allow you to give this chapter (this document) a new name.

Fifteen minutes to Ventura Publisher
Figure 2·2. To select Save As, move the cursor down the File menu until Save As is highlighted by a black bar. Then click the mouse button .
19
• When the Item Selector appears (Figure 2-3), type in the new name on the line labeled Selection. We suggest using the name PRACTICE. Backspace to correct any errors, or press Esc to clear the line and start over. When you have correctly typed the name, click on the OK button.
As soon as you click OK, Ventura saves the chapter, and automatically appends the extension CHP. (The full name,
Directory: C:\ TYPESET\* .CHP _______ _
I mn~l::~~:::1::::i! ". CHP :l~!l:l~::n~n~~l Selection: PRACTICE.~
SCAN3 .CHP t SCAN4 .CHP SCANS .CHP SCAN6 .CHP SCAN? .CHP SCANS .CHP SCAN9 .CHP
i p::::;:
SCANTOC . CHP !o= SOFTPRO . CHP ...
Figure 2·3. Save the chapter under a new name by typing that name onto the Selection line and clicking OK.

20
Loading text
Figure 2-4.
Chapter Two: Introduction to Ventura Publisher
therefore, is PRACTICE.CHP.) With the document safely renamed, you are ready to proceed.
Adding text takes place in two stages: (1) loading the text file and (2) placing it on the page. First make sure you are in the correct mode. Ventura's modes are represented by the icons in the Function Selector at the top of the Side-Bar. Ventura 2 has four modes and four icons. Professional Extension has five modes and five icons. The fifth function, present only in the Professional Extension, is the Table Edit function (Figure 2-4).
To load and place a text file, you should switch to Frame mode:
• Click once on the left-most icon in the Function Selector.
To confirm that you've done it right, look at the Side-Bar. If the left-most icon is dark, and the Addition Button reads "Add New Frame," you're in Frame mode. Once you're in the right mode, bring in an ASCII file called SAMPLE. TXT.
• Select Load TextiPicture from the File menu. (Reminder: Touch the cursor to the File menu. Move the cursor down the menu until Load TextiPicture is highlighted. Click the mouse button.)
The dialog box appears (Figure 2-5). Notice the four darkened buttons, Text, ASCII, One, and List of Files. If your dialog box does not look right, change it by starting from the top. Move the mouse cursor over the Text button and click once (this is called choosing a dialog box option). Once you choose Text, you will see the other options, including ASCII, One, and List of Files. Choose them as well. Once the dialog box looks like Figure 2-5, move the cursor to OK and click once.
The dialog box is replaced by an Item Selector (Figure 2-6). You will use this Item Selector to locate and choose the file you want:
• Click on the downward arrow at the lower right side of the Item Selector. The list of files scrolls down one line.
• Continue clicking and scrolling until you can see the file SAMPLE. TXT on the list.

Fifteen minutes to Ventura Publisher
Type of File: .. !line-Art ! ! IMage I Text ForJlat: I Generated I IIliIII I WordStar 3 I WS 4 _0/5.0 I
I HS-Word I I WordPerfect I I XyWrite I I a-Bit ASCII I
[]f[] 114ultHlate I I PRN-to-Table I I Writer I
1:1 of Files: liD I Several I
Destination: ImaMUra I Text Clipboard I L:r.~~.~f;::·.E~·~j;.~~~~:J
DO !Cancel!
: :
21
Figure 2·5. To load a text file for the test drive, make the Load Text/Picture dialog box match the one shown here.
Directory: C:\ TYPESET\ ... TXT _______ _
.IH::~:::~H:::~Hm ... TX T ::~~Hf:::H~n~~:
INVO ICE . TXT t lETTERHD . nn -
_i*UIU·W.:JI
-,
Selection: SmlPlE . TX~
Figure 2·6. Select the file SAMPLE.TXT from the list and click OK to lo?d the file into the chapter.
• Click once on SAMPLE. TXT to select it .
• Click once on the OK button.
Ventura Publisher responds with a screen message telling you it is loading and hyphenating the file. When it has finished, it displays the name of the file in the Assignment List - your signal that the file is ready to be placed.

22
Placing text
Chapter Two: Introduction to Ventura Publisher
You've loaded the text file SAMPLE.TXT. To place it on the Underlying Page, tell Ventura where you want it:
• Select the Underlying Page by moving the mouse cursor anywhere onto the Workspace and clicking once.
When you finish, the screen looks similar to Figure 2-7 . Notice the small black handles at the top of the Workspace (sometimes called selection buttons). They tell you that the Page has been selected and is ready to accept text or graphics.
Selection buttons + .................................................................................................................
,'.".: :
Figure 2-7. Tell Ventura where to place the text file by clicking on the Workspace (the Underlying Page) to select it.
To pour SAMPLE.TXT onto the page:
• Move the mouse cursor until it touches the name SAMPLE. TXT in the Assignment List. Click once.
The file flows onto the page (Figure 2-8). If you like, take a few moments to try moving around. Use the scroll bars at the right and bottom of the screen. To move down, move the cursor to the gray area below the scroll bar and click once. The display moves down one screen. You can move up and sideways in the same fashion .
... NOTE: If you select the Under/ying Page before you load the file, Ventura automatically places SAMPLE. TXT without any intervening steps.

Fifteen minutes to Ventura Publisher
fski"op·PUbiisiilng-·A!rives··o!i··your··PCi.····················· .......... .
~nable the Paragraph Tagging function (second function from F a Headline 1. .Then tag is as Headline 2, and Headline 3.~
~ag the next paragraph as a Sub Head 1. .:rhen tag it as a Sub
ragging Makes Publishing Eas~
Figure 2·8. Your screen will look something like this once you place the text file.
23
WARNING: Your screen may look substantially different depending on the style sheet active at the time you place the text. In a moment, you will load a new style sheet, which will make your document match more closely.
Loading a style sheet Now that you have text, let's give it a format (a style sheet):
• Select Load Diff. Style from the File menu. Ventura dis-plays an Item Selector (Figure 2-9).
• Scroll in the Item Selector until you see SAMPLEl.STY.
• Click on SAMPLEl.STY.
• Click on OK.
Applying a style sheet By loading a new style sheet, you immediately change overall attributes such as margins, columns, and headers. But to see the full result of a style sheet, you must apply it to the text. This process is called tagging.
To tag a document, switch to Paragraph mode:
• Click on the second icon at the top of the Side-Bar.
You'll know you're in the proper mode if the icon turns dark, the Addition button reads "Add New Tag," and the Assignment

24 Chapter Two: Introduction to Ventura Publisher
Directory: C:\ TYPESET\* .S1'.' ______ _
• miii~m~~iii~miii *. STY iii~iii~iim~m~~i
IXPUnE .STY t
~~~ :I~ I -.,.'U1P'IML1l:I I
SCAN ~STY ~. SCANBOOK .STY •
Selection: SAMPLE1 .ST~
Figure 2·9. To load a style sheet, select Load Diff. Style and use the resulting Item Selector to choose whch ones you want.
List shows names like Headline 1 and Sub Head 1. Once you're in Paragraph mode, tagging is a simple two-step process: (1) click on the paragraph and (2) click on the tag name in the Assignment List.
This is a good place to define the word paragraph as used by Ventura. In common usage, a paragraph is a collection of sentences, usually set off by indenting the first line. As used by Ventura, it is any separate text element set offby carriage returns. It can be a single word, or hundreds of words. A Ventura paragraph, no matter how short or how long, is ended by placing a return after the final character (by pressing Enter in Text mode or in the word processor). Anytime you place a return, you are telling Ventura to start a new paragraph.
To apply the style sheet, simply tell Ventura which paragraphs should use which tags. For instance, here's how to apply the Headline 1 tag to the first paragraph of the document .
• Move the cursor until it touches any part of the first line. Click once to select the paragraph. You know you've succeeded if the entire paragraph is highlighted by a black box (Figure 2-10).
• Move to the Assignment List. Click once on the word Headline 1. Ventura immediately applies the Headline 1 format to the first line (Figure 2-11).

Fifteen minutes to Ventura Publisher
' .... ~:w.,_ !:: I ~ ..... n ... n •• ~ : ~=-~!!~iJIi!iI!J!''1=-''!.J'~ __ ::. : : l~j:
! Enable the Paragraph Tagging function (second! :function from the left). Tag the paragraph above as al iHeadline 1, ,Then tag is as Headline 2, and Headlinei O~ :
! Tag the next paragraph as a Sub Head 1, ,Then tag! iit as a Sub Head 2, and Sub Head 3,'11 i
! Tagging Makes Publishing Easy'll !
! Each Tag you assign changes the text attributes for! e entire paragraph. For instance, you can take
list of features, and tag each one with wart to them all at onc
Figure 2·10. Ventura highlights the paragraph in reverse video to confirm that it as been selected.
i Enable the Paragraph Tagging function (second! ffunclion from the left), Tag the paragraph above as al iHeadline 1 . .Then tag is as Headline 2, and Headline:
p~ i ! Tag the next paragraph as a Sub Head 1, ,Then lag!
1:,t as a Sub Head 2, and Sub Head 3.'11 I::,
Tagging Makes Publishing Easy'll
Figure 2·11. As soon as you click on the tag name, Ventura applies the format to the paragraph.
25
The sample text you loaded contains instructions for taggjng different sections of the text. If you wish, take a few moments to follow the directions. Experiment to see the results of different choices and combinations. Whenever you're ready, continue on to learn how to bring in a picture.

26 Chapter Two: Introduction to Ventura Publisher
Loading and placing a picture You learned earlier to use Frame mode to place text files. You also use that mode to draw frames for pictures, and to place picture files inside. Switch back to Frame mode now:
• Select the left-most icon from the Side-Bar.
Now move to Reduced View to see the entire page (Figure 2-12).
Figure 2·12. Reduced View shrinks the page to fit the size of the screen.
• Select Reduced View from the View menu.
Before you can place a picture file, you need a frame in which to put it. To create a frame:
• Move to the Side-Bar. Click on the Addition button (which reads "Add New Frame.")
• Move the cursor to the left center of the page.
• Press the mouse button down until it changes to a pointing hand. Without releasing the button, drag the mouse diagonally downwards as illustrated in Figure 2-13.
• Release the button when you've created a new frame about the size of the one shown. The precise size and position aren't important for this exercise.

Fifteen minutes to Ventura Publisher
Figure 2·13. Hold the button while dragging the mouse to stretch the new frame to its intended size. Then release the button.
27
As you can see, text automatically flows around this new frame.
Let's change back to Normal View. Here's a tip before you switch. Ventura uses the cursor position to determine the upper left corner of the display area. If you want to be sure the new frame will show up, position the cursor at the upper left of the frame before you switch. (If you forget and get another part of the page, use the scroll bars to move.)
Now change the display to Normal View (Hint: use the View menu or press Ctrl-N). Make sure you can see the new frame as shown in Figure 2-14.
Now place a picture into this blank space. Check to make sure that the new frame has handles around the edges, so Ventura knows where you want the picture to go. (Ifit does not, place the cursor anywhere inside and click once to select the frame.)
• Select Load TextlPicture from the File menu.
• When the dialog box appears, choose Line-Art, GEM, One, and OK, in that order.
An Item Selector appears. As you have done previously, select the name of the file you wish to load:
• Scroll in the Item Selector until the filename COLUMBIA.GEM appears.

28 Chapter Two: Introduction to Ventura Publisher
Figure 2·14. Switch to Normal View (Ctrl-N) and position the screen so you can see the new frame.
• Click once on COLUMBIA.GEM .
• Click OK.
Ventura loads the picture file and places it in the previously blank frame. A Reduced View of the page now looks something like Figure 2-15. (Hint: Press Ctrl-R and Ctrl-N to cycle between Reduced and Normal View.) Notice that the picture file appears on the Assignment List along with the text file.
Figure 2·15. As soon as you click on the file name, Ventura places the picture into the frame you selected.

Understanding Ventura Publisher 29
You've finished the test-drive. To save the document, choose Save from the File menu. To print out the first page, turn on your printer, select To Print from File menu, and press Enter. To start over with a blank page, select New. To stop using the program, choose Quit. To reload this chapter another time, use Open Chapter and select PRACTICE.CHP from the Item Selector.
Understanding Ventura Publisher Now you've seen Ventura Publisher for yourself. In a few short minutes you've accomplished publishing tasks that would require hours using manual techniques. (And you've only experienced a fraction of Ventura's power and versatility!) Let's spend some time exploring and explaining what you saw on the screen.
The Ventura user interface The user interface is the means by which the user and the program communicate. If you understand Ventura's rules, you'll have an easier time putting its power to work.
Ventura's screen symbols During the test drive you had a chance to meet Ventura's main screen. In addition, Ventura uses special symbols inside the Workspace. Table 2-1 shows what these symbols look like and what they mean.

30 Chapter Two: Introduction to Ventura Publisher
Table 2-1. Screen symbols and their meaning.
Name Symbol Purpose
Paragraph End , Shows end of paragraph.
Line Break .J Starts new line without starting a new paragraph.
Horizontal Tab ~ Shows location of tab character.
End Of File D Shows end of text file.
Shows location of special space characters: non-breaking spaces, Special Spaces LI em spaces, en spaces, figure spaces, and thin spaces. Does not dis-
play for normal spaces.
Special Items 0 Shows location of special items such as frame anchors, index entries, footnotes, markers, and cross-references.
,.------------..., Column Guides
I I Shows location of margins and columns. I I L ____________ ..J
Non-printing Shows location of frames and graphics, even if they do not have Screen Borders rules around them when printed. Not visible in Paragraph mode.
Ventura and the mouse Each time you move the mouse, the cursor moves on the screen. The cursor shape changes according to the part of the screen and the mode you're in. Table 2-2 shows the different shapes. Notice that each mode has a main cursor shape. Usually it also has one or more secondary shapes that indicate special functions.
Selecting with the mouse
The main function of the mouse is to select. This is always done in the same fashion: by highlighting the item and pressing the mouse button once. (If the mouse has more than one button, Ventura Publisher uses the left one.) In menus, the item is highlighted (turns dark) the moment the cursor touches it. In Item Selectors and dialog boxes, choices are highlighted after you press the mouse button. In Text mode, choices are highlighted after you drag the mouse over the phrase you want and release the button.

Understanding Ventura Publisher 31
Table 2·2. Cursor shapes and their meaning.
Mode or Location
Side-Bar or Menus
Frame
Paragraph Tagging
Text
Graphics
Table Edit (Profes-sional Extension only)
Main Shape Secondary Shape(s) Purpose
~ Select modes and tools from
(none) the Side-Bar and options from the menus.
+ (FR ~1 Create or modify frame; as-sign text/graphics to frames.
~ (none) Assign paragraph styles to text.
I I Create or modify text; change font attributes.
~ $ ffirrer r~1 Create or modify Ventura's graphics.
+ ~1 Create or modify tables.
Dragging with the mouse
A secondary use of the mouse is to draw, move, and resize objects on the screen. When we use the term drag, we mean the process of moving the mouse while holding the button down. After you finish the movement, release the button.
Moving around the page with the mouse
The mouse is also used to move around the page, with the help of the scroll bars at the right edge and bottom edge of the screen (Figure 2-16). To move one line at a time, move the cursor to the arrow box and click. To move a screen at a time, put the cursor anywhere in the gray area and click. To move a distance of your own choosing, place the cursor on the white scroll bar and drag it to the new position.
In addition to the scroll bars on the side of the screen, you'll also see scroll bars in the Side-Bar, and in the Item Selectors. These smaller scroll bars operate in the same manner to move you up and down a list.
While we're talking about moving around, let's discuss moving to another page. You can (1) press the Page Up and Page Down

32
Scroll Bar
Chapter Two: Introduction to Ventura Publisher
Figure 2·16. You can move around the page with the mouse and the scroll bars.
keys to one page at a time or (2) use Go To Page from the Chapter menu, which jumps you to the page number you type.
Ventura and its menus Ventura has an abundance of features scattered amongst its nine menus. Learning them and what they control is one of the challenges to mastering the program. Table 2-3 gives you a general idea of where to find things. Later chapters go into depth about menus and their functions.
Table 2·3. Menus and their functions.
Desk Used only for program info.
File Opening loading and saving files, chapters, and style sheets.
Edit Cutting, copying, and pasting text, pictures, and special items. Also contains certain file functions.
View Selecting views and modes.
Chapter Settings that apply throughout the chapter.
Frame Settings that apply to a single frame (including the Underlying Page).
Paragraph Settings that apply to the text.
Graphic Settings that apply to drawing tools.
Options Settings that alter Ventura to suit your preferences or expand its utility.

Understanding Ventura Publisher 33
As you move through the menus, you'll notice items listed in gray. This means they're not currently available. If, for example, you are not in Graphic mode but you pull down the Graphic menu, you'll find the items in gray. You will be unable to select any of them. Change to Graphic mode and the menu items now show in black because they are available for use.
Ventura and the keyboard Al though you can accomplish most functions with the mouse and the menus, Ventura does assign special functions to certain keys. In addition, Ventura provides keyboard shortcuts for some menu functions. These shortcuts are listed to the right of the name when the menu drops down. Table 2-4 lists Ventura's key assignments for general functions.
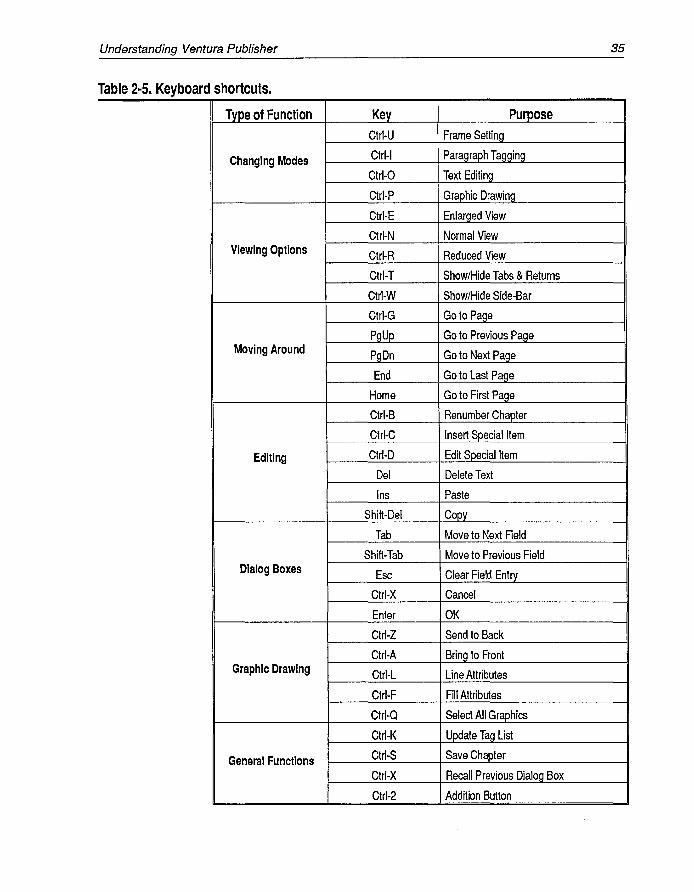
In addition, Table 2-5 lists other keyboard shortcuts. Although you may not feel you are ready to start using shortcuts, we wanted to make this table ,available from the start. Some users like to photocopy it and keep it near the keyboard for quick reference.
Finally, Table 2-6 shows you the typographic characters you can enter using special key combinations. If you're a beginner, you may not be familiar with typographic characters. We'll cover them more thoroughly in Chapters Three and Eleven. In those later sections, we also show you how to enter any character, even if it doesn't have a special key combination. For now, however, we wanted to list these combinations so you would have all the information on Ventura's keyboard in one place for easy reference.

34 Chapter Two: Introduction to Ventura Publisher
Table 2·4. Key assignments and their functions.
Type of Function Keys Purpose
Arrow keys Moves text cursor without erasing.
Movement Backspace Deletes characters to left of text cursor.
End Jumps to last page of document.
Home Jumps to first page of document.
Del Deletes the frame or graphic currently selected. Deletes selected text.
Deletes all characters on line in dialog Esc box. Also halts printing and go to page
functions. Redraws screen. Editing
Ins Pastes the frame, text, or graphic.
Shift-Del Copies the selected frame, text, or graphic to Clipboard.
In Text mode, inserts tab character. In Tab dialog boxes, jumps to the next field
where text could be inserted.
Used in conjunction with mouse or other keys. In Frame mode, press while
Alt dragging to crop images. In Text mode, press while typing numeric equivalents of non keyboard characters.
Used in conjunction with mouse or other keys. In Frame and Graphic
Ctrl modes, press and hold while clicking to select objects hidden behind others. Also used for keyboard shortcuts (see
Special Functions Table 2-5).
Used in conjunction with mouse or other keys. Press while clicking to select more than one object in Frame,
Shift Paragraph, Graphic, and Table modes. Press while clicking to define selection range in Text mode. Hold while drawing to keep tool enabled in Frame and Graphic modes.
Assign names to function keys for one-
Function keys key tagging in Paragraph and Text modes. Select options from Insert/Edit Spccial menu in Text mode.
Understanding Ventura Publisher 35
Table 2·5. Keyboard shortcuts.
Type of Function Key Purpose
Ctrl-U Frame Setting
Changing Modes Ctrl-I Paragraph Tagging
Ctrl-O Text Editing
Ctrl-P Graphic Drawing
Ctrl-E Enlarged View
Ctrl-N Normal View Viewing Options Ctrl-R Reduced View
Ctrl-T Show/Hide Tabs & Returns
Ctrl-W Show/Hide Side-Bar
Ctrl-G Goto Page
PgUp Go to Previous Page Moving Around PgDn Go to Next Page
End Go to Last Page
Home Go to First Page
Ctrl-B Renumber Chapter
Ctrl-C Insert Special Item
Editing Ctrl-D Edit Special Item
Del Delete Text
Ins Paste
Shift-Del Copy
Tab Move to Next Field
Shift-Tab Move to Previous Field Dialog Boxes Esc Clear Field Entry
Ctrl-X Cancel
Enter OK
Ctrl-Z Send to Back
Ctrl-A Bring to Front Graphic Drawing Ctrl-L Line Attributes
Ctrl-F Fill Attributes
Ctrl-Q Select All Graphics
Ctrl-K Update Tag List
General Functions Ctrl-S Save Chapter
Ctrl-X Recall Previous Dialog Box
Ctrl-2 Addition Button

36 Chapter Two: Introduction to Ventura Publisher
Table 2·6. Keys for special characters.
Character Name Symbol Key Combination
Copyright mark © Ctrl-Shift-C
Discretionary hyphen • (only appears wi Show Ctrl-Hyphen Tabs & Returns selected)
Em dash - Ctrl-]
Em space LJ Ctrl-Shift-M
En dash - Ctrl-[
En space LJ Ctrl-Shift-N
Figure Space LI Ctrl-Shift-F
Non-breaking space LJ Ctrl-space
Open quote " Ctrl-Shift-[
Close quote " Ctrl-Shift-]
Registered trademark ® Ctrl-Shift-R
Thin space none Ctrl-Shift-T
Trademark TM Ctrl-Shift-2
Dialog boxes Ventura is a rich, full-featured program with many options. Dialog boxes choose and control those options. Dialog boxes appear after you make a selection from a menu. As with Ventura's menus, gray type means the item is not currently available for selection.
Dialog boxes contain several features that provide Ventura with power and flexibility:
• buttons
• pop-up menus
• selection lines
• units of measurement
• help box

Understanding Ventura Publisher 37
Buttons
Ventura uses buttons for certain either/or choices. To select the choice represented by a button, move the mouse anywhere over the button and click once. The button becomes dark to show that your command was accepted. (Watch closely; sometimes it only stays dark for a brief moment.)
Pop-Up menus
Ventura also uses pop-up menus to control choices. You can spot a pop-up menu by the special symbol that appears to the right of a word (Figure 2-17). When you see this symbol, you can access a pop-up menu by placing the cursor anywhere to the left of the symbol on the same line (you do not have to be directly on top of the symbol). Press and hold the mouse button. The menu pops up. Move the cursor until the choice you want is highlighted. When you release the button, the choice is made.
"Body Text" RULING LINES ABOVE
l,m'!f1:i~~ Space Aboye Rule 1: ....,~O~. r;:1r"j __ ..... 1
Height of Rule 1: 00.00 CustOI11 Indent: 00.00 Space Below Rule 1: 00.00 CustOI11 Width: 00.00
Height of Rule 2: 00.00 Space Be low Ru Ie 2: O(} . 00
Height of Rule 3: 00.00 Dash Width: 00.00
Dash Spacing: 00 . 00
Space Below Rule 3: 00 .00 [.':~:] [:.'J Overall Height: 00.00
Table Rule list: Hidden t
] 36.00
Figure 2·17. To use a pop-up menu, place the cursor on the line and press the mouse button. Move to the choice you want and release the button.
You can only choose one item from a pop-up menu; you cannot choose more than one at a time.
Selection lines
Sometimes Ventura needs to know more information than you can supply with the mouse. For those situations, it provides

38 Chapter Two: Introduction to Ventura Publisher
selection lines to type in the setting. You can move from line to line with the mouse (click on the line), with the arrow keys, or with the Tab key. Pressing Tab jumps forward to the next line. Pressing Shift-Tab jumps backward. Pressing Esc clears the line of any existing numbers or letters. Pressing Backspace deletes the character to the left of the cursor.
Units of measurement
To change the units of measurement touch the name with the mouse cursor and click once (Figure 2-18). Click again, and the units change again. For example, click on the word "Inches" and it changes to "Centimeters." At any time, you can cycle between these four choices:
• Inches
• Centimeters
• Picas & Points
• Fractional Points
When you reach the end, the cycle starts over. As you change, Ventura automatically recalculates values. Inches are converted to centimeters; centimeters to picas & points, etc. You may see the tilde character (-). The measurement has not been lost. It is simply too big, or too small, to display in the space. Convert to different units to see it reappear.
Flow Text Around:
Upper Left 1(:
Frane Width: Horiz. Padding:
On I
99.991 II c:J 9B.59 99.99
Upper Left Y: 99.99 FraMe Height: 11 .119
Vert. Padding: 99 . eo
X Crop Offset: 00.00 [~:] L'.:] Y Crop Offset: 00.00 L~::J [::::1 Scale Width: 00.00 Scale Height: 00.00
Figure 2-18. Move the mouse cursor anywhere on top of the unit of measurement and click once to change to different units.

Understanding Ventura Publisher 39
Help box
All dialog boxes have a special square in the upper right. This help box is signaled by a question mark. To get help, click and hold the question mark (Figure 2-19). A pop-up menu appears that allows you to get a brief explanation of the dialog box and its functions. Click OK to return to the original dialog box.
Flow Text Around: On 1
Upper Left H: I ._ a c:::::J Frallle tHdth: 21.59
Horiz. Padding: BB. BO
Upper Left Y: BO.Ba Frane Height: 27.94
Vert. Padding: BO.Ba
H Crop Offset: ()O,OO [.~~] [:~] Y Crop Offset: OO,()O Scale Width: 00,00 Scale Height: 00,00
Figure 2·19. Help screens provide basic information about a dialog box and its features.
Tips for working with dialog boxes
EmI Dialog boxes are prepared to accept information as soon as the box appears on the screen. Normally the text cursor is already blinking on the first line in the dialog box.
EmI Use Enter as a shortcut for the OK Button. If you press Enter, the program assumes you are finished using the dialog box.
EmI If you change your mind, click on the Cancel button to return to where you were. Don't worry about clearing the settings-if you select Cancel, Ventura ignores any changes made in the dialog box.
EmI Use Ctrl-X as a shortcut for Cancel. If you press Ctrl-X while in a dialog box, it cancels the box and returns you to the Workspace. (If you press Ctrl-X while you are already in the Workspace, it brings up the previous dialog box.)
EmI Be careful when entering picas & points. Consider, for ex-

40 Chapter Two: Introduction to Ventura Publisher
ample, the measurement 41f2 picas. You might be tempted to enter 04,50. In actuality, Ventura interprets this as 4 picas and 50 points. Since 1 pica equals 12 points, the correct way to enter 4 1/2 picas is as 4 picas and 6 points. This is written as 04,06 (Figure 2-20).
**ofColul1lI1s: OJ II m m m m m [!] Settings For: I leFt Page I mn ••
Widths Gutters Margins ColUMn 1: 19,06 03,00
Top: 04,06 2: 19,06 BottOM: 04,061
3: f.lB,f.lB 00,00 left: 04,06 4: f.lB,f.lB 00,00 Right: 04,06 ~ 00,00 5: f.lB,f.lf.l 00,00 6: f.lB,f.lf.l 7: f.lB,f.lB 00,00 Calculated Width = 51,00 8: f.lB,f.lB 00,00 Actual Fra/lle Width = 51,00
Inserts: I Make Equal Widths I I Copy To Facing Page I DO I Cancel I
Figure 2·20. Take extra care when entering picas & points. To specify four and one-half picas, for instance, you must enter 04,06.
Ventura'S Item Selectors Dialog boxes choose options and enter measurements. To choose files, Ventura uses an Item Selector. When you see the phrase "Item Selector," think "File Selector" instead and you'll be on the right track. An Item Selector shows up any time Ventura needs to know which file you want to use. To use Item Selectors, you must understand four concepts: (1) how to choose files with the mouse, (2) how to choose files directly by typing their names, (3) how to filter files, and (4) how to change subdirectories and disk drives.
Choosing a file with the mouse
Make sure the file name appears on the Item Selector list. If you don't see it, use the scroll bar or scroll buttons until it shows. Select it by clicking on the name. Notice how the file name appears in the previously blank selection line as soon as you click. This is your confirmation that you've chosen the correct file. Once you've got the right file, click OK.

Understanding Ventura Publisher 41
Choosing files directly
To bypass the mouse, simply type in the file name directly. When the Item Selector appears, you'll see that the blinking text cursor is already on the selection line. To enter a file name, just start typing. Click OK when you're done. If you type the wrong name, press Backspace to erase the characters, or press Esc to clear the entire line and start over. If you change your mind, click on Cancel and Ventura returns you to the document. Use the selection line to bypass the mouse, to name a file that does not yet exist, or to create a new name for an existing file.
File filtering
Filtering excludes files that would otherwise clutter up the Item Selector. Look at Figure 2-21. This Item Selector appeared when we loaded text during our tutorial. Notice the extension TXT on the Directory line. Ventura knows that ASCII files should carry this extension. When you tell it to load a TXT file, Ventura shows only files with that extension. It automatically filters out all others so they don't show up. These other files are still in the subdirectory. It's just that Ventura is not showing them so they can't clutter up the list.
Ventura comes with a list of file extensions it prefers to use (Table 2-7). It will use these extensions unless you tell it otherwise. When you tell Ventura that you want to load, for
Directory: C:\ TYPESET\*. THT ______ _
• mn~!!!~~!i!~!!!!!! *. TH T !!~~n~n!!~!i!~~! Selection: SAMPLE . TH~
ItlVO[CE • THT t LETTERHD • THT -
_i-Utg'_UII .................. ~ .... : ........ .
.................................... -"
Figure 2·21. The designation *.TXT on the Directory line means that Ventura is filtering out everything except files that end with the TXT extension.

42 Chapter Two: Introduction to Ventura Publisher
example, a MultiMate text file, it remembers the subdirectory and the file extension you used last time. If you change either of these, Ventura remembers the changes the next time you load MultiMate files.
Table 2-7. Default file extensions.
ASCII *.TXT
Generated Text *.GEN
Wordstar *.WS
MultiMate *.DOC
Text Files Microsoft Word *.DOC
Word Perfect *.WP
XvWrite *.xy
Xerox Writer *.xWP
DCA *.RFT
PRN-to-Table (Professional Extension) *.PRN
GEM Line Art *.GEM
GEM Imaqe *.IMG
Autocad *.SLD
HPGL *.HPG
Mentor Graphics *.P*
PostScript *.EPS Graphics Files TIFF *.TIF
CGM *.CGM
VideoShow *.PIC
Macintosh Paint *.PNT
Macintosh PICT *.PCT
Lotus PIC *.PIC
Windows *.WMF
PC Paintbrush *.PCX
Chapter *.CHP
Stvle Sheet *.STY
Caption File *.CAP Program Files
Chapter Information File *.CIF
Ventura Graphics *.VGR
Publication *.PUB
Width Table *.WID

Understanding Ventura Publisher 43
How do you change the file filter? Simply place the text cursor on the Directory line, type in the new extension and click OK. Ventura immediately filters out all files except those that match the new extension.
Changing directories and disk drives
Ventura Publisher is an intelligent program. When it places an Item Selector on the screen, it remembers where you were the last time and takes you to that subdirectory.
It's easy to change directories and disk drives. One simple method is identical to the way we changed file filters. When the Item Selector appears, place the text cursor on the Directory line and type in the new directory name (and/or the new disk drive). As soon as you click OK, Ventura switches to the new directory. \
Another method uses the Backup button (see Figure 2-22). Clicking the Backup button takes you to the directory that is next highest on the tree. Suppose you want to open a chapter and the Directory line now shows: C:\TYPESET\CHAPTERS\*.CHP. Pressing the Backup button moves up one level and the Directory line now reads C:\TYPESET\*.CHP. Pressing it again moves up to the final, root level, and the Directory line reads C:\*.CHP.
Backup Button --ilf--l-i---+I+ F'"""~"'---~~
File List ---lil--t---+lf-+
.CHP
.CHP
.CHP
.CHP
.CHP
.CHP SCAN? .CHP SCANTOC .CHP SOFTPRO .CHP
Current Directory
Figure 2·22. The Backup button moves you up to the subdirectory at the next level.
44 Chapter Two: Introduction to Ventura Publisher
.. NOTE: Using the Backup button does not change the file filter.
When you click the Backup button, the file list changes to show what is available in the new subdirectory. As you browse through the list, you may see names preceded with a diamond character. These are directories or disk drives. To move to a new subdirectory, click once on the name, as if selecting a file. You find yourself in the new subdirectory, as confirmed by the Directory line.
If you back up enough times, you eventually see only the disk drive letters in the list. To move to a new drive, click on the one you want. You can also type in the letter of the new drive on the Directory line and click OK.
Tips for Using Item Selectors
a File filtering is not limited to the extension. For example, when writing this book, we started all our files with the two-letter code VP. To see only our book chapters, we typed in VP*.CHP. Ventura eliminated files that did not start with VP and end with .CHP.
a To see the complete contents of any directory, go to the Directory line and type "*.*" as the filter. Ventura will show every file. If you just wanted to look to see what was there, click on Cancel to return to the Workspace.
a If you hear a beep when you enter an Item Selector, it means that Ventura found too many files and doesn't have room to fit them all onto its list. This is potentially a dangerous situation, since you have no way of knowing how many files have been left off. To cure the problem, enter a different file filter to limit the number of files shown at one time.
a To make files appear at the top of the Item Selector list for quick reference, precede the file name with a symbol such as !, #, or %. The file list is displayed alphabetically, and certain symbols are placed before the letters of the alphabet.
a If you number your file names sequentially, use two-digit numbers to ensure that files appear in the proper sequence. For

Understanding Ventura Publisher 45
example, use CHAPOl, CHAP02 rather than CHAPl, CHAP2. Otherwise, CHAPll appears before CHAP2.
a Dialog boxes may sometimes refuse to accept a filename without a three-letter extension. To select a file without an extension, type a period followed by three spaces.
a You can activate the OK button by pressing the Enter key. You'll see the OK button turn dark just as if you'd selected it with the mouse. This shortcut works in dialog boxes, too. Anytime you see an OK button, you can select it by pressing Enter.
a You can activate the Cancel button by pressing Ctrl-X. (Note that Ctrl-X calls up the previous dialog box if you are not currently in a dialog box.
a If a disk drive does not appear on Ventura's list, you can still get to it with the Item Selector. Type the drive letter (and the subdirectory name if you want) on the Directory line and then select OK. For instance, if you add a RAM disk called E: and it doesn't show up on the list with a diamond character, simply type "E:\" onto the Directory line and click OK.
a To make file selection faster, move the cursor over the file name and click twice rapidly instead of once. If you press twice in a row without a pause, the second click activates the OK button. This method is faster, but it does have one slight disadvantage. If you've slipped and selected the wrong file by mistake, you won't have any opportunity to check your choice by looking at the selection line.
You can vary the speed of the double click option using Set Preferences from the Options menu. If you choose fast, you must click very rapidly to invoke the double click shortcut. If you choose slow you can wait longer between clicks and Ventura still recognizes it as a double click shortcut.
The Side-Bar We've learned a good deal about Ventura's user interface already. We've seen how it uses the mouse, the keys, and dialog boxes. These elements were pioneered by the research done at Xerox Palo Alto Research Center. They have become more or

46 Chapter Two: Introduction to Ventura Publisher
less standard in graphic environments. But there's one portion of the Ventura interface that's not like anything else -the Side-Bar. This unique feature gives Ventura much of its power, flexibility, and speed.
The Function Selector
Figure 2-23 shows the Side-Bar with its parts labeled. Notice that the Professional Extension has a fifth mode not available in the standard version. The Function Selector is at the top of the Side-Bar. Its icons control Ventura's modes of operation, as outlined in Table 2-8.
You can change modes in three ways. You can select the icon from the Function Selector. You can choose the mode from the View menu. Or you can use the keyboard shortcuts. (By the way, the View menu lists these shortcuts along the right side.)
The Function Selector at the top of the Side-Bar does not change when you change modes. Neither does the Page Number Box at the bottom. But the rest of the Side-Bar alters according to the mode you are in. Spend some time familiarizing yourself with the information found in the Side-Bar. Often it's the key to figuring out what's going on in the Workspace.
Table 2-8. Modes and their functions.
Mode Purpose Side-Bar Icon Keyboard Shortcut
Create or select a frame for ~ Frame text or pictures. ---
Ctrl-U
Create, change, or apply a r:J Paragraph style sheet. Ctrl-I
Create or modify text. Ej Text Ctrl-O
Create or modify simple II Graphic drawings or callouts. Ctrl-P
Create or modify tables (only Table in Professional Extension). r TClb.1-::: Ed:l.t: II none

Understanding Ventura Publisher 47
Figure 2·23.
Figure 2·24.
t 801L.
It<ll:i\
Supc:rsct":l.Pt
SUb5Cr:tpt
Underl1nl(!:
Double UndrL.n
Str:1ke- thru
:;:::::::;: Ov~t"$c:ot"e
... . ·u·~p·e· ... · ';~$'e' .
Figure 2·25
Frame mode selects and operate on frames, the containers for text and pictures. In this mode you can choose which frame you want, load text and pictures into it, change its size, add a new frame, or change frame attributes such as margins and columns.
As shown in Figure 2-23, in Frame mode, the Side-Bar exhibits these changes:
• The Addition button reads "Add New Frame." Select this button to draw a new frame on a page (as demonstrated in the test drive).
• The Assignment List displays the currently available files, whether text or pictures. If you don't see any names in the Assignment List, you have not yet loaded a file.
• The Current Selection Box shows the name of the file in the active frame. If the frame contains no files, it shows the word Empty. If you have not selected a frame, it is blank.
In Paragraph mode you create, modify, and apply tags. The Side-Bar shows these changes (Figure 2-24):
• The Addition button reads "Add New Tag." Select it to create an entirely new tag that is not already listed.
• The Assignment List displays the tags for the current style sheet.
• The Current Selection Box remains blank until you select a paragraph from the document. Then it shows the tag assigned to that paragraph.
In Text mode you create and edit text files. The Side-Bar has these characteristics (Figure 2-25):
• The Addition button shows "Set Font." Use it to change the font attributes of a few words within a paragraph (to change the entire paragraph, use the Font dialog box from the Paragraph menu while in Paragraph mode).
• The Assignment List displays the attributes (normal, bold, italic, etc.) you can apply to the text.

48
Figure 2·26.
,)o1n C .. lls
Spl:lt Cel.1.
Set T:lnt._.
No ... ~al Rule:s
Z_HIDDEN
Z_SINCiLE
Z_DOUBLE
Figure 2·27.
Chapter Two: Introduction to Ventura Publisher
• The Current Selection Box is empty when the cursor is over normal text. But text files also include marks that are usually not visible, such as the signals for italics, for paragraph returns, for index marks, and so on. When you move the cursor over one of these marks, the term "Attr. Setting" appears in the Current Selection Box.
In Graphic mode you create simple drawings of your own, or enhance drawings you have imported from outside programs. The Side-Bar shows these characteristics (Figure 2-26):
• The Addition button reads "Add New Frame."
• The Assignment List disappears to be replaced by buttons. These buttons represent a selection tool and Ventura's drawing tools: the line, the circle, the rectangle, the rounded rectangle, and the Box Text tool.
• The Current Selection Box shows the name of the tool in use.
In Table mode you create and modify tables (you create the text itself with a word processor or in Text mode). The SideBar shows these characteristics (Figure 2-27):
• The Addition button reads "Ins New Table." It creates a new table immediately in front of the cursor position.
• The Assignment List is divided into two sections. The top half shows commands for creating and modifying rows, columns, and cells. The bottom half has commands for creating and modifying lines in the table.
Understanding frames and pages The second half of this chapter is titled ''Understanding Ventura." We spent the last few pages understanding the user interface. We'd like to present a bit more theory before we turn you loose in the real world. The rest of this section deals with two important concepts: frames and chapter files.
Both topics are treated in more depth and detail later in the book. But because they are central to Ventura, you need a basic grasp of them right from the start. Here, then, is the theory behind frames in a nutshell:

Understanding Ventura Publisher 49
Frames are containers for text and graphics. You can give these containers attributes such as margins and columns. The Frame menu lists the various ways you can change a frame's attributes.
Ventura makes things easier by automatically drawing the first frame for you. We call this first frame the Underlying Page or, more simply, the Page. (Whenever we capitalize the word Page, we are talking about this special frame.) When Ventura draws the Underlying Page for you, it makes the boundaries equal to edges of the paper. What's more, Ventura will automatically repeat this Page frame as many times as needed to accommodate a long text file. That's why you don't have to laboriously draw a container on every page of a document (as you must with some other programs).
The Underlying Page, therefore, is a frame with a few special qualities:
• It is created automatically
• It repeats automatically as needed
• It cannot be deleted or copied
• It can have headers and footers
• Text flows automatically from Page to Page (with ordinary frames, text flows to the end and stops)
In many ways, however, the Underlying Page is just like any other frame:
• You can change its size
• You can give it margins and columns
• You can specify its frame typography
• You can put rules above, below, or around
Some documents don't need anything more than the Page. In most cases, however, you need additional containers. Fortunately, frames can overlap. You can have many frames, one on top of the other, each one containing a text file, a picture file, and/or a background pattern. In this fashion, you can create complex documents with almost any format, just by laying frames on top of the Underlying Page.

50 Chapter Two: Introduction to Ventura Publisher
Chapter Ten, "Special Document Formats," explains frames in more detail. It also explains when to use the Underlying Page by itself, when to combine it with other frames, and how to build chapters where all the text is contained in frames.
Chapter files Ventura Publisher is famous for its style sheets. Less well known - but equally important - are its chapter files.
The chapter file is the blueprint for the document. It lists all the elements and where they belong:
• Which text files to use and where to put them
• Which picture files to include
• Which style sheet to apply
In short, the chapter file stores a description of the document, the locations of the files on the disk, and the order and manner in which they appear. As you may know, Ventura doesn't create a separate layout file. Instead, it works with the original text and picture files. This approach saves a lot of unnecessary duplication, but it requires some way of keeping things straight.
Ventura does this job with the chapter file. Thus, when we use the word chapter in lowercase, we are not talking about a section in a book. We mean a special file, which Ventura uses to store the essential specifications of a document.
The first time you save a document, Ventura automatically builds a chapter file. This file always has the extension CHP. To load an existing document, select Open Chapter from the File menu. Although you could achieve the same effect by reloading the text, pictures, and style sheet separately, there's no need to go to this trouble more than once. Simply load the chapter file, and Ventura uses it to reload all the files and rebuild the document in its entirety.
Chapter Five, ''Working With Style Sheets," explains the inner workings of chapter files and style sheets.

The Ventura Formula 51
The Ventura Formula
Text
Pictures
Style
We've concluded our look at Ventura's basic concepts and terminology. You need one more fundamental principle before you're ready to tackle the rest of this book: The Ventura Formula:
Text + Pictures + Style = Chapter
As you can see, the formula is a simple one. Yet no matter what kind of document you produce, the Formula always holds true. The next few chapters explain each part of the formula in depth. Here's a preview:
Ventura Publisher works directly with text files from leading word processors (it can also produce text files on its own). These file store text and tags. Tags are the special codes that tell Ventura whether each paragraph is a headline, a subheading, and so on.
Most Ventura pictures come from outside files (Ventura can also produce simple drawings on its own). The files may come from graphics programs, from scanners, or from electronic clip art collections. As with text, Ventura deals with the original file. It uses the chapter file to store a pointer to the original picture, along with instructions on how to display it.
Ventura places tags into the original text files. These tags are notes that tell Ventura things like ''Make these three words a headline" or "make the next five items into a list," and so on.
How does Ventura know how to format those tags? Simple -it stores the format rules in a file known as the style sheet. This style sheet contains the format rules for the tags. For example: "Set all headlines in 36-point Helvetica Bold with a one-point rule underneath" or "Indent list items three picas and precede them with a bullet character."

52 Chapter Two: Introduction to Ventura Publisher
Because it is a separate file, you can reuse a style sheet over again by applying it to different documents. Or, to vary formats instantly, you can apply different style sheets to the same document.
This chapter has outlined the basic structure of Ventura Publisher. Now it's time to learn how to become productive. We'll start that process in the next chapter, which explores the first part of the Ventura formula: Text.

Chapter 7hree
Creating Text
The most important element of any document is the text. After all, it is the written word that conveys the message.
A desktop publishing program, even one as powerful as Ventura Publisher, cannot produce well-written text. What it can do is make text creation as simple as possible. That way, you can concentrate on perfecting your writing rather than on mastering a new tool. Ventura Publisher was created with this philosophy in mind.
Sounds good. I just use my word processor like always -right? Not quite. There are several tricks you should know, simple techniques that smooth the process. This chapter teaches you those techniques. It focuses on creating and editing text. (Chapter Six, "Document Design and Layout", explains loading and arranging text on the page.) This chapter includes two sections appropriate for beginners and a third section for more advanced users:
• creating text with word processors
• creating text with Ventura
• preformatting text files
Ventura'S approach to text Before we get into specifics, it will pay to understand Ventura's general approach. The key is the two-way communication between Ventura and text files (Figure 3-1). First Ventura reads in the files and pours them onto the page. When you have finished, Ventura automatically saves your changes back to the same files. At the same time, it inserts formatting codes.

54
The Headline The first paragraph of the story. The next sentence. The next paragraph
The Headline The first paragraph of the
~ story. The next sentence. The next paragraph
Raw text from the word ----+ ... is formatted in processor... Ventura
Chapter Three: Creating Text
@HEADLINE - The Headline The first paragraph of the story. The next sentence. The next
... and saved back to the word processor
file with codes.
Figure 3·1. Ventura can read and write fa the file formats of leading word processors. It stores some of its format codes in the text file.
Some DTP programs lump everything into a single layout file. Ventura, by contrast, continues to use the original files. Pointers in Ventura's chapter file tell it which files to use and where to find them. This approach has several advantages:
• Ventura supports numerous word processors, so you can use the one you like best.
• Ventura can also work with database software, spreadsheet software, and programming languages.
• You can combine different files from different sources in the same document.
• You can convert files from one format to another
• You can continue to work with the word processor after you bring files into Ventura.
Users find many reasons to continue working with a word processor after initial layout in Ventura. Changes of more than a few sentences are usually faster in WP mode. Word processors have spell checkers, grammar checkers, and search and replace functions absent from Ventura. Since you probably have skilled WP operators in your organization, you may often want to offload editing tasks to WP stations - especially since word processing doesn't require expensive, high-end computer equipment.
If you return to a word processor file after laying it out, you

55
will discover that Ventura has inserted tag names and format codes (Figure 3-2). In the final section of this chapter you will learn how to insert these codes in advance to preformat files.
C:IVPXRPT PAGE 1 LINE 19 COL ZS INSERT ON L----!----!----!----!----!----!----!----!----!----!----!--------R ~HEADZ = Two Kinds of Pictures Ve tura works with two kinds of pictures: Line-Art and IMages. ~ou ca Mix and Match both kinds in one docuMent. Later in the chapter we 11 look at both kinds in depth and exaMine their pros and cons. We 11 also look at specific prograMs in both categories. But first Ie 's clearly distinguish between the two. since yo to know the difference. Before you can load ou MU t specify in the <MS>LOAD TEXT/PICTURE<D> Dia t is Line-Art or IMage (see Figure 4-1).
n Ventura Publisher uses the terM <169>Line-Art<17B> it is referring to what the rest of the world calls <169>obJect-oriented graphics.<17B> Si ograMs contain the word Draw in their naMB.
aMe of <169>draw prograMs. <17B> Ventura Publisher r object-oriented prograMS directly: GEM Draw. and Mentor Graphics (and other forMats if they
~HEAD3 = Object Graphics An object-oriented prograM creates a MatheMatical description of an iMage. To draw a circle. for instance. it sends a MatheMatical expression that translates into a circle on the screen (and later on the page). l' 3" 4" 5 1 61 I:: ~ I: 9:
Figure 3·2. Ventura stores tag names and formatting codes in the text file.
Supported word processors Table 3-1 lists the file formats supported directly by Ventura in the first release of version 2. Don't give up if your favorite isn't on the list. Later in the chapter we explain several ways to use non-supported programs with Ventura. (You will notice from this table that Ventura also supports its own internal format, which has the GEN extension. Ventura generates GEN files when building indexes and tables of contents.)
You bring text files into Ventura with Load TextJFile from the File menu. Once you make a file part ofa chapter, you never have to load it again. Ventura automatically loads all component files when you open a chapter. To remove a file, use Remove Text/File from the Edit menu.
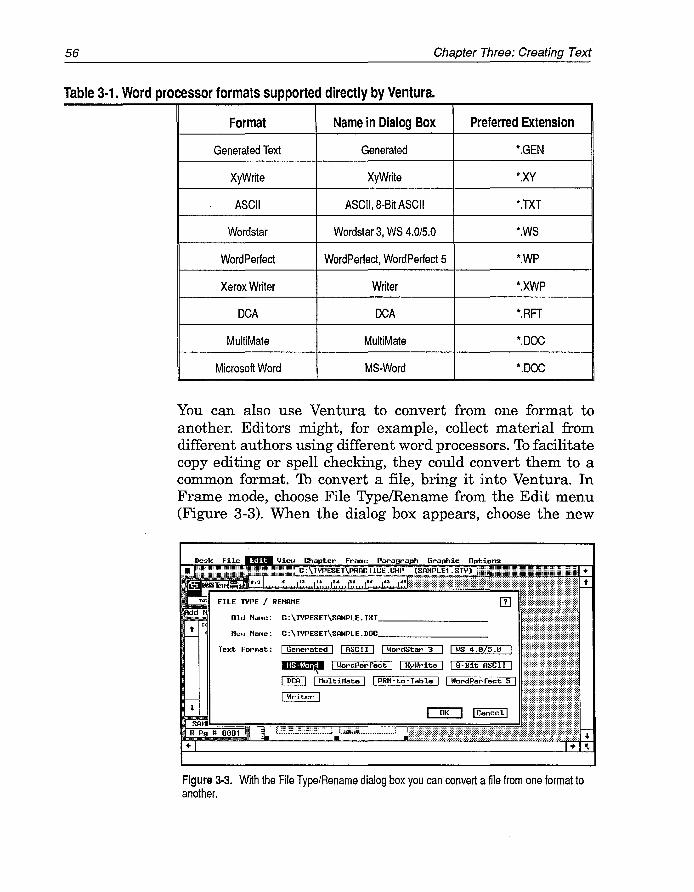
56 Chapter Three: Creating Text
Table 3·1. Word processor formats supported directly by Ventura.
Format Name in Dialog Box Preferred Extension
Generated Text Generated *.GEN
XyWrite XyWrite *.XY
ASCII ASCII, 8-Bit ASCII *.TXT
Wordstar Wordstar 3, WS 4.0/5.0 *.WS
WordPerfect WordPerfect, WordPerfect 5 *.WP
Xerox Writer Writer *.XWP
DCA DCA *.RFT
MultiMate MultiMate *.DOC
Microsoft Word MS-Word *.DOC
You can also use Ventura to convert from one format to another. Editors might, for example, collect material from different authors using different word processors. To facilitate copy editing or spell checking, they could convert them to a common format. To convert a file, bring it into Ventura. In Frame mode, choose File TypeJRename from the Edit menu (Figure 3-3). When the dialog box appears, choose the new
Old Harne: C :\TVPESET\SAMPLE. TXT ______ _
Hew Harne: C:\TVPESET\SANPLE.DOC ______ _
Text Format: I Generated I ~ I ~/ordStar 3 I I WS 4.0/5.0 I ImImliI;I I ~/ordPerfect I I XyWrite I I a-Bit ASCII I I DCA I I l'1ultit1ate I I PRH-to-Table I I ~'ordPerf'ect 5 I I ~/riter I
Figure 3·3. With the File Type/Rename dialog box you can convert a file from one format to another.

General rules for creating text 57
format. That's all there is to it. The file is saved to the new format the next time you save the chapter.
General rules for creating text Read this section to learn the ins and outs of creating text before bringing it into Ventura. It begins with general rules for all word processors. It concludes with comments on specific word processing, database, and spreadsheet programs.
As we've already seen, V~ntura Publisher views writing, illustration and layout as three separate tasks:
Text + Pictures + Style Sheet = Chapter
Consequently, when using a word processor you should concentrate on writing, not on formatting. Don't worry about fonts, margins, columns, indents, and the rest. You will take care of those factors in Ventura. What's all that mean while writing? Just this: Although your word processor has formatting commands, don't use them. At best, Ventura will ignore the commands. At worst, you will have to manually remove the formatting, cosHng yourself extra effort.
Below we've listed s~veral general rul~s for text formatting. At the end of the list, we give hints on how to ease the transition to Ventura-style text formatting.
Fortunately, most of the suggestions mean less work. If you follow the instructions, you will end up with bare-bones files devoid of any extras. We sometimes call this raw text.
Formatting rules for text files 1. Don't put in formatting commands. You will do the formatting in Ventura. Just type the text flush left. Margins don't matter - choose anything you like. Do not:
• center
• justify
• create columns

58 Chapter Three: Creating Text
2. Don't add headers, footers, footnotes, or page numbers.
3. Don't indent the first line of a paragraph, even if you want an indent on the printed page. You will indent in Ventura. That means no extra spaces, and no tab characters.
4. Don't hyphenate with the word processor. You're wasting your time, since Ventura has its own hyphenation routine. (You can, however, add discretionary hyphens or suppress hyphenation as discussed later.)
5. Don't imitate typographic effects. For instance, don't use asterisk for bullets or three periods for ellipses. To achieve these characters, add them later in Ventura, or put them in with the preformatting techniques explained later in this chapter. Exceptions: you can use two dashes (--) instead of an em dash ( - ) and inch marks ( " ) instead of open and close quotes ( "" ) because Ventura can filter these automatically.
6. Don't insert more than one space after periods and colons. Double-spacing detracts from the appearance of the final document.
7. Don't insert any spaces after the last sentence in a paragraph. Even a single extra space can create an unwanted empty line in the document.
S. Insert only one tab stop between columns in a table.
9. Use only true tab characters. Ventura Publisher recognizes tabs as long as they are real tabs. When you press the tab key, some word processors insert the actual ASCII tab character, Ctrl-I. Others insert a string of spaces instead. Still otherslike WordStar 3.3 -let you choose.
Ventura Publisher does not recognize a string of spaces as a tab, even if those spaces were inserted by pressing the tab key. If your word processor cannot insert the true tab character, you must insert Ctrl-I manually into the file. Use the arrow keys to judge if your word processor inserts tabs or spaces. Put the cursor at the left edge of the tab and press the right arrow. If the cursor jumps all the way to the tab stop, you have true tabs. Ifit moves one space at a time, you have space characters instead.
10. Use the word processor's native commands sparingly. Use

General rules for creating text 59
commands like bold only to change a few words within a paragraph - for instance, to create a bold phrase within an otherwise normal paragraph. To make the entire paragraph bold, type it normally. Add the bold font later with Ventura's Paragraph mode.
Table 3-3. Do's and Don'ts of Ventura text formatting.
DO: DON'T:
type flush left center
use attribute commands sparingly justify
type only one space after periods insert any spaces at the end of a paragraph
type only one tab between table entries create columns
use true tab characters add headers
add footers
add footnotes
add page numbers
indent the first line of paragraphs
hyphenate
insert imitation typographic characters
Trouble spots and how to handle them The transition from normal word processing to Venturaspecific word processing sometimes takes a bit of effort. For instance, it can be difficult to break the habit of hitting the space bar twice after periods. One solution is to prepare text files as before, then use search and replace to remove unwanted returns, spaces, and so on. Use Table 3-3 as a reminder of the things to search for.
Automatic conversion
Ventura does offer help for three of the most common habits: quote marks, em dashes, and double returns. The standard computer keyboard inserts inch marks ( " ) on both sides of quotations. Typesetting, on the other hand, uses two symbols, open quotes ( " ) and close quotes ( " ). Likewise, computer

60 Chapter Three: Creating Text
typists typically use two side-by-side dashes ( -- ) to represent the em dash ( - ).
You can instruct Ventura to filter out these symbols and insert true typographic characters instead. Use Set Preferences from the Options menu. Select /I and -- from the Auto Adjustments pop-up menu. (If you select Both, you will also get the conversion filter.)
You can also filter out double returns between paragraphs. Double returns are desirable in straight ASCII text, but they create problems with normal word processing files. The extra returns cause unnecessary and unwanted blank lines between each paragraph. Unfortunately, single-spacing creates documents that are hard to read on screen. One solution is to strip out the extra returns with search and replace. Another method is to insert Ventura's special PARAFILTR tag at the beginning of the file. The third and final section of this chapter explains how to add PARAFILTR and other tags to text files.
Tab stops
Tabs stops are another potential trouble spot. You must take two steps to make them work successfully with Ventura: (1) insert true tab characters and (2) insert only one tab stop between columns.
We explained above why and how to insert true tab characters. The second problem is accidentally inserting multiple tabs between columns. Here's what often goes wrong: Many word processors have predefined tab settings. When typing, you may press the tab key several times to jump to the right column (Figure 3-4). But each time you press the key, you insert another tab stop. When you later use Ventura Publisher to format that two-column list, Ventura expects to find only one tab stop between the left column and the right. Instead, the file may contain as many as five or six.
The second rule for tabular material is to insert one and only one tab stop between each column. (Certain advanced formatting techniques justify more than one tab character between columns. We cover these techniques in later chapters.)
If you want to go to the trouble, you can set the tabs in the word processor to imitate the appearance on the page. Do so if

General rules for creating text 61
One tab in row 1 --1111----'1---------.
Three tabs in row
~ Here-is-the-Pirst-entryi mntry-3i i i
* •
Here-is-the-second-entry~ The-next-enby~
Figure 3·4. Don't use extra tab stops between columns_ Put only one tab between columns, regardless of the on-screen appearance_
this makes it easier for you or your typists. But the appearance in the word processor doesn't matter to Ventura Publisher. All that matters is that you (1) insert a true tab character instead of spaces and (2) insert only one tab between columns.
Spell checking text files We recommend using a spelling checker before loading files into Ventura. Ventura inserts special codes to indicate tags, text attributes, fonts and so on. If you check the file after it has been loaded and saved by Ventura, the spell checking software reports these codes as misspelled words.
If you do heavy editing in Ventura, you may feel you need to spell check afterwards. Since Ventura uses the original word processing files, you won't have any compatibility problems with the spell checker. You will, however, need to add the tag names and codes to the user dictionary so the spell checker realizes they are not incorrect.
Naming text files Ventura Publisher has default file extensions for different word processing programs. Turn back to Table 3-1 to review the extensions assigned to the different file formats. When you load, for instance, a Microsoft Word file, Ventura looks for the

62 Chapter Three: Creating Text
extension DOC. You can change this default if you want. Some users, for instance, prefer to use the extension to indicate the type of document - LTR for letters, MEM for memos, and so on.
In most cases, however, we suggest staying with Ventura's defaults. Using the standard system makes it easier to assemble documents containing many files. The extension shows which files are in which formats.
We also suggest you adopt a naming system for the rest of the file name. For instance, here's how we named the files that made up this chapter of Inside Xerox Ventura Publisher:
• Ventura chapter file: IX03.CHP
• Text file (in WordStar format): IX03.WS
• Picture file: IX03FONT.IMG
As you can see, each file has a two-letter project code (IX) followed by a two-number chapter code (03). It's not necessary to duplicate our system. It is important, however, to develop a procedure and stick to it. A naming system brings many advantages. It makes it possible to share files with a workgroup because users can identify files at a glance. In addition, you can use DOS wildcard functions to archive files. Our system, for instance, lets us copy every file that relates to the book with a single command:
COPY IX*. * A:
Or we can copy just the WordStar text files:
COpy IX*.WS A:
Or we can copy only the files for Chapter Three:
COpy IX03*.* A:
Editing in the word processor after using Ventura As noted earlier, editing does not end once you create a layout. In all probability, there will continue to be revisions or additions to the text. It is acceptable, indeed often desirable, to edit a text file after it has been brought into a Ventura document. Open the file in the word processor just as you would normally.

General rules for creating text 63
Add text or make corrections to any portion. The next time you call up the Ventura chapter, the changes made in the word processor show up.
When you reopen a text file, you discover codes that were not present when you created it. These are Ventura Publisher's codes for tag names, special characters, text attributes, and other formatting. Be careful not to edit or delete these codes -they control the format and appearance of the Ventura Publisher document.
Attributes in word processor files Ventura supports a variety of text attributes. You can invoke seven of them directly in any supported word processor:
1. Bold
2. Underline
3. Superscript
4. Subscript
5. Strikethrough
6. Discretionary hyphens
7. Non-breaking spaces
What about italics, small caps, and other attributes not on the supported list? Ventura supports italics directly in some word processors. It also provides bracket codes for entering these attributes into text files. The final section of this chapter explains how.
For example, if you make a word bold in the word processor, it appears bold in Ventura, too. However, you should use, text attributes only for a few words within a paragraph (Figure 3-5). If you want an entire paragraph to be bold, type it normally and make it bold after you bring it into Ventura. When creating a large, bold headline, for example, don't -Use the bold command from the word processor. Instead, choose a large, bold font in Ventura (Figure 3-6).

64
Bold italic text
Chapter Three: Creating Text
I t==[ ......... 1· •.•.•... 2· ....... ·3· ......•. 4· •...... ·5· ........ G· •....... 7· ] . ~ HOTE-TO-HP-LASERJET-SERIES·II-AHD-WORD-3.1-USERS~
-'iou-do-not-need-to-set-youl'·page-length-to,18.5"-to-print'll -on-lettel'-siz8-papel'-as-in-Word·3.1.·'iou-can-now-use-the~ -default-value-of-l1".-lG~-iette~-ope~atiG'R-G/-tAe-ReN- IIPI
** ~ -driver8-with-the-Series-II.-please-change-the-settings-of'll 7' -mour-existing-documents-from-18.5"-to-l1".'11
'II DCA-COHVERSION-UTILITY'II -'iou-can-find-information-on-the-Revisahle-Form-DCA'II -conversion-utility-(WORD_DCA.EXE)-in-Appendix-E-of'll -Reference-to-Hicrosoft-Word.-Thel'e-is-additional'll -information-in-the-document-WORD_DCA.DOC-on-the-Utilities'll -disk.'11
'II ABOUT-THE-WORD-THP-FILES~ -If-you-set-a-TMP-envlronment-variahle-with-the-DOS-SET'II -command,-Word-will-create-and-maintain-its-THP-files-for-a~ -session-in-the-directory-specified-under-THP.-Do-not-store~ -the-TMP-files-on-a-Ramdrive.-In-case-of-power·failure'01''11
~=======================================================READHE.DOC= r.OMMAHD: Copy Delete Format Gallery Help Insert Jump Library
Options Print Quit Replace Search Transfer Undo Window 8dit document or press Esc to use menu P!l'1 Co2 {'II}? Microsoft Word
Figure 3·5. You can use a word processor command to make a few words bold within an otherwise normal paragraph.
If you set a TMP environment variable with the DOS command, Word will create and maintain its TMP files session in the directory specified under TMP. Do not st TMP files on a Ramdrive. In case of power failure or sys crash, the TMP files and data they store will be lost.~
• FirstBullet~
• Second Bu llet~ • Third Bullet~ If keys do not beh ave as documen ted when you use an hanced keyboard, or run Word with a terminate-and-6t
Figure 3·6. To make an entire paragraph bold (as with the headline shown here), type it as normal text in the word processor, then make it bold in Ventura.
Specific word processors The general rules in the preceding section apply to all word processors. Now we're ready to look at specific programs and file formats. Some of them have special considerations you should know about. At the end of this section, we have suggestions in the event your favorite program is not supported.

Specific word processors 65
Formatting ASCII files Think of ASCII as a generic brand - the plain vanilla version of text. Most word processors, spreadsheets, and databases can create ASCII in addition to their native file formats. ASCII files differ from word processing formats. For one thing, they contain a paragraph return at the end of every line. (Most word processors use returns only at the end of the paragraph.)
Normally, a return signals a new paragraph. But when Ventura loads an ASCII file, it ignores single returns - otherwise, every single line would be a separate paragraph. How does it know where to end paragraphs? Simple - it interprets two consecutive hard returns as the command for a new paragraph. This explanation leads to an important rule: You must always put two returns between paragraphs in an ASCII file.
What if you don't want to put (or can't put) two returns between paragraphs? For instance, some spreadsheet and database programs don't allow this option. In those cases, you can load the file as if it were WordStar 3 format. (Choose WordS tar 3 from the Load TextlPicture dialog box). No other conversion is necessary. Ventura will treat single returns as new paragraphs.
How (and" why) to create ASCII with other programs
ASCII is a versatile standard. It is the key to working with word processors, database managers and spreadsheet programs that are not directly supported by Ventura. By converting their files to ASCII, you can use them to create text for Ventura.
Some programs have a direct ASCII option (although it may be called "unformatted" or "non document" or "DOS Text"). Others have a special utility to convert the original file to ASCII. Even if the program doesn't have an ASCII option, you can still create ASCII files. Use the print function, but print to disk instead of to a printer. When a program prints, it strips out special commands and converts to ASCII. Consult the program manual for the commands to print to a disk file.
- NOTE: If you print to disk, set margins to zero to prevent unwanted space characters.

66 Chapter Three: Creating Text
Why use ASCII? Some companies choose ASCII as a common denominator between various word processing programs. In other cases (certain databases, spreadsheets, and programming languages) ASCII is the only text option available - or, at least, the only one compatible with Ventura.
There are other reasons to consider using ASCII. Many typists prefer two returns between paragraphs to make it easier to read text on the screen. But double returns must be removed to bring a file into Ventura (with search and replace or the PARAFILTR tag). If you go back and forth between Ventura and the word processor, you must reinsert and remove the double returns each time. One possible solution is to save in ASCII format. Ventura expects double returns in ASCII, so there is no need to remove them before loading .
.. NOTE: Once you save in ASCII format, it is difficult to work with the file again in the word processor. Every line will have a return at the end, making it troublesome to add or delete text.
Attributes in ASCII files
To create attributes like bold and underline in an ASCII file, use the bracket codes explained at the end of this chapter. This rule applies whether the file comes from a word processor, a database, a spreadsheet, or any other program. Don't use built-in attribute commands if the final output will be in ASCII format.
Two kinds of ASCII
A word to the technically proficient: Ventura supports ASCII in two forms. True ASCII appears in the Load TextiFile dialog box as AS ell. A variation appears as 8-bitASCll. True ASCII uses seven bits of data only. That allows only 128 characters -not enough to convey Ventura's full International Character Set. To allow more characters, Ventura also supports 8-bit ASCII, which uses the eighth bit for data instead of parity. Many word processing and database management programs are capable of producing ASCII files with characters that fall between 128 and 255.

Specific word processors 67
DCA format Document Content Architecture (DCA) format is supported by a variety of word processors, usually via a conversion utility that translates the native file format. As with ASCII, it often acts as a means of interchange between otherwise incompatible programs. Several popular programs support DCA, including:
• Displaywri te III and IV
• Lotus Manuscript
• Office Writer
• Samna Word
• Volkswriter
• WordStar 2000
Each program has a slightly different procedure for converting. Usually you save the file first in native format. Then you choose the Utilities submenu and select the DCA conversion routine. Sometimes DCA is referred to as Revisable Form Text instead. Refer to the program manuals for more details.
These word processors also allow you to save in ASCII, which is also supported by Ventura. Using DCA instead means that you can enter the text attributes with native commands, and those attributes will be preserved in Ventura. With ASCII format you must enter attributes with bracket codes.
To bring in a DCA file from the Load TextlFile dialog box, select Type of File: Text and Text Format: DCA.
Multimate format Ventura can read and write MultiMate files. To bring in a MultiMate file from the Load TextlFile dialog box, select Type of File: Text and Text Format: MultiMate.
Microsoft Word format Ventura can read and write files in Word format, including those created by Windows Write.

68 Chapter Three: Creating Text
Word and Ventura don't always get along. You must use extra caution when applying attributes like bold. Do not select a paragraph return when you are selecting text. If the attribute is applied across a return, it will be lost when Ventura saves the text back to the Word file. Likewise, do not apply any attributes to a tag code, or the tag will not take effect (it will appear as ordinary text). These problems are most likely to occur if you use the mouse to select text.
Although Word has style sheets, they are not compatible with Ventura's. Any formatting you do with a Word style sheet will be lost when you bring in the file. Word's style sheets do, however, offer some advantages. You can type only a single return between paragraphs, but set up the style sheet to double the space. This makes it easier to read the text on the screen without bringing on the hassle of stripping out extra returns.
You must also use caution with Word's hidden text. Using hidden text for tags or attributes may cause them to be ignored by Ventura, even if you make them visible before bringing in the file. In any case, the hidden code will be stripped away when Ventura saves back to Word format.
To bring in a Word or Windows Write file from the Load TextlFile dialog box, select Type of File: Text and Text Format: MS-Word.
WordPerfect format
Ventura can read and write WordPerfect files from versions 4.1 and higher.
To bring in a WordPerfect 4.1 or 4.2 file from the Load TextlFile dialog box, select Type of File: Text and Text Format: WordPerfect. To bring in a WordPerfect 5 file from the Load TextlFile dialog box, select Type of File: Text and Text Format: WordPerfect 5.
WordStar format
Ventura can read and write files from WordStar 3.3, 4.0, and 5.0. In Version 3.3, you must turn off hyphen-help (Ctrl-OH) and justification (Ctrl-OJ) at the beginning of every editing

Specific word processors 69
session. You can also patch or reinstall WordS tar so these options are off.
In Version 3.3 you must turn vari-tabs off (Ctrl-OV) if you want WordStar to insert true tab characters instead of spaces. In Version 4.0, you cannot insert tab characters with the tab key. Instead, you must press Ctrl-PI.
You cannot use WordStar's dot command formatting codes. Ventura will treat them as ordinary text. WordStar has a Document mode (D from the main menu) and a Nondocument mode (N from the main menu). WordStar's nondocument text files are straight ASCII files .
.. NOTE: You cannot convert an existing WordS tar document to ASCII simply by opening it in nondocument mode. The exact method of converting to ASCII varies between the different versions of WordStar. Perhaps the simplest way is to print to a disk file.
To bring in a WordStar 3.3 file from the Load TextJFile dialog box, select Type of File: Text and Text Format: WordStar US. Select Text Format: WS 4.0/5.0 for later versions.
Xerox Writer format
Xywrite
Ventura can read and write Xerox Writer 2.0 files. To bring in a Xerox Writer file from the Load TextlFile dialog box, select Type of File: Text and Text Format: Writer.
Ventura can read and write Xywrite II and Xywrite III files. Xywrite is a powerful, highly programmable word processor. A skilled Xywrite operator can set up a Ventura front end that allows the user to select and apply tags from a pop-up list. You can also set up a system to make tags and bracket codes visible or invisible with a single command.
To bring in a Xywrite file from the Load TextJFile dialog box, select Type of File: Text and Text Format: Xywrite.

70 Chapter Three: Creating Text
Unsupported word processors What should you do if the word processor you like best is not supported directly by Ventura? You have several options.
First, check with the vendor to see if it has developed a loadable Ventura filter since you purchased the program. If so, all you will need to do is acquire the filter and perform a brief, one-time installation. From that point on, your word processor appears as a choice in the Load TextlFile dialog box along with all the others.
Second, check the program manual to see ifit converts to any other formats. It is almost certain to have ASCII capabilities. I t may also be able to convert to DCA or one of the other supported file formats.
Finally, consider a separate conversion program. There are numerous packages on the market that can convert files from one format to another. Usually they have a long list of supported formats, giving you a wide range of options. With a conversion utility, you first save the file, then you run the utility to change the format. You load the converted file into Ventura. Popular conversion utilities include Word For Word from MasterSoft and Xchange and WVBridge from Emulation Technologies. See Appendix B, ''Manufacturers and Products.
Tips for working with word processors
a Put a single return between paragraphs. If you prefer two returns, use search and replace or the PARAFILTR technique to strip out the extras before loading into Ventura.
a Use your word processor's spelling checker on the caption file created within Ventura. This file will have the same name as the chapter and an extension of CAP. Treat the file as an ASCII format. Be careful not to add or delete any extra returns or to change the order of the sentences. Ventura stores all the captions in a single file. It counts returns to determine where to position them, so adding or deleting lines can throw off the captions for the entire chapter.
a Use the word processor to approximate the final document. If you know in advance the format you will use for the final

Creating text with other programs 71
document, you can imitate that format on screen in the word processor. For instance, you can set your word processing margins to correspond to the line length of the Ventura document. Although only an approximation, this technique helps writers gauge the proper length for sentences and paragraphs. Likewise, you can set up tab stops, spreadsheets, spacing, and other formatting to resemble the final document, making it easier for writers to visualize the results.
Creating text with other programs Up to this point, we have talked about word processors. You can also create text for Ventura with other programs.
Using a database program Database management programs are powerful text-generating tools for Ventura Publisher. Database software is more practical than word processing for such things as directories, catalogs, price lists, phone books, and specification sheets. Virtually all database programs, including best-sellers like dBase III, Rbase 5000, and DataFlex, can create ASCII files compatible with Ventura. When you combine the informationhandling of a database with the batch processing of Ventura Publisher, you have a powerful team. To coordinate the two packages, program the database to accept and store the data you need. Then print a report to disk. This creates an ASCII file that can be loaded into Ventura and formatted. If you have two returns between every paragraph, load the file as ASCII. If the report has only one return between paragraphs, load it into Ventura as a WordStar file. Be sure to program the database to trim out extra spaces (when entries don't fill all the spaces in the field). And ask it to leave out blank fields entirely.
Tips for generating text with a database
a To reduce the complexity of the document and speed performance in Ventura, use line breaks in place of carriage returns

72 Chapter Three: Creating Text
between two lines that have the Same tag. Here's how a listing might look without line breaks:
John Doe <J[
ACME Company <J[
123 Main Street <J[
Any town, USA <J[
Here's how it would look with line breaks instead (Ventura interprets the <R> bracket code as a line break):
John Doe <J[
ACME Company<R>123 Main Street<R>Anytown, USA <J[
You would read both examples into Ventura as WordS tar files. Both look the same on paper, but the line break version consumes less memory in Ventura - a concern when formatting multi-column directories with many entries.
For the ultimate in automated database publishing, read the final section in this chapter. It describes howto insert tags, text attributes, and other formatting information directly into text files before they are brought into Ventura. Using this technique, you can produce preformatted database reports. This method cuts days or even weeks from the process of publishing large directories.
EmI Commercial utilities can speed the process of using a database to create text files for Ventura. For instance, XVPlBase from Laser Edge writes a custom dBase program to read a database and write it out as a pretagged ASCII file. Users merely create a sample page to show XVPIBase what they want. Then the utility analyzes the page and writes a dBASE program automatically. No editing or tagging is required.
XVPlBase works only with dBASE. The DataTag utility from Publishing Solutions works with any database program capable of creating comma-delimited ASCII files (that is, virtually any program). DataTag looks at each field in the file and asks you what you want to tag it. You type in your answers, and DataTag puts each field on a separate line preceded by the tag name.

Creating text with other programs 73
Spreadsheet programs Spreadsheet programs like Lotus 1-2-3 and SuperCalc 4 can also create text for Ventura Publisher. Spreadsheet software is most useful for financial tables, comparison charts, and other tabular material (see Figure 3-7). For certain applications, you may prefer a spreadsheet. If the balance sheets already exist in Lotus 1-2-3, why bother to retype them for the annual report? And why use a word processor to create a complex financial table when a spreadsheet builds it faster while doing the math?
12 CONSOUDATED BALANCE SHEET
.. ""PII....,Grwip
"" .- CIo_ 1;II1II1IDII..,.1oa!. .... ~ .. 1e!) • ....". • ....". .. ..,. .... "' ... - .",.
=~ ,.,.. woo 1ImIIIseIt • ..".. ..... ftluwa:mllllJlJ
_''''7,DOt1l.~ .... ", ....... LocI_._ "'""'" ..... ~" ........ - - """" 6Ism1!!1i!r1Sl1lPll!"'JIII lIN!!! dum
-"""'- - ........ =~
,.,.. :::: ,.,.. == !aR 11H
! i!!!om ! '.!!!E ...... --,,:.. • - • ...... -,- .... '" .D ....
...... -- ....... ....... -_. on .... ....'" ,... ..... UI9!t 'M --.. "'IV . ..... ==~
..... ...... ....... ~ AMaId",tPl16 ....... AoaocI&II""'* ............. .....,
== NIl -!o!!!'!!! ,-............. .,. W==.,sr:'_,.1ICIC CoaI&IdI..-..lUf(*' ..... -*«DI1.1JlD.SI01bIrtC:
~~llIDMIber'J."'7 .. ''-O''1JS. ..... ...... 1.g1 ....
_. MM!)
b!t~!I. 1MB ~§.g
JoC!!I!bJ!!dIW .............. , LIK1!! ! U!Wl
Figure 3·7. You can use a spreadsheet program to generate the letters and numbers for your finaRcial tables.
Disregard formatting options such as right alignment or centering. The spreadsheet is just a temporary format. The final alignment and formatting occur inside Ventura.
The steps to convert a spreadsheet file into a usable text file depend on the program. First you must convert to an ASCII file. Some spreadsheets have a built-in ASCII option. If not, use the technique mentioned above: Print the worksheet, but send it to a disk file instead of the printer. Load the file into Ventura with the ASCII option (if it has two returns between paragraphs) or the WordS tar option (if it has one).

74 Chapter Three: Creating Text
Spreadsheet programs use spaces to separate columns. Ventura requires the actual tab character (Ctrl-I), not spaces. The solution is to strip out those spaces and replace them with the tab character. You can do this manually in Ventura (not recommended for anything but the smallest tables), in a word processor, or with special utilities.
Ventura's Professional Extension includes an external utility that reads ASCII files from spreadsheets and databases directly and converts them into the correct format for Extension's Table mode.
Tips for working with spreadsheets
D One way to clean up spreadsheet files is to transfer them into your word processor. Use search and replace to remove multiple spaces and substitute tab characters.
D You can embed a special symbol within each spreadsheet cell when you first create the table. (Use any symbol not encountered in the text. Possibilities include #, &, or *). Then you search for this symbol with your word processor and replace it with the tab character.
D Several commercial utilities simplify the conversion from a spreadsheet program to Ventura. XVP/Tabs from Laser Edge processes the print file, converts spaces to tabs, and performs other typographical niceties. It can also read Lotus WKS files directly, and make the appropriate conversions. Tabin from Corel is another utility with many sophisticated options. It processes and tags the file while converting spaces to tabs. It even generates a file that gives you suggested placements for tab settings.
D Lotus 1-2-3 users should consider another option. Ventura Publisher can directly import Lotus graphic files stored in the PIC format. Consider converting the spreadsheet file into a chart or graph if a visual aid would make your point more effectively than a table.
D To take the use of a spreadsheet program even further, program the left-most column to contain the tag name along with the labels. Use the spreadsheet's copy or macro function to

Creating text within Ventura 75
automate this insertion. Instead of Sales, for example, you might type in:
@COLLABEL = Sales
a To avoid the need to replace spaces with tabs use a monospaced font such as Courier after bringing the table into Ventura Publisher. Since all characters - and spaces - in this font have the same width, the columns and rows will align in Ventura Publisher just as they did in the spreadsheet program (which is also monospaced). Use Paragraph Typography from the Paragraph menu to set Normal Space Width to 1.000 so the columns will align perfectly.
Using a programming language The section at the end of the chapter explains how to insert tags and attributes directly into a file. Once you understand how the process works, you'll realize that programming languages like BASIC and Pascal can insert these tags. There are as many possibilities as there are programmers to create them. One example might be a program that prompts the user for variable information such as the price of gold or the names of the department managers and then outputs a pretagged file for Ventura.
Creating text within Ventura To this point, we've discussed how to create text files outside Ventura. This section explains how to create and edit text within Ventura. To learn how to arrange text and lay it out on the page, turn to Chapter Six, "Building the Chapter."
Ventura's Text mode was not designed to take the place of a word processor. It doesn't have search and replace, automatic scrolling at the end of the screen, and other features that speed text creation. We don't recommend Ventura for generating more than a page or so, but it's fine for short documents like ads, flyers, letters, and forms.

76 Chapter Three: Creating Text
Typing on the Page Obviously, you can use Text mode to edit a text file from another program. In addition, you can create separate files from scratch. This saves you from leaving Ventura, calling up a word processor, creating the file, re-entering Ventura, and loading in the file. The easiest way to create a text file is by switching to Text mode and clicking anywhere on a blank Underlying Page. The text cursor appears in the upper left. Start typing.
You've just created a text file. (To be completely accurate, the file isn't created until you save the chapter; that's when Ventura actually writes it to disk.) To name the file, Ventura uses the same name as the chapter. To decide which format and extension to use, Ventura selects the last format used by the Load TextlFile function. To determine where to put the file, Ventura uses the subdirectory containing the chapter file.
Let's say you are working on a chapter called SAMPLE.CHP located in the \ TYPESET subdirectory. The last time you used Ventura, you loaded text files in Wordstar format with the WS extension. If you start typing on the blank Underlying Page inside SAMPLE.CHP, Ventura automatically creates a text file in WordStar format called \ TYPESET\SAMPLE.WS.
To check the name of a file, switch to Frame mode and click on the Page. The file name appears in the Current Selection Box at the lower left of the Side-Bar.
Typing inside a frame A slightly different process occurs if you type on a blank frame (as opposed to a blank Underlying Page). In that case, Ventura places the text you type into its caption file. The caption file, which is stored in ASCII format, contains all the captiohs for all the frames in the document. If you prefer, you can put this text into a separate file using File TypelRename from the Edit menu.
-NOTE: If you type on an Underlying Page (or frame) already containing text, the words go into the existing text file. Only if the Page or frame is empty will Ventura create a new file.

Creating text within Ventura 77
Changing a file name, format, or location You can change the name, format, or path of a text file (or any combination). To change a file:
• Switch to Frame mode and select the Page or frame containing the file.
• Choose File TypelRename from the File menu.
• When the dialog box appears, enter the new name, format, and path.
When you save the chapter, Ventura saves the text in the new file. The previous file remains unchanged with its old name, format, path, and contents.
You can use the same technique with text typed into frames. When you click on the frame, you see the words "Frame Text" displayed in the Current Selection Box. This signals that the text is currently stored in the caption file. To put this text in a separate file of its own, open File TypelRename as explained above and type in the name, path, and format you want .
.. NOTE: The file will not actually be converted until after you save the chapter. Thus, if you abandon the chapter without saving, Ventura will not produce a converted text file.
Tips for creating files
a Ventura will rename the text file automatically if it matches the chapter's name and path. When you change the chapter name, Ventura changes the text file name. Thus, if you change \TYPESET\SAMPLE.CHP to \NEW\NEWSAMPL.CHP, Ventura automatically changes \ TYFESET\SAMPLE.TXT to \NEW\NEWSAMPL. TXT. The previous file is not deleted.
a You can rename the text in caption frames. Users generally find it most convenient to leave their captions in Ventura's caption file. However, if you prefer to have a separate file for each caption, use File TypelRename on each caption frame.

78 Chapter Three: Creating Text
Editing in Ventura When it comes time to edit, Ventura doesn't care how text was created. Editing commands work identically on all text regardless of its origin.
To edit text, begin by enabling Text mode. Position the mouse cursor at the insertion point and click once. The flashing text cursor appears. To add characters, simply begin typing. The Backspace key erases characters to the left of the cursor. The Del key erases characters to the right of the cursor.
Cutting, copying, and pasting You can copy, cut, and paste by selecting (highlighting) the text, then selecting the function you want. You can highlight text in two ways. For most applications, place the mouse cursor at the beginning and drag the cursor to the end. This method is the fastest and the easiest. For small edits where placement is difficult, use the Shift-Click method instead. First place the text cursor at the beginning of the selection. Now move the mouse cursor to the end, and click again while holding down the Shift key. The text between the two clicks will be highlighted.
The Shift-Click method allows more accurate positioning. It is best for selecting, for example, a single letter. It is also useful to shorten or lengthen a selection. Let's say you accidentally grab two extra words while making a selection. Place the mouse cursor at the correct end point and click while holding Shift to shorten the selection.
You can only select one continuous range of text at a time. Your selection can cross a column, but not a page boundary, even in Facing Pages View. Once you have selected the text, choose Cut Text, Copy Text, or Paste Text from the Edit menu (Figure 3-8). As you become more familiar with the program, you will find that it saves time to use the keyboard shortcuts:
• To copy, press Shift-Del
• To cut, press Del
• To insert, press Ins

Editing in Ventura
This is aline~ but this is another line,,"", land yet all four lines'""' Fre part ofthesameparagraph,~
~ This is very useful for tables, headings,~
1 You can also select text and shift it h",i,,'nnt~,11v e left, This is known as k
Figure 3·8. To edit, highlight the text, then choose the appropriate command from the Edit menu (or press the keyboard shortcut).
79
Ventura stores the text in the Text Clipboard (also called temporary memory). It stays there there until you cut or copy something else. As a result, you can cut or copy anything from a word to a sentence to a paragraph and repeatedly paste it elsewhere in the document. However, you cannot cut several items in a row and then paste them all. Only the last item remains in memory. The others are lost.
The cut function removes the selection from the page and places it in the Clipboard. The copy function works in exactly the same manner, except that the selection is not removed from the page. To place a selection anywhere in the document, move the mouse cursor to the insertion point and press Ins (or select Paste from the Edit menu).
Ventura maintains three separate Clipboards, one for frames, one for graphics, and one for text. Cutting or copying a frame or a drawing does not affect text. Text remains in the Clipboard when you close a chapter and open a new one. You can, therefore, use the Clipboard to copy or move short text sections from one chapter to another. And there is no need to worry about the original file format of the text. Ventura permits you, for example, to move a section from a WordStar file into the middle of a MultiMate file.

80 Chapter Three: Creating Text
Editing tabs, returns, and other marks To make editing easier and more accurate, choose Show Tabs & Returns from the Options menu. This choice creates visible marks in the text for tabs, returns, and the other important editing symbols listed in Table 3-3.
Table 3·3. Editing symbols in Text mode.
Name Descriptionin Current Selection Box
Tab character Horiz. Tab
Paragraph return Paragraph End
Line break Line Break
Discretionary hyphen Discr. Hyph 1
Fixed spaces (non-breaking, em, en, NoBreak Space figure, thin)
Index Index Entry
Anchor Frame Anchor
Footnote Footnote
Cross-Reference (Professional Reference Extension only)
End of file End of File
Attributes {bold, italic, etc.} Attr. Setting
.. NOTE: A Return starts a new line and tells Ventura to treat the next item as a separate paragraph. A line break starts a new line, but the line is treated as part of the preceding paragraph (retains the same tag formatting);
Text files also include markers that cannot be made visible. These markers denote the beginning and end of text attributes like bold and italic. Markers can be edited as if they were text. They can be cut, copied, and pasted, in conjunction with text or by themselves. Simply highlight the symbols (try using the Shift-Click method) then select an action from the Edit menu. For instance, to move an index reference or a frame anchor, you would cut the degree symbol from the text and paste it into the new location.

Editing in Ventura 81
At first glance it might seem impossible to edit markers that do not show on the screen. The key to finding attributes and marks is the Current Selection Box at the bottom of the SideBar. In Text mode, it remains blank until you move the text cursor onto an attribute or mark. Then the box displays the name of the marker.
Try this example. Move to a paragraph of body text and highlight a word. Change it to bold. Move the text cursor to the first letter in that word. The Current Selection Box is blank. Now press the left arrow key once. Result: the Current Selection Box now displays the words "Attr. Setting." In a similar fashion, you can locate other invisible codes within the text, whether they are marks or attributes.
Changing attributes in Text mode
Figure 3·9. IX03ASSI,IMG
Ventura Publisher retains certain attributes set within the word processor, such as bold and underline. Nevertheless, there will be many cases when you want to add attributes after bringing text in. Ventura makes nine attributes avail-able via the Assignment List in Text mode (Figure 3-9):
1. Bold
2. Italic
3. Small
4. Superscript
5. Subscript
6. Underline
7. Double Underline
8.Strike-thru
9. Overs core
To add an attribute, highlight the text, then select the attribute from the Assignment List. To combine attributes -Bold and Italic, for instance - highlight the text and select them one at a time. Attributes are not toggle commands -selecting them a second time will not turn them off. To combine attributes, choose them one after another from the As-

82 Chapter Three: Creating Text
signment List. To clear attributes, choose Normal from the top of the Assignment List.
-NOTE: Selecting Normal clears al/ attributes, not just the last one. If you select Bold and Italic, then decide you want only Bold, you must clear both attributes by selecting Normal, and then select Bold again.
The fourth item on the assignment list is Small. This stands for small caps, a useful effect not available with standard word processors. The best way to understand small caps is to see them side-by-side with normal caps and lowercase letters:
NORMAL CAPS SMALL CAPS lowercase
Small caps can set a word or phrase apart from the rest of the text. They make a word noticeable without being obtrusive. Small caps also come in handy for logos and headlines, either by themselves or in combination with normal capitals. Before selecting small caps, be sure to capitalize all the letters. When you choose Small from the Assignment List, Ventura is really just changing the letters to a smaller size. You could accomplish the same effect by using Set Font from the top of the Side-Bar. Initially Ventura sets the size of the font for you. You can change this specification, however, with Attribute Overrides from the Paragraph menu (Figure 3-10).
In addition to the standard attributes, the Assignment List
Line ~Iidth: Text-Wide t
O.OO~ Shift t By: 0.138 inches 0.008 0.043
Overs core Height: Strike - Thru Height:
Underline 1 Height: 0.008 Shift" By: 0.008 Underline 2 Height: 0.008 0.823
Superscript Size: OOB Shift t By: 0.865 Subscript Size: OOB Shift" By: 0.815
Sl11a11 Cap Size: OOB points
[][J I Cancel I
Figure 3·10. The Attribute Overrides dialog box lets you control the size of the font assigned to small caps, as well as the positioning of other attributes.

Editing in Ventura 83
also controls capitalization in Text mode. Scroll to the bottom of the list to see the three options:
1. Upper Case
2. Capitalize
3. Lower Case
Upper Case changes every letter in the selected phrase to capitals. Capitalize changes only the first letter of each word to capitals. Lower Case changes every letter to lowercase.
Ventura users who edit contributions from various authors will appreciate these built-in functions. By selecting one of the three choices, you can quickly make headlines and section titles conform to the capitalization standards you have set forth. It is almost always faster to let Ventura handle the capitalization changes than to correct the letters one-by-one with a word processor.
Changing fonts in Text mode
Text mode also lets you change the font for any section of text. Use Text mode to change the font when you want a few words to look different from the rest of the paragraph. Use Paragraph mode when you want to change the font of every word in the paragraph.
To change the font, select the text. Then click on the Set Font button at the top of the Side-Bar. The Font dialog box appears. This dialog box is identical to the one that appears when you select Font from the Paragraph menu. It works in the same fashion. However, because you access it through Text mode, it affects only the highlighted words. When you open the Font dialog box in Paragraph mode, it affects every word in the paragraph, and every similar tag in the document. Font settings made in Text mode override anything done in Paragraph mode. You can choose Bold and Italic from the Font dialog box or the Assignment List. The effect is identical either way. You can also choose Overscore, Strike-thru, Underline, and Double Underline in both places, but the effect differs. If you invoke them in Text mode they apply only to the selected text. If you invoke them in Paragraph mode they apply to the entire paragraph (Figure 3-11).

84 Chapter Three: Creating Text
l·· .. ·' .... · .... ·········· .. ········· .. ··· .. ········ .. ········· ................................................................. 1
I In this paraQraph, we have underlined on~ I keleQled lex! using the sidebar in text mode.~ ! ~n this oaraaraoh. we have underlined usina the Para! [graph menu. Notice that in this case. the entire para· <graph becomes underlined., !
I~.............I Figure 3·11. Invoking attributes in Paragraph mode applies them to the entire paragraph, not just to selected text.
When you change a font in Text mode, the paragraph retains its original line spacing. If you increase the size, the letters may overlap the lines above and below. To minimize this effect, position the text with the Shift function from the Font dialog box. Use the enlarged view for maximum accuracy. Shift the new text up or down a half point at a time until it fits into the space. Shifting affects only the selected words, not the rest of the paragraph.
You can also tell Ventura to automatically add spacing to lines with large type. Use Paragraph Typography from the Paragraph menu. Choose Grow Inter-Line To Fit: On.
Inserting non-keyboard characters in Text mode Professional-looking pages require characters and symbols not available on the standard keyboard. These non-keyboard characters are quite important. For example, the keyboard shows only inch marks ( " ). True typeset material uses two separate sets of marks, open quotes ( " ) for the beginning and close quotes ( " ) for the end.
Non-keyboard characters have several important functions:
• typographic symbols
• foreign language characters
• mathematical and scientific notation

Editing in Ventura 85
In a few cases, Ventura Publisher provides access to these symbols within a dialog box. For example, when creating footnotes or bullets, Ventura lets you choose from a variety of symbols. In addition, Ventura has keyboard shortcuts for the most common symbols, as shown in Table 3-4.
Table 3-4. Keyboard shortcuts and decimal equivalents for selected special characters.
Decimal Keyboard Name Appearance Equivalent Shortcut (If Any)
Copyright mark © 189 Ctrl-Shift-C
Trademark TM 191 Ctrl-Shift-2
Registered ® 190 Ctrl-Shift-R
Trademark
Open Quote " 169 Ctrl-Shift-[
Close Quote " 170 Ctrl-Shift-]
Ellipsis ... 193
Bullet . 195
Em Dash - 197 Ctrl-]
En Dash - 196 Ctrl-[
Hollow Box D none Ctrl-C-F1
Filled Box • none Ctrl-C-F1
Those new to publishing should consult the Glossary at the back of the book for definitions of any unfamiliar terms.
Non-keyboard characters via the keyboard
Most non-keyboard characters are not available through a dialog box or a keyboard shortcut. You can enter non-keyboard characters - whether or not they have a shortcut - by typing their decimal equivalent while holding down the Alt key. Let's backtrack just long enough to understand how the keyboard works. When you press a key, you send a decimal equivalent to the computer. The computer interprets it as a character. For instance, by pressing the lowercase a key, you send a 97, which the computer recognizes as an a. Press a lowercase b and you send a 98, and so on.

86 Chapter Three: Creating Text
Ventura's International Character Set goes up to 218, with each number assigned to a character. The standard keyboard, however, only has codes for about 128 or so. How can you gain access to those extra characters? Simple - hold down the Alt key and enter the decimal equivalent on the numeric keypad. (Don't use the numbers across the top of the keyboard). Table 3-4 gave the name, symbol, and decimal equivalent of some important non-keyboard characters that have no keyboard shortcut. The Xerox Ventura Publisher Reference Guide lists the entire extended character set in Appendix E.
For example, to place an ellipsis ( ... ) in the text, move the text cursor to the correct spot in the sentence. Hold down the Alt key while typing 193 on the numeric keypad (don't try to use the numbers above the keyboard). The ellipsis will appear on the screen as soon as you release the Alt key .
.. NOTE: You can use the decimal equivalent to insert characters for bullets and footnotes. The dialog boxes for these options give several choices. If you do not like the symbols shown, choose an alternative and enter its decimal equivalent into the space provided in the dialog box (Figure 3-12).
Desk File Edit View Chapter' Fral1le ' .. ' .• Gr'aphic Options
"First Par'agrh" SPECIAL EFFECTS
Special Effect: ~ 1 BiS First Char'I _
CoMMands: 1 Set Font Properties 1
Sp<'I(;e Fol" Bl.9 FiJ'\\'t;: [J~?r.~i~;~rJ C.~~~.;iF~i~.;:J 00.>' l:l.rIr."s
Show Bullet As:
Bu llet Char:
Indent After Bullet:
[!] 0 m 1 Hollow Box 1 1 Filled Box 1 1 Other 1
852j (ASe I 1)
81 J~6 picas & points
I-...
::::::::::::::::::;:::::::::::::::::::;:::::::::::;::::::::::::::::::::::::::::::::::::::::::::::::::::::::::::::::::::: 1+ ..
Figure 3·12. You can also use decimal equivalents to create different bullets in the Special Effects dialog box.
Using the Symbol font Ventura also provides access to an entire alphabet of special characters called the Symbol font. You've already learned how

Editing in Ventura 87
to change fonts. You've also seen how to enter decimal equivalents. By combining these two skills, you can gain access to an entire extra alphabet of symbols appropriate for mathematics and equations.
You switch to the Symbol font the same way you change to any other font. You can access the Font dialog box via the Paragraph menu (if you want an entire paragraph to appear in the Symbol font), or via the Set Font button in Text mode (if you just want to change a few letters).
The Symbol font is different in that every character is a symbol. In most fonts, pressing the a key gets you some kind of a, albeit in a different typestyle. But pressing the a key in the Symbol font gets you the Greek symbol alpha ( ex. ). Here's a more extended example:
Normal font: abc d e f g h i j k
Symbol font: ex. ~ X 8 e <\> Y11 t <p K
The secret to using the Symbol font, then, is to understand that the keyboard has been remapped. To enter a symbol, find it on the chart. Look across to see what it would be in the International Character Set. Then press that key on the keyboard.
What about non-keyboard characters above decimal 128? You access them the same way in the Symbol font as you do in any other: by holding down the Alt key while typing the number on the keypad.
In addition to the symbols explained here, you can also get other fonts with special characters. Most PostScript printers, for instance, contain a Dingbat font. Here's a brief sample:
Normal font: abc d e f g h i j k
Dingbat font: 0 0 * * l$ * ,l~ ~!~ * ~f~ * Non-keyboard characters in word processing files
You can also insert the extended character set directly into the word processing files before those files are brought into Ventura. In brief, the technique involves enclosing the decimal equivalent inside angle brackets (the same decimal equivalent explained above). Thus, Alt-193 produces the ellipsis in Ven-

88 Chapter Three: Creating Text
tura and <193> produces the ellipsis in a word processing file. See the final section in this chapter for complete details.
Tips for text editing within Ventura
iiIi Don't be alarmed if a sentence disappears during editing. The sentence has not vanished - it has simply been moved. You'll find it by going to the preceding page (if you're at the top) or the following page (if you're at the bottom). Ventura reformats every time you add or delete text. Your changes may invoke automatic widow and orphan control, causing Ventura to push a section of text from one page to another.
iiIi Don't forget about the Shift-Click method for highlighting text. It's the easiest way to select short sections, or individual characters. You can also use Shift-Click to expand (or shorten) a selection that has already been highlighted.
iiIi Make use of the Clipboard to speed editing. Use the copy function to put a commonly used phrase into the Text Clipboard where it can be reused.
iiIi Use small caps as a quick substitute for Set Font. Normally, Ventura chooses a new font size when you select Small from the Assignment List in Text mode. By using Attribute Overrides from the Paragraph menu, you can change this default setting. You can even use it to make the selected text larger instead of smaller. If you must frequently change the size of a few words within a paragraph, treat them as small caps and use Attribute Overrides to choose which size they should be.
iiIi Use superscript and subscript for additional quick font changes. As with small caps, Ventura normally chooses a smaller font, but you can change this setting in Attribute Overrides. You can also change the amount that the text is shifted up or down. To use these choices as quick substitutes for Set Font, choose the font size you want and set the shift to zero.
iiIi Learn to tag with the function keys in Text mode. That way you can type text and tag it at the same time, without switching to Paragraph mode.

Preformatting text files 89
Preformatting text files We wanted this chapter to provide one-stop-shopping on the subject of text. For that reason, we added this final, advanced section on preformatting. It gives instructions on all Ventura's preformatting options. At the end, a final summary chart provides a quick reference to every command.
You don't have to preformat files to use Ventura, so if you're a novice you may want to skim this material and come back later. Eventually, however, most users will want to learn about it. Many professional publishers tell us their greatest productivity gains come from preformatting text files.
Preformatting may seem cumbersome at first, because it means adding codes. In truth, when combined with keyboard macros it is often the fastest way to create documents. Preformatting can save hours of layout time (especially if you use a database or spreadsheet to preformat large documents).
Let's start by quickly reviewing the Ventura approach to text. The process starts with a raw text file. The file is brought into Ventura and the style sheet applied to create a formatted document. When the chapter is saved, the original text file is saved as well. If we go back to this file, we see that Ventura has inserted formatting codes.
Given this approach, it is easy to understand preformatting: just type in the codes before bringing the file in. You can insert two types of information: (1) tag names and (2) bracket codes. We will explore them both in turn, but remember that the basic concept is the same - you preformat a text file by typing in codes Ventura can understand.
Entering tags in advance Pretagging is the most obvious and common form of preformatting. If you know (1) the proper Ventura format for tag codes and (2) the exact spelling of the tag names, you can pretag as you type the text file. When you load that file into Ventura Publisher, it is automatically formatted according to the style sheet. And Ventura's tagging code is simple to learn: Type the at sign ( @ ) at the left margin. Then type the name

90 Chapter Three: Creating Text
of the tag, followed by a space, an equal sign, and a second space:
@TAGNAME =
You can use letters, numbers, or symbols in the tag name. Type the tag immediately in front of the paragraph you want to tag. Put it on the same line. Don't forget the spaces before and after the equal sign. And make sure that the at sign is the first character on the line.
Body text paragraphs do not have a tag name in the text file. Ventura Publisher already assumes anything without a tag is Body Text.
When you insert a tag into a text file, Ventura Publisher treats everything that follows as that tag until it sees a paragraph return. Then it reverts to Body Text. It formats the following paragraphs as Body Text until it sees another tag code. If you have three paragraphs in a row with the same tag name, you must put the tag code at the beginning of each one. Tag codes do not carryover to another paragraph.
-NOTE: If you want to start a new line without ending a para-graph, use a line break instead of a paragraph return.
When you type a tag into a text file, it's crucial to match the name in the style sheet letter-far-letter. You and I might realize that @HEADLINE and @HEADLINES mean the same thing, but to Ventura Publisher they are entirely different. Obviously, then, you can't preformat files until you have settled on the names you plan to use. What happens if you misspell a tag? No harm done - if Ventura Publisher doesn't recognize a tag, it formats the paragraph as Body Text. You can format it correctly later.
Using the PARAFILTR tag
There is one tag name that Ventura automatically recognizes no matter which document or which style sheet is active. It can be used in any text file. This special tag strips out double returns.
We explained earlier that word processing files require only one return between paragraphs. But text files are difficult to

Preformatting text files 91
read without double spacing. This is particularly true since you do not want to use any indentation.
But if you put in extra returns, they show up in Ventura as blank lines, throwing off the spacing of the docume~t. Theoretically, you could double space between paragraphs for readability, and then use the search and replace function of the word processor to strip out the extra return. However, you may find it more convenient to use Ventura Publisher's builtin PARAFILTR function.
To activate Ventura's built-in filter, place this special tag name at the top left of a document:
@PAFAFILTR ON =
Be sure to make it the first thing in the text file and follow the other rules for tag names. Spell it exactly as shown here. Don't forget the spaces before and after the word "ON" and before and after the equal sign.
-NOTE: When Ventura Publisher saves the text file, the double returns will be gone. You must reinsert them in the word processor if you wish to see double spacing on the screen again, or set up the word processor style sheet to add extra space between paragraphs.
The PARAFILTR technique is not without drawbacks. Some users put in extra returns to add space in a document - not really the best idea, but in the heat of meeting a deadline it's a quick and easy solution. Unfortunately, if your text file contains the PARAFILTR tag, Ventura will strip out those extra returns the next time you open your document. To avoid this, put a space on one of the lines, so Ventura no longer sees two returns in a row.
There is no way to turn off or delete PARAFILTR within Ventura. You must return to the word processor to take out the line.
Tips for pretagging
ImI Make the {Jt sign the first character at the left margin. If you put it any other column, Ventura does not recognize it as a tag name.

92 Chapter Three: Creating Text
ImI Don't apply attributes to the tag name. If you apply a text attribute like bold to the tag, the at sign may not be the first character in the left column. Even if the start command for the attribute is not visible on screen, it is in the file. If Ventura sees it first, it will not treat the at sign as the signal for a tag. To use attributes, start them after the tag name.
ImI The tag name must precede the rest of the paragraph.
ImI Spell the tag name exactly as it appears in the style sheet.
ImI Use a macro processor to speed pretagging and to avoid incor-rect formatting or spelling. Enter macro descriptions for the tags. For instance, Alt-l could stand for @HEADI = , while Alt-2 might stand for @HEAD2 = and so on. To pretag, all you have to do is press a key combination. We highly recommend macros. When using multiple tags it's far too easy to forget the correct syntax. Was that supposed to be @HEAD, @HEADlNG, or @HEADLINE? Does the style sheet use @COLUMNl, @COLUMN ONE, or @COLl? If your authors misspell a tag by even a single letter they nullify the pretagging. Many editors prepare macro files in advance and distribute them to their authors.
ImI Capitalization does not matter in the text file. Ventura makes no distinction between upper and lower case when it sees tags in a text file (although it does make the distinction within the program).
ImI The tag applies to the entire paragraph. When Ventura encounters a paragraph return (two returns in an ASCII file) it resets to Body Text. It continues to format as Body Text until it encounters another tag name.
ImI Consider using the PARAFILTR tag to strip out double returns.
ImI As an alternative to PARAFILTR, save the file in ASCII format. Ventura automatically treats double returns as a single return when it loads an ASCII file. This option is not suggested if you plan to do heavy editing in the word processor after loading into Ventura. ASCII files are more difficult to edi t in word processing mode.

Preformatting text files 93
a Another alternative to PARAFILTR may be available via your word processor. Put a single return between paragraphs, but set up the word processor to automatically add space before or after each paragraph.
a You can use Ventura to change tag names throughout a long file, or series of files. For instance, imagine that you want to change the tag name OLDNAME to the new designation of NEWNAME, and you need to make the change in 10 different text files. Load all the files into Ventura. Put anyone of them on the page (it doesn't matter which one). Click on a paragraph tagged as OLDNAME. Use Update Tag List from the Paragraph menu to change it to NEWNAME. Now save the chapter.
There is no need to load the other nine files onto the page. With that one brief action, you have changed OLDNAME to NEWNAME throughout all 10 files. Although you could also use search and replace in the word processor, it may often be faster to process a batch of files at once in Ventura than to run them one-by-one through a long search and replace routine.
Entering bracket codes in advance So far we've shown you how easy it is to preformat by adding tags in advance. Now we're ready to tackle bracket codes. The principle behind bracket codes is every bit as simple as pre tagging. In practice, however, the topic is more complex because bracket codes can carry four different kinds of information:
• text attributes (bold, italics, etc.)
• non-keyboard characters (symbols, etc.)
• formatting codes (font changes, point size changes, etc.)
• special functions (indexes, footnotes, etc.)
Beginning users sometimes struggle with bracket codes. It's not the concept that gives them a bad time. (You type letters or numbers between two brackets; how hard is that?) Rather, many novices don't understand the functions themselves. No wonder - if you don't have training in publishing and the

94 Chapter Three: Creating Text
graphic arts, concepts like base line jumps and secondary index references are bound to seem confusing.
So here's our advice to beginners: Try to grasp the theory of bracket codes. Then skim through the explanations of what they can accomplish. Don't worry if you don't understand all the effects yet. You'll catch on as you progress. At that time, you can return to this section for details.
The theory of bracket codes
Tags use the at sign ( @ ) to signal Ventura. Bracket codes use (you guessed it) angle brackets, one on each side of the code. (On most keyboards, the angle brackets are located above the comma and the period.) For instance, <MI> stands for medium-weight italics and <BI> means bold-italic.
When Ventura Publisher sees brackets in a text file, it does not print them or put them on screen. Instead, it treats the information inside as a formatting code. These formatting codes do not need to appear in the left margin. They can be anywhere in the text, as long as they are enclosed in brackets.
Ventura uses one code to tum on an effect and a second code to turn it off. The "stop" command varies, but the most common one is <D>. The <D> tells Ventura to return to the default (previous) condition. For example, here's how you would turn small caps on and off within a sentence:
An example of <S>MEDIUM ITALICS<D> with bracket
codes.
As we step you through the different effects possible with bracket codes, we will also explain how to tum them off. Incidentally, Ventura automatically reverts to the previous default whenever it sees a paragraph return. It goes back to normal and starts from scratch if it encounters a new code.
Ventura's use of angle brackets can cause one slight problem. What if you want to put brackets into the text file? If you enter them normally, Ventura assumes they enclose a formatting code. To make angle brackets appear on the page, you must double them up:
• Single brackets «X» are treated as a formatting code.

Preformatting text files 95
• Double brackets «<X») cause the inside set to print on the page.
The importance of bracket codes
Some of you may wonder why you should bother to learn bracket codes. There are several valid reasons.
Yes, it's true that you can perform all these same tasks in Ventura. In many cases, however, it makes more sense to add the effect in advance. Suppose an author is creating a programming manual and wants to use the Courier font in the middle of paragraphs to indicate what readers must type in. It's much better if the author makes the font change with bracket codes. Otherwise the editor must wade through each paragraph and guess which words need special treatment.
There are also occasions to use bracket codes within Ventura. Several important dialog boxes accept bracket codes. For instance, many users want advanced effects in their headers and footers - different fonts on the same line, different sizes on the same line, base line jumps to shift page numbers up or down, and so on (Figures 3-13 and 3-14). You can achieve these effects with bracket codes.
HEADERS 8: FOOTERS
Define: I Left Page Header I Right Page Header
I Left Page Footer I I Right Page Footer I Usage: _ []£[I ~
Left:
Center: < F2P24)J1Iicro< F14B IP4B)Publishing Reportlf--___ _
Right:
Inserts: I Chapter *" I I Page *" I I 1st ~1atch I I La~t t'1atch I '\
I Text Attr. I I Copy To Facing Page I c:::ID[] I Cancel I
Figure 3-13. By entering bracket codes into the Headers & Footers dialog box, you can create complex formats like the one shown below.

96 Chapter Three: Creating Text
Desk File Edit View Chapter Frafile Paragraph Graphic Options
• !!!~!!!!!!!!!!!!!!!!!!!!!i!i!!~ii!!!!i!!!~!i!i!!!!iiii!!ii!!!!!i!!!i!i!!~!!rC':'\Wj'iES'Ei'\TRASi'[-CHP'''-''''CtRASfr:-§iYr··!!i.!!!!!!!!!!!!!!!!!!!!!i!!!!!!i!~!!!i!!!!!i!!!i!!!m!!!!i!i!!!m!m!!! • 0,0 1'2 118 124 130 1~6 142 t
,.!,.
Figure 3·14. The font change and base line jump shown here in the header were created with bracket codes.
So much for the theory of bracket codes. Let's turn our attention to the four different effects they can achieve: text attributes, non-keyboard characters, formatting, and special functions.
Text attributes
Text attributes are the easiest and most common use of bracket codes. You turn them on with letter codes between angle brackets. You turn them off with the <D> code. Thus, to italicize the phrase Xerox Ventura Publisher, you would type:
Thus, to italicize the phrase <r>Xerox Ventura
Publisher<D>, you would type:
You saw earlier the nine attributes available in Ventura's Text mode. These same nine attributes can also be invoked in the word processor with bracket codes (Table 3-5).
-NOTE: Your printer may not support al/ the effects. If you specify an effect that is not available, Ventura ignores it.

Preformatting text files 97
Table 3·5. Bracket codes for text attributes.
Attribute Code
Bold <B>
Italic <I>
Small <S>
Superscript <A>
Subscript <v>
Underline <U>
Double Underline <=>
Strike-thru <X>
Overscore <0>
Medium weight (normal type) <M>
Restore to default (stop) <D>
You can combine attributes by putting multiple letters inside one set of brackets. Thus, to start bold italics, type <BI>. Notice that combining only works if you put the codes inside the same brackets. Ventura resets all attributes to the default whenever it sees a new code. Thus, if you enter <B><I>, you will get italic only.
No matter how many text attributes you are using together, apply the <D> code once to turn them all off. Even if you do not type in the <D> code, Ventura automatically turns off all text attributes when it encounters a return.
You've probably noticed that some of the attributes can also be entered with word processing commands. Nevertheless, some effects can only be entered as bracket codes (or within Ventura). With bracket codes, it is easier to transfer files between formats and systems. If you plan to use ASCII format, you should always use the bracket codes. Otherwise you wiUlose the attributes when you convert.
Entering non-keyboard characters in 'advance Earlier in this chapter, we explained non-keyboard characters and their importance. Inserting them into the text file is

98 Chapter Three: Creating Text
similar to inserting text attributes. To enter a non-keyboard character into a text file, type its decimal equivalent inside angle brackets. For instance, <193> denotes an ellipsis ( ... ). To know which numbers to use, turn to Table 3-4 earlier in this chapter (which shows the most commonly used symbols). You may recall that Ventura also supports some characters that do not appear on the character set chart. These can also be entered into the text file with the bracket codes shown in Table 3-6.
Table 3-6. Special bracket codes.
Character Bracket Code
Discretionary hyphen <->
Filled box <$81>
Hollow box <$80>
Fraction <$Enumerator/denominator>
Line break <R>
Em space <->
En space <,.,>
Figure space <+>
Non-breaking space <N>
Thin space <I>
Entering formatting codes in advance In the introduction to this section, we said we would talk about four ways to use bracket codes. So far we've seen how to use them for text attributes and for non-keyboard characters. Bracket codes can also contain formatting codes:
• size changes
• font changes
• color changes
• kerning and tracking changes (space between letters)
• base line jumps (shift text up and down)

Preformatting text files 99
Formatting codes consist of a single letter followed by numbers. The letter tells Ventura what to do; the numbers tell it how. For instance, consider the bracket code <P12>. The letter P tells Ventura to change the point size. The number 12 tells it how much - in this case, to 12-point type. Table 3-7 summarizes the bracket codes for all five formatting options. The lowercase n stands for the number you enter.
Table 3·7. Formatting options with bracket codes.
Formatting option Bracket code to start Bracket code to stop (reset to default)
Change point size <Pn> <P255>
Change font <Fn> <F255>
Change color <Cn> <C255>
Change kerning or tracking <B%n> <0%0>
Jump from base line <In> <JO>
Changing size with bracket codes
To change the size of type within a paragraph, use the code letter P, followed by the point size. To change to 14 point, type <P14>. To return to the previous size, type <P255>. Use this bracket only to enlarge a few words within a paragraph -like this, for example. To change the entire paragraph, use Font from the Paragraph menu.
Changing fonts with bracket codes
If you are a newcomer to Ventura, work with fonts in the program until you gain an understanding of typefaces and point sizes. Once you are familiar with typographical terminology, you can insert font changes in advance with bracket codes.
Often, authors need a certain typographic effect within a line - a special font, for example, or a symbol. It may be easier for them to insert the code while typing the manuscript than to make a note to the editor. You may even want to use bracket codes for font change while working in Ventura. For example, many designers like to have the page number larger than the

100 Chapter Three: Creating Text
rest of the header or footer, which can be accomplished by entering a bracket code in the Headers & Footers dialog box.
To change fonts, use the bracket code F followed by the ID number of the font. For example, <Fl> tells Ventura to switch to the Courier font and <F128> to switch to the Symbol font. Table 3-8 lists fonts alphabetically with their number codes.
Table 3-8. Font 10 numbers. The most popular fonts are shown in uppercase bold
FONT ID NUMBER FONT 10 NUMBER
American Typewriter 100 HELVETICA NARROW 50
AVANT GARDE 51 Korinna 53
Benguiat 26 Letter Gothic 105
Bodoni 36 Lubalin Graph 24
Bodoni Poster 37 Machine 101
BOOKMAN 23 Melior 31
Century Old Style 38 New Baskerville 33
Cheltenham 39 NEW CENTURY SCHOOLBOOK 20
COURIER 1 Orator 104
Courier Oblique 102 Optima 52
Franklin Gothic 56 PALATINO 21
Friz Quadrata 28 Park Avenue 35
Galliard 32 Prestige Elite 103
Garamond 22 Souvenir 25
Glypha 27 Sonata 130
Goudy 34 SYMBOL 128
HELVETICA (Swiss) 2 TIMES (Dutch) 14
Helvetica Black 55 Trump Mediaeval 30
Helvetica Condensed 59 ZAPF CHANCERY 29
Helvetica Condensed Black 60 ZAPF DINGBATS 129
Helvetica Condensed Light 58 RESET TO DEFAULT FONT 255
Helvetica Light 54

Preformatting text files 101
Ventura continues with the new font until it encounters another bracket code, a return, or the special code <F255>, which resets to the original font.
As with all bracket codes, font and point changes can be combined. Thus, <F51P24> changes to 24-point Avant Garde. You can also use a font change to switch to the Symbol or Dingbat fonts and thereby enter a special symbol into the middle of a text line. Here's how you would enter the alpha character in a text file:
The symbol <F128>a<F255> stands for alpha.
And here's what it would look like in Ventura:
The symbol ex. stands for alpha.
Changing colors with bracket codes
Ventura can support colored type for those few output devices capable of reproducing it. Of more practical value, it can create a separate overlay for each spot color. Normally, you would change colprs for the entire paragraph. Nevertheless, if you want to change colors within a paragraph, you can do so within the text file. Use the letter C for the bracket code. Enter a number from zero to seven to specify which color you want (Table 3-9). Enter <C255> to end the change and return to the previous color.
Table 3-9. Bracket codes for color changes.
Color Bracket Code
- White <CO>
Black <Ch
Red <C2>
Green <C3>
Blue <C4>
Cyan <C5>
Yellow <C6>
Magenta <C7>
Reset to previous color <C255>
102 Chapter Three: Creating Text
Changing kerning and tracking with bracket codes
Ventura uses kerning and tracking to refer to the spacing between letters. You can change these attributes for an entire tag (in Paragraph mode) or for individual groups of letters (in Text mode). You CRn also enter individual kerning and tracking with bracket codes. Use the two-character code B%, followed by a number that represents the number of ems. Use negative numbers to subtract space. Use positive numbers to add space. Type <DO/oO> to mark the end of the text to be kerned. If you are not familiar with tracking and kerning as implemented in Ventura, turn to Chapter Eight, "Advanced Functions."
Base line jumps with bracket codes
The base line is the imaginary line on which type rests. A base line jump, therefore, shifts a character up or down from its normal position. A common use of base line jumps is to reposition the page number in headers and footers. Within Ventura, you access this same function with the Shift line in the Font dialog box. This function is only active if you enter the dialog box in Text mode.
The code letter for a base line jump is J. The numbers that follow tell Ventura how far to jump. For instance, <J231> tells Ventura to shift up six points. To end the effect and return to the previous base line, enter <JO>.
The formula for calculating jumps is a bit complicated, so we have included a chart (Table 3-10) that gives you some common jumps. For jumps not shown here, you can experiment with the Font dialog box, and return to the text file to see what Ventura has entered. Or you can use the following formulas, where N represents the number to use in the bracket code and P represents the amount you wa~t to jump in points. For positive jumps (shifting above the base line):
N = 256 - (300/72 x P)
For negative jumps (shifting below the base line):
N = 300/72 x P

Preformatting text files 103
Table 3·10. Bracket codes for baseline jumps.
Amount to shift Bracket Code Result
Up 1 point <J252> Normal Text Shifted Text
Up 2 points <J248> Normal Text Shifted Text
Up3 points <J244> Normal Text Shifted Text
Up 4 points <J239> Normal Text Shifted Text
Up 5 points <J235> Normal Text Shifted Text
Up 6 points <J231> N lli t Shifted Text orma ex
Down 1 point <J4> Normal Text Shifted Text
Down 2 points <J8> Normal Text Sbifted Text
Down 3 points <J12> Normal Text Sbifted lext
Down 4 points <J17> Normal Text Shifted +ext
Down 5 points <J21 > Normal Text 8f:liHecl :re~t
Down 6 points <J25> Normal Text 51 'ft d Tr II e ext
Reset to original base line <JO> Normal Text Shifted Text
Entering special functions in advance We are near the end of our section on bracket codes. We have already seen how to insert attributes, non-keyboard characters, and formatting options. Ventura also uses bracket codes for several special functions:
• Footnotes
• Indexing
• Frame anchors

104 Chapter Three: Creating Text
• Hidden text
• Numbering
• Fractions
You can access all these functions within Ventura, and that's our recommendation for beginners. If you are an experienced user who wants to preformat these functions in the text file, the following section will show you how.
Entering footnotes with bracket codes
Chapter Eight, "Advanced Functions," explains how to insert footnotes within Ventura. However, some authors prefer to type in the reference as they create the text. This is generally more convenient than saving the reference inform.ation on paper to be typed in later. If you preformat footnotes as explained in this section, Ventura will take care of placing the actual reference on the correct page and in the correct format. Even though the bracket code sits within the main text, the words inside the brackets appear at the bottom of the page.
The angle bracket code for footnotes is $F, followed by the text you want to appear at the bottom of the page. Place the bracket code in the main text, immediately following the word that is to receive the footnote symbol. For instance, to insert a bibliographic footnote reference to this book, you would type something similar to:
<$FCavuoto, James, and Berst, Jesse. 1988. <I>Inside Xerox Ventura Publisher<D>. Torrance, CA: Micro Publishing and New Riders Publishing.>
Notice how the example above uses bracket codes to italicize the book title.
Indexing with bracket codes
If you are not familiar with Ventura's indexing function, review Chapter Eight, "Advanced Functions," before reading the discussion below. As with footnotes, indexing can be accomplished within Ventura, but many users prefer to do it within the word processor. In Ventura, the index entry is always invisible. You can see it only by moving the text cursor to the index mark and selecting Edit Special Item. By con-

Preformatting text files 105
trast, in a word processor, you can see all your index entries side-by-side, making it easier to figure out if you've left anything out.
The bracket code for indexes is similar to that for footnotes, but slightly more complicated. That's because Ventura's indexes can have two levels plus See Also references.
Text creation 123 editing 115, 125-128 See also Word Processing
In this example, "Text" is a primary entry, "creation" and "editing" are secondary entries and "See also Word Processing" is a See Also reference.
The bracket code is $1 followed by the primary reference and the secondary reference, separated by a semicolon. There are no spaces within the brackets. Thus, in the example above, you'd find the following bracket code at the spot corresponding to page 123 in the final document:
<$IText;creation>.
The bracket code for See references is $S; for See Also references $A. Thus, the bracket code for the See Also reference in the example above would look like this:
<$ATextiWord Processing>.
Finally, Ventura's indexing function also handles words that must be listed out of normal alphabetic order. You would not, for instance, want to find "The Acme Company" listed under the letter T. Instead, it belongs under the letter A. Ventura permits you to enter a different sorting criteria. This alphabetizing information is listed inside square brackets. For example, the bracket code <$IThe Acme Company[Acme Company]> creates a primary entry printed as "The Acme Company" but alphabetized as "Acme Company." You can enter alphabetizing information for the primary entry, the secondaryentry, or both.
You can put index entries anywhere in the text file except in front of a tag name. Tags must always be the first thing in the left column. In practice, however, it is usually best to group index entries together. Otherwise, they interrupt the flow and

106 Chapter Three: Creating Text
make it very difficult to read the file in the word processor. Many users group all index entries at the beginning of the paragraph, or, better yet, at the end of the subhead preceding that section, as shown in the exam pIe below.
Indexing with bracket codes<Bracket codes;indexing with><$IIndexing;with bracket codes>
If you are not familiar with Ventura's indexing function, review Chapter Eight, "Advanced Functions," before reading the discussion below.
Anchoring frames with bracket codes If you are new to Ventura, review the discussion on frame anchoring in Chapter Six, ''Building the Chapter," before reading this section. Ventura gives you a way to link pictures to text to ensure that a picture appears on the same page as its text reference. Anchoring involves two steps, which can be done in either order. One step is to give the picture an anchor name. The other step is to mark where you want it in the text. Marking the spot is done with an anchor reference. The anchor reference can be added within Ventura, or within the word processor with bracket codes.
The bracket codes for an anchor reference are the two symbols $&, followed by the anchor name. Thus, to anchor a picture called barchart, type <$&barchart>. Here's how it might look within the word processor.
As you can see in the nearby chart,<$&barchart> revenues have increased substantially in the fourth quarter.
You can also append an extra code that tells Ventura where you want the picture to appear. An anchor without an extra code causes the picture to move to the same page as the reference, (in the same relative position it had before it was moved). You can also select above, below, or floating anchors (Table 3-11).

Preformatting text files 107
Table 3·11. Bracket codes for anchors.
Type of Anchor Bracket Code
Same page as reference <$&anchorname>
Above the reference <$&anchorname[ 1\]>
Below the reference <$&anchorname[v]>
Floating <$&anchorname[-]>
Entering hidden text with bracket codes
Bracket codes can also create nonprinting remarks. These remarks show in the word processor. They do not display or print in Ventura. They are useful for including editorial comments. For example, authors might use hidden text to remind themselves which illustration to use. Editors might make editing comments, or track the revisions with hidden text. Or they might include instructions to authors or data entry operators. Those instructions would appear on the word processing screen, but they would be invisible in the Ventura document. The code symbols for hidden text are $!. Thus, to place the hidden remark "Use the sales chart to illustrate this point" into a word processing file you would type <$!Use the sales chart to illustrate this point>.
Numbering with bracket codes
Ventura lets you place the chapter or page number anywhere on a page. To put this referencing feature directly into a text file, use the code $R, followed by the type of reference in square brackets. To reference a chapter number, type <$R[C#]>. To reference a page number, type <$R[P#]>.
Entering fractions with bracket codes
You can enter fractions with bracket codes. The code symbols are $E. You type these symbols inside the brackets, followed by n / d, where n is the numerator of the fraction and d is the denominator. Thus, to enter the fraction 1/2, you would type <$El/2> into the word processing file.

108 Chapter Three: Creating Text
Tips on preformatting files At first glance, preformatting might seem like a tedious process. In fact, it can be a powerful and workable technique. What's more, there are several techniques that make it faster and simpler.
ImI A macro facility is the best answer. You'll find some type of macro program almost essential to effectively enter footnotes and indexes directly into text files. It is cumbersome and time-consuming to repeatedly type brackets and dollar signs. If your word processor doesn't have an adequate macro capability, supplement it with one of the many excellent standalone utilities on the market.
ImI You might also try search and replace. Ask authors to enter special symbols in place of the codes. At the end of the writing session, they can use the search and replace function to insert bracket codes in place of the symbols. This process can be automated using a keyboard macro program.
ImI Consider templates for your word processor for certain structured documents. The first step is to create a raw text file and bring it into Ventura Publisher. Experiment with layout and formatting until it looks perfect. Now save the chapter.
Saving the chapter automatically saves the word processing files. But now the file contains the tag names, text attributes, and formatting codes created by Ventura Publisher. To create a document template, delete the text, but leave the tags and codes intact. The next time you create a similar document, call up the blank file and type in the new text.
To make it easier for users to remember what goes where, replace the deleted text with instructions - "Type name here" or "Place part description here" for example. If. you use Ventura's hidden text feature, the instructions will show in the word processor, but not in the Ventura document.
This concept works well for short, fill-in-the-blank type documents like memos and forms. It can also be valuable for applications where authors must follow rigid specifications. Technical and military documentation, for example, often uses a highly structured approach.

Preformatting text files 109
When to preformat files When should you consider preformatting text files? We suggest that you start with the standard method until you've learned Ventura. Create raw text in your word processor, and do the formatting in Ventura Publisher. Stick with the basic approach until you've defined standard formats and tag names. Once you've formed some standards, consider preformatting. It offers several advantages. It saves layout time since the editor doesn't have to tag every single paragraph. Yet it doesn't add significantly to authors' time if they use keyboard macros or templates. There's less room for error when authors insert tags and attributes themselves.
Still, it is not necessary to preformat files. You may prefer to do all your formatting inside Ventura. There's no need to decide immediately. You can switch over at any time.
That's one of the great things about Xerox Ventura Publisher - it gives you choices. In this chapter, we learned about its alternatives for creating text. In the next chapter, we'll discuss Ventura's wide range of choices for creating pictures.

110 Chapter Three: Creating Text

Chapter Four
Creating Pictures
A s we saw in the previous chapter, the Ventura approach to text is uniquely versatile. You can create files with almost
any word processor, then load those files into a document. Ventura's approach to pictures is similar. You can create pictures with your favorite graphics program, then place the resulting files into a document.
This chapter explains how to produce high-quality illustrations for use with Ventura. It examines a variety of ways to generate pictures, including:
• draw programs
• paint programs
• scanners
• screen capture utilities
• Ventura's built-in Graphic mode
This chapter concerns only the creation of pictures. (To learn how to integrate pictures into the final document, turn to Chapter Six, "Building the Chapter.") To help you produce outstanding illustrations for Ventura, this chapter explores four key concepts:
1. the Ventura approach to pictures
2. how to create line-art pictures
3. how to create image pictures
4. how to work with Ventura's Graphic mode
Throughout this chapter (and the rest of this book), we use pictures to refer to any type of visual. Some of you may be more familiar with expressions such as images, art, or

112 Chapter Four: Creating Pictures
graphics. We have avoided using those terms generically because Ventura has very specific meanings for them, as you will learn below.
The Ventura approach to pictures Before you create any pictures for Ventura, you should understand (1) the two kinds of pictures Ventura will accept and (2) how Ventura handles different file formats. With this information, you will be prepared to choose which program to use, which type of picture file to create, and which file format to specify.
As with text, Ventura Publisher deals with the original file from the outside program. But there's a difference between Ventura's approach to text and pictures. Ventura changes text files by adding tags and codes. By contrast, Ventura does not change or modify picture files, no matter what you do with the picture after bringing it in.
Rather, Ventura uses the chapter file to store a pointer to the original file, along with instructions on how to display it. This approach presents a powerful capability. It allows you to revise a picture file after it has been used in a Ventura document. The next time you access or print that document, the updated picture will automatically be included, in the correct location and in the correct size.
Consider, for example, a corporate editor responsible for a quarterly financial summary. Now he or she can include bar charts in the first draft, even if based on preliminary data. When the final quarterly results come in, the bar charts will change. The nice part is that the Ventura financial document will automatically be updated, since it merely points to the file containing those charts.
We'd like to emphasize that this allows tremendous flexibility in using artwork from other programs. You can, for example, incorporate graphs from Lotus 1-2-3 or technical drawings from AutoCAD with complete assurance that those important files will not be modified in any way. This holds true even if
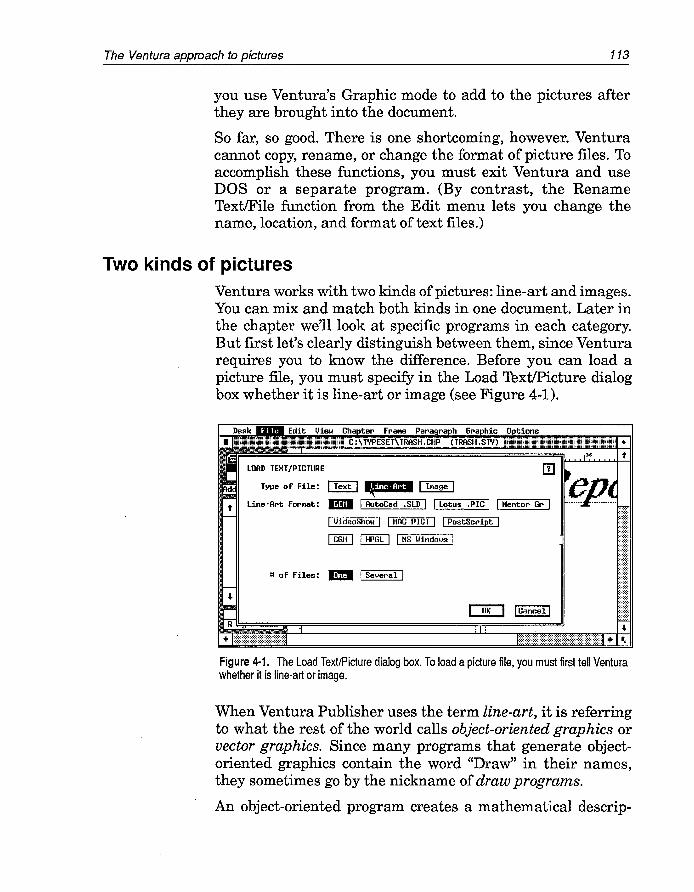
The Ventura approach to pictures 113
you use Ventura's Graphic mode to add to the pictures after they are brought into the document.
So far, so good. There is one shortcoming, however. Ventura cannot copy, rename, or change the format of picture files. To accomplish these functions, you must exit Ventura and use DOS or a separate program. (By contrast, the Rename Text/File function from the Edit menu lets you change the name, location, and format of text files.)
Two kinds of pictures Ventura works with two kinds of pictures: line-art and images. You can mix and match both kinds in one document. Later in the chapter we'll look at specific programs in each category. But first let's clearly distinguish between them, since Ventura requires you to know the difference. Before you can load a picture file, you must specify in the Load TextlPicture dialog box whether it is line-art or image (see Figure 4-1).
Type of File: I Text I ,iUli& I Image I
Line-Art Forll'lat: IDIII I AutoCad .SLD I "'-:-1 L-:"ot-us-.=-=PI:=-1C I I Mentor Gr I
IlJideoShow I I MAC PICT I I PostScript I
I CGt~ I I HPGL I I MS Windows I
1:1 of Files: liD I Several I
Figure 4·1. The Load Text/Picture dialog box. To load a picture file, you must first tell Ventura whether it is line-art or image.
When Ventura Publisher uses the term line-art, it is referring to what the rest of the world calls object-oriented graphics or vector graphics. Since many programs that generate objectoriented graphics contain the word "Draw" in their names, they sometimes go by the nickname of draw programs.
An object-oriented program creates a mathematical de scrip-

114 Chapter Four: Creating Pictures
tion of a picture. To draw a circle, for instance, it sends a mathematical expression that translates into a circle on the screen (and later on the page). To get a bit more technical, these programs define pictures in geometric terms; each picture is a compilation of lines, circles, squares, and other elementary objects (hence, object-oriented). In essence, the software redraws the picture each time it is displayed or reprinted.
Contrast this with the second type of picture: images. Images are created by bit-map graphics programs, also known as pixel-oriented programs. The words bit and pixel refer to the individual dots on the computer screen. Since many of the product names contain the word "Paint," they are nicknamed paint programs.
To understand bit-mapped pictures, think back to the card sections !that are often part of football halftime shows. Each person in the section holds a card. One side of the card is dark; the other is light. These sections can make patterns to create pictures. Your computer screen is like a miniature card section. To create an image, a bit-map program simply tells some of the dots to turn on, and others to turn off, just the way the halftime director tells some cardholders to show the light side and others to hold up the dark side (see Figure 4-2). The program creates a map showing which bits should be on and which should be off (hence bit-map). To get a hard copy of this
Figure 4·2. As you can see in this sample image from PC Paintbrush, a bit-map program constructs lines and curves by connecting individual pixels.

The Ventura approach to pictures 115
image, the program sends the same pattern of dots to the printer.
And therein lies a crucial distinction between line-art and images. We just said that when printing, most hit-map programs send the pattern of dots from the screen. If the screen has a resolution of 72 dots per inch (dpi) then the printed image will have an effective resolution of only 72 dpi, even if the printer is capable of better resolution. (Some bit-map programs, such as Publisher's Paintbrush, can create pictures at resolution.s up to 300 dpi.)
It's at print time that we see the vital difference between the two kinds of pictures. When an object-oriented program sends a circle to the printer, it sends the mathematical description. That description is t.ranslated into the full resolution of the printer (in this example, 300 dpi). Ifwe were to send this same circle to a typesetter, it would be printed at 1000 dpi (or higher) and look even smoother. Object-oriented programs are not limited by the poor resolution of most computer screens.
Choosing between line-art and images If you are new to computer-generated art, you may wonder which type of picture is best, line-art or image. Each has its advantages. In general, line-art is best for demanding applications such as technical illustrations, and when the picture will be printed at high resolution. Images are more suitable for informal applications that do not require the ultimate in accuracy or resolution.
Pros and cons of line-art
Charts, graphs, and other illustrations are an integral part of most corporate publications. Whether you're producing schematics for a technical manual, organizational charts for a departmental brochure, or blueprints for an engineering proposal, the art is often as important as the text. Objectoriented programs such as GEM Draw and AutoCAD are well suited to the preparation of such illustrations. As noted above, the picture prints at the full resolution of the output device. And there's a second advantage to line-art from objectoriented programs: It can be changed in size without any penalty in quality.

116 Chapter Four: Creating Pictures
This advantage allows you to create pictures without regard for the size they'll be on the page. For example, many people produce layouts by allocating text columns and leaving holes for the pictures. Since the size of the hole depends on how much text is on each page, you need the ability to change the picture to fit. The ability to change size - called scaling -makes life much easier than if you must worry about drawing the picture to fit the available space.
One disadvantage of object-oriented graphics programs is that they lack the flexibility of free-form paint programs. Since each image must be constructed from geometric primitives, it is more difficult to touch up a picture by adding or erasing a small portion. Draw programs are usually more expensive and more difficult to use than paint programs.
Appropriate uses for line-art include technical illustrations, diagrams, schematics, charts, and graphs (see Figure 4-3).
Figure 4·3. The line-art format is ideal for applications that demand fine detail and accuracy. This illustration was created with GEM Artline.
Pros and cons of images
Images are created by bit-map programs. This type of software offers more flexibility and spontaneity. Usually it can create brush stroke, spray paint, air brush, and other effects that simulate free-form hand sketches. One important feature is the ability to edit the individual pixels that make up the picture. Pixel editing is usually accomplished by zooming in on

The Ventura approach to pictures 117
a portion of the image. Such detail work is important to many creative designers, who touch up a picture before it is finished. In addition, bit-map (paint) programs are often less expensive and easier to learn and use than programs producing line-art.
Low resolution is the major disadvantage of paint programs. Images produced by a bit-map program are limited by the resolution of the computer display. Thus, an image created on a 72-dpi screen display will print at an effective resolution of 72 dpi, even if the printer is capable of much higher resolution. One exception is the file format called TIFF (Tagged Image File Format). As we describe in more detail below, TIFF contains gray-scale information that allows Ventura to render a photograph with the best quality possible for a particular output device. In other words, TIFF files contain more information than can be displayed on screen.
The image format is most appropriate when you want to simulate a spontaneous, hand-drawn sketch, or to bring in a photograph via a scanner (see Figure 4-4).
Figure 4·4. The image format is best suited to friendly, informal sketches. This image was created with MacPaint.

118
File formats
Chapter Four: Creating Pictures
To this point, we've concentrated on the distinction between line-art and images. To create pictures, you should also understand how Ventura works with different file formats. There's no point in creating a beautiful drawing if you can't bring it into your document. This section explains why (and how) to choose or convert to a Ventura-compatible format.
Computer users can choose from an astounding variety of graphics programs. Ventura supports many of them directly. If you open the Load TextlFile dialog box from the File menu, and click on Line-Art, you will see 10 different formats. If you click on Image, you will see four more formats. Table 4-1 lists the formats supported directly.
Table 4·1. Supported Graphic File Formats
Line·Art Image
GEM Draw Lotus 1-2-3
AutoCAD Slide GEM Paint Mentor Graphics HALO DPE Macintosh PICT PC Paintbrush PostScript
Macintosh MacPaint VideoShow TIFF CGM
Windows metafiles HPGL
Unfortunately, different programs use different formats. Ventura works directly with one line-art format (GEM Draw) and one image format (GEM Paint). When Ventura encounters others, it must convert them first. (If you watch closely as Ventura loads a non-GEM picture file, you will see a brief message reporting that it is "loading & converting" the file.)
As Ventura converts files, it creates duplicates in the native GEM format it understands. Duplicate line-art files have the same name as the original art, but an extension of GEM. Duplicate image files get the .IMG extension. (PostScript files are converted but not duplicated.) The conversions lead to severaltradeoffs:
The Ventura approach to pictures 119
• File duplication takes up disk space. You must have enough room for both the original and the converted files - a potential problem for long books with many illustrations .
• The conversion may not be complete or accurate. Although Ventura does an amazing job of rendering different formats, it does not always provide 100 percent fidelity.
• Certain formats work only on certain printers (notably PostScript).
Later in the chapter we examine leading graphics programs individually and mention potential limitations in more detail.
Working with unsupported formats
You are not limited to the file formats supported directly by Ventura. You can also use pictures in other formats, provided you convert them first. You have a variety of means at your disposal to make them compatible:
• use an option from the graphics program to save to a supported format
• print to a disk file to achieve compatibility
• use a screen capture program
• save to the Windows clipboard
• use a Ventura-supplied conversion utility
• use a commercial conversion program
.. NOTE: If you have a choice, convert to one of the GEM formats (GEM or IMGJ. These formats are easiest for Ventura to work with and do not require duplicate files.
Let's examine each of the conversion options.
Save to a supported format
Many graphics programs with native file formats can also save or convert to other formats. To name just one example, Media Cybernetics Inc., makers of Halo DPE, offers a conversion program called CUTTOIMG that allows both pictures and text to be converted to .IMG format and thereby used in

120 Chapter Four: Creating Pictures
Ventura Publisher. We mention other conversion possibilities below in a section that describes individual graphics programs.
If you use an unsupported graphics program, examine its documentation. Using Table 4-2, determine if the program can save or convert to any of the formats shown on the list. If so, use the graphics program to make the conversion. When naming files, use the extensions shown on the chart to show what format it is in.
Table 4·2. Recommended extensions for supported picture formats.
Type of File Format Extension
GEM *,GEM
AutoCAD Slide *,SLD
HPGL *,HPG
Mentor Graphics *,P* Line-Art
PostScript *,EPS
Macintosh PICT *,PCT
VideoS how *,PIC
Computer Graphics *,CGM Metafile
Windows Metafile *,WMF
Lotus PIC *,PIC
PC Paintbrush *,PCX
Image GEM *.lMG
TIFF *,TIF
Macintosh Paint *,PNT

The Ventura approach to pictures 121
-NOTE: We recommend use of the standard extensions. Not only does it facilitate working in Ventura, it also makes it possible for anyone to know the format of a given picture simply by looking at its extension.
Although Ventura does not require you to use the extensions shown here, these are its default assumptions. It will look first for files with these extensions unless you tell it otherwise. If you do not use these extensions, you may find it difficult to remember which pictures are in which format when you return to a document six months from now. Standard file extensions are virtually mandatory in work groups, where different people must work with the same files.
Print to disk
You may be able to achieve a compatible format by printing to a disk file. For instance, if the graphics application supports Hewlett-Packard pen plotters, you may be able to create an HPGL file by specifying the HP 7470 or 7475 plotter, and then printing the output to a file. The file so created can then be brought into Ventura.
If the graphics program supports PostScript, you may be able to specify PostScript as the printer, then print to a disk file. You can then convert this file to Encapsulated PostScript (explained in more detail below). If you are working with multiple illustrators, they should know that they do not have to own a PostScript printer to create a PostScript disk file. They can print to the disk file and send the file to another workstation equipped with a PostScript printer.
Use a screen capture program
If you have a screen capture program you can grab a snapshot of the picture on screen and save it to a file format supported by Ventura. This method has the disadvantage of creating an image at the resolution of the screen, even if the program is normally capable of creating line-art files. In addition, if the drawing is larger than the screen, you will get only the portion appearing on the screen. Unfortunately, few capture programs support big-screen monitors. Screen capture utilities are covered later in this chapter.

122 Chapter Four: Creating Pictures
Save to the Windows clipboard
Ventura 2 can import line-art created by Microsoft Windows programs, even though Ventura is not itself a Windows application. To do so, however, you must first convert the picture using the program CLIP2VP.EXE provided on the Ventura Utilities diskette. Follow the following procedure:
• Copy the file CLIP2VP.EXE from the floppy diskette to the \ WINDOWS directory on your hard disk.
• Start Microsoft Windows and run the program CLIP2VP from Windows.
• Shrink the CLIP2VP screen to icon size by clicking on the minimize icon.
• Run the Windows program and create the drawing.
• Select the desired portion of the drawing and copy it to the Windows clipboard.
• Click on the CLIP2VP icon to reopen its screen.
• Select the Save As ... option from the Command menu. Type in the file name you wish to use. The extension .WMF will automatically be added.
Now close the Windows graphics program and run Ventura Publisher. Once in Ventura, load the graphic image into Ventura specifying MS Windows as the line-art format .
.. Note: Ventura Publisher can only import line-art metafiles, not Windows Paint or other Windows image formats.
Use a Ventura conversion utility
The Ventura Utilities disk (#11) contains two conversion programs. After copying these utilities from the floppy to your hard disk, you invoke them from the DOS prompt.
AutoCAD DXF to GEM. DXF is a standard file format widely used in the computer-aided design field. The DXFTOGEM utility changes .DXF files to GEM Draw format (.GEM). This is not strictly required, since Ventura Publisher supports AutoCAD directly via the HPGL and SLD formats. In most cases, we recommend HPGL format as the most accurate way to bring

The Ventura approach to pictures 123
AutoCAD pictures into Ventura. AutoCAD is discussed in more detail later in the chapter.
However, there may be occasions when you prefer the simplicity and ease-of-operation of GEM Draw Plus to the power and sophistication of AutoCAD. That's where the conversion utility comes into play. It permits you to bring an existing AutoCAD picture into GEM Draw for modification. At the DOS prompt, type the name of the conversion utility followed by the name of the AutoCAD DXF file you wish to convert. The utility will create a new file with the same name but the GEM extension. Thus, to convert SAMPLE.DXF, type:
DXFTOGEM SAMPLE.DXF
The utility creates a new file called SAMPLE.GEM.
Text screen to PC Paintbrush. A text screen of 25 lines or less can be captured using a separate utility (such as SideKick), then converted to PC Paintbrush PCX format using Ventura's TXTTOPCX utility. By converting to PCX, you can capture lines and other screen effects not available if you bring the text in normally.
First capture the screen with a separate utility like SideKick or Hotshot (described below) and save it to a text file. Next, at the DOS prompt type the name of the utility followed by (1) the name of the file you wish to convert and (2) the type of display you are using. The formula is:
TXTTOPCX filename Idisplay code.
The four display codes are:
A: AT&T or Xerox 6065
C: Enhanced Monitor (EGA)
M: Monochrome Monitor (EGA)
0: Color Monitor (EGA or eGA)
Thus, a user with a monochrome monitor and an EGA card would convert a text file called EXAMPLE. TXT, by typing:
TXTTOPCX EXAMPLE.TXT 1M
Notice that there is a space before and after the file name and that the slash is a front slash (found below the question mark

124 Chapter Four: Creating Pictures
on most keyboards). The result is a file with the same name but the .PCX extension - for instance, EXAMPLE.PCX in the sample shown above .
.. This conversion program does not work with the Hercules, VGA, or higher-resolution video modes. It does not convert reverse video and boldface text.
Use a file converter
In addition to the conversion methods explained above, you can also buy commercial file converters from outside companies. Many of these programs accomplish other functions as well. For instance, HotShot Graphics not only converts files, it also edits graphics files, captures screens, and maintains picture libraries. Other file conversion programs include HiJ aak and Graphics Link PI us.
Professionals who use Ventura on a daily basis usually find a file conversion program essential if they typically have more than three or four pictures per chapter, especially if the pictures come from different sources in different formats.
Creating line-art So far you've learned how Ventura distinguishes between lineart and images, and how to select (or convert to) the right file format. Now you're ready to get into the details of specific graphics programs. We will examine some leading packages one by one, beginning with line-art programs.
Ventura Publisher directly accepts line-art files from the graphics programs discussed below. These choices appear in the Load TextlFile dialog box when you select Line-Art. Ventura can use pictures from other programs provided they are converted to one of these formats.
Bring in line-art files with Load TextJPicture from the File menu. Specify Type of File: Line-Art. Then click on the name of a program to specify the format. Chapter Six, "Building the Chapter" gives complete instructions on bringing pictures into Ventura documents.

Creating line-art 125
What should you do if your graphics program can save files in more than one supported format? In most cases, some experimentation will reveal which is best. As you will read below, most conversions have some limitations. By trying each format out, you can quickly learn which conversion produces the highest quality pictures for your particular application.
GEM Draw Plus GEM Draw Plus is an easy-to-use graphics program for the IBM PC and compatibles. Like Ventura Publisher, it is built around the GEM environment from Digital Research Inc. Since the interface is similar, most Ventura users will find they can learn GEM Draw quickly and easily (see Figure 4-5).
Figure 4·5. The GEM Draw interface will seem familiar to anyone who has used Ventura.
In addition, Ventura can load GEM Draw files directly, without conversion, thereby saving time and disk space. GEM Draw Plus incorporates a toolbox for selecting boxes, lines, circles, and freehand sketching. You point with the mouse to the desired tool, then position the cursor where you want to begin drawing. You drag the mouse to indicate the size of the object, such as the length of a line, the corners of a rectangle, or the radius of a circle. When you release the mouse button, the object is drawn on the page.
The program also features icons for fast and easy zooming to one portion of the page. With the touch of the mouse, you can

126 Chapter Four: Creating Pictures
move between five levels of magnification, plus a sixth view that reduces the full page to fit on screen. Use the pannericon to display different portions of the drawing by selecting the position of the screen window. Other features include onscreen rulers, a grid that can be either shown or hidden, and the ability to have multiple windows on screen at one time, each displaying a different drawing.
GEM Draw Plus can also add several different text fonts to a drawing. This is useful for annotating a diagram or filling boxes in an organizational chart.
Lotus 1-2-3 The popular Lotus 1-2-3 spreadsheet program incorporates a graphics module. This facility converts numerical data into graphs or charts. It has long been a popular feature of the program, since graphs are easier to comprehend than columns of numbers. Ventura Publisher adds to these capabilities by allowing you to integrate Lotus 1-2-3 graphs into your documents. This option will be particularly valuable to professionals who produce financial reports and summaries. They can continue to process their financial data in the spreadsheet, and then import a graphic representation for the final report.
To create a graph in Lotus, access the graph menu with the /G command. Select the desired options from the format submenu. Use Graph View to preview the chart and Graph Save to save it to a file with the .PIC extension. You will not print the graph, since you can load the .PIC file directly into Ventura (see Figure 4-6) .
.. Notice: Ventura Publisher version 2 can read PIC files but not . WKS worksheet files. The Professional Extension is required in order to bring in Lotus WKS worksheet files directly (see Chapter Eleven, "The Professional Extension'J.
Tips for working with Lotus graphs
a Touch up Lotus 1-2-3 graphs with PC Paintbrush's Chart Interpreter module. First create a .PIC file in Lotus. Call up PC Paintbrush and select Merge Pic from the page menu. PC

Creating line-art 127
Figure 4·6. A typical Lotus chart after loading into Ventura. If you do not care for the Lotus labels shown here, you can replace them in Ventura.
Paintbrush will read the Lotus graph onto the screen, where you can edit and enhance it. The advantage to this approach is that Paintbrush offers a wider variety of fonts, patterns, and other effects. The disadvantage is that the resulting picture will be treated as an image rather than line-art .
.. NOTE: Normally, Lotus graphs are treated as line-art. But once a Lotus graph has been brought into PC Paintbrush it must be loaded into Ventura Publisher by specifying Image and PC Paintbrush from the Load Text/Picture dialog box.
IiIi1 If you change the values in the spreadsheet, be sure to resave the graph file (.PIC file). Otherwise, the old values will remain in the graph.
IiIi1 You can use Graphics Options (/ GOT) to produce titles and subtitles for your graph. However, these titles will be treated as line-art, giving you little control over size and placement. Many users prefer to leave off titles and labels and add th~m after loading the chart into Ventura. To remove the Y-axis labels, select Graph Options Scale Y scale Format Hidden. To remove X-axis labels, select Graph Reset X.
If you have fill patterns in your Lotus charts and graphs, you may want to preserve the Lotus legend boxes. Select Opti911S Legend A and Options Legend B. You have several options for the labels on the legend boxes. You can insert them in Lotlls
128 Chapter Four: Creating Pictures
and use the font that Ventura substitutes when it brings in the file. You can insert them in Lotus and then cover them up with better labels in Ventura. Or you can type in blank spaces in Lotus to create space between the boxes, then create the labels in Ventura.
a If Lotus inserts unwanted labels and percentages in the final chart, yol.l can hide .these labels after loading the chart into Ventura with an opaque white rectangle in Graphic mode. You can replace labels by inserting an opaque white Box Text (formatted the way you want) on top of the Lotus label. With PostScript printers, you must first cover the label with a rectangle, then put the Box Text on top of the rectangle.
a Words & Figures, a Lotus 1-2-3 compatible spreadsheet program from Lifetree Software Inc., offers a wider selection and better quality of fonts than does 1-2-3. You may prefer to use this program to produce graphics from your spreadsheets. It can read Lotus WKS files directly.
a Several other programs can produce charts and graphs using data from Lotus 1-2-3. You can use any of these programs, as long as they can save files in a Ventura-compatible formats. Table 4-3 lists some of these programs and the file format you must use to bring images into Ventura. In general, modifying a chart and bringing it into Ventura involves the following steps:
• Create the spreadsheet in Lotus.
• Save the desired data range as a WKS, DIF, or SYLK file.
• Import the file into the graphics program.
• Format the graph.
• Save the graph in a Ventura-compatible format.
• Import the graph into Ventura using Load TextlPicture.

Creating line-art 129
Table 4·3. Graphics formats of common charting programs.
Program Worksheets Read Save Graphic As
Microsoft Excel (PC) WKS Windows Metafile
Microsoft Excel (Macintosh) WKS, SYLK, DIF MacPICT
GEM Graph WKS, DIF GEM
Windows Graph WKS, SYLK, DIF Windows
Harvard Graphics WKS CGM
Freelance Plus WKS VideoShow
Perspective WKS IMG
-NOTE: This section has passed on tips for creating pictures from Lotus. For information on Lotus text (spreadsheets), turn to Chapter Three, "Creating Text," and Chapter Six, "Building the Chapter."
AutoCAD
AutoCAD is widely regarded as the most popular computeraided design and drafting program on the market. It can generate sophisticated product diagrams, blueprints, and building designs. Many architects, engineers, and designers use the program in place of manual drafting methods. AutoCAD images can be brought in to Ventura Publisher in SLD format, DXF format, or HPGL format.
To create slide files (SLD) in Auto CAD , you must have the ADE-2 Advanced Drafting Extension. Use the MSLIDE command. Give the file the SLD extension.
To use DXF files with Ventura, you must first perform the DXF to GEM conversion from DOS, as described earlier in this chapter. However, this conversion cannot successfully translate certain attributes, including:
• Text mirroring, text expansion, text obliquing, text underscore and overscore, text symbol characters

130 Chapter Four: Creating Pictures
• Shape entity
• Tapering widths in polylines
• Curve fitting
• 3D rendering
• Ellipses that are not X-Y aligned
For better resolution, use the HPGL method (Figure 4-7). After creating and saving the drawing, configure AutoCAD for the Hewlett-Packard 7586. Then plot the drawing to a file with the .HPG extension. Although text, arcs, and lines are converted, there are still some limitations:
• All fonts are converted to Helvetica (Swiss).
• Color is not converted.
• Gaps may appear in fill patterns.
Figure 4·7. This chair was created in AutoCAD and output to an HPGL format file.
TipS for working with AutoCAD.
a Get the orientation right in AutoCAD first, before bringing line-art into Ventura. Many users will create AutoCAD drawings in landscape mode rather than portrait mode. Landscape offers a larger view of most floorplans and other designs. But unless you want a landscape orientation within the Ventura

Creating line-art 131
document, you must rotate the drawing 90 degrees before leaving AutoCAD. Ventura Publisher does not rotate pictures.
&m1 Draw pictures larger than the frame they will occupy. After creating a drawing in AutoCAD, you will import it into Ventura and place it inside a frame. Be sure that your drawing is larger than the frame it will occupy. This prevents Ventura from stretching and distorting the drawing to make it fit the frame. The need for a larger drawing applies to all three methods (SLD, HPGL, and DXF).
&m1 If you know the frame size in advance, we recommend that you create drawings at twice the size of the frame. Scale existing drawings to twice the frame size as well, then add borders and annotations (if any). Since the drawing is twice the intended size, make sure that annotations, text, symbols, and dimensions are twice the size you eventually want them to appear.
&m1 Two-color illustrations are possible if you create two separate files. The first file contains only the elements that will be black. The second shows only the elements that will be in color. Be sure that they are exactly the same so the two colors will appear in registration when the colors are overlapped. For better accuracy, include registration marks in the two drawings.
Mentor Graphics
Mentor Graphics manufactures a sophisticated computeraided design system for engineering professionals. The company's software runs on Apollo workstations. Ventura Publisher supports the PicED format used by Mentor Graphics. In order to bring a Mentor Graphics image into Ventura Publisher, you must first transfer the PicED format file from the Apollo workstation to an IBM PC. Since PicED consists of ASCII characters, this is relatively easy to do using telecomm unications software.
Windows line-art
If a Windows program supports any of the file formats listed previously in Table 4-1, save to that format and bring the drawing into Ventura directly. You may also be able to print to disk in HPGL or EPS format. If not, you can bring in the

132 Chapter Four: Creating Pictures
drawing via the Windows Clipboard. To do so, you place the drawing on the clipboard, then use the Ventura-supplied utilitydescribed earlier to save it to a file.
There are several limitations with this process. First, you should use the Windows Metafile option as the Clipboard format if available. Second, Ventura cannot bring in Windows Paint or other image files, only Metafile line-art. Third, you must convert the picture using the CLIP2VP.EXE utility provided with Ventura, as explained earlier in this chapter.
Encapsulated PostScript
Read this next section to learn how to create and work with Encapsulated PostScript pictures. This format will only print on PostScript machines. However, even if you don't have access to a PostScript printer, you may want to understand how to work with PostScript files, because you may decide to make use of a PostScript service bureau to produce high-quality output from Ventura.
Encapsulated PostScript format (EPSF) is a standard file structure that permits different applications to share files. A graphics package can create a PostScript image and encapsulate it. Once that's been done, it is available to be imported into a page layout program such as Ventura. Ventura doesn't interpret or modify Encapsulated PostScript files. It merely passes them through to the printer. The printer decodes the files and turns them into pictures.
EPSF is a valuable method of incorporating detailed pictures into Ventura Publisher. An EPSF file prints at the full resolution of the output device. With Encapsulated PostScript you can take full advantage of PostScript's effects, including graded tints (fountains), rotation, text at virtually any size, text along a curved path, and so on. Products such as Adobe Illustrator, Cricket Draw, and Corel's Headline and Newfont create EPSF files (Figure 4-8).
However, EPSF has some drawbacks. First, you can only print ~PSF pictures with a PostScript-compatible printer. In addition, EPSF files tend to be large. They hog valuable disk space and take a long time to print. Moreover, EPSF pictures can only be displayed on screen if they contain an embedded screen image, such as a TIFF file or Windows metafile. Other-

Creating line-art
Figure 4·8. EPSF format is great for drawings and illustrations, but tt is also valuable for special font effects, as shown in this example created with the Corel Headline package.
133
wise, when you load an EPS picture into Ventura Publisher, a large X is placed on screen where the final image will appear. If there is an embedded screen image, non-PostScript printers can print it, although they cannot print the high-resolution PostScript file itself. Certain programs, including Adobe Illustrator, create screen images, but many do not.
EPSF is a valuable graphics tools for those who have a PostScript-compatible printer. Many graphics programs for the IBM PC and Apple Macintosh support Encapsulated PostScript. Many desktop scanners can also save in EPSF format. And there are also a number of clip art vendors who sell high-quality EPSF pictures.
Tips for working with Encapsulated PostScript
a You can create PostScript files with Ventura. Ventura can print to a disk file as well as to a printer (using the Set Printer Info option from the Options menu). This capability lets you use reduced-size versions of Ventura documents as illustrations. First you select PostScript as the printer type and print the page to a disk file. Then you load the disk file as PostScript format and put it into a frame. We discuss this procedure in greater detail in Chapter Seven, "Producing Output."
-NOTE: PostScript files printed to disk with Ventura are not in true EPSF format. Although they will print in Ventura, they must be altered before use in other programs. To alter them, you must insert the correct header information and delete any commands not supported by EPSF, as described below.

134 Chapter Four: Creating Pictures
a You can shorten the PostScript files created by Ventura by temporarily renaming the PostScript prolog added by Ventura. This is an advanced technique. You must not use it if you plan to send your files to a printer or typesetter on a different system. However, if you plan to print the file with Ventura Publisher, you can eliminate about 20K of redundant information from each PostScript file. The simplest way to handle this chore is to build two batch files, one to remove the prolog and one to restore it. The PostScript prolog is contained in the file PS2.PRE in the \ Ventura directory.
a You can create and modify PostScript files with a word processor. Although PostScript is a sophisticated programming language, you can perform many basic tasks without learning it all. Since PostScript files are pure ASCII text, you can use a word processor to create an EPSF picture, provided you follow the PostScript guidelines.
Figure 4-9 shows an example of an EPSF file with the required header information at the top of the file. This particular file creates a US Post Office regulation barcode for
%IPS-Adobe-1.0 %% Title: Ventura Publisher Document %%Creator: Ventura Publisher %%Pages: (atend) %%BoundingBox: 0 0324 45 %%EndComments finch {72 mul} def Ipitch .0476 inch def /tall {O .125 inch rlineto gsave stroke grestore pitch -.125 inch rmoveto} def Ishort {O .05 inch rlineto gsave stroke grestore pitch -.05 inch rmoveto} def o setgray Icode [1 1 0 1 0 0 1 1 0 0 0 0 1 0 1 0 1 1 0 0 0 0 0 1 1 o 1 0 1 0 0 1 0 1 0 0 1 1 0 0 0 0 0 1 0 1 0 0 1 1 0 1] def 4018 moveto code { 1 eq {tall} {short} ifelse } forall
Figure 4·9. Typing in this information as an ASCII file will create an EPSF file that prints a bar code for business reply mail.

Creating line-art 135
business reply envelopes (see Figure 4-10). You can duplicate this file by typing it into your word processor and saving it as ASCII format. To change the pattern of tall and short lines, substitute a different sequence of Is and Os on the line line that begins with the word Icode. A 1 creates a tall line. A 0 creates a short line.
11.1111111111.1.11'111111.1.1 •• 1.11111'11111.1 •• 11.1
Figure 4·10. The bar code printout that results from the EPSF file shown in Figure 4-9.
a Of particular importance in every EPSF file is the header. These lines have nothing to do with the picture itself; rather, they are there to tell Ventura (or another application) how to work with the code and pass it through to the printer.
The most important term is the %%Bounding Box. The four numbers that follow give the coordinates of the picture's size. They tell Ventura how much space to allow. By changing these coordinates you can alter the size of the picture, or change which portion of the picture will print.
The coordinates are specified in points. There are 72 points to an inch. When converting from inches to points, you must multiply by 72 and then subtract one, since PostScript uses zero as its beginning number (instead of one). Thus, to convert 8.5 in. to points, you would multiply by 72 and subtract one (612 - 1 = 611). PostScript's default mode begins measurements from the lower left corner, which therefore has an X,Y value of 0,0.
The first two numbers following %%Bounding Box describe the X,Y coordinates of the lower left corner. The second two numbers describe the X,Y coordinates of the upper right corner. From these two points, PostScript can calculate the size of the rectangle containing the picture. When you load an EPSF image into Ventura Publisher, the rectangle with the large X has been specified by these coordinates.
a You can change the size of the bounding box with your word processor, thereby changing the size of the picture. You can

136 Chapter Four: Creating Pictures
also alter existing drawings, so that only a portion will print. Remember that the origin point (0,0) is the lower left corner. By adding numbers to the first two coordinates, you move the left corner up and to the right. By subtracting numbers from the second two coordinates you move the right corner down and to the left.
Let's assume for a moment that you have an existing Encapsulated PostScript file. Let's further assume that you don't want to print the outer two-inch margin. You could tell PostScript not to print this portion by adding two inches (144 points) to the first two coordinates of the bounding box and subtracting two inches from the last two coordinates. The effect, as shown in Figure 4-11, is to move the corners in, creating a two-inch, non -printing "margin."
,-------------, - Original Upper Right
New Lower Left Corner (144,144) ---t+
Original Lower Left /'" Corner (0,0)
Corner (611 ,791)
New Upper Right Corner (467, 547)
Figure 4·11. By changing the bounding box, you can control how much of an existing EPSF picture will actually print.
mil You can turn ordinary PostScript files into Encapsulated PostScript with a word processor. If your graphics program can print a PostScript file to disk, you may be able to modify it quickly and simply with your word processor so it will be in the Encapsulated PostScript format required by Ventura.
mil You can create different shades of gray with the Define Colors dialog box if you have a PostScript printer. First use Define Colors to redefine an existing color as a gray shade. Now apply that redefined color to the background instead of a pattern.

Creating line-art 137
For more information on PostScript programming, Encapsulated PostScript format, and PostScript reference materials, contact Adobe Systems, 1870 Embarcadero Road, Palo Alto, CA94303.
VideoShow
VideoShow is a general-purpose graphics program from General Parametrics, Inc., originally developed for producing slide presentations with PC-generated pictures. Many other graphic programs, including Harvard Presentation Graphics and Lotus Freelance Plus, can save files in this format (Table 4-4). Ventura converts VideoShow files with certain limitations. It converts only seven-bit pictures. It does not convert eight-bit pictures, 3D bars, or color (which is turned into shades of gray). It truncates polygons with more than 128 vertices.
HPGL
HPGL refers to Hewlett-Packard's Graphics Language for plotters and other vector-oriented devices. (This is different from the PCL language that resides in the LaserJet and LaserJet Plus.) Many CAD and drawing programs support HPGL as a printing option (too many to list here). Unfor-
~able 4·4. Partial listing of software packages supporting the VideoShow format.
• Autumn, Zenographics, Inc.
• Chart, Microsoft Corp.
• ChartMaster, DiagramMaster,& SignMaster, Ashton-Tate
• Freelance Plus, Lotus Development Corp.
• GraphWriter, Lotus Development Corp.
• Graphics Decision Support System, Data Business Vision
• Mirage, Zenographics, Inc.
• PC Presents!, Imedia Corp.
• PictureI t, General Parametrics Corp.
• PicturePak, Marketing Graphics, Inc.

138 Chapter Four: Creating Pictures
tunately, not all of them can print to a disk file. Three wellknown programs that can create HPGL files are AutoCAD, Microsoft Chart, and VersaCAD. To bring a picture into Ventura via HPGL, you must first print the picture to a disk file, then load the file into Ventura for conversion. Although text, arcs, and lines are converted, there are still some limitations:
• All fonts are converted to Helvetica (Swiss).
• Color is not converted.
• Gaps may appear in fill patterns.
Macintosh PICT
Macintosh PICT files are line-art created with programs such as Claris Corp.'s MacDraw II, Silicon Beach Software's SuperPaint, and IDD's MacDraft. However, some of these applications have their own native file format, so be sure to specify PICT when saving the file.
To use these files with Ventura, you must first transfer them to your PC. Usually the easiest method is to use a telecommunications link between the two computers. You can purchase special programs and cables expressly for transferring files between Macs and PCs, or you can use standard telecommunications programs. If you work in an office with a network that supports both PCs and Macs, you can transfer files over the network. You can also purchase special disk drive units that can read both PC and Mac formats. When transferring files, be sure that the utility transfers only the data fork. Some utilities transfer the data fork and the resource fork into a single file, which Ventura cannot successfully convert.
Ventura converts fonts in a PICT file to Times Roman (Dutch) or Helvetica (Swiss). It cannot convert bit-map images embedded within a PICT file.
CGM
CGM format refers to the Computer Graphics Metafile standard devised by Graphic Software Systems and others. This format is used by a long list of software packages (see Table 4-5). It is also used by programs that generate statistics and graphs from mainframe databases. You can also purchase

Creating line-art 139
Table 4-5. Partial listing of software supporting CGM.
• Cadwrite, IBM
• Concept 100, QMS
• Da Vinci Business Graphics, Professional Research Consult ants
• Display, ISSCO
• Freelance Plus, Lotus Development Corp .
• Graftime, Genigraphics Corp.
• Harvard Presentation Graphics, Software Publishing Corp.
• MathPlan 3.0, WordPerfect Corp.
• MicroCAD, Imagimedia Technologies
• pcExpress, Information Resources
• Personal Engineer, Computervision Corp.
• Redliner, AutoTrol Technology
• R:Base Graphics, Microrim Corp.
• SPD, Tektronix. Inc.
• TextCharts, Hewlett-Packard
electronic clip art in CGM format. Ventura converts fonts in a CGM file to Helvetica (Swiss). Ventura converts color, but it cannot convert polygons with more than 128 vertices.
Tips for working with line-art programs
Em1 Annotate pictures in Ventura Publisher. When possible, create text such as callouts, captions, and labels with Ventura, not in the graphics program. You will get better, more uniformquality fonts in Ventura Publisher. If you create text in the graphics program, the size may be inappropriate when you bring the picture into Ventura Publisher. For example, 8-point type in your diagram becomes 16-point type in Ventura Publisher if the picture is enlarged by a factor of two. By creating

140 Chapter Four: Creating Pictures
the text in Ventura Publisher, you can enforce a consistent font and point size from picture to picture.
-Note: One exception is rotated text, which can be useful to annotate certain graphs, vertical boxes, or extremely tight spaces. Since Ventura Publisher has certain limitations on rotated text, you may prefer to create it in the graphics program, depending on the size and slant you wish to achieve.
Iili3 You can convert bit-map images to high-quality line-art using a program such as Adobe Illustrator or GEM Artline. These programs let you use a bit-map image as a template you can trace over with sophisticated drawing tools present in the g:raphics programs. With Illustrator, you can save images in EPSF format. Artline lets you save images in GEM or EPSF format.
a Make the picture as large as practical in the graphics program so fine detail can be added. Then reduce the image to the correct size when it is brought into Ventura Publisher.
Creating images Ventura Publisher directly supports several image file formats. It can use images from other sources provided they are converted first. You bring in files from bit-map programs with Load TextlPicture from the File menu. Specify Type of File: Image. Then click on the name of a program to specify the image format. Chapter Six, "Building the Chapter," gives complete instructions on bringing pictures into Ventura documents.
GEM Paint
GEM Paint is a simple-to-use, pixel-oriented graphics program for the IBM PC. Like GEM Draw, it runs under the GEM environment. Also like GEM Draw, it incorporates a toolbox of functions. GEM Paint has two important tools not found in GEM Draw: the eraser and the microscope. The former lets you delete portions of a picture by dragging the eraser icon over them. The microscope magnifies an area of the picture,

Creating images 141
letting you fine-tune the image by turning individual pixels on or off. Other useful GEM Paint features include the ability to invert a picture - change white to black like a photographic negative. You can also select from a number of patterns to fill regions of the picture.
Ventura supports GEM Paint files (IMG) directly and does not need to convert them or create duplicate files.
Perspective
Perspective, from Three D Graphics, allows Ventura users to incorporate high-quality, three-dimensional charts and graphs into their publications. The program can read Lotus 1-2-3 WKS files and can choose from a nearly unlimited variety of graph types and orientations. The program can save files in GEM's IMG format. Thus, to bring them into Ventura Publisher, select the GEM option under Type of File: Image in the Load TextlPicture dialog box.
PC Paintbrush
PC Paintbrush, from Z-Soft Inc., is one of the most popular graphics programs for the IBM PC. Unlike many paint programs, it allows editing of images at 300 dpi using a zoomin mode. It also offers powerful tools and functions for creating detailed paintings. In addition to the ability to draw and fill rectangles, circles, and free-form lines, the program has several unique tools. One is useful for drawing curved lines. It lets you establish two points on the curve as well as the direction of the curve approaching either point.
In addition to supporting the original PC Paintbrush, Ventura Publisher can import images created with two enhanced versions, PC Paintbrush Plus and Publisher's Paintbrush. All three programs share the same user interface and most of the same commands. PC Paintbrush Plus offers the ability to bring in images directly from a scanner. Publishers' Paintbrush allows use of its graphics tools in a zoom-out mode that lets you see the full page as you work. PC Paintbrush can display only a portion of the image at a time.
Ventura converts PCX files, but it does not convert color. You can also convert text to PCX format with the TXTTOPCX conversion utility described earlier in this chapter.

142 Chapter Four: Creating Pictures
HaioDPE
Halo DPE from Media Cybernetics, Inc., which is also marketed by IMSI as the Desktop Publishers' Graphics program, is a full-featured pixel-oriented graphics program for the IBM PC and AT. Like PC Paintbrush, it offers tools for creating lines, circles, rectangles, and shaded regions. It also has a zoom-in edit mode that displays an area of the screen in detail for pixel editing. Halo DPE can also control a scanner directly from within the program. Scanners supported include the Canon IX-12, the CompuScan PCS 240, the Ricoh IS-30, the Microtek MS 300A, and the IBM 3117. Halo DPE can save files in IMG format, which is used directly by Ventura without the need for conversion.
Macintosh Paint Images
Ventura can import images created on the Apple Macintosh computer. These include images created with MacPaint, FullPaint, and other programs. In order to incorporate a Macintosh image into Ventura Publisher, you must first convert the Macintosh file into IBM PC format. There are several methods you can use to do this. First, programs such as MacLink and LapLink-Mac can transfer files between a Macintosh and PC using a serial cable, or null modem. Networks such as Sun Microsystems' TOPS and Apple's AppleShare allow PCs and Macintoshes to share files and disk space on a network, so that transfer.ring files is as easy as a standard operating system copy command. Finally, several companies manufacture disk drives for the Macintosh that can read and write IBM PC format. This allows you to transfer files via a media conversion process. Ventura converts Macintosh Paint files. Pictures transfer as 8x10 in. pages, even if you want only a small section.
TIFF
Ventura supports the TIFF format, a popular image format used by many desktop scanners. TIFF format is important because it is capable of storing gray-scale information. TIFF is discussed below under the section on scanners.

Creating images with scanners 143
Tips for image programs
&ilia Produce bit-map pictures larger than they will appear in the document. You can then reduce the image within Ventura with Sizing & Scaling from the Frame menu (see Chapter Six, "Building the Chapter"). Reducing the size of the image increases its apparent resolution. For example, if the screen has a resolution of72 dots per inch the original picture will have a resolution of 72 dpi. But if you reduce that image to 50% of its original size, it will print with an effective resolution of 144 dpi.
&ilia Annotate images in Ventura Publisher rather than in the paint program. The font quality from paint programs is even worse than from draw programs. If you must use paint fonts, look for a stroke font such as Roman in PC Paintbrush. These fonts scale better than bit-mapped fonts. Stroke fonts can be readily identified by examining the name of the file holding the font. Stroke fonts do not contain the word bit, which is used to identify bit-mapped fonts.
&ilia Use the screen patterns from Ventura Publisher rather than from the bit-map program if possible. Ventura Publisher's patterns are better matched to laser printer output than those from most paint programs. Ventura Publisher's patterns will also print at the maximum resolution of your output device, unlike the bit-mapped patterns of paint programs.
Creating images with scanners Scanners are devices that examine pictures on paper to create an electronic description for use by a computer. In essence, they look at a picture and create a bit-map image of it. This image can be brought into Ventura Publisher just like the ones created by paint programs - but with certain advantages, as you will see.
To import a picture from a scanner, you must first convert it to one of Ventura's four image formats: GEM Paint (IMG), PC Paintbrush (PCX), Macintosh Paint (PNT), or TIFF (TIF). This conversion is accomplished by the software that accom-

144 Chapter Four: Creating Pictures
panies the scanner. Many scanners on the market produce images in one of the supported formats.
Next you bring the image into Ventura Publisher just as you would bring in any other image file. Select Load Text/Picture from the File menu. Specify Type of File: Image. Then click on the format you are using (GEM Paint, PC Paintbrush, Macintosh Paint, or TIFF). Figure 4-12 shows a scanned image brought into Ventura Publisher from a Canon IX-12 scanner.
Figure 4·12. An image captured with a Canon IX-12 scanner using PC Paintbrush Plus.
Background on scanners There are two types of scanners: flatbed and sheetfed. Flatbed scanners rest the paper face-down against a glass window, much like an office photocopier. With sheetfed scanners, pages are fed into the scanner and passed by the sensing element. In either type, the imaging Jl1ethod is the same. A sensing element called a charge-coupled device (CCD) creates a bit-map description of the dark and white areas on the page.
Certain scanning characteristics affect the quality of the image:

Creating images with scanners 145
• Resolution
• Gray scale
• Brightness
• Contrast
Resolution refers to the dots per inch. The higher the resolution, the better the quality. However, high-resolution images take up more space on the disk and require more time to print on a laser printer. In practice, line drawings are less sensitive to resolution than photographs. You can achieve acceptable quality for drawings by scanning with resolutions as low as 100 dpi.
Gray scale is a measure of the different levels of gray (darkness) that make up an image. Line drawings require only two levels of gray - black and white. Each pixel is either on or off. Photographs, however, require somewhere between 16 and 256 levels of gray for acceptable quality.
You can verify this by examining a newspaper photograph with a magnifying glass. The photo is made up of rows of dots. Al though equally spaced wi thin each row, some dots are bigger than others. In dark regions the dots are large; in light regions they're small. The number of different sizes is a measure of the photo's different gray scales.
Interestingly, a typical newspaper or magazine photo is between 85 dpi and 133 dpi. Since both scanners and laser printers are capable of resolving 300 dpi, you might think that this is enough to produce magazine-quality photos. Unfortunately, this is not the case. Today's laser printers cannot vary the size of the dots they print. Thus there is no intrinsic gray-scale capability.
Some older models of scanners don't have intrinsic gray-scale capability either. To get around this problem, manufacturers simulate the appearance of gray scale by grouping a square array of laser printer pixels into larger halftone dots. This process, known as dithering, allows laser-printed photographs to show different levels of gray. For example, each halftone dot might consist of 16 printer pixels; four on a side (see Figure 4-13). But if you use four pixels in each direction to represent

146 Chapter Four: Creating Pictures
Halftone cell
Figure 4·13. Dithering simulates gray levels by constructing halftone cells out of printer pixels. By darkening more or fewer pixels, the printer simulates bigger or smaller halftone dots.
one halftone dot, then you cut the effective resolution by four - from 300 dpi to 75 dpi in the case of a laser printer.
Many newer scanners on the market, however, are capable of sensing and preserving multiple levels of gray. Such scanners, such as the Hewlett-Packard ScanJet, the Datacopy 830, and the Microtek MSF-300G, are superior to scanners without gray-scale capability for working with photographs.
Brightness refers to the overall lightness or darkness of the scanned image. Increasing the scanner's brightness setting is like turning on a brighter light when taking a photograph. If you set the brightness too high, you may wash out some of the detail in the image. If you set it too low, you will get unrecognizable black spots.
Contrast indicates the variation in intensity - the difference between the darkest dark and the lightest light. Increasing or decreasing the scanner's contrast setting has the same effect as decreasing the contrast setting on a television set.
Working with TIFF files
As mentioned earlier, TIFF, which stands for Tagged Image File Format, is a standard format for saving gray-scale photographic images. If given the choice, always select this file format when you are scanning photographic images. The reason is that Ventura Publisher will be able to optimize the

Creating images with scanners 147
appearance of your image regardless of which output device you are using. If your printer is a 300-dpi LaseIjet or LaserWriter, TIFF files may not look much better than images in IMG or PCX format. But if you later decide to send your document to a high-resolution typesetter such as the Linotronic 300, Ventura will be able to create a strikingly superior halftone image with excellent resolution and gray scale. In many cases, these images would be suitable for publication in professional books and magazines.
There is another advantage to using TIFF format images with Ventura Publisher. When you place a TIFF image in a frame, Ventura enables the Image Settings option from the Frame menu. This option allows you to modify the appearance of the picture.
Scanning software As mentioned earlier, Publisher's Paintbrush and PC Paintbrush Plus can drive some scanners directly, thereby placing their images in a file format usable by Ventura Publisher. The programs currently support the Dest PC Scan Plus, the Canon IX-12, and the Panasonic scanners. As noted above, the Dest machine has its own conversion facility for saving images in the right file format, or you can control the scanner with PC Paintbrush. To bring in an image from PC Paintbrush Plus, select the scan option from the Page menu (Figure 4-14). You then see a menu of scanner settings (which will vary according to the available features of your scanner). You can also specify a region on the page to be scanned. PC Paintbrush Plus scans the image and brings it onto the screen. Once there, you can edit it with the program's graphics tools. Although you can only see the scanned image at the resolution of your display screen, it will print at the full resolution of the scanner and printer. If you scan the image at 300 dpi and you have a 300 dpi laser printer, you will get a 300 dpi image on the printed page. By contrast, hit-map images from most paint programs are limited by the resolution of the computer screen, typically 72 dpi.
PC Paintbrush provides two different drivers for the Canon IX-12 scanner. One version is for the interface board supplied by Canon itself. The other version is for the JLaser Plus board.

148 Chapter Four: Creating Pictures
IMage: imiTmUi 1 Reuersel Units: ImlI Ifff] IPelsl
Bright: [6 ~ Contrast:
Scan Hode: I~I I Dither I Dither: ill_I c::I:J
Resolution: IBlI
• Figure 4·14. PC Paintbrush Plus is not only a good paint program, it can also control a scanner directly.
The JLaser Plus is an add-on board that installs inside a personal computer. It offers an additional two megabytes of memory plus the ability to drive any laser printer based on the Canon CX or SX engines at a full300-dpi resolution.
If you use the JLaser Plus to drive a laser printer for Ventura Publisher, you will certainly want to use it to drive your scanner as well. In addition to saving the expense of buying another interface card, it also speeds up imaging, since its two megabytes of memory serve as an image buffer.
There are several other programs that can control the scanning process and allow editing of images after they are scanned. Some of these programs, such as GEM Scan, Scan Do, and Halo DPE, work with a variety of scanners. Others, such as Hewlett-Packard's Scanning Gallery, were designed to work with one particular model of scanner.
Tips for scanners Keep these factors in mind when scanning artwork intended for Ventura Publis¥r.
a Bringing in photographs requires experimentation. The only way you will arrive at the best parameters is to try different values for brightness, contrast, and gray scale and compare the results.

Creating images with scanners 149
ImJ To find the best brightness and contrast settings, start with the contrast at its highest value. Leave it there while you find the appropriate level of brightness. Start at a low brightness level and gradually increase it until the unwanted black areas disappear. Then, maintain this level of brightness and gradually reduce the contrast level until different regions of the image begin to blend in with one another.
ImJ Select only the portion of the page you absolutely need. While it is possible to crop an image within Ventura Publisher, you will save both scanning time and disk storage space by keeping the image data to a minimum.
ImJ To scan a small photograph into a sheetfed scanner, tape it to a piece of paper. This makes it less likely to jam and allows more precision in selecting the region to be scanned.
ImJ Print scanned images at full size if possible. Although both your graphics program and Ventura Publisher can scale an image up or down, the quality will be decreased. The halftone cell pattern created by the dithering process is optimized for the current size. If you must go up or down in size, use an integer multiple, such as 200% or 50%.
ImJ Scan line drawings at 150 dpi. Since line drawings use only two shades of gray, little is gained by increasing the scan resolution to 300 dpi. A resolution of 150 dpi provides acceptable quality and cuts down on disk space by a factor of four. An exception to this is very fine line drawings, such as you might find on the back of a dollar bill. These fine images frequently need 300-dpi scanning to resolve the detail.
ImJ Consider bringing the scanned image into a graphics program for touchup prior to importing it into Ventura. Even basic graphics programs allow you to remove backgrounds and lighten shadows by editing pixels. And some of the more sophisticated programs allow sophisticated retouching.
150 Chapter Four: Creating Pictures
Screen capture utilities
Frieze
Snapshot
It is often useful to incorporate a picture from a computer screen into a Ventura document:
• In software documentation, to show the reader a sample screen from the program
• To include a picture from a program not supported directly by Ventura
• To annotate an existing picture with descriptive labels
Several utility programs can help you incorporate screen images into documents. We examine five such programs below. All four create a hit-map image of the screen that can be loaded into Ventura Publisher like any other image file. In some cases, they also accomplish other functions, such as graphics editing or file conversion.
Frieze is a support module for the PC Paintbrush graphics program. It is a memory-resident program, which means it is accessible while running other programs. It can save all or a portion of the screen, save either portrait or landscape images, and reduce or enlarge the screen. Once installed, Frieze is invoked by typing the Shift-PrtSc key on the PC keyboard. A two-line menu pops up at the top of the screen, including options for specifying the region to be saved, the size, the orientation, and the file name for the captured screen. This new file can be edited directly by PC Paintbrush, or incorporated into Ventura Publisher as a PC Paintbrush image .
.. Note: Frieze is installed automatically whenever you run PC Paintbrush.
Snapshot is a desk accessory that accompanies the GEM Paint program from Digital Research, Inc. You can use the program with any application in the GEM environment. Snapshot creates files in the GEM Paint IMG format.

Screen capture utilities 151
-NOTE: Snapshot may not be able to capture images from Ventura Publisher, since it consumes too much memory. However, Snapshot images captured from other programs can be loaded into Ventura.
To install Snapshot, copy the files SNAPSHOT.ACC and SNAPSHOT.RSC from the GEM Paint diskette to the GEMBOOT directory of your hard disk. Thereafter, it will be present as an option in the Desk menu.
To invoke Snapshot, select it from the Desk menu. You will see a dialog box with a camera icon in it. Click on the camera icon and an item selector box will appear that prompts you for the name of the image file you wish to create. Enter a filename, using the extension IMG. A cross hair appears that lets you select the region of the screen you want to capture by dragging the mouse across the screen. When you release the mouse button, your image is saved to disk. The image is saved in GEM Paint format. You can call up the captured screen with GEM Paint to edit or enhance it.
HotShot Graphics HotShot is valuable program for capturing screen images from IBM PC programs, including Windows applications. It also has many other uses. Like Frieze, the screen capture module is memory-resident, and appears when you invoke its activation key. HotShot incorporates two different modules: one for capturing text-based screens and another for capturing graphic screens. Once you have captured and saved a text or graphic screen, convert it from HotShot's native file format to IMG format with the conversion module supplied with HotShot.
The screen-capture facilities are only part of the HotShot feature set. One valuable function is the ability to modify a captured text screen, edit text on the screen, draw lines and arrows, and add shading. The drawing and editing tools are useful for creating organizational charts and other drawings from word processor files.
In addition, you can merge different pictures from different files into a single screen, then edit and save the result as a single file.

152
HiJaak
SideKick
Clip Art
Chapter Four: Creating Pictures
Those who work with pictures from different sources will appreciate HotShot's conversion capabilities. It is capable of changing files from almost any format to almost any other. HotShot's file management functions make this a simple task. You simply flag the files you want, then sit back as the program converts them in one batch. Power users will also want to know about the cataloging system. Catalogs are short descriptions of pictures and their location on the hard disk. This same feature also permits the creation of automatic slide shows.
HiJaak is a screen capture and file conversion program. It captures text and graphics screens from a wide range of monitors. In addition, it can convert the captured screen to any of 11 formats, including IMG, GEM, and PostScript, and Macintosh formats.
The popular SideKick background utility has a screen capture utility that can be used to bring text screens into Ventura. It is especially useful when combined with the Ventura TXTTOPCX conversion utility described above. Normally SideKick captures text only, hut the Ventura utility permits you to bring in certain screen effects as well.
To capture a screen or a portion of a screen with SideKick active, use the import command. This function allows you to define a rectangular region on the screen by using the block begin and block end markers -just as you would with a word processing program. Once you have done this, hit the escape key to return to the SideKick window and then issue the block copy command to paste the screen contents into a new file. This file can then be saved as an ASCII file and converted to PC Paintbrush format.
An electronic clip art collection is a library of pictures on disk.

Clip Art 153
The name comes from the days before graphics software. Companies would assemble catalogs of ready-to-use illustrations, and clients would clip out the ones they wanted. Today, clip art is also available as electronic files that can be loaded into programs such as Ventura.
Some people associate clip art with low-quality, cartoon-style pictures. In reality, you can find a wide variety of top-notch business-oriented packages (see Figure 4-15). Some collections have pictures of people and objects; others include symbols, borders, maps, and chart elements. These pictures come without copyright restriction - you can use and reuse them in your publications as you see fit.
Even if you don't have the time and skill to create your own original art, you can add the power of pictures to your publications via professional clip art. Well-chosen images catch the reader's eye and establish the basic concept of the text. Because Ventura lets you place one frame on top of another, you can often combine two images to produce a third.
To choose a clip art collection, first consider the subjects you need to cover. You can buy specialized collections if, for example, your only real need is maps of different states and countries. You can find theme collections for most major business topics. On the other hand, if you use a wide range of pictures, you may prefer a generalized sampler.
Next, consider the format. Many of the first clip art collections were produced for the Macintosh. Although Ventura supports several Macintosh formats, you must still go through the
~------------~~ I~
MasterCard '-Y..J
Figure 4·15. Clip art collections can provide useful business symbols and logos.

154 Chapter Four: Creating Pictures
trouble of getting the pictures from the Macintosh-compatible disks on to your PC. Look for PC format disks to save yourself the trouble. Most vendors offer both Mac and PC versions.
Second, try to find collections in one of the line art formats supported by Ventura. As noted above, line art produces higher resolution and better quality. The exception to this general rule is if you are seeking the informality of paint-type pictures. In addition, several vendors offer paint format pictures that have been scanned at 300 dpi. On a 300 dpi laser printer, their quality rivals that of line art formats. If you do all your printing on a laser printer, a high-quality paint collection may be sufficient. If you plan to send final output to a high-resolution device, however, look for a line-art format.
Next, consider how the clip art is presented. If each picture is in a separate file, you can easily and quickly load the one you want. Some collections - especially paint format collections - put many pictures into one file. You must then crop out the unwanted images with VP or a separate graphics package before you can use it. You should also evaluate how well the clip art package documents its pictures. A large collection is much easier to use if every picture is printed and labeled in thumbnail size. That way you can quickly find the one you want. Some collections force you to load each picture in turn to see what it offers. Finally, judge the quality of the art. Try to match the illustrations to the tone, style, and audience of your publication. Most vendors offer samples, either on paper or on disk. Appendix B, "Manufacturers and Products," lists some leading clip art sources.
Ventura'S Graphic mode Ventura's built-in Graphic mode can create simple drawings directly, just as Text mode can create small amounts of text. We do not recommend Graphic mode for serious drawing. First, it was not intended for full-scale illustration. Its real purpose is to annotate or enhance pictures brought in from other programs. Since it is not as capable as a full-blown graphics package, you spend more time and effort to achieve the same result.
Ventura's Graphic mode 155
Second, the pictures you create are "trapped" inside the chapter. Ventura does not provide any way save a picture created in Graphic mode as a separate file. All the pictures in a chapter are stored in a single VGR file. This file cannot be loaded into Ventura like an ordinary graphics file. One of the few options is to enlarge the picture to full-page size and print it to a PostScript file. You can also save the chapter under a new name, thereby creating a copy of the drawing in the new chapter. However, neither of these methods is very satisfactory. If you think you will ever want to use a picture in a different document, we highly recommend that you create it as a separate file with an outside graphics program.
Our personal preferences aside, we realize that many people use Ventura's built-in drawing tools to illustrate documents. This section, therefore, explains the basic techniques for creating pictures with Graphic mode. To learn how to use Graphic mode to edit and enhance existing pictures, turn to Chapter Six, "Building the Chapter."
.. This section contains advanced information. If you are brand new to Ventura, we recommend that you skip it and return later after you are more familiar with the program.
Despite the limitations of Graphic mode, a skilled user can create complex technical illustrations by combining the basic shapes available in Ventura (see Figure 4-16). Drawing inside Ventura is much easier if you understand the basics of Graphics mode.
Graphic mode capabilities Ventura's Graphic mode lets you add three types of drawing elements to your documents:
• lines
• shapes
• Box Text
These elements are line-art, not images. They print at the full resolution of your printer. When you use Graphic mode, Ventura stores the resulting drawings in a separate file with the VGR extension. The file name is the same name as the chap-

156
• Circuit Description
lIIi OVerview rbiI_ttDcs.a-html:lt:bn.allJd_21pa.q.l ..... d br. ~ lit..,... __ Jl_jR1 117 •• "
Mllbr •• a~pDNIft_.2.m. ailll:u:l:oallS ._b~:II .~.
Iii General ArchlfAlctu .. D ••• ~w"Unl'* a ~"D.u._l n. UD'. 21 • allMmJH. bp" P"_ •••
• JII9_ ••• ~.~-:a..toca.8nCb •• paaaMd ~ paQII_tn.~ .. QftfhIlt II • ..., *' .... UdakUaIIIlaulputtlllhll ..... OBhDro.-. a--=cnJ.ftMlDD$a1 .... _ta: .. UDl'.2 •• ZII"a4UI_.d_."OIlIII'-'DIwa.E"~ ... ~ bI.,..:bDaoM .... _DlF .... (JOl-tl2t).
~ ••• dMctb.aHbr. vGt=:=-.:.:.-:..:=::.-_m::!.~
Chapter Four: Creating Pictures
Figure 4·16. Although not intended to replace a full-scale graphics package, Ventura's Graphic mode can produce useful illustrations.
ter. Thus, any drawing for a chapter called SAMPLE.CHP Ventura are stored in a file called SAMPLE.VGR.
To do any drawing, you must first enter Graphic mode by clicking the right-most icon on the Function Selector (or by using the keyboard shortcut Ctrl-P). The Side-Bar changes to show icons representing the different drawing tools. While in this mode, you can also create, select, resize, or move frames. However, you must enter Frame mode to cut, copy, or paste frames or load files into frames. To use a tool, first select the icon. The mouse cursor then changes shape when you return to the workspace. The shape of the icon depends on the tool you select. Figure 4-17 shows the different shapes and their meanings.
The mouse shapes signal that Ventura is ready to draw. To form an element, move the mouse to the beginning point. Press and hold the mouse button. While still holding down,

Ventura'S Graphic mode 157
Icon in Side-Bar
Mouse shape in Workspace
Result of tool
~ I!~I TEXT [S] [QJ [J g ~ ITe I Ee r r ~
Selects ~ 1 0 D 0 Resizes Moves
Figure 4·17. Side-Bar icons, cursor shapes, and their results in Graphic mode.
drag the cursor to the end point. Release the mouse (see Figure 4-18).
You will have an easier time in Graphics mode if you follow these three steps in this order for all your drawings:
Figure 4·18. To draw a line, press and hold the mouse button at the beginning point. Then drag the mouse to the end point and release.
1. Select the parent frame
2. Set up the grid
3. Create and modify the graphic

158 Chapter Four: Creating Pictures
Selecting the parent frame Every Ventura graphic is attached to a "parent," which can be a frame or a page. You have three choices:
1. You can attach a graphic to the current page, in which case it appears only on that page.
2. You can attach a graphic to all pages, in which case it appears on every page of the document.
3. You can attach a graphic to a separate frame that resides on top of the Underlying Page, in which case it appears wherever the frame appears. If you move the frame, the graphic moves with it. If you delete the frame, the graphic disappears. If you make the frame into a repeating frame, the graphic repeats on every page where the frame appears.
It makes no difference if the parent frame is empty, contains text, or contains a picture. The parent is whatever was active just before you drew the graphic. To attach a graphic to the current page:
• Enable Graphic mode.
• Select the Underlying Page (click anywhere on the workspace). Gray handles appear around the edge of the page to show that it has been selected.
• Select the tool you want and draw. The graphic is now attached to the current page.
To attach a graphic to a frame:
• Enable Graphic mode.
• Select the frame (click anywhere on the workspace). Gray handles around the outside confirm your selection.
• Select the tool you want and draw. The graphic is now attached to the current page.
To attach a graphic to all pages:
• Enable Graphic mode.
• Select the graphic.
• Choose Show On All Pages from the Graphic menu.

Ventura'S Graphic mode 159
Parent frame
Ventura graphic
If you change your mind and want the graphic on one page only:
• Select the graphic.
• Choose Show On This Page from the Graphic menu.
If you accidentally attach a graphic to the wrong frame:
• Select the graphic and delete it (using the Edit menu or the Del key). This deletes the graphic and places a copy in temporary memory.
• Select the correct frame.
• Choose Paste Graphic from the Edit menu (or press the Ins key). This reinserts the copy from temporary memory, which is now attached to the correct frame.
Different graphics can have different parents, even if they are on the same page. Moreover, a graphic does not have to be within the boundaries of its parent frame. As you can see in Figure 4-19, a graphic and its parent can be separated by a wide distance, as long as they are on the same page.
Figure 4·19. A Ventura graphic does not have to reside within the boundaries of its parent frame. It can be separated by a wide distance, as long as it is on the same page.
It is crucial to choose the correct parent. Usually it's best to attach the graphic to a frame. That way you can move the frame and automatically move all the graphics with it. Obviously, if you are creating callouts (labels), you want them

160 Chapter Four: Creating Pictures
attached to the frame for that picture so they will move along with it.
If you are creating graphics that must be positioned with precision, attach them to a frame (as opposed to the current page). Then you can move the frame using Sizing & Scaling from the Frame menu, and the graphics will move by a corresponding amount. If there is no obvious choice as the parent frame, you can create a small, "invisible" frame just for the purpose of attaching a graphic. Place this frame outside the margins so it won't interfere with the flow of text. Make sure it does not have a fill pattern or ruling lines. Even though it is invisible when the page prints, you can see this frame on the screen in Frame mode. You can copy, move, or delete the frame as an easy way to copy, move, or delete its associated graphics.
Setting up the grid Beginners sometimes have trouble tapping the full power of Graphic mode. If there is a single secret to fast, efficient drawing, it is the use of a grid. You probably don't need a grid if you are producing a single label or a single line. But if you want to create two or more graphics at the same time, you should usually create a grid before you start. If you know how to set up a grid, Ventura does the hard work for you. It makes sure that everything you draw is the right size and in the right position.
Ventura's Line Snap and Column Snap features don't work in Graphic mode. Fortunately, Graphic mode has its own snap-to grid. To turn it on:
• Enable Graphic mode.
• Select the frame or page.
• Choose Grid Settings from the Graphic menu. The Grid Settings dialog box appears (see Figure 4-20).
• Choose Grid Snap: On, then select the units you want for both horizontal and vertical. In the example below we have selected four picas for the horizon tal and two for vertical.
The grid applies to the frame that was selected when you opened the dialog box. If you apply the grid to the current page, it will stay the same for every page in the document

Ventura's Graphic mode 161
Grid Snap: Off t
Horizontal Spacing: () ,2~'iO inches ~
Vertical Spacing: () ,2~m
Figure 4·20. Use the Grid Settings dialog box to choose the units of the invisible snap-to grid.
(until you change it). If you apply the grid to a frame, it stays in effect whenever you return to that frame, even if the grid settings for the Underlying Page are different from those of the frame. If you insert a page into the document (using InsertlRemove Page from the Chapter menu), you can give the inserted page different grid settings from those of the rest of the document.
The invisible grid starts from the upper left corner of the frame or page no matter what the margins are. This grid acts like a magnetic field. Any graphic you place on the page automatically snaps to the nearest line. You cannot misalign a shape; Ventura won't let you. With the grid shown nearby, for example, you can draw a line or a shape that is four picas wide; or eight picas wide; or any multiple of four. But you cannot draw a shape that is six picas wide unless you change the grid.
As you may have guessed, the key to working with Grid Snap is to choose the right units. If you know the sizes you want in advance, you can plan the grid for easy drawing. First consider the margin setting. Let's say that we have a document with margins of six picas. Let's further assume that we want to draw shapes that are four picas square, and some of these shapes must line up with the left margin.
If you set the grid to four picas vertically and horizon tally, the shapes will be the right size, but they will not snap to the

162 Chapter Four: Creating Pictures
margin. Since the invisible grid begins at the left edge of the page, we will have snap-to lines at four, eight, twelve and so on. Ventura will not let us position the shapes at the six-pica left margin.
One strategy is to set the grid to the common denominator of the shapes and the margins. In the example above, a grid setting of two picas will let us draw our four-pica shapes and align them to the six-pica left margin.
Another good idea is to set the vertical dimension according to the line spacing of Body Text. This line spacing is the basis for Ventura's Line Snap function. If you use a multiple of this same number for the vertical grid snap, your graphics will automatically align with the lines of text - a useful effect in certain applications. For instance, if the body text in the above example had a line spacing of 12.00 fractional pts. (one pica), a two-pica vertical grid setting would be a multiple of two.
Not all situations work out this easily. And that brings us to an important point: You can change the grid at any time during a drawing session. For maximum accuracy, it's sometimes wise to switch back and forth between different settings. Let's suppose that you want four-pica shapes, but the left margin is set at 07,06 picas & points. In such a case, you might want to set the horizontal grid to 04,00 picas & points to draw the shapes. Then you could switch to horizontal units of 07,06 picas to align the shapes with the margin.
Remember - Column Snap does not operate with graphics, so you must use the grid to automatically align shapes with the margin.
The snap-to grid is the solution for painlessly producing tables, forms, calendars, and other documents that require lines and shapes to align (Figure 4-21). Many beginning users try to construct such applications by painstakingly positioning boxes with the eye. Inevitably they have misalignments. The secret is to set up a grid so the shapes align automatically and perfectly.
So far we've shown you how to select the parent frame and how to set up the grid. Now you are ready to create the drawing. As you will recall, Ventura has three types of tools: lines, shapes, and Box Text.

Ventura's Graphic mode
FEBRUARY 1988
D11'lectll'o B.lle workshop 7:00 p.m. Lm. and p.m.
D11'lectll'o BasiC/Advanced 7:00p.m. workshop.
14 15 18
D11'lectll'o Advancod 7:00p.m. workshop
21
28
PAGINATIONS Duign and Prodw:tion N.ws for V.nlura U .. rs
New Riders Publishing P.O. 4846 Thousand Oaks, CA 91360
DTPlecturo Balle workshop 7:QOp.m. a.m. and p.m.
10 11
DTPlectu1'8 Blslc/Advanced 7:00p.m. workshop_
17 18
DTPlecturo Advanced 7:00p.m. workshop
25
Advanced workshop
Oponlab DTProom
12
Oponlab DTProom
19
Oponlab DTProom
26
Oponlab DTProom
13
20
27
Bulk Rate US Postage
PAID LOS ANGELES, CA
PERMIT'11111
163
Figure 4·21. Calendars and similar applications are simple and fast to produce with Box Text if you use a snap-to grid to align the shapes automatically,
Drawing a line We assume that you have enabled Graphic mode, selected the parent and (if necessary) set up a grid. To draw a line, follow the same three basic steps that operate all the graphic tools:
• Select the line tool from the Side-Bar.
• Position the cursor at the beginning point. Press and hold the mouse button.
• Drag the mouse to stretch the line to the end point. Release the mouse button.
Drawing a perfectly straight line
To draw a line that is precisely vertical, horizontal, or 45 degrees, hold down the Alt key while you draw:
• Select the line tool from the Side-Bar.

164 Chapter Four: Creating Pictures
• Position the cursor at the beginning point.
• Press and hold the Alt key. Now press and hold the mouse button, without releasing the Alt key.
• Drag the mouse to stretch the line to the end point. Release the mouse button and the Alt key.
When the Alt key is down, Ventura forces the line to conform to either the vertical, the horizontal, or the 45 degree slant (whichever is closest).
Resizing a line
To change the size of a line:
• Select the line. Handles appear along its length.
• Position the cursor exactly over the handle at the end you wish to change. Press and hold the mouse button. Wait until a pointing hand cursor shape appears.
• Move the end of the line to its new position. Release the mouse button.
If the pointing hand does not appear, you have not placed the cursor exactly on top of a handle at one of the ends. Release the mouse button. Reposition the cursor so it is on top of a handle, then follow the steps above.
Moving a line
To move a line:
• Select the line. Handles appear along its length.
• Position the cursor on top of the line anywhere except over one of the handles at the end. Press and hold the mouse button. Wait until a four-way arrow cursor appears before you move the mouse.
• Move the line to its new position. Release the mouse button.
If the four-way arrow does not appear, release the mouse button immediately without moving the mouse. Now reposition the cursor so it is not over an end handle. Then follow the steps above.

Ventura'S Graphic mode
Cutting, copying, and pasting a line
To delete a line:
• Select the line.
165
• Delete it by selecting Cut Graphic from the Edit menu or by pressing the Del key on the numeric keypad.
The line is now in temporary memory where it will remain until you replace it with something else. If you have suffered from the agony of delete - in other words, if you have accidentally cut something you wanted to keep - you can restore it immediately by pasting it back from temporary memory.
To copy a line into temporary memory without deleting it:
• Select the line.
• Copy it by choosing Copy Graphic from the Edit menu or by pressing Shift-Del.
Use the Del key from the numeric keypad. If your keyboard has Del keys at other locations, do not use them.
To paste a line, first place it on the clipboard by deleting it or copying it. Then choose Paste Graphic from the Edit menu, or press the Ins key. Ventura inserts the line at its previous location. If you press the Ins key five times, Ventura inserts five copies, one on top of the other. These copies will not be visible until you move them from the stack.
You can select, cut, copy, and paste multiple lines at the same time, as long as they have the same parent frame.
Changing line attributes
Ventura permits different line colors, widths, and end styles (Figure 4-22). To change line attributes:
• Enable Graphic mode.
• Select the line.
• Select Line Attributes (by choosing from the Frame menu or by typing Ctrl-L).
• Choose the attributes you wish and click OK.
Ventura has five preset thicknesses. It also allows you to set a

166 Chapter Four: Creating Pictures
THICKNESSES END STYLES
Thin Square
2 1 arrow • 3 2 arrows III ~
4 Square and round
2 round
Figure 4·22. Line attribute options.
line of any thickness with the Custom option. Choose Thickness: Custom, then type in the thickness you want. You can use any units to specify the thickness, but most professionals prefer to measure rules in fractional pts. Since type sizes and line spacing are almost always specified in fractional pts., it makes sense to use the same units for rules. When you choose end styles, a check mark indicates the current choice. You can make a line the same at each end or different at each end.
When selecting an end style, be aware that the left-most choice in the dialog box does not necessarily represent the left end of the line. The left-most choice stands for the beginning of the line - the first point you drew when you positioned the mouse and pressed the button. If you draw a line from right to left, then the beginning -. in Ventura's eyes - will be on the right. To set an end style for this beginning, select an option from the left column. Most people do not use the color option very often. If you are one of the rare people with a color printer, you can choose the color of lines with this option. A more common application is to put a white arrow on a black background.
Storing line attributes
If you have many similar lines to draw, you do not want to reset the line attributes for each one in turn. One way to change them all a t once is to choose Select All from the

Ventura's Graphic mode 167
Graphic menu, which highlights every graphic attached to that frame. Then you can change all the attributes at once.
A better way is to get the first line looking the way you want, then store its attributes. Once you store attributes, all future lines you draw will automatically take on those identical attributes. To store line attributes:
• Create the line and change its attributes until it looks the way you want.
• With the line still highlighted, select Line Attributes.
• Choose Defaults: Save To. Click OK to close the dialog box.
Now the attributes you just created are the default choices. They will automatically apply to all future lines until you change them.
Copying attributes
You can also copy attributes from one line to another:
• Select the line from which you wish to copy.
• Select Line Attributes.
• Choose Defaults: Save To and click OK to close the dialog box.
You have just made those attributes the default settings. Now you can copy those settings to another line:
• Select the line you wish to change.
• Select Line Attributes.
• Choose Defaults: Load From and click OK to close the dialog box.
Drawing a shape You draw shapes in much the same way you create lines. Assuming that you have enabled Graphic mode and (if necessary) set the grid, you then:
• Select one of the shape tools from the Side-Bar.
• Position the cursor at the beginning point. Press and hold the mouse button.

168 Chapter Four: Creating Pictures
• Drag the mouse to stretch the shape until it is the size you want. Release the mouse button.
You draw shapes by dragging diagonally. After you release the button, the shape is inserted on the page.
Drawing a perfect circle or square
To draw a shape that is a perfect circle or square (as opposed to an ellipse or rectangle), hold down the Alt key while you draw:
• Select the shape tool from the Side-Bar.
• Position the cursor at the beginning point.
• Press and hold the AU key. Then, without releasing the Alt key, press and hold the mouse button.
• Drag the mouse to stretch the shape to the size you want. Release the mouse button and the Alt key.
When the Alt key is down, Ventura constrains the shape.
Resizing a shape
To resize a shape:
• Select the shape. Handles appear around the outside.
• Position the cursor exactly over a handle. Press and hold the mouse button. Wait until a pointing hand cursor shape appears.
• Move the end of the shape to its new size. Release the mouse button.
If the pointing hand does not appear, you have not placed the cursor exactly over a handle. Release the mouse button. Reposition the cursor so it is on top of a handle, then follow the steps above.
If you grab a handle at a corner you can change both dimensions at once. If you grab a handle in the middle, you can change only one dimension at a time. For instance, if you want to change the width of a rectangle without changing its height, be sure to grab a handle in the middle. That way you can be sure that the height will not change accidentally.

Ventura'S Graphic mode
Moving a shape
To move a shape:
• Select the shape. Handles appear around the outside.
169
• Position the cursor anywhere inside the shape. Do not put the cursor over one of the handles. Press and hold the mouse button. Wait until a four-way arrow cursor appears.
• Move the shape to its new position. Release the mouse button.
If the four-way arrow doesn't appear, release the mouse button immediately without moving the mouse. Now reposition the cursor so it is not over a handle and follow the steps above.
Cutting, copying, and pasting a shape
You cut, copy, and paste shapes exactly as explained above for lines.
Changing and storing line attributes
You can change and store line attributes for shapes just as you can for lines. All aspects of the dialog box work the same as described above under "Drawing a line." In the case of shapes, the Line Attributes dialog box controls the line that appears around the outside of the shape. If you do not want a line around the outside, choose Thickness: None.
Changing, storing, and copying fill attributes
Fill attributes refer to the interior of a graphic shape - what color or pattern is inside. Ventura does not permit patterned rules in Graphic mode (although you can create theln in Paragraph mode). It does, however, let you put patterns inside shapes. You can have a fill pattern whether or not you have a line around the outside. To fill a shape:
• Select the shape.
• Select Fill Attributes (by choosing from the Graphic menu or by typing Ctrl-F). The dialog box shown in Figure 4-23 appears.
• Choose the attributes you want and click OK to close the dialog box.

170 Chapter Four: Creating Pictures
FILL ATTRIBUTES For RECTANGLE
Color: Black Pattern: 4
Result:
I Transparent
DeFaults: Load F .... om... I I Save To ...
01( I I Cancel
Figure 4·23. The Fill Attributes dialog box controls the patterns in the interior of a shape. Default values can be set or recalled using the Load From and Save To buttons.
Ventura has nine fill variations, ranging from Hollow (no pattern) to Solid (black), as shown in Figure 4-24. These options are preset and cannot be changed. If you have a PostScript printer, however, you can print to a disk file and use a word processor to modify the fill patterns, as described earlier in this chapter. Or you can use Define Color from the Paragraph menu to create new gray shades (PostScript printers only).
Hollow 2
D 3 4 5
6 7 Solid
Figure 4·24. The nine fill options available in Ventura.

Ventura'S Graphic mode 171
Opaque versus transparent
The Fill Attributes dialog box also lets you choose between opaque and transparent fill patterns. An opaque pattern hides anything beneath it. For instance, you can hide text by putting a rectangle on top of it if you have selected opaque. You can create the electronic equivalent of white-out fluid by creating a rectangle with an opaque background of solid white.
A transparent graphic lets anything below show through (provided your printer can handle transparent graphics; many cannot). This capability allows you to combine two images into one by overlapping them. (See below for more on combining graphics.)
-NOTE: Some printers, including PostScript and LaserJet-compatible printers, cannot handle transparent graphics. No matter what you choose in the Fill Attributes dialog box, the graphic will print with an opaque background.
If your printer cannot handle transparent graphics, you can still combine different graphics into bigger pictures. You must understand, however, that you do not have the capability to allow one graphic to show through anoth~r. Any time you put one graphic on top of another, the top graphic will obscure everything underneath.
Drawing Box Text Box Text is a special type of graphic. It behaves like a cross between a graphics rectangle and a frame. Like a rectangle, it is created and modified in Graphic mode. Like a frame, it can contain text.
You draw Box Text exactly as you create a shape. Assuming that you have enabled Graphic mode and (if necessary) set the grid, you then:
• Select the Box Text tool from the Side-Bar.
• Position the cursor at the beginning point. Press and hold the mouse button.
• Drag the mouse to stretch the box until it is the size you want. Release the mouse button.

172 Chapter Four: Creating Pictures
In other respects, Box Text performs like any other shape. You can constrain it, resize it, move it, cut it, copy it, paste it, fill it, or change its line attributes exactly as described above for shapes. The difference lies in the ability to place text inside the box. When you draw a Box Text rectangle, you will see a small end-of-file square inside the box. This is your signal that you can place text inside.
-NOTE: In version 1.1, the words "Box Text" appeared within each newly created Box Text rectangle. In version 2, only the end-at-tile ssymbol appears.
Putting text inside Box Text
To place text inside a Box Text rectangle:
• Enable Text mode.
• Place the cursor immediately in front of the end-of-file symbol. Click once to activate the text cursor.
• Type in the words you want to appear.
If the text you type is too long for the box, it disappears from view. Nevertheless, it has not been deleted. If you switch back to Graphic mode and enlarge the box, you will see the text.
Formatting text inside Box Text
When you type text inside the box, Ventura automatically tags it as Z_BoxText. You can change the format of this tag in Paragraph mode, or you can retag the text with a different name. If there is no Z_BoxText tag in the current style sheet, Ventura copies the attributes of Body Text. You can change these attributes just as you change any other tag:
• Enable Paragraph mode.
• Select the paragraph.
• Use the options from the Paragraph menu to change the formatting
But there is nothing that says you have to leave the text inside a box tagged as Z_BoxText. You can retag it as anything else, exactly as you would retag any other paragraph.

Ventura'S Graphic mode 173
• Enable Paragraph mode.
• Select the paragraph.
• Select the new tag from the Assignment List .
.. NOTE: Like al/ of Ventura's self-generated Z_ Tags, Z_BoxText does not appear on the Assignment List unless you choose Generated Tags: Shown from the Set Preferences dialog box.
Differences between Box Text and frames
Since you can place text in frames and in Box Text, some users become confused between the two. Here are a few key differences:
• The text you type into a Box Text is stored in the caption file for that chapter. You cannot save it as a separate file. By contrast, frame text is also stored in the caption file, but it can be saved to a separate file with File TypelRename from the Edit menu.
• You cannot load a text file into a Box Text rectangle. You must type in the material while in Ventura.
• You cannot load a picture file into a Box Text rectangle.
• You cannot set margins or columns inside a Box Text rectangle, nor can you use padding. Frames, on the other hand, can have margins, columns, and padding.
• Text flows around a frame (unless you turn Text Flow to Off). By contrast, text flows under a Box Text rectangle.
Box Text effects
Box Text is the method of choice for placing text anywhere on a page, without regard to margins and columns. It is ideal for forms, brochures, and advertisements. Although Ventura is known for its long document capabilities, Box Text provides design flexibility that rivals any other page layout program on the market.
By combining text with different borders and backgrounds, you can create a wide variety of useful effects. We show a small sampling in Figure 4-25.
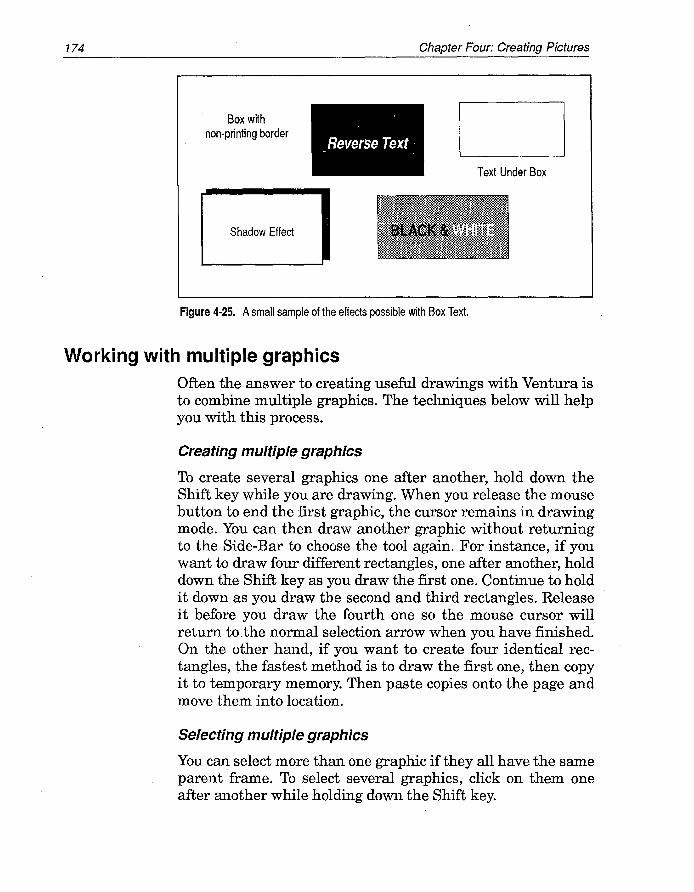
174
Box with non-printing border
Shadow Effect
Reverse Text
Chapter Four: Creating Pictures
Text Under Box
Figure 4-25. A small sample of the effects possible with Box Text.
Working with multiple graphics Often the answer to creating useful drawings with Ventura is to combine multiple graphics. The techniques below will help you with this process.
Creating multiple graphics
To create several graphics one after another, hold down the Shift key while you are drawing. When you release the mouse button to end the first graphic, the cursor remains in drawing mode. You can then draw another graphic without returning to the Side-Bar to choose the tool again. For instance, if you want to draw four different rectangles, one after another, hold down the Shift key as you draw the first one. Continue to hold it down as you draw the second and third rectangles. Release it before you draw the fourth one so the mouse cursor will return to the normal selection arrow when you have finished. On the other hand, if you want to create four identical rectangles, the fastest method is to draw the first one, then copy it to temporary memory. Then paste copies onto the page and move them into location.
Selecting multiple graphics
You can select more than one graphic if they all have the same parent frame. To select several graphics, click on them one after another while holding down the Shift key.

Ventura'S Graphic mode 175
Once you have selected the graphics, you can perform operations as a group. For instance, you can change all the line or fill attributes at one time. Or you can copy them all to temporary memory. Or you can move them all at once.
To move several graphics at a time, carefully position the mouse over the center of one graphic. Press and hold the mouse button until the four-way arrow appears. While holding the button down, move the shapes to the new location. All the selected graphics move in the same direction and the same amount. You must take extra care not to let the mouse button up, and not to click on a handle. If you do, you will select the graphic underneath the cursor and deselect all the others.
Often a better way to move multiple graphics is to move the parent frame, which automatically forces the graphics to move with it.
Working with multiple graphics is one key to faster drawings. Imagine, for instance, that you want to draw a calendar. Rather than drawing 31 rectangles one at a time, you might draw just the first row individually (using the snap-to grid for exact size and positioning). Next you could copy the entire row into memory. Then you could paste three copies of the row back onto the page and move the rows into position to complete the calendar.
Drawing in layers
Ventura allows you to put one graphic on top of another. Drawing in layers is the secret to using simple elements to construct complex drawings (see Figure 4-26).
You can use a stack analogy to understand how Ventura handles layers of graphics. The first graphic you draw is on the bottom. The second is on the top of the first. The third is on top of both of the first two, and so on. When graphics appear one on top of another, it can be difficult to select the shapes underneath. Ventura solves this problem with the Ctrl-Click technique. Place the cursor on top of the stack of graphics. If you then hold down the Ctrl key while clicking, Ventura cycles through the stack. The first mouse click selects the graphic on top. The second click selects the next layer down, and so forth. This same technique works for frames.

176 Chapter Four: Creating Pictures
• Figure 4·26. This sketch of a baseball diamond is a simple example of building a more complex shape from simple elements in Graphic mode.
Changing the layers
What happens if you want to change the order of the graphics in a stack? One way to bring a graphic to the top of the stack is to delete it, then immediately reinsert it. When you reinsert it, Ventura considers it to be the last graphic drawn and therefore puts it on top. Ventura also has commands for sending graphics to the top or bottom of the stack. To send a graphic to the bottom of the stack:
• Select the graphic .
• Select Send to Back from the Graphic menu (or press Ctrl-Z).
The Bring to Front command works in exactly the same way. Its keyboard shortcut is Ctrl-A.
Tips for working in Graphic mode
a Set up a snap-to grid before you start drawing. It is a matter of only a moment or two to adjust the grid for new sizes or to turn it off for free-form placement.

Ventura'S Graphic mode 177
a Make the grid units as large as possible (all other things being equal). The bigger the units, the less chance for error.
a Try to give the grid units an integer relationship with the margin setting if you want to align shapes along the margin. Alternatively, you can draw the shapes with one grid, then change the settings to align them.
a When choosing the parent frame, try to make logical groupings, so you can move related shapes as a unit by moving the parent frame.
a To move a very small graphic, attach it to a larger frame. The frame can be invisible if you don't want it to print. Then move the frame, and the graphic moves with it.
a Consider tying graphics to a repeating frame if you want them to appear on every page of the document. Although you can accomplish the same effect with Show On All Pages from the Graphic menu, that option does not give you the same control. When graphics are tied to a repeating frame, you can move the graphics by moving the frame. This gives you the ability to fine tune position using Sizing & Scaling from the Frame menu.
a Use a white rectangle or circle like "white-out fluid" to block out unwanted portions of a picture.
a If fill patterns from superimposed graphics bleed through to the layer above, separate each layer with a white, opaque shape.
a Create a. dashed or patterned line by drawing a Box Text rectanle the width you want the line. Then switch to Paragraph mode and use one of the Ruling Line options to put a dashed or patterned line above or below the text. Now you can change to Graphic mode to move the line anywhere you want it. You do not need to have any text inside the box to use this trick.
a Although you can put only one rule around a shape in Graphic mode, you can add additional lines around, above, or below in Paragraph mode.

178 Chapter Four: Creating Pictures
a To select a graphic underneath another, press the Ctrl key while clicking the mouse. Each time you click, Ventura selects the next layer down in the stack.
a It may be easier to create complex graphics if you create a blank page for a "sketchboard." When assembling multiple graphics, you can work on each individual element by itself on the blank area where it is easy to see what you are doing. Then you can copy it to temporary memory and paste it onto the correct page, where you can assemble it together with the other elements. Use a large frame to create a blank area. Be sure to select the correct parent when you paste the graphic back in.
a To draw several graphics in a row, hold down the Shift key as you draw. The mouse cursor stays in drawing mode and you can draw another graphic immediately without choosing the tool again from the Side-Bar.
a When drawing similar graphics, take the time to get the first one just right. Then you can use Defaults: Save To in Line Attributes and Fill Attributes to make these settings the defaults. All subsequent graphics will now match these settings.
a Use Box Text in place ofrectangles for forms and other applications where you might want to fill in information. Even if you originally leave the box blank, the use of Box Text gives you the option to fill in the form on screen in Ventura.
a If you can't type inside a Box Text, or if text disappears, the problem may be that the current font or line spacing for Z_BoxText is too large, and the text won't fit inside the box. The solution is to make the box bigger, or to cp.ange the format of Z_BoxText so it fits.
a Set the alignment of the Box Text tag to vertical in both the horizontal and vertical dimensions, using the Alignment option from the Paragraph menu. This will ensure that labels and callouts appear centered in the box.
a Make sure the desired parent frame is selected each time you create a new graphic. This will ensure that the graphics move

Ventura's Graphic mode 179
whenever the parent frame moves. If you mistakenly associate graphics with the wrong parent frame, select that frame, choose Select All from the Graphic menu, and then Cut Graphic from the Edit menu. Then point to the proper frame and select Paste Graphic. The graphics will be put back in their original location, but will now belong to the desired parent frame.
This chapter has examined several approaches to creating pictures for Ventura Publisher. Still to come are a variety of techniques for integrating those pictures into a document, which we explore in Chapter Six, "Building the Chapter."
We have now examined text and pictures, two of the three critical building blocks that form a Ventura Publisher document. The third piece of the puzzle, style sheets, is discussed in the following chapter.

180

Working with Style Sheets
This chapter is devoted to style sheets, the third part of the Formula and the key to Ventura's sophistication and
flexibility. Accordingly, it is one of the most important parts of this book. It covers both theory and practice. You can skip the theory and go straight to the hands-on section if you're the impatient type - but we don't recommend it. Understanding style sheets is the key to unleashing the full power of Ventura.
By the time you finish this chapter, you'll understand how Ventura works with style sheets and chapter files to control the format of a document. You'll also know how to load, apply, and change a style sheet. Along the way, you'll become acquainted with three key menus: the Chapter menu, the Frame menu and the Paragraph menu.
Style sheet basics You'll be surprised how much easier it is to work with Ventura once you understand a few basic principles. Most beginners quickly learn their way around Ventura's menus. Even so, they aren't quite sure what's going on - what's stored where and how things work together. Maybe we should have called this section "Style sheet intermediates." The truth is, most users don't figure out the big picture until they reach intermediate level.
This section will give you a boost up the learning curve. It begins with an explanation of two key points: how Ventura

182 Chapter Five: Working with Style Sheets
builds documents; and the differences between style sheets and chapter files.
Understanding Ventura documents Ventura can combine many different files into a single finished document. The first step to becoming a Ventura wizard is to understand how those files work together, and what role style sheets play. Let's quickly review what we've covered in earlier chapters before we plunge into new territory. You've already encountered the Ventura Formula:
Text + Style + Pictures = Chapter
As the Formula implies, the chapter file is the key to integrating the other three. It contains pointers to the other files, plus instructions on how to assemble them on the page. Think of the chapter file as the supervisor on a construction job. Supervisors may not hammer many nails, but they know what everybody else is supposed to be doing.
How Ventura combines files In addition to the chapter file and the style sheet, Ventura Publisher creates other files as needed. You will be ahead of the game if you learn to recognize these types, which fall into three main groups: document files, multi-chapter files, and program files. Figure 5-1 diagrams these files. We've briefly described each type below.
Document Files
Chapter Style Sheet
Text Picture Caption
Chapter Info Ventura Graphics
Backup
Multi-Chapter Files
Publication Generated Index Generated TOC
Figure 5-1. The types of files used in Ventura Publisher.
Program Files
Font Screen Font Printer Info
Width Table Hyphenation
Ventura

Style sheet basics 183
Document files
As Ventura builds a document, it uses different files to hold information. Some of these document files are named by the user (text files, for example). Others are named by Ventura (caption files, for instance). They all have two things in common: (1) they contain information about one specific document and (2) if you use Ventura's Multi-Chapter function to move a chapter, these files automatically move along with the chapter.
In a sense, then, we can define document files as those that are attached or linked to a specific document. There are eight kinds of document files in all, four of which users can name on their own:
Chapter file. The chapter file contains pointers to the other files needed to construct the document. In addition, it includes certain formatting information. Ventura creates the chapter file, but the user names it. It must always ends with the CHP extension, as in SAMPLE1.CHP.
Style sheet file. The style sheet contains formatting information - fonts, alignment, spacing, and much more. The user can choose any name for a style sheet as long as it has an STY extension - for instance, SAMPLE1.STY.
Text files. Text files are usually created with a word processor and loaded into Ventura (they can also be created within Ventura). You can have more than one text file in a document. Text files can have any name or extension, although most people choose an extension that indicates the file format: WP for WordPerfect files, WS for WordStar files, DOC for Microsoft Word files, and so on. SAMPLE.WS would be a typical text file name.
Picture files. Picture files contain graphics created with outside graphics programs. They can· have any name or extension' although most people choose an extension that indicates the file format: .PCX for Publisher's Paintbrush files, .SLD for AutoCAD slide files, and so on.
So much for the four document files that can be named by the user. By contrast, when Ventura creates and names the files described below, it uses the same name as the chapter. To tell the four different kinds, it uses a different extension:

184 Chapter Five: Working with Style Sheets
Caption file. The caption file contains the text you type into caption frames or empty frames. No matter how many captions you type, they are all stored in a single file. Ventura creates it automatically (if needed) and gives it the same name as the chapter, with an extension of CAP - for instance, SAMPLEl.CAP.
Ventura graphics file. This file contains any graphics you make with Ventura's built-in drawing tools. Ventura creates the file if needed, and gives it the same name as the chapter, plus the extension VGR - SAMPLEl.VGR, for instance.
Chapter information file. Ventura's programmers developed the chapter information file to hold a description of a chapter's contents. It is used by third-party add-on products such as Desktop Manager and VP Toolbox. Created automatically by Ventura, its name matches the chapter name, except that it ends with the extension CIF, as in SAMPLEl.CIF.
Backup files. If you tell Ventura to keep backups in the Set Preferences dialog box, it creates copies of every document file except picture files. It uses the same name, but changes the first letter of the extension to $. Thus, SAMPLEl.CHP become SAMPLEl.$HP, SAMPLEl.WS becomes SAMPLEl.$S, and soon.
Multi-Chapter files
We call this next category multi-chapter files because you create them with Multi-Chapter from the Options menu. Three types fall into this group.
Publication file. To tie more than one chapt'er together, Ventura builds a publication. This file links chapters in order so you can, for example, print all six chapters in a book with one command. You can give a publication any legal file name as long as it has the PUB extension. For instance, if you had four chapters called SAMPLEl.CHP, SAMPLE2.CHP, SAMPLE3.CHP, and SAMPLE4.CHP, you might combine them all into a publication called SAMPLE.PUB.
Generated index file. Ventura permits you mark index entries in chapters. Ventura searches chapters to find each entry appears, and generates a file to hold the page numbers. To name the file, Ventura uses the first five letters of the publica-

Style sheet basics 185
tion. Then it adds the three letters IDX (for index) and the extension GEN (for generated file). Thus, the index file for SAMPLE.PUB would be SAMPLIDX.GEN. (You can change this file name if you want.)
Generated TOe file. You build a table of contents (TOC) like an index, by searching through the chapters to find page numbers. Ventura names the resulting file with the first five letters of the publication, plus the letters TOC, plus the extension GEN. Thus the TOC file for SAMPLE.PUB is SAMPLTOC.GEN. (You can change the file name if you want.)
Let's review the document and multi-chapter file types with an example. Suppose you want to produce a book called SAMPLE. You decide to name the individual chapters SAMPLE1, SAMPLE2, etc. They will all use the same style sheet, SAMPLE.STY. Your word processor is WordStar and your graphics program is GEM Draw Plus. Given those assumptions, Table 5-1 summarizes what some of the file names might look like:
Table 5·1. Typical file names.
File Name File Type
SAMPLE1.CHP Chapter file
SAMPLE.STY Style sheet
SAMPLE1.WS WordStar text file
SAMFIG1.GEM Picture file
SAMPLE1.CAP Caption file
SAMPLE1.VGR Ventura graphics file
SAMPLE1.CIF Chapter information file
SAMPLE.PUB Publication file
SAMPLlDX.GEN Generated index file
SAMPLTOC.GEN Generated TOC file

186 Chapter Five: Working with Style Sheets
Program files
To this point, we have discussed document files and multichapter files. We call the third and final category program files. You won't encounter these files as often, but it pays to know what they do. Program files are not associated with any particular document. They usually reside in the \ VENTURA subdirectory. We don't have the space to list every type, but here are a few of the most important:
Font files. Printer fonts. They use extensions such as FNT, SFP, SFL, PFA, and PFB.
Screen font files. Generic fonts for screen display. They carry extensions like EGA, CGA, or VGA.
Hyphenation dictionaries. These files include the hyphenation algorithms (HYI and HY2 extension), the exception dictionary (HYPHEXPT.DIC), and the user dictionary (HYPHUSR.DIC).
Printer information files. Configuration details about the printers you install, such as where to find fonts. They carry the CNF extension, as in HPLJPLUS.CNF.
Width table files. Different printers and different fonts use different amounts of space for each character. These character widths are contained in the width files, which use the WID extension. The default width table is called OUTPUT.WID, the PostScript width table is POSTSCPT.WID, and so on.
Ventura files. The program itself is contained in a half dozen or so files with the name VP and a variety of extensions. One of these, VP.INF, is the initialization file. It remembers how you left things the last time you worked with Ventura.
As you may have noticed, recognizing file types is generally a matter of recognizing their extensions, as summarized in Table 5-2.
Style sheet basics 187
Table 5-2. File extensions and their meaning.s
Category Extension File Type
CAP Caption file
CHP Chapter file
Document CIF Chapter information file Files
GEM, PCX, etc. Picture files
STY Style sheet
TXT, WP, etc. Text files
VGR Ventura graphics file
GEN Generated TOC and index files Multi-chapter Files
PUB Publication file
CNF Printer information files
INF Initialization file
EGA, VGA, CGA Screen fonts Program
Files FNT Font files
DIC Hyphenation exception dictionary and user dictionary
HY1 and HY2 Hyphenation algorithms
SFP and SFL Fonts
WID Width table

188 Chapter Five: Working with Style Sheets
Understanding style sheets and chapter files Now that you have some insight into Ventura's files, you are ready to examine style sheets and chapter files, and the differences between them. Understanding these differences is crucial to the advanced techniques we cover later in the book.
Contents of a style sheet A style sheet contains formatting rules. Every chapter has one (and only one) style sheet. (You can, however, use the same style sheet for more than one chapter.) So far we haven't told you much that's new. Most people get the general idea behind style sheets. But not everyone understands specifically what a style sheet does - and doesn't - contain.
A style sheet holds formatting rules. These rules fall into two categories: (1) rules for the document as a whole and (2) for individual elements. Document-wide formatting relates to the Underlying Page - its margins and columns, for instance. The individual formatting applies to tags. Tags control such things as the font, alignment, and spacing for every page element - for headlines, for body text, for subheads, and so on. Table 5-3 shows the contents of a style sheet, divided into these two categories.
Table 5·3. Formatting controlled by the style sheet.
Document·Wide Formatting Tag Formatting
Page Layout (paper size, etc.) Font Widows & Orphans Alignment
Auto-Numbering Spacing Footnote Settings Breaks
Margins & Columns of Underlying Page Tab Settings Sizing & Scaling of Underlying Page Special Effects Vertical Rules on Underlying Page Paragraph Typography Ruling Lines on Underlying Page Ruling Lines Associated with Parqgraphs Background of Underlying Page Paragraph Backgrounds
Printer Info Color Definitions

Understanding style sheets and chapter files 189
Contents of a chapter file Style sheets get most of the attention, but chapter files also contain important formatting information.
• file information
• frame information
• header and footer information
• graphics information
• numbering information
Some of this information is in the chapter file itself. The rest is in the caption file (CAP) and Ventura graphics file (VGR) associated with that chapter. Table 5-4 lists some of the formatting information contained in a chapter file and its associated CAP and VGR files.
How chapters work with style sheets Now that you've seen the contents of chapters and style sheets, let's consider what this means when creating documents. Because many users don't know exactly what is stored where, they fail to understand a vital concept: To get a complete picture of a document's format, you need both a style sheet and a chapter file. You cannot capture all your design decisions in a style sheet alone.
Perhaps the best way to make this point is to review some key page elements. Table 5-5 lists a few elements encountered frequently in business documents. You will notice that most of them are controlled in part by the chapter file.
Because the chapter file controls some of the formatting, the best way to harness the power of Ventura is to work with chapter templates. Templates combine three important elements - a chapter, a style sheet, and sample frames - into a single, ready-to-run blank document. Chapter Ten, "Special Document Formats," explains templates in detail.

190 Chapter Five: Working with Style Sheets
Table 5·4. Formatting controlled by the chapter file.
Type of Information What It Contains or Controls
File Pointers to the component files information
Position on the Underlying Page Size Margins Columns
Frame Ruling lines information Anchor name
Fill attributes Caption frame Caption text (in CAP file) Frame text (in CAP file)
Position of header and footer frames Header and footer Size of header and footer frames
information Margins of header and footer frames Header and footer text
Position Parent frame
Graphics Box text (in caption file) information Size of graphics (in VGR file)
Line attributes (in VGR file) Fill attributes (in VGR file)
Starting page number Numbering Starting chapter number information Starting figure and table numbers
Numbering format

Loading and saving a style sheet 191
Table 5·5: How style sheets and chapter files work together.
Page element What the style sheet controls What the chapter file controls
Text Font, alignment, spacing, breaks, ruling Which text files go where lines, etc.
Frames Underlying Page only. Position, size, ruling lines, contents
Font, alignment, spacing, breaks, ruling Which picture files go in which frames, lines, etc. position of caption frame, figure and table
Captions numbering, starting numbers, numbering format, caption labels, caption text (via .CAPfile)
Spacing, ruling lines, overall font Margins of frame, header text, page num-
Headers and bers, starting number, numbering format,
footers tag matches within header, font changes within header, baseline jumps within header
Section Which tags will be numbered, plus font, Starting number, numbering format numbering alignment, spacing, etc.
Graphics Text attributes of Box Text Position, size, attributes, parent frame, text of Box Text
Loading and saving a style sheet The previous section explained the theory behind style sheets. If you grasp these fundamentals, you are already ahead of the game. It often takes months of trial and error before beginners decipher the relationship between style sheets and chapter files.
Now you are ready to learn how theory translates into practice. The next few sections explain how to work with style sheets:
• loading and saving style sheets
• applying style sheets
• changing style sheets and building new ones

192 Chapter Five: Working with Style Sheets
The discussions that follow are not constructed as step-by-step tutorials. Nonetheless, many of you may want to read this material while next to the computer, so you can experiment as you learn new concepts. To work with a new chapter, select New from the File menu. You will see UNTITLED.CHP in the Title Bar, followed by the name of the last style sheet you used (Figure 5-2). Ventura keeps the old style sheet active until you specifically request a new one.
Current Chapter File
Current Style Sheet
Figure 5·2. The Title Bar displays the chapter and style sheet that are currently active.
To load an existing chapter, choose Open from the File menu. Ventura automatically loads a style sheet when it opens a chapter. The name of the style sheet is displayed in the Title Bar after the name of the chapter. You will replace that style sheet when you load a new one.
Obviously, you can only load style sheets that already exist. In the beginning, therefore, you must work with the style sheets distributed with the program. Once you know your way around, you can build your own style sheets, or buy them from outside companies.
Most of the style sheets distributed with Ventura begin with the ampersand character (&), as in &BOOK-Pl.STY. If you request the example files during installation, they are installed automatically in the \TYPESET subdirectory.

Loading and saving a style sheet 193
-.. NOTE: If you didn't install the style sheets and you've changed your mind, run the VPPREP installation program again from the floppy disk. When asked if this is your first installation, reply IiNo." Then answer the questions. When asked at the end if you want the example files, answer IiYes. "
The starter style sheets are described in Appendix L of the Ventura Reference Guide. With one exception, they contain preformatted tags. One style sheet, however, does not contain any tags other than Body Text. DEFAULT.STY is essentially a blank slate. You will learn later how to use preexisting style sheets to build new sheets of your own.
To load a new style sheet:
• Select Load Diff. Style from the File menu.
• Use the Item Selector to move to the subdirectory containing the style sheet you want.
• Select the style sheet from the list (Figure 5-3). Click once on the style sheet name and once on the OK button, or double click on the name.
Directory: C:\ TYPESET\* .STY _______ _
• mi!!!ii!!!iiiii!!!i!!!ii *. STY i!i!!i!!!iiiiiiii!mmi!
&BOOK-P1.STY t &BOOK-P2.STY ~ &BRO-L2 .STY
-ih~EHf.·1 &NEWS-P2.STY ,
Selection: &LSTG-P2.STYI
OK
I Cancel I
Figure 5·3. Use the Item Selector to navigate to the proper subdirectory and choose a style sheet.
Saving a style sheet
As soon as you load the style sheet, save it under a new name - unless, that is, you want to save all your changes under the old name. Here's how:

194 Chapter Five: Working with Style Sheets
• Select Save As New Style from the File menu .
• Type the new name into the Item Selector (Figure 5-4) and click OK.
Directory: C:\ TYPESET\* .STY _______ _
• mmmm:mmm:m *. STY ::::::::::::::::::::m::: Selection: lISTING3.~
&BOOK-P1 .STY ~ &BOOK-P2.STY &BRO-l2 .STY
r~~~~dg I &t1f1G-P3 .STY po-&NEWS-P2.STY ,
OK
I Cancel I
Figure 5·4. Renaming a style sheet.
Ventura automatically adds the STY extension for you. You can also specify a new location if you want to store it in a different subdirectory. Specify a new subdirectory by naVigating there with the mouse (see below) or by typing its name on the Directory line and pressing Enter before you type the name of the style sheet.
Make it a habit to rename the style sheet immediately after calling it in to your document. If you forget and then later save the chapter file, you permanently modify the previous style sheet.
WARNING: Be careful not to confuse Save As with Save As New Style (Figure 5-5). Save As is for chapters and does not affect the style sheet.
Remember: Whenever you save the chapter, Ventura automatically saves all the associated files - including the style sheet. It saves under the old name unless you used Save As New Style first. You must rename the style sheet before saving or renaming the chapter.
Virtually everyone who uses Ventura learns this lesson the hard way sooner or later. At one time or another, we have all

Loading and saving a style sheet
Figure 5·5. To rename the style sheet, you must choose Save As New Style. Do not use Save As, which renames the chapter and does not affect the style sheet.
195
destroyed an existing style sheet (or chapter) because we absent-mindedly hit Ctrl-S before renaming. It is sometimes possible - but not always - to recover in DOS by using the backup files.
Tips for loading and saving style sheets
a If the Item Selector becomes too crowded with style sheet names, use the Selection line to filter some of them out. Better yet, move the style sheets you don't use very often to a separate subdirectory.
a Treat style sheets as you would any computer file - that is, be sure to back them up. Every time you create a new one, make a copy on floppy diskette for safekeeping.
a One way to back up a style sheet without leaving Ventura is to use Save As New Style. Use the same name, but change the location to the A: drive. Be careful, however, to use Load Diff. Style immediately afterward to load the style sheet from its location on the hard disk. Otherwise, Ventura will look for the style sheet on the A: drive the next time you open the chapter.
a You can recover the previous version of a style sheet or a chapter if you have chosen Keep Backup Files: Yes from the Set Preferences dialog box. Quit Ventura without saving the

196 Chapter Five: Working with Style Sheets
chapter again. Obviously, if you have made other changes, you will have to decide which is more important: recovering the style sheet or preserving the changes. Once out of Ventura use DOS to move to the subdirectory containing the style sheet. You should see the backup file - an identically named file with the extension $TY. Rename this file to a new name with the STY extension. Return to Ventura and use Load Diff. Style from the File menu to bring in the restored style sheet.
ImI To move a style sheet, you must rename it to a new location, then delete the old style sheet. Many people find it more convenient to delete files in DOS. You can also move and copy style sheets in DOS. Remember, however, that if you move or copy with DOS, you do not change the pointers in the chapter file. The chapter still looks for the style sheet in the old location. If you want the chapter to use the style sheet at the new location, you must use Save As New Style or Load Diff. Style. (If you use a utility program such as Desktop Manager, you can use the mouse to move, rename, delete, and copy files, style sheets, and chapters within Ventura without returning to DOS.)
Applying a style sheet Loading a style sheet attaches it to the current chapter and activates its formatting. As you recall, style sheets contain two kinds of formatting: document-wide and tag. Document-wide formatting takes effect immediately. Tag formatting takes effect only if you already have text on the screen and that text contains the same tag names as the new style sheet. Otherwise, you must apply the style sheet.
To apply a style sheet, you tell Ventura which paragraphs are which - which paragraphs you wish to treat as headlines, which as subheads, which as bullet lists, and so on. We call the procedure tagging. You must assign a tag to every paragraph except for Body Text. (Ventura automatically treats anything without a tag as Body Text.)
Obviously, then, you must have some text on the page before you can apply a style sheet to it. If you are unsure about how

Applying a style sheet 197
to create text for Ventura, review Chapter Three, "Creating Text." If you need help loading text onto the page, turn to Chapter Six, "Building the Chapter."
Let's quickly review Ventura's definition of a paragraph before we go any further. Back in junior high school, we all learned an involved definition that had to do with topic sentences and units of thought. Wrong kind of paragraph. In Ventura parlance, a paragraph is anything that ends with a return. It can be many lines, a single line, a single word, a single letter, or an empty paragraph with nothing but a return.
The idea of an empty paragraph deserves further discussion. You can apply a tag to an empty line. All you need is a paragraph return (see Figure 5-6). You can tag this return and assign attributes to it just as you tag text. Some people use empty paragraphs for such effects as page breaks, spacing, and ruling lines with no text.
This is an example of a paragraph wHh m'U is a tradiUonal paragraph that an EngHsh
v·Jjth a topic senteme followed by an expansion sraph's theme. Ventura also recognio:es other graphs. In fad, anything followed by a carriage considered a paragraph by the program. A one-word follows, then an empty paragraph.I
Empty paragraph_~-+-____ ---., ___ ~ Bold
Ital:1c
Slilall
SupcrS'cr:1pt
Subscript
Undcl'"linc
Doublc Undl'"Ln
Wordl I
Stl'":1kc-thl'"u
Headline Paragrapht" Yes, Ventura even recognio:es headlines as .c
Figure 5·6. A Ventura paragraph is anything that ends with a return: several sentences, a single sentence, a single word, a single character, or even a paragraph return with no text.
Now that you've got the definition of paragraph straight, you're ready to learn about tagging. You can tag text in three ways: with the mouse, with the function keys, or with the word processor.

198 Chapter Five: Working with Style Sheets
Tagging with the mouse The mouse provides the simplest method of tagging. Here's how it works:
• Enable Paragraph mode (click on the icon at the top of the Side-Bar or press Ctrl-I).
• Click once anywhere on a paragraph to select it. Ventura highlights the entire paragraph.
• Select a tag name from the Assignment List (Figure 5-7). As soon as you click on the tag name, Ventura applies its format.
Bullet
BY.1:tne
DCoCkhead
Toe entry
Be,~use of the dyn~mi' growth of the software industry over the l~st de,~de, the dem~nd for experien,ed, qu~lified progr~mmers has gre~ tly in're~sed, th us le~ding to a spir~ ling of s~laries.1I
But what ,~uses m~n~gers to p~y one programmer more thlln ~nother? ..Does the type oforguuz~tion, its size, or lo,~tion m~ke ~ difference? What ,areer p~th or programming speci~lIy le~ds to the most remuner~tion?1I
To ~nswer these questions, A,me M~g~zine re,ently ,onduded its third annual ,ompens~tion survey for software professionals .• This newsletter arti'le presents the results of thls study and explores what the findings may mean to you.1I
A,me M~gazine asked Joe Smith, a ,ompensation ,onsulting specialist for the software industry, to design and ,ondud the survey .• Twenty- four positio ns, representing four progr~mmor job families plus management, were included.1I
Da tl was ,ollected for base pay, bon us and incen tive p~ yments, ~nd whether nor not in,umbents re,eived sto,k options or other forms of equity.1I
Questionn~ires were sent to the data pro,essing he~ds of 2,~OO org~niz~tions throughout the United St~tes.1I
Figure 5·7. Applying the Headline tag to a paragraph.
Tagging multiple paragraphs
You can tag single paragraphs as explained above, or you can tag several at a time. For multiple selection, click on the first paragraph as you would normally. Then hold down the Shift key while clicking on the second paragraph. Continue to press the Shift key while you select the rest of the paragraphs. If you select a paragraph by mistake, you can deselect it by clicking on it a second time while still pressing the Shift key. You can select as many paragraphs as you want on a single page. You cannot, however, tag multiple paragraphs across page boundaries, even in Facing Pages View.
Once you have selected multiple paragraphs, choose the tag

Applying a style sheet 199
from the Assignment List as before. Ventura immediately applies it to all the highlighted paragraphs. Figure 5-8 shows how you might use this function to tag all the items in a list at one time.
Another subto ic
Figure 5·8. By holding the Shift key while you click with the mouse, you can highlight and tag several paragraphs at once.
Tagging with the function keys
Ventura permits you to assign tags to the 10 function keys. You only need to assign the keys once - from then on, they are available whenever you use that style sheet. Once assigned, you can select a tag by pressing a function key (in place of clicking on the tag name in the Assignment List). More importantly, with the function keys you can tag items while in Text mode as well as in Paragraph mode.
Tagging with the function keys presents several possible advantages. First, it eliminates the back and forth motion of the mouse, from text to Assignment List and back again. Second, it permits you to edit and tag at the same time while (in Text mode). Third, it permits you to compose documents directly in Ventura and tag them as you go along, without switching back and forth between Text and Paragraph modes. Fourth, it allows you to work with the Side-Bar hidden, since you don't need to access the Assignment List. This lets you see more of the page on screen.

200 Chapter Five: Working with Style Sheets
Assigning the function keys
It's up to you which tags are assigned to which function keys. Here's how it works:
• Open the Paragraph menu.
• Select Update Tag List. A dialog box appears (Figure 5-9).
UPDATE TAG LIST (C:\TYPESET\&VWGF-L1.STY)
iiliiiiiiiiiiiimiiiiiiiiiiiiiiiiHiiiiiiiiiiiiiiiiiiiiiiii Tag !!iiiiiliiiiiiiiiiiiiiiiiiiiiiiiiiiiiiiil!ii!i!iiii!iiiiiii t Major Heading
~ ~~::e~~:~k Table Item Title Topic level 1
Command: I Print Stylesheet... I I Remove Selected Tag I I .Save As New Stylesheet... I I Rename Tag ••• I I Assign Func Keys. •• I
Figure 5·9. The Update Tag List dialog box.
• Select the Assign Func. Keys button.
• Type the names of the tags into the blank spaces and click OK.
Figure 5-10 shows one way to assign the function keys. We suggest you choose a standard way of assigning function keys and stick with it for all your style sheets. An alphabetic system is probably the most practical for most applications, especially since the Assignment List is alphabetic too. But you may find certain style sheets lend themselves to different mnemonic devices. When tagging this book, for example, we used the tag names Head1, Head2, etc. It was an obvious and easy-toremember choice to assign Head1 to F1, Head2 to F2 and so on.
We suggest that you always use FlO for Body Text. The style sheets distributed with Ventura follow this convention. If you follow it too, you will always know where to find the Body Text tag at the press of a key. As you become more proficient, you
( J

Applying a style sheet 201
Desk File Edit View Chapter Frame .'. .•.• Graphic Options im!m!!!!!!!mmimimmimmm!!!!!m!!!! !:ii!:!:-.. •··· .. • .. · .. •· .... • .. ··.. .."........................................ ........................................... ···········!!i!!!!!!!!!!!!!!!!lii!i!ii:!!!!!!m!!!!!m!!!!!!:!!mm!iii!
UPDATE TAG LIST (C:\TYPESET\&BOOK-P2.STY)
i!!!i!!!im!!!i!!!mii!iiiii!!!iiii!!!ii!!!iii!!!!!!i!!!H Tag ,m!!!!!!i!!!Hmii!i!iiiHmmH!!!!!!i!!!mmmiiil t Chapter T' :le I
Firstpar :::::::::: - _. ASSIGN FUNCTION KEYS ~ Head2
Head3 F1: Head1 __ _ F= Major hea( F3: Head3,--=-__
, Minor hea( F5: Change Bar_ Page Brea~ F7: Chapter 1:1_
F9: Page Break_ Command: r::£!
F2: F4: F6: FB:
F10:
Head2.,--__ Bullet __ Chapter Title Firstpar Body Text!==
~ ~ !Cancel!
:::::::::::::::::::::::::::::::::::::::::::::::::
Figure 5-10. Assigning tag names to function keys.
f-m J
I may find yourself experimenting with tags. It's not hard to do something so bizarre that all the text disappears from the page. Often, the easiest way to recover is to press FlO, thereby reassigning the paragraph as Body Text.
Using the function keys
Once you've assigned the function keys, you can use them in Paragraph mode or in Text mode. In Paragraph mode, select a paragraph as before. Instead of using the mouse to select a tag, simply press the appropriate function key.
In Text mode, move the text cursor anywhere inside the paragraph you want to tag. You do not need to highlight the entire paragraph. Simply make sure the cursor is somewhere in the paragraph, then press the appropriate function key. To tag more than one paragraph in Text mode, highlight everything with the mouse, then press the appropriate function key.
Tagging paragraphs from the word processor When you tag with the first two methods explained above, Ventura inserts the tag names into the text files. If you prefer, you can insert the names in advance, thereby saving the time of paging through the document to tag each paragraph. Refer to the end of Chapter Three, "Creating Text," for detailed instructions on how to preformat word processing files.

202 Chapter Five: Working with Style Sheets
Tips for tagging These techniques can speed up the tagging process:
a Use shift-click to highlight as many similar paragraphs at one time as possible, then apply the tag to all of them at once.
a Use both hands. With the right hand, use the mouse to highlight paragraphs. With the left, press function keys to assign tags.
a Consider making a quick pass through the document just to place tags before trying to do any other editing. It seems to be easier to catch mistakes when text is in its true final format.
a Plan carefully when assigning function keys. Some style sheets have ten or fewer tags; they present no problems. If you have more than 10 tags, leave off the ones you'll only use once or twice, like chapter headings, titles, and headlines. Include those you encounter frequently, like lists, tables, and subheads.
Changing or building a style sheet Now we come to the crux of the matter, the techniques that enable you to tailor Ventura to your requirements. This section gives you a game plan for changing an existing style sheet or building a new one.
When you work in Ventura, you always start with an existing style sheet. Consequently, changing an existing style sheet and creating a new one are the same process. If you save under the same name, you change the existing style sheet. If you save under a new name, you create a new one.
A plan of attack Style sheets are versatile, powerful tools. If you approach them haphazardly, you are almost certain to get confused by the multitude of options. You need a plan of attack. We're not pretending that our method is the only way. But if you are starting out, our system provides a proven, tested method that

Changing or building a style sheet 203
saves time and prevents you from overlooking important steps.
Here are the eight steps we recommend for changing or building a style sheet:
1. Create a thumbnail sketch
2. Load an existing style sheet
3. Put text on the page
4. Change the document-wide formatting
5. Change the existing tag formatting
6. Add new tags (if necessary)
7. Remove and rename tags (if necessary)
8. Save the style sheet
Step one: make a thumbnail sketch
Before you start working with Ventura, make a simple drawing of the format you want (or of the changes you want to make to an existing design). Figure 5-11 shows an example. It's not important that your thumbnail look as good as the one shown here. What is important is that you make as many decisions as possible up front. Figure out the page size, margins, columns, gutters, spacing, and so forth in advance. Write these numbers down on the sketch. Otherwise you doom yourself to endless fiddling as you try option after option.
Step two: load an existing style sheet
Obviously, if you are changing an existing style sheet, you must load it (or open a chapter using the style sheet). But even if you are creating a new style sheet, you must start by loading an existing one.
Which style sheet should you load? If an existing style sheet is close to what you want, it's the obvious choice. The sample style sheets included with Ventura Publisher are one place to start. You can also buy additional style sheets from thirdparty vendors.
In many cases, however, starting with an existing style sheet is more work. You can end up doing so much changing, renam-

204
i _ B.f VVE'1f! h~A DuNE F,fAtll&· W/Pt:
J4.d 7i"'£~) &.'(.1)
Chapter Five: Working with Style Sheets
'-.... DVfJ8lt: ~?j)u: 10,,* 1Ie.f-Vi: I p elit.OK/
Figu re 5·11. Put your ideas on paper before you start to work with Ventura.
ing, and deleting that you would have been better off to start from scratch. Consequently, many users prefer to start with DEFAULT.STY, which does not contain any tags except for Body Text. Beginners tend to start from existing style sheets, since it's the easiest way to create a document in a hurry. Power users tend to start from a blank slate so they can have complete control over every aspect of the style sheet.
WARNING: Whichever style sheet you use as the starting pOint, be sure to rename it immediately to avoid corrupting the original.
Step three: put text on the page
Load a text file and place it on the page to see the results of changes as you make them. Ideally, you should use the same text that will be in the final document. But the main thing is to have something to work with. You can't change a tag without assigning it to a paragraph - and that means you have to have some text on the page.

Changing or building a style sheet 205
Step four: change the document-wide formatting
Start by altering the attributes that concern the document as a whole. Until you set up the basics like margins, columns, headers, and footers, you cannot accurately judge the effects of your other changes.
To change the document-wide formatting, use the dialog boxes listed in Table 5-6. These dialog boxes affect the chapter as a whole and many of them are found, appropriately, in the Chapter menu. You do not need to select a paragraph before changing document-wide formatting, nor do you need to be in Paragraph mode. As soon as you close the dialog box, the changes are reflected in the document.
Table 5-6. Document-wide formatting.
Menu
Chapter
Frame
Options
Dialog Box What It Controls
Page Size & Layout The orientation and size of the paper, single or double-sided printing, and which side to start on
Chapter Typography Widows and orphans, column balanCing, kerning, and other typographic decisions that apply to the entire chapter
Update Counters Numbering style and format
Headers & Footers Content and position of headers and footers
Footnote Settings Format of footnotes
Margins & Columns Number and format of margins, columns, and gutters
Vertical Rules Rules between columns and their format
Set Printer Info The printer and width table to use with this style sheet
Step five: change existing tags
Once you have changed the overall, document-wide formatting you can move on to the existing tags. (If you are starting with DEFAULT. STY, there is only one tag.)
To change an existing tag, assign it to a paragraph. Confirm that the paragraph is still highlighted, and the tag name

206 Chapter Five: Working with Style Sheets
appears in the Current Selection Box. Now you can change the tag's attributes with dialog boxes from the Paragraph menu (Figure 5-12). (The Paragraph menu is discussed in detail later in the chapter.) Your changes are reflected immediately, not just in the highlighted paragraph, but in all the paragraphs with the same tag.
We recommend changing Body Text first. Body Text is usually the foundation for the entire design. For instance, Ventura
Spacing ... Breaks •.. Tab Settings .•• Special EFFects ... Attribute OYerrides .•. Paragraph Typography ..•
Ruling Line Aboye •.• Ruling Line Below ... Ruling Box Around .•.
over 25,000 miles on four airlines, made over 500 Kodlchrome'f> slides, almost 200 Kodacolor'f> prints,and 5 1/2 hours of colorand sound videotape.1I
Figure 5·12. To change an existing tag, assign it to a paragraph, then select options from the Paragraph menu.
uses the line spacing of Body Text for the Line Snap function. In addition, Body Text is often the basis for other tags, so it pays to get it in shape right away.
Once you have formatted Body Text, you can start from the top of the document and work your way down, changing each tag as you come to it. Alternatively, you can start at the top of the Assignment List and work down. The key is to establish a systematic plan that prevents you from accidentally overlooking any tags.
We also recommend a systematic plan for working with the menus. To avoid overlooking key points, we suggest you go step-by-step through the three menus that contain most of the options stored in style sheets: the Chapter menu, the Frame menu, and the Paragraph menu.
We suggest you start with the Chapter menu, which you should normally need to go through only once. Next, proceed

Changing or building a style sheet 207
to the Frame menu, which you must use once for the Underlying Page and once for each additional frame in the document. Finally, move on to the Paragraph menu, which you must use once for each tag you add or change. In the beginning, you may have to look at each and every menu choice to discover which ones you need to change. As you improve, you'll quickly learn which ones you can skip and when.
Working with the menus is covered in detail in a separate section later in this chapter.
Step six: add new tags
If you can't get the look you want by changing the documentwide attributes and the existing tags, you will need to add new tags. You create a new tag by copying an existing tag. From there, you make changes until the new tag fits your specs. The previous tag is not changed in any way. You can copy attributes from any existing tag. Naturally, it makes sense to select the one that most closely resembles what you want. Here's how it works:
• Enable Paragraph mode
• Click on the Add New Tag button at the top of the Side-Bar. The dialog box shown in Figure 5-13 appears.
ADD NEW TAG [!] Tag Name to Add: head4l-1 __
Tag Name to Copy From: head3 __ _
c:::§D I Cancel I
prints, and 51/2 hours of color and sound videotape.1I
Chicago to Tokyo,-r
Figure 5·13. The Add New Tag dialog box names the new tag and tells Ventura which tag to copy from.

208 Chapter Five: Working with Style Sheets
• Type the new name on the top line. On the bottom line, type the tag name to copy from and click OK.
A faster way to tell Ventura where to copy from is to select a paragraph with that tag before you select Add New Tag. Ventura then places the old tag name on the bottom line, saving you the trouble of typing. If you have not selected a paragraph, Ventura assumes that you want to start with Body Text.
When you click OK to close the Add New Tag dialog box, Ventura creates the new tag and puts its name on the Assignment List. If a paragraph was highlighted when you selected Add New Tag, Ventura assigns the new tag to that paragraph.
At this point, the new tag is identical to the old one. Use the Paragraph menu to change its format (see below).
How Ventura adds tags
Incidentally, Ventura can also add tags to a document. In about a dozen instances, Ventura automatically generates both a paragraph and a tag to go with it. For instance, when you build a header with the Headers & Footers dialog box, Ventura creates paragraphs at the top of every page and tags those paragraphs as Z_Header. Tables 5-7 and 5-8 summarize the other instances where Ventura generates paragraphs and tags.
As you can see from the tables, Ventura begins the names of generated tags with the prefix Z_ (the letter Z followed by an underline character). Because the Assignment List is sorted alphabetically, generated tags end up together at the end of the list. Generated tags do not show on the Assignment List, however, unless you select Generated Tags: Shown from the Set Preferences dialog box.
If the style sheet does not have a format for a generated tag, Ventura copies the attributes of Body Text. You can change this format the same way you change any other tag.

Changing or building a style sheet 209
Table 5-7. Generated tags and where they are created.
Tag Where Created
Z_Boxtext Box text created in graphics drawing mode
Z_Caption Captions typed into frames created with Anchors & Captions
Z_Fnot Entry Footnote entries created with Insert Footnote
Z_Footer Footers created with Headers & Footers
Z_Header Headers created with Headers & Footers
ZJndex Main Paragraphs in index files created with Multi-Chapter
ZJndex Ltr Letters of the alphabet used as separators in index file
ZJndexTitle Title of Index
Z_LabeiCap Caption labels without automatic numbering
Z_Label Tbl Caption labels with automatic table numbering
Z_Label Fig Caption labels with automatic figure numbering
Z_SecN Numbers (or letters) created with Auto-Numbering. The Nstands , for a sequential number, as in Z_SEC1, Z_SEC2, etc.
Z_TOC Lvl1 Paragraphs in TOC files created with MUlti-Chapter
Z_TOCTitie Title of TOC
Table 5-8. Additional generated tags in Professional Extension only.
Tag Where Created
Z_HIDDEN Lines in tables
Z_SINGLE Lines in tables
Z_DOUBLE Lines in tables
Z_THICK Lines in tables

210 Chapter Five: Working with Style Sheets
Tag Where Created
Z_TBL_BEG Begins a table
Z_TBL_BODY Defines the tags to be used for each column in a table
Z_TBL_END Ends a table
Z_TBL_HEAD Defines the tags to be used for column headers in a table
In many cases, you can retag a generated paragraph. Just because Ventura tags a paragraph as Z_Boxtext or Z_Caption doesn't mean it has to stay that way. With certain exceptions, you can retag generated paragraphs. For instance, you can have as many different caption tags as you want. To group them together on the Assignment List you might choose to name them something like Z_Captionl, Z_Caption2, etc. If you prefer, you can give them entirely different names.
The following generated paragraphs cannot be retagged. In these cases, Ventura must have the names intact to accomplish certain special functions:
• Z_Header
• Z_Footer
• ZFnot Entry
• Z_Sec
• All table tags from the Professional Extension
All other generated tags can be retagged. Generated tags are covered in more detail under {q.eir respective sections in later chapters. Thus, Z_Header tags are discussed under headers, Z_Index tags under indexing, and so on.
Step seve.n: remove and/or rename tags
Our discussion of how to change style sheets would not be complete if we didn't talk about removing and renaming tags. Since you start from an existing style sheet, you often need to remove extraneous tags that do not apply to the new docu-
Changing or building a style sheet 211
ment. Likewise, you will often want to rename tags so they conform to a consistent in-house system.
We urge you to be stringent about cleaning out unused tags each time you create a new style sheet or make major changes to an old one. Otherwise, unused tags proliferate. Soon the Assignment List becomes overrun with mysterious tags that no longer have any function. The style sheet becomes unusable for anyone but the original author - and even he or she will have trouble. To a beginner, Ventura's limit of128 tags seems very large. Yet we have seen style sheets that bumped into this ceiling -largely because the operator was not strict about keeping the style sheet clean.
Both removing and renaming tags occur with Update Tag List from the Paragraph menu. When you select this option, Ventura first asks if you want to save the changes to your chapter. Then it takes you to the dialog box.
The dialog box shows the Assignment List at the left. To remove a tag:
• Scroll down the list until you see the tag name and highlight it with the mouse.
• Click on Remove Selected Tag. Ventura displays a secondary dialog box (Figure 5-14). The top line shows the tag to
Desk File Edit View Chapter FraMe '. Graphic Options
UPDATE TAG LIST (C:\TYPESET\RBOOK-P2.STY)
iiiiiiiiiiiiiiiiiiiiiiliiliiliiiiiiiiiiiiiiiiiiliimliiiiii Ta~ iliiiiliiiiiiiiiiiliiiiiiii::iiiiiiliiliiliiiiiiliiliiiiilil t Change Bar I
Chapter ** -==================;'1 ~ Chapter Tit ... r
Firstpar REMOVE TAG [!] head1
~ head2 TaS NaMe to ReMove: head31-1 __
~ M~j~r headir Tag NaMe to Convert to: Body Text ____
r::::21[J I Cancel I
I Assign Func Keys... I
Figure 5·14. The Remove Selected Tag dialog box.

212 Chapter Five: Working with Style Sheets
be deleted (if you accidentally selected the wrong one, type in the correct name).
• On the bottom line, type in the tag name to convert to. Click OK.
There may be paragraphs with this tag somewhere in the document. Ventura wants to know what to tag them instead. Ventura assumes that you want to convert them to Body Text, so it enters that tag name on the bottom line. To convert to something else, delete "Body Text" and type in the other tag name.
Once you close the secondary dialog box, you are returned to the Update Tag List dialog box. The old tag disappears from the Assignment List.
Renaming also occurs in the Update Tag List dialog box:
• Select the tag to be renamed from the list.
• Click on the Rename Tag button. A secondary dialog box appears (Figure 5-15).
Desk File Edit View Chapter Frame ' .. ' Graphic Options mm::::::i:iii:i!!!!i!H!!!mmHiiiiiiiiiiii!!!!!ii!!!i!!!r·············" ................................. . ..................... ".... .................... . .................................. ... "'i!ii!!!!l:!!!lmmm::::iiiim!!!ii:mmi:::iii:i::iimm
I-UPDATE TAG LIST (C:\TYPESET\&BOOK·P2.STY)
, M~jor heading New Tag Name: head411--__
Command: I Print St I Cancel I
I Save As
I Assign Func Keys... I
Figure 5·15. The Rename Tag dialog box .
• Confirm that the tag shown on the top line is the one you want to rename (if not type in the correct name).
• Type the new name into the bottom line and click OK.
Anything you enter on the bottom line, including capitaliza-

Changing or building a style sheet 213
tion and spaces, is reproduced faithfully and appears on the Assignment List. You can use this function to rename and regroup tags on the Assignment List to make them easier to find and remember.
Step Eight: Save the style sheet
We are going to assume that you followed our advice to rename the style sheet immediately. Once you have renamed the style sheet (and the chapter if necessary), you can hit the Ctrl-S shortcut at intervals to save your work. All you have to do at this stage, then, is save the chapter one last time to capture your changes. When you save a chapter, Ventura saves the style sheet as well.
Tips for changing and building style sheets
IiIiI Make changes to tags in the first few pages of a lengthy chapter if possible. When you change a tag, Ventura reformats all the preceding pages. The closer you are to the front of the document, the less time it takes.
IiIiI Build a better DEFA ULT. STY. The idea behind DEFAULT. STY was to provide a clean slate. Unfortunately, it has some unnecessary settings. In particular, it has Vertical Rules On (rules between columns), and eight unwanted tab settings associated with the Body Text.
Since you must build tags by copying from Body Text, those settings are duplicated throughout the style sheet in every new tag you create. It's not the end of the world, but these settings eat up memory and cause problems when they crop up unexpectedly.
Consequently, we recommend creating a new version of DEFAULT.STY called BLANK.STY. BLANK.STY has Vertical Rules Off, and the tab settings removed from Body Text. You can make. these changes yourself.
IiIiI Use Remove Tag to retag paragraphs. Assume that you have tagged numerous subheads as Head4. Now you decide that you want them all to be Head3 instead. You could go through the entire chapter and retag each one with the mouse. Or you

214 Chapter Five: Working with Style Sheets
could remove Head4 and convert to Head3. Now all the paragraphs are correctly tagged with one command.
a Use at least one lower case letter in the tags you create with Add New Tag. You may sometimes bring in a text file that contains tag names that are not in the current style sheet. When Ventura encounters such tags, it gives them the attributes of Body Text. It displays their names in upper case in the Assignment List. If your normal tag names use lower case, you can quickly spot these troublesome tags by their capitalization.
a You can view the function key assignments quickly by hitting Ctrl-K while in any mode except Paragraph. This bypasses the Update Tag List dialog box.
Working with the menus Now that you have a game plan for style sheets, you can turn your attention to the specifics. This section provides an introduction to the three menus you use to build style sheets:
• the Chapter menu
• the Fram.e menu
• the Paragraph menu
We have deliberately avoided describing every option in every dialog box in every menu. Instead, we have covered the basics below - the fundamental skills you need to build the style sheet for an average business document. Those of you who want to go further will find the more complex, esoteric functions covered in later chapters.
In the previous section, we suggested establishing a routine. One idea was to start with document-wide formatting before proceeding to individual tags. Another was to systematically proceed down three menus in order: the Chapter menu, the Frame menu, and the Paragraph menu.
As it happens, these two suggestions work hand-in-hand. Most document-wide functions are found in the Chapter and

Working with the menus 215
Frame menus. Most individual tag functions reside in the Paragraph menu. Thus, if you work from left to right (from Chapter to Frame to Paragraph), you automatically do document-wide formatting first and the tag formatting second.
We will follow our own advice and proceed down each of the three menus in turn. We have skipped the menu options that don't apply to building style sheets (we cover them in later chapters). We havemade no attempt to duplicate the Reference Guide. Instead, we have spotlighted key features, with special attention to trouble spots and difficult functions. We have tried to show you some things that aren't obvious, and to indicate why and when you should use various functions.
The Chapter menu The Chapter menu contains formatting options that apply to the entire document. You might think that it would also include all the options for the Underlying Page, since the Underlying Page repeats throughout the document. But the Underlying Page is actually a special kind of frame. Many of its options are controlled, therefore, by the Frame menu.
Page Size & Layout
This menu choice controls the size of pages and the way they are printed (Figure 5-16).
Ot'ientation: Papet' Type & Dimension:
Sides: Stat't On:
POt'tt'ait Lettet'. Double Right Side
I B.5 x 11 in. I I 1
r:::2D I Cancel I
prints, and 5 112 hours of color and sound videotape.1
Ch icago to Tokyo"
Figure 5-16. The Page Size & Layout dialog box.

216 Chapter Five: Working with Style Sheets
Orientation refers to whether the text appears vertically (Portrait) or horizontally (Landscape).
Paper Type & Dimension refers to the size of the paper:
• Half sets up an Underlying Page that is 5.5x8.5 in. (half of a standard letter-size sheet). Since laser printers don't have a paper tray for half-size sheets, Ventura positions this smaller page in the middle of an 8.5x11 in. sheet of paper.
• Letter is a standard 8.5x11 in. page. Warning: Most laser printers can only print to within a half inch of the paper's edge. Consequently, you have a half-inch dead zone on all four sizes. Thus, your usable live area is really 7.5x10 in.
• Legal is the 8.5x14 in. size standard in American courts and law offices. Most laser printers can optionally accommodate a legal-size paper tray.
• Double is an 11 xl 7 in. sheet, sometimes called tabloid size.
• B5 andA4 refer to paper sizes popular in Europe.
• Broad Sheet is the 18x24 in. size used for newspaper and tabloid layouts.
If you select Double or Broad Sheet, Ventura presents you with several options, depending on the capabilities of your printer. These options let you print a larger format on a small format printer.
If you have a PostScript printer, you can shrink the page to fit on a 8.5x11 in. sheet. This option makes proofing possible on a laser printer before sending final output to a large-format typesetter. Alternatively, Ventura overlaps several output sheets that can be pieced together to form a large page for camera-ready output. The option "3 strips" (Broad Sheet only) applies only to certain typesetting machines that can produce eight-inch strips that are 24 inches long. If your printer or typesetter is capable of large pages, select Nothing.
You can create other page sizes not shown here. See the discussion of the Sizing & Scaling dialog box further in this chapter for details.
Sides determines whether the document is single-sided, like most business letters and memos, or double-sided like books

Working with the menus 217
and magazines. This is an important option, since it controls other Ventura features.
For instance, if you choose Single, you cannot choose Facing Pages View (there are no facing pages in a single-sided document). Likewise, you cannot create different headers and footers for left and right pages.
If you choose Double, Ventura automatically makes mirror copies of such things as headers, footers, repeating frames, and margins - that is, identical but reversed. Suppose you place the page number on the upper left of the left-hand page and then copy this to the facing page. Ventura automatically mirrors the command. It places the page number on the upper right of the right-hand page.
It is important to understand that the Sides option refers to the finished form of the document. When assembling cameraready pages for the printer, you usually output on only one side of the paper - even though the final result has type on both sides. The one-sided pages are printed and assembled into a double-sided document.
Start On sets the first page of the document. It is traditional in publishing to make page one a right-hand page. We suggest you stick with this convention - it is convenient to know that right-hand pages always have odd numbers. Choose Start On: Right Side to make page one a right-hand page. Choose Start On: Left Side to make page one a left-hand page.
Chapter Typography
This dialog box controls important typographic settings for the chapter as a whole (Figure 5-17). You can override these settings by putting text inside a frame and using Frame Typography from the Frame menu.
Widows & Orphans control the number of isolated lines allowed to appear at the top and bottom of a page or column (Figure 5·18). The number you enter into the dialog box represents the minimum number of lines that must appear together. The default setting is 2. If two lines appear together, Ventura allows them to remain on the page. If one line appears alone at the top or bottom, Ventura moves the line to another page or column so it remains with the rest of the

218
Widow '-
Orphan
2
Chapter Five: Working with Style Sheets
CHAPTER (DEFAULT) TYPOGRAPHY SETTINGS
Widows (Min Lines at Top): 2 t Orphans (Min Lines at Botto~): 2 t
Colu~n Balance: Off t Move Down To 1st Baseline By: Cap Height t
Pair Kerning: On t Vert. Just. Within Fra~e: Off t Vert. Just. Around Fra~e: Off t
V~wt; •• Juwt;. (Uh"(oI~'ld: 100.0 .:. m; l'op I;,f Fr'~lI'I~I: (). 194 i.m·;h~lw
f.lt; not;t;OI.1 of Fr·<'lI.I~I: (). 194
DO I Cancel I
Figure 5·17. The Chapter Typography dialog box.
paragraph. If you increase the setting to 5, Ventura moves text any time it encounters four or fewer lines by themselves.
Eliminating isolated lines makes text easier to read. However, it also creates a problem by leaving a blank space where the lines would otherwise have appeared. Some users prefer to set Widows & Orphans to 1. Then they page through the document and manually correct widows and orphans by editing text or by changing the size of frames. For most purposes, you should select the smallest number that makes the text easy to follow (usually 2). But for books, manuals, and similar
-,
Figure 5·18. Widows are isolated lines at the top of a page (left). Orphans are isolated lines at the bottom (right).

Working with the menus 219
documents with only one column and long paragraphs, you might want to increase the setting to 3.
Column Balance determines whether or not Ventura fills up one column before it moves to the next. The left example shown in Figure 5-19 has Column Balance: Off. Notice how Ventura filled up all of column one before putting any text into column two. Conversely, the right example has Column Balance: On. Ventura has made all three columns as even as possible.
Figure 5·19. Ventura has attempted to equal out the column lengths in the right example because it has column balance on.
For most applications, choose Column Balance: Off. For newspaper-style layouts, you can combine Column Balance: On with frame-wide alignment to create banner headlines. See Chapter Ten, "Building the Chapter."
Move Down To 1st Baseline By determines how Ventura decides where to start the first line of text. In either case it measures down from the top of the column. If you choose Cap Height, Ventura counts down the height of the tallest capital letter. If you choose Inter-Line, Ventura counts down by the Inter-Line spacing.
Suppose, by way of example, that you have 10-point capital letters and your Inter-Line spacing is 12 points. If you choose Cap Height, the first baseline starts 10 points from the top of the column. If you choose Inter-Line, it starts 12 points down.

220 Chapter Five: Working with Style Sheets
Most people would never notice the effect of this setting in single-column documents. In multi-column documents, however, it can affect whether text aligns across columns. With careful planning, you can set up the line spacing of all your tags so text in adjacent columns will align. This is done by making all spacing an integer of the Body Text spacing (see Chapter Six, ''Building the Chapter," for details). But this scheme is thwarted if Ventura uses the cap height. The more columns, the more the discrepancy multiplies. For this reason, we suggest selecting Inter-Line for most applications.
Pair Kerning overrides the kerning settings of individual tags. To enable kerning, you must take two steps. First you must turn on kerning for the entire document in this dialog box. Then you must turn it on for each tag. (Not as hard as it sounds; you simply turn it on for Body Text, then clone all your other tags from that.)
Owners of Professional Extension will also find various vertical justification features in this dialog box. See Chapter Eleven, "The Professional Extension."
Update Counters and Auto-Numbering
These two menu options affect document-wide formatting and the style sheet. However, because of their complexity, they have been treated separately in Chapter Eight, "Advanced Functions."
Headers & Footers
The Headers & Footers option is not recorded in the style sheet. The settings in this dialog box apply only to the current chapter. However, this function creates two generated tags, Z_Header and Z_Footer. The attributes that you apply to those tags are recorded in your style sheet, even though the contents are not.
Footnote Settings
Footnote settings are stored in the style sheet. This menu option has been treated separately in Chapter Eight, "Advanced Functions."

Working with the menus 221
The Frame menu The Frame menu comes mostly into play during document layout (which is covered in Chapter Six). That's when you place frames on the page and determine how you want them to look. However, three of the options affect document-wide formatting. That's because the Underlying Page - which affects the entire document - is also a frame .
.. NOTE: Only the attributes of the Underlying Page are recorded in a style sheet. Attributes of separate frames are stored in the chapter file.
Margins & Columns
This dialog box specifies the number and size of margins, columns, and gutters (Figure 5-20).
Desk File Edit View Chapter I:im!n Paragraph Graphic Options
~.~.~.~:
i Beca ~f the s iast dec ~erience tlasgrea ~o a spir I But v ~ay one ianother'l ~anizati ~ake a ~ath or ;eads to
MARGINS & COLUl1NS
** of ColUMns:
Settings For:
ColUMn 1: 2: 3: 4: 5: 6: 7: 8:
Inserts:
I Left Page I mn.ikHA Widths 13> 041 13>04 13>04 00,00 ()O,OO 00,00 00,00 00,00
Gutters
01>09 01>09 00,00 00,00 00,00 00,00 00,00
Figure 5-20. The Margins & Columns dialog box.
on t alwa
t r--
# of columns is self-explanatory. Click on the desired number.
Settings For tells Ventura which page is being described, in case you wish to have different left and right pages.
Widths / Gutters sets the widths of the columns and the spaces between them (the gutters). The columns are numbered from the left. When you enter values for Column 1, you are describing the left-most column on the page. For columns of equal

222 Chapter Five: Working with Style Sheets
width, enter only the measurements for the first column and the first gutter. Then click on Make Equal Widths.
Margins sets margins on the inside of the frame or the Underlying Page. To set the margins of the Underlying Page, enable Frame mode, then select the Underlying Page before opening the dialog box.
In the case of Underlying Page, the margins usually represent where you want the text to appear. Ventura also lets you create supplementary text margins with the Spacing dialog box~
To set equal margins on both pages, enter the settings for either the left or the right page, then click OK. Ventura automatically copies them to the other page. To create mirrored margins (identical but reversed), set one side, then click on Copy to Facing Page. To have different left and right pages, set each one separately before you click OK. Ventura won't let you create different left and right pages unless you previously chose Sides: Double from the Page Size & Layout dialog box.
Mirroring is useful for creating binding margins (extra room on the inside to allow for the space taken up during binding).
Calculated Width and Actual Frame Width enable you to see in advance if your measurements fit into the frame. As you enter values for columns, gutters, and margins, Ventura adds them up (calculates them) and displays the results. Calculated Width shows your settings. Actual Frame Width shows the overall size of the selected frame for comparison.
Calculated width equals the left margin plus all the columns plus the right margin. To use this feature, enter the correct margin settings first. Then you can check the accuracy of the column settings.
Inserts contains two important functions. We have already demonstrated how to make columns equal by entering the first two values, then clicking on Make Equal Widths. You can also transfer all your values to the opposite page by clicking on Copy to Facing Page. Ventura automatically makes a mirror copy of the margins.

Working with the menus 223
Sizing & Scaling
We'll have more to say about the Sizing & Scaling dialog box in Chapter Six, "Building the Chapter." It permits some sophisticated techniques with frames and pictures.
But Sizing & Scaling can also affect document-wide formatting, because you can use it to change the size of the Underlying Page. We have already mentioned that the Underlying Page is similar to an ordinary frame in many respects. And just like any other frame, you can change its dimensions with the Sizing & Scaling dialog box. .
Most people are satisfied with the page sizes available in the Page Size & Layout dialog boxes. When you select one of these sizes (Half, Letter, Legal, etc.), Ventura changes the dimensions of the Underlying Page for you.
If you want an unusual size not available from Page Size & Layout, you can create a different Underlying Page:
• Enable Frame mode and select the Underlying Page.
• Select Sizing & Scaling (Figure 5-21).
Desk File Edit View Chapter IJ.mln Paragraph Graphic Options
I I::::::::::::::::::::::::::::::::::::::::::::::::::::iiiiiiiii:iir"'c":Yfyp"Es"E"T\&N"EW~Fp;:(:CHP""""'nHi"EwiFp2':'s"Tyf"'iiiiii::i:iii:iiiiiiiii:iiiiiiiiiiiiiiiiiiiHiiiimmmi:1 +
- It SIZING & SCALING [!] Flow Text Around:
Upper Left x: FraMe Width:
Horiz. Padding:
On t
00 .001 .. c=::J 08.50 00.00
Upper Left Y: 00.00 FraMe Height: 11.00
Vert. Padding: 00.00 inches
X Crop Offset: f.lf.Ulf.l r·:.·:F..:·:.H: ... ·: .. :J Y Crop Offset: flfl,flfl L"::~·:.J L .. :: .. :J Scale Width: flf.Lf.lf.l Scale Height: f.lf.l,flf.l
DO I Cancel I '.:. ~~ads to th~ most r~muneration? ;1 r~w p~riph~ral d~vic~ allows a;l;changl?d by CD-ROM. I ... + rtt~((J I(((~ttr~d + II"
Figure 5·21. The Sizing & Scaling dialog box
• Enter the new width of the Underlying Page on the Frame Width line. Enter the new height on the Frame Height line.
When printed on a 8.5x11 in. sheet of paper, this new, smaller Underlying Page appears in the upper left (Figure 5-22).

224 Chapter Five: Working with Style Sheets
8.5 in
6in
.s 00
.s --
Figure 5·22. If you create a smaller Underlying Page with Sizing & Scaling, it initially appears in the upper left corner of the larger sheet of paper.
To center the smaller Underlying Page on the larger sheet of paper, use Upper Left X and Upper Left Y from Sizing & Scaling. Upper Left X controls the position from the top to bottom. Upper Left Y controls the position from left to right.
To center a page horizontally, subtract the new width from the old width and divide by two. Enter this number into the Upper Left X line. For instance, suppose you create a new Underlying Page that is 6x8 in. To center the new page horizontally:
8.5 (old width) - 6 (new width) = 2.5
2.5/2 = 1.25
You would enter Upper Left X: 01.25 inches.
To center the page vertically, subtract the new from the old and divide by two:
11 (old height) - 8 (new height) = 3
3/2 = 1.5/
You would enter Upper Left Y: 01.50 inches.
Figure 5-23 illustrates the results of these example settings.

Working with the menus 225
8.5 in
6in
.S .S 00 --
Figure 5·23. Use X and Y Offset to center a smaller page on a larger sheet of paper.
Vertical Rules
This menu option permits the user to place rules between columns, or anywhere on the page (Figure 5-24).
Settings For tells Ventura which page you are working on.
Inter-Col. Rules creates vertical rules between columns. To put a rule between every column, choose On and specify the width. Ventura automatically makes the rule the length of the column and centers it in the gutter.
-. NOTE: All measurements are controlled by the units shown for Rule 1. If the Rule 1 Width is in inches, the number you type for the width of the Inter-Col. Rules will also be interpreted as inches.
Ventura can create rules as small as a fraction of a point and as large as 36 points. In most cases, you will want a thin rule between columns (00.25 fractional pts. or smaller).

226
Rule 1 units of measurement
Chapter Five: Working with Style Sheets
Desk File Edit View Chapter ~ Paragraph Graphic Options
• I~~~~~~~~m~~~~~l~~~l~l~llll~ll~~ll~~~~~~~~~~~l~~~l~~l~~~~l~~~l~r"C":\j:YPE~fE'T\ihfEW~Fp2"jjHP""""'{&tj'EW~Fp2"j~'tYf"'!llllililiiiiiiiiiiiiiiiiiiiiiiiiiiiiiiiiiiiiimmmmiiiiiii • .1..
VERTICAL RULES ........................... . ....................... . 1Pay scales Settings For: I LeFt Page I mn,PH.s rformation on t I Because of the d nalterable, alw< ~ the software ind Inter-Col. Rules: On I Width: o.()(nl riginal copy is
last decade, the d Rule 1 Position: 00.00 e chiving easy. m berienced,qualified Rill .. 1 lH..tt-.h· A .AllA inches capacity, low co:::::::::: fhas greatly increase ature of CD-RC :ltt ~o a spiraling of sal Rule 2 Position: 00.00 ous new capabil ::::::::::
~1:;~;':~:t~ Rule ~n::::: I :::" To Facing Page I ~:;~:~:,~h~:1 bnization, its siz and use inforrr(:)l ~ake a difference I:::][:] I Cancel I mediate and 10 ::tt path or program" ill be dramaticatill ~eads to the most remuneration? llrew peripheral device allows alilchanged by CD-ROM, ~
.. I{:::ttttl rtttt:ft] + ..
Figure 5·24. The Vertical Rules dialog box.
Rule 1 Position and Rule 2 Position lets you place one or two vertical rules anywhere on the page (not just between columns). One possible application would be to place vertical rules on the outsides of columns. However, Ventura provides no way to automatically control the length of these rules. This feature, therefore, should be used only if you want vertical rules that extend all the way from the top margin to the bottom margin.
Rules created in this dialog box appear throughout the document. You cannot turn them on or off for selected pages only. For rules on selected pages, for rules of different lengths, or for rules that are not vertical, use Graphic mode instead.
Although Ventura does not allow control of the length of the vertical rules, it does permit their placement from left to right. To place a vertical rule, specify its distance from the left edge of the Underlying Page (see Figure 5-25), not from the margin. Even when placing a vertical rule inside a frame, you must measure from the left edge of the Page containing that frame.
Rule 1 Width and Rule 2 Width apply to rules placed separatelyon the page. They have no effect on Inter-Column rules, which are specified in the space to the right of the Inter-Col. Rules line.
Inserts permits you to copy your specifications to the opposite page. To create identical pages, enter the specifications for one

Working with the menus 227
non -n-QiIi:iiii:ffir.iCiiii-'iiWiiilOO-l
::::~ ::::.._ .. _ .... ::.'-t"'..=.e.~~
~~~~~;;;~ =~__ .a:;~;:;:~
==:'--:::='~=-:S-~3'~= :- .... ---- ..... ~."::::":' ............................................... :
Figure 5·25. To place a vertical rule, specify the distance from the left edge of the Underlying Page, which is 2 inches in this example.
page and click OK. Ventura duplicates the settings on the second page. To create mirrored pages, enter the specs for one page, then click on Copy to Facing Page. To create different pages, enter each page separately before you click OK.
Paragraph menu The Paragraph menu controls the typographic attributes of tags. Using this menu, you can create an amazing assortment offormats and effects. You can have up to 128 separate tags in a single style sheet.
A tremendous amount of typographic sophistication lurks in the Paragraph menu. Plan to spend some time mastering its options. It is time well spent. Ventura Publisher is so powerful that many tasks can be accomplished in several ways. As a general rule, it is usually best to do the job with a tag even if you have other options. Once you create a properly formatted tag, you can quickly reproduce your results. By re-using the same style sheet, you can effortlessly duplicate the format in another document.
Font
First a word about type terminology. A typeface is a particular design - Times, for instance. A type font is a specific variety of a typeface - for example, Times 14-point bold italic.

228 Chapter Five: Working with Style Sheets
When you select Font, a dialog box appears with four scrollable lists. The contents of these lists vary according to the printer you use. Figure 5-26 shows the Font dialog box for a PostScript printer. Figure 5-27 shows the same dialog box as it appears for a Hewlett-Packard LaserJet Plus.
Desk File Edit View Chapter Fra~e •
"FlRSTPAR" FONT
iiiiiiiiii\\\\\\\\i\miiliiiiii\i\iiiiiHmiii\\\\iiii Face immmi\i\ii\iii\i\\iiiiiiiiiiiiiiiiii\iiiiiiiiiiii\i t Helvetica
Custo~ Size: 010.0\ points
Overscore: Off t Strike-Thru: Off t
Underline: Off t Double Underline: Off t
:::;:;:::;:;:::;:;:::::
~immm Size mmm t I
,J.
Figure 5·26. The Font dialog box for PostScript printers.
Graphic Options
mmii Sty Ie mmi U~.lht.
Bold t.. It.(.~:Lk N- Italic B- Italic
im Color m White
.:IF.r.:I~
Red Green Blue Cyan Yellow Magenta
Desk File Edit View Chapter Fra~e Paragraph I~ Options
"Body Text" FONT
t I
Sy~bol Courier
Overscore: Off t Strike-Thru: Off t
Underline: Off t Double Underline: Off t
:;:;:;:::::::::::;:::;:;:;:;:::;:::::::::;
........... " ...... " .................... .
\mmm Size mmm 6 t 8
12 14 18 24
:mm: St Ie imm LiHht.
Bold l.. It.(.~:Lit.~ N- Italic H· It.(.~l.il.~
iii! Color iii .... ." White
Red Green Blue Cyan Yellow Magenta
::::::::::;:;:;:;:;:::;:;:;:::::::::;:;:;:::::;:;:;:::::::;:::;:::;:::::;:::::::;:;:::::;:;:::;:;:;:;:;:;::::::::::::::::::::::~:::::::::::::::::::
Figure 5·27. The Font dialog box for Hewlett-Packard LaserJet printers.
I i
I I
Face specifies the typeface for this particular tag. If you install new fonts on your existing printer, their names appear in this list. (See Chapter Seven, "Producing Output," for tips on how to add fonts.) To choose a new typeface, scroll down the list.

Working with the menus 229
Highlight the one you want with the mouse. If you install a PostScript printer, you will see a long list of fonts. Not all of these are necessarily active for your particular printer.
Size controls the point size of the type. The numbers vary according to the capabilities of your printer. If you are using a PostScript or Interpress printer, the word Custom appears. You then type in the desired point size (in half point increments). For other printers, the list shows the available point sizes. Highlight the size you want with the mouse.
Style enables you to control the weight (light, medium, bold) and the slope (normal or italic) of the typeface. If a style shows in gray, it is not available for your printer. You can choose any style that shows in black type by clicking on it with the mouse.
Overscore, Strike-Thru, Underline, and Double Underline apply these attributes to the paragraph. Changes made in the Font dialog box apply to the entire paragraph, and to every paragraph with the same tag. You can also change the Font and apply attributes in Text mode. However, changes in Text mode affect only the highlighted text at that one point in the document.
Alignment
This option governs the way text lines up (Figure 5-28).
Horz. Alignment: Vert. Alignment:
Text Rotation: Hyphenation:
Successive Hyphens: Overall Width:
First Line: Relative Indent:
Justified Top None USENGLSH 2
t t t t t
Column-Wide t Indent t Off t
In/Outdent Width: 00.171 inches In/Outdent Height: 001 lines
[n fl'(.)l"I !H~.lht. t.€.) l)ee.il"l(.~l: f.lF.Lf.If.I N(.~x.il"lul"l H€.)t.(.~t.ed Hf.d~.lht.: f.If.I .f.If.I
l::]
230 Chapter Five: Working with Style Sheets
Horz. Alignment controls the five basic methods of setting type horizontally. Figure 5-36 shows the effects of the five choices.
This is an example of justified text alignment. liT otice how the text is aligned. This is commonly used in books, magazines, and newspapers.
This is an example of right-aligned text. liT otice how thl? tl?xt is alignl?d. This is sometimes used in
advl?rtising.
This is an example of left-aligned text. liToticl? how the text is alignl?d. This is sometimes used in magazinl?s and nl?wsll?ttl?rs.
This is an I?xampll? of centered tl?xt. liT otice how the text is aligned. This is commonly used for
headlines.
Figure 5·29. Horizontal alignment options.
Decimal alignment: 124.5 12,432.67
13.0
Vert. Alignment governs vertical alignment with reference to the margins of the frame or Page containing the text. Figure 5-30 shows the effects of the three choices.
Desk File Edit View Chapter FraMe Paragraph Graphic Options
~';'h'~t~~;'~'~h'~;'~~~'t"k~~;"'~'~~';"~'~;"i"~bi~~"i~"~'i~~ ~{hen taking a snapshot: light levels, focus, apertur~ ~pel?d, and more. When using a scannl?r, a different ~et of factors influences image quality, things likJ. ~ontrast, brightness, rl?solution, and gray levels. !
l.::-.::-~-=-":: __ :-__ :-__ :-.::-:~-:::-=_-=-_-:.-:.-::::.::-::.::--=.::-:j t : ~ : ~ photographer must kl?ep many variabll?s in min~ when taking a snapshot: light levels, focus, apl?rture: ~peed, and more. When using a scanner, a differen~ ~et of factors influencl?s image quality, things lik~ Fontrast, brightness, resolution, and gray ll?vl?ls. 1
t ............................................ · .. · ...... · ............................................................................................ 1
~: .................................................... -.-------------------.j
photographer must keep many variables in mind ~hen taking a snapshot: light levels, focus, aperturE pel?d, and more. Whl?n using a scannl?r, a differen I?t of factors influl?nces image quality, things like
: =tr.ast, .. hJ;ightnGlss, .. r.Gls.oluti=, .. aJ:lc1. .. gr.ay .. !Gl1{.GI!s ......... = ~ ::::::::::
I IlIl
I i l tIT ! ...
Figure 5·30. The three vertical alignment options.
Text Rotation permits you to revolve text from its normal posi tion along the baseline. Figure 5-31 shows the results of

Working with the menus 231
rotate2
~!
II ~i
·""'''1'-''''1
Figure 5·31. The four options for rotated text.
the four choices. Rotated text is particularly useful for tables, labels, forms, and callouts.
Although the text rotates, the paragraph does not. If you come back to select this text again, whether in Paragraph or in Text mode, you must select where it would have been ifnot rotated. Most often, you can use the first letter as a guide to the location.
If you rotate text, other effects rotate with it, such as ruling lines and boxes around. You can limit how much vertical space the rotation takes up with the Maximum Rotated Height line at the bottom of the dialog box.
Hyphenation governs whether or not text for this tag is hyphenated, and if so, with which dictionary. By choosing the name of a hyphenation dictionary (such as USENGLSH), you tell Ventura to use that dictionary to place discretionary hyphens into the text file as it is loaded into Ventura. Ventura then uses these hyphens if needed to justify lines. By choosing Off, you force Ventura to keep words undivided.
In general, you want text hyphenated, since this improves the appearance of most documents. There are, however, numerous exceptions, including headlines and other display type. See Chapter Eight, "Advanced Functions," for a further discussion of Ventura's hyphenation alternatives.
Successive Hyphens controls the number of lines in a row that

232 Chapter Five: Working with Style Sheets
can be hyphenated. This problem comes in to play most often in narrow, justified columns where Ventura has to hyphenate frequently. Without a hyphenation limit, you can end up with a so-called ladder of hyphens in the right column. Most designers suggest a limit of two or three successive hyphens.
Overall Width determines whether the tagged text is confined to the column or spaced across the entire frame. Choosing frame-wide causes a headline to be spread across the entire page, even though the rest of the text is restricted to narrow columns (Figure 5-32). Frame-wide, in other words, overrides the normal column boundaries. It causes a paragraph to stretch the full width of the frame even if the rest of the text is restricted to columns. However, if you put a frame-wide headline in the middle of a page, it will overlap the text in the left column unless you set Column Balance On.
Desk File Edit lJie~~ Chapter FraMe Paragraph Graphic Options
• I!!!!!!!!!!!!!!!!!!!!!!!!!!!!!!!!!!!!!!!!!!!!!!!!!!!!!!!!!!!!!!!!!!!!!!!!!!r···C··:,\"TYP·E8·Et\&tfEW~Fp2"j;::Hp·· ...... ·{NE~{:·8tYr···i!!!!!!!!!!!!!!!!!!!!!!i!!!!!!!!!!!!!!!!!!!!!!!!iiii!!ii!iimmmmmi • r· .............................................. 1 r················································! ! ............................. _ .. _. __ ......... __ .+.: ! This is! a banner headline" := !A photographer must keep many: ~etermine the file format in: rrhis is why line art images are lvariables in mind when taking ai ~hich you save it. tf i ~ometimes called "om.-bit" im isn apsh ot: light levels, focus': :In this chapter, we'll examine the: :ages, because only one bit of data iaperture speed, and more. Wheni iPro cess of capturing an image] ~s stored for each dot scanned. tf :using a scanner, a different set of: :With your desktop scann er.: lContinuous Tonetf = ~actors influences image quality,] !y ou'llieam that images fall into] ~emember our gray-scale con t~~t ~hings like contrast, brightness,i ione of two categories-line arti ~inuum from the last chapter'? We ~~tt ;resolution, and gray levels. On a: land continuous tone-that dic-: !:tivided it into a certain numbe :::::::::: icamera, variables are set by adi ~ate which scanner control set-] :of ranges depending on hoy, ~t~t ~usting a lens, dial, or other kind: ~ings will be used in a particular: ;many levels of gray a gray-scalE :::::::::: lofcontrol.Inmostscanners,vari-i isitu ati on. You'll see why gray-l :controller could recognize.:::::::::: ]ables are adjusted by means ofi ~cale capability is needed to ac-] 13canned pix els, we learned tt~~ scanner control software. II l :curately render halftones. We'll: :could be placed into any of 16 }~{: K::h ances are that 31 our scannerl ialso cOYer the features to look fori 154, or 256 gray-level categories ~~tt ]comeswithascannercontrolpro~ ~n a scanner control program.! fiepending on the range in whicr:~{:~:~ ;.:ram grovided by t~e ~;n~~a~l fFinally, we'll.dis<~us!,the impl~-i ~t fall:. I~. y oU.t.,remo,,: e th e~
+ JJJJ~ttJ l~tt~}}}}1 + II..
Figure 5-32. A frame-wide banner headline.
You turn on Column Balance for the Underlying Page with the Chapter Typography dialog box. Even if Column Balance is off for the Underlying Page, you can place a frame on top of the Page and override the chapter defaults with the Frame Typography dialog box.
First Line is misleading because it can affect more than the first line of a paragraph. You may also notice that there is a space between Relative Indent and the In/Outdent settings immediately below. In fact, these four choices - First Line,

Working with the menus 233
Relative Indent, In/Outdent Width, and In/Outdent Heightfunction together to control how (and whether) text lines will be indented and outdented from the rest of the paragraph.
Thanks to the First Line option, there is no need to insert tabs or spaces to indent the first line of a paragraph. Type the paragraph flush left in your word processor, then use this option to tell Ventura to indent the line. If you choose Indent, the line is pushed to the right. If you choose Outdent, the line is pushed left, overriding the margin settings. Outdent is useful for so-called hanging indents. Outdent can also be used to push a bullet character into the left margin. And by entering a high number like 99 into the In/Outdent Height line, you can effectively cause an entire paragraph to shift to the left of the normal margins.
Neither Indent nor Outdent takes effect unless you enter an amount in In/Outdent Width. In / Outdent Width controls the amount of fixed space you add. This amount applies to both Indent or Outdent (whichever you chose above). The standard indent is one em (equivalent to the point size of the type). Long text lines and other special circumstances demand larger indents. If you do not want any kind of indent, make this amount zero. The In/Outdent Width is measured from the left margin. If you have created temporary margins with In From Left in the Spacing dialog box (see below), then it is measured from this temporary margin. ___
In/Outdent Height specifies the number of lines for which the indent or outdent takes effect. Under most circumstances, this is one. However, you may want an indent (or outdent) of two or more lines to produce a special effect.
Relative Indent is covered in more detail in Chapter Eight, "Advanced Functions." For most purposes it should be turned off by choosing None. If you choose On, each line will automatically start where the previous line ended (Figure 5-33). This effect is useful when you want to put two separate tags on the same line, and you don't know where the first one will end.
In From Right to Decimal is grayed out and inactive unless you choose Decimal alignment from the Horz. Alignment popup menu.
Maximum Rotated Height is grayed out and inactive unless

234 Chapter Five: Working with Style Sheets
Desk File Edit View Chapter FraMe Paragraph Graphic Options • Ijjjjjjjjjjjjjllljjjlmllll!jijiljjljljjjjjljjjjjjjjjjjjjjijjjjjjmjjjjjjjjlliiiiijr··c":·\"TYP"j~s·E·t\ffElf:·cHP··· .. ·· .. Cti"Elf:·s·Tyy···\llllllllllljljlljlllllllllllllmllllllljjjjlllljjlllljlllllllilliilllllllllilimil •
...!..
This is the second sentencefF This is the third sentencefF
IJ
Figure 5·33. A relative indent starts each new paragraph where the previous one left off.
you rotate the text. If you do not set a maximum rotated height, Ventura pushes the text below out of the way to make room for the rotated text, no matter how much space it requires. If you set a maximum height, Ventura sticks to that limit. If it cannot fit the rotated line into the maximum, it wraps it and creates additional rotated lines (Figure 5-34).
~ "0
~ (Ii 0 ~
~ ~ ..c ~ 0 u
(Ii
""'" .-u Cot c e 00
(Ii ....... ~ c =' c..-.
~ e 0 ~ .- ..c ~ ~ .~ .- ~
e9 e !
Figure 5·34. You can limit the vertical space taken up by rotated text.
Spacing
It is easy to confuse Spacing with Alignment, the menu choice that precedes it. Alignment controls the way in which text is

Working with the menus 235
placed. Spacing controls the amount (Figure 5-35). We recommend using fractional pts. to measure the spacing in the first four lines of this dialog box. Spacing is related to type size, which is always specified in points. Using the same units makes it easier to create consistent, pleasing designs.
Above: BB.BBI fractional pts Below: BB.BB
Inter-Line: 2B.BB fractional pts Inter-Paragraph: BB.BB
Add in Above: '.hib@,. I When Not at ColuMn Top I
Settings For: \ Left Page \ Wa'fI,. In FrOM Left: BB.BB inches
In FrOM Right: BB.BB
Inserts: \ Copy To Facing Page \
C]D I Cancel \
Figure 5·35. The Spacing dialog box.
Above and Below refer to extra space above and/or below the entire paragraph. They do not affect the space between the lines. In general, this amount should have relationship with Inter-Line spacing. If, for example, Inter-Line is 12.00 fractional pts., then 06.00, 12.00,18.00, and 24.00 would be among the appropriate choices for above and below space.
In some ways, you can think of Above and Below space as minimum settings. If Ventura encounters two tags in a row with conflicting amounts of Above and Below space, it uses the larger of the two. It does not add them together. Thus, you do not have to worry that spacing effects will accumulate and give undependable results.
A good rule for beginning desktop publishers is to use only Above space for most tags (if you need extra space at all; many times Inter-Line spacing is all that is required). Spacing effects are more predictable if all the tags use Above space rather than a mixture of Above, Below, and Inter-Paragraph. If you cannot get the effect you want with Above space alone, then use Below space. You can achieve what you want most of the time with Above space alone. In addition, Above spacing

236 Chapter Five: Working with Style Sheets
can be partially controlled with the Add in Above line (see below).
Inter-Line refers to the spacing between lines of a paragraph. Typographers refer to it as leading (pronounced ledd- ing). As a general rule, type of14 points or below should have an extra point or two of space between lines for easy readability. Thus, 10-point type should have Inter-Line spacing of 11 or 12 points (written in the dialog box as 11.00 fractional pts. or 12.00 fractional pts).
Larger type sizes can usually be set solid - the typographic term which means to use the same Inter-Line spacing as the point size - for instance, 30-point type with 30 points of Inter-Line spacing.
Ventura automatically adjusts the Inter-Line spacing each time you change the Font size unless you use the Set Preferences dialog box to disable this feature. Once you disable it, Ventura remembers your preference in the future. If you pick Auto-Adjustments: Both or Auto-Adjustments: Style, Ventura will change the spacing. Since this can have unpredictable results, we recommend working with Auto-Adjustments set to None or" and --.
Inter-Paragraph adds space between identical paragraphs. Most users get best results by setting Inter-Paragraph to zero for all tags. They use Above and Inter-Line to control the spacing of most tags, and Below for occasional special purposes.
The Add in Above line lets Ventura do some of the thinking for you. The program will look at a page and decide if Above spacing is appropriate. Text elements like subheads need extra space above them when they are in the middle of the page. This space helps set them apart from the body text (Figure 5-36). But these same subheads don't need the space when they are the first line at the top of a column. In that case the additional white area would throw off the balance of the page. To control this problem, select When Not At Column Top. If you want extra space at all times, select Always.
In From Left and In From Right are supplementary margin settings that can be used in addition to the original margins of the frame. They have several applications. The most common

Working with the menus
C~·~~:~~·=~:~~~~··············l iY ou've got a hint of what scan-; ;ners can do. Maybe you've seeni ~hem advertised in computer: !magazines, or demonstrated at a; ~ocal computer dealer. Perhaps; ~he company next door has in-: ~talled one. They seem like neat; \:ievices, these compact machinesl ~hat can take a picture from paper: land throw it up on a computer; ~creen. Probably a lot of fun.! 1I'hink of all the laughs smart-: ;aleck workers will get as they scanl
boss's photo and replace his; white teeth with v
fAdd·W·i.·~~·N·~~A~·T"~~fi··········: ~ut scanners have other uses as; :well. Graphic designers can use: ~canned images as a basis fori ;original artwork. Office managers: :canscanformstouse as templates. ~or invoices, shipping orders, and. ;other documents on a laser iPrinter. Companies with rooms ifull of paper records can use opti-. ;cal characterrecognition software ~o convert their files into search;able databases. And anyone who jneeds to transmit documents to \:iistant locations can do so with ~he addition of a PC facsimile. lmodem.ff trhe best way to learn about scan-
237
Figure 5·36. The example at right has the above spacing set to take effect only when it is not at the top of a column.
is for temporary indents. Long quotations, for instance, are often set apart from the rest of the text by temporary indents on the left and the right (see Figure 5-37).
neat devices, these compact machines that a picture from paper and throw it up on a:
screen. Probably a lot of fun. Think of all; laughs smart-aleck workers will get as they scan: boss's photo and replace his pearly white teeth! vampire fangs, or worse. ff ;
''Scanners are much more than a tool for : raising employee morale. They can be 1 useful- and sometimes essential-in : almost any computer application : involving communication of visual ; images. Just as microcomputers : themselves are found in situations no one : would have envisioned s ev eral years ag 0, ;
scanners and other digitizing devices can : be used in many ways that might seem : surprising. -II i
. The first scanner application that may come to; !mind is desktop publishing. With the introduction ofl ~ow-cost laser ams like:
Figure 5·37. Temporary margins creating with In From settings in the Spacing dialog box.
There are other cases when you want supplementary margins different from those of the frame or column. Mirrored (or complementary) left and right pages are one example. In that case, the frame margin is identical for each page, but the text is spaced in from left on one page and in from right on the other.
238 Chapter Five: Working with Style Sheets
It is important to distinguish the In From option from the In/Outdent in the Alignment dialog box. Use In/Outdent to affect the first line (or first few lines). Use In From to affect every line in the tag.
The two options can be used together. Figure 5-38 shows one idea. In this example, In From Left pushes the entire paragraph to the left. Then In/Outdent pushes the first line back to the right again. The result is a hanging indent.
Settings For applies to the In From settings. As with other Ventura options, facing pages can be identical, mirrored, or different. For identical pages, enter the In From Left and In From Right settings, then click on Inserts: Copy to Facing Page. For mirrored pages or different pages:
• Click on Right page and enter its settings.
• Click on Left page and enter its settings.
• Click OK.
Breaks
Breaks is a versatile option ·with advanced applications. It provides a high degree of control over the text placement. We cover special uses such as tables and auto-numbered section headings in Chapter Eight, "Advanced Functions."
The Breaks dialog box determines what happens before and after a paragraph. It controls whether or not a paragraph
Desk File Edit View Chapter FraMe Paragraph Graphic Options • I!l!!!!!!!!!!!!!!!!!!!!!!!!!!!!!!!!!!!!!!!!!!!!!!!!!!!!!!!!!!!!!!!!!!!!!!!!!!!!!!!!!!r .. t:":'\'fyp'E~fE'f\N·Ei,{:·CHp ........ dfElfJfi'y'j' .... !!!!!!!!!!!!!!!!!!!!!!!!!!!!!!!!!!!!!!!!!!!!!!!!!!!!!!!!!!!!!!!!!!!llimm!!iiiiii! •
But scanners have other usps as well. Graphic d"sign"rs can US" scanned images: t as a basis for original artwork. Office managers can scan forms to use as: I:::::::::: templates for invoices, shipping orders, and other documents on a laser: l~~~~~~ printer. Companies with rooms full of paper records can use optical: :~:}~:~ character recognition software to convert their files into searchabl~ ~t~~~~~ databases. And anyone who needs to transmit documents to distant loca-! }~:} tions can do so with thp addition of a PC facsimile modem." : :~:}~:~
The best way to learn about scanner applications, of course, is to watch the! I~I~ machines in use. WhUp wp'd lov" to have you come to our office to s"e! ~:~:~:~:~: our extensive scanner selection, it's not all that large and things could get! ~~~~~t~ a bit crowded. So we'll use this chapter to see a few examples of how: :~:~:~:~:~ useful scanners can be. We'll look at a magazine, advertising agency,! }~:~:~: graphic designer, and corporate newsletter." ! ~
Meet George, managing editor of .l'otholdt?r World. George's monthly mission is: to assemble articles, columns, photographs, ads and other materials into!
: ..................................... ~~:.'!!.?:~~:.: .. l.:.~~~~~ .. ~.~~~:~~.~.~.~~ .. ~~!.~~~~~~~: .. ~~.~~:.~.:!~~~~.?~~.~~::~1(."j
Figure 5·38. A hanging indent.

Working with the menus 239
should jump (break) to the next page, the next column,or the next line (Figure 5-39).
Page Br-eak: ImI I Befor-e I I After- I I Befor-e & After- I I Befor-e/Until Left I I Befor-e/Until Right I
Column Br-eak: III!I I Befor-e I I After- I I Befor-e & After- I
Line Br-eak: [§J 1:«,".14. ~ I Befor-e & After- I Next Y Position: 111.%6" I Beside Last Line of Pr-ev. Par-a I
Allow Within: ~ ~
Keep With Next: ~ III!I
Figure 5·39. The Breaks dialog box.
[]!L] I Cancel I
Page Break sends tags to a new page. Selecting Before creates a page break before the tag. In other words, the paragraph always starts on a new page. Selecting BeforelUntil Left means that Ventura will keep breaking pages until it finds a left page. Then it will start the paragraph. This is useful for technical manuals, for instance, where you want each section to start on the left in order to have a double page spread.
BeforelUntil Right means that Ventura will skip pages until it can place the paragraph on a right page. This might be appropriate, for example, for chapter titles in a book. The traditional rule is to start a chapter on a right-hand page. If you give the first tag in the chapter (the title, for instance) a BeforelUntil Right, Ventura will automatically create blank pages if necessary to force the title paragraph to start on a right-hand page.
-NOTE: This page break technique applies only if you have multiple chapters of your book inside a single Ventura chapter. Many users prefer to keep each book chapter as a separate Ventura chapter. In that case, select Start On: Right Side from the Page Size & Layout dialog box to force the chapter to begin on a right hand page.
Selecting After puts a page break after the paragraph. In

240
Page break paragraph
Chapter Five: Working with Style Sheets
other words, the next paragraph is forced onto the next page. Page Break: Mter is valuable for creating a special page break tag that can be applied to an empty paragraph. If you set the Alignment to Right, and the Line Break to None, the page break paragraph resides out of the way in the right margin on the same line as the previous paragraph (Figure 5-50).
copy. : Butscannershave other uses as well. Graphicdesigners can use scanned:
images as a basis for original artwork. Office managers can scan forms t~ use as templates for invoices, shipping orders, and other documents on a: laser printer. Companies with rooms full of paper records can use optica~ character recognition software to convert their files int(9habl~ databases. And anyone who needs to transmit documents to istant ca . tions can do so with the addition of a PC facsimile modem. :J
Figure 5·40. Page Break: After gives this empty paragraph the power to force the following text onto the next page.
Selecting Before & After isolates the tag on a page by itself, because Ventura puts page breaks before and after.
Column Break operates in the same fashion as Page Break. Most tags use the No option here, which lets Ventura decide on its own where to end columns. Selecting Before forces a column break before the paragraph, causing it to start at the top of the next column. Selecting After puts a break after, sending the following text to the top of a new column (no matter how much space is left below). And selecting Before & Mter causes the tag to stand alone in a column.
Line Break works in the same fashion as the previous two options. Most tags include some kind of line break. Before puts a line break ahead of the paragraph, causing it to start on a new line, no matter what precedes it.
Choosing Mter puts the line break after the paragraph, forcing the next paragraph to a new line. This choice is useful for the last entry in a table.

Working with the menus 241
Choosing Before & After means that the tag is always separated by line breaks above and below. Choosing No means that the tag can reside on the same line with other tags. This option is useful for certain newsletter layouts (Figure 5-41) .
........................... _--_ ... _ .................. _ ........................ _ ..... -- ...... _-.-------_ ... _ ....................................... . [Potholder World: Meet George, managing editor of Po/holder
fP.::::::::::::. Case Studylf mission is to assemble articles, columns, pho'tographis,1 materials into the world's leading magazine for afici but underappreciated kitchen utensil. Being a Po/holder World is put together by means of a desktop
In the old days before computers, articles covering ments in potholders would be sent to a typesetting notes indicating how the type should look: which and body text size, column width, and so on. It would form of galleys, long white strips of film containing George, an all-purpose managing editor, would cut the and paste them onto pages on a layout board. He would for illustrations or photographs, drawing boxes with show where the graphics should go. If
Drawings and photos come in various sizes and shapes, and shapes rarely corresponded to the little boxes them on the page. For this reason, most images had to before they could be used. To crop an image simply
Figure 5·41. The second column of this newsletter has no line break before and thus can reside on the same line as the headline.
The line break option does not affect lines within a paragraph. It concerns itself with breaks between paragraphs. If you choose Line Break: No, words within the paragraph still wrap to the next line when they reach the right margin. Ventura will not, however, put a line break before or after that paragraph.
The line break choice of one paragraph can override that of another. For example, assume that you want a paragraph to reside on the same line as the preceding paragraph. You choose, therefore, Line Break: No. If the paragraph still resides on a separate line, check the paragraph that precedes it. It is quite likely that its tag contains an Mter or a Before & Mter line break.
Next Y Position refers to the vertical position of the tag. It applies only if you have not specified a line break before. If you choose Line Break: Before, Ventura is going to start the paragraph on a new line anyway.
If you do not specify a line break before, you have two options. Normal places the beginning of the tag at the same spot

242 Chapter Five: Working with Style Sheets
vertically as the first line of the previous tag. Beside Last Line ofPrev. Paragraph places it next to the last line.
Allow Within controls whether or not to allow line breaks within a paragraph. Choosing Yes allows line breaks. If there isn't room for an entire paragraph at the bottom of a page (or column), Ventura will break it in two and send part of it to the next page (or column).
Choosing No does not permit line breaks within the paragraph. It has the effect of forcing the entire paragraph to stay on the same page. If there is not enough room at the bottom, it is sent to the next page (or column).
Allow Within is another feature that automates formatting by letting Ventura make some of the page layout decisions. It is useful when you have special paragraphs that should not be split up. For instance, many people like to put warnings inside special boxes. Normally, you don't want these warnings to be split up. (In addition, boxes created in Paragraph mode won't cross boundaries, so only the first half would have a line around.) To prevent such paragraphs from splitting, choose Allow Within: No. I
Keep With Next forces a paragraph to stay on the same page or column as the following paragraph. If there is not room for both of them, Ventura moves both of them to the next page (or column).
Keep Wi th Next can prevent headings from becoming separated from the text they refer to. If a heading occurs at the bottom of a page, it is possible that it could be isolated, while the following paragraph is sent to the next column or page. To avoid this possibility, choose Keep With Next: Yes for headings.
'-NOTE: When Ventura forces a heading to another page or column, it may cause a white space gap at the bottom.
Most tags should use Keep With Next: No, since forcing tags to stay on the same page greatly reduces Ventura's ability to produce balanced, pleasing pages. It is possible to choose Keep With Next: Yes and return to the Workspace to find that all your text has disappeared. You have created an impossible situation, where Ventura cannot keep all the paragraphs

Working with the menus 243
together, so it endlessly creates new pages looking for one where everything will fit. To repair this situation, open the Breaks dialog box again and choose Keep With Next: No.
Advanced Paragraph attributes
The Tab Settings, Special Effects, Attribute Overrides, and Paragraph Typography menu options are covered in Chapter Eight, "Advanced Functions."
Ruling Line Above, Ruling Line Below, Ruling Box Around
These three menu options are virtually identical in function except for the position of the line - whether it is above, below, or around the paragraph. Figure 5-42 shows a few of the possible permutations.
FIRSTPAR
l::lnc above
l::lnc below
s:1nslc
tt"::lplc
Line aboveft
Line belowft
Line above and belowft
Double lines above and belowft
I' Single box aroundft
ft ft ft
Figure 5-42. A few of the many lines possible with Ventura.
It is important to distinguish between the lines created in these dialog boxes and those created with Graphic mode. Graphic lines are drawn with the mouse. They are linked to frames - move the frame and the lines move with it. Move the text within the frame, however, and the lines stay in their original position. By contrast, ruling lines from the Paragraph menu are drawn automatically by Ventura and linked to a paragraph. If you move the paragraph, the lines move with it. Throughout the document, every paragraph with the same name has the identical lines.

244 Chapter Five: Working with Style Sheets
There are limitations to the use of these ruling lines. Lines above and below can appear either separately or together. You cannot, however, combine a box around with lines above or below. You can have up to three lines of varying widths, up to a total of 36 points. Although you can vary the widths, all the rules from one dialog box must be the same pattern and color. Boxes around will not extend past column and page boundaries. If the paragraph continues onto the next page (or column), the box does not show up for the second portion.
Figure 5-43 shows the dialog box for Ruling Line Above.
t
Desk File Edit View Chapter FraMe '. ••.• Graphic Options
"above below" RULING LINES ABOVE [II Width: ColUMn Color: Black
Pattern: Solid Dashes: OfF
Space Above Rule 1: aa.aa Height of Rule 1: aa.aal
Space Below Rule 1: aa.aa Height of Rule 2: aa.aa
Space Below Rule 2: aa.oa Height of Rule 3: oa.oa
Space Below Rule 3: aa.aa Overall Height: 00.00
Table Rule List: Hidden
I I I t
CustoM Indent: CustOM Width:
Dash Width: Dash Spacing:
.. 8
t
F.lf.UIF.l F.lF.I.F.IF.I
f.lF.l.F.IF.I F.lF.I.F.IF.I
] 3 ••••
:::::::::::::::::::::::::::::::::::::::::::::::::::::::::::::::::::::::::::::::::::::::::::::::::
Figure 5·43. The Ruling Line Above dialog box.
t
Width determines the line's width in relation to the paragraph and the margins. Choose None to turn off the ruling line feature, even if there are specifications in the dialog box. Choose Text to create a line that is only as wide as the text. Choose Margin to create a line the width of the margin (no matter how short or long the text). Choose Column to make lines that extend to the column boundaries. Choosing Frame to draw· a line the full width of the frame margin. Choose Custom to create a line with a fixed length and position that you specify. Figure 5-44 illustrates the options.
Color controls the color of the line. The same color is assigned to any and all lines you create in this dialog box. Black is the normal choice for rules. The other colors refer to printing options covered in Chapter Seven, "Producing Output," or special gray tints, as covered in Chapter Eight, "Advanced

Working with the menus 245
Desk File Edit View Chapter Frame Paragraph Graphic Options • I!!!!!!!!!!!!!!!!!!!!!!!i!!!!!!!!!!!!!!!!!!!!!!!!!!!!!!!!!!!!!!!!!!!!!!!!!!!!!!!!!!!!r"'C":'\"rVp'Es'E'T\ti'fjf:'t:Hp··· .. ····(i'i'EW·JHvy .. ·iiiiii!ii!!!!iii!!!!i!ii!!i!i!ii!!iii!!i!iii!iiii!!i!i!i!!iii!!!!!!!ii!i!i!!i!iliili! +
-_ ............................................................ ··· .. ·······1 r···· .. ····················· .... · ........ ·· .. ·· .. ············ ........ ·· .... ·· .. ····1 I. I
This is an example of a ruling line t~* spans the width of the frame. II' 1
This is an example of a ruling line that spans the width of the textft
This is an ex ample of a ruling line that spans a custom widthD I
Figure 5·44. Ventura provides five options for line widths. The Custom option can be any length and any position.
t
IT
Functions." White creates an invisible line under normal circumstances. However, white lines are visible against gray or black backgrounds.
Pattern varies the shading of the lines. The same pattern is assigned to all the lines created by this dialog box.
Dashes Off turns dashed lines on or off. Dash Width and Dash Spacing control the size of the dashes and the space between them (Figure 5-45).
r············ .... ········· ,. ••••••••••••••••••••••••••••••••••••••••••• -1
: Black dashed line. II' i
; ',tt,rn,d lin". l Another patterned line. II'
: . Double patterned line. D
Figure 5·45. Examples of the effects possible with dashed and patterned ruling lines.

246 Chapter Five: Working with Style Sheets
Custom Indent and Custom Width specify the position of a Custom rule. Indent specifies how far from the left margin the rule should start. By choosing a negative indent you can force the rule to the left of the margin.
Space Above Rule 1 allows you to allot extra space between the rule and the top edge of the frame. If you put space above rule 1 for a ruling box around, you create space around the entire outside of the box.
Height of Rule 1 specifies the thickness of the rule. Although you can use any units, we recommend the same fractional pts. used to specify font sizes and spacing.
When you change the units to fractional pts, you see the number 36.00 displayed in the upper right of the dialog box. This is your reminder that you can have any combination of rules and spaces up to a maximum of 36 points.
Space Below Rule 1 affects the white space allotted between rules.
Height of Rule 2, Space Below Rule 2, and Height of Rule 3 work the same as their counterparts for Rule 1.
Space Below Rule 3 can be misleading. The number you enter here can indeed apply to the space below the third rule. But it might better be called "Space Below Last Rule." The plus and minus Buttons shown here can lead to some interesting effects. Most tags use the plus, to indicate positive space below the rule.
If you choose the minus sign, you indicate negative space. In other words, the space is subtracted. The effect is to shift the line down, without affecting the text of the paragraph. You can use this feature, for example, to cause a wide ruling line above to shift down and overlap the text below it. Figure 5-46 shows two possible applications.
Overall Height shows the total of all ruling lines and spaces. The space taken up by ruling lines is added to any above or below space specified for the paragraph. Thus, if you request 12 points of space above the paragraph and add a 3-point ruling line above, you will have a total of15 points above the paragraph. Incidentally, you can create ruling lines larger than 36 points, but you cannot preview them in the dialog box.

Working with the menus
doub~o
FI"'STP~'"
.1::lnc above:
.1:lnc bc.1ow
s:lng.1a
tr-::lp.10
247
White on black .
Figure 5·46. Use Space Below Rule 3 to shift a ruling line down on top of the text underneath.
Tips for working with menus
a Ctrl-X brings up the previous dialog box when you're in the Workspace. When creating a new effect, you often need to experiment: try a setting, return to the page to see the results, try something else, return to the page. Hitting Ctrl-X brings up the last dialog box without the need to reach for the mouse. If you are inside a dialog box, Ctrl-X is the equivalent of clicking on the Cancel button.
a If you make a change and text disappears, don't click the mouse. Even though the paragraph has disappeared, it is still active. You can return to the Paragraph menu and undo your last change to recover. If you click the mouse you will deactivate the paragraph, and you may have a hard time recovering. If you always assign the FlO function key as Body Text, you can also recover by pressing FlO before clicking the mouse.
a If you make an irretrievable mistake, try using the Abandon option from the File menu. Abandon takes you back to the previous version of the document. If you save every five minutes or so, it may be faster just to revert to the previous version than to fix a troublesome mistake.

248 Chapter Five: Working with Style Sheets
Managing style sheets The bulk of this chapter has been devoted to skills for building style sheets. During your first few weeks with Ventura, those are the skills you'll need to master the menus. Once you get past that stage, however, you will find that your problems are related to administration, not to the software. You won't have trouble remembering how to change options. But you may have other problems:
Naming tags
• What did I call that brochure style sheet?
• Where did I store the chapter template for repair manuals?
• What was the name of the tag that created a special caption effect?
• Is this the most recent version of the style sheet? Or did I load the old one by mistake?
This section provides tips that will help you overcome these hurdles and create an efficient production environment. Even if you work by yourself, these ideas will save you time and money. If you share files with others, they are virtually mandatory. You don't have to adopt the specific strategies we recommend below. But you do need to establish and maintain some kind of logical system. Without one, you won't get the productivity benefits promised by desktop publishing. Instead of control and cost savings, you'll get chaos and confusion.
You can make your life easier with a systematic plan for naming tags.
Agree in advance on a core group of tag names, and use these names in every style sheet. With standard tag names, you can completely change the look of a document just by loading a new sheet. If the tag names are identical, the tag attributes from the new style sheet are instantly applied throughout the document. If the names are different, you must page through the document to retag the paragraphs.
More importantly, standard tag names make it easy and simple for authors to pretag their text files. Most users report

Managing style sheets 249
that pretagging and preformatting result in dramatic productivity gains.
What should the tag names be? As you choose your standard system, keep several things in mind. First, remember that the Assignment List shows tags in alphabetical order. Use this fact to group similar tags together. Names like Subheadl, Subhead2, and Subhead3 are listed together where they are easy to find. Names like Firstsub, Secondsub, and Thirdsub are scattered them around where location is difficult.
Try to determine which tags you will use together, and group them alphabetically. Tables, for instance, are easier to build if the style sheet lists the columns as Tablel, Table2, and Table3, and the title as TableTitle. Some people even go to the trouble of deciding which tags they use most often, and naming them so they appear at the top of the Assignment List. You can use tag names that start with A, or symbols as the first character to cause names to sort to the top.
Technical documentation groups and other sophisticated users will probably already have a standard list of page elements. In such cas~s, the best idea is to move this familiar list over to Ventura. Make Ventura conform to your way of doing things, not the other way around. It's quite simple to rename tags, and Ventura gives you enough space to use the words people are already familiar with.
Management tips
lim Large departments report less confusion when one individual is designated as the Ventura lead. This person is generally responsible for designing, coding, and distributing style sheets to the rest of the workgroup.
lim Try to reach agreement on when and how style sheets can be changed. The style sheet approach lets you create a unified, high-quality look for all your company documents. If people change style sheets without guidance, this consistency may be lost. Even worse, an important style sheet can be lost if someone copies over it with a corrupted sheet that has the same name.
lim Some companies use the DOS ATTRIB command to change

250 Chapter Five: Working with Style Sheets
the style sheet to read only status. That lets users read and apply the style sheet. They can make temporary changes if necessary to solve a one-time formatting problem. And they can save the style sheet under a new name. They cannot, however, save their changes back to the original style sheet.
a Consider buying style sheets. Ventura comes with about two dozen style sheets with sample chapters. You can also buy style sheet collections from third-party vendors. These collections can save you the time of building a library of formats on your own; or they can serve as the starting point for your own documents; or they can help you become more adept by studying professional exam pIes for tricks and techniques.
a To prevent people from using an old, outdated version, put a date tag on the Assignment List. This tag does not format any text. Its only function is to contain the date, so users can confirm they have the most recent one. We often precede the date with an exclamation point, so the version tag appears at the top of the Assignment List.
a Document your style sheets with Ventura's Print Stylesheet function from the Update Tag List dialog box. This function creates a generated text file. You then create a chapter and load the report into the chapter. Ventura provides a style sheet on the \ TYPESET directory called STYLOG.STY to format the report, or you can build one of your own. Print the report as a hard copy backup and a reference tool. You can use it to record the tag names, and to reproduce complex tags in other style sheets. You can also buy third-party utilities that produce style sheet reports and add other functions.
With the conclusion of this chapter, we have shown how to build all three elements of the Ventura Formula. Now it's time to bring them all together. In the following chapter we outline an easy, efficient way to layout documents with Ventura Publisher.

Chapter Six
Building the Chapter
Once you've created text, pictures, and a style sheet, you're ready to assemble them into a document. This chapter
outlines document layout techniques. When you finish reading, you'll know how to create the underlying structure for a document, how to work with text and pictures, and how to save what you've done. You will also know the different layout strategies for the three types of Ventura documents.
This chapter concerns itself with overall strategies and basic skills. For advice on specialized applications, turn to Chapter Ten, "Special Document Formats."
Three document categories Ventura documents fall into three categories: page, frame, and free-form. These categories refer to text and the way it is handled. It is important to understand the distinctions so you know which methods to use when building documents of your own.
In page-style documents:
• the main text is in a single file
• the main text resides on the Underlying Page
• the basic format is the same from page to page
In frame-style documents:
• the text is in multiple files
• the text resides in separate frames
• the format varies within an overall design structure
In free-form documents:

252 Chapter Six: Building the Chapter
• the text is in Ventura's caption file, or in multiple short files
• the text resides in Box Text, or in separate frames
• the format differs from page to page
These three types are the key to Ventura's versatility. They give you the efficiency of page-style for long documents and the adaptability of frame-style for multiple-article publications plus the flexibility of free-form for design-intensive pages. Table 6-1 demonstrates the differences in more detail.
Table 6·1. Ventura's three document categories.
Document Type Location of Main Text Format Typical Examples
Books
Page Single file Consistent from page to Directories On the Underlying Page page Reports
Manuals
Multiple files Varies from page to page Newsletters
Frame Multiple frames on top of within confines of a grid Magazines the Underlying Page structure Newspapers
Marketing materials
Caption file or multiple Varies widely from page to Advertisements
Free-form small files page with few restrictions Forms Box Text or multiple frames
How category determines layout strategy Different document types demand different layout strategies, as summarized in Table 6-2. In this chapter, you will learn the procedures for page-style documents. Page-style documents are the most common and have the widest applications. In addition, the basic skills for building page-style documents apply to the other types as well. Chapter Ten, "Special Document Formats," discusses the special requirements of framestyle and free-form chapters.

253
Table 6-2. Layout strategies for different document types.
Page Frame Free-Form
Create the underlying structure Create the underlying structure Create the underlying structure
Load, place, tag, and edit text Create frames for the text Create Box Text or frames for text
Create frames for pictures Load, place, tag, and edit text Type in, tag, and edit the text
Load, place, and edit pictures Create frames for pictures Create frames for pictures
Save the chapter Load, place, and edit pictures Load, place, and edit pictures
Save the chapter Save the chapter
A game plan for building a chapter Throughout the first few chapters, we've referred to the Ventura formula: Text + Pictures + Style = Chapter. The formula illustrates how a Ventura chapter is constructed from three essential components. In that sense, the formula describes what happens before you build a chapter.
If we rearrange the formula, it also becomes a good model for what goes on while you build a chapter:
Style + Text + Pictures = Chapter
Table 6-3 lists layout strategies for page-style document, showing the best order for working on things:
Table 6-3. How the revised Formula guides chapter layout.
Style Create the underlying structure
Text Load, place, tag, and edit the text file
Pictures Create frames for pictures Load, place, and edit pictures
Chapter Save the chapter Create a chapter template
The new version of the formula suggests an efficient way of working - a game plan, or blueprint. We think a game plan is crucial for beginning Ventura users. First-timers often complain that Ventura is too much ofa good thing. It has so much

254 Chapter Six: Building the Chapter
power and so many options that people don't know where to start and what to do next. For maximum efficiency, resist the temptation to strike out randomly. Instead, take a systematic, step-by-step approach. If you become uncertain about the next step, try using the revised formula as a guide:
• Have you finished the underlying structure (Style)? If so, it's time to move on to text.
• Have you loaded, placed, and edited the text? You're ready for pictures.
• Done with the pictures? Now move on to the chapter phase.
• Have you saved the chapter and turned it into a reusable template? Time to pat yourself on the back.
Once you become proficient, you'll invent your own work strategies and formulas. In the meantime, the formula offers a starting point.
Building page-style chapters This section steps you through the techniques for building a page-style document. You will encounter a range of essential skills, most of which apply to all kinds of documents:
• completing the underlying structure
• working with text
• working with frames and pictures
• creating a chapter template
A page-style document puts the main text file onto the Underlying Page. This is not to say that you can't have other small files associated with the chapter. You may, for example, want to keep tables and spreadsheets in separate files inside frames. And it's not to say that the format never varies. You are likely to have illustrations, charts, diagrams, tables, and pictures in varying combinations.
Nevertheless, the main text is in a single file, the structure of the Underlying Page does not change, and the document uses

Building page-style chapters 255
the same basic typography throughout. If you tend to think of the document as a single unit, you probably have a page-style document. If you think of it as separate articles lumped together, you probably have a frame-style document.
Building an underlying structure It makes sense to complete the underlying structure - the document-wide formatting - before you start adding text and pictures. You lose the advantage of the WYSIWYG screen if you don't have the page design in place. It's tough to judge the true effects of text and pictures unless you see them in the context of the complete page.
In the previous chapter, "Working with Style Sheets," you began the process of building a structure. (If you haven't built a style sheet yet, review Chapter Five before going on.) Many of the properties you assigned - the page size, the margins and columns, the chapter typography - apply to the Underlying Page and, therefore, to the document as a whole.
Now you're going to complete the basic structure by adding elements that are stored with the chapter file: headers, footers, and page numbers. To do so, you will start a chapter, load a style sheet, and create the headers and footers.
One quick tip before you start: You may find it easier to work on a document if you use the option and preference settings listed in Table 6-4. They help you visualize the page more accurately. Chapter Nine, "Advanced Tips and Techniques," gives further details on changing preferences and creating an efficient work environment.
Starting a chapter To start a new chapter from scratch:
• Select New from the File menu.
• Select Save As from the File menu. An Item Selector appears.
• Enter the chapter's new name (and, optionally, its new location) in the Item Selector. Click OK.

256 Chapter Six: Building the Chapter
Table 6-4. Recommended option settings for building a chapter.
Feature
Set Preferences
Set Ruler
Rulers
Column Guides
Tabs & Returns
Column Snap
Line Snap
Setting What It Does
Generated Tags: Displays automatically generated tags at bottom of Shown Assignment List
Text to Greek: 6 Shows unreadable small text as blocks to speed screen redraw
On-Screen Kerning: Eliminates screen kerning to speed redraw None
Auto -Adjust" and - Converts symbols to typographic equivalents
Horizontal & Vertical Conforms to standard typographic measurement Units: Picas
Shown Displays rulers on top and left side of page
Shown Displays lines to show column boundaries
Shown Shows visible marks in text indicating tabs, returns, line breaks, end of file markers, etc.
On Aligns frames with column edges
On Aligns frames vertically with line spacing of body text
Your new chapter has been opened. You can save it at any time by pressing Ctrl-S.
If you are continuing work on a chapter you started earlier, you take a different approach to reopen that document:
• Choose Open from the File menu. An Item Selector appears.
• Navigate to the correct subdirectory with the mouse (or by typing the path name on the Directory line).
• Scroll down the Item Selector until you see the name of the chapter.
• Select the chapter and click OK.
Ventura loads the chapter and all its associated files.

Building page-style chapters 257
Loading the style sheet In theory, it is best to have the style sheet complete before building the chapter. In practice, you will probably change it the first few times you use it (usually to add a tag for an unexpected contingency).
If you make changes, consider whether you want them to be reflected in the original style sheet, or if you want to create a new one. To alter the previous style sheet, do nothing. Ventura will save your changes under the original name when you save the chapter. To preserve the original!intact, use Save As New Style as soon as you bring in the original style sheet.
To load a style sheet:
• Select Load Diff. Style from the File menu.
• Use the Item Selector to navigate to the proper subdirectory.
• Select the style sheet from the list, and click OK.
Creating headers and footers A header is a line or two of text that repeats at the top of every page. Traditional typesetters often call them running heads. A footer repeats at the bottom of the page. ~.
In the following section, we explain how to create and format a header. The explanations apply equally to footers. We'll get into the mechanics in a moment. First, though, let's take a moment to understand the theory. When you ask for a header, Ventura responds by adding a frame at the top of the page. It matches the side margins of that frame to the Underlying Page. Then it centers the header text between the top of the page and the top of the column (Figure 6-1). If you don't like these settings, you can change them.
It pays to set page margins before creating the header. That way, Ventura does the work of matching the header frame to the rest of the page. Unless you say otherwise, the header appears on every page of the document. It can have one or two lines of text. Each line can have text at the left, in the middle, at the right, or any combination (Figure 6-2).

258
Header frame
Chapter Six: Building the Chapter
Figure 6·1. When Ventura creates a header frame, it matches the side margins to the Underlying Page and fills up the space between the top of page and the top of column.
Desk File Edit View Chapter Fra~e Paragraph Graphic Options
• liiiiiiiiiiiiiiiiiiiiiiiiiiiiii\i\\\\\mmmm\\mmmmimi\m\\\\\\\\\\\\r"C":'\'TYP'E~fEt\tfEifj:HP"""'''dfE\rJftYf'''\\!\\!\!\!!!!!\\\\\\\\\!\\\\!imi\\\\\\\\\\!!!!l!!!!!!!!m!mmm!mmmm!! •
'r-!-Line 1 Left Line 1 Center Line 1 Right Line 2 Left Line 2 Center Line 2 Right f··············· .. ··········-········~·-~··;;;;;··~·~··;··~··~·~:·:;;;·;;.:;;-~·;.;··;.;;,.··~·~~·:;;;.;.··~··~1
~ ~to=IQS~~:O".FI.~~ JKYU ~$ mQnth'tf m\ssion15 to ~lCr;:rt'ic:mj i :n~~=.::.:.~"!.::=~":.":::~:.,:/f~M:~_ ... ~
+ l~t~}t}J .1}}}}}}t~:1 + ..
Figure 6·2. You can have up to two lines of header text on the left, center, or right, in any combination.
Creating headers is a two-step process. First, you use the Headers & Footers dialog box to create the header frame and put something in it. Second, you format the resulting text.
Creating the header frame and contents
The first step to generating a header is to specify what goes where. Select Headers & Footers from the Chapter menu.

Building page-style chapters 259
Ventura responds with a dialog box that has space to type in what you want (Figure 6-3).
HEADERS & FOOTERS t
DeFine: I LeFt Page Header I Right Page Header
I LeFt Page Footer I Ir-:R:-:"i""':'gh~t-=P:--ag-e-:F:-oo~t-er""'l
Usage: .. []EJ left: Line 1 Leftl-I ______________ _
Line 2 Left _______________ _ Center: Line 1 Center _____________ _
Line 2 Center _____________ _ Right: Line 1 Right, ______________ _
Line 2 Right ______________ _
Inserts: I Chapter ** I I Page ** I I 1 st Hatch I I Last Hatch I I Text Attr. I I Copy To Facing Page I
Figure 6·3. The Headers & Footers dialog box.
Define tells Ventura what you want and what page to put it on. To create mirrored (identical but reversed) headers:
• Click on Left Page Header.
• Type in what you want.
• Click on Copy to Facing Page.
To create different headers, one for the left page and one for the right page:
• Click on Left Page Header.
• Type in what you want to appear on the left page.
• Without closing the dialog box, click on Right Page Header.
• Type in what you want for the right page and click OK.
-NOTE: You cannot have different headers on left and right pages unless you've previously selected Sides: Double from the Page Size & Layout dialog box.
Usage turns on a header or footer for the entire document. (Later you will see how to turn off headers for a single page while leaving them elsewhere.) You must click on Usage: On

260 Chapter Six: Building the Chapter
for each header on each page. If you select Copy to Facing Page, Ventura turns Usage to On for that facing page.
Left, Center, and Right tell Ventura what to put in the header. You can type in text, or you can ask Ventura to insert it for you. If you type in text, Ventura inserts it on every page. Figure 6-4 shows text in the dialog box. Figure 6-5 shows how it looks on the page. As you can see, text entered on the Left line is left-justified. Text on the Center line is centered. Text on the Right line is right-justified.
Define: 1 Left Page Header 1 Right Page Header
1 Left Page Footer 1 '-:1 R"""'ig"""h""'t '=""'Pa-ge--"-Fo-ot-er-'I
Usage: m []IT] Left:
Center:
Right:
Chapter One:--:-----.-__________ _ The Plot Thickensf-I _________ ,----lPlll _____________ ,, __ _
Inserts: 1 Chapter Il 1 ~ I 1 st Match 1 I Last Match I
1 Text Rttr. 1 1 Copy To Facing Page 1
Figure 6·4. The entries in this dialog box create the header shown in Figure 6-5.
Chapter One:· • The Plot Thickens· + ..... ,._ ..... __ ..... -..................................................................................................... _ ............. -.................. ,-_ ......... _.+--... ..
Chapter In:
Figure 6·5. This header was created with the dialog box shown in Figure 6-4.

Building page-style chapters 261
You are not limited to typing text directly onto the header lines. By entering codes, you can instruct Ventura to insert text that changes depending on conditions. For instance, you can ask for the page number. Ventura will take care of the counting and insert a different number on each page.
The buttons next to Inserts provide shortcuts for entering codes. First you put the cursor on the line where you want the code (Left, Center, or Right). Then you click on a button, and Ventura puts the code onto the line. If you prefer, you can type in codes directly.
The first two buttons, Chapter # and Page #, insert codes for numbers. If you click on Chapter #, Ventura inserts the code [C#]. This tells Ventura to put the current chapter number into the header. The Page # button inserts the code [P#]. This code instructs Ventura to find and insert the current page number. You can combine these codes with each other, and with other text on the same line. For instance, here's what you might type to create the chapter-by-chapter numbering favored in technical documentation:
Page [C:ff:J-[P:ff:J
Here's what this code would create on page five of the third chapter:
Page 3-5
Chapter Eight, "Advanced Functions," elaborates on Ventura's counting and numbering functions.
The 1st Match and Last Match buttons are the key to creating powerful and versatile live headers. Live headers change for each page, depending on the contents of that page. Pick up any phone book for an example. You'll see something like "SmithSnider" on the top of one page and "Snider-Socha" on the next. Figure 6-6 shows another example.
You've previously seen how to place chapter and page numbers into the header. Live headers are created in a similar fashion. Let's recreate the phone book example used above. Suppose we want a live header at the center of each page. Let's further assume that, in our phone book, surnames are tagged separately as LastName. We will tell Ventura to (1) look on each page and find the first and last instances of the
262 Chapter Six: Building the Chapter
Live header __ J..'-:~----------""'~_'.""""" __ ".".-
Circulation Management Software __ .... -tIt.III. --..... an ........ .,.IMIIMII ... ......... "" • .uG
Digitizers
...... "'---=~'r".lnItrrAT~.oCI
...... D ..... ___ 7II" ..
-.., DI" ••• VOR" .... PO 11M PC or PM: t74I.OO
Editorial Software ~'hIIt---lfl_"" N.w.P1D,...,. =~ . .:vl"I~ .. ~.f'OO __ -til,. ... -l.a_ahMCI,...,.. .... BNxr.P&'Z ,.1.00 11_-__ ..... _ ...... :::.:'-'-.... -1:% .... IItrllMlCIIft.,... ••• It ...... RfWtAMDotnI"1iIMI CDnn ......... ' ....... A8ClIIr. .. PO ,1 .. .00
=.~-tI._ .. N ... ~""",,.rtnOn ..... tDItII1acE ,121.00 __ tt .....
--..-. =-=::-cullltra_ ... M'erIIWI .. l.OO
p;;auotopa;t ••
Product Updates
-NfIWOrk.CIUIMnt .......... .... nIDIh ._. 0lIl ____ ... ""' ••
/OEJC .....,.1Ct-IIMed.1IU'INIft111 .. ~ ,....-am NmhIUncI.Wlrato. IIMAT.M .... _ 11_
~.=r';"-'---... M7 ...
::t:'rwtrItIM' ....... .......... 11M PO .. _
____ "1114 ...
=l1li .............. -=~.......... ".00 --_ ...... ,. --== ...... 1dIhttIO IN PO 11_" _-___ lIrm_ JIl'MDIIf •• NffIIrrIIfrI NetworkwnlonotXl'WlMPW .. PO 111(.00
tJPIi.8durii
-_ .... --,.,~.,. ........ IICId .. _ ........ 11 •• .00
Fonlll and Font Software ....... __ .17 .... _ .. ... "" ......... _-=- -",., ... _"'_ ... -_... " • .00' ____ 411411_
~.-""'-"'" MUIhII'I .t •• -...... WA--Itt ...... u.-:='0:.'1:""- _.00' ____ •• 111' ...
FGntBcWJMFIlM MPlIMtJ«1cfI • ... PO ... .00
Forms Software a..NtnIlll:C ... _4 ......... --fnl'Jn!I,nllllfldlta .. " .,.PO ... :.=m,.........,_ ........ FcrnI."ntnddltlMyY;OIMu .. ..,...dtorm.l ..... ... PO --COpr., .. ntiOfOpuWldiingHllpDri
Figure 6·6. Live headers make it easier to find information in directories, listings, and catalogs.
LastN arne tag and (2) put those paragraphs on the center line of the header.
Here's the procedure:
• Open the dialog box and activate the header by selecting Define: Right Page and Usage: On.
• Put the cursor on the Center line. Click on 1st Match.
Ventura places this code on the line:
[<tag name]
• Erase the words "tag name" without erasing any of the brackets. In its place, type LastName. Now the code reads:
[<LastName]
So far you've instructed Ventura to examine each page, find the first paragraph tagged as LastN ame, and place that text on the center line of the header. To finish building the header:

Building page-style chapters 268
• Type a hyphen, the click on Last Match. Ventura inserts a similar code. This code, however, tells Ventura to find the last paragraph on the page.
• Replace "tag name" with LastN arne again. The end result is shown in Figure 6-7.
HEADERS & FOOTERS
Define: 1 Left Page Header 1 Right Page Header
1 Left Page Footer 1 ""1 R=i,..-g',..-lt,..-P""'"a-ge---",.Fo-o-te-r .... 1
Usage: III []ff]
Left:
Center: [(LastNallle] - [)LastNallle]1-1 __________ _
Right:
Inserts: 1 Chapter ** I I Page ** I I 1 st Match I I Last Match I I Text Attr. I 1 Copy To Facing Page I
Figure 6-7. These codes tell Ventura to find the first and last paragraphs tagged as LastName and put the text into the header.
This formula creates a different live header for each page containing the first and last surnames. The first header of your directory might look something like this:
Aames-Anderson
The second header might read something like this:
Andrews-Bryant
And so on, with Ventura doing the work of searching each page and finding the appropriate text.
In real life, we would have added page numbers to the header. Although we used LastName in the example, we could just have easily used any other tag name, like Section Head, Headl, Product, Category, or whatever. You can use live headers for a wide variety of documents. They make it easier for readers to find their way around. They have wide applications for directories, price lists, catalogs, proposals, reports, technical manuals - any medium-to-Iong reference document. For instance, if you look at the pages in this book, you

264 Chapter Six: Building the Chapter
will see that we insert section headings at the top of righthand pages, to make it easier for you to find the passage you want.
Formatting headers So far we've shown you~how to create a header frame and tell Ventura what to put inside. Now we'll look at the ways to format the header - to change its appearance and position. You have four alternatives, which you can apply alone or in combination:
• bracket codes inside the header dialog box
• tag formatting in Paragraph mode
• changing the header frame
• turning headers on and off
As with our previous discussion, the concepts apply equally to footers.
Formatting with bracket codes
Look back at a picture showing the Headers & Footers dialog box. In the previous section, we examined every button in the Inserts section except the one called Text Attr. This button assists in modifying header text with attributes like bold, italics, and so on. The technique is identical to entering bracket codes in text files, as explained at the end of Chapter Three. When you click on Text Attr., Ventura inserts the code <D> on the line. This bracket code is the signal to turn off an effect. You erase the D and type in the bracket code for the attribute you want to apply. For instance, to turn on bold you would use the bracket code <B>. To turn on italics, you would enter <I>. For bold-italics, you would use <BI>, and so on.
To make the entire header bold, make the change in Paragraph mode. Use text attributes only to make a word or short phrase different from the rest of the header. Don't forget to turn off the effect. Ventura applies the attribute until it encounters a paragraph return or the ending code ( <D> ).
Here's how you'd make the page number bold while leaving the rest of the header in normal text:

Building page-style chapters 265
Left: Chapter [C#]
Center:
Right: Page <B>[P#]<D>
As you can see, the code for the page number is surrounded by the bracket codes to tum bold on and off. We've been using bold as an example, but you can apply any of the bracket codes explained in Chapter Three, including:
• attributes
• font changes
• point size changes
• baseline jumps (shifting text up or down)
Changing the tag attributes
Formatting headers in Paragraph mode is easier to understand once you realize that Ventura generates its own header tag. When it creates the text, Ventura assigns it a tag called Z_Header. (Footers are Z_Footer). If there are no specifications for Z_Header in the current style sheet, Ventura uses those of Body Text. If you don't want your headers to look like the main text - and you probably won't - you can change these tag specifications.
You cannot change the pre-assigned tag name or give header text a different tag. With this limitation, header tags can be formatted like any others. The tag name appears in the Assignment List provided you choose Generated Tags: Shown from the Set Preferences dialog box.
To change a header's font, for instance:
• Enable Paragraph mode.
• Click anywhere on the header to select it.
• Select Font from the Paragraph menu.
• Make the changes you want and click OK.
The changes apply to all the text in the header, ·and to every header throughout the document. Not every dialog box applies to header text. You cannot, for exam pIe, change the alignment.

266 Chapter Six: Building the Chapter
The Spacing dialog box, however, is the key to changing the header's vertical position. When Ventura first creates the header, it centers the text between the top of the page and the top of the column. You can use Spacing from the Paragraph menu to change this. Add space above to push the header down toward the rest of the text. Subtract space above to push the header up (Figure 6-8).
Desk File Edit View Chapte~ F~ame Pa~ag~aph G~aphic Options
• mllllllllllllllllll::m::::::::::::::::::::::::::::::::::::::l:l:l:::l:lllll:ll:lr··c·:'\"fvp"E~fE't\tfElfJ::HP· ·······dfEW·Jfivj"· .. iiiiiiiiiliiiiiiiiiiiiiiiiiiiiiii:iiiiiiiiiiiiiiiiiimiiiiiiiiiiiiimmiiiiiiiiiii +
Space above pushes the header
down
____ ~ ________________________________________ ~t ~
This header t~xt has been moved down
+ [ttt?~J 1}\~tt~~ttJ + II..
Figure 6-8. The Spacing dialog box provides one way to change the position of the header.
Changing the header frame
It's not always possible to get the look you want with bracket codes and paragraph attributes. In some cases, you may need to alter the header frame:
• Enable Frame mode.
• Select the header frame.
• Select Margins & Columns from the Frame menu.
• Make the changes you want and click OK.
When Ventura creates a header frame, it uses the margins of the Underlying Page. By altering these side margins, you can create hanging headers, or indented headers (Figure 6-9). By changing the top and bottom margins, you move the text up or down.

Building page-style chapters 267
New left margin for header frame
~------.jll Header text .•..•••••.•••.••••..•••••••••••••••.••.•.•••••••••.•••••••.•••.• 1.. ••••••.••••••.••••••...•.•••.•••.•••• : •..
no one would have envisioned severa.l years ilgO, seann@fS and can be used in many ways that might seem surprising."
The first scanner application that may come to mind Is Introduction of low·cost laser printers and page layout and Xerox Ventura Publisher, desktop publishing has become segments of the computer market Editors can design a page on a created with a word processor, and apply attributes like type size, spacing to headlines and body copy.
Meet George, managing editor of F\}fll"A/N 'Y",A/. assemble articles, columns, photographs, ads and other magazine for aficionados of the helpful but underappreciated magazine of the 1980s, F\}tll"A/N ,y",A/ is puttogether by means system.
Figure 6·9. Certain header formats require you to change the margins of the header frame.
-. NOTE: To change the vertical position of a header, try to use the Spacing dialog box before trying frame margins.
The settings of the Spacing dialog box are stored with the style sheet. You can thus have the identical spacing in another document just by loading the same style sheet. The margins of the header frame, by contrast, are stored with the chapter file. To recreate this effect, you must use a chapter template, or you must build it over again from scratch in each chapter. Although you can change the inner margins of a header frame, you cannot resize or reposition it. You can also apply a frame background to a header frame. On the screen, it looks as though the background extends all the way to the edge of the paper. In reality, part of this background extends into the dead zone of a laser printer. It will not print out except on typesetters that can mark to the edge of the page.
Turning headers off
You may want to turn off the header on a page, even though you want headers in the rest of the document:
• to keep page numbers and other header text off the title page or chapter opening
• to create extra space for a full-page illustration
• to create a completely blank page

268 Chapter Six: Building the Chapter
To turn off the header for an individual page:
• Go to the page.
• Select Turn Header Off from the Chapter menu.
If you change your mind, return to the Chapter menu and select Turn Header On.
-NOTE: Don't turn off headers until you finish the layout. If you make changes too early, you may find the headers turned off on the wrong pages.
Page numbering You've already seen how to create a page number in a header or footer. Ventura also permits you to place page numbers anywhere on the page. To insert a page number (and/or a chapter number):
• Enable Text mode.
• Place the text cursor where you want the page number to appear.
• Select Ins Special Item from the Edit menu.
• Press F6 to bring up the secondary dialog box (Figure 6-10).
• Choose Page # .
.......... _ ........ _ ...................................................................................................................... .. George, managing editor of .Pothold~r World George's monthlyi is to assemble articles, columns, photographs, ads and otherl
? Do you wish to insert a I Page l=t WAIT reFerence to the current
page or chapter nUMber IChapter l=t
or cancel the request?
Figure 6·10. Insert Cross Reference Dialog Box.

Working with text 269
The current page number appears. You can use this feature to put page numbers anywhere, including inside repeating frames, captions, or box text. See Chapter Nine, "Special Document Formats," for suggestions on using this feature together with repeating frames to put page numbers in unusual positions and formats.
Working with text
Loading text
Earlier we suggested a revised version of the Ventura Formula as a model for building a chapter: Style (Format) + Text + Pictures = Chapter. So far you've learned to load a style sheet and create headers and page numbers. Now you are ready to work with text - to load, place, tag, and edit it.
To load a single text file:
• Select Load TextlPicture from the File menu.
• Select Type of File: Text. Then choose the file format you want to load.
• Select # of Files: One and Destination: List of Files. When you click OK, an Item Selector appears with which you can select the text file you want.
• Use the Item Selector to navigate to the subdirectory containing the file. Select the file name from the list and click OK (or double click on the file name).
There is a brief pause while Ventura brings the file into memory and inserts discretionary. hyphens. Once hyphenated, the file name is visible on the Assignment List in Frame mode.
To load more than one file at a time:
• Follow the procedures above, but select # of Files: Several. The Item Selector appears.
• Select the first file name. Ventura loads and hyphenates that file, then redisplays the Item Selector so you can select another one.

270 Chapter Six: Building the Chapter
• When you are through selecting files, click Cancel to return to the workspace .
., NOTE: To load multiple files in different formats, you must open Load Text/File once for each format.
When you return to the workspace, the file names are displayed alphabetically in the Assignment List in Frame mode. This signals that they are available to be placed on the page.
Placing text files Now you're ready to place the text file you loaded. Here's where the process deviates slightly depending on the type of document. Ventura Publisher has three modes for placing text: page, frame, and free-form. The key points to remember:
• When you place text on the Underlying Page, Ventura automatically creates new pages to accommodate the entire file.
• When you place text in frames, Ventura fills the frame to the bottom. Then it stops and waits for you to tell it where to put the rest of the file.
• When you type text into Box Text, Ventura stores it in the caption file. Each Box Text can be positioned independently of all the others.
This chapter focuses on p~ge-style documents. Chapter Ten, "Special Document Formats," gives additional tips on the frame-style and free-form methods of building chapters.
When you load a file, Ventura puts the name on the Assignment List in Frame mode. If you are in Frame mode and you select the Page before loading the text file, Ventura places it on the Page. If you did not select the Page or you were not in Frame mode, Ventura waits for you to place the file:
• Enable Frame mode.
• Click once on the workspace to select the Underlying Page.
• Click on the file name in the Assignment List.
Ventura pours the file onto the page (Figure 6-11). Although you can't see it, Ventura also creates as many additional pages as necessary to accommodate the entire file.

Working with text
'The Adwnllre Beglm1l
~B~~ L.~w""'lII:II'''''''''''':'~'~':II''''''lIII'''':'':lIII''.l ;,.. .. -. -_ .... " .. -- :
g~~~~;,r~~~ =-_ .............. __ ..................... _ ............. :
271
Figure 6·11. To place text on the Underlying Page, select the Page, then select the file name from the Assignment List.
Placing more than one file on the Underlying Page
Page-style documents usually have a single text file on the Underlying Page. Still, there may be occasions when you want to place more than one file.
For short sidebars, spreadsheets, and tables, place a frame on top of the Underlying Page, and pour the file into the frame. This is especially useful if you want to separate the new text with a ruling box around, or give it a different graphic treatment, such as a different type style or a gray screen.
But what if you want to place two text files one after the other on the same Underlying Page? The easiest way is to pour in the first file, then enter Text mode. Position the cursor where you want to insert the second file, and select Load TextlPicture from the File menu. Select Destination: Text Cursor to make the new text file appear at the text cursor. The new text will then be poured into the desired location and merged with the previous text.
You can also combine two or more text files using DOS or (better yet) a word processor. If the two text files are from different word processors, convert them to compatible formats with Ventura so you can combine them. Combining text files is the most efficient way to handle batch-oriented tasks like books and manuals.

272 Chapter Six: Building the Chapter
Removing a Page
You cannot remove an Underlying Page if it contains a text file. You can, however, delete a Page if the text is in frames. When you remove a page, you delete the frames as well.
Removing text files To remove a text file from the Page (or from a frame on top of the Page):
• Enable Frame mode.
• Select the Page (or the frame).
• Select Remove Text/File from the Edit menu. A dialog box appears (Figure 6-12).
Figure 6·12. The Remove Text/File dialog box.
• Confirm that the file you want to remove shows on the top line. If not, clear the line and type in the correct name.
• Choose Remove from: List of Files to delete the file from memory and from the Assignment List. Choose Remove from: Frame to delete it from the current Page (or frame) while still leaving it on the Assignment List where it will be available to be placed somewhere else.
If you select the Underlying Page and then click on a second file name in the Assignment List, Ventura assumes that you

Working with text 273
want to replace the first file. This is a shortcut method of removing a file from a frame - by selecting the frame and clicking on the name of a new file. Ventura removes the old file from the frame and replaces it with the new one. The old one remains on the Assignment List.
Renaming and relocating text files To give a text file a new name, and/or to specify a new location (to put it on a different disk or subdirectory):
• Enable Frame mode.
• Select the Page or frame containing the file.
• Select File TypelRename from the Edit menu (Figure 6-13).
Old Nal'1le: C:\TVPESET\BOOI<.TXT _______ _
New Nal'1le: C:\WORD\BOOI<.TXT!I--_______ _
Text Forl'1lat: I Generated I IimiIII I WordStar 3 I I WS 4.0/5.0 I I MS-~Iord I I WordPerfect I I XyWrite I I a-Bit ASCII I I ~Iriter I I t1ultiMate I I DCA I I WordPerfect 5 I I PRN-to-Tflb1e I
Figure 6·13. The File Type/Rename dialog box.
• You see the old name and location (path) on the top line. Type in the new name and/or the new location on the New Name line and click OK.
- NOTE: If the text file has the same name and path as the chapter, Ventura automatically changes the text file name when you change the chapter name.
You can rename and relocate any text file on the Page or in a frame, including text you typed directly into Ventura. You cannot rename or relocate picture files inside Ventura (unless

274 Chapter Six: Building the Chapter
you are using an add-on utility such as Desktop Manager). The changes do not take place until and unless you save the chapter.
Converting to a different file format To convert to a different file format, follow the procedure for renaming and relocating a file. When the dialog box appears, you will see one of the buttons darkened to indicate the current format. Click on the new format, then click OK to close the dialog box. The change takes effect the next time you save the file. If you abandon the chapter without saving, the change is not recorded. You can rename, relocate, and change the format of files at the same time or in any combination in the File TypelRename dialog box.
-NOTE: If you change the file format we suggest that you change the file extension to match. See Chapter Three, "Creating Text," for our recommendations.
Tips for loading and placing text
a Load all the files at one time to save time and make the layout process more efficient.
a Don't load unnecessary files. Each file takes up memory, whether or not it is actually put to use in the document. The less memory, the fewer pages you can process at one time. If you load a file and later decide not to use it, remove it from the Assignment List with Remove TextIFile from the Edit menu.
a Don't use the USENGL2.HY2 alternate hyphenation algorithm unless absolutely necessary. It is slower than the default algorithm. See Chapter Eight, "Advanced Functions," for more about Ventura's hyphenation options.
a If you want to keep the original text file unchanged, use File TypelRename from the Edit menu to assign a new name before you make any edits. This tip may be useful for technical documentation where editors must keep an unchanged copy of the original manuscript. If you write over the original file by mistake, you may be able to retrieve the backup copy made by

Working with text 275
Ventura. This file has the same file name as the original, except that the first letter of the extension has been changed to a dollar sign ($).
a End-of-file markers are useful for confirming that you have placed all of the available file and there is no more remaining. End-of-file markers are small squares that appear immediately after the last character in a file. They appear only if you select Show Tabs & Returns from the Options menu.
Tagging text
Editing text
The next step in building a chapter is to tag the text:
• Enable Paragraph mode.
• Click anywhere on the paragraph you wish to tag to high-light it.
• Select the tag name from the Assignment List.
For faster tagging, use Shift-Click to select all the similar paragraphs on the page, and apply the tag name to them all at once. If you prefer to edit and tag in separate steps, we recommend tagging first. It seems to be easier to spot mistakes when text is in its proper format. Applying the style sheet by tagging the text is covered in more detail in Chapter Five, "Building the Style Sheet." If you prefer to pretag the word processing file, you will find complete preformatting instructions in Chapter Three, "Creating Text."
Once you have created the underlying structure and tagged the document, you are ready to edit the text. At this point, your pages should look very close to their final form. Many users like to make a final edit of the text at this time, before they add the distraction of illustrations. We do not recommend the editing tools in Ventura for wholesale changes and large block moves. For large-scale editing, return to the word processor. However, the editing functions in Ventura's Text mode are fine for last minute changes and corrections. Chapter Three, "Creating Text," covers Ventura's text editing tools in detail.

276 Chapter Six: Building the Chapter
Working with pictures Once you have the text loaded, placed, tagged, and edited, you're ready to add pictures to your document. The most efficient method involves three steps:
1. Load the picture file(s).
2. Add a frame for the first picture.
3. Place the picture.
Repeat these essential three steps as needed for additional pictures. You may also want to consider three options for some or all of the pictures:
4. Edit and enhance the picture.
5. Caption the picture.
6. Anchor the picture.
This section explains Ventura's many options for putting pictures into documents. It also explains how to create timesaving frame templates.
We recommend that you tackle pictures after finishing the format (style) and the text. The underlying structure needs to be in place before you position and size frames. For instance, there's no point in snapping frames to column guides if the column guides are in the wrong place. What's more, you can't tell where pictures belong until the text is in its final format. Yes, Ventura gives you the power to move the pictures if you decide to change the text. But no, you don't want to spend all your time moving frames back and forth because you added pictures too early in the process.
Loading pictures Loading picture files is a straightforward process. You use the same dialog box as you did for text files. You can also remove picture files with Remove Text/File from the Edit menu. You cannot, however, rename a picture file or change its format.
To load a single picture file:
• Select Load TextlPicture from the File menu.

Working with pictures 277
• Select Type of File: Line-Art or Type of File: Image. (See Chapter Four, "Creating Pictures," for a full discussion of the differences between line-art and image pictures.)
• Choose the file format you want to load from the line labeled Line-Art Format or Image Format.
• Select # of Files: One. An Item Selector appears.
• Use the Item Selector to navigate to the subdirectory containing the file. Select the file name from the list and click OK (or double click on the file name).
Ventura loads brings the file and converts it (if necessary). Once loaded, the file name is visible on the Assignment List in Frame mode.
To load more than one file at a time:
• Follow the procedures above, but select # of Files: Several. The Item Selector appears.
• Select the first file name. Ventura loads that file, then redisplays the Item Selector so you can select another one.
• When you are through selecting files, click Cancel to return to the workspace.
-NOTE: To load multiple files in different formats, you must open Load Text/File separately for each format.
When you return to the workspace, the file names are displayed alphabetically in the Assignment List in Frame mode. This signals that they are available to be placed on the page.
Before you can place a picture file, however, you must create a frame to contain it. Whatever type of illustration you wantdrawings, photos, diagrams, charts - you will need a frame to contain it. To add frames efficiently and correctly, you need to understand how they work.
Understanding frames This section provides a quick course in frames and how to use them. To work efficiently, you need six basic frame skills:

278 Chapter Six: Building the Chapter
1. drawing
2. cutting, copying, and pasting
3. fine-tuning size and position
4. putting margins inside
5. putting padding outside
6. creating borders and backgrounds
First, a few basics. Frames are containers for text or picture files. They have an invisible boundary. In Frame mode, Ventura defines the boundary with on-screen borders that do not show on the printed page. To make the border visible, you must add ruling lines or boxes to the frame (Figure 6-14).
j l ! !
I
Desk File Edit View Chapter Frame Paragraph Graphic Options
~ ...••........•••..••••••.••........ __ ._ •••• __ ._ ........•..••• 1 D D
Figure 6·14. Ventura lets you put ruling lines and boxes around frames.
Frames can have margins and columns inside their boundaries. These margins override the margins of the Underlying Page. Thus, it is possible to have a one-column frame on top of a three-column Underlying Page.
You can draw frames anywhere on the page and you can overlap them. There is virtually no limit to the number of frames you can combine on a single page. You can also add backgrounds (Figure 6-15).

Working with pictures 279
Flow Text Around: On
Flow Text Around: Off
r---------------~ I I I I
I I I I I I I I L _______________ J
..
. . . .. . .. . .", .
. ...... .. :" :: .. ",
Figure 6·15. The nine standard backgrounds available through the Frame Background dialog box.
Text flows automatically around a frame unless you specifically tell Ventura otherwise (Figure 6-16).
Desk File Edit View Chapter Frallle Paragraph Graphic Options • !!lit::::::::::::::::::::::::::::::::::::::::::::::::::::::i:::ir"c":'\'Tvpt~fE'T\&BOoiFpr'j::HP""""'(i:n'iOOK':'p'C's'Tvj"'''iiiimiiiiiiiiiiiiiiiiiiiil!!l!!i!!Hi •
• +
Figure 6·16. Text flows automatically around frames unless you use the Sizing & Scaling dialog box to tell Ventura otherwise.
t
I

280 Chapter Six: Building the Chapter
You can attach a caption frame to any frame (Figure 6-17). When you move, copy, resize, or delete the original frame, the caption frame changes too.
Desk File Edit View Chapter Frame Paragraph Graphic Options • I!!!!!!!!!!!!!!!!!!!!!!!!!!!!!!!!!!!!!!!!!!!!!!!!!!!!!!!!!!!!i!!!!····c .. i·\"TYp·ES"E"Y\&oooR·:·P·1···:·CHp·········(&OOOR:'P'1"':'S'yy"j' "'I!m!!!!!!!!!!!!!!!!!!!!!!!!!!!!!!!!!!!!!!!!!!!!!!!!!!!!!!!!iii! +
.H.ong .K ong .H.yatt .H.otel, .f\o1l alyzmg our g OOCl tortune, we concluded! t that we wanted to do : ~:
~:~:~:~~:PaF~~rs::; l, ~ j' I1I1I1I1I1
Original Frame time, United, having just DIIOO, ~tl gn tt~~ -++---------:::g~onrr::le=n--:T.ns;:---';:r~ou:T:lte:::;:"s~an::::r1Cl.. ;au :;:;:;:;:; ;..~~:c~~: h~:~ot ~~~ Ij\I
Caption Frame _+t-_____ ----'y .... o,,, .... .,, .... ii'v.lo:U-0rl . ,. ...... lI ......... tl'lrw ..... H' ~t ..... ttn'-'f.l.oll-+h~ CaptiontextforframeC III€ II~~ ~~t~~:~ pdo~~i~ni~~~:sF~~ ............................................................................................................. ~ ~
~~ ! On February 10th, United acquired this authority, and on February!
1 lth Debbie began putting our trip together, "We left on March 2nd: and returned on March 26th, "We entered seven countries, traveles! over 25,000 miles on four airlin es, mad e ov E'l' 500 Kodachrome r :
slides, almost 200 Kodacolor® prints, and 5 112 hours of color and! sound videotap e, tI !
Figure 6·17. Caption frames are attached to the original frame and move along with ~,
Drawing frames With some frame theory under our belts, let's move on to the practical steps to using frames for pictures. Before you can place a picture on the page, you need a container for it. To draw a frame:
• Enable Frame mode.
• Select the Add New Frame button from the Side-Bar (or press the keyboard shortcut Ctrl-2).
• Return the mouse cursor to the workspace. It changes to indicate it is ready to add a frame.
• Position the cursor where you want the upper left corner of the frame. Press and hold the mouse button until a pointing finger cursor appears (Figure 6-18).
• Drag the cursor to the lower right corner of the frame and release the mouse button. The new frame appears.

Working with pictures
r· .. ·· .. ····· .. __ ······_· .......... ···_··· .. ···· .. · .. · .. · .. ········ ............................................................. ! I i ! i I I I !
I I I I
i ! I i i i I !
L. .... _ .... _ ...................................................................................................................... ..J~
Figure 6·18. To draw a frame, press and hold the mouse button until the pointing finger appears, then stretch the frame to ns full size.
Snapping frames to columns and lines
281
Ventura provides two snap-to functions that make frame placement easier and more accurate. Snap-to functions are similar to magnets. If you get a frame close to a snap-to element, it is automatically pulled into position. They operate whether you are adding, moving, or resizing a frame.
To enable the snap-to functions, select Turn Column Snap On or Turn Line Snap On from the Options menu (these are toggle selections, so use the same menu choices to turn them off again). Column snap forces the sides of the frame to align with the side of the column, provided it is close enough to bring the "magnet" into play (Figure 6-19). The column guides don't have to be showing, but they make it easier to see what you're doing. Select Show Column Guides from the Options menu to make them appear.
Line snap forces the top and bottom of the frame to align with the line spacing of Body Text. If Body Text has line spacing of one pica (12 fractional pts.), then the vertical frame will be in increments of one pica. Your frames could be one pica tall, or five picas, or fifty picas, but they could never be one and a half picas, or five and a quarter. As you draw, the frame will jump in units of one pica as it snaps to each line (Figure 6-19).
These functions are valuable allies. You can never be as accurate manually as Ventura's computer-assisted snap-to fea-

282
.................................................... For this reason, most! or scaled before they!
an image simply means! ou might do this to change:
Imn'izontalily oriented rectangle! or to draw attention to a!
!!!Th,,,,; duy<>_ To scale an image: it. This is usually ex-l
a percentage. An imagel
Chapter Six: Building the Chapter
Figure 6·19. Column snap forces frames to align with the left and right edges of the columns. Line snap is like having a grid of invisible magnetic lines across the page. Frames align automatically to one of the lines.
tures. You can draw frames free-hand knowing that they are properly sized and positioned to work with the rest of the page design. For this reason, it is important to set the format of the Underlying Page and the Body Text before you add frames. Otherwise you will be snapping frames to incorrect positions.
Drawing multiple frames
To draw several frames in a row, hold down the Shift key as you draw. The cursor stays in its add shape, indicating that you can draw another frame immediately without clicking Add New Frame again. Continue to hold down the Shift key until you are ready to draw the last frame. Release the Shift key before drawing the last frame.
Drawing a perfect square
To draw a perfect square, hold down the Alt key while you draw. Ventura lets you control the size of the frame, but it won't let the frame become a rectangle. To create a perfect square from an existing rectangle, press and hold the Alt key as you resize the frame.
Cutting, copying, and pasting framJs Frames can be cut, copied, and pasted just like text, using the Edit menu or the keyboard shortcuts. Copying or cutting puts

Working with pictures 283
the selected frame and all its attributes and text into temporary memory. If there was already a frame in temporary memory, copying or cutting erases it and substitutes the new frame instead. The new frame stays in temporary memory until you erase it by putting another frame there.
-NOTE: Putting a frame into the Frame Clipboard does not affect the Clipboards for text and graphics, which are retained separately.
To cut a frame:
• Enable Frame mode.
• Select the frame.
• Select Cut Frame from the Edit menu or press the Del key.
The frame is deleted from the page and placed in memory. To replace a frame cut by mistake, press Ins immediately.
To copy a frame:
• Enable Frame mode.
• Select the frame.
• Select Copy Frame from the Edit menu or press Shift-Del.
The frame remains on the page, but Ventura places a copy on the clipboard. If you watch closely, you will see the disk drive light go on as Ventura stores the information.
To paste a frame:
• Enable frame mode.
• Cut or copy the frame to put it on the clipboard.
• Move to the page where you want the frame to appear.
• Select Paste Frame from the Edit menu or press Ins.
The frame appears on the page at the same position it occupied when you put it on the clipboard.
Pasting multiple copies
Each time you press the Ins key (or select Paste Frame) you place another copy of the frame on the page. You will see

284 Chapter Six: Building the Chapter
Ventura redraw the screen each time. However, each copy is placed exactly on top of the previous one. What appears to be a single frame can actually be multiple frames stacked one on top of the other. To see the other copies, select the top frame and move it out of the way.
Selecting overlapping frames
When frames overlap each other, it can be difficult to select the ones underneath. To grab a frame at the bottom ofa stack, place the mouse cursor on the top frame. Hold the Ctrl key while clicking with the mouse. Each time you Ctrl-Click, Ventura selects the next frame down in the stack. When you reach the bottom, Ventura starts at the top again.
Putting multiple frames onto the clipboard
You can put multiple frames onto the clipboard, but they must be cut or copied at the same time:
• Enable Frame mode.
• Move all the frames to the same page. It doesn't matter whether or not they overlap.
• Use Shift-Click to select all the frames at once.
• Cut or copy all the frames to the clipboard.
Moving or copying to another page
Use the clipboard to move or copy a frame (or several frames) to another page. First, cut or copy the frame(s) to the clipboard. Then move to the page and paste in the frame.
Moving or copying to another chapter
You can also use the clipboard to move or copy frames from one chapter to another. First, open the chapter containing the frame (or frames) you want to copy. Put the frame(s) onto the clipboard. Open the second chapter. Move to the correct page and paste the frame(s). Be sure to paste the frames before you cut or copy anything else to avoid erasing them from the clipboard.

Working with pictures 285
Fine-tuning size and position
Ruler cross hairs
Ventura provides several aids to refine the size and position of frames:
• rulers and cross-hairs for easier positioning
• the ability to move with the mouse
• handles for resizing with the mouse
• a dialog box for mathematical precision
Using the rulers and crosshairs
Rulers are optional measuring guidelines at the top and left side of the workspace. You can choose the units of measurement. You can also use them together with the crosshairs (Figure 6-20) for measuring frames and other page elements.
Figure 6·20. The crosshairs move along with the cursor to show its current position. Use them to measure page elements.
To turn the rulers on, select Show Rulers from the Options menu. To change the units of measurement, select Set Ruler from the Options menu. When the dialog box appears (Figure 6-21), use the pop-up menus to select the units you want for the horizontal (top) and vertical (left side) rulers. You can have different units for each one if you prefer.
You can also change the zero point. By default, the ruler measures from the edge of the page. You can cause Ventura to
286 Chapter Six: Building the Chapter
Horizontal Units: Picas t Vertical Units: Picas t
Horizontal Zero Point: 00.001 picas & points Vertical Zero Point: 00.00
DO !Cancel!
Figure 6·21. The Set Rulers dialog box.
measure, for instance, from the edge of the margins. Suppose that your page had one-inch margins on all sides. Setting the zero point at one inch (so the rulers would begin at the margins) would make it easier to gauge spacing, indents, and tab settings.
Ventura also provides a free-hand way to set the zero point:
• Move the cursor to the 0,0 box at the upper left of the rulers.
• Press and hold the button until a four-way arrow appears.
• Drag the cursor to the new starting point. When the cursor moves over the page, it becomes crosshairs. Place it at the upper left corner of the item to be measured.
• Release the mouse button; the zero point will reset to the position marked by the crosshairs.
To return the ruler to normal, click once in the 0,0 box.
Moving frames
To move a frame anywhere on the same page without changing its dimensions:
• Select the frame.
• Place the mouse cursor anywhere inside the frame. Do not place the cursor onto the black handles at the edge.

Working with pictures 287
• Press and hold the mouse button until a four-way cursor appears.
• Drag the frame to its new location and release the button.
To move a frame to another page, use the cutting and pasting techniques described above.
Resizing with the mouse
To resize a frame with the mouse:
• Enable Frame mode.
• Select the frame.
• Place the cursor on top of one of the black handles that appear around the edge.
• Press and hold the mouse button until the cursor changes to a pointing finger. (If it does not change to a finger, you were not exactly on top of the handle. Try again.)
• Drag the edge of the frame to its new position.
Selecting a corner handle lets you change both the horizon tal and the vertical dimensions (as you did when drawing the frame). Selecting a middle handle moves only one dimension at a time (Figure 6-22).
Figure 6·22. To prevent both dimensions from changing, grab a middle handle when resizing a frame.

288 Chapter Six: Building the Chapter
Resizing and repositioning with a dialog box
For absolutely precise sizing and positioning, use Sizing & Scaling from the Frame menu (Figure 6-23). The two "Upper Left" lines specify the position of the frame's top left corner; the following two lines specify its size.
SIZING & SCALING
Flow Text Around: On t
Upper LeFt X: 136. 13131 .. c::J Frame Width: 19.1313
Upper LeFt Y: 134.136 .. c::J Frame Height: 14.135
Horiz. Padding: 1313.1313 Vert. Padding: 1313.1313 picas & points
P .i e t.Ul 't.~ :i:(.~<.~ 1.1 I )~.J : rJ:J.f::.·J.i:~.·.~:.(.~.~.~:!.~.~:~.·:J [)!.~::::.B.!:~.~:~:~f~:~::::E~:~.!:~.~:;.!:~.~.~.~~:.:']
A~~pe(.~t. H<.~t • .i(.): [:I:'i.~:!I~.~.!;.!:!I~.~.~:~.!f] [::I!.~~.~:;.!:~.~.~.(~:~.!~::]
X Crop OHset: f.lf.l.f.lf.l r:.:~·.:·] L::::J Y Crop OHset: f.lf.l.f.lf.l L.:~~:J c::] Scale Width: f.lf.l.f.lf.l Scale Height: f.lf.!.f.!f.I
CEJ I Cancel I
Figure 6·23. The Sizing & Scaling dialog box.
To reposition a frame with the dialog box:
• Select the frame.
• Select Sizing & Scaling.
• On the Upper Left X line, type in the distance you want the frame from the left margin.
• On the Upper Left Y line, type in the distance you want the frame from the top margin. Click OK.
When you return to the workspace, the screen redraws and the frame moves to its new position.
To resize a frame:
• Select the frame.
• Select Sizing & Scaling.
• Enter the new width on the Frame Width line.
• Type the new height on the Frame Height line. Click OK.

Working with pictures 289
You will learn more about the Sizing & Scaling dialog box when we discuss how to crop and scale pictures.
Tips for adding and positioning frames
a To move a frame a small distance on the page place the cursor anywhere inside the selected frame. Press and hold the mouse button. The cursor changes to a four-way arrow. While still holding down, drag the frame to its new position. You cannot use this method to move to another page.
a For more precise movement on-screen, use Ventura's keyboard mode. Place the cursor in the center of the frame, then press and release Ctrl-RightShift. The numeric keypad now controls the mouse. To drag the frame, press the End key. The four-way arrow cursor appears. Use the arrow keys to move the frame in small increments. When it's in the right spot, press Home.
For more precision, press the Shift key while using the arrows. The frame will move in even smaller increments. Press and release Ctrl-RightShift again to return to mouse mode.
&:ill To move a frame to another page, cut or copy the frame to the clipboard. Then move to the new page and paste it.
a To position a frame partially off the page, specify a negative value for X or Y in the dialog box. This has limited value on laser printers unless the Underlying Page is smaller than 8.5xll. Most laser printers cannot print close to the edge of the page. It does have application with some phototypesetters for producing bleed pictures. It could also be useful with the half-page size to create thumb tabs or other bleed effects.
a Be careful about which handle you grab when fine-tuning frame position. If you've got the vertical dimensions correct, don't grab a corner. Select a middle handle from either side. When. you select a middle handle, Ventura changes only one dimension, leaving the other one intact.
a Creating identical frames is faster and easier by copying than by drawing duplicates. Add the first frame, then copy and paste it repeatedly to create the others.
a For more accurate measurements, change to Enlarged View

290 Chapter Six: Building the Chapter
and use hairline marks on the rulers. These hairlines move as the cursor moves. Use them to set the beginning and ending points of the frame.
Adju$ting frame margins This section covers basic frame skills. You've already learned a variety of ways to add and change frames. You also need to know how to create margins and padding for frames - white space buffers on the inside and outside, respectively.
If you place pictures or text inside a frame with no margins, they extend the full width and height. In many cases, however, you want extra white space around the inside, especially if you have a ruling box around the frame (Figure 6-24).
Desk File Edit View Chapte~ F~aMe Pa~a9~aph G~aphic Options
6 r·D;·~~~i~~;··~~d·;h·~~·~;·~;·;;;;··i~··~;;i;·~;·~·i·~·;~ ""- ~nd shapes, and those sizes and shapes rarelyj
~orresponded to the little boxes George had! i:l.rawnforthem onthe page. For this reason, mos~ ~mages had to be cropped or scaled before theyj
.
'L ~ould be used. To crop an image simply mean~ ~o cut part of it away. You might do this to change! its shape from a horizontally oriented rectanglJ, ~o a vertical rectangle, or to draw attention to ~ ~articular objectinthe picture. To scale an imag~
,£.,. Jstoreduceorenlargeit.D i
t:::~:=:=:~=:~=:~:==::=::==:=:::::j
Drawings and photos come in various sizes and shapes, and those sizes and shapes rarely corresponded to the little boxes George had drawn for them on the page. For this reason, most images had to be cropped or scaled before they could be used. To crop an image simply means to cut part of it away. You might do this to change its shape from a horizontally oriented rectangle to a vertical rectangle,
~ ................................................................................................................................... · .. ·· .. ··lilif
Figure 6·24. Without a margin, pictures and text extend the full height and width of a frame (left side). With a margin, frames have a white space buffer inside (right side).
You add a margin to a frame the same way you do to a page:
• Enable Frame mode.
• Select the frame.
• Select Margins & Columns from the Frame menu.
• Enter the amounts you want for Top, Bottom, Left, and Right, and click OK.
In some cases, you may want only a point or two - just enough to keep the picture inside from overlapping and

Working with pictures 291
obscuring a ruling box around. In other cases, however, you may want a more generous margin. As a rule of thumb, use the line spacing of Body Text for interior frame margins, especially if you will be putting text inside the frame.
Incidentally, you can use this same dialog box to put multiple columns inside a frame. Although you would rarely want multiple columns for frames containing pictures, we will be using this feature when we discuss frame-style chapters.
Adding frame padding When you add a frame, text flows around it (unless you use the Sizing & Scaling dialog box to specify otherwise). But even though the text doesn't penetrate inside the frame, it butts flush against the edge (Figure 6-25).
jtI ...................................................... ········..,···M·~~~···G·~~~~·e,
! !World. George's. ! !articles, column i baterials into t ,. ~ficionados of j !citchen utensil. ! :Pothold€'r i ~~~ ~ .......................................... "................................................................................ In the old ~he latest developments in potholders would be sent to a ~ndicating how the type should look: which typeface to . and so on. It would come back in the form of g
of type. George, an all-purpose managing editor, onto pages on a layout board. He would I
Figure 6·25. Without frame padding, text sits flush against the frame boundary.
To get some breathing room, use the Sizing & Scaling dialog box. By entering a value on the line labeled Horiz. Padding, you put buffer space along the left and right side of the frame. Vert. Padding puts space along the top and bottom.
You can use padding for a variety of purposes. Vertical padding can keep lines of text from resting flush upon a frame. How much to add depends on the layout of your pages. As a general rule, use vertical padding that has an integer relationship with the line spacing of body text. For instance, if Body

292 Chapter Six: Building the Chapter
Text has 12-point inter-line spacing, consider adding 6, 12, or 24 points offrame padding.
Horizontal padding can allow pictures to reside by themselves. Figure 6-26 shows how a page from this book might look without horizontal padding. Together, horizontal and vertical padding can provide a white space buffer on all sides for frames that must be placed in the middle of text blocks.
0 ... ' __ ... -_"11,
.. _ct __ ,.44iq'ClNl.aIIow
wrllli.ct.., ____ n.. . "Otb,onhrnra,...
lookwl.tM ... ~
=::.t.'ta::.~=
~~IIDII'fWtbl,..uiDrUID~.'\t'W" .,..IJ~liIDdtm.krra...U.ID._'_pl..thlu. JUUI.olMdlUeb.
-NOTE:PItkItr1can.Irt«IIm"nm."""' .. IMfCIIfl. Undflf)lllvAW .. Fwl3an<».1f1flU1'YIlllpIat» fWD""'" nMtCDcrJ'a'lDlfltr.wywn*» .. rrhl""fl:rIlIMt". .."M'HIKJtpwh«l ....... ~ th.f).,..,.,
Adding rulIng II""" .. .w.nlIDrlblaeorUJ.)IImIIIII .....
..... b .......
..... Swlkrl' .. AMMhm..Pr-.-.
....... heW1II: .... nlICI), ..... _ ........... (Il_CIIokOK.
'1IN. .... _ ... JbI. .... ~orllDl:JLLtD.*"' ..
lMIIwCftill,".' ... ,.. ...... .u .... hLO" JiIo-.tnofta __ IIt""'_"~ __ 1Ppr., _ ....... w..olCGlltllllll.
Figure 6·26. How a page from this book might look if we did not use horizontal padding to keep text from intruding next to frames .
.. NOTE: Padding can affect text in frames as well as text on the Under/ying Page. For instance, if you try to place two frames next to one another, and you notice that the caption text has disappeared or is pushed to one side, decrease the padding.
Adding ruling lines
To add a ruling line (or lines) around a frame:
• Enable frame mode.
• Select the frame.
• Select Ruling Box Around from the Frame menu.

Working with pictures 293
• Enter the height of the rule(s), and the space between them (if any). Click OK.
You can also add lines above, below, or both .. Lines above and below create what some page designers call an open box. Open boxes are often used for tables, spreadsheets, charts, logos, mastheads, and tables of contents.
Whether or not to add a ruling line around depends on the type of picture. In general, use ruling lines when there is a lot of open space in the picture. Certain pictures, such as graphs and charts, already have rules or borders; you may not need to box those types. Photographs can usually do without a box around. Choose a single thin rule for most applications. Thick rules and multiple lines draw attention to themselves and away from the picture.
However, some applications demand multiple rules. You may want to put several rules around a caution note in a technical manual. (You can also put a ruling box around the text in Paragraph mode if you don't want it to reside in a frame by itself.) Or you may need multiple rules to imitate computer screens. If you glance through this book, you will see that our sample dialog boxes have two rules around them, closely approximating the appearance of dialog boxes on screen.
Some users like to use boxes with rounded corners to imitate the shape of the standard monitor. Ventura does not have a rounded box around, but you can achieve the same result by attaching a rounded rectangle in Graphic mode.
Adding a round rectangle
To added a rounded rectangle (round rec) to a frame:
• Enable Graphic mode.
• Select the frame.
• Choose the round rec tool from the Side-Bar. Draw the round rec to match the frame's dimensions (Figure 6- 27).
Obviously, the frame should not have a ruling box or it will conflict with the round rec. If you make the round rec slightly larger than the frame you need not worry about adding a margin. The frame boundary will keep the picture from touching the rectangle. The rectangle is attached to the frame and

294 Chapter Six: Building the Chapter
.~ ••••••••.••••••••••••••••••••••••••••••••••••••••••• ···········w·'·---------Ii i I Meet Ii ! I WOrld
II II Ire "1!
~-=_==--:!:::--=-=--::-_=:=-=-=JI~ "";;.' th, : covering
be sent to a typesetting shop with handwritten notes typeface to use, headline and body text size, column
e form of galleys, long white strips of film containing c
Figure 6·27. To imitate a computer screen, attach a rounded rectangle to the frame in Graphic mode.
moves with it, but be sure the frame is the right size before you add the rectangle. If you change the frame, the rect_angle will not change with it, and you will have to resize it separately.
Adding a circle
The same method described above for adding a round rectangle also allows you to put a circle around a frame (and, therefore, a circle around the text or picture inside that frame).
Adding frame backgrounds Frame backgrounds are useful for a variety of effects, including reverse text and tint blocks for sidebars. To add a background pattern to a frame:
• Select the frame.
• Select Frame Background from the Frame menu (Figure 6~28).
• Select the color and pattern you want. You will see a preview of your choice in the Result box. Click OK.
In addition to the standard patterns available here, you can define other shades of gray by assigning them to a color, as described in Chapter Eight, "Advanced Functions."

Working with pictures
Color: Black t Pattern: Hollow t
Result:
Figure 6·28. The Frame Background dialog box.
295
Layered frames You can put frames on top of one another to create special effects. One application is to create a shadow effect (Figure 6-29). Another use is to combine two (or more) pictures into one by loading the pictures into frames, then putting the frames on top of one another.
covering potholders
with handwritten notes indicating how the type should text size, column width, and so on. It would come
Figure 6·29. By putting a white frame on top of a black one, you create a shadow effect.

296 Chapter Six: Building the Chapter
Placing pictures Let's pause for a quick recap. The process of putting pictures into a chapter has three essential steps: load the picture file; add a frame; place the picture. And three optional steps: edit and enhance the picture; caption the picture; anchor the picture.
So far we've covered loading files and adding frames and we are ready to move ahead. As you learned earlier, you can place text files on the Underlying Page or in a frame. Picture files, by contrast, must always be in a frame. To place a picture file:
• Enable frame mode.
• Select the frame.
• Select the file name from the Assignment List.
If you place the wrong picture into the frame, remove it with Remove TextlFile from the Edit menu.
Editing pictures We use the word editing to cover anything that affects the way pictures look. You can edit pictures in four ways:
• scaling
• cropping
• adding graphics
• changing the image settings
These editing tools affect the way pictures look on the screen and on the printed page. They do not affect the original graphics file, which remains untouched.
Scaling pictures
Scaling a picture means to enlarge or reduce it. Look again at the previous illustratiQri of the Sizing & Scaling dialog box. The top half controls the size of the frame. The bottom half controls the picture inside the frame.
Your first decision is how to scale the picture. If you want Ventura to do the work, choose Fit in Frame. If you want to control the size manually, choose By Scale Factors.

Working with pictures 297
If you choose Fit in Frame, you can enlarge or reduce the picture by enlarging or reducing the frame. Whatever size you make the frame, Ventura will change the picture size to fit.
Both line-art and images can use the Fit in Frame option. It enlarges the image until it fills the frame margins (or the entire frame if you did not set any margins). If you pick Aspect Ratio: Distorted, Ventura stretches the picture as much as necessary to completely fill the frame (Figure 6-30). Use this option when accurate dimensions don't matter (as with cartoons) or when the shape of the picture matches the shape of the frame (as with a square picture and a square frame).
Figure 6·30. If you choose Aspect Ratio: Distorted (right), Ventura stretches the picture as much as necessary to fill the entire frame.
But often - as with technical drawings, for example - you cannot afford to distort the picture. In such cases, use Aspect Ratio: Maintained. Ventura still tries to fit the picture into the frame. But it stretches it only as much as it can without changing the existing ratio between horizontal and vertical. Although this option guarantees that the aspect ratio remains the same, it may leave extra white space around the picture.
Suppose, for instance, that the original picture is 4x5 in. Ventura would permit enlargements to 6x7.5 in., or 8xlO in., or any other measurement that preserved the same ratio.
If you prefer, you can control the scaling yourself. Select Picture Scaling: By Scale Factors. Ventura then displays the

298 Chapter Six: Building the Chapter
current dimensions at the bottom of the dialog box (Scale Width and Scale Height). The current dimensions are the actual size of the picture before it was brought into Ventura. Thus, if you created the picture at 4x5 in. in Publisher's Paintbrush, those are the dimensions that will show when you select By Scale Factors.
To change a picture's size, type in the new dimensions. When using By Scale Factors, you enlarge or reduce the picture independently of the frame size. For instance, you can make the picture larger than the frame. If so, Ventura shows as much as it can, starting at the upper left corner. To show the portion you want, use the cropping feature explained below.
If you select Aspect Ratio: Maintained, Ventura will only let you change the Scale Width. (Scale Height appears in gray to show it is not available.) Mter you enter the new width, Ventura calculates the height necessary to maintain the aspect ratio. For instance, to double a 2x3 in. picture, enter a new width of four inches. Ventura calculates the height necessary to maintain the same aspect ratio (in this case, six).
If you choose Aspect Ratio: Distorted, Ventura lets you change either the Scale Width or the Scale Height. For instance, you could enlarge a 4x5 in. original to 6x9 in. by entering Scale Width: 06.00 in. and Scale Height: 09.00 in. Be careful- you have the power to stretch and distort the picture, so choose the settings with care. Table 6-5 shows the effect of the four possible combinations.
Table 6·5. Effect of picture scaling options.
Apect Ratio: Aspect Ratio: Maintained Dist6rted
Fit in Frame ~I By Scale Factors

Working with pictures 299
Tips for scaling pictures
a When scaling bit-mapped images keep an integer (whole number) relationship between the original and the final size. This produces the cleanest image and reduces the possibility of Moire patterns. For example, note the original scale dimensions and enter new ones that are 2.0 times as big, not 1.73 times. Choose Aspect Ratio: Maintained to help you preserve the integer relationship.
a Scanned images should be printed at the original size if possible (or at least at an integer multiple of the original size). To make an image the same size as the original, select Aspect Ratio: Maintained. Then select By Scale Factors. Switching to By Scale Factors while the aspect ratio is maintained gives you an image the same size as the original.
Cropping pictures with Sizing & Scaling Scaling is one way to edit a picture. Cropping is a second method. Scaling changes the size of a picture. Cropping changes which part of the picture shows inside the frame.
Think of the frame as a window onto the picture. You can change the position of that window to display any portion of the picture. Originally, Ventura places the window at the upper left (Figure 6-31). You can use the mouse or Sizing & Scaling dialog box to alter the position of the window (and thereby alter what shows through). You can only crop pictures that are larger than the frame. Otherwise, there's nowhere to move the window - it already shows the entire picture. Thus, if you select Fit in Frame, you cannot crop a picture, because it will never be larger than the frame.
One way to crop a picture is with the Sizing & Scaling dialog box. If a picture is larger than the frame, Ventura starts by showing the upper left corner. Use X Crop Offset to move the window left or right (Figure 6-32). Positive X values move it to the right. Negative X values move it to the left. Positive Y values move the window down. Negative Yvalues move it up.
You can also crop interactively with the mouse. As with the dialog box method, this technique only comes into play if the picture is larger than the frame. To crop with the mouse:

300 Chapter Six: Building the Chapter
Figure 6·31. If the picture (gray region) is larger than the frame, the frame acts as a window onto the picture. The image at right shows the result that would be displayed on screen.
Figure 6·32. The result when a crop offset distance is specified (arrows indicate distance of X and Y crop offsets).
• Select the frame.
• Place the cursor in the middle of the picture.
• Press and hold the Alt key. Press and hold the mouse button until a small hand appears (Figure 6-33).
• Move the mouse in the direction you want the picture move. When the image is repositioned, release the Alt key and the mouse button.
Changing the image settings
Ventura can alter certain parameters of TIFF and PostScript gray scale images. When you place a TIFF image into a frame,
Working with pictures
return, but at the same time, United, having just gotten its routes ancU equipment from Pan American, had not yet received authority to fii: to other destinations or between points in the Far East, °11 1
igure 1-111 This picture has very little to do with this story, You might rantlo place a more appropriate picture in this frame,a
LO;:;·F'i?b~~·~rii··1"6·ih:·u~ii·;ra·~q~i·;e~fthi;··a~th~rltii~";;d"o~"F~b~iia;Yl 11th Debbie began putting our trip together. yWe left on March and returned on March 26th, ",We entered seven countries, over 25,000 miies on four airlines, made over 500 Kod,ichrome""1
301
Figure 6-33. To crop with the mouse, hold down the Alt key while pressing down the mouse button.
Ventura enables the Image Settings option at the bottom of the Frame menu (until then it stays gray). This option allows you to modify the appearance of the picture.
- NOTE: The Image Settings function is only available if (1) the image is in TIFF or PostScript format and (2) the image contains gray scale information and (3) the image is sent to a PostScript output device.
You are not required to modify the image settings. Ventura automatically chooses the most appropriate ones for your printer. The following section applies only to those who wish to experiment with the appearance of halftone images.
As shown in Figure 6-34, the dialog box lets you modify three parameters: the screen type, the screen angle, and the screen frequency (lines per inch). The screen type refers to the shape of the halftone cells in the image. You have five choices: Default, Dot, Line, Ellipse, and Custom.
Normally you will select Dot, which creates a circular halftone cell. However, you can obtain some interesting effects by using Line or Ellipse. If you select Default, Ventura chooses the screen type for you.
Screen angle refers to the rows of halftone dots. Generally, the rows are rotated 45 degrees. This minimizes conflicts between halftone rows and vertical or horizontal lines within the pic-

302 Chapter Six: Building the Chapter
IMAGE SETTINGS - (Gray Scale Image)
Halftone Screen Type: Dot 1
Halftone Screen Angle: 045 Lines Per Inch: 00751
Figure 6-34. The Image Settings dialog box.
ture. Screen frequency (lines per inch) refers to spacing between dots. The more lines, the higher the resolution (the more dots per square inch).
The greater the lines per inch, the better the resolution. Unfortunately, the greater the resolution, the fewer gray scales. There is always a trade-off between screen frequency and gray scale. For 300-dpi laser printers, the optimal screen frequency is about 60 lines per inch, which allows for 25 levels of gray. If you are sending your output to a 2540-dpi laser imagesetter, you can produce a 150-line screen, while still allowing for 256 levels of gray.
Normally, you will want to leave all of these settings at the default for your printer. Each printer manufacturer optimizes screen type, angle, and frequency. This information is available to Ventura when it prints.
Using Graphic mode to enhance pictures This section is devoted to ways of altering and enhancing pictures once you've brought them into your chapter. Ventura's Graphic mode provides an excellent way to enhance and modify pictures:
• Add simple lines to complete a drawing.
• Block out unwanted portions using opaque white shapes.

Working with pictures 303
• Shade portions for emphasis.
• Annotate drawings using Box Text and arrows.
• Create shadow effects for headlines and banners.
Ventura's drawing functions all work in the same fashion. To use any of the tools:
• Enable Graphic mode.
• Select the frame containing the picture.
• Select the tool you want from the Side-Bar.
• Position the cursor where you want the graphic to start. Press and hold the mouse button.
• Stretch the graphic to the correct size. Release the mouse button.
WARNING: 8e sure to select the correct frame before you start drawing. Otherwise the graphics may be attached to a different frame or to the Underlying Page by mistake.
Review Chapter Four, "Creating Pictures," for more on the basics of Graphic mode. This section concentrates on how to use Graphic mode to dress up pictures.
Ventura's graphic tools are particularly useful for two reasons. First, the lines, arrows, shapes, and patterns you draw do not have to be within the boundaries of the frame. As you can see in Figure 6-35, box text and arrows (or any other graphic) can extend outside the frame. Second, you can link graphics to a frame. If you move the frame, the graphics move along with it, whether or not they are inside the frame.
Box Text for annotations
Ventura's Box Text tool provides a method of annotating drawings. It does, however, have certain limitations. To use it most efficiently, follow this procedure: First, decide in advance what to say for each annotation to gauge the approximate size of the box. Then create a box text big enough for the largest annotation. Now get the box just the way you want it. Adjust the line

304 Chapter Six: Building the Chapter
Desk File Edit View Chapter FraMe Paragraph Graphic Options • :::::::::::::::::::::::::::::::::::!:!!!!!!!!!!:!!:!!!i!:!:!!::::!!:!:!!:!!!!!::!:!!: .... c .. :\jyp·ES'E'f\tfElfJ:!Hp ........ ·('tfElf: sty,),,"'I!::!!!!!!!!!!::!:!!:!!!!!!!!!:!!!:!!!:!!!!!!!!!!!!!ii!!i!!iii!!!!i:i!::::iiiiii::lii •
:36 t
,:····" .......... ·." ...... ,· .... ··,·· .. ••·· .. • .. • .... • .. · .......... • .. ··r·· ........................................................................ . o
---+---- L-f_ea_d _____ ---'
i--_~ ___ --I"0dy
Figure 6·35. Even though you can attach Box Text and lines to a frame, they do not have to stay within the boundaries of that frame.
attributes, fill attributes, and size until they are just right. Do not type in the words yet.
Once you have the look you want, use the first Box Text as a template. Copy it repeatedly until you have Box Text for every annotation. Move the boxes into position around the drawing.
-NOTE: If you change your mind about attributes after placing all the Box Text rectangles, use Select All from the Graphic menu (or Gtrl-O) to select and change them all at once.
Now you can switch to Text mode and type in the annotations. Then switch to Paragraph mode and change the font (if necessary). Finally, switch back to Graphic mode, choose the line tool and draw arrows from text to picture.
Tips for annotations
a Put in arrows after typing text. Until then, you don't know exactly where to position the arrow.
a Keep annotations as short as possible to avoid clutter.
a Use the Shift-Click method to select more than one graphic at a time, just as you use it to select multiple paragraphs in Paragraph mode. Likewise, you can de-select a graphic (and

Working with pictures 305
leave all the others selected) by Shift-Clicking on it a second time.
D To select all the graphics associated with a frame, use Select All from the Graphic menu, (the keyboard shortcut is Ctrl-Q).
D Pay extra attention to the frame selected when you create annotations. If you don't pay attention, you could find the graphic linked to the wrong frame.
D If you have trouble getting Box Text to print out, set the fill attributes to transparent. If you must cover up what is underneath, cover it first with a rectangle that has a solid white fill pattern. Then put the Box Text on top of the rectangle.
D For more accurate placement of Box Text and other graphics, use Grid Settings from the Graphic menu. This option creates an invisible snap-to grid.
Adding captions After you loaded the picture, placed it in a frame, and edited it, you can add captions. It's probably easiest to think of captioning as a three-step process:
1. Attaching the caption and caption label.
2. Creating the caption text.
3. Formatting the caption.
Attaching the caption frame
Attaching the caption occurs with the Anchors & Captions dialog box from the Frame menu (Figure 6-36). This dialog box performs four functions. First, it determines the position of the caption. Second, it can optionally add a brief caption label. Third, it can record the anchor name for a frame. And fourth, it can turn on automatic numbering functions. Let's begin first with the most straightforward application: determining the position of the caption frame.
To create captions in Ventura, attach a caption frame to the frame containing the picture. The only way to do this is with the Anchors & Captions dialog box. You can have only one

306 Chapter Six: Building the Chapter
ANCHORS & CAPTIONS
Anchor:
Caption: Off t
Label:
Inserts: I Table ** I I Figure ** I I Chapter ** I I Text Attr. I
Figure 6·36. The Anchors & Captions dialog box.
caption frame attached to a picture frame, and you cannot attach one caption frame to another. Ventura draws the caption frame for you, but you can change it later. The caption frame is linked to the picture frame. It always butts up flush against one side. It moves when you move the frame.
In addition, one dimension of the caption frame is linked to the frame and must be identical. For instance, a caption frame beneath a picture can be as deep as you want, but it can never be wider than the picture (Figure 6-37). If you make the caption frame wider, the picture frame becomes wider.
Caption frame -+--;;1-1 H····· .. ······················ ............ · .......... · .............. · ............ · ............ · ............ ·· ............ · ............ ·1
Figure 6·37. The caption frame shares one dimension with the picture frame.

Working with pictures 307
To create a caption frame with no label inside:
• Enable Frame mode.
• Select Anchors & Captions from the Frame menu.
• Select the position of the frame from the pop-up menu next to the line labeled Caption and click OK.
When you return to the workspace, Ventura has drawn a caption frame. Figure 6-38 shows the five options.
Caption Below
Caption left
Caption right
Figure 6-38. Ventura lets you choose the position of the caption frame, but you can have only one per picture.

308 Chapter Six: Building the Chapter
To change the size of a caption frame, use the mouse to resize it the same way you would resize any other frame. To avoid accidentally changing the dimensions of the picture frame, always grab caption frames by a middle handle.
Adding a caption label
You can also use Anchors & Captions to create a brief label. The most common use for this label is to number figures and tables. This short label may be only a small portion of the entire caption. Later, you can add more text by typing directly into the caption frame.
To add a label, use the Anchors & Captions dialog box as described above to determine the position of the caption frame. Then, with the dialog box still open:
• Move to the Label line. Type in the label you want to appear. This label can be up to 60 characters long. It is generally best to keep the label as short as possible .
• Click OK. When you return to the workspace you will see the label in the caption frame .
.. NOTE: Anything you type here can be edited only by returning to this dialog box. By contrast, text added to the caption frame can be edited in Text mode.
Adding figure or table numbering
While you are adding a label, you can enable automatic figure or table numbering. Ventura lets you have both table and figure numbering active in the same chapter, so tables and figures can have a separate numbering sequence. In the discussion below, we refer to figure numbering, but the techniques apply equally to table numbering.
With automatic figure numbering, you can let Ventura worry about the sequence of pictures. It will scan the pages, count the figures, and enter the correct sequential number into the caption label.
To invoke figure numbering, enter codes on the Label line. You can type them in yourself, or you can enter them by clicking on the Inserts buttons at the bottom of the dialog box.

Working with pictures 309
Take a look at any caption from this book. The label portion is the phrase "Figure C-F," where C represents the chapter number and F the figure number. For instance, the seventh figure in Chapter Four is labeled "Figure 4-7."
You create such a label in the Anchors & Captions dialog box. First you type the word Figure followed by a space on the Label line. Then you click on the Chapter # button to insert the code [C#]. Next you type a hyphen, then click on the Figure # button to insert the code [F#]. If you wanted punctuation (a period, for instance), you would also type it into the dialog box. The resulting code would read:
Figure [C#]-[F#].
You could type "Figure 1-1," but you would have to edit the label whenever you change the order of the pictures. With numbering codes, Ventura keeps track of the sequence.
Incidentally, you don't have to label your pictures as ''Figure'' and your tables as "Table." You can just as easily call them illustrations, charts, or nothing at all. Some people use the label line to contain a number with no words. Likewise, you do not have to include numbering in the label.
Changing the numbering style
Unless you tell it otherwise, Ventura starts with the number one and uses Arabic numerals. To change the starting number for figure numbers:
• Select Update Counters from the Chapter menu (Figure 6-39).
• Click on Initial Figure.
• Choose the Update Method you want.
To ask Ventura to number across chapter boundaries, select Previous Number + 1. If you print multiple chapters at one time, Ventura remembers the last number from the previous chapter. It adds one to that number to start the first figure in the next chapter.
To set a figure number of your own choosing, select the Restart Number button. Move the cursor to the Restart Number line. Type in the number from which you want to start.
310 Chapter Six: Building the Chapter
Desk File Edit View Frame Paragraph Graphic Options
• iiliiiiiiiiiiiiiii!!!ii!!!!!!!!!!!!!!!!!!!!!!!!!!!!!!!!!!!!!!!!!!!!!!!!!!!!!!!!!!!!!!"""·C·:Yi'VP"ES·E"t\r-I'ElfJ::Hp .... · .... C'1i"Elf:·s"tilj·····!!!!!!!!!!!!!!!!!!!ii!!!!!!!!!!iiiiiiiii!!!!!!jim!!!!!!!!!!!!!!!!!!!!!!!!!!!!!!!!!! • 0,0 t
UPDATE COUNTERS
~Ihich Counter: I Chapter I I'Mi4S L:If.iIi~::.=I~~¥.~I~;i::] [::Jf.~I~~::::.(Iii~:~r_i·J
I Initial Page I I Initial Table I I Initial Figure I Update Method: Previous Nur~ber + 1
I Restart": I ~nc.l I I Number Format: 1,2 t
Figure 6·39. The Update Counters dialog box.
To change the numbering format for figures:
• Select Update Counters from the Chapter menu.
• Click on Initial Figure.
• Use the Number Format pop-up menu to choose the style you prefer.
You can choose Arabic or Roman numerals or you can have Ventura spell out the numbers. You can also choose letters instead of numbers to sequence figures or tables, with full control over capitalization.
See Chapter Eight, "Advanced Functions," for other tips on Ventura's numbering functions.
Creating the caption text
So far we have shown you how to create a brief caption label with the Anchors & Captions dialog box. But what if you want a longer caption? Simply go to the caption frame, enlarge it (if necessary), and type in the caption with Text mode. We call words typed into the caption frame caption text (as opposed to the caption label). You can combine labels with text (as we do in the captions for this book), or you can have either one separately. Here's how it works:
• Enable Frame mode and attach a caption frame as explained above.

Working with pictures 311
• Select the caption frame and stretch it until it is at least twice as large.
• Enable Text mode. If you haven't already, select Show Tabs & Returns from the Options menu. An end of file marker appears in the caption frame.
• Position the text cursor in front of the end of file marker. Start typing. If you run out of room, stretch the caption frame as far as needed to accommodate the extra text.
The text you type in this way is stored in the caption file, along with the caption label (if any).
Changing the format of captions
When you create caption labels and caption text, Ventura automatically assigns tags to them. Initially, it assigns these tags the same attributes as Body Text. You can change tag formats, thus changing the appearance of caption labels and text. The generated tag names vary:
Labels without numbering: Z_LABEL CAP
Labels with figure numbering: Z_LABEL FIG
Labels with table numbering: Z_LABELTBL
Caption text: Z_CAPTION
You can't change the original names, but you can retag the paragraphs once they appear on the page. You can also change the format as you would for any other text. For instance, to change the format ofa caption label with figure numbering:
• Enable Paragraph mode.
• . Select a caption label (or caption text). You will see the assigned tag name Z_LABEL FIG in the Current Selection Box.
• Use the Paragraph menu to change its format.
Any changes will apply to every Z_LABEL FIG paragraph in the document. Alternatively, you could select a different tag from the Assignment List.

312 Chapter Six: Building the Chapter
Caption labels and caption text on the same line
When Ventura generates tags for caption labels and text, it uses the same attributes as Body Text. Since Body Text usually has a line break before or after, the paragraphs first reside on different lines. To place both paragraphs on the same line, remove the line break for caption text:
• Enable Paragraph mode.
• Select the caption text paragraph.
• Select Breaks from the Paragraph menu. Choose Line Break: No .
.. NOTE: You don't necessarily have to choose Line Breaks: No. The key is to set the breaks for both tags so there is no line break between the two paragraphs.
At this point, both tags are on the same line, but they probably overlap, making it impossible to read either one. One solution is to align the label flush left and the text flush right, using Alignment from the Paragraph menu. This solution only works, however, ifboth the label and the text are short enough that they don't meet in the middle. Another solution is to leave the caption text flush left, but to give it a relative alignment:
• In Paragraph mode, select the caption text .
• Select Alignment from the Paragraph menu. Choose Rela-tive Indent: On.
Now the text is aligned relative to the previous paragraph, which means it begins where the label leaves off. This still leaves us with a small problem: the caption text begins exactly where the label stops. To create some space between the two you can type a space after the last letter of the label in the Anchors & Captions dialog box, or use the Alignment dialog box to create a small first line indent - just enough to keep the text from touching the label.
Tips for captions
a Check the caption file separately with a spelling and/or grammar checker, just as you would check any other file. Don't forget to use ASCII format.

Working with pictures 313
-NOTE: Be careful not to delete any paragraph returns in the CAP file. Ventura keeps track of its captions by covnting them. If you delete a return, you'll throw off the numbering, and captions will appear in the wrong frames.
a You can put padding around a caption frame. Be careful, however, because the padding can affect text in the picture frame, or in adjacent frames and captions.
a To achieve the effect of padding on one side of a caption, add an extra blank line to the caption frame. This preserves extra space without the problem of padding encroaching into the picture frame. This method is not appropriate if you put a ruling box around your captions, since it would leave too much white space at the bottom of the caption frame.
a You cannot edit the label in Text mode as you can the rest of the caption. To change the label, use Anchors & Captions from the Frame menu to return to the original dialog box.
a Don't get frustrated by the process of getting captions to look right. You are creating tags that can be reused over andover again. Once you have fine-tuned the format and the appearance, you can reuse these settings in other documents that access the same style sheet.
Anchoring frames Ventura provides a method for ensuring that frames appear on the same page as the text that refers to it. This feature does not have perfect judgment; it doesn't do away with the need to check each page. But it can speed the layout process.
Most editors wait until all text changes have been made to place pictures. If they do it too early, the text may move to another page, while the picture stays behind. By inserting a frame anchor, you ensure that frames can be returned to the same page as the text reference. Ventura will move them for you. When a frame moves, everything attached to the frame moves with it - any text, pictures, captions, or graphics ..
Anchoring links a frame to a particular spot in the text. It involves two steps: (1) giving an anchor name to the frame and (2) putting an anchor marker in the text. Anchor names pro-
314 Chapter Six: Building the Chapter
vide a means for Ventura to tell which frames are which. The anchor markers show Ventura where to place those frames.
Assigning an anchor name
To attach an anchor name to a frame:
• Enable Frame mode.
• Select the frame.
• Select Anchors & Captions from the Frame menu.
• Type the anchor name on the line labeled Anchor.
What should you use as the anchor name? Ventura permits up to 16 characters. The shorter the name the easier it is to work with. The key to naming anchors is to choose something that is (1) unique, so Ventura can tell frames apart and (2) easy to remember, because you must use the identical name for the text marker.
If you have small chapters with few pictures, you can use any descriptive name, as long as you write it down for later reference. For longer documents, it is essential to come up with a naming system, especially if different people work on the. same document. If the frame contains a picture file, we recommend using the file name as the anchor name. This suggestion is especially appropriate for technical documentation.
You should avoid the temptation to use sequential numbers as anchor names. Typing in Fig-I, Fig-2, etc., may seem logical at the time. However, there is nothing in these anchor names that would let someone else decipher the contents of the frame. More importantly; the order of pictures often changes - if not in this first version, then in some future revision. If frames are added, deleted, or rearranged, you could end up with a frame that reads Figure 4 on the page, but whose anchor name is Fig-7. The potential for confusion is enormous.
Where should you place the marker? The most obvious answer is immediately after the text reference. Thus, if you use references such as "see Figure 4-7," consider placing the anchor marker immediately after this phrase. If you do not use text references, choose the spot next to which you'd like the frame to appear.

Working with pictures 315
Some users prefer to put the marker at the end of the paragraph containing the text reference, rather than in the middle of a sentence. Ventura signals frame anchors (and other special items) in the text with a degree symbol ( 0 ). This small mark is visible only if you select Show Tabs & Returns. Even then, it is hard to spot. Placing it at the end of the paragraph makes it easier to find, especially if you are consistent throughout the document.
Inserting the anchor marker
Once a frame has an anchor name, you can mark its anchor spot in the text. To insert an anchor marker:
• Enable Text mode.
• Place the cursor at the spot in the text where the anchor should appear.
• Select Ins Special Item from the Edit menu (or press CtrlC). A secondary menu appears.
• Highlight Frame Anchor and click once (or press F5). The InsertlEdi t Anchor dialog box appears (Figure 6-40).
INSERT/EDIT ANCHOR
Fral1le's Anchor Nal~e: l1aPl-1 __ _
F rallIe' s New Locat ion: Fixed, On Saflle Page As Anchor
I Relative, Below Anchor Line I ~ I Relative, Above Anchor Line I
I Relative, Autolllatically At Anchor I
DO ! Cancel!
and returned on March 26th. uWe entered seven countries, traveled! over 25,000 miles on four airlines, made over 500 Kodachrome(i)!
Figure 6·40. The Insert/Edit Anchor dialog box.
• Type in the anchor name of the frame on the top line. Be sure to match the spelling you used in the Anchors & Captions dialog box.
• Choose the location you want and click OK.

316 Chapter Six.' Building the Chapter
Ventura provides four anchoring options. The first three leave the frame in its old location until you issue a re-anchor command. Then the frame is moved to the same page as the text marker. The fourth option moves frames automatically as soon as the text marker moves.
Fixed, On Same Page As Anchor moves the frame to the new page when you issue the re-anchor command. It places the frame at the same spot it had on the old page. You can reposition it after reanchoring.
Relative, Below Anchor Line puts the frame on the new page when you issue the re-anchor command. It places the frame below the line containing the text marker. This option may cause the frame to be pushed below the margins. You can reposition the frame after re-anchoring. This is probably the most common choice, since most editors want pictures to appear after the text reference.
Relative, Above Anchor Line is the same as the previous command, except that the frame appears immediately above the text marker.
Relative, Automatically At Anchor causes frames to move along with text. One application is to associate logos, symbols, key caps, or other small drawings with a paragraph of text. These drawings can reside within the paragraph. In fact, Ventura treats the frame almost as if it were a character. For example, the text cursor jumps over the frame.
To use the automatic anchor with a small frame, choose Grow Inter-Line to Fit: On from the Paragraph Typography dialog box. This allows Ventura to adjust the line spacing as necessary within the paragraph to accommodate the frame.
To use the automatic anchor with a large frame, you must meet several conditions. You must insert a line break (CtrlEnter) at the end of the paragraph. The anchor marker must follow this line break immediately. The frame should be snapped to both sides of the column guides and column snap should be on (Options menu) .
... NOTE: Use of automatic anchoring feature may override frame padding and other frame settings.

Working with pictures 317
Issuing the re-anchor command
Automatic frame anchors move the frame every time you add or delete text. The other three options do not move the frame until you issue the command:
• Select Re-Anchor Frames from the Chapter menu or press the keyboard shortcut Ctrl-B. A brief dialog box appears (Figure 6-41).
return, but at the same time, United, having just gotten its routes an~ equipmentfrom Pan American, had not yet received authority to fly: to other destinations or between points in the Far East, °Il i I '\
? Do you wish to re -anchor WAIT just this page's fral1les,
or all page's fral1les, or cancel the request?
I This Page I I All Pages I I Cancel I J~~-!
u might ! 1!:=='Wr~;;;;;:;;:I"urn;, ",iii'~ ... :;r.v~ini"liTiTii"u", v;rn ~",ii'ii',,,,,i'ii'iiTii u",,=iiB'vm "",~m;;;:;,u,,' v'm" ,"iii"" ,m",,;;:;;, ' Qii'ii"" v;r.;:",_:;==::!f !
"'O;:;-F;b~uary'·i'Oth'~·u~i;'~:r~cq~i;e;f'ihi;'i~th'~-~i'ty;'·';;;';r;;n"Feb~~~~Y1 11th Debbie b Egan putting our trip together. uWe left on March 2ndl and retumirl on March 26th, uWe enterirl seven counhie'S, traveled: over 25,000 mile'S on four airlines, made over 500 Kodachrome®:
Figure 6·41. The Re-Anchor Frames dialog box .
• Choose whether or not you want to move the frames that appear on the current page, orall the frames in the document.
Ventura moves the frame(s) to the same page as the anchor marker(s). This feature is merely a starting point. It may cause frames to extend past the margins or to overlap each other. It also fails to move frames if the user forgets to insert a text mark or to match the anchor names exactly. Mter anchoring frames, you should check each page and manually adjust those frames that are improperly positioned. Do not select Re-anchor Frames again or you will undo the changes.
Creating a frame template As you have seen in this section, Ventura offers many options to control the appearance of frames. To name just a few:

318 Chapter Six: Building the Chapter
• margins
• captions
• padding
• ruling lines
• backgrounds
You can spend a lot of time reinventing the wheel if you must redo all these settings for each and every frame in the document. The alternative is to create reusable frame templates.
A frame template is a simple concept. First, get the frame to look just right. Then make sure that it is empty (that it doesn't have any text or picture inside). Now copy it to the clipboard. To place a copy of this template anywhere in the document, move to the page, enable Frame mode, and press Ins. Your frame template appears, complete with all specifications including (if you want) caption frames and figure numbering.
Don't delete the template after putting it onto the clipboard. If you cut, copy, or paste another frame, you will erase the template from memory. Put it out of the way at the end of the document in case you need it again.
A single frame template is all that's required if you only have one size and type of picture per document. Most publications, however, have several standard sizes. One solution is to create all the templates and put them on a page (or pages) at the end of the chapter. When you need a specific frame type, jump to the end, copy the template to the clipboard, and jump back to the page where it's needed.
Be sure to erase the templates and any unnecessary blank pages at the end of the document if you want Ventura to do automatic numbering across chapter boundaries. Extra pages at the end of a chapter throw off the counting function.
Marking pictures in the text file You can save time by asking authors to mark the spot in the text file where they want a picture to appear. At the most rudimentary level, this can be as simple as a separate line saying "Put the picture of the space shuttle here." If you want

Working with pictures 319
to get a little fancier, you can ask authors to insert captions or frame anchors too. You can even set up special tags that leave space for frames, or do away with frames altogether.
By using the preformatting techniques in Chapter Three, "Creating Text," you can set up macros that automatically insert the correct codes and phrases. While they are at it, authors can insert the caption, figure number, description, or anchor name, if they know this information in advance.
You can also ask authors to insert a special tag that creates extra room in the document. You can use this spacer tag for a quick preview of the chapter's ultimate length. Depending on the way you work, you may even be able to use it to do away with frames altogether.
Some publications strip in photos and illustrations manually. They use frames only to create a blank space of the corr~ct size. You may be able to save time by using tags to create the space. This will save you from the trouble of creating frames on a page-by-page basis. It will also allow authors to specify illustrations and their locations as they create the text. You can also create captions with tags, and have Ventura number the captions consecutively.
Let's begin with a simple example: a single-column format that has one standard illustration size. You could create a'tag called Picture. Use Spacing to add enough space above (and/or below) to create a blank area of the correct size. Choose Add In Above: Always so Ventura does not remove the white space if it happens to fall at the top of a column. Next go to Breaks and choose Allow Within: No. This means no line breaks are allowed within the paragraph, forcing it to remain togeth~r on one page. (It wouldn't be much help to have half of the picture space on one page and half on another).
That's all there is to the basic technique - a tag that adds the correct amount of space for an illustration. In this form, you might ask authors to insert the tag into documents. When you bring them into Ventura, you have immediate feedback on the approximate length of the chapter, since the spacer tag creates space where the illustrations will go.
Now let's consider some variations on the theme:

320 Chapter Six: Building the Chapter
• Apply the tag to a return for a blank space with nothing inside.
• Apply the tag to text to create a message inside the space. The message could be a standard phrase such as "Place illustration here." It could also be,a special phrase typed in by the author, such as "Place third quarter sales chart here." To center the message vertically, add equal amounts of space above and below. To center it horizontally, choose Horz. Alignment: Center from the Alignment dialog box .
• Use a margin-wide ruling box around to create a keyline. Remember to add space above rule 1 to create a white space buffer. Make the space equal to body text line spacing.
• To caption the illustration, give the tag the font, spacing, alignment, ruling lines, and other desired attributes for captions. You can have a single tag that creates space and formats the caption. Or you can have one tag to create space and describe the illustration, and a separate tag for the caption. If you choose two tags, use Keep With Next from the Breaks dialog box to keep both on the same page.
• To automatically number the captions, use the Auto-Numbering feature explained in Chapter Eight. With auto-numbered captions, you can move illustrations around and Ventura will keep track of the correct sequence.
Set up as many different sizes as you need. Simply give each size a different tag name. You can have different widths as well as different heights by varying the tags between columnwide, margin-wide, frame~wide, or custom width.
You may encounter spacing problems because Allow Within is set to No. The larger the illustration, the greater the chance of a white space gap if Ventura has to move the tag to another page. The solution is very simple. Move the spacer paragraph just as you would move any other. Place it slightly higher or lower on the page until the blank space fills with text.

Working with pictures 321
Tips for frames
a Add several frames in quick succession by holding down the Shift key as you draw. Ventura lets you continue to add frames until you release the Shift key.
a Move frames as a group by Shift-Clicking to select them all. Carefully place the cursor in the center of one frame. When you drag it to a new location, the others will move along.
a Hide pictures for faster layout. Pictures take a long time to redraw on the screen.
a Hide pictures for faster proofprintouts. If you hide the pictures on screen, Ventura will ask if you want to leave them hidden when you print. When printing copies simply to proof the text, leave the pictures hidden to greatly speed the printing, especially for bit-map images on PostScript printers.
a To overlap two pictures put them into separate frames, and overlap the frames. You cannot load two picture files into the same frame.
a Create a library of complex frames in a special library chapter. They could be empty frame templates in a variety of sizes and styles. Or they could contain pictures you want to reuse. If the frame size is important (as with a frame template), leave them at their original size. If the contents and effects are important (as with a logo), reduce them to thumbnail size so you can fit multiple frames on one page. To use the library, open the library chapter, gather all the frames you want on one page, select them all, and copy them to the clipboard. Now open the chapter you want to work on and paste in the frames. Move and resize them as necessary.
Controlling page and column breaks You may occasionally find a page or column that ends awkwardly. Several options are available to correct this. First, you can add a bit of white space by creating a very small new frame. Second, you can adjust the size of any pictures on the page. Third, you can edit the text. This is often a good choice,

322 Chapter Six: Building the Chapter
since you can sometimes gain or lose a line just by adding or deleting a few words from a paragraph.
In cases where you want to force a page or column to end, you can create a special tag called Page Break, as we mentioned in Chapter Five. You can also use the same idea for column breaks. Don't worry about the tag's font or other appearance, since you will apply it only to empty paragraphs.
Completing the chapter In an effort to get a handle on Ventura's enormous power, we've suggested taking a structured, step-by-step approach to building a chapter. We recommended the Ventura Formula as a guideline: Style + Text + Pictures = Chapter. You've covered style, text, and pictures already. Now you are ready to finish with chapter techniques. In this section we discuss saving chapters, and creating chapter templates.
Saving the chapter Your document is finished. You've loaded the style sheet, and worked with the text and pictures. You've paged through the document one last time to make sure everything looks right. Your final step, then, is to save the work you've done.
We've discussed this step last. In reality, we advise renaming and saving style sheets, text files, and chapters immediately, at the start of the work session. That's your best guarantee that you won't forget. It also means you can hit Ctrl-S periodically without worrying that you will accidentally overwrite a file you wanted to save. Ctrl-S is the keyboard shortcut for Save. You should use it several times during layout. As with any computer application, it's smart to periodically backup in the event of a power outage, head crash, or other disaster.
To save the chapter, simply choose Save from the file menu. The first time you perform this action, Ventura asks for the name you want to use. We recommend a file naming system for every file that goes into a chapter. One easy method is to start every file (regardless of type) with the same brief code.
Completing the chapter 323
These codes are more than a convenience. Used carefully, they provide a way to filter out unnecessary files using Ventura's Item Selector (or using DOS). For example, because we always used the IX code for this book, examining a subdirectory for IX*. * files would reveal every file created for the book. Filtering with IX06*.* let us restrict things to Chapter Six only.
To save a chapter, choose Save or Save As from the File menu. Both choices save not only the chapter file, but all component files as well. Changes made to the chapter, including renaming style sheets and text files, do not take effect until you save.
Choose Save to store under the original name (if you haven't chosen a name, Ventura will prompt you). Choose Save As to save under a new name. When you rename a chapter file, Ventura automatically renames the caption file (CAP extension), chapter information file (CIF), and Ventura graphics file (VGR) to match. If the text file has the same name and path as the chapter, Ventura renames it as well.
With those exceptions, all files retain their previous names and locations. This has several important consequences. First, you must rename style sheet and text files before you save the chapter. Otherwise they are written to the original file names. You must rename each text file separately.
To work on this document from now on, choose Open from the File menu. Ventura opens and loads not only the chapter file, but all other files needed to construct the document.
See Chapter Nine, "Advanced Tips and Techniques," for more tips on file and chapter management.
Abandoning your work
To abandon your last changes and return to the previous version of the chapter, select Abandon from the File menu. Ventura reloads the previous version - the chapter as it existed the last time you saved. If you press Ctrl-S often enough, Abandon can act as a primitive Undo function. It will take you back to the point where you were the last time you pressed Ctrl-S.
324 Chapter Six: Building the Chapter
Creating chapter templates As we've seen, building a chapter can be a lot of work the first time around. Fortunately, there is a simple way to save most of that work in a reusable form. A chapter template is a collection of elements that work together to give a complete picture of the document's format. Its purpose is to store everything that can be reused, so you don't have to build it again. A template typically includes:
• a chapter file
• a style sheet
• frame templates
• elements that don't change from version to version, such as logos, standing heads, mastheads, mailing labels, headers, footers, page numbering, and so on.
If you rely solely on style sheets, you must redo work for each new chapter: retype header text, redraw frames, etc. You also risk discrepancies. If you are building a long technical manual, for instance, every chapter must have the identical format. And if you are sending your pages out for offset printing, it is essential that crop marks, headers, and other repeating elements are in the same position for every chapter.
Let's discuss footers in more detail as an example. Imagine that you are doing a technical manual with 10 chapters. You want a sophisticated footer. You make these choices:
• la-point Helvetica normal italic
• Hairline ruling line above
• Page numbers in the footer
• Header frame has wider margin than text, so page numbers project beyond text margin
• Live header, with different match on left and right page
• Font change in header, so page number is larger than text
• Baseline jump in header, so text aligns with top of page number instead of bottom
• 'fu.rn off the footer on the first page of every chapter

Completing the chapter 325
Of these choices, only the first two are stored in the style sheet. To duplicate this footer in the other 10 chapters, you would have to turn on all the other effects one at a time, for each of the 10 chapters. If you make a mistake, you risk having an inconsistent chapter. Obviously, it makes sense to do the footer formatting only once, then reuse it.
Also, a style sheet does not specify frame formatting. Yet frames must be very carefully sized, positioned, and captioned to create a pleasing page. For instance, frame padding - the white space buffer outside the frame - should have a relationship with the line spacing of the body text. If the body text has 12 points of line spacing, the frame padding should be 12 or 24 points. There are several other frame-related attributes that you can store in a document template, such as caption, numbering, and anchors.
The first template
You can't build the first template until you've completed the chapter. There's no sense storing the format until you have everything looking the way you want. Then take the chapter and turn it into a template, following these steps:
• Save the chapter under a new name. You can choose TEMPLATE.CHP or any other name that reminds you that this is a reusable format. The template for this book is called IXPLATE.CHP.
• Remove all text files except those associated with reusable elements like logos and so on (Remove TextlFile from the Edit menu).
• Remove all picture files except those associated with reusable elements.
• Keep one example of each frame style in the chapter. Put these empty sample frames together on one or two pages near the front of the document. Delete all other frames.
• Save the chapter.
Notice that we did not rename the style sheet. We want the template to call up the style sheet we plan to use for our documents. Usually a chapter template only needs to be a few pages long.

326 Chapter Six: Building the Chapter
Templates for frame-style documents
The template process is slightly different for frame-style documents (which are discussed in detail below). Frame-style documents such as newsletters contain all their text files inside frames. To create a useful template, you remove the text files, but you leave all the frames in place (Figure 6-42). Then you can create a new issue just by pouring new text files into those frames.
Document Gallery News AN(IfI~&"ortforV.*-$'11.3,""U,."
r."
Figure 6·42. A chapter template for a newsletter.
__ ChoI
I
DI""*"...., ..... " .. IIfI .. llllot~ ...... Ii' .. _,. .. tI ............ tl,. ........... 1 "'104.T«M\CIt,OAIOI"(f1J)ln-m7.E";~""o.iu •• ~Eer."""""'JNt. ......... == ... rr"" ........... tt ... ",... ........... ~,...,.,_~. . """'"
Templates for free-form documents
Free-form documents have most of their text in Box Text and/or frames. Since most free-form documents are only a page or two long, it is usually easiest to leave the Box Text in place in the template. Simply save a chapter under a template name. To create a new document from this template, save it under a new name and type in any new text you need.
Keeping templates up to date
In real life, you will sometimes have to redo the template. Document formats typically evolve and change. If changes are made to the style sheet only, you need not redo the template.

Completing the chapter 327
But if the changes involve formatting stored in the chapter file, you must either make the same changes to the template chapter, or go through the template creation process again.
Using a template
To use a template chapter:
• Open the template.
• Rename it immediately. Always rename before doing anything else to preserve the template intact.
• Format the document as you would normally.
N ow that your document is laid out and saved to disk, you are ready to print. For tips and techniques to make printing easier, turn to the next chapter.

328 Chapter Six: Building the Chapter

Chapter Seven
Producing Output
The work described in previous chapters - text editing, picture creation, style sheet design, and page layout - has
been done on screen. In this chapter we get to the bottom line of desktop publishing: the printed page. No matter how nice a document appears on screen, it is the paper output that readers receive and react to.
Ventura Publisher can print anything from one page to thousands of pages. It can use any of dozens of output devices. This chapter will help you get a handle on all this power and show you how to produce better printed pages. It explores several important topics, including:
• printing options
• getting ready to print
• using more than one printer
• printing single and multiple chapters
• binding pages after they are printed
• preparing laser-printed pages for offset printing
Throughout this chapter, we use the term printing to mean sending a document from Ventura Publisher to an output device. We use the term lithography to refer to the process of duplicating original pages on an offset press. Thus, when we speak of a printer, we are referring to hardware that outputs pages from Ventura Publisher. When we mention a lithographer, we mean the person who supervises offset printing.

330 Chapter Seven: Producing Output
Printing options Read this section if you meet any of the following conditions:
• you have not yet selected a printer
• you plan to buy a second printer or replace an existing one
• you would like to improve or upgrade an existing printer
• you want to know more about printer technology
Ventura Publisher has a wide range of printing options. It supports dot-matrix printers, ink jet printers, laser printers, and phototypesetters. As you'll see below, you can easily configure Ventura Publisher to work with more than one printer. That way you can use the one that's most appropriate for the task at hand. Even if you own only one output device, you can use your own (inexpensive) printer for proofing, and send the final output to a (high-end) phototypesetter.
Which output device is best for you? The best way to tackle that question is to examine the issues that set them apart: resolution, engines, page description languages, and speed. These issues apply even to existing machines, since you can often find upgrade options that add new capabilities.
The resolution issue The most obvious distinction between printers is the resolution of the type. Resolution is typically measured in dots per inch (dpi). Resolution affects the smoothness of the letter forms and the quality of fine lines and diagonals. At low resolutions, the eye can distinguish the individual dots that form letters and lines. At higher resolutions, the dots merge so they cannot be seen by the naked eye. Resolution has an even more dramatic affect on image quality (see Figure 7-1).
Most professionals consider 1000 dpi to be the threshold for true typeset-quality. The resolutions of dot-matrix printers (usually less than 250 dpi) are clearly inferior. The 300-dpi resolution of most desktop printers falls somewhere in between - good enough for some applications, but too coarse for others. You can also find printers that bridge the gap between typeset and desktop, with resolutions of 400 dpi to 600 dpi.

Printing options 331
Figure 7·1. The top image was printed on a 300-dpi laser printer; the bottom image was produced on a 2540-dpi Linotronic imagesetter. The images were scanned with a 64-gray level Datacopy scanner.
The higher the resolution, the higher the price. Choosing the right resolution means determining your uses. If you are producing slick brochures or advertisements for glossy magazines, typeset quality is essential. If your budget cannot

332 Chapter Seven: Producing Output
afford the outright purchase of a high-resolution output device, you can use a low-resolution unit for sample pages. Then you can send the final document to a service bureau that charges on a per-page basis for high-resolution output.
The engine issue Even when the resolution is the same, output quality can vary according to the engine. Different printers use different engines - the internal components that put marks on paper. To produce a complete output device, an engine is combined with a controller - hardware and software that tells the engine where those marks should go.
In the widest sense of the word, you could consider a dotmatrix printer to be a marking engine. Likewise, a laser printer is an engine. You can also interface Ventura with laser imagesetters (in essence, high-resolution laser printers) and with phototypesetters. Each different engine gives different results.
But even within one class, there are wide differences in approach, price, and quality. Many consumers, for instance, do not realize the distinctions in the category of 300 dot-per-inch (dpi) printers. Most 300-dpi devices share technology with office copiers. Usually, a laser marks where toner should gohence, the popular nickname laser printers. In other cases, a liquid-crystal shutter does the marking. One way or another, the controller signals where to put the dots. Once that is done, heat fuses the toner to the paper, creating recognizable letters, numbers, and symbols.
Today's inexpensive desktop printers produce type at 300 dots per inch (dpi). Despite this common resolution, there is a quality difference between different engines. Which engine is best depends on how you intend to use the printer.
Write-black engines mark only the spots that get toner (the" spots that will be black). This method often does a better job of producing fine lines and serifs. On the other hand, it is sometimes accused of producing washed out blacks. This type of engine is often preferred by people who use laser-printed pages as masters for offset lithography. Offset tends to fill in

Printing options 333
and darken the original page, so it is important that the master is not too dark to begin with.
Write~white engines mark the spots that do not get toner. They often produce blacker blacks, but they sometimes fall down in the area of fine lines and serifs. These engines are sometimes preferred for applications where the laser printed page will be the distribution copy. In such cases, the thicker lines and blacker blacks may make a better impression.
In addition, different printers produce different sized dots. All other things being equal, the smaller the dot, the better the results. Although there is no way for the ordinary consumer to test dot size, you can gain a rough idea by comparing output (see below for one suggested procedure).
Most printer manufacturers do not make the engine itself. Ra ther, they buy an engine from one of several leading manufacturers. Consequently, you can buy two different printers from two different companies that have the identical engine. In such cases, other considerations such as speed, fonts, and page description language may determine which one is best for you.
Incidentally, the engine usually includes the entire chassis, so it also affects paper-handling, durability, supply costs, service costs, and replacement costs.
The page description language issue A page description language (PDL) is a software program that controls where to put text and graphics on a page. These languages endow an output device with more power and flexibility. In addition, page description languages are device independent. A page description driver can send pages to any compatible printer. Without a page description language, each separate printer requires a separate driver.
Ventura Publisher supports two page description languages: PostScript and Interpress. Although each has its unique strengths and weaknesses, PostScript is currently in the widest use. It qualifies as an industry standard, which brings a certain margin of safety to users. PostScript, which was developed by Adobe Systems, is not only supported by numerous laser printers, but also by phototypesetters.

334 Chapter Seven: Producing Output
When choosing a printer, you should give careful consideration to whether or not you need a PDL. At first glance, it would seem that a PDL printer is more expensive. In the long run, however, a non-PDL printer can be just as costly. If you need typographic sophistication, you may have to buy additional fonts, add-on boards, or hard disk storage to bring a non-PDL printer up to the same level of performance.
A PDL printer uses outline fonts. The system stores one set of outlines for any given typeface (see Figure 7-2). From those outlines it generates bit-maps on the fly. Whenever it needs a certain type in a certain size it generates a bit-map and sends it to the printer. In other words, it tells the printer which dots to turn on and off to produce each character.
ABCDEabcde 5.5 pt
ABCDEabcde 13.5 pt
ABCDEabcde 19pt
ABCDEabcde 37p!
ABCDEabcd \ 51 pt
Figure 7·2. Printers with a page description language like PostScript can scale any size font from a single set of outlines.
By contrast, many non-PDL machines must generate a bit map in advance for each and every size and style. Since there are literally thousands of variations, a non-PDL printer must either (1) store many megabytes of font information or (2) make do with a partial set of fonts. Non-PDL printers may also have size limitations. They may not, for instance, be able to produce type larger than 30 points. These size restrictions can severely hamper your efforts to produce truly professional-looking pages.
(
Printing options 335
In addition, many PostScript printers come with a wide variety of typefaces built-in. By contrast, you must usually purchase fonts separately for non-PDL printers. When you add up the cost of the fonts, the time to install them, and the expense of the hard disk space, a non-PDL printer can end up costing more in the long run.
PDL printers do have shortcomings. First, the initial price is higher - you must pay for the printer plus the PDL software and hardware. Second, they are often slower than other devices. In high-pressure environments, slow printing times can produce a production bottleneck. Fortunately, you can often solve this bottleneck via print buffers (see below).
If your budget permits, we recommend a laser printer with a page description language. On the other hand, if you are sure you will be producing only simple documents that do not require a wide variety of typefaces or sizes, then a non-PDL printer will be adequate. If you already own a non-PDL printer, there are several upgrade options that permit LaserJet printers to add PostScript compatibility.
What about PostScript clones?
The popularity of PostScript has led to the development of PostScript compatible languages, popularly called PostScript clones. In theory, these alternate languages can interpret all PostScript commands. Unfortunately, not all of them are entirely successful.
PostScript clones advertise themselves as being cheaper, or faster, or both. It is difficult to judge the validity of these claims. Before considering a clone, be aware of the risks. Perhaps the greatest potential danger comes in the area of fonts. If the clone fonts do not match standard Adobe spacing, you sacrifice device independence. One advantage to PostScript is the ability to print a sample page on a laser printer, then send that page to a typesetter. If your PostScript clone cannot match the standard fonts used by PostScript typesetters, you lose this capability.
A second danger is in quality. Be sure that a clone language produces high-quality type, especially at the 300-dpi resolution of a laser printer. Most clones produce fine type on highresolution typesetters. At lower resolutions, however, some

336 Chapter Seven: Producing Output
cannot match the quality of Adobe's fonts, which contain builtin scaling hints.
What about peL?
Printer Command Language (PCL) designates the internal command set that operates the Hewlett-Packard LaserJet printers and compatibles. Although not a full-scale page description language, it does provide some of the same functions. In addition, it has achieved the status of an industry standard.
If you cannot afford a PDL printer, you should at the least insist on LaserJet compatibility. Most of today's important software programs support LaserJet PCL. However, some LaserJet clones do not provide perfect emulations. Problems tend to show up in the printing of pictures, shades of gray, or landscape orientations.
The speed issue Once you have looked at the other factors, you should also consider the speed of a printer. Speed depends on several factors, including the coprocessor (if any), the controller version, the interface, and the memory.
A coprocessor is an auxiliary chip that offloads printing tasks from your personal computer. All PostScript printers have some type of processor, because PostScript printers must scale fonts and turn them into bit-maps before printing. More recent models sometimes have special processors optimized just for PostScript. Some non-PostScript printers also use coprocessors to speed operation.
The controller version is important because manufacturers continue to improve their systems. In addition, Adobe Systems periodically revises PostScript. Always question vendors to verify that you are receiving the latest controller. Otherwise you may receive an older model that has been languishing on a warehouse shelf.
The interface is the way the controller connects to the printer. The controller tells the printer which marks to put where on the page. After the controller makes these decisions, however, it must send the information to the printer. Today's printers

Printing options 337
generally use one of three options: serial, parallel, or highspeed (sometimes called video or direct interfaces).
A serial interface sends information one bit at a time. It is the same method used to send data over phone lines via modem. It is also the slowest of the three options. Because of their association with telecommunications, serial ports go by the name of COM ports (for communications). Ventura designates them as COMl and COM2 (see Figure 7-3).
Device Nal1le: Ip.I'iMri;l1Q1
Screen Fonts: EGAI (Use those l1latching this File extension.)
Output To: _I LPT2 II LPT3 I I]Qffi] I Cot12 I I Direct I """1 F",..,i."..le-n-al1l-e ..... 1
Width Table: C:\VENTURA\OUTPUT.WID __________ _
COl1ll1land: I Load DiFFerent ~Hdth Table (Le .• Font Metrics) I
[]
338 Chapter Seven: Producing Output
they bypass the output ports, Ventura designates high speed interfaces as Direct.
Putting the controller card inside the computer does have drawbacks. It ties the printer closely to that particular computer - you can't just unplug a cable and plug the printer back into a different machine. Sharing printers over a network is also more difficult when the controller is in the computer instead of the printer. In addition, printers that use the Direct setting cannot print to a file because of the large file sizes that result.
The memory in a printer also affects speed. Some printers use memory as a scratch pad for composing bit maps of the page. Without sufficient memory, you are limited in the size of graphics you can produce. In addition, some printers cache fonts - they store font bit maps for reuse. Storing the font in high-speed RAM memory saves the time to generate it from an outline and/or to send it to the printer. Obviously, the more RAM, the more room to cache fonts. In general, 2 MB or more can speed printing. Although font caching doesn't affect the first page printed, it does help subsequent pages, provided they use fonts already in memory.
Depending on the model, you may be able to add a coprocessor, controller, interface, or memory to an existing printer to improve its performance.
Testing a printer As you can see from the previous discussion, printer performance depends on a variety of interlocking factors. The best way to judge printers is to test them head to head. We suggest use of a loupe. This small device, available at art supply stores, magnifies type for easy inspection.
Ventura provides a convenient test page. Ventura's install program automatically copies a chapter called CAPABILI.CHP to the \TYPESET subdirectory. By loading and printing this single-page chapter for each printer, you can gauge its strengths and weaknesses (see Figure 7-4). If you are new to Ventura and don't know how to print yet, follow the procedure outlined later in this chapter.

Printing options
Figure 7·4. Print CAPABILI,CHP from the \TYPESET subdirectory to test a printer's capabilnies, including the range of type sizes, the ability to handle reverse text, and the size of the imaging area.
339
Even if you have already purchased a printer, it is wise to print this page to find out exactly what it can (and can't) do. If you haven't yet bought a printer, ask your dealer to perform the test for several printers. If you time each printout, you can also get a rough measure of speed. Once you have identical samples, examine these areas with special care:
• Type oflO points or less. Small type presents the toughest challenge, especially for 300-dpi devices. Check with the loupe to see if letters are too coarse and bulky. Look to see if loops and serifs have filled in.
• The edges of large type. Do you see a noticeable waviness or stair-step effect?
• Fine lines. Does the printer produce them with precision?
• diagonals. Check for a jagged, stair-step effect.
• Solid dark areas. Do they have a gray, washed out appearance, or are they solid black?

340 Chapter Seven: Producing Output
A look at specific printers Now that we have examined the issues affecting printer performance, we can look at specific types and brands. Although we do not have the space to consider every brand on the market, we can glance at some popular options.
Dot matrix printers
Dot matrix printers are the least expensive alternative. Ventura Publisher supports the IBM Proprinter, the Epson MXlFXlRXJLQ series, the NEe P-series, and the Toshiba P351SX (plus any brand capable of emulating one of these) .
.. NOTE: Some inexpensive laser printers advertise Epson compatibility. Ventura Publisher can drive these machines in Epson emulation mode, but the output will be at dot-matrix resolution (120 x 140), not at the 300-dpi maximum resolution of the laser printer.
Frankly, we can't recommend dot-matrix printers for most business applications. Although it is surprising how far Ventura Publisher can push the limits of these inexpensive devices, the final output simply is not up to professional standards. The whole point of desktop publishing, after all, is to create top-notch pages.
Nor is a dot-matrix printer a good option as a proofing device. Theoretically you might produce dot-matrix pages for proofreading, then transmit them (via phone or disk) to a phototypesetter for final output. But printing a page on a dot-matrix printer is so slow that it creates a production bottleneck.
If you must use a dot-matrix printer with Ventura Publisher, we recommend a print spooler to permit you to continue using the computer for other tasks during the many minutes it will take to print each page. Print buffers and spoolers are covered later in this chapter.
Xerox 4020 c%r ink jet
This printer produces text and graphics in up to eight colors at up to 240 dpi. This resolution makes it unacceptable as camera-ready art for professional-quality publishing. How-

Printing options 341
ever, the 4020 can produce color originals for in-house documents, including business charts, maps, and presentation materials. It can also be useful as a proofing device for documents produced via color offset lithography.
- NOTE: Color overlays for offset printing should be produced on a higher-resolution printer using the technique explained later in the chapter, not with a color printer.
The Hewlett-Packard LaserJet
This popular printer has both pros and cons. On the plus side, it is supported by many software packages - an important consideration if you plan to use it for other tasks. The LaserJet prints graphics at 150 dpi or 300 dpi. However, it comes up short in the area of graphics and typesizes when compared with printers equipped with a page description language. For instance, it cannot print reverse text (white text on a black background). And since it cannot print both portrait and landscape fonts on the same page, it cannot use Ventura's rotated text feature.
The Xerox 4045
This laser printer is roughly equivalent to the HP LaserJet Plus in typestyles, point sizes, and capabilities. It does, however, offer a unique advantage: a built-in convenience photocopier suitable for light-duty applications. The 4045 Model 50 features 1.5 megabytes of memory, which allows graphics to be printed at a full 300 dpi.
The Apple LaserWriter
The Apple LaserWriter is the most widely used PostScript printer. It shares the pros and cons of all PostScript devices: more typographic flexibility versus slower performance and a higher price.
The LaserWriter II uses the sam.e Canon LBP-SX engine found in the LaserJet Series II. This engine has blacker blacks than the Canon LBP-CX engines used in the original LaserWriter and the original LaserJet. It also has improved paper handling. On the down side, the print tends to be slightly too dark for producing offset masters. However, if the machine is

342 Chapter Seven: Producing Output
turned to its lightest setting, it produces acceptable quality for offset reproduction.
The QMS PS 810
This PostScript machine also uses the Canon LBP-SX engine. Its controller uses a faster processor, thereby achieving better print times that some other PostScript machines. It can be configured with additional RAM for even faster printing.
The Varityper VT600
With high-resolution output devices often costing $50,000 and up, it's no wonder that so many people have convinced themselves that 300-dpi output is perfectly adequate, thank you very much. The Varityper VT600 represents a middle ground in both price and performance. Prices vary with different models, but all of them are under $20,000.
The PostScript-compatible VT600 prints at 600 dpi. The VT600 could be an excellent choice for book publishers who need something better than 300 dpi but don't require full-scale typesetting. Likewise, it might be a good compromise for technical documentation. Such documents require fine lines to reproduce the subtleties of technical documentation, blueprints, diagrams, and so on.
Although not as razor sharp as a typesetter, VT600 print is an improvement over 300 dpi that is easily visible with the naked eye. Small type is crisper, display type is smoother, and fine lines are finer. It is suitable for all but the most demanding applications. On top of all that, it is faster than most desktop laser printers.
The JLaser board
The JLaser board from Tall Tree Systems is not a printer, but a special add-in board that works with many different brands of printers. You buy a JLaser board to speed and improve the performance of an existing printer. The board plugs in to your computer. It is not, strictly speaking, a controller. Rather, it provides a large amount of memory where your computer can build a bitmap of the page. Then it sends this bitmap over a high-speed interface directly to the printer.

Printing options 343
This direct-connect device offers several advantages. It can drive several different laser printers, including some models that are not otherwise compatible with Ventura Publisher. Because the JLaser board contains 2 megabytes of RAM, printing is faster than with many other laser printers. The RAM can also be used as extended memory for other programs, or as an image buffer for a scanner.
In the area of typestyles and sizes, the JLaser does not match the flexibility of a PostScript printer. For instance, it is limited to fonts of 48 points and smaller. It can, however, use thirdparty fonts for the Hewlett-Packard LaserJet Plus, and third party font packages, such as Bitstream's Fontware. It also bogs down when printing in landscape format. Since most people buy the Jlaser for speed, they will be in for a disappointment if they produce lots of landscape pages.
Because it is a memory card, the Jlaser maps memory into the PC's address space. This can cause compatibility problems with clone computers, fast computers, or other memory cards. The company offers versions for slow and fast computers. Check for compatibility before you buy.
The LaserMaster CAPCard
The LaserMaster CAPcard is a controller board that resides inside the computer. As with the JLaser, it provides memory for page construction and a high-speed direct interface. But the CAPcard is a complete controller. It has a high-speed coprocessor and separate font memory. The com pany has developed special printer drivers for leading applications, including Ventura Publisher, AutoCAD, GEM, and Windows.
Like a PostScript controller, the CAPcard can generate fonts on the fly from outlines stored in memory. The CAPcard also offers performance advantages. It is one of the few output devices that can print everything on the Ventura capabilities page. In addition, it offers enhancements such as rotated, outline, and filled type - effects you cannot achieve in Ventura even with a PostScript printer unless you buy a separate utility (see Figure 7-5).
It is important to note, however, that the CAPcard is not a PostScript machine. It does offer Bitstream fonts with the same widths as standard PostScript fonts. But if you want to

344 Chapter Seven: Producing Output
Figure 7·5. The LaserMasterCAPcard permits special font effects, in addition to enhancing printing speed.
print true PostScript pages, you must first use a software utility to convert the page, thereby losing the speed advantage. For emulation of the HP LaserJet, you must run a memory resident program. These utilities provide a means to print through the CAPcard even with applications that do not support it directly.
The CAPcard also comes with other utilities for fast font downloading, for adding fonts to Ventura, and other useful tasks.
Phototypesetters
Most people associate desktop publishing with laser printers. But Ventura Publisher users can also send their documents to phototypesetters. Typesetting service bureaus around the country can accept documents via disk or modem. The resulting high-quality pages are shipped or delivered to the client. This option is particularly useful since Ventura lets you use inexpensive laser printers to create test copies for proofread-

Getting ready to print 345
ing. When everything is perfect, the document is sent to the typesetter for the final version.
Many of the typesetters use PostScript, with the most wellknown being the Linotronic 200 and 300. This is an appealing option, since you can use the PostScript printer to create a laser-printed page, then send the identical document to a Linotronic.
Alternatively, third-party manufacturers have developed typesetter drivers for non-PostScript typesetters. For example, Edco Services Inc. offers a Ventura driver for the Linotype 202. This model cannot print graphics, but it can produce type and rules. There are many other typesetter options. Consult Appendix B, ''Manufacturers and Products," for a list of those available at the time we went to press.
Getting ready to print Read this section to learn about the steps you must take before you can start printing. It covers how to install more than one printer, how to switch between printers, and how to choose the paper stock.
Installing a second printer One of Ventura's most valuable features is its ability to change the output device. Ventura permits you to have many printer drivers installed at one time. (To conserve disk space, install only printers you plan to use.) You can choose among dot matrix printers, laser printers, phototypesetters, or disk files. There are several situations where this proves useful:
Using a typesetting service. High-quality documents such as magazines, advertisements, and brochures require the superior resolution of typesetters. You might, therefore, print the document on a laser printer for proofreading, then send it to a typesetting service bureau for final output.
Speeding production. If you have more than one brand of printer in your office, you might use the fastest one to produce working copies, and another to produce final copies of higher
346 Chapter Seven: Producing Output
quality. For example, a JLaser board can produce extremely fast copies of a lengthy report, but it lacks the font and graphic capabilities of a PostScript printer. Since the JLaser hooks up to existing printers, you can actually use the same printer in two modes. Use JLaser mode for speed and convenience; use PostScript mode for the ultimate in font and graphic quality.
Color proofs. You might want to use a color ink-jet printer to get a rough idea of color combinations on the final page. Because inexpensive ink-jet printers don't have high resolution, you would use a different device to print the actual overlays.
Electronic distribution and disk files. You may decide to distribute copies of Ventura Publisher documents on diskette or via a data communications network, rather than on paper. In this case, recipients might have access to different output devices than the one you used to create the document. For instance, you might want to print PostScript files to disk, even though you don't have a PostScript printer yourself.
There are two steps to using a second printer: (1) installing its driver and (2) selecting it while in Ventura.
To use a second printer, you must first install its driver. The easiest way to specify the second printer is during the original installation. When Ventura asks if you would like to install another printer, answer ''Yes'' and choose the second device from the list of options.
The Ventura installation program also asks you to specify the communications port for each printer. Thus, it is possible to have more than one printer connected at a time. You might, for instance, install the first printer to a parallel port and the second to a serial port. Conversely, you can use only one port and switch cables when you switch printers. Don't worry if you are not sure which port to use when installing a printer. You can switch ports at the click of a mouse within Ventura.
If you've already installed Ventura and you want to add a second printer, the process is almost as easy. Get out the floppy disks again, and proceed as if you were going to reinstall Ventura. However, when the install program asks if you are installing for the first time, answer ''No.'' That way, the install program will only copy over the new printer files. It

Getting ready to print 347
will not take you through the entire installation process again. You will, however, need to tell Ventura again which graphics board and which mouse type you are using.
Installing serial printers
If you are using a serial printer, you may have to take additional steps to configure the port. For the Apple LaserWriter, the Hewlett-Packard LaserJet, and many other popular printers, the typical command is:
MODE COM1:96,n,8,1,p
The first word ("mode") invokes the DOS mode command, which must be on the root directory. If it is not, copy it from a DOS floppy disk or subdirectory. The second word ("coml") assumes that you are using the COMl port. If you were using COM2, you would substitute that port instead. The remaining letters and numbers tell DOS how to set up the port:
• 96 = 9600 baud
• n = no parity
• 8 = eight data hits
• 1 = one stop bit
• p = configuring for a printer
If you are using more than one serial printer with different settings, you will need to set up batch files to reconfigure the port each time you switch. If you are using only one serial printer, you may want to automate the procedure by adding the mode command line to your AUTOEXEC.BAT file so it is automatically invoked when you turn on the computer. You could also add it to the batch file that starts Ventura (typically called VP.BAT or VPPROF.BAT). Review your DOS manual for more information on the MODE and batch file commands, and your printer manual to verify the settings.
Switching printers The first printer you install becomes the default printer. If you do not tell Ventura otherwise, it uses this printer automatically. To change to a new printer driver, use Set Printer Info

348 Chapter Seven: Producing Output
from the Options menu (see Figure 7-6). You must take two steps. First, tell Ventura which printer you want. Second, load the width table for that printer.
Device Name: .lh.-hiM I POSTSCRIPT 1
Screen Fonts: EGAI (Use those ... atching this File extension.)
Output To: ~ I LPT2 II LPT3 1 []!!!I!] I COt12 1 ImIZ!!I:!I '-:1 F:""'!"'i1::-e-na-... e---'1
Wi.dth Table: C :\VENTURA\JLASER .WID __________ _
Command: 1 Load D i F Ferant ~J idth Tab Ie ( i • a., Font Natr ics) 1
Figure 7·6. With the Set Printer Info dialog box, you can switch between the output devices shown next to Device Name. You must also select the width table you want.
Selecting the printer driver
The first line of the dialog box shows the printer drivers currently available. The default driver is darkened. To choose another driver, simply select it with the mouse .
.. NOTE: If you are using a PostScript printer and want to use a different PostScript machine, there is no need to switch printer drivers. All PostScript devices use the same driver.
When you install a printer driver, you also tell Ventura which communications port to use. The program remembers this information. When you switch printer drivers, Ventura switches to the correct port, as shown on the Output To line. If you've changed the setup, click on the new port and Ventura will remember from now on .
.. NOTE: The option Direct applies only to devices such as the JLaser printer and the LaserMaster CAPcard, which use a direct connection rather than a serial or parallel port.
If you select Filename, Ventura will direct the output to a disk file, as explained below.

Getting ready to print 349
So far switching printers has been a simple point-and-click process. But there is one more step you must take to guarantee high quality output: use the correct width table.
Understanding width tables
One of Ventura's most important features is its WYSIWYG display. What you see on the screen is an accurate representation of the printed page. Yet Ventura Publisher sometimes uses the same screen fonts for different printers. To make sure those screen fonts match the printed fonts, Ventura uses width tables (also called WID files or font metrics).
These tables store the space taken up by each character. When Ventura displays a character on screen, it first consults the width table. This tells it how much space to allot. It also consults the identical width table when printing. In this fashion, the lines and paragraphs on the screen match those on the printed page.
As long as you are using only one printer, the width table is handled automatically. During installation, Ventura copies the width table for the first printer to a default file called OUTPUT.WID. Ventura uses this default width table unless you tell it otherwise. And that's just the point - if you switch printers, you must switch width tables.
-IMPORTANT: The contents of OUTPUT.WID changes depending on the printer you install first. If you install a Xerox 4045 first, it contains the width table for that printer. If you install a PostScript printer first, it contains PostScript widths.
Changing width tables
The Width Table: line shows which width table is currently in use. To change width tables, select Load Different Width Table. An Item Selector appears (see Figure 7-7). Choose the width table that matches the new printer. The names of the WID files clearly identify which printer they support.
There's an easy way to make sure that the width table matches the printer. Simply check the last line of the dialog box, labeled Quality. If it reads "Ultimate," then the table

350 Chapter Seven: Producing Output
Directory: C:\UEtiTURA\*.WID. ______ _
.1~\\\\\~\\\\\~\i\~1\\ *. WID \~!\!~~\\\ll\\\ll\i
+ ~~~~E .WID ~ OUTPUT .WID POSTSCPT .WID
................................. ~
'"
Selection: ~._
Figure 7·7. The names of the width files identify the printer they support. OUTPUIWID is the default width table. It is a duplicate of the width file for the first printer you installed.
matches the printer. If it reads ''Draft,'' then you have loaded a width table that does not match the printer .
.. NOTE: Sometimes you may want to deliberately load the wrong width table, so one printer can imitate another.
Imitating another printer
On occasion, you may want to imitate another output device. For example, you may want a laser printer to imitate the final output from a phototypesetter. You can proofread the laser printed pages, then send the document to the phototypesetter when everything is perfect.
Consider the case of a magazine publisher who wants to create proof pages on his Xerox 4045, then send to a PostScript typesetter to create camera-ready art. If she does this without making any modifications, she'll be in for an unpleasant surprise. The pages may look perfect when they come out of the 4045, but they will have flaws when returned from the typesetter.
The reason for the problem goes back to width tables. Every printer uses slightly different character widths, even for the same typestyle in the same size. The differences aren't great, but they add up. It only takes a difference of a character or two to push a word down to another line. It only takes an extra line

Getting ready to print 351
or two to throw off the formatting of an entire page, and, therefore, the formatting of the entire document.
Fortunately, Ventura Publisher provides a simple solution. To make one printer imitate another, simply load a different width table. To make the Xerox 4045 imitate a PostScript device, load the PostScript width table. It's that simple. True, the resulting 4045 output won't look terrific - the printer will be using the wrong spacings. But the important thing is that lines will end where they are supposed to end and pages will break where they are supposed to break.
If you don't imitate other printers very often, simply load the different width table whenever you need it. Those who do it routinely can take a shortcut. Reinstall Ventura Publisher as if for the first time. This time install the final output device first, thereby making it the default OUTPUT.WID file. For example, the magazine publisher could install PostScrip~ as the first printer. Then the PostScript tables would be stored in the default OUTPUT. WID file. The publisher can choose the Xerox 4045 as the device and know that Ventura will still use the PostScript widths stored in OUTPUT.WID. (As you will recall, Ventura uses OUTPUT.WID unless you tell it otherwise.) She can confirm this by checking the Quality line to verify that it shows "Draft." To print a document with the proper 4045 character widths, she need only use the Set Printer Info dialog box to load the 4045 width tables .
.. NOTE: The width table is recorded in the style sheet for that document. If you change width tables to something other than the default OUTPUT. WID, the style sheet looks for that new width table whenever it is loaded. You do not have to change tables again unless you use a new style sheet.
Choosing paper stock So far in this section on getting ready to print, we have discussed how to install and switch between different printers. The paper you choose can also affect the quality of the output. Several companies now make special paper stocks for 300 dpi. These special papers do not curl from the heat that occurs when toner is fused to the page. In addition, many brands are coated to provide a smooth, bright surface that

352 Chapter Seven: Producing Output
shows off laser printing at its best. As an added bonus, these coated papers create less paper dust inside the printer.
In addition, you can find specialty papers. For instance, several brands feature a wax holdout on one side. This makes it easier to use the paper for traditional paste-up. You can print type or graphics and then wax the paper without worrying that the wax will bleed through. You can also find special transparency materials that will stand up to the heat of a laser printer. By loading the transparencies instead of paper, you can create instant slides for overhead projectors. Likewise, some companies make sheets of adhesive-backed labels that can be printed with a laser printer. And you can buy colored stock, including paper that is colored on twothirds of the sheet. When you print on this paper then fold it in thirds you have a brochure that is colored on the outside and white on the inside.
For everyday, in-house reports, you can make do with ordinary 20 lb. bond. If you are using laser-printed pages as masters for offset reproduction, consider spending the extra money for special coated papers. Although the results are not dramatically different, these papers do produce a slightly cleaner, crisper type. Before stocking a large supply, test the paper with your machine. Some early laser printers had trouble with coated paper, which caused them to jam.
Some printers have more than one print tray, so you can keep several kinds on hand. See below for instructions on how to tell Ventura which print tray to use.
Selecting size and orientation This section has covered the steps you must take to get ready to print. Certain decisions that affect the printout are made in advance. Choices such as paper size, orientation, and single versus double-sided must be made before you design and lay out the document. Chapter Six, "Building the Chapter," discusses these options and how to select the right ones.

Printing a single chapter 353
Printing a single chapter The following section explains how to print a single chapter. It assumes that you are ready to print - that you have installed and selected the correct printer, as described above. Printing multiple chapters is described separately below. Remember: always select the printer you want before using the To Print dialog box.
To print a single chapter, load the chapter using Open Chapter from the File menu. Then choose To Print from the File menu (see Figure 7-8). You can be on any page when you choose To Print; you need not move to the beginning or end.
(POSTSCRIPT - Ultinate)
Which Pages: Current t
Fran Page: eoo11 Through Page: e001
Nunber of Copies: e1
Collated Copies: DFF t Printing Order: 1st to Last t
Paper Tray: DeFault t Crop Harks: OFF t
Spot Color Overlays: OFF t l1uH;i··Chp. P"int; Fil.~Jw: C(mh1.m'Jd .;
Device Nane: POSTSCRIPT Output To: LPT1:
Figure 7·8. The To Print dialog box.
The dialog box presents you with a variety of options, which we will discuss in turn. Several lines, however, are there for information only. The top line, for instance, displays the name of the printer in 'parentheses. If you have the correct width table for that printer, you will see the word "Ultimate" following the printer name. Ifnot, you will see "Draft." Checking the top line is a good way to verify that you have the matching width table. At the bottom of the dialog box, the printer name is repeated again on the Device Name line. The output port is also shown. Once again, this is a good way to check that things are set up properly before you start printing.

354 Chapter Seven: Producing Output
You cannot change these informational settings within the To Print dialog box. If you discover an error when checking these lines, use the Cancel button to close the To Print dialog box. Then use Set Printer Info to change the settings, as described above. In addition, one of the pop-up menus does not operate when printing a single chapter. The Multi-Chp. Print Files line is grayed out for single chapters. It operates only if you access this dialog box via Multi-Chapter from the Options menu.
Choosing which pages to print Your first choice is which pages to print. Ventura allows you to print all the pages in the chapter, selected pages, or only the current page - the page you were on when you entered the dialog box. You can also elect to print only the left-hand or right-hand pages to create double-sided printing by sending the paper through twice.
Printing a single page
The default setting is Current. This allows a quick shortcut for a single copy of the current page. Select To Print and immediately press Enter. Ventura will print a single copy of the page you were on when you opened the dialog box.
Printing aI/ pages
To print every page in the chapter, open the Which Pages pop-up menu and choose All. Ventura will print every page in the document. You can control whether it starts from the first page or the last (see below).
Printing selected pages
To print a range of pages within the chapter, move to the Which Pages pop-up menu and choose Selected. Now move to From Page: and type in the starting page. Move the text cursor to Through Page: and type in the ending page (see Figure 7-9). When you click OK, Ventura will print only the pages you have specified.

Printing a single chapter
Which Pages: Selected t
From Page: BBB3 Through Page: BOB71
Number or Copies: B1
Collated Copies: Ofr t Printing Order: 1st to last t
Paper Tray: Derault t Crop Marks: Ofr t
Spot Color Overlays: Ofr t Nul.t;·i··ehp. Pr"irlt; F:i.l.~tw: eOI'lbirl~td .;
Deyice Name: POSTSCRIPT Output To: lPT1:
Figure 7·9. To print selected pages, type in where you want Ventura to begin and end.
Printing left and right pages for double-sided printing
355
By printing first the left and then the right pages, you can do double-sided printing on an ordinary laser printer. If the chapter begins on a right page, start by printing all the left pages. Then turn the stack of paper over and print the right pages on the opposite side. Here it is step-by-step:
• Select the Which Pages pop-up menu.
• Select Left.
• Press Enter (or click OK) to print only the left pages.
• Turn the stack of pages over and re-insert them in the paper tray. Be sure they are inserted so they will print on the blank side. With some printers this means putting them face down in the paper tray. With others it means putting them face up.
• Repeat the printing process, this time selecting Right from the Which Pages pop-up menu .
.. NOTE: Use this technique only to produce a few final copies in-house. For offset printing, your lithographer will require single-sided original pages.

356 Chapter Seven: Producing Output
Printing more than one copy To print more than one copy, move the cursor to the Number of Copies line. Type in the number you want. To avoid excessive wear on the printer, and excessive print times, we don't recommend printing more than five copies. For larger quantities, take a master to a photocop~ shop or offset printer. To reduce printing time, select Collated Copies: Offwhen printing multiple copies of the same document.
Collating pages The idea behind desktop publishing is to make you more productive. It makes sense to figure out Ventura's paper handling options so you can get your system to do as much of the work as possible. Two steps can save you needless shuffling and sorting: (1) letting Ventura collate pages and (2) letting Ventura put the pages in the proper order.
If you print more than one copy, you may choose between collated or uncollated. For example, suppose you want to print five copies of a 20-page chapter. If you choose Collated Copies: Off, Ventura will print five copies of page 1, five copies of page 2, and so on. If you choose Collated Copies: On, Ventura will print pages 1 to 20, then start over and print 1 to 20 again, and so on until it has produced five copies of the chapter, each in sequential order.
There's a drawback to letting Ventura collate the pages: it takes much longer to print. Therefore, we recommend Collated Copies: Off if you want the fastest possible print time. You will have to do the sorting yourself. Collated Copies has no effect if you are printing a single copy. Ventura always prints single copies in collated order.
Choosing the printing order By choosing the right printing order, you make it unnecessary to shuffle through pages to rearrange them. If your printer stacks pages face down in the output tray, choose 1st to Last from the printing order pop-up. When you turn the stack over, you will find the first page on top, where it belongs. If your printer stacks pages face up, choose Last to 1st. This choice

Printing a single chapter 357
avoids the need to reshuffle the pages after printing to put them in proper reading sequence.
Choosing the paper tray Some desktop publishers use alternate paper trays to hold different types of paper - letterhead in one tray, for instance, and plain paper in another; or legal size in one, letter in another. If your printer has multiple paper trays, you can select among them using the Paper Tray pop-up menu. Set it to Default if you have only one tray. To choose a different tray, select Alt #1 or Alt #2. Choose Manual to print single pages one at a time with the manual feed slot.
Printing crop marks The Crop Marks pop-up menu turns Ventura's automatic crop marks feature on or off. With Crop Marks: On, Ventura prints crop marks at the four corners of the Underlying Page (see Figure 7-10). These marks appear on every page, but only on the printout; they do not show up on screen. They show which portions of the paper to trim off after printing. They help the lithographer maintain consistent positioning.
TillecfFleporl 1-1
PROPOSAL TO ACME INSURANCE CORPORATION
Corporate TraInIng The Corporate Training department hal identified an objective to rcdeaign and rdormat over9000pagcs oftcttual and graphic information whichoorutitutcs thecornpany"J trainingdoalmc:ntatKmclcmcntt.
In addition to redesigning this Jub.tantial amount of information. the dq>arlmc:nt will abo add new .cctiQllJ to the current traininacurriculum..
Thctrainingdocumcntation is currentlyavai1ablcin8 varic:tyof media. monty on much copied papCIJ. The docwncntation iI IOmcwhatoutofdatClinccthccollcctionofmatcrialadatcsback ten year.. According to the Corporale Director of Training. there is no orderly fa.hion or design for thil information.
The corporation bas hired a COI1Iultant. Ms. Joan Belden who haJ designed a tpccific format and proccu for the training documentation. MI. Belden will becomcamcmbc:r of thcAcmc m.urance staff to coordinate. the proCCUeI: of rewriting the doc:umcntation..
OJITcntly. there it: an in-house printing and typc. ... c:tting shop. Becawe. of delB)'J and prioritie.. the. training department doca DOthave.rcadyacce.JtothiJfacility. Duetothe.Jizc.andnBture. ofthi. project. a dcciJion hat been made. to evaluate dcpartmenIBI or work-group dc:ak-top publilhinglOlution"pccifi",nyfor the training facility.
Having an departmental facilityfor documentation willgive. the. trainingopcration the following bcncfiu:
Pagel
Figure 7·10. Ventura-generated crop marks.

358 Chapter Seven: Producing Output
Obviously, there is no point in putting crop marks on an 8.5xll in. page if the paper size is already 8.5x11 in. The crop marks option is only meaningful if the Underlying Page is at least an inch smaller than the paper. Otherwise, the crop marks fall into the printer's dead zone - the area near the edge where the printer cannot produce any marks.
You don't have to tell Ventura where to put the marks - it automatically uses the corners of the Underlying Page. To change the position of Ventura's crop marks, change the size of the Underlying Page with Sizing & Scaling from the Frame menu, as described in Chapter Six, "Building the Chapter."
If you previously selected the Half option as your page size (using Page Size & Layout from the Chapter menu), Ventura changes the size of the Underlying Page to 5.5x8.5 in. In addition, Ventura centers this smaller page on the 8.5xll in. sheet of paper (as you can see in Figure 7-10).
If you change the size of the Underlying Page yourself, you must also center it yourself. Unless you tell it otherwise, Ventura starts the page from the upper left corner of the sheet of paper. That would make some of the crop marks fall outside the printing area. To center the Underlying Page, use Sizing & Scaling from the Frame menu. Change the Upper Left X and Upper Left Y to move the upper left corner down and to the right.
If you don't want automatic crop marks, you can draw them yourself on the Underlying Page. Create the crop marks in Graphic mode. Then select all the crop marks, and choose Show On All Pages from the Graphic menu to make them appear on every page of the document. This is also the way to produce registration marks (see Figure 7-11).
Figure 7-11. A registration mark can be created with Ventura's graphic mode.
Printing a single chapter 359
Printing color overlays Spot Color Overlays option is useful for reproducing multicolor documents on an offset press. In order to produce a multi-color document, the lithographer requires several originals for each page of your document; one for each ink color. For example, if you are producing a brochure with blue headings and black text, the lithographer needs two sheets. One sheet has only headings; the other has only the text. The lithographer produces two printing plates, using black ink with one and blue ink with the second.
Lithographers can make these plates on their own, if you tell them which portions of the page are supposed to be in which color. Most people do this via see-through tissue overlays on top of the printed pages. They circle the colored text on the tissue and write in instructions to the lithographer.
You may be able to save money and time by creating the two versions in advance. Ventura's Spot Color function will automatically print a separate page for each color (including black). The lithographer uses these pages to make separate printing plates. In the example mentioned above, Ventura would print two pages, one for black and one for blue. Each page is labeled at the top so you don't get the colors mixed up.
To enable the printing of separate overlays, choose Spot Color Overlays: On. You should be aware, however, that this choice has no effect unless you take two previous steps: (1) choose colors for text and/or graphics and (2) enable the colors using Define Colors from the Paragraph menu.
To choose colors for text, use the Font dialog box in Paragraph mode (see Figure 7-12). For instance, in the example above, you would click on a heading and change its color to blue. You can also assign colors to ruling lines, boxes, graphics, backgrounds, and fill patterns with their respective dialog boxes.
After you have chosen colors for each individual element, you must also enable the colors using the Define Colors dialog box (see Figure 7-13). Choose Color Setting: Enabled one by one for each color you plan to use. Each color you enable in this dialog box will then print out on a separate page when you select Spot Color Overlays: On.

360 Chapter Seven: Producing Output
Desk File Edit View Chapter Fraflle .,. .' .• Graphic Options iii::!:!:!!!!!i!!!!!!!!!!!!!!!!!!!!: ····················iiiiiii!iii!!iiiiiiiiiii!iiiiHiiimiii!i!i!!i!!!::!!i!!!!!!!!!!!!!!!!!!!ii!!ii!
"heading" FONT
iiiimmiiimmmmmimiimiimiiiiiiiiiiiiiiii Face imimmiimiiiiimmmimiimmmmimiHH t Helvetica
Courier
~.~~.~~.~~.~~.~ ~~:~~IGarde Gothic Book/Deflli ~ I TC Bookfllan light/Demi
, Helvetica Narrow Palatino
Custofll Size: 919.9 points
Overscore: Off t Strike-Thru: Off t
Underline: Off t Double Underline: Off t
:::::::::::::::::::::;::::::::::::::::::::::::::::::::::
mHiiHi Size lHmm t .lilh .... UU.
t--
Hmm Sty Ie mmi l..i~Jht.
Bold 1. . [t.i.~:t.i.(.~ N- Italic B- Italic
im Color Hi White Black Red Green
_lIm.-
Cyan Yellow Magenta
Figure 7·12. Use the Font dialog box to select colors for text. You can also assign colors to ruling lines, boxes, graphics, backgrounds, and fill patterns.
Screen Display: Colors t
Color Number: I + I 2 I .. I
Color Setting: Enabled
Color Name: Red'l-l ___ _
Cyan: ~I+~I-===============~ t1agenta: I + I::::::::::::::::::::::::::::::::::::::::::::::::::::::::::::::::::::::::::::::l I .. I 100.0
Yellow: I + I::::::::::::::::::::::::::::::::::::::::::::::::::::::::::::::::::::::::::::::l I .. I 100.0
Black: I + I I::::::::::::::::::::::::::::::::::::::::::::::::::::::::::::::::::::::::::::::1 .. I 000 .9
OOL.,.;;;,;;;,=;;....J
Figure 7·13. Use the Define Color dialog box to enable each color you wish to use for spot color overlays.
--
For more on the Define Colors dialog box and its other functions, turn to Chapter Eight, "Advanced Functions."
.. NOTE: You do not need a c%r monitor or a c%r printer for over/ays.
Color is not added until paper reaches the printing press. It is perfectly acceptable for your laser printer to use black toner to create the original for each color. In fact, lithographers don't want spot color overlays in color. They want them in black,

Printing a single chapter 361
clearly labeled with which pages are for which colors. However, if you have a color monitor or a color printer, you can use them to preview the color combinations and get a rough idea how they will appear together.
Printing large pages If you have selected Double (11x17 in.) from Page Size & Layout in the Chapter menu, you do not need to do anything differently in the To Print dialog box. Mter you click OK, however, you will see a second dialog box. Choose Overlap to create four 8.5xll in. pages. You can paste those four pages together to create a single llx17 in. sheet. Choose Nothing if you are sending the file to a typesetter that is capable of printing an llx17 in. page. If you have a PostScript printer, you can choose Shrink to reduce the large page to fit an 8.5xll in. sheet of paper.
If you have selected Broadsheet (18x24 in.), the secondary dialog box gives you a Print in Strips option. This option applies only to typesetting machines that can produce strips 24 inches long.
Stopping a print job To stop a print job in progress, press the Esc key. Don't be alarmed if it takes a while for the command to take effect. When you press Esc, Ventura finishes the page it is working on before it stops. Complex pages can takes several minutes to process on certain printers. If you press Esc by mistake, Ventura gives you the chance to continue (see Figure 7-14).
? Do you wish to stop or continue .......-_St_o~p ........ WAIT printing?
I Continue I
Figure 7·14. Press Esc to cancel a print job in the middle. Ventura gives you a chance to continue printing, or to confirm the cancellation.

362 Chapter Seven: Producing Output
Printing to a disk file Ventura includes a handy print to disk option. You may want to use it for any of several reasons:
• To send the resulting file (via modem, network, or floppy disk) to another location for printing.
• To speed operations (printing to disk is faster than printing to an output device).
• To spool the file so printing can go on in the background, freeing the computer for other activities.
• To produce a PostScript file that you can load into Ventura and use as an illustration.
Printing to disk involves two steps. First, use Set Printer Info to specify that the output is supposed to go to a file. Second, use the To Print dialog box to start printing.
Refer back to the picture of the Set Printer Info dialog box shown earlier in this chapter. Use this dialog box to send the output to a file instead of to a port. Thus, instead of selecting LPTI or COM2, choose Filename. If you plan to send the disk file to someone else, be sure to specify the device (printer) and width file that match the printer setup at the other location .
.. NOTE: You don't have to actually own or use a printer to create a compatible disk file. For instance, you can create PostScript print files even if you don't have a PostScript printer. Simply install PostScript as one of your secondary printer choices. Then specify the PostScript device and width table before you print to a filename.
After selecting the correct printer, open To Print as you would normally. Select the printing options you want (Which Pages, and so on). After you click OK, an Item Selector appears to allow you to name the file and specify its location.
Type in the name and location of the file. Ventura automatically adds the extension COO to print files, but you can choose a different extension if you prefer. If you are printing multiple chapters, Ventura also lets you specify if you want each chapter in a separate file or all the chapters in one big file. Ventura

Printing to a disk file 363
then proceeds to print to the file name you have selected. Printing to a disk file almost always takes less time than printing to an output device .
.. NOTE: Disk files can become very large. All the downloaded fonts are sent to the file. This creates huge files with the LaserJet Plus. PostScript files can also become unwieldy.
See below for tips on how to reduce the size of print files. Direct devices such as the JLaser card and the LaserMaster CAPcard do not have a print to file option. These devices gain their speed by creating a one megabyte bitmap of each page and sending it directly to the printer. This expedites printing, but it creates disk files that are too large to be practical.
Printing Encapsulated PostScript files U sing the PostScript printer driver, you can print single pages to disk. Then you can load those single-page PostScript files into a Ventura chapter as if they were Encapsulated PostScript (EPSF) pictures. You load an EPSF print file using the Load TextlPicture command and specify PostScript as the line art format. You can then crop or scale this figure as you would any other graphic. The PostScript page does not appear on the screen (an X shows the spot) but it does appear on the printed page. The sample pages that appear throughout this book were created in this fashion.
Although the disk file prints in Ventura, it is not in true EPSF format. You cannot export it to other software programs without modification. See Chapter Four, "Creating Pictures," for more on how to create and modify Encapsulated PostScript files.
Printing multiple chapters to a file Printing multiple chapters is covered in detail below. If you print multiple chapters to a file, Ventura gives you the choice of putting them all in one file, or each chapter in a separate file. To put them all into one large file, choose Multi-Chp. Print Files: Combined from the To Print dialog box. Unless you specify otherwise, Ventura uses the extension COO for the single file. To put them into separate files, choose Multi-Chp.

364 Chapter Seven: Producing Output
Print Files: Separate. For separate files, Ventura uses the sequential extensions COO, Cal, C02, etc.
Copying a print file to the printer You can get a hard copy of a print file by copying it to the printer. Use the standard DOS copy command. For example, to send a print file called SAMPLE.COO to a non-PostScript printer attached to LPT1: type the following command at the DOS prompt:
COPY/B SAMPLE.COO LPT1:
Press enter to begin copying. The IB parameter alerts DOS that the file contains binary information. The IE switch is not necessary for PostScript printers, since PostScript files are pure ASCII text.
If the file is located elsewhere than the current directory, include the path in front of the file name:
COPY/B C:\CHAPTERS\SAMPLE.COO LPT1:
To copy a print file to a serial printer, you must (1) configure the serial port, (2) reroute the output to the serial port, then (3) execute the copy command. For most serial printers, the correct series of commands are:
MODE COM1:96,N,8,1 MODE LPT1:=COM1: COPY/B SAMPLE.COO LPT1:
Press Enter after each line.
If you are using a PostScript printer, you must copy a handshaking utility to the printer in advance. Once you send this short file, it remains in the printer, even when power is off. You will not need to send it again. You can find the file, called DTR.TXT, on the \POSTSCPT subdirectory of the Utilities disk that came with Ventura. Place the floppy disk in the A: drive. Now copy the file to the printer. For instance, if your printer uses the LPT1 port:
COpy A:\POSTSCPT\DTR.TXT LPT1:

Printing to a disk file 365
Press Enter to copy the file. You do not need to copy this file if you are printing normally from Ventura, only if you plan to copy files directly to the printer.
Tips for printing to a disk file
Reducing file size
You can reduce the size of print files by making Ventura think the fonts are resident in the printer. If Ventura thinks the fonts need to be downloaded, it will include the space-consuming bit-maps in the print file. Ifit thinks the fonts are already resident in the printer, it will leave them out. The print file will be much smaller and the print time much faster.
Before printing to disk, use AddlRemove Fonts from the Options menu to tell Ventura the fonts are resident. (If you don't know how to use the AddlRemove Fonts dialog box, the subject is covered later in this chapter). First select the face. Then click on the word Download at the bottom of the Style list. The word will change to Resident to show that Ventura now thinks they are already in the printer. You must repeat this process for each typeface in the document .
... NOTE: To print a shortened file, you must download the fonts in advance, because they were omitted from the print file. Load the fonts before starting Ventura with the utilities supplied by the printer manufacturer or the font vendor. If you turn off the printer, you must reload the fonts.
Shortening PostScript print files
This is an advanced technique not recommended for beginning or intermediate Ventura users.
In this chapter and in Chapter Three we talked about creating PostScript files by printing to disk. These files are not in true EPS format. They will print in Ventura, but they may not work correctly in other applications. In Chapter Four, "Creating Pictures," we mentioned how to modify these files with a word processor.
Advanced users may also want to know that Ventura's PostScript files contain almost 20K of redundant information. This

366 Chapter Seven: Producing Output
extra information does not do any harm, but it does take up space and slow printing. You can do away with it if you prefer more com pact files.
At the beginning of every PostScript print job, Ventura sends a prolog to the printer. If you are printing to disk files, it sends the same prolog to each file. You can avoid this unnecessary duplication by temporarily renaming the prolog file before printing to disk. By renaming the file, you "hide" it from Ventura.
When you are ready to print to an output device (instead of to a disk file), you must restore the prolog. Likewise, if you are creating files to be sent to another program or output device (such as a typesetter), you must leave the prolog in place. This method is valid only if you plan to print the files with Ventura itself. Since Ventura will send the prolog when it starts the print job, you don't need to duplicate it in each file.
Here's how to eliminate the prolog. You must perform this brief procedure in DOS before loading Ventura. The prolog file, called PS2.PRE, resides in the \ VENTURA subdirectory. Go to the \ VENTURA subdirectory and use DOS to give it a new file name. For instance, from the DOS prompt, type the following line and press Enter:
RENAME PS2.PRE PS2.BAK
Now load Ventura and print to disk as you would normally. When you are ready to print to an output device, return to DOS. Go back to the \ VENTURA subdirectory and restore the prolog:
RENAME PS2.BAK PS2.PRE
If you do a lot of printing to disk, set up the renaming/restoring process in batch files. Then you can rename and load Ventura with one command. The trick is to merge the renaming commands with a batch file that loads Ventura.
The easiest way to create the batch file is to type it with a word processor that saves in ASCII format. You might call one batch file VPNOPRO.BAT to indicate that it does away with the prolog. Start by typing in these lines
CD \ VENTURA RENAME PS2.PRE PS2.BAK

Printing multiple chapters 367
Now read in the VP.BAT command to merge it with this file (use VPPROF.BAT if you have the Professional Extension). VP.BAT is a batch file created by Ventura during installation. It varies depending on the configuration of your system. For instance, if you have a mouse, you may have included a command to load the mouse driver before loading Ventura. It probably looks something like this:
MOUSE
CD \ VENTURA DRVRMRGR VP 1% /S=SD_xxxxx.xxx/M=xx
(The x's represent specific information about your graphics card and mouse.)
Now go to the end of the batch file and enter commands to restore the prolog so Ventura will be ready for normal printing the next time you need it:
CD \ VENTURA RENAME PS2.BAK PS2.PRE
CD\
Assuming you are using the C: drive, the end result should look similar to this:
C: CD\ ECHO OFF MOUSE CD\VENTURA RENAME PS2.PRE PS2.BAK DRVRMRGR VP 1% /S=SD_xxxxx.xxx/M=xx RENAME PS2.BAK PS2.PRE
CD\
N ow you've got a batch file that renames the prolog, loads Ventura, and returns and restores the prolog when you've finished.
Printing multiple chapters Printing more than one chapter at a time is a two-step process. First, you create a publication. A publication is a list of the

368 Chapter Seven: Producing Output
chapters to be printed, in the correct order. Once you have a publication, you can use it to (1) print all the chapters at once, (2) create a table of contents, (3) create an index, or (4) archive the publication (make a backup copy).
Chapter Eight, "Advanced Functions," covers the creation of a publication. It also explains indexing, creating tables of contents, and archiving.
Printing multiple chapters is very similar to printing a single chapter. You use the same To Print dialog box. The main difference is that you access the dialog box in a different way - via Multi-Chapter from the Options menu. Multi-Chapter is the dialog box where you combine separate chapters into publications. Before it can print single multiple chapters, Ventura needs to know which chapters you want, and in which order you want to print them. That is the function of the Multi -Chapter dialog box.
Creating the publication The first step in printing multiple chapters is to combine the chapters into a publication. Although we don't have space to duplicate the material on building publications in Chapter Eight, the following list summarizes the steps:
• Select Multi-Chapter from the Options menu. The MultiChapter dialog box appears (see Figure 7-15).
iimiiiiiimmm§iimmmiiiHii C: \ TYPESET\UNT I TlED • PUB mmiiHiHiiiiiiiHiHiiHiiHiHiH
t -
H~'JN Open elo\~~J
Add Chapter ••• R~II'IOV~'J Ch<'lp
P":i.nt; ••• M<'lk(,J roe ... M~lk(,J 1 ndt'Jx ••• R~Jn(U'lb~Jr' ••• Copy fln ...
Figure 7·15. The Multi-Chapter dialog box is the first step to printing multiple chapters.

Printing multiple chapters 369
• If an existing publication is already active, select New from the secondary menu to the right of the dialog box. Selecting New clears the screen.
• Select Add Chapter. An Item Selector appears. Use it to choose the first chapter you want in the publication.
• Continue adding chapters until the publication is complete.
• Click on Save or Save As to save the publication.
Printing the publication Once you've built the publication, you're ready to renumber it (if necessary). Renumbering is discussed in the section that follows this one.
After renumbering the publication, you are ready to print. Ifit is not already open, use Multi-Chapter to open it again. Make sure the list shows all the chapters in the correct order. If you have chapters for a table of contents and an index, be sure to put them in their proper sequence.
Now select Print from the secondary menu. The familiar To Print dialog box appears. Use the dialog box to select the print options you wish, just as you do to print a single chapter. For instance, you can use the Which Pages pop-up menu if you want Ventura to print only the first four pages of each chapter.
-NOTE: The Multi-Chp. Print Files line in the dialog box does not operate unless you are printing multiple chapters to a disk file, as described earlier.
When you click OK, Ventura Publisher prints each of the chapters in order. It's as if you have created a large macro file. This macro file opens each chapter in turn, prints it, and then gets the next one.
Numbering pages across chapters Most users split long documents into chapters of 15 to 50 pages. Ventura permits you to number these pages sequentially. You can ask Ventura to number across chapters automatically as it prints. Or you can do it manually by changing the starting page number for each chapter yourself.

370 Chapter Seven: Producing Output
Automatic numbering
Automatic numbering occurs with Ventura's Multi-Chapter printing provided you take two steps. First, you must set up the chapters correctly in advance. Then you must remember to renumber the chapters before you print.
The first chapter does not need any changes. Each succeeding chapter, however, must have the counters set so they will use the previous chapter's numbers as the starting point:
• Open the chapter .
• Select Update Counters from the Chapter menu (Figure 7-16).
Which Counter: I Chapter I I This Page I [TE~·:F~~:::J~~f~.,(~!':J [:JE.r~~·::::.(E~~i~.:~L.1
Initial Page I Initial Table I I Initial Figure I Update Method: I Restart NU~lber I Previous NUMber + 1
R~:wt;<ilr>t; NW'lb~'w: 0001
NUMber ForMat: 1.2 t
Figure 7·16. For automatic numbering across chapters, use the Update Counters dialog box to start the initial page with the previous chapter's last number plus one.
• Click on Which Counter: Initial Page to specify the starting page number.
• Choose Update Method: Previous Number + 1.
Previous Number + 1 tells Ventura Publisher to use the last number of the previous chapter to figure out where to start numbering. For instance, if Chapter One ends on page 24, Ventura will start Chapter '!\vo with page 25 (24 + 1 = 25).
If your document uses chapter numbers in any of its numbering functions, you must -also make the same change to the chapter counter. For instance, many users reference the chapter number in their captions, as in "Figure 8-3," or "Table 5-1."

Printing multiple chapters 371
Ventura will automatically change the chapter counter for you as we!J, if you set up the chapter properly. Assuming you have loaded the chapter and opened the Update Counters dialog box:
• Choose Which Counter: Chapter.
• Choose Update Method: Previous Number + 1.
You must perform these steps for each chapter except the first. Once you have done it, you need not worry about manually updating the first page number in each chapter.
The work you did to set up the chapters won't take effect unless you also renumber the chapters before you start printing. This step updates all the counters used by Ventura Publisher for pages, figures, numbers, and other sequenced items. To renumber:
• Use the Multi-Chapter dialog box to open the publication containing the chapters.
• Select Renumber from the secondary menu.
Manual numbering
Some users may prefer manual numbering for several reasons:
• you want to print chapters separately as you finish them, without waiting to print them all together as a publication.
• you want to create a gap in the numbering to insert illustrations or other materials.
• your chapters contain extraneous material at the end that would throw off the numbering.
Some users store things at the end of their chapters. For instance, they may have several pages devoted to frame templates - blank frames in standard sizes that can be reused. Frame templates save the time of drawing the same sizes over and over again and adding margins, padding, captions, and so on. Likewise, some desktop publishers use the end of the chapter to store an edit history, or editing comments from reviewers. These extra pages will throw off the numbering if Ventura does it automatically.

372 Chapter Seven: Producing Output
In any case, you should know how to manually number pages for other reasons. In many cases, you do not want to start a chapter as page one. For instance, many books start the page numbering with the front matter. Chapter One may actually start with a number like 17.
You use the Update Counters dialog box for manual numbering. Open the chapter and the dialog box. To start page numbering at something other than one (or one plus the previous chapter's last number):
• Choose Which Counter: Initial Page.
• Choose Update Method: Restart Number.
• Move to the Restart Number: line and type in the new starting number.
Tips for manual renumbering
iiliI Plan on which number to start with. For instance, you may need to carefully count the pages for the TOC, preface, and other front matter. Likewise, problems can arise if you want each chapter to start on a right-hand page with a blank lefthand page facing it. In our experience, it is best to add blank page(s) at the end of the previous chapter. You can use InsertlRemove Page from the Chapter menu. Alternatively, you can tag an empty paragraph at the bottom of the page with a page break, thereby forcing a new page.
If the previous chapter ends on a right page, you must add a blank left page to the end. If you want headers and/or footers to appear on the blank page(s), do nothing. If you do not want them to appear, use Turn Header (Footer) Off from the Chapter menu.
These steps are only necessary if you want blank left pages for each chapter opening.
Troubleshooting tips for printing The suggestions below may help you pinpoint problems with Ventura and your printer.

Printing multiple chapters 373
Won't print anything
a Printer malfunction. Press the self-test button. If the printer doesn't have one, try turning it on and off again. Some printers put out a test page upon start-up. If you can't get a test page, the problem probably lies with the printer.
a Printer switch settings. The printer's configuration settings may be incorrect. For instance, some printers let you choose between serial and parallel cables. If you switch from one to another and forget to change the switch, the printer will not operate.
a Cables. Are they attached correctly and securely? Cables can look like they are connected when one side is loose. If the problem occurs the first time you use Ventura, you may have the wrong cable. Most printers have a flashing light or LED indicator that tells you when the printer is receiving data. Try printing while watching this light. If it shows the printer is receiving data, you know that the cables are properly attached (although it is still possible you have a cable that is incorrectly wired).
a Serial cables present a special problem. Many laser printers don't use a standard serial cable. Instead, they use a wiring scheme similar to a null modem cable. The diagrams in Appendix F of the Ventura Reference Guide give serial cable specifications. Check with your dealer or the printer manufacturer for other guidelines.
a Serial port. If you are using a serial port, make sure it is configured properly with the DOS MODE command. If you have more than one COM port, verify that they do not conflict. Set one to COMl and the other to COM2.,
a Wrong port. You may have installed Ventura with the wrong port. It is very easy to type LPT2: by mistake when you meant LPTl:. If the printer operates normally from other programs, but won't work with Ventura, check the Set Printer Info dialog box to verify that you have selected the right port.
a Driver conflicts. Certain device drivers such as GEMPRINT.SYS may keep Ventura from printing properly. If

374 Chapter Seven: Producing Output
you have previously installed GEM applications with this driver, remove it from the CONFIG.SYS file.
a Copying files to the printer. Some users print to disk files, then copy the files to the printer. Several things can go wrong.
If you are printing through a serial port, you must have it correctly configured, as explained earlier in this chapter.
If you are using a PostScript printer, you must copy the handshaking utility DTR.TXT to the printer in advance, as explained earlier in this chapter under "Printing to a disk file." When you copy a print file to a non-PostScript printer, you must also use the IB switch to alert DOS that the file contains binary data. For instance, to copy the print file SAMPLE.COO to LPTl, enter:
COPY/B SAMPLE.COO LPT1:
Won't print over network
a To print a PostScript file on an Apple network, you must modify the POSTSCPT.CNF configuration file in the \ VENTURA subdirectory. Change the line that reads "eoftype(PC)" to "eoftype(MAC)". This suppresses the printing of Ctrl-D characters, which the Apple network may read as end of file markers. You must make this change prior to printing PostScript files to disk.
Boxes and borders won't print
a Non-printing borders. You may be confusing a non-printing screen border with ruling box around. Frames and graphics show borders on screen even if you have not specified any boxes around. These borders help you position the page elements and see where they are. They do not show in Paragraph mode. To verify that you have a printing border, change to Paragraph mode. Hit the Esc key to redraw the screen. If the lines disappear, they were non-printing screen borders. Use the Ruling Lines and Ruling Box Around dialog boxes from the Frame menu to add rules that will print. Use Line Attributes from the Graphic menu to add ruling lines to graphics.

Printing multiple chapters 375
a Overlapping graphics in PostScript. If you have a PostScript printer, the picture inside the frame may be overlapping and therefore obscuring the ruling line. PostScript cannot print transparent overlapping graphics. When one graphic overlays another, the one on top blocks out anything underneath, even though it looks correct on screen. The solution is to put a small margin inside the frame. This margin prevents the picture from overlapping the ruling line.
a Ruling boxes that cross boundaries. If you created the ruling box in Paragraph mode, you should be aware that such borders will not cross column or page boundaries. The box will print on the first page (or first column). But if the text continues, the text will print, but the box disappears. Put the text inside frames or Box Texts if you want boxes to appear one after another following page or column boundaries.
Dashed lines won't print
a Ventura cannot display or print thick dashed rules. If the rule does not show on the screen, it will not print. Reduce the thickness until it displays properly. To achieve a thick, dashed effect, try combining two or more dashed rules. You can also use a dashed ruling box around. Use negative space below rule three to delete the space in the middle of the box un til the top and bottom rules touch. The effect is to create a large dashed line.
Edges blank or header/footer won't print
a You have probably put text or graphics into the dead zone of the printer. Different printers vary in their ability to print close to the edge of the paper, but almost all of them have a thin strip around the outside that cannot print. If you put text in this area, it will show on the screen, but it will not print out. To test your device, print CAPABILLCHP from the \ TYPESET directory as described earlier in this chapter. Then move the text until it is inside the live area.

376 Chapter Seven: Producing Output
Wrong spacing between lines
IillI You may have set Auto-Adjustments to Styles (found in Set Preferences in the Options menu). With this function enabled, Ventura automatically changes the line spacing every time you change the font size. You can override this by opening the Spacing dialog box and resetting the spacing after changing the font size. Or you can turn off the Styles adjustment so that Ventura will not make any adjustments on its own.
Wrong spacing between letters
IillI You may have the wrong width table for the printer. To change printers, you must use Set Printer Info to change both the device name and the width table. To verify that you have the right width table, check to see that the To Print dialog box shows the word "Ultimate" at the top and the bottom.
Working with a service bureau Throughout this chapter we have mentioned that you can use service bureaus for high-resolution output. In this section, we give you more details.
Around the country, shops have sprung up to provide desktop publishing services. They go by names like image-setting services, remote printing services, or desktop publishing service centers. Many of them are copy shops and print shops who have added desktop services to their product mix.
These centers usually offer consulting, training, plus rental time on personal computers with DTP software. In addition, most offer access to a high-resolution printer. Some have typesetters on the premises. Others, especially the franchise chains, have access via a telecommunications link.
High-resolution means different things to different service bureaus. Some centers offer 600 dpi output. Others use 1000 dpi output from plain-paper laser imagesetters. Others use Linotronic machines that produce type on phototypesetting paper at resolutions of1270 dpi or 2540 dpi. And some centers can give you a choice.

Printing multiple chapters 377
Some service centers require a disk file - usually a PostScript file. Follow the instructions elsewhere in this chapter for printing to a PostScript file. If the service bureau charges by the hour (as opposed to the page), you can save time (and therefore money), by printing a disk file that has the fonts set to Resident. Other service bureaus have Ventura up and running on their own machines. In those cases, you can simply take a Ventura chapter to the center on a floppy disk. Be sure to use Multi-Chapter to copy the chapter to the floppy.
Check closely for compatibility before you head to a service center. For instance, chapters created on Ventura 2 may not open and print on a machine equipped with Ventura 1.1. In addition, the fonts used in your document must match the fonts available in the typesetter. This is most likely to be a problem if you are using downloaded fonts.
Expect some discrepancies. Patterns and backgrounds look different on a laser printer than they do on a typesetter. To avoid return trips, don't go to the typesetter until the pages are perfect. By carefully proofreading in advance, you avoid costly reprinting charges. To learn how to use a laser printer as a typesetter proofing device, read the section in this chapter titled "Using one printer to imitate another."
Where do you find service bureaus? The Type World Directory of PostScript Printout Services (see Appendix B) is a good source. Another is the local computer paper. If you don't have access to such a publication, try the yellow pages under Printing or Copying Services. Be sure to comparison shop. Rates can vary by 100 percent, even within the same city. When evaluating potential service bureaus, ask these questions:
1. Can it print Ventura chapters directly, or must you first create a disk file? If so, what type of disk file? (Usually the answer is a PostScript file.)
2. What resolutions does it offer? What are the charges for each level of resolution?
3. Does it charge by the page, or by time, or both? (By the page is the safest for you.)
4. Does it guarantee turnaround time?
5. Does it offer volume discounts?

378
Fonts
Chapter Seven: Producing Output
Some bureaus can accept files by modem, but sending anything more than a few pages over the phone can tie up your lines for many minutes (even hours), and rack up long distance charges if they are outside the local area.
The question of fonts confuses most beginning Ventura users. Part of the confusion arises because there are several interrelated issues. This section explores all five aspects:
• understanding fonts
• buying fonts
• installing fonts
• downloading fonts
• screen fonts
Understanding fonts Before it can produce characters, a laser printer needs a bit map for each one - a blueprint, if you will, describing just where to put the dots to form each letter, number, or symbol. PostScript printers generate hit maps as needed. They store an outline of each typeface. When you, for instance, request the letter a in 10-point Times, the PostScript printer uses the outline to generate a bitmap. This process is known as scaling the font.
Non-PostScript printers, by contrast, need to have the bit maps created in advance. Those bit maps are stored on the hard disk. When you request the letter a, the bit map is sent from the hard disk to the printer. Whereas a PostScript printer stores only one outline - from which it can make virtually any size - a non-PostScript printer needs a separate bit map for each size and style of each typeface. Thus, it must have a bitmap for 10- point Times, and a separate one for I2-point Times. If you want II-point Times, a non-PostScript machine, cannot produce it unless there is already an II-point bitmap.

Fonts
Width tables
379
.. NOTE: There are exceptions to these general rules. For details on a non-PostScript printer that can scale fonts, read the section earlier in this chapter describing the LaserMaster CAPcard.
Ventura comes with font information for both PostScript and non-PostScript printers. For PostScript printers, it contains the information necessary to access the font outlines that reside with the printer controller. For non-PostScript machines, Ventura has a set of bit maps for three typefaces in a range of sizes.
For users of non-PostScript printers, Ventura provides a good, basic starter set: Swiss, Dutch, Courier, and Symbol. Advanced desktop publishers, however, will soon find they need a much broader range of sizes and styles. Fortunately, you can supplement this starter set by buying additional fonts, as we describe below.
We mentioned width tables earlier in this chapter. As the name implies, these tables tells Ventura how much space to allot for each character. When Ventura installs a printer driver and font information, it also installs a matching width table. When you buy new fonts (see below), you should look for vendors who supply a Ventura-compatible width table. Otherwise, you must generate the width table on your own. You must merge the new width table with the old one, so Ventura has width information for all the fonts it may have to use.
Buying fonts You can find a wealth of additional output fonts compatible with Ventura Publisher. They may be provided by the printer manufacturer or by outside companies. Ventura Publisher provides a core set of basic fonts, so you need not purchase standard fonts such as Dutch or Swiss. You may, however, want to buy supplemental Dutch and Swiss fonts that fill in the missing sizes and styles from Ventura's basic set for nonPostScript printers. When choosing new fonts, you should obviously consider style. Each typeface has a slightly different "flavor." In addition to aesthetics, however, you should also

380 Chapter Seven: Producing Output
verify that the fonts conform to the Ventura Font Guideline. This system assigns different numbers to different fonts, so Ventura can tell them apart. And they should include a Ventura-compatible width table. It is preferable if they also include matching screen fonts.
-NOTE: Bit-map fonts can take up many megabytes of disk space. Two MB or more per font family is not unusual. (Outline fonts for PostScript take up much less room.) Before purchasing fonts, verify that you have enough space to store them.
Installing fonts Some font vendors include a special Ventura program that automates font installation. Ifnot, you can do it yourself with a four-step process:
• Copy the new font files.
• Copy the new width table.
• Merge the new width table with the old one.
• Tell Ventura the status of each new font.
Copying font files
For PostScript printers, copy font files to a subdirectory called \PSFONTS.
For non-PostScript printers, copy font files to the \ VENTURA subdirectory.
PostScript and LaserJet users can also choose to put fonts in different subdirectories, as long as they tell Ventura where to find them. PostScript users must edit the first line of the ASCII file POSTSCPT.CNF, which is found in the \ VENTURA subdirectory. This line currently reads:
PSFONTS(C:\PSFONTS)
Note that there are no spaces in this line. If you have decided to put your PostScript fonts in, for example, C: \POSTFONT instead, change this first line to read:
PSFONTS(C:\POSTFONT)

Fonts 381
If you use a different subdirectory, substitute its name in place of C:\POSTFONT.
LaserJet users can also set up a separate font subdirectory. You must type the location into a LaserJet configuration file stored in the \ VENTURA subdirectory. Let's assume that you have created a subdirectory called C:\LJFONTS to contain LaserJet font files. Now create an ASCII text file called HPLJPLUS.CNF. On the first line of the file, type:
HPFONTS(C:\LJFONTS)
If you use a different subdirectory, substitute its name in place of C:\LJFONTS. Now save the file. That's all that the configuration file needs to contain to tell Ventura where to find fonts. (Advanced users: you can also use this configuration file together with the HPDOWN utility to download fonts in advance. See below under ''Downloading fonts.")
Copying width tables
The first step in installing fonts was to copy the font files to the correct subdirectory. The second step is to copy the width table for those fonts. You can put the width table in the same subdirectory where you put the fonts, or in the \ VENTURA subdirectory. Width tables have an extension of WID. Use DOS to copy the file.
Merging width tables
The third step in font installation is to merge the width tables. Ventura's current width table contains the spacing information for the fonts it uses already. Now you must mergejn the new information, so Ventura can use the new fonts, too. If you were planning to use only the new fonts, you could simply switch to the new width table. In practice, however, it makes more sense to merge width tables. That way, Ventura has the spacing information it needs no matter which fonts you use.
The merging takes place in Ventura, but you may want to use DOS first to take a safety precaution. Go to the \ VENTURA subdirectory and make a backup copy of the current width table. If something goes wrong, you can revert to the backup. For instance, if you currently use XRX4045.WID, you might make a copy called XRX4045.0LD.

382 Chapter Seven: Producing Output
Now load Ventura. First make sure that you have the correct width table:
• Select Set Printer Info from the Options menu (see Figure 7-17).
Desk File Edit View Chapter Frallle Paragraph Graphic .llililJl il'"i'I9I
• \\\\\\\\\\\\\\\\\\\\\\\\\\\\\\\\\\\\\\\\\\\\\\\\\\\\\\\\\\\\\\\\\\\\\\U····C·:·\WORD\uN"T·rfl:"ED··:·CHp·········CCAPAu"f[·f':'s"Tyj" "'Iliiil\\iiiiilimiiiiiiii\iiii\\iii\iiili\iiiiiiiii\imiimmmiii •
SET PRINTER INFO (POSTSCRIPT - Uitilllate) [!] r!..
Screen Fonts: EGAI (Use those Illatching this rile extension.)
Output To: m:ITJ I LPT2 II LPT3 I I Cml1 II COM2 I I Direct I .-u--;g-m-I"IW·
Width Table: C:\VENTURA\POSTSCPT.WID _________ _
COlllllland: I Load Dirrerent Width Table (i.e., Font Metrics) I
C2[J I Cancel I
+ I I~~~tt~t~~~~~:~~t~tt~~~~~~~~~~~~~t~~~~~~~~t~~tt~~~t:~~~~~~~~~~~~~~~~~~~~~~~~t~~~~~~~tttt~~~~J~~~1 + ...
~igure 7·17. Before merging width tables, check Set Printer Info to make sure the old width table is loaded already.
• Check the Width Table line to confirm that the right width table is currently active.
• If the wrong width table is shown, click on Load Different Width Table. An Item Selector appears. Choose the correct width table and click OK.
- NOTE: Do not load the new width table. You must load the old width table before you can merge in the new one.
Now that you have confirmed that the old width table is active, you can merge in the new one:
• Select AddlRemove Fonts from the Options menu (see Figure 7-18).
• Select Merge Width Tables. An Item Selector appears. Select the new width table and click OK. You return to the AddlRemove Fonts dialog box.
You have merged the two width tables. You must now decide what name to give it. If you use the same name as the old width file, you will overwrite it. The only way to restore the old
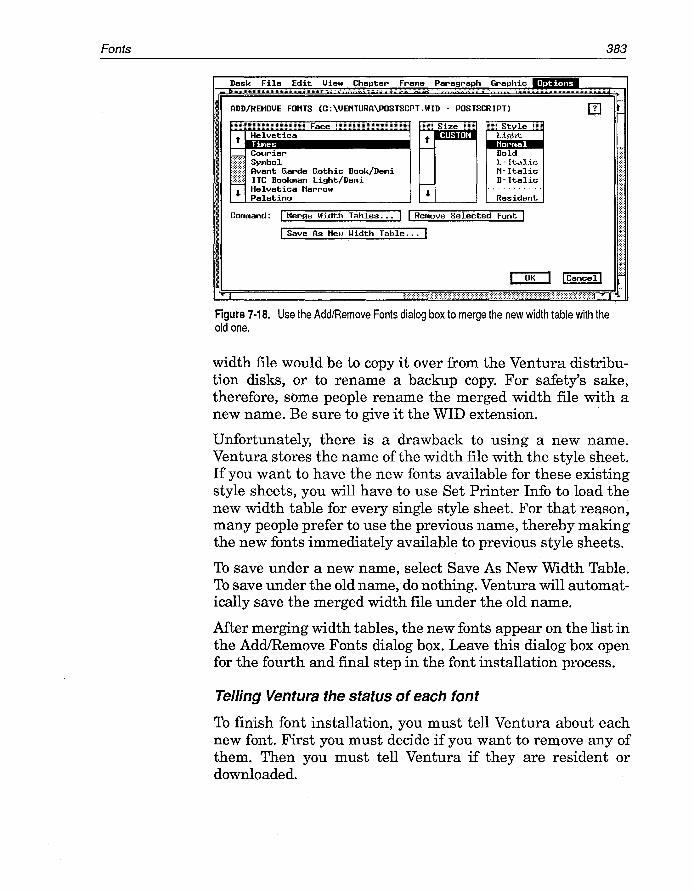
Fonts
ADD/REMOVE FONTS (C:\VENTURA\POSTSCPT.WID - POSTSCRIPT)
!ll!jll!!!lljljl1jii!!!j!!!1!!ilj!!!li!!!!l!!1!lj!jjj!!j!i Face iji!ll!!!!!!l!!!!!!!!!!!I!lj!jljj!j!I!!!!!lj!!!!!!!!!!jl! t Hel,:,etica
][\ ~~:~~~:arde Gothic Book/DeMi J]J ITC Bookman Light/Demi
, ~:~~~~~~a Narrow
iiiiiiiiii Size miiiiii t~
t--
iiimii Style mmi Li~.Jht.
Bold 1.. rt.al.1e N- Italic B- Italic
Resident
ComMand: I Merge Width Tables ... I I Remove Selected Font I I Save As New ~Hdth Table ... I
383
Figure 7·18. Use the Add/Remove Fonts dialog box to merge the new width table with the old one.
width file would be to copy it over from the Ventura distribution disks, or to rename a backup copy. For safety's sake, therefore, some people rename the merged width file with a new name. Be sure to give it the WID extension.
Unfortunately, there is a drawback to using a new name. Ventura stores the name of the width file with the style sheet. If you want to have the new fonts available for these existing style sheets, you will have to use Set Printer Info to load the new width table for every single style sheet. For that reason, many people prefer to use the previous name, thereby making the new fonts immediately available to previous style sheets.
To save under a new name, select Save As New Width Table. To save under the old name, do nothing. Ventura will automatically save the merged width file under the old name.
After merging width tables, the new fonts appear on the list in the AddlRemove Fonts dialog box. Leave this dialog box open for the fourth and final step in the font installation process.
Telling Ventura the status of each font
To finish font installation, you must tell Ventura about each new font. First you must decide if you want to remove any of them. Then you must tell Ventura if they are resident or downloaded.

384 Chapter Seven: Producing Output
The width table you installed may contain unnecessary font information. Some vendors include width tables for the entire font family, including sizes and styles you don't even own, much less plan to use. Leaving these extra fonts in the width file won't hurt anything. However, it can be confusing to see a size or style in the Font dialog box that you don't really have available on disk. For this reason, you may want to remove fonts from the width table. Simply click on the font, the size, and the style you wish to delete. (PostScript users do not need to select a size.) Then choose Remove Selected Font.
Do not remove Times (Dutch) or Helvetica (Swiss) fonts. Ventura uses them as a reference point for certain operations.
The only remaining task is to tell Ventura whether to treat each font as downloaded or resident. Downloaded means that you are asking Ventura to take charge of the downloading. Each time you print, Ventura looks to see which fonts are needed, then downloads them to the printer.
Resident means that the fonts are already in the printer. When Ventura encounters the resident designation, it knows that it doesn't have to bother with downloading. Some fonts are resident because they are built into the printer. But you can also make fonts resident by downloading them yourself before running Ventura.
We recommend specifying fonts as resident, even if that means you must download them first before running Ventura. In everyday work situations, you often find yourself printing test pages and samples. If the fonts are not resident, Ventura must download them, even to print a single page. If you make a few changes and want to print the same page again, Ventura must download the fonts all over again. See below for more on downloading fonts in advance.
To tell Ventura the status of a font, first click on the face, size, and style (PostScript users don't have to choose a size). Then check the word that appears at the bottom of the Style section in the AddlRemove Fonts dialog box. This is a toggle button that switches back and forth between "Resident" and "Download." If you want Ventura to treat the fonts as resident, be sure "Resident" is showing. If you want Ventura to download the fonts each time, be sure "Download" is showing.

Fonts 385
Font-building utilities
Some vendors sell fonts in discrete sizes - in other words, you buy a separate font file for every size and style you want (PostScript users need only one font file for each style). Other vendors sell font-building utilities. These utilities let you decide which sizes and styles you want. Once you have chosen, the program then generates the font files. In most cases, these programs also build screen fonts that match the fonts and fit the resolution of your screen. We believe font-building utilities can be an excellent value, since they allow you to tailor a collection of fonts to your specific needs. See Appendix B, "Manufacturers and Products," for listings of font-building utilities.
Downloading fonts Before you can use a downloaded font, you must first install it and merge its width table as described above.
Ventura Publisher can automatically download fonts to a laser printer whenever it needs them. Download simply means to copy the font files from the hard disk to the laser printer. Although this process is automatic, you may want to fool Ventura Publisher into thinking that all your fonts are resident (see above). You can dramatically improve print speed by downloading once at the beginning of each day, instead of at the beginning of each and every print job. Once you've downloaded the fonts, you cannot turn off the printer; if you do, you will erase the fonts, and you will have to download them again.
Many font vendors and printer manufacturers supply downloading utilities. Follow the directions in their manuals to send the fonts to the printer before loading Ventura Publisher. Owners of LaserJet-compatible printers can also download fonts with the HPDOWN utility supplied with Xerox Ventura Publisher. First you list the fonts in a configuration file (a one-time process). Then you run the HPDOWN program.
Begin by using DOS to copy HPDOWN.EXE from the Utilities disk to the \ VENTURA subdirectory. Next, create the configuration file. This is the same ASCII text file described above

386 Chapter Seven: Producing Output
in the section on installing fonts. The first line of the file contains the name of the subdirectory where you store the fonts. The following lines list which fonts to download. The example below shows a configuration file that will download four fonts from the C: \LJFONT subdirectory.
HPFONTS(C:\LJFONTS) PERMFONT(l TMSN3010.SFP) PERMFONT(2 TMSN3012.SFP) PERMFONT(3 TMSB3010.SFP) PERMFONT(4 TMSB3012.SFP)
To download more fonts, you would simply continue the listing. Obviously, you should strive to conserve time and printer memory by downloading only fonts you will really use. Once you've built the configuration file, you can reuse it over and over again with HPDOWN. To use this utility, use DOS to move to the \ VENTURA subdirectory. Be sure the printer is on and ready to receive commands. At the DOS prompt, type:
HPDOWN
Once you press Enter, the fonts will be sent to the printer. They will remain in memory until you turn it off. Be patient. Depending on the printer, it can take up to 30 seconds for each font file.
For speed and convenience, put HPDOWN into a batch file that also loads Ventura. You might call it VPDOWN.BAT to signal that it downloads fonts as well as loading Ventura. Here is a sam pIe batch file you can modify to match your particular system setup:
C: MOUSE CD\VENTURA HPDOWN DRVRMRGR VP 1% /S=SD_xxxxx.xxx/M=xx
(The x's represent specific information about your graphics card and mouse.)
This downloading explanation assumes that you have already tricked Ventura into thinking the fonts are resident. If not, use AddlRemove Fonts from the Options menu to do so, follow-

Fonts 387
ing the instructions above in the section titled "Telling Ventura the status of each font."
WARNING: Downloading fonts to a laser printer can use up memory that would otherwise have been available for printing graphics. Downloading can therefore cause out of memory errors for complex pages with large graphics.
Screen fonts Just as you were starting to think you understood this whole font thing, we're going to ask you to sit still for one more topic. So far, we've only discussed printer fonts (or output fonts). Ventura also uses a second type of fonts: screen fonts. Screen fonts are nothing more than a way to imitate printer fonts on a monitor. In general, a computer display has lower resolution than an output device. Accordingly, screen fonts rarely match precisely the bit-for-bit pattern produced in a printer. Fortunately, they don't need to - it is the printed page, not the computer display that your readers receive.
During the installation program, Ventura copies over screen fonts. Their resolution is matched to your screen. These are generic screen fonts; that is, they represent a wide range of different typefaces. If you select any serif typeface - whether Times, Bookman, or Schoolbook - Ventura uses its generic serif screen fonts. Thus, Times and Bookman look the same on screen, even though they appear very different on paper. If you select a sans serif face - Helvetica or Avant Garde, for instance - you see the generic sans serif screen font. And if you use a monospaced font like Courier, Ventura displays its generic monospaced screen font.
How can Ventura get away with using the same screen font for different printer fonts? The answer is by adjusting the space on screen to match the spacing of the printer font. By consulting the width table, Ventura knows how much space to allot. Even though the character shapes are the same on screen for Times and Bookman, the line endings are different. Ventura Publisher adjusts the space between words on screen as necessary to assure that each line ends at the correct location -namely, the same place they will end on paper.

388 Chapter Seven: Producing Output
This generic font approach is adequate for most applications. Nevertheless, there are several reasons to consider adding others:
• so the monitor will more closely match the printed page.
• so you can ~ee symbols and dingbats on screen .
• to add higher-quality fonts.
• to speed the display.
The more closely the monitor matches the page, the less need for test prints. With a true imitation of the font on screen, you can more accurately judge the subtle distinctions between different typefaces.
In addition, Ventura's screen fonts only contain characters for its own international character set. If you use symbols or dingbats, they may not appear on screen. This is one reason, for example, many people with PostScript printers choose to buy and use the PostScript screen fonts.
You may also want to add higher-resolution fonts if you upgrade to a big-screen monitor. Some monitor vendors provide screen fonts with their units. Others use Ventura's EGA fonts. However, many people will prefer the superior appearance of the higher-resolution VGA fonts provided with Ventura 2.
In some cases, however, you may want to add screen fonts with a lower resolution. The lower the resolution, the fewer pixels to move around. The fewer the pixels, the faster the display. If you have a large display that is hampered by slow redrawing time, try using lower-resolution EGA fonts. Although Ventura's eGA fonts would be even faster, they are so coarse as to be nearly unreadable at smaller point sizes.
Where to obtain screen fonts
Most font vendors provide matching screen fonts. (If a font vendor does not, you can still use the printer fonts. Ventura will substitute its generic screen fonts.) Adobe Systems, for instance, sells screen fonts in Ventura Publisher form. And many font-generating utilities can generate screen fonts, too. This is a particularly appealing option, since you can specify

Fonts 389
the resolution of your monitor. If you later switch to a different monitor with a different resolution, you can generate new screen fonts to match.
In addition, Ventura has three sets of its own. By necessity, its CGAfonts are low-resolution, to match the 640x200 resolution of the CGA display. EGA fonts are middle of the road in resolution. They are matched to the 640x350 resolution of a standard EGA monitor. VGA fonts are the best. They match the VGA resolution of 640x480.
Installing screen fonts
If you obtain screen fonts from an outside source, installation is usually as simple as copying the files to the \ VENTURA subdirectory.
Things are not quite so simple if you are trying to get different fonts from the Ventura distribution disks. Ventura's fonts come in compressed form, so adding fonts is not just a simple matter of copying the files to the \ VENTURA subdirectory. To get the new files off the disk, you must reinstall Ventura. During the install process, Ventura will expand the font files from their compressed format. At that point they will be available for use. Be careful, however. The reinstall process creates a new batch file. Rename your old batch file (usually called VP.BAT or VPPROF.BAT) to avoid copying over it.
Switching screen fonts
Switching to a new set of screen fonts is simple once you have installed them in the \ VENTURA subdirectory. All screen fonts of a given type have the same extension. To switch screen fonts, use Set Printer Info to tell Ventura the new extension to look· for. For instance, here is how you would switch to the PostScript fonts with the extension PSF:
• Select Set Printer Info from the Options menu.
• Move the text cursor to Screen Fonts.
• Erase the existing three character extension and type PSF in its place.
• Click OK.

390 Chapter Seven: Producing Output
After you click OK, Ventura reads the hard disk and builds a list of the available screen fonts. Don't be alarmed - if the list is a long one, it can take a minute or two. When it has finished building the list, Ventura returns you to the document.
Disadvantages and problems with screen fonts
You may experience problems if you install screen fonts in large sizes, or if you install many different sizes. You may see a message at startup indicating that Ventura did not have room to load all the screen fonts.
You may also experience a significant slowdown. Although Ventura can theoretically handle hundreds of screen fonts, keeping track of them all places a burden on DOS. Ventura must read from disk when a new font is loaded to the screen. These disk accesses slow the system. A set of PostScript screen fonts, for instance, can take 2 MB on your hard disk.
Solutions include deleting unneeded screen fonts, adding memory (if you have less than I MB), adding a disk cache, or upgrading to Professional Extension, which can use EMS memory for increased capacity.
You may also encounter certain scaling problems, especially if you use fonts that are not precisely matched to those of your monitor. For instance, many early users obtained PostScript screen fonts originally designed for the Macintosh computer. Although converted to PC format, they have a different aspect ratio than fonts for a typical PC screen. The problem arises because Ventura uses the IO-point Times (or Dutch) as the basis to scale the rest of the page. When it uses a Macintosh font to do this, it ends up with a measurement that is not quite tall enough. As a result, the entire page appears smaller than normal on certain monitors.
Other problems can crop up when buying screen fonts from outside vendors. These screen fonts may not match the resolution of your screen. For instance, you may have a VGA monitor. Yet some screen fonts only come in EGA resolutions. This can present you with the need to sacrifice your highquality VGAfonts to use the EGA versions. See below for a tip on how to get around this difficulty.

Fonts 391
Tips for working with screen fonts
a You can combine screen fonts of different resolutions by giving them all the same extension. If you use VGA fonts, but you want to add some additional EGA screen fonts, rename the EGA files to the VGA extension. Be careful when renaming files not to overwrite high-resolution fonts with low-resolution versions.
a Rename screen fonts you don't use. For instance, if you install the complete set of PostScript screen fonts, you may want to rename the ones you don't use very often. Ventura expects PostScript screen fonts to have an extension of PSF. Change the extension to anything else and those files will be invisible to Ventura. You can always rename them back if you later start using a different font.
a To improve screen redraw time, increase the buffers in the computer's CONFIG.SYS file. Buffers set aside areas in RAM where DOS can temporarily store information. More buffers means more room to store screen fonts and other screen information. Your CONFIG.SYS file probably contains a line reading "BUFFERS=15"· or "BUFFERS=20." Change this line to "BUFFERS=30." If this still doesn't help, try "BUFFERS=50." Warning: two buffers consume about lK of RAM, so BUFFERS=50 uses up 25K that cannot, therefore, be used for a document.
Do not increase the buffers if you are using only Ventura's standard screen fonts. The extra memory is not needed. Adding buffers would only serve to reduce the RAM available for creating documents.
a To make things even easier on Ventura study the documents you produce, then create screen font groupings that match those documents. Each different screen font grouping will contain only screen fonts in the sizes and styles you use, and nothing more. By giving each group a different extension, you could use different groupings for different documents. Of course, you would preserve the original, all-in-one grouping for those cases where you are building a new document and you don't know in advance what you will need.

392 Chapter Seven: Producing Output
lim To speed up a large screen display, switch from high-resolution screen fonts to low-resolution EGA fonts. Although they do not look as good, they draw in about half the time. If you need better resolution for a particular job, you can always switch back to the high-res screen fonts.
lim For even faster screen redraws (and a boost in overall Ventura performance), install a disk cache. See Chapter Nine, "Special Tips and Techniques," for specific suggestions.
Speedup tips for printing
Download the PostScript prolog
lim You can shave 10 seconds or so from every PostScript print job by downloading the PostScript prolog in advance. The prolog is a set of subroutines Ventura uses to set up PostScript for its way of doing things. Normally, Ventura sends the prolog at the front of every print job. If you prefer, you can download a permanent version of the prolog to your printer before running Ventura.
You must download the permanent prolog every time you start your printer, so most users will want to make it part of a batch file. First copy the file PERMVP.PS from the \POSTSCPT subdirectory of the Ventura Utility disk, so you will have it available whenever you need it. Then use DOS COpy to download the file to disk, as described earlier in this chapter. For instance, to copy it to a printer attached to LPT1:
COPY/B C:\VENTURA\PERMVP.PS LPT1:
Once you have downloaded PERMVP.PS, you must rename PS2.PRE, which is the temporary prolog Ventura normally uses. Refer to the previous section in this chapter on how to rename PS2.PRE and how to make the renaming part of a batch file .
.. NOTE: Be sure you've configured the serial port correctly (if you have a serial printer), and that you have sent the one time file DTR. TXT to the printer before you try to copy PERMVP.PS to the printer.
Fonts 393
Download fonts
a For faster printing with downloadable fonts, do the downloading once before running Ventura. Otherwise, Ventura will download the fonts each time you print, greatly increasing print times. See the previous section in this chapter for how to download fonts.
Hide pictures
a Ventura version 2 can hide pictures not only on screen, but also at print time. For draft printouts, choose Hide Pictures from the Options menu before you print. You can save many minutes this way, especially if you use a PostScript printer.
Use a print spooler/buffer
a Earlier in this chapter we told you how to print to a disk file, then copy this file to the printer. Print buffers are programs that automate this process. Some of them can be set up so they are transparent to the user. You print normally, but the buffer program intercepts the output and puts it on hard disk. (If you set up the buffer to print and copy from a RAM disk, you will achieve even greater speed improvements.) Then it sends this disk file to the printer.
The beauty of a print buffer is that it works in the background. While it doles out information to the printer, you get your keyboard back and can continue to work. Although a print buffer won't make your printer any faster, it will remove the need for you to stop working until the printer is finished.
One of our favorite buffers is LaserTorq, from LaserTools Corp. (see Appendix B) Print buffers do use some memory, so they reduce the space available for your document.
Add a direct printer interface
a Consider adding a direct-interface controller card like the JLaser or the LaserMaster CAP card to your existing printer. You can still use it in its previous mode if certain applications demand it. But for everyday printing and draft printouts, you will appreciate the speed of the direct interface.

394 Chapter Seven: Producing Output
Binding pages Many Ventura Publisher documents are used as camera-ready art for offset printing. (We offer guidelines for offset printing below.) In this case, the lithographer handles the issue of binding the output. But some Ventura users will distribute laser-printed originals or photocopies of Ventura Publisher pages. In that instance, it's up to the user to take care of binding. We feel many desktop publishers undermine their efforts by using amateurish bindings to hold together their documents.
The binding solutions suggested below range in price from a few dollars (three-hole punching) to fifty dollars (a bare-bones saddle stapler) to hundreds of dollars (spiral, Velobind, and glue-binding units).
Three-hole punching is the simplest, easiest way to bind pages. It is appropriate for certain manuals and reports, particularly if they are subject to frequent revision. It's simple to snap out just one section and replace it with a new one. Pay special attention to the inside margin to allow enough room for the holes. We recommend leaving an extra 3 picas (half inch). In other words, if you normally leave 3 picas, leave 6 instead. Although a three-hole punch is adequate for small jobs, those who do more than a few dozen pages should consider buying prepunched paper. It is available from most suppliers at prices only slightly higher than ordinary paper. One disadvantage: Three-ring bindings have a distinct schoolbook connotation. Although practical, they do not convey a slick, professional image.
Saddle-stitching is an option, especially for small booklets of less than 50 pages. Swingline sells a tabletop, manual saddle stitcher, the model 615, for less than $75. Electric models cost several hundred dollars.
Comb or spiral binding is appropriate for short manuals and other applications where the user will want to lay the book flat. The Ibico binding system, for example, consists of a paper punch and an insertion tool for the plastic combs that hold the pages together. Spiral bindings of more than about 100 pages are often inconvenient to use. As with three-hole punching,

Guidelines for offset printing 395
leave an extra 3 picas (half inch) on the inside margin. Disadvantage: Spiral binding has the same inexpensive connotations associated with three-ring binders.
Velobinding does not steal as much space as spiral and threering binding. It is more secure than either, with less chance of losing pages. And, Velobind offers a more professional look. Disadvantage: Velobound documents cannot easily lie flat when opened.
Guidelines for offset printing Some users will distribute laser-printed pages of their Ventura Publisher documents. But many others will use those pages as camera-ready art. The pages will be taken to a lithographer, where they will be used to create printing plates. The tips and techniques outlined below will help you improve the quality of pages intended for offset printing.
Creating windows for photos As we saw in Chapter Four, Ventura Publisher allows you to bring pictures directly into the document. But you may sometimes prefer to leave windows (spaces) in the document where photographs can be inserted using traditional methods. There are several reasons to consider this approach:
• To incorporate high-quality halftones.
• To incorporate color artwork.
• To allow space for artwork that will be photographically enhanced.
• To allow space for artwork that is not yet completed or that will be supplied by another party.
• To allow space for an oversize picture such as a poster or blueprint that will be reduced in your document.
In general, laser printers are not capable of reproducing high quality photographs, as explained in Chapter Four. The quality may be acceptable for in-house publications or certain

396 Chapter Seven: Producing Output
tabloid newspapers. But for professional books, magazines, brochures, and advertisements, you may want to handle photographs in the traditional manner.
Here's how to prepare the Ventura pages to receive those photos: First, decide which photographs you plan to use, and where they belong in the text (approximately). Next, create an empty frame to accommodate the photograph. When choosing the size and shape of the frame, keep the subject of the photo in mind. If you are using a shot of Wilt Chamberlin, for example, do not make the frame wider than it is tall. If you are using a photo of a dachshund, do not make the frame taller than it is wide. Add a caption to the frame, as you would with any other pictures.
Remember that you don't need to use the entire contents of the photo; you may crop it by selecting new top, left, right, and bottom edges. In this case, make sure that the shape (aspect ratio) of the frame matches that of the cropped image area.
You may want to add a ruling box around the empty frame. This gives positioning information to the lithographer. Alternatively, consider setting the frame background to black, so the frame will print as a solid black rectangle. Depending on the prepress process used by your lithographer, black windows may make it easier to insert photographs. (Consult your lithographer to see if this is required.)
Next, draw lines on the border of the photo to indicate the cropping region (the portion you want to save). Finally, compute the percentage of enlargement or reduction necessary to make the cropped photo fit the empty frame. To do this, divide the width of the cropped photo by the width of the frame and multiply by 100 percent. Write this number on the back of the photo with a felt pen so the lithographer will know how much to enlarge or reduce the picture.
Proof photos You may want to consider a second approach for photographs. You can use a scanner to digitize the photos, then place them into the Ventura document. These low-quality digitized images serve only as proofing copies; the actual photos will be reshot by the lithographer as explained above. The advantage

Guidelines for offset printing 397
is that you see a complete mockup of every page before sending it off. What's more, it's easier for the lithographer to avoid mixing up photos when he or she can refer to actual lowresolution sample pages.
You should scan the photographs as discussed in Chapter Four, "Creating Pictures." Use the scanner's software to crop the photo. Create frames just as if you were going to make blank windows for the photos. But now you will fill those frames with the digitized photos using the Load TextlPicture dialog box. After loading the photo, select Sizing & Scaling from the Page menu and select Fit in Frame. If the shape of the frame corresponds to the shape of the cropped photo, the photo will fill the frame without significant distortion. Note: We don't recommend using Fit in Frame or fractional scale factors when you are dealing with scanned images that will actually be used as final camera-ready artwork. Use the technique described here only for proofing purposes .
.. NOTE: Use this technique only for scanned images used for proofing purposes. Scanned images used for final cameraready copy should be original size if possible.
Tips for photos
a When sizing photos, pay attention to the relative sizes of objects in nearby pictures. If you have a picture of a building next to a picture of a thumbtack, for instance, do not enlarge the thumbtack so that it looks bigger than the building.
a If you routinely used standard sized windows for photos, consider using the advanced tag technique described in Chapter Nine. This technique is faster than placing frames for creating blank spaces.
Working with your lithographer Check with your lithographer before you take in laser printed pages for reproduction. She may be able to suggest steps you can take to improve the quality of the finished product. The exact recommendations will depend on the equipment and the way she prefers to work. Some of the possibilities include:

398 Chapter Seven: Producing Output
• Using special paper in the laser printer.
• Over- or underexposing the negatives to fill in the dots and make letters appear more dense.
• Photoreducing the final pages to make the low resolution less apparent.
With the conclusion of this chapter, we have now covered the basics required to produce a Ventura Publisher document. These essentials are"all you need to know to build straightforward, everyday applications. For those of you who want to go further, who want to achieve true high-performance desktop publishing, we offer more. Our final four chapters explore the advanced functions and special techniques that turn Ventura Publisher into a desktop publishing powerhouse.

Chapter Eight
Advanced Functions
Previous chapters discussed Ventura's basic features. In this chapter, we move on to advanced functions. Novice
desktop publishers may not use these features in the beginning. But nearly everyone will eventually encounter publications that can benefit from added power and functionality. We grouped the advanced functions into eight categories:
• File management
• Indexing
• Table of Contents
• Footnotes
• Numbering
• Tab Settings
• Typography
• Hyphenation
File management techniques We made file .management the first topic for two reasons. First, it's an important issue that everyone should understand. Second, it involves the Multi-Chapter dialog box, which you will meet again when you learn to create indexes and tables of contents.
This section recaps and amplifies file-handling material mentioned in previous chapters. In addition, it introduces some new techniques and concepts. It covers four topics:

400 Advanced Functions
• individual file functions
• multi-chapter file functions
• DOS file functions
• file utilities
Individual file functions Ventura has several functions for working with the individual files that make up a chapter: text files, picture files, style sheet files, and chapter files.
Working with text files
To load a text file into a chapter, use Load TextlFile from the Edit menu. You must know and specify the file format and the destination - whether you want to send it to the Assignment List, to the Text Clipboard, or to a spot marked by the cursor where it will be merged with an existing file. When you have made your choices, Ventura brings up an Item Selector, with which you can locate and choose the file.
To rename a text file, use File TypelRename from the Edit menu. First enable Frame mode, then select the Page or frame containing the text file. Choose File TypelRename and type in the new name. You can also specify a new location and a new format at the same time. The previous file remains on the disk under its old name and location.
To copy a text file to a new disk or subdirectory, use File TypelRename. Specify the new location. The previous version remains on the disk under its old name and location. The change does not take place until you save the file.
To convert to a different file format, use File TypelRename. Click on the button that represents the new format. If you choose a different file name, extension, or location at the same time, the old version remains on the disk. If you choose the identical name and path, you will overwrite the old version. Ventura warns you before the overwriting takes plaGe. File format changes do not take place until you save the file.
To remove a text file from the chapter, enable Frame mode and click on the frame or Page containing the file. Select Remove

File management techniques 401
TextlFile from the Edit menu. You can remove the file from the chapter, in which case it is no longer available for use. Or you can remove it from the current frame or Page, in which case it remains on the Assignment List for use elsewhere in the chapter.
To move a text file to a new disk or subdirectory, you must use File TypelRename to copy it to another location, then delete the old version in a separate step.
To delete a text file from the disk, use DOS File Ops from the File menu. You can also delete it with DOS before or after loading Ventura. (Both methods are explained later in this section.)
Working with picture files
To load a picture file into a chapter, use Load TextJFile from the Edit menu. You must know and specify the file format. When you have made your choices, Ventura brings up an Item Selector, With which you can locate and choose the file.
You cannot rename a picture file, copy it to a new location, move it to a new location, or convert it to another format within Ventura. To rename or move a picture file, you must exit Ventura. Use DOS to rename or move the file. Then return to Ventura and reload the picture file into the chapter under its new name or location.
To remove a picture file from a chapter, enable Frame mode and click on the frame or Page containing the file. Select Remove TextlFile from the Edit menu. You can remove the file from the chapter, in which case it is no longer available for use. Or you can remove it from the current frame or Page, in which case it remains on the Assignment List for use elsewhere in the chapter.
To delete a picture file from the disk, use DOS File Ops from the File menu. You can also delete it with DOS before or after loading Ventura. (Both methods are explained later in this section.)
Working with style sheets
To load a style sheet file into Ventura, use Load Diff. Style from the File menu.

402 Advanced Functions
To remove a style sheet from a chapter, load a new one in its place.
To rename a style sheet file, leaving the original intact, use Save As New Style. Do not use Save As, which applies only to the chapter file. Be sure to use the extension STY. If you do not type in an extension, Ventura automatically adds STY for you.
To move a style sheet, rename it to a new location with Save As New Style, then delete the old version from the old location.
To delete a style sheet file, use DOS File Ops from the File menu. You can also delete it with DOS before or after loading Ventura. (Both methods are explained later in this section.)
To archive a style sheet onto a different disk or subdirectory, use Save As New Style. You can save under the identical name, changing only the location (the path). Or you can, for example, give the style sheet a special code or extension to identify it as a backup .
.. NOTE: If you have two versions of a style sheet with the same name, it is possible to accidentally overwrite the new version with the old one. It is better policy to use a different name or extension for the backup.
To bring in a new version of a style sheet file from a floppy disk without exiting Ve:q.tura, use Load Diff. Style from the File menu. Navigate to the floppy disk with the Item Selector, and load the style sheet. Rename it immediately to its proper name and location on the hard disk with Save As New Style.
Working with chapter files
To create a new chapter, select New from the File menu. You will get a blank, untitled chapter without any picture or text files. This chapter uses the style sheet that was active when you selected New. To attach a different style sheet, select Load Diff. Style.
To open an existing chapter, select Open from the File menu. Use the Item Selector to find and choose the chapter you want. Ventura loads the chapter file, along with all other files necessary to build the document.
To revert to the previous version of a chapter, select Abandon

File management techniques 403
from the File menu. Ventura discards the changes you have made and reloads the previous version of the chapter.
To rename a chapter, use Save As from the File menu. If you also want the text files and style sheet to have new names, you must rename them separately before you use Save As. Exception: if the text file has the same name and same path as the chapter, Ventura renames it automatically when it renames the chapter. The previous chapter remains on the disk under its old name.
To copy a chapter to a new location, use the Multi-Chapter technique described later in this section. Use Multi-Chapter even if you only want to copy a single chapter. To move a chapter, use Multi-Chapter, then separately delete the chapter file and all its component files from the old location.
To archive a chapter to a new disk or subdirectory, use the Multi-Chapter function described later in this section.
To move a chapter and its component files, you must first move the text files, picture files, and style sheet individually. Then you can use Save As to save the chapter to the new location. The old chapter will remain in its previous location and must be deleted manually. (Don't forget to delete the CAP, VGR, and CIF files as well.)
To delete a chapter from the disk, use DOS File Ops from the File menu to delete the chapter file and all of its component files. Do not delete the style sheet if it is used by other chapters. You can also use DOS to delete the chapter.
Ventura's built-in DOS functions
You will find Ventura's built-in DOS functions under DOS File Ops in the File menu (Figure 8-1). The first step in using this dialog box is to specify the correct file. You can do this by typing the path and name directly onto the File Spec line and clicking OK. Or you can choose Operation: Select Different File Specification. In that case, Ventura brings up an Item Selector so you can use the mouse to select the file name you want.
Once you have entered the new specification you can create or delete a subdirectory, or you can delete files. To make a directory, type its full path designation on the File Spec line. Click

404 Advanced Functions
File Spec: C:\*.*I-I _________ _
I Select Different File Specification I I Make Directory I I Remove Directory I I Delete Matching File(s) I
Figure 8-1. The DOS File Operations dialog box.
once on the Make Directory button. Then click Done to close the dialog box.
You can delete any type of file, including chapter files and style sheets. All DOS wild card functions operate. Thus, if you enter C:\BOOK\TEST.* on the File Spec line, and then select Delete Matching Files, you will delete every file in the \BOOK subdirectory with the name TEST, regardless of its extension. For instance, this command would delete TEST.CHP, TEST.STY, TEST.CAP, and TEST.TXT among others .
.. NOTE: Deleting a chapter file by itself does not automatically delete al/ the component files, nor does it delete any backup files created by Ventura.
It can be virtually impossible to remember all the component files that make up a large chapter. For this reason, it is essential to establish a file naming system. Such a system should establish unique code letters or numbers for every file in a chapter. That way, you can use wild card functions to speed file management.
Multi-Chapter file functions Normal DOS commands work on Ventura files, but they can cause problems, as we will explain in a moment. To avoid

File management techniques 405
these problems, use the Multi-Chapter dialog box when moving, copying, and archiving chapters .
.... NOTE: Don't be fooled by the name of the dialog box. You should use Multi-Chapter for single chapters as well as for multiple chapters that are combined in a publication.
Why the need for a special copy function? The answer lies in the way Ventura constructs documents. Ventura uses the original text and picture files. Ventura's chapter file merely "points" to these component files. If you move these files, Ventura can't find them (Figure 8-2). It opens the chapter, but displays a message that it cannot locate the component files.
? • E3 A:\NEWS.TXT
~ A:\NEWS.STY I
? •
~ ? • C:\ART\PIX.GEM A:\PIX.GEM
Figure 8·2. Ventura's chapters point to the component files (top). If you move the files with DOS, Ventura doesn't know where to find them (bottom).

406 Advanced Functions
.. NOTE: If you accidentally move files, you can rebuild the chapter by reloading the component files from their new locations.
You can use the Multi-Chapter dialog box to copy a single chapter, or to copy multiple chapters that have been combined into a publication.
Copying a single chapter with Multi-Chapter
Let's assume that you are working on a chapter called SAMPLE.CHP. You've finished formatting and printing and you want to back up the chapter by copying it to the A: drive .
• Select Multi-Chapter from the Options menu. Ventura will give you an opportunity to save your work if you haven't already done so. The Multi-Chapter dialog box appears (Figure 8-3). Ventura automatically opens the last publication used. If you haven't used the Multi-Chapter function since loading Ventura, it shows a new, untitled publication containing the current chapter.
New ~pen 1 • .lOSf~
81.lVe ••• Saye As •••
Add Chapter ..•
_ . I~f:\~'~~~\ . I::I.~I:) ... Print ••• Make TOC ••• Make Index ••• Renumber ••• Copy All ...
Figure 8·3. The Multi-Chapter dialog box has a secondary menu. You use it to move chapters and publications. You also use ~ to create indexes and tables of contents.
• Choose New from the secondary menu. The list clears .
• Choose Add Chapter from the secondary menu. An Item Selector appears. Use it to select the chapter you want to copy.

File management techniques 407
• Mter adding a chapter, you see its name highlighted on the list (Figure 8-4). If the chapter name is not highlighted, click once on the name with the mouse.
::~::i§gm§g:ii§g:::g::m§:::::¥.:::g! c: \ IX\UHTI TlED . PUB i!:iggngg!:!§!W!~!:!:!§!:!~§!:!§g!
t C: \ TYPESET\SCOOP .CHP Hew Open Glosf.~
Saye ••. Saye As ••.
Add Chapter ••• Remove Chap
Pl'.int.. •• Ni.\kt~ TIlG ••• Ni.\kt~ rndt~)( ••• Hf.mlJl"!t)1~I' •••
Figure 8·4. To copy a single chapter,. highlight the chapter name before choosing Copy All.
• Once the chapter name is highlighted, select Copy All from the secondary menu. The Copy All dialog box appears. Ventura lists the chapter to be copied at the top of the dialog box, under the section called SOURCE.
• Move to the first line of the Destination section, which is labeled ''PUB & CHPs." Type in the full path and name of the new location.
If you want all the component files to go to the same location as the publication and chapter files, click on Make All Directories the Same As the First. Ventura copies the destination from the first line onto all the other lines (Figure 8-5).
If you want different types of component files to go to different locations, type these locations on the different lines.
• When you have entered all the destinations, click OK to start the copying process.
Ventura copies the entire chapter and all its component files to the locations you specified. It also changes the pointers. Suppose, for instance, you copy SAMPLE.CHP and all its component files to the A: drive. If you now open the version of

408 Advanced Functions
SOURCE (fro", this file)
PUB or CHP: C:\TYPESET\SCOOP.CHP ______ _
DESTINATION (to these directories)
PUB & CHPs: A:\BACKUPI-I ________ _ STYs & WIDs: A:\BACKUP _________ _
Text Files: A:\BACKUP _________ _ Graphic Files: A:\BACKUP _________ _
I",age Files: A:\BACKUP _________ _
COJUlland: I Make All Directories the Sallie As the First I
Figure 8·5. Click on Make All Directories the Same As the First to send all the component files to the same destination.
SAMPLE.CHP that is on A:, Ventura will expect all the text, picture, and style sheet files to be on A:.
Ventura does not provide a choice for leaving files behind. You cannot, therefore, copy some of the files wi thou t copying all of them. You can, however, accomplish much the same thing by copying a file to the subdirectory on which it already resides -in essence, copying it to itself.
The most troublesome file is the width table. This file contains spacing information for different printers. There are very few occasions when you need or want to copy this file. Unfortunately, Ventura insists on copying it whenever it copies the rest of the chapter. Width files often take up more than lOOK. If you have a medium to large chapter, the size of the width file will often prevent you from fitting the entire chapter onto a 360K floppy disk. This is particularly frustrating since the width table is rarely (if ever) of any value.
One solution is to set the Copy All dialog box so the width file is copied back to its original subdirectory. Unfortunately, the dialog box groups width files with style sheets, so it must go in the same subdirectory with the width file .
.. NOTE: You do not have to create new subdirectories when using the Copy All function. If you specify a new subdirectory,

File management techniques 409
Ventura automatically creates it for you before copying the files.
Copying multiple chapters
To copy multiple chapters with Ventura, you must first group them into a publication. Then you copy the entire publication. Later in this chapter we will show you how to use a publication to build indexes and tables of contents.
Creating a publication
To create a publication:
• Select Multi-Chapter from the Options menu.
• Select Open from the secondary menu.
Now you are ready to add chapters one by one until you have a complete list.
• Select Add Chapter from the secondary menu. An Item Selector appears.
• Use the Item Selector to locate and select the chapter you wish to add.
• Repeat the process until all the chapters show on the list.
• When the listing is complete, select Save from the secondary menu to name and save the publication. Ventura automatically assigns the extension PUB to publications.
To change the order of a chapter in the listing, move the mouse cursor on top of the chapter name. Press and hold the mouse until a hand appear. Drag the chapter to its new location in the -list and release the mouse button.
To display a list of the component files in a chapter, highlight a chapter on the Multi-Chapter listing. Now select Open from the secondary menu. Ventura displays a list of the files. To return to the normal Multi-Chapter display, select Close from the secondary menu.
Loading an existing publication
To access a publication created earlier:
• Select Multi-Chapter from the Options menu.

410 Advanced Functions
• Select Open from the secondary menu.
• Use the Item Selector to find and select the publication you want. Click OK to open the publication and display a list of the chapters in the publication.
Copying a publication
To copy an entire publication:
• Create or open a publication as explained above.
• Make sure you have not highlighted any individual chapters on the list. If you have, you will copy just the chapter, not the entire publication.
• Select Copy All from the secondary menu.
• Enter the destination as you would for a single chapter (see above).
Multi-Chapter copies every chapter on the list. It copies not just the chapter files, but every component file as well.
Copying a single chapter that Is part of a publication.
To copy a chapter that appears in a publication, highlight the chapter name with the mouse. Then select Copy All. Ventura will copy only that chapter and ignore the rest of the publication.
Backing up a chapter or publication with Multi-Chapter
You will often use Multi-Chapter to place a backup copy of a chapter onto a floppy disk. If you have occasion to use the backup, remember that it now points to the floppy disk. To put a chapter (or a publication) from a floppy disk onto the hard disk, use Multi-Chapter again. Specify the appropriate subdirectories on your hard disk where you normally keep text, chapter, pictures, and style sheet files.
You cannot change the name of a chapter during Multi-Chapter. You cannot, therefore, create special names for backup versions. You will have two versions of the chapter under the same name, one with pointers to the floppy disk and one in the original location. Be careful not to copy an old version on top of a new one.

File management techniques 411
Backing up a chapter or publication with DOS
Many users find it more convenient to back up their work with DOS. You can safely do this as long as you remember that the pointers do not change when you use DOS. Let's assume that the chapter currently resides on the C: \ SAMPLE subdirectory. If you copy the chapter to the A: drive with DOS, you cannot open it from A: (since the pointers are still looking for C:\SAMPLE). Nor could you copy it to D:\SAMPLE, or to any other location except C:\SAMPLE.
You can also use DOS to copy chapters from one computer to another, as long as you put all the files in the same location on the second computer. In other words, if the chapter and all its files reside on C:\TYPESET, you can use DOS to move them to another computer as long as you copy them to C:\ TYPESET on that computer.
-NOTE: Be careful when using DOS Copy to move chapters. It is very easy to overlook one or more of the component files.
The most efficient way to use DOS with Ventura is to place all the files for one project - and only the files for that project -into a single subdirectory. Then you can move the entire chapter with the DOS *.* wildcard.
File management utilities You can purchase third-party utilities for Ventura, some of which include file management functions. VP Toolbox from SNA is a product you can use before or after working with Ventura. It adds a variety of useful functions, including the abili ty to copy or delete chapters. A single command moves the chapter and all its files.
Desktop Manager from New Riders is a utility that works "inside" Ventura. It adds numerous file management functions, along with document management, style sheet management, and timed backup. Its dialog boxes are available in Ventura at the press of a key combination (Figure 8-6).
With Desktop Manager, you can copy, move, rename, or delete any file, style sheet, chapter, or publication with a single

412 Advanced Functions
Chaptel" : C : \ TYPESET\&BOOK -P1 • CHP
Stage: '.mum; I 1st Dl"aft I I 2nd Dl"aft I I Final I Schedule: 1/91/801 1/01/BO 1/9t/BO 1/01/88
Status: Ii!!D ~I O:-n ..... Ho-::-ld7"11 I At Review I I In Queue I Wl"itel": ___ _ Illustl"atol": ___ _
Editol": ___ _ Managel": ___ _
Figure 8·6. Desktop Manager is a file and document management utility that runs "inside" Ventura.
command. In addition, Desktop Manager provides full control over which files move and which files stay behind.
See the buying guide appendix for more information on Ventura utilities.
File management tips
IiIiI To copy just one chapter from a publication, select Multi-Chapter, then select Copy All. You do not need to create a publication for one chapter.
IiIiI Floppy disks can contain subdirectories, too. If you can't locate a file on a floppy disk, it may be inside a subdirectory. Use the Item Selector to find the subdirectory and view its contents.
IiIiI To see a list of all the files associated with one chapter while in the Multi-Chapter dialog box, click on the chapter name and then select Open. A list is displayed.
)
IiIiI Quick start-up technique. Ventura loads a chapter automatically if you specify its name and path at the DOS prompt. To open TEST.CHP on the \ TYPESET subdirectory, enter
VP \TYPESET\TEST.CHP
IiIiI We highly recommend a standard naming system for chapters and their component files. For instance, we suggest that every

Indexing
Indexing
413
file belonging to the chapter start with a unique two-letter code. The jobs of moving, renaming, archiving, and deleting are much easier if you can use wild card functions and if you can identify files at a glance by their names.
This section explains how to produce and format indexes with Ventura. The process involves three steps:
1. Insert index entries into the text.
2. Generate the index.
3. Format the index.
Inserting index entries Your first step is to tell Ventura what to index by inserting marks into the text file. When you later generate the index, Ventura searches for these marks, called index entries. It lists them in alphabetical order, along with the page number on which they appear. The eventual result is an index.
Index entries do not appear on screen or on the printed page. Ventura stores them in the text file. Figure 8-7 shows a listing as it appears in the Ventura dialog box, the word processor, and the final version.
Although entries are invisible on screen, Ventura marks their spot with the degree symbol ( 0 ). This special item symbol is visible in Text mode if you select Show Tabs & Returns from the Options menu.
Inserting index entries in Ventura
You can insert entries in Text mode or directly in the word processor. To insert an entry while in Ventura:
• Enable Text mode.
• Place the text cursor at the spot you wish to mark.
• Select Ins Special Item from the Edit menu (or press the

414 Advanced Functions
INSERT/EDIT INDEH ENTRY
Type of Entry: Index
Prilllary Entry: ProFessional Extensiont-I _______ _ Prinary Sort Key:
Secondery Entry: overview of ___________ _ Secondary Sort Key:
<$IProfessional Extension;overview of>
Professional Extension overview of 255
Figure 8·7. A typical index entry as it appears in the dialog box (top), the word processor (center), and the final index (bottom).
keyboard shortcut Ctrl-C). A secondary dialog box appears (Figure 8-8).
The Adventure Begins
Box Char ... Footnote year when Gerry won Index Entry... ichRush-Presbyt Fraction. • • The prize was two FraMe Anchor. . • 'nes, and ten nights
Hong !Cong Cross Ref... ood fortune, we con that we wan e 0 0 mo a en days in Hong Kong return, but at the same time, United, having just gotten its routes equipment from Pan American, had not yet received authority to to other destinations or between points in the Far East.
Figure 8·8. The secondary menu for Ins Special Item .
• Select Index Entry from the list (or press the Keyboard shortcut F3). The InsertlEdit Index Entry dialog box appears .
• Define the entry (explained below) and click OK.

Indexing 415
When you click OK, Ventura inserts the degree symbol onto the screen to show the spot (assuming you have chosen Show Tabs & Returns). When you save the chapter, Ventura stores the information you just typed inside brackets.
Defining the entry
You use the InsertlEdit Index Entry dialog box to define the entry - that is, to type in the words you want to appear in the index. It may be helpful to start by reviewing a typical twolevel index so you are sure you know the terminology. A twolevel index contains primary entries, representing broad categories, and optional secondary entries, representing specific topics. For example, here is a primary entry with four secondary entries, as they would appear in an index:
Frames Adding 135, 137 Deleting 138 Loading pictures 14,147-153 Loading text 13, 141-144
To create the first two lines in this example, you would go to page 135. There you would type "Frames" and "Adding" into the dialog box:
Type of Entry: Index
Primary Entry: Frames
Secondary Entry: Adding
You would place an identical entry on page 137. On page 138, you would insert this information
Type of Entry: Index
Primary Entry: Frames
Secondary Entry: Deleting
You do not have to include a secondary entry. If you do not insert a secondary entry, the page number appears next to the primary entry in the finished index.
You can put more than one index entry at the same spot. In this fashion, you can index the same topic several different ways. For instance, in addition to "Frames; Loading pictures,"

416 Advanced Functions
you might also want other entries, such as "Pictures; Loading into frames," "Containers; See Frames" and so on. The entries can go one after another in the file.
Page numbers in the index
You must put a separate entry on any and every page you want to appear in the final index. For instance:
Frames Adding 135,137
You create this listing by inserting the same entry twice, once on page 135 and once on page 137. As you can see, Ventura creates only one listing for the words, but includes the page numbers one after another separated by a comma.
If you put identical entries on the same page, Ventura ignores the duplicate and lists the page number only once. If you put identical entries on consecutive pages, Ventura lists the beginning and ending pages. For instance, Ventura does not create listings like this:
Frames Loading pictures 147,148,149,150,151,152,153
Instead, it shows:
Frames Loading pictures 147-153
You must enter identical entries on seven consecutive pages to create the listing "147-153" in the example above. If your document has live headers, you can use a shortcut to create page ranges. You could have created the same listing with a single entry, provided the phrase "Loading pictures" appeared in a header or footer on page 147 through 153.
Look at the headers in this book. We include headings and subheadings to make it easier for you to find your way around. We use Ventura's matching feature to look on the page for paragraphs tagged as Headchap and Head1. When it finds such paragraphs, it displays them in the header. It continues to list them on following pages until it encounters a different Headchap or Head1 paragraph.
If you put an index entry into a paragraph that shows in a

Indexing 417
header, Ventura puts the entry into the header along with the text. In other words, it lists all the pages where the header appears, not just the page with the entry. For instance, suppose we had a second level subheading "Loading pictures." Imagine further that we added an index entry for "Frames;loading pictures" on the same line. Ifwe made second level subheadings appear in the headers, it would have the effect of duplicating the entry on every page on which the header appears. If the subheading "Loading pictures" appeared on page 147 through 153, then the listing shown above would result - even though we only typed the entry once.
You can have more than one index entry associated with the current word. The entry, or entries, must appear in the same paragraph. Otherwise, Ventura will not carry them over into the header or footer.
Adding See and See Also entries
To create a standard index listing, choose Type of Entry: Index. You'can also choose Type of Entry: See or Type of Entry: See Also to generate two other kinds of listings. When you choose See (or See Also), the words you type on the Primary Entry line still become a listing in the final index. But the words you type on the Secondary Entry line are not shown with a page number. Instead, the words See (or See Also) are placed in front of the subheading.
See listings redirect readers. They tell readers to look for information under a different topic instead:
Containers See Frames
See Also listings tell readers where to look for additional information:
Paragraph mode Cursor shapes in 124 Enabling 122 Functions 122-127 See Also Tags
When creating these references, you do not type the words See or See Also into the dialog box. Ventura inserts these words (or
418 Advanced Functions
any other words you choose to substitute) automatically when it generates the index. To create the See listing described above, you enter:
Type of Entry: See
Primary Entry: Containers
Secondary Entry: Frames
To create the See Also listing, you enter:
Type of Entry: See Also
Primary Entry: Paragraph mode
Secondary Entry: Tags
Because Ventura generates the phrases See and See Also itself, you must take a special step to add parentheses. Some editors believe See Also references belong inside parentheses:
Paragraph mode Cursor shapes in 124 Enabling 122 Functions 122-127 (See Also Tags)
To accomplish this, you must type the closing parenthesis into the dialog box. You add the opening parenthesis when you generate the index, as explained later in this section. For instance:
Type of Entry: See Also
Primary Entry: Paragraph mode
Secondary Entry: Tags)
Changing the sort key
In most cases, you can ignore the lines labeled Primary Sort Key and Second Sort Key. When alphabetizing the index, Ventura uses the words on the entry lines unless you put something different on the sort key lines.
One use for the sort key is to force correct alphabetization. For instance, the rules of grammar say that you should ignore prepositions and conjunctions when alphabetizing. You might,

Indexing 419
for example, have an index entry for The Wilcox Company. You want this entry to be listed under W (for Wilcox), not under T (for The). In such cases:
• Type how you want the listing to appear on the Entry line.
• Type how you want the listing to be alphabetized on the Sort line.
There are several other applications for Ventura's Sort Key feature. The rules of grammar say that numbers should be alphabetized as though they were spelled out. To accomplish this, enter the numerals on the Entry line(s) while spelling them out on the Sort line(s). For instance:
Primary Entry: 20th Century Fox
Primary Sort Key: Twentieth Century Fox
You can also enter artificial alphabetization to force an entry to appear at the very top or very bottom of a listing. For instance, some experts believe See Also references should appear at the top of the sub-listings, so readers can see the other alternatives immediately:
Multi-Chapter See Also Publication Archiving Indexing Printing Table of Contents
To force a See Also reference to the top of the list, enter AAA as the sort key:
Type of Entry: See Also
Primary Entry: Multi-Chapter
Primary Sort Key:
Secondary Entry: Publication
Secondary Sort Key: AAA
Other people believe See Also references should come at the end of the listing, under the theory that they are of secondary importance. To force it to the bottom of the list, enter ZZZ as the sort key.

420 Advanced Functions
Editing an Index entry
To change an existing entry:
• Enable Text mode. Choose Show Tabs & Returns from the Options menu.
• Return to the page where you originally placed the index entry. Locate the degree symbol that marks its spot. Place the cursor next to the degree symbol.
• Use the arrow keys to move the text cursor back and forth over the degree symbol until the Current Selection Box reads "Index Entry," "Index-See," or "Index-See Also".
• Select Edit Special Item from the Edit menu (or press the keyboard shortcut Ctrl-D). The InsertlEdit Index Entry dialog box appears, showing the previous entry.
• Move to the line(s) you want to alter and make your chan-ges. Click OK.
Because there is no way to make entries visible in Ventura, it can be difficult to find the right page and the right entry, especially if there are multiple entries on the page. Many users find it easier to edit index entries in the word processor (see below).
Deleting an index entry
To delete an index entry, simply delete the degree symbol that marks its spot:
• Enable Text mode.
• Place the text cursor on top of the degree symbol. Confirm that the Current Selection Box reads "Index Entry," "Index-See," or "Index-See Also".
• Press Del (or select Cut Text from the Edit menu).
You can also delete by backspacing over the degree symbol. Either method places the index entry onto the clipboard.
Moving an index entry
To move an index entry, move the degree symbol that marks its spot:

Indexing 421
• Delete the entry as described above. This places it in temporary memory.
• Move the text cursor to the new location. Press Ins (or select Paste Text from the Editmenu).
Copying an index entry
To copy an index entry, first place it onto the clipboard. Copy the degree symbol as you would copy any other text. It can be hard to select the degree symbol without accidentally grabbing nearby text as well. Try using the Shift-Click method. Or use the Del or Backspace keys. Delete, then immediately replace the entry at its original location, thereby placing it onto the ,clipboard where it can be repasted.
Where to place index entries
Where should you insert the entry? For the ultimate in page numbering accuracy, place the entry immediately preceding the word or phrase. This ensures that the listing will show the page where the phrase starts, even if it breaks across a page boundary and continues onto the next page.
If you don't need this level of precision, you can make things easier by grouping entries. Many people feel that an index is equally helpful if it lists the page where the general topic starts, even if the actual phrase occurs later in the paragraph. If you agree, you can streamline indexing by standardizing the location of entries. We suggest grouping them at the end of headings and subheadings, and/or at the beginning of paragraphs.
As mentioned, index entries show on screen as a degree symbol ( 0 ). You will have trouble finding these marks later if they are scattered throughout the text. With a standard location, you always know where to look. If your document has headings and subheadings, put index entries at the end of these lines (Figure 8-9). Group all the index entries for that subsection in one spot; Ventura doesn't care how many entries you put in a row.
This is an easy location for editors and authors to find when revising. In addition, by putting index marks at the end of each heading, you keep them out of the way in the text file. If

422
Multiple index entries at the end of
the heading
Advanced Functions
~r.:--:r::r.-:::-::-:::"'r."':=~~~ $00000000000001 _
T his trip really began in September last year when Gerry won first! prizein araffle at the fashion show which Rush-Presbyterian-St.!
Luke's Medical Center holds every year . .J'h" prize was two round: trip tickets to Hong Kong on United Airlines, and ten nights in the: Hong Kong Hyatt Hotel. ,.Analyzing our good fortune, we concluded! that we wanted to do more than spend ten days in Hong Kong and! return, but at the same time, United, having just gotten its routes and: equipment from Pan American, had not yet received authority to fly: to other destinations or between points in the Far East. off
Figure 8·9. If your document has headings and subheadings, consider grouping all your index entries at the end of those lines.
you ever decide to edit a Ventura chapter with the word processor, you'll find that numerous index entries can be quite distracting if they are scattered about. The same file is simpler to read and edit if entries are grouped at the end of each heading.
By putting entries at the end of headings, you can also create page ranges with a single entry, by placing the heading into a live header or footer (as described earlier).
Still, you cannot always put index entries after headings. Some documents don't have any headings. Others have them so infrequently that it would be unfair to readers to use them as a catchall for every topic in the section. Remember -wherever you put the entry is the page number that Ventura lists in the index. If entries are too far from the actual phrase, the index is useless.
If the document doesn't average one subhead per page, you probably shouldn't group entries after headings. In that case, put them all together at the beginning of each paragraph. The end of the paragraph would actually be a more convenient spot, but that runs the risk of inaccurate page numbers in the index.

Indexing 423
What to choose for index entries
So far our discussion has centered on how to insert index entries. You should also consider what to enter.
We don't have the space for an in-depth discussion. The Chicago Manual of Style, for instance, devotes almost 50 pages to the topic. We have, however, listed a few of the most important principles below.
• In most books, you can safely index every heading and subheading. Since headings usually indicate the main areas of interest, spend extra time to consider the other terms people might use to describe those same topics. Include entries for those other terms as well.
• Index proper names when they apply to the subject of the book, except when they are used in a passing or trivial reference.
• Determine your target audience, and structure the index for them. In a technical book for a lay audience, therefore, the indexer must index subjects by their common names as well as their technical titles. In a technical book for scientists, the indexer can eliminate lay terminology.
• Index every major subject. This is much harder than it sounds, and may require the services of a professional indexer.
• If the primary entry is listed on three or more pages, add secondary entries so readers know which aspects are discussed on which pages.
• Primary entries should usually be nouns or noun phrases.
• Secondary entries can be nouns, adjectives, verbs, or phrases that describe some aspect of the primary entry.
• Do not index trivial passing references.
• Do not em ploy cross references unless they actually lead to ne~ information.
• Use a See reference when you want the reader to look somew here else instead.

424
\
Advanced Functions
• Use a See Also reference when you want the reader to look somewhere else in addition.
• Entries must be spelled identically or Ventura will index them separately. For instance, the words "Frame" and "Frames" create two different entries.
When to index
Most people agree that indexing "should be done at the end of the writing or editing process. The indexer needs to concentrate only on indexing until it is finished. If you do the indexing as one task, it's easier to stay consistent. When manually indexing with pencil and paper, it's not hard to realize that "Frame" and "Frames" mean the same thing. To Ventura, however, those are two separate listings. If you enter one spelling on one page, and another spelling somewhere else, you'll have to go to extra work to correct the error. You must correct the generated index file, or you must return to one of the entries, edit it, and regenerate the index.
Inserting index entries in the word processor
If you prefer, you can insert index entries directly into the word processor, either before or after the initial layout in Ventura. You cannot, however, use the word processor's indexing function. Whether or not the word processor has its own indexing feature; you must use bracket codes to put Venturacompatible index entries into the file.
Chapter Three, "Creating Text," explains in detail how to add bracket codes, including the codes for index entries. Here is a brief recap. Use the bracket code <$Ip;s> for normal index entries, where p equals the primary entry and s represents the secondary entry.
There are no spaces before or after the semicolon. If you want a primary reference without a secondary reference, enter it by itself inside the brackets, without a semicolon:
<$IFrames>
See references use the code <$Sp;s>. Do not type the word See, since Ventura inserts it automatically when it generates the index:

Indexing 425
<$SContainers;Frames>
See Also references use the code <$Ap;s>. Do not type the words See Also. Here is a typical word processor entry for a See Also reference:
<$AFrames;Pictures>
Here is the resulting index listing:
Frames See Also Pictures
For all three kinds of entries, place sort keys in square brackets immediately following the entry. Thus, to sort 20th Century Fox as if the number were spelled out, you would type:
<$I20th Century Fox[Twentieth Century Fox]>
Generating the index At the beginning of this section, we said that indexing is a three-step process:
1. Insert entries.
2. Generate the index.
3. Format the index.
To this point, you've learned how to insert entries. These entries, which are stored in the text files, have no effect until you generate the index. This function extracts the entries and their page numbers, puts them in alphabetical order, and lists them in a separate file.
You generate an index with the Multi-Chapter dialog box. First you open the publication you want to index. If you have not yet created a publication, turn back to the explanation earlier in this chapter. It shows you how to add chapters, change their order, and save them as a publication.
Incidentally, you should use Multi-Chapter even if you only want to index a single chapter. In that case, you simply create a publication that contains only one chapter.
• Open the publication.
• Make sure all the chapters show on the list and that they
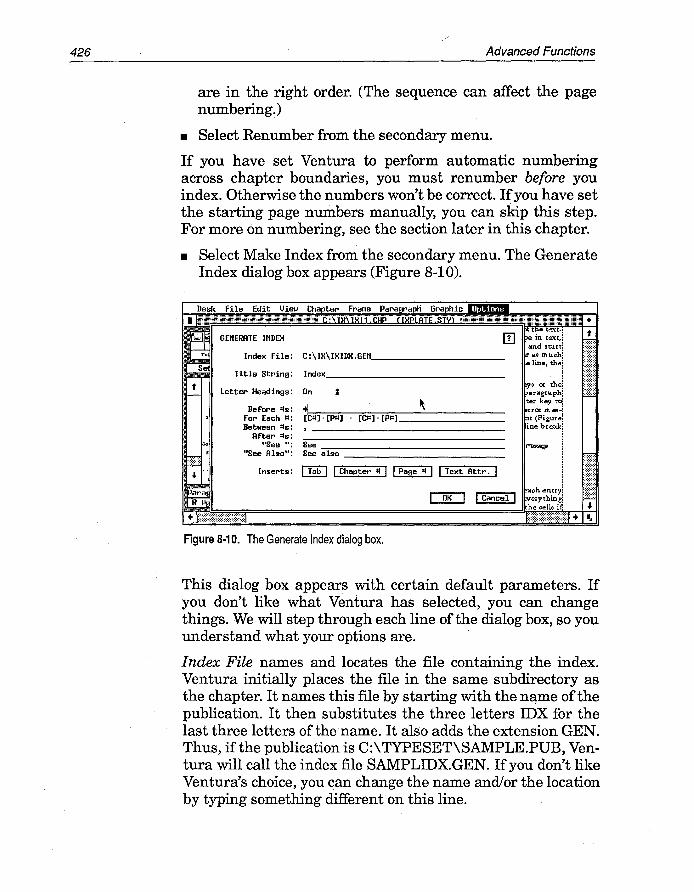
426 Advanced Functions
are in the right order. (The sequence can affect the page numbering.)
• Select Renumber from the secondary menu.
If you have set Ventura to perform automatic numbering across chapter boundaries, you must renumber before you index. Otherwise the numbers won't be correct. If you have set the starting page numbers manually, you can skip this step. For more on numbering, see the section later in this chapter.
• Select Make Index from the secondary menu. The Generate Index dialog box appears (Figure 8-10).
Index File: C:\IK\IKIDK.GEN, _______ _
Title String: Index __________ _
Letter Headings: On t
Before *'s: +I ~ For Each 1:1: [Cl:I)-[Pl:I] - [Cl:I]-[PI:I] _____ _ Between *'s: , ___________ _
After l:Is: "See ": See -=--_________ _
"See Also": See also _________ _
Inserts: ~ I Chapter 1:1 I I Page 1:1 I I Text Attr. I
Figure 8·10. The Generate Index dialog box.
This dialog box appears with certain default parameters. If you don't like what Ventura has selected, you can change things. We will step through each line of the dialog box, so you understand what your options are.
Index File names and locates the file containing the index. Ventura initially places the file in the same subdirectory as the chapter. It names this file by starting with the name of the publication. It then substitutes the three letters IDX for the last three letters of the name. It also adds the extension GEN. Thus, if the publication is C:\ TYFESET\SAMPLE.PUB, Ventura will call the index file SAMPLIDX.GEN. If you don't like Ventura's choice, you can change the name and/or the location by typing something different on this line.

Indexing 427
Title String simply means the title. Ventura places whatever you type here at the top of the index file. It tags this word (or words) as Z_INDEX TITLE.
Letter Headings controls whether or not Ventura places letters between each alphabetic group - anA before the listings that begin with A, a B before the B listings, and so on. Ventura inserts these letters as separate paragraphs on their own line, tagged as Z_INDEX LTR. If your index does not have any listings for a certain letter, Ventura does not create a letter heading. Thus, if you have no Q listings in the index, Ventura will not create a Q letter heading. All listings that do not begin with a letter of the alphabet are grouped together at the top of the index under with an exclamation mark ( ! ) as the letter heading.
Before #s defines what Ventura inserts between the listing and the page number. The default is a tab character, represented by a small arrow. The tab character is useful if you want the page numbers to be right aligned across from the listing, as shown in Figure 8-11.
Some editors prefer an index where the page number follows immediately after the listing (Figure 8-12). To produce this effect, delete the tab character and insert a space.
For each # controls the appearance of the page numbers. If you use chapter-by-chapter numbering, leave the default codes [C#]-[P#]. The code [C#] stands for chapter numbers. The code [P#] stands for page numbers. As shown here, the index will generate listings like this:
Frames 1-4
In the example immediately above, the index entry for "Frames" appears on the fourth page of the first chapter.
Consecutive pages will show like this:
Frames 1-4 -1-7
In this example, index entries for "Frames" appear consecutively on the fourth, fifth, sixth, and seventh pages of the first chapter.
If you do not use chapter-by-chapter numbering, be sure to
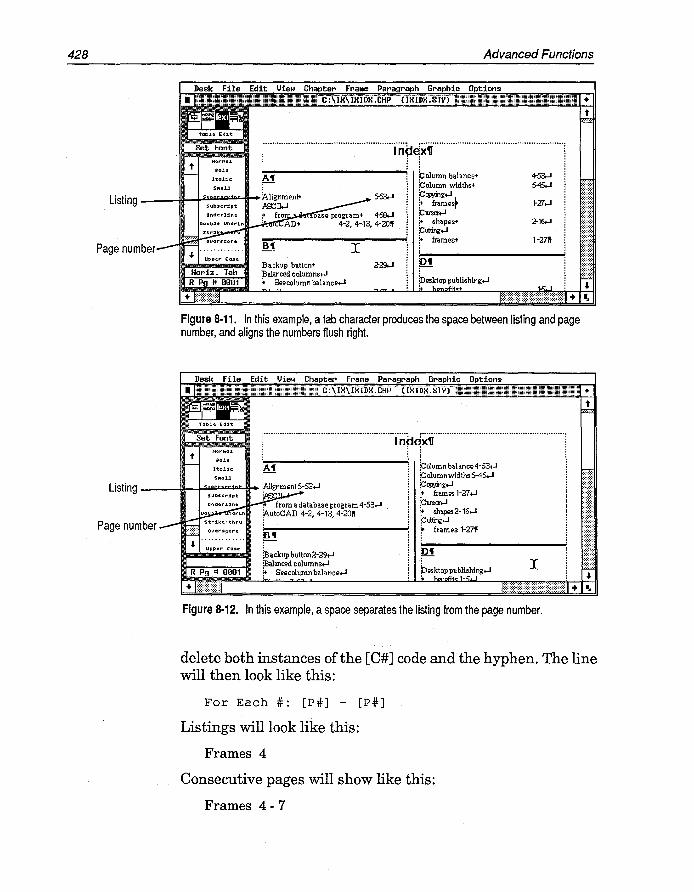
428 Advanced Functions
r························································i·nf1x~··········································· ............ .
Column balance+ ~ k::olumn widths+ 5-45.-1
Listing --~'--I~~~""'r k:cwing..,J t fram"s~ l:urscr..,J
Page number iB'I ~ackup button+ !Balanced columns..,J ~ Seecolumn bala.nce"'"
I
~ shapes+ l:uttirg..,J ~ frames+
i
1-2711
Figure 8·11. In this example, a tab character produces the space between listing and page number, and aligns the numbers flush right.
r························································i·nd1x~··········································· ............ .
}::dumnbalance4-S3 .... i::: olumnwidlhs5-4S ....
Listing __ ~r--I~=:.:,.oJ;.."'" iAJignment~-~+-l k:cwing..,J :. frames 1-27..,J i:urscr..,J
Page number ~ shapes 2-16..,J l:uttirg..,J r frames 1-2711
I
Figure 8·12. In this example, a space separates the listing from the page number.
delete both instances of the [C#] code and the hyphen. The line will then look like this:
For Each #: [P#] - [P#]
Listings will look like this:
Frames 4
Consecutive pages will show like this:
Frames 4-7

Indexing 429
Between #s defines the punctuation and spacing between page numbers, when a listing appears on more than one page. In most cases, you will want to use the default of a comma and a space. However, if you prefer a semicolon or other punctuation instead, type it onto this line. The default parameters produce listings like this:
Frames 4,7,18
After #s controls the punctuation that appears after the final page number (if any). The default is no punctuation. If you want punctuation, type it on this line. For instance, if you type a period on this line, index listings will look like this:
Frames 4,7,18.
Punctuation after numbers is most useful for indexes where the secondary entries follow one another in a paragraph format. For instance, here is how such a listing might look by adding semicolons after:
Paragraph mode Cursor shapes in 124; Enabling 122; Functions 122-127, 134, 138; Keyboard shortcut 122; See Also Tags
"See" defines the text that appears in front of See listings. The default is the word See, which produces listings like this:
Containers See Frames
You can substitute another word or phrase. For instance, if you type "Look under" on this line, you will create listings like this one:
Containers Look under Frames
See Also controls the text that appears in front of See Also listings. The default is the phrase See also, which produces listings like this:
Paragraph mode See also Tags
You can substitute a different phrase, or different capitalization if you do not like the default.

430 Advanced Functions
Inserts provides a convenient way to enter codes into the dialog box. Clicking on Tab inserts a tab character. Clicking on Chapter # and Page # insert the codes [C#] and [Pi] respectively. Clicking on Text Attr. inserts the code <D>. Since <D> is the code for turning off a text attribute, you would replace <D> with the attribute you wanted to add. Use text attributes only for making a word or phrase different from the rest of the text in the index. For instance, to make page numbers bold, while leaving the rest of the paragraph in normal text, you would enter the code <B> in front of the page number code. If you use a code to turn on a text attribute, be sure to insert the ending code to turn it off again. Chapter Three, "Creating Text," gives details on bracket codes. Any text attribute that can be added to a text file can also be added to a dialog box.
When the Generate Index dialog box specifies the format you want, click OK to start the indexing process. Ventura loads each chapter in turn, in the order you specified in the publication. It searches the fue for index entries and records their page number. When finished, it alphabetizes them and records them in a file. You can load and format this file as you would any other text file.
Mter generating the index file, Ventura returns to the MultiChapter dialog box. If you save the publication at this time (using Save from the secondary menu) the index settings will be saved along with it. You will not have to change them the next time you generate an index from this publication .
.. NOTE: If you use Multi-Chapter to copy a publication to a new location, the path for the generated index file is not changed. You must open the Generate Index dialog box and regenerate the index to make this change.
Formatting the index So far you have learned to insert index entries and generate an index file. Formatting the index is the third and final step.
To format an index, you create a chapter and load in the generated index file created in the previous step. Most indexes resemble the page format of the main document, but with several differences. Most indexes, for instances, use a two-
Indexing 431
column format, even if the main document is in a single column. And most indexes use a smaller type size to fit more information on to the page.
For this reason, it is often best to create a separate style sheet for the index. By starting with the style sheet for the main document, you minimize the time to build the new one.
Here are the steps you might take to build an index chapter:
• Select New from the File menu to start a new chapter. Use Save As to give it a name.
• Load the style sheet from the main document. Rename it immediately using Save As New Style.
• Select Load TextlFile from the File menu.
• Select Type of File: Text, Text Format: Generated, # of Files: One, and Destination: List of Files. When the Item Selector appears, use it to find and load the index file generated previously.
• Place the file on the page and format it as you would any other document.
Ventura assigns three tags to the text it generates for the index file:
• Z_INDEX TITLE is assigned to the title word or phrase at the top of the page.
• Z_INDEX LTR is assigned to the letter headings between alphabetic categories (if any).
• Z_INDEX MAIN is assigned to the listings.
Initially, Ventura gives these tags the same attributes as Body Text. You can change the format of these tags with the Paragraph menu. You can also assign a different tag to any or all of the text. Figure 8-13 shows a typical index. Notice that Ventura does not use paragraph returns to separate listings within a letter category. For instance, everything between B and C is a single paragraph. New lines are created with line breaks.

432 Advanced Functions
Z-'NDEX TITLE
Z-'NDEX LTR
; .................................................... ·····i"n~~x~··········································· .............. j
---111-~~~ ..... 1 i bclumnbalanc&>"-S3.,.J ! ~olumnwidths5-45.,.J 1
Z-'NDEX MAIN
;8' ~ackup button2-29.,.J :Balanced columns.,.J ~ Se&>columnbalance.,.J
~qJying.,.J : :. frames 1-27.,.J : p~~.,.J i 1" shapes 2-16.,.J : iCu~.,.J : ~ frames 1-271F ! ~ i ;Df
:: .
Figure 8·13. Ventura tags the index file when it generates ~.
Tips on Indexing
a To index an item under several different names, insert as many index entries as you need. Ventura permits you to create multiple entries at the same spot in the text.
a Try to place the index mark in front of the item you are indexing. Proper indexing procedures call for·the index to list the page on which the material begins. If you insert the mark after a long phrase or section you could end up with improper page numbering.
a Try placing index marks in a separate pass through the document. We feel indexing is too complex to do simultaneously with layout and editing. Instead, we suggest saving it until the end, and moving through the entire document at one time. You are likely to be more consistent in your categorization if you do it all at once.
a To avoid inconsistent indexing in a long document generate and print out the index for each chapter as you go along. Begin with the first chapter. After inserting the index entries, generate the index file, and format an index chapter. Print it out for reference. Now you have an alphabetized reminder of the topics, categories, and spellings you used for the first chapter. Now insert the index entries for the second chapter, and repeat the process. With each chapter you will have a

Creating a table of contents 433
longer and more comprehensive partial index as your guide. You will find automated indexing much easier, faster, and more accurate if you have a printed reminder.
a To edit an existing index consider using a word processor rather than Ventura. Within the word processor, all the index entries are visible as bracket codes. This visibility makes it easy to locate, compare, and alter entries. In Ventura, by contrast, you must open the dialog box for each entry one by one - a time-consuming process.
Creating a table of contents Ventura's built-in table of contents (TOC) function is similar in many ways to its index facility. In both cases, you use the Multi-Chapter dialog box to extract information from the chapter(s) and put it in a separate file. Then you load this text file into a chapter to format its appearance.
To create an index, however, you must go through the document to mark the entries. To create a TOC, you simply tell Ventura which tags to use. Ventura searches the document, pulls out every paragraph with those tags, and lists them along with their page number in its special TOC file.
For instance, to make Ventura create a one-level TOC, we would instruct it to look for Headl tags and extract the text and page number. To create a two-level TOC, we'd tell Ventura to look for Headl and Head2. In real life, we would also extract the chapter title and chapter number and include them in our TOC.
Let's run through the process in detail. To begin:
• Select Multi-Chapter from the Options menu. Use the Multi-Chapter dialog box to open the publication you want to work with. Confirm that the chapters are in the correct order.
- NOTE: To build a TOe for a single chapter, put it into a publication by itself.
• Select Renumber from the secondary menu.

434 Advanced Functions
If you have set Ventura to perform automatic numbering across chapter boundaries, you must renumber before you generate the table of contents. If you have set the numbers manually, or if you only have one chapter, you can skip this step.
• Select Make TOC from the secondary menu. The Generate Table Of Contents dialog box appears (Figure 8-14).
GEIfERATE TABLE OF CONTENTS
TOC File: C:\IX\IXTOC.GEN _______ _ Title String: Table of Contents
Level 1: [*Headchapl:l]+[CI:I]'--:· [=PI:I=] 1------Level 2: [*Head1 ]t[CI:I]· [PI:I] _______ _ Level 3: [*Head2]t[CJ:I]· [Pl:l] _______ _ Level 4: [*Head3]t[CJ:I]· [Pl:l] _______ _ Level 5: Level 6: Level 7: Level 8: Level 9:
Level 10:
Inserts: I Tag Text I ~ I Chapter 1:1 I I Page 1:1 I I Text Attr. I
Figure 8·14. The Generate Table Of Contents dialog box.
With this dialog box, you control the name and path of the TOC file, plus its contents.
TOe File specifies the name and location of the file. Ventura makes a suggestion on this line, but you have the option to change it. Ventura starts wjth the name of the publication and substitutes "TOC" for the last three letters. Thus, if the publication is SAMPLE.PUB, Ventura suggests SAMPLTOC as the file name. Since this is a file generated by Ventura, it appends the extension GEN. It puts the file in the same subdirectory as the chapter file. If you don't like any of these choices, you can change them by typing something else onto the line.
Title String specifies the title that will appear at the top of the file. Ventura suggests "Table of Contents." Most editors prefer to use just the word "Contents." You can make this substitution, or any other change, by typing it onto the line. When it

Creating a table of contents 435
generates the TOC file, Ventura puts this phrase at the top of the file and tags it as Z_TOC TITLE.
Levell specifies the first tag to extract. In our example, we told Ventura to find and list the tag containing the number of the chapter, called HeadChap#. To do this, we used the Tag Text insert button at the bottom of the dialog box:
• Place the text cursor on the Levell line. Click on Tag Text.
• Ventura inserts a code onto the line:
[*tag name]
• Erase the words "tag name" without erasing the rest of the code. In place of "tag name," type in the name of the tag you want Ventura to extract for the TOC. In our example, we typed in:
[ *HeadChap#]
Ventura will now extract every paragraph in the publication tagged as HeadChap# and put it into the generated TOC file. It will be tagged as Z_TOCl.
On the Level 2 line, repeat the process to tell Ventura the second tag to extract. In this case, we typed in the tag name Headl, which is our tag name for section heads.
• Click on Tag Text. Erase "tag name" and replace it with "Headl."
Since we also wanted page numbers with this text, we added additional codes to the line. To force the page numbers to align with the right margin, we inserted a tab character:
• Move the text cursor immediately after the rightmost bracket in the code [*HeadChap]. Click on the Tab button. Ventura inserts an arrow character to mark the tab location.
-NOTE: You must click on the Tab button to insert the tab character. You cannot insert it by pressing the Tab key on the keyboard.
Next we added the chapter and page numbers:
• With the text cursor immediately following the tab charac-

436 Advanced Functions
ter, click on the Chapter # button. Now type a hyphen to separate the chapter and page numbers.
• Click on the Page # button.
At this stage, we are ready to format our TOC. However, we could have continued to add levels. For instance, we could have asked Ventura to extract second-and third-level headings as well as first level heads. In addition, we could have use the Text Attr. command to help us enter bracket codes, as described in the indexing section of this chapter.
When you have entered all the tag names and codes:
• Click OK. Ventura loads each chapter in the publication and extracts the requested text and page numbers. It stores this information in the file name and location you specified.
• When Ventura finishes generating the TOC, it returns you to the Multi-Chapter dialog box. Use Save to save the publication. The settings you created for the TOC are now saved for future reuse.
Formatting the TOC
As with an index, generating a TOC with Multi-Chapter gives you a pretagged text file. You load this file into a chapter and format as you would any other document. You may want to use the style sheet from the main document, and simply add formats for the TOC tags. Or you may want to create a separate style sheet for the TOC, starting with the style sheet for the main document.
Here are the steps you might take to build a TOC chapter.
• Select New from the File menu to start a new chapter. Use Save As to give it a name.
• Load the style sheet from the main document.
• Rename it immediately using Save As New Style if you want a separate style sheet for the TOC. Otherwise, you can skip this step.
• Select Load TextlFile from the File menu.
• Select Type of File: Text, Text Format: Generated, # of Files: One, and Destination: List of Files. When the Item Selector

Inserting Footnotes 437
appears, use it to find and load the TOC file generated previously .
• Place the file on the page and format it as you would any other document.
Ventura assigns tags to the text it generates for the index file:
• Z_TOC TITLE is assigned to the title word or phrase at the top of the page.
• Z_TOCI is assigned to text you extracted with the Levell line in the Generate Table of Contents dialog box .
• Z_TOC2 is assigned to text from Level 2, and so on for the maximum oflO levels.
Initially, Ventura gives these tags the same attributes as Body Text. You can change the format of these tags with the Paragraph menu. You can also assign a different tag to any or all of the text.
Tips for TOes
a You can use Thntura's Toe feature several times on the same document for different purposes. You might do it once to create a TOC. You might do it a second time to create a list of illustrations. Just be sure to give the generated file a different name each time you use the feature for a different purpose. Otherwise, you will overwrite the first file.
a You need not reconstruct the chapter containing the generated TOC file each time you regenerate the TOC. Ventura will automatically update the chapter for you. This allows you to place a frame containing the TOC file within a chapter holding all the front matter of a book.
Inserting Footnotes Ventura Publisher permits you to create footnotes. A symbol or number appears in the main text next to the item you wish to comment on. The same symbol or number appears at the bottom of the page, where you can type in the reference (Fig-

438 Advanced Functions
ure 8-15). Ventura creates a special frame to hold footnotes, and permits you to put a line between the footnotes and the main text.
• The Home 'ley goes to the first plge of the dotument.1I
• TheEnd "ley goes to tile 1ut page of the doeument.II
• ThePgUp 'ley goes to the previous plge. ."
• The Pg On 'ley goes to the next plge. • 2tI
PaUp i. the same IS Ih. 9 keyl
PaOnis thesune as the 3lctyCl
1-....
Figure 8-15. Footnotes are signalled by a number or symbol in the main text. The reference appears at the bottom of the page inside a special footnote frame.
To create footnotes, you must first enable the feature with Footnote Settings from the Chapter menu. In this dialog box you also determine the format. Once you have turned on footnoting, you can then insert references in Text mode.
Enabling footnotes
Begin by enabling footnotes and determining their format:
• Select Footnote Settings from the Chapter menu. The dialog box appears (Figure 8-16).
The Footnote Settings dialog box may seem a bit intimidating the first time you encounter it. Most of the functions are straightforward, if you have the patience to work through the dialog box from top to bottom. You only need to determine the settings once. From then on they stay with the style sheet.
The main purpose of this dialog box is to control the symbol or number that appears in the main text. To enable footnotes, choose one of the buttons from Usage & Format. Two of them insert numbers into the main text to signal a footnote. The third one inserts symbols, such as asterisks.

Inserting Footnotes
Usage 8 FOMlat: []I[] lit Frol1l Start of Page (1,2,3) I lit Frol1l Start of Page (User-Defined) I
It Frolll Start of Chapter (1,2,3)
Start With 1:1: 00811 NUlllber Tenplate: "*- ~
Position of tlumer: tIo Shift t
User- Defined Strings: 1 : t~ : ~I : 4: f): 6: 7: EI:
Separator Line Width: 89.DB fractional pts Space Above line: 80.00
Height of line: 89.09
439
Figure 8·16. Use the Footnote Settings dialog box to enable footnotes and determine their format.
To insert numbers, choose # From Start of Page (1,2,3) if you want Ventura to start the numbers over again with each page. Under this system, if you had three footnotes on page one and two footnotes on page two, the page one symbols would read 1, 2, and 3, while the page two symbols would read 1, and 2.
If you want Ventura to number consecutively throughout the chapter, choose # From .Start of Chapter (1,2,3). Under this system, page one symbols would be 1, 2, and 3. Page two symbols would read 4, and 5.
To start with a number other than one, move to the Start With # line and type in the new number. To put parentheses or brackets around the number, use the Number Template line. For instance, to put parentheses around every number or symbol, type:
Number Template: (*)
To add square brackets, type:
Number Template: [*]
To put a hyphen in front of every number, type:
Number Template: -* To mark footnotes with symbols instead of numbers, choose # From Start of Page (U ser-Defined). The U ser-Defined Strings line, which previously was gray, now appears in black to indi-

440 Advanced Functions
cate that it is active. Ventura suggests asterisks and plus marks for footnote symbols. If you don't like these suggestions, you can substitute any other characters you prefer by typing them onto the line.
If the symbol you want is not a normal keyboard character, you can enter it by holding down the Alt key while you type its decimal equivalent on the numeric keypad. For instance, to use the cross character (t) as a footnote symbol, type Alt-187. Chapter Three, "Creating Text," explains non-keyboard characters.
Use the Position of Number line to change where the symbol appears. If you select No Shift, they appear on the same baseline as the normal text, in the same type size. If you select Superscript, Ventura shifts them above the baseline and puts them in a smaller type size. If you select Subscript, Ventura shifts them below and puts them in a smaller type size.
-NOTE: You can control the point size and the amount of the shift with Attribute Overrides from the Paragraph menu.
The final few lines in the Footnote Settings dialog box control the width and height of the separator line. If you do not want a separator line, leave these lines blank.
To create a separator line, first determine the width you want. Six to twelve picas is a typical width, but if your footnotes are long and involved, you may way the line to run the full width of the column.
Unfortunately, you cannot create a six-pica separator line by typing 06,00 picas onto the Separator Line Width line. Ventura measures the line from the left edge of the page, not the left edge of the margin. Thus, if you have a four-pica left margin, you must enter 10,00 picas onto the line (4 + 6 = 10)to achieve a six-pica line.
Even though Ventura measures the separator line from the left edge of the page, it only prints the portion within the column guides.
To set the thickness of the separator line, type in the correct measurement into Height of Line.
Normally Ventura places the separator line at the top -of the

Inserting Footnotes 441
footnote frame. To move the line down from the top (closer to the footnote text), place space above the line. The amount you type on the Space Above Line is the amount the line is pushed down. This amount does not affect the position of the footnote text. If you place enough space above the line, you can push it completely below the footnote text, or even into the bottom margin (Figure 8-1 7).
• The Home ~ey goes to the firsl plge of the document.1I
• TheEnd ~ey goes to the last pago of the documenl.1
• ThePgUp ~ey goe.Io the previous page.·11l
• ThePg Dn ~ey goe. to the nexl plge. • 'if
Footnote frame - ....... -+---.11 PgUp i. tho same as Iho 9 keyl
24 fractional pts from top of frame
PiOn Is the same 1$ the 3 byC + 1-,1..
Figure 8·17. Use Space Above Line to push the separator line down from the top of the footnote frame.
Adding footnotes to the text
Once you have enabled footnoting and ~et its parameters, you can insert footnotes anywhere in the text. To create a footnote:
• Enable Text mode.
• Move the cursor immediately after the word you wish to reference.
• Select Ins Special Item from the Edit menu (keyboard shortcut: Ctrl-C).
• Select Footnote from the secondary menu (keyboard shortcut: F2).
A number or symbol appears in the text next to the word, in the format you chose in the Footnote Settings dialog box. At the same time, Ventura creates a footnote frame at the bottom of the page. This frame contains two separate paragraphs. One paragraph repeats the footnote number or symbol from
442 Advanced Functions
the main text. The second paragraph initially reads "Text of Footnote." You will substitute your own footnote reference for this second paragraph.
To substitute your own text:
• Move the text cursor to the bottom of the page. Erase the phrase "Text of Footnote" and type in the correct phrase.
Each time you insert another footnote on the same page, Ventura enlarges the footnote frame and inserts another line. The footnote frame cannot be any larger than half the size of the page.
Formatting footnotes in Paragraph mode
Ventura initially tags the footnote number or symbol as Z_FNOT # and the footnote text as Z_FNOT ENTRY. You cannot change these names or retag the paragraphs. You can however, change the format of the tags in Paragraph mode. When Ventura creates the tags it assigns the attributes of Body Text. You can change these attributes by selecting a paragraph and changing it with the options from the Paragraph menu.
Inserting footnotes into word processing files
Authors can insert footnote references directly into word processing files with bracket codes. Chapter Three, "Creating Text," explains how to use bracket codes for footnoting and other functions. Footnotes inserted in advance do not appear in Ventura until you enable the footnoting function. They are not lost - they are simply invisible until you use Footnote Settings from the Chapter menu to turn them on.
Tips for footnoting
imI To put the footnote symbol or number on the same line with the footnote text, use the Breaks dialog box to make sure there is no line break between the two. The most common method is to give the number a line break before and the text a line break after. Use In From Left in the Spacing dialog box to keep the footnote text from overlapping the number.

Numbering functions 443
&lIl1 To make the number or symbol at the bottom of the page into a superscript (or subscript), put Z_FNOT # and Z_FNOT ENTRY on separate lines, but give Z_FNOT # a very small line spacing. First make sure there is a line break between Z_FNOT # and Z_FNOT ENTRY. Now give Z_FNOT # a smaller font and a smaller inter-line spacing. For instance, if Z_FNOT ENTRY has a line spacing of 10 points, try five points for Z_FNOT #.
&lIl1 If your footnotes exceed half the page you cannot use the footnoting feature. Instead, draw a frame on the page and type the footnotes in separately. If you have already created other footnotes with the built-in function, you can tag the text you type as Z_FNOT # and Z_FNOT ENTRY so it will look identical to the other footnotes.
Numbering functions Ventura's numbering capabilities set it distinctly apart from ordinary desktop publishing software. Although Ventura's numbering options are powerful, they require some study. This section provides details on how to make best use of them. We have divided the information into two categories: (1) document numbering and (2) auto-numbering.
Document numbering options Ventura's document numbering functions will automatically keep track of chapters, pages, figures, and tables. In Chapter Six, "Building the Chapter," we explained how to insert chapter numbers, page numbers, figure numbers, and table numbers into your documents by placing one of the following codes into a header, footer, caption, heading, or other location:
• [C#] (chapter number code)
• [P#] (page number code)
• [F#] (figure number code)
• [T#] (table number code)

444 Advanced Functions
Placing the code tells Ventura to display the number at that location. In this section, we will show you how to change and customize those numbers. To control the format and other parameters, you use the Update Counters dialog box .
• Select Update Counters from the Chapter menu (Figure 8-18).
Which Counter: I Chapter I IilfdWO [Ir~I~~::~:'!!:;.FI!:;.] f.JE{~~.~I.Iiji~.i.:~?'J
I Initial Page I I Initial Table I I Initial Figure I Update Method: Previous NUlllber + 1 I Restart Nlllllber I
NUlllber Forlllat: AJB
1-....
Figure 8-18. The Update Counters dialog box.
If you want the counters to start with the Arabic numeral 1 , you don't need to make any changes. If you want it to start with anything else, you should use the dialog box:
• Select the type of counter you wish to modify from the line labeled Which Counter.
To change the chapter numbering, select the Chapter button. You can manually change the number, or you can ask Ventura to number chapters in order automatically. To manually adjust the chapter number:
• Select Which Counter: Chapter.
• Select Update Method: Restart Number.
• Move the text cursor to the Restart Number line and type in the new number. For instance, to set the chapter number to five, type "0005."

Numbering functions 445
To automatically continue the numbering from the previous chapter:
• Select Which Counter: Chapter.
• Select Update Method: Previous Number + 1.
This causes Ventura to look at the number of the previous chapter and number the current one consecutively. You will not be able to see this choice on screen while working on the document. It does not take effect until print time. For automatic numbering across chapter boundaries you must (1) print the chapters with the Multi-Chapter dialog box and (2) select Renumber from the Multi-Chapter dialog box before you print.
To change the appearance of the chapter number:
• Select Chapter
• Select the format you want from the Number Format: popup menu (Figure 8-19). For instance, to display chapter numbers as uppercase Roman numerals, choose I, II.
Which Counter: iIliffiUM I This Page I [IFI~~~·.::!:!:i.~~~E;] DhE.:II~!~.i.:~~:J
I Initial Page I I Initial Table I I Initial Figure I Update Method: I Pl'evious NUlllbet' + 1 I
Restal't NUfIlber: 00011
Restart Humber
Figure 8·19. Select the numbering format you prefer from the pop-up menu.
To change the page numbering on the current page, select This Page. Use Update Method: Restart Number to change the current page by typing a new number on the Restart Number line.

446 Advanced Functions
You can restart the page numbering as many times as you want within a single chapter. If you wanted, for some reason, to have seven Page 3's in a row, you could restart the number at 0003 for each of those seven pages. If you wanted the rest of the chapter to number itself consecutively, you would choose Previous Number + 1 for those pages. Any page numbering choices you make to the Underlying Page apply to every page after that until (and unless) you make another change.
To change the appearance of the page numbers, use the popup menu from Number Format. You can mix and match numbering styles in the same document. Any change you make affects the current page and every page after that until (and unless) you make another change.
To change the page numbering on the first page of the document:
• Select Which Counter: Initial Page.
• Select Update Method: Restart Number.
• Type in the new starting number on the Restart Number line.
To cause Ventura to number consecutively from the previous chapter:
• Select Which Counter: Initial Page.
• Select Update Method: Previous Number + 1.
- NOTE: If you restart page numbering, the new numbers will not show in the Page Number box at the bottom of the SideBar. That box always displays the true consecutive page count of the current chapter. To use the Go To Page function, or to print selected pages, you must refer to the on-screen page numbers, not the artificial numbering you have created with the Update Counters dialog box.
You can also change the starting number and the numbering style of figures and tables, provided you have inserted figure or table numbering into the Anchors & Captions dialog box. To change the numbering style for one picture only:
• Enable Frame mode.

Numbering functions 447
• Select the frame containing the picture.
• Select Update Counters.
• Select Which Counter: This Table or Which Counter: This Figure.
• Change the numbering and click OK.
The changes affect that frame only. If you move the frame, the new numbering moves with it.
Auto-Numbering Ventura's auto-numbering is a versatile, powerful function. You can use it to keep track of simple lists. Or you can use it for military style section numbering. Or you can use it to create traditional outlines:
I. First level A. Second level
1. Third level
You can also use it to generate text automatically. For instance, you can automatically insert the word "WARNING" or "CAUTION" at the beginning of every cautionary note in your product manuaL We used this technique to generate the TIP labels in this book (see page 443).
Or you can use Auto-Numbering for formatting. In the section heads in this book, the thick rule above the heading is created with the heading tag, but the second, thin rule that accompanies it is created with Auto-Numbering.
In all these cases, if you rearrange, delete, or add to the list, Ventura automatically renumbers for you. In this section,we will step you through the creation ofa variety of auto-number-ing effects. .
Auto-Numbering basics
All auto-numbering functions work in the same basic map.ner. You open the Auto-Numbering dialog box and turn the function on. Then you tell Ventura which tagname(s) to watch for. Ventura scans the document and number these paragrap4s. It generates a separate paragraph to contain the number.

448 Advanced Functions
Seems simple enough. The first-time user, however, is apt to be confused by Ventura's ability to number multiple levels. Bear with us for a moment while we explain the multi-level concept before getting back to Ventura's implementation. Anybody who went to grade school is familiar with one type of multi-level numbering:
I. A.
1. 2. 3.
B. 1. 2.
True, parts of this traditional outline use letters instead of numbers, but Ventura can handle alphabetic as well as numeric sequencing. If you have been in the military, you are familiar with another multi-level numbering style:
1. 1.1
1.2
1.1.1 1.1.2
1.2.1 1.2.2 1.2.3
This second example is a good place to introduce Ventura's nomenclature. It is obviously a three-level numbering scheme and it is easy to see which level is which. Levell has one number, Level 2 has two numbers, and Level 3 has three numbers. But our traditional outline was ~lso an example of three-level numbering. However, the traditional outline showed only one level of numbering at a time. Here's how it would look if all the levels were shown sim ul taneously:

Numbering functions 449
L LA
I.A.1 LA.2
LB LB.1 LB.2 I.B.3
Whether or not all three levels are shown, Ventura would still refer to the Roman numeral (I) as Levell, to the uppercase letters (A and B) as Level 2, and to the Arabic numbers (1, 2, and 3) as Level 3.
Auto-Numbering for simple lists
Let's start with a simple example. Suppose you want to include an occasional list in your documents, and you want Ventura to do the numbering for you. First you would create a special tag. You'd probably call it List or something equally obvious. Next, you would assign this tag to each paragraph in the list. Finally, you would open the Auto-Numbering dialog box and tell it to number every paragraph with that tag:
• Select Auto-Numbering from the Chapter menu (Figure 8-20).
• Select Usage: On.
Desk File Edit View Chapter FraMe Paragraph Graphic Options • iiimmiimmimiiiiiiimmmiimimmir-··\tvneset\techdocs\u,ffIiTED··:-i'~HFi·" .. ···(·ifBOoiFFi"fJff\iy···miiiiiiiiiimimiimiiiiiiiiiimiiimimm +
I~ AUTO-NUMBERING [II r-!-
Usage: II!II IJ!£!J l Level 1: l*Listl.1] ___________ _
1 Level 2: Level 3:
& t:~:~ ~~ Level 6: Level 7: Level 8: Level 9:
Level 1B:
Inserts:
•
I Chapter ** I o::;!] [E!J ~ [LID I i. ii I I Suppress Previous Level I I Text Attr. I r--;w--"1 .....-:---=~ III
L-!!!i.-J I Cancel I
Figure 8·20. The Auto-Numbering dialog box.
,

450 Advanced Functions
• Move the text cursor to the Levell line. Click on the 1,2 button. Ventura inserts the code:
[*tag name, 1]
This button specifies arabic numerals, starting with the number one. If you wanted a different numbering style, you would click on a different button -A,B for uppercase letters, a,b for lowercase letters, and I,ll or i, ii for upper or lowercase roman numerals.
• Erase the words "tag name" and insert the tag you want Ventura to number - in this case, List. The code now reads:
[*List,l]
• Click OK to close the dialog box.
When you return to the workspace, Ventura has generated a paragraph and a number for every paragraph tagged as List (Figure 8-21).
Z_FNOT ENT~Y
Z_SEC1
iiii··················································· ............................................................ .
!he first itemlf
flf rhe second itemlf
rlf
!he third itemlf
~ ~
Figure 8·21. The numbers in this example were generated by Auto-Numbering.
The paragraphs in our example are tagged as Z_SEC1, because they were generated on Levell. If you had used Level 2, they would be tagged as Z_SEC2, and so on. Initially, Z_SEC1 has the same attributes as Body Text, but you can change its format in Paragraph mode. (You cannot, however, change the name of the tag, or assign a different tag name to the number.)
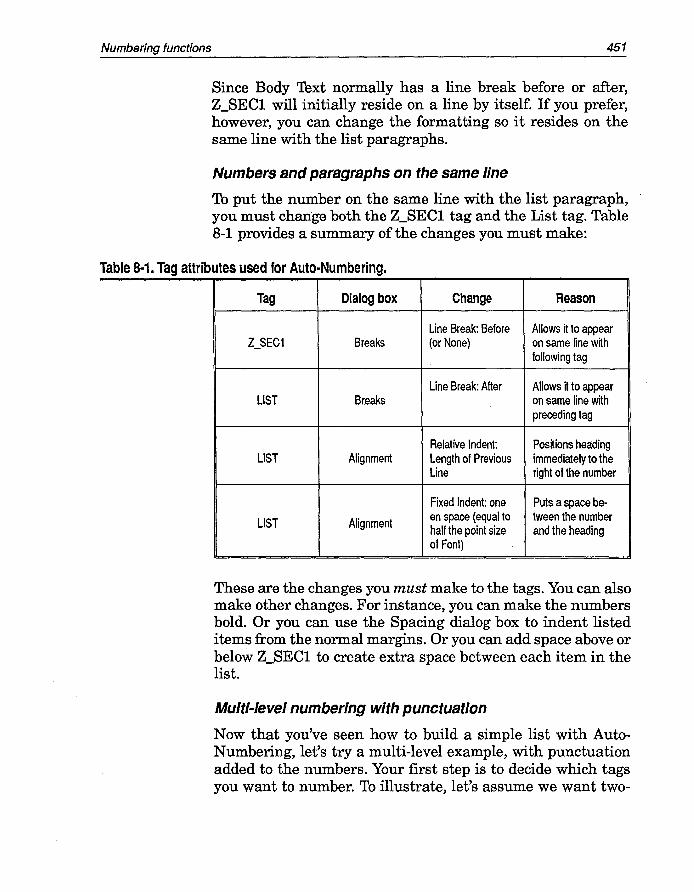
Numbering functions 451
Since Body Text normally has a line break before or after, Z_SEC1 will initially reside on a line by itself. If you prefer, however, you can change the formatting so it resides on the same line with the list paragraphs.
Numbers and paragraphs on the same line
To put the number on the same line with the list paragraph, you must change both the Z_SECl tag and the List tag. Table 8-1 provides a summary of the changes you must make:
Table 8-1. Tag attributes used for Auto-Numbering.
Tag Dialog box Change Reason
Line Break: Before Allows n to appear Z_SEC1 Breaks (or None) on same line wtth
following tag
Line Break: After Allows n to appear LIST Breaks on same line with
preceding tag
Relative Indent: Positions heading LIST Alignment Length of Previous immediately to the
Line right of the number
Fixed Indent: one Puts a space be-
LIST Alignment en space (equal to tween the number half the point size and the heading of Font)
These are the changes you must make to the tags. You can also make other changes. For instance, you can make the numbers bold. Or you can use the Spacing dialog box to indent listed items from the normal margins. Or you can add space above or below Z_SEC1 to create extra space between each item in the list.
Multi-level numbering with punctuation
Now that you've seen how to build a simple list with AutoNumbering, let's try a multi-level example, with punctuation added to the numbers. Your first step is to decide which tags you want to number. To illustrate, let's assume we want two-

452 Advanced Functions
level, military-style numbering for the tags Heading and Subheading, like this:
1. First Heading 1.1 First subheading 1.2 Second subheading
2. Second Heading 2.1 First subheading 2.2 Second subheading 2.3 Third subheading
As before, select Auto-Numbering from the Chapter menu. Then take these three steps. First, put the text cursor on the level you want. Next click on the numbering style you want to use. Finally, type in the name of the tag to number, followed by a period for punctuation. The dialog box will have the following entries for the two levels:
Levell: [*HEADING,l].
Level 2: [*SUBHEADING,l].
Since you want Arabic numbers, you would put the cursor on Levelland click on the 1,2 Button. Ventura inserts [*tag name,l] onto the line. You delete "tag name" and replace it with HEADING. To separate the numbers, type a period on the same line immediately after the code. Without a period, a number such as 1.1 would read as 11. The final code reads:
[*HEADING,l] .
To number the Subheading paragraphs, repeat the process on the Level 2 line so it reads:
[*SUBHEADING,l] .
This example used a period for punctuation, but you can add any punctuation - or, as we'll see below, any text at all.
Traditional outline style
With slight modifications, you can use the techniques explained above to create a traditional outline style. The first change is simply to click on different number styles when in the Auto-Numbering dialog box. For Levell, click on the I,ll Button to get Roman numerals. For Level 2, use A,B for uppercase letters, and so on.

Numbering functions 453
The second change hides the numbers from the previous level so they are not printed. Type the tag name into Level 2 as previously, but before leaving the line, click on the Suppress Previous Level Button. This inserts the code [-], which tells Ventura not to print the previous number. This code can appear at the very beginning or very end of the line. Without the code, the outline looks like this:
1. First Heading I.A. first subheading I.B. second subheading
With the suppress code inserted, it looks like this:
1. First Heading A. first subheading B. second subheading
.. NOTE: Clicking on the buttons at the bottom of the dialog box is merely a convenient way to enter codes. If you prefer, you can type them in directly.
Figure 8-22 shows how the dialog box would look for a threelevel traditional style outline. Note the periods at the end of the lines, which provide the punctuation after the numbers.
l:!Jiesk File Edit View .... Fral1le Graphic Options • ~~\ rVPF!'!FT\lltfT FD r.HP rnFFAl1i .~TY)
I~ AUTO-NUI1BERING
Usage: .. []ill Level 1: Level 2: Level 3:
[*Head1, I] . ...."....,. ________ _ [*Head2,A][-]·II--________ _ [*Head3,1][-]. _________ _
Level 4: Level 5: --------~------Level 6: Level 7: Level 8: Level 9:
Level 10:
Inserts: , Chapter ** I [L]J [E!] ~ IJ:JI] I i, ii , , Suppress PI'evious Level' , Text Attr. I
DO' Cancel'
+
Figure 8·22. The Auto-Numbering dialog box to establish a three-level outline. The indents would be created by formatting in Paragraph mode.
+

454 Advanced Functions
Restarting the numbering
The techniques explained so far create a numbering system that is sequential throughout the chapter. We've been showing examples with the list items grouped one after another:
1. First item 2. Second item 3. Third item
But you can also use Auto-Numbering with paragraphs scattered throughout the chapter. You could place the first paragraph on page one, and the second on page eight. Ventura will still number them correctly and in sequence.
In some cases, you may want to start from one again within the same chapter. For example, perhaps you are compiling parts lists for a repair manual, and you have several lists in the chapter. You want each of those lists to start over again at one.
A simple technique enables you to reset to one. Basically, it tricks Ventura into resetting the numbering. To understand how it works, glance over this numbering scheme:
1.
2.
1.1. 1.2. 1.3
2.1. 2.2.
Notice how the Level 2 numbering started at one and proceeded sequentially (1.1, 1.2, etc.) until it encountered a Levell number At that point, it reset and started over (2.1, 2.2, etc.) To reset numbering, then, all you have to do is use Levell to contain a tag that resets the numbering to one. When Ventura sees the Levell tag, it resets all the lower levels to one.
For instance, you could put Body Text on Levell. That way, Ventura will reset the numbering to one every time it sees a Body Text paragraph. However, we don't want a number next to every paragraph of Body Text. Fortunately, Ventura provides a way to count th~ paragraphs (thereby resetting the

Numbering functions 455
lower levels to one) without actually printing the numbers. To keep Ventura from inserting the numbers, move the text cursor to the code line and erase the comma and number. To insert numbers for Body Text, the code reads like this:
Levell: [*BODY TEXT, 1]
To count Body Text without inserting numbers, it reads like this:
Levell: [*BODY TEXT]
Now that you've used Body Text at Levell to reset lists, you can construct a numbering scheme using Levels 2 through 10.
If you prefer, you can use another tag name to reset numbering. For instance, you could create a tag with formatting identical to Body Text. Call it Reset. Now you have the ability to reset the numbering at will by tagging the previous paragraph as Reset.
Starting with a number other than one
To start the list with something other than one, erase the 1 in the code and type in the new number. For instance, to start the list with the number five, the code would read:
[*List,5]
Renumbering the chapter
When you close the Auto-Numbering dialog box you immediately see the numbers Ventura has generated. However, if you later make changes to the text, Ventura has to be told about it. To do this, you select Renumber Chapter from the Chapter menu. You can also use the keyboard shortcut Ctrl-B.
By giving the Renumber Chapter command, you instruct Ventura to start from page one and count everything over again. A simple example: You have a chapter with four numbered sections:
1 234
Later you decide to delete #3 and put #2 last. At this point, the section numbers look like this:
142

456 Advanced Functions
By selecting Renumber Chapter, you force Ventura to recount from the beginning:
123
Adding chapter numbers
Chapter numbers can be added to any or all levels of a numbering scheme. Simply place the text cursor where you want the number, and click on the Chapter # Button. Ventura inserts the chapter numbering code ([C#]) at that spot. For instance, here's how to include chapter numbers in our previous section numbering example:
Levell: [CI]. [*Heading,l] .
Level 2: [CI]. [*Subheading,l].
Notice that we put a period after the chapter number, as well as after the section number. The result would look something like this in the first chapter:
1.1 First Heading 1.1.1. First subheading 1.1.2. Second subheading
And something like this by the seventh chapter:
7.1. First Heading 7.1.1. First subheading 7.1.2. Second subheading
Numbers in the margin
Some documents require that section numbers appear on the same line as the text, but in the left margin. You can achieve this format automatically in Ventura by making a few slight changes to the tags.
First change the Z_SEC tags. Use the Alignment dialog box to create an outdent for the first line. On the Fixed Indent line, enter the amount you want to push the section numbers left. Be careful not to push them so far left that they disappear into the gutter. Then make sure the tags for the text paragraphs themselves do not have any indent in the Alignment dialog box. If they do, remove this indent so the first line of the text is flush with the left margin.

Numbering functions 457
Generating text with Auto-Numbering
Earlier in this· section we showed you how to add punctuation by typing it into the Auto-Numbering dialog box. In the same fashion, you can ask Ventura to automatically insert text during auto-numbering. You can insert text along with numbers, or you can do away with the numbers entirely and use Ventura strictly for text.
The example below shows how to ask Ventura to automatically generate the word "CAUTION!" every time it sees the Warning tag in the document. Notice that we erased the comma and the number inside the square code brackets. Because of this, Ventura will not print any numbers, only the text. We've shown it on Levell, but you can produce the exact same effect using any of the 10 levels:
Levell: [*Warning] CAUTION !
Section symbols and text attributes with Auto-Numbering
You saw above how to use Auto-Numbering to generate text. You can also generate symbols. For instance, some legal documents require section symbols" § ." You can enter a section symbol, or any other non-keyboard symbol, directly into the Auto-Numbering dialog box with bracket codes. Put the text cursor on the line where you want the symbol to appear. Type in the bracket code. If you prefer, you can click on the Text Attr. button, which inserts the code <D> for you. Erase the D and type the correct code between the brackets. For instance, the decimal code for section symbols (§) is <185>.
You can also insert bracket codes for different attributes, fonts, point .sizes, or colors, as described in Chapter Three, "Creating Text."
Auto-Numbering for ruling lines
You can also use the Auto-Numbering dialog box to attach a ruling line to a paragraph. This is most useful when you want to add a second line in a different format. For instance, if you turn to any first level heading in this book, you will notice a double rule above - a short, thick rule combined with a long, thin rule. The thick rule is attached to the heading tag. The

458 Advanced Functions
thin rule, however, is generated automatically by Auto-Numbering:
Level 3: [*Headl]<I>
This code creates a paragraph containing nothing but a thin space (the < I > bracket code stands for a thin space). We then used Paragraph mode to attach the thin ruling line to this paragraph.
We eliminated the numbers because we don't want numbers associated with our headings. We added the thin space because you cannot generate an empty paragraph. You have at least two ways to get around this. First, you can allow numbering, but set the font to white. The numbers, therefore, will be invisible - white text on a white background. Alternatively, you can eliminate the numbering, but generate a space character. For instance, by entering the bracket code < I > on a line, you generate a thin space. The code <-> generates an en space.
Combining numbering
In this section, we have hinted at the vast array of effects possible with Auto-Numbering. One key to effective use of this function is to understand that you can combine multiple effects within the dialog box. There is absolutely nothing to say you cannot use Level 2 for something else just because you've already used Levell for numbering. For instance, here's just one possible way you might load up the Auto-Numbering dialog box with useful functions:
Levell: Reset tag to reset lists to 1.
Level 2: Make simple lists.
Levels 3, 4, 5: Format three-level traditional outline.
Level 6: Generate the word NOTE: to accompany special notations in the text.
Level 7: Generate the word WARNING: to accompany cautionary paragraphs.
Level 8: Generate the word Chapter to accompany chapter numbers.

Tab settings 459
Levels 9 and 10: Generate ruling lines for special formatting effects.
Tab settings Ventura Publisher permits you to apply up to 16 tab settings. A tab is a means of jumping text to a new location. When Ventura encounters a tab stop, it jumps to the spot you have specified (Figure 8-23). Ventura can fill the space with dots, underlines, blank spaces, or other characters.
Desk File Edit View Chapter FraMe Paragraph Graphic Options • linlllilllllmlll:iWlI1111Iillllilllliiimlilr'-\typeset \techdocs\u!i"Tl·i'I."E]j··;·cHp·········c&BooR·:·p·1···.·s"i'y') .. imll:lilill~~~liiiljl!li~llmllilmllimli •
11.11 I" 14' In: I'· t
...... A 3-pica tab setting
Figure 8·23. As you can see from the ruler, Ventura was instructed to jump to a position three picas from the left margin. In addition, n has filled the space with dots.
Setting a tab stop has four steps:
• choosing which tab stop to set
• choosing the type of tab (the alignment)
• choosing the location of the tab
• choosing the leader character (if any)
illI
Before we get into specifics, we should make a few comments about when to use tab stops and about their limitations. Tabs are used most frequently for tables. They are appropriate if the table has one line per entry.
However, if you produce tables with more than one line per

460 Advanced Functions
entry, you should not use tab stops. If you own Ventura 2, use the side-by-side paragraphs method explained in Chapter Ten. If you own the Professional Extension, use Table mode.
Tab settings have several limitations. First, as implied above, they cannot wrap words. If you have a long entry that belongs on more than one line, you must manually enter line breaks to force new lines. Otherwise, the tab may force it outside the right margin. Second, you cannot have tab stops in justified text. To be more accurate, you can set tabs, but they will not take effect until you use the Alignment dialog box to choose a different alignment option.
Choosing which tab to modify To set tabs:
• Enable Paragraph mode.
• Select the paragraph to which you wish to assign tabs.
• Open the Alignment dialog box and confirm that the alignment is not justified.
• Select Tab Settings from the Paragraph menu (see Figure 8-24).
• Move the mouse cursor to the Tab Number line. Click on the arrows to select the tab you want to modify.
"BodV Text" TAB SETTINGS
Tab NlI(IJber: I + I 1 I + I Tab Type: left t
Tab Shown As: leader Char t Tab Location: 03,0131 picas & points
leader Char: t 1346 (ASC II)
leader Spacing: 2 Auto· leader: Off
Figure 8-24. The Tab Settings dialog box.
t t

Tab settings 461
Tabs are identified by number. These numbers are a simple sequence, and have nothing to do with the position of the tab on the page. However, each tab has to be to the right of the previous one - you cannot jump backwards with a tab setting. Likewise, tabs do not take effect if the text cursor is already to the right of the tab stop. For instance, suppose you set tabs at one, two, and three inches. You type in some text that, let's say, reaches to 2.5 inches. If you press the tab key now, the cursor will jump to tab stop number three, at three inches. It will not jump backwards to the first stop at one inch.
Incidentally, you can set more than one tab at a time. Once you've set one, just click the Tab Number line to get to the next one. Click OK when you've finished with them alL
Choosing the tab type To enable the tab stop, select a tab type: Left, Right, Center, or DecimaL Figure 8-25 illustrates the differences.
13 picas 1 Left tabs are the most common
Center tabs are useful for headings
Right tabs are used for numbers 1
Decimal tabs are useful for financial tables $432.76
$23.50 ($1,234.00)
Figure 8·25. The four lines shown here all have the tab stop set at 13 picas, but all four are different tab types.
Choosing the tab location There are two keys to accurately setting tab locations. The first is to realize that tabs are measured from the left margin, not from the left edge of the page. If you are using the rulers gauge the position, reset the zero point to the edge of the margin. That way, the ruler will show the correct measure-

462 Advanced Functions
ments. Otherwise, you must subtract the left margin setting to get the correct tab setting.
The second key is to forget whatever you may have learned about tabs in high school typing class. Typewriters, and some word processors, have tabs set at fixed intervals (often one inch). To jump to a position four inches from the margin, you would press the tab key four times. When working in Ventura, however, you should· abandon this approach. To jump four inches, set a single tab stop at (you guessed it) four inches.
Always set as few tab stops as possible. First, tab settings take up memory. Second, using multiple tab stops makes it impossible to know how many times to press the tab key to create the spacing you want. Third, with multiple tab stops, you cannot change the spacing with a single change of the tab settings. You have to change all (or most) of them. Instead, use one and only one tab stop for each jump you want to make.
Unfortunately, Ventura's default style sheet has tabs set in the fashion of a typewriter. This is poor typographic practice. In Chapter Five, we explain how to create a new default style sheet that corrects this and other mistakes.
Choosing the leader character When the tab character jumps to a new location, it creates a gap. You can fill this gap with blank spaces, or with any other character.
Ventura's default is for open (blank) spaces. To create leader characters:
• Select Tab Shown As: Leader Char .
• Move to the Leader Char line and use the pop-up menu to choose the type of character you want.
Ventura provides four options. Spaces places blank spaces as leader characters. It accomplishes the same thing as choosing Tab Shown As Open Space. The option ... creates leader dots. The option _ creates an underline. The Custom option lets you specify any character you want to fill the gap.
To create a custom leader character, choose Custom, then type in the decimal (ASCII) equivalent of the character you want.

Tab settings 463
For instance, to use an asterisk as a leader character, you would type in 042.
You can also vary the spacing between the characters .
• Use the pop-up menu from Leader Spacing to choose the number of extra spaces you want between each leader character.
For instance, an underline with no spacing (Leader Spacing: 0) creates a solid line. An underline with spacing creates a dashed line effect. Figure 8-26 shows some common leader effects.
+ oesph" ................. .
! _________________________________________ If
_____________ If
Figure 8·26. A few of the many leader characters you can create with tab settings .
.. NOTE: Leader dots in directories and listings are more attractive if you set them up with two tab stops. The first tab stop creates the dots between the listing and the number. The second tab stop creates a small amount of open space between the dots and the number. This makes the numbers easier to read. It also makes the page more attractive, because all the leader dots end at the same spot, even if the numbers vary in size.
Leader dots without tabs Choose Auto-Leader: On to create leader dots without the need to insert a tab character. Ventura will automatically

464 Advanced Functions
place dots between the end of the paragraph and the right column (Figure 8-27). You can vary their spacing with the Leader Spacing line.
·i ,:'
jN~;-~:~=::==--":=':=~:~-=-~:~:::~:::=::::::::'~-::::':::':-~p ................. . F ompany -----------------..,..----------------- - - - ---I !Address j
r~~~~~J Figure 8-27. Leader dots created with Auto-Leader from the Tab Settings dialog box are useful for creating forms.
Typographic functions Power users will discover an array of built-in typographic features for fine-tuning the look of pages. In addition, the Professional Extension has even more typographic features, as covered in Chapter Eleven.
This section covers four important dialog boxes from the Paragraph menu:
• Define Colors, for setting font color or shading
• Special Effects, for adding true typographic bullets, drop caps and other effects
• Attribute Overrides, for changing the look of underscores, superscripts, and other effects
• Paragraph Typography, for kerning, letterspacing, and space band control.
As we go along, we will mention other dialog boxes that affect typography.

Typographic functions 465
Defining colors Ventura lets you assign colors to text, ruling lines, frame backgrounds, and graphics patterns. Despite its name, most people will not use the Define Colors dialog box for changing colors. Instead, they will find it more useful for defining and modifying shades of gray for background patterns.
Changing colors
Changing colors may be useful in two situations. First, if you actually own and use a color printer, you can create exactly the color you want for the output device. You can choose from millions of possible color combinations, but you can only define seven colors at a time.
Second, if you have a color monitor, you can use this option to change the on-screen colors so they more closely match what you want on the page. Even though the actual colors will be created in the printing process with ink, you can use the screen as a preview.
To modify colors, select Define Colors from the Paragraph menu (Figure 8-28).
DEFINE COLORS
Screen Display: Colors I
Color NUPIDer: I .. I 2 I .. I
Color Setting: Enabled
Color Nal1le: Redll--__
Cyan: I .. I 1:';:::::::::::::::::::::::::::::::::::::::::::::::::::::::::::::::::::::::;:::1 .. 1
Magenta: I .. I:::::::::::::::::;::::::::::::::::::::::::::::::::;::::,:,:,:,,::,:,:,::::::::1 I .. I 1 DO .0
Yellow: I .. r::,::,:::,::::,:;::::,::::::::::::::::::::,:::::::::::,::::::::::::::::::::::1 I .. I 100.0
Black: I .. I 1::::;:::;::::,::::::::::::::::::::,:::::::::::,:,::::::,::::::::::::::::::,:::1 .. I 000.0
Figure 8·28. The Define Colors dialog box.
Select Screen Display: Colors if you have a color monitor and want to use it to preview the colors. Choose Screen Display:
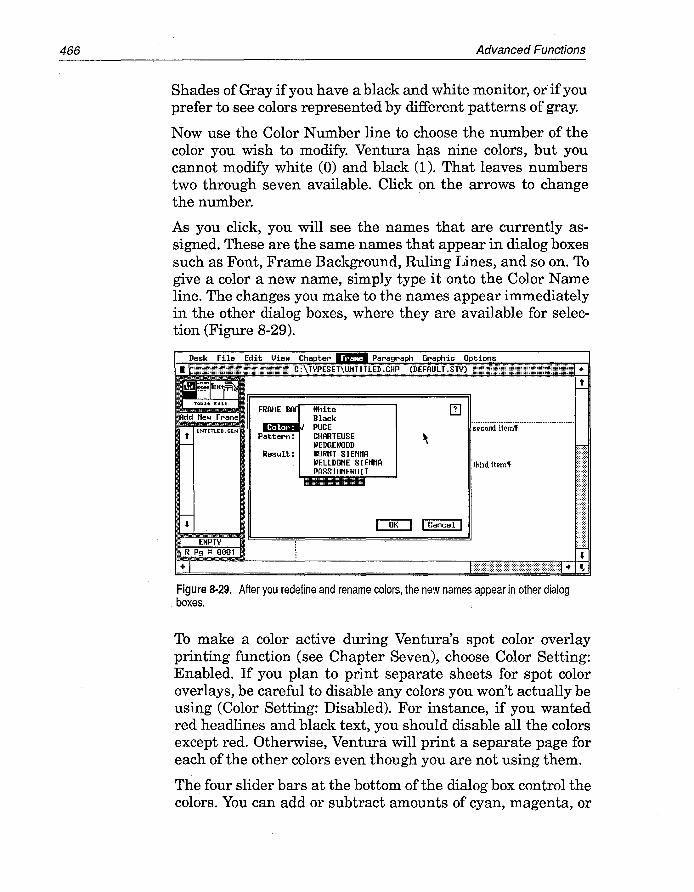
466 Advanced Functions
Shades of Gray if you have a black and white monitor, or if you prefer to see colors represented by different patterns of gray.
Now use the Color Number line to choose the number of the color you wish to modify. Ventura has nine colors, but you cannot modify white (0) and black (1). That leaves numbers two through seven available. Click on the arrows to change the number.
As you click, you will see the names that are currently assigned. These are the same names that appear in dialog boxes such as Font, Frame Background, Ruling Lines, and so on. To give a color a new name, simply type it onto the Color Name line. The changes you make to the names appear immediately in the other dialog boxes, where they are available for selection (Figure 8-29).
FRAME BAC
..,...,....
Result:
White Black PUCE CHARTEUSE WEDGEWOOD BURNT SI ENIiA WELlDONE SIENNA PASSIONFRUIT
·;·~~~r=d·ii~mw···-··········----··
third item!f
Figure 8·29. After you redefine and rename colors, the new names appear in other dialog boxes.
To make a color active during Ventura's spot color overlay printing function (see Chapter Seven), choose Color Setting: Enabled. If you plan to print separate sheets for spot color overlays, be careful to disable any colors you won't actually be using (Color Setting: Disabled). For instance, if you wanted red headlines and black text, you should disable all the colors except red. Otherwise, Ventura will print a separate page for each of the other colors even though you are not using them.
The four slider bars at the bottom of the dialog box control the colors. You can add or subtract amounts of cyan, magenta, or
Typographic functions 467
yellow. By mixing these colors in different percentages, you can create millions of combinations. You can slide the bars with the mouse. Or you can click on the arrows to increase by two tenths of a percent with each click. If you have a color monitor, the results show in the preview box.
Changing shades of gray
To change any color to a shade of gray, slide the top three color bars all the way to the left. This turns off all the color. Then use the bottom slider bar to add as much gray as you want. We recommend following the industry practice of naming these shades according to the percentage of gray, as shown on the right side of the Black slider bar. For instance, Gray 5%, Gray 10%, Gray 15%, and so on. Enter these names on the Color Name line.
If you are using a laser printer, be aware that patterns with small percentages of gray print darker on a laser than on a typesetter. You might, therefore, want to compensate. Conversely, patterns with a high percentage of gray look darker on a laser printer.
For instance, even the lightest of Ventura's standard patterns is too dark for use behind text of less than 14 points (when printed on a laser printer). By using the Define Colors dialog box you can easily create lighter patterns that are more appropriate for sidebars and tint blocks. Rather than assign a standard pattern to a frame background, you would assign a color instead - except that the color has been redefined as a shade of gray.
You can put these shades into frames, graphics, or hollow boxes. With a PostScript printer, you can also have gray text. In addition to the standard patterns offered in many of these dialog boxes, you can have different, alternative gray patterns by assigning colors instead of patterns. Do not mix patterns with colors that have been redefined as shades of gray.
Special Effects The Special Effects option from the Paragraph menu provides two useful features: big first characters and bullets. To use either of these:

468 Advanced Functions
• Enable Paragraph mode.
• Select the paragraph you want to change.
• Select Special Effects from the Paragraph menu.
You can have a big first character, or a bullet character, but not both. Big first characters are useful for setting off the first paragraph in a chapter (as done in this book), article, or section. Once you click on the Big First Char button, you can then specify its size and position.
To set the size of the big first character, click on Set Font Properties within the Special Effects dialog box. The Font dialog box will appear, where you can choose the size and style you want. The choices you make here will affect only the first character, not the rest of the paragraph. Most people choose a bold font two or three times as large as the rest of the paragraph. Thus, if the paragraph is twelve-point Times normal, the big first character would typically be Times Bold in the 24 to 36-point range.
The most common choice is to use the same face as the rest of the paragraph. Quite often, however, designers will vary the first character for contrast (Figure 8-30).
mi;··p~~~gi·~phh~s·ii;;~;·t~~t··aiid·~·ii;;~;··l IT"his·p·~~·~~~ph·ha·s·ih~·sp·~~~·fOi·Big·Fii;i·s·~ 1 ~ first character in drop cap mode. This para-l ~o Custom: 001 line. Normally it would drop graph has Times text and a Times first charac- i ilown three lines. Because we put it on the first ~er in drop cap mode. This paragraph has l ~aseline instead, it rises above the rest of the trimes text and a Times first character in drop l ~aragraph. 0 icap mode. If i : :
!ThiS paragraph uses a Helvetica first charac- i iter for the drop cap. This paragraph uses a i ;Helvetica first character for the drop cap. This i ~ !paragraph uses a Helvetica first character for l ~he drop cap." i ~ i 1 JUs paragraph has a Zapf Chancery first char-i i acter as the drop cap. This paragraph has a i ~apf Chancery first character as the drop cap. i trhis paragraph has a Zapf Chancery first char- i iacter as the drop cap. If i : 1
Figure 8·30. A few of the effects possible with a big first character.

Typographic functions 469
Changing the position of the big first character
When you create a big first character, Ventura positions it for you. You can change this position.
When you select the font size, Ventura creates space for the new, enlarged character. It treats the character as a drop cap - a larger character that extends down into the text paragraph. First it decides how many lines to indent. It does this by aligning the top of the big first character with the top of the paragraph. Then it indents these lines as far as necessary.
You have two options for changing the position of the big first character. First, you can change the number of lines it drops down. Space for Big First is usually set to Normal. The number of lines shows in gray text. To change this setting, click on Custom, and type in the number of lines you want instead. As you can see in Figure 8-30, this can force the big first character to rise above the rest of the paragraph. Conversely, you might want to drop it further into the text, to leave room to put a black or shaded box around the big first character.
If this function does not accomplish what you're after, you can make even finer adjustments in the Font dialog box. Click on Set Font Properties again to bring up the dialog box (Figure 8-31). Then use the Shift function to move the big first character up or down.
FOtlT SETTItlG FOR BIG FIRST CHARACTER
CustOIll Size: 024 • B po ints
Overscore: Off t 8trike-Thru: Off t
Underline: Off t Double Underline: Off t
Shift: Up
i:ii Color ii; White
.:IF.r.I_ PUCE CHARTEUS I~EDGH!oO BURIH 81 WEllDOtlE PASS IOtI F
t 03.l- fractional pts
Figure 8·31. Use the shift function from the Font dialog box to adjust the Big First Character up or down.

470
Bullets
Advanced Functions
.. NOTE: Ventura's on-screen preview is only an approximation. You may have to produce a test print to accurately judge very fine spacing adjustments.
Reverse and shaded drop caps
Reverse and shaded drop caps require extra steps. They are covered in Chapter Ten, "Special Document Formats."
The Special Effects dialog box also controls bullet characters at the beginning of a paragraph. Bullets are an excellent way to set off lists, warnings, notes, and so on. To create a bullet:
• Select Special Effect: Bullet.
• Select the bullet you want by clicking on one of the options next to the-Show Bullet As: line.
• Move to the Indent After Bullet line and type in the amount of space you wish to leave between the bullet and the rest of the paragraph.
• Use Set Font Properties to change the size of the bullet, and/or make it bold, and/or switch to a different font (if necessary).
If you do not use Set Font Properties, the bullet is the same type size as the rest of the paragraph.
If you do not like any of the bullet styles shown, you can create others by clicking Other. Then move the cursor to the Bullet Char line and type in the decimal equivalent of the character you want. You are not restricted to the characters available with the current font. You can use Set Font Properties to switch to a different font and use one of its characters instead. Set Font Properties affects only the bullet. The rest of the paragraph will remain in its original font. Figure 8-32 shows how a few of the standard and custom effects for comparison.
Be sure to enter an indent amount or the bullet will overlap the text. We recommend a one em indentation as a good starting point. (An em space is equal to the point size of the type. If you are using 10 point type, for example, start with a 10-point indent and see how it looks.)

Typographic functions
• A paragraph with a solid bullet.
o A paragraph with a hollow box bullet.
,.. A paragraph with a filled box bullet.
~ A paragraph with a pointing hand bullet.
,.. A paragraph with a curved arrow bullet.
t/ A paragraph with a check mark bullet.
Figure 8·32. A few of the bullets you can create with the Special Effects dialog box.
471
-.. NOTE: You can a/so enter bullet characters at the beginning of a paragraph (or anywhere within a paragraph) by holding down the Alt key and typing the decimal equivalent. However, if you want the rest 9f the paragraph to be indented automatically, you should use the Special Effects dialog box.
Hanging bullets
You can create bullets that hang in the left margin. First create a bullet as explained above. Note the amount of the Indent After Bullet. Now go to the Alignment dialog box. Choose First Line: Outdent. For the In/Outdent Width, enter the same amount as the Indent After Bullet. The Indent After Bullet pushes the paragraph right. The First Line: Outdent pushes it left again. The end result is that the paragraph lines up at the original margin, but the bullet hangs out to the left.
Attribute Overrides The Attribute Overrides dialog box (Figure 8-33) lets you adjust the positioning and size of several text attributes:
• Underline
• Overscore
• Superscript

472 Advanced Functions
Desk File Edit View Chapter Fral\1e ' .. '. Graphic Options
• li~~iii~i:iii~iiiii~iiii~i:i~~iiiiii!ii!!i!i~!!ii!~i!iiiiii~~iiiii!r"'c":\typt1fE'T\OtiHf[Ejj':'cHp""""'('DtFAurI': s'tyj""i~iii:i~:iiii~iii~ii!i~~iiiiii!!!~!iiii~iiiii~iii!~iii~ii!i!iiiii~ii!i +
'""" .. "~~.~~:~~~.:.~.~.~~.~:~~.~ .. ~~.~~~.~~~:........... ~ m •.. \ i line Width: Text-Wide t IlfIIl
O ... erscore Height: 99.661 Shift t By: 19.92 fractional pts Strike'Thru Height: 99.66 93.72
Underline 1 Height: 99.66 Shift", By: 91.92 Underline 2 Height: 9B .66 92.52
Superscript Size: 919 Shift t By: 95.64 Subscript Size: 919 Shift", By: 91.32
Sl\1all Cap Size: 919 points
Figure 8-33. The Attribute Overrides dialog box.
• Subscript
• Small Caps
=.
I ...
These attributes are available from the Assignment List in Text mode. Normally, Ventura makes these choices for you. For instance, it positions the underline for you when you make this choice. When you choose superscripts, it automatically chooses a font size two points smaller than the rest of the paragraph.
To overrule these default choices, enter new values in this dialog box. In addition, you can choose whether underlines and overscores will be the width of the words, or the entire width of the margin. Margin-wide lines are useful for creating table effects and special graphic designs.
Incidentally, you can use Superscript, Subscript, and Small Cap as shortcuts for font changes. You can specify any font size in the Attribute Overrides dialog box (including fonts larger than the paragraph). In addition, you can choose not to have super-and subscripts shift from the baseline. By selecting three different font sizes and assigning them to these attributes, you can select them at any time from the Assignment List in Text mode.

Typographic functions 473
Paragraph Typography Xerox Ventura Publisher has a wide range of typographical spacing controls. To apply these controls to a tag:
• Enable Paragraph mode.
• Select a paragraph with the correct tag.
• Make the changes and click OK.
The choices made in the Paragraph Typography dialog box (Figure 8-34) apply only to the selected paragraph. Let's examine it from top to bottom to learn how it can help achieve professional-looking results.
"Test4" TYPOGRAPHY SETTINGS
Autooatic Pair Kerning: Off t letter Spacing: On t Up to: B. 1 BBI Ellis
Tracking: looser t B.OOO Ellis
Grow Inter· line To Fit: On t
Hinilllulll Space Width: 0.6130 * (space width) = B.15B Ellis NOrlllal Space Width: 1.0130 * (space width) = B .250 Ellis
Haxilllulll Space Width: 2.0130 * (space width) = B.500 EIllS
Vert. Just. At Top of Para: At Bottolll of Para:
Between lines of Para:
B1,B2 B1,132 13B,13B
picas & points
Figure 8·34. TheParagraph Typography dialog box.
Automatic Pair Kerning is the first option. Kerning reduces the spaces between selected pairs of letters to make them look better. The letters A and V provide an example:
AV AV The top example shows normal spacing. The bottom example

474 Advanced Functions
has been kerned. Notice how the shapes of the two letters permit them to be pulled together slightly for a more attractive appearance.
Automatic kerning is accomplished by building a kerning table for each font. These lists contain different pairs of letters that need specially spacing, with the amounts the spacing should be changed. By selecting Automatic Pair Kerning: On, you are telling Ventura to consult this table, and make minute adjustments in spacing if necessary.
Kerning tables must be supplied with the font. Ventura does not create them on its own. All of the fonts supplied with Xerox Ventura Publisher have kerning information. Most thirdparty font vendors also include kerning information with their products.
Kerning is most obvious in large display type. It also subtly improves the appearance of body text. We recommend that kerning be used throughout most documents, for every tag. However, kerning the body text will increase formatting time. If you have a older, slow computer and response time is a problem, consider turning kerning off to speed it up .
.. NOTE: Kerning takes effect only if you previously selected Pair Kerning: On from the Chapter Typography dialog box. To turn kerning off for the entire document with one command, use the Chapter Typography dialog box.
Ventura lets you choose whether or not to show kerning on the screen. Set Preferences from the Options menu includes aline specifying which type sizes should be kerned on screen. Onscreen kerning slows down the display and has little value. Screen fonts are only an approximation of the printed version. Their on-screen kerning, therefore, is only an approximation as well. In most cases, it makes sense not to show kerning on the screen. At most, select kerning only for large type sizes (24 and above).
Letter Spacing is the next option. To understand its effect, you should grasp how Ventura justifies lines. It tries to fit as many words on each line as possible by adjusting the spaces between words. If the space between words falls below the preset minimum (shown in this same dialog box), then Ventura moves the

Typographic functions 475
last word to the next line. Likewise, it adds space between words if necessary to stretch out the type to fit between the margins.
Occasionally, this leads to rivers, large gaps between words. Letter spacing cures this defect by adding space between letters as well as between words. It does not affect most lines. But loose lines - lines with an unacceptable amount of space between words - usually look better if a tiny amount of space is added between all the letters.
When should you use letter spacing? It is only required for tags that are justified. Generally you can do without it if you have only one fairly long column. Narrow columns, however, often need letter spacing. If you are unsure if it's needed, select Show Loose Lines from the Options menu. This highlights all loose lines. The more loose lines, the more value to letter spacing.
To use letter spacing:
• Choose Letter Spacing: On.
• Enter the maximum amount of space to allow between letters. A typical value is 0.100 ems. Anything higher than 0.150 ems may cause problems if the space between letters approaches the size of the space between words.
• Set Minimum Space Width less than 1.000, for instance 0.600.
• Set Normal Space Width to 1.000.
• Set Maximum Space Width to greater than 1.000, for in-stance 2.000.
These width settings give Ventura the latitude it needs to com press or expand word spacing first, before it resorts to letter spacing.
Ventura's letter spacing feature increases the room between letters, but only if necessary to improve the appearance of a particular line. The Tracking command, by contrast, forces Ventura to add or subtract space between each and every letter on each and every line.

476
Tracking Off 'llakirgllgbter Tracking Looser
Advanced Functions
The most common application for tracking is to improve the appearance of display type. We have already explained kerning, which decreases the spacing between certain pairs of letters. Tracking applies to all the letters. The larger the type, the greater the need to reduced the space between letters. As type is enlarged, the proportional amount of space needed decreases. When 36-point type is spaced the same as 10-point type, it looks too loose, even though the proportional amounts are the same.
You specify tracking in Ems. One Em is equivalent to the point size of the type. Thus, for l2-point type one Em equals 12 points; for 24-point type, one Em equals 24 points. The amount varies widely according to the printer, the type size, and your personal taste. We cannot give you any hard and fast rules. We do think, however, that display type larger than 16 points should be tracked tighter. Many designers feel type should be spaced so the letters almost (but not quite) touch. Experiment to find the right amounts. Create a series of tags, and tighten each one a different amount. It's best to experiment with tracking in units of 0.05 Ems or so.
You can even use tracking on body text. Be careful, however, not to sacrifice legibility.
Grow Inter-Line To Fit causes Ventura to automatically add more space between lines if you put big letters into the middle of a paragraph. One most common application is in scientific and technical papers where you occasionally want to insert a formula or equation within a paragraph. Unless the line spacing is enlarged, the larger font will overlap the lines above and below.
When the line spacing is expanded, however, it creates an unsightly gap in the middle of the paragraph. For this reason, we do not recommend it except for special applications.
The Minimum, Normal and Maximum Space Widths control the space between words. The smaller the amount of the Normal Space Width, the closer words are together. The

Typographic functions 477
smaller the amount you set as the Minimum Space Width, the closer Ventura spaces words when trying to squeeze as many words as possible onto a line. The larger the Maximum Space Width, the wider the space Ventura will allow when trying to stretch a line out, before it resorts to letter spacing.
The numbers shown are a percentage of the normal width. For a tighter look, enter a lower percentage for the normal space width. Anything less than 75% (0.750) for Body Text usually results in lines that are so crowded that they are difficult to read.
Users of the Professional Extension (Chapter Eleven) will also find vertical justification options in the Paragraph Typography dialog box.
Manual kerning We saw above how Ventura implements automatic pair kerning. There may be other times when you want to manually change the spacing between letters. For these situations, Xerox Ventura Publisher provides a manual kerning feature. Tracking adds or subtracts space between every letter in the paragraph. Manual kerning adds or subtracts space only for the letters you select.
Manual kerning takes place in Text mode, since that is the only mode in which you can select individual letters.
• Enable Text mode.
• Highlight the letters to be kerned.
• Hold down the Shift key. Press the left arrow to move the letters closer together. Press the right arrow to move them further apart.
If you prefer, you can accomplish the same function by highlighting the text and choosing Set Font. Choose Kern: Looser to add space between the letters. Choose Kern: Tighter to subtract space. Enter the amount in Ems. It is usually best to experiment with kerning in units of 0.05 Ems.
Manual kerning is appropriate for headlines and logos. Don't use it to reduce the space between letters of an entire logo or

478 Advanced Functions
headline. In that case, the tracking feature is a better way to accomplish the effect.
Table 8-2 summarizes the typographic effects possible with Ventura Publisher, and offers some application information on each.
Table 8·2. Summary chart for typography.
Function Effect Dialog Box Typical Uses
Pair Kerning Adjust spacing between Chapter Typography Headlines and display certain loose letter pairs Frame Typography type; professional publica-throughout document Paragraph Typography tions
Manual Kerning Adjust space between Set Font Headlines and display two letters at one point in (Also keyboard control) type; special effects the document
Tracking Adjust letterspacing Par~graph Typography Aiding readability of equally within a line lengthy text blocks;
copyfitting
Grow Inter-Line Adjust line spacing auto- Paragraph Typography Equations; free-form text matically when font size changes
Letter Spacing Resolve "river" problem in Paragraph Typography Extremely narrow loose lines of text columns; unhyphenated
text
Space Widths Control spacing between Paragraph Typography Reduce overall "white-words ness" of text; alleviate
rivers problem
Attribute Overrides Change size and posnion Attribute Overrides Redlining; forms; mathe-of underlines, overscores, matical expressions sub- and superscripts, and small caps
Big First Character Create dropped or raised Big First Character Book chapters; magazine initial capital letter articles
Bullets Automatically generate Special Effects Lists; instruction booklets; "flag" character and out- directories; forms; ques-dent from text tionnaires

Hyphenation options 479
Hyphenation options Beginning users rarely give thought to Ventura's hyphenation. They are quite happy with the default settings. However, more advanced users will discover that the program has several hyphenation options and controls:
• Change hyphenation algorithms
• Hyphenate foreign languages
• Customize the hyphenation
• Suppress hyphenation
Ventura's hyphenation feature comes into play when text files are loaded. I t looks at each word and adds discretionary hyphens according to preprogrammed rules. These discretionary hyphens tell Ventura where it can safely break a word if necessary to justify a line. This method is sometimes called logic-based hyphenation. Because English is not a very logical language, Ventura also contains an exception dictionary. The exception dictionary overrides decisions made by the hyphenation algorithm.
Hyphenation can be turned on or off for any paragraph. The control is located in the Alignment dialog box (Figure 8-35). In general, hyphenation should be off for headlines and other display type. It should be on for most other paragraphs.
Horz. Aligmlent: Vert. Aligm~ent:
Text Rotation:
Succe~~!~:l~Y~I~~~~ ~ ~;r=..:..::;:;.;;;.;.;....-~ First Line:
Relative Indent:
In/Outdent Width: 00 .001 inches In/Outdent Height: 001 lines
Itl F,'m,1 Right; to lk~GiJ,It'll.: 00.00 MdXhl\U~ RQl;('ltfO'd H(d.9hl:: 00.00
t t
Figure 8-35. Select Hyphenation: Off for headlines and other paragraphs that should never be hyphenated.

480 Advanced Functions
Changing hyphenation dictionaries
Ventura's standard hyphenation algorithm shows in the Alignment dialog box as USENGLSH. It rarely adds in incorrect hyphen, but it sometimes misses hyphenation opportunities. This is most noticeable in publications with narrow, justified columns. Such formats demand frequent hyphenation to avoid rivers and white space gaps.
If you create multi-column documents, or you want improved hyphenation, you can choose a more efficient algorithm in place of the default version:
• Use DOS to copy the file USENGLS2.HYl to the \ VENTURA subdirectory. Rename the file to SLOWENGL.HY2.
• Run Ventura. Open a chapter and enable Paragraph mode.
• Open the Alignment dialog box for every tag you wish to hyphenate with the slower, more accurate dictionary. Select Hyphenation: SLOWENGL.
You can use two algorithms in the same document, so it is not necessary to use the slow algorithm for every tag. However, if you want Ventura to automatically use the slow algorithm for every tag in every document, remove the original USENGLSH.HYl file from the \ VENTURA subdirectory. Now rename the file SLOWENGL.HY2 to SLOWENGL.HYl. When Ventura starts up, it looks in the \ VENTURA subdirectory for a file with the HYl extension and makes it the first choice in the Alignment dialog box.
If the slow algorithm is named as HYl and is the only one in the subdirectory, Ventura will use it for every document. You will notice the delay when loading text files, or when adding and reformatting large amounts of text.
Hyphenating foreign languages
Because Ventura lets you use two different hyphenation algorithms in the same document, you can have one for English and one for another language. This capability is useful for dual-language publications, such as government documents that must show two official languages. You can have one set of tags for English and another set for the foreign language. Use

Hyphenation options 481
the Alignment dialog box to specify the correct algorithm for each tag.
To add hyphenation for French, Spanish, Italian, German, or British English, use DOS to copy the appropriate algorithm from the Utilities that came with Ventura. Copy it to the \ VENTURA subdirectory on the hard disk. All the algorithms have the extension HY2. USENGLISH will show as the first hyphenation option and the foreign language as the second. Do not copy more than one extra algorithm to the subdirectory. (Or if you do, don't allow it to duplicate the HYI and HY2 extensions. )
Customizing hyphenation
Ventura Publisher provides a dictionary for your personal use. You can use it to add hyphenation points for words, or to suppress hyphenation (for instance, to make sure a product name or company name is not hyphenated). Add too many words and you will slow down hyphenation. But, within reason, you can add words if you find Ventura's logic does not hyphenate them as you like.
To add words, use your word processor to insert them into the ASCII file HYPHUSER.DIC on the \ VENTURA subdirectory. The file already has a few words in it to get you started. Remember that the hyphens you enter here will only appear in the document if the word happens to fall at the end of a line. Be sure to save in ASCII mode. Follow these rules:
• Enter words in lowercase only
• Alphabetic order
• One word per line
• Type in hyphens where you want them to appear in the word
• Type an asterisk between each letter after the eighth letter.
This last rule needs further explanation. The hyphenation algorithm looks in the user dictionary, but it only reads the first seven letters of each word. To force it to read further, you must place an asterisk in front of each extra letter. Thus, to enter plural into the user dictionary, you would type:

482 Advanced Functions
plu-ral
Plural has only six letters. But to add indefatigable, you would type:
in-de-fat-*i*g*a-*b*l*e
If you want, you can do away with asterisks after the final hyphen. For instance, if you enter con-sid-e*r-*a*b*l*e, Ventura will correctly hyphenate that word, even though it contains more than seven letters. If you enter con- sid-e*r*able, it will also hyphenate consideration and considerate, because the algorithm will only read to the a.
You can also enter words you do not want hyphenated. For example, you might want a multi-syllable company name to remain intact, so it is never divided at the end of a line. To make it unavailable for hyphenation, enter it as described above without any hyphens. For instance:
micropublishing
You can even create separate hyphenation dictionaries for separate applications. For example, you might have one dictionary HYPHUSER.MED for medical terms, another HYPHUSER.LAW for legal terms, etc. In order to activate one of these application dictionaries, first make a backup copy of the original exception dictionary. Now put the new dictionary in the Ventura subdirectory and name it HYPHUSER.DIC.
Suppressing hyphenation You can suppress hyphenation in several ways, some of which we have already mentioned in passing. To tell Ventura never to hyphenate a word, enter it into the user hyphenation dictionary without any hyphens.
To suppress hyphenation for certain tags (while leaving it on for the rest of the document), select a paragraph with that tag, then choose Hyphenation: Off from the Alignment dialog box.
To suppress hyphenation for a single word at one spot only, enter a discretionary hyphen (Ctrl-hyphen) immediately in front of the word.

Hyphenation options 483
Tips for hyphenation
a By adding the renaming process to batch files that also load Ventura, you can create different batch files that automatically rename different language algorithms and/or different user dictionaries for different document types. You could have one for French and English documents, another for French and German translations, another for legal documents (with a special legal user dictionary), one for technical documents, and so on.
a If your word processor lets you create a user dictionary for spell-checking, you can merge proper names from this dictionary into the HYPHUSER.DIC file.
We have explored many of Ventura's advanced functions in this chapter. These functions demonstrate the superiority of this software for producing sophisticated documents in a short amount of time. But this is not the whole story. You can extend Ventura's capabilities even further - if you know the tricks, tips, and inside secrets. In the next chapter of this book, we present special techniques for power users.

484 Advanced Functions

Chapter Nine
Advanced Tips & Techniques
This chapter presents a series of tips, tricks, and shortcuts that make Ventura faster and easier to use. We suggest
you skim through this chapter to locate the techniques that can help with your particular job. We made the explanations as to-the-point as possible. We assume that you understand the basic skills from earlier chapters. Our goal is to point you toward power techniques you might miss on your own.
This chapter is devoted to techniques that apply to any type of document. (If you are looking for help on specific document types or formatting effects, turn to Chapter Ten, "Special Document Formats.") You will find two sections. The first explains how to create an efficient systems environment. The second passes on performance techniques.
Creating a systems environment "Systems environment" is a phrase we borrowed from the mainframe world. It refers to the process of setting things up - the computer, the software, the work process - for maximum productivity.
Once you've mastered the basics of Ventura, your attention turns to making it as efficient and comfortable as possiblein other words, to make it fit the way you like to work. This section covers a variety of ways to customize Ventura:

486 Chapter Nine: Advanced Tips & Techniques
• Establishing and saving preferences
• Setting up the hard disk
• Using batch files
Establishing and saving preferences Ventura has a variety of controls that affect how it operates and how it appears on screen. We have described these controls below. We have also included charts that show which settings to choose for speed, for accuracy, and for WYSIWYG preview. At the end of the section, we explain how to save these settings for reuse. As you will see, you can store and reuse different preferences on the same computer.
Most preference settings are found in the Options menu (Figure 9-1). Let's step through some of the key functions.
Hide Side-Bar AW Hide Rulers Hide Colullln Guides Hide All Pictures Hide Tabs 8: Returns AT Show loose Lines
Turn Colullln Snap Off L4~~!!~y Turn line Snap Orf ;;; _ ........................................ .
Add 1:h .. 'oltc.wing e1:ring 1:0 C .... fig .• '.:1
Figure 9·1. The Options menu controls most of Ventura's customization alternatives.
Set Preferences
The Set Preferences dialog box (Figure 9-2) controls more options than any other.
Generated Tags governs the tags Ventura creates on its own for such things as headers, footers, captions, and so on. Generated Tags: Hidden means they will not appear on the Assignment List. Generated Tags: Shown means they will be

Creating a systems environment 487
Generated tags
Generated Tags Hidden I Text to Greek 10 I
Keep Backup Files No I Double Click Speed 3 I
On -Screen Kern ing 36 I Auto-Adjustl1ents "and - - I
Pop' Up Menu SYl1bols ShDwn I Menu Type Drop-Down I
Decinal Tab Char: 8461 (ASCI I)
[][J I Cancel I t=::=j:==:f======r==~::::~~~d atrin& - Ccmfig.aya::<r
Figure 9·2. The Set Preferences dialog box.
visible. Since generated tags always begin with Z_, they show up at the bottom of the list (Figure 9-3).
Glossary1l A.'1I
Add the folloowing 8tring to Ccmfig.ay,,::<r
Figure 9·3. Ventura's generated tags begin with the letter Z. They do not show up on the Assignment List unless you select Generated Tags: Shown.
The theory behind leaving them hidden is that Ventura does the assigning, so you don't need to have them available. In practice, however, it is not unusual to mistag a paragraph, and need to retag it correctly. Since the Z-tags are all at the end of the list, they don't get in the way. In addition, many users need to have more than one caption format, for instance. In such cases, it makes sense to name the additional formats

488 Chapter Nine: Advanced Tips & Techniques
Z_Captionl, Z_Caption2, and so on. In such a case, you'll want the generated tags to show.
Text to Greek refers to the point size at which Ventura substitutes gray bands in place of actual text. If you select Text to Greek: None, Ventura attempts to draw every character on the screen, even if they are so small that they cannot be read (Figure 9-4). If you select a number, Ventura turns anything that size or smaller into gray bands (Figure 9-5).
~- ---- -: ---. -. -.--- ------- --. --_ .. ----_. -:
~
-.---, . ~~~ .. awtglhll~1 -- : ~rt- • .r,pf-"""'~ ~:-."'III_1I'hn_ .. w1 •• ~
~~w=-===~.:i ;'~.&!lI~~ =-:1~.I.~".r~ ~,~"'IJ"":=~ .....-.....~'IIM.r.mfOnIn'IIIID..e ________ ~~~~:':'J
Figure 9·4. If you select Text to Greek: None, Ventura draws every character, even those that are too small to read.
Figure 9·5. Because this example has Text to Greek: 6, Ventura has substituted gray bands for the smaller type.

Creating a systems environment 489
The numbers refer to the height of the characters in pixels on the screen. Why bother to greek the text? Greeking greatly decreases the screen redraw time. For maximum speed, therefore, ask Ventura to greek smaller sizes. Generally speaking, anything less than 6 is unreadable, so 6 is a good starting point. However, for visualizing layouts, sometimes it helps to see the shape of the characters, even if you can't read them correctly. In those cases, choose Text to Greek: None.
Keep Backup Files refers to the chapter file, style sheet, and text file. If you select Yes, Ventura creates new files, with the same name and the first letter of the extension changed to $. Thus, SAMPLE.CHP becomes SAMPLE.$HP, SAMPLE.STY becomes SAMPLE.$TY, and so on. Ventura leaves these files behind when you close a chapter. If you select No, Ventura creates these backup files for its own use, but then it erases them when you close the chapter.
Yes is the safer choice. If you have a system crash, you can use DOS to rename the backup files to the original extensions, and load the old version. That way, you lose only the work you did since the last time you saved the chapter. However, this system has the disadvantage of strewing lots of backup files around your hard disk. You will need to periodically clean them off to free up space for current applications.
Because Ventura creates backup files anyway, you can often recover with DOS even if you've chosen Keep Backup Files: No. If the system crashes during a work session, look for files with the $ extension. Ventura doesn't erase them until you close the chapter (that is, until you open a new one or quit Ventura).
Double Click Speed controls how long Ventura waits for a double click before starting an action. Double-clicking is a shortcut for selecting and then clicking OK. Every time you click, Ventura waits a specific amount of time to see if you will click again, thereby turning the original action into a double click. The lower the number, the longer Ventura waits (and, therefore, the slower its response time). The higher the number, the less Ventura waits. If you don't use the double-click method, choose Fast - there's no sense having Ventura waiting around if you won't be using the double click anyway. If you do use double click, the number you select depends on the

490 Chapter Nine: Advanced Tips & Techniques
speed of your index finger. The faster you are able to double click, the higher the number you can pick.
On-Screen Kerning governs whether or not Ventura attempts to imitate the printed kerning on screen. It only applies if you have (1) set Pair Kerning: On with Chapter Typography and (2) selected Automatic Pair Kerning: On with Paragraph Typography. Since screeri fonts are only rough approximations of the printed fonts, on-screen kerning can never be precise. In general, it serves only to slow down the screen display without adding any real benefits. We recommend On-Screen Kerning: None for most applications. If you are doing demanding applications where kerning is a consideration, you may, want to select On-Screen Kerning: 24, which shows it for type size of 24 points or above. Kerning is difficult to detect on screen for smaller sizes. The choice you make here has no effect one way or another on the kerning for the printed page.
Auto-Adjustments refers to two separate and very different options. Auto-Adjustments: Style means that Ventura automatically changes the inter-line spacing every time you change the font size. Ventura changes spacing the same amount you change the font. Assume you have 12-point type with inter-line spacing of14.00 fractional pts. You increase the font to 14 points - an increase of roughly 16.66%. Ventura then increases the inter-line spacing the same 16.66% - in this case, to about 16.34 fractional pts. You can override this choice with the Spacing dialog box.
Such odd spacing sizes are poor typographic practice. We recommend that you avoid choosing Auto-Adjustments: Styles. This same pop-up menu, however, provides access to a useful conversion feature. The selection Auto-Adjustments: II
and -- automatically converts inch marks (") to true open and close quotes ( " and " ) and double hyphens (--) to em dashes (-). The conversion takes place when Ventura brings in the text file. It is set up to allow you to continue to use inch marks with numerals as an abbreviation for inches. Most users should choose this option. If you don't want either one, select Auto-Adjustments: None.
Pop-Up Menu Symbols refers to the up/down arrows in dialog boxes that signal the existence of a pop-up menu. Whether or not you have the symbols hidden or shown, the menus work in

Creating a systems environment 491
Set Ruler
the same way. The menu appears if you hold down the mouse button anywhere to the left of the symbol (or where the symbol would have been if it is hidden). The symbols aren't necessary for the operation of the menus, or to remember where to press, but they are a good reminder of which selections have pop-up menus available and which ones don't. We recommend choosing Pop-Up Menu Symbols: Shown.
Menu Type controls the way in which you access the menus. If you choose Drop-Down, the menus descend the moment you touch them with the mouse cursor. To activate a choice, you highlight it and click the button. If you choose Pull-Down, menus do not appear until you click and hold the mouse button. To activate a choice, you drag the mouse to highlight the selection, then release the button. If you are converting from a different computer system or operating environment with pull-down menus, you may want to select that style to make the transition easier.
Decimal Tab Char governs the character used for decimal alignment. In the United States, this character is the period (ASCII 046), as in 12.44. Many European countries, however, use the comma (ASCII 044) instead, as in 12,44. To tell Ventura to align numbers around the comma instead of the period, enter 044 on this line. Otherwise, leave the default setting of 046 for the period.
This dialog box controls the units and zero point of the onscreen rulers (Figure 9-6). You can use inches, centimeters, or picas for the horizontal and/or the vertical ruler. If you wish to match the traditional newspaper system, you can select picas for the horizontal and inches for the vertical.
You can also change the zero point. Many people prefer to do this interactively with the mouse. If you prefer, you can set it here. For instance, if you know that your left margin is six picas (one inch), you might want to set the horizontal zero point to one inch. That way you can more easily gauge such things as In From Left spacing, Tab Settings, and indents, all of which measure from the left margin, not the left edge of the page.

492 Chapter Nine: Advanced Tips & Techniques
Horizontal Units: Inches Vertical Units: Inches
Horizontal Zero Point: 88. 8~ inches Vertical Zero Point: 00 .00
c:::mc:l I Cancel I
Add th .. following; 8tring to Config.eY8:1'
Figure 9-6. The Set Ruler dialog box.
Screen display options Six of the selections from the Options menu affect the screen display. We will briefly describe them and their uses.
Show/Hide Side-Bar
This option toggles the Side-Bar on and off. With the Side-Bar gone, you can see and work on more of your document at one time (Figure 9-7).
Many users initially shy away from hiding the Side-Bar, since it controls so many important functions. However, if you take
iF'I;;;"E~;~""""""""""""""'i'h'~"""~'~~';;;:;d""'~';;i~';;"~""Th;"t'h'i'~d"~~i~'~;:;";;';i~ht'.~~:] : describes some features of pound a bit on the second! : the item called out in the column.lI :
i r~~l f~~ufu~' ~~~~nt1:t t~~ i i wide to fit on one line. This i i 1~P~ o~~~ep~~~~~~e ~h~f~i i i where flowing text is used.lI : : : iSecond model.lI The next column. It also oc· The second model comparesl : cupiesthe middle row of the quite favorably to the first!
table.lI model described above.: There's not as much text here. IIi
1 Figure 9-7. By hiding the Side-Bar, you can see more of the document at one time.

Creating a systems environment 493
the time to learn Ventura's keyboard shortcuts, you will discover that you can perform most actions with the Side-Bar hidden. For instance, Ctrl-2 activates the Addition Button. Likewise, you can change modes with the keyboard, and tag paragraphs with the function keys. If you can't afford a bigscreen monitor, hiding the Side-Bar is one way to improve the efficiency of your current display. You can also use the keyboard shortcut Ctrl-W to toggle the Side-Bar on or off.
Show/Hide Rulers
This choice toggles the ruler display on or off. Working with the rulers on makes it easier to measure and specify settings. Working with them off speeds the screen redraw and fits slightly more of the page into the workspace. You must show both rulers; you cannot select just one. To change the units or the zero point, use Set Ruler from the Options menu.
Show/Hide Column Guides
This toggle turns on (or off) a non-printing border around the columns. Working with the column guides visible makes it easier to position frames, to create balanced layouts, and to visualize the live area. Working with them off gives you a better preview of what readers will see on the printed page.
Show/Hide Picture
This choice can hide all the pictures in the document, or any picture individually. To hide an individual picture, enable Frame mode and select the frame containing the picture. When you pull down the Options menu you will see the selection Show (or Hide) This Picture. To hide all the pictures in the document, select the Underlying Page in Frame mode, then pull down the Options menu and select Show (or Hide) All Pictures. If you pull down the Options menu in any mode other than Frame mode, it controls all pictures.
Hiding pictures greatly improves the speed of the screen display. We recommend hiding pictures all the time except when you are specifically working with a given frame. If you are working on a page with several pictures, hide all the pictures in the document, then show only the the one you are working on right now.

494 Chapter Nine: Advanced Tips & Techniques
When you print a document with hidden pictures, Ventura lets you choose whether or not to hide them during printing, too.
Show/Hide Tabs & Returns
This selection should have been named Show / Hide Editing Marks because it applies to more than just tabs and returns. It toggles the screen display of several other important symbols, as well, including end of file symbols, line breaks, and special spacing characters.
Working with these marks shown makes editing easier, faster, and more accurate. Working with them hidden gives you a screen preview more similar to the printed page.
Show Loose Lines
This option toggles the display of lines where Ventura has had to space words too far apart. You can view and control the maximum space between words in the Paragraph Typography dialog box. Ventura tries not to exceed these maximums, but sometimes it must to justify a line. Loose lines are highlighted (shown in reverse video) when you select this option.
Basically, this option is for those who feel they must have the utmost in typographic sophistication. It permits them to spotlight problem lines so they can attempt to correct them (by editing, by inserting hyphens, by using Letter Spacing, and so on).
Turn Column Snap On/Off
This option forces new frames to align with the columns. If you move or stretch a frame close to a column guide, it automatically snaps to the position of the guide, as if magnetically attracted. In most cases, it is wise to work with Column Snap On. Ventura is more accurate at aligning elements than you can be. However, in some cases you will need to turn it off to position frames at other locations.
Turn Line Snap On/Off
This function forces new frames to align with the inter-line spacing of Body Text. It is helpful in creating pleasing layouts

Creating a systems environment 495
where all the page elements relate to one another. If Body Text has an inter-line spacing of one pica (12 fractional pts), then all frames will snap vertically to units of one pica.
You can also use Line Snap to create a bigger grid. Temporarily set Body Text to a large line spacing - for instance, six picas. Line Snap will then force all frames to become increments of six picas. When you've finished drawing the frames, return Body Text to its normal setting.
You can override column and line snap with the Sizing & Scaling dialog box. However, the next time you move or resize the frame, it will again snap to the guides (unless you have turned the snap-to features off).
Different settings for different purposes In everyday working situations, you will often find yourself switching back and forth between different preferences for different purposes. Table 9-1 shows three possible combinations. The settings for "speed" refer to Ventura. They reduce the overhead so Ventura can reformat and redraw the screen as fast as possible. This combination of settings will be most appreciated by those who work on slower, XT-class computers.
The settings for efficiency help you do a better, faster job of positioning and editing page elements. In general, they turn on a variety of layout marks and aids. The settings for WYSIWYG preview turn off marks that will not appear in the final printout. Most of these WYSIWYG settings, however, slow Ventura down. Taken together, they can make quite a difference, so you may want to reserve these settings until the end, for a final, on-screen proof. You will also notice that we recommend Paragraph mode for accurate previews, since that mode turns off the non-printing borders around frames and graphics.

496 Chapter Nine: Advanced Tips & Techniques
Table 9·1. Preference settings for different purposes.
SPEED EFFICIENCY WYSIWYG PREVIEW
Generated tags Hidden Shown Hidden
Text to Greek 8 6 None
Double Click Speed Fast 4 dna
On-Screen Kerning None 24 All
Set Ruler dna Horizontal zero
dna point to left margin
ShowlHide Side- Shown Shown Hidden Bar
ShowlHide Rulers Hidden Shown Hidden
ShowlHide Column Hidden Shown Hidden Guides
Hidden (except Show/Hide Pictures Hidden when working on a Shown
specific picture)
Column Snap On On dna
Line Snap On On dna
Mode dna dna Paragraph
Saving prefe.rences for reuse When you exit the program, Ventura saves the current settings in a file called VP.INF (VPPROF.INF for the Professional Extension). For instance, if you have the rulers showing when you quit, Ventura remembers and turns them on again when you start up the next session.
You can save different versions of Ventura - that is, you can save different combinations of options. You could, for instance, have a speed version, an efficiency version, and a preview version, as explained above. A more likely application, how-

Creating a systems environment 497
ever, is to permit different people to use Ventura on the same machine. Each person can have his or her own customized version, without the need to reset the options each time.
The key is to modify the batch file that loads Ventura, which is called VP.BAT (VPPROF.BAT for the Professional Extension). You simply specify a different subdirectory for each user's personalized INF file. Thus, Bill's INF file might be stored as C:\BILL\ VP.INF, while Susan's is stored as C: \ SUSAN \ VP.INF. Bill would load Ventura with a batch file that specified his INF. Susan would load it with a slightly different batch file that specified the location of her INF file.
Later in this chapter we explain how to use batch files for this purpose and for other enhancements.
Setting up the hard disk This section is about establishing a productive systems environment. One key is organizing the hard disk properly. Ventura can work with files that are scattered anywhere on the hard disk. Unfortunately, this opens the door to deficient organization. As your library of Ventura documents grows, you will find it harder and harder to locate the files you want; to archive and back up documents; and to update old documents when it is time for revision.
Setting up a hard disk for efficient desktop publishing is covered in more detail in the New Riders handbook New Writing. Nevertheless, we can give you a few starting points.
In its default state, Ventura stores everything in the \ TYPESET directory. Soon, however, that directory becomes overcrowded with chapter, style, text, and graphics files. Just scrolling through the Item Selector becomes a pain. The solution is to set up an electronic filing system ..
Paper filing systems usually work best when each project is stored in its own folder. The same holds true for electronic filing. You will find Ventura easier to work with if all the files for each project are in a separate subdirectory. That way you can back up a project in DOS just by copying the contents of the subdirectory. Likewise, you can delete an unwanted document with a single command.

498 Chapter Nine: Advanced Tips & Techniques
Use File TypelRename to move a text file to a new subdirectory. Use Save As New Style to move a style sheet. Use Save As to move a chapter to a new location. You must go back to the old location and delete the previous versions if you don't want them anymore. (Alternatively, you can use a third-party utility programs to move chapters with a single command.)
Tips for hard disk management Here are a few of the things to keep in mind as you create and name subdirectories. Some of these tips conflict with one another. You must mix and match between conflicting alternatives to pick the best solution for the way you like to work.
a DOS permits only 112 subdirectories in the root directory. Although this initially sounds like a large number, it is not unusual to use several dozen for programs and utilities. Depending on the nature of your work, you may find yourself with more projects (documents) than you can store in the root directory. To avoid this problem, put document subdirectories under another subdirectory, where the limitation does not apply. For instance, some people store all documents in subdirectories underneath \ TYPESET. Remember, however, that the longer the path, the more trouble it is to remember and type. \
a The shorter the subdirectory name, the easier and faster it is to type. We like to use two letter codes for document subdirectories - for instance, we stored this book in C: \ IX. We often use the same two code letters for file names, too, making it easy to find and manipulate documents.
a The shorter the subdirectory name, the easier it is for people to forget what it means. If different people must use the same computer, you may want to forsake the convenience of short names for the safety and ease of use of longer names.
a For complex documents, use subdirectories under the subdirectories. For instance, you could have a separate sub-subdirectory for each chapter. Or a separate sub-subdirectory for pictures, to keep them from overcrowding and confusing the main subdirectory. Sub-subdirectories are not necessary for shorter, simpler projects.

Creating a systems environment 499
a Identical subdirectories on different computers make it simple to share documents across computers. When we have more than one person working on a project, we set up the same document subdirectories on each machine. That way we can use DOS to copy chapters, and we know that the pointers in the chapter file will match from computer to computer.
a Consider one subdirectory for drafts and a second for final copy. Documents like newsletters can benefit from using the same file names issue after issue. That way, you can use the same template chapter. Ventura automatically loads in the same file names for each issue. It doesn't care that you changed the contents of the file in the meantime. Thus, you could have one subdirectory for the final edition of a newsletter, and a separate subdirectory for the text files of each monthly issue.
Using batch files Advanced users can use batch files in a variety of ways to enhance Ventura. The first aspect is to understand the batch file that loads Ventura, called VP.BAT. Then you can combine VP.BAT with other batch files to customize Ventura.
The VP.BATfile
A batch file gets special treatment from DOS. When DOS sees the BAT extension, it treats each line in the file as a separate instruction. When you type VP at the DOS prompt, you are actually invoking a batch file called VP.BAT. (When Professional Extension users type VPPROF, they invoke VPPROF.BAT.) Ventura creates this file during installation, but you can modify it to change and customize the program.
Here's a typical VP.BAT program:
Load chapter file Screen fonts
( ~~J Gall up driver program ~~@ %1 ~VG~
Load Ventura Screen driver ~ouse type

500 Chapter Nine: Advanced Tips & Techniques
The heart of the batch file isDRVRMRGR VP, which loads the operating environment and Ventura. All the commands that follow are options. If you reinstall Ventura, the installation program may modify some of these options for you. Advanced users, however, can change the batch file on their own to customize Ventura without reinstalling. In addition, certain options are available only by adding to the batch file.
To edit this (or any) batch file, use a word processor or text edi tor capable of saving in ASCII format. Let's step through the available options so you can learn how to change them. (If you use Professional Extension, substitute the word VPPROF wherever you see VP.)
To open a chapter at the same time you load Ventura, simply type the name and path of the chapter after you type VP. Thus, to open C:\TEST\SAMPLE.CHP, type: VP C:\TEST\SAMPLE at the DOS prompt and press Enter. You do not need to change the batch file to use this feature. The %1 in the batch is a variable for the purpose of receiving the name you type in and passing it along to Ventura.
The rest of Ventura's options are controlled by switches. These switches are signaled by a forward slash. You use a letter to show what kind of switch it is, followed by an equals sign. For instance, the switch to specify a mouse is M=. After the equals sign, you type in the value you want. For instance, M=Ol signifies the COMI serial port (the zero) and the Mouse Systems mouse (the one).
You must have a screen driver switch and a mouse switch (except in the unlikely event you plan to work without a mouse). The other switches are optional. You can use them alone or in combination. To combine switches, list them one after another with no punctuation or spaces in between.
To use a different screen driver change the value of the screen driver switch (lS=). You must first copy over the correct driver from the installation disk and place it in the \ VENTURA subdirectory. Then you must enter its name in the batch file after the screen driver switch. For instance:
DRVRMRGR VP %1 IS=SD_CG~5.CGA/M=Ol
To use a different mouse, or a different port for the mouse change the mouse switch (!l\tI=). The value is a two-digit num-
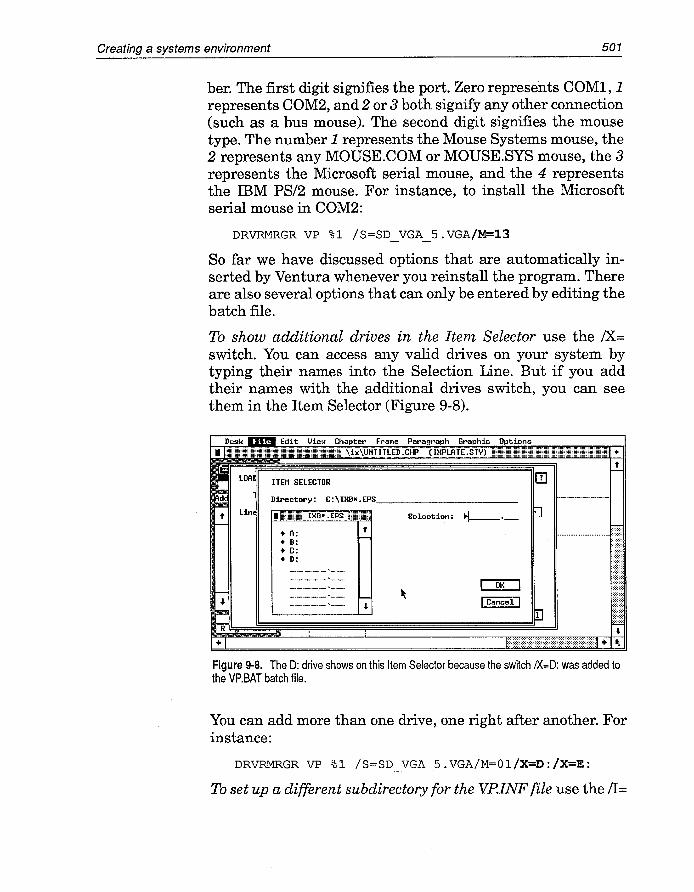
Creating a systems environment 501
ber. The first digit signifies the port. Zero represents COMl, 1 represents COM2, and 2 or 3 both signify any other connection (such as a bus mouse). The second digit signifies the mouse type. The number 1 represents the Mouse Systems mouse, the 2 represents any MOUSE.COM or MOUSE.SYS mouse, the 3 represents the Microsoft serial mouse, and the 4 represents the IBM PS/2 mouse. For instance, to install the Microsoft serial mouse in COM2:
DRVRMRGR VP %1 /S=SD_VGA_5.VGA/M=13
SO far we have discussed options that are automatically inserted by Ventura whenever you reinstall the program. There are also several options that can only be entered by editing the batch file.
To show additional drives in the Item Selector use the IX= switch. You can access any valid drives on your system by typing their names into the Selection Line. But if you add their names with the additional drives switch, you can see them in the Item Selector (Figure 9-8).
Directory: c:\nm*.EPS, ________ _
.I~!!mm!m~m I)!O*. EPS §~m~~!i!~~!i
+ A: + B: + c: • D:
t r-
.................................... ~
.J.
Selection: 1oJ..--'-
Figure 9-8. The D: drive shows on this Item Selector because the switch !X=D: was added to the VP.BAT batch file.
You can add more than one drive, one right after another. For instance:
DRVRMRGR VP %1 /S=SD_VGA_5.VGA/M=Ol/X=D:/X=E:
To set up a different subdirectory for the VP.INF file use the 11=

502 Chapter Nine: Advanced Tips & Techniques
switch, followed by the full path name of the subdirectory. For instance:
DRVRMRGR VP %1 /S=SD_VGA_5.VGA/M=Ol/I=C:\BILL
VP.INF is the initialization file that stores the preferences and options you have specified for Ventura. If you do not use the II= switch, it is automatically stored in the \ VENTURA subdirectory. See the section titled "Saving preferences for reuse" earlier in this chapter to learn how and why to use different subdirectories to store different INF files.
To change the drive for overflow files use the 10= switch. Normally, Ventura stores temporary files on the hard disk. To speed up operation, you can reroute the files to a RAM disk. (Professional Extension users don't need to bother with this switch. The Extension automatically uses EMS memory for temporary files.) Enter the letter designation of the drive after the switch. For instance:
DRVRMRGR VP %1 /S=SD_VGA_5.VGA/M=Ol/0=F:
To take memor-y from the screen buffer and add it to the text area use: the IA switch. When a document exceeds memory, Ventura spools portions to disk. This slows down operation and, in earlier versions, made the program less reliable. By transferring screen (graphics) memory to text, you can build longer documents before spooling becomes necessary. However, you pay a penalty, since you must steal memory used to display and convert pictures. In fact, some printers and conversions won't work without the full screen buffer. We do not recommend this option unless you do not use pictures in your documents. You can specify any amount in lK increments up to a maximum of 32. For instance:
DRVRMRGR VP %1 /S=SD_VGA_5.VGA/M=Ol/A=16
Other batch files Once you understand how to modify the VP.BAT file, you can use it together with other batch files to create different versions of the program:
• Different INF files
• Different hyphenation routines

Creating a systems environment 503
• Different screen drivers
• With or without the PostScript preamble
• With or without a RAM disk
• With or without memory resident utilities
In addition, you may want combinations of these options. Or you may want to set up the batch file so it automatically invokes a menu or a DOS shell when you exit. The variations are almost endless. We can't give them all to you here. What we can do is make a few general comments about how to write batch files for Ventura, followed by a few examples.
Quick course in batch files for Ventura
Since we don't have the space for a full-scale run-down on batch file programming, we will start by telling you where to get more information. Your DOS manual has the basic information, but you may not find it easy to use. You may want to consider a book instead. One of our favorites is Van Wolverton's Running MS-DOS.
Most people recommend putting batch files in their own special subdirectory, usually called C: \BATCH or something similar. Then you can put a path command in the AUTOEXEC.BAT file. AUTOEXEC.BAT is a special batch file that runs automatically when you start up the computer. A path command tells the operating system where to search for things it can't find in the current location. To tell DOS to always look in the C:\BATCH subdirectory, you would enter the following line into AUTOEXEC.BAT:
PATH C:\BATCH
You can specify multiple paths by separating them with a semicolon:
PATH C:\BATCH;C:\DOS;C:\UTILITY
If you store all the batch files in a subdirectory, and specify that subdirectory path in AUTOEXEC.BAT, you can invoke any batch file from any location. Just type the name of the batch file. DOS will automatically search in the batch file subdirectory if it can't find it in the current location.

504 Chapter Nine: Advanced Tips & Techniques
The examples we provide are for a representative system. To use these batch files, you must type in the actual names and paths for your computer. If you are new to batch files, we recommend that you comment your efforts heavily. Not only does this make it easier for someone else to use the file, it also makes it easier for you to remember what you had in mind when you come back to revise a batch file weeks or months from now. To add a comment, begin the line with a semicolon.
You may have to add commands to make things work properly on your system. For instance, our examples don't load a mouse driver. We have assumed that (1) you don't need one or (2) you loaded it with the AUTOEXEC.BAT file. If not, add it to the beginning of every batch file. For instance:
CD\MOUSE
MOUSE.COM
CD\
The idea behind the examples below is to use batch files along with the VP.BAT file we have already explained. The basic trick is to have each batch file call up the VP.BAT file at the end. In other words, the batch file can first accomplish some function (such as renaming hyphenation dictionaries), then it can load Ventura by invoking VP.BAT. Invoking VP.BAT is as simple as typing in the letters VP on a line by itself .
.. NOTE: To run the Professional Extension, use the batch file VPPROF.BAT instead of VP.BAT.
If you really want to get fancy, you can add additional commands that will take place after you quit Ventura. These commands must appear in the batch file after the VP line. DOS will wait until you quit from Ventura before it executes these commands. For instance, you could set up the batch file to rename the hyphenation dictionaries back to their old names after you finish each Ventura session. Or you could instruct it to load a menuing program or DOS shell when it's through. Some of the examples below illustrate this technique.
You may also want to search the bulletin boards and user groups for special utilities to improve your batch files. If you have a modem, you can find these utilities on most Ventura

Creating a systems environment 505
bulletin boards. If not, perhaps a friend who does can download them for you. Or perhaps you can get them on a floppy disk at a users group meeting. One useful example is the shareware utility COLDBOOT.COM. This utility resets the computer (as if you had pressed Ctrl-Alt-Del), thereby clearing all the memory. It is useful when you want to remove resident programs to free up memory for Ventura.
With the general comments out of the way, you are ready to examine some examples. Remember that most of them can be combined. In addition, you can set them up as individual choices from a master menu, if you have a menu utility such as HOT from Executive Systems Inc.
Multiple INF batch files
This batch file lets different people share Ventura on the same computer. Each person can preserve his or her favorite preferences in an INF file on their own subdirectory. This batch file loads a version of Ventura with the 1= switch set to load and store VP.INF from a different subdirectory.
BILL.BAT
DRVRMRGR VP %1 /S=SD_VGA_5.VGA/M=Ol/I=C:\BILL
You can use the same technique to create different INF settings for different versions for your own use. For instance, you could have a speed version, an efficiency version, and a preview version, as explained above.
You can also set this up in a menu, so that different people access their own versions by pressing a letter or number corresponding to their names.
Different hyphenation dictionaries
You can set up different hyphenation options by first copying all of Ventura's hyphenation options to the hard disk. Then you can set up batch files that rename these hyphenation algorithms so Ventura can find them. (Ventura won't access hyphenation algorithms unless they have a specific file name.) You will notice that these batch files rename the algorithms back to the original, default state.
This batch file makes the slower, more accurate hyphenation

506 Chapter Nine: Advanced Tips & Techniques
algorithm the first, default choice, then changes back after the Ventura work session is over:
HYPSLOW.BAT
CD \VENTURA COpy USENGLISH.HY1 USENGLISH.FAS COPY USENGLISH.HY2 USENGLISH.SLO COpy USENGLISH.SLO USENGLISH.HY1 COpy USENGLISH.FAS USENGLISH.HY2 DRVRMRGR VP %1 /S=SD_VGA_5.VGA/M=Ol CD \ VENTURA COpy USENGLISH.FAS USENGLISH.HY1 COpy USENGLISH.SLO USENGLISH.HY
Download PostScript preamble
This batch file downloads the PostScript preamble to the printer, then renames it so Ventura won't bother to copy it each and every time it prints. This version assumes a PostScript printer attached to the COMl serial port.
POSTHAST.BAT
MODE COM1:9600,N,8,1 CD \ VENTURA REN PS2.PRE PS2.BAK COpy PERMVP.PS COM1: DRVRMRGR VP %1 /S=SD_VGA_5.VGA/M=Ol CD \ VENTURA REN PS2.BAK PS2.PRE
Memory resident programs
Depending on your system, the amount of memory, and other variables, you may be able to safely use certain memory resident utilities with Ventura Publisher. However, resident utilities do rob memory that Ventura could otherwise use for building the document. For that reason, you may want to set up batch files that automatically load the resident utilities. That way, if you have a particularly long document to format, you can load a maximum memory version of Ventura (see below), eliminating the overhead of the utilities.
There are many ways to manage memory. You may prefer to

Creating a systems environment 507
use one of the many available programs that can load and unload programs. Our batch files use a very simple technique - they put a message on screen reminding you to hit Ctrl-AltDel to reboot the computer if you want to clear the memory. For a more elegant solution, substitute the shareware utility COLDBOOT.COM in place of this manual technique. Or type in the correct commands for the memory manager you use.
This batch file loads the HotShot screen grabber program, then loads Ventura. Use it if you need to capture Ventura screens to print later in another documents.
HOTVENT.BAT
CD\HSG GRAB
DRVRMRGR VP %1 /S=SD_VGA_5.VGA/M=Ol ECHO: REBOOT TO CLEAR MEMORY-RESIDENT PROGRAMS
The next example loads the popular Lightning disk caching program, for faster operation. There are other good cache programs on the market. You could also clear memory by usi,ng Lightning's own unload command.
CACHE.BAT
L A OFF 412 DRVRMRGR VP %1 /S=SD_VGA_5.VGA/M=Ol
Document batch files
You can set up different batch files that will not only load Ventura, but automatically open the correct chapter. For instance, if you use a template chapter, the batch file could open the template. Then all you would have to do is save it under a new name to start work.
For an even more automated approach, use the same text and picture file names for each issue. For instance, you might name the lead story in a newsletter NLLEAD. TXT. The news department might go by the name of NLNEWS.TXT, and so on. Each month you would write different stories. When they were perfect, you would copy them to the old file names (NLLEAD. TXT, etc.). Since this will copy over the old versions, you should be sure to make a backup copy first.
Now set up a newsletter chapter that always looks for these

508 Chapter Nine: Advanced Tips & Techniques
file names. Your batch file can specify the same chapter name each time - for instance, NEWSLET.CHP. This chapter will also load in the same files. It won't know (or care) that you have changed those files in the meantime. With all the files in their proper frames, all you have to do fine-tune the new articles to fit the space.
This batch file will automatically copy the constituent text files to the file names the template is expecting each month. To use this, supply the batch file with the three-letter file extension for the appropriate month; for example, type NEWSLET JAN to move all of the January files into the template.
NEWSLET.BAT
COpy \WORDSTAR\*.%l \ISSUE\*.TXT CD \VENTURA DRVRMRGR VP \ISSUE\NEWSLET /S=SD_VGA 5.VGA /M=32
Performance techniques The tips in this section will help you get more performance from Ventura. Most of them are advanced techniques that require some understanding of DOS, as well as a basic grounding in Ventura.
Adding buffers The disk operating system provides a special area where it stores frequently used information. These buffers speed operation. A program like Ventura can find what it needs in the buffer - which uses high-speed RAM memory - rather than by searching the (relatively) slow disk.
You may be able to speed Ventura's operation slightly by increasing the number of buffers. You can control these buffers with the CONFIG.SYS file. DOS looks for this special file every time it starts up, and uses it to configure the system the way you want it. To edit this file, use the ASCII mode of a word processor or text editor.

Performance techniques 509
Adding additional buffers is as simple as adding a line to the file. For instance, to increase the buffers to 30, type:
BUFFERS=30
Ventura requires a minimum of 15 buffers for proper operation. Every buffer eats about .5K of RAM, so 30 buffers will use up about 15K. This RAM is no longer available for use by Ventura in building long documents. The game, therefore, is to experiment to use the fewest possible buffers while still speeding up performance.
You are most likely to need the extra speed if you have installed additional screen fonts. If so, you may find that adding more buffers still won't do the trick. In that case, try a commercial disk caching utility (see below), or try restricting the number of screen fonts (see Chapter Seven).
Adding a disk cache A disk cache sets up a large buffer area for information from the hard disk. Every time you get something from the disk, the cache stores it in case you need it again. When you ask for information, the program looks first in the RAM memory of the cache. Only if it can't find it there does it resort to the slower hard disk.
There are numerous utilities on the market. Not all utilities work with all types of computers and all types of memory. Shop around to find the one that matches up best with your system. Look for a cache utility that uses as little core memory as possible. Instead, find one that uses extended or expanded memory, so you can reserve the core memory below 640K for Ventura's use. A disk cache of 512K is probably the minimum for seeing true performance improvements with Ventura. A cache of one to two Megabytes is even better.
Adding a RAM disk We have previously explained how to modify the VP.BAT program so that Ventura will store overflow files on a RAM disk. You may also want to consider loading the Ventura program files onto the RAM disk at the beginning of every work session. Then you can load and unload Ventura much more quick-

510 Chapter Nine: Advanced Tips & Techniques
ly if you need to use other programs in the middle of a publishing session. You must reinstall Ventura with the RAM disk operational to configure the program to look to the correct disk drive for its program files. Then you must copy over all the necessary files from the \ VENTURA subdirectory to the RAM disk every day before beginning the work session.
Usually a disk cache is superior to a RAM disk, offering the same speed benefits with fewer drawbacks and much less setup. You must specifically copy information to and from a RAM disk. A disk cache, however, automatically intercepts information and stores it for reuse. If, however, you cannot use a cache for one reason or another, consider a RAM disk as an alternative.
Memory management techniques Most users will never experience memory problems. When Ventura can't fit all of a document into RAM, it swaps out portions to the hard disk. Operation slows down, but otherwise everything works fine. However, certain very large, very complex documents may encounter memory problems.
If you have encountered memory problems or error messages, read this section for some possible solutions. Because memory is a confusing and (let's be honest) tedious subject for most users, we are going to start with solutions. At the end we will include some theory for those of you who want to know more about the inner workings.
-NOTE: The easiest and fastest way to overcome memory problems is to upgrade to the Professional Extension, which uses EMS memory to overcome most limitations.
If your budget won't permit an upgrade, three strategies will help you solve memory shortcomings. First, learn to free up as much memory as possible. Second, learn which document elements are memory-hungry, so you can avoid them. Third, review our list of tricks and tips for overcoming memory shortages.

Performance techniques 511
Spotting memory problems
You know that you have run into a memory-related limitation if you see one of these error messages:
Not enough memory to run the program. Either add memory to your system or check your CONFIG.SYS and AUTOEXEC.BAT files for any drivers or resident applications that can be removed.
Fatal Error! The VP.RSC file couldn't be found or would not fit in memory.
Fatal Error! The GEM VDI screen driver couldn't be loaded.
Fatal Error!. There wasn't enough memory for the screen graphics buffer.
You're out of memory. Save your document and quit the program as soon as possible.
You're trying to load a file containing a paragraph that is larger than 8000 characters. This has corrupted memory, so quit as soon as possible.
This frame is too complex to completely format. Try splitting it into two frames or reducing the number of columns, tabs, leaders, and lines of text.
There wasn't enough memory to load and hyphenate all of the text file you requested. You may have to split this chapter & file into two parts and try again.
There wasn't enough space for all the requested font files. Some fonts may not display or print correctly.
There was not enough memory to begin the archive process.
Freeing up memory
If you are running into memory problems, the first step is to free up as much RAM as possible. Here are some alternatives:

512 Chapter Nine: Advanced Tips & Techniques
• Do not use any memory resident applications whatsoever .
• Eliminate device drivers from the CONFIG.SYS file unless they are absolutely necessary.
• Reduce the buffers to 20 (Substitute "BUFFERS=20" for the current buffers command in the CONFIG.SYS file).
• Use only one hyphenation algorithm.
• Reduce the size of the user hyphenation dictionary ifit has more than a few words in it.
• As a last resort, consider switching to an older version of DOS, which uses less RAM that your current version. For instance, DOS 3.0 uses about 15K more than DOS 2.0. Likewise, an EGA board consumes slightly more system memory than a Hercules card.
• If you have Microsoft Windows on an AT or 386 computer, you can use the file HIMEM.SYS to add 64K of DOS RAM to your system. Add the line DEVICE=HIMEM.SYS to your CONFIG.SYS file, and make sure that at least 64K of extended memory is available for it.
• You may be able to increase memory to 704K if you have an extended memory board such as the JLaser Plus AT board. The JLaser board can allocate an additional 64Kofmemory to DOS. Ventura Publisher will recognize this additional memory. Insert this command into the CONFIG.SYS file:
DEVICE=JBOOT.BIN 704K
- NOTE: Ventura generally recognizes memory on the JLaser board as EMS memory. Unfortunately, you must have at least one megabyte of memory not allotted to EMS in order to use the JLaser for output. If you wish to disable EMS memory, you must put the switch IE=O in your VP.BAT file.
Avoiding memory-hungry page elements
Certain page elements eat into available memory. In particular, tabs, tags, and leader dots are memory hungry.
Eliminate unneeded tags from your style sheet since they consume memory whether used or not.

Periormancetechniques 513
Use the body text tag for the most common page element. Ventura Publisher always has a body text tag. You cannot eliminate it, so make good use of it. Each time you add a tag you consume another amount of memory. You can minimize the use of additional tags by making sure the pre-existing body text is assigned to the page element that appears most often.
Use line breaks instead of paragraphs, particularly for large documents such as directories with many paragraphs per page. Wherever possible, start new lines with a line break instead of a carriage return to preserve memory.
Link chapters at print time. This suggestion is not a memory management technique per se but a reminder that Ventura can link multiple chapters into a publication. This publication can be printed at one time. Since Ventura prints a publication by sequentially opening and printing each individual chapter, this approach requires no more memory than does the largest chapter in the publication. Perhaps the simplest way to overcome memory problems in a long chapter is to split it into two parts and then link them when you print. It is also much easier to work on short documents.
Understanding memory requirements
Three different factors can limit available memory. You need to know about all three, since anyone of them can create problems. Each of these limitations acts independently of the others; the ones that you encounter will depend on the type of system you have and the kind of documents you create. We'll describe all three.
System memory refers to the RAM memory available when Ventura Publisher loads a document. In general, you want as much as possible. The amount of system memory is determined by the total RAM (640K) minus the amounts consumed by:
• DOS
• Any device drivers present in your CONFIG.SYS file
• Any RAM-resident utilities
• The hyphenation algorithm and exception dictionary

514 Chapter Nine: Advanced Tips & Techniques
• The first eight font descriptions in the width table.
• The screen driver
• Ventura Publisher itself
Anything left is available to Ventura Publisher documents. Ventura requires that there be at least lOOK of leftover memory in order for it to run, or 40K if you have EMS memory.
Frame memory. Ventura Publisher places a limit on the amount of memory that can be consumed by one frame. You will seldom encounter this limitation. If you do, you can often overcome it by dividing your page into two or more frames, using the frame-by-frame layout approach discussed in Chapter Six. For example, in a three-column document, you could create three one-column frames. If the problem is chronic throughout a long document, create repeating frames on top of the Underlying Page. We wish to emphasize that steps like these are necessary only if you run out ·of frame memory and you see this error message:
This frame is too complex to completely format. Try splitting it into two frames or reducing the number of columns, tabs, leaders, and lines of text.
Line elements memory. Ventura Publisher places a limit on the number of lines on a page, regardless of how many frames are on that page. You may run into this memory limitation if you use a very small font, such as 6-point type, and more than three full-length columns per page. If you run out of page memory, an entire column of text may disappear from the screen. The text has not been lost. Ventura is simply not able to deal with it on this page.
Diagnosing memory problems
A little-known dialog box may help you diagnose memory problems. Select Publisher Info from the desk menu. You will see an informational dialog box (Figure 9-9).
Click on the word "Ventura" in the "Ventura Software, Inc." box. Doing this will bring up a second dialog box, as shown in Figure 9-10.

Performance techniques 515
Click here to see the secret diagnostic
dialog box
Herox Desktop Publishing Series: Ventura Publisher Edition
Professional Extension. EMS- (SYS=48 kb. APP=1369 kb) Non-Network
Don Heiskell Lee Jay Lorenzen
John Grant John Meyer
Inc .• 1986-1989
Figure 9·9. The Publisher Info dialog box.
VENTURA PUBLISHER DIAGNOSTICS
Internal MeRory in Use: External MeRory in Use:
EMS Menory in Use: Text Menory in Use: Paragraphs in Use:
Line Elelllents in Use:
Ext. MeR. Swapped Out: Text Mell. Swapped Out:
Width Table Size: Graphics Buffer Size:
Screen Fonts Size: Hyphenation Size:
Perlll. Strings Size: FARCODE Overlay Size:
3728 I 25989 bytes 513392 I 119152
114698 I 1392649 36728 I 69569
227 I 1924 paras 67 I 1922 ele"ents
9 9
9786 bytes 48BBB 68BOB 10244 19957 61776
Figure 9·10. This diagnostics dialog box can help you spot memory problems.
Some of the information in this dialog box is highly technical in nature and beyond the scope of this book; however, you may be able to get some insight into your memory problems by observing the data presented here. At the top of the box is a list of memory factors. The left number shows the actual memory in use. The right number shows the total possible. If you think of the slash as standing for the phrase "in use out of a possible ... " you will understand the numbers. Thus, the top line 3720 / 25000 bytes means "3720 in use out of a possible 25000."

516 Chapter Nine: Advanced Tips & Techniques
The actual numbers you see on your screen will vary depending on your computer, your operating system, your version, your monitor, and other factors.
Internal Memory in Use is the amount of RAM for internal program functions. The number on the right is the total amount reserved. The number on the left is the amount actually used at the moment. You cannot affect these numbers.
External Memory in Use is the most important number in the dialog box. On the right it shows the total amount of RAM you have available for the document. To the left of the slash it shows how much you have used so far. When the document size exceeds the RAM available, Ventura swaps the overflow to the hard disk, slowing operations.
EMS Memory in Use refers to the amount of EMS memory available and actually used by Ventura. The number to the right shows how much EMS memory is available. The number to the left shows how much you are using so far.
Text Memory in Use displays the amount of external memory devoted to your text files. This is roughly equal to the size of the text file(s) in the Side-Bar.
Paragraphs in Use refers to the maximum number of paragraphs per chapter. In Version 2, this is 1024.
Line Elements in Use is another important number, one that will affect people who produce directories and similar documents. These documents have small type and many lines per page. Line elements are not the same as lines of text. Every line of text counts as two line elements. Other effects can also eat up line elements. For instance, font changes, tab settings, and leader tabs all use additional line elements. You can have 725 line elements per page (1022 if you have EMS memory). Subtract the number on the left from the number on the right to see how many line elements you have left for the current page or frame. If the result is below 100, you will soon need to break to a new page or frame.
Ext. Mem. Swapped Out: shows how much of the document Ventura has had to store on disk. If the value is greater than 0, this indicates that Ventura Publisher has made use of its disk swapping capability because the size of the document exceeded the External Memory available.

Performance techniques 517
Text Memory Swapped Out: shows how much text memory has been swapped to the disk.
Width Table Size displays the memory taken up by the current width table. In general, it does not pay to remove fonts from the width table to reduce its size, since Ventura puts only the first few fonts into RAM and gets the others from disk as needed.
Graphics Buffer Size is the amount of RAM reserved to convert and display pictures on the screen. If you do not have pictures in your document, you can transfer some of this buffer for use by the document. To do so, use the IA= switch in the VP.BAT file as explained earlier in the chapter.
Screen Fonts Size is the amount of RAM used by the screen fonts. You can reduce this amount by deleting screen font sizes that you do not use in your documents. Or you can make up different groups of screen fonts for different documents, so you always use the minimum amount of RAM for screen fonts. See Chapter Seven.
Hyphenation Size shows the RAM taken by the hyphenation algorithm and exception dictionary. Ventura must have at least one hyphenation algorithm and one exception dictionary. If you have a second algorithm, and/or a very large user dictionary, you can delete them to free up some RAM.
Perm. Strings Size shows the RAM used for program functions such as error messages. You cannot reduce this amount.
FARCODE Overlay Size refers to the program segments outside the limits of the C compiler used to develop Ventura. Ventura maintains this information in RAM for quick access. You cannot reduce this amount.
Configuring your computer system to run Ventura most productively can be a time-consuming and frustrating process, particularly if you have other hardware and software that is equally demanding of system resources. But once you have arrived at the optimal configuration, you should find that Ventura Publisher performs quite well considering the complex tasks it must perform.

518 Chapter Nine: Advanced Tips & Techniques
Now that you are proficient in using Ventura's tools properly, we would like to give you some practical advice on using the program for a variety of document applications. We explore these in the next chapter.
Chapter Ten
Special Document Formats
Previous chapters have delved into Ventura's functions and options. This chapter concentrates on applying those op
tions to different kinds of documents and formats. We have divided it into four sections:
• Special formats and effects - an assortment of formatting tricks and ideas.
• Building frame-style documents - how to create newsletters, magazines, and similar frame-intensive publications.
• Building free-form documents - the best strategies for creating forms, ads, and similar documents.
• Document notes and suggestions - a final section with advice and tips on the major document types.
Special formats and effects Think of this section as a menu of tricks, tips, techniques, and ideas. We have assumed that you already understand Ventura's commands and functions. If not, you should review the previous chapters. Those chapters explain the how of Ventura's functions. This section explains the why, where, and when. It suggests ways to apply Ventura creatively to produce a wide range of formats and effects.
In this section, we describe the following 21 types of document formats or special effects:

520
Ballot boxes
• Ballot boxes
• Bullets
• Chapter openings
• Coupons
• Fill-in lines
• Fractions
• Frames and pictures
• Headers
• Headings
• Indents
• Jumptext
Chapter Ten: Special Document Formats
• Kickers
• Labels
• Logos and Nameplates
• Page numbers
• (Pull quotes
• Ruling Lines
• Tables
• Thumb tabs
• Title pages
• Type effects
Ventura is so powerful that there is virtually no end to the things you can do with it. The effects listed here, however, should give you a starting point for your own experiments. Browse through this list and find the effects 01' page elements you need for your document. For each one, you will find a few brief pointers, tips, or examples. Where necessary, we have mentioned other chapters of this book that give further details.
Ballot boxes are hollow squares. Most people use them as check off boxes in questionnaires and similar documents (Figure 10-1). You may also find these hollow boxes useful as bullet characters (in place of the typical round bullet) or as end-of-article symbols in magazines and newsletters.
Ventura provides several ways to create a ballot box. By far the most convenient is the hollow box character added to Version 2 of Ventura. To insert a hollow box anywhere in a line of text, position the text cursor, then select Ins Special Item from the Edit menu (keyboard shortcut: Ctrl-C). Choose Box Char from the secondary menu (keyboard shortcut: Fl). Ventura lets you choose a hollow or filled box. The hollow version creates the ballot box effect.

Special formats and effects
I DESIGNTYPE CORPORATION
I tlif 'A&A1'OOA 1.01 A .. OI"I'. etA .....
TaAIlIllIO QVIITIO"XAI ••
::.-=-======= 0.';;;;;; ---.. -~------_.(.......)--(.......)--..................
0- 0--W' ... ,.. •• ~ ..... ........, ....... ...t
0'" 0'"
=::r-:d':':':-~.=~~!: __ wI1~UI ........... ~ .. ,-Wl""''''''''''*''''''' " ... -.~...".."...,.*.",.,,,,"'" gr.,..,.....,. ... ....,..,
Db D ... 1I'~ __ ~ .. ,.. .. f 0-_ 0-_
0_ 0 .... 0 ..... _ 0 __
Figure 10-1. Ballot boxes for a questionnaire.
521
You can edit this hollow box like any other text character. For instance, you can use Set Font in Text mode to make it bigger or smaller (while leaving the rest of the paragraph unchanged). To enter a hollow box character directly into a text file, enter the bracket code <$BO>. (The bracket code <$Bl> creates a filled box.)
To position a ballot box at the front of the first line of a paragraph, use Special Effects from the Paragraph menu. Choose Show Bullet As: Hollow Box.
You can also create ballot boxes with Ruling Box Around. For a square box at the front of a line choose a Custom width equal to the inter-line spacing. Use a very thin Rule 1 height -00.06 fractional pts., for instance. To push this box out into the margin, use the Alignment dialog box to create an outdent. The Ruling Box Around method, however, has a disadvantage if the paragraph is more than one line long. To keep the box only one line deep, assign it to an auto-numbering Z_Sec tag. Use Auto-Numbering from the Chapter menu to "number" the paragraph - but don't let the number appear. Now put a ruling box around this empty paragraph as described above. Every time you renumber the chapter, Ventura will automatically generate the ballot boxes.

522
Bullets
Chapter Ten: Special Document Formats
You can also create hollow boxes with frames and graphics rectangles. Simply draw the shape and put a box around it. These methods, however, are rarely appropriate for ballot boxes. They do not move along with the text. Every time you move the text you must reposition the boxes.
See also "Bullets" below for suggestions on using filled boxes. See Chapter Three for more on entering bracket codes into text files. See Chapter Eight for more on using Auto-Numbering to create formatting effects.
Use the Special Effects dialog box to create bullets. In addition to the common round bullet, you can also create a variety of other valuable effects.
For instance, you can have hollow or filled boxes. By using the Define Colors dialog box, you can assign shades of gray to different colors and thereby fill the box with gray instead of black:
o A hollow box • A black filled box 1m A gray filled box
Or you can signal special sections with symbols:
Many of these symbols are only available in special Pi or Dingbat fonts. Many PostScript printers, for instance, can access the Zapf Dingbats font. To create a bullet character from a font that is different than the rest of the paragraph, choose Show Bullet As: Other. Then type the decimal equivalent on the Bullet Char line. Then use Set Font Properties to choose the font for this bullet character. This choice will affect only the bullet, not the rest of the paragraph. Unless you have special screen fonts, the symbol will not show properlyon the screen, but it will print correctly.

Special formats and effects
Newsline
s·c·Q·O·P
Figure 10-2. Bullet characters were entered in between the letters of SCOOP to create the nameplate effect.
You can also use Set Font to change the size of the bullet.
523
To enter bullet characters in the midst of a line (Figure 10-2), hold down the Alt key while typing their decimal equivalent on the numeric keypad. For instance, to place a round bullet character in the middle of a line, type Alt-195. To place a Dingbat character in the line, you must type its decimal equivalent, then change its font with Set Font in Text mode.
To push bullets into the margin, use the Alignment dialog box to create an outdent.
Chapter openings Several of Ventura's functions will help you create easy, effective chapter openings If you keep each chapter in the document as a different Ventura chapter, you can use Page Size & Layout to make sure they all start on the correct side (traditionally, chapters start on a right-hand page). You can use Update Counters to set the Update Method to Previous Number + 1, which will automatically number across the chapter boundaries. (To set the page number manually, choose Update

524
Coupons
Chapter Ten: Special Document Formats
Method: Restart Number and type in the new starting number you want.)
If you put more than one document chapter inside a single Ventura chapter, use the Breaks dialog box to make sure chapter openings start on the correct page. For instance, to force it to start on a right-hand page, determine which paragraph appears first (usually the chapter number or the chapter title). Then assign Page Break: BeforelUntil Right for that tag.
To generate the chapter number automatically, use AutoNumbering from the Chapter menu. Use the Spacing dialog box to put extra space above and/or below the chapter title and number to separate them from the main text.
Many books and manuals don't show page numbers on the first page of a chapter. Use Turn Header Off from the Chapter menu to disable the header for the first page only.
For drop caps and similar effects, use the Special Effects dialog box. Usually you will want to have a "Body First" tag for the first paragraph. It will usually be similar to standard body text, except for a big first character and/or extra space above.
See also Page Numbers later in this section.
Clip-out coupons are an important part of many brochures, flyers, and direct mail pieces (Figure 10-3).
Usually you will want to put the coupon in its own frame. Then you can reposition the coupon without affecting the rest of the document. Use Ruling Box Around from the Frame menu to put a line around the coupon. To create a dotted or dashed line, choose Dashes: On. Type in the width and spacing you want for the dashes.
If you have access to a Dingbat font you can place a scissors character ( ~ ) on the line to indicate it should be clipped and mailed. Use Box Text to put the symbol at the precise point you want it.
You can use Frame Background to put a tint screen effect in the coupon. Be careful that the background pattern is not too

Special formats and effects 525
Fractions
.............. - ~Bunus =~~:=:;w =::~'i:C:''C' ",,,,,,"" __ 111_
- ............. &~ .. -*-1...., ... ....., ==::r,.-=--_~
....... CAP .... __ .............. J'IU ... ................. ......wa.IIlIIII ......... .... "'IIIIrrI, • .--.... =:sk~~ ..--,..~ ... ~ .. -.... ,.. ...... ,...~" ..... DWlIUUI~ ..... =-cr:".=:'_~. 0..,.110 ..... ,.. ...... 1Wb" ..... ,.~ ..
....... .crwIl .......... ............ =-_ ......... ~.I ........ ~ ....
... ..... _, ....... .-... ..... __ .. ,..11 ... .... -........ ~ ~:=:'-:.i::' .. DCo\c.C»ca ..... __ ,..
., .... 1J ........ - ==: .. ~ =:~'::':::I_"" .... ~ .. ,-Image One ................ " .... .. .... .-t-_ .. ,ndIr
... ""'o.r..u,,, ...... ,.."' .............. =::.~..,... ............ ,... ...... ~~-................ ~ . ., .... ~ .. ........ .u.s--, ... ~':"",..,,.,.
-~ f"IIlHII.*7.u,. ..... .."..w. _ .. -1tItc,....,. ............ ..... W--.II, .....
~_"""''''''I ~ ...... -~ -........ ........ whnllJ-..... ... .,d ... l~ . ........................ ............... _, ... _ ..... ,..r.~
i .. ~".=:.'=.::.. ~ --- ..................... ".. .-- "'_ .......... 111 ...... :-............. ~ ................... .... t .... " __ ilf"Ih-... : .-1 .. ...u_ -~~-...
~..::=== -"'I ........ qoalt7c.u : .. .w_. ___
........ __ la ........... ;:=:s..~ • ~BadU.fIIIId.
.. ___ ,..w... • I,. ....... ,.....s- .... .......... tw,.u,-..o. ;---.,...-ot,-.. _'"' .................... ....... _~...,s.,. ... :M_rt .... !!.. .......
. ---..... IIIIl1 ... ,. ...... ".11 ........ ~.----...... _~rr. .... .,..,,.._...,111--',, TraW.cuulSapport. :---.......... ,. ...... ::.e:~~:. : ....... _-
......... f,..Co\P--.. ...u...s-w ...... ~' • .., ~""--:w=.. ............... ............ IIIIW~
..... _ .... ~hntllN ..... • .,... .. ,.atat .. c ....... ---_,t... ....... _..n. .. .._-
::..~~=.-.... "._.-1 .. ___
~""'IDs.-... :nw-__ ......... a-.....,. =.::;::.::::.. .. ~=:..~iri,~-= 0Ir~ .. _'-lf' .. 1IiIIM~""", ..... , .. ...-tl. __ ,~ "ci&o ... "pI1c:atio:Ia ....... ~ ::"'~._O ... ll1-''''''_~_CAPIll 1ftr1ab1 ..... ,.-..t\.-.... .................. ....~ .......... ; ....................... ;
Figure 10-3. One example of a clip-out coupons
dark, or it will obscure the type. If the standard patterns are too dark, create a lighter shade of gray with Define Colors. Assign the gray shade to a color, and make the Frame Background that color.
Create a separate tag for fill-in lines. Make sure it is not justified, so tabs will take effect. Then use Tab Settings to create the lines. Choose Tab Shown As: Leader Char. Then select the underline as the Leader Character. For solid horizontal lines, make sure the leader spacing is o. For dashed and dotted lines, pick a number from 1 to 8 from the Leader Spacing pop-up menu. Make sure the inter-line spacing is adequate so that readers have room to print or type in their names - not any smaller than 12 fractional pts.
Use hollow box characters for ballot boxes (see above in this section).
Do not type fractions as you would on a typewriter, in the same size font separated by a full-size slash. Instead, use Ins Special Item from the Edit menu to create fractions in the correct typographic style. Select Fraction from the Insert Special Item dialog box. Type fractions with a front slash between

526 Chapter Ten: Special Document Formats
numerator and denominator to create fractions with a slanted bar. Thus, you would type 13/32 to create 13/32• Type fractions with the word over between numerator and denominator to create fractions with a horizontal bar. Thus, you would type 13 over 32 to create ~~.
To make fractions larger or smaller, select the fraction in Text mode and use Set Font to change the size. You can delete and copy fractions in Text mode like any other text. To edit fractions, however, you must use Edit Special Item from the Edit menu.
Frames and pictures Chapter Six, ''Building the Chapter," presented a number of basic frame techniques:
• drawing
• copying
• deleting
• margins
• padding
• captions
• Box Text for callouts
In this section we present some additional ideas and techniques.
Irregular text runarounds
To create an irregular text runaround, load the picture inside a frame as normal. At this point, the text flows around the frame (Figure 10-4).
With the frame still selected, open the Sizing & Scaling dialog box. Choose Flow Text Around: Off. Now the text flows underneath the frame (Figure 10-5).
Now use small, invisible frames to selectively push the text away from the parts of the picture that project into the text (Figure 10-6).

Special formats and effects
!prints, lnd 5112 hours of eolor ond sound v;deollp"'i
IChicagotoTOkyO~ 1
i 11:03 P.M. Chingo ~m •. ,.39,000 feel somowharoi i.>ver the Weslern Pi.ific, we Ire B hours and &12: : minutes out of Los Angele.:
·._------.:...--;-----__ 1 with about 2 more hour to ,0: ~ Tokyo .• We were lbou! ani hour and len minutes late oul: of Los Ang.l ••. II l Trilt'el Log' :
So flr, it's been. long and! :interesting da. y iln.d. I guess: it'S! just aboul h11f over .• We didi
J!,--...,....,-::-:::-:----'1!'--+-.,...-......,,....,..,....--"'! t~e fonowing:1f i • Aro •• &t 5:30 A.M.lI i
'''' ....................................................... ; ......... ~ ................................... _, • Left Ihe house at 7:00 A.M.t: Los Angeles at 12:35 P.M.1f : Tokyo .t 11:&15 P.M.1f :
527
Figure 10-4. To create a text runaround, start by loading the picture into a frame as normal.
Figure 10-5. Then turn Flow Text Around to Off.
·~Wt,·:l~;;;.;;';:;.~~~l~~;:;.'~~~~ ..... -.... ·r.::::::;::;;;M;:~i:;;;::i.':!s Anieles at 12:35 P.M.1f • Arrived in Tokyo 1111:&16 PM.1f
+
Figure 10-6. Then create a "stairstep" of small frames to push the text away.

528 Chapter Ten: Special Document Formats
Shadow effects
Shadow effects are useful for setting off headlines, banners, pictures, callouts, tables of contents, and special notes (Figure 10-7). To create a shadow effect, use graphic rectangles attached to the frame. Fill the rectangles with black or gray. Place them along two sides for the shadow effect.
Figure 10-7. The shadow effect sets off the notice in the lower left of this newsletter page.
Be sure the frame is selected when you create the graphic rectangles. That way they will be attached to the frame, and so they will move along with it.
You can create a similar effect by putting a white frame on top of a black or gray one, and shifting the darker frame slightly, so only the edges show. This method makes it harder to reposition the frame, however. To move it, you must carefully select both frames and move them together to avoid misaligning them. The dual-frame method also has the disadvantage of slowing printing on some output devices. It also requires an extra step with some printers (putting a third frame in between so the dark frame doesn't show through the light one).
You can use a similar technique with graphic shapes, includ-

Special formats and effects 529
ing Box Text. For instance, you could put a shadow behind a Box Text, rather than behind a frame.
Tint blocks
Use Frame Background to put a light gray pattern inside a frame to separate it from the rest of the text. If the pattern is too dark and obscures the text, assign a color to the background instead of a pattern. Then use Define Colors to assign a light gray pattern to the color.
Frame telnplates
Although we mentioned frame templates in Chapter Six, they are so important we wanted to reinforce the notion. Once you create an valuable effect, there is no need to do it over again. Simply save the frame in a special chapter. You can save it together with its contents if it's the total effect you want to reproduce. Or you can save an empty frame ifit's the settings (the margins, captions, padding, labels, etc.) that you want to reuse. Then you can use these frames over and over again by copying them from the "library" chapter to the document at hand.
Repeating frames Repeating frames are a powerful tool for a variety of advanced formats. Under most circumstances, any text or graphics placed into a repeating frame will repeat identically throughout the document. Use this feature if you will want a frame with the same size and contents on all or most pages. The trick is to create the frame exactly the way you want it: size, position, and contents (text or picture). Then choose Repeating Frame from the Frame menu (Figure 10-8). The ftame and everything in it will be reproduced throughout the document.
The dialog box permits you to choose if you want the frame to repeat just on left pages, just on right pages, or on all pages. You can also go to an individual page and turn off a repeating frame just for that page, while leaving it on in the rest of the document.
You can use repeating frames to make a logo appear

530 Chapter Ten: Special Document Formats
For All Pages: []IT] I Left I I Right I On Current Page: Show This Repeating Frame
I Hide This Repeating Frame I
I Show All Hidden Frames I ~
DO
Figure 10-8. The Repeating Frame dialog box.
throughout a document (Figure 10-9). You can use them to . create thumb tabs and extra large headers, both of which are explained later in this section.
Under one special condition, however, text in a repeating frame is not cloned throughout the document. This occurs if you place text from a file that is also on the Underlying Page .
I.u.MmtllG_ ..... ~"""-.. ~..tt..gf ... IJM,..."., .. :ax..w ........... " ..... ~ ....... c.,a ... AlIW~(QUrJI,....-Pt-... o.~ CAD~·W1Ioal1 .. IJIII_.....--"'.ru.4"" .. o-.1~· ....... '"~ ..,1. •.
....a\Jtlla~ ............ PII ...... ~ ....... _ .............. _
.... ~ ........ __ ....... ttUf~ ................... IIII •• s..1nIo
... ...,u.. ........................ ..,w. .. ._ • .., ...... r_.--. ...
..s.. ........... " ...................... an. ... .w. ..... a.".. ........ ...,. ....
...... _ .... ~"' .. tI&W ..... " ..... _ ........... .,..t.Or •• OIh.
........... --.. ....,n.w ....... ,. ........................ ....,. .. ..... ., ..... ~,.._IWaIW ...... "W.w.s. ........ ~ .......... _ Aw-sllA.., .... ......
A"""'/vItI/CAJ) .... ~ ... _ .. ,. ......... Ia .. t..SlIJ .... 230#JO., ... .... ItJIirICAJtI......,WaJ-w.. ..... __ ~ZIDo .. ,...IIIl ........ .a.u.a.. ... liI7.t*-.................... -.;f.r.~~ynttMl .. ........... .,111J"t1l1 .. 1:1UOC1..,., ....... .s.S,11.'S .... '"*Ats-.... _ ....
ba.6_.MMllZlJl!I"""'~MDI"
.. Q\D .... ~6 ..... _.fJ .. _"'r.4!It.~ ....... MIllCa\PIwr ....
...-~v .. ~ .......... .a...I,. ........ 1-. .. _.w.u.,.,. ...... _
..... _ ................ ..a. ...... taM.t_ • .u ... _ ........ ......
....... ...ua,.-w. .................. fI.IW..-hI._ .. "-IIUJ ........ ..,
... --.PIDt .................... a........m_ ........... " ... -'-''-'' ..... .-,-... -..-... II ...... .....",.~ ... -~ .... - ....... ,.. ........... .... -. ...,.,.., .. -.~ ...... .l6nhI ... ~.,.._Jt)I)Ia .............. 1UIII...mp9 ..... o-nI
.... .... r.-.1M111'rrtflt ........ II.~ ............ ~.,1qJ_ ... .,
.. .. m. ......... _
JHI*,,.,. .. __ ..s..d .............. ,. ....... __ ..... ~lJIIH&.
...... n.I .... r.I ......... ' ................................. ,...,uw
......... AIIIICAD ..... ..,.,...I11 ............. ., ....... _.,. .. ~ .. _ ....... ...w.. .............. "''-'-',. •• , ..... ,.. •• .t .... JOlZ •• rct
..... ... _.,.JIIG.--.a.tlalrrt ................ ~ ................ _
'r._ ...... ~ ..... u..s.. •• td*IIf.' .. .
....c....lKlIl)l....., ........... , .. _ ....... .,.. .... Aae.cAD ...
.... D<»~_"'-..... OJ ... w~., ...... ft»~, ..... w.s. •• , •
.... .,.e.IW~ •• IIIjKt. • .t_ ... _ ....... ..w.."" .. _ ..... S..-...s1
Figure 1 0-9. Because the logo is inside a repeating frame, it is duplicated on every page of the document.

Special formats and effects 531
To understand how this works, you may want to review the discussions of frame-style documents in Chapter Six and further on in this chapter. In frame-style documents, text resides inside frames on top of the Underlying Page. If a file cannot fit entirely into a frame, Ventura remembers where it left off. You can select another frame and Ventura will take up where it left off, placing more of the text file in the new frame.
This same effect occurs with repeating frames, provided the text file also appears on the Underlying Page. Under those circumstances, clicking on the repeating frame and then on the name of the text file will cause Ventura to pour as much of that file into the repeating frame as it can fit. The balance of the text will automatically continue onto the following pages.
You can also build unusual columnar formats with repeating frames. Suppose, for example, that you want to create a threecolumn stairstep effect throughout the document. The leftmost column could be created standard length on the Underlying Page. The next two shorter columns could be repeating frames. Using frame-style layout, you could flow text from column to column.
You can also use repeating frames for forms or repetitive letters. A repeating frame (or several repeating frames) holds the portions that do not change. The information that does change (for instance, the name and address in a form letter) goes on the Underlying Page. Make sure that the final tag on each page has Page Break: After from the Breaks dialog box. Each time Ventura Publisher encounters the page break command it will start a new Underlying Page and create a new repeating frame, thereby creating a new form.
With this technique you do not need to know how many forms are required. Ventura will build new ones as needed. It's easy to see how you could instruct a database or accounting program to dump, for example, the day's orders into a text file. The database could also insert the tags as part of the report process. All the forms for the day could then be created by bringing this file into Ventura Publishe,r.

532
Headings
Chapter Ten: Special Document Formats
Headers with Repeating Frames
Chapter Six, "Building the Chapter," delved into headers and how to build them. You will find Ventura's standard header (and footer) functions adequate for most applications. However, to create extra large headers and footers, use a repeating frame instead. We will discuss an extra large header, but the same principles apply to an extra large footer.
Draw a frame at the top of the page. Type in the header text as you want it to appear. To place chapter or page numbers in the header, position the text cursor where you want the number to appear and use Ins Special Item from the Edit menu.
Headings are signposts that guide readers through a document. Ventura has a variety of methods for making them more eye-catching and effective.
Headlines and main headings should be larger than the main text - usually 18 points or larger. Subheads should usually be slightly larger than the main text, although they can also be the same size if you use italics, bold, or small caps to set them apart. Don't let headings compete. Establish a clear hierarchy (Figure 10-10). Make the title larger than the main heading, which is larger than the second-level heading, which is larger than the third-level heading, and so on.
1;ou can also establish a hierarchy with white space, ruling lines, indents, bold type, italics, and other formatting effects. Upper and lower case headings are easier to read than all caps.
Aligning headings
Centered headings impart a traditional look and feel to a document. In most cases, flush left headings are more effective. The eye travels naturally to the left side of the page. Centered headings divide the white space, making it less noticeable. Flush right alignment can be valuable for title pages, and for marginal headings, where you want the heading in the left column to be as close as possible to the related text in the right column.

Special formats and effects
_suazssFACfOlll
• AJrt-c:...,. •• .....u,.k ...... _Il.fo~ ...... ... pZ.body, ... S .... body ... s.np.bctdyl ... S...,_bod1 MoIII.'IIII ... body ...... _pl.bodyl .... _p .. b04,. .... s..pa. body .... SMtopbo.,-' ... S..,.body ..... S_pkbo4JI_.
·""pkbNJl .. ·• ..... MdJ .... a..,kbct4J1 ...
a.._1Mp0ll ...... " ...... _1DII' ........ ,...*'t ... ...... S_plab04:r ...... S-pkbodyl ... S ..... bocIJlUI. s_pae body .... S-pbodyIW.S ..... body ..... S_pl.boclyl ... s...pl.bo4yI .... ""P .. bodyCNZ ...... p.bolfyl .... MIp .. body ... S_pbOlly .... S_pl.body' ... S_p ... HoIy .... S_ ... bodylNJ.S-p.bo4J ••• S ..... bo4y&ul.S_pkboclyl ... .. ,..lIodJ ... ·
O"~IO .... ,pt'041*ltwpalt4 .... ~ • • _pl.bo4yI..r ....... body .... S-plIbo4yI."","NdJ ..... S_p ... booSy .... S-pl.bo4yl ... S_plltMdy .... s_pa. lIody .... S-pIeobodyl .... .., .. bodyloNl··_pkohdJ1 ... S-pl.bo\tJ' ... s-pJlobody .......... bo4y' ...
Figure 10·10. The subheadings in this document are subordinate to the main headings, as established by type size, ruling lines, spacing, and other typographic treatment.
Hanging or outdented headings
533
Many manuals and books (including this one), place headings in an extra wide left margin. This isolates the heading and makes it more noticeable. Usually the effect is created by leaving the heading at the left margin and using In From Left spacing to push the main text to the right. Conversely, you can use the margin to restrict the main text, then use First Line: Outdent from the Alignment dialog box to push the heading left past the margin.
Glance through a few pages of this book. You will see that first and second level headings start all the way to the left margin. Third level headings start further in, even with the main text.
You can also create a similar effect with mirrored margins and headings. In a mirrored format, headings on the left page would be in the left margin, while headings on the right page would be in the right margin. You only need one heading tag to create this effect, but it must have different (opposite) In From Left and In From Right settings for left and right pages.

534
Marginal heading
Chapter Ten: Special Document Formats
Marginal headings
Marginal headings are slightly different from hanging or outdented headings. Hanging headings, like the first and second level headings in this book, start at the left margin. If they are long enough, they continue on for the width of the column. Marginal headings, by contrast, are restricted entirely to the margin. If they are longer, the rest of the heading wraps down inside the margin to create a second or third line (Figure 10-11).
Outdented heading -m-t-----B..-1
Figu re 10-11. Marginal headings are restricted to the margin. They do not extend into the text area.
To achieve marginal headings you must (1) make sure that there are no line breaks between the heading and the main text, so they can reside on the same line and (2) use the Spacing dialog box to restrict the text to the margin.
Banner headlines
Banner headings occur in multi-column documents. They stretch across all the columns, not just a single column. To create a banner headline, select the headline paragraph and choose Overall Width: Frame-Wide from the Alignment dialog box. For single-column headlines, choose Column-Wide.
If you want banner headlines within the body of the main text (as for newspaper-style layouts), you must choose Column Balance: On from the Chapter Typography or Frame Typo-

Special formats and effects 535
graphy dialog boxes. Otherwise, the text will not balance underneath the headlines, and headlines will overlap text.
What if you want a heading to stretch across some, but not all of the columns? You can put the headline into a separate frame, or you can restrict it with In From Right spacing.
See Chapter Six, "Building the Chapter," for more on Alignment options.
~.tallingth. ' .• _a Master I!qulprrant
~~.rvlaor
'lWtHCIiDD~ ... IMt ... ,.,U. ...
~= ... ~.':s~ ::::."=)W
• ~4dr .. ......... .~ .. -.... -.--
Figure 10-12. The heading in the upper left has been isolated by placing column breaks before and after.
Iso/a ted headings
With the Breaks dialog box, you can force headings to appear first on a page or column (Page Break: Before or Column Break: Before) or be the only element in the column (Column Break: Before & Mter). Figure 10-12 shows an example of an isolated heading.
We have discussed line breaks and page breaks repeatedly in this book. Some users don't realize that you can also create column breaks. A column break forces text to the top of the next column, instead of the next page or line.

536
Indents
Chapter Ten: Special Document Formats
Numbered headings
Ventura's Auto-Numbering feature can generate militarystyle section numbering, traditional-style outlines, and other numbered headings. See Chapter Eight, "Advanced Functions," for more about this topic.
Run-in headings
Run-in headings reside on the same line with the text they describe. They carry a different typographic treatment to distinguish them from the main text. Sometimes they are partially outdented.
One easy way to create run-in headings is with text attributes. Simply use Text mode to assign bold, italics, small caps, and/or a larger font size.
You can also create two separate tags, one for the heading and one for the text that follows. To place them on the same line, use the relative indent feature described below under "Indents."
Indents are another special format worthy of extra consideration. Because of Ventura's flexibility, you can create some unusual and useful formats. Since the Alignment dialog box (Figure 10-13) can be confusing, let's start by reviewing a run-of-the-mill single-line fixed indent.
To indent the first line of a paragraph by, for example, 12 fractional pts., you would select:
First Line: Indent
Relative Indent: Off
In/Outdent Width: 12,00 fractional pts.
In/Outdent Height: 001 lines
To indent the first two lines, you would select In/Outdent Height: 002 lines.
Occasionally, you may want to create an outdent, whereby the first line of a paragraph is pushed to the left of the margin (called hanging indents). Choose First Line: Outdent. Type in

Special formats and effects 537
Relative indent
Horz. Alignlllent: Justified t Vert. AlignJ\ent: Top I
Text Rotation: Hone t Hyphenation: USEHGLSH I
Successive Hyphens: 3 Ii Overall Width: Frane-Wide t
First Line~. Indent t Relative Indent:· Off t
In/Outdent Width: In/Outdent Height:
12.1 fractionl!ll pts 051 lines
If 1 Ff'O'" Right; tl1 1)('f:iJ,U'll: 00.00 Mmd.l"(I1~ Rot,'ltl,d Hld.9ht;: 00.00
Figure 10-13. The Alignment dialog box.
the amount of spacing in the In/Outdent Width line. To cancel an indent or an outdent, simply enter In/Outdent Width: 00,00.
Relative indents
Ventura also has a unique relative indent feature. Normally, Relative Indent is Off. By choosing Relative Indent: On instead, each new paragraph starts where the previous one left off. In other words, the first line of the new line is pushed right exactly the· length of the preceding line (Figure 10-14).
ifhe'irstp~r'i'ir~ph:ft'-""-""-""'-''''-''''-'''''-''''-''··_·····_·····_····_····· .. ·· .. _ .. ··_·····_····_····1 l' · Th~ •• ,,",, pu .... ph ...... whm th, ",rl,u pu .... ph I.ft off.' I This third!
aragraph also has arelative indent 0 i J I I :
~---------.--------------______ I
Figure 10-14. Because Relative Indent is On, each one of these paragraphs is indented to the spot where the previous paragraph left off.

538 Chapter Ten: Special Document Formats
In and of itself, this stairstep effect is not very useful. But Relative Indent does come in very handy if you combine it do two other things: (1) turn off the line break between paragraphs and (2) insert a small first line indent.
Turning off the line break allows two paragraphs to reside on the same line. As you can see in Figure 10-15, this allows you to create such things as run-in heads. The bold heads are one paragraph; the normal text is a second paragraph. They reside on the same line because they do not have a line break between them. Use the Breaks dialog box. Most people create the effect by putting a line break before the first paragraph and a line break after the second one.
Run-in head ---+--....... s .... ..=.?~~=:~ ... ~ _ .... t~IItip ....... _l .... ...... 01....tbl_ .. _""""" ~ .. c:ompikatiom • ....u..II_ ... .........,-.dt.c:ourwit.I'UbImtl .. ~ci ... • 1 .... lopl_oI ... _ ....... claim.tothlprar-pne'tbofmdc:int •• w.u .pro&.ionIlJali1i.ty.Ccadrulrw.t\lStka cndJ:lUlbe~bputidpat»c\alUMIIiN.nI. which f_twt faculty with .uqw lCIIdrmieuddinicsl.~
... ...." .............. rlok __ "'" othmiMomdh\eWaa ..... timwilllllo::t _ __ lazdiarwitheumt4~ofma:lbl
... thelCimli6:luiIofll&OdlmlUdblpnoo tieewithinthel'lpedalU •• plt.rMoI ................. loplbapllco_oI_.,. •• ur:hpmlt .. ....
Tuition n.. ... ."tKh..- .. NOO.nur. lftd~aIl~tiom,CllUnlh4"'" ...... ...,....
Dis=r:.~-::~~ O"'IIIIiM .... ,.'b&l1l1ntmlldnaa.M IUtrr-pntlonclD\wd allollU1b1clldurMI tn r-PI"'- nariftd. It MMG 1n.\II a.u. P ............ tlw .. __
r:'"~~r.. :::r =~~J,,. "'~=--SLe=-,q,. $-;:
Figure 10-15. The run-in heads in this document reside on the same line as the paragraphs they describe. The following paragraphs have both a relative indent and a first-line indent.
If you combine a relative indent with two paragraphs on the same line, you still have one problem. A relative indent is exactly the same length as the previous line. Consequently, the text from the second paragraph will butt up flush against the last letter of the second paragraph. To create a small space between the two tags, use First Line: Indent.
Relative indents have many other applications:

Special formats and effects 539
Jump text
Jump text in small frame
• put a caption label and caption text on the same line, as with the figures in this book
• Question and Answer interview formats for magazines and newsletters
• numbered section headings (see Chapter Eight's discussion of Auto-Numbering)
Jump text is a small phrase telling the reader where to find the rest of an article. For instance, "Continued on page 17," or "See Newsmakers, pg. 17."
Theoretically, you could type the jump phrase right in the text file at the right spot. In practice, it makes more sense to put it in a separate frame (Figure 10-16). That way, it will stay in place if you add or subtract text from the article. If you turn on the line snap feature, you can easily draw small frames that are only one or two lines deep.
Kickers
Kickers are small lines of text that precede a headline (Figure
Training workshops underway
Figure 10·16. Jump text is best placed in a small frame.

540
Document Gallery News A M:llthIJ "-PDrt tar v.nhn Styli ShwI u. ..
This Is the First Headline IlIChol .... QInnl....,aIP m. hU. CICIaeGdIll1M*_ .. olt. _ .... .. G .. n. .. Mma_ .. ,._,....of~_pl.chtplWia ... D....uct ... liI .... f"'~tlMol.uol'tbl.ch ___ iD. .. f ... MAST.1XT.1a. p~ )'IM'MtIIbN4wi1.loatMucb.41d'Iftd.lI •• yUHU ..... led_ poiat ........ AltraUlh-.q.'1I1U .. y-a.del.c..-.JUUI'''' ...... iD.. InpbAPms-_Ile.iMp~b ___ id:oV __ Fub~
.u.r ..... tHoGII\.Ib.. __ .1bit •• _ .. ~iDa.OI'~ foryaurM ___ ... N_~ ............ Widl .. lI)"pt'.tblY01IM.._. b .. cIr.Ie,.oroe.c~mr_.iDa.
'Ib .... fqrIbtMllp.D-.J..c.a...,.ID..filtNlWS.TXT.II ... ~ .. pk*CID. .. UDIIody .. ,....irMt.MUit.ylon .... Ib.IftNCbw4, 1D.~_pl ... blilllcaa-.al--' .. U.H...."..I ..... _ ...
b ...... ollbJ. ..... 1b.."'YIlllPu._DyloDo-.,6.ia.fMIlJ --.,U.fialpt.nlplphofaP'U'WllphillllGtr ___ 4i«.aaIlyt-.ltody T""_IO"-aatlDDkal'tnd,
A;J"4~ J..illbt_ia.IIla .. ic.k,.aIbbM4,..;uor-.~'IJ1'lbIoulcl.DIo
._4iaeetibl.plee..1c ... ....uy.l>..&to u. ..... CO\IMlUl:IbNdlio. __ y .. ~ ..... yJllV"Jde......,_ ... .u~ __
Chapter Ten: Special Document Formats
Kicker ---1_ ~ .... -
Labels
The Next Headline
Figure 10-17. Kickers are short lead-ins for headlines.
10-17). Usually they act as a teaser, as a lead-in to the headline, or as amplification of the headline topic.
Type the kicker immediately ahead of the headline and give it its own tag. One good style is to set the kicker flush left above a headline that is slightly indented. Kickers are usually italic, or underlined, or both.
This section discusses two types of labels: creating labels inside a document, and printing peel-off labels.
Label space in documents
Label space can be built into the back sheet of a document to create a self-mailer. The most common applications are flyers, brochures, direct mail advertisements and newsletters. The size of the label depends on (1) how you plan to fold the document and (2) postal regulations. Figure 10-18 shows two examples.
Use a separate frame to create the space for the label. Box Text is a simple way to position a return address within the label area.

Special formats and effects
................... "'........ .., ........ " ...... u...A.~ ................... .u,._ ................. ..,.s._
n.. ... u. ... I1.~ • ____ u._wllWt._ "s..tu..("·"flllu-.·· ."U..,..w.d~ ...... -....... .... ...... ut .. w.. ... .....
~..:,-.=.. .. ......
D .oa .... .......... ". L.-.v. .... CA
541
Figure 10·18. These newsletters have the mailing label designed into the back page so you can just fold and mail.
Peel-off labels
Creating peel-off labels with laser printers can be difficult with database programs or word processors. First, the programs may not support your laser printer. Second, you may have to do some programming to solve the problem of skipped lines. If an address doesn't have as many lines as the one before (for instance, if one individual doesn't have a company name), it can throw off the spacing for all the labels that follow.
You can solve this problem in Ventura with a special Spacer tag. First create the addresses. Separate each line with a line break code, not with a carriage return. Add a carriage return between each address. Pretag this empty paragraph as Spacer. The addresses don't need any tag, since you will treat them as Body Text. Put the addresses into a text file compatible with Ventura. Here's how two addresses might look in the file:
John Doe<R>XYZ Company<R>123 Main Street<R>Anytown, USA 00000 ~

542 Chapter Ten: Special Document Formats
Fred Freelance<R>456 Elm Avenue<R>Smalltown, USA
00000 ~
Now you are ready to format the labels in Ventura. Bring in the text file with the addresses. Create an Underlying Page with the correct number of columns - one column for one-up labels, two columns for two-up, and so on. Set the top and bottom margins according to the space between the top of the sheet and the top of the first label.
It's easier if you format the Spacer first. Align it Right, so you can easily see the paragraph return against the right margin. Set Above, Inter-Line, and Inter-Paragraph to zero. Set the Below spacing to height of your labels. For one inch labels, then, you'd set the Below spacing to one inch. Now use the Breaks dialog box to select Line Break: Before.
You've just told Ventura to put exactly one inch of space below every Spacer paragraph. Now format the Body Text using any reasonable font and inter-line spacing. Make sure there is no space above or below the tag. Then use Breaks to choose Line Break: None. '
Since the addresses don't have any line breaks after the paragraph, Ventura ignores their spacing and uses that of the Spacer paragraph - which is always exactly one inch, no matter how many or how few lines in the address label.
Logos and nameplates Normally, a nameplate appears on the first page of a newsletter or similar publication. Many users refer to this as a logo. Technically, a logo is a special design identifying an entire company.
Ideally, a nameplate typeface should be decorative and strong. It should establish the correct image for your company and publication. If you don't have the font you need on your system, consider creating it with a drawing program, and bringing it into Ventura as a picture. As mentioned above, you can also cause a logo to repeat throughout a publication by putting it inside a repeating frame.
Ventura wasn't intended as a graphic design program for the creation of fancy logos and artwork. Nonetheless, it has a

Special formats and effects 543
number of features you can use to dress up a logo or nameplate. Scan the rest of this section for ideas you can apply to logos and nameplates. Pay particular attention to ''Ruling lines" and "Type effects."
Page numbers
Pull quotes
Our discussion of headers and footers in Chapter Six explained how to put page numbers at the top or bottom of the page. We also mentioned that you can put page number~ (and/or chapter numbers) anywhere using Ins Special Item from the Edit menu.
For instance, here's how you would cause page numbers to appear at the outside center of each page.
• Move to a left page and enable Frame mode.
• Draw a small frame at the left center. Use the rulers to center it. Do not allow it to encroach upon the dead zone of your printer. Hold down the Alt key while drawing or resizing to force it to become a perfect square. Add a ruling box around and/or a frame background if desired.
• Enable Text mode. Place the text cursor inside the frame. Type any text you want to precede the page number (for instance, the word "Page").
• Use Ins Special Item to place a page number reference.
• Enable Frame mode and make the frame a repeating frame for left pages.
• Repeat the process for the right page.
Pull quotes, also called lift outs, call outs, or blurbs, are enlarged excerpts used as teasers and decorative elements for magazine and newsletter articles (Figure 10-19).
You can separate pull quotes with boxes, ruling lines, or fill patterns. Make the font larger than the Body Text, but not so large that it overpowers the headings. You can create a separate tag, and leave the pull quotes in the normal text

544
Pull quote
Ruling lines
Chapter Ten: Special Document Formats
Figure 10-19. This pull quote is set off from the rest of the text with ruling lines and a larger type size.
stream, but most people find it easier and more effective to put pull quotes inside their own small frame.
Ventura has a wealth of ruling line effects. We can only touch on a few of them here. Table 10-1 lists the various ways to create ruling lines within Ventura. As you can see, you have an amazing assortment of methods to choose from.
When you consider that you can combine rules, and that you can also achieve dashed and patterned rules, you will understand that the number of variations is enormous.
There are dozens - if not hundreds - of ways to combine rules with type and artwork to create attractive logos and nameplates. If you can visualize it, Ventura can probably create it for you. Pay particular attention to the custom width option, which lets you draw a rule of any width and place it almost anywhere. We hope the samples below will give you a few ideas. We have included a few hints as well.

Special formats and effects 545
Table 10-1. Options for creating ruling lines.
Frame mode Ruling lines above or below frames
Paragraph mode Ruling lines above or below para-
graphs
Horizontal rules Underscore, overscore, and
Text mode strikethrough
Tab settings with underscore as the leader character
Graphic mode Line drawing tool
Any mode Vertical Rules from the Chapter menu
Ruling Box Around a frame that is Frame mode so thin it looks like a line instead of
Vertical rules a box
Ruling box around a paragraph, Paragraph mode with the custom width so thin it
looks like a line instead of box
Graphic mode Line drawing tool
Frame mode Ruling Boxes Around frames
Boxes and borders Paragraph mode Ruling Boxes Around Paragraphs
Graphic mode Rectangles, circles, rounded rec-tangles, or Box Text
Custom width horizontal rules
The ruling line functions of the Paragraph menu permit rules to be the width of the text, the margin, the column, the frame, or a custom length. The last option provides many unique opportuni ties to the creative desktop publisher.
Special graphic effects are possible by varying the width and the vertical position. Don't forget the Space Below Rule 3 function that permits you to move a rule down into the text below. Read the "Type effects" section further in this chapter to see how this can create white type on a black rule.

546 Chapter Ten: Special Document Formats
By varying the width, the indent, and the space below a custom rule, you can make it part of a logo. Or you can create rules to set offheadings that are always the same size regardless of the width of the text. We used that technique to create the thick portion of the double rule that accompanies our first-level headings.
Or you can make square bullets by creating a custom rule that is exactly as wide as it is tall. You can make these bullets very large and noticeable by indenting
the first few lines of the paragraph, and creating a custom rule that fills the space left by the multi-line indent - similar to a big first character without the character. You can make these bullets dashed by selecting Dashes: On. Or you can fill these large square black bullets with a Big First Character whose color has been turned to white, as explained below in "Type effects."
11111 A similar effect can be achieved by using the dashed rule option. In this example, we have moved the square into the margin by specifying a custom indent of negative 36 points for the rule.
A Thin Separator Rule
A thin, short rule can separate headlines from body text. Use the custom indent and width options from the Ruling Line Below dialog box.
Combining horizontal rules
Horizontal ruling lines can separate page elements while serving a decorative purpose at the same time. For instance, they can set off a logo, a nameplate, a header or footer, a warning, a sidebar, a pull quote, or a table of contents, to name just a few examples. Double or triple rules have extra impact ifused with care. In addition, you may want to combine two rules of different widths and thicknesses (Figure 10-20).
Ventura doesn't allow two rules of different lengths in the same dialog box. To create this effect, you must use two tags. Then use space above and below the rules to shift them until they touch. Sometimes you can create one rule with one tag, and the second one with the tag that follows it. In other cases, you must assign one of the rules to an empty paragraph,

Special formats and effects
Figure 10·20. The nameplate in this newsletter is set off by double rules of different widths and lengths.
547
whose only job is to be a carrier for the ruling line. Or you can generate a paragraph with Auto-Numbering, and assign the second rule to the resulting Z_SEC paragraph.
You can also draw rules in Graphic mode, but you cannot be as precise by hand as you can with a dialog box. If you decide to draw the rules by hand, be sure to attach them to a frame (even if it's an invisible frame off to the side) so you can move the rules as one unit by moving the frame.
Text-wide horizontal rules
You can assign a text-wide rule to a paragraph tag. This is a useful way to ensure that you will have a ruling line underneath a paragraph no matter how long, or short, it is. For instance, you can use it to underline a kicker (see "Kickers" elsewhere in this section).
Dashed and patterned horizontal rules
You cannot create dashed or patterned rules in Graphic mode. In Frame and Paragraph mode, however, you can create dashed rules by choosing Dashes: On from the dialog box. You can also control the width and spacing of the dashes. In addition, you can assign patterns to rules in the same dialog box.

548 Chapter Ten: Special Document Formats
As you can see in Figure 10-21, you can combine dashes and patterns.
__ II-
Figure 10-21. The decorative effect on this title page is actually a very wide dashed rule with a pattern.
You can also create dashed horizontal lines in Text mode with tab settings. Use the underscore as the leader character for the tab stop. Then use the Leader Spacing line to make it a dashed line by inserting spaces between each underline.
Vertical rules
In Chapter Six we explained how to place inter-column rules using the Vertical Rules option from the Frame menu. You can also create vertical rules elsewhere on the page.
The Vertical Rules dialog box provides the ability to place up to two additional rules on the page (in addition to any intercolumn rules you select). However, we advise against using this feature in most applications. Rules created here have several disadvantages:
• They extend all the way from the top to the bottom of the frame, even if you want less.

Special formats and effects 549
• They cannot be drawn in; they must be positioned by enter-ing measurements.
• The rules remain stationary even if you move the frame.
It is usually better to create vertical rules with the line tool in Graphic mode. These rules have none of the limitations described above. They can be tied to the frame so they move with it. Hold down the Alt key while drawing to make the rules perfectly vertical. Choose Show On All Pages from the Graphic menu if you want the lines to appear on every page of the document.
Vertical rules for change bars
You can also create a verti<fal rule in Paragraph mode using Ruling Box Around. The trick is to choose a height for the box, but to give it a custom width of zero. The advantage of this method is that the vertical rule will always be the exact length of the paragraph. By manipulating the custom indent, you can cause the line to appear anywhere you want, although the left margin is the most common location.
You can, for instance, use this method to create change bars. Change bars are vertical lines placed in the margin to alert authors and editors that alterations have been made to the original manuscript. Certain legal, military, and technical documentation applications require change bars. To create a change bar, create a new tag identical to body text except for a ruling line around. Give the ruling line a small height, and select a Custom Width of 00,00 picas & points. To place the change bar in the margin, use the custom indent line. -usually a negative indent of about 01,00 picas & points. Because the custom width is set to 0, the ruling line will not go around the text. It will appear as a vertical line in the margin next to the new text as the editor types it in.
To make change bars even more convenient, assign the tag to a function key. Now editors can press this key whenever they add new material and know that the change will be documented with a marginal change bar.
Dashed vertical rules
Dashed vertical rules are not available with the Graphic

550
Tables
Chapter Ten: Special Document Formats
mode's line tooL If you need this effect, you can create it in Frame or Paragraph mode. In Paragraph mode, follow the instructions above for change bars, but select Dashes: On from the Ruling Box Around dialog box.
In Frame mode, create a frame with a dashed box around. Give it a width of zero to create a vertical dashed line. (By the way, if you give it a height of zero, you create a dashed horizontal line.) Be careful, however, since it can be difficult to select a thin frame. Usually it is best to leave it highlighted and to reposition it with the Sizing & Scaling dialog box.
As with most other formats, Ventura has a variety of ways to create tables:
1. with spaces and monospaced fonts
2. with tab settings
3. with Box Text
4. with side-by-side paragraphs
5. with the Table Edit mode in the Professional Extension
We explain the fifth option, Table mode, in Chapter Eleven, "The Professional Extension." We explain the other four options in this section. We have listed them in approximate order of their difficulty for the beginning user. We wish to emphasize, however, that the side-by-side paragraphs method is the most versatile and useful. If you are trying to create tables without the benefit of the Professional Extension, we highly recommend that you become proficient with side-byside paragraphs.
Tables with monospaced fonts
If you are working in a word processor, you can create simple tables with spaces. You simply tap the space bar the correct number of times to line up each column. Likewise, when you print a table from a spreadsheet, the program inserts spaces to make the columns line up.
Word processors and spreadsheets use monos paced fonts. Every character and every space has the same width. By

Special formats and effects 551
contrast, most of the fonts used with Ventura are proportionally spaced. Different characters take up different amounts of room on the line. The letter i, for instance, is relatively thin, so it gets less space than the wider m character.
When you bring in a monospaced table, and format it with proportional fonts, the spacing is thrown off. For instance, notice what happens to this simple table when we switch it from a monospaced font (top example) to a proportional font (bottom example).
The First Column 1 First Column 2
Second Column 1 Second Column 2
Third Column 1 Third Column 2
The First Column 1 First Column 2
Second Column 1 Second Column 2
Third Column 1 Third Column 2
As you can see, a monospaced table doesn't look right when you bring it into Ventura unless you choose a monos paced font. A monospaced font is one that mimics the spacing system of a typewriter - that is, every character is assigned the same amount of space.
The good news is that you can bring in spaced tables without alteration and format them with a monospaced font such as Courier. The bad news is that monospaced fonts aren't very attractive. Since they usually imitate the look of a typewriter, they do not achieve a professional, typeset look. As if that weren't enough, it's actually harder to create a table with spaces than it is to build it with tabs or side-by-side paragraphs (see below).
For these reasons, we can't recommend monospaced tables for most applications. They may have some value for internal reports and studies, particularly if the tables have already been typed and you don't want to convert them. Otherwise, use one of the other methods described below.
If you find yourself building monospaced tables, be sure not to justify the lines. And don't forget that you can use fixed-width figure spaces to align columns. You can enter figure spaces in Ventura (Ctrl-Shift-F), or directly into a text file using bracket

552 Chapter Ten: Special Document Formats
codes. See Chapter Three, "Creating Text," for an explanation of bracket codes.
Tables with tab settings
Those of you with word processing backgrounds probably associate tables with the use of tab stops. In Ventura Publisher, however, tab stops should be used only for simple tables with a single line per entry (Figure 10-22).
Desk File Edit View Chapter Frane Paragraph Graphic Options • Il~1.!l!~!l!l!~!lj!!1.!l!~~!l!~~!l!~~!!!~!i!l!1.Ul!1.U~1.!i!1.~!l!1.1.!l!r··C·:\iYP-ES·ET\iftBr:-pr:·CHP·-··-"(&TjjFp·C·§T\if-m1.Ul!1.!l!l!1.!l!1.~U1.¥,!l!1.!l!!!1.!l!l!1.!l!!!1.!l!~1.!l!1.1.!!!~!!!!!1.!!!! +
r!-~ ... m .... m ...... _ ... m··v;;~Enii~dD~·c;;mber31:·1·9ii7~·-m ... -'-"Y;;ar8i'deiiDec~mii;;r'31';-1'iiii8!"--"'-i
~~ 1
! ~~:~·i~'~~~:;~~.:::'.:':::'::'::::::::::::.~.~.~:~~:~~~:~~: $1,3~~:~~~:g~~ ! i TotaJln(ome~ ...... _ ........ _ ...... $1 2 .. 72 .. 5.00. $1 370'355.0ot' i
lC05tOf Sale5~ ! Cost of Goods ........................... $234,344.00· $456,765.00f : Packaging .................................... (12,65 ... 00). 54.678.0m! : Other· ............................................ 12,232.00· 56.567.0m! :
T""'C''''f S .. " .. __ ...... $223.9"'" ... ".:0 I .
Itt~1 + ..
Figure 10-22. You can build simple, single-line tables like this one using tab settings.
Tabs permit decimal alignment and leader dots. (Version 2 of Ventura makes these same effects available with ordinary paragraphs as well.) Decimal columns are important to financial and scientific tables; they force all the entries to line up around a decimal point, like this:
A ........................................ 123.456
B ......................................... 12.3
C ................................... 12345
D ........................................... 1.23
In addition, when you choose decimal alignment, Ventura automatically hangs parentheses outside the normal margin, so negative numbers in financial reports line up properly. If you look again at Figure 10-22, you will notice that the negative numbers align with the right-most numeral, not with the

Special formats and effects 553
right-hand parenthesis. The parenthesis has been pushed to the right.
Leader dots are useful for product specifications, price lists, and directories, since they lead the reader's eye across the page:
John A. Doe ....... 555-1212
J. Q. Doe ............ 555-0011
If you need either of these effects, you can use tab settings to create the table instead of separate tags as long as the entries do not exceed one line in each column. For multiple-line columns, use the side-by-side paragraph technique explained further below.
Proper use of tab stops in Ventura Publisher starts with your word processing program. Review Chapter Three for complete details on inserting tabs into text. The two key points: (1) make sure the word processor inserts actual tab characters, not merely a string of spaces and (2) make sure you have just one tab stop inserted between columns. The temptation is to insert extra tabs to line up the text in the word processor. Don't do it. As long as you have only one tab between columns, Ventura formats everything correctly once you load the file.
-NOTE: Hit the Tab key once to separate each column. Hit the Return key once to end each row in the table.
Once the text file is loaded into Ventura, create a single tag and apply it to each row of the table. When choosing horizontal alignment, do not select Justified. Ventura's justification feature overrides tab settings. In multi-column pages, you may want to specify Overall Width: Frame-Wide so the table can spread across all columns. If you choose Overall Width: Column-Wide it will be confined to a single column.
Select Tab Settings from the Paragraph menu to specify the column widths and other characteristics. Chapter Eight, "Advanced Functions," explains the operation of the Tab Settings dialog box.

554 Chapter Ten: Special Document Formats
Tips on tabs for tables
D Experiment with tab locations until you get them right. If you fail to leave enough space for lengthy entries, the text wraps to the extreme left margin of the table, not the left edge of the column. As a result, you must adjust the tab locations to accommodate the longest entry in each column. You must also experiment to visually balance the table.
D Consider using a line break to separate the rows in a table. A line break is created by pressing Ctrl-Enter in text editing mode, or by typing <R>into the word processing file. Advantage: You do not have to tag each line separately. A line break tells Ventura to start a new line without starting a new paragraph. Disadvantage: The table is harder to enter and read in the word processor. The exception is Microsoft Word, which can not only enter line breaks that are read by Ventura, but also displays them on separate lines in the word processing screen.
D A sans-serif font (such as Helvetica or Swiss) and a point size smaller than body text are typical choices for tabular material.
D To create lines between each row, use the Ruling Lines dialog boxes from the Paragraph menu. To create vertical lines between columns, use Graphic mode to draw in the lines. If you plan to add vertical lines, make sure the table is in a separate frame. Select the frame before drawing the lines, so they are attached to frame. Now you can move the table anywhere in the document and the lines will move with it .
.. NOTE: We recommend using the Box Text method instead for tables with vertical lines.
Tables with Box Text
You can also use Ventura's Box Text feature to construct simple tables (Figure 10-23). This method is appropriate if(l) you want lines between rows and/or columns and (2) the table is small enough to type directly into Ventura.
Constructing a table with Box Text follows the same principles as building a free-form document (see the final section of this

Special formats and effects 555
Democratic 56 280
Republican 44 155
Figure 10·23. This table was created entirely with Ventura's Box Text function.
chapter). The secret is to construct the Grid Settings so each Box Text automatically snaps into alignment.
When you first type material into a Box Text, Ventura assigns it the Z_BOXTEXT tag. Many users do not realize that they can change this tag. If you create a series of tags called Center, Vertical Center, Left, Right, Justified, and Decimal, you will have the ability to align the text within the box in any fashion by assigning the correct tag.
Tables with side-by-side paragraphs
The most useful and versatile table creation option is the side-by-side paragraphs method (called vertical tabbing in the Xerox Reference Guide). With this method, your tables can have multi-line entries. Ventura automatically adjusts the spacing to fit.
Creating side-by-side paragraphs takes three steps:
• type each cell as a separate paragraph
• align the paragraphs into columns
• move the paragraphs side-by-side
First you type the paragraphs one after another (Figure 10-24). Each paragraph represents one cell in the table. Type them in the same order they occur when reading the table left to right. Create one tag for each column. Our example has

556
In From Left and In From Right spacing restricts this column
In From Left spacing restricts this column
Chapter Ten: Special Document Formats
rF'I~t"E~t~ii"""""""""""""""""""'" ...................................................... ·······························1
~he second column describes some features of the item called out in the first column.! lNotice.that the text .for the column is too :-vide to .fit on one line. This type of style might bel iseful In a comparison chart where flOWing text IS used. II l rrhethird column might expound a bit on the second column.1I :
~econd model.V 1
~he next column. It also occupies the middle row of the table.1T i ~he second model compares quite favorably to the first model described above. There'~ :not as much text here. II :
! ~ I
Figure 10-24. To create a table with side-by-side paragraphs, start by typing each cell as a separate paragraph.
three columns, so we might call these tags COLI, COL2, and COL3.
Your next step is to align the paragraphs into columns. To do this, you use In From Left and In From Right from the Spacing dialog box (Figure 10-25). Formerly, each paragraph was the full width of the margins. Now each paragraph is restricted into a narrow column.
The second column describes some features of
'~:::.!:::·----------------·'~~j~fr:f;£~~~i~~~~··----------------~'i::::': type ofstyle might be useful in a comparison chart where flowing text is used. II
The third column might ex·! ;:: ••• -------------------------------_'~pound a bit on the second:
column.1I .:.~::::: .. r",ond mod,!..
The second model com
Figure 10-25. Give each column a separate tag. Restrict the text to narrow columns with In From Left and In From Right spacing.
Be sure to allow extra space for a gutter between columns to

Special formats and effects 557
prevent the text from touching when you put the paragraphs side-by-side.
Now you are ready for the third and final step: moving the paragraphs side-by-side. To do this, remove the line breaks between the column tags. In our example, COLI will get a line break before. COL2 will get a line break of none. And COL3 will get a line break after (Figure 10-26).
Line break before --+--_ rF'I~t"E~tr;;Ii""""""""""""""'T'h'~"'"'~'~~'';;~~;i''''~'';;i~'~'~''''Th~''t'hi'~d''~~'~;;;~'';;';i;hi"~;:l : describes some features of pound a bit on the second:
No line break
Line break after
: the item called oul in the column.1I :
1 ~~~! f~~Utl,~' ~~~~nt~:t the 1
, w;d. to fit on 0 I The next column, It also oc- The second model comparesi cupiesthe middle row ofthe quite favorably to the first: table.' model described above,:
There's not as muchtexl here. '1~
1 Figure 10·26. With the Breaks dialog box, remove any line breaks between the columns, so they can all reside on the same line.
To prevent a table from breaking across a page, use the Breaks dialog box to choose Allow Within: No and Keep With Next: Yes for all three column tags .
.. NOTE: If you set Keep With Next: Yes for the third column, you will need a separate tag for the last entry in the table. This last entry must have Keep With Next: No. Otherwise, Ventura will try to keep this final table entry on the same page with whatever paragraph follows.
While in the Breaks dialog box, make sure the Next Y Position is set to Normal for each of the tags. In Ventura Publisher, the Y position refers to vertical position of the upper left corner. A normal Y position puts the top line of each column even with the top line of the previous one. By contrast, Beside Last Line ofPrev. Para puts the top of each column even with the bottom of the previous one.

558 Chapter Ten: Special Document Formats
Table 10-2 lists the key attributes for the example discussed above, should you want to duplicate it for practice.
Table 10-2. Key tag attributes for a three-column table with side-by-side paragraphs.
Attribute COL1 COL2 COL3
Font Helvetica 12 Helvetica 12 Helvetica 12
Alignment Left Justified Justified
Above Spacing 12 pt 0 0
Below Spacing 0 0 0
Inter-Line Spacing 14 pt 14 pt 14 pt
In From Left 0 13 picas 26 picas Spacing
In from Right 27 picas 14 picas 0 Spacing
Line Breaks Before No After
Although we showed you a three-column example, you can use the same method to create as many columns as will fit on the page. Give the first column a line break before, the middle columns a line break of none, and the last column a line break after.
Lines around side-by-side paragraphs
To add rules to the table, use the Ruling Lines dialog boxes. You can put lines between each row, or boxes around each cell. For boxes, choose Ruling Box Around for each of the column tags. You must redo the spacing of the columns so there is no gutter between the columns. In other words, to each column must start exactly where the other one left off. That way, the ruling lines will overlap exactly. To keep the text from touching the lines, put space below the rule.
For extra space between the text and the lines, or to create blank cells, use line breaks.

Special formats and effects 559
Thumb tabs
Title pages
Type effects
Thumb tabs are small dark marks at the edge of directories and similar publications. They make it easier to find specific parts of the document. They show up better if you print them on both sides of the paper, so use the Left & Right option in the Repeating Frame dialog box. Create a small frame with an opaque black fill pattern at the upper right of the first (righthand) page and turn it into a repeating frame. Repeat the process for the next chapter, but place this repeating frame one notch lower. Use the rulers and enlarged view to get the size and position correct. If your printer cannot produce reverse text, use a gray box instead.
Use the text rotation feature from the Alignment dialog box to place text sideways in the thumb tab. To create vertical text, simply place a line break after each letter.
We have produced an example of a thumb tab in the upper righthand corner of this page .
.. NOTE: Most laser printers won't print to the edge of the page, so thumb tabs are only possible when creating pages smaller than the 8.5x11 in. page size.
Title pages for reports, proposals, and similar documents should be simple and uncluttered (Figure 10-27). Try to use design elements that relate to and foreshadow the design of the interior pages. Avoid extremely large display type, which is more appropriate for ads, flyers, and brochures.
You can use Ventura's page break features to isolate the title material on its own page.
We reminded you earlier that you can treat a logo as a picture and bring it into a frame. There are several other ways to get unusual font effects.

560
Report on Desktop Publishing
Chapter Ten: Special Document Formats
PROPOSAL
'Doble"c.m. ...
o..toph~O' ........
~-...........,
Figure 10-27. These simple, clean title pages echo the design elements used in the interior pages.
Reverse type
Reverse type is an effective technique that is available with some (but not all) laser printers. It is accomplished by putting white text onto a black background. You can accomplish a similar effect by putting either white or black type against a gray background. Figure 10-28 shows both effects.
The easiest way to get a black background is to create a frame and choose a black fill pattern (Frame Background from the Frame menu). Ventura automatically changes the font to white if you select a black background for a frame.
Likewise, you can put a black or gray fill pattern inside a Box Text. Frames and Box Texts are fine for one-time effects. For repetitive effects - for instance, for a heading that will repeat throughout the document - we recommend a second method instead. Frames and graphic shapes have to be drawn one by one. But if you use a ruling line to create the black or gray background, Ventura can generate it for you. Although it takes longer the first time around, it results in a tag that can be used over and over again.
The theory is simple: make the white text overlap a wide black rule. To create this effect, start in Paragraph mode. Add a new

Special formats and effects
ASSO Series CRT Controllers
... "'-~IJ'--_. --..,., -- . ---
-.. ~.~ 1 ~ :f-·· -- ·-··rr --" ...... ~~E - ~;
==-: : !!!!'--: ::~ ....
Figure 10·28. The title and heading of this sample page use reverse type.
561
tag and call it Reverse (or something similar). Change the font characteristics until the text looks the way you want. Select white for the color. Now create a black ruling line above for this tag. Select a width at least 4 points bigger than the type size.
These steps give you everything you want except the overlap. The key to forcing the text to overlap the rule is found in the Ruling Line Above dialog box (Figure 10-29). Notice Space
"Reyerse" RULIHG LIHES ABOIJE
Width: Margin Color: Black
Pattern: Solid Dashes: Off
Space Above Rule 1: 90 .00 Height of Rule 1: 18._
Space Below Rule 1: BO • BO Height of Rule 2: BO • BO
Space Below Rule 2: DO • DO Height of Rule J: DO . Be
36.90
CustOR Indent: 00.00 L.~:.:.1 [:'::1 Custo", Width: 00 .00
Dash Width: 00.00 DlIsh Splicing: 00.00 fractional pts
Space Below Rule 3: 18. L [!J" Overall Height: BO • Be ~
Table Rule List: Hidden t
Figure 10·29. The Ruling Line Above dialog box.

562 Chapter Ten: Special Document Formats
Below Rule 3 at the bottom left. As you may recall from an earlier chapter, this number actually represents the space below the last ruling line (not just the third line). If you enter a positive number, Ventura adds space. But if you enter a negative number (by clicking on the minus sign), Ventura subtracts space. If you subtract enough space, the text moves up to overlap the rule.
How much negative space should you enter in Space Below Rule 3? Start by entering the same amount as the height of the rule. Then experiment until it looks the way you want.
We have described white text on a black rule. The same technique can be used to put white text onto a gray rule, or black text on a white rule.
-NOTE: Some printers cannot produce white text on a black background. In many cases, however, you can buy special fonts for these printers that achieve the same effect.
Reverse drop cap
You can create a reverse drop cap (or a drop cap against a colored or patterned background) by combining two tags. The first tag controls the single large character. The second tag controls the text in the paragraph that follows. For instance, you might call these tags ''DropCap'" and "FirstPar" (Figure 10-30).
The Adventure Begins~
DropCap ---+t---t-...:;.:..:;.J:;..:;.;:J;,.,--!i--+-~---_ first prize in a raffle at the fashion show which ilhiS trip really began in September lastllear when
Firstpar --II-fi.i-~t-t--r--~--
byterian-St Luke's Medical Center holds every prizQ was two round trip tickc1ts to Hong Kong on Unih.>d and ten nights in the Hong Kong Hyatt HoteL .Analyzing fortune, we concluded that we wanted to do more than in Hong Kong and return, but at the same time, United, gotten its routes and equipment from Pan American, received authorltllto fill to other destinations or between
Figure 10-30. The reverse drop cap shown here was created with two tags.

Special formats and effects 563
Make sure that both tags are typographically identical; that is, that they have the same font size and inter-line spacing. Let's assume that you choose 10-point type on 12-point interline spacing. Start by creating a Big First Character with the Special Effects dialog box. For instance, you might choose a 30-point big first character, and a Custom Space for Big First of 3 lines. Be sure to choose a font color of white, so the text wi}l show up against the background you are about to build.
So far you've built the large capital letter. Now you need to create the black background. Select the DropCap paragraph. Select Ruling Line Above from the Paragraph menu. Choose Width: Custom, Color: Black, and Pattern: Solid. Now enter a Height of Rule 1 equal to the point size of the big first character - in our example, 30 points. Enter an identical Custom Width (30 points). Finally, enter a space below Rule 3 that is also equal to the point size (30 points).
With DropCap still selected, select Line Break: Before from the Breaks dialog box.
Now you can create the following text. First create an indent that is large enough to accommodate the big first character you just built. For In/Outdent Width, enter the point size plus about three points (33 points for our example). For In/Outdent Height enter the same number you used in the Special Effects dialog box (3 lines in our example). Next, give the tag a line break after, so it will reside on the same line as the DropCap paragraph.
The instructions above create the basic effect, but you should experiment to get the look you want. For a gray background, choose a patterned rule instead of a black one. Choose a color if you want a colored background. To move the letter within the background, return to Set Font Properties in the Special Effects dialog box. Use the Shift line to move the letter up or down. For a deeper (higher) background, increase the height of the rule. For a wider background, increase the custom ,vidth. You will then have to increase the First Par indent accordingly.
Tracking
Many people use tracking (from the Paragraph Typography dialog box) to improve the appearance of display type by

564 Chapter Ten: Special Document Formats
Figure 10-31. This newsletter nameplate uses looser tracking to space the letters of the word "Ventura" further apart, so it aligns with the word "Scoop."
moving the letters closer together. You can also use tracking to move letters further apart to create a special effect (Figure 10-31).
Baseline shifts
Because Ventura lets you control each letter individually, you can shift letters up or down to create special nameplate effects. Use the Set Font button in Text mode to shift individual letters.
Other type effects
Many type and printer vendors offer special display fonts. These typefaces are inappropriate for long stretches of text, but they can be useful for special purposes such as logos and headlines. You can also buy special effects packages that start with a normal font and transform it to create rotated, expanded, condensed, patterned, outlined, or shadowed type, among others. Ventura also comes with some type effects for PostScript printers. See Chapter Seven, "Producing Output," for more on fonts.
Other type effects can be created using the drawing tools to

Building frame-style chapters 565
lay a screen of white dots on top of large black type. Normally, when you select a fill pattern, the printer creates an arrangement of tiny black dots. If you select white for the color of the fill pattern, you have created a pattern of white dots. If you put that pattern on top of large black type, the result is patterned type. Only the very largest type sizes of 24 points and up are big enough to show this effectively. Not all printers can recreate this effect.
In a similar fashion, you can create a box with a series of closely spaced white lines. If you move the box over black type, the white lines become visible where they intersect with the type. The result is an interesting logo type effect similar to the one seen in logos from companies like IBM and Ventura Software.
Building frame-style chapters In Chapter Six, we explained that Ventura can create three kinds of documents: page-style, frame-style, and free-form. This section explains how to build a frame-style chapter. Frame-style chapters are the most complex document type. If you can master this method, you can produce virtually any type of publication with Ventura.
Many of the skills and steps are the same ones described in Chapter Six for page-style documents. But there is a crucial difference. In a page-style chapter, you put text on the Underlying Page. That's the method of choice when all (or most) of the chapter is contained in a single file. By contrast, in framestyle documents, you first draw frames onto the page. Then you pour text into the frames.
Some documents contain many different text files. Newsletters and magazines are common examples. Theoretically, you could combine them all into one large file and place that file on the Underlying Page. In practice, it's usually easier to keep each article as a separate file. In frame-style chapters, you put those separate files into frames. The frames go on top of the Underlying Page. They act as containers for the text files.

566 Chapter Ten: Special Document Formats
How Ventura handles text in frames Let's review how Ventura works with text in frames to better understand how to build this type of chapter. If you place a text file onto the Underlying Page, Ventura creates as many new pages as needed to fit the entire file. But if you place a file into a frame, 'Ventura places text to the bottom of the frame and stops. Then it waits for you to tell it where to put the rest of the file (Figure 10-32).
Figure 10-32. Text has been poured into the left-hand column. Ventura has filled to the bottom of the frame. It will not place the rest of the file until you tell it where you want it.
Frames create boundaries separating different files. For instance, you can use frames to place one text file into the left column, and a second, separate file into the right column (Figure 10-33).
Or you could leave the two files at the top of the page, and place a third file into a frame that stretches the full width of the margin (Figure 10-34). The possibilities are virtually endless.
Incidentally, you can combine text in frames with text on the Underlying Page. For instance, that's how you would add a short sidebar to a long report. The report goes on the Underlying Page. The sidebar sits in a separate frame on top of the Page. In frame-style documents, however, all of the text resides in separate frames.
When Ventura puts part of a file into a frame, it remembers

Building frame-style chapters 567
Figure 10-33. A different, separate file has been poured into the right-hand column.
Figure 10-34. Now a third file has been added in a separate, third frame. This third frame has only one column.
where it left off. You can then put the rest of the file into another frame (or frames). Best of all, the second frame doesn't have to be next to the first one, or even on the same page. For instance, you can put part of a file onto page one, and continue the rest of it on page two - or page three, or page four, or wherever you want. Consequently, articles can leap-frog one another. Many publishing professionals refer to this as chaining articles.
Ventura remembers the link between frames. As you make editing changes, text flows back and forth between frames,

568 Chapter Ten: Special Document Formats
without your intervention. There's more good news. When you put a frame on top of the Underlying Page, you can choose to mimic the format and typography of the Page, or you can use a different format. As you saw above, you can put a single column frame at the bottom of a three-column page.
Using the Underlying Page as a snap-to grid The first step in creating frame-style documents is to understand that frames act as containers for articles. The second step is to learn how to position the frames for an attractive look. Obviously, your newsletter won't look right if you scatter frames haphazardly about.
The solution is simple. You format the Underlying Page with the correct margins and columns even though you are not going to place any text on the Page. Then you use the U nderlying Page as a framework - a snap-to guide for positioning frames. Thanks to Ventura's snap-to features, frames automatically align because they will jump to the column guides (Figure 10-35) .
.......................... ;-.................... _ ......... _ ......... ., - .! !
1 i ! I i i 1 !
i i ~ -I I
r'·--···-·····-·'···-···--···--···--·'·-.. ~
· · J ...... _ ... _ .... _ ... I Figure 10-35. By formatting the Underlying Page in advance, you can draw frames by snapping them to the column guides.
Those of you with a background in the graphic arts will realize that you are using the Underlying Page to set up a simple grid. A grid is an underlying system of spacing page elements that gives form and structure to a design.

Building frame-style chapters 569
You need one more bit of theory before you are ready to start building a newsletter. Ventura can only flow text in a forward direction. To Ventura, forward refers to two different things. On a page-by-page basis, it means that Ventura cannot flow text to a previous page. You cannot start an article on page four and continue it on page two.
On a single page, forward refers to the order frames were drawn. You cannot flow backward from the second frame to the first one. Position makes no difference. Figure 10-36 ill ustrates the distinction.
: + :[J I ......................... .J
Figure 10-36. Frame #1 was drawn first. Ventura can flow text from #1 to #2, but not the reverse, not matter what their position on the page.
Fortunately, Ventura provides a simple method for changing the order of frames. To make a frame the last one in Ventura's eyes, simply delete and reinsert it again.
Creating the Page grid N ow let's walk through the process of creating a frame-style chapter. You begin by establishing a format for the Underlying Page. This is the structure onto which you hang frames.
As with page-style documents, you can use the revised Ventura Formula as a general guideline. Table 10-3 summarizes the process.

570 Chapter Ten: Special Document Formats
Table 10-3. Stages in building a frame-style chapter.
Style Create the underlying structure
Text Draw frames and put the text inside Edit the Pictures
Pictures Draw frames and put the pictures inside Edit the pictures
Chapter Save the chapter Create a chapter template
First determine the format you want. In the examples below, we show a three-column newsletter, but the same principles apply to other formats and document types. Build the style sheet. Be sure to choose margin and column settings that represent the correct spacing (Figure 10-37).
MARGINS & COLUt-INS
** of ColuMns: OJ m II m II] m m [[] Settings For: I Left Page I 'Mfln,:mrtW
Colullln 1: 2: 3: 4: 5: 6: 7: B:
Widths ~3,BO 13,1'10 13,8B 1il1iI.1il1iI f.l1iI,f.lf.I f.l1iI,f.If.I F.!1iI,liIf.I IiIB,liIf.I
Gutters
91.06 91.06 00,00 00,00 00,00 00,00 00,00
Margins Top: 94.07
BottOlll: 94.07 Left: 96.08
Right: 93.00
Calculated Width = 51 ,01 Actual Frallle Width = 51,00
Inserts: I Make Equal Widths I I Copy To Facing Page I ~ t:::][:] I Cancel I
Figure 10-37. These margin and column settings create the Underlying Page.
Then complete the structure by adding headers and/or footers (if desired). Now add frames for each separate article and page element on page one. Snap them to the column guides so they fit into the overall page design. Choose Show Column Guides from the Options menu so you can see what you're doing. Don't forget to draw frames for such things as the nameplate, the articles, the masthead, pictures, and the table of contents (Figure 10-38).

Building frame-style chapters 571
Nameplate
Articles ----~~----4_~--_+*
Table of
Figure 10-38. Draw frames for each of the major page elements. In this example, we have created frames for the nameplate, the articles, and the table of contents.
When you have blank frames drawn in for page one, use InsertlRemove Page from the Chapter menu to add a second page. Draw the frames for the articles and pictures on this page. You don't have to be exact - you can resize the frames later if necessary. Right now you just want to build the basic structure.
Continue with this process for the rest of the pages in the document. If you are not sure where you will need frames on a page, leave them off and add them later.
Overriding default settings
The frames you create for your text files do not have to conform to the settings of the Underlying Page. For instance, the sample newsletter page in Figure 10-38 has a one column frame at the top, stretched over a three-column Underlying Page. In this case, we will use it to contain a masthead.
The margins and column settings of a frame override the settings of the Underlying Page. You can also override the settings in the Chapter Typography dialog box for features such as widows, orphans, column balance and so on. Normally a frame automatically matches the settings of the Underlying Page. To change this, select the frame, then select Frame Typography from the Frame menu (Figure 10-39). Change the settings and click OK. Your changes apply only to the selected frame.

572 Chapter Ten: Special Document Formats
at ColuMn Balance: On
Moye Down To 1st Baseline By: Default Pair Kerning: Default
Vert. Just. Within Fral'4e: Default Vert. Just. Around Fral'4e: Default
lJI.\I'1"., • .IU~lt~, ~nowt~d: OOI1UI :.; At 'fop C.li' h'31'11.': a,1i!0H inc.\hes
At. flot,tc.)!:) 01' f'1'31'11~: B, 1i!0H
Figure 10-39. The Frame Typography dialog box can override the chapter settings for an individual frame.
Loading and placing the text With a framework in place, you are ready to work on the text. Load the text files as a group, using the procedures outlined in Chapter Six. Now place them one by one into the proper frames.
To place a text file into a frame:
• Enable Frame mode.
• Select the frame.
• Select the file name from the Assignment List.
Ventura pours as much of the file as will fit into the frame and stops at the bottom. To continue placing this file, go to the frame where you want the rest of the text to appear and repeat the process: select the frame, then select the file name from the Assignment List. Ventura fills the new frame with the remaining text.
You can continue this process as many times as necessary until the text file has been completely placed. If you want, you can leave part of a file unplaced. Ventura won't lose the rest of the file, nor will it forget to save it. It simply won't display or print it. At any time, you can draw another frame and place the rest of the file.

Building frame-style chapters 573
-NOTE: If you choose Show Tabs & Returns from the Options menu, you will be able to tell when you have reached the end of the file by the square end-of-file symbol.
You will be pleased to know that Ventura does not require you to place an entire file at one time. You can stop in the middle and begin another task, such as placing a different file in another frame. Whenever you are ready to put more of the first file somewhere else, Ventura continues where it left off.
This feature greatly speeds up the layout of frame-style documents like newsletters. You can start several articles on page one. When you are finished, move to page two and continue any or all of them onto that page. Then move to page three and so on.
Ventura remembers this path and dynamically adjusts the text. For instance, suppose you place a text file into frames on pages one, three, four, five, and eight. As you make changes to the text, Ventura flows text back and forth as necessary between these frames.
Jump text
When continuing articles onto following pages, most designers recommend ajump line - for instance, "Continued on page 4," or "See Market Research, page 4." You could add this jump text right in the text file. However, if you add or delete text, the jump phrase may be pushed out of position onto another page. A better solution is to place jump text into separate, very small frames.
- NOTE: Users of Professional Extension can insert cross references so Ventura will automatically track which page the article jumps to and insert the correct number.
Completing a frame-style chapter The rest of the process of building a frame-style chapter duplicates the steps of a page-style chapter:
• draw frames for pictures
• load picture files inside

574 Chapter Ten: Special Document Formats
• edit the pictures
• save the chapter
• create a chapter template
See Chapter Six, "Building the Chapter," if you need to brush up on these skills.
Tips for frame-style chapters
a Use Reduced View when you first place text files in frames. This lets you see how much of the frame is filled and how much space remains. It also speeds text flow, assuming you have set Text to Greek: 6 in the Set Preferences dialog box. Once you've placed the text, return to Normal View to tag and edit it.
a Use Go to Page tojump quickly to the next page containing the continuation of an article. For instance, if you start an article on page one, and continue it to page eight, you can jump directly from one to the other. Enable Frame mode and select the frame containing the text file. Choose Go to Page from the Chapter menu (or press the shortcut Ctrl-G). Select Relative to: File and Which Page: Next. Ventura jumps you to the next page containing that text file, no matter how far it is from the current page. To jump backwards, select Which Page: Prevo
a Save time constructing newsletters and similar documents by using the same text file names for each issue. When you finish with an issue, back up the chapter and the text files under new names and in a new location. When you write stories for the next issue, use the same text file names as you did for the first issue. Put them in the same location, so Ventura's chapter file knows where to find them.
When you open the newsletter chapter, it will look for the previous file names in the previous location. Since you have put new text into the old file names, you have created a new issue without even loading new files. Obviously, you will have to do some fine-tuning to make the new text fit precisely. This technique is best for publications that use the same basic format from issue to issue. Typical file names might be NLLEAD.TXT for the newsletter's lead story, NLNEWS.TXT

Building frame-style chapters 575
for the news section, and so on. The same concept works for picture files as well.
D You can combine the previous technique with batch files to further automate newsletter production. If you create a template that always looks for the same filep.ames, you can then program a short batch file that not only loads Ventura, but opens the newsletter template as well. You could have separate batch files for all your major document types: NEWSLET.BAT, BROCHURE.BAT, RELEASE.BAT, etc. See Chapter Nine, "Special Tips and Techniques," for more on using batch files with Ventura.
Balanced columns in frame-style layout Ventura can automatically balance columns. This feature is particularly useful for the last page of a multi -column book or manual. Without column balance, text fills the left-most column all the way to the bottom. Only then does it proceed to the next column(s), and only if it has sufficient text.
Column balance forces Ventura to place equal amounts of text in each column, creating a visually pleasing result. Although the most common application is the last page in a chapter or section, column balance also helps when illustrations or sidebars are stretched across the entire width of a multicolumn layout.
The Column Balance button occurs in the Chapter Typography and Frame Typography dialog boxes. Choose On to force the columns to balance horizontally. Choose Off to allow them to be uneven. We recommend On for books and manuals and Off for most newsletters and magazines. (Choose On if you use banner headlines, however.) You can mix and match within the same document; for instance, you could have Column Balance: Off on the Underlying Page, but On for certain frames on top of the page. Column Balance is of no value for single-column formats (there's nothing to balance), so turn it off to increase text formatting speed .
.. NOTE: Column Balance has certain limitations. It balances columns as closely as possible, but you may be required to fine-tune the spacing on your own.

576 Chapter Ten: Special Document Formats
Al though the headline extends across the frame, text subordinate to that headline does not necessarily line up in columns underneath the headline, but jumps to the top of the next column. Figures 10-40 and 10-41 show the effect with column balance on and off.
Figure 10·40. With column balance on, text in multi-column frames will align evenly under frame-wide tags such as the headings in this document.
Figure 10·41. With column balance off, text in multi-column frames will not align itself evenly if frame-wide tags intervene. Choose Column Balance: On to avoid this problem.

Building free-form chapters 577
Building free-form chapters A free-form chapter is one where each page has a different format, and text is contained in Box Text or separate frames. Advertisements and forms are the most common examples (Figure 10-42). Although Ventura is widely-known for its longdocument power, it is also capable of creating short, free-form documents quickly and efficiently.
PAGE MAKEOVERS.
··foH hJUi.lD4clk:k.n.t .. .uit __ trJcrca104oc:1.IDOdIGlItklOt.~1bCIJcu>>from.
.cke.i.p."~WiQa:xe.roxVCDtuahblilbMlIl4~hiJh-ll«f<_ St)'le.S~1o.QIIIlfICC_'Wbokli~oflop-n01cbdoli ...
tMilyau4cpkklJ.PormDrointonJatioa,caU. Softftre, Ofti,Qe.Syl&oml.
For all your software needs •••
"'''''~ •• I---..''''.IOI~.'''''''''_",
Figure 10-42. Use Box Text and frames to construct free-form documents such as ads and forms.
Chapter Four, "Creating Pictures," provides a complete course in the fundamentals of Graphic mode. Review this chapter to learn the basics. In this section, we will simply add a few comments on how to build documents with Box Text and other graphic shapes.
In our discussion earlier of frame-style chapters, we pointed out the importance of building the Underlying Page. The Page provides a structure for the frames. In· the same fashion, the secret to building free-form documents is to construct a snapto grid. The Grid Settings dialog box performs the same snapto functions for Graphic mode as Column and Line Snap for frames.

578 Chapter Ten: Special Document Formats
Once you determine the correct grid settings, building a freeform document is extremely simply. Because the grid automatically snaps everything into position, it's hard to go wrong. Boxes and rules align automatically.
Tips for free-form documents
lim You can retag Box Text. The first time you type inside a Box Text, Ventura automatically assigns the Z_BOXTEXT tag. You can retag this text to anything else you want to create a variety of styles and formats.
lim To link graphics select them all (using the Graphic menu or the keyboard shortcut Ctrl-Q). Then when you move one graphic you move them all. If you don't want to move them all, deselect some of them. Graphics that are selected together move together.
lim To create several groups on the same page assign all the graphics in one group to a frame, all the graphics in the other group to another frame and so on. These grouping frames can be small, invisible (no ruling lines), empty and off in the margin. Their only function is to link a group of graphics. To choose one group, select the proper frame in frame setting mode, then switch to graphics drawing and press Ctrl-Q (select all).
a To fine-tune the position of a graphic, link the graphic to a frame, and place the upper left corner of the graphic at the upper left corner of that frame. Now you can use Sizing & Scaling from the Frame menu to adjust the upper left X,Y position of the frame - and, therefore, of the graphic.
lim To move a tiny line or box that is difficult to position, surround it with a larger box, choose select all and move the small graphic by dragging the larger one (you may have to deselect some of the other graphics on the page).
lim Don't forget that you can save line and fill attributes. If you are building, for instance, a series of rectangles with the same attributes, click on the Save To buttons in Line Attributes and Fill Attributes. From then on, every box you draw will have the same attributes.

Notes on document types 579
a You can copy more than one graphic shape to the Graphic Clipboard. For instance, to speed drawing, use Shift-Click to select an entire row of boxes. Copy all of them to the Clipboard. Then you can paste in the entire row at once to create a large form or calendar in moments.
a Ventura's page and chapter numbering features work anywhere on the page, not just in headers and footers. You can use it to create sequentially numbered forms.
Notes on document types We wish to finish this chapter with some general comments on the major document types. The rest of this chapter has provided tips on special formats. This section provides tips on which formats are appropriate for which documents.
Advertisements, flyers, and other marketing materials We recommend that you build most marketing materials as free-form documents, provided they are only a page or two in length. For longer documents, such as brochures and proposals, you will probably want to put most of the text on the Underlying Page.
Though Ventura Publisher is known for its long-document power, it is admirably suited to one-and two-page documents as well. It is safe to say that anything you can do with another program, you can do with Ventura. For most free-form documents, you can type the text inside Ventura Publisher, since there is generally not too much to write. You will probably want to use individual frames or box text to hold the text within the ad. Logos and unusual typestyles (stretched, angled, pi fonts) can be created in outside graphics programs and then brought into Ventura as pictures.
Books, handbooks, manuals Books are a prime application for Ventura Publisher. Its batch processing capabilities make it ideal for long documents that

580 Chapter Ten: Special Document Formats
would be a headache with other desktop publishing programs. To make best use of this batch processing power, minimize the use of separate frames. Keep as much of the activity as possible on the Underlying Page.
Camera-ready art for book pages needs crop marks to show the printer where to line up the negatives on the masking sheets. These marks are reference points that keep the pages of the book from ending up crooked or off center. They also indicate the final size of the page. Crop marks are printed along with the rest of the page, then trimmed off when the book is bound.
Ventura has a built-in crop marks feature that is turned on and off in the To Print dialog box. To use this feature, you must make sure the Underlying Page is the same size as the final trim size. (Hint: Select on the Underlying Page, then use Sizing & Scaling to change its size.) If you are using anything larger than 7.5xl0 in. pages, the crop marks will probably fall into the dead zone of a laser printer.
For pages 6x9 in. or smaller, you can use a utility program such as XVP/Saddle to enlarge the page during printing. Then the offset printer can reduce it back down to its original size. This trick improves the resolution. It is not necessary if you are using a typesetter for your final output.
Catalogs, directories, listings Perhaps no other type of document demonstrates the amazing power of Ventura Publisher as well as directories and listings. Most directories consist of repeating elements that are consistently formatted. For example, in a product directory, the product category names might always appear at the top of a column in 12-point Helvetica Bold and company names in B-point Helvetica Light.
An intelligent approach to directories is to use a database management program such as dBase III or DataFlex to generate both the text and the tags. It is then just a matter of loading the resulting ASCII file into Ventura Publisher. If you have previously created a style sheet for the directory, you will see the document instantly formatted according to your specifications.

Notes on document types 581
Forms
The key to this technique is to devise a report format for your database that creates an ASCII file with Ventura Publisher tags inserted in it. For instance, you might instruct the program to print the character string "@PROD_CAT = " before outputting the contents of the Product Category field.
Forms are quick, easy, and simple to produce with Ventura Publisher. You can produce camera-ready masters for reproduction at a quick print shop. Or, by using Box Text for the rectangles and divisions, you can even fill in the forms on screen and print them out with Ventura.
And because of Ventura's style sheet approach, you may be able to merge data from another program into a Ventura file. In this fashion, you can print both the form and the data in one pass.
Simple, one-page forms that will be filled out by hand don't need much discussion here. Use any and all graphic drawing and frame techniques you need to get the right look. Box Text is the easiest way to create simple forms like invoices. Use grid snap to make sure the boxes line up with each other. Fill some of the boxes with a pattern to set them apart.
But if you want to merge the form with data from another computer application, use tags as much as possible to create graphic effects. If graphics are needed, put them on the Underlying Page so they'll be reproduced on every page. Separate logos and address information from the data by putting them into repeating frames that appear on every page. The idea is to create a format and style sheet that can reproduce as many forms as needed just by pouring in tagged text .
.. NOTE: Make sure that the last tag on the page includes a page break. This will force Ventura to a new page where it will start the next form.
This method won't work, of course, unless you can get the other application to generate the tags. Many accounting programs, for instance, are limited in their reporting abilities. Others, however, are based around database management software, and may have the capabilities you need. And most

582 Chapter Ten: Special Document Formats
popular database programs can do what you want - namely, pull out specified information, insert tags before it, and put them together into an ASCII file.
The preceding section about directory publishing gave additional thoughts on getting other software to generate tags. And the final section of Chapter Three, Creating Text, gave a full explanation of how to preformat files by inserting tags and other information.
Magazines and newsletters Ventura Publisher can be a powerful tool for producing magazines, especially trade and technical magazines that folIowa consistent format from month to month. Use frame-style chapters. The bulk of the work will come in building the first issue. Once that is done, you can use chapter templates as a starting point for each successive issue.
If there are advertisements in your magazine, you can use frames to indicate where they will be placed so that your lithographer can strip in the right negative from each client. Place a label in the empty frames to indicate which ad goes where, and any other pertinent information about the ad. Handle photographs within the editorial pages using the techniques described in Chapter Seven.
For short, simple newsletters, you can place all the articles into a single text file, and place that file onto the Underlying Page. This is the fastest technique, but it does not allow the design flexibility of the frame-style approach.
Letters, memos, and correspondence Standardized memo formats can improve your image if they incorporate good design. They can cut costs if you are able to use the laser printer to put the company logo on the same page (without the need to reload the printer with letterhead). They can convey more information if graphics are combined with text on the page. And they can increase productivity if information is in a standard format, so readers always know where to look for the facts they need.
One approach to creating memos with Ventura Publisher is to

Notes on document types 583
Proposals
Reports
put the logolletterhead material into a separate frame at the top of the page. Use this as the document template as described above - load the template, then bring in the text file. Rename the document if you want to save an electronic version, or simply abandon it after printing if you do not.
A second approach uses a word processing file as a template. This standardized file can be handed out to all the people who write memos. (If they use different word processors, create it once and use Chapter Three's technique to convert it to different formats.) This file will have the correct tag names inserted. It can also include text that you want to appear in every memo. All the writers need to do is fill in the blanks.
Once you master this simple template technique for memos, you'll find ways to adapt it to other, more complex documents.
Since proposals are usually intended to get business, they are vitally important. Appearance and readability are crucial. This is one application where it might pay to hire a professional to create a graphic design you can use over and over again. As an alternative, search for outstanding proposal samples you can imitate.
Consider using a repeating frame to place the company logo on every other page. You may want to include the date in the header or footer as well. Live headers can also be a good idea. Key them to the section heading, or even to the subtitles, so readers can glance at the top of the page to know exactly where they are.
The longer the report, the more important it is to use Ventura's Table of Contents and indexing capabilities. Consider adding live headers as well, to make reference easier.
Drawings and charts can be incorporated through the standard means: by saving the desired illustration to a file, then loading that file into a frame. Spreadsheets can be incorporated using the technique from Chapter Three for converting and inserting tab characters into spreadsheets.

584 Chapter Ten: Sp~cial Document Formats
Technical documentation Organization is one key to usable, effective documentation, and Ventura has several features to aid organization, including table of contents, indexing, footnotes, and live headers.
You may also find that you cari enforce a degree of standardizatidh upon your authors by supplying them with template documents for their word processors. If they are given the organization in advance, their job becomes one of filling in the blanks. And if the template incorporates tags, the editor's job becomes one of simply loading the pretagged text files into Ventura and fine-tunirig the end result.
Those who document software may be able to benefit from DoubleDOS, DesqView, and other programs that provide the ability to switch back and forth from one application to another. The idea is to keep the word processing program in one partition. In another partition, the writer keeps the software being documented along with a screen capture utility like HotShot. The writer works in tandem: He or she uses the software in one partition, switches to the word processor to write about it, switches back to the software again, and so on. When the writer needs a screen to illustrate a point, he or she invokes the capture utility to put the screen into a file. Then the writer jumps back to the word processor and inserts that file name at the spot where the illustration belongs. The writer can also insert the caption at the same time.
When laying out the dbcupIent, the editor has merely to stop at each reference and load. the screen file into a frame. If the screen illustrations are a standard size, the editor can keep a frame in temporary memory and paste it in as needed.
We hope the advice in the preceding section will serve as a starting point for bright ideas of your own. We also hope you'll share those ideas with other Ventura Publisher users. This book is periodically revised, partly to keep up with new revisions of the product, but also to stay up-to-date with creative new ways to apply the power of Ventura Publisher. Please send us the tips and tricks you develop on your own to the address at the back and front of this book.

Chapter Eleven
The Professional Extension
The first 10 chapters of this book presented an overview of the basic capabilities of Ventura's standard version. When
Xerox Corp. announced version 2 of Ventura Publisher in late 1988, they also announced a new product called the Professional Extension that augments version 2. This chapter examines the Professional Extension (PE) in detail:
• how to install PE and use it with expanded memory
• how to create and edit tables
• how to create and edit equations
• how to insert and use cross references
• how to use vertical justification
• how to use the advanced hyphenation dictionary
It's important to realize that PE extends the capabilities of the base product. It does not supersede or do away with any functions. All the skills you learned in the previous chapters still apply, because all of the base product's features work exactly the same in PE as they did before. PE adds extra functions to the ones you already learned.
In many cases, you may want to use PE's new features instead. For instance, most users find PE's table mode more convenient that the table building methods available in version 2 (see Chapter Ten). However, if you prefer, you can still do things the old way. Likewise, the Professional Extension can load and use style sheets from versions 1.1 and 2 without any modification.

586 Chapter Eleven: The Professional Extension
WARNING: If you are using the Extension, you may not be able to trade chapters with people who are using version 1.1 or version 2. Style sheets created with the Professional Extension should be readable by version 2, however.
Overview of Professional Extension The Professional Extension was designed, as the name implies, for professional publishers. Its added capabilities are particularly well suited to magazines, books, newsletters, technical documentation, and other complex applications.
Still, you may want to acquire the Extension even if you are not a full-time publisher. Its use of EMS memory makes document production faster and more efficient. Its extra features let you add a professional touch to pages, even if you don't use all of them all the time. Also, you will be assured of document compatibility with other PE users. Given the rapid development of the desktop publishing industry, PE features that seem optional today may well be considered mandatory on tomorrow's desktop publishing system~
/
Specifically, the features present in the Professional Extension are:
EMS Support
Table editor
EMS, the Expanded Memory Specification, is a standard method of addressing more memory than allowed by MS-DOS (640K). If you have installed additional memory that conforms to the EMS standard, Ventura can make use of it. With EMS memory, Ventura can (1) run more quickly, (2) create longer and more complex documents, and (3) use the advanced Edco hyphenation dictionary.
PE's Table editor is a powerful and flexible tool for complex tables, matrices, and forms. It works as a fifth mode, augmenting the Frame, Text, Paragraph Tagging, and Graphic modes of Ventura's standard version.

Installing the Professional Extension 587
Equation editor Similarly, PE's equation editor is a valuable function for technical publications. It easily creates mathematical expressions, scientific formulas, and Greek symbols.
Cross References Although Ventura version 2 added some useful cross referencing features, the PE extends them. For instance, you can reference figures, tables, captions, or text passages that appear elsewhere in the publication. Thus, each time the page number, figure number, or other variable information changes, your text reference changes accordingly.
Vertical justification This feature ensures that text aligns vertically at the top and bottom, just as text aligns horizontally at the left and right margins.
Edco hyphenation dictionary The Edco hyphenation dictionary brings the quality of Ventura's hyphenation up to the level of dedicated typesetting systems. It requires 1.2 megabytes of EMS memory to run.
Installing the Professional Extension Installing the PE is relatively straightforward. First, remember that the PE is an add-on product to Ventura version 2. You must purchase the standard version of Ventura in addition to the PE. You can also buy them as a bundled package.
If you have not yet installed version 2 If you buy the PE at the same time you buy version 2, you only have to go through installation once. Insert the disk labeled "Professional Extension disk 1" into the A: drive. Change to the A: drive and type VPPREP. Then answer the questions on screen. At one point, you will be asked if you want to install
588 Chapter Eleven: The Professional Extension
the Edco hyphenation dictionary. To do so, you must have (1) an additional 1.3 MB of disk space on your hard disk over and above what you need for Ventura and (2) at least 1.2 MB of EMS.
The installation program creates the required directories and copies the files you need. Notice that the PE installation program also installs the standard version 2 at the same time. You can run the standard version by typing VP from the DOS prompt. To run the PE, type VPPROF ins~ead.
If you have already installed version 2 If you are adding the Professional Extension after installing version 2, the process is not much different. Again, insert the first PE diskette into drive A:, change to drive A, and type VPPREP. The installation program adds the PE functions to your system.
Should you later need to reinstall for a new printer, display, or pointing device, be sure to use the installation disk for the Professional Extension, not the standard version. When reinstalling, you can answer "No" when asked if you are installing for the first time. Answering ''No'' saves time since the installation program copies only new files you don't already have, rather than all the files.
EMS support One limitation of MS-DOS computers is the 640K memory limitation. When Ventura loads a long document on a conventional DOS computer, it keeps part of the document on disk, swapping sections in and out to the hard disk as needed. Swapping slows the program, since disk operations are sluggish compared to operations performed in memory. Limited memory also restricts maximum document size and prevents creation of complex chapters with many frames and tags.
A number of companies have developed a way to go beyond the 640K barrier. It's called EMS, for Expanded Memory Specification. To use expanded memory, you must install a memory board that conforms to the EMS standard. You also

Table Edit mode 589
need software - a Lotus/IntelJl.\1icrosoft EMS driver (version 3.0 or later). If you own a computer based on the Intel 80386 chip that comes with extended memory, you may also be able to use this memory as expanded memory. Contact your computer manufacturer to find an EMS driver compatible with your machine.
As long as EMS is properly installed, the Professional Extension recognizes it automatically. It uses EMS to, among other things, swap long documents, thereby avoiding slower disk swapping. It also loads program overlays into EMS, for faster operation. In addition, the EMS memory permits Ventura to format complex documents that would otherwise cause out of memory error messages.
To use EMS, you may need to add a command line to your computer's CONFIG.SYS file. The manual that comes with your memory board will tell you how. By looking at the statistics in the Desk menu, you can see how much EMS memory is installed and how much is available to the program. See Chapter Nine, "Special Tips and Techniques," for more on memory management with Ventura.
-NOTE: Version 2 can also use EMS memory, but only for program overlays. It doesn't swap documents into EMS.
Table Edit mode We are starting our discussion of the Extension features with Table Edit mode. For many users, Table Edit mode is the most valuable, most frequently used PE function, particularly if they produce technical documentation or similar publications. We have made extensive use of the table editor in this book.
This section explains several facets of Table Edit mode:
• Creating tables in Ventura
• Entering text into tables
• Editing tables
• Creating tables in a word processor

590 Chapter Eleven: The Professional Extension
How Table Edit mode works
\Join Ce~l:;
SP~:lt Cc~ls
Norfl\ol f{ulcs
Z_HIODEN
Z_SINQl.E
Figure 11·1.
The Professional Extension's table features are set up as a fifth operating mode, in addition to the existing Frame, Text, Paragraph, and Graphic modes. When you load PE, you will see a fifth function button at the top of the Side-Bar (Figure 11-1). You access Table Edit mode by clicking on that button. You can also create a table in Text mode.
Creating a table does not require you to exit Ventura Publisher or your current chapter file. You enter table text using Ventura's Text mode. As you do, you have access to all the normal editing, tagging, and text attribute tools. The only difference is that the text conforms to the boundaries of the current cell. In a sense, it as if you were typing inside a tiny frame, or a small Box Text. However, text in a table remains within the normal text stream. If you look at the word processing file after creating a table, you will see the table text in the proper position in the text file (Figure 11-2).
You can place tables inside separate frames if you choose to do so. But one of the strengths ofPE's Table Edit mode is that it makes this segregation unnecessary. If you instruct it to do so, Ventura will keep a table together on one page. Conversely, you can tell Ventura to break a table if necessary, and it will
Fi 1e: C: ,TVPESET,MANUAL. TXT- - - - - - ---- - - --~tl~ Scroll 8 .. 9)speed G)oto S)et M)ask D)ispla~ Mode: NORMAL
p, then select this letter and use the Font Settings button to change this one letter to a s~Mbol ront.
<P12B}Table l-A.<P255D)
~Z_TBL_BEG = COLUMNS(6), DIMEHSION(IN), COLUIDTHS(1.5B,.71,El,El,El,El), HGUTTER(.B56), UGUTTER(.B56), BOX(Z_DOUBLE). HGRID(Z_SIHGLE), UGRID(Z_SINGLE), KEEP(OFF)
mZ_TBL_BODY = TABLE TEXT, TABLE TEXT. TABLE TEXT. TABLE TEXT, TABLE TEXT, TABLE TEXT
Header1<$!B11>, HeaderZ<$!B11), Header3<$!B11>, Header4<$!B11>, HeaderS<$!Bl1>, <$!B11>
Text, Text, Text, Text, Text,
Text, Text, Text, Text, Text,
Text, Text, Text, Text. Text,
Figure 11·2. Although the text in a table is restricted inside cells, it appears in the word processor as part of the normal text stream.

Table Edit mode 591
automatically repeat the header rows on the following page (Figure 11-3).
,",0:10 Cells
SP1:l..t eel.1s
Sat T:lnt •••
NOt"~a.l Flu~cs
Z_HIDDEN
Z:_SJNGLE
Z_DOUBLE
Figure 11·3. If you want it to, Ventura will automatically repeat the header row when it breaks a table across page or column boundaries.
The uses of Table Edit mode As explained in Chapter Nine, you can create simple tables in version 2 with tab settings. You put each row into one paragraph and separate the columns with a tab stop. By defining the number, location, and alignment of the tabs, you create simple tables. This process is somewhat cumbersome, however, since you must create a new tag for each new table. Moreover, you are limited to tables with short entries (short cells). Any cell requiring more than one line creates formatting problems (Figure 11-4).
But many tables need cells of variable length, sometimes several paragraphs long. For instance:
• Product comparison charts
• Procedural manuals and troubleshooting guides
• Business forms
The PE's table editor is ideally suited for these applications. You do not need a different tag for each table you create. Each cell in the table is a "minidocument" that can contain several lines or paragraphs of text. And you can easily modify the
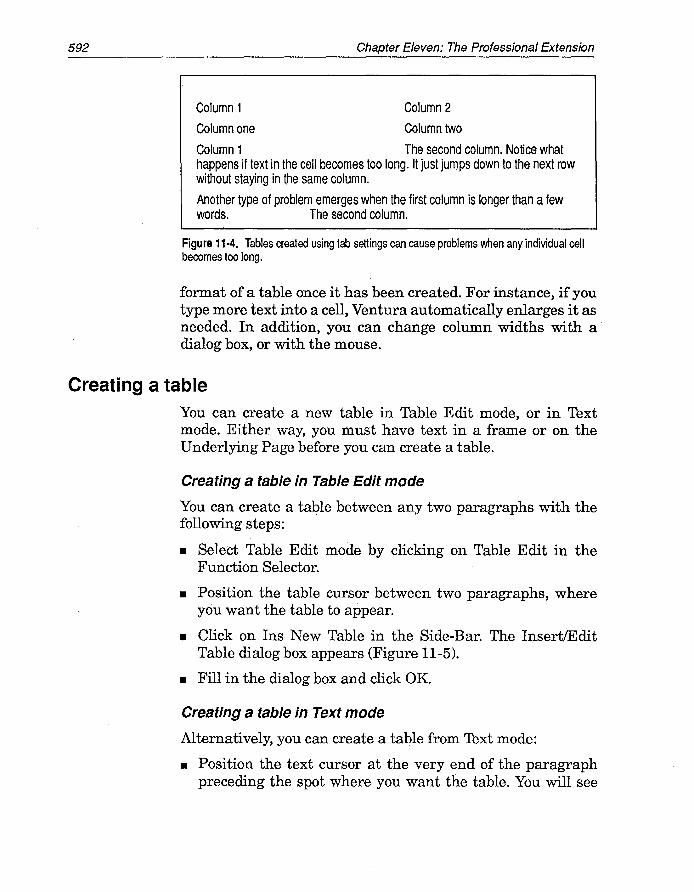
592 Chapter Eleven: The Professional Extension
Column 1 Column 2
Column one Column two
Column 1 The second column. Notice what happens if text in the cell becomes too long. It just jumps down to the next row without staying in the same column.
Another type of problem emerges when the first column is longer than a few words. The second column.
Figure 11·4. Tables created using tab settings can cause problems when any individual cell becomes too long.
format of a table once it has been created. For instance, if you type more text into a cell, Ventura automatically enlarges it as needed. In addition, you can change column widths with a dialog box, or with the mouse.
Creating a table You can create a new table in Table Edit mode, or in Text mode. Either way, you must have text in a frame or on the Underlying Page before you can create a table.
Creating a table in Table Edit mode
You can create a table between any two paragraphs with the following steps:
• Select Table Edit mode by clicking on Table Edit in the Function Selector.
• Position the table cursor between two paragraphs, where you want the table to appear.
• Click on Ins New Table in the Side-Bar. The InsertlEdit Table dialog box appears (Figure 11-5).
• Fill in the dialog box and click OK.
Creating a table in Text mode
Alternatively, you can create a table from Text mode:
• Position the text cursor at the very end of the paragraph preceding the spot where you want the table. You will see

Table Edit mode 593
1* of Rows. Columns: 00031.0003
Overall Width: Column t .. .,. .... fr"'l(;t;".\.omll. pt;w Horz. Alignment: I..('l Ft; .f 00.00
Break Across Pages: Allowed t " of Header Rows: 0000
Box Around: On Horz. Grid: On Vert. Grid: On
Space Above: 00.00 fractional pts Space Between Rows: 04.00
Space Between Columns: 04.00 Space Below: 00.00
Vert. Just at Top: 00.00 Vert. Just at Bottom: 00.00 ~
Figure 11·5. The Insert/Edit Table dialog box.
the words Paragraph End in the Current Selection Box at the bottom of the Side-Bar.
• Select Ins Special Item from the Edit menu (or press CtrlC). The secondary menu appears (Figure 11-6).
Footnote Index Entry ... Equation ... Frame Anchor .•. Cross Ref .. . Marker Name .. . Variable Def .. .
.:-:==....~-----.. -: :~:~~::-~ 1 ._._ ... _- :
LT!.!a~b~le!:...:....:.~. __ ....,.......t:;j.-'-" ••• --'--·---···'·-···--i
Figure 11·6. This secondary dialog box appears when you select Ins Special Item in Text mode.
• Select Table (or press function key F9). The InsertlEdit Table dialog box appears.
• As in Table Edit mode, you fill in the dialog box and click OK.

594 Chapter Eleven: The Professional Extension
Insert/Edit Table dialog box
The Insert/Edit Table dialog box (Figure 11-5) controls the table format. It determines the width; the number of rows and columns; the number of header rows; the spacing above, below, and between rows and columns; the grid settings (the lines between cells); and other variables. You can change these settings later if you choose.
# of Rows, Columns. You can enter any number of rows and columns between 1 and 9999. The first number indicates the rows, the second the columns.
Overall Width can be set to the column width or a custom width. If you select Overall Width: Column, the table automatically adjusts itself to fit exactly into the width of the column. If you select Overall Width: Custom, you must select the horizontal alignment you want (see below). A custom width can not be wider than the page. If you have a multi-column page, but you want the table to stretch the full width of the frame, choose Custom.
Horz. Alignment is active only if you choose Overall Width: Custom. In that case, you can specify how to align the table. If you choose Left, it will align flush against the left margin. If you choose Center, it will be centered inside the margins. If you choose Right, it will align flush right. If you choose Indent, you can specify how far to move the table from the left margin.
Break Across Pages. In some cases, a table may be too long for a particular column or page. You can permit the table to spill over to the next page or column by setting Break Across Pages to Allowed. Otherwise, Ventura will force the entire table to stay on the same page together, even if it means creating a large white space at the bottom of the previous page. To keep the table together, choose Break Across Pages: No. Choose No only for tables that are shorter than a page.
# of Header Rows. If you do allow the table to break, you can set the number of rows to repeat at the top of the next page (or column). If you choose # of Header Rows: 0003, for example, Ventura will repeat the first three rows of the table after each page or column break. Ventura will not place a break between header rows. If you don't want to repeat any material, choose 0000.

Table Edit mode 595
The next three settings in the Insert/Edit Table dialog box determine whether ruling lines appear in the table. Box Around is a line around the entire table. Horz. Grid and 'W:?rt. Grid are ruling lines placed between rows and columns. To make the lines appear, turn the setting on. The words "Z_DOUBLE" and "Z_SINGLE" refer to the tags that Ventura automatically assigns to these ruling lines. You can change the settings of these tags, or use different tags instead.
The tags determine line attributes like width, style (dotted or solid, for example), and spacing. For each type of line, you can choose from among four automatically generated tags, or type a tag name of your own. The generated tags are Z_DOUBLE, Z_SINGLE, Z_THICK, and Z_HIDDEN. Z_SINGLE draws a single thin line, Z_THICK draws a single thick line, Z_DOUBLE draws two thin lines, and Z_HIDDEN hides the rule. Applying Z_THICK to Box Around, Z_SINGLE to Horizontal Grid, and Z_DOUBLE to Vertical Grid would place a thick rule around the table with thin horizontal grid lines and double vertical lines (Figure 11-7).
Figure 11·7. In this example, the ruling box around has the Z_ THICK tag, the vertical lines are Z_DOUBLE and the horizontal lines are Z_SINGLE.
The spacing commands in the InsertlEdit Table dialog box work in a similar manner to Ventura's other spacing commands. Space Above and Space Below determine how much space to add between the table and the paragraphs above or

596 Chapter Eleven: The Professional Extension
below. In most cases, you should put extra space above and below your tables. We recommend an amount equal to or greater than the inter-line spacing of Body Text. If Body Text has an inter-line spacing of 12 points, then you might choose 12.00,24.00, or 36.00 fractional pts. above and below the table.
Space Between Columns and Space Between Rows determine the spacing between entries in each cell. Space Between Columns adds space to the left of each column, preventing text from touching adjacent cells. Space Between Rows adds extra space between rows. In many cases, it is sufficient to add 25% to 50% of the inter-line spacing of your table tags. If Table Text has 12.00 fractional pts. of inter-line spacing, for example, you might choose, 03.00, 04.00, or 06.00 fractional points.
Vert. Just at Top and vert. Just at Bottom determine the maximum amount of space that can be used for Vertical Justification. If Vert. Just at Top is set to 18.00 fractional pts., for example, Ventura's vertical justification feature will add no more than 18 points to the spacing above the table. If you are not using vertical justification, you can ignore these fields. Vertical Justification is explained later in this chapter.
When you have completed the settings in the dialog box, click OK. Ventura returns to the workspace. You will see a blank table that matches the specifications you entered.
At first, all the columns and rows are the same width and height. You can change this as you see fit. For instance, as you add text to a cell, the entire row grows to accommodate the new spacing requirements.
Entering text into a table When you create a table, Ventura treats it as part of the text. It treats each cell as a separate paragraph. To type in text, enable Text mode, move the cursor to the first cell, and start typing. Once the cursor is inside a cell, you can enter as much text as desired. If you enter more than can fit on one line, the entire row expands to accommodate the extra.
You can skip from cell to cell with the arrow keys or the mouse. Pressing an arrow key when at the end of a paragraph jumps you to the next cell. You cannot use the Enter key to start a new paragraph. If you do, you will see an error message that

Table Edit mode 597
prompts you to tell Ventura what you want (Figure 11-8). To start a new line within a cell, use a line break (Ctrl-Enter).
? Only one paragraph is allowed I Above I I~'---H---""-"'-'''''-l:: WAIT per table cell. Do you want to
insert a blank paragraph above I Below I H---+t---' or below this entire table. or cancel the request?
Figure 11·8. You cannot start a new line by pressing Enter within a cell. If you do, you will see the error message shown here.
Formatting the table text
Ventura applies a default tag called Table Text to each entry in each celL Ventura starts by assuming you want everything to be Table Text, but you can change some or all of the cells if you prefer. Initially, Table Text has the same attributes as Body Text. You can change the attributes as you see fit in Paragraph mode. You can also retag any or every cell with different tags. You add, assign, and modify these tags in Paragraph mode, just as any others.
You may prefer to create and name tags according to their alignment. Use the Alignment dialog box to create different combinations of horizontal and vertical alignment. As you can see in Figure 11-9, these combinations give you nine different positions within a cell.
In addition, you can choose decimal alignment, if your table includes numbers. The Alignment dialog box also provides the means to create rotated text, a useful effect for many tables (Figure 11-10).
You can place leader characters in your table by choosing Auto-Leader from the Tab Settings dialog box and selecting a

598 Chapter Eleven: The Professional Extension
~~~:-~~~.----------------------------------------------------------------------------------------------------------------------------------1
I ClmtQrLQft C enter Right
Figure 11·9. You can create tags to position text in any of nine positions within a cell.
Desk File Edit View Chapter Frame Paragraph Graphic Options • liii!ili!il!l!!illlilii!i!ii!!!!!ii!!!iii!!l!i!!ii!!!!ii!!!!!mr C··:·\j'yp·ES·E"f\tfrnoc·:·pl··:CHp····· ···(&"fDoc·~·p-1·":·s"fyf·-!!iiiii!iiiliiiiili!iiii!!!!imi!ii!!iiim!mm!l!!mmili •
t !:rablel-A. lIT
- ~ ~ -'.;:3
~ rJl
~ ~ ~ -B .~ 8
Still more text Still more text Still more text Still more text Still more text Still more text
"'T;~t""""""""''''''''''''''''''''''''''''''''H' -=-M=-or-e T=-e-=-xt-------H-::-:-=---:--:---------I
Ted MorA T."t Text More Text Text More Text Text More Text Text More Text I ,
+ [{:~{?{t~1 II:~tttt:~: • ...
Figure 11·10. Rotated text is a valuable way to save space in complex tables.
desired leader character, such as a period or hyphen. Tagging a blank cell automatically fills one line with the leader characters. Tagging a cell containing text places leaders between the text and the right column margin. This "margin" is determined by the Space Between Columns line in the InsertlEdit Table dialog box. You can also use In From Right and In From Left from the Spacing dialog box to reduce the leader width within each cell.
As with any text, you can also affect the appearance by assigning attributes from the Assignment List, or by using Set Font

Table Edit mode 599
in Text mode. You may find it easier to keep just a few tags and use the Set Font feature in Text mode to change typefaces or type size. Consider choosing Grow Interline to Fit: On from the Paragraph Typography dialog box for your table tags. That way changes in font size will automatically increase the space between the lines.
Formatting the ruling lines
The ruling lines in Ventura's tables are separate paragraphs. Like other paragraphs, they have tags. Assigning, accessing and modifying these tags, however, is different from modifying text tags.
Ruling line tags are first assigned when you open the InsertlEdit Table dialog box (Figure 11-11). Ventura's default choices are Z_DOUBLE for the box around and Z_SINGLE for the horizontal and vertical lines. You cannot retag ruling lines in Paragraph mode. One way to retag them is to ~eturn to the InsertlEdit Table dialog box. Type in different tag names on the appropriate line(s). You can use one of the four generated tags for table rules or you can enter tag names of your own.
Using the InsertlEdit Table dialog box is the only way to retag the box around a table. However, you can retag vertical and horizontal rules in Table mode. First select the rule(s) you want to retag. Then choose a new tag from the list at the bottom of the Assignment List.
I:t of Rows.ColuMns: 000·7.000;~
Overall Width: ColUMn I ..... .... Fr><~~7t;·l.Om'll pt:w Horz. AlignMent: l..~lft; .;; 00.00
Break Across Pages: Allowed I I:t of Header Rows: 0001
Box Around: On Horz. Grid: On Vert. Grid: On
I PATTERN RULE~ I Z_S INGLE __ I Z_DOUBLE __
Space Above: 00.00 Fractional pts Space Between Rows: 04.00
Space Between ColUMns: 04.04 Space Below: 00.00
Vert. Just at Top: 00.00 Vert. Just at BottOM: 00.00 c::::2D I Cancel I
Figure 11·11. You can assign new tag names for ruling lines by entering them in the Insert/Edit Table dialog box.

600
Even though Ruling Line Above is disabled for this paragraph, you can define a ruling line for Table Edit mode.
Setting Table Rule
Chapter Eleven: The Professional Extension
To select a portion of a horizontal line, click once on the line while in Table Edit mode. To select more, drag the cursor over the line you wish to select. To select all or part of a vertical rule, drag the cursor over the rule.
With the rule selected, point to the tag you wish to assign from the Assignment List. The first time you use Table Edit mode, you will see the four generated tags on the list, plus the choice Normal Rules at the top. Normal Rules has the same effect as Normal in Text mode - that is, it resets the format to its previous, default condition. Use it if you want to undo your changes and start over. You can select adjacent line segments or the entire line. If you apply a new tag to a line segment, it overrides the tag applied to the entire line.
Adding ruling line tags to Table Edit mode
To add a tag to Table Edit mode's Assignment List, you must switch to Paragraph mode. Click on a paragraph. Now click on the tag whose name you wish to show up in Table Edit mode, or create a new one with the Add New Tag button. Select Ruling Line Above from the Paragraph menu (you may also choose Ruling Line Below or Ruling Box Around). Now select Table Rule List: Shown from the bottom left of the Ruling Lines Above dialog box (Figure 11-12).
Selecting Table Rule List: Shown enables the ruling options of the dialog box- even if you have set Width: None. Any type of
Desk File Edit Vie,~ Chaptel" Frar~e ' .. ' .• Gl"aphic Options
"PATTERN RULE" RULING LINES ABOVE
~Iidth : None Colol": Black
Pattern: 3 Dashes: Off
Space Above Rule 1: Height of Rule 1:
Space Below Rule 1: Height of Rule 2:
Space Below Rule 2: Height of Rule 3:
Space Below Rule 3: Ovel"all Height:
00.001 04.00 00.00 00.00 00.00 00.00
00.00 04.00
::
l~ ~: ~: ~ i: ~ i o~ i ~ ~ i i~ i ~ ~ i ~ ~i iii ~ ~ ~~ ~ i ~ i ~: i ~ il Custml Indent: Custor~ ~Hdth:
Dash Width: Dash Spacing:
0f.L00 013.1313
013.1313 1313.1313
II]
36.00
• t
List: Shown enables --+"IIIim!!m+-_ Table Rule List: Shown
fractional pts III the ruling options in this dialog box.
C§j[J I Cancel I ::::::::::::::::::::::::::::::::::::::::::::::::::::::::::::::::::::::
Figure 11·12. To make a tag's name appear on the Assignment List in Table mode, select Table Rule List: Shown from any ruling lines dialog box.

Table Edit mode 601
rule you can create in this dialog box can be used in Table Edit mode by selecting the tag from the Assignment List.
Once you choose Table Rule List: Shown from any ruling line dialog box, it affects the other two ruling line dialog boxes as well. This action causes a tag name to appear on the Assignment List in Table Edit mode.
A tag doesn't have any effect in Table mode unless you define settings for the ruling line. By typing the height and spacing choices you want, you determine the appearance of ruling lines in Table Edit mode. A tag can have ruling line settings that are active in Table Edit mode, but not in Paragraph mode. In practice, however, it is best not to use text paragraphs to carry rule settings for tables. Instead, create separate tags whose only function is ruling line effects.
Modifying ruling line tags
Modifying tags that apply to lines is a bit tricky and can be confusing. You apply ruling lines in Table Edit mode, but you modify them in Paragraph mode. To do so, enable Paragraph mode and apply the tag to any paragraph. Select the Ruling Lines Above or Below dialog box. Make sure Table Rule List is set to Shown. Now change the settings of the ruling lines.
Editing a table Once you've set up your table, you can easily modify settings for individual cells, groups of cells, or the entire table. Some editing commands are found in the Assignment List in Table Edit mode. You will find other editing commands in the Edit menu. As shown in Figure 11-13, the Edit menu options change when you are in Table Edit mode.
The first step in modifying a table is to select the cell, or group of cells, you want to adjust:
• Enable Table E4tt mode.
• Place the cursor at ~he beginning of the section.
• Press and hold the mouse button as you drag to the end of the area you want to select.
When you release the mouse button, the selected area is high-

602
Current Selection Box
Chapter Eleven: The Professional Extension
.................................................. -tws-IISI!ISISIIII_-~SiSIIIIIIlII'j~-IIIM2W!l-MI!IIi
Figure 11·13. The Edit menu shows different choices in Table Edit mode.
lighted with dotted lines. You can also see the range of cells selected in the Current Selection Box (Figure 11-14).
Figure 11·14. You can confirm your choice of cells by examining the range shown in the Current Selection Box.
The Shift-Click method works in Table Edit mode, too. To enlarge or reduce a selection, hold down the Shift key while you click again at the new ending point. Users of mouseoriented spreadsheet programs such as Microsoft Excel should be immediately familiar with the table editor's method of selecting a range of cells.
Once you have selected a range of cells, you can insert rows or columns; cut, copy, and paste rows or columns; change column

Table Edit mode 603
widths; apply cell attributes; apply tags to rules; and apply global changes to cells.
Cut, copy, and paste commands work the same way they do in other modes. Select any portion of a row or column, and choose Cut or Copy from the Edit menu. You will be asked if you wish to cut rows (cut everything on both sides of the selection) or columns (cut everything above and below the selection). You can also cancel the operation. The same keyboard shortcuts apply in Table mode as in all others.
After it is cut or copied, the row or column is placed in the Table Clipboard. It can then be pasted to a different area of the table or to another table altogether. If you select the entire table, Ventura asks you to verify that you want to go forward with the operation.
-.. NOTE: You do not have to highlight an entire row or column to cut or copy it. Select a single cell, then choose the editing command you want.
To apply global changes to the table, enter Table Edit mode, select any portion of the table, and choose Edit Table Settings from the Edit menu (or press Ctrl-D). This brings up the InsertlEdi t Table dialog box, allowing you to change any of the settings entered when the table was first set up.
Column widths can be changed in two ways: with the mouse or with a dialog box. To change column widths with the mouse, place the cursor in the middle of the column you want to change. Hold down the Alt key, then press and hold the mouse button. When vertical rules appear from top to bottom on the screen, move the cursor right or left to change the column width (Figure 11-15).
You can also change column widths by choosing the Set Column Width command from the Edit menu (or press CfrlC). The Table Column Widths dialog box appears (Figure 11-16). To set columns widths, first select the correct column number. Then choose whether you want Fixed or Variable widths, and enter the number. Repeat for each column you want to change.
Fixed-width columns are set at the measurement you enter. Variable-width columns use any space left over when fixed-

604 Chapter Eleven: The Professional Extension
Figure 11-15. You can change column widths on screen by holding down the Alt key while dragging with the mouse.
Spl:lt Ce~ls
III Colurm NUI~ber: I. I 1 I .. I Width Setting: Fixed
Fixed Width: 07.051 picas & points I.h~l'.i(.~bl1.~ IUdt.h: 149f.! proportions
--'.g
Z_HIDOEN
Z_SINGLE
Z_DOUBLE I::]!L] I Cancel I I~~~--
Figure 11-16. The Table Column Widths dialog box.
width columns have been set. The number you enter determines how the leftover space is allocated. If Column 1 is set at 3 and Column 2 at 1, the first column gets three times as much space as the second. You can also use percentages for the variable width. However, you must use percentages for all the variable columns, and the percentages must add up to 100.
Making changes with the Assignment List
The Assignment List in Table Edit mode offers a variety of tools for modifying tables. The top of the Assignment List

Table Edit mode
Joined cells
605
contains commands for inserting rows or columns. Just select the cell or cells after which you want to insert the row or column. Then select the command from the Assignment List. Ventura presents a dialog box telling you how many rows or columns it will insert and asking for confirmation. Click on Yes and the rows or columns will be inserted. To determine how many rows or columns to insert, select that same number when you drag the mouse across the cells.
The Assignment List also contains two commands for joining and splitting cells. In some cases, you may want to create one large cell from two or more adjacent cells (Figure 11-17) .
... ".., .... _w. ................. ""'_ .... -, - .. ,.
01"." ......... - ....... -.. ... Cll41'C11\. ...-TXl.N' ....
....... ....... .,....,.,111. ..... TOO.lllliI ....
....""' .... -II. 1W\ ............. ar ..... ... .., ~ ........
Figure 11·17. The large white spaces in this table were created by joining cells.
First select the cells you want to combine. Then click on Join Cells in the Assignment List. If you change your mind, you can separate them again with the Split Cells command. If the joined cells have text, only the text from the upper left cell shows in the new large cell. However, if you split the cells, the original text reappears. Joining cells has the effect of hiding the rules and the text. Even though they are hidden, Ventura still treats each cell as a separate entity.
You can also apply a background pattern with the Assignment List. You can apply a tint - either a color or shade of gray-

606 Chapter Eleven: The Professional Extension
to any cell or group of cells. First select the range you want to change. Then choose Set Tint from the Assignment List. Ventura asks you for the color and pattern. If you do not like any of Ventura's predetermined shades of gray (patterns), you can create alternates. Tint the cell(s) with a color. Then use Define Colors from the Paragraph menu to redefine that color as a shade of gray instead.
Creating tables in a word processor You can create tables in advance with a word processor, provided you take two steps. First, you must insert the proper tags to define the beginning and ending point of the table, and the number of columns. (If you like, you can specify other settings at the same time.) Second, you must type the text in a special format that Ventura can interpret as table text.
Inserting table tags
To create a table within your word processor, you must observe several rules very carefully. At a minimum, Ventura requires the following four pieces of information:
• The table begin tag, @Z_TBL_BEG = . This tells Ventura that the text that follows should be placed in a table.
• The number of columns, using the COLUMNS(n) command. This should follow immediately after the table begin command, in the same paragraph.
• The data in each row of the table. Each row should be entered as a single paragraph, with a comma and space separating each column within the row. (If you want to use a comma within a cell, use a double comma (,,) to tell Ventura.
• The table end command, @Z_TBL_END = . This demarcates the end of the table data.
Figure 11-18 shows this minimum set of commands within a text file. It is important that you follow these specifications to the letter; ifnot, Ventura may refuse to accept your table when you load the text file. Also, notice that the minimum commands given above will produce a very plain, unformatted

Table Edit mode 607
able- ..@z - TBL_BEG = COLUMNS (3) Beginning of t
First item, Second Item, Third Item
Data rows -::::::: --.. Another Item, Next Item, Following Item
Blank row
Literal comma
End of table
, , , Last Row" with a real comma, Next Item, Last Item
.... @Z TBL END = -
Figure 11·18. Example of minimum level of formatting required for creating a table in the word processor.
table that you will need to modify in Ventura's Table Edit mode.
In addition to these commands, you may want to enter more detailed information about your table within the word processor. Table 11-1 shows the optional table formatting commands that can be inserted in your word processor.
Pre tagging in the word processor
By default, Ventura assigns the tag Table Text to any text within your table. If you would like to change the tag name assigned to the columns or the headers in your table, use the @Z_TBL_HEAD = command or the @Z_TBL_BODY = command for header rows or table body, respectively. For example, to assign different tag names to the four columns in a table, you would enter the command:
@Z_TBL_BODY = Tablel, Table2, Table3, Table4
Similarly, you can predefine the ruling lines within your word processor by inserting the BOXO, HGRIDO, VGRIDO, or RULEO commands.
Creating tables with a spreadsheet program Creating tables in a spreadsheet has two aspects: (1) working correctly inside the spreadsheet and (2) bringing the table into Ventura.

608 Chapter Eleven: The Professional Extension
Table 11-1. Table formatting commands.
Command Description Required? Examples
Required @Z_TBL_BEG = Defines beginning of table (Must be the first @Z_TBL_BEG =
item)
Required. Comes @Z_TBL_BEG = COLUMNS(3) COLUMNS(n) Defines number of columns immediately after @Z_TBL_BEG= COLUMNS(4)
@Z_TBL_BEG =
DIMENSION(IN)
DIMENSION( ) Defines dimensions used in Optional DIMENSION(PT)
table DIMENSION(CM) DIMENSION(PI)
Defines width of columns in CO~WIDTHS(.5, 1.5,2)
COLWI DTHS( ) dimensions specified above, or Optional COLWIDTHS(E2,E1 ,E1 ,E1) in number of proportions. COLWI DTHS(12,E2,E1) En specifies n proportions
Optional
WIDTH() Defines overall width of custom (if not specified, WIDTH(4.5) table uses width of cur-
rent text colmn)
INDENT( ) Defines indent of table from text Optional INDENT(1.00) column for custom table INDENT(2IN)
ABOVE() Space above table Optional ABOVE(S.5) ABOVE(2PD
BELOW() Space below table Optional BELOW(1.0) BELOW(13PT)
VJTOP() Amount of vertical justification Optional VJTOP(2)
allowed above table VJTOP(15PT)
VJBOT() Amount of vertical justification Optional VJBOT(6) allowed below table
HGUTTER( ) Space allowed between Optional HGUTTER(12) columns of table HGUTTER(1 PI)
VGUTIER() Space allowed between rows of Optional VGUTTER(7)
table VGUTTER(1 PI)
BOX() Specifies name of tag used for Optional
BOX(Z_DOUBLE) lines around table BOX(Z_SINGLE)

Table Edit mode
Command
HGRID()
VGRID()
KEEP()
RULE()
@Z_TBL_HEAD =
@Z_TBL_BODY=
@Z_TBL_END =
609
Description Required? Examples
Specifies name of tag used for Optional HGRID(Z_SINGLE)
lines between rows HGRID(Z_DOUBLE)
Specifies name of tag used for Optional VGRI D(Z_ THICK)
lines between columns VGRID(Z_SINGLE)
Permits or disallows table to be Optional KEEP(ON)
broken KEEP(OFF)
Defines alternative rule type for Optional RULE(Z_THICK,ROC3 ... R2C5)
range in table RULE(Z_SINGLE,R5C5 ... R5C6)
Defines tag names for header Optional @Z_TBL_HEAD =
rows Head2,Head3,Head3
Optional @Z_TBL_BODY = TableLeft, Defines tag names for non- Must precede TableCenter,TableCenter,
header rows row(s) that it TableRight modifies
Defines end of table Required @Z_TBL_END= Must be last item
Creating the table
Text from a spreadsheet can be entered if first converted to PRN format or another ASCII format. To accomplish this, format your spreadsheet as desired, access the print range feature, and print to file rather than the printer. In Lotus 1-2-3, the command is:
/PRfile.prn
Specify the desired range and then select GO to produce the output file.
Be sure to make your column widths large enough, since Ventura requires a minimum of two space characters between any two cells in the same row.
Bringing a spreadsheet table into Ventura
Once the spreadsheet has been correctly formatted and printed to disk, it is a simple matter to convert it to a Ventura table. Run Ventura and enter Text mode. Place the cursor at

610 Chapter Eleven: The Professional Extension
the position where you want the table to appear. Then select Load TextlPicture from the File menu, just as if you were importing a text file. One of the options in the dialog box is "PRN-to-Table." Select that, then select Text Cursor as the location (Figure 11-19). Click on "OK," then select the print file you created in your spreadsheet program. If it doesn't show up on the item selector, be sure you are looking at the proper subdirectory and that the file filters display the PRN file extension.
LOAD TEXT/PICTURE
Type of File: 1m I Line-At't I I hlage I Text Fot'l1lat: I Genet'ated I ~ II~ot'dStat' 3 I I NS 4.13/5.13 I
I ~lS-Not'd I I ~lordPerfect I I Xyl'Irite I I a-Bit ASCII I
I Nt'iter I I Nultit1ate I ~ I NordPerfect 5 I
1:1 of Files: liD I Several I Destination: I List of Files I I Text Clipboard I '@'3"HiM
Figure 11·19. To load a spreadsheet print file into a Ventura table, select Text Format: PRN-to-Table and Destination: Text Cursor from the Load Text/Picture dialog box.
The PRN file is converted to a text file with the extension TBL, then pours onto the page following the text cursor. Any changes made to the table text will be reflected in the TBL file, not the original PRN file. Figure 11-20 shows an example of a table created from a spreadsheet file. Figure 11-21 shows how the same table would look if it had been loaded as a regular text file.
You can use a similar procedure to import files from dBase III Plus and other database management programs. Each row in the table will correspond to a record, while cells will constitute individual fields. The simplest way to do this is to create an SDF file from the database. The problem is that the SDF format does not place two spaces between each field; if any fields are completely filled, they will not show up correctly in the table. '!\vo alternatives are available. You can set up a report format with two spaces between each field and print

Creating and editing equations 611
PC Users
Mac Users
PCDTP
Mac DTP
TOTAL DTP
PC LANs
Mac LANs
1987 & prior 1988 1989 1990 1991
14000 5000 6200 7000 8000
1500 850 1250 1550 1800
105 170 265 425 575
185 280 415 520 620
290 450 680 945 1195
450 215 285 350 460
100 78 130 195 240
Figure "·20. This table was imported using the PRN-to-Table file format.
1987 & prior 1988 1989 1990 1991
PC Users 14000 5000 6200 7000 8000
Mac Users 1500 850 1250 1550 1800
PCDTP 105 170 265 425 575
MacDTP 185 280 415 520 620
TOTALDTP 290 450 680 945 1195
PCLANs 450 215 285 350 460
MacLANs 100 78 130 195 240
Figure 11·21. How the table above would look if loaded as a regular text file.
the report to disk. Or you can write a simple program that does the same thing.
Creating and editing equations The Professional Extension's equation editor can create complex scientific and mathematical equations, including true fractions, Greek characters, and mathematical symbols.
To create an equation:

612 Chapter Eleven: The Professional Extension
• Enable Text mode.
• Select Ins Special Item from the Edit menu (or hit Ctrl-C).
• When the secondary menu appears, choose Equation (or press F4). The Equation Editing screen appears (Figure 11-22).
Desk File Edit Viel4 Chapter Frallle Paragraph Graphic Options
i·+-1-o I i~ +2
Figure 11·22. You enter codes into the top half of the equation editor. The results show in the bottom half, beneath the double lines.
The equation screen has two parts. In the top half, you enter the codes for the equation. In the bottom half, you preview the effect of those codes. The bottom half, in other words, shows what the equation will look like in text. An equation can appear anywhere in the text stream of a document.
When you return to text mode, whatever shows below the double lines appears in the text.
Creating the equation
You enter equations as abbreviations that describe the symbols to be included. After you enter the abbreviations, the actual equation appears below. Here's a simple example of an formula entered in the equation editor:
sqrt { x sup 2 ,.., + ,.., pi sup 2 }.
The result is:

Creating and editing equations 613
Sqrt is the Equation editor's code for the square root symbol.
The brackets "0" group part of the equation together.
Sup creates superscript "2" after x and pi.
The tilde ( .... ) enters a space between items. You must use the tilde character to create a space. You cannot create a space by striking the space bar.
pi creates the Greek symboln.
Note that characters in the final formula appear in italicized form. Except for mathematical operators like "sin" and "cos," all characters appear as italics.
The equation editor recognizes certain parts of an equation as an expression. An expression is any single character, a code such as "pi," a group of characters not separated with a space, and anything placed within brackets. In the exam pIe above, { x sup 2 .... + .... pi sup 2 } is an expression.
More than 100 codes and commands are recognized by the editor. The Xerox Ventura Publisher Reference Guide provides a complete list. Codes (or special words) are abbreviations that produce special characters or symbols, such as "pi," which produces the symbol "n." Codes can be further broken down into symbol codes and romanized codes. Symbol words, such as "pi" are converted into their equivalent symbols. Romanized words, such as "sin," "cos," and "log," are printed in normal, rather than italicized type.
Commands modify codes, words or numbers. The code "sqrt," for example, creates a square root symbol that grows to fit the following expression. ''bold'' places the following expression in boldface. In most cases, commands modify the expression that follows (not the expression that precedes). Commands also fall into several categories. Some commands change the font for the expressions that follow. Some commands create math symboIs or change the placement of the following expression. Typing X over Y produces the equation ~, for exam pIe. And
some commands produce diacritical marks. Unlike other commands, diacritical marks modify the preceding characters. For example, xyz bar produces xyz.
When entering equations, there are a few things to remember:

614 Chapter Eleven: The Professional Extension
• Spaces must be placed before and after all codes. Otherwise, the code itself will be printed in the equation.
• Spaces are otherwise ignored in the equation editor. X+ Y and X + Y both appear as X+Y. The tilde character ( ,.., ) is used to insert a normal space and the caret character (A ) is used for a thin space.
• In most cases, equation editor commands modify the expression that follows. Commands that produce diacritical marks are the exception to this.
Formatting equations
Although an equation may appear to be a long chain of separate elements, to Ventura each equation is a single, separate entity. When moving the cursor, and copying or deleting equations, they behave as if they were a single text character. You can change the font size and other attributes as you would with any other text.
Equations can take up a lot of room on a line, both vertically and horizontally, so it's a good idea to set Grow Inter-Line to Fit: On in the Paragraph Typography menu. This way, line spacing will be adjusted to accommodate large formulas.
Entering equations in a word processor By far the easiest way to use Ventura's equation function is to enter equations directly into Ventura. That way you can instantly see the results of your codes, and change them as necessary. Still, some companies may not have the luxury of a Ventura workstation for each and every author. In those cases, you may want authors to enter the equation in~ their word processing files. You can proof and correct these equations after you bring them into Ventura.
You can enter formulas directly in your word processor using the same codes and commands described above. Each equation must be preceded with <$E and followed with a close bracket >. In other words, you use the same command language as you do in the on-screen editor. The only difference is that you place the expression inside bracket codes. Thus, if the expression in the editor is left (pile {x above y above z} then the

Creating and using cross references 615
equivalent word processor code is <$Eleft {pile {x above y above z}>, which produces:
{~ See Chapter Three, "Creating Text," for a complete explanation of preformatting and bracket codes.
Creating and using cross references The Professional Extension's cross reference feature is an enhancement of the cross reference function in Ventura 2. With it, you can reference any figure, table, caption, or text passage within the text. If the page number, figure number, or other variable information changes, the text reference changes accordingly.
Suppose you're editing a book on the History of Desktop Publishing. On page 124, the author mentions the famous Acme Laser Printer, which was discussed earlier in Chapter Two. You can insert a sentence that says, "The Acme Printer, as discussed on page," leaving a blank after "page." The cross reference feature causes Ventura to substitute the correct page number in place of the blank. If the first mention of the Acme Laser Printer is on page 20 in Chapter Two, the above sentence will read, "The Acme Printer, as discussed on page 20." Later, if you add enough illustrations to Chapters One and '!\vo that the mention moves to page 25, the cross reference feature causes the sentence to read, "The Acme Printer, as discussed on page 25." The page number changes as the book is expanded.
8ross-referencing is a powerful function, but it has some dangers. First, you must often know in advance what you want to reference. If you do not, you will have to return to previous chapters to insert markers. Returning to previous chapters negates most of the speed and efficiency advantages of cross referencing.

616 Chapter Eleven: The Professional Extension
Second, the cross reference does not appear in the text until you use the Multi-Chapter dialog box to Renumber the chapters. Until that time, only a degree symbol ( 0 ) shows. Suppose you plan to insert a long phrase such as "Inside Xerox Ventura Publisher." You can see that the formatting of many lines and paragraphs will change when this long phrase is substituted in place of the degree symbol. Thus, to accurately format a series of chapters, you must use Multi-Chapter to Renumber them before you format. Then, in case you moved any referenced items when you formatted, you must renumber and reformat again to catch any changes.
Despite these shortcomings, the cross..;reference feature has numerous applications for professional publishers. Newsletters, newspapers, and magazines can use it to create Continued From and Continued To references that remain correct even if pagination changes. Book publishers can enter references to figures, tables, pages, and chapters without worrying about where the referenced text or graphics have moved. You can also use it for mail-merge functions, inserting variable information at reference points to create customized documents.
In this section, we will explain the key applications of the cross reference function, and provide some examples of its use.
The simplest application is inserting the current page or chapter number, a feature identical to the cross reference function in Ventura 2. But the Professional Extension adds the ability to reference text or frames in other pages or chapters. To do this, you must create a link between the reference and the text or frame to which it refers.
Inserting the current page or chapter number To insert a reference to the current page or chapter number, enter Text mode and follow a procedure similar to that used with the version 2 cross reference feature:
• Place the cursor where you want the page or chapter number to be inserted .
• Select Ins Special Item from the Edit menu, or press Ctrl-C.
After the pop-up menu appears, select Cross Ref. or press the
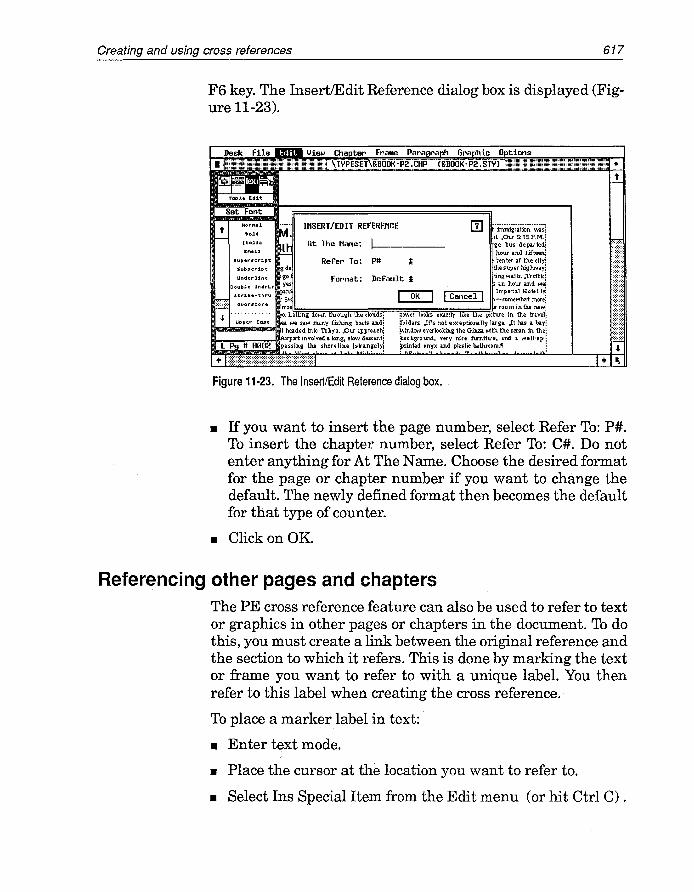
Creating and using cross references 617
F6 key. The InsertlEdit Reference dialog box is displayed (Figure 11-23).
INSERT/EDIT REFERENCE
At The Nallle:
Refe .... To: PI:I ~
FO .... lllat: Default ~
W!s:
5:15P.M.; bus deparled:
Ind fifteen: of the city:
highway: .Trame: and we:
.1 Holel is: In-solnew~Lllt more;
~s~~~~~~~=="'~~~~~.~~ i:i;'~r~~l Jt's not exception ny large. Jt hls I bay; over1ooldr,s: the Gin •• with the ocean in the: und, Yery niee !unit",e, Ind I wen·.p·: onyx Ind plastic bathroom.1I ;
Figure 11·23. The Insert/Edit Reference dialog box.
• If you want to insert the page number, select Refer To: Pi. To insert the chapter number, select Refer To: C#. Do not enter anything for At The Name. Choose the desired format for the page or chapter number if you want to change the default. The newly defined format then becomes the default for that type of counter.
• Click on OK.
Referencing other pages and chapters The PE cross reference feature can also be used to refer to text or graphics in other pages or chapters in the document. To do this, you must create a link between the original reference and the section to which it refers. This is done by marking the text or frame you want to refer to with a unique label. You then refer to this label when creating the cross reference.
To place a marker label in text:
• Enter text mode.
• Place the cursor at the location you want to refer to.
• Select Ins Special Item from the Edit menu (or hit Ctrl C) .

618 Chapter Eleven: The Professional Extension
• Select Marker Name or hit F7 from the menu that pops up. The InsertlEdit Marker Name dialog box appears (Figure 11-24).
INSERT/EDIT MARKER NAME
Marker Nal1le: 1-1 ___ _
~olderli. Jt's not exceplioJ\ll1y large. Jt hlS I
lHindow overlooking the Ginn with the ocean in ?la c kgro und, Vir y ni c e flJl"nituri, lnd I ~inted onyx lnd pllstic bathroom.1I
Figure 11·24. The Marker Name dialog box lets you mark a point in text that can later be referenced.
• Enter a marker name.
Ventura does not distinguish between upper and lower case letters, so the word "SECTION" will be regarded as the same as "section." It's a good idea to write the marker name on a piece of paper so you can recall it when entering the reference.
To place a marker in a picture or text frame, go back to the familiar Anchors & Captions dialog box. If you recall, Anchors & Captions allows you to enter a label to anchor a frame to the text that refers to it. The same name used to anchor the frame to text is used for cross-referencing purposes. First, enter Frame mode, then:
• Select the frame you want to refer to.
• Select Anchors & Captions.
• Enter a unique label name in the Anchor Name field.
• Click on OK.
The marker names you've entered represent one end of the cross reference link. Now you can refer to them by completing the link. You essentially follow the same procedure described above for inserting the current page or chapter number, with

Creating and using cross references 619
one additional step. Enter Text mode and place the cursor where you want the page or chapter number to be inserted. Then:
• Select Ins Special Item from the Edit menu, or press the Ctrl-C. key
• Select Cross Ref. from the pop-up menu or enter F6.
• After At The Name:, enter the marker name for the text or frame you want to refer to.
Follow the same procedure used to insert the current page or chapter number, entering the code for the kind of counter you want to generate and a new format if you want to change the default. After you click on OK, you will see a degree symbol ( 0 ) instead of the cross reference (if you do not, make sure you have selected Show Tabs and Returns in the Options menu). To generate the actual number, you :tnust use the Multi-Chapter option in the Options menu to renumber the publication (See Chapter Eight). After adding each chapter to the file list, click on Renumber to produce the cross references.
In addition to the page or chapter number, you can also create automatic references to other kinds of information: the section number in which the referenced text or picture appears, a figure number, a table number, caption text, or variable text. This is done by choosing the appropriate code from the Refer To: field in the InsertlEdit Reference dialog box. The choices are summarized below:
P#, for Page Number, inserts the page number of the text or frame marked earlier.
C# inserts the chapter number of the referenced text or frame.
F# inserts a figure number for a referenced frame. This is the same as the Figure number generated with the Anchors & Captions features in Frame mode.
T# inserts a table number for a referenced table. This does not apply to tables created with the Table Editor, but to tables placed into frames (see below).
S* inserts the section number preceding the referenced text or frame.

620 Chapter Eleven: The Professional Extension
C* inserts the caption from a referenced frame if a caption has been entered under Anchors & Captions.
V* inserts a variable text reference (see below).
In some cases, you may want to generate multiple references. The most common example is combining a chapter and page number, as in: "The Acme Laser Printer, as mentioned in Chapter Two, page 20." To do this, you must create two cross references that refer to the same marker name in Chapter Two. One cross reference would refer to the chapter number, using "One" for the format to indicate that the reference should be spelled out. The other cross reference would refer to the page number, with "I" as the format to indicate that Arabic numerals should be used.
Cross referencing tables One confusing aspect of the cross reference feature pertains to tables. In version2, most tables used in Ventura publications are placed in frames. With the Anchors & Captions dialog box, you can use a table counter to label and caption table frames just as you use a figure counter to label and caption picture frames. The T# code applies only to these table frames. It will not work with tables created in text with the table editor.
There is a way to reference tables created in Table Edit mode, however. You must create a unique tag for table captions, and use Auto-Numbering to create section numbers. Each section corresponds to \a table number. You can then place a text marker in the caption. When you create the cross reference, enter S*, for section number, in the Refer To: field. At the Name: should refer to the marker name you just created for the frame. It's a somewhat cumbersome technique, but it will work. Remember to use just one of the two techniques -frame or table editor - to create the tables if you want to number them consistently.
Variable text references Variable text references work in a similar manner to other cross- references. If you've ever used a merge-print program to generate form letters, this feature should be easy to grasp. In a merge-print application, you set up a form letter in which

Creating and using cross references 621
variable names are used for pieces of information that will be inserted from a database file. For example, the letter might begin "Dear &firstname&." When the merge-print function is invoked, the program prints a series of letters in which first names from a database are inserted in place of the variable "&firstname&."
With the variable text reference feature, you can insert variable names throughout your document and replace them with any desired text in a single operation. Unlike merge-print programs, however, the PE does not show the actual variable name. Instead, you enter the variable name as a cross-reference. A degree symbol then appears in the text location to indicate the presence of the variable.
Suppose you want to create a "generic" proposal you will send to a number of companies. At certain places in the document, you want to refer to the particular company being addressed. To do this, place the text cursor at the location where you want to insert the variable, and go to the InslEdit Reference dialog box. Then:
• In the At the Name: field, enter your variable name, in this case "Company."
• In the Refer To: field, select V*. Notice that the format field is grayed.
• Click OK.
Repeat this process at each point in the generic document where you want to reference the company name. When you are ready to print a version of your generic chapter that is directed at a specific company, you must insert a variable definition in the chapter that instructs Ventura to replace each occurrence of the reference "company" with the actual company name.
The variable definition can be placed in any location in the document that precedes the reference. It's a good idea to insert your variable definitions at the beginning of the first chapter, since they'll be easy to locate and edit.
To insert the variable definition:
• Enter Text mode.

622 Chapter Eleven: The Professional Extension
• 'Select Ins Special Item from the Edit menu.
• Choose Variable Def (or press F8) from the pop-up menu. The InsertlEdit Variable Definition dialog box appears (Figure 11-25).
:::: i'.!
INSERT/EDIT VARIABLE DEFINITION
Variable NaMe: COlIIPany __ _
Substitute Text: Micro Publishinslt--_________ _
exactly like the picture in the Jt'$ not exceptiol'lillly large. Jt has overlooking the Ginn with the o.eln
very nice f\rnit\re, and a and plastic bathroom.1I
Figure 11·25. The Insert/Edit Variable Definition dialog box allows you to substitue new text for every occurrence of a reference (Company in this case).
• Enter the variable name and the text you want to substitute for it. If the document is addressed to a company called "Micro Publishing," enter "Company" for Variable Name and ''Micro Publishing" for Substitute Text.
• Click on OK.
When the chapter is re-numbered, "Micro Publishing" will appear at each variable cross reference. To change the company, enter new substitute text in the Insert/Edit Variable Definition dialog box. The new name will appear when you perform the renumbering operation in the Multi-Chapter dialog box.
Editing the cross reference As we have noted, a degree symbol is used to indicate the presence of a cross reference or marker name in text (the symbol will not appear, however, if Tabs and Returns are hidden in the Options menu). When you place the text cursor just before the degree symbol, the Current Selection Box in

Creating and using cross references 623
the Side-Bar indicates whether the symbol refers to a reference, variable definition, or marker name. To delete the crossreference, simply delete the degree symbol. To edit .the reference, select Edit Special Item from the Edit menu.
In Chapter Three, we showed how bracket codes can be used in your word processor to achieve many effects otherwise created in Ventura Publisher. You can also enter cross references in your word processor. Codes for doing this are shown in Table 11-2.
Table 11-2. Word processor codes for cross references.
Type
Marker
Variable Definition
Reference
Code Example
<$M[label]> <$M [Widget description]>
<$V[label]definition> <$V[Company]Micro Publishing> <$V[Product]ModeI123-Q>
<$R[type ,label, format]string> <$R[C#,lntro,ONE]> Type = C#, P#, F#, T#, S*, C*, or V* <$R[F#,Widget photo,1 ]000> Format = 1, A, a, I, i, ONE, One, or one <$R[C*,map label,i]> string = Optional temporary value <$R[V" ,Company]XYZ Corp.>
In some cases, you may accidentally create a cross reference that refers to a non-existent marker name or frame anchor. If so, the mistake won't show up immediately. But when you try to renumber the publication, you'll get an error message indicating the mistake. The PE generates a text file listing where the mistake occurred and the marker name it could not identify. You can load this file into a frame or study it with a word processor to see where the problem lies. The file uses the GEN extension for generated files. The file name consists of the first five characters of the publication name plus "ERR."
Cross reference examples Let's show some examples of using the cross-referencing feature to give you a better idea of how it works. We'll look at how a magazine might use the feature for "continued on" and "continued from" page references. Then we'll see how cross references might be used in History of Desktop Publishing.

624 Chapter Eleven: The Professional Extension
Magazine
Suppose you're a magazine editor who wants to continue an article from Page 15 to Page 52. You want to have a line at the bottom of the last column on Page 15 that says, "Continued on Page 52." And on Page 52, of course, you want a line that says, "Continued from Page 15." But there's always the possibility that the magazine's advertising sales force will do a betterthan-usual job and sell a few more ad pages. Depending on how the ads are placed, either section of the article might have to move.
Frames are placed on each page, with the article jumping from one to the other. Go into Frame mode, and give each frame an anchor name by means of the Anchors & Captions dialog box in the Frame menu. For example, you might use "Part One" for the first frame and "Part '!\vo" for the second. Then place smaller frames at the bottom of the first frame and the top of the second frame. These will contain the "continued" text. You do not need to give them an anchor name, but for the purposes of discussion we'll call them "Part One Jump" and "Part '!\vo Jump."
Enter Text mode, and type the following into the small "Part One Jump" frame we just created on page 15:
Continued on Page
Be sure to leave a space after the word "Page." Select Ins Special Item from the Edit menu (or hit Ctrl-C), then CrossRef from the pop-up menu that appears (or hit F6). The InsertlEdit Reference dialog box is shown. After At The Name:, type in the anchor name for the "Part '!\vo" frame. Select P# in the Refer To: field. You can also change the numeric format if you want to have it read "Continued on Page Fifty-'!\vo" instead of "Continued on Page 52."
Now go to the "Part '!\vo" frame on page 52. Enter "Continued from Page" in the jump frame, and follow the same procedure described above. Enter the anchor name "Part One" in the Insert/Edit Reference dialog box. As the pagination of the magazine changes, the "Continued To" and "Continued From" page references will change accordingly.

Creating and using cross references 625
Book
Earlier, we described a book on the History of Desktop Publishing. If you recall, the author mentions the Acme Laser Printer, which was first described earlier in the book. The editor, using the PE, wants to add a cross reference that will remain accurate even if the page number of the first reference changes.
The original mention of the printer is on page 20 in Chapter Two. The second mention is on page 124. It reads, in part, "The Acme Printer, as discussed on page x," with a blank left in place of the "x." To insert the cross reference, follow the same general procedure described for the "continued" references. The difference is that instead of referring to a frame, we'll refer to a section of text. While in Text mode:
• Place the cursor at the point of the original mention in Chapter Two.
• Choose Ins Special Item from the Edit menu (or hit Ctrl-C).
• Select Marker Name from the pop-up menu (or press F7).
• Enter a marker name, such as "Laser Printer," in the In-sertlEdit Marker Name dialog box.
Go back to Page 124, where you again refer to the printer. Type "The Acme Laser Printer, as discussed on page" leaving a space after the word "page." Then go to the Cross Reference dialog box as we did in our magazine example. Enter "Laser Printer" in the At The Name: field, and P# in the Refer To: field.
Variable Names
Suppose Acme Laser Printers is the target of a hostile corporate takeover bid by Discount Laser Printers. It is possible that the name "Acme" will have to be changed to "Discount," but you're not sure. One way out of this dilemma is to replace the brand name of the printer with a variable. You can then go back and replace the variable with "Acme" or ''Discount'' as the situation warrants.
The first step is to insert a cross reference at each mention of the brand name "Acme." Enter a variable name, such as "Brand," in the At the Name field. Enter V* in the Refer To field. The V* code causes the Format field to be grayed.

626 Chapter Eleven: The Professional Extension
Now you can record your variable definition. Go into Text mode and position the text cursor, preferably on the first page of the first chapter. Select Variable Def(or hit F8) from the Ins Special Item menu. Enter ''Brand'' in the variable name field. Enter the desired company name (either "Acme" or ''Discount") in the substitution text field. When you renumber the publication, the chosen variable, "Discount" or "Acme," will appear at each cross-reference point. To change it again, return to the InsertlEdit Variable Definition dialog box and enter the new substitution text.
In some cases, this operation may be more easily performed with a word processor's search and replace function. But the variable name feature is helpful if:
• You don't want to go back to your word processor.
• You don't want to replace every mention of a phrase.
• You want to replace several variables at once.
• You want to make changes in multiple chapter files.
Vertical justification This section details the functions and commands of the PE's vertical justification feature. It covers the following areas:
• uses of vertical j ustifica tion
• differences between feathering and carding
• applying vertical justification
Uses of vertical justification Vertical justification is a handy feature that allows for more attractive page designs. Earlier, we discussed justification as an aspect of horizontal text alignment. Justified columns are evenly aligned on both sides, with spaces evenly inserted between characters and words to assure uniform width.
Vertical justification places spaces between lines and paragraphs to assure columns of uniform height. Figure 11-26

Vertical justification
Figure 11·26. The page on the left has vertical justification on; the page on the right has vertical justification off.
627
shows two versions of the same column, one justified and one not justified. Extra spacing is used in the justified column to make it reach the bottom of the page. The unjustified column, without any extra spacing, does not reach the bottom.
The need for vertical justification can arise in many situations. You may be at the end of an article or section and don't have enough text to reach the bottom of the page. Or, if Keep With Next is used to link a headline with following text, the headline can be forced to a new column or page, again leaving space.
Widow and Orphan controls can also force text to a new column or page. It is possible to use spacing controls in Ventura to achieve uniform column length by placing extra gaps between frames, paragraphs or sections, but this is a time-consuming, trial-and-error effort. With vertical justification, the program can add spacing in an eye-pleasing manner according to rules that you specify.
The problem with vertical justification is that it can sometimes make a page look worse than it would if columns were unjustified. If too much space is added, gaps between lines and paragraphs can be so large that text blocks seem to be floating in the middle of a vacuum. On pages with multiple columns, spacing can move lines out of alignment with those in neighboring columns. Also, certain paragraphs or frames may not lend themselves to extra spacing.

628 Chapter Eleven: The Professional Extension
Fortunately, the PE lets you determine just how columns are vertically justified to avoid unattractive page designs. The order in which it performs justification also minimizes spacing problems. For each page element - frames, paragraphs, tables, and lines - you can define a maximum amount of space that can be added above or below. You can also set page elements so that no extra spacing can be added.
Carding versus feathering The PE uses two different forms of vertical justification: carding and feathering. They differ in the way they add space between frames, paragraphs and lines. Each has its pros and cons.
The carding option is related to Ventura's line snap feature (Figure 11-27). When it adds space between page elements, it uses exact multiples of inter-line spacing. Ifinter-line spacing is 12 points, carding will add spacing in units of 12, 24, 36 points - any multiple of12.
Desk File Edit View Chapter FraMe Paragraph Graphic Options
:Image dioitizerfor Macintosh :?~~ nn ;wntln onsunants •••••••••••
. ladram Coro, : ;>alette "!aatllre :Virt"n innllt rtiniti,,,r : '~5.nn : lM PC ClRnK. nOR ?1
:.-- • r,
: __ ........ "", .<.A • ...... "" ............ ....
: . • C>.
. '5551923 6666: : : .... : : ..... ~..:>O ..........
! ~;;;;;:-.modem II ; ;~~~·rf~~~~rl~~~~~csimile modem on eXDansion II~~
1<:""'" "Q., "".,<:: :~~5.nn
Figure 11·27. When carding, Ventura adds space in multiples of the line spacing.
The advantage of carding is that it allows even alignment of text across adjacent columns. If all spacing settings for paragraphs, frames, tables and other elements are set at multiples of inter-line spacing, text will be evenly aligned at its baseline.

Vertical justification 629
If any settings are not in multiples of inter-line spacing, alignment will be thrown off.
The disadvantage of carding is that it can sometimes lead to unattractive page designs, especially if justification is permitted between lines in a paragraph. In this case, some lines will have extra spacing, others will not. Also, there are some cases where carding will not permit justification unless you allow unacceptably large amounts of space between frames and paragraphs.
As we'll see below, the PE's vertical justification feature adds space according to a certain set of rules, adding space first between frames, then between paragraphs, and finally between lines. For each page element, you can set a maximum amount of space that can be added above or below. The program will try to add as much space as it can, up to the limits set by the user. If it cannot get the column to reach the bottom of the page, no justification takes place at all. And since carding further restricts the amount of space that can be added between page elements, it increases the possibility that the program will not be able to add enough space to achieve justification.
Feathering is analogous to turning the line snap feature off. The feathering option adds whatever space is needed to make a column reach the bottom of a page - up to the maximum amount set by the user - even if it causes body text in adjacent columns to go out of alignment. If14.5 points of space are needed between paragraphs to achieve justification, feathering will add it even if inter-line spacing is set to 12 points.
The feathering option generally results in more attractive page designs, since spacing is added in an even manner. This is especially noticeable if you allow spacing between lines in a paragraph. The downside, of course, is that you cannot have multiple-column layouts with evenly aligned text baselines.
In general, you should use carding for:
• Newsletters
• Newspapers
• Magazines

630
\
"
Chapter Eleven: The Professional Extension
• Any other document where even alignment across adjacent columns is important.
Use feathering for:
• books
• flyers
• brochures
• any other document where even alignment across adjacent columns is not important
Applying vertical justification Vertical justification is controlled from several areas in the PE:
• the Chapter Typography dialog box
• the Frame Typography dialog box (Frame mode)
• the Paragraph Typography dialog box (Paragraph mode)
• the InsertlEdit Table dialog box (Table Edit mode)
Global attributes for vertical justification are set in the Chapter Typography dialog box. They can be overridden in the Frame Typography dialog box, which has its own commands for setting justification within and around frames. The Paragraph Typography dialog box controls spacing above and below paragraphs and between lines within the paragraph. The InsertlEdit Table dialog box controls vertical justification above and below tables.
When the PE performs justification, it does so in a certain order. Space is first added between frames and surrounding text, up to the maximum amount allowed by the user. If the column still does not reach the bottom of the page, space is added between paragraphs, again up to the maximum amount allowed. Space is then added between lines in a paragraph (tables are treated like paragraphs for the purpose ofjustification). If the column is not justified after all this space has been added, justification is canceled and the original amount of space at the bottom of the page remains.

Vertical justification 631
Now we'll look at the specific steps you must take to use the justification feature:
• Turn it on globally for the entire document with the Chapter Typography dialog box .
• Override chapter settings for individual frames with the Frame Typography dialog box (if necessary).
• Specify paragraph settings with the Paragraph Typography dialog box.
• Specify table settings with the InsertlEdit Table dialog box.
Chapter Typography
Vertical justification is set globally for the entire chapter in the Chapter Typography dialog box in the Chapter menu (Figure 11-28). Here, you can turn on the vertical justification feature and set the maximum amount of spacing allowable around frames in the chapter. It can be invoked from any of Ventura's program modes.
Widows (Min Lines at Top): 2 t Orphans (Min Lines at BOttoM): 2- t
ColuMn Balance: OFF t Move Down To 1st Baseline By: Cap Height t
Pair Kerning: On t Vert. Just. Within FraMe: Feathering t Vert. Just. Around FraMe: Fixed t
Vert. Just. Allowed: 100.01 % At Top of FraMe: 01,00 picas & points
At BOttOM of FraMe: 01~00
Figure 11·28. The Chapter Typography dialog box controls the amount and type of vertical justification.
Your first choice in this dialog box is whether to use carding or feathering, which were described above. Whichever you choose, you can override it within individual frames. As mentioned earlier, carding should be used when text must be

632 Chapter Eleven: The Professional Extension
evenly aligned across adjacent columns. Otherwise, use feathering.
Vert. Just. Allowed globally increases or decreases the maximum amount of justification set for each page element: lines, paragraphs, tables, and frames. If maximum spacing for a certain paragraph were set at 12 points, entering 200 percent for Vert. Just. Allowed would double this maximum to 24 points. Normally it should be set at 100 percent.
Three settings allow you to control how spacing is added around frames:
• Vert. Just. Around Frame
• At Top of Frame
• At Bottom of Frame
Vert. Just. Around Frame determines whether a frame can be moved from a fixed position. If you set it as Moveable, space can be added above or below a frame. If space is added between paragraphs or lines above the frame, of course, the frame will move down. If you set Vert. Just. Around Frame to Fixed, space cannot be added to any lines, paragraphs or tables above the frame. This keeps the frame a specified distance from the top of the page. Frames should be fixed if you want to keep them in the same location on a page.
At Top of Frame and At Bottom of Frame are used to enter a maximum amount of spacing for all frames in the chapter. These settings can be overridden in the Frame Typography dialog box. If you set each at 24 points, no more than 24 points of spacing can be added above or below any frame in the chapter, unless you override the setting in the Frame Typography dialog box.
Frame Typography
In many cases, you may need to override the frame settings used in the Chapter Typography dialog box. You may want to permit more or less maximum spacing above or below a particular frame. You may want to turn off justification within a frame, or use carding instead offeathering. In these cases, you need to go to the Frame Typography dialog box in the Frame

Vertical justification 633
menu (Figure 11-29). Here you can override chapter settings for any particular frame or inserted page.
Widows (Min Lines at Top): Default I Orphans OHn Lines at Bottolll): Default I
Colullln Balance: Off I Move Down To 1st Baseline By: Default I
Pair Kerning: Default I Vert. Just. Within Frallle: Feathering I Vert. Just. Around Frallle: Moveable I
Vert. Just. Allowed: 100.0 % At Top of Frallle: 00.001 picas & points
At Bottom of Frallle: 00.00
Figure 11-29. The Frame Typography dialog box.
The dialog box contains five settings that affect vertical justification:
• Vert. Just. Within Frame
• Vert. Just. Around Frame
• Vert. Just. Allowed
• At Top of Frame
• At Bottom of Frame
vert. Just. Within Frame allows you to turn justification on or off for text within the frame. As with the equivalent Chapter Typography dialog box setting, you can choose between feathering and carding. If the global setting is for feathering, you can change it to carding within that particular frame.
vert. Just. Around Frame allows you to override global settings for whether frames are fixed or moveable. In most cases, the global setting allows frames to be moveable. But in certain cases, it may be importqnt to keep a frame in a fixed position on the page.
vert. Just. Allowed permits you to change the maximum amount of spacing allowed between elements within the

634 Chapter Eleven: The Professional Extension
frame. Suppose you allow a maximum of12 points of spacing above and below frames in the Chapter Typography dialog box. If you enter 200% for this setting, up to 24 points of spacing can be added between frames within this frame. This setting can be helpful if you add frames to an inserted page and you want to increase or decrease the allowable amount of spacing. You would select the frame and then change this setting.
At Top of Frame and At Bottom of Frame allow you to change the maximum amount of space that can be added above or below the frame.
Paragraph Typography
The Paragraph Typography dialog box (Figure 11-30) allows you to control maximum allowable spacing for lines and paragraphs. You can specify the amount of space that can be added above or below a particular paragraph, and how much can be added between lines within the paragraph. It is invoked from the Paragraph menu if a paragraph has been tagged. You can have different settings for each tag in your style sheet.
AutOMatic Pair Kerning: Off Letter Spacing: On
Tracking: Looser
Grow Inter-Line To Fit: On
t t Up to: 0.1001 EMS t 0.000 EMS
MiniMUM Space Width: 0_600 * (space width) = 0.150 EMS NorMal Space Width: 1.000 * (space width) = 0.246 EMS
MaxiMUM Space Width: 2.000 * (space width) = 0.491 EMS
Vert. Just. At Top of Para: 01,00 picas & points At BOttOM of Para: 01,00
Between Lines of Para: 00,00
Figure 11·30. The Paragraph Typography dialog box.
Use the Paragraph Typography settings if you want the PE to add space between paragraphs or lines of text to achieve justification. In many cases, columns cannot be attractively

Vertical justification 635
justified if space is added only to frames. A large gap at the bottom of the page is usually less of an eyesore than large gaps between frames within the column. For this reason, it is often wise to allow some extra spacing between paragraphs to achieve justification.
The Paragraph Typography dialog box has three settings:
• Vert. Just. at Top of Para.
• At Bottom of Para.
• Between Lines of Para.
The first two settings allow you to specify the maxim um amount of space permitted above or below paragraphs. They are similar to the equivalent settings in the Frame Typography and Chapter Typography dialog boxes.
Between Lines of Para. allows you to set a maximum amount of spacing between lines of text. Be careful when using this feature. If you permit a small amount of space, you can improve the overall appearance of the page without having noticeable gaps. But lines that are spaced too loosely can be hard to read. Under no circumstances should you allow space between lines if carding is used. If you do, you'll see that some pages have gaps equal to interline spacing between some lines, but not others.
Insert/Edit Table
The table editor allows you to set the maximum extra spacing above and below tables, in a manner similar to that allowed by the paragraph controls. The settings are found in the Insert/Edit Table dialog box. As we mentioned earlier, tables are treated the same as paragraphs for the purposes of justification. Each table can have its own unique justification settings.
How vertical justification works Now let's look at an example of how vertical justification might work. Suppose the maximum amount of spacing allowed for frames and paragraphs is 12 points above and 12 points below. The maximum amount of spacing allowed for lines within a paragraph is 6 points above and below. A column

636 Chapter Eleven: The Professional Extension
on a particular page consists of one picture frame and three paragraphs. White space at the bottom of the page amounts to 72 points.
The vertical justification feature first adds 12 points of space above and below the frame. This leaves 48 points of white space at the bottom of the page. Ventura then adds 12 points below the first paragraph, above the third paragraph, and above and below the middle paragraph. That uses up the remaining 48 points. If more space were needed, the vertical justification feature would then add up to 6 points between each line. If space is still left at the bottom of the page when the maximum amount has been added to each page element, no vertical justification takes place.
Spacing between frames, paragraphs, and lines is added in proportion to the maximum amount of spacing permitted for each page element. Suppose we allowed 6 points of space above a frame and 12 points below. If an extra 15 points of spacing are needed to make the column reach page bottom, 5 points are added above the frame and 10 points below.
Edco hyphenation dictionary The Edco hyphenation dictionary provided with the Professional Extension improves on the hyphenation features found in the standard version of the program. Containing 130,000 words, it brings hyphenation quality to the level of dedicated typesetting systems. It runs a little more slowly than the standard hyphenation feature, but provides more control over how hyphenation is performed and reduces the number of hyphenation errors. To run it, you need at least 1.2 MB of EMS memory, plus an extra 1.3 MB of hard disk storage.
The hyphenation feature actually contains three dictionaries. The main dictionary contains whole words, while the other two dictionaries contain common prefixes and suffixes in the English language.
The prefix and suffix dictionaries are standard ASCII files that can be edited with most word processors.

Edco hyphenation dictionary 637
Installing the Edco dictionary To load the hyphenation dictionary, you must add two or three lines to the VPPROF.BAT file that launches Ventura. The Professional Extension's installation program does this for you automatically, but you can modify its default choices. This can be done with any word processor that handles ASCII files. The extra lines will look something like this:
DRTLCFG -M6 -B2 E3 -AA -PC:\VENTURA\DICT
DLOAD ENGLISH
DLOAD -u
The first line configures the hyphenation function according to the user's wishes. The second line actually loads the dictionary in to memory. The third line, which is optional, removes the dictionary from memory, freeing up EMS for other uses. The first two lines should be at the beginning of the batch file. The third line should be at the end of the file.
Each of the arguments in the first line can be changed to reflect the user's wishes. They are as follows:
M. The minimum number of characters for a word to be hyphenated. IfM is set to 6, words with fewer than six characters cannot be hyphenated. We recommend -M6 for most applications.
B. The minimum number of characters that can be placed before the hyphen. If it is set at two, a hyphen cannot be inserted between the first two characters. We recommend -B3 for most applications. However, if your publications have very narrow columns, you may prefer -B2.
E. The minimum number of characters that can be placed after the hyphen. If it is set at three, at least three characters must be placed on the next line after the hyphen. We recommend E3 for most applications.
A. This determines how apostrophes are handled. AA is the default for the particular language in use. AE causes the dictionary to recognize an apostrophe as the end of a word. AC handles the apostrophe as a normal character. The English dictionary uses AE as a default, so entering AA and AE have the same effect.

638 Chapter Eleven: The Professional Extension
P. The directory path for the dictionary. \ VENTURA \DICT is the default. The installation program automatically copies the dictionary to that subdirectory. If you wish to move it, type the new location here in the batch file so Ventura will know where to find it.
Enter all commands in the same format shown above. Do not add spaces between the hyphen and the letter, or the letter and the number. Place spaces between each option, however.
Once the dictionary is installed, it is activated when you select the USDICT option in the Alignment dialog box. If you install and load the Edco dictionary, but fail to specify USDICT for each tag, Ventura will continue to use its default hyphenation algori thm instead. If you make any changes to the Prefix or Suffix dictionaries, they will show up only if you exit Ventura, remove the dictionary from memory, then reload the Professional Extension.
Changing the dictionaries Typographically sophisticated users who wish to modify the Edco hyphenation dictionary may want to make use of two utility programs that come with the Professional Extension. These are the DUPD and CHKWORD programs.
DUPD
DUPD allows you to update the Edco dictionary by adding words, deleting words, or changing hyphenation points for words. Before running this program, you must make a list of all the changes you wish to make. Use you word processor's ASCII or non document mode to put words, one per line, into the file. Each word should be preceded by one of three symbols:
• the equals sign (=) to change the hyphenation points
• the plus sign (+ ) to add the word to the dictionary
• the exclamation point (!) to delete the word from the dictionary
Use the hyphen character within words to indicate acceptable

Edco hyphenation dictionary 639
hyphenation points. Here's an example of what an update file might look like:
+micro-Publishing
+Laser-Jet
=Z-ebr-a
!Ventura
Once you have created and saved your update file in ASCII format, execute the program DUPD as follows:
CD\VENTURA\DICT
DUPD UPDATE.LST
The program will then modify the Edco dictionary with your desired changes.
CHKWORD
The CHKWORD utility allows you to examine the contents of the Edco dictionary to see if certain words are present, and if so, what the hyphenation points are. To run this program, simply type CHKWORD from the DOS prompt. You will be asked for a word to check. Enter the word in question, followed by Enter.
Ifit finds the word, CHKWORD will display it on screen, with hyphen characters denoting the acceptable hyphenation points in the word. In addition, CHKWORD uses the tilde character ( .... ) to indicate hyphenation points that would be acceptable if you used more liberal settings for the M, B, and E parameters in your VPPROF.BAT file (see previous discussion of hyphenation controls).
Now that you have a familiarity with the capabilities of the Professional Extension, you are well on your way to producing sophisticated, complex, and attractive documents that would probably not be possible with any other desktop publishing program. But if you get stuck at some point in the future, remember that this book is here to help as a reference source or an applications guide.

640 Chapter Eleven: The Professional Extension
To conclude this book, we've left you with two appendices that should come in handy. Appendix A presents a glossary of terms you'll come across in desktop publishing and Ventura Publisher. Appendix B is a directory of products and services in several categories that cater particularly to users of Xerox Ventura Publisher.
Thank you for letting us be your guide to Ventura Publisher, and good luck in creating your own documents.
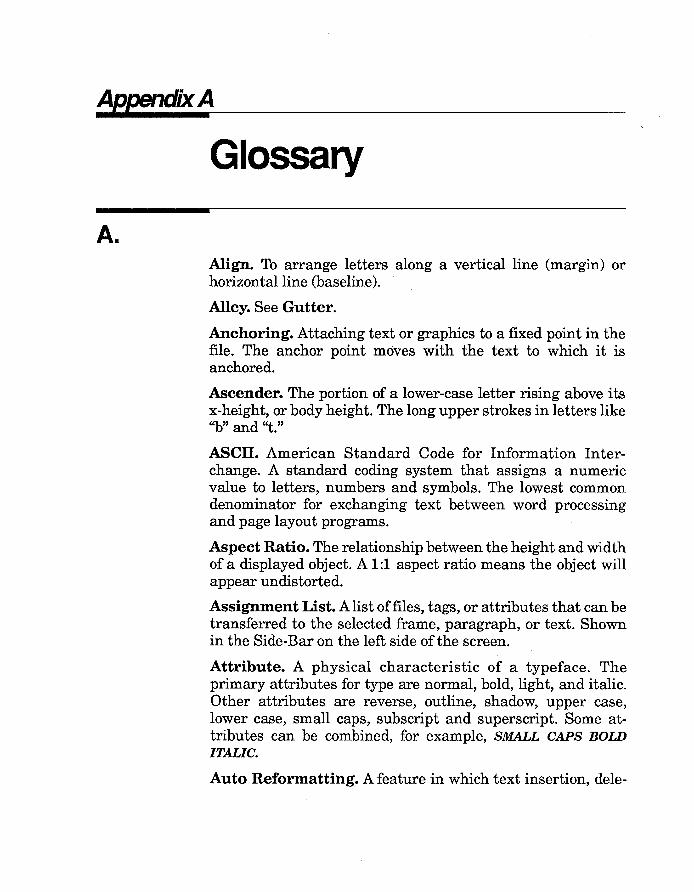
Appendix A
A.
Glossary
Align. To arrange letters along a vertical line (margin) or horizontal line (baseline).
Alley. See Gutter.
Anchoring. Attaching text or graphics to a fixed point in the file. The anchor point moves with the text to which it is anchored.
Ascender. The portion of a lower-case letter rising above its x-height, or body height. The long upper strokes in letters like ''b'' and "t."
ASCII. American Standard Code for Information Interchange. A standard coding system that assigns a numeric value to letters, numbers and symbols. The lowest common denominator for exchanging text between word processing and page layout programs.
Aspect Ratio. The relationship between the height and width of a displayed object. A 1:1 aspect ratio means the object will appear undistorted.
Assignment List. A list offiles, tags, or attributes that can be transferred to the selected frame, paragraph, or text. Shown in the Side-Bar on the left side of the screen.
Attribute. A physical characteristic of a typeface. The primary attributes for type are normal, bold, light, and italic. Other attributes are reverse, outline, shadow, upper case, lower case, small caps, subscript and superscript. Some attributes can be combined, for example, SMALL CAPS BOLD ITALIC.
Auto Reformatting. A feature in which text insertion, dele-

642
B.
Appendix A: Glossary
tion or reformatting causes text to flow as necessary to all linked pages.
Auto Text Flow (Autoflow). A feature in which text flows automatically from page to page when text is first placed.
Backup Button. A small black box in Ventura file-selection boxes that allows access to another directory.
Baseline. The imaginary horizontal line on which type is placed. Line spacing is measured from baseline to baseline.
Bastard Title. A page, usually the first page in a book, containing only the title. Ifit appears after the contents and just before the text it is a half title. Many people use the two terms interchangeably.
Batch File. A file used with DOS to group DOS commands and execute them in a specific order.
Binding. Securing pages together and attaching a cover. Popular methods include case, hard, or perfect binding, and saddle stitching.
Bit-Map. Type and images formed by patterns of dots, as opposed to object-oriented images, where shapes are formed from mathematical descriptions.
Bleed. Extending an image to the edge of a page without a margin.
Block. A unit of text or graphics that can be manipulated as a whole.
Board. A synonym for camera-ready copy and mechanicals from the days when text and illustrations were pasted on to stiff pieces of artboard.
Body Text. The main text of a document. Ventura treats any untagged paragraph as Body Text.
Bold. Type with a heavier, darker appearance than regular type.

c.
c.
643
Box Text. A feature found in Ventura's Graphics mode that allows creation of text associated with graphic elements.
Break. The beginning or ending point for a line, column, or page.
Bullet. A bold dot or other symbol used to emphasize or set off items in a list ..
Callout. Words describing portions of an illustration, often with arrows pointing to the described object.
Camera-Ready Copy. Text and illustrations laid out on a page in the proper size and position, and ready to be photographed for a printing plate. See Mechanicals.
Caption. Traditionally, a title or explanation above an illustration, as compared to a legend, which appeared below. Today used interchangeably for any accompanying text whether above, below or to the side.
Carding. A form of vertical justification that adds space only between user-defined elements such as paragraphs and illustrations. See Feathering and Vertical Justification.
Chapter. A Ventura Publisher file containing references to constituent text, graphics, and style sheet files.
Cicero. A European unit of measurement for type. One Cicero is 4.55 millimeters.
Clipboard. A temporary electronic storage area where text or graphics can be held for reuse.
Code-Based. Desktop publishing software that does not provide an interactive screen preview of the printed page. Codebased programs use embedded codes to signal changes in typestyle, spacing, and other specifications.
Collate. To sort multiple reproductions of pages into corrrectly ordered sets.
Color Separations. Set of four halftone transparencies for making plates in four-color process printing.

644
D.
Appendix A: Glossary
Commercial Printer. A printing company that emphasizes quality and longer print runs. Usually uses metal printing plates. Most books and magazines are produced by commercial printers. See Quick Printer.
Condensed Font. A version of a typeface with a narrow, compressed appearance.
Continuous Tone. A photograph or illustration containing shades of gray. Must be converted to a halftone for printing. See Line Art.
CPU. The Central Processing Unit. A microchip that acts as the "brains" of a computer, controlling most processing functions.
Crop. To cut or trim an illustration or other graphic element.
Crop Marks. Traditionally, tiny marks on the corners Or edges of drawings and photographs that tell the camera operator which portions of the illustration to include and which to eliminate (crop out). Often used today to mean any corner, trim or registration mark, including those on text pages.
CRT. Cathode Ray Tube. An abbreviation for a computer display.
Current Selection Box. An area in the lower left corner of the Ventura Publisher display showing useful information, which varies depending on the selected mode.
Cursor. An on-screen position indicator. Usually a blinking square or line.
Default. A specification that takes effect in the absence of any other. Most programs have default settings for variables like margins and type sizes that apply unless the user requests something else.
Descender. The portion of a lowercase letter falling below the baseline. The long lower portion of letters like "g" and "p."

E.
E.
645
Dialog Box. A pop-up window that allows the user to choose among different options.
Digitize. To convert information to the digital format useable by a computer. For instance, an illustration can be digitized by a scanner. See Scanner.
Dingbats. Symbols used for emphasis or decoration. Some desktop publishing systems have access to special dingbat fonts.
Discretionary Hyphen. A hyphen indicating where a word may be broken if necessary. The hyphen will not appear unless the word must be broken at the end of a line.
Display Type. Type large enough for headlines and other display purposes. Usually considered to be 14 points or larger.
Dithering. A process by which continuous-tone photographs are converted into bit-mapped images simulating varying shades of gray.
Draw Program. A program used to create object-oriented graphics. See Object.Oriented Graphics.
Drop Cap. An oversized first letter, usually used at the beginning of a chapter or section. The first letter is top-aligned with the remainder of the first line of text; the bottom portion of the initial letter extends downward into one or more lines of text.
Dummy. A mock-up or preview of a book. Sometimes it is a rough preliminary layout. Other times it is made from blank pages or photocopies of galley pages.
Ellipsis. Equally spaced periods (usually three) indicating the omission of a section of text.
Em. A printing measurement unit equal to the point size of the current font.
Em Space. A space equal to the width of the letter m in the current point size. It is created by pressing and holding both

646
F.
Appendix A: Glossary
the Crtl and Shift keys and then pressing "M." (Ventura actually uses the width of the @ character.)
End Paper. Blank paper attached to the first and last pages and then glued to the cover ofa hardbound book.
En. A printing measurement unit equal to half the em, or half the point size of the type.
Expanded Font. A version of a typeface with a stretched, wide appearance.
Export. To copy text or graphics from one program to another.
Feathering. A form of vertical justification that adds spaces evenly between all lines in a column. See Carding and Vertical Justification.
Five-Color Printing. A printing process in which a fifth tone, such as gold or silver, is added to the four process colors normally used in color reproduction. Often seen on massmarket book covers. See Four-Color Printing.
Flush. Absence of indentation. Flush left text is butted up even with the left margin, flush right with the right margin.
Font. All letters, numbers and symbols in one size and typeface. Helvetica Bold Italic is a typeface. 12-point Helvetica bold italic is a font. Font is sometimes used interchangeably with typeface.
Footer. One or more lines of type that appear at the bottom of every page.
Format. The appearance of a document, especially its design elements like margins, columns, spacing and page layout. In this book, also used to indicate a precoded software style sheet or template containing the specifications for one particular page style.
Format File. See Style Sheet.
Four-Color Printing. Enables a printer to reproduce most colors by mixing the three primary colors (cyan, yellow,

G.
G.
647
magenta) and black. Also known as process color printing. See Five-Color Printing.
Frame. A block positioned on a page into which the user can place text or graphics.
Frame mode. A mode in Ventura Publisher in which frames can be created, positioned, and manipulated.
Front Matter. The pages that precede the main text of a book, including the title page, copyright page and contents page(s).
Galley. In typesetting terminology, a reproduction of a column of type, usually printed on a long paper sheet.
Generic Font. A screen font used to represent many different similar fonts. It provides only a representation of the font, but allow the user to see the proper line endings.
Graphics. Any drawing, chart, graph, illustration, design element or photograph used in a publication.
Graphic mode. A mode in Ventura Publisher in which simple graphics, such as lines and boxes, can be created and edited.
Grayscale. The number of gradations of gray between white and black that can be generated by a particular scanner or software package.
Greeking. Conversion of text to lines that show approximate position but not the actual characters. Used when drawing the actual text would slow down the display unacceptably.
Grid. A matrix of horizontal and vertical lines used by designers and pasteup artists to organize and align the elements of a page. Some desktop publishing programs use an electronic version of a grid, consisting of light gray lines on the screen.
Gutter. The inner margin between two columns or facing pages of text.

648
H.
I.
Appendix A: Glossary
Hairline. Very thin rule of about 111 00 of an inch. Many laser printers are not capable of reproducing a true hairline rule.
Halftone. A special version of a photograph that can be reproduced by a printing press. A halftone breaks a continuous- tone photo into tiny dots, which the press can reconstruct with ink. The eye interprets the dots as tones and shades. The density of the dot pattern, called a screen, determines the ultimate quality of the printed reproduction. A halftone can be a positive or a negative. See Screen.
Half Title. See Bastard Title.
Hanging Indent. Text with the first line flush left and the rest of the paragraph indented. This glossary is set with a hanging indent.
Header. A title repeated on consecutive pages. For most books, the header contaip.s the book title on left-hand pages and the chapter title on nght-hand pages.
Head or Heading. A word or phrase used to divide a chapter into sections. Usually printed on a line by itself in boldface.
Import. To copy text or graphics into one program from another.
Imposition. The arrangement of pages on a large sheet of paper so that wlU~ri printed and folded the pages will be in the correct order. See Signature.
Indent. A specified space at the beginning of a line or paragraph of text.
Initial Caps. Text in which the first letter of each word is capitalized.
Inter-Line Spacing. See Leading.
Italic. A slanted typeface. Previously, italic typefaces were separately designed and had their own letterforms, whereas

J.
J.
K.
L.
649
oblique typefaces were obtained by taking a vertical face and giving it a slant. Today, most desktop publishing programs produce oblique typefaces but call them italics.
Justify. To place spaces between words or characters in a col umn so that one or both margins are even.
Kerning. The reduction of space between characters to make them fit more tightly. When performed for all characters, it may be called negative letterspacing. When performed for individualletters, it may be called manual kerning.
Keyline. An outline to indicate the size and position of photos or other page elements that will be placed separately.
Landscape. Horizontal orientation of pages or screen displays. See Portrait.
Laser Printer. Anon-i.mpact output device that fuses toner to paper to create near-typeset quality text and graphics. The basic technology is similar to that of a photocopier.
Layout. The arrangement of a page, especially the spacing and position of text and graphics. Often used to describe a rough sketch. As a verb, the process of placing text and graphics in their proper position on the page.
Leader Dots. Evenly spaced dots or dashes to guide the eye across a page. Especially useful in tables, lists, catalogs and directories.
Leading. Vertical spacing between lines of type, specified in points. Pronounced ledding.

650
M.
Appendix A: Glossary
Left-Justified. See Ragged Right.
Letter Spacing. Adjusting the normal space between letters. Usually assumed to be positive (adding space) unless otherwise noted. Negative letterspacing is usually called kerning.
Ligatures. Two or more letters that touch to form a single unit when placed next to each other. Traditional phototypesetters accommodate ligatures for special letter pairs such as fi, ff and others.
Line Art. A drawing that contains no grays or middle tones. Even when cross-hatching and other techniques are used to simulate shading, line art is made up exclusively of black (lines) and white (paper).
Lithography. See Offset Printing.
Lower-case. Small letters, as opposed to capital letters.
Macros. A feature that assigns a command or string of characters to one key so an entire command can be entered with a single keystroke.
Make Up. The physical assembly of page components of a page, usually on stiff paper called artboards or flats. Also known as paste-up.
Margin. The blank border along the edge of a page.
Measure. The length of a line.
Mechanicals. Camera-ready pages on artboards or flats, with text and art in position. See Camera-Ready Copy.
Modem. A device that allows computers to send information over phone lines.
Monospaced Font. A type style with an equal amount of space allotted for each character. Most typewriters produce monos paced characters.
Mouse. A small, hand-held device for positioning the cursor on the screen. When the mouse is rolled across the surface of

N.
N.
o.
P.
651
the desk, the cursor moves a corresponding distance on the screen.
Numerals. Symbolic representations of numbers, such as Arabic numerals (1, 2, 3, 4, etc.) or Roman numerals (I, II, III, IV, etc.).
Object. Oriented Graphics. Graphic images created by means of mathematical descriptions. They can usually be displayed or printed at the full resolution of the monitor or output device.
Oblique. See Italic.
Offset Printing. A widely used printing process in which a page is reproduced/photographically on a metal plate attached to a revolving cylinder. Ink is transferred from the plate to a rubber blanket from which it is transferred to paper.
Orphan. The first line of a paragraph isolated at the bottom of a page. See Widow.
Overlay. A sheet laid on top of a page for spot-color printing.
Page Description Language. A programming language, such as PostScript, that gives precise instructions for how a page should look to an output device. See PostScript.
Pagination. The process of numbering pages in a book. In desktop publishing, often extended to mean the process of laying out or flowing text onto all pages of a document.

652 Appendix A: Glossary
Paint Program. A program used to create bit-mapped graphics. See Bit-Map.
Panning. Moving a graphic image inside a frame to see its various sections.
Pant one Matching System. A popular system for specifying spot colors. Each color has its own PMS number by which it can be selected. See Spot Color.
Paragraph. In Ventura Publisher, a distinct section of text. Can be a single word or sentence.
Paragraph mode. The mode in Ventura Publisher in which style sheet tags are created and applied to text elements.
Pasteup. The act of assembling all page elements, such as type and illustrations, into position. Traditionally done by attaching the separate elements with glue or wax. In desktop publishing, accomplished electronically on screen.
Phototypesetting. The process by which pages are composed and/or produced on a phototypesetter, which generally permits very high resolution compared with a laser printer.
Pica. A printing measurement unit used to specify line lengths, margins, columns, gutters and so on. Equivalent to 12 points, or about 1/6 of an inch.
Pixel. A picture element, or the smallest possible unit on a page or screen. Used to describe resolution.
Pi Font. A special font with math symbols, dingbats or other special characters.
Plate. A thin, flexible sheet of metal, paper or plastic used in offset printing. It contains a photographic reproduction of the page.
Point. A printing measurement unit equivalent to 1/12 of a pica, or about 1/72 of an inch. Used to specify type sizes, line spacing, and rule widths.
Point Size. The vertical measurement of type, roughly equivalent to th~ distance between the highest ascender and lowest descender, plus a small bit of breathing room on top and bottom.

Q.
Q.
R.
653
Portrait. Vertical orientation of a page or display. See Landscape.
Position Stat. A photocopy or other reproduction of a halftone that is pasted onto a mechanical to show the printer how to crop and position the final image.
PostScript. A page description language developed by Adobe Systems and used by many laser printers and phototypesetters. See Page Description Language.
Process Camera. A camera used in graphic arts to photograph mechanicals and create printing plates.
Process Colors. The four colors needed for four-color printing: yellow, magenta, cyan and black. See Four-Color Printing.
Proof. A trial copy of a page or publication used to check accuracy. Also short for proofread, meaning to check for mistakes.
Publication. A file in Ventura Publisher containing references to related chapters.
Quick Printer. A print shop that emphasizes speed, short print runs and acceptable quali ty. Not widely used for book or magazine publishing except by short-run self-publishers. See Commercial Printer.
Ragged Left. See Right-Justified.
Ragged Right. Used to describe columns of text in which the left side lines up evenly and the right side varies. Also known as left-justified type.
Recto. Aright-hand page.
Register. Precise alignment of printing plates or negatives.

654
s.
Appendix A: Glossary
Register Marks. Marks used to permit exact alignment of pages. Usually printed just outside the live area and then trimmed off. The standard register mark is a small circle with a cross inside.
Resolution. The density of dots or pixels on a page or display, usually measured in dots per inch. The higher the resolution, the smoother the appearance of text or graphics.
Reverse Type. Light letters on a dark background.
Right-Justified. Used to describe columns of text in which the right side lines up evenly and the left side varies. Also known as ragged left.
Roman. The traditional name for upright (unslanted) type, as distinguished from oblique, backslant or italic type.
Ruler. In a desktop publishing program, a measuring guide on the edge of the screen.
Rule. A straight line whose width is normally specified in points.
Runaround. When text deviates from its normal margins to fit around an illustration that projects into the text area.
Running Head. See Header.
Sans Serif. Typestyles without little strokes known as serifs, such as Helvetica and Avant Garde. Sometimes called block or gothic. This sentence is set in a sans serif typestyle.
Scale. To change the size of a piece of artwork.
Scanner. A digitizing device that converts a piece of artwork into an electronic bit-map that can be loaded and manipulated by a software program. A means of converting hand-drawn art or photos into electronic form.·
Screen. The pattern of dots used to make a halftone or tint. Halftone screens are measured in lines, equivalent to dots per inch. Tint screens are measured in percentages, with a IO-per-

s. 655
cent screen being very light and a lOO-percent screen being totally black.
Separations. Transparencies or pages used for color reproduction. Each separation is used to reproduce a particular color. See Process Color, Four-Color Process, and Five-Color Process.
Serif. A tiny decorative stroke in character designs. Serif typefaces, such as Times or Palatino, use serifs in their designs. The type you are reading is a serif typeface. See Sans Serif.
Signature. A section of a book or magazine consisting of a large piece of paper folded into the smaller size used in the publication. Most printers use signatures of 16 or 32 pages. See Imposition.
Size. To change the size ofa piece of artwork.
Small Caps. Letters with the shape of capital letters, but smaller than normal. Often, small caps are equal to the xheight of the typeface. THIS SENTENCE IS SET IN SMALL CAPS.
Snap-To. A feature in which a page element is pulled into alignment when placed close to prespecified guidelines.
Solid. Aline of type set with no extra line spacing.
Spine,~ The bound edge of a book visible when books are stored side-by-side on a shelf.
Spot Color. The use of one or more extra colors on a page, used to highlight specified page elements. Colors are usually specified as PMS codes. See Pant one Matching System.
Strip. To paste one piece of film, usually a halftone, into a piece of film containing a page to produce a printing plate.
Style Sheet. Format and type specifications for a page design that can be stored and reused in desktop publishing programs.
Subhead. A heading, usually set in smaller type than a main headline, used to break up chapters or articles into smaller sections.
Subscript. A number, letter, or symbol, that is smaller than the standard text and aligned below the baseline. Often used in mathematical and scientific notation, such as H20.

656
T.
Appendix A: Glossary
Superscript. A number, letter, or symbol that is smaller than the standard text and aligned above the baseline. Often used in mathematical notation or to indicate footnotes.
Tags. Style sheet elements that specify font, type size, line spacing, and other attributes for sections of text. Can be applied while text is created in a word processor or in Ventura Publisher's Paragraph mode. See Style Sheet.
Template. A predesigned page with specified areas for text, heads and illustrations.
Text Flow-Through. A feature in which text flows freely between columns and pages as changes are made. Changes on one page automatically cause reformatting on other affected pages.
Text Mode. A mode in Ventura Publisher in which text can be created or edited.
Tint. A light color or shade obtained by printing a fine pattern of dots on the page. See Screen.
Tint Block. An area printed with a color or shade (screened) to lower its intensity. Tint blocks are used to distinguish a section of text from the main body and to provide a color or shaded background for line drawings.
Tracking. Reduction or enlargement of space between characters and words. See Kerning and Letterspacing.
Trim Size. The size of a finished book after all the edges have been trimmed. Typically specified in inches with the horizontal measurement first.
Turnkey System. A desktop publishing system sold as a package with all necessary software and hardware components.
Typeface. A particular type design, such as Helvetica Bold. See Font, Typeface Family.
Typeface Family. A set of all the different variations - wide,

u.
u.
v.
w.
657
narrow, italic, bold, bold italic - of a given type design. Helvetica is a type family. See Font, Typface.
Underlying Page. The frame that automatically appears on each page in Ventura Publisher.
Upper-case. Capital letters.
Upper and Lower. Text that uses upper- and lower-case letters. Abbreviated u&lc.
Verso. A left-hand page.
Vertical Justification. A feature in which a column of text is spaced so that it spans an entire page or section from top to bottom.
Weight. Variations in the thickness of letter-strokes in a family of type, such as light, medium, bold and extra bold.
Widow. The last line of a paragraph isolated at the top of a page. See Orphan.
Wrap. A typesetting feature in which text runs around a graphic element.
WYSIWYG. An acronym for What You See Is What You Get, meaning that text and graphics on a screen correspond closely to final printed output. Pronounced wizzy-wig.

658
x.
z.
Appendix A: Glossary
X-Height. The height of a lower-case letter in a particular font without ascenders or descenders, equivalent to the height of the letter x.
Zoom. To view an enlarged (zoom in) or reduced (zoom out) portion of a page on screen.

AppendixB
Manufacturers and Products
Clip Art
Dynamic Graphics 6000 N. Forest Park Dr. Peoria,IL61614 3096888800
DeskTop Art Various packages grouped by subject. Include business, education, health care, sports. $74.95
Metro Imagebase Inc. 18623 Ventura Blvd. #210 Tarzana, CA 91356 8188811997
Metro Imagebase Electronic Art Various graphic images in PCX format. $145
Micrografx, Inc. 1303 Arapaho Richardson, TX 75801 2142341769
Micrografx Clip Art Various clip art packages. $49.95
PC Quik-Art, Inc. 394 S. Milledge Ave. #200 Athens, GA 30606 4045431779
PC Quik-Art 50,000 symbols and pictures. $59.95
Fonts and Font Software
Adobe Systems, Inc. 1585 Charleston Rd. Mountain View, CA 94039 415961 4400
PC Fonts PC-format typefaces of the Adobe Type Library. $95 to $370 per package. $185 for most.
Advanced Vision Research 2201 Qume Dr. San Jose, CA 95131 4084341115
MegaFont Creates Hewlett-Packard format soft fonts. $250
Bitstream Inc. Athenaeum House 215 First st. Cambridge, MA 02142 6174976222
PC Fontware Digitized type fonts for Ventura Publisher. $195
Fundamentals Packaged typefaces aimed at specific publication categories. $395

660
Conographic Corp. 16802 Aston St. Irvine, CA 92714 7144741188
ConoFonts Downloadable fonts for HP LaserJet Plus. $125
Corel Systems Corp. 1600 Carling Ottawa, Ontario Canada K1 Z 7M4 6137288200
Headline Allows creation of unusual headline effects from PostScript fonts. $185
Newfont Allows creation of special effects from PostScript fonts, including shading, outlining, and angling. $185
Digi-Fonts 3000 Youngfield St., Ste. 285 Lakewood, CO 80215 3032338113
Digi-Fonts Font packages for Hewlett-Packard LaserJet printers. $69.95
GNU Business Information Systems 100 Hilltop Rd. Ramsey, NJ 07446 201 825 1222
Professional Font Manager Allows creation and editing of fonts, signatures, and logos. $495
LeBaugh Software Corp. 1 0824 Old Mill Rd., Ste. 6 Omaha, NE 68154 8005322844
LePrint HeadLiner Creates headline fonts with special effects in PCX file format. $100
Appendix B: Manufacturers and Products
Soft Craft, Inc. 16 N. Carroll St., Ste. 500 Madison, WI 53703 6082573300
Display Font Pack Display fonts for HP LaserJet printers. $95
Font Editor Allows creation and editing of HP LaserJet fonts. $290
WYSlfonts Creates screen fonts from HP or SoftCraft printer fonts. $95
Specific Solutions 1898 Anthony Ct. Mountain View, CA 94040 415941 3941
FontEdit Font generator and editor for bit-mapped fonts used by GEM programs. $165
Straightforward 3901 Via Oro Ave. Long Beach, CA 90810 2138308773
MSDfont Professional Font management software for HP and QMS printers. $100
Straightforward Fonts Font packages for Ventura Publisher and Microsoft Word. Supports most printers. $25
SWFTE International Ltd. P.O. Box 219 Rockland, DE 19732 302658 1123
Glyphix 2.0 Font generation software for LaserJet Plus and Series II printers. $99.95

Graphics Software
VS Software 2101 S. Broadway Little Rock, AR 72216 501 3762083
FontGen Allows creation and editing of fonts. $250
Ventura Supplemental Font Pak Fonts for Ventura Publisher. $169.95
Weaver Graphics Fox Pavilion Box 1132 Jenkintown, PA 19046 2158849286
LJ Fonts Library of soft fonts for HP LaserJet Plus, and Series II printers. $29.99
Xerox Corp. 101 Continental Blvd. EI Segundo, CA 90245 8008228221
Fontegra Allows use of Xerox 4045 fonts with Ventura Publisher. $90
ZSoft Corp. 450 Franklin Rd., Ste. 100 Marietta, GA 30067 4044280008
Publisher's Type Foundry Font editor for creating bitmap, outline versions of digital fonts. $495
Graphics Software Adobe Systems Inc. 1585 Charleston Rd. Mountain View, CA 94039 415961 4400
Adobe Illustrator/Windows version Creates object-oriented graphics from scratch or from scanned templates. $495
Autodesk, Inc. 2320 Marinship Way Sausalito, CA 94965 4153322344
AutoCAD
661
CAD software for IBM computers. Allows 2-D drafting and 3-D visualization. $2850
Bright Ideas, Inc. 87-A Ocean st. South Portland, ME 04106 2077676031
CVT Converts PC image files among different formats. $99.95
Digital Research Inc. 60 Garden ct. Monterey, CA 93942 4086493896
GEM Artline Object-oriented graphics program for IBM compatibles; can use scanner input as drawing template. $495
GEM Draw Plus Object-oriented graphics editor for IBM PC. $249
GEM Paint On-screen graphics design tool Included with GEM Desktop.
GEM Scan Allows scanning and editing of graphic images. $95
General Parametrics 1250 Ninth st. Berkeley, CA 94710 4155243950
Video Show Ventura-compatible graphic presentation software. $4595

662
Hammerlab Corp. 938 Chapel st. New Haven, CT 06510 2036240000
Scan-Do Scanner control and graphics program running under Microsoft Windows. Supports Canon, Princeton, and Panasonic scanners. Creates gray-scale TIFF files. $195
Inner Media 60 Plain Rd. Hollis, NH 03049 6034653216
Col/age Plus Publishing Utilities Screen-capture, image librarian, and other graphics utilities. $89.95
Inset Systems Inc. 12 Mill Plain Rd. Danbury, CT 06811 2037940396
HiJaak Graphics conversion and screen-capture utility. $89
Media Cybernetics 8484 Georgia Ave. Ste. 200 Silver Spring, MD 20910 301 4953305
HaloDPE Scanner-control and graphics editing program for IBM computers. $295
Meta Software 150 Cambridge Ave. Cambridge, MA 02140 6175766920
Design Object-oriented graphics and text processor based on Microsoft Windows. $350
Appendix B: Manufacturers·and Products
Micrografx, Inc. 1303 Arapaho Richardson, TX 75801 2142341769
Windows Draw Object-oriented drawing program for IBM PC. $299
Designer Windows-compatible graphic arts and technical illustration program. $695
Microsoft Corp. 10611 NE 36th St. Redmond, WA 98073 2068828080
Windows Paint Pixel-oriented graphics program (comes bundled with Windows). $99
PC Quikart 394 S. Milledge Ave., Ste. 200 Athens, GA 30606 404543 1779
The Graphics Link & The Graphics Link Plus Graphics file conversion utilities. $99.95 (Graphics Link), $149.95 (Graphics Link Plus)
Symsoft 444 1 st St., Ste. K Los Altos, CA 94022 415941 1552
Hotshot Graphics Captures, edits, and catalogs text and graphic images $249
VS Software 2101 S. Broadway Little Rock, AR 72216 501 3762083
SLeD Paint and graphics editing program geared toward business users. $150

Monitors
ZSoft Corp. 450 Franklin Rd., Ste. 100 Marietta, GA 30067 4044280008
Publisher's Paintbrush Scanner-control and graphics editing program for IBM compatibles. $285
PC Paintbrush + Paint program for IBM compatibles. Includes scanner control capability. $149
Monitors Amdek Corp. 1901 Zanker Rd. San Jose, CA 95112 8007226335
1280 Graphics Subsystem 15-inch high-resolution monochrome monitor and graphics board. Identical to Wyse WY-700. $999
AST Research Inc. 2121 Alton Ave. Irvine, CA 92714 7148631333
Turbo Vision High-resolution 15-inch portrait-mode display. $1995
Beaver Computer Inc. 1026 W. Maude Ave., Ste. 302 Sunnyvale, CA 94086 4087200580
1024 Graphics Subsystem 14-inch high-resolution monitor/controller. $695
Conographic Corp. 1 6802 Aston St. Irvine, CA 92714 7144741188
Conovision 2800 System High-resolution 19-inch monochrome monitor and controller. $2850
663
ConoVision 1600 High-resolution controller for IBM compatibles. $695
Cornerstone Technology 1883 Ringwood Ave. San Jose, CA 95131 4082791600
Vista 1600 for the PC High-resolution monitor for IBM PC or compatibles. $2395
DualPage 19-inch, two-page monochrome display with 16 gray levels. Includes gray-scale fonts for Ventura Publisher. $2795
SinglePage Full-page, 15-inch high-resolution monochrome display. Includes gray-scale fonts for Ventura Publisher. $995
CPT Corp. 8100 Mitchell Rd. Minneapolis, MN 55440 6129378000
HiPerformance Display System 15-inch portrait-mode monitor and controller. $1895
Everware Technology Co. 2365 Paragon Dr., Unit F San Jose, CA 95131 4089220209
Hi-Re 1024 14-inch landscape-mode monitor for IBM compatible computers. $695
IBM 900 King St. Rye Brook, NY 10573 9149344836
Monochrome Display 8507 19-inch monitor for IBM PS/2 models. Requires 8514/A adapter. $865 ($1290 for adapter)

664
Micro Display Systems, Inc. 1310 Vermillion St. Hastings, MN 55033 6124372233
Genius, Genius MC, Genius Plus 15-inch high-resolution portrait mode monitor. $1495 (Genius), $1695 (Plus), $1795 (Genius MC)
Genius 2 19-inch high-resolution landscape mode monitor. $2795
Moniterm Corp. 5740 Green Circle Dr. Minnetonka, MN 55343 6129354151
Viking 1 19-inch high-resolution monochrome monitor, controller board, and driver. $2395
Viking 2400 24-inch high-resolution landscape monitor for IBM compatibles, PS/2. $2595
Viking 10 19-inch color monitor. $4695
Princeton Graphic Systems 601 Ewing 8t. Bldg. A Princeton, NJ 08540 6096831660
LM-300 Monitor 15-inch high-resolution portrait display without interface (interface $750 more). $839
LM-301 15-inch high-resolution landscape display (excluding interface). $839
LM-317 17-inch landscape mode display for IBM compatibles (requires interface). $750
Appendix B: Manufacturers and Products
Princeton Publishing Labs, Inc. 19 Wall St. Princeton, NJ 08540 (609) 924-1153
PPLMultiView Full-page display with EGA, CGA, and grayscale VGA compatibility. $999
Taxan U.S.A. Corp. 18005 Cortney Ct. City of Industry, CA 91748 8188101291
Crystal View 19-inch high-resolution monochrome monitor. $2195
Ventek Corp. 31336 Via Colinas, Ste. 102 Westlake Village, CA 91362 818991 3868
AT 2000 High-resolution 20-inch display with VGA compatibility for IBM AT compatibles. $2695
PS2000 20-inch landscape-mode monitor for PS/2 models 50,60, and 80. $2495
Western Digital Imaging 800 E. Middlefield Rd. Mountain View, CA 94043 4159603360
2Page Display System Monochrome 19-inch double-page monitor with graphics controller. $2395
WYSE Technology 3571 N. First St. San Jose, CA 95134 4084331000
WY-700 15-inch high-resolution landscape monitor. $995
WY-7190 19-inch monochrome display emulating CGA, MDA, Hercules, VGA, and WY-700. $2195

Printers
Printers Apple Computer, Inc. 20525 Mariani Ave. Cupertino, CA 95014 4089961010
LaserWriter /I NT 300 dpi, 8 ppm PostScript laser printer $4599
LaserWriter /I NTX 300 dpi, 8 ppm PostScript laser printer with expanded memory $6599
AST Research Inc. 2121 Alton Ave. Irvine, CA 92714 7148631333
TurboLaserlPS 300 dpi, 8 ppm PostScript laser printer. $5495
Hewlett-Packard P.O. Box 15 Boise, ID 83707 2083233869
LaserJet /I 8-ppm, 300-dpi laser printer. $2595
IBM 900 King St. Rye Brook, NY 10573 914 934-4836 Personal PagePrinter
300-dpi PostScript laser printer. $4999
NEC Information Systems, Inc. 1414 Massachusetts Ave. Boxborough, MA 01719 6172648425 .
Silentwriter LC-890 300-dpi 8ppm LED array PostScript printer. $4795
Okidata 532 Fe"owship Rd. Mt. Laurel, NJ 08054 6092352600
Laserline 6
665
300 dpi 6 ppm laser printer with Laserjet emulation. $1995
Printware 1385 Mendota Heights Rd. St. Paul, MN 55120 6124561400
720 10 Laser Imager 8 ppm, 1200 x 600 dpi laser printer with PostScript-compatible option. Includes native driver for Ventura. $13,500 (without PDL) $18,00 (with PrintScript)
QMS, Inc. One Magnum Pass Mobile, AL36619 2056334300
PS 800+,8001/,810, 1500 300 dpi, 8-ppm PostScript laser printers (1500 is 15 ppm). $5495 (SOO+), $6495 (SOO II), $5495 (S10), $9995 (1500)
Quadram Corp. One Meca Way Norcross, GA 30093 4049236666
OuadLaser PostScript Printer PostScript printer based on Ricoh engine. $3995
Qume Corp. 500 Yosemite Dr. Milpitas, CA 95035 40S 942 4000
LaserTen 300 dpi, 10 ppm laser printer. HP-compatible. ~~5 .
Scrip Ten 300-dpi, 10 page-per-minute PostScript laser printer. $5595
666
Rlcoh Corp. 180 Passaic Ave. Fairfield, NJ 07430 201 8827762
PC Laser 6000 300 dpi, 6 ppm laser printer. HP-compatible option. $2395
Texas Instruments Inc. 9901 S. Wilcrest Houston, TX 77251 7138792031
OmniLaser 2115,2108,2106 300 dpi PostScript laser printers. $7995 (2115), $5995 (2108), $4595 (2106)
Xerox Corp. 101 Continental Blvd. EI Segundo, CA 90245 8008228221
4045 Laser CP 300 dpi, 10-ppm laser printer with copier option. $4995
Printer Controllers Conographic Corp. 16802 Aston St. Irvine, CA 92714 7144741188
Conovision 2800 Display controller with optional processor for Canon laser engines. $1985
ConoDesk 6000 High-speed laser printer and scanner interface with ConoScript page description language. $1995
DP-Tek, Inc. 245 N. Hydraulic Wichita, KS 67214 3162693068
LaserPort Hewlett-Packard printer controller designed to enhance photo reproductions. $895
Appendix B: Manufacturers and Products
Intel Corp. PCEO 5200 N. Elam Young Pkwy. Hillsboro, OR 97124 5036297402
Visual Edge Printing enhancement for HP LaserJet II that improves halftone imaging. $695
The Laser Connection P.O. Box 850296 Mobile, AL 36685 2056337223
PSJet Add-on PostScript controller for printers based on Canon CX engines. $2495
LaserGo, Inc. 9235 Trade Place, Ste. A San Diego, CA 92126 6195302400
Go Card PostScript-compatible controller for HP LaserJet printers. Includes 13 LaserWriter-compatible fonts. $295
LaserMaster Corp. 7156 Shady Oak Rd. Eden Prairie, MN 55344 6129446069
CAP Card Provides fast output and graphics from Ventura Publisher to HP LaserJet and other Canonbased printers. $895
Oasys 8352 Clairmont and Mesa Blvd. San Diego, CA 92111 6195769500
Jet-Assisted Takeoff Provides LaserJet Plus features to HP LaserJet. $1695

Printer Control Software
OMS, Inc. One Magnum Pass Mobile, AL 36619 2056334300
JetScript PostScript controller for Hewlett-Packard LaserJet II. $2495
Tall Tree Systems 2585 E. Bayshore Rd. Palo Alto, CA 94303 4154931980
JLaser Plus 2 MB multifunction board with printer, scanner control. Works with Canon CX and SX engines, Canon and Ricoh scanners. $699
Printer Control Software Atech Software 5962 La Place Ct., Ste. 245 Carlsbad, CA 92008 6194386883
Publisher's PowerPak Permits Ventura Publisher output to dot-matrix printers. $199.95
Custom Applications 900 Middlesex Turnpike Billerica, MA 01821 6176678585
Freedom of Press Software-based PostScript-compatible interpreter for HP- compatible and dot-matrix printers. $495
Elixir Technologies 14350 Addison Ave. Ste. 17 Sherman Oaks, CA 91423 8189076661
VPT097 Allows VP output to Xerox 9700 printers. $2500
LaserGo, Inc. P.O. Box 850296 Mobile, AL 36685 6195302400
Go Scrip t
667
Software-only PostScript clone for HP LaserJet printers. $195
LaserTools Corp. 3025 Buena Vista Way Berkeley, CA 94708 4158432234
LaserTorq Spooler for HP, PostScript laser printers. $99
Publications EP&P Magazine 29 N. Wacker Dr. Chicago, IL 60606 3127262802
microPublishing Report 21150 Hawthorne Blvd., Ste. 104 Torrance, CA 90503 213371 5787
PC Publishing 950 Lee st. Des Plaines, IL 60016 3122960770
Personal Publishing 25W550 Geneva Rd. Wheaton, IL 60188 3124624654
Publish! 501 Second St. San Francisco, CA 94107 415243 0600
TypeWorld Directory of PostScript Printout Services P.O. Box 170 Salem, NH 03079 6038982822

668
The Ventura Letter 1 Heath St. West Toronto, Ontario Canada M4V 1T2 4164823710
Ventura Publishes 16160 Caputo Dr. Ste. B Morgan Hill, CA 95037 4082275030
Scanners Abaton Technology 7901 Stoneridge Dr., Ste. 500 Pleasanton, CA 94566 4154638822
Scan 300SF 300 dpi sheetfed scanner; permits 16 levels of gray. $2195
Scan 300FB 300 dpi flatbed scanner; permits 16 levels of gray. $2295
Advanced Vision Research 2201 Qume Dr. San Jose, CA 95131 4084341115
AVR-302 Image Scanner 300-dpi flatbed scanner with image buffer card. $2695
AST Research Inc. 2121 Alton Ave. Irvine, CA 92714 7148631333
Turbo Scan 300 dpi sheetfed scanner. $1795
AT&T Bell Labs 1 Speedwell Ave. Morristown, NJ 07960 8002471212
Overview Scanner Camera-based desktop scanner. $2000
Appendix B: Manufacturers and Products
Canon USA Inc. One Canon Plaza Lake Success, NY 11042 5164886700
IX-12 300 dpi sheetfed scanner. $1190
IX-12F 300-dpi high speed flatbed image scanner. $1495
The Complete PC 521 Cottonwood Dr. Milpitas, CA 95035 4084340145
The Complete Hand Scanner 200-dpi hand-held scanner for text and graphics up to 2.5" wide. $249
Datacopy 1215 Terra Bella Ave. Mountain View, CA 94043 4159657900
JetReader 300-dpi sheetfed image scanner. Interface additional. $1300
Model 730 300 dpi flatbed scanner; can scan 16 levels of gray. Interface additional. $1800
Pro Scan 830 300-dpi flatbed scanner with 64 levels of gray. $3995
Dest Corp. 1201 Cadillac Ct. Milpitas, CA 95035 4089467100
PC Scan 2000 300-dpi sheetfed scanner, supports 256 levels of gray. $2335
PC Scan 1000 300-dpi flatbed scanner, supports 16 levels of gray. $2635

Style Sheets
Hewlett-Packard P.O. Box 15 Boise, 10 83707 2083233869
ScanJet 300 dpi flatbed scanner with software and interface. Can scan 16 levels of gray. $1990
IBM 900 King st. Rye Brook, NY 10573 914 934-4836
PageScanner 300-dpi gray-scale flatbed scanner $2395
Microtek Lab Inc. 16901 S. Western Ave. Gardena, CA 90247 213321 2121
MSF-400G 400-dpi flatbed scanner, supports 256 levels of gray. $3995
MSF-300G 300-dpi flatbed scanner, supports 256 levels of gray. $3495
MSF-300Q 300-dpi flatbed scanner, supports 64 levels of gray. $2295
Packard Bell 21800 Oxnard St., Ste. 700 Woodland Hills, CA 91367 8187162727
Pocket Scanner 200-dpi hand-held scanner accommodates images up to 2.5" wide $295
Panasonic Two Panasonic Way Secaucus, NJ 07094 201 3487000
FX-RS505 400-dpi flatbed scanner. No gray scale. $1499
FX-RS506 400-dpi flatbed image scanner, supports 16 levels of gray. $1899
Pentax Teknologies 880 Interlocken Parkway Broomfield, CO 80020 3034601606
SB-A4301
669
Flatbed image scanner, up to 300 dpi, 16 levels of gray scale $2200
Princeton Graphic Systems 601 Ewing St. Bldg. A Princeton, NJ 08540 6096831660
LS-300 Scanner 300-dpi sheetfed image scanner. $1095
Ricoh Corp. 180 Passaic Ave. Fairfield, NJ 07006 201 8827762
RS320 300-dpi flatbed image scanner. No gray scale.$1495
Style Sheets
BCA/Desktop Designs P.O. Box 2191 Walnut Creek, CA 94595 800 72-STYLE
Ventura Designer Stylesheets Style sheets in various categories. $29.95-$49.95 per package
Micro Publishing 21150 Hawthorne Blvd., Ste. 104 Torrance, CA 90503 213371 5787
Document Gal/ery Style Sheets 50 document styles on a disk, including newsletters, business forms, technical documentation, and directories. $39.95

670
New Riders Publishing P.O. Box 4846V Thousand Oaks, CA 91360 818991 5392
Desktop Power Series Style sheets in various categories. $39.95
Training & Seminars ABCIS Orchard Lake Training Center 20770 Orchard Lake Rd. Farmington Hills, MI 48024 313471 5100
Ventura Video Training Course Video training package. $495
Fliptrack Learning Systems 999 Main St., Ste. 200 Glen Ellyn, IL 60137 312790 1117
How to Use Xerox Ventura Publisher. Audio-tape training package. $195
Micro Publishing 21150 Hawthorne Blvd., Ste. 104 Torrance, CA 90503 213371 5787 Seminars on Ventura Publisher.
Training Specialties Inc. 249 S. Pacific Coast Hwy. Solana Beach, CA 92075 619481 4858
Ventura Publisher training. Video, audio, workbook training course. $298
TypeWorld P.O. Box 170 Salem, NH 03079 6038982822
Ventura World Conference and exhibition devoted to Ventura Publisher; concurrent with Type-X show.
Appendix B: Manufacturers and Products
Video Tutor 219 IIihau St. Kailua, HI 96734 808 254-6419
Xerox Ventura Publisher on the IBM PC. Video training course. $195
Typesetting Interfaces The Computer Group 1717 W. Beltline Hwy. Madison, WI 53713 6082731803
Typesetter's Connection Converts Ventura Publisher files to Compugraphic MCS format. $895
Computer Solutions for Publishing 21171 Banff Ln. Huntington Beach, CA 92646 7145367008 D-Link Allows Ventura software output to digital phototypesetters. $595
Edco Services, Inc. 12410 N. Dale Mabry Hwy. Tampa, FL33618 8139627800
Pub Set Allows Ventura Publisher output directly to Linotronic 100, 202, 300, and 500, and Compugraphic 8600 typesetters. $2500
Hampstead Computer Graphics P.O. Box 469 East Hampstead, NH 03826 6033295076
Connexion Typesetter conversion program for Ventura Publisher. $3000

User Groups
Mumford Micro Systems P.O. Box 400 Summerland, CA 93067 8059694557
VepSet Compugraphic typesetter driver for Xerox Ventura Publisher. $1250
Xitron 1428 East Ellsworth Ann Arbor, MI48014 313971 8530
XIP Converts VP files to Linotronic 202 format.
User Groups
Ventura Users of North America Wilson Publishing & Computing 1 Heath St. West Toronto, Ontario Canada M4 V 1 T2 4164823710
Ventura Publisher Users Group 16160 Caputo Dr., Suite B Morgan Hill, CA 95037 408778 1125
Ventura Utilities Aristocad Inc. 1650 Centre Point Dr. Milpitas, CA 95035 8003382629 800 426 8288 (CA)
The Soft Kicker Software emulator for full-page displays; scrolls automatically at screen edges. $69
Busarow Software 282 Kenderton Trail Beavercreek, OH 45430 5134299876
DTP-Pro Utilities
671
File conversion/management utilities for Xerox Ventura Publisher. $99.95
Corel Systems Corp. 1600 Carling Ave. Ottawa, Ontario Canada K1 Z 7M4 6137288200
Tabin Utility for properly aligning tabular material. $99
Ventura Utilities Seven file management utilities. $99
Digital Presentation Systems 220 W. 24th St. New York, NY 10011 212924 7661
VP Utility Pak Table conversion, index creation, text processing. $69.95
Edco Services, Inc. 12410 N. Dale Mabry Hwy. Tampa, FL 33618 8139627800
Linebreakr Memory-resident hyphenation program. $195
Emulation Technologies Bulkley Bldg., 1501 Euclid Ave. Cleveland, OH 44115 216241 1140
VTune File conversion utility; creates fractions, converts spaces to tabs. Runs from within VP. $99
WVBridge Converts Wang WP documents to Ventura format. $195

672
The Laser Edge 360 17th St., Ste. 203 Oakland, CA 94612 415835 1581
XVPISaddle Post-processing utility for printing side-by-side impositions. $79
XVPITabs Edits and tags Lotus 1-2-3 files for Ventura Publisher. $89
XVPIFonts Installs HP LaserJet soft fonts for Ventura Publisher. $79
XVPIBase dBase III applications generator for Ventura Publisher. $89
Metroplex Digital Corp. P.O. Box 815729 Dallas, TX 75381 214231 8944
PubStarl Ventura keyboard macros for word processors. $99
New Riders Publishing P.O. Box 4846V Thousand Oaks, CA 91360 818991 5392
Desktop Manager File management utilities for Ventura Publisher. $99.95
Pecan Software Systems 1410 39th St. Brooklyn, NY 11218 718851 3100
With Style Allows viewing and editing of style sheets. $79.95
Appendix B: Manufacturers and Products
Publishing Solutions 205 E. 78th St.,Ste. 17-T New York, NY 10021 2122882470
Data Tag Converts delimited database ASCII files to VP text files. $119
prinTAG Converts large spreadsheets to VP format. $129.95
Sage Productions, Inc. 5677 Oberlin Dr. San Diego, CA 92121 6194557513
Tagteam WordPerfect-to-Ventura Publisher conversion utility. $69.95
SNA, Inc. P.O. Box 3662 Princeton, NJ 08543 . 6096831237
VP Toolbox File management, style sheet utilities for Ventura Publisher. $99
Word Processing Programs Ashton-Tate 20101 Hamilton Ave. Torrance, CA 90502 2133298000
MultiMate , Word processing package for IBM PC. $595
Digital Research Inc. 60 Garden Ct. Monterey, CA 93942 4086493896
GEM 1st Word Plus Graphics-based WYSIWYG word processor; includes GEM Paint. $295

Word Processing Programs
MicroPro International Corp. 33 San Pablo Ave. San Rafael, CA 94903 4154578990
WordStar 5.0 Word processing software with mail-merge, indexing, table-of-contents generation. $350
Wordstar 2000 Word processing software with telecommunications, document management features. $495
Microsoft Corp. 10611 NE 36th St. Redmond, WA 98073 2068828080
Word 4.0 Word processing program, includes style sheets. $450
Software Publishing 1901 Landings Dr. Mountain View, CA 94043 4159628910 Professional Write Word processing program with spreadsheet and database connections. $199
WordPerfect Corp. 323 N. State St. Drem, UT 84057 801 2274000
WordPerfect 5.0 Word processing program with extensive document-management features. $495
XyQuest 3 Loomis St. Bedford, MA 01730 6172754439
XyWrite 11/ Word processing program for IBM PC. $395
673

674

ApeendixC
Ventura Character Sets Decimal International Symbol Dingbat Decimal International Symbol Dingbat
32 60 < < -:-33 I ! ~ 61 = = t
34 " ::J ®l 62 > > '1l'
35 # # ~ 63 ? ? t
36 $ 3 ~ 64 @ - ffi
37 % % tr 65 A A ¢
38 & & (f) 66 B B + 39
, 3 @ 67 C X +
40 ( ( '* 68 0 d + 41 ) ) 181 69 E E + 42 * * or 70 F <I> • 43 + + eo 71 G r ~
44 , , ~ 72 H H * 45 - - fbJ 73 I I "* 46 ~ 74 J -() 0
47 I / Ii§> 75 K K * 48 a 0 @? 76 L A * 49 1 1 C$ 77 M M * 50 2 2 .0- 78 N N * 51 3 3 ./ 79 0 0 "* 52 4 4 t/ 80 P II "* 53 5 5 X 81 Q <3 * 54 6 6 at 82 R P .. ', ',"
55 7 7 X 83 S L * 56 8 8 )( 84 T T * 57 9 9 .. 85 U y * 58 : + 86 V <; * 59 , ; + 87 W n *

676
Decimal International Symbol Dingbat Decimal International Symbol Dingbat
88 X ... • 122 z ~ I
89 Y \}I • 123 { { i
90 Z Z • 124 I I !'
91 [ [ * 125 } } " 92 \ * 126 ... - " .. 93 ] ] * 127
94 AA .l ~ 128 Q
95 \"I 129 0 1 ~ -
96 I 'Sf 130 e , : 97 a a 0 131 a :5 : 98 b ~ 0 132 a / • 99 c X * 133 a 00 • 100 d () * 134 a f ~
101 e £ • 135 c; '" ~
102 f <l> * 136 e • + 103 9 'Y ~I~ 137 e • • 104 h 11 ~i~ 138 e • • 105 i t * 139 'j H ~
106 j <p * 140 1 ~ CD
107 k 1( * 141 1 i @
108 I A • 142 A. --7 ®
109 m ~ 0 143 A J, ®
110 n v • 144 E 0 @
111 0 0 0 145 a3 ± ®
112 P 1t 0 146 If. " ®
113 q 8 0 147 6 ~ ®
114 r p 0 148 0 x @
115 s 0' .A 149 0 oc ®
116 t 't T 150 U a 0
117 u u • 151 U • @
118 v m .:. 152 y 8)
119 w ro • 153 6 -:f. 0
120 x ~ I 154 0 - 0
121 Y 'I' I 155 ¢ ~ <D

677
Decimal International Symbol Dingbat Decimal International Symbol Dingbat
156 £ ... 8 190 ® => --.
157 ¥ I (3 191 TM .u. ' ... 158 11 - CD 192
" 0 1111"
159 f .J (Ii) 193 ... ( -160 a ~ CD 194 %0 ® >-
161 f S (2) 195 . © >-
162 6 9\ @ 196 - TM > 163 U f.J ® 197 - L .. 164 ii ® @ 198 ( ,.. 165 N E9 @ 199 A I • 166 11 0 (J) 200 A l • 167 Q (l ® 201 E r c)
168 i u ® 202 E I ¢
169 " :J ®l 203 E L 0;;:>
170 " :J 0 204 1 r ~
171 ( r:t. f) 205 f ~ 0
172 > c €) 206 i l c:>
173 i c 0 207 'j I 0
174 « E 0 208 6 " 175 » e: (;) 209 6 ) 0
176 a L f) 210 6 f ~
177 6 V (i) 211 S r ]I»
178 0 ® 0 212 S I .. " 179 " © en> 213 CJ J ]1+
180 re TM -+ 214 0 ') -,"
181 CE II ~ 215 0 I ~
182 A ...j H 216 Y j »
183 A t 217 B l ... 184 6 -, ...... 218 L I ... 185 § 1\ -. 219 Z J .. 186 + v ,w 220 / I .. 187 t ¢:::> +- 221 r .. 188 ~ <= ... 222 J ~>
189 © 11 ---+

678

A Abandon 247,323,403 Add Chapter 409 Add in Above 236 Add New Frame 280 AddlRemove Fonts 365, 382 Addition button 24
keyboard shortcut 493 Adobe Systems
See PostScript Alignment 229 Altkey
changing column width in Table Edit mode 603 cropping pictures 300 entering non keyboard characters 85 in Graphic mode 164
Anchors See Frame anchors
Anchors & Captions 305,314,618 Apple LaserWriter 341 Archiving 62, 402 ASCII
defined 641 file format 65 from a database program 71 from a spreadsheet program 609
Aspect Ratio 298 Assign Func. Keys 200 Assignment List
defined 641 Attribute Overrides 440,471 Auto-Adjustments 490 Auto-Leader 463 Auto-Numbering 220,447 AutoCAJ) 112,115,122,129 Automatic Pair Kerning 473
Index
B Background patterns
examples of 278 in frames 267 in tables 606
Backup files 184,489 See also Multi-Chapter style sheets 195 using DOS 411
Backup button 43-44 defined 642
Ballot boxes 520 Banner headings 534 Base line
defined 642 Base line jumps 102, 569 Batch files
background 503 for loading chapters 507 VP.BAT 499
Big First Character 468, 568 Binding 394
defined 642 Bitmaps 115
defined 642 BodyText 90
defined 642 used with Line Snap 495
Books 625 Box Char 520, 526 Box Text 155, 1 71
annotations with 303 creating tables with 557 defined 643 fill attributes 305
Bracket codes 93,264 Break Across Page 594 Breaks
allow within 242 column 240 controlling 321

680
line 240 Page 239 purpose 238
Bring to Front 176 BroadSheet
See Page Size & Layout Bullets 470
defined 643 varieties of 522
Business forms See Forms
c Callout 643 Camera-Ready 643 Cancel button 39 Capitalization 83
of markers 618 Caption files
See Files,caption Captions
adding 305, 310 attaching 305 defined 643 padding 313 spell-checking 312
Carding defined 643 vs. feathering 628
Carriage returns differences with line breaks 80 fil tering extra 60 hiding 494 in ASCII files 65 usingPARAFlLTRtag 90
Change bars 549 Chapter files
abandoning 403 building new 255 ClF file 184 contents of 189 copying 406, 409 defined 643 elements of 50, 182 renaming 403 saving 322 templates 324 viewing component files 409 working with 402
Chapter menu 215
Chapter Typography 217, 631 Chart programs 129 CHKWORD 639 Circles 294 Clipboard
defined 643 frame 283 graphic 165 index entries on 421 Microsoft Windows 122 table 603 text 79,400
Collating 356 defined 643
Color changing 465 color numbers 466 defining 465 li thography 395 of ruling lines 245 paper stocks 352 printers 340 printing overlays 359 proofing 346 separations 643
Column Balance 219,232, 576 Column Guides
ShowlHide 493 Column Snap
in Frame mode 281 in Graphic mode 162 turn onloff 494
Column widths 221 setting in Table mode 603
Columns setting widths 222
Comb binding 395 CONFlG.SYS 374, 391
command line for EMS 589 Continued jumps 624 Continuous tone
defined 644 Controllers
See Printers Copying
frames 282 graphics 165 tables 603 text 78
Coupons 524 Crop marks
creating in Graphic mode 358
Index

Index
defined 644 printing 357
Cross References applications 616 creating 615 described 587 editing 622 examples 623 markers 617 tables 620 word processor codes 623
Crosshairs 285 Current Selection Box 48 Cursor
shapes 30 Cutting
D
frames 282 graphics 165 text 78
Dashes 245 Database programs 71,611 DCA format 67 Decimal alignment 234
within Table 597 Decimal Tab Char 491 Define Colors 359, 465 Desktop publishing
benefits 6 defined 4 limitations 9
Dialog boxes defined 645 described 36 inserts 222
Dictionary See Hyphenation dictionary
Dingbat font 87 defined 645
Dingbats 522 Directories 72
changing 43 for batch files 503 naming 498 use ofleaders 463
Discretionary hyphens 479 defined 645
Disk cache 509
RAM disks 509 recommended capacity 15 setting up 497 showing additional drives in Item Selector 501
681
storage required for Edco dictionary 636 storage required for screen fonts 390
Display type defined 645
Displays See Monitors
Distribution electronic 346
Dithering defined 645 scanned images 146
Document Content Architecture See DCA
Documents categories of 251 free-form 577 Ventura files 183
DOS File Ops 402-403 Double Click Speed 490 Double Underline 229 Double-sided documents 216 Double-sided printing 355 Downloaded fonts
See Fonts Draft quality 353 Draw programs 114
defined 645 Drop cap
See Big First Char Drop- down menus
See menus DUPD 638 Duplex printing
See Printing
E Ellipsis
Em defined 645
as amount of indent 233,470 as amount ofletter spacing 475 as amount of tracking 476
Em space defined 646
EMS
682
disabling 512 display of amount in use 516 required for Edco dictionary 587 support in Professional Extension 588 support in version 2 589
Encapsulated PostScript See PostScript
EPSF See PostScript
Epson See Printers
Equation editor commands 613 creating equations 611 creating in word processor 614 described 587 formatting equations 614
Expanded memory See EMS
Extension See File extensions
F
Facing Pages setting equal margins 222
Facing pages view 216 Feathering 628
defined 646 Figure numbering
See Numbering,figure File conversion 122, 274 File extensions
backup files 489 chapters 183 defaults 42 explained 186 generated index 185 generated TOC 185 graphics 120 print fIles 363 printer fonts 186 screen fonts 186 style sheets 194 Ventura graphics 184 word processing 56 183
File filters 41 ' File management
copying files 406 techniques for 400 tips for 412
utility programs 411 File TypelRename 76 Files
backup 184 caption 77,184,324 chapter 183 converting formats 57,119,124 274 deleting 404 ' graphics formats supported 118 moving 183 Multi-Chapter 184 naming 61, 76 picture 183 printer information 186 removing 55,273 renaming 273 text 183,400 types 182 Ventura graphics 184 width table 186
Fill attributes 169 Filters
See File filters First line indent 233 Fit in Frame 296 Fonts
background on 378 changing in Text mode 83 changing with bracket codes 99 choices for tables 557 defined 227,646 downloaded 379,385,393 generic 387 in non- PDL printers 335 installing 380 kerning information supplied 474 memory required 338 Pi 652 PostScript 378 resident vs. downloaded 384 screen 186,387-388 utility programs 385 vendors 659
Footers See Headers
Footnote Settings 438 Footnotes
bracket codes for 104 inserting 438 inserting into word processor 442 positioning 440 Separator Line 440
Index

Index
symbols 440 tags 442
Foreign languages characters 85 decimal tab character 491 hyphenation 480
Formats See style sheets
Forms creating with repeating frames 531 creating with Table Editor 591 fill-in lines 525
Fractions bracket codes for 107 entering 525
Frame anchors bracket codes for 106 inserting markers 315
Frame Background 294 Frame menu 221 Frame Typography 632 Frames
adding 280 adding captions 305 adjusting margins 290 anchoring 313,315 background on 277 background patterns 294 cutting, copying, and pasting 282 defined 48, 647 drawing multiple 282 fine-tuning 285 frame handles 289 moving 286, 289 padding 291 repeating 529 selecting 284 sizing & scaling 288 templates 317,529 tips on adding 289 vertical justification 632
Function keys assigning 200 tagging with 199 using 201
Function selector 46
G
Galley defined 647
Generate Index 426 Generate Table Of Contents 434 Generated files 55 Generated Tags
shown vs. hidden 487 Generic font
defined 647 Go to Page 575 Graphic mode
Box Text 171 described 154 enhancing pictures 112 302 grid 160 ' parent frame 158, 303 tools 163
Graphics capturing screen images 150 clip art 153,659 creating 111 cropping 149,299 drawing mode 226 editing 296 enhancing with Graphic mode 302 formats supported 118 from outside Ventura Publisher 51 hiding 493 Images 114, 140, 143 leaving windows 116 line art 124,139 loadi?g 113, 124, 276, 400 multiple 174 placing 296 scaling 116,143,296,299 scanned images 143, 299, 397 software vendors 661 TIFF 142, 146 Ventura's approach 112
Gray scale 145, 294 defined 647
Gray shades 467 Greeking
defined 647 selecting text size 488
Grid defined 647 Snap 161
Grid Settings 160
683

684
Grow Inter-Line To Fit 84,476 Gutters
H
between columns 222 defined 647
Halftone defined 648
Hanging bullets 471 Hanging indents 238, 533 Header Rows
in Table 594 Headers
defined 648 formatting 264 header frames 266, 324 live 261 mirrored frames 259 Repeating Frames in 532 tag attributes 265 turning off 267
Headers & Footers 220,257 Headings 532 Help boxes 39 Hewlett-Packard LaserJ et
See LaserJ et Hidden text 107 Hints
See tips Hollow boxes
See Box Char Horiz. Alignment
of Table 594 HotShot 151 HPGL 121 Hyphenation
adding words to 638 algori thms 479 alternate algorithm 274 as Paragraph attribute 231 changing dictionaries 480 dictionary 186, 505 discretionary hyphens 479 Edco dictionary 636-637, 639 examining contents of Edco dictionary 639 exception dictionaries 481 foreign languages 480 memory consumed by dictionary 51 7 suppressing in dictionary 482 tips for 483
within word processor 58 Hyphens
converting to em dashes 490
Image Settings 301 Images
See Graphics Imposition 648 Indents 536, 648
relative 537 Index
appearance in word processor 413 bracket codes for 104 choosing entries 423 copying entries 421 default parameters 426 deleting entries 420 formatting 430 generated file 185 generating 425 inserting entries 413
Index
inserting entries in word processor 424 Letter headings 427 placement of entries 421 secondary entries 415 See and See Also entries 41 7 sort keys 418 tips for 432
Initial Cap See Big First Char
Ins Special Item 414,441,593, 616 InsertlEdit Index Entry 414 InsertlEdit Reference 617 InsertlEdit Table 594, 635 InsertlEdit Variable Definition 622 Installation 16, 347 Interpress 333 Italics 649 Item Selectors
J
described 40 showing additional drives 501 tips for using 44
JLaser increasing DOS memory 512 printer interface 342, 393 scanner control 148

Index
used with PostScript printer 346 Jump text 539, 574 Justification
defined 649
K Keep Backup Files 489 Keep With Next 242 Kerning
bracket codes for 102 defined 649 information supplied with fonts 474 manual 477 on-screen 474, 490 Pair 220, 473
Key assignments 33 Keyboard
in place of mouse 289 inserting special characters 85 kerning with 477 shortcuts 35
Kickers 539
L
Labels mailing 540 peel-off 541
Landscape 649 LaserJet
downloading fonts 385 font dialog box for 228 font directory 381 Printer Command Language 336 size of print files 363 transparent graphics 171 using MODE command 347
LaserMaster CAPcard 343, 379 Layout strategies 252 Leader characters 459,462,598 Leader Spacing 463 Leaders
defined 649 Letter Spacing 475 Ligatures
defined 650 Line attributes 170 Line breaks 80, 90 Line Snap 282
in Graphic mode 160
685
turn on/off 494 Line-art
defined 113 Lines
See rules Linotronic 345 Li thography
binding 394 color 341,346 defined 329 guidelines for offset printing 395 halftone images 146, 395 spot color overlays 359 working with 397
Load Diff. Style 257 Logos 542,569 Loose Lines 475,494 Lotus 1-2-3 73, 112, 126,141, 609 Lotus Manuscript 67
M Macintosh 10
paint format 142 PICT format 138
Macro programs 92 Magazines 624 Make Index 426 Marginal headings 534 Margins
binding 222, 394 Margins & columns 221,290 Markers
inserting 61 7 Maximum Space Width 475 Memory
adding buffers 508 clearing memory-resident programs 507 diagnosing problems 514 disk cache 509 error messages 511 frame 514 graphics buffer 51 7 internal vs. external 516 line elements 514 management techniques 510 memory- intensive page elements 512 printer 338, 387 system 513 transferring screen memory 502 used by BUFFERS 391

686
used by files 275 Memory expansion
See EMS Memory-resident programs 506 Mentor Graphics 131 Menu Type
Drop-Down vs. Pull-Down 491 Menus
pop-up 36 purpose of 32 selecting items 18 used for creating style sheets 214
Merge Width Tables 382 Microsoft Windows 122,131,512 Microsoft Word 67 Mirrored frames 259 MODE command 347, 364 Monitors
screen fonts provided 388 speeding display 392 vendors of 663
Monospaced fonts defined 650 in tables 551
Mouse choosing a fil e 40 defined 651 double click speed 45 dragging 31 resizing with 287 selecting with 30 shapes 157 switch in VP.BAT 500 tagging with 198 use within Ventura Publisher 30
MS-DOS 15 Multi -Chapter
archiving 403 file types 184 indexing 425 Make TOe 433 moving files 183,404 printing 368 Renumber 426
MultiMate 67
N Next YPosition 241 N on -keyboard characters
See special characters
NormalSpace Width 475 Normal View 27 Numbering
across chapters 369,445 adding chapter numbers 456 bracket codes for 107 figure.and table 308 footnotes 439 headings 536 inserting current page or
chapter number 261,268,443,616 number style 309, 445
Index
numbers and paragraphs on same line 451 outline style 452 renumber chapter 455 renumber operation 619
o Object graphics
See Graphics,line-art Offset printing
See Lithography On-Screen Kerning 490 Opaque fill attributes 1 71 Options
recommended for building chapters 256 See also Set Preferences
Orphan defined 651
Outdents 233 Outline
See numbering Output ports 337 OUTPUT.WID 349, 351 Overall Width 232
of Table 594 Overflow drive 502 Overscore 229,471
p
Padding See Frame,padding
Page description languages defined 333, 651 Interpress 333 PostScript 333 printers with 341 shortcomings of 335
Page numbers

Index
across chapters 369 in headers 261 inindex 416 inserting current number 268, 616 See also Numbering on first page of chapter 524 placement of 543
Page Size & Layout 215 Pages
inserting 272 orientation 215
Thomas Paine 3 Paint programs 114 Panning
defined 652 Paper
binding 394 choosing stocks 351 laser 398 size and orientation 352 trays 357
PARAFILTRtag 90 Paragraph
defined 24,197,652 Paragraph menu 227 Paragraph Typography 473, 634 Pasting
frames 282 graphics 159 text 78
Patterns of ruling lines 245
PC Paintbrush 114,123,141, 143, 147, 150 PCL
See LaserJ et Performance
enhancing 508 Photographs
gray scale required 145 leaving windows for 395 proof 396 stri pping in 9 tips for 397
Phototypesetters See Typesetting
Pica defined 652
Pictures Graphics 51,111
PostScript Apple LaserWriter 341 clones 335
downloading preamble 506 EPSF 132-133 font dialog box for 228 font directory 380 fonts 378 handshaking 364,374 printers 348 printing EPSF 363 printing oversized pages 216 printing to a file 362 prolog 134, 392 removing prolog 366 screen fonts 388 service bureaus 132 strengths of 332 typesetters 345
Preferences See Set Preferences
Pretagging See Tagging
Print Stylesheet 250 Printers
appearance of gray shades 467 cables 373 color 340 controllers 666 costs of supplies 333 dot-matrix 330, 332, 340 drivers 348 engines 332, 342 interfaces 337,346,373 laser 145,332 memory 338 serial 347,373 speed 336 spoolers 393 testing 338 vendors of 665 width tables 349
Printing a publication 368-369 a single chapter 353-361 double-sided 355 imitating another printer 350 over a network 374 oversize pages 361 paper stock 351 selected pages 354 stopping 361 switching printers 347 to a file 121,362-365,369 transparent graphics 1 71
687

688
troubleshooting problems 372 using more than one printer 345 See also Lithography See also Printers
Professional Extension addi tiona! options in Paragraph Typo-
graphy 477 batch file used 504 differences with version 2 16 installing 587 overview of 586
Publication file defined 368
Publication files copying 410 creating 407 defined 653 loading 409 naming 184 printing 369 See also Multi-Chapter
Pull quotes 543
Q
QMS PS 810 340 Quality
Draft vs. Ultimate 350 Question and Answer format 539 Quotation marks
converting 60,490
R RAM disks 509 Re-Anchor Frames 31 7 Redlining
See Change bars Relative Indent 233,537 Remove TextlFile 55, 272, 401 Renumber 371,426 Renumber Chapter 455 Repeating frames 529 Resolution
defined 654 halftone images 302 output devices 330 scanners 145
Returns See Carriage returns
Reverse type 470,564-565
defined 654 Revisable Form Text
DCA 67 Rotated text 140,231 Rounded rectangles 293 Rows
in Table Editor 594 Rulers 285
setting units 491 ShowlHide 493 zero point 286, 491
Rules adding 292 in Graphic mode 165 Inter-Col 225 selecting in Table mode 600 Vertical 225, 548 wi th graphics drawing mode 226
Ruling Box Around 292 Ruling lines
custom indent 246 custom width 545 formatting in Table 599 variety of effects 544 with paragraph tags 243 within Table 595
Runarounds 526 defined 654
s Sans Serif
defined 654 Scanners 51
background 144 defined 143, 654 graphics programs for 141 gray scale 145 software 147 tips 148 vendors of 668
Scientific characters 85 Screen capture programs 121,150 Screen Display
Colors vs. Shades of Gray 466 options for 492
Screen drivers switch in VP.BAT 500
Screen fonts See Fonts,screen
Screen frequency
Index

Index
halftone images 301 Screen patterns 143 Scroll bars 1 7 Scrolling 31 See and See Also entries
See Index Select All 305 Send to Back 176 Serifs
defined 655 Service bureaus
See Typesetting Set Column Widths 603 Set Font button 83 Set Font Properties 470 Set Minimum Space Width 475 Set Preferences
establishing 486 Generated Tags: Shown 208 keep backup files 184 recommended options 256
Set Printer Info 354, 362, 382, 389 Set Ruler 491 Shades of Gray 466 Shadow effects 528 Shifting text 84 Show Loose Lines 475, 494 Show Rulers 285 Show Tabs & Returns 80 ShowlHide Column Guides 493, 573 ShowlHide Pictures 493 ShowlHide Rulers 493 ShowlHide Side-Bar 492 ShowlHide Tabs & Returns 494, 574 Side-Bar
described 17,45 ShowlHide 492
Signature 655 Sizing & Scaling 143, 223, 288, 296, 495 Small caps 82 Snap-To 655 Sort entries
See Index Spacing
function of dialog box 234 Inter-Line 236 letter 475 within Table 596
Special characters entering in word processor 97 keyboard shortcuts 85
Special effects 467,524
Spell checking 61, 70 Spoolers 393 Spot color
defined 655 Spot Color Overlays 359 Spreadsheet programs 73,126,609-610 Strike-Thru 229 Style sheets
appl~ng 23,196-197,199,201 backing up 195 basics 181 changing 202-203 contents of 188,324 defined 10,51,655 loading 23,191,203,257,401 managing 248-249 menus used 214 Microsoft Word 68 moving 196, 403 printing 250 samples included with program 192 saving 193,257 vendors of 669 width tables in 351
Subdirectories See directories
Subscri pt 472 Successive Hyphens 232 Superscript 471 Symbol font 86 Symbols
inserting in text mode 85
T
Tab Settings 460, 555 Table editor 590
changing column Widths 603 creating a table 592 described 586 header rows 594 spacing 596 tags for line attributes 595 tags used 210 text in word processor 590 vertical justification in 635
Table of Contents creating 433 formatting 436 generated file 185 Renumber required 433
689

690
Tips for 437 Title String 434
Tables applications 591 created with side-by-side paragraphs 558 creating from spreasheets 74 creating in word processor 606 creating with tabs 460 formatting 597 methods of creating 550
Tabloids 216 Tabs
entering in word processor 58 hiding 494 leaders 459 location 461 setting 459 types 461 used to produce tables 554
Tagging 275 adding new tags 207 defined 23, 196 empty paragraphs 197 for Table editor 607 generated tags 311 in word processor 89,201 multiple paragraphs 198 removing a tag 210 renaming a tag 211 tips 202 while in text mode 199 wi th a programming language 75 with the function keys 199 with the mouse 198
Tags capitalization of 92,214 defined 656 footnotes 442 for Table elements 607 for Table rules 595 generated 208-209 in Professional Extension 209 in style sheet 188 naming 248
Technical documentation 15 Templates
defined 656 Temporary memory
See Clipboard Text
attributes in word processor 63 bracket codes for attributes 96
clipboard 400 destination when loading 400 editing 274
Index
editing in Ventura 78-79,81,83,85,87 files 51 formatting in word processor 57 hidden 68 loading 20,269,274,400,573 placing 22, 270-271 rotated 140 selecting 78 tagging 275 Ventura's approach 53
Text Attr. button 264 Text mode
changing attributes 81 defined 656 described 75, 77 editing symbols 80 entering into a Table 596 tagging 199
Text to Greek 488 Thumb tabs 563 Thumbnail sketches 203 TIFF 142,146,300 Tint blocks 529 Tints
Tips defined 656
adding frames 289 captions 312 creating files 77 editing text in Ventura 88 file management 412 footnotes 442 for changing style sheets 213 for faster tagging 202 generating text from a database 71 graphics drawing 304 hard disk management 498 hyphenation 483 indexing 432 loading text 274 preformatting files 108 pre tagging 91 printing to disk 365 renumbering 372 scaling pictures 299 Table of Contents 437 using Item Selectors 44 using scanners 148 using tabs 556

Index
working with AutoCAD 130 working with Dialog Boxes 39 working with images 143 working with line-art 139 working with Lotus graphs 126 working with photos 397 working with screen fonts 391 working with spreadsheets 74 working with word processors 70
Title bar 17 Title pages 564 Tracking 475
bracket codes for 103 defined 656
Transparent fill attributes 1 71 Troubleshooting
printer problems 372 Typefaces
See fonts Typesetters
imaging halftones 147 printing from Ventura 344 vendors of interfaces 670
Typesetting 6, 11 cost of machines 6 defined 652 Linotronic 345 non-PostScript 345 output from Ventura Publisher 330 350 PostScript machines 333 ' proofing on a laser printer 350 service bureaus 345, 376
Typographic effects summarized 478
Typographic functions variety of 464
u tntimate quality 353 Underline 229,471 Underlying page 22
as controlled by Frame menu 221 as controlled by style sheet 215 attributes 49 creating unusual sizes 223 crop marks on 358 graphics on 158 in style sheet 188 removing files from 273 repeating frames on 530
rules on 226 text on 254, 270, 274 typing text onto 76
Units of measurement changing in dialog box 38
Update Counters 220, 309 370 444 User interface 29 " Utility programs 72, 671
v Variables 625
described 620 Varityper VT600 342 Ventura formula 51, 182, 253 Ventura Publisher
batch file 499 diagnostics 514 program files 186
Vertical alignment 230 Vertical justification
applying 630 defined 657 described 626 within Table 596
Vertical rules 225, 548 Vertical tabbing 558 VideoShow 137 Views
changing 26,575 VP Toolbox 411 VP .INF 496, 505
w Widows
defined 657 Widows & Orphans 218 Width tables 186,349
changing 349 character widths 350 copying 408 defined 349 fonts in 379 in style sheet 351 memory consumed by 51 7 merging 381 provided with third-party fonts 385
Windows See Microsoft Windows
Word processors 51
691

692 Index
creating tables in 606 editing batch files 500 entering bracket codes in 93 entering equations in 614 entering footnotes in 442 inserting index entries in 424 proper use of tabs 554 supported by Ventura 55 tagging paragraphs in 201 tips for working with 70 vendors of 672-673
WordPerfect 68 WordStar 68 Workspace 17 Write-white vs. write-black engines 333 WYSIWYG 495
x Xerox 4020 340 Xerox 4045 341 Xerox Writer 69 XyWrite 69
z Z_Tags
See Generated tags

Mid
New Riders Library
Bestselling how-to books, reference guides, learning materials, and companion disks for corporate and technical publishing from the desktop. Use the postage-free card at the back of the book to order today.
INSIDE XEROX VENTURA PUBLISHER A Guide to Professional-Quality Desktop Publishing on themMPC James Cavuoto and Jesse Berst 704 pages, 330 illustrations ISBN 0-934035-59-8 $24.95 2nd Edition
The best reference guide to Ventura Publisher is now even better! Inside Xerox Ventura Publisher, 2nd Edition, has been completely rewritten for Ventura Publisher Version 2 and includes more of what readers have asked for: more hands-on examples, more easy-to-use charts, and more time-saving tips and tricks.
PUBLISHING POWER WITH VENTURA The Complete Teaching Guide to Xerox Ventura Publisher Martha Lubow and Jesse Berst 624 pages, 230 illustrations ISBN 0-934035-61-X $27.95 2nd Edition
Unlock the inner secrets of Ventura Publisher Version 2 with this well-written tutorial. You'll learn how to create your own great-looking business documents by producing the "real world" documents presented in this book. These documents include reports, newsletters, directories, technical manuals, and books. Companion software is available.
DESKTOP MANAGER ISBN: 0-934035-34-2 $99.95 Supports Version 1 and 2
Desktop Manager is the desktop accessory software for IBM and compatible personal computers that helps your manage your Ventura Publisher documents, running transparently from within the Ventura Publisher environment. A multifunction software utility, Desktop Manager provides file management, timed backup, document control, style sheet settings, and report generation. This essential utility program comes complete with an 180-page guide.
For fast service, call a New Riders Sales Representative now at (818) 991-5392

INSIDE Xerox Ventura Publisher
STYLE SHEETS FOR BUSINESS DOCUMENTS (Book and Disk Set) Martha Lubow and Jesse Berst 320 pages, 150 illustrations ISBN 0-934035-22-9 $39.95 Supports Version 1 and 2
Introducing a cure for the conunon document-Style Sheets for Business Documents. This book and disk set contains more than 30 predesigned Ventura Publisher templates for creating top-quality business documents. Style sheets are presented for proposals, reports, marketing materials, ads, brochures, and correspondence. More than 100 pages of design tips and tricks are also included.
STYLE SHEETS FOR TECHNICAL DOCUMENTS (Book and Disk Set) By Byron Canfield and Chad Canty 320 Pages 150 illustrations ISBN: 0-934035-29-6 $39.95 Supports Version 1 and 2
Get the maximum out of Ventura Publisher with these advanced technical document formats. This book/disk combination presents more than 25 ready-to-use templates for creating technical documents and books. Also includes techniques for creating pictures and tables, plus advanced tips for modifying formats to fit your needs.
STYLE SHEETS FOR NEWSLETTERS (Book and Disk Set) By Martha Lubow and Polly Pattison 320 Pages over 150 illustrations ISBN: 0-934035-31-8 $39.95 Supports Version 1 and 2
This book and disk set presents more than 25 pre designed Ventura Publisher templates for creating one-, two-, three-, and four-column newsletters. Just open the chapter template, load in your own text, and print. A complete description of every style sheet and key tag for all chapter templates is also included.
For fast service, call a New Riders Sales Representative now at (818) 991·5392

NEW WRITING By Jesse Berst 320 Pages over 150 illustrations ISBN: 0-934035-27 -X $9.95
New Riders Library
The essential handbook for the modern writer and editor. New Writing shows you how to save production time by preformatting documents. Learn to manage your fIles, styles and style sheets. Also presented are the elements of style you need to succeed in today's desktop publishing arena. Companion software is available.
New Riders Library also includes books on AutoCAD
INSIDE AUTOCAD D. Raker and H. Rice 750 pages, over 400 illustrations ISBN: 0-934035-49-0 $29.95
INSIDE AutoCAD, the best selling book on AutoCAD, is entirely new and rewritten for AutoCAD's 3D Release 10. This easy-to-understand book serves as both a tutorial and a lasting reference guide.
INSIDE AUTOLISP J. Smith and R. Gesner 672 pages, over 150 illustrations ISBN: 0-934035-47-4 $29.95
Introducing the most comprehensive book on AutoLISP for AutoCAD Release 10. Learn AutoLISP commands and functions and write your own custom AutoLISP programs.
INSIDE AUTOSKETCH By Frank Lenk 240 pages, over 120 illustrations ISBN: 0-934035-20-2 $17.95
INSIDE AutoSketch gives you real-life mechanical parts, drawing schematics, and architectural drawings.
For fast service, call a New Riders Sales Representative now at (818) 991-5392

INSIDE Xerox Ventura Publisher
CUSTON.UZINGAUTOCAD J. Smith and R. Gesner 480 pages, over 100 illustrations ISBN: 0-934035-45-8 $27.95
Uncover> the hidden secrets of Auto CAD's 3D Release 10 in this all new edition. Discover the anatomy of an AutoCAD menu and build a custom menu from start to fInish.
AUTOCAD FOR ARCHITECTS AND ENGINEERS John Albright and Elizabeth Schaeffer 480 pages, over 160 illustrations ISBN: 0-934035-53-9 $29.95
Learn by doing a typical AEC project using high-powered design development with AutoCAD Release 10. Learn to construct working drawings using techniques from real life AEC projects.
STEPPING INTO AUTOCAD By Mark Merickel 380 pages, over 140 illustrations ISBN: 0-934035-51-2 $29.95
This popular tutorial has been completely rewritten with new exercises for Release 10. The book is organized to lead you step by step from the basics to practical tips on customizing AutoCAD for technical drafting.
AUTOCAD QUICK REFERENCE GUIDE New Riders Publishing 180 pages, over 50 illustrations ISBN: 0-934035-57-1 $11.95
All essential AutoCAD functions and commands are arranged alphabetically and described in just a few paragraphs.
THE AUTODESK FILE Written and Edited by John Walker 608 pages ISBN 0-934035-63-6 $24.95
The unvarnished history of Autodesk, Inc. the company behind AutoCAD. Read the original memos, letters and reports that trace the rise of Autodesk, from start-up to their present position as the number one CAD software company in the world.
For fast service, call a New Riders Sales Representative now at (818) 991-5392

Order from New Riders Publishing Today
Yes, please send me the productivity.boosting material I have checked below. Make check payable to New Riders Publishing.
Name ___________________________________ __
o Check enclosed. Company: __________________________________ ___ o Charge to my credit card:
o Visa o Mastercard Ad~ss: __________________________________ __
Card # _________________ ___ City: ____________________________ _
Expiration: _________________________________ _ State ____________________ .Zip: ______________ _
Signature: __________________________________ _ Phone: _____________________________________ _
The easiest way to order is to pick·up the phone and call (818) 991·5392 between 9:00 AM and 5:00 PM PST. Please have your credit card readily available and your order can be placed in a snap!
Quantity Description of Item Unit Cost Total Cost
~
Inside Xerox Ventura Publisher 2nd Edition
Publishing Power with Ventura 2nd Edition
Publishing Power Disk
Style Sheets for Business Documents-BookIDisk Set
Style Sheets for Newsletters-BooklDisk Set
Style Sheets for Technical Documents-BooklDisk Set
Desktop Manager for Xerox Ventura Publisher
New Writing
New Writing - Desktop Utility Disk
COOKIES (Put the fun back in your computer)
Send to:
New Riders Publishing P.O. Box 4846
Thousand Oaks, CA 91860 (818)991-5892
Shipping and Handling: see information below.
Sales Tax: California please add 6.5% sales tax.
TOTAL:
$24.95
$27.95
$14.95
$39.95
$39.95
$39.95
$99.95
$ 9.95
$ 7.95
$ 6.95
.'
Shipping and Handling: $3.50 for the first book and $1.00 for each additional book. Floppy disk add $1.50 for shipping and handling. Add $15.00 per book for overseas shipping and handling. Jfyou have to have it NOW, we can ship product to you in ·24 to 48 hours. For an additional $5.00 RUSH CHARGE for processing plus the actual cost of air freight, you'11 be able to receive your item over night or in 2 days.
New Riders Publishing P.O. Box 4846 Thousand Oaks, CA 91860 (818) 991-5892 FAU{(818) 991-9263
To order: Fill in the reverse side, fold, and mail I I I
-----------------------------------------------------~--
BUSINESS REPLY MAIL FIRST CLASS PERMIT NO. 53 THOUSAND OAKS, CA .
POSTAGE WILL BE PAID BY ADDRESSEE
NEW RIDERS PUBLISHING
P.O. Box 4846-P
Thousand Oaks, CA 91360
NO POSTAGE NECESSARY IF MAILED IN THE
UNITED STATES

Try a Free Sample Issue of ...
microPublishing Report The Most Authoritative Newsletter on the Desktop Publishing Industry
Dear Reader:
I hope you have enjoyed our book, Inside Xerox Ventura Publisher. If so, I would like to let you know about our newsletter devoted to desktop publishing, microPublishing Report.
Each month, microPublishing Report brings you the latest happenings in the desktop publishing industry, including insightful analysis of industry trends, exhaustive product evaluations, candid profiles of key companies, and practical tips and guidelines for specific publishing applications. I want to send you a free sample issue of microPublishing Report, which you can receive by filling out the postage-paid reply card below and returning it to us.
As editor of microPublishing Report, I can tell you that no other publication offers the up-to-the-minute, unbiased, and expert reports and analysis you'll find in our newsletter. We've been quoted in publications such as, PC Week, Business Week, and The Wall Street Journal. And microPublishing Report is delivered to you in a digestible, comprehensible format.
microPublishing Report Small Computer Solutions lor Publications Prolessionals _. ..... ,-
_"IhtJt.wntDlIw ..... of _____ printw .... t..a oalput
Ifl.,..... ...... .,. r_G4_ (m111J.flf1
Plus, as a subscriber, you'll receive several added bonuses such as the free product directory updates and free telephone consultation (see reverse). Please return this reply card to us for more information and a sample copy.
James Cavuoto Editor and Publisher
D Yes, please send my free sample issue of microPublishing Report to the address below. I understand there is no obligation whatsoever. Name ____________________________________________________ __
Company ________________________________________________ __
Address __________________________________________________ __
City ________________ State __ Zip
Telephone
To send for your free copy of microPublishing Report, fill out this card, fold, and mail. Call (213) 371-5787 for faster response.

microPublishing Report Send Now for Your Free Sample Issue
Read About. .. The Trends Network publishing, database publishing, graphics chips, electronic distribution.
The Hardware Gray scale printers, color output, full-pag~ displays, hardware platforms.
The Software Unbiased reviews of major software products, including graphics, page layout, utilities, and more.
The Companies No-holds-barred profiles of key vendors.
The Events Up-to-the-minute reports from major shows.
Special Bonuses ... The following special bonuses come free with your subscription to microPublishing Report:
Free Directory The Directory of Desktop Publishing Suppliers, a com prehensive source of information on desktop publishing prodUcts and services in 25 categories. Updated four times per year.
Free Telephone Consultations Two free telephone consultations with the editors.
Free Special Report Publishing Trends: 1988, a 32-page report on the important technical developments in desktop publishing.
To reserve your free sample issue, fill out the postage-paid reply card on the reverse side and return it to us.
BUSINESS REPLY MAIL FIRST CLASS PERMIT NO. 374 TORRANCE, CA
POSTAGE WILL BE PAID BY ADDRESSEE
microPublishing Report 21150 Hawthorne Blvd. Suite 104
Torrance, CA 90503·9902
NO POSTAGE NECESSARY
IF MAILED IN THE
UNITED STATES
11.1 •• 11.11.1.1.111111.11.1.1 •• 1.1 •• 1111.111.11111.1

ISBN 0-934035-59-8
- --
- - -
INSIDE XEROX VENTURA PUBLISHER
Now the Best Book on Xerox Ventura is Even Better
INSIDE XEROX VENTURA has more of what readers have asked for-more hands-on examples, more easy~to~use charts, more time saving tips and tricks
• Uncover all the hidden secrets of Xerox Ventura Version 2.
• Explore the professional techniques needed for creating good looking documents.
• Cut your layout time in half with easy high~speed preformatting methods.
Whether you are new to Xerox Ventura Publisher, or an experienced user INSIDE XEROX VENTURA PUBLISHER is your key to high~quality documents.
90000
9 780934 035590 $24.95 u.s. ISBN 0-934035-59-8