
imageRUNNER 2206 User's Guide
235
imageRUNNER 2206 User's Guide USRMA-3373-01 2018-11 en Copyright CANON INC. 2018
-
Upload
khangminh22 -
Category
Documents
-
view
2 -
download
0
Transcript of imageRUNNER 2206 User's Guide

imageRUNNER2206
User's Guide
USRMA-3373-01 2018-11 en Copyright CANON INC. 2018

Contents
Basic Operations ............................................................................................................................................ 2
Parts and Their Functions .......................................................................................................................................... 4
External View ....................................................................................................................................................... 5
Internal View ........................................................................................................................................................ 7
Control Panel ....................................................................................................................................................... 9Display ........................................................................................................................................................ 11Customizing the <Home> Screen .................................................................................................................... 14
Using the Display .................................................................................................................................................... 16
Placing Documents ................................................................................................................................................. 19
Loading Paper ......................................................................................................................................................... 20
Loading Paper in the Paper Drawer ....................................................................................................................... 22
Loading Paper in the Multi-Purpose Tray ............................................................................................................... 25
Loading Envelopes in the Multi-Purpose Tray ......................................................................................................... 28
Loading Preprinted Paper .................................................................................................................................... 31
Specifying Paper Size and Type ............................................................................................................................. 34Registering a Custom Paper Size .................................................................................................................... 36
Setting Auto Shutdown Time ................................................................................................................................... 38
Entering Sleep Mode ............................................................................................................................................... 39
Copying ................................................................................................................................................................ 42
Basic Copy Operations ............................................................................................................................................. 44
Selecting Copy Paper .......................................................................................................................................... 46
Canceling Copies ..................................................................................................................................................... 47
Various Copy Settings .............................................................................................................................................. 49
Enlarging or Reducing ......................................................................................................................................... 50
Selecting Document Type .................................................................................................................................... 51
Adjusting Density ............................................................................................................................................... 52
Copying Multiple Documents onto One Sheet (2 on 1/4 on 1) ................................................................................... 53
Copying Both Sides of an ID Card onto One Page .................................................................................................... 55
Erasing Dark Borders and Frame Lines (Erase Frame) .............................................................................................. 56
Collating Copies by Page ..................................................................................................................................... 58
Splitting Facing Page Documents into Separate Pages for Copying ........................................................................... 60
Configuring Copy Settings to Your Needs ................................................................................................................. 61
Changing Default Settings ................................................................................................................................... 62
Registering Frequently Used Copy Settings ............................................................................................................ 63
Using the Machine as a Printer ....................................................................................................... 65
Printing from a Computer ....................................................................................................................................... 66
Canceling Prints ................................................................................................................................................. 68
Checking the Printing Status ................................................................................................................................ 71
Configuring Print Settings to Your Needs ............................................................................................................... 73
I

Registering Combinations of Frequently Used Print Settings .............................................................................. 74Changing Default Settings ............................................................................................................................. 76
Using the Machine as a Scanner ..................................................................................................... 79
Scanning from the Machine ..................................................................................................................................... 80
Scanning from a Computer ...................................................................................................................................... 83
Scanning Using an Application ............................................................................................................................. 84
Configuring Scan Settings in ScanGear MF ............................................................................................................. 86
Security ................................................................................................................................................................ 88
Protecting the Machine from Unauthorized Access ................................................................................................... 89
Setting Access Privileges ...................................................................................................................................... 90Setting the System Manager PIN .................................................................................................................... 91
Restricting the Machine's Functions ........................................................................................................................ 92
Restricting USB Functions .................................................................................................................................... 93
Setting Menu List ........................................................................................................................................ 95
Preferences ............................................................................................................................................................ 96
Timer Settings ........................................................................................................................................................ 99
Common Settings ................................................................................................................................................. 104
Copy Settings ........................................................................................................................................................ 106
Printer Settings .................................................................................................................................................... 108
Adjustment/Maintenance ..................................................................................................................................... 109
System Management Settings ............................................................................................................................... 114
Troubleshooting ......................................................................................................................................... 119
Clearing Jams ........................................................................................................................................................ 121
Countermeasures for Each Message ...................................................................................................................... 130
Countermeasures for Each Error Code .................................................................................................................... 133
Common Problems ................................................................................................................................................ 134
Installation/Settings Problems ........................................................................................................................... 136
Copy/Printing Problems .................................................................................................................................... 137
Miscellaneous Problems .................................................................................................................................... 138
When You Cannot Print Properly ............................................................................................................................ 139
Printing Results Are Not Satisfactory ................................................................................................................... 141
Paper Creases or Curls ...................................................................................................................................... 145
Paper Is Fed Incorrectly ..................................................................................................................................... 147
When a Problem Cannot Be Solved ......................................................................................................................... 149
Maintenance ................................................................................................................................................. 151
Cleaning the Machine ........................................................................................................................................... 152
Exterior ........................................................................................................................................................... 153
Platen Glass ..................................................................................................................................................... 154
Transfer Roller ................................................................................................................................................. 155
II

Drum .............................................................................................................................................................. 156
Fixing Assembly ............................................................................................................................................... 157
Replacing the Toner Cartridges .............................................................................................................................. 159
Configuring Purchase Information for Consumables ............................................................................................. 161
How to Replace the Toner Cartridges .................................................................................................................. 163
How to Replace the Drum Unit ............................................................................................................................... 166
Printing Reports and Lists ..................................................................................................................................... 170
User Data List/System Manager Data List ............................................................................................................ 171
Copy/Print Charge Log Report ............................................................................................................................ 172
Viewing the Counter Value .................................................................................................................................... 173
Initializing Settings ............................................................................................................................................... 175
Initializing Menu ............................................................................................................................................... 176
Initializing System Management Settings ............................................................................................................ 177
Initializing All Data/Settings ............................................................................................................................... 178
Replacement Parts ................................................................................................................................................ 179
Appendix ........................................................................................................................................................... 181
Third Party Software ............................................................................................................................................. 182
Feature Highlights ................................................................................................................................................ 183
Going Green and Saving Money ......................................................................................................................... 184
Improving Efficiency ......................................................................................................................................... 186
Going Digital .................................................................................................................................................... 187
So Much More .................................................................................................................................................. 189
Specifications ....................................................................................................................................................... 190
Main Unit ........................................................................................................................................................ 191
Available Paper ................................................................................................................................................ 194
Scan Function .................................................................................................................................................. 197
Printer Functions .............................................................................................................................................. 198
System Environment ......................................................................................................................................... 199
Options ................................................................................................................................................................ 200
Optional Equipment .......................................................................................................................................... 201
Manuals and Their Contents .................................................................................................................................. 202
Using User's Guide ................................................................................................................................................ 203
Screen Layout of User's Guide ............................................................................................................................ 204
Viewing User's Guide ........................................................................................................................................ 207
Basic Windows Operations .................................................................................................................................... 208
Notice .................................................................................................................................................................. 212
III

Basic OperationsBasic Operations ................................................................................................................................................. 2
Parts and Their Functions ..................................................................................................................................... 4
External View .................................................................................................................................................... 5
Internal View .................................................................................................................................................... 7
Control Panel .................................................................................................................................................... 9Display ..................................................................................................................................................... 11Customizing the <Home> Screen ............................................................................................................. 14
Using the Display ................................................................................................................................................. 16
Placing Documents .............................................................................................................................................. 19
Loading Paper ...................................................................................................................................................... 20
Loading Paper in the Paper Drawer ................................................................................................................ 22
Loading Paper in the Multi-Purpose Tray ........................................................................................................ 25
Loading Envelopes in the Multi-Purpose Tray ................................................................................................. 28
Loading Preprinted Paper ............................................................................................................................... 31
Specifying Paper Size and Type ....................................................................................................................... 34Registering a Custom Paper Size ............................................................................................................. 36
Setting Auto Shutdown Time .............................................................................................................................. 38
Entering Sleep Mode ........................................................................................................................................... 39
Basic Operations
1

Basic Operations3EEJ-000
This chapter describes basic operations, such as how to use the control panel or how to load the paper anddocuments, that are frequently performed to use the functions of the machine.
◼Parts and Their FunctionsThis section describes the exterior and interior parts of the machine and their functions, as well as how to use the keyson the control panel and how to view the display. Parts and Their Functions(P. 4)
◼Using the DisplayThis section describes how to toggle the display and select items. Using the Display(P. 16)
◼Placing DocumentsThis section describes how to place documents on the platen glass. Placing Documents(P. 19)
(
◼Loading PaperThis section describes how to load the paper into the paper drawer and multi-purpose tray. Loading Paper(P. 20)
Basic Operations
2

◼Entering Sleep ModeThis section describes how to set the sleep mode. Entering Sleep Mode(P. 39)
Basic Operations
3

Parts and Their Functions3EEJ-001
This section describes the parts of the machine (exterior, front and back side, and interior) and how they function. Inaddition to describing the parts of the machine used for such basic operations as placing documents, loading paper,and replacing the toner cartridges, this section also describes the keys on the control panel and display. Read thissection for tips on how to use the machine properly.
External View(P. 5) Internal View(P. 7) Control Panel(P. 9)
Basic Operations
4

External View3EEJ-002
Multi-purpose trayLoad the paper into the multi-purpose tray when you want to temporarily use a type of paper different fromthat which is loaded in the paper drawer. Loading Paper in the Multi-Purpose Tray(P. 25)
Platen coverSecures the originals placed on the platen glass. Placing Documents(P. 19)
Control panelThe control panel consists of keys such as the [Start] key and [Stop] key, a display, and status indicators. Youcan perform all the operations and specify settings from the control panel. Control Panel(P. 9) Display(P. 11)
Paper drawer 1Load the type of paper you frequently use into the paper drawer. Loading Paper in the PaperDrawer(P. 22)
USB portConnect a USB cable when connecting the machine and a computer.
Basic Operations
5

Power socketConnect the power cord.
Power switchTurns the power ON or OFF. To restart the machine, turn OFF the machine, wait for at least 10 seconds, andturn it back ON.
Toner codeThis code indicates the type of genuine toner that can be used with the machine. Use toner with a code thatincludes the same letters as the code on the front cover of the machine.
Basic Operations
6

Internal View3EEJ-003
Platen glassPlace documents to scan on the platen glass. Also, use the platen glass to place thick or bound documentssuch as books. Placing Documents(P. 19)
Drawer 1 left coverOpen this cover when clearing a paper jam in paper drawer 1. Clearing Jams(P. 121)
Fixing assemblyWhen a paper jam occurs around the fixing assembly, clear the paper jam from here. ClearingJams(P. 121)
Left coverOpen this cover to clear a paper jam inside the main unit. Clearing Jams(P. 121)
Toner cartridgeReplace the toner cartridge when the toner runs out. How to Replace the Toner Cartridges(P. 163)
Drum unitReplace the drum unit before the usage period expires. How to Replace the Drum Unit(P. 166)
Basic Operations
7

Front coverOpen this cover to replace the toner cartridge or drum unit. How to Replace the Toner Cartridges(P. 163)
Basic Operations
8

Control Panel3EEJ-004
[Home] keyPress to display the <Home> screen. Customizing the <Home> Screen(P. 14)
DisplayYou can view the progress of copy and other jobs and error statuses. The display is a touch panel, allowingyou to operate the screen by touch to specify settings. Display(P. 11) Using the Display(P. 16)
[Back] keyPress to return to the previous screen. If you press this key when specifying settings, for example, thesettings are not applied and the display returns to the previous screen.
[Paper Settings] keyPress to select a paper source, such as a paper drawer or multi-purpose tray, and register paper size andtype.
Basic Operations
9

[Status Monitor] keyPress to check the status of printing, or to view the usage history. You can also check the status of themachine, such as the remaining amounts of paper and toner, or whether any errors occurred. Display(P. 11)
[Energy Saver] keyPress to put the machine into sleep mode. The key lights up green when the machine is in sleep mode. Pressthe key again to exit sleep mode. Entering Sleep Mode(P. 39)
[Counter Check] keyPress to display the total number of pages used for operations such as copying or printing on the touchpanel display. You can also check the serial number of the machine (three letters and five numbers).
[Stop] keyPress to cancel copying and other operations.
[Start] keyPress to scan or copy documents.
[Error] indicatorBlinks or lights up when an error such as a paper jam occurs.
[Processing/Data] indicatorBlinks while operations are being performed. Lights up when there are documents waiting to be processed.
[Reset] keyPress to reset the settings.
[ID Card Copy] keyPress to copy a card-size original, such as an ID card and driver's license. Copying Both Sides of an IDCard onto One Page(P. 55)
LINKS
Using the Display(P. 16)
Basic Operations
10

Display3EEJ-005
The <Home> screen for initiating operations and screens for specifying settings appear in the display. You can alsoview job progress and messages here. Touch the display to operate it.
<Home> Screen
The <Home> screen is displayed when the power is turned ON or by pressing on the control panel. Use
this screen to specify settings for and register functions.
Toggle functionsSwitch to copy or scan functions. Copying(P. 42) Using the Machine as a Scanner(P. 79)
<Favorite Copy Set.>You can register frequently used combinations of copy settings, and recall them easily when needed. Registering Frequently Used Copy Settings(P. 63)
<Home Screen Settings>Allows you to change the order that the <Home> screen buttons are displayed in. Customizing the<Home> Screen(P. 14)
<Menu><Timer Settings>, <Preferences>, and many other machine settings start from this button. Setting MenuList(P. 95)
<Status Monitor> Screen
When you press , a screen is displayed that enables you to check the status of documents that are being
printed, as well as the status of the machine such as the toner level.
Basic Operations
11

<Error Information/Notification>Displays the details of any errors that occurred. Countermeasures for Each Message(P. 130)
<Device Information>Displays the status of the machine, such as the amount of paper or toner remaining.
<Paper Information>Displays whether paper is loaded in each paper source.
<Toner Level>Displays the amount of toner remaining. Depending on the environment in which your machine is located,other internal parts may reach the end of their lifetime before the toner runs out.
Status of copy/print jobsDisplays the current status of the selected item. The <Copy/Print Job Status> screen is shown below as anexample.
When a Message Is DisplayedMessages are displayed at the top of the screen in situations such as when toner level is low or when a cover isleft open. The display alternates between showing the normal screen and the message.
Countermeasures for Each Message(P. 130)
Basic Operations
12

When <You have notifications.> or <Tap Icon on Right ->> Is DisplayedTap to view the notification.
When an Error OccursIn some cases when an error occurs, instructions on how to respond to the error are displayed. Follow the on-screen instructions to solve the problem. The screen displayed when a paper jam occurs is shown below as anexample ( Countermeasures for Each Message(P. 130) ).
LINKS
Customizing the <Home> Screen(P. 14) Using the Display(P. 16)
Basic Operations
13

Customizing the <Home> Screen3EEJ-006
You can change the order that buttons in the <Home> screen are displayed in according to your application or apreferred arrangement.
◼Changing the Home Screen Button Display Order
1 Press and tap <Home Screen Settings>.
● If a screen for entering a PIN is displayed, enter the PIN, and tap <Apply>. Setting the System ManagerPIN(P. 91)
2 Tap <Set Display Order>.
3 Tap the button to move.
4 Tap <Previous> or <Next> to move the button, and tap <Apply>.
5 Repeat steps 3 and 4 to move all buttons you want to move.
6 Tap <End>.
Basic Operations
14

◼To Insert Blanks in <Home> Screen
1 Press and tap <Home Screen Settings>.
● If a screen appears prompting you to enter a PIN, enter the correct PIN, and tap <Apply>. Setting theSystem Manager PIN(P. 91)
2 Tap <Insert and Delete Blank>.
3 Tap the button where you want to insert a blank, and tap <Insert>.
● To delete an inserted blank, select the blank, tap <Delete>, and proceed to step 5.
4 Tap <Apply>.
5 Tap <End>.
LINKS
Display(P. 11)
Basic Operations
15

Using the Display3EEJ-007
The display is a touch panel, allowing you to operate directly on the screen.
Avoid the following actions.The display may misfunction or be damaged.
● Pressing forcefully
● Pressing with pointed objects (fingernails, ballpoint pen, pencil, etc.)
● Operating with wet/soiled hands
● Operating the display while an object is placed on it
TapTouch the screen lightly and quickly. Use for selecting or finalizing items.
Long TouchKeep finger held on the screen. When text cannot be completely displayed on one line ("..." appears), touch andhold the line to scroll all of the text. Also continuously increases/decreases the copy magnification.
◼Selecting itemsTap an item name or button to make a selection.
Basic Operations
16

If an item is mistakenly touchedSlide your finger away then release it from the screen to cancel the selection.
To return to the previous screenPress to return to the previous screen.
◼Scrolling the screenThe scroll bar is displayed on the screen when there is still information that is undisplayed. If the scroll bar isdisplayed, tap / to scroll the screen. The screen changes page by page, and the page number isdisplayed in the scroll bar.
◼Changing values and settings
Changing valuesTap / to enter values.
Basic Operations
17

To move the cursorWhen / is displayed, tap to move the cursor.
Changing setting valuesTo adjust a value on a scale, tap <-> / <+>.
● You can change a variety of display-related settings, such as the scrolling speed or display language:
Display Settings(P. 96)
● To change the screen that is automatically displayed when the machine remains idle for a specified length oftime:
Function After Auto Reset(P. 101)
Basic Operations
18

Placing Documents3EEJ-008
Place documents on the platen glass. For information about the scannable area of a document, see MainUnit(P. 191) .
Use documents that are completely dryWhen placing documents, make sure that any glue, ink, or correction fluid on the documents has completelydried.
1 Open the platen cover.
2 Place the document face down on the platen glass.
● Align the corner of the document with the top-left corner of the platen glass.
To scan transparent documents (for example, tracing paper or transparencies), cover them with plain whitepaper.
3 Gently close the platen cover.
● The machine is ready to scan the document.
● When scanning is complete, remove the document from the platen glass.
Basic Operations
19

Loading Paper3EEJ-009
You can load the paper into the paper drawer or multi-purpose tray. Load the paper you usually use into the paperdrawer. The paper drawer is convenient when using large amounts of paper. Use the multi-purpose tray when youtemporarily use size or type of paper that is not loaded in the paper drawer. See Available Paper(P. 194) foravailable paper sizes.
Paper Type and Setting for the MachineSee the table below to specify the paper settings according to the type and weight of the paper to load into thepaper source. For more information about how to specify the paper settings on the machine, see SpecifyingPaper Size and Type(P. 34) . For the amount of paper that can be loaded in each paper source, see Available Paper(P. 194) .
Paper Type Paper WeightPaper Setting
on the Machine
Plain paper64 to 75 g/m² <Plain 1 (64-75 g/m²)>
76 to 90 g/m² <Plain 2 (76-90 g/m²)>
Recycled paper 64 to 80 g/m² <Recycled (64-80 g/m²)>
Color paper 64 to 80 g/m² <Color (64-80 g/m²)>
Heavy paper91 to 105 g/m² <Heavy 1 (91-105 g/m²)>
106 to 128 g/m² <Heavy 2 (106-128 g/m²)>
Bond paper 75 to 90 g/m² <Bond>
Envelope <Envelope>
Pre-punched 75 to 80 g/m² <Pre-Punched>
Transparency <Transparency>
Label <Labels>
Do not use the following types of paper:● Wrinkled or creased paper
● Curled or rolled paper
● Torn paper
● Damp paper
● Very thin paper
● Paper printed by a thermal transfer printer
Basic Operations
20

● Highly textured paper
● Glossy paper
Paper handling and storage● Store the paper on a flat surface.
● Keep the paper wrapped in its original package to protect the paper from moisture or dryness.
● Do not store the paper in such a way that may cause it to curl or fold.
● Do not store the paper vertically or stack too much paper.
● Do not store the paper in direct sunlight, or in a place subject to high humidity, dryness, or drasticchanges in temperature or humidity.
When printing on paper that has absorbed moistureSteam may emit from the paper output area, or water droplets may form on the back side of the controlpanel or around the paper output area. There is nothing unusual about any of these occurrences, whichoccur when the heat generated from fixing toner on the paper causes moisture in the paper to evaporate(most likely to occur at low room temperatures).
LINKS
Registering a Custom Paper Size(P. 36)
Basic Operations
21

Loading Paper in the Paper Drawer3EEJ-00A
Load the paper that you usually use in the paper drawer. When you want to print on paper that is not loaded in thepaper drawer, load the paper in the multi-purpose tray. Loading Paper in the Multi-Purpose Tray(P. 25)
1 Hold the handle of the paper drawer and pull it out until it stops.
2 Push down the metal plate to lock it.
3 Adjust the position of the paper guides.
While squeezing the toppart of the right guide, slideit to align with the sizeindicator for the paper to beloaded.
Basic Operations
22

While squeezing the toppart of the front guide, slideit to align with the sizeindicator for the paper to beloaded.
4 Prepare paper.
● Fan the paper stack well, and tap it on a flat surface to align the edges.
Size abbreviations on the paper guidesThe abbreviations on the paper guides in the paper drawer indicate paper sizes as follows:
● LGL: Legal
● LTR: Letter
● STMT: Statement
5 Insert the paper into the paper drawer.
Make sure that the paper size setting of the paper drawermatches the size of the paper to load in the paper drawer.
Load the paper stack with the print side face up, and againstthe left guide of the paper drawer.
Basic Operations
23

Do not exceed the load limit mark when loading paperMake sure that the paper stack does not exceed the load limit mark. Loading too much paper can causepaper jams.
When loading envelopes or paper with a logo, see Loading Envelopes in the Multi-Purpose Tray(P. 28) or Loading Preprinted Paper(P. 31) .
6 Gently insert the paper drawer into the machine.
» Continue to Specifying Paper Size and Type(P. 34)
When changing the paper size or typeIf you load a different size or type of paper into the machine, make sure to change the settings. If you do notchange the settings, the machine cannot print properly.
LINKS
Available Paper(P. 194)
Basic Operations
24

Loading Paper in the Multi-Purpose Tray3EEJ-00C
When you want to print on paper that is not loaded in the paper drawer, load the paper in the multi-purpose tray.Load the paper that you usually use in the paper drawer. Loading Paper in the Paper Drawer(P. 22)
1 Open the multi-purpose tray.
● Pull out the auxiliary tray ( ), and extend the tray extension ( ) when loading large-sized paper.
2 Adjust the slide guides ( ) to match the size of the paper.
Basic Operations
25

3 Insert the paper into the multi-purpose tray until the paper stops.
● Load the paper with the print side face down.
● Fan the paper stack well, and tap it on a flat surface to align the edges.
Do not exceed the load limit mark when loading paper
Make sure that the paper stack does not exceed the load limit mark ( ). Loading too much paper can causepaper jams.
When loading envelopes or paper with a logo, see Loading Envelopes in the Multi-Purpose Tray(P. 28) or Loading Preprinted Paper(P. 31) .
Continue to Specifying Paper Size and Type(P. 34)
Printing on the Back Side of Printed Paper (Manual 2-Sided Printing)
You can print on the back side of printed paper. Flatten any curls on the printed paper and insert it into themulti-purpose tray in the orientation indicated below ( ), with the side to print face down (previously printed
side face up).
Basic Operations
26

● You can use only the paper printed with this machine.
Basic Operations
27

Loading Envelopes in the Multi-Purpose Tray3EEJ-00E
Make sure to flatten any curls on envelopes before loading them. Also pay attention to the orientation of envelopesand which side is face up.
Before Loading Envelopes(P. 28) Loaded Orientation(P. 29)
This section describes how to load envelopes in the orientation you want, as well as procedures that you needto complete before loading envelopes. For a description of the general procedure for loading paper in the paperdrawer or multi-purpose tray, see Loading Paper in the Paper Drawer(P. 22) or Loading Paper in theMulti-Purpose Tray(P. 25) .
Before Loading Envelopes
Follow the procedure below to prepare the envelopes before loading.
10 envelope at a time can be loaded in the multi-purpose tray. Follow steps 1 to 4 in the procedure below toprepare the envelope for loading.
1 Close the flap of each envelope.
2 Flatten them to release any remaining air, and make sure that the edges are pressedtightly.
Basic Operations
28

3 Loosen any stiff corners of the envelopes and flatten any curls.
4 Align the edges of the envelope on a flat surface.
Loaded Orientation
Load the envelopes in portrait orientation, short edge first, with the non-glued side (front side) face up.
Load the envelopes, as shown in the illustrated bellow ( : feeding direction).
Basic Operations
29

Basic Operations
30

Loading Preprinted Paper3EEJ-00F
When you use paper that has been preprinted with a logo, pay attention to the orientation of the paper when loadingit in the paper source. Load the paper properly so that printing is performed on the same side as the logo.
Loading Paper with Logos in Portrait Orientation(P. 31) Loading Paper with Logos in Landscape Orientation(P. 32)
● This section describes how to load preprinted paper with the proper orientation. For a description of thegeneral procedure for loading paper in the paper drawer or multi-purpose tray, see Loading Paper in thePaper Drawer(P. 22) or Loading Paper in the Multi-Purpose Tray(P. 25) .
Loading Paper with Logos in Portrait Orientation
The loading method varies depending on the size of the paper with the logo and the paper source that is used.
When Loading A4-size Paper with LogosLoad the paper so that the logo faces up in the paper drawer and faces down in the multi-purpose tray, asshown in the illustrations below.
Paper drawer Multi-purpose tray
Pay attention to the orientation when placing a document. Place as follows, with the document facing down onthe platen glass.
Platen glass
When Loading A3-size Paper with LogosLoad the paper so that the logo faces up in the paper drawer and faces down in the multi-purpose tray, asshown in the illustrations below.
Basic Operations
31

Paper drawer Multi-purpose tray
Pay attention to the orientation when placing a document. Place as follows, with the document facing down onthe platen glass.
Platen glass
Loading Paper with Logos in Landscape Orientation
The loading method varies depending on the size of the paper with the logo and the paper source that is used.
When Loading A4-size Paper with LogosLoad the paper so that the logo faces up in the paper drawer and faces down in the multi-purpose tray, asshown in the illustrations below.
Paper drawer Multi-purpose tray
Pay attention to the orientation when placing a document. Place as follows, with the document facing down onthe platen glass.
Platen glass
When Loading A3-size Paper with LogosLoad the paper so that the logo faces up in the paper drawer and faces down in the multi-purpose tray, asshown in the illustrations below.
Basic Operations
32

Paper drawer Multi-purpose tray
Pay attention to the orientation when placing a document. Place as follows, with the document facing down onthe platen glass.
Platen glass
Basic Operations
33

Specifying Paper Size and Type3EEJ-00H
You must specify the paper size and type settings to match the paper that is loaded. Make sure to change the papersettings when you load the paper that is different from the previously loaded paper. You can also register a defaultpaper size and paper type for the multi-purpose tray, which is convenient if you always load paper of the same sizeand type.
If the setting does not match the size and type of loaded paper, a paper jam or printing error may occur.
1 Press .
2 Select the paper source.
If the same size/type of paper is always set in the Multi-Purpose TrayTap <Multi-Purpose Tray> <On>.
If you want to register the paper in paper drawer 1Tap <Drawer 1>.
3 Select the loaded paper size.
● If the loaded paper size is not displayed, tap <Other Sizes>.
4 Select the loaded paper type.
Basic Operations
34

When a frequently used paper size is knownYou can set the machine to display only frequently used paper sizes in the selection screen.
1 Press .
2 Tap <Select Frequently Used Paper Sizes>.
3 Select the paper source.
4 Select the frequently used paper sizes.
The paper sizes without check mark are displayed in the <Paper Size (Other Sizes)> screen.
5 Tap <Apply>.
LINKS
Loading Paper in the Paper Drawer(P. 22) Available Paper(P. 194)
Basic Operations
35

Registering a Custom Paper Size3EEJ-00J
You can register a custom paper size and type to load in the multi-purpose tray.
1 Press .
2 Tap <Multi-Purpose Tray>.
3 Tap <On>.
4 Tap <Custom>.
5 Specify the paper size.
1 Specify the length of the <X> side.
● Tap <X>.
● Input the length of the <X> side using / , with / to move the cursor between the digits
for inputting whole numbers and fractions, and tap <Apply>.
Basic Operations
36

2 Specify the length of the <Y> side.
● Tap <Y>.
● Input the length of the <Y> side, and tap <Apply>.
3 Tap <Apply>.
6 Select the paper type.
LINKS
Loading Paper in the Paper Drawer(P. 22) Loading Paper in the Multi-Purpose Tray(P. 25)
Basic Operations
37

Setting Auto Shutdown Time3EEJ-00L
By enabling this setting, you can set the machine to automatically shut down. The machine automatically turns OFFafter the specified period of idle time has elapsed since entering the sleep mode. You can cut electric powerconsumption at night and on holidays if you forget to turn OFF the machine.
<Menu> <Timer Settings> <Auto Shutdown Time> Set the time period <Apply>
NOTE
● The default setting is 4 hours.
Basic Operations
38

Entering Sleep Mode3EEJ-00R
The sleep mode function reduces the amount of power consumed by the machine by disabling power flow to thecontrol panel. If no operations will be performed on the machine for a while, such as during a lunch break, you cansave power simply by pressing on the control panel. You can also use the Auto Sleep Time setting to
automatically put the machine into sleep mode if it remains idle for a specified length of time.
NOTE
When in sleep modeWhen the machine enters sleep mode, lights up yellow green.
Situations in which the machine does not enter sleep mode● When the machine is in operation
● When the [Processing/Data] indicator is lit up or blinking
● When the machine is performing an operation such as adjustment or cleaning
● When a paper jam occurs
● When the menu screen is displayed
● When a job is waiting to be scanned to a computer
● When an error message is displayed on the screen (There are some exceptions. The machine sometimesenters sleep mode when error messages are displayed.)
When You Want to Set the Auto Sleep TimerThe factory default settings for the amount of time that elapses before the machine enters auto sleep mode arelisted below. We recommend using the factory default settings to save the most power. If you want to changethe amount of time that elapses before the machine enters auto sleep mode, follow the procedure below.
● 10 minutes (setting range is 3 to 60 minutes)
<Menu> <Timer Settings> <Auto Sleep Time> Set the amount of time that elapses before themachine automatically enters sleep mode <Apply>
Basic Operations
39

Exiting Sleep Mode
Press . You can also tap the display or press any key other than to exit sleep mode.
Basic Operations
40

CopyingCopying .................................................................................................................................................................. 42
Basic Copy Operations ........................................................................................................................................ 44
Selecting Copy Paper ...................................................................................................................................... 46
Canceling Copies ................................................................................................................................................. 47
Various Copy Settings ......................................................................................................................................... 49
Enlarging or Reducing .................................................................................................................................... 50
Selecting Document Type ............................................................................................................................... 51
Adjusting Density ........................................................................................................................................... 52
Copying Multiple Documents onto One Sheet (2 on 1/4 on 1) ......................................................................... 53
Copying Both Sides of an ID Card onto One Page ........................................................................................... 55
Erasing Dark Borders and Frame Lines (Erase Frame) .................................................................................... 56
Collating Copies by Page ................................................................................................................................ 58
Splitting Facing Page Documents into Separate Pages for Copying ................................................................ 60
Configuring Copy Settings to Your Needs .......................................................................................................... 61
Changing Default Settings .............................................................................................................................. 62
Registering Frequently Used Copy Settings .................................................................................................... 63
Copying
41

Copying3EEJ-00S
This chapter describes basic copy operations and various other useful functions.
◼Using Basic OperationsBasic Copy Operations(P. 44) Selecting Copy Paper(P. 46) Canceling Copies(P. 47)
◼Using Copy Settings to Suit Your Needs
Enlarging or Reducing(P. 50) Collating Copies by Page(P. 58) Selecting DocumentType(P. 51)
Adjusting Density(P. 52) Erasing Dark Borders and FrameLines (Erase Frame)(P. 56)
Copying Both Sides of an ID Cardonto One Page(P. 55)
Copying
42

Copying Multiple Documentsonto One Sheet (2 on 1/4 on 1)(P. 53)
Splitting Facing Page Documentsinto Separate Pages forCopying(P. 60)
◼Simplifying Your Frequent Copy OperationsChanging Default Settings(P. 62) Registering Frequently Used Copy Settings(P. 63)
Copying
43
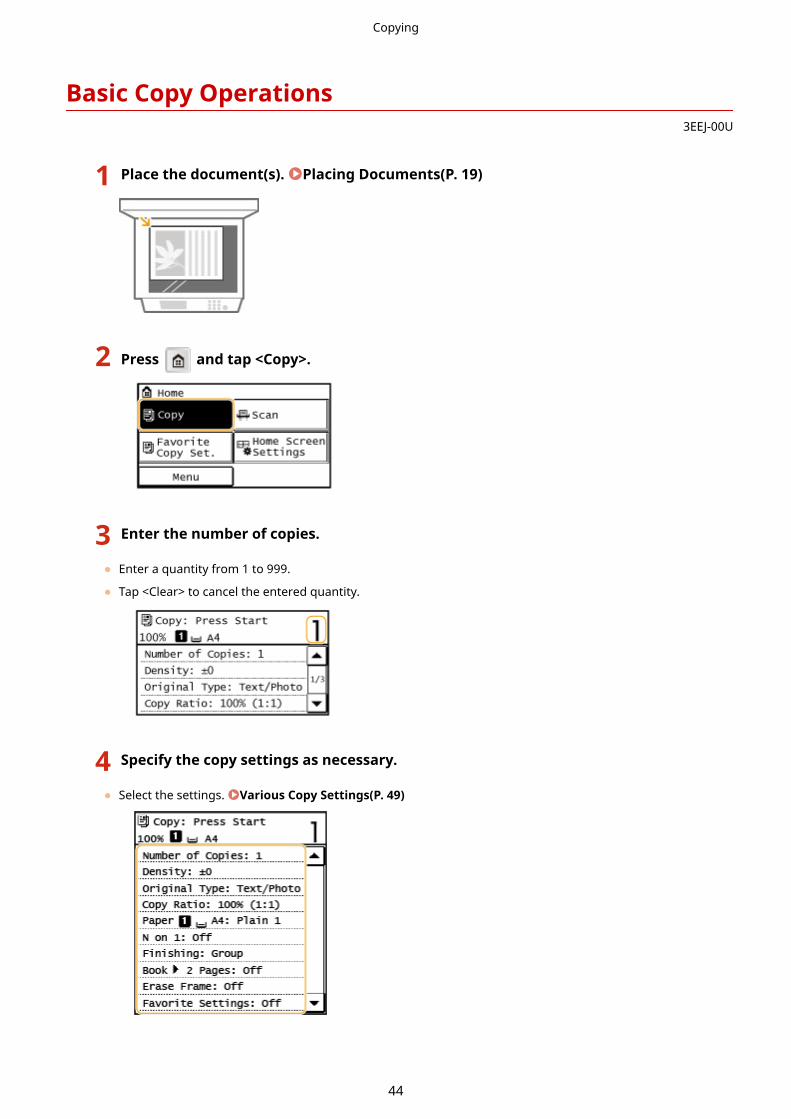
Basic Copy Operations3EEJ-00U
1 Place the document(s). Placing Documents(P. 19)
2 Press and tap <Copy>.
3 Enter the number of copies.
● Enter a quantity from 1 to 999.
● Tap <Clear> to cancel the entered quantity.
4 Specify the copy settings as necessary.
● Select the settings. Various Copy Settings(P. 49)
Copying
44

5 Press .
● Copying starts.
● If you want to cancel copying, tap <Cancel> <Yes>. Canceling Copies(P. 47)
When placing documents on the platen glass in step 1
Depending on the copy settings you made, the screen for selecting the document size is displayed whencopying multiple documents. Follow the procedure below.
1 Select the document size.
2 Place the next document on the platen glass, and press .
● Repeat this step until you finish scanning the entire document.
3 Tap <Start Copy>.
● When the <Paper Size & Settings Mismatch> message appears.
Countermeasures for Each Message(P. 130)
When copying documents with text or images that extend to the edges of the pageThe edges of the document might not be copied. For more information about the scan margins, see MainUnit(P. 191) .
● If you always want to make copies with the same settings:
Changing Default Settings(P. 62) Registering Frequently Used Copy Settings(P. 63)
Copying
45

Selecting Copy Paper3EEJ-00W
Specify the paper source that contains the paper to use for printing out copies.
NOTE
● You must first specify the size and type of paper that is loaded in the paper source.
Specifying Paper Size and Type(P. 34) Loading Paper(P. 20)
<Copy> <Paper> Select the paper source ( , )
< >Selects the paper loaded in the multi-purpose tray.
< >Selects the paper loaded in the paper drawer.
LINKS
Basic Copy Operations(P. 44)
Copying
46

Canceling Copies3EEJ-00X
If you want to cancel copying immediately after pressing , tap <Cancel> on the screen or press on the
control panel. You can also cancel copying after checking the copy status.
◼Tap <Cancel> on the Screen That is Displayed While Copying
◼Press to Cancel
If the Screen Displays a List of Documents When is Pressed
Documents have been scanned and are waiting to be printed. Select the copy document to cancel.
◼Use to Cancel
<Copy/Print Job> <Job Status> Select the desired job <Cancel> <Yes>
Copying
47

Copy detailsThe number of copies, settings, and other details are displayed. If you only want to check the details withoutcanceling copying, press to return to the copy main screen.
<Cancel>Cancels copying.
LINKS
Basic Copy Operations(P. 44)
Copying
48

Various Copy Settings3EEJ-00Y
A variety of settings are available to suit your needs, such as when you want to save paper or make your documentseasier to read.
Enlarging or Reducing(P. 50) Collating Copies by Page(P. 58) Selecting DocumentType(P. 51)
Adjusting Density(P. 52) Erasing Dark Borders and FrameLines (Erase Frame)(P. 56)
Copying Both Sides of an ID Cardonto One Page(P. 55)
Copying Multiple Documentsonto One Sheet (2 on 1/4 on 1)(P. 53)
Splitting Facing Page Documentsinto Separate Pages forCopying(P. 60)
Copying
49

Enlarging or Reducing3EEJ-010
You can enlarge or reduce copies by using a preset copy ratio such as <A5> → <A4>,or by setting a custom copy ratio in increments of 1%.
NOTE
<Copy Ratio> is not available when using <ID Card Copy>.
<Copy> <Copy Ratio> Select the copy ratio
<Custom Ratio>Use / to enter the copy ratio, and tap <Apply>. You can set any copy ratio from 25% to 400% in 1%increments.
Preset copy ratioSelect a copy ratio.
LINKS
Basic Copy Operations(P. 44)
Copying
50

Selecting Document Type3EEJ-011
You can select the optical image quality for the copy depending on the documenttype, such as text-only documents, documents with charts and graphs, or magazinephotos.
<Copy> <Original Type> Select the document type
<Text>Suitable when copying documents that only contain text.
<Text/Photo>Suitable when copying documents that contain both text and photos.
<Photo>Suitable when copying documents that contain printed photos, such as magazines or pamphlets.
Even if <Density> is set to <Auto Density>, when <Original Type> is set to <Text/Photo> or <Photo>, <AutoDensity> is canceled.
LINKS
Basic Copy Operations(P. 44)
Copying
51

Adjusting Density3EEJ-012
You can adjust the density of the copy if the text or images in a document are toolight or dark. You can also automatically set an optimal density for a document.
<Copy> <Density> Adjust the density <Apply>
<->Decreases the density.
<+>Increases the density.
<Auto Density>An optimal density for the document is automatically set.
<Original Type> is automatically set to <Text>. ( Selecting Document Type(P. 51) )
LINKS
Basic Copy Operations(P. 44) Auto Recognize Original Orientation (P. 107)
Copying
52

Copying Multiple Documents onto One Sheet (2 on 1/4on 1)
3EEJ-013
You can copy two or four documents onto a single sheet at a reduced size. Thisdecreases the number of pages, enabling you to save paper.
● Using <2 on 1>/<4 on 1> reduces the copy ratio automatically (the copy ratio is displayed on the screen). You
can increase or further reduce the copy ratio before pressing , but the edges of the document might
not be copied if you increase it.
● <2 on 1>/<4 on 1> is not available when using <Erase Frame>, <Book -> 2 Pages>, or <ID Card Copy>.
● When you copy multiple documents onto one page, margins may be created in the copied image.
<Copy> <N on 1> Select <2 on 1> or <4 on 1> Select the document size on the <Scan Size>screen On the <Output Size> screen, select the paper source that contains the paper you want touse
<2 on 1>/<4 on 1>Select <2 on 1> to copy two pages of documents onto a single sheet, or select <4 on 1> to copy four pages ofdocuments onto a single sheet.
<Select Layout>Specify how to arrange the documents on the page.
Copying
53

LINKS
Basic Copy Operations(P. 44)
Copying
54

Copying Both Sides of an ID Card onto One Page3EEJ-014
You can use <ID Card Copy> to copy the front and back sides of a card onto the same side ofa page. This function is useful when copying a driver's license or ID card.
● <ID Card Copy> is available with A4/Letter size paper or larger.
● <Copy Ratio> is automatically set to <100% (1:1)>.
● <ID Card Copy> is not available when using <Erase Frame>, <Book -> 2 Pages>, or <2 on 1>/<4 on 1>.
Place the card Turn the card over
How to place the card
● When the <Paper Size & Settings Mismatch> message appears.
Countermeasures for Each Message(P. 130)
LINKS
Basic Copy Operations(P. 44)
Copying
55

Erasing Dark Borders and Frame Lines (Erase Frame)3EEJ-015
When copying documents that are smaller than the output paper size, framelines may appear around the edges in the copied image. When copying facingpages from thick book, dark borders may appear. <Erase Frame> enables youto erase these frame lines and dark borders.
NOTE
● The width of the frame to erase is increased or decreased relative to the <Copy Ratio> setting.
● <Erase Frame> is not available when using <2 on 1>/<4 on 1> or <ID Card Copy>.
<Copy> <Erase Frame> Select the type of Erase Frame Specify the width of the frame toerase <Apply> Select the paper size on the <Scan Size> screen
Original FrameSpecify <Outer Frame Width> to erase the dark borders and frame lines that appear around the copy if theoriginal is smaller than the selected paper size. You can also use this mode to create a blank border aroundthe edge of the copy.
Book FrameSpecify <Center Frame Width> and <Outer Frame Width> to erase the dark borders, as well as center andcontour lines that appear if you are copying facing pages in a bound original onto a single sheet of paper.
LINKS
Copying
56

Basic Copy Operations(P. 44)
Copying
57

Collating Copies by Page3EEJ-016
When preparing multiple copies of multi-page documents, you can select <Group>,<Collate>, <Rotate + Group>, or <Rotate + Collate> for the order of copied papers. Thisfunction is useful when preparing handouts for meetings or presentations.
<Copy> <Finishing> Select page order
<Group>The copies are grouped by page. For example, if you are making three copies of a five-page document, theprintouts will be arranged in the following order.
<Collate>The copies are collated by sequential page order.
For example, if you are making three copies of a five-page document, the printouts will be arranged in thefollowing order.
<Rotate + Group>The copies are grouped by page, and each group is rotated 90 degrees.
For example, if you are making three copies of a five-page document, the printouts will be arranged in thefollowing order.
Copying
58

<Rotate + Collate>The copies are collated by sequential page order, and each group is rotated 90 degrees.
For example, if you are making three copies of a five-page document, the printouts will be arranged in thefollowing order.
LINKS
Basic Copy Operations(P. 44)
Copying
59

Splitting Facing Page Documents into Separate Pagesfor Copying
3EEJ-017
You can copy documents with two facing pages such as books and magazines intoseparate pages, dividing the left and right pages.
NOTE
● When scanning a facing page document, place it on the platen glass. Place the document face down with itscorner aligned with the top-left corner of the platen glass, as shown below.
● <Book -> 2 Pages> is not available when using <2 on 1>/<4 on 1> or <ID Card Copy>.
<Copy> <Book->2 Pages>
<Off>Does not set this function.
<On>Sets this function.
Copying
60

Configuring Copy Settings to Your Needs3EEJ-018
The default settings are the settings that are displayed whenever you turn ON the machine, or when you press . Ifyou register your frequently used settings as default settings, you can eliminate the need to configure the samesettings every time you make copies. In addition, you can also register combinations of multiple copy settings and usethem whenever you need them.
NOTE
The machine comes pre-configured with factory default settings ( Setting Menu List(P. 95) ). You canchange and register the default settings according to your needs.
Change the copy ratio to 95% and register it as thedefault setting. From now on, you can make copieswithout changing the copy ratio. Changing DefaultSettings(P. 62)
Go to <Favorite Settings> and register the combination of<Number of Copies> and <Finishing Type> turned<Collate>. You can then easily use this settingcombination whenever you need it. RegisteringFrequently Used Copy Settings(P. 63)
Copying
61

Changing Default Settings3EEJ-019
The default settings are the settings that are displayed whenever you turn ON the machine, or when you press . Ifyou change these default settings to match the operations that you perform frequently, you can eliminate the need toconfigure the same settings every time you make copies.
<Menu> <Copy Settings> <Change Default Settings> Select the setting Change the defaultvalue of the selected item <Apply> <Apply>
SettingsSelect the item you want to set, and change the default value.
LINKS
Basic Copy Operations(P. 44) Various Copy Settings(P. 49) Copy Settings(P. 106)
Copying
62

Registering Frequently Used Copy Settings3EEJ-01A
You can register up to four frequently used combinations of copy settings. By simply selecting a registered settingcombination when it is needed, you can eliminate the need to configure the same settings every time you makecopies, such as if you frequently set the number of copies to 5, set <Erase Frame> to <On>, and increase the sharpnesswhen copying. You can register the setting combinations as <Settings 1> to <Settings 4>.
<Copy> <Favorite Settings> <Regist./Edit> Select <Settings 1> to <Settings 4> Select eachsetting and set the value <Apply> <Yes>
<Settings 1> to <Settings 4>Register frequently used combinations of copy settings as one of the modes. To edit the settings for a modethat has already been registered, select that mode, and tap <Regist./Edit> again.
SettingsConfigure your frequently used settings. Various Copy Settings(P. 49)
NOTE
● If you want to delete a registered setting, tap <Copy> <Favorite Settings> <Delete> select the setting <Yes>.
● If you want to use a registered setting, tap <Copy> <Favorite Settings> select the setting.
● Registered settings are saved even when the machine is turned OFF.
● You can change the settings of a mode after it is activated.
LINKS
Basic Copy Operations(P. 44)
Copying
63

Using the Machine as a PrinterUsing the Machine as a Printer ................................................................................................................ 65
Printing from a Computer ................................................................................................................................... 66
Canceling Prints .............................................................................................................................................. 68
Checking the Printing Status .......................................................................................................................... 71
Configuring Print Settings to Your Needs ....................................................................................................... 73Registering Combinations of Frequently Used Print Settings ................................................................... 74Changing Default Settings ....................................................................................................................... 76
Using the Machine as a Printer
64

Using the Machine as a Printer3EEJ-01C
There are many ways to use the machine as a printer. You can print documents on your computer by using the printerdriver. Make full use of the print functions to suit your needs.
◼Printing from a ComputerYou can print a document made on your computer by using the printer driver. Printing from a Computer(P. 66)
Using the Machine as a Printer
65

Printing from a Computer3EEJ-01E
You can print a document made with an application on your computer by using the printer driver. There are usefulsettings on the printer driver, such as enlarging/reducing, that enable you to print your documents in various ways.Before you can use this function, you need to complete some procedures, such as installing the printer driver on yourcomputer. For more information, see the manuals for the relevant drivers on the online manual website.
About the Printer Driver Help(P. 66) Basic Printing Operations(P. 66)
About the Printer Driver Help
Clicking [Help] on the printer driver screen displays the Help screen. On this screen, you can see the detaileddescriptions that are not in the User's Guide.
Basic Printing Operations
This section describes how to print a document on your computer by using the printer driver.
Paper settings on the machine
● Normally, it is necessary to specify the paper size and type for the paper loaded in each paper source beforeproceeding to printing.
1 Open a document in an application and display the print dialog box.
2 Select the printer driver for this machine, and click [Preferences] or [Properties].
3 Specify the print settings as necessary, and click [OK].
● Switch the tab according to the settings.
Using the Machine as a Printer
66
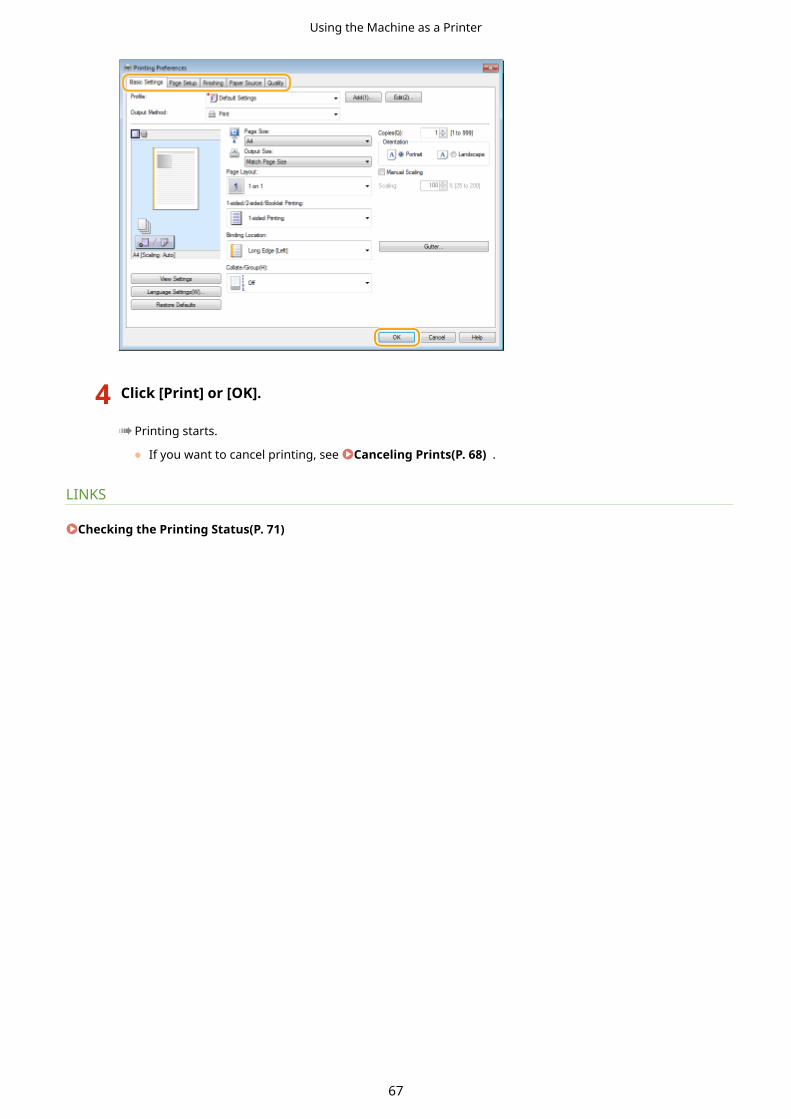
4 Click [Print] or [OK].
➠Printing starts.
● If you want to cancel printing, see Canceling Prints(P. 68) .
LINKS
Checking the Printing Status(P. 71)
Using the Machine as a Printer
67

Canceling Prints3EEJ-01F
You can cancel printing from your computer or on the control panel of the machine.
From a Computer(P. 68) From the Control Panel(P. 69)
From a Computer
You can cancel printing from the printer icon displayed on the system tray on the desktop.
1 Double-click the printer icon.
When the printer icon is not displayedOpen the printer folder ( Displaying the Printer Folder(P. 208) ), right-click your printer icon, and click[See what's printing] (or double-click the icon of the printer driver for the machine).
2 Select the document you want to cancel, and click [Document] [Cancel].
3 Click [Yes].
● Printing of the selected document is canceled.
Several pages may be output after you cancel printing.
Canceling from an applicationOn some applications, a screen like shown below appears. You can cancel printing by clicking [Cancel].
Using the Machine as a Printer
68

From the Control Panel
Cancel printing using or .
◼Press to Cancel
If the Screen Displays a List of Documents When is Pressed
Tap the document to cancel.
◼Use to Cancel
<Copy/Print Job> <Job Status> Select the document on the <Copy/Print Job Status>
screen <Cancel> <Yes>
Using the Machine as a Printer
69

Several pages may be output after you cancel printing.
LINKS
Basic Printing Operations(P. 66) Checking the Printing Status(P. 71)
Using the Machine as a Printer
70

Checking the Printing Status3EEJ-01H
You can check the current print statuses.
● When <Display Job Log> is set to <Off>, you cannot check the print logs. Display Job Log(P. 115)
Useful in the Following Cases
● When your documents are not printed for a long time, you may want to see the waiting list of thedocuments waiting to be printed.
● When you cannot find your printouts that you thought had been printed, you may want to see whether anerror has occurred.
1 Press .
2 Tap <Copy/Print Job>.
3 Tap <Job Status>.
4 Select the document to check.
<Copy/Print Job Status>
Displays a list of the documents that are being processed or are waiting to be processed.
<Details>
Displays detailed information about the document selected from the list.
LINKS
Basic Printing Operations(P. 66)
Using the Machine as a Printer
71

Canceling Prints(P. 68)
Using the Machine as a Printer
72

Configuring Print Settings to Your Needs3EEJ-01J
You can register combinations of settings as "profiles" to suit your different printing objectives. Also, you can registerthe settings that you frequently use as the default settings. Once the default settings are registered, they are displayedautomatically in the printer driver screen, and you can skip the operations to specify them and proceed to printingimmediately.
Set "TOP SECRET" as a watermark and register it in"profiles." You can then select this watermark fromprofiles whenever you need it. RegisteringCombinations of Frequently Used PrintSettings(P. 74)
Set [2 on 1] as a default setting in the printer driver. Fromthe next print job, every printout page will show 2 pagesfrom the document. Changing DefaultSettings(P. 76)
Using the Machine as a Printer
73

Registering Combinations of Frequently Used PrintSettings
3EEJ-01K
Specifying combinations of settings such as "1-sided landscape orientation on A4 size paper in save toner mode" everytime you print is time consuming. If you register your frequently used combinations of print settings as "profiles," youcan specify print settings simply by selecting one of the profiles from the list. This section explains how to registerprofiles and how to print using profiles.
Registering a Profile(P. 74) Selecting a Profile(P. 75)
Registering a Profile
1 Change the settings that you want to register as a profile, and click [Add].
● Make print settings as required on the [Basic Settings], [Page Setup], [Finishing], and [Quality] tabs.
2 Enter a profile name in [Name], select an icon, and then click [OK].
● As necessary, enter comments about the profile in [Comment].
● Click [View Settings] to see the settings that will be registered.
Using the Machine as a Printer
74

Editing a profileBy clicking [Edit] on the right side of [Profile] on the screen shown in step 1, you can change the name, icon, orcomment of the profiles you have previously registered. However, you cannot edit the pre-registered profiles.
Selecting a Profile
Simply select the profile that suits your objective, and click [OK].
Changing the settings of the currently selected profileYou can change the settings of the currently selected profile. In addition, the changed settings can beregistered as another profile.
LINKS
Basic Printing Operations(P. 66) Changing Default Settings(P. 76)
Using the Machine as a Printer
75

Changing Default Settings3EEJ-01L
The default settings are the settings that are first displayed whenever you open the print settings screen of the printerdriver. You can change these settings to the settings that you use most often. For example, if you always want to print2 document pages on each printout page, set [2 on 1] as the default page layout setting. From the next time that youopen the printer driver screen, the setting will always be [2 on 1], eliminating the need to change this setting everytime you make prints.
To perform the following procedure, log on to your computer with an administrator account.
1 Open the printer folder. Displaying the Printer Folder(P. 208)
2 Right-click the icon of the machine and then click [Printing preferences].
3 Change the settings on the printing preferences screen, and click [OK].
● Make print settings as required on the [Basic Settings], [Page Setup], [Finishing], and [Quality] tabs.
Using the Machine as a Printer
76

LINKS
Basic Printing Operations(P. 66) Registering Combinations of Frequently Used Print Settings(P. 74)
Using the Machine as a Printer
77

Using the Machine as a ScannerUsing the Machine as a Scanner ............................................................................................................. 79
Scanning from the Machine ................................................................................................................................ 80
Scanning from a Computer ................................................................................................................................. 83
Scanning Using an Application ....................................................................................................................... 84
Configuring Scan Settings in ScanGear MF ..................................................................................................... 86
Using the Machine as a Scanner
78

Using the Machine as a Scanner3EEJ-01R
You can scan original documents by using the control panel of the machine or an application on a computer.Whichever way you use, the scanned documents are converted into electronic file formats such as PDFs. Use the scanfunction to convert large-volume paper documents into files so that you can organize them easily.
● To use this machine as a scanner, you must complete preparations in advance, including installation ofsoftware to a computer. For more information, see the manuals for the relevant drivers or software on theonline manual website.
● Depending on the operating system and the version of the scanner driver or applications you are using, thescreens in this manual may differ from your screens.
◼Scanning from the MachineYou can scan and save documents to your computer by using the control panel of the machine.
Scanning from the Machine(P. 80)
◼Scanning from a ComputerYou can scan documents placed on the machine from a computer. The scanned documents are saved to the computer.You can scan using MF Scan Utility (included with the machine), or with other applications such as an image-processingor word-processing application. Scanning from a Computer(P. 83)
Using the Machine as a Scanner
79

Scanning from the Machine3EEJ-01S
The sequence of "scanning a document and saving it to a computer" can only bedone when scanning from the machine. Scan while specifying what computerdocuments will be saved to; whether to scan documents in color or black and white;whether to save documents as PDFs or JPEGs; and other settings.
1 Place the document(s). Placing Documents(P. 19)
2 Press and tap <Scan>.
3 Tap <Computer>.
4 Select the scan type.
Using the Machine as a Scanner
80

Scan type Color Resolution File format
<Color Scan> Color 300 dpi JPEG (Exif)
<Black & White Scan> Black and white*1 300 dpi PDF (searchable*2)
<Custom 1> Color 300 dpi JPEG (Exif)
<Custom 2> Color 300 dpi JPEG (Exif)
*1 Documents are scanned in black and white only, with no intermediate shades of gray.
*2 A PDF format where characters on the document are scanned as text data and the text can be searched using a computer.
To change settings
● The settings in the table above are all factory default settings. You can change settings from MF ScanUtility. For more information, click [Instructions] on MF Scan Utility.
● If you are a macOS user, see the manuals for the relevant drivers or software on the online manualwebsite.
5 Press .
● Scanning starts.
● To cancel, tap <Cancel> <Yes>.
You cannot scan while the ScanGear MF is displayed. Close thescreen before scanning.
When placing documents on the platen glass in step 1
When scanning is complete, follow the procedure below (when file format is PDF).
1 If there are additional pages of documents to be scanned, place the next document on the platen glass,
and press .
● Repeat this step until you finish scanning all of the pages.
● When there is only one page to be scanned, proceed to the next step.
Using the Machine as a Scanner
81

2 Tap <Finish Scan>.
● The save destination folder is displayed on the computer.
About the save destination folder● By default, the scanned data is saved to the [My Documents] folder. A subfolder named with the scanning
date is created, and the data is saved to that folder.
● You can change the save destination from the MF Scan Utility. For more information, click [Instructions] onMF Scan Utility.
Using the Machine as a Scanner
82

Scanning from a Computer3EEJ-01U
There are two ways to scan from a computer: using MF Scan Utility and using an application such as an image-processing or word-processing application.
Scanning Using MF Scan Utility
MF Scan Utility is an application included with the machine that enables you to scandocuments or images to a computer. You can forward the scanned data to a specifiedapplication, or attach it to an e-mail message. For more information, click [Instructions]on MF Scan Utility.
● If you are a macOS user, see the manuals for the relevant drivers or software on the online manual website.
Scanning Using an Application
You can scan images by using an application such as a word-processing or image-processing application, and load the images directly into the application. You do notneed to start another application to scan.
Using the Machine as a Scanner
83

Scanning Using an Application3EEJ-01W
You can scan originals from applications such as image-processing or word-processingsoftware. The scanned image is directly loaded in the application, allowing you to editor process the image immediately. The following procedure varies depending on theapplication.
● The application must be compatible with TWAIN or WIA*. For more information, see the instruction manualfor your application.
* TWAIN is a standard for connecting image input devices, such as scanners, with computers. WIA is a function that is anintegrated standard in Windows.
● When using the machine with a USB connection, exit sleep mode before scanning. Entering SleepMode(P. 39)
1 Place the document(s). Placing Documents(P. 19)
● The second or subsequent documents may not be scanned, or an error message may be displayeddepending on the application. In such a case, place and scan one document at a time.
● When <Auto Online for Remote Scan> is set to <Off>, you must tap <Scan> <Remote Scanner> in the<Home> screen to bring the machine online. Auto Online for Remote Scan(P. 115)
2 From the application, select the start scan command.
● The procedure for selecting the start scan command varies depending on the application. For moreinformation, see the instruction manual for your application.
3 Select the scanner driver for the machine.
● Select ScanGear MF or WIA. If you select ScanGear MF, you can configure advanced scan settings.
4 Configure the scan settings as necessary.
5 Click [Scan].
Using the Machine as a Scanner
84

● Scanning starts.
● When scanning is complete, the scanned image is forwarded to an application.
LINKS
Configuring Scan Settings in ScanGear MF(P. 86)
Using the Machine as a Scanner
85

Configuring Scan Settings in ScanGear MF3EEJ-01X
You can use ScanGear MF to configure advanced scan settings when you scan. Theway of starting ScanGear MF differs depending of the way of scanning from thecomputer.
Starting from MF Scan UtilityWhen scanning from MF Scan Utility, click [ScanGear] to start ScanGear MF. For more information, click[Instructions] on MF Scan Utility.
● If you are a macOS user, see the manuals for the relevant drivers or software on the online manualwebsite.
Starting from an applicationTo scan from applications such as image-processing or word-processing software, select ScanGear MF asscanner driver. Scanning Using an Application(P. 84)
Operations available with ScanGear MF● Previewing the image before scanning
● Specifying the scanning area
● Finely adjusting the image quality
How to use ScanGear MF
● Click for ScanGear MF, and see help.
Using the Machine as a Scanner
86

SecuritySecurity .................................................................................................................................................................. 88
Protecting the Machine from Unauthorized Access .......................................................................................... 89
Setting Access Privileges ................................................................................................................................. 90Setting the System Manager PIN ............................................................................................................. 91
Restricting the Machine's Functions .................................................................................................................. 92
Restricting USB Functions ............................................................................................................................... 93
Security
87

Security3EEJ-01Y
Confidential information is handled by information devices everywhere, including computers and printers, and any ofthese devices may become a target for malicious third parties at anytime. Attackers may directly gain unauthorizedaccess to your devices, or indirectly take advantage of negligence or improper use. Either way, you may incurunanticipated losses when your confidential information is leaked. To counter these risks, the machine is equippedwith a variety of security functions. Set the necessary configuration depending on your environment.
◼Establishing the Basics of Information Security
Protecting the Machine from Unauthorized Access(P. 89)
Security
88

Protecting the Machine from Unauthorized Access3EEJ-020
Prevent unauthorized third parties from accessing and using the machine.
Security
89

Setting Access Privileges3EEJ-021
Protect the machine from unauthorized access by only allowing users with access privileges to use the machine. Whenprivileges are set, the user must enter a PIN to change settings.
System Manager PINSystem Manager PIN is intended exclusively for Administrators having full access privileges. If you specify thisPIN, you need to log on to the machine using this PIN in order to access <System Management Settings>.
Setting the System Manager PIN(P. 91)
Security
90

Setting the System Manager PIN3EEJ-022
Set a System Manager PIN that is intended exclusively for Administrators. You can access <System ManagementSettings> only when the PIN has been entered correctly. It is recommended that only Administrators know the PIN.
1 Tap <Menu> in the <Home> screen.
2 Tap <System Management Settings>.
3 Select <System Manager Information Settings> <System Manager PIN> <OK>.
4 Specify the System Manager PIN.
● Enter a number of up to seven digits, and tap <Apply>.
● When <PIN (Confirm)> is displayed, enter the PIN once again to confirm.
● You cannot set a PIN that consists only of zeros, such as "00" or "0000000".
● To disable the PIN, press to erase the PIN (leave the text box blank), and tap <Apply>.
Security
91

Restricting the Machine's Functions3EEJ-023
Some of the functions of the machine may rarely be used or provide opportunities for misuse. For security purposes,the machine can be set to limit its capabilities by partially or completely disabling these functions.
Restricting USB Functions
Restricting USB Functions(P. 93)
Security
92

Restricting USB Functions3EEJ-024
You can disable the USB port located on the right side of the machine. If this port is disabled, the machine cannotcommunicate with a computer via USB.
1 Tap <Menu> in the <Home> screen.
2 Tap <System Management Settings>.
● If a screen for entering a PIN is displayed, enter the PIN, and tap <Apply>. Setting the System ManagerPIN(P. 91)
3 Select <Use as USB Device>.
4 Select <Off>.
<Off>
Disables the USB port located on the back side of the machine.
<On>
Enables the USB port located on the back side of the machine.
5 Restart the machine.
● Turn OFF the machine, wait for at least 10 seconds, and turn it back ON.
Security
93

Setting Menu ListSetting Menu List ............................................................................................................................................. 95
Preferences .......................................................................................................................................................... 96
Timer Settings ..................................................................................................................................................... 99
Common Settings ............................................................................................................................................. 104
Copy Settings ..................................................................................................................................................... 106
Printer Settings ................................................................................................................................................. 108
Adjustment/Maintenance ................................................................................................................................. 109
System Management Settings .......................................................................................................................... 114
Setting Menu List
94

Setting Menu List3EEJ-025
There are various settings in this machine. You can adjust each of the settings in detail. Access these settings bytapping <Menu> in the <Home> screen.
You can print the setting menu in list form to check the current settings:
User Data List/System Manager Data List(P. 171)
Setting Menu List
95

Preferences3EEJ-026
All the settings about the display are listed with short descriptions. Defaultsettings are marked with a dagger ( ).
If a screen for entering a PIN is displayedEnter the PIN and tap <Apply>. Setting the System Manager PIN(P. 91)
Asterisks (*)Settings marked with "*1" may be unavailable or vary or have different defaults depending on your country orregion.
Display Settings(P. 96)
Display Settings
Default Screen after Startup/RestorationBy default, the <Home> screen is displayed immediately after the machine is turned ON or when the Auto Resetfunction is performed. Specify the setting to change the default screen and display the main screen of adifferent function.
Home
CopyScan
<Menu> <Preferences> <Display Settings> <Default Screen after Startup/Restoration>
Select a function to display the desired screen
Home Screen Button Display SettingsChange the order in which the <Home> screen buttons are displayed. Customizing the <Home>Screen(P. 14)
<Menu> <Preferences> <Display Settings> <Home Screen Button Display Settings> Select
<Set Display Order> or <Insert and Delete Blank> Change display settings
Setting Menu List
96

ContrastAdjust the brightness of the display to suit the installation location of the machine.
Five Levels
<Menu> <Preferences> <Display Settings> <Contrast> Use <->/<+> to adjust the
brightness <Apply>
Invert Screen ColorsSelect <On> to invert the display colors. Select <On> if the display is hard to view even after the brightness wasadjusted in <Contrast>.
Off
On
<Menu> <Preferences> <Display Settings> <Invert Screen Colors> Select <On> or
<Off>
Millimeter/Inch Entry SwitchSelect the unit of measurement.
Millimeter
Inch
<Menu> <Preferences> <Display Settings> <Millimeter/Inch Entry Switch> Select
<Millimeter> or <Inch>
Notify to Check Paper SettingsYou can set the machine so that, after you load the paper in the paper drawer, a pop-up screen is displayedprompting you to confirm the paper loaded in the paper drawer is the same as the paper registered in thepaper settings.
OffOn
Setting Menu List
97

<Menu> <Preferences> <Display Settings> <Notify to Check Paper Settings> Select <On>
or <Off>
Message Display TimeSpecify the interval in seconds at which two different messages are alternately displayed.
1 to 2 to 5 (sec.)
<Menu> <Preferences> <Display Settings> <Message Display Time> Set a number for the
interval <Apply>
Scrolling SpeedAdjust the speed for scrolling the screen by selecting from three levels.
SlowStandard
Fast
<Menu> <Preferences> <Display Settings> <Scrolling Speed> Select the speed
Language *1
Select the display language used for the display, reports, and lists.
Arabic, Bulgarian, Catalan, Chinese (Simplified), Chinese (Traditional), Croatian, Czech, Danish, Dutch,English , Estonian, Finnish, French, German, Greek, Hungarian, Italian, Japanese, Korean, Latvian,
Lithuanian, Norwegian, Polish, Portuguese, Romanian, Russian, Slovak, Slovene, Spanish, Swedish, Turkish
<Menu> <Preferences> <Display Settings> <Language> Select a language
Setting Menu List
98
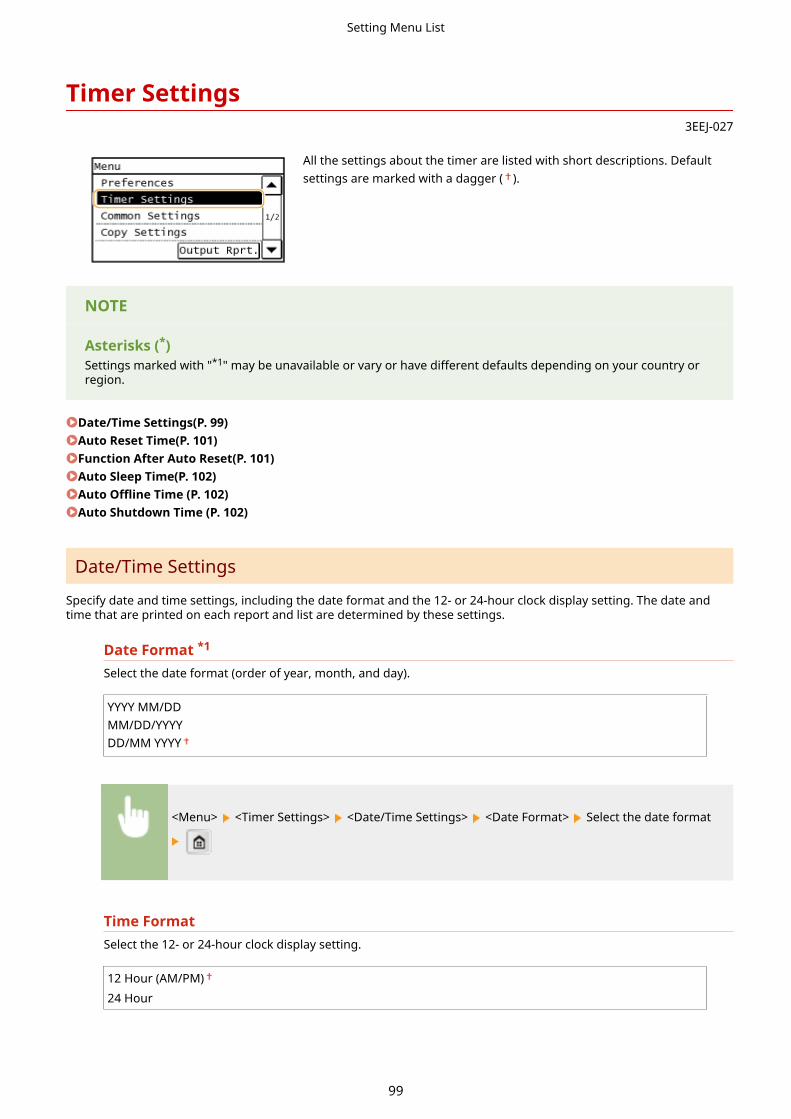
Timer Settings3EEJ-027
All the settings about the timer are listed with short descriptions. Defaultsettings are marked with a dagger ( ).
NOTE
Asterisks (*)Settings marked with "*1" may be unavailable or vary or have different defaults depending on your country orregion.
Date/Time Settings(P. 99) Auto Reset Time(P. 101) Function After Auto Reset(P. 101) Auto Sleep Time(P. 102) Auto Offline Time (P. 102) Auto Shutdown Time (P. 102)
Date/Time Settings
Specify date and time settings, including the date format and the 12- or 24-hour clock display setting. The date andtime that are printed on each report and list are determined by these settings.
Date Format *1
Select the date format (order of year, month, and day).
YYYY MM/DDMM/DD/YYYYDD/MM YYYY
<Menu> <Timer Settings> <Date/Time Settings> <Date Format> Select the date format
Time FormatSelect the 12- or 24-hour clock display setting.
12 Hour (AM/PM)
24 Hour
Setting Menu List
99

<Menu> <Timer Settings> <Date/Time Settings> <Time Format> Select the display setting
Current Date/Time SettingsSet the current date and time. Use / to move the cursor, and / to specify the date and time orswitch between <AM>/<PM>.
<Menu> <Timer Settings> <Date/Time Settings> <Current Date/Time Settings> Set the
date and time <Apply>
The current date and time cannot be changed for 1 hour after daylight saving time is in effect.
Time Zone *1
Select the time zone. If the time zone setting is changed, the values set in <Current Date/Time Settings> are alsochanged accordingly.
(UTC-12:00) International Date Line West to (UTC) Coordinated Universal Time to (UTC+14:00) Kiritimati
Island
UTCCoordinated Universal Time (UTC) is the primary time standard by which the world regulates clocks andtime. The correct UTC time zone setting is required for Internet communications.
<Menu> <Timer Settings> <Date/Time Settings> <Time Zone> Select a time zone
Daylight Saving Time Settings *1
Enable or disable daylight saving time. If daylight saving time is enabled, specify the dates from which and towhich daylight saving time is in effect.
Setting Menu List
100

Off On
Start: Month, Week, Day
End: Month, Week, Day
<Menu> <Timer Settings> <Date/Time Settings> <Daylight Saving Time Settings> Select a
month and day <Apply>
Auto Reset Time
If a key is not pressed for a specified period of time, the screen and the settings are initialized to display the defaultscreen (Auto Reset). Specify the interval at which the Auto Reset is performed. Select <0> to disable the Auto Resetfunction. The Auto Reset is not performed in the following cases:
● The setting menu is displayed.
● The machine is processing data, such as when printing documents.
● An error message is displayed and the [Error] indicator is blinking (However, Auto Reset is performed when theerror does not prevent the user from continuing to use a function.)
0 (Auto Reset is disabled.)1 to 2 to 9 (min.)
<Menu> <Timer Settings> <Auto Reset Time> Set the Auto Reset time <Apply>
The screen displayed after the Auto Reset is performed can be selected in <Function After Auto Reset>.
Function After Auto Reset
Select whether to return the display to the default screen after the Auto Reset is performed. If <Default Function> isselected, the main screen of the function selected in <Default Screen after Startup/Restoration> is displayed ( Default Screen after Startup/Restoration(P. 96) ). If <Selected Function> is selected, the display returns to the mainscreen of the function that was selected.
Default Function
Selected Function
Setting Menu List
101

<Menu> <Timer Settings> <Function After Auto Reset> Select <Default Function> or
<Selected Function>
Auto Sleep Time
If the machine has not been operated or has had no data to process for a specified period of time, the machine enterssleep mode to save energy consumption (Auto Sleep). Specify the period of time after which auto sleep is performed.Auto Sleep is not performed when the setting menu is displayed. We recommend using the factory default settings tosave the most power. Entering Sleep Mode(P. 39)
3 to 10 to 60 (min.)
Auto Offline Time
If a key has not been pressed for a specified period of time after the screen below is displayed (the machine is setonline for scanning), the machine automatically becomes offline. Specify the time period at which the machinebecomes offline. You can also set the machine to remain online.
0 (The machine remains online.)1 to 5 to 60 (min.)
<Menu> <Timer Settings> <Auto Offline Time> Set the time period <Apply>
Auto Shutdown Time
Set a timer to automatically shut down the machine after the specified period of idle time has elapsed since themachine entered sleep mode. Setting Auto Shutdown Time(P. 38)
0 (Auto Shutdown is disabled.)1 to 4 to 8 (hr.)
Setting Menu List
102

<Menu> <Timer Settings> <Auto Shutdown Time> Set the Auto Shutdown time
<Apply>
Setting Menu List
103
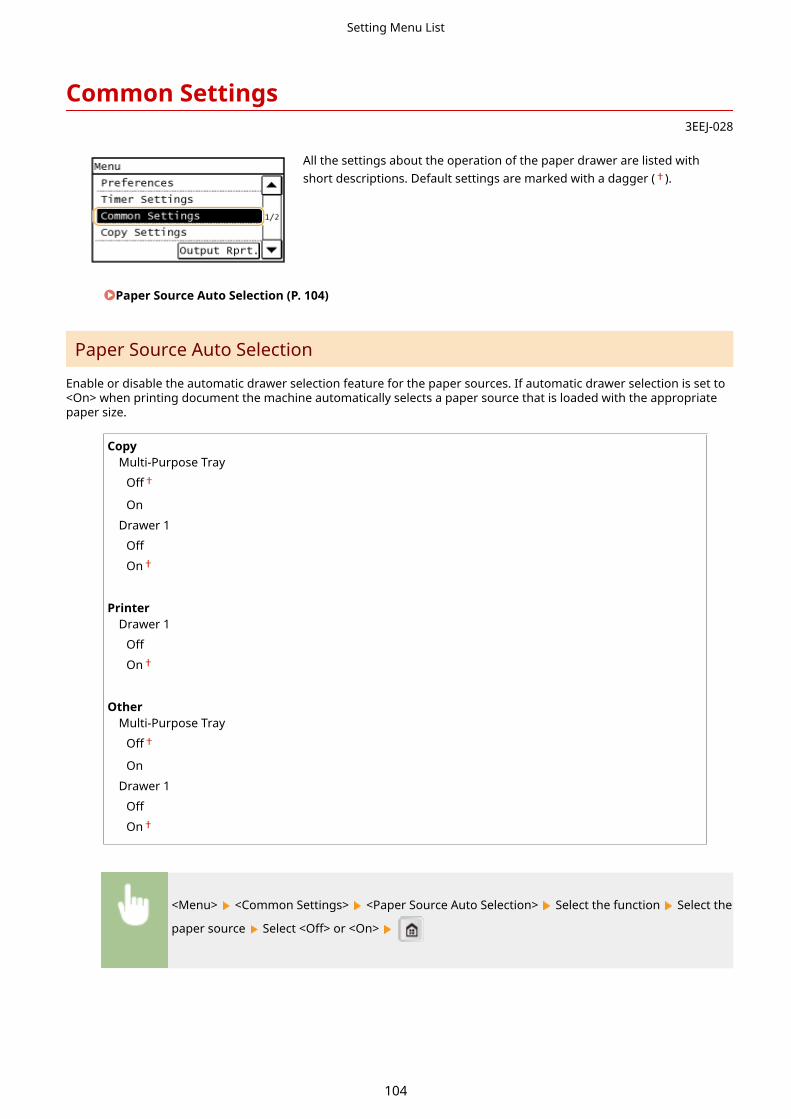
Common Settings 3EEJ-028
All the settings about the operation of the paper drawer are listed withshort descriptions. Default settings are marked with a dagger ( ).
Paper Source Auto Selection (P. 104)
Paper Source Auto Selection
Enable or disable the automatic drawer selection feature for the paper sources. If automatic drawer selection is set to<On> when printing document the machine automatically selects a paper source that is loaded with the appropriatepaper size.
CopyMulti-Purpose Tray
Off
On
Drawer 1
Off
On
Printer
Drawer 1
Off
On
Other
Multi-Purpose Tray
Off
On
Drawer 1
Off
On
<Menu> <Common Settings> <Paper Source Auto Selection> Select the function Select the
paper source Select <Off> or <On>
Setting Menu List
104

FunctionsSelect the function for which you want to configure automatic drawer selection.
NOTE:Select <Other> for functions such as printing reports and lists.
Paper SourcesSelect the paper source for which you want to enable.
NOTE:
<Multi-Purpose Tray> is not displayed if <Printer> was selected on the previous screen ( ). Automaticdrawer selection is always enabled for printing on paper fed from the multi-purpose tray.
Setting Menu List
105

Copy Settings3EEJ-029
All the settings about the copy are listed with short descriptions. Defaultsettings are marked with a dagger ( ).
Change Default Settings (P. 106) Auto Recognize Original Orientation (P. 107) Initialize Default Settings (P. 107)
Change Default Settings
You can change the factory default settings about copy. The selected settings are used as the default settings of thecopy function. Changing Default Settings(P. 62)
Number of Copies1 to 999
Density
-4 to 0 to +4
Auto Density
Original Type
Text
Text/Photo
Photo
Copy Ratio
Custom Ratio100% (1:1)
400% (Max)
200% A5->A3
141% A5->A4, A4->A3
70% A4->A5, A3->A4
50% A3->A525% (Min)
Paper
Multi-Purpose Tray
Drawer 1
N on 1
Off
2 on 1
4 on 1
Setting Menu List
106

ID Card Copy
Select Layout
Finishing
Group
Collate
Rotate + Group
Rotate + Collate
Book -> 2 Pages
Off
On
Erase Frame
Off
Original Frame
Book Frame
Auto Recognize Original Orientation
Automatically rotate images by calculating original size/copy ratio/etc, and print them on paper loaded in the papersource.
OffOn
<Menu> <Copy Settings> <Auto Recognize Original Orientation> Select <On> or <Off>
Initialize Default Settings
Select to restore the copy settings that you specified in <Change Default Settings> to the factory defaults.
<Menu> <Copy Settings> <Initialize Default Settings> <Yes>
Setting Menu List
107

Printer Settings3EEJ-02A
All the settings about the printer are listed with short descriptions. Defaultsettings are marked with a dagger ( ).
Paper Size Override (P. 108) Print Quality(P. 108)
Paper Size Override
Select whether to switch between printing on A4 and Letter size paper if one of these paper sizes is loaded but theother is not. For example, if you are printing a Letter size document but only A4 paper is loaded in the machine, themachine will print your document on A4 paper.
Off
On
<Menu> <Printer Settings> <Paper Size Override> Select <Off> or <On>
Print Quality
You can change settings related to print quality.
Toner SaveYou can save toner consumption when printing without using a printer driver. Select <On> when you want tocheck the layout or other appearance characteristics before proceeding to final printing of a large job.
Off
On
<Menu> <Printer Settings> <Print Quality> <Toner Save> Select <Off> or <On>
Setting Menu List
108

Adjustment/Maintenance3EEJ-02C
All the settings about adjustment and maintenance are listed with shortdescriptions. Default settings are marked with a dagger ( ).
Printer Density (P. 109) Toner Save (P. 109) Speed/Image Quality Priority for Rotate + Collate (P. 110) Special Processing(P. 110) Clean Transfer Roller(P. 112) Clean Drum Unit(P. 112) Clean Fixing Assembly (P. 113)
Printer Density
Adjust the density to the most appropriate levels for copying and printing reports and lists.
Nine Levels
<Menu> <Adjustment/Maintenance> <Printer Density> Adjust the density <Apply>
Toner Save
Select whether to reduce toner consumption when copying.
CopyOff
Save Mode (Low Saving)
Save Mode (High Saving)
<Menu> <Adjustment/Maintenance> <Toner Save> <Copy> Select <Off>, <Save Mode (Low
Saving)>, or <Save Mode (High Saving)>
Setting Menu List
109

Speed/Image Quality Priority for Rotate + Collate
When <Rotate + Collate> is set, you can specify either <Speed Priority> or <Image Quality Priority>.
Speed Priority
Image Quality Priority
<Menu> <Adjustment/Maintenance> <Speed/Image Quality Priority for Rotate + Collate>
Select <Speed Priority> or <Image Quality Priority>
Special Processing
If the print results are not satisfactory due to the paper type or usage environment, you may use the settings below toimprove the quality of the printouts.
Special Printing Mode OPaper jams may frequently occur when using the multi-purpose tray to copy/print on the reverse side of paperthat has already been copied/printed on. <Off> should normally be specified for this setting. Only change thissetting if the above symptom occurs.
Off
Mode 1Mode 2
IMPORTANT
Do not use paper that has been exposed to high temperature or humidity for an extended period oftime. Printing on such paper may result in frequent paper jams.
<Menu> <Adjustment/Maintenance> <Special Processing> <Special Printing Mode
O> Select the mode
Special Printing Mode MChange the <Special Printing Mode M> setting if there is a degradation in print quality or irregularity in printdensity. This mode enables you to select one of five levels for the machine's transfer output. Select a highermode number if you want to print on paper to which toner does not adhere well, such as index cards. Select alower mode number when printing on paper that has been stored at high temperature and high humidity for along time.
Mode 1Mode 2Mode 3
Mode 4
Setting Menu List
110

Mode 5
<Menu> <Adjustment/Maintenance> <Special Processing> <Special Printing Mode M>
Select the mode
Special Printing Mode NChange the <Special Printing Mode N> setting if paper curls or jams when printing on paper that has absorbedmoisture. If <Mode 3> is set, the effect of this setting is maximized, but it may take the machine longer to print.
Off
Mode 1Mode 2Mode 3
IMPORTANT
Do not use paper that has been exposed to high temperature or humidity for an extended period oftime. Printing on such paper may result in frequent paper jams.
NOTE
If both <Special Printing Mode P> and <Special Printing Mode N> are enabled when printing on alightweight paper, <Special Printing Mode P> overrides <Special Printing Mode N>.
<Menu> <Adjustment/Maintenance> <Special Processing> <Special Printing Mode N>
Select the mode
Special Printing Mode SIf you switch to a larger size of paper than previously used, it may take a long time for the machine to resumeprinting. In this case, set the <Special Printing Mode S> setting to <Mode 1> or <Mode 2> to reduce the waitingtime for the next print. If <Mode 1> is set, waiting time is minimized.
Off
Mode 1Mode 2
NOTE
If this mode is enabled, the previously printed image may re-appear faintly on the next output.
Setting Menu List
111

<Menu> <Adjustment/Maintenance> <Special Processing> <Special Printing Mode S>
Select the mode
Special Printing Mode PSet the <Special Printing Mode P> setting to <On> if paper curls when printing on a lightweight paper.
Off
On
NOTE
If both <Special Printing Mode P> and <Special Printing Mode N> are enabled, <Special Printing Mode P>overrides <Special Printing Mode N>.
<Menu> <Adjustment/Maintenance> <Special Processing> <Special Printing Mode P>
<On>
Special Printing Mode FUneven images may appear on the printed paper. In this case, change this setting. If <Mode 3> is set, the effectof this setting is maximized.
Off
Mode 1Mode 2Mode 3
<Menu> <Adjustment/Maintenance> <Special Processing> <Special Printing Mode F>
Select the mode
Clean Transfer Roller
Clean the transfer roller if print quality deteriorates or dots appear on printouts. Transfer Roller(P. 155)
Clean Drum Unit
Clean the drum unit if print quality deteriorates. Drum(P. 156)
Setting Menu List
112

Clean Fixing Assembly
Clean the fixing assembly after a toner cartridge is replaced or if black streaks appear on printouts. FixingAssembly(P. 157)
Setting Menu List
113
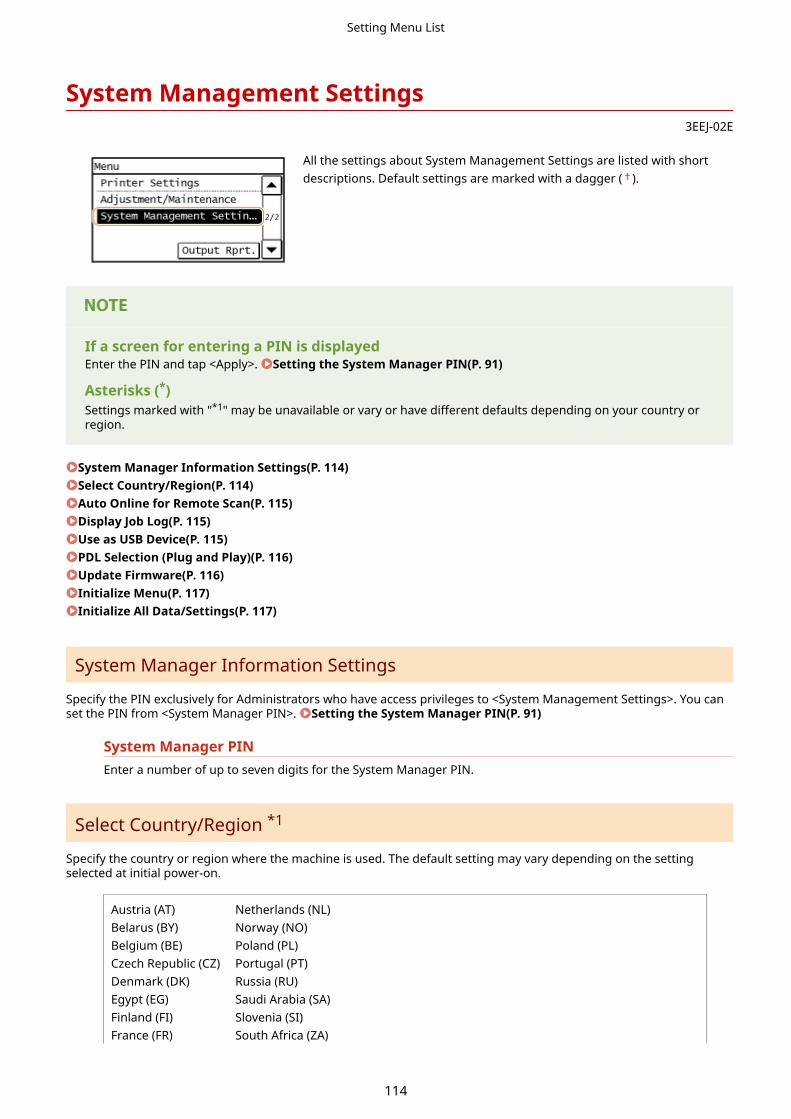
System Management Settings3EEJ-02E
All the settings about System Management Settings are listed with shortdescriptions. Default settings are marked with a dagger ( ).
If a screen for entering a PIN is displayedEnter the PIN and tap <Apply>. Setting the System Manager PIN(P. 91)
Asterisks (*)Settings marked with "*1" may be unavailable or vary or have different defaults depending on your country orregion.
System Manager Information Settings(P. 114) Select Country/Region(P. 114) Auto Online for Remote Scan(P. 115) Display Job Log(P. 115) Use as USB Device(P. 115) PDL Selection (Plug and Play)(P. 116) Update Firmware(P. 116) Initialize Menu(P. 117) Initialize All Data/Settings(P. 117)
System Manager Information Settings
Specify the PIN exclusively for Administrators who have access privileges to <System Management Settings>. You canset the PIN from <System Manager PIN>. Setting the System Manager PIN(P. 91)
System Manager PINEnter a number of up to seven digits for the System Manager PIN.
Select Country/Region *1
Specify the country or region where the machine is used. The default setting may vary depending on the settingselected at initial power-on.
Austria (AT)Belarus (BY)Belgium (BE)Czech Republic (CZ)Denmark (DK)Egypt (EG)Finland (FI)France (FR)
Netherlands (NL)Norway (NO)Poland (PL)Portugal (PT)Russia (RU)Saudi Arabia (SA)Slovenia (SI)South Africa (ZA)
Setting Menu List
114

Germany (DE)Greece (GR)Hungary (HU)Ireland (IE)Italy (IT)Jordan (JO)Luxembourg (LU)
Spain (ES)Sweden (SE)Switzerland (CH)Ukraine (UA)Great Britain (GB)
Other
<Menu> <System Management Settings> <Select Country/Region> Select a country or
region
Auto Online for Remote Scan
Select whether to use this feature to go online for remote scanning, even without using the control panel.
OffOn
<Menu> <System Management Settings> <Auto Online for Remote Scan> Select <On> or
<Off>
Display Job Log
Select whether to display the copying, printing and scanning logs on the display of the machine.
OffOn
<Menu> <System Management Settings> <Display Job Log> Select <Off> or <On>
Use as USB Device
Enable or disable the USB port that is used for connecting the machine to a computer.
OffOn
Setting Menu List
115

<Menu> <System Management Settings> <Use as USB Device> Select <Off> or <On> Restart the machine
PDL Selection (Plug and Play)
Select a page description language so that the machine is detected as a printer that is compatible with that languagewhen it is connected to a computer by using Plug and Play.
USBSelect a page description language so that the machine is detected as a printer that is compatible with thatlanguage when it is connected to a computer via USB.
UFRII LT
UFRII LT (V4)
Any setting change is enabled the next time the main power is turned ON.
<Menu> <System Management Settings> <PDL Selection (Plug and Play)> <USB> Select a
page description language
<UFRII LT>Detects and connects the machine as a UFRII LT printer.
<UFRII LT (V4)>Detects and connects the machine as a UFRII LT printer that is compatible with XML Paper Specification (XPS).
Update Firmware
Select how to install the firmware update according to the environment of the machine.
● <Via PC>
Select to manually install the firmware update available on the Canon Web site yourself. For instructions onhow to install the update, see the instruction manual available on the Web site.
● <Version Information>
Setting Menu List
116

Select to check details for the current firmware.
Via PCVersion Information
Initialize Menu
Select to restore the settings listed below to the factory defaults. You can restore all the settings listed below at once,or you can restore individual settings separately. Initializing Menu(P. 176) Initializing System ManagementSettings(P. 177)
PreferencesTimer SettingsCommon SettingsCopy SettingsPrinter SettingsAdjustment/MaintenanceSystem Management SettingsInitialize All
Initialize All Data/Settings
Delete all data on the machine and return it to its factory default settings.
<Menu> <System Management Settings> <Initialize All Data/Settings> <Yes> <Yes> Restart the machine
Setting Menu List
117

TroubleshootingTroubleshooting ............................................................................................................................................. 119
Clearing Jams ..................................................................................................................................................... 121
Countermeasures for Each Message ................................................................................................................ 130
Countermeasures for Each Error Code ............................................................................................................. 133
Common Problems ............................................................................................................................................ 134
Installation/Settings Problems ..................................................................................................................... 136
Copy/Printing Problems ............................................................................................................................... 137
Miscellaneous Problems ............................................................................................................................... 138
When You Cannot Print Properly ...................................................................................................................... 139
Printing Results Are Not Satisfactory ............................................................................................................ 141
Paper Creases or Curls ................................................................................................................................. 145
Paper Is Fed Incorrectly ................................................................................................................................ 147
When a Problem Cannot Be Solved .................................................................................................................. 149
Troubleshooting
118

Troubleshooting3EEJ-02F
When a problem occurs, check this chapter to find out solutions before contacting Canon.
◼Paper JamsIf a document or paper jams, see Clearing Jams(P. 121) to remove the jammed paper.
◼A Message or Error Code AppearsIf the screen displays a message or error code (three digits), see the following sections.
Countermeasures for Each Message(P. 130) Countermeasures for Each Error Code(P. 133)
◼Common ProblemsIf you suspect that the machine is malfunctioning, see the following sections before contacting Canon.
Common Problems(P. 134) Installation/Settings Problems(P. 136) Copy/Printing Problems(P. 137) Miscellaneous Problems(P. 138)
◼Printing Results are Not SatisfactoryIf printing results are not satisfactory, see When You Cannot Print Properly(P. 139) .
◼When a Problem Cannot Be SolvedIf a problem persists, see When a Problem Cannot Be Solved(P. 149) to find out where to contact.
Troubleshooting
119

Troubleshooting
120

Clearing Jams3EEJ-02H
If a paper jams, <Paper jammed.> is displayed on the screen. Press <Next> to display simple solutions. If it is difficult tounderstand the procedures on the display, see the following sections to clear jams.
Paper Jams in the Paper Drawer 1(P. 121) Paper Jams around the Output Area(P. 124) Paper Jams around the Fixing Assembly(P. 126) Paper Jams in the Multi-Purpose Tray(P. 127)
When removing the jammed paper, do not turn OFF the machineTurning OFF the machine deletes the data that is being printed.
If paper tearsRemove all the paper fragments to prevent them from becoming jammed.
If paper jams repeatedly● Tap the paper stack on a flat surface to even the edges of the paper before loading it into the machine.
● Check that the paper is appropriate for the machine.
Available Paper(P. 194)
● Check that no jammed paper fragments remain in the machine.
Do not forcibly remove the jammed document or paper from the machineForcibly removing the paper may damage parts. If you are not able to remove the paper, contact your localauthorized Canon dealer.
When a Problem Cannot Be Solved(P. 149)
Paper Jams in the Paper Drawer 1
1 Remove the jammed paper from the output tray.
Troubleshooting
121

2 Press the button on the left cover of the main unit, and open the left cover.
3 Open the drawer 1 left cover.
Troubleshooting
122

4 Remove the jammed paper.
5 Grip the handle, and pull out the paper drawer 1 until it stops.
6 Remove the jammed paper.
7 Gently push the paper drawer 1 back into the machine until it clicks.
8 Close the drawer 1 left cover.
9 Place your hand where the hand symbol is located on the left cover of the main unit,and then gently close the left cover until it clicks into place in the closed position.
Troubleshooting
123

Paper Jams around the Output Area
1 Remove the jammed paper from the output tray.
2 Press the button on the left cover of the main unit, and open the left cover.
3 Remove the jammed paper.
Troubleshooting
124
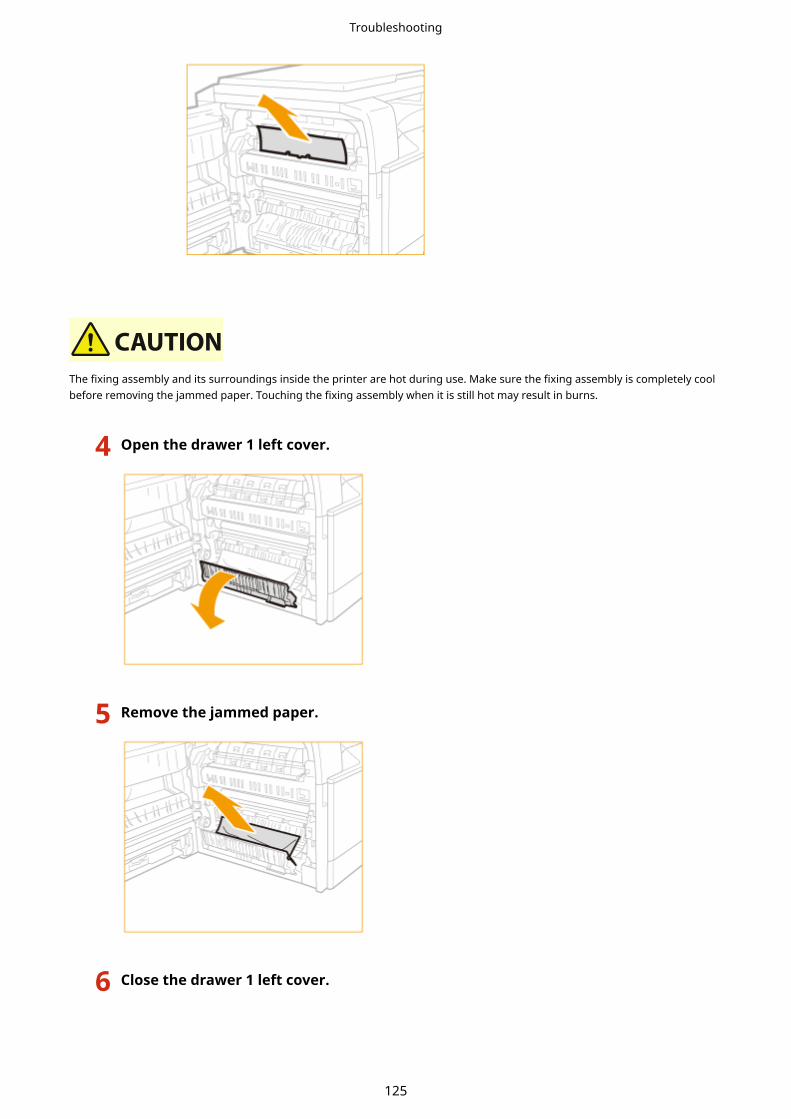
The fixing assembly and its surroundings inside the printer are hot during use. Make sure the fixing assembly is completely coolbefore removing the jammed paper. Touching the fixing assembly when it is still hot may result in burns.
4 Open the drawer 1 left cover.
5 Remove the jammed paper.
6 Close the drawer 1 left cover.
Troubleshooting
125

7 Place your hand where the hand symbol is located on the left cover of the main unit,and then gently close the left cover until it clicks into place in the closed position.
Paper Jams around the Fixing Assembly
1 Remove the jammed paper from the output tray.
2 Press the button on the left cover of the main unit, and open the left cover.
3 Open the drawer 1 left cover.
Troubleshooting
126

4 Remove the jammed paper.
The fixing assembly and its surroundings inside the printer are hot during use. Make sure the fixing assembly is completely coolbefore removing the jammed paper. Touching the fixing assembly when it is still hot may result in burns.
5 Close the drawer 1 left cover.
6 Place your hand where the hand symbol is located on the left cover of the main unit,and then gently close the left cover until it clicks into place in the closed position.
Paper Jams in the Multi-Purpose Tray
1 If paper is loaded in the multi-purpose tray, remove the paper.
Troubleshooting
127

2 Press the button on the left cover of the main unit, and open the left cover.
3 Remove any jammed paper.
Troubleshooting
128

4 Place your hand where the hand symbol is located on the left cover of the main unit,and then gently close the left cover until it clicks into place in the closed position.
Troubleshooting
129

Countermeasures for Each Message3EEJ-04S
If the memory is full or you encounter operation problems, a message appears on the display. Find out moreinformation about messages in the following list.
Could not perform cleaning.
Paper jammed during cleaning.
● Remove the jammed paper, set paper correctly, and perform cleaning again.Clearing Jams(P. 121)
The amount of toner required for cleaning the fixing assembly is insufficient.
● Cleaning requires toner. Replace the toner cartridge, and perform the cleaning again.Replacing the Toner Cartridges(P. 159)
Insert the drum unit.
The drum unit is not inserted.
● Insert the drum unit.How to Replace the Drum Unit(P. 166)
No Paper: XXXX*
* <Drawer 1> or <Multi-Purpose Tray> is displayed for XXXX.
Paper is not loaded in the paper drawer or the multi-purpose tray.
● Load the paper.Loading Paper(P. 20)
Paper on which reports or lists can be printed is not loaded.
● Reports or lists can be printed on A4 or Letter size paper. Load A4 or Letter size paper and set its size.Loading Paper(P. 20) Specifying Paper Size and Type(P. 34)
Paper jammed.
Paper jams.
● Remove the jammed paper, and print again (Printing may resume automatically).Clearing Jams(P. 121)
Troubleshooting
130
Paper Size & Settings Mismatch
The paper size setting on the control panel does not match the loaded paper size.
● Match the paper size setting specified in <Paper Settings> and the size of the paper that is actually loaded.
To use the loaded paperChange the setting of <Paper Settings> to match the loaded paper size.
Specifying Paper Size and Type(P. 34)
If printing from a computer, check whether the paper size setting in the printer driver matches the loadedpaper size.
To load paper without changing the settingsLoad the paper with the size that is set to <Paper Settings>.
Loading Paper(P. 20)
Prepare the toner cartridge.
The toner cartridge needs to be replaced soon.
● It is recommended to replace the toner cartridge when printing a large volume of documents.Replacing the Toner Cartridges(P. 159)
Replace the toner cartridge.
The toner cartridge has reached the end of its lifetime.
● Replace the toner cartridge with a new one.Replacing the Toner Cartridges(P. 159)
The connection with the PC has been lost. Check the connection.
The connection to the computer was lost during a scan.
● Check the connection between the machine and the computer.
The memory is full.
An original could not be scanned due to insufficient memory space.
● If a printing job is queued, wait until the job is completed.
● If scanning, change the file format to reduce its file size.Scanning from the Machine(P. 80)
Troubleshooting
131

The memory is full. Scanning will be canceled. Do you want to print?
The document being printed contains a page with a very large amount of data.
● Select whether to print as far as the portion scanned into memory or to cancel the job.
● Copy the document in two or more parts.
Turn the main power OFF and ON. If the device does not recover, contactyour dealer or service representative.
An error has occurred with the machine.
● Turn OFF the power switch, wait 10 seconds, and turn it back ON. If the problem persists, turn OFF thepower switch, disconnect the power cord, and contact your local authorized Canon dealer or the Canonhelp line. Be sure to provide the displayed <Ennn-nnnn>.
Turn the main power OFF and ON. If the problem persists, change the drumunit.
The drum unit has reached the end of its lifetime.
● Replace the drum unit.How to Replace the Drum Unit(P. 166)
Troubleshooting
132

Countermeasures for Each Error Code3EEJ-04U
If printing is not successful or another error occurs, that error appears on a message on the <Status Monitor> screenas a three-digit number (error code). Check the following to find out causes and solutions for each error code. Fordetails of the <Status Monitor> screen, see <Status Monitor> Screen(P. 11) .
#037
Memory is full.
● If a printing job is queued, wait until the job is completed.
#099
An operation that caused a job to be canceled has been performed.
● When you cancel a job, this error code is displayed, but this is not abnormal. Print documents again asnecessary.
#852
The machine turns OFF for some reason.
● Check whether the power plug is inserted into an outlet firmly.
#853
A document could not be printed because its data size exceeded the machine's upper processingcapability.
● The machine may not be able to print documents with many pages. Reduce the number of pages perprinting, or print when no print job is queued or no document is being printed. If you are still unable toprint, check the document data for any defects.
Printing was canceled from the computer.
● If you cancel an operation when the print data is being sent to the machine from a computer, this errorcode is displayed, but this is not abnormal. Print again as necessary.
You tried to print a file that is either corrupted or not supported.
● Check the file and try again.Basic Printing Operations(P. 66)
Troubleshooting
133

Common Problems3EEJ-02L
If you encounter problems when using the machine, check the items in this section before contacting us. If theproblems persist, contact your local authorized Canon dealer.
Check the Following
Is the machine turned ON? Is the power cord connected?
● If the machine is turned ON but does not respond, turn it OFF, check whether the power cord is connectedcorrectly, and turn it back ON.
Is the USB cable connected correctly?
● Check whether the USB cable is connected correctly.
Parts and Their Functions(P. 4)
Is sleep mode activated?
● If you leave the machine unattended for a specific period of time, it enters sleep mode for powerconservation, not allowing you to operate it.
To cancel sleep mode, press .
Is any message displayed on the screen?
● If a problem occurs, a message is displayed.
When a Problem Cannot Be Solved(P. 149)
Has the Power Switch Been Just Turned ON?
● Wait a few moments until the machine starts and warms up.
Are the Settings Properly Configured?
● If the machine does not start operating even after has been pressed, the settings may not have been
configured properly. Check the configured settings.
Is the [Error] Indicator on or Blinking?
● Make sure that paper is loaded properly in the paper drawer or multi-purpose tray.
Loading Paper(P. 20)
● Check if paper is jammed.
Clearing Jams(P. 121)
Troubleshooting
134

● Turn OFF the power switch, wait 10 seconds, and turn it ON again. If the problem is solved, the [Error]indicator will turn off and the display will return to standby mode. If the [Error] indicator keeps blinking,unplug the power cord and contact your local authorized Canon dealer.
When a Problem Cannot Be Solved(P. 149)
Paper Is Not Fed, or Multiple Sheets of Paper Are Fed at a Time.
● Make sure that the paper is properly loaded.
Loading Paper(P. 20)
● Make sure that the number of paper you have loaded or paper to be used meets the paper requirements.
Loading Paper(P. 20)
● Make sure to load the same size and type of paper into the paper drawer or multi-purpose tray.
Paper Jams Occur Repeatedly.
● Make sure that the paper is properly loaded.
Loading Paper(P. 20)
● Make sure that the number of paper you have loaded or paper to be used meets the paper requirements.
Loading Paper(P. 20)
If a problem persists even after checkingClick the link that corresponds to the problem.
Installation/Settings Problems(P. 136) Copy/Printing Problems(P. 137) Miscellaneous Problems(P. 138)
Troubleshooting
135

Installation/Settings Problems3EEJ-02R
See Common Problems(P. 134) also.
Problem with the USB Connection
Cannot communicate.
● Change the USB cable. If you are using a long USB cable, replace it with a short one.
● If you are using a USB hub, connect the machine directly to your computer using a USB cable.
Troubleshooting
136

Copy/Printing Problems3EEJ-02S
See Common Problems(P. 134) also.
Printing/copy results are not satisfactory. Paper creases or curls.When You Cannot Print Properly(P. 139)
You cannot print.
● Can you print a Windows test page? If you can print a Windows test page, there is no problem with themachine or the printer driver. Check the print settings of your application.
Printing a Test Page in Windows(P. 208)
If you cannot print a test page, check the following according to your environment.
USB connection
● Have you selected the correct port? If there is no port to use or you are not sure, reinstall the printerdriver. When you reinstall the printer driver, the correct port is created automatically. For moreinformation, see the manuals for the relevant drivers on the online manual website.
Checking the Printer Port(P. 209)
● Is bidirectional communication enabled? Enable bidirectional communication, and restart the computer.
Checking Bidirectional Communication(P. 210)
● Disable security software and other resident software.
● Connect to another USB port on the computer.
● Can you print from a USB connection to another computer? If you also cannot print from other computers,contact your local authorized Canon dealer or the Canon help line.
Printing seems to be slow. *
● Print or delete data in memory.
* When the free space in memory is running low, the processing speed of the machine becomes slow, just as a computerdoes. There is nothing abnormal.
It takes a long time before printing starts.
● Did you print to narrow width paper? After you print to narrow width paper, the machine may cool itself tomaintain the print quality. As a result, it may take some time before the next job is printed. Wait until themachine is ready to print. Printing will resume when the temperature inside the machine has fallen.
A blank sheet is output (nothing is printed).
● Did you pull the sealing tape out when loading the toner cartridge? If you did not pull it out, remove thetoner cartridge, pull the sealing tape out, and reload the toner cartridge.
How to Replace the Toner Cartridges(P. 163)
Troubleshooting
137

Miscellaneous Problems3EEJ-02U
See Common Problems(P. 134) also.
Steam is Emitted from the Machine's Output Area.
● Use only dry paper in the machine. Moisture evaporates from damp paper due to the heat generatedinside the fixing assembly (it is most likely to occur at low room temperatures). This is not a malfunction,but you can prevent this by using a stack of new unopened paper. However, if you smell somethingburning, immediately turn OFF the machine, unplug the power plug from the AC power outlet, and contactyour local authorized Canon dealer. Continued use may lead to a fire or electrical shock.
Water Droplets From in the Output Area.
● Use only dry paper in the machine. Moisture evaporates from damp paper due to the heat generatedinside the fixing assembly (it is most likely to occur at low room temperatures). This is not a malfunction,but you can prevent this by using a stack of new unopened paper. However, if you smell somethingburning, immediately turn OFF the machine, unplug the power plug from the AC power outlet, and contactyour local authorized Canon dealer. Continued use may lead to a fire or electrical shock.
The Settings That You Specified Are Not Enabled or Saved.
● If you turn OFF the machine immediately after changing settings via the control panel, the settings maynot be stored in the machine. After changing the settings, wait for approximately five seconds beforeturning OFF the machine.
Troubleshooting
138

When You Cannot Print Properly3EEJ-02W
If printing results are not satisfactory, or paper creases or curls, try the following solutions. If the problems persist,contact your local authorized Canon dealer.
Streaks Appear onPrintouts(P. 141)
White Streaks Appear(P. 141) Toner Smudges and SplattersAppear(P. 141)
Printouts Are Faded(P. 142) Printed Pages Have WhiteSpecks(P. 142)
Print Density Is Uneven(P. 143)
Printouts Are Grayish(P. 143) The Toner Adheres to theHand(P. 144)
Paper Creases(P. 145)
Troubleshooting
139

Paper Curls(P. 145) Printouts Are Skewed(P. 147) Paper Is Not Fed/Two or MoreSheets Are Fed Together(P. 147)
Troubleshooting
140

Printing Results Are Not Satisfactory3EEJ-02X
Dirt inside the machine may affect printing results. Perform care and cleaning to the machine first.Cleaning the Machine(P. 152)
Streaks Appear on Printouts
Are you using appropriate paper?
● Check usable paper, and replace with appropriate paper.
Available Paper(P. 194) Loading Paper(P. 20)
White Streaks Appear
Is toner running low?
● Check how much toner is left, and replace the toner cartridges as necessary.
Replacing the Toner Cartridges(P. 159)
Toner Smudges and Splatters Appear
Troubleshooting
141

Are you using appropriate paper?
● Check usable paper, and replace with appropriate paper.
Available Paper(P. 194) Loading Paper(P. 20)
Is toner running low?
● Check how much toner is left, and replace the toner cartridges as necessary.
Replacing the Toner Cartridges(P. 159)
Printouts Are Faded
Is toner running low?
● Check how much toner is left, and replace the toner cartridges as necessary.
Replacing the Toner Cartridges(P. 159)
Are you using appropriate paper?
● Check usable paper, and replace with appropriate paper. Also, specify the paper size and type settingsproperly.
Available Paper(P. 194) Loading Paper(P. 20) Specifying Paper Size and Type(P. 34)
Printed Pages Have White Specks
Are you using appropriate paper?
● Check usable paper, and replace with appropriate paper.
Troubleshooting
142

Available Paper(P. 194) Loading Paper(P. 20)
Is the drum in the toner cartridge deteriorated?
● Replace the toner cartridge with a new one.
Replacing the Toner Cartridges(P. 159)
Print Density Is Uneven
Is toner running low?
● Check how much toner is left, and replace the toner cartridges as necessary.
Replacing the Toner Cartridges(P. 159)
Printouts Are Grayish
Is <Density> in <Copy Settings> set too dark?
● Adjust the setting so that density is lighter.
Setting Menu List(P. 95)
Is the printer installed where it is subject to direct sunlight or strong light?
● Install the printer in an appropriate location.
Was the toner cartridge been left in direct sunlight for a long period of time?
● Store the toner cartridge in an appropriate location for two to three hours, then try printing again. Thismay solve the problem. If the problem persists, replace the toner cartridge.
Replacing the Toner Cartridges(P. 159)
Troubleshooting
143

The Toner Adheres to the Hand
The paper type setting specified is not appropriate.
● Select the appropriate paper type setting. Loading Paper(P. 20)
The paper type loaded is not appropriate.
● Make sure that the number and type of the paper loaded in the paper drawer meets the paperrequirements. Available Paper(P. 194)
Troubleshooting
144

Paper Creases or Curls3EEJ-02Y
Paper Creases
Is paper loaded correctly?
● If paper is not loaded below the load limit mark or is loaded obliquely, it may crease.
Loading Paper(P. 20)
Are you using paper that has absorbed moisture?
● Replace with appropriate paper.
Loading Paper(P. 20)
Are you using appropriate paper?
● Check usable paper, and replace with appropriate paper.
Available Paper(P. 194)
Paper Curls
Are you using appropriate paper?
● Check usable paper, and replace with appropriate paper. Also, specify the paper size and type settingsproperly.
Available Paper(P. 194) Loading Paper(P. 20) Specifying Paper Size and Type(P. 34)
● Change the setting of <Paper Type> to a setting for thinner paper. For example, if the current setting is<Plain 2 (76-90 g/m²)>, change it to <Plain 1 (64-75 g/m²)>.
Troubleshooting
145

Specifying Paper Size and Type(P. 34) Available Paper(P. 194)
Troubleshooting
146

Paper Is Fed Incorrectly3EEJ-030
Printouts Are Skewed
Do the paper guides align with the edges of the paper?
● If the paper guides are too loose or too tight, the printouts are skewed.
Loading Paper(P. 20)
Is the paper source the multi-purpose tray?
● Load the paper into the paper drawer.
Loading Paper in the Paper Drawer(P. 22)
Are you printing on curled envelopes?
● Uncurl the envelopes, and print again.
Loading Envelopes in the Multi-Purpose Tray(P. 28)
Paper Is Not Fed/Two or More Sheets Are Fed Together
Is paper loaded correctly?
● Fan the paper stack thoroughly so that paper is not stuck together.
● Check whether paper is loaded correctly.
Loading Paper(P. 20)
● Check whether the number of sheets of paper loaded is appropriate and whether the appropriate paper isused.
Available Paper(P. 194)
Troubleshooting
147

Loading Paper(P. 20)
● Check whether mixed sizes and types of paper are loaded together.
Troubleshooting
148

When a Problem Cannot Be Solved3EEJ-031
If you have read this chapter and a problem is yet to be resolved, contact your authorized Canon dealer.
Do not disassemble or repair the machine yourself
● If you disassemble or repair the machine yourself, it may not be covered by the warranty.
◼ Information To Prepare Before When Contacting CanonWhen contacting us, have the following information ready:
● Product name (imageRUNNER 2206)
● Dealer where you purchased the machine
● Problem details (performed operations and the results, phenomena, etc.)
● The error code displayed on the touch panel display
Troubleshooting
149

MaintenanceMaintenance ..................................................................................................................................................... 151
Cleaning the Machine ....................................................................................................................................... 152
Exterior ......................................................................................................................................................... 153
Platen Glass .................................................................................................................................................. 154
Transfer Roller .............................................................................................................................................. 155
Drum ............................................................................................................................................................ 156
Fixing Assembly ............................................................................................................................................ 157
Replacing the Toner Cartridges ........................................................................................................................ 159
Configuring Purchase Information for Consumables ................................................................................... 161
How to Replace the Toner Cartridges ........................................................................................................... 163
How to Replace the Drum Unit ......................................................................................................................... 166
Printing Reports and Lists ................................................................................................................................ 170
User Data List/System Manager Data List ..................................................................................................... 171
Copy/Print Charge Log Report ...................................................................................................................... 172
Viewing the Counter Value ............................................................................................................................... 173
Initializing Settings ........................................................................................................................................... 175
Initializing Menu ........................................................................................................................................... 176
Initializing System Management Settings ..................................................................................................... 177
Initializing All Data/Settings .......................................................................................................................... 178
Replacement Parts ............................................................................................................................................ 179
Maintenance
150

Maintenance3EEJ-032
This chapter describes upkeep of the machine, including how to clean the machine and initialize settings.
◼Basic Cleaning Cleaning the Machine(P. 152)
● The machine becomes dirty Exterior(P. 153)
● Smudge marks appear on originals or printouts Platen Glass(P. 154)
● Streaks appear on printouts Fixing Assembly(P. 157)
◼Replacing Toner Cartridges
● If you want to check the remaining toner level Replacing the TonerCartridges(P. 159)
● How to replace toner cartridges How to Replace the TonerCartridges(P. 163)
◼Printing Reports and Lists
● If you want to check the machine settings Printing Reports and Lists(P. 170)
◼Checking the Total Pages Printed by the MachineIf you want to check the total page number of printouts Viewing the Counter Value(P. 173)
◼ Initializing SettingsIf you want to restore the settings Initializing Settings(P. 175)
Maintenance
151

Cleaning the Machine3EEJ-033
Regularly clean the machine to prevent deterioration in printing quality and to ensure that you use it safely and easily.
Where to Clean
Exterior of the machine and ventilation slots
Exterior(P. 153)
Interior of the machine and fixing assembly
Fixing Assembly(P. 157)
Platen glass and the underside of the platen cover Platen
Glass(P. 154)
Maintenance
152

Exterior3EEJ-034
Regularly wipe the exterior of the machine, especially around the ventilation slots, to keep the machine in goodcondition.
1 Turn OFF the machine, and unplug the power cord from the AC power outlet.
● When you turn OFF the machine, data that is waiting to be printed is deleted.
2 Clean the exterior of the machine and the ventilation slots.
● Use a soft, well-wrung-out cloth dampened with water or a mild detergent diluted with water.
● To locate the ventilation slots, see External View(P. 5) .
3 Wait for the exterior of machine to dry completely.
4 Reconnect the power cord and turn ON the machine.
Maintenance
153

Platen Glass3EEJ-035
Regularly wipe off the dust from the platen glass and the underside of the platen cover to prevent smudges to beprinted on documents or printouts.
1 Turn OFF the machine, and unplug the power cord from the AC power outlet.
● When you turn OFF the machine, data that is waiting to be printed is deleted.
2 Open the platen cover.
3 Clean the platen glass and the underside of the platen cover.
● Clean the areas with a cloth dampened with water. Then, wipe the area with a soft, dry cloth.
4 Wait for the cleaned area to dry completely.
5 Gently close the platen cover.
6 Reconnect the power cord and turn ON the machine.
Maintenance
154

Transfer Roller3EEJ-036
When the transfer roller inside the machine becomes dirty, print quality may deteriorate or dots may appear onprintouts. If this happens, follow the procedure below to clean the transfer roller. Note that you cannot clean thetransfer roller when the machine has documents waiting to be printed.
1 Press and tap <Menu>.
2 Tap <Adjustment/Maintenance>.
3 Tap <Clean Transfer Roller>.
4 Tap <Start>.
● Cleaning starts. When the <Finished.> message is displayed approximately 30 seconds later, press to
return to the <Home> screen.
Maintenance
155

Drum3EEJ-037
When the drum unit inside the machine becomes dirty, print quality may deteriorate. If this happens, follow theprocedure below to clean the drum unit. Note that you cannot clean the drum unit when the machine has documentswaiting to be printed.
1 Press and tap <Menu>.
2 Tap <Adjustment/Maintenance>.
3 Tap <Clean Drum Unit>.
4 Tap <Start>.
● Cleaning starts. When the <Finished.> message is displayed approximately 30 seconds later, press to
return to the <Home> screen.
Maintenance
156

Fixing Assembly3EEJ-038
Dirt may adhere to the fixing assembly inside the machine and cause black streaks to appear on printouts. To cleanthe fixing assembly, perform the following procedure. Note that you cannot clean the fixing assembly when themachine has documents waiting to be printed. To clean the fixing assembly, you need A4 or Letter size paper. Set thepaper in the paper drawer or multi-purpose tray before performing the following procedure.
● Cleaning requires toner. Make sure that there is sufficient toner remaining beforehand.
● It takes approximately 90 seconds to clean the fixing assembly.
Checking Toner Level(P. 160) Loading Paper in the Multi-Purpose Tray(P. 25)
1 Press and tap <Menu>.
2 Tap <Adjustment/Maintenance>.
3 Tap <Clean Fixing Assembly>.
4 Load paper (A4 or LTR) in the multi-purpose tray, and tap <OK> <Start>.
● A sheet for cleaning the fixing assembly is printed.
Follow the instructions on the screen to place the sheet for cleaning with the side to be printed face up inthe multi-purpose tray, and then press <OK>.
Maintenance
157

● After cleaning is completed and the message <Finished.> appears, press to return to the <Home>
screen.
Maintenance
158

Replacing the Toner Cartridges3EEJ-039
The machine will display a message when a toner cartridge is nearly empty. Note that the print quality becomes poor ifyou continue printing without taking any action. You can check the remaining toner level on the display.
When a Message Appear(P. 159) If Printouts Are Poor in Quality(P. 159) Checking Toner Level(P. 160)
◼When a Message AppearThe message that is displayed depends on the amount of remaining toner. Depending on which message is displayed,you will need to make sure that you have a replacement toner cartridge ready or replace the toner cartridge. How toReplace the Toner Cartridges(P. 163) Replacement Parts(P. 179)
<Prepare the toner cartridge.>This message notifies you that a toner cartridge needs to be replaced soon. Shake the toner cartridge to evenlydistribute the toner inside the cartridge. Replace the toner cartridge if you see this message before you start toprint a large job.
● You can continue printing when this message is displayed, but the print quality may deteriorate.
◼ If Printouts Are Poor in QualityIf your printouts begin to show any of the following features, your toner cartridge is nearly empty. Replace the nearlyempty toner cartridge even if no message is displayed.
How to Replace the Toner Cartridges(P. 163)
White streaks appear Partially faded Uneven density
Toner smudges and splatters appear Blank space of originals becomes grayish inprintouts
Maintenance
159

◼Checking Toner LevelYou can check the level of remaining toner according to the following, whenever you want to. It is recommended thatyou check the level before you start to print a large job.
<Device Information> <Toner Level> Check the toner level
Toner LevelDisplays the amount of remaining toner.
● The toner level value that is displayed is an approximation, and may differ from the actual value.
LINKS
Replacement Parts(P. 179)
Maintenance
160

Configuring Purchase Information for Consumables3EEJ-03A
You can scan and register the documentation of your local authorized Canon dealer (business card, information, etc.).You can print their contact information when you run out of consumables.
Registering/Editing Purchase Information(P. 161) Printing Purchase Information(P. 161) Deleting Purchase Information(P. 162)
Registering/Editing Purchase Information
You can scan and register/edit the documentation of your local authorized Canon dealer (business card, information,etc.).
1 Press and tap <Menu> <Output Rprt.> <Purchase Information for
Consumables>.
2 Tap <Register/Edit Purchase Information> <Yes>.
3 Place the document. ( Placing Documents(P. 19) ) press .
● If the documentation is already registered, a confirmation screen for overwriting the existing data isdisplayed.
Printing Purchase Information
Specify to print purchase information for consumables. The following items are printed:
Product Name
Genuine Canon Toner Name
Documentation data for your local authorized Canon dealer
Maintenance
161

1 Press and tap <Menu> <Output Rprt.> <Purchase Information for
Consumables>.
2 Tap <Print> <OK> press .
Deleting Purchase Information
Delete purchase information that you no longer need.
1 Press and tap <Menu> <Output Rprt.> <Purchase Information for
Consumables>.
2 Tap <Delete Purchase Information> <Yes>.
3 Press .
Maintenance
162
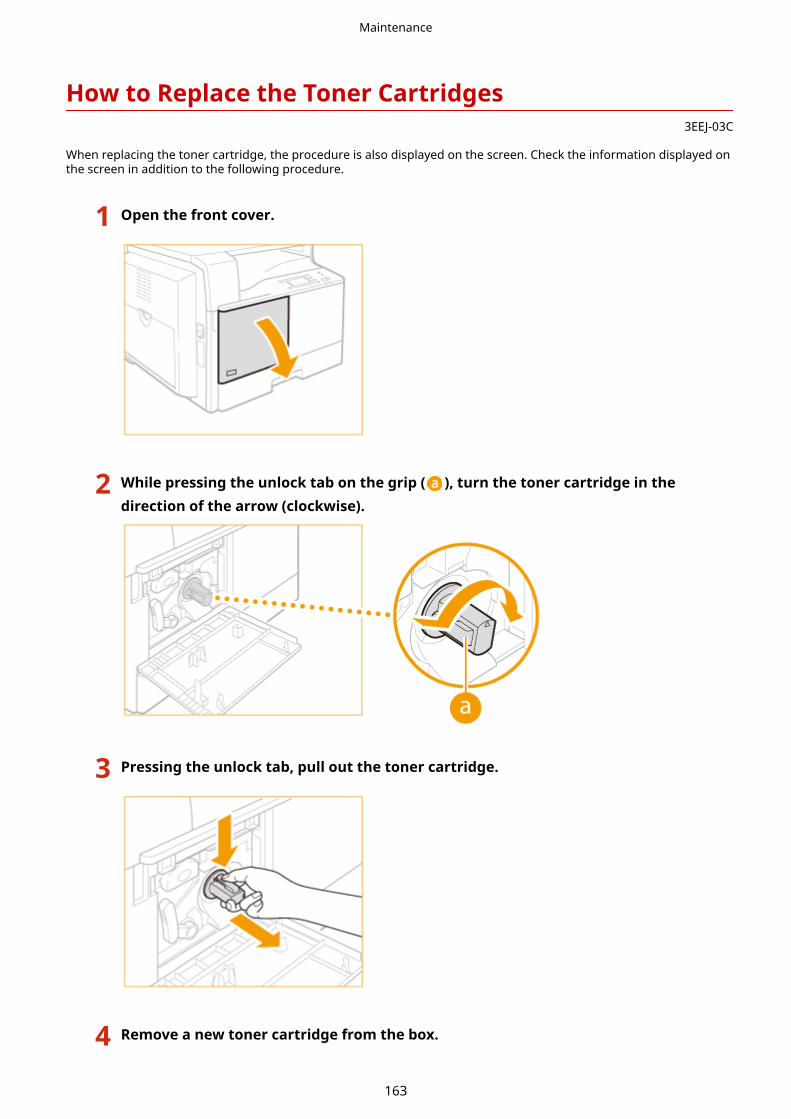
How to Replace the Toner Cartridges3EEJ-03C
When replacing the toner cartridge, the procedure is also displayed on the screen. Check the information displayed onthe screen in addition to the following procedure.
1 Open the front cover.
2 While pressing the unlock tab on the grip ( ), turn the toner cartridge in thedirection of the arrow (clockwise).
3 Pressing the unlock tab, pull out the toner cartridge.
4 Remove a new toner cartridge from the box.
Maintenance
163

5 Shake the new toner cartridge 5 or 6 times as shown below to evenly distribute thetoner inside the cartridge.
6 Install the toner cartridge.
● Make sure that the side of the cartridge with the label is facing up, and push the toner cartridge into themachine as far as it will go.
● Support the new toner cartridge with one hand from underneath, while pushing it into the machine with theother hand.
7 Hold the toner cartridge in place with one hand, and then remove the protective sealby pulling it straight out with the other hand.
Maintenance
164

● Pull out the seal slowly, otherwise the toner may scatter and soil your clothes or skin.
● Make sure that you pull out the seal completely, otherwise print errors may occur.
● Make sure that you pull the seal straight out. Pulling the seal upwards or downwards may break theseal. If the seal breaks inside the toner cartridge and cannot be removed completely, the tonercartridge cannot be used.
● Throw away the seal after removing it from the toner cartridge.
8 Turn the toner cartridge in the direction of the arrow (counterclockwise).
Turn the toner cartridge fully until it locks into place.
9 Close the front cover.
If you cannot close the front coverMake sure that the toner cartridge is inserted properly. Forcing it closed may cause damage.
Maintenance
165
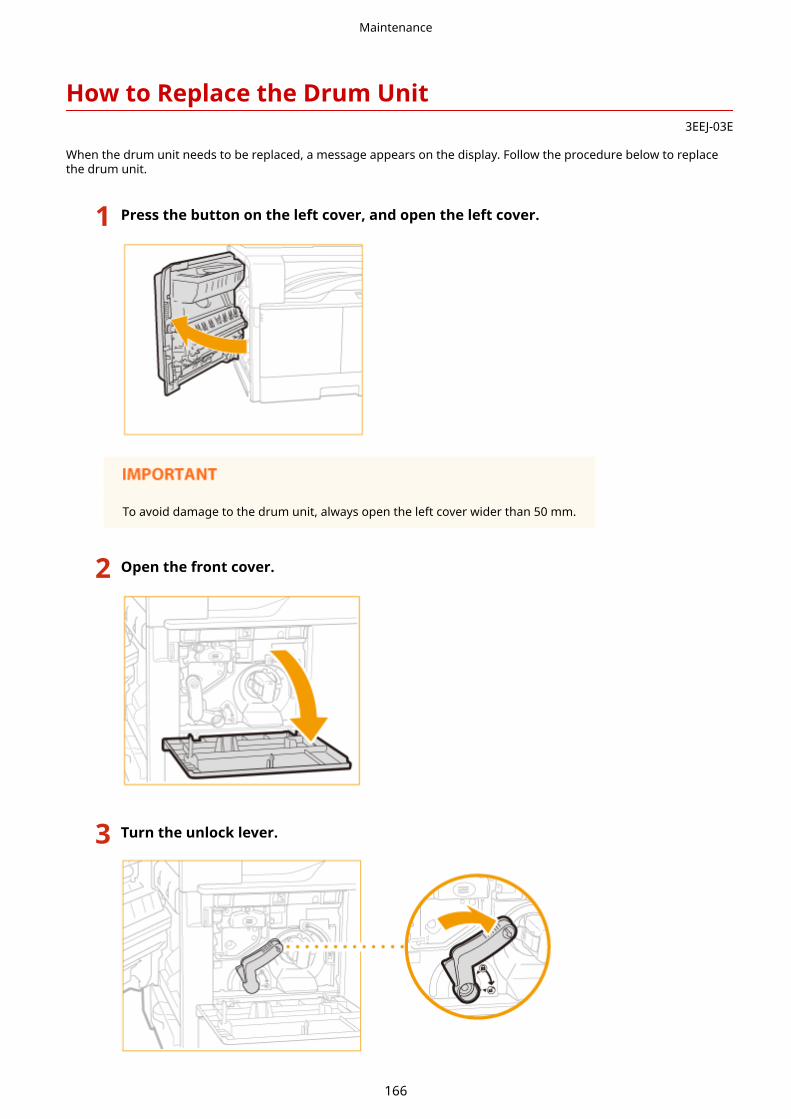
How to Replace the Drum Unit3EEJ-03E
When the drum unit needs to be replaced, a message appears on the display. Follow the procedure below to replacethe drum unit.
1 Press the button on the left cover, and open the left cover.
To avoid damage to the drum unit, always open the left cover wider than 50 mm.
2 Open the front cover.
3 Turn the unlock lever.
Maintenance
166
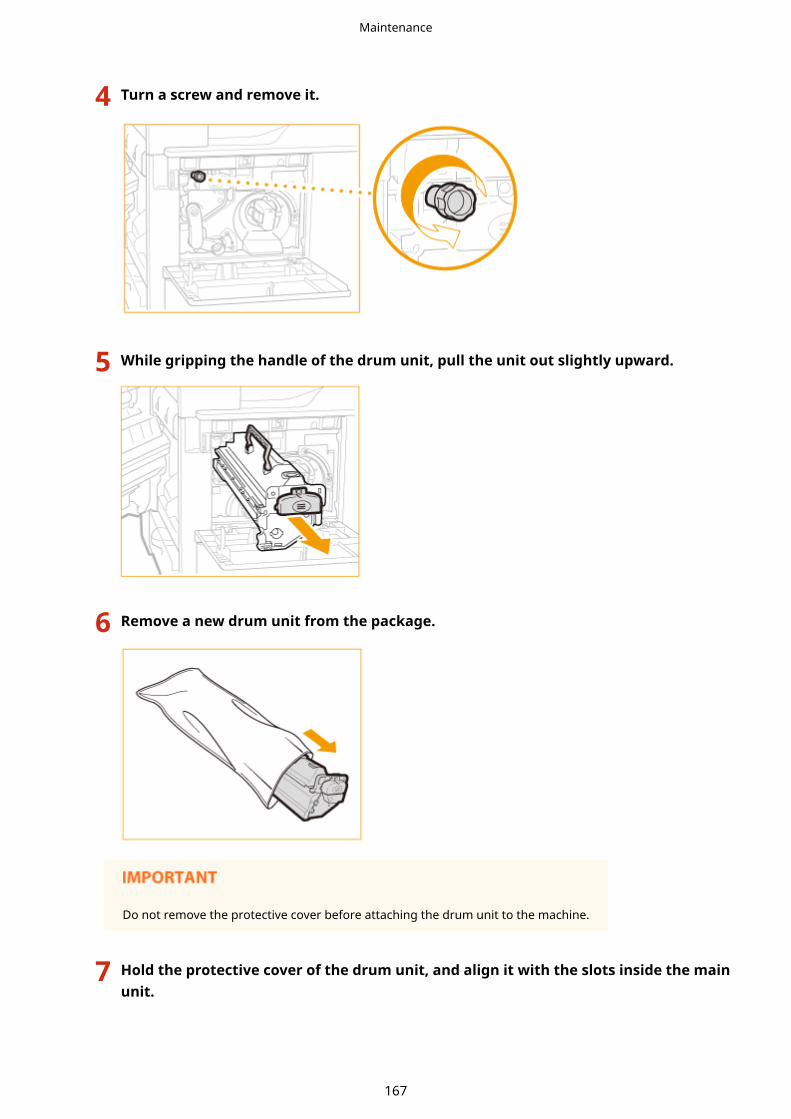
4 Turn a screw and remove it.
5 While gripping the handle of the drum unit, pull the unit out slightly upward.
6 Remove a new drum unit from the package.
Do not remove the protective cover before attaching the drum unit to the machine.
7 Hold the protective cover of the drum unit, and align it with the slots inside the mainunit.
Maintenance
167

8 While holding the protective cover, insert the drum unit.
Be careful not to touch the blue-green part of the drum.
9 Remove the protective cover of the drum unit.
10 Turn a screw and attach it.
Maintenance
168

11 Turn the unlock lever to its vertical position.
12 Check the counter enter the date and counter value in the drum counter label.
13 Affix the counter label ( ) on the drum unit.
14 Close the front cover and left cover.
Maintenance
169

Printing Reports and Lists3EEJ-03F
You can check the machine settings by printing reports and lists.
User Data List/System Manager Data ListYou can check the list of the settings ( Setting Menu List(P. 95) ) as well as the content that has beenregistered in the machine. User Data List/System Manager Data List(P. 171)
Copy/Print Charge Log ReportYou can check the counter information. Copy/Print Charge Log Report(P. 172)
Maintenance
170

User Data List/System Manager Data List3EEJ-03H
You can check the list of setting items ( Setting Menu List(P. 95) ) and current settings registered in the machine.This list includes the paper size and type registered in the machine.
<Menu> <Output Rprt.> <Print List> <User Data List> or <System Manager Data List> Check that the size and type of paper displayed on the screen is loaded in the machine <OK> <Yes>
Example:
The User Data List does not include the setting information for <System Management Settings>. To checkall setting items, print the System Manager Data List.
LINKS
Loading Paper(P. 20)
Maintenance
171

Copy/Print Charge Log Report3EEJ-03J
You can check the counter numbers which are used for the total counter (charge counter).
<Menu> <Output Rprt.> <Print List> <Copy/Print Charge Log Report> Check that the sizeand type of paper displayed on the screen is loaded in the machine <OK> <Yes>
Example:
Maintenance
172

Viewing the Counter Value3EEJ-03K
You can check total for the number of pages used for printouts. This total includes reports and lists, in addition tocopies and printouts of data from computers.
Select the item you want to check.
NOTE
● Each item of the counter is counted under the following conditions.
● Depending on the settings performed by the local authorized Canon dealer, the following counter may notbe displayed or counter not listed below may be displayed.
Number Counter Name Counted Items Counted Number per One Printed/Scanned Sheet*1
Job Type Size Number of Printed/ScannedSides
Large *2 Small *3 One-Sided
101 Total 1 All Print Jobs 1 1 1
102 Total 2 All Print Jobs 2 1 1
103 Total (Large) All Print Jobs 1 0 1
112 Total (Black & White/Large) All Print Jobs 1 0 1
113 Total (Black & White/Small) All Print Jobs 0 1 1
201 Copy (Total 1) Copy Jobs 1 1 1
202 Copy (Total 2) Copy Jobs 2 1 1
203 Copy (Large) Copy Jobs 1 0 1
301 Print(Total 1)
All Print Jobs(Except Copy Jobs)
1 1 1
501 Scan(Total 1)
AllScanJobs
1 1 1
Maintenance
173

*1 The counted number per one printed/scanned sheet for each item on the counter is as follows:
"number in the Size (Large or Small) column" × "number in the Number of Printed/Scanned Sides (One-Sided or Two-Sided)column"
Example: For large, single-sided print, the number added to <102: Total 2> is 2 × 1 = 2.
*2 Large: Standard size larger than A3/11" x 17".
*3 Small: Standard size smaller than B4/LGL.
Maintenance
174

Initializing Settings3EEJ-03L
You can restore the following settings:
Initializing Menu(P. 176) Initializing System Management Settings(P. 177) Initializing All Data/Settings(P. 178)
Maintenance
175

Initializing Menu3EEJ-03R
You can restore the settings of the machine ( Setting Menu List(P. 95) ).
If a screen for entering a PIN is displayed, enter the PIN and tap <Apply>. Setting the System ManagerPIN(P. 91)
<Menu> <System Management Settings> <Initialize Menu> Select the item you want toinitialize <Yes>
Items for initializingSelect the setting you want to initialize.
<Initialize All>Initializes all the settings.
Maintenance
176

Initializing System Management Settings3EEJ-03S
You can restore the settings of the machine ( Setting Menu List(P. 95) ). Some settings require restarting themachine to be initialized.
If a screen for entering a PIN is displayed, enter the PIN and tap <Apply>. Setting the System ManagerPIN(P. 91)
<Menu> <System Management Settings> <Initialize Menu> <System ManagementSettings> Select the item that you want to initialize <Yes> Restart the machine if necessary.
Items for initializingSelect the setting you want to initialize.
<Initialize All>Initializes all the settings.
Maintenance
177

Initializing All Data/Settings3EEJ-03U
To make changes to registered data and settings all at once such as when changing the installation location of themachine, you can delete registered data and initialize all settings ( Setting Menu List(P. 95) ) together at the sametime. You are required to restart the machine after initializing all data/settings.
● If a screen for entering a PIN is displayed, enter the PIN and tap <Apply>. Setting the System ManagerPIN(P. 91)
<Menu> <System Management Settings> <Initialize All Data/Settings> <Yes> <Yes> andrestart the machine.
Maintenance
178

Replacement Parts3EEJ-03W
This section describes the replacement parts (consumables/consumable parts) used by the machine. Purchase thereplacement parts from the authorized Canon dealer that you purchased the machine from. Follow the precautionswhen handling and storing the replacement parts.
Genuine ConsumablesCanon continuously develops technology innovations in Canon manufactured Toner,Cartridge, and Parts, specifically designed for use in Canon Multi-Functional machines.Experience the benefits of optimal print performance, print volume and high qualityoutputs, achieved through Canon's new advanced technologies. Therefore, the use ofCanon genuine consumables is recommended for your Canon Multi-Functional machines.
● For information on handling and storing the replacement parts, follow the precautions indicated in theGetting Started included with the machine.
● You can check the level of remaining toner.
Checking Toner Level(P. 160)
◼Toner Cartridge for Replacement
Confirm that the code on the front cover of the machine and the one on the package of the genuine toner are thesame.
Model name Genuine Canon toner
imageRUNNER 2206 ● Canon C-EXV 42 Black Toner
Be careful of counterfeit toners
● Please be aware that there are counterfeit Canon toners in the marketplace. Use of counterfeit toner mayresult in poor print quality or machine performance. Canon is not responsible for any malfunction, accidentor damage caused by the use of counterfeit toner. For more information, see global.canon/ctc.
◼Drum Unit
Product Name Model Number
imageRUNNER 2206 ● Canon C-EXV 42 Drum Unit
Maintenance
179

AppendixAppendix ............................................................................................................................................................. 181
Third Party Software ......................................................................................................................................... 182
Feature Highlights ............................................................................................................................................ 183
Going Green and Saving Money ................................................................................................................... 184
Improving Efficiency ..................................................................................................................................... 186
Going Digital ................................................................................................................................................ 187
So Much More .............................................................................................................................................. 189
Specifications .................................................................................................................................................... 190
Main Unit ...................................................................................................................................................... 191
Available Paper ............................................................................................................................................. 194
Scan Function ............................................................................................................................................... 197
Printer Functions .......................................................................................................................................... 198
System Environment .................................................................................................................................... 199
Options .............................................................................................................................................................. 200
Optional Equipment ..................................................................................................................................... 201
Manuals and Their Contents ............................................................................................................................. 202
Using User's Guide ............................................................................................................................................ 203
Screen Layout of User's Guide ...................................................................................................................... 204
Viewing User's Guide .................................................................................................................................... 207
Basic Windows Operations ............................................................................................................................... 208
Notice ................................................................................................................................................................. 212
Appendix
180

Appendix3EEJ-03X
This chapter contains technical specifications of this machine, instructions on how to use the User's Guide, disclaimers,copyright information, and other important information for customers.
Appendix
181

Third Party Software3EEJ-03Y
For information related to third-party software, click the following icon(s).
Appendix
182

Feature Highlights3EEJ-040
This section describes tips for leveraging the features of the machine by category. You can make use of the featuresaccording to your intended purposes and operating environment.
Going Green and Saving Money(P. 184) Improving Efficiency(P. 186) Going Digital(P. 187) So Much More(P. 189)
Appendix
183

Going Green and Saving Money3EEJ-041
Print Multiple Pages on a Single Sheet
To really start saving paper, shrink multiple pages onto a single sheet - 2 or 4 pages for copies, and up to 16pages for print jobs sent from your computer.
To copy multiple pages of a document onto one sheet: Copying Multiple Documents onto One Sheet (2 on1/4 on 1)(P. 53) To print multiple pages of a document onto one sheet: Printing from a Computer(P. 66)
Sleep Mode
For saving energy and money, a sleep mode that powers down a machine when nobody is using it has becomean essential feature. This machine will enter sleep mode automatically, and can also be put to sleep wheneveryou want. Press once to put the machine to sleep. Press it again to instantly wake the machine back into
action.
For more information about this function, see Entering Sleep Mode(P. 39) .
Save Toner
Got multi-page documents or drafts that don't need presentation-quality printing?
Appendix
184

There's a setting that uses less toner. Give it a try and save toner and money.
For more information about this function, see Printing from a Computer(P. 66) .
Appendix
185

Improving Efficiency3EEJ-042
Make Print Settings Quickly with Intuitive Operation
You can easily specify the page layout as well as binding position, etc. intuitively on the preview image in theprinter driver. The simple click-operation allows you to conveniently make settings while viewing how settingsare applied.
For more information, see Printing from a Computer(P. 66) .
Appendix
186

Going Digital3EEJ-043
Scan Only What You Need
What if you're scanning a whole page of a newspaper but all you're really interested in is a headline and aphoto? Use ScanGear MF. You can select what you want from a preview, and then have the scanner disregardthe rest. Otherwise you'll have to use an editing program to crop out everything you don't need.
Using your product to scan, print or otherwise reproduce certain documents, and the use of such imagesas scanned, printed or otherwise reproduced by your product, may be prohibited by law and may resultin criminal and/or civil liability. If you are uncertain about the legality of using your product to scan, printor otherwise reproduce any particular document, and/or of the use of the images scanned, printed orotherwise reproduced, you should consult in advance with your legal advisor for guidance.
For more information about this function, see Configuring Scan Settings in ScanGear MF(P. 86) .
Searchable PDFs
Searching of text in a PDF can be done with a "searchable PDF*". By scanning an original with both text andimages, text portions are converted by OCR into text data. In addition to being able to search for textinformation, you can also copy required portions into an Excel spreadsheet or Word document in MicrosoftOffice. Eliminate the need to type in customer data, addresses, etc. from scratch.
* You cannot create a searchable PDF in the macOS environment.
Appendix
187

For more information about this function, see Scanning from a Computer(P. 83) .
Add Images to a Work in Progress
Some applications work with the machine to let you easily import scanned images directly into documentsyou're working on. This way you can skip the steps of opening a separate application just for receiving thescanned images and then exporting them to the application you're really using.
For more information about this function, see Scanning Using an Application(P. 84) .
Appendix
188

So Much More3EEJ-044
Make Posters
Blow up a regular one-sheet printout and make an exceptionally large poster. A large poster will be printed outon nine sheets. Put them together in a 3x3 grid, and voila!
For more information about this function, see Printing from a Computer(P. 66) .
Appendix
189
Specifications3EEJ-04W
Specifications are subject to change without notice for product improvement or future release.
◼Machine SpecificationsMain Unit(P. 191) Available Paper(P. 194)
◼Functional SpecificationsScan Function(P. 197) Printer Functions(P. 198)
◼Environment To Use the MachineSystem Environment(P. 199)
Appendix
190

Main Unit3EEJ-04X
● For information on paper sizes and types for each paper source, see " Available Paper(P. 194) ."
Name Canon imageRUNNER 2206
Type Desktop
Color Supported Black and White
Resolution for Reading 600 dpi x 600 dpi
Resolution for Writing 600 dpi x 600 dpi
Number of Tones 256
Acceptable Originals Up to 297.0 mm x 431.8 mm
Copy Size/Copy Paper Paper Sizes
● Max (Paper drawer) : 11" x 17"
● Min (Paper drawer) : A5R
● Max (Multi-purpose tray): 297.0 mm x 431.8 mm
● Min (Multi-purpose tray): 95.0 mm x 148.0 mm
Margin
● TOP: 3.0 mm ± 1.5 mm
● Left: 3.0 mm ± 2.0 mm
Paper Weight
● Paper drawer: 64 g/m² to 90 g/m²
● Multi-purpose tray: 64 g/m² to 128 g/m²
Paper Type Available Paper(P. 194)
Warm-Up Time *1 After Powering ON
13 seconds
Returning from the Sleep mode
4.3 seconds
First Copy Time
(A4)
7.4 seconds
Copy Speed *2 22 sheets/minute
Appendix
191

(A4)
Scanning Speed
(A4)
● Full Color: 3.42 seconds
● Black and White: 1.71 seconds
Magnification 25 % to 400 % (in 1 % increments)
Paper Feeding System/Capacity *3 Paper drawer
300 sheets (64 g/m²)/250 sheets (80 g/m²) x 1
Multi-purpose tray
● A4, A4R, B5, B5R, A5, A5R, Letter, LetterR, Statement, StatementR100 sheets (64 g/m²)/80 sheets (80 g/m²)
● A3, B4, 11" x 17", Legal50 sheets (64 g/m²)/50 sheets (80 g/m²)
● Transparency50 sheets
● Label1 sheet
● Envelope10 sheets
Paper Output System/Capacity *3 ● A4, B5, Letter250 sheets (64 to 80 g/m²)
● Other sizes100 sheets (64 to 80 g/m²)
Multiple Copies 999 sheets
Power Source AC 220 V - 240 V, 2.4 A, 50/60 Hz
Power Consumption *1 Maximum Power Consumption
1.5 kW
During Sleep Mode
2.0 W
With the Main Power Turned OFF
0.1 W
Dimensions(W x D x H)
622 mm x 589 mm x 499 mm
Weight Approx. 28.7 kg*4
Installation Space See "Getting Started".
Manuals and Their Contents(P. 202)
Memory Capacity RAM: 256 MB
*1May vary depending on the environment and conditions under which the machine is being used.
Appendix
192

*2Copy/print speeds are measured based on internal testing using A4 size paper copied/printed with 100% copy/printratio to original on one-sided paper. Internal testing involved continuously copying/printing the same one page ofcontent on plain paper (copy speed is tested by copying on the platen glass). Copy/print speeds may vary depending onpaper type, paper size or paper feeding direction.The device may automatically pause or slow down in order to adjust printer condition such as controlling temperature ofa certain unit or limiting impact to image quality during continuous copying/printing.
*3May vary depending on the installation environment and paper to use.
*4The toner cartridge is included.
Appendix
193

Available Paper3EEJ-04Y
The paper types that can be used with this machine are shown in the following table.
◼Supported Paper Sizes: Available : Unavailable
Paper Sizes Multi-Purpose tray Paper Drawer 1
A3 *1
B4 *1
A4 *1
A4R
B5
B5R
A5
A5R
11" x 17" *1
Legal *1
Letter *1
LetterR
Statement
StatementR
Executive
Oficio
Oficio (Ecuador)
Appendix
194

Paper Sizes Multi-Purpose tray Paper Drawer 1
Oficio (Brazil)
Oficio (Mexico)
Oficio (Argentina)
Letter (Argentina)
LetterR (Argentina)
Letter (Government)
LetterR (Government)
Legal (Government)
Foolscap (Australia)
Foolscap
8K
16K
16KR
F4A
Legal (India)
Custom *2
Envelope No.10 (COM10) *3
Envelope Monarch *3
Envelope ISO-C5 *3
Envelope DL *3
*1Can be used for printing reports or lists.
*2Custom paper size of 95.0 to 297.0 mm in width and 148.0 to 431.8 mm in length can be loaded in the multi-purposetray.
*3Make sure the flap is folded.
Appendix
195

◼Supported Paper TypesChlorine-free paper can be used with this machine.
: Available : Unavailable
Paper Type Multi-Purpose tray Paper Drawer 1
Plain 1
Plain 2
Heavy 1
Heavy 2
Recycled
Color
Pre-Punched *
Bond
Transparency
Labels
Envelope
*Usable paper sizes are A4, A4R, Letter, LetterR.
Appendix
196

Scan Function3EEJ-050
Type Color Scanner
Original Scanning Size (Max) Same as "Acceptable Originals" in "Main Unit"
Main Unit(P. 191)
Resolution (Max) 600 dpi x 600 dpi
Scanning Speed Same as "Scanning Speed" in "Main Unit"
Main Unit(P. 191)
Interface USB
USB 1.1 Full-Speed, USB 2.0 Hi-Speed
Protocol Supported USB
Output Format (Push Scan) TIFF (MMR), JPEG (Single-Page), PDF
Appendix
197

Printer Functions3EEJ-051
Type Internal
Print Size Available Paper(P. 194)
Print Speed Same as "Copy Speed" in "Main Unit"
Main Unit(P. 191)
Resolution Data Processing
600 dpi x 600 dpi
Page Description Language (PDL) UFR II-LT
Resident Fonts None
Interface USB
USB 1.1 Full-Speed, USB 2.0 Hi-Speed
Appendix
198

System Environment3EEJ-053
System Requirements for the User's Guide Windows
● Internet Explorer 9 and later
● Microsoft Edge
● Firefox
● Firefox ESR
● Chrome*
macOS
● Safari
● Firefox
● Chrome*
Linux
● Firefox
iOS
● Safari*
Android
● Chrome*
*Only when viewing manuals on the Internet.
Appendix
199

Options3EEJ-054
Installing options on the machine enables you to use more features.
◼Knowing What Types of Options are AvailableOptional Equipment(P. 201)
Appendix
200

Optional Equipment3EEJ-04C
The functionality of the machine can be expanded by installing optional equipment to the machine. Install the optionalequipment to meet your needs such as by loading a large amount of paper.
Optional Paper Drawer(P. 201)
Optional Paper Drawer
You can install the optional paper drawer to the machine.
◼FL Cassette-BBYou can replace the standard paper drawer of the machine with the optional paper drawer.
● For how to load paper into the paper drawer, see Loading Paper(P. 20) .
● For available paper sizes, see Available Paper(P. 194) .
Appendix
201

Manuals and Their Contents3EEJ-04E
The manuals listed below are included with the machine. Refer to them as necessary.
Getting Started
Read this manual first. It describes the flow of settings to perform beforeusing this machine.
User's Guide (This Manual)
This manual describes all the functions of the machine in a manual that isviewed using a Web browser. You can browse information by category orenter a keyword to search for pages on a specific topic. Using User'sGuide(P. 203)
Appendix
202

Using User's Guide3EEJ-055
The User's Guide is a manual that can be viewed on your computer or mobile device and it describes all of thefunctions of the machine. You can search from your intended use or enter a keyword to quickly find the page you arelooking for. The section describes the screen layout of the User's Guide and how to read the Guide. You can specifyhow the appearance of the User's Guide looks.
◼Screen Layout of User's GuideThis section describes the screens configuring the User's Guide and how to use the on-screen buttons. ScreenLayout of User's Guide(P. 204)
◼Viewing User's GuideThis section describes the meaning of the marks used in the User's Guide, how the keys on the control panel and thebuttons on the computer display are represented, and other matters that help you understand the informationcontained in the User's Guide. Viewing User's Guide(P. 207)
◼Specifying How the Appearance of the User's Guide LooksYou can change the character size used in the User's Guide, and switch the screen layout to fit to the device you use toview the User's Guide.
● If you do not have access to Adobe Reader to view the manuals in PDF format, try other programs such asPDF Preview developed by Vivid Document Imaging Technologies.
How to Find the Topic You Are Looking for
Search the contents● You can find the page you are looking for by selecting the topic from the "Contents" on the left side of the
screen.
Search by keyword● Perform a search by entering a keyword, such as "envelope" or "toner cartridge," and the pages containing
the keyword are displayed. You can find the page you are looking for from those results. You can also enterphrases such as "connecting to a network." The keyword search also supports the AND Boolean to search formultiple keywords. For the organization of the search screen and how to operate the search screen, see Search(P. 205) .
Appendix
203

Screen Layout of User's Guide3EEJ-056
The User's Guide is divided into different screens, and the content of each screen varies.
Top PageAppears when User's Guide is started.
/
Click to also display all of the sections under the chapters. Click to return to the previous display.
/
Click to toggle the display between the contents and search. When the table of contents is displayed, eachclick on switches between hiding and showing the display. When the search display is shown, eachclick on switches between hiding and showing the display.
Click to set parameters to determine how the User's Guide is displayed, such as character size or layout.
Click to display information on how to view the User's Guide, how to perform a search, and otherinformation.
/
Click to display the previous or following topic.
[Notice]
Click to view important information you should know when using the machine.
Appendix
204
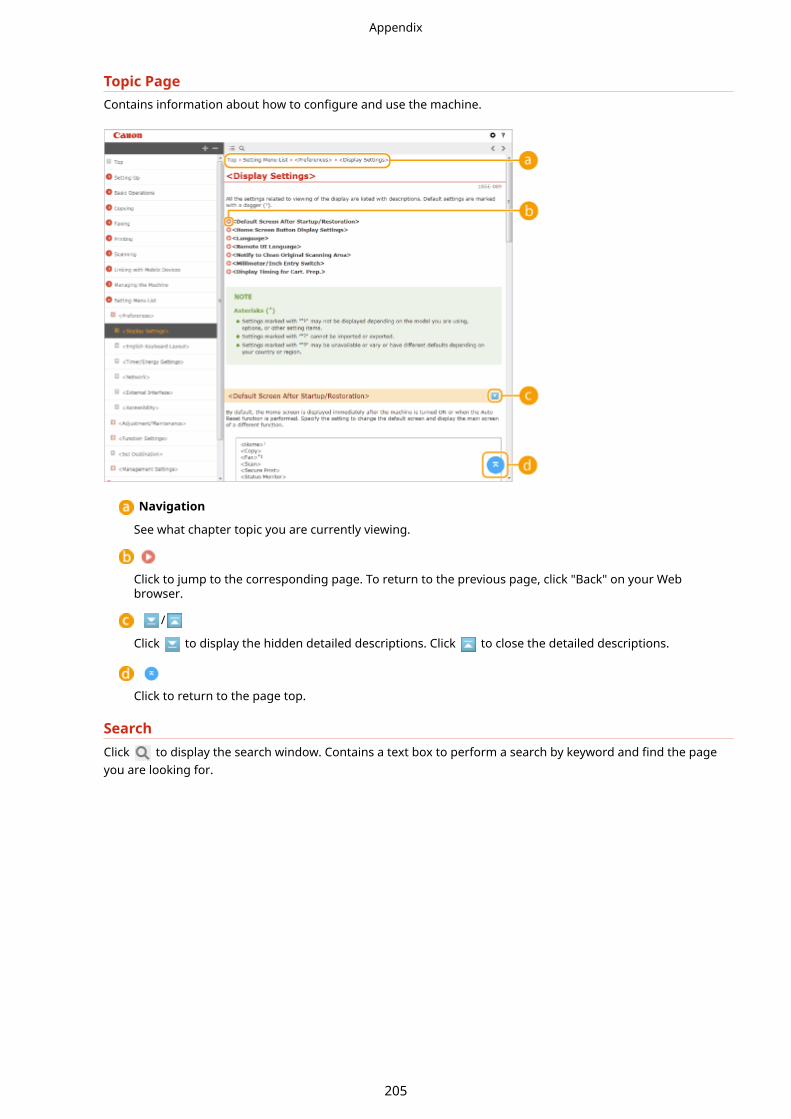
Topic PageContains information about how to configure and use the machine.
Navigation
See what chapter topic you are currently viewing.
Click to jump to the corresponding page. To return to the previous page, click "Back" on your Webbrowser.
/
Click to display the hidden detailed descriptions. Click to close the detailed descriptions.
Click to return to the page top.
SearchClick to display the search window. Contains a text box to perform a search by keyword and find the pageyou are looking for.
Appendix
205

[Enter keyword(s) here]
Enter a keyword or keywords and click to display the search results. You can search for pagescontaining all the keywords by separating the keywords by a space (blank). Also you can only search forpages containing an exact phrase by enclosing the keywords in double quotation marks.
Search result
Displays the search results of the pages that contain the specified keywords. From the results, locate thepage you are looking for and click the topic title of the page.
● The specified keyword(s) are shown in bold in the search results.
Appendix
206

Viewing User's Guide3EEJ-04J
This section describes the marks, buttons, screens, and other items used in the User's Guide. The warnings are alsogiven in the "Important Safety Instructions" in the "Getting Started" included with the machine. See also theseinstructions.
MarksCautions regarding safety, restrictions and cautions regarding the handling of the machine, useful tips, andother information are indicated using the marks below.
Indicates a caution concerning operations that may lead to injury to persons ifnot performed correctly. To use the machine safely, always pay attention tothese cautions.
Indicates an operation that must not be performed. Read these items carefully,and make sure not to perform the described operations.
Indicates operational requirements and restrictions. Be sure to read these itemscarefully to operate the machine correctly, and avoid damage to the machine orproperty.
Indicates a clarification of an operation, or contains additional explanations for aprocedure.
Indicates useful functions or tips for using the machine.
Keys and Buttons Used in this ManualKeys on the control panel and buttons on the computer display appear in the following notation:
Type Example
Keys on the control panel
Settings displayed on the control panel<Timer Settings><Paper jammed.>
Buttons and other text interfaces displayed on the computer display [Preferences]
Computer Screens Used in This ManualUnless otherwise noted, displays used in the User's Guide are those for the imageRUNNER 2206. Depending onthe operating system you are using, the appearance of the displays used in this manual may slightly differ fromthe actual displays. Also, the appearance of drivers and software may differ depending on their version.
Appendix
207
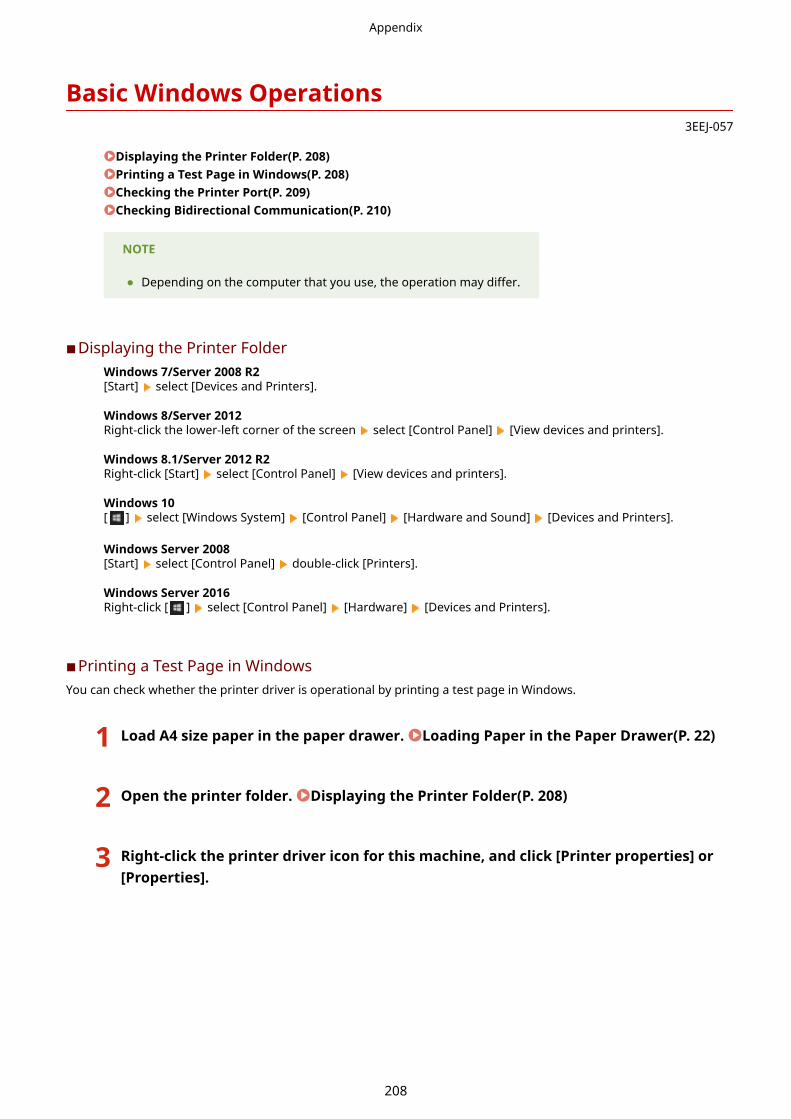
Basic Windows Operations3EEJ-057
Displaying the Printer Folder(P. 208) Printing a Test Page in Windows(P. 208) Checking the Printer Port(P. 209) Checking Bidirectional Communication(P. 210)
NOTE
● Depending on the computer that you use, the operation may differ.
◼Displaying the Printer FolderWindows 7/Server 2008 R2[Start] select [Devices and Printers].
Windows 8/Server 2012Right-click the lower-left corner of the screen select [Control Panel] [View devices and printers].
Windows 8.1/Server 2012 R2Right-click [Start] select [Control Panel] [View devices and printers].
Windows 10[ ] select [Windows System] [Control Panel] [Hardware and Sound] [Devices and Printers].
Windows Server 2008[Start] select [Control Panel] double-click [Printers].
Windows Server 2016Right-click [ ] select [Control Panel] [Hardware] [Devices and Printers].
◼Printing a Test Page in WindowsYou can check whether the printer driver is operational by printing a test page in Windows.
1 Load A4 size paper in the paper drawer. Loading Paper in the Paper Drawer(P. 22)
2 Open the printer folder. Displaying the Printer Folder(P. 208)
3 Right-click the printer driver icon for this machine, and click [Printer properties] or[Properties].
Appendix
208

4 Click [Print Test Page] in [General] tab.
➠The test page is printed.
◼Checking the Printer Port
1 Open the printer folder. Displaying the Printer Folder(P. 208)
2 Right-click the printer driver icon for this machine, and click [Printer properties] or[Properties].
Appendix
209

3 In the [Ports] tab, check that the port is selected correctly.
◼Checking Bidirectional Communication
1 Open the printer folder. Displaying the Printer Folder(P. 208)
2 Right-click the printer driver icon for this machine, and click [Printer properties] or[Properties].
Appendix
210

3 In the [Ports] tab, make sure that the [Enable bidirectional support] check box isselected.
Appendix
211

Notice3EEJ-04R
◼Product Information required by COMMISSION REGULATION (EU) No 801/2013 amendingRegulation (EC) No 1275/2008
Power consumption of the product in networked standby if wired network ports are connected and all wirelessnetwork ports are activated (if they are available at the same time).
Model Name Power consumption of the product in networked standby
imageRUNNER 2206 3.0 w or less
● The above value(s) are the actual values for single machine, chosen arbitrarily, and may therefore vary fromthe value of the machine in use. Optional network ports are not connected and/or activated in themeasurement.
◼WEEE and Battery Directives
Only for European Union and EEA (Norway, Iceland and Liechtenstein)
These symbols indicate that this product is not to be disposed of with your household waste, according to the WEEEDirective (2012/19/EU), the Battery Directive (2006/66/EC) and/or national legislation implementing those Directives.If a chemical symbol is printed beneath the symbol shown above, in accordance with the Battery Directive, thisindicates that a heavy metal (Hg = Mercury, Cd = Cadmium, Pb = Lead) is present in this battery or accumulator at aconcentration above an applicable threshold specified in the Battery Directive.This product should be handed over to a designated collection point, e.g., on an authorized one-for-one basis whenyou buy a new similar product or to an authorized collection site for recycling waste electrical and electronicequipment (EEE) and batteries and accumulators. Improper handling of this type of waste could have a possibleimpact on the environment and human health due to potentially hazardous substances that are generally associatedwith EEE. Your cooperation in the correct disposal of this product will contribute to the effective usage of naturalresources.For more information about the recycling of this product, please contact your local city office, waste authority,approved scheme or your household waste disposal service or visit www.canon-europe.com/weee, or www.canon-europe.com/battery.
◼Environmental InformationReducing your environmental impact while saving money
Power Consumption and Activation TimeThe amount of electricity a device consumes depends on the way the device is used. This product is designed and setin a way to allow you to reduce your electricity costs. After the last print it switches to Ready Mode. In this mode it canprint again immediately if required. If the product is not used for a time, the device switches to its Power Save Mode.The devices consume less power (Watt) in these modes.If you wish to set a longer Activation Time or would like to completely deactivate the Power Save Mode, pleaseconsider that this device may then only switch to a lower energy level after a longer period of time or not at all.Canon does not recommend extending the Activation Times from the optimum ones set as default.
Appendix
212

Energy Star ® The Energy Star® programme is a voluntary scheme to promote the development and purchase of energy efficientmodels, which help to minimise environmental impact.Products which meet the stringent requirements of the Energy Star® programme for both environmental benefits andthe amount of energy consumption will carry the Energy Star® logo accordingly.
Paper typesThis product can be used to print on both recycled and virgin paper (certified to an environmental stewardshipscheme), which complies with EN12281 or a similar quality standard. In addition it can support printing on mediadown to a weight of 64g/m².Lighter paper means less resources used and a lower environmental footprint for your printing needs.
Duplex printing (Standard duplex printing products only)Duplex printing capability enables you to print on both sides automatically, and therefore helps to reduce the use ofvaluable resources by reducing your paper consumption.The duplex function has been auto enabled during the set up and driver installation and Canon strongly recommendsthat you do not disable this function. You should continue to use the duplex function to reduce the environmentalimpact of your work with this product at all times.
◼Disclaimers● The information in this document is subject to change without notice.
● CANON INC. MAKES NO WARRANTY OF ANY KIND WITH REGARD TO THIS MATERIAL, EITHER EXPRESS OR IMPLIED,EXCEPT AS PROVIDED HEREIN, INCLUDING WITHOUT LIMITATION, THEREOF, WARRANTIES AS TO MARKETABILITY,MERCHANTABILITY, FITNESS FOR A PARTICULAR PURPOSE OF USE, OR NON-INFRINGEMENT. CANON INC. SHALLNOT BE LIABLE FOR ANY DIRECT, INCIDENTAL, OR CONSEQUENTIAL DAMAGES OF ANY NATURE, OR LOSSES OREXPENSES RESULTING FROM THE USE OF THIS MATERIAL.
◼CopyrightReproduction of the contents of this document in whole or in part without prior permission is prohibited.
◼TrademarksAdobe, Acrobat, and Reader are registered trademarks of Adobe Systems Incorporated in the United States and/orother countries.Apple, Bonjour, Mac, macOS, OS X and Safari are trademarks of Apple Inc.Microsoft, Windows, Windows Vista, Windows Server, Internet Explorer, Word and Excel are either registeredtrademarks or trademarks of Microsoft Corporation in the United States and/or other countries.This product contains the Universal Font Scaling Technology or UFST® under license from Monotype Imaging, Inc.UFST® is a trademark of Monotype Imaging, Inc. registered in the United States Patent and Trademark Office and maybe registered in certain jurisdictions.UFST: Copyright © 1989 - 1996, 1997, 2003, 2004, 2008, all rights reserved, by Monotype Imaging Inc.
Appendix
213

The Adobe PDF logo is a trademark or registered trademark of Adobe Systems Incorporated in the United States andother countries.
Copyright © 2008 Adobe Systems Incorporated. All rights reserved.
Protected by U.S. Patents 6,185,684; 6,205,549; 7,213,269; 7,272,628; 7,278,168; Patents pending in the U.S. and othercountries.
All instances of the name PostScript in the text are references to the PostScript language as defined by Adobe SystemsIncorporated unless otherwise stated. The name PostScript also is used as a product trademark for Adobe Systems'implementation of the PostScript language interpreter.
Except as otherwise stated, any reference to a "PostScript printing device," "PostScript display device," or similar itemrefers to a printing device, display device or item (respectively) that contains PostScript technology created or licensedby Adobe Systems Incorporated and not to devices or items that purport to be merely compatible with the PostScriptlanguage.
Adobe, the Adobe logo, Adobe LiveCycle® Policy Server, InDesign, PostScript, the PostScript Logo, and PostScript 3 areeither registered trademarks or trademarks of Adobe Systems Incorporated in the United States and/or othercountries.
All other trademarks are the property of their respective owners.
Portions of this software are copyright © 2007 The FreeType Project (www.freetype.org). All rights reserved.
All other product and brand names are registered trademarks, trademarks or service marks of their respective owners.
V_180517
Appendix
214

This Font Software is licensed under the SIL Open Font License,Version 1.1.
This license is copied below, and is also available with a FAQ at:http://scripts.sil.org/OFL
-----------------------------------------------------------SIL OPEN FONT LICENSE Version 1.1 - 26 February 2007-----------------------------------------------------------
PREAMBLEThe goals of the Open Font License (OFL) are to stimulate worldwidedevelopment of collaborative font projects, to support the fontcreation efforts of academic and linguistic communities, and toprovide a free and open framework in which fonts may be shared andimproved in partnership with others.
The OFL allows the licensed fonts to be used, studied, modified andredistributed freely as long as they are not sold by themselves. Thefonts, including any derivative works, can be bundled, embedded,redistributed and/or sold with any software provided that any reservednames are not used by derivative works. The fonts and derivatives,however, cannot be released under any other type of license. Therequirement for fonts to remain under this license does not apply toany document created using the fonts or their derivatives.
DEFINITIONS"Font Software" refers to the set of files released by the CopyrightHolder(s) under this license and clearly marked as such. This mayinclude source files, build scripts and documentation.
"Reserved Font Name" refers to any names specified as such after thecopyright statement(s).
"Original Version" refers to the collection of Font Softwarecomponents as distributed by the Copyright Holder(s).
"Modified Version" refers to any derivative made by adding to,deleting, or substituting -- in part or in whole -- any of thecomponents of the Original Version, by changing formats or by portingthe Font Software to a new environment.
"Author" refers to any designer, engineer, programmer, technicalwriter or other person who contributed to the Font Software.
PERMISSION & CONDITIONSPermission is hereby granted, free of charge, to any person obtaininga copy of the Font Software, to use, study, copy, merge, embed,modify, redistribute, and sell modified and unmodified copies of theFont Software, subject to the following conditions:
SIL OPEN FONT LICENSE
215

1) Neither the Font Software nor any of its individual components, inOriginal or Modified Versions, may be sold by itself.
2) Original or Modified Versions of the Font Software may be bundled,redistributed and/or sold with any software, provided that each copycontains the above copyright notice and this license. These can beincluded either as stand-alone text files, human-readable headers orin the appropriate machine-readable metadata fields within text orbinary files as long as those fields can be easily viewed by the user.
3) No Modified Version of the Font Software may use the Reserved FontName(s) unless explicit written permission is granted by thecorresponding Copyright Holder. This restriction only applies to theprimary font name as presented to the users.
4) The name(s) of the Copyright Holder(s) or the Author(s) of the FontSoftware shall not be used to promote, endorse or advertise anyModified Version, except to acknowledge the contribution(s) of theCopyright Holder(s) and the Author(s) or with their explicit writtenpermission.
5) The Font Software, modified or unmodified, in part or in whole,must be distributed entirely under this license, and must not bedistributed under any other license. The requirement for fonts toremain under this license does not apply to any document created usingthe Font Software.
TERMINATIONThis license becomes null and void if any of the above conditions arenot met.
DISCLAIMERTHE FONT SOFTWARE IS PROVIDED "AS IS", WITHOUT WARRANTY OF ANY KIND,EXPRESS OR IMPLIED, INCLUDING BUT NOT LIMITED TO ANY WARRANTIES OFMERCHANTABILITY, FITNESS FOR A PARTICULAR PURPOSE AND NONINFRINGEMENTOF COPYRIGHT, PATENT, TRADEMARK, OR OTHER RIGHT. IN NO EVENT SHALL THECOPYRIGHT HOLDER BE LIABLE FOR ANY CLAIM, DAMAGES OR OTHER LIABILITY,INCLUDING ANY GENERAL, SPECIAL, INDIRECT, INCIDENTAL, OR CONSEQUENTIALDAMAGES, WHETHER IN AN ACTION OF CONTRACT, TORT OR OTHERWISE, ARISINGFROM, OUT OF THE USE OR INABILITY TO USE THE FONT SOFTWARE OR FROMOTHER DEALINGS IN THE FONT SOFTWARE.
SIL OPEN FONT LICENSE
216

- 1 -
The Software Subjected to the Other License Conditions
Please refer to Table of Software and respective License terms below, for more detail and corresponding
license conditions.
Table of Software
Names of Software Terms and Conditions of the
License:
See Page
Adobe PDF Scan Library 2
bldimake 5
FreeType 6
Incl 11
JPEG 12
math 13
pcftypes.h 14
xpm 15

- 2 -
Adobe PDF Scan Library
Portions use software under the following terms:
______________________________________________________________________________________
This product contains either BSAFE and/or TIPEM software by RSA Security Inc.
______________________________________________________________________________________
This product includes software developed by the Apache Software Foundation (http://www.apache.org/).
Copyright (c) 1998-2000 The Apache Software Foundation. All rights reserved.
Redistribution and use in source and binary forms, with or without modification, are permitted provided that the
following conditions are met:
1. Redistributions of source code must retain the above copyright notice, this list of conditions and the
following disclaimer.
2. Redistributions in binary form must reproduce the above copyright notice, this list of conditions and the
following disclaimer in the documentation and/or other materials provided with the distribution.
3. The end-user documentation included with the redistribution, if any, must include the following
acknowledgment:
"This product includes software developed by the Apache Software Foundation (http://www.apache.org/)."
Alternately, this acknowledgment may appear in the software itself, if and wherever such third-party
acknowledgments normally appear.
4. The names "Xerces" and "Apache Software Foundation" must not be used to endorse or promote products
derived from this software without prior written permission. For written permission, please contact
5. Products derived from this software may not be called "Apache", nor may "Apache" appear in their name,
without prior written permission of the Apache Software Foundation.
THIS SOFTWARE IS PROVIDED ``AS IS'' AND ANY EXPRESSED OR IMPLIED WARRANTIES, INCLUDING,
BUT NOT LIMITED TO, THE IMPLIED WARRANTIES OF MERCHANTABILITY AND FITNESS FOR A
PARTICULAR PURPOSE ARE DISCLAIMED. IN NO EVENT SHALL THE APACHE SOFTWARE
FOUNDATION OR ITS CONTRIBUTORS BE LIABLE FOR ANY DIRECT, INDIRECT, INCIDENTAL,
SPECIAL, EXEMPLARY, OR CONSEQUENTIAL DAMAGES (INCLUDING, BUT NOT LIMITED TO,
PROCUREMENT OF SUBSTITUTE GOODS OR SERVICES; LOSS OF USE, DATA, OR PROFITS; OR
BUSINESS INTERRUPTION) HOWEVER CAUSED AND ON ANY THEORY OF LIABILITY, WHETHER IN
CONTRACT, STRICT LIABILITY, OR TORT (INCLUDING NEGLIGENCE OR OTHERWISE) ARISING IN ANY
WAY OUT OF THE USE OF THIS SOFTWARE, EVEN IF ADVISED OF THE POSSIBILITY OF SUCH
DAMAGE.

- 3 -
This software consists of voluntary contributions made by many individuals on behalf of the Apache Software
Foundation and was originally based on software copyright (c) 1999, International Business Machines, Inc.,
http://www.ibm.com. For more information on the Apache Software Foundation, please see
<http://www.apache.org/>.
______________________________________________________________________________________
March 27, 2003
Portions of this product are based on Modifications created from the Original Code known as the "Sablotron
XSLT Processor". The Sablotron XSLT Processor is subject to the Mozilla Public License Version 1.1 (the
"License"). You may obtain a copy of
the License at http://www.mozilla.org/MPL/
Software distributed under the License is distributed on an "AS IS" basis, WITHOUT WARRANTY OF ANY
KIND, either express or implied. See the License for the specific language governing rights and limitations
under the License.
The Original Code is the Sablotron XSLT Processor.
The Initial Developer of the Original Code is Ginger Alliance Ltd. Portions created by Ginger Alliance are
Copyright (C) 2000 Ginger Alliance Ltd. All Rights Reserved.
Pursuant to sections 3.2 and 3.6 of the License, the Modifications created by Adobe Systems Incorporated are
available as Source Code. The Modifications may be downloaded via the Internet from:
http://partners.adobe.com/asn/tech/xml/sablotron/index.jsp
The Original Code may be downloaded via the Internet from:
https://sourceforge.net/projects/sablotron/
______________________________________________________________________________________
Portions Copyright (c) 1997-1999 Silicon Graphics Computer Systems, Inc.
Permission to use, copy, modify, distribute and sell this software and its documentation for any purpose is
hereby granted without fee, provided that the above copyright notice appear in all copies and that both that
copyright notice and this permission notice appear in supporting documentation. Silicon Graphics makes no
representations about the suitability of this software for any purpose. It is provided "as is" without express or
implied warranty.
______________________________________________________________________________________

- 4 -
The Loki Library
Portions Copyright (c) 2001 by Andrei Alexandrescu . This code accompanies the book: Alexandrescu,
Andrei. "Modern C++ Design: Generic Programming and Design Patterns Applied".
Portions Copyright (c) 2001. Addison-Wesley. Permission to use, copy, modify, distribute and sell this software
for any purpose is hereby granted without fee, provided that the above copyright notice appear in all copies and
that both that copyright notice and this permission notice appear in supporting documentation. The author or
Addison-Wesley Longman make no representations about the suitability of this software for any purpose. It is
provided "as is" without express or implied warranty.
______________________________________________________________________________________
Updated Information/Additional Third Party Code Information available at http://www.adobe.com/go/thirdparty .
______________________________________________________________________________________

- 5 -
bldimake
Copyright (c) 1985, 1986, 1987, 1988 The Open Group
All right Reserved.
Permission to use, copy, modify, distribute, and sell this software and its documentation for any purpose is
hereby granted without fee, provided that the above copyright notice appear in all copies and that both that
copyright notice and this permission notice appear in supporting documentation. The above copyright
notice and this permission notice shall be included in all copies or substantial portions of the Software.
THE SOFTWARE IS PROVIDED "AS IS", WITHOUT WARRANTY OF ANY KIND, EXPRESS OR IMPLIED,
INCLUDING BUT NOT LIMITED TO THE WARRANTIES OF MERCHANTABILITY, FITNESS FOR A
PARTICULAR PURPOSE AND NONINFRINGEMENT. IN NO EVENT SHALL THE OPEN GROUP BE LIABLE
FOR ANY CLAIM, DAMAGES OR OTHER LIABILITY, WHETHER IN AN ACTION OF
CONTRACT, TORT OR OTHERWISE, ARISING FROM, OUT OF OR IN CONNECTION WITH THE
SOFTWARE OR THE USE OR OTHER DEALINGS IN THE SOFTWARE.
Except as contained in this notice, the name of The Open Group shall not be used in advertising or otherwise
to promote the sale, use or other dealings in this Software without prior written authorization from The Open
Group.

- 6 -
FreeType
The FreeType Project LICENSE
----------------------------
2006-Jan-27
Copyright 1996-2002, 2006 by
David Turner, Robert Wilhelm, and Werner Lemberg
Introduction
============
The FreeType Project is distributed in several archive packages;
some of them may contain, in addition to the FreeType font engine,
various tools and contributions which rely on, or relate to, the
FreeType Project.
This license applies to all files found in such packages, and
which do not fall under their own explicit license. The license
affects thus the FreeType font engine, the test programs,
documentation and makefiles, at the very least.
This license was inspired by the BSD, Artistic, and IJG
(Independent JPEG Group) licenses, which all encourage inclusion
and use of free software in commercial and freeware products
alike. As a consequence, its main points are that:
o We don't promise that this software works. However, we will be
interested in any kind of bug reports. (`as is' distribution)
o You can use this software for whatever you want, in parts or
full form, without having to pay us. (`royalty-free' usage)
o You may not pretend that you wrote this software. If you use
it, or only parts of it, in a program, you must acknowledge

- 7 -
somewhere in your documentation that you have used the
FreeType code. (`credits')
We specifically permit and encourage the inclusion of this
software, with or without modifications, in commercial products.
We disclaim all warranties covering The FreeType Project and
assume no liability related to The FreeType Project.
Finally, many people asked us for a preferred form for a
credit/disclaimer to use in compliance with this license. We thus
encourage you to use the following text:
"""
Portions of this software are copyright © <year> The FreeType
Project (www.freetype.org). All rights reserved.
"""
Please replace <year> with the value from the FreeType version you
actually use.
Legal Terms
===========
0. Definitions
--------------
Throughout this license, the terms `package', `FreeType Project',
and `FreeType archive' refer to the set of files originally
distributed by the authors (David Turner, Robert Wilhelm, and
Werner Lemberg) as the `FreeType Project', be they named as alpha,
beta or final release.
`You' refers to the licensee, or person using the project, where
`using' is a generic term including compiling the project's source
code as well as linking it to form a `program' or `executable'.
This program is referred to as `a program using the FreeType

- 8 -
engine'.
This license applies to all files distributed in the original
FreeType Project, including all source code, binaries and
documentation, unless otherwise stated in the file in its
original, unmodified form as distributed in the original archive.
If you are unsure whether or not a particular file is covered by
this license, you must contact us to verify this.
The FreeType Project is copyright (C) 1996-2000 by David Turner,
Robert Wilhelm, and Werner Lemberg. All rights reserved except as
specified below.
1. No Warranty
--------------
THE FREETYPE PROJECT IS PROVIDED `AS IS' WITHOUT WARRANTY OF ANY
KIND, EITHER EXPRESS OR IMPLIED, INCLUDING, BUT NOT LIMITED TO,
WARRANTIES OF MERCHANTABILITY AND FITNESS FOR A PARTICULAR
PURPOSE. IN NO EVENT WILL ANY OF THE AUTHORS OR COPYRIGHT HOLDERS
BE LIABLE FOR ANY DAMAGES CAUSED BY THE USE OR THE INABILITY TO
USE, OF THE FREETYPE PROJECT.
2. Redistribution
-----------------
This license grants a worldwide, royalty-free, perpetual and
irrevocable right and license to use, execute, perform, compile,
display, copy, create derivative works of, distribute and
sublicense the FreeType Project (in both source and object code
forms) and derivative works thereof for any purpose; and to
authorize others to exercise some or all of the rights granted
herein, subject to the following conditions:
o Redistribution of source code must retain this license file
(`FTL.TXT') unaltered; any additions, deletions or changes to
the original files must be clearly indicated in accompanying
documentation. The copyright notices of the unaltered,

- 9 -
original files must be preserved in all copies of source
files.
o Redistribution in binary form must provide a disclaimer that
states that the software is based in part of the work of the
FreeType Team, in the distribution documentation. We also
encourage you to put an URL to the FreeType web page in your
documentation, though this isn't mandatory.
These conditions apply to any software derived from or based on
the FreeType Project, not just the unmodified files. If you use
our work, you must acknowledge us. However, no fee need be paid
to us.
3. Advertising
--------------
Neither the FreeType authors and contributors nor you shall use
the name of the other for commercial, advertising, or promotional
purposes without specific prior written permission.
We suggest, but do not require, that you use one or more of the
following phrases to refer to this software in your documentation
or advertising materials: `FreeType Project', `FreeType Engine',
`FreeType library', or `FreeType Distribution'.
As you have not signed this license, you are not required to
accept it. However, as the FreeType Project is copyrighted
material, only this license, or another one contracted with the
authors, grants you the right to use, distribute, and modify it.
Therefore, by using, distributing, or modifying the FreeType
Project, you indicate that you understand and accept all the terms
of this license.
4. Contacts
-----------
There are two mailing lists related to FreeType:

- 10 -
Discusses general use and applications of FreeType, as well as
future and wanted additions to the library and distribution.
If you are looking for support, start in this list if you
haven't found anything to help you in the documentation.
Discusses bugs, as well as engine internals, design issues,
specific licenses, porting, etc.
Our home page can be found at
http://www.freetype.org
--- end of FTL.TXT ---

- 11 -
Incl
Copyright (c) 1994-96 SunSoft, Inc.
Permission is hereby granted, free of charge, to any person obtaining a copy of this
software and associated documentation files (the "Software"), to deal in the Software
without restriction, including without limitation the rights to use, copy, modify,
merge, publish, distribute, sublicense, and/or sell copies of the Software, and to
permit persons to whom the Software is furnished to do so, subject to the following
conditions:
The above copyright notice and this permission notice shall be included in all copies
or substantial portions of the Software.
THE SOFTWARE IS PROVIDED "AS IS", WITHOUT WARRANTY OF ANY KIND, EXPRESS OR IMPLIED,
INCLUDING BUT NOT LIMITED TO THE WARRANTIES OF MERCHANTABILITY, FITNESS FOR A
PARTICULAR PURPOSE AND NONINFRINGEMENT. IN NO EVENT SHALL SUNSOFT INC. OR ITS
PARENT COMPANY BE LIABLE FOR ANY CLAIM, DAMAGES OR OTHER LIABILITY, WHETHER IN AN
ACTION OF CONTRACT, TORT OR OTHERWISE, ARISING FROM, OUT OF OR IN CONNECTION WITH
THE SOFTWARE OR THE USE OR OTHER DEALINGS IN THE SOFTWARE.
Except as contained in this notice, the name of SunSoft, Inc. shall not be used in advertising or otherwise to
promote the sale, use or other dealings in this Software without prior written authorization from SunSoft, Inc.

- 12 -
JPEG
"this software is based in part on the work of the Independent JPEG Group.".

- 13 -
math
Copyright (c) 1993 by Sun Microsystems, Inc. All rights reserved.
Developed at SunPro, a Sun Microsystems, Inc. business.
Permission to use, copy, modify, and distribute this software is freely granted, provided that this notice is
preserved.
copysignf.c:* Copyright (c) 1993 by Sun Microsystems, Inc. All rights reserved.
math_private.h:* Copyright (c) 1993 by Sun Microsystems, Inc. All rights reserved.
powf.c:* Copyright (c) 1993 by Sun Microsystems, Inc. All rights reserved.
scalbnf.c:* Copyright (c) 1993 by Sun Microsystems, Inc. All rights reserved.

- 14 -
pcftypes.h
Copyright (c) 2000, 2001, 2002 by Francesco Zappa Nardelli
Permission is hereby granted, free of charge, to any person obtaining a copy of this
software and associated documentation files (the "Software"), to deal in the Software
without restriction, including without limitation the rights to use, copy, modify,
merge, publish, distribute, sublicense, and/or sell copies of the Software, and to
permit persons to whom the Software is furnished to do so, subject to the following
conditions:
The above copyright notice and this permission notice shall be included in all copies
or substantial portions of the Software.
THE SOFTWARE IS PROVIDED "AS IS", WITHOUT WARRANTY OF ANY KIND, EXPRESS OR IMPLIED,
INCLUDING BUT NOT LIMITED TO THE WARRANTIES OF MERCHANTABILITY, FITNESS FOR A
PARTICULAR PURPOSE AND NONINFRINGEMENT. IN NO EVENT SHALL THE AUTHORS OR
COPYRIGHT HOLDERS BE LIABLE FOR ANY CLAIM, DAMAGES OR OTHER LIABILITY, WHETHER IN AN
ACTION OF CONTRACT, TORT OR OTHERWISE, ARISING FROM, OUT OF OR IN CONNECTION WITH
THE SOFTWARE OR THE USE OR OTHER DEALINGS IN THE SOFTWARE.

- 15 -
xpm
Copyright (c) 1989-95 GROUPE BULL
Permission is hereby granted, free of charge, to any person obtaining a copy of this
software and associated documentation files (the "Software"), to deal in the Software
without restriction, including without limitation the rights to use, copy, modify,
merge, publish, distribute, sublicense, and/or sell copies of the Software, and to
permit persons to whom the Software is furnished to do so, subject to the following
conditions:
The above copyright notice and this permission notice shall be included in all copies
or substantial portions of the Software.
THE SOFTWARE IS PROVIDED "AS IS", WITHOUT WARRANTY OF ANY KIND, EXPRESS OR IMPLIED,
INCLUDING BUT NOT LIMITED TO THE WARRANTIES OF MERCHANTABILITY, FITNESS FOR A
PARTICULAR PURPOSE AND NONINFRINGEMENT. IN NO EVENT SHALL GROUPE BULL BE LIABLE
FOR ANY CLAIM, DAMAGES OR OTHER LIABILITY, WHETHER IN AN ACTION OF
CONTRACT, TORT OR OTHERWISE, ARISING FROM, OUT OF OR IN CONNECTION WITH THE
SOFTWARE OR THE USE OR OTHER DEALINGS IN THE SOFTWARE.
Except as contained in this notice, the name of GROUPE BULL shall not be used in advertising or otherwise to
promote the sale, use or other dealings in this Software without prior written authorization from GROUPE
BULL.