
Piano Scales - The Ultimate 'Get Started' Guide! Guide Sheet
Upload
khangminh22Category
view
2download
0
1120 ADSL RouterGET STARTED USER’S GUIDE
Version: 5.3 172160
GET STARTED USER’S GUIDE
Telindus Technical Publications - Geldenaaksebaan 335 - B-3001 Leuven - Belgium - Tel. +32 16 382011
Copyright and statements Telindus 1120 ADSL Router
Copyright noticeThe information and descriptions contained in this publication are the property of Telindus. Suchinformation and descriptions must not be copied or reproduced by any means, or disseminated ordistributed without the express prior written permission of Telindus.
This publication could include technical inaccuracies or typographical errors, for which Telindusnever can or shall be held liable. Changes are made periodically to the information herein; thesechanges will be incorporated in new editions of this publication. Telindus may make improvementsand/or changes in the product(s) described in this publication at any time, without prior notice.
This equipment, for safety and hygiene purposes, complies with the specific provisions contained inARAB/RGPT 54 quater 3.1 (RD 20 06 1975, Art.1, Section X, Accident Prevention Policy).
Version 5.3 September, 2001MRP 172162 ©TELiNDUS
i Get Started User’s Guide
Telindus 1120 ADSL Router Copyright and statements
Statements
http://www.telindus.com/products/conformity/
Hereby, TELINDUS declares that this Telindus 1120 ADSL Router is in compliance withthe essential requirements and other relevant provisions of Directive 1999/5/EC.
Bij deze, verklaart TELINDUS dat deze Telindus 1120 ADSL Router inovereenstemming is met de essentiële vereisten en andere relevante bepalingen vanRichtlijn 1999/5/EC.
Par la présente, TELINDUS déclare que ce Telindus 1120 ADSL Router est enconformité avec les exigences essentielles et autres articles applicables de la Directive1999/5/EC.
Hiermit, TELINDUS erklärt daß dieser Telindus 1120 ADSL Router ist in Fügsamkeit mitden wesentlichen Anforderungen und anderen relevanten Bereitstellungen vonDirektive 1999/5/EC.
Mediante la presente, TELINDUS declara que el Telindus 1120 ADSL Router cumplecon los requisitos esenciales y las demás prescripciones relevantes de la Directiva1999/5/CE.
A TELINDUS declara que o Telindus 1120 ADSL Router cumpre os principais requisitose outras disposições da Directiva 1999/5/EC.
Col presente, TELINDUS dichiara che questo Telindus 1120 ADSL Router è inacquiescenza coi requisiti essenziali e stipulazioni attinenti ed altre di Direttivo 1999/5/EC.
Με το παρόν, η TELINDUS δηλώνει ότι αυτό το Crocus HDSL είναι συµµορφούµενο µε τις βασικές απαιτήσεις και µε τις υπόλοιπες σχετικές διατάξεις της οδηγίας 1999/5/EC.
Get Started User’s Guide ii
Copyright and statements Telindus 1120 ADSL Router
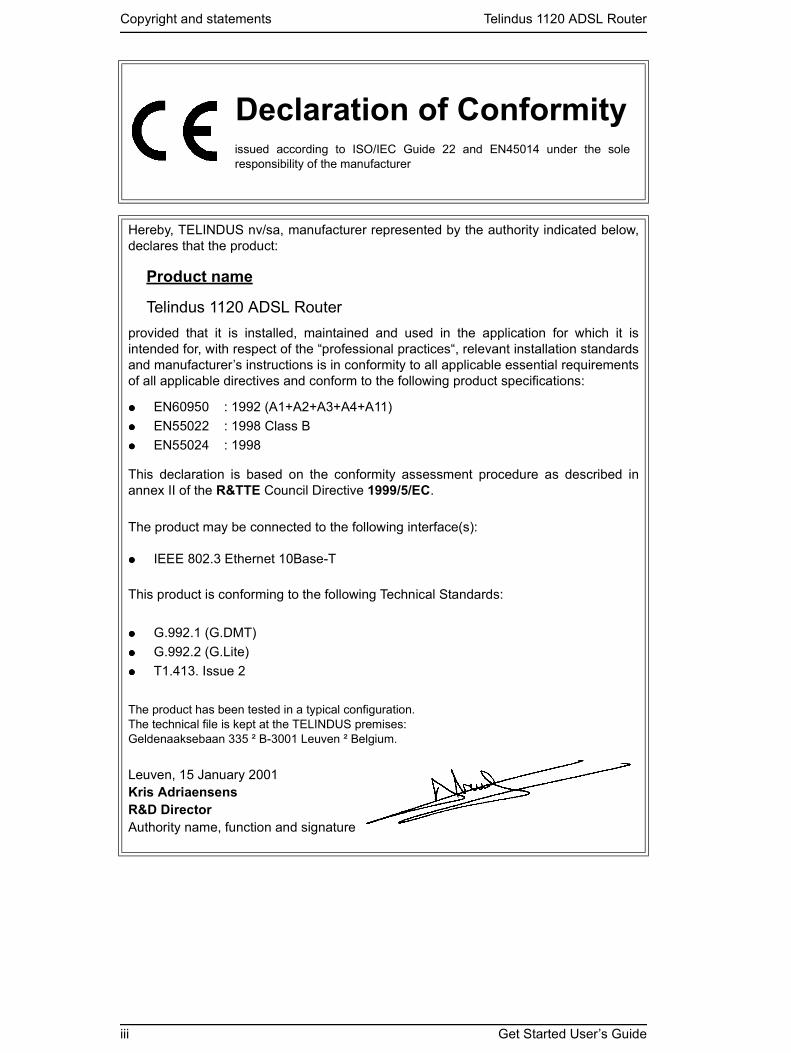
Hereby, TELINDUS nv/sa, manufacturer represented by the authority indicated below,declares that the product:
Product name
Telindus 1120 ADSL Routerprovided that it is installed, maintained and used in the application for which it isintended for, with respect of the “professional practices“, relevant installation standardsand manufacturer’s instructions is in conformity to all applicable essential requirementsof all applicable directives and conform to the following product specifications:
EN60950 : 1992 (A1+A2+A3+A4+A11) EN55022 : 1998 Class B EN55024 : 1998
This declaration is based on the conformity assessment procedure as described inannex II of the R&TTE Council Directive 1999/5/EC.
The product may be connected to the following interface(s):
IEEE 802.3 Ethernet 10Base-T
This product is conforming to the following Technical Standards:
G.992.1 (G.DMT) G.992.2 (G.Lite) T1.413. Issue 2
The product has been tested in a typical configuration.The technical file is kept at the TELINDUS premises:Geldenaaksebaan 335 ² B-3001 Leuven ² Belgium.
Leuven, 15 January 2001Kris AdriaensensR&D DirectorAuthority name, function and signature
Declaration of Conformityissued according to ISO/IEC Guide 22 and EN45014 under the soleresponsibility of the manufacturer
iii Get Started User’s Guide
Telindus 1120 ADSL Router Copyright and statements
Statement: The Telindus 1120 ADSL Router may be used provided that it is installed,maintained and used in the application which it is intended for, with respect tothe professional practice, relevant installation standards and manufacturer’sinstructions (see also CE declaration of conformity).
Destination of use: The Telindus 1120 ADSL Router allows data transfer via standard twisted paircables according to ITU-T G.992.1, G.992.2, ANSI T1.413 Issue 2.
Interfaces: The Telindus 1120 ADSL Router may be connected to the following interfaces:IEEE 802.3 Ethernet 10Base-T.
In case of problems: Should you doubt or encounter problems with the Telindus 1120 ADSL Router,please contact your dealer for advice.
Verklaring: De Telindus 1120 ADSL Router mag gebruikt worden op voorwaarde dat hetwordt geïnstalleerd, onderhouden en gebruikt voor de toepassing waarvoorhet ontworpen is, met betrekking tot het professioneel gebruik, de relevanteinstallatie richtlijnen en de richtlijnen van de fabrikant (zie ook de CE verklaringvan conformiteit).
Toepassingsgebied: De Telindus 1120 ADSL Router laat een data transfer toe over standaardtwisted pair draden in overeenstemming met ITU-T G.992.1, G.992.2, ANSIT1.413 Issue 2.
Interfaces: De Telindus 1120 ADSL Router mag aangesloten worden op de volgendeinterfaces:IEEE 802.3 Ethernet 10Base-T.
Bij problemen: Indien u twijfelt of problemen hebt met de Telindus 1120 ADSL Router,contacteer uw verdeler voor advies.
Déclaration: Le Telindus 1120 ADSL Router peut être employé à condition qu'il soit installé,entretenu et utilisé dans la fonction pour laquelle il a été conçu, en suivant lesrègles de pratique professionnelles, les standards d’installation d’application etles instructions du fabricant (voyez aussi la déclaration CE de Conformité).
Domaine d’utilisation: Le Telindus 1120 ADSL Router permet le transfert de données sur des câblesà paires torsadées conformes à ITU-T G.992.1, G.992.2, ANSI T1.413 Issue2.
Les interfaces: Le Telindus 1120 ADSL Router peut être connecté aux interfaces suivantes:IEEE 802.3 Ethernet 10Base-T.
En cas de problèmes: En cas de doute ou si vous rencontrez des problèmes avec le Telindus 1120ADSL Router, veuillez demander conseil à votre revendeur
Erklärung: Der Telindus 1120 ADSL Router darf benutzt werden, vorausgesetzt, er wirdinstalliert, unterhalten und in der Funktion benutzt für die er entwickelt wurde,in dem die Regeln der Berufsausführung, sowie die vorgeschriebenenInstallationsstandards und die Anweisungen des Fabrikanten berücksichtigtwerden (siehe hierzu die Konformitätserklärung der EG).
Anwendungsbereich: Der Telindus 1120 ADSL Router erlaubt Datenübertragung über üblichesverdrillte Leitungspaar kabel nach ITU-T G.992.1, G.992.2, ANSI T1.413 Issue2.
Verbindung: Der Telindus 1120 ADSL Router darf an die folgende Schnittstellenangeschlossen werden:IEEE 802.3 Ethernet 10Base-T.
Bei Problemen: Wenn Sie zweifeln sollten oder Problemen mit dem Telindus 1120 ADSLRouter begegnen sollten, bitte verständigen Sie Ihren Händler für Rat.
Get Started User’s Guide iv

Copyright and statements Telindus 1120 ADSL Router
Declaración: El Telindus 1120 ADSL Router puede usarse con tal de que sea instalado,mantenido y usado en la aplicación para la cual ha sido destinado ,con elrespeto del las prácticas profesionales, normas de la instalación pertinentese instrucciones del fabricante (también vea declaración de CE deConformidad).
Destino de uso: El Telindus 1120 ADSL Router permite los datos transfieren vía el partrenzado cablegrafia normal según ITU-T G.992.1, G.992.2, ANSI T1.413Issue 2.
Interfaces: El Telindus 1120 ADSL Router puede ser conectado a los siguientesinterfaces:IEEE 802.3 Ethernet 10Base-T.
En el Caso de Problema: Si duda o encuentra problemas con el Telindus 1120 ADSL Router, porfavor pida el consejo de su distribuidor.
Declaração: O Telindus 1120 ADSL Router poderá ser fornecido, instalado, mantido eutilizado para a o fim a que se destina, desde que respeite o cumprimentode todos os standards de instalação e directivas do fabricante (consultardeclaração de Conformidade da UE).
Declaração de Utilização: O Telindus 1120 ADSL Router permite dados transferem por cabos de partrançados normais de acordo com ITU-T G.992.1, G.992.2, ANSI T1.413Issue 2.
Interfaces: O Telindus 1120 ADSL Router poderá ter os seguintes interfaces:IEEE 802.3 Ethernet 10Base-T.
Problemas: Em caso de dúvida ou se forem detectados problemas com o Telindus 1120ADSL Router, contactar o seu fornecedor para aconselhamento.
Dichiarazione: Il Telindus 1120 ADSL Router può essere usato a condizione che siainstallato, manutenuto ed usato nella applicazione per la quale è destinato,con rispetto delle pratiche professionali, degli standard di installazioneattinenti e delle istruzioni del costruttore (vedere anche la dichiarazione CEdi Conformità).
Destinazione di uso: Il Telindus 1120 ADSL Router permette trasferimento dei dati via paio tortocavi standard secondo ITU-T G.992.1, G.992.2, ANSI T1.413 Issue 2.
Interfacce: Il Telindus 1120 ADSL Router può essere collegato agli le seguentiinterfacce:IEEE 802.3 Ethernet 10Base-T.
In Caso di Problema: In caso di dubbi o problemi di incontro col Telindus 1120 ADSL Router, perfavore contatti il Suo rivenditore per consiglio.
v Get Started User’s Guide
Telindus 1120 ADSL Router Table of contents
Table of Contents
1. Before You Begin .................................................11.1 Introduction ................................................................................ 11.2 Package Includes ...................................................................... 11.3 Diagrams of the Telindus 1120 ADSL Router ........................... 11.4 Minimum System Requirements ............................................... 21.5 Internet Service ......................................................................... 31.6 Information You Will Need ......................................................... 3
2. Hardware Installation ...........................................42.1 Setup Instructions ...................................................................... 42.2 Connect to the Ethernet ............................................................ 42.3 Connect to the ADSL Line ........................................................ 42.4 Connect to the Power Adapter ................................................. 5
3. Software Installation & Configuration ................63.1 Detecting TCP/IP in Windows® 95/98 ....................................... 63.2 Installing TCP/IP in Windows® 95/98 ........................................ 73.3 Configuring TCP/IP in Windows® 95/98 ................................... 73.4 Detecting TCP/IP in Windows® 2000 ........................................ 83.5 Installing TCP/IP in Windows® 2000 ........................................... 83.6 Configuring TCP/IP in Windows® 2000 .................................... 83.7 Detecting TCP/IP in Windows® NT ........................................... 93.8 Installing TCP/IP in Windows® NT ............................................ 93.9 Configuring TCP/IP in Windows® NT ........................................ 9
4. Configuring Your Router ...................................104.1 Load Telindus 9100 Maintenance Application Installation
Software .................................................................................. 104.2 Multiple Router Selection Window ........................................... 114.3 Basic Internet Access Configuration ....................................... 114.4 ADSL Configuration ................................................................. 12
5. Troubleshooting .................................................145.1 I Cannot Detect the Router ...................................................... 145.2 Router and PC Are Not in the Same Subnet ........................... 155.3 Cannot Upgrade the Firmware ................................................ 15
Appendix A: Understanding Configuration Parameters ............. 16Appendix B: Ethernet Cable Pinout ........................................... 18
Telindus 1120 ADSL Router Before You Begin
1. Before You BeginThis chapter includes:
1.1 IntroductionThe Telindus 1120 ADSL Router is an integrated device that allows multiple workstationsto share high-speed bandwidth provided by DSL technology. In addition to fast Internetaccess and advanced routing technologies, the Telindus 1120 ADSL Router incorporatesnumerous features that facilitate network access and management.
1.2 Package Includes• One ADSL Telindus 1120 ADSL Router• Power cord and adapter• Software CD-ROM (contains Telindus Installation software, Software User’s
Guide)• One RJ-11 to RJ-11 ADSL phone cable (7ft)• One RJ-45 to RJ-45 straight Ethernet cable (7ft)
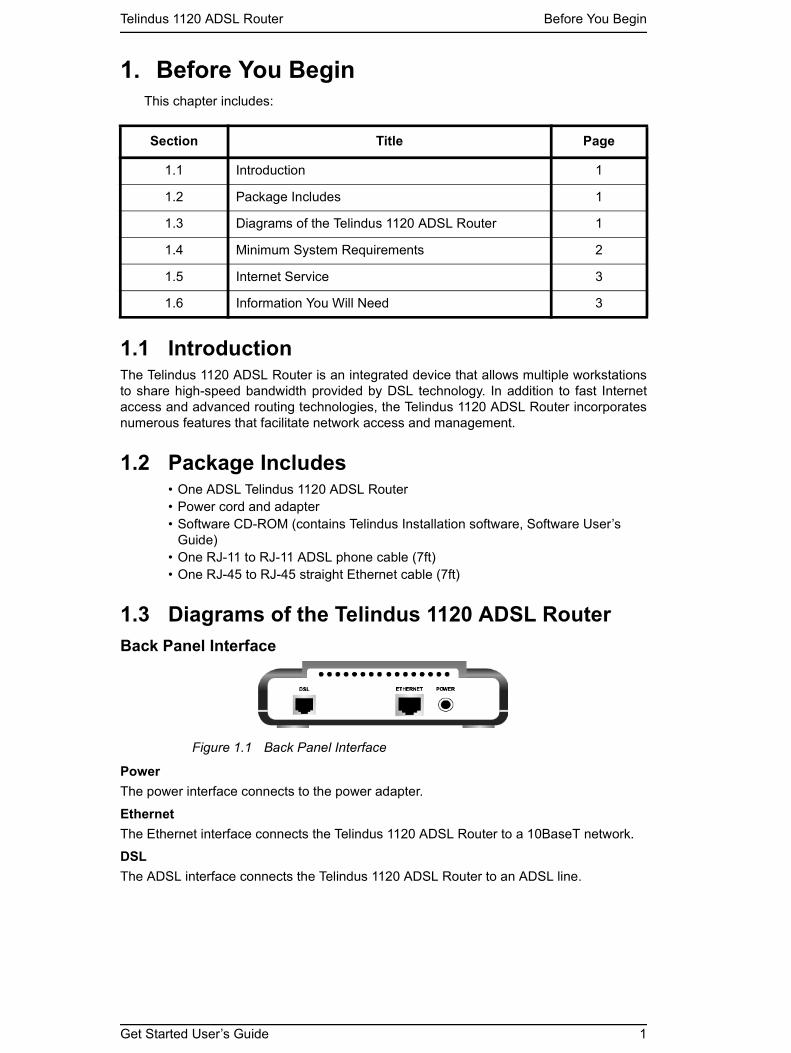
1.3 Diagrams of the Telindus 1120 ADSL RouterBack Panel Interface
Figure 1.1 Back Panel Interface
PowerThe power interface connects to the power adapter.
EthernetThe Ethernet interface connects the Telindus 1120 ADSL Router to a 10BaseT network.DSLThe ADSL interface connects the Telindus 1120 ADSL Router to an ADSL line.
Section Title Page
1.1 Introduction 1
1.2 Package Includes 1
1.3 Diagrams of the Telindus 1120 ADSL Router 1
1.4 Minimum System Requirements 2
1.5 Internet Service 3
1.6 Information You Will Need 3
Get Started User’s Guide 1
Before You Begin Telindus 1120 ADSL Router
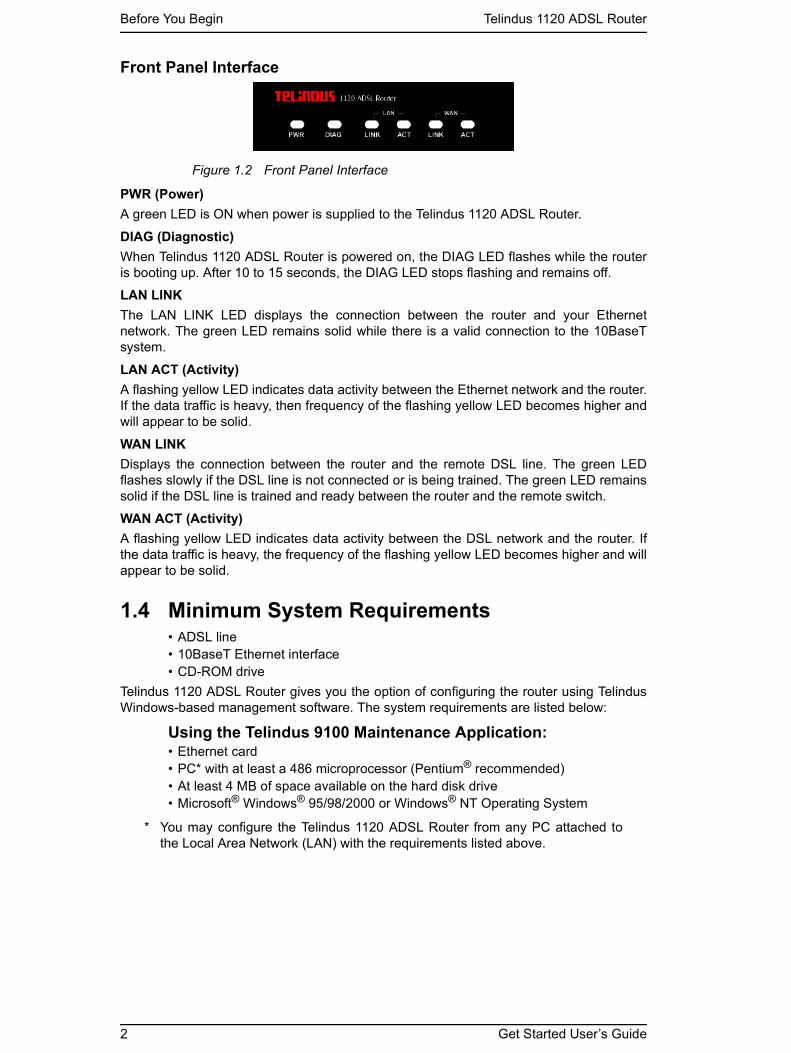
Front Panel Interface
Figure 1.2 Front Panel Interface
PWR (Power)A green LED is ON when power is supplied to the Telindus 1120 ADSL Router.
DIAG (Diagnostic)When Telindus 1120 ADSL Router is powered on, the DIAG LED flashes while the routeris booting up. After 10 to 15 seconds, the DIAG LED stops flashing and remains off.LAN LINKThe LAN LINK LED displays the connection between the router and your Ethernetnetwork. The green LED remains solid while there is a valid connection to the 10BaseTsystem.
LAN ACT (Activity)A flashing yellow LED indicates data activity between the Ethernet network and the router.If the data traffic is heavy, then frequency of the flashing yellow LED becomes higher andwill appear to be solid.
WAN LINKDisplays the connection between the router and the remote DSL line. The green LEDflashes slowly if the DSL line is not connected or is being trained. The green LED remainssolid if the DSL line is trained and ready between the router and the remote switch.WAN ACT (Activity)A flashing yellow LED indicates data activity between the DSL network and the router. Ifthe data traffic is heavy, the frequency of the flashing yellow LED becomes higher and willappear to be solid.
1.4 Minimum System Requirements• ADSL line• 10BaseT Ethernet interface • CD-ROM drive
Telindus 1120 ADSL Router gives you the option of configuring the router using TelindusWindows-based management software. The system requirements are listed below:
Using the Telindus 9100 Maintenance Application:• Ethernet card• PC* with at least a 486 microprocessor (Pentium® recommended)• At least 4 MB of space available on the hard disk drive• Microsoft® Windows® 95/98/2000 or Windows® NT Operating System
* You may configure the Telindus 1120 ADSL Router from any PC attached tothe Local Area Network (LAN) with the requirements listed above.
2 Get Started User’s Guide
Telindus 1120 ADSL Router Before You Begin
1.5 Internet ServiceMany Internet Service Providers (ISPs) offer different types of Internet access accounts.Typically, you will have the option to choose either a Single User or a Multiple Useraccount, routers are compatible with both types of accounts. With a Single User account,which is the same as terminal adapter or digital modem account, the Network AddressTranslation (NAT) option should be selected during the configuration of your Telindus 1120ADSL Router. If you ordered a Multiple User account from your ISP, they will assign aspecific IP Address for your router and a range of IP Addresses for your network. You willneed this information when you configure the Telindus 1120 ADSL Router. In this case, theNAT option should not be selected.
1.6 Information You Will NeedTo configure your router, you will need to receive information from your ISP and theremote network to which you connect, such as an Internet Service Provider (ISP) or acompany server. Consult the sections below for a detailed list of information on utilizingthe Ethernet interface and ADSL interface. If you are unfamiliar with any of the termslisted, please see Appendix A: Understanding Configuration Parameters.
Utilizing the Ethernet Interface:The following information should be obtained from your ISP or company server:
• IP Address• Subnet Mask• Gateway IP Address
Utilizing the ADSL Interface:The following information related to your ADSL connection should be obtained from yourISP or a company server:
• VPI• VCI• PPP User name & Password (Only if encapsulation mode is PPP)• DNS Address (Optional)
Get Started User’s Guide 3

Hardware Installation Telindus 1120 ADSL Router
2. Hardware InstallationThis chapter includes:
SAFETY PRECAUTION: Turn off all electronic devices, including your personal computer,before you begin to connect and disconnect cables.
2.1 Setup InstructionsStep 1. Choose a location for the Telindus 1120 ADSL Router close to a power outlet
and the ADSL line outlet. Preferably, select a convenient location that doesnot experience too much foot traffic and away from sunlight.
Step 2. Choose a level surface for the Telindus 1120 ADSL Router – such as adesktop, shelf, or table.
Step 3. Place the Telindus 1120 ADSL Router on the predetermined surface, so youcan see the back panel.
2.2 Connect to the Ethernet 10BaseT Interface Connection Step 1. Locate your Ethernet cable (included).Step 2. Attach the Ethernet cable to the Ethernet interfaces of your
Telindus 1120 ADSL Router. Step 3. Plug in the loose end of the Ethernet cable to your Ethernet network.
Option 1. Attach the included Ethernet cable to the Ethernet port on a PC.Option 2. Attach the included Ethernet cable to the uplink port on a hub. If the
uplink port is unavailable, then you can use a crossover Ethernetcable (Not included) and attach it to the non-uplink ports on a hub.
Step 4. The LAN Link LED on the front panel should be lit green to indicate a validEthernet connection. If the LAN Link LED is not lit, then repeat steps 1through 3.
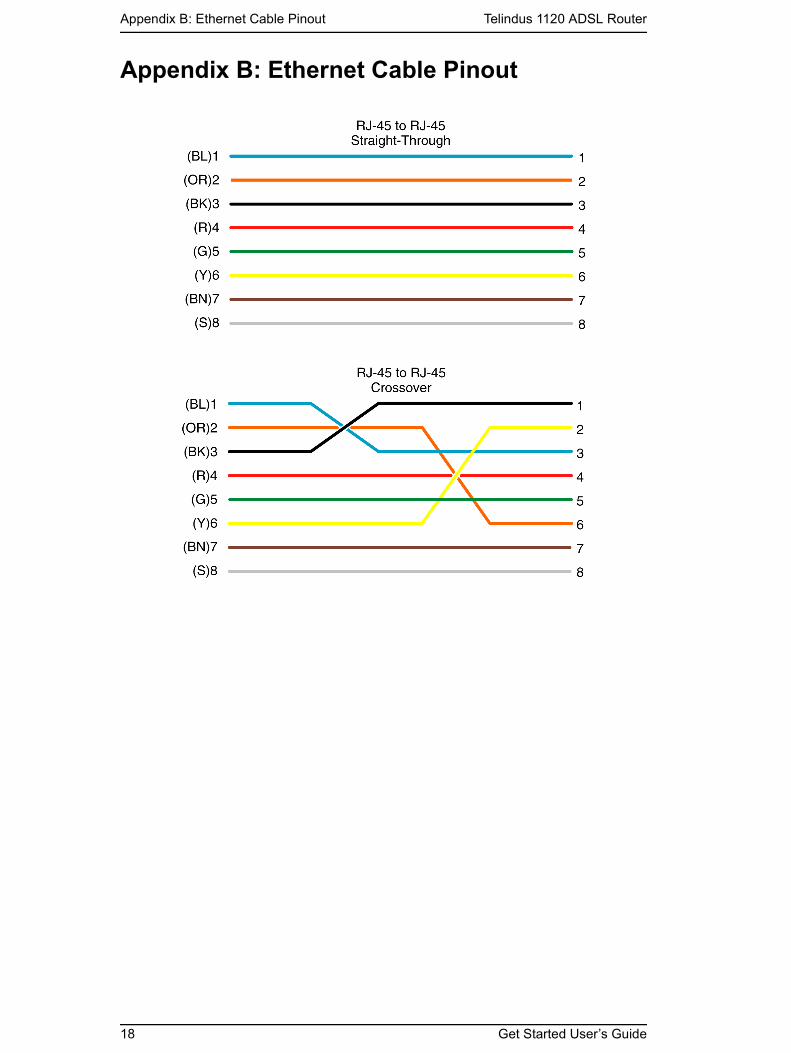
Note: See Appendix B: Ethernet Cable Pinout for further information about thedifferences between a straight-through and a crossover Ethernet cable.
2.3 Connect to the ADSL Line Step 1. Plug one of the RJ-11 connector end of the ADSL phone cable
(included) into the ADSL interface of the Telindus 1120 ADSLRouter (RJ-11 to RJ-11).
Step 2. Plug the other RJ-11 connector end of the ADSL phone cableinto the ADSL outlet on the wall.
Section Title Page
2.1 Setup Instructions 4
2.2 Connect to the Ethernet 4
2.3 Connect to the ADSL Line 4
2.4 Connect to the Power Adapter 5
4 Get Started User’s Guide

Telindus 1120 ADSL Router Hardware Installation
2.4 Connect to the Power Adapter Step 1. Plug the power adapter into the power interface of the Telindus
1120 ADSL Router.Step 2. Connect one end of the power cord to the power adapter, and
insert the other end of the power cord to the power outlet onthe wall.
Step 3. Switch your Telindus 1120 ADSL Router to ON.
Get Started User’s Guide 5
Software Installation & Configuration Telindus 1120 ADSL Router
3. Software Installation & ConfigurationThis chapter includes:
To gain high-speed and shared access to another Local Area Network (LAN) or the WideArea Network (WAN), your LAN needs to be configured for the Telindus 1120 ADSLRouter. You must install a network protocol on each workstation on your LAN so they cancommunicate with the Telindus 1120 ADSL Router. The Telindus 1120 ADSL Routerrequires the TCP/IP network protocol. The TCP/IP Properties window in Windows® 95/98/2000 or NT connects the workstation’s Ethernet information to the network’sprotocol data. Make sure that each PC on your LAN has TCP/IP available. To ensuresmooth setup, you should install the TCP/IP network protocol on the network PCs beforeyou install the Telindus 1120 ADSL Router.
Note: To ensure that your Telindus 1120 ADSL Router will assign an IP address to yourPCs, if you set them to get IP addresses automatically, we have already configured yourTelindus 1120 ADSL Router prior to shipping. The Telindus 1120 ADSL Router isconfigured with the default IP address of 192.168.1.1 and subnet mask of255.255.255.0. The Telindus 1120 ADSL Router’s DHCP server is enabled with IP pooladdresses starting from 192.168.1.2.
3.1 Detecting TCP/IP in Windows® 95/98Step 1. Turn on your computer and start Windows® 95/98.Step 2. Click the Start button and then select Settings.Step 3. Choose Control Panel and double click Network icon.Step 4. Click the Configuration tab.
A. If you see TCP/IP listed under Network Components, you already have TCP/IP on your Windows® 95/98. Proceed to the section titled “ConfiguringTCP/IP in Windows® 95/98”.
B. If you do not see TCP/IP listed under Network Components, you do not haveTCP/IP on your Windows® 95/98. Proceed to “Installing TCP/IP in Windows®
95/98” in the next section.
Section Title Page
3.1 Detecting TCP/IP in Windows® 95/98 6
3.2 Installing TCP/IP in Windows® 95/98 7
3.3 Configuring TCP/IP in Windows® 95/98 7
3.4 Detecting TCP/IP in Windows® 2000 8
3.5 Installing TCP/IP in Windows® 2000 8
3.6 Configuring TCP/IP in Windows® 2000 8
3.7 Detecting TCP/IP in Windows® NT 9
3.8 Installing TCP/IP in Windows® NT 9
3.9 Configuring TCP/IP in Windows® NT 9
6 Get Started User’s Guide
Telindus 1120 ADSL Router Software Installation & Configuration
3.2 Installing TCP/IP in Windows® 95/98Step 1. From the Configuration tab in the Network window, click Add.Step 2. Select Protocol for the type of network component, and click Add.Step 3. Choose Microsoft for Manufacturers list box and TCP/IP for Network
Protocols list box, then click OK.Step 4. Check to see if TCP/IP is listed under Network Components.
A. If you do not see TCP/IP listed under Network Components, you have notinstalled TCP/IP. Repeat steps 1 - 4.
B. If you see TCP/IP listed under Network Components, you already have TCP/IP on your Windows® 95/98. Proceed to “Configuring TCP/IP inWindows® 95/98” in the next section.
3.3 Configuring TCP/IP in Windows® 95/98Step 1. From the Configuration tab, select TCP/IP (for Ethernet adapters) listed under
Network Components and then click Properties.Step 2. Select the IP Address tab.You now have the option of using either dynamic or static IP addressing.To enable dynamic IP addressing:Step 1. Click Obtain an IP Address automatically.Step 2. OPTIONAL: Click the DNS Configuration tab and select Disable DNS. If you
previously entered any parameters, clear all pre-existing settings.*Step 3. Select the Gateway tab and then click Remove to clear all preexisting
settings.Step 4. Click OK to exit TCP/IP Properties window and click OK to exit Network
window. When prompted, restart Windows® 95/98. If you are not prompted torestart Windows® 95/98, do so manually. Proceed to the section titled“Configuring Your Router.”
* If specifically required by your ISP, you may need to enter DNS information.To enable static IP addressing:Step 1. Click Specify an IP Address and then type the IP Address and Subnet Mask
(for your PC).Step 2. Click the Gateway tab.Step 3. Type in your Gateway IP Address (the IP address for the Telindus 1120 ADSL
Router) from your ISP and then click Add.Step 4. Click the DNS tab. Enter the Host name, Domain name, and DNS Service
Search Order (for your LAN) and then click Add.Step 5. Click OK to exit TCP/IP Properties window and click OK to exit Network.Step 6. When prompted, restart Windows® 95/98. If you are not prompted to restart
Windows® 95/98, please do so manually. Proceed to the section titled“Configuring Your Router.”
Get Started User’s Guide 7
Software Installation & Configuration Telindus 1120 ADSL Router
3.4 Detecting TCP/IP in Windows® 2000Step 1. Turn on your computer and log-in to Windows® 2000.Step 2. Click the Start button and select Settings.Step 3. Choose Control Panel, and then double click Network and Dial-up
Connections icon.Step 4. Double click on the Local Area Connection icon. In the Local Area Connection
Status window, click on the Properties button.Step 5. In the Local Area Connection Properties window:
A. If you see the Internet Protocol (TCP/IP) listed, you already have TCP/IP on your Windows® 2000. Proceed to the section titled “Configuring TCP/IP in Windows® 2000”.
B. If you do not see Internet Protocol (TCP/IP), you do not have TCP/IP on yourWindows® 2000. Proceed to the next section, “Installing TCP/IP in Windows®
2000.”
3.5 Installing TCP/IP in Windows® 2000Step 1. From the General tab in the Local Area Connection Properties window, click
Install.Step 2. In the Select Network Component Type window, select the Protocol icon for
the type of network component and click Add.Step 3. Choose the Internet Protocol (TCP/IP) icon from the Network Protocol list box,
then click OK.Step 4. Check to see if Internet Protocol (TCP/IP) is listed under Network
Components.A. If you do not see TCP/IP listed under Network Components, you have not
installed TCP/IP. Repeat steps 1 - 4.B. If you see TCP/IP listed under Network Components, you already have
TCP/IP on your Windows® 2000. Proceed to “Configuring TCP/IP inWindows® 2000” in the next section.
3.6 Configuring TCP/IP in Windows® 2000Step 1. From the General tab in the Local Area Connection Properties window, select
Internet Protocol (TCP/IP) listed under Network Components and clickProperties.
To enable dynamic IP addressing:Step 1. Click Obtain an IP Address automatically.Step 2. OPTIONAL: You can either click Obtain DNS server address automatically or
Use the following DNS server addresses options. If you choose to Use thefollowing DNS server addresses option, then you need to enter the Preferredand Alternate DNS server IP addresses.
Step 3. Click OK to exit the Internet Protocol (TCP/IP) Properties window. Proceed tothe section titled “Configuring Your Router.”
To enable static IP addressing:Step 1. Click Use the following IP Address and then type the IP Address, Subnet
Mask, and Default gateway.Step 2. Enter the Preferred and Alternate DNS server IP addresses.Step 3. Click OK to exit the Internet Protocol (TCP/IP) Properties window. Proceed to
the section titled “Configuring Your Router.”
8 Get Started User’s Guide
Telindus 1120 ADSL Router Software Installation & Configuration
3.7 Detecting TCP/IP in Windows® NTStep 1. Turn on your computer and log-in to Windows® NT. Step 2. Click the Start button and select Settings.Step 3. Choose Control Panel, and then double click Network icon.Step 4. Click the Protocols tab.
A. If you see TCP/IP listed under Network Protocols, you already have TCP/IPon your Windows® NT. Proceed to the section titled “Configuring TCP/IP inWindows® NT“.
B. If you do not see TCP/IP listed under Network Protocols, you do not haveTCP/IP on your Windows® NT. Proceed to the next section, “Installing TCP/IPin Windows® NT.”
3.8 Installing TCP/IP in Windows® NTNote: Consult your Network Administrator if you do not have authorization to changesettings for your PC.
Step 1. From the Protocols tab in the Network window, click Add.Step 2. Select TCP/IP Protocol listed under Network Protocols, Click OK.Step 3. Check to verify TCP/IP listed under Network Protocols, then click OK.
A. If you do not see TCP/IP listed under Network Protocols, you have notinstalled TCP/IP. Repeat steps 1 - 3.
B. If you see TCP/IP listed under Network Protocols, then you have successfullyinstalled TCP/IP. Proceed to the section titled “Configuring TCP/IP inWindows® NT”.
3.9 Configuring TCP/IP in Windows® NTStep 1. From the Protocols tab, select TCP/IP (for Ethernet adapters) listed under
Network Protocol and then click Properties. Step 2. Select the IP Address tab.You now have the option of using either dynamic or static IP addressing.To enable dynamic IP addressingStep 3. Click Obtain an IP Address from DHCP Server.Step 4. OPTIONAL: Click the DNS tab and select Disable DNS. If you previously
entered any parameters, clear all pre-existing settings.*Step 5. Click OK to exit Network Properties window. Proceed to the section titled
“Configuring Your Router.”
* If specifically required by your ISP or remote server, you may need to enter DNS information.
To enable static addressingStep 6. Click Specify an IP Address and then type the IP Address and Subnet Mask
(for your PC). Step 7. Click the DNS tab. Enter the Host name, Domain name, and DNS Service
Search Order (for your LAN).Step 8. Click OK to exit Network Properties window. Proceed to the section titled
“Configuring Your Router.”
Get Started User’s Guide 9
Configuring Your Router Telindus 1120 ADSL Router
4. Configuring Your RouterThis chapter includes:
The Telindus 9100 Maintenance Application gives you access to the configuration andadministrative controls for the Telindus 1120 ADSL Router. Install the Telindus 9100Maintenance Application software on PCs that you want to access to these controls.There are many ways to configure your router. However, for the purposes of this GetStarted manual, we are going to guide you through the process of configuring your routerfor the first time by using the Windows-based Telindus 9100 Maintenance Application, sothat you can easily access the Internet through Telindus 1120 ADSL Router.If you have difficulties configuring your router, consult the Troubleshooting section of thisguide, or the help menu in the Telindus 9100 Maintenance Application, or refer to theFAQs located on TELINDUS’s website (http://www.telindus.com).
Note: To connect to the Internet after configuration, simply type in a web address in yourbrowser and hit enter.
IMPORTANT: You must install the TCP/IP network protocol on the PCs before you installthe Telindus 9100 Maintenance Application. For more information on installing andconfiguring TCP/IP, refer to the instructions in the previous section.
4.1 Load Telindus 9100 Maintenance Application Installation Software
Step 1. Start Windows® 95/98/NT/2000.Step 2. Insert TELINDUS CD into your CD-ROM drive.Step 3. Click Start, then choose Run.Step 4. Click the Browse button and look in your CD-ROM drive.Step 5. Select the TELINDUS folder, and then the Telindus 9100 Maintenance
Application folder.Step 6. Select the setup.exe file and click the Open button.Step 7. Click the OK button.
Section Title Page
4.1 Load Telindus 9100 Maintenance Application Installation Software
10
4.2 Multiple Router Selection Window 11
4.3 Basic Internet Access Configuration 11
4.4 ADSL Configuration 12
10 Get Started User’s Guide
Telindus 1120 ADSL Router Configuring Your Router
4.2 Multiple Router Selection WindowWhen you run the Telindus 9100 Maintenance Application, the Multiple Router Selectionwindow will appear. The first thing the Telindus 9100 Maintenance Application will do issearch for one or more TELINDUS routers attached to the same network as your PC. Youwill see the Detection window telling you that it is searching. This procedure may take afew seconds. When it has finished searching, it will list all the detected Telindus 1120ADSL Router, both configured and unconfigured. From this list you can select the specificrouter that you wish to configure or re-configure.
Note: If the Telindus 9100 Maintenance Application is unable to detect any router or if itgives you an error message, consult the on-line help menu for more detailed instructions.
Select the Telindus 1120 ADSL Router that you wish to manage and click Enter to openthe Telindus 9100 Maintenance Application, which is where you can configure your router,check your router’s status, or use some router maintenance tools. If you do not want touse the Telindus 9100 Maintenance Application at this time, click Exit. You may configureyour router at any time, however, inter-networking is not possible with an unconfiguredrouter.
4.3 Basic Internet Access ConfigurationThe Telindus 9100 Maintenance Application is a flexible tool that can accommodate manynetworking configurations. For the purposes of this Get Started User’s Guide, we willprovide a simple, step-by-step guide for creating a basic Internet access configuration foryour router. You will need to enter information that you received from your ISP, phonecompany, or network administrator – refer to the “Information You Will Need” section forconfiguration parameters. Step 1. Launch your Telindus 9100 Maintenance Application.Step 2. From the Multiple Router Selection window, select the router that you wish to
configure and click Enter.Step 3. From the Telindus 9100 Maintenance Application window, click the
Configuration icon.Step 4. Configure the Administrative Security Setup (optional):
A. Double-click the General Configuration icon.B. Select the Administrative Security feature from the list located in the left
panel.C. In the right panel, provide a Router Name and select the Password
Protected checkbox.D. Click Change Password, enter the New Password, and confirm the new
password. Click OK.
Note: Be sure to record your Router Name and Password for future reference. Withoutthem you will not be able to access the configuration feature of the Telindus 9100Maintenance Application.
Step 5. Specify the Domain Name Server (optional):A. Select the DNS Server feature from the list located in the left panel.B. Enter the Primary DNS IP Address and Secondary DNS IP Address.C. Double-click Back to Configuration Menu.
Get Started User’s Guide 11
Configuring Your Router Telindus 1120 ADSL Router
Step 6. Configure the LAN Interface:A. Double-click the LAN Configuration icon.B. Enter the Primary LAN IP Address supplied by your Internet Service
Provider (The default LAN IP address for the Telindus 1120 ADSL Router is192.168.1.1).
C. Enter the Subnet Mask supplied by your Internet Service ProviderThe default LAN Subnet Mask is 255.255.255.0).
Step 7. Enable DHCP (optional):A. Select the DHCP feature from the list located in the left panel.B. Specify whether the primary or secondary IP address and subnet address will
be used for running Dynamic Host Control Protocol (DHCP).C. Reserve IP addresses as needed.
Step 8. Enable RIP and IGMP (optional):A. Select the Protocol Configuration feature from the list located in the left panel.B. Select the Enable RIP on LAN Interface checkbox and choose the Version
and RIP Update.C. Select the Enable IGMP checkbox.
4.4 ADSL ConfigurationStep 1. Create a ADSL Connection Profile:
A. From the Configuration menu, double-click the DSL Configuration icon.B. You have the option to choose ANSI T1.413, G.LITE, G.DMT, or Multi Mode
as your DSL line mode.
Note: The DSL line mode refers to the entire Telindus 1120 ADSL Router unit and noteach individual ATM PVC profile. Once you have made your choice, all subsequent ATMPVC profiles created will be using the same line mode.
C. Double-click the Make New ATM PVC icon.D. Assign a name to the ATM interface. Click OK.E. In the ATM PVC Properties window, enter the VPI (Virtual Path Identifier
and VCI (Virtual Channel Identifier) value given by your ISP.F. Select the ATM Service Type feature from the list located in the left panel.G. In the ATM Service Type window, select either UBR (Unspecified Bit Rate) or
CBR (Constant Bit Rate) as the desired ATM Service Type. Also enter adesired PCR (Peak Cell Rate) specified by your ISP.
H. Select the Protocol Configuration feature from the list located in the left panel.I. In the Protocol Configuration window, you can select the following three
Encapsulation Types: SNAP/IP, VC MUX over ATM, LLC PPP over ATM,PPP over Ethernet, or SNAP/Bridge. Option 1. In case you select VC MUX PPP over ATM, LLC PPP over ATM, or
PPP over Ethernet as your encapsulation type, then you can checkthe Enable Network Address Translation (NAT) checkbox if youhave a single user account for the NAT Properties feature. You canthen select the Specified NAT IP Address checkbox and enter thedesired IP address, or you can select the Specified NAT Pool IPAddresses and enter the requested values.Also, you MUST select the PPP Configuration feature from the listlocated in the left panel, and enter the User Name and Password.Move on to substep J.
Option 2. If you select SNAP/IP as your encapsulation type, then you cancheck the Enable Network Address Translation (NAT) checkboxif you have a single user account for the NAT Properties feature.You can then select the Specified NAT IP Address checkbox andenter the desired IP address, or you can select the Specified NATPool IP Addresses and enter the requested values.
12 Get Started User’s Guide
Telindus 1120 ADSL Router Configuring Your Router
Move on to substep J.Option 3. If you select SNAP/Bridge as your encapsulation type, then you can
check the Enable Network Address Translation (NAT) checkboxif you have a single user account for the NAT Properties feature.You can then select the Specified NAT IP Address checkbox andenter the desired IP address, or you can select the Specified NATPool IP Addresses and enter the requested values. Move on to substep J.
J. Click Apply, and review the summary of you basic configuration.K. Click Finish to save the parameters to Telindus 1120 ADSL Router.
Congratulations! You are ready to begin using your Telindus 1120 ADSL Router for sharedInternet access. Enjoy!
Get Started User’s Guide 13
Troubleshooting Telindus 1120 ADSL Router
5. TroubleshootingThis chapter includes:
If you can not find the answers to your problems here, consult the help menu in theTelindus 9100 Maintenance Application or refer to the FAQs located on TELINDUS’swebsite (http://www.telindus.com).
5.1 I Cannot Detect the Router1. Verify that your router is connected to your Ethernet LAN.
• If you are connecting your Telindus 1120 ADSL Router to an Ethernet networkhub, use a straight-through Ethernet cable, and make sure you are connectingto the uplink port of the hub.
• If you are connecting your Telindus 1120 ADSL Router to an Ethernet networkPC, then use a straight-through Ethernet cable.
Note: See Appendix B: Ethernet Cable Pinout for further information about thedifferences between a straight-through and a crossover Ethernet cable.
Another way you can confirm that there is a physical connection to your LAN is bychecking the LED located on the front panel of the Telindus 1120 ADSL Router. TheLAN Link LED of will lit green to indicate a valid LAN connection. If the LAN Link LEDof is not green, then check the connection between the router and your LAN. Re-startthe Telindus 9100 Maintenance Application to see if it can detect the router.
2. Your PC is configured as “Obtain an IP Address Automatically” in TCP/IP Properties in Windows® 95/98/2000 or Windows® NT, and the Telindus 1120 ADSL Router is set to “Enable DHCP.”Since you cannot detect the Telindus 1120 ADSL Router, you must configure the PCto “Specify an IP Address” first. If your ISP has given you IP Addresses for your LANfor a Multiple User LAN Access account, then configure your PC with the informationprovided. If you have a Single User account from your ISP, you can still configure yourPC to “Specify an IP Address.” In TCP/IP Properties for Windows® 95/98/2000 orWindows® NT set your IP Address to a value between 192.168.1.2 and192.168.1.254, the Subnet Mask to 255.255.255.0, and the Gateway as 192.168.1.1.When prompted, restart your computer otherwise do so manually. Re-start Telindus9100 Maintenance Application to see if it can detect the router.
Section Title Page
5.1 I Cannot Detect the Router 14
5.2 Router and PC Are Not in the Same Subnet 15
5.3 Cannot Upgrade the Firmware 15
14 Get Started User’s Guide
Telindus 1120 ADSL Router Troubleshooting
3. Your PC is configured to dynamically receive the IP address from the router’s DHCPserver, and the Telindus 9100 Maintenance Application still cannot detect the router. You may need to manually force the PC to request an IP Address from the router. InWindows Explorer for Windows® 95/98/2000, open the Winipcfg.exe from theWindows directory. This application shows the IP Addresses for your EthernetAdapter. Click Release and then click Renew. You should receive a valid IP Address,such as 192.168.1.2. For Windows NT, use the DOS Command Prompt, type ipconfig/release and press the Enter key, and then type ipconfig/renew and press the Enterkey. You should receive a valid IP Address, such as 192.168.1.2. Re-start the Telindus9100 Maintenance Application to see if it can detect the router.
5.2 Router and PC Are Not in the Same SubnetYour router and PC must be in the same subnet. Otherwise, you will be unable toaccess the Telindus 9100 Maintenance Application and configure your router. Verifythat you have entered the correct information provided by your Internet ServiceProvider (ISP) for your router’s and PC’s IP Address and Subnet Mask. For morespecific information about your account, consult your ISP.
5.3 Cannot Upgrade the Firmware1. You may have inadvertently tried to download the wrong file to your router. The
Telindus 1120 ADSL Router can only use upgrades created by TELINDUS, NV. Theupgrades are available by downloading the file from TELINDUS’s website(www.telindus.com). The correct file format is *.bin. The serial number of the Telindus1120 ADSL Router unit is needed when you are obtaining the firmware fromTELINDUS’s website. The serial number is located on the bottom label of yourTelindus 1120 ADSL Router device.
2. There may have been an illegal operation on your router. Please re-boot your routerby disconnecting the power adapter and reconnecting it after 30 seconds.You mayhave to do this more than once.
Get Started User’s Guide 15
Appendix A: Understanding Configuration Parameters Telindus 1120 ADSL Router
Appendix A: Understanding Configuration ParametersWhen you order Internet service your provider will give you a great deal of information. Alist of the information presented to you by the remote network you will be dialing (ISP,company server, POP account) is provided to you in Section 1.5 “Internet Service.”Definitions of common configuration terms are available below. Please note thatterminology used by various remote networks may vary.
Explaining IP AddressesLAN IP AddressIn the most basic terms, the Primary LAN IP address is the logical location of the Telindus1120 ADSL Router on the local Ethernet network. If there is another subnet in the Ethernetnetwork you would like Telindus 1120 ADSL Router to be able to access, you can specifya Secondary LAN IP Address.
DNS Server IP AddressThe IP address of the primary DNS (Domain Name System) server should be assigned bythe ISP. Specifying a secondary DNS server IP address is optional.
NAT IP AddressNetwork Address Translation (NAT) IP Address is a Public IP Address. It can be a single,fixed Public IP address, or an ISP assigned Public IP address. NAT is used to translatePrivate IP addresses to a Public IP address. Many Private IP addresses can be translatedthrough the single Public NAT IP address. The router keeps track of all the translationtraffic so that information arriving at the single NAT IP Address can seamlessly beforwarded to the appropriate Private IP address.
DHCP IP Address AssignmentDynamic Host Control Protocol (DHCP) IP Address Assignment is a method the routeruses to dynamically assign LAN IP addresses within its local network. The router has asubnet (range) of available LAN IP addresses with which to assign to other networkdevices on its local network. It “leases” these LAN IP addresses for a user-defined amountof time. After the lease time expires, the LAN IP address is made available for assigning toother network devices.The subnet of LAN IP addresses that the router assigns are based on a single DHCP IPAddress. All traffic going to and from the subnet of Private IP addresses goes through theDHCP IP Address. For situations where a LAN IP address is assigned as the DHCP IP Address, a WAN IPaddress will have to be assigned to the NAT IP Address, and NAT has to be enabled sothat the DHCP IP Address can be translated into a WAN IP address.
Unnumbered WAN IP AddressSome network devices do not use WAN IP addresses when negotiating a connection. Thisis known as unnumbered IP. When running unnumbered IP, no WAN IP addresses areused, but the LAN IP addresses are used instead.
16 Get Started User’s Guide
Telindus 1120 ADSL Router Appendix A: Understanding Configuration Parameters
Terminology for Configuration ParametersDomain Name System (DNS) IP Address The DNS IP Address is the IP Address for your Domain Name Server. This IP Address orInternet Protocol Address identifies the domain name’s server to the network and theInternet.
IP Packet FilteringEstablishing IP packet filters allows you to monitor and selectively filter packets that enteror leave the Telindus 1120 ADSL Router. You can use filtering to protect your network fromunauthorized access, and restrict certain web traffic from leaving your LAN. This is doneby examining each packet that enters the Telindus 1120 ADSL Router to see if thefollowing characteristics match the criteria for the filter (true), or whether they do not match(false):
IP address: identifies each device on a TCP/IP network and the InternetSubnet mask: a series of bits designed to ‘mask’ certain portions of an IP addressTCP/IP port: used to distinguish between requests for different services, such as
telnet, ftp, or the web.Protocol type: a set of rules governing the information flow within a communications
infrastructureFor either true/false condition, the following packet dispositions can be set:
Pass: automatically pass through the routerRestrict: pass only if there is an available connectionDiscard: packet is blocked and discarded Pass to next filter: packet goes to the next filter in sequenceThe IP Packet Filtering allows for up to 32 sequential filters, and each filter can be setto examine source packets, destination packets, or both.
Get Started User’s Guide 17
Appendix B: Ethernet Cable Pinout Telindus 1120 ADSL Router
Appendix B: Ethernet Cable Pinout
18 Get Started User’s Guide
Copyright © 2022 FDOKUMEN